Onkyo Home Entertainment XEM26 CD Receiver System User Manual X EM22 SYXE8 En NorthAmerica
Onkyo Corporation CD Receiver System X EM22 SYXE8 En NorthAmerica
UserManual.wiki
>
Onkyo Home Entertainment
>
XEM26 User Manual
Users Manual
Navigation menu
Upload a User Manual
Namespaces
Wiki Guide
HTML
PDF
Info
Views
User Manual
Discussion / Help
Navigation

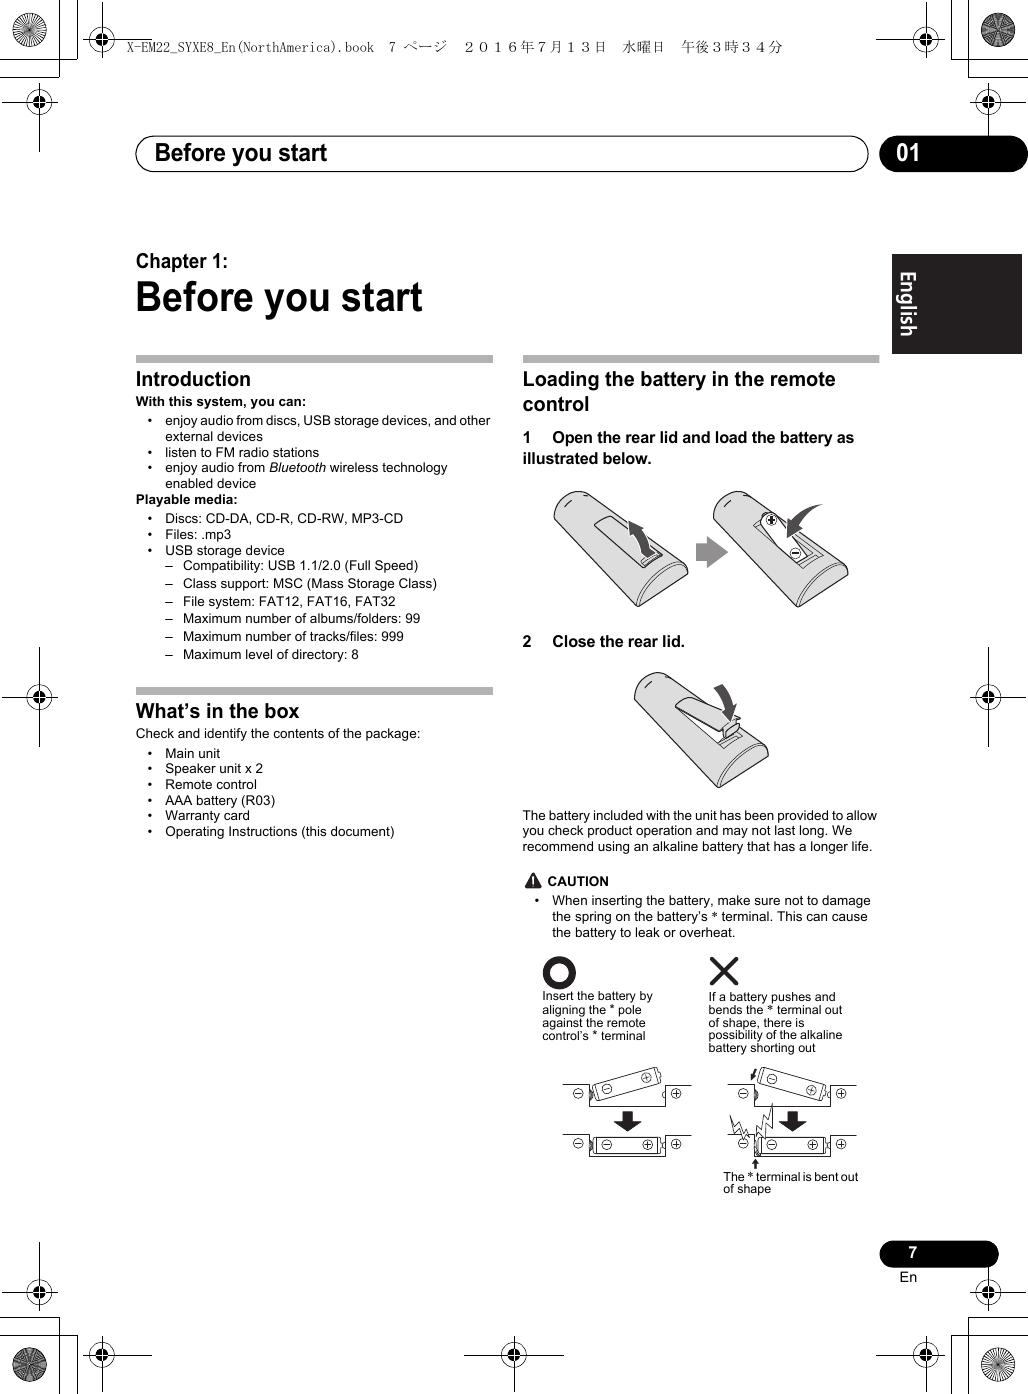
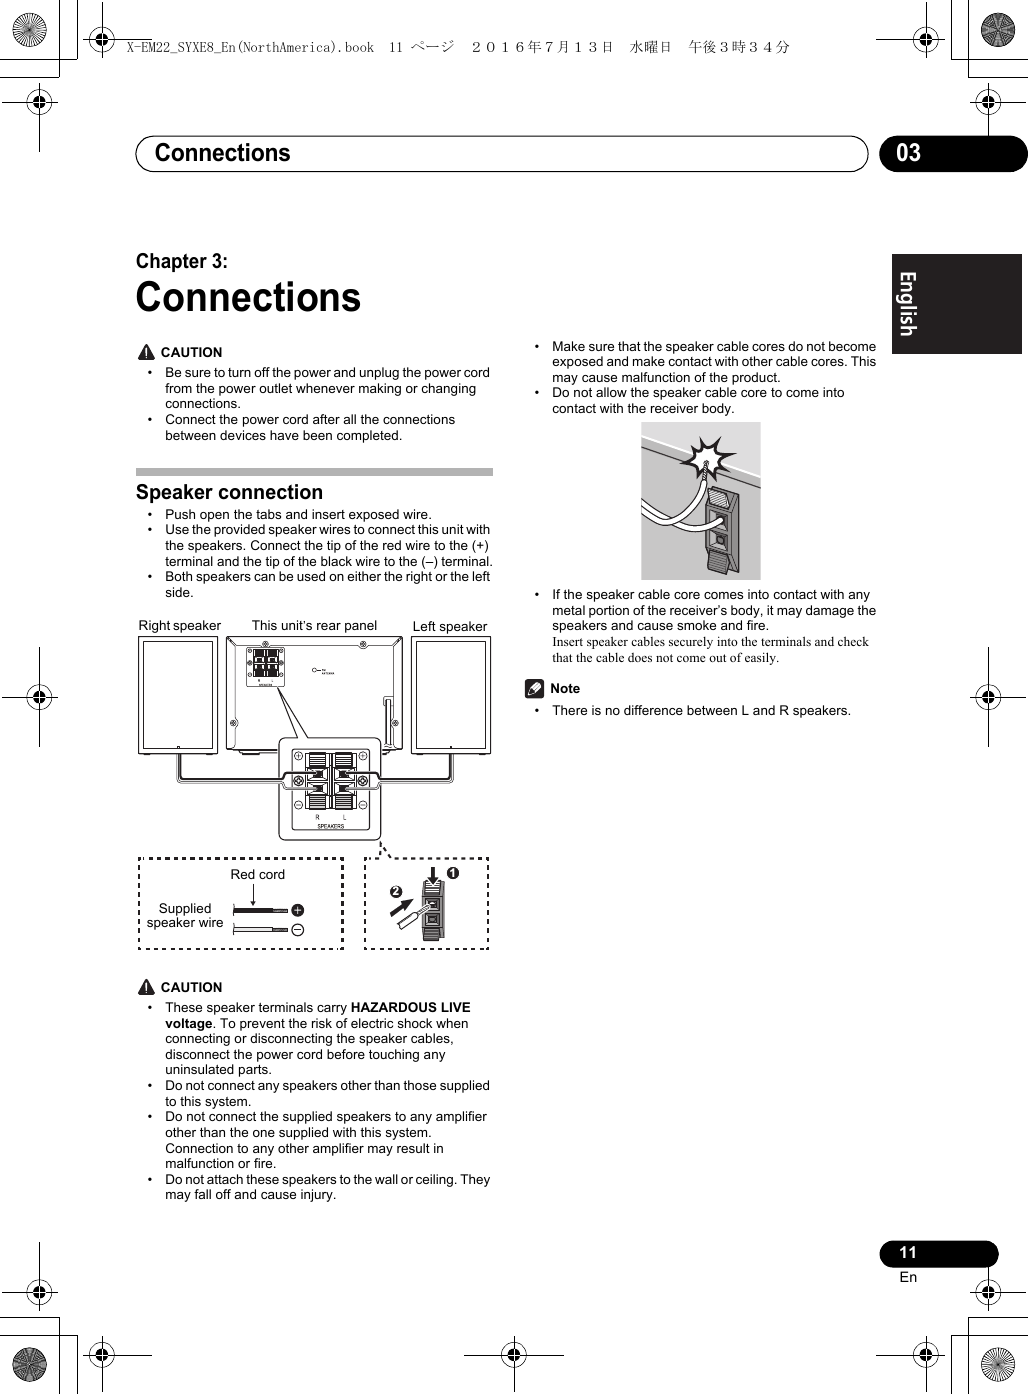
![Part names and functions0210EnOverview of the remote control1ÍSTANDBY/ON• Switch between standby and on.2 Input function buttons• Use to select the input source (DISC, BT, USB, AUDIO IN, TUNER).3:9• Skip to the track. • Press and hold to play quickly within a track.• Tune to the station.• Press and hold to search the radio station automatically.4/ • Skip to the previous or next album.• Select a preset radio station.5VOLUME +/–• Use to set the listening volume.6MUTE• Use to mute or restore volume.7DIMMER/DISPLAY• Display the current status or media information.• Display the available ID3 information of MP3 tracks.• Press and hold to dim or brighten the display. The brightness can be controlled in three steps. However the brightness cannot be controlled during FM entry.• Display the available information of an RDS radio station.8EQ• Use to select EQ.[FLAT] l [ROCK] l [CLASSIC] l [POP] l [JAZZ] l (Back to beginning)9<OPEN/CLOSE• Open or close the disc tray.101;• Use to play, pause, or resume playback.• Use to confirm actions.11REPEAT• Use to select the repeat mode of each input source.•[CD]/[BT]Repeat 1 [REP ONE] l Repeat all [REP ALL] l (Back to beginning)•[USB]Repeat 1 [REP ONE] l Repeat album [REP ALB] l Repeat all [REP ALL] l (Back to beginning)12 ∫• Use to stop playback.13SHUFFLE• Shuffled order of track playback from a DISC, USB.14PROGRAM• Use to program audio tracks.• Use to program radio stations.15SLEEP/TIMER• Set the sleep timer in the working mode.• Set alarm timer in the standby mode.16CLOCK• In the working mode or standby mode, press to display the clock for a while.• In the standby mode, press and hold to set the clock.1315141212348756391110164X-EM22_SYXE8_En(NorthAmerica).book 10 ページ 2016年7月13日 水曜日 午後3時34分](https://usermanual.wiki/Onkyo-Home-Entertainment/XEM26/User-Guide-3080478-Page-10.png)
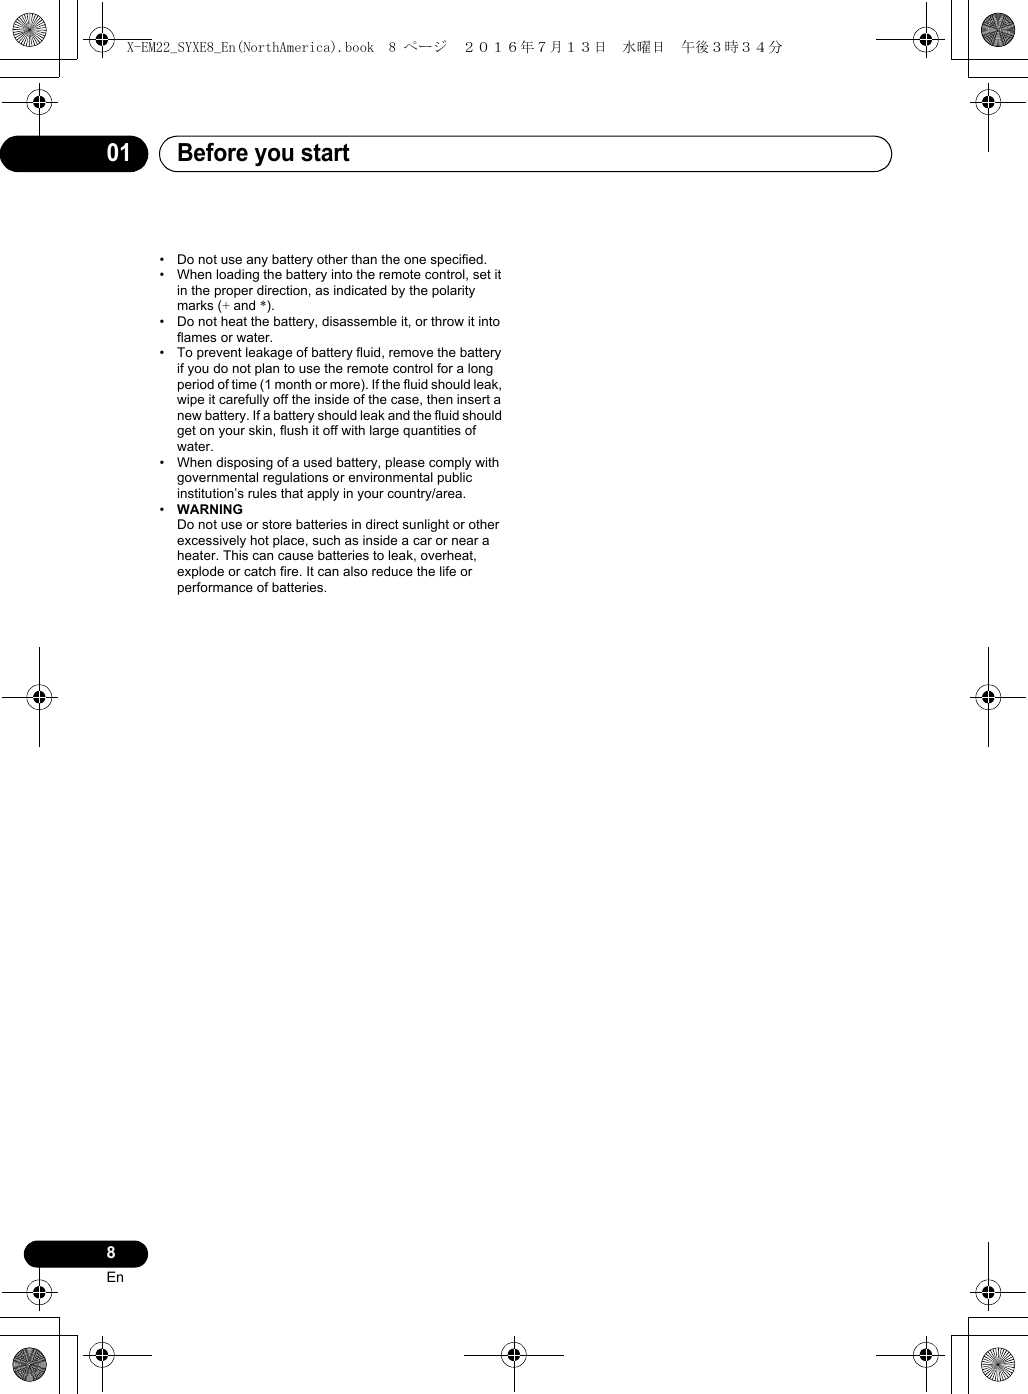
![Getting started 0413EnEnglish Français EspañolChapter 4:Getting started CAUTION• Use of controls or adjustments or performance of procedures other than herein expressly specified may result in hazardous radiation exposure or other unsafe operation.Always follow the instructions in this chapter in sequence.Turning on1Press ÍSTANDBY/ONThis product switches to the last selected source.APS mode• After this product is kept inactive for 15 minutes, it automatically switches to the standby mode.Setting the clock Note• During setting, if no action is made within 90 seconds, the system exits clock setting without saving earlier operations.• When power supply is restored after unit is plugged in again or after a power failure, reset the clock.1 In the standby mode, press and hold CLOCK to activate clock setting.[24H] blinks.2 Press :/9 to select [24H] or [12H] and then press CLOCK to confirm.The hour digits will blink.3 Press :/9 to set the hour, and then press CLOCK to confirm.The minute digits blink.4 Press :/9 to set the minute, and then press CLOCK to confirm.Selecting a sourcePress INPUT repeatedly to select a source.•[DISC]: the disc in the disc tray•[BT]: Bluetooth capable device that is paired•[USB]: .mp3 files stored on the connected USB storage device•[TUNER]: the FM radio•[AUDIO IN]: the audio input through the AUDIO IN socketX-EM22_SYXE8_En(NorthAmerica).book 13 ページ 2016年7月13日 水曜日 午後3時34分](https://usermanual.wiki/Onkyo-Home-Entertainment/XEM26/User-Guide-3080478-Page-13.png)
![Playing0514EnChapter 5:PlayingPlaying a disc1 Press DISC on the remote control or INPUT repeatedly on the main unit to switch the source to [DISC].2 Press < to eject the disc tray.3 Load a disc with the printed side facing up.4 Press < again to close the disc tray.Playback starts automatically after a few seconds.• If playback does not start automatically, press 1; to start playback.Playing from a USB storage deviceThis system can play .mp3 files that are copied onto a supported USB storage device: • Flash drive• Memory card reader• HDD: hard disk drive (This product can detect only a portable HDD with USB power peak current no more than 500 mA.) Note• Pioneer does not guarantee compatibility with all USB storage devices.• NTFS (New Technology File System) file system is not supported.1 Connect the USB storage device to the USB socket.2 Press USB on the remote control or INPUT repeatedly on the main unit to switch the source to [USB].Playback starts automatically.If playback does not start automatically,1 Press / to select an album.2 Press :/9 to select a track.3 Press 1; to start playback.Controlling playbackDuring playback, follow the instructions below to control playback.Buttons Functions1; Pause or resume playback.∫Stop playback.:/9Skip to the previous or next track.Press and hold to rewind a track or search forward fast within a track./9Skip to the previous or next album when no less than one album exists.REPEATSelect an available play mode.• Repeat 1 [REP ONE]: repeat the current track• Repeat all [REP ALL]: repeat all tracks• Repeat album [REP ALB]: repeat the current album (only USB function)SHUFFLESelect an available play mode.• Shuffle : play tracks randomlyShuffle is unavailable for programmed tracks.X-EM22_SYXE8_En(NorthAmerica).book 14 ページ 2016年7月13日 水曜日 午後3時34分](https://usermanual.wiki/Onkyo-Home-Entertainment/XEM26/User-Guide-3080478-Page-14.png)
![Playing 0515EnEnglish Français EspañolProgramming tracks Note• You can program up to 20 tracks.• During programming, if no operation is made within 20 seconds, the system returns to the stop mode without saving earlier operations.For a CD1 Press ∫ to stop playback.[[T0]], the total number of tracks, and the duration time are displayed.2 Press PROGRAM to activate the programming.[01 PR01] (the sequence number) are displayed with [01] blinking.3 Press :/9 to select a track.4 Press PROGRAM again to program the selected track.5 Repeat steps 3 and 4 to program more tracks.6 Press 1; to start playback.For MP3 files1 Press ∫ to stop playback.[FXX] (XX indicates the total number of albums) and [XXX] (XXX indicates the total number of tracks) are displayed.2 Press PROGRAM to activate the programming.[01 PR01] are displayed with [01] blinking.3 Press /9 repeatedly to select an album.[FXX] (XX indicates the album number) are displayed.4 Press :/9 repeatedly to select a track.[XXX] (XXX indicates the track number) are displayed.5 Press PROGRAM again to confirm the selected track.6 Repeat steps 3 to 5 to program more tracks.7 Press 1; to start playback.Erasing the program1To erase the program,• Switch to another source.X-EM22_SYXE8_En(NorthAmerica).book 15 ページ 2016年7月13日 水曜日 午後3時34分](https://usermanual.wiki/Onkyo-Home-Entertainment/XEM26/User-Guide-3080478-Page-15.png)
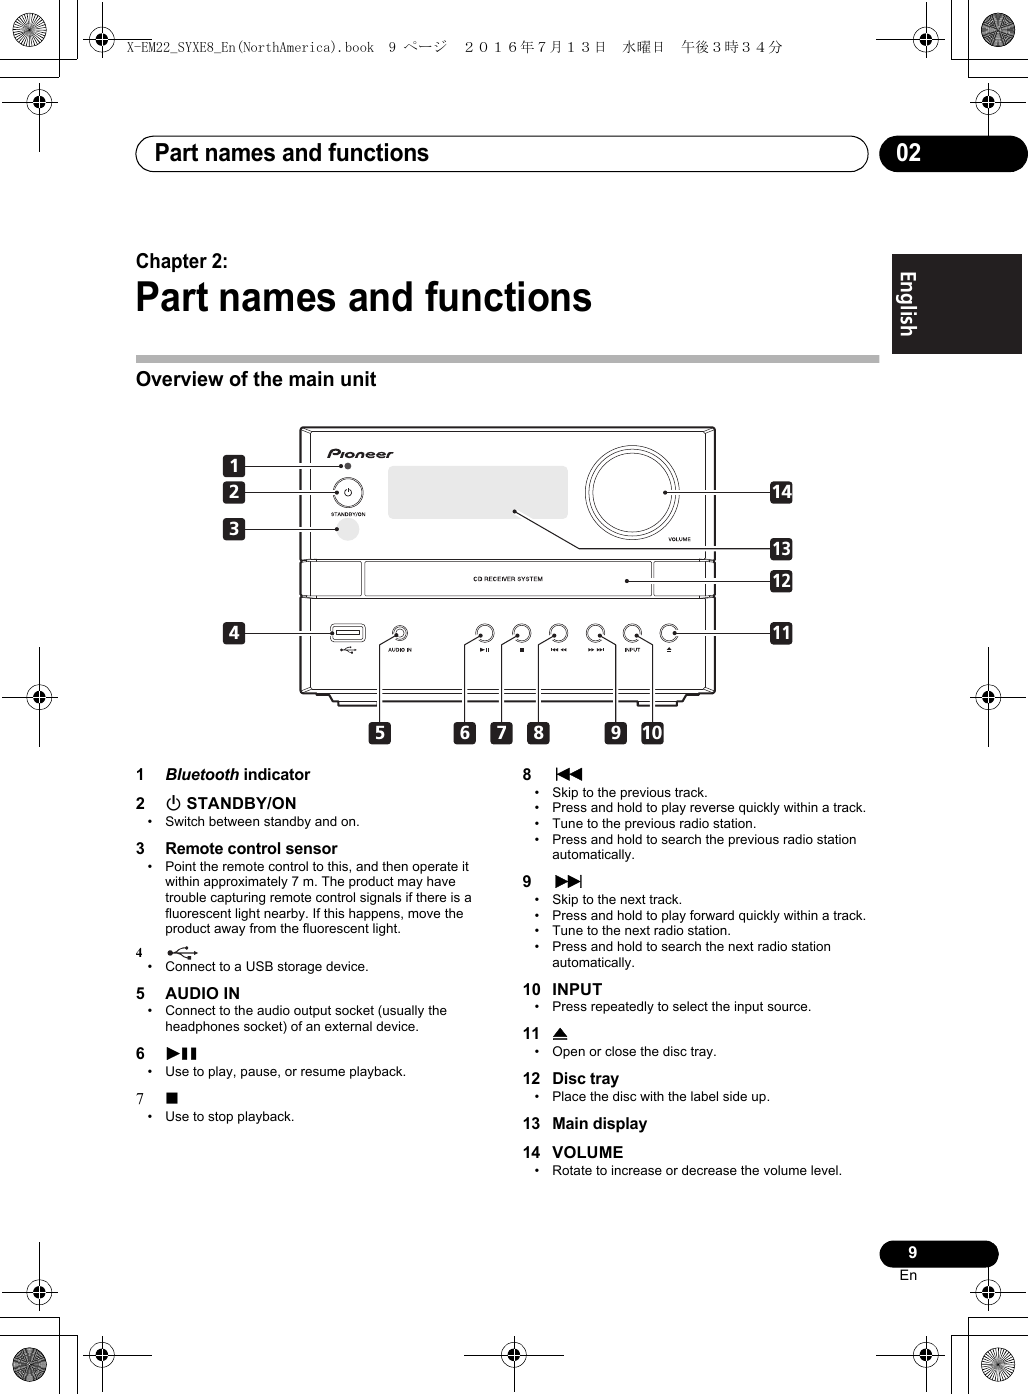
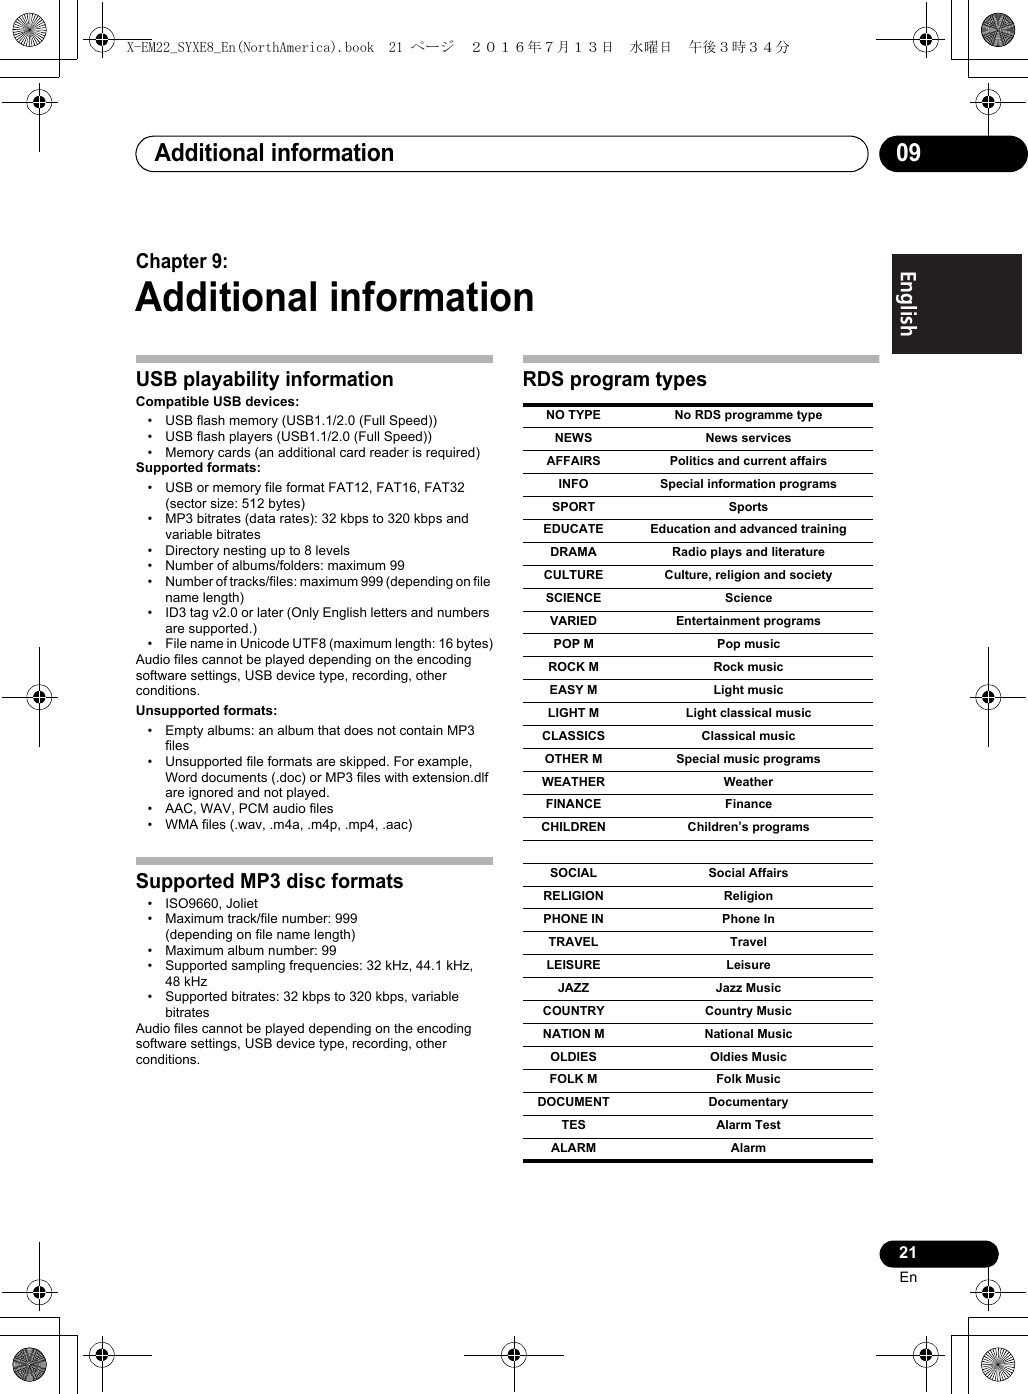
![Bluetooth® Audio playback16En06Chapter 6:Bluetooth® Audio playbackMusic playback using Bluetooth wireless technologyThe unit is capable of playing back music stored on Bluetooth capable devices (cell phones, digital music players etc.) wirelessly. You can also use a Bluetooth audio transmitter (sold separately) to enjoy music from devices that do not have Bluetooth functionality. Please refer to the user’s manual for your Bluetooth capable device for more details. Note• The Bluetooth® word mark and logos are registered trademarks owned by Bluetooth SIG, Inc. and any use of such marks by PIONEER CORPORATION is under license. Other trademarks and trade names are those of their respective owners.• The Bluetooth wireless technology enabled device must support A2DP profiles.• Pioneer does not guarantee proper connection and operation of this unit with all Bluetooth wireless technology enabled devices.Remote control operationThe remote control supplied with this unit allows you to play and stop media, and perform other operations. Note• The Bluetooth wireless technology enabled device must support AVRCP profiles.• Remote control operations cannot be guaranteed for all Bluetooth wireless technology enabled devices.Pairing with the unit (Initial registration)In order for the unit to playback music stored on a Bluetooth capable device, pairing must first be performed. Pairing should be performed when first using the unit with the Bluetooth capable device, or when the pairing data on the device has been erased for any reason.Pairing is a step required to allow communication using Bluetooth wireless technology to be carried out.• Pairing is only performed the first time that you use the unit and the Bluetooth capable device together.• In order to allow communication using Bluetooth wireless technology to take place, pairing must be performed on both the unit and the Bluetooth capable device.1 Press BLUETOOTH on the remote control or INPUT repeatedly on the main unit to switch the source to [BT].The Bluetooth indicator blinks.2 Turn on the power to the Bluetooth capable device that you wish to pair with, and perform pairing procedure on it. Note• This unit will be displayed as “X-EM26” on all Bluetooth capable devices that you have.Pairing will start.• Place the Bluetooth capable device close to the unit.• Please refer to the user’s manual for your Bluetooth capable device for details on when pairing can be performed and the procedures required for pairing.• When PIN code entry is requested, enter “0000.” (This unit does not accept any PIN code setting other than “0000.”)Music dataDevice not equipped with Bluetoothwireless technology:Digital music player+Bluetooth® audio transmitter(commercially available)Bluetooth wireless technologyenabled device:Digital music playerBluetooth wireless technologyenabled device:Cell phoneX-EM22_SYXE8_En(NorthAmerica).book 16 ページ 2016年7月13日 水曜日 午後3時34分](https://usermanual.wiki/Onkyo-Home-Entertainment/XEM26/User-Guide-3080478-Page-16.png)
![Bluetooth® Audio playback17EnEnglish Français Español063 Confirm on the Bluetooth capable device that pairing has been completed.• If pairing with the Bluetooth capable device has been completed correctly, a beep will sound, and the Bluetooth indicator will switch from blinking to staying lit.• If the Bluetooth indicator will not switch from blinking to staying lit, the pairing was not completed correctly so please try pairing with the unit again.• If paring has been completed correctly, you need not repeat this procedure again.Even devices that have already been paired with this unit will not connect during pairing mode in the following cases.In such cases, delete pairing history from the Bluetooth wireless technology device and perform pairing again. In order to pair with the unit, press and hold the 1; on the unit for 3 seconds.• Up to 8 pairing history can be recorded with this unit. If connecting to a Bluetooth wireless technology device over 8 units, the oldest pairing history will be deleted.• If the settings are reset to the factory setting, all pairing history will be deleted. In order to reset to factory setting, press and hold the 1; on the unit for more than 8 seconds.Listen to music on the unit from a Bluetooth capable device1 Press BLUETOOTH on the remote control or INPUT repeatedly on the main unit to switch the source to [BT].The unit will start using the BT function, and connect with a Bluetooth capable device.2A Bluetooth connection will be created between the Bluetooth capable device and the unit.Procedures for connecting to the unit should be performed from the Bluetooth capable device.• Please refer to the user’s manual for your Bluetooth capable device for details of the connection procedures.3 Playback music from the Bluetooth capable device. Note• When Bluetooth capable devise is not connected and no operations have been performed for more than 15 minutes, the unit will automatically power off.Radio wave cautionThis unit uses a 2.4 GHz radio wave frequency, which is a band used by other wireless systems (see list below). To prevent noise or interrupted communication, do not use this unit nearby such devices, or make sure these devices are switched off during use.• Cordless phones• Cordless facsimiles• Microwave ovens• Wireless LAN devices (IEEE802.11b/g)• Wireless AV equipment• Wireless controllers for game systems• Microwave-based health aids• Some baby monitorsOther, less common, equipment that may operate on the same frequency:• Anti-theft systems• Amateur radio stations (HAM)• Warehouse logistic management systems• Discrimination systems for train or emergency vehicles Note• In the event noise appears in your television image, there is the possibility that a Bluetooth wireless technology enabled device or this unit (including products supported by this unit) are causing signal interference with the antenna input connector of your television, video, satellite tuner, etc. In this event, increase the distance between the antenna input connector and the Bluetooth wireless technology enabled device or this unit (including products supported by this unit).• If there is something obstructing the path between this unit (including devices supported by this unit) and the device equipped with Bluetooth wireless technology (such as a metal door, concrete wall, or insulation containing tinfoil), you may need to change the location of your system to prevent signal noise and interruptions.Scope of operationUse of this unit is limited to home use. (Transmission distances may be reduced depending on communication environment). In the following locations, poor condition or inability to receive radio waves may cause the audio to be interrupted or stopped:• In reinforced concrete buildings or steel framed or iron-framed buildings.• Near large metallic furniture.• In a crowd of people or near a building or obstacle.• In a location exposed to the magnetic field, static electricity or radio wave interference from radio communication equipment using the same frequency band (2.4 GHz) as this unit, such as a 2.4 GHz wireless LAN device (IEEE802.11b/g) or microwave oven.X-EM22_SYXE8_En(NorthAmerica).book 17 ページ 2016年7月13日 水曜日 午後3時34分](https://usermanual.wiki/Onkyo-Home-Entertainment/XEM26/User-Guide-3080478-Page-17.png)
![Listening to the FM radio 0719EnEnglish Français EspañolChapter 7:Listening to the FM radioTuning to an FM radio station Note• Make sure that you have connected and fully extended the FM antenna.1 Press FM on the remote control or INPUT repeatedly on the main unit to switch the source to tuner.2 Press and hold :/9 until the frequency starts to change.• To tune to a station at a specific frequency, press :/9 repeatedly until the desired frequency is displayed.Programming radio stations Note• You can program up to 30 preset radio stations.• To overwrite a programmed radio station, store another one with its sequence number.1 Tune to a radio station.2 Press PROGRAM to activate programming.[XX] (XX indicates the sequence number) blinks.3 Press / to allocate a sequence number from 1 to 30 to this radio station, and then press PROGRAM to confirm.The preset sequence number and the frequency of this radio station are displayed.4 Repeat steps 1-3 to program more stations. Tip• Press and holding PROGRAM will allow you to freely select any radio station. The selected station will be saved automatically.Tuning to a preset radio station• Press / to select the sequence number of that preset radio station.Display RDS information RDS (Radio Data System) is a service that allows FM stations to show additional information. If you tune to an RDS radio station, [RDS] and the station name are displayed.1 Tune to an RDS radio station.2 Press DISPLAY repeatedly to scroll through the available information:• Station name• Frequency• Program type such as [NEWS] (news), [SPORT] (sport), [POP M] (pop music)...• Text messages• CT (Clock Time)X-EM22_SYXE8_En(NorthAmerica).book 19 ページ 2016年7月13日 水曜日 午後3時34分](https://usermanual.wiki/Onkyo-Home-Entertainment/XEM26/User-Guide-3080478-Page-19.png)
![Other features0820EnChapter 8:Other featuresTurn on automaticallyYou can set a time for automatic power on. Note• Make sure that you have set the clock before this setup.1 In standby mode, press the CLOCK to display time and then press and hold SLEEP/TIMER.[SOURCE] (time for auto power on) blinks.2 Press :/9 to select [SOURCE].3 Press SLEEP/TIMER.The hour digits blink.4 Press :/9 to set the hour.5 Press SLEEP/TIMER again.The minute digits blink.6 Press :/9 to set the minute.7 Press SLEEP/TIMER again.8 Press :/9 to set the volume.9 Press SLEEP/TIMER.The clock time and [TIMER] are displayed.• To deactivate the timer, display the time and then press SLEEP/TIMER again.• The power cannot be turned on while the timer is being set. Finish setting the time, then turn on the power.Setting the sleep timerIn the working mode, press SLEEP/TIMER repeatedly to select a preset period (15, 30, 45, 60, 90 or 120 minutes).When the sleep timer is activated, [SLEEP] is displayed on the lower-right corner of the main display.• To deactivate the sleep timer, press SLEEP/TIMER repeatedly until [SLEEPOFF] is displayed.Routing audio from other devicesThrough the AUDIO IN socket1 Connect a stereo mini-plug cable (commercially available) to• the AUDIO IN socket on the front panel of the main unit, and• the headphones socket on the external device (for example, an MP3 player).2 Press AUDIO IN on the remote control or INPUT repeatedly on the main unit to switch the source to [AUDIO IN].3 Play the external device.USB 500 mA chargeThe USB terminal on this unit has a 500 mA output. A USB device up to 500 mA can be connected and used/charged.Setting and deactivating the DEMO modeYou can set it to DEMO mode where the display scrolls the words. When the power is off (standby mode) press and hold ∫. This will set the DEMO mode. To deactivate, press ∫ again.X-EM22_SYXE8_En(NorthAmerica).book 20 ページ 2016年7月13日 水曜日 午後3時34分](https://usermanual.wiki/Onkyo-Home-Entertainment/XEM26/User-Guide-3080478-Page-20.png)
![Additional information 0923EnEnglish Français EspañolWhen the Bluetooth wireless technology device is connected or operatedCautions on useWhen moving this unitWhen moving this unit, be sure to first check that there is no disc loaded. Then press ÍSTANDBY/ON, wait until [GOOD BYE] disappears on main display to turn off, and then unplug the power cord. Damage may occur if the unit is transported or moved with a disc inserted, or when another device is connected to the USB terminal, or AUDIO IN mini-plug jack.Place of installation• Choose a stable place near the TV or stereo system being used with this unit.• Do not place this unit on top of a TV or color monitor. Also, install it away from cassette decks and other devices easily affected by magnetic forces.Avoid the following locations:• Places exposed to direct sunlight• Humid or poorly ventilated places• Extremely hot places• Places exposed to vibrations• Places in which there is much dust or cigarette smoke• Places exposed to soot, steam, or heat (kitchens, etc.)Do not place objects on this unitDo not place any objects on top of this unit.Do not obstruct the ventilation holes.Do not use this unit on shaggy rugs, beds, sofas, etc., or wrapped in cloth, etc. Doing so will prevent the heat from dispersing, leading to damage.Do not expose to heat.Do not place this unit on top of an amplifier or other components that generate heat. When rack mounting it, to avoid the heat given off by the amplifier or other audio components, place it on a shelf below the amplifier.• Turn off the power of this unit when not using it.• Depending on signal conditions, striped patterns may appear on a TV screen and noise may enter the sound of radio broadcasts when the power of this unit is on. If this happens, turn off the power of this unit.ProblemSolutionThe Bluetooth wireless technology device cannot be connected or operated.Sound from the Bluetooth wireless technology device is not emitted or the sound is interrupted.Check that no object that emits electromagnetic waves in the 2.4 GHz band (microwave oven, wireless LAN device or Bluetooth wireless technology apparatus) is near the unit. If such an object is near the unit, set the unit far from it. Or, stop using the object emitting the electromagnetic waves.Check that the Bluetooth wireless technology device is not too far from the unit and that obstructions are not set between the Bluetooth wireless technology device and the unit. Set the Bluetooth wireless technology device and the unit so that the distance between them is less than about 10 m* and no obstructions exist between them.* The distance given is to be used as a rough guide. The actual allowable distance between devices may vary depending on conditions in the surrounding environment.The Bluetooth wireless technology device may not be set to the communication mode supporting the Bluetooth wireless technology. Check the setting of the Bluetooth wireless technology device.X-EM22_SYXE8_En(NorthAmerica).book 23 ページ 2016年7月13日 水曜日 午後3時34分](https://usermanual.wiki/Onkyo-Home-Entertainment/XEM26/User-Guide-3080478-Page-23.png)