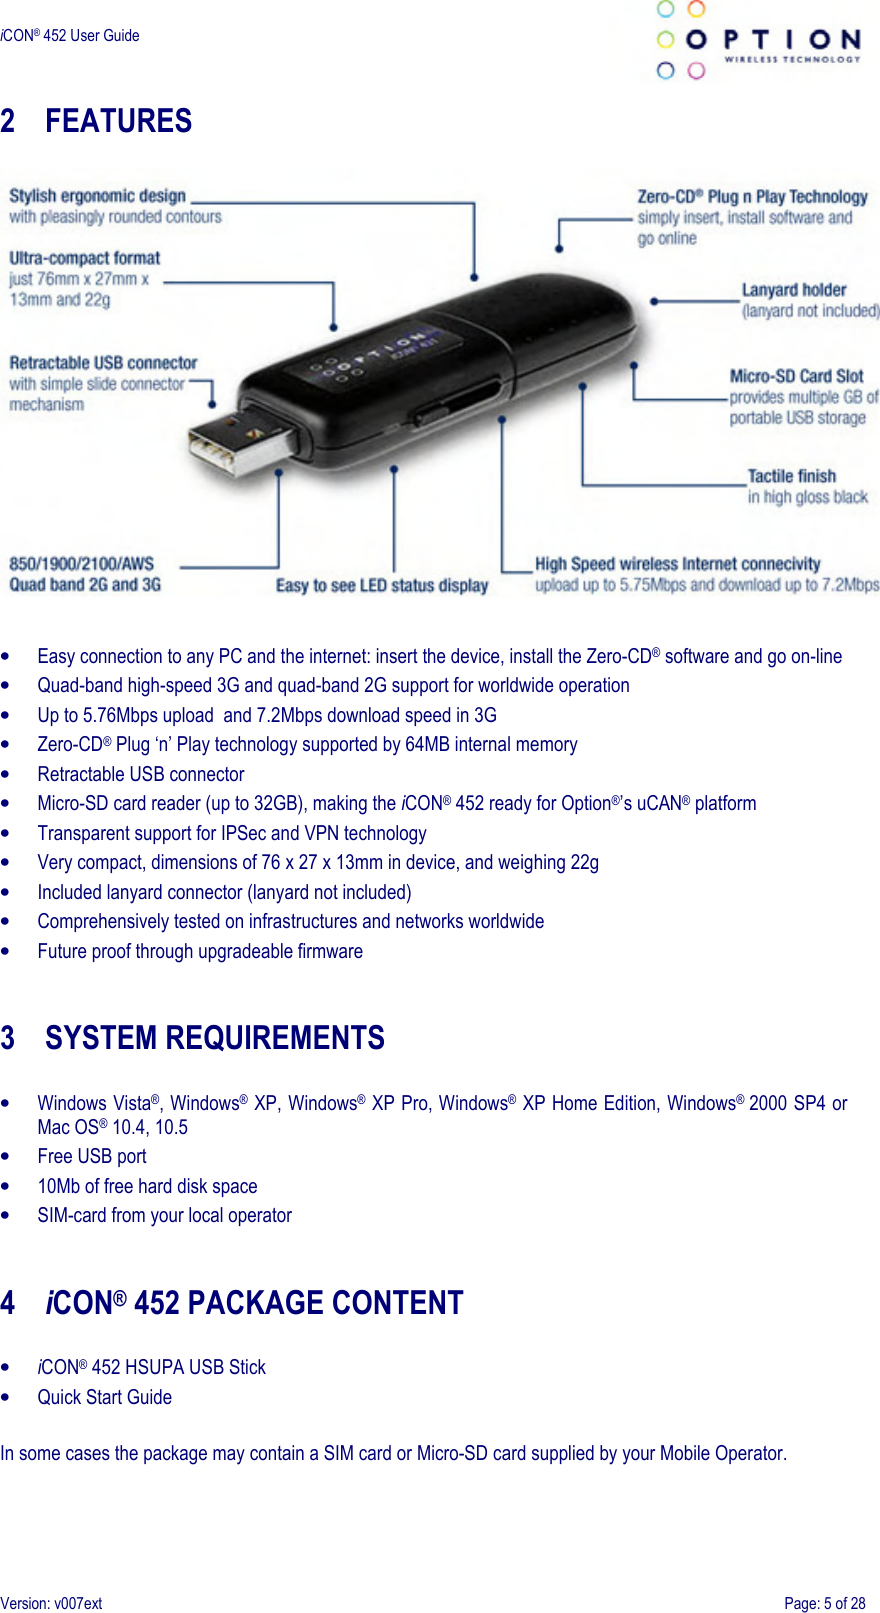
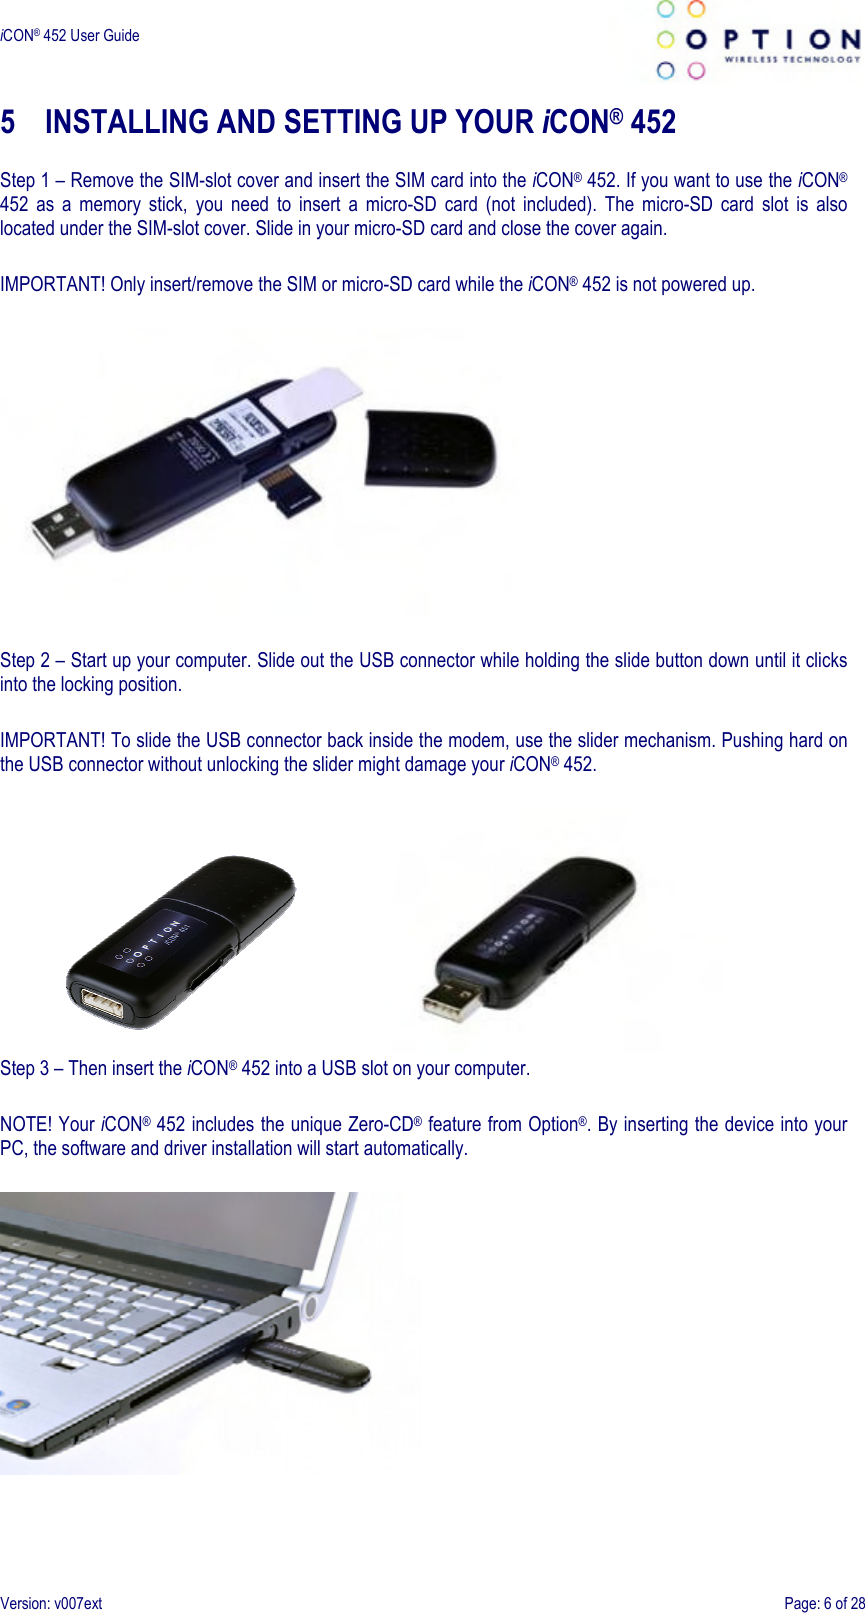
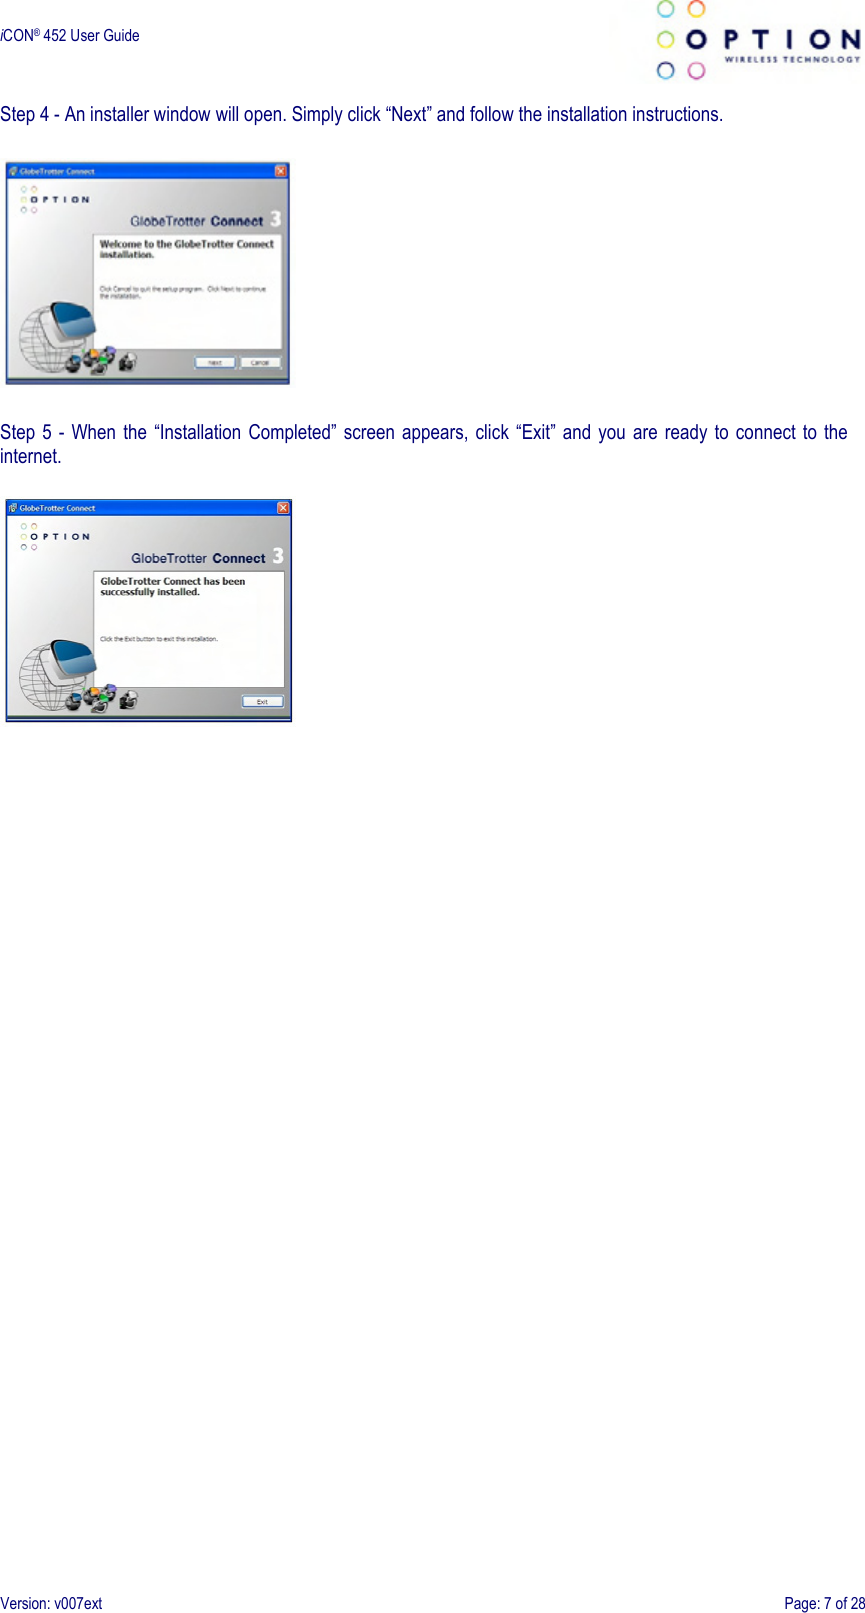
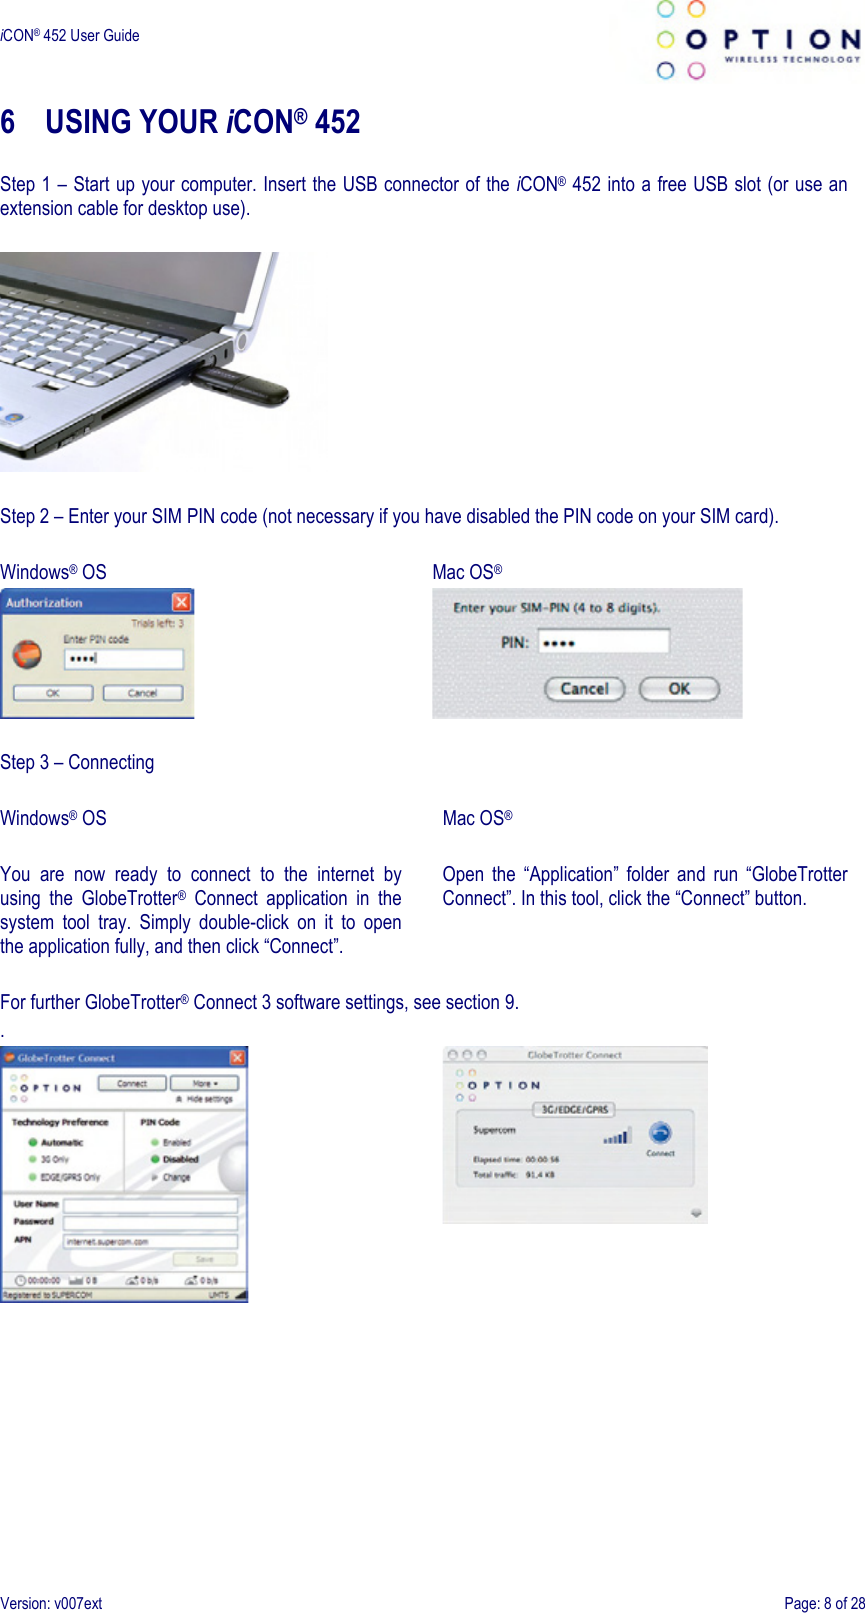
Option NV OGI0452 HSUPA/HSDPA/UMTS/EDGE/GPRS/GSM USB dongle User Manual

Option NV HSUPA/HSDPA/UMTS/EDGE/GPRS/GSM USB dongle

Contents

User manual

 iCON® 452 User Guide The intelligent HSUPA USB modem Fast, future-proof and truly worldwide
 iCON® 452 User Guide     Version: v007ext  Page: 2 of 28 NOTICE  The information in this User Guide is subject to change without notice. The contents herein are provided "as is". Except as required  by  applicable law, no warranties  of  any kind, either express  or  implied,  including, but  not limited to, the implied warranties of merchantability and fitness for a particular purpose, are made in relation to the accuracy, reliability or contents of this document.   COPYRIGHT  Reproduction,  transfer,  distribution  or  storage  of  part  or  all  of  the  contents  in  this  User  Guide  in  any  form  is prohibited without the prior written permission of Option® nv.   TRADEMARK  Copyright  2009  ©.  Option  nv.  All  rights  reserved.  Option,  GlobeTrotter,  Zero-CD  and  the  Option  logo  are registered trademarks of Option. All third-party trademarks are the property of their respective owners.
 iCON® 452 User Guide     Version: v007ext  Page: 3 of 28 CONTENTS  1 WELCOME  4 2 FEATURES  5 3 SYSTEM REQUIREMENTS  5 4 iCON® 452 PACKAGE CONTENT  5 5 INSTALLING AND SETTING UP YOUR iCON® 452  6 6 USING YOUR iCON® 452  8 7 LED STATUS INDICATOR  10 8 SAFE REMOVAL  10 9 GLOBETROTTER® CONNECT 3 SOFTWARE  11 9.1 Product Features  11 9.2 Short Description And Intended Use  11 9.2.1 Basic Use  11 9.3 Installing And Setting Up Globetrotter® Connect 3  11 9.3.1 Installation  11 9.3.2 Installation Process  12 9.3.3 Running GlobeTrotter® Connect 3  12 9.3.4 Entering your PIN code  13 9.3.5 Checking Status  13 9.3.6 Exit GlobeTrotter® Connect 3  14 9.4 Setting Up A Connection To The Internet  14 9.4.1 Connecting to the Internet  14 9.4.2 Disconnecting  15 9.4.3 Changing the program options  15 9.4.3.1 APN  16 9.4.3.2 Enable / Disable the Pin Code  16 9.4.3.3 Technology Selection  16 9.5 Additional Features  17 9.5.1 Using the SMS Centre  17 9.5.2 Network Selection  18 9.5.3 Auto (Re)Connect  18 10 TROUBLESHOOTING  19 11 DETAILED TECHNICAL SPECIFICATIONS  20 12 PRODUCT SUPPORT AND ADDITIONAL HELP  22 12.1 Technical Support  22 12.2 Help  22 APPENDIX A: LIMITED WARRANTY  23 APPENDIX B: HEALTH, SAFETY AND CERTIFICATION INFO  24
 iCON® 452 User Guide     Version: v007ext  Page: 4 of 28 1 WELCOME               The new iCON® 452 from Option® offers the latest available technology in the world market.  Perfect for tech-savvy consumers and mobile professionals alike, this little device offers high upload (5.76Mbps) and download (7.2Mbps) speeds.  With its compact size, the iCON® 452 delivers a complete solution in an innovative, intelligent and stylish USB design,  and  equipped  with  a  quad-band  configuration  (850/1900/2100/AWS),  it  is  convenient  for  true  global usage  with  3G/GPRS/EDGE  support.  It  can  therefore  be  used  as  a  convenient  high  speed  data  roaming solution for travelers, enabling access to e-mail and internet virtually everywhere in the world.  The iCON® 452’s attractive style with retractable USB connector is compact enough to fit easily into your palm, and its very light weight of 22g ensures maximum portability and convenience in fixed (PC) or mobile (laptop) environments.  Also  featuring  a  Micro-SD  slot,  the  device  converts  from  data  modem  to  true  USB  storage  solution  (e.g. enabling portable applications), for up to 32GB.  The  technology  used  in  the  iCON®  452  provides  the  latest  features,  but  takes  up  less  space.  This  enables devices to be built that are feature-packed, but remain highly compact. The result is the iCON® 452.  Particular attention has been placed on the iCON® 452’s look and feel. With its special textures and rounded edges, the iCON® 452 is particularly comfortable to touch and projects a confident and refined image serving as your reliable mobile access companion for years to come.  The  iCON®  452  considerably  enhances  your  working  speed.  This  results  in  faster  e-mail  access,  instant messaging and swift browsing, streaming and downloading. Also on-line gaming is now possible in the blink of an eye.  Installing and operating the iCON® 452 is child’s play. After inserting a SIM card and plugging the iCON® 452 USB stick into a free USB port, the easy to use connection software is auto installed, bringing internet access within a mouse-click’s reach. Quad-band configuration Zero-CD®  Micro-SD card slot High speed wireless internet connectivity Download 7.2/Upload 2.0 (5.76 Ready)  Retractable USB connector
 iCON® 452 User Guide     Version: v007ext  Page: 5 of 28 2 FEATURES    • Easy connection to any PC and the internet: insert the device, install the Zero-CD® software and go on-line • Quad-band high-speed 3G and quad-band 2G support for worldwide operation • Up to 5.76Mbps upload  and 7.2Mbps download speed in 3G • Zero-CD® Plug ‘n’ Play technology supported by 64MB internal memory • Retractable USB connector • Micro-SD card reader (up to 32GB), making the iCON® 452 ready for Option®’s uCAN® platform • Transparent support for IPSec and VPN technology • Very compact, dimensions of 76 x 27 x 13mm in device, and weighing 22g • Included lanyard connector (lanyard not included) • Comprehensively tested on infrastructures and networks worldwide • Future proof through upgradeable firmware   3 SYSTEM REQUIREMENTS  • Windows Vista®, Windows® XP, Windows® XP Pro, Windows® XP Home Edition, Windows®  2000 SP4 or Mac OS® 10.4, 10.5 • Free USB port • 10Mb of free hard disk space • SIM-card from your local operator   4 iCON® 452 PACKAGE CONTENT  • iCON® 452 HSUPA USB Stick • Quick Start Guide  In some cases the package may contain a SIM card or Micro-SD card supplied by your Mobile Operator.
 iCON® 452 User Guide     Version: v007ext  Page: 6 of 28 5 INSTALLING AND SETTING UP YOUR iCON® 452  Step 1 – Remove the SIM-slot cover and insert the SIM card into the iCON® 452. If you want to use the iCON® 452  as  a  memory  stick,  you  need  to  insert  a  micro-SD  card  (not  included).  The  micro-SD  card  slot  is  also located under the SIM-slot cover. Slide in your micro-SD card and close the cover again.  IMPORTANT! Only insert/remove the SIM or micro-SD card while the iCON® 452 is not powered up.    Step 2 – Start up your computer. Slide out the USB connector while holding the slide button down until it clicks into the locking position.  IMPORTANT! To slide the USB connector back inside the modem, use the slider mechanism. Pushing hard on the USB connector without unlocking the slider might damage your iCON® 452.    Step 3 – Then insert the iCON® 452 into a USB slot on your computer.  NOTE! Your iCON® 452 includes the unique Zero-CD® feature from Option®. By inserting the device into your PC, the software and driver installation will start automatically.
 iCON® 452 User Guide     Version: v007ext  Page: 7 of 28 Step 4 - An installer window will open. Simply click “Next” and follow the installation instructions.    Step 5 - When  the  “Installation  Completed”  screen  appears,  click “Exit”  and  you are  ready  to  connect  to  the internet.
 iCON® 452 User Guide     Version: v007ext  Page: 8 of 28 6 USING YOUR iCON® 452  Step 1 – Start up your computer. Insert the USB connector of the iCON® 452 into a free USB slot (or use an extension cable for desktop use).    Step 2 – Enter your SIM PIN code (not necessary if you have disabled the PIN code on your SIM card).  Windows® OS   Mac OS®     Step 3 – Connecting  Windows® OS  You  are  now  ready  to  connect  to  the  internet  by using  the  GlobeTrotter®  Connect  application  in  the system  tool  tray.  Simply  double-click  on  it  to  open the application fully, and then click “Connect”.  Mac OS®  Open  the  “Application”  folder  and  run  “GlobeTrotter Connect”. In this tool, click the “Connect” button. For further GlobeTrotter® Connect 3 software settings, see section 9. .
 iCON® 452 User Guide     Version: v007ext  Page: 9 of 28 Disconnecting can be done in the same way.  Windows® OS  Right  click  on  the  GlobeTrotter®  Connect  application icon  in  the  system  tool  tray  and  click  “Disconnect”. Alternatively  click  on  the  “Disconnect”  button  in  the GlobeTrotter® Connect window.  Mac OS®  Open  the  “Application”  folder  and  run  “GlobeTrotter Connect“. In this tool, click the “Disconnect” button.
 iCON® 452 User Guide     Version: v007ext  Page: 10 of 28 7 LED STATUS INDICATOR  The  iCON®  452  is  equipped  with  a  multicolor  LED.  The  different  operating  statuses  are  indicated  by  the frequency and color of blinking. The colors indicate different network generations (data speed capabilities). The blinking scheme indicates the state of connection to the network.  Color  Light Frequency  Meaning Off  Off  Not powered Red  Permanent  Initializing Green  Blinking  Ready to connect to 2G networks Blue  Blinking  Ready to connect to 3G networks Green  Permanently Lit  Connected to 2G network Blue  Permanently Lit  Connected to 3G network Blue-Red  Flickering  A problem occurred   8 SAFE REMOVAL  Before ejecting the  iCON® 452,  always tell Windows® that  you want to remove the card first. Use the “Safely Remove Hardware” icon in the system tray. If you do not do this, you may cause the system to crash.
 iCON® 452 User Guide     Version: v007ext  Page: 11 of 28 9 GLOBETROTTER® CONNECT 3 SOFTWARE  9.1 Product Features  • Easy installation • Simple intuitive user interface • Compatible with most modern desktop and laptop PCs equipped with Microsoft Windows® 2000, Windows® XP or Windows Vista®  9.2 Short Description And Intended Use  The GlobeTrotter® Connect 3 application is a small, easy to use tool to manage your connection to the internet over 2G and 3G mobile networks. It is designed for use with all of Option®’s data products.  9.2.1 Basic Use  The focus is on simplicity and most users will use it only in basic mode, where it displays a window with network information and a “Connect” button. The main purpose is therefore simply to Connect/Disconnect to and from the internet.   Figure 1: GlobeTrotter® Connect 3 Basic View  While GlobeTrotter® Connect 3 is connected, the  “Connection Time”, “Volume” and  “Current Data Speed” are displayed in the area just above the status bar. An arrow pointing up is followed by the upload speed in Kbit/s and an arrow pointing down is followed by the download speed.  9.3 Installing And Setting Up Globetrotter® Connect 3  9.3.1 Installation  Your iCON® 452 is equipped with Zero-CD® technology, and the GlobeTrotter® Connect 3 application is installed as soon as you connect the product for the first time.
 iCON® 452 User Guide     Version: v007ext  Page: 12 of 28 9.3.2 Installation Process  The  installation  process  is  straightforward.  You  will  see  various  screens  appear,  indicating  the  installation progress of your iCON® 452.        Figure 2: Found New Hardware Balloon  Figure 3: GlobeTrotter® Connect 3 Installation Wizard  Click “Next” to continue the installation.  After  GlobeTrotter®  Connect  3  is  installed,  the  following  screen  will  be  shown.  Click  “Finish”  to  close  the installation wizard.   Figure 4: Successfully installed GlobeTrotter® Connect 3  9.3.3 Running GlobeTrotter® Connect 3  As soon as you plug in the iCON® 452, GlobeTrotter® Connect 3 shows up in the Systray.   Figure 5: GlobeTrotter® Connect 3 icon  GlobeTrotter®  Connect  3  is  now  ready  to  make  a  connection.  Don’t  forget  that  apart  from  the  software,  the iCON® 452 also needs to be ready, e.g. you can’t use the iCON® 452 if it isn’t registered to the network or if the PIN code hasn’t been entered yet.
 iCON® 452 User Guide     Version: v007ext  Page: 13 of 28 9.3.4 Entering your PIN code  If you have enabled the PIN code on your SIM card, you will automatically be asked to type it in. If enabled, you won’t be able  to use your iCON®  452 until you have  typed in the  PIN code. This will happen every time you power up the device.   Figure 6: Pin Code Dialog  9.3.5 Checking Status  Once the PIN code is entered (or immediately if you have disabled the PIN code), the iCON® 452 will look for the network. You can check the status by moving your mouse pointer over the GlobeTrotter® Connect 3 icon to get a quick status report showing the network name, technology being used and the signal quality.   Figure 7: Network Information Balloon  If GlobeTrotter® Connect 3 is opened, you can see the signal strength immediately in the lower right corner. If you  need  to  know  the  signal  strength  more  accurately  (e.g.  in  fringe  areas  you  may  want  to  determine  the location  where  you  have  the  best  reception)  double-click  on  the  signal  strength  indicator  to  see  an  enlarged view of the signal strength indicator.   Figure 8: Signal Strength Indicator  The indicator next to the signal strength shows 3G if you have 3G coverage. Once you have a connection, the indicator shows HS if a HSUPA (HS) connection was established.   Figure 9: Enlarged Signal Strength Indicator
 iCON® 452 User Guide     Version: v007ext  Page: 14 of 28 9.3.6 Exit GlobeTrotter® Connect 3  When  you  click    or  ,  this  doesn’t  kill  the  application.  It  just  retreats  to  the  Systray  (see Figure 5: GlobeTrotter® Connect  3 icon). This behavior  is equivalent to  other  Windows®  applications such  as MSN messenger. To terminate the application you must “Right Click” on the Title Bar and choose “Exit”.   Figure 10: Exit GlobeTrotter® Connect 3  9.4 Setting Up A Connection To The Internet  When you want to connect to the internet, you need to specify how you want to connect. You can do this in the settings screen (see the “Changing the program options” section of this manual, section 9.4.3).  As your mobile operator often preconfigures  GlobeTrotter® Connect 3 for you, the settings  may already be in there.  9.4.1 Connecting to the Internet  To connect to the internet simply click on the  “GlobeTrotter Connect” icon in the  Systray  (see  screenshot)  to display its menu. Click “Connect” to start the internet connection.   Figure 11: Connect  If the software has not been configured, connecting to the internet will fail. In this case refer to the “Changing the program options” section of this manual, section 9.4.3.
 iCON® 452 User Guide     Version: v007ext  Page: 15 of 28 9.4.2 Disconnecting  To disconnect, click on the Systray icon to show the menu and select the “Disconnect” option.   Figure 12: Disconnect  9.4.3 Changing the program options  Although  GlobeTrotter®  Connect  3  is  simple  and  straightforward,  it  has  a  number  of  items  that  need  to  be configured at least once (either preconfigured by the operator or manually by the user).  To change the settings, launch the GlobeTrotter® Connect 3 main window. You can do this by double clicking on the Systray icon or by selecting “Open GlobeTrotter Connect” from the Systray Icon menu.   Figure 13: Basic View  Click on “Show settings” to make the configuration options visible.   Figure 14: Advanced View
 iCON® 452 User Guide     Version: v007ext  Page: 16 of 28 9.4.3.1 APN  The  Access  Point  Name  (APN)  defines your route  to  the  internet.  Your  mobile  operator  can  supply  the  APN (some operators may also specify a user name and password if required).  Most  users  will  never  have  to  change  this  setting.  If  you  have  entered  the  APN  manually  a  button  saying Automatic will appear next to the Save button. If you press this button the software will try to ‘guess’ the APN needed based on your SIM.  9.4.3.2 Enable / Disable the Pin Code  By  clicking  on  “Enabled”  or  “Disabled”  you  can  enable  or  disable  the  PIN  code  on  your  SIM.  For  security reasons you will have to provide the PIN code before you can disable the PIN code. If you enable the PIN code you’ll have to enter a new code.  9.4.3.3 Technology Selection  It is recommended that you allow your iCON® 452 to decide what technology to use to connect to the internet. Sometimes  local  conditions  will  make  connecting  difficult,  and  the  default  setting  “Automatic”  may  not  give optimum performance.  In these  circumstances you can  experiment by forcing the  data  connection on to  “3G Only” or “EDGE/GPRS Only”. Remember to switch back the setting to “Automatic” when conditions change.
 iCON® 452 User Guide     Version: v007ext  Page: 17 of 28 9.5 Additional Features  Via the “More” button additional features are available.   Figure 15: Accessing additional functionality  9.5.1 Using the SMS Centre  To launch the SMS Centre click the “More” button and select “SMS Centre”. On the left-hand side you will see the different folders: • Inbox • Sent • Unsent (contains draft SMSs)   Figure 16: SMS Centre  Click on any of these folders to see the messages it contains. To read a message, click on it in the Sender or Date column. The text of a selected message is shown in the grey box on the right.  To Reply or Forward a message, select it as above and press the appropriate button. A new message window opens containing the Reply number and the text to be forwarded.
 iCON® 452 User Guide     Version: v007ext  Page: 18 of 28 To create a new message, press the “New” button. The New SMS Message window opens and you can start typing your message (maximum 160 characters). To send the message, fill in the recipient’s telephone number and click “Send”. If you prefer to send your message at a later time click the “Save” button which automatically stores your message in the Unsent folder for later use.   Figure 17: New Message  To delete a message, select it as explained above, and press the “Delete” button.  9.5.2 Network Selection  GlobeTrotter®  Connect  3  will  automatically  select  a  network  for  you.  However,  you  can  select  a  network manually.  To  do  this,  simply  choose  “Network  Selection”  via  the  “More”  button  and  select  “Manual”. GlobeTrotter® Connect  3 will start scanning for available networks (this may  take  several minutes). Once the scan is completed, the “Select” button will allow you to choose a network. In a similar way you can go back to Automatic mode.  9.5.3 Auto (Re)Connect  If  “Auto  Connect”  is  selected,  GlobeTrotter®  Connect  3  will  try  to  connect  as  soon  as  the  network  and GlobeTrotter®  Connect  3  are  available.  If  a  connection  is  dropped,  GlobeTrotter®  Connect  3  will  try  to  re-establish the connection as soon the network is available again.  If the you manually Disconnect (press the “Disconnect” button), the Auto Connect feature is disabled until you re-launch GlobeTrotter® Connect 3.   Figure 18: Activating Auto Connect  Note: Auto Connect only works on the Home network.
 iCON® 452 User Guide     Version: v007ext  Page: 19 of 28 10 TROUBLESHOOTING  If you are having trouble getting a reliable connection, please check with  your network provider for advice on network coverage in your area.  Other  characteristics  such  as  network  cell  handover,  dead  coverage  spots,  geographic  or  structural obstructions, etc. may also affect the performance of the data transmission.  Symptom / possible causes  Possible solution No LED burning. Check if the device is firmly plugged into a USB port or check the connection of the cable if you are using this. If still not working, try to use another USB port. No SIM inserted.  Disconnect  the  iCON®  452.  Insert  the  SIM  and reconnect the iCON® 452. Insufficient signal strength. Move the device  to  a  location  with  better coverage (e.g. a window). The extension cable can be of help for this. Use the signal strength tool to see the signal strength. SIM  card  was  not  present  when  connecting  the device to a USB port. Disconnect  the  device,  insert  the  SIM  and reconnect. Drivers  are  not  properly  loaded.  Device  shows yellow  exclamation  marks  in  the  PC’s  Device Manager window. Close  communication  software  that  might  be accessing  the  device.  Close  all  ports  before disconnecting  the  device  from  your  computer. Reinsert the device. LED  is  blinking,  but  does  not  change  to  solid  after an attempt to connect. The APN is not correct. Check the settings with the ones  that  you’ve  obtained  from  your  network operator. You  are  roaming  and  the  network  you  are  using does not allow data links with your home operator. Manually select another network that  supports data links with your home operator. Your connection software doesn’t detect the device. Probably  due  to  faulty  driver  installation.  Remove previously  installed  connection  software.  Also remove  any  other  drivers  of  similar  devices.  Re-install the software. Conflict with other programs. Disable  or  remove  any  other  communication program that might connect with the device. Slow  speed  and/or  no  or  weak  UMTS/HSUPA network where you are. Check  in  the  communication  software  tool  which settings  are  used  (“UMTS  preferred”  is recommended)  and  also  check  which  network  is used (UMTS / HSUPA or GPRS / EDGE).
 iCON® 452 User Guide     Version: v007ext  Page: 20 of 28 11 DETAILED TECHNICAL SPECIFICATIONS  Specifications 3G • Quad-band 850/1900/2100/AWS • HSDPA modes: • HSDPA 1.8: Categories 1-4, 11 and 12 • HSDPA 3.6: Categories 5 and 6 • HSDPA 7.2: Category 8 • HSUPA 2.0: Category 5 • HSUPA 5.76: Category 6 • UE Power Class 3 (power class 4 for 1900 MHz)  E-GPRS • 850/900/1800/1900 MHz • GSM Power Class 4 (2W) for 850/900 bands • GSM Power Class 1 (1W) for 1800/1900 bands • EDGE/GPRS air interface • 3GPP Rel99 with selected Rel4 features • EDGE 8PSK class E2 (+27 dBm in 850/900 bands, +26 dBm in 1800/1900 bands) • GPRS/EGPRS Multislot Class 12 (4 slots Rx, 4 slots Tx) • GPRS/EDGE Class B Type 1 MT • GPRS CS1-CS4; EDGE MCS1-MCS9 • EDGE data throughput (peak): 247Kbps • EDGE data throughput (average): 200Kbps uplink and 215Kbps downlink • Circuit-switched data: 14.4 and 9.6Kbps  Terminal Equipment Interfaces • USB 2.0 high speed interface, fully compatible with USB 1.1 interface • Drivers: Windows® 2000 Pro, Personal and XP Pro/Home, Windows Vista®  and Mac OS® 10.4, 10.5 • PCSC compatible driver, compliant with ISO 7816 and 3GPP TS11.11 • SIM-ME interface as specified in 3GPP GSM TS11.11 and GSM 11.12 and with compliance to ISO 7816 • SIM Application toolkit capable SIM to 3GPP GSM TS11.14 • NDIS  or  Standard  modem  emulation  for  compatibility  with  terminal  programs/dialers  and  for  use  with proprietary operating systems. AT Interface 3GPP TS27.005, ATD*99# and ATD*99***<CID># support • Multiple communication ports for simultaneous data call and network coverage reports  Hardware Specifications • USB stick with retractable USB connector • Status LED indicators • SIM card interface compliant with 3GPP 31.101 and 31.102 supporting 1.8 and 3V UICCs  Environmental • Operating Temperature 0 to + 40° C • RoHS compliant
 iCON® 452 User Guide     Version: v007ext  Page: 21 of 28  Approvals and Certifications • All applicable regulatory approvals (i.e. FCC, R&TTE, PTCRB), Operator and Infrastructure IOT • Microsoft WHQL certified drivers  Current Dimensions (LxWxH) • In device 76 x 27 x 13 mm • Weight 22g
 iCON® 452 User Guide     Version: v007ext  Page: 22 of 28 12 PRODUCT SUPPORT AND ADDITIONAL HELP  GlobeTrotter® Connect 3 updates will be made available on the Option® support website.  12.1 Technical Support  Questions and answers regarding GlobeTrotter® Connect 3 can be found on the Option® support website.  12.2 Help  To access the Help file go to “Help” via the “More” button.
 iCON® 452 User Guide     Version: v007ext  Page: 23 of 28 APPENDIX A: LIMITED WARRANTY  HARDWARE:  Option®  warrants  its  products  to  be  free  from  defects  in  workmanship  and  materials,  under normal use and service, for one year. If a product does not operate as warranted during the applicable warranty period,  Option®  shall,  at  its  option and  expense,  repair the  defective product  or  part, deliver  to  Customer  an equivalent product or part to replace the defective item. All products replaced will become property of Option®. Replacement  products  may  be  new  or  reconditioned.  Option®  shall  not  be  responsible  for  any  software, firmware,  information  or  memory  data  of  Customer  contained  in,  stored  on,  or  integrated  with  any  products returned to Option® pursuant to any warranty.  SOFTWARE:  Option®  warrants  that  the  software  programs  licensed  from  it  will  perform  in  substantial conformance to the program specifications therefore for a period of ninety (90) days from the date of purchase from  Option®  or  its  Authorized  Reseller.  Option®  warrants  the  magnetic  media  containing  software  against failure during the warranty period. No updates are provided. Option®’s sole responsibility hereunder shall be (at Option®’s discretion) to  replace  any  defective  media  with  software,  which  substantially  conforms  to Option®’s applicable  published  specifications.  Customer  assumes  responsibility  for  the  selection  of  the  appropriate applications program and associated reference materials. Option® makes no warranty that its products will work in combination with any hardware or applications software products provided by third parties, that the operation of the software products will be uninterrupted or error-free, or that all defects in the products will be corrected. For  any  third-party  products  listed  in  the  Option®  software  product  documentation  or  specifications  as  being compatible, Option® will make reasonable efforts to provide compatibility, except where the non-compatibility is caused by a “bug” or defect in the third party’s product.  STANDARD  WARRANTY  SERVICE: Standard  warranty  service  for  hardware  products  may  be  obtained  by delivering the defective product, accompanied by a copy of the dated proof a purchase, to Option®’s Corporate Service Center or to an Authorized Option® Reseller during the applicable warranty period. Standard warranty service for software products may be obtained by calling Option®’s Corporate Service Center or an Authorized Reseller,  within  the  warranty  period.  Products  returned  to  Option®’s  Corporate  Service  Center  must  be  pre-authorized  by  Option®  with  a  Return  Material  Authorization  (RMA)  number  marked  on  the  outside  of  the package, and sent prepared, insured, and packaged appropriately for safe shipment. The repaired or replaced item will be shipped to Customer, at his own expense, not later than thirty (30) days after receipt by Option®.  WARRANTIES  EXCLUSIVE: If  an  Option®  product  does  not  operate  as  warranted  above,  customer’s  sole remedy  shall  be  repair  or  replacement,  at  Option®’s  option.  The  foregoing  warranties  and  remedies  are exclusive and are in lieu of all other warranties, express or implied, either in fact or by operation of law, statutory or  otherwise,  including  warranties  of  merchantability  and  fitness  for  a  particular  purpose,  Option®  neither assumes nor authorizes any person to assume for it any other liability in connection with the sale, installation, maintenance or use of its products. Option® shall not be liable under this warranty if its testing and examination disclose that the alleged defect in the product does not exist or was caused by Customer’s or any third person’s misuse, neglect, improper installation or testing, unauthorized attempts to repair, or any other cause beyond the range of intended use, or by accident, fire or other hazard.  LIMITATION OF LIABILITY: In no event, whether based in contract or tort (including negligence) shall Option® be liable for incidental, consequential, indirect, special or punitive damages of any kind, or for loss of revenue, loss of business, or other financial loss arising out of or in connection with the sale, installation, maintenance, use,  performance,  failure,  or  interruption  of  its  products,  even  if  Option®  or  its  Authorized  Reseller  has  been advised of the possibility of such damages.
 iCON® 452 User Guide     Version: v007ext  Page: 24 of 28 APPENDIX B: HEALTH, SAFETY AND CERTIFICATION INFO   FCC-ID NCMOGI0452  Your iCON® 452 is like a mobile phone Your  iCON®  452  uses  the  same  technology  as  a  mobile  phone. It  is  important  that  you  always  obey  all  safety regulations related to mobile phone use. If you have any doubt about the safe operation of your iCON® 452 you should remove the iCON® 452 from the PC and seek advice from authorized personnel. This device may neither be connected to a USB hub, nor to a PC network, nor to a USB 1.0 interface.  Handle with care This device is designed to be plugged directly into the USB port of a computer, however, every precaution should be  taken  to  avoid  stress  on  the  device  should  the  computer  be  lifted,  moved,  relocated  or  packaged.  Should regular movement of this nature be envisaged, an extender cable (sometimes supplied with the device) should be used  so  as  to  avoid  damage  to  the  device.  It  should  be  noted  that  any  damage  sustained  as  a  result  of  the aforementioned mishandling will  be regarded as “User  Damage”  and shall render the  product  warranty null and void.  1. Safety Measurements  Please read  the following guidelines  carefully.  Not following these  guidelines can cause harm to  the USB stick, yourself or other persons.  1.1 General recommendations for use  • Always treat your product with care and keep in a clean and dust-free place. Do not expose your product to open flames or lit tobacco products. • Do not expose to liquid, moisture or humidity. Do not expose the iCON® 452 to rain or other liquids.  • Do not drop, throw or try to bend your product. • Do not paint your product. • Do not attempt to disassemble your product. Doing so may be dangerous and it will void the warranty. • Do not touch the antenna unnecessarily. (This is located either inside the product or as an external antenna.)  1.2 Traveling: Handle the USB stick with care while traveling. It is recommended to remove the USB stick from the laptop.  1.3 Ambient temperatures: Do not expose the iCON® 452 or the antenna to ambient temperatures beyond the range of -10 and +55 degrees Celsius.  1.4 Explosive atmosphere: Turn off your PC in any area with a potentially explosive atmosphere. It is rare, but your  PC  could  generate  sparks,  which  could  cause  an  explosion  or  fire.  Areas  with  a  potentially  explosive atmosphere  are  not  always  clearly  marked.  They  include  fuelling  areas  (petrol  filling  stations),  below  deck  on boats, fuel or chemical transfer or storage facilities, and areas where the air contains chemicals or particles, such as  grain,  dust,  or  metal  powders.  Do  not  transport  or  store  your  PC and  accessories  in  the  compartment  of  a vehicle which contains flammable gas, liquid or explosives.  1.5 Blasting areas – construction sites: Turn off your PC when in a blasting area in order to avoid interfering with two-way radios used in blasting operations.  1.6 Do not use on aircraft: Using a wireless devices on aircraft can cause interference and is illegal. Remove your iCON® 452 if you intend to use your PC whilst in an aircraft. Do not use it when the plane is on the ground without permission from the aircraft crew.  1.7 Do not use in hospitals: Please ensure you follow any local regulations or rules. People are often asked to switch off all electronic devices in some areas of a hospital. This is a recommendation that Option® fully supports. Using the iCON® 452 close to sensitive electronic devices could possibly result in interference. If you intend to use your PC in such areas, you must remove the iCON® 452.
 iCON® 452 User Guide     Version: v007ext  Page: 25 of 28 1.8 Interference from radio signals: Option® relies on advice from health authorities and relevant expert bodies about potentially undesirable reactions to radio emissions from the iCON® 452.  1.9 Immunity to interference: Electromagnetic interference is the disturbance of the normal operation of a device due to its response to radio signals from an external source. Occasionally, in some situations you may hear short sounds  coming  from  audio  equipment  such  as  radio  or  multimedia  PC.  However,  these  audible  signals  do  not interfere with the operation of the equipment.  The  Directive  from  the  European  Commission  (2004/108/EC)  governing  all  forms  of  electronic  equipment concerns  interference  that  such  equipment  produces,  and  its  immunity  to  interference  from  outside.  Any equipment compliant with that directive is unlikely to suffer interference. All wireless devices may get interference which could affect performance.  1.10 Cardiac pacemakers, implanted defibrillators and other medical implant devices  It is possible that  the iCON® 452  may interfere with some  types of pacemakers  or implanted defibrillators when operated close to the implanted device. You should  seek advice  from your doctor that is specific to the implant before  using  the  iCON®  452.  Health  authorities  in  many  countries  have  set  up  advisory  services  for  medical devices and implants including providing advice about maintaining separation distance between the mobile device or other radio frequency equipment and the implant. Option® operating companies reflect the advice given by their relevant health authority or national advisory service, and as a minimum recommend a separation distance of at least 20cm between the iCON® 452 or other radio frequency terminal equipment and the embedded device.  1.11  Hearing  devices:  People  with  hearing  aids  or  other  cochlear  implants  may  experience  interfering  noises when using  mobile  devices or  when one is nearby.  The level of interference will depend  on  the  type of  mobile device, the type of hearing device and the distance between the two. Increasing the distance between the iCON® 452 and hearing device may reduce interference.  1.12 Children: Do not allow children to play with your iCON® 452. They could hurt themselves or others, or could accidentally damage the iCON® 452. Your iCON® 452 contains small parts with sharp edges that may cause an injury or which could become detached and create a choking hazard.  1.13 Driving: Do NOT use the iCON® 452 while driving. Park the vehicle first.  1.14  SIM  cards:  To  protect  against  damage  from  electrostatic  discharge  (ESD)  do  not  touch  the  SIM  card connectors. As a precaution, always make sure that the iCON® 452 is already in your hand before you insert or remove the SIM card.  1.15 Accessories:  Only use  Option®  approved  accessories.  Do  not  connect  with  incompatible  products.  When used with accessories, Option® can only guarantee safe and correct operation of our products if the accessories are tested and approved by us.  1.16 Safe distance: The iCON® 452 has been thoroughly tested to comply with SAR requirements. These tests simulate the absorption by the human body of radiation from the iCON® 452.  This device complies with the SAR regulation as stated by the FCC. The measurements were made according to the Supplement C to OET Bulletin 65 of the Federal Communications Commission (FCC) Guidelines [OET 65] for evaluating compliance of mobile and portable devices with FCC limits for  human  exposure  (general  population)  to  radiofrequency  emissions.  The  device  was  tested  in  all  applicable USB  orientations  with  a  separation  of  5mm  to  the  flat  phantom.  The  FCC  guidelines  define  a  limit  of  1.2W/kg averaged over a mass of 1g for single platform devices, in this case a notebook platform.  This device complies with the SAR regulation as stated by the European Council Recommendation. The  SAR  limit  as  defined  by  the  European  Council  Recommendation  is  2.0W/kg  for  a  mass  of  10g  (European Council Recommendation 1999 519 EC), based upon ICNIRP guidelines. Details are available upon request. For day-to-day use we would advise the user to keep a minimum distance from the antenna of 20cm. Users concerned  with the risk of Radio  Frequency exposure may wish to limit the duration of their calls and to position the antenna as far away from the body as is practical.
 iCON® 452 User Guide     Version: v007ext  Page: 26 of 28 2. Certification requirements  2.1 Federal communications commission notice This equipment has been tested and found to comply with the limits for a Class B digital device, pursuant to Part 15 of the FCC Rules. These limits are designed to provide reasonable protection against harmful interference in a residential installation. This equipment generates uses and can radiate radio frequency energy and, if not installed and used in accordance with the instructions, may cause harmful interference to radio communications. However, we  cannot  guarantee  that  interference  will  not  occur  in  a  particular  installation.  If  this  equipment  does  cause harmful interference to radio or television reception, which can be determined by turning the equipment off and on, the user is encouraged to try to correct the interference by one or more of the following measures: • Reorient or relocate the receiving antenna. • Increase the separation between the equipment and receiver. • Connect the equipment into an outlet on a circuit different from that to which the receiver is connected. • Consult the dealer or an experienced radio or television technician for help.  2.2 Modifications The  FCC  requires  the  user  to  be  notified  that  any  changes  or  modifications  made  to  this  device  that  are  not expressly approved by Option®, could void the user's authority to operate the equipment.  This device complies with Part 15 of the FCC rules. This device complies with Part 15 of the FCC rules. Operation is subject to the following two conditions: (1) This device may not cause harmful interference, and (2)  This  device  must  accept  any  interference  received,  including  interference  that  may  cause  undesirable operation.  2.3 Exposure Information to Radio Frequency Energy This USB 2.0 device has been tested in a notebook for compliance with the SAR requirements as stated by the FCC.  Users concerned  with the risk of Radio  Frequency exposure may wish to limit the duration of their calls and to position the antenna as far away from the body as is practical.  The  USB  Stick  has  been  tested  with  specific  integral  antenna  for  SAR  compliance  with  one  notebook  having vertical and horizontal USB slots with  a separation distance of  5mm between the  panthom and the device. The device  can  be  used  in  notebook  computers  with  substantially  similar  physical  dimensions,  construction,  and electrical and RF characteristics.  2.4 Manufacturer's disclaimer statement The information in this document is subject to change without notice and does not represent a commitment on the part of the vendor. No warranty or representation, either expressed or implied, is made with respect to the quality, accuracy  or  fitness  for  any  particular  purpose  of  this  document.  The  manufacturer  reserves  the  right  to  make changes to the content of this document and/or the products associated with it at any time without obligation to notify any person or organization of such changes. In no event will the manufacturer be liable for direct, indirect, special,  incidental  or  consequential  damages  arising  out  of  the  use  or  inability  to  use  this  product  or documentation, even if advised of the possibility of such damages.  For questions regarding your product or declaration, contact: Option | Gaston Geenslaan 14 | 3001 Leuven | Belgium | www.option.com  2.5 System requirements • USB 2.0 slot. • Must be supplied by a SELV (Safety Extra Low Voltage) circuit with limited power. For questions regarding your product or FCC declaration, contact: Option | Gaston Geenslaan 14 | 3001 Leuven | Belgium | www.option.com  To identify this product we refer to the Part, Series or Model number found on the product.
 iCON® 452 User Guide     Version: v007ext  Page: 27 of 28
 iCON® 452 User Guide     Version: v007ext  Page: 28 of 28                                                                         Option nv – Gaston Geenslaan 14 – 3001 Leuven Belgium – T +32 16 317 411 – F +32 16 207 164  www.option.com

Navigation menu