Option OGLH-V2E Multimode GSM/GPRS/EDGE/UMTS/HSDPA PCMCIA CARD User Manual Manual UK
Option NV Multimode GSM/GPRS/EDGE/UMTS/HSDPA PCMCIA CARD Manual UK
Option >
Contents
- 1. User Manual
- 2. User Manual 2
- 3. Safety Manual
- 4. Users Manual
User Manual

© Option Wireless Technology | Kolonel Begaultlaan 45 | 3012 Leuven | Belgium
For support and registration: http://www.option.com/support/index.shtml
---------
-
-
--
-
-
-
-
-
-
-
-
-
-
-
-
-
-
-
-
-
-
-
-
-
-
-
-
-
-
-
-
-
-
-
-
-
-
-
-
-
-
-
-
-
-
-
-
-
-
-
-
-
-
-
-
-
-
-
-
-
-
-
-
-
-
-
-
-
-
-
-
-
-
-
-
-
-
-
-
-
-
-
-
-
-
-
-
--
-
-
-
-
-
-
-
-
-
-
-
-
-
-
-
-
-
-
-
-
-
-
-
---
www.option.com
globetrotter mobilitymanager
manual in cn / d / e / f / i / nl / p on cd
Globetrotter HSDPA '7.2 Ready' E

Warning! Do not insert the card!
Registering your card is of great value to you.
As soon as you register, you will qualify for:
> Validation of warranty, which includes repair or replacement if faulty
> After-sales customer care
> Advanced bulletins on product updates and software upgrades
During the installation process, you will have the possibility to register online
or via E-mail.
You may also register on-line at:
http://www.option.com/registration/4_3_registration.shtml
3
register with option
Register with Option 3
Introduction 4
System Requirements 5
Installation 8
Getting Started 10
Troubleshooting 35
Safety Information 36
contents

Congratulations on your purchase of the Option GlobeTrotter card.
GlobeTrotter together with the GlobeTrotter Mobility Manager software is the ultimate
high performance solution for providing mobile wireless connectivity to Laptops
and Notebooks. The GlobeTrotter solution enables users to browse the Internet,
send and receive e-Mails, send and receive SMS text messages and all with SIM
management seamlessly integrated with Microsoft Outlook™.
The technology in your Option GlobeTrotter card supports real time remote connectivity
and is ideal for the synchronization of mobile devices with the office or home computer.
GlobeTrotter is designed to support IPsec client software providing secure remote IP
mobile access to corporate networks.
This guide describes how to install the GlobeTrotter Mobility Manager (GlobeTrotter MM)
software on your PC and how to start using it. For more detailed information, consult
the GLobeTrotter MM Online Help Guide.
Contents of the sales package
In the sales package, you will find the following items:
> Option GlobeTrotter card
> A CD-Rom containing the software
To overcome any installation and usage barriers and to enhance the user experience,
the following documentation is also included:
> This Quick Start Guide, which gives the installation of the GlobeTrotter Mobility
Manager Software in a limited number of steps, and assists the user in making
his/her first data call
>
Online User Manual, which describes a number of common usage scenarios. The online
User manual can be accessed at all times through the Help menu of the software.
introduction
4
The GlobeTrotter Mobility Manager software requires:
Processor
> Client (a computer not working in a server capacity): Min. 90-megahertz (MHz)
Intel Pentium II-class processor or higher
> Server (a computer working in a server capacity): Min.133-MHz Intel Pentium-
class processor
Operating System
> Windows XP Professional
> Windows XP Home Edition
> Windows 2000
Memory
> Client: 64 megabytes (MB) of RAM, 96 MB recommended
> Server: 128 MB of RAM, 256 MB recommended
Hard Disk
Min. 50 MB for installation of SW & Drivers
Display
800 x 600 or higher-resolution display with 256 colors
Input Device
Microsoft mouse or compatible pointing device
system requirements (minimum requirements) 5

Communications software
When you run the installation program, the following programs will be installed on
your computer:
> Windows GlobeTrotter device drivers
> The GlobeTrotter Mobility Manager
The GlobeTrotter Mobility Manager
The GlobeTrotter Mobility Manager GlobeTrotter MM simplifies SMS messaging and
the configuration of GPRS settings for applications such as downloading e-mail or
browsing the Internet. It also gives the possibility to manage a WLAN connection.
The GlobeTrotter MM application incorporates a powerful SMS editor and a viewer
for reading SMS messages. Incoming and outgoing messages are listed in Outlook™-
style directories.
The Setup page gives users a quick and easy way to set up any type of connection
to access the Internet (GSM, GPRS, 3G or WLAN).
system requirements (minimum requirements) 7
Other requirements
> Microsoft Internet Explorer 6.00 or later
>
The latest Windows service packs and critical updates from the Windows Update site.
> The target system may not have any version of the ‘Funk Odyssey’WLAN client
installed, otherwise the installation will fail
Please refer to the GlobeTrotter datacard Product Sheet for datacard system requirements.
Network services
To use your Option GlobeTrotter card, you must first activate an account with a mobile
phone Service Provider and have received a Subscriber Identity Module (SIM) card.
Often the GlobeTrotter is supplied as a package with an airtime agreement. If you do
not already have an airtime agreement, please ask your supplier about obtaining one
for a compatible network. Please refer to the GlobeTrotter datacard Product Sheet
which will detail the types of network and services it is compatible with.
Some service providers may not provide all communications services. Contact your
service provider for further information about the availability and details of the services
in your home network.
Additional information may be required from your service provider to activate
the data functionality of the Option GlobeTrotter card such as:
> User Name - if applicable
> Password - if applicable
> Access Point Name (APN)
> IP Address - if not dynamic
> DNS Address - if not dynamic
system requirements (minimum requirements)
6

9.
The software will automatically be copied into Program Files\Option\GlobeTrotter
Mobility Manager. Another target folder can also be chosen during the installation
process.
10.
At the end of the installation you will have to reboot the PC and if you have selected
automatic start up, the GlobeTrotter MM application will start up after the reboot.
11. Insert the Option GlobeTrotter card into the PCMCIA slot of your PC.
12. Wait until the system has recognized the card.
13. You will now be asked to register the product.
Registration is required to benefit from the warranty and customer care.
By connecting to the Internet you can register online immediately
at http://www.option.com/registration/4_3_registration.shtml
Choose Cancel if you want to register later. You will be able to start the registration
from the help menu in the main interface. When you click cancel each time you
start GlobeTrotter MM you will be asked to register.
Uninstalling the Option GlobeTrotter card and the GlobeTrotter Mobility Manager.
1. Go to the Control Panel of the operating system.
2. Open Add/Remove Programs.
3.
To uninstall the GlobeTrotter card and the GlobeTrotter MM software, select
GlobeTrotter Mobility Manager
and click the Remove... button. Follow the steps
of the uninstall wizard.
installation 9
This section provides step-by-step instructions on how to install the Option
GlobeTrotter card on your PC.
NOTE: For illustration purposes we show the GlobeTrotter GPRS datacard, your
datacard may look different but the process is the same.
NOTE: There are some slight differences in the installation process between
Windows 2000 and XP Pro/Home Edition. If the installation differs from the steps
described in this section, follow the instructions on the screen.
If you want to quit the Setup program without installing or uninstalling, click Cancel
and then Exit Setup to quit Setup. If you want to return to the Setup program after
having quit the installation before it was completed, follow the installation steps as
if you were installing the program for the first time.
Installing the Option GlobeTrotter card and the GlobeTrotter Mobility Manager
WARNING! DO NOT INSERT THE CARD!
It is advised to connect your PC to the mains, before starting the installation
1. Start Windows.
2. Close all applications.
3. Insert the CD-Rom into your computer’s CD-Rom drive. If auto play is enabled
the setup will start automatically.
4. If this does not happen, select the Run command from the Start menu.
5. Select the drive that contains the CD. Go to D:\GlobeTrotter Mobility Manager
Setup.exe (D: represents the CD-Rom drive).
6. Click OK to execute the file.
7. Select the language you want to install the program in.
8. The installation will start.
installation
8

The GlobeTrotter Mobility Manager Home Page
The Home Page is the place where you have a complete overview on everything
that the GlobeTrotter Mobility Manager can offer.
From the Home Page you can:
> Access every section of GlobeTrotter Mobility Manager (the Toolbar)
> Access every subsection (the Navigation bar)
> View the status of the registered mobile network and Wireless LAN
> View the indication of unread SMS
> Quick launch a connection
In case you have unread SMS, these will be shown in the GlobeTrotter MM Home
Page. The indicator will show you the number of unread messages.
From the Home Page, you have the possibility to connect directly to an available
network. Once you have created or imported a connection profile, this will be listed
on the Home Page if the network (GSM/GPRS/UMTS/WLAN) is available.
getting started 11
Starting the Option GlobeTrotter card.
Slide the SIM card into the SIM card slot of the Option GlobeTrotter card and insert
the Option GlobeTrotter card into the PC Card slot of your computer. It is recom-
mended to insert the card in the top PCMCIA slot. You may have to enter the PIN
(Personal Identity Number) code if the PIN code request is activated in the SIM card.
The PIN code is usually supplied with the SIM card. If you enter an incorrect PIN
code three times in a row, you will need a PUK (Personal Unblocking Key) code to
unblock the SIM card. If this doesn’t work, contact your service provider.
Using the GlobeTrotter card for SMS and Phonebook management.
During the installation of the GlobeTrotter Mobility Manager software a link is created
in the Startup folder. GlobeTrotter Mobility Manager will subsequently start every time
the computer is turned on. The GlobeTrotter Mobility Manager icon then appears in the
task bar. If the GlobeTrotter Mobility Manager software does not start automatically
when the computer is switched on, or if the GlobeTrotter Mobility Manager program
has been closed in the meantime, it can be started again from the Start menu.
Once the program has started, the PIN code will be
requested (if the PIN code request is activated on the SIM
card) in order to activate the Globetrotter card. The card
will subsequently be registered onto the network.
If the PIN code request has been disabled, the
GlobeTrotter card will be registered on the network as
soon as it is powered on.
At the end of the network registration the GlobeTrotter MM
interface will open and you are ready to start a connection.
getting started
10
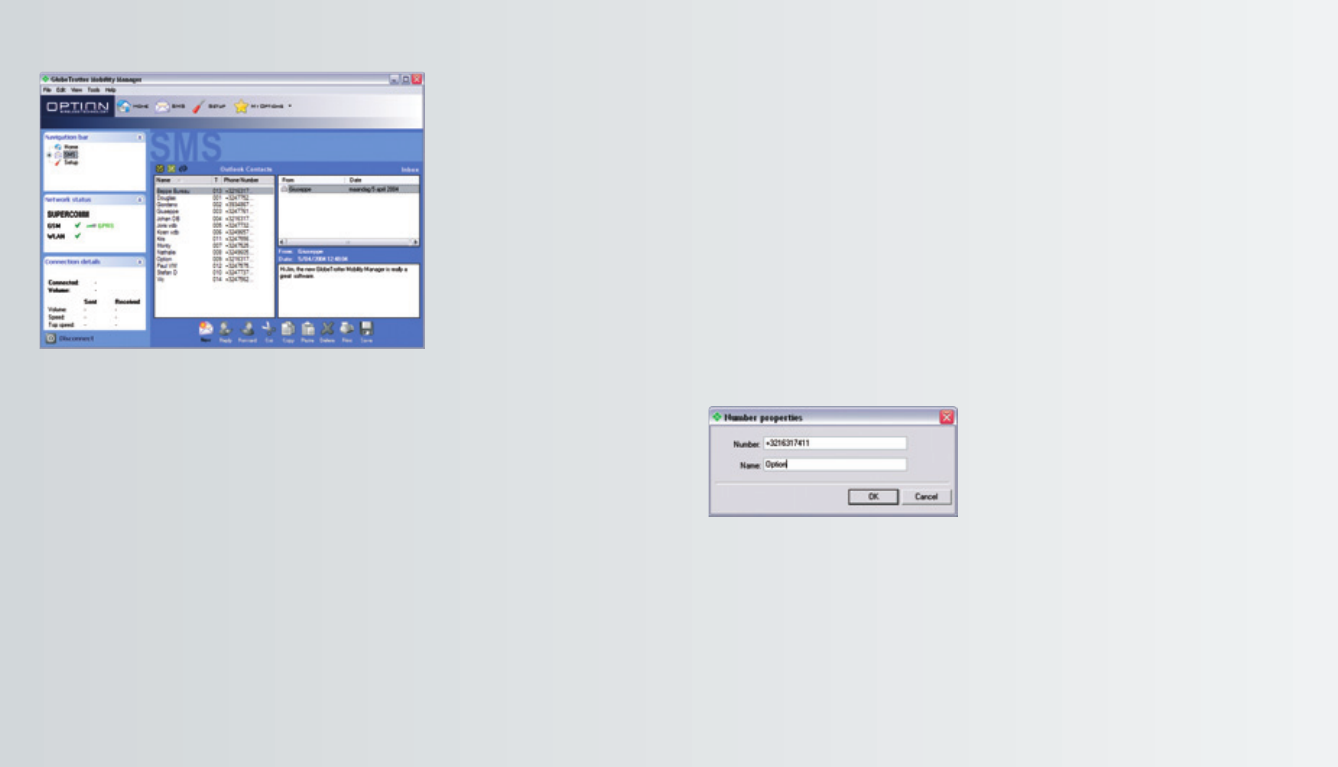
You can read, create, reply, forward and delete an SMS by clicking the icons on the SMS
Message Management Bar, which is located at the bottom of the GlobeTrotter
Mobility Manager SMS Page
The Phone book
The available phonebooks are:
> SIM Phonebook
> Outlook contacts (if Outlook is present)
Contacts are read on the fly, which means that no duplicate phonebooks or synchronization
is necessary. The software will operate directly on the SIM and on the Outlook contacts.
You can edit the name or phone entry in the SIM contacts by right click on the SIM
contacts and select new or by going to ‘File/New/Contact/SIM’. Then you get the
following popup window where you can edit your contact.
You can edit the name or phone entry in the Outlook contacts by going to
‘File/New/Contact/Outlook’. Then you get the standard Outlook window to make
a new contact.
You can also create new, cut, copy paste either the SIM contacts or the Outlook
contacts by clicking on the icons in the “SMS Message Management Bar”
getting started 13
The SMS Centre
You can access the SMS center:
> From GlobeTrotter Mobility Manager Home Page by clicking:
- the SMS button on the top toolbar
- the icon next to the “You have received n SMS messages” text
- the SMS icon on the upper left navigation bar
> By clicking the “SMS envelope” icon in the systray. This is as a result of the system
having recognized that a new SMS message had arrived.
The SIM or Outlook address book will be shown when clicking on the respective icon.
By clicking on the Synchronize button (icon with the two arrows) you can synchronize your
Outlook contacts with your GlobeTrotter MM contacts. The Synchronize button will force
GlobeTrotter MM to (re)import the Outlook contacts.This action deletes all the current
contacts held in GlobeTrotter MM. This is useful when you have updated Outlook contacts
independently of GlobeTrotter MM.
getting started
12
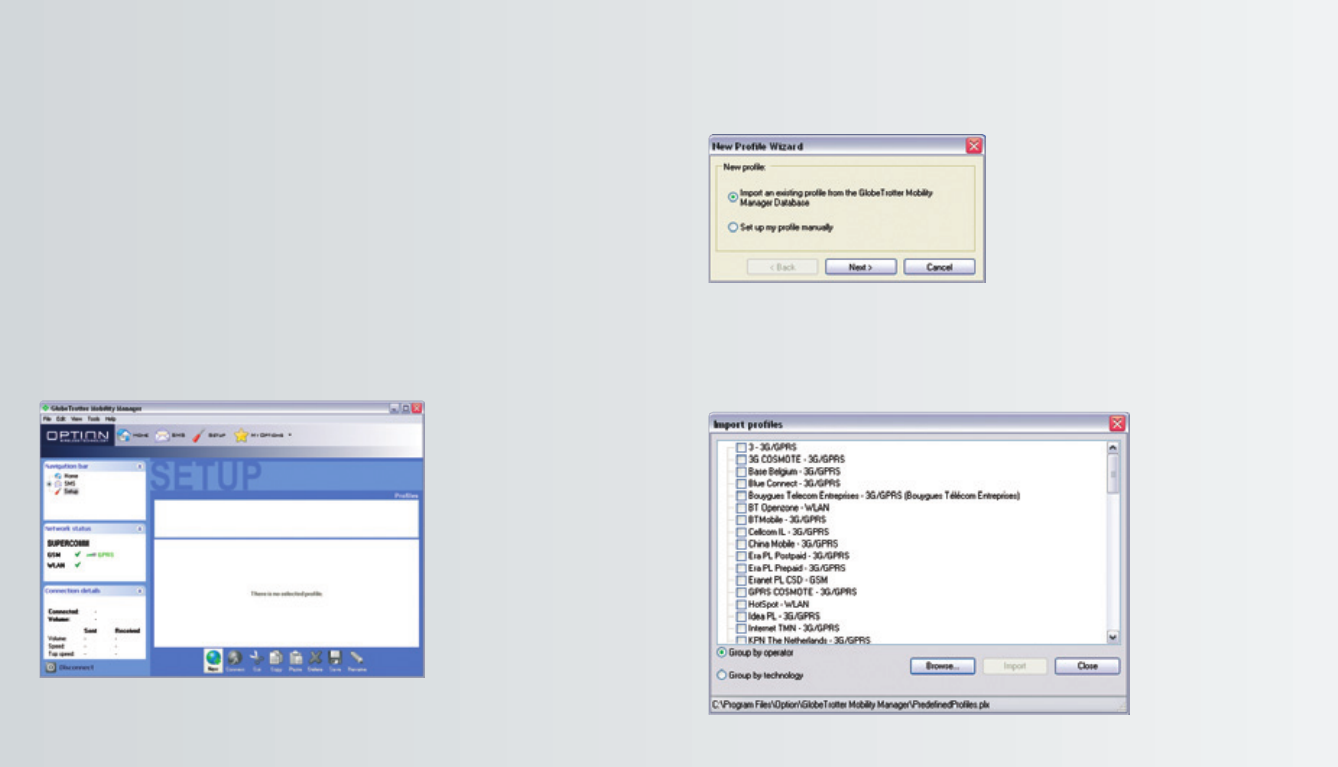
The software offers you two possibilities:
> To import an existing profile from the GlobeTrotter Mobility Manager Database.
> To Set up the profile manually
If you choose to import an existing connection, the software will open a dialog window.
You can then select one of the connections to import and this will become available
within GlobeTrotter MM.
getting started 15
Setup
The Setup page allows you to create, edit and configure a GPRS, GSM, UMTS or WLAN
connection.
Once a connection has been defined it can also be started from here.
In the top of the screen you have a list of all available connections.
Using the GlobeTrotter card for a DATA connection
Tip: Most Service Providers use automatic DNS Server assignment. However; if you
can connect but you have trouble opening a webpage we advise you to enter the
DNS settings manually. Please contact your Service Provider to obtain the required
DNS settings.
Depending on your network operator, a GPRS, GSM, UMTS or WLAN connection might
already have been installed. If not, you will have to create a new connection following
the next steps. Click on Setup. Click on New to create a new connection.
getting started
14

In
Name Servers (DNS)
you can specify the DNS if required by your carrier.
In PDP type you can specify the PDP type. You can choose between IP and PPP. If required
by your carrier you have to fill in the address. (Typically the connection is type
IP
).
In
Dial up Network
you can modify the card
settings and the dial properties.
getting started 17
You can ‘Group’ all existing connections by Operator or by Radio Access
Technologies (e.g. GSM, GPRS, 3G, WLAN).
If you select to set up the connection manually, the software offers you three possibilities:
> 3G/GPRS
>GSM
>WLAN
When you set up your 3G/GPRS connection manually right-click on the connection
and select rename. Enter a name for your connection (e.g. “My GPRS connection
with Operator X”) and fill in all the parameters of your GPRS connection. Enter the
GPRS/UMTS settings you received from your provider.
getting started
16
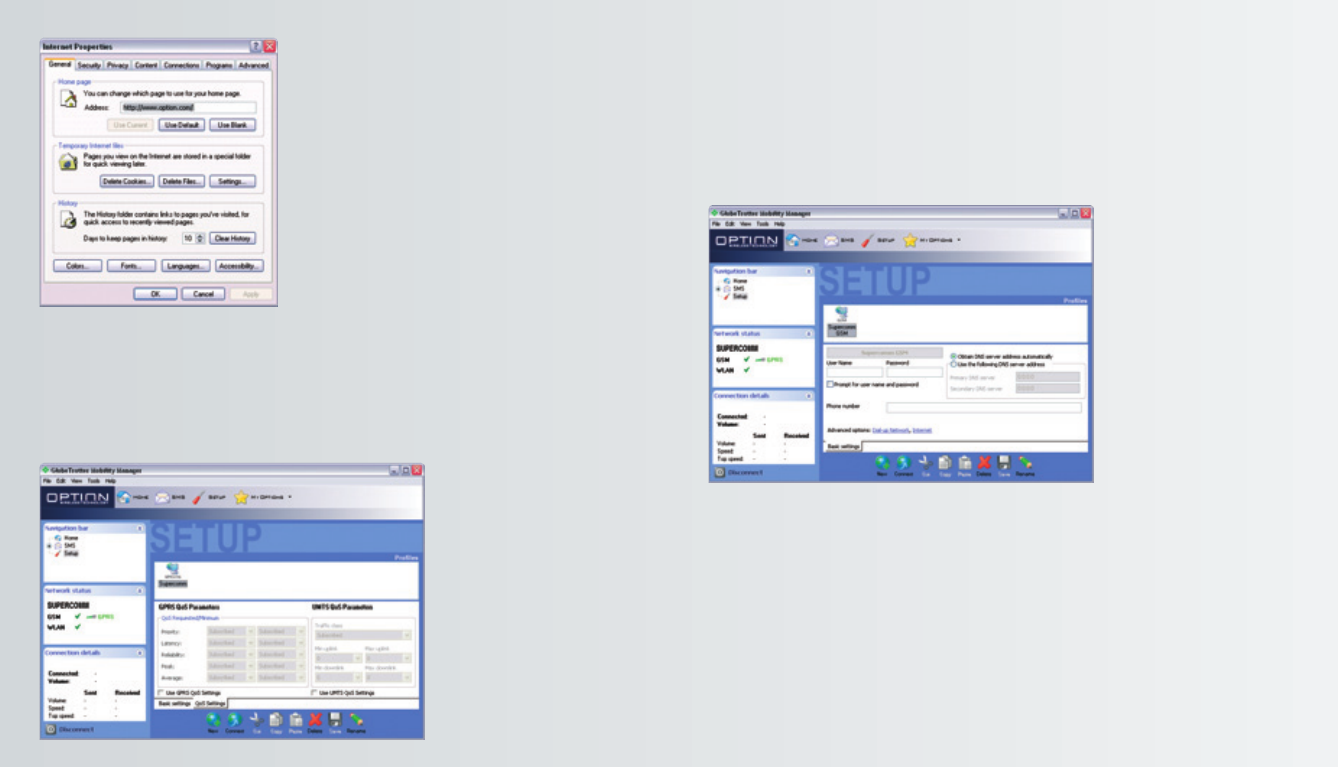
Click Save. You are now ready to start a 3G/GPRS connection!
Setting up a GSM connection is similar to setting up a GPRS connection.
When highlighting a GSM connection, the configuration pane shows different values
compared to the GPRS connection pane.
Click Save. You are now ready to start a 3G/GPRS connection!
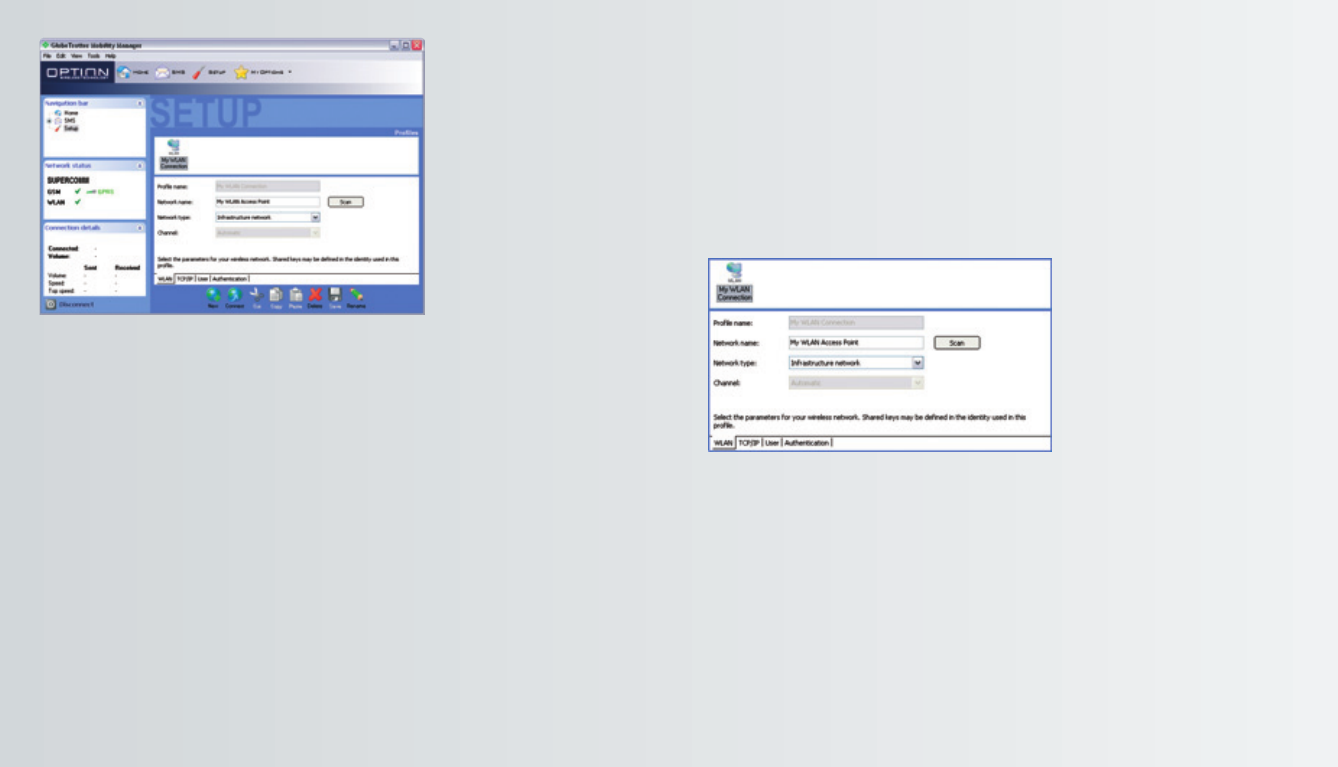
Setting up a WLAN connection
Note: This feature is only available on cards supporting WLAN.
getting started 19
In
Internet
you can modify the internet
properties.
In Quality of Service (QoS), you can change the QoS parameters. See the help files
for definitions of the QoS parameters.
CAUTION! Do not change the QoS parameters unless your provider explicitly informs
you to do so.
getting started
18
NOTE: If you are using the profile that has been modified then the changes will not
come into effect until you have stopped the connection and restarted it.
WLAN Settings
This group of settings determines the communication parameters used on the air
interface. It’s shown in a separate tab in the WLAN configuration dialogue. If an
authenticated connection to a wireless network is required, additional parameters
are needed that may interact with the parameters described in this section.
> The user may either enter the network name or select it from a list, which was
generated by clicking the Scan button. A network might not broadcast it’s name
for security reasons and so will not appear in the list, you will need it’s details
from your IT administrator.
> The list of available networks is not updated automatically while this dialogue is
open, you must click “Scan”. While the scan is active a progress dialogue is shown.
getting started 21
Managing Profiles
The configuration dialogue for WLAN profiles works like the configuration dialogue
for GPRS/3G or GSM connections. The user selects the desired profile from the list at
the top and can modify the different parameters in the panes in the middle. Some
common operations are available in the tool bar at the bottom.
> To create a new profile, the user clicks the button “New” at the bottom of the
configuration pane. The user has the option to import an existing WLAN
connection from the GlobeTrotter Mobility Manager Database or to create
a new WLAN connection manually. All settings in a new profile are set to their
default values until changed by you.
> By clicking “Delete” the selected profile is removed from the list. A profile may
be deleted only if it’s not currently being used for communication.
> The user can save any changes to the current pane (including any changes to
other panes) immediately by clicking “Save”. This button is only available when
the data on the current or another pane has been changed.
getting started
20
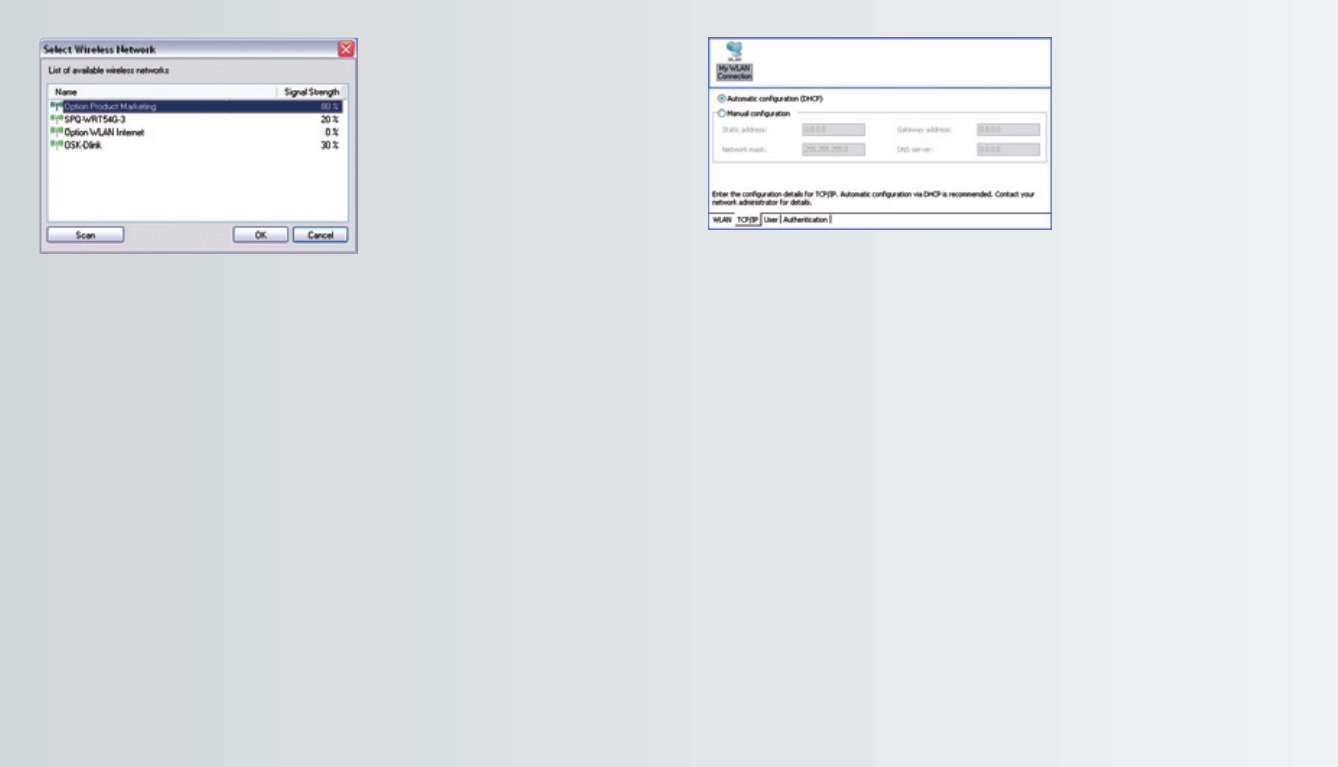
The check box in the page determines whether the other controls are activated.
If “Automatic configuration (DHCP)” is on, the other settings cannot be modified.
In this case the AP configures TCP/IP automatically.
If “Automatic configuration (DHCP)” is off, the user can enter values in the other fields of
the page and configure TCP/IP manually. The fields “Static address”,“Network mask”,
“Gateway address”, and “DNS server” have the same meaning as in the Windows system’s
control panel for configuring a TCP/IP connection.
User Information
For WLAN networks that require user authentication you must define the user data within
the WLAN profile. The same information is used by all the supported authentication
methods. Additional WLAN profiles should be created if you want alternative user data.
> The user enters his data in the dialogue shown below. User data is only used
when authentication takes place. However, these settings can be entered even
if the currently selected authentication method does not use them.
getting started 23
Once the scan for networks is complete, all networks found are added to the pop-
up menu of available networks. For each network the following information is
shown: > Name of network
> Signal strength
> Selecting a network from the pop-up menu assigns the network’s name as well as
the network mode and the communication channel for point-to-point networks.
TCP/IP Settings
If a connection to an AP is established (including any authentication), the device uses the
TCP/IP protocol for accessing other machines over the WLAN connection. This group of
settings is shown in a separate tab on the configuration.
getting started
22
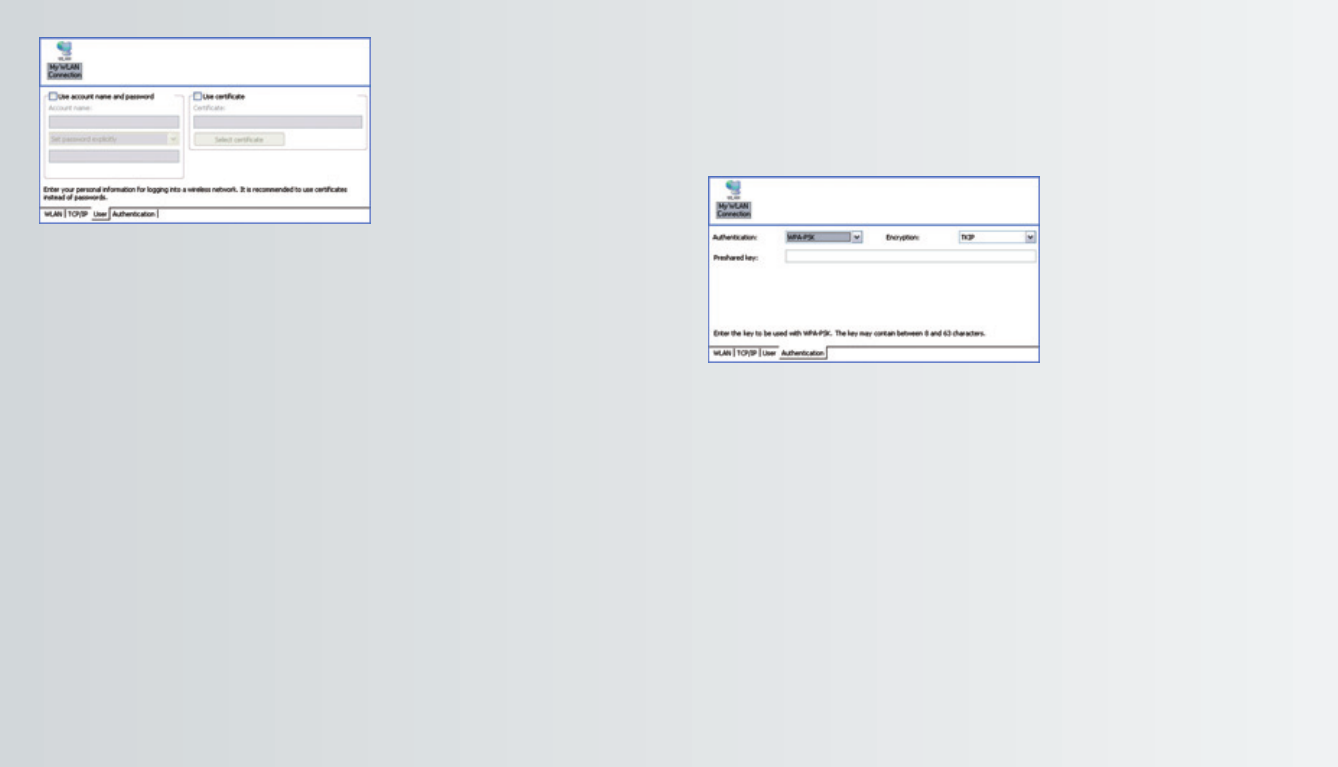
Authentication
Especially on wireless networks it is easy to gain physical access to the network.
Hence it is important to make sure that only the intended group of people is able
to use the network and any resources attached to it. The identity of the users has
to be checked and this is called authentication.
>
Different authentication methods (including “no authentication”) are supported.
Each method requires different authentication parameters. The user’s credentials
are taken from the corresponding page (see “User Information”) and are not specific
to a particular method of authentication. If the user selects a different method of
authentication, the user’s personal data are reused without resetting or changing it.
>
Communication over the air interface is usually encrypted. For some authentication
methods encryption of network traffic is required and cannot be turned off.
If such an authentication method is selected, the appropriate encryption method
is activated as well.
> The supported methods of authentication are “Open”,“Shared”,“WPA-PSK”, and “WPA”.
> The method of encryption is selected from a drop down list (e.g. None, WEP, TKIP,
and AES). This list is only available when it is allowed for by the selected method
of authentication. The dependencies between authentication method and
encryption scheme are shown here:
getting started 25
> The field for entering a user name holds the user’s account name used for logging
into the wireless network. This usually different from the user’s real name
(e.g. “jdoe17” vs.“John Doe”). For a new profile the user name is set initially to the
account name of the current user.
> There are two fields for setting a password in a profile. The first determines
whether the password is contained in the profile or taken from the user’s
account information. Its possible values are “Prompt for password” and
“Use password”. The field for entering a password and the corresponding
check box are active only when “Use password” is selected.
> The field for the password does not show the password in clear text but as
a sequence of asterisks. As long as “Clear text” is checked, the password is
displayed in clear text. The check box is initially not marked.
> The field for the user’s certificate displays the “friendly name” of the certificate
selected by the user. This field is initially empty (i.e. no certificate is preselected).
A certificate is selected in the dialogue shown below. This list of certificates
shows all certificates for the current user. The list contains only usable
certificates, i.e. expired or invalid certificates are not shown.
getting started
24

while WPA-PSK is more secure without the need for a dedicated authentication server.
WPA
On the WPA settings pane, the user selects the method of authentication used when
the device communicates with a RADIUS server. RADIUS servers are typically used in a
corporate environment.
> The method of authentication is selected from the “Main Protocol” pop-up menu.
The following bullets describe in more detail additional parameters that might
be necessary for the different methods:
-EAP/LEAP This protocol does not use any additional parameters.
-
EAP/PEAP This protocol uses certificates for authentication. By setting the appropriate
check box, the user may request a verification of the server’s certificate.
-
EAP/SIM This protocol does not use any additional parameters. The user’s SIM
must be present when he wants to attach to a WLAN network. Usually
the user enters the SIM-PIN when the main application is started.
If the user did not enter the SIM-PIN when the main application started,
the main application prompts the user for the SIM-PIN using the usual
dialog for entering a SIM. The main application can simply check whether
the SIM-PIN is needed when the user tries to open a connection with
EAP/SIM as its authentication method and prompt the users as appropriate.
-EAP/TokenCard This protocol does not need any additional parameters.
-EAP/TLS This protocol uses certificates for authentication. The user must select
a personal certificate for this method to work. If there is no certificate selected,
this triggers a warning. The only additional parameter for this method is
whether the server’s certificate should be verified.
-EAP/TLS This protocol uses a certificate for authentication.
All connections can be started from the GlobeTrotter MM controller icon in the taskbar.
getting started 27
Open
Open authentication lets users attach to networks quickly as there is no access
control and encryption may be turned off. The amount of configuration is therefore
minimal. This mode is ideal for an ad-hoc network created for instance during a
meeting to exchange data or collaborate on a document. If encryption is set to
“None”, the files for entering WEP keys are hidden.
Shared
Shared authentication using WEP encryption provides weak security. If this method
has been selected, the user can either enter four shared keys. You can choose if you
want a 40(64) bit [equivalent to 10 hexadecimal or 5 ASCII characters] or 104 (128)
bit [equivalent to 26 hexadecimal or 13 ASCII characters] WEP key.
> The user can enter up to four different WEP keys. All entered keys must be of
the same length or the configuration is invalid. If the configuration is invalid,
the triggers a warning.
> The user can enter a key either as a sequence of hexadecimal digits or as a string
of characters as defined by the format buttons above the key fields.
> As long as the user enters a key and the key’s length is not correct, an appropriate
warning is shown.
WPA-PSK
If the user selects authentication via WPA-PSK, he has to enter a so-called
pre-shared key. Such keys contain between 8 and 63 characters. The user may
enter these characters in an appropriate password field. The text of the key is
shown masked unless the check box “Clear text” is turned on.
Note WPA-PSK is a stronger encryption method than WEP, users are advised to use
WPA-PSK whenever possible. The amount of configuration is essentially the same
getting started
26
Start a connection
A connection can be started from:
> The connect button in one of the GlobeTrotter MM connectivity tabs
> From the Windows icon tray controller > right-click > ”Connect using” for every
available connection
> From the Windows icon tray controller > left-click > ”Connect” for the default
connection
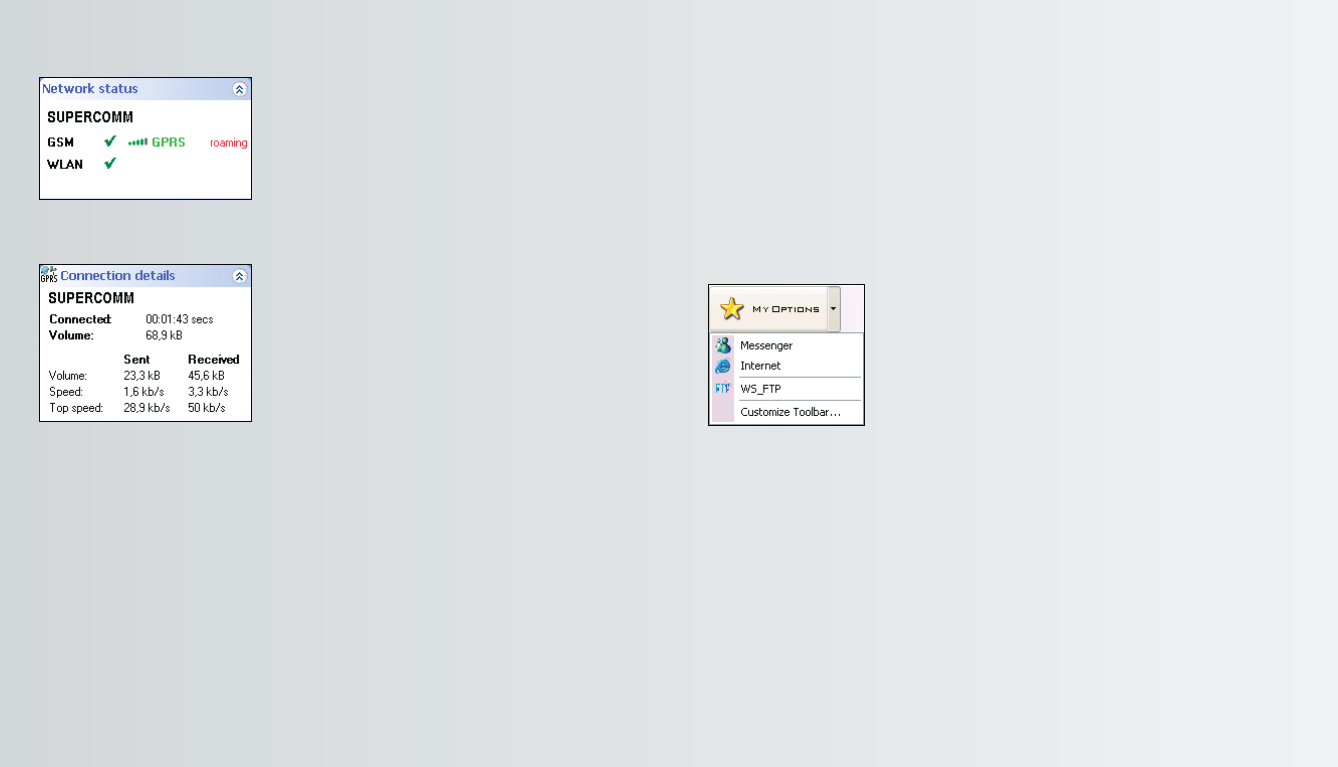
My Options
Using the GlobeTrotter MM My Options button you can add shortcuts to your favorite
applications. The drop down list gives immediate access to all applications that you have
added. You can consider My Options button as an extension of the main toolbar.
From the menu View > Customize Toolbar it’s possible to choose which buttons you
want to appear in the Toolbar and in the My Options list. Or you can also do it in
‘My Options / Customize Toolbar…’
Configuration settings
The configuration tabs are accessible from:
> GlobeTrotter MM controller > Left Click > Settings > Configuration
> Menu bar > Tools > Configuration
getting started 29
The Connection states tab
Once that you are connected, the network status tab will show the connection statistics
Which means:
> Connected with (GSM/GPRS/UMTS)
> Duration of the connection
> Total volume of data transferred
> Sent and received data volume
> Current speed (upload and download)
> Top speed (upload and download)
getting started
28
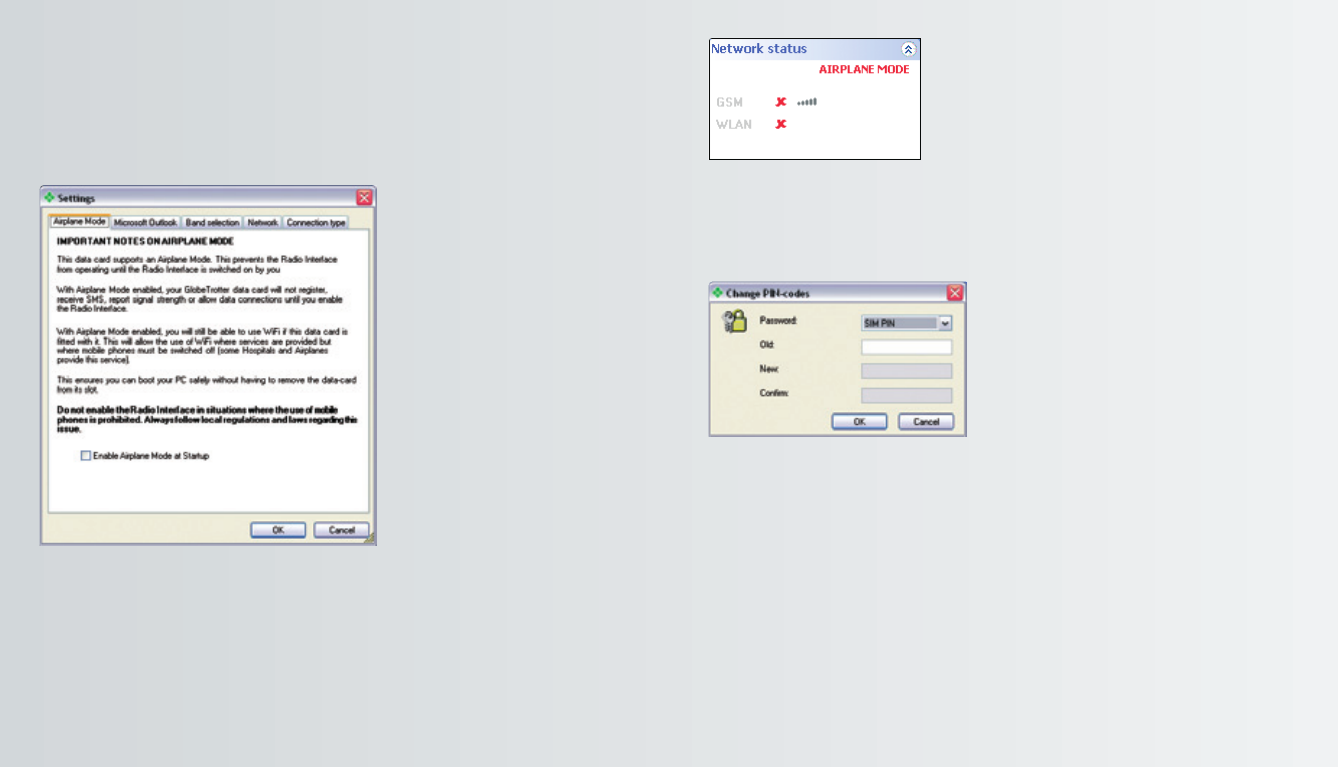
b) If you untick <Enable Airplane Mode at Startup>, then the data card will behave
normally.
Security
The following passwords can be changed:
> SIM PIN
> SIM PIN2
Change a password: the old password must be entered and the new password
is entered twice.
getting started 31
Airplane mode
Airplane mode allows the user to safely use other functions of a wireless device
(such as WLAN functions) on an airplane during flight. All Option GlobeTrotter
cards together with the GlobeTrotter Mobility Manager software will support
airplane mode.
a) If you tick <Enable Airplane Mode at Startup>, the card’s radio will be powered
down. Therefore, as specified into the pop up, the card will not register and
you will not be able to make an Internet dial up connection or send/receive SMS.
In the network status pane, a message will remind you that Airplane Mode
is enabled.
The message will be shown every time that the radio is off
(FOR CARDS SUPPORTING AIRPLANE MODE)
getting started
30
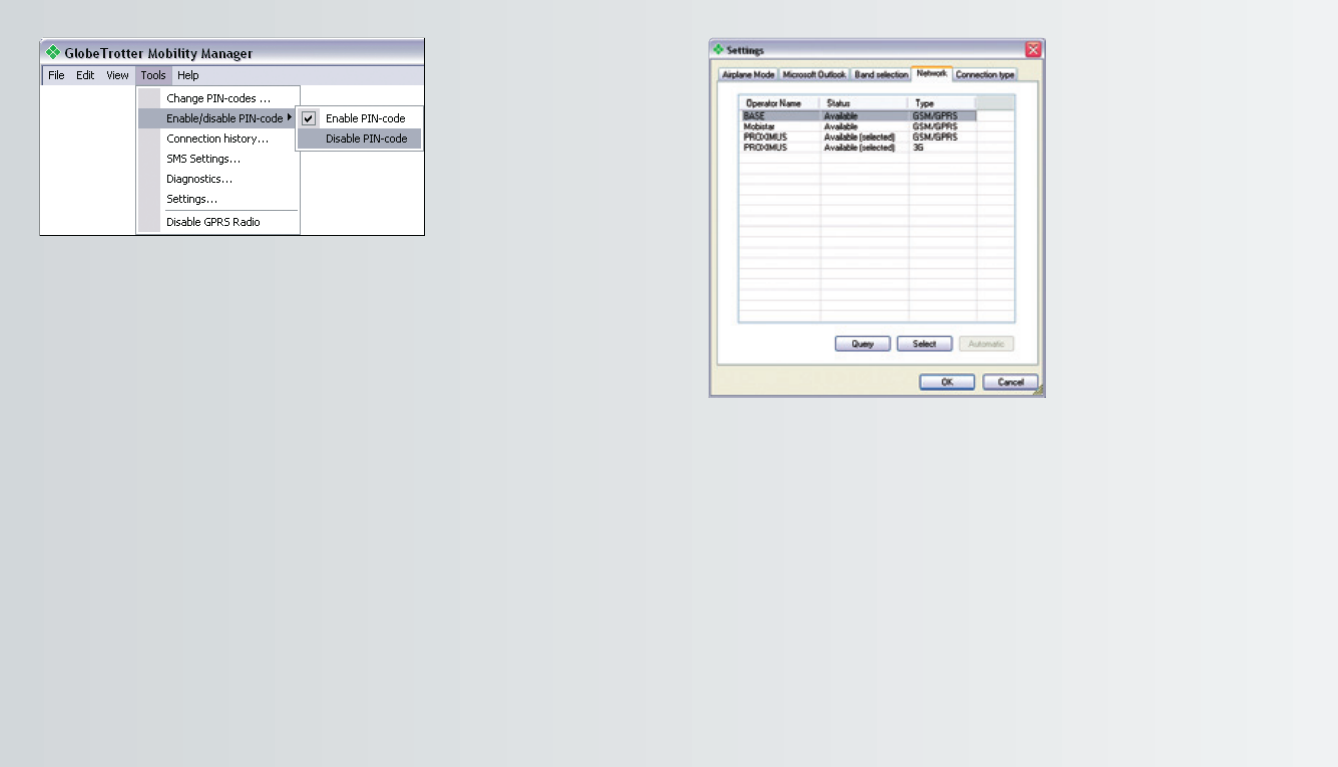
To check the current settings and read the current list of networks, click Query. The list
displays all available networks. The operator’s status is shown in the second column.
To register with a different operator, highlight the Operator name, click Select and click OK
Selecting an operator switches the GlobeTrotter to manual registration mode; it will
try to register with the selected operator only. To go back to automatic registration,
you must click Automatic.
getting started 33
PIN code:
If PIN-code is enabled, PIN must be entered any time a new connection to the network
is initiated after the device has been turned off.
If PIN-code is disabled, you will not be prompted for a PIN-code.
Network operator selection
The network operator selection window displays a list of available networks and
selects the chosen network provider from the list.
getting started
32

troubleshooting 35
Diagnostic Utilities
A general diagnostic tool, which will check the basic settings like installation,
network availability, signal strength…
Connection History, another advanced diagnostic utilitity is accessible from within
GlobeTrotter MM.
getting started
34
This section points out the basic problems that could occur when you are installing
and using the card. There is a list of symptoms and possible actions you can take in
any of the following situations below.
Not enough disk space for installation.
There is not enough space to complete the installation on the selected drive.
Select another drive for installation or delete unnecessary files to free up
additional disk space. If there are several hard disk drives in the system and you
decide to install the program on a drive other than the one where the Windows
system files are located, disk space is required on both drives. The program will
always need to place some files in the Windows directory.
Setup does not accept the target directory.
The program can only be installed on a local drive. If the path to the directory is
greater than 80 characters, it will not be accepted. Select another directory or
shorten the names of the subdirectories.
The GlobeTrotter card cannot be installed or used.
The Interrupt Request (IRQ) resources may be in conflict. Check the GlobeTrotter
resources from Control Panel/System/Hardware/Device Manager.
If there is a resource conflict, consult the Windows online help on changing the
resource settings.
The GlobeTrotter card is not properly inserted.
Make sure that the PC Card slot or the computer is functioning properly and that
the GlobeTrotter drivers are installed (In Control Panel > Ports).
Also make sure that the SIM card has been inserted.
Refitting the antenna (Only for cards with replaceable antenna’s)
When the antenna becomes disconnected, refit it as follows:

Read these simple guidelines. Breaking the rules may be dangerous or illegal.
Further detailed information is given in this manual.
Driving: Do not use the GlobeTrotter while driving; park the vehicle first.
Interference: All wireless devices may get interference, which could affect performance.
Do not use in hospitals: Follow any regulations or rules. Do not use near medical
equipment.
Do not use in airplane: Wireless devices can cause interference. Using them on air-
planes is illegal.
Do not use near refueling points: Do not use the device at a refueling point. Do not
use near fuel or chemicals.
Use sensibly: Do not touch the antenna unnecessarily.
Use qualified service: Do not attempt to dissemble the GlobeTrotter. Doing so will
void warranty. Service should only be performed by Authorized Service Centers.
Accessories: Use only approved accessories. Do not connect incompatible products.
Liquids: Do not expose your card to rain, or spill beverages on it.
Extreme temperatures: Do not expose the card or the antenna to extreme tempera-
tures, below -25 or over +70 degrees Celsius.
Traveling: Handle the card with care while traveling. It is recommended to remove
the card from the laptop.
www.option.com
safety information
36

© Option Wireless Technology | Kolonel Begaultlaan 45 | 3012 Leuven | Belgium
For support and registration: http://www.option.com/support/index.shtml
---------
-
-
--
-
-
-
-
-
-
-
-
-
-
-
-
-
-
-
-
-
-
-
-
-
-
-
-
-
-
-
-
-
-
-
-
-
-
-
-
-
-
-
-
-
-
-
-
-
-
-
-
-
-
-
-
-
-
-
-
-
-
-
-
-
-
-
-
-
-
-
-
-
-
-
-
-
-
-
-
-
-
-
-
-
-
-
-
--
-
-
-
-
-
-
-
-
-
-
-
-
-
-
-
-
-
-
-
-
-
-
-
---
www.option.com
globetrotter mobilitymanager
manual in cn / d / e / f / i / nl / p on cd