Option OGLW1 Globetrotter Combo User Manual QSG combo def
Option NV Globetrotter Combo QSG combo def
Option >
Contents
- 1. Exhibit 8 Unser Manual
- 2. Exhibit 8 user manual
Exhibit 8 Unser Manual
features
>Tri-band GPRS/GSM card for use on networks worldwide:
EGSM900, GSM1800, PCS1900
>WLAN card for use on 2.4 Ghz band
>
GSM Voice capability as well as GSM and GPRS Data (up to 53.6 kbps) connectivity
>WLAN high speed data (up to 11 Mbps) connectivity
>GPRS Class B,Type 1 GPRS MT
>Multislot Class 10 GSM 05.02 (4 slots receive, 2 slot transmit, 5 maximum active)
>ETSI Multiplexer for simultaneous calls and network coverage reports
>Integral antenna: robust, retractable and flexible, user exchangeable
>GPRS SMS GSMS Supported
>802.11b Ethernet Interface
>802.11 WEP encryption and Wi-Fi certified WPA
>Supports EAP-SIM (3GPP TS 23.234) within the purview of 802.1x Authentication
>The embedded SIM reader is provided with a related API interface: PC SC-driver
>Optional Accessories: quality headset; external tri-band GPRS/GSM antenna
>Roaming between WLAN and GPRS/GSM networks
system requirements
>Windows 98SE/ME/2000/XP
>Type II PC-Card slot
www.option.com
Universal Tri-Band
WLAN |GPRS |GSM
PC-Radio Card
High speed WLAN |GPRS
Wireless Internet Card
globetrotter combo

Warning ! Do not insert the card !
Registering your card is of great value to you.
As soon as you register, you will qualify for:
> Validation of warranty, which includes repair or replacement if faulty
> After-sales customer care
> Advanced bulletins on product updates and software upgrades
During the installation process, you will have the possibility to register online or
via E-mail.
You also have the alternative to register on-line directly at:
http://www.option.com/registration/4_3_registration.shtml
register with option 3
Register with Option 3
Introduction 4
System Requirements 6
Installation 10
Getting Started 14
Troubleshooting 39
Agency Requirements 41
Safety Information 45
contents
2

Contents of the sales package
In the sales package, you will find the following items:
> Option GlobeTrotter card
> A CD-Rom containing the software
To overcome any installation and usage barriers and to enhance the user experi-
ence, the following documentation is also included:
> Quick Start Guide, which gives the installation of the GlobeTrotter Mobility
Manager Software in a limited number of steps, and assists the user in
making his/her first data call
> Online User Manual, which describes a number of common scenarios of use.
The online User manual can be accessed at all times through the Help menu
of the software.
introduction 5
Congratulations on your purchase of the Option GlobeTrotter card.
GlobeTrotter is the ultimate solution to provide high performance mobile wire-
less functionality for Laptops and Notebooks enabling users to browse the
Internet, send and receive e-Mails, with SIM management seamlessly integrated
with Microsoft Outlook™.
The “Always On” feature of GPRS lends itself to real time remote connectivity
and is ideal for the synchronization of mobile devices with the office or home
computer. GlobeTrotter is designed to support IPsec client software providing
secure remote IP mobile access to corporate networks.
The GlobeTrotter card plugs into any compatible portable computers or other
devices with a PC Card type II or III slot.
This guide describes how to install the GlobeTrotter Mobility Manager (GTMM)
software on your PC and how to start using it. For more detailed information,
consult the GTMM Online Help Guide.
introduction
4

Hard Disk
Min. 15 MB for installation of SW & Drivers
Display
800 x 600 or higher-resolution display with 256 colors
Input Device
Microsoft mouse or compatible pointing device
Slot
Type II PC-Card slot
Other requirements
> Microsoft Internet Explorer 5.01 or later
> The latest Windows service packs and critical updates from the Windows
Update site.
system requirements (minimum requirements) 7
The GlobeTrotter card requires:
Processor
> Client (a computer not working in a server capacity): Min. 90-megahertz
(MHz) Intel Pentium II-class processor or higher
> Server (a computer working in a server capacity): Min.133-MHz Intel Pentium-
class processor
Operating System
> Microsoft Windows® Server 2003
> Windows XP Professional
> Windows XP Home Edition
> Windows 2000
> Windows 98SE
Memory
> Client: 64 megabytes (MB) of RAM, 96 MB recommended
> Server: 128 MB of RAM, 256 MB recommended
system requirements (minimum requirements)
6

Communications software
When you run the installation program, the following programs will be installed
on your computer:
> Windows based telephony driver (TAPI compatible)
> The GlobeTrotter Mobility Manager (TAPI compatible)
The GlobeTrotter Mobility Manager
The GlobeTrotter Mobility Manager simplifies SMS messaging and the configu-
ration of GPRS settings for applications such as downloading e-mail or browsing
the Internet. It also gives the possibility to make a WLAN connection.
The GTMM application also incorporates a powerful SMS editor, message tem-
plates, and a viewer for reading SMS messages. Incoming and outgoing mes-
sages are listed in Outlook™-style directories. The application also offers many
other facilities, including the automatic generation of SMS texts.
The GPRS centre gives users a quick and easy way of defining GPRS connection
settings.
The WLAN centre gives users a quick and easy way to scan and connect on a
WLAN network.
system requirements (minimum requirements) 9
Network services
The GlobeTrotter card operates on the EGSM 900, GSM 1800 and PCS 1900 cellu-
lar networks.
To use your Option GlobeTrotter card, you must first activate an account with a
GPRS/GSM network provider and have received a Subscriber Identity Module
(SIM) card from the GPRS/GSM provider.
Some service providers may not provide all communications services. Contact
your service provider for further information about the availability and details of
the services in your home network.
Additional information may be required from your service provider to activate
the GPRS functionality of the Option GlobeTrotter card such as:
> User Name - if applicable
> Password - if applicable
> Access Point Name (APN)
> IP Address - if not dynamic
> DNS Address - if not dynamic
system requirements (minimum requirements)
8
Antenna
You need to eject the pop out antenna from the card in order to be able to
establish a connection.
Installing the Option GlobeTrotter card and the GlobeTrotter Mobility Manager
WARNING! DO NOT INSERT THE CARD!
It is advised to connect your PC to the mains, before starting the installation
1. Start Windows.
2. Close all applications.
3. Insert the CD-Rom into your computer’s CD-Rom drive. If auto play is enabled
the setup will start automatically.
installation 11
This section provides step-by-step instructions on how to install the Option
GlobeTrotter card on your PC.
NOTE: There are some slight differences in the installation process between
Windows 2000 and XP Pro/Home Edition. If the installation differs from the
steps described in this section, follow the instructions on the screen.
If you want to quit the Setup program without installing or uninstalling, click
Cancel and then Exit Setup to quit Setup. If you want to return the Setup pro-
gram after having quit the installation before it was completed, follow the
installation steps as if you were installing the program for the first time.
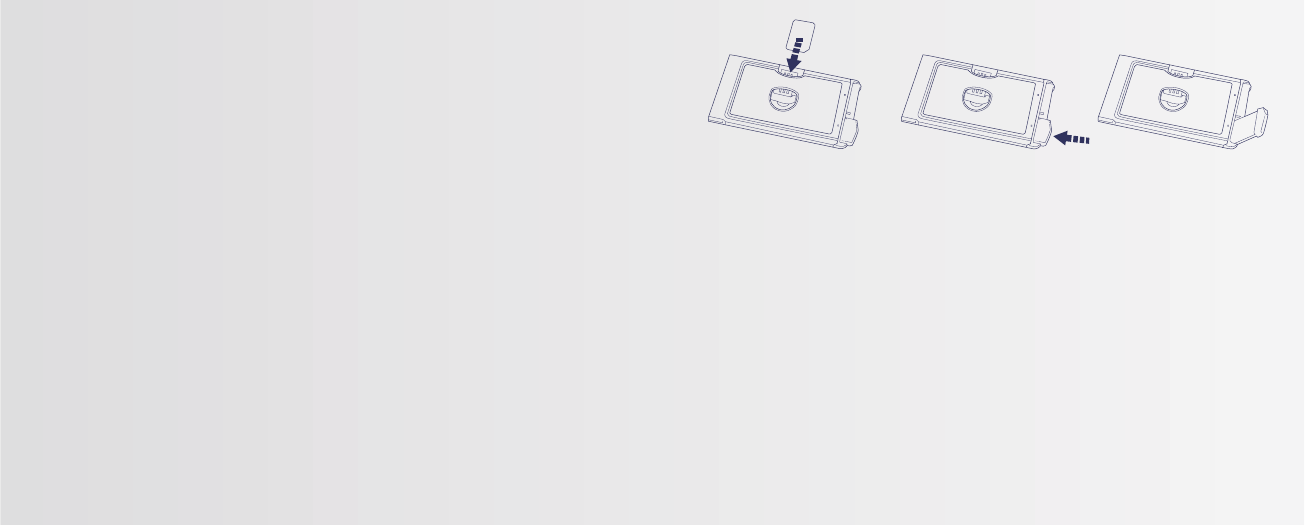
Inserting the SIM card in the Option GlobeTrotter card
1. Verify that you have a plug-in SIM card and locate the golden connector area
on this SIM. Please make sure the golden connector is perfectly clean.
2. Look for the SIM connector on top of the Option GlobeTrotter card.
3. Slide the SIM card with the cut corner of the SIM to the centre of the
GlobeTrotter, and with the golden connector area on it facing to the Option
GlobeTrotter card.
installation
10

Choose Cancel if you want to register later. You will be able to start the
registration from the help menu in the main interface. When you click cancel
each time you start GTMM you will be asked to register.
Uninstalling the Option GlobeTrotter card and the GlobeTrotter Mobility Manager
1. Go to the Control Panel of the operating system.
2. Open Add/Remove Programs.
3. To uninstall the GlobeTrotter card and the GTMM software,
select GlobeTrotter Mobility Manager and click the Remove... button.
Follow the steps of the uninstall wizard.
Installation 13
4. If this does not happen, select the Run command from the Start menu.
5. Select the drive that contains the CD. Go to D:\MobilityManagerSetup*.exe
(D: represents the CD-Rom drive).
6. Click OK to execute the file.
7. Select the language you want to install the program in.
8. The installation will start.
9. The software will automatically be copied into
Program Files\OPTION\Mobility Manager. Another target folder can
also be chosen during the installation process.
10. For some operating systems, it will be necessary to reboot the computer.
11. At the end of the installation you can automatically start
the GTMM application.
12. Insert the Option GlobeTrotter card into the PCMCIA slot of your PC.
13. Wait until the system has recognized the card.
13. You will now be asked to register the product. Registration is required to ben-
efit from the warranty and customer care. By connecting to the Internet you
can register online immediately at
http: //www.option.com/registration/4_3_registration.shtml
Installation
12

You have to select which type of connection you want to set up. (1)
You have to select either importing an existing connection or setting up
a connection manually. (2)
getting started 15
Starting the Option GlobeTrotter card.
Slide the SIM card into the SIM card slot of the Option GlobeTrotter card and
insert the Option GlobeTrotter card into the PC Card slot of your computer. It is
recommended to insert the card in the top PCMCIA slot. You may have to enter
the PIN (Personal Identity Number) code if the PIN code request is activated in
the SIM card. The PIN code is usually supplied with the SIM card. If you enter an
incorrect PIN code three times in a row, you will need a PUK (Personal
Unblocking Key) code to unblock the SIM card. If this doesn’t work, contact your
service provider.
Using the GlobeTrotter card for a DATA connection
Caution! Some Service Providers use automatic DNS Server assignment.
However if you can connect but have trouble opening a webpage we advise you
to enter the DNS settings manually. Please contact your Service Provider to
obtain the required DNS settings.
Depending on your network operator, a GPRS or GSM connection might already
have been installed. If not, you will have to create a new connection following the
next steps. Click on GSM GPRS folder. Click on New to create a new connection.
getting started
14
12
In Name Servers (DNS) you can specify the DNS if required by your carrier.
getting started 17
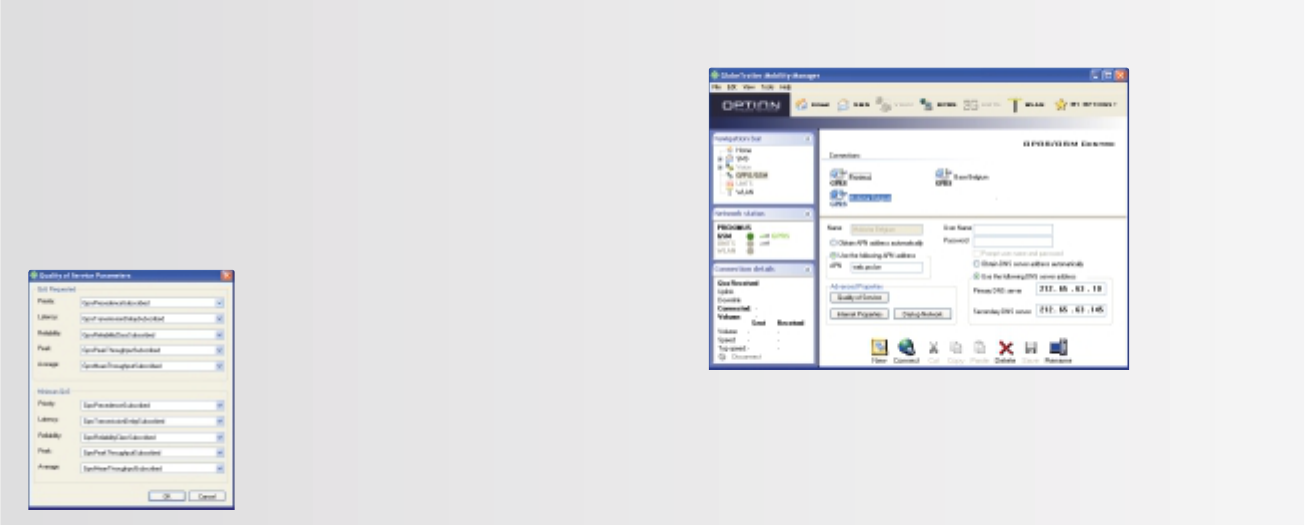
When you set up your connection manually right click on the connection and
select rename. Enter a name for your connection (e.g. My GPRS connection with
Operator X) and fill in all the parameters of your GPRS connection. Enter the
GPRS settings you received from your provider.
In Quality of Service (QoS), you can change the QoS parameters. See the help
files for definitions of the QoS parameters.
CAUTION! Do not change the QoS parameters unless your provider explicitly
tells you to do it.
getting started
16
Using the GlobeTrotter card for SMS, Voice and Phonebook management.
During the installation of the GlobeTrotter Mobility Manager software a link is
created in the Startup folder. GlobeTrotter Mobility Manager will subsequently
start every time the computer is turned on. The GlobeTrotter Mobility Manager
icon then appears in the task bar. If the GlobeTrotter Mobility Manager software
does not start automatically when the computer is switched on, or if the
GlobeTrotter Mobility Manager program has been closed in the meantime, it can
be started again in the Start menu.
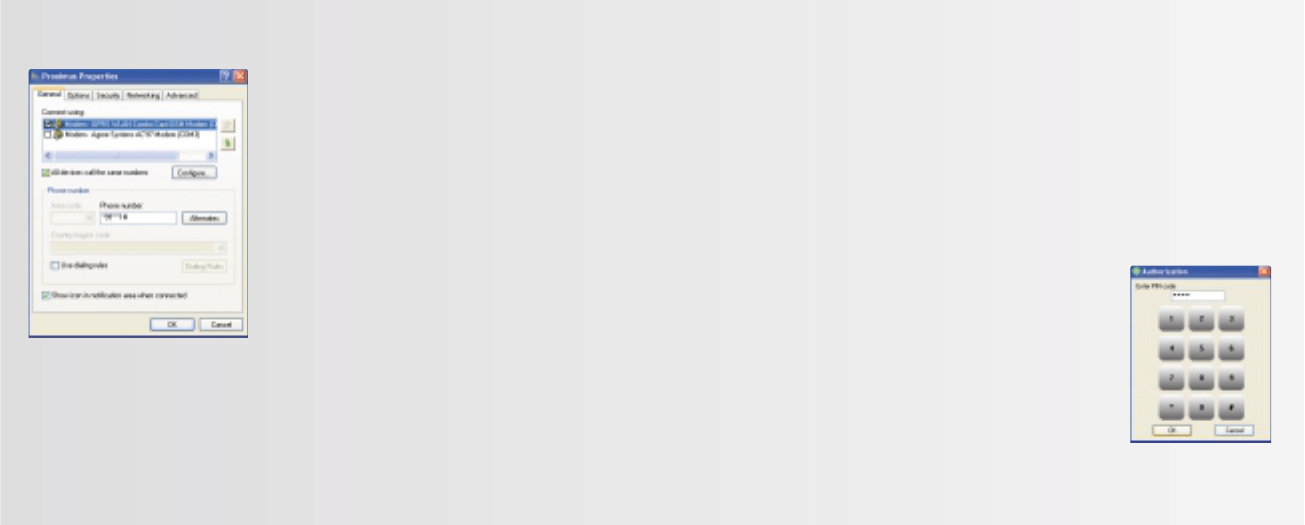
Once the program has started, the PIN code will be
requested (if the PIN code request is activated on the
card) in order to activate the Globetrotter card. The card
will subsequently be registered onto the network.
If the PIN code request has been disabled, the
GlobeTrotter card will be registered on the network as
soon as it is powered.
At the end of the network registration the interface will open and the connec-
tion will start
getting started 19
In Dial up Network you can modify the card settings and the dial properties.
Click Save. You are now ready to start a GPRS connection!
Setting up a GSM connection is similar to setting up a GPRS connection, so
please refer to the above steps.
All connections can be started from the GTMM controller icon in the taskbar.
getting started
18
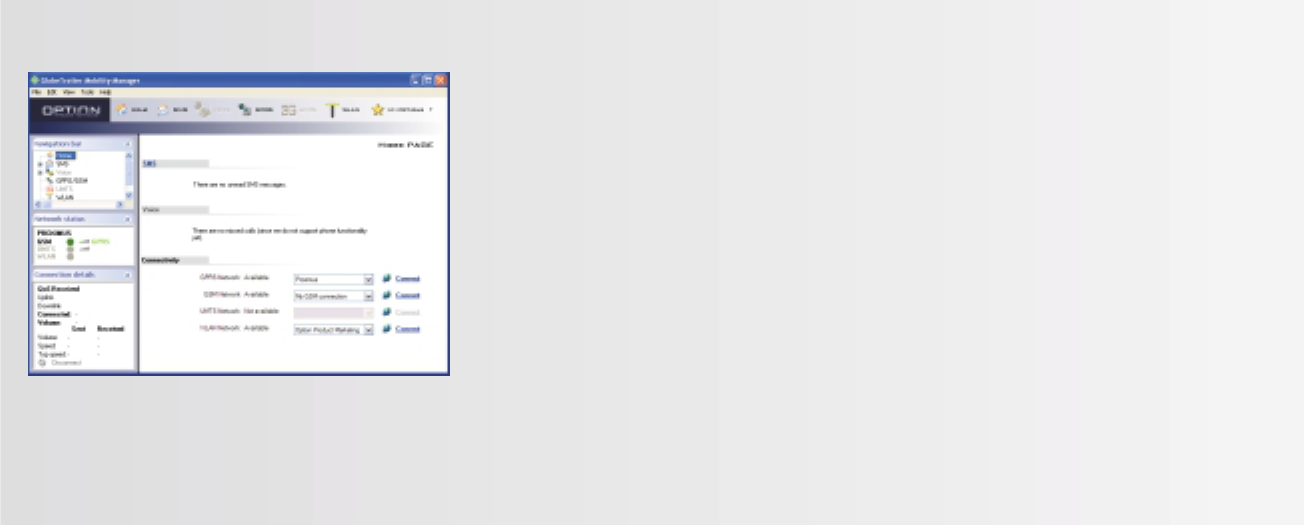
From the Home Page you can:
> Access every section of GlobeTrotter Mobility Manager (the Toolbar)
> Access every subsection (the Navigation bar)
> Overview about the status of the available network
> Indication of missed calls and SMS
> Quick connection launch
In case you have missed calls or unread SMS, these will be shown in the GTMM
Home Page. A text will inform about the number of missed calls and/or unread
messages.
In the Home Page, you have the possibility to connect directly to an available net-
work. Once you have created or imported a connection, this will be available for a
quick connect in the Home Page if the used network (GSM/GPRS/WLAN) is available.
getting started 21
The GlobeTrotter Mobility Manager Home Page
The Home Page is the place where you have a complete overview on everything
that the GlobeTrotter Mobility Manager can offer.
getting started
20
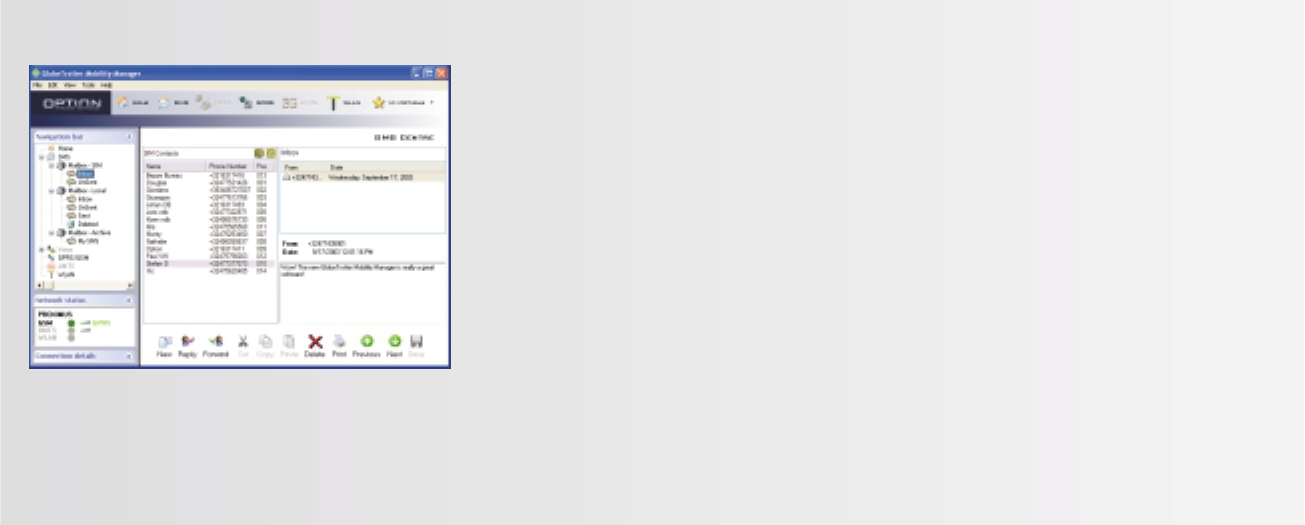
You can access the SMS center:
> From GlobeTrotter Mobility Manager Home Page:
- By left-clicking once on the SMS button on the top toolbar
- By left-clicking once on the “Icon” next to the “You have received n SMS
messages” section
- By left-clicking once on the SMS icon on the upper left navigation bar
> By left-clicking once the “SMS envelope” icon in the systray. This is as a result
of the system having recognized that a new SMS message had arrived.
The SIM or Outlook address book will be shown when clicking on the respective icon.
You can read, create, reply, forward and delete an SMS by clicking the icons on
the SMS Message Management Bar, which is located at the bottom of the
GlobeTrotter Mobility Manager SMS Page
getting started 23
The SMS Centre
getting started
22
You can also create new, cut, copy paste either the SIM contacts or the Outlook
contacts by clicking on the icons in the “SMS Message Management Bar”
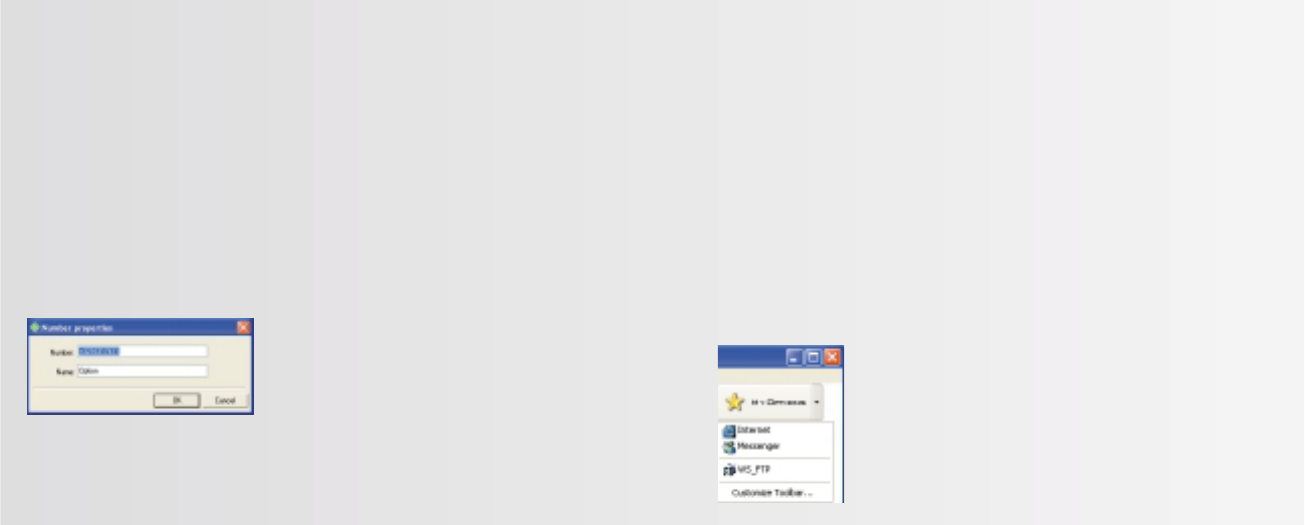
My Options
Using the My Options button you can add shortcuts to your favorite applica-
tions. With a drop down it has immediately an overview to all application that
you have added. You can consider My Options button as an extension of the
main toolbar.
From the menu View > Customize Toolbar it’s possible to choose which buttons
you want to appear in the Toolbar and in the My Options list. Or you can also do
it in ‘My Options/Customize Toolbar…’
getting started 25
The Phone book
The available phonebooks are:
> SIM Phonebook
> Outlook contacts (if Outlook is present)
Contacts are read on the fly, which means no duplicate phonebooks or synchro-
nization. The software will operate directly on the SIM and in the Outlook contacts.
You can edit the name or phone entry in the SIM contacts by right click on the
SIM contacts and select new or by going to ‘File/New/SIM contact. Then you get
the following popup window where you can edit your contact.
You can edit the name or phone entry in the Outlook contacts by going to
‘File/New/Outlook contact’. Then you get the standard Outlook window to make
a new contact.
getting started
24
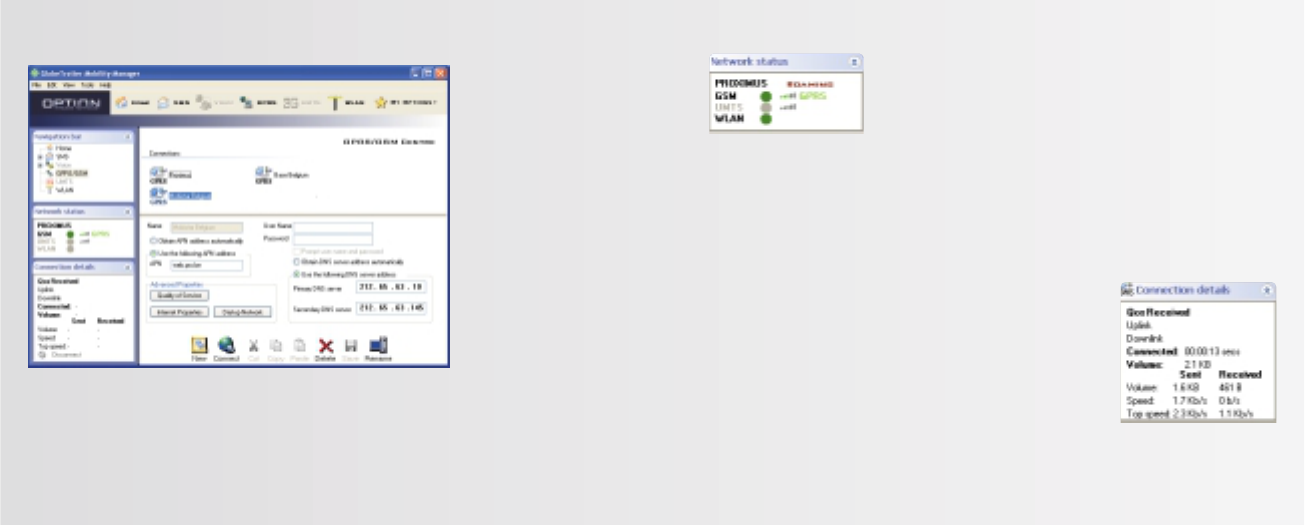
The Connection states tab
Once that you are connected, the network status tab will show the connection
statistics.
Which means:
> Connected with (GSM/GPRS/WLAN/UMTS)
> Duration of the connection
> Total volume transferred
> Sent and received volume.
> Actual speed (upload and download)
> Top speed (upload and download)
> QoS Received (Up- and Downlink). ONLY AVAILABLE FOR UMTS CONNECTIONS.
getting started 27
GPRS Connectivity
The GPRS page allows you to create, edit and configure a GPRS connection. Also,
when a connection is present, this can be started from there.
In the top of the screen you have a list of all available connections.
getting started
26
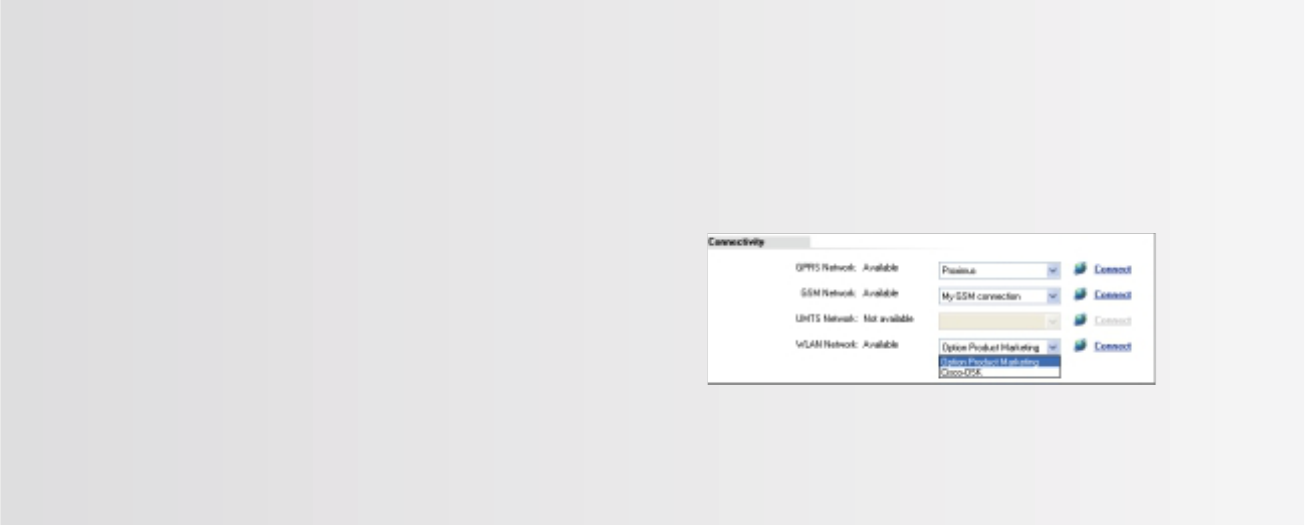
WLAN
First time using WLAN
When you go to the GlobeTrotter Mobility Manager Home Page, in the
Connectivity Section you will find a drop down list for WLAN network: this drop
down list will contain all the available Access Points in the area and will also dis-
play the profile you make later.
getting started 29
Start a connection
A connection can be started from:
> The connect button in one of the connectivity tabs
> From the controller > right-click > “Connect using” for every available connection
> From the controller > left-click > “Connect” for the default connection
getting started
28
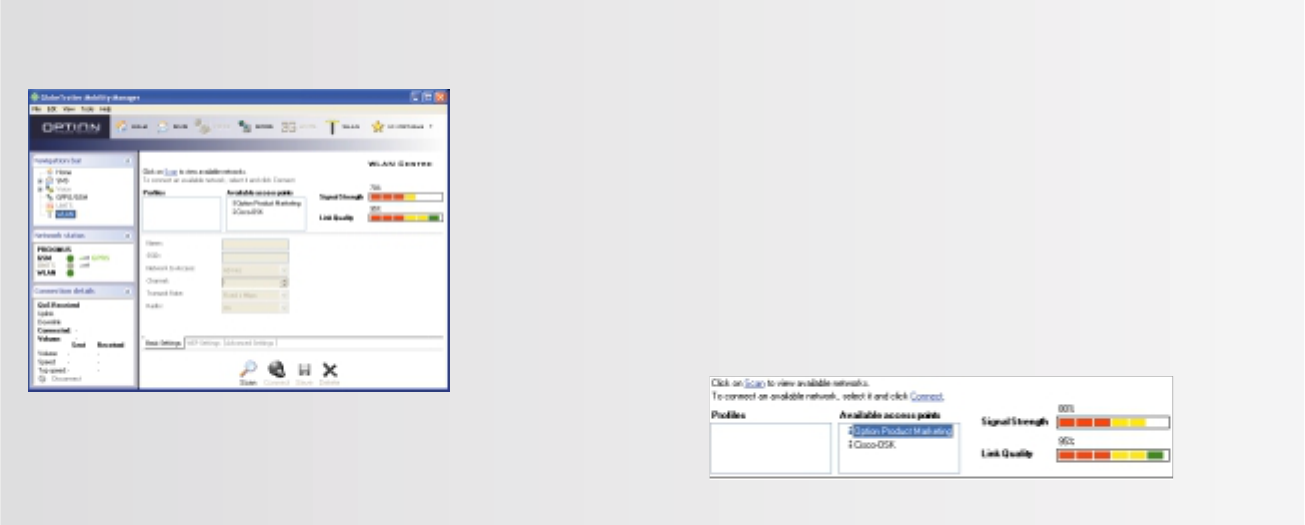
> How to make a profile
Go to the WLAN page.
On top you find the Monitor Screen, which is divided into three parts:
From left to right is:
- The Saved Profiles
- All the available Access Points in the area
- The Signal Strength and Link Quality for the selected profile.
> Steps to make a Profile
- First you need to click “Scan” to find all the available access points in your
area, all these access points will be listed in the Available AP window.
getting started 31
When you have a profile available, you can choose it in the drop down list and
click “Connect” to get access to the WLAN using your settings.
The screen is divided into three parts:
> The monitor screen
Here you have an overview of the WLAN access points that are available and the
profiles you have previously saved on the computer.
getting started
30
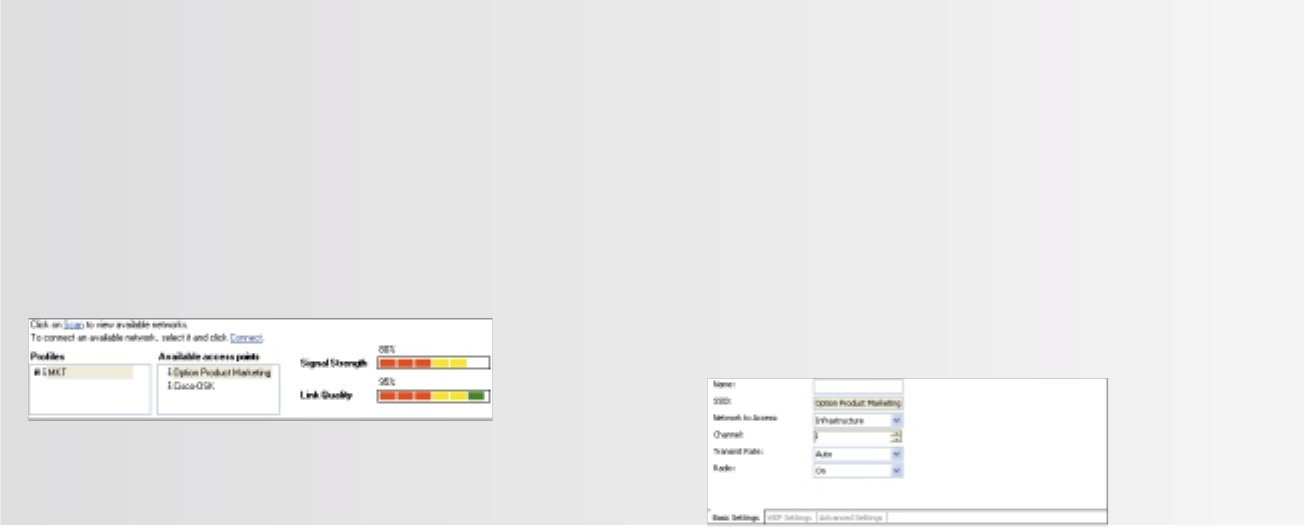
> The settings screen
If you highlight one of the connections in the Monitor screen, the settings
will become editable. You can change the basic settings, WEP settings and
advanced settings.
For a WLAN connection you have found for the first time, all Basic Settings will
be as default. When you select an access point you can give a friendly name to
this connection in the NAME field and change any settings if required by the
WLAN provider.
If something has been changed from the default settings, the SAVE button will
become available.
You can save the connection and this will be always available in the profiles list
(indicated by the floppy icon).
getting started 33
- When you select one of them, all the technical settings will be displayed in
the “Basic Settings”, where it includes the name of SSID (Access Point
Name) etc.
- You can give a friendly name to this connection in the NAME field and
change any settings if required by the WLAN provider and / or Access Point.
- If necessary you can also change the WEP Settings. GTMM uses alphanu-
meric encryption. When you use 64 bits, you need to give in 5 characters
and for 128 bits you need to give in 10 characters.
- Finally click “Save” to save all your settings
- Your profile name will now be available in the profile window.
getting started
32
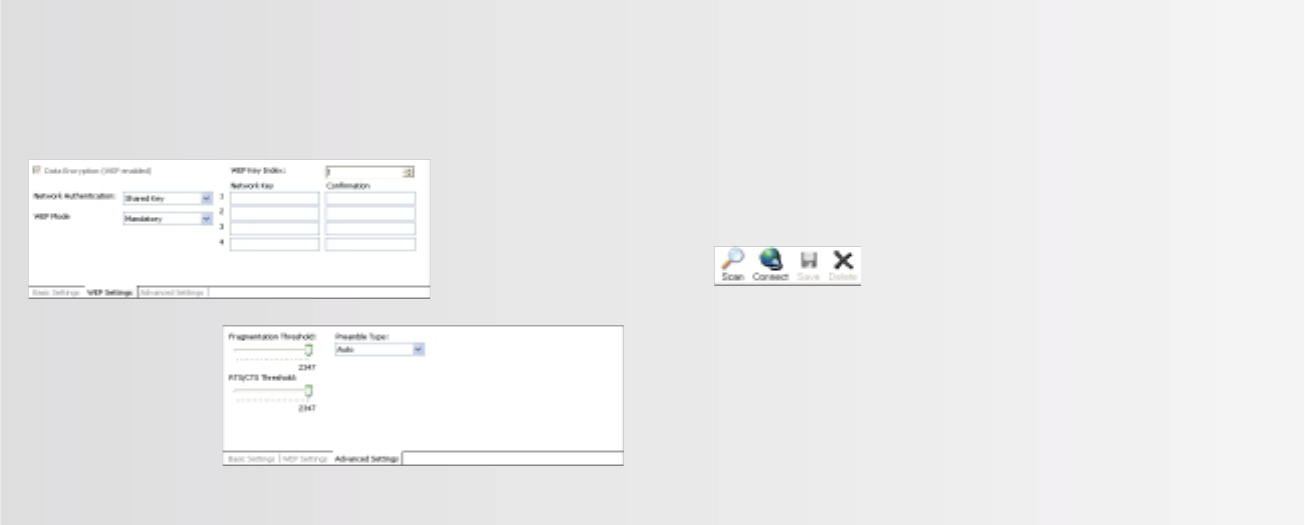
> The tasks screen
In the bottom part of the screen you will have buttons to the most used tasks
Here you can:
-SCAN to check the connections in range
-CONNECT to the highlighted connection
-SAVE the changes you have made in the highlighted connection settings
-DELETE to remove a saved WLAN connection
getting started 35
The WEP Settings will indicate if the access point that you use on this moment
uses data encryption or not. This will be automatically indicated. That informa-
tion comes from the access point.
The encryption key needs to be alphanumeric. You can choose between 64 bits or
128 bits. For 64 bits you use 5 characters and for the 128 bits you use 10 characters.
The Advanced Settings
give you the opportunity
to select other
parameters like:
- Preamble Type
- Fragmentation
Threshold
- RTS/CTS Threshold
getting started
34
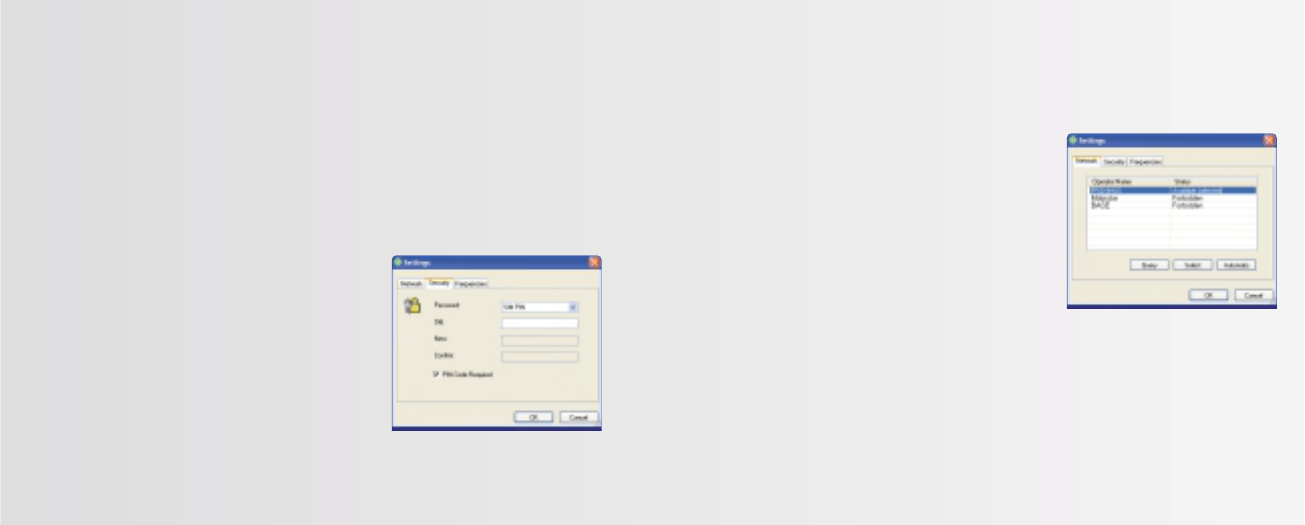
> Network operator selection
The network operator selection window calls a list of available network opera-
tors and selects the chosen network provider from the list.
To check the current settings and read the
current list of operators from the network,
tap Query. The list displays all available
operators sorted alphabetically. The opera-
tor’s status is shown in the second column.
To register with a different operator, high-
light the Operator name, tap Select and
click OK.
Selecting an operator switches the device to manual registration mode; the
device will try to register with the selected operator only. To go back to auto-
matic registration, you must tap Automatic.
getting started 37
Configuration Settings
The configuration tabs are accessible from:
- GTMM controller > Left Click > Settings > Configuration
- Menu bar > Tools > Configuration
> Security
The following passwords can be changed:
- SIM PIN
- SIM PIN2
To change a password, the old password needs to
be entered and two times the new password.
PIN code Require: if checked, PIN must be entered
any time a new connection to the network is ini-
tiated after the device has been turned off.
getting started
36
This section points out the basic problems that could occur when you are
installing and using the card. There is a list of symptoms and possible actions
you can take in any of the following situations below.
Not enough disk space for installation.
There is not enough space to complete the installation on the selected drive.
Select another drive for installation or delete unnecessary files to free up addi-
tional disk space. If there are several hard disk drives in the system and you
decide to install the program on a drive other than the one where the Windows
system files are located, disk space is required on both drives. The program will
always need to place some files in the Windows directory.
Setup does not accept the target directory.
The program can only be installed on a local drive. If the path to the directory is
over 80 characters, it will not be accepted. Select another directory or shorten
the names of the subdirectories.
troubleshooting 39
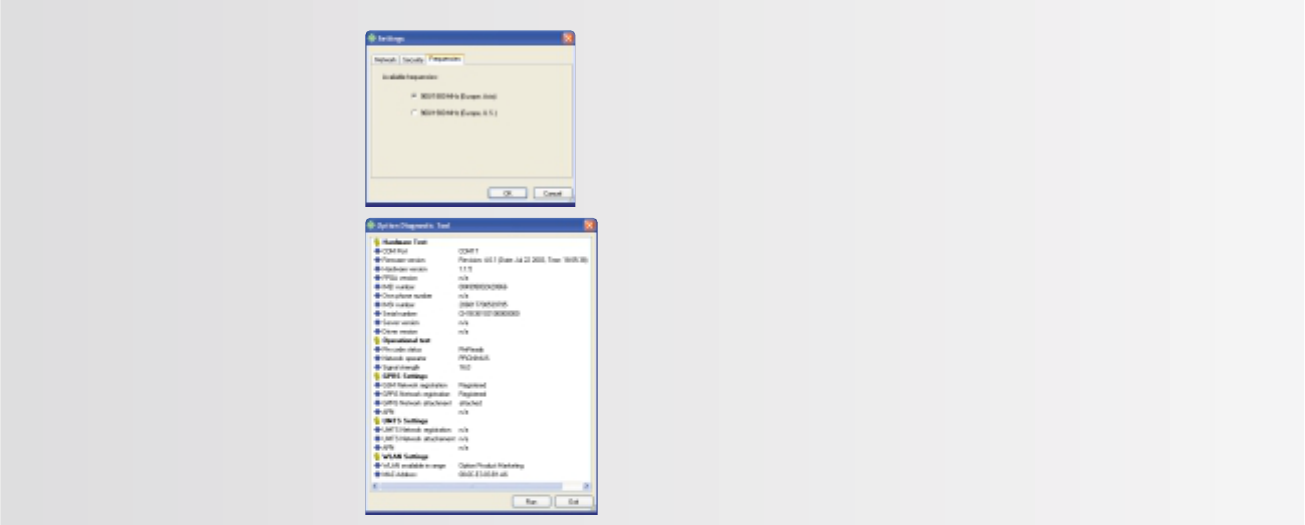
> Frequencies
The cards can use all three common fre-
quencies for GSM/GPRS: 900MHz, 1800
MHz and 1900 MHz. Automatic selection is
supported for only two bands 900/1800
and 900/1900. Switching between bands
has to be done manually.
Two radio buttons are available:
- 900/1800 MHz (Europe, Asia)
- 900/1900 MHz (Europe, US)
> Diagnostic Utilities
A general diagnostic tool will check the
basic settings like installation, network
availability, signal strength…
Other advanced diagnostic utilities will be
accessible in GTMM, such as:
-UMTS Trace
- Connection History
getting started
38

Federal communications commission notice
This equipment has been tested and found to comply with the limits for a Class
B digital device, pursuant to Part 15 of the FCC Rules. These limits are designed to
provide reasonable protection against harmful interference in a residential
installation. This equipment generates, uses, and can radiate radio frequency
energy and, if not installed and used in accordance with the instructions, may
cause harmful interference to radio communications. However, there is no guar-
antee that interference will not occur in a particular installation. If this equip-
ment does cause harmful interference to radio or television reception, which can
be determined by turning the equipment off and on, the user is encouraged to
try to correct the interference by one or more of the following measures:
- Reorient or relocate the receiving antenna.
- Increase the separation between the equipment and receiver.
- Connect the equipment into an outlet on a circuit different from that to
which the receiver is connected.
- Consult the dealer or an experienced radio or television technician for help.
agency Requirements 41
The GlobeTrotter card cannot be installed or used.
The Interrupt Request (IRQ) resources may be in conflict. Check the GlobeTrotter
resources from Control Panel/System/Hardware/Device Manager.
If there is a resource conflict, consult the Windows online help on changing the
resource settings.
The GlobeTrotter card is not properly inserted.
Make sure that the PC Card slot or the computer is functioning properly and
that the GlobeTrotter drivers are installed (In Control Panel > Ports).
Also make sure that the SIM card has been inserted.
Refitting the antenna
When the antenna becomes disconnected, refit it as follows:
troubleshooting
40

For questions regarding your product or FCC declaration, contact:
Option | Kolonel Begaultlaan 45 | 3012 Leuven | Belgium
www.option.com
Exposure Information to Radio Frequency Energy
This PCMCIA card has been tested in different notebooks for compliance with
the SAR requirements.
The maximum measured body SAR values (averaged over a mass of 1 g) are 0.18 W/kg
for GSM1900 and 0.20 W/kg for WLAN, which is well below the limit of 1.6 W/kg.
For safe and efficient use the user should keep the antenna of the card at a mini-
mum
distance of 1 cm away from this body.
CAUTION: Users concerned with the risk of Radio Frequency exposure may wish
to limit the duration of their calls and to position the antenna as far away from
the body as is practical.
agency Requirements 43
Modifications
The FCC requires the user to be notified that any changes or modifications made
to this device that are not expressly approved by Option may void the user’s
authority to operate the equipment.
Cables
Connections to this device must be made with shielded cables with metallic
RFI/EMI connector hoods in order to maintain compliance with FCC Rules and
Regulations.
Declaration of Conformity for products marked with the FCC logo
United States only
This device complies with Part 15 of the FCC rules. Operation is subject to the fol-
lowing two conditions:
(1) this device may not cause harmful interference, and
(2) this device must accept any interference received, including interference that
may cause undesired operation.
agency Requirements
42

safety information 45
European Union notice
Products bearing the CE marking comply with the R&TTE Directive (99/5/EC),
EMC Directive (89/336/EEC) and the Low Voltage Directive (73/23/EEC) issued by
the Commission of the European Community.
Compliance with these directives implies conformity to the following European
Norms (in parentheses are the equivalent international standards and regulations):
Radio Frequency spectrum efficiency:
- EN 301 511, v9.0.2
- EN 300 328-2, v1.4.1
Electromagnetic Compatibility
- EN 301 489-1: v1.4.1
- EN 301 489-7: v1.2.1
- EN 301 489-17: v1.2.1
Safety and Health
- EN 60950: 2000
- EN 50371 (07/02) & IEEE P1528/D1.2 (04/03)
This product may be used in all EU and EFTA countries.
agency Requirements
44
Read these simple guidelines. Breaking the rules may be dangerous or illegal.
Further detailed information is given in this manual.
Driving
Do not use the GlobeTrotter while driving; park the vehicle first.
Interference
All wireless devices may get interference, which could affect performance.
Do not use in hospitals
Follow any regulations or rules. Do not use near medical equipment.
Do not use in airplane
Wireless devices can cause interference. Using them on airplanes is illegal.
Do not use near refueling points
Do not use the device at a refueling point. Do not use near fuel or chemicals.
Use sensibly
Do not touch the antenna unnecessarily.

Ides all voice call features found on mobile phones including registers of made
calls. Calls can be made from the Phonebook.
The application also incorporates a powerful SMS editor, message
templates, and a viewer for reading SMS messages. Incoming and outgoing
messages are listed in Outlook™-style directories. The application also offers
many other facilities, including the automatic generation of SMS texts.
47
Use qualified service
Do not attempt to dissemble GlobeTrotter. Doing so will void warranty. Service
should only be performed by Authorized Service Centers.
Accessories
Use only approved accessories. Do not connect incompatible products.
Liquids
Do not expose your card to rain, or spill beverages on it.
Extreme temperatures
Do not expose the card or the antenna to extreme temperatures, below -25 or
over +70 degrees Celsius.
Traveling
Handle the card with care while traveling. It is recommended to remove the
Card from the laptop and put it in the protective leather wallet.
More information
www.option.com
safety information
46