Oracle Washer Dryer D H09993100 Users Manual Hyperion Security Administration Guide
2015-02-05
: Oracle Oracle-Washer-Dryer-D-H09993100-Users-Manual-497462 oracle-washer-dryer-d-h09993100-users-manual-497462 oracle pdf
Open the PDF directly: View PDF ![]() .
.
Page Count: 206 [warning: Documents this large are best viewed by clicking the View PDF Link!]
- Contents
- About Hyperion Security
- Setting Up Authentication
- User Management Console
- Configuring User Directories
- Operations Related to User Directory Configuration
- Using the Unique Identity Attribute to Handle Inter-OU Moves in LDAP-Enabled User Directories
- Configuring Oracle Internet Directory, MSAD, and Other LDAP-Enabled User Directories
- Configuring an SAP Provider
- Configuring an NTLM User Directory
- Configuring Relational Databases as User Directories
- Testing User Directory Connections
- Editing User Directory Settings
- Deleting User Directory Configurations
- Managing User Directory Search Order
- Setting Global Parameters
- Overriding Cache Refresh Interval for MSAD and other LDAP-Enabled User Directories
- Setting Timeout to Resolve SAP Keystore File
- Connection Pooling
- Using Special Characters
- Working with Applications and Projects
- Delegated User Management
- Managing Native Directory
- About Native Directory
- Managing Native Directory Users
- Managing Native Directory Groups
- Managing Roles
- Changing Native Directory root User Password
- Backing Up the Native Directory Database
- Synchronizing Native Directory Database with the Shared Services Repository
- Recovering Native Directory Data
- Setting Up Native Directory for High Availability and Failover
- Migrating Native Directory
- Managing Provisioning
- Provisioning Users and Groups
- Deprovisioning Users and Groups
- Generating Provisioning Reports
- Importing and Exporting Native Directory Data
- Overview
- Use Scenarios
- Installing the Import/Export Utility
- Before Starting Import/Export Operations
- Sample importexport.properties File
- Sequence of Operations
- Preparing the Property File
- Product Codes
- Considerations for Setting Filters
- Prerequisites for Running Import/Export Utility from a Remote Host
- Running the Utility
- Import File format
- Using the Update Native Directory Utility to Clean Stale Native Directory Data
- Troubleshooting
- Hyperion Product Roles
- Shared Services Roles
- Essbase Roles
- Reporting and Analysis Roles
- Financial Management Roles
- Planning Roles
- Business Rules Roles
- Business Modeling Roles
- Strategic Finance Roles
- Transaction Manager Roles
- Performance Scorecard Roles
- Strategic Finance Roles
- Data Integration Management Roles
- Essbase Provider Services Roles
- Shared Services Roles and Permitted Tasks
- Essbase User Provisioning
- Launching User Management Console from Essbase
- Essbase Projects, Applications, and Databases in Shared Services
- Essbase Users and Groups in Shared Services
- Assigning Database Calculation and Filter Access
- Setting Application Access Type
- Synchronizing Security Information Between Shared Services and Essbase
- Migrating Essbase Users to Shared Services Security
- Backing Up Security Information
- Reporting and Analysis User Provisioning
- Financial Management User Provisioning
- Planning User Provisioning
- Business Rules User Provisioning
- Performance Scorecard User Provisioning
- Business Modeling Roles and Tasks
- Essbase Provider Services User Provisioning
- Data Integration Management User Provisioning
- Glossary
- Index
HYPERION
RELEASE 9.3.1
SECURITY ADMINISTRATION GUIDE
P/N: DH09993100
Hyperion Security Administration Guide, 9.3.1
Copyright © 2005-2007, Oracle and/or its affiliates. All rights reserved.
Authors: James Chacko
The Programs (which include both the software and documentation) contain proprietary information; they are provided
under a license agreement containing restrictions on use and disclosure and are also protected by copyright, patent, and
other intellectual and industrial property laws. Reverse engineering, disassembly, or decompilation of the Programs, except
to the extent required to obtain interoperability with other independently created software or as specified by law, is
prohibited.
The information contained in this document is subject to change without notice. If you find any problems in the
documentation, please report them to us in writing. This document is not warranted to be error-free. Except as may be
expressly permitted in your license agreement for these Programs, no part of these Programs may be reproduced or
transmitted in any form or by any means, electronic or mechanical, for any purpose.
If the Programs are delivered to the United States Government or anyone licensing or using the Programs on behalf of the
United States Government, the following notice is applicable:
U.S. GOVERNMENT RIGHTS Programs, software, databases, and related documentation and technical data delivered to
U.S. Government customers are "commercial computer software" or "commercial technical data" pursuant to the
applicable Federal Acquisition Regulation and agency-specific supplemental regulations. As such, use, duplication,
disclosure, modification, and adaptation of the Programs, including documentation and technical data, shall be subject
to the licensing restrictions set forth in the applicable Oracle license agreement, and, to the extent applicable, the additional
rights set forth in FAR 52.227-19, Commercial Computer Software--Restricted Rights (June 1987). Oracle USA, Inc., 500
Oracle Parkway, Redwood City, CA 94065.
The Programs are not intended for use in any nuclear, aviation, mass transit, medical, or other inherently dangerous
applications. It shall be the licensee's responsibility to take all appropriate fail-safe, backup, redundancy and other measures
to ensure the safe use of such applications if the Programs are used for such purposes, and we disclaim liability for any
damages caused by such use of the Programs.
Oracle is a registered trademark of Oracle Corporation and/or its affiliates. Other names may be trademarks of their
respective owners.
The Programs may provide links to Web sites and access to content, products, and services from third parties. Oracle is
not responsible for the availability of, or any content provided on, third-party Web sites. You bear all risks associated with
the use of such content. If you choose to purchase any products or services from a third party, the relationship is directly
between you and the third party. Oracle is not responsible for: (a) the quality of third-party products or services; or (b)
fulfilling any of the terms of the agreement with the third party, including delivery of products or services and warranty
obligations related to purchased products or services. Oracle is not responsible for any loss or damage of any sort that you
may incur from dealing with any third party.

Contents
Chapter 1. About Hyperion Security ..................................................... 11
Security Components .................................................. 11
User Authentication ................................................... 11
Authentication Components .......................................... 11
Security API ................................................... 12
Native Directory ................................................ 12
User Directories ................................................ 12
User Authentication Scenarios ......................................... 12
Single Sign-on Directly to Hyperion Products ........................... 12
Single Sign-on from External Systems ................................ 13
Provisioning (Role-Based Authorization) .................................... 14
Roles ........................................................... 15
Global Roles ................................................... 16
Predefined Roles ................................................ 17
Aggregated Roles ............................................... 17
Users ........................................................... 17
Groups .......................................................... 17
Chapter 2. Setting Up Authentication .................................................... 19
Setting Up Direct Authentication to Hyperion Products ......................... 19
Creating Users on the User Directory .................................... 19
Creating Groups ................................................... 20
Migrating Users and Groups to Shared Services Security ...................... 20
Installing and Deploying Shared Services ................................. 20
Identifying User Directories to Shared Services ............................. 20
Setting Up SSO with SAP Enterprise Portal ................................... 21
Nested SAP Groups ................................................. 22
Inheritance Policy for Nested Groups .................................... 23
Deployment Locations .............................................. 23
Prerequisites ...................................................... 23
Setting Up SSO from SiteMinder .......................................... 25
Special Considerations .............................................. 26
Contents iii

Configuring the SiteMinder Policy Server ................................. 27
Configuring the SiteMinder Web Agent .................................. 27
Enabling SiteMinder Authentication in Shared Services ....................... 27
Other Procedures .................................................. 28
Using NTLM to Support SSO ............................................ 28
NTLM with UNIX Application Environments ............................. 29
Support for Multiple NTLM Domains ................................... 29
Chapter 3. User Management Console ................................................... 33
Launching User Management Console ...................................... 33
Overview of User Management Console ..................................... 34
Navigating in User Management Console .................................... 34
Searching for Users, Groups, Roles, and Delegated Lists .......................... 34
Chapter 4. Configuring User Directories .................................................. 37
Operations Related to User Directory Configuration ............................ 37
Using the Unique Identity Attribute to Handle Inter-OU Moves in LDAP-Enabled User
Directories .......................................................... 38
Planning the Migration to the Unique Identity Attribute ...................... 38
Back Up Native Directory and Hyperion Product Repositories ............... 39
Migration Sequence ............................................. 39
Behavior During Migration ........................................ 39
Important Considerations When Using the Unique Identity Attribute ......... 39
Configuring Oracle Internet Directory, MSAD, and Other LDAP-Enabled User
Directories .......................................................... 40
Configuring an SAP Provider ............................................. 46
Configuring an NTLM User Directory ...................................... 49
Configuring Relational Databases as User Directories ........................... 50
Testing User Directory Connections ........................................ 53
Editing User Directory Settings ........................................... 53
Deleting User Directory Configurations ..................................... 54
Managing User Directory Search Order ..................................... 54
Adding a User Directory to the Search Order .............................. 55
Changing the Search Order ........................................... 56
Removing a Search Order Assignment ................................... 56
Setting Global Parameters ............................................... 57
Overriding Cache Refresh Interval for MSAD and other LDAP-Enabled User
Directories .......................................................... 58
Setting Timeout to Resolve SAP Keystore File ................................. 59
Connection Pooling ................................................... 59
iv Contents

Using Special Characters ................................................ 61
Chapter 5. Working with Applications and Projects ........................................... 65
Overview ........................................................... 65
Working with Projects .................................................. 65
Creating Projects .................................................. 66
Modifying Project Properties .......................................... 67
Deleting Projects .................................................. 67
Managing Applications ................................................. 67
Assigning Access Permissions to Applications ............................. 68
Moving Applications ............................................... 69
Copying Provisioning Information Across Applications ...................... 69
Deleting an Application .............................................. 69
Chapter 6. Delegated User Management .................................................. 71
About Delegated User Management ........................................ 71
Hierarchy of Administrators ............................................. 71
Shared Services Administrators ........................................ 71
Delegated Administrators ............................................ 72
Enabling Delegated User Management Mode ................................. 72
Creating Delegated Administrators ........................................ 72
Planning Steps .................................................... 73
User Accounts for Delegated Administrators ........................... 73
Create a Delegation Plan .......................................... 73
Provisioning Delegated Administrators .................................. 73
Creating Delegated Lists ............................................. 73
Modifying Delegated Lists ............................................ 75
Deleting Delegated Lists ............................................. 77
Viewing Delegated Reports ........................................... 77
Chapter 7. Managing Native Directory .................................................... 79
About Native Directory ................................................. 79
Installation Location ................................................ 79
Default Users and Groups ............................................ 80
Starting Native Directory ............................................. 80
Starting Native Directory in Normal Mode ............................. 80
Starting Native Directory in Debug Mode .............................. 80
Stopping Native Directory ......................................... 81
Managing Native Directory Users ......................................... 81
Creating Users .................................................... 81
Contents v

Modifying User Accounts ............................................ 82
Deactivating User Accounts ........................................... 83
Activating Inactive User Accounts ...................................... 84
Deleting User Accounts ............................................. 84
Managing Native Directory Groups ........................................ 84
Creating Groups ................................................... 85
Modifying Groups ................................................. 86
Deleting Groups ................................................... 88
Managing Roles ...................................................... 88
Creating Aggregated Roles ............................................ 89
Modifying Aggregated Roles .......................................... 90
Deleting Aggregated Roles ............................................ 90
Changing Native Directory root User Password ............................... 91
Backing Up the Native Directory Database ................................... 91
Best Practices ..................................................... 91
Hot Backup ...................................................... 92
Cold Backup ...................................................... 92
Synchronizing Native Directory Database with the Shared Services Repository ......... 93
Recovering Native Directory Data ......................................... 93
Setting Up Native Directory for High Availability and Failover ..................... 94
Out of the Box Deployment ........................................... 94
Cold Standby Deployment ............................................ 96
Hot Standby Deployment ............................................ 98
Migrating Native Directory .............................................. 99
Chapter 8. Managing Provisioning ..................................................... 101
Provisioning Users and Groups .......................................... 101
Deprovisioning Users and Groups ........................................ 102
Generating Provisioning Reports ......................................... 102
Importing and Exporting Native Directory Data .............................. 103
Overview ....................................................... 104
Use Scenarios .................................................... 105
Move Provisioning Data Across Environments ......................... 105
Manage Users and Groups in Native Directory ......................... 105
Bulk Provision Users and Groups ................................... 105
Installing the Import/Export Utility .................................... 106
Before Starting Import/Export Operations ............................... 106
Sample importexport.properties File ................................... 106
Sequence of Operations ............................................. 107
vi Contents

Preparing the Property File .......................................... 107
Product Codes ................................................... 111
Considerations for Setting Filters ...................................... 112
Prerequisites for Running Import/Export Utility from a Remote Host ........... 113
Running the Utility ................................................ 113
Import File format ................................................ 114
XML File Format .............................................. 114
CSV File Format ............................................... 118
Chapter 9. Using the Update Native Directory Utility to Clean Stale Native Directory Data ............... 125
About the Update Native Directory Utility .................................. 125
Installing the Update Native Directory Utility ................................ 126
Running the Update Native Directory Utility ................................ 126
Update Native Directory Utility Options ................................ 127
Update Native Directory Utility Log Files ................................ 128
Product-Specific Updates .............................................. 128
Essbase ......................................................... 129
Planning ....................................................... 129
Financial Management ............................................. 130
Reporting and Analysis ............................................. 131
Strategic Finance ................................................. 132
Chapter 10. Troubleshooting ......................................................... 133
Shared Services Log Files ............................................... 133
User Directory Error Codes ............................................. 134
Troubleshooting Tools and Utilities ....................................... 134
CSSSpy ........................................................ 134
WebDAV Browser ................................................ 134
Appendix A. Hyperion Product Roles .................................................... 135
Shared Services Roles ................................................. 135
Essbase Roles ....................................................... 137
Reporting and Analysis Roles ............................................ 137
Financial Management Roles ............................................ 139
Planning Roles ...................................................... 141
Business Rules Roles .................................................. 142
Business Modeling Roles ............................................... 143
Strategic Finance Roles ................................................ 143
Transaction Manager Roles ............................................. 144
Performance Scorecard Roles ............................................ 144
Contents vii

Strategic Finance Roles ................................................ 144
Data Integration Management Roles ...................................... 145
Essbase Provider Services Roles .......................................... 145
Appendix B. Shared Services Roles and Permitted Tasks ...................................... 147
Appendix C. Essbase User Provisioning .................................................. 149
Launching User Management Console from Essbase ........................... 149
Essbase Projects, Applications, and Databases in Shared Services .................. 150
Essbase Users and Groups in Shared Services ................................ 151
Assigning Database Calculation and Filter Access ............................. 151
Setting Application Access Type .......................................... 153
Synchronizing Security Information Between Shared Services and Essbase ........... 154
Migrating Essbase Users to Shared Services Security ........................... 155
Backing Up Security Information ......................................... 155
Appendix D. Reporting and Analysis User Provisioning ....................................... 157
Launching User Management Console from Workspace ........................ 157
Reporting and Analysis Roles ............................................ 157
Reporting and Analysis Role Hierarchy .................................... 157
Content Manager Branch ........................................... 158
Scheduler Manager Branch .......................................... 158
Sample Role Combinations ............................................. 159
Appendix E. Financial Management User Provisioning ........................................ 161
Assigning Users and Groups to Financial Management Applications ............... 161
Assigning User Access to Security Classes ................................... 162
Setting Up E-mail Alerting ............................................. 163
Process Management Alerting ........................................ 164
Intercompany Transaction Alerting .................................... 165
Running Security Reports for Financial Management Applications ................. 165
Migrating Financial Management Users to Shared Services Security ................ 166
Appendix F. Planning User Provisioning .................................................. 167
Launching User Management Console From Planning ......................... 167
Returning to Planning From User Management Console ........................ 167
Updating Users and Groups in Planning .................................... 168
Migrating User and Group Identities ................................... 168
Deprovisioning or Deleting Users and Groups ............................ 168
Updating Users With a Utility ........................................ 169
Roles in Planning .................................................... 170
viii Contents

Write Access to Data in Essbase ....................................... 170
Roles Between Planning and Business Rules .............................. 170
Access Permissions Between Planning and Essbase ......................... 170
About Connection Types and Planning .................................... 171
Migrating Users to Shared Services ........................................ 171
Appendix G. Business Rules User Provisioning ............................................. 173
About Business Rules Security ........................................... 173
Launching User Management Console ..................................... 174
Business Rules User Roles .............................................. 174
Migrating Business Rules Users to Shared Services Security ...................... 175
Appendix H. Performance Scorecard User Provisioning ....................................... 177
Launching User Management Console from Performance Scorecard ............... 177
Managing Permissions in Performance Scorecard .......................... 178
Creating and Provisioning Users and Groups over Shared Services ................. 178
Access Permissions ................................................ 179
Before You Begin ................................................. 179
Creating a New User or Group Using Shared Services ....................... 179
Assign Performance Scorecard Properties Individually ...................... 180
Assign Bulk Properties in Performance Scorecard .......................... 181
Migrating Performance Scorecard Users and Groups to Shared Services Security ...... 182
Appendix I. Business Modeling Roles and Tasks ............................................ 189
Administrator ....................................................... 189
Builder ............................................................ 190
End User .......................................................... 190
Appendix J. Essbase Provider Services User Provisioning ...................................... 191
Provisioning the Administrator Role in Shared Services ......................... 191
Migrating Analytic Provider Services Users to Shared Services .................... 192
Appendix K. Data Integration Management User Provisioning .................................. 193
Authentication Methods ............................................... 193
Data Integration Management User Roles ................................... 194
Glossary ........................................................... 195
Index ............................................................. 199
Contents ix

xContents

1About Hyperion Security
In This Chapter
Security Components..............................................................................................................11
User Authentication................................................................................................................11
Provisioning (Role-Based Authorization).........................................................................................14
Security Components
Hyperion application security comprises two distinct and complementary layers that control
user access and permissions:
●“User Authentication” on page 11
●“Provisioning (Role-Based Authorization)” on page 14
User Authentication
User authentication enables single sign-on functionality across Hyperion products by validating
the login information of each user to determine authenticated users. User authentication, along
with product-specific authorization, grants the user access to Hyperion products. Authorization
is granted through provisioning.
Single sign-on (SSO) is a session and user authentication process that permits a Hyperion
product user to enter credentials only once at the beginning of a session to access multiple
Hyperion products. SSO, which is requested at session initiation, eliminates the need to log in
separately to each Hyperion product to which the user has access.
Authentication Components
These components are used to support SSO:
●“Security API” on page 12
●“Native Directory” on page 12
●“User Directories” on page 12
Security Components 11

Security API
The Security Application Programming Interface (Security API) is the main interface to validate
users and interpret user access to Hyperion products. It is a Java API that enables Hyperion
products to authenticate users against user directories configured in Oracle's Hyperion® Shared
Services. It also allows integration with a security agents such as Netegrity SiteMinder, and
retrieval of users and groups based on names and identities. Each Hyperion application
implements the Security API to support user authentication.
Native Directory
Native Directory (OpenLDAP), an open source Lightweight Directory Access Protocol (LDAP)-
enabled user directory, is bundled and configured with Shared Services.
Native Directory functions:
●Used to maintain and manage the default Shared Services user accounts required by
Hyperion products
●Is the central storage for all Hyperion provisioning information because it stores the
relationships between users, groups, and roles.
Native Directory is accessed and managed using the User Management Console. Refer
toChapter 7, “Managing Native Directory” for more information on provisioning users.
User Directories
User directories refer to any corporate user and identity management system compatible with
Shared Services. Hyperion products are supported on a large number of user directories. These
include LDAP-enabled user directories, such as Sun Java System Directory Server (formerly
SunONE Directory Server) and Microsoft Active Directory, Windows NT LAN Manager
(NTLM); SAP Provider; and custom-built user directories that support LDAP version 3.
In addition to Native Directory, which is automatically configured for your environment, one
or more user directories can be configured as the user information provider for Hyperion
products.
User directories used with Hyperion products must contain an account for each user who
accesses Hyperion products. These users may be assigned to groups to facilitate provisioning.
User Authentication Scenarios
●“Single Sign-on Directly to Hyperion Products” on page 12
●“Single Sign-on from External Systems” on page 13
Single Sign-on Directly to Hyperion Products
Direct authentication connects Hyperion products to available user directories to verify the user
name and password (credentials) entered on the Login screen.
12 About Hyperion Security
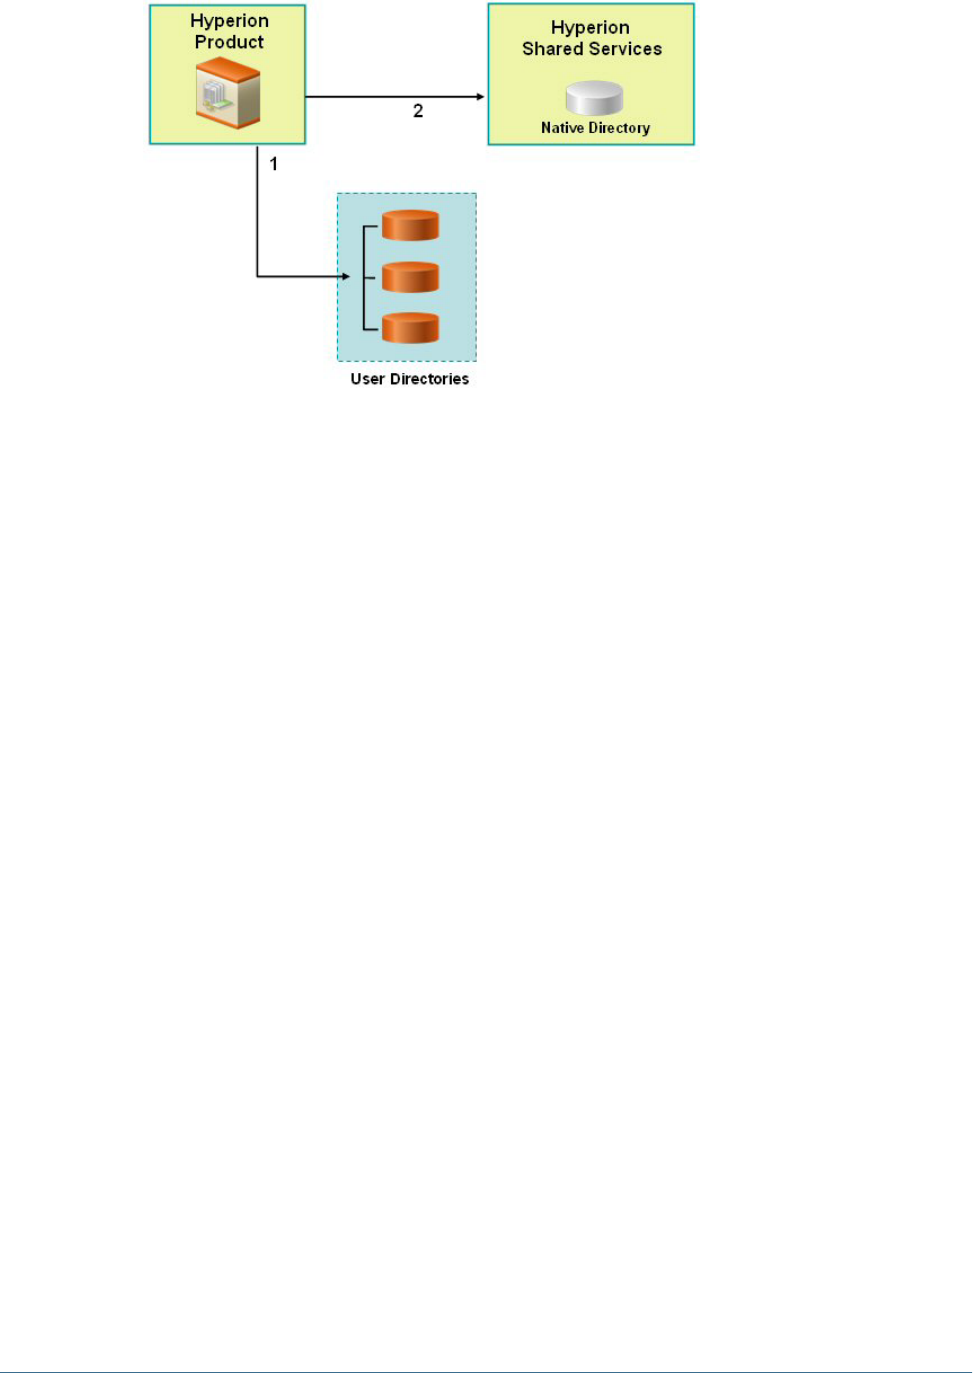
1. Using a browser, users access the Hyperion product login screen. They enter user names
and passwords.
The Security API implemented on the Hyperion product queries the configured user
directories (including Native Directory) to verify user credentials. A search order is used to
establish the search sequence. On finding a matching user account in a user directory, the
search is terminated and the user's information is returned to the Hyperion product.
Access to Hyperion product is denied if a user account is not found in any of the user
directories.
2. Using the retrieved user information, the Hyperion product queries Shared Services to
obtain provisioning details for the user. Provisioning details are stored in Native Directory.
On receiving provisioning information from Shared Services, the appropriate Hyperion product
is made available to the user. At this point, SSO is enabled for all Hyperion products for which
that user is provisioned. Access permissions within Hyperion products are determined by the
provisioning information.
Single Sign-on from External Systems
Hyperion products can be configured to accept pre-authenticated users from external sources,
such as Netegrity SiteMinder and SAP Enterprise Portal, to enable SSO. In this scenario,
Hyperion products use the user information provided by a trusted external source to determine
access permissions of users.
SSO with SAP is supported by accepting an SAP logon ticket. In this scenario, users defined in
an SAP user directory can navigate between the SAP Portal and Hyperion products. If an SAP
provider is configured, users can also directly log on to Hyperion products using the user ID
and password stored in the SAP system. The SAP provider creates the SAP logon ticket to enable
SSO with SAP systems.
User Authentication 13

1. Using a browser, users access the login screen of a web identity management solution (for
example, SiteMinder) or SAP Enterprise Portal. They enter user names and passwords,
which are validated against configured user directories to verify user authenticity. Hyperion
products are also configured to work with these user directories.
When users navigate to a Hyperion product, information about the authenticated user is
passed to Hyperion product, which accepts the information as valid.
If the user logged on to SAP Portal, an SAP logon ticket is passed to Hyperion product. The
Security API implemented on Hyperion product decrypts the SAP logon ticket using a
specified SAP certificate.
If the user logged on to a web identity management solution, a custom HYPLOGIN HTTP
header is passed to Hyperion product.
2. To verify user credentials, Hyperion product tries to locate the user in one of the user
directories based on the search order. If a matching user account is found, user information
is returned to Hyperion product.
3. Using the retrieved user information, Hyperion product queries Shared Services to obtain
provisioning details for the user.
On receiving user provisioning information from Shared Services, the Hyperion product is
made available to the user. SSO is then enabled for all Hyperion products for which that
user is provisioned.
Provisioning (Role-Based Authorization)
Hyperion application security determines user access to products using the concept of roles. A
role is a set of permissions that determines user access to product functions.
Each Hyperion product provides several default roles tailored to suit various business needs.
Predefined roles from each Hyperion application registered with Shared Services are available
from User Management Console. These roles are used for provisioning. You may also create
additional roles that aggregate the default roles to suit specific requirements. The process of
14 About Hyperion Security
granting users and groups specific access permissions to Hyperion resources is called
provisioning.
Native Directory and configured user directories are sources for user and group information for
the provisioning (authorization) process. You can browse and provision users and groups from
all configured user directories from User Management Console. Provisioning data is stored in
Native Directory. You can also use application-specific aggregated roles created in Native
Directory in the provisioning process.
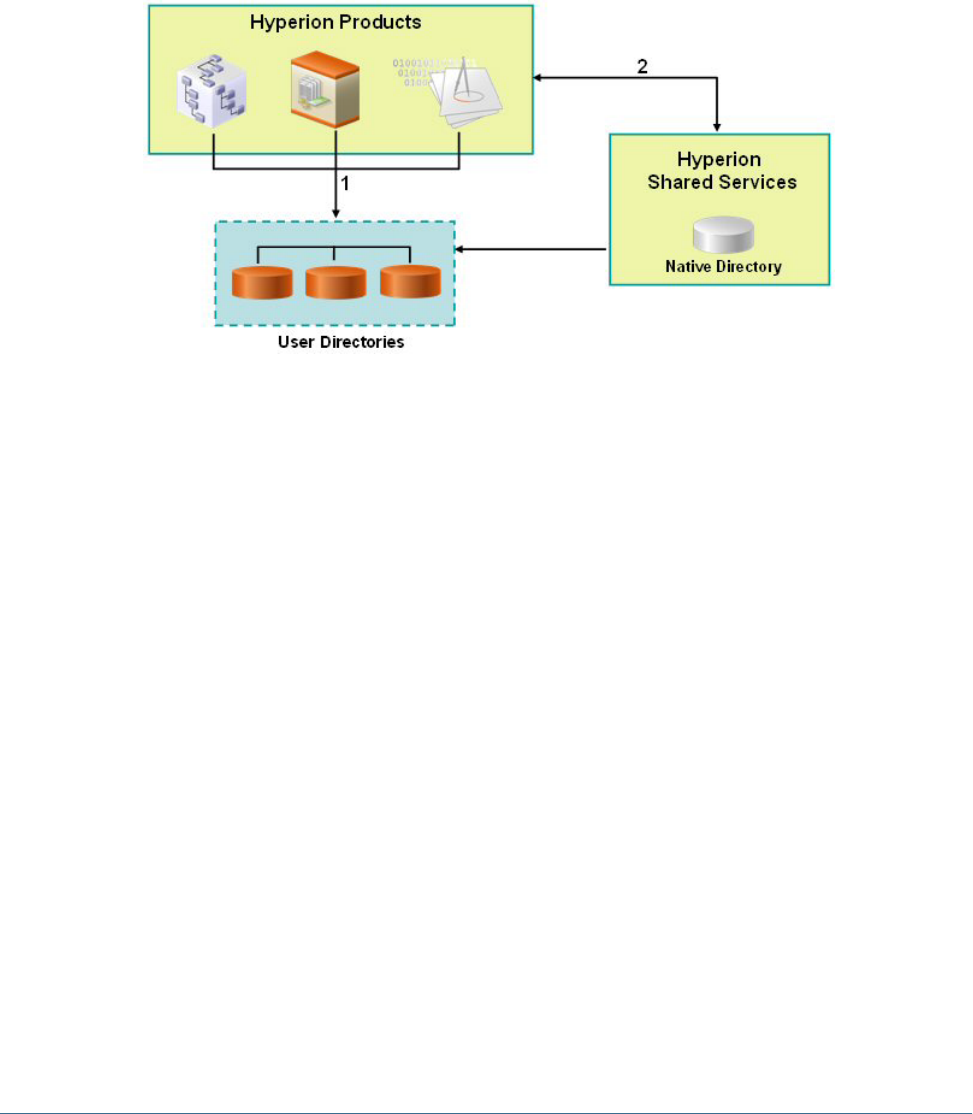
This illustration depicts a broad overview of the authorization process:
1. After a user is authenticated, Hyperion product queries the user directories to determine
the user's groups.
2. Hyperion product uses the group and user information to retrieve the user's provisioning
data from Shared Services. The product uses this data to determine resources that a user can
access.
Product-specific provisioning tasks, such as setting product-specific access control, are
completed from each product. This data is combined with provisioning data to determine
the product access for users.
Role-based provisioning of Hyperion products uses these concepts.
Roles
A role is a construct (similar to access control list) that defines the access permissions granted
to users and groups to perform functions on Hyperion resources. It is a combination of resource
or resource types (what users can access; for example, a report) and actions that users can perform
on the resource (for example, view and edit).
Access to Hyperion application resources is restricted; users can access them only after a role
that provides access is assigned to the user or to the group to which the user belongs. Access
restrictions based on roles enable administrators to control and manage application access.
Provisioning (Role-Based Authorization) 15

Global Roles
Global roles are Shared Services roles that enable users to perform certain tasks within the User
Management Console. See Appendix B, “Shared Services Roles and Permitted Tasks” for a
complete list of Shared Services global roles.
Administrator
The Administrator role provides control over all products that integrate with Shared Services.
It enables more control over security than any other Hyperion product roles and should therefore
be assigned sparingly. Administrators can perform all administrative tasks in User Management
Console and can provision themselves.
This role grants broad access to all applications registered with Shared Services. The
Administrator role is, by default, assigned to the admin Native Directory user, which is the only
user available after you deploy Shared Services. This user account is initially used to create
accounts for other administrators. For example, the Shared Services Administrator assigns other
administrative users either the Directory Manager or Provisioning Manager role (a product-
specific role assigned for individual applications). In turn, these users manage general user access
to applications.
Directory Manager
Users who are assigned the Directory Manager role can create and manage users and groups
within Native Directory.
Do not assign to Directory Managers the Provisioning Manager role because combining these
roles allows Directory Managers to provision themselves. If a user is assigned the Provisioning
Manager role for an Oracle's Hyperion® Essbase® – System 9 application as well as the Directory
Manager role, this user can create a new user, assign the user any role within the Essbase
application, and log in as the new user, thereby granting personal access to the Essbase
application.
The recommended practice is to grant one user the Directory Manager role and another user
the Provisioning Manager role.
Project Manager
Users who are assigned the Project Manager role can create and manage projects within Shared
Services.
LCM Manager
Users who are assigned the LCM Manager role can execute the Artifact Life Cycle Management
Utility to promote artifacts and data across product environments and operating systems.
16 About Hyperion Security

Predefined Roles
Predefined roles are built-in roles in Hyperion products. You cannot delete these roles from the
product. Predefined roles are registered with Shared Services during the application registration
process.
Aggregated Roles
Aggregated roles are custom roles that aggregate multiple product roles within a Hyperion
product. An aggregated role consists of multiple roles, including other aggregated roles. For
example, a Shared Services Administrator or Provisioning Manager can create a role for Planning
that combines the Planner and View User roles into an aggregated role. Aggregating roles can
simplify the administration of products that have a large number of granular roles.
You cannot create an aggregated role that spans products, and you cannot include global Shared
Services roles in aggregated roles. Aggregated roles are also known as custom roles.
Users
User directories store information about the users who can access Hyperion products. Both the
authentication and the authorization processes utilize user information. You can only create
and manage Native Directory users from User Management Console.
Users from all configured user directories are visible from User Management Console. These
users can be individually provisioned to grant access rights on the Hyperion products registered
with Shared Services. Hyperion does not recommend the provisioning of individual users.
Groups
Groups are containers for users or other groups. You can create and manage Native Directory
groups from User Management Console. Groups from all configured user directories are
displayed in User Management Console. You can provision these groups to grant permissions
for Hyperion products registered with Shared Services.
Provisioning (Role-Based Authorization) 17

18 About Hyperion Security

2Setting Up Authentication
In This Chapter
Setting Up Direct Authentication to Hyperion Products ........................................................................19
Setting Up SSO with SAP Enterprise Portal......................................................................................21
Setting Up SSO from SiteMinder .................................................................................................25
Using NTLM to Support SSO......................................................................................................28
Setting Up Direct Authentication to Hyperion Products
The security environment of Hyperion products comprises two complementary layers:
authentication and authorization.
Setting up Hyperion security to authenticate users directly involves several broad procedures.
See details in later sections.
●“Creating Users on the User Directory” on page 19
●“Creating Groups” on page 20
●“Migrating Users and Groups to Shared Services Security” on page 20
●“Installing and Deploying Shared Services” on page 20
●“Identifying User Directories to Shared Services” on page 20
Creating Users on the User Directory
The security environment of Hyperion products requires that user credentials be checked against
a user directory as a part of the authentication process. This requirement mandates that each
Hyperion application user have an account on the user directory. A unique user identifier
(typically the user name) defined on the user directory is the foundation on which Hyperion
application security is built.
In most deployment scenarios, existing user directories (with user accounts) are used to support
user authentication. For information on creating user accounts, see vendor documentation. See
“Creating Users” on page 81 for information on creating Native Directory users.
Setting Up Direct Authentication to Hyperion Products 19

Creating Groups
User accounts on user directories can be granted membership to groups based on common
characteristics such as the user function and geographical location. For example, users can be
categorized into groups such as Staff, Managers, Sales, and Western_Sales based on their function
within the organization. A user can belong to one or more groups on the user directory, which
is an important consideration in facilitating the provisioning process.
The procedures to create groups and assign group membership vary depending on the user
directory being used. For information on creating groups and assigning group membership, see
vendor documentation. See “Managing Native Directory Groups” on page 84 for information
on creating Native Directory groups.
Migrating Users and Groups to Shared Services Security
If you are upgrading Hyperion products from a release that did not support provisioning, you
must migrate users and groups from the products to Shared Services. You can migrate users who
were authenticated through native product security or through an external directory in that
release. Each product has a migration tool that enables you to migrate user, group, and role
information from Hyperion products to Shared Services. For migration information, see the
appropriate product appendix at the end of this guide.
After migrating users, you can provision users or groups as needed. See Chapter 8, “Managing
Provisioning” for details.
Installing and Deploying Shared Services
See Hyperion Shared Services Installation Guide for information about installing Shared Services
and deploying it to an appropriate application server.
Identifying User Directories to Shared Services
The Shared Services installation and deployment process sets up and configures Native Directory
as the default user directory for Hyperion products. Each additional user directory that you use
to support user authentication and SSO must be configured separately using User Management
Console.
During the user directory configuration process, you assign the search order for each user
directory. This order determines the sequence in which the authentication process searches
within configured user directories to locate the user account that matches the user login
credentials. By default, Hyperion application security is configured to terminate the search
process when a matching user account is found. If you are using multiple user directories,
Hyperion recommends that user accounts be normalized across user directories.
Information on configuring user directories:
●“Configuring Oracle Internet Directory, MSAD, and Other LDAP-Enabled User
Directories” on page 40
20 Setting Up Authentication

●“Configuring an SAP Provider” on page 46
●“Configuring an NTLM User Directory” on page 49
Setting Up SSO with SAP Enterprise Portal
Hyperion products handle SSO to SAP Enterprise Portal by issuing an SAP logon ticket. This
action enables users who log in to Hyperion products to navigate seamlessly to SAP applications.
The illustrated concept:
1. When a user logs in to Hyperion products, the Security API implemented on the product
authenticates the user against configured user directories, including Native Directory.
Hyperion product issues a Hyperion logon token, which enables SSO to Hyperion products.
The Hyperion logon token contains an SAP logon ticket.
Note:
For SSO with SAP to work, you must configure SAP as valid provider on Shared Services.
2. When the user subsequently navigates to the SAP system or uses an SAP data source, the
SAP logon ticket contained in the Hyperion token is passed to SAP to enable SSO. At this
point, the SAP system assumes the responsibility to validate the credentials in the SAP logon
ticket.
Hyperion products handle SSO from SAP Enterprise Portal by accepting an SAP logon ticket.
This action enables users who log in to SAP Enterprise Portal to navigate seamlessly between
SAP and Hyperion products. The illustrated concept:
Setting Up SSO with SAP Enterprise Portal 21
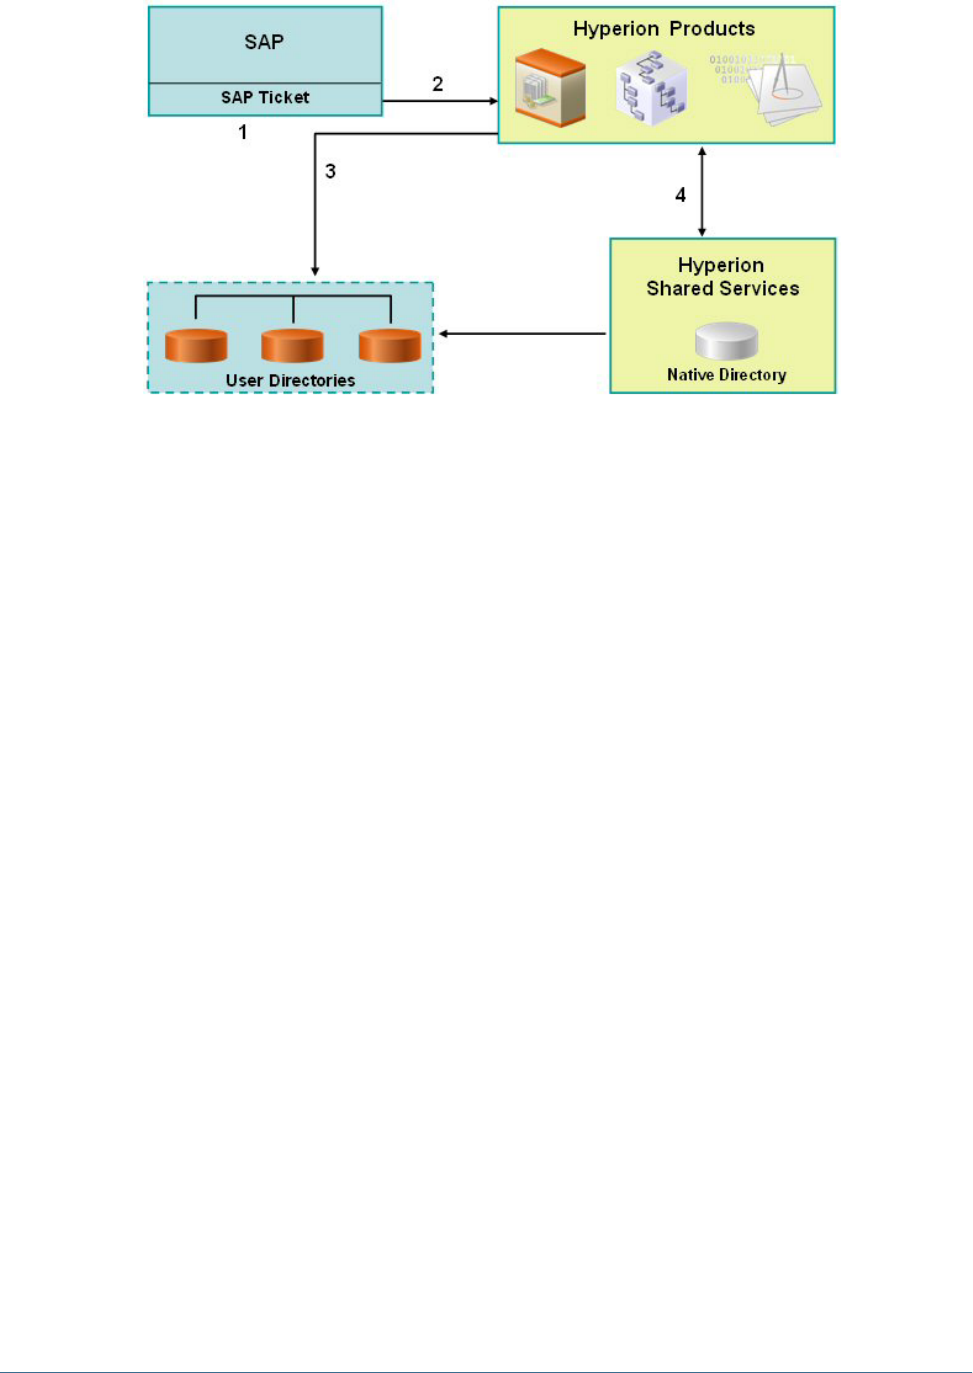
1. When a user logs in to SAP Enterprise Portal, SAP authenticates the user against the SAP
provider and issues an SAP logon ticket. SSO to SAP is enabled at this time.
2. The user navigates to a Hyperion product. The SAP logon ticket is passed to the Hyperion
product, which decrypts the SAP logon ticket using a SAP certificate stored on the Shared
Services server machine to retrieve the user name.
3. Accepting the user name, retrieved from the SAP ticket, as a valid, the Hyperion product
queries user directories to determine the user's groups. The SAP provider must be configured
as a user directory in Shared Services for this process to work.
4. Using the group information, Hyperion product gets the provisioning information for the
user from Shared Services.
Assumptions in both scenarios:
●If using a non-SAP corporate directory, the corporate user directory used by SAP Enterprise
Portal is supported by Shared Services. See Hyperion Installation Start Here for a list of
supported user directories.
●Users accounts and groups are already defined on the corporate user directory.
●The corporate user directories are configured to work with Shared Services.
●Users and groups are provisioned to access Hyperion products.
Nested SAP Groups
After configuring an SAP user directory, available SAP users and groups are displayed in User
Management Console. Shared Services considers the SAP roles to be the equivalents of groups
created by any corporate directory server. Each role from the SAP user directory is displayed as
a distinct group in User Management Console. Shared Services, however, does not retrieve the
relationships that exist between simple and composite roles within the SAP user directory. If
needed, nested groups can be created in Native Directory to mimic the relationship that existed
between the simple and composite roles in the SAP user directory.
22 Setting Up Authentication
Inheritance Policy for Nested Groups
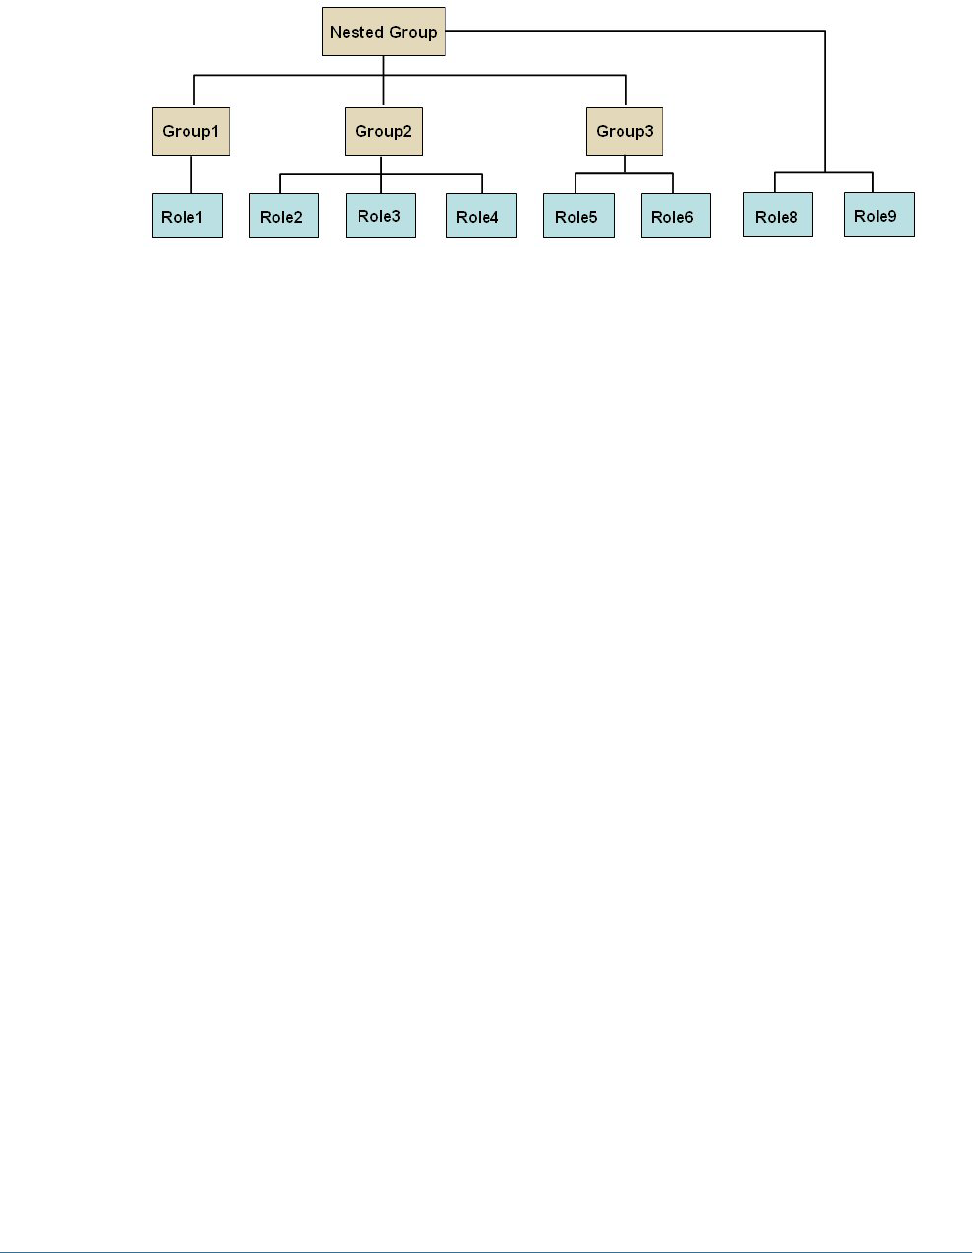
If you use nested groups from Native Directory to mimic nested SAP groups for provisioning,
the component groups inherit the roles assigned to the nested group. The illustrated concept:
In addition to the roles assigned directly to it, each component role (for example, Group2)
inherits all the roles assigned to the nested group (Role8 and Role9 in the illustration). For
example, the role assignment of Group1 in the illustration is Role1, Role8, and Role9. The nested
group does not inherit the groups assigned to component groups.
Deployment Locations
Deployment location conventions:
●<
Hyperion_Home
> denotes the root directory where Hyperion products are installed. The
location of this directory is specified during the installation process. For example:
C:\Hyperion (Windows)
/vol1/Hyperion (UNIX)
●<
HSS_Home
> denotes the Shared Services root directory. For example:
C:\Hyperion\deployments\<
App_Server_Name
>\SharedServices9 (Windows)
/vol1/Hyperion/deployments/<
App_Server_Name
>/SharedServices9 (UNIX)
Prerequisites
●All SAP systems within the SAP landscape must be set up for single sign-on with the SAP
login ticket. User names must be normalized across the SAP landscape so that a user name
in one SAP system refers to the same user across all SAP systems. See the SAP documentation
for more information.
●Copy or download the SAP JCo binaries (.dll files for Windows and shared libraries for
UNIX) into
<Hyperion_Home>
/common/SAP/bin directory. For example:
/vol1/Hyperion/common/SAP/bin(UNIX)
C:\Hyperion\common\SAP\bin (Windows).
These binaries are available in your SAP distribution. Registered SAP users may also
download them from the SAP Web site https://service.sap.com/connectors.
Setting Up SSO with SAP Enterprise Portal 23

●Copy or download the SAP JCo archives (.jar files) into
<Hyperion_Home>
/common/
SAP/lib directory. For example:
/vol1/Hyperion/common/SAP/lib (UNIX)
C:\Hyperion\common\SAP\lib (Windows)
These binaries are available in your SAP distribution. Registered SAP users may also
download them from the SAP Web site https://service.sap.com/connectors.
●Copy or download the following SAP libraries into
<Hyperion_Home>
/common/SAP/
lib directory. For example,
/vol1/Hyperion/common/SAP/lib (UNIX)
C:\Hyperion\common\SAP\lib (Windows)
These libraries are required to verify the SAP SSO logon ticket provided to Hyperion
products. You can extract these libraries from the file system of any SAP J2EE Engine 6.30
or later release. Or extract them from Enterprise Portal EP60 SP2 or later by searching
through the SDA files containing libraries. This step is required only if Hyperion products
are plugged into SAP Enterprise Portal.
❍com.sap.security.core.jar
❍com.sap.security.api.jar
❍sapjco.jar
❍sap.logging.jar
❍iaik_jce.jar
❍iaik_jce_export.jar (if using the export version of the IAIK-JCE libraries)
●Expand the contents of each of the SAP jar files by running the explodejar.bat
(Windows) or explodejar.sh (UNIX) file available in the
<Hyperion_Home>
/common/
SAP/lib directory.
●Using User Management Console, configure the SAP provider for Shared Services. See
“Configuring an SAP Provider” on page 46 for detailed information.
●If you are providing SSO to Hyperion products from SAP Enterprise Portal, install the SAP
Digital Certificate (SAP X509 certificate) in a convenient location. Hyperion recommends
that this certificate be installed in the following directory where the CSS.xml file is stored:
<HSS_Home>/config. For Example:
C:\Hyperion\deployments\WebLogic9\SharedServices9\config (Windows)
/vol1/Hyperion/deployments/WebLogic9/SharedServices9/config (UNIX)
●Using User Management Console, provision SAP users and groups to provide them
appropriate access rights to Hyperion products. See Chapter 8, “Managing Provisioning”
for detailed information.
24 Setting Up Authentication
Setting Up SSO from SiteMinder
Hyperion products can be integrated with Web access management solutions such as Netegrity
SiteMinder to provide SSO to Hyperion products. Where SSO from SiteMinder is accepted,
Hyperion products trust the authentication information sent by SiteMinder regarding the
protected resources on the user directory. The illustrated concept:
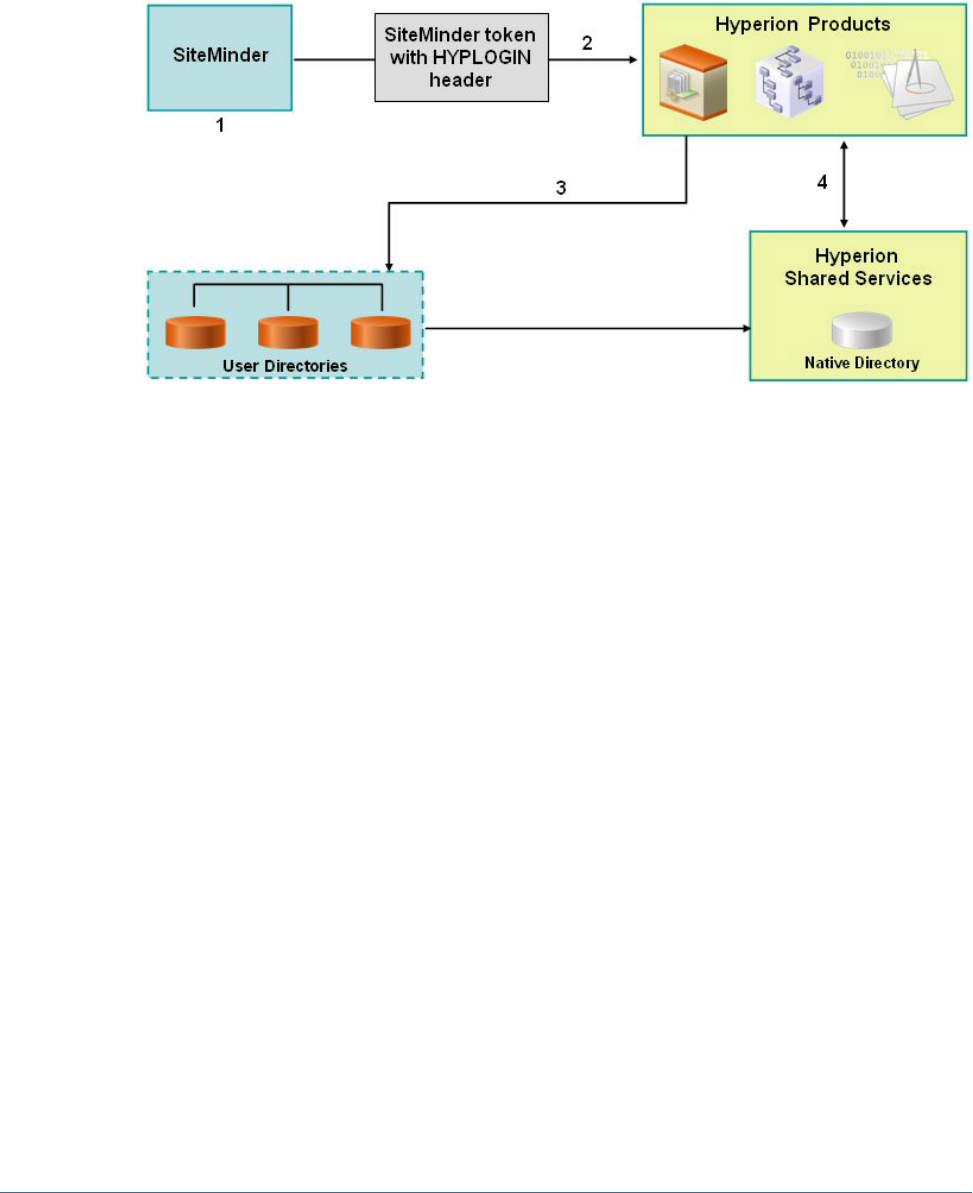
1. When a user logs in to SiteMinder to access Hyperion products, SiteMinder presents a login
screen. SiteMinder forwards the user credentials to the SiteMinder Policy Server, which
authenticates users against configured user directories.
2. If the user is authenticated, the SiteMinder Policy Server grants access to Hyperion products
and passes a SiteMinder token that has HYPLOGIN HTTP header appended to it.
HYPLOGIN is configured to SM_USERLOGINNAME parameter in SiteMinder.
Note:
In SiteMinder Version 6, configure HYPLOGIN to use SMUSER parameter. HYPLOGIN is a
header that you must create to support SiteMinder integration with Hyperion products. See
SiteMinder documentation for information on configuring HYPLOGIN HTTP header to
carry the user name of the authenticated user.
3. The Security API implemented on the Hyperion product parses the HYPLOGIN HTTP header
and validates the user against the user directories configured on Shared Services.
4. Hyperion product checks Shared Services for the user's provisioning information. Based on
the provisioning information, the Hyperion product provides access to the user.
To enable SSO, SiteMinder and Shared Services must be configured to use the same set of user
directories. Also, the user directories configured in Shared Services must be set up to support
security agent for single sign on. See “Setting Global Parameters” on page 57 for details.
The SiteMinder–enabled SSO, general overview:
Setting Up SSO from SiteMinder 25
The following SiteMinder security agents are tested and supported for SSO with Hyperion
products:
●SiteMinder Policy Server 5.5 SP 2
●SiteMinder Web Agent 5.5 SP 2
Note:
The corporate user directories configured with Shared Services must be trusted when SSO from
SiteMinder is enabled. This is because Shared Services does not store a password in the token
when a security agent is used.
Special Considerations
SiteMinder is a Web only solution. Desktop applications and their addins (for example,
Microsoft Excel and Report Designer) cannot use authentication through SiteMinder.
Hyperion products are supported only on NTLM and LDAP-enabled user directories (including
MSAD).
26 Setting Up Authentication

Configuring the SiteMinder Policy Server
A SiteMinder administrator must configure the policy server to enable SSO to Hyperion
products.
The configuration process:
●Setting up protection for the Web resources of Hyperion products.
●Configuring a response that adds a custom HTTP header to make the user login name
available to Hyperion applications. The header must include the parameter HYPLOGIN and
must contain the login name of the authenticated user.
See the “Responses and Response Groups” topic in the Netegrity Policy Design Guide for detailed
information. For example, if you use cn from an LDAP–enabled user directory as the login name
attribute in the configuration file, the HYPLOGIN parameter should carry the value of the cn
attribute, which is the login name of the authenticated user. SiteMinder administrators can also
configure the header to SM_USERLOGINNAME (SMUSER for SiteMinder version 6), the user name
specified by the user during logon.
Configuring the SiteMinder Web Agent
The Web agent is installed on a Web server that intercepts requests for Hyperion application
Web resources, such as JSPs, ASPs, and HTML files on the application server. If these Web
resources are protected, the Web agent issues a challenge to unauthenticated users. When a user
is authenticated, the policy server adds HYPLOGIN, which carries the login name of the
authenticated user. Thereafter, the HTTP request is passed on to the Web resources of the
Hyperion application, and the login name is extracted from headers.
SiteMinder supports SSO across Hyperion products running on heterogeneous Web server
platforms. If Hyperion products use different Web servers, you must ensure that the SiteMinder
cookie can be passed among Web servers within the same domain. You do this by specifying the
appropriate Hyperion application domain as the value of the Cookiedomain property in the
WebAgent.conf file of each Web server.
See the “Configuring Web Agents” chapter in the Netegrity SiteMinder Agent Guide.
Note:
Because Shared Services uses basic authentication to protect its content, the Web server that
intercepts requests to Shared Services should enable basic authentication to support SSO with
SiteMinder.
Enabling SiteMinder Authentication in Shared Services
Integration with SiteMinder requires that you enable SiteMinder Authentication in Shared
Services. This can be done from User Management Console or by editing the CSS.xml file. This
file is located in <
HSS_Home
>/config. For example:
C:\Hyperion\deployments\WebLogic9\SharedServices9\config (Windows)
Setting Up SSO from SiteMinder 27

/vol1/Hyperion/deployments/WebLogic9/SharedServices9/config (UNIX)
➤To enable SiteMinder authentication:
1In Shared Services, configure the user directories that SiteMinder use to authenticate users. See the following
topics:
●“Configuring Oracle Internet Directory, MSAD, and Other LDAP-Enabled User
Directories” on page 40
●“Configuring an NTLM User Directory” on page 49
2Select the Support for Security Agent for Single Sign-oncheck box to specify that the user directories are
used to support SSO from security agents such as SiteMinder. See “Setting Global Parameters” on page
57.
Other Procedures
You must perform these tasks, if not already completed:
●Using User Management Console, configure the corporate directories used by SiteMinder.
See Chapter 4, “Configuring User Directories.”
●Using User Management Console, provision the users and groups to grant appropriate
access to Hyperion products. See Chapter 8, “Managing Provisioning.”
Using NTLM to Support SSO
Shared Services allows you to configure Windows NT LAN Manager (NTLM) as a user directory
to support SSO. Refer to “Configuring an NTLM User Directory” on page 49 for information
on configuring the NTLM user directory.
Under these conditions, you must perform prerequisite steps to support SSO using NTLM:
●NTLM user directory is to be used to authenticate and provision users where Shared Services
and Hyperion products are running in a UNIX environment. In this scenario, Hyperion
Remote Authentication Module must be deployed on the Windows domain that contains
the user accounts.
●Shared Services and Hyperion products are running in a Windows environment, but users
are in Windows NTLM domains that are not trusted on the domain where the Shared
Services host machine is installed. The prerequisite for this scenario is that you deploy
Hyperion Remote Authentication Module on each domain that is not trusted by the domain
where Shared Services host machine is installed.
Do not implement Hyperion Remote Authentication Module if all users belong to the NTLM
domain where the Shared Services host machine is installed or if a trust relationship is established
between the domain where the Shared Services host machine is installed and the NTLM domains
to which users belong.
28 Setting Up Authentication
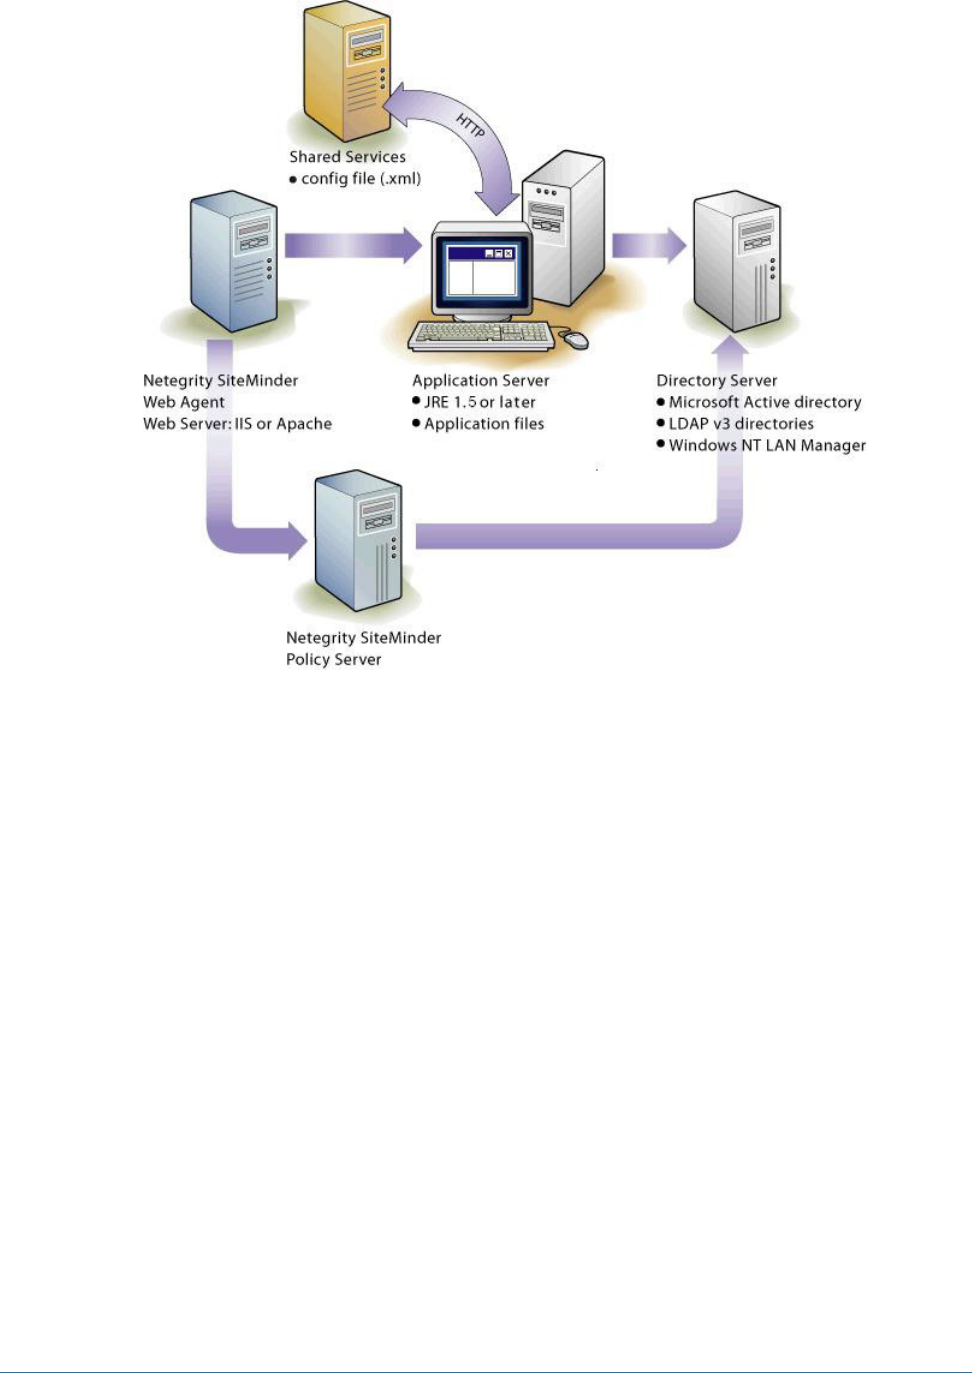
NTLM with UNIX Application Environments
The following illustration depicts how the Hyperion Remote Authentication Module enables
communication between NTLM and Shared Services running in a UNIX environment.
The Shared Services configuration file (CSS.xml) resides on the application server, as do the
Hyperion application binaries. For NTLM connectivity, you also need NTLM support library
file (css-9_3_0.dll) on the machine that hosts Hyperion Remote Authentication Module in
the NTLM domain.
The NTLM Primary Domain Controller and the Hyperion Remote Authentication Module can
be on a Windows 2000 or Windows 2003 server. Hyperion does not recommend, however, that
you combine the Hyperion Remote Authentication Module with the NTLM Primary Domain
Controller on the same server. The Hyperion Remote Authentication Module host machine
needs to be in the same domain as the NTLM Primary Domain Controller.
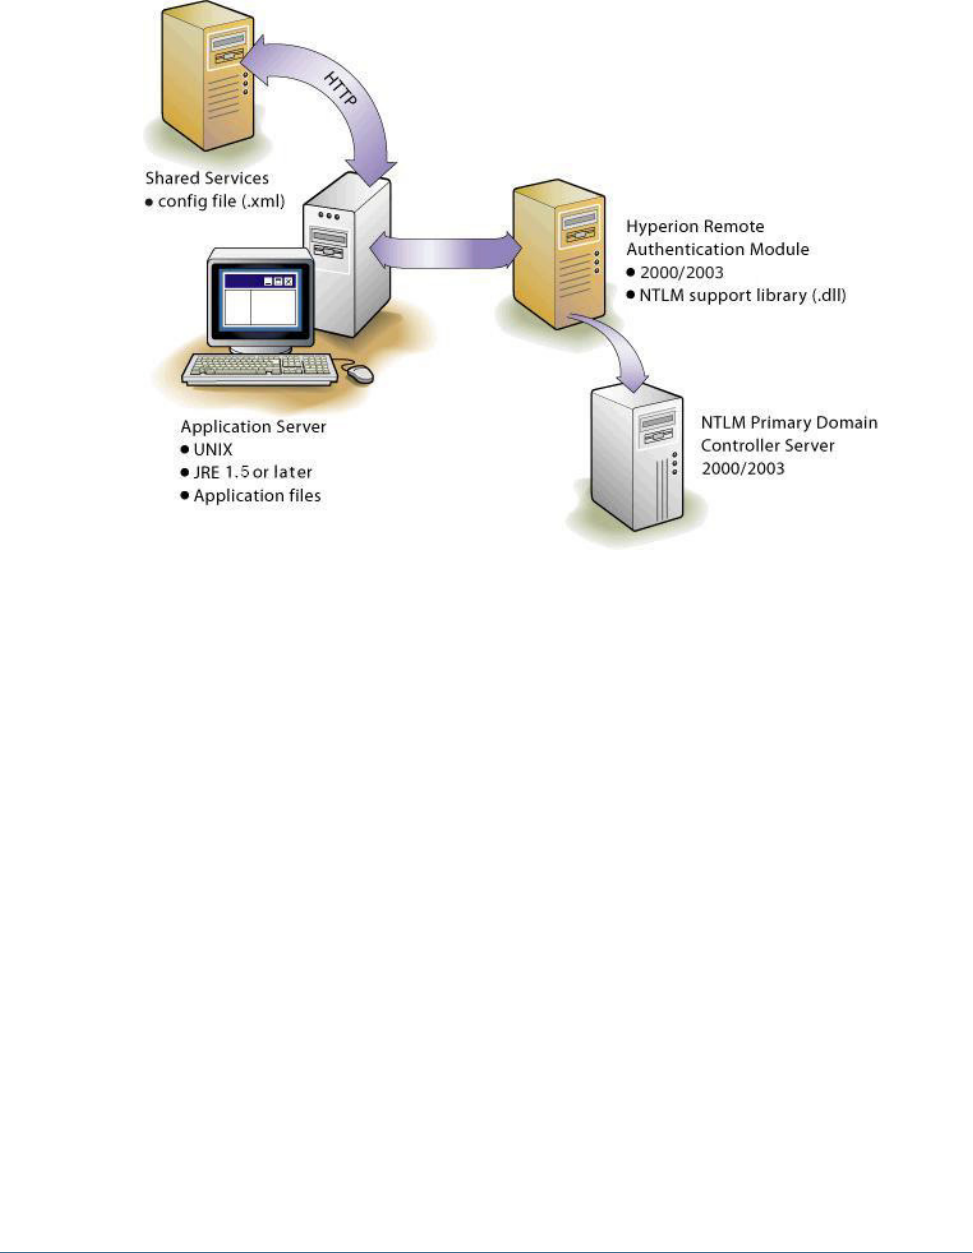
Support for Multiple NTLM Domains
Hyperion Remote Authentication Module enables a Hyperion product to authenticate users
belonging to other NTLM domains that are not trusted by the domain on which Shared Services
is installed.
The following illustration depicts how users spread across multiple NTLM domains can be given
access to Hyperion products deployed in a Windows environment:
Using NTLM to Support SSO 29
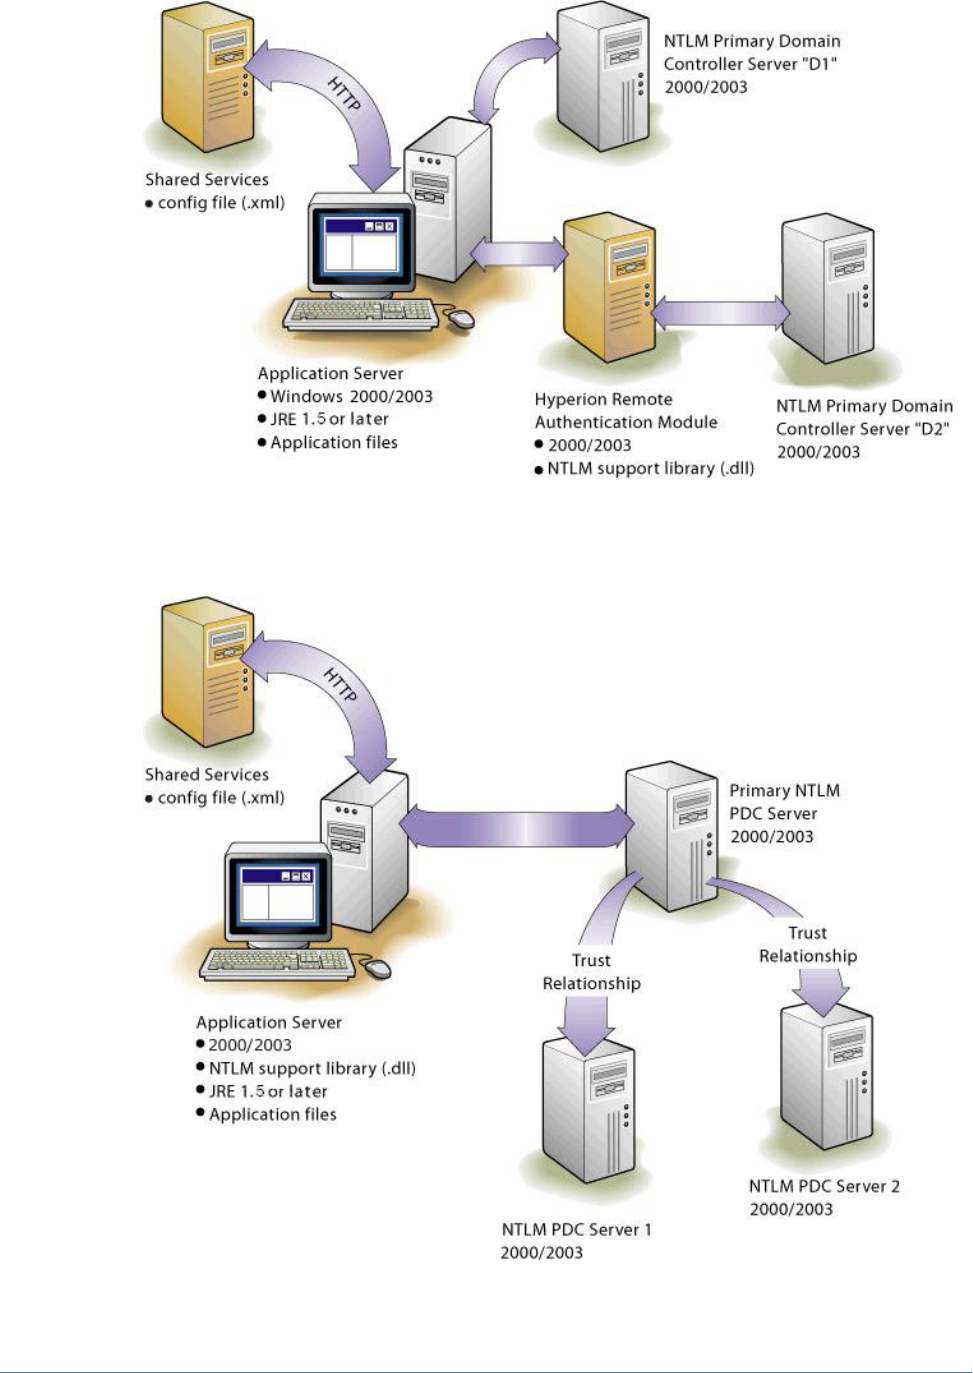
Without the Hyperion Remote Authentication Module, the only way to use multiple NTLM
domains for Hyperion products is to establish trust relationships between the Shared Services
host machine's domain and the NTLM domains where user accounts are available.
30 Setting Up Authentication


32 Setting Up Authentication

3User Management Console
In This Chapter
Launching User Management Console...........................................................................................33
Overview of User Management Console .........................................................................................34
Navigating in User Management Console .......................................................................................34
Searching for Users, Groups, Roles, and Delegated Lists......................................................................34
Launching User Management Console
Launch User Management Console using one of the following methods:
●Using a browser and connecting to the User Management Console URL
●On Windows, navigating Start > All Programs > Hyperion > Foundation
Services > User Management Console
●From a Hyperion product interface
➤To launch User Management Console by connecting to a URL:
1Using a browser, access the following URL:
http://<server_name>:<port_number>
/interop
In the URL,
<server_name>
indicates the name of the computer where the application server
that hosts Shared Services is running and
<port_number>
indicates the server port that Shared
Services is using; for example, http://myserver:58080/interop.
Note:
Pop-up blockers may prevent User Management Console from opening.
2On the Logon screen, type your user name and password.
Initially, the only user who can access User Management Console is admin (default password
for admin is password).
3Click Log On.
Note:
Valid SAP users may get a CSSAuthenticationException error message during log on if the
SAP account is locked. Contact your SAP Administrator to unlock the account.
Launching User Management Console 33

If you receive Java Virtual Machine (JVM) errors in User Management Console while using
Microsoft Internet Explorer, ensure that your Internet Explorer installation includes Microsoft
XML parser (MSXML) version 4. MSXML is bundled with Internet Explorer 6.0.
To verify that you have the correct MSXML, check that the following file exists:
c:\winnt\system32\msxml4.dll
If this file is missing, install Internet Explorer 6.0 or later.
Overview of User Management Console
User Management Console comprises an Object Palette and task tabs. When you log in for the
first time, the User Management Console displays the Object Palette and a Browse tab.
The Object Palette is a navigation frame where you can choose objects (such as, user directories,
users, groups, projects, and applications). Typically, the details of your current selection in the
Object Palette are displayed in the Browse tab. Additional task tabs open as needed depending
on the task that you perform; for example, a Report tab when you generate a report, or a
Configure tab when you configure a user directory.
Depending on the current configuration, User Management Console lists your existing objects
—user directories, projects, and unassigned applications—on the Object Palette. You can
expand these object listings to view details. For example, you may expand the User Directories
object to view a list of all currently configured user directories. You may also search configured
user directories for users and groups.
A context-sensitive menu, accessible by right-clicking an object, is associated with some objects
on the Object Palette.
Navigating in User Management Console
When performing actions on objects in the Object Palette, you can right-click an object to access
a context-sensitive menu. These menu options change dynamically, depending on what you
select. The commands displayed on the right-click menu are also available on a menu from the
menu bar. Buttons representing currently enabled menu options are displayed on the toolbar.
Note:
Because Native Directory is administered from User Management Console, some menu options
available in the context-sensitive menu for Native Directory are not available for other user
directories.
Searching for Users, Groups, Roles, and Delegated Lists
User Management Console enables searching for users and groups from configured user
directories and for application roles registered with Native Directory.
34 User Management Console

When searching for users in Native Directory, you can search for all users, active users, or inactive
users. Search boxes that are displayed on the Browse tab reflect the search context based on the
selection in the Object Palette.
➤To search for users, groups, roles or delegated lists:
1In the Object Palette, expand User Directories.
2Expand the user directory to search. Roles are available only in Native Directory.
3To search for users:
a. Right-click Users.
b. Select a search context (All, Active, or Inactive).
Appropriate search boxes are displayed on the Browse tab.
Note:
You can select a search context only if you are searching within Native Directory.
c. Enter the search string and click Search. Use an asterisk (*) as the wildcard in pattern
searches. Alternatively, click Show All to list all users.
A list of users is displayed on the Browse tab.
4To search for groups or roles:
a. Select Groups or Roles.
Appropriate search boxes are displayed on the Browse tab.
Note:
Shared Services considers Oracle and SQL Server roles as the equivalents of groups in user
directories. Oracle roles can contain other roles creating a hierarchy of roles. Shared
Services does not display the relationships between database roles in the search results but
honors them during the provisioning process. SQL Server roles cannot be nested. Because
DB2 does not support roles, Shared Services does not display groups if you select a DB2
database provider.
b. For Name, type the Search string and click Search. Use an asterisk (*) as the wildcard in
pattern searches. Alternatively, click Show All to list all groups or roles.
A list of groups or roles is displayed on the Browse tab.
5To search for delegated lists:
a. Select Delegated Lists.
Appropriate search boxes are displayed on the Browse tab.
b. For List Name, type the Search string and click Search. Use an asterisk (*) as the wildcard
in pattern searches. Alternatively, click Show All to list all lists.
A list of matching delegated lists is displayed on the Browse tab.
Searching for Users, Groups, Roles, and Delegated Lists 35

36 User Management Console

4Configuring User Directories
In This Chapter
Operations Related to User Directory Configuration............................................................................37
Using the Unique Identity Attribute to Handle Inter-OU Moves in LDAP-Enabled User Directories.........................38
Configuring Oracle Internet Directory, MSAD, and Other LDAP-Enabled User Directories...................................40
Configuring an SAP Provider ......................................................................................................46
Configuring an NTLM User Directory..............................................................................................49
Configuring Relational Databases as User Directories .........................................................................50
Testing User Directory Connections ..............................................................................................53
Editing User Directory Settings....................................................................................................53
Deleting User Directory Configurations...........................................................................................54
Managing User Directory Search Order ..........................................................................................54
Setting Global Parameters ........................................................................................................57
Overriding Cache Refresh Interval for MSAD and other LDAP-Enabled User Directories ....................................58
Setting Timeout to Resolve SAP Keystore File...................................................................................59
Connection Pooling ................................................................................................................59
Using Special Characters..........................................................................................................61
Operations Related to User Directory Configuration
Native Directory is configured automatically when you install and deploy Shared Services. You
can configure external user directories to support SSO and authorization.
From User Management Console, you can perform several tasks related to configuring and
managing user directories. These topics provide instructions:
●Configuring user directories
❍“Configuring Oracle Internet Directory, MSAD, and Other LDAP-Enabled User
Directories” on page 40
❍“Configuring an SAP Provider” on page 46
❍“Configuring an NTLM User Directory” on page 49
❍“Configuring Relational Databases as User Directories” on page 50
●“Testing User Directory Connections” on page 53
●“Editing User Directory Settings” on page 53
Operations Related to User Directory Configuration 37

●“Deleting User Directory Configurations” on page 54
●“Managing User Directory Search Order” on page 54
●“Setting Global Parameters” on page 57
Using the Unique Identity Attribute to Handle Inter-OU Moves in
LDAP-Enabled User Directories
Native Directory, the default user directory for Hyperion products, maintains a link to
provisioned users and groups defined in external user directories. When the following actions
take place in an LDAP-based user directory including MSAD, these links are broken, creating
stale data in Native Directory and causing loss of access to Hyperionapplications.
●Users and groups are moved across Organizational Units (OU).
●Multiple users or groups are assigned identical common name (CN).
●CN of provisioned users or groups are modified.
Shared Services resolves this issue by using a unique identity attribute that identifies user
directory users and groups without reference to the location of their accounts.
Caution!
Before migrating to the unique identity attribute, you must clean the stale data, if any, in Native
Directory by running the Update Native Directory Utility utility. See Chapter 9, “Using the
Update Native Directory Utility to Clean Stale Native Directory Data” for detailed information.
Support for inter-OU moves can be implemented while you configure LDAP-enabled user
directories (see “Configuring Oracle Internet Directory, MSAD, and Other LDAP-Enabled User
Directories” on page 40).
Planning the Migration to the Unique Identity Attribute
You must migrate users and groups to the new unique identity attribute only if you face any of
the following scenarios in your MSAD or other LDAP-based user directories, which create
broken links and stale data in Native Directory.
●You moved users and groups across OUs.
●You have multiple users or groups with identical CN.
●You modified the CN of users or groups.
Because migrating to the new unique identity attribute affects all Hyperion products, plan the
migration to minimize application downtime.
38 Configuring User Directories

Back Up Native Directory and Hyperion Product Repositories
After migrating users and groups to use the new identity attribute, you cannot revert to the
previously used identity attribute. Before starting the migration, create backups of Native
Directory database and the Hyperion product databases that store user and group information.
●Native Directory repository
●Shared Services repository
●Essbase (security file)
●Oracle's Hyperion® Planning – System 9 repository
●Oracle's Hyperion® Financial Management – System 9 repository
●Oracle's Hyperion® Reporting and Analysis – System 9 repository
Migration Sequence
Before migrating to the unique identity attribute, run the Update Native Directory Utility if
Native Directorycontain stale data. See Chapter 9, “Using the Update Native Directory Utility
to Clean Stale Native Directory Data.”
Begin by migrating Shared Services users and groups to the unique identity attribute. If you use
Essbase and Planning, migrate Essbase users and groups, and then migrate Planning users and
groups.
You can migrate Financial Management and Reporting and Analysis users and groups anytime
after migrating Shared Services users and groups.
See “Product-Specific Updates” on page 128 for more information.
Behavior During Migration
After you migrate Shared Services users and groups to the unique identity attribute,Hyperion
products stop working until the user and group information contained in product-specific
repositories is updated to reflect the unique identity attribute.
Shared Services and Hyperion product migration to the unique identity attribute can take
considerable time, depending on the number of users and groups involved. Because Hyperion
products will not be available during this time, Hyperion recommends that you schedule in a
way that minimizes downtime.
Important Considerations When Using the Unique Identity Attribute
●The unique identity attribute can be set only for MSAD and other LDAP-enabled user
directories.
●For migration to work, all similar user directories configured on Shared Services must be
migrated to the new unique identity attribute. All MSAD user directory configurations must
be updated with the unique identity attribute before Shared Services can migrate MSAD
users and groups to the new attribute. Similarly, the configuration of all LDAP-enabled user
Using the Unique Identity Attribute to Handle Inter-OU Moves in LDAP-Enabled User Directories 39

directories other than MSAD (SunONE, IBM Directory Server, Novell eDirectory, and
custom user directories) must be updated to the new identity attribute before Shared Services
can migrate users and groups from these user directories to the new attribute.
For example, assume that three MSAD user directories are configured on Shared Services.
Two are configured to use the new identity attribute ObjectGUID, and the third is
configured to use the old identity attribute (DN). In this scenario, users and groups are not
migrated until the third configuration also uses a unique attribute other than DN.
●Reverse migration is not supported. After migrating to the new unique identity attribute,
you cannot return to the previous identity attribute (DN).
Hyperion recommends that you back up Native Directory database before migrating to the
new unique identity attribute. If you return to DN as the identity attribute, you can restore
data from the backup.
●If your Release 9.2.x user directory configuration uses an attribute other than DN, you must
upgrade to Shared Services Release 9.3.1.
●Do not migrate to the unique identity attribute by using the Update Native Directory Utility
if you changed the attribute identified as loginAttribute (using the Login field of the
User Configuration screen or by editing CSS.xml). If you run the utility, provisioning data
of the users whose accounts are defined on the user directory for which the
loginAttribute is changed is deleted from Native Directory. You cannot recover the
deleted data; however, you can restore it from the latest backup.
Configuring Oracle Internet Directory, MSAD, and Other LDAP-
Enabled User Directories
Use the procedures in this section to configure any LDAP-enabled corporate user directory, such
as Oracle Internet Directory, MSAD, Sun Java System Directory Server, IBM Tivoli Directory
Server, or a custom user directory.
Note:
Existing Oracle Virtual Directories that are configured to use a database can be configured in
Shared Services as external LDAP providers.
➤To configure Oracle Internet Directory, MSAD and other LDAP-enabled user directories:
1Launch User Management Console, as explained in “Launching User Management Console” on page 33.
2Select Administration > Configure User Directories.
The Defined User Directories screen opens. This screen lists all user directories, including Native
Directory, that are already configured.
3Click Add.
4In Directory Type, select an option:
40 Configuring User Directories
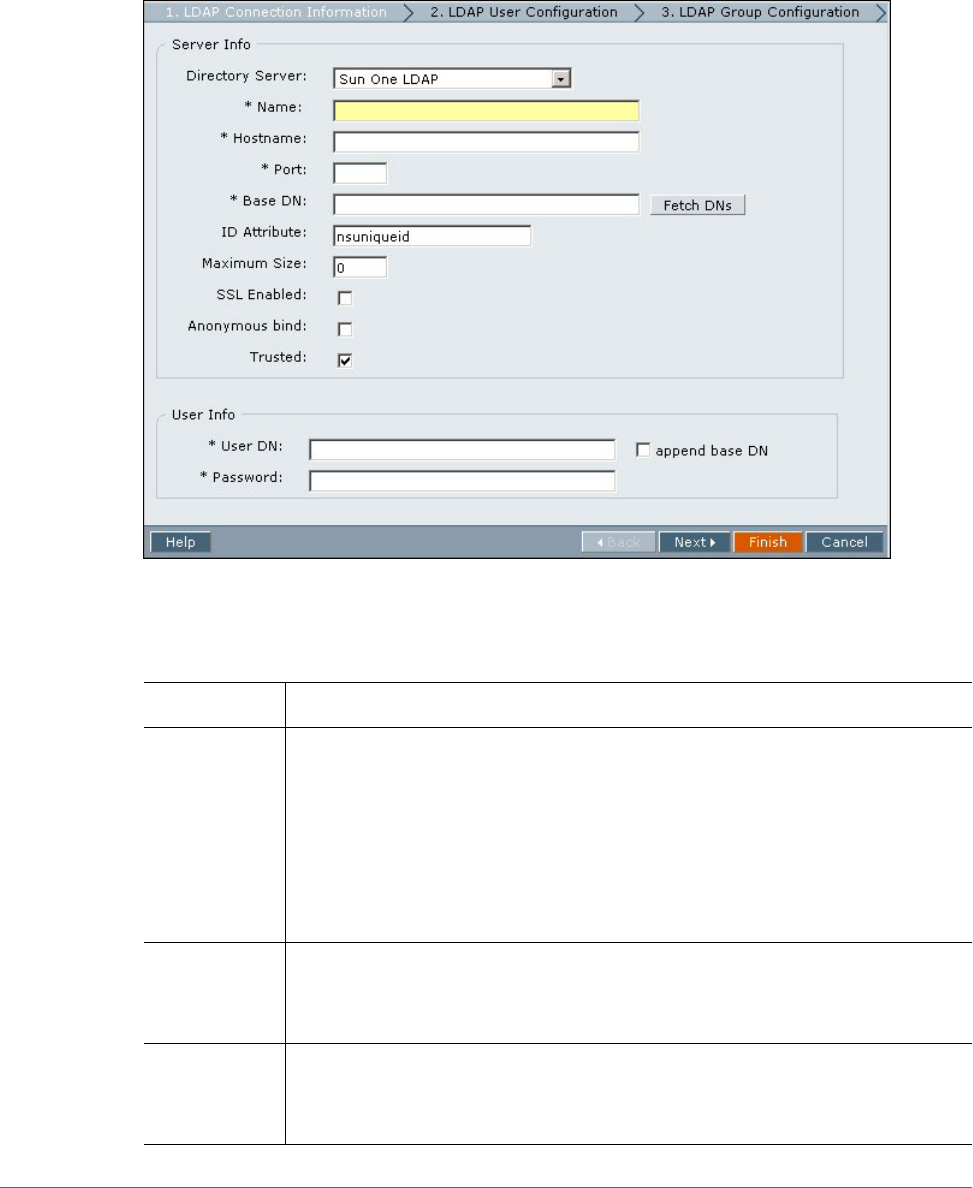
●Lightweight Directory Access Protocol (LDAP) to configure an LDAP-enabled user
directory other than MSAD.
●Microsoft Active Directory (MSAD) to configure MSAD.
5Click Next.
The Connection Information screen for the selected user directory type opens.
6Enter the required parameters.
Table 1 Connection Information Screen
Label Description
Directory Server The user directory product you are using. Select Other if you are using an LDAP Version 2 (or
later) product other than those listed.
The ID Attribute value changes to the recommended unique identity attribute for the selected
product.
Note: To configure an existing Oracle Virtual Directory that is configured with an underlying
database, choose Other.
Example: Oracle Internet Directory
Name A descriptive name for the user directory. Used to identify a specific user directory if multiple user
directories are configured.
Example: MY_OID
Host Name Name of the server that hosts the user directory. Use the fully qualified domain name if the user
directory is to be used to support SSO from SiteMinder.
Example: MyServer
Configuring Oracle Internet Directory, MSAD, and Other LDAP-Enabled User Directories 41

Label Description
Port The server port number where the user directory is running.
Example: 389
Base DN The distinguished name (DN) of the container in the user directory hierarchy where the search for
users and groups should begin. You can also use the Fetch DNs button to list available Base DNs
and then select the appropriate Base DN from the list.
See “Using Special Characters” on page 61 for restrictions on the use of special characters.
Hyperion recommends that you be as specific as possible while identifying the Base DN.
Example: dc=example,dc=com
ID Attribute The attribute that carries the identity of the user. The recommended value of this attribute, which
must uniquely identify a user in the user directory, is automatically set for Oracle Internet Directory
orclguid, SunONE (nsuniqueid), IBM Directory Server (Ibm-entryUuid), Novell
eDirectory (GUID), and MSAD (ObjectGUID). You may change the default value if necessary.
See “Important Considerations When Using the Unique Identity Attribute” on page 39.
Maximum Size Maximum number of results that a search can return.
For LDAP-enabled user directories other than MSAD, leave this blank to retrieve all users and
groups that meet the search criteria. The maximum size entered in this screen is constrained by
the user directory settings.
For MSAD, set this value to 0 to retrieve all users and groups that meet the search criteria.
SSL Enabled The check box that enables the use of Secure Socket Layer (SSL) for communication with this
user directory.
Anonymous Bind The check box to indicate that Shared Services can bind anonymously to the user directory to
search for users and groups. If this option is not selected, you must specify in the User DN an
account with sufficient access permissions to search the directory where user information is stored.
Oracle Internet Directory connections do not support anonymous binds.
Note: Hyperion recommends that you do not bind anonymously with the user directory.
Trusted The check box to indicate that this provider is a trusted source. User credentials from trusted
sources are not validated during SSO. If this option is not set, the user credentials are validated
every time the user requests SSO to a different Hyperion product.
User DN This box is disabled if the Anonymous bind option is selected.
The user account that Shared Services should use to establish a connection with the user directory.
Typically, for LDAP-enabled user directories other than MSAD, you use the Directory Manager
account cn=Directory Manager for this purpose. For MSAD, you use the Security Account
Manager name (sAMAccountName).
You may use other accounts that have sufficient access permissions to search the directory where
user information is stored. Notice that this account must have proxy right to authenticate as a
different user.
Special characters are not allowed in the User DN value. See “Using Special Characters” on page
61 for restrictions on the use of special characters.
Example:
●cn=Directory Manager (user directories other than MSAD)
●sAMAccountName=pturner (MSAD)
42 Configuring User Directories
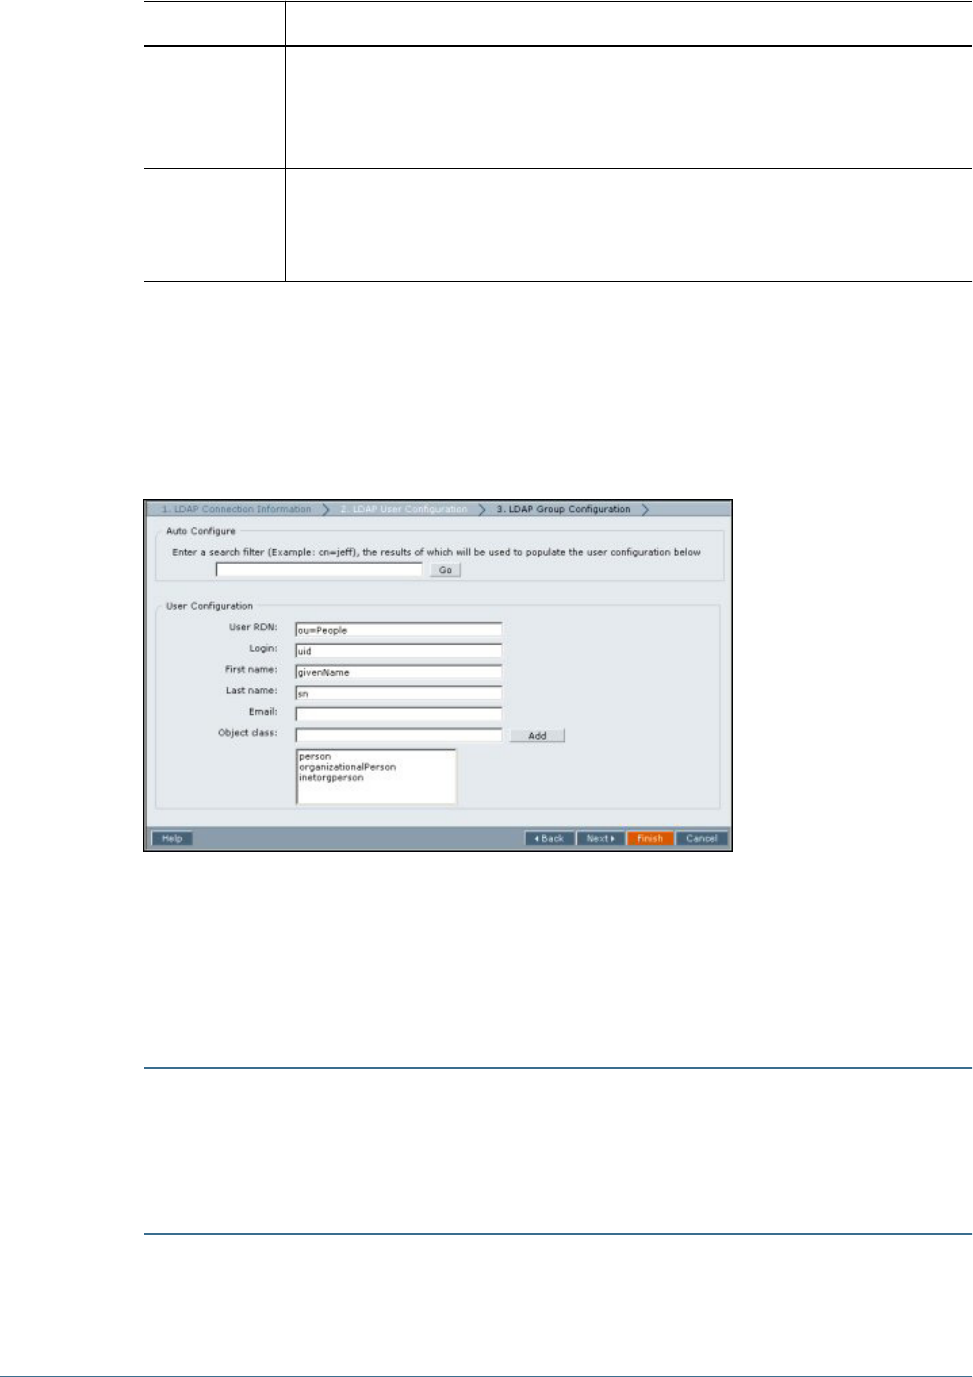
Label Description
Append Base DN The check box for appending the base DN (the distinguished name of the node where the search
for users and groups could begin) to the specified value. Do not append Base DN to the Directory
Manager account.
This check box is disabled if the Anonymous bind option is selected.
Password Password of the account specified in the User DN box.
This box is disabled if the Anonymous bind option is selected.
Example: UserDNpassword
7Click Next.
The User Configuration screen for the selected user directory type opens. Shared Services uses
the properties set in this screen to create a filter that is used to search for users in the user directory.
Using this filter speeds the search.
Hyperion recommends that you use the Auto Configure area of the screen to retrieve the required
information.
Note:
Data entry in the User Configuration screen is optional. If you do not specify the settings for the
filter, Shared Services searches the entire directory structure to locate users. This may have
performance implications, especially if the user directory contains accounts for many users.
Caution!
If the user URL is not set for user directories that contain / (slash) or \ (backslash) in its node
names, the search for users and groups fails. For example, any operation to list the user or group
fails if the user URL is not specified for a user directory where users and groups exist in a node
such as OU=child\ou,OU=parent/ou, or OU=child/ou,OU=parent\ou.
8In the text box in the Auto Configure area, enter a unique user identifier.
Configuring Oracle Internet Directory, MSAD, and Other LDAP-Enabled User Directories 43

The user identifier must be expressed in the format <attribute>=<identifier>; for
example, uid=jdoe.
Attributes of the user are displayed in the User Configuration area.
If you are configuring Oracle Internet Directory as a user directory, you cannot automatically
configure the filter because the root DSE of Oracle Internet Directory does not contain entries
in the Naming Contexts attribute. See Oracle documentation for detailed information.
Note:
You can manually enter required user attributes into text boxes in the User Configuration area.
Table 2 User Configuration Screen
Label Description
User RDN The Relative DN of the user. Each component of a DN is called an RDN and represents a branch in
the directory tree. The RDN of a user is generally the equivalent of the uid or cn.
See “Using Special Characters” on page 61 for restrictions on the use of special characters.
Example: ou=People
Login The attribute that stores the login name of the user. Users use the value of this attribute as the User
Name while logging into Hyperion products.
Example: uid
First Name The attribute that stores the first name of the user.
Example: givenName
Last Name The attribute that stores the last name of the user.
Example: sn
Email The attribute that stores the e-mail address of the user (optional)
Example: mail
Object Class Object classes of the user (the mandatory and optional attributes that can be associated with the
user). Shared Services uses the object classes listed in this screen in the search filter. Using these
object classes, Shared Services should find all users who should be provisioned.
You can manually add additional object classes if needed. To add an object class, type the object
class name into the Object class box and click Add.
Delete object classes by selecting the object class and clicking Remove.
Example: person, organizationalPerson, inetorgperson
9Click Next.
Note:
Data entry in the Group Configuration screen is optional. If you do not enter the group filter
settings, Shared Services searches the entire directory structure to locate groups. This process
can negatively affect performance, especially if the user directory contains many groups.
44 Configuring User Directories
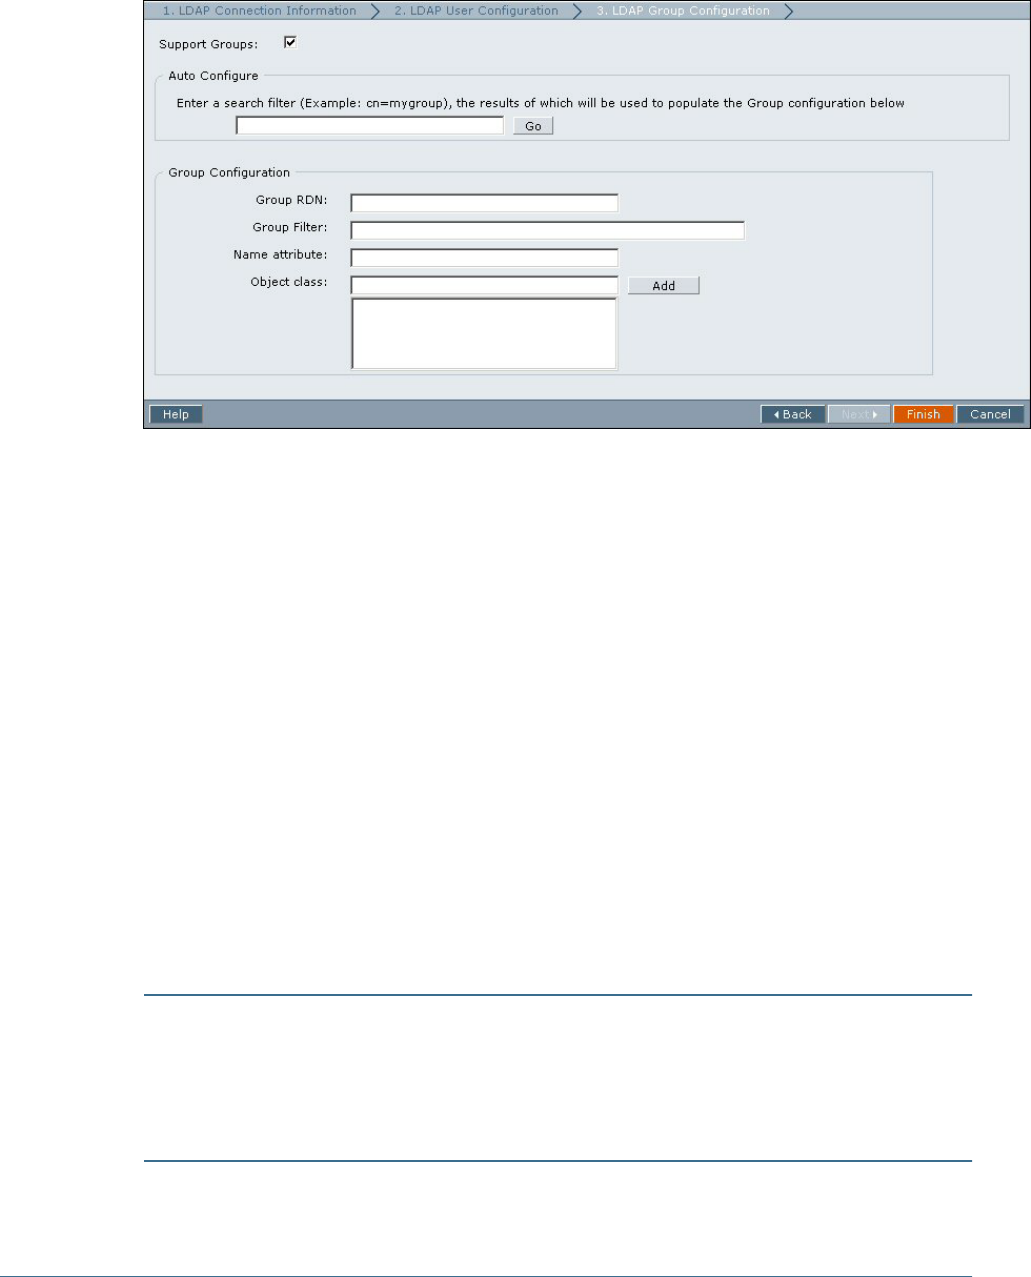
The Group Configuration screen for the selected user directory type opens. Shared Services uses
the properties set in this screen to create a filter to search for groups in the user directory. Using
this filter speeds the search.
10 Clear Support Groups if you do not plan to provision groups or if users are not categorized into groups on
the user directory. Deselecting this option disables the fields on this screen.
If you are supporting groups, Hyperion recommends that you use the Auto Configure area to
retrieve the required information.
If you are configuring Oracle Internet Directory as a user directory, you cannot automatically
configure the filter because the root DSE of Oracle Internet Directory does not contain entries
in the Naming Contexts attribute. See Oracle documentation for detailed information.
11 In the Auto Configure area, enter a unique group identifier and click Go.
The group identifier must be expressed in <attribute>=<identifier> format; for example,
cn=western_region.
Attributes of the group are displayed in the Group Configuration area.
Note:
You can manually enter required group attributes into text boxes in the Group Configuration
area.
Caution!
If the group URL is not set for user directories that contain / (slash) or \ (backslash) in its node
names, the search for users and groups fails. For example, any operation to list the user or group
fails if the group URL is not specified for a user directory in which users and groups exist in a
node such as OU=child\ou,OU=parent/ou or OU=child/ou,OU=parent \ ou.
Configuring Oracle Internet Directory, MSAD, and Other LDAP-Enabled User Directories 45

Table 3 Group Configuration Screen
Label Description
Group RDN The Relative DN of the group. Each component of a DN is called an RDN and represents a branch
in the directory tree. This value, which is relative to the Base DN, is used as the group URL.
Specify a Group RDN that identifies the lowest user directory node where all the groups that you
plan to provision are available.
The Group RDN has a significant impact on login and search performance. Because it is the starting
point for all group searches, you must identify the lowest possible node within which all groups for
Hyperion products are available. To ensure optimum performance, the number of groups present
within the Group RDN should not exceed 10,000. If more groups are present, use an appropriate
group filter to retrieve only the groups you want to provision.
Note: Shared Services displays a warning if the number of available groups within the Group URL
exceeds 10,000.
See “Using Special Characters” on page 61 for restrictions on the use of special characters.
Example: ou=Groups
Group Filter An LDAP query that retrieves only the groups that are to be provisioned with Hyperion product roles.
For example, the LDAP query (cn=Hyp*) retrieves only groups whose names start with the prefix
Hyp.
The group filter is used to limit the number of groups returned during a query. Group filters are
especially important if the node identified by the Group RDN contains groups that need not be
provisioned. Filters can be designed to exclude the groups that are not to be provisioned, thereby
improving performance.
Name Attribute The attribute that stores the name of the group.
Example: cn
Object class Object classes of the group (the mandatory and optional attributes that can be associated with the
group). Shared Services uses the object classes listed in this screen in the search filter. Using these
object classes, Shared Services should find all the groups associated with the user.
You can manually add additional object classes if needed. To add an object class, type the object
class name into the Object class text box and click Add.
To delete object classes, select the object class and click Remove.
Example: groupofuniquenames?uniquemember
12 Click Finish.
Shared Services saves the configuration and returns to the Defined User Directories screen, which
now lists the user directory that you configured.
13 Test the configuration. See “Testing User Directory Connections” on page 53.
14 Add the user directory to the search order used by Shared Services. See “Adding a User Directory to the
Search Order” on page 55 for details.
15 Specify global parameters if needed. See “Setting Global Parameters” on page 57 for details.
Configuring an SAP Provider
Before starting these procedures, meet all prerequisites in “Prerequisites” on page 23.
46 Configuring User Directories
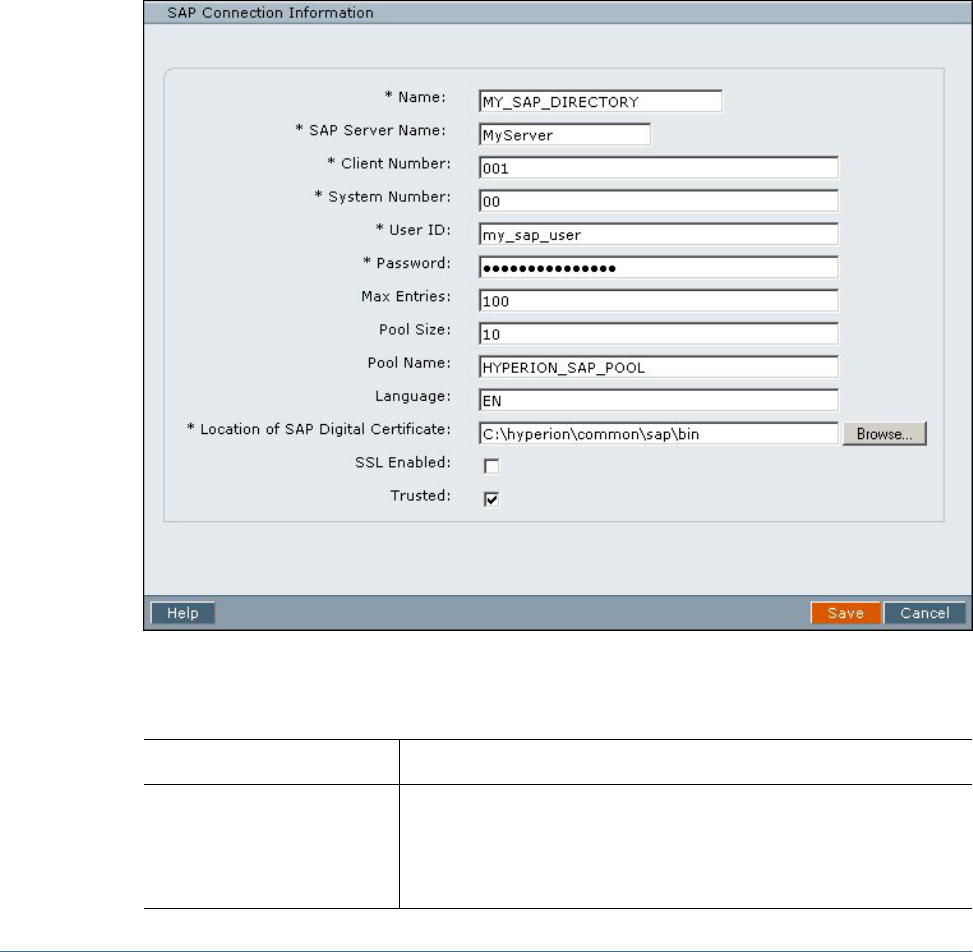
By default, the timeout for resolving SAP keystore file is set to 10 seconds. After configuring an
SAP provider, you can manually edit the CSS.xml file to set a different timeout. See “Setting
Timeout to Resolve SAP Keystore File” on page 59 for details.
➤To configure an SAP provider:
1Launch User Management Console. See “Launching User Management Console” on page 33.
2Select Administration > Configure User Directories.
The Defined User Directories screen that lists all configured user directories, including Native
Directory, opens.
3Click Add.
4In the Directory Type screen, select SAP and click Next.
The SAP Connection Information screen opens.
5In the SAP Connection Information screen, enter the appropriate configuration parameters.
Table 4 SAP Connection Information Screen
Label Description
Name A unique configuration name for the SAP provider. You use this name to identify
the SAP provider in situations where multiple SAP providers are defined in Shared
Services.
Example: MY_SAP_DIRECTORY
Configuring an SAP Provider 47

Label Description
SAP Server Name The host name (or the IP address) of the computer where the SAP Server is
running, or the SAP router address.
Example: myserver
Client Number The client number of the SAP system to which you want to connect.
Example: 001
System Number The system number of the SAP System to which you want to connect.
Example: 00
User ID The user name that Shared Services should use to access SAP. This user must
have access permissions to use Remote Function Calls (RFC) to connect to SAP
and to access user, activity groups, and their relationship data.
Example: my_sap_user
Password The password of the user identified in the User ID box.
Example: my_sap_password
Max Entries The maximum entries that a query to the SAP provider can return.
Example: 100
Pool Size JCo connection pool size.
Example: 10
Pool Name A unique name for the connection pool that should be used to establish a link
between Shared Services and SAP.
Example: HYPERION_SAP_POOL
Language Language for messages, for example error messages, from SAP. By default, this
is read from the system locale of the server hosting Shared Services.
Example: EN
Location of SAP Digital Certificate The location of SAP X509 certificate. Hyperion products use this certificate to
parse the SAP login ticket and to extract the user ID needed to support SSO.
Required only if Hyperion products are plugged into SAP Enterprise Portal.
Example: C:\Hyperion\common\SAP\bin (Windows) or /app/
Hyperion/common/SAP/bin (UNIX).
SSL Enabled Check box that enables you to use Secure Socket Layer (SSL) to communicate
between Shared Services and the SAP provider.
Trusted Check box that enables you to specify that this provider is a trusted source. User
credentials from trusted sources are not validated during SSO. If you do not select
this option, user credentials are validated every time user requests SSO to a
different Hyperion product.
6Click Save.
Shared Services saves the configuration and returns to the Defined User Directories screen, which
now lists the SAP provider that you configured.
48 Configuring User Directories
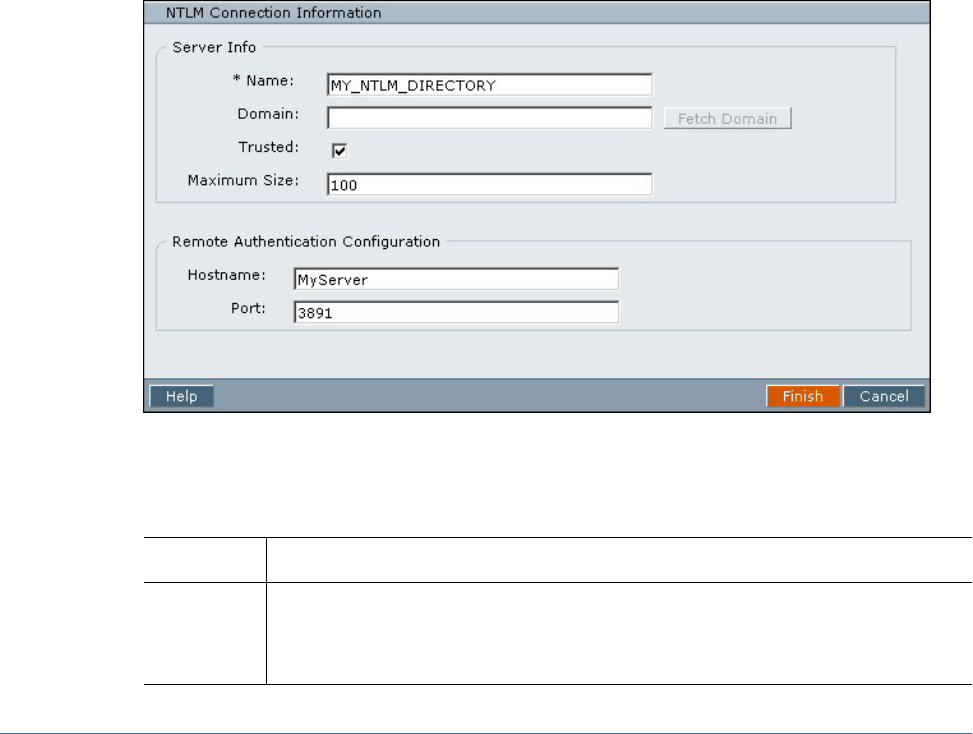
7Test the SAP provider configuration. See “Testing User Directory Connections” on page 53.
8Add the SAP provider to the search order used by Shared Services. See “Adding a User Directory to the
Search Order” on page 55 for details.
9Specify global settings if needed. See “Setting Global Parameters” on page 57 for details.
Configuring an NTLM User Directory
Before starting these procedures, meet all the prerequisites in “Using NTLM to Support SSO”
on page 28.
➤To configure an NTLM user directory:
1Launch the User Management Console. See “Launching User Management Console” on page 33.
2Select Administration > Configure User Directories.
The Defined User Directories screen that lists all the configured user directories, including Native
Directory, opens.
3Click Add.
4In Directory Type select NT LAN Manager (NTLM) and click Next.
The NTLM Connection Information screen opens.
5Enter the required configuration parameters in the NTLM Connection Information screen.
Table 5 NTLM Connection Information Screen
Label Description
Name A unique configuration name for the NTLM user directory. You use this name to identify the directory
in situations where multiple NTLM directories are configured with Shared Services.
Example: MY_NTLM_DIRECTORY
Configuring an NTLM User Directory 49

Label Description
Domain The name of the NTLM domain. You may use the Fetch Domain button to retrieve the domain name.
If the domain is not specified, Shared Services, at run time, detects and uses all visible domains.
This may affect performance. The search order is: local computer, domain of local computer, and
trusted domains visible to the local computer.
Note: Because Shared Services does not detect domains when NTLM is used with Hyperion Remote
Authentication Module (HRAM), you must specify the domain if HRAM is used.
Example: MY_DOMAIN
Trusted Check box to indicate that this provider is a trusted source. User credentials from trusted sources
are not validated during SSO. If this option is not selected, Hyperion products validate user
credentials every time the user switches between Hyperion products.
Maximum Size Maximum number of entries that a query to the NTLM user directory can return.
Example: 100
Hostname Name of the Windows server where HRAM is installed to support SSO to Hyperion products running
in a UNIX environment. Required only if Hyperion products are running in a UNIX environment.
Example: MyHRAMServer
Port The port number where HRAM is running.
Example: 3891
6Click Finish.
Shared Services saves the configuration and returns to the Defined User Directories screen, which
now lists the NTLM provider that you configured.
7Test the configuration. See “Testing User Directory Connections” on page 53.
8Add the user directory to the search order used by Shared Services. See “Adding a User Directory to the
Search Order” on page 55 for details.
9Specify additional parameters, if needed, for the NTLM user directory. See “Setting Global Parameters” on
page 57 for details.
Configuring Relational Databases as User Directories
User and group information from the system tables of Oracle, SQL Server, and IBM DB2
relational databases can be used to support provisioning. If group information cannot be derived
from the database's system schema, Shared Services does not support the provisioning of groups
from that database provider. For example, Shared Services cannot extract group information
from IBM DB2, because the database uses groups defined on the operating system. You can,
however, add these users to groups in Native Directory and provision those groups.
You must configure Shared Services to connect to the database as the database administrator;
for example, Oracle SYSTEM user, to retrieve the list of users and groups.
50 Configuring User Directories
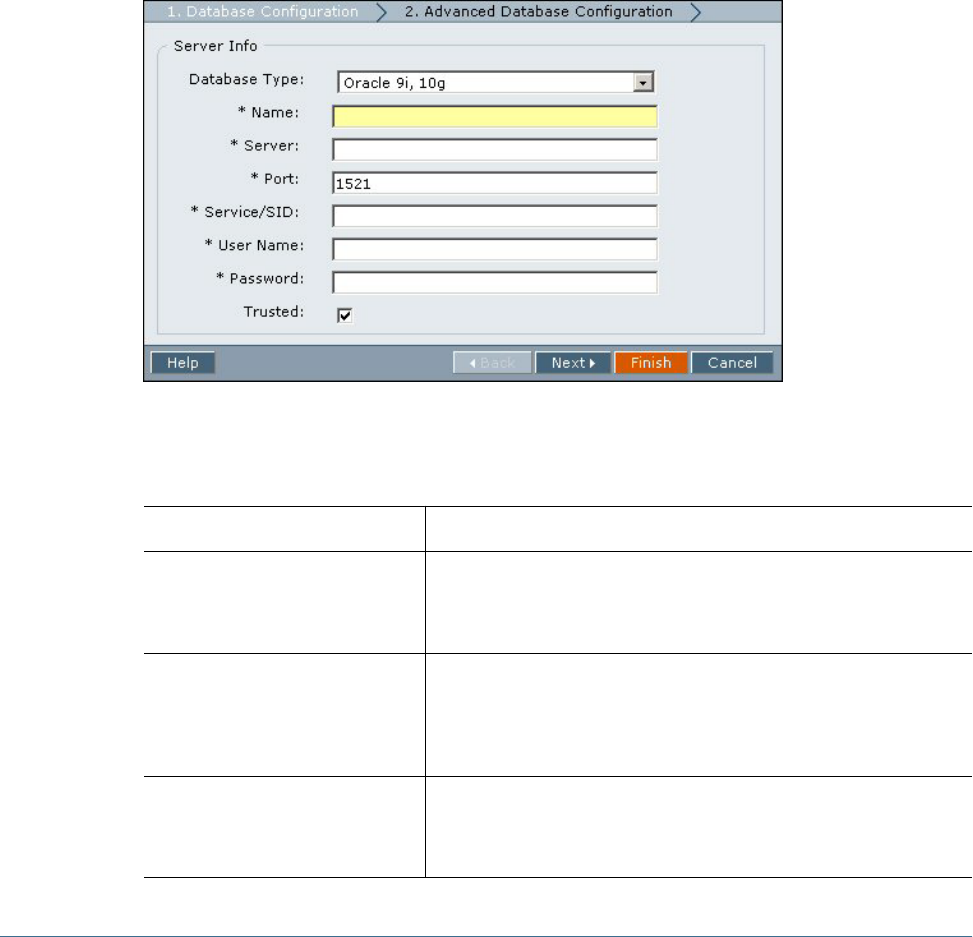
Note:
Shared Services can retrieve only active database users for provisioning. Inactive and locked
database user accounts are ignored.
➤To configure database providers:
1Launch User Management Console. See “Launching User Management Console” on page 33.
2Select Administration > Configure User Directories.
The Defined User Directories screen, which lists all configured user directories, including Native
Directory, opens.
3Click Add.
4In the Directory Type screen, select Relational Database (Oracle, DB2, SQL Server).
5Click Next.
6In the Database Configuration tab, enter configuration parameters.
Table 6 DB Connection Information Screen
Label Description
Database Type The relational database vendor. Shared Services supports only Oracle, IBM
DB2, and SQL Server databases as database providers.
Example: Oracle 9i, 10g
Name A unique configuration name for the database provider. You use this name
to identify the database provider in situations where multiple providers are
defined in Shared Services.
Example: Oracle_DB_FINANCE
Server The host name (or the IP address) of the computer where the database server
is running.
Example: myserver
Configuring Relational Databases as User Directories 51
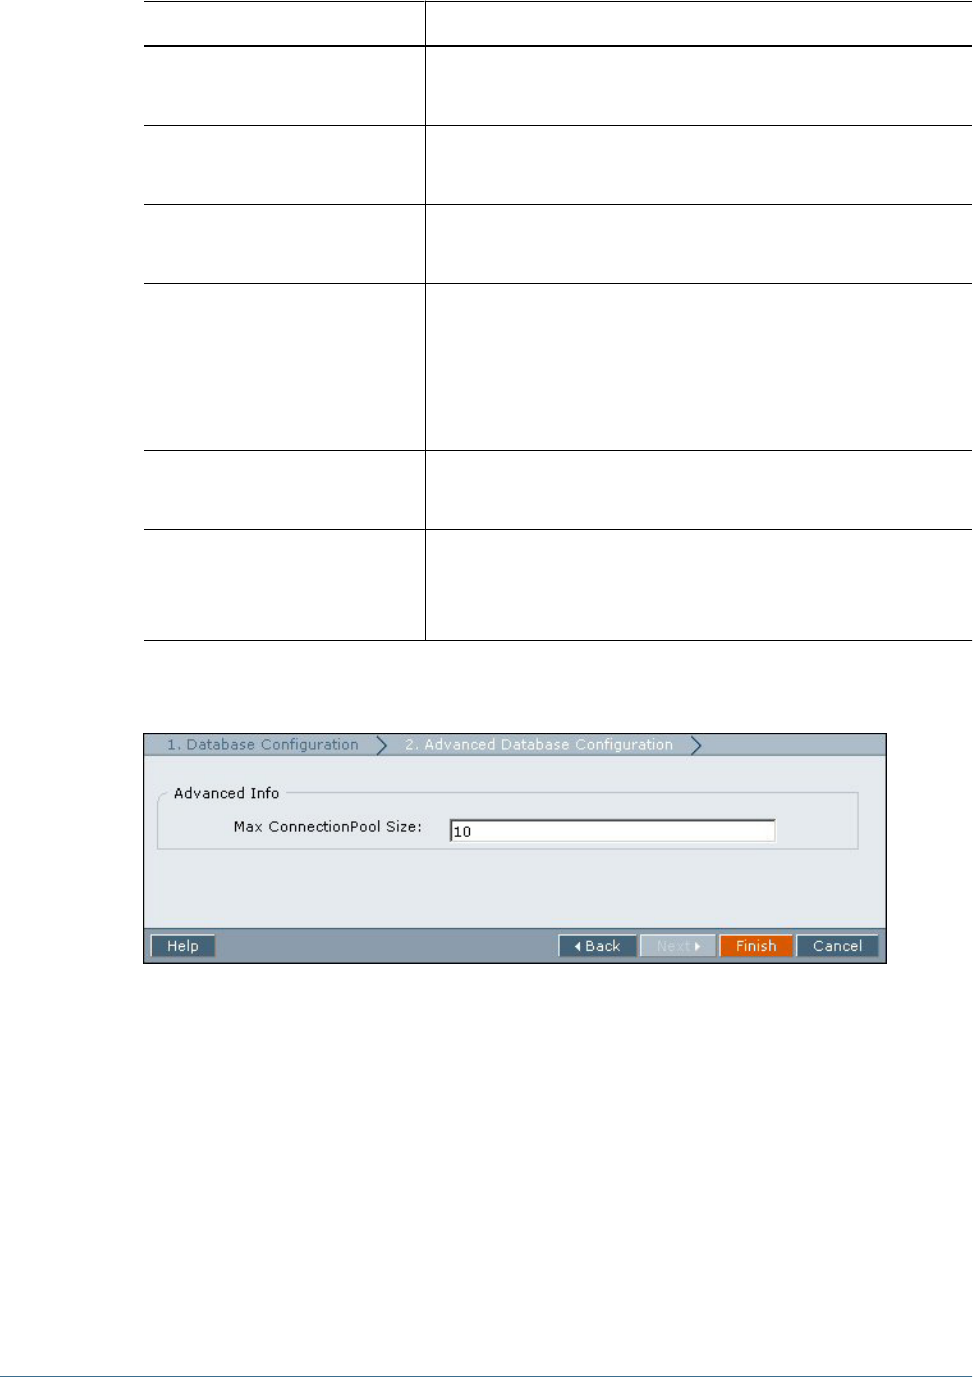
Label Description
Port The port where the database server is available to accept requests.
Example: 1521
Service/SID (Oracle only) The system identifier (default is orcl).
Example: orcl
Database (SQL Server and DB2 only) The database to which Shared Services should connect.
Example: master
User Name The user name that Shared Services should use to access the database. This
user must have access privileges to database system tables. Hyperion
recommends that you use the database Administrator's user name for SQL
Server and IBM DB2 databases, and the system account for Oracle
databases.
Example: SYSTEM
Password The password of the user identified in the User Name box.
Example: system_password
Trusted Check box that enables you to specify that this provider is a trusted source.
User credentials from trusted sources are not validated during SSO. If you do
not select this option, user credentials are validated every time a user
requests SSO to a different Hyperion product.
7Optional: To define the maximum database connection pool size (default is 10), click Next.
The Advanced Database Configuration screen opens.
8In Max ConnectionPool Size, enter the maximum number of connections in the database connection pool
created for this provider.
9Click Finish.
10 Click OK to return to the Defined User Directories screen.
11 Test the database provider configuration. See “Testing User Directory Connections” on page 53.
12 Add the database provider to the search order used by Shared Services. See “Adding a User Directory to the
Search Order” on page 55 for details.
13 Specify global settings if needed. See “Setting Global Parameters” on page 57 for details.
14 Restart Shared Services.
52 Configuring User Directories

Testing User Directory Connections
After configuring a user directory, test the connection to ensure that Shared Services can
successfully connect to the user directory using the current settings.
Note:
Establishing a successful test connection does not mean that Shared Services will use the
directory. Shared Services uses only the directories that have been assigned a search order.
➤To test user directory connection:
1Launch the User Management Console, as explained in “Launching User Management Console” on page
33.
2Select Administration > Configure User Directories.
The Defined User Directories screen that lists all the configured user directories, including Native
Directory, opens.
3From the list of user directories, select the directory to test.
4Click Test.
A status message indicating the results of the test is displayed.
5Click OK.
Editing User Directory Settings
You can modify any of the parameters of an existing user directory configuration. Hyperion
recommends not editing the configuration data of user directories that have been used for
provisioning.
Caution!
Editing some settings, for example, the Base DN, in the user directory configuration invalidates
provisioning data. Exercise extreme care when modifying the settings of a user directory that
has already been provisioned.
➤To edit a user directory configuration:
1Launch the User Management Console, as explained in “Launching User Management Console” on page
33.
2Select Administration > Configure User Directories.
3From Defined User Directories screen, select the user directory to edit.
4Click Edit.
5Modify the configuration settings as needed.
Testing User Directory Connections 53

For explanation of the parameters you can edit, see the following tables:
●MSAD and other LDAP-enabled user directories:
❍Table 1, “ Connection Information Screen,” on page 41
❍Table 2, “ User Configuration Screen,” on page 44
❍Table 3, “ Group Configuration Screen,” on page 46
●SAP providers: Table 4, “ SAP Connection Information Screen,” on page 47
●NTLM user directories: Table 5, “NTLM Connection Information Screen,” on page 49
●Database providers: Table 6, “ DB Connection Information Screen,” on page 51
6Click Finish to save the changes.
Deleting User Directory Configurations
You can delete a user directory configuration at any time. Deleting a directory configuration
invalidates all the provisioning information for the users and groups derived from the user
directory. It also removes the directory from the search order.
Tip:
If you do not want to use a configured user directory that was used for provisioning, remove it
from the search order so that the user directory is not searched for users and groups. This action
maintains the integrity of provisioning information. It also enables you to use the user directory
at a later time, if needed.
➤To delete a user directory configuration:
1Launch the User Management Console, as explained in “Launching User Management Console” on page
33.
2Select Administration > Configure User Directories.
3From Defined User Directories screen, select the directory to delete.
4Click Delete.
Managing User Directory Search Order
The search order associated with a configured user directory determines the position of the
directory in the search order that Shared Services uses to retrieve user and group information.
Shared Services ignores user directories that are not included in the search order. Consequently,
these user directories are not used to support authentication and provisioning.
54 Configuring User Directories

Note:
Shared Services terminates the search for the user or group when it first encounters the specified
user account. If a user has multiple accounts across user directories, Shared Services retrieves
the account from the user directory that is listed first in the search order.
By default, Native Directory is set as the first directory in the search order. Additional user
directories are given the next available sequence number in the search order. You can perform
these tasks to manage the search order:
●“Adding a User Directory to the Search Order” on page 55
●“Changing the Search Order” on page 56
●“Removing a Search Order Assignment” on page 56
Adding a User Directory to the Search Order
The order in which you add a user directory to the search order is retained as the default search
order. You must have already configured the user directory that you want to include in the search
order. To configure a user directory, see these topics:
●“Configuring Oracle Internet Directory, MSAD, and Other LDAP-Enabled User
Directories” on page 40
●“Configuring an SAP Provider” on page 46
●“Configuring an NTLM User Directory” on page 49
●“Configuring Relational Databases as User Directories” on page 50
➤To add a user directory to the search order:
1Launch User Management Console, as explained in “Launching User Management Console” on page 33.
2Select Administration > Configure User Directories.
3From Defined User Directories screen, select the directory to add to the search order.
4Click Add.
This button is available only if you have selected a user directory that is not already used in the
search order.
Note:
If you have NTLM and MSAD user directories configured, ensure that the MSAD user directory
comes after NTLM in the search order.
Shared Services assigns a default search order, which you may change. For more information,
see “Changing the Search Order” on page 56.
Managing User Directory Search Order 55

Changing the Search Order
The default search order assigned to each user directory, including Native Directory, is based
on the sequence in which the directory was added to the search order.
➤To change the search order:
1Launch the User Management Console, as explained in “Launching User Management Console” on page
33.
2Select Administration > Configure User Directories.
3From Defined User Directories screen, select the directory whose search order you want to change.
4Click Move Up or Move Down as needed.
Note:
If you have NTLM and MSAD user directories configured, ensure that the MSAD user directory
comes after NTLM in the search order.
Shared Services displays a message indicating that the search order was updated.
5Click OK.
The Defined User Directories screen is displayed, which lists the user directories in the updated
order.
Removing a Search Order Assignment
Deleting a user directory from the search order does not invalidate the directory configuration.
It merely removes the user directory from the list of directories that are searched for
authenticating users. A directory that is not included in the search order is set to Not Used
status. When you remove a user directory from the search order, the search sequence assigned
to the other user directories is automatically updated.
Note:
You cannot remove Native Directory from the search order.
➤To delete a user directory from the search order:
1Launch User Management Console, as explained in “Launching User Management Console” on page 33.
2Select Administration > Configure User Directories.
3From Defined User Directories screen, select the directory to remove from the search order.
4Click Remove.
Shared Services displays a confirmation dialog box.
5Click OK.
56 Configuring User Directories

Shared Services displays a message indicating that the search order was updated.
6Click OK to return to the Defined User Directories screen, which lists the status of the user directory as
Not Used.
Setting Global Parameters
These global parameters are applicable to all user directories included in the search order.
●Token timeout–Specifies the time, in minutes, after which the SSO token issued by Hyperion
products or the security agent will expire. Users are forced to log in again after this period.
Note:
Token timeout is not the same as session timeout.
●Logging level–Sets the level at which security issues are recorded in the Shared Services
security log file.
Administrators can change the Shared Services log level on-the-fly to capture relevant
information to debug Shared Services issues. Shared Services application server restart is not
required to activate log level change.
Log files belonging to Hyperion products are stored in <
Hyperion_Home
>/logs, allowing
administrators to easily locate log files to monitor the applications and troubleshoot issues.
Product log files are created in a product-specific folder. For example, Shared Services logs
are in <
Hyperion_Home
>/logs/SharedServices9. Existing log files are not moved to
the new location.
●Delegated User Management Mode–Supports the distributed management of provisioning
activities.
●Support for Security Agent for Single Sign-on–Indicates whether user directories are used
to support SSO from security agents such as SiteMinder.
➤To set global parameters:
1Launch User Management Console, as explained in “Launching User Management Console” on page 33.
2Select Administration > Configure User Directories.
3In Defined User Directories, set global parameters.
Table 7 Global Parameters for User Directories
Parameter Description
Token Timeout Time limit (in minutes) after which the SSO token issued by Hyperion
products/security agent becomes invalid. Users will be logged out
after token timeout period. Token timeout is set based on the server's
system clock.
Example: 480
Setting Global Parameters 57

Parameter Description
Logging level Level at which user directory related issues are recorded in the Shared
Services security log files.
Example: WARN
Support for Security Agent for Single Sign-on Option enabling support for SSO from security agents such as
SiteMinder.
Enable Delegated User Management Mode Option enabling delegated user management of Hyperion products.
See Chapter 6, “Delegated User Management.”
4Click OK.
Overriding Cache Refresh Interval for MSAD and other LDAP-
Enabled User Directories
By default, Shared Services uses 60 minutes as the cache refresh interval; the period after which
Shared Services refreshes its internal cache of information retrieved from each LDAP-enabled
user directory configured with Shared Services.
Provisioning information for newly added users and groups in LDAP-enabled user directories
is available to Shared Services only after the next cache refresh. This may result in new users and
members of new groups not getting their provisioned roles for up to 60 minutes.
➤To change the cache refresh interval:
1Using a text editor, open CSS.xml file.
This file is located in <
HSS_home
>/config. For example, C:\Hyperion\deployments
\WebLogic9\SharedServices9\config (WebLogic 9.1 on Windows) and /vol1/
Hyperion/deployments/WebLogic9/SharedServices9/config (WebLogic 9.1 on
UNIX).
2Insert the following code into the definition of the LDAP-enabled user directory for which you want to modify
cache refresh interval. This line must be placed immediately after the <authType>simple</
authType> code line.
<cacheRefreshInterval>
<interval>
</cacheRefreshInterval>
Be sure to replace
<interval>
with the desired cache refresh interval in minutes. For example,
<cacheRefreshInterval>10</cacheRefreshInterval> to set the interval to 10 minutes.
You can set the interval to 0 if you want to refresh the cache for every call. This affects
performance.
Note:
Cache refresh interval must be set separately for each LDAP-enabled user directory.
3Save and close the CSS.xml file.
4Restart the application server if it is running.
58 Configuring User Directories

Setting Timeout to Resolve SAP Keystore File
By default, Shared Services uses 10 seconds as the timeout for resolving the SAP keystore file.
You can override this value in the Shared Services configuration file.
➤To change the timeout for resolving the SAP keystore file:
1Using a text editor, open CSS.xml.
This file is in <
HSS_home
>/config. For example, C:\Hyperion\deployments\WebLogic9
\SharedServices9\config (WebLogic 9.1 on Windows) and /vol1/Hyperion/
deployments/WebLogic9/SharedServices9/config (WebLogic 9.1 on UNIX).
2Insert the following code into the SAP provider definition. This code must be placed immediately after the
token timeout declaration.
<keystore>
<timeout><interval></timeout>
</keystore>
Be sure to replace
<interval>
with the desired keystore timeout interval in seconds. For
example, <timeout>22</timeout> to set the interval to 22 seconds.
3Save and close CSS.xml.
4Restart the application server if it is running.
Connection Pooling
Previous releases of Hyperion products created connection threads to external user directories
on a need-to-use basis. To improve performance, Shared Services allows connection pooling
where user directory connections use a common connection pool.
Shared Services uses a default connection pool setting that is used for all configured user
directories. Default connection pool settings are not recorded in CSS.xml. To use custom
connection pool settings for a user directory, you must update the configuration settings of the
user directory in CSS.xml with a connection pool definition. User directory configurations that
do not contain a connection pool definition use the default connection pool.
➤To define connection pool for a user directory configuration:
1Using a text editor, open CSS.xml.
This file is in <
HSS_home
>/config. For example, C:\Hyperion\deployments\WebLogic9
\SharedServices9\config (WebLogic 9.1 on Windows) and /vol1/Hyperion/
deployments/WebLogic9/SharedServices9/config (WebLogic 9.1 on UNIX).
2In each of the user directory configuration definitions, include a connection pool definition similar to the
following:
<connectionPool>
<maxSize>100</maxSize>
Setting Timeout to Resolve SAP Keystore File 59

<timeout>90000</timeout>
<evictInterval>60</evictInterval>
<allowedIdleConnTime>120</allowedIdleConnTime>
<growConnections>false</growConnections>
</connectionPool>
See Table 8 for an explanation of these attributes.
A sample CSS.xml containing a connection pool definition:
<ldap name="ExampleLDAP">
<trusted>true</trusted>
<url>ldap://myServer:390/dc=example,dc=com</url>
<userDN>cn=Directory Manager</userDN>
<password>{CSS}haGFq18Y1357xXN2b0u+ZQ==</password>
<authType>simple</authType>
<connectionPool>
<maxSize>100</maxSize>
<timeout>90000</timeout>
<evictInterval>60</evictInterval>
<allowedIdleConnTime>120</allowedIdleConnTime>
<growConnections>false</growConnections>
</connectionPool>
<user>
<url>ou=People</url>
</user>
<group>
<url>ou=Groups</url>
</group>
</ldap>
Table 8 Connection Pool Attributes
Element Attribute Description
<connectionPool> Connection pool definition
<maxSize> Maximum number of connections in the pool. Default is
100 for LDAP-enabled directories, including MSAD, and
300 for Native Directory.
<timeout> Timeout (in milliseconds) to get the connection from the
pool. An exception is thrown after this period. Default is
300000 milliseconds (5 minutes).
<evictInterval> Optional: The interval (in minutes) for running the eviction
process to clean up the pool. The eviction process cleans
up idle connections that have exceeded the
allowedIdleConnTime. Default is 60 minutes.
<allowedIdleConnTime> Optional: The time (in minutes) after which idle
connections in the pool are cleaned up by the eviction
process. Default is 120 minutes.
<growConnections> This option indicates whether the connection pool can
grow beyond <maxSize>. Default is false. If you do not
allow the connection pool to grow, the system throws an
error if a connection is not available within the time set for
<timeout>.
60 Configuring User Directories

3Verify that each user directory configuration contains a connection pool definition.
4Optional: Define socket connection timeout for user directories by including the <socketTimeOut>
parameter in the Native Directory user directory definition. For example, the following setting specifies a
socket timeout of 5 seconds.
<socketTimeOut>60000</socketTimeOut>
Note:
Socket timeout set for Native Directory applies to all configured user directories.
Use a high socket timeout value in the following scenarios:
●A large number of users and groups are defined in the user directory.
●The machines that host the user directories are geographically distant from the machine that
hosts Shared Services.
●A low-bandwidth network connection exists between the machine that hosts Shared Services
and the machine that hosts the user directory.
A sample Native Directory definition containing socket timeout definition:
<native name="Native Directory">
<startupRetryInterval>5</startupRetryInterval>
<startupRetryLimit>5</startupRetryLimit>
<socketTimeOut>60000</socketTimeOut>
<connectionPool>
<maxSize>600</maxSize>
<timeout>1000</timeout>
<growConnections>true</growConnections>
</connectionPool>
</native>
5Save and close CSS.xml.
6Restart Shared Services and all Hyperion products.
Using Special Characters
MSAD and other LDAP-enabled user directories allow special characters in entities such as DNs,
user names, roles, and group names. Special handling may be required for Shared Services to
understand such characters.
Generally, you must use escape characters while specifying any special character used in user
directory settings for LDAP-enabled user directories, including MSAD; for example, user and
group URLs and Base DN. Native Directory and NTLM do not require special handling of
characters.
Table 9 lists the special characters that can be used in user names, group names, user URLs,
group URLs, and in the value of OU in user DN. Native Directory and NTLM do not require
special handling of characters.
Using Special Characters 61

Table 9 Supported Special Characters
Character Name or Meaning Character Name or Meaning
(open parenthesis $dollar
)close parenthesis +plus
“quotation mark /slash
'single quotation mark \backslash
,comma ^caret
&ersand ;semicolon
=equal to #pound
<less than @at
>greater than
Table 10 Special Characters that Should not Be Used in Application IDs
Character Name or Meaning Character Name or Meaning
,comma ;semicolon
<less than +plus
>greater than =equal to
&ersand
Table 11 Special Characters that Should not Be Used in Application Names
Character Name or Meaning
[open bracket
]close bracket
(open parenthesis
)close parenthesis
●Special characters are not permitted in the value set for the Login User attribute.
●Asterisk (*) is not supported in user names, group names, user and group URLs, and in the
name of the OU in UserDN.
●Attribute values containing a combination of special characters are not supported.
●Ampersand (&) can be used without an escape character. For MSAD settings, & must be
specified as &.
●User and group names cannot contain both a backslash (\) and slash (/). For example, names
such as test/\user and new\test/user are not supported.
62 Configuring User Directories

●Space is not supported as a special character in Base DN.
Table 12 Characters that Need not Be Escaped
Character Name or Meaning Character Name or Meaning
(open parenthesis 'single quote
)close parenthesis ^caret
$dollar @at
These characters must be escaped if you use them in user directory settings (user names, group
names, user URLs, group URLs and User DN).
Table 13 Escape for Special Characters
Special Character Escape Sample Setting Escaped Example
comma (,)
slash (/)
plus sign (+)
equal to (=)
pound (#)
semicolon (;)
backslash (\) ou=test,ou
ou=test/ou
ou=test+ou
ou=test=ou
ou=test#ou
ou=test;ou
ou=test\,ou
ou=test\/ou
ou=test\+ou
ou=test\=ou
ou=test\#ou
ou=test\;ou
less than (<) \< ou=test<ou ou=test\<ou
greater than (>) \> ou=test>ou ou=test\>ou
“ (quotation mark) \\ (two backslashes) ou=test”ou ou=test\\”ou
\ (backslash) \\\ (three backslashes) ou=test\ou ou=test\\\\ou
Caution!
If the user URL is not specified, users created within the RDN root must not contain / (slash)
or \ (backslash). Similarly, these characters should not be used in the names of groups created
within the RDN root if a group URL is not specified. For example, group names such as
OU=child\ou,OU=parent/ou or OU=child/ou,OU=parent\ou are not supported. This
issue does not apply if you are using a unique attribute as the ID Attribute in the user directory
configuration.
Using Special Characters 63

64 Configuring User Directories

5Working with Applications and
Projects
In This Chapter
Overview ............................................................................................................................65
Working with Projects..............................................................................................................65
Managing Applications............................................................................................................67
Overview
Applications and projects are two important Shared Services concepts. An application is a
reference to a single instance of a Hyperion application that is registered with Shared Services.
The registration process makes Shared Services aware of the existence of the Hyperion
application. All provisioning activities are performed against an application.
In User Management Console, Hyperion applications are organized into projects. A project is
a container for applications. For example, a project may consist of a Reporting and Analysis
application and a Planning application. To provision users to an application, the application
must belong to a project.
This chapter contains information on creating and managing projects. It also provides
information on working with applications.
Working with Projects
A project is a container for Hyperion applications. For example, a project may contain a Planning
application and one or more Reporting and Analysis applications. An application can belong to
only one project.
Applications that are registered withShared Services but do not yet belong to a project are listed
under Unassigned Applications in User Management Console.
The applications that are registered with Shared Services but have not been assigned to a project
are listed under the Unassigned Applications node within User Management Console.
Applications assigned to a project are listed under the Projects node of User Management
Console.
An application can belong to only one project, but a project may contain multiple applications.
You can start the provisioning process only after applications are assigned to projects.
Topics covering project management tasks:
Overview 65

●“Creating Projects ” on page 66
●“Modifying Project Properties” on page 67
●“Deleting Projects ” on page 67
Note:
You must be a Shared Services Administrator or Project Manager to create and manage projects.
Shared Services Administrators can work with all registered applications but a Project Manager
can work only with the application for which that person is the project manager.
Creating Projects
During the project creation process, you can also assign applications to the new project.
➤To create a project:
1Launch the User Management Console, as explained in “Launching User Management Console” on page
33.
2Right-click Projects in the Object Palette, and select New.
3Enter a unique project name in Name text box and enter an optional description in Description box.
Note:
Project names that start with the less than symbol (<), for example <my_project do not appear
in the Provisioning screen. Hyperion recommends that you create project names that start with
a character other than the less than symbol.
4To assign applications to this project:
a. From List Applications in Project, select<Unassigned Applications> or an existing
project that contains applications that you want to assign to the project.
b. Click Update List to list the applications in the Available Applications list.
c. From Available Applications, select the applications to assign to the project and click
Add.
The selected applications appear in the Assigned Applications list.
d. To remove an assigned application, from Assigned Applications, select the application to
remove from the project and click Remove. To remove all applications from the Assigned
Applications list, click Reset.
5Click Finish.
6Click Create Another to create another project, or OK to close the status screen.
66 Working with Applications and Projects

Modifying Project Properties
You can modify all properties and settings of an existing project, including application
assignments.
Note:
You can also add applications to projects by moving them from another project or from the
Unassigned Applications node. Refer to “Moving Applications ” on page 69.
➤To modify a project:
1Launch the User Management Console, as explained in “Launching User Management Console” on page
33.
2Select Projects from the Object Palette.
3On the Browse tab, right-click the project to modify and select Open.
4Modify the project properties as needed. See step 4 on page 66 for information on assigning or removing
applications.
5Click Save.
Deleting Projects
Deleting a project removes the association of applications with the project, removes provisioning
assignments from applications within the project, and deletes the project container. Applications
from deleted projects are moved to the Unassigned Applications node.
➤To delete a project:
1Launch the User Management Console, as explained in “Launching User Management Console” on page
33.
2Select Projects from the Object Palette.
3In the Browse tab, right-click the project and select Delete.
4Click OK in the confirmation screen.
Managing Applications
User Management Console keeps track of all Hyperion applications that are registered with
Shared Services. The registration process is completed from individual Hyperion applications
and not from Shared Services.
All registered applications, initially, are listed under the Unassigned Applications node on User
Management Console because the registration process does not automatically assign
applications to a project. Applications must be assigned to a project before users and groups can
Managing Applications 67

be provisioned against the roles belonging to those applications. Applications that have been
assigned to a project are listed under the Project node of User Management Console.
Topics covering application management tasks:
●“Assigning Access Permissions to Applications ” on page 68
●“Moving Applications ” on page 69
●“Copying Provisioning Information Across Applications” on page 69
●“Deleting an Application” on page 69
Assigning Access Permissions to Applications
User Management Console enables application administrators to perform provisioning tasks,
such as assigning access permissions to application-specific objects; for example, reports and
calculation scripts. For example, for Essbase applications, users with the appropriate Oracle's
Essbase® Administration Services permissions can assign filter and calculation script access to
selected users and groups.
Some products require that certain security tasks be performed in the product interface itself,
not through User Management Console. For example, using the Administration Services
interface, you must create filters and calculation scripts. You can then provision these objects
by assigning specific users or groups from User Management Console. Likewise, you must assign
access permission on repository content of Reporting and Analysis from within that product,
not from User Management Console.
You must either be a Shared Services administrator or be provisioned with the appropriate
product role (Planning Manager, for example) to assign access permission from the User
Management Console. See the appropriate product appendix at the end of this guide for
instructions on assigning access permission for specific products.
Before starting this procedure, ensure that the required servers and applications are running.
➤To assign application-specific access permissions:
1Launch User Management Console, as explained in “Launching User Management Console” on page 33.
2From the Projects node in the Object Palette, expand the project containing the application.
3Right-click the application and select the appropriate menu item for that application. An application-specific
tab is displayed.
Note:
If the application is not running, an error message is displayed when you select the application.
Restart the product server and refresh the Object Palette by clicking View > Refresh to access
the application.
4Assign access permissions as needed. Refer to the appropriate product appendix at the end of this guide
for details.
68 Working with Applications and Projects

Moving Applications
You can move assigned applications from one project to another and from unassigned
applications to existing projects. Moving an application removes the association between the
application and the project but does not affect provisioning assignments for the application.
➤To move an application:
1Launch User Management Console, as explained in “Launching User Management Console” on page 33.
2Right-click the application and select Move To.
3On the Move To tab, select the destination project for the application.
4Click Save.
Copying Provisioning Information Across Applications
If you have multiple products of the same type (product and product version), you can copy
provisioning information from one application to another. When you copy provisioning
information, all user, group, and role information is copied to the target application. Product-
specific access control settings are not copied.
➤To copy provisioning information across applications:
1Launch User Management Console, as explained in “Launching User Management Console” on page 33.
2From Projects in the Object Palette, right-click the application from which you want to copy provisioning
information and select Copy Provisioning.
The Copy Provisioning tab opens. This tab lists the target application to which you can copy
provisioning information.
3Select the destination project.
4Click Save.
Deleting an Application
Shared Services administrators can delete applications from projects or from available
unassigned applications.
Deleting an application from a project moves it from the project to the Unassigned Applications
node on the Object Palette. You may now assign this application to a different project. When
you delete an application from a project, all provisioning information for that application is
removed.
Deleting an application from the Unassigned Applications node on the Object Palette deregisters
the application and removes all meta data information for that application. Perform this process
only if there is no other way to deregister or delete the application.
Managing Applications 69

➤To delete an application:
1Launch User Management Console, as explained in “Launching User Management Console” on page 33.
2From existing projects or from unassigned applications, locate the application to delete.
3Right-click the application and select Delete.
4Click OK in the confirmation dialog box.
70 Working with Applications and Projects

6Delegated User Management
In This Chapter
About Delegated User Management.............................................................................................71
Hierarchy of Administrators .......................................................................................................71
Enabling Delegated User Management Mode...................................................................................72
Creating Delegated Administrators...............................................................................................72
About Delegated User Management
Delegated user management enables creating a hierarchy of administrator users for Hyperion
products focusing on the expertise and access needs of such users. This feature allows the Shared
Services Administrator to delegate the responsibility of managing users and groups to other
administrators who are granted restricted access to manage users and groups for which they are
responsible.
In delegated administration mode, a search for users and groups retrieves only the users and
groups for which an administrator is responsible. Only the admin or users with the Administrator
Shared Services role can view all the users and groups across delegated administrators.
Hierarchy of Administrators
The default Shared Services Administrator account (admin) is the most powerful account in
Hyperion products. Hyperion recommends that you change the password of this account after
you first access Shared Services.
Two tiers of administrators exist in delegated administration mode:
●“Shared Services Administrators” on page 71
●“Delegated Administrators” on page 72
Shared Services Administrators
Hyperion recommends that you create Shared Services Administrator accounts similar to the
default admin account to administer Shared Services and other Hyperion applications.
About Delegated User Management 71

You can create Shared Services Administrator accounts by provisioning users and groups with
the Shared Services Administrator role, which provides unfettered access to all Shared Services
functions.
Delegated Administrators
In contrast to Shared Services Administrators, Delegated Administrators have limited
administrator-level access to Shared Services and Hyperion products. Delegated Administrators
can access only the users and groups for which they are granted Administrator access, dividing
user and group management tasks across multiple administrators.
The permissions of Delegated Administrators on Hyperion products are controlled by the access
rights that a Shared Services Administrator has granted them through provisioning. For example,
assume that a Delegated Administrator is granted the Directory Manager global role in Shared
Services, enabling the user to create new users and groups in Native Directory. Without
additional roles, this Delegated Administrator cannot view a list of users and groups that other
administrators created.
If they have the permission to provision users (granted through the Provisioning Manager role),
Delegated Administrators can create other Delegated Administrators and provision them to
further delegate administrative tasks.
Enabling Delegated User Management Mode
You must enable Delegated User Management mode for Shared Services before you can create
delegated administrators. The default Shared Services deployment does not support delegated
administration.
Additional screens and menu options become available after you switch to Delegated User
Management mode.
➤To enable Delegated User Management mode:
1Launch the Oracle's Hyperion® Shared Services User Management Console, as explained in “Launching User
Management Console” on page 33.
2From Administration, select Configure User Directories.
3From Defined User Directories, select Enable Delegated User Management Mode.
4Click OK.
5Restart Shared Services.
Creating Delegated Administrators
●“Planning Steps” on page 73
●“Provisioning Delegated Administrators” on page 73
72 Delegated User Management

●“Creating Delegated Lists” on page 73
●“Viewing Delegated Reports” on page 77
Planning Steps
User Accounts for Delegated Administrators
Shared Services Administrators create Delegated Administrators from existing user accounts in
the user directories configured on Shared Services. Unlike in the provisioning process, delegated
administration capabilities cannot be assigned to groups. Before starting the process of
delegating Shared Services administration, verify that Delegated Administrators are created as
users in a configured user directory.
Create a Delegation Plan
The delegation plan should identify the levels of Delegated Administrators needed to effectively
administer Hyperion products. The plan should identify:
●Users and groups that each Delegated Administrator should manage. This list can be used
while creating Delegated Lists. See “Creating Delegated Lists” on page 73.
●Shared Services and Hyperion product roles that each Delegated Administrator should be
granted.
Provisioning Delegated Administrators
Shared Services Administrators provision Delegated Administrators to grant them roles based
on the delegation plan.
Delegated Administrators must be granted Shared Services roles depending on the activities they
should perform. See “Shared Services Roles” on page 135 for a list of Shared Services roles.
Delegated Administrators can be granted roles from Hyperion products; for example,
Provisioning Manager from Planning, to allow them to perform administrative tasks in
Hyperion products.
Creating Delegated Lists
Delegated lists identify the users and groups that a Delegated Administrator can manage. Each
list is assigned to one or more Delegated Administrators. Delegated Administrators can:
●View only the users and groups assigned to them through delegated lists. All other users and
groups remain hidden from their view.
●Create delegated lists for other users they manage.
●Search and retrieve only the users and groups that are included in their delegated lists.
Creating Delegated Administrators 73

Note:
Shared Services displays the Delegated List node only if the current user is assigned to manage
delegated lists.
The users and groups that a Delegated Administrator creates are not automatically assigned to
the administrator who created them. A Shared Services Administrator must add these users and
groups to delegated lists before Delegated Administrators can access them. Delegated
Administrators, however, can assign these users and groups to the delegated lists that they create.
➤To create delegated lists:
1Launch User Management Console, as explained in “Launching User Management Console” on page 33.
2In Native Directory in Object Palette, right-click Delegated List, and select New.
The Create Delegated List screen opens.
3In Name, enter a unique name for the delegated list.
4Optional: In Description, type a description of the list.
5Optional: To add groups to the list, click Next.
a. In Search for Groups, enter the name of the group to assign to the list. Leave this field
empty to retrieve all groups. Use * as the wildcard for pattern searches. If you are a
Delegated Administrator, only groups assigned to you are displayed.
b. In Directory, select the user directory from which groups are to be displayed.
c. Click Go.
d. From Available Groups, select one or more groups.
e. Click Add.
The selected groups are listed in Assigned Groups.
Note:
Shared Services considers Oracle and SQL Server database roles as the equivalents of groups
in user directories. Oracle database roles can be hierarchical. SQL Server database roles
cannot be nested. Because DB2 does not support roles, Shared Services does not display
groups if you select a DB2 database provider.
f. Optional: To unassign a group, from Assigned Groups, select a group and click Remove.
To unassign all groups, click Reset.
6Optional: To add users to the list, click Next.
a. In Search for Users, type the name of the user to assign to the list. Leave this field blank
to retrieve all users. Use * as the wildcard for pattern searches. If you are a Delegated
Administrator, only users assigned to you are displayed.
b. In Directory, select the user directory from which users are to be displayed.
c. Click Go.
74 Delegated User Management

d. From Available Users, select one or more users.
e. Click Add.
The selected users are listed in Assigned Users.
f. Optional: To unassign a user, from Assigned Users, select a user and click Remove. To
unassign all users, click Reset.
Note:
The Delegated Administrator of the list is automatically added as a user.
7Optional: To assign Delegated Administrators for this list, click Next.
The Managed By tab opens.
a. In Search for Users, enter the name of the user to assign as the Delegated Administrator
of the list. Leave this field blank to retrieve all users. Use * as the wildcard for pattern
searches. If you are a Delegated Administrator, only users assigned to you are displayed.
b. In Directory, select the user directory from which users are to be displayed.
c. Click Go.
d. From Available Users, select one or more users.
e. Click Add.
The selected users are listed in Assigned Users.
f. Optional: To unassign a user, from Assigned Users list, select the user and click Remove.
To unassign all users, click Reset.
Note:
The user who creates the list is automatically added as a Delegated Administrator of the list.
8Click Finish.
Modifying Delegated Lists
Delegated Administrators can modify only the lists assigned to them. Users with Shared Services
Administrator role can modify all delegated lists.
➤To modify delegated lists:
1Launch User Management Console, as explained in “Launching User Management Console” on page 33.
2In the Native Directory node in the Object Palette, select Delegated Lists.
3Search for the delegated list to modify. See “Searching for Users, Groups, Roles, and Delegated Lists” on
page 34.
Delegated lists that meet the search criterion are listed on the Browse tab.
4Right-click the delegated list and select Properties.
Creating Delegated Administrators 75

The Delegated List Properties screen opens.
5Optional: On General, modify the list name and description.
6Optional: To add groups, click Group Members.
a. In Search for Groups, enter the name of the group to assign to the list. Leave this field
empty to retrieve all groups. Use * as the wildcard for pattern searches. If you are a
Delegated Administrator, only groups assigned to you are displayed.
b. In Directory, select the user directory from which groups are to be displayed.
c. Click Go.
d. From Available Groups, select one or more groups.
e. Click Add.
The selected groups are listed in Assigned Groups.
f. Optional: To unassign a group, from Assigned Groups, select the group and click
Remove. To unassign all groups, click Reset.
7Optional: To add users to the list, click User Members.
a. In Search for Users, enter the name of the user to assign to the list. Leave this field blank
to retrieve all users. Use * as the wildcard for pattern searches. If you are a Delegated
Administrator, only users assigned to you are displayed.
b. In Directory, select the user directory from which users are to be displayed.
c. Click Go.
d. From Available Users, select one or more users.
e. Click Add.
The selected users are listed in Assigned Users.
f. Optional: To unassign a user, from Assigned Users list, select the user and click Remove.
To unassign all users, click Reset.
Note:
The Delegated Administrator of the list is automatically added as a user.
8Optional: To modify Delegated Administrator assignment, click Managed By.
The Managed By page opens.
a. In Search for Users, enter the name of the user to assign as the Delegated Administrator
of the list. Leave this field blank to retrieve all users. Use * as the wildcard for pattern
searches. If you are a Delegated Administrator, the users assigned to you are displayed.
b. In Directory, select the user directory from which users are to be displayed.
c. Click Go.
d. From Available Users, select one or more users.
e. Click Add.
The selected users are listed in Assigned Users.
76 Delegated User Management

f. Optional: To unassign a user, from Assigned Users list, select the user and click Remove.
To unassign all users, click Reset.
Note:
The user who creates the list is automatically added as a Delegated Administrator of the list.
9Click Save.
Deleting Delegated Lists
➤To delete delegated lists:
1Launch User Management Console, as explained in “Launching User Management Console” on page 33.
2In the Native Directory node in the Object Palette, select Delegated Lists.
3Search for the delegated list to modify. See “Searching for Users, Groups, Roles, and Delegated Lists” on
page 34.
Delegated lists that meet the search criterion are listed on the Browse tab.
4Right-click the delegated list and select Delete.
5Click OK in the confirmation dialog box.
Viewing Delegated Reports
Delegated reports contain information about the users and groups assigned to the selected
delegated lists and the delegated administrators to whom the list is assigned.
Shared Services Administrators can generate and view delegated reports on all delegated lists.
Delegated Administrators can generate reports on the delegated lists they created and the
delegated lists assigned to them.
➤To view delegated reports:
1Launch User Management Console, as explained in “Launching User Management Console” on page 33.
2In Native Directory in Object Palette, right-click Delegated List, and select View Delegated Reports.
The View Delegated Report screen opens.
3In Delegated List Name, enter the name of the list for which the report is to be generated. Use * as wildcard
for pattern searches.
4In Managed By, enter the user ID of the Delegated Administrator whose assignments in the specified list
are to be reported. Use * as wildcard for pattern searches.
5Click Create Report.
6Click Cancel to close the report or Print Preview to preview the report.
If you preview the report:
Creating Delegated Administrators 77

a. Click Print to print the report.
b. Click Close to close the View Report window.
78 Delegated User Management

7Managing Native Directory
In This Chapter
About Native Directory.............................................................................................................79
Managing Native Directory Users.................................................................................................81
Managing Native Directory Groups...............................................................................................84
Managing Roles....................................................................................................................88
Changing Native Directory root User Password..................................................................................91
Backing Up the Native Directory Database......................................................................................91
Synchronizing Native Directory Database with the Shared Services Repository .............................................93
Recovering Native Directory Data.................................................................................................93
Setting Up Native Directory for High Availability and Failover .................................................................94
Migrating Native Directory.........................................................................................................99
About Native Directory
Shared Services uses Native Directory to store user provisioning data and a relational database
to store product registration data.
After the initial logon to a Hyperion product, the product directly queries Native Directory for
user provisioning information. Hyperion products can function normally only if Native
Directory is running.
User Management Console displays a list of users and groups for each configured user directory,
including Native Directory. These lists are used to provision users and groups against application
roles.
User Management Console is the central administration point for Native Directory, the default
user directory that is installed with Shared Services. Other user directories are administered
through their own administration screens.
Installation Location
By default, Native Directory is installed to
<Hyperion_Home>/SharedServices/
<HSS_version>
/openLDAP.
Examples:
●C:\Hyperion\SharedServices\9.3.1\openLDAP (Windows)
About Native Directory 79

●/vol1/Hyperion/SharedServices/9.3.1/openLDAP (UNIX)
The install location of Native Directory is referred to as <
openLDAP_Home
> throughout this
document.
Native Directory data is stored in <
openLDAP_Home
>/var/openldap-data, and utilities are
stored in <
openLDAP_Home
>/bdb/bin.
By default, Native Directory is deployed to port 58089 as a process (UNIX) or a service
(Windows).
Default Users and Groups
Native Directory, by default, contains one user account (admin, with password as the default
password). Using this account, you can perform all Native Directory and Shared Services
administration tasks.
All Shared Services users belong to the WORLD group, the only default Native Directory group.
WORLD is a logical group. All Shared Services users inherit any role assigned to this group. A
user gets the sum of all permissions assigned directly to that user as well as those assigned to the
user's groups (including WORLD group).
If Shared Services is deployed in delegated mode, the WORLD group contains groups as well as
users. If the delegated list of a user contains the WORLD group, then the user can retrieve all
users and groups during search operations.
Starting Native Directory
By default, Native Directory is installed as a Windows service or UNIX process.
Starting Native Directory in Normal Mode
On Windows, you can start Native Directory by starting Hyperion S9 OpenLDAP service from
the Services window, or by executing <
openLDAP_Home
>startService.bat.
On UNIX systems, run <
openLDAP_Home
>/startOpenLDAP script to start the process.
Starting Native Directory in Debug Mode
➤To start Native Directory in debug mode:
1Using a command prompt window, navigate to <
openLDAP_Home
>.
2Execute the following command:
slapd —d 1.
80 Managing Native Directory

Stopping Native Directory
On Windows, you can stop Native Directory by stopping Hyperion S9 OpenLDAP service from
the Services window, or by executing <
openLDAP_Home
>stopService.bat.
On UNIX systems, run <
openLDAP_Home
>/stopOpenLDAP script to stop the Native Directory
process.
Managing Native Directory Users
Shared Services Administrators or Directory Managers can perform the following tasks to
manage Native Directory user accounts:
●“Creating Users” on page 81
●“Modifying User Accounts” on page 82
●“Deactivating User Accounts” on page 83
●“Deleting User Accounts ” on page 84
●“Provisioning Users and Groups” on page 101
●“Deprovisioning Users and Groups” on page 102
●“Generating Provisioning Reports” on page 102
Note:
Users in external user directories cannot be managed from User Management Console.
Creating Users
➤To create users:
1Launch User Management Console, as explained in “Launching User Management Console” on page 33.
2In the Native Directory node in the Object Palette, right-click Users, and select New.
3In the Create User screen, enter the required information.
Table 14 Create User Screen
Label Description
User Name A unique user identifier as per the naming conventions of your organization (for example, first
name initial followed by last name, as in jyoung)
User names can contain any number or combination of characters.
You cannot create identical user names, including names that are differentiated only by number
of spaces. For example, you cannot create user names user 1 (with one space between
user and 1) and user 1 (with two spaces between user and 1).
First Name First name of the user (optional)
Managing Native Directory Users 81

Label Description
Last Name Last name of the user (optional)
Description Description of the user (optional)
Email Address Email address of the user (optional)
Password The password for this user account. Passwords are case-sensitive and can contain any
combination of characters.
Confirm Password The entry in the Password text box
4Optional: To add the user to one or more groups, click Next.
a. On the Group Membership page, in Search for Groups, type the name of the group to
assign to the user (type * to list all available groups).
b. Click Go.
c. From Available Groups, select one or more groups.
d. Click Add.
The selected groups are listed in Assigned Groups list.
e. Optional: To unassign a group, from Assigned Groups list, select the group and click
Remove. To unassign all groups, click Reset.
5Click Finish.
6Click Create Another to create another user or OK to close the Create User screen.
Modifying User Accounts
For the default admin account, you can only modify e-mail address, password, and group
membership. For all other user accounts, you can modify any property.
➤To modify user accounts:
1Launch User Management Console, as explained in “Launching User Management Console” on page 33.
2In the Native Directory node in the Object Palette, select Users.
3Search for user account. See “Searching for Users, Groups, Roles, and Delegated Lists” on page 34.
A list of users that meet the search criterion is displayed on the Browse tab.
4Right-click the user account and select Properties.
The User Properties screen opens.
Note:
The User Properties screen displays the Managed By tab if Shared Services is deployed in
Delegated Administration mode.
5On the General tab, modify one or more user properties.
82 Managing Native Directory

See Table 14 for descriptions of the properties that you can modify.
6Optional: Modify the user's associations with Native Directory groups.
a. In Search for Groups box on the Member Of tab, type the name of the group to assign to
this user (type * to list all available groups), and click Go.
b. From Available Groups, select one or more groups to assign to the user, and click Add.
The selected groups are listed in Assigned Groups.
To remove an assigned group, from Assigned Groups, select the group to remove, and
click Remove.
7To view the delegated administrators assigned to the user, open the Managed By tab, which is available only
if Shared Services is deployed in Delegated Administration mode.
8Click Save.
Deactivating User Accounts
You can deactivate user accounts that should not have access to Hyperion applications. Account
deactivations are, typically, temporary suspensions where the Native Directory administrator
hopes to reactivate the accounts in the future.
●Inactive user accounts cannot be used to log on to Hyperion applications, including User
Management Console.
●Group associations of inactive accounts are maintained and remain visible to Native
Directory administrators.
●Role associations of inactive accounts are maintained.
●Inactive user accounts are not displayed on the product-specific access-control screens of
items for which access is disabled.
●Inactive user accounts are not deleted from Native Directory.
Note:
The admin account cannot be deactivated.
➤To deactivate user accounts:
1Launch the User Management Console, as explained in “Launching User Management Console” on page
33.
2In the Native Directory node in the Object Palette, right-click Users, and select Show Active to list all user
accounts you can deactivate.
To search for a specific user account to deactivate, see “Searching for Users, Groups, Roles, and
Delegated Lists” on page 34.
3Right-click the user account, and select Deactivate.
Managing Native Directory Users 83

Activating Inactive User Accounts
Activating inactive user accounts reinstates all associations that existed before the accounts were
deactivated. If a group of which the inactive user account was a member was deleted, the roles
granted through the deleted group are not reinstated.
➤To activate deactivated user accounts:
1Launch User Management Console, as explained in “Launching User Management Console” on page 33.
2In the Native Directory node of the Object Palette, right-click Users, and select Show Inactive to list all
inactive user accounts you can activate.
To search for a specific user account to activate see “Searching for Users, Groups, Roles, and
Delegated Lists” on page 34.
3Right-click the user account, and select Activate.
Deleting User Accounts
Deleting a user account removes the user’s associations with Native Directory groups, the role
assignments of the user, and the user account from Native Directory.
Note:
The admin account cannot be deleted.
➤To delete user accounts:
1Launch User Management Console, as explained in “Launching User Management Console” on page 33.
2From the Native Directory node of the Object Palette, click Users.
3Search for a user account. See “Searching for Users, Groups, Roles, and Delegated Lists” on page 34.
A list of users that meet the search criterion is displayed on the Browse tab.
4Right-click the user account, and select Delete.
Managing Native Directory Groups
Native Directory users can be grouped based on common characteristics. For example, users
can be categorized into groups such as staff, managers, and sales based on function, and
Sales_West and Managers_HQ, based on location. A user can belong to one or more groups.
Native Directory groups can contain other groups and users from user directories configured
on Shared Services.
Group affiliations of a user are important considerations in the authorization process. Typically,
groups, rather than individual user accounts, are used to facilitate the provisioning process.
Tasks performed by Shared Services administrators or directory managers:
84 Managing Native Directory

●“Creating Groups” on page 85
●“Modifying Groups” on page 86
●“Deleting Groups” on page 88
●“Provisioning Users and Groups” on page 101
●“Deprovisioning Users and Groups” on page 102
●“Generating Provisioning Reports” on page 102
Note:
Groups on external user directories cannot be managed from User Management Console.
Creating Groups
Native Directory groups can contain users and groups from any user directories configured on
Shared Services, including Native Directory. Groups that contain other groups are known as
nested groups.
Each component group of a nested group used in provisioning inherits all roles assigned to the
nested group. Similarly, users assigned to a group inherit the roles assigned to the group.
When a group from an external user directory is added to a Native Directory group, Shared
Services creates a reference in the database to establish the relationship.
➤To create Native Directory groups:
1Launch User Management Console, as explained in “Launching User Management Console” on page 33.
2In the Object Palette, right-click Groups, and select New.
3For Name in the Create Group screen, enter a unique group name.
Group names are not case-sensitive.
4Optional: Enter a group description.
5Perform an action:
●To create the group without adding groups or users, click Finish, and go to step 10.
●To create a nested group or assign users to the group, click Next.
The Group Members tab is displayed.
6Create a nested group. To skip this step, click Next.
a. In Search for Groups, enter the criterion for retrieving groups. Use * (asterisk) as the
wildcard to retrieve all available groups.
b. In Directory, select the user directory from which to retrieve groups.
All configured user directories are listed in the Directory list.
c. Click Go.
Groups that match the search criterion are listed under Available Groups.
Managing Native Directory Groups 85

d. From Available Groups, select the groups to nest within the new group.
e. Click Add.
The selected groups are listed under Assigned Groups list.
To remove an assigned group, from Assigned Groups, select the group to remove and click
Remove. To remove all assigned groups, click Reset.
f. Optional: To retrieve and assign groups from other user directories, repeat Steps a-e.
7To create the group without adding users, click Finish. To add uses to the group, click Next.
The User Members tab is displayed.
8To assign users to the group:
a. In Search for Users, enter the search criterion. Use * (asterisk) as the wildcard to retrieve
all users.
b. In Directory, select the user directory from which to retrieve users.
All configured user directories are listed under Directory.
c. Click Go.
User accounts matching the search criterion are listed under Available Users.
d. From Available Users, select one or more users to add to the group.
e. Click Add.
The selected user accounts are listed under Assigned Users. To remove a selected user,
from Assigned Users, select the user to remove and click Remove. To remove all selected
users, click Reset.
f. Optional: To retrieve and assign users from other user directories, repeat Steps a-e .
9Click Finish.
10 From the confirmation screen, select Create Another (to create another group) or select OK (to return to
the Browse tab).
Modifying Groups
You can modify the properties of all Native Directory groups except WORLD (the container for
all users and groups within Native Directory). If you remove a subgroup from a nested group,
the role inheritance of the subgroup is updated. Similarly, if you remove a user from a group,
the role inheritance of the user is updated.
Note:
You cannot modify the settings of the WORLD group.
➤To modify groups:
1Launch User Management Console, as explained in “Launching User Management Console” on page 33.
86 Managing Native Directory

2In the Native Directory node of the Object Palette, select Groups.
3Search for a group. See “Searching for Users, Groups, Roles, and Delegated Lists” on page 34.
A list of groups that meet the search criterion is displayed on the Browse tab.
4Right-click a group, and select Properties.
The Group Properties screen is displayed.
Note:
The Group Properties screen displays the Managed By tab if Shared Services is deployed in
Delegated Administration mode.
5If you want to modify general properties of the group, on the General tab, edit the name and description.
6If you want to modify group assignments, open the Group Members tab and perform one or both actions:
a. To add groups to the group:
●In Search for Groups, enter the search criterion. Use * (asterisk) as the wildcard to
retrieve all groups.
●In Directory, select the user directory from which to retrieve groups.
●Click Go.
●From Available Groups, select one or more groups, and click Add.
Selected groups are listed in the Assigned Groups list. To remove a selected group,
from Assigned Groups, choose the group and click Remove. To undo all your actions
in this tab, click Reset.
●Optional: To retrieve and assign groups from other user directories, repeat this
procedure.
b. To remove groups from the group:
●From Assigned Groups, select one or more groups.
●Click Remove.
Removed groups are listed in the Available Groups list.
7If you want to modify user assignments, open the User Members tab and perform one or both actions:
a. To add users to group:
●In Search for Users, enter the search criterion. Use * (asterisk) as the wildcard to
retrieve all available user accounts.
●In Directory, select the user directory from which to retrieve user accounts.
All configured user directories are listed in the Directory list.
●Click Go.
●From Available Users, select one or more users to assign to the group.
●Click Add.
The selected users are listed in Assigned Users list.
Managing Native Directory Groups 87

To remove an assigned user, from Assigned Users, select the user and click Remove.
To undo all your actions in this tab, click Reset.
●Optional: To retrieve and assign users from other user directories, repeat this
procedure.
b. To remove users from the group:
●From Assigned Users, select one or more users.
●Click Remove.
8To view the delegated administrators assigned to the group, open the Managed By tab, which is available
only if Shared Services is deployed in Delegated Administration mode.
9Click Save.
Deleting Groups
Deleting a group removes the group’s associations with users and roles and removes the group’s
information from Native Directory but does not delete the users or subgroups assigned to the
deleted group.
➤To delete groups:
1Launch User Management Console, as explained in “Launching User Management Console” on page 33.
2From the Object Palette, select Groups.
3Search for the group to delete. See “Searching for Users, Groups, Roles, and Delegated Lists” on page 34.
A list of groups that meets the search criterion is displayed on the Browse tab.
4Right-click the group, and select Delete.
Managing Roles
Roles define the operations that users can perform in specific applications.
Application roles from all registered Hyperion applications can be viewed but not updated or
deleted from User Management Console. Tasks performed by Shared Services Administrators:
●“Creating Aggregated Roles” on page 89
●“Modifying Aggregated Roles” on page 90
●“Deleting Aggregated Roles” on page 90
●“Generating Provisioning Reports” on page 102
Note:
You can provision newly created users and groups from LDAP-enabled user directories,
including MSAD. However, the roles provisioned to the new users and groups are available to
the users (become effective) only after Shared Services refreshes its cache. By default, the cache
88 Managing Native Directory

refresh interval is set to 60 minutes, which can be modified. See “Overriding Cache Refresh
Interval for MSAD and other LDAP-Enabled User Directories” on page 58.
Creating Aggregated Roles
To facilitate administration and provisioning, Shared Services Administrators can create
aggregated roles that associate multiple product-specific roles with a custom Shared Services
role. Users with Shared Services Provisioning Manager role can create aggregated roles for the
product for which they are Provisioning Managers. Shared Services Administrators can create
aggregated roles for all Hyperion products.
For information on aggregated roles, see “Aggregated Roles” on page 17.
Note:
You can create roles only after at least one Hyperion application has been registered with Shared
Services.
➤To create aggregated roles:
1Launch User Management Console, as explained in “Launching User Management Console” on page 33.
2From the Object Palette, right-click Roles, and select New.
The Create Role screen is displayed.
3For Name, enter a role name. Role names that contain special characters are not supported. Role names
should not start or end with a \ (backslash). See “Using Special Characters” on page 61 for more information.
4Optional: For Description, enter a role description.
5From Product Name, select the product for which to create the role.
This list includes all Hyperion applications registered with Shared Services.
6Click Next.
7On the Role Members tab, find the roles to add.
●To retrieve all roles from the selected application, click Go.
●To search for a role, enter the role name in Search for Roles and click Go. Use * (asterisk)
as the wildcard in pattern searches.
8From Available Roles, select the application roles to assign.
9Click Add.
The selected roles are listed in Assigned Roles list.
To remove a selected role, from Assigned Roles, select the role and click Remove. To undo all
your actions in this tab, click Reset.
10 Click Finish.
Managing Roles 89

Modifying Aggregated Roles
You can modify only aggregated roles; default application-specific roles cannot be modified
from Shared Services. You may change all role properties except the product name.
➤To modify aggregated roles:
1Launch User Management Console, as explained in “Launching User Management Console” on page 33.
2In the Object Palette, select Roles.
3Retrieve an aggregated role. See “Searching for Users, Groups, Roles, and Delegated Lists” on page 34.
4Right-click the role, and select Properties.
The Role Properties screen is displayed.
5If you want to modify general properties of the role, on the General tab, edit the name and description.
6If you want to modify role member assignments, open the Role Members tab, and perform one or both
actions:
a. To add role members:
●Retrieve the roles to add.
❍To retrieve all roles, click Go.
❍To retrieve a specific role, enter the role name in Search for Roles and click Go.
Use * (asterisk) as the wildcard in pattern searches.
●From Available Roles, select one or more roles.
●Click Add. The selected roles are listed under Assigned Roles.
To remove a selected role, from Assigned Roles, select one or more roles and click
Remove. To undo your actions in this tab, click Reset.
b. To remove role assignments:
●From Assigned Roles, select one or more roles to remove.
●Click Remove.
7Click Save.
Deleting Aggregated Roles
You can delete aggregated roles that are created from Shared Services. You cannot delete
application-specific roles.
➤To delete aggregated roles:
1Launch User Management Console, as explained in “Launching User Management Console” on page 33.
2In the Object Palette, select Roles.
3Retrieve an aggregated role.
See “Searching for Users, Groups, Roles, and Delegated Lists” on page 34.
90 Managing Native Directory

A list of roles that meet the search criterion is displayed on the Browse tab.
4Right-click a role, and select Delete.
5In the confirmation dialog box, click OK.
Changing Native Directory root User Password
Shared Services Administrators can change the password of the Native Directory root user
account, which provides complete control over Native Directory. The default root password is
hard-coded in a file and is not visible to users.
root, the most powerful Native Directory user account, provides complete control over Native
Directory. The password of the root user account is stored in a file. Native Directory does not
provide an interface to change this password. To improve security, Shared Services provides a
screen to change the root password. If you update the password, Shared Services stores an
encrypted version of the password in CSS.xml. The updated password takes effect after you
restart Native Directory and Shared Services.
Note:
Only a user provisioned with Shared Services Administrator role can change the root password.
➤To update Native Directory root password:
1Launch User Management Console, as explained in “Launching User Management Console” on page 33.
2From Administration, select Change Native Directory Password.
3In Current Password, enter the existing root account password. This field is automatically populated if
the default password has not been changed previously.
4In New Password and Confirm Password, enter the new password for root account.
5Click Finish.
6Restart Native Directory by restarting the Hyperion S9 OpenLDAP Windows service or UNIX process.
7Restart Shared Services.
Backing Up the Native Directory Database
The Native Directory database must be backed up periodically to recover from loss of
provisioning data due to media failures, user errors, and unforeseen circumstances. Hyperion
recommends that you regularly back up this database.
Best Practices
Hyperion recommends monthly cold backups of the Native Directory database and Shared
Services repository. Perform hot backups daily to supplement the cold backups.
Changing Native Directory root User Password 91

●Schedule hot backups when database usage is at its lowest.
●Back up the Shared Services repository and Native Directory database at the same time so
that backup is in sync.
●Store backup for disaster recovery.
●Test backup and recovery procedures to ensure that the process works.
Hot Backup
Regular incremental backups of the Native Directory database can be performed without
shutting down Native Directory. Known as hot backups, they do not interfere with the
availability of Shared Services.
Use backup.bat (Windows) or backup.sh (UNIX) to schedule daily hot backups. This
Hyperion-supplied backup file is stored in <
Hyperion_Home
>/SharedServices/
<hss_version>
/server/scripts; for example C:\Hyperion\SharedServices\9.3.1
\server\scripts (Windows) or /vol1/Hyperion/SharedServices/9.3.1/server/
scripts (UNIX).
See Hyperion Shared Services Installation Guide for information on the files and directories that
are backed up.
Note:
This procedure backs up Shared Services configuration files and Native Directory.
➤To run a hot backup:
1Using a command prompt window, navigate to <
Hyperion_Home
>/SharedServices/
<hss_version>
/server/scripts.
2Execute the following command.
●Windows: backup.bat <
backup_directory
>
●UNIX: backup.sh <
backup_directory
>
where
backup_directory
indicates the path of the directory where the backup is to be
stored.
3Monitor the backup process to ensure that it runs successfully.
Cold Backup
Cold backups are performed after shutting down Native Directory.
92 Managing Native Directory

Note:
Data in the Native Directory database is synchronized with the data available in the Shared
Services repository. Hyperion recommends that you back up the Shared Services repository
along with the Native Directory database.
➤To back up Native Directory database:
1Stop Native Directory service or process.
2Copy <openLDAP_Home> into a secure location.
Synchronizing Native Directory Database with the Shared
Services Repository
The database configured with Shared Services stores information related to product registration.
The Native Directory database contains provisioning data for all products. These databases work
in tandem to support Hyperion products.
Data inconsistencies between the databases impact normal operations. Inconsistencies could
occur during manual database update or database upgrades or in replicated Native Directory
environments in which the Native Directory slave has taken over for a failed Native Directory
master. (See “Setting Up Native Directory for High Availability and Failover” on page 94 for
detailed information on Native Directory replication.)
To remove inconsistencies, the Native Directory database must be synchronized with the Shared
Services database. The synchronization process uses the Shared Services database as the master
database to resolve data inconsistencies.
Messages (errors as well as information) related to the operation are recorded in the
SharedServices_syncOpenLDAP.log file. See Chapter 10, “Troubleshooting.”
➤To synchronize the Native Directory database with the Shared Services repository:
1Launch User Management Console, as explained in “Launching User Management Console” on page 33.
2Select Administration > Sync Native Directory.
The Sync Native Directory tab displays the status of the synchronization operation.
3Optional: Click Refresh to update the status.
4Optional: Click View Log to display a log file that details the operations that were performed during the
synchronization process.
Recovering Native Directory Data
To enable SSO and provisioning, Native Directory must be running. If Native Directory service
(Windows) or process (UNIX) fails, causing Native Directory to crash, you must recover the
provisioning data before users can access Hyperion products, including Shared Services.
Synchronizing Native Directory Database with the Shared Services Repository 93
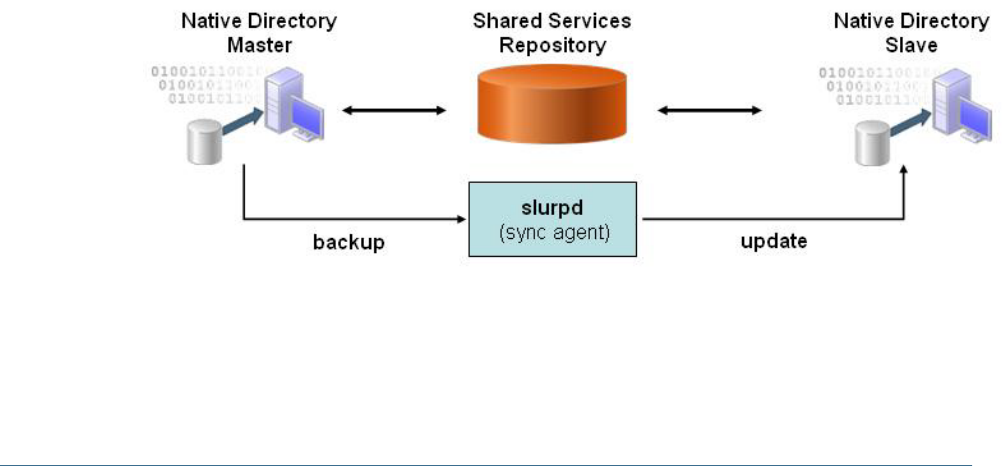
➤To recover provisioning data after a Native Directory crash:
1Verify that the Native Directory service (Windows) or process (UNIX) is not running.
2Open a command prompt (Windows) or console (UNIX) window.
3Navigate to
<openLDAP_Home>\bdb\bin
. For example,
<Hyperion_Home>\SharedServices
\<HSS_version>
\openLDAP\bdb\bin (Windows) or <Hyperion_Home>/SharedServices/
<HSS_version>/openLDAP/bdb/bin (UNIX)
4Run the db_recover utility, using the following command:
db_recover –h <
Path_Native_Directory_data_file
>
For example, db_recover –h ../../var/openldap-data
Where openldap-data indicates the name of Native Directory data file.
5Monitor the utility to ensure that it runs successfully.
6Restart the Hyperion S9 OpenLDAP service or process.
7On the application server, restart Shared Services.
Setting Up Native Directory for High Availability and Failover
Native Directory high availability and failover can be achieved through various scenarios.
●“Out of the Box Deployment” on page 94
●“Cold Standby Deployment” on page 96
●“Hot Standby Deployment” on page 98
Out of the Box Deployment
The out of the box failover scenario involves establishing a master-slave relationship between
two fully synchronized installations of Native Directory running on separate machines.
➤To set up a replicated Native Directory environment:
1Install and configure Shared Services on two server machines (for example, machine1 and machine2).
See the Hyperion Shared Services Installation Guide for instructions.
94 Managing Native Directory

2On the server machines, stop the Hyperion S9 OpenLDAP service or process.
3On the master server (for example, machine1), create a directory (for example, C:\OpenLDAP\logs
in Windows or /apps/OpenLDAP/logs in UNIX) to store the replication log files.
4On the master server, update the <
openLDAP_Home
>\slapd.conf file with the following directives.
●replica directive.
replica uri=ldap://<
slave_host_name
>:58089
binddn= “cn=Replicator,dc=css,dc=hyperion,dc=com”
bindmethod=simple credentials=security
Where
<slave_host_name>
is the name of the slave host machine (for example,
machine2). You can use the IP address of the slave host instead of the DNS name. You must
specify one replica directive for each slave.
Caution!
The second and third lines of the replica directive must be preceded by at least one white
space, to denote that the line is a continuation of the previous line.
●replogfile directive:
replogfile
<path_to_sldap.replog>
Examples:
❍replogfile C:\\OpenLDAP\\logs\\sldap.replog (Windows)
❍replogfile /apps/OpenLDAP/logs/sldap.replog (UNIX)
5On the slave server (for example, machine2), update the
<HSS_home>
\openLDAP\slapd.conf file:
a. Add an updatedn entry.
The values and the binddn entry (in the master slapd.conf file) must be the same.
Example: updatedn=”cn=Replicator,dc=css,dc=hyperion,dc=com”
b. Add the following updateref entry that provides the URI to the Native Directory master.
updateref “ldap://
<master_host_name>
”
For example, updateref “ldap://machine1”.
You can use IP address instead of the DNS name; for example, updateref “ldap://
192.168.167.166”
c. Update the rootdn value to be identical to the updatedn (replicator) value:
rootdn “cn=Replicator,dc=css,dc=hyperion,dc-com”
6Copy Native Directory data from the master server to the slave server .
The default location of Native Directory data is <
openLDAP_Home
>/var/OpenLdap-data.
7On the master server, update the CSS.xml file, which is located in the
<HSS_home>
\config.
Setting Up Native Directory for High Availability and Failover 95

You should include the following slave definition immediately after the <native
name=”Native Directory”> declaration:
<slaves>
<slave>
<url>ldap://
<slave_host_name>
:58089</url>
<type>failover</type>
</slave>
</slaves>
Where
<slave_host_name>
is the name of the slave server machine and 58089 is the Native
Directory port.
8On the master server and then on the slave server, start the Hyperion S9 OpenLDAP service or process.
9On the master server, start the slurpd replication service or process by performing an action:
●On Windows, execute the following command from a command prompt window.
<
openLDAP_Home
>\slurpd -f
<master_slapd_config_file>
Example: C:\Hyperion\SharedServices\9.3.1\OpenLdap\slurpd -f
slapd.conf
●On UNIX, execute the following command after navigating to <
openLDAP_Home
>/usr/
local/libexec:
./slurpd -f <
openLDAP_Home
>/usr/local/etc/openldap/slapd.conf -t
<openLDAP_Home>
/usr/local/var/openldap-slurp —d 1
Example: ./slurpd -f /var/Hyperion/SharedServices/9.3.1/openLDAP/ usr/
local/etc/openldap/slapd.conf -t /app/Hyperion/SharedServices/9.3.1/
openLDAP/usr/local/var/openldap-slurp —d 1
Note:
slurpd must always be running to synchronize data between the master and slave servers.
Cold Standby Deployment
In cold standby deployment (see following illustration), the primary environment consists of
Shared Services (1) including Native Directory (2) and one or more Hyperion products (3). The
standby environment consists of an inactive Native Directory (5) instance. The instances in
primary and standby environments connect to a Native Directory database (6) hosted on the
same physical hard drive that is dual attached to the primary and standby environments.
This deployment uses a hardware load balancer (4) to perform these tasks:
●Detect the failure of the Native Directory instance in the primary environment
●Start the Native Directory service (Windows) or process (UNIX) in the standby environment
●Route all requests to the standby Native Directory instance
96 Managing Native Directory
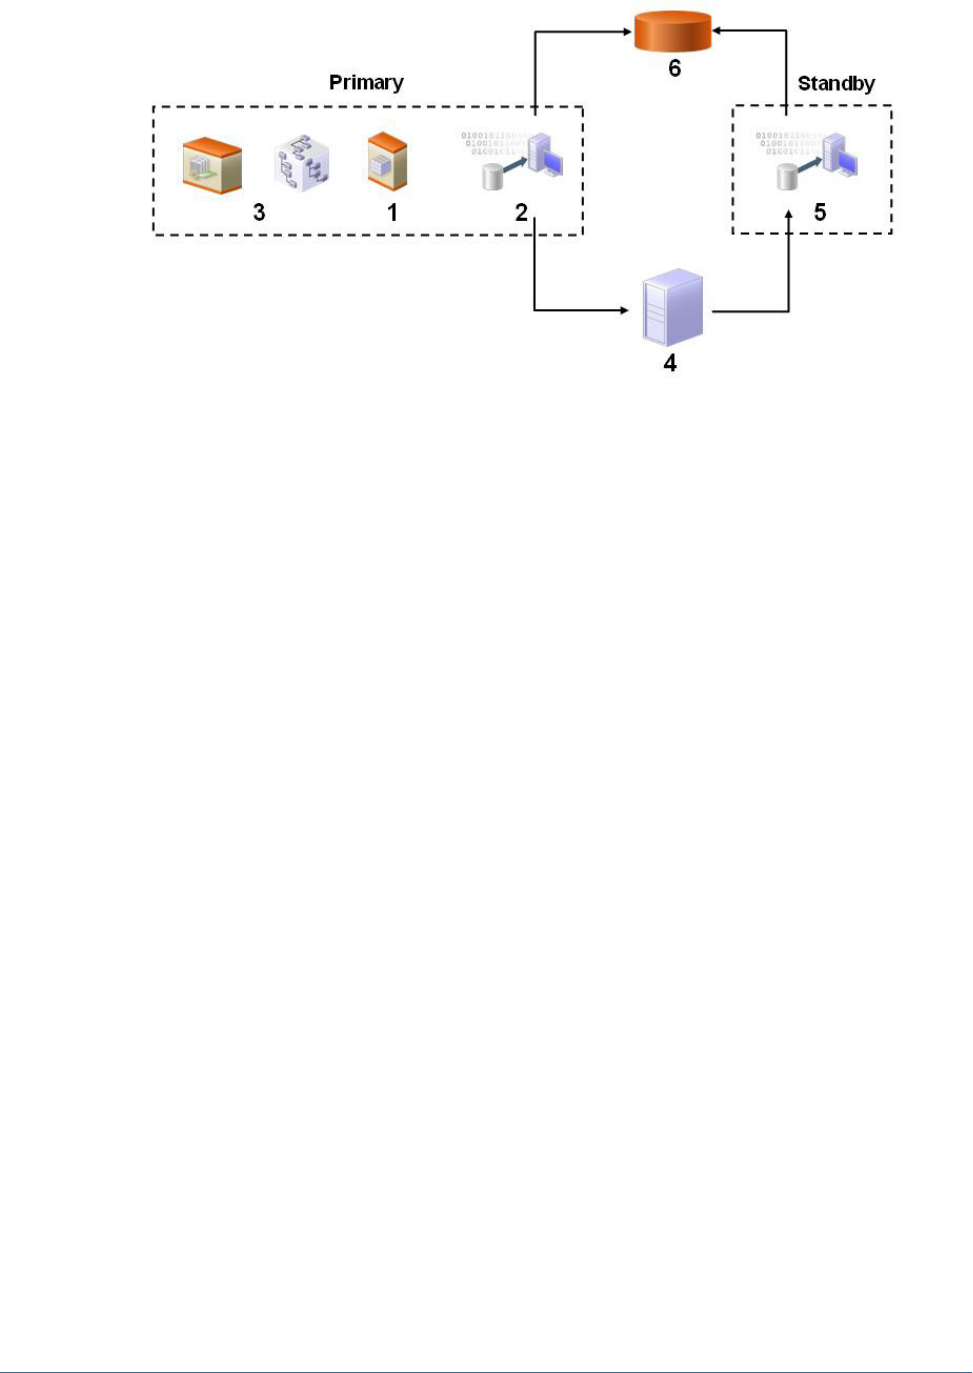
Note:
Native Directory in the standby environment handles all calls until the primary environment is
brought back online and the load balancer is configured to route calls to the primary
environment.
➤To deploy Native Directory for failover in cold standby mode:
1Install Shared Services in the primary and standby environments. Refer to the Hyperion Shared Services
Installation Guide for instructions.
2Configure and deploy Shared Services in the primary environment.
You need not configure or deploy Shared Services in the standby environment.
3Verify that Hyperion S9 OpenLDAP service or process is running in the primary and secondary
environments.
4Stop the Hyperion S9 OpenLDAP service or process in the secondary environment.
5Move Native Directory data to the shared drive or volume. This drive or volume must be visible to the computers
hosting Native Directory instances in primary and secondary environments.
a. Create the var/openldap-data directory structure to store Native Directory data.
b. Move the contents of <
openLDAP_Home
>/var/openldap-data from the primary
environment to the var/openldap-data directory on the shared drive or volume.
6Modify slapd.conf in both primary and secondary environments.
a. Using a text editor, open <
openLDAP_Home
>/slapd.conf.
b. Modify the directory parameter so that it points to the directory where Native Directory
data is stored on the shared drive.
c. Save and close the files.
7Configure the load balancer and monitoring application.
Setting Up Native Directory for High Availability and Failover 97

The load balancer must host a monitoring application capable of checking if Native Directory
is running in the primary environment. This can be achieved by using the LDAP ping mechanism
or by using corporate process monitoring tools (for example, Tivoli and UniCenter).
a. Configure the monitoring application to perform these tasks:
●Use the following directive (embedded in a batch or shell file) to look for an active
Native Directory instance in the primary environment.
ldapsearch –H
ldapurl
cn=*. For example, ldapsearch –H ldap://
myserver:58089/dc=css,dc=example,dc=com cn=*
●Using the following command, start Native Directory in the standby environment if
Native Directory is not active in the primary environment. You must create custom
scripts to start Native Directory.
net start “Hyperion S9 OpenLDAP” (Windows).
b. Configure the load balancer to reroute all requests to the standby environment upon
detecting a failure in the primary environment. You can use DNS name or IP address
redirection for this purpose. See documentation from the load balancer vendor for
information on how to complete this step.
8Start Hyperion S9 OpenLDAP service or process on primary and standby environments.
9Test your deployment.
A simple test would be to stop the Hyperion S9 OpenLDAP service or process in the primary
environment. The monitoring application on the load balancer should restart the process or
service in the standby environment.
Hot Standby Deployment
In hot standby deployment (see following illustration), the primary environment consists of
Shared Services (1) including Native Directory (2), and one or more Hyperion products (3).
The standby environment consists of an active Native Directory (5) instance. Each Native
Directory instance connects to its own database (6). A sync agent (7) backs up Native Directory
in the primary environment and updates it in the standby environment to synchronize the
databases at scheduled intervals.
The sync agent is not a part of Hyperion software distribution. The sync agent is similar to a
corporate scheduling agent or workflow tool that enables executing and monitoring jobs.
Customers must use their own sync agent to initiate backup and restore processes.
Hot Standby Deployment uses a hardware load balancer (4) to perform these tasks:
●Detect the failure of the Native Directory instance in the primary environment
●Route all requests to the standby Native Directory instance upon detecting a failed instance
in the primary environment.
98 Managing Native Directory
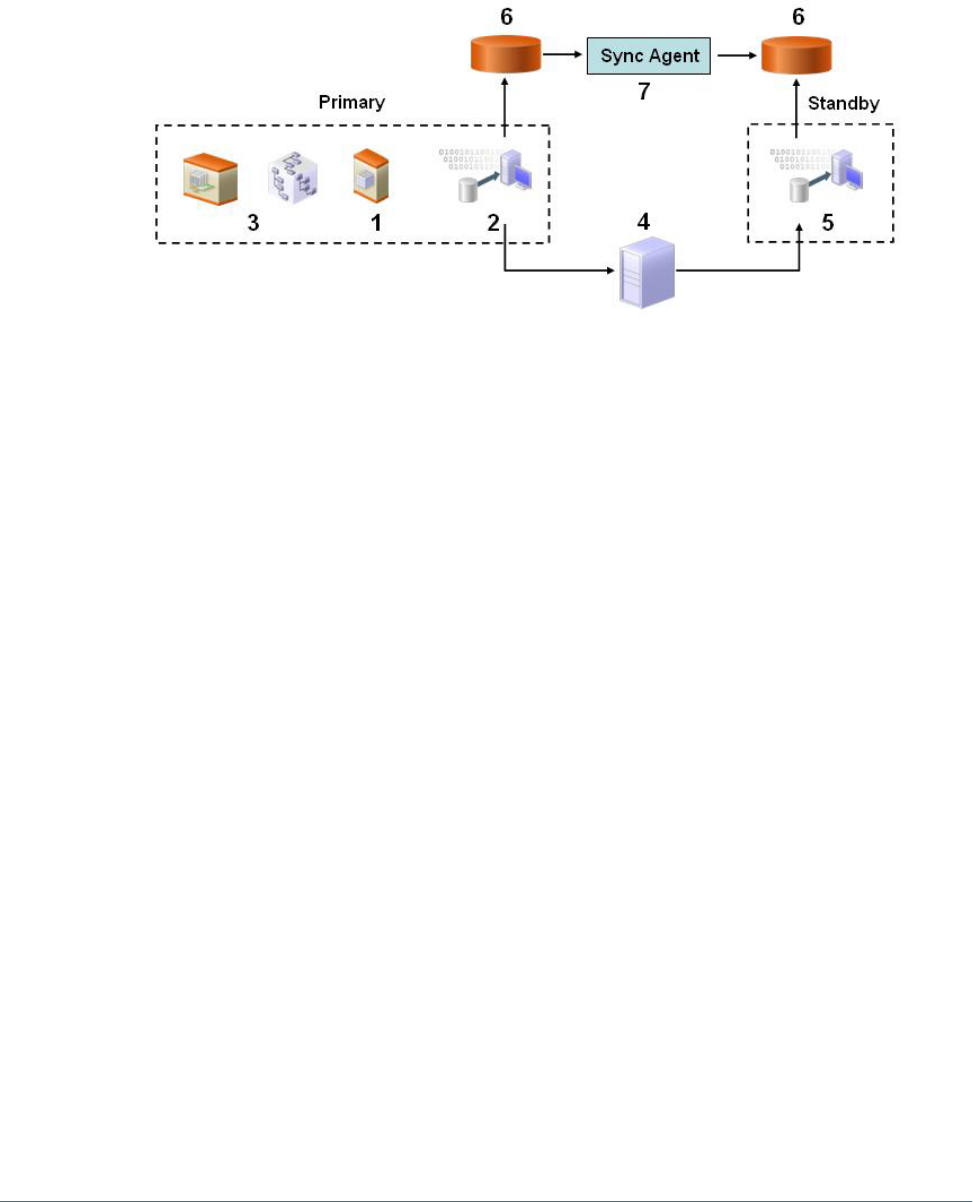
Note:
Native Directory in the standby environment handles all calls until the primary environment is
brought back online and the load balancer is configured to route calls to the primary
environment.
➤To deploy Native Directory for failover in hot standby mode:
1Install Shared Services in the primary and standby environments.
Refer to the Hyperion Shared Services Installation Guide for instructions.
2Configure and deploy Shared Services in the primary environment.
You need not configure or deploy Shared Services in the standby environment.
3Verify that Hyperion S9 OpenLDAP service or process is running in the primary and secondary
environments.
4Configure the process monitoring application with the following directive to check if Native Directory service
(Windows) or process (UNIX) is running in the primary environment:
ldapsearch –H
ldapurl
cn=*. For example, ldapsearch –H ldap://myserver:
58089/dc=css,dc=example,dc=com cn=*
5Configure the load balancer to reroute all requests to the standby environment on detecting a failure in the
primary environment.
You can use DNS name or IP address redirection for this purpose. See documentation from the
load balancer vendor for information on how to complete this step.
6Configure the sync agent (scheduler) to back up Native Directory data from the primary environment and to
update the standby environment.
7Test the configuration.
Migrating Native Directory
The Native Directory database stores security-related data. You must migrate Native Directory
data as a part of migrating Shared Services. See Hyperion Shared Services Installation Guide for
Migrating Native Directory 99

details. Migration is the process of copying an application instance from one operating
environment to another; for example, from development to testing or from testing to
production.
You use the Import/Export utility to migrate Native Directory.
➤To migrate Native Directory:
1On the computer that hosts the source Shared Services server, perform the following actions:
a. Install the Import/Export utility. See “Installing the Import/Export Utility” on page 106.
b. Create the importexport.properties file. “Preparing the Property File” on page
107.
c. Execute the Import/Export utility to export Native Directory data into an export file. See
“Running the Utility” on page 113.
d. Verify that the export file has been created.
2On the computer that hosts the target Shared Services server, perform the following actions:
a. Stop Hyperion Shared Services OpenLDAP service or process.
b. Back up <
openLDAP_Home
>, for example, C:\Hyperion\SharedServices\9.3.1
\opneLDAP (Windows) or /app/Hyperion/SharedServices/9.3.1/openLDAP
(UNIX).
c. Back up the Shared Services repository.
d. Copy the export file from the computer that hosts the source Shared Services server.
e. Install the Import/Export utility. See “Installing the Import/Export Utility” on page 106.
f. Create the importexport.properties file or copy it from the computer that hosts the
source Shared Services server. Ensure that the export file name matches the value of
import.file property. See “Preparing the Property File” on page 107.
g. Validate the export file. If any errors are indicated, fix them and validate the export file
again until it is error free.
h. Execute the Import/Export utility to import Native Directory data from the export file.
See “Running the Utility” on page 113.
100 Managing Native Directory

8Managing Provisioning
In This Chapter
Provisioning Users and Groups .................................................................................................101
Deprovisioning Users and Groups..............................................................................................102
Generating Provisioning Reports................................................................................................102
Importing and Exporting Native Directory Data................................................................................103
Provisioning Users and Groups
Provisioning is the process of granting roles from Hyperion applications to the users and groups
that are available in the configured user directories. Provisioning is managed at the user or group
levels by Provisioning Managers or Shared Services Administrators assigning one or more
Hyperion application roles to a user or group. See “Provisioning (Role-Based Authorization)”
on page 14 for detailed information on how provisioning works.
Note:
Provisioning managers cannot modify their own provisioning data.
Tip:
To facilitate administration, Hyperion recommends that you provision groups rather than users
and that you use aggregated roles.
➤To provision users or groups:
1Launch User Management Console, as explained in “Launching User Management Console” on page 33.
2Find a user or group to provision.
See “Searching for Users, Groups, Roles, and Delegated Lists” on page 34.
3Right-click the user or group, and select Provision.
The Provisioning tab is displayed.
4Optional: Select a view.
Roles can be displayed in a hierarchy (tree) or a list. You must drill down the hierarchy to display
available roles. The list view lists all available roles but does not show their hierarchy.
Provisioning Users and Groups 101

5Select one or more roles, and click Add.
The selected roles appear in Selected Roles.
6Click Save.
A dialog box, which indicates that the provisioning process is successful, is displayed.
7Click OK.
Deprovisioning Users and Groups
Deprovisioning removes all the roles the user or group is assigned from an application. Shared
Services administrators can deprovision roles from one or more applications. Provisioning
managers of applications can deprovision roles from their applications. For example, assume
that the group Sales_West is provisioned with roles from Planning and Financial Management.
If this group is deprovisioned by a Planning Provisioning Manager, only the roles from Planning
are removed.
➤To deprovision users or groups:
1Launch User Management Console, as explained in “Launching User Management Console” on page 33.
2Find a user or group to deprovision.
See “Searching for Users, Groups, Roles, and Delegated Lists” on page 34.
3Right-click the user or group, and select Deprovision.
The Deprovision tab is displayed.
4Select one or more applications, or select all available applications by selecting Check All.
5Click OK.
6Click OK in the confirmation dialog box.
7Click OK in the Deprovision Summary screen.
Generating Provisioning Reports
Shared Services Administrators and Provisioning Managers can use the reporting capabilities of
User Management Console to review the provisioning data of users, groups, and roles.
Provisioning reports can contain information on users and groups assigned to roles from selected
applications and roles from selected applications assigned to one or more users.
Provisioning reports enable administrators to review the access rights and permissions granted
to users and groups across Hyperion applications. Thus, provisioning reports are useful audit
tools, to track user access for compliance reporting.
➤To generate provisioning reports:
1Launch User Management Console, as explained in “Launching User Management Console” on page 33.
102 Managing Provisioning

2In the Object Palette, select a user, group, or role. See “Searching for Users, Groups, Roles, and Delegated
Lists” on page 34.
3Select Administration > View Report.
4Enter report generation parameters.
Table 15 View Report Screen
Label Description
Find All Select the object type (user, group, or role) for which the report is to be generated.
For User or For Role The label of this changes depending on what is selected in Find All.
Enter the name of the user, group, or role for which the report is to be generated. Use *
(asterisk) as the wildcard to specify a pattern.
Show Effective Roles Select Yes to report on all effective roles (inherited as well as directly assigned). Inherited
roles (as opposed to directly assigned roles) are assigned to groups to which the user or group
belongs. Select No to report on only directly assigned roles.
Group By Select how to group the data in the report. Available grouping criteria depend on the selection
in Find All.
In Application Select the applications from which provisioning data is to be reported or select Select All to
report on all applications.
Note: You can report only on the applications belonging to a project.
5Click Create Report.
The report is displayed on the Provision Report tab.
6To print the report:
a. Click Print Preview.
The report is displayed in View Report window.
b. Click Print.
c. Select a printer, and click Print.
d. Click Close.
Importing and Exporting Native Directory Data
This section contains the following topics:
●“Overview” on page 104
●“Use Scenarios” on page 105
●“Installing the Import/Export Utility” on page 106
●“Before Starting Import/Export Operations” on page 106
●“Sample importexport.properties File” on page 106
●“Preparing the Property File” on page 107
Importing and Exporting Native Directory Data 103

●“Product Codes” on page 111
●“Considerations for Setting Filters” on page 112
●“Sequence of Operations” on page 107
●“Preparing the Property File” on page 107
●“Considerations for Setting Filters” on page 112
●“Prerequisites for Running Import/Export Utility from a Remote Host” on page 113
●“Running the Utility” on page 113
●“Import File format” on page 114
❍“XML File Format” on page 114
❍“CSV File Format” on page 118
Overview
The Import/Export utility, a standalone, command-line utility, is primarily a tool to manage
provisioning by facilitating the bulk-provisioning of user and groups with Hyperion product
roles. It allows Shared Services Administrators to use an XML or CSV file as the source file to
create Native Directory users, groups, and provisioning information. Shared Services
Administrators can use the Import/Export utility to export, import, and validate data related to
various entities:
●Users
●Groups and their relationships
●Roles and their relationship with other roles
●User and group provisioning data
●Delegated lists
●Internal identities of users and groups defined in Native Directory
The utility can be used to export data from a source Native Directory into an export file, which
can then be updated imported into a target Native Directory. This utility cannot be used to
import data into external user directories. Hyperion recommends that you run the utility on the
computer that hosts Shared Services.
You can use the Import/Export utility to create, update, replace, and delete users, groups, and
roles that originate from Native Directory. You can also use it to modify groups and role
relationships. The utility also validates the quality of the files used for import operations.
Components of the Import/Export utility:
●Batch (Windows) or shell (UNIX) file to invoke the operation
●Properties file to configure the utility
●Sample XML data file
●Sample CSV (comma-separated values) data file
104 Managing Provisioning

Use Scenarios
●“Move Provisioning Data Across Environments” on page 105
●“Manage Users and Groups in Native Directory” on page 105
●“Bulk Provision Users and Groups” on page 105
Move Provisioning Data Across Environments
Shared Services Administrators can use Import/Export utility to move users, groups and
provisioning data across environments, for example from a development environment to a
production environment.
Moving data across environments involves these steps:
●Exporting the data from the source environment into an XML or CSV file
●Modifying the XML or CSV file, if needed
●Validating the updated XML or CSV file
●Importing the XML or CSV file into the target environment
Manage Users and Groups in Native Directory
Shared Services Administrators can create an XML or CSV file containing user and group data,
which can then be imported into a target Native Directory to manage users and groups. Bulk
creation of users and groups involves these steps:
●Creating a properly formatted XML or CSV file that defines users and groups. See “Preparing
the Property File” on page 107.
●Validating the XML or CSV file
●Importing the XML or CSV file into the target environment
Bulk Provision Users and Groups
Shared Services Administrators can bulk-provision users and groups using the Import/Export
utility. Bulk provisioning involves these steps:
●Exporting the data from Native Directory into an XML or CSV file or creating a properly
formatted XML or CSV file
●Modifying the XML or CSV file to include information on role assignment to users and
groups
●Validating the XML or CSV file
●Importing the XML or CSV file back into the Native Directory to update it
Importing and Exporting Native Directory Data 105

Installing the Import/Export Utility
An archive containing the utility is installed into <
Hyperion_Home
/common/utilities/
CSSImportExportUtility. Extract the contents of the archive into a directory to which the
user who performs the import/export operation has read, write, and execute permissions. The
extraction process creates the importexport directory and copies the required files into it. This
directory is referred to as
<ImpEx_home>
in this discussion.
Before Starting Import/Export Operations
●Create a back up of the source Native Directory by exporting data to an LDAP Data
Interchange File (LDIF).
●Ensure that all user directories configured in Shared Services (including Native Directory)
are running.
●Ensure that Shared Services is running.
●If you are running the Import/Export utility from a server that does not host Shared Services,
verify that the prerequisites indicated in “Prerequisites for Running Import/Export Utility
from a Remote Host” on page 113 are met.
Sample importexport.properties File
#import export operations
importexport.css=file:/C:/Hyperion/deployments/Tomcat5/SharedServices9/
config/CSS.xml
importexport.cmshost=localhost
importexport.cmsport=58080
importexport.username=admin
importexport.password={CSS}MRcYv323uzxGr8rFdvQLcA==
importexport.enable.console.traces=true
importexport.trace.events.file=trace.log
importexport.errors.log.file=errors.log
importexport.locale=en
# importexport.ssl_enabled = true
# export operations
export.fileformat=xml
export.file=C:/exportNew.xml
export.internal.identities=true
export.native.user.passwords=true
export.provisioning.all=true
export.delegated.lists=false
export.user.filter=*@Native Directory
export.group.filter=*@Native Directory
export.role.filter=*
export.producttype=HUB-9.2.0
#export.provisioning.apps=(HUB=Global Roles)
# import operations
import.fileformat=xml
import.file=C:/exportNew.xml
106 Managing Provisioning

import.operation=update
import.failed.operations.file=c:/failed.xml
import.maxerrors=0
Sequence of Operations
●“Preparing the Property File” on page 107
●Exporting the data into an export file. “Running the Utility” on page 113.
●(Optional): Modifying the data in the export file. See “XML File Format” on page 114 and
“CSV File Format” on page 118.
●Validating the import file. See “Running the Utility” on page 113.
●Importing the data. See “Running the Utility” on page 113
Preparing the Property File
The importexport.properties file is a Java properties file that the Import/Export utility uses
during runtime to identify the system components to use for the operation.
The importexport.properties file contains three sections:
●Import export operations: The settings in this section are used during import and
export operations. These settings identify the Shared Services instance and the user
credentials.
●Import operations: This section contains the parameters for import operations.
●Export operations: This section contains the parameters for export operations.
➤To prepare importexport.properties file:
1Make a backup copy of the importexport.properties file. This file is available in the
<ImpEx_home>
/samples directory; for example, C:\hyperion\common\utilities
\CSSImportExportUtility\importexport\samples (Windows) or apps/Hyperion/
common/utilities/CSSImportExportUtility/importexport/samples (UNIX).
Note:
Hyperion recommends that the importexport.properties file used for the operation be
stored in
<ImpEx_home>
.
2Using a text editor, open the importexport.properties file. See “Sample importexport.properties
File” on page 106.
3Update properties. Typically, you should update the properties in import export operations and
one other section, depending on the operation you want to perform:
●Update import operations to import data into Native Directory or to validate an import
file
●Update export operations to export data into an .xml or .csv file.
Importing and Exporting Native Directory Data 107

Table 16 Properties for Import–Export Operations
Property Description
import export operations
importexport.css The URI where the Shared Services configuration file is stored.
For import operations, use the configuration file of the Shared
Services instance that manages the Native Directory instance
into which data is to be imported. For export operation, use
the configuration file of the Shared Services instance that
manages the Native Directory instance from which data is to
be exported.
Note: The CSS.xml file used by Shared Services server is
preferred. However, a local copy in any directory can be used.
Examples:
●http://
MyServer:<port>
/framework/
getCSSConfigFile
Note: If Shared Services is deployed in SSL-enabled
environment, specify the secure URL
●
file:/<HSS_home>
/config/CSS.xml
importexport.cmshost The DNS name or IP address of the machine that hosts Shared
Services.
Example: myserver
importexport.cmsport The Shared Services port number.
Example: 58080
importexport.username User account with which to access Shared Services. This user
must be able to perform update operations in Native Directory.
Example: admin
importexport.password Password of the user identified in
importexport.username. The utility encrypts this
password if you enter a plain text password.
Example: password
importexport.enable.console.trace
s
Indicates whether trace information should be displayed in
the console where the Import/Export utility is executed. Set
this property to true to display trace information in the
console.
Example: true
importexport.trace.events.file The name and location of the trace log file.
If you do not plan to capture trace information in a file, do not
set this value.
Example: impExtrace.log
importexport.errors.log.file The name and location of the error log file that should capture
information on failed transactions during the import or export
operation.
108 Managing Provisioning

Property Description
Note: Import/Export utility does not create the error log if
you do not specify a file name.
Example: impExerror.log
importexport.locale Locale (two-letter language code) to use for the operation.
Supported locales are en, fr, it, de, es, pt_BR, nl, ja,
ko, zh_CN, zh_TW, ru, tr.
The utility attempts to retrieve only data in the specified locale.
If data in the specified locale is not available, Native Directory
data in the default locale of the server where the utility is run
is exported or imported.
Example: en
importexport.ssl_enabled Indicates if the import/export operation uses SSL connection.
Set the value of this property to true for SSL connections.
Example: true
Note: If using SSL connection, make sure that the value of
importexport.cmsport indicates the SSL port where
Shared Services is available.
export operations
export.fileformat The format of the export file. You can export data into XML or
CSV files.
Example: xml
export.file Location of the file into which the data is to be exported.
Import/Export utility creates the file as part of the export
process.
Example: C:/hyperion/common/utilities/
CSSImportExportUtility/importexport/
export.xml
export.internal.identities Indicates whether to export the internal identities of Native
Directory users and groups.
Internal identity, a component of user and group DN, is unique
to each user and group. Shared Services uses an auto-
generated identifier as the internal identity. Hyperion products
utilize the DN for provisioning purposes. Provisioning
information becomes invalid if internal identity is not
available, or if it was changed.
If you are migrating users from one system to another, you
must export the internal identity of users and groups to
preserve provisioning information.
Example: true
export.native.user.passwords Indicates whether to export the encrypted passwords of the
Native Directory users.
Note: You cannot perform the CREATE import operation if
passwords are not specified in the source file.
Importing and Exporting Native Directory Data 109

Property Description
Example: true
export.provisioning.all Indicates whether to export all provisioning data. Set this
property to false to export a subset of the provisioning data
by using these properties in tandem:
●export.projectnames
●export.applicationnames
Alternatively, you can select a subset by setting
export.provisioning.apps.
Note: The values of these properties are ignored if
export.provisioning.all is set to true.
Example: true
export.delegated.lists Indicates whether to export delegated lists.
Example: true
export.user.filter (Optional.) Filter to use to select users for export.
See “Considerations for Setting Filters” on page 112.
Example: *
export.group.filter (Optional.) Filter to use to select groups for export.
See “Considerations for Setting Filters” on page 112.
Example: *
export.role.filter (Optional.) Filter to use to select roles for export.
See “Considerations for Setting Filters” on page 112 for more
information.
Example: *
export.producttype (Optional.) A comma-separated list of product types for which
roles are to be exported (must be specified as <product
code>-<product version>). See “Product Codes” on
page 111.
Example: HAVA–9.3.1
export.provisioning.apps A list of applications (in (projectname=application
name) format) from which provisioning data is to be exported.
Applications names are listed in the User Management
Console.
Example:
((
Planning_Project
=
Plannig_Application_Nam
e
)(
Hyperion_BI+_Project_Name
=
Hyperion
System 9 BI+ Appplication1
))
import operations
import.fileformat The format of the import file. You can import data from XML
or CSV files.
Example: xml
110 Managing Provisioning

Property Description
import.file Location of the file to import or validate.
You can import data from XML or CSV files, created through
an export operations. If you manually create the file, be sure
to format it correctly. Use the sample CSV and XML files
available in
<ImpEx_home>
/samples as reference.
Example: C:/hyperion/common/utilities/
CSSImportExportUtility/importexport/
import.xml
import.operation The option for the import operation. Valid options are:
●create—Users, groups, and roles are created. Group,
role, and provisioning relationships are augmented.
●update—Users, groups, and roles are updated. Group,
role, and provisioning relationships are replaced.
●create/update—A create operation is attempted on
each entity in the file. If the operation fails, an update
operation is attempted.
●delete—Deletes users, groups, and roles. Group, role,
and provisioning relationships are deleted.
Example: create
import.failed.operations.file The name and location of the file where the Import/Export
utility should record information on failed transactions.
Example: impFailedOps.log
import.maxerrors (Optional.) The maximum number of allowable errors during
the import operation. The import operation aborts after the
limit is reached.
Example: 100
4Save and close the file.
Product Codes
Table 17 Hyperion Product Codes
Product Code Product Name
EDS Analytic High Availability Services
ESB Essbase Server
ESBAPP Essbase Application
ESVP Oracle's Hyperion® Smart View for Office
HAVA Reporting and Analysis
HBR Oracle's Hyperion® Business Rules
Importing and Exporting Native Directory Data 111

Product Code Product Name
HFM Financial Management
HP Planning
HPS Oracle's Hyperion® Performance Scorecard – System 9
HSF Oracle's Hyperion® Strategic Finance
HTM Oracle's Hyperion® Translation Manager
HUB Shared Services
Considerations for Setting Filters
The Import/Export utility uses the settings specified in importexport.properties to identify
the components (Shared Services, Native Directory, and other user directories) to use for the
import or export operation.
During an export operation, Import/Export utility exports users, groups, and roles based on the
filters set for each. The filters are independent of each other.
If a user directory is not specified in the export.user.filter or export.group.filter
value, the filter is applicable to only the user directory where the filter condition is first
encountered; other user directories are ignored. User directories are searched (encountered) in
the order specified in the Shared Services configuration file (CSS.xml). Because roles are
available only in Native Directory, directory specification is irrelevant to role filters.
Note:
If a filter is not specified, data is not exported. *, which is the default filter, exports all data.
Examples: Setting the value of export.user.filter, export.group.filter, and
export.role.filter to
k*@Native Directory
exports all Native Directory users, groups,
and roles that have names starting with k.
Setting the value of export.user.filter, export.group.filter, and
export.role.filter to
*
exports all users and groups from the first user directory in the
search order (see “Managing User Directory Search Order” on page 54) and all roles from Native
Directory.
To export users and groups from a specific user directory, set the value of
export.user.filter and export.group.filter to specify the user directory. For example,
to export all users and groups from an LDAP-enabled user directory called LDAP-West, set the
value of these filters to *@LDAP-West.
While updating importexport.properties, you can specify how you want to access trace
information. You can view trace information in the console where the Import/Export utility is
executed or store the information in a trace log file, or choose not to generate trace information.
You can also view trace information in the console and record it in a file.
112 Managing Provisioning

The trace log file can be voluminous. Generate a trace file only if you need to debug the import
or export operation. Use the information in the error log to identify failed transactions in the
trace file.
Note:
Generating trace information will impact the performance of the Import/Export utility
Prerequisites for Running Import/Export Utility from a
Remote Host
If the Import/Export utility is being run from a remote host that does not host Shared Services
server:
●Verify that Sun JDK 1.5 is installed on the machine from which the Import/Export utility is
run.
●Update the JAVA_HOME declaration in CSSExport, CSSImport, and CSSValidate batch
files (Windows) or scripts (UNIX) with the location of Sun JDK 1.5 on the machine from
which the Import/Export utility is run.
Running the Utility
The Import/Export utility comprises three batch files (Windows) or scripts (UNIX).
●CSSExport
●CSSImport
●CSSValidate
Before running the utility verify that Shared Services is running.
➤To run the Import/Export utility:
1Open a command prompt (Windows) or console (UNIX) window.
2Navigate to
<ImpEx_home>
, for example, C:\hyperion\common\utilities
\CSSImportExportUtility\importexport (Windows) or apps/Hyperion/common/
utilities/CSSImportExportUtility/importexport (UNIX).
3Execute a command:
●To export data, run
CSSExport.bat importexport.properties (Windows) or
CSSExport.sh importexport.properties (UNIX)
●To import data, run
CSSImport.bat importexport.properties (Windows) or
CSSImport.sh importexport.properties(UNIX)
Importing and Exporting Native Directory Data 113

●To validate data, run
CSSValidate.bat importexport.properties (Windows) or
CSSvalidatealidate.sh importexport.properties(UNIX)
Note:
If the importexport.properties file is not in the directory from which the command is being
executed, be sure to use the appropriate path in the commands.
Summary information about the operations is displayed in the console. If transactions fail,
review the error log and trace log to determine the cause of the problem and make necessary
corrections.
Import File format
Import source file can be an XML file or a CSV file.
●“XML File Format” on page 114
●“CSV File Format” on page 118
XML File Format
The data to be imported or validated using the Import/Export utility can be formatted using
XML elements and attributes.
Sample XML file:
<?xml version="1.0" encoding="UTF-8"?>
<css_data>
<user id="Test1" provider="Native Directory">
<login_name>Test1</login_name>
<first_name>Test</first_name>
<last_name>User1</last_name>
<description>Test user 1</description>
<email>jch@example.com</email>
<internal_id>39e706a46ad531be:-49fd959f:
112005bb52e:-8000</internal_id>
<password>{SHA}D1E0sCEVJhyNL3ukAwldcwRJCG4=</password>>
</user>
<group id="mygroup01" provider="Native Directory">
<name>mygroup01</name>
<description>mygroupDescr</description>
<internal_id>39e706a46ad531be:-48fd959f:
112005bb52e:-8000
</internal_id>
</group>
<group_members group_id="G1">
<group id="CONNECT" provider="orcl">
<name>CONNECT</name>
<user id=”myUser” provider="orcl">
<login_name>myUser</login_name">
114 Managing Provisioning

</user>
</group_members>
<role id="Administrator" product_type="HUB-9.0.0">
<name>Administrator</name>
<description>Have unrestricted access</description>
</role>
<role_members role_id="Administrator" product_type="HUB-9.0.0">
<role id="Provisioning Manager" product_type="HUB-9.0.0">
<name>Provisioning Manager</name>
</role>
</role_members>
<provision project_name="HUB" application_name="Global Roles">
<roles>
<user id="Test1" provider="Native Directory">
<login_name>Test1</login_name>
</user>
<role id=Administrator" product_type="HUB-9.0.0">
<name>Administrator</name>
<description>Complete access</description>
</role>
</roles>
</provision>
<delegated_list id="test2">
<name>test2</name>
<description>List description</description>
<manager>
<user id="admin" provider="Native Directory">
<login_name>admin</login_name>
</user>
</manager>
<user id="admin" provider="Native Directory">
<login_name>admin</login_name>
</user>
<group id="G1" provider="Native Directory">
<name>G2</name>
</group>
<delegated_list>
</css_data>
Table 18 XML Schema for Import Files
Element Attribute Description and Example
css_data Root element of the file (a container for all other elements).
user A container for attributes of a user.
id A unique user id on the user directory (typically, the same as
login_name)
Example: pturner
provider Name of the source user directory
Example: Native Directory
login_name Login name of the user
Example: pturner
Importing and Exporting Native Directory Data 115

Element Attribute Description and Example
first_name First name of the user
Example: Paul
last_name Last name of the user
Example: Turner
description User description
Example: Administrative User
email Email address of the user.
Example: pturner@example.com
internal_id The auto-generated internal identity of the Native Directory
user.
Example: 911
password Encrypted password of the user.
Example: {SHA}W6ph5Mm5Pz8GgiULbPgzG37mj9g=
group_members A container for the definitions of groups that contain subgroups
or users.
group_id Name of the nested group.
Example: test-group
group A container for group attributes.
id Group identifier. Same as group name
Example: testgroup
provider Source user directory for the group
Example: LDAP-West
name Group name
Example: testgroup
description Group description
Example: Test group
internal_id The auto-generated internal identity of the Native Directory
group.
Example: 611
role A container for the attributes of a role
id Unique role identifier
Example: Basic User
116 Managing Provisioning

Element Attribute Description and Example
product_type Product type to which the role belongs (specified as
<product code>-<product version>)
Example: HAVA-9.3.1
name Unique role name
Example: Basic User
description Role description
Example: Launch and view business rules and
objects.
role_members A container for attributes of aggregated roles.
id Unique role identifier
Example: Basic User
product_type Product type to which the role belongs (specified as
<product code>-<product version>)
Example: HAVA-9.3.1
name Unique role name
Example: Basic User
provision A container for provisioning information for a project-
application combination.
This element contains a definition for each user and/or group
who is provisioned to a role in a specific application that
belongs to a project.
project_name The project to which the application belongs
Example: Business Rules
application name The application to which the role belongs.
Example: local host
Delegated List Container for delegated lists. The users and groups that are
managed through a list must also be defined within this
container.
id Unique list identifier, typically the same as the delegated list
name.
Example: Basic User
name Name of the delegated list.
Example: MyList1
description List description
Example: Delegated list for application
creators
Importing and Exporting Native Directory Data 117

Element Attribute Description and Example
manager Users and groups who manage the list. Each manager definition
may contain user and group definitions. The provider
identified must be the user directory that contains the
manager's account.
CSV File Format
The CSV file format is a tabular data format that contains fields separated by commas and
enclosed in double quotation marks. The Import/Export utility supports only Excel-compliant
CSV files. The CSV files that Excel outputs differ from the standard CSV files:
●Leading and trailing white space is significant.
●Backslashes are not special characters and do not escape anything.
●Quotes inside quoted strings are escaped with double quotes rather than backslashes.
Excel converts data before putting it in CSV format.
Conversions that Excel performs on CSV files:
●Tabs are converted to single spaces.
●New lines are always represented as the UNIX new line ("\n").
●Numbers greater than 12 digits are represented in truncated scientific notation form.
The Import/Export utility categorizes the CSV file into the following entities:
●User
●Group
●Role
●Group_children
●Role_children
●Provisioning
●Delegated list
Each section is identified by two mandatory lines: entity and header. The entity line is identified
by a predefined entity name preceded by the # character. The header line follows the entity line.
The header line is a comma-separated list of predefined attributes for the entity.
The order of attributes in the header line is not significant. However, the data lines, which follow
the header line, must present data in the order in which the header line presents attributes. If
data is not to be specified, you use a comma to indicate that a value is not to be set. The entity
line, header line, and data lines provide the information required for processing.
Boundaries applied to create, update, and delete operations on CSV files:
●Users, groups, and roles are processed one data line at a time.
●Group members are processed with multiple data lines under one header and one parent
group.
118 Managing Provisioning

●Role members are processed with multiple data lines under one header and one parent role.
●User provisioning is processed with multiple data lines under one header and one group or
user.
Error handling is based on the process boundaries. One error is counted for each failure in a
process boundary.
Sample CSV file:
#user
id,provider,login_name,first_name,last_name,description,email,internal_id,p
assword
admin,Native Directory,admin,admin,none,Administrative User,,911,{SHA}**=
MyDemoTest,Native Directory,MyDemoTest,admin,none,Administrative
User,-,MyDemoTest222,{SHA}**
#group
id,provider,name,description,internal_id
G1,Native Directory,G1,,39e71be:-4859f:11252e:-8000
WORLD,Native Directory,WORLD,All users are members of this group,611
#group_children
id,group_id,group_provider,user_id,user_provider
G1,CONNECT,orcl,,
G1,,,myUser,orcl
#group_children
id,group_id,group_provider,user_id,user_provider
G2,G1,Native Directory,,
#group_children
id,group_id,group_provider,user_id,user_provider
G2Test,,,,
#group_children
id,group_id,group_provider,user_id,user_provider
G3,G2,Native Directory,,
#role
id,product_type,name,description
Administrator,HUB-9.0.0,Administrator,Administrators have unrestricted
access
#role_children
id,product_type,role_id,member_product_type
Administrator,HUB-9.0.0,Provisioning Manager,HUB-9.0.0
#provisioning
project_name,application_name,role_id,product_type,user_id,user_provider,gr
oup_id,group_provider
HUB,Global Roles,Administrator,HUB-9.0.0,TestUser1,Native Directory,,
#delegated_list
id,name,description,manager_id,manager_provider,user_id,user_provider,group
_id,group_provider
test2,test2,testDescription,admin,Native Directory,admin,Native Directory,,
test2,test2,testDescription,admin,Native Directory,,,G2,Native Directory
Table containing attribute descriptions:
●Table 19, “User Entity Attributes,” on page 120
●Table 20, “Group Entity Attributes,” on page 121
●Table 21, “Role Entity Attributes,” on page 121
●Table 22, “Group_Children Entity Attributes,” on page 122
Importing and Exporting Native Directory Data 119

●Table 23, “Role_Children Entity Attributes,” on page 122
●Table 24, “Provisioning Entity Attributes,” on page 123
●Table 25 on page 123
The following user delineation in an import CSV file can be used to create the user Test_1 in
a Native Directory with the login name Test_1,first name New1, last name User1, description
Test User, e-mail id Test1@example.com, internal id 39e706a46ad531be:-48fd959f:
112005bb52e:-8001, and encrypted password mypwd:
id,provider,login_name,first_name,last_name,description,email,internal_id,
password
Test_1,,Test_1,New1,User1,Test User,Test1@example.com,
39e706a46ad531be:-48fd959f:112005bb52e:-8001,mypwd
Note:
The utility encrypts plain text passwords specified in the import file.
Table 19 User Entity Attributes
Attribute Description and Example
id A user id
Example: admin
provider (Optional.) Name of the source user directory
Example: Native Directory
login_name Login name of the user
Example: admin
first_name (Optional.) First name of the user
Example: admin
last_name (Optional.) Last name of the user
Example: none
description (Optional.) User description
Example: Administrative User
email (Optional.) Email address of the user
Example: admin@example.com
internal_id The auto-generated internal identity of the Native Directory user.
Example: 911
password The password of the user.
Example: password
120 Managing Provisioning

The following group delineation in an import CSV file can be used to create the WORLD in a
Native Directory with the group id WORLD, description Contains all users, and internal id
611:
id,provider,name,description, internal_id
WORLD,,WORLD,Contains all users,611,
Table 20 Group Entity Attributes
Attribute Description and Example
id Group identifier
Example: testgroup
provider Source user directory for the group
Example: LDAP-West
name Group name
Example: testgroup
description (Optional.) Group description
Example: Test group
internal_id The auto-generated internal identity of the Native Directory group.
Example: 911
The following role delineation in an import CSV file can be used to create an aggregated role in
Native Directory with role id Designer_rep for product hava–9.3.1 (Reporting and Analysis,
version 9.3.1), role name Designer_rep, and description Report Designer. Product type
indicates the product to which the aggregated role belongs.
id,product_type,name,description
Designer_rep,hava–9.3.1,Designer_rep,Report Designer
Table 21 Role Entity Attributes
Attribute Description and Example
id Role identifier
Example: Basic User
product_type Product type (specified as <product code>-<product version>) to which the role
belongs
Example: HBR-4.1.1.1
name Role name
Example: Basic User
description (Optional) Role description
Example: Launch and view Business rules and objects.
Importing and Exporting Native Directory Data 121

The following child group delineation in an import CSV file can be used to create the nested
group childGp1 with group id childGp1. User member of this group is Test1. Both the user
and group are defined in Native Directory:
id,group_id,group_provider,user_id,user_provider
childGp1,childGp1,Native Directory,Test1,Native Directory
Table 22 Group_Children Entity Attributes
Attribute Explanation
id Identifier of the nested group
Example: test-group
group_id Name of the nested group
Example: test-group
group_provider The source user directory of the group.
Example: Native Directory
user_id Unique identifier of a user who belongs to this group
Example: pturner
user_provider The source user directory of the user assigned to the group.
Example: LDAP-West
The following child role delineation in an import CSV file can be used to create the nested role
Designer_rep, which belongs to the product hava–9.3.1 (Reporting and Analysis, version
9.3.1), and is assigned to the user Test1:
id,product_type,role_id,member_product_type
Test1,hava–9.3.1,Designer_rep,hub–9.3.1
Table 23 Role_Children Entity Attributes
Attribute Explanation and Example
id Unique identifier of a user to whom the role is assigned
Example: Test1
product_type Product type (specified as <product code>-<product version>) to which
the role belongs
Example: hava–9.3.1
role_id Unique role identifier
Example: Designer_rep
member_product_type The product type (specified as <product code>-<product version>) to
which the child role belongs.
Example: hava–9.3.1
The following provisioning delineation in an import CSV file can be used to create a role
assignment for application name Global Roles that is assigned to the project test_proj. The
122 Managing Provisioning

role id is Administrator, which belongs to product type HUB-9.0.0. User Test1 and group
Group1 defined in Native Directory are provisioned with this role.
project_name,application_name,role_id,product_type,user_id,user_provider,gr
oup_id,group_provider
HUB,Global Roles,Administrator,HUB-9.0.0,Test1,Native
Directory,Group1,Native Directory
Table 24 Provisioning Entity Attributes
Attribute Description and Example
app_id The application to which the role belongs
Example: WebAnalysis
product_type Product type (specified as <product code>-<product version>) to which the role
belongs
Example: hava–9.3.1
role_id Unique role identifier
Example: Provisioning Manager
user_id Unique identifier of a user who is provisioned to the role
Example: pturner
group_id Unique identifier of a group that is provisioned to the role.
Example: testgroup
The following delegated list definition in an import CSV file can be used to create delegated list
with list id and name testlist, and description my_list. Users admin and Test1 defined in
Native Directory are delegated administrators of this list which allows them to manage group
testGroup defined on Native Directory.
id,name,description,manager_id,manager_provider,user_id,user_provider,group
_id,group_provider
testlist,testlist,my_list,admin,Native Directory,,testGroup,NativeDirectory
testlist,testlist,my_list,Test1,Native Directory,,testGroup,NativeDirectory
Table 25 Delegated List Entity Attributes
Attribute Description and Example
id The list identifier. Typically, the same as the list name.
Example: testlist
name Delegated list name.
Example: testlist
description Delegated list description.
Example: my_list
manager_id Unique identifier of a user or group who manages the list. Each manager must be identified
in a separate definition.
Importing and Exporting Native Directory Data 123

Attribute Description and Example
Example: admin
manager_provider The user directory that stores the manager's account.
Example: Native Directory
user_id Unique identifier of a user member of the list. Each member must be identified in a
separate definition.
Example: pturner
manager_provider The user directory that stores the user member's account.
Example: Native Directory
group_id Unique identifier of a group that is a member of the list. Each member must be identified
in a separate definition.
Example: myGroup
group_provider The user directory that stores the group's account.
Example: Native Directory
124 Managing Provisioning

9Using the Update Native
Directory Utility to Clean Stale
Native Directory Data
In This Chapter
About the Update Native Directory Utility......................................................................................125
Installing the Update Native Directory Utility ..................................................................................126
Running the Update Native Directory Utility...................................................................................126
Product-Specific Updates.......................................................................................................128
About the Update Native Directory Utility
If the external user directory configuration in Shared Services uses an identity attribute that
reflects the location of users and groups (for example, DN), inter-OU move of users and groups
can cause stale data within Native Directory because the Hyperion security system is not
synchronized to be aware of such changes. Hyperion provides the Update Native Directory
Utility to synchronize Native Directory data with the data in configured LDAP-enabled user
directories. Running this utility makes the stale provisioning data usable.
Caution!
If your Native Directory contains stale data, you must run the Update Native Directory Utility
before migrating users and groups to use the unique identity attribute.
The sequence of action for migrating to the unique identity attribute is as follows:
●Run the Update Native Directory Utility to synchronize user and group identities between
Native Directory and user directories. See “Running the Update Native Directory Utility”
on page 126.
●Reconfigure external user directories to use the unique identity attribute. See “Using the
Unique Identity Attribute to Handle Inter-OU Moves in LDAP-Enabled User Directories”
on page 38.
●Restart Shared Services.
The Update Native Directory Utility performs these actions:
●Deletes the user from Native Directory if the user account is not available in the external
user directory
About the Update Native Directory Utility 125

●Deletes user accounts derived from the external user directory if the user directory is
removed from the Shared Services search order
●Updates Native Directory if the user or group in the external user directory is moved from
one OU to another (the OU to which the user or group is moved must be configured in
Shared Services)
Update Native Directory Utility does not update Native Directory if the external user
directory cannot be reached because of configuration or connection problems.
Note:
After migrating user and group information in Native Directory, you must migrate the user
and group information in Hyperion product repositories. See “Product-Specific Updates”
on page 128 for detailed procedures.
Installing the Update Native Directory Utility
The UpdateNativeDir.zip archive containing the Update Native Directory Utility is installed
in <
Hyperion_Home
>/common/utilities/SyncOpenLdapUtility.
➤To install the Update Native Directory Utility:
1Extract UpdateNativeDir.zip to a convenient location, preferably to <
Hyperion_Home
>. This
creates the updateNativedir folder.
2Using a text editor, open updateNativedir.bat (Windows) or updateNativedir.sh (UNIX).
a. Verify that JAVA_HOME points to Sun Java version 1.4.2 or above is available (for example,
<
Hyperion_Home
>/common/JRE/Sun/1.5.0/bin).
b. Save and close updateNativedir.
Running the Update Native Directory Utility
The Update Native Directory Utility synchronizes the data related to all the external user
directories included in the search order in CSS.xml.
➤To run the Update Native Directory Utility:
1Using a command prompt or console window, navigate to the directory where the Update Native Directory
Utility is installed.
2Execute the following command:
●updateNativedir -cssLocation <
location_of _CSS.XML
> [-options]
(Windows)
●updateNativedir.sh -cssLocation <
location_of _CSS.XML
> [-options]
(UNIX)
126 Using the Update Native Directory Utility to Clean Stale Native Directory Data

Where <
location_of _CSS.XML
> identifies the directory or application server location where
the CSS.xml configuration file is stored. Methods to specify this location:
●As an absolute path; for example, C:\Hyperion\deployments\WebLogic9
\SharedServices9\config (Windows) and updateNativedir /app/Hyperion/
deployments/WebLogic9/SharedServices9/config (UNIX)
●As a file located on the application server; for example, <SharedServices URL>/
framework/getCSSConfigFile, where <SharedServices URL> is:
❍http://<
AppServer_hostname
>:<
port
>/interop (non-SSL deployment); for
example, http://myServer:58080/interop/framework/getCSSConfigFile
❍https://AppServer_name:SSL_port/interop (SSL deployment); for example,
updateNativeDir https://myServer:58082/interop/framework/
getCSSConfigFile.
Update Native Directory Utility options are discussed in “Update Native Directory Utility
Options” on page 127.
The utility lists the user providers specified in the search order and queries whether to continue
with the operation.
3Enter 1 to continue running the utility and 0 to cancel the operation.
4Monitor the log files to verify the progress.
5If you plan to migrate to the unique identity attribute, update the external user directory configuration, see
“Using the Unique Identity Attribute to Handle Inter-OU Moves in LDAP-Enabled User Directories” on page
38.
6Restart Shared Services to refresh the cache so that the updates done by the utility are visible to Shared
Services.
Update Native Directory Utility Options
Table 26
Option Description
-nodelete Optional: Use this option to generate CSSMigration-Deleted*.log that lists all the users and
groups that must be deleted from Native Directory because the corresponding identities were removed
from the user directory.
If this option is not set, the utility automatically deletes the user and group information from Native
Directory.
Example: updateNativeDir -cssLocation D:\CSS.xml —nodelete creates
CSSMigration-Deleted_<
time_stamp
>.log.
updateNativeDir -cssLocation D:\CSS.xml creates CSSMigration-
Deleted_<
time_stamp
>.log and also deletes from Native Directorythe users and groups whose
identities are not available in external user directories.
-noprompt Optional: Use this option to invoke silent mode operation. Used for scheduled jobs because no
operator interaction is required.
Running the Update Native Directory Utility 127

Option Description
Example: updateNativeDir -cssLocation D:\CSS.xml –noprompt updates Native
Directory in silent mode.
-noupdate Optional: Use this option if you only want to generate CSSMigration-
Update_<
time_stamp
>.log that lists the users and groups that needs to be updated in Native
Directory. User and group information in Native Directory is not updated if you use this option.
Example: updateNativeDir -cssLocation D:\CSS.xml —noupdate creates
CSSMigration-Update_<
time_stamp
>.log.
updateNativeDir -cssLocation D:\CSS.xml creates CSSMigration-
Update_<
time_stamp
>.log and updates the user and group information in Native Directory.
Update Native Directory Utility Log Files
By default, Update Native Directory Utility log files are created in updateNativedir/logs. If
the utility cannot create updateNativedir/logs, the log files are created in $TMP
\Hyperion-logs or %TEMP%\Hyperion-logs.
●CSSMigration-Ambiguous_<
time_stamp
>.log that lists the identities that were not
updated because more than one similar identities were detected by the utility. Identities
listed in this file must be manually updated.
●CSSMigration-Deleted_<
time_stamp
>.log that lists the deleted external user
directory entries that must be deleted from Native Directory. These entries are automatically
removed from Native Directory if the nodelete option is not set when executing the utility.
●CSSMigration-Updated_<
time_stamp
>.log that lists the Native Directory identities
that needs to be updated. If the -noupdate option is not set when executing the utility, the
utility updates these entries in Native Directory.
●CSSMigration-ignored_<
time_stamp
>.log that lists all the entries on which no action
was taken because they need not be updated.
Product-Specific Updates
Hyperion products must perform steps to update their internal repositories in the following
scenarios:
●Native Directory is updated using Update Native Directory Utility
●Shared Services is reconfigured to use the unique identity attribute. See “Using the Unique
Identity Attribute to Handle Inter-OU Moves in LDAP-Enabled User Directories” on page
38
The following Hyperion products must update their internal repositories:
●“Essbase” on page 129
●“Planning” on page 129
●“Financial Management” on page 130
128 Using the Update Native Directory Utility to Clean Stale Native Directory Data
●“Reporting and Analysis” on page 131
●“Strategic Finance ” on page 132
The following Hyperion products do not need to perform any migration procedures:
●Performance Scorecard
●Hyperion System 9 Analytic High Availability Services
●Oracle's Essbase® Integration Services
●Oracle's Hyperion® Provider Services
●Analytic Deployment Services
Essbase
Caution!
Hyperion recommends that you back up Essbase security file and the data in Native Directory
before starting the migration process. After migrating users and groups to use the new identity
attribute, you cannot revert to the previously used identity attribute. To revert, restore user and
group data in Native Directory and Essbase from the backups.
Before starting Essbase after the upgrade, edit the IDMIGRATION setting in <
Hyperion_Home
>
\AnalyticServices\bin\essbase.cfg to indicate whether to migrate to the new identity
attribute that Shared Services uses.
On starting up, Essbase checks essbase.cfg and performs the action indicated by the
IDMIGRATION setting.
Table 27 IDMIGRATION Syntax
Syntax Description
CHECKANDMIGRATE Default option. Checks for identity attributes that have changed in Shared Services and
updates them in Essbase security.
NOMIGRATION Makes no changes in Essbase security.
FORCEDMIGRATION Updates Essbase users and groups without checking whether identity attributes have
changed.
Planning
Caution!
Hyperion recommends that you back up the user and group data in Native Directory and the
Planning repository before starting the migration process. After migrating users and groups to
use the new identity attribute, you cannot revert to the previously used identity attribute. To
Product-Specific Updates 129

revert, restore user and group data in Native Directory and Planning repository from the
backups.
Note:
After upgrading your system, migrate users and groups to the new identity attribute before
performing any other operation such as loading security or changing existing security settings.
Such changes may be lost during the migration.
Planning stores information about provisioned users and groups in the Planning repository. If
Shared Services was upgraded to use the new identity attribute, you must synchronize the
information in the Planning repository with that in the configured user directories by clicking
Migrate Users/Groups . This button is available in Planning when assigning access to data forms,
members, or task lists.
Note:
HspUserUpdate utility is no longer used to update users.
Financial Management
Caution!
Hyperion recommends that you backup the user and group data in Native Directory and
Financial Management before starting the migration process. After migrating users and groups
to use the new identity attribute, you cannot revert to the previously used identity attribute. To
revert, restore user and group data in Native Directory and Financial Management repository
from the backups.
Financial Management records information about provisioned users and groups in the Financial
Management repository. If Shared Services was upgraded to use the new identity attribute, you
must synchronize the information in the Financial Management repository with that in the
configured user directories.
Note:
After upgrading Financial Management, migrate users and groups to the new identity attribute
before performing any other operation such as loading security or changing existing security
settings. Such changes may be lost during the migration.
Click the Migrate Users button on the Security tab of the Financial Management Configuration
Utility to synchronize the information in the Financial Management repository with that in the
configured user directories.
130 Using the Update Native Directory Utility to Clean Stale Native Directory Data

Migrating Financial Management users is a one-time operation that must be completed before
starting Financial Management after upgrading to Release 9.3.1.
Reporting and Analysis
Caution!
Hyperion recommends that you back up the user and group data in Native Directory and
Reporting and Analysis before starting the migration process. After migrating users and groups
to use the new identity attribute, you cannot revert to the previously used identity attribute. To
revert, restore user and group data in Native Directory and Reporting and Analysis repository
from the backups.
Reporting and Analysis uses the SyncCSSIdentity_BI utility to synchronize user and group
identities stored in its relational database to reflect the identity attribute set in Shared Services.
See “Using the Unique Identity Attribute to Handle Inter-OU Moves in LDAP-Enabled User
Directories” on page 38 and “Running the Update Native Directory Utility” on page 126.
Note:
After upgrading Reporting and Analysis, migrate users and groups to the new identity attribute
before performing any other operation such as loading security or changing existing security
settings. Such changes may be lost during the migration.
Run the SyncCSSIdentity_BI utility only if Shared Services was upgraded to use the new
identity attribute. Do not run the utility if Shared Services does not use the new identity attribute
or if you do not have stale data resulting from inter-OU moves in the user directories. This utility
needs to be run only once after upgrading Shared Services and Reporting and Analysis.
The SyncCSSIdentity_BI utility is installed in <
BIPlus_Home
>/syncCSSId. Execute the
utility after upgrading Reporting and Analysis but before starting Reporting and Analysis
services.
See <
BIPlus_Home
>/syncCSSId/ReadmeSyncCSSId_BI.txt for detailed instructions to
run the SyncCSSIdentity_BI utility. Runtime information from the utility is written into
<
BIPlus_Home
>/syncCSSId/BI_Sync.log .
On successfully executing the utility, the value of
ConfigurationManager.CSSIdSyncState in V8_PROP_VALUE table in Reporting and
Analysis database is set to 0 (for NO_SYNC). Other possible values for this property are 1
(CHECK_AND_SYNC, which is the default value) and 2 (FORCE_SYNC).
If the synchronization state in the database is not 0 (NO_SYNC), and the system determines that
identity synchronization is required, the authentication service writes warning messages to
Hyperion_Home
>/logs/BIPlus/CSSSynchronizer.log. However, Reporting and
Analysis services will run normally.
Product-Specific Updates 131

Strategic Finance
Strategic Finance automatically migrates users to the unique identity attribute used by Shared
Services to resolve issues where domain name or organizational unit changes might result in the
loss of provisioning and object access information.
132 Using the Update Native Directory Utility to Clean Stale Native Directory Data
10 Troubleshooting
In This Chapter
Shared Services Log Files.......................................................................................................133
User Directory Error Codes......................................................................................................134
Troubleshooting Tools and Utilities.............................................................................................134
Shared Services Log Files
Runtime errors and messages are recorded in log files stored on the Shared Services server.
Log File Contains
SharedServices_Security.log Security-related error messages concerning users, groups,
roles, and provisioning operations
SharedServices_Admin.log Messages-related to the User Management Console and any
messages reported during Shared Services runtime
SharedServices_Metadata.log Metadata management and registration-related errors and
messages
SharedServices_Taskflow.log Taskflow-related errors and messages from Common Event
Services
SharedServices_Taskflow_CMDExecute.
log
Taskflow scheduling errors and messages from Common Event
Services
SharedServices_Taskflow_Optimize.lo
g
Taskflow optimization errors and messages from Common Event
Services
SharedServices_SyncOpenLDAP.log Messages from the synchronization of Native Directory with
Shared Services database
SharedServices_Memory_Profiler.log Messages-related to the memory usage by the Common
Administrative Service
SharedServices_Security_Client.log Product-specific messages and errors generated by Hyperion
products
SharedServices_Security_Client.log is located in the Temp directory of the product
using the external authentication client. The location of the Temp directory varies, based on the
application server and platform.
Shared Services Log Files 133

All Shared Services log files are located in
<Hyperion_home>
\logs\SharedServices9.
User Directory Error Codes
Most LDAP-enabled user directories use a standard set of error codes. These error codes and
their description are available at the following Web site:
http://www.directory-info.com/LDAP/LDAPErrorCodes.html.
Error codes specific to MSAD are explained at the following Web site: http://
msdn.microsoft.com/library/en-us/debug/base/system_error_codes.asp
Troubleshooting Tools and Utilities
●“CSSSpy” on page 134
●“WebDAV Browser” on page 134
CSSSpy
CSSSpy is used to validate connections to external user directories and user login. It can also be
used to retrieve user role information and to assess performance. CSSSpy can connect to any
user directory and authenticate a user and perform various Shared Services calls, bypassing
Hyperion products.
CSSSpy is deployed with Shared Services. To launch CSSSpy, use the following URL:
http://<
HSS_hostname
>:
<port>
/interop/cssSpy; for example, http://myServer:
58080/interop/cssSpy where myServer indicates the DNS name of the Shared Services host
machine.
WebDAV Browser
The WebDAV browser helps to view and validate the meta data contained in .product
and .instance files, which are created when an application is registered with Shared Services.
Use the WebDAV browser to diagnose:
●A failed product registration
●A failed application launch from Shared Services
The WebDAV browser is a part of Shared Services installation. To launch WebDAV browser,
use the following URL:
http://<
HSS_hostname
>:
<port>
/interop/content; for example, http://myServer:
58080/interop/content where myServer indicates the DNS name of the Shared Services
host machine.
Use Shared Services Administrator credentials to log on to the WebDAV browser.
134 Troubleshooting
AHyperion Product Roles
In This Appendix
Shared Services Roles...........................................................................................................135
Essbase Roles....................................................................................................................137
Reporting and Analysis Roles...................................................................................................137
Financial Management Roles...................................................................................................139
Planning Roles ...................................................................................................................141
Business Rules Roles............................................................................................................142
Business Modeling Roles........................................................................................................143
Strategic Finance Roles .........................................................................................................143
Transaction Manager Roles .....................................................................................................144
Performance Scorecard Roles ..................................................................................................144
Strategic Finance Roles .........................................................................................................144
Data Integration Management Roles...........................................................................................145
Essbase Provider Services Roles ...............................................................................................145
Shared Services Roles
All Shared Services roles are power roles. Typically, these roles are granted to power users who
are involved in administering Shared Services and other Hyperion products.
Role Name Description
Administrator Provides control over all products that integrate with Shared Services. It enables more
control over security than any other Hyperion product roles and should therefore be
assigned sparingly. Administrators can perform all administrative tasks in User
Management Console and can provision themselves.
This role grants broad access to all applications registered with Shared Services. The
Administrator role is, by default, assigned to the admin Native Directory user, which is
the only user available after you deploy Shared Services.
Directory Manager Creates and manages users and groups within Native Directory.
Do not assign to Directory Managers the Provisioning Manager role because combining
these roles allows Directory Managers to provision themselves.
The recommended practice is to grant one user the Directory Manager role and another
user the Provisioning Manager role.
Shared Services Roles 135

Role Name Description
LCM Manager Runs the Artifact Life-Cycle Management utility to promote artifacts or data across product
environments and operating systems
Project Manager Creates and manages projects within Shared Services
Create Integrations Creates Shared Services data integrations (the process of moving data between
applications) using a wizard.
For Oracle's Enterprise Performance Management Architect, creates and executes data
synchronizations.
Run Integrations Views and runs Shared Services data integrations.
For Performance Management Architect, executes data synchronizations.
Dimension Editor
●Dimension Viewer
●Interactive Editor
Creates and manages import profiles for dimension creation. Also, creates and manages
dimensions manually within the Performance Management Architect user interface or the
Classic Application Administration option.
Required to access Classic Application Administration options for Financial Management
and Planning using Web navigation.
Dimension Viewer can read or view dimensions. This role automatically maps to the
Dimension Reader access on dimensions.
Interactive Editor can modify members within a dimension, and grants dimension writer
access to all dimensions. Does not allow users to delete dimensions.
Note: Dimension Viewer and Interactive Editor roles are reserved for future use.
Application Creator
●Analytic Services Application Creator
●Financial Management Application Creator
●Planning Application Creator
●External Application Creator
Creates and deploys Performance Management Architect applications. Users with this
role can create applications, but can change only the dimensions to which they have
access permissions.
Required, in addition to the Dimension Editor role, for Financial Management and
Planning users to be able to navigate to their product’s Classic Application Administration
options.
When a user with Application Creator role deploys an application from Performance
Management Architect, that user automatically becomes the application administrator
and provisioning manager for that application.
The Application Creator can create all applications.
The Analytic Services Application Creator can create Generic applications.
The Financial Management Application Creator can create Consolidation applications
and Performance Management Architect Generic applications. To create applications,
the user must also be a member of the Application Creators group specified in Financial
Management Configuration Utility.
The Planning Application Creator can create Planning applications and Performance
Management Architect Generic applications.
The External Application Creator can create external views and export application views
but cannot export the library.
Note: External Application Creator role is reserved for future use.
136 Hyperion Product Roles

Essbase Roles
Additional Shared Services roles are required for Performance Management Architect. See
“Shared Services Roles” on page 135.
Role Description
Power Roles
Administrator Grants full access to administer the server, applications and databases
Application Manager Creates, deletes and modifies databases, and application settings within the assigned application. Includes
Database Manager permissions for the databases within the assigned application
Create/Delete Application Creates and deletes applications and databases within applications. Includes Manager permissions for the
applications and databases created by this user
Database Manager Manages the databases, database objects, locks and sessions within the assigned application
Load/Unload Application Start and stops an application or databases
Interactive Roles
Calc Calculates, updates and reads data values based on the assigned scope, using any assigned calculations
and filter
Write Updates and reads data values based on the assigned scope, using any assigned filter
Filter Accesses specific data and meta data according to the restrictions of a filter
View Roles
Read Read data values
Server Access Accesses any database that has a default access other than none
Reporting and Analysis Roles
Role Description
Power Roles
Reporting and Analysis Administrator Conditionally accesses all resources (unless the file is locked by “no access”), but not all
functionality; accesses the Administer and Impact Manager modules
Applies to Oracle's Hyperion® Financial Reporting – System 9, Oracle's Hyperion®
Interactive Reporting – System 9, Oracle's Hyperion® SQR® Production Reporting – System
9, and Oracle's Hyperion® Web Analysis – System 9
Reporting and Analysis Global Administrator Universally and implicitly accesses all resources and functionality; accesses the Administer
and Impact Manager modules
Note: Reporting and Analysis Global Administrators can never be denied access.
Essbase Roles 137

Role Description
Applies to Financial Reporting, Interactive Reporting, SQR Production Reporting, and Web
Analysis
Content Manager Manages imported repository content and execute tasks, with implicit access to all
resources (unless the file is locked by “no access”); contains the Data Source Publisher
role
Applies to Financial Reporting, Interactive Reporting, SQR Production Reporting, and Web
Analysis
Data Source Publisher Imports data source connectivity files
Applies to Interactive Reporting and Web Analysis
Favorites Distributor Pushes content to users’ Favorites folders using the Favorites Manager
Applies to Financial Reporting, Interactive Reporting, SQR Production Reporting, and Web
Analysis
Job Manager*Creates and manages public job parameters, output directories, and output printer
locations
Applies to Interactive Reporting and SQR Production Reporting
Schedule Manager Creates and manages events, calendars, time events, public parameters, and physical
resources; creates batches; contains the Scheduler and Job Manager roles
Applies to Financial Reporting, Interactive Reporting, and SQR Production Reporting
Interactive Roles
Analyst Accesses interactive content using full analytic and reporting functionality
Applies to Financial Reporting, Interactive Reporting, and Web Analysis
Content Publisher Imports, saves, and modifies batches, books, reports and documents; creates and modify
shortcuts and folders
Applies to Financial Reporting, Interactive Reporting, SQR Production Reporting, and Web
Analysis
Data Editor Pushes Web Analysis data to Essbase
Job Publisher*Imports and modifies documents, jobs, and job output; run jobs; contains the Smart Form
Publisher role
Applies to Interactive Reporting, and SQR Production Reporting
Personal Page Publisher*Publishes Personal Pages to the repository, where they can be viewed by other repository
users; contains the Personal Page Editor role
Applies to Interactive Reporting andSQR Production Reporting
Report Designer Accesses authoring studios to create and distribute documents
Applies to Financial Reporting and Web Analysis
Scheduler Schedules jobs and batches using the Schedule module; navigates the repository and
assigns access control; contains the Explorer and Job Runner roles
Applies to Financial Reporting, Interactive Reporting, andSQR Production Reporting
138 Hyperion Product Roles

Role Description
Smart Form Publisher*Loads custom forms for programs (forms prompt job runners to enter information used to
define jobs)
Applies to SQR Production Reporting
Note: You must have the Job Publisher role to leverage Smart Form Publisher functionality.
View Roles
Dynamic Viewer*Views, reprocesses, and prints Interactive Reporting documents.
Explorer Lists repository content in the Explore module and in context using the Open dialog box;
searches, views, and subscribes to content
Note: Access to the repository does not grant access to individual files and folders, which
are secured by file properties and permissions.
Applies to Financial Reporting, Interactive Reporting, SQR Production Reporting, and Web
Analysis
Interactive Reporting Viewer*Reviews and prints static Interactive Reporting documents
Job Runner*Runs jobs, and views public job parameters and physical resources
Applies to Interactive Reporting and SQR Production Reporting
Personal Page Editor*Creates, modifies, and customizes Personal Pages; copies content from other users'
published Personal Pages
Applies to Interactive Reporting and SQR Production Reporting
Personal Parameter Editor Defines points of view and personal parameters on database connections to customize
query result sets
Applies to Interactive Reporting, SQR Production Reporting, and Web Analysis
Viewer Reviews Workspace content; content is static and accessible only from the Favorites folder
Note: This role provides minimal end-user functionality; use it only when no other role
assignments are possible.
Applies to Financial Reporting, Interactive Reporting, SQR Production Reporting, and Web
Analysis
System Roles
Trusted Application Enables credentialed client-server communication of Interactive Reporting database
connection files (.oce extension) that encapsulate connectivity, database type, network
address, and database user name information
*This Reporting and Analysis role does not apply and should not be assigned to Financial Management and Planning users who access Financial Reporting or Web
Analysis through Oracle's Hyperion® Workspace.
Financial Management Roles
Additional Shared Services roles are required for Performance Management Architect. See
“Shared Services Roles” on page 135.
Financial Management Roles 139

Role Description
Power Roles
Application Administrator Performs all Financial Management tasks. Access to this role overrides any
other access setting for the user
Load System Loads rules, and member lists
Inter-Company Transaction Admin Opens and closes periods, locks and unlocks entities, and manages reason
codes. Users with the role can also perform all Inter-Company tasks
Interactive Roles
Approve Journals Approves or rejects journals
Create Journals Created, modifies, deletes, submits, and unsubmits journals
Create Unbalanced Journals Create unbalanced journals
Default Opens and closes applications, manages documents and favorites, manages
Smart View, accesses running tasks, data tasks, load and extract tasks. Cannot
extract meta data or rules.
Journals Manager Performs all tasks related to journals
Post Journals Posts and unposts journals
Manage Templates Grants access to the journals template task in the Setup Journals module
Generate Recurring Grants access to the generate recurring task in the Setup Journals module
Review Manager Performs all tasks involving process management
Reviewer 1 through Reviewer 10 Views and edits a block of data when that data is at the user’s designated
process management level
Submitter Submits a block of data for final approval
Lock Data Locks data in Data Explorer
Unlock Data Unlocks data in Data Explorer
Consolidate All Runs consolidate all
Consolidate Runs consolidate
Consolidate All with Data Runs consolidate with all data
Run Allocation Runs allocations
Manage Data Entry Forms Manages data entry forms in the Web
Save System Report On Server Saves system reports on server
Load Excel Data Loads data from Smart View
140 Hyperion Product Roles

Role Description
Inter-Company Transaction User Created, edits, deletes, loads and extracts transactions. Runs matching report
by account or ID, runs transaction report and drills through from modules.
Inter-Company Transaction Match Template Manages intercompany matching templates
Inter-Company Transaction Auto Match by Account Auto match intercompany transactions by account
Inter-Company Transaction Auto Match by ID Auto match intercompany transactions by ID
Inter-Company Transaction Manual Match with Tolerance Manual match intercompany transactions with tolerance check
Inter-Company Transaction Manual Match Manual match intercompany transactions
Inter-Company Transaction Unmatch Unmatches intercompany transactions
Inter-Company Transaction Post/Unpost Posts and unposts intercompany transactions
Enable write back in Web Grid Enters and saves data directly to a Web grid
Database Management Copies and clears data, and deletes invalid records
Manage Ownership Enters and edits ownership information
Task Automation Sets up automated tasks
Manage Custom Documents Loads and extracts custom documents to and from the server
Extended Analytics Creates and executes extended anlaytics queries
Data Form Write Back from Excel Submits data from Smart View while using a Web Data Entry Form
View Roles
Advanced User Uses the Browser View and can access Running Tasks
Read Journals Reads journals
Receive Email Alerts for Process Management Receives e-mails
Receive Email Alerts for IC Transactions Receives e-mails
Reserved Not currently used
Planning Roles
Additional Shared Services roles are required for Oracle's Enterprise Performance Management
Architect. See “Shared Services Roles” on page 135.
Role Description
Power Roles
Planning Roles 141
Role Description
Administrator Performs all application tasks except those reserved for the application owner and Mass Allocate role.
Creates and manages applications, manages access permissions, initiates the budget process,
designates the e-mail server for notifications.
Application Owner Reassigns application ownership.
Mass Allocate Accesses the Mass Allocate feature to spread data multi-dimensionally down a hierarchy, even to cells
not visible in the data form and to which the user does not have access. Any user type can be assigned
this role, but it should be assigned sparingly.
Analytic Services Write Access For planners and interactive users: Grants users the same access permissions they have in Planning to
Planning data in Essbase. Enables users having write access, to change Planning data directly in Essbase
using another product such as Financial Reporting or a third-party tool.
Interactive Roles
Interactive User Creates and maintains data forms, Smart View worksheets, business rules, task lists, Financial Reporting
reports, and Oracle's Hyperion® Application Link adapter processes and flow diagrams. Manages the
budget process. Can perform all Planner tasks. Interactive users are typically department heads and
business unit managers.
Planner Roles
Planner Enters and submits plans for approval, runs business rules and Oracle's Hyperion® Application Link flow
diagrams. Uses reports that others have created, views and uses task lists, enables e-mail notification
for themselves, creates data using Smart View.
View Roles
View User Views and analyzes data through Planning data forms and any data access tools for which they are
licensed (for example, Financial Reporting, Web Analysis, Smart View). Typical View users are executives
who want to see business plans during and at the end of the budget process.
To learn which roles do not apply and should not be assigned to Planning users who access
Financial Reporting or Web Analysis, see “Reporting and Analysis Roles” on page 137.
Business Rules Roles
Role Description
Power Roles
Administrator Creates, launches, edits, validates, and manages business rules, sequences, macros, variables, and projects. Assigns
access permissions to business rules, sequences, macros, variables, and projects.
Interactive Roles
Interactive User Creates business rules, sequences, macros, variables, and projects. Assigns access permissions to business rules,
sequences, macros, variables, and projects.
142 Hyperion Product Roles
Role Description
Basic User Launches business rules and sequences to which the user has access. Views variables and macros, business rules, and
sequences to which the users has access. Edits business rules, sequences, macros, variables, and projects for which
the user has editing permissions.
Business Modeling Roles
Role Description
Power Roles
Administrator Manages the users, security and databases for the application, both on the desktop and the Web. Sets up and maintain
databases and containers, installs and configures application (authentication, users and groups, provisioning). Sets up
global tools on the Web Home Page.
Interactive Roles
Builder Creates the original model or enterprise model by defining all elements of the model, such as boxes, links, variables and
financial values, and attaching financial data
View Roles
End User Updates model periods. Uses business and operational knowledge to adjust parameters for the original model, experiments
with the workings of the scenario over the Web to search for process improvements, time or money savings, or unexpected
bottlenecks or benefits.
Strategic Finance Roles
Role Description
Power Roles
Power Manager Adds and maintains servers, databases, users, and groups. Creates and maintains entities, and designs ad views reports.
Interactive Roles
Interactive User Creates and maintains entities, and enters data into entities. Adds scenarios and subaccounts and dimensions. Designs
ad views reports.
Basic User Enters data into entities. Adds scenarios and subaccounts. Views reports.
View Roles
View User Views entities and reports.
Business Modeling Roles 143
Transaction Manager Roles
Role Description
Power Roles
Administrator Administers all system resources
Interactive Roles
Basic User Views system resources
Performance Scorecard Roles
Role Description
Power Roles
Power Manager Power Manager role provides the administrative capability within an Performance Scorecard environment
Interactive Roles
Basic User Grants access to reports, scorecards, measures and initiatives with the additional role of result collection administration
Interactive User Primarily a designer role, the Interactive User has access to all business objects for creation and modification. These
include maps (accountability, strategy, cause and effect) as well as scorecards, initiatives and measures.
Strategic Finance Roles
Role Description
Power Roles
Administrator Administers Oracle's Hyperion® Strategic Finance and assigns access to entities. Includes Interactive User capabilities.
Interactive Roles
Basic User Enters data, adds scenarios and subaccounting
Interactive User Models, changes dimensional structure and enters data
View Roles
View User Views data
144 Hyperion Product Roles

Data Integration Management Roles
Role Privileges
Power Roles
Oracle's Hyperion® Data Integration Management
Administrator
Operates workflows and uses Workflow Manager, uses
designer, browses repository, and administers repository
and server.
Data Integration Management Designer Operates workflows uses designer, browses repository,
and uses Workflow Manager.
Data Integration Management Operator Operates workflows and browses repository.
Essbase Provider Services Roles
Analytic Provider Services provides the Administrator power role, which allows users to create,
modify, and delete Analytic Server clusters.
Data Integration Management Roles 145

146 Hyperion Product Roles
BShared Services Roles and
Permitted Tasks
Table 28 Shared Services User Roles and Tasks Matrix
Tasks Administrator
Directory
Manager
Project
Manager
Provisioning
Manager
Create
Integrations
Run
Integrations
Create users X X
Modify user
details
X X
Delete users X X
Deactivate
and Activate
user accounts
X X
Create groups X X
Modify group
details
X X
Delete groups X X
Create
projects
X X
Modify project
details
X X
Delete
projects
X X
Provision
users
x X
Deprovision
users
X X
Provision
groups
X
Deprovision
groups
X X
Generate
provision
reports
X X
147

Tasks Administrator
Directory
Manager
Project
Manager
Provisioning
Manager
Create
Integrations
Run
Integrations
Assign access
to data
integrations
X X
Create data
integrations
X X
Edit data
integrations
X
Copy data
integrations
X X
Delete data
integrations
X X
Create data
integration
groups
X X
View data
integrations
X X X
Run, or
schedule to
run, data
integrations
X X
Run, or
schedule to
run, data
integration
groups
X X
148 Shared Services Roles and Permitted Tasks

CEssbase User Provisioning
In This Appendix
Launching User Management Console from Essbase ........................................................................149
Essbase Projects, Applications, and Databases in Shared Services........................................................150
Essbase Users and Groups in Shared Services ...............................................................................151
Assigning Database Calculation and Filter Access ...........................................................................151
Setting Application Access Type................................................................................................153
Synchronizing Security Information Between Shared Services and Essbase...............................................154
Migrating Essbase Users to Shared Services Security........................................................................155
Backing Up Security Information ...............................................................................................155
This appendix provides information that is specific to Essbase and Shared Services.
You can use Shared Services to provide security for Essbase applications, databases, and objects.
To use Shared Services security, you must migrate Analytic Server and any existing Essbase users
and groups to Shared Services.
For detailed information on Essbase security, see the Hyperion Essbase - System 9 Database
Administrator's Guide and the Hyperion Essbase - System 9 Administration Services Online Help.
See “Essbase Roles” on page 137 for information on Essbase roles.
Launching User Management Console from Essbase
To manage Essbase users in User Management Console, you must log in to User Management
Console as a user who is provisioned with the following Shared Services roles:
●Provisioning Manager role for the appropriate Analytic Server or applications.
●Directory Manager role for the appropriate authentication directory.
When you launch User Management Console from Administration Services, you automatically
log in to User Management Console as the Essbase user that connects the Analytic Server you
are accessing.
Note:
In Shared Services security mode, you must use the same user to log in to Administration Services
Console as you use to connect the Analytic Server.
Launching User Management Console from Essbase 149

When you launchUser Management Console from a browser, you log in as whatever user is
appropriate. For example, you must log in as a Shared Services Administrator in order to
provision an Essbase Administrator with the Directory Manager role, so that he or she can create
and delete users.
➤To launch User Management Console:
1From Enterprise View, find the appropriate Analytic Server.
2Under the server node, select the Security node.
3Right-click and select User Management from the pop-up menu.
User Management Console launch page is opened in a separate browser window.
4Click Launch to open User Management Console.
5Use the Help menu in User Management Console to get assistance with managing and provisioning users
and groups.
For information on launching User Management Console from MaxL, see the Essbase Technical
Reference.
Note:
To ensure that Essbase security status and Shared Services security status are synchronized, you
may need to refresh security information. For information on refreshing security information,
see the Hyperion Essbase - System 9 Database Administrator's Guide.
Essbase Projects, Applications, and Databases in Shared
Services
Shared Services and Essbase both use the term “application.” Essbase uses “application” to refer
to a container for databases. Shared Services uses “application” to refer to an object for which
you provision users. In this document, “application” refers to a Shared Services application,
unless an Essbase application is specifically stated. In most cases, an Essbase application maps
to a Shared Services application and so there is no need to distinguish between the two types of
application.
For Essbase, migration is done at the Analytic Server level. When you migrate an Analytic Server
to Shared Services, a Shared Services project is created for the Analytic Server. The project is
named as follows Analytic Servers:machineName:AnalyticServer# where machineName is
the Analytic Server machine name and AnalyticServer# is the sequence number. If you migrate
multiple Analytic Servers on the same machine, each Analytic Server migrated gets a different
sequence number (AnalyticServer#). Also, if you delete the security file and re-migrate an
Analytic Server, each successful migration creates a new server project with a new sequence
number. You can delete any unwanted projects in User Management Console.
Essbase automatically creates the following applications within the project and automatically
registers the applications with Shared Services:
150 Essbase User Provisioning

●An application with the same name as the Shared Services project. This application allows
you to specify security at the Analytic Server level, and is known as the global Analytic
Server application.
●A Shared Services application for each Essbase application on the Analytic Server. In Shared
Services, if an Essbase application contains multiple databases, the databases must have the
same user security access levels. (However, users can have different calculation script and
database filters assigned for databases within the same application. See “Assigning Database
Calculation and Filter Access” on page 151).
Once you have migrated to Shared Services, when you create a new application and database in
Essbase, a corresponding Shared Services application is created within the Analytic Server project
and the application is automatically registered with Shared Services.
Essbase Users and Groups in Shared Services
When you migrate to Shared Services, all native Essbase users and groups that do not already
exist in an external authentication directory are converted to native Shared Services users and
groups in the native Shared Services user directory and are given equivalent roles. Any externally-
authenticated users are registered with Shared Services but are still stored in their original
authentication directory. For more information on migrating users and groups, see the Hyperion
Essbase - System 9 Database Administrator's Guide.
Note:
Shared Services supports aggregated groups, in which a parent group contains one or more sub-
groups. The sub-groups inherit the roles of their parent group. For example, if a parent group
is provisioned with the Essbase Administrator role, any sub-groups (and users in the groups)
inherit the Essbase Administrator role.
Once you have migrated to Shared Services, you must create and manage users and groups in
User Management Console, or through the external authentication provider.
Note:
If manual user synchronization is specified, when you provision a user with an Analytic Server
role, you must request a refresh of security information to enable the user to log in. For
information on manual user synchronization, see the Hyperion Essbase - System 9 Database
Administrator's Guide.
Assigning Database Calculation and Filter Access
After provisioning users for Essbase applications in User Management Console, you can assign
more granular access permissions to users and groups for a specific Essbase application and
database. For example, after assigning a user access to an application and assigning the user’s
Essbase Users and Groups in Shared Services 151

role for the application, you may want to assign an Essbase filter to the user, or assign the user
access to a specific calculation script.
When you select an Essbase application from User Management Console, a screen is displayed
that lists all users and groups who are provisioned to that application. On this screen, you select
the users and groups to which you want to assign additional permissions. After clicking Next to
go to the next screen, you select the database you want to work with, and then use the appropriate
drop-down lists to assign filter and calculation script access to selected users and groups. For
descriptive information about these two screens, click the Help button on one of these screens
to display a context-sensitive help topic.
When you assign database calculation and filter access, you automatically log in
toAdministration Services and Essbase as User Management Console logged in user. This user
must be a valid Essbase Administrator, Application Manager, or Database Manager. The user
must have the Provisioning Manager role for the appropriate application(s).
You cannot assign database calculation or filter access to an Essbase Administrator or
Application Manager.
➤To assign database calculation and filter access:
1Launch User Management Console.
See “Launching User Management Console from Essbase” on page 149.
2Expand the Projects node, and select the appropriate Essbase application.
3Right-click and select Assign Access Control.
4Select the appropriate item from the Available Users and Groups drop-down list to display only users, only
groups, or both.
5Select the users and/or groups that you want to work with for the application. To select multiple users/
groups, press the Ctrl key between selections.
6Click the appropriate arrow button to move your selections to the Selected Users and Groups box. To move
all users and groups, click the double arrow button.
7Click Next to go to the next screen.
This screen lists the users who have access to the application and displays their user roles.
8From the Database drop-down list, select the database you want to work with.
9To assign an Essbase filter to users and groups:
a. Select the check box next to each user and group you want to assign a filter to.
b. From the Filter drop-down, select the appropriate filter.
The filter list is populated with the filters that exist for the selected database on Analytic
Server.
10 To assign users and groups access to an Essbase calculation script:
a. Select the check box next to each user and group you want to assign calculation script
access to.
b. From the Calc drop-down, select the appropriate calculation script.
152 Essbase User Provisioning

The calculation list is populated with the calculation scripts that exist for the selected
database on Analytic Server.
11 If you want to want to assign only calculation access, select No update from the Filter drop-down list.
12 If you want to want to assign only filter access, select No update from the Calc drop-down list.
Note:
If you have not yet clicked Save, you can click Reset to revert to the original settings (or to revert
to the settings changed since the last save).
13 Click the apply check mark icon next to the Calc drop-down list to apply your selections.
14 Click Save to save the changes.
Status messages are displayed on a new screen. The changes are reflected immediately in
Administration Services Console.
➤To refresh Essbase with database calculation and filter access security information for newly
provisioned users, click the Refresh button.
Although you can assign access to database filters and calculation scripts through User
Management Console, you must create the filters and calculation scripts in Essbase. For
information on creating database filters, see the Hyperion Essbase - System 9 Database
Administrator's Guide
Setting Application Access Type
Essbase and Hyperion Planning have the concept of an “application access type” for Essbase and
Hyperion PlanningPlanning users. For example, when an Essbase user is created using any
Essbase administration tool, the user is automatically assigned the application access type
“Essbase”; when a Hyperion Planning user is created using the Planning interface, the user is
automatically assigned the application access type “Planning.” A user’s application access type
specifies whether the user has access to Essbase applications only, to Planning applications only,
or to both.
When you select a global Analytic Server application from User Management Console, a screen
is displayed that lists all users and groups who are provisioned to that application. On this screen,
you select the users and groups for which you want to assign application access type. After
clicking Next to go to the next screen, you use the drop-down list to assign application access
type to the selected users and groups. For descriptive information about these two screens, click
the Help button on one of these screens to display a context-sensitive help topic.
When you assign database calculation and filter access, you automatically log in to
Administration Services and Essbase as User Management Console logged in user. This user
must be a valid Essbase Administrator and must have the Provisioning Manager role for the
appropriate application(s).
Setting Application Access Type 153

➤To set application access type for users:
1Launch User Management Console.
See “Launching User Management Console from Essbase” on page 149.
2Expand the Projects node, and select the global Essbase application.
Note:
An application with the same name as the Shared Services project is created within the project.
This global application allows you to specify security at the Analytic Server level.
3Right-click and select Assign Access Control.
4The Available Users box lists the users that are provisioned to the global application.
5Select the users that you want to work with. To select multiple users, press the Ctrl key between selections.
6Click the appropriate arrow button to move your selections to the Selected Users box. To move all users,
click the double arrow button.
7Click Next to go to the next screen.
This screen lists the selected users.
8Select the check box next to the users whose application access type you want to change.
9From the User type drop-down list, select Analytic Services or Planning, as appropriate.
Note:
If you have not yet clicked Save, you can click Reset to revert to the original settings (or to revert
to the settings changed since the last save).
10 Click the apply check mark next to the User type drop-down list to apply your selections.
11 Click Save to save the changes.
Status messages are displayed on a new screen. The changes are reflected immediately in
Administration Services Console.
➤To refresh Essbase with application access type information for newly provisioned users, click
the Refresh button.
Synchronizing Security Information Between Shared Services
and Essbase
To ensure that Essbase security status is synchronized with Shared Services security status, you
may need to refresh security information from Shared Services. When the security status is out
of synch, the user, group, and application information displayed in Essbase may be different
from that in Shared Services. For more information on refreshing security information from
Shared Services, see the Hyperion Essbase - System 9 Database Administrator's Guide and the
Hyperion Essbase - System 9 Administration Services Online Help.
154 Essbase User Provisioning

Migrating Essbase Users to Shared Services Security
Before you can use Shared Services to manage security, you must migrate Analytic Server and
any existing Essbase users and groups to Shared Services. For detailed information on migrating
users and groups to Shared Services, see the Hyperion Essbase - System 9 Database Administrator's
Guide and the Hyperion Essbase - System 9 Administration Services Online Help.
Backing Up Security Information
For information on backing up security information when Essbase is in Shared Services security
mode, see the Hyperion Essbase - System 9 Database Administrator's Guide.
Migrating Essbase Users to Shared Services Security 155

156 Essbase User Provisioning

DReporting and Analysis User
Provisioning
In This Appendix
Launching User Management Console from Workspace.....................................................................157
Reporting and Analysis Roles...................................................................................................157
Reporting and Analysis Role Hierarchy.........................................................................................157
Sample Role Combinations.....................................................................................................159
Launching User Management Console from Workspace
You use User Management Console to manage Reporting and Analysis users, groups, and roles.
You must be a Shared Services Administrator or Provisioning Manager to provision users or
groups. See Chapter 8, “Managing Provisioning.”
➤To launch User Management Console from Workspace, select Navigate > Administer > User
Management.
User Management Console opens in a separate window.
Reporting and Analysis Roles
You provision users and groups by assigning combinations of predefined roles (see Appendix A,
“Hyperion Product Roles”) to achieve specific product access and functionality.
Reporting and Analysis Role Hierarchy
Roles organize into hierarchies that contain other roles. Oracle's Hyperion® Reporting and
Analysis – System 9 roles aggregate into these branches:
●“Content Manager Branch” on page 158
●“Scheduler Manager Branch” on page 158
Launching User Management Console from Workspace 157
Content Manager Branch
158 Reporting and Analysis User Provisioning
Scheduler Manager Branch
Sample Role Combinations
This table provides examples of the access and functionality achieved by assigning combinations
of roles.
Combined Role Tasks Access Permissions
Explorer + Favorites Distributor + Personal Page
Editor + Personal Parameter Editor
●Review interactive Web Analysis and
Financial Reporting content in
Workspace
●List and subscribe to repository content
●Review accessible interactive content
in Oracle's Hyperion® Web Analysis
Studio
●Access Personal Page
●Access Favorites Manager
●Define Web Analysis points of view,
personal variables, and personal
parameters, to customize the query
result set
Share interactive content without
modifying content or saving changes to
the repository
Sample Role Combinations 159

Combined Role Tasks Access Permissions
Explorer + Analyst + Content Publisher ●Review interactive Web Analysis,
Financial Reporting, and Interactive
Reporting content in the Oracle's
Hyperion® Workspace
●List and subscribe to repository content
●Review accessible interactive content
in Web Analysis Studio
●Edit queries, re-query and arrange data
●Create Financial Reporting batches and
books
●Import, modify and Save As dialog box
Iinteractively use document types to edit
queries, re-query, and save changes
back to the repository
Personal Page Publisher Data Source Publisher
+ Analyst + Report Designer + Job Manager
●Create and distribute new interactive
Web Analysis, Financial Reporting, and
Oracle's Hyperion® Interactive
Reporting – System 9 content
●Create and distribute custom Oracle's
Hyperion® Web Analysis – System 9
documents in Oracle's Hyperion® Web
Analysis Studio Design Documents
interface
●Access Oracle's Hyperion® Financial
Reporting Studio
●Access Personal Pages and distribute
content to repository users
●Distribute data source connectivity files
to repository users
●Distribute batches, books, reports and
documents to repository users
●Import and modify SQR Production
Reporting files and Oracle's Hyperion®
SQR® Production Reporting – System 9
output
●Create, save and run jobs
●Create and manage output directories
Access most content creation
functionality, but not administrator
access to resources
Content Manager + Schedule Manager ●Manage all published content in the
repository and all content creation
functionality
●Create and manage events, calendars,
time events, calendars, public
parameters, and physical resources
Access all content creation and
scheduling functionality, but not
administrator access to resources
Reporting and AnalysisAdministrator + Data
Editor
●Conditional access to all resources
●Access the Administer module
●Access the Impact Manager module
●Ability to write edits back to Essbase
Access most functionality and modules,
with conditional access to resources
160 Reporting and Analysis User Provisioning

EFinancial Management User
Provisioning
In This Appendix
Assigning Users and Groups to Financial Management Applications.......................................................161
Assigning User Access to Security Classes....................................................................................162
Setting Up E-mail Alerting.......................................................................................................163
Running Security Reports for Financial Management Applications .........................................................165
Migrating Financial Management Users to Shared Services Security.......................................................166
There are two ways to set up security for Financial Management applications:
●Create a file with security information and load it into an application. See “Creating
Application Security Files” and “Loading Application Security” in the Hyperion System 9
Financial Management Administrator's Guide.
●Use the Shared Services User Management Console to set up security. This appendix
provides information specific to Financial Management and the Shared Services user
management system.
Before setting up security for Financial Management applications, you must do the following:
1. Create projects. See “Working with Projects” on page 65.
2. Create Oracle's Hyperion® Financial Management – System 9 applications and add
applications to a project—See the Enterprise Performance Management Architect
Administrator's Guide.
3. Provision users by assigning users and groups to applications and assigning roles to users
and groups. See Chapter 8, “Managing Provisioning.”
Assigning Users and Groups to Financial Management
Applications
Note:
Before you can assign users and groups to applications, you must provision users. For
information on provisioning users, see Chapter 8, “Managing Provisioning.”.
Assigning Users and Groups to Financial Management Applications 161
Only a user assigned to the Provisioning Manager role can define users and groups for an
application
Only the users and groups provisioned for the application are available when you select users
and groups.
➤To select users and groups for an application:
1From Select Users and Groups, select an option:
●Show All to show all users that are provisioned
●Users or Groups, and in Search Criteria, enter the search criteria, and click Search.
2From Available Users and Groups, select users and groups to assign to the application, and use the arrow
keys to move them to the Selected Users column.
Tip:
Use the Shift and Ctrl keys to add or remove multiple users and groups.
3Click Next or Select Classes.
Assigning User Access to Security Classes
After you define users and groups and security classes, you can specify the level of access each
user and group has to each security class in the application and set up e-mail alerts.
Note:
You must select users and classes for the application before you can access the Assign Access
module.
Table 29 User Access Level
Access Level User and Group Tasks
None No access to elements assigned to the security class.
Metadata View a specified member in a list but cannot view or modify data for the member.
Read View data for elements assigned to the security class but cannot promote or reject.
Promote View data for elements assigned to the security class and can promote or reject.
All Modify data for elements assigned to the security class and can promote and reject.
You can use the Pivot Table feature to toggle between two views for assigning access. For example,
if you have users and groups on rows and security classes on columns and click Pivot Table,
users and groups will be on columns and security classes on rows.
162 Financial Management User Provisioning

Note:
A user assigned to the Application Administrator role for an application has access to all
information in the application.
➤To assign user access to security classes:
1Select cells for which to assign access rights.
Tip:
Use the Shift and Ctrl keys to select multiple cells. Select a column or row by clicking in the
column or row header.
2From Access Rights, select the access level to assign.
3Click Set to apply the level to the selected cells.
4Optional: To add an e-mail alert, select cells in the table and click Add Alert.
Caution!
The alerting process uses the e-mail addresses stored in the external authentication files. To
receive e-mail alerts, users must be on Microsoft Active Directory or LDAP. See “Setting Up E-
mail Alerting” on page 163.
Note:
To remove e-mail alerts, select the cell and click Remove Alert.
5Click Save.
6Click Next or Security Reports.
Setting Up E-mail Alerting
You can use e-mail alerting for intercompany transactions and during the process management
review process. E-mail alerts help highlight a key event or data change in the system. For example,
you can send an e-mail alert that an intercompany transaction is mismatched and needs to be
matched, or that a process unit is ready for the next promotion level.
Note:
The alerting process uses the e-mail addresses that are stored in the external authentication files.
To receive e-mail alerts, users must be on Active Directory or LDAP.
Setting Up E-mail Alerting 163

Process Management Alerting
➤To set up process management e-mail alerts:
1For the scenario in the process unit, set the SupportsProcessManagement meta data attribute to “A” to allow
alerts.
2Assign the user to the Receive E-mail Alerts for Process Management role.
3Assign the user to Process Management notifiable roles as defined in Table 30.
4Assign the user ALL or PROMOTE access to the security classes assigned to the scenario and entity in the
process unit and add an alert for each security class.
Users who meet all criteria receive e-mail alerts.
Table 30 Process Management User Roles and Alert Notification
Process Unit Level Before or After Action Process Management User Roles Notified
First Pass Users with ALL or PROMOTE access to the entity are notified.
Review Level 1 Reviewer 1 and Submitter roles are notified.
Review Level 2 Reviewer 2 and Submitter roles are notified.
Review Level 3 Reviewer 3 and Submitter roles are notified.
Review Level 4 Reviewer 4 and Submitter roles are notified.
Review Level 5 Reviewer 5 and Submitter roles are notified.
Review Level 6 Reviewer 6 and Submitter roles are notified.
Review Level 7 Reviewer 7 and Submitter roles are notified.
Review Level 8 Reviewer 8 and Submitter roles are notified.
Review Level 9 Reviewer 9 and Submitter roles are notified.
Review Level 10 Reviewer 10 and Submitter roles are notified.
Submitted Review Supervisor role is notified. Only users with this role can approve
the submitted process unit.
Approved Reviewer 1 to Reviewer 10 and Submitter roles are notified.
Published Users with ALL, READ, or PROMOTE access to the entity are notified.
Note:
E-mail alerts are not generated when the process unit is at the Not Started level or for the Sign
Off action.
Users with the Application Administrator role do not receive e-mail alerts. For a user with the
Application Administrator role to receive e-mail alerts, set up as a separate user and assign the
164 Financial Management User Provisioning

role to receive alerts. The user that performed the action to the process unit is also notified with
an e-mail confirmation log stating to whom e-mails were sent.
Intercompany Transaction Alerting
➤To set up intercompany transaction e-mail alerts:
1Assign the user to the Receive E-mail Alerts for IC Transactions role.
2Assign the user to the Inter-Company Transaction Admin or Inter-Company Transaction User role.
3Assign the user ALL, READ, or PROMOTE access to the security classes that are assigned to the scenario and
entity in the transaction and add an alert for each security class. See “Assigning User Access to Security
Classes” on page 162.
Users who meet all criteria receive e-mail alerts from the Intercompany Transactions or
Intercompany Partner Matching Report modules.
For information on generating e-mail alerts in intercompany transactions, see the Hyperion
System 9 Financial Management User's Guide.
Running Security Reports for Financial Management
Applications
You can run security reports on the information that you selected while setting up security for
the application. You can run reports for classes by user, roles by user, classes and roles by user,
and users by group. You can view the report online or you can export it to a CSV file.
➤To create a security report:
1Select a report option:
●Rights
❍Classes by User
❍Roles by User
●Users by Group
2Select an option:
●Launch Report to open the report in a new window
●Export to File to save the as a CSV file.
Running Security Reports for Financial Management Applications 165

Migrating Financial Management Users to Shared Services
Security
For information on migrating users to Shared Services security, see “Using the Schema Upgrade
Utility” in the Hyperion System 9 Financial Management Installation Guide.
166 Financial Management User Provisioning

FPlanning User Provisioning
In This Appendix
Launching User Management Console From Planning .......................................................................167
Returning to Planning From User Management Console.....................................................................167
Updating Users and Groups in Planning.......................................................................................168
Roles in Planning ................................................................................................................170
About Connection Types and Planning ........................................................................................171
Migrating Users to Shared Services............................................................................................171
After setting up users and groups, you assign their access permissions to dimension members,
data forms, and task lists—from within Planning or from User Management Console. To assign
access in Planning, see the Hyperion Planning - System 9 Administrator's Guide.
Launching User Management Console From Planning
➤To launch User Management Console from within Planning, select Administration > User
Management.
User Management Console opens in the same browser window as the Planning application.
Returning to Planning From User Management Console
If you launch User Management Console from within a Planning application, you can return
to your previous place in the Planning application.
➤To return to the Planning application from User Management Console:
1From within User Management Console, select File > Return to Application <
application name
>.
2Click OK .
Launching User Management Console From Planning 167

Updating Users and Groups in Planning
Planning and Business Rules get the latest list of users, groups, and roles from User Management
Console when:
●The application is refreshed with Security Filters selected.
●The ProvisionUsers utility is run. (See “Updating Users With a Utility” on page 169.)
●Someone logs into the application; Planning synchronizes that user with User Management
Console.
Migrating User and Group Identities
When you change a user or group's identity or their position in the user directory hierarchy,
you must update—or migrate—this information to Planning.
➤To migrate changed user and group identities from User Management Console to Planning:
1Take an action:
●Select Administration > Manage Data Forms and select a data form.
●Select Administration > Dimensions and select a dimension member.
●Select Administration > Manage Task Lists and select a task list.
2Click Assign Access.
3Click Add Access or Edit Access.
4Click Migrate Identities.
Deprovisioning or Deleting Users and Groups
When you deprovision or delete users or groups in Shared Services, you should update the user
and group tables in the Planning relational database to conserve space.
➤To remove deprovisioned users and groups from the Planning database tables:
1Take an action:
●Select Administration > Manage Data Forms and select a data form.
●Select Administration > Dimensions and select a dimension member.
●Select Administration > Manage Task Lists and select a task list.
2Click Assign Access.
3Click Add Access or Edit Access.
4Click Remove Non-provisioned Users/Groups.
168 Planning User Provisioning

Updating Users With a Utility
The ProvisionUsers utility—run by administrators through a command line interface—
synchronizes users maintained in User Management Console with a Planning application.
➤To use the utility, launch the ProvisionUsers.cmd file from the bin directory, using the
following syntax:
ProvisionUsers /ADMIN:
adminName
/PASS:
password
/A:
appName
[/U:
user1
[;user2;user3]
] [/R:
n
]
If you installed Planning in the default location, the bin directory is in this path:
<
HYPERION_HOME>
:/Planning/bin.
Table 31 ProvisionUsers Syntax
Parameter Description Required?
/ADMIN:adminName The administrator's name for logging on to the Planning
application.
Yes
/PASS:password The administrator's password. Yes
/A:
appName
The Planning application to synchronize (must be on the server on
which the utility is run).
Yes
[/U:
user1[;user2;user3]
]Specifies users to synchronize. For example, to synchronize users
Planner1 and Planner2, use /U:Planner1;Planner2.
Omitting this argument synchronizes all users.
No
[/R
:n
]Specifies an interval, in minutes, in which synchronization is run.
For example, to synchronize every 30 minutes, use /R:30.
Omitting this argument performs the synchronization once.
No
/? Specified by itself, prints the syntax and options for
ProvisionUsers.
No
Example 1
Entering:
ProvisionUsers /ADMIN:admin /PASS:password /A:App1
Synchronizes all users in the App1 application.
Example 2
Entering:
ProvisionUsers /ADMIN:admin /PASS:password /A:App2 /U:Planner1 /R:60
Synchronizes user Planner1 in the App2 application every 60 minutes.
Updating Users and Groups in Planning 169
Roles in Planning
Subject to the applicable license for the software and users, Planning supports the roles described
in the Appendix A, “Hyperion Product Roles.”
Write Access to Data in Essbase
All administrators have write access to Planning data in Essbase. By default, security filters that
Planning generates in Essbase for planners and interactive users are read-only. However, you
can grant planners and interactive users the same access permissions they have in Planning to
data in Essbase by assigning them the Analytic Services Write Access role. Using another product
such as Financial Reporting, Essbase Excel Add-in, or third-party tools, they can then change
Planning data—to which they have write access in Planning—directly in Essbase.
Note:
Security filters are always read-only for view users.
Roles Between Planning and Business Rules
Table 32 Roles in Planning and Business Rules
Planning Role Business Rules Role Tasks Performed
Administrator Administrator ●Designs business rules
●Launches business rules for a Planning application
Interactive user Interactive user ●Designs business rules
●Launches rules that have been assigned Launch permissions by an
administrator
Planner Basic user Launches business rules that have been assigned Launch permissions by
an administrator
View user None None
If a Planning user has different roles across Planning applications, the user’s highest role is used
in Business Rules. For example, if a user is an administrator in one application and a planner in
another application, the user becomes an administrator in Business Rules.
Access Permissions Between Planning and Essbase
After security filters are updated in the Essbase database, a Planning user's access in Essbase
depends on the user type that establishes the connection.
170 Planning User Provisioning
Table 33 Access Permissions Between Planning and Essbase
User Type for Connection View User Planner Interactive User Administrator
Named User Filter Access Calculate Calculate Database Designer*
*Not reflected in Application Manager.
About Connection Types and Planning
Planning establishes a connection to the Essbase database using the appropriate user type.
Table 34 Connection Types and Planning
Program Used to Log on to Planning Application Essbase Connection
Planning and Oracle's Hyperion® Smart View for Office client through the
Planning provider
Pool of supervisor user connections
Oracle's Hyperion® Financial Reporting – System 9, Business Rules, and third-
party tools
Named user
Migrating Users to Shared Services
If you are upgrading a Planning application from an earlier release, follow the instructions in
the Hyperion Planning - System 9 Installation Guide. Before users can log on to the new release
of Planning, you must also migrate the upgraded application’s users and groups to the User
Management Console.
➤To migrate existing users and groups for a Planning application to the User Management
console:
1After logging in to the Planning application, a message prompts you to migrate the existing users and groups,
and a Migrate Users and Groups button is displayed.
2Click Migrate Users and Groups.
If the migration is successful, the application is populated with the existing user and group role
assignments and the Migrate Users and Groups button no longer displays. All Planning groups
are added to Native directory in the User Management Console. Planning administrators that
are migrated to the User Management console are automatically assigned the Provisioning
Manager role.
If the migration is not successful, a window displays the users and groups that failed to migrate.
Take an action:
●Click OK to ignore the errors and complete the migration.
●Click Cancel to cancel the migration and resolve the errors. Until you have completed the
migration process, Planning presents the Migrate Users and Groups button each time you
log on.
About Connection Types and Planning 171

172 Planning User Provisioning

GBusiness Rules User
Provisioning
In This Appendix
About Business Rules Security .................................................................................................173
Launching User Management Console.........................................................................................174
Business Rules User Roles......................................................................................................174
Migrating Business Rules Users to Shared Services Security................................................................175
This appendix provides information that is specific to Business Rules and User Management
Console within Shared Services. User Management Console provides a centralized user interface
where you can perform user management tasks for Hyperion products.
About Business Rules Security
When you migrate Analytic Administration Services and Business Rules users, groups, and roles
to Shared Services, the users and groups are automatically provisioned for use in Business Rules
and other Hyperion products. For more information on managing users and groups in Shared
Services, see Chapter 7, “Managing Native Directory.”
After users and groups are migrated to Shared Services, you assign Business Rules roles to them.
Business Rules has three predefined roles that you can assign to users and groups: administrator,
interactive user, and basic user. These roles determine what tasks users and groups can perform
on Business Rules repository objects, such as business rules, sequences, macros, variables, and
projects, while working in Business Rules. For a description of Business Rules roles, see “Business
Rules User Roles” on page 174. For information on assigning roles from Shared Services, see
Chapter 8, “Managing Provisioning.”
After you assign roles to users and groups in Shared Services, you assign them access permissions
to repository objects in Business Rules. For example, you might want to assign a user access
permissions to edit all of the business rules in a Business Rules project. See the Hyperion Business
Rules Administrator's Guide or the Hyperion Business Rules Hyperion Essbase - System 9
Administration Services Online Help.
About Business Rules Security 173

Launching User Management Console
➤To launch the Hyperion, from the Windows Start menu:
1Select Programs > Hyperion > Foundation Services > User Management Console.
2Create users and groups. See Chapter 7, “Managing Native Directory.”
3Provision users and groups. See Chapter 8, “Managing Provisioning.”
Business Rules User Roles
Subject to the applicable license for the software and users, Oracle's Hyperion® Business Rules
supports three pre-defined user roles. For information about assigning Business Rules roles to
users and groups, see Chapter 8, “Managing Provisioning.”
Note:
You cannot edit Business Rules roles.
●Administrator: A user or group who has the role of administrator can do any of the following
tasks:
❍Create, launch, edit, validate, and manage business rules, sequences, macros, variables,
and projects
❍Assign access permissions to business rules, sequences, macros, variables, and projects
❍Create and edit users and groups
Note:
You create and edit users and groups in User Management Console. You cannot create
users and groups in Business Rules.
❍Set up the repository and log file
Note:
You set up the repository and log file using the Configuration Utility in Shared Services.
●Interactive User: A user or group who has the role of interactive user can do any of the
following tasks (as long as they are assigned by an administrator):
❍Create business rules, sequences, macros, variables, and projects
❍Assign access permissions to business rules, sequences, macros, variables, and projects
●Basic User: A user or group who has the role of basic user can do any of the following tasks
(as long as they are assigned by an administrator):
❍Launch business rules and sequences to which the user has access
❍View business rules and sequences to which the users has access
174 Business Rules User Provisioning

❍View all variables and macros
❍Edit specific business rules, sequences, macros, variables, and projects for which the user
was granted editing permissions
Migrating Business Rules Users to Shared Services Security
To migrate native Analytic Administration Services and Business Rules users to Shared Services,
you need to run the Externalize Users utility in Analytic Administration Services. When you run
this utility, all native Analytic Administration Services and Business Rules users from the
previous release are copied from the Analytic Administration Services/Business Rules repository
into the Shared Services repository. (See the Essbase Administration Services Installation Guide.)
After you run the Externalize Users utility, you upgrade the Business Rules repository from the
previous release to this release of Business Rules using the Migrate Repository feature in Business
Rules (for releases 3.x through 4.0) or the Configuration Utility (for releases 4.1 through the
current release). When you upgrade the repository to this release, the repository is also upgraded
automatically in Shared Services. (See the Hyperion Business Rules Administrator's Guide.)
During the repository upgrade, Business Rules roles assigned to users are migrated and assigned
equivalent roles in Shared Services. In addition, any Business Rules groups are migrated to Shared
Services. If the groups have roles assigned to them, these roles are also migrated and assigned
equivalent roles in Shared Services. If a Business Rules group does not exist in Shared Services,
it is created.
When you upgrade the Business Rules repository, all Business Rules repository objects including
rules, sequences, variables, macros, projects, and database locations and access permissions
assigned to them, are upgraded in Shared Services. Now you are ready to use Shared Services to
manage security for Business Rules.
Migrating Business Rules Users to Shared Services Security 175

176 Business Rules User Provisioning

HPerformance Scorecard User
Provisioning
In This Appendix
Launching User Management Console from Performance Scorecard ......................................................177
Creating and Provisioning Users and Groups over Shared Services.........................................................178
Migrating Performance Scorecard Users and Groups to Shared Services Security .......................................182
You can provision users for Performance Scorecard using Shared Services. This feature enables
you to use existing user information for a number of Hyperion applications, or to provision
multiple users at one time.
To provision users through Shared Services, you need to select this as an option after installation,
when you run the Configuration Utility, as outlined in the Hyperion Performance Scorecard -
System 9 Installation Guide. The Shared Services Administrator must also be provisioned to the
Performance Scorecard application.
The provisioning process requires you to have both Shared Services and Performance Scorecard
configured and running. External authentication ensures that the applications can communicate
seamlessly to provision users easily and accurately.
The information in this Appendix provides instructions for the Performance Scorecard portion
of user provisioning only.
See “Performance Scorecard Roles” on page 144 for information on Performance Scorecard
roles.
Launching User Management Console from Performance
Scorecard
This section describes how to launch User Management Console from within Performance
Scorecard.
➤To launch User Management Console:
1Log on to Performance Scorecard as an administrator.
2Ensure the Shared Services server is running.
3From Performance Scorecard, select Administration > User Management.
The User Management Console on Shared Services is displayed.
Launching User Management Console from Performance Scorecard 177

From the Shared Services User Management Console, you can perform the following tasks:
●Add and provision new users
●Modify or delete existing users
●Perform bulk provisioning of multiple users
For detailed instructions on using User Management Console, refer to Chapter 3, “User
Management Console.”
Managing Permissions in Performance Scorecard
User provisioning through Shared Services requires configuration on both the Shared Services
server and Performance Scorecard application. You can provision users and groups individually,
or migrate existing users on Performance Scorecard to perform user provisioning on multiple
users.
When you configure the application in the Configuration Utility after installing Performance
Scorecard, you must use the Shared Services server, which automatically points to the Shared
Services CSS.xml file for external authentication. This step enables Performance Scorecard and
the Shared Services server to communicate seamlessly when provisioning users.
Note:
The Shared Services Administrator must also be provisioned to the Performance Scorecard
application.
You can access Shared Services through Performance Scorecard or directly, using the appropriate
URL. The URL to User Management Console is in the following format:
http://<
server name
>:<
port number
>/interop
Creating and Provisioning Users and Groups over Shared
Services
You can provision users and groups for Performance Scorecard using Shared Services. This
feature enables you to use existing user information for a number of Hyperion applications, or
to provision multiple users at one time.
In order to provision users for Performance Scorecard from existing users in Shared Services,
you need to select this as an option after installation, when you run the Configuration Utility,
as outlined in theHyperion Performance Scorecard - System 9 Installation Guide. The Shared
Services Administrator must also be provisioned to the Performance Scorecard application.
When you configure the application in the Configuration Utility after installing Performance
Scorecard, you must use the Shared Services server, which automatically points to the Shared
Services CSS.xml file for external authentication. This step enables and the Shared Services
server to communicate seamlessly when provisioning users.
178 Performance Scorecard User Provisioning

The provisioning process requires you to have both the Shared Services server and Performance
Scorecard configured and running. External authentication ensures that the applications can
communicate seamlessly to provision users easily and accurately.
To provision users to enable them to use Performance Scorecard, these main steps are required:
1. Register with Shared Services.
2. Create the users and groups.
3. Provision the users and groups with the Performance Scorecard properties: security role,
employee and primary domain.
4. Assign the Performance Scorecard properties to users and groups, either individually or
using one-time bulk provisioning.
Access Permissions
User provisioning through Shared Services requires configuration on both the Shared Services
server and Performance Scorecard applications. You can provision users and groups
individually, or using bulk provisioning.
Note:
The Shared Services Administrator is automatically provisioned to the Performance Scorecard
application.
Before You Begin
Before you create and provision users using Shared Services, ensure the following conditions
have been completed:
●Performance Scorecard has been configured to use Shared Services-based provisioning, and
to obtain directory definition file from Shared Services(css.xml).
●The Performance Scorecard application has been registered on Shared Services. Registration
is managed through the Oracle's Hyperion® Configuration Utility™, and may be performed
during installation or later. For instructions on configuring and registering Performance
Scorecard applications with Shared Services, refer to theHyperion Performance Scorecard -
System 9 Installation Guide.
●Shared Services is running
●Performance Scorecard is running
Creating a New User or Group Using Shared Services
You can create users for Performance Scorecard through Shared Services User Management
Console.
Creating and Provisioning Users and Groups over Shared Services 179

➤To create and provision a new user from Performance Scorecard:
1Ensure the Shared Services server is running.
2Log on to Performance Scorecard as an Administrator.
3From Performance Scorecard, select Administration > User Management.
The Shared Services User Management Console is displayed.
4From the Shared Services User Management Console, create and provision the users and groups as outlined
in the Hyperion Security Administration Guide.
5After the users and groups are provisioned, assign Performance Scorecard user and group properties using
one of these options:
●Assign properties individually, as outlined in “Assign Performance Scorecard Properties
Individually” on page 180.
●Assign bulk properties for all provisioned users at one time, as outlined in “Assign Bulk
Properties in Performance Scorecard” on page 181.
Assign Performance Scorecard Properties Individually
After a user or group has been created and provisioned, all active directly and indirectly
provisioned users and groups must be assigned Performance Scorecard-specific attributes or
properties. If the users or groups are not assigned the Performance Scorecard permissions, the
user logon is rejected by Performance Scorecard as an unknown user.
Individual user or group properties are created each time the properties are edited and saved on
Oracle's Hyperion® Shared Services User Management Console. If this step is skipped, user logon
will be rejected by Performance Scorecard due to unknown user.
➤To assign Performance Scorecard permissions individually:
1Log on to Performance Scorecard as an Administrator.
2From the View pane, select Projects, and expand the tree to select the project and application to which the
newly provisioned user has been assigned.
The Available Users and Groups list for the selected project is displayed.
3Select the name of the newly provisioned user from the list, and click Next.
4On Manage Properties, click Select to select the employee.
The Select Employee dialog box is displayed.
5From Select Employee, select the name of the Performance Scorecard employee record that is to be
associated with the selected user ID.
180 Performance Scorecard User Provisioning
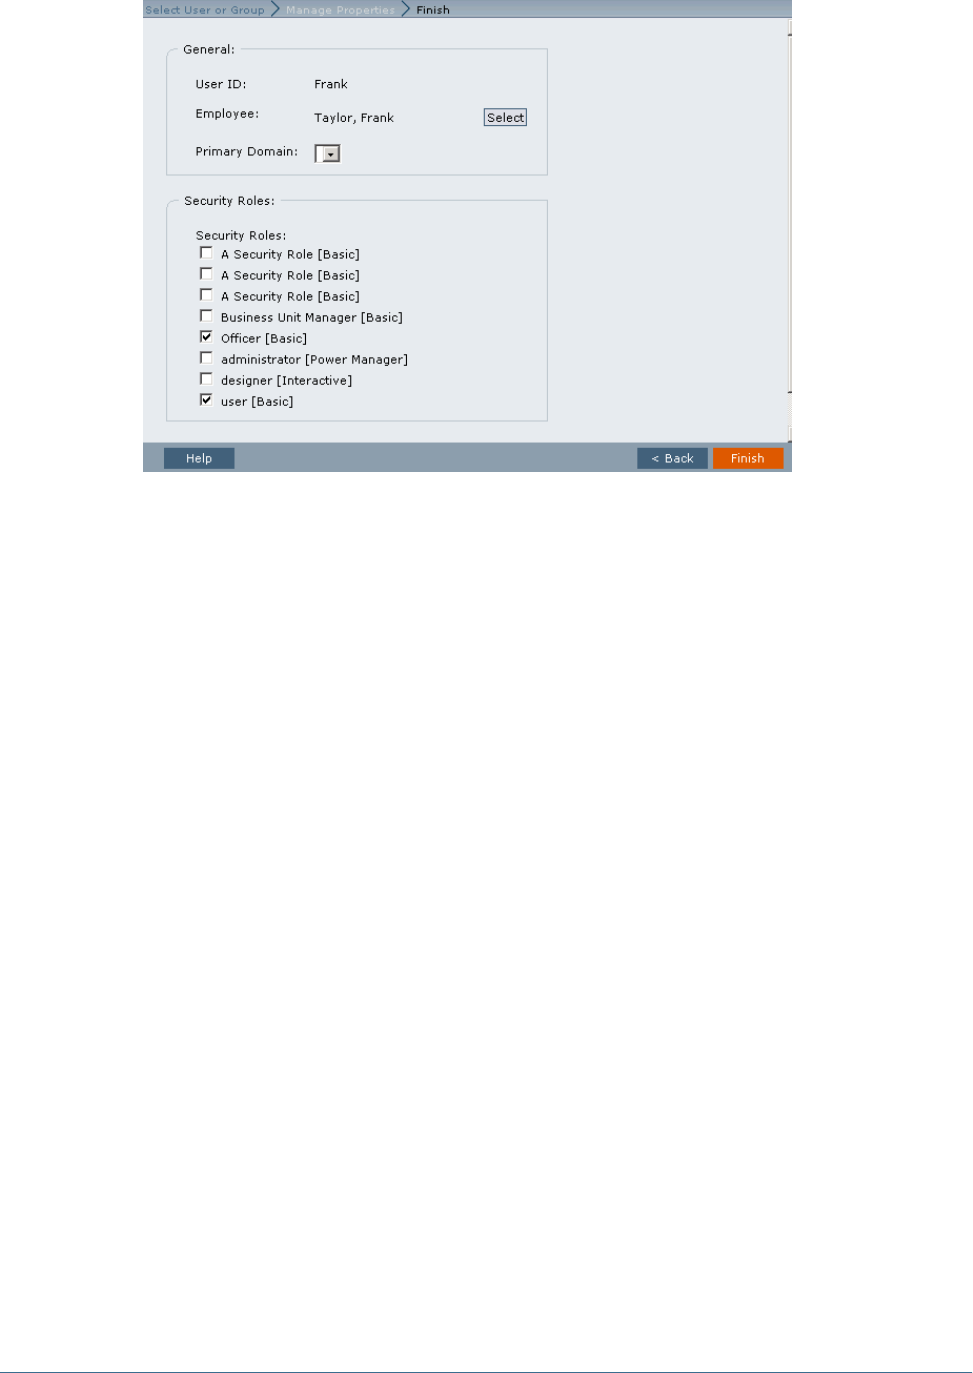
6Optional: From Primary Domain on the Manage Properties tab, select a Primary Domain for the user.
7Under Security Roles, select the Performance Scorecard security role that you want to assign to the user.
For detailed information on Performance Scorecard security roles, refer to the Hyperion
Performance Scorecard - System 9 Administrator's Guide.
8Click Finish to complete the provisioning of the user for both Shared Services and Performance Scorecard.
Assign Bulk Properties in Performance Scorecard
As an alternative to assigning permissions individually, you can assign permissions to all newly
provisioned users and groups at one time. The Synchronize with Shared Services button is
provided on the User Account List and Group Account List page which updates Performance
Scorecard with newly provisioned users or groups in Shared Services.
When you synchronize users:
●Group synchronization is implicitly launched to ensure that associated user groups become
available for the user.
●All active directly and indirectly provisioned users are pulled from Shared Services.
●The Shared Services list is compared to the Performance Scorecard User Account, matched
by Logon Name (user id).
●Any missing user accounts are automatically created. The appropriate default security role
is set based on directly and indirectly provisioned role (Performance Scorecard Power
Manager > admin,Performance Scorecard Interactive > designer,Performance Scorecard
Basic > user).
●An employee record is created and associated with each created user. The first name, last
name, and e-mail ID are obtained from directory user information.
Creating and Provisioning Users and Groups over Shared Services 181

●All user accounts that are no longer provisioned in Shared Services are listed for optional
deletion. The list excludes the default admin, designer, and user accounts.
When you synchronize groups:
●All active directly and indirectly provisioned groups are pulled from Shared Services.
●The Shared Services list is compared to the Performance Scorecard Group Account, matched
by Group Name.
●Any missing group accounts are automatically created. The appropriate default security role
is set based on the directly and indirectly provisioned roles (Performance Scorecard Power
Manager > admin, Performance Scorecard Interactive > designer,Performance Scorecard
Basic > user).
●All group accounts that are no longer provisioned in Shared Services are listed for optional
deletion.
➤To assign bulk Performance Scorecard permissions:
1Log on to Performance Scorecard as an Administrator.
2From Object View, select Security > User Account List.
The list displays all existing Performance Scorecard users and provisioned Shared Services users.
For Groups, select Security > Group Account List.
3On the Account List, click Synchronize with Shared Services to update user or group account information
inPerformance Scorecard with the provisioned users and groups in Shared Services.
A confirmation message is displayed.
4Click Yes to confirm you want to synchronize all users with users on the Shared Services server. The users
and groups are synchronized, and the results are displayed on the Synchronized with Shared Services Results
window. The results show the names of all users and groups that were newly provisioned, and the names of
any users and groups who are no longer provisioned on Shared Services.
5Select any users or groups that you want to delete, and complete the synchronization.
Migrating Performance Scorecard Users and Groups to Shared
Services Security
When you have a large number of users and groups to provision through Shared Services, you
can perform a one-time migration. For example, you can provision all existing members at once
with the same security access. Subsequently, you can assign the properties to individual users or
groups who require particular access after the main transfer.
Caution!
The Migration option is only available once. After you have migrated the bulk of your users and
groups in this one-time operation, the option is disabled and cannot be used again.
182 Performance Scorecard User Provisioning

Before performing a migration, the following tasks must be performed:
●Ensure that the Performance Scorecard Administrator exists in Shared Services, and has
been assigned the security role of Provisioning Manager.
●Ensure that the Performance Scorecard application has been registered and assigned to a
project in Shared Services.
●Ensure that all employee e-mail addresses are in a valid and correct format, such as
<user>@<provider>.com. Any users with incorrect e-mail addresses will not be migrated
correctly.
Refer to the Hyperion Security Administration Guide for detailed instructions.
➤To migrate users and groups to Shared Services from Performance Scorecard:
1Ensure the Shared Services server is running.
2Log on to Performance Scorecard as an Administrator.
3From Performance Scorecard, select Administration > User Provisioning Migration.
The Shared Services Administrator For Migration page is displayed.
4Enter the User ID and Password for the Administrator.
The migration administrator must exist in Shared Services, and have been assigned as the
Provisioning Manager.
5Click Next to display the Pre-Migration Check page.
6Click Perform Pre-Migration Check to verify existing data, and create the database tables for the migration.
As the verification progresses, appropriate status messages are displayed. A message is shown when the
pre-migration progress check is complete. Click OK to dismiss the message and continue.
7Click Next to display the Externalize Users page.
The page shows a list of all users in the model, their details and service provider. The Migration
Action status is displayed as Migrate.
Migrating Performance Scorecard Users and Groups to Shared Services Security 183
8For each user that you DO NOT WANT to include in the migration, click Edit. The Migration dialog box is
displayed.
9From Migration Action, select Do Not Migrate for the selected user, then click Save.
184 Performance Scorecard User Provisioning
This user will not be included in the one-time migration. In future, if the user needs to be added
to the Shared Services list, you must add the user individually, as outlined in “Creating and
Provisioning Users and Groups over Shared Services” on page 178.
Caution!
Because the Migration option is only available once, Hyperion recommends that you include as
many users in the migration as possible. After you have migrated the bulk of your users in this
one-time operation, the option is disabled and cannot be used again.
10 Repeat step 9 for each user that you want to exclude from the migration.
11 Optional: When the list of users is complete, select the Externalize Groups tab to select the groups that
you want to migrate.
The page shows a list of all groups in the model, the details and service provider. The Migration
Action status is displayed as Migrate.
12 For each group that you DO NOT WANT to include in the migration, click Edit.
The Migration dialog box is displayed.
Migrating Performance Scorecard Users and Groups to Shared Services Security 185
13 From Migration Action, select Do Not Migrate for the selected group, then click Save.
This group will not be included in the one-time migration. In future, if the group needs to be
added to the Shared Services list, you must add the group individually, as outlined in “Creating
and Provisioning Users and Groups over Shared Services” on page 178.
Caution!
Because the Migration option is only available once, Hyperion recommends that you include as
many users in the migration as possible. After you have migrated the bulk of your users in this
one-time operation, the option is disabled and cannot be used again.
14 Repeat step 13 for each group that you want to exclude from the migration.
15 When the list of groups is complete, click Next to display the Migration to Shared Services page.
186 Performance Scorecard User Provisioning
16 Click Test migration.
A confirmation is displayed when the test migration process has been successfully completed.
Click OK to dismiss the message. If a problem is indicated in the migration status messages,
correct any errors and try again.
17 Click Migrate to begin the migration process.
The progress of the migration is indicated by the Migration status messages. A message is
displayed to advise the migration has been successfully completed.
All migrated users and groups are displayed, and have the inherited Performance Scorecard
attributes for their security roles.
Migrating Performance Scorecard Users and Groups to Shared Services Security 187

188 Performance Scorecard User Provisioning

IBusiness Modeling Roles and
Tasks
In This Appendix
Administrator.....................................................................................................................189
Builder ............................................................................................................................190
End User..........................................................................................................................190
Administrator
The administrator manages users, security and databases, both on the desktop and the Web.
On the desktop component of the application, the administrator is responsible for these tasks:
●Set up and maintain databases and containers
●Create and drop database tables
●Install and configure application and associated properties
●Set up and modify authentication settings
●Manage users and groups
●Provision users to specific models and model data
●Assign owners to models and scenarios
●Convert models
For the Web component of the application, the administrator is responsible for the following
tasks:
●Configure application and Web servers
●Set up global tools on the Web Home Page, as outlined in the Hyperion Business Modeling
Web User's Guide.
In some instances, the tasks assigned to the administrator and model builder may overlap. The
Hyperion Business Modeling Model Builder's Guide provides additional detail and explanation in
cases where the administrator requires more information about the application.
If you are planning to import and export meta data and data between authorized Hyperion
applications through Shared Services, the administrator is also responsible to register products,
set up and manage models over the Shared Services, and create data integrations.
Administrator 189

Builder
The builder or model builder is the user who actually creates the original model or enterprise
model by defining all elements of the model, such as boxes, links, variables and financial values,
and attaching financial data.
The builder can perform the following tasks:
●Build and update models
●Calculate models and save results to Essbase or a relational database
●Assign permissions for users to specific models and model data
●Designate which portions of a model are available for sharing over the Web
●Play scenarios in the application and over the Web
●Generate reports in the application and over the Web
●Create integrations for the Oracle's Hyperion® Business Modeling Adapter.
For detailed information on building a model, refer to the Hyperion Business Modeling Model
Builder's Guide.
End User
The end user’s role is an integral part of updating model periods and playing with scenarios.
Using business and operational knowledge to adjust parameters for the original model, the end
user can experiment with the workings of the scenario over the Web to search for process
improvements, time or money savings, or unexpected bottlenecks or benefits.
Based on security set by the model builder, the end user can perform these tasks:
●Update model period data
●Modify available data to play scenarios over the Web
●Generate reports over the Web
●Compare multiple scenarios
●Save changes to forward to the model owner
●Save changes as a new scenario to be shared with other users.
190 Business Modeling Roles and Tasks

JEssbase Provider Services User
Provisioning
In This Appendix
Provisioning the Administrator Role in Shared Services......................................................................191
Migrating Analytic Provider Services Users to Shared Services..............................................................192
Provisioning the Administrator Role in Shared Services
Use Shared Services to provide security for Provider Services, which is administered through
Administration Services. To use Shared Services security, you must register Provider Services
with Shared Services.
In Shared Services mode, the only role that you must assign for Provider Services is the
Administrator role to create, modify, and delete Analytic Server clusters. Only the Administrator
can create Essbase clusters in Provider Services. No other roles can be assigned. Non-
administrator users can only connect to the clusters.
➤To provision the Administrator role:
1Log into Shared Services User Management Console at: http://<sharedservices_server>:
58080/interop/.
For example, http://localhost:58080/interop/.
2In Logon, enter the administrator username and password.
By default, admin and password are the username and password.
3Click Log on.
4In the navigation pane, expand Projects and APS 9.3.0 Servers.
Provider Services is listed.
5To create a user to provision:
a. In the navigation pane, expand User Directories and a directory, such as Native
Directory.
b. Select Users and right-click, then select New.
c. Fill in the information to create a new user.
d. Click Next to add the user to one or more existing groups, or click Finish.
e. Click OK to add the user, or click Create Another to continue adding users.
Provisioning the Administrator Role in Shared Services 191

6To select an existing user to provision:
a. In the navigation pane, expand User Directories and a directory, such as Native
Directory.
b. Select Users, right-click, then select Show All.
7To search for a particular user, enter the user ID in the User box, then click Search.
8From the list, select a user ID and select Provision.
9In Provision Users or Groups, expand APS 9.3.0 Servers and expand the name of Provider Services.
10 Select Administrator and select to select the role.
11 Click Save.
The user is provisioned as an Provider Services administrator. Log into Oracle's Essbase®
Administration Services Console with the administrator user name and password to create and
manage Analytic Server clusters.
12 In Provision Summary, review the provisioning information and click OK.
Migrating Analytic Provider Services Users to Shared Services
Because Oracle's Hyperion® Provider Services has no other users, migration to Shared Services
is unnecessary.
192 Essbase Provider Services User Provisioning

KData Integration Management
User Provisioning
In This Appendix
Authentication Methods.........................................................................................................193
Data Integration Management User Roles.....................................................................................194
You can provision users for Data Integration Management using Shared Services User
Management Console. This feature enables you to use existing user information for a number
of Hyperion applications, or to provision multiple users at one time.
Note:
You also use the User Management Console to modify or delete user provisioning for Data
Integration Management.
As with other Hyperion products, Data Integration Management should be registered with
Shared Services with application-specific roles. As with other Hyperion products, Data
Integration Management should be registered with Shared Services with application-specific
roles. When users are provisioned for Data Integration Management in Shared Services, they
can use Informatica, and there is no need to create those users again in Informatica.
This appendix covers only the Data Integration Management portion of user provisioning. For
detailed instructions on starting and using the Shared Services User Management Console, see
the Hyperion Security Administration Guide.
Provisioning users for Data Integration Management involves two tasks:
1. Using the Shared Services User Management Console to provision the users
2. Synchronizing users withHyperion Configuration Utility to push them to the Informatica
repository.
Authentication Methods
Data Integration Management is integrated with Informatica PowerCenter to provide a way of
uniting disparate sources of data across an enterprise. You can configure Data Integration
Management to use either Shared Services authentication or native Informatica authentication.
Authentication Methods 193

Note:
You can use Shared Services authentication with Data Integration Management installations on
Windows, AIX, Linux, or Solaris platforms but not on HP-UX platforms.
For Shared Services authentication, you must register Data Integration Management with Shared
Services and select the Use Hyperion Shared Services Authentication option when you configure
Data Integration Management with Shared Services. Otherwise, Data Integration Management
uses Informatica native authentication.
Data Integration Management User Roles
Users and roles within Shared Services that have been provisioned for Data Integration
Management should be synchronized with the Informatica repository. As part of this
synchronization, provisioned users are registered with Informatica. The roles assigned to each
user are synchronized with Informatica group assignments.
Hyperion Configuration Utility can create a batch file for synchronizing users. You can then run
the batch file to perform user synchronization whenever users are provisioned or deprovisioned
with the Oracle's Hyperion® Shared Services User Management Console. This batch file is
created if you select the Generate Batch File option when synchronizing users with Oracle's
Hyperion® Configuration Utility™.
The following table describes Data Integration Management roles:
Role Privileges
Data Integration Management Administrator ●Workflow Operator
●Use Designer
●Browse Repository
●Use Workflow Manager
●Admin Repository
●Admin Server
●Use Repository Manager
Data Integration Management Designer ●Workflow Operator
●Use Designer
●Browse Repository
●Use Workflow Manager
Oracle's Hyperion® Data Integration Management Operator ●Workflow Operator
●Browse Repository
194 Data Integration Management User Provisioning

Glossary
access permissions A set of operations that a user can
perform on a Hyperion resource.
aggregated role A custom role that aggregates multiple
predefined roles within a Hyperion product.
application (1) A software program designed to run a
specific task or group of tasks such as a spreadsheet program
or database management system. (2) A related set of
dimensions and dimension members that are used to meet
a specific set of analytical and/or reporting requirements.
(3) A management structure containing one or more
Essbase databases and the related files that control many
system variables, such as memory allocation and autoload
partameters.
authentication Verification of identity as a security
measure. Authentication is typically based on a user ID and
password. Passwords and digital signatures are forms of
authentication.
automated stage A stage that does not require human
intervention, for example, a data load.
business process A set of activities that collectively
accomplish a business objective.
configuration file The security platform relies on an XML
document to be configured by the product administrator or
installer of the software. The XML document must be
modified to indicate meaningful values for properties,
specifying locations and attributes pertaining to the
corporate authentication scenario.
context variable A variable that is defined for a particular
taskflow to identify the context of the taskflow instance.
dimensional hierarchy A type of Shared Services model
that typically includes a hierarchy of related group
members, such as entities or accounts. See also model.
external authentication Logging on to Hyperion
applications by means of user information stored outside
the application, typically in a corporate user directory such
as MSAD or NTLM.
filter In Shared Services, a method that enables users to
filter selected members from the model when the model is
imported. See also model.
filter A constraint placed on data sets to restrict values to
specific criteria. For example, to exclude certain tables, meta
data, data values, or to control access.
group A container that enables the assignment of similar
access permissions to a group of users.
identity A unique identification of one valid user or group
existing on an external authentication repository.
integration Process that is run to move data between
Hyperion applications using Shared Services. Data
integration definitions specify the data moving between a
source application and a destination application, and enable
the data movements to be grouped, ordered, and scheduled.
link (1) Fixed references to a specific object in the
repository. Links can reference folders, files, shortcuts, and
other links using unique identifiers. (2) The point during
the execution of a taskflow instance where the activity in one
stage ends and control passes to another stage, which starts.
link condition A logical expression that is evaluated by the
taskflow engine to decide the sequence of stage execution
within a taskflow. These expressions are defined within the
taskflow definition and are used to identify the flow
relationship between activities. The expressions are also
used to effect the desired sequence of stage execution. This
definition may include parallel or sequential execution
conditions. The link condition is defined in terms of context
variables defined for the taskflow.
Glossary 195

load balancing Distribution of requests across a group of
servers, which ensures optimal end user performance.
managed server An application server process running in
its own Java Virtual Machine (JVM).
manual stage A stage that requires human intervention to
complete the stage.
model (1) In data mining, a collection of an algorithm's
findings about examined data. A model can be used
(applied) against a wider set of data to generate useful
information about that data.(2) A file or string of content
containing an application-specific representation of data.
Models are the basic data managed by Shared Services.
Models are of two major types: dimensional and non-
dimensional application objects. (3) In Business Modeling,
a network of boxes connected to represent and calculate the
operational and financial flow through the area being
examined.
private application An application for the exclusive use of
a product to store and manage Shared Services models. A
private application is created for a product during the
registration process.
product In Shared Services, a product is an application
type, such as Hyperion PlanningOracle's Hyperion®
Planning – System 9 or Hyperion Performance
ScorecardOracle's Hyperion® Performance Scorecard –
System 9.
project An instance of Hyperion products that are grouped
together to comprise an implementation. For example, a
Planning project may consist of a Planning application, an
Oracle's Hyperion® Essbase® – System 9 cube, and a
Financial Reporting Server instance.
promotion The process of copying artifacts from one
operating environment to another operating environment;
for example, from a testing environment to a production
environment.
provisioning The process of granting users and groups
specific access permissions to Hyperion resources.
repository Stores meta data, formatting, and annotation
information for views and queries.
role The means by which access permissions are granted to
users and groups for Hyperion resources.
security agent A Web access management solutions
provider employed by companies to protect Web resources;
also known as Web security agent. The Netegrity SiteMinder
product is an example of a security agent.
security platform A framework enabling Hyperion
applications to use external authentication and single sign-
on using the security platform driver.
shared application An application in Shared Services that
enables two or more products to share their models. See also
model.
Single Sign-On A feature that enables you to access
multiple Hyperion products after logging on just once using
external credentials.
stage A description of a task that forms one logical step
within a taskflow, usually performed by a single individual.
A stage can be manual or automated.
stage action For automated stages, the action that is
invoked to execute the stage.
sync The ability to synchronize models in Shared Services
with models in the application.
synchronized The condition that exists when the latest
version of a model resides in both the application and in
Shared Services.See model.
task list A listing of tasks for a particular user along with
detailed status information for each task.
taskflow The automation of a business process in whole or
in part, during which tasks are passed from one taskflow
participant to another for actions, according to a set of
procedural rules.
taskflow definition The representation of the business
process in the taskflow management system, which enables
the process to be automated. The taskflow definition
consists of a network of stages and their relationships;
criteria to indicate the start and end of the taskflow; and
information about individual stages, such as participants,
associated applications, associated activities, and so on.
taskflow instance The representation of a single instance of
a taskflow including its state and associated data.
196 Glossary

taskflow management system A system that defines,
creates, and manages the execution of a taskflow. It enables
the creation of taskflow definitions, interaction with
taskflow participants (users or applications), and the
launching of other applications during the execution of a
business process.
taskflow participant The resource that performs the task
associated with the taskflow stage instance. The taskflow
system requires a participant for both manual and
automated stages. For a manual stage, the task is shown on
the task list for the user to execute the task. For an automated
stage, Shared Services, along with the application, executes
the task. For automated stages, the application executes the
task on behalf of the participant.
token An encrypted identification of one valid user or
group on an external authentication system.
user directory A centralized, corporate store of user and
group information. May also be referred to as a repository
or provider.
Glossary 197

198 Glossary

Index
Symbols
<HSS_Home>, 23
<Hyperion_Home>, 23
A
access permissions, 68
Business Modeling, 143
Business Rules, 142
Data Integration Management, 145
Essbase, 137
Financial Management, 139
Performance Scorecard, 144
Planning, 141
Provider Services, 145
Reporting and Analysis, 137
Shared Services roles, 135
Strategic Finance, 143, 144
Transaction Manager, 144
activate user accounts, 84
add to search order, 55
Administrator role, 16
aggregated roles, 17, 88
creating, 89
delete, 90
modify, 90
application-level access, 68
applications, 23
adding to existing projects, 67
adding to new projects, 66
copying provisioning between, 69
Defined, 65
delete, 69
removing from projects, 67
assigning access permission, 68
audit provisioning assignments, 102
authentication, 12
components, 11
managing directories, 79
overview, 11
scenarios, 12
authorization
aggregated roles, 17
global roles, 16
groups, 17
overview, 14
predefined roles, 17
roles, 15
users, 17
B
Browse tab, 34
browser problems
JVM errors, 34
pop-up blockers, 33
Business Modeling
roles, 143
Business Rules
launching the User Management console, 174
migrating users to Shared Services, 175
roles, 142
roles and permissions, 173
roles, described, 174
security for, 173
C
cache refresh interval, 58
change root password, 91
change search order, 56
cold standby, 96
configure
LDAP-enabled, 40
MSAD, 40
NTLM, 49
Oracle Internet Directory, 40
ABCDEFGHI J LMNOPRSTUVWX
Index 199

relational database provider, 50
SAP Provider, 46
SiteMinder policy server, 27
SiteMinder Web agent, 27
user directories, 20
copying provisioning information, 69
creating
aggregated roles, 89
delegated administrators, 72
delegated lists, 73
groups, 20, 85
projects, 66
provisioning reports, 102
users, 19, 81
CSSSpy, 134
CSV format
Import/Export utility, 118
D
Data Integration Management
user roles, 194
Data Integration Management roles, 145
database
recover Native Directory data, 93
synchronize with Native Directory, 93
deactivate users, 83
default
password, 33
user, 16
delegated administration
creating administrators, 72
delegated administrators, 72
enabling, 72
hierarchy, 71
provisioning, 73
Shared Services Administrators, 71
delegated lists
creating, 73
deleting, 77
modifying, 75
delegated reports, 77
delegated user management mode, 57
delegation plan, 73
delete
aggregated roles, 90
application, 69
applications from project, 67
groups, 88
projects, 67
user accounts, 84
user directories, 54
deleting
delegated lists, 77
deployment location, 23
deprovision
groups, 102
users, 102
Directory Manager role, 16
E
edit user directory settings, 53
enabling
delegated administration, 72
Essbase
application access type, 153
backing up security information, 155
calculation and filter access, 151
global Essbase application, 150
launching User Management Console, 149
migrating to Shared Services, 155
projects, applications, and databases, 150
roles, 137
synchronizing and refreshing security information
from Shared Services, 154
user management and security, 149
user provisioning, 149
users and groups, 151
export provisioning data, 103
F
failover
cold standby, 96
hot standby, 98
Native Directory, 94
out of the box, 94
Financial Management
assigning user access
setting up e-mail alerting, 163
assigning user access to security classes, 162
assigning users and groups, 161
migrating users, 166
roles, 139
running security reports, 165
ABCDEFGHI J LMNOPRSTUVWX
200 Index

G
generate provisioning reports, 102
global parameters
delegated user management mode, 57
logging level, 57
security agent support, 57
token timeout, 57
global roles
Administrator, 16
Directory Manager, 16
LCM Manager, 16
Project Manager, 16
groups, 17
creating, 20, 85
delete, 88
deprovisioning, 102
manage Native Directory, 84
modify, 86
nested, 85
nested from SAP, 22, 23
provisioning, 101
rename, 86
H
hierarchy
delegated administration, 71
high availability of Native Directory, 94
hot standby, 98
Hyperion deployment locations, 23
Hyperion Remote Authentication Module, 29
I
import provisioning data, 103
Import/Export utility
<ImpEx_home>, 106
considerations, 112
CSV format, 118
home, 106
prerequisites, 106, 113
properties, 108
running, 113
XML format, 114
Import/Export utility (provisioning data), 103
inter-OU move, 38
considerations, 39
migration behavior, 39
migration sequence, 39
planning, 38
J
JVM errors, 34
L
launch User Management Console, 33
LCM Manager role, 16
LDAP, 12
LDAP-enabled user directories
configuring, 40
identifying to Shared Services, 20
log files
SharedServices_Admin.log, 133
SharedServices_Memory_Profiler.log, 133
SharedServices_Metadata.log, 133
SharedServices_Security.log, 133
SharedServices_Security_Client.log, 133
SharedServices_SyncOpenLDAP.log, 133
SharedServices_Taskflow.log, 133
SharedServices_Taskflow_CMDExecute.log, 133
SharedServices_Taskflow_Optimize.log, 133
log files of Shared Services, 133
logging level, 57
M
manage
Native Directory groups, 84
Native Directory Roles, 88
search order, 54
user directories, 79
users, 81
migrate Native Directory, 99
migrating users, 20
modify
aggregated roles, 90
groups, 86
projects, 67
user directory settings, 53
users, 82
modifying
delegated lists, 75
move
planning inter-OU move, 38
users and groups across OUs, 38
ABCDEFGHI J LMNOPRSTUVWX
Index 201

MSAD
configuring, 40
N
naming guidelines
groups, 85
roles, 89
users, 81
Native Directory, 12
activate deactivated accounts, 84
change root password, 91
cold standby failover, 96
create aggregated roles, 89
create users, 81
deactivate user accounts, 83
delete aggregated roles, 90
delete groups, 88
export, 103
failover, 94
groups, 84
high availability, 94
hot standby failover, 98
manage roles, 88
migrate , 99
modify groups, 86
modify user accounts, 82
out of the box failover, 94
recover data, 93
synchronize, 93
update aggregated roles, 90
users, 81
nested groups, 22, 85
inheritance policy, 23
NTLM
Hyperion Remote Authentication Module, 29
support for SSO, 28
supporting UNIX application environments, 29
O
Object Palette, 34
object-level security, 68
OpenLDAP, 79
out of the box failover scenario, 94
P
Performance Scorecard
access permissions, 178, 179
assign permissions
bulk, 181
individually, 180
launching the User Management Console, 177
migrating, 182
roles, 144
Planning , 167
about roles, 170
access permissions overview, 167
access permissions with Essbase, 170
Analytic Services Write Access role, 170
and connection types with Analytic Services, 171
deleting or deprovisioning users or groups, 168
launching User Management Console, 167
migrating identities, 168
migrating users, 171
ProvisionUsers utility, 169
returning to Planning from User Management
Console, 167
roles, 141
roles with Business Rules, 170
synchronizing users and groups with a utility, 169
synchronizing with User Management Console,
168
planning delegated administration
delegation plan, 73
user accounts, 73
pop-up blockers, 33
predefined roles, 17
prerequisites
for SAP single sign-on, 23
Import/Export Utility, 106, 113
print provisioning reports, 102
product-specific access, 68
Project Manager role, 16
projects
adding applications to new projects, 66
creating, 66
deleting, 67
renaming, 67
properties for Import/Export utility, 108
Provider Services
role, 191
user provisioning, 191
Provider Services roles, 145
provisioning
ABCDEFGHI J LMNOPRSTUVWX
202 Index

delegated administrators, 73
exporting data, 103
generating report on, 102
groups, 17, 101
importing data, 103
overview, 14
recover Native Directory data, 93
users, 17, 101
R
relational database provider
configuring, 50
remove search order, 56
renaming
groups, 86
projects, 67
users, 82
Reporting and Analysis
launching User Management Console, 157
role hierarchy, 157
Reporting and Analysis roles, 137
aggregated
Content Manager branch, 158
Scheduler Manager branch, 159
combining, 159
Job Manager, 138
reports
delegated reports, 77
on provisioning assignments, 102
roles
aggregated, 17, 88
assign to group, 101
assign to user, 101
Business Modeling, 143
Business Rules, 142
create aggregated, 89
Data Integration Management, 194
Data Integration Management, 145
defined, 15
delete aggregated, 90
Essbase, 137
Financial Management, 139
global, 16
manage, 88
Performance Scorecard, 144
Planning, 141
predefined, 17
Provider Services, 145, 191
remove assignment, 102
Reporting and Analysis, 137
Shared Services roles, 135
Strategic Finance, 143, 144
Transaction Manager, 144
update aggregated, 90
run Import/Export utility, 113
S
SAP
keystore timeout, 59
libraries, 24
nested groups, 22
single sign-on from Enterprise Portal, 21
single sign-on prerequisites, 23
search order
add to, 55
change, 56
manage, 54
remove, 56
security
authentication, 11
authentication components, 11
authentication scenarios, 12
Native Directory, 12
OpenLDAP, 12
product-specific, 68
security API, 12
single sign-on, 12, 13
user directories, 12
Shared Services
Administrator role, 16
cache refresh interval, 58
Directory Manager role, 16
LCM Manager role, 16
log files, 133
Project Manager role, 16
recover Native Directory data, 93
roles, 135
SAP keystore, 59
synchronize database with Native Directory, 93
SharedServices_Admin.log, 133
SharedServices_Memory_Profiler.log file, 133
SharedServices_Metadata.log file, 133
SharedServices_Security.log file, 133
SharedServices_Security_Client.log file, 133
ABCDEFGHI J LMNOPRSTUVWX
Index 203

SharedServices_SyncOpenLDAP.log file, 133
SharedServices_Taskflow.log file, 133
SharedServices_Taskflow_CMDExecute.log file, 133
SharedServices_Taskflow_Optimize.log file, 133
single sign-on
assumptions for SAP, 22
direct, 12
for SAP nested groups, 22
from SAP, 21
from SiteMinder, 25
using NTLM, 28
using SiteMinder, 25
using trusted credentials, 13
SiteMinder
configure policy server, 27
configure Web agents, 27
enabling authentication, 27
single sign-on from, 25
supported security agents, 26
slapd.conf, 95
special characters, 61
Strategic Finance roles, 143, 144
support for security agent, 57
synchronize databases, 93
T
task tabs, 34
test user directory, 53
token timeout, 57
tools and utilities
CSSSpy, 134
WebDAV Browser, 134
Transaction Manager roles, 144
trusted single sign-on, 13
U
user
authentication, 11
authentication components, 11
authentication scenarios, 12
user accounts
for delegated administration, 73
user directory
add to search order, 55
change search order, 56
configure, 20
configure LDAP-enabled, 40
configure MSAD, 40
configure NTLM, 49
configure Oracle Internet Directory, 40
configure relational database, 50
configure SAP, 46
create groups, 20
create users, 19
defined, 12
delete, 54
edit settings, 53
global parameters, 57
manage search order, 54
operations related to, 37
remove from search order, 56
test connection, 53
use of special characters, 61
User Management Console
default credentials, 33
launch, 33
menus, 34
overview, 34
toolbar buttons, 34
user provisioning
copying to another application, 69
users, 17
activate inactive, 84
create, 19
creating, 81
deactivate accounts, 83
deleting, 84
deprovisioning, 102
manage in Native directory, 81
migrating to Shared Services, 20
modifying, 82
naming guidelines, 81
provisioning, 101
renaming, 82
V
viewing
delegated reports, 77
W
WebDAV Browser, 134
WORLD, 80
ABCDEFGHI J LMNOPRSTUVWX
204 Index


