Oregon Scientific Global Distribution MB109 Dry Erase Weather Board User Manual
Oregon Scientific Global Distribution Limited Dry Erase Weather Board
User Manual
Weatherboard
Model: MB108
User Manual
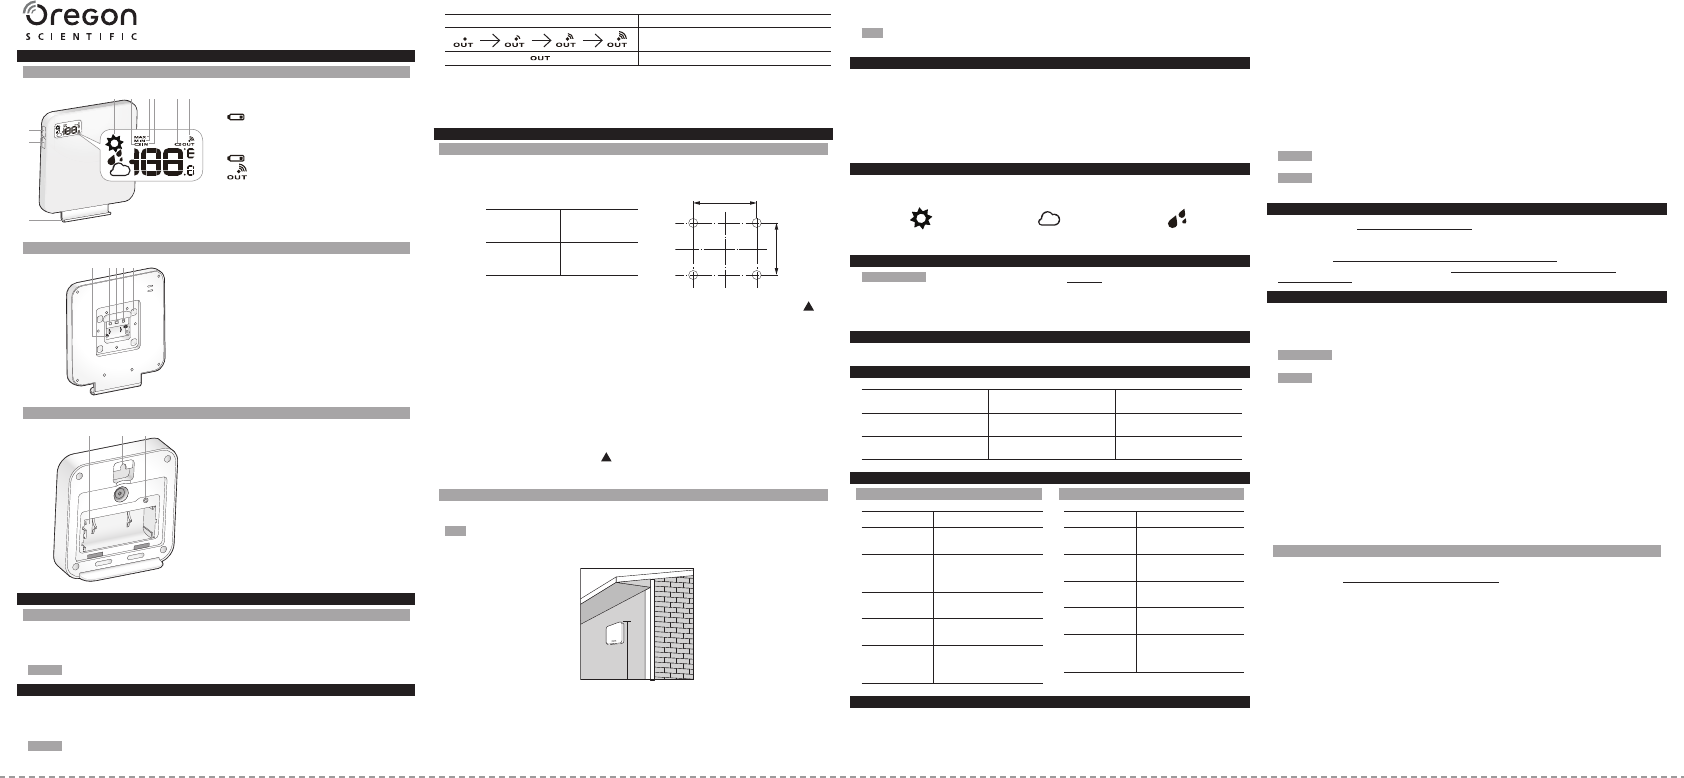
OVERVIEW
FRONT VIEW
1. Weather forecast
2. : main unit batteries low
3. Maximum or minimum temperature is
displayed
4. Indoor temperature is displayed
5. : remote sensor batteries low
6. : remote sensor reception indicator
7. IN / OUT TEMP: toggle between current /
indoor / outdoor temperature
8. MIN / MAX: view minimum and
maximum indoor / outdoor temperature
9. Whiteboard marker tray
BACK VIEW
1. Battery compartment
2. SENSOR: initiate search for sensor
3. °C / °F: select temperature unit
4. RESET: reset unit to default settings
5. Wall mount hole
SENSOR
1. Battery compartment
2. Wall mount hole
3. RESET: return to default settings
GETTING STARTED
MAIN UNIT INSTALLATION
Insert batteries:
1. Remove the battery compartment cover.
2. Insert batteries, matching the polarities (+/-).
NOTE Batteries should not be exposed to excessive heat such as sunshine or re.
REMOTE SENSOR INSTALLATION
1. Using Philips screwdriver, open battery compartment door.
2. Insert batteries, matching the polarities (+/-).
3. Replace screw and close the battery door.
NOTE Use alkaline batteries for longer usage and consumer grade lithium batteries
in temperatures below freezing.
The sensor reception icon shows the status:
ICONS MEANING
Main unit is searching for sensor(s)
No sensor found
After every sensor initialization, the main unit may take up to 4 minutes to receive the
data from the sensor.
If search fails, initiate another search by pressing RESET on the sensor and SENSOR
on the main unit
POSITIONING PRODUCT
MAIN UNIT
Mounting with screws:
1. Find a suitable location to mount the unit.
2. Using a pencil, mark where the screws should be using below dimensions as a
guide.
Horizontal 2.9 in
(73.6 mm)
Vertical 2.4 in
(60 mm)
73.6
60.0
3. Place wall mount bracket onto wall in desired position making sure the arrow is
pointing up,
4. Take out screws from packaging. Using Philips screwdriver, screw wall mount
bracket onto wall.
5. Hang Weatherboard on the wall mount bracket hooks.
Mounting with sticker:
Recommended for at surfaces made of glass or metal. Do not mount on wood
surfaces or those with paint nishing.
1. Wipe the wall surface and the wall mount bracket where the sticker will be.
2. Peel away adhesive paper from one side of the sticker, being careful not to let the
glue stick to anything.
3. Position sticker on wall mount bracket and press down rmly for about 20-30
seconds.
4. Peel away the other adhesive paper. Position wall mount bracket in desired
location making sure the arrow is pointing up. Press rmly for about 20-30
seconds.
5. Hang Weatherboard on the wall mount bracket hooks.
SENSOR
Secure the sensor in the desired location using the wall mount hole or stand.
TIP Ideal placements for the sensor would be in any location on the exterior of the
home at a height of not more than 1.5 m (5 ft) and which can shield it from direct
sunlight or wet conditions for an accurate reading.
1.5m (5ft)
For best results:
• Place the sensor within 40 m (131 ft) of the main unit.
• Place the sensor out of direct sunlight and moisture.
• Position the sensor so that it faces the main unit, minimizing obstructions such as
doors, walls and furniture.
• Place the sensor in a location with a clear view to the sky, away from metallic /
electronic objects.
• Position the sensor close to the main unit during cold winter months as below-
freezing temperatures may affect battery performance and signal transmission.
TIP The transmission range may vary depending on many factors. You may need to
experiment with various locations to get the best results.
TEMPERATURE
To toggle temperature unit:
• Slide °C / °F switch to select.
To toggle between indoor / outdoor temperature display:
• Press IN / OUT TEMP.
To view minimum and maximum temperature records:
• Press MIN / MAX repeatedly.
WEATHER FORECAST
This product forecasts the next 12 to 24 hours of weather forecast within a 30-50 km
(19-31 mile) radius.
Sunny Cloudy Rainy
CLEANING THE WEATHERBOARD
IMPORTANT Only use whiteboard markers. NEVER use permanent markers on the
Weatherboard.
To keep the Weatherboard in top condition, use a whiteboard eraser to wipe away ink
immediately after use.
RESET
Press RESET to return to the default settings.
TROUBLESHOOTING
DISPLAY AREA PROBLEM
LL.L Temperature Reading is below range
HH.H Temperature Reading is above range
SPECIFICATIONS
MAIN UNIT
TYPE DESCRIPTION
L x W x H 8 x 0.9 x 9 in
(203 x 23 x 228 mm)
Weight
243g ( oz) without
battery and wall
mount bracket
Tempera-
ture range
-5°C to 50°C (23°F
to 122°F)
Signal
frequency 433 MHz
Power
2 x UM-4 (AAA)
1.5 V batteries (not
included)
SENSOR
TYPE DESCRIPTION
L x W x H 3 x 1 x 3 in
(75 x 25.6 x 76 mm)
Weight 53.7g without
battery
Temperature
range
-20°C to 60°C (-4°F
to 140°F)
Transmis-
sion range
40 m (131 ft) unob-
structed
Power
2 x UM-4 (AAA)
1.5 V batteries (not
included)
PRECAUTIONS
• Do not subject the unit to excessive force, shock, dust, temperature or humidity.
• Do not cover the ventilation holes with any items such as newspapers, curtains
etc.
• Do not immerse the unit in water. If you spill liquid over it, dry it immediately with a
soft, lint-free cloth.
• Do not clean the unit with abrasive or corrosive materials.
• Do not tamper with the unit’s internal components. This invalidates the warranty.
• Only use fresh batteries. Do not mix new and old batteries.
• Images shown in this manual may differ from the actual display.
• When disposing of this product, ensure it is collected separately for special
treatment and not as normal household waste.
• Placement of this product on certain types of wood may result in damage to its
nish for which Oregon Scientic will not be responsible. Consult the furniture
manufacturer’s care instructions for information.
• The contents of this manual may not be reproduced without the permission of the
manufacturer.
• Do not dispose old batteries as unsorted municipal waste. Collection of such
waste separately for special treatment is necessary.
• Please note that some units are equipped with a battery safety strip. Remove the
strip from the battery compartment before rst use.
NOTE The technical specications for this product and the contents of the user
manual are subject to change without notice.
NOTE Features and accessories will not be available in all countries. For more
information, please contact your local retailer.
ABOUT OREGON SCIENTIFIC
Visit our website (www.oregonscientic.com) to learn more about Oregon Scientic
products.
If you’re in the US and would like to contact our Customer Care department directly,
please visit: https//:us.oregonscientic.com/service/support.asp
For international inquiries, please visit: https://us.oregonscientic.com/about/
international.asp
FCC STATEMENT
This device complies with Part 15 of the FCC Rules. Operation is subject to the
following two conditions: (1) This device may not cause harmful interference, and (2)
This device must accept any interference received, including interference that may
cause undesired operation.
WARNING Changes or modications not expressly approved by the party
responsible for compliance could void the user’s authority to operate the equipment.
NOTE This equipment has been tested and found to comply with the limits for
a Class B digital device, pursuant to Part 15 of the FCC Rules. These limits are
designed to provide reasonable protection against harmful interference in a residential
installation.
This equipment generates, uses and can radiate radio frequency energy and, if not
installed and used in accordance with the instructions, may cause harmful interference
to radio communications. However, there is no guarantee that interference will not
occur in a particular installation. If this equipment does cause harmful interference to
radio or television reception, which can be determined by turning the equipment off
and on, the user is encouraged to try to correct the interference by one or more of the
following measures:
• Reorient or relocate the receiving antenna.
• Increase the separation between the equipment and receiver.
• Connect the equipment into an outlet on a circuit different from that to which the
receiver is connected.
• Consult the dealer or an experienced radio / TV technician for help.
DECLARATION OF CONFORMITY
The following information is not to be used as contact for support or sales. Please visit
our website at www2.oregonscientic.com/service for all enquiries.
We
Name: Oregon Scientic, Inc.
Address: 19861 SW 95th Ave.,Tualatin,
Oregon 97062 USA
Telephone No.: 1-800-853-8883
declare that the product
Product No.: MB108
Product Name: Weatherboard
Manufacturer: IDT Technology Limited
Address: Block C, 9/F, Kaiser Estate,
Phase 1, 41 Man Yue St.,
Hung Hom, Kowloon,
Hong Kong
is in conformity with Part 15 of the FCC Rules. Operation is subject to the following
two conditions: 1) This device may not cause harmful interference, and 2) This
device must accept any interference received, including interference that may cause
undesired operation.
1 2 3 4 5
1
7
8
9
2 3 4 5 6
1 2 3