Oregon Scientific Pair Of Pmr446 Two Way Personal Radios Tp391 Users Manual
TP391 to the manual 570b5e8a-34e4-46be-b4ba-6a10270623a2
2015-02-04
: Oregon-Scientific Oregon-Scientific-Pair-Of-Pmr446-Two-Way-Personal-Radios-Tp391-Users-Manual-374451 oregon-scientific-pair-of-pmr446-two-way-personal-radios-tp391-users-manual-374451 oregon-scientific pdf
Open the PDF directly: View PDF ![]() .
.
Page Count: 18

Pair of PMR446 Two-Way
Personal Radios
Model: TP391
USER MANUAL
MANUALE D’USO
MANUEL DE L’UTILISATEUR
BEDIENUNGSANLEITUNG
MANUAL DE USUARIO
MANUAL DO USUÁRIO
HANDLEIDING
BRUKSANVISNING
P/N:086L004722-016 REV.1 PAGE: 1/152

EN
CONTENTS
Introduction ............................................................................................. 1
Key Features ........................................................................................... 1
Front view............................................................................................... 1
Back view ............................................................................................... 3
LCD display symbols ............................................................................. 4
Safety and Care Instructions ................................................................. 5
Safety precautions ................................................................................. 5
Caring for this product ............................................................................ 5
Caution ................................................................................................... 5
Getting Started ........................................................................................ 6
Power ..................................................................................................... 6
Turn the unit ON/OFF ............................................................................ 7
Volume ................................................................................................... 8
Reset ...................................................................................................... 8
Talk to another transceiver ..................................................................... 8
Page another transceiver ....................................................................... 8
Keypad lock ........................................................................................... 9
Menu Options .......................................................................................... 9
Select a channel or CTCSS ................................................................. 10
Call tone ................................................................................................11
VOX level / voice delay time .................................................................11
Roger beep .......................................................................................... 12
Dual watch (DW) .................................................................................. 13
Scan for a Channel / CTCSS ................................................................ 13
Reset ...................................................................................................... 14
Troubleshooting .................................................................................... 14
Specications ....................................................................................... 15
AboutOregonScientic ....................................................................... 16
EU-Declaration of conformity .............................................................. 16
PAIR OF PMR446 TWO WAY PERSONAL RADIOS
MODEL: TP391
USER MANUAL
P/N:086L004722-016 REV.1 PAGE: 2/152
1
EN
INTRODUCTION
Thank you for selecting the Oregon Scientic™ TP391as your product of
choice. This product is a portable, easy-to-use two-way radio transceiver that
you can use to contact your family and friends at shopping malls, amusement
parks, sports events, beaches, forests and so on. You can also use it as a
vital communications tool in a neighborhood watch.
The transceiver has 8 channels and 38 CTCSS (Continuous Tone Coded
Squelch System) codes. If someone else is using the same channel as you,
you can select another channel or use the CTCSS feature. Talk with another
person if you are both tuned to the same channel and/or CTCSS code.
Please note that the use of this item is subject to applicable regulations of
the country where used.
KEY FEATURES
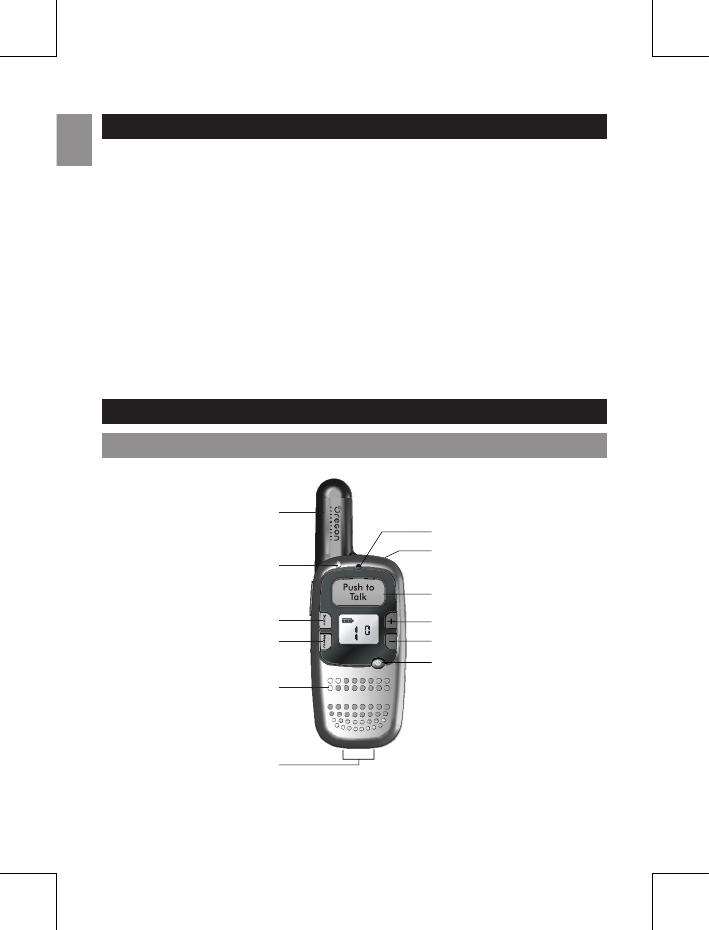
FRONT VIEW
1
0
6
7
8
10
11
9
2
3
4
5
P/N:086L004722-016 REV.1 PAGE: 3/152
2
EN
NO. DESCRIPTION FUNCTION
0 Antenna Receives and transmits signals
1 LED indicator Lights up red when transmitting a signal
2 Auto scans for available channel / Monitors
current channel for activity
3 Scrolls through menu options / Locks and
unlocks the keypad
4 Speaker Generates audible sound
5 Connection Slot pins into a desktop charger docking
pins station (docking station not included)
6 Microphone Picks up voice sounds
7 Headset jack / Allows use of headset for hands-free
charger jack communication or use of AC adapter for
charging
8 Push to talk / Conrms selection in Menu Mode
9 Increase volume / Select Channel, CTCSS,
Call Tone, Mic / VOX level in Menu Mode
10 Decrease volume / Select Channel, CTCSS,
Call Tone, Mic / VOX level in Menu Mode
11 Press to turn the unit on or off
P/N:086L004722-016 REV.1 PAGE: 4/152
3
EN
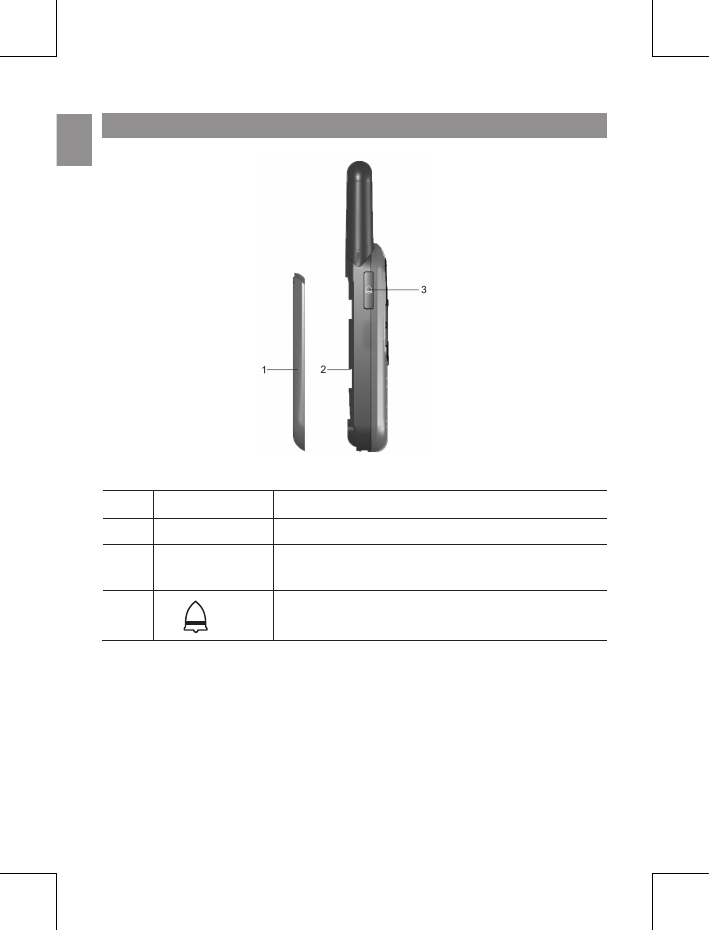
BACK VIEW
NO. DESCRIPTION FUNCTION
1 Battery door Remove to access battery compartment
2 Battery Uses lithium 3.7V-720mAh rechargeable
compartment battery
3 Sends call tone to other users of the same
frequency
P/N:086L004722-016 REV.1 PAGE: 5/152
4
EN
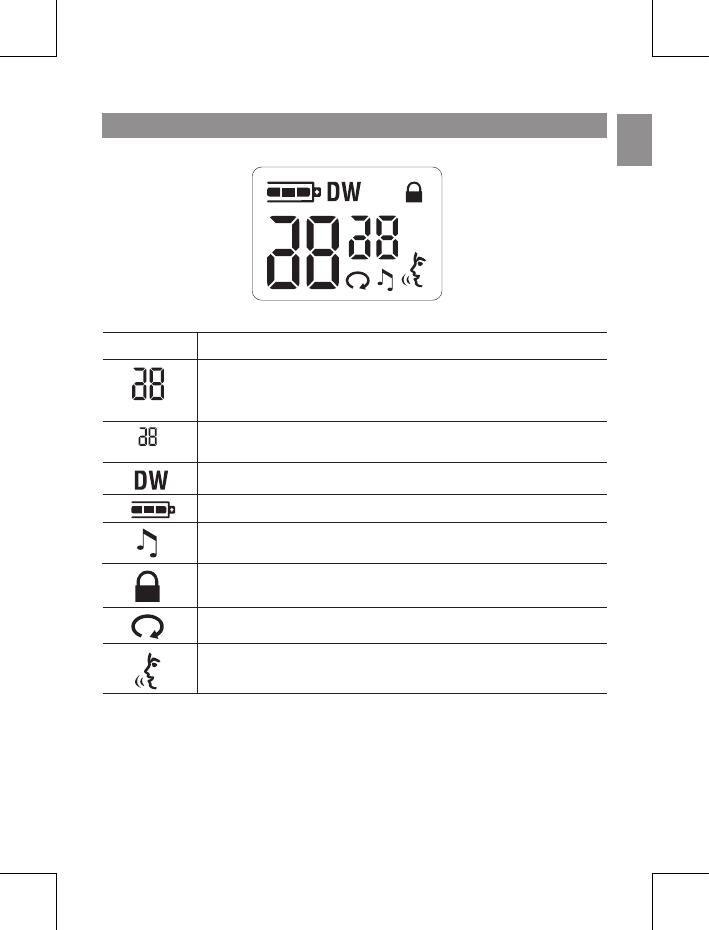
LCD DISPLAY SYMBOLS
SYMBOL FUNCTION
Channel number: Select between 8 channels
CTCSS code: Adjust to minimize interference problems
Dual Watch: Monitor 2 channels simultaneously
Battery indicator: Provides battery status during operation
Call tone: Page another user
Keypad lock: Locks keypad to prevent accidental button
activation
Auto-scan: Unit is scanning Channels or CTCSS
VOX: Voice activation system
(big)
(small)
P/N:086L004722-016 REV.1 PAGE: 6/152

5
EN
SAFETY AND CARE INSTRUCTIONS
SAFETY PRECAUTIONS
Please observe the following safety precautions when setting up and using
this product.
* LCD panel – The LCD panel is made of glass, and may break if the unit
is dropped or impacted.
* Heat sources – Keep the product away from heat sources such as
radiators, stoves, heaters, and other heat-generating products.
* Water and moisture – Do not use the product in or near water or in high
moisture areas such as a bathroom.
CARING FOR THIS PRODUCT
To ensure you receive the maximum benet from using this product, please
observe the following guidelines.
* Cleaning – Use a damp cloth. Do not use liquid cleaning agents,
benzene, thinner, or aerosols.
* Repair – Do not attempt to repair the product or modify the circuitry
by yourself. Contact the retailer or a qualied repairman if the product
requires servicing. Only use replacement parts that are recommended by
the manufacturer.
* Do not scratch hard objects against the LCD display as this may cause
damage.
CAUTION
* To avoid risk of re or injury, do not attempt to charge non-rechargeable
batteries. Please turn off the unit while charging.
* Replace only batteries with the same or equivalent type recommended
by the manufacturer.
* Please dispose of old, defective batteries in an environmentally friendly
manner in accordance with the relevant legislation.
* See additional battery warnings in the “Power” section of the user
manual.
P/N:086L004722-016 REV.1 PAGE: 7/152

6
EN
* Do not dispose this product as unsorted municipal waste. Collection of
such waste separately for special treatment is necessary.
* No naked ames, such as lighted candles, should be placed near the
apparatus.
* To reduce the risk of electric shock, do not expose this application to rain
or moisture.
GETTING STARTED
POWER
To insert the batteries:
1. Slide the battery door open.
2. Insert the lithium battery into the battery compartment, making sure
the polarities (+ and –) match.
3. Slide the back cover and clip into place.
WARNING: There is a danger in which incorrectly placing the battery can
cause an explosion. Always make sure the radio is switched off before
installing or changing the battery. Replace only with the same or equipment
type. Use ONLY with lithium 3.7V 720mAH rechargeable battery. Contact
your local retailer for more information.
NOTE: will ash to indicate low battery power.
P/N:086L004722-016 REV.1 PAGE: 8/152
7
EN
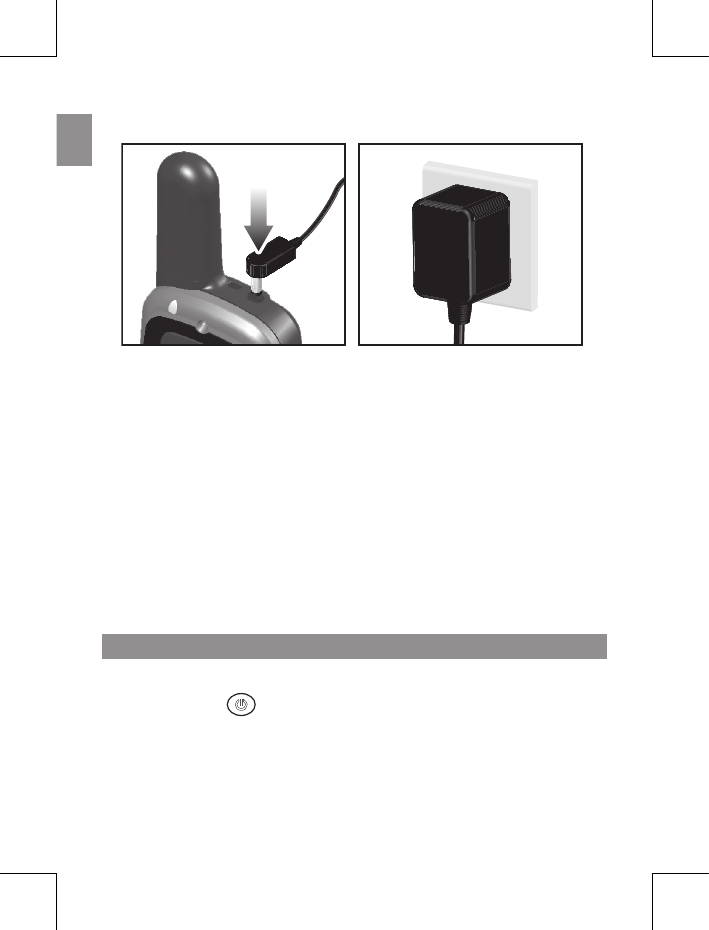
To charge the battery using the AC adapter:
Charge the battery for 12 hours on the rst charge. After that, it should take 3
or less hours to charge. The LCD backlight will be turned on when charging.
The LED indicator will be turned on when battery is full.
NOTE:
1. To maintain the battery life of your two-way transceiver it is
recommended that you only charge the battery when needed.
Overcharging the battery will reduce performance.
2. For best results ensure that the unit is turned off before charging.
3. Remove batteries before storing your radio for extended periods.
Batteries corrode over time and may cause permanent damage to
your radio.
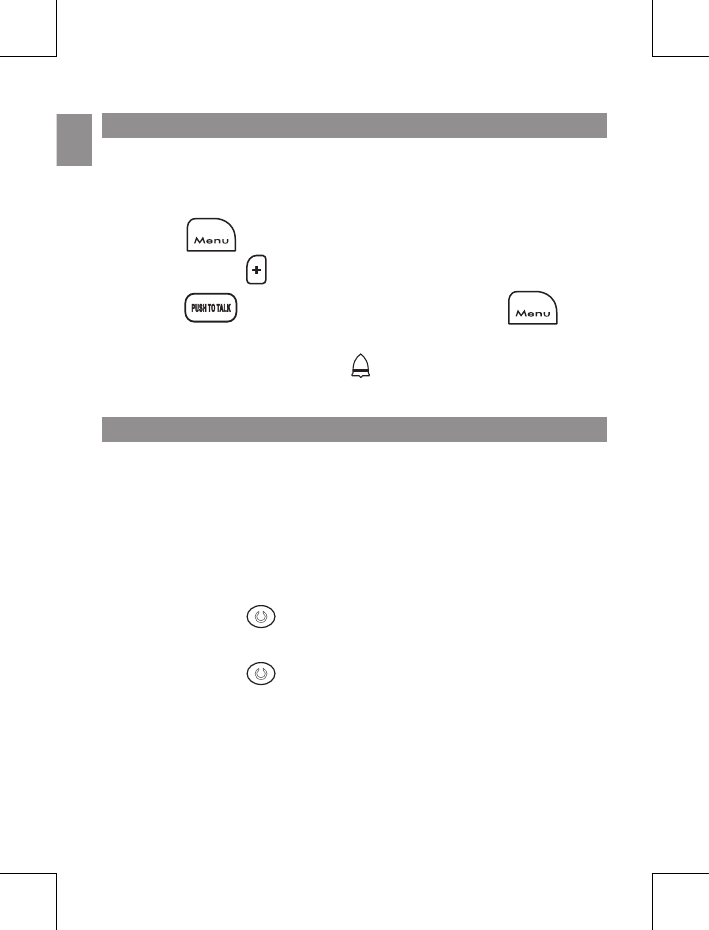
TURN THE UNIT ON / OFF
To turn the unit ON or OFF:
Press and hold until you hear a beep and the LCD display appears
or disappears.
P/N:086L004722-016 REV.1 PAGE: 9/152

8
EN
VOLUME
To change the volume level:
Use or to increase or decrease volume.
RESET
To reset the unit:
Remove the batteries for two minutes and insert them again.
TALK TO ANOTHER TRANSCEIVER
For best transmission speak about 5 cm away from the radio and leave a
short pause before speaking once you have pressed .
To talk to another transceiver:
1. Press and hold to check if the channel is free.
2. Press and hold and speak into the microphone to transmit.
When nished, release the button. The transceiver will automatically
play received transmissions.
3. Release once you have nished speaking to allow other
radios to respond.
NOTE: You can only communicate with another transceiver that is on the
same channel and using the same CTCSS code as your transceiver.
PAGE ANOTHER TRANSCEIVER
To page all transceivers tuned to the same channel:
Press .
NOTE: The call tone will be heard from your device and from the receiving
party’s unit at the same time.
P/N:086L004722-016 REV.1 PAGE: 10/152
9
EN
KEYPAD LOCK
To avoid accidentally changing the channel and the unit’s preferred settings,
you can lock the keypad.
To lock or unlock the keypad:
Press and hold for 1.5 seconds. appears when the keypad
is locked.
NOTE: While the keypad is on you can still use the and keys.
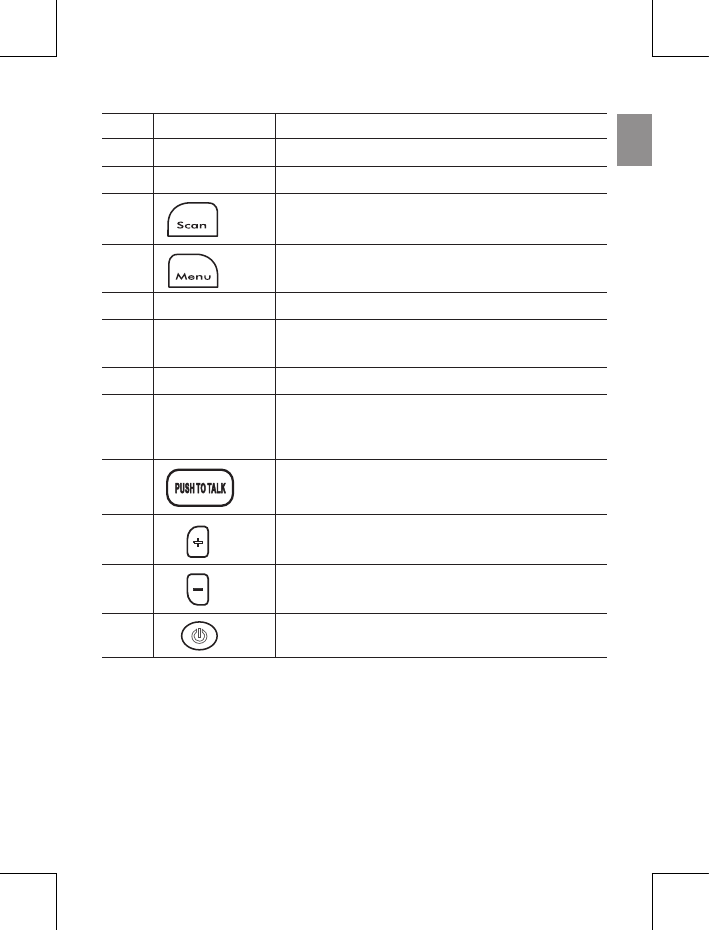
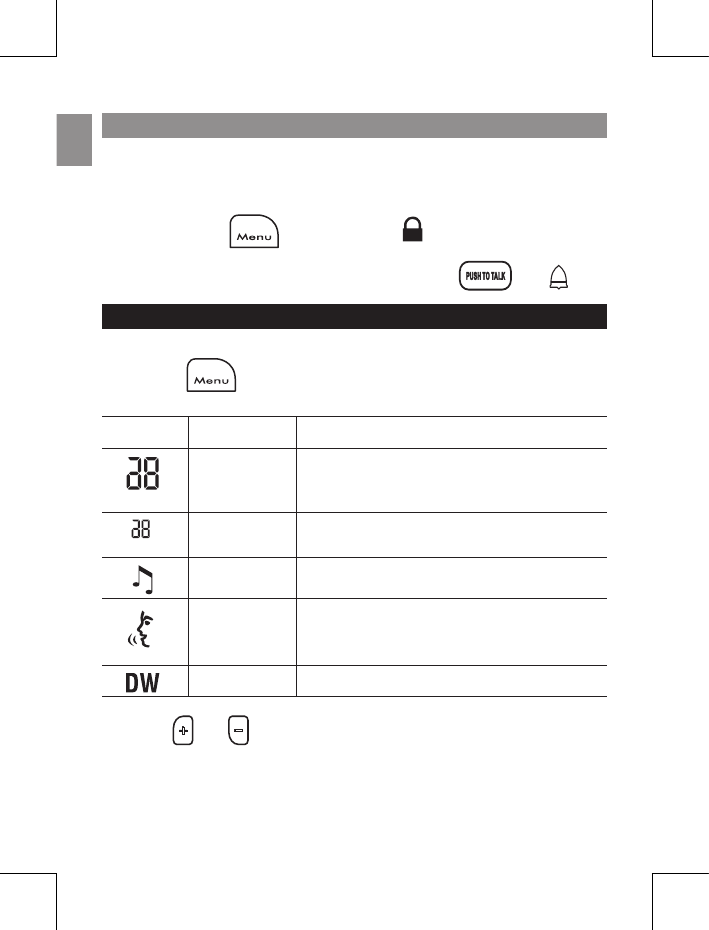
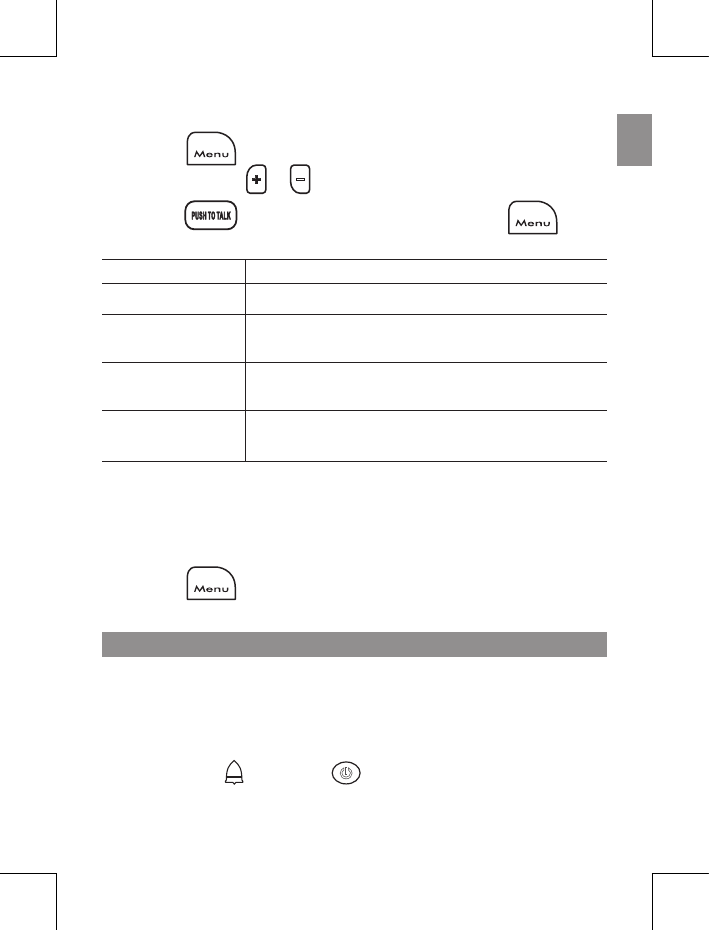
MENU OPTIONS
To access the Menu Options and change settings:
1. Press . The transceiver will then toggle between the following
congurable settings:
SYMBOL SETTING DESCRIPTION
Channel Selects channel for transmission
CTCSS Selects a CTCSS code for the current
channel
Call tone Selects 1 of 10 call tones
VOX Enables / disables voice-activated
transmission (0-3); selects transmission
delay time (1-5)
Dual Watch Monitors 2 channels simultaneously
2. Use and to select settings.
(big)
(small)
P/N:086L004722-016 REV.1 PAGE: 11/152
10
EN
3. Press to conrm and move to the next setting or press
to conrm the changes and exit the Menu Options. Settings
will automatically be conrmed after 5 seconds if no key is pressed.
SELECT A CHANNEL OR CTCSS
The transmitter and receiver must be on the same channel using the same
CTCSS code in order for you to communicate with another party.
This feature allows you to utilize a less often-used range of CTCSS codes
within a main channel to avoid congestion on the main channel and lter
out unwanted noise and static. There are 38 CTCSS codes for each main
channel.
To select between 8 channels or 38 CTCSS codes:
1. Press once (for channel) or twice (for CTCSS code) until the
corresponding channel / CTCSS number starts ashing.
2. Press and hold or to change the channel or CTCSS code.
3. Press to conrm and exit the menu. Or, press to
conrm and go to the next Menu Option.
NOTE: To communicate with other units that do not have CTCSS code
capability, switch your unit to the same channel and set the CTCSS code
to “0”.
TIP: Before trying to transmit on the selected channel, press to
check the activity on that channel. If someone is already on the selected
channel, try another channel that is clear. To change the basic channel, in
menu mode, press or to move to the next higher or lower channel
number.
P/N:086L004722-016 REV.1 PAGE: 12/152
11
EN
CALL TONE
To alert other radios set to the same channel as you that you want to
communicate with them, you can transmit a call tone to pre-warn them.
To change the call tone:
1. Press 3 times until the number starts ashing.
2. Press and hold to change the tone.
3. Press to conrm and exit the menu. Or, press to
conrm and go to the next Menu Option.
NOTE: To page another unit, press . The selected call tone will be heard
from your device and from the receiving party’s unit at the same time.
VOX LEVEL / VOICE DELAY TIME
The Voice Activated Transmission (VOX) function allows your voice to activate
transmission automatically when the transceiver is used with an optional
hands-free microphone / headset. If the unit is set to VOX level 1, 2 or 3,
it will automatically detect and transmit your voice through to the selected
channel.The VOX level and transmission delay time should be adjusted
according to your voice loudness and personal preference.
To set up a headset:
1. Press and hold to switch the radio off.
2. Plug in the headset
3. Press and hold to switch the radio back on again.
NOTE: This product is only compatible with Oregon Scientic headsets,
please ask your local retailer for further information.
P/N:086L004722-016 REV.1 PAGE: 13/152
12
EN
To change the VOX level:
1. Press 4 times until the number starts ashing.
2. Press and hold or to change the VOX level.
3. Press to conrm and exit the menu. Or, press to
conrm and go to the next Menu Option.
LCD SYMBOL DESCRIPTION
0 VOX disabled
3 Low sensitivity – only audibly loud voices are
transmitted (useful for noisy environments)
2 Normal sensitivity – ideal setting for voice-activated
transmission
1 High sensitivity – detects and transmits all sounds
(including background noise)
Once the VOX level is activated you can set a delay time, which keeps the
unit transmitting for 1 to 5 seconds after you have nished speaking (level
1 = 1 second and level 5 = 5 seconds).
To set the delay time:
1. Press 5 times until the number starts ashing.
2. Follow steps 2-3 above.
ROGER BEEP
With Roger Beep, the receiving party hears a beep tone when a message
has been transmitted. This avoids situations where messages are interrupted
during transmission.
To disable / enable Roger Beep:
Press and hold , then press to turn ON the unit.
P/N:086L004722-016 REV.1 PAGE: 14/152
13
EN
DUAL WATCH (DW)
The Dual Watch feature allows you to monitor more than one channel
simultaneously.
To set Dual Watch:
1. Press 6 times until “DW” appears and the channel number
starts ashing.
2. Press and hold or to select a watch channel (1-8).
3. Press to conrm and exit the menu. Or, press to
conrm and go to the next Menu Option. Once set, the display will
toggle between 2 open channels and the unit will be able to receive
transmissions from the 2 channels (your existing channel and the
channel set in DW).
To disable Dual Watch:
Follow steps 2-3 above and select “0” for step 2.
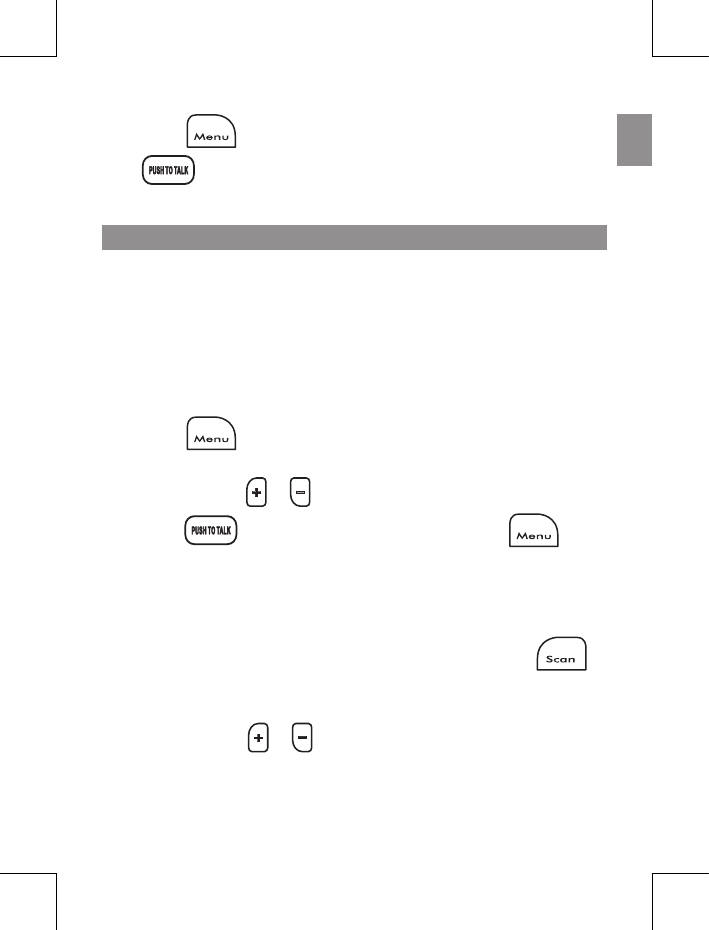
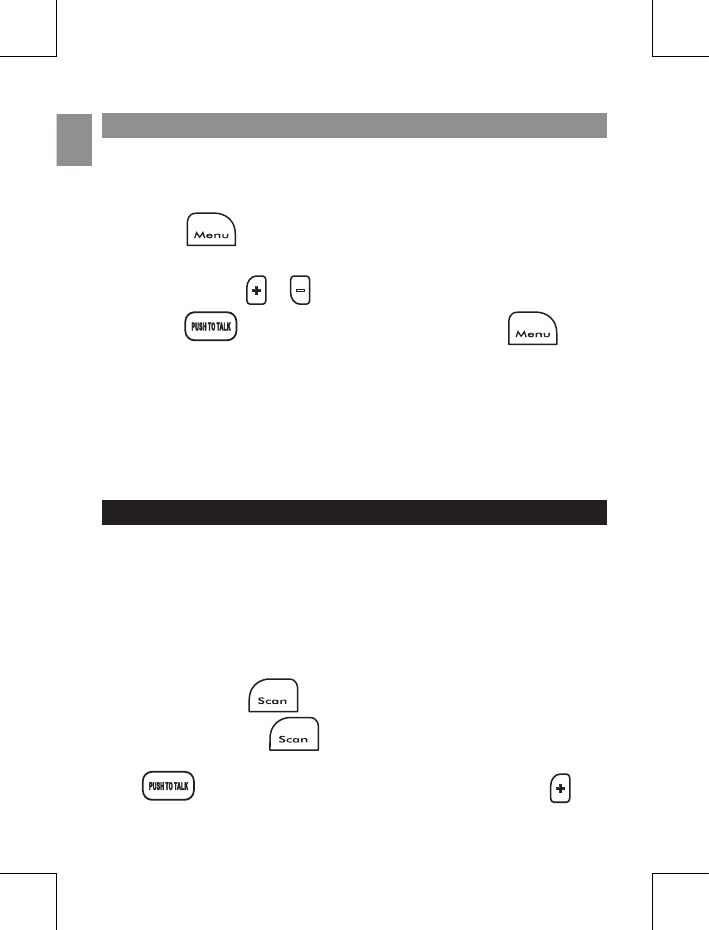
SCAN FOR A CHANNEL / CTCSS
There are 2 scenarios when scanning for a channel / CTCSS is
necessary:
1. If you have a CTCSS code set and want to make sure that the
channel is not busy.
2. If you are in a fringe area and the radio is cutting in and out.
To auto-scan for a channel / CTCSS:
1. Press and hold . The unit will go to monitor mode.
2. Press and release , the unit will start enter scan mode.
3. Once an active channel is found the unit will stop scanning. Press
to communicate with other radios on that channel or to
resume scanning.
P/N:086L004722-016 REV.1 PAGE: 15/152
14
EN
To stop auto-scan:
Press . The unit will revert back to the original channel that was
set prior to scanning.
NOTE: If you activate a scan while your code is set to 0, the radio will
check for any activity on each channel, regardless of the code used on that
channel. If you activate a scan while the code is between 1 and 38, the radio
will only check for activity on the specic channel and code combinations
set on your radio.
RESET
To reset to the default settings, remove the batteries and power adapter
and leave for several minutes.
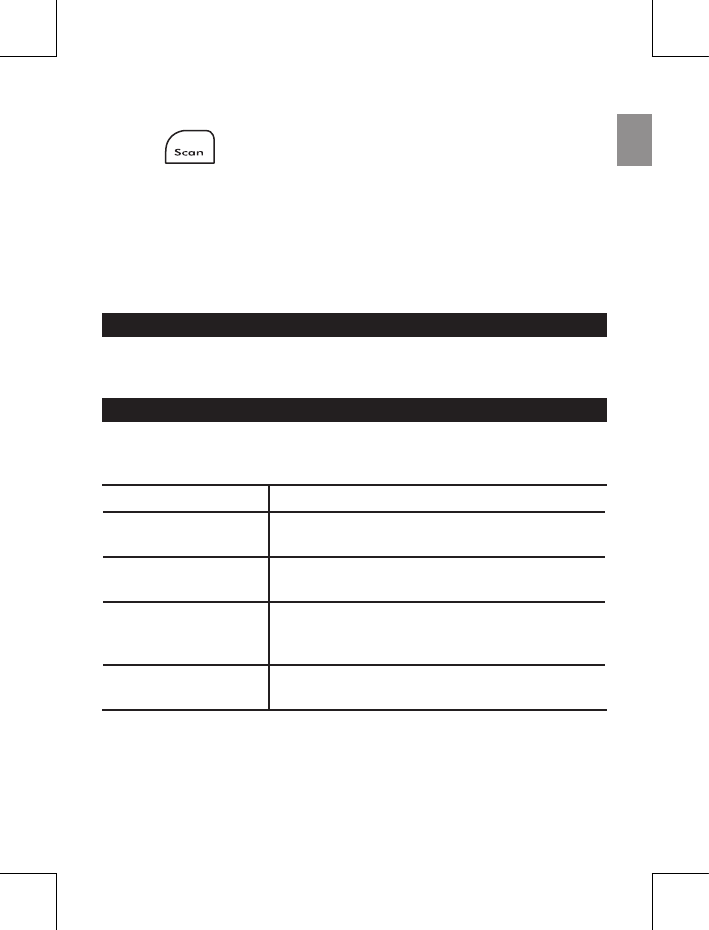
TROUBLESHOOTING
See below for some common problems and their remedies. DO NOT attempt
any repairs yourself. This will invalidate your warranty.
PROBLEM POSSIBLE CAUSES / REMEDIES
Can’t turn the radio
on
● Check the battery is correctly installed
and has been fully charged
Can’t communicate
with other radios
● Check the channel and CTCSS code
No information is
displayed on the
LCD display
● Reset by removing the batteries and power
adapter for several minutes. This will return
the unit to the default settings
VOX function is not
working
● Check the headset is correctly plugged in and
is compatible with the TP391 radio
P/N:086L004722-016 REV.1 PAGE: 16/152

15
EN
SPECIFICATIONS
Operation frequency 446.00625 to 446.09375 MHz
Channels 8
CTCSS Codes 38 standard codes
Modulation type FM
Microphone Internal / external condenser type
Power supply 3.7V 720mAH Li-ion battery
Sensitivity <= -119 dBm
Noise squelch Auto
VOX levels 3
Call tones 10
Audio output power 125mW
Audio distortion < 5%
RX signal to noise ratio >43dB
TX RF output power 500 mW @ 4.5VDC
Dimensions (H x W x D) 120 x 42 x 20 mm (4.7 x 1.7 x 0.8 in)
Weight (without batteries) 70 grams (2.5 oz)
P/N:086L004722-016 REV.1 PAGE: 17/152

16
EN
ABOUT OREGON SCIENTIFIC
Visit our website (www.oregonscientic.com) to learn more about Oregon
Scientific products such as digital cameras; MP3 players; children’s
electronic learning products and games; projection clocks; health and
tness gear; weather stations; and digital and conference phones. The
website also includes contact information for our Customer Care department
in case you need to reach us, as well as frequently asked questions and
customer downloads.
We hope you will nd all the information you need on our website. However
if you are in the US and would like to contact the Oregon Scientic Customer
Care department directly, please visit:
http://www2.oregonscientic.com/service/default.asp
OR call 1-800-853-8883. For international inquiries, please visit:
www2.oregonscientic.com/about/international.asp
EU-DECLARATION OF CONFORMITY
Hereby, Oregon Scientic, declares that the Pair of PMR446 Two-Way
Personal Radios (model: TP391) is in compliance with the essential
requirements and other relevant provisions of Directive 1999/5/EC.
A copy of the signed and dated Declaration of Conformity is available on
request via our Oregon Scientic Customer Service.
COUNTRIES RTTE APPROVAL COMPLIED
All EU countries, Switzerland
and Norway
N
CH
P/N:086L004722-016 REV.1 PAGE: 18/152
