Orion 5520 Users Manual
2015-02-05
: Orion Orion-5520-Users-Manual-497829 orion-5520-users-manual-497829 orion pdf
Open the PDF directly: View PDF ![]() .
.
Page Count: 2
IN 313 Rev D 10/10
Orion® 1.25" Multiple Filter Wheel
#5520
Congratulations on your purchase of a quality Orion accessory. The
Orion Multiple Filter Wheel allows use of up to five 1.25" filters without
the time-consuming and sometimes frustrating process of removing
an eyepiece or imaging system every time a different filter is needed.
With its innovative design and compatibility with 1.25" Orion filters,
the Orion Multiple Filter Wheel lets you dial in the details of virtually
any celestial object with a simple turn of the wheel.
Parts List
1 Filter wheel assembly
1 1.25" nosepiece
1 Camera adapter
1 1.25" eyepiece adapter
1 Hex key
Filter Installation
Use the supplied hex key to unthread the four socket head screws of
the front (non-labeled) panel of the filter wheel assembly (Figure 2).
Be sure to place the screws in a safe place so they do not become
lost. Once all four screws have been removed, gently separate the
front plate from the filter wheel. Install the 1.25" filters of your choice
into the tray simply by threading them into the filter tray. You may
wish to note the number designation of each installed filter for conve-
nient reference during use. You may find it useful to leave one of the
five threaded filter locations empty, providing an unfiltered option for
viewing or imaging. Once you have installed all the filters you wish to
use, carefully place the filter tray back into the wheel assembly. Be
sure the small plastic tab fully registers with the central hole of the
wheel assembly so that it “clicks” into place. Position the rear plate
so that the opening is aligned with the opening of the front plate.
Complete installation by reattaching the rear plate of the filter wheel
assembly with the socket head screws.
If you are installing an individual filter or swapping one filter for anoth-
er, you can avoid partial disassembly of the filter wheel. To install
an individual filter, unthread the 1.25" nosepiece from the assembly
to expose the internal filter tray. Rotate the tray so the desired filter
location is shown. Install the 1.25" filter by placing it on the filter tray
and rotating it clockwise with your fingertips. Orion 1.25" filters fea-
ture a knurled rim which will prove helpful for this type of installation.
Be careful not to touch the actual filter surface. Note: individual filter
installation without disassembly may not be convenient for all users,
especially those with large fingers!
Attaching a Camera to the Filter Wheel
The Multiple Filter Wheel can be extremely useful for astro-imaging
with a camera body, be it a SLR camera, CCD, or CMOS device. To
attach a SLR camera to the filter wheel, use the included camera
adapter and an optional T-ring for your SLR model. Attach the side of
the camera adapter without the knurled lock ring to the rear (labeled)
plate of the wheel assembly by rotating it clockwise until tight. Now
thread your SLR camera T-ring onto the exposed T-threads (Figure 3).
Note: The filter wheel arrives with the camera adapter pre-
installed.
If you are using a digital imager that features T-threads, you can
attach it directly to the Multiple Filter Wheel. If your digital imager
has a 1.25" nosepiece, remove it to expose the T-threads. Now sim-
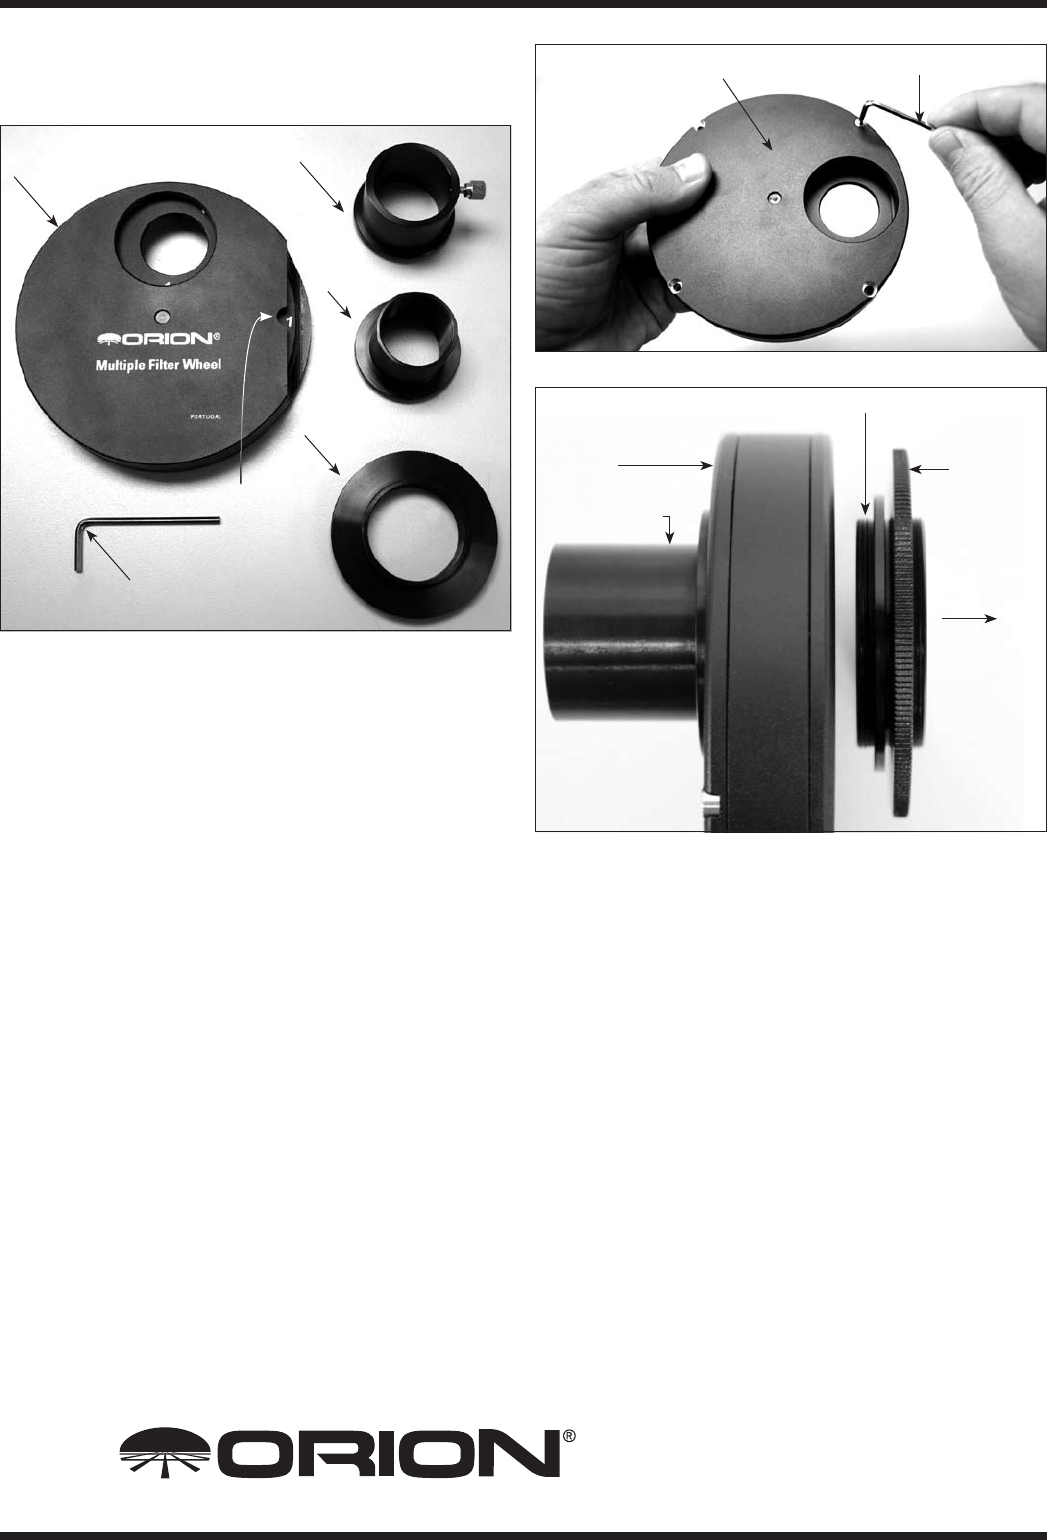
Figure 1. The Multiple Filter Wheel
Filter wheel assembly 1.25" eyepiece adapter
1.25" nosepiece
Camera adapter
Hex key
Figure 2. Partial disassembly of the filter wheel.
Front panel Hex key
Notch
Customer Support (800) 676-1343
E-mail: support@telescope.com
Corporate Offices (831) 763-7000
89 Hangar Way, Watsonville, CA 95076
OrionTelescopes.com
Providing Exceptional Consumer Optical Products Since 1975
© 2008-2010 Orion Telescopes & Binoculars
Figure 3. Attaching the camera adapter.
Filter wheel
assembly
to camera
T-ring or
imager
Knurled
lock ring
Camera adapter
1.25" nosepiece
ply thread the imager onto the camera adapter, and then thread the
adapter onto the rear (labeled) plate of the filter wheel assembly
(Figure 4a).
You can lock your camera or digital imager in a preferred position by
using the camera adapter's locking ring. Once you have positioned
your camera or imager, rotate the knurled locking ring counter clock-
wise until it locks the camera or imager into place.
Attaching the Filter Wheel to a Telescope
Now that you have installed your 1.25" filters into the wheel assem-
bly, it is time to attach the filter wheel to your telescope.
Using the 1.25" nosepiece
If your telescope features a 1.25” focuser, adapter, or diagonal
the easiest way to attach the Multiple Filter Wheel is by using the
included 1.25" nosepiece. Thread the nosepiece onto the front plate
of the wheel assembly. Now simply insert the nosepiece into your
telescopes’ 1.25" focuser or accessory and secure by tightening the
thumbscrew.
Using T-threads
Some Orion telescopes feature focus adapters with exterior T-threads.
If you are using such a telescope, you can attach the Multiple Filter
Wheel directly to the T-threads without using the 1.25" nosepiece.
Carefully attach the wheel to the T-threads by rotating the entire
assembly clockwise until tight.
Attaching an Eyepiece to the Filter Wheel
For visual use, you will need to attach the 1.25" eyepiece adapter to
the Multiple Filter Wheel. To do this, thread the 1.25" adapter onto
the back (labeled) plate of the wheel assembly. Once the adapter is
completely attached, unscrew the knurled thumbscrew until it is flush
with the inside surface of the adapter and insert a 1.25" eyepiece.
Secure the eyepiece by tightening the thumbscrew (Figure 4b).
Use
The Orion Multiple Filter Wheel features a helpful number system that
allows you to quickly place the filter of your choice into the light path.
Simply note the reference number of each filter during installation,
then rotate the knurled wheel until the desired number is displayed in
the small notch in the filter wheel housing (Figure 1).
When using the Multiple Filter Wheel, you may find it useful to leave
one of the five threaded filter locations empty, as it provides an unfil-
tered option for viewing or imaging.
Keep in mind that use of the Multiple Filter Wheel requires 20mm
of inward focus travel. This will not be a problem for most telescope
designs, but could be a problem for Newtonian reflectors.
Care and Storage
Feel free to leave your 1.25" filters installed in the wheel during stor-
age. To avoid excessive dust buildup, be sure to attach the dustcaps
prior to storing, and use a foam-lined accessory case.
The foam-lined box your Multiple Filter Wheel arrives in also acts as
a convenient storage container. Simply unthread the 1.25" nosepiece
from the filter wheel and place the wheel and nosepiece in the die-
cut foam. If you have the 1.25" eyepiece adapter installed, unthread
it and replace with the T-thread ring. Now you can safely store your
filter wheel without worrying about dust build-up on your filters.
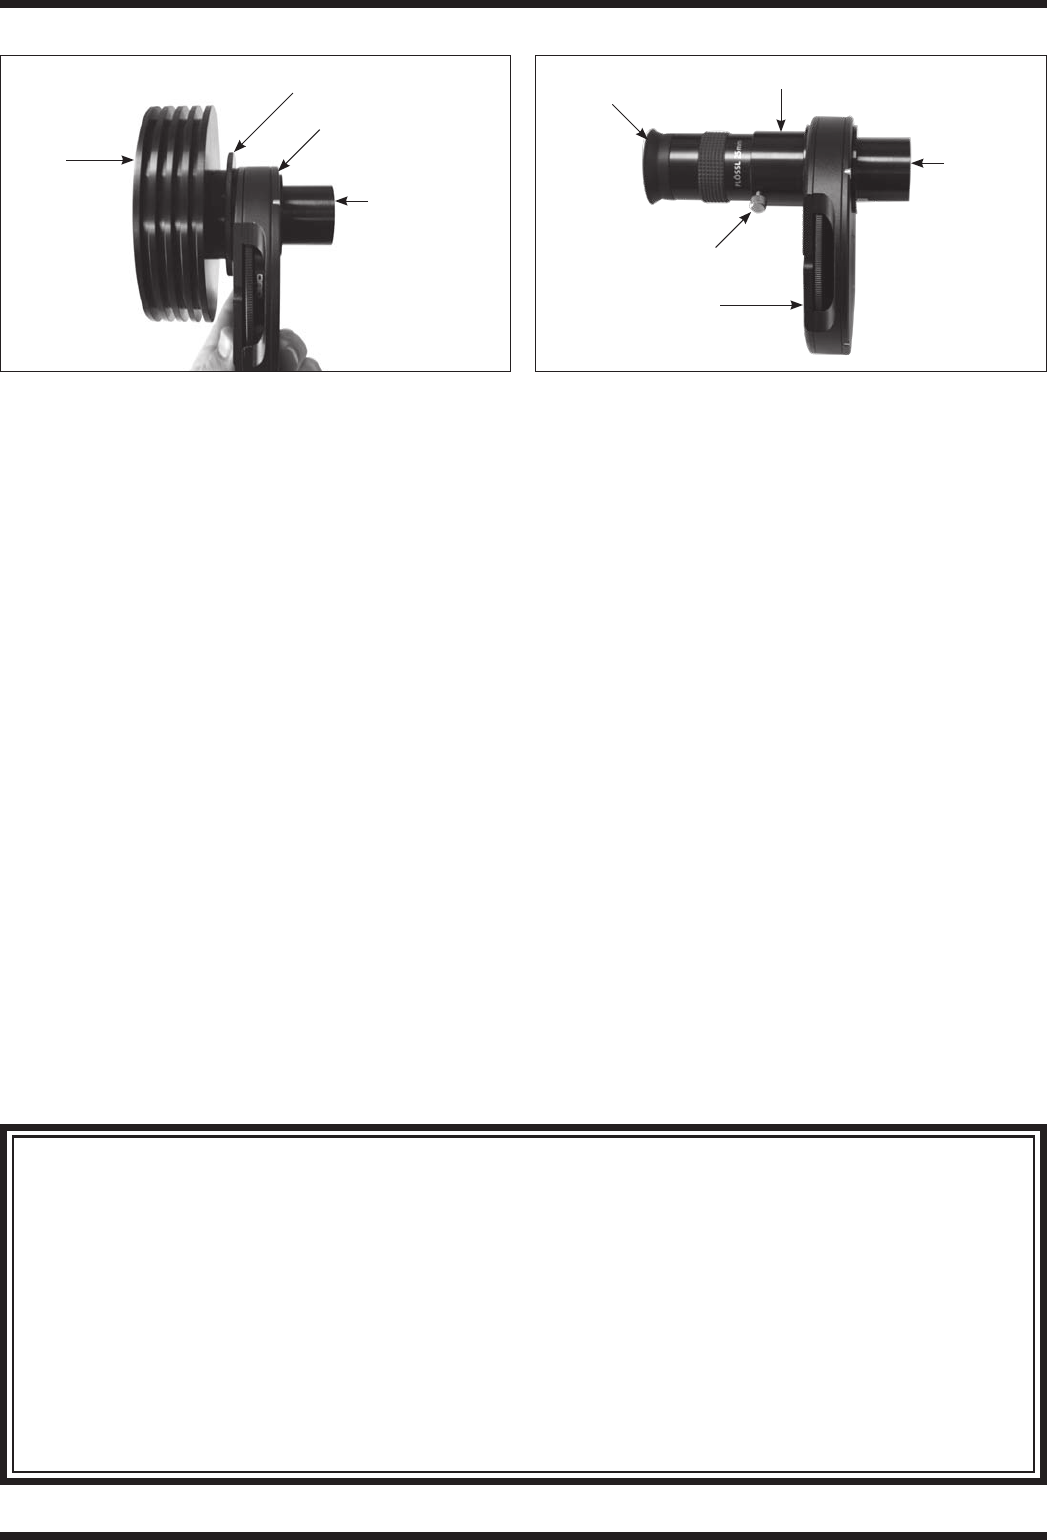
Figure 4a. The Multiple Filter Wheel with digital imager attached via
T-threads.
Figure 4b. The Multiple Filter Wheel with 1.25" eyepiece attached.
Digital
imager
Camera adapter
Filter wheel assembly
1.25"
nosepiece
1.25"
nosepiece
One-Year Limited Warranty
This Orion 1.25" Multiple Filter Wheel is warranted against defects in materials or workmanship for a period of one year from
the date of purchase. This warranty is for the benefit of the original retail purchaser only. During this warranty period Orion
Telescopes & Binoculars will repair or replace, at Orion’s option, any warranted instrument that proves to be defective, provided
it is returned postage paid to: Orion Warranty Repair, 89 Hangar Way, Watsonville, CA 95076. If the product is not registered,
proof of purchase (such as a copy of the original invoice) is required.
This warranty does not apply if, in Orion’s judgment, the instrument has been abused, mishandled, or modified, nor does it
apply to normal wear and tear. This warranty gives you specific legal rights, and you may also have other rights, which vary from
state to state. For further warranty service information, contact: Customer Service Department, Orion Telescopes & Binoculars,
89 Hangar Way, Watsonville, CA 95076; (800)-676-1343.
1.25"
eyepiece
Thumbscrew
1.25" eyepiece adapter
Filter wheel
assembly
