Oster Tssttvdg01 Digital Countertop Oven With Convection Instruction Manual
Oster-Tssttvdg01-Users-Manual-333035 oster-tssttvdg01-users-manual-333035
Oster-Tssttvdg01-Oster-Digital-Countertop-Oven-With-Convection-Owner-S-Manual oster-tssttvdg01-oster-digital-countertop-oven-with-convection-owner-s-manual
Digital Countertop Oven to the manual b8460805-03e8-486c-b0d0-02e88218713d
2015-03-30
: Oster Oster-Tssttvdg01-Oster-Digital-Countertop-Oven-With-Convection-Instruction-Manual-678793 oster-tssttvdg01-oster-digital-countertop-oven-with-convection-instruction-manual-678793 oster pdf
Open the PDF directly: View PDF ![]() .
.
Page Count: 46
User Manual
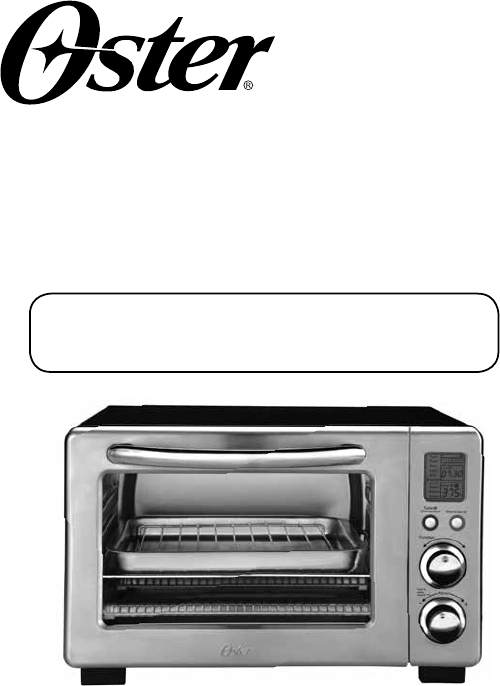
Digital Countertop
Oven
Manual de Instrucciones Horno Digital para
Mostrador
P.N. 147418 Rev.1
Visit us at www.oster.com
MODEL/MODELO
TSSTTVDG01
English-2
IMPORTANT SAFEGUARDS
When using electrical appliances, basic safety precautions should always
be followed, including the following:
READ AND SAVE THESE
INSTRUCTIONS
• READALLINSTRUCTIONS,PRODUCTLABELSANDWARNINGS
BEFOREUSINGTHECOUNTERTOPOVEN.
• Donottouchhotsurfaces.Alwaysuseovenmittswhenhandlinghot
materialsandallowmetalpartstocoolbeforecleaning.Allowtheunittocool
thoroughlybeforeputtinginortakingoffparts.Alwaysusetheovenhandles
whenmovingtheunit.
• Whentheunitisnotinuseandbeforecleaning,pressthe“Start/Cancel”
buttonandremovethecountertopovenfromthepoweroutlet.
• Toprotectagainstriskofelectricalshock,donotimmersetheappliancein
wateroranyotherliquids.
• Closesupervisionisalwaysnecessarywhenthisoranyapplianceisusednear
children.Thisapplianceisnotforusebychildren.
• Donotoperatethisoranyappliancewithafrayedordamagedcordorplug
oraftertheappliancemalfunctionsorisdroppedorhasbeendamagedin
anymanner.ReturnthecountertopoventothenearestAuthorizedSunbeam
ApplianceServiceCenterforexamination,repairorelectricalormechanical
adjustment.
• Donotuseattachmentsnotrecommendedbythemanufacturer;theymay
causefire,electricshockorpersonalinjury.
• Donotuseoutdoorsorforcommercialpurposes.
• Donotusethisapplianceforotherthanitsintendeduse.
• Donotletthecorddangleovertheedgeofatabletoporcountertoportouch
hotsurfaces.
• Donotplacetheappliancenearahotgasorelectricburnerorinaheated
oven.
• Extremecautionshouldbeusedwhenusingcontainersconstructedofmaterial
otherthanmetalorglass.
• Afiremayoccurifthecountertopoveniscoveredortouchingflammable
materials,includingcurtains,draperies,walls,etc.,wheninoperation.Donot
storeanyitemsontopoftheappliancewheninoperation.
• Whenusingcountertopoven,pulltheunitoutaminimumof6inchesaway
fromthewallorothercords.
English-3
• Donotstoreanymaterials,otherthanmanufacturer’srecommended
accessories,inthisunitwhennotinuse.
• Donotplaceanyflammablematerialsinoven,suchaspaper,cardboard,
plasticoranymaterialsthatmaycatchfireormelt.
• Donotcovertheoventrayorrackwithmetalfoil.Thiswillcauseoverheating
oftheappliance.
• Oversizedfoodsormetalutensilsmustnotbeinsertedintheapplianceasthey
maycreateafireorriskofelectricalshock.
• Donotcleanwithmetalscouringpads.Piecescanbreakoffthepadandtouch
electricalpartsinvolvingariskofelectricalshock.
• Useextremecautionwhenremovingpanordisposingofhotgreaseorother
hotliquids.
• Toturnthisapplianceoff,pressthe“Start/Cancel”buttonandremovecord
fromoutlet.TheLCDwillturnoffafter30seconds.
This Unit Is for Household Use Only
Short Power Supply Cord Instructions
Ashortpower-supplycordisprovidedtoreducetheriskresultingfrom
becomingentangledinortrippingoveralongercord.Anextensioncord
maybeusedifcareisexercisedinitsuse.Ifanextensioncordisused,the
electricalratingofthecordmustbeatleastasgreatastheelectricalrating
oftheappliance.Theextensioncordshouldbearrangedsothatitwillnot
drapeoverthecountertoportabletopwhereitcanbepulledonbychildren
ortrippedoverunintentionally.
For Products Purchased in the United States and Canada Only
Toreducetheriskofelectricalshock,thisappliancehasapolarizedplug(one
bladeiswiderthantheother).Thisplugfitsapolarizedoutletonlyoneway;
iftheplugdoesnotfitfullyintotheoutlet,reversetheplug.Ifitstilldoesnot
fit,contactaqualifiedelectrician.Do not attempt to defeatthissafetyfeature.
SAVE THESE INSTRUCTIONS
English-4
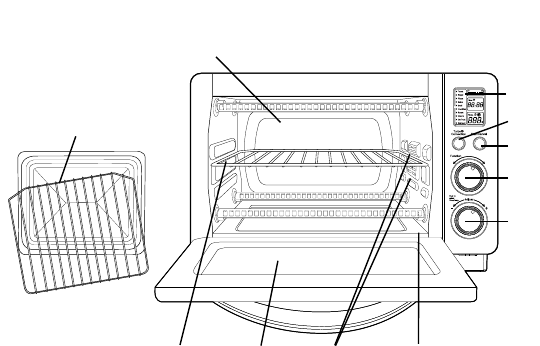
Product Diagram
1. LCD Display
2. Turbo Convection Heat Button –Usetoactivateorcancel
turboconvectionheat.
3. Start/Cancel Button –Pressthisbuttontoturntheapplianceoff.
4. Function Selector Knob –Selectcookingfunctionbyturningknob
todesiredsetting.
5. Time/Temperature Control Knob –Adjustthedialthermostatto
thedesiredtemperature/Adjustthedialtothedesiredtime
6. Removable Wire Rack –See“PositioningRack”section.
7. Tempered Glass Door –Forfrontviewingoffood.
8. Three Rack Positions
9. Removable Crumb Tray –Forcrumborfallenfoodparticlescollection.
Pullsoutforeasycleaning.
10.Baking Pan/Cookie Sheet in One and Broil Rack –Useforallyourbaking
needs,broilingandgrillingneeds.
11. Easy Clean Interior Walls –Allowsfastcleanup.
1
8
10
4
5
2
3
9
6 7
11

English-5
a c
f
bd
e
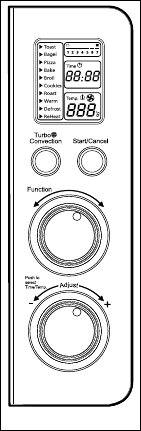
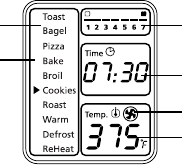
LCD Display
a. Functions Indicator –Toast,Bagel,Pizza,Bake,Broil,
Cookies,Roast,Warm,Defrost,Reheat
b. Function Indicator Arrow
c. 1-7 color shade setting indicator
d. Time Indicator
e. Turbo Convection Heat Icon
f. Temperature Indicator
Preparing Your Toaster Oven
Ifyouareusingyourtoasterovenforthefirsttime,please:
•Removeanystickersfromthesurfaceoftheoven.
•Openovendoorandremoveallprinteddocumentsandpaperfrom
insidethetoasteroven.
•Cleantherackandpanwithhotwater,asmallamountofdishwashing
liquidandanonabrasivespongeorcleaningpad.
DONOTIMMERSETHEBODYOFTHEUNITINWATER.
•Drytheunitthoroughlybeforeusing.
•Selectalocationforthetoasteroven.Thelocationshouldbeinanopen
areaonaflatcounterwheretheplugwillreachanoutlet.
•Plugthetoasterovenintoanelectricaloutlet.
English-6
Using Your Toaster Oven (See Fig. 1)
Plugtheunitin.Theunitwillemittwolong
“beeps”andtheLCDscreenwillilluminate.The
functionoptionwillappearwithanindicatoron
thepresetTOASTfunction.TheLCDandthe
Start/Cancelbuttonlightwillbeilluminatedfor
30secondsandthengooutifnootherbuttonsor
knobsarepressedormoved.
PLEASE NOTE: oncetheblueLCDdisplaygoes
out–youcanpressormoveanybuttonorknobto
“wakeup”thedisplayandoperateasnormal.
Step 1. Select Function
TurntheFunctionKnobtochooseoneof
thefollowing10optionsfromthemenu:
Toast,Bagel,Pizza,Bake,Broil,Cookies,
Roast,Warm,DefrostandReheat.The
indicatorarrowwillmovefromfunctionto
functionastheknobisturned.
NOTE:Ifthecookingprocessisnotstartedorno
furtherbuttonispressedorknobisturned
within30secondsthebluebacklightand
theStart/CancelButtonLightwillturnoff.
Step 2. Temperature:
Turnthetemperature/timeknobtoincrease
ordecreasethetemperaturesetting.
Step 3. Time:
Turnthetemperature/timeknobto
increaseordecreasethecookingtime.The
maximumtimesettingis60minutes.
NOTE: Pressthetemperature/timeknobtotoggle
betweenthetempertaureandtimeselction.
Figure 1

English-7
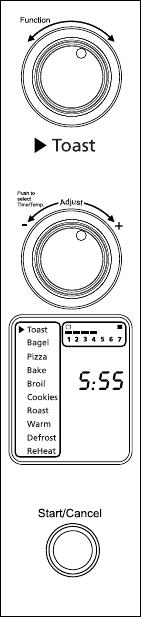
Using the Toast Function (See Fig. 2)
Step 1. TurntheFunctionKnobtotheToast
function.WhenyouselecttheToastfunction,
the1-7colorshadesettingindicatorwill
becomevisibleontheLCD.Bothupperand
lowerheatingelementswillheat.
DefaultColorShadeSettingis4.Thiswill
bethedefaulteverytimetheToasterOven
isunpluggedandpluggedbackin.Ifthe
ToasterOvenremainspluggedinsince
thelasttimeyouhaveselectedadifferent
shadefortheToastfunction(evenifnot
activated),theunitwillrememberthelast
shadesettingyouselected.
NOTE:Thebottomrackpositionisrecommended
fortoasting.
Thetemperatureortimeisnotadjustable
fortheToastfunction.
Step 2. To adjust the shade color:
TurntheTemperature/TimeKnobtoadjust
theshadecolor.Thecolorshade-setting
indicatorwillshowyourselectionasyouturn
theknob.Theframearoundtheshadesetting
indicatorontheLCDdisplaywillbeblinking.
Step 3. To Start:
PresstheStart/CancelButtontostartthe
toastingprocess.TheredStart/Cancel
Buttonlightwillilluminate.TheLCD
DisplaywillshowtheToastFunction,the
shadecolorselectionandthecountdown
time.Theunitwillbegintooperateandthe
timerwillstartcountingdown.(Step3)
WhentheToastingiscomplete,theunit
willemit3beeps.TheLCDandtheStart/
CancelButtonLightwillturnoffafter30
seconds.
NOTE:Youcancancelthetoastingcycleatany
timebypressingtheStart/CancelButton
once.
Figure 2
English-8
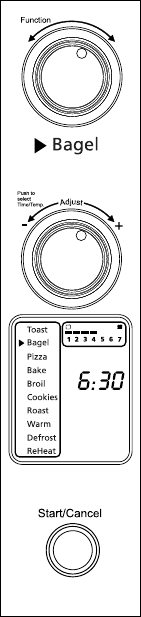
Using the Bagel Function (See Fig. 3)
Step 1. TurntheFunctionKnobtotheBagel
function.WhenyouselecttheBagelfunction,
the1-7colorshadesettingindicatorwill
becomevisibleontheLCD.Onlyupper
heatingelementwillheat.DefaultColor
ShadeSettingis4.Thiswillbethedefault
everytimetheToasterOvenisunplugged
andpluggedbackon.IftheToasterOven
remainsplugged-insincethelasttimeyou
haveselectedadifferentshadefortheBagel
function(evenifnotactivated),theunit
willrememberthelastshadesettingyou
selected.
NOTE:Thebottomtrackpositionisrecommended
forbageltoasting.Forbestresultstoastbagel
withcutsideup.
Thetemperatureortimeisnotadjustable
fortheBagelfunctiononceithasstarted.
Step 2. To adjust the shade color:
TurntheTemperature/TimeKnobtoadjust
theshadecolor.Thecolorshade-setting
indicatorwillshowyourselectionasyouturn
theknob.Theframearoundtheshade-setting
indicatorontheLCDdisplaywillbeblinking.
Step 3. To Start:
PresstheStart/CancelButtontostartthe
bageltoastingprocess.TheredStart/Cancel
Buttonlightwillilluminate.TheLCD
DisplaywillshowtheBagelFunction,the
shadecolorselectionandthecountdown
time.Theunitwillbegintoworkandthe
timerwillstartcountingdown.
WhentheBageltoastingiscomplete,the
unitwillemit3beeps.TheLCDandthe
Start/CancelButtonLightwillturnoffafter
30seconds.
NOTE:Youcancancelthebageltoastingcycle
atanytimebypressingtheStart/Cancel
Buttononce.
Figure 3

English-9
Using the Pizza/ Turbo Convection Heat
Function (See Fig. 4)
Step 1. TurntheFunctionKnobtothePizza
function.WhenyouselectthePizza
function,theTurboConvectionHeatwill
automaticallyactivate.
Step 2. IfyouwishtoswitchtotheregularPizza
function,presstheTurbobuttononceto
turnofftheTurboConvectionHeatdefault
selection.ThebluelightoftheTurbo
ConvectionHeatbuttonwillturnoff.
TheTurboConvectionHeatFunctionturns
onabuilt-infanthatcirculateshotairin
theovenchamber,cookingyourfoodfaster
andmoreevenly.
Default Temperature:400ºF.
Default Time:16minutes.
Step 3. To set the temperature:
TurntheTemperature/TimeKnobif
youwishtoincreaseordecreasethe
temperaturesetting.Theframearoundthe
temperaturesettingontheLCDdisplay
willbeblinking.ForthePizzaFunction,the
temperaturecanbesetfrom350to450ºF
in25-degreeincrements.Onceyouhave
selectedthedesiredtemperature,pressthe
knoboncetosetthatselection.Theframe
ofthetemperaturewilldisappearandthe
frameofthetimesettingwillstartblinking.
Step 4. To set the time:
TurntheTemperature/TimeKnobifyou
wishtoincreaseordecreasethecooking
time.ThemaximumtimesettingforPizza
is60minutes(1hour).Onceyouhave
selectedthedesiredcookingtime,pressthe
Startbuttontoinitiatethecookingprocess.
Theframeofthetimewilldisappear.
Figure 4
English-10English-10
Step 5. To Start:
PresstheStart/CancelButtontostartthe
cookingprocess.TheredStart/Cancel
Buttonlightwillilluminate.TheLCD
DisplaywillshowthePizzaFunction,
thecountdowntimeandtheselected
temperature.Theunitwillbegintowork
andthetimerwillstartcountingdown.
WhenthePizzafunctioncycleiscomplete,
theunitwillemit3beeps.TheLCDandthe
Start/CancelButtonLightwillturnoffafter
30seconds.
NOTE:Youcancancelthecookingcycleatany
timebypressingtheStart/CancelButton
once.
Using the Bake/ Turbo Convection Heat
Function (See Fig. 5)
Step 1. TurntheFunctionKnobtotheBake
function.WhenyouselecttheBake
function,theTurboConvectionHeatwill
automaticallyactivate.
Step 2. IfyouwishtoswitchtotheregularBake
function,presstheTurbobuttononceto
turnofftheTurboConvectionHeat.The
bluelightoftheTurboConvectionHeat
buttonwillturnoff.
TheTurboConvectionHeatFunctionturns
onabuilt-infanthatcirculateshotairin
theovenchamber,cookingyourfoodfaster
andmoreevenly.
Default Temperature: 325ºF.
Default Time:30minutes.

English-11
Step 3. To set the temperature:
TurntheTemperature/TimeKnobif
youwishtoincreaseordecreasethe
temperaturesetting.Theframearoundthe
temperaturesettingontheLCDdisplay
willbeblinking.FortheBakeFunction,the
temperaturecanbesetfrom150to450ºF
in5-degreeincrements.Onceyouhave
selectedthedesiredtemperature,pressthe
knoboncetosetthatselection.Theframe
ofthetemperaturewilldisappearandthe
frameofthetimesettingwillstartblinking.
Step 4. To set the time:
TurntheTemperature/TimeKnobifyou
wishtoincreaseordecreasethecooking
time.ThemaximumtimesettingforBake
is60minutes(1hour).Onceyouhave
selectedthedesiredcookingtime,pressthe
Startbuttontoinitiatethecookingprocess.
Theframeofthetimewilldisappear.
Step 5. To Start:
PresstheStart/CancelButtontostartthe
cookingprocess.TheredStart/Cancel
Buttonlightwillilluminate.TheLCD
DisplaywillshowtheBakeFunction,
thecountdowntimeandtheselected
temperature.Theunitwillbegintowork
andthetimerwillstartcountingdown.
WhentheBakingcycleiscomplete,theunit
willemit3beeps.TheLCDandtheStart/
CancelButtonLightwillturnoffafter30
seconds.
NOTE:Youcancancelthecookingcycleatany
timebypressingtheStart/CancelButton
once.
Figure 5
English-12
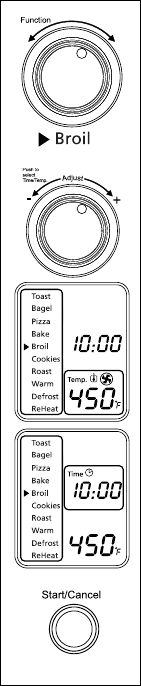
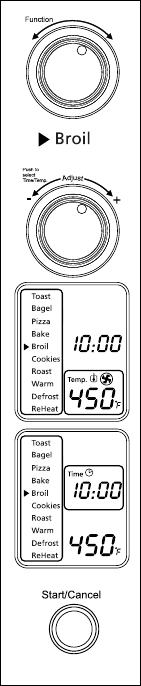
Using the Broil Function (See Fig. 6)
Step 1. TurntheFunctionKnobtotheBroil
function.WhenyouselecttheBroilfunction,
theupperheatingelementswillheat.
Default Temperature:450ºF.
Default Time:10minutes.
Step 2. To set the temperature:
TurntheTemperature/TimeKnobif
youwishtoincreaseordecreasethe
temperaturesetting.Theframearoundthe
temperaturesettingontheLCDdisplay
willbeblinking.FortheBroilFunction,the
temperaturecanbesetfrom400to450ºF
in25-degreeincrements.Onceyouhave
selectedthedesiredtemperature,pressthe
knoboncetosetthatselection.Theframe
ofthetemperaturewilldisappearandthe
frameofthetimesettingwillstartblinking.
Step 3. To set the time:
TurntheTemperature/TimeKnobifyou
wishtoincreaseordecreasethecooking
time.ThemaximumtimesettingforBroil
is60minutes(1hour).Onceyouhave
selectedthedesiredcookingtime,pressthe
Startbuttontoinitiatethecookingprocess.
Theframeofthetimewilldisappear.
Step 4. To Start:
PresstheStart/CancelButtontostartthe
broilingprocess.TheredStart/Cancel
Buttonlightwillilluminate.TheLCD
DisplaywillshowtheBroilFunction,
thecountdowntimeandtheselected
temperature.Theunitwillbegintowork
andthetimerwillstartcountingdown.
WhentheBroilingcycleiscomplete,the
unitwillemit3beeps.TheLCDandthe
Start/CancelButtonLightwillturnoffafter
30seconds.
NOTE:Youcancancelthebroilingcycleatany
timebypressingtheStart/CancelButton
once.
Figure 6

English-13
Using the Cookies/Turbo Convection Heat
Function (See Fig. 7)
Step 1. TurntheFunctionKnobtotheCookies
function.WhenyouselecttheCookies
function,theTurboConvectionHeatwill
automaticallyactivate.
Step 2. IfyouwishtousetheregularCookies
function,pressTurbobuttononcetoturn
offtheTurboConvectionHeat.Theblue
lightoftheTurboConvectionHeatbutton
willturnoff.
TheTurboConvectionHeatFunctionturns
onabuilt-infanthatcirculateshotairin
theovenchamber,cookingyourfoodfaster
andmoreevenly.
Default Temperature:350ºF.
Default Time:11minutes.
Step 3. To set the temperature:
TurntheTemperature/TimeKnobif
youwishtoincreaseordecreasethe
temperaturesetting.Theframearoundthe
temperaturesettingontheLCDdisplaywill
beblinking.FortheCookiesFunction,the
temperaturecanbesetfrom150to450ºF
in5-degreeincrements.Onceyouhave
selectedthedesiredtemperature,pressthe
knoboncetosetthatselection.Theframe
ofthetemperaturewilldisappearandthe
frameofthetimesettingwillstartblinking.
Step 4. To set the time:
TurntheTemperature/TimeKnobifyou
wishtoincreaseordecreasethecooking
time.Themaximumtimesettingfor
Cookiesis60minutes(1hour).Once
youhaveselectedthedesiredcooking
time,presstheStartbuttontoinitiatethe
cookingprocess.Theframeofthetimewill
disappear.
Figure 7
English-14
Step 5. To Start:
PresstheStart/CancelButtontostartthe
cookingprocess.TheredStart/Cancel
Buttonlightwillilluminate.TheLCD
DisplaywillshowtheCookiesFunction,
thecountdowntimeandtheselected
temperature.Theunitwillbegintowork
andthetimerwillstartcountingdown.
WhentheCookiesfunctioncycleis
complete,theunitwillemit3beeps.The
LCDandtheStart/CancelButtonLightwill
turnoffafter30seconds.
NOTE:Youcancancelthecookingcycleatany
timebypressingtheStart/CancelButton
once.
Using the Roast/Turbo Convection
Function (See Fig. 8)
Step 1. TurntheFunctionKnobtotheRoast
function.WhenyouselecttheRoast
function,theTurboConvectionHeatiswill
automaticallyactivate.
Step 2. IfyouwishtousetheregularRoast
function,presstheTurbobuttononceto
turnofftheTurboConvectionHeat.The
bluelightoftheTurboConvectionHeat
buttonwillturnoff.
TheTurboConvectionHeatFunctionturns
onabuilt-infanthatcirculateshotairin
theovenchamber,cookingyourfoodfaster
andmoreevenly.
Default Temperature: 350ºF.
Default Time:60minutes.

English-15
Step 3. To set the temperature:
TurntheTemperature/TimeKnobif
youwishtoincreaseordecreasethe
temperaturesetting.Theframearoundthe
temperaturesettingontheLCDdisplaywill
beblinking.FortheRoastFunction,the
temperaturecanbesetfrom150to450ºF
in5-degreeincrements.Onceyouhave
selectedthedesiredtemperature,pressthe
knoboncetosetthatselection.Theframe
ofthetemperaturewilldisappearandthe
frameofthetimesettingwillstartblinking.
Step 4. To set the time:
TurntheTemperature/TimeKnobifyou
wishtoincreaseordecreasethecooking
time.ThemaximumtimesettingforRoast
is60minutes(1hour).Onceyouhave
selectedthedesiredcookingtime,pressthe
Startbuttontoinitiatethecookingprocess.
Theframeofthetimewilldisappear.
Step 5. To Start:
PresstheStart/CancelButtontostartthe
cookingprocess.TheredStart/Cancel
Buttonlightwillilluminate.TheLCD
DisplaywillshowtheRoastFunction,
thecountdowntimeandtheselected
temperature.Theunitwillbegintowork
andthetimerwillstartcountingdown.
WhentheRoastingcycleiscomplete,the
unitwillemit3beeps.TheLCDandthe
Start/CancelButtonLightwillturnoffafter
30seconds.
NOTE:Youcancancelthecookingcycleatany
timebypressingtheStart/CancelButton
once.
Figure 8

English-16
Using the Warm Function (See Fig. 9)
Step 1. TurntheFunctionKnobtotheWarmfunction.
Default Temperature: 150ºF.
Default Time: 60minutes.
YoumaymanuallyactivatetheTurbo
ConvectionHeatbypressingtheTurbo
buttononcetoturniton.Thebluelightof
theTurbobuttonwillturnon.
Step 2. To set the temperature:
TurntheTemperature/TimeKnobif
youwishtoincreaseordecreasethe
temperaturesetting.Theframearoundthe
temperaturesettingontheLCDdisplaywill
beblinking.FortheWarmFunction,the
temperaturecanbesetfrom150to200ºF
in25-degreeincrements.Onceyouhave
selectedthedesiredtemperature,pressthe
knoboncetosetthatselection.Theframe
ofthetemperaturewilldisappearandthe
frameofthetimesettingwillstartblinking.
Step 3. To set the time:
TurntheTemperature/TimeKnobifyou
wishtoincreaseordecreasethewarming
time.ThemaximumtimesettingforWarm
is60minutes(1hour).Onceyouhave
selectedthedesiredwarmingtime,press
theStartbuttontoinitiatethewarming
process.Theframeofthetimewill
disappear.
Step 4. To Start:
PresstheStart/CancelButtontostartthe
warmingprocess.TheredStart/Cancel
Buttonlightwillilluminate.TheLCD
DisplaywillshowtheWarmFunction,
thecountdowntimeandtheselected
temperature.Theunitwillbegintowork
andthetimerwillstartcountingdown.
Figure 9

English-17
WhentheWarmingcycleiscomplete,the
unitwillemit3beeps.TheLCDandthe
Start/CancelButtonLightwillturnoffafter
30seconds.
NOTE:Youcancancelthewarmingcycleatany
timebypressingtheStart/CancelButton
once.
Using the Defrost Function (See Fig. 10)
Step 1. TurntheFunctionKnobtotheDefrost
function.
Default Temperature:450ºF.
Default Time: 16minutes.
YoumaymanuallyactivatetheTurbo
ConvectionHeatbypressingtheTurbo
buttononcetoturniton.Thebluelightof
theTurbobuttonwillturnon.
Step 2. To set the temperature:
TurntheTemperature/TimeKnobif
youwishtoincreaseordecreasethe
temperaturesetting.Theframearoundthe
temperaturesettingontheLCDdisplaywill
beblinking.FortheDefrostfunction,the
temperaturecanbesetfrom150to450ºF
in5-degreeincrements.Onceyouhave
selectedthedesiredtemperature,pressthe
knoboncetosetthatselection.Theframe
ofthetemperaturewilldisappearandthe
frameofthetimesettingwillstartblinking.
Step 3. To set the time:
TurntheTemperature/TimeKnobifyou
wishtoincreaseordecreasethedefrosting
time.Themaximumtimesettingfor
Defrostis60minutes(1hour).Once
youhaveselectedthedesireddefrosting
time,presstheStartbuttontoinitiatethe
cookingprocess.Theframeofthetimewill
disappear.
Figure 10

English-18
Step 4. To Start:
PresstheStart/CancelButtontostartthe
defrostingprocess.TheredStart/Cancel
Buttonlightwillilluminate.TheLCD
DisplaywillshowtheDefrostingfunction,
thecountdowntimeandtheselected
temperature.Theunitwillbegintowork
andthetimerwillstartcountingdown.
WhentheDefrostingcycleiscomplete,the
unitwillemit3beeps.TheLCDandthe
Start/CancelButtonLightwillturnoffafter
30seconds.
NOTE:Youcancancelthedefrostingcycleatany
timebypressingtheStart/CancelButton
once.
Using the Reheat Function (See Fig. 11)
Step 1. TurntheFunctionKnobtotheReheat
function.
Default Temperature:325ºF.
Default Time: 15minutes.
YoumaymanuallyactivatetheTurbo
ConvectionHeatbypressingtheTurbo
buttononcetoturniton.Thebluelightof
theTurbobuttonwillturnon.
Step 2. To set the temperature:
TurntheTemperature/TimeKnobif
youwishtoincreaseordecreasethe
temperaturesetting.Theframearoundthe
temperaturesettingontheLCDdisplaywill
beblinking.FortheReheatfunction,the
temperaturecanbesetfrom150to450ºF
in5-degreeincrements.Onceyouhave
selectedthedesiredtemperature,pressthe
knoboncetosetthatselection.Theframe
ofthetemperaturewilldisappearandthe
frameofthetimesettingwillstartblinking.
Figure 11
English-19
Step 3. To set the time:
TurntheTemperature/TimeKnobifyouwish
toincreaseordecreasethereheatingtime.
ThemaximumtimesettingforReheatis60
minutes(1hour).Onceyouhaveselectedthe
desiredreheatingtime,presstheStartbutton
toinitiatethereheatingprocess.Theframeof
thetimewilldisappear.
Step 4. To Start:
PresstheStart/CancelButtontostartthe
reheatingprocess.TheredStart/Cancel
Buttonlightwillilluminate.TheLCD
DisplaywillshowtheReheatFunction,
thecountdowntimeandtheselected
temperature.Theunitwillbegintowork
andthetimerwillstartcountingdown.
WhentheReheatingcycleiscomplete,the
unitwillemit3beeps.TheLCDandthe
Start/CancelButtonLightwillturnoffafter
30seconds.
NOTE:Youcancancelthereheatingcycleatany
timebypressingtheStart/CancelButton
once.
English-20
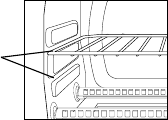
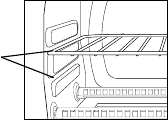
Positioning Pan
• Toaccommodateawidevarietyoffoodstheovenhastworackpositions.
Therackcanbeinsertedintheovenintheupperorlowerrackguides.The
rackwillfitintoeitheroftherackguidesinsideoftheCountertopOven.
(SeeFigureBelow)
• Beforeremovingtherackallowtheunittocool.
• Toremovetherack,opentheovendoorandpulltheracktowardsthe
frontoftheoven.Therackwillslideontherackguidesontheinsideofthe
oven.
PLEASENOTE:theovenrackmaytiltdownwardcausingfoodtoshift
whentherackispulledout,proceedwithcaution.
• Positioningoftheovenrackwilldependonthesizeofthefoodand
desiredbrowning.Movetheracktothelowerrackpositiontopreventtop
browningandmovetheracktotheupperrackpositiontopreventbottom
burning.
• Forbesttoastingresults,positiontherackinthelowerrackguide.
Rack Guide
Options
English-21
Cleaning Your Countertop Oven
DONOTIMMERSEINLIQUIDS.
Step 1. PresstheStart/CancelButtonOFFandremoveplugfromelectrical
outlet.Allowtocool.
Step 2. Wipeunitdownwithdampcloth.DONOTIMMERSEINWATER.
Makesuretoonlyusemild,soapywater.Abrasivecleaners,scrubbing
brushesandchemicalcleanerswilldamagethecoatingonthisunit.
Step 3. RemovecrumbtraybypullingoutofCountertopOven.
Step 4. Shakeoffcrumbsfromcrumbtray.Cleaningthecrumbtrayoften
willavoidanyaccumulations.
Step 5. Removewirerackandcleanwithdampclothorplaceintoprackof
dishwasher.
Storing Your Countertop Oven
Allowtheappliancetocoolcompletelybeforestoring.Ifstoringthe
CountertopOvenforlongperiodsoftimemakecertainthattheCountertop
Oveniscleanandfreeoffoodparticles.StoretheCountertopOveninadry
locationsuchasonatableorcountertoporcupboardshelf.Otherthanthe
recommendedcleaning,nofurtherusermaintenanceshouldbenecessary.
English-22
1 Year Limited Warranty
SunbeamProducts,Inc.doingbusinessasJardenConsumerSolutionsorifin
Canada,SunbeamCorporation(Canada)LimiteddoingbusinessasJarden
ConsumerSolutions(collectively“JCS”)warrantsthatforaperiodofoneyear
fromthedateofpurchase,thisproductwillbefreefromdefectsinmaterial
andworkmanship.JCS,atitsoption,willrepairorreplacethisproductorany
componentoftheproductfoundtobedefectiveduringthewarrantyperiod.
Replacementwillbemadewithaneworremanufacturedproductorcomponent.
Iftheproductisnolongeravailable,replacementmaybemadewithasimilar
productofequalorgreatervalue.Thisisyourexclusivewarranty.DoNOT
attempttorepairoradjustanyelectricalormechanicalfunctionsonthisproduct.
Doingsowillvoidthiswarranty.
Thiswarrantyisvalidfortheoriginalretailpurchaserfromthedateofinitialretail
purchaseandisnottransferable.Keeptheoriginalsalesreceipt.Proofofpurchase
isrequiredtoobtainwarrantyperformance.JCSdealers,servicecenters,orretail
storessellingJCSproductsdonothavetherighttoalter,modifyoranyway
changethetermsandconditionsofthiswarranty.
Thiswarrantydoesnotcovernormalwearofpartsordamageresultingfromany
ofthefollowing:negligentuseormisuseoftheproduct,useonimpropervoltage
orcurrent,usecontrarytotheoperatinginstructions,disassembly,repairor
alterationbyanyoneotherthanJCSoranauthorizedJCSservicecenter.Further,
thewarrantydoesnotcover:ActsofGod,suchasfire,flood,hurricanesand
tornadoes.
What are the limits on JCS’s Liability?
JCSshallnotbeliableforanyincidentalorconsequentialdamagescausedbythe
breachofanyexpress,impliedorstatutorywarrantyorcondition.
Excepttotheextentprohibitedbyapplicablelaw,anyimpliedwarrantyor
conditionofmerchantabilityorfitnessforaparticularpurposeislimitedinduration
tothedurationoftheabovewarranty.
JCSdisclaimsallotherwarranties,conditionsorrepresentations,express,implied,
statutoryorotherwise.
JCSshallnotbeliableforanydamagesofanykindresultingfromthepurchase,
useormisuseof,orinabilitytousetheproductincludingincidental,special,
consequentialorsimilardamagesorlossofprofits,orforanybreachofcontract,
fundamentalorotherwise,orforanyclaimbroughtagainstpurchaserbyany
otherparty.
Someprovinces,statesorjurisdictionsdonotallowtheexclusionorlimitation
ofincidentalorconsequentialdamagesorlimitationsonhowlonganimplied
warrantylasts,sotheabovelimitationsorexclusionmaynotapplytoyou.
Thiswarrantygivesyouspecificlegalrights,andyoumayalsohaveotherrights
English-23
thatvaryfromprovincetoprovince,statetostateorjurisdictiontojurisdiction.
How To Obtain Warranty Service
In the U.S.A.
Ifyouhaveanyquestionregardingthiswarrantyorwouldliketoobtainwarranty
service,pleasecall1-800-334-0759andaconvenientservicecenteraddresswillbe
providedtoyou.
In Canada
Ifyouhaveanyquestionregardingthiswarrantyorwouldliketoobtainwarranty
service,pleasecall1-800-667-8623andaconvenientservicecenteraddresswillbe
providedtoyou.
IntheU.S.A.,thiswarrantyisofferedbySunbeamProducts,Inc.doingbusinessas
JardenConsumerSolutionslocatedinBocaRaton,Florida33431.InCanada,this
warrantyisofferedbySunbeamCorporation(Canada)Limiteddoingbusinessas
JardenConsumerSolutions,locatedat20BHerefordStreet,Brampton,Ontario
L6Y0M1.Ifyouhaveanyotherproblemorclaiminconnectionwiththisproduct,
pleasewriteourConsumerServiceDepartment.
PLEASE DO NOT RETURN THIS PRODUCT TO ANY OF THESE
ADDRESSES OR TO THE PLACE OF PURCHASE.
Español-24
PRECAUCIONES IMPORTANTES
Cuando se utilicen artefactos eléctricos deben seguirse siempre las
precauciones básicas de seguridad incluyendo las siguientes:
LEA Y GUARDE ESTAS
INSTRUCCIONES
• LEATODASLASINSTRUCCIONES,ETIQUETASDELPRODUCTO
YADVERTENCIASANTESDEUTILIZARELHORNOPARA
MOSTRADOR.
• Notoquelassuperficiescalientes.Utilicesiempreguantesparahornoscuando
manipulematerialescalientesydejequelaspiezasmetálicasseenfríenantesde
limpiarlas.Dejequelaunidadseenfríeporcompletoantesdecolocaroquitar
piezas.Uselasasasdelhornoparamoverlodeunlugaraotro.
• Sielhornonoestáenusoyantesdelimpiarlo,presioneelbotónde“Iniciar/
Cancelar”ydesconecteelcabledeltomacorriente.
• Paraprotegersecontraelriesgodedescargaseléctricas,nosumerjaelartefacto
enaguanienotroslíquidos.
• Serequiereestrictasupervisióncuandoseutiliceesteocualquierotroartefacto
cercadelosniños.Esteartefactonodebeserutilizadoporniños.
• Noutiliceningúnelectrodomésticoquetengaunenchufeocabledañado
oraído,odespuésdequeelartefactohayapresentadofallas,sehaya
caídoohayasufridocualquierotrodaño.DevuelvaelhornoalCentrode
ServicioAutorizadodeArtefactosSunbeammáscercanoparasuinspección,
reparación,ajusteeléctricoomecánico.
• Noutiliceaditamentosnorecomendadosporelfabricanteyaqueestopuede
ocasionarincendios,descargaseléctricasolesionespersonales.
• Noutiliceenexterioresoparafinescomerciales.
• Noutiliceesteproductoparaotrosfinesdistintosalosrecomendados.
• Nodejequeelcableeléctricocuelguedelbordedelamesaolamesadanique
entreencontactoconsuperficiescalientes.
• Nocoloqueelelectrodomésticocercaosobreunquemadorcaliente,yaseade
gasoeléctrico,nidentrodeunhornocaliente.
• Sedebeemplearextremaprecauciónalutilizarcontenedoresquenoseande
metalovidrio.
• Sisecubreelhornoparamostradoroésteentraencontactoconmateriales
inflamables,incluyendocortinas,tapices,paredes,etc.,durantesu
funcionamiento,podríaproducirseunincendio.Nocoloqueningúnartículo
sobreelelectrodomésticomientrasestéenfuncionamiento.
Español-25
• Alutilizarelhornodemesa,colóqueloaunadistanciamínimade15cm(6
pulgadas)delaparedodeotroscables.
• Noalmacenedentrodelaunidadningúnmaterial,distintoalosaccesorios
recomendadosporelfabricante,cuandonoestéenuso.
• Nointroduzcamaterialesinflamablesenelhorno,talescomopapel,cartón,
plástico,ocualquierotromaterialquepuedaincendiarseoderretirse.
• Noforrelabandejaolaparrilladelhornoconpapeldealuminio.Esto
ocasionaráqueelartefactosesobrecaliente.
• Nodebenintroducirsealimentosdemasiadograndesniutensiliosmetálicos
dentrodelartefacto,yaquepuedenproducirincendiosodescargaseléctricas.
• Nolimpieconestropajosmetálicos.Podríandesprendersepedazosdel
estropajoyentrarencontactoconlaspiezaseléctricas,locualgeneraríaun
riesgodedescargaseléctricas.
• Debeemplearseextremaprecauciónalsacarlabandejaodesechargrasasu
otroslíquidoscalientes.
•
Paraapagarelelectrodoméstico,presioneelbotónde“Iniciar/Cancelar”y
saqueelcabledeltomacorriente.Eldisplayseapagarádespuésde30segundos.
Esta unidad es sólo para uso doméstico
Instrucciones del cable de alimentación corto
Seproporcionauncabledealimentacióncortoparadisminuirlosriesgos
originadosporenredosotropiezosconcableslargos.Sepuedeutilizaruna
extensiónsiseempleanlasdebidasprecauciones.Siseusaunaextensión,la
capacidadnominalindicadadelamismadebeserporlomenosigualomayor
aladelartefacto.Laextensióndebecolocarsedemaneraquenocuelguedel
mostradorodelamesa,dondelosniñospodríanhalarlaopodríaocasionar
tropiezosaccidentales.
Únicamente para productos comprados en Estados Unidos y Canadá
Paradisminuirelriesgodedescargaeléctricaesteartefactocuentaconun
enchufepolarizado(unaclavijaesmásanchaquelaotra).Esteenchufeentra
deunasolamaneraenuntomacorrientepolarizado;sielenchufenoentrapor
completoeneltomacorriente,inviértalo.Siaúnnoencaja,comuníquesecon
unelectricistacalificado.No intente alterarestacaracterísticadeseguridad.
CONSERVE ESTAS
INSTRUCCIONES

Español-26
Diagrama del Producto
1. Pantalla LCD
2. Botón de calentamiento por convección turbo:Úseloparaactivarocancelarel
calentamientoporconvecciónturbo.
3. Botón para iniciar/cancelar: Presioneestebotónparaapagarelproducto.
4. Perilla selectora de función:seleccionelafuncióndecoccióngirandola
perillaalajustedeseado.
5. Perilla de control de tiempo/temperatura: Gradúelaruedadeltermostatoala
temperaturadeseada/Ajustelaruedaalatemperaturadeseada.
6. Rejilla removible: Consultelasección“Posicionamientodelarejilla”
7. Puerta de vidrio templado: Paraverlosalimentosdesdeelfrente.
8. Tres posiciones para colocar la rejilla
9. Bandeja recolectora removible: Pararecolectarlasmigajasorestosde
comidaquecaigan.Sesacaparafacilitarsulimpieza.
10.Combinación de fuente para hornear, bandeja para galletas y parrilla para asar:
úselasparatodassustareasdehorneadoyasado.
11. Paredes interiores fáciles de limpiar: Permitenlalimpiezarápida.
1
8
10
4
5
2
3
9
6 7
11
Español-27
a c
f
bd
e
Pantalla de LCD
a. Indicador de función:Tostar,Bagel,Pizza,Hornear,Dorar,Galletas,
Asado,Calentar,Descongelar,Recalentar
b. Flecha indicadora de función
c. Indicador de temperatura
d. Indicador de tiempo
e. Icono de calentamiento por convección turbo
f. Indicador del ajuste de intensidad de tostado del 1 al 7
Preparación Del Horno Tostador
Alutilizarelhornotostadorporprimeravez,recuerde:
•Retirartodaslasetiquetasdelasuperficiedelhorno.
•Abrirlapuertadelhornotostadorysacartodoslosdocumentos
impresosypapelesqueseencuentrendentro.
•Limpiarlarejillaylabandejaconaguacaliente,unapequeñacantidad
dedetergentelíquidoparalavarplatosyunaesponjanoabrasivao
unaalmohadillalimpiadora.NOSUMERGIRELCUERPODELA
UNIDADENAGUA.
•Secarbienlaunidadantesdeutilizarla.
•Escogerunlugarparacolocarelhornotostador.Deberácolocarloen
unespacioabierto,sobreunmostradorplano,dondeelenchufepueda
llegaraltomacorriente.
•Enchufarelhornoenuntomacorriente.

Español-28
Uso Del Horno Tostador (Fig. 1)
Enchufelaunidad;éstaemitirádospitidoslargos
ylapantallaLCDseiluminará.Laopciónde
funciónapareceráconunindicadorenlafunción
predeterminadadeTOSTAR.LapantallaLCDyel
botóndeinicio/cancelarpermanecerániluminados
durante30segundosyposteriormenteseapagarán
sinoseoprimenbotonesosemuevenperillas.
NOTA: DespuésdequelapantallaLCDseapague
puedeoprimircualquierbotónomovercualquier
perillapara“despertar”lapantallayhacer
funcionarelhornonormalmente
Paso 1. Selección de la función
Girelaperilladefunciónparaelegirunade
lassiguientes10opcionesdelmenú:Tostar,
Bagel,Pizza,Hornear,Dorar,Galletas,
Asado,Calentar,Descongelar,Recalentar.
Laflechaindicadorasemoverádeuna
funciónaotraconformegirelaperilla.
NOTA:Sielprocesodecocciónnoempiezao
noseoprimeningúnotrobotónnise
giraningunaotraperillaenunplazode
30segundos,laluzdefondoazuldela
pantallaylaluzdelbotóndeiniciar/
cancelarseapagarán.
Paso 2. Temperatura:
Girelaperilladetemperatura/tiempopara
aumentarodisminuirlagraduaciónde
temperatura.
Paso 3. Tiempo:
Girelaperilladetemperatura/tiempopara
aumentarodisminuireltiempodecocción.
Eltiempodecocciónmáximoesde60
minutos.
NOTA:Oprimalaperilladetemperatura/tiempo
paraseleccionarentrelasopcionesde
temperaturaytiempo.
Figura 1
Español-29
Uso De La Función De Tostar (Fig. 2)
Paso 1. GirelaperilladefunciónaTostar.Cuando
seleccionelafuncióndeTostar,elajustede
intensidaddetostadodel1al7apareceráen
lapantallaLCD.Tantoelelementotérmico
superiorcomoelinferiorsecalentarán.
Elajustedeintensidaddetostado
predeterminadoes4.Cadavezquese
desenchufeyvuelvaaenchufarseelhorno
tostador,elajustepredeterminadoserá4.Si
elhornotostadorpermaneceenchufadodesde
laúltimavezqueseleccionóunaintensidadde
tostadodistintaparadichafunción(aunqueno
seactive),launidadrecordaráelúltimoajuste
deintensidadseleccionado.
NOTA:Esrecomendadousarlaposicióninferiordela
rejillaparalafuncióndeTostar.
EnlafuncióndeTostarnosepuedeajustarla
temperaturanieltiempo.
Paso 2. Para ajustar la intensidad de tostado:
Girelaperilladetemperatura/tiempopara
ajustarlaintensidaddetostado.Elajustede
laintensidaddetostadomostrarásuselección
conformegirelaperilla.Elmarcoquerodea
elindicadordelafuncióndetostadoenla
pantallaLCDestaráparpadeando
Paso 3. Para comenzar:
oprimaelbotóndeiniciar/cancelarpara
comenzarelprocesodetostado.Laluzroja
delbotóndeiniciar/cancelarseiluminará.La
pantallaLCDmostrarálafuncióndeTostar,la
intensidaddetostadoseleccionadayeltiempo
delcronómetrodecuentaregresiva.Launidad
comenzaráafuncionaryeltemporizador
empezarálacuentaregresiva.
Cuandotermineelciclodetostado,launidad
emitirátrespitidos.LapantallaLCDyel
botóndeiniciar/cancelarseapagarándespués
de30segundos.
NOTA:Puedecancelarelciclodetostadoencualquier
momentooprimiendounavezelbotónde
iniciar/cancelar.
Figura 2

Español-30
Uso De La Función De Bagel (Rosquilla De
Pan) (Fig. 3)
Paso 1. GirelaperilladefunciónaBagel.Cuando
seleccionelafuncióndeBagel,elajustede
intensidaddetostadodel1al7apareceráen
lapantallaLCD.Sóloajustedeintensidadde
tostadopredeterminadoes4.Cadavezquese
desenchufeyvuelvaaenchufarseelhornotostador,
elajustepredeterminadoserá4.Sielhorno
tostadorpermaneceenchufadodesdelaúltimavez
queseleccionóunaintensidaddetostadodistinta
paralafuncióndeBagel(aunquenoseactive),la
unidadrecordaráelúltimoajustedeintensidad
seleccionado.
NOTA:Esrecomendadousarlaposicióninferiordela
rejillaparalafuncióndeBagel.Paramejores
resultadoscoloquelarosquilladepanconla
partecortadahaciaarriba.
EnlafuncióndeBagelnosepuedeajustarla
temperaturanieltiempounavezquehaya
comenzado.
Paso 2. Para ajustar la intensidad de tostado:
Girelaperilladetemperatura/tiempopara
ajustarlaintensidaddetostado.Elajustede
laintensidaddetostadomostrarásuselección
conformegirelaperilla.Elmarcoquerodeael
indicadordelafuncióndetostadoenlapantalla
LCDestaráparpadeando.
Paso 3. Para comenzar:
Oprimaelbotóndeiniciar/cancelarpara
comenzarelprocesodetostadodelarosquillade
pan.Laluzrojadelbotóndeiniciar/cancelarse
iluminará.LapantallaLCDmostrarálafunción
deBagel,laintensidaddetostadoseleccionaday
eltiempodelcronómetrodecuentaregresiva.La
unidadcomenzaráafuncionaryeltemporizador
empezarálacuentaregresiva.
Cuandotermineelciclodetostadodela
rosquilladepan,launidademitirátrespitidos.
LapantallaLCDyelbotóndeiniciar/cancelar
seapagarándespuésde30segundos.
Figura 3

Español-31
NOTA:Puedecancelarelciclodetostadodelarosquilla
depanencualquiermomentooprimiendouna
vezelbotóndeiniciar/cancelar.
Uso De La Función De Pizza/ Calentamiento
Por Convección Turbo (Fig. 4)
Paso 1.GirelaperilladefunciónaPizza.Alseleccionar
lafuncióndePizza,elcalentamientopor
convecciónturboseactivaráautomáticamente.
Paso 2.SideseacambiaralafunciónnormaldePizza,
oprimaelbotónTurbounavezparaapagar
laselecciónpredeterminadadecalentamiento
porconvecciónturbo.Laluzazuldelbotónde
calentamientoporconvecciónturboseapagará.
Lafuncióndecalentamientoporconvección
turboenciendeunventiladorincorporadoque
hacecircularairecalienteenlacámaradel
hornoquepermitecocinarlosalimentosmás
rápidayuniformemente.
Temperatura predeterminada:400gradosF.
Tiempo predeterminado: 16minutos.
Paso 3. Para fijar la temperatura:
Girelaperilladetemperatura/tiemposi
deseaaumentarodisminuirlagraduación
detemperatura.Elmarcoquerodeala
graduacióndetemperaturaenlapantalla
LCDestaráparpadeando.Paralafunciónde
Pizzalatemperaturapuedegraduarsede350
a450gradosF,enincrementosde25grados.
Cuandohayaseleccionadolatemperatura
deseada,oprimalaperillaunavezparafijar
dichaselección.Elmarcodelatemperatura
desapareceráyeldelajustedetiempo
comenzaráaparpadear.
Paso 4. Para fijar el tiempo:
Girelaperilladetemperatura/tiemposidesea
aumentarodisminuireltiempodecocción.El
ajustedetiempomáximoparahornearpizzas
es60minutos(1hora).Unavezquehaya
seleccionadoeltiempodecoccióndeseado,
oprimaelbotóndeiniciarparacomenzarel
procesodecocción.Elmarcodelindicadorde
tiempodesaparecerá.
Figura 4
Español-32
Paso 5. Para comenzar:
Oprimaelbotóndeiniciar/cancelarpara
comenzarelprocesodecocción.Laluzroja
delbotóndeiniciar/cancelarseiluminará.La
pantallaLCDmostrarálafuncióndePizza,
eltiempodelcronómetrodecuentaregresiva
ylatemperaturaseleccionada.Launidad
comenzaráafuncionaryeltemporizador
empezarálacuentaregresiva.Cuandotermine
elciclodelafuncióndePizza,launidad
emitirátrespitidos.LapantallaLCDyel
botóndeiniciar/cancelarseapagarándespués
de30segundos.
NOTA:Puedecancelarelciclodecocciónencualquier
momentooprimiendounavezelbotónde
iniciar/cancelar.
Uso De La Función De Hornear/
Calentamiento Por Convección Turbo (Fig.
5)
Paso 1. GirelaperilladefunciónaHornear.Al
seleccionarlafuncióndeHornear,el
calentamientoporconvecciónturbose
activaráautomáticamente.
Paso 2.Sideseacambiaralafunciónnormalde
Hornear,oprimaelbotónTurbounavez
paraapagarlafuncióndecalentamiento
porconvecciónturbo.Laluzazuldelbotón
decalentamientoporconvecciónturbose
apagará.
Lafuncióndecalentamientoporconvección
turboenciendeunventiladorincorporadoque
hacecircularairecalienteenlacámaradel
hornoquepermitecocinarlosalimentosmás
rápidayuniformemente.
Temperatura predeterminada: 325gradosF.
Tiempo predeterminado: 30minutos.

Español-33
Paso 3. Para fijar la temperatura:
Girelaperilladetemperatura/tiemposi
deseaaumentarodisminuirlagraduación
detemperatura.Elmarcoquerodeala
graduacióndetemperaturaenlapantalla
LCDestaráparpadeando.Paralafunción
deHornearlatemperaturapuedegraduarse
de150a450gradosF,enincrementosde
5grados.Cuandohayaseleccionadola
temperaturadeseada,oprimalaperillauna
vezparafijardichaselección.Elmarcodela
temperaturadesapareceráyeldelajustede
tiempocomenzaráaparpadear.
Paso 4. Para fijar el tiempo:
Girelaperilladetemperatura/tiemposidesea
aumentarodisminuireltiempodecocción.
Elajustedetiempomáximoparalafunción
deHorneares60minutos(1hora).Unavez
quehayaseleccionadoeltiempodecocción
deseado,oprimaelbotóndeiniciarpara
comenzarelprocesodecocción.Elmarcodel
indicadordetiempodesaparecerá.
Paso 5. Para comenzar:
Oprimaelbotóndeiniciar/cancelarpara
comenzarelprocesodecocción.Laluzroja
delbotóndeiniciar/cancelarseiluminará.La
pantallaLCDmostrarálafuncióndeHornear,
eltiempodelcronómetrodecuentaregresiva
ylatemperaturaseleccionada.Launidad
comenzaráafuncionaryeltemporizador
empezarálacuentaregresiva.
CuandotermineelciclodeHornear,launidad
emitirátrespitidos.LapantallaLCDyel
botóndeiniciar/cancelarseapagarándespués
de30segundos.
NOTA:Puedecancelarelciclodecocciónencualquier
momentooprimiendounavezelbotónde
iniciar/cancelar.
Figura 5
Español-34
Uso De La Función De Dorar (Fig. 6)
Paso 1. GirelaperilladefunciónaDorar.Al
seleccionarlafunciónDorarloselementos
térmicossuperioressecalentarán.
Temperatura predeterminada: 450gradosF.
Tiempo predeterminado:10minutos.
Paso 2. Para fijar la temperatura:
Girelaperilladetemperatura/tiemposi
deseaaumentarodisminuirlagraduación
detemperatura.Elmarcoquerodeala
graduacióndetemperaturaenlapantalla
LCDestaráparpadeando.Paralafunciónde
Dorarlatemperaturapuedegraduarsede400
a450gradosF,enincrementosde25grados.
Cuandohayaseleccionadolatemperatura
deseada,oprimalaperillaunavezparafijar
dichaselección.Elmarcodelatemperatura
desapareceráyeldelajustedetiempo
comenzaráaparpadear.
Paso 3. Para fijar el tiempo:
Girelaperilladetemperatura/tiemposidesea
aumentarodisminuireltiempodecocción.
ElajustedetiempomáximoparaDorar
es60minutos(1hora).Unavezquehaya
seleccionadoeltiempodecoccióndeseado,
oprimaelbotóndeiniciarparacomenzarel
procesodecocción.Elmarcodelindicadorde
tiempodesaparecerá.
Paso 4. Para comenzar:
Oprimaelbotóndeiniciar/cancelarpara
comenzarelprocesodedorado.Laluzroja
delbotóndeiniciar/cancelarseiluminará.La
pantallaLCDmostrarálafuncióndeDorar,
eltiempodelcronómetrodecuentaregresiva
ylatemperaturaseleccionada.Launidad
comenzaráafuncionaryeltemporizador
empezarálacuentaregresiva.
CuandotermineelciclodeDorar,launidad
emitirátrespitidos.LapantallaLCDyelbotón
deiniciar/cancelarseapagarándespuésde30
segundos.
Figura 6

Español-35
NOTA:Puedecancelarelciclodedoradoencualquier
momentooprimiendounavezelbotónde
iniciar/cancelar.
Uso De La Función De Galletas/
Calentamiento Por Convección Turbo (Fig. 7)
Paso 1. GirelaperilladefunciónaGalletas.Al
seleccionarlafuncióndeGalletas,el
calentamientoporconvecciónturboseactivará
automáticamente.
Paso 2. Sideseacambiaralafunciónnormalde
Galletas,oprimaelbotónTurbounavez
paraapagarlafuncióndecalentamientopor
convecciónturbo.Laluzazuldelbotónde
calentamientoporconvecciónturboseapagará.
Lafuncióndecalentamientoporconvección
turboenciendeunventiladorincorporadoque
hacecircularairecalienteenlacámaradel
hornoquepermitecocinarlosalimentosmás
rápidayuniformemente.
Temperatura predeterminada: 350gradosF.
Tiempo predeterminado:11minutos.
Paso 3. Para fijar la temperatura:
Girelaperilladetemperatura/tiemposi
deseaaumentarodisminuirlagraduaciónde
temperatura.Elmarcoquerodealagraduación
detemperaturaenlapantallaLCDestará
parpadeando.ParalafuncióndeGalletas
latemperaturapuedegraduarsede150a
450gradosF,enincrementosde5grados.
Cuandohayaseleccionadolatemperatura
deseada,oprimalaperillaunavezparafijar
dichaselección.Elmarcodelatemperatura
desaparecerá.
Figura 7
Español-36
Paso 4. Para fijar el tiempo:
Girelaperilladetemperatura/tiemposidesea
aumentarodisminuireltiempodecocción.
Elajustedetiempomáximoparalafunción
deGalletases60minutos(1hora).Unavez
quehayaseleccionadoeltiempodecocción
deseado,oprimaelbotóndeiniciarpara
comenzarelprocesodecocción.Elmarco
deltiempodesapareceráyeldelajustede
temperaturacomenzaráaparpadear..
Paso 5. Para comenzar:
Oprimaelbotóndeiniciar/cancelarpara
comenzarelprocesodecocción.Laluzroja
delbotóndeiniciar/cancelarseiluminará.La
pantallaLCDmostrarálafuncióndeGalletas,
eltiempodelcronómetrodecuentaregresiva
ylatemperaturaseleccionada.Launidad
comenzaráafuncionaryeltemporizador
empezarálacuentaregresiva.
Cuandotermineelciclodelafunciónde
Galletas,launidademitirátrespitidos.La
pantallaLCDyelbotóndeiniciar/cancelarse
apagarándespuésde30segundos.
NOTA:Puedecancelarelciclodecocciónencualquier
momentooprimiendounavezelbotónde
iniciar/cancelar..
Uso De La Función De Asar/ Convección
Turbo (Fig. 8)
Paso 1. GirelaperilladefunciónaAsar.Al
seleccionarlafuncióndeAsar,el
calentamientoporconvecciónturbose
activaráautomáticamente.
Paso 2. Sideseacambiaralafunciónnormalde
Asar,oprimaelbotónTurbounavez(Paso
2)paraapagarlafuncióndecalentamiento
porconvecciónturbo.Laluzazuldelbotón
decalentamientoporconvecciónturbose
apagará.

Español-37
Lafuncióndecalentamientopor
convecciónturboenciendeunventilador
incorporadoquehacecircularairecaliente
enlacámaradelhornoquepermitecocinar
losalimentosmásrápidayuniformemente.
Temperatura predeterminada: 350gradosF.
Tiempo predeterminado:60minutos.
Paso 3. Para fijar la temperatura:
Girelaperilladetemperatura/tiemposi
deseaaumentarodisminuirlagraduación
detemperatura.Elmarcoquerodeala
graduacióndetemperaturaenlapantalla
LCDestaráparpadeando.Paralafunción
deAsarlatemperaturapuedegraduarse
de150a450gradosF,enincrementosde
5grados.Cuandohayaseleccionadola
temperaturadeseada,oprimalaperillauna
vezparafijardichaselección.Elmarcode
latemperaturadesapareceráyeldelajuste
detiempocomenzaráaparpadear.
Paso 4. Para fijar el tiempo:
Girelaperilladetemperatura/tiemposi
deseaaumentarodisminuireltiempode
cocción.Elajustedetiempomáximopara
lafuncióndeAsares60minutos(1hora).
Unavezquehayaseleccionadoeltiempo
decoccióndeseado,oprimaelbotón
deiniciarparacomenzarelprocesode
cocción.Elmarcodelindicadordetiempo
desaparecerá.
Paso 5. Para comenzar:
Oprimaelbotóndeiniciar/cancelarpara
comenzarelprocesodecocción.Laluzroja
delbotóndeiniciar/cancelarseiluminará.
LapantallaLCDmostrarálafunciónde
Asar,eltiempodelcronómetrodecuenta
regresivaylatemperaturaseleccionada.
CuandotermineelciclodeAsar,launidad
emitirátrespitidos.LapantallaLCDy
elbotóndeiniciar/cancelarseapagarán
despuésde30segundos.
Figure 8

Español-38
NOTA:Puedecancelarelciclodecocciónencualquier
momentooprimiendounavezelbotónde
iniciar/cancelar.
Uso De La Función De Calentar (Fig. 9)
Paso 1. Gire la perilla de función a Calentar.
Temperatura predeterminada: 150gradosF.
Tiempo predeterminado: 60minutes.
Puedeactivarmanualmentelafunciónde
calentamientoporconvecciónturbooprimiendo
unavezelbotónTurboparaencenderla.Laluz
azuldelbotónTurboseencenderá.
Paso 2. Para fijar la temperatura:
Girelaperilladetemperatura/tiemposi
deseaaumentarodisminuirlagraduaciónde
temperatura.Elmarcoquerodealagraduación
detemperaturaenlapantallaLCDestará
parpadeando.ParalafuncióndeCalentar
latemperaturapuedegraduarsede150a
200gradosF,enincrementosde25grados.
Cuandohayaseleccionadolatemperatura
deseada,oprimalaperillaunavezparafijar
dichaselección.Elmarcodelatemperatura
desapareceráyeldelajustedetiempo
comenzaráaparpadear.
Paso3. Para fijar el tiempo:
Girelaperilladetemperatura/tiemposi
deseaaumentarodisminuireltiempode
calentamiento.Elajustedetiempomáximo
paralafuncióndeCalentares60minutos(1
hora).Unavezquehayaseleccionadoeltiempo
decalentamientodeseado,oprimaelbotónde
iniciarparacomenzarelprocesodecalentar.El
marcodelindicadordetiempodesaparecerá.
Paso 4. Para comenzar:
Oprimaelbotóndeiniciar/cancelarpara
comenzarelprocesodecalentamiento.Laluz
rojadelbotóndeiniciar/cancelarseiluminará.
LapantallaLCDmostrarálafunciónde
Calentamiento,eltiempodelcronómetrode
cuentaregresivaylatemperaturaseleccionada.
Launidadcomenzaráafuncionaryel
temporizadorempezarálacuentaregresiva.
Figura 9

Español-39
CuandotermineelciclodeCalentamiento,la
unidademitirátrespitidos.LapantallaLCDy
elbotóndeiniciar/cancelarseapagarándespués
de30segundos.
NOTA:Puedecancelarelciclodecalentamientoen
cualquiermomentooprimiendounavezel
botóndeiniciar/cancelar.
Uso De La Función De Descongelar (Fig. 10)
Paso 1. GirelaperilladefunciónaDescongelar.
Temperatura predeterminada: 450gradosF.
Tiempo predeterminado 16minutos.
Puedeactivarmanualmentelafunción
decalentamientoporconvecciónturbo
oprimiendounavezelbotónTurbopara
encenderla.LaluzazuldelbotónTurbose
encenderá.
Paso 2. Para fijar la temperatura:
Girelaperilladetemperatura/tiemposi
deseaaumentarodisminuirlagraduaciónde
temperatura.Elmarcoquerodealagraduación
detemperaturaenlapantallaLCDestará
parpadeando.ParalafuncióndeDescongelar
latemperaturapuedegraduarsede150a
450gradosF,enincrementosde5grados.
Cuandohayaseleccionadolatemperatura
deseada,oprimalaperillaunavezparafijar
dichaselección.Elmarcodelatemperatura
desapareceráyeldelajustedetiempo
comenzaráaparpadear.
Paso 3. Para fijar el tiempo:
Girelaperilladetemperatura/tiemposi
deseaaumentarodisminuireltiempode
descongelado.Elajustedetiempomáximopara
lafuncióndeDescongelares60minutos(1
hora).Unavezquehayaseleccionadoeltiempo
dedescongeladodeseado,oprimaelbotónde
iniciarparacomenzarelprocesodecocción.El
marcodelindicadordetiempodesaparecerá.
Figura 10

Español-40
Paso 4. Para comenzar:
Oprimaelbotóndeiniciar/cancelarpara
comenzarelprocesodedescongelado.Laluz
rojadelbotóndeiniciar/cancelarseiluminará.
LapantallaLCDmostrarálafunciónde
Descongelar,eltiempodelcronómetrode
cuentaregresivaylatemperaturaseleccionada.
Launidadcomenzaráafuncionaryel
temporizadorempezarálacuentaregresiva.
CuandotermineelciclodeDescongelar,la
unidademitirátrespitidos.LapantallaLCD
yelbotóndeiniciar/cancelarseapagarán
despuésde30segundos.
NOTA:Puedecancelarelciclodedescongeladoen
cualquiermomentooprimiendounavezel
botóndeiniciar/cancelar.
Uso De La Función De Recalentar (Fig. 11)
Paso 1. GirelaperilladefunciónaRecalentar..
Temperatura predeterminada: 325gradosF.
Tiempo predeterminado: 15minutos.
Puedeactivarmanualmentelafunción
decalentamientoporconvecciónturbo
oprimiendounavezelbotónTurbopara
encenderla.LaluzazuldelbotónTurbose
encenderá
Paso 2. Para fijar la temperatura:
Girelaperilladetemperatura/tiemposi
deseaaumentarodisminuirlagraduaciónde
temperatura.Elmarcoquerodealagraduación
detemperaturaenlapantallaLCDestará
parpadeando.ParalafuncióndeRecalentar
latemperaturapuedegraduarsede150a
450gradosF,enincrementosde5grados.
Cuandohayaseleccionadolatemperatura
deseada,oprimalaperillaunavezparafijar
dichaselección.Elmarcodelatemperatura
desapareceráyeldelajustedetiempo
comenzaráaparpadear.
Figura 11
Español-41
Paso 3. Para fijar el tiempo:
Girelaperilladetemperatura/tiemposidesea
aumentarodisminuireltiempoderecalentado.
Elajustedetiempomáximoparalafunción
deRecalentares60minutos(1hora).Unavez
quehayaseleccionadoeltiempoderecalentado
deseado,oprimaelbotóndeiniciarpara
comenzarelprocesoderecalentar.Elmarcodel
indicadordetiempodesaparecerá.
Paso 4. Para comenzar:
Oprimaelbotóndeiniciar/cancelarpara
comenzarelprocesoderecalentado.Laluz
rojadelbotóndeiniciar/cancelarseiluminará.
LapantallaLCDmostrarálafunciónde
Recalentar,eltiempodelcronómetrode
cuentaregresivaylatemperaturaseleccionada.
Launidadcomenzaráafuncionaryel
temporizadorempezarálacuentaregresiva.
CuandotermineelciclodeRecalentar,la
unidademitirátrespitidos.LapantallaLCDy
elbotóndeiniciar/cancelarseapagarándespués
de30segundos.
NOTA:Puedecancelarelcicloderecalentadoen
cualquiermomentooprimiendounavezel
botóndeiniciar/cancelar.
Español-42
Posicionamiento De La Rejilla
• Elhornoposeedosposicionesparacolocarlarejillaloquelepermite
adaptarseaunaampliavariedaddealimentos.Larejillapuedeintroducirse
enelhornoenlasguíassuperioresoenlasinferiores.Larejillaencajará
encualquieradelasguíasqueseencuentranenelinteriordelhornopara
mostrador.(Verlafiguraabajo)
• Dejequelaunidadseenfríeantesdesacarlarejilla.
• Parasacarla,abralapuertadelhornoyhalelarejillahaciaadelante.La
rejillasedeslizaráporlasguíaslocalizadasenelinteriordelhorno.
NOTA:tengacuidadoalhalarlarejilladelhornohaciaafuerayaqueésta
podríainclinarsehaciaabajoyocasionarquelosalimentossedeslicen.
• Laposicióndelarejilladelhornodependerádeltamañodelosalimentos
ylaintensidaddedorado.Coloquelarejillaenlaposiciónmásbajapara
evitarquesetuestelapartesuperiorycolóquelaenlaposiciónmásalta
paraevitarquesequemelaparteinferior.
• Paraobtenerlosmejoresresultadosaltostar,coloquelarejillaenlaguía
inferior.
Opciones de
Guías para
Rejillas
Español-43
Limpieza Del Horno Para Mostrador
NOSUMERJAENLÍQUIDOS.
Paso 1.Oprimaelbotóndeiniciar/cancelarparaapagarloysaqueelenchufe
deltomacorriente.Dejequeseenfríe.
Paso 2. Limpielaunidadconunpañohúmedo.NOSUMERJAENAGUA.
Asegúresedeusarúnicamenteaguayunjabónsuave.Loslimpiadores
abrasivos,cepillosparafrotarylimpiadoresquímicosdañaránel
recubrimientodelaunidad.
Paso 3. Saquelabandejarecolectoradelhornoparamostrador.
Paso 4. Sacudalasmigajasdelabandejarecolectora.Lalimpiezafrecuentede
labandejarecolectoraevitaráqueseproduzcanacumulaciones.
Paso 5. Saquelarejillaylímpielaconunpañohúmedoocolóquelaenel
anaquelsuperiordellavaplatosautomático
Almacenamiento Del Horno Para Mostrador
Dejequeelelectrodomésticoseenfríeporcompletoantesdeguardarlo.Sise
vaaalmacenarelhornoparamostradorporperíodosprolongadosdetiempo,
asegúresedequeestélimpioydesprovistodepartículasdealimentos.Guarde
elhornoparamostradorenunlugarseco,comoporejemploenunamesa,
mesadaoenelestantedeunaparador.Noesnecesarioningúnotrotipode
mantenimiento,salvolalimpiezarecomendadaenestemanual.
Español-44
Garantía limitada de 1 año
SunbeamProducts,Inc.,queoperabajolarazónsocialJardenConsumer
Solutions,yenCanadá,SunbeamCorporation(Canada)Limited,queoperabajo
larazónsocialJardenConsumerSolutions(enconjuntodenominadas“JCS”),
garantizaqueesteproductonopresentarádefectosnienelmaterialnienlamano
deobraduranteelperíododeunañoapartirdelafechadecompra.JCS,asu
discreción,repararáoreemplazaráesteproductoocualquiercomponentedel
mismoqueseconsideredefectuosoduranteelperíododegarantía.Elreemplazose
efectuaráporunproductoocomponentenuevooreacondicionado.Sielproducto
yanoestuvieradisponible,puedereemplazarseporunproductosimilardeigualo
mayorvalor.Estaessugarantíaexclusiva.NOintenterepararniajustarninguna
delasfuncioneseléctricasomecánicasdeesteproducto.Silohace,anularála
garantía.
Estagarantíatienevalidezparaelcompradorminoristaoriginalapartirdelafecha
delacomprainicialylamismanoestransferible.Conserveelrecibodeventa
original.Parahacervalerlagarantíaesnecesarialapruebadelacompra.Los
distribuidoresdeJCS,loscentrosdeservicionilastiendasminoristasquevendan
productosdeJCSnotienenpotestadparaalterar,modificarnicambiardeforma
algunalostérminosycondicionesdeestagarantía.
Estagarantíanoamparaeldesgastenormaldelaspiezasnilosdañosquese
produzcanaconsecuenciadecualquieradelassiguientescircunstancias:uso
negligenteoinadecuadodelproducto,usoconunvoltajeocorrienteinapropiados,
usocontrarioalasinstruccionesdefuncionamiento,desensamblaje,reparacióno
alteraciónporpartedetercerosajenosaJCSounCentrodeServicioAutorizado
deJCS.Asimismo,lagarantíanoampara:actosdefuerzamayortalescomo
incendios,inundaciones,huracanesytornados.
¿Cuáles son los límites de la responsabilidad de JCS?
JCSnoseráresponsablepordañosaccidentalesoresultantesocasionadosporel
incumplimientodealgunagarantíaoestipulaciónexpresa,implícitaoestatutaria.
Salvoenlamedidaenqueloprohíbanlasleyespertinentes,algunagarantía
oestipulaciónimplícitasobrelacomerciabilidadoadecuaciónparaunfin
determinadotendráunaduraciónlimitadaalplazodelagarantíaantesmencionada.
Sunbeamdesconocecualesquieraotrasgarantías,estipulacionesorepresentaciones,
expresas,implícitas,estatutariasodecualquierotranaturaleza.
Sunbeamnoseráresponsablepordañosdeningúntipoqueresultendelacompra,
utilizaciónousoinadecuadodelproducto,olaimposibilidaddeusodelmismo,
incluyendodañosaccidentales,especiales,resultantesosimilaresolapérdida
deganancias,niporningúnincumplimientocontractual,fundamentalodeotra
naturaleza,niporningunaacciónemprendidaportercerosencontradelcomprador.
Español-45
Algunasprovincias,estadosojurisdiccionesnopermitenlaexclusiónolimitación
delosdañosaccidentalesoresultantesnilaslimitacionesencuantoaladuración
deunagarantíaimplícita,porlotanto,esposiblequelaslimitacionesoexclusiones
anterioresnoseapliquenensucaso.
Estagarantíaleotorgaderechoslegalesespecíficosperoquizásustedgoceademás
deotrosderechosquevaríandeunestado,unaprovinciaounajurisdicciónaotra.
Cómo obtener servicio en garantía
En EE.UU.
Sitienepreguntasrelativasaestagarantíaodeseaobtenerservicioengarantía,
sírvasellamaral1-800-334-0759yseleproporcionaráladireccióndeuncentrode
servicioqueleresulteconveniente.
En Canadá
Sitienepreguntasrelativasaestagarantíaodeseaobtenerservicioengarantía,
sírvasellamaral1-800-667-8623yleproporcionaremosladireccióndeuncentro
deservicioqueleresulteconveniente.
EnEE.UU.,estagarantíalaofreceSunbeamProducts,Inc.,bajolarazónsocial
JardenConsumerSolutions,ubicadaenBocaRaton,Florida33431.EnCanadá,
estagarantíalaofreceSunbeamCorporation(Canada)Limited,bajolarazónsocial
JardenConsumerSolutions,ubicadaen20BHerefordStreet,Brampton,Ontario
L6Y0M1.Sitienealgúnproblemaoreclamoenrelaciónaesteproducto,sírvase
escribiranuestrodepartamentodeatenciónalcliente.
LE ROGAMOS QUE NO DEVUELVA ESTE PRODUCTO A NINGUNA DE
LAS DIRECCIONES ANTERIORES NI AL LUGAR DONDE LO ADQUIRIÓ.

Forproductquestionscontact:
JardenConsumerService
USA:1.800.334.0759
Canada:1.800.667.8623
www.oster.com
©2011SunbeamProducts,Inc.doingbusinessasJardenConsumer
Solutions.Allrightsreserved.DistributedbySunbeamProducts,Inc.doing
businessasJardenConsumerSolutions,BocaRaton,Florida33431.Jarden
ConsumerSolutionsisasubsidiaryofJardenCoporation(NYSE:JAH)
Parapreguntassobrelosproductosllame:
JardenConsumerService
EE.UU.:1.800.334.0759
Canadá:1.800.667.8623
www.oster.com
©2011SunbeamProducts,Inc.operandobajoelnombrede
JardenConsumerSolutions.
Todoslosderechosreservados.
DistribuidoporSunbeamProducts,Inc.operandobajoelnombrede
JardenConsumerSolutions,BocaRaton,Florida33431.JardenConsumer
SolutionsesunasubsidiariadeJardenCoporation(NYSE:JAH)
CBA-081211
PrintedinChina ImpresoenChina
