PANASONIC Compact VHS C Camcorder Manual 97100145
User Manual: PANASONIC PANASONIC Compact VHS C Camcorder Manual PANASONIC Compact VHS C Camcorder Owner's Manual, PANASONIC Compact VHS C Camcorder installation guides
Open the PDF directly: View PDF ![]() .
.
Page Count: 50

Panason/c
Palrncol_dEP ®
Camcorder
Operating Instructions
[vusl_
PV-54
PV-S64
(PV-S64 shown)
Consists of PV-54D/PV-A16
Consists of PV-S64D/PV-A16
Before attempting to connect, operate or adjust this product, please read these instructions thoroughly.
Spanish Quick Use Guide is included. Gufa para rapida consulta en espa5ol est& incluida.
VQTW0466
Thank you for choosing PanasonicY
You have purchased one of the most sophisticated and
reliable products on the market today. Used properly,
we're sure it will bring you and your family years of
enjoyment. Please take time to fill in the information at
right. The serial number is on the tag located on the
underside of your Palmcorder. Be sure to retain this
manual as your convenient Palmcorder information
source.
_DDate of Purchase
Dealer Purchased From
Dealer Address
Dealer Phone No.
Model No.
k. Serial No.
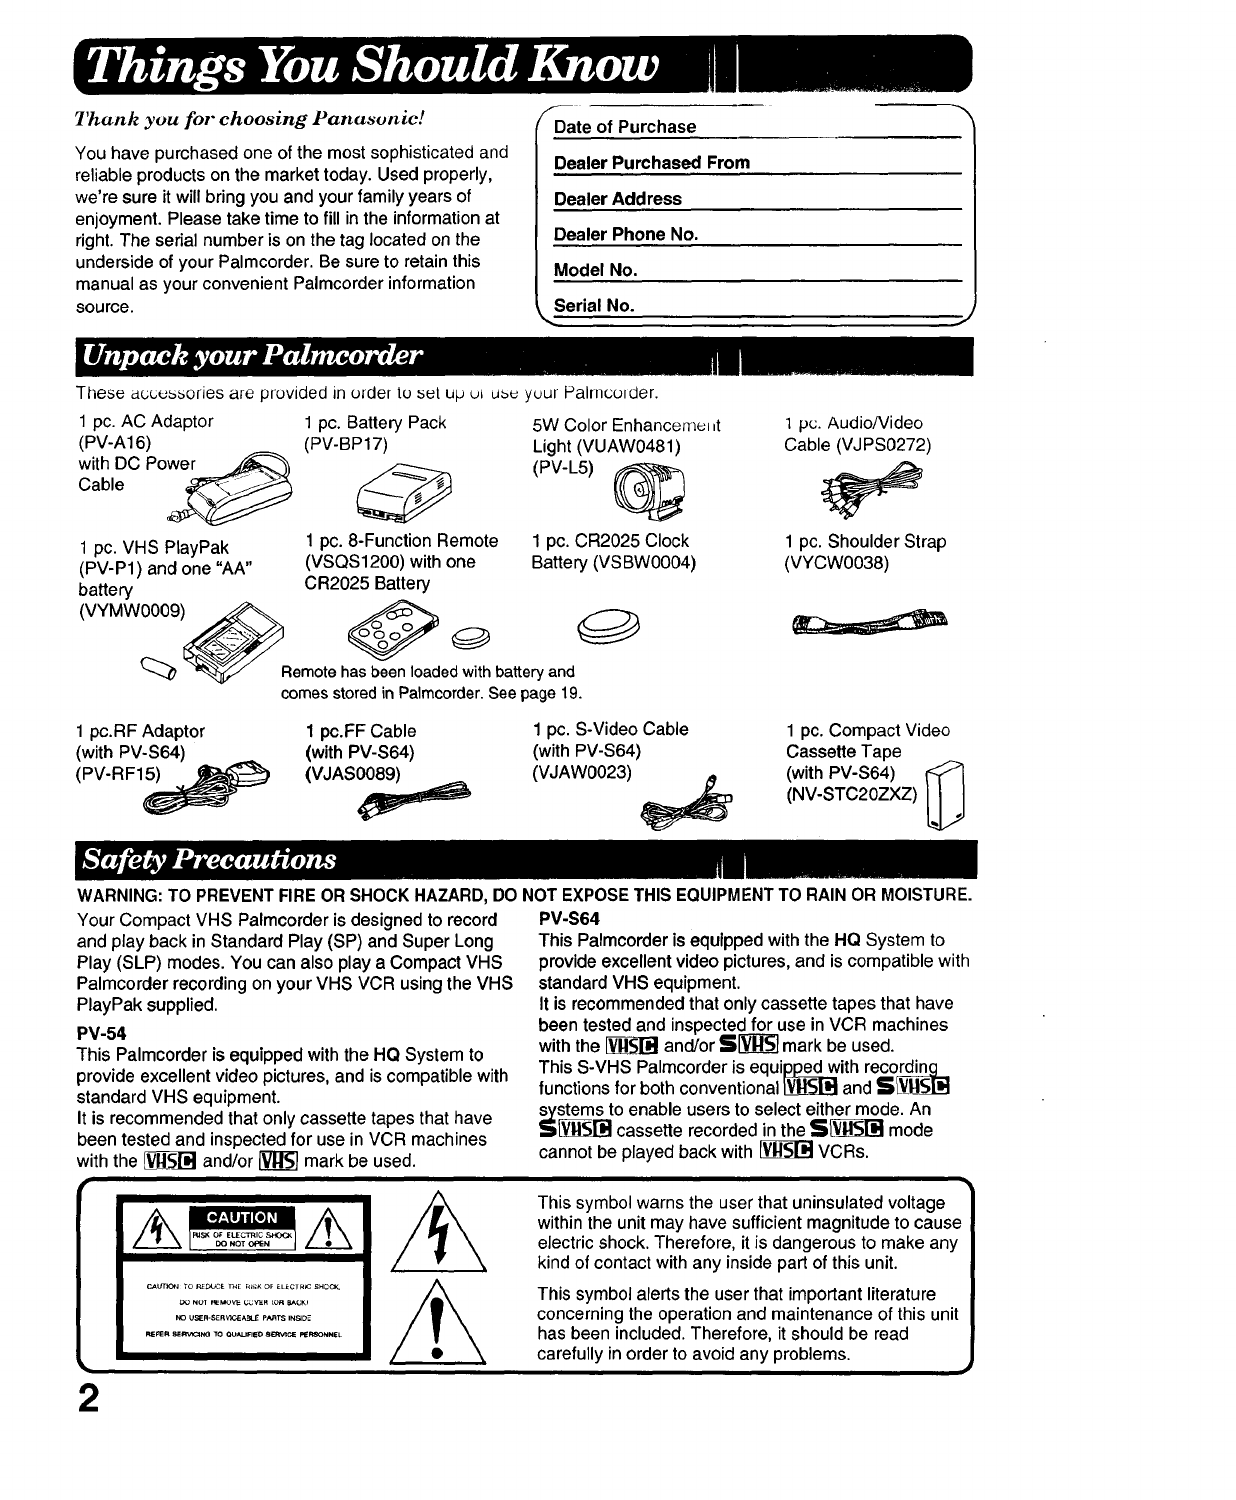
These accessories are provided in older to set up u_ us_ yuur Palrnco_der.
J
1 pc. AC Adaptor
(PV-A16)
with DC Po_
Cable
1 pc. VHS PlayPak
(PV-P1) and one "AA"
battery
1 pc. Battery Pack
(PV-BP17)
1 pc. 8-Function Remote
(VSQS1200) with one
CR2025 Battery
5W Color Enhanceme_ _t
Light (VUAW0481)
(PV-L5) _
1 pc. CR2025 Clock
Battery (VSBW0004)
Remotehas been loaded withbattery and
comes stored in Palmcorder. See page 19.
1 pc.RF Adaptor 1 pc.FF Cable 1 pc. S-Video Cable
(with PV-S64) (with PV-S64) (with PV-S64)
(PV-RFI_ (VJAS0089)_ (VJAW0023)
1 pc. Audio/Video
Cable (VJPS0272)
1 pc. Shoulder Strap
(VYCW0038)
1 pc. Compact Video
Cassette Tape
(with PV-S64) _
(NV-STC20ZXZ)
WARNING: TO PREVENT FIRE OR SHOCK HAZARD, DO NOT EXPOSE THIS EQUIPMENT TO RAIN OR MOISTURE.
Your Compact VHS Palmcorder is designed to record
and play back in Standard Play (SP) and Super Long
Play (SLP) modes. You can also play a Compact VHS
Palmcorder recording on your VHS VCR using the VHS
PlayPak supplied.
PV-54
This Palmcorder isequipped with theHQ System to
provideexcellentvideopictures,and iscompatiblewith
standardVHS equipment.
It is recommendedthatonlycassette tapesthat have
beentestedand inspectedfor use inVCR machines
withthe _and/or_markbe used.
PV-S64
This Palmcorder is equipped with the HQ System to
provide excellent video pictures, and is compatible with
standard VHS equipment.
It is recommended that only cassette tapes that have
been tested and inspected for use in VCR machines
with the _ and/or ,_] mark be used.
This S-VHS Palmcorder is equipped with recording
functions for both conventional _ and SL_
stems to enable users to select either mode. An
_ cassette recorded in the SV_ mode
cannot be played back with _ VCRs.
2
I
This symbol warns the user that uninsulated voltage
within the unit may have sufficient magnitude to cause
electric shock. Therefore, it is dangerous to make any
kind of contact with any inside part of this unit.
This symbol alerts the user that important literature
concerning the operation and maintenance of this unit
has been included. Therefore, it should be read
carefully in order to avoid any problems.
1.
2.
3.
4.
5.
6.
7.
8,
Read Instructions All the safety and operating
instructions should be read before the unit is operated.
Retain instructions -- The safety and operating
instructions should be retained for future reference.
Heed Warnings -- All warnings on the unit and in the
operating instructions should be adhered to.
Follow Instructions -- All operating and maintenance
instructions should be followed.
Cleaning -- Unplug this video unit from the wall outlet
before cleaning. Do not use liquid or aerosol cleaners.
Use a dry cloth for cleaning.
Attachments -- Do not use attachments not
recommended by the video product manufacturer as they
may be hazardous.
Water and Moisture -- Do not use this video unit near
water -- for example near a bath tub, wash bowl, kitchen
sink, or laundry tub, in a wet basement, or near a
swimming pool, and the like.
Accessories -- Do not place this video unit on an
unstable cart, stand, tripod, bracket, or table. The video
unit may fall, causing serious injury to a child or adult,
and serious damage to the unit. Use only with a cart,
stand, tripod, bracket, or table recommended by the
manufacturer, or sold with the video unit. Any mounting
of the unit should follow the manufacturer's instructions
and should use a mounting
accessoryrecommendedby the
manufacturer.An applianceandcart
combinationshouldbe movedwith
care. Quickstops,excessiveforce,
and unevensurfacesmaycause the
applianceand cartcombinationto
overturn.
11.
12.
13.
(3rounding ol Polarization -- This video unit may be
equipped with either a polarized 2-wire AC (Alternating
Current) line plug (a plug having one blade wider than
the other) or 3-wire grounding type plug, a plug having a
third (grounding) pin.
The 2-wire polarized plug will fit into the power outlet only
one way. This is a safety feature. If you are unable to
insert the plug fully into the outlet, try reversing the plug.
If the plug still fails to fit, contact your electrician to
replace your obsolete outlet. Do not defeat the safety
purpose of the polarized plug.
The 3-wire grounding type plug will fit into a grounding
type power outlet. This is a safety feature. If you are
unable to insert the plug into the outlet, contact your
electrician to replace your obsolete outlet. Do not defeat
the safety purpose of the grounding type plug.
Power-CordProtection-- Power-supply cords should be
routedsothatthey are notlikelyto be walkedonor
pinchedby itemsplaceduponoragainstthem, paying
particularattentiontocordsof plugs,convenience
receptacles,and thepointwheretheyexit from theunit.
Outdoor Antenna Grounding -- If an outside antenna or
cable system is connected to the video unit, be sure the
antenna or cable system is grounded so as to provide
some protection against voltage surges and built-up
static charges. Part 1 of the Canadian Electrical Code, in
USA Section 810 of the National Electrical Code,
provides information with respect to proper grounding of
the mast and supporting structure, grounding of the lead-
in wire to an antenna discharge unit, size of grounding
conductors, location of antenna discharge unit,
connection to grounding electrodes, and requirements for
the grounding electrode.
9. Ventilation -- Slots and openings in the cabinet are
provided for ventilation and to ensure reliable operation
of the video unit and to protect it from overheating. These
openings must not be blocked or covered. Never place
the video unit on a bed, sofa, rug, or other similar
surface, or near or over a radiator or heat register. This
video unit should not be placed in abuilt-in installation
such as a bookcase or rack unless proper ventilation is
provided or the manufacturer's instructions have been
adhered to.
10. Power Sources -- This video unit should be operated
only from the type of power source indicated on the
marking label. If you are not sure of the type of power
supply to your home, consult your appliance dealer or
local power company. For video units intended to be
operated from battery power, or other sources, refer to
the operating instructions.
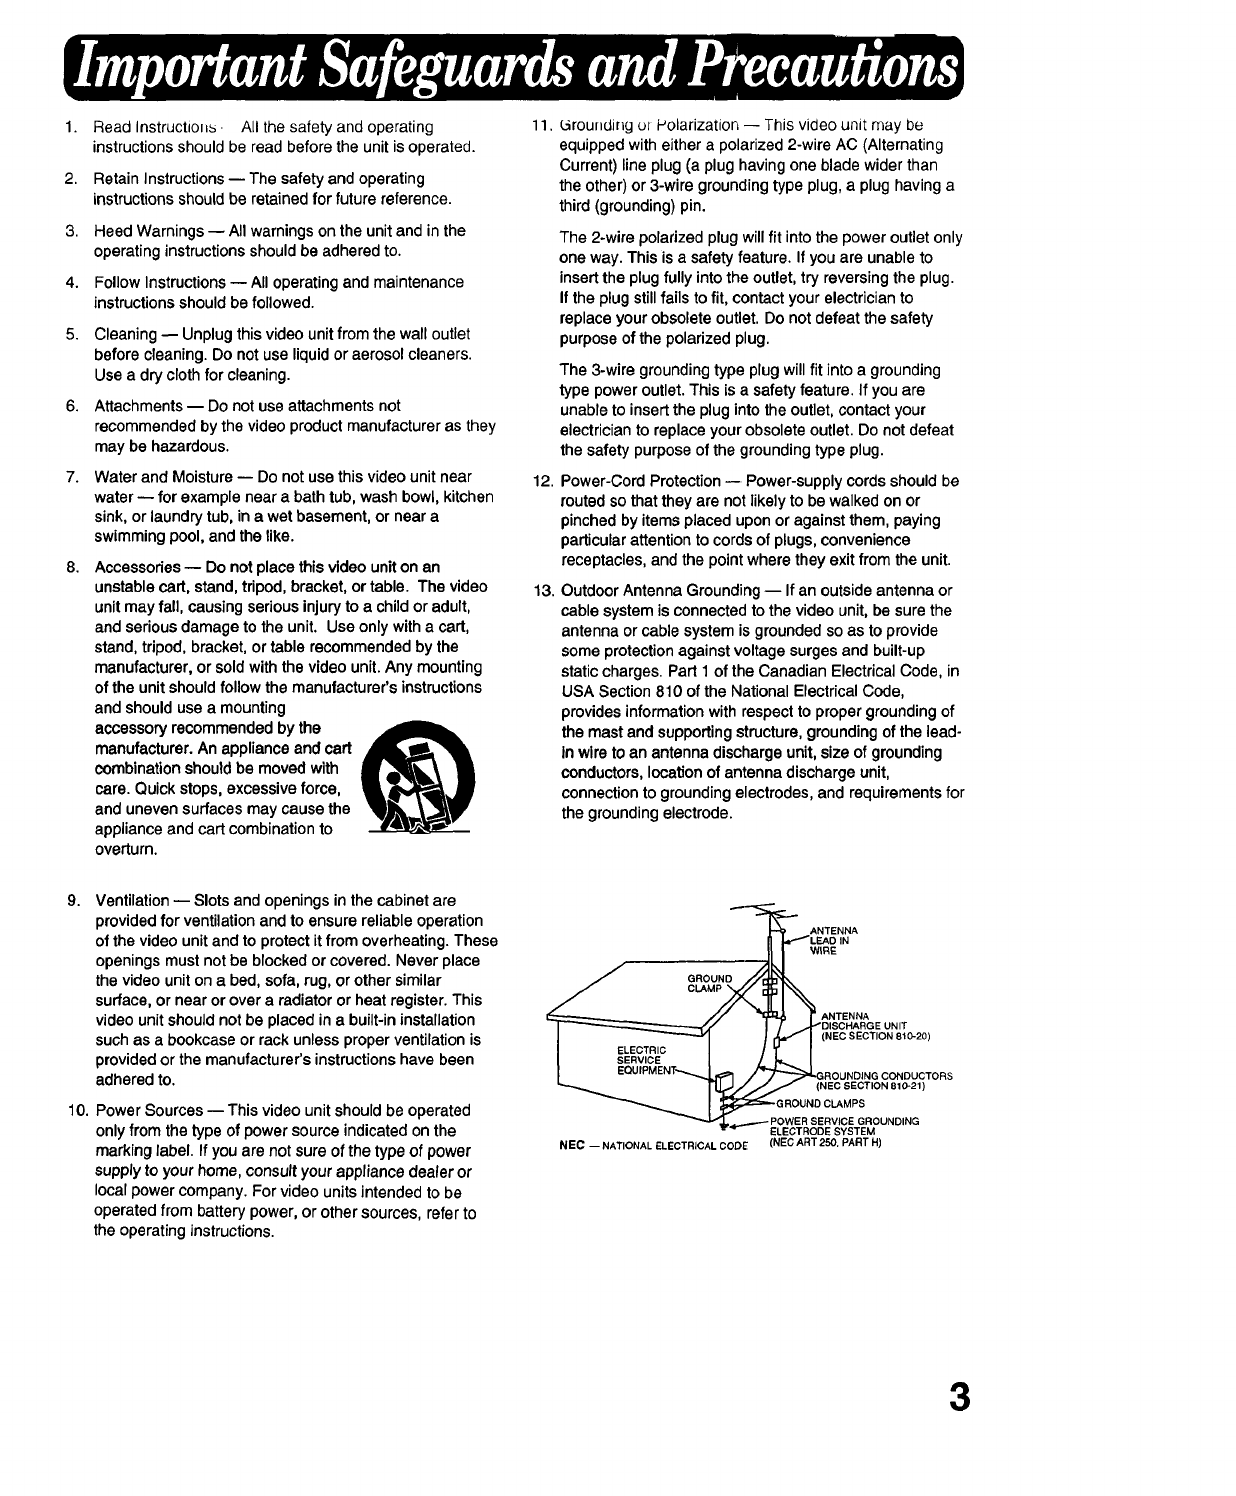
"_ ANTENNA
_] _,_LEAD IN
---JLI
JGROUND f/l_O_l_
,
I LC
I .......... _ 1 / / _GROUNDING CONDUCTORS
N _JJ (NEC SECTION 810-21)
I! _=_-GROUND CLAMPS
_,...-_ POWER SERVICE GROUNDING
ELECTRODE SYSTEM
NEC -- NATIONALELECTRICALCODE (NEO ART250, PARTH)
3
14. Lightning -- I-or added protection of this video unit
receiver during a lightning storm, or when it is left
unattended and unused for long periods of time, unplug it
from the wall outlet and disconnect the antenna or cable
system. This will prevent damage to the video unit due to
lightning and power-line surges.
15. Power Lines -- An outside antenna system should not be
located in the vicinity of overhead power lines or other
electric light or power circuits, or where it can fall into
such power lines or circuits. When installing an outside
antenna system, extreme care should be taken to keep
from touching such power lines or circuits as contact with
them might be fatal.
16. Overloading -- Do not overload wall outlets and
extension cords as this can result in a risk of fire or
electric shock.
17. Objects and Liquids -- Never push objects of any kind
into this video unit through openings as they may touch
dangerous voltage points or short out parts that could
result in a fire or electric shock. Never spill liquid of any
kind onto the video unit.
18. Servicing -- Do not attempt to service this video unit
yourself as opening or removing covers may expose you
to dangerous voltage or other hazards. Refer all servicing
to qualified service personnel.
19. Damage Requiring Service -- Unplug this video unit from
the wall outlet and refer servicing to qualified service
personnel under the following conditions:
a. When the power-supply cord or plug is damaged.
b. If any liquid has been spilled onto, or objects have
fallen into the video unit.
c. If the video unit has been exposed to rain or water.
d. If the video unit does not operate normally by
following the operating instructions. Adjust only those
controls that are covered by the operating
instructions, as an improper adjustment of other
controls may result in damage and will often require
extensive work by a qualified technician to restore
the video unit to its normal operation.
e. If the video unit has been dropped or the cabinet has
been damaged.
f. When the video unit exhibits a distinct change in
performance -- this indicates a need for service.
20. Replacement Parts -- When replacement parts are
required, be sure the service technician has used
replacement parts specified by the manufacturer or have
the same characteristics as the original part.
Unauthorized substitutions may result in fire, electric
shock or other hazards.
21. Safety Check-- Upon completion of any service or
repairs to this video unit, ask the service technician to
perform safety checks to determine that the video unit is
in safe operating order.
USE & LOCATION
•TO AVOID SHOCK HAZARD ... Your Camcorder and power supply should not be exposed to rain or moisture.
Do not connect the power supply or operate your Camcorder if it gets wet. Your Camcorder has been designed
for outdoor use, however it is not designed to sustain direct exposure to water, rain, sleet, snow, sand, dust, or a
direct splashing from a pool or even a cup of coffee. This action could permanently damage the internal parts of
your Camcorder. Do not attempt to disassemble this unit. There are no user serviceable parts inside. Unplug
your Camcorder from the power supply before cleaning.
•DO NOT AIM YOUR CAMCORDER AT THE SUN OR OTHER BRIGHT OBJECTS.
•DO NOT EXPOSE YOUR CAMCORDER TO EXTENDED HIGH TEMPERATURE ... Such as, in direct
sunlight, inside a closed car, next to heater, etc... This action could permanently damage the internal parts of
your Camcorder.
•AVOID SUDDEN CHANGES IN TEMPERATURE ... If the unit is suddenly moved from a cold place to a warm
place, moisture may form on the tape and inside the unit.
•DO NOT LEAVE YOUR CAMCORDER OR THE POWER SUPPLY TURNED ON WHEN NOT IN USE
•STORAGE OF YOUR CAMCORDER ... Store and handle your Camcorder in a manner that will not subject it to
unnecessary movement (avoid shaking and striking). Your Camcorder contains a sensitive pick-up device which
could be damaged by improper handling or storage.
CARE
•TO CLEAN YOUR CAMCORDER ... Do not use strong or abrasive detergents when cleaning your Camcorder
body.
• TO PROTECT THE LENS ... Do not touch the surface of the lens with your hand. Use a cornrnerciatcamcorder
lens solution and lens paper when cleaning the lens. Improper cleaning can scratch the lens coating.
•TO PROTECT THE FINISH OF YOUR CAMCORDER ... Before handling your Camcorder, make sure your
hands and face are free from any chemical products such as suntan lotion as it may damage the finish.
4

Getting Started
Things You Should Know ........................................................................................................ 2
Important Safeguards and Precautions .............................................................................. 3
Palmcorder Accessory System ............................................................................................. 6
Attaching the Shoulder Strap ................................................................................................. 7
Supplying Power ......................................................................................................................... 8
Battery Care ................................................................................................................................ 10
Cassette Information ............................................................................................................... 11
Auto Lock Mode ........................................................................................................................ 12
Setting the Date/Time .............................................................................................................. 13
Electronic Viewfinder Indications ......................................................................... 15
Color Enhancement Light ..................................................................................... 16
Basic Operation
Camera Recording ................................................................................................ 17
8-Function Remote Control .................................................................................. 19
Super VHS System (S-VHS) (PV-S64) ................................................................... 2o
VHS Hi-Fi Stereo Sound System .......................................................................... 21
Playback your Recordings .................................................................................................... 22
Special Features
Tape Counter/Counter Memory/Lap Time Counter/Tape Remaining Functions ............................. 25
Four Speed Power Zoom/High Speed Shutter ............................................................................... 26
Focusing ........................................................................................................................................ 27
White Balance/Backlight Button ..................................................................................................... 28
VHS Index Search System/Book Mark Search .............................................................................. 29
Digital Color Fade .......................................................................................................................... 30
Digital Zoom .................................................................................................................................. 31
Digital Electronic Image Stabilization System (D.E.I.S.) ................................................................. 32
Still/Strobe/Wide ............................................................................................................................ 33
Digital Wipe/Mix (PV-S64) ............................................................................................................. 34
Copying your Tapes (dubbing) ............................................................................. 35
Dubbing over Recordings
Dubbing over Audio ....................................................................................................................... 37
Dubbing over Video ....................................................................................................................... 38
Dubbing over Audio/Video ............................................................................................................. 39
For Your Information
Notes on Operations ............................................................................................. 40
Spanish Quick Use Guide/Gu{a Para Uso Rdpido ............................................... 42
Index of Controls .......................................................................................................................44
Index ..............................................................................................................................................48
Specifications .............................................................................................................................49
Before Requesting Service .................................................................................................... 50
3"h_soperating instruction book is designed for use with models PV-54 and PV-S64.
Illustrations in this manual show the PV-S64. Features may vary, so please read carefully.
5
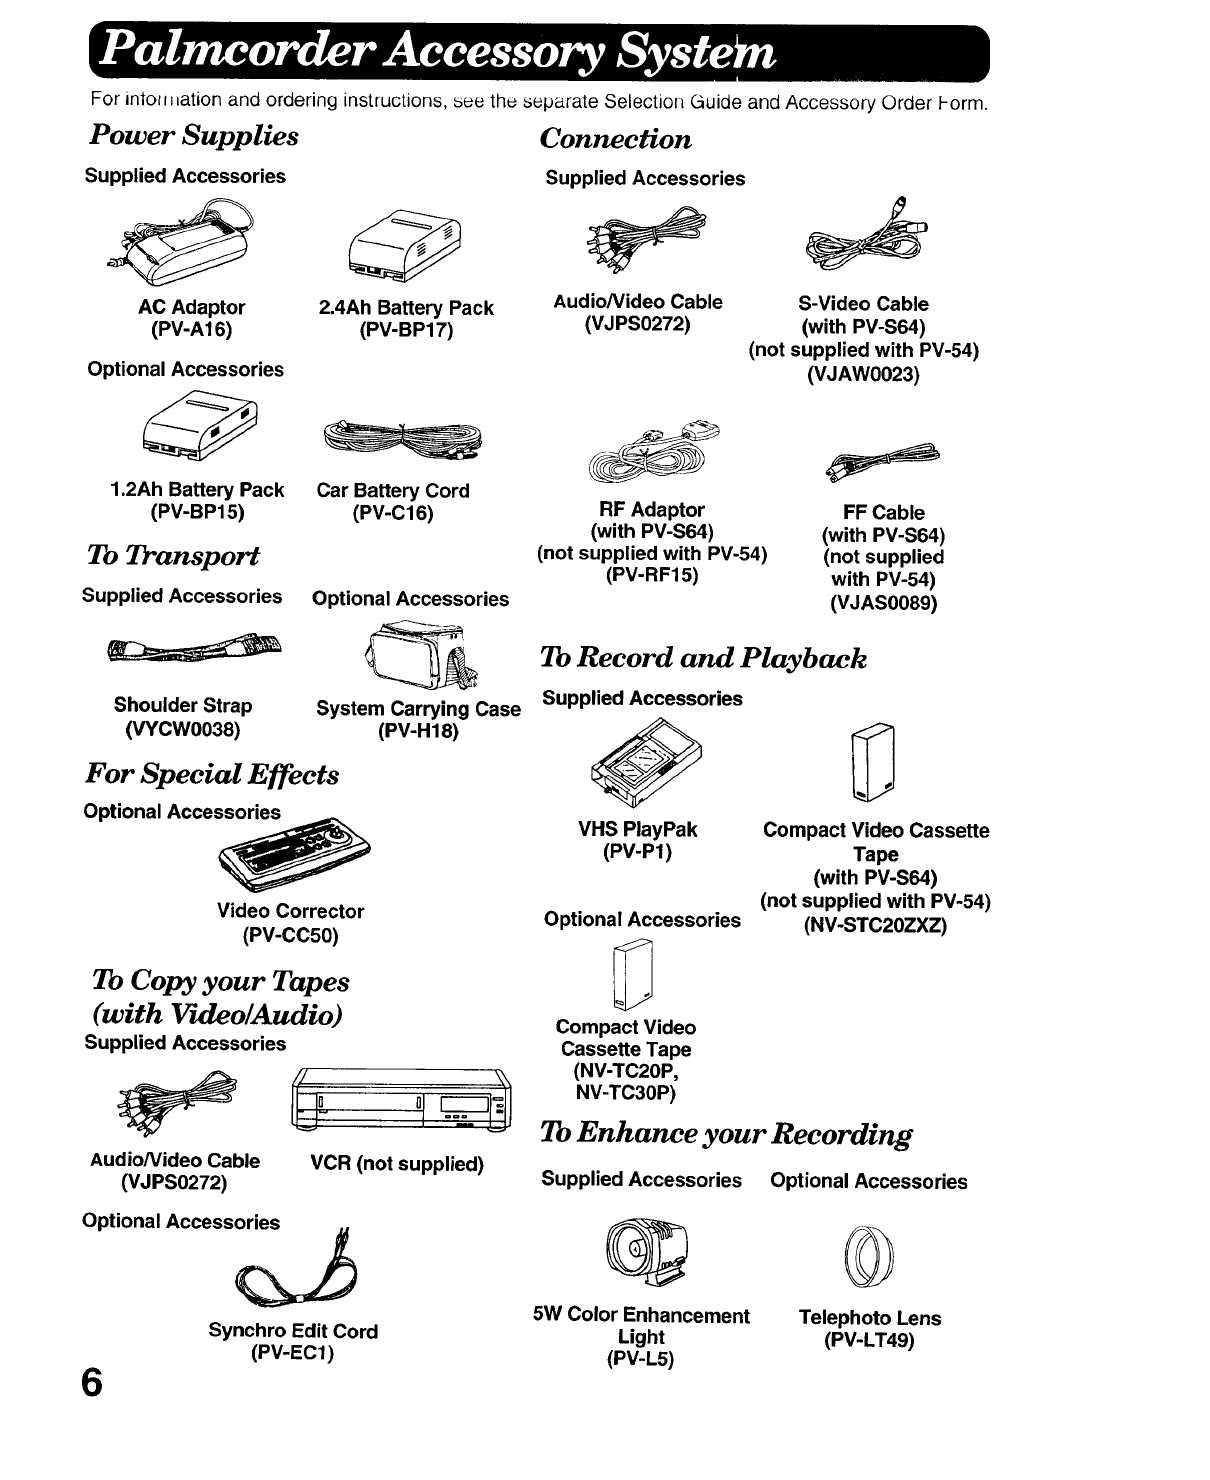
For intol_llation and ordering instructions, see the separate Selection Guide and Accessory Order Form.
Power Supplies
Supplied Accessories
AC Adaptor
(PV-A16) 2.4Ah Battery Pack
(PV-BP17)
Optional Accessories
1.2Ah Battery Pack
(PV-BP15) Car Battery Cord
(PV-C16)
To Transport
Supplied Accessories
Shoulder Strap
(VYCW0038)
Optional Accessories
System Carrying Case
(PV-H18)
For Special Effects
Optional Accessories
Video Corrector
(PV-CC50)
To Copy your Tapes
(with _rwleo/Audio)
Supplied Accessories
Audio/Video Cable
(VJPS0272) VCR (not supplied)
Optional Accessories
Synchro Edit Cord
(PV-EC1)
6
Connection
Supplied Accessories
Audio/Video Cable
(VJPS0272) S-Video Cable
(with PV-S64)
(not supplied with PV-54)
(VJAW0023)
RF Adaptor
(with PV-S64)
(not supplied with PV-54)
(PV-RF15)
FF Cable
(with PV-S64)
(not supplied
with PV-54)
(VJAS0089)
To Record and Playback
Supplied Accessories
VHS PlayPak
(PV-P1) Compact Video Cassette
Tape
(with PV-S64)
(not supplied with PV-54)
Optional Accessories (NV-STC20ZXZ)
Compact Video
Cassette Tape
(NV-TC20P,
NV-TC30P)
To Enhance your Recording
Supplied Accessories Optional Accessories
G ©
5W Color Enhancement Telephoto Lens
Light (PV-LT49)
(PV-L5)
@
t
®
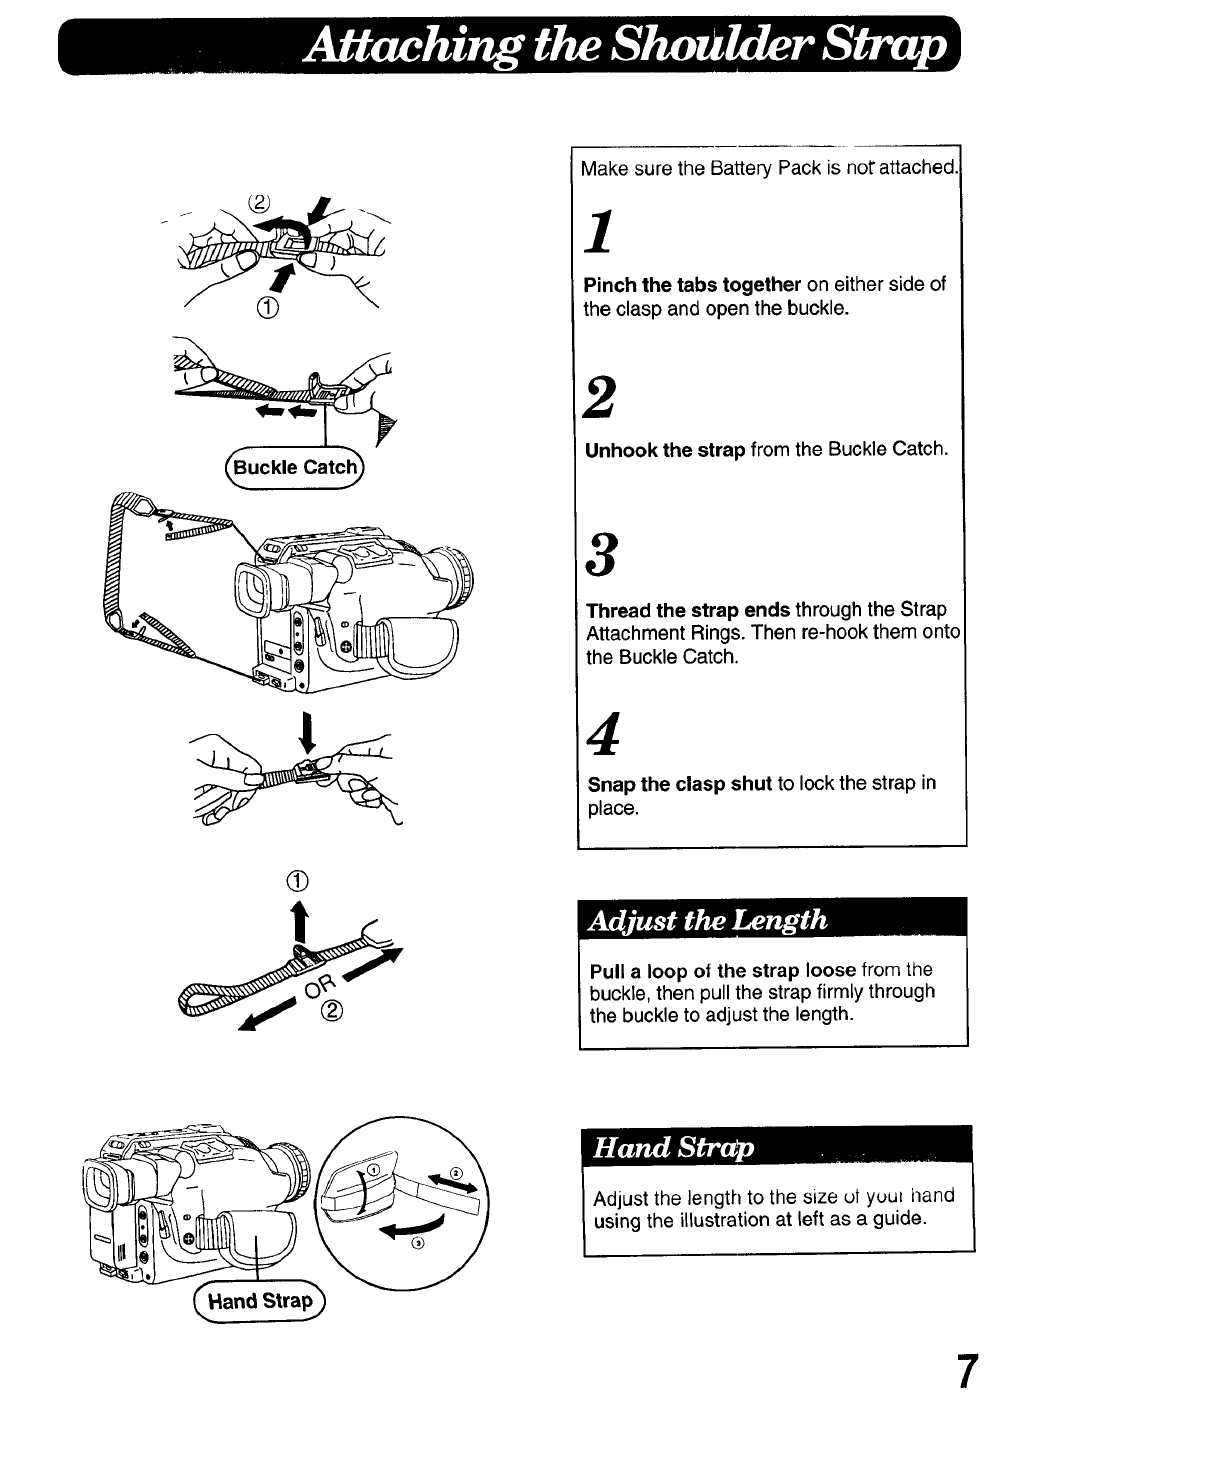
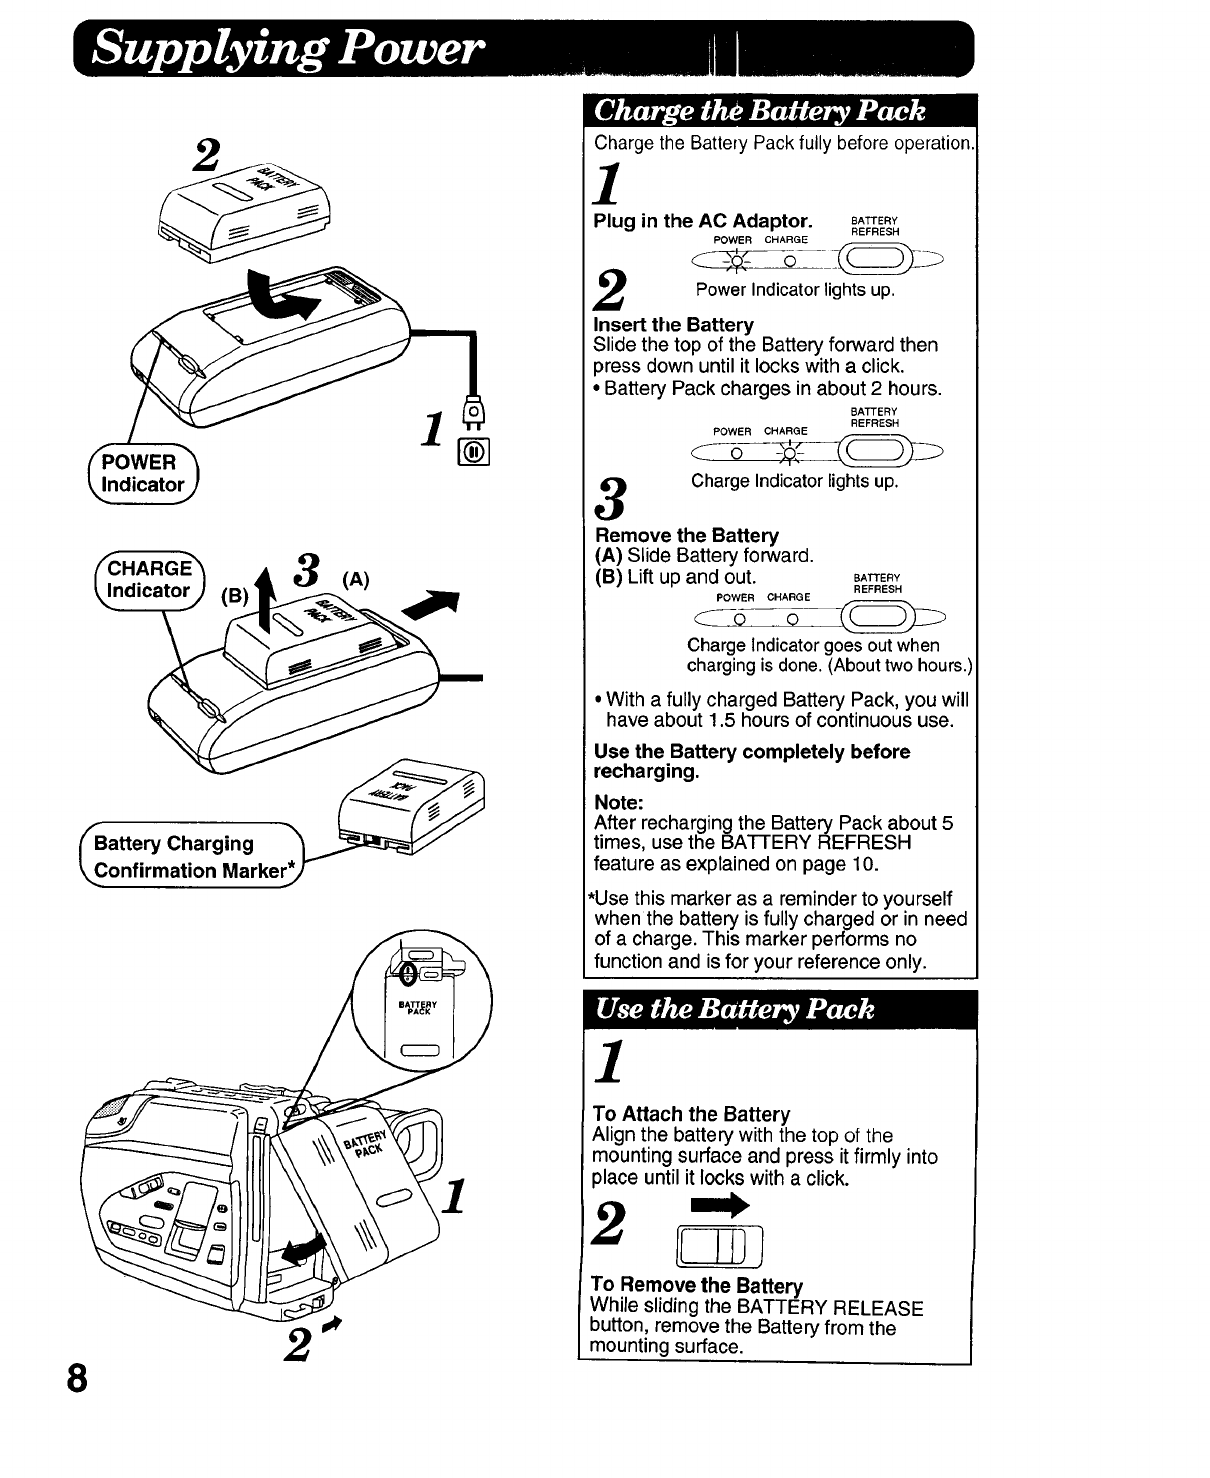
Make sure the Battery Pack is not"attached.
1
Pinch the tabs together on either side of
the clasp and open the buckle.
2
Unhook the strap from the Buckle Catch.
3
Thread the strap ends through the Strap
Attachment Rings. Then re-hook them onto
the Buckle Catch.
4
Snap the clasp shut to lock the strap in
place.
Pull a loop ot the strap loose from the
buckle, then pull the strap firmly through
the buckle to adjust the length.
Adjust the length to the size ut yuut tland
using the illustration at left as a guide.
7
2
a"nr,TC, arn';a'r.e
82
Charge the Battery Pack fully before operation
1
Plug in the AC Adaptor. SA_ER¥
REFRESH
POWER CHARGE
lights up.
Power Indicator
Insert the Battery
Slide the top of the Battery forward then
3ress down until it locks with a click.
•Battery Pack charges in about 2 hours.
BATTERY
REFRESH
POWER CHARGE
Charge Indicator lights up.
Remove the Battery
(A) Slide Battery forward.
(B) Lift up and out. BATTERY
REFRESH
POWER CHARGE
Charge Indicator goes out when
charging is done. (About two hours.i
• With a fully charged Battery Pack, you will
have about 1.5 hours of continuous use.
Use the Battery completely before
recharging.
Note:
After recharging the Battery Pack about 5
times, use the BATTERY REFRESH
feature as explained on page 10.
*Use this marker as a reminder to yourself
when the battery is fully charged or in need
of a charge. This marker performs no
function and is for your reference only.
]
To Attach the Battery
Align the battery with the top of the
mounting surface and press it firmly into
place until it locks with a click.
To Remove the Battery
While sliding the BATTERY RELEASE
button, remove the Battery from the
mounting surface.
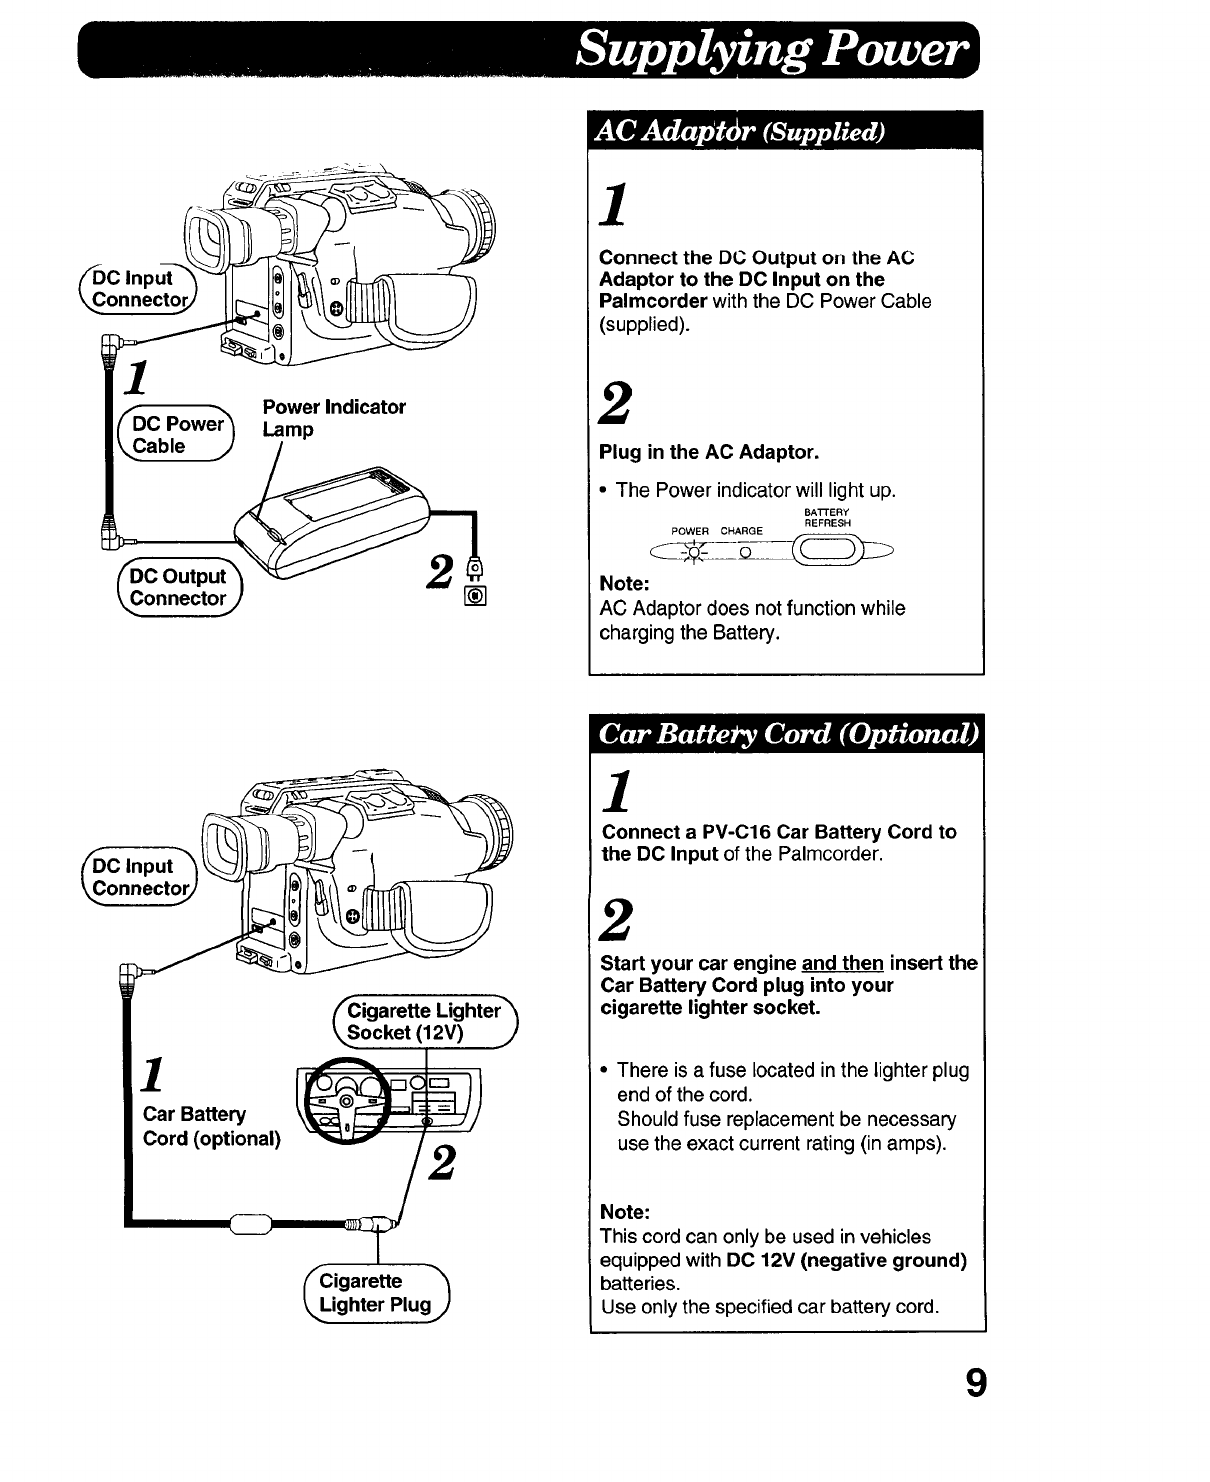
fD _. Power Indicator
C Power Lam
_,_able _ P
_Dc Outpu
_€onnectorj) []
1
Connect the DC Output orl the AC
Adaptor to the DC Input on the
Palmcorder with the DC Power Cable
(supplied).
2
Plug in the AC Adaptor.
•The Power indicator will light up.
BA'n'ERY
REFRESH
POWER CHARGE
Note:
AC Adaptor does not function while
charging the Battery.
/_C input "_
_onnectorj) _1
1
Car Battery
Cord (optional)
Cigarette Lighter_
ocket (12V) j/
Cigarette _'_
ighter Plugj)
1
Connect a PV-C16 Car Battery Cord to
the DC Input of the Palmcorder.
2
Start your car engine and then insert the
Car Battery Cord plug into your
cigarette lighter socket.
•There is a fuse located in the lighter plug
end of the cord.
Should fuse replacement be necessary
use the exact current rating (in amps).
Note:
This cord can only be used in vehicles
equipped with DO 12V (negative ground)
batteries.
Use only the specified car battery cord.
9

F
I
2
Ni-Cd
A'I-rENTION:
The product that you have purchased is
powered by a rechargeable battery. The
battery is recyclable. At the end of its useful
life, under various state and local taws, it
may be illegal to dispose of this battery into
the municipal waste stream. Check with your
local solid waste officials for details in your
area for recycling options or proper disposal.
This feature completely discharges the
Battery before recharging begins.
To keep your Battery in top condition,
use Refresh after about every 5 charges.
1
Place the Battery into the AC Adaptor.
BATTERY
REFRESH
2
Press the BA'VI'ERY REFRESH button.
The Charging indicator will flash when
discharging begins and stop flashing when
complete.
•Should you accidentally press the
BA-I-rERY REFRESH button, remove the
battery pack and then re-insert it to begin
charging.
• It takes about 10 hours when both Battery
Refresh and charging are performed.
Caution:
• Charge only with specified charger.
• The battery pack can be charged within a
temperature range of 32° F (0° C) and 104°
F (40° C).
• The battery pack may be warm after
charging or just after use. This is normal.
• Do not use an insufficiently charged or worn
out battery pack.
Safety precautions:
•Do not get the battery near, or dispose of in,
fire.
•Do not directly connect (short circuit) the
positive (+) and negative (-) terminals.
• Never attempt to disassemble or reassemble
the battery pack.
To avoid damage to the
Battery Pack:
•Do not drop or jar the battery pack.
• Use the battery pack with specified units
only.
• If the battery pack is used in extremely
high temperatures, a safety device will
automatically prevent operation.
To insure longer battery life:
• While not in use, remove battery pack from
the Paimcorder and AC Adaptor and store
in a cool, dark, dry place.
•Keep the battery pack terminals clean.
10

Use tapes with the _ or SIvltSI-'4
(only PV-S64) mark in this unit.
Tape Speed Selector
Position
SP (Standard Play)
SLP (Super Long Play)
T-20 T-40
20 Minutes 40 Minutes
One Hour Two Hours
Cassette type
T-30
30 Minutes
One Hour
30 Minutes
1
3
Connect the Palmcorder to a power source.
1
Turn the Tape Wheel in the direction of the
arrow until there is no slack.
TAPE EJECT
2
Slide the TAPE EJECT switch to open the
door.
3
Insert the cassette vertically with the
window facing away from the Palmcorder
body.
ooogoo
Press PUSH TO CLOSE to close the door.
B
sliding ta_
Cassettes have a record tab to erasure that
recordings are not accidentally erased.
ATo prevent accidental erasure
Break off the tab with a screwdriver.
(Some tapes have a sliding tab.)
BTo record again
Cover the hole with cellophane tape.
11
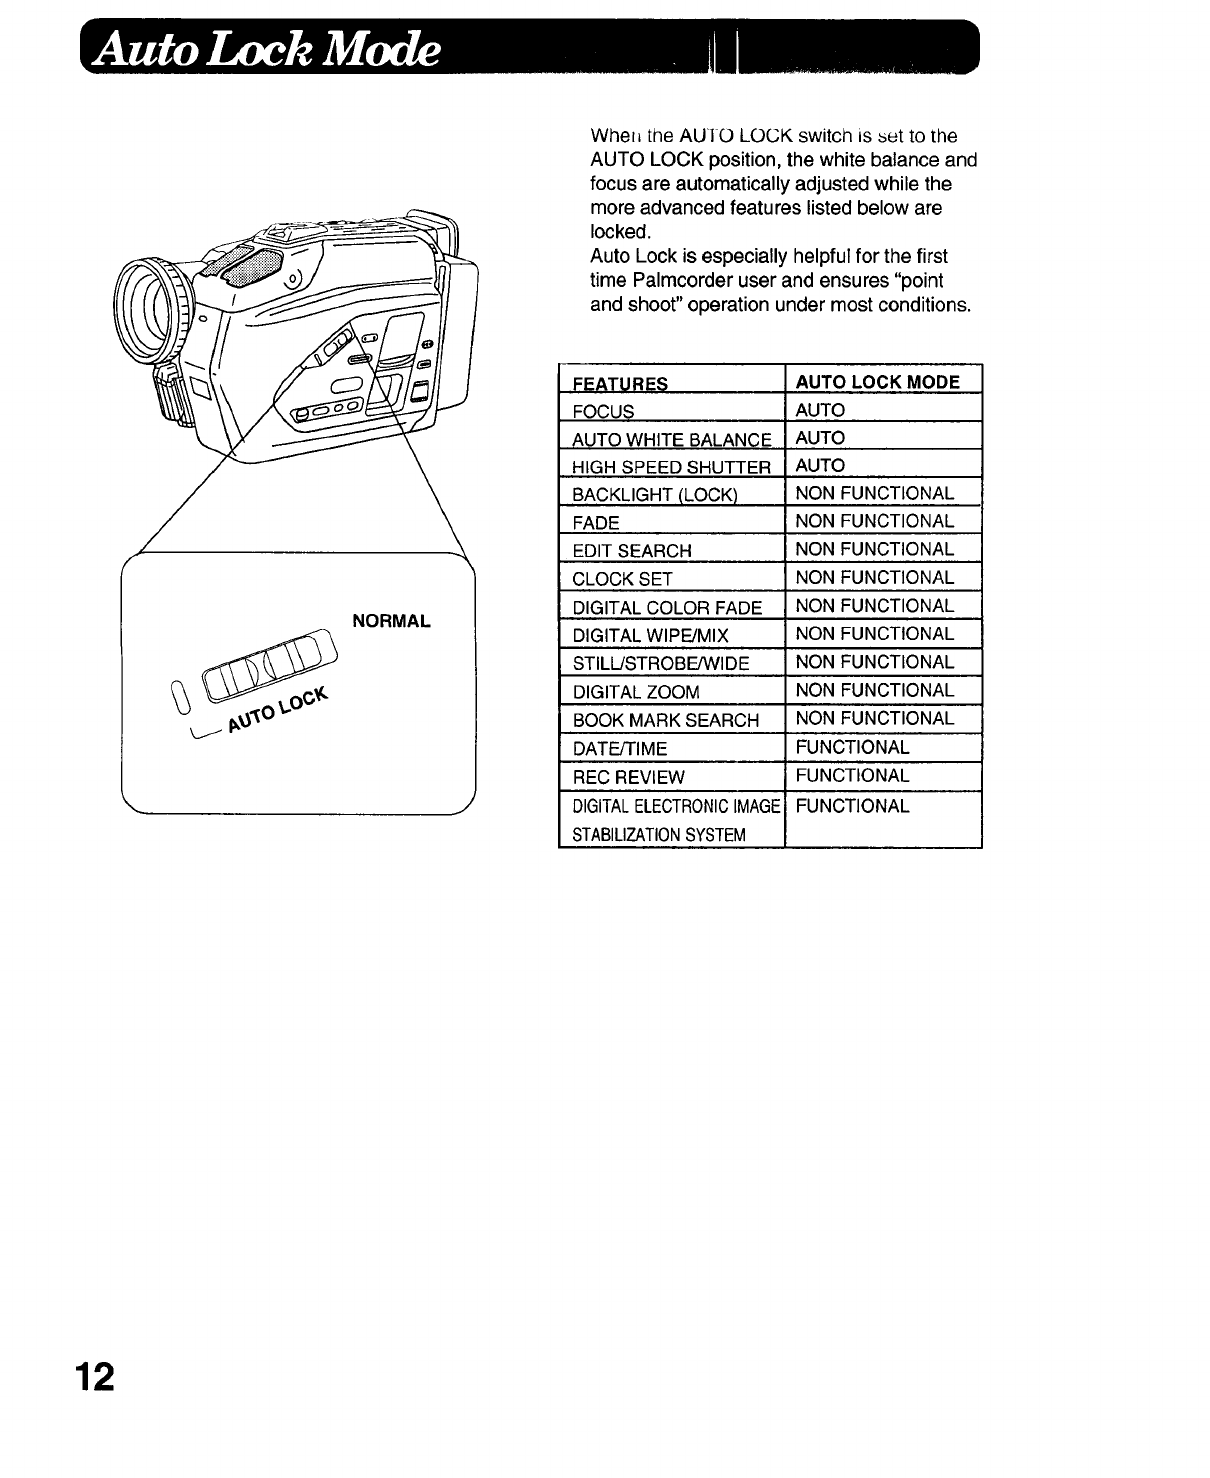
Whel_ the AU! 0 LOCK switcl_ is _et to the
AUTO LOCK position, the white balance and
focus are automatically adjusted while the
more advanced features listed below are
locked.
Auto Lock is especially helpful for the first
time Palmcorder user and ensures "point
and shoot" operation under most conditions.
NORMAL
J
FEATURES AUTO LOCK MODE
FOCUS AUTO
AUTO WHITE BALANCE AUTO
HIGH SPEED SHUTTER AUTO
BACKLIGHT (LOCK) NON FUNCTIONAL
FADE NON FUNCTIONAL
EDIT SEARCH NON FUNCTIONAL
CLOCK SET NON FUNCTIONAL
DIGITAL COLOR FADE NON FUNCTIONAL
DIGITAL WIPE/MIX NON FUNCTIONAL
STILL/STROBE/WIDE NON FUNCTIONAL
DIGITAL ZOOM NON FUNCTIONAL
BOOK MARK SEARCH NON FUNCTIONAL
DATE/TIME FUNCTIONAL
REC REVIEW FUNCTIONAL
DIGITALELECTRONICIMAGE FUNCTIONAL
STABILIZATIONSYSTEM
12
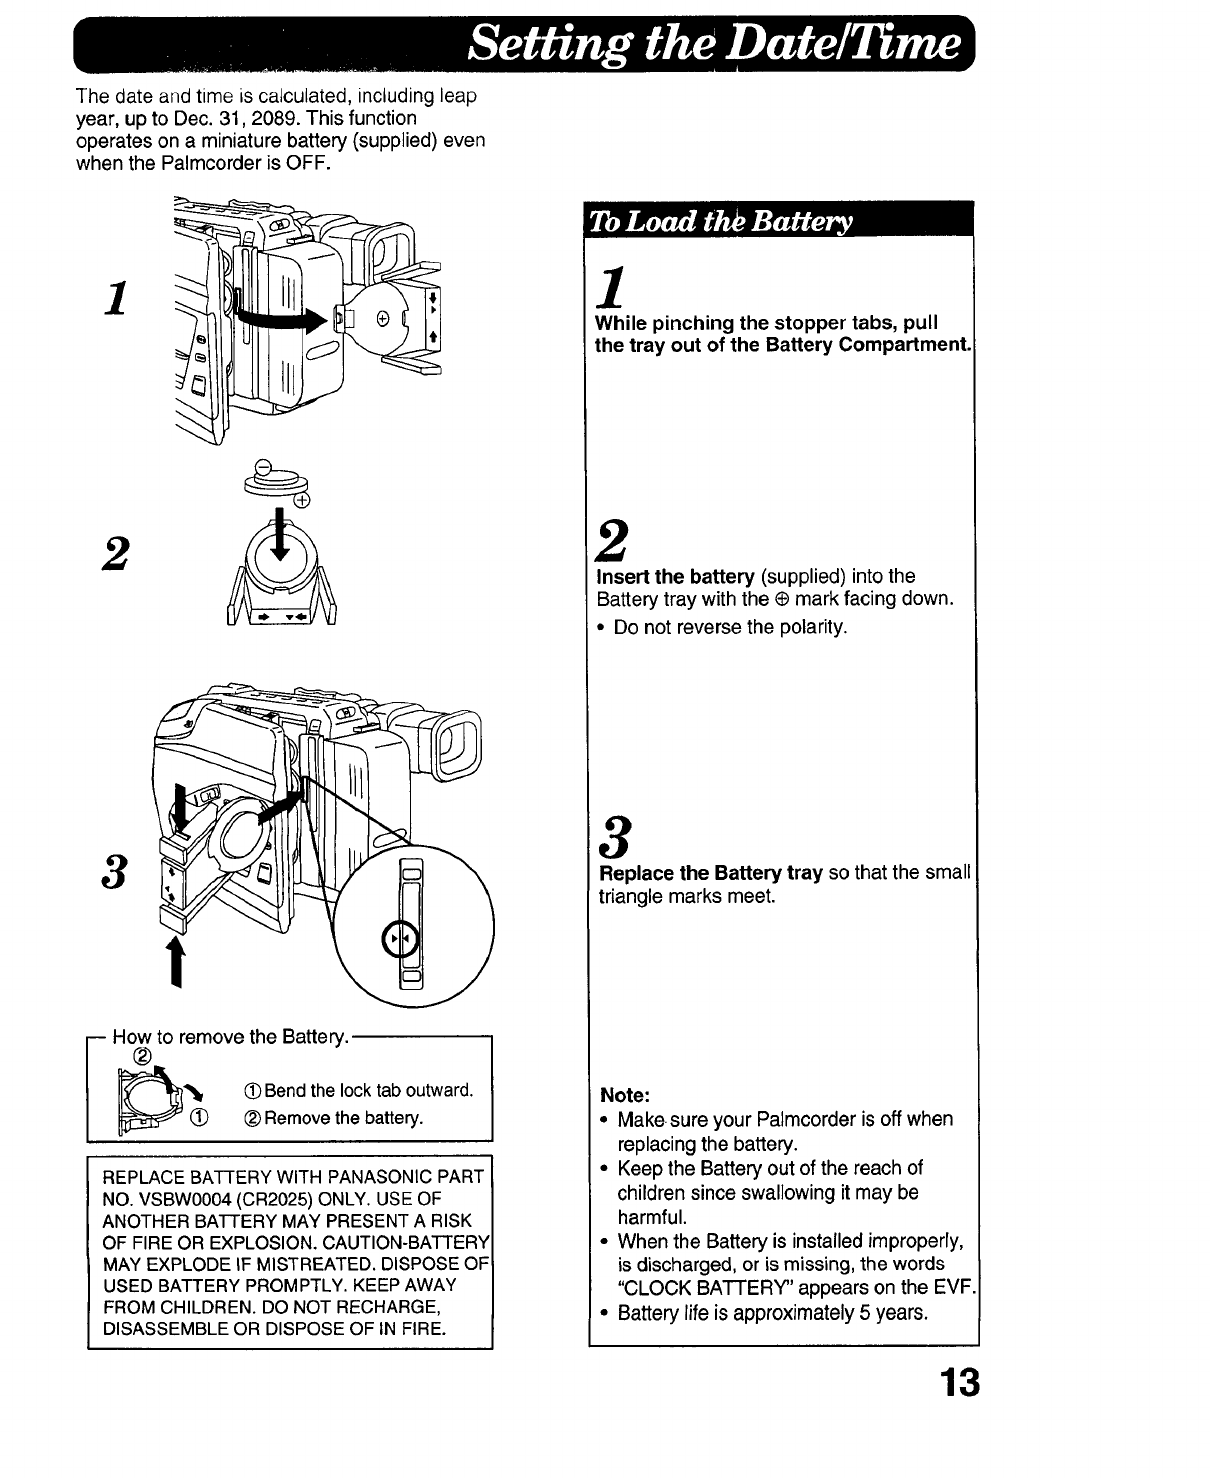
The date and time is calculated, including leap
year, up to Dec. 31,2089. This function
operates on a miniature battery (supplied) even
when the Palmcorder is OFF.
1
2
3
i How to remove the Battery.
®
*_ _ Bend the lock tab outward.
Remove the battery.
REPLACE BATTERY WITH PANASONIC PART
NO. VSBW0004 (CR2025) ONLY. USE OF
ANOTHER BATTERY MAY PRESENT A RISK
OF FIRE OR EXPLOSION. CAUTION-BATTERY
MAY EXPLODE IF MISTREATED. DISPOSE OF
USED BATTERY PROMPTLY. KEEP AWAY
FROM CHILDREN. DO NOT RECHARGE,
DISASSEMBLE OR DISPOSE OF IN FIRE.
1
While pinching the stopper tabs, pull
the tray out of the Battery Compartment.
2
Insert the battery (supplied) into the
Battery tray with the ¢ mark facing down.
• Do not reverse the polarity.
3
Replace the Battery tray so that the small
triangle marks meet.
Note:
• Makesure your Palmcorder is off when
replacing the battery.
• Keep the Battery out of the reach of
children since swallowing it may be
harmful.
• When the Battery is installed improperly,
is discharged, or is missing, the words
"CLOCK BATTERY" appears on the EVF
• Battery life is approximately 5 years.
13
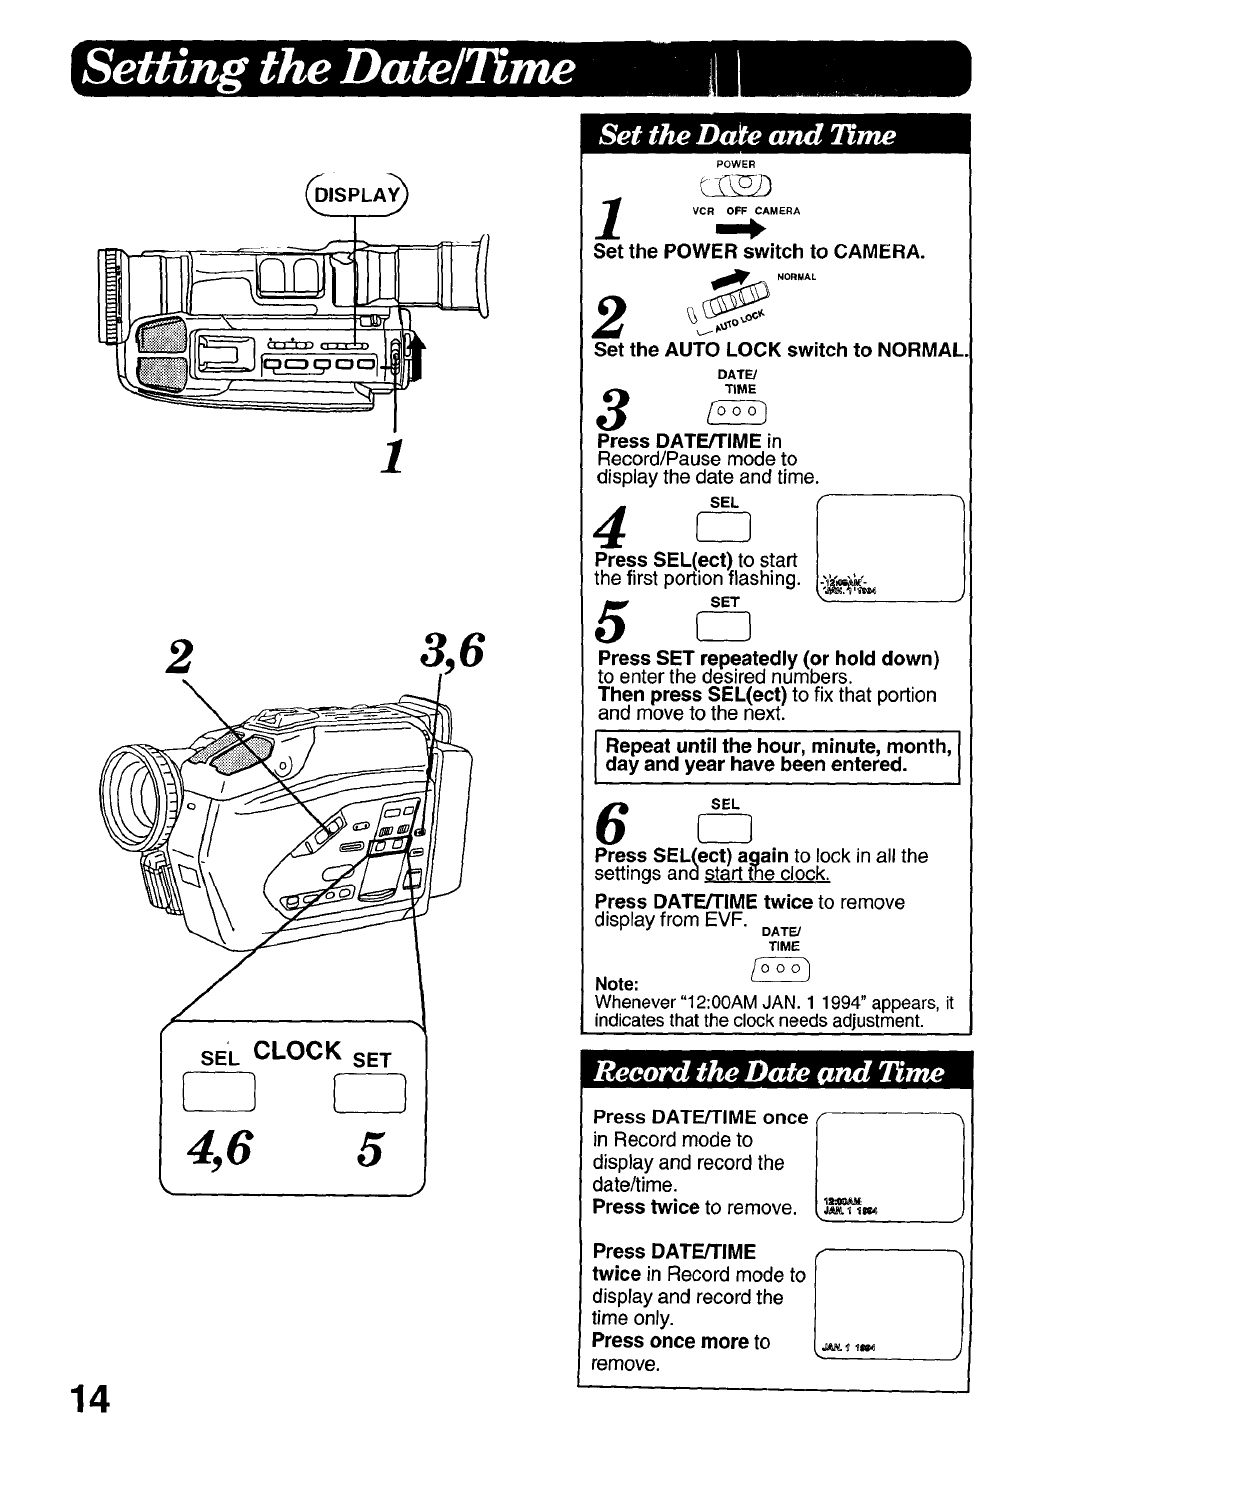
14
2
\
SE'L CLOCK SET
1
4,6 5
POWER
VCR OFF CAMERA
Set the POWER switch to CAMERA.
NORMAL
_o
Set the AUTO LOCK switch to NORMAL
DATE/
TIME
3
Press DATE/TIME in
Record/Pause mode to
display the date and time.
SEL
4
Press SEL(ect) to start
the first portionflashing. ,_._.,_
5
Press SET repeatedly (or hold down)
to enter the desired numbers.
Then press SEL(ect) to fix that portion
and move to the next.
IRepeat until the hour, minute, month, I
day and year have been entered. ,
I
6
Press SEL(ect) again to lock in all the
settings and start the clock.
Press DATE/TIME twice to remove
display from EVF. DATE/
TIME
Note:
Whenever"12:00AMJAN. 1 1994"appears,it
indicatesthat the clock needs adjustment.
PressOAT M °ncel1
in Record mode to
display and record the
date/time.
Press twice to remove. _ ,=,
Press DATE/TIME in
twice in Record mode to
displayand recordthe
time only.
Press once more to _,=,
remove.
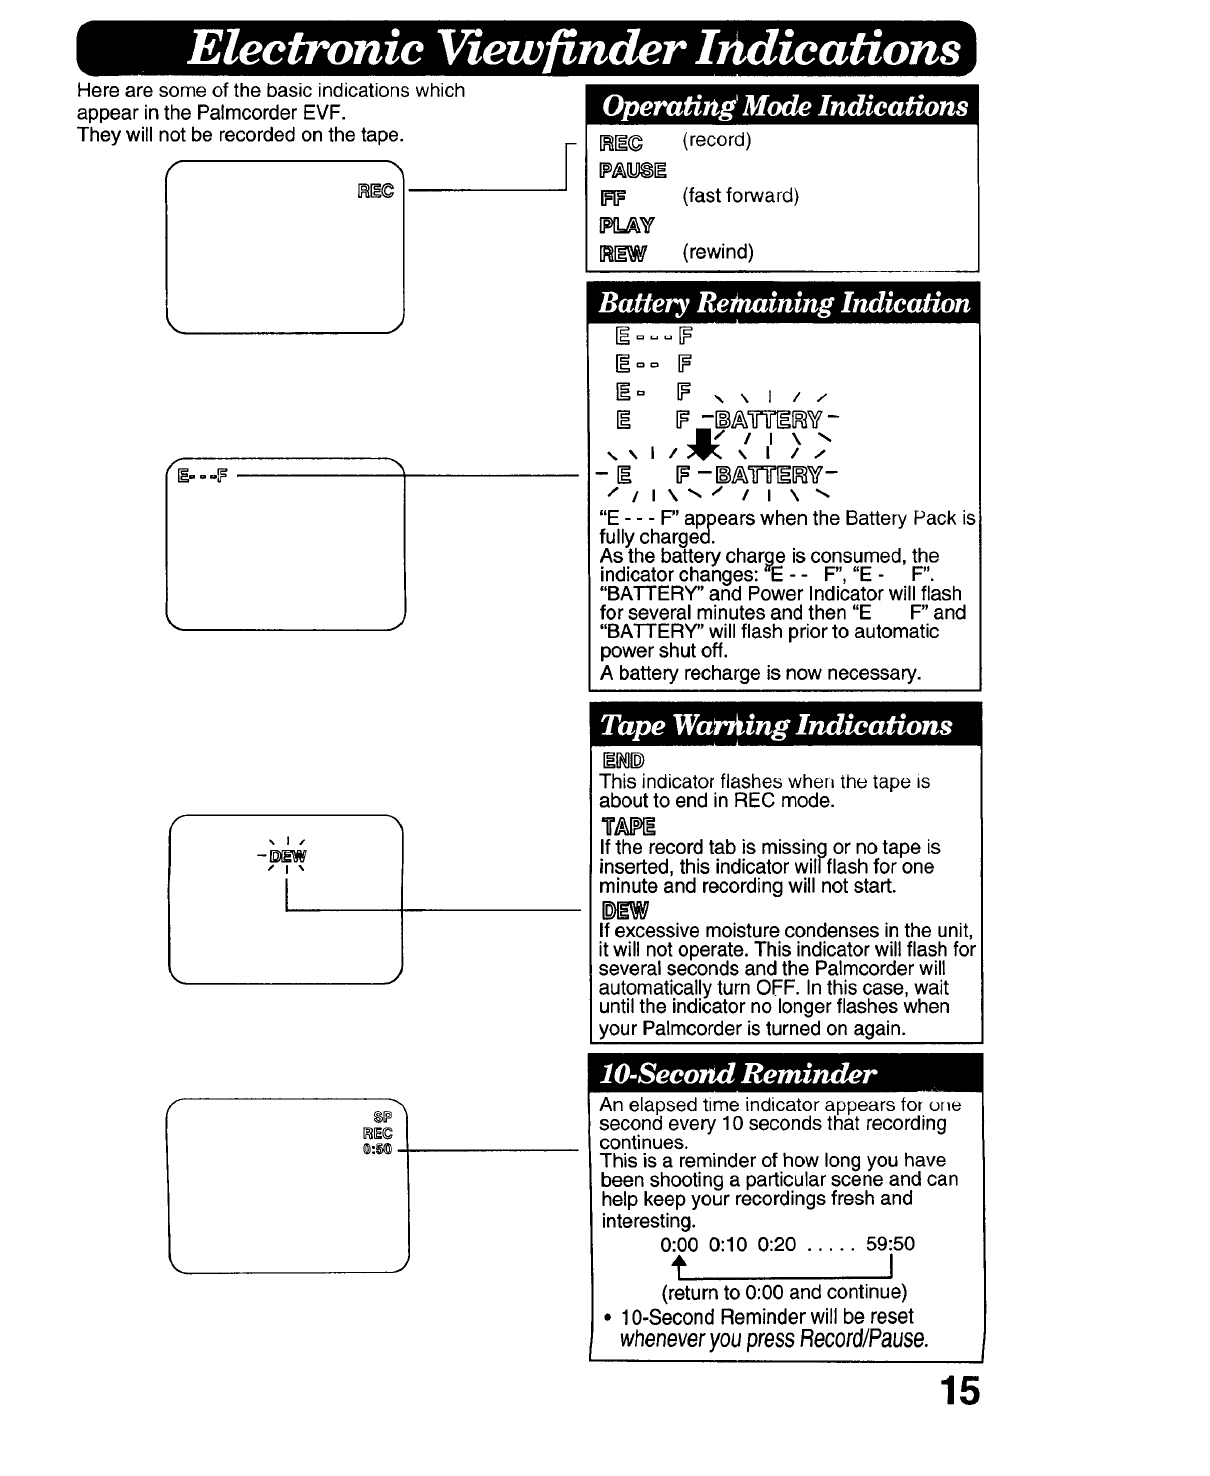
Here are some of the basic indications which
appear in the Palmcorder EVF.
They will not be recorded on the tape.
/I \
I
F(record)
(fast forward)
(rewind)
F_= _ ,, ,, I / /
IF -[ A71f'AAV -
•,,. \ I /.;qPr_ \ I / _'
-A IF-I_A71f'_RV-
/11\%/ I I \
"E - - - F" appears when the Battery Pack is
fully charged.
As the battery charge is consumed, the
indicator changes: "E - - F", "E - F".
"BATTERY" and Power Indicator will flash
for several minutes and then "E F" and
"BATTERY" will flash prior to automatic
power shut off.
A battery recharge is now necessary.
This indicator flashes when the tape is
about to end in REC mode.
If the record tab is missing or no tape is
inserted, this indicator wil/flash for one
minute and recording will not start.
If excessive moisture condenses in the unit,
it will not operate. This indicator will flash for
several seconds and the Palmcorder will
automatically turn OFF. In this case, wait
until the indicator no longer flashes when
your Palmcorder is turned on again.
An elapsed time indicator appears for one
second every 10 seconds that recording
continues.
This is a reminder of how long you have
been shooting a particular scene and can
help keep your recordings fresh and
interesting.
0:00 0:10 0:20 ..... 59:50
t I
(return to 0:00 and continue)
• 10-Second Reminder will be reset
wheneveryoupressRecordlPause.
15
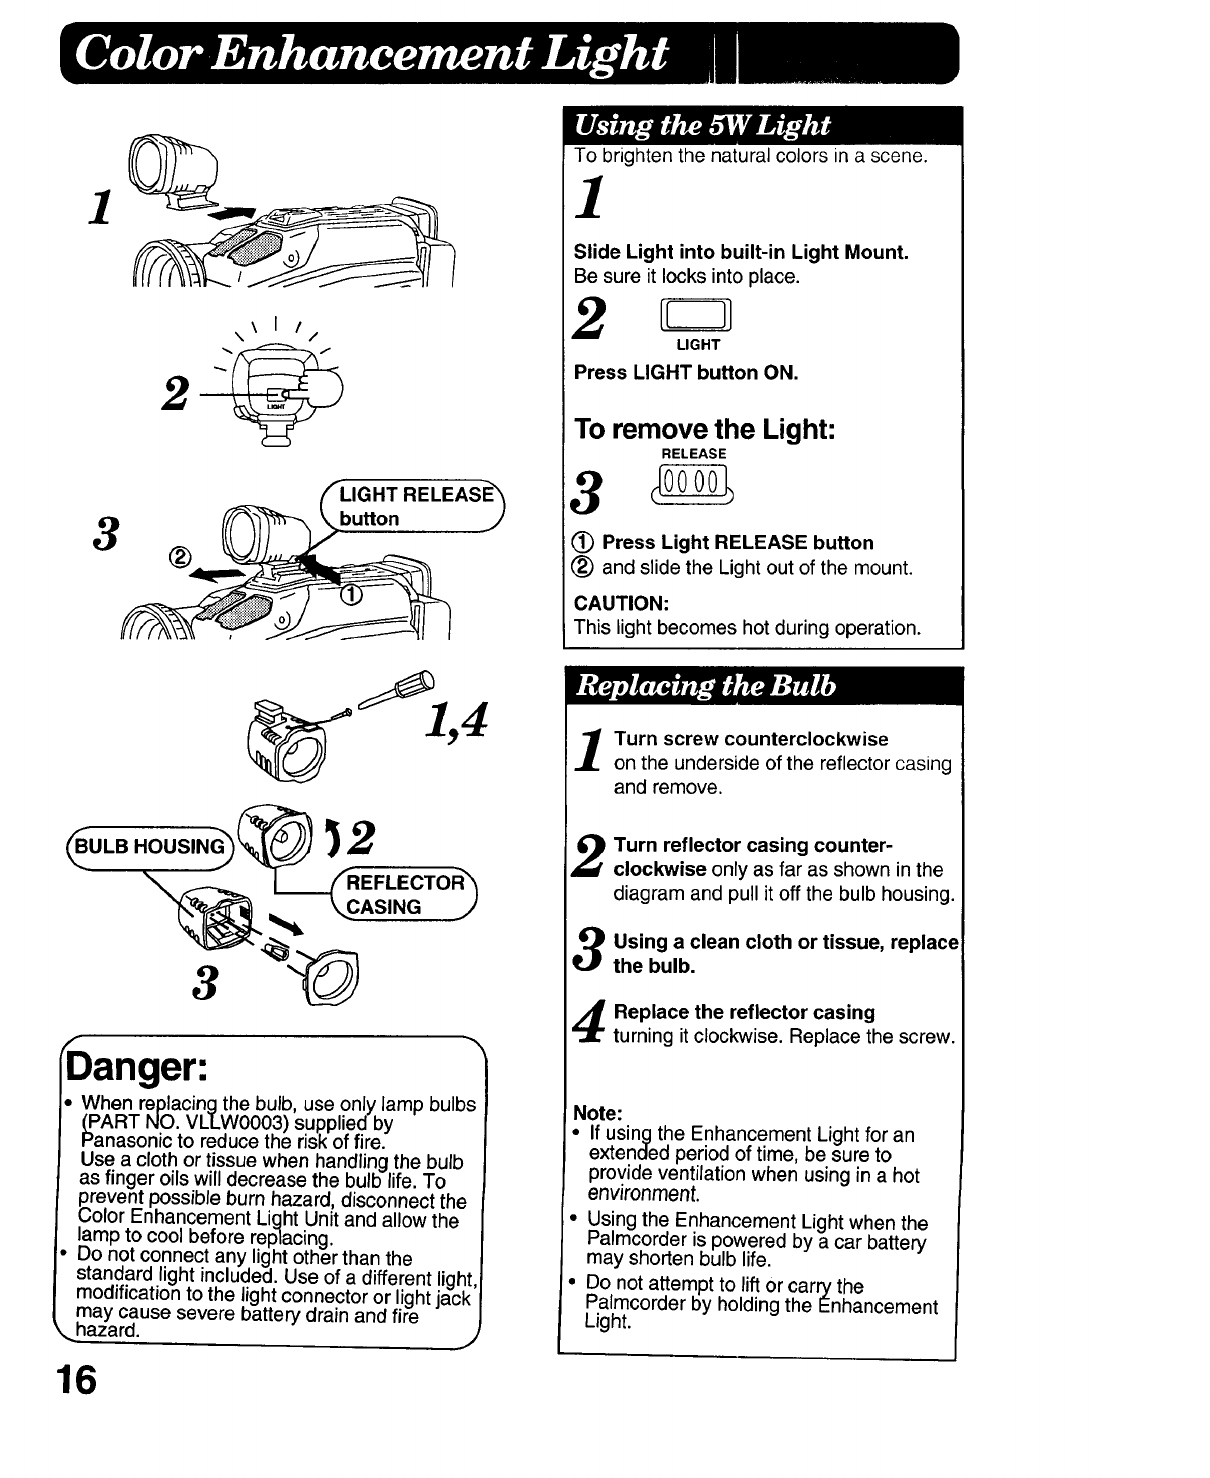
]
3
2
®
/
\ I /
\/
buttonLIGHTRELEAS_
To brighten the natural colors in a scene.
1
Slide Light into built-in Light Mount.
Be sure it locks into place.
2LIGHT
Press LIGHT button ON.
To remove the Light:
RELEASE
Press Light RELEASE button
(_) and slide the Light out of the mount.
CAUTION:
This light becomes hot during operation.
ULB
CASING
irDanger:
•When replacingthe bulb, use only lamp bulbs
(_PARTNO. VLLW0003) supplied by
Panasonic to reduce the risk of fire.
Use a cloth or tissue when handling the bulb
as finger oils will decrease the bulb life. To
revent possible burn hazard, disconnect the
olor Enhancement Light Un t and allow the
lamp to cool before replacing.
Do not connect any light other than the
standard light included. Use of a different light,
modification to the light connector or light jack
may cause severe battery drain and fire
_. hazard, j
16
Turn screw counterclockwise
on the underside of the reflector casing
and remove.
Turn reflector casing counter-
clockwise only as far as shown inthe
diagram and pull it off the bulb housing.
Using a clean cloth or tissue, replace
the bulb.
Replace the reflector casing
turning it clockwise. Replace the screw.
Note:
•If using the Enhancement Light for an
extended period of time, be sure to
provide ventilation when using in a hot
environment.
• Using the Enhancement Light when the
Palmcorder is powered by a car battery
may shorten bulb life.
• Do not attempt to lift or carry the
Palmcorder by holding the Enhancement
Light.
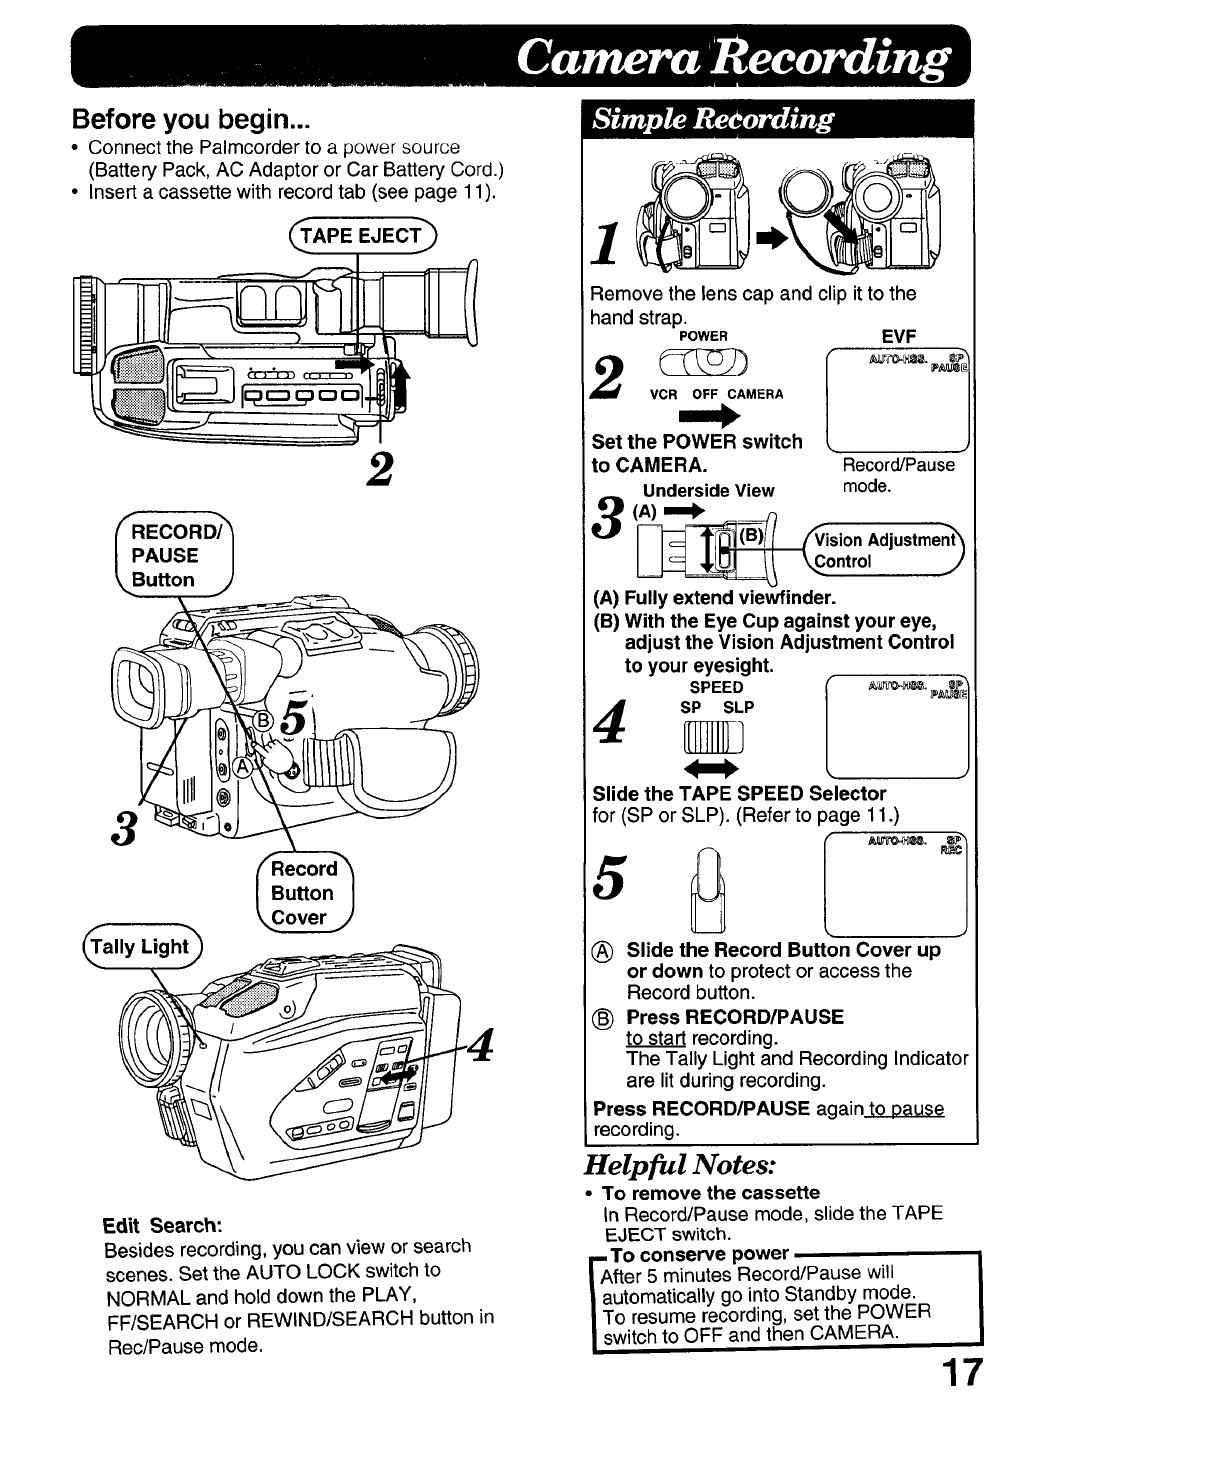
Before you begin...
•Connect the Palmcorder to a power source
(Battery Pack, AC Adaptor or Car Battery Cord.)
•Insert acassette with record tab (see page 11).
2
Edit Search:
Besides recording, you can view or search
scenes. Set the AUTO LOCK switchto
NORMAL and hold down the PLAY,
FF/SEARCH or REWIND/SEARCH button in
Rec/Pause mode.
Remove the lens cap and clip it to the
hand strap.
POWER EVF
17
V_MERA
Set the POWER switch
to CAMERA. Record/Pause "
Underside View mode.
(A) _
_[ /_ision Adjustment_
Fw_W f d_CeC:ntrOI j/
(;) in
( ) " e Eye Cup against your eye,
adjust the Vision Adjustment Control
to your eyesight. _,
SPEED l _.._. =P
SP SLP _P_u_
• e the TAPE SPEED Selector
for (SP or SLP). (Refer to page 11.)
®to start recording.
The Tally Light and Recording Indicator
are lit during recording.
Press RECORD/PAUSE again to Dause
recording.
Helpful Notes:
•To remove the cassette
In Record/Pause mode, slide the TAPE
EJECT switch.
To conserve power
fter 5 minutes Record/Pause will
utomatically go into Standby mode.
o resume recording, set the POWER
witch to OFF and then CAMERA.

_OWER Switch_
18
If you stop recording but plan to resume
within 24 hours, use the Edit Standby
feature to make a smooth transition
between scenes.
Set the POWER switch to OFF while in
Record/Pause mode and leave the
cassette inthe Palmcorder.
Set the POWER switch to CAMERA and
press RECORD/PAUSE (within 24 hours)
to continue recording.
Note:
• If it is longer than 24 hours before you
resume recording, use the manual Easy
Edit feature described below.
For proper continuity when taping from the
Stop mode, or after charging the Battery
Pack. POWER
VCR OFF CAMERA
the POWER switch to VCR,
Press REWIND to go back a
few seconds on the tape.
Then, press PLAY to review
the picture on the Viewfinder.
STILL
switch to CAMERA.
will go into the Record/
mode. _
Press RECORD/PAUSE to continue
recording.
Now, press STILL at the
location you wish to continue
your recording.
POWER
REW
Press REWIND while in Record/Pause
mode to review the last few seconds of
your recording.

Operate tiqe major lunctiulls ot your Palmcorder
from up to 16 feet (5 m) (approx.) away.
"Remote Control_
•j
Signal
]
2
3
Remote Control
REPLACE BATTERY
WITH PANASONIC PART
NO. VSBW0004 (CR2025)
ONLY. USE OF
ANOTHER BAT'rER¥
MAY PRESENT A RISK
OF FIRE OR EXPLOSION
CAUTION-BATTERY MAY
EXPLODE IF
MISTREATED. DISPOSE
OF USED BATTERY
PROMPTLY. KEEP AWAY
FROM CHILDREN.
DO NOT RECHARGE,
DISASSEMBLE OR
DISPOSE OF IN FIRE.
To remove, slide the Remote Control
switch to eject the Remote Control.
To store, insert the Remote
into the slot until it locks into place.
Select the REMOTE ON position on the
Remote.
Aim at the Remote Sensor and press the
desired buttons.
VCR CAMERA
Controlled Functions MODE MODE
REC/PAUSE - o
iT(telephoto) Zoom - o
W(wide angle) Zoom - o
PLAY o -
FF/SEARCH o -
REW/SEARCH o -
STOP o -
STILL o -
• After 5 minutes in the Rec/Pause mode,
the Palmcorder will go into the Standby
mode (power will shut off) to conserve
battery life.
In this case, press REC/PAUSE down
for about one second, the Palmcorder
comes back on and goes into the
Record mode.
• Select the Remote OFF position on the
Remote when not in use.
]_While pinching the stopper tab,
®pull the Battery Tray out.
Insert the battery (supplied) into the
,BatteryTray with the(_ mark facing
up,
Do not reverse the polarity.
3Replace the Battery Tray.
• For Battery replacement, set the
Remote Power switch to OFF.
19
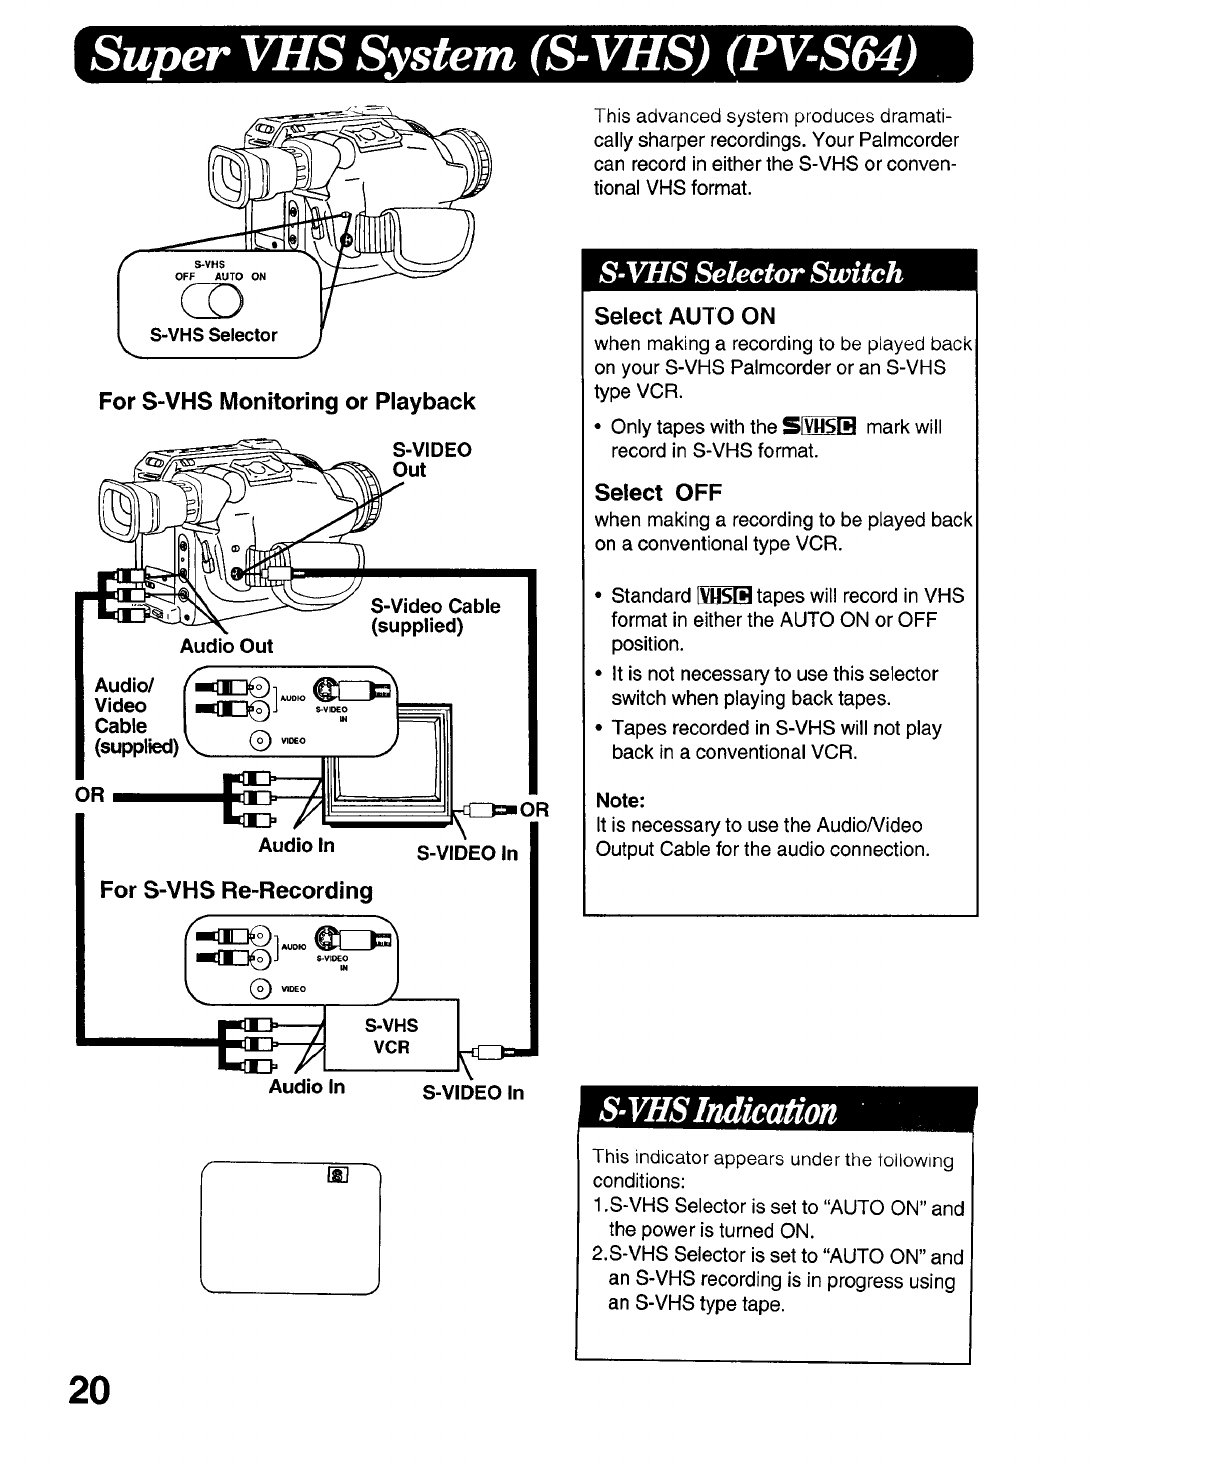
For S-VHS Monitoring or Playback
_S-VIDEO
S-Video Cable
(supplied)
Audio Out
OR
Audio In
For S-VHS Re-Recording
S-VHS
VCR
Audio In
S-VIDEO In
S-VIDEO In
This advanced system produces dramati-
cally sharper recordings. Your Palmcorder
can record in either the S-VHS or conven-
tional VHS format.
Select AUTO ON
when making a recording to be played back
on your S-VHS Palmcorder or an S-VHS
type VCR.
• Only tapes with the S_ mark will
record in S-VHS format.
Select OFF
when making a recording to be played back
on aconventional type VCR.
•Standard _ tapes will record in VHS
format in either the AUTO ON or OFF
position.
• It is not necessary to use this selector
switch when playing back tapes.
• Tapes recorded in S-VHS will not play
back in a conventional VCR.
Note:
It is necessary to use the AudioNideo
Output Cable for the audio connection.
[] lThis indicator appears under the toilowing
conditions:
1.S-VHS Selector is set to "AUTO ON" and
the power is turned ON.
2.S-VHS Selector is set to "AUTO ON" and
an S-VHS recording is in progress using
an S-VHS type tape.
20
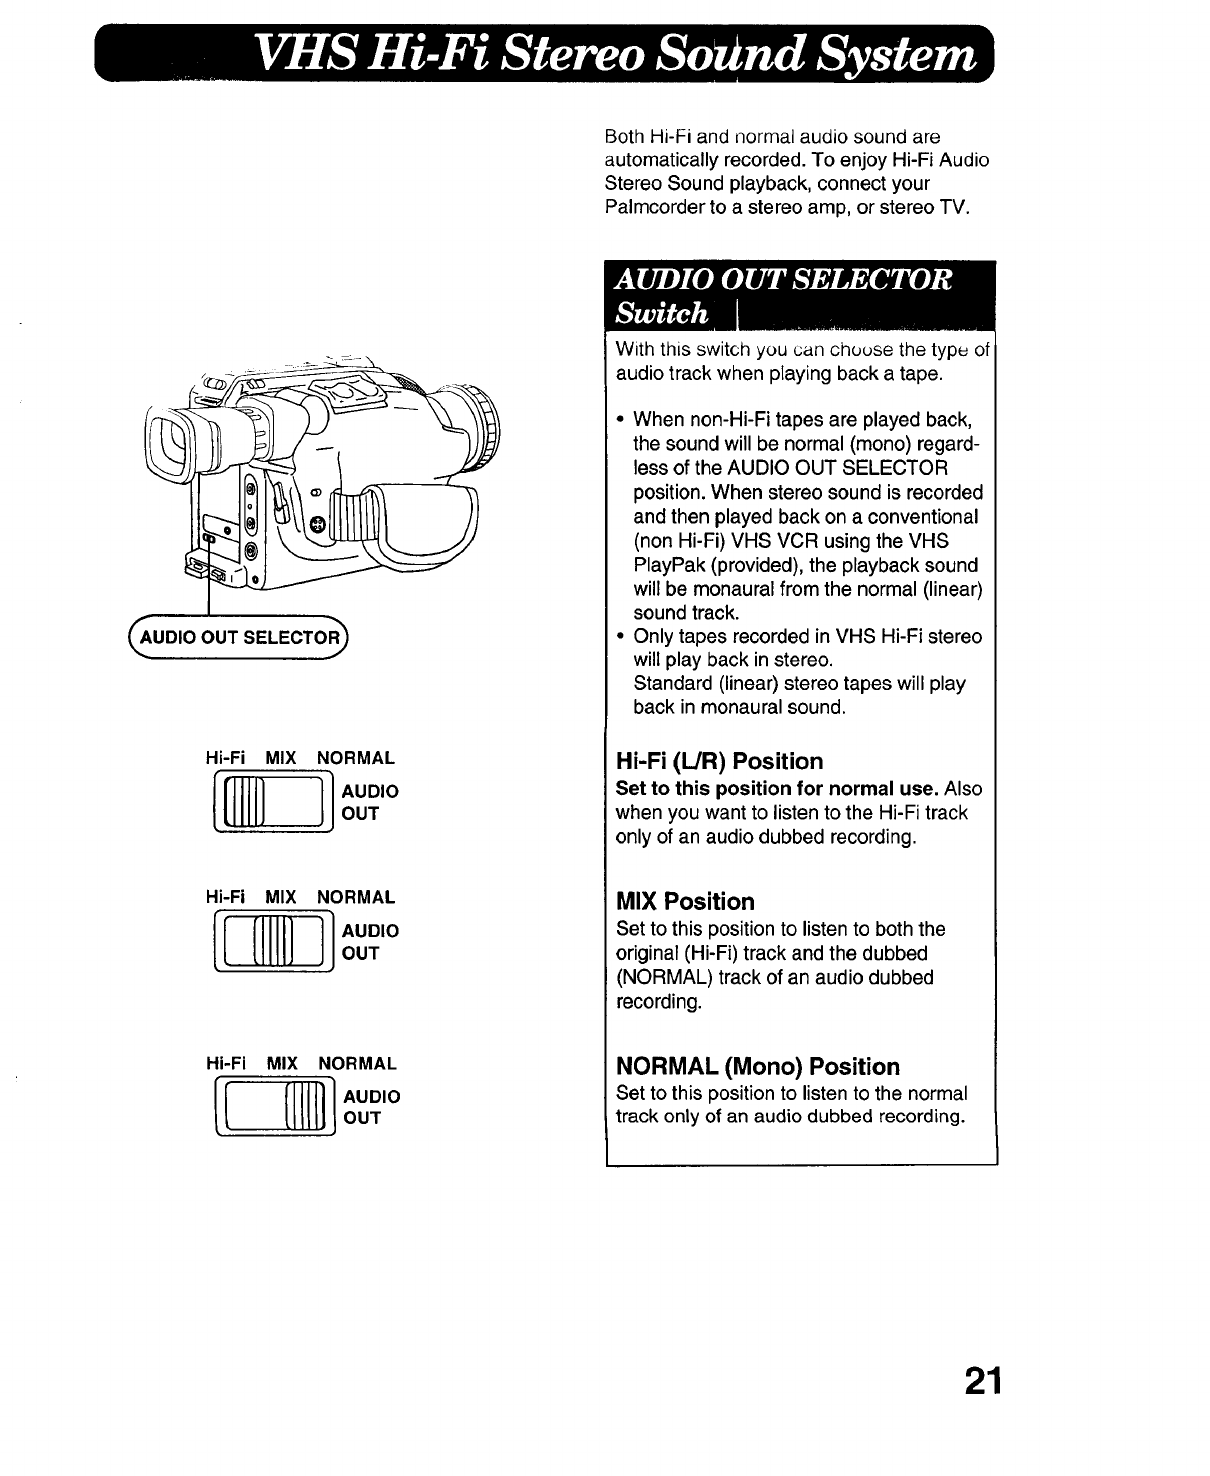
Both Hi-Fi and normal audio sound are
automatically recorded. To enjoy Hi-Fi Audio
Stereo Sound playback, connect your
Palmcorder to a stereo amp, or stereo TV.
(_UDIO OUT SELECTOR_
Hi-Fi MIX NORMAL
[_ UDIOOUT
Hi-Fi MIX NORMAL
[_ UDIOOUT
Hi-Fi MIX NORMAL
[[ '°
With this switch you can chuuse the typu of
audio track when playing back a tape.
•When non-Hi-Fi tapes are played back,
the sound will be normal (mono) regard-
less of the AUDIO OUT SELECTOR
position. When stereo sound is recorded
and then played back on a conventional
(non Hi-Fi) VHS VCR using the VHS
PlayPak (provided), the playback sound
will be monaural from the normal (linear)
sound track.
• Only tapes recorded in VHS Hi-Fi stereo
will play back in stereo.
Standard (linear) stereo tapes will play
back in monaural sound.
Hi-Fi (L/R) Position
Set to this position for normal use. Also
when you want to listen to the Hi-Fi track
only of an audio dubbed recording.
MIX Position
Set to this positionto listen to both the
original (Hi-Fi) track and the dubbed
(NORMAL) track of an audio dubbed
recording.
NORMAL (Mono) Position
Set to this positionto listen to the normal
track only of an audio dubbed recording.
21
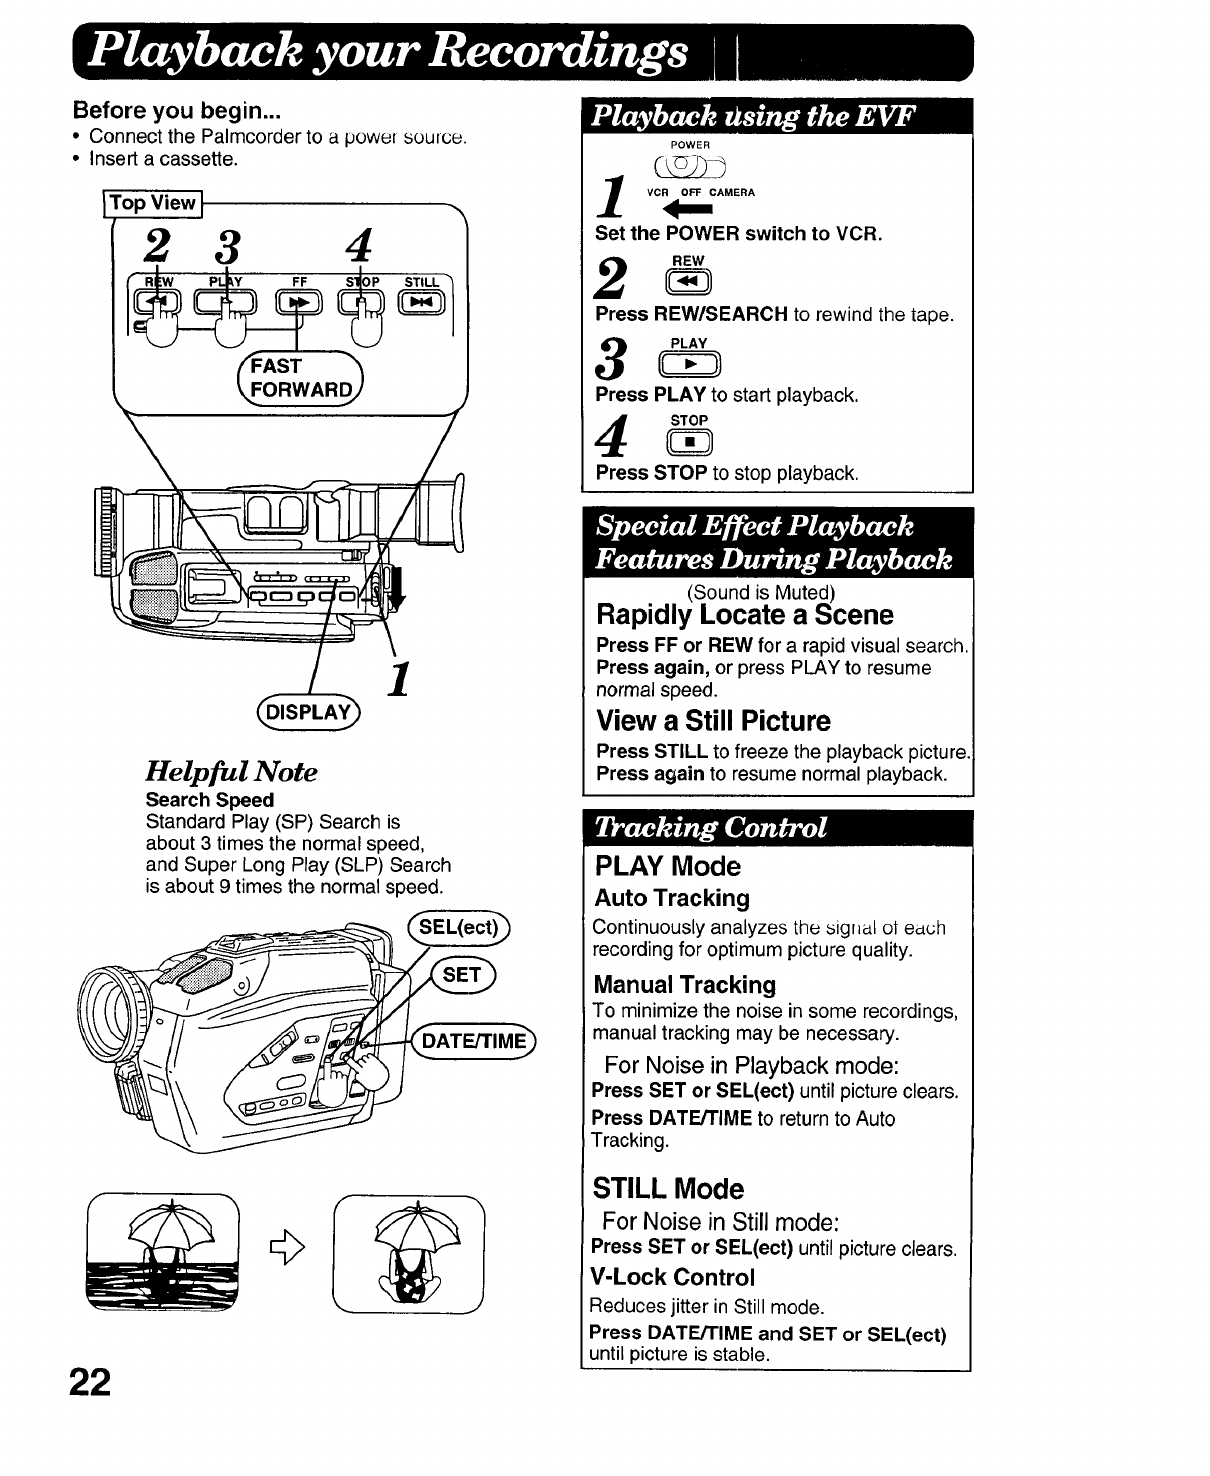
Before you begin...
•Connect the Palmcorder to a power source.
• Insert a cassette.
ITop View I "
2 3 4
STtLL
AST
ORWARDJ
Helpful Note
Search Speed
Standard Play (SP) Search is
about 3 times the normal speed,
and Super Long Play (SLP) Search
is about 9 times the normal speed.
22
POWER
VCR OFF CAMERA
Set the POWER switch to VCR.
Press REW/SEARCH to rewind the tape.
Press PLAY to start playback.
Press STOP to stop playback.
(Sound is Muted)
Rapidly Locate a Scene
Press FF or REW for a rapid visual search.
Press again, or press PLAY to resume
normal speed.
View a Still Picture
Press STILL to freeze the playback picture.
Press again to resume normal playback.
PLAY Mode
Auto Tracking
Continuously analyzes the sigr_l ot each
recording for optimum picture quality.
Manual Tracking
To minimize the noise in some recordings,
manual tracking may be necessary.
For Noise in Playback mode:
Press SET or SEL(ect) until picture clears.
Press DATE/TIME to return to Auto
Tracking.
STILL Mode
For Noise in Still mode:
Press SET or SEL(ect) until picture clears.
V-Lock Control
Reduces jitter in Still mode.
Press DATE/TIME and SET or SEL(ect)
until picture is stable.
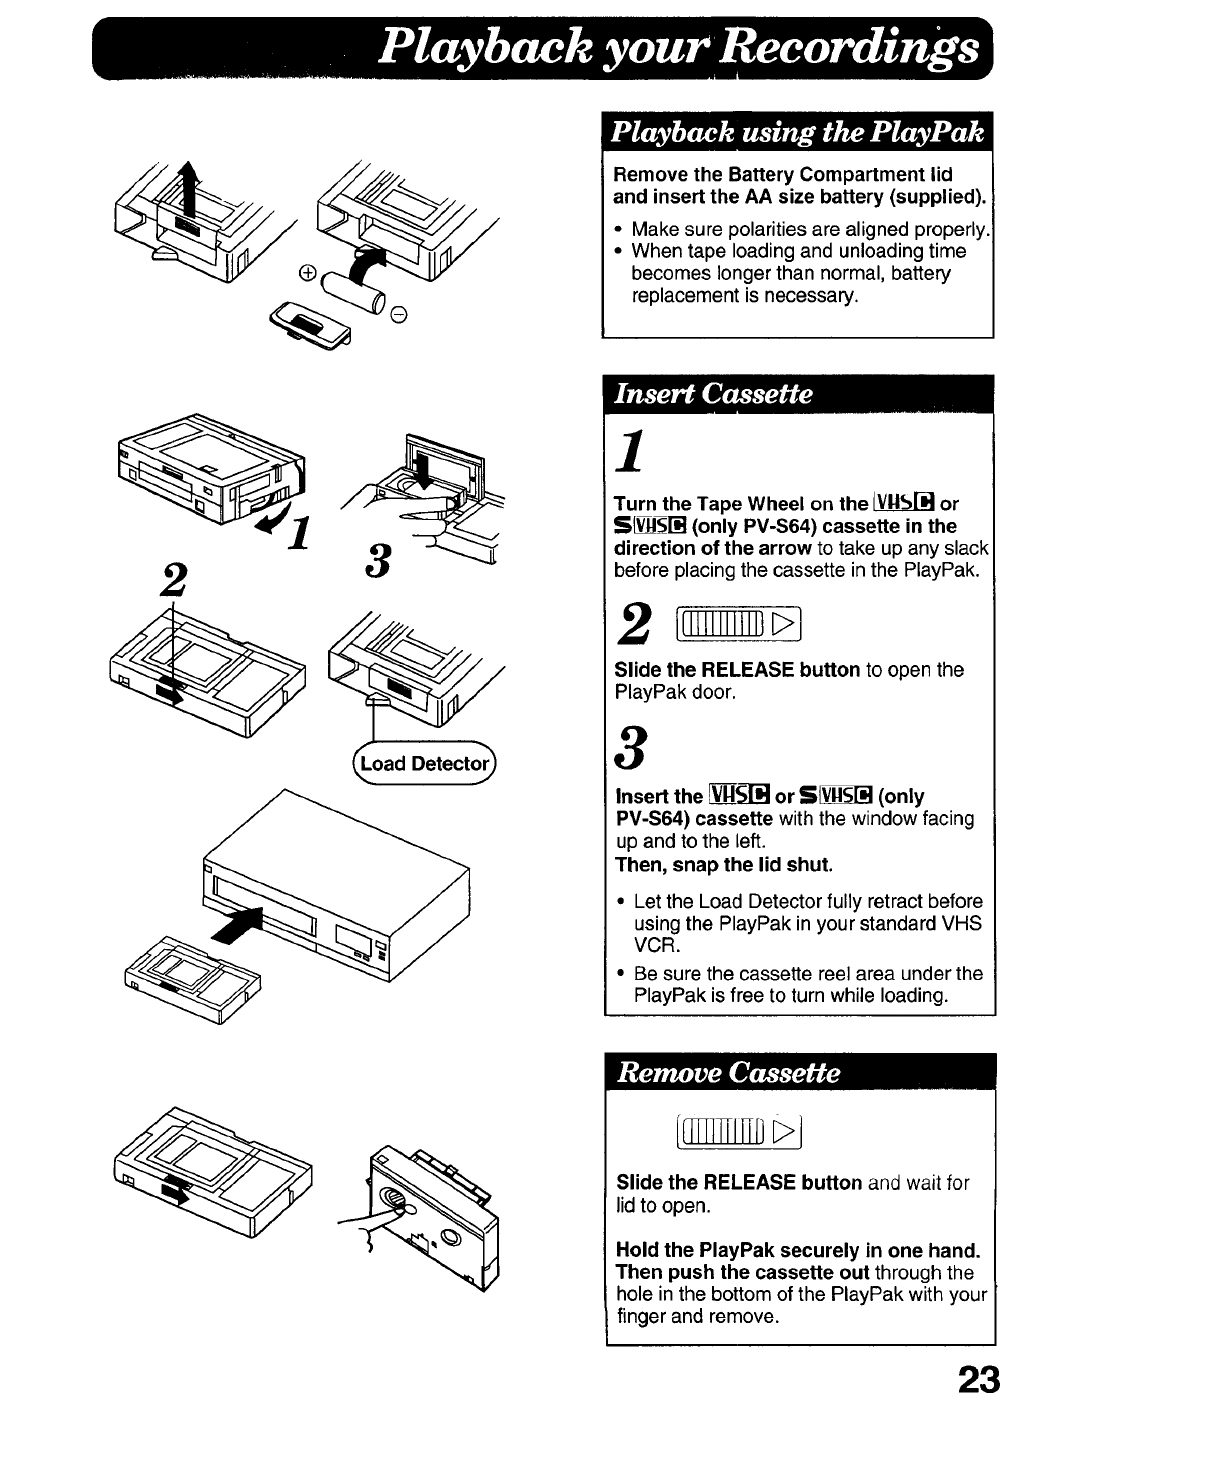
Remove the Battery Compartment lid
and insert the AA size battery (supplied).
• Make sure polarities are aligned properly.
• When tape loading and unloading time
becomes longer than normal, battery
replacement is necessary.
Turn the Tape Wheel on the _or
S V_YVSI"d(only PV-S64) cassette in the
direction of the arrow to take up any slack
before placing the cassette in the PlayPak.
Slide the RELEASE button to open the
PlayPak door.
3
Insert the V[V-gS-_i]or S[Y!_;[_] (only
PV-S64) cassette with the window facing
up and to the left.
Then, snap the lid shut.
•Let the Load Detector fully retract before
using the PlayPak in your standard VHS
VCR.
• Be sure the cassette reel area under the
PlayPak is free to turn while loading.
{ lNIlll/ J
Slide the RELEASE button and wait for
lid to open.
Hold the PlayPak securely in one hand.
Then push the cassette out through the
hole in the bottom of the PlayPak with your
finger and remove.
23
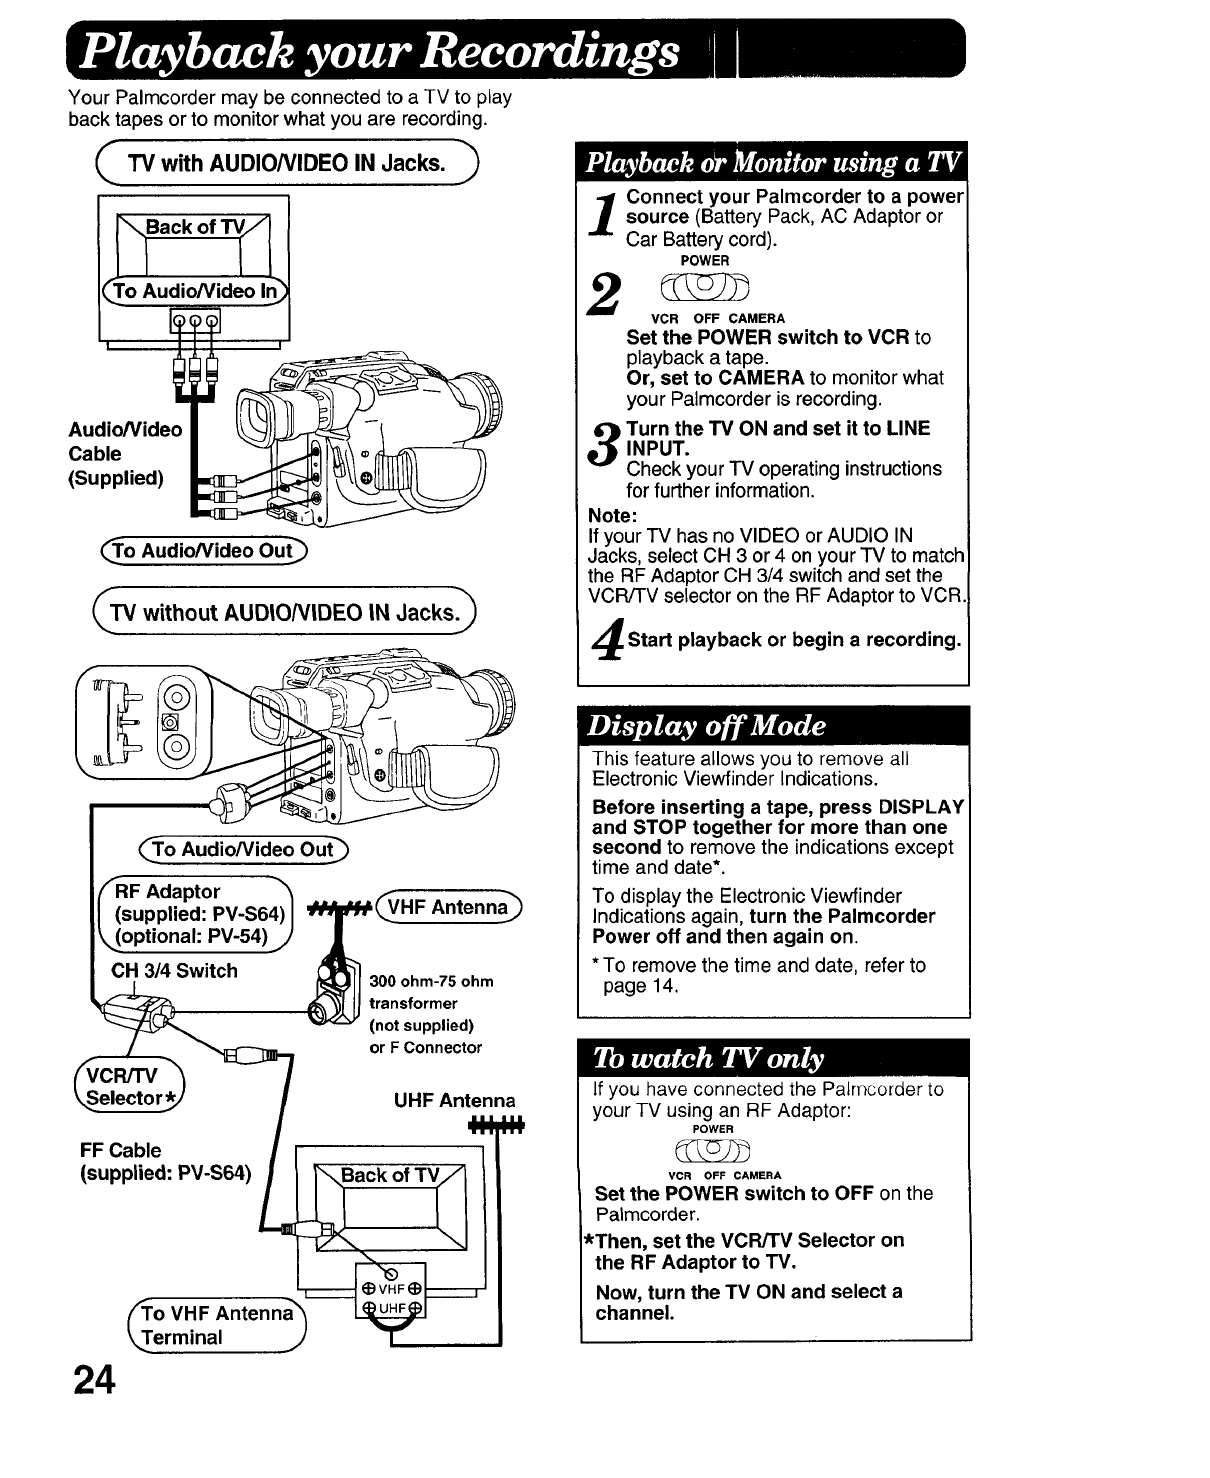
Your Palmcorder may be connected to a TV to play
back tapes or to monitor what you are recording.
_TV with AUDIO/VIDEO IN Jacks.
Audio/Video
Cable
(Supplied)
_o Audio/Video Out_
_TV without AUDIO/VIDEO IN Jacks)
Connect your Palmcorder to a power
source (Battery Pack, AC Adaptor or
Car Battery cord).
POWER
2VCR OFF CAMERA
Set the POWER switch to VCR to
playback a tape.
Or, set to CAMERA to monitor what
your Palmcorder is recording.
Turn the TV ON and set it to LINE
INPUT.
Check your TV operating instructions
for further information.
Note:
If your TV has no VIDEO or AUDIO IN
Jacks, select CH 3 or 4 on your TV to match
the RF Adaptor CH 3/4 switch and set the
VCR/TV selector on the RF Adaptor to VCR.
Start playback or begin a recording.
_To Audio/Video Out_
FRF Adaptor _'_
(supplied: PV-S64) I __HF Antenna_
k,_optionah PV-54) j/
CH 3/4 Switch (_L_JJ300ohm-75ohm
(_, LJ transformer
(not supplied)
or F Connector
FF Cable
(supplied: PV-S64)
o VHF
erminal
24
UHF Antenna
Back of TVQ
This feature allows you to remove all
Electronic Viewfinder Indications.
Before inserting a tape, press DISPLAY
and STOP together for more than one
second to remove the indications except
time and date*.
To display the Electronic Viewfinder
Indications again, turn the Palmcorder
Power off and then again on.
* To remove the time and date, refer to
page 14.
If you have connected the Palmcorder to
your TV using an RF Adaptor:
POWER
VCR OFF CAMERA
Set the POWER switch to OFF on the
Palmcorder.
*Then, set the VCR/TV Selector on
the RF Adaptor to TV.
Now, turn the TV ON and select a
channel.
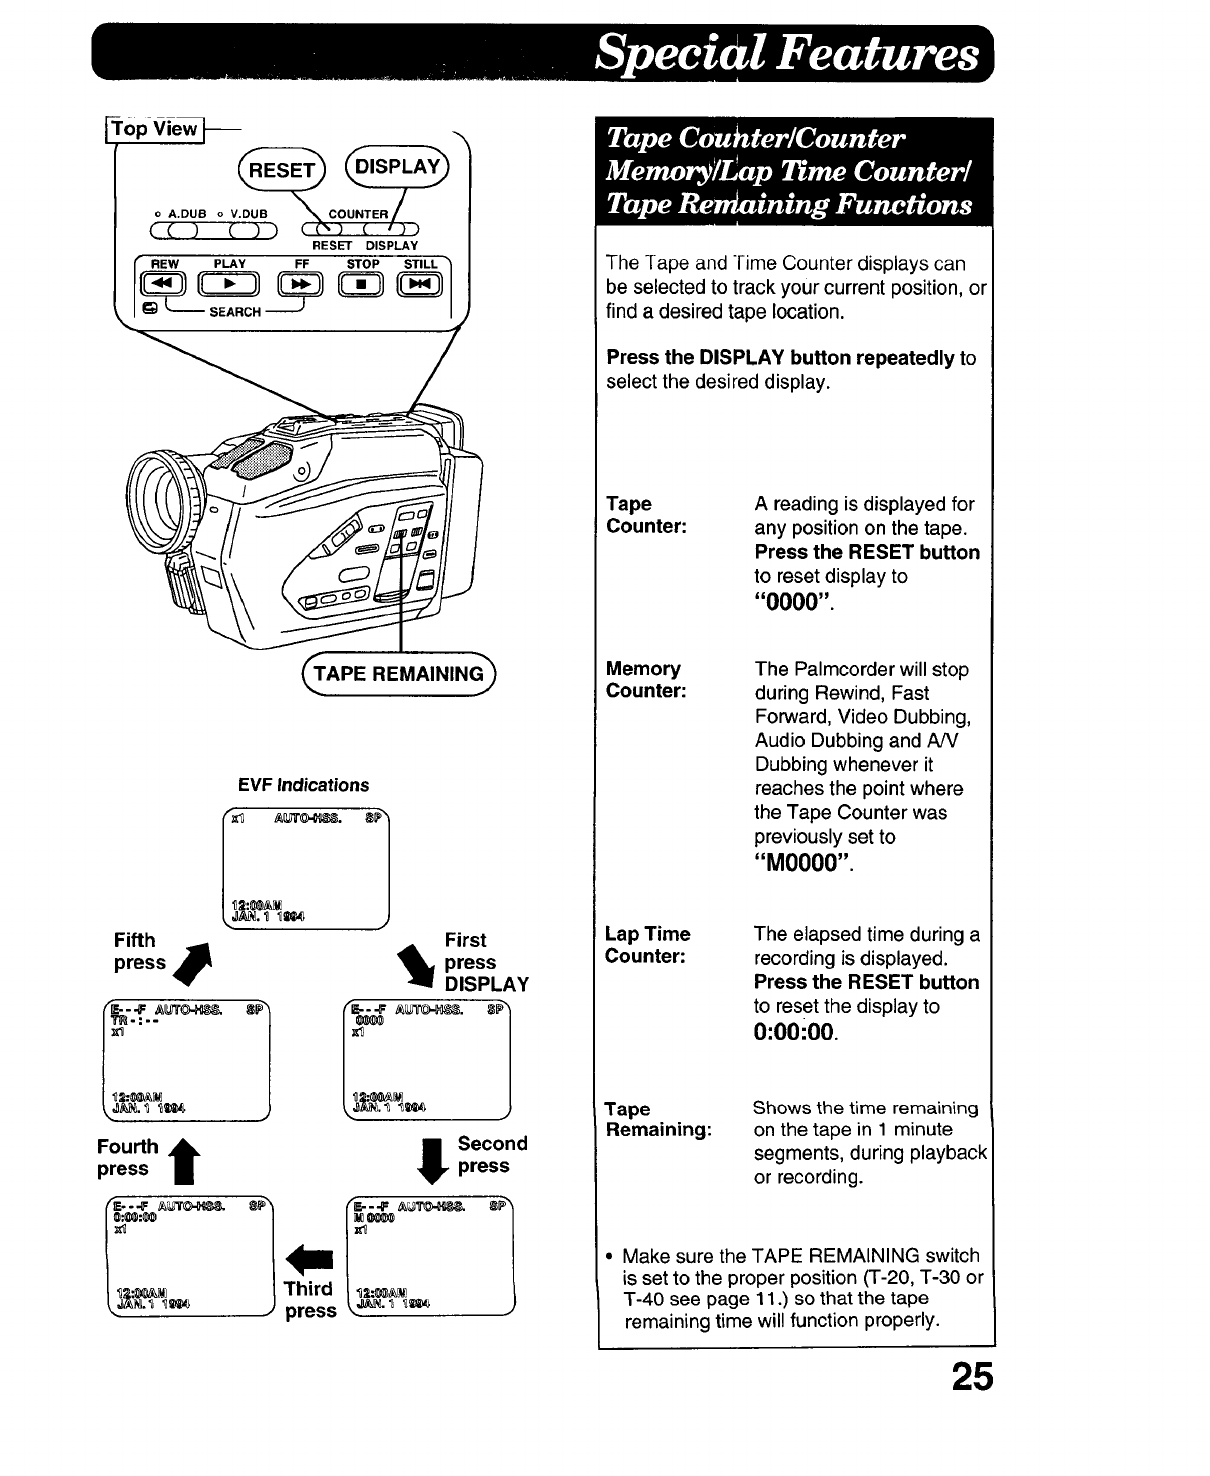
Top ViewS-- -.
RESET DISPLAY
_APE REMAINING_
EVF Indications
Fifth
press
First
I_]_ press
DISPLAY
_2:_ /_2:_
Fourth t I SecOnd
press press
I
The rape and Time Counter displays can
be selected to track your current position, or
find a desired tape location.
Press the DISPLAY button repeatedly to
select the desired display.
Tape
Counter: A reading is displayed for
any position on the tape.
Press the RESET button
to reset display to
"OOO0".
Memory
Counter: The Palmcorder will stop
during Rewind, Fast
Forward, Video Dubbing,
Audio Dubbing and A/V
Dubbing whenever it
reaches the point where
the Tape Counter was
previously set to
"M0000".
Lap Time
Counter: The elapsed time during a
recording is displayed.
Press the RESET button
to reset the display to
O:OOiO0.
Tape
Remaining:
Shows the time remaining
on the tape in 1 minute
segments, during playback
or recording.
•Make sure the TAPE REMAINING switch
is set to the proper position (T-20, T-30 or
T-40 see page 11.) so that the tape
remaining time will function properly.
25
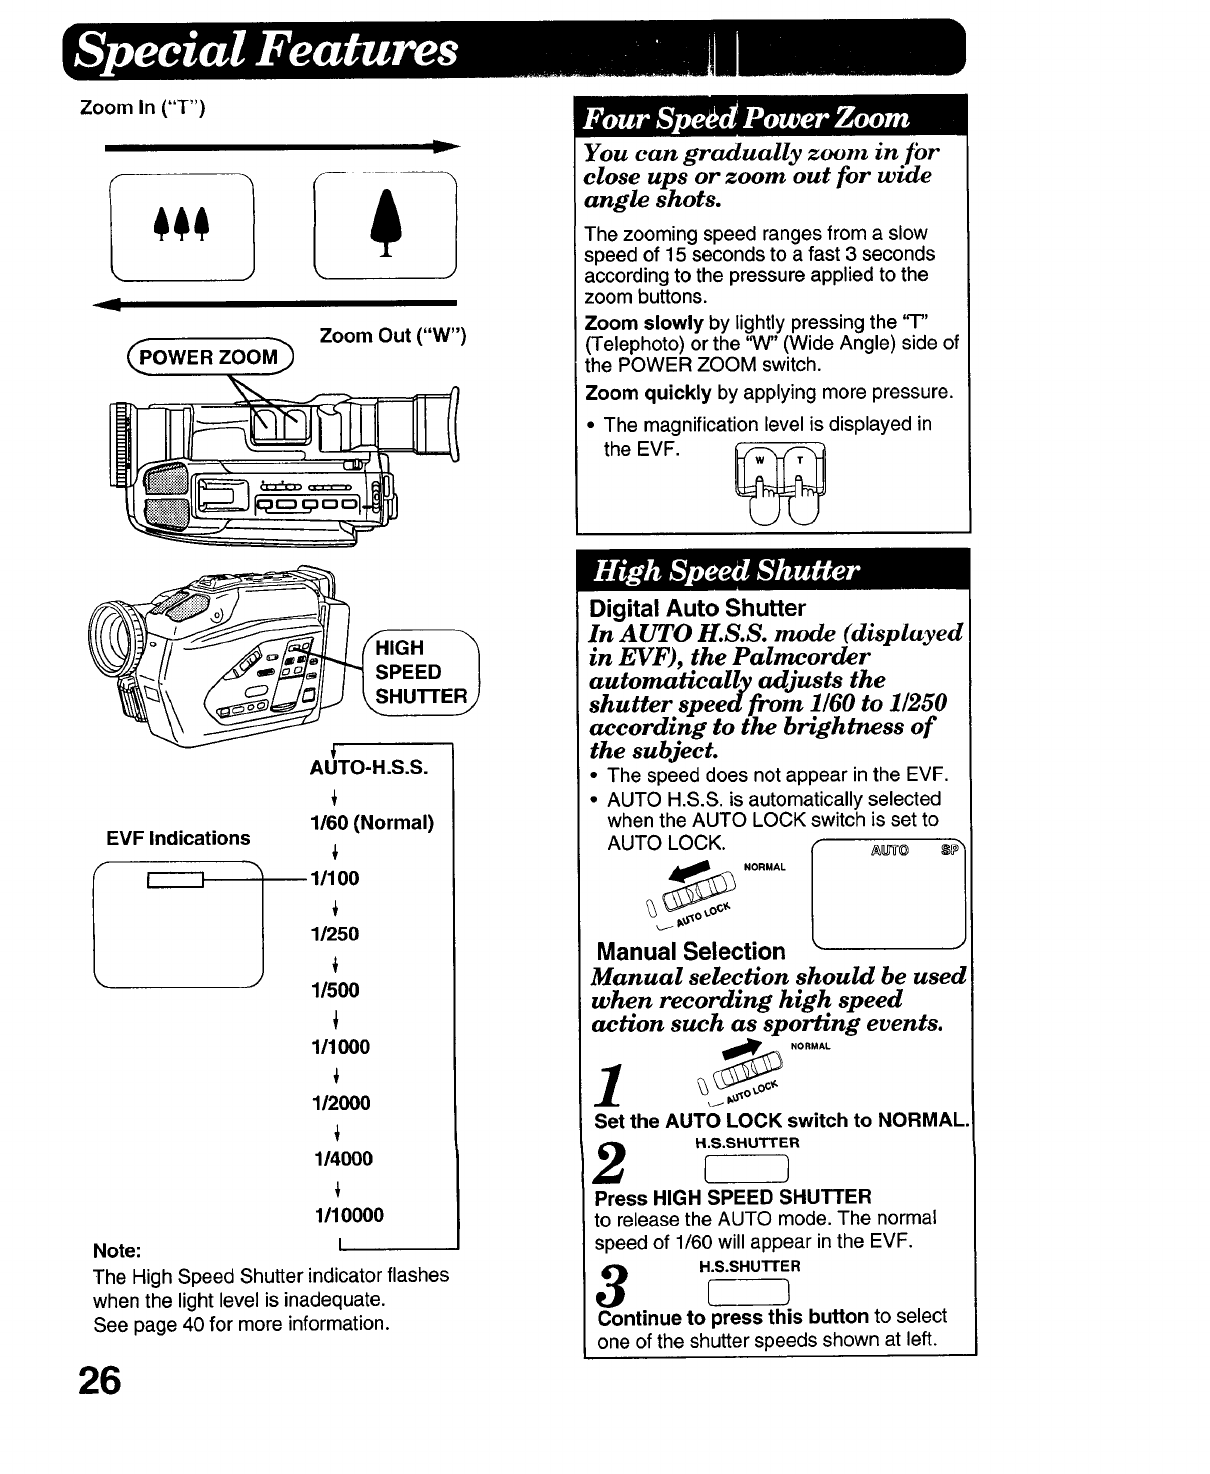
Zoom In ("T")
__POWER ZOOM3
y
Zoom Out ("W")
AUTO-H.S.S.
1/60 (Normal)
EVF Indications
If------I 11/100
1/250
1/500
111000
112000
114O00
1110000
Note: I
The High Speed Shutter indicatorflashes
when the light level is inadequate.
See page 40 for more information.
26
You can gradually zoom in ]'or
close ups or zoom out for wide
angle shots.
The zooming speed ranges from a slow
speed of 15 seconds to a fast 3 seconds
according to the pressure applied to the
zoom buttons.
Zoom slowly by lightly pressing the "T"
(Telephoto) or the 'V¢' (Wide Angle) side of
the POWER ZOOM switch.
Zoom quickly by applying more pressure.
• The magnification level is displayed in
the EVF.
Digital Auto Shutter
In AUTO H.S.S. mode (displayed
in EVF), the Palmcorder
automatically adjusts the
shutter speed from 1/60 to 1/250
according to the brightness of
the subject.
• The speed does not appear in the EVF.
• AUTO H.S.S. is automatically selected
when the AUTO LOCK switch is set to
AUTO LOCK. _ _.
Y,, NORMAL
Manual Selection
Manual selection should be used
when recording high speed
action such as sporting events.
NORMAL
1
Set the AUTO LOCK switch to NORMAL.
H.S.SHUTTER
2
Press HIGH SPEED SHUTTER
to release the AUTO mode. The normal
speed of 1/60 will appear in the EVF.
H.S.SHUTTER
3
Continue to press this button to select
one of the shutter speeds shown at left.
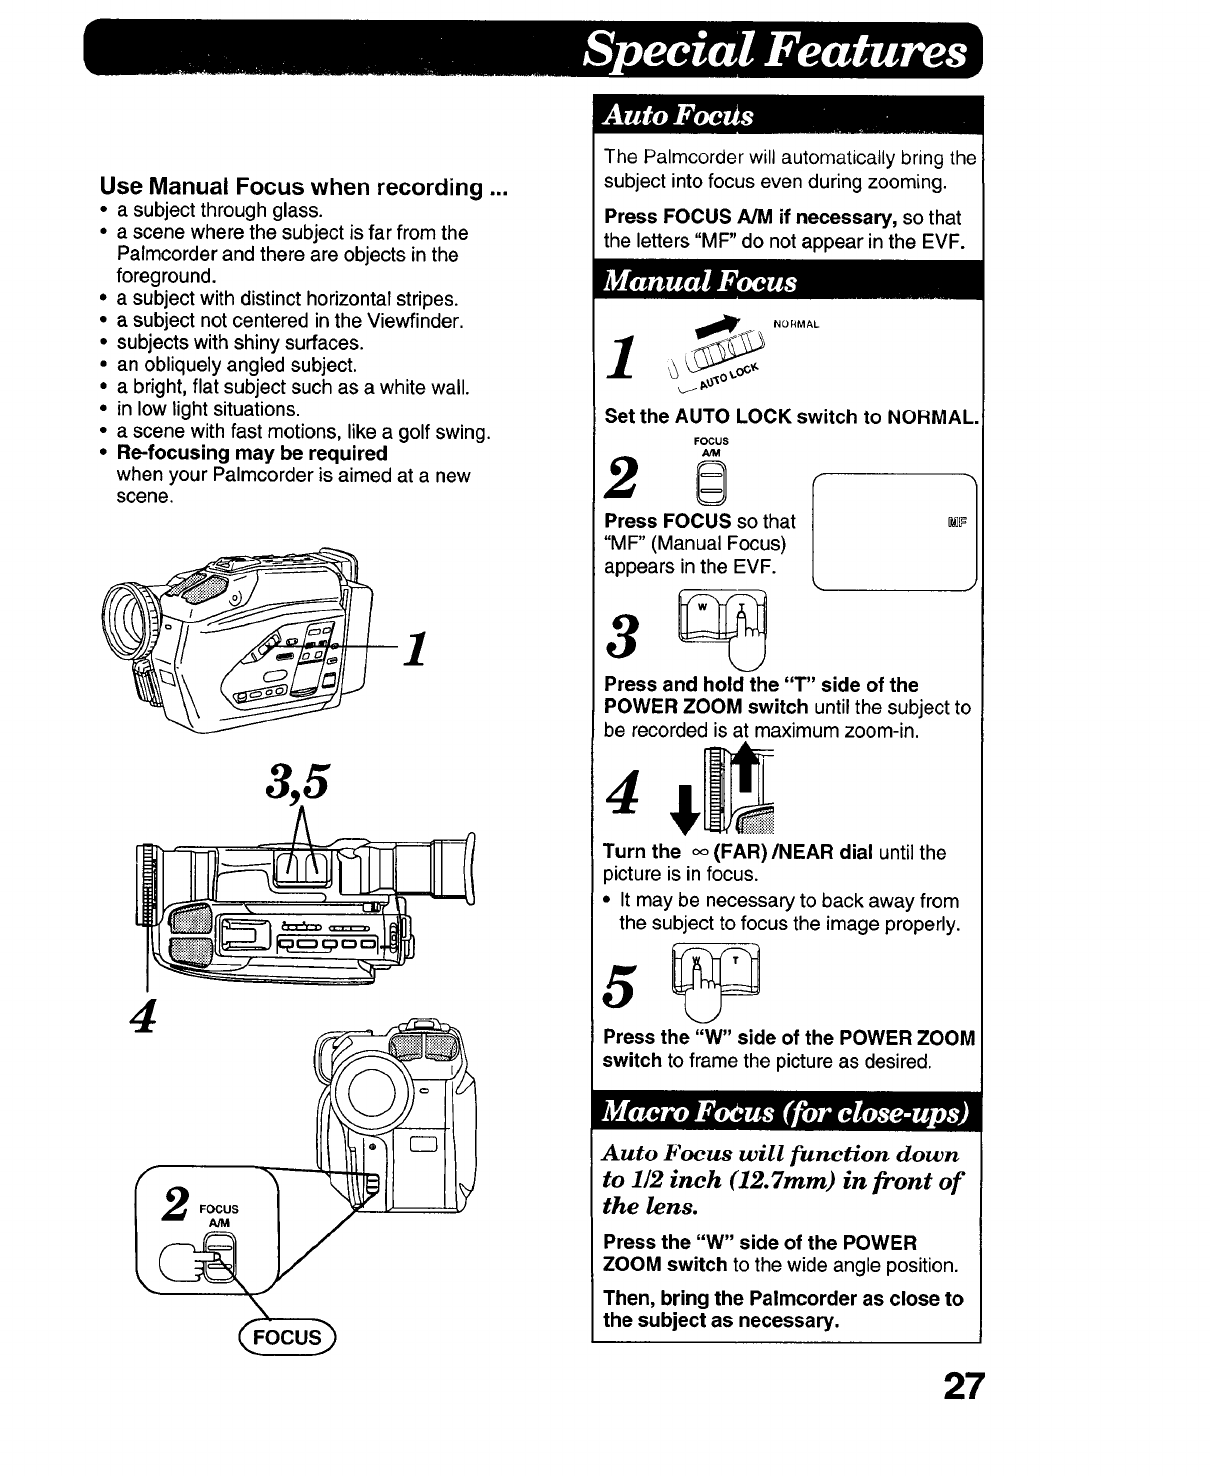
Use Manual Focus when recording ...
•a subject through glass.
• a scene where the subject is far from the
Palmcorder and there are objects in the
foreground.
•a subject with distincthorizontal stripes.
•asubject not centered in the Viewfinder.
•subjects with shiny surfaces.
• an obliquely angled subject.
•a bright, flat subject such as a white wall.
•in low lightsituations.
• a scene with fast motions, like agolf swing.
• Re-focusing may be required
when your Palmcorder is aimed at a new
scene.
4
I
The Palmcorder will automatically bring the
subject into focus even during zooming.
Press FOCUS A/M if necessary, so that
the letters "MF" do not appear inthe EVF.
!_. NORMAL
Set the AUTO LOCK switch to NORMAL
FOCUS
A/M
2 6
Press FOCUS so that _
"MF" (Manual Focus)
appears inthe EVF.
Press and hold the "T" side of the
POWER ZOOM switch until the subject to
be recorded is at maximum zoom-in.
Turn the oo(FAR)/NEAR dial until the
picture is in focus.
•It may be necessary to back away from
the subject to focus the image properly.
Press the "W" side of the POWER ZOOM
switch to frame the pictureas desired.
Auto Focus will function down
to 1/2 inch (12.7mm) in front of
the lens.
Press the "W" side of the POWER
ZOOM switch to the wide angle position.
Then, bring the Palmcorder as close to
the subject as necessary.
27

Use for continuous color balance
in both indoor and outdoor
lighting situations.
When the AUTO LOCK switch is to AUTO
LOCK, or when there is no EVF indication,
AUTO White Balance is selected.
1 2
LIGHT_
Use under the conditions described below.
"/- NORMAL
1
Set the AUTO LOCK switch to NORMAL.
WB
12
Press WHITE BALANCE
repeatedly to select one
of the following settings.
Select" -_0_-" OUTDOOR
when recording outdoor
scenes from indoors, or
outdoors with an amber
filter.
Select "_C>" INDOOR
when recording indoor
scenes from outside, or
indoors with a blue filter.
__EVFIndicationS)
I "
I "
J
• White Balance is affected by Color
Temperature. See the chart on page 41.
!
EVF Indications
.-_ normal (no display)
i_ First press
(low)
i_ Second press
_r (medium)
Third press
(,high)
Fourth press
Select one of these positions so that the subject
can be seen clearly.
28
Use when recording a subject that
is darker than the surrounding
scene, in a shadowed area or
when the light source is in back of
your subject.
Make sure the AUTO LOCK switch is set to
NORMAL.
BACK LIGHT
Press BACKLIGHT to obtain the desired
position while recording.
BACK LIGHT
Press until there is no display in the EVF
when lighting conditions return to normal.

EVF Indication
,_ls, 1
-.,_,=F..-
Top View J -,
3
fRESET DISPLAY
FF
2
An invisible index mark is automatically
placed on the tape at the beginning of each
recording (the Index indicator will flash).
Then, you can enjoy automatic review and
playback of indexed tapes using Panasonic
VCR models which feature the VHS Index
Search System.
•No mark is placed where a recording
resumes after the Palmcorder has been
put into Pause.
You can go directly to a blank
portion of tape just where the
recording you have done so far
ends.
_NORMAL
II__°
Set the AUTO LOCK switch to NORMAL.
Press the REW and FF
buttons at the same time
in the "CAMERA" mode.
._ It.
• The Palmcorder will advance or rewind
and then stop at the begining of a blank
section of tape.
PLAY
3c5
Press PLAY to cancel this function.
•A tape, once recorded, is not considered
"blank" even if it has been erased.
if the Book Mark Search feature is used
directly after an Edit Search (see page
17) was performed, the Pa/rncorder will
stop approximately where the Edit
Search was begun, regardless of
whether it begins a blank portion of tape
or not.
29
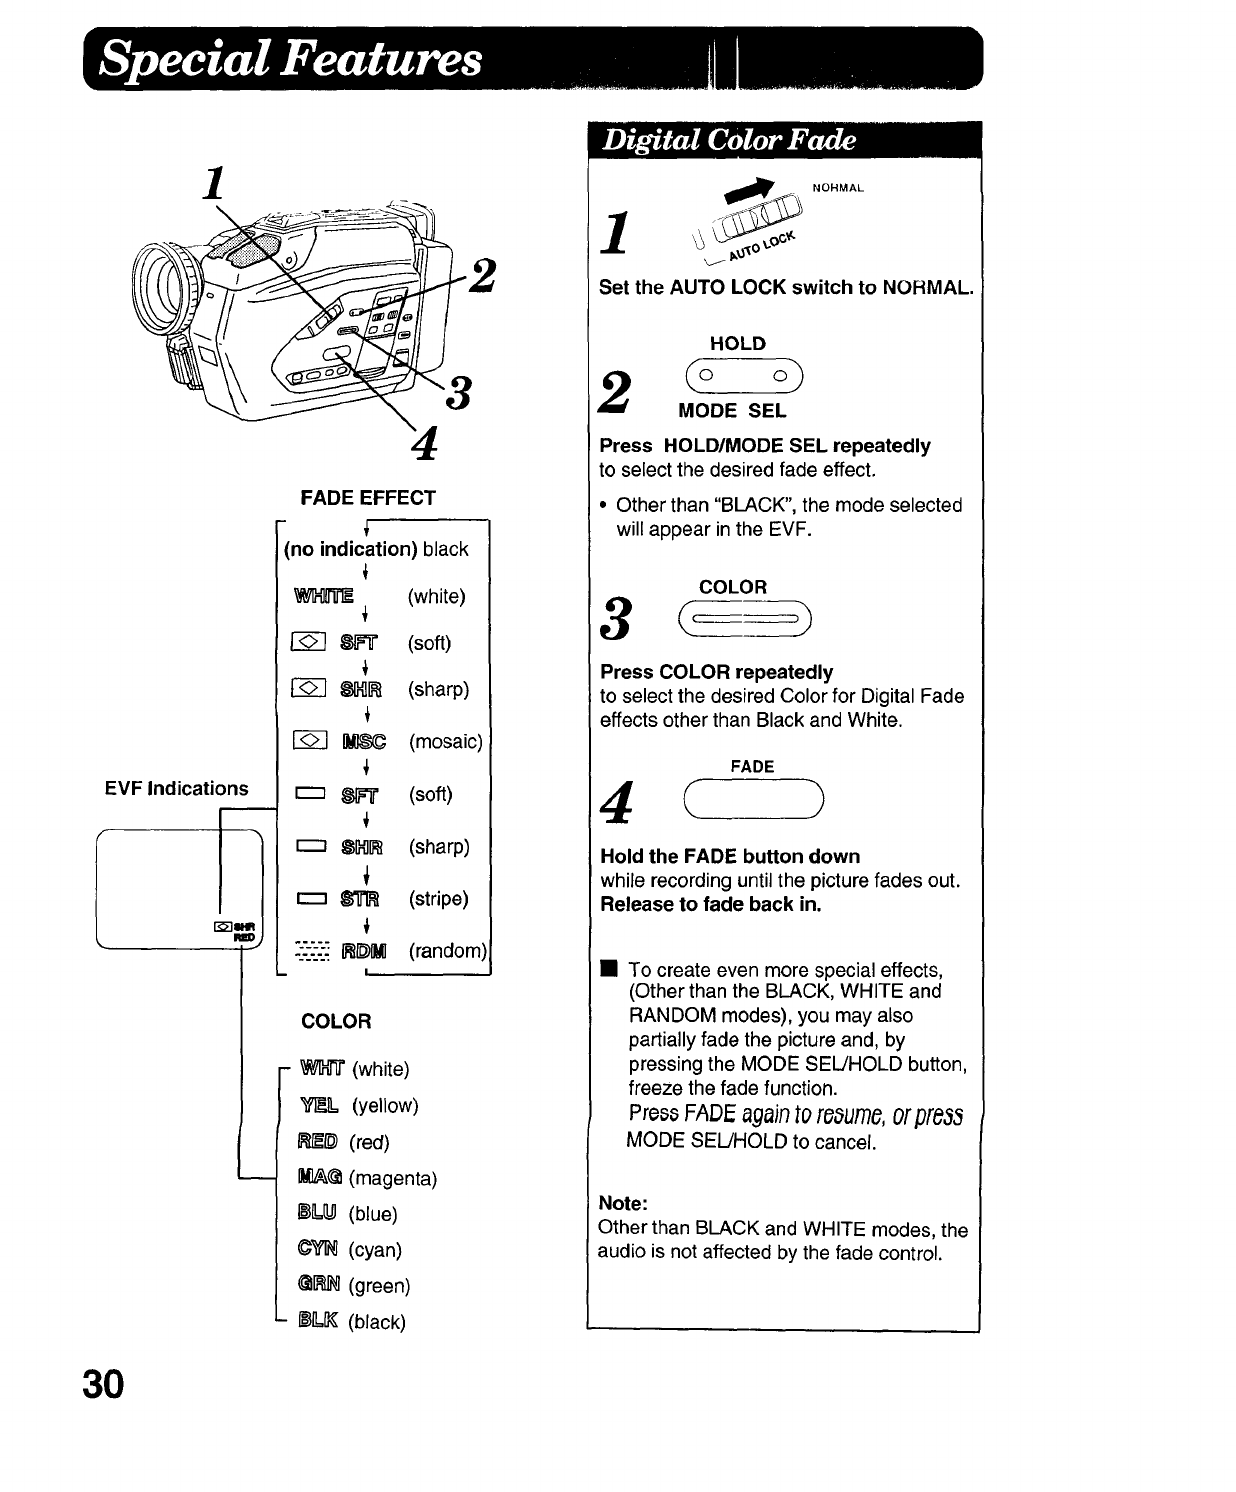
1
EVF Indications
3O
4
FADE EFFECT
'no indication) black
_I_[]DIfE (white)
I-_ 8Fir (soft)
8IH]I_ (sharp)
i
_ (mosaic)
r-_ 8FT (soft)
r--_ 8M[_ (sharp)
8"[]'R (stripe)
-'.----_F_I_M (random)
I
COLOR
- _ (white)
_L (yellow)
_# (red)
IM]_@(magenta)
I_ILI_ (blue)
¢'_ (cyan)
@1]_ (green)
I_IL_ (black)
i'__ NOHMAL
Set the AUTO LOCK switch to NORMAL.
HOLD
2MODE SEL
Press HOLD/MODE SEL repeatedly
to select the desired fade effect.
•Other than "BLACK", the mode selected
will appear in the EVF.
COLOR
Press COLOR repeatedly
to select the desired Color for Digital Fade
effects other than Black and White.
FADE
4 ( ?
Hold the FADE button down
while recording until the picture fades out.
Release to fade back in.
• To create even more special effects,
(Other than the BLACK, WHITE and
RANDOM modes), you may also
partially fade the picture and, by
pressing the MODE SEL/HOLD button,
freeze the fade function.
Press FADI_againto reaume,or pre33
MODE SEL/HOLD to cancel.
Note:
Other than BLACK and WHITE modes, the
audio is not affected by the fade control.
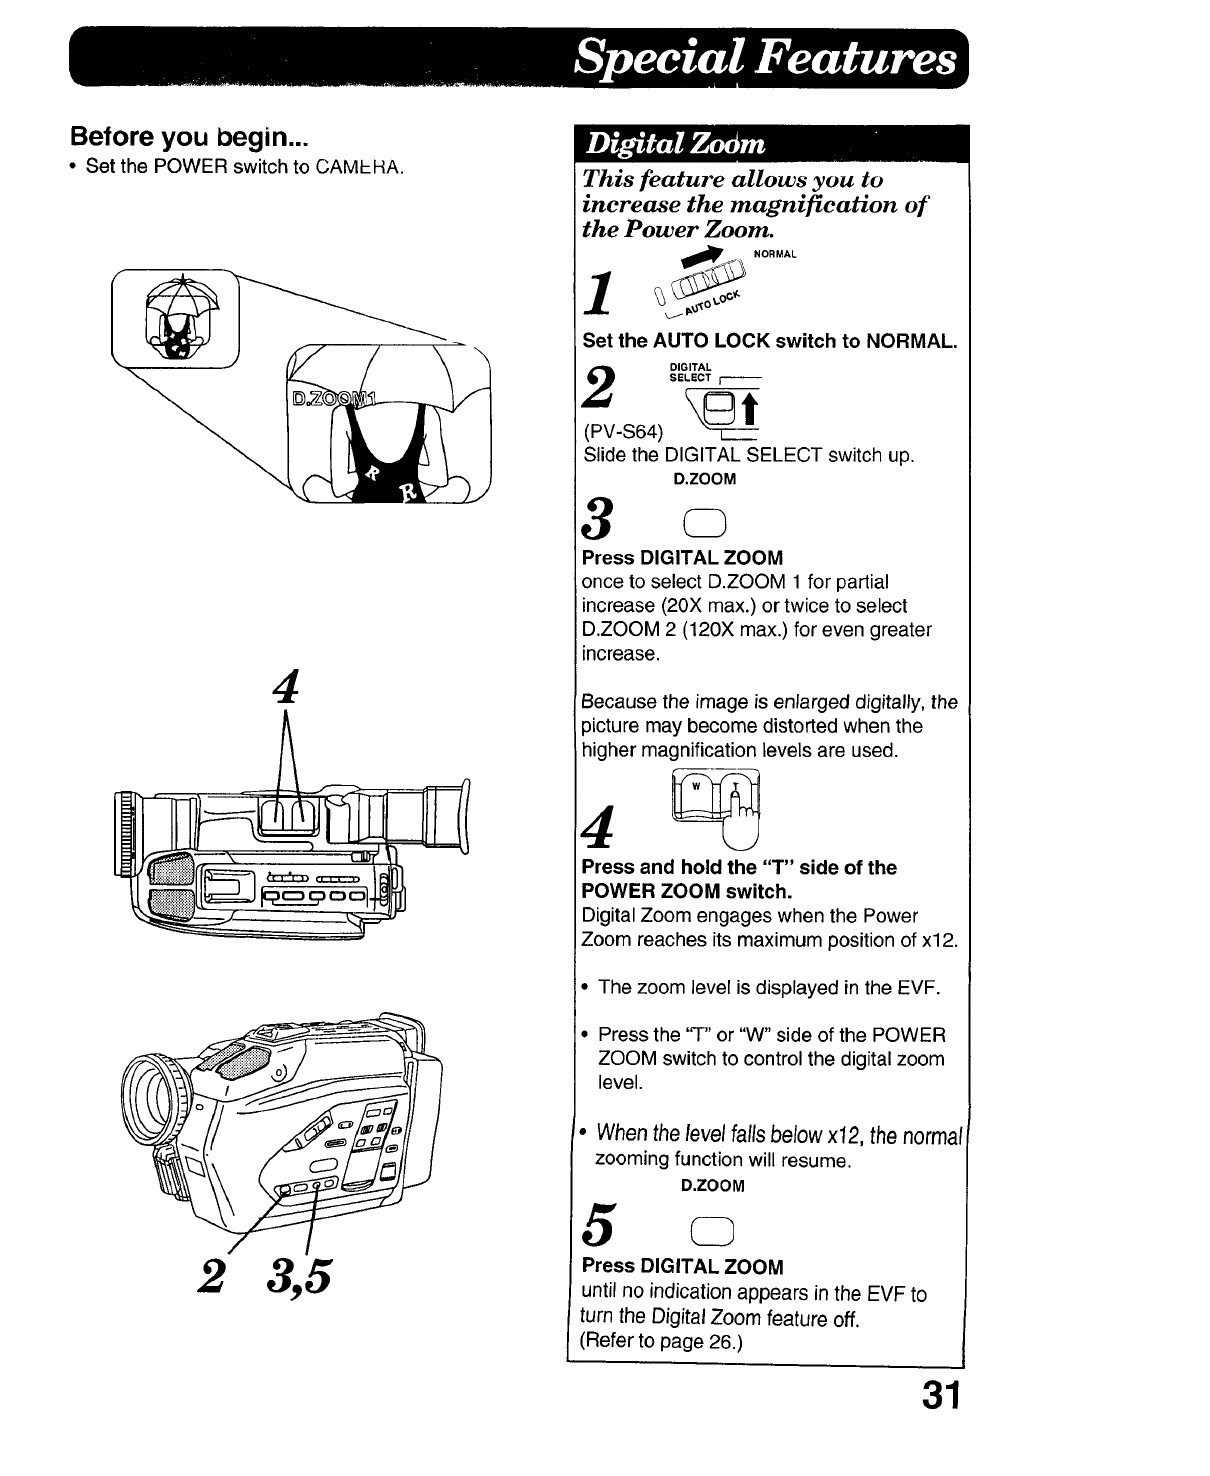
Before you begin...
• Set the POWER switch to CAMEHA.
4
2 3,5
This feature allows you to
increase the magnification of
the Power Zoom.
_NORMAL
1_ _-_o
Set the AUTO LOCK switch to NORMAL.
DIGITAL
SELECT _---
(PV-S64)
Slide the DIGITAL SELECT switch up.
D.ZOOM
3o
Press DIGITAL ZOOM
once to select D.ZOOM 1 for partial
increase (20X max.) or twice to select
D.ZOOM 2 (120X max.) for even greater
increase.
Because the image is enlarged digitally, the
3icture may become distorted when the
higher magnification levels are used.
Press and hold the "T" side of the
POWER ZOOM switch.
Digital Zoom engages when the Power
Zoom reaches its maximum position of x12.
• The zoom level is displayed in the EVF.
• Press the "r" or "W" side of the POWER
ZOOM switch to control the digital zoom
level.
• When the level fallsbelow x12, the normal
zooming function will resume
D.ZOOM
5
Press DIGITAL ZOOM
until no indication appears in the EVF to
turn the Digital Zoom feature off.
(Refer to page 26.)
31
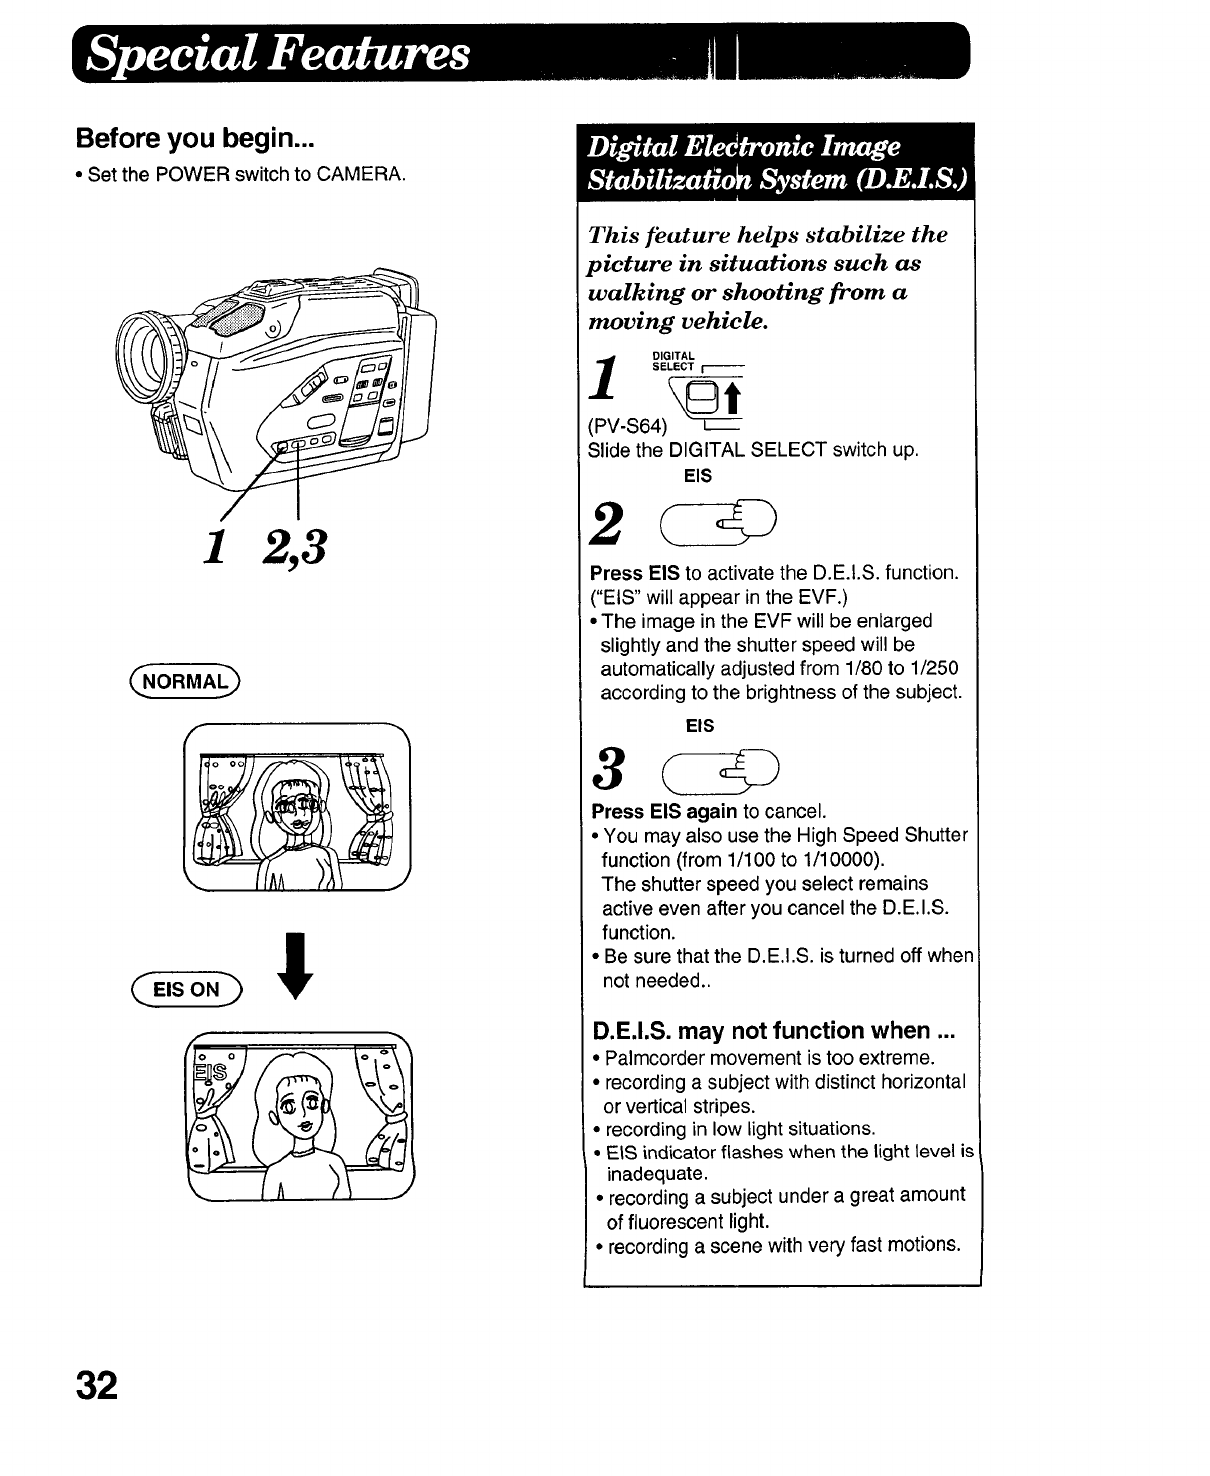
Before you begin...
•Set the POWER switch to CAMERA.
CNORMA D
C,,so.h !
f
32
This feature helps stabilize the
picture in situations such as
walking or shooting from a
moving vehicle.
DIGITAL
SELECT I
(PV-S64) --£z--_
Slide the DIGITAL SELECT switch up.
EIS
2@
Press EIS to activate the D.E.I.S. function.
("EIS" will appear in the EVF.)
• The image in the EVF will be enlarged
slightly and the shutter speed will be
automatically adjusted from 1/80 to 1/250
according to the brightness of the subject.
EIS
3@
Press EIS again to cancel.
• You may also use the High Speed Shutter
function (from 1/100 to 1/10000).
The shutter speed you select remains
active even after you cancel the D.E.I.S.
function.
•Be sure that the D.E,I.S. is turned off when
not needed..
D.E.I.S. may not function when ...
• Palmcorder movement is too extreme.
• recording a subject with distinct horizontal
or vertical stripes.
• recording in low light situations.
• EtS indicator flashes when the light level is
inadequate.
• recording a subject under a great amount
of fluorescent light.
• recording a scene with very fast motions.
LWide Screen")
IQI IQI
_AUTO LOCK_
___DIGITALSELECT_
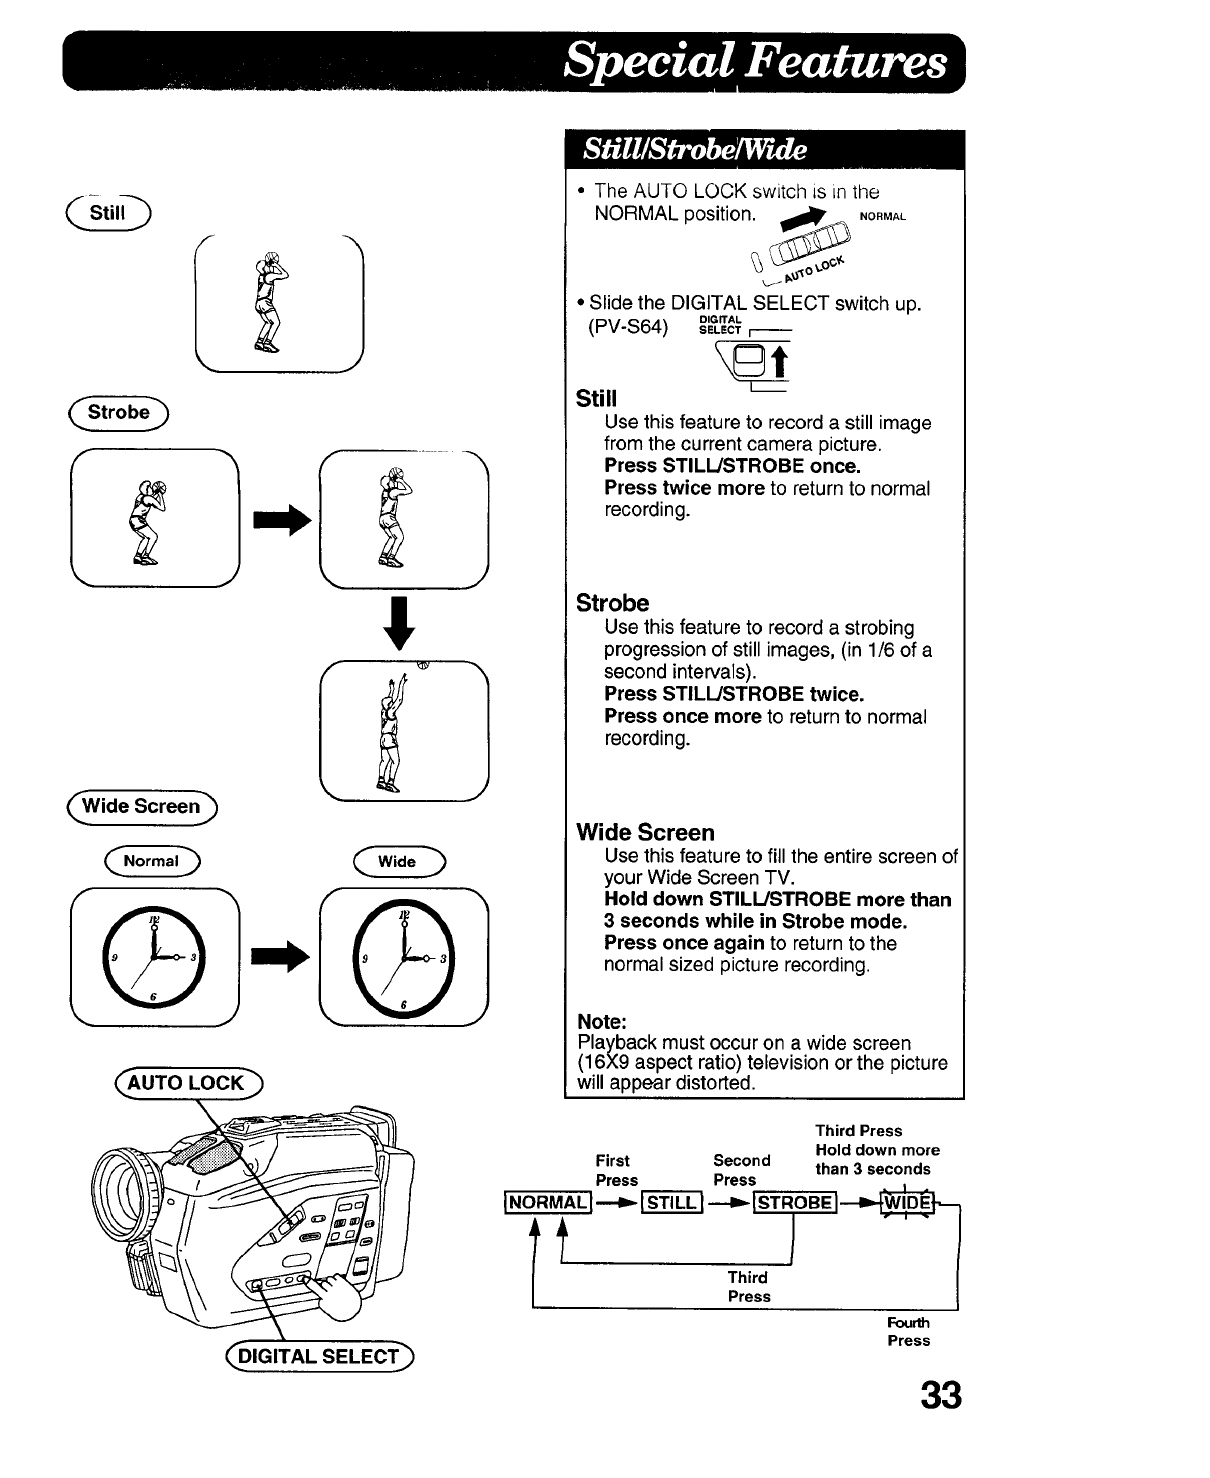
•The AUTO LOCK switch is in the
NORMAL position. _ ,O,MAL
,j. p.o"_°
•Slide the DIGITAL SELECT switch up.
(PV-S64) o,GrrAL
SELECT r--
[m
Still
Use this feature to record a still image
from the current camera picture.
Press STILL/STROBE once.
Press twice more to return to normal
recording.
Strobe
Use this feature to record a strobing
progression of still images, (in 1/6 of a
second intervals).
Press STILL/STROBE twice.
Press once more to return to normal
recording.
Wide Screen
Use this feature to fill the entire screen o
your Wide Screen TV.
Hold down STILL!STROBE more than
3 seconds while in Strobe mode.
Press once again to return to the
normal sized picture recording.
Note:
Playback must occur on a wide screen
(16X9 aspect ratio) television or the picture
will appear distorted.
Third Press
Hold down more
First Second than 3 seconds
Press Press
INORMALI--- --- IsTROBEI
Fourth
Press
33
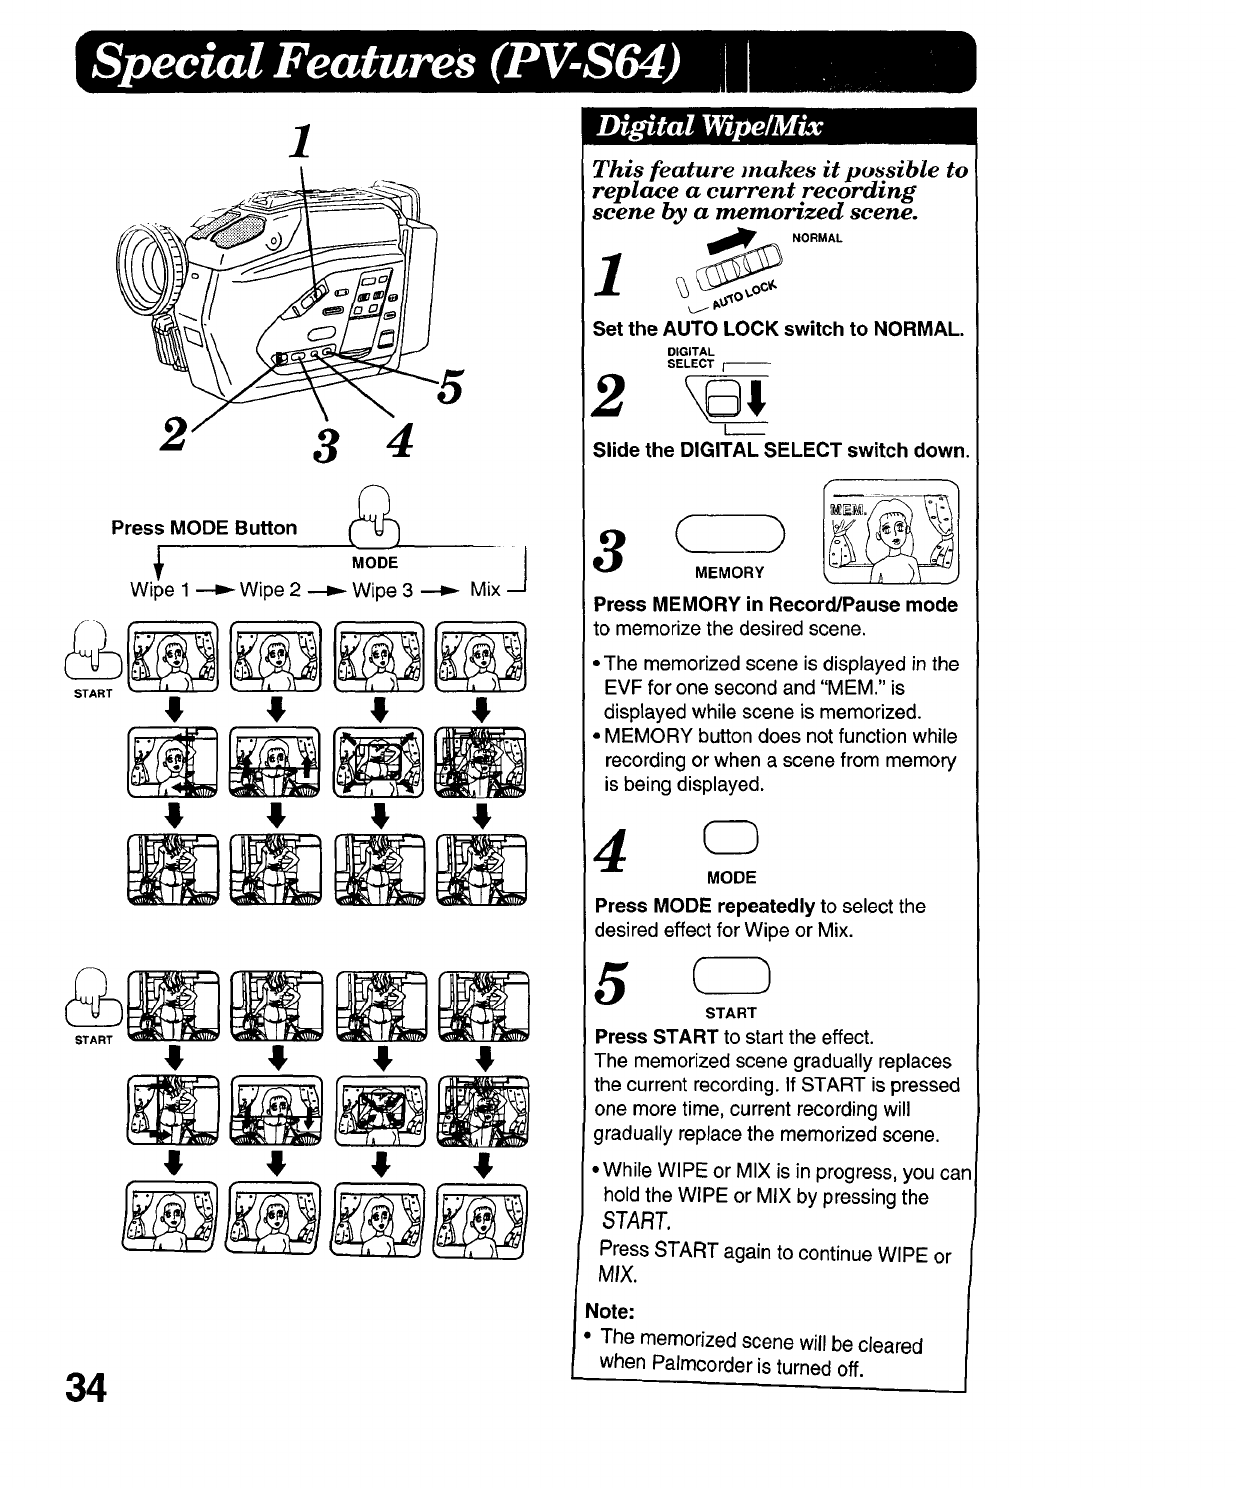
1
2 3 4
Press MODE Button
Wipe 1 _ Wipe 2 _ Wipe 3 _ Mix
34
This feature makes it possible to
replace acurrent recording
scene by a memorized scene.
NORMAL
1y _o
Set the AUTO LOCK switch to NORMAL.
DiGiTAL
SELECT _--
12 Re;
L_____
Slide the DIGITAL SELECT switch down.
3( )
MEMORY
Press MEMORY in Record/Pause mode
to memorize the desired scene.
•The memorized scene is displayed in the
EVF for one second and "MEM." is
displayed while scene is memorized.
• MEMORY button does not function while
recording or when a scene from memory
is being displayed.
4c3
MODE
Press MODE repeatedly to select the
desired effect for Wipe or Mix.
5CD
START
Press START to start the effect.
The memorized scene gradually replaces
the current recording. If START is pressed
one more time, current recording will
gradually replace the memorized scene.
•While WIPE or MIX is in progress, you can
hold the WIPE or MIX by pressing the
START.
Press START again to continue WIPE or
MIX.
Note:
•The memorized scene will be cleared
when Palmcorder is turned off.
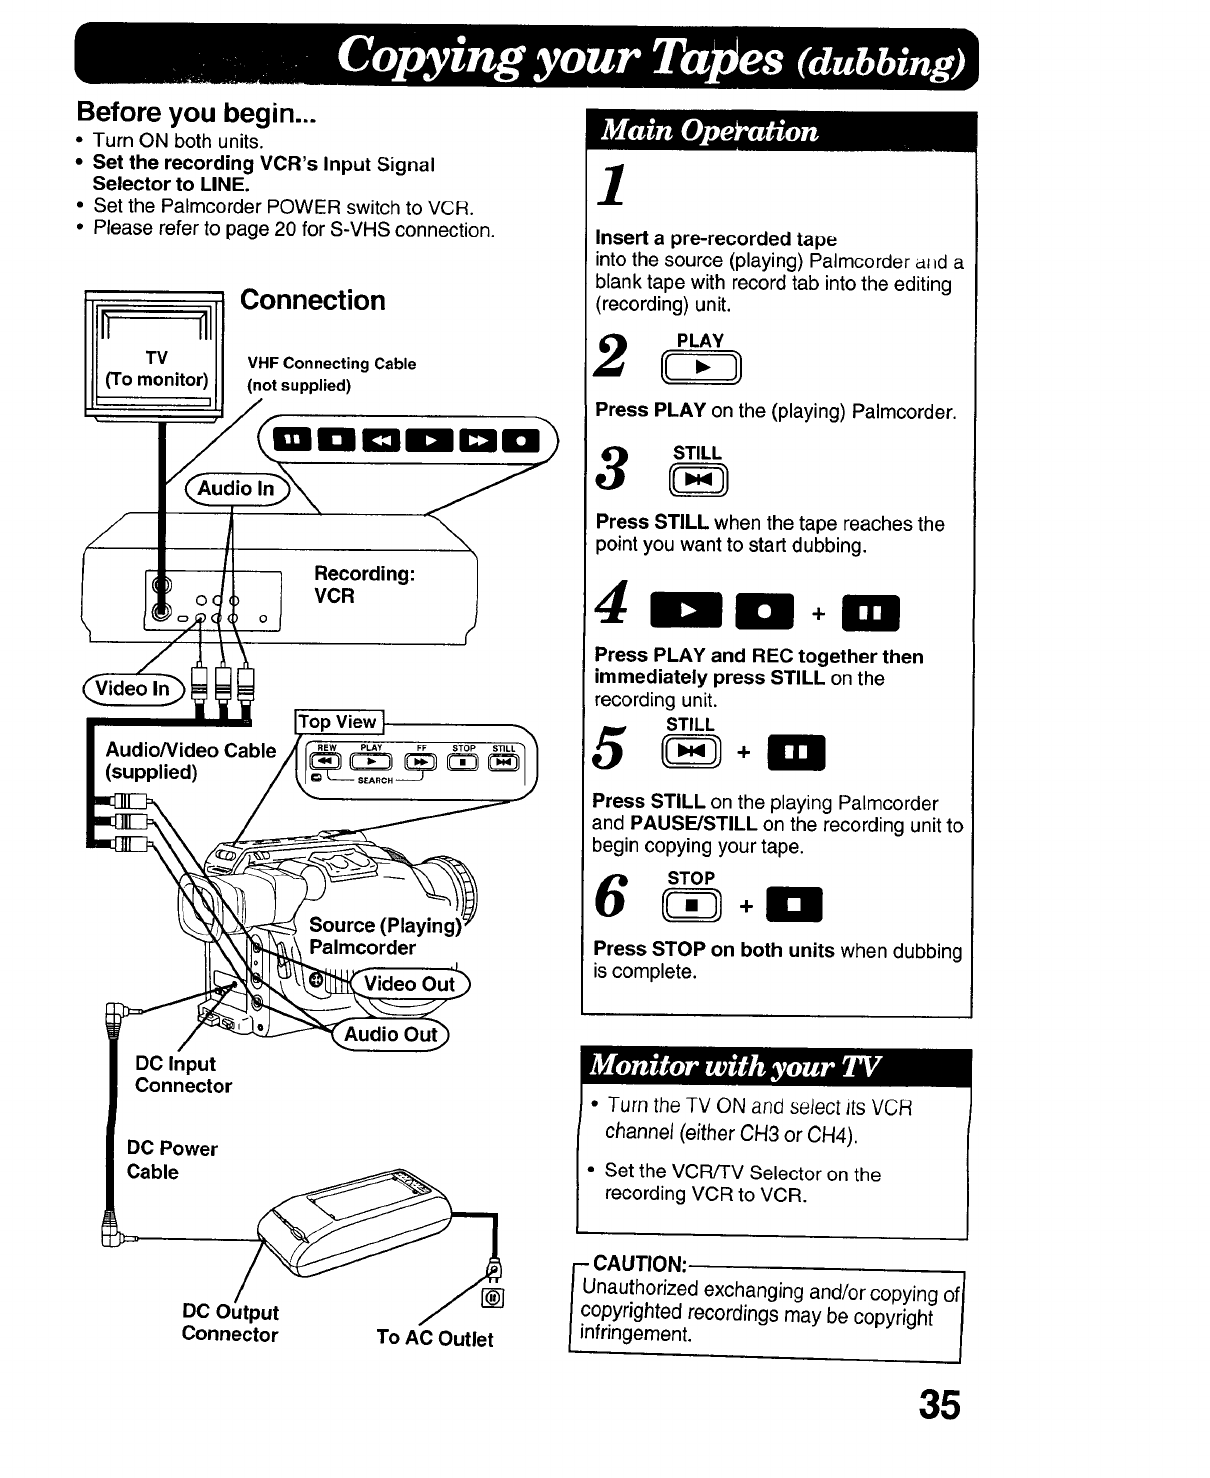
Before you begin...
•Turn ON both units.
• Set the recording VCR's Input Signal
Selector to LINE.
• Set the Palmcorder POWER switch to VCR.
• Please refer to page 20 for S-VHS connection.
Connection
n
TV VHF Connecting Cable
(To m°nit°r)_ll (not supplied)
Recording:
VCR
i ITop View I _.
Audio/Video Cabletlc_v_ _ _ _ _1
__lmcorder 4.
,0eoou,
'DO Input
Connector
DC Power
Cable
DC 0
Connector To AC Outlet
1
Insert a pre-recorded tape
into the source (playing) Paimcorder al=d a
blank tape with record tab into the editing
(recording) unit.
Press PLAY on the (playing) Palmcorder.
Press STILL when the tape reaches the
point you want to start dubbing.
+
Press PLAY and REC together then
immediately press STILL on the
recording unit.
STILL
5 +m
Press STILL on the playing Palmcorder
and PAUSE/STILL on the recording unit to
begin copying your tape.
STOP
Press STOP on both units when dubbing
is complete.
• Turn the TV ON and select its VCR
channel (either CH3 or CH4).
• Set the VCR/TV Selector on the
recording VCR to VCR.
-CAUTION:.
Unauthorized exchanging and/or copying of/
copyrighted recordings may be copyright 1
infringement.
35
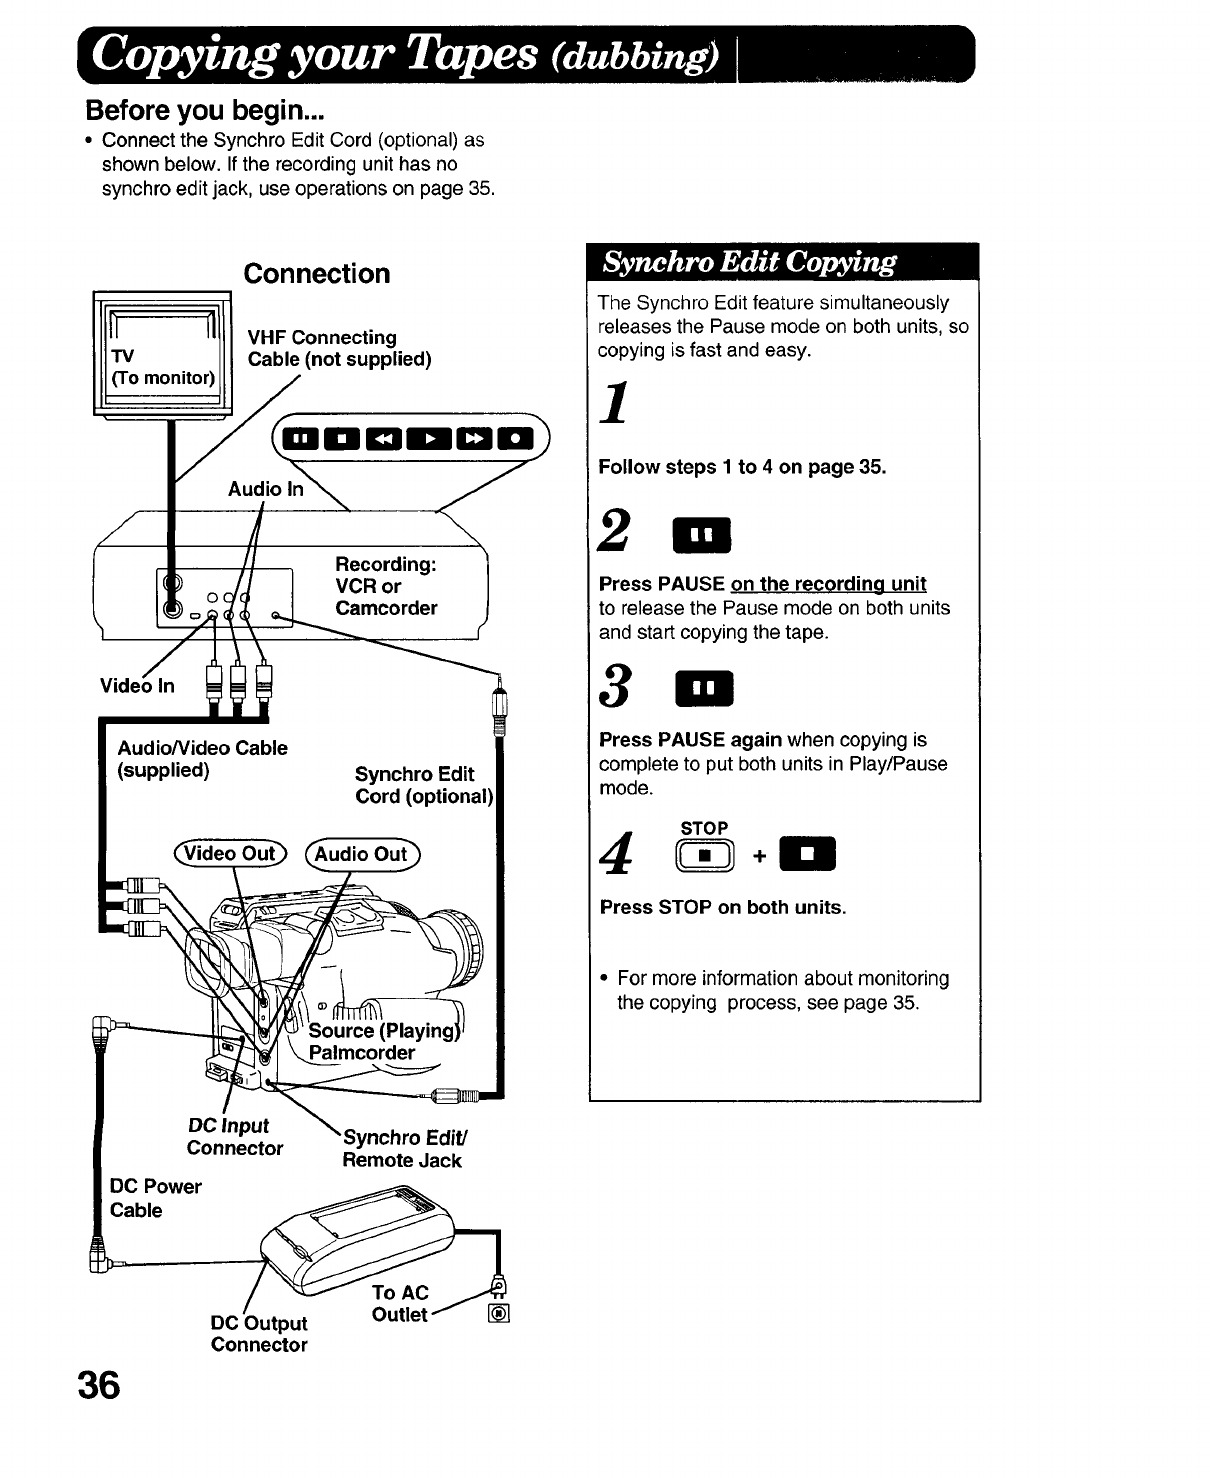
Before you begin...
•Connect the Synchro Edit Cord (optional) as
shown below. If the recording unit has no
synchro edit jack, use operations on page 35.
Connection
VHF Connecting
Cable (not supplied)
Recording:
VCR or
Camcorder
Audio/Video Cable
(supplied) Synchro Edit
Cord (optional)
_udio
The Synchro Edit feature simultaneously
releases the Pause mode on both units, so
copying is fast and easy.
1
Follow steps 1to 4 on page 35.
2
Press PAUSE on the recording unit
to release the Pause mode on both units
and start copying the tape.
3
Press PAUSE again when copying is
complete to put both units in Play/Pause
mode.
STOP
4
Press STOP on both units.
•For more information about monitoring
the copying process, see page 35.
36
DC Input Synchro Edit/
Connector Remote Jack
DC Power
Cable
DC Output
Connector
Before you begin...
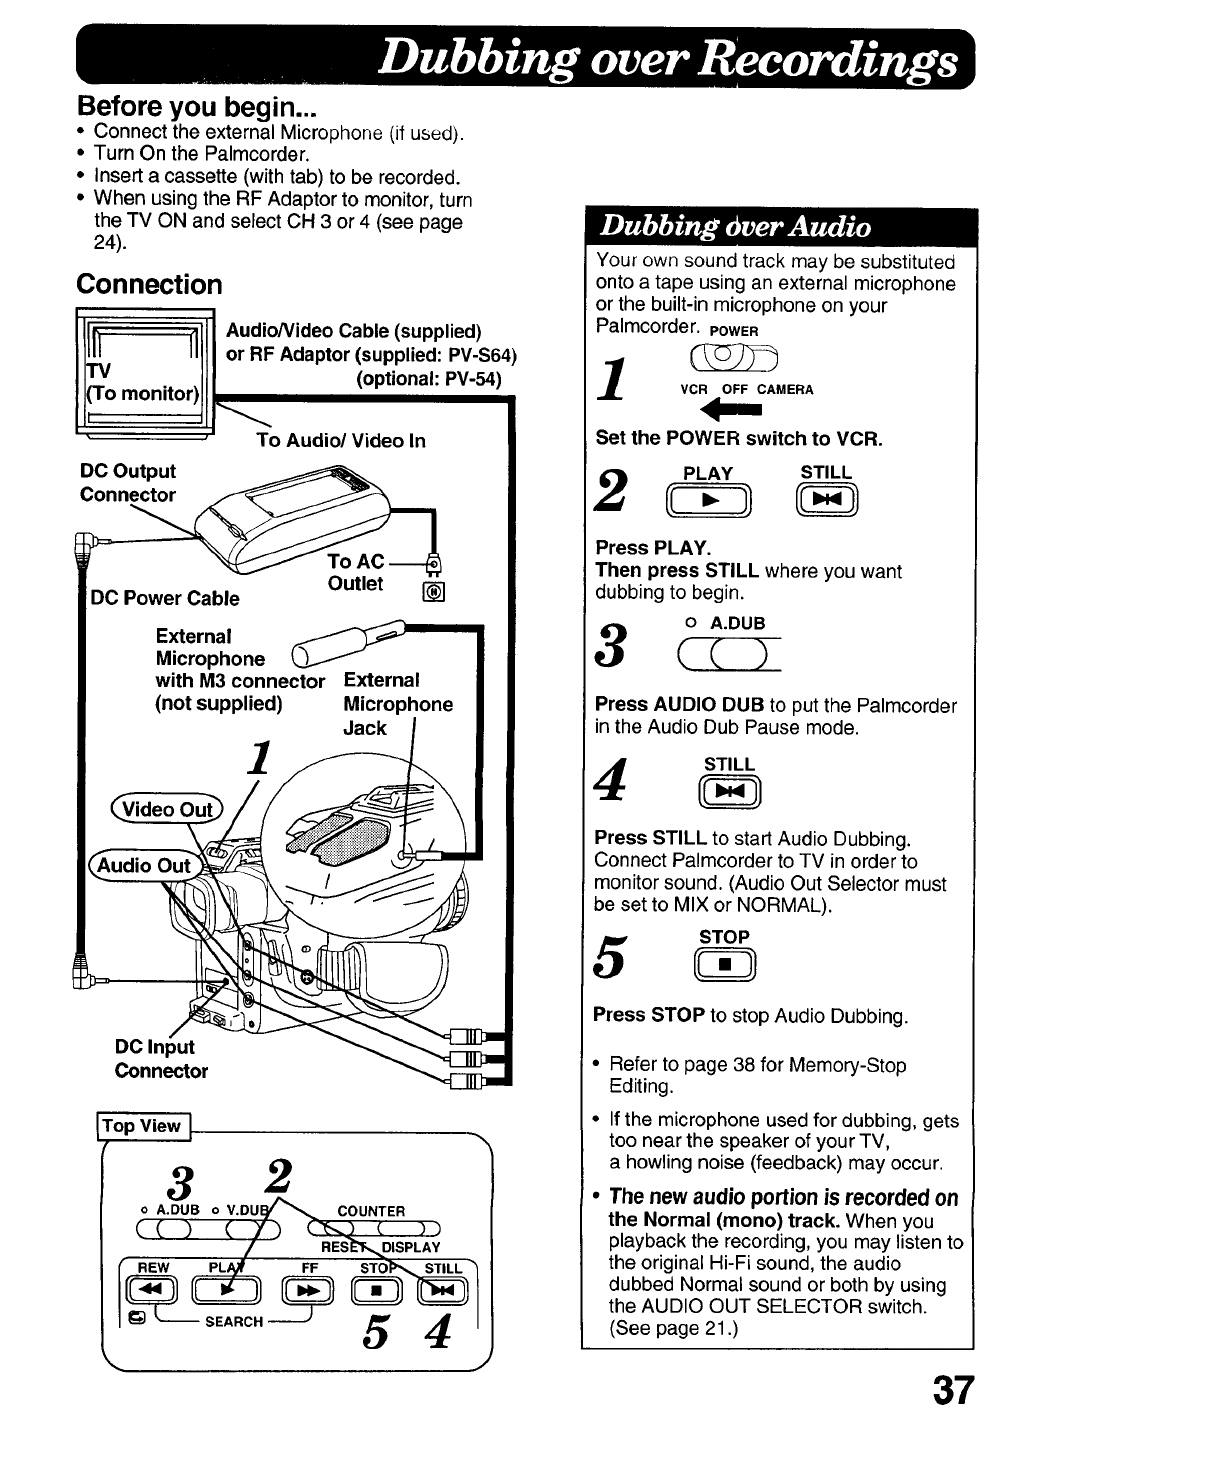
• Connect the external Microphone (if used).
• Turn On the Palmcorder.
• Insert a cassette (with tab) to be recorded.
• When using the RF Adaptor to monitor, turn
the TV ON and select CH 3 or 4 (see page
24).
Connection
.111Audio/Video Cable (supplied)
_111t or RF Adaptor (supplied: PV-S64)
..11| (optional: PV-54)
m°niz°qll __
•To Audio/Video In
DC Output
Connector
DC Power Cable
1
[]
DC Input
Connector
Top View I
r32
o A.DUB o V.DU_,.,_ COUNTER
/RES E'T',_DISPL AY
('- REW PLA_ FF STO]_,_ STILL
Your own sound track may be substituted
onto a tape using an external microphone
or the built-in microphone on your
Palmcorder. POWER
VCR OFF CAMERA
Set the POWER switch to VCR.
PLAY STILL
Press PLAY.
Then press STILL where you want
dubbing to begin.
0A.DUB
3
Press AUDIO DUB to put the Palmcorder
inthe Audio Dub Pause mode.
4
Press STILL to start Audio Dubbing.
Connect Palmcorder to TV in order to
monitor sound. (Audio Out Selector must
be set to MIX or NORMAL).
5
Press STOP to stop Audio Dubbing.
Refer to page 38 for Memory-Stop
Editing.
If the microphone used for dubbing, gets
too near the speaker of your TV,
a howling noise (feedback) may occur.
The new audio portion is recorded on
the Normal (mono) track. When you
playback the recording, you may fisten to
the original Hi-Fi sound, the audio
dubbed Normal sound or both by using
the AUDIO OUT SELECTOR switch.
(See page 21.)
37

Before you begin...
• Turn ON the Palmcorder.
•Insert a cassette (with tab) to be dubbed.
• To monitor the dubbing, see connections on
page 39.
1
Top View I
3
o A.DUB o V.DUB
SEARCH
\54
38
Your Palmcorder uses advanced Flyir=g
Erase Head technology to produce
exceptionally clean edits. You can r6place
existing video segments with new ones such
as a title etc. The original Hi-Fi sound is
erased while the Normal (mono) sound
remains unchanged.
POWER
1VCR OFF CAMERA
Set the POWER switch to VCR.
PLAY STILL
Press PLAY to locate the starting point for
dubbing.
Then press STILL where dubbing is to
begin.
•To preset the stopping point of your
replacement segment, see the Memory-
Stop Editing section below.
0V.DUB
Press VIDEO DUB to put the Palmcorder
in Video Dub Pause mode.
STILL
Press RECORD/PAUSE or STILL to start
taping a replacement video segment.
Press STOP to stop dubbing.
You can set an automatic Edit stopping
point.
In step 2, locate the point at which you
want the dubbing to stop.
_) Press DISPLAY twice.
(_ Then press RESET to reset the
Counter Memory to M0000.
(_) Now rewind to the editing start point,
and continue with steps 2-4. The tape
will now stop automatically at "M0000".
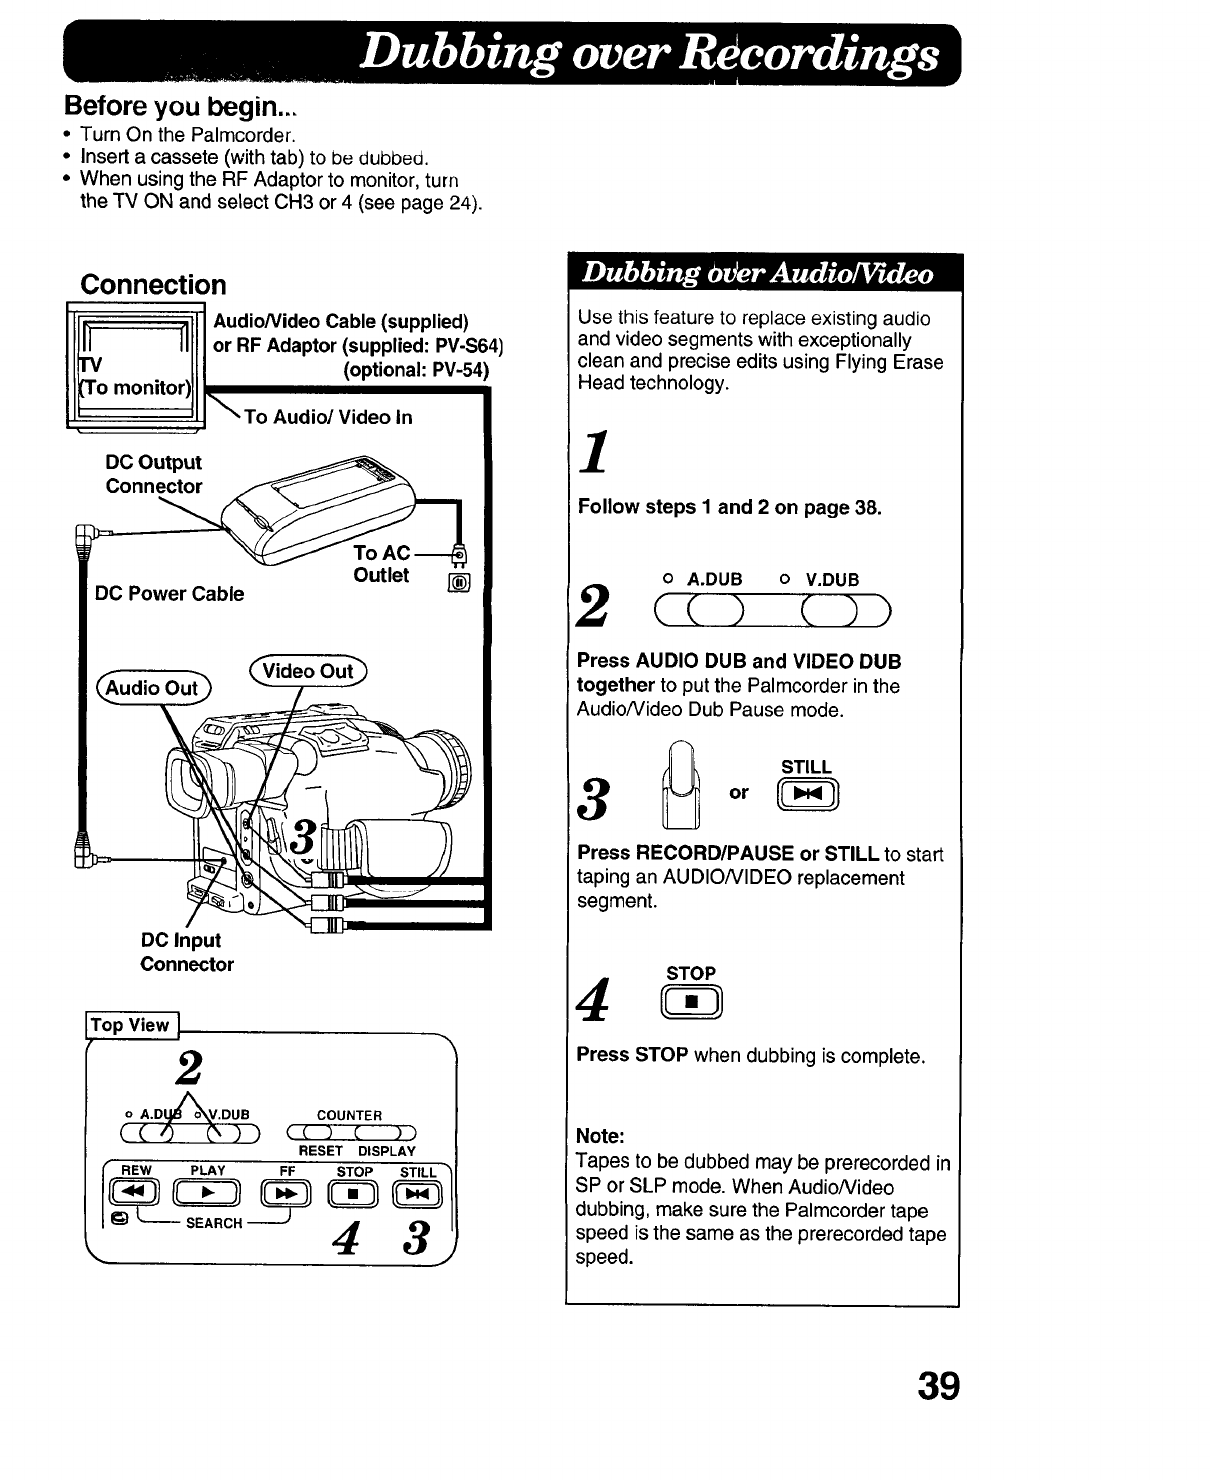
Before you begin...
•Turn On the Palmcorder.
•Insert a cassete (with tab) to be dubbea.
•When using the RF Adaptor to monitor,turn
the TV ON and select CH3 or 4 (see page 24).
Connection
III1_ _1111Audio/Video Cable (supplied)
IlJll III or RF Adaptor (supplied: PV-S64)
IF III (optional:PV-54)
i Tomon.o,)I\
L' '!l_To Audio/Video In
DC Output
Connector
To
Outlet
DC Input
Connector
Top View ]
2
o A.Dt_V.DUB
((0 _))
rREW PLAY FF
SEARCH
COUNTER
c( ) ( ))
RESET DISPLAY
STOP STILL
4 3 I
Use this feature to replace existing audio
and video segments with exceptionally
clean and precise edits using Flying Erase
Head technology.
1
Follow steps I and 2 on page 38.
o A.DUB o V.DUB
Press AUDIO DUB and VIDEO DUB
together to put the Palmcorder in the
Audiofideo Dub Pause mode.
STILL
3
Press RECORD/PAUSE or STILL to start
taping an AUDIONIDEO replacement
segment.
STOP
4
Press STOP when dubbing is complete.
Note:
Tapes to be dubbed may be prerecorded in
SP or SLP mode. When Audio/Video
dubbing, make sure the Palmcorder tape
speed is the same as the prerecorded tape
speed.
39
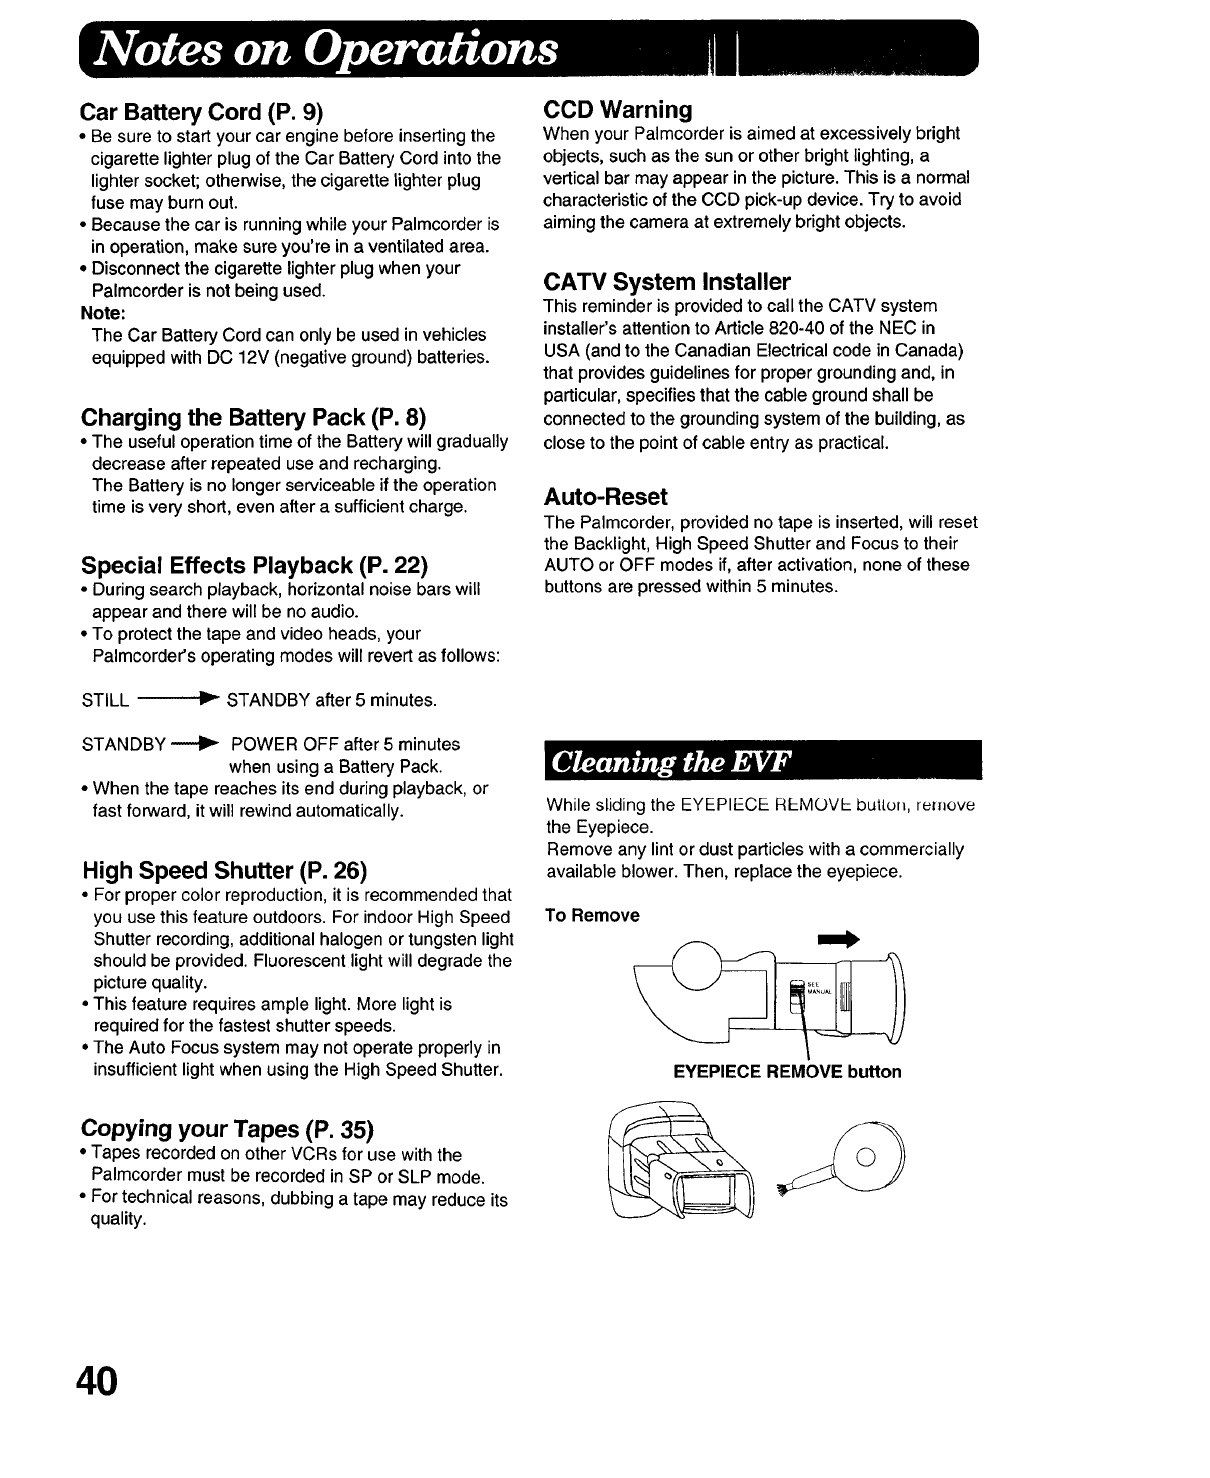
Car Battery Cord (P. 9)
•Be sure to start your car engine before inserting the
cigarette lighter plug of the Car Battery Cord into the
lighter socket; otherwise, the cigarette lighter plug
fuse may burn out.
•Because the car is running while your Palmcorder is
in operation, make sure you're in a ventilated area.
•Disconnect the cigarette lighter plug when your
Palmcorder is not being used.
Note:
The Car Battery Cord can only be used in vehicles
equipped with DC 12V (negative ground) batteries.
Charging the Battery Pack (P. 8)
•The useful operation time of the Battery will gradually
decrease after repeated use and recharging.
The Battery is no longer serviceable if the operation
time is very short, even after a sufficient charge.
Special Effects Playback (P. 22)
•During search playback, horizontal noise bars will
appear and there will be no audio.
•To protect the tape and video heads, your
Palmcorder's operating modes will revert as follows:
STILL ,-- STANDBY after 5 minutes.
STANDBY _ POWER OFF after 5 minutes
when using a Battery Pack.
• When the tape reaches its end during playback, or
fast forward, it will rewind automatically.
High Speed Shutter (P. 26)
•For proper color reproduction, it is recommended that
you use this feature outdoors. For indoor High Speed
Shutter recording, additional halogen or tungsten light
should be provided. Fluorescent light will degrade the
picture quality.
•This feature requires ample light. More lightis
required for the fastest shutter speeds.
•The Auto Focus system may not operate properly in
insufficient light when using the High Speed Shutter.
Copying your Tapes (P. 35)
• Tapes recorded on other VCRs for use with the
Palmcorder must be recorded in SP or SLP mode.
•For technical reasons, dubbing a tape may reduce its
quality.
CCD Warning
When your Palmcorder is aimed at excessively bright
objects, such as the sun or other bright lighting, a
vertical bar may appear in the picture. This is a normal
characteristic of the CCD pick-up device. Try to avoid
aiming the camera at extremely bright objects.
CATV System Installer
This reminder is provided to call the CATV system
installer's attention to Article 820-40 of the NEC in
USA (and to the Canadian Electrical code in Canada)
that provides guidelines for proper grounding and, in
particular, specifies that the cable ground shall be
connected to the grounding system of the building, as
close to the point of cable entry as practical.
Auto-Reset
The Palmcorder, provided no tape is inserted, will reset
the Backlight, High Speed Shutter and Focus to their
AUTO or OFF modes if, after activation, none of these
buttons are pressed within 5 minutes.
While sliding the EYEPIECE REMOVE but[of_, re_r=ove
the Eyepiece.
Remove any lint or dust particles with a commercially
available blower. Then, replace the eyepiece.
To Remove
EYEPIECE REMOVE button
40
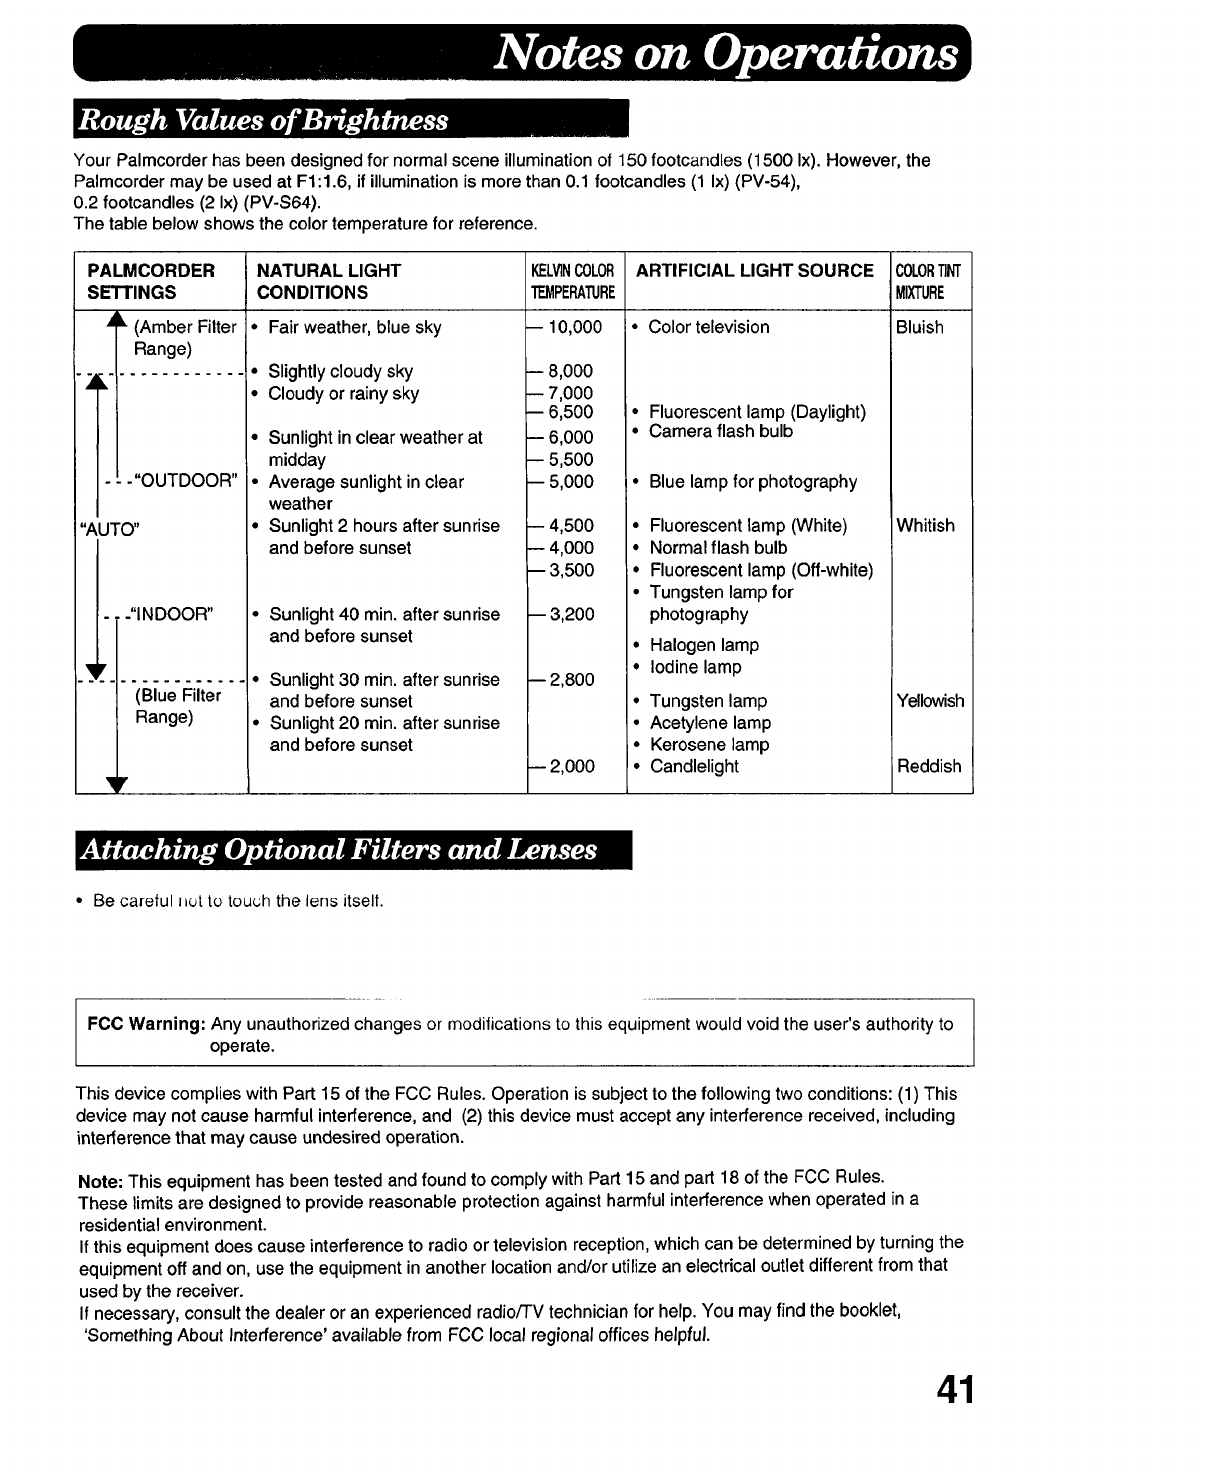
Your Palmcorder has been designed for normal scene illumination of 150 footcandles (1500 Ix). However, the
Palmcorder may be used at F1:1.6, if illumination is more than 0.1 footcandles (1 Ix) (PV-54),
0.2 footcandles (2 Ix) (PV-S64).
The table below shows the color temperature for reference.
PALMCORDER
SETTINGS
,4k (Amber Filter *
Range)
_1;,...............
---"OUTDOOR" •
"AUTO" •
-. -"INDOOR"
(Blue Filter
Range)
'It
NATURAL LIGHT
CONDITIONS
Fair weather, blue sky
Slightly cloudy sky
Cloudy or rainy sky
KELVINCOLOR
TEMPERATURE
--10,000
--8,000
--7,000
--6,500
ARTIFICIAL LIGHT SOURCE C_OR_
MIXTURE
• Color television Bluish
Sunlight in clear weather at
midday
Average sunlight in clear
weather
Sunlight 2 hours after sunrise
and before sunset
• Sunlight 40 min. after sunrise
and before sunset
• Sunlight 30 min after sunrise
and before sunset
•Sunlight 20 rain after sunrise
and before sunset
-- 6,000
-- 5,500
-- 5,000
-- 4,500
-- 4,000
-- 3,500
-- 3,200
-- 2,800
-- 2,000
• Fluorescent lamp (Daylight)
• Camera flash bulb
Blue lamp for photography
• Fluorescent lamp (White)
• Normal flash bulb
• Fluorescent lamp (Off-white)
• Tungsten lamp for
photography
• Halogen lamp
• Iodine lamp
Whitish
•Tungsten lamp Yellowish
•Acetylene lamp
• Kerosene lamp
• Candlelight Reddish
• Be careful I=utto touch the lens itselt.
FCC Warning: Any unauthorized changes or modifications to this equipment would void the user's authority to
operate.
This device complies with Part 15 of the FCC Rules. Operation is subject to the following two conditions: (1) This
device may not cause harmful interference, and (2) this device must accept any interference received, including
interference that may cause undesired operation.
Note: This equipment has been tested and found to comply with Part 15 and part 18 of the FCC Rules.
These limits are designed to provide reasonable protection against harmful interference when operated in a
residential environment.
If this equipment does cause interference to radio or television reception, which can be determined by turning the
equipment off and on, use the equipment in another location and/or utilize an electrical outlet different from that
used by the receiver.
If necessary, consult the dealer or an experienced radio/TV technician for help. You may find the booklet,
'Something About Interference' available from FCC local regional offices helpful.
41
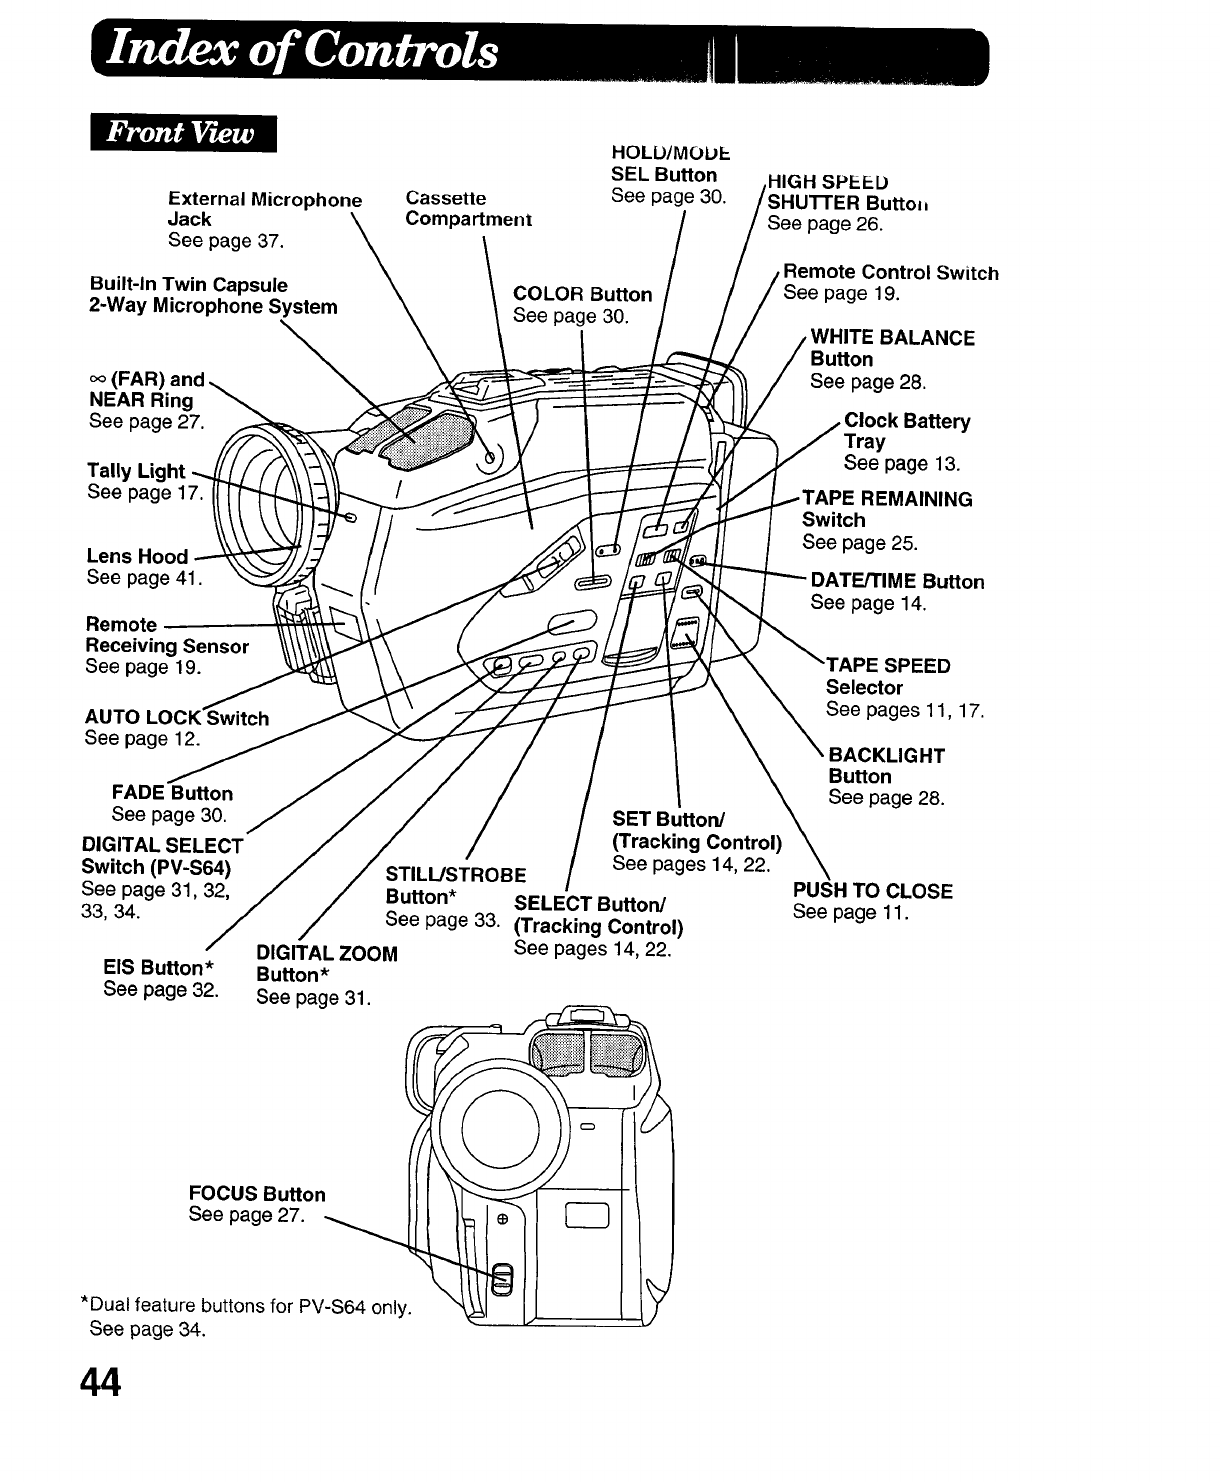
External Microphone
Jack
See page 37.
Built-In Twin Capsule
2-Way Microphone System
Cassette
Compartment
HOLD/MOUI-
SEL Button
See page 30.
COLOR
See page 30.
(FAR)
NEAR Ring
See page 27.
Tally Light
See page 17.
Lens Hood
See page 41.
Remote
Receiving Sensor
See page 19.
AUTO LOC_ itch
See page 12.
FADE Button
See page 30.
DIGITAL SELECT
Switch
See page 31, 32,
33, 34.
EIS Button*
See page 32.
SET Button/
(Tracking Control)
See pages 14, 22.
STILL/STROBE
Button* SELECT Button/
See page 33. (Tracking Control)
DIGITAL ZOOM See pages 14, 22.
Button*
See page 31.
FOCUS BuHon
See page 27.
*Dualfeature buttonsfor PV-S64 only.
See page 34.
HIGH SPEED
Buttol_
See page 26.
Remote Control Switch
See page 19.
BALANCE
Button
See page 28.
Clock Battery
See page 13.
REMAINING
Switch
See page 25.
DATE/TIME Button
See page 14.
_PESPEED
Selector
See pages 11, 17.
BACKLIGHT
Button
See page 28.
PUSH TO CLOSE
Seepage11.
44
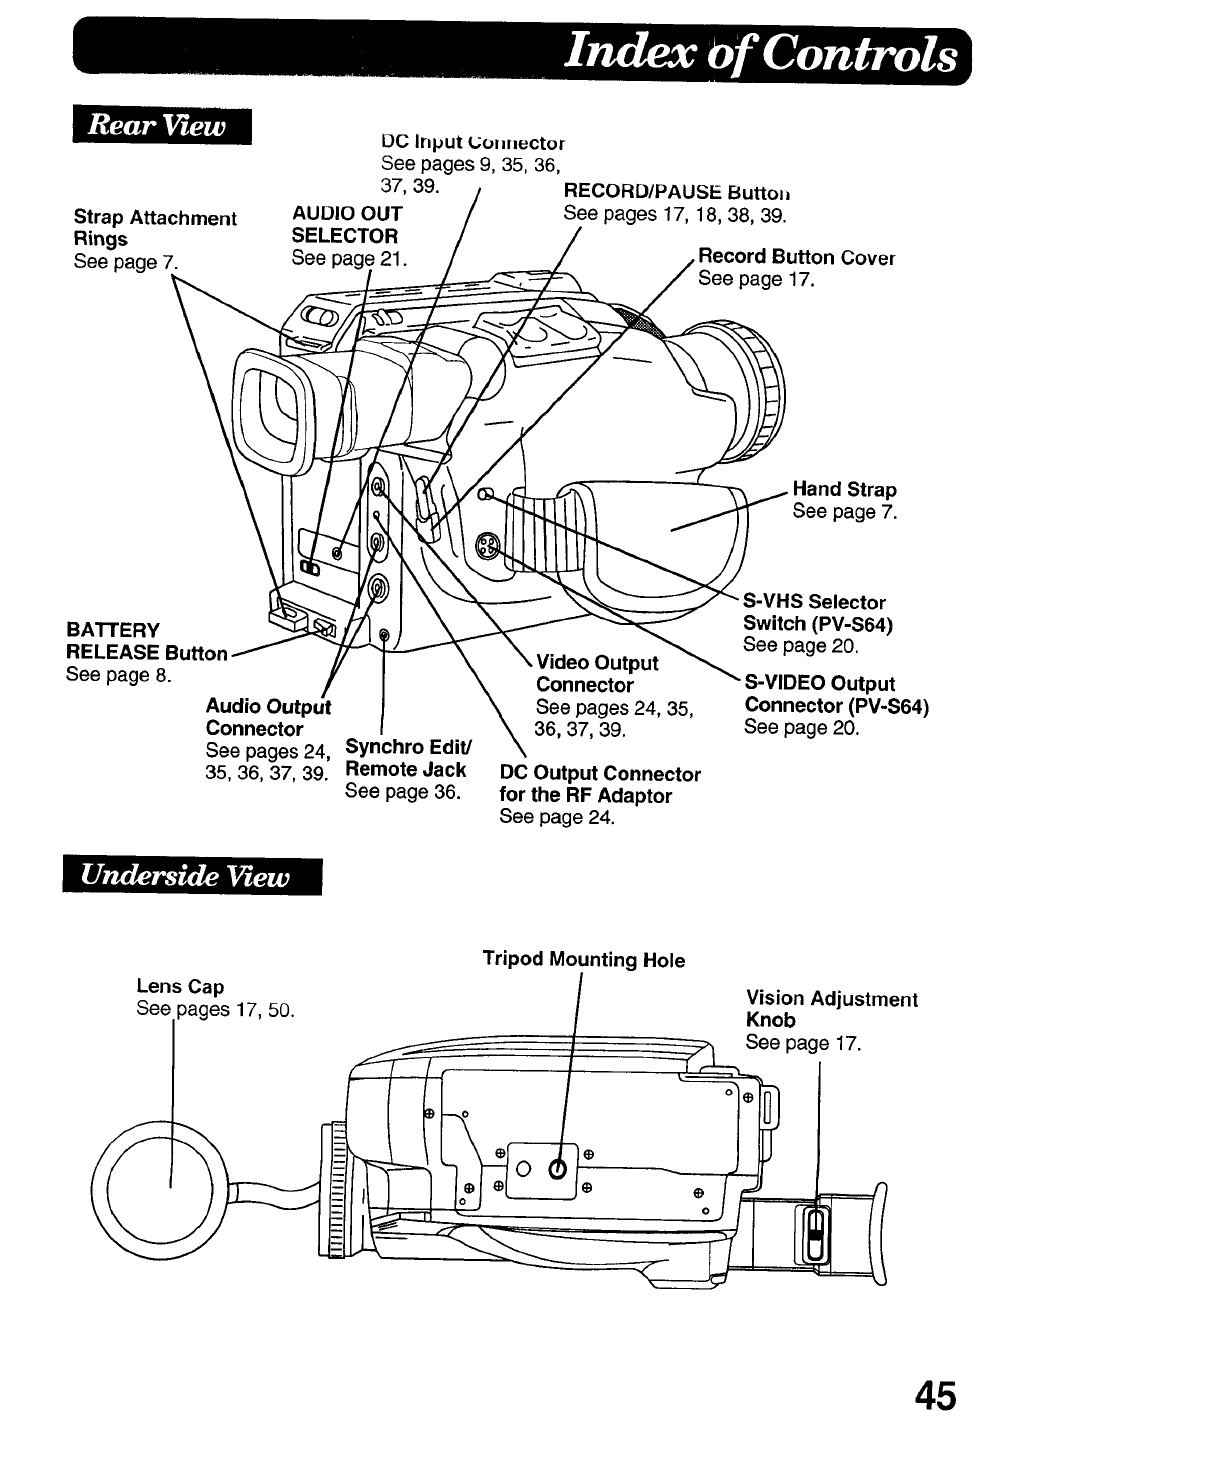
Strap Attachment
Rings
See page 7.
I_C Input Uol=nuctor
See pages 9, 35, 36,
37, 39. RECORD/PAUSE ButtolJ
AUDIO OUT See pages 17, 18, 38, 39.
SELECTOR
See pag_ 21. Record Button Cover
page 17.
Hand Strap
See page 7.
BATTERY
RELEASE Button
See page 8.
Audio Output
Connector
See pages 24,
35, 36, 37, 39.
Synchro Edit/
Remote Jack
See page 36.
utput
Connector
See pages 24, 35,
36, 37, 39.
DC Output Connector
for the RF Adaptor
See page 24.
tS Selector
Switch (PV-S64)
See page 20.
S-VIDEO Output
Connector (PV-S64)
See page 20.
Lens Cap
See pages 17, 50.
Tripod Mounting Hole
Vision Adjustment
Knob
See page 17.
III
45
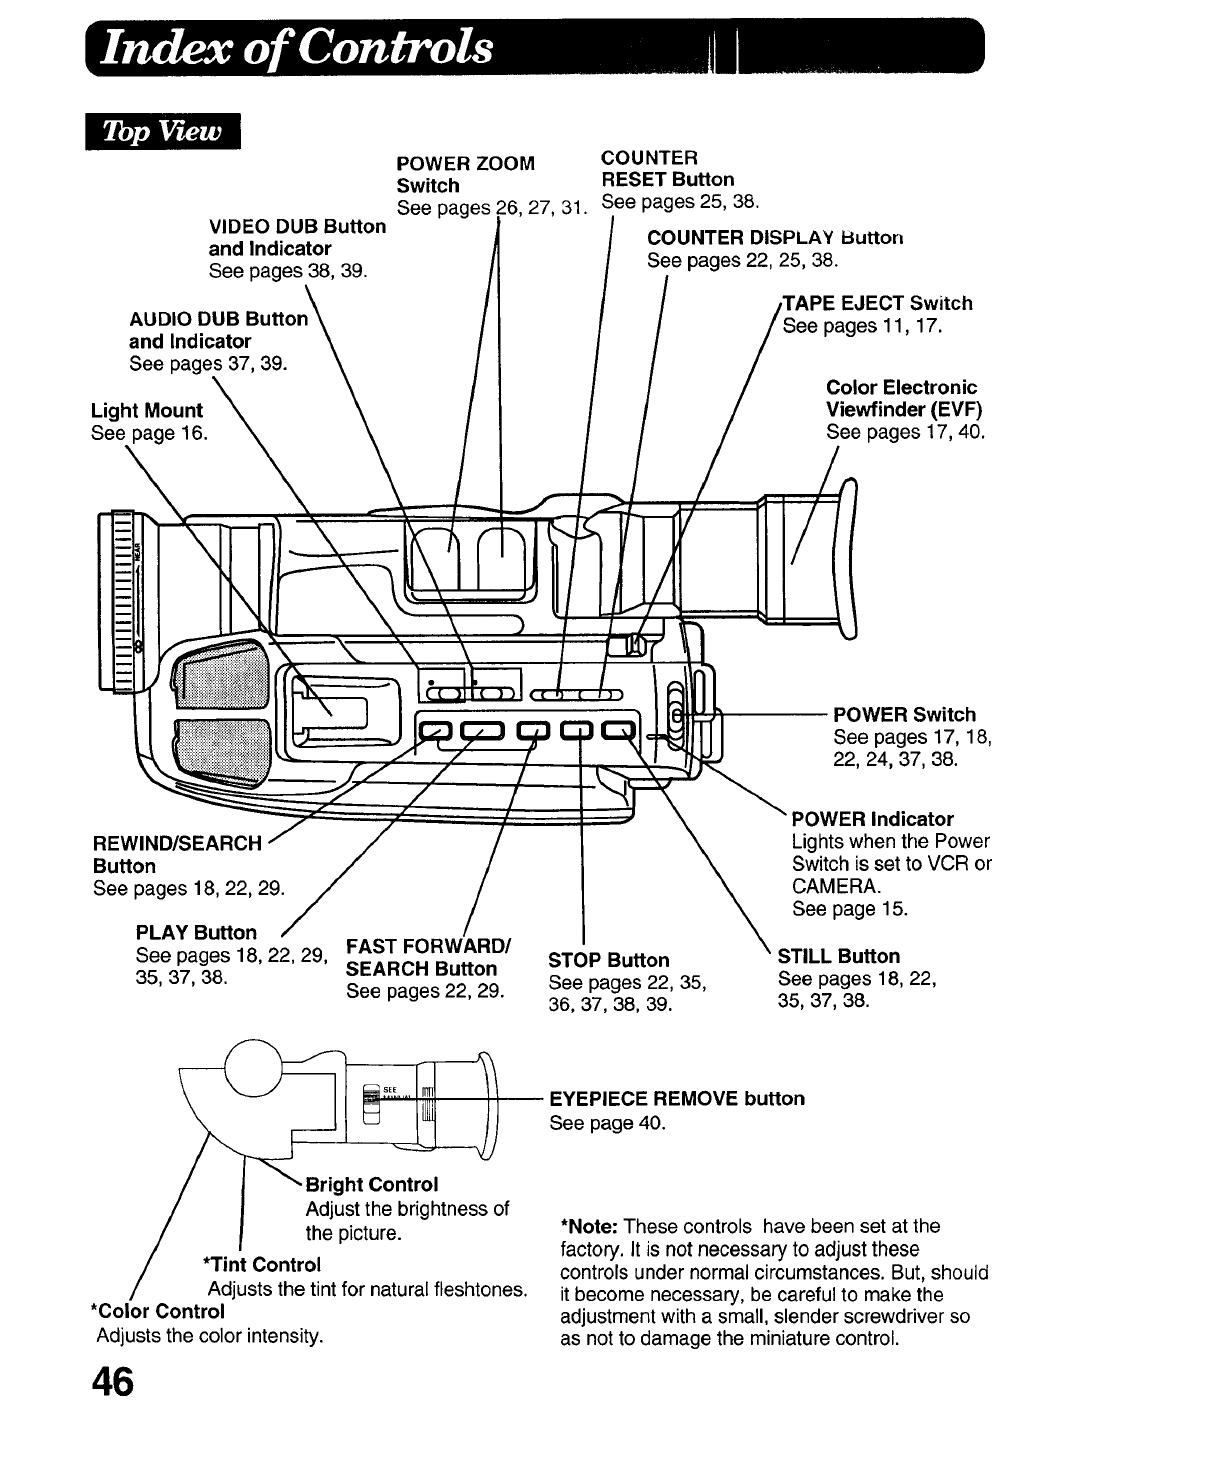
VIDEO DUB Button
and Indicator
See pages 38, 39.
AUDIO DUB Buttor
and Indicator
See pages 37, 39.
Light Mount
See page 16.
POWER ZOOM
Switch
See pages __6,27, 31.
COUNTER
RESET Button
See pages 25, 38.
COUNTER DISPLAY Button
See pages 22, 25, 38.
,TAPE EJECT Switch
pages 11,17.
Color Electronic
Viewfinder (EVF)
See pages 17, 40.
REWIND/SEARCH
Button
See pages 18, 22, 29.
PLAY Bu_on
See pages 18,22,29,
35,37,38.
FAST FORWARD/
SEARCH Button
See pages 22, 29.
STOP Button
See pages 22, 35,
36,37,38,39.
POWER Switch
See pages 17,18,
22,24,37,38.
POWER Indicator
Lights when the Power
Switch is set to VCR or
CAMERA.
See page 15.
STILL Buffon
See pages 18,22,
35,37,38.
_EYEPIECE REMOVE button
See page 40.
ht Control
Adjust the brightness of
the picture.
*Tint Control
Adjusts the tint for natural fleshtones.
*Color Control
Adjusts the color intensity.
46
*Note: These controls have been set at the
factory. It is not necessary to adjust these
controls under normal circumstances. But, should
it become necessary, be careful to make the
adjustment with a small, slender screwdriver so
as not to damage the miniature control.
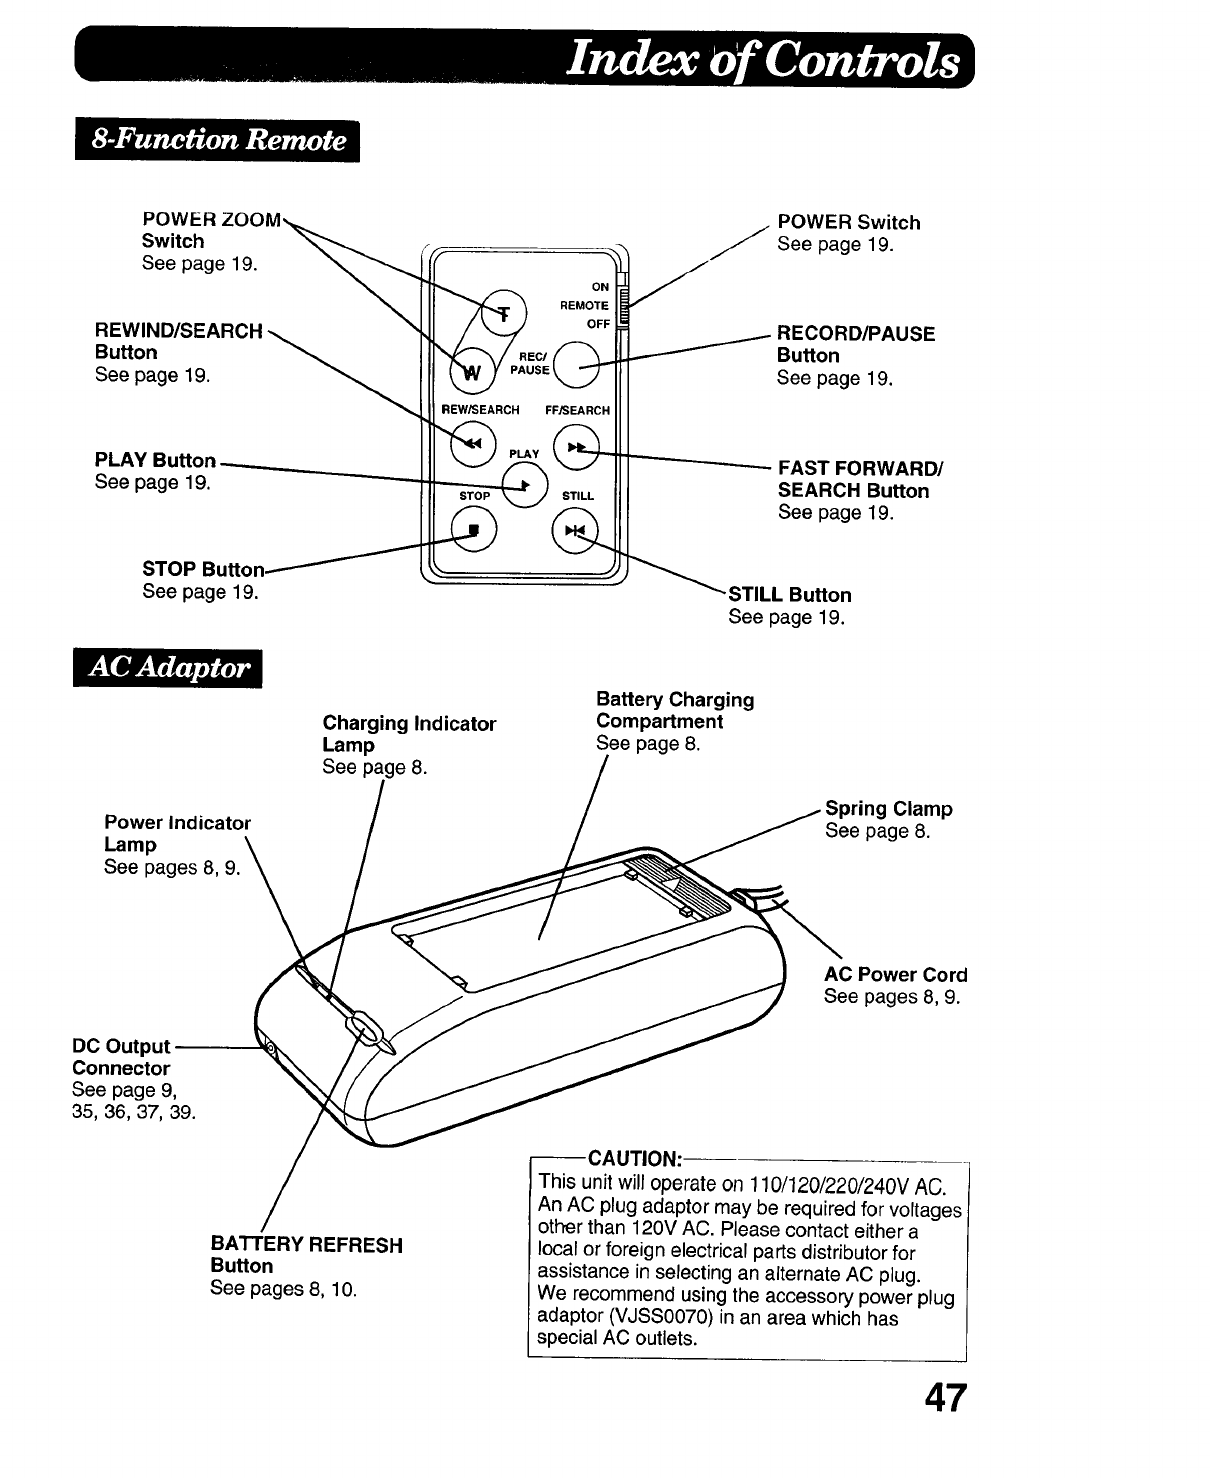
POWERZOOM,_,,_
Switch _
See page 19. __
REWIND/SEARCH
Button
See page 19.
PLAY Button
See page 19.
STOP Button_
See page 19.
q
REW/SEARCH FFJSEARCH
POWER Switch
_See page 19.
.--- RECORD/PAUSE
I F Button
See page 19.
------------- FAST FORWARD/
SEARCH Button
See page 19.
• _STILL Button
See page 19.
Power Indicator
Lamp
See pages 8, 9.
Charging Indicator
Lamp
See page 8.
Battery Charging
Compartment
See page 8.
Clamp
See page 8.
DC Output
Connector
See page 9,
35, 36,37,39.
BATTERY REFRESH
Button
See pages 8, 10.
AC Power Cord
See pages 8,9.
--CAUTION:
This unit will operate on 110/120/220/240V AC.
An AC plug adaptor may be required for voltages
other than 120V AC. Please contact either a
local or foreign electrical parts distributor for
assistance in selecting an alternate AC plug.
We recommend using the accessory power plug
adaptor (VJSS0070) in an area which has
special AC outlets.
47
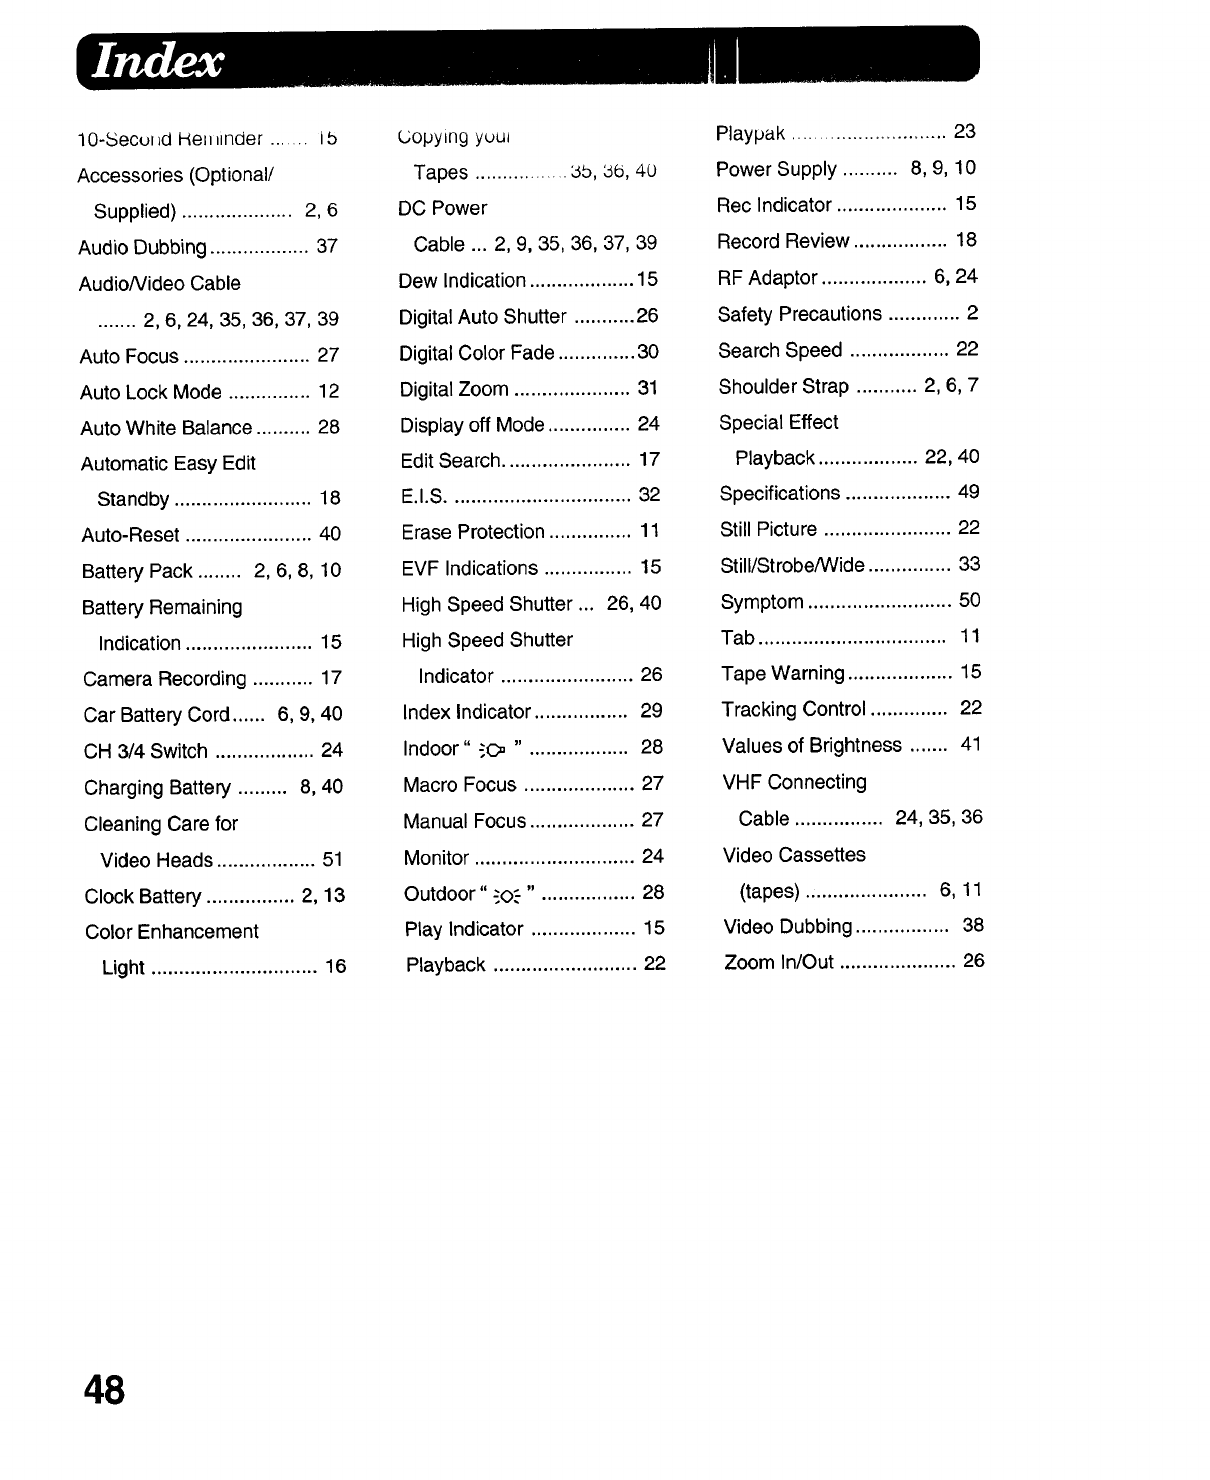
10-Secul _dHell_inder ....... i5
Accessories (Optional/
Supplied) .................... 2, 6
Audio Dubbing .................. 37
AudioNideo Cable
....... 2, 6, 24, 35, 36, 37, 39
Auto Focus ....................... 27
Auto Lock Mode ............... 12
Auto White Balance .......... 28
Automatic Easy Edit
Standby ......................... 18
Auto-Reset ....................... 40
Battery Pack ........ 2, 6, 8, 10
Battery Remaining
Indication ....................... 15
Camera Recording ........... 17
Car Battery Cord ...... 6, 9, 40
OH 3/4 Switch .................. 24
Charging Battery ......... 8, 40
Cleaning Care for
Video Heads .................. 51
Clock Battery ................ 2, 13
Color Enhancement
Light .............................. 16
Copyln 9 yuul
Tapes ................. bb, be, 40
DC Power
Cable ... 2, 9, 35, 36, 37, 39
Dew Indication ................... 15
Digital Auto Shutter ........... 26
Digital Color Fade .............. 30
Digital Zoom ..................... 31
Display off Mode ............... 24
Edit Search ....................... 17
E.I.S ................................. 32
Erase Protection ............... 11
EVF Indications ................ 15
High Speed Shutter ... 26, 40
High Speed Shutter
Indicator ........................ 26
Index Indicator ................. 29
Indoor" "O3 ". ................. 28
Macro Focus .................... 27
Manual Focus ................... 27
Monitor ............................. 24
Outdoor" "0.'-" •................ 28
Play Indicator ................... 15
Playback .......................... 22
Playpak ............................ 23
Power Supply .......... 8, 9, 10
Rec Indicator .................... 15
Record Review ................. 18
RF Adaptor ................... 6, 24
Safety Precautions ............. 2
Search Speed .................. 22
Shoulder Strap ........... 2, 6, 7
Special Effect
Playback .................. 22, 40
Specifications ................... 49
Still Picture ....................... 22
Still/Strobe/Wide ............... 33
Symptom .......................... 50
Tab .................................. 11
Tape Warning ................... 15
Tracking Control .............. 22
Values of Brightness ....... 41
VHF Connecting
Cable ................ 24, 35, 36
Video Cassettes
(tapes) ...................... 6, 11
Video Dubbing ................. 38
Zoom In/Out ..................... 26
48
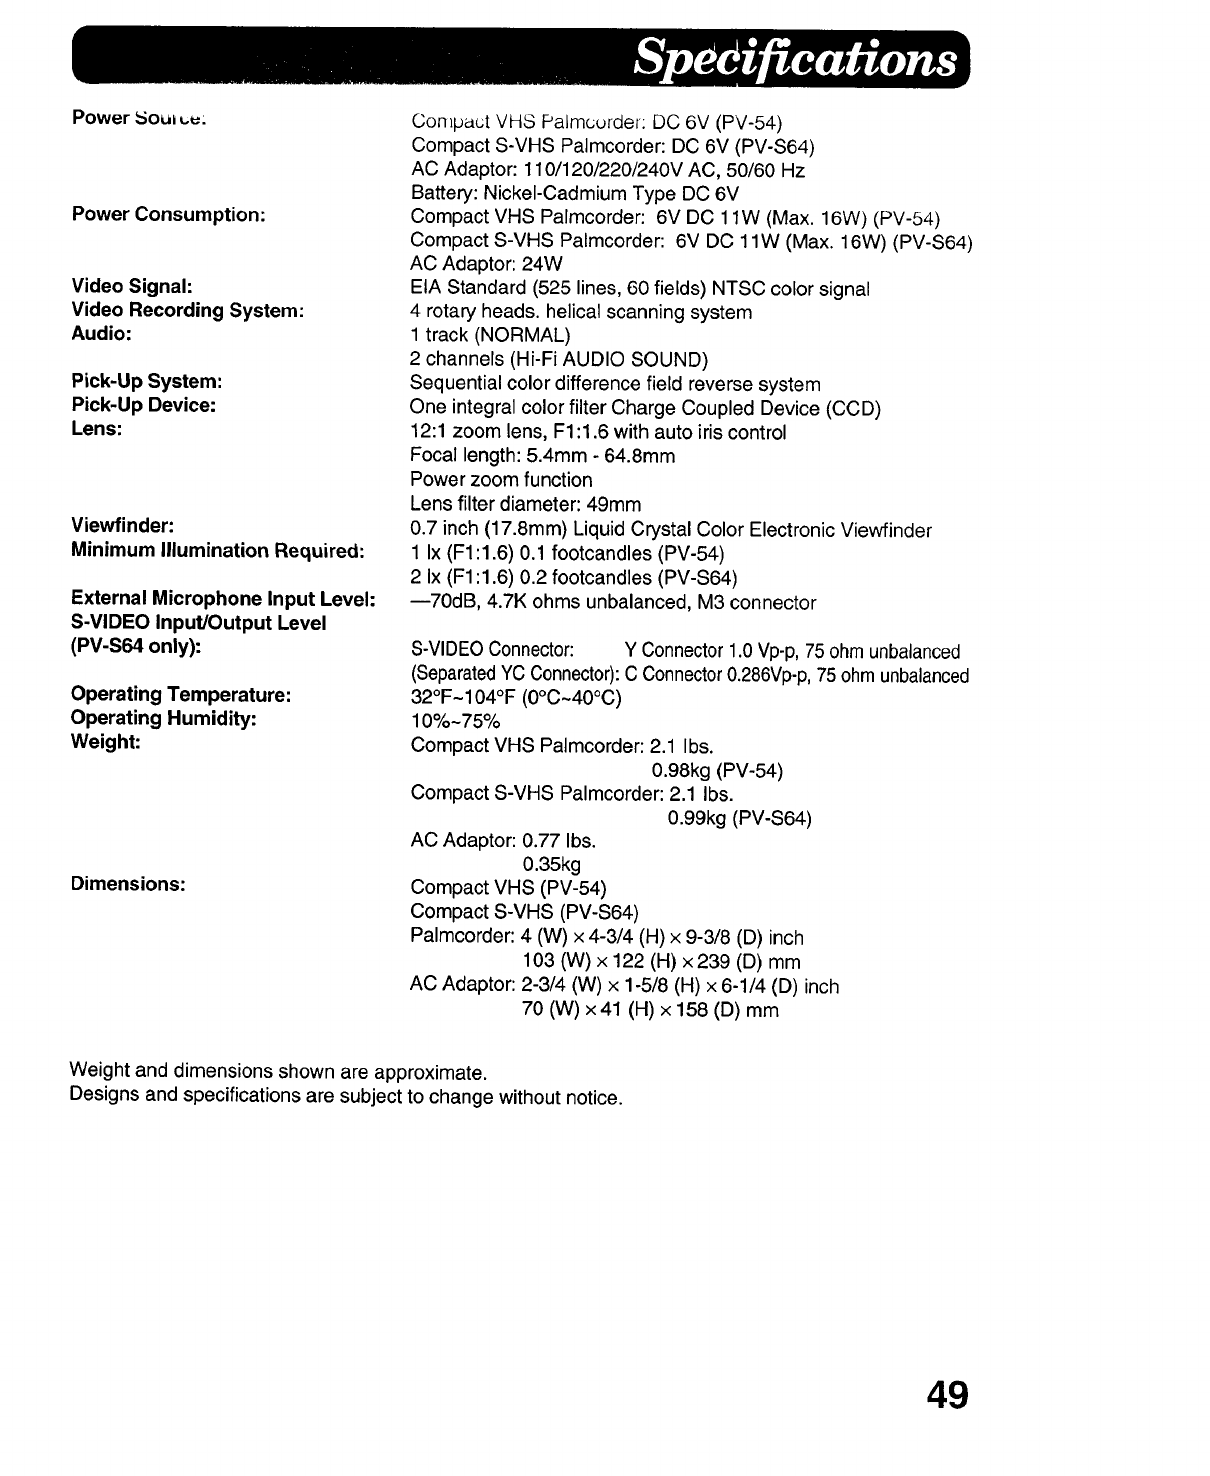
Power _oul L.u:
Power Consumption:
Video Signal:
Video Recording System:
Audio:
Pick-Up System:
Pick-Up Device:
Lens:
Viewfinder:
Minimum Illumination Required:
External Microphone input Level:
S-VIDEO Input/Output Level
(PV-S64 only):
Operating Temperature:
Operating Humidity:
Weight:
Dimensions:
Compact VHS Palmcurder: DC 6V (PV-54)
Compact S-VHS Palmcorder: DC 6V (PV-S64)
AC Adaptor: 110/120/220/240V AC, 50/60 Hz
Battery: Nickel-Cadmium Type DC 6V
Compact VHS Palmcorder: 6V DC 1lW (Max. 16W) (PV-54)
Compact S-VHS Palmcorder: 6V DC 1lW (Max. 16W) (PV-S64)
AC Adaptor: 24W
EIA Standard (525 lines, 60 fields) NTSC color signal
4 rotary heads, helical scanning system
1 track (NORMAL)
2 channels (Hi-Fi AUDIO SOUND)
Sequential color difference field reverse system
One integral color filter Charge Coupled Device (CCD)
12:1 zoom lens, F1:1.6 with auto iris control
Focal length: 5.4ram - 64.8mm
Power zoom function
Lens filter diameter: 49mm
0.7 inch (17.8mm) Liquid Crystal Color Electronic Viewfinder
1 Ix (F1:1.6) 0.1 footcandles (PV-54)
2 Ix (F1:1.6) 0.2 footcandles (PV-S64)
--70dB, 4.7K ohms unbalanced, M3 connector
S-VIDEOConnector: Y Connector 1.0 Vp-p, 75 ohm unbalanced
(SeparatedYC Connector):C Connector 0.286Vp-p,75 ohm unbalanced
32OF-104OF (0oc~40°C)
10%-75%
Compact VHS Palmcorder: 2.1 Ibs.
0.98kg (PV-54)
Compact S-VHS Palmcorder: 2.1 Ibs.
0.99kg (PV-S64)
AC Adaptor: 0.77 Ibs.
0.35kg
Compact VHS (PV-54)
Compact S-VHS (PV-S64)
Palmcorder: 4 (W) x 4-3/4 (H) x 9-3/8 (D) inch
103 (W) x 122 (H) x239 (D) mm
AC Adaptor: 2-3/4 (W) x 1-5/8 (H) x 6-1/4 (D) inch
70 (W) x 41 (H) x 158 (D) mm
Weight and dimensions shown are approximate.
Designs and specifications are subject to change without notice.
49
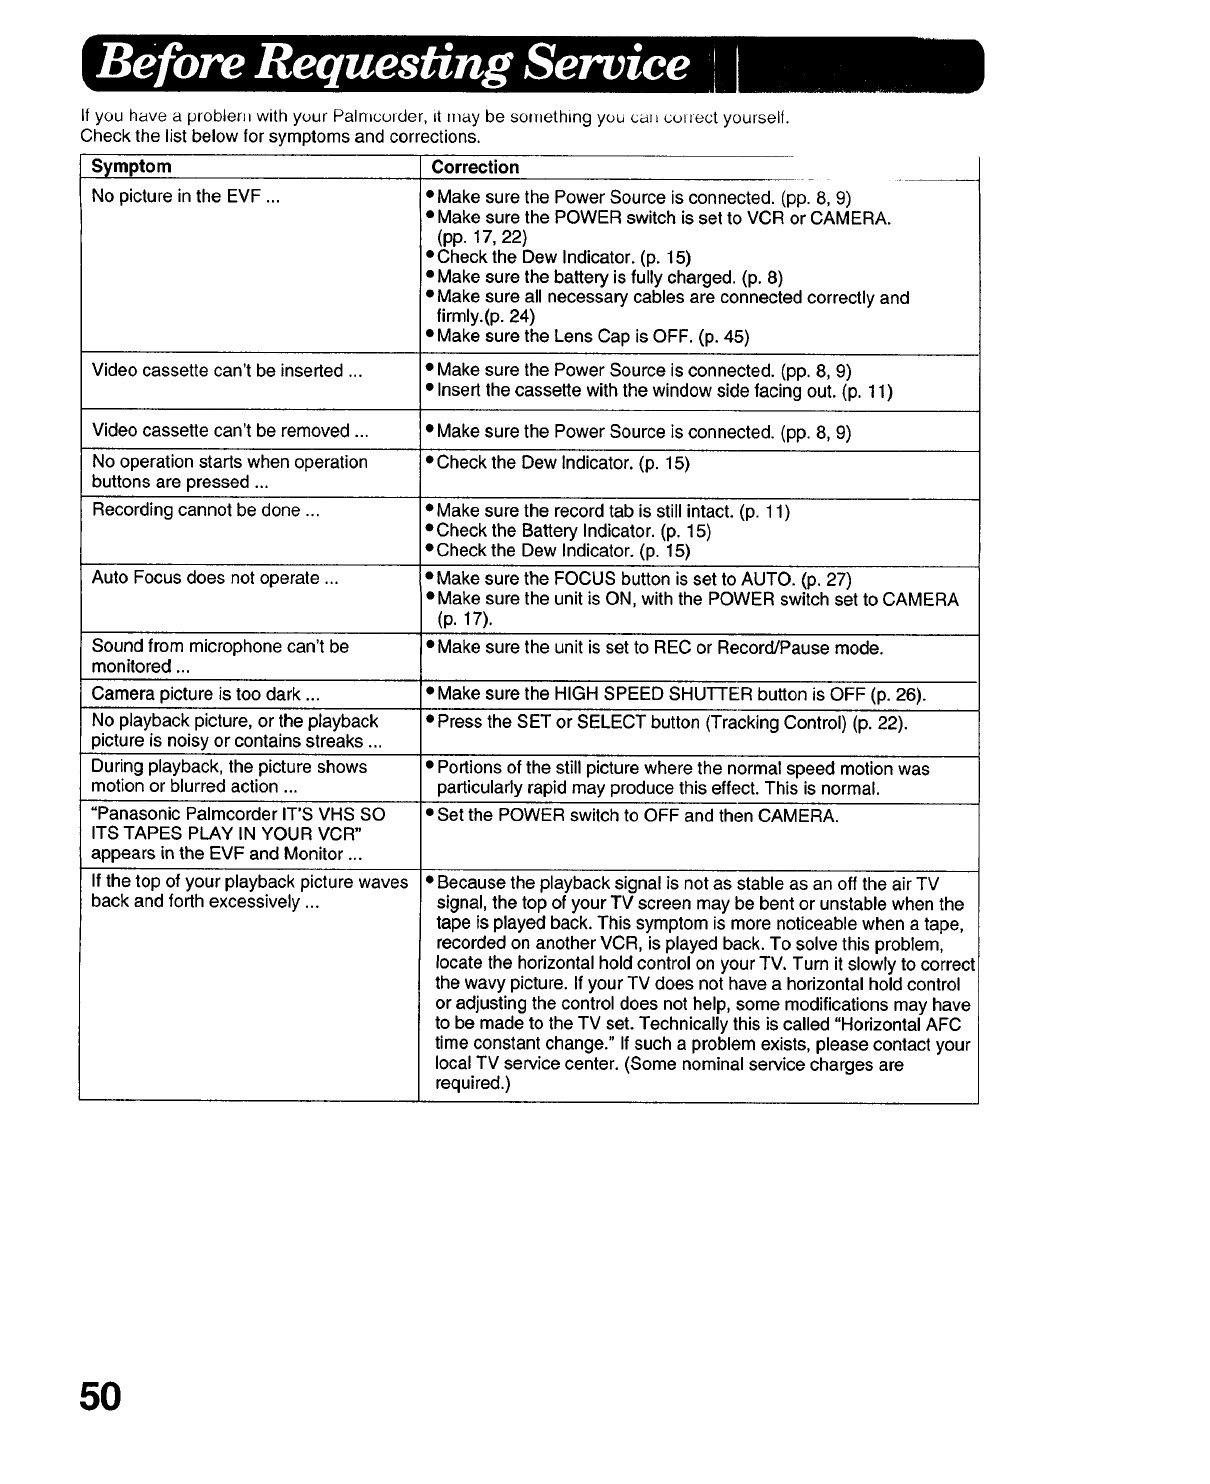
It you have a problem with your Palmcotder, it may be something you cal_ cotiect yourself.
Check the list below for symptoms and corrections.
Symptom Correction
No picture inthe EVF ... eMake sure the Power Source is connected. (pp. 8, 91
Video cassette can't be inserted ...
Video cassette can't be removed ...
No operation starts when operation
buttons are pressed ...
Recording cannot be done ...
Auto Focus does not operate ...
Sound from microphone can't be
monitored ...
Camera picture is too dark ...
No playback picture, or the playback
picture is noisy or contains streaks ...
During playback, the picture shows
motion or blurred action ...
"Panasonic Palmcorder IT'S VHS SO
ITS TAPES PLAY IN YOUR VCR"
appears in the EVF and Monitor ...
If the top of your playback picture waves
back and forth excessively ...
•Make sure the POWER switch is set to VCR or CAMERA.
(pp. 17, 22)
• Check the Dew Indicator. (p. 15)
•Make sure the battery is fully charged. (p. 8)
•Make sure all necessary cables are connected correctly and
firmly.(p. 24)
• Make sure the Lens Cap is OFF. (p. 45)
• Make sure the Power Source is connected. (pp. 8, 9)
• Insert the cassette with the window side facing out. (p. 11)
• Make sure the Power Source is connected. (pp. 8, 9)
• Check the Dew Indicator. (p. 15)
• Make sure the record tab is still intact. (p. 11)
°Check the Battery Indicator. (p. 15)
• Check the Dew Indicator. (p. 15)
*Make sure the FOCUS button is set to AUTO. (p. 27)
• Make sure the unit is ON, with the POWER switch set to CAMERA
(p. 17).
• Make sure the unit is set to REC or Record/Pause mode.
*Make sure the HIGH SPEED SHUTTER button is OFF (p. 26).
• Press the SET or SELECT button (Tracking Control) (p. 22).
• Portions of the still picture where the normal speed motion was
particularly rapid may produce this effect. This is normal.
• Set the POWER switch to OFF and then CAMERA.
• Because the playback signal is not as stable as an off the air TV
signal, the top of your TV screen may be bent or unstable when the
tape is played back. This symptom is more noticeable when a tape,
recorded on another VCR, is played back. To solve this problem,
locate the horizontal hold control on your TV. Turn it slowly to correct
the wavy picture. If your TV does not have a horizontal hold control
or adjusting the control does not help, some modifications may have
to be made to the TV set. Technically this is called "Horizontal AFC
time constant change." If such a problem exists, please contact your
local TV service center. (Some nominal service charges are
required.)
50
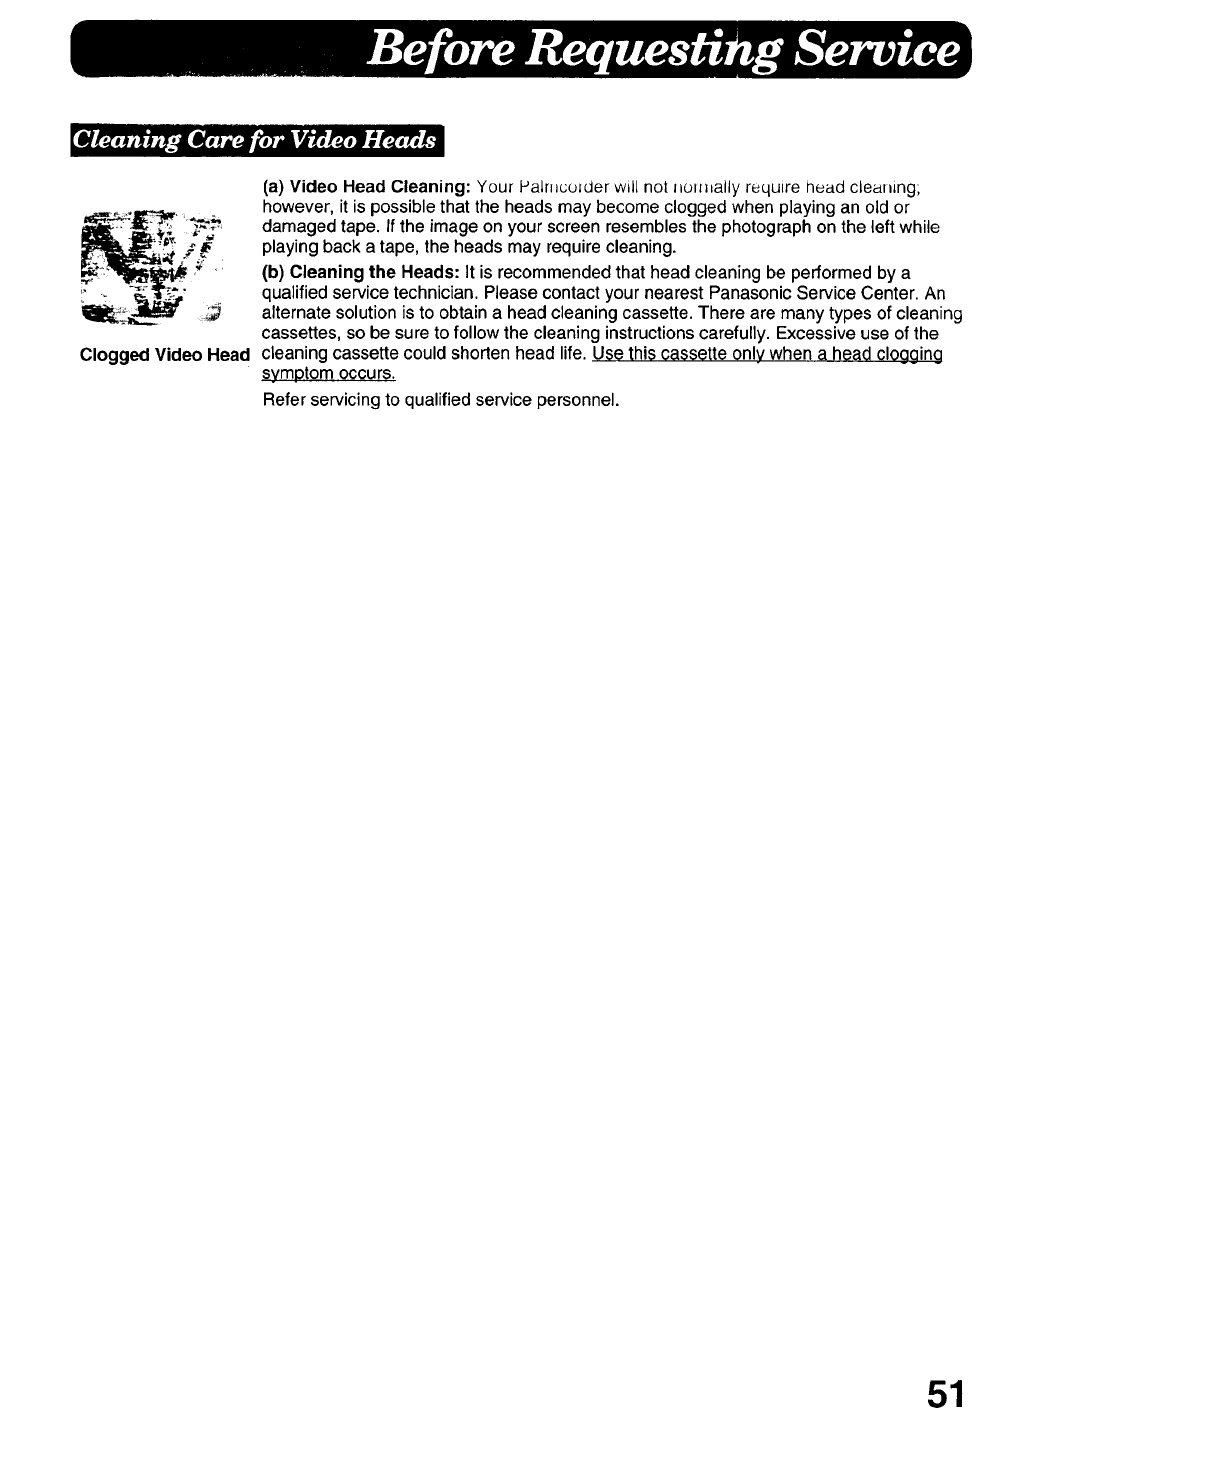
Clogged Video Head
(a) Video Head Cleaning: Your Palmcolder will not nom_ally require head cleaning;
however, it is possible that the heads may become clogged when playing an old or
damaged tape. If the image on your screen resembles the photograph on the left while
playing back a tape, the heads may require cleaning.
(b) Cleaning the Heads: It is recommended that head cleaning be performed by a
qualified service technician. Please contact your nearest Panasonic Service Center. An
alternate solution is to obtain a head cleaning cassette. There are many types of cleaning
cassettes, so be sure to follow the cleaning instructions carefully. Excessive use of the
cleaning cassette could shorten head life. Use this cassette only when a head clogging
symptom occurs.
Refer servicing to qualified service personnel.
51

Panasonic
Panasonlc Company
Division of Matsushlta Electric
Corporation of Amedca
One Panason_c Way. Secaucus,
New Jersey 07094
Panasonlc Company (West) of Amedca,
Division of Matsushlta Electric
Corporation of America
6550 Kataila Ave,
Cypress, CA 90630
Panasonlc Sales Company,
Division of Mstsushita Electric
of Puerto Rico, Inc.
San Gabriel Industrial Park
65th Infantry Avenue KM 9.5
Carolina, Puerto Rico 00630
PrintedinJapan
VQTW0466 ®
