PANASONIC TV/VCR Or DVD Combo Manual 97100154
User Manual: PANASONIC PANASONIC TV/VCR or DVD Combo Manual PANASONIC TV/VCR or DVD Combo Owner's Manual, PANASONIC TV/VCR or DVD Combo installation guides
Open the PDF directly: View PDF ![]() .
.
Page Count: 38
.I I. I .... 1Ill II II I I IIII .N I I T _ Ill I
Thank you for choosing
Panasonic
Omnivlsion _
Combination VCR
MODEL PV-M2765
Operating
Instructions
Before attempting to connect, operate or adjust this product,
please read these instructions completely.
Spanish Quick Use Guide is included.
Guia para r&pida consulta en espaSol estd incluido.
VQTS3110 (A)
Thtttgs You Should Know
Unpacking Your Combination VCR
The accessories shown below are provided to
help you use or set up your Combination VCR.
Optional accessories are also listed.
Accessories
(_'8 6 ;5'
®60®; Remote Control
VSQS1412
Optional Accessories
• 1/2" Video Cassette Tape
2 "AA"
Batteries
Load the batteries in the Remote Control
1Lift off the lid after pressing
in and up on the latch with
your thumb nail or other
narrow object.
Install two batteries as
indicated inside the Battery
Compartment.
3Fit the lid's hinge piece into _1__
the indent on the case, and
snap lid into place.
Battery replacement caution
•Do not mix old and new batteries. (Also, never mix
alkaline with manganese batteries.)
Safety Precautions
Warning: To prevent fire or shock hazard, do not expose this equipment to rain or
moisture.
This video recorder, equipped with the HQ (High Quality) System, is compatible with existing
VHS equipment.
Only use those tapes with the _ mark. It is recommended that only cassette tapes that have
been tested and inspected for use in 2, 4, 6, and 8 hour VCR machines be used.
This television receiver provides display of television closed captioning in accordance with
§15.119 of the FCC rules.
fI II II
CAUTION TO REDUCE THE RISk OF ELECT RIG ShO_" k
DO NOT REMOVE COVER _OR BACk,
NO USER-SERVICEABLE PARTS INSIDE
REFER SERVICING 'TO QUALIFIED SERVICE PERSONNEL
This symbol warns the user that uninsulated voltage within
the unit may have sufficient magnitude to cause electric
shock. Therefore, it is dangerous to make any kind of
contact with any inside part of this unit.
This symbol alerts the user that important literature
concerning the operation and maintenance of this unit have
been included. Therefore, it should be read carefully in order
to avoid any problems.
_'L,t_t _[ulations
_ yuul purchase of one of the most sophisticated and reliable
_roducts on the market today. Used properly, we're sure it will bring
,ou and your family years of enjoyment. Please take time to fill in the
"fformation below. The serial number is on the tag located on the
lack of your Combination VCR. You'll want to keep this manual
_andy as your convenient Combination VCR information source.
Date of Purchase
Dealer Purchased From
Dealer Address
Dealer Phone No.
Model No.
Serial No.
PV-M2765
Open this flap to
reveal the Control
Reference Guide

o= ,[rol H Te nce L uide
_ ROGRAM
TIMER
Indicator
ON TIMER
Indicator
REPEAT __
Indicator
Built In
Speaker
D udio/Video
In Jacks
Cas_etle
-- Compartment
VOLUME
UP/DOWN
CHANNELUP/DOWN
TRACKINGUP/DOWN
Remote
Sensor
POWER O
Phones Jack STOP/
EJECT
REWIND/ PLAY/ FAST REC and
SEARCH REPEAT FORWARD/ REC Indicator
SEARCH
_1 ON TIMER
POWER
D STOP
REWIND/
SEARCH
D SLOW/
FRAME ADVANCE
ZERO SEARCH/
1 MINUTE SKIP
D CLOSED
CAPTION
CATV
CHANNEL
UP/DOWN
D CATVPOWER
MENU
_1_ PROGRAM-
DISPLAY
NUMBERED
keys
ADD/DELETE J
(ZDO
000
SLEEP
_I_ MUTE
PLAY _i
_1 FAST FORWARD/
SEARCH
PAUSE/STILL
_r_ ECORD/TIME
CHANNEL UP/DOWN _
TRACKING UP/DOWN
q_ VOLUMEUP/DOWN
SELECT/SET _!_WHEEL
_I_cLEAR
COUNTER
RESET
_ SPEED
RAPID TUNE m
The numbers and letters above correspond wJth those used =n the operat=ng _nstruct=on_
Please keep this page folded out when using the manual.
l'ttble ol C'ottteutts
Product Information (,Front Panel Indications, VHF/UHF Antenna Jack) ......................................................... 4
Basic and Cable Connections (Outdoor Antenna, Cable Box, Scrambled/Unscrambled Channels) ............ 5
One Time Setup (On-Screen Language, Channel Memory, Auto Clock Set) ...................................... 6, 7
Change or Re-enter One Time Setup Items (Refers to Items on page 6 and 7) ...................................... 8
On Screen Displays (OSD) (Function, Channel, Menu, VCR Status/Clock, Warning, Instruction) ............... 9
TV Operation (Main Operation, Using the 100 key, Rapid Tune, Audio Mute, Phones) .................................. 10
Audio Adjustment (Bass, Treble, Reset) ........................................................................................................ 10
Picture Adjustment (Color, Tint, Bright, Picture, Sharpness, Reset) ............................................................. 11
TV Timer Features (On Timer, Sleep Timer) ................................................................................................. 12
Closed Caption System (Main Operation, Caption On Mute) ........................................................... 13
Play Back a Tape/Playback Features (Special Effects, Quality Picture Features) ............................. 14
Record On a Tape (Main Operation, One Touch Record, Input Select) ............................................... 15
Set Up a Timer Recording (Main Operation, Cancel-Clear-Replace Program) .................................... 16, 17
Setting a Timer Recording at the Unit .................................................................................... 18
Copy Your Tapes (Dubbing) (Connection, Main Operation) ....................................................................... 19
Cable Box Universal Remote Control Operation (Main Operation, Cable Box Code List) .................... 20
Tape Operation (Repeat Play, One Minute Skip, Zero Search, Auto Functions) .................................... 21
MTS Broadcast/VHS Hi-Fi Stereo System (Stereo/SAP/Mono Broadcast, Select Audio Mode) ............ 22, 23
Cassette and Care Information (Record Tab, Tape Speed, Tape Cleaning) ............................................. 24
Before Requesting Service (Self-check Items) ........................................................................................... 25
Helpful Notes on Operations (Cable Connection, Basic Function, Daylight Saving Time, Specifications) ...... 26
Spanish Quick Use Guide/Gufa para r_.pida consulta .................................... 27, 28, 29, 30, 31
Product Features
Auto Clock Set ......................................................................................................................... 6, 7
Auto Daylight Saving Time ........................................................................................................ 26
Auto Operation Functions (Auto Playback, Rewind, Tape Eject, Power Off) ................................................. 21
Auto Repeat Function ................................................................................................................ 21
Cable Box Universal Remote Control Feature .......................................................................... 20
Closed Caption System ............................................................................................................. 13
Easy-to-Read On Screen Displays .............................................................................. 6, 7, 16, 17
Front-mounted A/V In Terminals ............................................................................................... 19
MTS Broadcast System ............................................................................................................. 22
One Minute Skip ........................................................................................................................ 21
One Month, 8 Program Auto Timer Recording .................................................................... 16, 17
One Touch Recording (OTR) .................................................................................................... 15
PanaBlack TM Picture Tube ........................................................................................................ 14
Program Director Remote Control ....................................................................................... 16, 17
.............................. 25
Quick Play Mechanism ................................................................................ 10
Rapid Tune ..................................................................................................................... 14
Special Effects Playback ........................................................................................................... 23
VHS Hi-Fi Stereo System .......................................................................... iiiiiiiiiiiiiiiiiiiiiiiiiiiiiiii 21
Zero Search ............................................................................................... 6
181-CH TV/CATV Tuner/All Channel Auto Set ........................................................................... 3
I
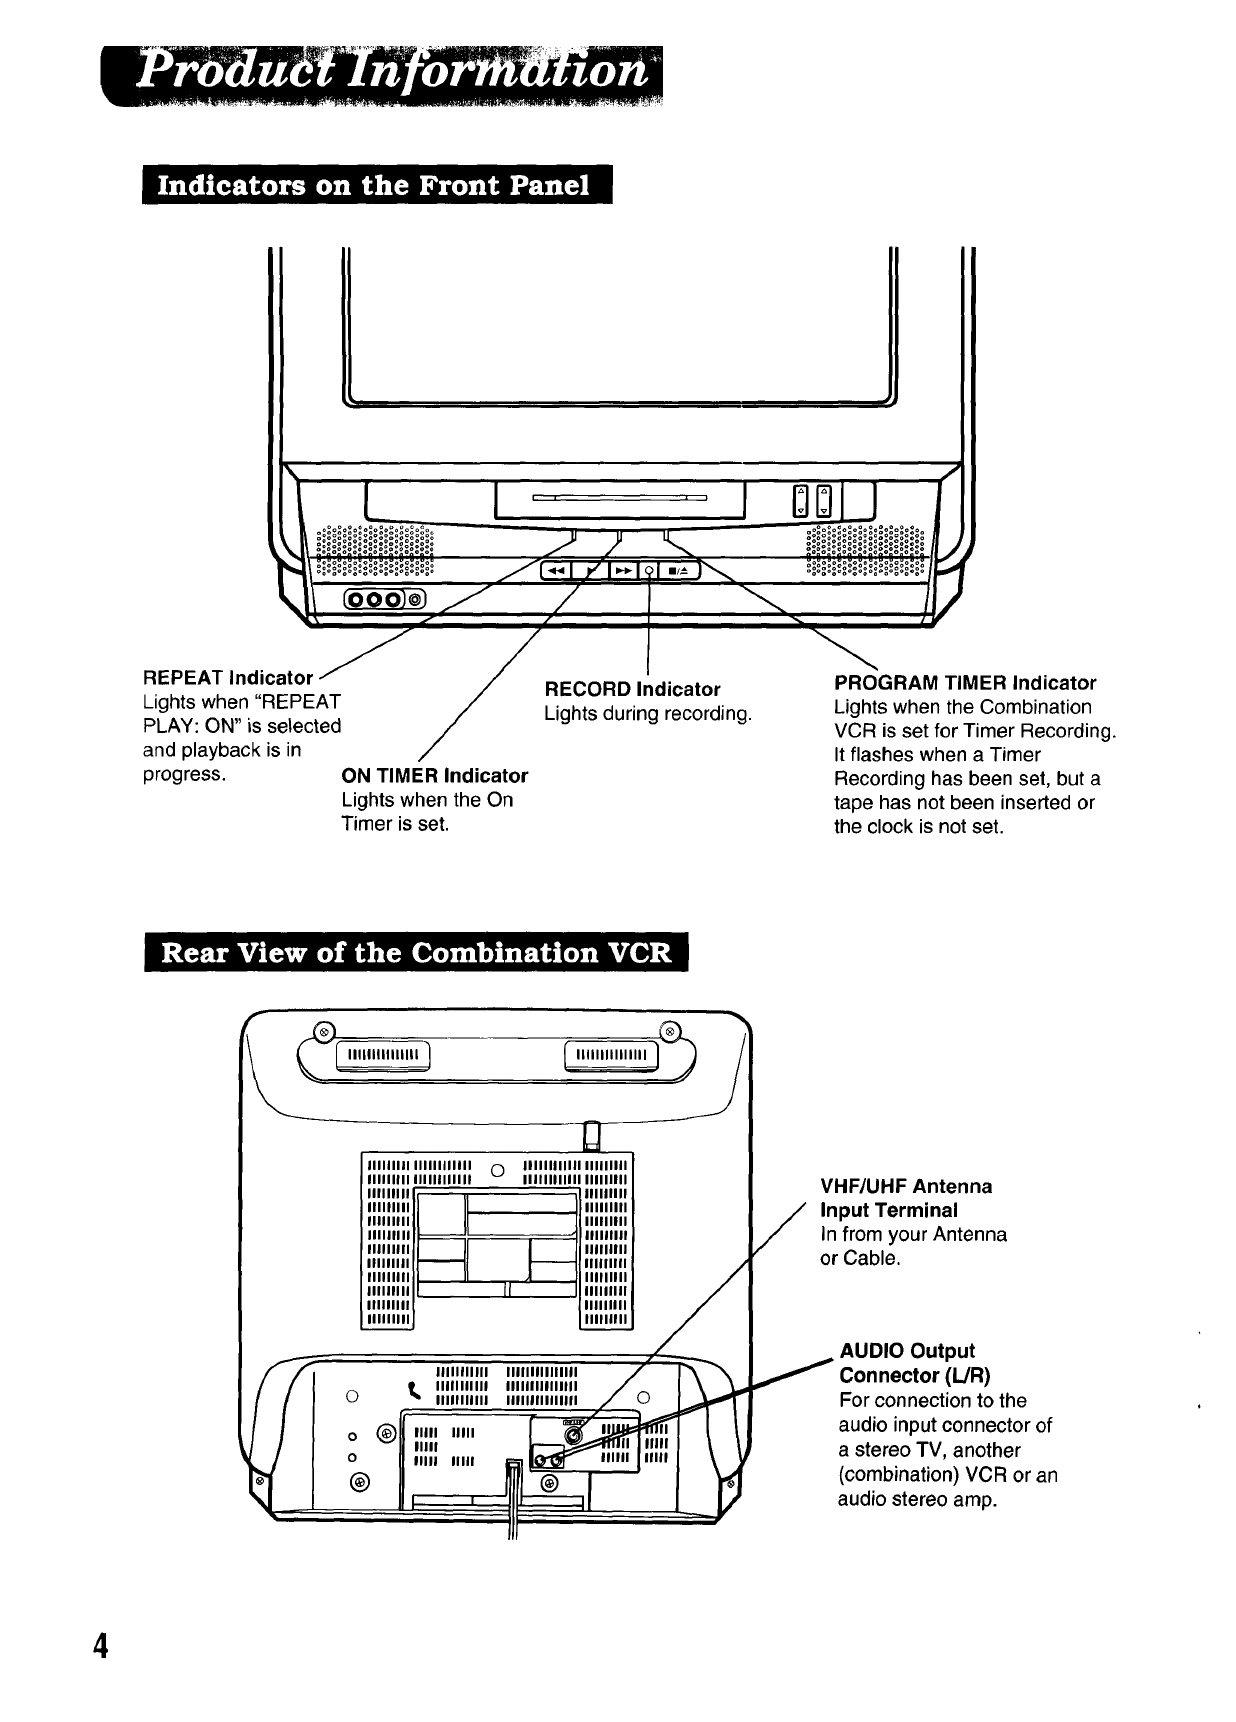
REPEAT Indicator
Lights when "REPEAT
PLAY: ON" is selected
and playback is in
progress. ON TIMER Indicator
Lights when the On
Timer is set.
RECORD Indicator
Lights during recording.
PROGRAM TIMER Indicator
Lights when the Combination
VCR is set for Timer Recording.
It flashes when a Timer
Recording has been set, but a
tape has not been inserted or
the clock is not set.
I
#, l S
IIIIIIlil IIIIIIIIIIII OIIIIIIIIIIII IIIIIIIII
IIIIIIIII IIIIIIIIIIII IIIIIIIIIIII IIIIIIIII
Illlllll il IIIIIIIII
IIIIIIII IIIIIIIII
IIIIIIII IIIIIIIII
IIIIIIII IIIIIIIII
'"'""
IIIIIIII 1111111111
.im,i lllmim
IIIIIIII {I Ilillllllll
IIIIIIII _111111111
f
/
i
IIIIIIIIIII
Ot_ Ilillliltll
IIIllllilll
(_ IIIII UlII
0vIIIII
O IIIII IIIII
@
IIIIIIIIIIII1|1
IIIIIIIIIIIIIII
IIIIIInlllllfl
VHF/UHF Antenna
Input Terminal
In from your Antenna
or Cable.
AUDIO Output
Con nector (L/R)
For connection to the
audio input connector of
a stereo TV, another
(combination) VCR or an
audio stereo amp.
4
Unhook the antenna from your previous TV or
VCR and connect it to the back of the
Combination VCR as shown in the diagram. If
your antenna system has separate UHF and
/ VHF lead-ins, you need a UHF/VHF Band Mixer
not supplied).
Back of Combination VCR
from or
Antenna __
300-75 ohm
Transformer
(not supplied)
o _illii!!!{ii!!!!!!!!i!!!!!!_
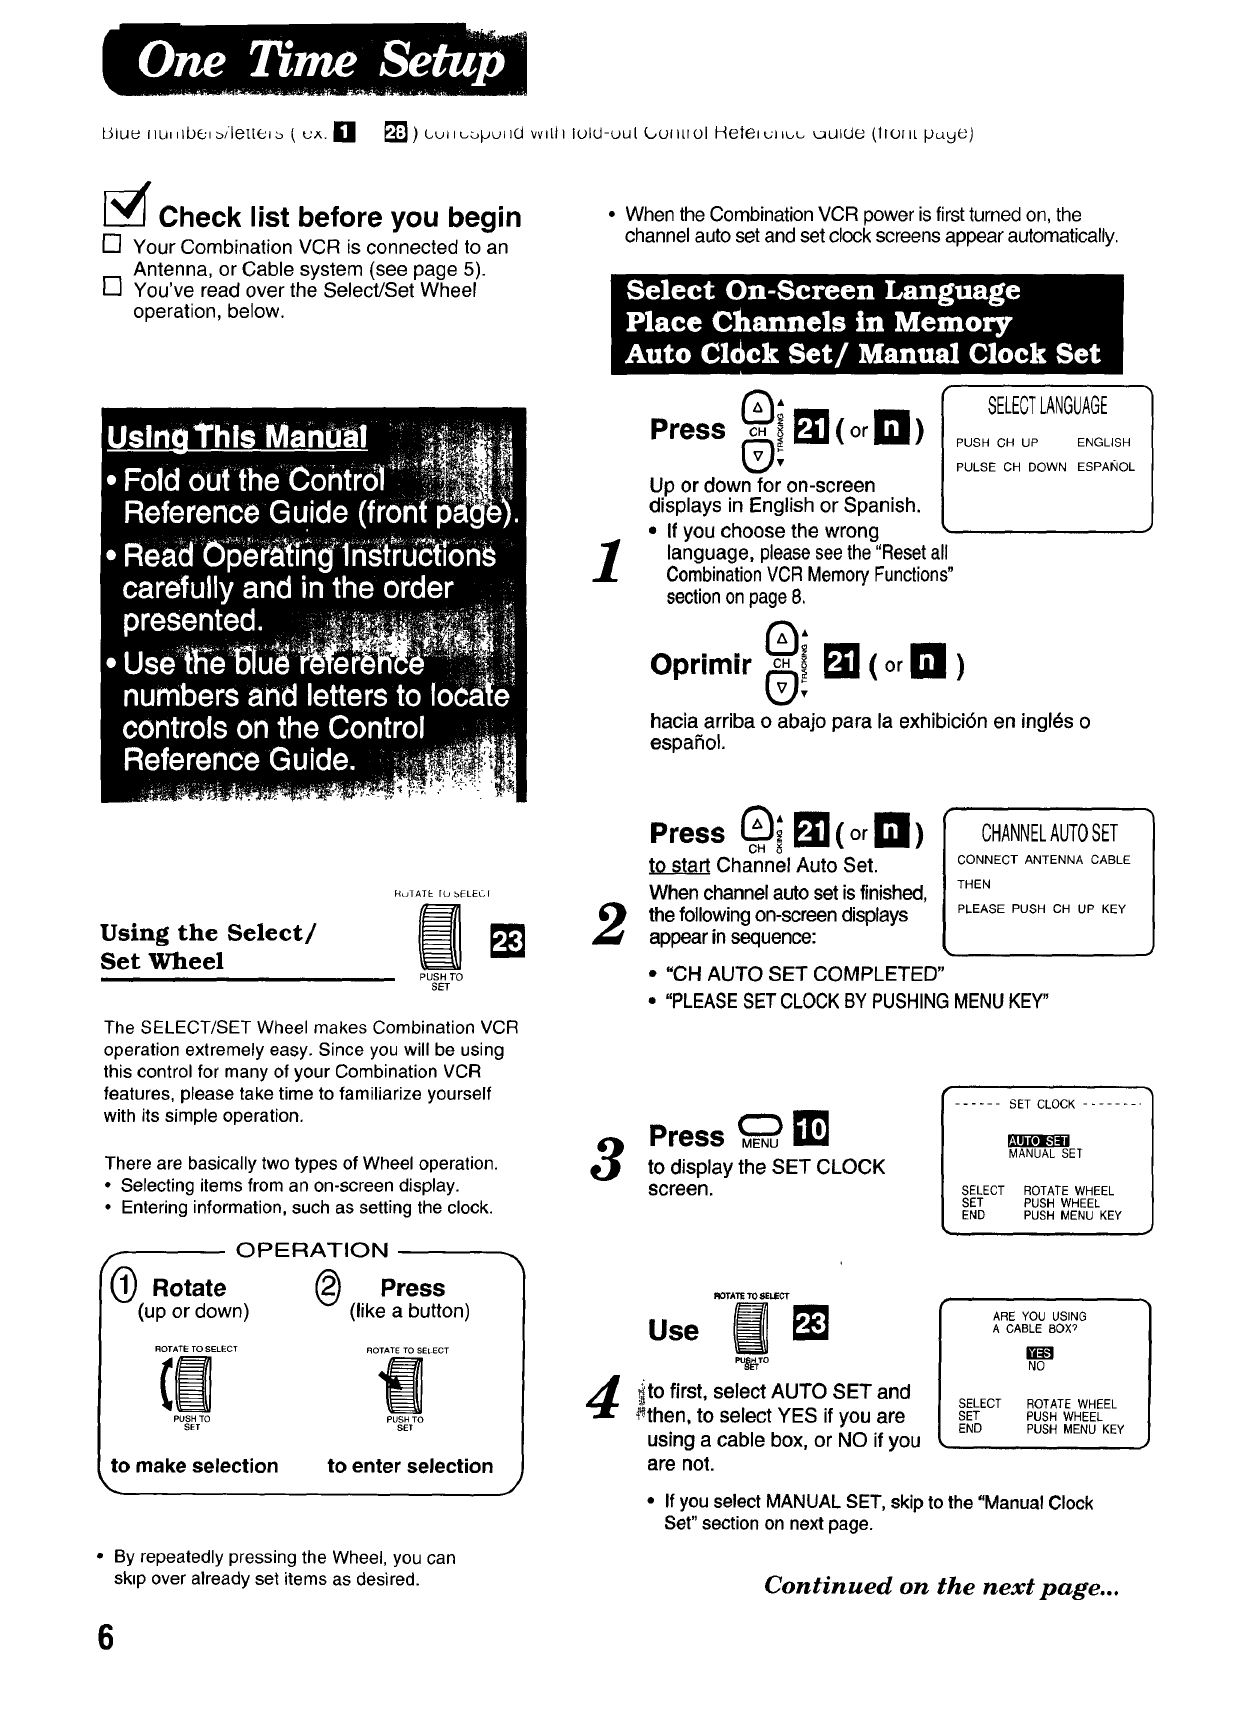
(A) Without a Converter/Descrambler Box
With this connection, you can use your
Combination VCR remote control to select
channels for viewing and select unscrambled
channels for timer recording. Scrambled
channels may not be viewed or recorded with
this connection.
(B) With a Converter/Descrambler Box
With this connection, you may record and view
any channel including scrambled channels.
Please note, however that channel selection
must be made at the cable company converter
box. Timer recording is limited to one channel at
a time, and you can only view the channel you
are recording.
(A)
from
CATV
(cable)
(B)
from
CATV
(cable)
Back of
Combination VCR
Cable TV
Converter Box
To Watch and Record
Scrambled/Unscrambled
Channels
Set the Combination VCR channel selector
to the output channel of the cable converter
box (e.g. CH3).
Now, select channels to be viewed or
recorded at the cable converter box.
FCC WARNING: Any unauthorized changes or
modifications to this equipment would void the user's
authority to operate.
Note to CATV System Installer
This reminder is provided to call the CATV (Cable TV)
System Installers attention to Article 820-40 of the NEC
that provides guidelines for proper grounding and, in
particular, specifies that the cable ground shall be
connected to the grounding system of the building, as
close to the point of cable entry as practical.
5
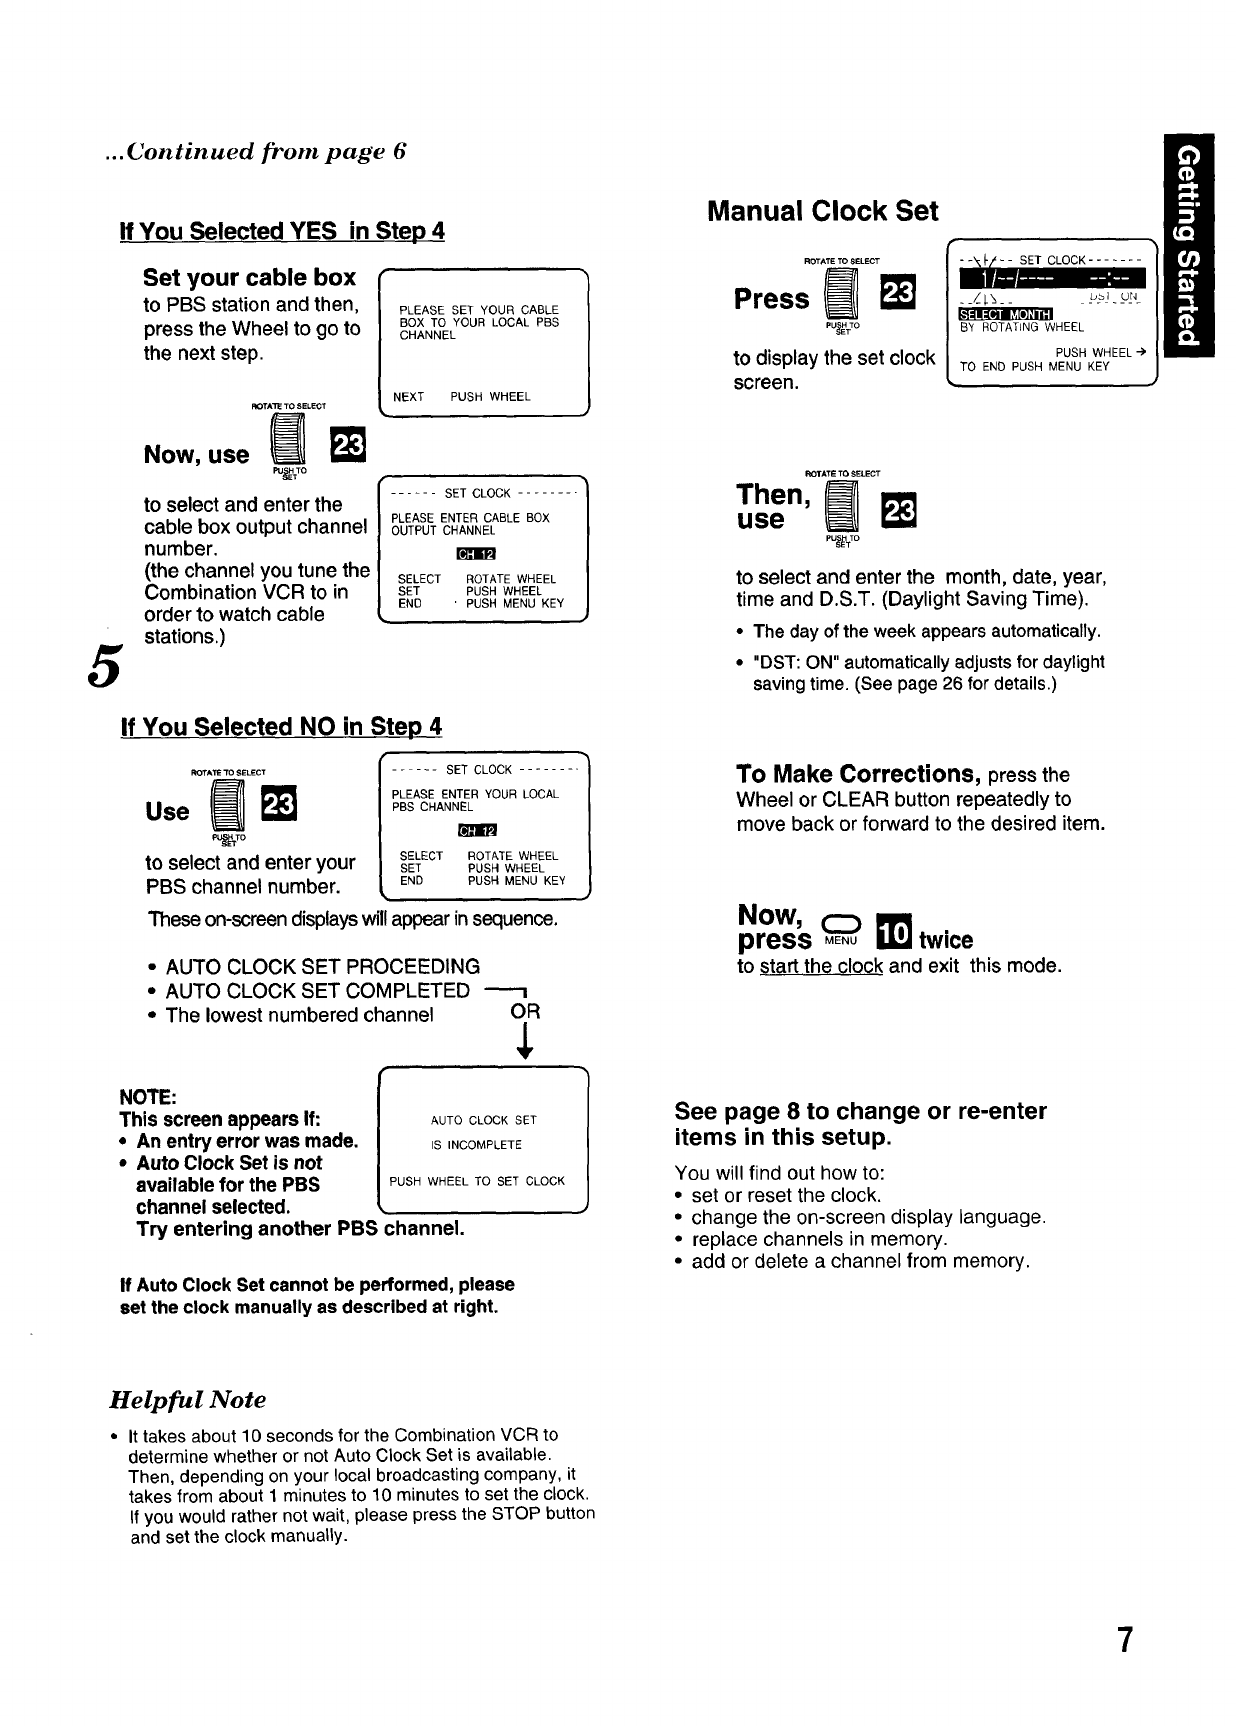
Ulu_ llu,,Ibe,_.ilet[e_( ux.[] k"T_) C.UIIL.bpUIIOw*LllIOld-uutbuli_.rolHele,uJLuuL_UlLIO.(ll011Lpo.ye)
_' Check list before you begin
[] Your Combination VCR is connected to an
Antenna, or Cable system (see page 5).
[] You've read over the Select/Set Wheel
operation, below.
• When the Combination VCR power is first turned on, the
channel auto set and set clock screens appear automatically.
1
Press _i I_ (or I_1)
Up or down for on-screen
displays in English or Spanish.
• If you choose the wrong
language, pleasesee the "Resetall
CombinationVCR MemoryFunctions"
sectionon page 8.
SELECTLANGUAGE
PUSH CH UP ENGLISH
PULSE CH DOWN ESPANOL
0;
Oprimir 0! I_(or In)
hacia arriba o abajo parala exhibici6n eningl_s o
espahol.
Using the Select/
Set Wheel
RulATE [LJ bELEGI
PUSH TO
SET
The SELECT/SET Wheel makes Combination VCR
operation extremely easy. Since you will be using
this control for many of your Combination VCR
features, please take time to familiarize yourself
with its simple operation.
There are basically two types of Wheel operation.
•Selecting items from an on-screen display.
• Entering information, such as setting the clock.
OPERATION
flO Rotate @Press
(up or down) (like a button)
ROTATE TO SELECT ROTATE TO SEI ECT
PUSH TO PUSH TO
SET SET
to make selection to enter selection J
• By repeatedly pressing the Wheel, you can
skip over already set items as desired.
2
3
4
Press _; I_ (or !111)
CH
to sta_ Channel Auto Set.
When channelauto setis finished,
the followingon-screen displays
appear insequence:
CHANNELAUTOSET
CONNECT ANTENNA CABLE
THEN
PLEASE PUSH CH UP KEY
• "CH AUTO SET COMPLETED"
• "PLEASESET CLOCKBY PUSHINGMENUKEY"
Press _ _I
to display the SET CLOCK
screen.
r ..... SET CLOCK ........
MANUAL SET
SELECT
/SET
LEND
r,I._lJ[O]_,_lll
ROTATE WHEEL
PUSH WHEEL
PUSH MENU KEY
ROTATE10 8ELECT
use m
PORTO
ito first, select AUTO SET and
_then, to select YES if you are
using a cable box, or NO if you
are not.
ARE YOU USING
A CABLE BOX ?
NO
SELECT ROTATE WHEEL
SET PUSH WHEEL
END PUSH MENU KEY
• If you select MANUAL SET, skip to the "Manual Clock
Set" section on next page.
Continued on the next page...
6
... Continued from page 6
5
If You Selected YES in Step 4
Set your cable box
to PBS station and then,
press the Wheel to go to
the next step,
PLEASE SET YOUR CABLE
BOX TO YOUR LOCAL PBS
CHANNEL
NEXT PUSH WHEEL
ROTATE TO SELECT
.OWN. N
f
to select and enter the |...... SETCLOCK........
[
PLEASE ENTER CABLE BOX
cable box output channel OUTPUTCHANNEL
number, rmm
(the channel you tune the SELECTROTATEWHEEL
Combination VCR to in SET PUSHWHEEL
order to watch cable END 'PUSH MENU KEY
stations.)
If You Selected NO in Step 4
PU_TO
to select and enter your
PBS channel number.
..... SET CLOCK .......
PLEASE ENTER YOUR LOCAL
PBS CHANNEL
SELECT ROTATE WHEEL
SET PUSH WHEEL
END PUSH MENU KEY
These on-screen displays will appear in sequence.
• AUTO CLOCK SET PROCEEDING
• AUTO CLOCK SET COMPLETED
•The lowest numbered channel OR
¢
NOTE:
This screen appears if:
• An entry error was made.
•Auto Clock Set is not
available for the PBS
channel selected.
Try entering another PBS
AUTO CLOCK SET
IS INCOMPLETE
PUSH WHEEL TO SET CLOCK
:hannel.
If Auto Clock Set cannot be performed, please
set the clock manually as described at right.
1
Manual Clock Set
ROTATE TO SELECT
Press _IP"_
p%Vo
to display the set clock
screen.
F-- SET CLOCK .......
--/-l-&-- b_l ur4
B'Y ROTATLNG WHEEL
PUSH WHEEL
TO END PUSH MENU KEY
ROTATE TO SELECT
Then,
use
_Jss_To
to select and enter the month, date, year,
time and D.S.T. (Daylight Saving Time).
•The day of the week appears automatically.
• "DST: ON" automatically adjusts for daylight
saving time. (See page 26 for details.)
To Make Corrections, press the
Wheel or CLEAR button repeatedly to
move back or forward to the desired item.
Now,
press _11_Itwice
to start the clock and exit this mode.
See page 8 to change or re-enter
items in this setup.
You will find out how to:
• set or reset the clock.
• change the on-screen display language.
•replace channels in memory.
• add or delete a channel from memory.
Helpful Note
•It takes about 10 seconds for the Combination VCR to
determine whether or not Auto Clock Set is available.
Then, depending on your local broadcasting company, it
takes from about 1 minutes to 10 minutes to set the clock.
if you would rather not wait, please press the STOP button
and set the clock manually.
7
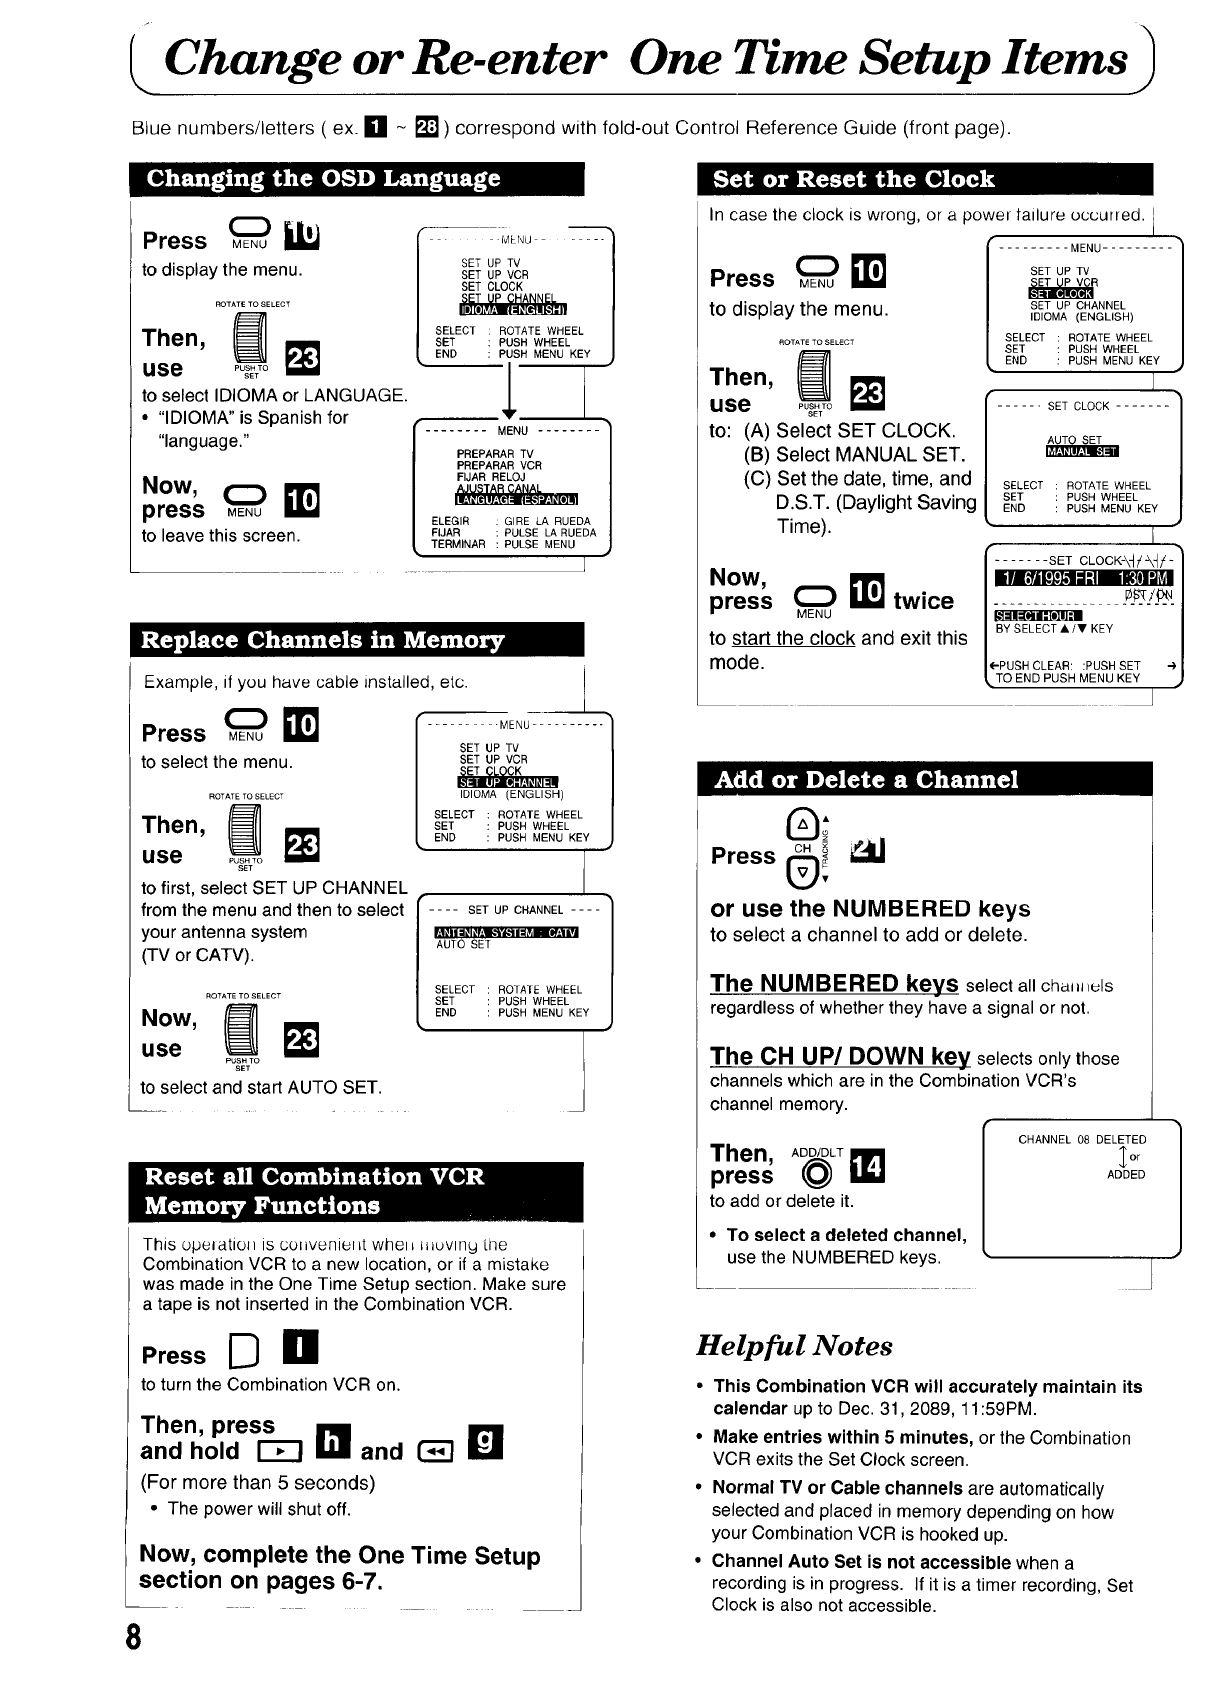
Change or Re-enter One Time Setup Items
Blue numbers/letters ( ex. [] - [] ) correspond with fold-out Control Reference Guide (front page).
[,;'_':I_[o____
Press _
to display the menu.
ROTATE TO SELECT
Then, _
use PC#;;o
to selectlDIOMA or LANGUAGE.
• "IDIOMA"is Spanish for
"language."
Now,
press MENU E
to leave this screen.
I MMqU ..... q
SET UP TV n
SET UP VCR /
SELECT ROTATE WHEEL /
SET PUSH WHEEL /
END PUSH MENU KEY J
,
........ MENU ........ }
J
PREPARAR TV
PREPARAR VCR
FIJAR RELOJ
ELEGIR GIRE LA RUEDA
El JAR PULSE LA RUEDA
TERMINAR PULSE MENU
t
Example, if you have cable installed, etc.
Press ME(_u_'llJ
to select the menu.
ROTATE TO SELECT
""en, N
use _o_g;o
to first, select SET UP CHANNEL
from the menu and then to select
your antenna system
(TV or CATV).
l
ROTATE TO SELECT
.°w, m
use PUSH TO
SET
to select and start AUTO SET.
-MENU ..........
SET UP TV
SET UP VCR
IDIOMA (ENGLISH)
SELECT ROTATE WHEEL
SET PUSH WHEEL
END PUSH MENU KEY
i c-1....
AUTO SET
SELECT ROTATE WHEEL
SET PUSH WHEEL
END PUSH MENU KEY
|
This opelatioH is conveniel_t whell l=_uvlny Llle
Combination VCR to a new location, or if a mistake
was made in the One Time Setup section. Make sure
a tape is not inserted in the Combination VCR.
PressD n
to turn the Combination VCR on.
Then, press
and hold I'm and _B
(For more than 5 seconds)
• The power will shut off.
Now, complete the One Time Setup
section on pages 6-7.
8
In case the clock is wrong, or a powel tailure occurred. I
I
Press ME(_.u_!_
to display the menu.
ROTATE TO SELECT
Then, I_
use Pus.To
SET
to: (A) Select SET CLOCK.
(B) Select MANUAL SET.
(C) Set the date, time, and
D.S.T. (Daylight Saving
Time).
......... MENU .........
SET UP TV
_R
SET UP CHANNEL
IDIOMA (ENGLISH)
SELECT ROTATE WHEEL
SET PUSH WHEEL
END PUSH MENU KEY
...... SET CLOCK .......
AUTO SET
SELECT ROTATE WHEEL
|SET PUSH WHEEL
L END PUSH MENU KEY
I
r ....... SET CLOCK-\-_ /_/-
.ow,
press _E(_"u_!_ twice__ / BYsELEcTA/"KEY
to start the clock and exit this
mode. I{-PUSH CLEAR: :PUSH SET 4,
LTO END PUSH MENU KEY •
0;
OH_ _1
Press _;
or use the NUMBERED keys
to select a channel to add or delete.
The NUMBERED keys select all cha, l, luls
regardless of whether they have a signal or not.
The CH UP/DOWN key selects only those
channels which are in the Combination VCR's
channel memory.
Then, ADD/DLT
p ess@ii1
to add or delete it.
•To select a deleted channel,
use the NUMBERED keys.
CHANNEL 08 DELETED
_or
ADDED
Helpful Notes
• This Combination VCR will accurately maintain its
calendar up to Dec. 31, 2089, 11:59PM.
• Make entries within 5 minutes, or the Combination
VCR exits the Set Clock screen.
•Normal TV or Cable channels are automatically
selected and placed in memory depending on how
your Combination VCR is hooked up.
•Channel Auto Set is not accessible when a
recording is in progress. If it is atimer recording, Set
Clock is also not accessible.
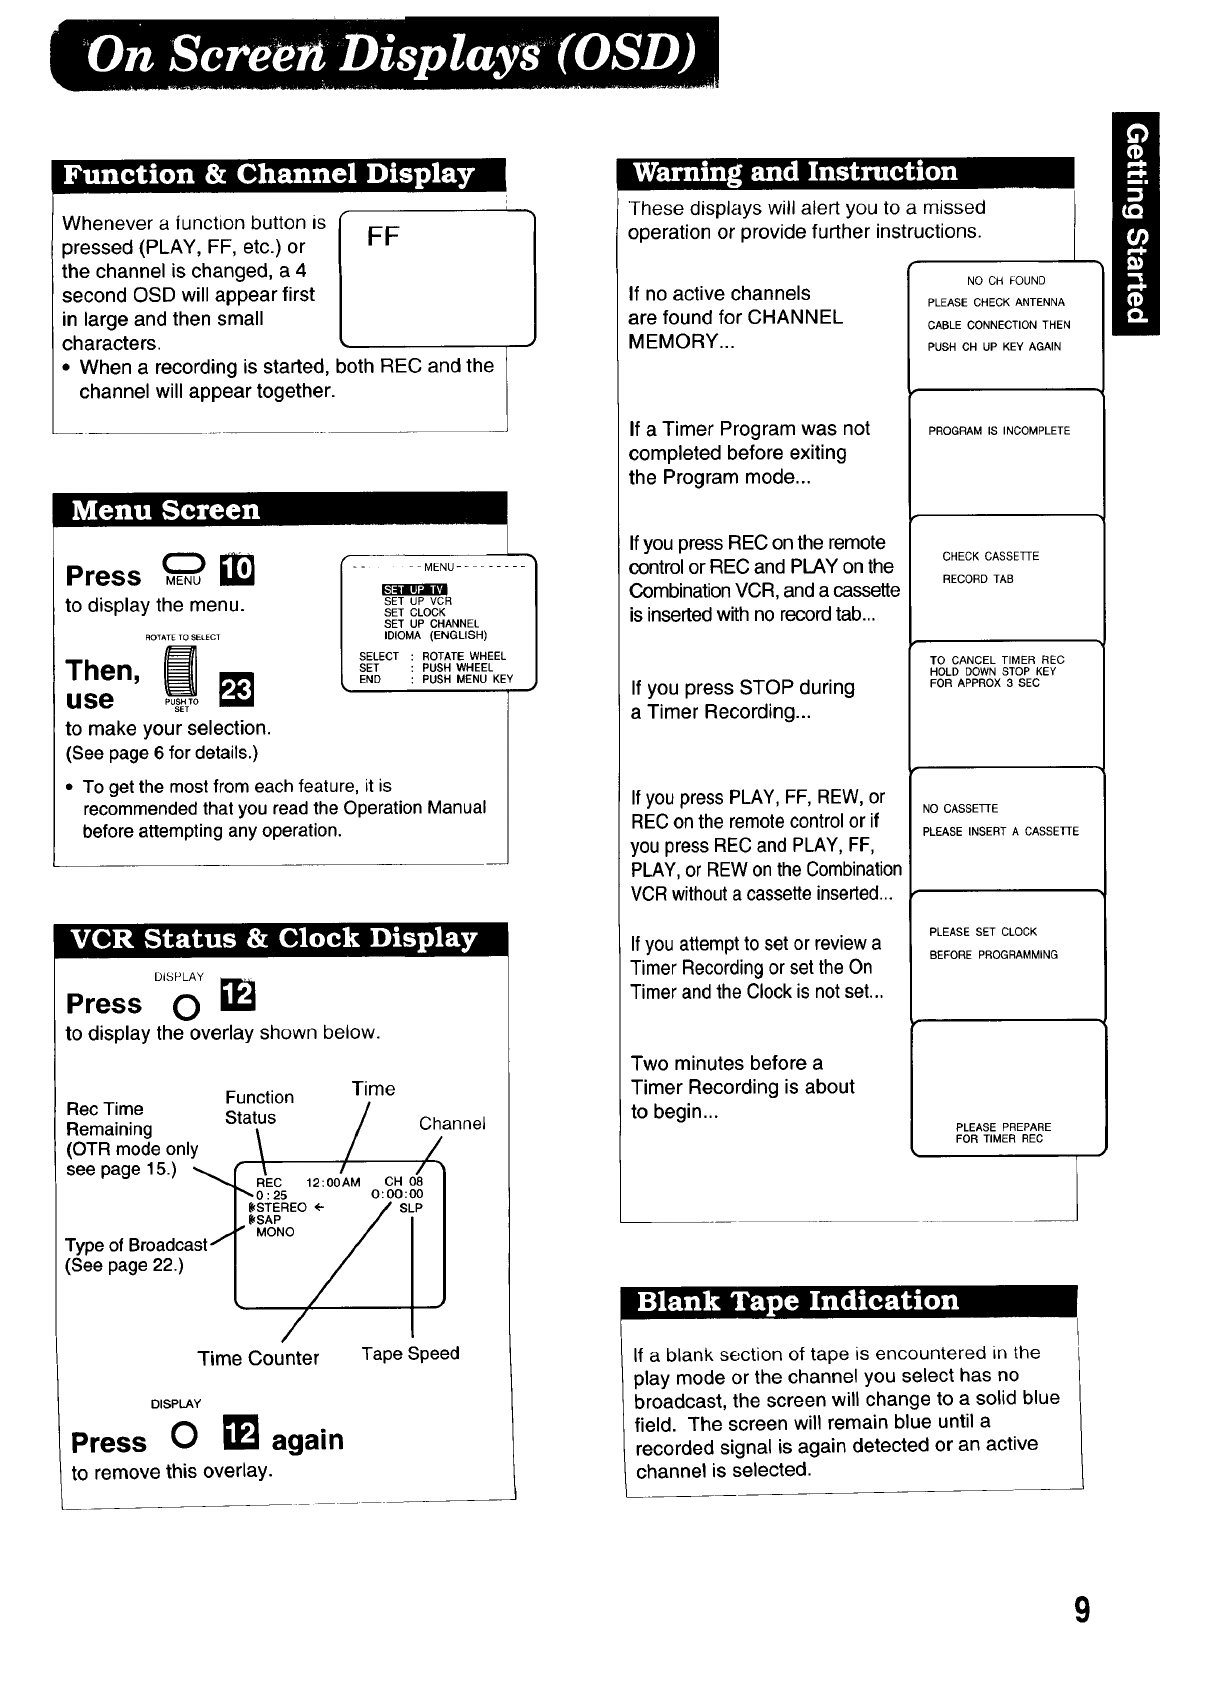
bm 'rttt' !r6-a
Whenever a |unction button is
pressed (PLAY, FF, etc.) or
the channel is changed, a 4
second OSD will appear first
in large and then small
characters.
• When a recording is started,
channel will appear together.
FF
)oth REC and the
Press
to display the menu.
ROTATE TO SELECT
Then,
use
to make your selection.
(See page 6 for details.)
SET UP VCR
SET CLOCK
SET UP CHANNEL
IDIOMA (ENGLISH)
SELECT ROTATE WHEEL
SET PUSH WHEEL
END PUSH MENU KEY
• To get the most from each feature, it is
recommended that you read the Operation Manual
before attempting any operation.
DISPLAY
Press O
to display the overlay shown below.
Function Time
Rec Time _.. /
Remaining _ta[.us /Channel
(OTR mode only \ / /
see page15.) _ f\//•
"_ REC 12:00AM CH 08
F"_ 0 : 25 O: 00:00
I{{(STEREO ÷SLP
I. {{(SAP
MONO I
Typeof Broadcast/I I
(See page 22.) LI.
Time Counter Tape Speed
DISPLAY
Press 0again
to remove this overlay.
These displays will alert you to a missed
operation or provide further instructions.
If no active channels
are found for CHANNEL
MEMORY...
If a Timer Program was not
completed before exiting
the Program mode...
If you press REC on the remote
control or REC and PLAY on the
Combination VCR, and a cassette
is inserted with no record tab...
If you press STOP during
a Timer Recording...
If you press PLAY, FF, REW, or
REC on the remote control or if
you press REC and PLAY, FF,
PLAY, or REW on the Combination
VCRwithout a cassette inserted...
If you attempt to set or review a
Timer Recording or set the On
Timer and the Clock is not set...
Two minutes before a
Timer Recording is about
to begin...
NO CH FOUND
PLEASE CHECK ANTENNA
CABLE CONNECTION THEN
PUSH CH UP KEY AGAIN
PROGRAM IS INCOMPLETE
CHECK CASSE]q'E
RECORD TAB
TO CANCEL TIMER REC
HOLD DOWN STOP KEY
FOR APPROX 3 SEC
NO CASSETTE
PLEASE INSERT ACASSE]3-E
PLEASE SET CLOCK
BEFORE PROGRAMMING
PLEASE PREPARE
FOR TIMER REC
If a blank section of tape is encountered in the
play mode or the channel you select has no
broadcast, the screen will change to a solid blue
field. The screen will remain blue until a
recorded signal is again detected or an active
channel is selected.
I
9
blue J_ur.bers/lene_ [ ux. L1 [] ) _utlu_pullO with luld-udt Control Helere_l_u Guide (lrollt pdge)
[_' Check list before you begin
[] All connections are made (see page 5).
[] Your Combination VCR is plugged in.
1Press!_F_ll (orlnl)
to turnthe CombinationVCR on.
1Press _
to display the menu
screen. ....... SET UP TV ......
ROTATETOSELECT
2Use
to first, select SET UP TV and then, to
select AUDIO ADJUST.
CAPTION
VIDEO ADJUST
AUDIO MODE STEREO
SELECT ROTATE WHEEL
SET PUSH WHEEL
END PUSH MENU KEY
Then, select a channel
using the CHANNEL UP/DOWN or
NUMBERED keys.
0
3Press(_ F_(or r_ )
to adjust the volume level.
24 IIIIIIIIIII ................
3
4
ROTATE TO 8ELECT
Use _
to select and display the
desired audio adjust
overlay. (See below.)
TREBLE ......... I........
NORMAL
SELECT ROTATE WHEEL
SET PUSH WHEEL
END PUSH MENU KEY
Use F_
to adjust and set the control.
•Repeat steps 3 and 4 as necessary.
When selecttng CATV channels 100 to 12b w_th
the NUMBERED keys, first press the 100 key I
and then enter the remaining two digits. J
For example, for channel 125:
Press NUMBERED keys 100-2-5. 5
Press _ NTJ twice
to exit this mode.
•If no button is pressed within 5 minutes,
the audio adjust overlay disappears.
• Adjustment scale and setting indicator
numbers are displayed to assist you.
h I UIJL.
Press 0
to display the
last channel you
were watching.
Prevloub Prebent
Channel Channel
CHO8_,----,,-CHIO
•When selecting channels wJth the CH UP/DOWN
key, the channels must be displayed for at least 4
seconds in order for the Combination VCR to
recognize them as a new selection.
r,,1u I L )
/
Press OJ
to instantly mute the sou_d.
Press again, to restore the prewou_ _ut_d level.
Connect ai_ udrpho_e {not supplied) or heddphol_e
(not supplied) to the Phones jack U'
10
BASS Control
To adjust the intensity ol low
frequency sound.
TREBLE Control
To adjust the intensity of htgh
frequency sound.
u UAbb
--I---
+
0 TREBLE
......... I ..........
ADJUST ROTATE WHEEL
SET PUSH WHEEL
• The levels set here do not affect other audto
equipment when connected to the Audio Output
L/R Connector.
__ I
In step 3above, _- _s_ "__E__
Use _o_;o ISELECT ROTATE WH
to select and set NORMAL I SET PUSHWHEEL I
PUSH MENU KEY /
LEND
All controls retum to factory settings, J
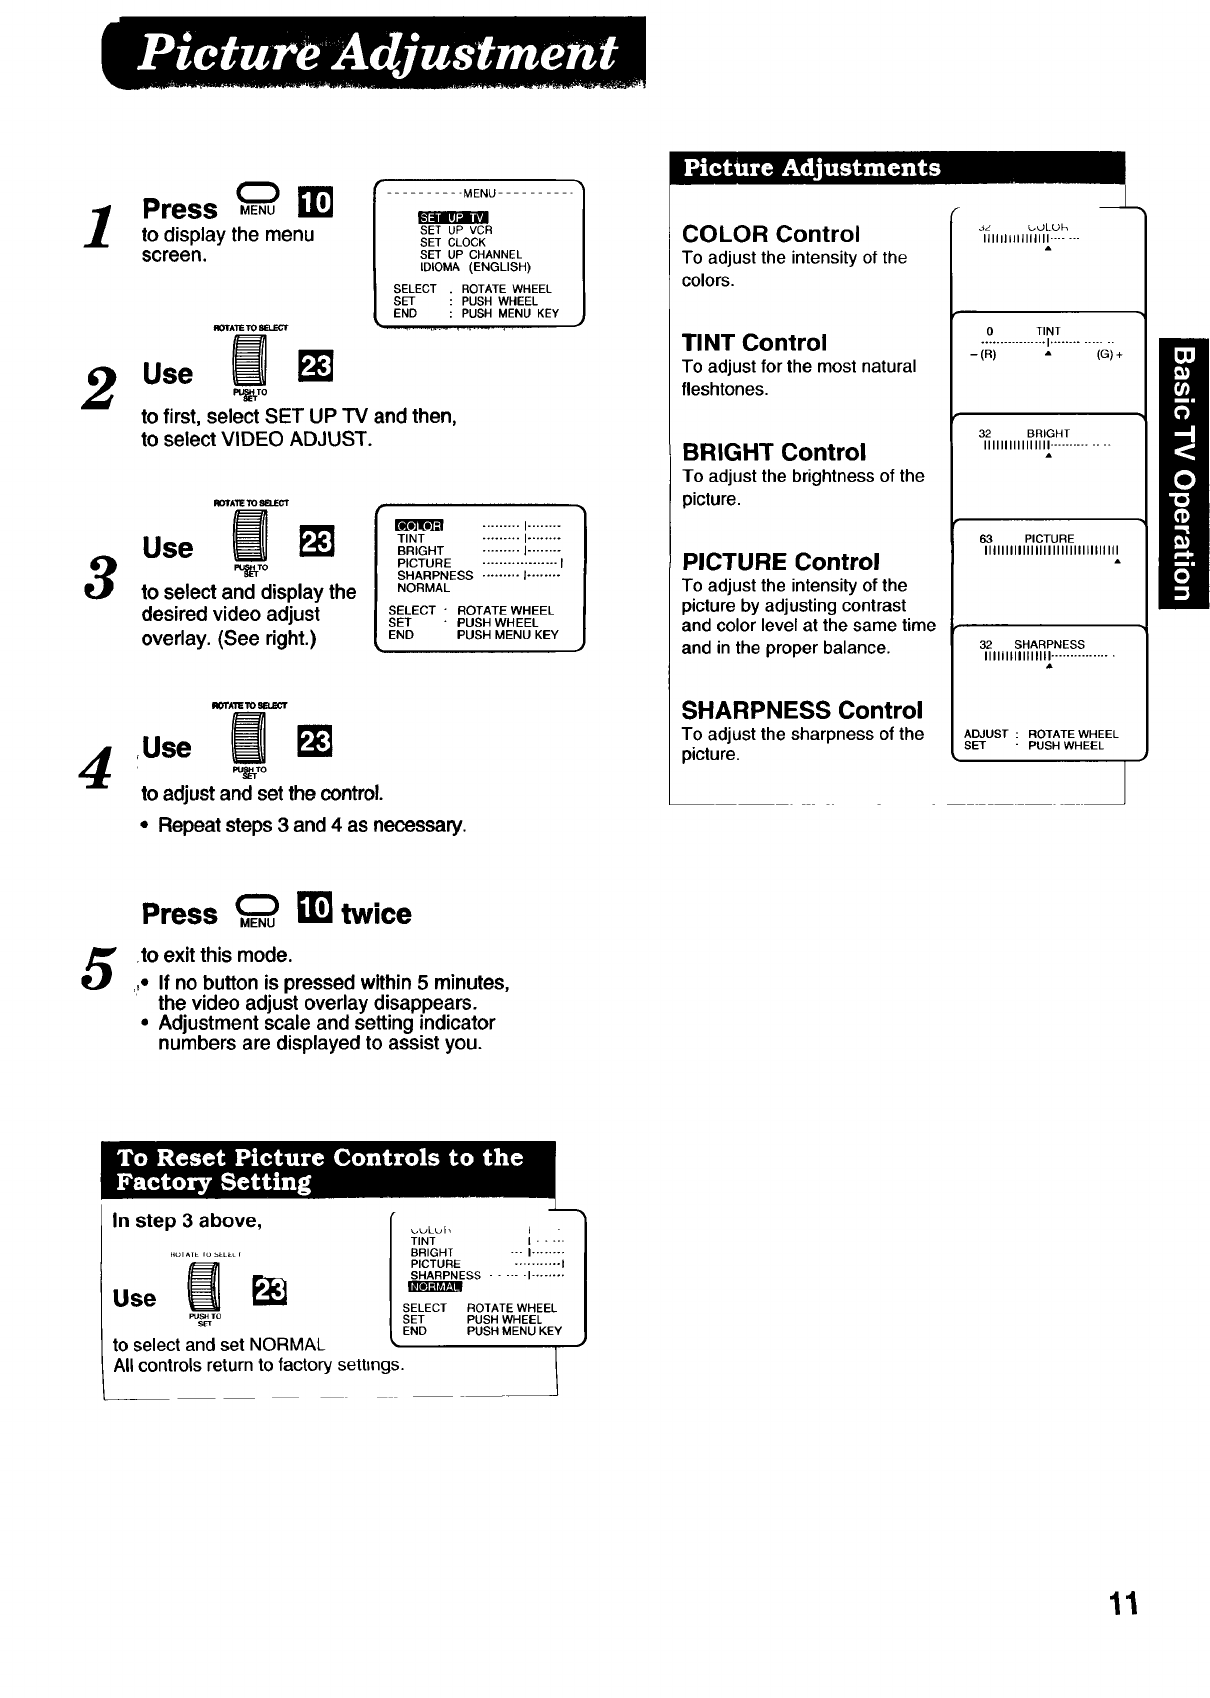
]Press _MENU
B
to display the menu SETUPVCR
SET CLOCK
screen, sETuPCHANNEL
IDIOMA (ENGLISH)
SELECT . ROTATE WHEEL
SET : PUSH WHEEL
END : PUSH MENU KEY
IIOTATETOBELECT _ .................
2Use Pu_LUrm
to first, select SET UP TV and then,
to select VIDEO ADJUST.
3
IIOTAI"I_ _8EI.C-_*'T
Use PJk']
eu_To
to select and display the
desired video adjust
overlay. (See right.)
m ......... I........
TINT ......... I........
BRIGHT ......... I........
PICTURE .................. I
SHARPNESS ......... I ........
NORMAL
SELECT" ROTATE WHEEL
SET "PUSH WHEEL
END PUSH MENU KEY
II_TATETOgELE_Ir
4Use m
to adjust and set the control.
•Repeat steps 3 and 4as necessary.
COLOR Control
To adjust the intensity of the
colors.
TINT Control
To adjust for the most natural
fleshtones.
BRIGHT Control
To adjust the brightness of the
picture.
PICTURE Control
To adjust the intensity of the
picture by adjusting contrast
and color level at the same time
and in the proper balance.
SHARPNESS Control
To adjust the sharpness of the
picture.
4z L._JLUh
IIIIIlllllllllll .......
A
0 TINT
................. I...............
-(R) "(G) +
32 BRIGHT
IIIIIIIIIIIIIIII ..............
63 PICTURE
IIIIIIIIIIIIIIIIIIIIIIIlllllllll
32 SHARPNESS
IIIIIIIIIIIIIIII ................
A
ADJUST : ROTATE WHEEL
SET " PUSH WHEEL
Press _ _] twice
.to exit this mode.
,,- If no button is pressed within 5 minutes,
the video adjust overlay disappears.
•Adjustment scale and setting indicator
numbers are displayed to assist you.
In step 3 above,
PUs_rTo
to select and set NORMAL
All controls return to factory settings.
_,uLuh " 1
TINT kl
BRIGHT "'" I........
PICTURE ........... I
ESS ...... I........
SELECT ROTATE WHEEL
SET PUSH WHEEL
END PUSH MENU KEY
11
L_Iu_d llulubrdlb/leaelb ( e×.[L _ _ ) cuvzebpurld ,,,viLli luld-uuL _OI1LIOI Hetel,...J ,,.._. ,..JuIdc tlrozll paye).
[_ Check list before you begin
[] All connections are made (see page 5).
[] Your Combination VCR is plugged in.
The Combination VCR can be set for auto power on.
1Press°"6' L1
The ON TIMER display appears on-screen.
_=l_l _'-I--
2
ROTATE TO 8ELECT
Use _F_
%s_To
tosettheON time.
use
to select either a channel
number for TV mode or
"PLAY" for VCR Playback
mode when the
.... ".,| /ONI _MER .......
.... _/IX___/.J \
BY ROTATING WHEEL
PUSH WHFEL_
TO END PUSH ON-TIMER KEY
Combination VCR comes on.
•Make sure a tape is inserted if VCR Playback
mode is selected.
The Combination VCR can be set for auto power off.
Press s(__ I]L'_j
to display the desired sleep timer.
• Each press of the SLEEP button will change
the overlay as follows:
SLEEP TIMER 30
SLEEP TIMER 60
1
SLEEP TIMER 90
SLEEP TIMER 00
,If you press the DISPLAY
button with the SLEEP
TIMER set, the remaining
time will appear on-screen.
SLEEP TIMER 1 2
To cancel,press SLEEP button until "SLEEP
TIMER 00" appears.
To makecorrections,
press the Wheel or CLEAR button repeatedly to
move back or forward to the desired item.
3
ON TIMER
Press O1"1 [ ONT,.ERSET
to set the ON TIMER CANCELPUSHCLEARKEY
function.
This screen will appear
for about 5 seconds.
• The ON TIMER indicator
lights on the front panel.
To cancel,press the CLEAR button while
above screen is displayed.
"ON TIMER END" will appear for about 5
seconds on-screen.
On Timer Feature Note:
• 60 minutes after the Combination VCR turns
itself on, it will turn itself back off unless any
remote or Combination VCR button is pressed.
12
[_' Check list before you begin
[] All connections are made (see page 5).
[] Your Combination VCR is plugged in.
Th=ssystem not only allows the heanng _mpa=redto enjoy
selected programs, but also makes valuable information from
your TV stations available to you.
C,C,
Press O
to select the desired caption
mode (see below).
Selected mode is displayed
as an overlay on the screen.
CAPTION OFF
Each press of the CC button will change the
caption mode as follows:
CAPTIONOFF--c, CAPTIONCl
TEXTC1
TEXTC2'_-'-CAPTION C2_1-_'J
• The oveday will disappear in 5 seconds.
• You may also select the caption mode from the menu
screen. Press MENU. Use WHEEL to select SET UP TV
and then CAPTION. Finally choose the desired caption
mode with WHEEL.
Caption Mode: CAP Cl or C2
A narration of selected TV programs will be displayed
on the screen. Check your TV program listings for CC
(Closed Captioned) broadcasts.
Caption Mode: TEXT 01 or C2
The lower half of the screen will be blocked out. When
the TV station broadcasts text, such as program
listings, special information, etc., it will appear in this
space. This text block will remain on the screen until
you cancel this mode.
Caption Mode: OFF
Narration will not appear on the screen even if a
closed caption or text broadcast is received.
• The closed caption or text signal may be
broadcast over C1, C2, or both. Also, text contents
can vary so you may wish to try different settings.
This feature allows you to turn off the sou_d ana,
at the same time, display the closed caption
narration. Perfect for when you need silence, but
would like to continue enjoying the program.
Press MENU
to display the menu.
......... MENU .........
m
SET UP VCR
SET CLOCK
SET UP CHANNEL
IDIOMA (ENGLISH)
SELECT
SET
END
ROTATE TO SELECT
_] ROTATE WHEEL
Then, I_ PUSHWHEEL
PUSH MENU KEY
use ......
SET
to first, select SET UP TV
and then, to select the
CAPTION screen. f
ROrA'ETOSELECT / ....... CAPTION .......
Next, _ [ _F
rotate ...... _
SET SELECT ROTATE WHEEL
SET PUSH WHEEL
to select the CAPTION ON END PUSHMENUKEY
MUTE mode.
• Make sure CAPTION MODE is "OFF."
ROTATE TO SELECT
Now,
press PUsS_TTO
to select the desired caption mode.
Each press of the Wheel will change the display as
shown below:
C NO ---_ CAP Cl---_ CAP C2b
Record: Your Combination VCR will
automatically record the Closed CaptionFFext
signal. Just follow normal recording operation.
Playback: To display the Closed Caption
narration or Text during playback, simply
follow the steps listed above left.
13
LPlayback Features
Jluu _ut_hbe_b/lettel_ (e_,. [] - F_) cuL_u_pv_ ,d wttll lold-out Control Reference Guide (front page).
[_' Check list before you begin
[] All connections are made (see page 5).
[] Your Combination VCR is plugged in.
1Insert a
cassette ra
m
m
..,.,.
•Combination VCR power comes on automatically.
Playback begins if cassette has no record tab.
2Press _'_ _ (or _r)
to start playback if necessary.
3
REW/_ :. :,
Press (_ ILl (or D)
FFI_
or _) _J (or a)
to quickly locate a scene during playback.
•SP modetapes havea searchspeedof 9 times
and SLP mode tapes 27 timesthe normal speed.
•Some noisebarswillappear duringsearch.
These features work best m SP or SLP mode.
Sound will be muted.
Slow Motion Playback
Press _6w D
Then, press _ _ (or I_ )
to release.
StiJ (Freeze) Frame Picture
Press
to freeze and release the ptcture.
Frame by Frame Advance
Press repeatedly
or SLOW
hold down (_)
in Still mode, to advance the still ptcture one
frame at a time.
Press PAUSE or PLAY to release
Intelligent Search
If after a Rew or FF search is done the
search is re-started within 5 seconds, the
search speed decreases (SP mode: 5 times,
SLP mode: 9 times) for a duration of 8 sac.
Then normal search speed resumes.
4
F
STOP
Press _I_1 (orB)
to stop playback.
Then, ,,o,.,_
press _I_1
on the Combination VCR to eject the cassette.
Caution:
Please inspect your cassette tape
for any loose or peeling labels as it
may become jammed in your unit.
J
Digital Auto Tracking
Thts feature continuously analyzes the sayrLai
and adjusts for optimum ptcture quahty.
Manual Tracking Control
Use during Playback and Slow Motton to reduce
picture noise.
0;
Press®!N (orD)
unhl the picture clears up.
To return to Auto tracking, elect and re-_nsert the tape.
V-Lock Control
Use during Still mode to reduce jitter.
Press _i I_ (orB)
until the picture is stabilized.
pansRlack TM Picture Tube
This Combination VCR uses a PanaBlack TM
picture tube for better color reproduction and
picture contrast.
14
1
2
3
4
I_ Check list before you begin
[] All connections are made (see page 5).
[] Your Combination VCR is plugged in.
Insert a
cassette irJJi
with record tab,
• Combination VCR power comes on automatically.
"ressSi
to select a channel to
be recorded.
• To record from an outside
source, see "Selecting the
Input Mode" on this page.
02
Press "O° _J
until the desired speed
appears on-screen. [SLP
REC/TIME
Press (_
to start recording.
( or !_! andU)
REC
• The on-screendisplaychanges
as shown.Press the REC/
TIME button again if you want
to set a recording length. (See
the "One Touch Recording"
section on this page for more
02
TO SET SPECIFIC REC TIME
PLEASE PUSH REC KEY
•I
After 2 seconds
4,
details.) REC
$STEREO
$SAP
MONO
CH O2
O CO 30
SLP
TO SET SPECIFIC REC TIME
PLEASE PUSH REC KEY
]
]
You can set up the Combff_atlon VCR to turn Itselfoff
at a preset time making _ta one touch timer recording.
In step 4,
Continue REC/TIME
topress @ _ (orU)
to set the recording length.
Each press will change the t=meas shown
in the diagram below.
_44: _: rmji: _ c_.__:O0:_0_._:13_._
Press _ i_
to display the menu screen.
ROTATE TO SELECT
.ext,
use PUSH TO
SEt
to first, select SET UP VCR
from the menu and then,
select INPUT SELECT.
L
MENU - --
SET UP TV
SET CLOCK
SET UP CHANNEL
IDIOMA (ENGLISH)
SELECT ROTATE WHEEL
SET PUSH WHEEL
END PUSH MENU KEY
ROTATE TO SELECT
press PO_.;o
to select 'TUNER" or "LINE".
Now,
press ME.U!i_ twice
to exit this mode.
..... SET UP VCR ....
REPEAT PLAY OFF
I_l'JIII I_P41['_@ m III1_1=1
PLAY AUD;O HIFJ
SELECT ROTATE WHEEL
SET PUSH WHEEL
END PUSH MENU KEY
• You can also select LINE using the CH UP/DOWN.
The numbers will change in the order shown below.
_1--2--3
((CATV) (CATV) (TV))
_LINE<t--'--125 or 69.1--0"
PAUSE
5Press (_)
to pause or resume the recording,
6Press _ _ (or!?1)
to 8top recording,
Helpful Notes
•While it is possible to change the tape speed when you
are recording, there will be some distortion on the tape
where the change occurred.
• Press PAUSE to pause normal recordings in progress.
One Touch Recordings can go into Pause mode.
• After the Combination VCR has been in Pause mode
for 5 minutes, it willstop automatically to protect the
tape and video head.
• The recording time remaining will appear when the
DISPLAY button is pressed during OTR mode (See
page 9). 15
dlu_ L,u_,be_,le[[e,_ ( e^. Ill - _ )culrebpurld with lold-uut (..;OliLrOI Helelullcu _ulde Llrolll. pdge).
[_ Check list before you begin
[] All connections are made (see page 5.)
[] Your Combination VCR is plugged in.
[] The clock is set.
[] The tape is long enough.
[] The record tab is in place.
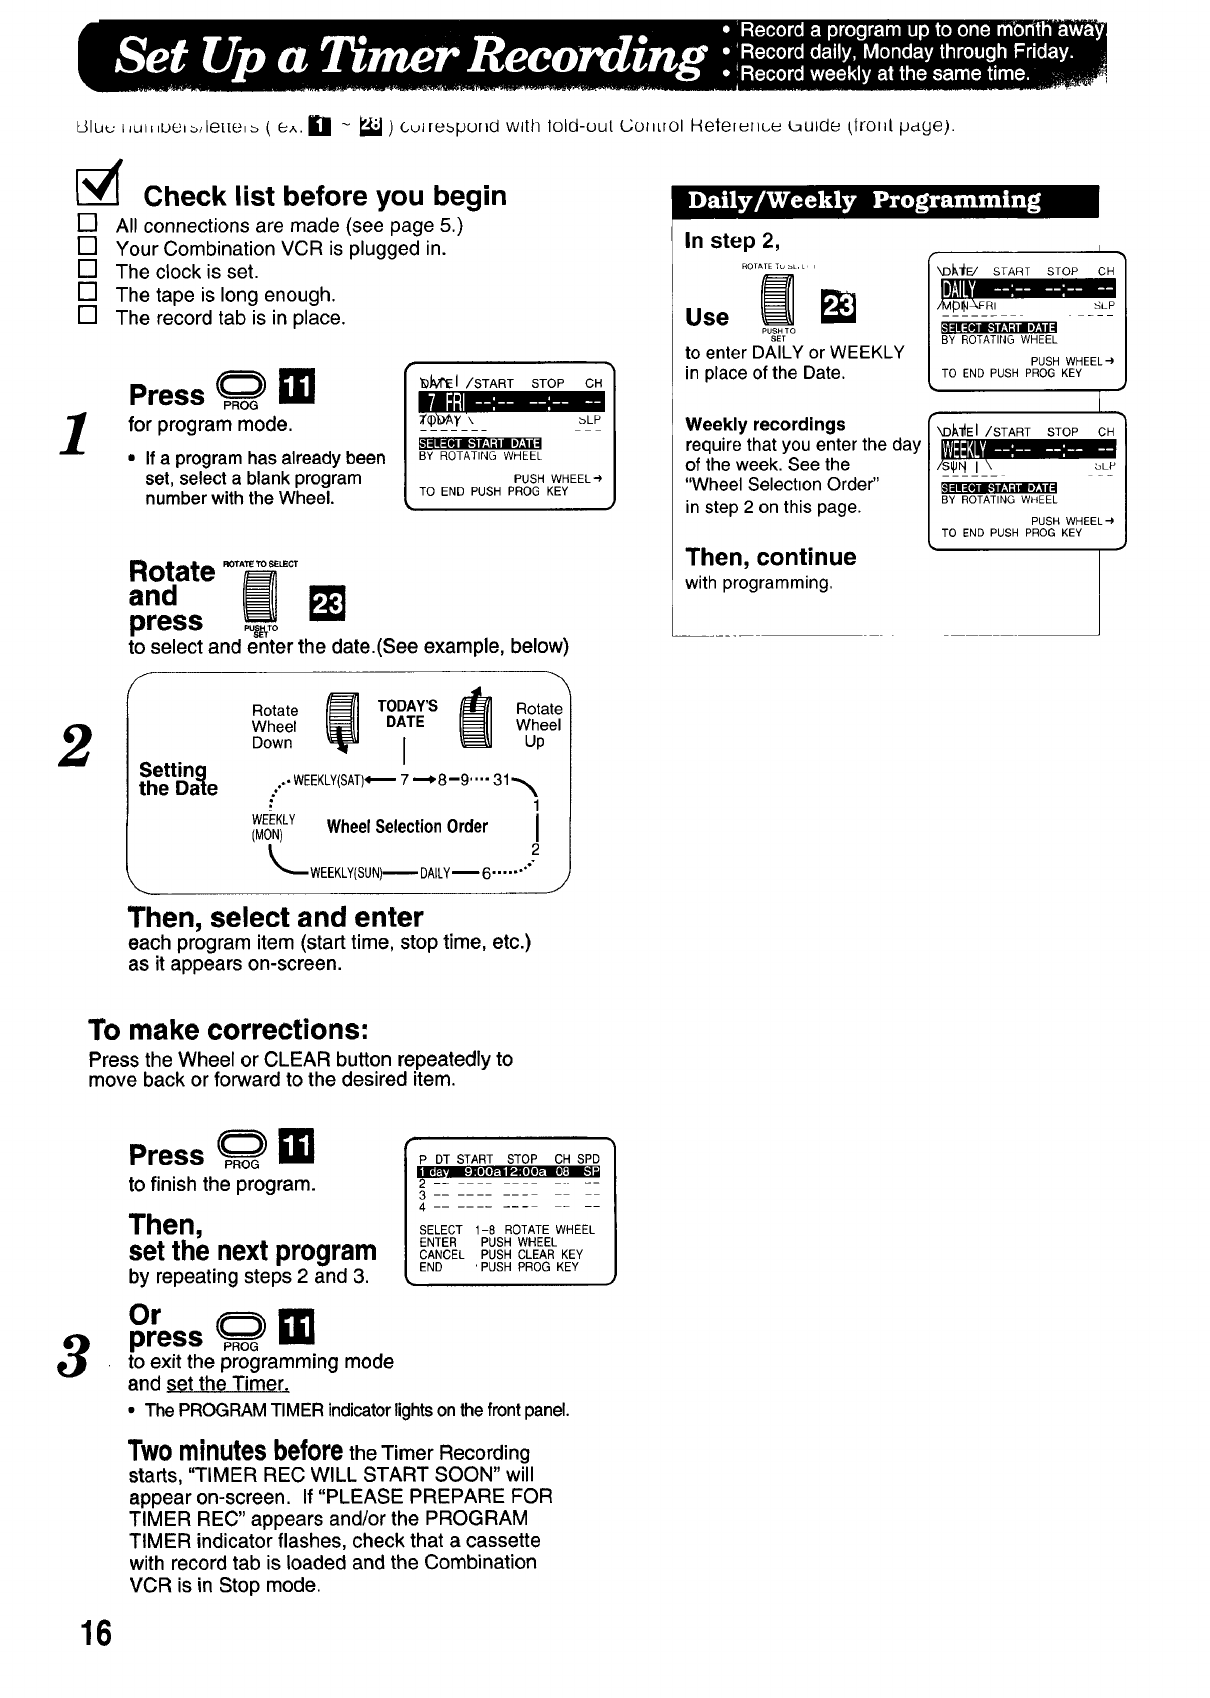
Press P._O_i_
for program mode.
• If a program has already been
set, select a blank program
number with the Wheel.
_M'E I/START STOP CH
aLP
|,
BY ROTATING WHEEL
PUSH WHEELe
TO END PUSH PROG KEY
2
Rotate .o,,,_,o,_,
press _,o
to select and enter the date.(See example, below)
F
Setting
the Date
Rotate _] TODAY'S _] ROtWuhpte
Wheel DATE el
Down I
.., WEEKLY(SAT)_ 7 "--_8--9 .... 31 -_
1
WEEKLY WheelSelectionOrder I
(MON) i
2
_WEEKLY(SUN)-- DAILY16 ....... "
Then, select and enter
each program item (start time, stop time, etc.)
as it appears on-screen.
In step 2,
RO[ATE Tu _L, L,,
PUSH TO
SET
to enter DALLYor WEEKLY
in place of the Date.
Weekly recordings
require that you enter the day
of the week. See the
"Wheel Selecbon Order"
in step 2 on this page.
Then, continue
with programming.
I
rXDJ_I_E/ START STOP CH 1
117:1!'.......... /
BY ROTATING WHEEL /
/
PUSH WHEEL'-') /
TO END PUSH PROG KEY l
I
• I
"_I_'_EI/START STOP CH
15!I_'_= .....
/s_rl I\ bLP
BY ROTATING WHEEL
PUSH WHEEL'-)
TO END PUSH PROG KEY
To make corrections:
Press the Wheel or CLEAR button repeatedly to
move back or forward to the desired item.
3
Press _ i_
to finish the program.
Then,
set the next program
by repeating steps 2 and 3.
Or
press _ EE!
P DT START STOP CH SPD
2
3
4
SELECT 1-8 ROTATE WHEEL
ENTER PUSH WHEEL
CANCEL PUSH CLEAR KEY
END 'PUSH PROG KEY
to exit the programming mode
and set the Timer.
• The PROGRAMTIMERindicatorlightsonthefrontpanel.
Twominutesbeforethe Timer Recording
starts, "TIMER REC WILL START SOON" will
appear on-screen. If "PLEASE PREPARE FOR
TIMER REC" appears and/or the PROGRAM
TIMER indicator flashes, check that a cassette
with record tab is loaded and the Combination
VCR is in Stop mode.
16
_IOP
Hold _
(or_I_ ) down
for a few seconds to cancel
the Timer Recording.
• Any future daily or weekly
recordings will be performed
as programmed.
TO CANCEL TIMER REC
HOLD DOWN STOP KEY
FOR APPROX 3 SEC
I1
(Recording is not in progress.)
Press@ TM
to display all programs.
ROTATETOSELECT
Next, {_rotate F._
PUSHTO
SET
to select the desired
program number.
•hen,
press
to clear the program.
P DT START STOP CH SPD 1
0." Ho II. 0; •
2 8 lO:OOp 12:00p 125 SLP
310 8:00p 9:00p 10 SP
4 SU 9:00plO:OOp L SLP
SELECT 1-8:ROTATE WHEEL
ENTER :PUSH WHEEL
CANCEL :PUSH CLEAR KEY
END :PUSH PROG KEY
3 10 8:00p 9:00p 10 SP
4 SU 9:00plO:OOp L SLP
SELECT 1-8 : ROTATE WHEEL
ENTER :PUSH WHEEL
END :PUSH PROG KEY
.ow,
press
to return to normal TV.
(Recordil_g is l_ot in plogluss.)
Press p.(_oG_11
to display all currently set
programs.
ROTATE TO SELECT
Then,
use ,,°;_7oi_
to select and enter the
desired program.
Review or replace the
program contents.
Now,
press _oG _11
to return to normal TV.
Ir
| 3 10 8:00p 9:OOp 10 SP
4 SU 9:00p lO:OOp L SLP
l SELECT 1-8:ROTATE WHEEL
l ENTER PUSH WHEEL
l CANCEL PUSH CLEAR KEY
END PUSH PROG KEY
,_:1 /START STOP CH 1
I_?:llogoIo] I PI)I I P$1/
BY ROTATING WHEEL /
('-PUSH CLEAR : PUSH WHEEL-')|
TO END PUSH PROG KEY J
Helpful Notes
•Another way to review program contents
is to press the PROGRAM button while a timer
recording is in progress. Program in progress is
flashing.
• Check your times carefully to avoid
overlapping.
• Two minutes before the Timer Recording
starts, "PLEASE PREPARE FOR TIMER REC"
appears on-screen if turned on. If the record tab is
missing the tape ejects and the PROGRAM
TIMER indicator flashes.
•If there is a power interruption of more than
about one minute, the recording can not be
performed or continue.
• If "PROGRAM IS INCOMPLETE" appears,
check all entries carefully and make any
corrections. Then, continue with step 3 on
previous page.
•When recording from an external source,
rotate the wheel until "L" appears instead of the
Channel.
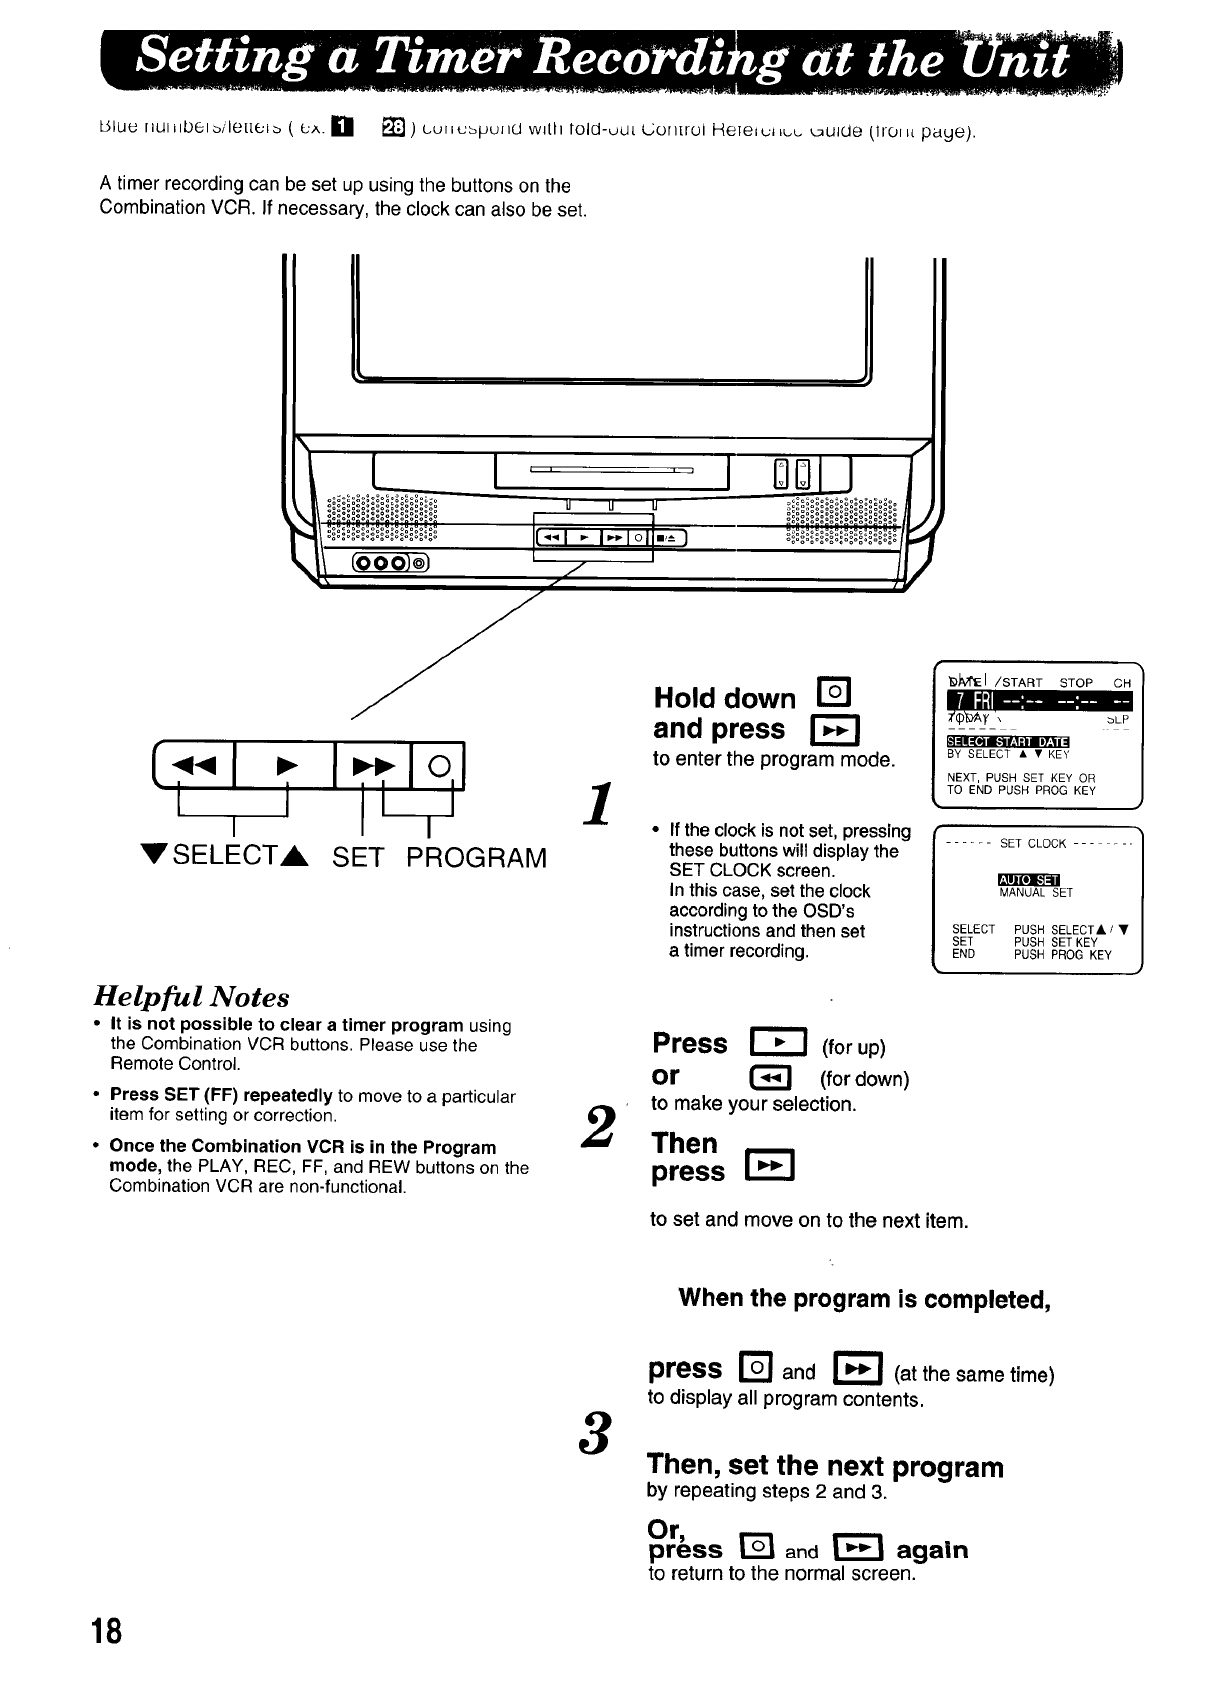
Uluu raui_lbe,o,"le[tet_ ( cA. Igl [] ) uu,_ubpu_id wdlt lold-out L;on[rol HeTelut Lu__ulde (lroi _tpaye).
A timer recording can be set up using the buttons on the
Combination VCR. If necessary, the clock can also be set.
o(.o__e_e)_
I
[.'.".1.-I.... Io.I
i i i
VSELECTA SET PROGRAM
,IM!ilo] [-"]=111
Helpful Notes
•It is not possible to clear a timer program using
the Combination VCR buttons. Please use the
Remote Control.
•Press SET (FF) repeatedly to move to aparticular
item for setting or correction.
•Once the Combination VCR is in the Program
mode, the PLAY, REC, FF, and REW buttons on the
Combination VCR are non-functional.
1
Hold down
and press
to enter the program mode.
• If the clock is not set, pressing
these buttons will display the
SET CLOCK screen.
In this case, set the clock
according to the OSD's
instructions and then set
a timer recording.
_JvrEI /START STOP CH
-'-=tlt...........
BY SELECT • • KEY
NEXT, PUSH SET KEY OR
TO END PUSH PROG KEY
...... SET CLOCK ......
MANUAL SET
SELECT PUSH SELECT&IV
SET PUSH SET KEY
END PUSH PROG KEY
Press _ (forup)
or _(for down)
to make your selection.
Then
press
to set and move on to the next item.
When the program is completed,
3
press _and r_ (at the same time)
to display all program contents.
Then, set the next program
by repeating steps 2 and 3.
Or,
press ['_ and _again
to return to the normal screen.
18
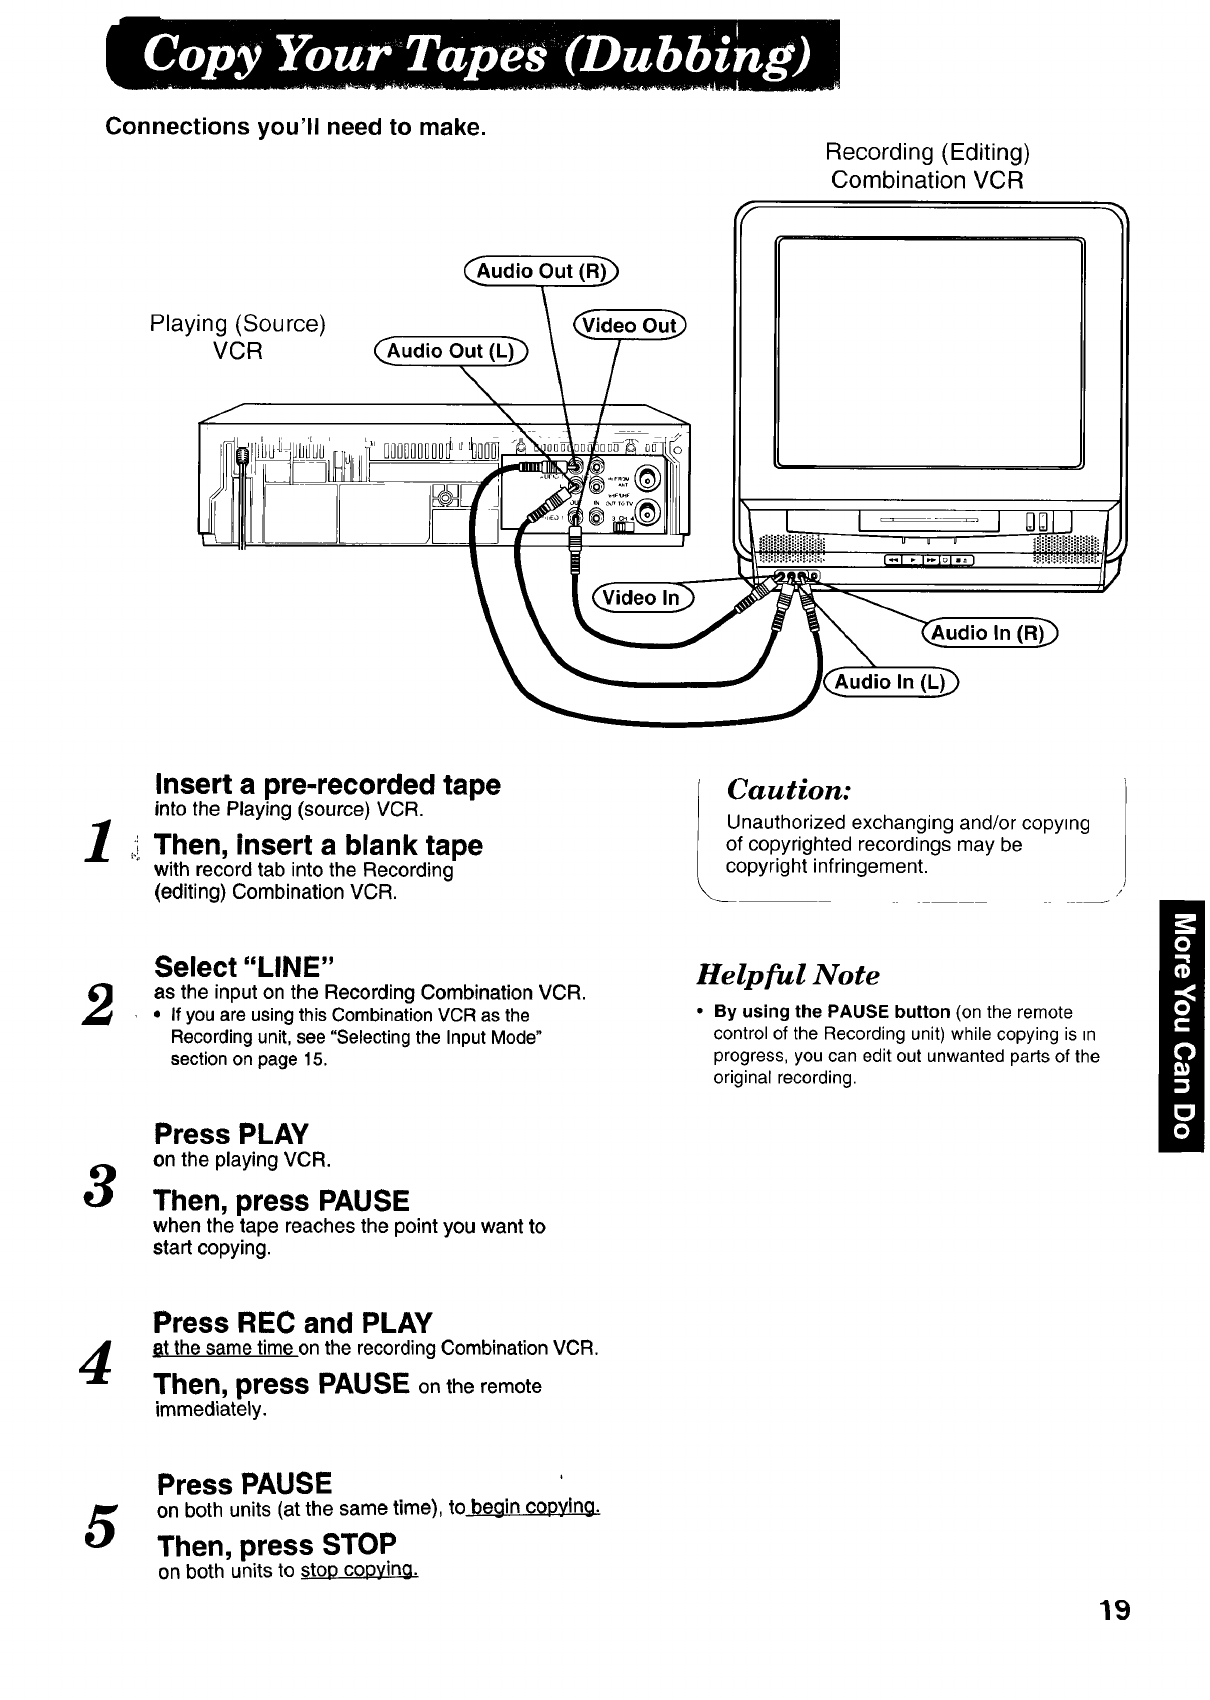
Connections you'll need to make. Recording (Editing)
Combination VCR
Playing (Source)
VCR (_Audio Out (L)
oooo_oDoo¢__
_.Audio Out (R)_
!- ./ideo Out_
_,_ J /(AudX'io In (L)_
1
Insert a pre-recorded tape
into the Playing (source) VCR.
Then, Insert a blank tape
with record tab into the Recording
(editing) Combination VCR.
Caution:
Unauthorized exchanging and/or copying
of copyrighted recordings may be
copyright infringement.
2Select "LINE"
as the input on the Recording Combination VCR.
, If youare usingthisCombinationVCR as the
Recordingunit,see "Selecting the InputMode"
sectionon page 15.
Helpful Note
•By using the PAUSE button (on the remote
control of the Recordingunit) whilecopying is in
progress, you can edit out unwanted parts of the
original recording.
3
Press PLAY
on the playing VCR.
Then, press PAUSE
when the tape reaches the point you want to
start copying.
4Press REC and PLAY
time on the recordingCombinationVCR.
Then, press PAUSE onthe remote
immediately.
5Press PAUSE
on both units (at the same time), to begin copying.
Then, press STOP
on both units to stop c0Dying.
19
151uu iJuJ_bbJb/letterb ( _.;,, _ _t?j) (.u+tubput}ct wdll told-uut L, urluol Heteiu_tuu _uJdu klro+_[ page).
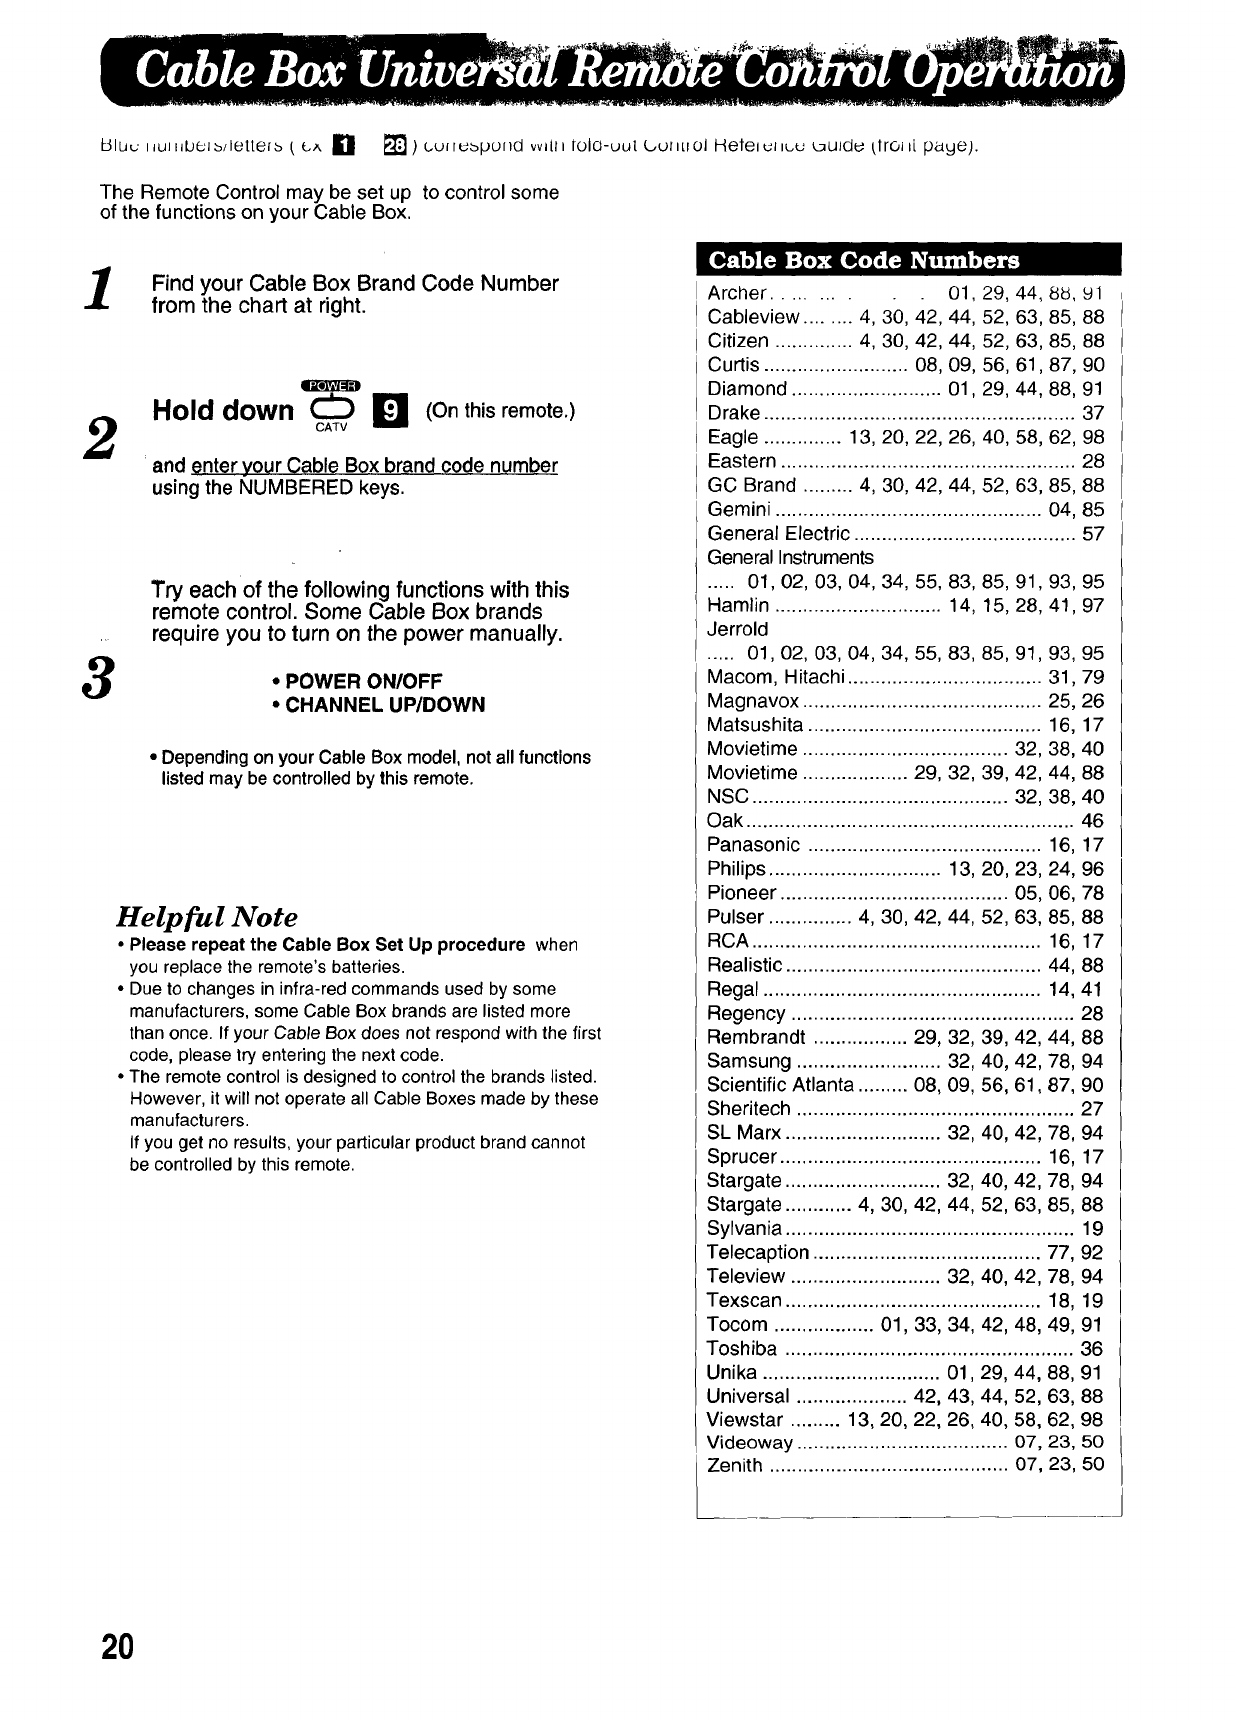
The Remote Control may be set up to control some
of the functions on your Cable Box.
1
2
3
Find your Cable Box Brand Code Number
from the chart at right.
m
Hold down (Onthis remote.)
CATV
and enter your Cable Box brand code number
using the NUMBERED keys.
Try each of the following functions with this
remote control. Some Cable Box brands
require you to turn on the power manually.
• POWER ON/OFF
•CHANNEL UP/DOWN
• Depending on your Cable Box model, not all functions
listed may be controlled by this remote.
Helpful Note
•Please repeat the Cable Box Set Up procedure when
you replacethe remote'sbatteries.
• Due to changesin infra-redcommandsusedby some
manufacturers,some Cable Boxbrandsare listedmore
thanonce. If your Cable Box does notrespond withthe first
code, pleasetry enteringthe nextcode.
•The remote control isdesignedto controlthe brandslisted.
However,it willnotoperateall Cable Boxesmade by these
manufacturers.
If you get no results,yourparticularproductbrandcannot
be controlledby thisremote.
Archer ......... 01,29, 44, 88, Yl
Cableview ........ 4, 30, 42, 44, 52, 63, 85, 88
Citizen .............. 4, 30, 42, 44, 52, 63, 85, 88
Curtis .......................... 08, 09, 56, 61,87, 90
Diamond ........................... 01,29, 44, 88, 91
Drake ........................................................ 37
Eagle .............. 13, 20, 22, 26, 40, 58, 62, 98
Eastern ..................................................... 28
GC Brand ......... 4, 30, 42, 44, 52, 63, 85, 88
Gemini ................................................ 04, 85
General Electric ........................................ 57
General Instruments
..... 01,02, 03, 04, 34, 55, 83, 85, 91, 93, 95
Hamlin .............................. 14, 15, 28, 41,97
Jerrold
..... 01,02, 03, 04, 34, 55, 83, 85, 91, 93, 95
Macom, Hitachi ................................... 31,79
Magnavox ........................................... 25, 26
Matsushita .......................................... 16, 17
Movietime ..................................... 32, 38, 40
Movietime ................... 29, 32, 39, 42, 44, 88
NSC .............................................. 32, 38, 40
Oak ........................................................... 46
Panasonic .......................................... 16, 17
Philips ............................... 13, 20, 23, 24, 96
Pioneer ......................................... 05, 06, 78
Pulser ............... 4, 30, 42, 44, 52, 63, 85, 88
RCA .................................................... 16, 17
Realistic .............................................. 44, 88
Regal .................................................. 14, 41
Regency ................................................... 28
Rembrandt ................. 29, 32, 39, 42, 44, 88
Samsung .......................... 32, 40, 42, 78, 94
Scientific Atlanta ......... 08, 09, 56, 61,87, 90
Sheritech .................................................. 27
SL Marx ............................ 32, 40, 42, 78, 94
Sprucer ............................................... 16, 17
Stargate ............................ 32, 40, 42, 78, 94
Stargate ............ 4, 30, 42, 44, 52, 63, 85, 88
Sylvania .................................................... 19
Telecaption ......................................... 77, 92
Teleview ........................... 32, 40, 42, 78, 94
Texscan .............................................. 18, 19
Tocom .................. 01, 33, 34, 42, 48, 49, 91
Toshiba .................................................... 36
Unika ................................ 01,29, 44, 88, 91
Universal .................... 42, 43, 44, 52, 63, 88
Viewstar ......... 13, 20, 22, 26, 40, 58, 62, 98
Videoway ...................................... 07, 23, 50
Zenith ........................................... 07, 23, 50
20
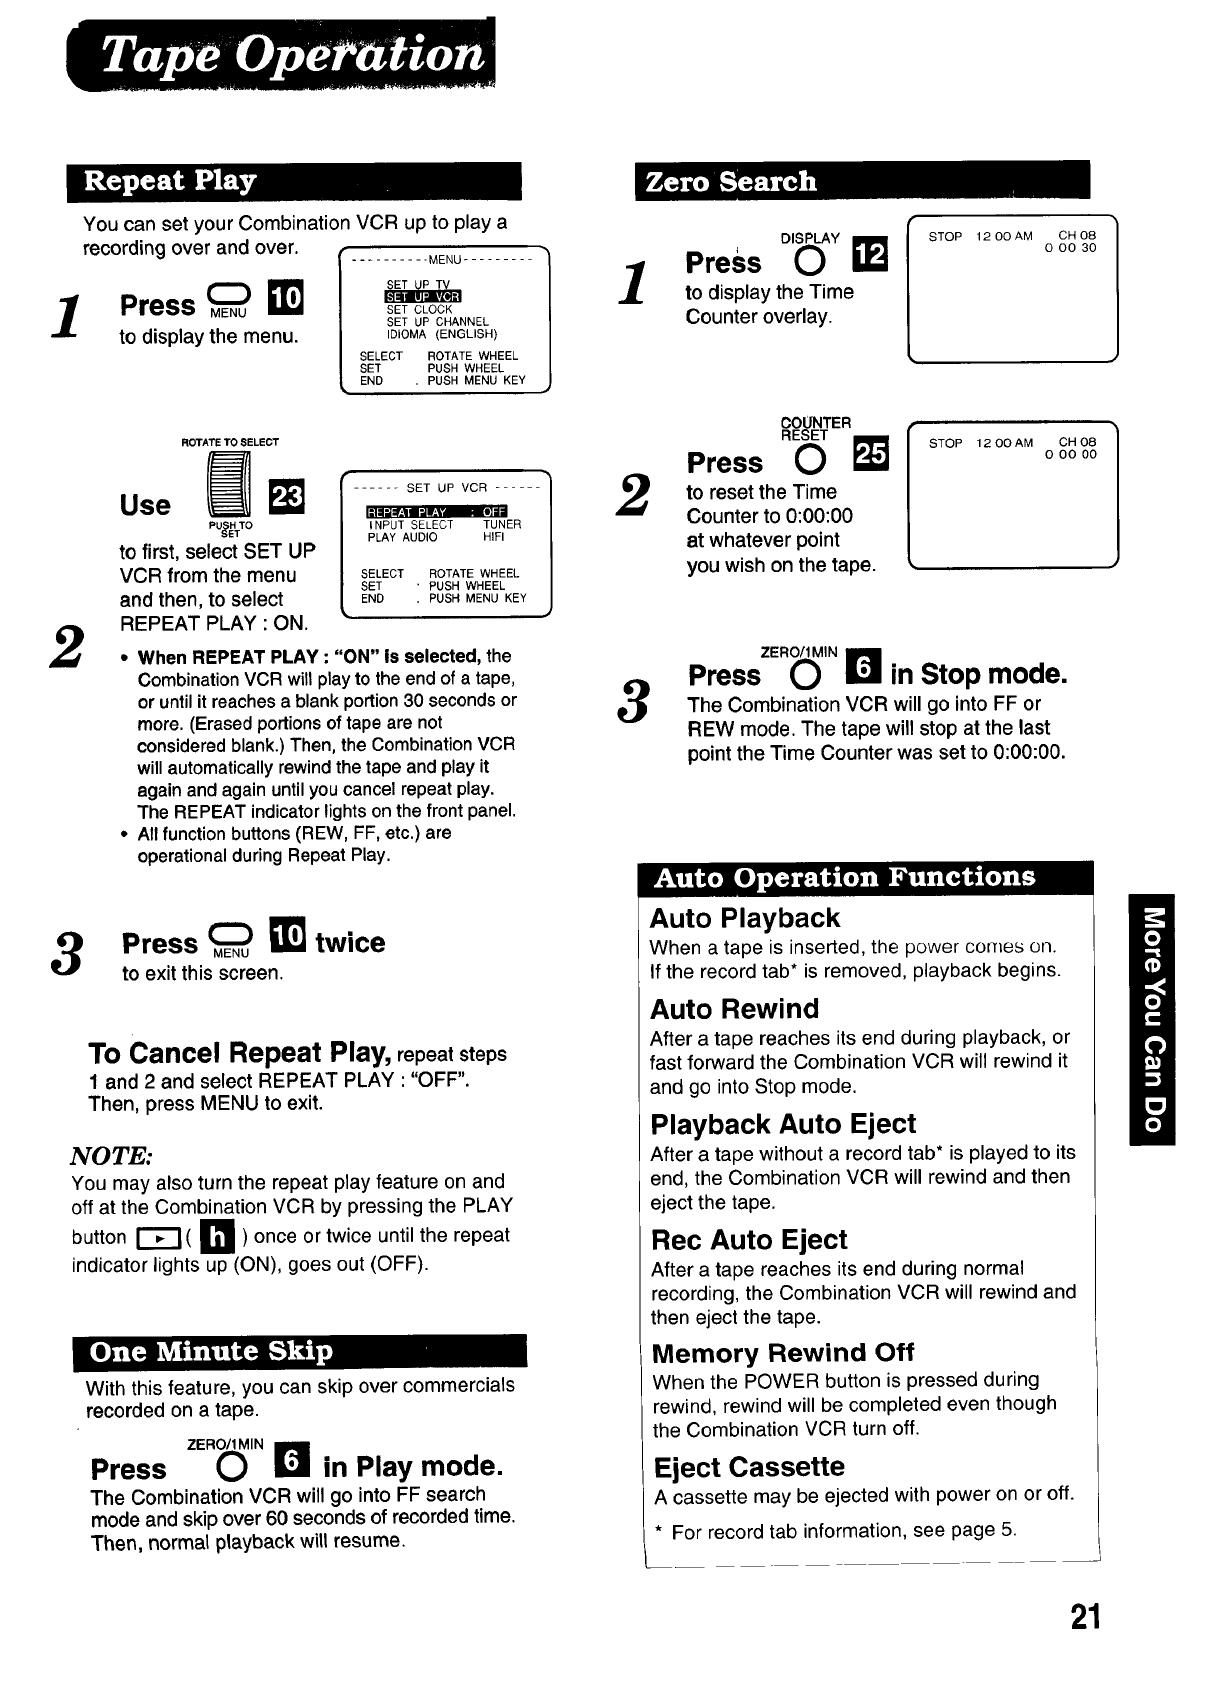
You can set your Combination VCR up to play a
recording over and over.
1Press _
to display the menu.
MENU .........
SET CLOCK
SET UP CHANNEL
IDIOMA (ENGLISH)
SELECT ROTATE WHEEL
SET PUSH WHEEL
END , PUSH MENU KEY
2
ROTATE TO SELECT
Use
_u&vo
to first, select SET UP
VCR from the menu
and then, to select
REPEAT PLAY : ON.
SET UP VCR ...... /
/
i_l [] _ ii /
INPUT SELECT TUNER /
PLAY AUDIO HIFI I
I
SELECT ROTATE WHEEL /
SET 'PUSH WHEEL /
END .PUSH MENU KEY /
J
•When REPEAT PLAY : "ON" is selected, the
CombinationVCR will play to the end of a tape,
oruntilit reachesa blank portion30 secondsor
more. (Erasedportionsof tape are not
consideredblank.)Then, the CombinationVCR
willautomaticallyrewindthetape andplay it
again and againuntilyoucancelrepeatplay.
The REPEAT indicatorlightson the front panel.
•All function buttons(REW, FF, etc.) are
operationalduringRepeatPlay.
3Press _ _]_ twice
to exit this screen.
To Cancel Repeat Play, repeat steps
1 and 2and select REPEAT PLAY ""OFF".
Then, press MENU to exit.
NOTE:
You may also turn the repeat play feature on and
off at the Combination VCR by pressing the PLAY
button r_ ( I'm ) once or twice until the repeat
indicator lights up (ON), goes out (OFF).
With this feature, you can skip over commercials
recorded on a tape.
Press ZER_,Nr_ in Play mode.
The Combination VCR will go into FF search
mode and skip over 60 seconds of recorded time,
Then, normal playback will resume.
1
2
3
Press D,_Y _j
to display the Time
Counter overlay.
STOP 1200AM CH08
0 O0 30
COUNTER
RESET
Press 0
to reset the Time
Counter to 0:00:00
at whatever point
you wish on the tape.
STOP 12 O0 AM CH 08
0 O0 O0
PressZE"_ 'Nr_ in Stop mode.
The Combination VCR will go into FF or
REW mode. The tape will stop at the last
point the Time Counter was set to 0:00:00.
Auto Playback
When a tape is inserted, the power comes on.
If the record tab* is removed, playback begins.
Auto Rewind
After a tape reaches its end during playback, or
fast forward the Combination VCR will rewind it
and go into Stop mode.
Playback Auto Eject
After a tape without a record tab* is played to its
end, the Combination VCR will rewind and then
eject the tape.
Rec Auto Eject
After a tape reaches its end during normal
recording, the Combination VCR will rewind and
then eject the tape.
Memory Rewind Off
When the POWER button is pressed during
rewind, rewind will be completed even though
the Combination VCR turn off.
Eject Cassette
A cassette may be ejected with power on or off.
* For record tab information, see page 5.
21
l/,lut _,u_llbuJ b/le[[e+ b £ _,x. [] - _ ) ,_,u_,_,uVu_Ld with lold-ou[ (50_,LlOl Helere_ _,.,u_uide (trut it pdgt).
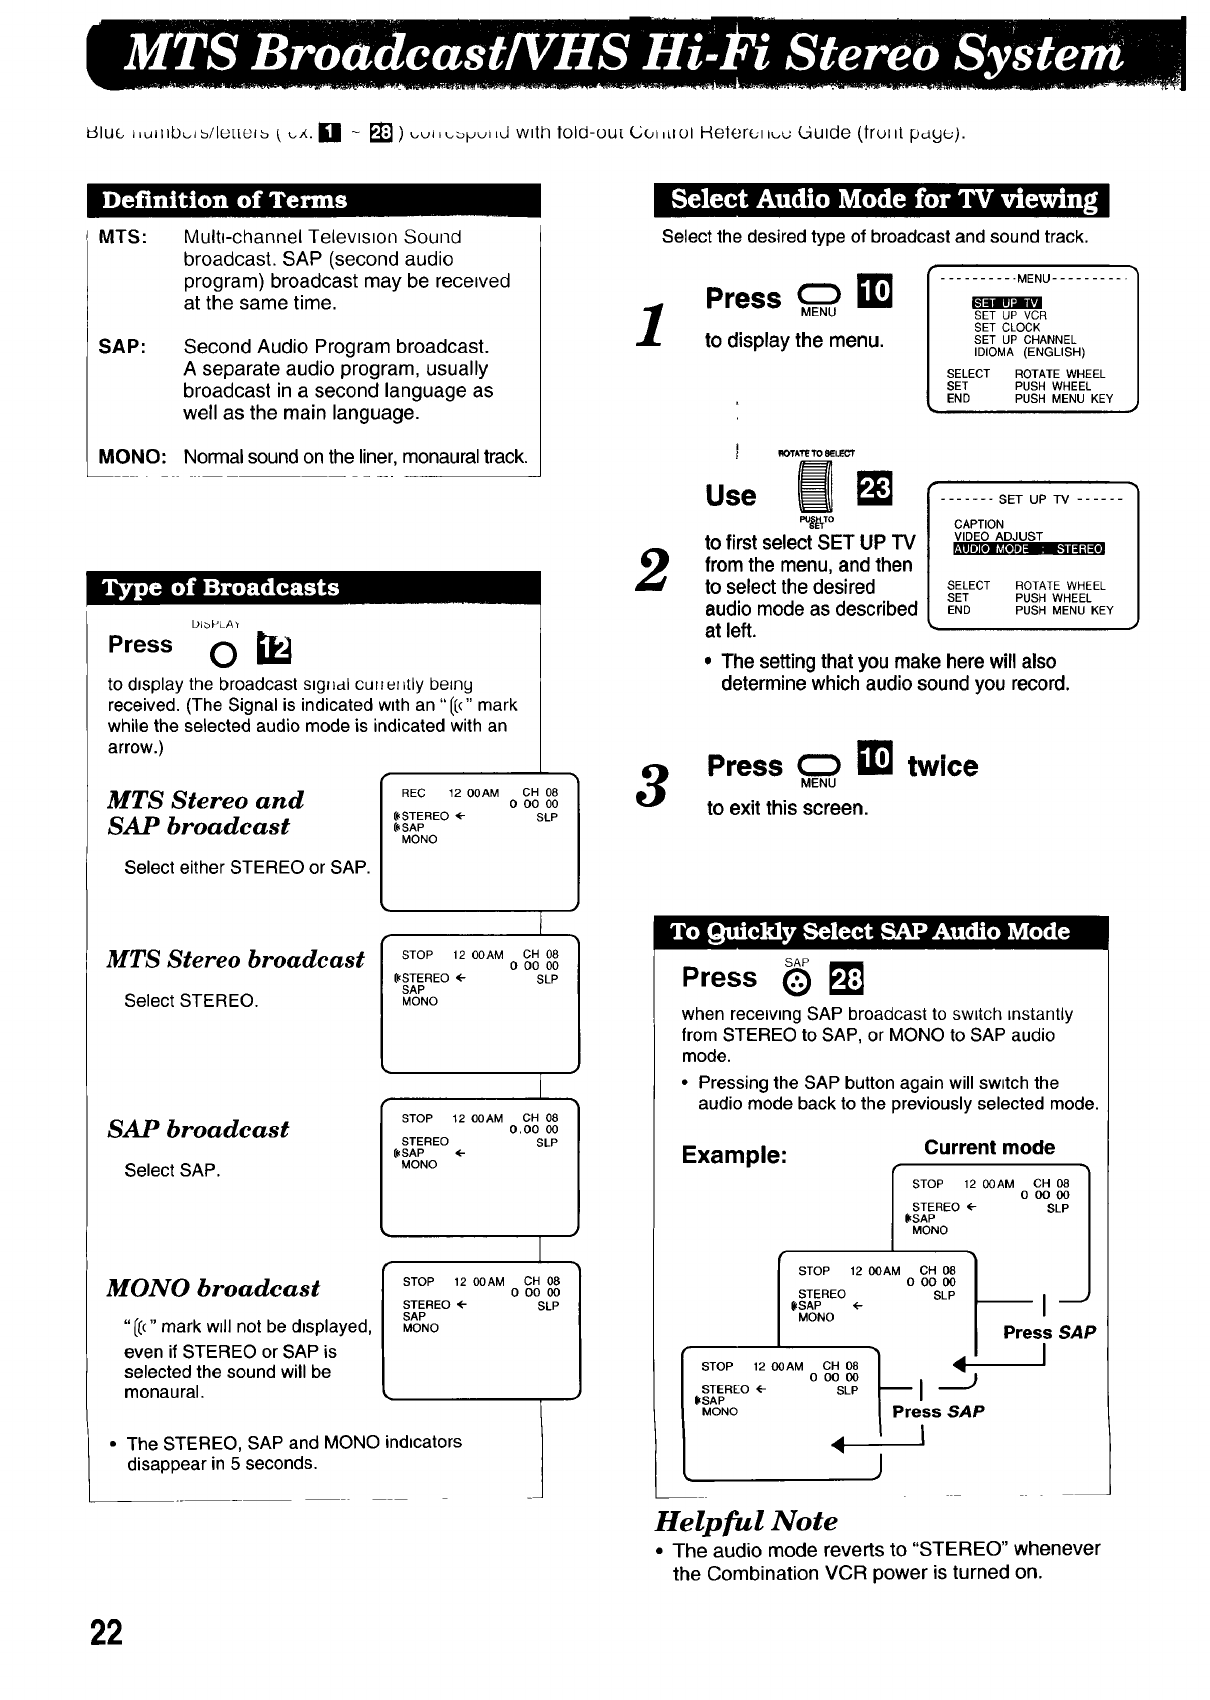
MTS: Multi-channel Television Sound
broadcast. SAP (second audio
program) broadcast may be received
at the same time.
SAP: Second Audio Program broadcast.
A separate audio program, usually
broadcast in a second language as
well as the main language.
MONO: Normal sound on the liner, monaural track.
DIbPLA'r
Press O i_
to displaythebroadcastsng__,_Icullur=tlybe=ny
received.(The Signalisindicatedwithan "1[("mark
whilethe selectedaudiomode isindicatedwithan
arrow.)
MTS Stereo and
SAP broadcast
Select either STEREO or SAP.
MTS Stereo broadcast
Select STEREO.
SAP broadcast
Select SAP.
MONO broadcast
"/8" mark will not be displayed,
even if STEREO or SAP is
selected the sound will be
monaural.
REC 12 00AM CH 08
O O0 00
(((STEREO _- SLP
[((SAP
MONO
I STOP 12 OOAM CH 08
OO0 00
|({(STEREO <- SLP
I
STOP 12 OOAM CH 08
O,O0 00
STEREO SLP
_SAP ,(--
MONO
I
STOP 1200AM CH 08
O OO00
STEREO _ SLP
SAP
MONO
• The STEREO, SAP and MONO indicators
disappear in 5 seconds.
" " 4 0 0 kl 0 0 " 0 l, m" ,.1 ;"
Select the desired type of broadcast and sound track.
1
W I ........... MENU ..........
Press m.e a
SET UP VCR
SET CLOCK
to display the menu. SET UP CHANNEL
IDIOMA (ENGLISH)
SELECT ROTATE WHEEL
SET PUSH WHEEL
END PUSH MENU KEY
2
I _40TA'r_'to_Lr=CT
Use _ r- SET UP TV ......
PU_TO CAPTION
to first select SET UP TV WDEOADJUST
' DI I| "I
from the menu, and then
to select the desired SELECT ROTATEWHEEL
WHEEL
PUSH MENU KEY
audio mode as described LsNET PUSH
at left.
• The setting that you make here will also
determine which audio sound you record.
3Press _ _] twice
MENU
to exit this screen.
Press _
when receiving SAP broadcast to switch instantly
from STEREO to SAP, or MONO to SAP audio
mode.
•Pressing the SAP button again will sw;tch the
audio mode back to the previously selected mode.
Example: Current mode
I STOP 12 OOAM
STEREO (--
({(SAP
MONO
I STOP 120DAM OH 08 )
ODO 00 /
/ STEREO SLP /
/((,SAP (-- [
MONO
[ STOP 1200AM oCo_H 00_ _Pr_ssS_AIp
lSTEREO <-- SLP
/%% <j
OH 08
ooo0o
SLP
I
Press SAP
I
Helpful Note
• The audio mode reverts to "STEREO" whenever
the Combination VCR power is turned on.
22
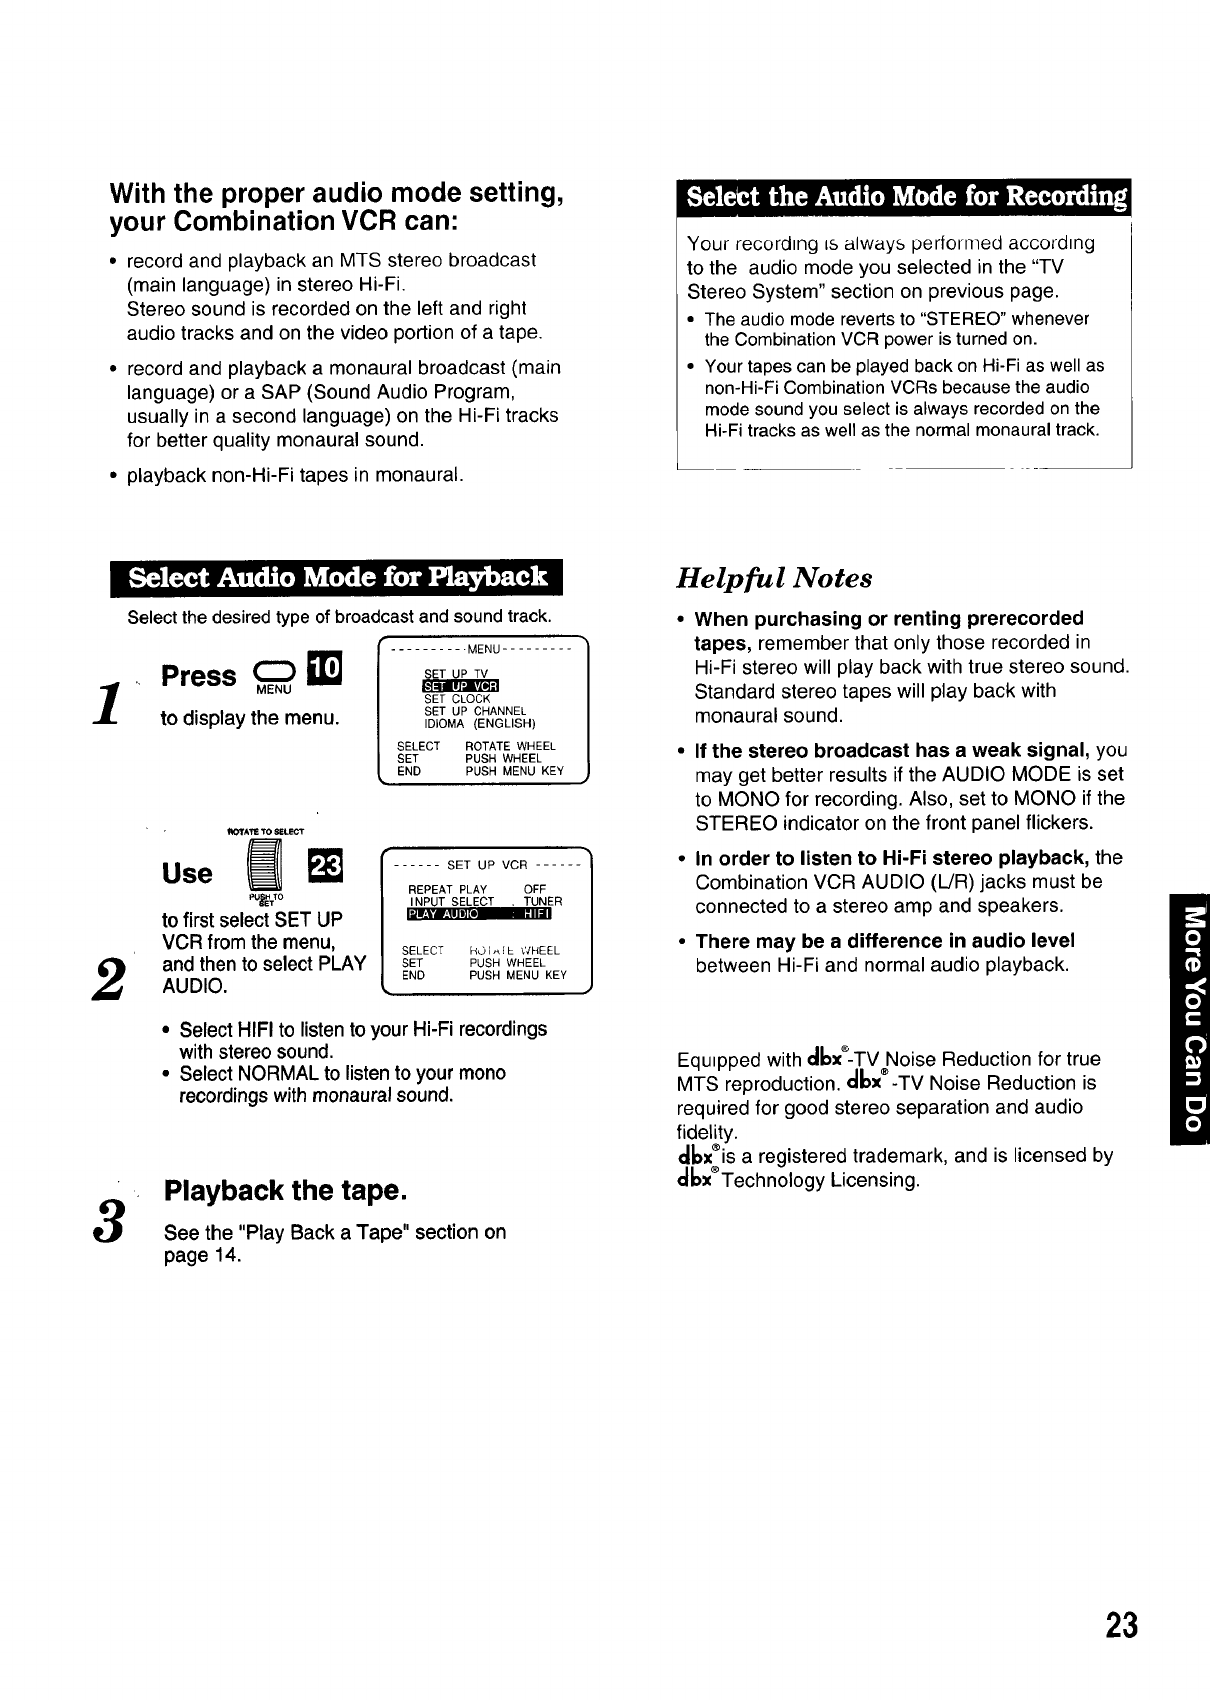
With the proper audio mode setting,
your Combination VCR can:
• record and playback an MTS stereo broadcast
(main language) in stereo Hi-Fi.
Stereo sound is recorded on the left and right
audio tracks and on the video portion of a tape.
• record and playback a monaural broadcast (main
language) or a SAP (Sound Audio Program,
usually in a second language) on the Hi-Fi tracks
for better quality monaural sound.
• playback non-Hi-Fi tapes in monaural.
Select the desired type of broadcast and sound track.
Your recording is always performed according
to the audio mode you selected in the "TV
Stereo System" section on previous page.
• The audio mode reverts to "STEREO" whenever
the Combination VCR power is turned on.
• Your tapes can be played back on Hi-Fi as well as
non-Hi-Fi Combination VCRs because the audio
mode sound you select is always recorded on the
Hi-Fi tracks as well as the normal monaural track.
1
2
3
Press
to display the menu.
MENU .........
SET CLOCK
SET UP CHANNEL
IDIOMA (ENGLISH)
SELECT ROTATE WHEEL
SET PUSH WHEEL
END PUSH MENU KEY
I_K_rATE TO SELECT
use m
to first select SET UP
VCR from the menu,
and then to select PLAY
AUDIO.
I ..... SET UP VCR -]
REPEAT PLAY OFF
INPUT SELECT . TUNER
I_l_Vl±lll_L ,.._1
SELECT HOI_]L WHEEL
SET PUSH WHEEL
END PUSH MENU KEY
•Select HIFI to listen to your Hi-Fi recordings
with stereo sound.
• Select NORMAL to listen to your mono
recordings with monaural sound.
Playback the tape.
See the "Play Back a Tape" section on
page 14.
Helpful Notes
When purchasing or renting prerecorded
tapes, remember that only those recorded in
Hi-Fi stereo will play back with true stereo sound.
Standard stereo tapes will play back with
monaural sound.
If the stereo broadcast has a weak signal, you
may get better results if the AUDIO MODE is set
to MONO for recording. Also, set to MONO if the
STEREO indicator on the front panel flickers.
In order to listen to Hi-Fi stereo playback, the
Combination VCR AUDIO (L/R) jacks must be
connected to a stereo amp and speakers.
There may be a difference in audio level
between Hi-Fi and normal audio playback.
Equ=pped with cibx*-TV Noise Reduction for true
MTS reproduction, cllax®-TV Noise Reduction is
required for good stereo separation and audio
fidelity.
_x®is a registered trademark, and is licensed by
_x®Technology Licensing.
23
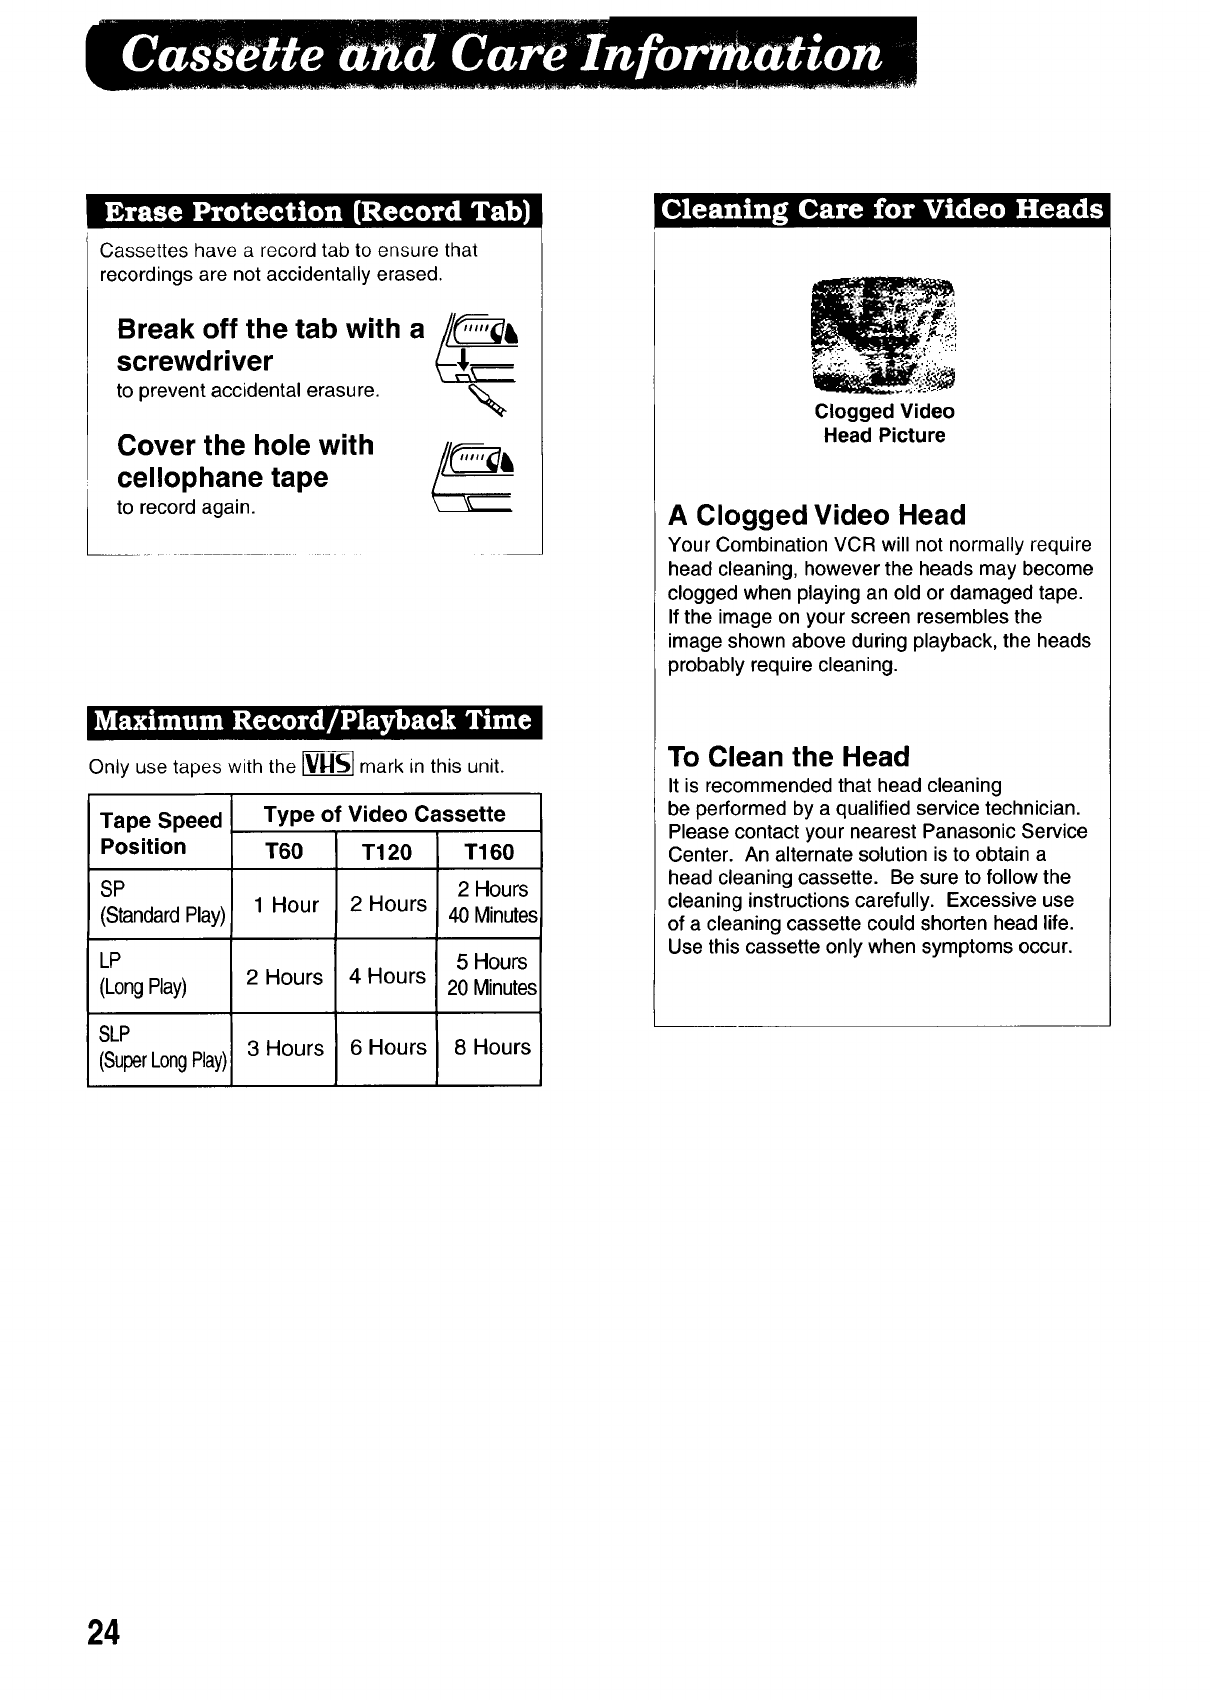
Cassettes have a record tab to ensure that
recordings are not accidentally erased.
Break off the tab with a
screwdriver
to prevent accidental erasure.
Cover the hole with
cellophane tape
to record again.
%
Only use tapes with the _ mark in this unit.
Tape Speed
Position
SP
(Standard Play)
LP
(Long Play)
SLP
(SuperLongPlay)
Type of Video Cassette
T60
1 Hour
2 Hours
3 Hours
T120
2 Hours
4 Hours
6 Hours
T160
2 Hours
40 Minutes
5 Hours
20 Minutes
8 Hours
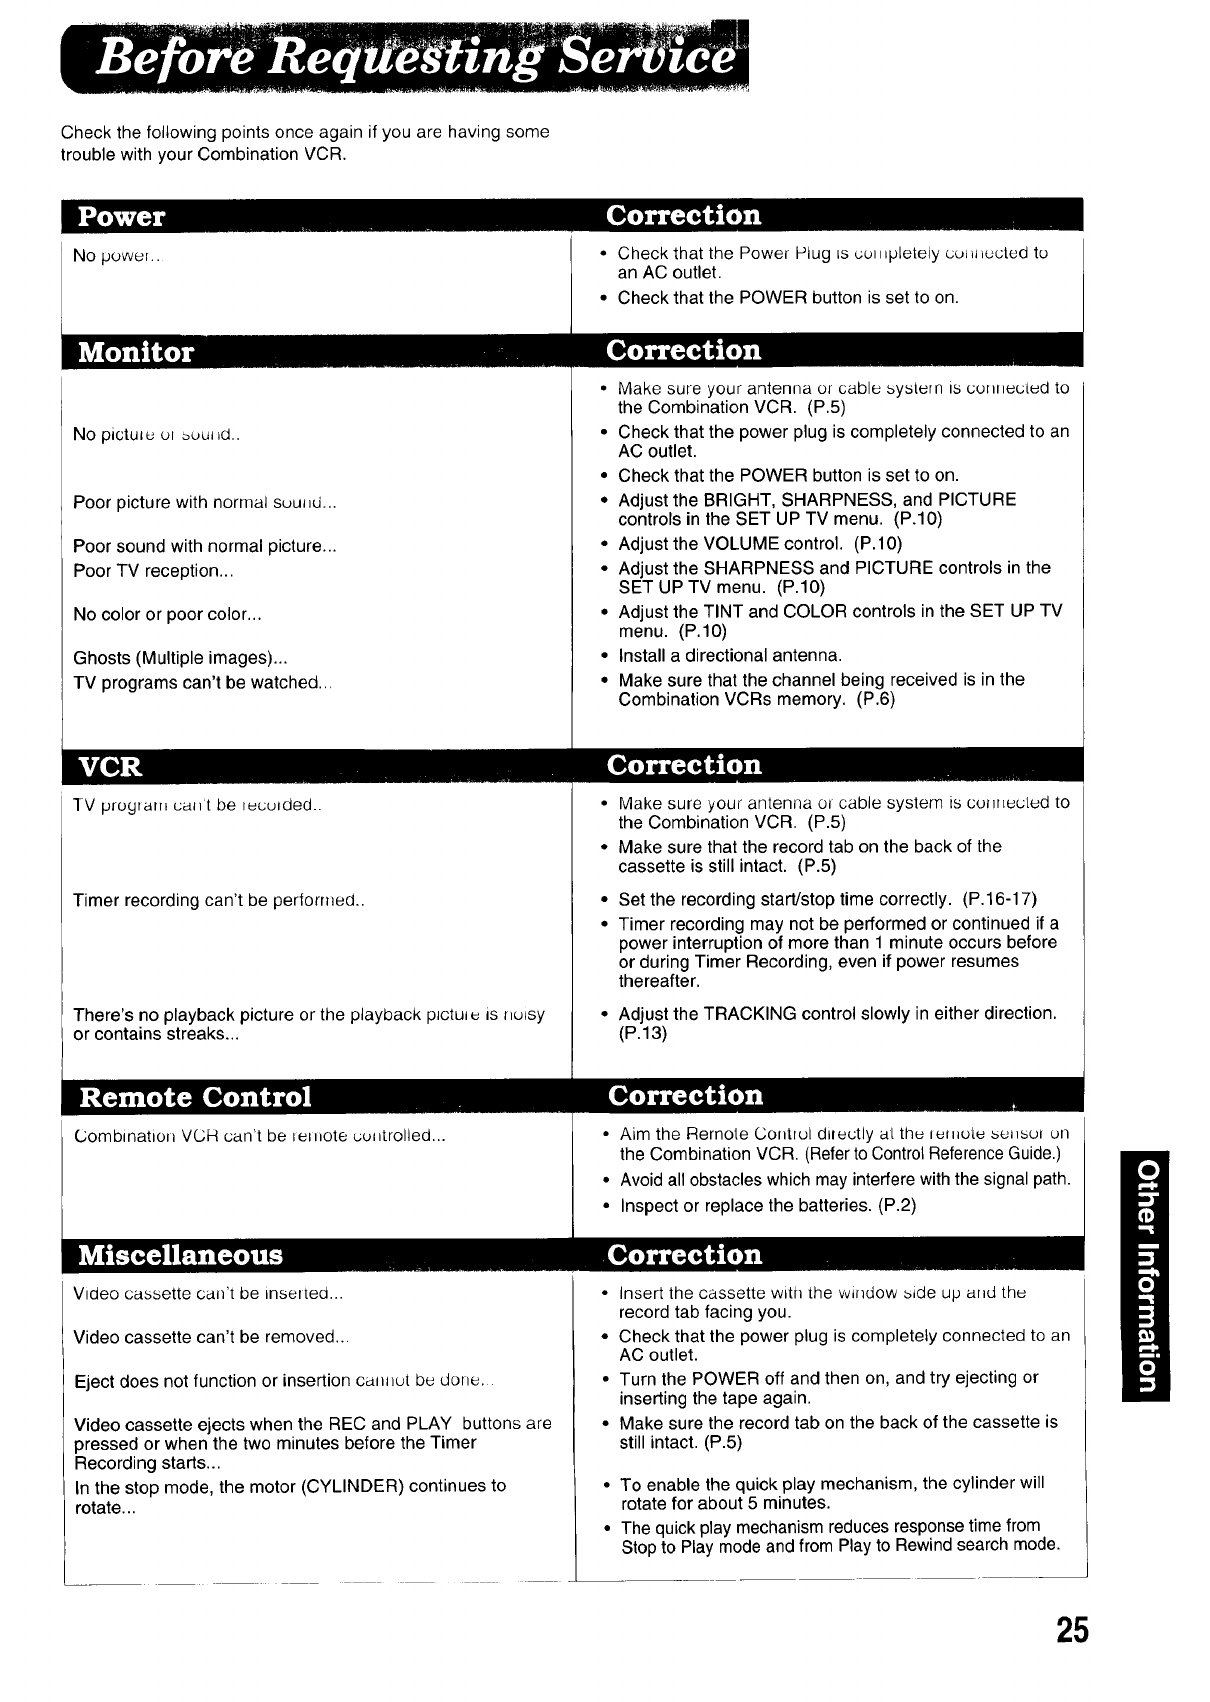
Clogged Video
Head Picture
A Clogged Video Head
Your Combination VCR will not normally require
head cleaning, however the heads may become
clogged when playing an old or damaged tape.
If the image on your screen resembles the
image shown above during playback, the heads
probably require cleaning.
To Clean the Head
It is recommended that head cleaning
be performed by a qualified service technician.
Please contact your nearest Panasonic Service
Center. An alternate solution is to obtain a
head cleaning cassette. Be sure to follow the
cleaning instructions carefully. Excessive use
of a cleaning cassette could shorten head life.
Use this cassette only when symptoms occur.
24
Check the following points once again if you are having some
trouble with your Combination VCR.
No power..
No pictutuu_buul_d..
Poor picture with normal suuJ_d...
Poor sound with normal picture...
Poor TV reception...
No color or poor color...
Ghosts (Multiple images)...
TV programs can't be watched...
TV program uallt be ruculded..
Timer recording can't be performed..
There's no playback picture or the playback pJctul_ AsnuLsy
or contains streaks...
Combination VCH can't be letnote uul_trolled...
• Check that the Power Plug Lscul_,pleteiy cutH_ucted to
an AC outlet.
• Check that the POWER button is set to on.
•Make sure your antenna or cable system ts connected to
the Combination VCR. (P.5)
• Check that the power plug is completely connected to an
AC outlet.
• Check that the POWER button is set to on.
• Adjust the BRIGHT, SHARPNESS, and PICTURE
controls in the SET UP TV menu. (P.10)
• Adjust the VOLUME control. (P.IO)
*Adjust the SHARPNESS and PICTURE controls in the
SET UP TV menu. (P.IO)
• Adjust the TINT and COLOR controls in the SET UP TV
menu. (P.IO)
• Install a directional antenna.
• Make sure that the channel being received is in the
Combination VCRs memory. (P.6)
Make sure your antenna or cable system is cu_r_ecLud to
the Combination VCR. (P.5)
Make sure that the record tab on the back of the
cassette is still intact. (P.5)
Set the recording start!stop time correctly. (P.16-17)
Timer recording may not be performed or continued if a
power interruption of more than 1 minute occurs before
or during Timer Recording, even if power resumes
thereafter.
Adjust the TRACKING control slowly in either direction.
(P.13)
•Aim the Remote Contrul directly aLthe ,emute sul_sul ell
the Combination VCR. (Refer to Control Reference Guide.)
• Avoid all obstacles which may interfere with the signal path.
• Inspect or replace the batteries. (P.2)
Video cassette can't be insetted...
Video cassette can't be removed...
Eject does not function or insertion ca,u_ut be done.
Video cassette ejects when the REC and PLAY buttons are
pressed or when the two minutes before the Timer
Recording starts...
In the stop mode, the motor (CYLINDER) continues to
rotate...
• Insert the cassette with the window side up and the
record tab facing you.
• Check that the power plug is completely connected to an
AC outlet.
• Turn the POWER off and then on, and try ejecting or
inserting the tape again.
•Make sure the record tab on the back of the cassette is
still intact. (P.5)
• To enable the quick play mechanism, the cylinder will
rotate for about 5 minutes.
• The quick play mechanism reduces response time from
Stop to Play mode and from Play to Rewind search mode.
25
With cable connections, numbers selec[ed to _cewe
specific channels may differ from those for antenna
connections. Refer to your cable service information.
•During search playback, horizontal noise bars will
appear on the TV screen.
Spring
First Sunday in April (minus 1 hou0
Because the clock automatically changes from 2AM to
3AM, keep in mind that any part of a scheduled timer
recording which falls between these two times
will not be performed.
Examples:
A recording set to begin at 1:30AM and end at 2:30 will
actually record for 30 minutes.
A recording set to begin at 1:30AM and end at 3:30 will
actually record for 1 hour, and so on.
• After the Combination VCR is in the Still or Slow mode
for 3 minutes, it will go into the Stop mode
automatically to protect the tape and video head.
• The special effects playback feature is intended for
tapes recorded in SP or SLP speed. Tapes recorded
in LP mode can also be viewed in special effects
playback, but the picture may be completely snowy.
• Timel recolding may not be perfolmed or continue if a
power interruption of more than about 1 minute occurs
before or during timer recording, even if power
resumes thereafter.
• If the start times of 2 preset programs overlap, the
preset time of the lower numbered program will have
priority.
• If the preset time for a timer recording comes up
during a normal recording or One Touch Recording,
the timer recording will not be performed.
1:00
I2:00 _3:00 4:00
I
Autumn
Last Sunday in October (plus 1 hour)
The clock automatically changes from 2:00AM back to
1:00AM and therefore affects your recording length.
Examples:
A recording set from 12:50AM to 2:30, will actually
record for 2 hours and 40 minutes.
A recording set from 1:00AM to 1:30, will actually record
for 30 minutes. (Not affected.)
A recording set from 1:30AM to 2:30, will actually record
from 1:30 to 2:00 and then go into the Stop mode until it
becomes 1:30 again. The recording will then continue
until 2:30 for a total recording time of 1 hour and
30 minutes.
1:00 2:00 3:00 4:00
• Even if a recording of a daily or weekly series is
affected, other recordings of the series will be
performed as programmed.
Display
Picture Tube:
VCR
Video RecordingSystel_J:
Audio Track:
Tuner:
Broadcast Channels:
CATV Channels:
26
27 inch nleasured diagollal 1L)0''
deflection Picture Tube
4 rotary heads helical
scanning system
1track (Normal)
2 channel (Hi-Fi Audio Sound)
VHF 2-13, UHF 14~69
Midband A through I (14-22)
SuperbandJ through W (23~36)
Hyperband AA-EEE (37~64)
Lowband A-5-A-1 (95-99)
Special CATV channel 5A (01)
UItraband 65-94, 100-125
General
Power Source.
Power Consurnptio__:
Television System:
Speaker:
OperatingTemperature:
Operating Humidity:
Weight:
Dimensions:
i2_0VAU, _(..)Hz
Approx. 157 watts
EIA Standard NTSC color
2 pieces
41°F-104°F(5°C-40°C)
10%-75%
88.2 Ibs. (40 Kg)
27-1/16" (W) X 27-15/16" (H)
X 21-5/16" (D)
688 (W) X 659 (H)
_X542 (D) mm
Note: Designs and specifications are subject to
change without notice.

Desenganchelaantenadeltelevisoro
registradordevideoquetuvieraanteriormentey
conectelaa lapartetraseradelRegistradorde
VideodeCobinaciOn,comosemuestraenel
diagrama.Sielsistemadesuantenatiene
conductoresUHFy VHFseparados,usted
necesitaunMezcladordeBandaUHF/VHF(no
vieneconelequipo).
desde la ...... o
antena
Transformador de _-
300-75 ohmios
(no est_ incluido)
Parte trasera de la
combinaciOn de VCR/TV
(A) Sin la caja convertidora/
decodificadora
Con esta conexi6n usted pedra utilizar su
control rernoto del Registrador de combinacion
de VCR/TV para seleccionar los canales que
desee vet y seleccionar canales no codificados
para su grabaci6n prograrnada. Esta conexi6n
no perrnite ver ni qrabar canales codificados.
(B) Con una caja convertidora/
decodificadora
Con esta conexi6n, usted podr_, grabar y ver
cualquier canal, incluyendo los canales
codificados, observe, sin embargo, que la
selecci6n de canales se debe efectuar en la
caja convertidora de TV pot cable que
surninistra esta empresa. La grabaci6n
prograrnada est,. limitada a un canal cada vez, y
s01o se podra ver el canal que este grabando.
Parte trasera de la
(A) combinacion de VCR/-I-V
desde CATV
(TV por ca_
(B)
desde
CATV (TV
por cable)
Caja convertidora
de TV por cable
Para ver y grabar un
canales codificado/no
codi ficado
Coloque el selector de canal del
Registrador de cornbinaciOn de VCR/TV en
el canal de salida de la caja convertidora
de televisi6n por cable (por eiemple el
canal 3).
DespuOs, seleccione en la caja
convertidora de TV por cable los cnales
que se quieran ver o grabar.
27
LOSI]UIIIUIus/letra_ ,_/dle_ t eJ.[] " _"_) Cuttubpul iden d la 9uta de tuieret icia de cul _irolde la iJagma doblada {paglna del lrenie).
10primir(_i_l(° _)
hacia arriba o abajo para la
lexhibicion en ingles o espa_ol.
Oprimir c_ i _11(o D )
." los canales, las siguientes
/
para iniciar la fijaci6n
autom__tica de los canales.
Cuando termina la fijaci6n de
i
/
Oprimir _ I_
para la exhibici6n de la
/pantalla de la fijaci6n del reloj.
SELECTLANGUAGE
Si
PUSH CH UP :ENGLISH
PULSE CH DOWN:ESPANOL
I
AUTOPROGRAMARCANAL
CONECTE EL CABLE DE LA
ANTENA, LUEGO.,.
PULSE LA TECLA CH UP
informaciones apareceran en la pantalla: MENU"
"AUTOPROGRAMCION COMPLETO"
"PORFAVORFIJEELRELOJCON ELBOTONDE
ELEGIR GIRE LA RUEDA
FIJAR PULSE LA RUEDA I
TERMINAR PULSE MENU /
ROTATE TO SELECT ]
UNA CAJA DE TV POR CABLE
Use
para elejir la fijacion autom_fitica NO
y luego, siesta usando una caja ELEGIR GIRELARUEDA
de TV por cable elija Sl, y si no FIJAB PULSELARUEDA
TERMINAR PULSE MENU
esta unsado elija NO. I
i
ud. ha elejido SI en el paso 4
Fije su caja de TV por cable
al canal PBS de su local y luego PORFAVORFIJESUCAJA
DE TV POR CABLE AL CANAL
PBS DE SU LOCAL
presionela ruedaparapasar al
siguientepaso°............
Ahora, use
• para elegir y fijar el nL_merodel
canal de salida de su caja de TV
por cable. (El canal sintonizado
en la combinaci6n de VCR para
ver la TV por cable.)
Si ud. ha elejido NO en el paso 4
ROTATeTOS_LeCT
ose m
PU_O
para elegir y fijar el nL_mero de
su canal PBS.
Estas pantallas apareceran a
LUEGO :PULSE LA RUEDA
....... FIJAR RELOJ .......
POR FAVOR FIJE EL CANAL
DE SALIDA DE SU CAJA DE
TV POR CABLE
ELEGIR GIRE LA RUEDA
FIJAR PULSE LA RUEDA
TERMINAR PULSE MENU
....... FIJAR RELOJ ....... |
/
POR FAVOR FIJE EL CANAL |
PBS DE SUI_L /
ELEGIR GIBE LA RUEDA /
FIJAR PULSE LA RUEDA /
TERMINAR PULSE MENU /
continuaciSn: )
t
• FIJACION AUTOMATICA DEL RELOJ EN PROCESO I
.. FIJACION AUTOMATICA COMPLETO _ I
El canal con el nt_mero menor O .J_
NOTA: r] 4' /
Esta pantalla aparece si: / FIJACIONAUTOMATICADEL I
•Urla fijaci6n ha errado, / RELOJESINCOMPLETO /
•La fijacibn autom_tica no estd / /
disponible en el canal PBS | ;U SEF' '# tO ELOJ/
que ha fijado. [ ,J
Si no se puede ajustar el reloj automdticamente,
por favor fije el reloj como se describe a la derecha.
Fijaci6nATmsacnual den reloi
Oprimir _I_
para la exhibici6n de la pantalla
de la fijaci6n del reloj.
ROTATE TO SELECT
•ue o,
use PUSH TO
SET
GIRANDO LA RUEDA /
PARA TERM_NULSEpLtsREU%IDEANu ") J
para elegir y fijar el mes, la fecha, el aSo, la hora y
la hora veraniega.
• El dia de la semana aparece automaticamente.
• "VERANO: ACT" ajusta automaticamente a la
hora veraniega.
LPara hacer correciones, oprimir la rueda ola
tecla CLEAR repetidamente para retroceder o
avanzar al paso que clesea.
i L
Ahora, oprimir _EO_U_ dos veces
para iniciar a efectuar el reloj y salir desde este modo.
Notas dtiles para la _aeidn automdtica del reloj
• Este dura cerca de 10 segundos para determinar si
es posible o no la fijacibn autom_ltica del reloj.
Luego, dependiendo a la compa_ia emisora de TV de
su local, este requiere cerca de 1 a 10 minutos para
fijar el reloj. Si ud. no podra esperar, por favor
presione el bot6n STOP y fije el reloj manualmente.
I
Introducir una cinta de video
•La combinaci6n de VCR se enciende
/' autom_tticamente. Empieza a reproducir si la
I cinta no tiene la long(iota para evitar el borrado.
[ _ PLAY
20primir__ (o!_1)
para iniciar la reproduccJ6n si es necesario.
II
REW/_
Oprimir(_ B (o!_11)
FF/_
-. o[B(oll)
') para Ioealizar rfipidamente una escena durante
la reproduccidn.
• La velocidad de bt_squeda en el modo SP es a
9 veces m&s r&pida que la velocidad normal y
en el modo SLP es a 27 veces mas rapida.
• Durante la bt_squeda apareceran algunas
barras de ruido.
Oprimir 1_ _1 (o IR_)
'_ para parar la reproduccion.
.....Luego, oprimir _!_1
en la combinaci6n de VCR para expulsar la cinta.
28
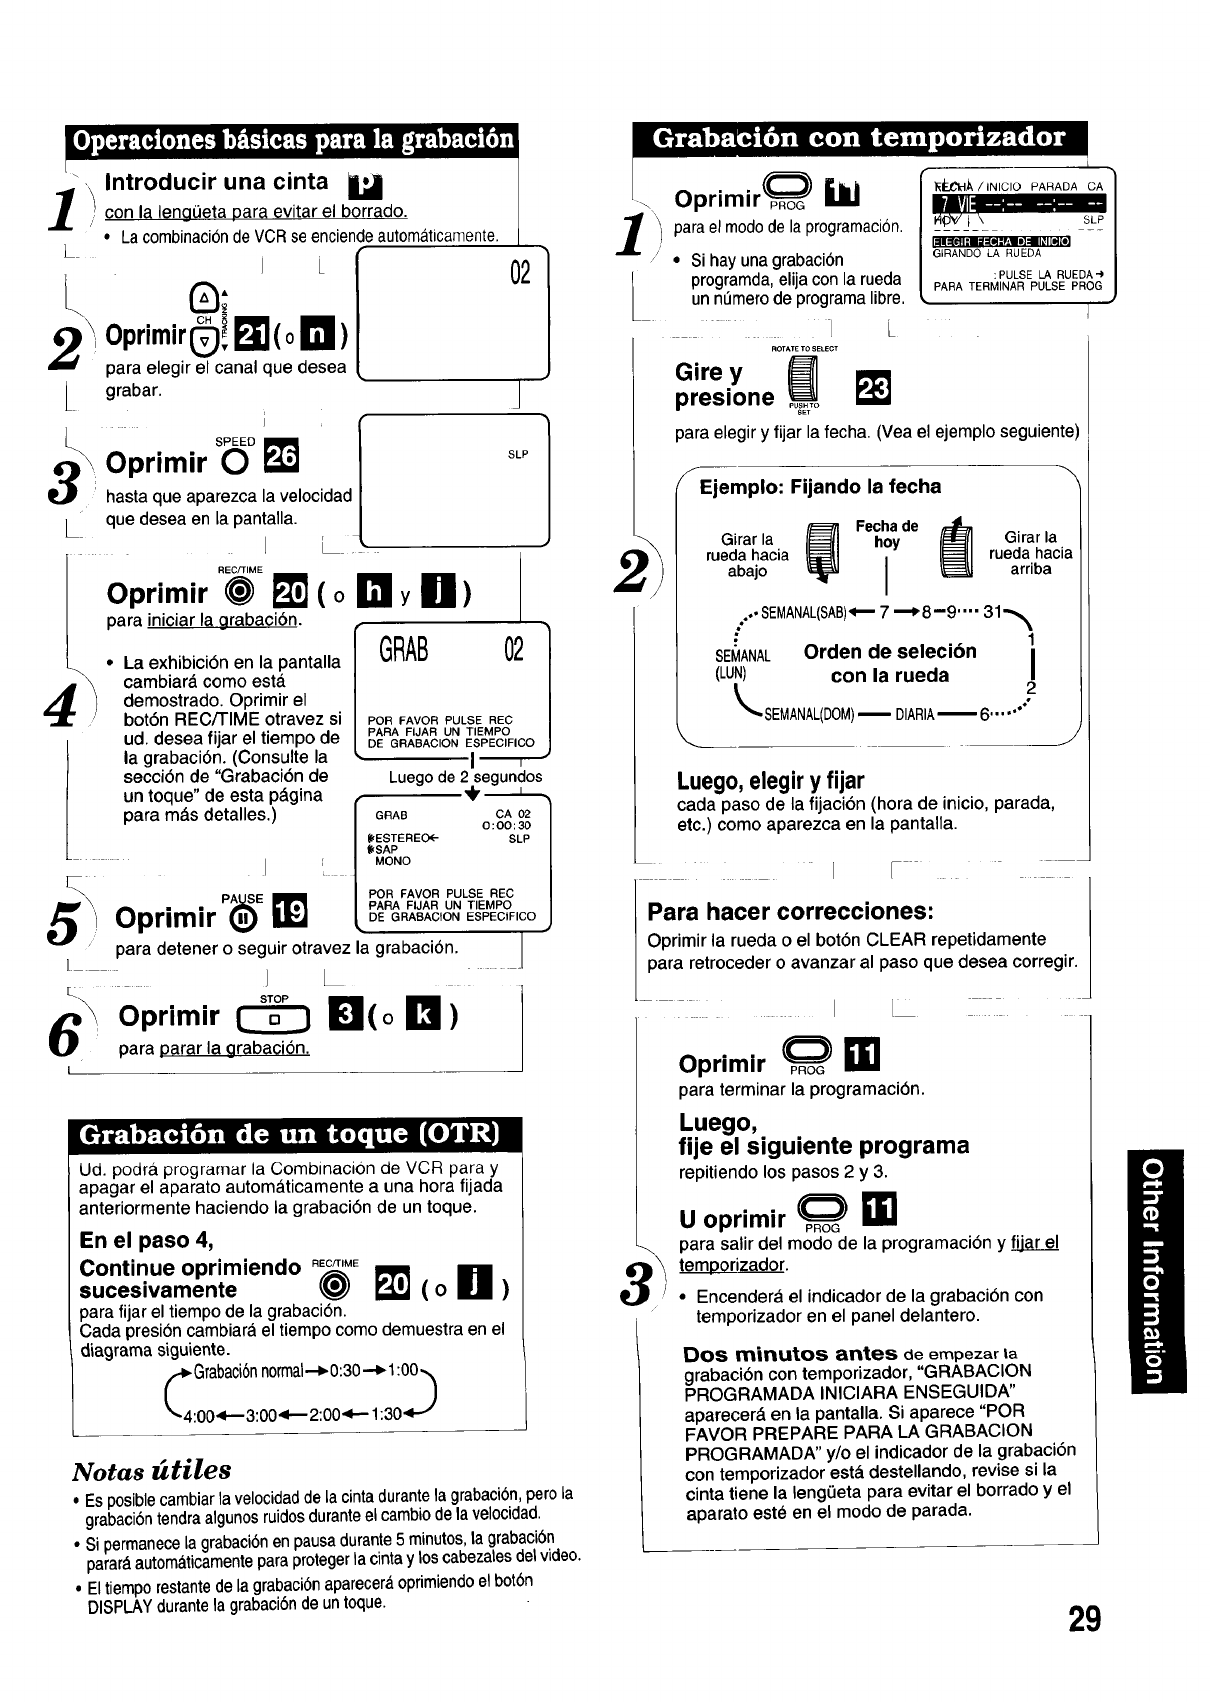
[0j,I+) +_[,+(o+,[,+.-s;_ [+}'+'l'3:J +:• +:s,-+"O,}:Tel',),u
[-- +.+
_._ Introducir una cinta U
I/, con la lengOeta para evitar el borrado.
• La combination de VCRse enciendeautomaticamente.
I
A,_ . . CH +
2\_upr'mir!_:I_(o I_1)
para elegir el canal que desea
grabar.
02
J
S+E Om I
__ Oprimir 0 I_ l SLP
hasta que aparezca la velocidad |
que desea en la pantalla. /
","Eo_"ME/L---
Oprim,r _ _'] (o ITIly Iil)
[ parR iniciar la grabacion.
•La exhibioiSn en la pantalla GRAB 021
cambiar_, como esta. |
demostrado. Oprimir el |
botSn REC/TIME otravez si PORFAVORPULSEREC /
•' • PARA FIJAR UN TIEMPO
ud desea flar el tlem ode
• J P DE GRABAC ON ESEpP_P?FICO I
la grabaciSn. (Consulte la _1
secciSn de "GrabaciSn de Luego de 2"segundos
un toque' de esta p_gina (_'
/parR m_.s detalles.) /GRAB CA02 I
//0:00:30 I
| / _ESTEREO<-- SLP I
L/ ((<SAP /
+t MONO REC I
I'L _
PAil_l: POR FAVOR PULSE
A=L . • 'J_,_ / PARA FIJAR UN TIEMPO I
uprim=r ,_) LDE GRABACtON ESPECtFICO J
m
parR detener o seguir otravez la grabaciSn.
[___
,Oprimir (_ !_!1(o B)
' parR Darar la grabacion,
Ud. podra programar la Combinacion de VCR parr y
apagar el aparato automa_ticamente a una hora fijada
anteriormente haciendo la grabaciSn de un toque•
En el paso 4,
Continue oprimiendo _M_
sucesivamente _I (o111 )
parR fijar el tiempo de la grabaciSn.
Cada presioncambiar_ el tiempo como demuestra en el
diagrama siguiente.
Notas _tiles
• Es posiblecambiar la velocidadde la cinta durantela grabacibn,pero la
grabaciSntendra algunosruidos duranteel cambiode la velocidad.
• Si permanecela grabaciSnen pausa durante5 minutos,la grabaciGn
parar_automa_ticamenteparRprotegerla cintay los cabezalesdetvideo.
• Eltiempo restantede la grabacibnaparecer_oprimiendoel botbn
DISPLAYdurante la grabaciSnde un toque.
/
l
Oprimir_ ibi
parRel modode la programacion.
•Si hay una grabacibn
programda, elija con la rueda
un n_mero de programa libre.
_]L
ROTATE TO SELECT
Girey __'1
presione _T
_._/,.,o,o PA.AOA'CA]
_-;il_ - " I
.. ,. +++I
GIRANDO LA RUEDA /
:PULSE LA RUEDA") /
PARA TERMINAR PULSE PROG J
]
parR elegir y fijar la fecha. (Yea el ejemplo seguiente
f
Ejemplo: Fijando la fecha
Fecha de
Girar la hoy Girar la
rueda hacia rueda hacia
abajo arriba
ooOOSEMANAL(SAB)_7 --_8-9 .... 31-,_
•1
SEMANAL Orden de sele¢ion I
(LUN) con la rueda
LSEMANAL(DOM>-- DIARIA-- 6...... 2
\J
Luego,elegiryfijar
cada paso de la fijacibn (hora de inicio, parada,
etc.) como aparezca en la pantalla.
+ • /
Para hacer correcciones: [
Oprimir la rueda o el botSn CLEAR repetidamente
para retroceder o avanzar al paso que desea corregir.
]
Oprimir _ _1
para terminar la programaciSn.
Luego,
fije el siguiente programa
repitiendo los pasos 2y3.
Uoprimir _
parR salir del modo de la programacJSn y
temporizador.
• Encendera el indicador de la grabacibn con
temporizador en el panel delantero.
Dos minutos antes de empezar ta
grabacion con temporizador, "GRABACION
PROGRAMADA INICIARA ENSEGUIDA"
aparecerd en la pantalla. Si aparece "POR
FAVOR PREPARE PARA LA GRABACION
PROGRAMADA" y/o el indicador de la grabaciSn
con temporizador est_ destellando, revise si la
cinta tiene la leng0eta para evitar el borrado y el
aparato est_ en el modo de parada.
29
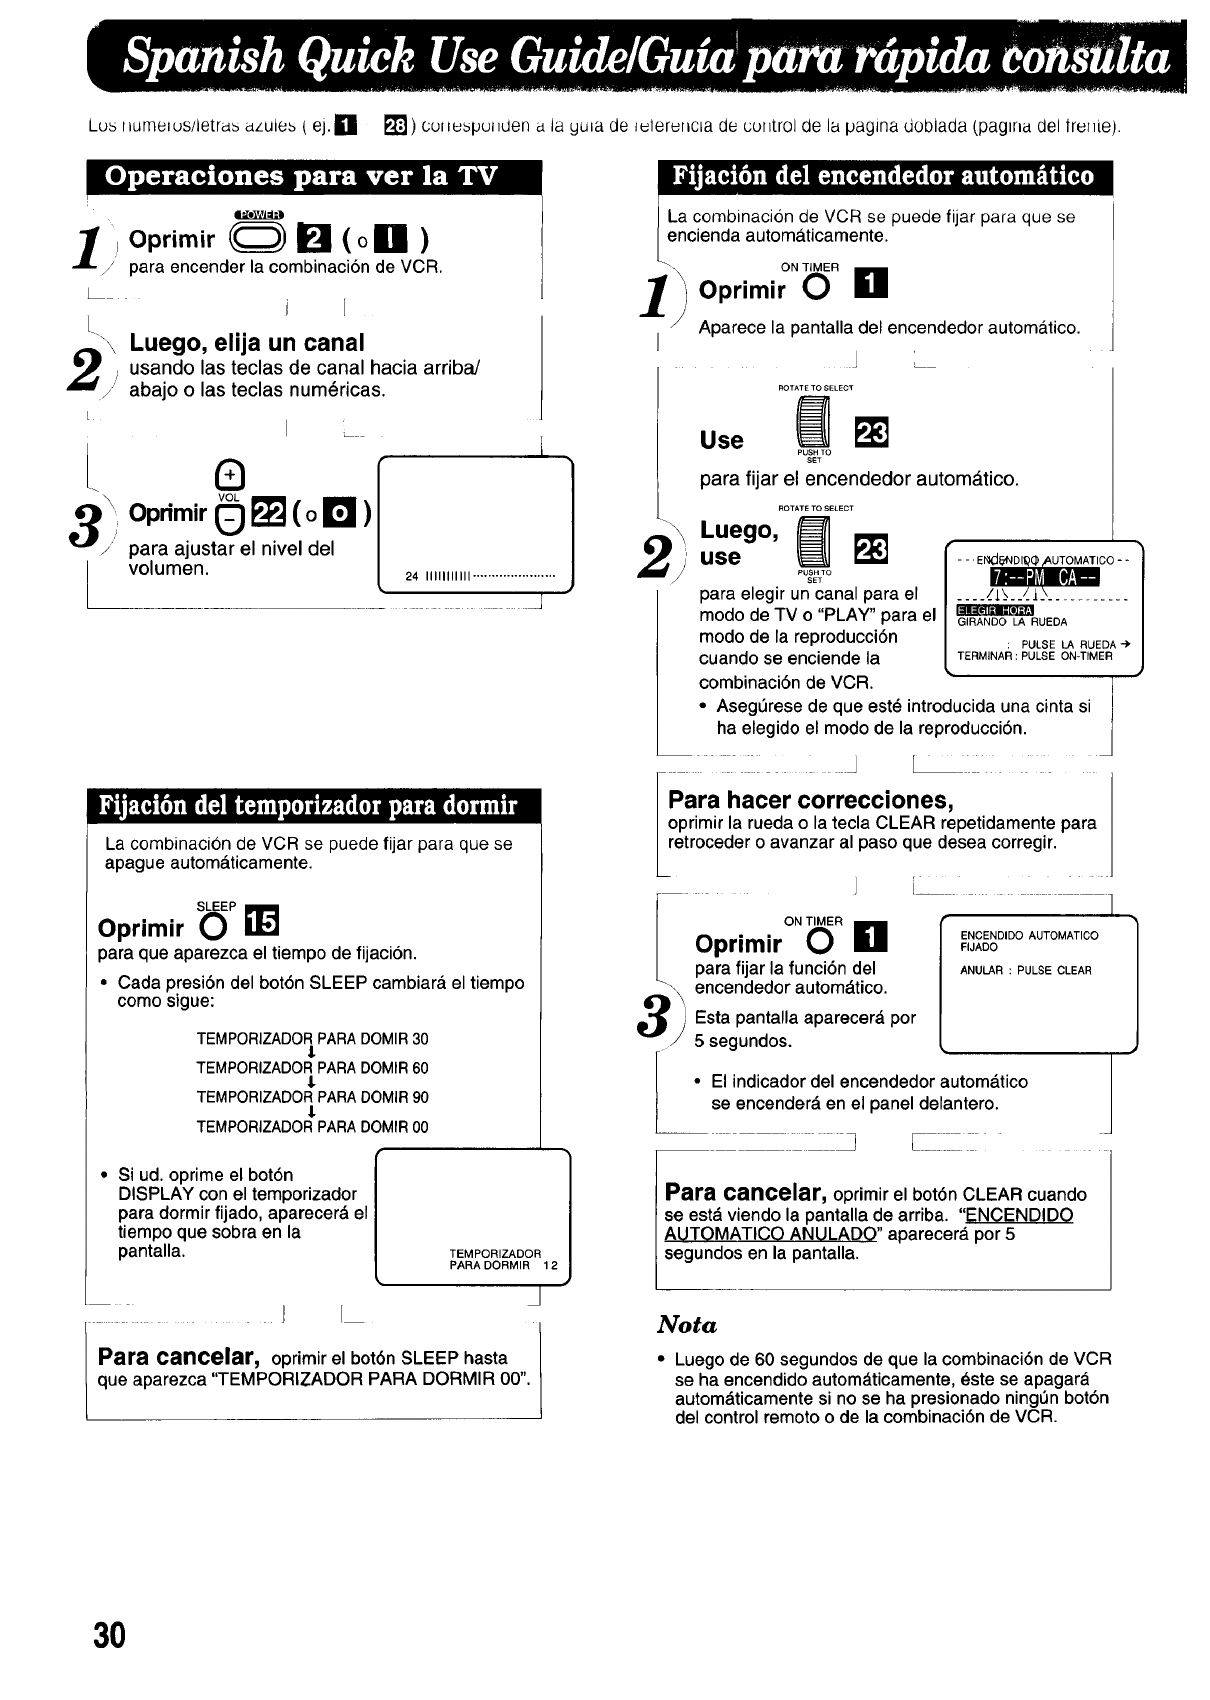
Lus liumelus/letras azules ( ej.Ei _r_l) coiiuspul_den a la yuia de i_ler_ncia de coiitrol de la pagina doblada (pagiria del irei_ie).
x
1'Oprimir _ _ (oill)
/para encender la combinaci6n de VCR.
i
I_ \Luego, elija un canal
_ _,i usando las teclas de canal hacia arriba/
abajo o las teclas num_ricas.
LI
VOL
30primir _ _ (o El )
/" para ajustarel niveldel
volumen.
I
i1
24 IIIIIIIIIII ...................... J
J
J
La combinacion de VCR se puede fijar para que se
apague automa.ticamente.
Oprimir S(_P_J
para que aparezca el tiempo de fijacion.
•Cada presiSn del bot6n SLEEP cambiara el tiempo
como sigue:
TEMPORIZADOR PARA DOMIR 30
l
TEMPORIZADOR PARA DOMIR 60
l
TEMPORIZADOR PARA DOMIR 90
l
TEMPORIZADOR PARA DOMIR 00
•Si ud. oprime el bot6n
DISPLAY con el temporizador
para dormir fijado, aparecerd el
tiempo que sobra en la
pantalla. TEMPORIZADOR 1
PARA DORMIR 12
J
J/
Para cancelar, oprimir el bot6n SLEEP hasta /
que aparezca "TEMPORIZADOR PARA DORMIR 00". L
La cornbinacion de VCR se puede fijar para que se
encienda automa.ticamente.
10primir"OR L1
Aparece la pantalla del encendedor automatico.
J L
Use F_
PUSH TO
SEt
para fijar el encendedor autom_tico.
,Luego, _
use
para elegir un canal para el
modo de TV o "PLAY" para el
modo de la reproducci6n
cuando se enciende la
--.E_CO-- 1
_/1__._/_]__ /
.... ........... ,
/
/
: PULSE LA RUEDA-)' m
TERMINAR : PULSE ON-TIMER /
,)
combinacidn de VCR. ' I
•AsegQrese de que est_ introducida una cinta si I
ha elegido el modo de la reproducci6n. |
d
fara hacer correcciones,
Ioprimir la rueda o la tecla CLEAR repetidamente para
retroceder o avanzar al paso que desea corregir.
iI
°NT'6°El
Oprimir ,,J,ooENCENO'O0AUTOMATICO
para fijar la funci6n del ANULAR:PULSECLEAR
encendedor automdtico.
Esta pantalla aparecerd por
5 segundos.
•El indicador del encendedor autom&tico
L se encender_, en el panel delantero.
),_ _i___171 1
Para cancelar, oprimir el bot6n CLEAR cuando I
se est_ viendo la pantalla de arriba. "ENOENDIDO I
AUTOMATICO ANULADO" aparecer_, por 5
segundos en la pantalla.
Nota
• Luego de 60 segundos de que la combinaci6n de VCR
se ha encendido autom_.ticamente, _ste se apagar_.
autom_ticamente si no se ha presionado ningOn bot6n
del control remoto o de la combinaci6n de VCR.
30

(_._,
Oprimir O U
para elegir el modo de dialogo
titulado que desea. (vea el
siguiente diagrama)
El modo que se elige aparecera
en la pantalla.
DIALOGO Tll ULADO
I NACT I VO
Cada presi6n del bot6n CC cambiara, el modo como
demuestra al siguiente:
DIALOGOTITULADO._ OlALOGOTITULADO
INACTIVO OP1
TEXTOOP1
TEXTOOP24---- DIALOGOTrrULADO
OP1
• La pantalla desaparecer_ en 5 segundos.
• Ud. podr_, elegir tambi_n el modo de dialogo
titulado en la pantalla del menu. Oprimir el bot6n
MENU. Use la rueda para elgir PREPARAR TV y
luego para elegir DIALOGO TITULADO.
Finalmente elija con la rueda, el modo del dialogo
titulado que desea.
Modo de dialogo titulado: OP1 o OP2
ExhibirA los dialogos titulados de programas de TV
seleccionados. Revise en su lista de programas de
TV si son emitidas con dialogos titulados.
Modo de dialogo titulado:
TEXTO OP1 o TEXTO OP2
La mitad de la pantalla hacia abajo sera.n
bloqueados. Cuando una emisora de TV transmite
textos como por ejemplo listas de programas,
informaciones especiales, etc., dichos textos
aparecera.n en este espacio reservado. Este espacio
bloqueado permanecerA en la pantalla hasta eliminar
este modo.
Modo de dialogo titulado: INACTIVO
Las narraciones no aparecera_n en la pantalla aunque
este recibiendo programas con dialogos titulados.
• Los dialogos titulados pueden ser transmitidos en
OP1 o OP2, o en los dos canales. Tambi6m, los
contenidos del texto pueden ser diferentes, por
eso ud. deber& fijar de acuerdo al canal que
desea recibir.
Grabacion: Su combinacion de VCR grabara_
automaticamente la serial de texto/dialogo titulado.
$61o siga las operaciones normales para la grabacion.
Reproduccibn: Para ver las narraciones o textos
durante la reproducci6n, siga simplemente los pasos
que describen ateriormente.
Este sistema en estereo esta disefiado
solamente para ver la TV. Las grabaciones y
reproducciones seran siem )re monodias.
Oprimir 0 _1 .........FIJARFIJARRELojMENUpuLSE.........LA RUEDA ]
PULSE MENU ,)
ll|l_l=l:! li|
PREPARAR VCR
AJUSTAR CANAL
para ver la pantalla del LANGUAGE(ESPAI_OL)
menu. ELEGIR GIRE LA RUEDA
TERMINAR
[
i
ROTATE TO SELECT
use
\. primeramentepara elegir
if " PREPARAR TV desde el
menu y iuegoparaelegirel
modo de audioque desea.
(ESTEREO, SAP, MONO)
SAP: Emisi6n de pragrama de audio secundario.
Un programa de audio separado,
generalmente emitidos en idioma secundario
como tambien en idioma principal.
PREPARAR TV ..... /i
DIALOGO TITULADO /
IAJIUISTEDE1L_m]IoMAGEN_II =l:l=[i] |
ELEGIR GIRE LA RUEDA
FIJAR PULSE LA RUEDA |
TERMINAR PULSE MENU !
)
Oprimir _ _1 dos veces
para salir de esta pantalla.
31

Matsushita Consumer Electronics
Company, Division of Matsushita
Electric Corporation of America
One Panasonic Way Secaucus,
New Jersey 07094
Printed in U.S.A.
VQTS3110 (A)
Panasonic Sales Company,
Division of Matsushita Electric ot
Puerto Rico, Inc. ("PSC")
Ave. 65 de Infanteria. Km. 9.5
San Gabriel Industrial Park, Carolina, [ I
Puerto Rico 00985 IPI
Panasonic
Customer Service Center 2F-3, One Panasonic Way, Secaucus, NJ 07094 (Headquarters)
201-348-9090 (9:00am-8:00pm Monday-Friday, EST)
To locate at_independent authorized servicenter or parts distributor in your area,
within the USA dial toll free 1-800-545-2672, 24 hours a day, 7 days a week.
CALIFORNIA
6550 Katella Avenue
Cypress, CA 90630
Phone (714) 373-7425
Fax (714) 894-8534
800 Dubuque Avenue
So. San Francisco, CA 94080
Phone (415) 871-6373
Fax (415) 871-6840
20201 Sherman Way
Suite 102
Canoga Park, CA 91306
Phone (818) 709-1775
Fax (818) 709-2165
3878 Ruffin Road
Suite A
San Diego, CA 92123
Phone (619) 560-9200
Fax (619) 560-1831
COLORADO
1640 South Abilene Suite D
Aurora, CO 80012
Phone (303) 752-2024
Fax (303) 752-0610
FLORIDA
3700 North 29th Avenue
Suite 102
Hollywood, FL 33020
Phone (305) 925-2880
Fax (305) 925-5224
4710 Eisenhower Boulevard
Suite A1
Tampa, FL 33634
Phone (813) 884-4746
Fax (813) 886-4564
Factory Servicenters
GEORGIA
4245 International Boulevard
Suite C
Norcross, GA 30093
Phone (404) 717-6880
Fax (404) 717-6668
HAWAII
99-859 Iwaiwa Street
Aiea, Hawaii 96701
Phone (808) 488-1996
Fax (808) 486-4369
ILLINOIS
*1703 North Randall Road
Elgin, IL 60123
"12:30 to 4:30, Mon-Fri"
Phone (708) 468-5486
Fax (708) 488-5485
9060 Golf Road
Niles, IL 60714
Phone (708) 299-1700
Fax (708) 299-1710
MARYLAND
Sulphur Springs
Business Center
1638 Sulphur Springs Road
Baltimore, MD 21227
Phone (410) 242-2607
Fax (410) 247-3047
MASSACHUSETTS
60 Glacier Drive, Suite G
Westwood, MA 02090
Phone (617) 329-4280
Fax (617) 329-0586
* pick-up/drop-off only
MICHIGAN
37048 Van Dyke Avenue
Sterling Heights, MI 48312
Phone (810) 939-2060
Fax (810) 939-2638
MINNESOTA
7850-12th Avenue South
Airport Business Center
Bloomington, MN 55425
Phone (612) 854-8624
Fax (612) 854-2089
MISSOURI
11982 Dorsett Road
Maryland Heights, MO 63043
Phone (314) 739-5301
Fax (314) 739-3631
OHIO
2236 Waycross Road
Cincinnati, OH 45240
Phone (513) 851-4180
Fax (513) 851-8443
PENNSYLVANIA
2221 Cabot Boulevard West
Suite B
Langhorne, PA 19047
Phone (215) 741-0661
Fax (215) 741-0521
Campbell's Run
Business Center
500 Business Center Drive
Pittsburgh, PA 15205
Phone (712) 788-2174
Fax (712) 288-2176
TENNESSEE
919-8th Avenue South
Nashville, TN 37203
Phone (615) 244-4434
Fax (615) 244-6713
TEXAS
7482 Harwin Drive
Houston, TX 77036
Phone (713) 781-1528
Fax (713) 781-0643
13615 Welch Road
Suite 101
Farmers Branch, TX 75244
Phone (214) 385-1975
Fax (214) 960-7626
WASHINGTON
20425-84th Avenue South
Kent, WA 98032
Phone (206) 872-7922
Fax (206) 872-0918
Matsushita Electric
of Puerto Rico, Inc.
Panasonic Sales Company/
Factory Servicenter
Ave. 65 de Infanteria, Kin. 9.5
San Gabriel Industrial Park
Carolina, Puerto Rico 00985
Phone (809) 750-4300
Fax (809) 768-2910
EAST (PCE)
2221 Cabot Boulevard West
Suite A
Langhorne, PA 19047
Phone (215) 741-0676
Fax (215) 750-6492
Covers:
CT, DE, ME, MD, MA, NH, NJ,
NY, PA, RI, VT, VA, DC, WV
Regional Customer Care Department
EAST (PCE)
1854 Shackleford Court
Suite 4105
Norcross, GA 30093
Phone (404) 717-6860
Fax (404) 717-6678
Covers:
AL, FL, GA, MS, NC, SC, TN
CENTRAL (PCC)
1703 North Randall Road
Elgin, IL 60123
Phone (708) 468-5530
Fax (708) 468-5528
Covers:
AR, IL, IN, IA, KS, KY, LA, MI,
MN, MO, NE, ND, OK, SD, TX,
WI, OH
WEST (PCW)
6550 Katella Avenue
Cypress, CA 90630
Phone (714) 373-7440
Fax (714) 373-7447
Covers:
AK, AZ, CA, CO, ID, MT, NV,
NM, OR, UT, WA, WY, HI
1-800-332-5368 (Consumer Orders Only)
Matsushita Services Company Box 01,545 Tollgate Road Suite C, Elgin, IL 60123
(8:00am-7:30pm Monday-Thursday; 8:00am-5:00pm Friday; 9:00am-12:30pm Saturday; CST)
(Visa, Mastercard, Discover card, Check or Money Order) As of September '94
Warranty
Matsushita Consumer Electronics
Company, Division of Matsushita
Electric Corporation of America
One PanasonicWay Secaucus,
New Jersey07094
Panasonic Sales Company,
Division of Matsushita Electric of
Puerto Rico, Inc. ("PSC")
Ave. 65 de Infanteria, Kin. 9.5
San Gabriel Industrial Park, Carolina,
Puerto Rico 00985
Tel. (809) 750-4300
Fax. (809) 768-2910
PANASONIC Video Equipment
Limited Warranty
Matsushita Consumer Electronics Company or Panasonic
Sales Company (collectively referred to as "The
warrantor") will repair this product with new or refurbished
parts, free of charge, in the U.S.A. or Puerto Rico from the
date of original purchase in the event of a defect in
materials or workmanship as follows:
Parts (Except LCD; camera pick-up tube/CCD Image
Sensor)
New or rebuilt parts in exchange for defective parts for one
(1) year from the date of original purchase.
LCD (If included)
New or rebuilt LCD Display in exchange for defective LCD
display for one (1) year from the date of original purchase.
Camera Pick-Up Tube/COD Image Sensor (If included)
New pick-up tube/CCD Image Sensor in exchange for
defective pick-up tube/CCD Image Sensor for six (6)
months from the date of original purchase.
One Year Extended Warranty on Picture Tube (If
included)
New or rebuilt picture tube in exchange for a defective
picture tube during the second (2nd) year after original
purchase. Purchaser pays for all labor charges for removal
and installation of picture tube.
Batteries (If included)
New rechargeable batteries in exchange for defective
rechargeable batteries for ten (10) days from the date of
original purchase. Non-rechargeable batteries are not
warranted.
Tape (If included)
New video cassette tape in exchange for a defective video
cassette tape for five (5) days from the date of original
purchase.
Labor
Products that do not include a Picture Tube/LCD
Display
Carry-in or mail-in service for ninety (90) days from the
date of original purchase. After the ninety (90) day labor
warranty period is over, purchaser pays for all labor
charges.
Products that include a Picture Tube/LCD Display of
18" and below
Carry-in or mail-in service for ninety (90) days from the
date of original purchase. After the ninety (90) day labor
warranty period is over, purchaser pays for all labor
charges for removal and installation of parts and picture
tube.
Products that include a Picture Tube/LCD Display of
19" and above
In-home or carry-in service for ninety (90) days from the
date of original purchase. After the ninety (90) day labor
warranty period is over, purchaser pays for all labor
charges for removal and installation of parts and picture
tube.
In-home, carry-in or mail-in service, as applicable, in the
continental U.S.A. can be obtained during the warranty
period by contacting a Matsushita Services Company
(MSC) Factory Servicenter listed in the Servicenter
Directory. Or call 800-545-2672, toll free, to locate an
authorized MSC Servicenter. Carry-in or mail-in service in
Puerto Rico can be obtained during the warranty period by
calling the telephone numbers listed in the Servicenter
Directory.
This warranty is extended only to the original purchaser.
A purchase receipt or other proof of date of original
purchase will be required before warranty service is
rendered.
This warranty only covers failures due to defects in
materials or workmanship which occur during normal
use and does not cover normal maintenance, including,
but not limited to, video and audio head cleaning. It
does not cover damage which occurs during shipment
or failures which are caused by products not supplied
by the warrantor or failures which result from accident,
misuse, abuse, neglect, mishandling, misapplication,
alteration, faulty installation, set-up adjustments,
improper antenna, inadequate signal pick-up,
maladjustment of consumer controls, line power surge,
modification or commercial use, such as hotel, office,
restaurant, or other business or rental use of the
product or service by anyone other than an MSC
Factory Servicenter or authorized MSC Servicenter or
damage that is attributable to acts of God.
LIMITS AND EXCLUSIONS
There are no express warranties except as listed
above.
THE WARRANTOR SHALL NOT BE LIABLE FOR
INCIDENTAL OR CONSEQUENTIAL DAMAGES
(INCLUDING, WITHOUT LIMITATION, DAMAGE TO
TAPES) RESULTING FROM THE USE OF THIS
PRODUCT, OR ARISING OUT OF ANY BREACH OF
THIS WARRANTY. ALL EXPRESS AND IMPLIED
WARRANTIES, INCLUDING THE WARRANTIES OF
MERCHANTABILITY AND FITNESS FOR A
PARTICULAR PURPOSE, ARE LIMITED TO THE
APPLICABLE WARRANTY PERIOD SET FORTH
ABOVE. Some states do not allow the exclusion or
limitation of incidental or consequential damages, or
limitations on how long an implied warranty lasts, so the
above exclusions or limitations may not apply to you.
This warranty gives you specific legal rights and you
may also have other rights which vary from state to
state.
If a problem with this product develops during or after
the warranty period, you may contact your dealer or
Servicenter. If the problem is not handled to your
satisfaction, then write to the Consumer Affairs Division
at the company address indicated above. SERVICE
CALLS WHICH DO NOT INVOLVE DEFECTIVE
MATERIALS OR WORKMANSHIP ARE NOT
COVERED. COSTS OF SUCH SERVICE CALLS ARE
THE RESPONSIBILITY OF THE PURCHASER.
Printed in U.S,A.
VQAS0326 (G)
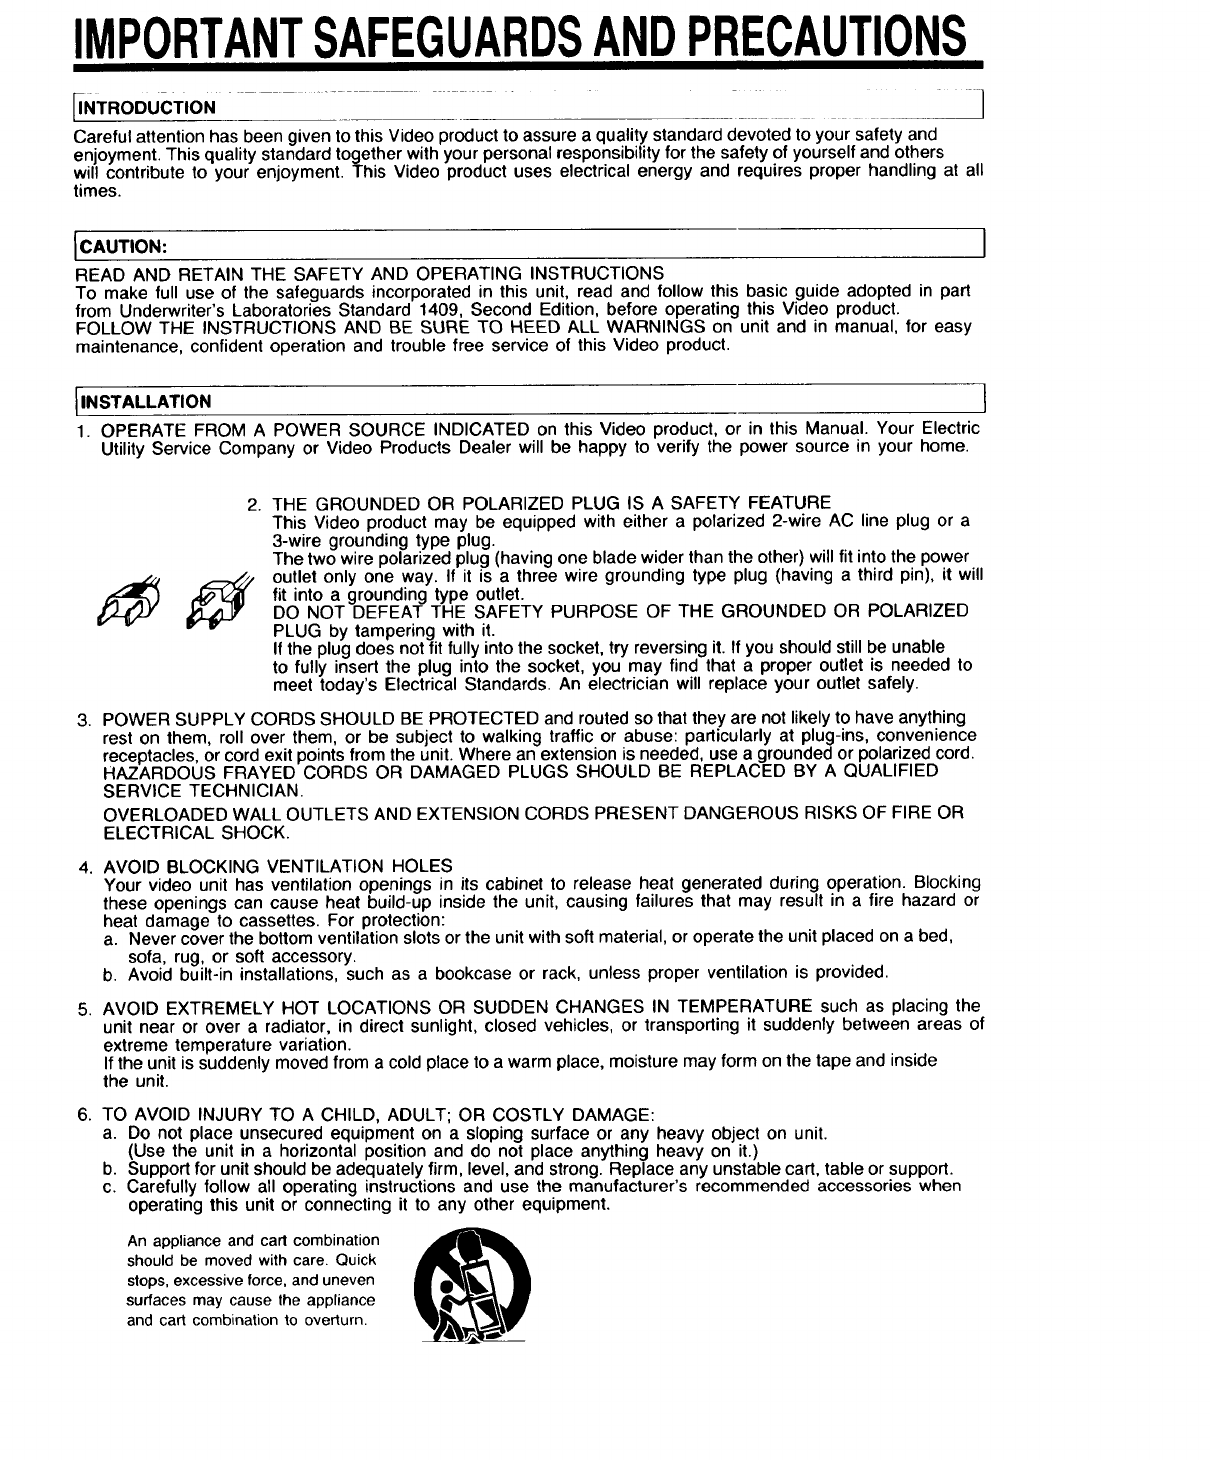
IMPORTANTSAFEGUARDSANDPRECAUTIONS
[INTRoDucTION ..... i
Careful attention has been given to this Video product to assure a quality standard devoted to your safety and
enjoyment. This quality standard together with your personal responsibility for the safety of yourself and others
will contribute to your enjoyment. This Video product uses electrical energy and requires proper handling at all
times.
ICAUTION:
READ AND RETAIN THE SAFETY AND OPERATING INSTRUCTIONS
To make full use of the safeguards incorporated in this unit, read and follow this basic guide adopted in part
from Underwriter's Laboratories Standard 1409, Second Edition, before operating this Video product.
FOLLOW THE INSTRUCTIONS AND BE SURE TO HEED ALL WARNINGS on unit and in manual, for easy
maintenance, confident operation and trouble free service of this Video product.
IINSTALLATION
1. OPERATE FROM A POWER SOURCE INDICATED on this Video product, or in this Manual. Your Electric
Utility Service Company or Video Products Dealer will be happy to verify the power source in your home.
I
2. THE GROUNDED OR POLARIZED PLUG IS A SAFETY FEATURE
This Video product may be equipped with either a polarized 2-wire AC line plug or a
3-wire grounding type plug.
The two wire polarized plug (having one blade wider than the other) will fit into the power
outlet only one way. If it is a three wire grounding type plug (having a third pin), it will
fit into a grounding type outlet.
DO NOT DEFEAT THE SAFETY PURPOSE OF THE GROUNDED OR POLARIZED
PLUG by tampering with it.
If the plug does not fit fully into the socket, try reversing it. If you should still be unable
to fully insert the plug into the socket, you may find that a proper outlet is needed to
meet today's Electrical Standards. An electrician will replace your outlet safely.
3. POWER SUPPLY CORDS SHOULD BE PROTECTED and routed so that they are not likely to have anything
rest on them, roll over them, or be subject to walking traffic or abuse: particularly at plug-ins, convenience
receptacles, or cord exit points from the unit. Where an extension is needed, use a grounded or polarized cord.
HAZARDOUS FRAYED CORDS OR DAMAGED PLUGS SHOULD BE REPLACED BY A QUALIFIED
SERVICE TECHNICIAN.
OVERLOADED WALL OUTLETS AND EXTENSION CORDS PRESENT DANGEROUS RISKS OF FIRE OR
ELECTRICAL SHOCK.
4. AVOID BLOCKING VENTILATION HOLES
Your video unit has ventilation openings in its cabinet to release heat generated during operation. Blocking
these openings can cause heat build-up inside the unit, causing failures that may result in a fire hazard or
heat damage to cassettes. For protection:
a. Never cover the bottom ventilation slots or the unit with soft material, or operate the unit placed on a bed,
sofa, rug, or soft accessory.
b. Avoid built-in installations, such as a bookcase or rack, unless proper ventilation is provided.
5. AVOID EXTREMELY HOT LOCATIONS OR SUDDEN CHANGES IN TEMPERATURE such as placing the
unit near or over a radiator, in direct sunlight, closed vehicles, or transporting it suddenly between areas of
extreme temperature variation.
If the unit is suddenly moved from a cold place to a warm place, moisture may form on the tape and inside
the unit.
6. TO AVOID INJURY TO A CHILD, ADULT; OR COSTLY DAMAGE:
a. Do not place unsecured equipment on a sloping surface or any heavy object on unit.
(Use the unit in a horizontal position and do not place anything heavy on it.)
b. Support for unit should be adequately firm, level, and strong. Replace any unstable cart, table or support.
c. Carefully follow all operating instructions and use the manufacturer's recommended accessories when
operating this unit or connecting it to any other equipment.
An appliance and cart combination
should be moved with care. Quick
stops, excessive force, and uneven
surfaces may cause the appliance
and cart combination to overturn.
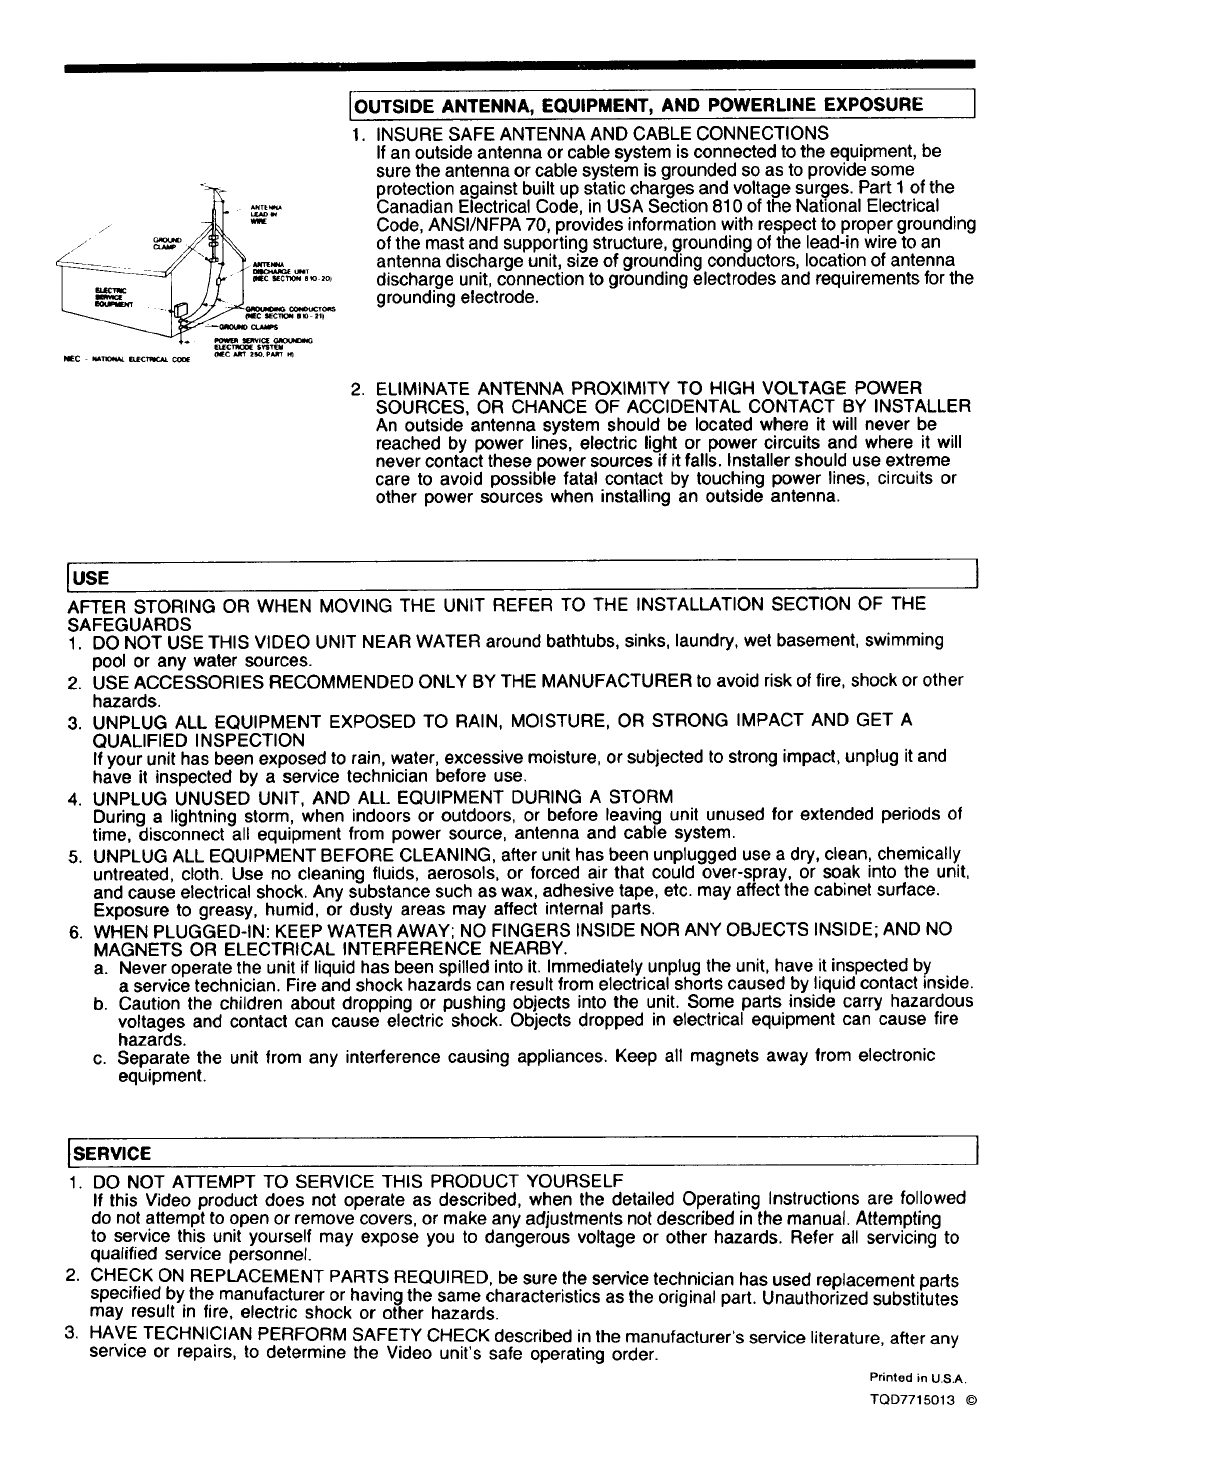
jF _
---- _ UlmT
_c _T_N llm 2,1
OUTSIDE ANTENNA, EQUIPMENT, AND POWERLINE EXPOSURE I
1. INSURE SAFE ANTENNA AND CABLE CONNECTIONS
If an outside antenna or cable system is connected to the equipment, be
sure the antenna or cable system is grounded so as to provide some
protection against built up static charges and voltage surges. Part I of the
Canadian Electrical Code, in USA Section 810 of the National Electrical
Code, ANSI/NFPA 70, provides information with respect to proper grounding
of the mast and supporting structure, grounding of the lead-in wire to an
antenna discharge unit, size of grounding conductors, location of antenna
discharge unit, connection to grounding electrodes and requirements for the
grounding electrode.
2. ELIMINATE ANTENNA PROXIMITY TO HIGH VOLTAGE POWER
SOURCES, OR CHANCE OF ACCIDENTAL CONTACT BY INSTALLER
An outside antenna system should be located where it will never be
reached by power lines, electric light or power circuits and where it will
never contact these power sources if it falls. Installer should use extreme
care to avoid possible fatal contact by touching power lines, circuits or
other power sources when installing an outside antenna.
IUSE ]
AFTER STORING OR WHEN MOVING THE UNIT REFER TO THE INSTALLATION SECTION OF THE
SAFEGUARDS
1. DO NOT USE THIS VIDEO UNIT NEAR WATER around bathtubs, sinks, laundry, wet basement, swimming
pool or any water sources.
2. USE ACCESSORIES RECOMMENDED ONLY BY THE MANUFACTURER to avoid risk of fire, shock or other
hazards.
3. UNPLUG ALL EQUIPMENT EXPOSED TO RAIN, MOISTURE, OR STRONG IMPACT AND GET A
QUALIFIED INSPECTION
If your unit has been exposed to rain, water, excessive moisture, or subjected to strong impact, unplug itand
have it inspected by a service technician before use.
4. UNPLUG UNUSED UNIT, AND ALL EQUIPMENT DURING A STORM
During a lightning storm, when indoors or outdoors, or before leaving unit unused for extended periods of
time, disconnect all equipment from power source, antenna and cable system.
5. UNPLUG ALL EQUIPMENT BEFORE CLEANING, after unit has been unplugged use adry, clean, chemically
untreated, cloth. Use no cleaning fluids, aerosols, or forced air that could over-spray, or soak into the unit,
and cause electrical shock. Any substance such as wax, adhesive tape, etc. may affect the cabinet surface.
Exposure to greasy, humid, or dusty areas may affect internal parts.
6. WHEN PLUGGED-IN: KEEP WATER AWAY; NO FINGERS INSIDE NOR ANY OBJECTS INSIDE; AND NO
MAGNETS OR ELECTRICAL INTERFERENCE NEARBY.
a. Never operate the unit if liquid has been spilled into it. Immediately unplug the unit, have it inspected by
a service technician. Fire and shock hazards can result from electrical shorts caused by liquid contact inside.
b. Caution the children about dropping or pushing objects into the unit. Some parts inside carry hazardous
voltages and contact can cause electric shock. Objects dropped in electrical equipment can cause fire
hazards.
c. Separate the unit from any interference causing appliances. Keep all magnets away from electronic
equipment.
ISERVICE I
1. DO NOT ATTEMPT TO SERVICE THIS PRODUCT YOURSELF
If this Video product does not operate as described, when the detailed Operating Instructions are followed
do not attempt to open or remove covers, or make any adjustments not described in the manual. Attempting
to service this unit yourself may expose you to dangerous voltage or other hazards. Refer all servicing to
qualified service personnel.
2. CHECK ON REPLACEMENT PARTS REQUIRED, be sure the service technician has used replacement parts
specified by the manufacturer or having the same characteristics as the original part. Unauthorized substitutes
may result in fire, electric shock or other hazards.
3. HAVE TECHNICIAN PERFORM SAFETY CHECK described in the manufacturer's service literature, after any
service or repairs, to determine the Video unit's safe operating order.
Printed in US.A,
TQD7715013 ©
