PANASONIC Compact VHS C Camcorder Manual 97100282
User Manual: PANASONIC PANASONIC Compact VHS C Camcorder Manual PANASONIC Compact VHS C Camcorder Owner's Manual, PANASONIC Compact VHS C Camcorder installation guides
Open the PDF directly: View PDF ![]() .
.
Page Count: 7
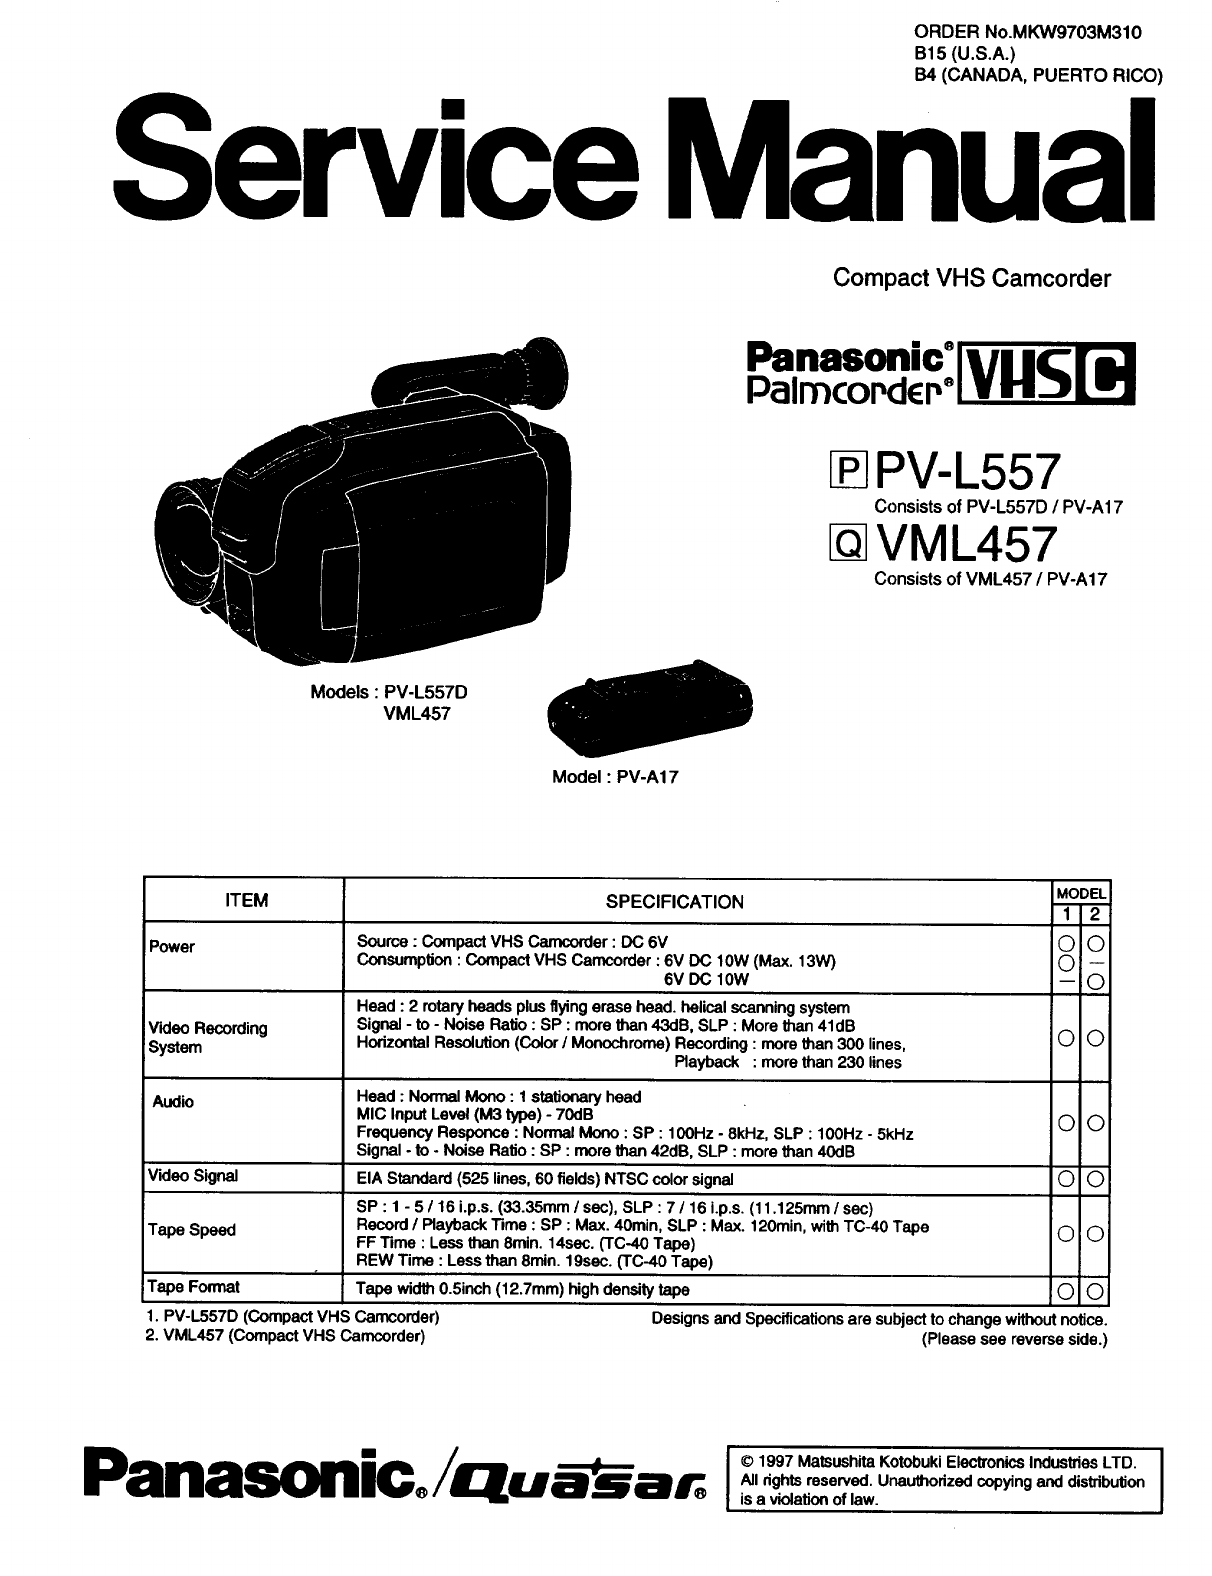
ORDER No.MKW9703M310
B15 (U.S.A.)
B4 (CANADA, PUERTO RICO)
ServiceManual
Compact VHS Camcorder
Panasonic°[ [ T
Palmcor,dcp°!1
I PV-L557
Consists of PV-L557D /PV-A17
VML457
Consists of VML457 /PV-A17
Models : PV-L557D
VML457
Model: PV-A17
ITEM SPECIFICATION MODEL
1 2
Power Source : Compact VHS Camcorder : DC 6V O(_
Consumption :Compact VHS Camcorder : 6V DC 10W (Max. 13W) O --
6V DC lOW -- (_
Head : 2 rotary heads plus flying erase head. helical scanning system
VkJeo Recording Signal - to - Noise Ratio : SP : more than 43dR, SLP : More than 41dB
System Horizontal Resolution (Color /Monochrome) Recording : more than 300 lines, O O
Playback : more than 230 lines
Audio Head : Normal Mono : 1stationary head
MIC Input Level (M3 type) - 70dB (_) O
Frequency Responce : Normal Mono : SP : 100Hz -8kHz, SLP : 100Hz -5kHz
Signal -to -Noise Ratio : SP : more than 42dB, SLP : more than 40dB
EIA Standard (525 lines, 60 fields) NTSC color signal O(_)
SP : 1 -5/16 i.p.s. (33.35mm /sec), SLP : 7 /16 i.p.s. (11.125mm /sec)
Record /Playback Time : SP :Max. 40min, SLP : Max. 120min, with TC-40 Tape (_) O
FF Time : Less than 8min. 14sec. (TC-40 Tape)
REW Time : Less than 8min. 19sec. (TC-40 Tape)
r
Tape width 0.5inch (12.7mm) high density tape !O
Designs and Specifications are subject to change without notice.
(Please see reverse side.)
VideoSignal
Tape Speed
Tape Format
1. PV-L557D (CompactVHS Camcorder)
2. VML457 (CompactVHS Camcorder)
Panasonic/Uu ar. [©l"'--" '--" "° I
All rights reserved. Unauthodzed copying and distribution
®is a violation of law.
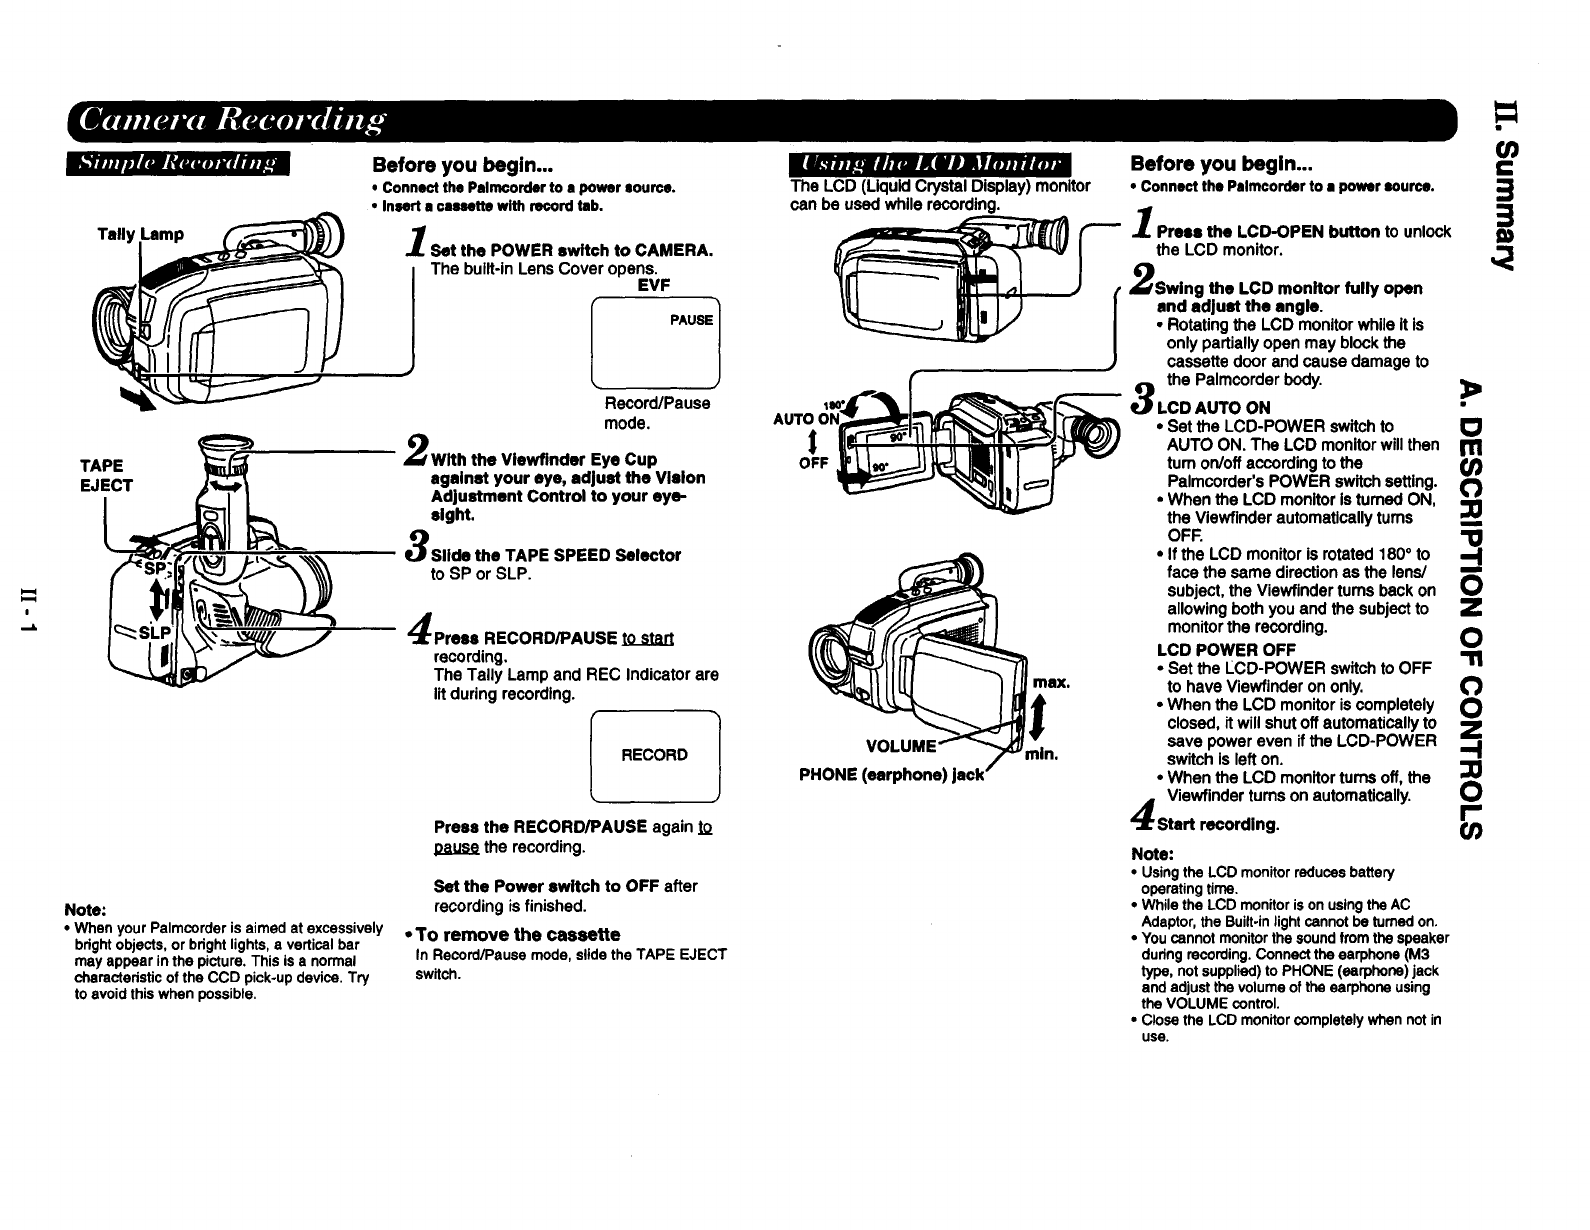
Tally
TAPE
EJECT
Before you begin...
• Connect the Palmcorder to • power aoun:e.
• Insert acassette with record tab.
Set the POWER switch to CAMERA.
The built-in Lens Cover opens.
EVF
PAUSE1
Record/Pause
mode.
With the Vlewflnder Eye Cup
against your eye, adjust the Vision
Ad|ustment Control to your eye-
eight.
Slide the TAPE SPEED Selector
to SP or SLP.
Press RECORD/PAUSE to start
recording,
The Tally Lamp and REC Indicator are
litduringrecording.
RECORD 1
Press the RECORD/PAUSE again to
the recording.
Note:
•When yourPatmcorder is aimed at excessively
bdghtobjects, or bdght lights,a verticalbar
may appear inthe picture. This is a normal
charactedsticof the CCD pick-up device. Try
to avoid this when possible.
Set the Power switch to OFF after
recording is finished.
• To remove the cassette
In Record/Pause mode, slide the TAPE EJECT
switch.
l_.a ._ajnz_KiOlYma.u.m
The LCD (LiquidCrystalDisplay) monitor
can be used whilerecording.
OFF
max.
VOI
PHONE (earphone)
min.
Before you begin...
• Connect the Palmcorder to a power source.
Press the LCD-OPEN button to unlock
the LCD monitor.
,_Swing the LCD monitor fully open
Iandadjust the angle.
• Rotating the LCD monitor while It is
only partially open may block the
cassette door and cause damage to
the Palmcorderbody.
LCD AUTO ON >
Note:
•Usingthe LCD monitorreducesbattery
operatingtime.
• While the LCD monitoris on usingthe AC
Adaptor,the Built.inlightcannot be turned on,
• Youcannot monitorthe soundkom the speaker
dudng recording.Connectthe earphone (M3
type, notsupplied)to PHONE (earphone)jack
and adjust the volume of the earphone using
the VOLUME control.
•Close the LCD monitorcompletelywhen not in
use.
.=
O_
3=
• Set the LCD-POWER switch to
AUTO ON. The LCD monitor will then r_
tum on/off according to the Or)
Palmcorcler's POWER switch setting.
•When the LCD monitor is turned ON,
the Viewflnder automatically tums
OFF.•If the LCD monitor is rotated 180 ° to
face the same direction as the lens/
subject, the Viewfinder turns back on
allowing both you and the subject to
monitor the recording.
LCD POWER OFF
•Set the LCD-POWER switch to OFF
to have Viewfinder on only. (")
•When the LCD monitor is completely O
closed, itwill shut off automatically to Z
save power even if the LCD-POWER -'1
switch is left on.
•When the LCD monitor turns off, the
Viewfinder turns on automatically. 0
Start recording, r-
rk, L_wAwll'lJ _E*m*RJ,J_
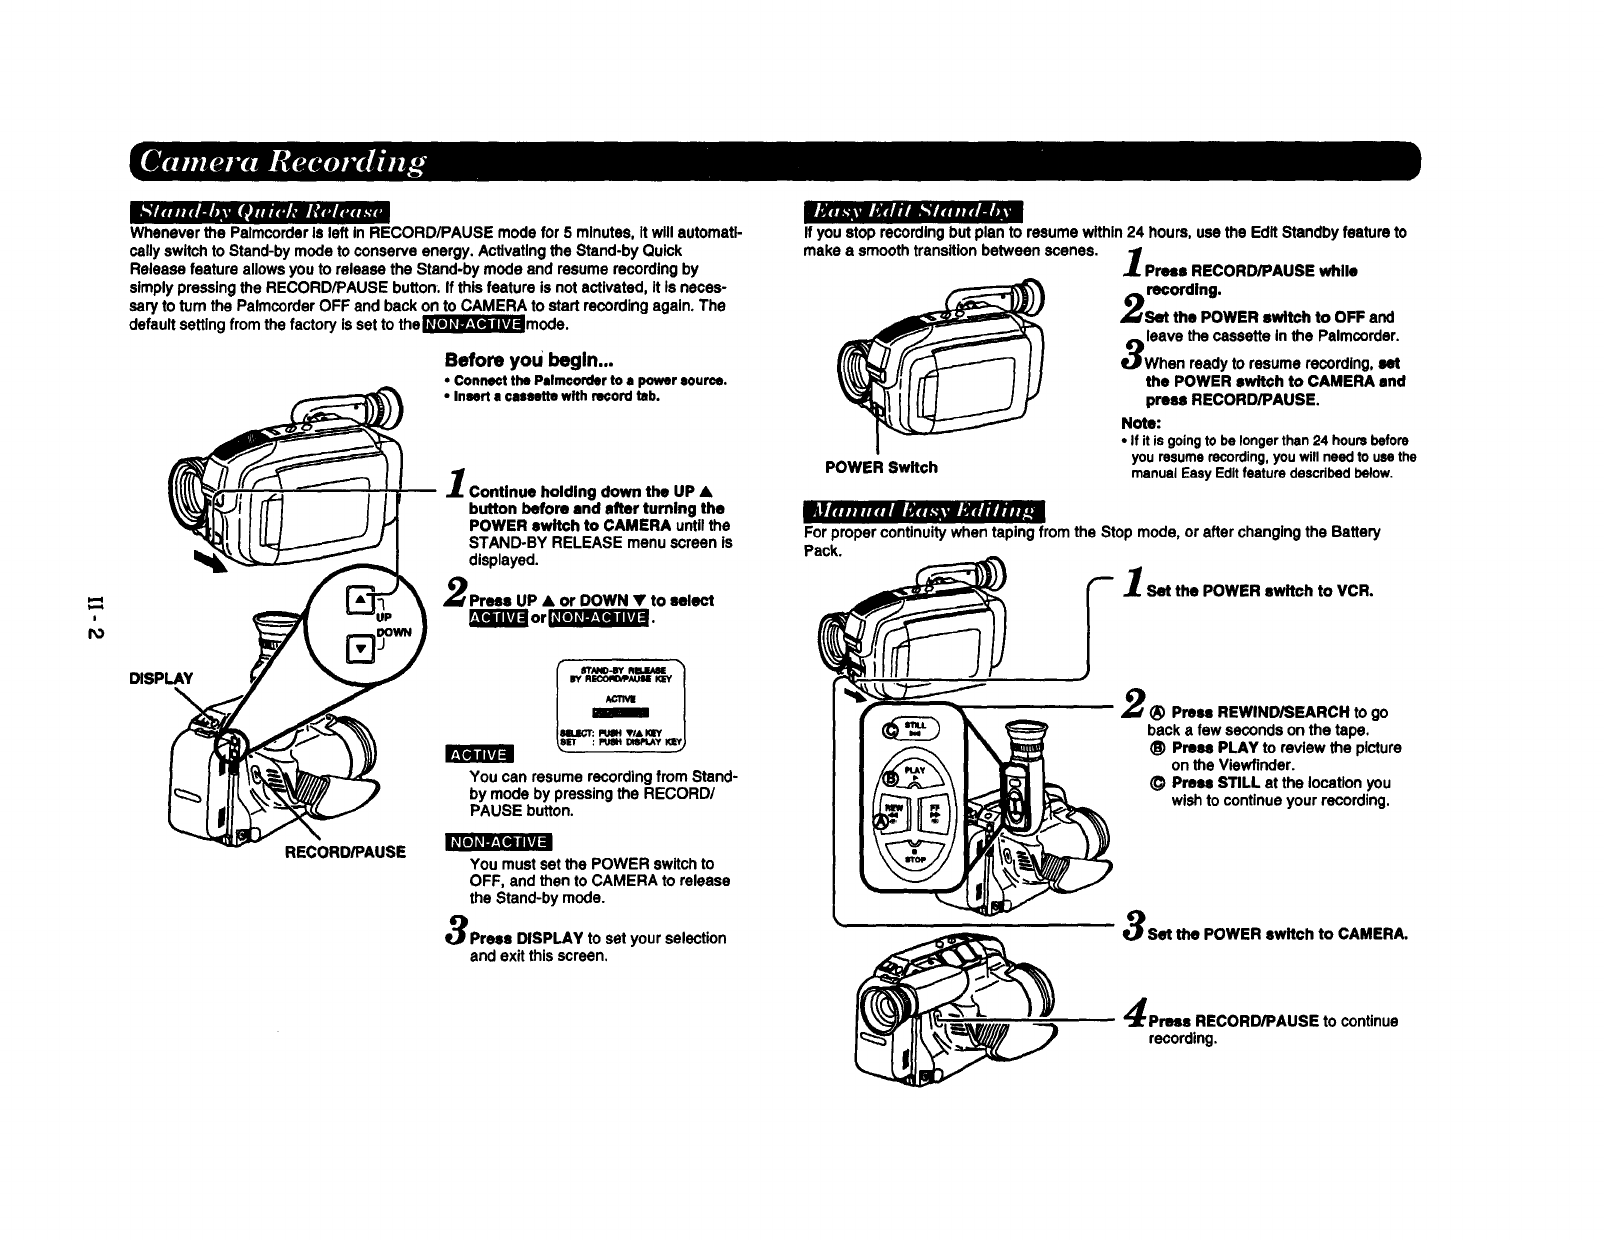
Whenever the Pslmcorder Is left In RECORD/PAUSE mode for 5 minutes, Itwill automatl-
cally switch to Stand-by mode to conserve energy. Actlvatlng the Stand-by Quick
Release feature allows you to release the Stand-by mode and resume recording by
slmply pressing the RECORD/PAUSE button. If this feature is not activated, it Is necas-
sary to turn the Palmcorder OFF and back on to CAMERA to start recording again. The
default setting from the factory Is set to the_mode.
Before you begin...
• Connect the Palm€order to a power source.
• Insert • cassette with record tab.
DISPLAY
B[e]lll_J=
RECORD/PAUSE
Continue holding down the UP •
button before and after turning the
POWER switch to CAMERA until the
STAND-BY RELEASE menu screen is
displayed.
Prses UP •or DOWN •to select
_]_ or I__ I .
PUSH VI& KEY
: Pt_H DlSlq.Ay tq_.
You can resume recording from Stand-
by mode by pressing the RECORD/
PAUSE button.
You must set the POWER switch to
OFF, and then to CAMERA to release
the Stand-by mode.
Press DISPLAY to set your selection
and exit this screen.
If you stop recording but plan to resume within 24 hours, use the Edit Standby feature to
make a smooth transition between scenes, Proel RECORD/PAUSE while
recording.
Set the POWER switch to OFF and
leave the cassette In the Palmcordsr.
When ready to resume recording, set
the POWER switch to CAMERA and
press RECORD/PAUSE.
Note:
• If it is goingto be longerthen24 hoursbefore
youresumerecording,youwillneedto usethe
POWER Switch manualEasyEditfeaturedescribedbelow.
For proper continuity when taping from the Stop mode, or after changing the Battery
Pack.
"-- ISet the POWER ewltch to VCR.
2_) Press REWIND/SEARCH to go
back a few seconds on the tape.
_) Press PLAY to review the picture
on the Viewfinder.
(_ Press STILL at the location you
wish to continue your recording.
Set the POWER switch to CAMERA.
Prsee RECORD/PAUSE to continue
recording.
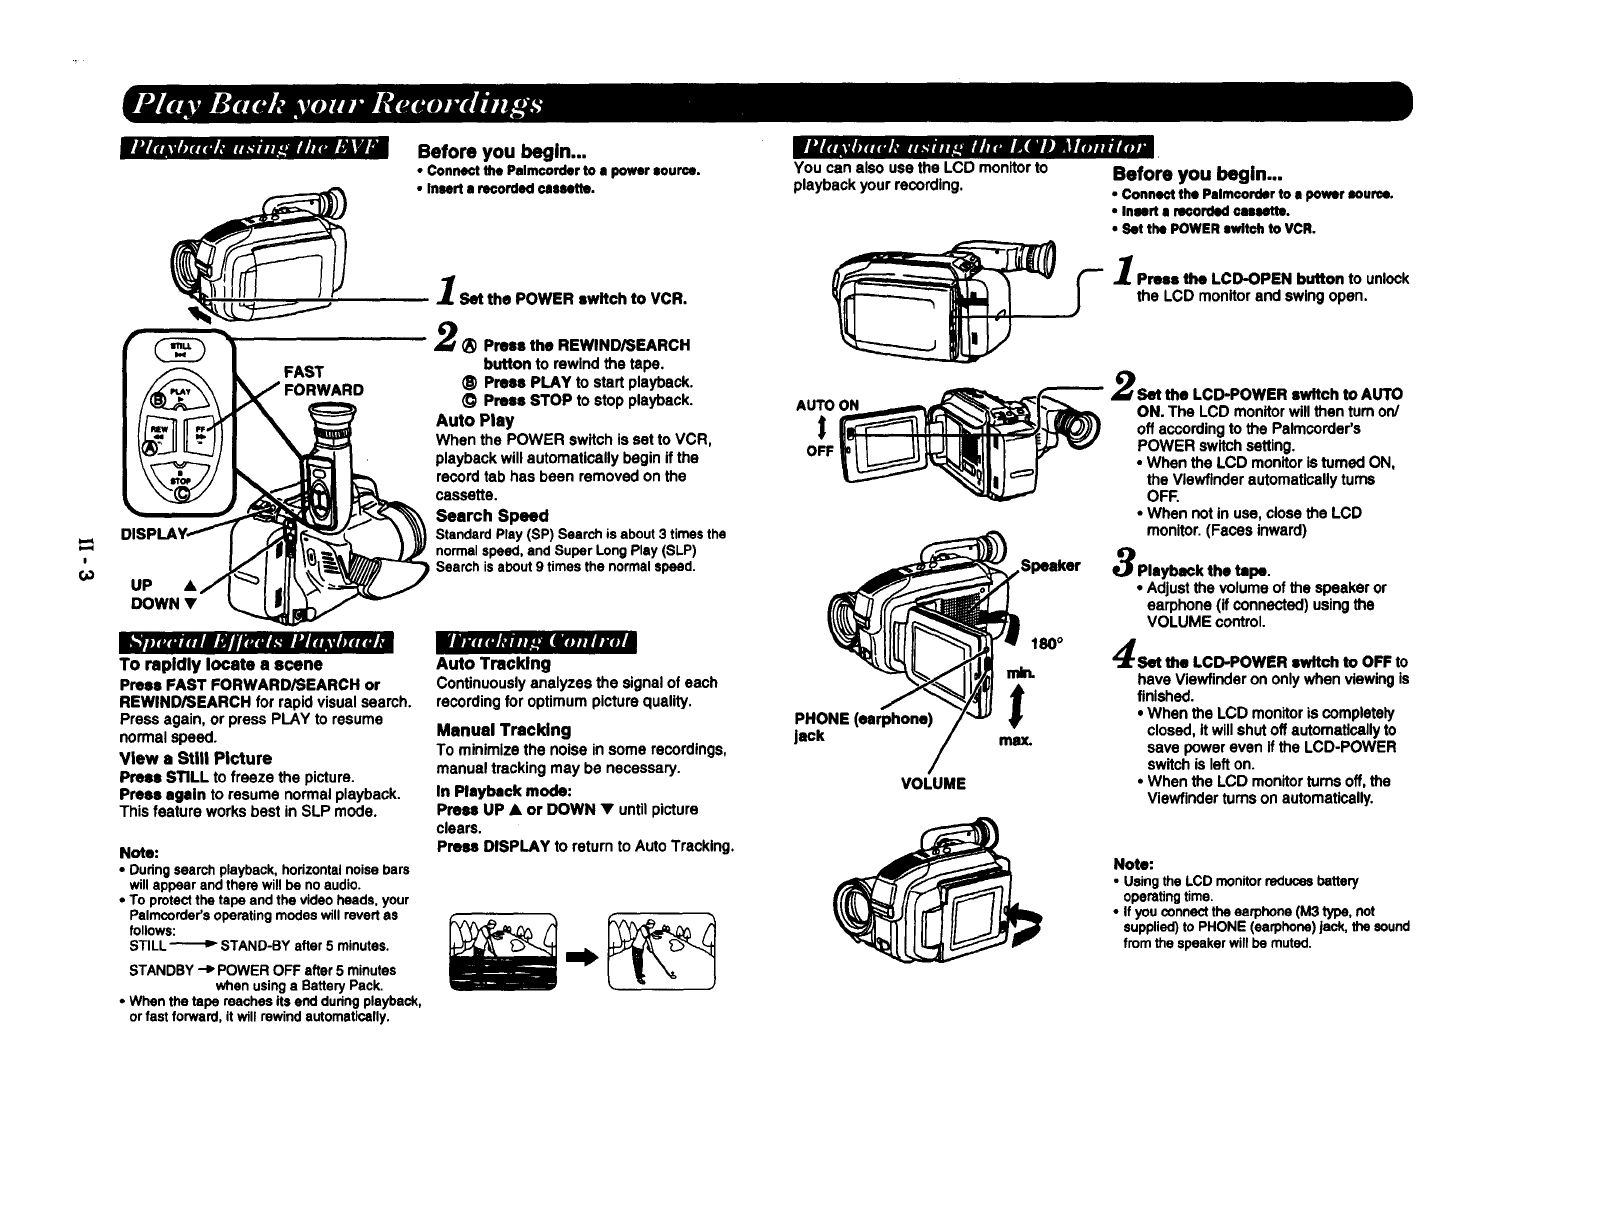
€_
FAST
FORWARD
UP •
DOWN•
b'tnzuM.#l FMh_uu_JFM._v..uJ Wbx#zu_lnm4mlunml_
To rapidly locate a scene
Press FAST FORWARD/SEARCH or
REWIND/SEARCH for rapid visual search.
Press again, or press PLAY to resume
normal speed.
View • Still Picture
Press STILL to freeze the picture.
Press again to resume normal playback.
This feature works best in SLP mode.
Note:
• During search playback, horizontal noise bars
will appear and there will be no audio.
•To protect the tape and the video heads, your
Palmcorder's operating modes will revert as
follows:
STILL _STAND-BY after 5 minutes,
STANDBY -P" POWER OFF after 5 minutes
when using aBattery Pack.
• When the tape reaches its end during playback,
or fast forward, it will rewind automatically.
Before you begin...
• Connect the Palmcorder to apower source.
•Insert s recorded cassette.
Set the POWER switch to VCR.
2(_ Press the REWIND/SEARCH
button to rewind the tape.
(E) Press PLAY to start playback.
(D Press STOP to stop playback.
Auto Play
When the POWER switch is set to VCR,
playback will automatically begin if the
record tab has been removed on the
cassette.
Search Speed
StandardPlay(SP) Searchis about3 timesthe
normalspeed,and Super LongPlay(SLP)
Searchisabout9 timesthe normalspeed.
Auto Tracklng
Continuously analyzes the signal of each
recording for optimum picture quality.
Manual Tracklng
To minimize the noise in some recordings,
manual tracking may be necessary.
In Playback mode:
Press UP •or DOWN •until picture
clears.
Press DISPLAY to return to Auto Tracking.
I
INRiv*.{uhuui._.n u/nliKill ! |fan.it-- m
You can also use the LCD monitor to Before you .,,,:,.k,--In...
playback your recording. • Connectthe Pslmcorderto • powersource.
•InsertI _o_ cal_.
• Set the POWERs_ to VCR,
Pren the LCD-OPEN button to unlock
the LCD monitor and swing open.
AUTO ON
PHONE (earphone)
lack
,Speaker
180 °
inn.
VOLUME
Sot the LCD-POWER switch to AUTO
ON. The LCD monitor will then turn on/
off according to the Palmcorder's
POWER switch setting.
• When the LCD monitor is turned ON,
the Vlewfinder automatically turns
OFR
•When not in use, close the LCD
monitor. (Faces inward)
Playheck the tape.
• Adjust the volume of the speaker or
earphone (if connected) using the
VOLUME control.
Set the LCD-POWER switch to OFF to
have Viewfinder on only when viewing is
finished.
•When the LCD monitoris completely
closed, it willshut offautomatically to
save power even if the LCD-POWER
switch is left on.
•When the LCD monitorturns off, the
Viewfinder turns on automatically.
Note:
• Using the LCD monitor reduces battery
operating time.
•If you connect the earphone (M3 type, not
supplied) to PHONE (earphone) jack, the sound
from the speaker wilf be muted.
VUtl,,v.ltu_t_'_an_uwJntw Ntl-v J_/__ltlel&VO]m#Mr,_mlmWllllUll_uu
laae.y_Md IVI_J Illi rel,:_uhi
)14
T
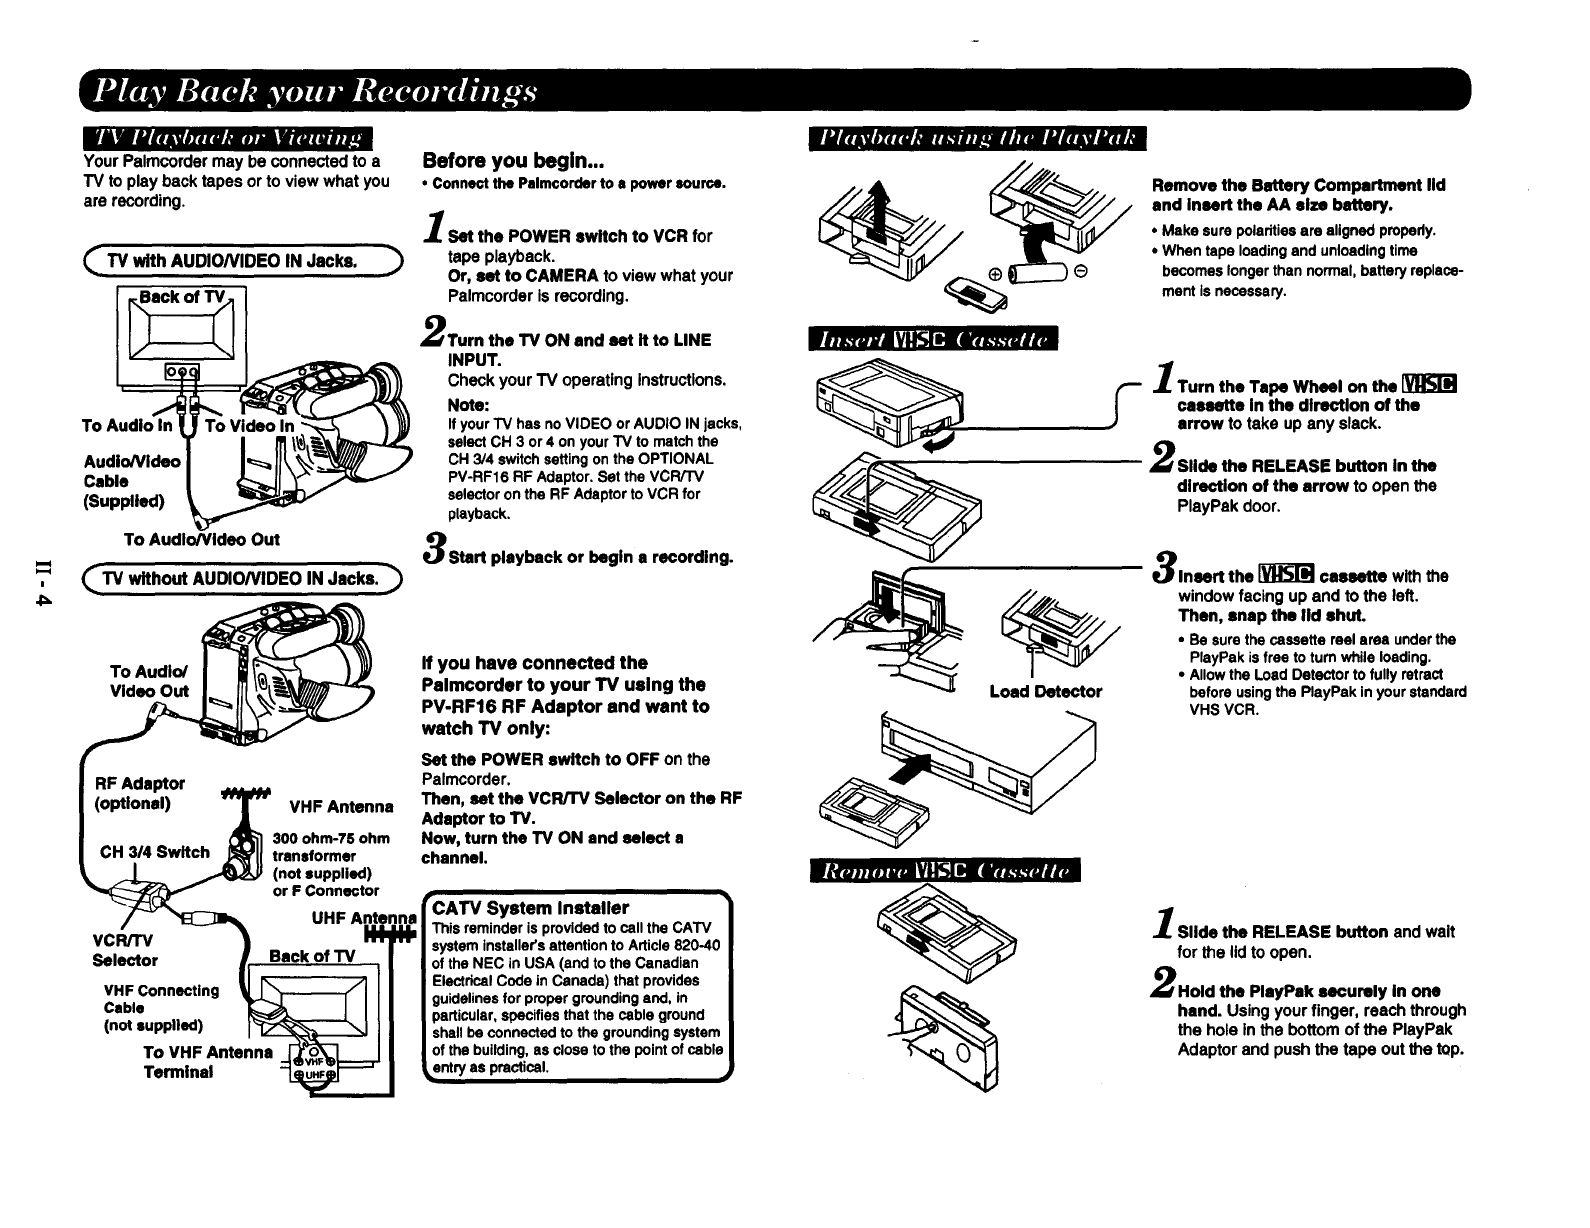
Your Palmcordermay be connectedto a
TV to play backtapes orto view what you
are recording.
(_TV with AUDIONIDEO IN Jacks.
To Audio In
Cable
(Supplied)
To Audio/Video Out
(_TV without AUDIONIDEO IN Jacks.
To Audio/
Video Out
RF Adaptor
(optional) VHF Antenna
300 ohm-T5 ohm
CH 3/4 Switch transformer
(not supplied)
or F Connector
• UHF Antenna
vc.=v
Selector IBack of TV /
Ceb,a _I III
,n..,,.ed) I ll
To VHF Antenna -_NL---.J I
Terminal
Before you begin...
* Connect the Palmcorder to apower source.
l Set the POWER switch to VCR for
tape playback.
Or, set to CAMERA to view what your
Palmcorder is recording.
Turn the TV ON and set it to LINE
INPUT.
Check your TV operating Instructions.
Note:
Ifyour TV has no VIDEO or AUDIO IN jacks,
select CH 3 or4 on your TV to match the
CH 3/4 switchsetting on the OPTIONAL
PV-RF16 RF Adaptor. Set the VCR/TV
selector on the RF Adaptor to VCR for
playback.
Start playback or begin arecording.
If you have connected the
Palmcorder to your TV using the
PV-RF16 RF Adaptor and want to
watch TV only:
Set the POWER switch to OFF on the
Palmcorder.
Then, set the VCR/'rv Selector on the RF
Adaptor to TV.
Now, turn the TV ON and select a
channel. rhu.z.h'_ 1I_1SI SI[ wl_.-_.-ruti_
'CATV System Installer
This reminder is provided to call the CATV
system installer'sattention to Article 820-4C
of the NEC in USA (and to the Canadian
ElectricalCode in Canada) that provides
guidelinesfor proper groundingend, in
particular,specifies that the cable ground
shallbe connected to the groundingsystem
of the building,as close to the pointof cable
_ntry as practical. ,J
Load Detector
Remove the Battery Compartment lid
and insert the AA size battery.
• Make sure polaritieeare aligned properly.
•When tape loading and unloadingtime
becomes longer than normal, battery replace-
ment is necessary.
--'1 Turn the Tape Wheel on the
cassette in the direction of the
arrow to take up any slack.
Slide the RELEASE button in the
direction of the arrow to open the
PlayPak door.
Insert the _ cassette with the
window facing up and to the left.
Then, snap the lid shut.
* Be sure the cassette reel area under the
PlayPak is free to turn while loading.
•Allow the Load Detector to fully retract
before usingthe PlayPak inyour standard
VHS VCR.
Slide the RELEASE button and wait
for the lid to open.
Hold the PlayPak securely In one
hand. Using your finger, reach through
the hole In the bottom of the PlayPak
Adaptor and push the tape out the top.
m Lu mm_
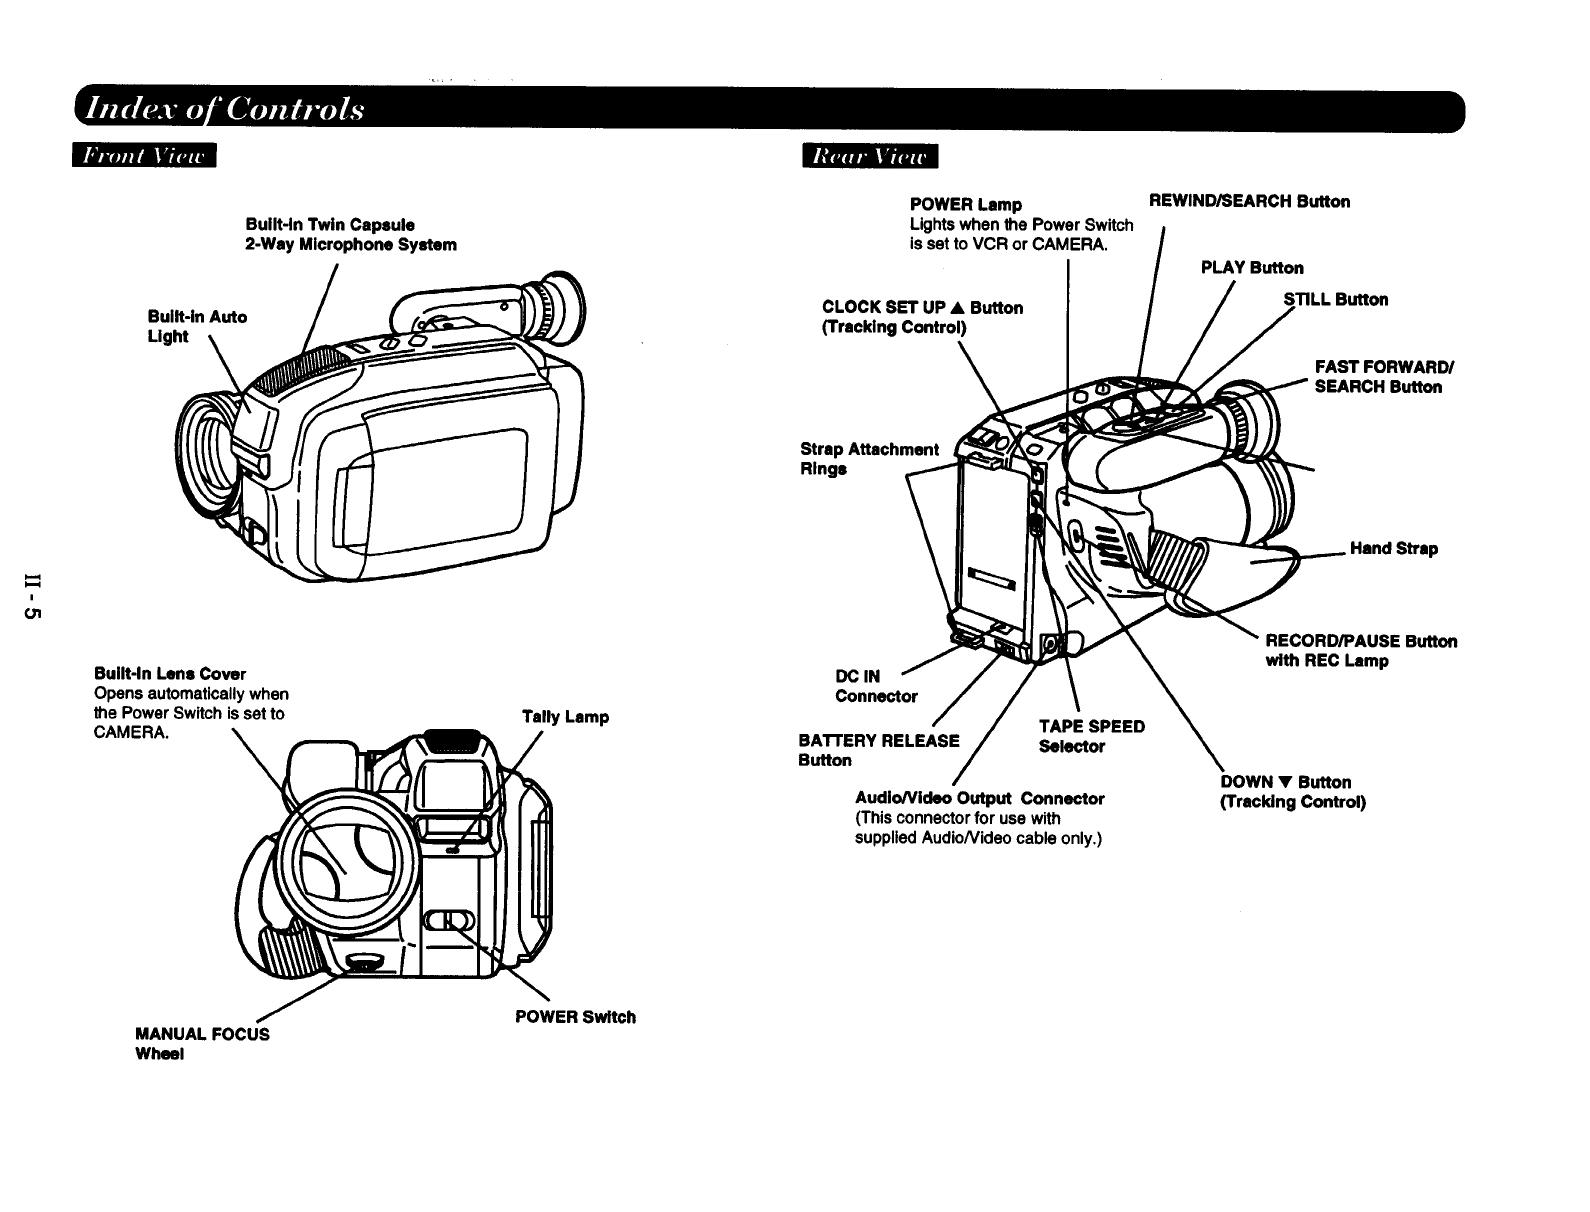
Built-in Twin Capsule
2-Way Microphone System
Built-in Auto
Light
POWER Lamp
Lights when the Power Switch
is set to VCR or CAMERA.
CLOCK SET UP • Button
(Tracking Control)
REWIND/SEARCH Button
PLAY Button
STILL Button
FAST FORWARD/
SEARCH Button
Strap Attachment
Rings
I
Built-In Lens Cover
Opensautomaticallywhen
the PowerSwitch is set to
CAMERA.
Tally Lamp
DC IN
Connector
BATrERY RELEASE
Button
TAPE SPEED
Sek_'tor
Audio/video Output Connector
(This connectorfor use with
suppliedAudio/Videocable only.)
Hand Strap
RECORD/PAUSE Button
with REC Lamp
DOWN •Button
(Tracking Control)
MANUALFOCUS
Wheel
POWER Switch
mW_r.,
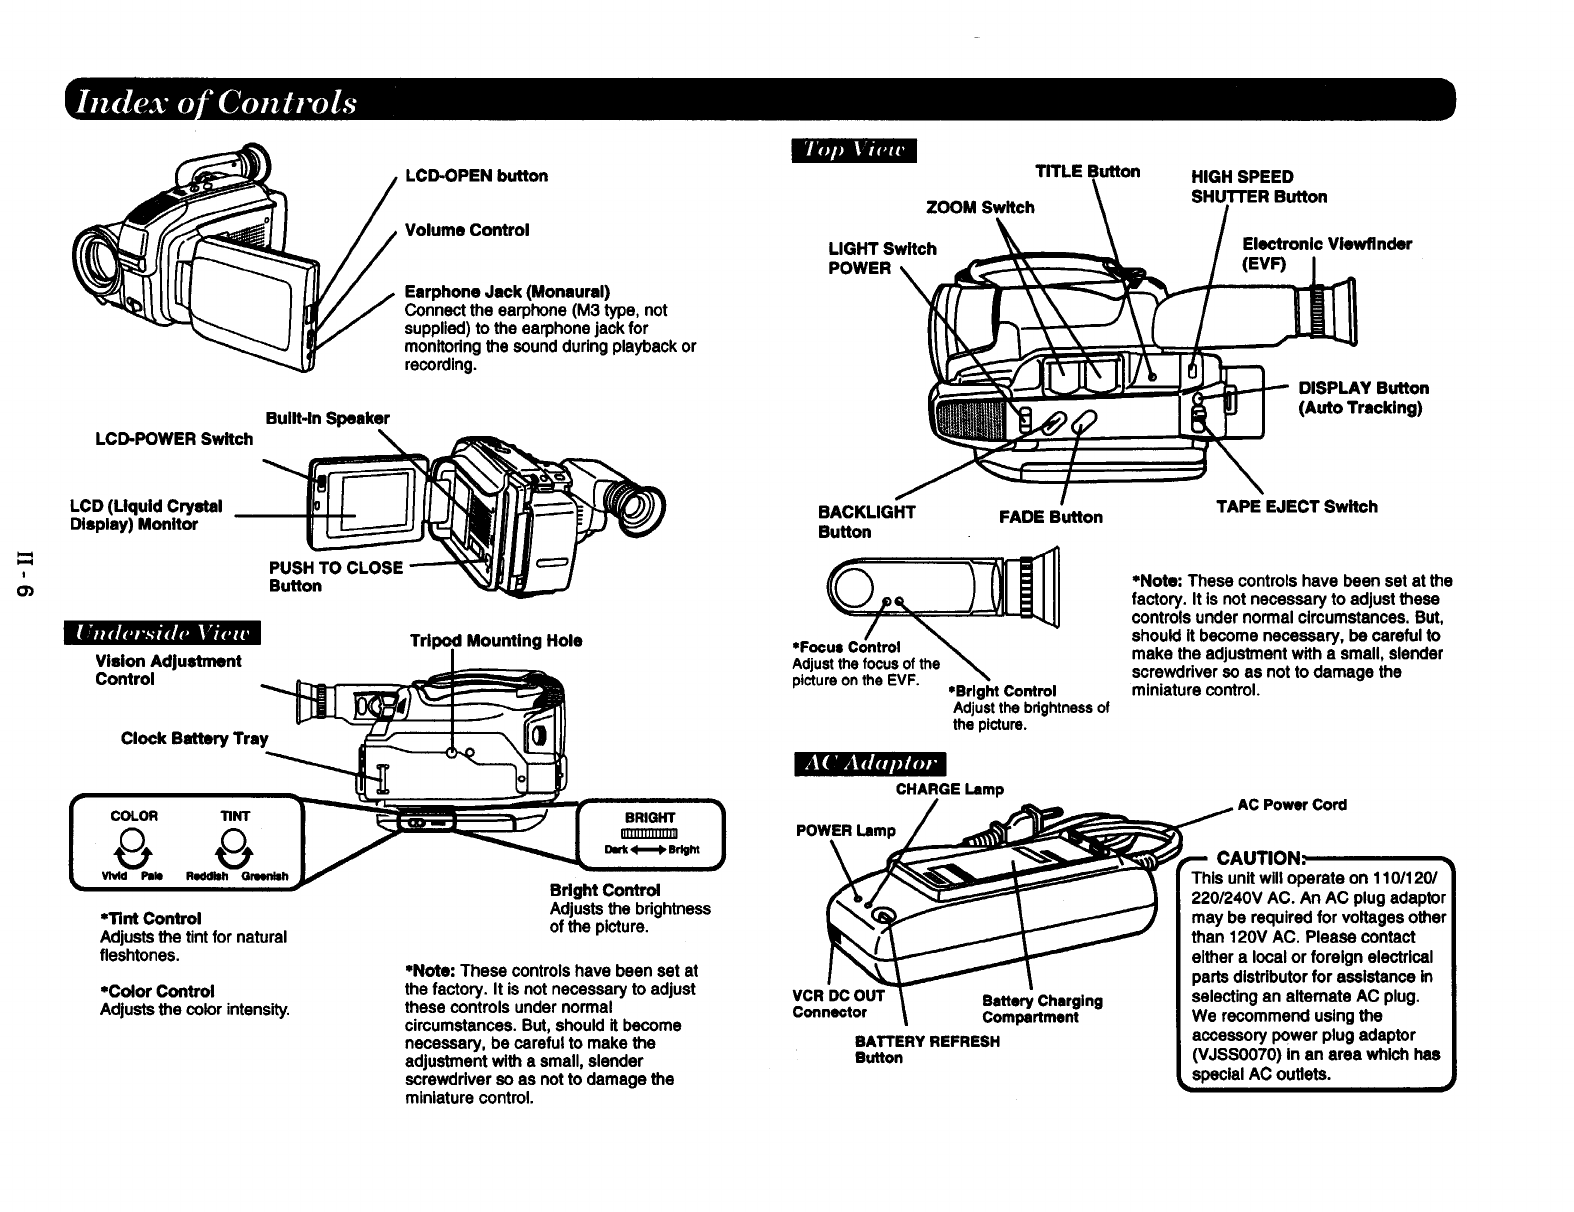
LCD-POWER Switch Built-In Speaker
LCD-OPEN button
Volume Control
Earphone Jack (Monaural)
Connect the earphone (M3 type, not
supplied) to the earphone jack for
monitoring the sound during playback or
recording.
TITLE Button
ZOOM Switch
LIGHT Switch
POWER
HIGH SPEED
SHUTrER Button
Electronic Vlewflnder
(EVF)
DISPLAY Button
(Auto Tracking)
LCD (Uquld Crystal
Display) Monitor
Vision Adjustment
Control
Clock Battery Tray
PUSH TO CLOSE
BuRon
Tripod Mounting Hole
BACKLIGHT FADE Button
Bu_on
*Focus Control
Adjust the focus of the
picture on the EVF. *Bright Control
Adjust the brightness of
the picture.
TAPE EJECT Switch
*Note: These controlshave been set at the
factory. It is not necessaryto adjustthese
controlsunder normalcircumstances.But,
should itbecome necessary, be careful to
make the adjustmentwith a small,slender
screwdriverso as not to damage the
miniaturecontrol.
liT_itlWff;pm;
COLOR TINT
G G
*Tint Control
Adjusts the tint for natural
fleshtones.
*Color Control
Adjuststhe color intensity.
BRIGHT
l)ltk e--J> Bdght
Bright Control
Adjusts the brightness
of the picture.
*Note: These controlshave been set at
the factory. It is not necessaryto adjust
these controlsundernormal
circumstances.But,should itbecome
necessary, be carefulto make the
adjustmentwith a small, slender
screwdriverso as notto damage the
miniaturecontrol.
CHARGE Lamp
POWER Lamp
VCR DC OUT Battery Charging
Connector Compartment
BATTERY REFRESH
Button
AC Power Cord
CAUTION:
This unit will operate on 110/120/
220/240V AC. An AC plug adaptor
may be required for voltages other
than 120V AC. Please contact
either a local or foreign electrical
parts distributor for assistance in
selecting an alternate AC plug.
We recommend using the
accessory power plug adaptor
(VJSS0070) In an area which has
special AC outlets.
m =1
