PANASONIC TV/VCR Or DVD Combo Manual 98050455
HTS3548/93 98050455
User Manual: PANASONIC PANASONIC TV/VCR or DVD Combo Manual PANASONIC TV/VCR or DVD Combo Owner's Manual, PANASONIC TV/VCR or DVD Combo installation guides
Open the PDF directly: View PDF ![]() .
.
Page Count: 39
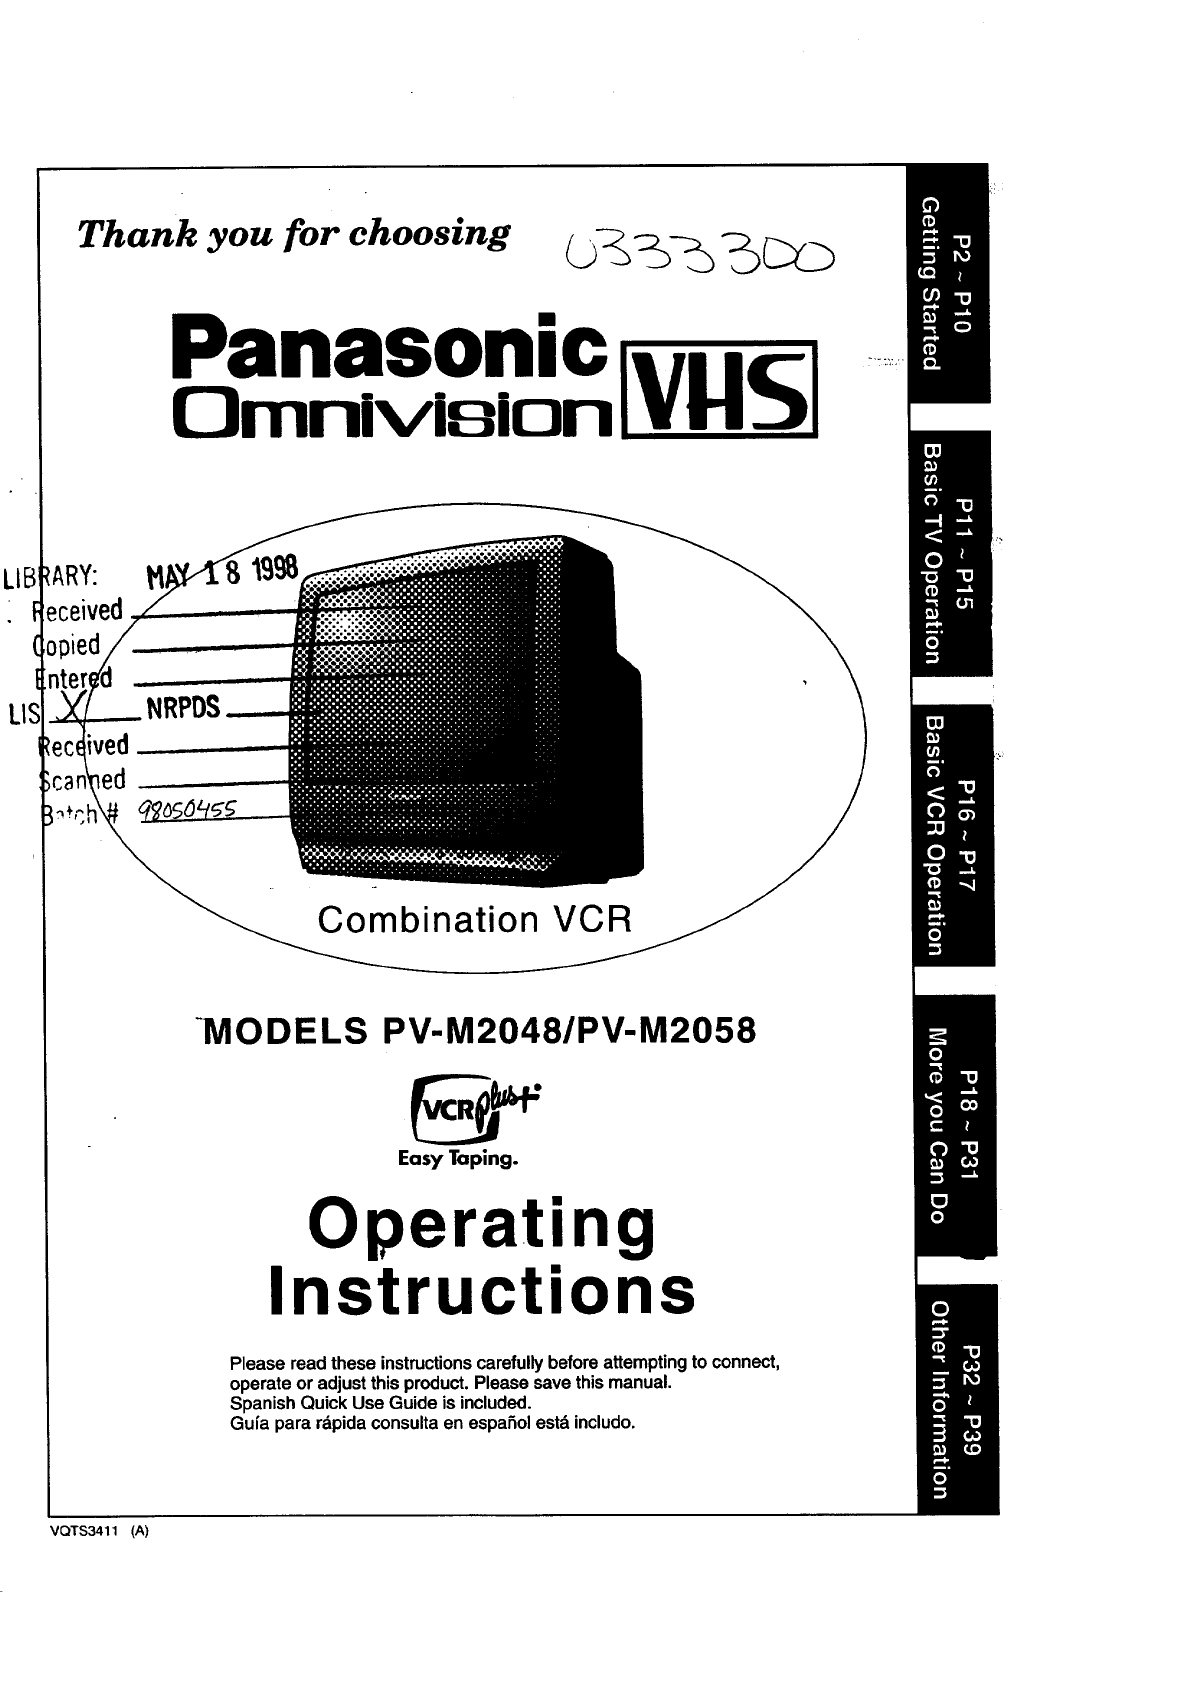
Thank you for choosing
Panasonic
Omnivieton _
ARY:
_ceived
Combination VCR
-MODELS PV-M2048/PV-M2058
Eosy Toping.
Operating
Instructions
Please readthese instructionscarefullybeforeattemptingto connect,
operate oradjustthisproduct.Pleasesavethismanual.
SpanishQuickUse Guide is included.
Gufa para rdpidaconsultaen espaSolestd includo.
VQ'rS3411 (A)
Things You Should Know
Congratulations Date of Purchase
onyourpurchaseof oneofthemostsophisticatedandreliableproducts Dealer Purchased From
onthemarkettoday.Usedproperly,itwillbringyouandyourfamily Dealer Address
yearsofenjoyment.Pleasefill intheinformationatright.Theserial Dealer Phone No.
numberis onthetag locatedonthe backof yourCombinationVCR. Model No.
Safety Precautions SerialNo.
Warning: To prevent fire or shock hazard, do not expose this equipment to rain or moisture.
This videorecorder,equippedwiththe HQ ( HighQuality)System,iscompatiblewithexistingVHS equipment.
Only usethosetapeswiththe _mark. It is recommendedthatonlycassettetapesthathave been testedand
inspectedfor use in2, 4, 6, and8 hourVCR machinesbe used.
Thistelevisionreceiverprovidesdisplayof televisionclosedcaptioninginaccordancewith§15.119of the FCCrules.
This symbolwams the user that uninsulated voltagewithinthe unit
may have sufficientmagnitudeto cause electricshock.Therefore, it is
dangerousto make any kindof contactwith any insidepart of this unit.
This symbol alertsthe userthat importantliterature concemingthe
operation and maintenance of this unithas been included.
Therefore, itshouldbe read carefullyin order to avoid any problems.
Table of Contents
Things You Should Know ................................................................ :.-....'_......;.-.=.............................. 2
Important Safeguards and Precautions ............................................... :....:.:..:...::;.. ........................ 3
Unpacking Your Combination VCR •Product Features ................................................... ............... 4
[tt"_ll i, =,.l.-t_.t i _,i
Antenna or Cable Connections (Outdoor Antenna, Cable Box, Scrambled/Unscrambled Channels) ................. 5
Location of Controls (Remote Control, Combination VCR) .................................................................... 6, 7
One Time Setup (On-Scraen Language, Channel Memory, Auto Clock Set) ............................................... 8, 9
On-Screen Displays (OSD) (Function, Channel, Menu, VCR Status/Clock, Warning, Instruction) .................... 10
i;_. k'l _litj[lJl iI;,) f:.l |(0) I I
TV Operation (MainOperation,Usingthe100key,RapidTune,AudioMute,Phones,SELF-DEMOMode,NITE/GAMEmode)....... 11
Picture Adjustment (Color,Tint, Brightness,Picture,Sharpness,Reset) ..................................................... 12
TV Timer Features (AlarmTimer,Sleep Timer).................................................................................... 13
Closed Capti6n System (MainOperation, CaptionOnMute) .................................................................. 14
FM Radio ...................................................................................................................................... 15
Playback a Tape (MainOperation,Special Effects,Quality Picture Features)............................................... 16
Record On a Tape (MainOperation,One TouchRecord,InputSelect)....................................................... 17
_¢RI'RI_T_
Timer Recording (Main Operation,Cancel, Clear or ReplaceProgramContents)..................................... 18, 19
Copying Your Tapes (Connection,MainOperation).................... ................... :............. _....:................... 20
Special VCR Features .(ChannelCaptipn,TimeStamp,BlueBackON/OFF,VCRLock,WarningBeeper)....... 21, 22, 23
Tape Operation (IndexSearch, Repeat Play, One MinuteSkip,Zero Search,AutoFunctions)............... 24, 25, 26
MTS Broadcast/TV Stereo System (Stereo/SAP/MonoBroadcast,SelectAudioMode)<For Model PV-M2058 only>...... 27
•"VCR Plus+ Setup ................................................................................................................... 28, 29
VCR Plus+ Programming .............................................................................................................. 30
Cable BoxUniversalRemote Control Operation(Main0peraUon,DSSandCableBoxCodeList)<For ModelPV-M2058only>...31
[I]ih (t,) dl i'_ (0) iI I I_.1 | [I) I I
•Unit and Cassette Information .......................................................... _ ........................................ 32
Before Requesting Service (Self-checkItems) .................................................................................. 33
Service Center List ....................................................................................................................... 34
Warranty ....................................................................................................................................... 35
Spanish Quick Use Guide/Guia para rdpida consulta ............................................................ 36~39
2
Important Safeguards and Precautions
IFOR YOUR SAFETY, READ AND RETAIN ALL
SAFETY AND OPERATING INSTRUCTIONS.
HEED ALL WARNINGS IN THE MANUAL AND
ON THE UNIT
!INSTALLATION I
1 POWER SOURCE CAUTION
Operate only from a power source indicated on the
unit or in this manual.
If necessary, have your Electric Utility Service
Company or Video Products Dealer verify the power
source in your home.
2 POLARIZED OR GROUNDING PLUG
As a safety feature, this Video product comes with
either a poladzed power cord plug (one blade is
wider than the other), or a three-wire grounding type
plug.
pOLARIZED PLUG CAUTION:
This plug will only fit into an outlet one way. If you
cannot fully insert the plug, try reversing it. If it still will
not fit, have an electrician install the proper wall outlet.
Do not defeat the safety feature by tampedng with the
plug.
GROUNDING PLUG CAUTION:
This plug will only fit into a three-hole grounding outleL
If necessen/, have an electrician install the proper
outlet. Do not defeat the safety feature by tampering
with the plug.
3 POWER CORD
Make sure power cords are muted so that they are
not likely to have anything rest on them, roll over
them, or be in the way of walking traffic.
If an extension cord is used, make sure it also has
either a polarized or grounded plug and that the
cords can be securely connected.
Frayed cords, damaged plugs, and damaged or
cracked wire insulation are hazardous and should be
replaced by a qualified service technician.
Overloaded outlets and extension cords are fire
hazards and should be avoided.
4 DO NOT BLOCK VENTILATION HOLES
Ventilation openings in the cabinet release heat
generated during operation. If they are blocked, heat
build-up inside the unit can cause failures that may
result in a fire hazard or heat damage to cassettes.
For protection follow these rules:
a. Never cover ventilation slots or the unit while in
use, or operate the unit when placed on a bed,
sofa, rug, or other soft surface.
b. Avoid built-in installation, such as a book case or
rack, unless proper ventilation is provided.
5 AVOID'EXTREMELY HOT LOCATIONS OR
SUDDEN TEMPERATURE CHANGES
Do r_otplace the unit over or near any kind of heater
or regulator, in direct sunlight, inside a closed
vehicle, etc.. Do not move the unit suddenly between
areas of extreme temperature variation. If the unit is
suddenly moved from a cold place to a warm place,
moisture may condense in the unit and on the tape.
6 TO AVOID PERSONAL INJURY _}
•Do not place unsecured equipment on a sloping
surface.
•,Do not place this unit on any support that is not
firm, level and adequately strong. The unit could fall
causing sadous injury to child or
adult and damage to the unit.
•An appliance and cart combination
should be moved with care. Quick
stops, excessive force, and
unpven surfaces may cause the
appliance and carl combination to
ovedum.
•Carefully follow all operating
instructions and use the manufacturer's
recommended accassories when operating this unit
or connecting it to any other equipment.
[OUTDOOR ANTENNA INSTALLATION I
1 SAFE ANTENNA AND CABLE CONNECTION
Ifan outside antenna or cable_=..=_o,wr=,.,)__
system is connected to the
equipment, be sure the
antenna or cable system is
grounded so as to provide
some protection against
built up static charges and
voltage surges. Section 810 =Moum_co,,=_ro_
(NIIC _lnO-=1}
of the National Electrical =_=,m=.,_
Code, ANSI/NFPA 70 (in
Canada, part 1 of the ,o,,,==R_ce=_m_e,,m=
Canadian Electrical Coda) _ ._=._rn_co= _=_n,r=.p_rr_
provides information with respect to proper grounding of the mast and
supporting structure, grounding of the lead-in wire to an antenna discharge
unit, size of grounding conductors, location of antenna discharge unit,
connection to grounding electrodes and requirements for the grounding
electrode.
2 KEEP ANTENNA CLEAR OF HIGH VOLTAGE POWER LINES
OR CIRCUITS
An outside antenna system should be located well away from power lines,
electric light or power circuits and where it will never come into contact with
these power sources if it should happen to fall. When installing an outside
antenna, extreme care should be taken to avoid touching power lines,
circuits or other power sources as this could be fatal. Because of the
hazards involved, antenna installation should be left to a professional.
I USINGTHEVIDEOUNIT I
If the unit has been in storage or moved to a new location, refer first to the
INSTALLATION section of these safeguards.
1 KEEP THIS VIDEO UNIT AWAY FROM WATER OR MOISTURE
OF ANY KIND.
2 IF EQUIPMENT IS EXPOSED TO RAIN, MOISTURE, OR
STRONG IMPACT, unplug the unit and have it inspected by a qualified
service technician before use.
3 DURING AN ELECTRICAL STORM
Dudng a lightning storm, whether indoors or outdoors, or before leaving the
unit unused for extended pedods of time, disconnect all equipment from the
power source as well as the antenna and cable system.
4 WHEN THE UNIT IS PLUGGED IN
•Never expose the unit to rain or water. DO NOT OPERATE if liquid has
been spilled into the unit. Immediately unplug the unit, and have it
inspected by a service technician. Fire and shock hazards can result from
electrical shorts caused by liquid contact inside.
•Never drop or press any object through openings in the unit. Some internal
parts carry hazardous voltages and contact can cause electdc shock or fire
hazard.
•Avoid placing the unit directly above or below your TV sat as this may
cause eisctdcal interference. Keep all magnets away from electronic
equipmenL
5 USING ACCESSORIES
Usa only accessodes recommended by the manufacturer to avoid risk of fire,
shock, or other hazards.
6 CLEANING THE UNIT
Unplug the unit. Then, use a clean, dry, chemically untreated cloth to gently
remove dust or debris. DO NOT USE cleaning fluids, aerosols, or forced air
that could over-spray, or seep into the unit and cause,electrical shock. Any
substance such as wax_ adhesive tape, etc. may mar the _abinet surface.
Exposure to greasy, humid, or dusty areas may adversely affect internal pads.
I SERVICE I
1 DO NOT SERVICE THIS PRODUCT YOURSELF
If, after carefully following the detailed operating instructions, this Video
product does not operate properly, do not attempt to open or remove covers,
or make any adjustments not dascdbed in the manual. Unplug the unit and
contact a qualified service technician. :..
2 IF REPLACEMENT PARTS ARE REQUIRED
Make sure the sen/ice technician uses only parts specified by the manufacturer,
or those having the same safety characteristics as the original pads. The usa of
unauthorized substitutes may result in fire, alectdc shock, or other hazards.
3 HAVE THE SERVICE TECHNICIAN PERFORM A SAFETY CHECK
After any service or repairs to the unit, request the sancta technician to
conduct a thorough safety check as described in the manufacture's service
literature to insure that the video unit is in safe operating condition. 3

UnpackingYourCombinationVCRoProductFeatures
Unpacking Your
Combination VCR
The accessoriesshownbelow are providedto
help you use or set up your Combination VCR.
Accessories
tw i ,L\
INl-I I+IH
O®®i
QQ®t
Q®®
Model PV-M2058 remote
is shown here.
Remote Control
VSQS1563 (PV-M2048)
VSQS1564 (PV-M2058)
2"AA" Batteries
To order accessories, -
call toll free 1-800-211-PANA(7262).
Load the batteries
Press in and up on
the latch with your
thumb nail and lift
off the lid.
Installtwo batteries
as indicatedinside
the Battery
Compartment.
Fit the lid's hinge
pieceintothe indent
onthe case, and
snapthe lidinto
place.
Battery replacement caution
•Do not mix old and new batteries.
•Do not mix alkaline with manganese batteries.
Product Features
Alarm Timer ..=............................................................................................................................... 13
All Channel Auto Set/181 -CH TV/CABLE Tuner ............................................................................. 8
Auto Clock Set ............................................................................................................................ 8, 9
Auto Daylight Saving Time ............................................................................................................ 32
Auto Operation Functions (Auto Shut Off, Auto Playback, Rewind, Tape Eject, Power Off) ............................. 26
Auto Repeat Function ................................................................................................................... 26
Cable Box Universal Remote Control Feature <For Model PV-M2058 only> ............................... 31
Closed Caption System ................................................................................................................. 14
Easy-to-Read English/Spanish/French On-Screen Displays .......................................... 8, 9, 18, 19
FM Radio .................................................................................... ,............ ................... ;.................. 15
Front-mounted AN In Terminals ............................................................................................. 20, 28
MTS Broadcast System .<For Mode! PV-M2058 only> ................................................................. 27
NITE/GAME Mode ........................................................................................................................ 11
One Minute Skip ............................................................................................................................ 26
One Month, 8 Program Auto Timer Recording ........................................................................ 18, 19
One Touch Recording (OTR) ........................................................................................................ 17
PanaBlack TM Picture Tube ...................................................... ...................................................... 16
Quick Play Mechanism .......................................................................................................... ......... 33
Rapid Tune .................................................................................................................................... 11
Special Effects Playback .............................................................................................................. 16
Special VCR Features (ChannelCaption,Time Stamp, BlueBackON/OFF Feature,VCR Lock, Waming Beeper)...... 21~23
VCR Plus+ Recording ................................................................................ ,.................................. 30
VHS Index Search System (Direct Access Search, Program Index Search, Index Scan Search) ............... 24, 25
Zero Search .................................................................................................................................. 26
4
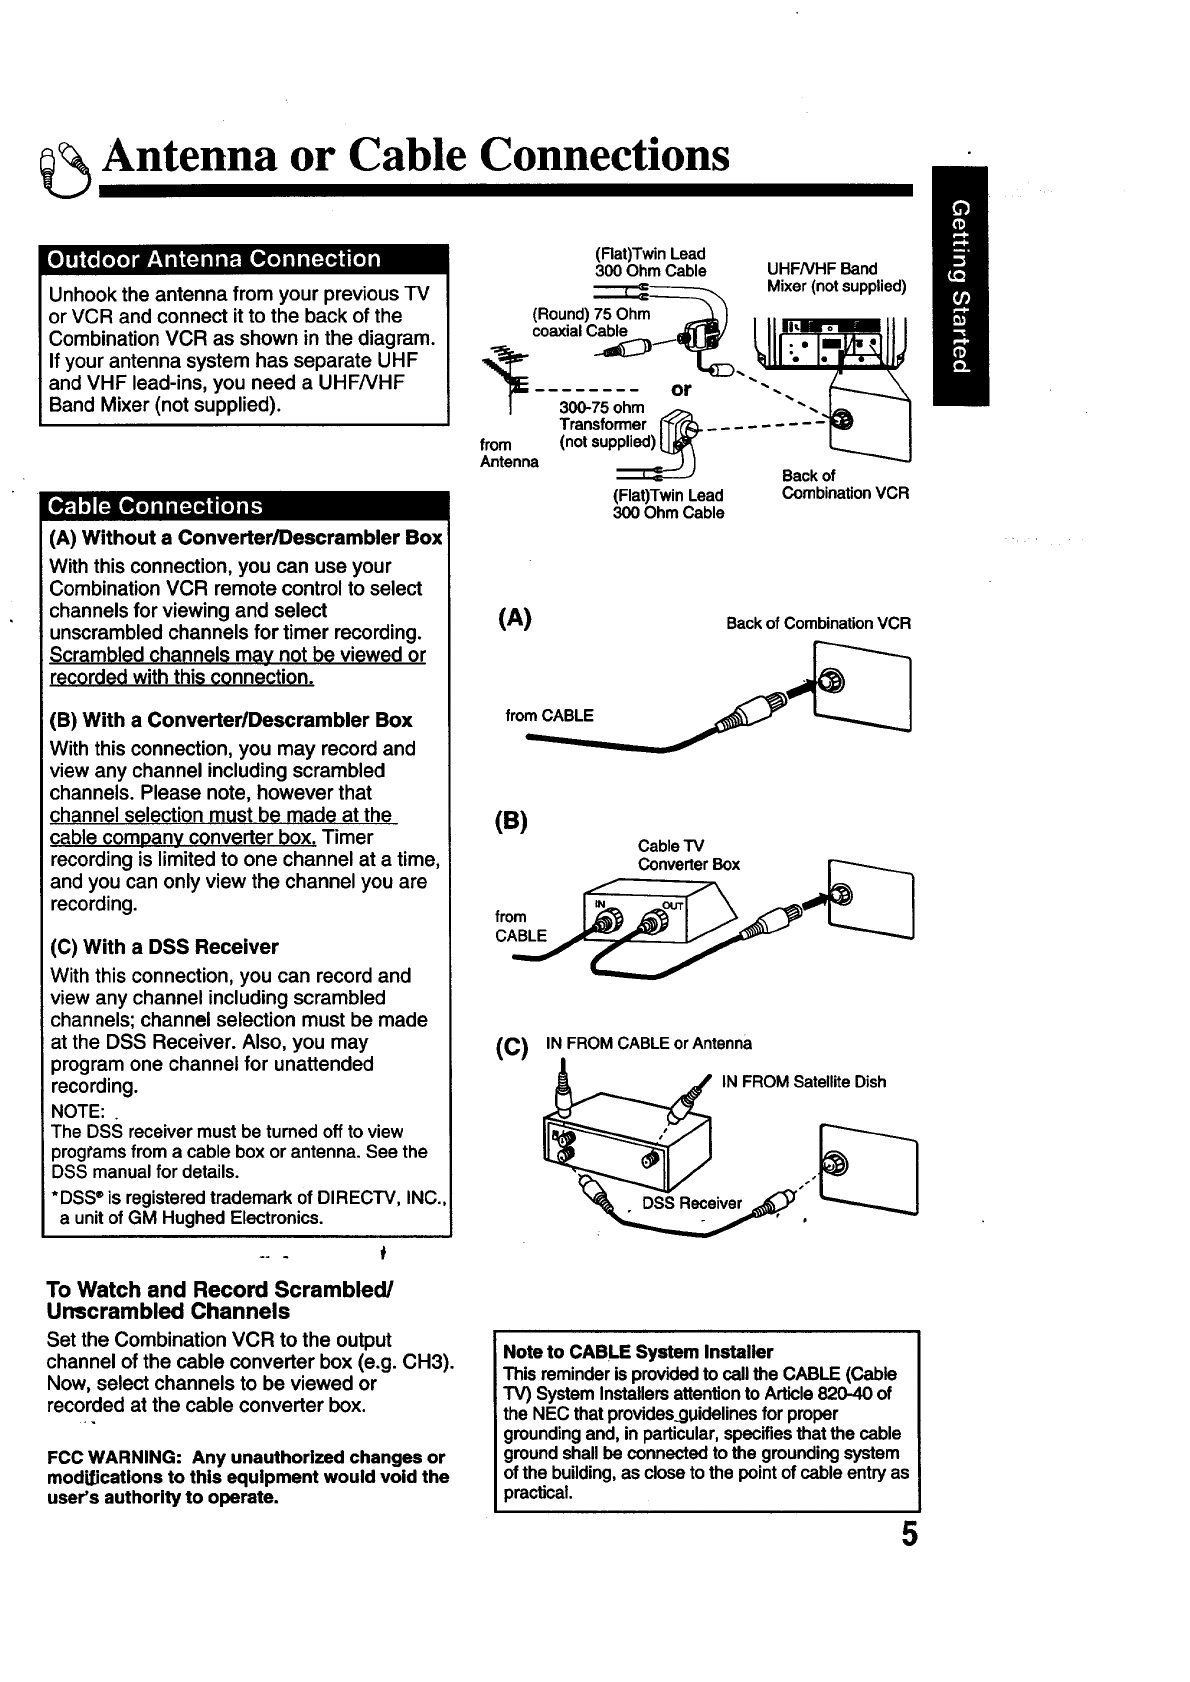
Antenna or Cable Connections
Unhook the antenna from your previous TV
or VCR and connect it to the back of the
Combination VCR as shown in the diagram.
If your antenna system has separate UHF
and VHF lead-ins, you need a UHFNHF
Band Mixer (not supplied).
(A) Without a Converter/Descrambler Box
With this connection, you can use your
Combination VCR remote control to select
channels for viewing and select
unscrambled channels for timer recording.
Scrambled channels may not be viewed or
recorded with this connection.
(B) With a Converter/Descrambler Box
With this connection, you may record and
view any channel including scrambled
channels. Please note, however that
channel selection must be made at the
cable company converter box. Timer
recording is limited to one channel at a time,
and you can only view the channel you are
recording.
(C) With a DSS Receiver
With this connection, you can record and
view any channel including scrambled
channels; channel selection must be made
at the DSS Receiver. Also, you may
program one channel for unattended
recording.
NOTE:
The DSS receivermustbe turnedoffto view
programsfrom a cableboxor antenna.See the
DSS manualfor details.
*DSS ®is registered trademark of DIRECTV, INC.,
a unit of GM Hughed Electronics.
-. . I_
To Watch and Record Scrambled/
Unscrambled Channels
Set the Combination VCR to the output
channel of the cable converter box (e.g. CH3).
Now, select channels to be viewed or
recorded at the cable converter box.
FCC WARNING: Any unauthorized changes or
modiIications to this equipment would void the
user's authority to operate.
(Rat)Twin Lead
300 Ohm Cable UHFNHF Band
oh Mixer(notsupplied)
(Round) 75
or "_ .,,.
301t-75ohm _
Transformer['_[_('_._ _ -
from (not sup_
Antenna
(Flat)TwinLead CombinationVCR
300OhmCable
(A) Back of Combination VCR
re--
(B)
Cable TV
., ConverterBox
(c) IN FROM CABLE or Antenna
.__R ._rlN FROM Satellite Dish
js'_
Note to CABLE System Installer
This reminder is provided to call the CABLE (Cable
TV) System Installers attention to Article 820-40 of
the NEC that provides.guidelines for proper
grounding and, in particular, specifies that the cable
ground shall be connected to the grounding system
of the building,as close to the point of cable entry as
practical.
5
Location of Controls
[|;liilol _][Ofo] 11{'_ l ;]lJ] |(o] iI_
NITE/GAME
See page 11.
I"VNCR <PV-M2058 only>
See page 31.
POWER
See pages 8, 11.
MUTE
See pages 11, 14.
CHANNEL UP/DOWN
SELECT UP/DOWN
See pages 8-15, 17-19, 21-26, 28-30.
ACTION
See pages 8-10, 12, 14, 17,
21-23, 26, 28, 29.
NUMBERED KEY
See pages 9, 11, 15, 17, 24, 30, 31.
DISPLAY
See pages 10, 13, 15, 26, 27.
INDEX
See pages 24, 25.
REWIND/SEARCH
See pages 16, 24, 25.
PAUSE
See pages 16, 17.
PLAY_
See pages 16, 25.
ADD/DELETE
See pages 8, 9,13;15,19,21,29.
AUDIO <PV-M2058 one>
See pages 15, 27.
QQQ
Q
QQ
@Q
pLAy FFI8
Model PV-M2058 remote
is shown here.
DSS CABLE <PV-M2058 only>
See page 31.
RAPID TUNE
See page 11.
VOLUME UP/DOWN
SET/BACKSPACE
See pages 8-14, 17-19, 21-26, 28-30.
PROGRAM
See pages 18, 19, 30.
TRACKING UP/DOWN
See page 16.
SLEEP
See page 13.
FMrFV ENTER
See pages 15, 31.
ON-YIMER
See page 13.
FAST FORWARD/SEARCH
See pages 16, 24, 25.
STOP
See pages 16, 17, 19, 25.
RECORD/TIME
See page 17.
SPEED
See page 17.
ZEROI1 MINUTE SKIP
See page 26.
SLOW
See page 16.
COUNTER RESET
See page 26.
1 ;|_1 |TJ [_',viol [I[_,] i|! _I iP-.ll [ol ilT[_ :!
AC Power Plug
When plugged into an
AC outlet, the
Combination VCR
consumes 5 W of electric
power in OFF condition.
,,]--I
I
6
_-_VHF/UHF Antenna
Input Terminal
In from your
Antenna or Cable.
See page 5.
Model PV-M2058 unit is shown here.
Cassette
Compartment
See pages 16, 17.
CHANNEL UP/DOWN
TRACKING UP/DOWN
See pages 8, 11, 16, 17.
VOLUME UP/DOWN
See pages 8, 11.
See pages 20, 28.
POWER
See pages 8, 11.
1FM/TV
See page 15.
NITE/GAME
See page 11.
Built-In Speaker
(X 1) <PV-M2048>
(X 2) <PV-M2058>
Remote
Sensor
See page 11.
STOP/EJECT REWIND/SEARCH PLAY/REPEAT FAST FORWARD/ RECORD/
See pages See pages See pages SEARCH TIME
16, 17, 19, 25. 16, 24, 25. 11, 16, 25, 26. See pages 16, 24, 25. See pages 17, 23.
Model PV-M2058 unit is shown here.
ON TIMER Indicator
Lights when the On
Timer is set.
See page 13.
REPEAT Indicator
Lights when "REPEAT PLAY:
ON" is selected and playback
is in progress.
See page 26.
PROGRAM TIMER
indicator
Lights when the
Combination VCR is set for
Timer Recording. It flashes
when a Timer Recording
has been set with no tape
inserted, the clock is not set,
or the tape is in motion.
See pages 17-19, 30:
RECORD Indicator--
Lights during recording. In
Rec Pause or OTR Pause
mode, the indicator flashes.
See page 17.
7
One Time Setup
*Important: If the remote control POWER,
CH AV, ACTION, PROG,
INDEX, ON-TIMER, R-TUNE,
FM[I'V and ADD/DLT button
does not work when pressed,
press the TVNCR button on the
remote and try the button again.
Whenthe CombinationVCR isturned onfor
the firsttime, itautomatically entersthe
setupmode.Setupincludesthe following:
•Choosethe languagefor on-screenmenus
and messages.
•Tell theCombinationVCR howyour
equipmentis hookedup (page 5) so the
CombinationVCR can correctlyplace
channelsintomemory.
•GettheCombinationVCR readyfor clockset.
[_!_Check list before you begin.
[] YourCombinationVCR isconnectedto an
Antenna,orCablesystem(seepage5).
Model PV-M2058 unit is shown here.
1 2 2.3-4
1
ACTION
SELECTI
SET
(Av4_)
keys
DELETE
Model PV-M2058 remote is shown here.
Using the bV '_ _ke_s
Whenever a menu or program
screen is displayed, CHANNEL
UP/DOWN and VOLUME UP/DOWN on
the remote control function as •Vd•
on_/. For VOLUME UP/DOWN functions,
use the buttons on the Combination VCR.
8
ToSetLanguage,ChannelsandClock
1 Press POWER* to turn the Combination VCR on.
2Press CH AV, or VOL_ for on
screen displays in English,
Spanish or French.
•If you choose the wrong language,
please see the =Reset all Combination
VCR Memory Functions" section on
page 32.
•If you use a cable box, the cable box must be left on for auto
channel set.
SELECTLANGUAGE
PUSH CH • :English
OPRIMIR CH •:Espa_ol
APP. VOL + :Fran;ais
Important: If you use a cable box, turn it on and select
the PBS station in your time zone.
3Press CH • to start Channel CHANNEL/CLOCKAUTOSET
Auto Set and Clock Auto Set. coNNEct_._ CABLE
These on-screen displays will
appear in sequence.
•CH AUTO SET PROCEEDING
•CH AUTO SET COMPLETED
• AUTO CLOCK SET PROCEEDING
AUTOCLOCKSET
(NIMR._EO
END :PUSH CH UP KEY
AND IF YOU USE A CABLE
BOX, TUNE IT TO YOUR
LOCAL PBS CH THEN...
PLEASE PUSH CH UP KEY
AUTOCLOCK SET I
IS INCOMPLETE
PUSH ACTION TO SET CLO<3_
AI4_ If the displayed time is correct, press CH • to
exit.
•This concludesonetimeCombinationVCRsetup.
•See importantnoteatthe bottomof thispage.
If the displayed time and DST. are not correct...
If you happen to live close to two time zones, the Combination VCR may
have recognized the PBS channel (setting channel) in the wrong time
zone. Please do the following to correct the situation.
a. Make a note of the SETTING: CH number shown on-screen and
press CH •to exit.
b. Delete the setting channel from the Combination VCR channel memory.
(See the Add or Delete a Channel section on the next page.)
c. Press ACTION to display the MAIN MENU.
d. Press •v<• to select._CLOCK," and then gres.,s,ACTION to display
the SET CLOCK screen.
•If you use a cable box and have multiple PBS stations, tune the
cable box to a different PBS station and try auto clock set again
using the menu.
e. Press •v to select "AUTO CLOCK SET," and then press •to set
and CH •to start Auto Clock set.
o cL6C_K_ _:
_n vcR_isturned
youmust=_ connecttheRFccax_ ;_.
set,andchannelautosetfeatures._ i
_lt foranyreason thetimels changedm_inually,automatictime
• correction will not occur.
lf AUTO CLOCK SET IS INCOMPLETE
appears, please set the clock manually.
a. Press ACTION to display the SET
CLOCK screen.
b. Press &v to select and •to
enter the month, date, year, time
and DST. (Daylight Saving Time).
To Make Corrections,
repeatedly press 4• to move the
cursor to the incorrect entry and
make the correction.
c. Press ACTION twice to start the
clock and exit the MAIN MENU.
s;o.
•"DST:ON" automatically
adjusts for daylight
saving time. (See page 32.)
ACTION SET
(Av<=,)
keys
keys
To Change the OSD Language
1 PressACTION to displaythe MAIN MENU.
2 Press AV<• to selectthe languageselection
icon.
3 PressAcTIoN repeatedlyto changethe language
as shown.
MAIN IdeNU
d
S_JECT:& v 41p KEY
SET :ACTION KEY
L_.
4
LI <Spanish>
MENUPRnNCnPXL I
I_]d_ I <French>
-=°E_J
I, REGLIER :ACTION
Press AV 4• to select "EXIT," and then press
ACTION to exit the MAIN MENU.
To Replace Channels in Memory
In case,youhave cableinstalled,etc.
1Press ACTION to display the MAIN MENU.
4
Press AV<• to select"CH," |
and then press ACTION to I
display the SET UP CHANNEL
screen.
Press AV repeatedly to select
"ANTENNA," and then press
• to select your antenna
system ("-rv" or "CABLE"):.
Press AV to select "AUTO
,,SET," and then press
• to start.
• To exitthe SET UP CHANNEL
screen, press ACTION twice.
MAIN M6NU
SELECT:A •<_" KEY
SET :ACTION KEY
.... SET UP CHANNEL .... |
1
VCR Plus+ CH SET UP
SELECT:& • KEY
SET :_. KEY
ENO :ACTION KEY
ADD/m
DELETE
Model PV-M2058 remote is shown here.
To Set or Reset the Clock
Incase theclockis wrong,or a powerfailureoccurred.
1Press ACTION to ..... SET CLOCK ......
display the MAIN
MENU. AUTOCLOCKSET
2 Press AV<• to
select =CLOCK." s_uEcr:. •KEY
sE'r :lp KEY
Then, press s_o :ACT'IONKEY
ACTION to display
the SET CLOCK r _ SETCLOC_
screen.
3"/1\ DST:ON
Press AV to select |.................. :
"MANUAL," and then Im-_m'ag_
•to display the I sa.Ecr:.•KEY
SET CLOCK screen. [ _ I_K,_oNKEY
4Please do steps b
and c at the top of this page.
To Add or Delete a Channel
1SeecachaneIiN08D
using the 1
NUMBERED keys CHANNEL 08 DELETED
to add or CH AV
to delete.
2 Press ADD/DLT
to add or delete
the channel.
•To select a channel once it's deleted, use the
NUMBERED keys.
9
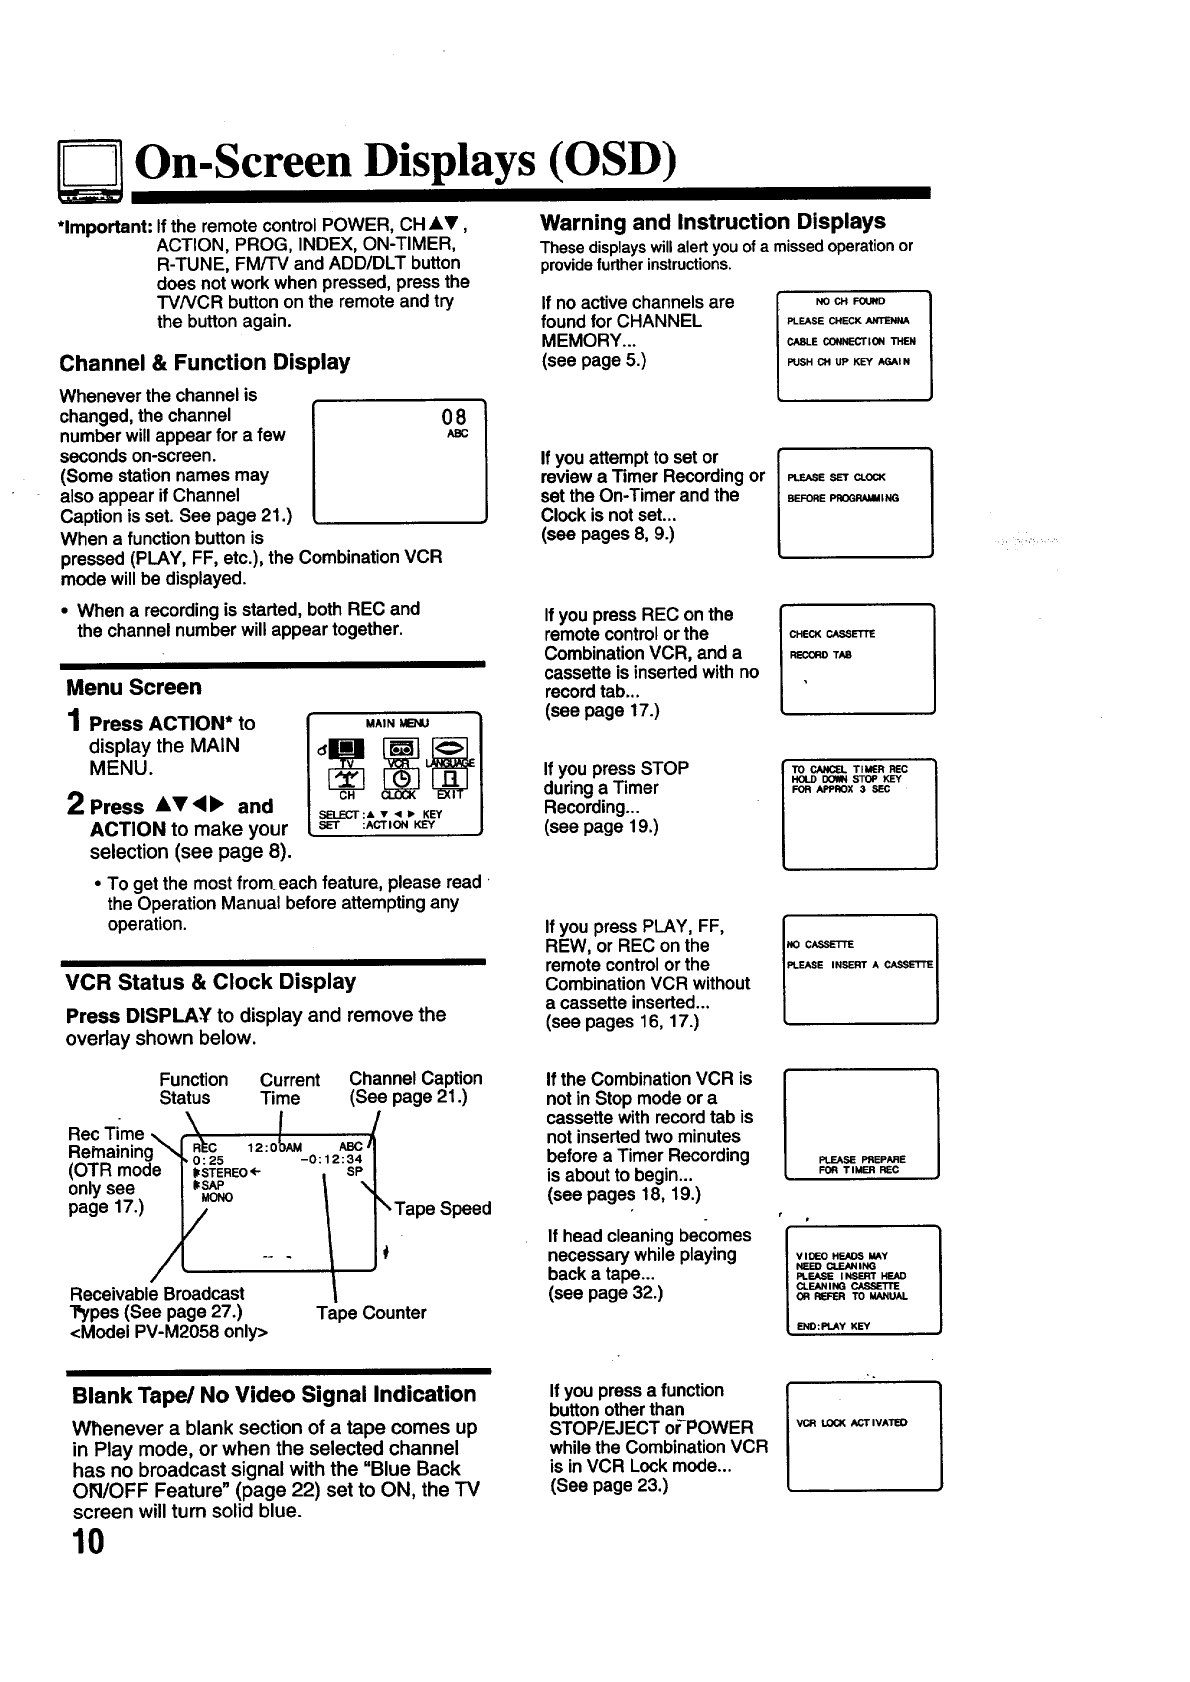
On-Screen Displays (OSD)
*Important: If the remote controlPOWER, CH AV,
ACTION, PROG, INDEX, ON-TIMER,
R-TUNE, FM/TV andADD/DLT button
doesnotworkwhenpressed,pressthe
TVNCR buttonon the remoteandtry
the buttonagain.
Channel & Function Display
Wheneverthe channelis
changed,the channel
numberwillappear for afew
secondson-screen.
(Some stationnamesmay
alsoappearif Channel
Captionis set. See page21.)
When a function buttonis
pressed(PLAY, FF, etc.), the CombinationVCR
modewillbe displayed.
• When a recordingisstarted,both REC and
the channelnumberwillappear together.
08
ABC
Menu Screen
1 Press ACTION* to
display the MAIN
MENU.
2PressA_'<I_ and
ACTION to make your
selection (see page 8).
•To get the mostfromeach feature,pleaseread
the OperationManual beforeattemptingany
operation.
VCR Status & Clock Display
Press DISPLAY to display and remove the
overlay shown below.
Warning and Instruction Displays
Thesedisplayswillalertyouofa missedoperationor
provide furtherinstructions.
If no active channels are
found for CHANNEL
MEMORY...
(see page 5.) l NO CH FOUND
PLEASE CHECK ANTENNA
CABLE CONNECTION THEN
PUSH CH UP KEY AGAIN
If youattemptto set or
reviewa Timer Recordingor
setthe On-Timer andthe
Clockis notset...
(see pages8, 9.)
PLEASE SET CLOCK
BEFORE PROGRAMMING
If youpressREC on the
remotecontrolorthe
CombinationVCR, and a
cassetteis insertedwithno
recordtab...
(see page 17.)
CHECK CASSETTE
RB3ORD TAB
If you pressSTOP
duringa Timer
Recording...
(seepage 19.)
TO CANCEL TIBER REC
HOLD D(TtlN STOP KEY
FOR APPROX 3 SEC
If youpress PLAY, FF,
REW, or REC onthe
remotecontrolor the
CombinationVCR without
a cassetteinserted...
(seepages 16, 17.)
pLEAsNOCASSETTE
E INSERT A CASSE'I-_
Function
Status
Rec T;me. ,_, /
R=f-naininn_1 REC 12:0"OAM ABC t
, 'A_"_ _, _P O: 25 -0:12:34
(,U/H mooe IttSTEREO<- SP
onlysee l Ls_-, \
page 17 )IF
/4 V-- _
ReceivableBroadcast
Pypes (See page27.)
<ModelPV-M2058 only>
Current ChannelCaption
Time (See page21.)
r
\Tape Speed
Ta )e Counter
Blank Tape/No Video Signal Indication
Whenever a blank section of atape comes up
in Play mode, or when the selected channel
has no broadcast signal with the "Blue Back
OR/OFF Feature" (page 22) set to ON, the TV
screen will turn solid blue.
10
If the CombinationVCR is
notinStopmodeora
cassettewithrecordtab is
notinsertedtwominutes
beforea Timer Recording
is aboutto begin...
(see pages18, 19.)
If headcleaningbecomes
necessarywhileplaying
backa tape...
(see page32.)
If you press a function
button other than
STOP/EJECT oP-POWER
while the Combination VCR
is in VCR Lock mode...
(See page 23.)
PLEASE PREPARE
FOR TIMER REC
r
IIDEO HEADS MAY
NEED CLEANING
PLEASE INSERT HEAD
CLEANING CASSETTE
OR REFER TO MANUAL
END:PLAY KEY
VCR LOCK ACTIVATED
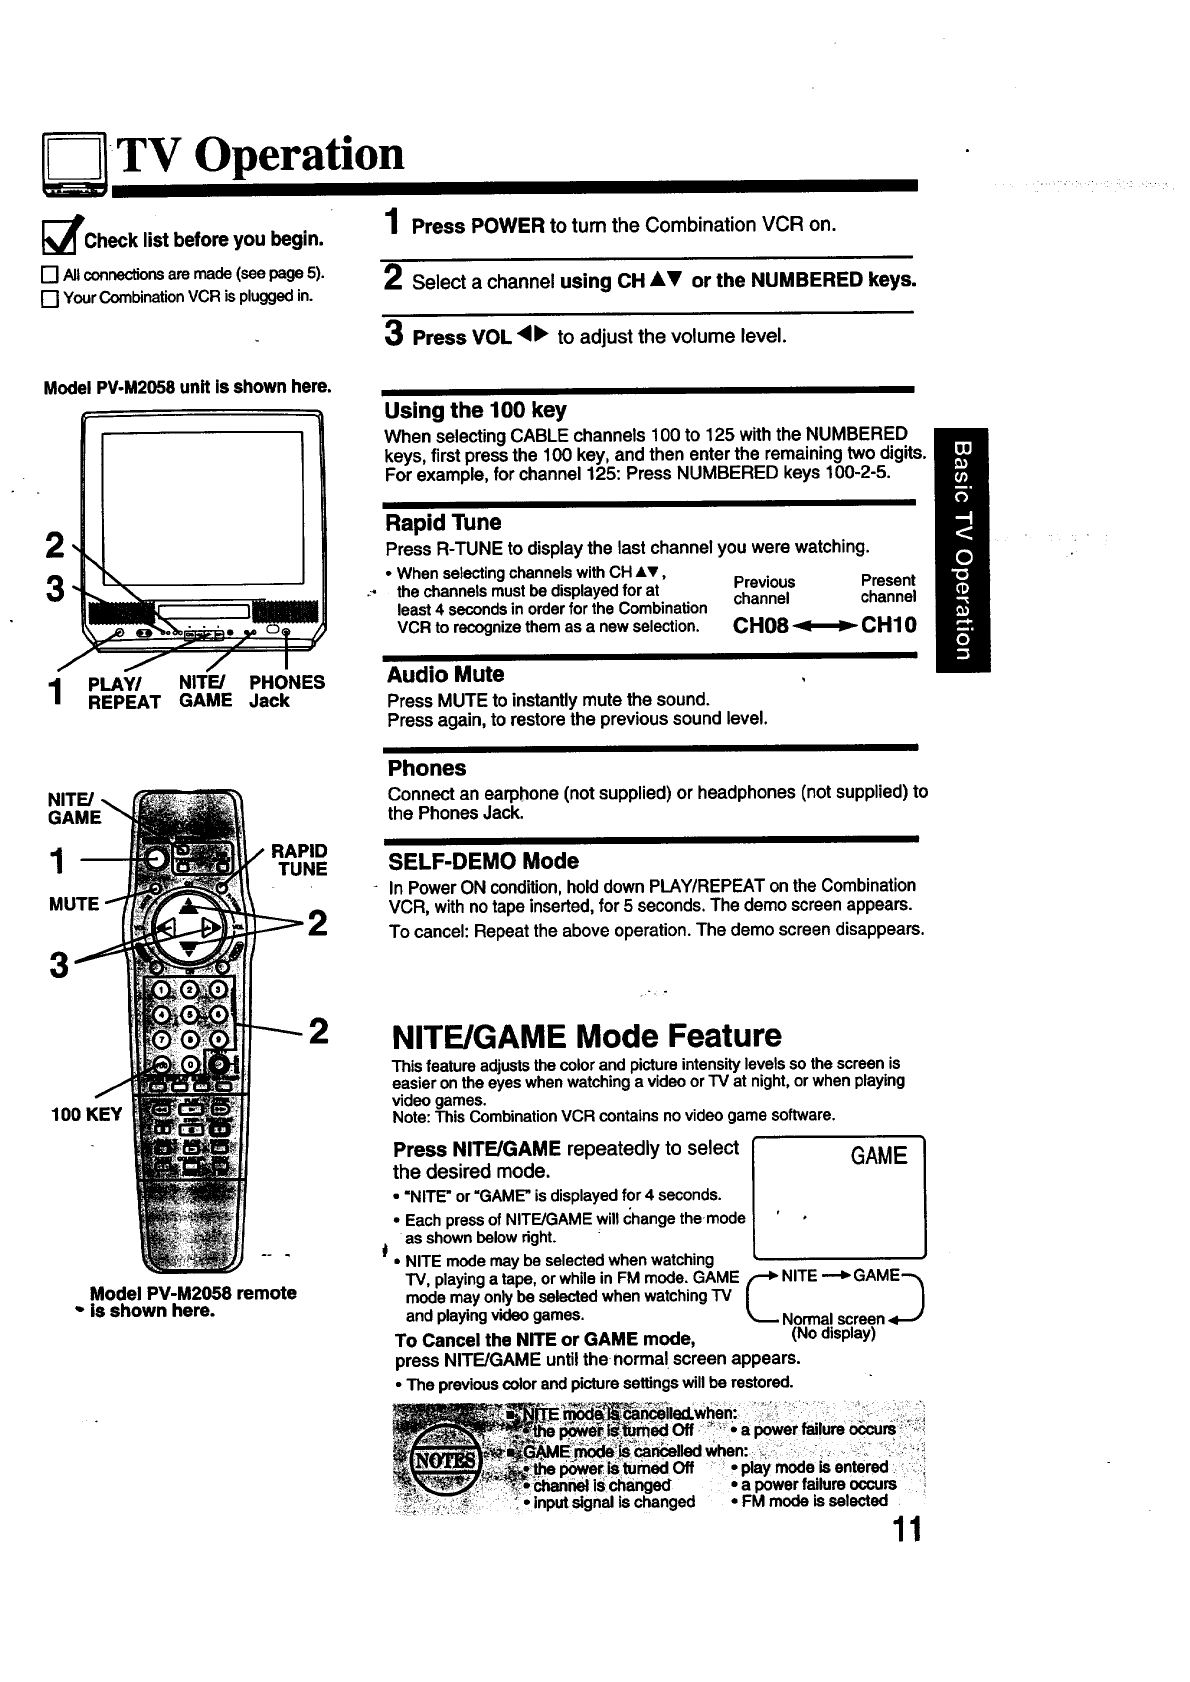
Operation
l_PCheck list before you begin.
[] Allconnections are made (see page 5).
[] Your Combination VCR is plugged in.
1Press POWER to tum the Combination VCR on.
2Select a channel using CH AV or the NUMBERED keys.
3PressVOL'"toadjust the volume level.
Model PV-M2058 unit is shown here.
2
3
Using the 100 key
When selecting CABLE channels 100 to 125 with the NUMBERED
keys, first press the 100 key, and then enter the remaining two digits.
For example, for channel 125: Press NUMBERED keys 100-2-5.
Rapid Tune
Press R-TUNE to display the last channel you were watching.
•When selecting channels with CH AV, Previous Present
the channels must be displayed for at channel channel
least 4 seconds in order for the Combination
VCR to recognize them as a new selection. CH08 _CH10
-11 PLAW NITE/ PHONES
/REPEAT GAME Jack
Audio Mute
Press MUTE to instantly mute the sound.
Press again, to restore the previous sound level.
NITE/
1RAPID
TUNE
MUTE
3
100 KEY
Model PV-M2058 remote
"is shown here.
2
2
Phones
Connect an earphone (not supplied) or headphones (not supplied) to
the Phones Jack.
SELF-DEMO Mode
In Power ON condition, hold down PLAY/REPEAT on the Combination
VCR, with no tape inserted, for 5 seconds. The demo screen appears.
To cancel: Repeat the above operation. The demo screen disappears.
NITE/GAME Mode Feature
This feature adjusts the color and picture intensity levels so the screen is
easier on the eyes when watching a video or TV at night, or when playing
video games.
Note: This Combination VCR contains no video game software.
Press NITE/GAME repeatedly to select GAME
the desired mode.
• "NITE- or =GAME" is displayed for 4 seconds.
•Each press of NITE/GAME will change themode 0
as shown below right.
•NITE mode may be selected when watching
TV, playing a tape, or while in FM mode. GAME FI_NITE ---I_ GAME-_
mode may only be selected when watching TV !!
and playing video games. _Normal screen <--J
To Cancel the NITE or GAME mode, (No display)
press NITF_JGAME until the norma! screen appears.
•The previous color and picture settings will be restored.
• play mode is entered _ :--;i
• a power failure occurs !
_• input signal is changed • FM mode is selected 11
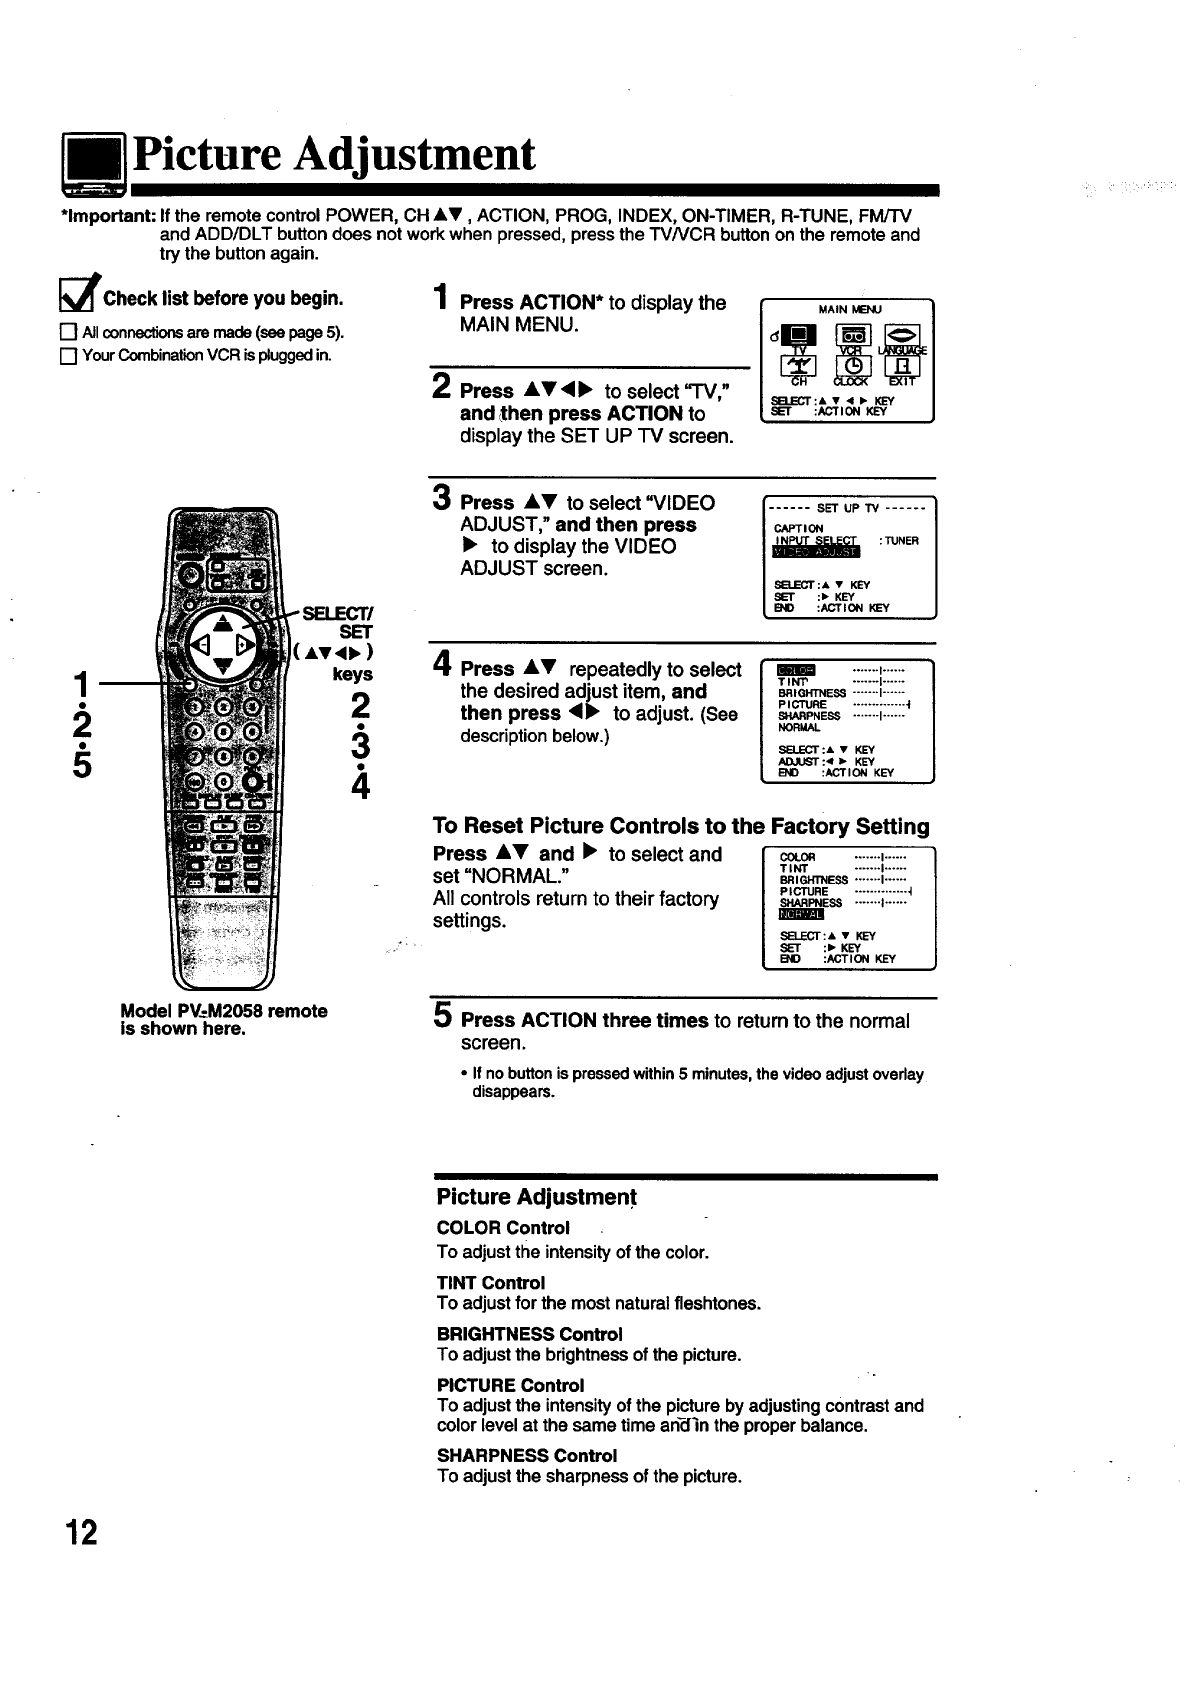
Picture Adjustment
*Important: If the remote control POWER, CH &V, ACTION, PROG, INDEX, ON-TIMER, R-TUNE, FM/TV
and ADD/DLT button does not work when pressed, press the TVNCR button on the remote and
try the button again.
I_Check list before you begin.
[] Allconnectionsaremade(seepage5).
[] YourCombinationVCR ispluggedin.
4
! Press ACTION* to display the
MAIN MENU.
2Press At • • to select "I'V,"
and then press ACTION to
display the SET UP TV screen.
i
2
SET
Av4_ )
keys
2
3Press &V to select "VIDEO
ADJUST," and then press
•to display the VIDEO
ADJUST screen.
...... SET UP 1_/ ......
CAPTION
INPUT SELECT : TUNER
SBJEC'r Av: KEY
SET :1_ KEY
END :ACTION KEY
4Press AT repeatedly to select
the desired adjust item, and
then press •• to adjust. (See
descriptionbelow.)
TINT' ....... I......
BRIGHTNESS ....... I......
PICTURE .............. "1
SHARPNESS ....... I......
NORMAL
SELECT:& •KEY
_:._1 I_ KEY
END :ACTION KEY
To Reset Picture Controls to the Factory Setting
Press &V and •to select and coLON .......,......
set "NORMAL." t,nt ......._......
BRIGHTNESS ....... I......
All controls return to their factory _eSSP'cTu"E.....................,......_
settings. I
_:A • KEY
SET :I_ KEY
END ;ACTiON KEY
Model PV-M2058 remote
Is shown here. O Press ACTION three times to return to the normal
screen.
• If nobuttonis pressedwithin5 minutes,thevideoadjustoveday
disappears.
Picture Adjustment
COLOR Control
To adjust the intensity of the color.
TINT Control
To adjust for the most natural fleshtones.
BRIGHTNESS Control
To adjust the brightness of the picture.
PICTURE Control
To adjust the intensity of the picture by adjusting contrast and
color level at the same time andln the proper balance.
SHARPNESS Control
To adjust the sharpness of the picture.
12
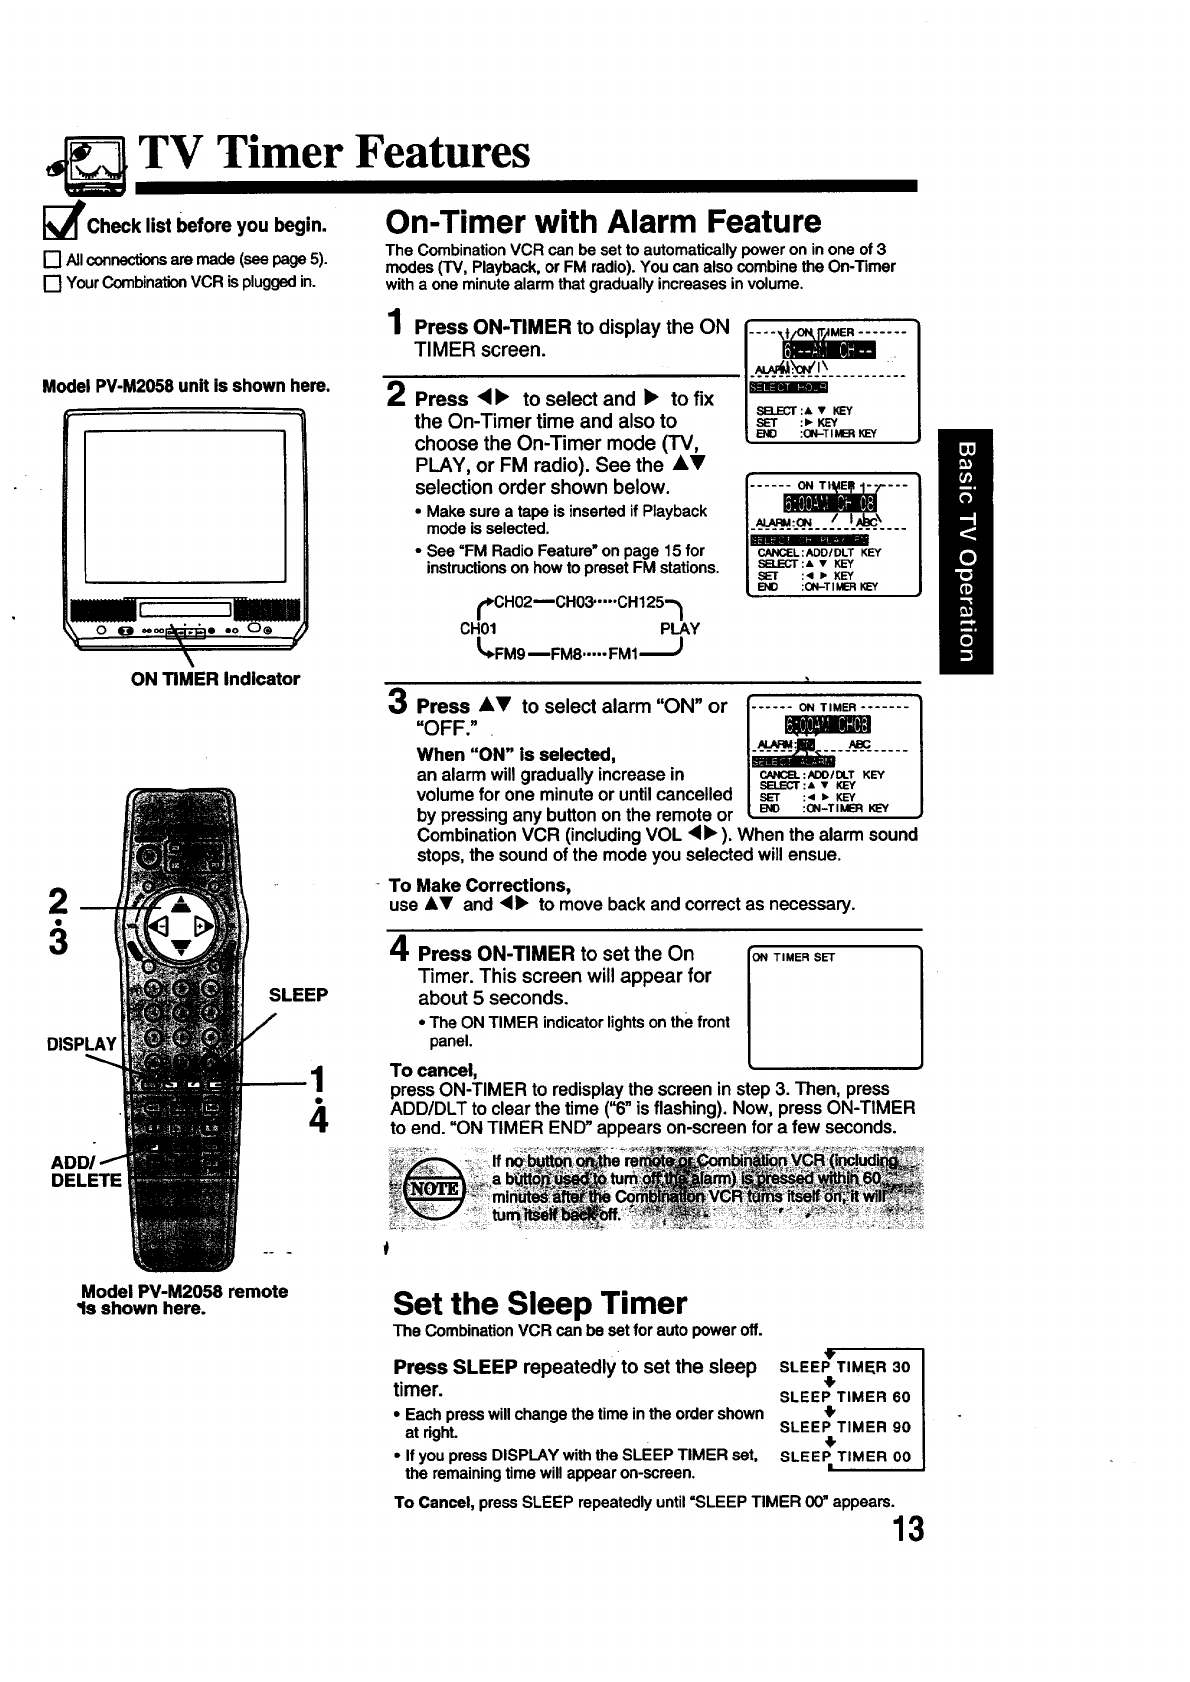
TV Timer Features
I_'Check list before you begin. On-Timer with Alarm Feature
The CombinationVCR can be setto automaticallypoweron inone of 3
[] Allconnectionsaremade(seepage5). modes(TV, Playback,or FM radio).You can alsocombinethe On-Timer
[] YourCombinationVCR is pluggedin. witha one minutealarmthat graduallyincreasesin volume.
Model PV-M2058 unit is shown here. m_
ON TIMER Indicator
.2
3
DISPLA_
SLEEP
,4
/ Press ON-TIMER to display the ON
TIMER screen.
2Press •• to select and •to fix
the On-Timer time and also to
choose the On-Timer mode (TV,
PLAY, or FM radio). See the AV
selection order shown below.
• Makesurea tape is insertedifPlayback
modeisselected.
•See =FMRadioFeature"on page 15 for
instructionson howto presetFM stations.
_'CH02_CH03"-'-'CH125-_
CH01 PLAY
_'FM9--FM8 ..... FM1'_)
__,uG._Yt\
SBJECT :,k VKEY
SET :)'KEY
END :ON.-TIMB_
ALARM_" "-
CANCEL: ADD/DLT KEY
SB.ECT :& vKEY
SET :4 =. KEY
END :0N-T 114B:I
3Press AV to select alarm "ON" or
"OFF."
When "ON" is selected,
an alarm will gradually increase in
volume for one minute or until cancelled
by pressing any button on the remote or
Combination VCR (including VOL <1_ ). When the alarm sound
stops, the sound of the mode you selected will ensue.
CANCEL :ADD/DLT KEY
SELECT :& VKEY
SET :4 _" KEY
END :ON-TIMER KEY
To Make Corrections,
use AT and <, to move back and correct as necessary.
Press ON-TIMER to set the On
Timer. This screen will appear for
about 5 seconds.
•The ON TIMER indicatorlightsonthefront
panel.
To cancel,
ON TIMER SET
pressON-TIMER to redisplaythe screenin step3. Then, press
ADD/DLTto clearthe time ("6"isflashing). Now, pressON-TIMER
to end. =ONTIMER END"appearson-screenfor afew seconds.
DELETE
Model PV-M2058 remote
Is shown here. Set the Sleep Timer
The Combination VCR can be set for auto power off.
Press SLEEP repeatedly to set the sleep
timer.
•Eachpresswillchangethetime intheordershown
at dghL
•IfyoupressDISPLAYwiththe SLEEPTIMER set.
the remainingtimewillappearon-screen.
t
SLEEP TIME, R 30
,I,
SLEEP TIMER 60
SLEEP TIMER 90
,I,
SLEEP TIMER 00
I
To Cancel, press SLEEP repeatedly until =SLEEP TIMER Off' appears. 13
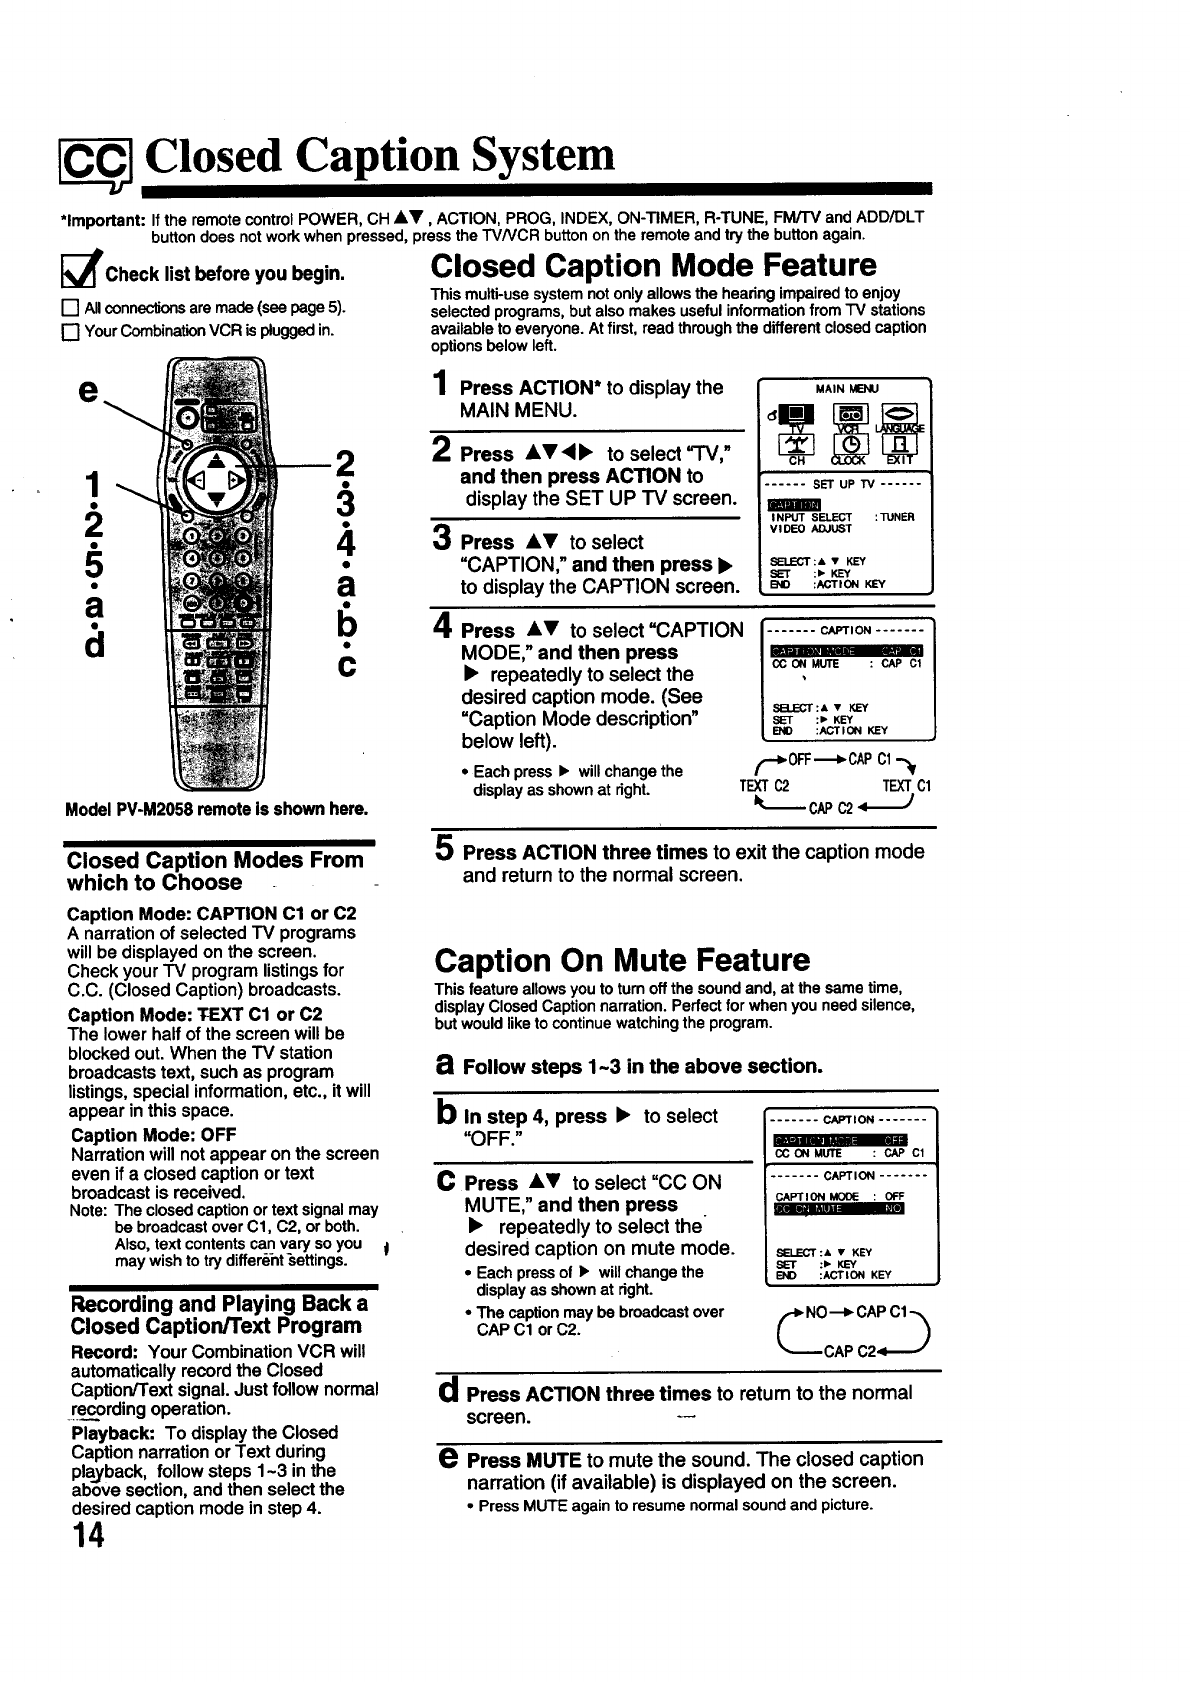
Closed Caption System
[] Allconnectionsare made (see page 5).
[] Your Combination VCR is plugged in.
*Important: If the remote control POWER, CH AV, ACTION, PROG, INDEX, ON-TIMER, R-TUNE, FM/TV and ADD/DLT
buttondoesnotworkwhenpressed,presstheTVNCRbuttonontheremoteandtrythebuttonagain.
_Check list before you begin. Closed Caption Mode Feature
Thismulti-usesystemnotonlyallowsthehearingimpairedto enjoy
selectedprograms,butalsomakesusefulinformationfrom"IVstations
availabletoeveryone.Atfirst,readthroughthedifferentclosedcaption
optionsbelowleft.
e
!
2
5
a
d
1 Press ACTION* to display the
MAIN MENU.
2Press &_l'4• to select=l'V,"
3
a
bmlm
C
Model PV-M2058 remote is shown here.
and then press ACTION to
display the SET UP TV screen.
Press &T to select
=CAPTION," and then press •
to display the CAPTION screen.
MAIN MENU
...... SET UP TV ......
=mnm
INPUT SELECT :TUNER
VIDEO ADJUST
SELECT :& V KEY
SET :_ KEY
BID :ACTION KEY
4Press AT to select =CAPTION
MODE," and then press
•repeatedly to select the
desired caption mode. (See
=Caption Mode description"
below left).
• Each press •will change the
display as shown at right.
....... CAPTION .......
CC ON MUTE : CAP Cl
SELECT :& VKEY
SL=T :1_ KEY
END :ACTION KEY
(--_OFF._CAP C1-_
TEXTC2 TEXTC1
"-_- cAPc2- _)
Closed Caption Modes From
which to Choose
5 Press ACTION three times to exit the caption mode
and returnto the normal screen.
Caption Mode: CAPTION Cl or C2
A narrationof selectedTV programs
willbe displayedonthe screen.
Checkyour"IV programlistingsfor
C.C. (ClosedCaption)broadcasts.
Caption Mode: TEXT Cl or C2
The lowerhalfof the screenwillbe
blockedout.When the TV station
broadcaststext, suchas program
listings,specialinformation,etc., itwill
appearinthisspace.
Caption Mode: OFF
Narrationwill notappear onthe screen
even if a closedcaptionortext
broadcastis received.
Note:Theclosedcaptionortextsignalmay
bebroadcastoverC1,C2,orboth.
Also, textcontentscanvarysoyou j
maywishto try differ_ht _ettings.
m W liBIH _. m
Recording and Playing Back a
Closed Caption/Text Program
Record: Your Combination VCR will
automatically record the Closed
Caption/Text signal. Just follow normal
re_ording operation.
Playback: To display the Closed
Caption narration or Text during
playback, follow steps 1-3 in the
above section, and then select the
desired caption mode in step 4.
14
Caption On Mute Feature
This feature allowsyouto turnoffthesoundand, atthe sametime,
displayClosedCaptionnarration.Perfectfor whenyouneed silence,
butwouldliketo continuewatchingtheprogram.
aFollow steps 1-3 in the above section.
bIn step 4, press •to select
"OFF."
C Press &1' to select =CC ON
MUTE," and then press
•repeatedly to select the
desired caption on mute mode.
•Eachpressof •willchangethe
display as shownatright.
•Thecaptionmaybebroadcastover
CAPC1 orC2.
....... CAPTION .......
CC ON MUTIE : CAP Cl
....... CAPTION .......
CAPTION MODE : OFF
SELECT :& •KEY
SET :_ KEY
END :ACTION KEY
J
qPress ACTION three times to retum to the normal
screen.
ePress MUTE to mute the sound. The closed caption
narration (if available) is displayed on the screen.
•Press MUTE again to resume normal sound and picture.
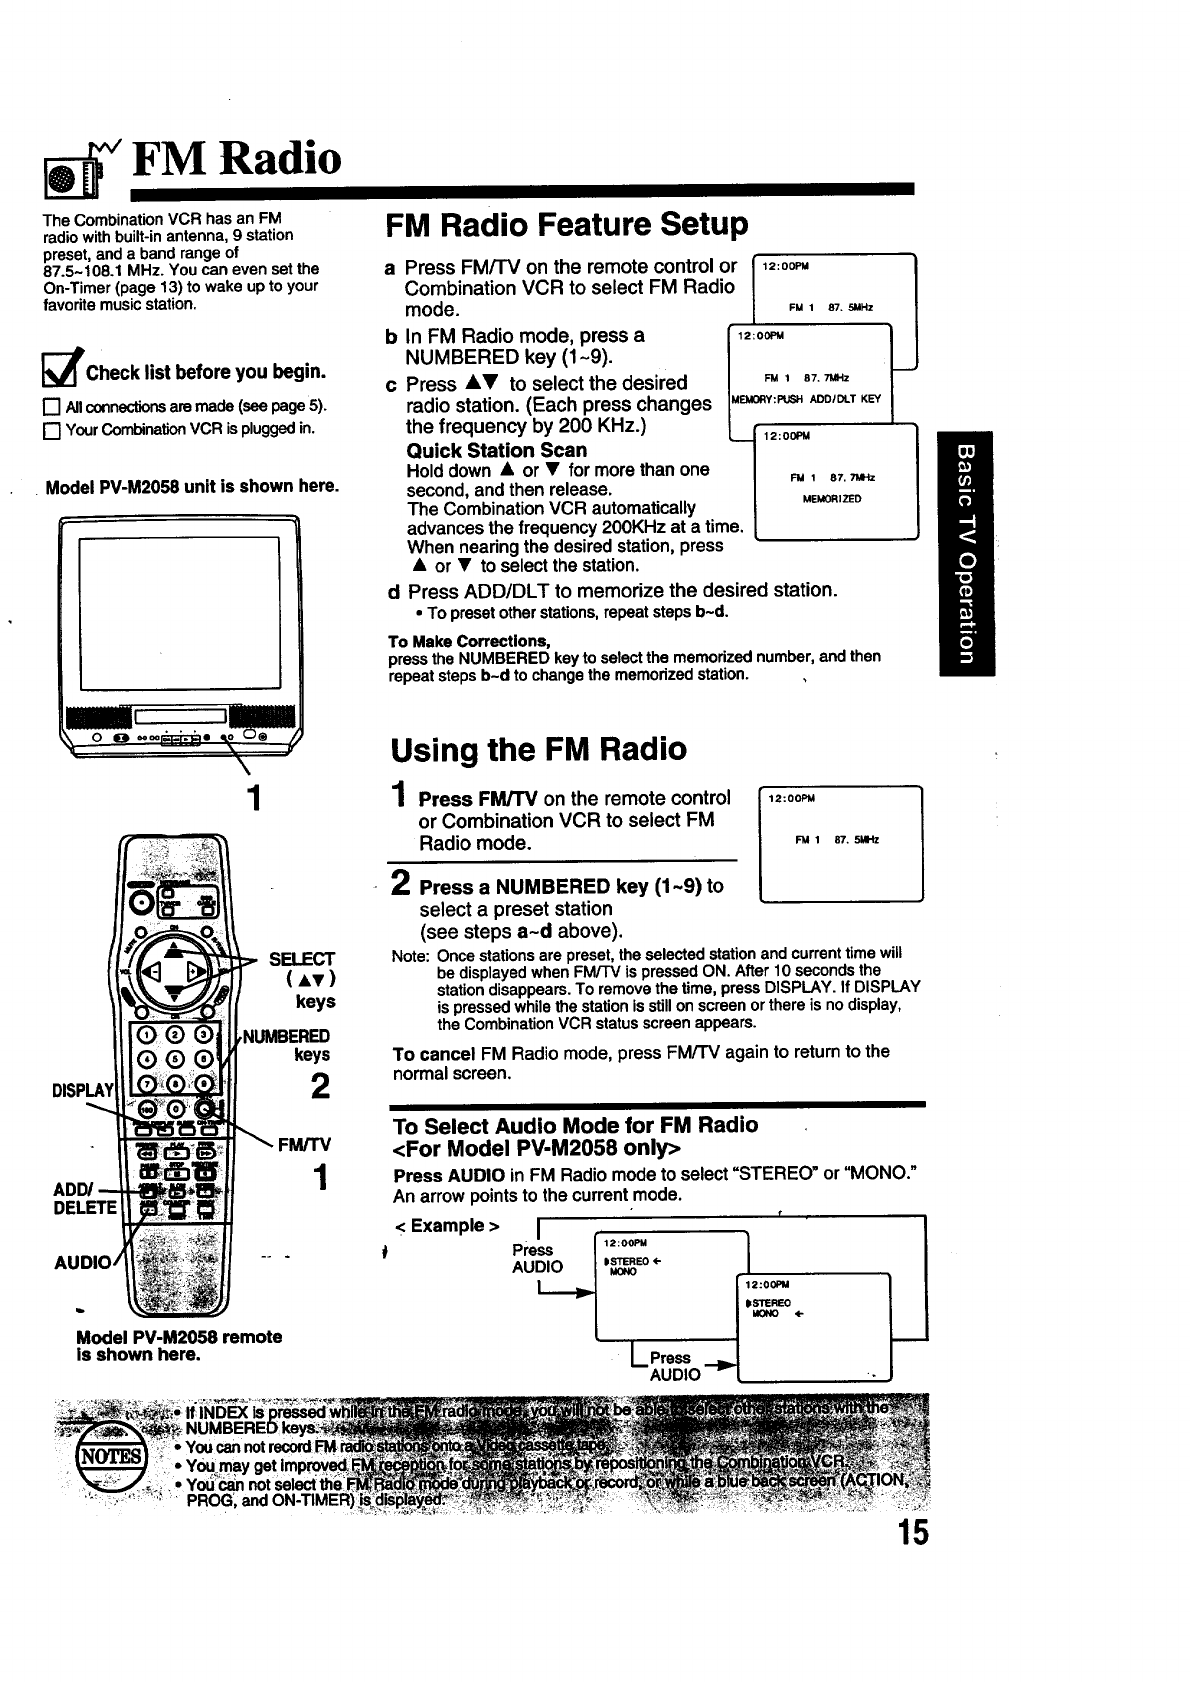
FM Radio
The Combination VCR has an FM
radio with built-in antenna, 9 station
preset, and a band range of
87.5-108.1 MHz. You can even set the
On-Timer (page 13) to wake up to your
favorite music station.
_Check list before you begin.
[] Allconnectionsaremade(seepage5).
[] Your Combination VCR is plugged in.
Model PV-M2058 unit is shown here.
FM Radio Feature Setup
DELETE
I I
QQ Q
QQQ
1
a Press FM/TV on the remote control or 1,2:oo_ |
Combination VCR to select FM Radio L
mode. F., 87._,z
b In FM Radio mode, press a [,2:oo_ I
NUMBERED key (1~9). I [
c Press AV to select the desired I _, 8,._ |
radio station. (Each press changes I"_°Rv:Pus",ooJ_.TK_ |
the frequency by 200 KHz.) L._i 12.ooPM /
Quick Station Scan |
Holddown • or • formorethanone / Fu1 87_w
second,andthenrelease /
• . " . MEMORIZED
The CombmatlonVCR automattcally |
advancesthefrequency200KHz at a time. I
When nearingthe desiredstation,press
•or •to selectthe station.
d Press ADD/DLT to memorize the desired station.
• To preset other stations, repeat steps b~d.
To Make Corrections,
press the NUMBERED key to select the memorized number, and then
repeat steps b-d to change the memorized station.
Using the FM Radio
1Press FM/TV on the remote control
or Combination VCR to select FM
Radio mode.
Model PV-M2058 remote
is shown here.
SELECT
(Av)
keys
NUMBERED
keys
2
1
12:00PM
FM 1 87. 5MHz
2Press a NUMBERED key (1-9) to
select a preset station
(see steps a~d above).
Note: Once stations are preset, the selected station and current time will
be displayed when FM/TV is pressed ON. After 10 seconds the
stationdisappears.Toremovethetime,pressDISPLAY.If DISPLAY
ispressedwhilethestationisstillonscreenorthereis nodisplay,
theCombinationVCRstatusscreenappears.
To cancel FM Radiomode,press FM/TV againto returnto the
normalscreen.
To Select Audio Mode for FM Radio
<For Model PV-M2058 only>
Press AUDIO inFM Radiomodeto select=STEREO"or"MONO."
An arrowpointsto the currentmode.
< Example >
Pi;e 12:oopu
AU_.__ jS_'REO_No÷
L Press __.
AUDIO
12:00PM
ISTEREO
MO_O ÷
15
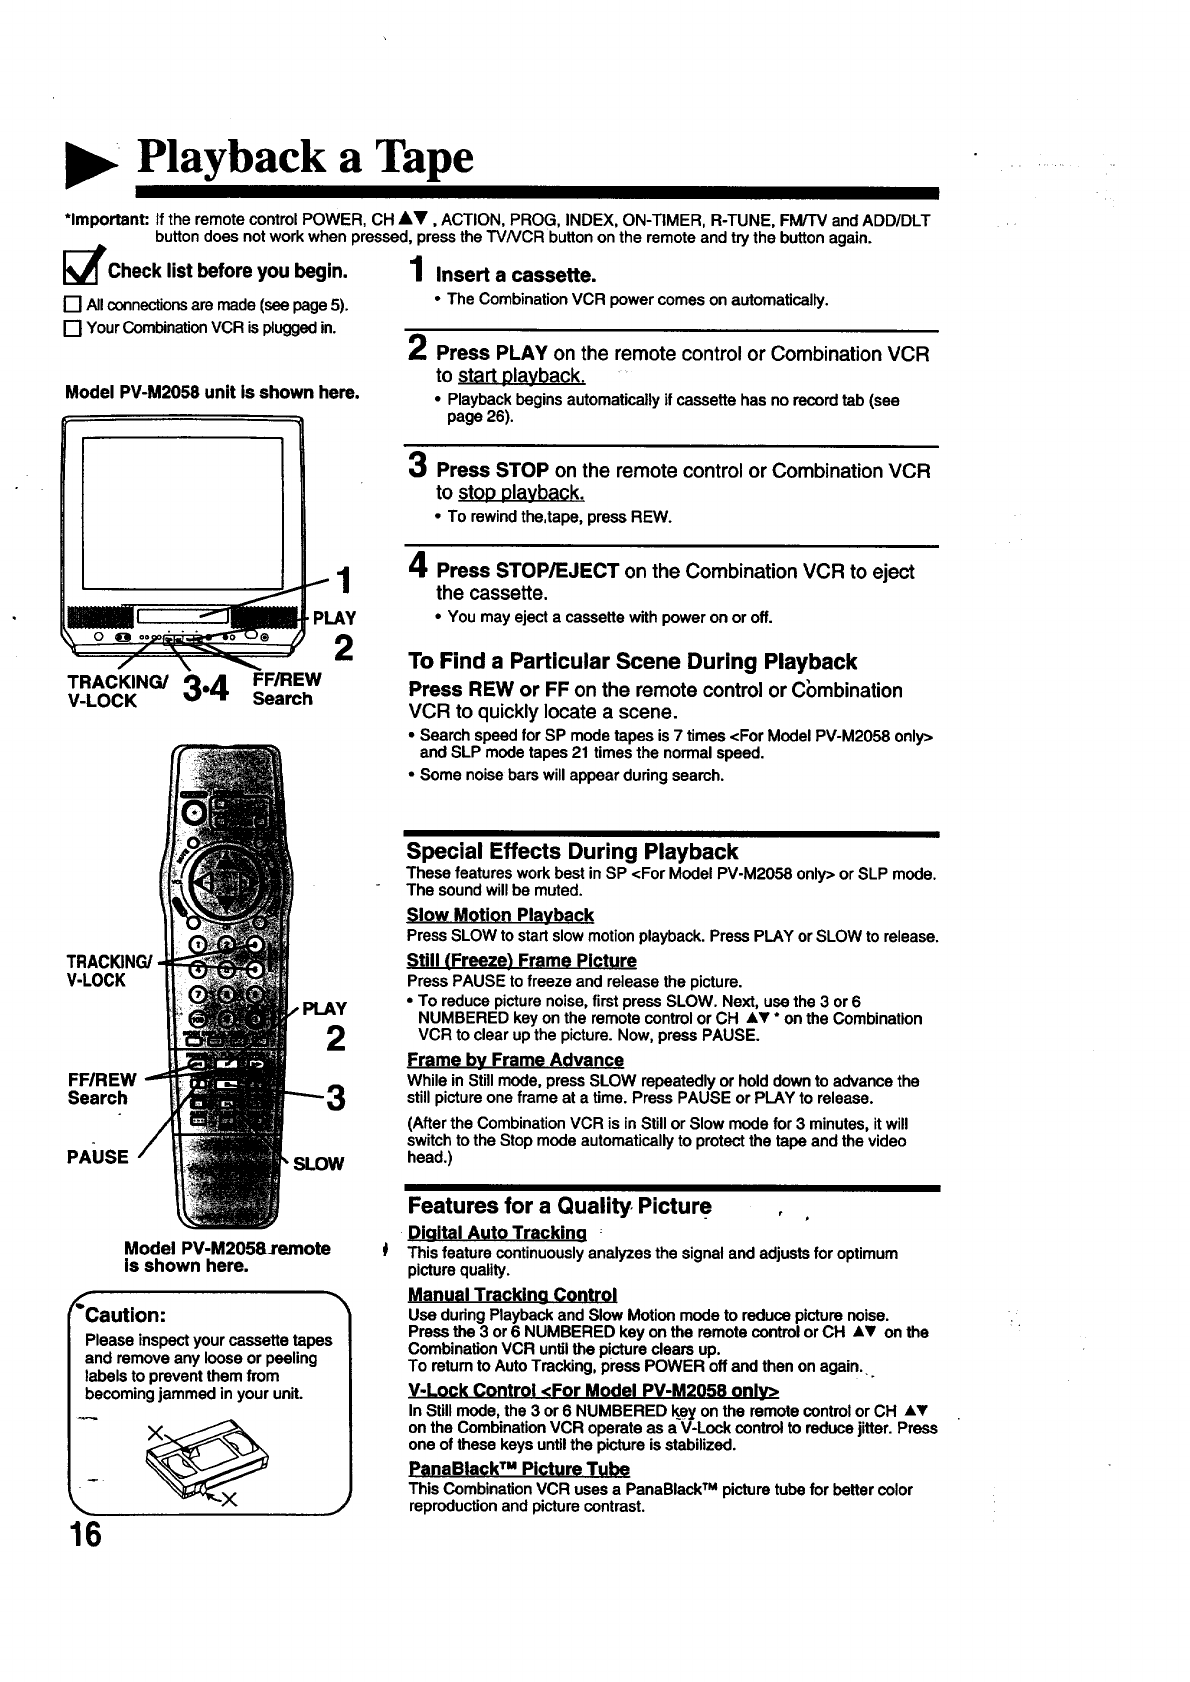
Playback a Tape
*Important: If the remote control POWER, CH &V, ACTION, PROG, INDEX, ON-TIMER, R-TUNE, FM/rV and ADD/DLT
button does not work when pressed, press the TVNCR button on the remote and try the button again.
I_PCheck list before you begin.
[] Allconnectionsare made (see page 5).
[] Your Combination VCR is plugged in.
Model PV-M2058 unit is shown here.
1Insert a cassette.
•The Combination VCR power comes on automatically.
tPress PLAY on the remote control or Combination VCR
to start playback.
•Playback begins automatically if cassette has no record tab (see
page 26).
3Press STOP on the remote control or Combination VCR
to stop playback.
•To rewind the,tape, press REW.
T.ACK,. 3"4
V-LOCK
1
PLAY
2
FF/REW
Search
Press STOP/EJECT on the Combination VCR to eject
the cassette.
•You may eject a cassette with power on or off.
To Find a Particular Scene During Playback
Press REW or FF on the remote control or C_)mbination
VCR to quicklylocate a scene.
• Search speed for SP mode tapes is 7 times <For Model PV-M2058 only>
and SLP mode tapes 21 times the normal speed.
•Some noise bars will appear during search.
TRACKING/
V-LOCK
FFIREW
Search
.PLAY
2
PAUSE •SLOW
Model PV-M2058_remote
is shown here.
_Caution:
Please inspectyourcassettetapes
and removeany looseorpeeling
labelsto preventthemfrom
becomingjammed inyourunit.
16
Special Effects During Playback
These features work best in SP <For Model PV-M2058 only> or SLP mode.
The sound will be muted.
Slow Motion Playback
Press SLOW to start slow motion playback. Press PLAY or SLOW to release.
Still (Freeze_ Frame Picture
Press PAUSE to freeze and release the picture.
•To reduce picture noise, first press SLOW. Next, use the 3 or 6
NUMBERED key on the remote control or CH AV ° on the Combination
VCR to clear up the picture. Now, press PAUSE.
Frame by Frame Advance
While in Still mode, press SLOW repeatedly or hold down to advance the
still picture one frame at a time. Press PAUSE or PLAY to release.
(After the Combination VCR is in Still or Slow mode for 3 minutes, it will
switch to the Stop mode automatically to protect the tape and the video
head.)
Features for a Quality. Picture ,
DiQital Auto Tracking
This feature continuously analyzes the signal and adjusts for optimum
picture quality.
Manual Tracking Control
Use during Playback and Slow Motion mode to reduce picture noise.
Press the 3 or 6 NUMBERED key on the remote control or CH AT on the
Combination VCR until the picture clears up.
To return to Auto Tracking, press POWER off and then on again..
V-Lock Control <For Model PV-M2058 only>
In Still mode, the 3 or 6 NUMBERED k_e¥on the remote control or CH AT
on the Combination VCR operate as a V-Lock control to reduce jitter. Press
one of these keys until the picture is stabilized.
PanaBlackTM Picture T_!_
This Combination VCR uses a PanaBlack TM picture tube for better color
reproduction and picture contrast.
_VCheck list before you begin.
[] Allconnectionsaremade(seepage5).
[] YourCombinalJonVCR ispluggedin.
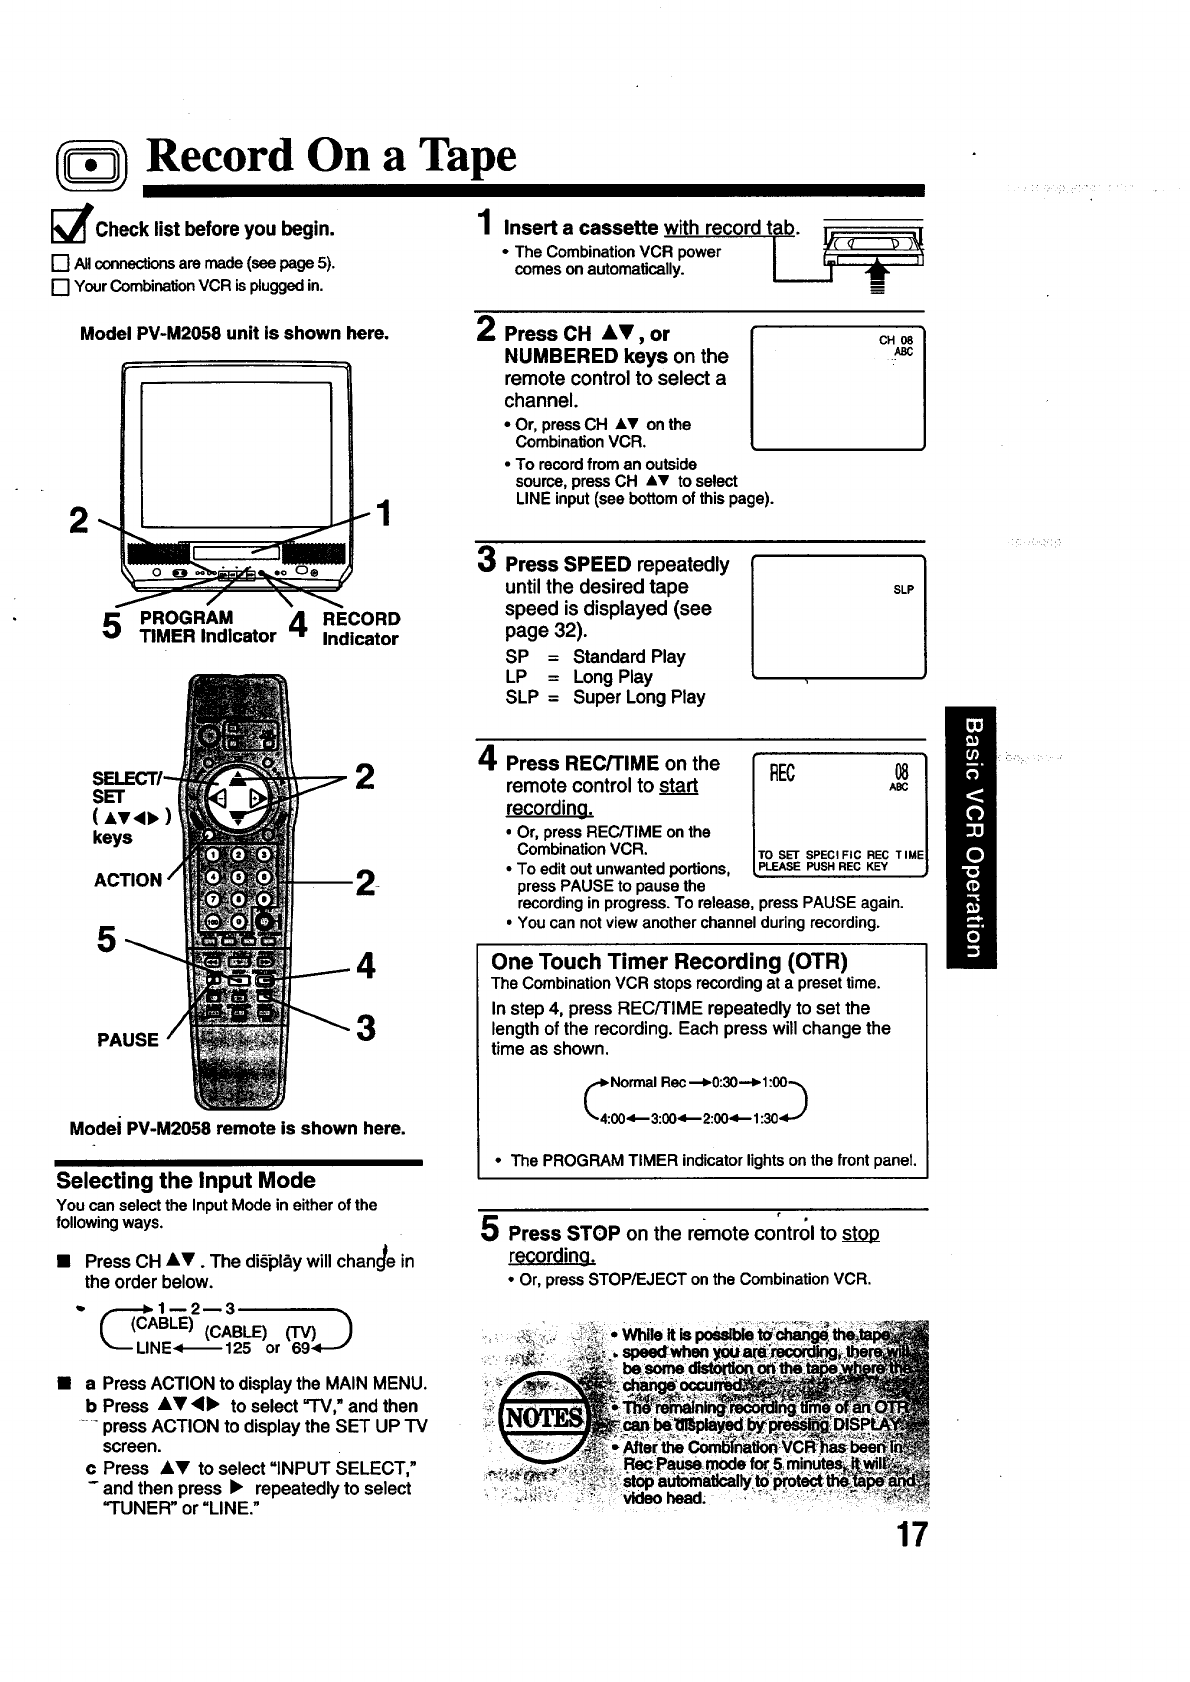
Record On a Tape
1Insert a cassette with record tab. _c=q p A[.
•The CombinationVCR power _.i _
comeson automatically.
Model PV.M2058 unit is shown here.
5 PROGRAM 4RECORD
TIMER Indicator Indicator
SET
(Av<_, )
keys
5
PAUSE
2
4
3
2_
Modei PV-M2058 remote is shown here.
Selecting the Input Mode
Youcanselectthe InputMode ineitherof the
followingways.
•Press CH AY. The di,_pl_ywill chan_e in
the order below.
•, ,,.---_ lm 213
LINE<-_ 125 or
aPressACTIONto displaythe MAINMENU.
b Press &_l'<b" to select=TV,"andthen
....pressACTION to displaythe SET UP -rv
screen.
c Press 4,V to select"INPUT SELECT,"
- andthen press •repeatedlyto select
=TUNER"or"LINE."
2Press CH AV, or
NUMBERED keys on the
remote control to select a
channel.
•Or, pressCH ,LV on the
CombinationVCR.
•To recordfrom an outside
source,pressCH ,Lv to select
LINE input(see bottomof thispage).
CH O8
ASC
3Press SPEED repeatedly
untilthe desired tape
speed is displayed (see
page 32).
SP = StandardPlay
LP = LongPlay
SLP = Super LongPlay
8LP
remote control to start
recording.
•Or, press REC/TIMEon the
CombinationVCR.
• To edit out unwanted portions, _E_ SPECIPuSHREcFICKEyRECTIM
pressPAUSEto pausethe
recordinginprogress.To release,pressPAUSE again.
•Youcannotviewanotherchannelduringrecording.
One Touch Timer Recording (OTR)
TheCombinationVCR stopsrecordingat a presettime.
In step 4, press RECFI'IME repeatedly to set the
length of the recording. Each press will change the
time as shown.
• The PROGRAM TIMER indicator lights on the front panel,
ۥ
5 Press STOP on the remote control to
recording.
•Or, pressSTOP/EJECT onthe CombinationVCR.
17
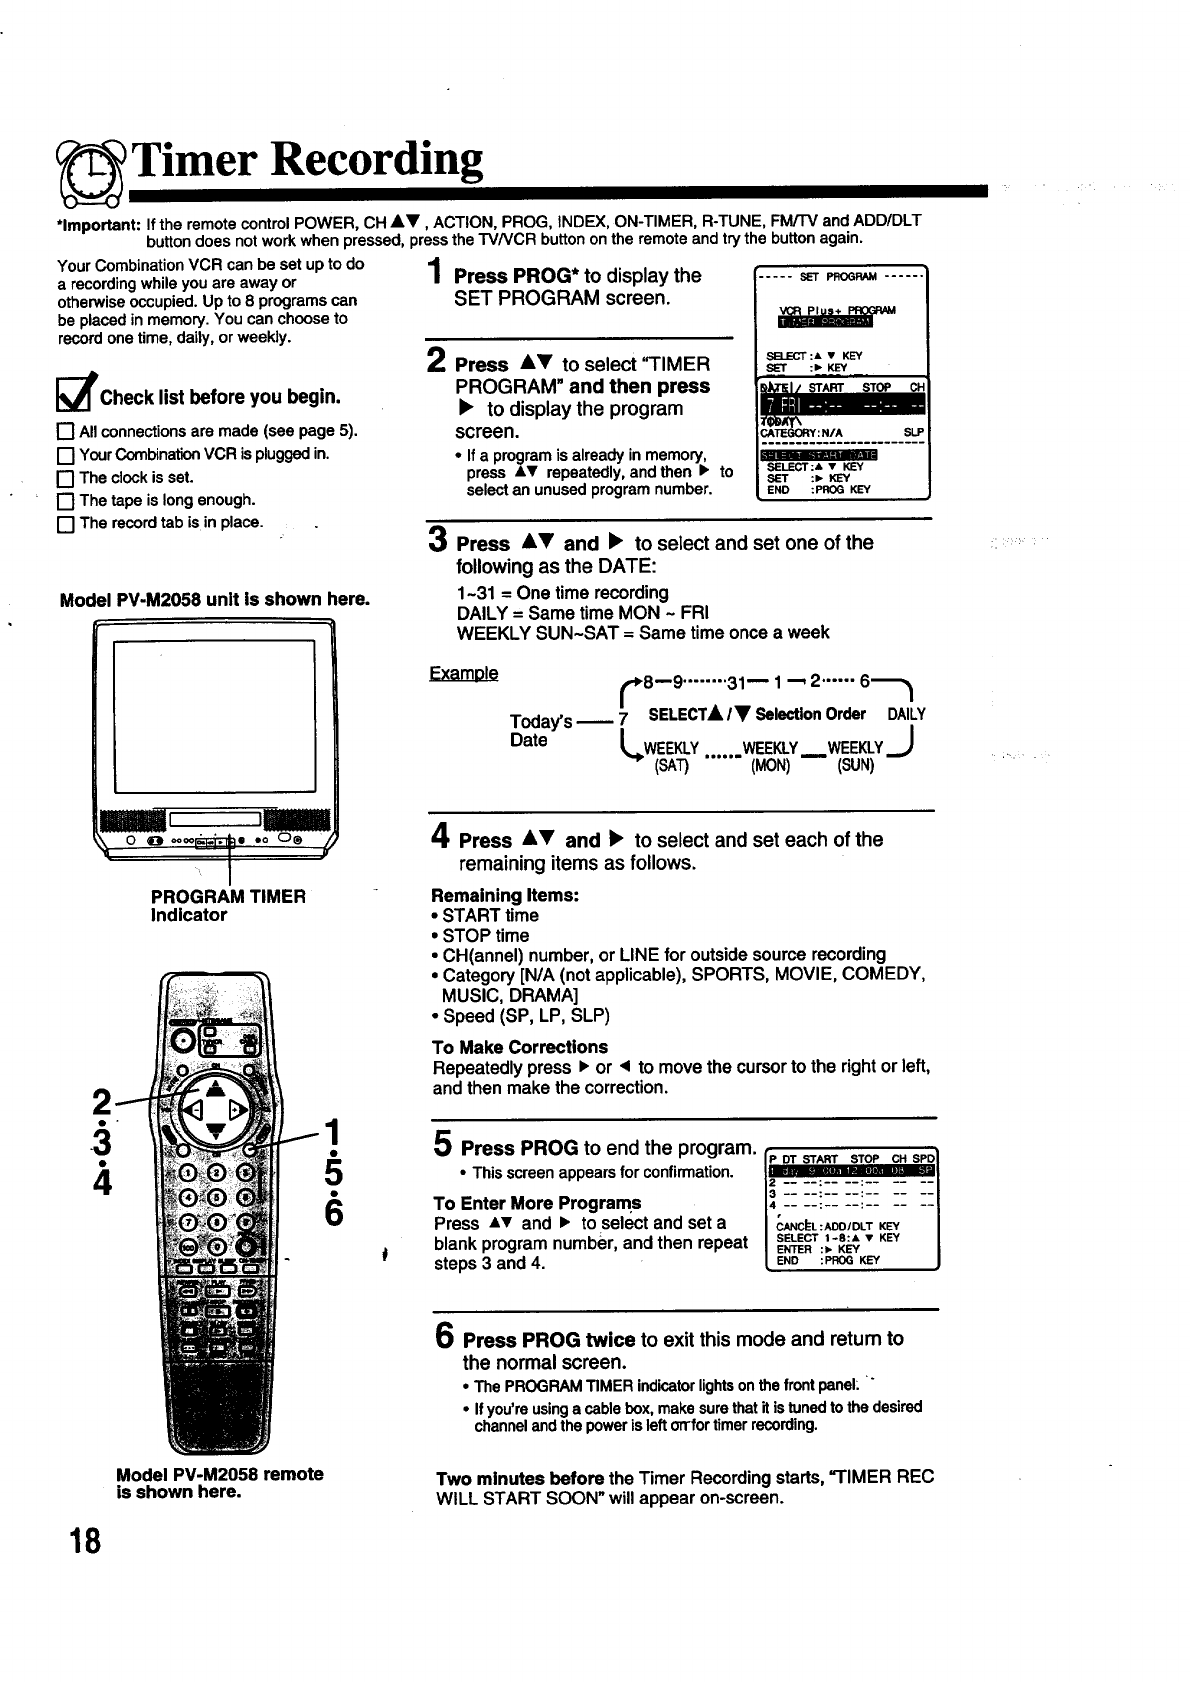
Timer Recording
YourCombinationVCR can be set upto do
a recordingwhileyou are awayor
otherwiseoccupied.Up to 8 programscan
be placedinmemory.Youcan chooseto
recordonetime, daily,or weekly.
*Important: If the remotecontrolPOWER, CH &V, ACTION, PROG,INDEX, ON-TIMER, R-TUNE, FM/TV andADD/DLT
buttondoes notwork whenpressed,pressthe TVNCR buttonon the remoteand trythebuttonagain.
1Press PROG* to display the
SET PROGRAM screen.
I_PCheck list before you begin.
rl Allconnectionsare made(see page 5).
[] YourCombinationVCR ispluggedin.
[] The clockis set.
[] The tape is longenough.
[] The recordtab is inplace.
Model PV-M2058 unit is shown here.
6
iLJl
00.oor_-_-_e eo O®
PROGRAM TIMER
Indicator
2Press &V to select 'q'IMER
PROGRAM" and then press
•to display the program
screen.
• If a programis alreadyinmemory,
press Av repeatedly,and then •to
selectan unusedprogram number.
SET PROGRAM
SELECT:A •KEY
SET :1_ KEY
STOP
SELECT:" •KEY
SET :=, KEY
END :PROG KEY
3Press At and •to select and set one of the
following as the DATE:
1-31 = One time recording
DAILY= Sametime MON - FRI
WEEKLY SUN-SAT = Same timeoncea week
'_8--9 ........ 31-- 1 "-- 2...... 6_,_
Today's-- 7 SELECTA IV SelectionOrder DAILY
Date LWEEKLY WEEKLY WEEKLYJ
-- (SAT) ...... (MON)-- (SUN)
4Press AT and •to select and set each of the
remaining items as follows.
Remaining Items:
•START time
•STOP time
• CH(annel) number, or LINE for outside source recording
•Category [N/A (not applicable), SPORTS, MOVIE, COMEDY,
MUSIC, DRAMA]
•Speed (SP, LP, SLP)
To Make Corrections
Repeatedly press •or < to move the cursor to the right or left,
and then make the correction.
5 Press PROG to end the program.
- This screenappearsfor confirmation. -_-__i!ii--i--ii-t_l
To Enter More Programs
Press Av and • to select and set a I (;ANC_I.:ADO/DLT KEY I
blank program number, and then repeat I SELECT1-8:A•KEY I
| ENTER :1_ KEY |
steps 3 and 4. I ENO :FROGKEY ]
OPress PROG twice to exit this mode and return to
the normal screen.
•The PROGRAMTIMER indicatorlightson thefrontpanel."
•Ifyou'reusinga cablebox,makesurethatitistunedto the desired
channelandthepoweris lefton-fortimerrecording.
Model PV-M2058 remote
is shown here. Two minutes before the Timer Recording starts, =TIMER REC
WILL START SOON" will appear on-screen.
18
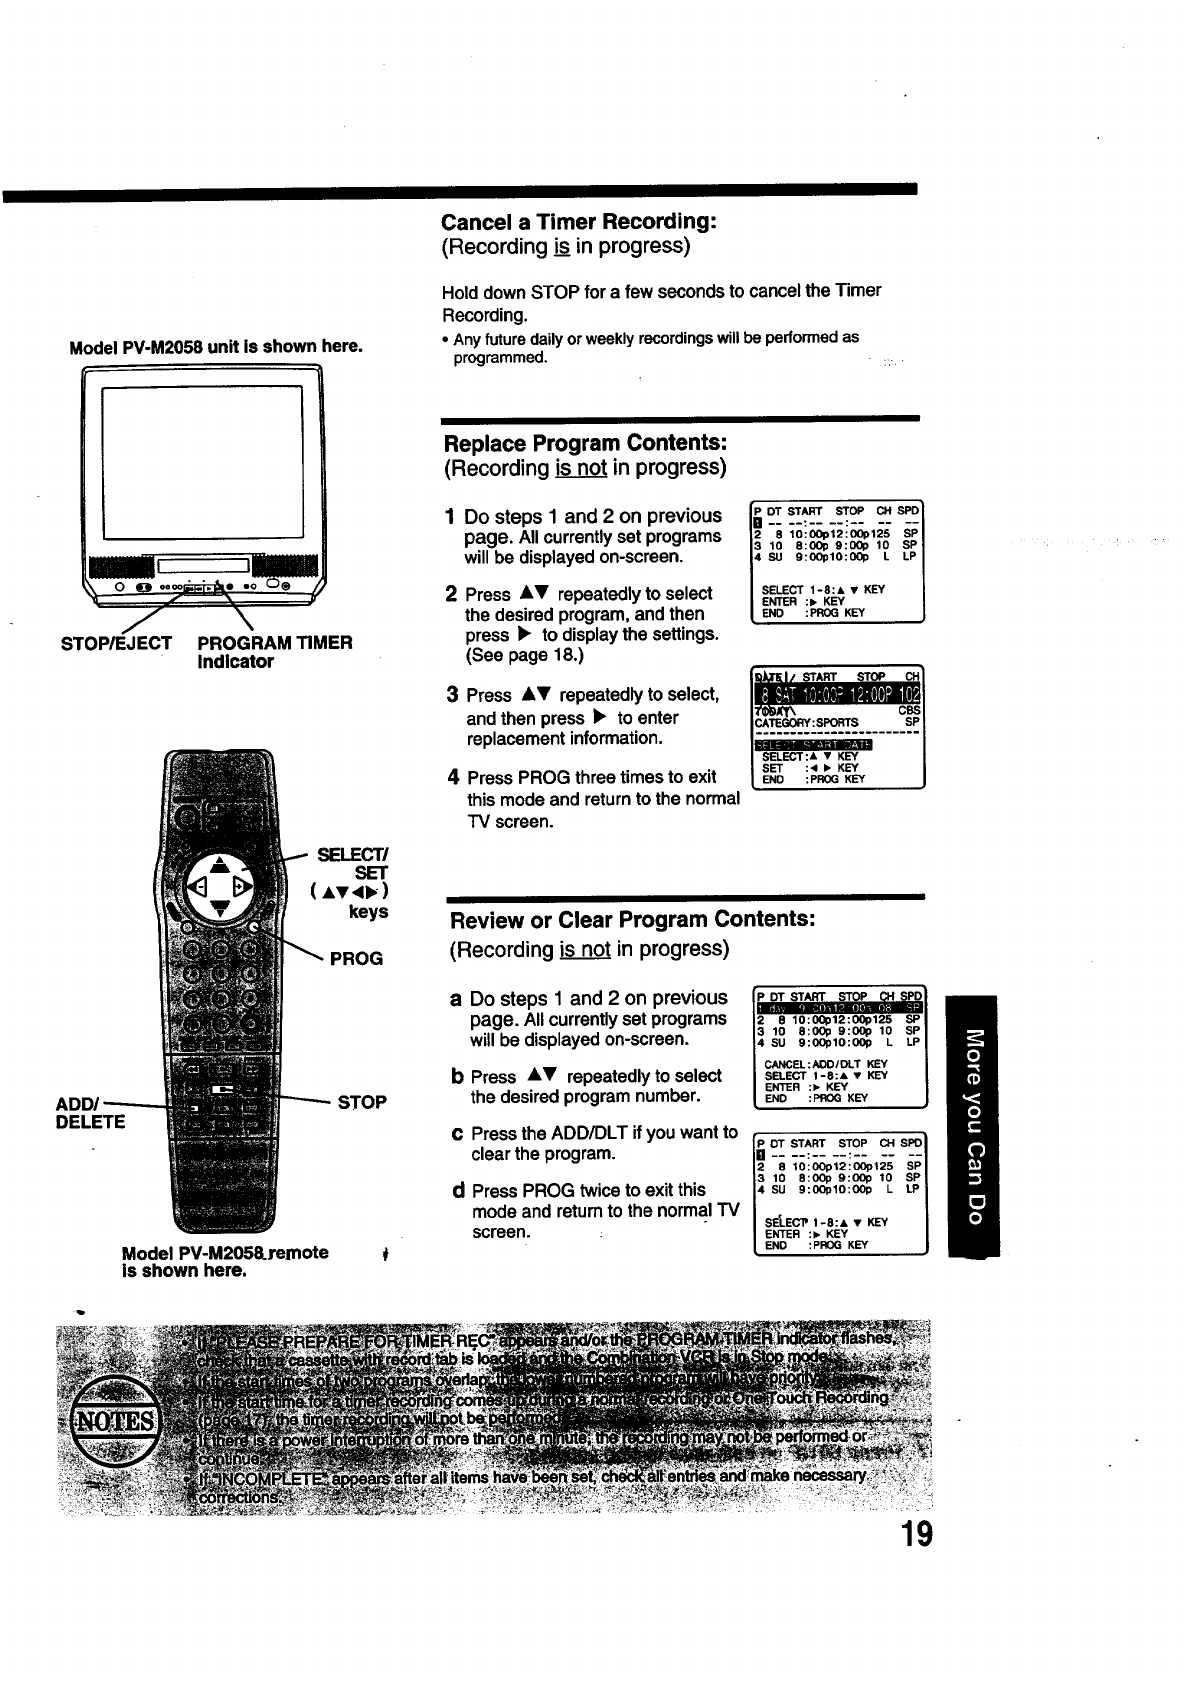
Model PV-M2058 unit is shown here.
I
Cancel a Timer Recording:
(Recording is in progress)
Hold down STOP for afew seconds to cancel the Timer
Recording.
• Anyfuture dailyorweeklyrecordingswillbe performedas
programmed. :_
[]
STOP/EJECT PROGRAM TIMER
Indicator
DELETE
SELECT/
SET
keys
PROG
STOP
Model PV-M205ELremote
is shown here.
Replace Program Contents:
(Recording is no.___.jtin progress)
3
4
Do steps Iand 2 on previous
page. Allcurrentlyset programs
willbe displayedon-screen.
Press AV repeatedlyto select
the desiredprogram,andthen
press•to displaythe settings.
(See page18.)
Press AT repeatedlyto select,
andthenpress •to enter
replacementinformation.
Press PROG three times to exit
this mode and return to the normal
TV screen.
PDT START STOP CH SPD I
2-; ;o::_,;;i_12¥ s;
3 lo s:_ 9:_ lo sP
4 SU 9:00plO:00p L
LP
SELECT 1-8:& •KEY
ENTER :• KEY
END :PROG KEY
SET
END
STOP
:4 •KEY
:PROG KEY
Review or Clear Program Contents:
(Recording is not in progress)
b
Do steps 1and 2on previous
page. All currentlysetprograms
will be displayedon-screen.
Press AV repeatedly to select
the desired program number.
13 lo s:oop9:ooplO sP/
14 SU 9:00plO:OOp L LP|
I CANCEL:ADD/DLT KEY i
I SELECT 1-8:& •KEY /
IENTER :• KEY /
tEND :P_ KEY j
C Pressthe ADD/DLT if youwant to fpOTSTARTSTOPC, SPOI
clearthe program............... la
12 8lO;OOp12;OOp125 SP
|3 10 8:00p 9:00p 10
d PressPROG twiceto exitthis /4 su 9:_1o:_ • s_
modeand returnto the normalTV Ii sE'LEc_1-.:, ,,
screen. I ENTER :• KEY
LEND : PROG KEY
19
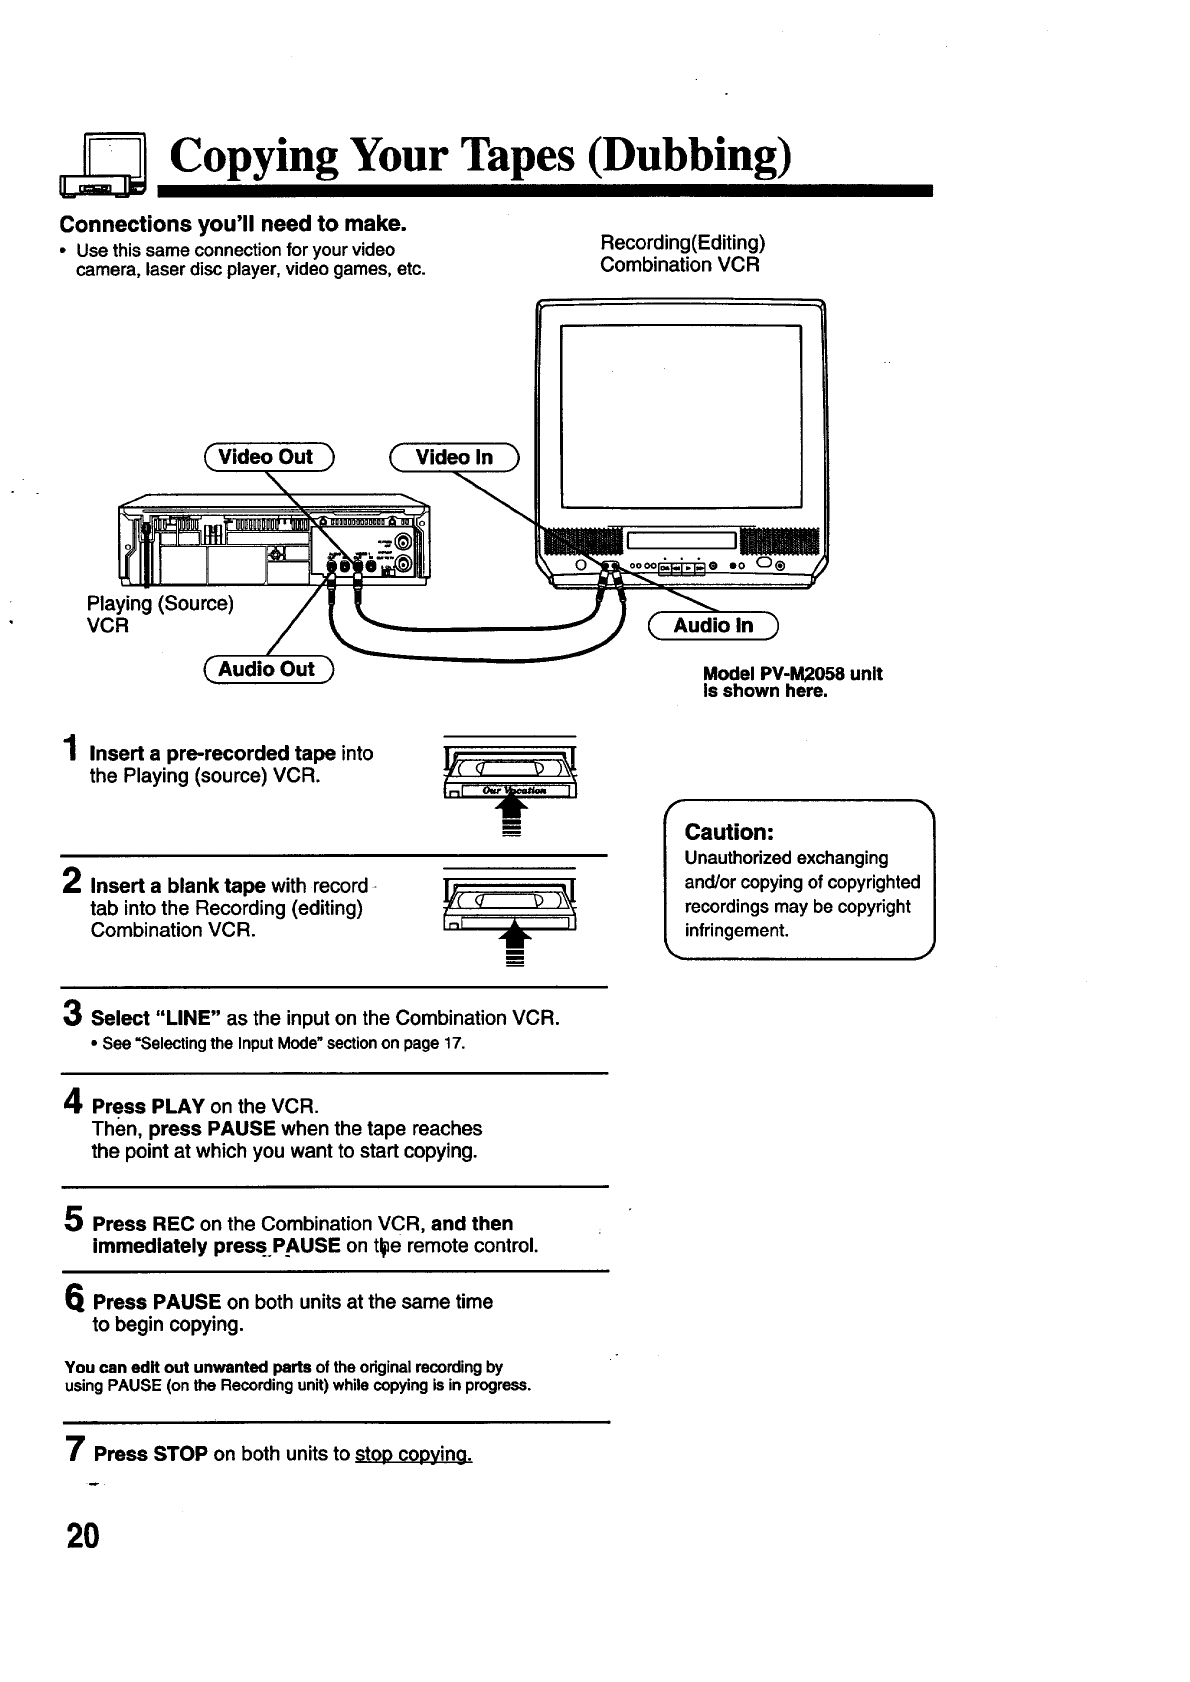
Copying Your Tapes (Dubbing)
Connections you'll need to make.
•Use thissame connectionforyourvideo
camera,laserdiscplayer,videogames,etc.
Recording(Editing)
Combination VCR
_Video Out _ _" Video In
Playing (Source)
VCR
out
_" Audio In
Model PV-M2058 unit
Is shown here.
1Insert a pre-recorded tape into
the Playing (source) VCR.
lm
2Insert a blank tape with record
tab into the Recording (editing)
Combination VCR. t
Select "LINE" as the input on the Combination VCR.
• See "Selecting the Input Mode" section on page 17.
Caution:
Unauthorizedexchanging
and/orcopyingof copyrighted
recordingsmay be copyright
infringement.
J
4Press PLAY on the VCR.
Then, press PAUSE when the tape reaches
the point at which you want to start copying.
5 Press REC on the Combination VCR, and then
immediately press.PAUSE on tl_e remote control.
_Press PAUSE on both units at the same time
to begin copying.
Youcaneditoutunwantedpartsoftheoriginalrecordingby
using PAUSE (on the Recording unit) while copying isinprogress.
7Press STOP on both units to StODcoDying.
2O
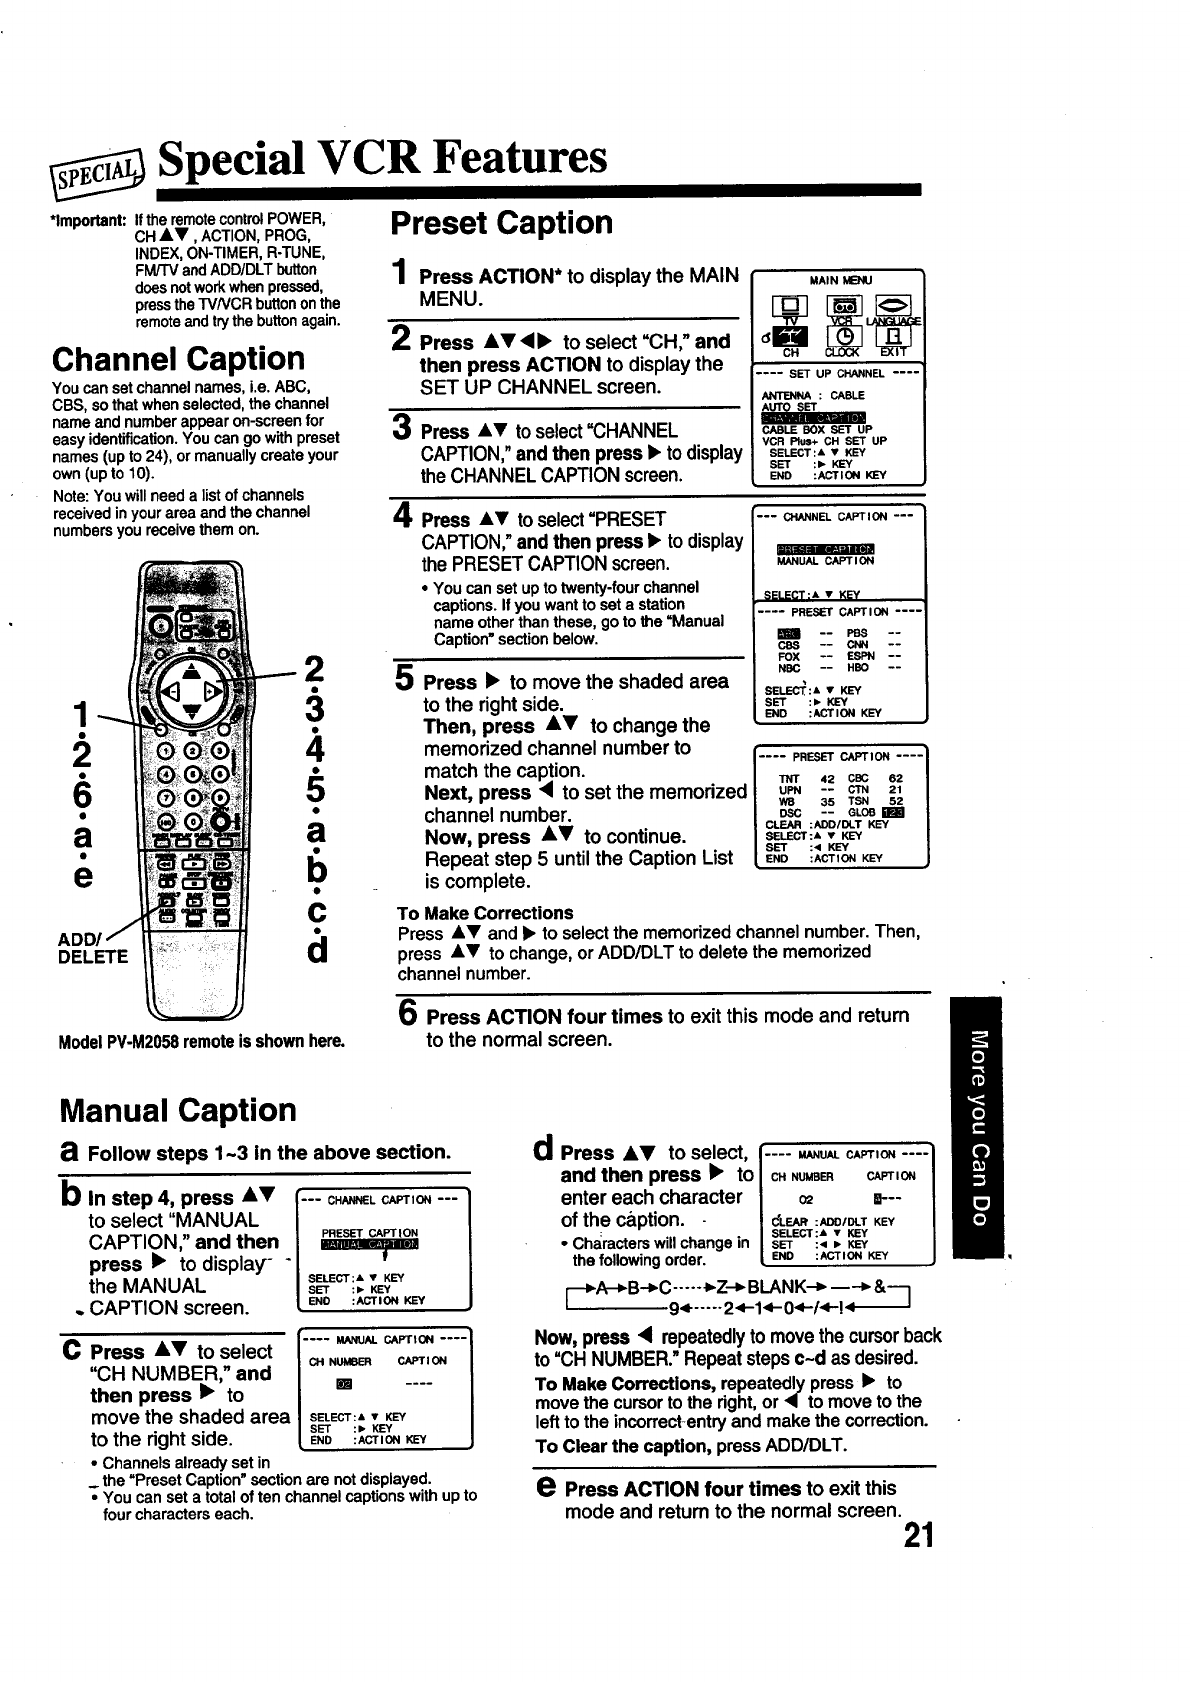
Special VCR Features
*Important: If the remotecontrolPOWER,
CH &V, ACTION, PROG,
INDEX, ON-TIMER, R-TUNE,
FM/TV and ADD/DLT button
does notwork when pressed,
press the TVNCR button onthe
remoteand try the buttonagain.
Channel Caption
You can set channel names, i.e. ABC,
CBS, so that when selected, the channel
name and number appear on-screen for
easy identification. You can go with preset
names (up to 24), or manually create your
own (up to 10).
Note: You will need a list of channels
received in your area and the channel
numbers you receive them on.
2
3.
4
5.
d
ModelPV-M2058remote is shown here.
Preset Caption
1Press ACTION* to display the MAIN
MENU.
2Press AV4• to select "CH," and
then press ACTION to display the
SET UP CHANNEL screen.
3Press AV to select=CHANNEL
CAPTION,"and then press •to display
the CHANNELCAPTION screen.
MAIN MENU
.... SET UP CHANNEL ....
ANTENNA : CABLE
CABLE BOX SET UP
VCR Plus+ CH SET UP
SELECT:& • KEY
SET :1_ KEY
END :ACTION KEY
4
5
Press AV to select"PRESET
CAPTION,"and then press•to display
the PRESET CAPTION screen.
• Youcansetuptotwenty-fourchannel
captions.Ifyouwantto seta station
nameotherthanthese,gotothe=Manual
Caption"sectionbelow.
Press •to move the shaded area
to the right side.
Then, press A_' to change the
memorized channel number to
match the caption.
Next, press •to set the memorized
channel number.
Now, press A_' to continue.
Repeat step 5 untilthe Caption List
is complete.
--- CHANNEL CAPTION ---
aw=mm=_zlaa
MANUAL CAPTION
_LECT: A • KEY
.... PRESET CAPT I ON ....
m"" PBS --
CBS -- CNN --
FOX -- ESPN --
NBC -- HBO --
SELECt:a` •KEY
SET :P, KEY
END :ACTION KEY
L ... PRESET CAPTION .... I
TNT 42 CBC 62 I
UPN -- CTN 21 l
we 35 TSN 52 |
DSC -- GLO5 II_ I
CLEAR :ADD/Dt.T KEY /
SELECT:a` •KEY I
SET :< KEY /
END :ACTION KEY J
To Make Corrections
Press &_l' and •to selectthe memorizedchannelnumber.Then,
press AV to change,orADD/DLT to deletethe memorized
channelnumber.
6Press ACTION four times to exit this mode and return
to the normal screen.
Manual Caption
aFollow steps 1-3 in the above section.
bin step 4, press &_' l--- c._,_, c_=_,ON---
to select "MANUAL I
CAPTION," and then
press •to display- -
the MANUAL SELECT:"• KEY
SET :1. KEY
.CAPTION screen. ENO :ACTIONKEY
C Press &_l' to select
"CH NUMBER," and
then press •to
move the shaded area
to the right side.
• Channelsalreadysetin
_the"PresetCaption"sectionarenotdisplayed.
•Youcansetatotaloftenchannelcaptionswithupto
fourcharacterseach.
I... ....!
C.N:. I
ISELECT:a, •KEY I
I SET :=- KEY I
L END :ActionK_ j
dPress AV to select, [.... wJ_uALCA_r,ON.... |
and then press •to I c, NU_ER CAPTIONI
enter each character I '_ a---
of the c&ption. - IC'LE_,_:_/_.T KEY /
A. : ..... I SELECT:a` •KEY /
•unaractersWill changein l SET :,4 _KEY l
the following order. [END :ACTIONKEY j
_,-A-_B--_C ..... _Z--_ BLANK--_ --
9+ ..... 2 <-1 "4-0<-/<-! •
NOW, press • repeatedly to move the cursor back
to "CH NUMBER." Repeat steps ¢~d as desired.
To Make Corrections, repeatedly press • to
move the cursor to the right, or 4to move to the
left to the incorrectentry and make the correction.
To Clear the caption, press ADD/DLT.
ePress ACTION four times to exit this
mode and return to the normal screen. 21
Special VCR Features (continued)
If the remote control
POWER, CH AV,
ACTION, PROG,
INDEX, ON-TIMER,
R-TUNE, FM/TV and
ADD/DLT button does
not work when pressed,
press the TVNCR
button on the remote
and try the button
again.
*Important:
_PCheck list before you begin.
[] The clockis setto correcttime.
2.
C
Model PV-M2058 remote
Is shown here.
!
2
4
a
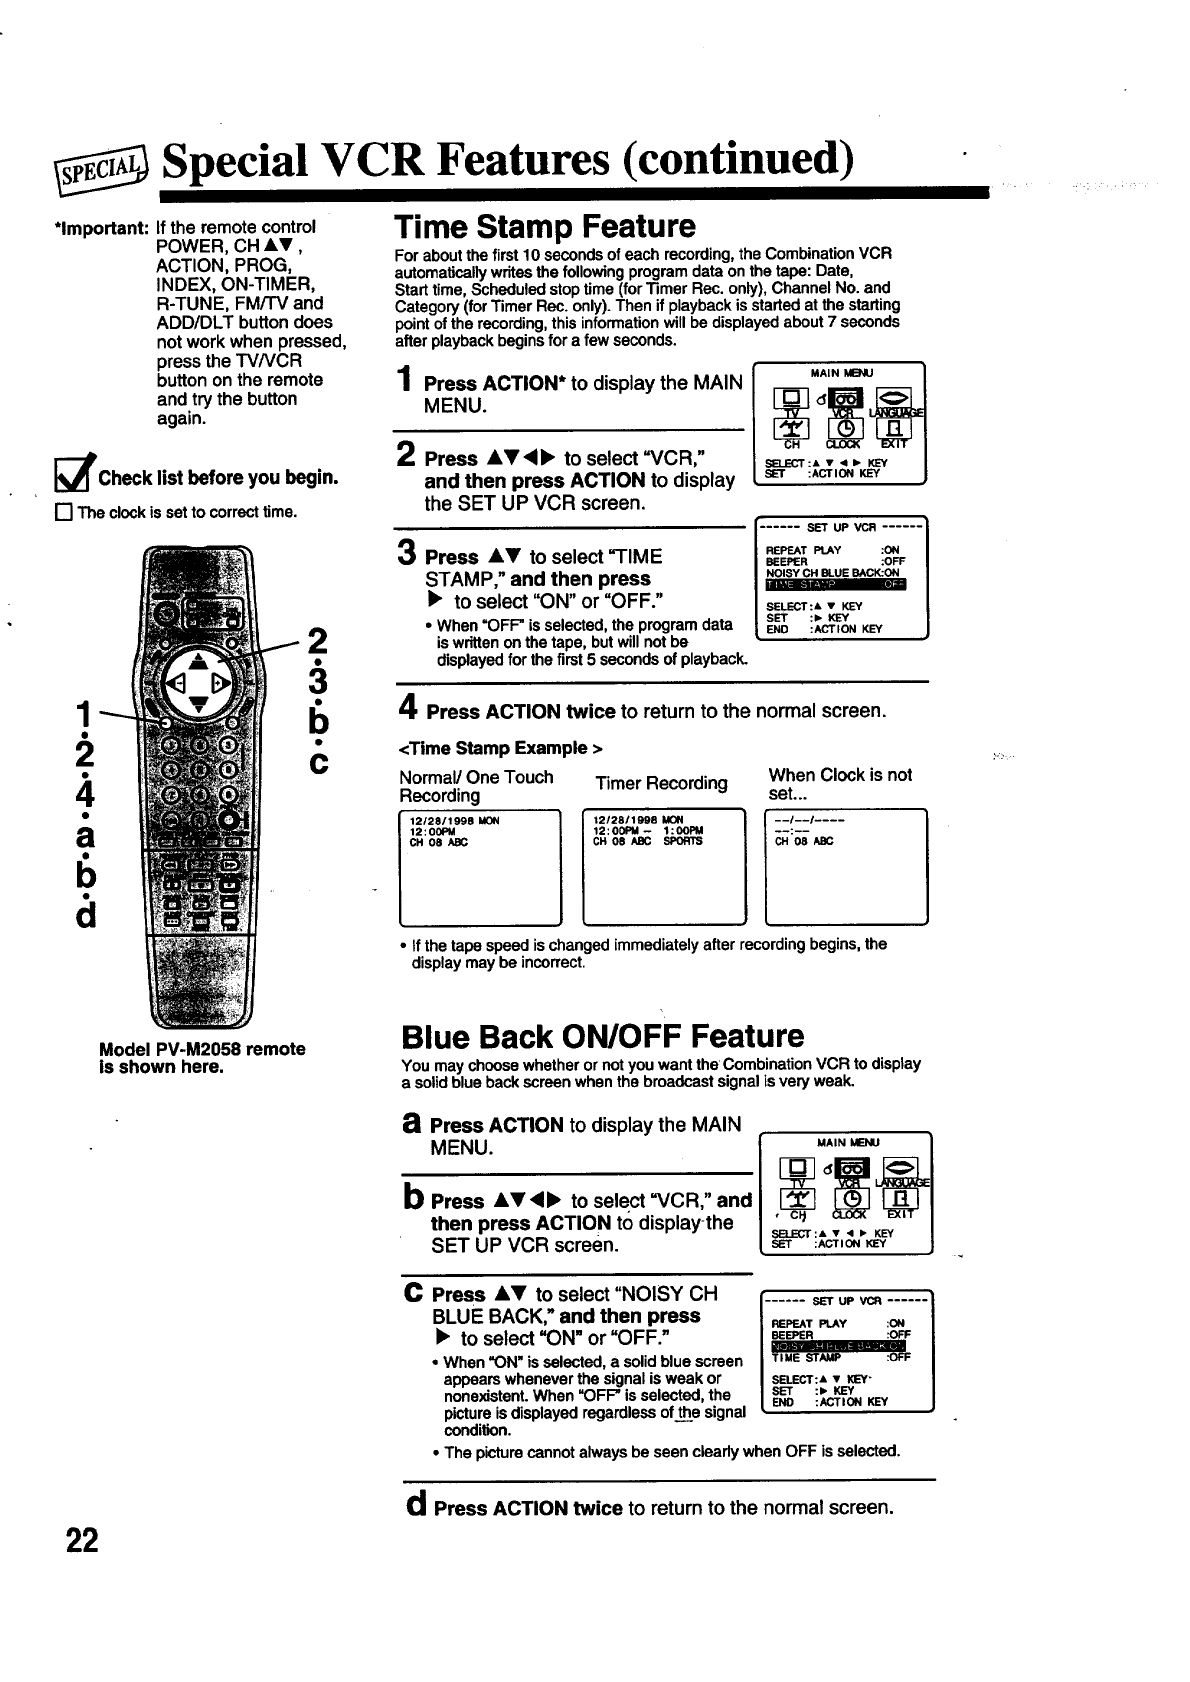
Time Stamp Feature
Forabout the first 10secondsof each recording,the CombinationVCR
automaticallywritesthefollowing programdataon thetape: Date,
Starttime,Scheduledstoptime (forTimer Rec.only),ChannelNo.and
Category(forTimerRec. only).Then if playbackis startedat the starting
pointof the recording,thisinformationwillbedisplayedabout7seconds
afterplaybackbeginsfor afew seconds.
1 Press ACTION* to display the MAIN
MENU.
2Press AV_ to select "VCR,"
and then press ACTION to display
the SET UP VCR screen.
3Press AV to select "TIME
STAMP," and then press
• to select "ON" or "OFF."
•When=OFF"is selected,the programdata
is writtenonthetape, butwillnot be
displayedfor the first5 secondsof playback.
MAIN MENU
:ACTION KEY
I ..... SET UP VCR ...... I
REPEAT Pt.AY :ON I
BEEPER :OFF I
_!SVCH._UES*C_ON [
I
SELECT:', • KEY l
SET :, KEY I
END :ACTION KEY J
4Press ACTION twice to return to the normal screen.
<Time Stamp Example >
Normal/One Touch
Recording
1212811998 MON
12: OOPM
CH 08 ABG
Timer Recording
t2/28/1998MON
12:00PM-- I:00PM
CH 08 ABC SPORTS
When Clock is not
set...
I--!--t ....
• If thetape speedis changedimmediately afterrecordingbegins, the
displaymaybe incorrect.
Blue Back ON/OFF Feature
You maychoosewhetherornotyouwant theCombinationVCR to display
a solidblue backscreenwhenthe broadcastsignalis veryweak.
aPress ACTION to display the MAIN
MENU. [ c_MA'N_L_
bPress &Y,d• to select =VCR," and
then press ACTION to displaythe "
SELECT:A _' _1_. KEY
SET UP VCR screen. SET :ACT,ON_-v
C Press &v to select "NOISY CH
BLUE BACK," and then press
•to select "ON" or "OFF."
•When"ON"isselected,asolidbluescreen
appearswheneverthesignalisweakor
nonexistent.When"OFF"isselected,the
pictureisdisplayedregardlessofthesignal
condition.
I ..... SET UP VCR ...... !
REPEAT PLAY !ON I
SELECT:A • KEY- [
SET :_ KEY l
END :ACTION KEY j
•The picture cannot always be seen clearly when OFF is selected.
dPress ACTION twice to return to the normal screen.
22
I_Check list before you begin.
[] All connections are made (see page 5).
[] Your Combination VCR is plugged in.
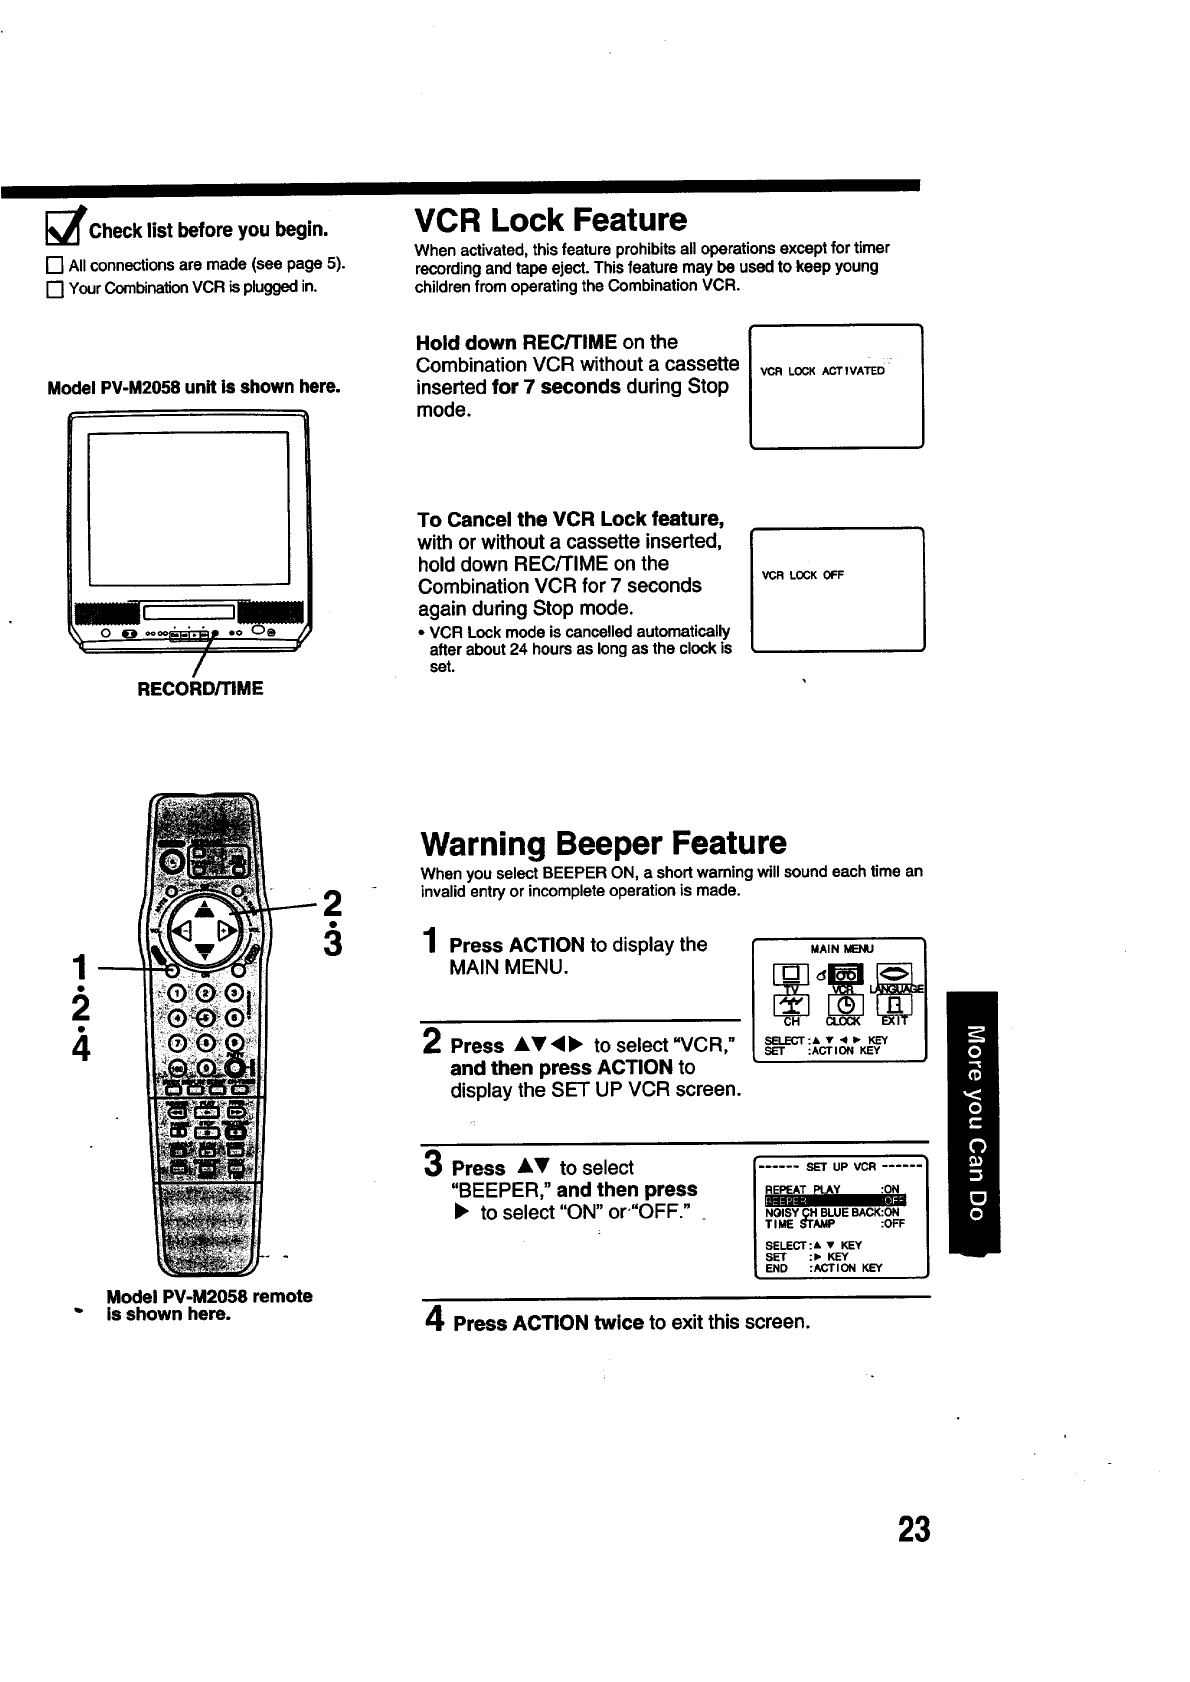
VCR Lock Feature
When activated, this feature prohibits all operations except for timer
recording and tape eject. This feature may be used to keep young
children from operating the Combination VCR.
Model PV-M2058 unit Is shown here.
Hold down REC/TIME on the
Combination VCR without a cassette
inserted for 7 seconds during Stop
mode.
VCR LOCK ACTIVATED
IIII1_[
RECORD/TIME
To Cancel the VCR Lock feature,
with or without a cassette inserted,
hold down REC/TIME on the
Combination VCR for 7 seconds
again during Stop mode.
• VCR Lock mode is cancelled automatically
alter about 24 hours as long as the clock is
set.
VCR LOCK OFF
Model PV-M2058 remote
is shown here.
2
3
Warning Beeper Feature
When you select BEEPER ON, a short warning will sound each time an
invalid entry or incomplete operation is made.
1Press ACTION to display the
MAIN MENU.
2Press A_'<• to select =VCR,"
and then press ACTION to
display the SET UP VCR screen.
MAIN MBNU
SELECT:AT <1_ KEY
SET :ACTION KEY
3Press AY to select
"BEEPER," and then press
•to select "ON" or'"OFF."
...... SET UP VCR ...... I
REPEAT PLAY :ON |
I
NOISY (_H BLUE BACK:ON |
TIME STAMP :OFF I
I
SELECT:& • KEY /
SET :, KEY /
END :ACTION KEY J
4Press ACTION twice to exit this screen.
23
J o o Tape Operation
t,, o.w. ,_
*Important: If the remote control POWER, CH A_!I', ACTION, PROG, INDEX, ON-TIMER, R-TUNE, FMITV and ADD/DLT
button does not work when pressed, press the TVNCR button on the remote and try the button again.
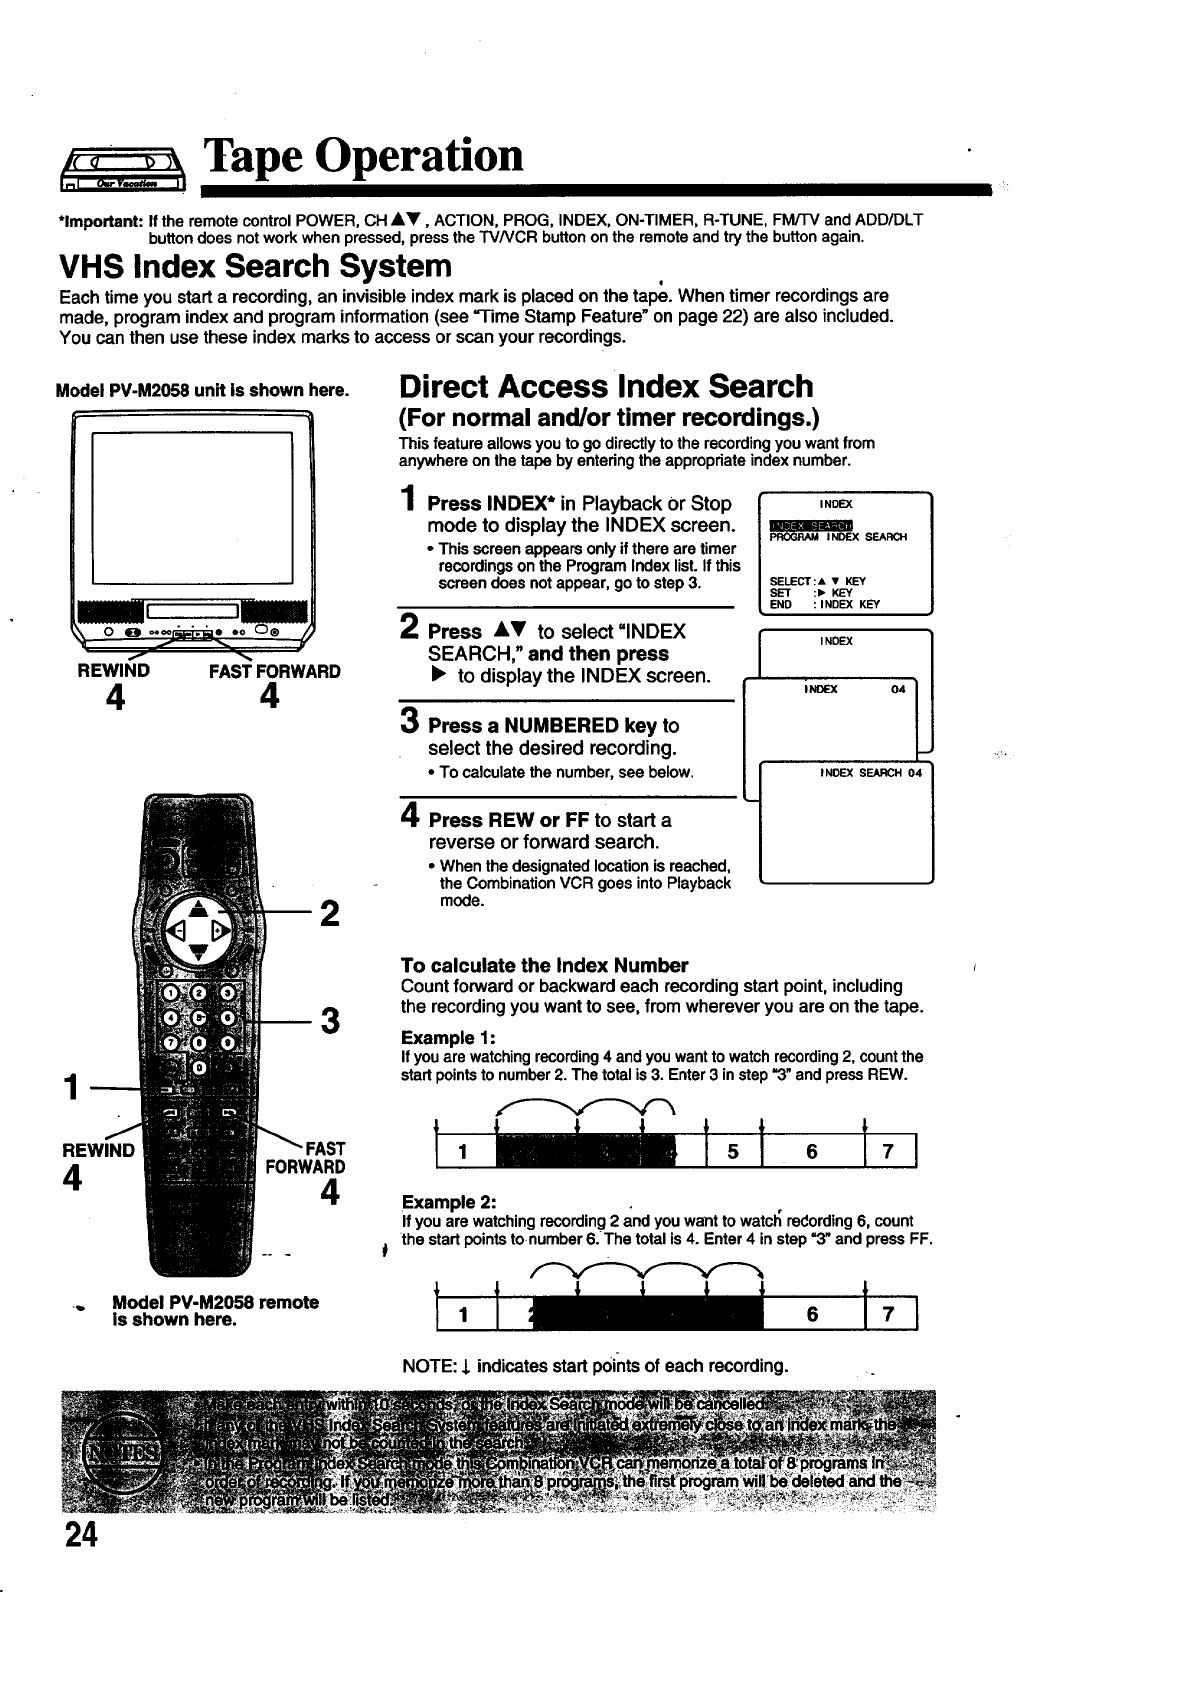
VHS Index Search System
Each time you start a recording, an invisible index mark is placed on the tape. When timer recordings are
made, program index and program information (see =Time Stamp Feature" on page 22) are also included.
You can then use these index marks to access or scan your recordings.
Model PV-M2058 unit is shown here.
REWIND FAST FORWARD
4 4
Direct Accesslndex Search
(For normal and/or timer recordings.)
This feature allows you to go directly to the recording you want from
anywhere on the tape by entering the appropriate index number.
1Press INDEX* in Playback or Stop
mode to display the INDEX screen.
•This screen appears only ifthere are timer
recordings on the Program Index list. If this
screen does not appear, go to step 3.
2Press AV to select "INDEX
SEARCH," and then press
•to display the INDEX screen.
O Press a NUMBERED key to
select the desired recording.
•To calculate the number, see below.
4Press REW or FF to start a
reverse or forward search.
•When the designated location is reached,
the Combination VCR goes into Playback
mode.
I NDEX
PROGRAM INDEX SEARCH
SELECT:& • KEY
SET :1_ KEY
END : INDEX KEY
,N°I
i.aEx 04
1
REWIND
4
24
3
FORWARD
4
Model PV-M2058 remote
is shown here.
To calculate the Index Number
Count forward or backward each recording start point, including
the recording you want to see, from wherever you are on the tape.
Example 1:
If you are watching recording 4 and you want to watch recording2, count the
start points to number 2. The total is 3. Enter 3 in step =3"and press REW.
Example 2: . ,
If you are watching recording 2 and you want to watch redording 6, count
the start points to number 6. The total is 4. Enter 4 in step "3" and press FF.
NOTE: _indicates start points of each recording.
Timer recordings must be recorded
back to back in order for them to be
placed on the Program Index list. If a
timer recording is followed by s
function, such as REW or PLAY the
data is lost.
Model PV-M2058 unit is shown here.
STOP/ REWIND FAST FORWARD
EJECT C C
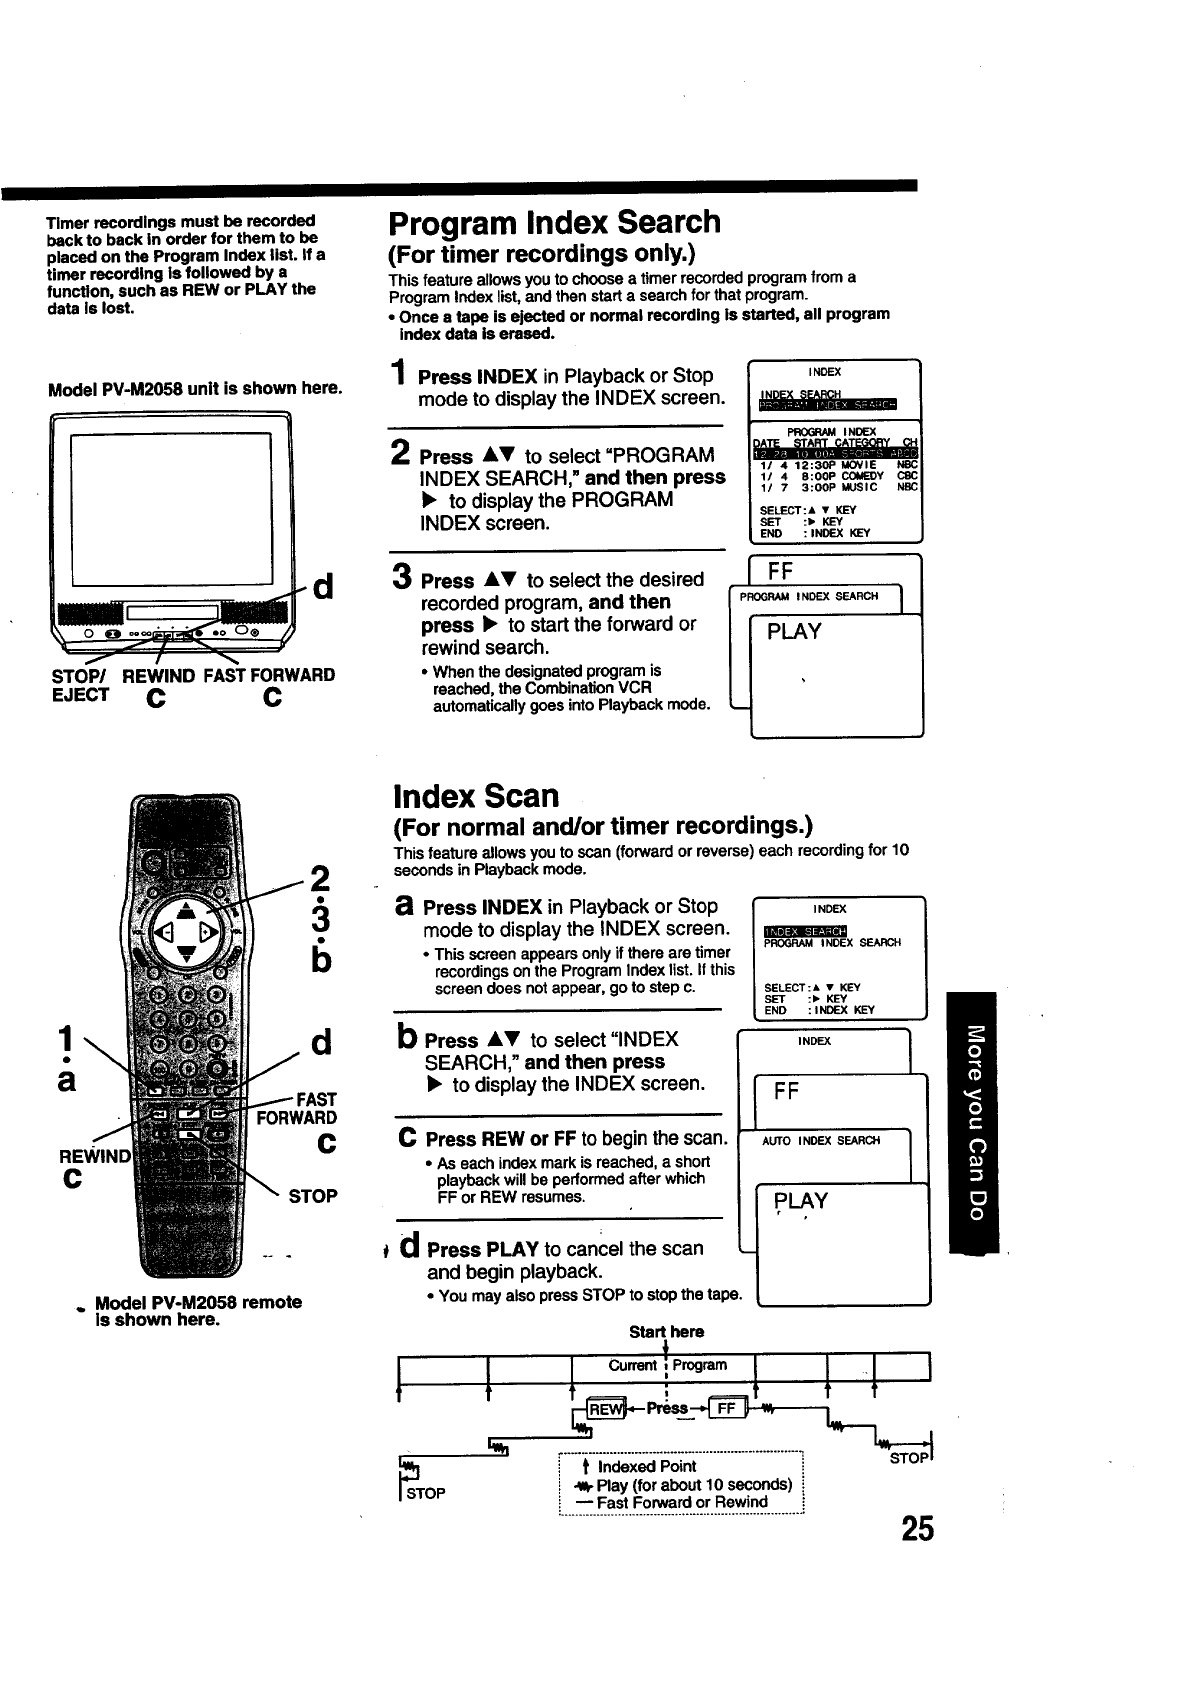
Program Index Search
(For timer recordings only.)
This feature allows you to choose a timer recorded program from a
Program Index list, and then start a search for that program.
• Once a tape is ejected or normal recording is started, all program
index data is erased.
1Press INDEX in Playback or Stop
mode to display the INDEX screen.
2Press AV to select =PROGRAM
INDEX SEARCH," and then press
•to display the PROGRAM
INDEX screen.
3Press AV to select the desired
recorded program, and then
press •to start the forward or
rewind search.
•When the designated program is
reached, the Combination VCR
automatically goes into Playback mode.
INDEX
i_Jm
11 4 12:30P MOVIE NSC
1/ 4 8:00P_Y CBC
1/ 73:00PMUSIC NBC
SELECT:A • KEY
SET :, KEY
END :INDEX KEY
FF
ROG:L_NyDEX SEARCH I
1 d
a
REWIND
C
FORWARD
C
STOP
. Model PV-M2058 remote
is shown here.
Index Scan
(For normal and/or timer recordings.)
This feature allows you to scan (forward or reverse) each recording for 10
seconds in Playback mode.
aPress INDEX in Playback or Stop
mode to display the INDEX screen.
•This screen appears only if there are timer
recordings on the Program Index list. If this
screen does not appear, go to step c.
bPress 4=V to select "INDEX
SEARCH," and then press
•to display the INDEX screen.
C Press REW or FF to begin the scan.
•As each index mark is reached, a short
playback will be performed after which
FF or REW resumes. I
cancel
(] Press PLAY to the scan
and begin playback.
You may also press STOP to stop the tape
1
IINDEX
PROGRAM INDEX SEARCH
SELECT:& •KEY
SET :, KEY
END :INDEX KEY
I NDEX
FF
AUTO I NDEX SEARCH
PLAY
r
Start hera
t Indexed Point
Play (for about 10 seconds)
Fast Forward or Rewind 25
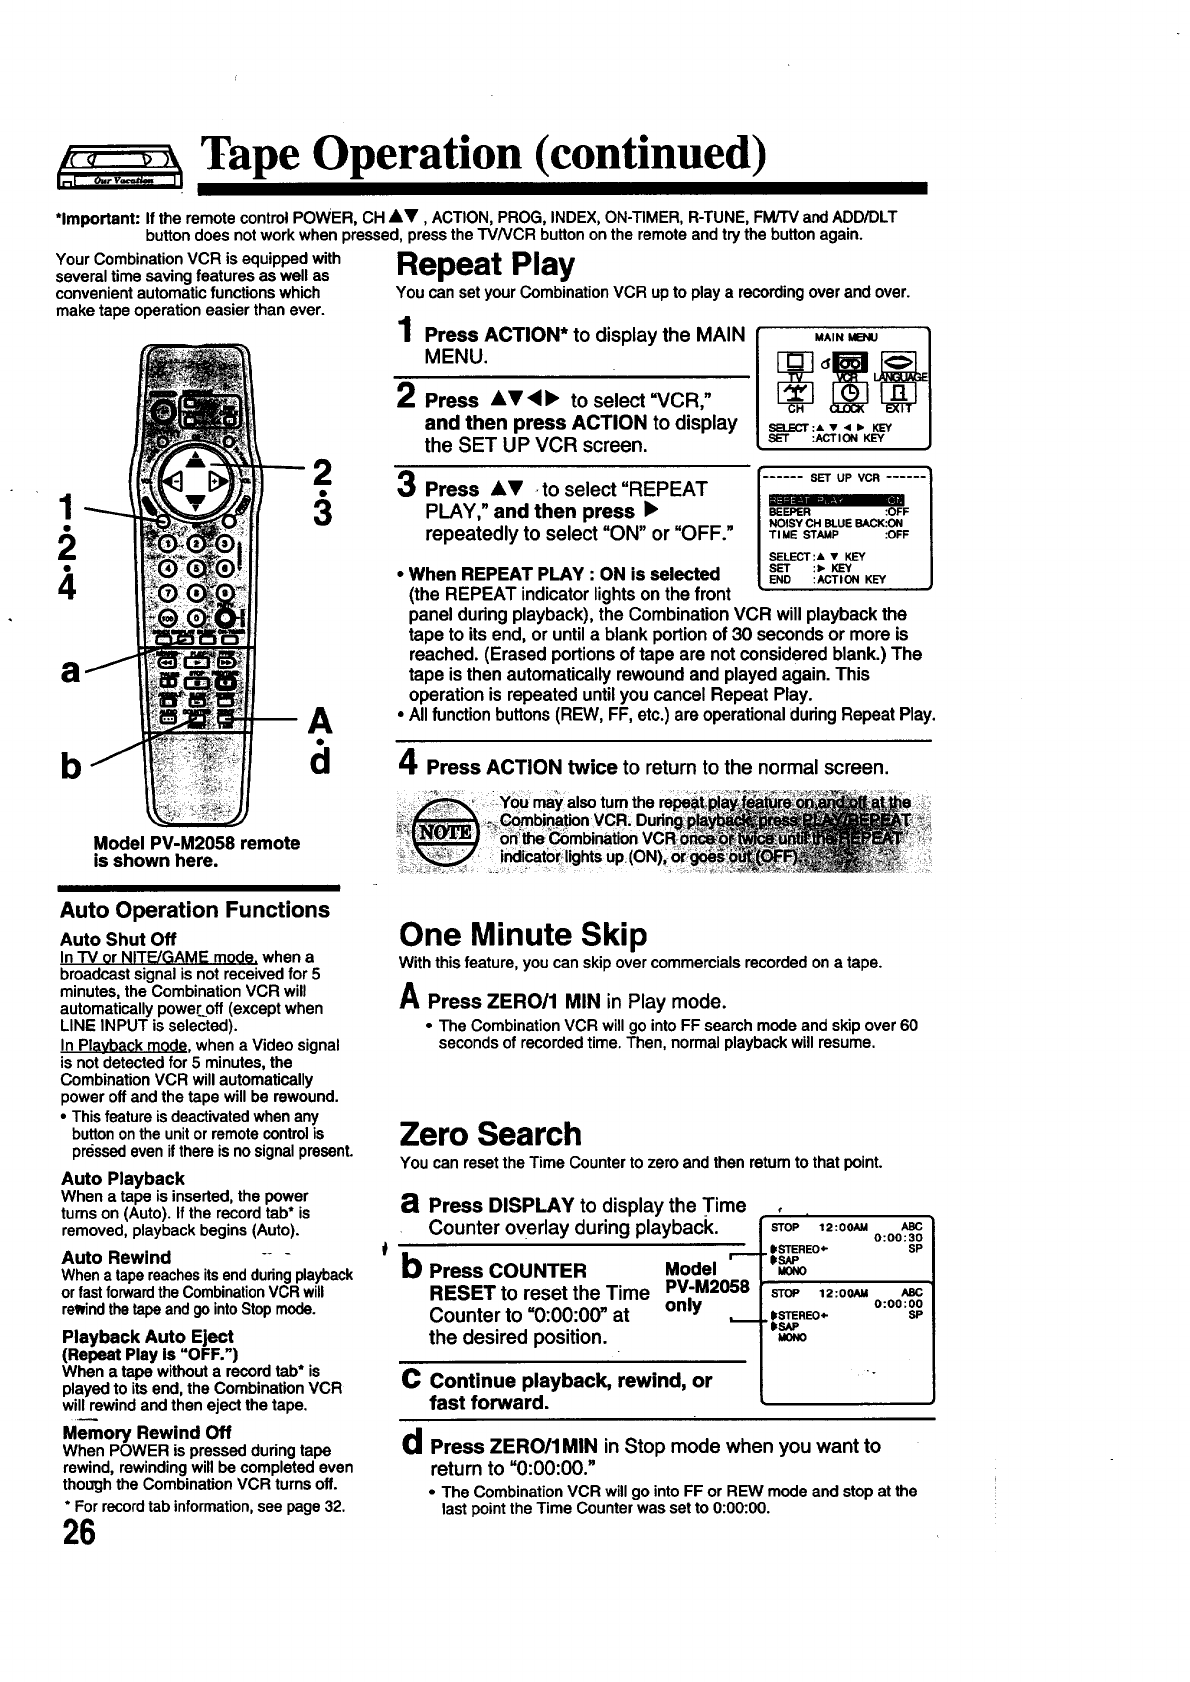
Tape Operation (continued)
*Important: Ifthe remote controlPOWER, CH &V, ACTION,PROG, INDEX,ON-TIMER,R-TUNE,FM/TVandADD/DLT
buttondoes notworkwhen pressed,presstheTVNCR buttonon the remoteand try thebuttonagain.
Your CombinationVCR isequippedwith
severaltimesavingfeatures aswell as
convenientautomaticfunctions which
maketape operationeasierthanever.
!
2.
4
a
2.
3
b
Repeat Play
You can setyourCombinationVCR up to playa recordingoverand over.
4
/ Press ACTION* to display the MAIN
MENU.
2Press &V<b to select=VCR,"
and then press ACTION to display
the SET UP VCR screen.
3Press AV .to select"REPEAT
PLAY," and then press
repeatedly to select "ON" or =OFF."
• When REPEAT PLAY : ON is selected
(the REPEAT indicator lights on the front
MAIN MENU
SELECT A v 4 I_KEY:
SET :ACTION KEY
...... SET UP VCR ...... ]
BEEPER :OFF J
NOISY CH BLUE BACK:ON I
TIME STAMP :OFF /
i
SELECT:A • KEY /
SET :lb KEY J
END :ACTION KEY ,J
paneldudngplayback),the CombinationVCR willplaybackthe
tape to itsend, or untila blankportionof 30 secondsormoreis
reached.(Erasedportionsof tape are notconsideredblank.)The
tape is thenautomaticallyrewoundand playedagain.This
operationis repeateduntilyoucancelRepeatPlay.
•Allfunctionbuttons(REW,FF,etc.)areoperationalduringRepeatPlay.
4Press ACTION twice to return to the normal screen.
Model PV-M2058 remote
is shown here.
Auto Operation Functions
Auto Shut Off
In TV or NITE/GAME mode. when a
broadcast signal is not received for 5
minutes, the Combination VCR will
automatically power off (except when
LINE INPUT is selected).
In Plavback mode, when a Video signal
is not detected for 5 minutes, the
Combination VCR will automatically
power off and the tape will be rewound.
•This feature is deactivated when any
button on the unit or remote control is
pressed even if there is no signal present.
Auto Playback
When atape is inserted, the power
turns on (Auto). If the record tab* is
removed, playback begins (Auto).
Auto Rewind "-
When a tape reaches itsend duringplayback
or fast forwardthe CombinationVCR will
rewindthe tape and go intoStop mode.
Playback Auto Eject
(Repeat Play is "OFF.")
When a tape without a record tab* is
played to its end, the Combination VCR
will rewind and then eject the tape.
Memory Rewind Off
When POWER is pressed during tape
rewind, rewinding will be completed even
though the Combination VCR turns off.
* For record tab information,see page 32.
26
: i_icatc)_ lights up:(ON)_
One Minute Skip
With this feature, you can skip over commercials recorded on a tape.
A Press ZEROI1 MIN in Play mode.
•The Combination VCR will go into FF search mode and skip over 60
seconds of recorded time. Then, normal playback will resume.
Zero Search
You can reset the Time Counter to zero and then retum to that point.
aPress DISPLAY to display the Time
Counter overlay during playback.
bPress COUNTER
RESET to reset the Time
Counter to =0:00:00" at
the desired position.
Model
PV-M2058
only
C continue playback, rewind, or
fast forward.
d
€
STOP 12:00AM
I=STEREO*-
"I_SAP
MONO
STOP 12:00AM
If S'rEREO4-
"I_SAP
MONO
ABC
0:00:30SP
ABC
0:00:00SP
Press ZERO/1MIN in Stop mode when you want to
return to =0:00:00."
•The Combination VCR will go into FF or REW mode and stop at the
last point the Time Counter was set to 0:00:00.

MTS Broadcast/TV Stereo System
[_Check list before you begin.
[] Allconnectionsaremade(seepage5).
[] YourCombinationVCR ispluggedin.
IMPORTANT NOTE:
This stereo system is designed
for TV viewing only. Recording
and playback will always be in
monaural.
AUDIO
<For Model PV-M2058 only>
Receivable Broadcast Types
The followingarepossiblebroadcasttypeswiththeiraccompanying
on-screendisplays.The signalbeingreceivedis indicatedwithan ={(("
markwhiletheselectedaudiomodeisindicatedwithan arrow.To cnange
theaudiomodeforthesebroadcasts,follow the =SelectAudioMode forTV
Viewing"section(below).
Press DISPLAY to display the broadcast signal currently
being received and the selected audio mode.
MT_ Stereo and SAP broadcast
Multi-channel Television Sound Stereo
(main language) and Secondary Audio
Program (sub language) broadcasts are
being received simultaneously. Select the
STEREO or SAP audio mode as desired. I STOP 12:00AM ABC
0:00:00
ISTEREO'*- SP
tSAP
MONO
MTS Stereo broadcast
Multi-channelTelevisionSoundStereo
broadcastis beingreceived.Selectthe
STEREO audiomode.
•If a stereobroadcastisweak andthe
displayflickers, youmaywantto selectthe
MONO audiomodefor betterresults.
STOP 12:00AM ABC
0:00:00
I STEP,£O ',,.. SP
SAP
MONO _
SAP broadcast
SecondaryAudioProgram(sublanguage)
broadcastis beingreceived.SelectSAP
audiomodefor the sublanguage.
STOP 12:00AM
STEREO
tSAP _-
MONO
ABC
0:00:00SP
MONO broadcast
Normalmonauralsoundbroadcastis being
received.
STOP 12:00AM ABC
0:00:00
STEREO SP
SAP
MONO *"
Select Audio Mode for TV Viewing
Press AUDIO to select the desired audio mode as described
above. (Arrow shows selection.)
=EachpressofAUDIO will_:hangetheaudiomodeas shownbelow.
< Example >
0:00:00 I
lSTEIE'O_" .- .qP I•
SAP I STOP 12:00AM ABC I
uo.o I o:oo:_ I "
tSTEREO
I SAP ,.- I STOP 12:00AM ABC
I MONO Io:oo:oo
/Press I I"=°"
_AUDIO--]_i ./I
-27
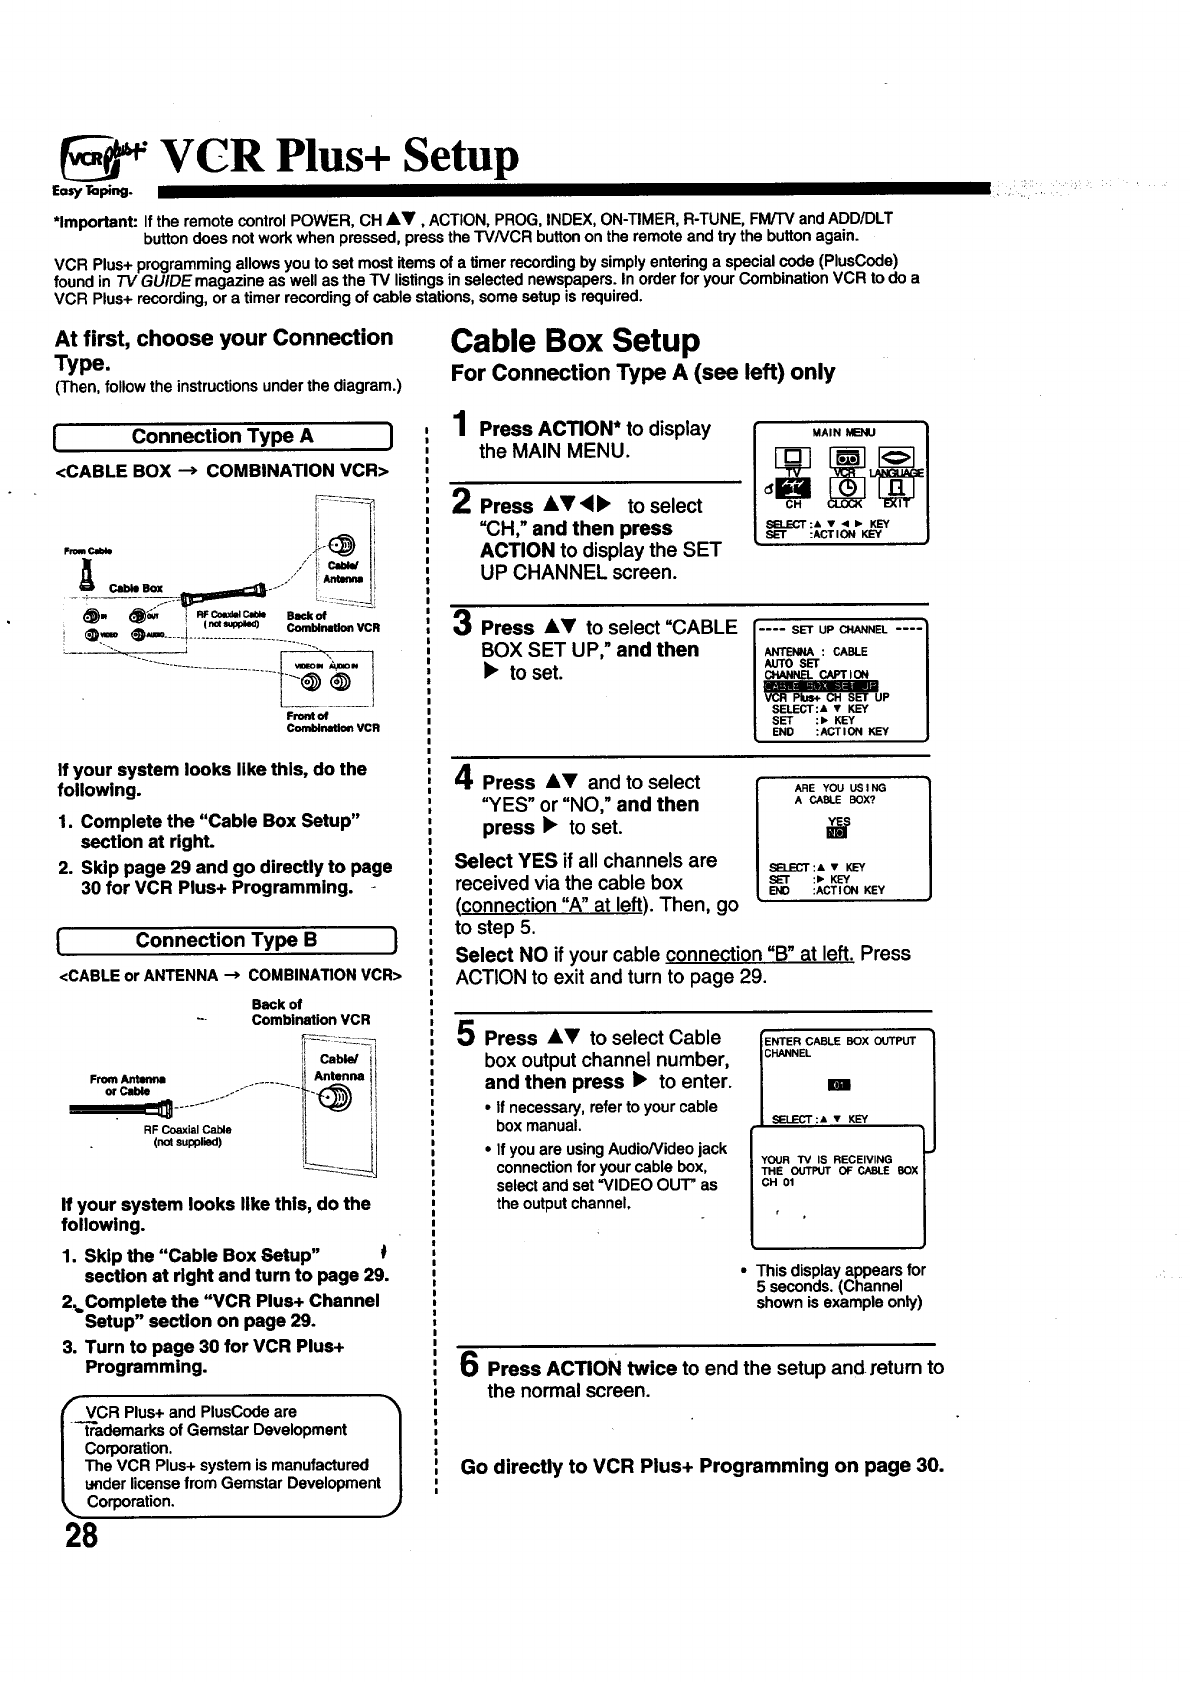
VCR Plus+ Setup
Eo,yTa_ng.
*Important: If theremote controlPOWER, CH &_', ACTION,PROG,INDEX,ON-TIMER,R-TUNE,FM/TVandADD/DLT
buttondoes notworkwhenpressed,presstheTVNCR buttonon theremoteandtrythe buttonagain.
VCR Plus+programmingallowsyouto set mostitemsof a timer recordingby simplyenteringa specialcode (PlusCode)
found in TV GUIDE magazineaswellas theTV listingsin selectednewspapers.In orderfor yourCombinationVCR to do a
VCR Plus+recording,ora timerrecordingof cablestations,somesetup is required.
At first, choose your Connection
Type.
(Then.followthe instructionsunderthediagram.)
[ Connection Type A ]
<CABLE BOX --> COMBINATION VCR>
I/I c,_ll
i _.. _ .......]_(.'_ c=.=...,o.vc,
[.......... I
Front of
Comblnatimt VCR
If your system looks like this, do the
following.
1. Complete the "Cable Box Setup"
section at righL
2. Skip page 29 and go directly to page
30 for VCR Plus+ Programming.
{ Connection Type B }
<CABLEorANTENNA --) COMBINATIONVCR>
Back of
~- Combination VCR
Cable/
From Antenna IAntenna
H_J
RF Coaxial Cable [
(not supplied) _[_ "_--"=_
)M
If your system looks like this, do the
following.
1. Skip the "Cable Box Setup"
section at right and turn to page 29.
2,,Complete the "VCR Plus+ Channel
Setup" section on page 29.
3. Turn to page 30 for VCR Plus+
Programming.
rVCR Plus+and PlusCodeare _'_
-T_demarks of GemstarDevelopment J
Corporation.
The VCR Plus+ systemis manufactured
underlicensefrom GemstarDevelopment
%, Corporation.
28
Cable Box Setup
For Connection Type A (see left) only
1Press ACTION* to display
the MAIN MENU.
2Press A_!'<• to select
=CH," and then press
ACTION to display the SET
UP CHANNEL screen.
C_H MAIN__
d
SELECT:*"
SET :ACTION KEY
3Press AV to select =CABLE
BOX SET UP," and then
•to set.
.... SET UP CHANNEL .... J
ANTENNA : CABLE
_INL_'LETcAPT ION
SELECT:A •KEY
SET :h KEY
END :ACTION KEY
4Press &V and to select ARE YOU US ING
A CABLE BOX?
=YES" or "NO," and then
press •to set.
Select YES if all channels are Sa_'T:, • KE_
received via the cable box _ :_KE_
END :ACTION KEY
(connection "A" at left). Then, go
to step 5.
Select NO if your cable connection =B" at left. Press
ACTION to exit and turn to page 29.
im
_) Press &_l' to select Cable
box output channel number,
and then press •to enter.
•Ifnecessary,referto yourcable
boxmanual.
• Ifyouare usingAudio/Videojack
connectionfor yourcablebox,
selectand set "VIDEO OUT" as
theoutputchannel.
ENTER CABLE BOX OUTPUT
CHANNEL
SEL.ECT:A •KEY I
YOUR TV IS RECEIVING !
THE OUTPUT OF CABLE BOX
CH 01
r
•This display appears for
5 seconds. (Channel
shown is example only)
6Press ACTION twice to end the setup and.return to
the normal screen.
Go directly to VCR Plus+ Programming on page 30.
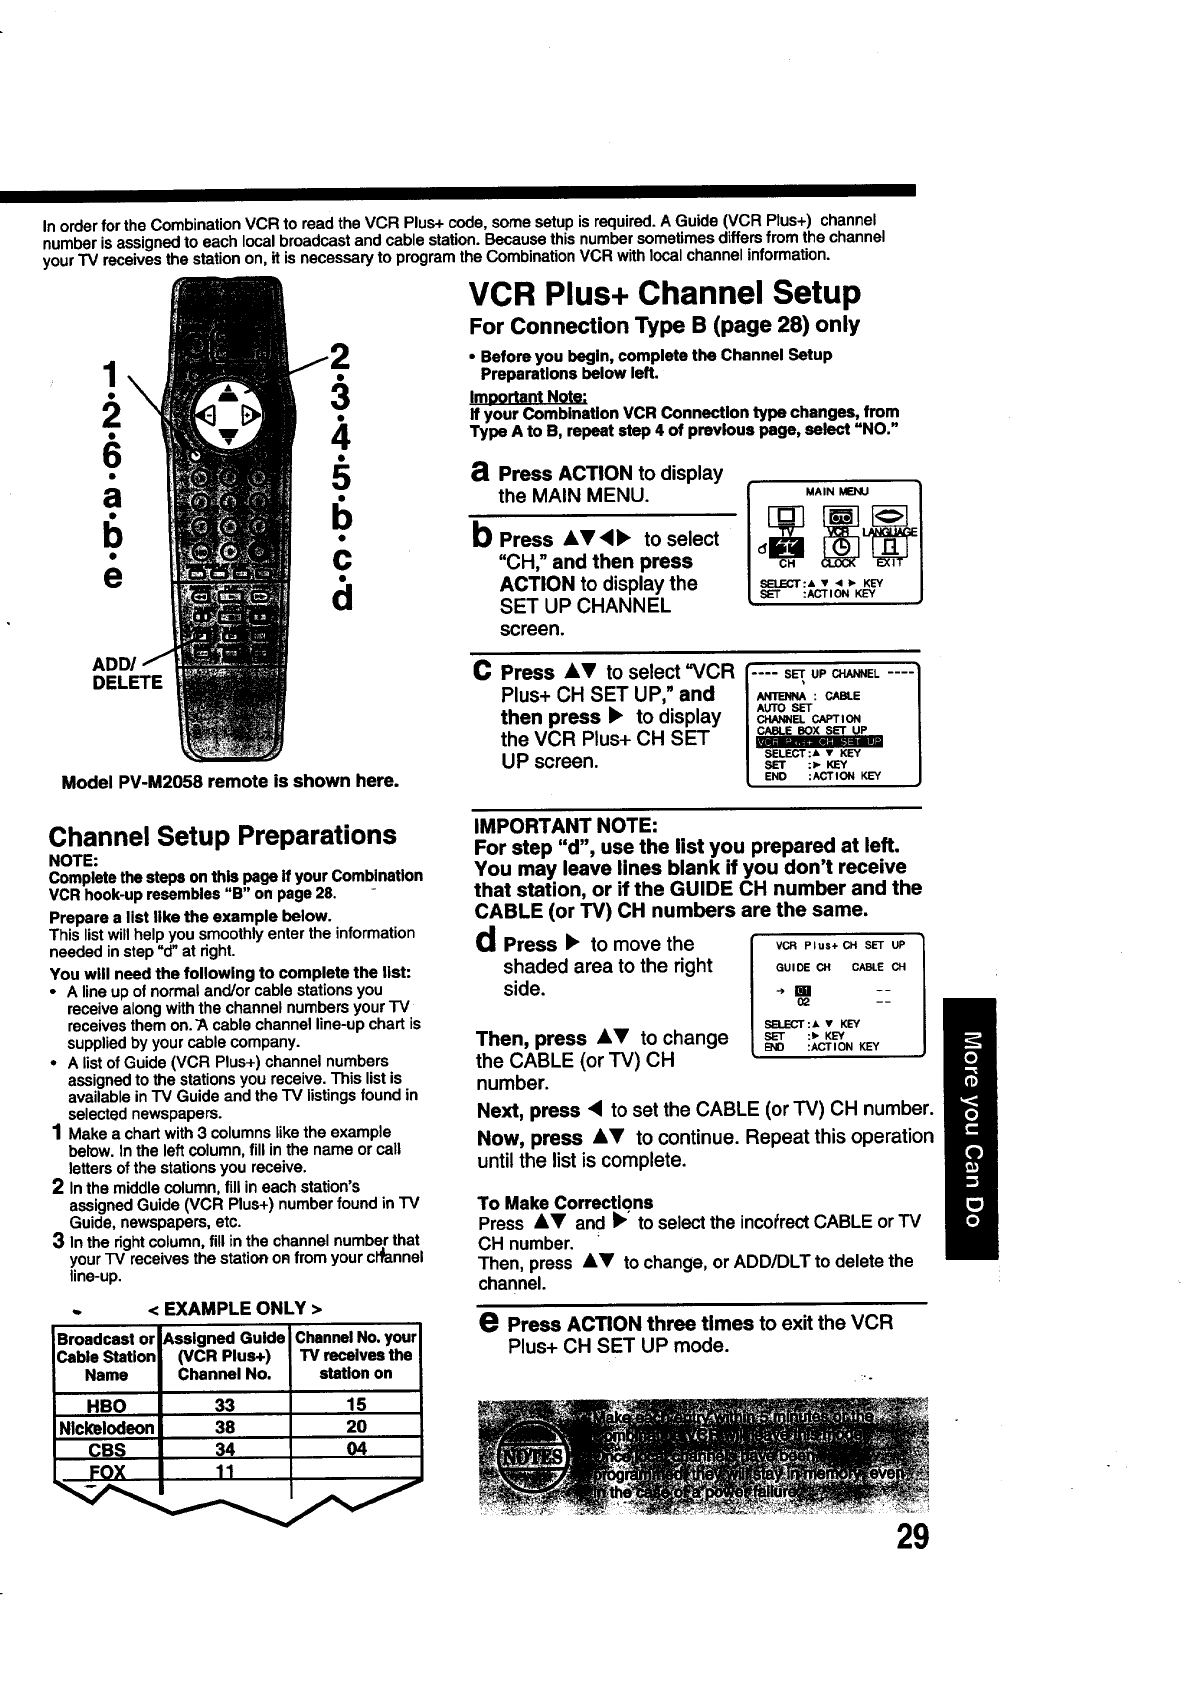
In orderforthe CombinationVCR to read the VCR Plus+code,some setupis required.A Guide (VCR Plus+) channel
numberis assignedto each localbroadcastandcable station.Becausethisnumbersometimesdiffersfrom thechannel
yourTV receivesthe stationon,it is necessaryto programthe CombinationVCR withlocalchannelinformation.
a
e
VCR Plus+ Channel Setup
For Connection Type B (page 28) only
•Before you begin, complete the Channel Setup
Preparations below left.
ImDortant Note:
If your Combination VCR Connestlon type changes, from
Type A to B, repeat step 4 of previous page, select "NO."
aPress ACTION to display
the MAIN MENU.
bPress AV4• to select
"CH," and then press
ACTION to display the
SET UP CHANNEL
screen.
MAIN MENU
ADD/
DELETE
Model PV-M2058 remote is shown here.
C Press AV to select =VCR
Plus+ CH SET UP," and
then press •to display
the VCR Plus+ CH SET
UP screen.
ANTENNA:GABLE
AUTO SET
CHANNEL CAPTION
,_LECYr:A • KEY
END :ACTION KEY
Channel Setup Preparations
NOTE:
Complete the steps on this page if your Combination
VCR hook-up resembles "B" on page 28.
Prepare a list like the example below.
This listwill help you smoothly enter the information
needed in step "d" at right.
You will need the following to complete the list:
• A line up of normal and/or cable stations you
receive along with the channel numbers your TV
receives them on. "Acable channel line-up chart is
supplied by your cable company.
•A list of Guide (VCR Plus+) channel numbers
assigned to the stations you receive. This list is
available in TV Guide and the "IV listings found in
selected newspapers.
1Make a chart with 3 columns like the example
below. In the left column, fill in the name or call
letters of the stations you receive.
2In the middle column, fill in each station's
assigned Guide (VCR Plus+) number found in TV
Guide, newspapers, etc.
3In the right column, fill in the channel number that
your TV receives the station ORfrom your ctt_annel
line-up.
•. < EXAMPLE ONLY >
Broadcast or iAseigned Guide Channel No. your
Cable Station (VCR Plus+) "IV recelvse the
Name Channel No. station on
33 15
38 20
34 04
FOX 11
HBO
Nickelodeon
CBS
IMPORTANT NOTE:
For step "d", use the list you prepared at left.
You may leave lines blank if you don't receive
that station, or if the GUIDE CH number and the
CABLE (or TV) CH numbers are the same.
dPress •to move the
shaded area to the right
side.
VCR Plus+ CH SET UP
GUIDE CH CABLE CH
-) m--
02 --
SELECT:& • KEY
SET :)- KEY
END :ACTION KEY
Then, press &Y to change
the CABLE (or TV) CH
number.
Next, press •to set the CABLE (or TV) CH number.
Now, press &1' to continue. Repeat this operation
until the listis complete.
To Make Corrections
Press &V and •" to select the incorrect CABLE or'IV
CH number.
Then, press &_l' to change, or ADD/DLT to delete the
channel.
ePress ACTION three times to exit the VCR
Plus+ CH SET UP mode.
29
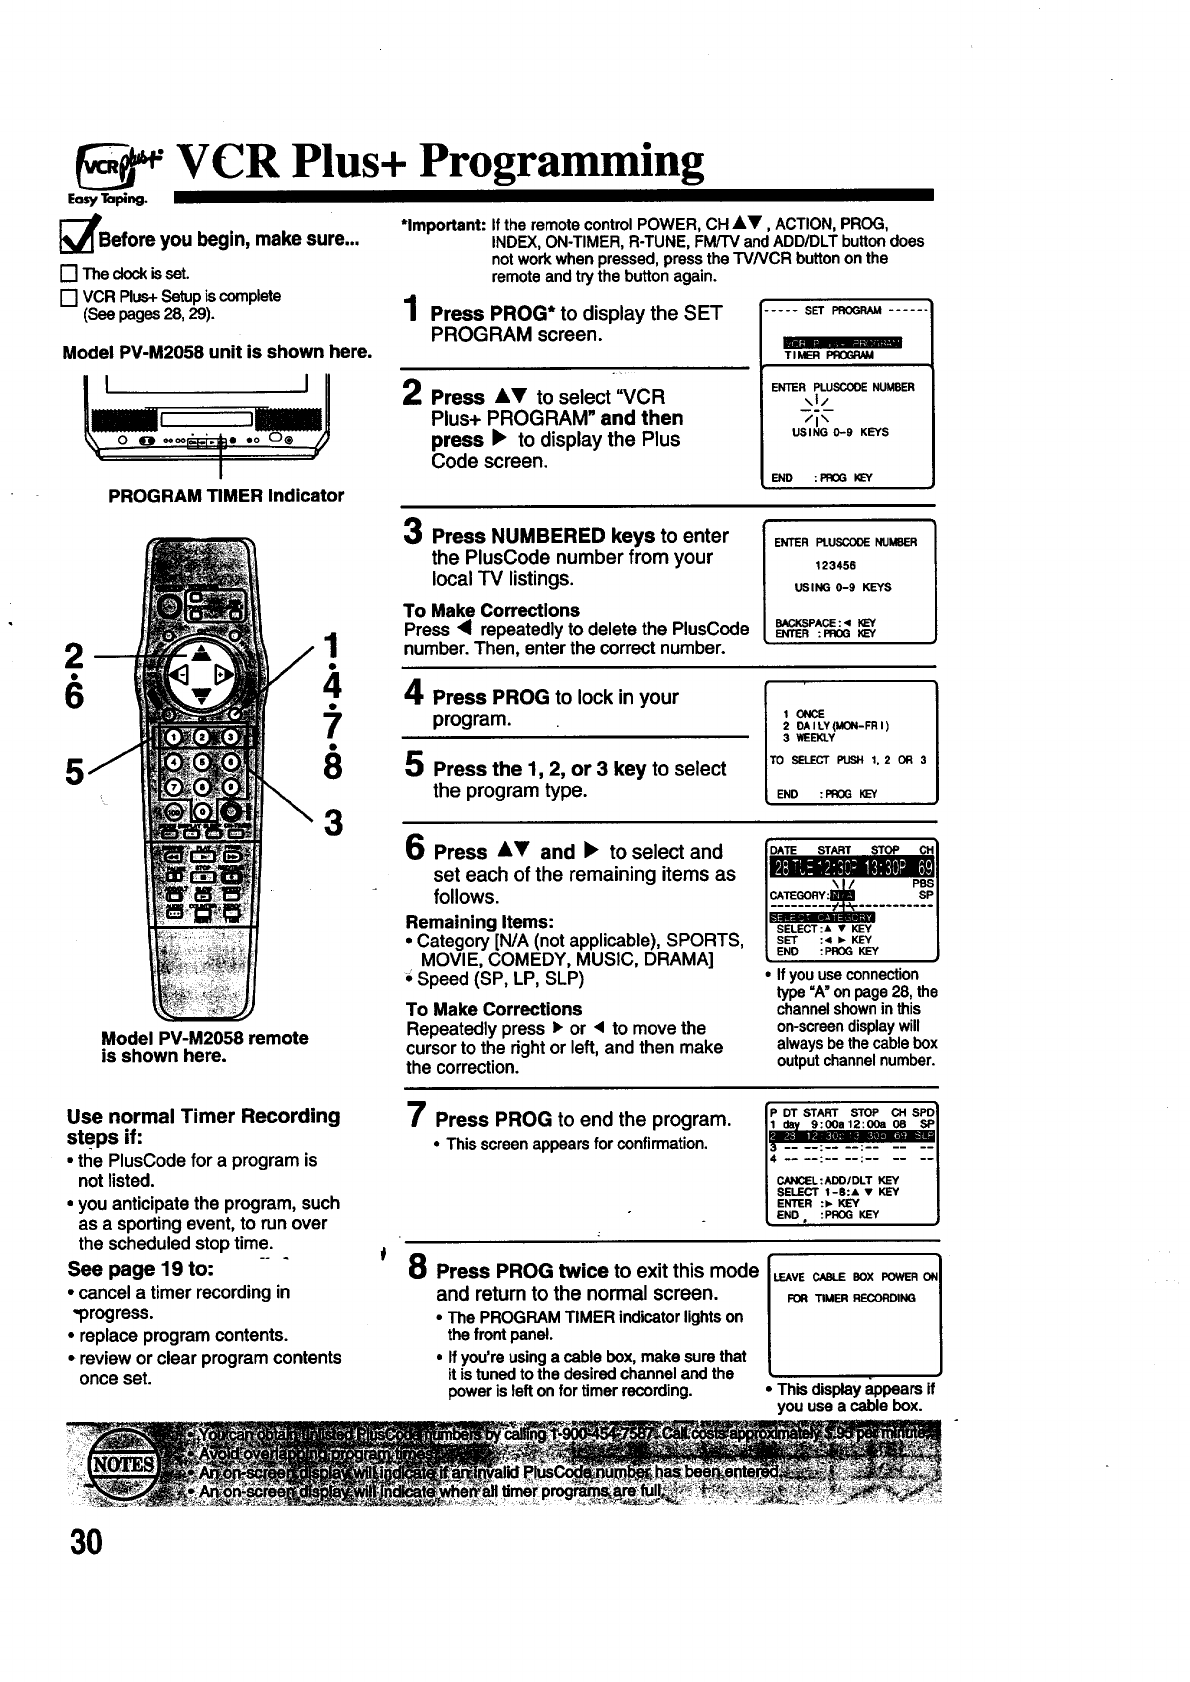
VCR Plus+ Programming
E=y Ta_.
_PBefore you begin, make sure...
I'-] Theclockisset.
[] VCR Plus+Setupiscomplete
(Seepages28, 29).
Model PV-M2058 unit is shown here.
lilac }II N
0 0 oooor_-_e *o O®
/
PROGRAM TIMER Indicator
*Important: If the remote control POWER, CH &V, ACTION, PROG,
1
INDEX, ON-TIMER, R-TUNE, FM/TV and ADD/DLT button does
notwork when pressed, press the TVNCR button on the
remote and try the button again.
Press PROG* to display the SET
PROGRAM screen.
2Press &V to select "VCR
Plus+ PROGRAM • and then
press •to display the Plus
Code screen.
..... SET PROGRAM
TIMER
ENTER PLUSCOOE NUMBER
\I/
/I \
USING 0-9 KEYS
END :I_OG
2.
6
Model PV-M2058 remote
is shown here.
!
4
7
8
3
3Press NUMBERED keys to enter
the PlusCode number from your
local TV listings.
To Make Corrections
Press 4 repeatedly to delete the PlusCode
number. Then, enter the correct number.
ENTER PLUSCODE NUMBER
123456
USING 0-9 KEYS
BACKSPAGE:4KL=Y
I_ITER :PROG KEY
4
5
Press PROG to lock in your
program.
Press the 1, 2, or 3 key to select
the program type.
I 1ONCE
2 OAt LY(MON-FR I)
3 WEEKLY
TO SELECT PUSH I, 2 OR 3
END : FROG
6Press AT and •to select and
set each of the remaining items as
follows.
Remaining Items:
•Category [N/A (not applicable), SPORTS,
MOVIE, COMEDY, MUSIC, DRAMA]
Speed (SP, LP, SLP)
To Make Corrections
Repeatedly press )' or < to move the
cursor to the rightor left, and then make
the correction.
DATE START STOP CH 1
mllmmlallll POSI
SELECT:A • KEY /
SET :4 •KEY /
END : PROG KEY J
• Ifyouuseconnection
type=A"on page28, the
channelshowninthis
on-screendisplaywill
alwaysbethecablebox
outputchannelnumber.
Use normal Timer Recording
steps if:
• the PlusCode for a program is
not listed.
•you anticipate the program, such
as a sporting event, to run over
the scheduled stop time.
See page 19 to:
•cancel a timer recording in
-progress.
• replace program contents.
•review or clear program contents
once set.
3O
7Press PROG to end the program.
•This screenappearsfor confirmation.
P DT START STOP CH SPDI
1 day 9:00a12:00a 08 SP I
-: ::;:_- :_-;-- -
I_:ADDIDLT KEY I
I SELECTI-B:A • KEY I
I ENTER:• KEY I
!END, :PROG KEY J
8 Press PROG twice to exit this mode
and retum to the normal screen.
•The PROGRAMTIMER indicatorlightson
thefrontpanel.
•Ifyou'reusinga cable box,make surethat
itistunedto the desiredchannelandthe
poweris left on fortimerrecording.
LEAVE CASLIE BOX POWER ON1
FOR TIMER RECORDING
• This display appears if
you use a cable box.
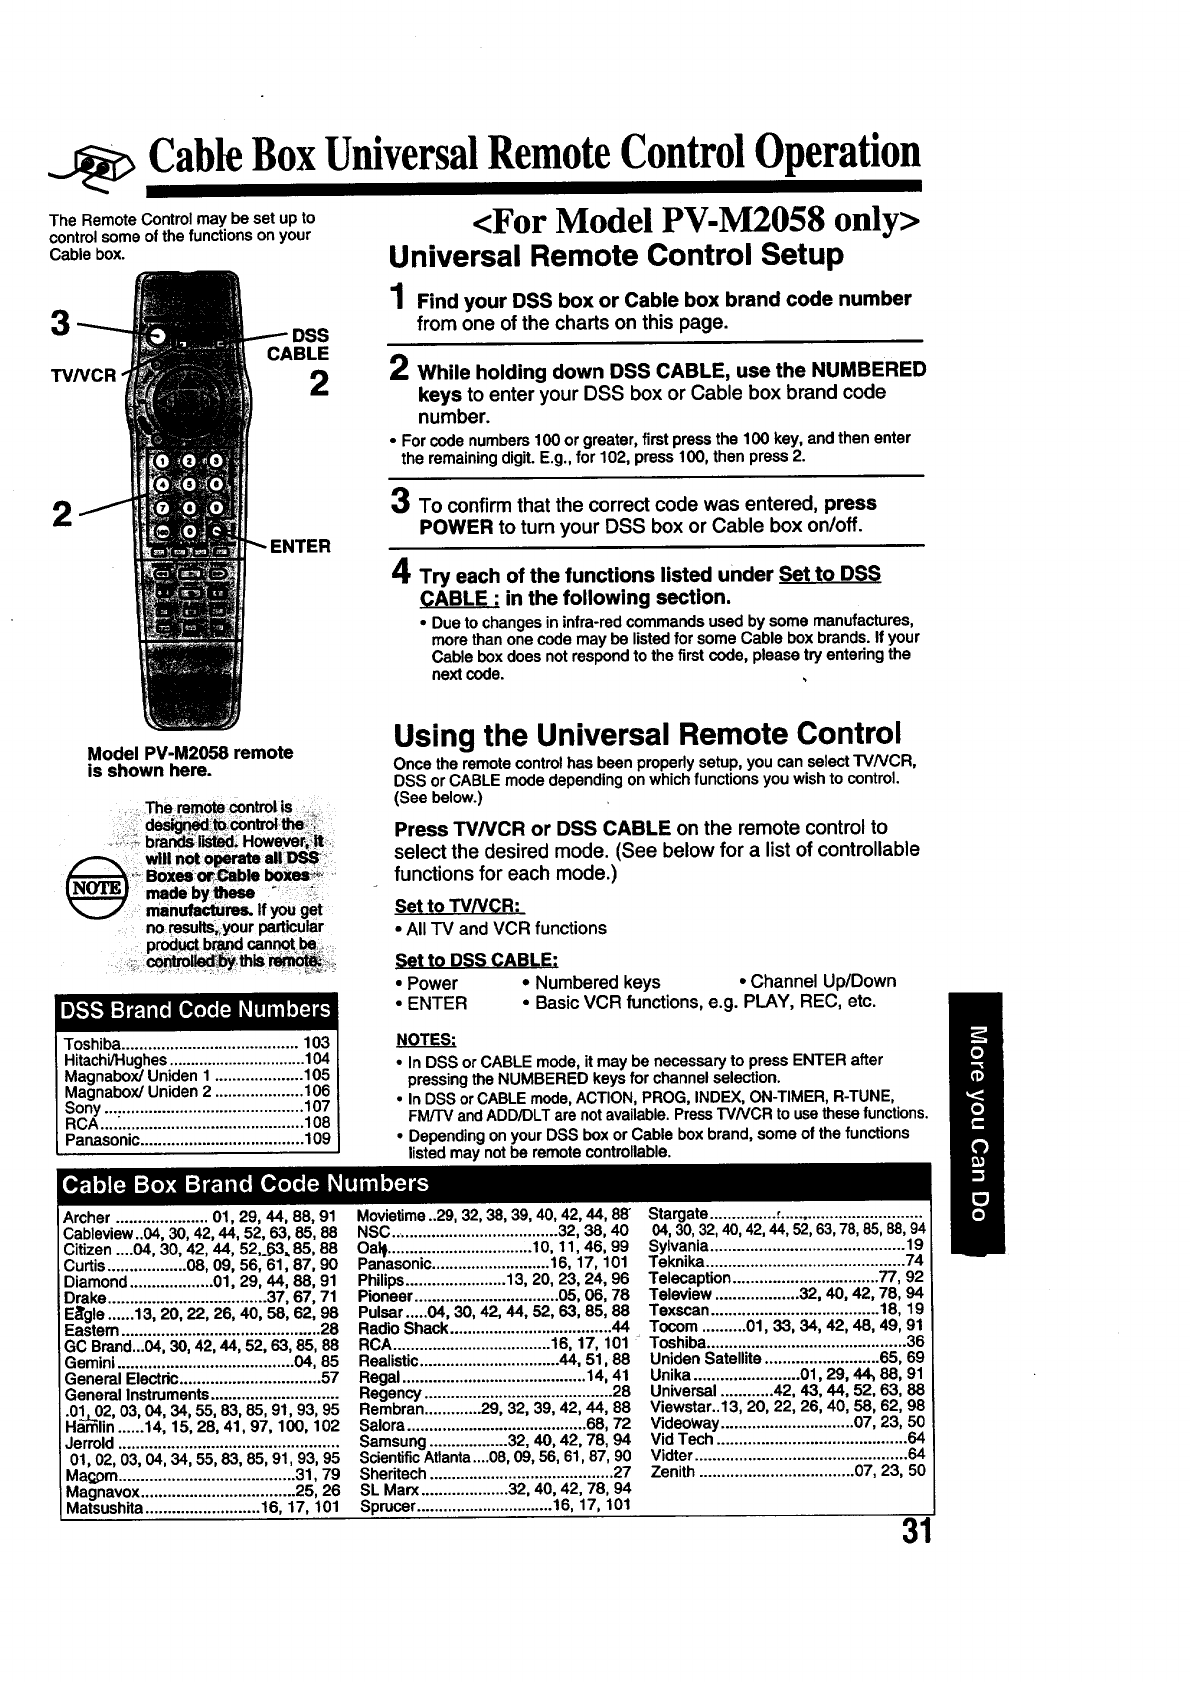
CableBoxUniversalRemoteControlOperation
TheRemote ontrolmaybesetupto <For Model PV-M2058 only>
control some of the functions on your
cab,ebox Universal Remote Control Setup
1Find your DSS box or Cable box brand code number
3from one of the charts on this page.
DSS
CABLE
TVNCR" 22While holding down DSS CABLE, use the NUMBERED
keys to enter your DSS box or Cable box brand code
number.
•Forcodenumbers100orgreater,firstpressthe100key,andthenenter
theremainingdigit.E.g.,for 102,press100,thenpress2.
23To confirm that the correct code was entered, press
POWER to turn your DSS box or Cable box on/off.
4Try each of the functions listed under Set to DSS
CABLE : in the following section.
•Due to changes in infra-red commands used by some manufactures,
more than one code may be listed for some Cable box brands. If your
Cable box does not respond to the first code, please try entering the
next coda.
Model PV-M2058 remote
is shown here.
Toshiba ........................................ 103
Hitachi/Hughes ................................ 104
Magnabox/Uniden 1 .................... 105
Magnabox/Uniden 2 .................... 106
Sony ............................................. 107
RCA...._ ......................................... 108
Panasonic ..................................... 109
Using the Universal Remote Control
Once the remote control has been properly setup, you can select TV/VCR,
DSS or CABLE mode depending on which functions you wish to control.
(See below.)
Press TV/VCR or DSS CABLE on the remote control to
select the desired mode. (See below for a listof controllable
functions for each mode.)
Set to TV/VCR:
•All IV and VCR functions
_et to DSS CABLE:
•Power •Numbered keys
•ENTER •Channel Up/Down
•BasicVCR functions,e.g. PLAY, REC, etc.
NOTES:
•In DSS or CABLE mode, it may be necessary to press ENTER after
pressing the NUMBERED keys for channel selection.
•In DSS or CABLE mode, ACTION, PROG, INDEX, ON-TIMER, R-TUNE,
FM/TV and ADD/DLT are notavailable. Press TVNCR to use these functions.
•Depending on your DSS box or Cable box brand, some of the functions
listed may not be remote controllable.
&mher ..................... 01, 29, 44, 88, 91
Cableview..04, 30, 42, 44, 52, 63, 85, 88
Citizen .._04, 30, 42, 44, 52,__3, 85, 88
Curtis .................. 08, 09, 56, 61, 87, 90
Diamond ................... 01, 29, 44, 88, 91
Drake .................................... 37, 67, 71
E_gle ...... 13, 20, 22, 26, 40, 58, 62, 98
Eastem ............................................. 28
GC Brsnd...04, 30, 42, 44, 52, 63, 85, 88
Gemini ........................................ 04, 85
General Electdc................................ 57
General Instruments .............................
.0!_02, 03, 04, 34, 55, 83, 85, 91, 93, 95
Hamlin ...... 14, 15, 28, 41, 97, 100, 102
Jerrold ..................................................
01, 02, 03, 04, 34, 55, 83, 85, 91, 93, 95
Mac,,.om........................................ 31, 79
Magnavox ................................... 25, 26
Matsushita .......................... 16, 17, 101
Movietime ..29, 32, 38, 39, 40, 42, 44, 88"
NSC ....................................... 32, 38, 40
Oal_............................... ,10, 11, 46, 99
Panasonic ........................... 16, 17, 101
Philips....................... 13, 20, 23, 24, 96
Pioneer ................................. 05, 06, 78
Pulsar ..... 04, 30, 42, 44, 52, 63, 85, 88
Radio Shack ..................................... 44
RCA .................................... 16, 17, 101
Realistic ................................ 44, 51,88
Regal .......................................... 14, 41
Regency ........................................... 28
Rembran ............. 29, 32, 39, 42, 44, 88
Salora ......................................... 68, 72
Samsung .................. 32, 40, 42, 78, 94
ScientificAtlanta ....08, 09, 56, 61, 87, 90
Sheritech .......................................... 27
SL Marx .................... 32, 40, 42, 78, 94
Sprucer ............................... 16, 17, 101
Stargate ............... :................................
04, 30, 32, 40, 42, 44, 52, 63, 78, 85, 88, 94
Sylvania ............................................ 19
Teknika ............................................. 74
Telecaption ................................. 77, 92
Teleview ................... 32, 40, 42, 78, 94
Texscan ...................................... 18, 19
Tocom .......... 01, 33, 34, 42, 48, 49, 91
Toshiba ............................................. 36
Uniden Satellite .......................... 65, 69
Unika ........................ 01,29, 44, 88, 91
Universal ............ 42, 43, 44, 52, 63, 88
Viewstar..13, 20, 22, 26, 40, 58, 62, 98
Videoway .............................. 07, 23, 50
Vid Tech ........................................... 64
Vidter ................................................ 64
Zenith ................................... 07, 23, 50
31
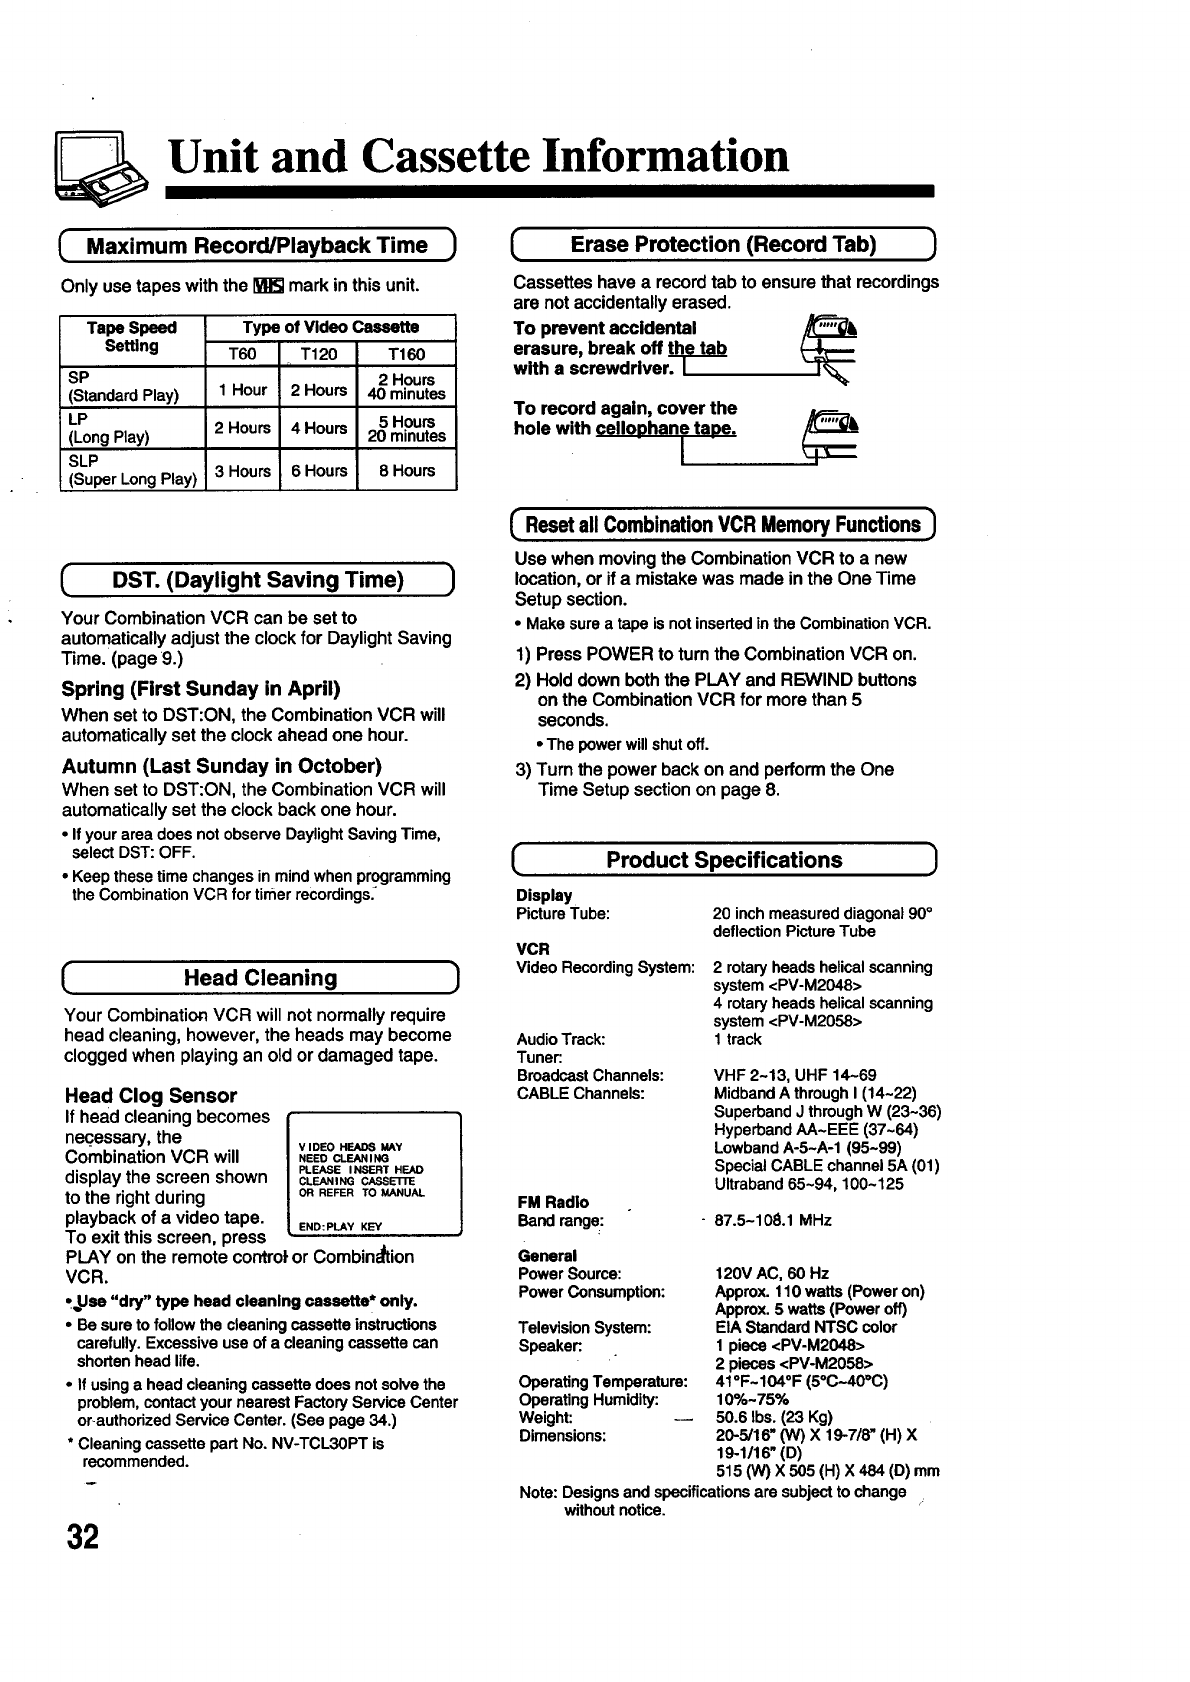
Unit and Cassette Information
(Maximum Record/PlaybackTime )
Only use tapes with the _ mark in this unit.
Tape Speed Type of Video Cassette
Setting
SP
(StandardPlay)
LP
(LongPlay)
SLP
(SuperLongPlay)
T60 T120 T160
rl 2 Hours
1 Hour 2 Hours 40 minutes
2 Hours 4 Hours 5 Hours
20 minutes
3 Hours 6 Hours 8 Hours
(Erase Protection (Record Tab)
Cassettes have a record tab to ensure that recordings
are not accidentally erased.
To prevent accidental
erasure, break off
with a screwdriver. I
To record again, cover the
hole with cello DhanitaDe.
(DST. (Daylight Saving Time) J
Your Combination VCR can be set to
automatically adjust the clock for Daylight Saving
Time. (page 9.)
Spring (First Sunday in April)
When set to DST:ON, the Combination VCR will
automatically set the clock ahead one hour.
Autumn (Last Sunday in October)
When set to DST:ON, the Combination VCR will
automatically set the clock back one hour.
•If yourarea does not observeDaylightSavingTime,
selectDST: OFF.
•Keepthese time changesinmindwhen programming
theCombinationVCR for timerrecordings_
(Head Cleaning )
Your Combination VCR will not normally require
head cleaning, however, the heads may become
clogged when playing an old or damaged tape.
Head Clog Sensor
If head cleaning becomes
nec.essary, the v=OEOW=JmSu*Y
Combination VCR will NEEOCLEANING
PLEASE I NSERT HEAD
display the screen shown CLEA.,_c_sse-rm
to the right during oRREFERTOMANUAL
playback of a video tape. END:PLAYKEY
TO exit this screen, press
PLAY on the remote contro| or Combin_ion
VCR.
•.,,Use"dry" type head cleaning cassette* only.
•Be suretofollowthe cleaningcassetteinstructions
carefully.Excessiveuse of a cleaningcassette can
shortenhead life.
•If usinga head cleaningcassettedoes notsolvethe
problem,contactyour nearestFactoryServiceCenter
or authorizedServiceCenter. (See page 34.)
• CleaningcassettepartNo. NV-TCL30PT is
recommended.
32
(Reset all Combination VCR Memory Functions
Use when moving the Combination VCR to a new
location, or if a mistake was made in the One Time
Setup section.
•Makesurea tape is notinsertedintheCombination VCR.
1) Press POWER to turn the Combination VCR on.
2) Hold down both the PLAY and RE;WIND buttons
on the Combination VCR for more than 5
seconds.
•The powerwillshutoff.
3) Turn the power back on and perform the One
Time Setup section on page 8.
(
Display
PictureTube:
Product Specifications
VCR
Video Recording System:
AudioTrack:
Tuner:
BroadcastChannels:
CABLEChannels:
FM Radio
Bandrange:
)
20 inch measured diagonal 90°
deflection Picture Tube
2 rotary heads helical scanning
system <PV-M2048>
4rotary heads helical scanning
system <PV-M2058>
1 track
VHF 2-13, UHF 14-69
Midband A through I (14-22)
Superband J through W (23-36)
Hyperband AA-EEE (37-64)
Lowband A-5-A-1 (95-99)
Special CABLE channel 5A (01)
Ultraband 65-94, 100-125
87.5-108.1 MHz
General
Power Source:
Power Consumption:
TelevisionSystem:
Speaker:.
OperatingTemperature:
OperatingHumidity:
Weight:
Dimensions:
120V AC, 60 Hz
Approx. 110 watts (Power on)
Approx. 5 watts (Power off)
EIA Standard NTSC color
1 piece <PV-M2048>
2 pieces <PV-M2058>
41 ° F- 104 ° F (5°C~40°C)
10%- 75%
50.6 Ibs. (23 Kg)
20-5/16" ON) X 19-7/8" (H) X
19-1/16" (D)
515 ON) X 505 (H) X 484 (D) mm
Note: Designsandspecificationsaresubjecttochange
withoutnotice.
Before Requesting Service
Check the following points once again if you are having trouble with your Combination VCR.
•2tw_=_= [el_J_41ttlg
No power...
[_
No pictureor sound...
Poor picture with normal sound...
Poor sound with normal picture...
Poor TV reception...
No color or poor color...
Ghost (multiple) images...
TV programs cannot be watched...
Channelcan notbe selected...
"IV program cannot be recorded...
Stereo or SAP broadcasts cannot be
recorded...
Timerrecordingcannotbe
)erformed...
qo playbackpicture,or theplayback
)ictureis noisyor containsstreaks...
VCR cannot be controlled...
LRtnl_F4[_
Combination VCR cannot be
controlled...
The ACTION, PROG,ON-TIMER
and FM/TV cannot be used...
Video cassette cannot be inserted...
Video cassette cannot be removed...
Eject does not function or insertion
cannot be done... -- -
Videocassetteejectswhen a
reeordingisstarted,orthe power is
tumedofffortimerrecording...
In stop mode, the VCR motor
(CYLINDER) continues to rotate...
VCR cannot be controlled...
•Completelyinsertthe PowerPlugintoan AC walloutlet.
•Set the POWERbuttonto ON.
•MakesureyourantennaorcablesystemisconnectedtotheCombinationVCR.(P.5}
•Checkthatthe powerplugiscompletelypluggedintoan AC outlet.
•Checkthatthe POWER buttonis setto on.
•Adjustthe BRIGHT,SHARPNESS, andPICTURE controlsinthe SET UPTV
menu.(P.12)
•AdjusttheVOLUME control.(P.11)
•Adjustthe SHARPNESSandPICTUREcontrolsinthe SET UPTV menu.(P.12)
•AdjusttheTINT and COLORcontrolsin theSET UP "IV menu.(P.12)
•Installa directionalantenna.
•Make surethat the channelbeingreceivedis intheCombinationVCR's
memory.(P. 8)
•Thedesignofthis unitis suchthatonlythe channelbeingrecordedcan beviewed.
•MakesureyourantennaorcablesystemisconnectedtotheCombinationVCR.(P.5)
•Makesurethatthe recordtab is intacton thecassette. (P. 32)
•This unit is not designed for stereo/SAP broadcast recording.
•Set the recordingStart/Stoptimecorrectly.(P.18-19)
• Timerrecordingmaynot beperformedorcontinuedif a powerinterruptionof more
than1 minuteoccursbefore orduringa Timer Recording,afterpoweris restored.
•Adjust the TRACKING control in either direction. (P.16)
•Make sure that VCR LOCK is set to off. (P. 23)
•Aimthe RemoteControldirectlyattheremotesensoronthe CombinationVCR.(P.7)
•Avoidallobstacleswhichmay interferewiththe signalpath.
•Inspecttheremotebatteriesfor possiblereplacement.(P. 4)
•Make surethatVCR LOCKis set to off.(P. 23)
•ExposingtheCombinationVCR remotesensorto directfluorescentoroutdoor
lightmaycausesignalinterference.
•Press the TVNCR button to select MAIN mode. (P. 31)
•Insert the cassette window side up; record tab facing you.
•Check that the power plug is completely plugged into an AQ outlet.
•Turn the POWER off and then on_and try ejecting or inserting the tape again.
• Make sure the record tab is intact on the cassette. (P. 32)
•To enablethequickplaymechanism,theVCR cylinderwillrotatefor about5
minutes.This reducesresponsetimefrom Stopto Playmodeand from Play to
RewindSearchmode.
•Make sure that VCR LOCK is set to off. (P. 2"3)"
If you cannot resolve the problem, please call the Customer SaUsfaction Center for product
assl'_tanoe at 201-348-9090.
To locate an authorized servicenter call toll free 1-800-211-PANA(7262). 33
Service Center List
CALIFORNIA
6550 Katella Avenue
Cypress, CA 90630
800 DubuqueAvenue
S. San Francisco,
CA 94O80
20201 Sherman Way
Suite 102
Canoga Park, CA
91306
3878 Ruffin Road
Suite A
San Diego, CA 92123
COLORADO
1640 SouthAbilene
Street
SuiteD
Aurora,CO 80012
FLORIDA
3700 North 29=Avenue
Suite.102
Hollywood, FL 33020
GEORGIA
8655 RoswellRoad
Suite100
Atlanta,GA 30350
ILLINOIS
1703 North Randall
Road
Elgin, IL 60123
(Pick-up/Drop-off only)
9060 Golf Road
Niles, IL 60714
MARYLAND
62 Mountain Road
Glen Bumie, MD21061
MASSACHUSETTS
60 GlacierDrive,
SuiteG
Westwood,MA02090
MICHIGAN
37048 Van Dyke
Avenue
StedingHeights,
MI 48312
MINNESOTA
7850-12 = Avenue South
Airport Business Center
Bloomington, MN 55425
OHIO
2236 WaycrossRoad
CivicCenter Plaza
ForestPark,OH 45240
PENNSYLVANIA
2221 Cabot BlvdWest
Suite B
Langhorne,PA 19047
Chartiers Valley
ShoppingCenter
1025WashingtonPike
Bridgeville,PA 15017
TENNESSEE
919-8 =Avenue South
Nashville, TN 37203
TEXAS,
7482 Harwin Drive
Houston, TX 77036
13615Welch Road
Suite101
FarmersBranch,
TX 75244
WASHINGTON
20425-84 = Avenue
South
Kent, WA 98032
HAWAII
99-859 Iwaiwa Street
Aiea, Hawaii 96701
Phone (808) 488-1996
Fax (808) 486-4369
Customer Orders Only 800-211-PANA(7262)
34
As of October '97
Warranty
Panasonic Consumer Electronics Company,
Division of Matsushita Electric Corporation
of America,
One Panasonic Way
Secaucus, New Jersey 07094
Panasonic Sales Company,
Division of Matsushita Electric of Puerto Rico, Inc.
AVE. 65 de Infanteria, Kin. 9.5
San Gabriel Industrial Park
Carolina, Puerto Rico 00985
Panasonic Video Products
Limited Warranty
Panasonic Consumer Electronics Company or Panasonic Sales Company (collectively referred to as "the Warrantor")
will repair this product with new or refurbished parts, free of charge, in the USA or Puerto Rico, in the event of a defect
in materials or workmanship as follows (all time periods commence from the date of the original purchase):
PRODUCT
CAMCORDER
VCR
A/V MIXER
MONITOR-VCR
PARTS
ONE (1) YEAR, EXCEPT CCD IMAGE SENSOR
CCD IMAGE SENSOR- SIX (6)MONTHS
ONE (I)YEAR
ONE (1) YEAR
ONE (1) YEAR, EXCEPT CRT
CRT -TWO (2) YEARS
LABOR
NINETY (90)DAYS
NINETY (90) DAYS
NINETY (90) DAYS
NINETY (90)DAYS
NINETY (90) DAYS
CAT- NINETY (90) DAYS
CUSTOMER PAYS ALL LABOR
CHARGES AFrER 90 DAYS
Monitor-VCR In-home or carry-in Service: 22" (diagonal) CAT /LCD and Larger
Monitor-VCR Carry-in Service: 21" (diagonal) CAT /LCD and smaller
Batteries (if included) -New rechargeable batteries in exchange for defective rechargeable batteries for ten (10) days. Non-rechargeable
batteries are not warranted.
(if included) -New video cassette tape in exchange for a defective video cassette tape for five (5) days.
In-home, carry-in or mall-in service, as applicable, in the USA can be obtained during the warranty period by contacting a Panasonic
Services Company (PASC) Factory Servicenter listed in the Service Directory. Or call toll free 1-800-211-PANA(7262), to locate an
authorized PASC Servicenter. Carry-in or mail-in service in Puerto Rico can be obtained during the warranty period by calling the
Panasonic Sales Company telephone number listed in the Servicenter Directory.
This warranty is extended only to the original purchaser. A purchase receipt or other proof of the date of the original purchase is
requires before warranty service is rendered.
This warranty only covers failures due to defects in materiais and workmanship which occur during normal use and does not cover
normal maintenance, including, but not limited to, video and audio head cleaning. The warranty does not cover damage which occurs in
shipment, or failures which are caused products not supplied by the warrantor, or failures which result from accident, misuse, abuse,
neglect, mishandling, misapplication, alteration, modification, faulty installation, set-up adjustments, improper antenna, inadequate
signal pickup, maladjustment of consumer controls, improper operation, power line surge, improper voltage supply, lightning damage,
commercial use such as hotel, office, restaurant, or other business or rental use of the product, or service by anyone other than a PASC
Factoby Servicenter or aPASC authorized Servicenter, or damage that is attributable to acts of GOd.
LIMITS AND EXCLUSIONS
There are noexpress warranties except as listed above.
THE WARRANTOR SHALL NOT BE LIABLE FOR INCIDENTAL OR CONSEQUENTIAL DAMAGES (INCLU[)ING, WITHOUT
LIMITATION, DAMAGE TO TAPES) RESULTIN_ FROM THE USE OF THIS PRODUCTS, OR ARISING OUT OF ANY BREACH
OF THE WARRANTY. ALL EXPRF_S AND IMPLqEDWARRANTIES, INCLUDING THE WARRANTIES OF MERCHANTABILITY
AND FITNESS FOR PARTICULAR PURPOSE, ARE LIMITED TO THE APPLICABLE WARRANTY PERIOD SET FORTH ABOVE.
Some states do not allow the exclusion or limitation of incidental or consequential damages, or limitations on how long an implied
waffanty lasts, so the above exclusions or limitations may not apply to you.
This warranty gives you specific legal rights and you may also have other rights which vary from state to state.
If a problem with this product develops during or after the warranty period, you may contact your dealer or Servicenter. If the problem is not
handled to your satisfaction, then write to the Customer Satisfaction Center at the Panasonic Consumer Electronics Company address above.
SERVICE CALLS WHICH DO NOT INVOLVE DEFECTIVE MATERIALS OR WORKMAN_tlIP AS DETERMINED BY THE
WARRANTOR, IN ITS SOLE DISCRETION, ARE NOT COVERED. COSTS OF SUCH SERVICE CALLS ARE THE
RESPONSIBILITY OF THE PURCHASER.
warvid 10/20/'97
35
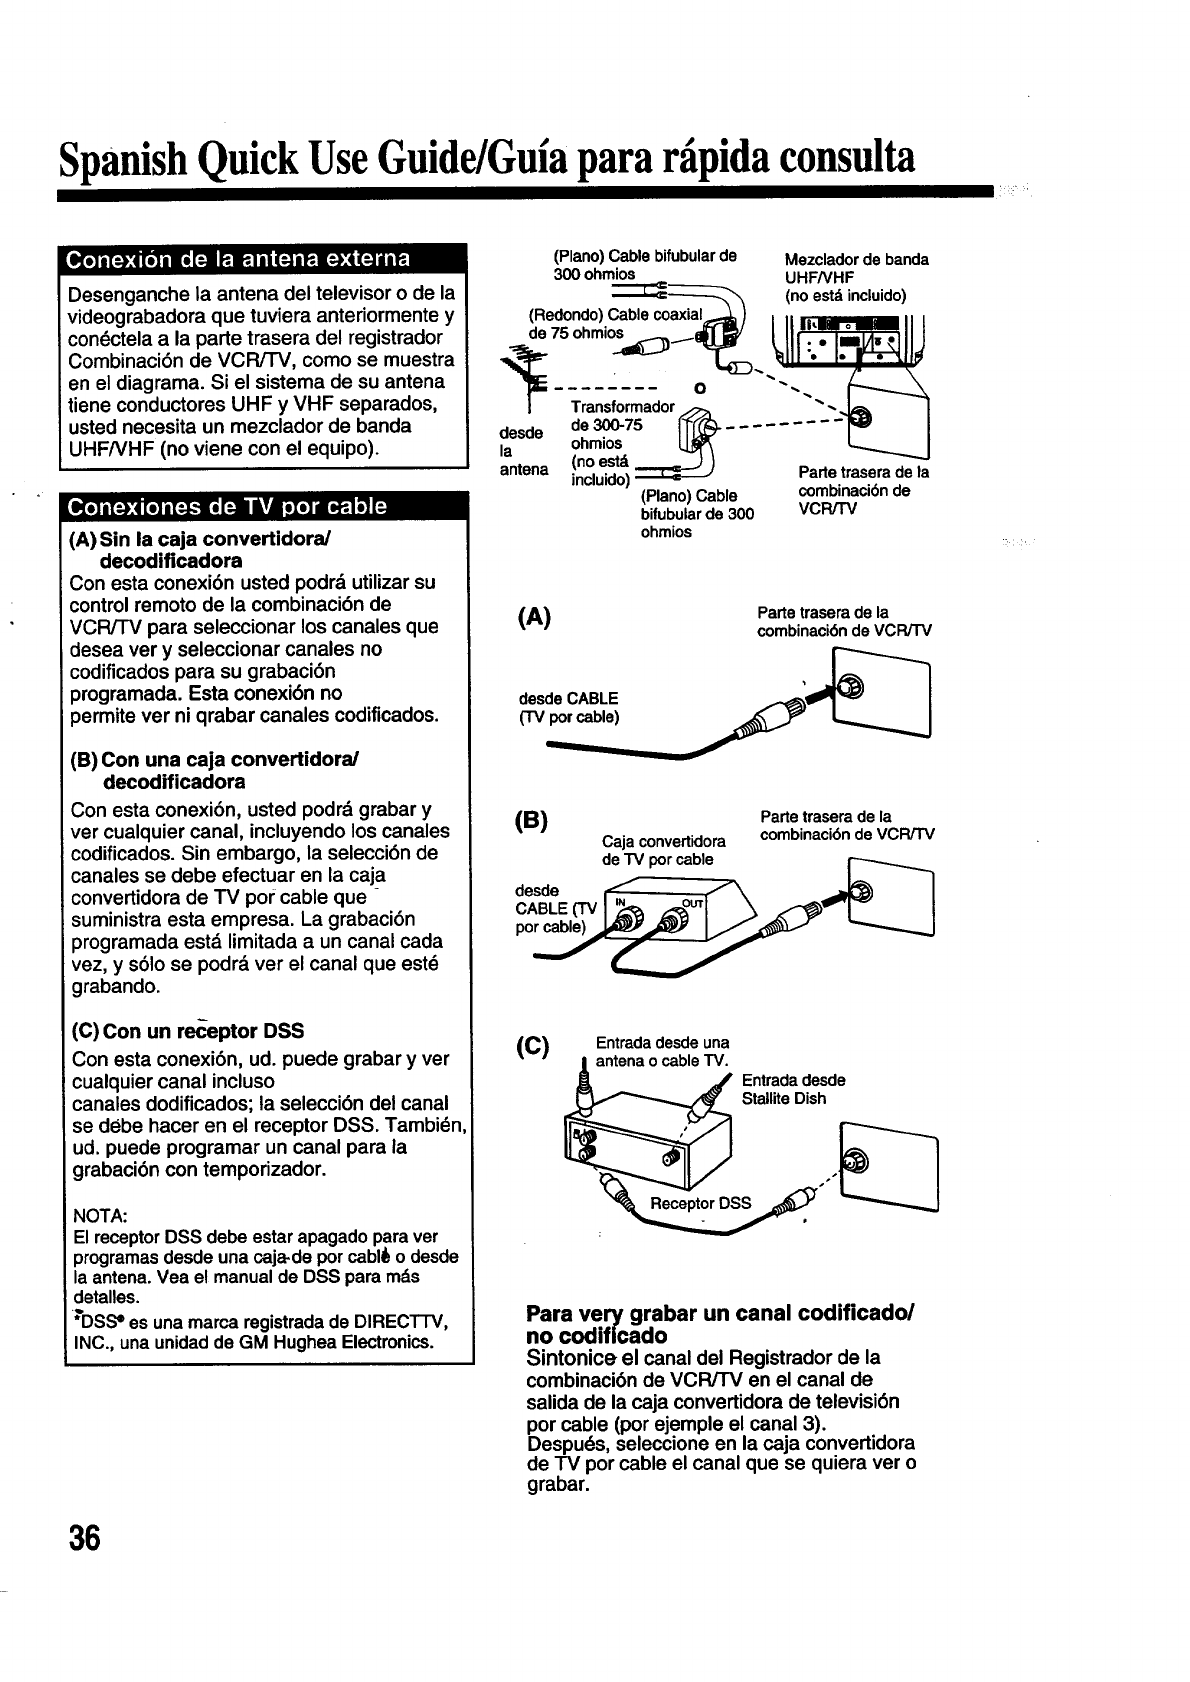
SpanishQuickUseGuide/Guiapararfipidaconsulta
Desenganche la antena del televisor o de la
videograbadora que tuviera anteriormente y
con_ctela a la parte trasera del registrador
Combinaci6n de VCRFFV, como se muestra
en el diagrama. Si el sistema de su antena
tiene conductores UHF y VHF separados,
usted necesita un mezclador de banda
UHF/VHF (no viene con el equipo).
[_,TiF_4_'J_,.".]_L"q/iT/ ,[._i L"_l_l_."l_
(A) Sin la caja convertidoraJ
decodificadora
Con esta conexi6n usted podrd utilizar su
control remoto de la combinaci6n de
VCR/TV para seleccionar los canales que
desea ver y seleccionar canales no
codificados para su grabaci6n
programada. Esta conexi6n no
3ermite ver ni qrabar canales codificados.
(B) Con una caja convertidora/
decodificadora
Con esta conexi6n, usted podrd grabar y
ver cualquier canal, incluyendo los canales
codificados. Sin embargo, la selecci6n de
canales se debe efectuar en la caja
convertidora de TV por cable que
suministra esta empresa. La grabaci6n
programada estd limitada a un canal cada
vez, y s61o se podrd ver el canal que est_
grabando.
(C) Con un re<_eptor DSS
Con esta conexibn, ud. puede grabar y ver
cualquier canal incluso
canales dodificados; la selecci6n del canal
se debe hacer en el receptor DSS. Tambi_n
ud. puede programar un canal para la
grabaci6n con temporizador.
NOTA:
El receptorDSS debe estarapagadopara ver
programasdesde unacaja.de porcabl6o desde
la antena.Vea el manualde DSS param_s
detalles.
*_DSS• es una marca registradade DIRECTrV,
INC., unaunidadde GM HugheaElectronics.
(Piano) Cable bifubular de Mezclador de banda
300 ohmios UHFNHF
_=_;;_¢_ (no estd incluido)
(Redondo) Cable coaxiala..._)I II _II I
____,__ o " -..
/Transformador_ "",-_ 1
desdede30 7S ......... I
_ohmios II_ _ I
I- __
(no estd
antena incluido)_'---J Partstraseradela
(Piano) Cable combinaci6n de
bifubular de 300 VCR/TV
ohmios
(A) Parts trasera de la
combinaci6n de VCR/TV
CABLE
Parte trasera de la
(B) Caja convertidora combinaci6n de VCR/TV
de TV por cable
desde f._ _I
CABLECrVl .k I
(C) Entrada desde una
antena o cable TV.
Entrada dasde
Stallita Dish
Para very grabar un canal codificadol
no codificado
Sintonice el canal del Registrador de la
combinacibn de VCR/TV en el canal de
salida de la caja convertidora de televisi6n
por cable (por ejemple el canal 3).
Despu_s, seleccione en la caja convertidora
de TV por cable el canal que se quiera ver o
grabar.
36
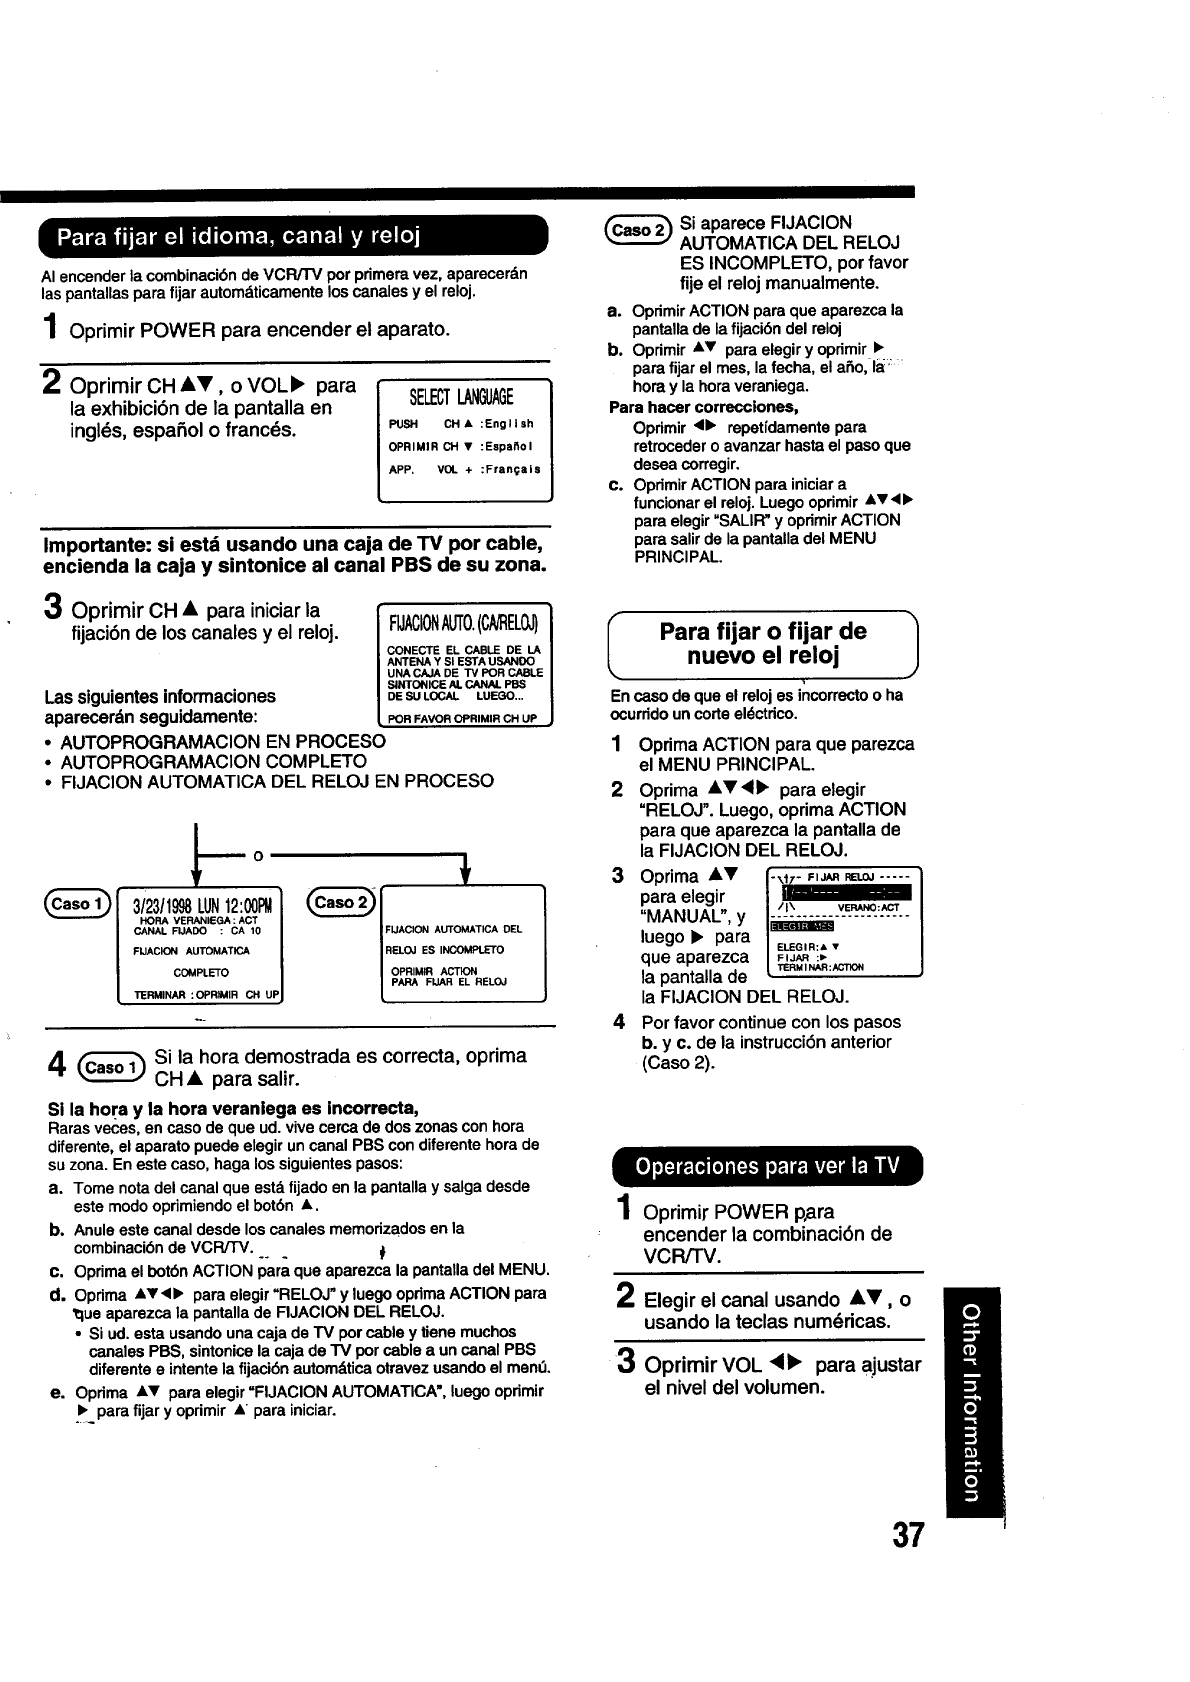
AI encender la combinaci6n de VCR/I-V por primera vez, aparecerdn
las pantallas para fijar automdticamente los canales y el reloj.
10primirPOWER para encender el aparato.
20primirCH AV, o VOL_ para
la exhibici6n de la pantalla en
ingles, espa5ol o franc_s.
SELECTLANGUAGE
PUSH CH •:English
OPRIMIRCHV :Espa_ol
APP, VOL +:Fran_ais
Importante: si estd usando una caja de TV por cable,
encienda la caja y sintonice al canal PBS de su zona.
30primirCH • para iniciar la
fijaci6n de loscanales yel reloj.
Lassiguientesinformaciones
aparecerdnseguidamente:
FIJACIONAUT0.(C/VRELOJ)
CONECTE EL CABLE DE LA
ANTENA Y Sl ESTA USANDO
UNA CAJA DE "IV POR CABLE
SlNTONICE AL Ch.NAL PBS
DE SU LOCAL LUEGO...
POR FAVOR OPRIMIR CH UP
• AUTOPROGRAMACION EN PROCESO
• AUTOPROGRAMACION COMPLETO
• FIJACION AUTOMATICA DEL RELOJ EN PROCESO
-.-o
3/23/1998LUN12:00PM
HORA VERANIEGA : ACT
CANAL FIJADO :CA 10
FUACION AUTOMATICA
COMPLETO
"I_RMINAR :OPRIMIR CH UP
4Si la hora demostrada es correcta, oprima
CH • para salir.
Si la hora y la hora veraniega es incorrecta,
Raras veces, en caso de que ud. vive cerca de dos zonas con hora
diferente, el aparato puede elegir un canal PBS con diferente hora de
su zona. En este caso, haga los siguientes pasos:
a. Tome nota del canal que estd fijado en la pantalla y salga desde
este modo oprimiendo el bot6n A.
b. Anule este canal desde los canales memorizados en la
combinaci6n de VCRiTV....
c. Oprima el bot6n ACTION para que aparezca la pantalla del MENU.
d. Opdma ,L_,<• para elegir "RELOJ" y luego opdma ACTION para
tlue aparezca la pantalla de FIJAClON DEL RELOJ.
°Si ud. esta usando una caja de TV por cable y tiene muchos
canales PBS, sintonica la caja de "IV pot cable a un canal PBS
diferente e intente la fijaci6n automdtica otravez usando el menU.
e. Opdma =,v para elegir =FIJAClON AUTOMATICA', luego oprimir
o1__para fijar y oprimir A para iniciar.
Si aparece FIJAClON
AUTOMATICA DEL RELOJ
ES INCOMPLETO, por favor
fije el reloj manualmente.
a. Oprimir ACTION para qua aparezca la
pantalla de la fijaci6n del reloj
b. Oprimir A_' para elegir y oprimir •
para fijar el mes, la fecha, et aF=o,l_ '_
hora y la hora veraniega.
Para hacer correcciones,
Opdmir <• repetidamente para
retroceder o avanzar hasta el paso que
desea corregir.
c. Opdmir ACTION para iniciar a
funcionar el reloj. Luego oprimir AT • •
para elegir "SALIR" y opdmir ACTION
para salir de la pantalla del MENU
PRINCIPAL.
IPara fijar o fijar de 1nuevo el reloj
1
En caso de qua el reloj es incorrecto o ha
ocurddo un corte eldctdco.
1
2
3
4
Oprima ACTION para que parezca
el MENU PRINCIPAL.
Oprima &1',_l_ para elegir
"RELOJ". Luego, oprima ACTION
para que aparezca la pantalla de
la FIJACION DEL RELOJ.
Oprima AV
para elegir /1\ VERANO:ACr
"MANUAL", y......................
luego • para ELEGIR:AV
que aparezca F_JA. :,-
TERMI NAR :ACTION
la pantalla de
la FIJACION DEL RELOJ.
Por favor continue con los pasos
b. y c. de la instrucci6n anterior
(Caso 2).
10primirPOWER p_ra
encender la combinaci6n de
VCRFFV.
2Elegir el canal usando •I', o
usando la teclas numdricas.
30primirVOL <b para aiustar
el nivel del volumen.
37
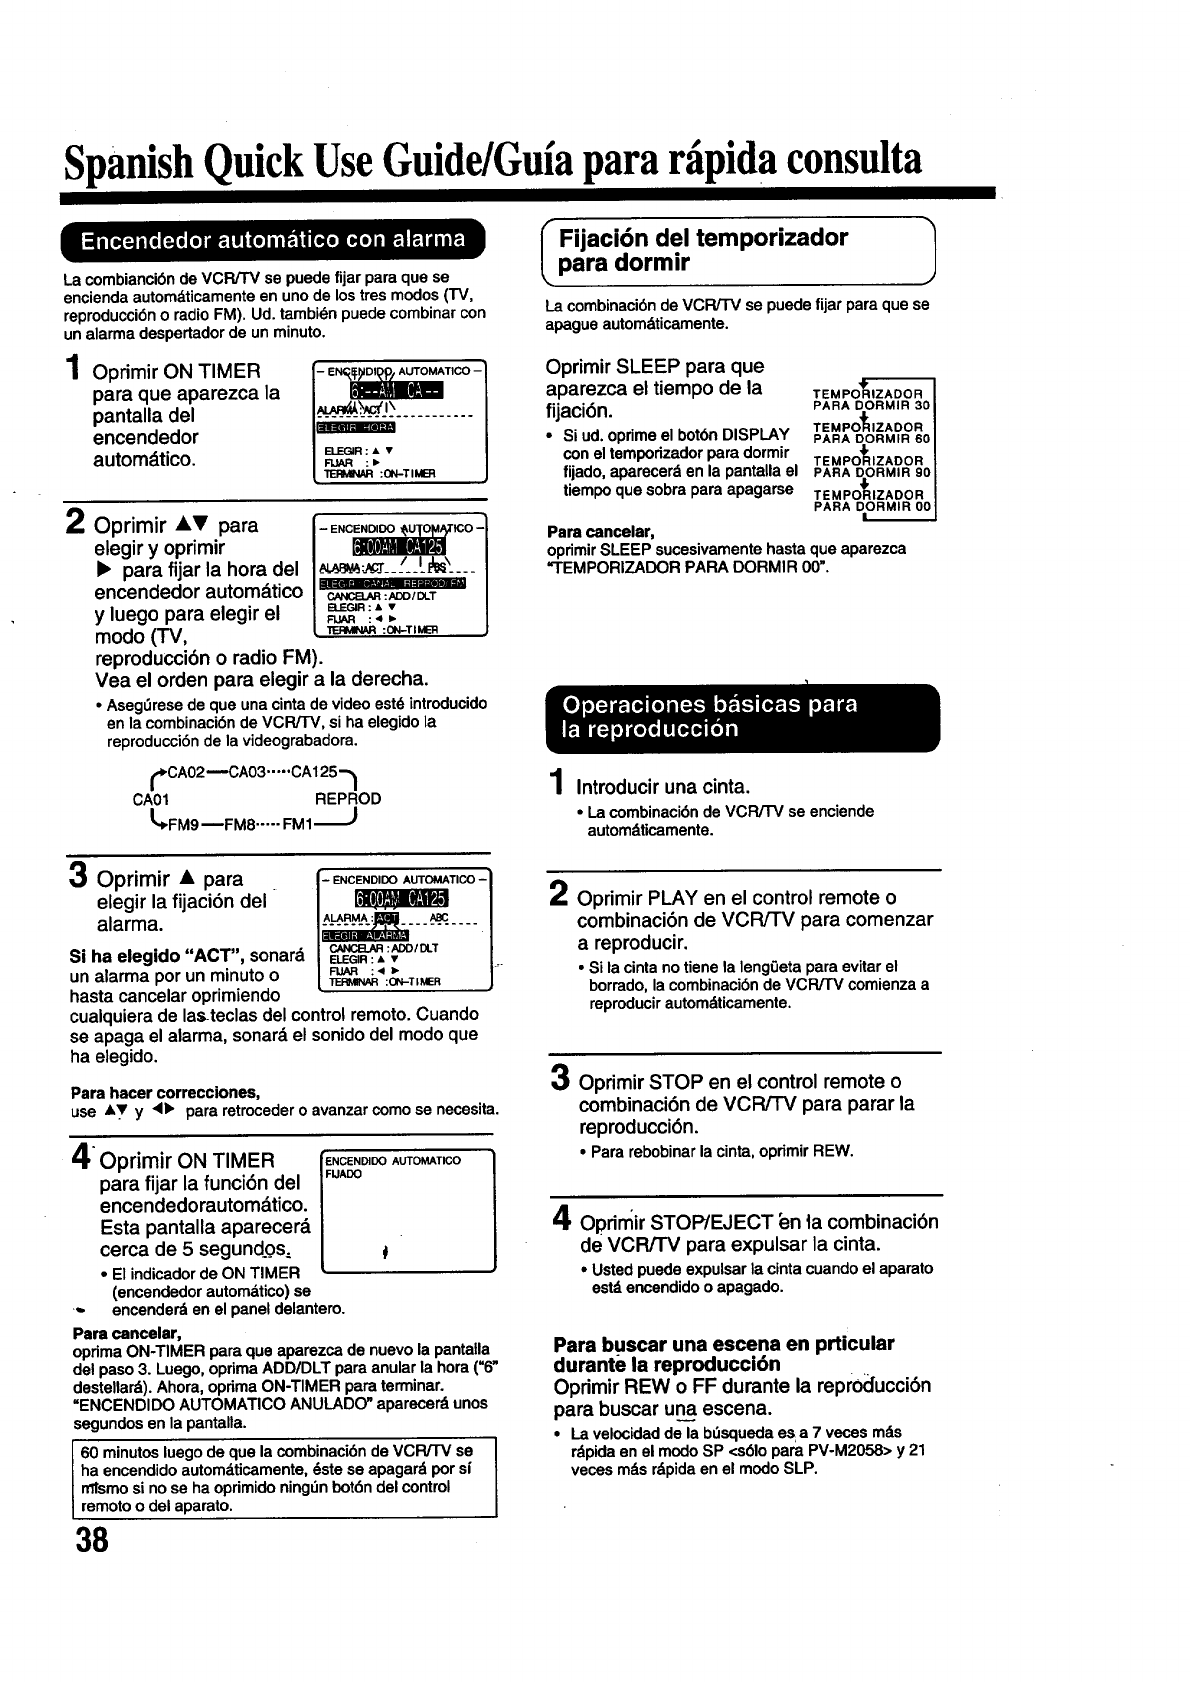
SpanishQuickUseGuide/Guiapararfipidaconsulta
La combianci6nde VCR/TV se puedefijar para que se
enciendaautomdticamenteen unode lostres modos(TV,
reproducci6no radioFM). Ud.tambidnpuedecombinarcon
unalarma despertadorde unminuto.
1Oprimir ON TIMER
para que aparezca la
pantalla del
encendedor
automdtico.
EI__TICO --"
:x_._'..L',...........
B..EGIR : & •
[TE_/_I_:0N-T IMER
mE
20primirAT para
elegir y oprimir
• para fijar la hora del
encendedor automdtico
y luego para elegir el
modo (-rv,
-ENCE_ICO -I
__,_____/..LA_"..._I
_:,N3D/DLT I
B.EGIR: .• • I
FUAR :4_ 1
:(3N-TIMER
reproducci6n o radio FM).
Yea el orden para elegir ala derecha.
•Aseg_rese de que una cinta de video est6 introducido
en la combinaci6n de VCR/TV, si ha elegido la
reproducci6n de la videograbadora.
_.CA02mCA03 ..... CA125"_
CA01 REPROD
L,FMg--FMS.....FMI
30primir• para
elegir la fijaci6n del
alarma.
Si ha elegido "ACT", sonard
un alarma por un minuto o
hasta cancelar oprimiendo
- ENCENDIDO AUTOMATICO --I1
_oIom[o_
:ADD/DLT
ELIEGIR :• •
FUAR :<1_
:ON-TIMER
cualquierade las_teclasdel controlremoto.Cuando
seapaga el alarma,sonardel sonidodel modoque
ha elegido.
Para hacer correcciones,
use AT y,41_ para retroceder o avanzar como se necesita.
40primirON TIMER
para fijar la funci6n del
encendedorautomdtico.
Esta pantalla aparecerd
cerca de 5 segundos.
•El indicador de ON TIMER
(encendedor automdtico) se
-.,.encender_en el panel delantero.
Pare canceler,
optimaON-TIMER pareque aparezcade nuevola pantalla
del paso3. Luego,oprimaADD/DLT pareanularlahora (=6"
destellar_).Ahora,oprimaON-TIMER paraterminar.
=ENCENDIDOAUTOMATICOANULADO"aparecer&unos
segundosen la pantalla.
60 minutosluegode que la combinaci6nde VCR/TV se
ha encendidoautomdticamente,6stese apagardpors|
mlsmosi no se ha oprimidoning_nbot6ndelcontrol
remotoo del aparato.
38
IFijaci6n del temporizador 1
pare dormir
La combinaci6n de VCR/TV se puede fijar para que se
apague automdticamente.
Oprimir SLEEP para que
aparezca el tiempo de la TEMPO_
fijaci6n. PARA D.ORMIR 30
TEMPO_IZADOR !
•Si ud. oprime el botbn DISPLAY PARA DORMIR 60
con el temporizador para dormir TEMPOt_IZADOR
fijado, aparecerd en la pantalla el PARA DORMIR 90
tiempo que sobra para apagarse 4'
TEMPORIZADOR
PARA D=ORMIR 00
Pare canceler,
oprimir SLEEP sucesivamente hasta que aparezca
"TEMPORIZADOR PARA DORMIR 00".
,4
/ Introducir una cinta.
•La combinaci6n de VCRi'rv se enciende
autom&ticamente.
20primirPLAY en el control remote o
combinacibn de VCR/TV para comenzar
a reproducir.
•Si la cinta no tiene la leng0eta para evitar el
borrado, la combinaci6n de VCR/TV comienza a
reproducir autom&ticamente.
30primirSTOP en el control remote o
combinaci6n de VCR/'rv para parar la
reproducci6n.
•Para rebobinar la cinta, oprimir REW.
40primirSTOP/EJECT bn 4acombinacibn
de VCR/TV para expulsar la cinta.
•Usted puede expulsar la cinta cuando el aparato
estd.encendido o apagado.
Para buscar una escena en prticular
durante la reproducci6n
Oprimir REW o FF durante la reproducci6n
para buscar una escena.
• La velocidad de la bfisqueda e s a 7 veces mds
rdpida en el modo SP <s61opare. PV-M2058> y 21
veces mds rdpida en el modo SLP.
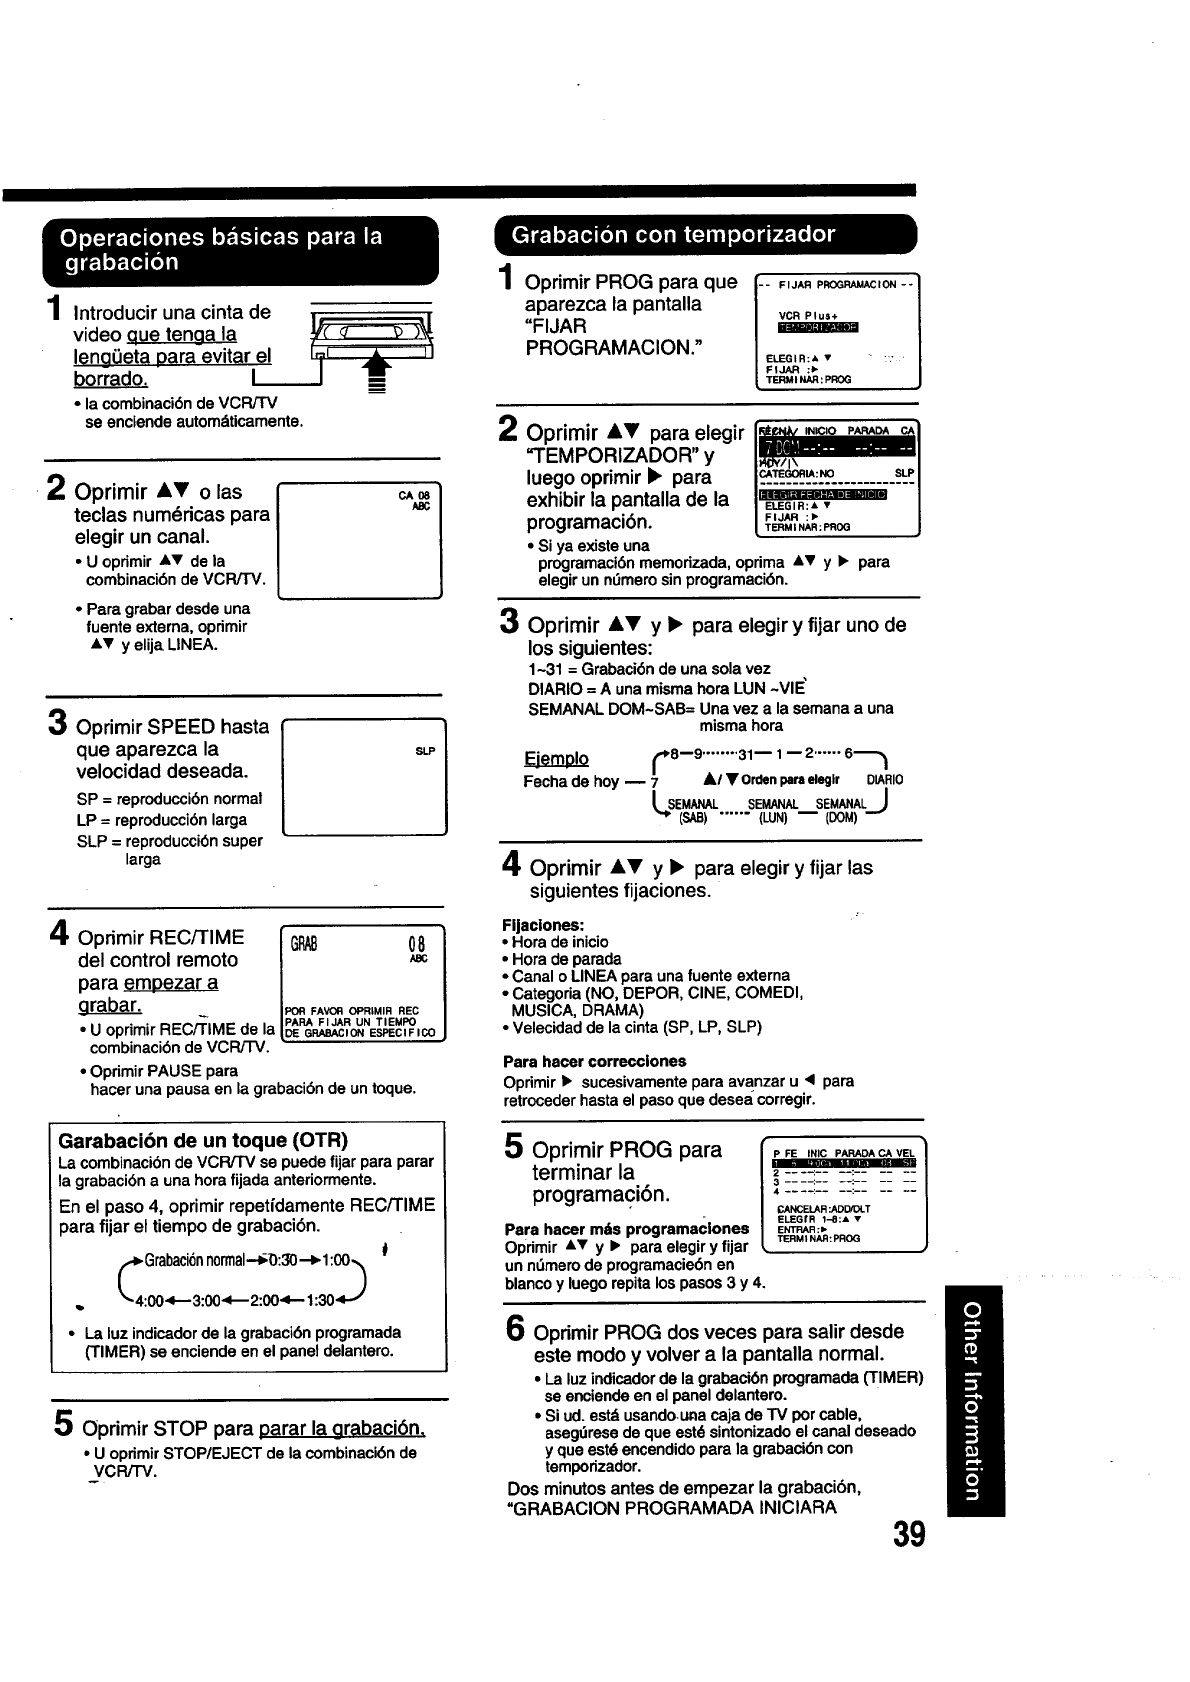
1Introducir una cinta de
video aue tenga la
leng(Jeta para evitar el
borrado. I_
•la combinaci6nde VCR/TV
se enciendeautom_ticamente.
•20primir iT o las {
teclas num_ricas para i
elegir un canal. I
•U oprimiriV de la I
combinaci6nde VCR/TV. J
•Para grabardesde una
fuente extema,oprimir
&v y elijaLINEA.
CAO8
30primirSPEED hasta
que aparezca la
velocidad deseada.
SP = reproducci6nnormal
LP = reproducci6n larga
SLP = repmducci6nsuper
larga
40primirREC/TIME I GI_
del control remoto
para empezar a
I_:_ FAVOR OPRIMIR REC
•U oprimirREC/'FIMEde a [DEIPAFIAGRABACloNFIJARUNEsPECIFIcoTIEMPO
combinacibn de VCR/TV.
•Oprimir PAUSE para
haceruna pausaen la grabaci6nde un toque.
Garabaci6n de un toque (OTR)
La combinaci6nde VCR/TV sepuede fijarpareparer
la grabaci6na una horafijadaanteriormente.
En el paso 4, oprimir repefidamente REC/TIME
para fijar el tiempo de grabaci6n.
#
cGrabad0nn0rmal--_0:30--_1:0(0
., 4:00,4--3:00_2:00_-- 1:304-,/
• La luz indicadorde la grabaci6nprogramada
(TIMER) se enciende en el paneldelantero.
50primir STOP para Darar la grabaci6n.
•u oprimirSTOP/EJECT de la combinaci6nde
VCRiTV.
1Oprimir PROG para que
aparezca la pantalla
"FIJAR
PROGRAMAClON." -- FIJAR P_ION --ELEGIR:A •-:':
FIJAR :Ib
TERMI NAR : PROG
20primir&_' para elegir INICIOPARADA
=TEMPORIZADOR" y
luego oprimir •para
exhibir la pantalla de la
programaci6n.
•si yaexisteuna
programaci6nmemorizada, oprima &v y •para
elegirun nOmerosinprogramaci6n.
30primir&V y • para elegir yfijar uno de
los siguientes:
1-31= Grabaci6ndeunasolavez
DIARIO= AunamismahoraLUN-VIE'
SEMANALDOM~SAB=Unaveza lasemanaa una
mismahora
1 8-9........31-1-2......
Fecha de hoy _7A/• OLden paraeleglr DIARI0
SEMANAL SEMANAL SEMANALJ
(SAB) ...... (LUN) m(DOM)
40primiriT y• para elegir y fijar las
siguientes fijaciones.
Fljaciones:
• Hora de inicio
•Hora de parade
• Canal o LINEA para una fuente externa
•Categoria (NO, DEPOR, CINE, COMEDI,
MUSICA, DRAMA)
•Velecidad de la cinta (SP, LP, SLP)
Para hacer correcciones
Oprimir •sucesivamente para avanzar u 4para
retroceder hasta el paso que desea corregir.
50primir PROG para
terminar la
programacibn.
Para hacer rodsprogramaciones
Oprimir&T y •paraelegiry fljar
unnSmerode programacie6nen
;-i-- :
If.,ANCELAR :ADD/DLT
I ELEGrR 1-8:1, •
blancoy luegorepitalospasos3 y 4.
60primirPROG dos veces para salir desde
este modo yvolver a la pantalla normal.
•La luzindicadorde la grabaci6nprogramada(TIMER)
seenciendeen el paneldelantero.
•Si ud.estd usandounacaja de TV porcable,
asegdresede queest6sintonizadoel canal deseado
y queest6encendidoparala grabaci6ncon
temporizador.
Dos minutos antes de empezar la grabacibn,
"GRABACION PROGRAMADA INICIARA 39
