PANASONIC Compact VHS C Camcorder Manual 98070477
User Manual: PANASONIC PANASONIC Compact VHS C Camcorder Manual PANASONIC Compact VHS C Camcorder Owner's Manual, PANASONIC Compact VHS C Camcorder installation guides
Open the PDF directly: View PDF ![]() .
.
Page Count: 76

Panason,c ®
PalIT)COI'_dEI"_ PalmSightTM
Camcorder
Operating Instructions
PV-L858
Pleasereadtheseinstructionscarefullybeforeattemptingto operatethisproduct.Pleasesavethismanual.
Sp_oQuick Use Guide is included.
Guia para rdpida consulta en espa_ol est:_ incluida. VQTW0688(A)
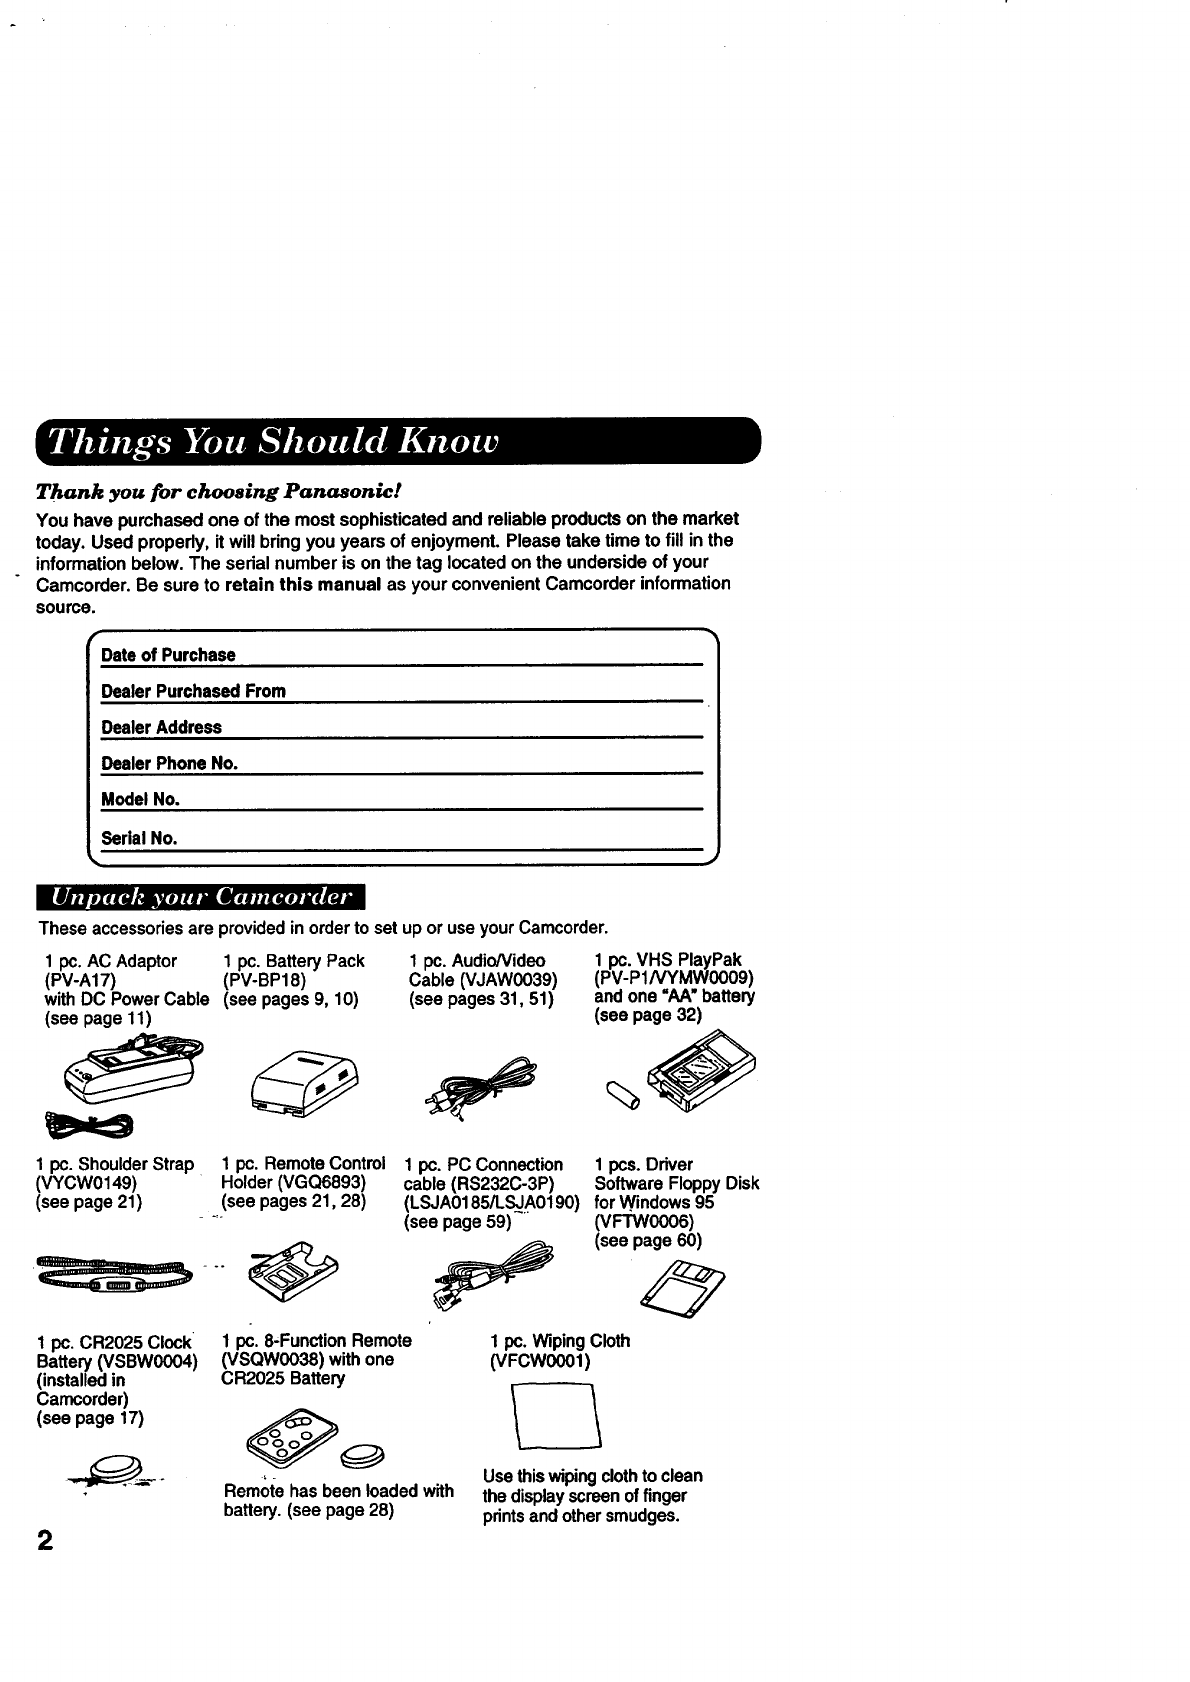
Thank you for choosing Panasonic!
You have purchased one of the most sophisticated and reliable products on the market
today. Used propedy, it will bring you years of enjoyment. Please take time to fill in the
information below. The serial number is on the tag located on the underside of your
Camcorder. Be sure to retain this manual as your convenient Camcorder information
source.
e--
Date of Purchase
Dealer Purchased From
Dealer Address
Dealer Phone No.
Model No.
Serial No.
,
118allp_rttut,_Y#,tum#z_wJll:_#l_r_am
Theseaccessoriesare providedinordertoset uporuseyourCamcorder.
1 pc.AC Adaptor 1pc. BatteryPack
(PV-A17) (PV-BP18)
withDC PowerCable (see pages9, 10)
(see page 11)
1pc. Audio/Video
Cable (VJAW0039)
(see pages 31, 51)
1pc. VHS PlayPak
(PV-P1NYMW0009)
and one =AA" battery
(sea page 32)
1pc. Shoulder Strap 1 pc. Remote Control
(VYCW0149) Holder (VGQ6893)
(see page 21) (see pages 21,28)
1 pc. CR2025 Clock
Battery (VSBW0004)
(installed in
Camcorder)
(see page 17)
2
1pc. PC Connection 1 pcs. Driver
cable (RS232C-3P) Software Floppy Disk
(LSJA0185/LS_I_,0190) for Windows 95
(see page 59) (VFTW0006)
(seepage 60_
1pc. 8,Function Remote
(VSQW0038) with one
CR2025 Battery
Remote has been loaded with
battery. (see page 28)
1pc. Wiping Cloth
(VFCW000t)
_?Z
Usethiswipingclothto clean
the displayscreenoffinger
printsand othersmudges.
WARNING: TO PREVENT FIRE OR SHOCK HAZARD, DO NOT EXPOSE THIS
EQUIPMENT TO RAIN OR MOISTURE.
"Your Compact VHS Camcorder is designed to record and play back in Standard Play
(SP) and Super Long Play (SLP) modes. You can also play a Compact VHS
Camcorder recording on your VHS VCR using the VHS PlayPak supplied.
This Camcorder is equipped with the HQ System to provide excellent video pictures,
and is compatible with standard VHS equipment.
It is recommended that only cassette tapes that have been tested and inspected for use
in VCR machines with the _and/or _mark be used.
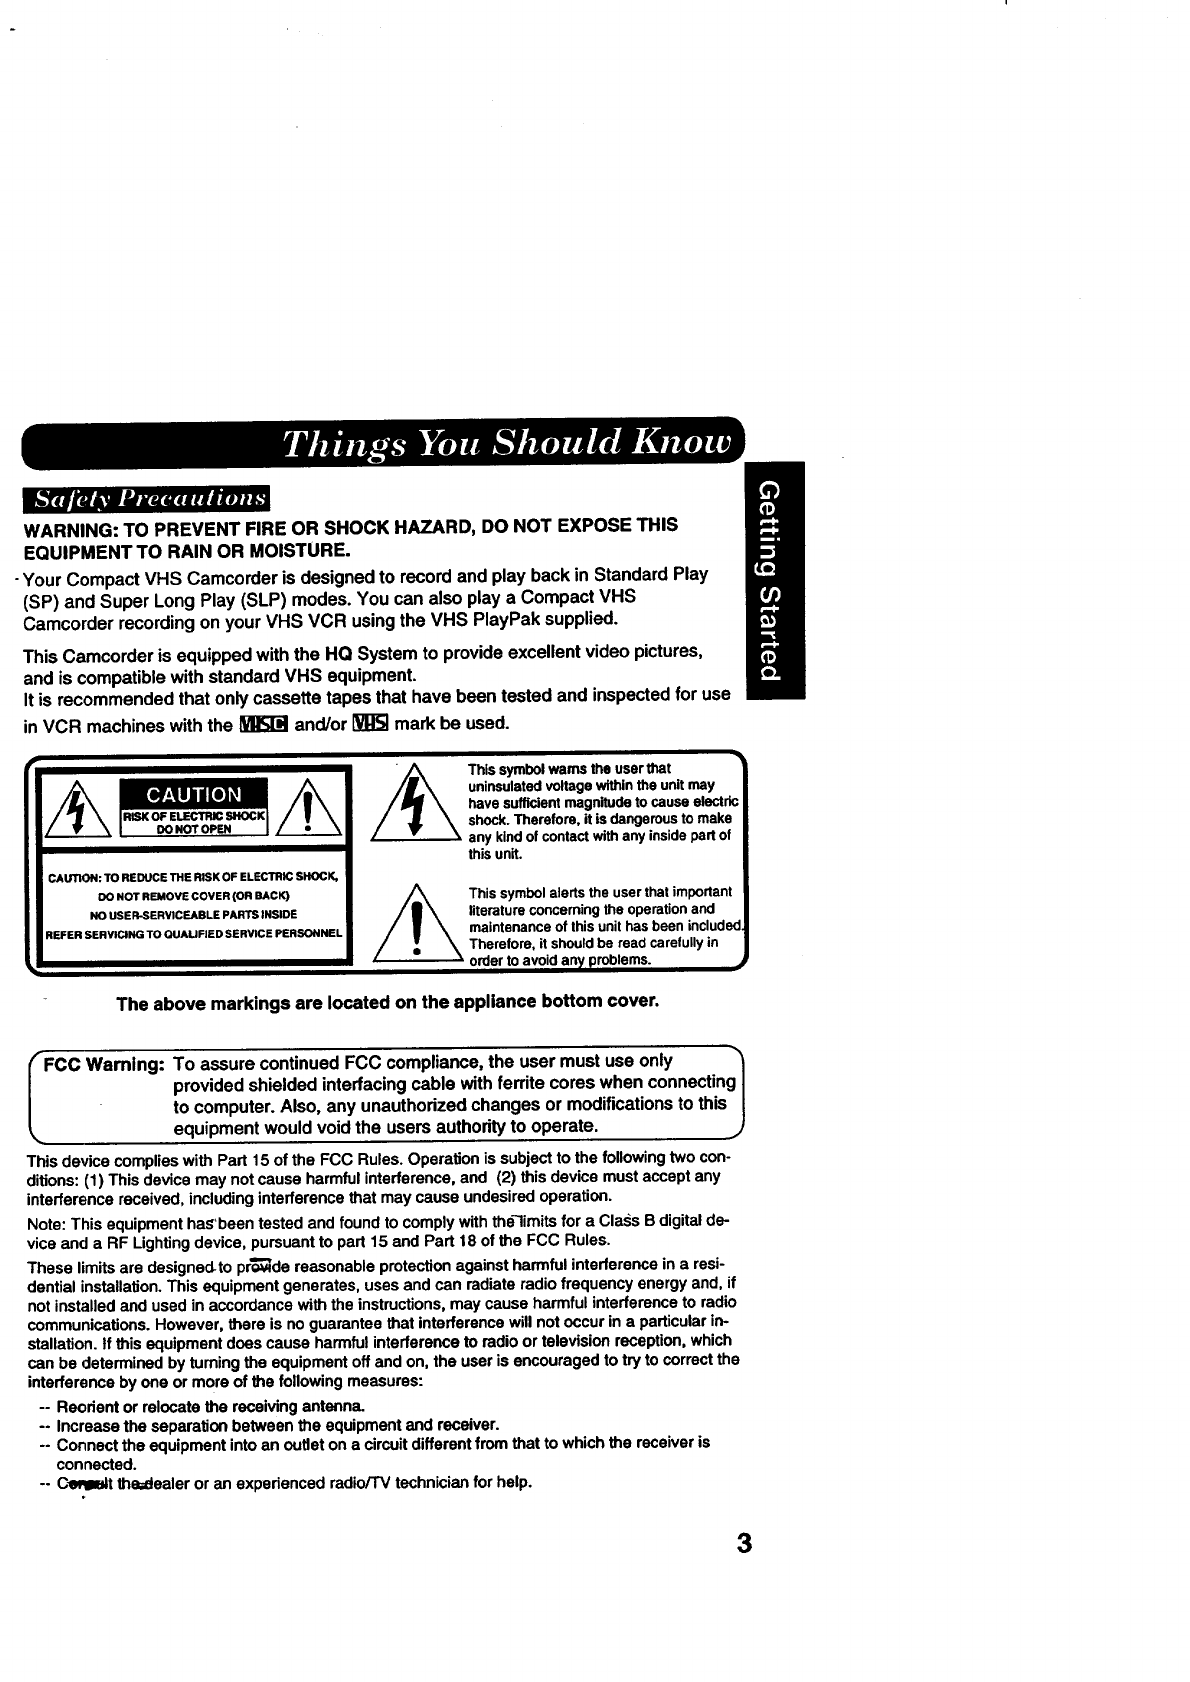
CAUTION: TO REDUCE THE RISK OF ELECTRIC SHOCK,
DO NOT REMOVE COVER (OR BACK)
NO USER-SERVICEABLE PARTS INSIDE
REFER SERVICING TO QUAUFIED SERVICE PERSONNEL
/_ This symbol warns the user that
uninsulated voltage within the unit may
have sufficient magnitude to cause electrk
shock. Therefore, it is dangerous to make
any kind of contact with any inside part of
this unit.
This symbol alerts the user that important
literature concerning the operation and
maintenance of this unit has been included
Therefore, it should be read carefully in
order to avoid an_/problems, i
The above markings are located on the appliance bottom cover.
rFCC Warning: To assure continued FCC compliance, the user must use only
provided shielded interfacing cable with ferrite cores when connecting I
to computer. Also, any unauthorized changes or modifications to this |
_. equipment would void the users authority to operate. .)
This device complies with Part 15 of the FCC Rules. Operation is subject to the following two con-
ditions: (1) This device may not cause harmful interference, and (2) this device must accept any
interference received, including interference that may cause undesired operation.
Note: This equipment has'been tested and found to comply with the'limits for a Cla.ss B digital de-
vice end a RF Lighting device, pursuant to part 15 and Part 18 of the FCC Rules.
These limits are designed-to pr_de reasonable protection against harmful interference in a resi-
dential installation. This equipment generates, uses and can radiate radio frequency energy and, if
not installed and used in accordance with the instructions, may cause harmful interference to radio
communications. However, there is no guarantee that interference will not occur in a particular in-
stallation. If this equipment does cause harmful interference to radio or television reception, which
can be determined by turning the equipment off end on, the user is encouraged to try to correct the
interference by one or more of the following measures:
-- Reorient or relocate the receiving antenna.
-- Increase the separation between the equipment end receiver.
-- Connect the equipment into an outlet on a circuit different from that to which the receiver is
connected.
-- Cefllmtt the;dealer or an experienced radio/TV technician for help.
3
1. Read Instructions mAll the safety and operating
instructions should be read before the unit is
operated.
2. Retain Instructions -- The safety and operating
instructions should be retained for future reference.
3. Heed Warnings -- All warnings on the unit and in
the operating instructions should be adhered to.
4. Follow Instructions -- All operating and
maintenance instructions should be followed.
5. Cleaning -- Unplug this video unit from the well
outlet before cleaning. Do not use liquid or aerosol
cleaners. Use a dry cloth for cleaning.
6. Attachments -- Do not use attachments not
recommended by the video product manufacturer
as they may be hazardous.
7. Water and Moisture -- Do not use this video unit
near water-- for example near a beth tub, wash
bowl, kitchen sink, or laundry tub, in a wet
basement, or near a swimming pool, and the like.
8. Accessodes -- Do not place this video unit on an
unstable cart, stand, tdpod, bracket, or table. The
video unit may fall, causing serious injury to a child
or adult, and safious damage to the unit. Use only
with a cart, stand, tripod, bracket, or table
recommended by the manufacturer, or sold with the
video unit. Any mounting of the unit should follow
the manufacturer's instructions and should use a
mounting accessory recommended by
the manufacturer. An appliance and
cart combination should be moved
with care. Quick stops, excessive
torce, and uneven surfaces may
cause the appliance and cart
combination to overturn.
9. Ventilation -- Slots and openings in the cabinet are
provided for ventilation and to ensure reliable
operation of the video unit and to protect it from
overheating. These openings must not be blocked
or covered. Never place the video unit on a bed,
sofa, rug, or other similar surface, or near or over a
radiator or heat register. This video unit should not
be placed in a built-in installation such as a
bookcase or rack unless proper ventilation is
provided or the manufacture_'.s_'nstmctions have
been adhered to.
10. Power Sources --This video unit should be
operated only from the type of power source
indicated on the marking label. If you are not sure
of the type of power supply to your home, consult
your appliance dealer or local power company. For
video units intended to be operated from baltery
power, or other sources, refer to the operating
instructions.
11. Grounding or Polarization -- This video unit may
be equipped with either a poladzed 2-wire AC
(Alternating Current) line plug (a plug having one
blade wider then the other) or 3-wira grounding
type plug, a plug having a third (grounding) pin.
The 2-wire poladzed plug will fit into the power
outlet only one way. This Is asafety feature. If you
are unable to insert the plug fully into the outlet, try
reversing the plug. If the plug still fails to fit, contact
your electdcisn to replace your obsolete outlet. Do
not defeat the safety purpose of the polarized plug.
The 3-wire grounding type plug will tit into a
grounding type power outlet. This is a safety
feature. If you are unable to insert the plug into the
outlet, contact your electrician to replace your
obsolete outlet. Do not defeat the safety purpose of
the grounding type plug.
12. Power-Cord Protection -- Power-supply cords
should be routed so that they are not likely to be
walked on or pinched by items placed upon or
against them. Paying particular attention to cords of
plugs, convenience receptacles, and the point
where they exit from the unit.
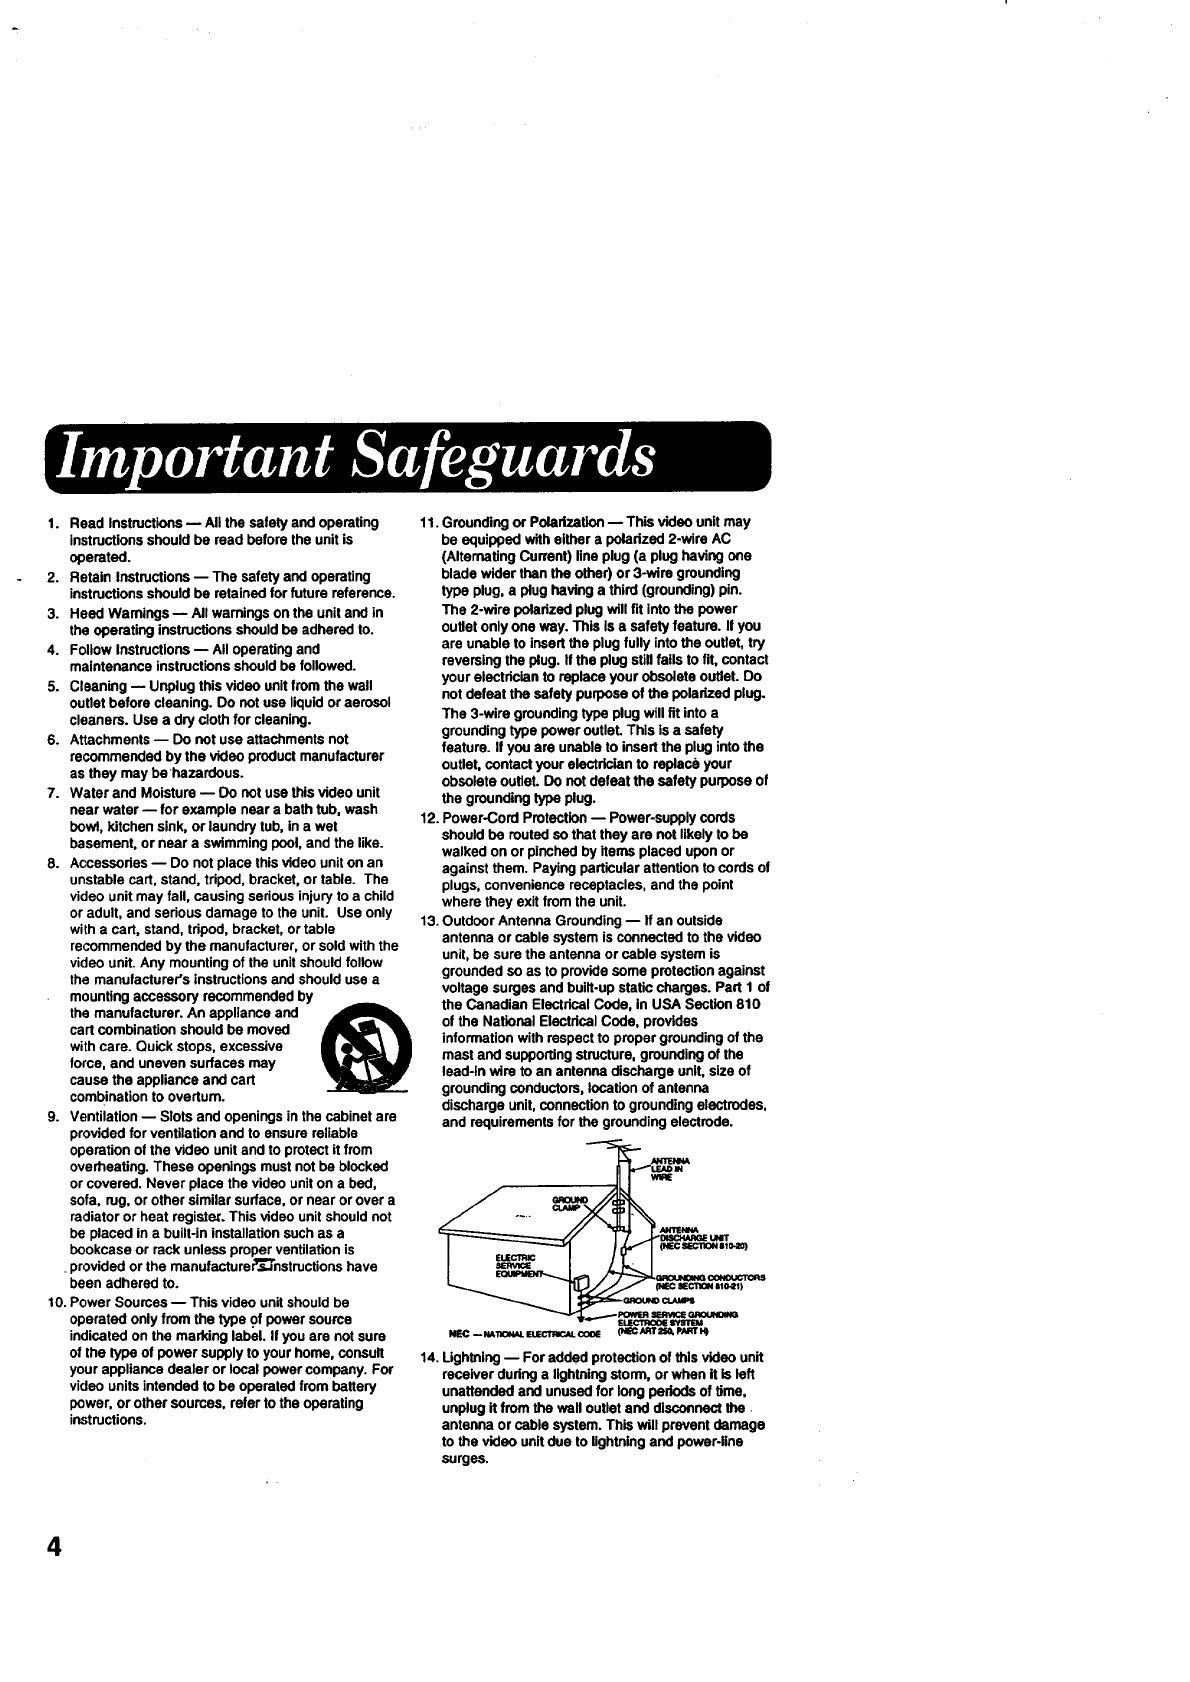
13. Outdoor Antenna Grounding -- If an outside
antenna or cable system is connected to the video
unit, be sure the antenna or cable system is
grounded so as to provide some protection against
voltage surges and built-up static charges. Part I of
the Canadian Electrical Code, in USA Section 810
of the National Electdcal Code, provides
information with respect to proper grounding of the
mast and supporting structure, grounding of the
Isad-ln wire to an antenna discharge unit, size of
grounding conductors, location of antenna
discharge unit, connection to grounding electrodes,
and requirements for the grounding electrode.
,e..,..--POWER M U
14. Lightning -- For added protection of this video unit
receiver dudng a lightning storm, or when it is left
unattended and unused for long periods of time,
unplug it from the well outlet and disconnect the
antenna or cable system. This will prevent damage
to the video unit due to lightning and power-line
surges.
4
15. Power Lines -- An outside antenna system should
not be located in the vicinity of overhead power
lines or other electric light or power circuits, or
where it can fall into such power lines or circuits.
When installing an outside antenna system,
extreme care should be taken to keep from
touching such power lines or circuits as contact
with them might be fatal.
16. Overloading -- Do not overload wall outlets and
extension cords as this can result in a dsk of fire or
electric shuck.
17. Objects and Liquids -- Never push objects of any
kind into this video unit through openings as they
may touch dangerous voltage points or short out
parts that could result in afire or elactdc shock.
Never spill liquid of any kind onto the video unit.
18. Servicing -- Do not attempt to service this video
unit yourself as opening or removing covers may
expose you to dangerous voltage or other hazards.
Refer all servicing to qualified service personnel.
19. Damage Requiring Service -- Unplug this video
unit from the wall outlet and refer servicing to
qualified service personnel under the following
conditions:
a. When the power-supply cord or plug is
damaged.
b. If any liquid has been spilled onto, or objects
have fallen into the video unit.
c. If the video unit has been exposed to rain or
water.
d. If the video unit does not operate normally by
following the operating instructions. Adjust only
those controls that are covered by the operating
instructions, as an improper adjustment of other
controls may result in damage and will often
require extensive wed( by a qualified technician
to restore the video unit to its normal operation.
e. If the video unit has been dropped or the cabinet
has been damaged.
f. When the video unit exhibits a distinct change in
performance -- this indicates a need for service.
20. Replacement Parts -- When replacement ports are
required, be sure the service technician has used
replacement parts specified by the manufacturer or
have the same characfadstics as the original part.
Unauthorized substitutions may result in fire,
electric shock or other hazards.
21. Safety Check-- Upon completion of any service or
repairs to this video unit, ask the service technician
to perform safety checks to determine that the
video unit is in safe operating order.
USE & LOCATION
• TO AVOID SHOCK HAZARD ... Your Camcorder and power supply should not be exposed to rain or moisture.
Do not connect the power supply or operate your Camcorder if it gets wet. Your Camcorder has been designed
for outdoor use, however it is not designed to sustain direct exposure to water, rain, sleet, snow, send, dust, or
a direct splashing from a pool or even a cup of coffee. This action could permanently damage the intemal parts
of your Camcorder. Do not attempt to disassemble this unit. There are no user serviceable parts inside. Unplug
your Camcorder from the power supply before cleaning.
• DO NOT AIM YOUR CAMCORDER AT THE SUN OR OTHER BRIGHT OBJECTS.
•DO NOT LEAVE THE CAMCORDER WITH THE EVF AIMED DIRECTLY AT THE SUN AS THIS MAY CAUSE
DAMAGE TO THE INTERNAL PARTS OF THE EVF ....
•DO NOT EXPOSE YOUR CAMCORDER TO EXTENDED HIGH TEMPERATURE ... Such as, in direct sunlight,
inside a closed car, next to a heater, etc... This action could permanently damage the internal parts of your
Camcorder. ....
• AVOID SUDDEN CHANGES IN TEMPERATURE ... If the unit is suddenly moved from a cold place to a warm
place, moisture may form on the tape and inside the unit.
•DO NOT LEAVE YOUR CAMCORDER OR THE POWER SUPPLY TURNED ON WHEN NOT IN USE.
•STORAGE OF YOUR CAMCORDER ... Store and handle your Camcorder In a manner that will not subject it to
unnecessary movement (avoid shaking and stalking). Your Camcorder contains a sensitive pick-up device which
could be damaged by improper handling or storage.
CARE
•TO CLEAN YOUR CAMCORDER ... Do not use strong or abrasive detergents when cleaning your Camcorder
body.
•TO PROTECT THE LENS ... Do not touch the surface of the lens with your hand. Use a commercial camcordar
lens solution and lens paper when cleaning the lens. Improper cleaning can scratch the lens coating.
•TO_ECT.,I'HE FINISH OF YOUR CAMCORDER ... Before handling your Camcorder, make sure your
hands'and face are free from any chemical products, such as suntan lotion, as it may damage the finish.
5
[_.l | aua[ol,,'l i+'rl i':Js
Things You Should Know .................................................................................................. 2
Important Safeguards ....................................................................................................... 4
Precautions ....................................................................................................................... 5
Serf Demo Mode ............................................................................................................... 7
Quick Operation Guide ..................................................................................................... 8
Supplying Power ............................................................................................................... 9
Cassette Information ....................................................................................................... 12
MENU Mode .................................................................................................................... 13
Setting the Clock ............................................................................................................. 14
Electronic Viewfinder/LCD Monitor Indications ............................................................... 18
Attaching the Shoulder Strap and Remote Control Holder ............................................ 21
Built-in Auto Light ............................................................................................................ 22
l-'P.kl _lJ bI'JP.II [o] i
Camera Recording .......................................................................................................... 23
8-Function Remote Control ............................................................................................. 28
Playing Back your Recordings ........................................................................................ 29
Four-Speed Power Zoom ................................................................................................ 33
Backlight .......................................................................................................................... 33
Focus .............................................................................................................................. 34
High Speed Shutter ......................................................................................................... 35
Fade ................................................................................................................................ 36
Color Digital Filter............................................................................................................ 38
Digital Zoom .................................................................................................................... 39
Digital Electronic Image Stabilization System ................................................................. 40
Still /Strobe /Wide ......................................................................................................... 41
Digital+Wipe ..................................................................................................................... 42
Security Mode ................................................................................................................. 43
Audio Sensitivity.............................................................................................................. 44
"13meLapse ..................................................................................................................... 45
Tally Lamp ....................................................................................................................... 46
Intelligent "Idler ................................................................................................................ 47
Message Mode ............................................................................................................... 50
Copying your Tapes+(dubbing) ....................................................................................... 51
Using the Digital Still Camera ......................................................................................... 52
PC Connection ..................................................................... :................... ................... 59
HI _o] IVio] !Id_ (o] iii_l I(ol l l
Palmcorder Accessory System ....................................................................................... 61
Palmcorder Accessory Order Form ................................................................................. 62
Notes Regarding Operations .......................................................................................... 63
Specifications .................................................................................................................. 64
Before Requesting Service ............................................................................................. 65
Request for Service Notice ............................................................................................. 66
Index of Controls ............................................................................................................. 67
Index ............................................................................................................................... 72
Warranty .......................................................................................................................... 73
Spa'h'_Qult_ +UseGuide/Guia Para Uso R=4pido.......................................................... 75
6
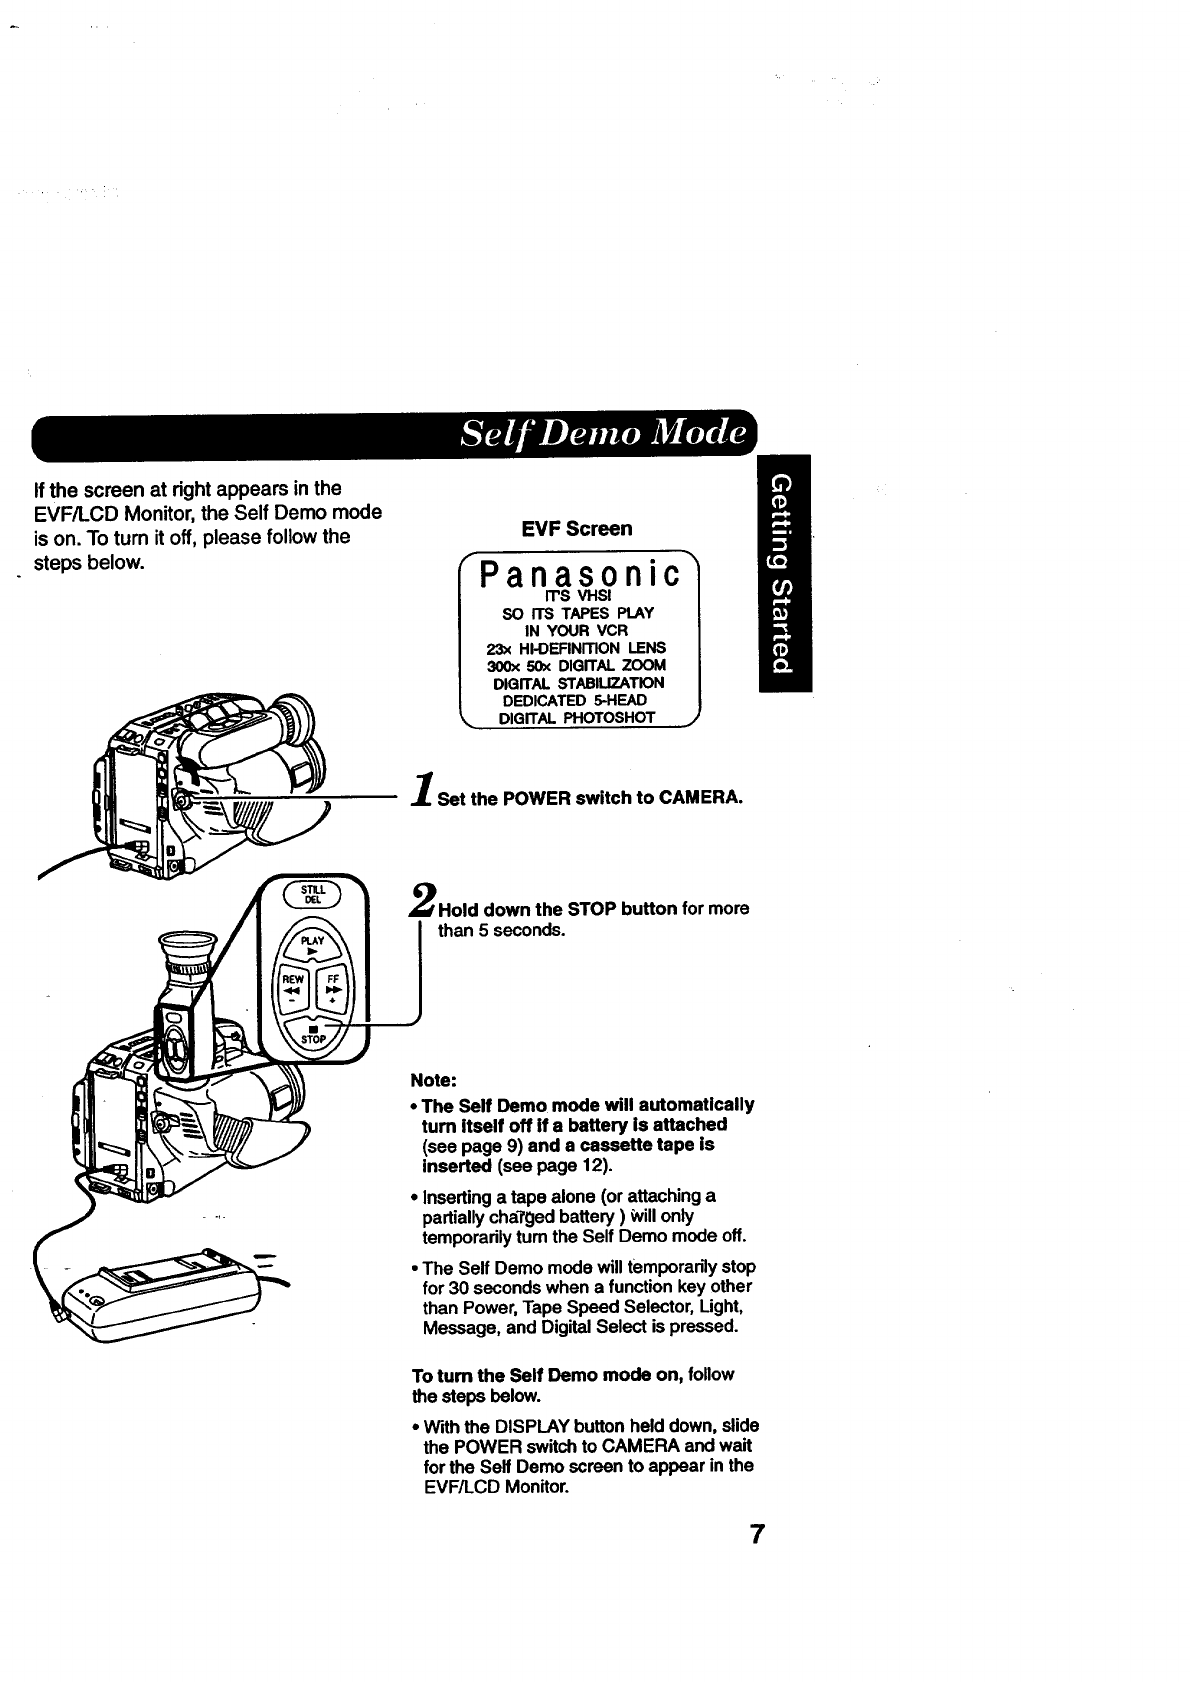
If the screen at right appears inthe
EVF/LCD Monitor, the Self Demo mode
is on. To turn it off, please follow the
steps below.
EVF Screen
rPanasonic
IT'S VHS!
SO ITS TAPES PLAY
IN YOUR VCR
23x HI-DEFINITION LENS
300x 50x DIGITAL ZOOM
DIGITAL STABILIZATION
DEDICATED 5-HEAD
DIGITAL PHOTOSHOT j
Set the POWER switch to CAMERA.
Hold down the STOP button formore
than 5 seconds.
Note:
• The Self Demo mode will automatically
turn itself off if a battery is attached
(see page 9) and a cassette tape is
inserted (see page 12).
•Inserting a tape alone (or attaching a
partially chaTged battery ) Willonly
temporarily tum the Self Demo mode off.
•The Self Demo mode will temporarily stop
for 30 seconds when a function key other
than Power, Tape Speed Selector, Light,
Message, and Digital Select is pressed.
To turn the Self Demo mode on, follow
the steps below.
•With the DISPLAY button held down, slide
the POWER switch to CAMERA and wait
for the Self Demo screen to appear in the
EVF/LCD Monitor.
7
rJkl#mrux, m_ruuu=(dmm_.
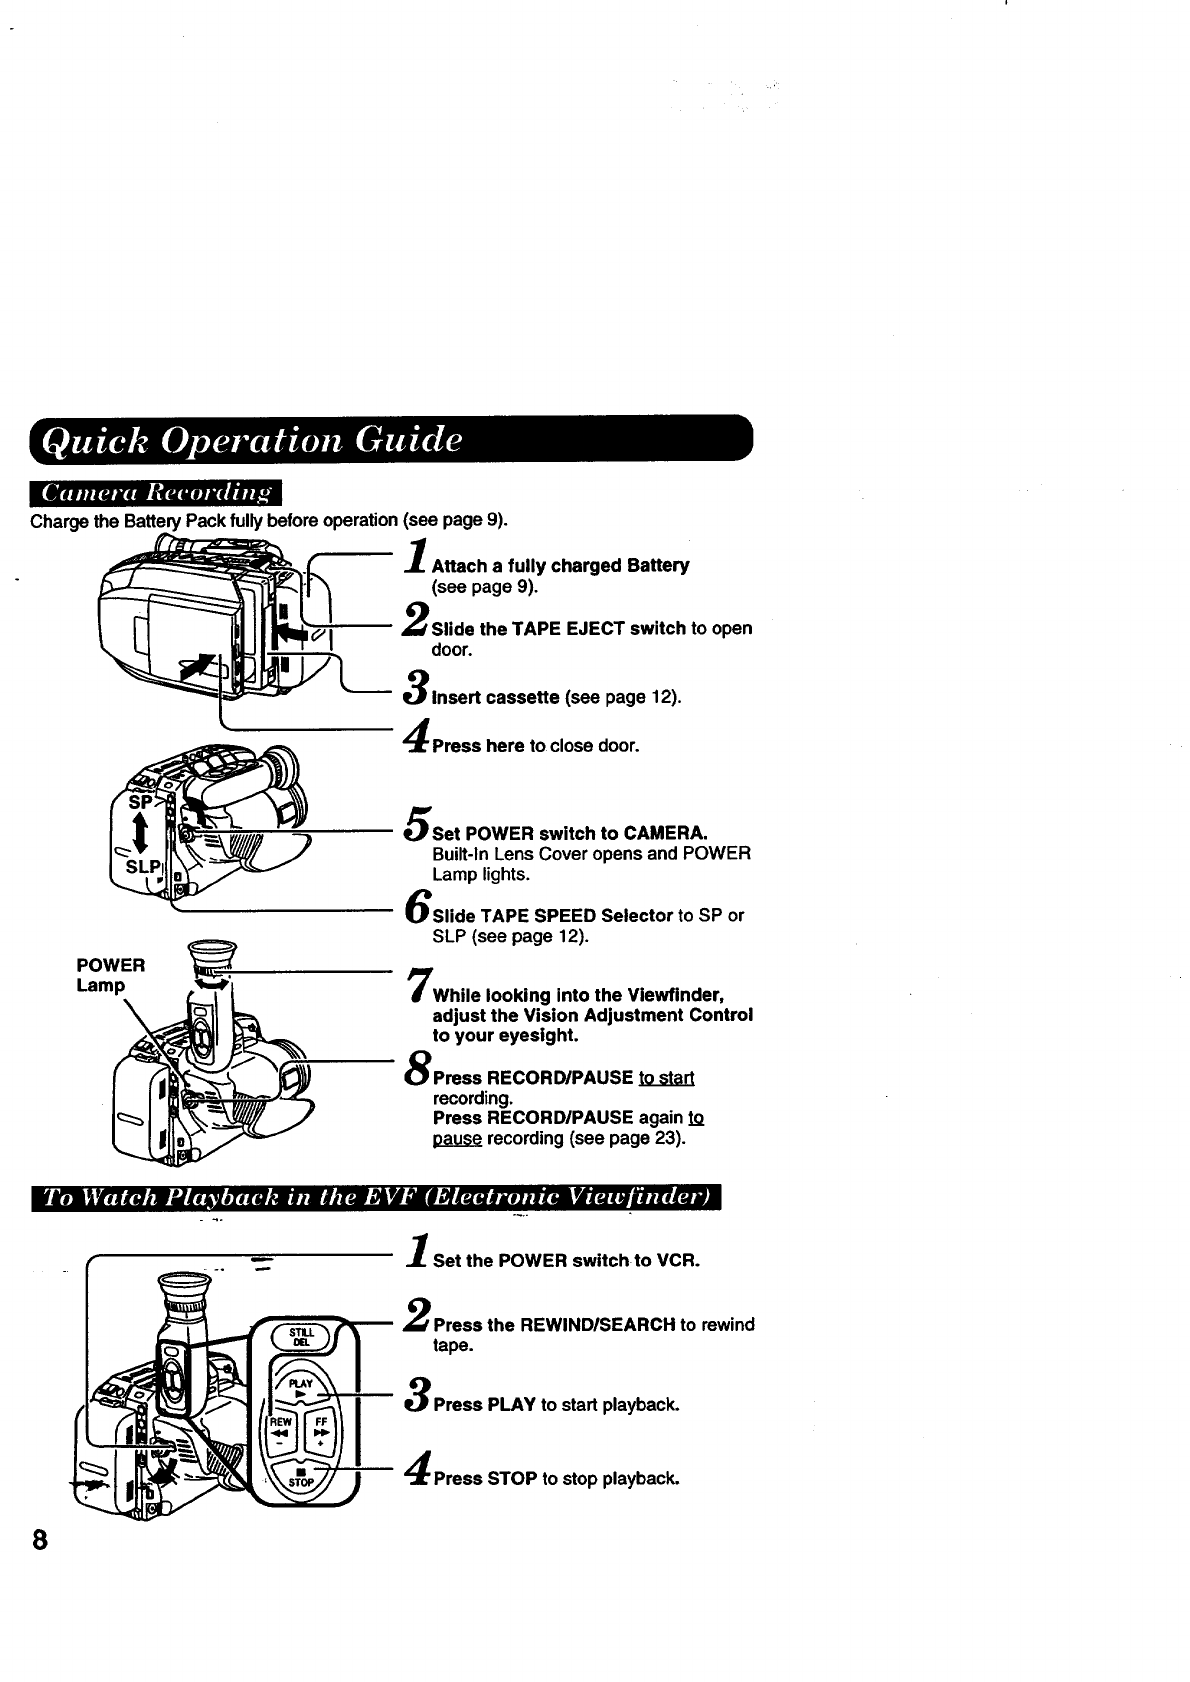
Charge the Battery Pack fully'before operation (see page g).
Attach a fully charged Battery
(see page 9).
Slide the TAPE EJECT switch to open
door.
Insert cassette (see page 12).
Press here to close door.
Set POWER switch to CAMERA.
Built-In Lens Cover opens and POWER
Lamp lights.
Slide TAPE SPEED Selector to SP or
SLP (see page 12).
POWER
Lamp 7While looking into the Viewfinder,
adjust the Vision Adjustment Control
to your eyesight.
Press RECORD/PAUSE to start
recording.
Press RECORD/PAUSE again to
recording (see page 23).
8
P1Set the POWER switch to VCR.
Press the REWINDISEARCH to rewind
tape.
"" 3Press PLAY to start playback.
Press STOP to stop playback.
w
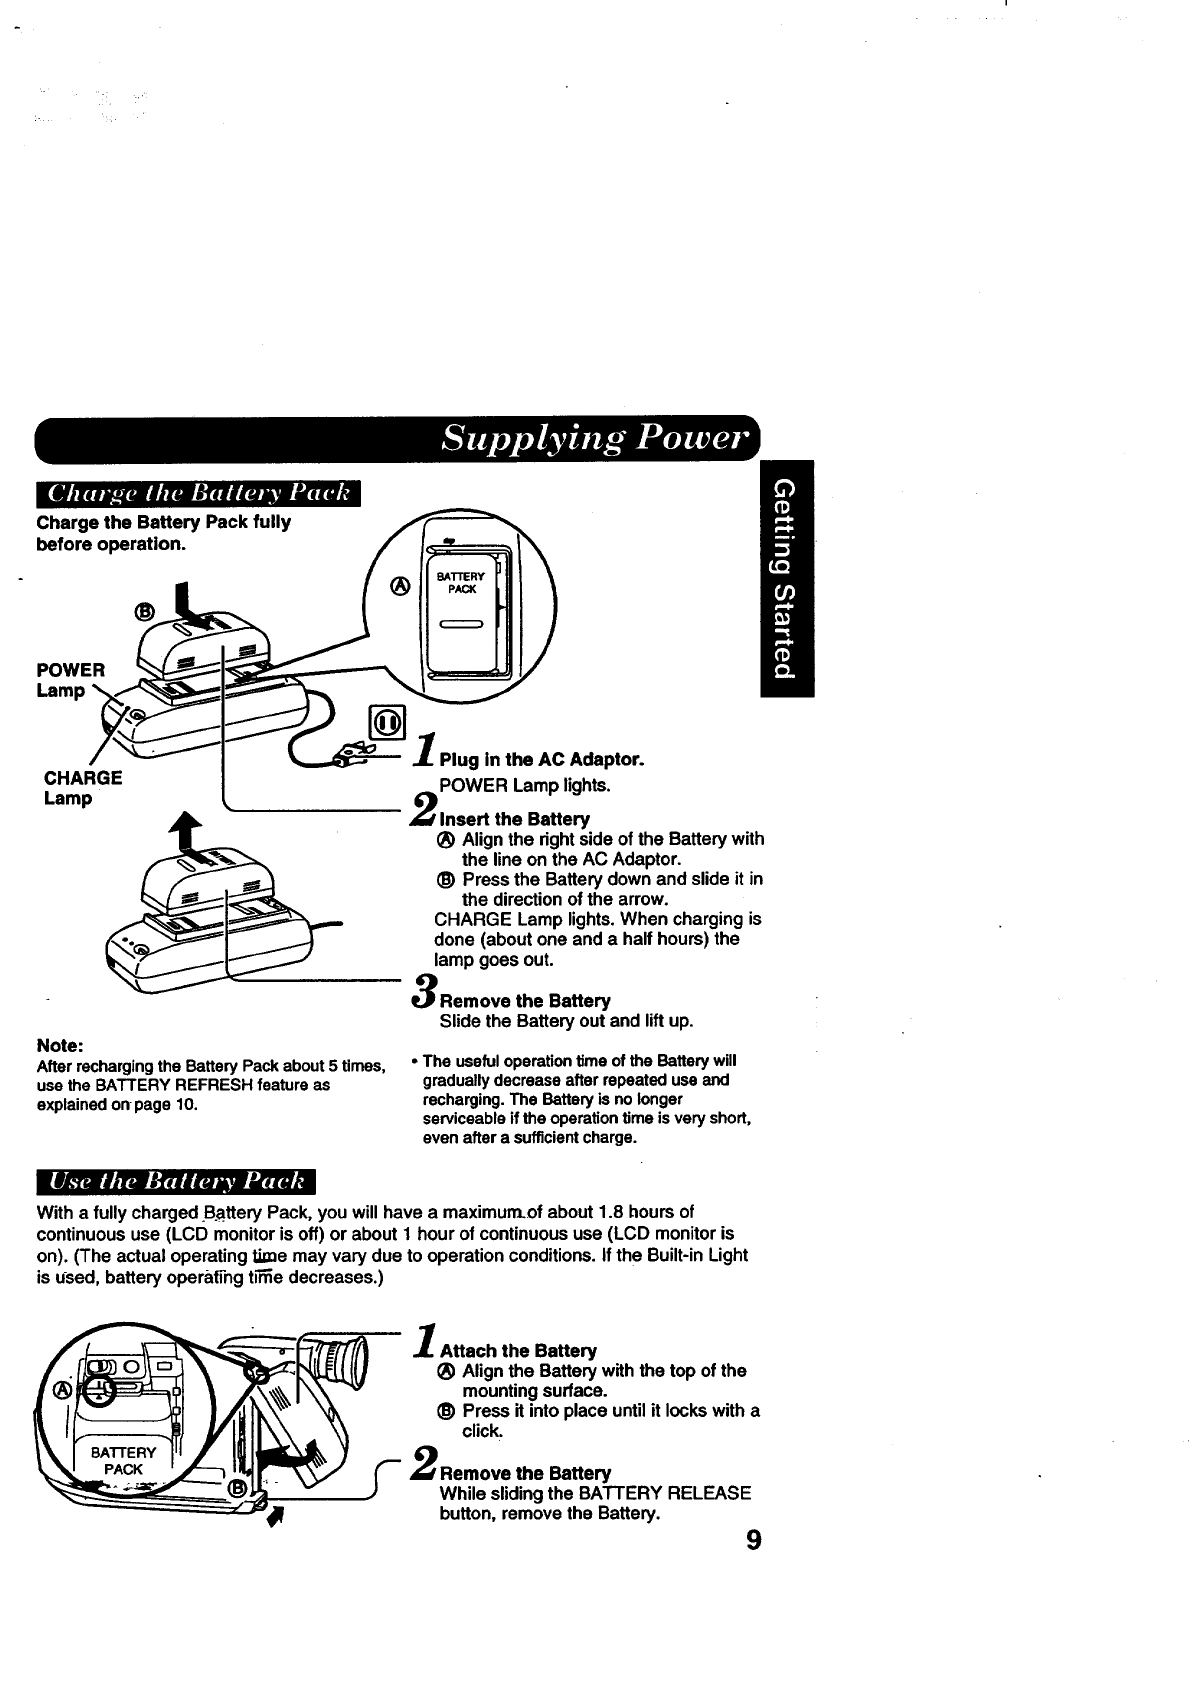
Charge the Battery Pack fully
before operation.
@
POWER
Lamp
CHARGE
Lamp
Note:
After recharging the Battery Pack about 5 times,
use the BATTERY REFRESH feature as
explained on page 10.
Plug in the AC Adaptor.
POWER Lamp lights.
Insert the Battery
(_ Align the right side of the Battery with
the line on the AC Adaptor.
_) Press the Battery down and slide it in
the direction of the arrow.
CHARGE Lamp lights. When charging is
done (about one and a half hours) the
lamp goes out.
Remove the Battery
Slide the Battery out and lift up.
• The useful operation time of the Battery will
gradually decrease after repeated use and
recharging. The Battery is no longer
serviceable if the operation time is very short,
even after a sufficient charge.
I#,..rmh_ifflit=i..wkt,u_
With a fully charged B.attery Pack, you will have a maximum_of about 1.8 hours of
continuous use (LCD monitor is off) or about 1 hour of continuous use (LCD monitor is
on). (The actual operating time may vary due to operation conditions. If the Built-in Light
is used, battery operatTng ti_e decreases.)
Attach the Battery
_) Align the Battery with the top of the
mounting surface.
_) Press it into place until it locks with a
click.
F 2 Remove the Battery
While sliding the BATTERY RELEASE
button, remove the Battery. 9
|_fl/14ru_w t'f_x*_'lAW_mlmt miCd
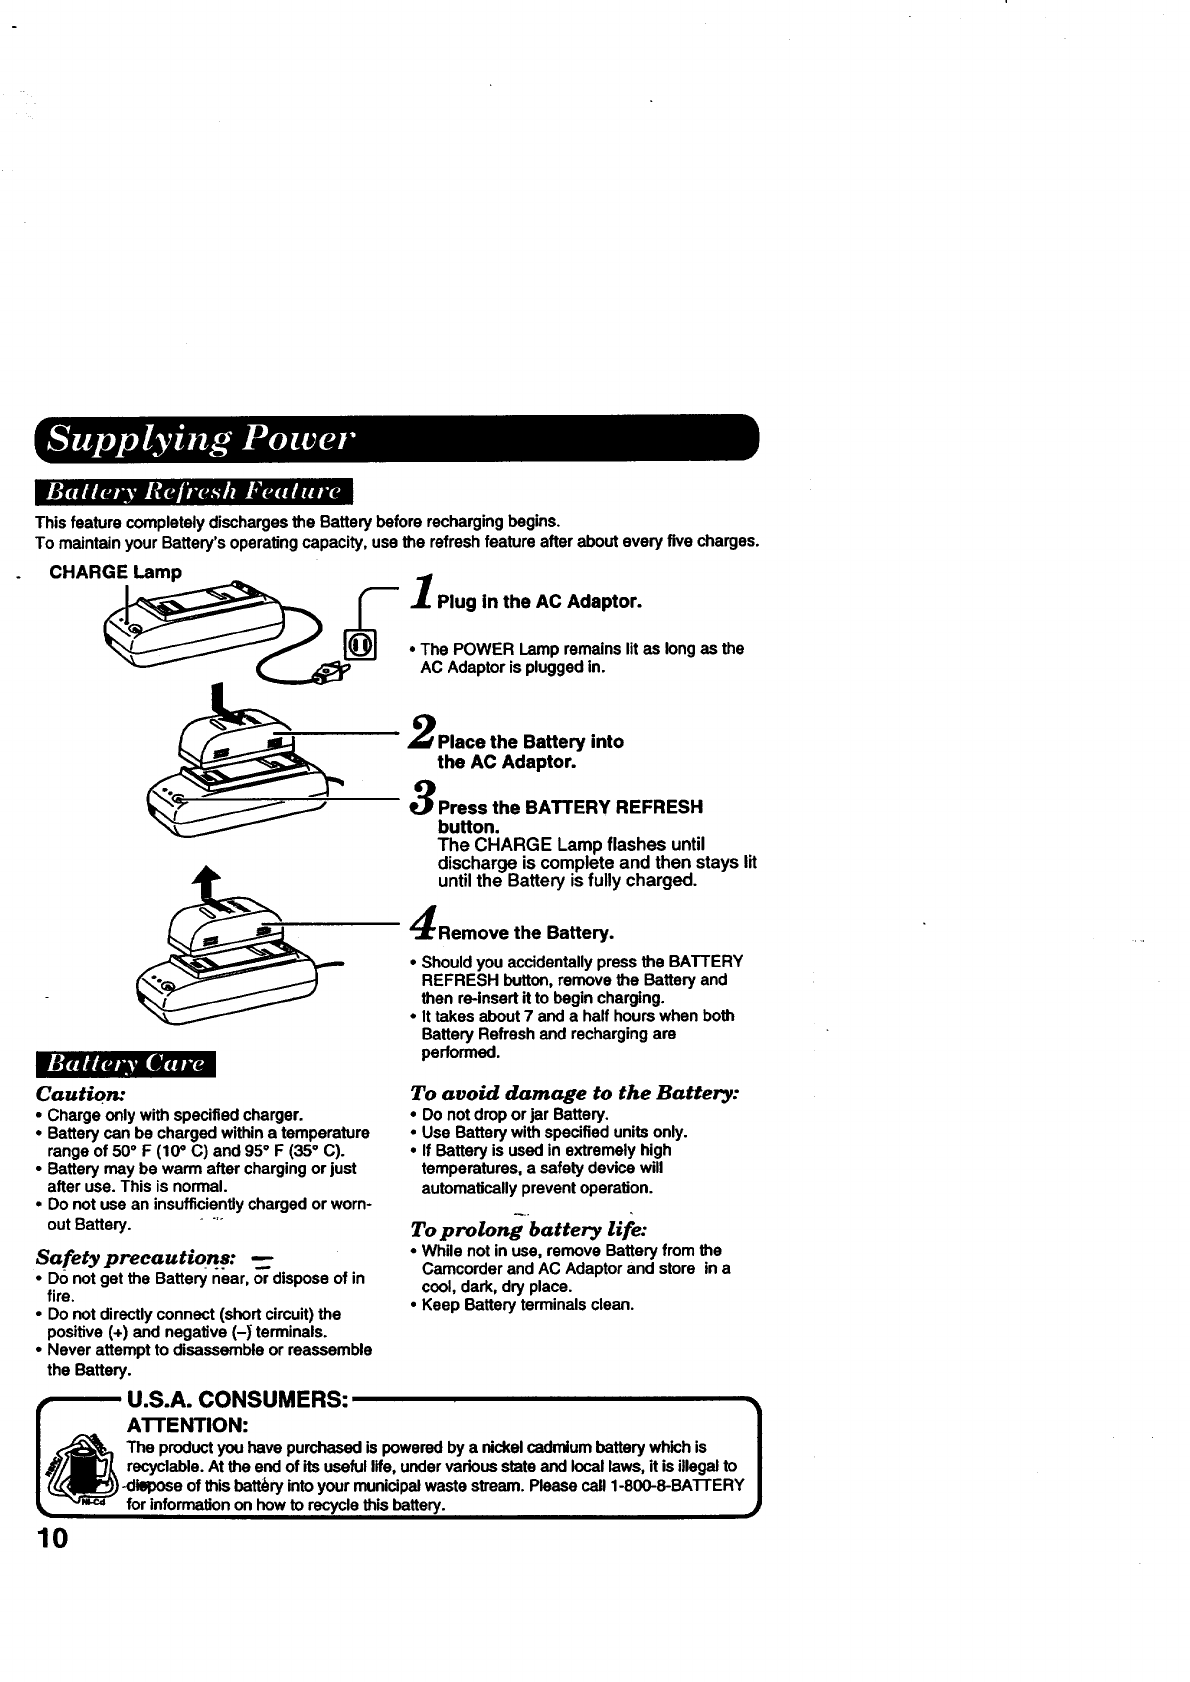
This feature completely discharges the Battery before recharging begins.
To maintain your Battery's operating capacity, use the refresh feature after about every five charges.
CHARGE Lamp
Plug in the AC Adaptor.
•The POWER Lamp remains lit as long as the
AC Adaptor is plugged in.
Place the Battery into
the AC Adaptor.
Press the BATTERY REFRESH
button.
The CHARGE Lamp flashes until
discharge is complete and then stays lit
until the Battery is fully charged.
Remove the Battery.
• Should you accidentally press the BATTERY
REFRESH button, remove the Battery and
then re-insert it to begin charging.
• It takes about 7 and a half hours when both
Battery Refresh and recharging are
performed.
Caution:
•Charge only with specified charger.
• Battery can be charged within a temperature
range of 50 ° F (10°C) and 95 °F (35 °C).
•Battery may be warm after charging or just
after use. This is normal.
•Do not use an insufficiently charged or worn-
out Battery. - "
Safety precautions:
• Do not get the Battery near, or dispose of in
fire.
•Do not directly connect (short circuit) the
positive (+) and negative (-) terminals.
• Never attempt to disassemble or reassemble
the Battery.
To avoid damage to the Battery:
• Do not droporjar Battery.
•Use Batterywithspecifiedunitsonly.
•IfBattery is usedin extremelyhigh
temperatures,a safety devicewill
automaticallypreventoperation.
To prolong battery life:
• While not in use, remove Battery from the
Camcorder and AC Adaptor and store in a
cool, dark, dry place.
• Keep Battery terminals clean.
U.S.A. CONSUMERS:
ATTENTION: 1
._,_--_ The product you have purchased is powered by a nickel cadmium battery which is
_y/___ recyclable. At the end of its useful life, under various state and local laws, it is illegal to
<llepose of this battbry into your municipal waste stream. Please call 1-800-8-BA'I-rERY
• "_-= for information on how to recycle this battery.
10
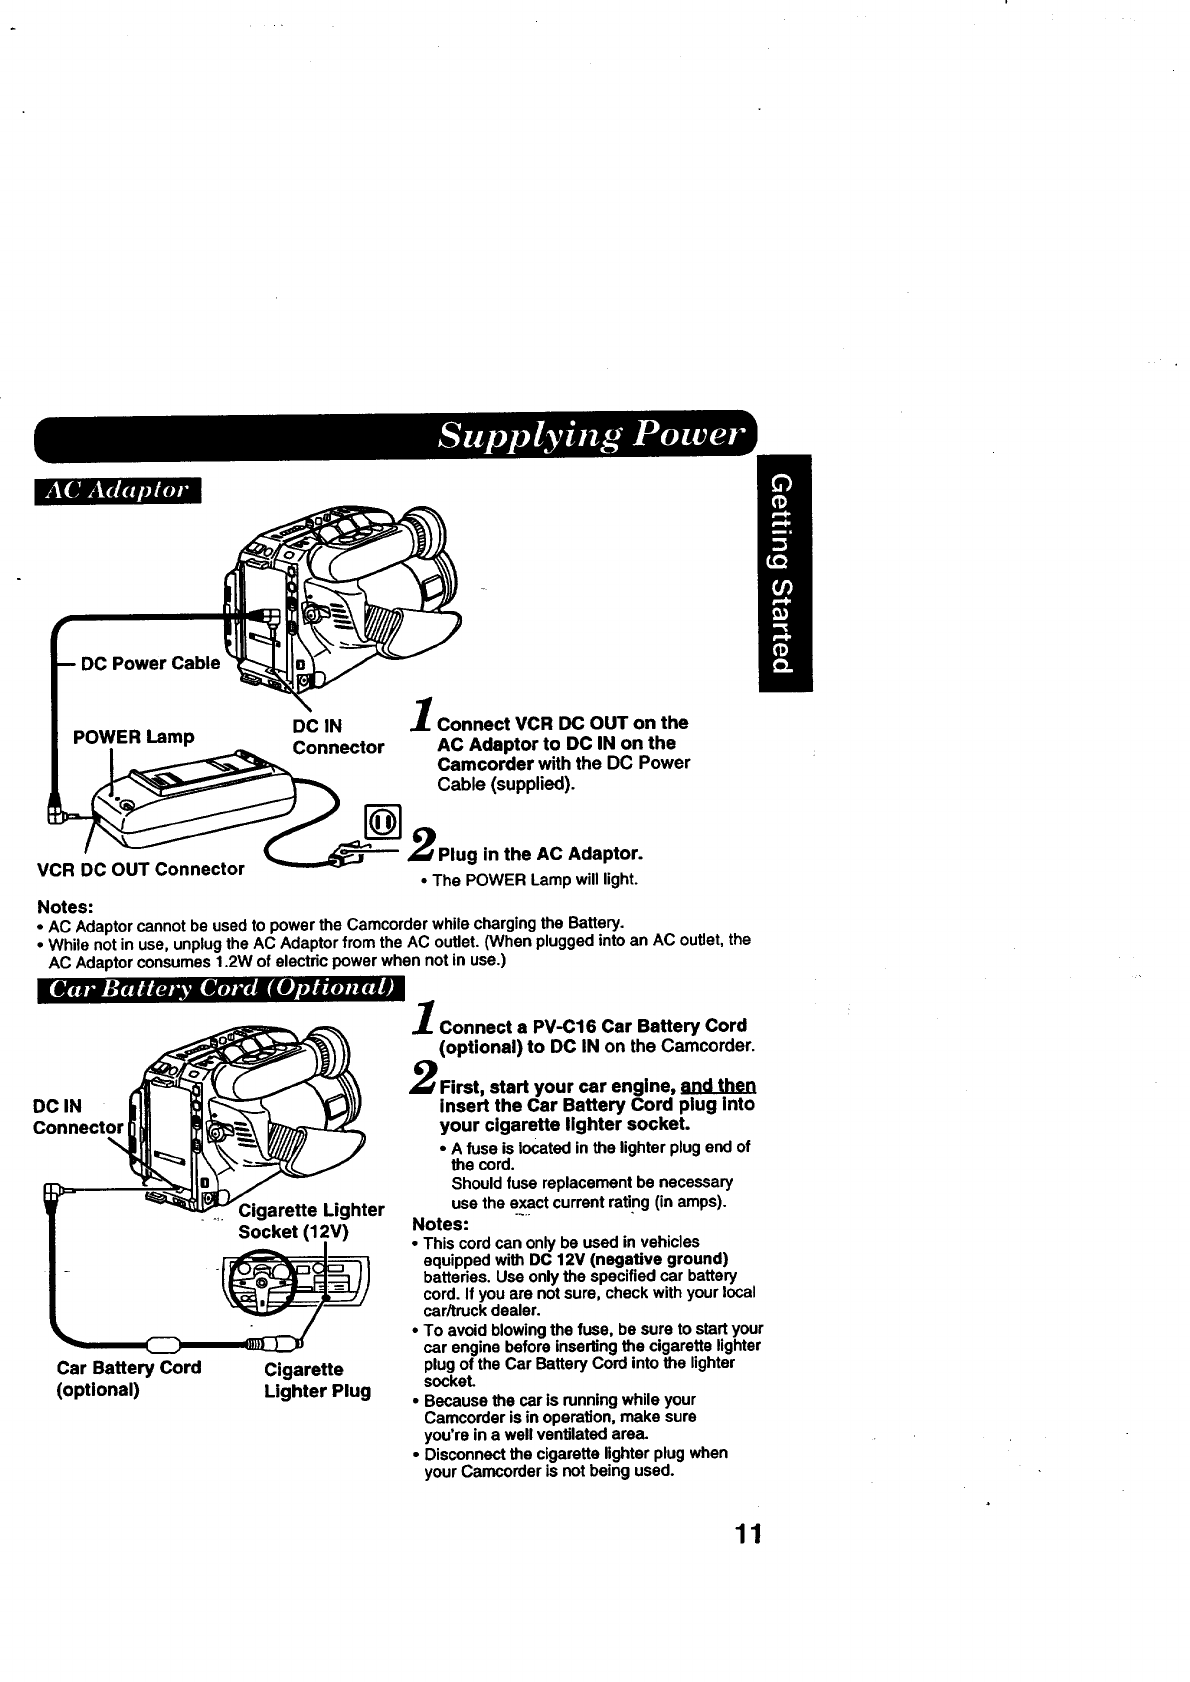
DC Power Cable
1
DC IN Jr. connect VCR DC OUT on the
POWER Lamp _,_ Connector AC Adaptor to DC IN on the
Camcorder with the DC Power
Cable (supplied).
VC___----'°_'-----_ 2Plug in the AC Adaptor.
• The POWER Lamp will light.
Notes:
• AC Adaptorcannotbe usedto powerthe Camcorderwhilechargingthe Battery.
•While notin use,unplugtheAC Adaptorfromthe AC outlet.(When pluggedintoan AC outlet,the
AC Adaptorconsumes1.2W of electricpowerwhen not in use.)
I[Ikdw_ifl'lituA_dk._illJTIR_m_qll..
DC IN
Connector
.... Cigarette Lighter
Socket (12V)
Car Battery Cord Cigarette
(optional) Lighter Plug
Connect a PV-C16 Car Battery Cord
(optional) to DC IN on the Camcorder.
First, start your car engine, and then
insert the Car Battery Cord plug into
your cigarette lighter socket.
•A fuse is located in the lighter plug end of
the cord.
Should fuse replacement be necessary
use the exact current rating (in amps).
Notes:
•This cord can only be used in vehicles
equipped with DC 12V (negative ground)
batteries. Use only the specified car battery
cord. If you are not sure, check with your local
car/truck dealer.
•To avoid blowing the fuse, be sure to start your
car engine before inserting the cigarette lighter
plug of the Car Battery Cord into the lighter
socket.
•Because the car is running while your
Camcorder is in operation, make sure
you're in a well ventilated area.
•Disconnect the cigarette lighter plug when
your Camcorder is not being used.
11

Elkl_'_u 4i_ ii.._reaMttelnlihunlt. K_.,-
F1 Wheel in the direction
Turn the Tape
of the arrow until there is no slack.
Attach the Battery (see page 9).
Slide the TAPE EJECT switch to open
the door.
A
".,f.'lnsert the cassette vertically with its
window side facing out.
Press here to close the door.
• To remove the cassette, slide the TAPE EJECT switch.
TAPE SPEED Selector
Use tapes with the _mark in this unit.
Tape Speed Selector
Position
SP (StandardPlay)
SLP(SuperLongPlay)
Cassette type
T-20 T-30 T-40
20 minutes 30 minutes 40 minutes
1hour 1 hour 2 hours
30 minutes
• SLP may have slightly more picture noise during playback.
V_xl _y_ bK. €_uJE.n Jk-_,_
Cassettes have a record tab to ensure that recordings are not accidentally erased.
(1To prevent accidental erasure,
_'_ =."p_j,,,_ Jbreak off the tab with a screwddver.
r2,o recordagain,
I__ _cover the hole with adhesive tape.
_Slide tab type _(If slide type, slide tab closed.)
12
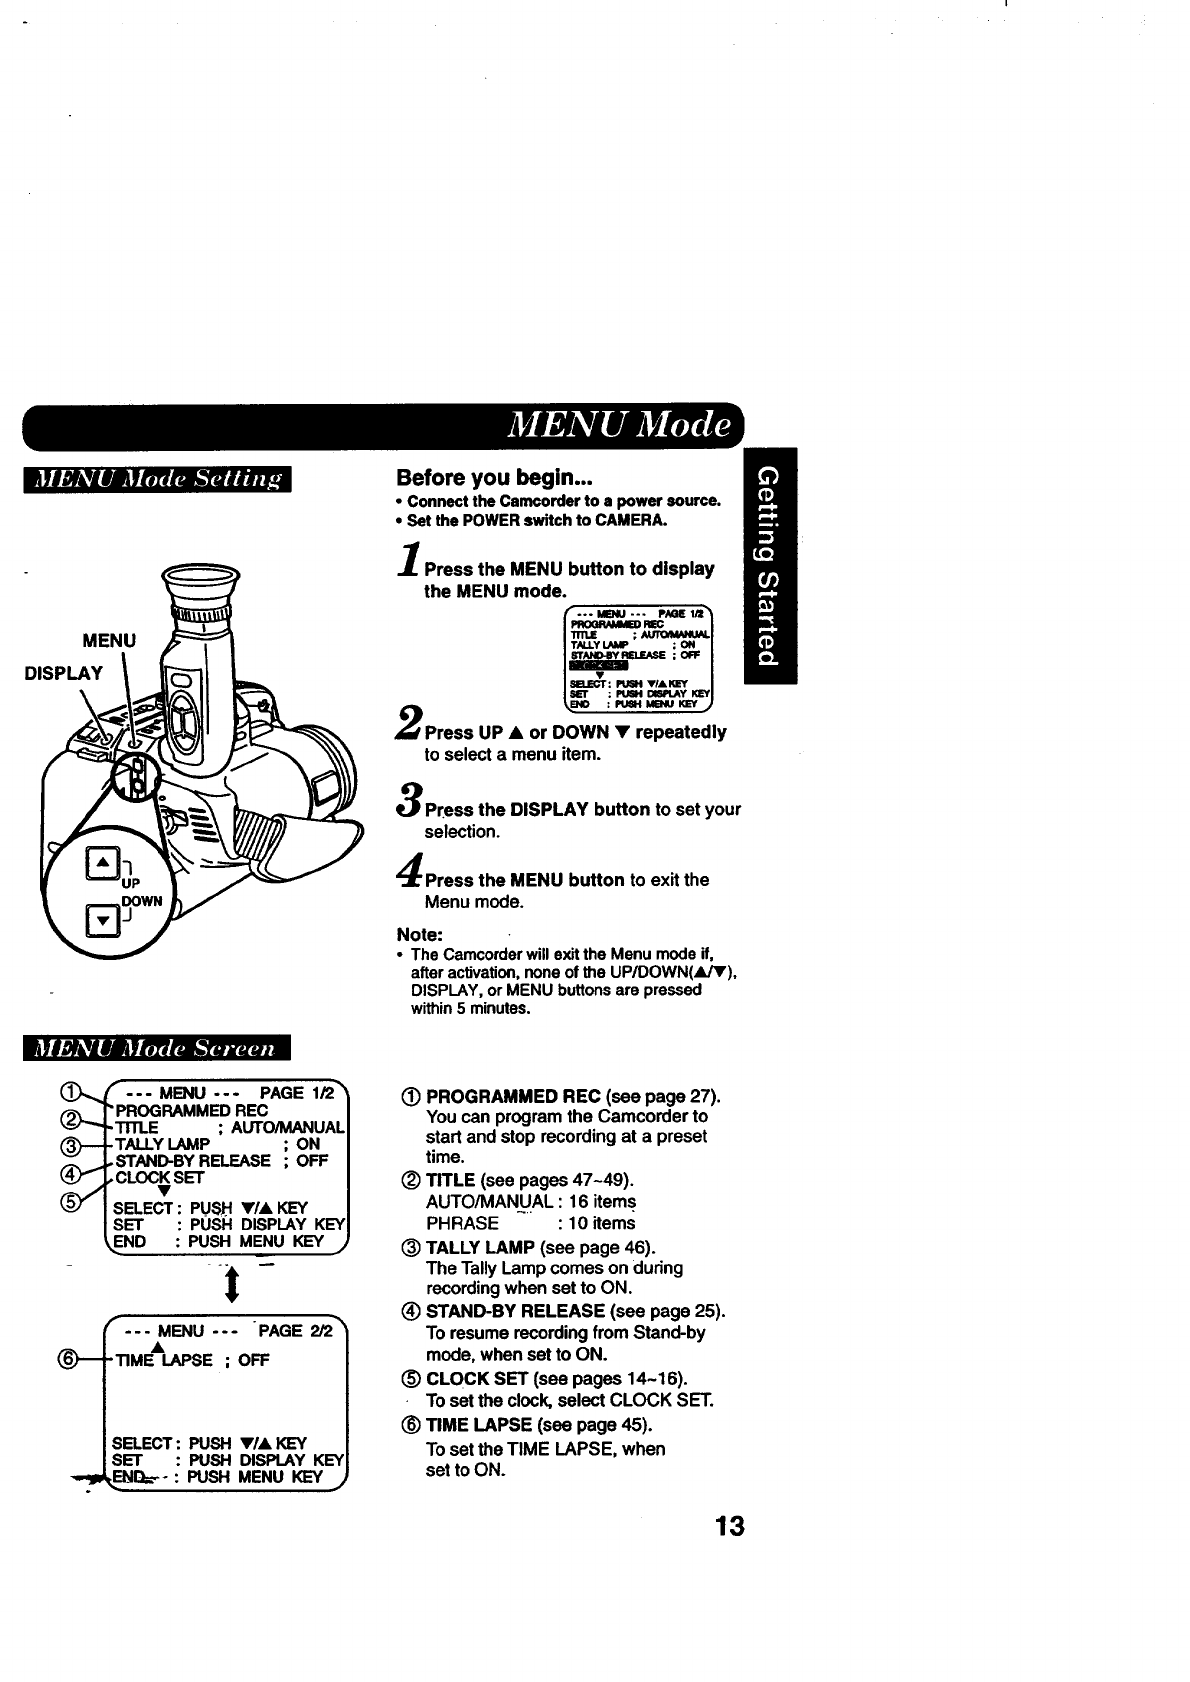
MENU
DISPLAY
Before you begin...
• Connect the Camcorder to a power source.
•Set the POWER switch to CAMERA.
Press the MENU button to display
the MENU mode.
[--- MB_U--- P_I_
_REC
I TALLY _: ON
[ IIELECT: PUSH VlAI_'Y
ISLrr : PtJSH OlSPI.Ay KEV
_,a_o :_Menuxevj
Press UP •or DOWN • repeatedly
to select a menu item.
Press the DISPLAY button to set your
selection.
Press the MENU button to exit the
Menu mode.
Note:
•The Camcorder will exit the Menu mode if,
after activation, none of the UP/DOWN(AIJV),
DISPLAY, or MENU buttons are pressed
within 5 minutes.
I11I._1 II 1._d_.Iu_uun J
f--- MENU --- PAGE 1/2"_
"PROGRAMMEDREC
-TITLE ; AUTO/MANUAL
-TALLY LAMP ; ON
,STAND-BY RELEASE ; OFF
•CLOCKSET
SELECT: PUSH Y/A KEY
SET : PUSH DISPLAY KEY
END : PUSH MENU KEY j
I
--- MENU --- PAGE 2/2"
'TIME LAPSE ; OFF
SELECT: PUSH v/•
SET :PUSH DISPLAY KEY
,EN[L----: PUSH MENU KEY J
(_ PROGRAMMED REC (see page 27).
You can program the Camcorder to
start and stop recording at a preset
time.
(_ TITLE (see pages 47-49).
AUTO/MANUAL : 16 items
PHRASE : 10 items
(_) TALLY LAMP (see page 46).
The Tally Lamp comes on during
recording when set to ON.
(_ STAND-BY RELEASE (see page 25).
To resume recording from Stand-by
mode, when set to ON.
(_ CLOCK SET (see pages 14-16).
To set the clock, select CLOCK SET.
(_ TIME LAPSE (see page 45).
To set the TIME LAPSE, when
set to ON.
13
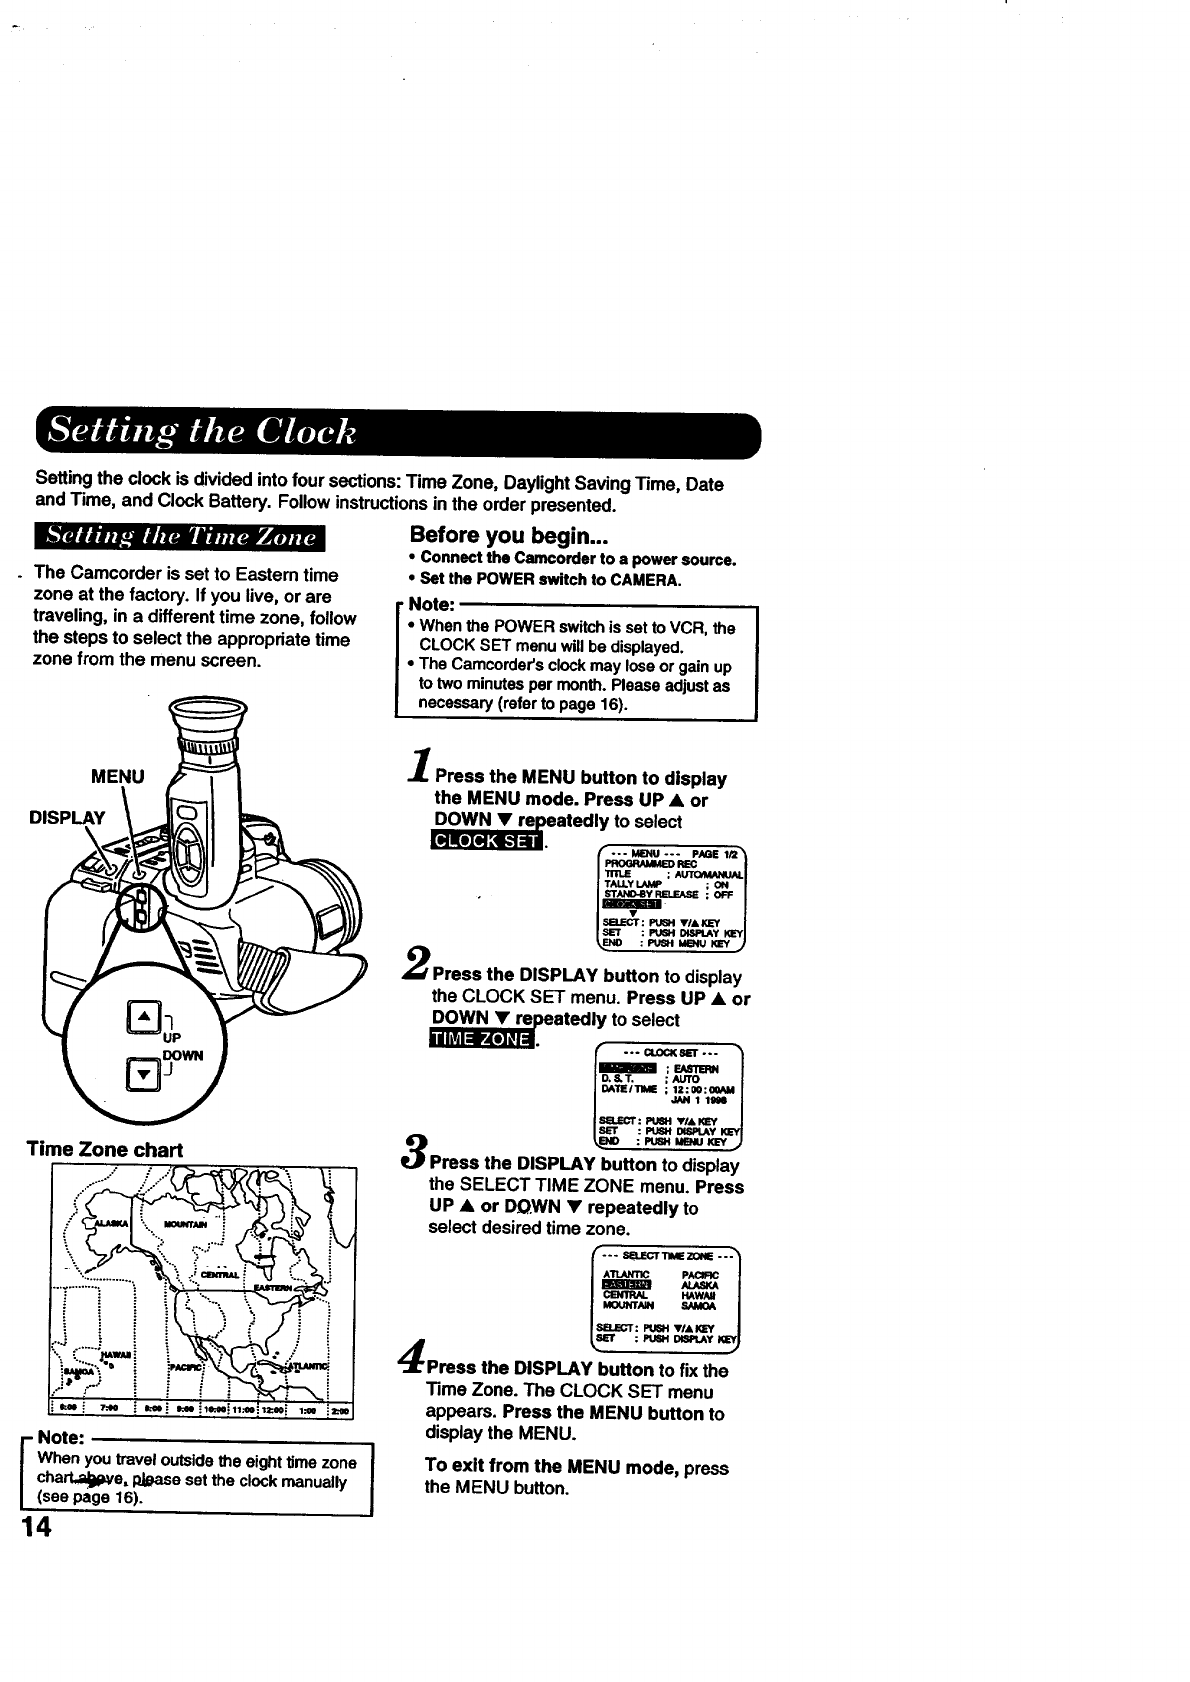
Setting the clock is divided into four sections: Time Zone, Daylight Saving Time, Date
and Time, and Clock Battery. Follow instructions in the order presented.
Before you begin...
_.'r_immn ,.m_riHt,_ _mnuttd_. .d
The Camcorderis set to Eastemtime
zone at the factory.If you live, or are
traveling,in a differenttime zone, follow
the stepsto selectthe appropriatetime
zone from the menuscreen.
• Connect the Camcorder to a power source.
• Set the POWER switch to CAMERA.
Note:
•When the POWER switch is set to VCR, the
CLOCK SET menu will be displayed.
•The Camcorder's clock may lose or gain up
to two minutes per month. Please adjust as
necessary (refer to page 16).
MENU
DISPLAY
Time Zone chart
F: i- i
iNote: I
When you traveloutsidethe eighttime zone
chart.a_we. I:d#aseset the clockmanually
(see page 16).
14
Press the MENU button to display
the MENU mode. Press UP •or
_eatedly to select
I STANO-ByRELEASE ;OFF /
ISEI" : PU_I DISPLAYKEYI
Press the DISPLAY button to display
the CLOCK SET menu. Press UP •or
at_lly to select
IO.S.T. ; AUTO /
I DA'rEITIME ; 12:00:00Nd /
/ "I'/
ISI_/_T: _ .i,& KL=Y/
Is_r : Push =spray _'YI
_.a_o :Pua._NU_w j
Press the DISPLAY button to display
the SELECT TIME ZONE menu. Press
UP •or DQWN •repeatedly to
select desired time zone.
--- SB.EC'r'r_Ez0NE--o'_
/ AllANTIC pAClRC
/ _ HAWAII
MOUNlrAIN ,SAMOA
Press the DISPLAY button to fix the
Time Zone. The CLOCK SET menu
appears. Press the MENU button to
display the MENU.
To exit from the MENU mode, press
the MENU button.
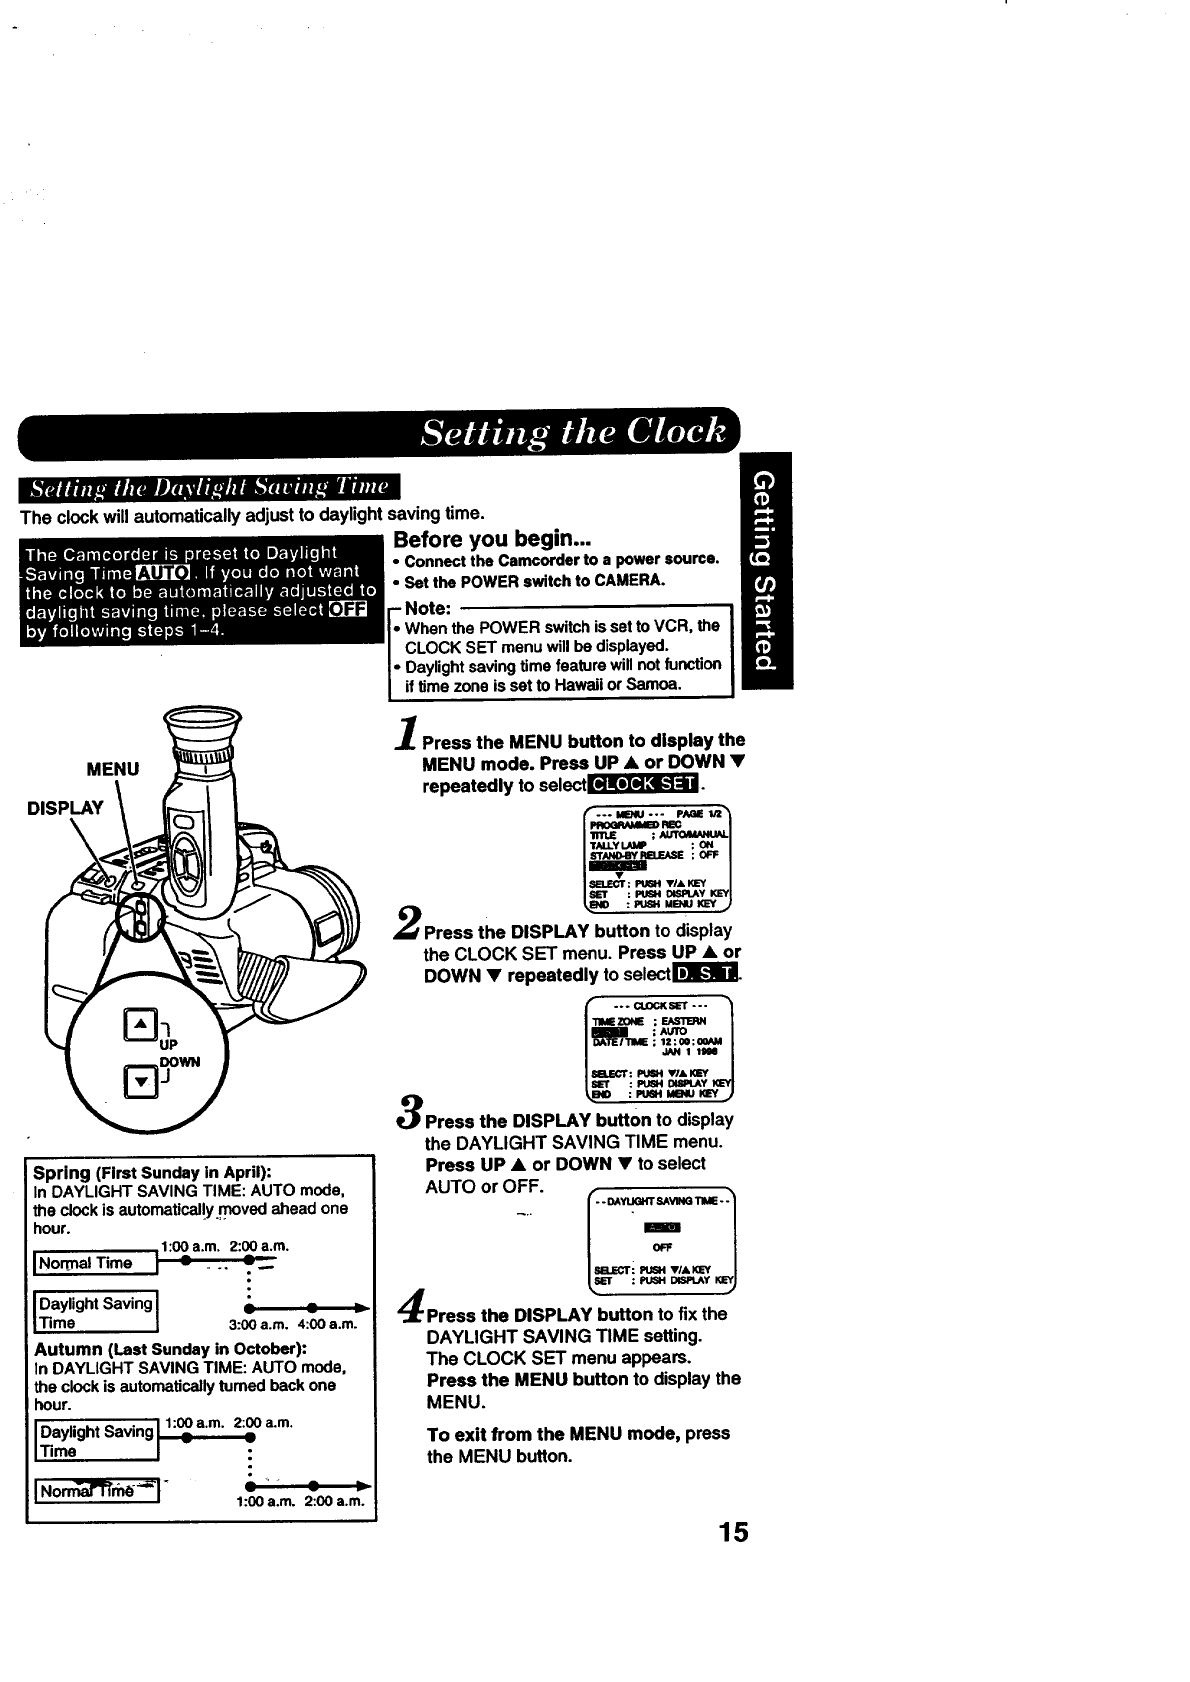
Theclockwillautomaticallyadjusttodaylightsavingtime.
Before you begin...
•Connectthe Camcorderto a power source,
•Set the POWERswitch to CAMERA.
r- Note:
Io When the POWER switchis setto VCR, the
lCLOCK SET menu willbe displayed.
_oDaylightsavingtime feature willnot function
Iif timezone is set to Hawaiior Samoa.
MENU
DISPLAY
Spring (First Sunday in April):
In DAYLIGHT SAVING TIME: AUTO mode,
the clock is automatical!y.,moved ahead one
hour. 1:00 a.m. 2:00 a.m.
iINormal Time
iDaylight Saving J •--
Time I 3:00 a.m. 4:00 a.m.
Autumn (Last Sunday in October):
In DAYLIGHT SAVING TIME: AUTO mode,
the clock is automatically turned back one
hour.
1:00 a.m. 2:00 a.m.
IDaylight Saving _:
JTime
"_""_r__ +_- _
1:00 a.m. 2:00 a.m.
Press the MENU button to display the
MENU mode. Press UP •or DOWN •
repeatedly to selectS.
;AUTOJU_J_LI
;ON l
:_'F|
: IPtJ6H VI& KEY J
:_DISPLAY KEYI
:_s. MENUXZVJ
Press the DISPLAY button to display
the CLOCK SET menu. Press UP •or
DOWN •repeatedly to sel_-.lr_I_mL
Im..Ec'r: Pue4W&KIY I
ISET : PU6H DI_LAY KEYI
Press the DISPLAY button to display
the DAYLIGHT SAVING TIME menu.
Press UP •or DOWN •to select
AUTO or OFF.
I m.r=cTi PUSHv/A_'Y
Press the DISPLAY button to fix the
DAYLIGHT SAVING TIME setting.
The CLOCK SET menu appears.
Press the MENU button to display the
MENU.
To exit from the MENU mode, press
the MENU button.
15
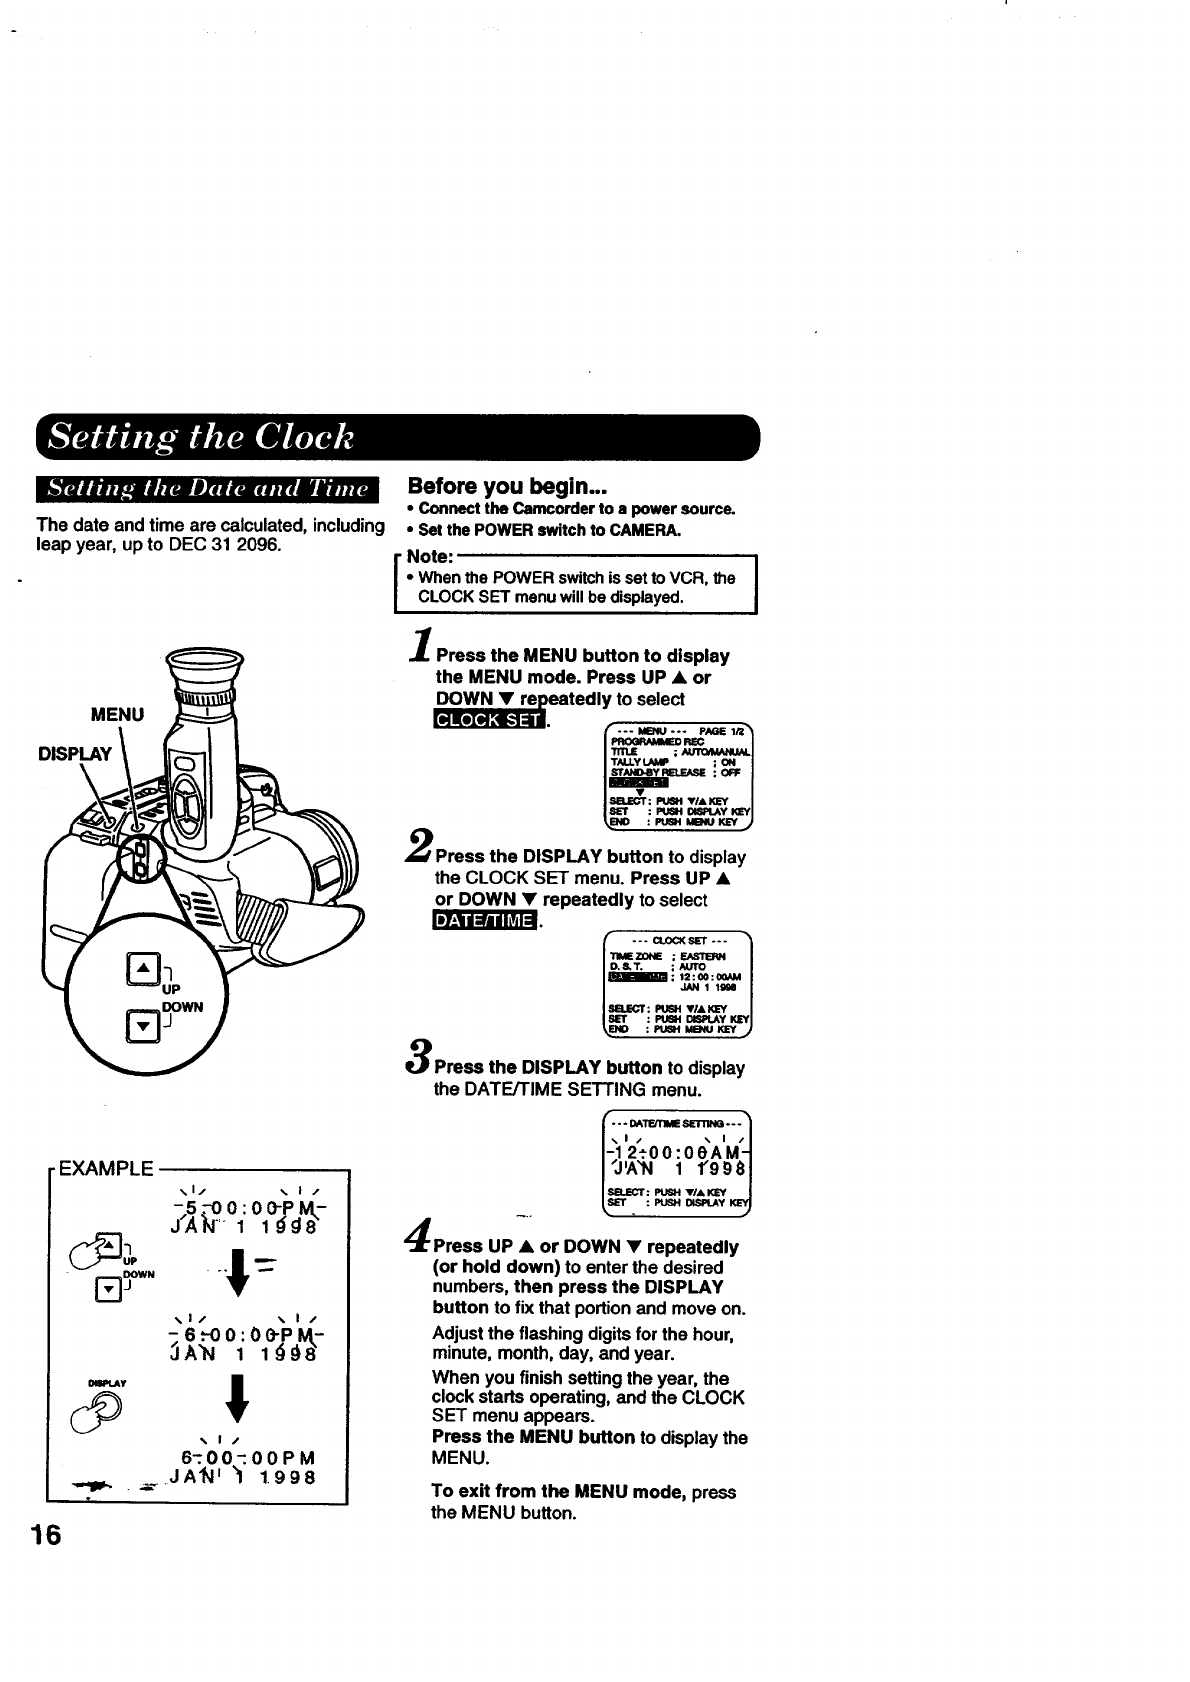
_TLZIHzJ._nlhz_.l_Vh_ r_#mt_||_mnR
|
The date and time are calculated, including
leap year, up to DEC 31 2096.
MENU
ID7-'1d_J diL_l:
16
,EXAMPLE
ITI w" ; --
I)IIPLAy
% I /
6-:00-00PM
JA'N n'1 1.998
Before you begin...
• Connect the Camcorder to a power source.
• Set the POWER switch to CAMERA.
Note: j
•When the POWER switch is set to VCR, the
CLOCK SET menu will be displayed.
Press the MENU button to display
the MENU mode. Press UP •or
eatedly to select
I "rrn.E ;/UUqO_ANUALI
I TN.LY LAMP ;ON /
Press the DISPLAY button to display
the CLOCK SET menu. Press UP •
or DOWN •repeatedly to select
fTIME '" CLOCKsE'r "-" "_
ZONE ;_
I D,S.T. ;AUTO l
II: I=:OO:eOAM/
i._N, ,m |
i m.scr: PushvIA KEY /
IsEr : PUSHDEPLAyKkWl
_.mo =_u_ .mu x_'vj
3Pm_ the DISPLAY button to display
the DATE/TIME SETTING menu.
_- - - DA'rFJtlMESE'IlllNG- --"_
i:12:oo:ooAM:i
/"'" 1 1"998 I
I Sig_F=CT:PU6H TI&KL=Y /
--.. _,SL=T : PUSH I)ISP_y KEY)
Press UP •or DOWN •repeatedly
(or hold down) to enter the desired
numbers, then press the DISPLAY
button to fix that portion and move on.
Adjust the flashing digits for the hour,
minute, month, day, and year.
When you finish setting the year, the
clock starts operating, and the CLOCK
SET menu appears.
Press the MENU button to display the
MENU.
To exit from the MENU mode, press
the MENU button.
!
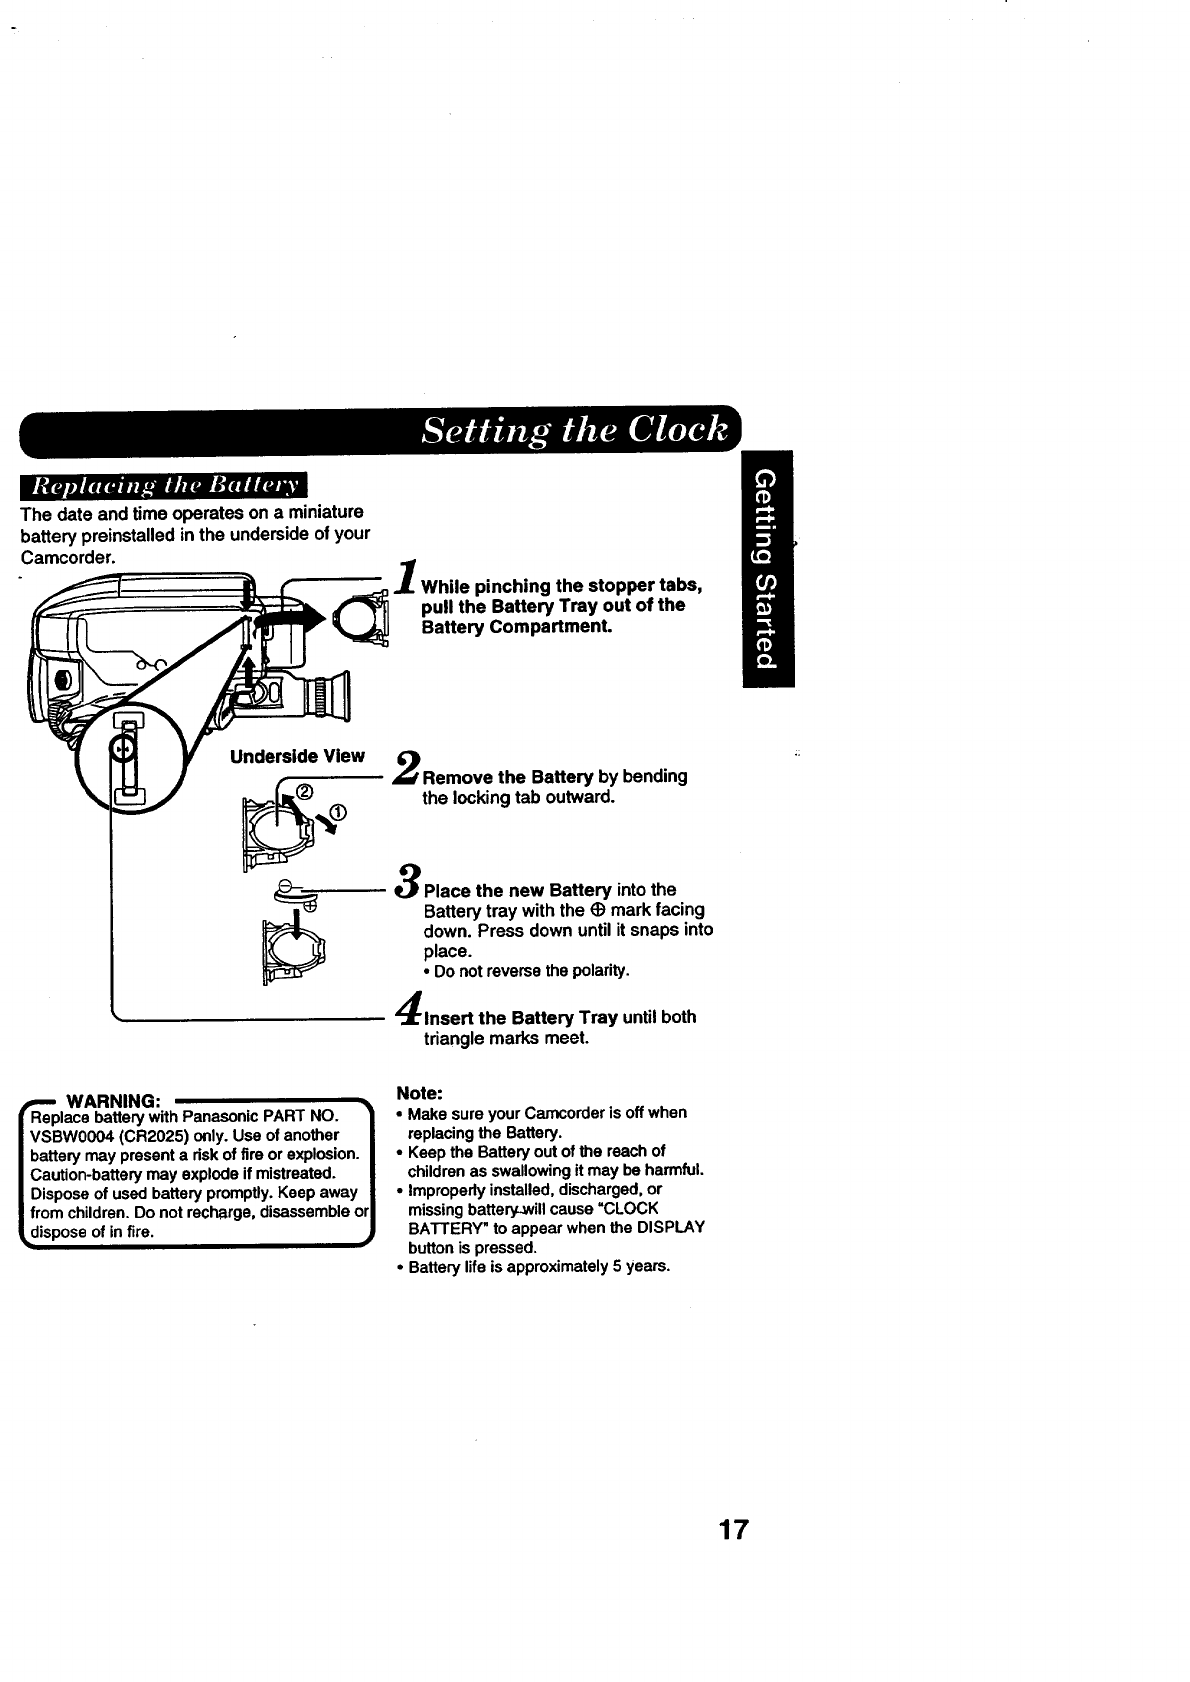
The date and time operates on a miniature
battery preinstalled in the underside of your
Camcorder.
1hile pinching the stopper tabs,
pull the Battery Tray out of the
Battery Compartment.
Underside View Remove the Battery by bending
the locking tab outward.
Place the new Battery into the
Battery tray with the (3 mark facing
down. Press down until it snaps into
place.
•Do not reverse the polarity.
Insert the Battery Tray until both
triangle marks meet.
_-. WARNING:
Replace battery with Panasonic PART NO. 1
VSBWO004 (CR2025) only. Use of another |
battery may present a risk of fire or explosion, l
Caution-battery may explode if mistreated. |
Dispose of used battery promptly. Keep away l
from children. Do not recharge, disassemble or|
dispose of in fire. )
Note:
•Make sure your Camcorder is off when
replacing the Battery.
•Keep the Battery out of the reach of
children as swallowing it may be harmful.
•Improperly installed, discharged, or
missing battery-will cause "CLOCK
BATTERY" to appear when the DISPLAY
button is pressed.
•Battery life is approximately 5 years.
17
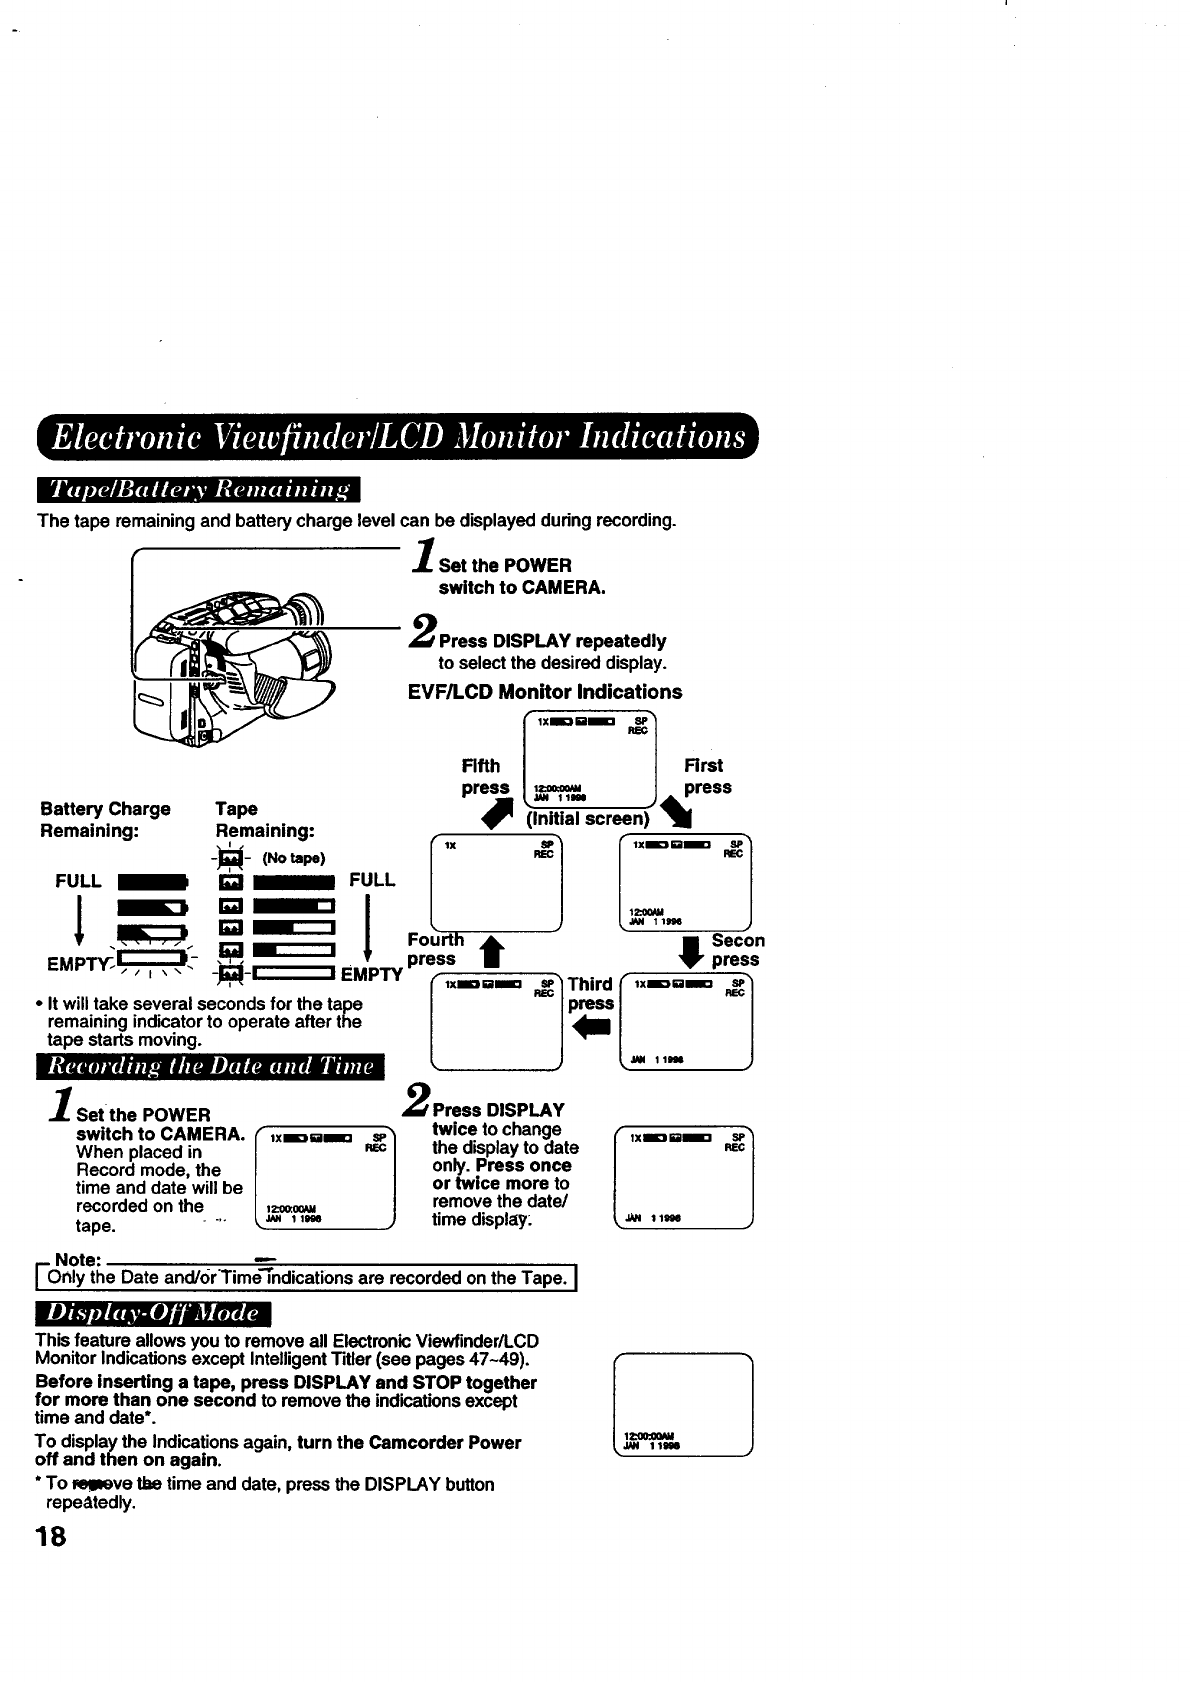
[fk_a_zui,'fl'/i_u_w hU.tlll-_'all:_
The tape remaining and battery charge level can be displayed dudng recording.
Set the POWER
switch to CAMERA.
Battery Charge
Remaining:
FULL 1
Press DISPLAY repeatedly
to selectthe desireddisplay.
EVF/LCD Monitor Indications
Tape
Remaining:
(No tape) I Ix
-]1_- FULL L
,I_, Fourth
I'_-"=='= "_I
Fl.h / / Rrst
/1=o=0_ / press
k_ 1,,,, J4k.'.
(Initial screen) 1
:!
press t
-J_-, , EMPTY _ Ix--,,=---,
lX Bill ='am'!
12:0_
JAN 119mB
•It willtake severalsecondsforthe tape
remainingindicatorto operateafter the
tape startsmoving.
f&UU, Xt/all_ li, rwltt/4rm_#l,B#e,i=
Set the POWER
switch to CAMERA. 1 Ix---,gm
When placed in L
Record mode, the
time and date will be
recorded on the lzo_.0o=
tape. - '" _ _'_
I econ
press
Press DISPLAY
twice to change
the display to date
only. Press once
or twice more to
remove the date/
time displ_[y-
the Date and/()rTime'_ndications are recorded on the Tape. I
This feature allows you to remove all Electronic Viewfinder/LCD
Monitor Indications except Intelligent Titler (see pages 47-49).
Before Inserting a tape, press DISPLAY end STOP together
for more than one second to remove the indications except
time and date*.
To display the Indications again, turn the Camcorder Power
off and then on again.
*To =_meve the time and date, press the DISPLAY button
repeatedly.
18
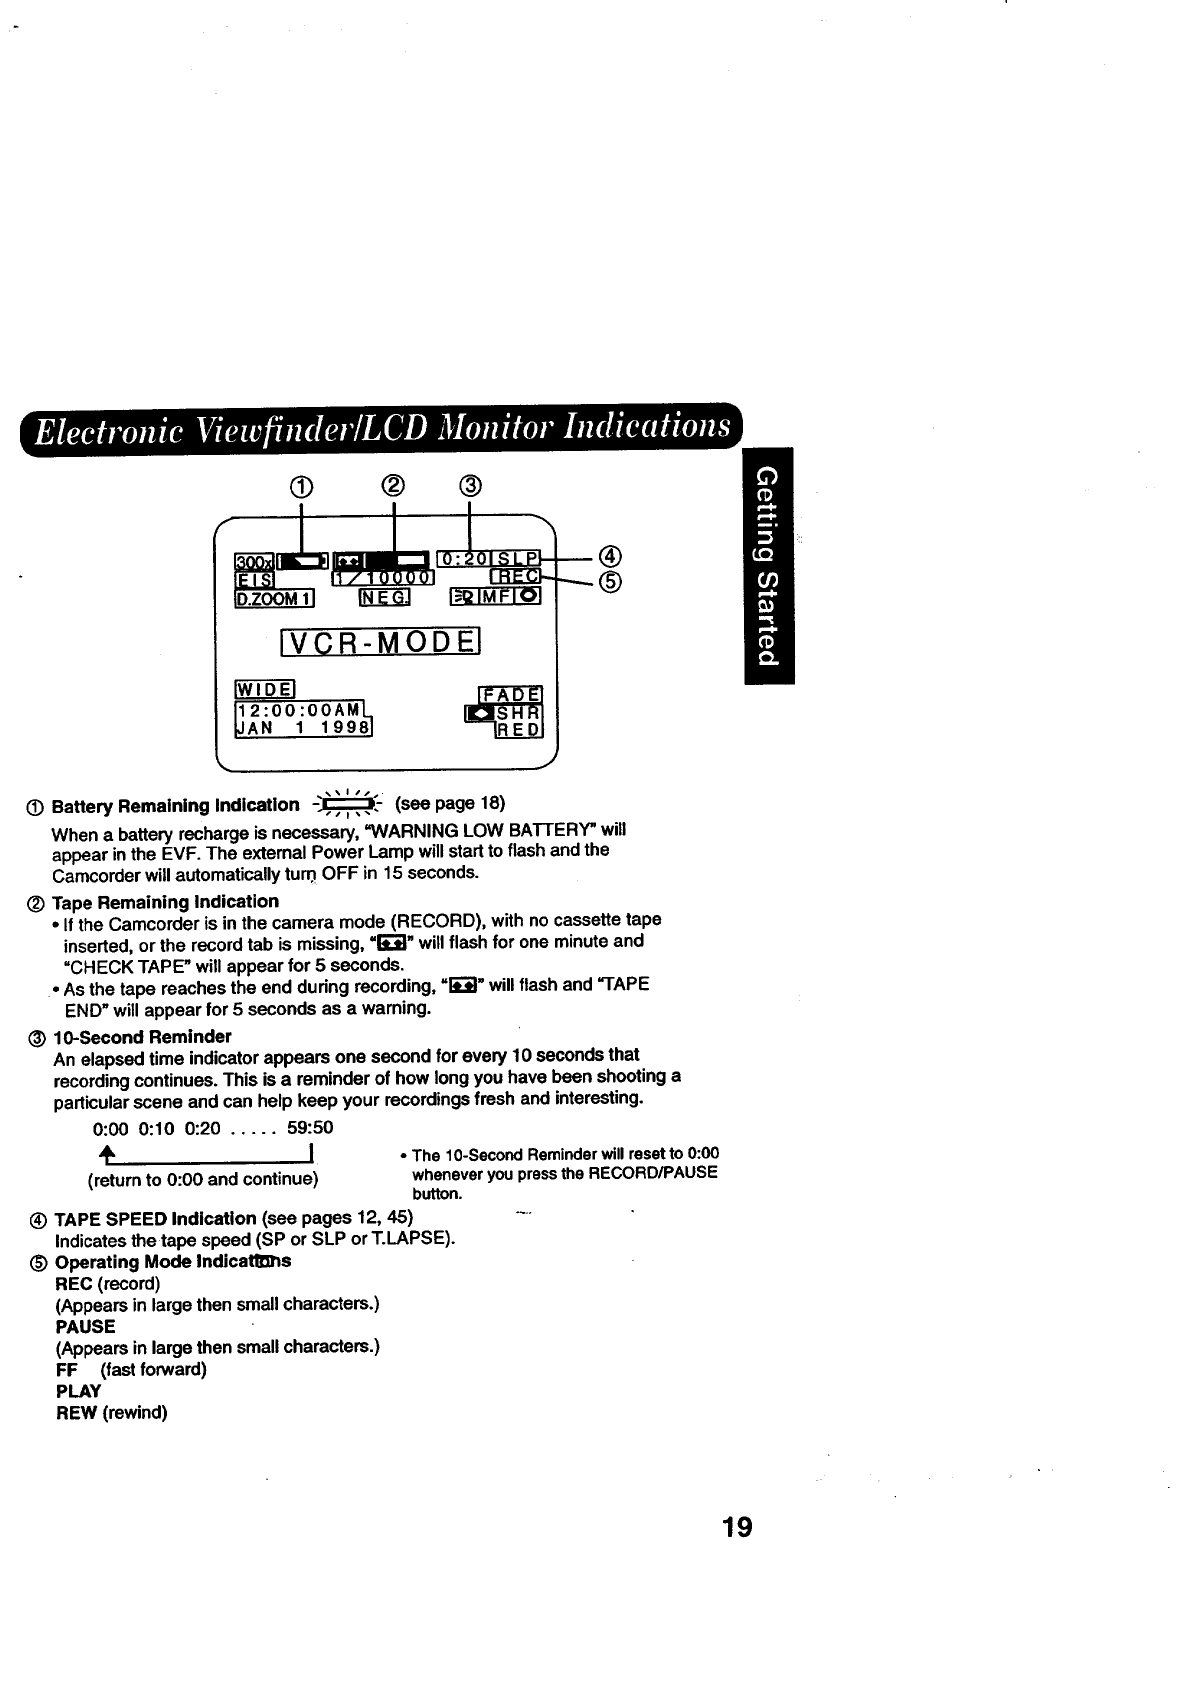
• ® @
IVCR-MODEI
•Battery Remaining Indication -_- (see page 18)
When a battery recharge is necessary, =WARNING LOW BATTERY" will
appear in the EVF. The extemal Power Lamp will start to flash and the
Carncorder will automatically tu_ OFF in 15 seconds.
(_) Tape Remaining Indication
•If the Camcorder is in the camera mode (RECORD), with no cassette tape
inserted, or the record tab is missing, -l_'ol" will flash for one minute and
"CHECK TAPE" will appear for 5 seconds.
•As the tape reaches the end during recording, "1_'-.1"will flash and "TAPE
END" will appear for 5 seconds as a waming.
(_) 10-Second Reminder
An elapsed time indicator appears one second for every 10 seconds that
recording continues. This is a reminder of how long you have been shooting a
particular scene and can help keep your recordings fresh and interesting.
0:00 0:10 0:20 ..... 59:50
I* The 10-SecondReminderwill resetto 0:00
(return to 0:00 and continue) wheneveryoupressthe RECORD/PAUSE
button.
®TAPE SPEED Indication (see pages 12, 45) -"
Indicates the tape speed (SP or SLP or T.LAPSE).
(_) Operating Mode IndicatOrs
REC (record)
(Appears in large then small characters.)
PAUSE
(Appears in large then small characters.)
FF (fast fonNard)
PLAY
REW (rewind)
19
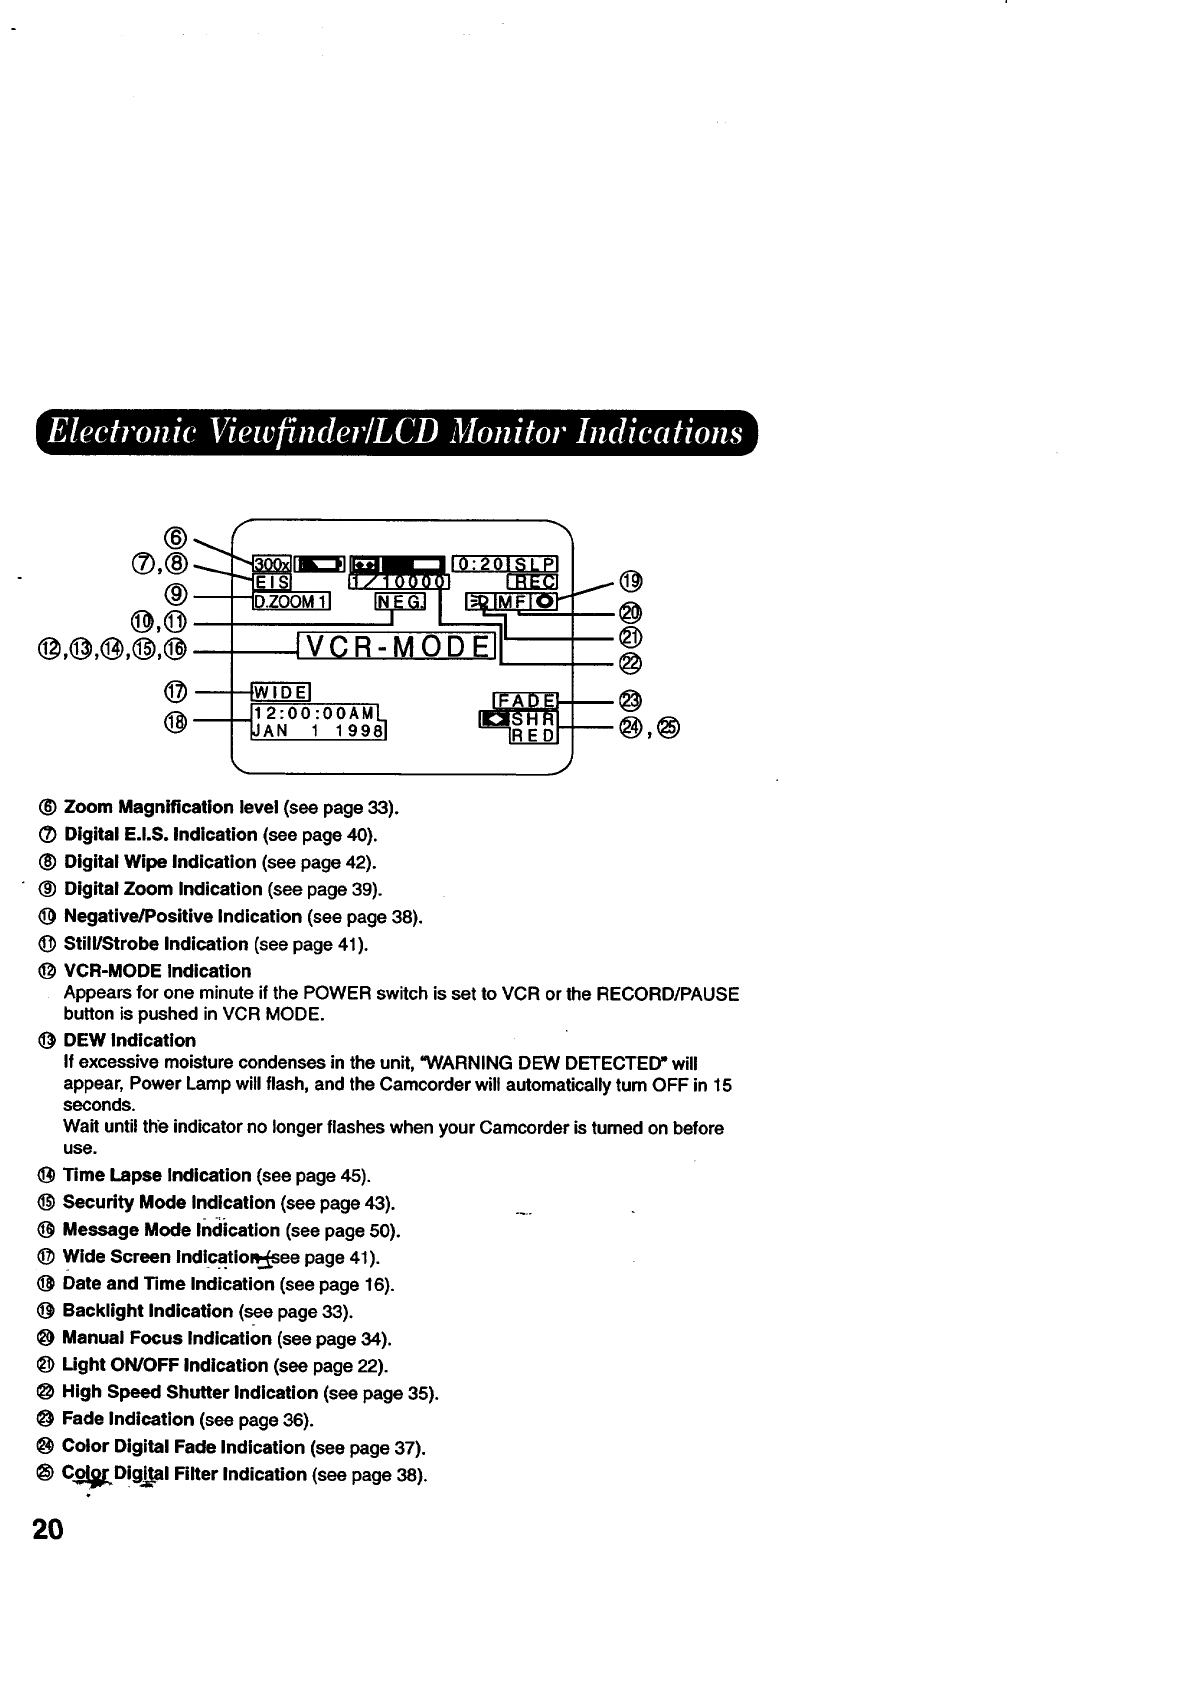
®
®
Zoom Magnification level (see page 33).
(_ Digital E.I.S. Indication (see page 40).
Digital Wipe Indication (see page 42).
Digital Zoom Indication (see page 39).
_) Negative/Positive Indication (see page 38),
OStill/Strobe Indication (see page 41).
@ VCR-MODE Indication
Appears for one minute if the POWER switch is set to VCR or the RECORD/PAUSE
button is pushed in VCR MODE.
(_ DEW Indication
If excessive moisture condenses in the unit, "WARNING DEW DETECTED" will
appear, Power Lamp will flash, and the Camcorder will automatically tum OFF in 15
seconds.
Wait until the indicator no longer flashes when your Camcorder is tumed on before
use.
Time Lapse Indication (see page 45).
Security Mode Indication (see page 43) .....
Message Mode Indication (see page 50).
Wide Screen Indicatio_see page 41).
ODate and Time Indication (see page 16).
OBacklight Indication (see page 33).
Manual Focus Indication (see page 34).
_) Ught ON/OFF Indication (see page 22).
High Speed Shutter Indication (see page 35).
OFade Indication (see page 36).
Color Digital Fade Indication (see page 37),
_) CQ_Digi_l Filter Indication (see page 38).
2O
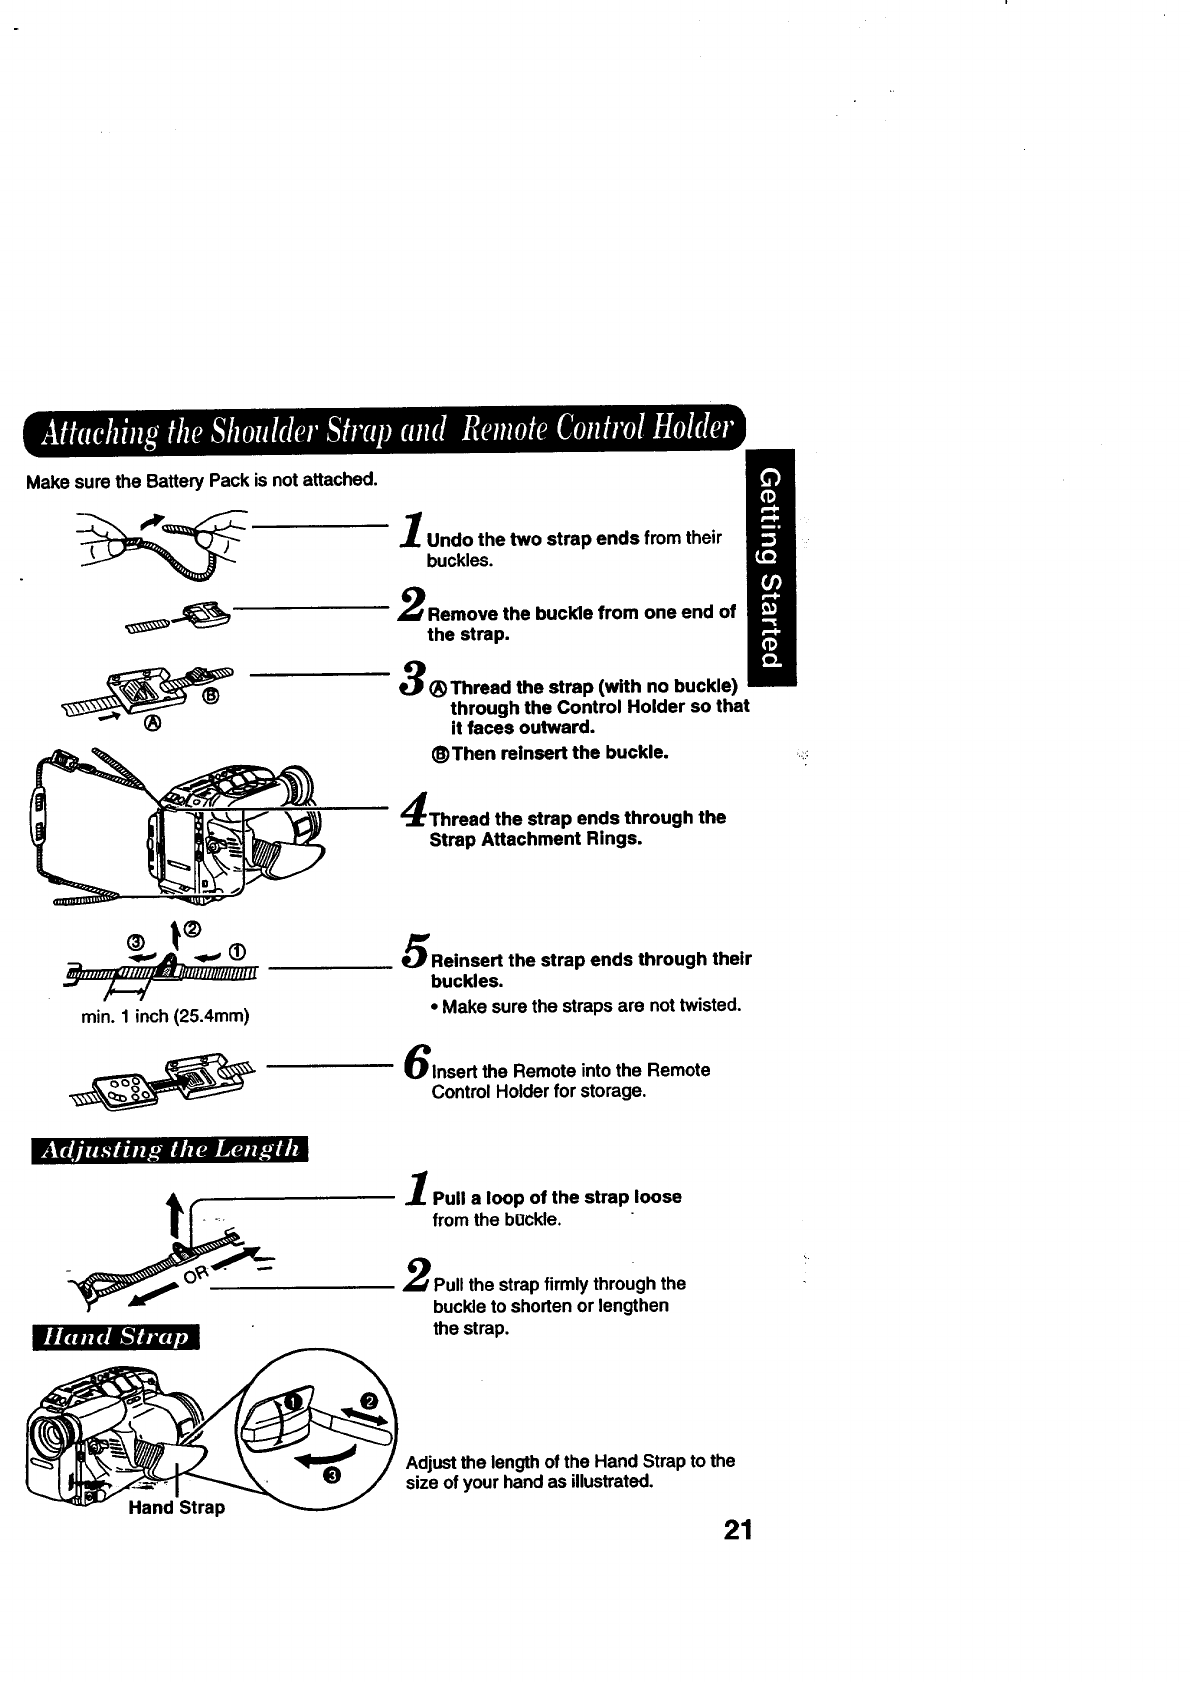
Make surethe BatteryPack is notattached.
Undo the two strap ends from their
buckles.
Remove the buckle from one end of
the strap.
34_ Thread the strap (with no buckle)
through the Control Holder so that
it faces outward.
_)Then reinsert the buckle.
Thread the strap ends through the
Strap Attachment Rings.
min. 1 inch (25.4mm)
Reinsert the strap ends through their
buckles.
• Make sure the straps are not twisted.
Insert the Remote into the Remote
Control Holder for storage.
Pull a loop of the strap loose
from the buckle.
Pull the strap firmly through the
buckle to shorten or lengthen
the strap.
Hand Strap
Adjust the length of the Hand Strap to the
size of your hand as illustrated.
21
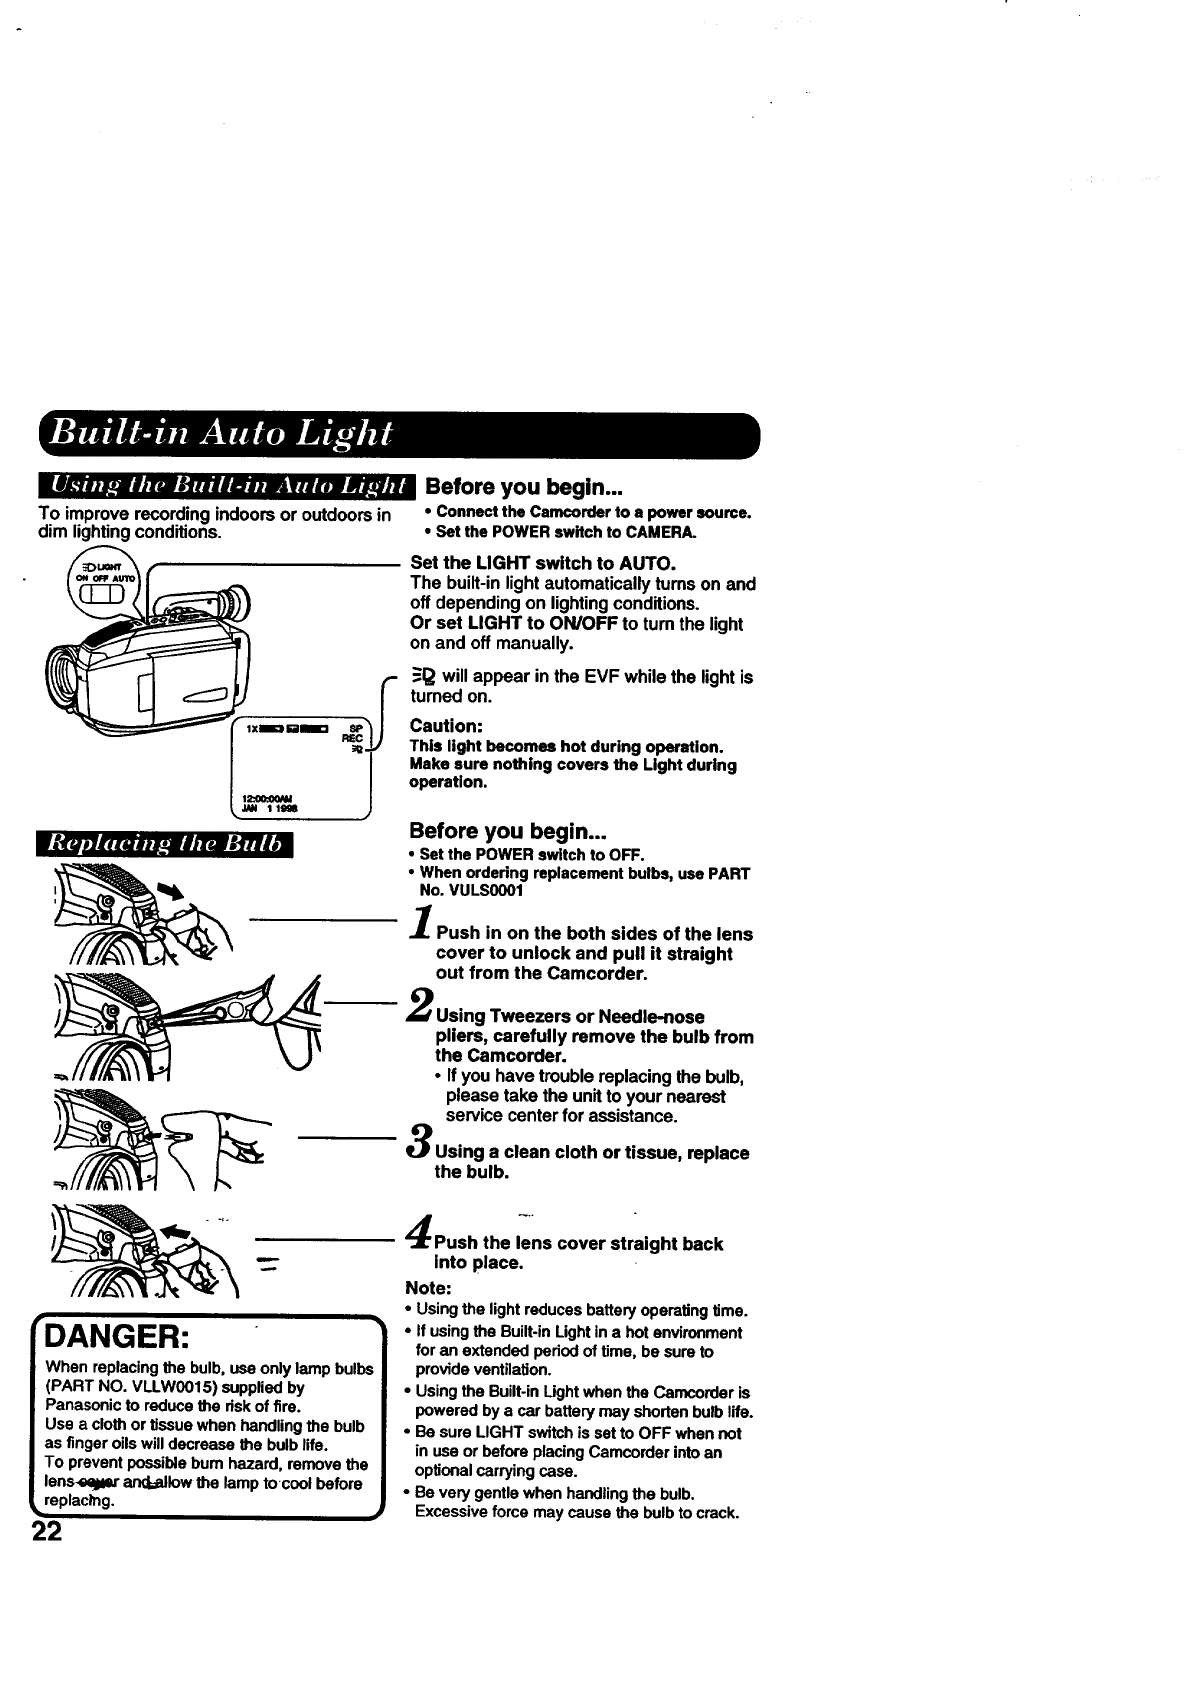
Ili_m_.,_i,,_h-_il-_,_mv_mw_.n- Before you begin...
To improve recording indoors or outdoors in
dim lighting conditions.
Vlzu.t.uwli.._ rhm I_Tlle_
"DANGER:
When replacing the bulb, use only lamp bulb6
(PART NO. VLLWO015) supplied by
Panasonic to reduce the risk of fire.
Use a cloth or tissue when handling the bulb
as finger oils will decrease the bulb life.
To prevent possible bum hazard, remove the
lens-eql_ and_low the lamp tocool before
_replacing. •
22
• Connect the Camcorder to • power source.
• Set the POWER switch to CAMERA.
Set the LIGHT switch to AUTO.
The built-in light automatically tums on and
off depending on lighting conditions.
Or set LIGHT to ON/OFF to tum the light
on and off manually.
-_1_will appear inthe EVF whilethe lightis
tumed on.
Caution:
This light becomes hot during operation.
Make sure nothing covers the Light during
operation.
Before you begin...
• Set the POWERswitchto OFF.
•When ordering replacementbulbs, usePART
No. VULS0001
Push in on the both sides of the lens
cover to unlock and pull it straight
out from the Camcorder.
Using Tweezers or Needle-nose
pliers, carefully remove the bulb from
the Camcorder.
• If you have trouble replacing the bulb,
please take the unit to your nearest
service center for assistance.
Using a clean cloth or tissue, replace
the bulb.
Push the lens cover straight back
into place.
Note:
•Using the light reduces battery operating time.
•If using the Built-in Light in a hot environment
for an extended period of time, be sure to
provide ventilation.
•Using the Built-in Light when the Carncorder is
powered by a car battery may shorten bulb life.
•Be sure LIGHT switch is set to OFF when not
in use or before placing Camcorder into an
optional carrying case.
•Be very gentle when handling the bulb.
Excessive force may cause the bulb to crack.
TAPE
EJECT
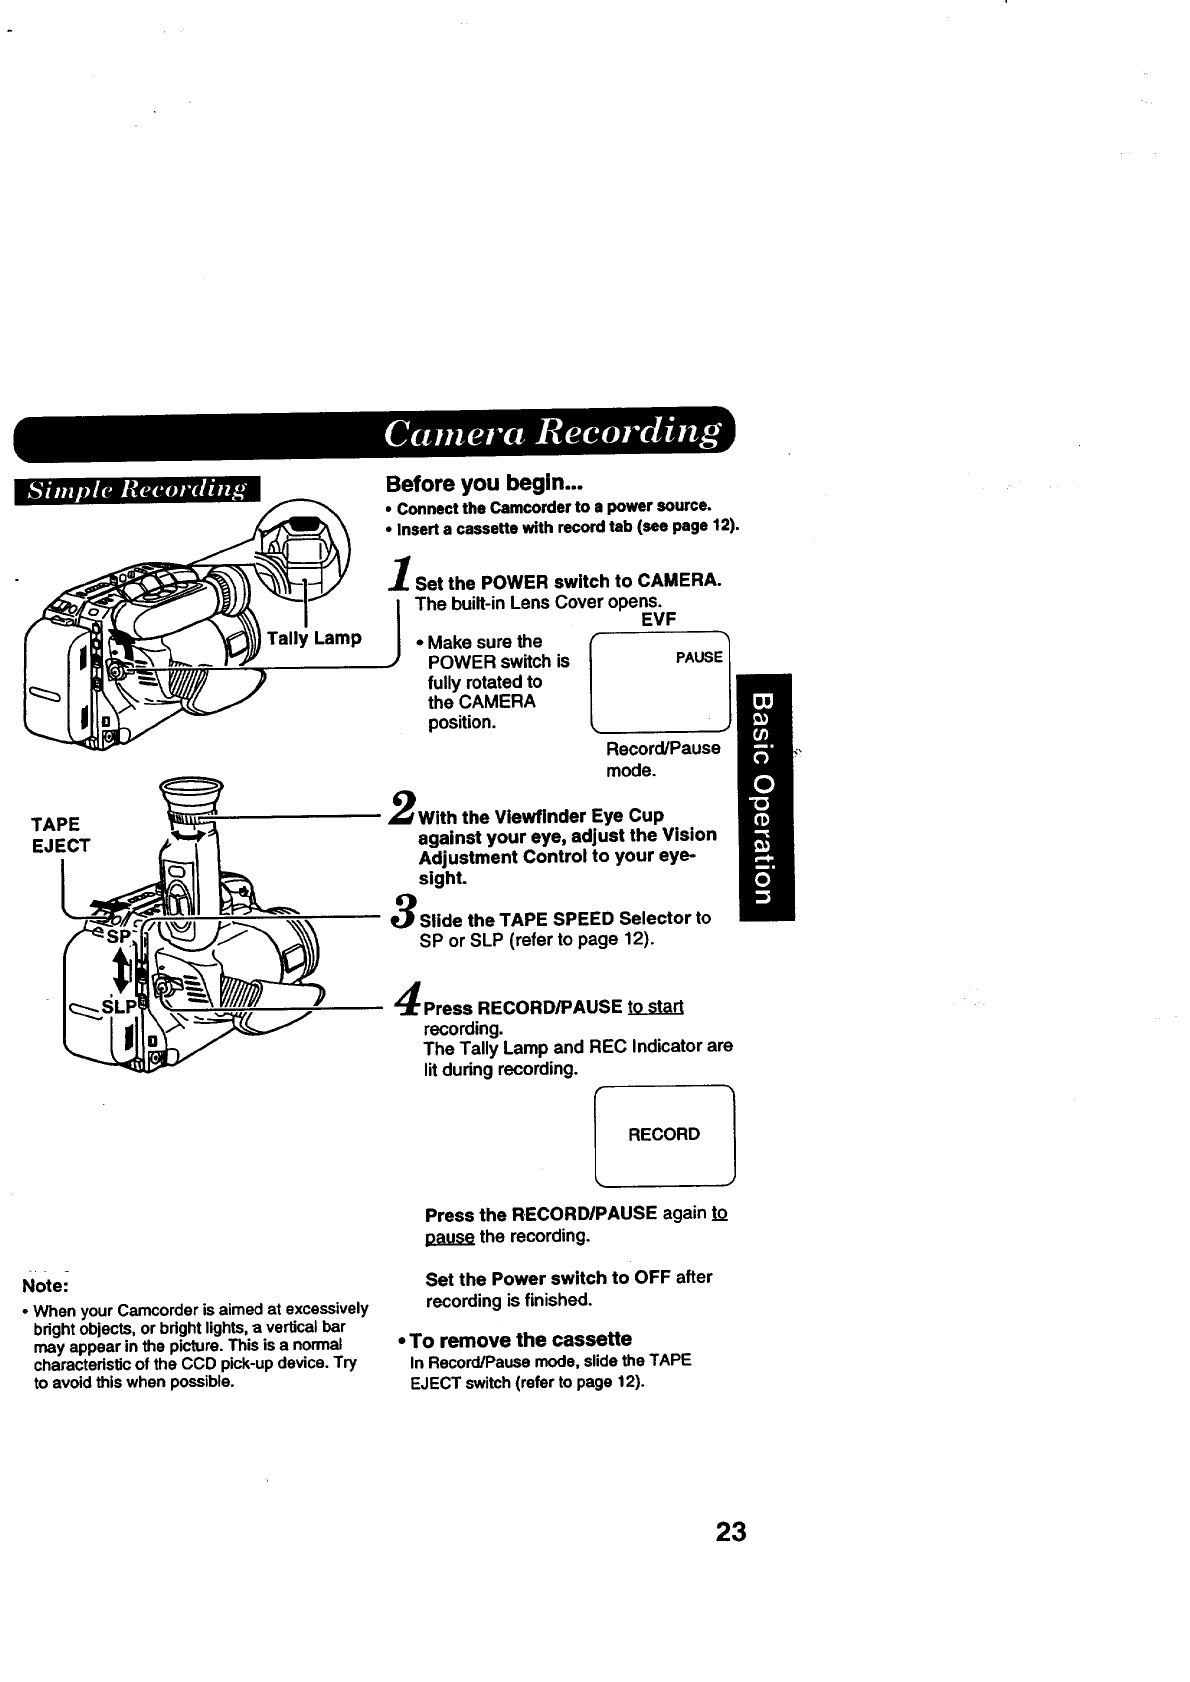
Before you begin...
• Connect the Camcorder to a power source.
• Insert a cassette with record tab (see page 12).
'Set the POWER switch to CAMERA.
The built-inLens Coveropens.
EVF
• Make surethe
POWER switchis
fully rotatedto
the CAMERA
position.
Record/Pause
mode.
With the Viewflnder Eye Cup
against your eye, adjust the Vision
Adjustment Control to your eye-
sight.
Slide the TAPE SPEED Selector to
SP or SLP (referto page 12).
Press RECORD/PAUSE to start
recording.
The Tally Lampand REC Indicatorare
litduringrecording.
RECORD
Notei
• When your Camcorderis aimed at excessively
brightobjects,or brightlights,a verticalbar
mayappear in the picture.This is a normal
characteristicof the CCD pick-updevice.Try
to avoidthiswhen possible.
Press the RECORD/PAUSE againto
the recording.
Set the Power switch to OFF after
recording is finished.
•To remove the cassette
In Record/Pausemode,slidethe TAPE
EJECT switch(referto page 12).
23
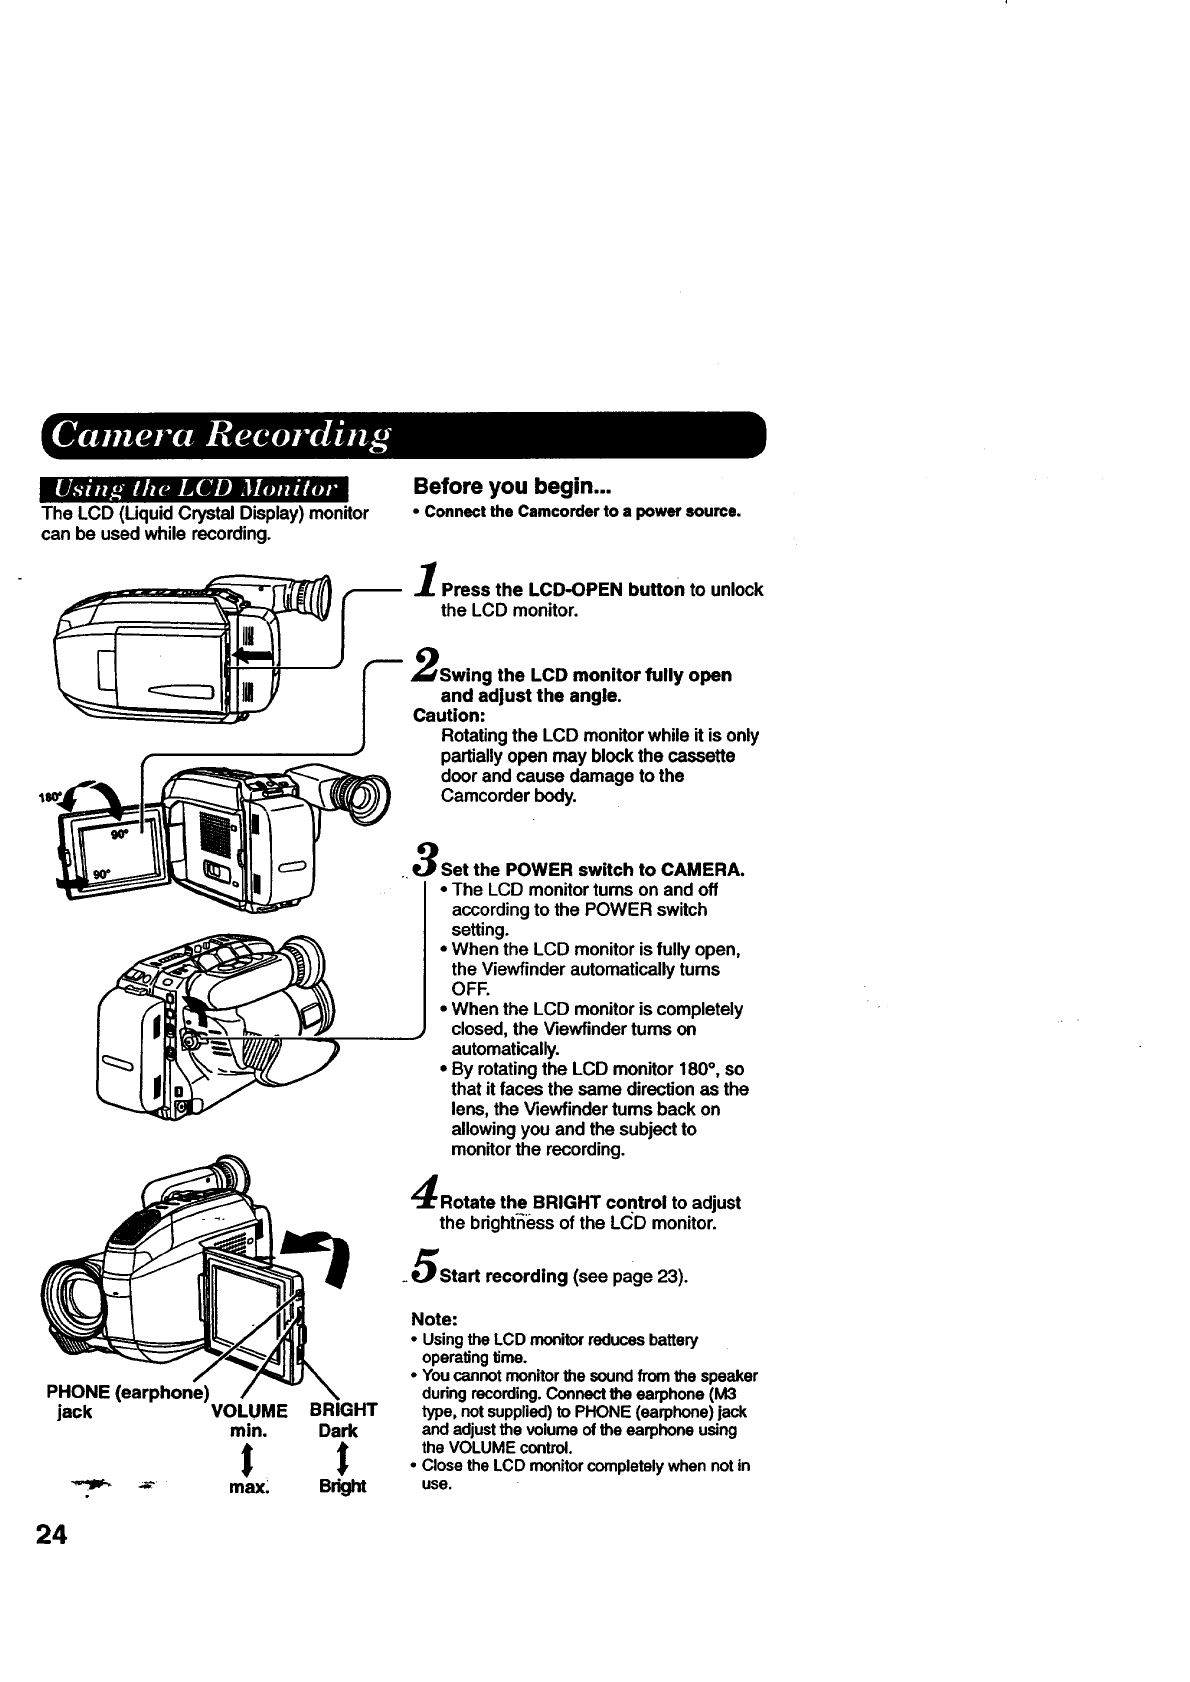
F_£_wl_J_eHw KH#J JtmH _J
The LCD'(Uquid CrystalDisplay)monitor
can be usedwhile recording
Before you begin...
• Connect the Camcorder to a power source,
1
__ 1. Press the LCD-OPEN button to unlock
the LCD monitor.
Swing the LCD monitor fully open
and adjust the angle.
Caution:
Rotating the LCD monitor while it is only
partially open may block the cassette
door and cause damage to the
Camcorder body.
PHONE (earphone)
jack VOLUME BRIGHT
rain. Dark
'_ max. Bright
,r'j
_.D Set the POWER switch to CAMERA.
J • The LCD monitor tums on and off
according to the POWER switch
setting
•When the LCD monitor is fully open,
the Viewfinder automatically turns
OFF
• When the LCD monitor is completely
closed, the Viewfinder turns on
automatically
• By rotating the LCD monitor 180 °, so
that itfaces the same direction as the
lens, the Viewfinder tums back on
allowing you and the subject to
monitor the recording
Rotate the BRIGHT control to adjust
the brightness of the L(_D monitor.
_5Start recording (see page 23)
Note:
•UsingtheLCD monitorreducesbattery
operatingtime.
•Youcannotmonitorthesoundfromthe speaker
duringrecording.Connectthe earphone(M3
type, notsupplied)to PHONE (earphone)jack
and adjustthe volumeoftheearphoneusing
the VOLUMEcontrol.
•ClosetheLCD monitorcompletelywhen notin
use.
24
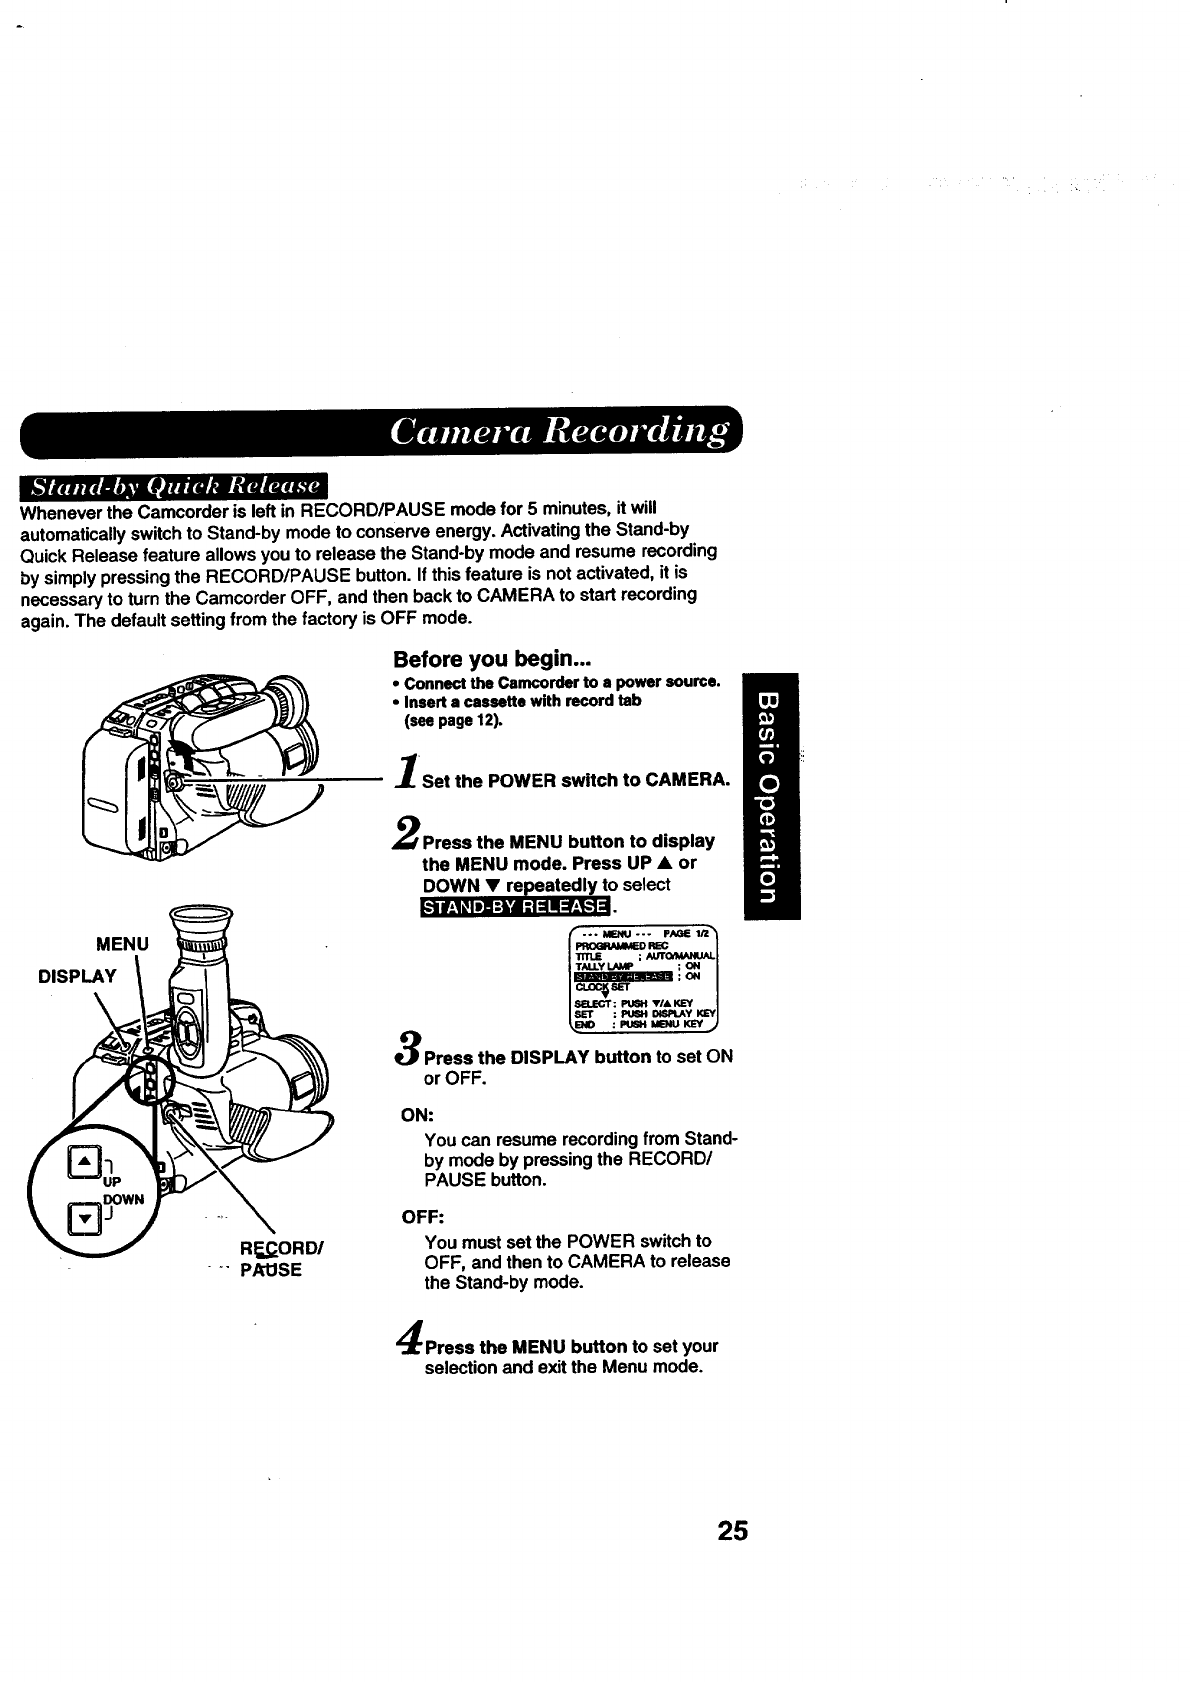
Ik'/Ar_#lJrr,II,l_tli_mRUl_l_._r=-
Whenever the Camcorder is left in RECORD/PAUSE mode for 5 minutes, it will
automatically switch to Stand-by mode to conserve energy. Activating the Stand-by
Quick Release feature allows you to release the Stand-by mode and resume recording
by simply pressing the RECORD/PAUSE button. If this feature is not activated, it is
necessary to turn the Camcorder OFF, and then back to CAMERA to start recording
again. The default setting from the factory is OFF mode.
Before you begin...
• Connectthe Camcorderto a power source.
• Inserta cassettewith recordtab
(seepage12).
Set the POWER switch to CAMERA.
MENU
DISPLAY
Press the MENU button to display
the MENU mode. Press UP •or
DOWN •repeatedly to select
k-]lif-l_,IiI :,'| :i:111:r-_[,.1:1.
:_ VI&KEY |
: pUSH DiSPLAy KE_'I
: PUSH MENU KEY J
Press the DISPLAY button to set ON
or OFF.
ON:
You can resume recording from Stand-
by mode by pressing the RECORD/
PAUSE button.
OFF:
You must set the POWER switch to
OFF, and then to CAMERA to release
the Stand-by mode.
Press the MENU button to set your
selection and exit the Menu mode.
25
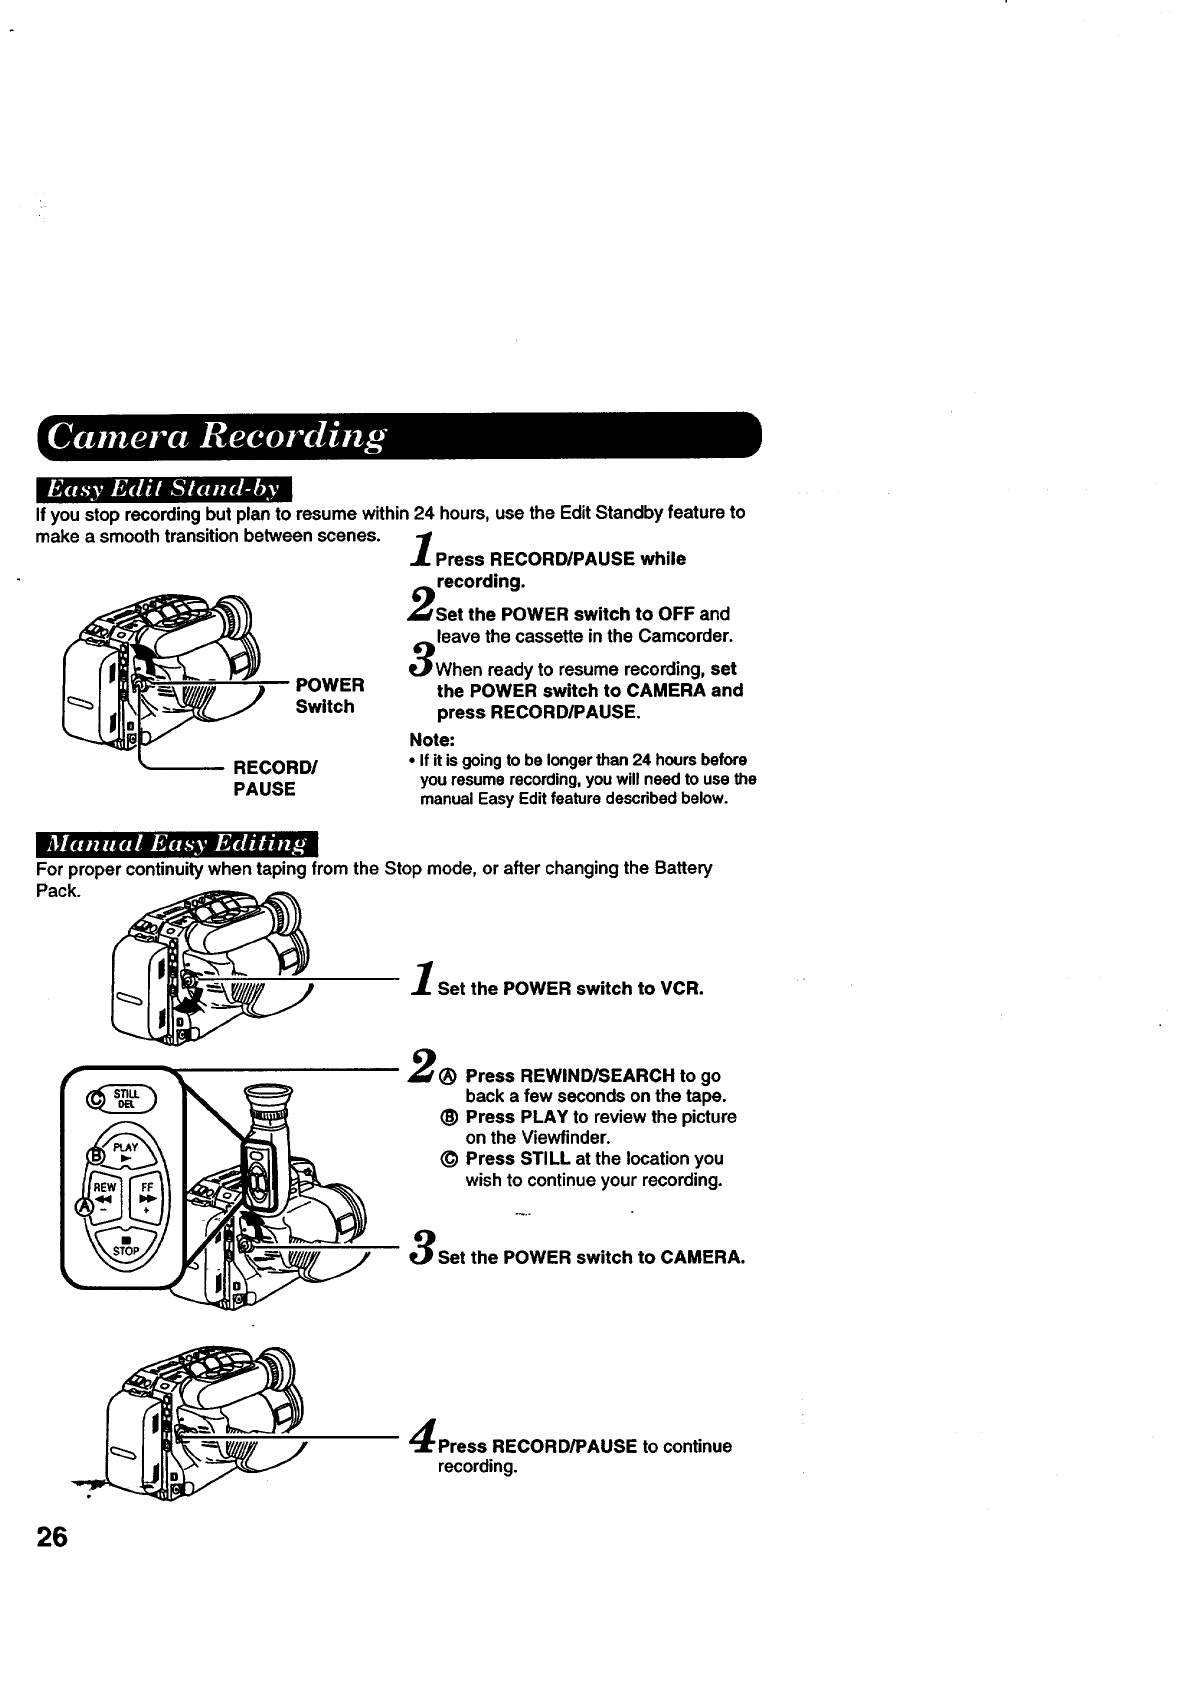
If you stop recording but plan to resume within 24 hours, use the Edit Standby feature to
make a smooth transition between scenes. Press RECORD/PAUSE while
recording.
Set the POWER switch to OFF and
leave the cassette in the Camcorder.
When ready to resume recording, set
POWER the POWER switch to CAMERA and
Switch press RECORD/PAUSE.
Note:
RECORD/ • Ifitis goingto be longerthan 24 hoursbefore
PAUSE youresumerecording,youwill need to use the
manualEasy Edit featuredescribedbelow.
liJi....B_r, k..w ,_/t_rh II..'
For proper continuity when taping from the Stop mode, or after changing the Battery
Pack.
Set the POWER switch to VCR.
2(_ Press REWIND/SEARCH to go
back a few seconds on the tape.
_) Press PLAY to review the picture
on the Viewfinder.
_) Press STILL at the location you
wish to continue your recording.
Set the POWER switch to CAMERA.
Press RECORD/PAUSE to continue
recording.
26
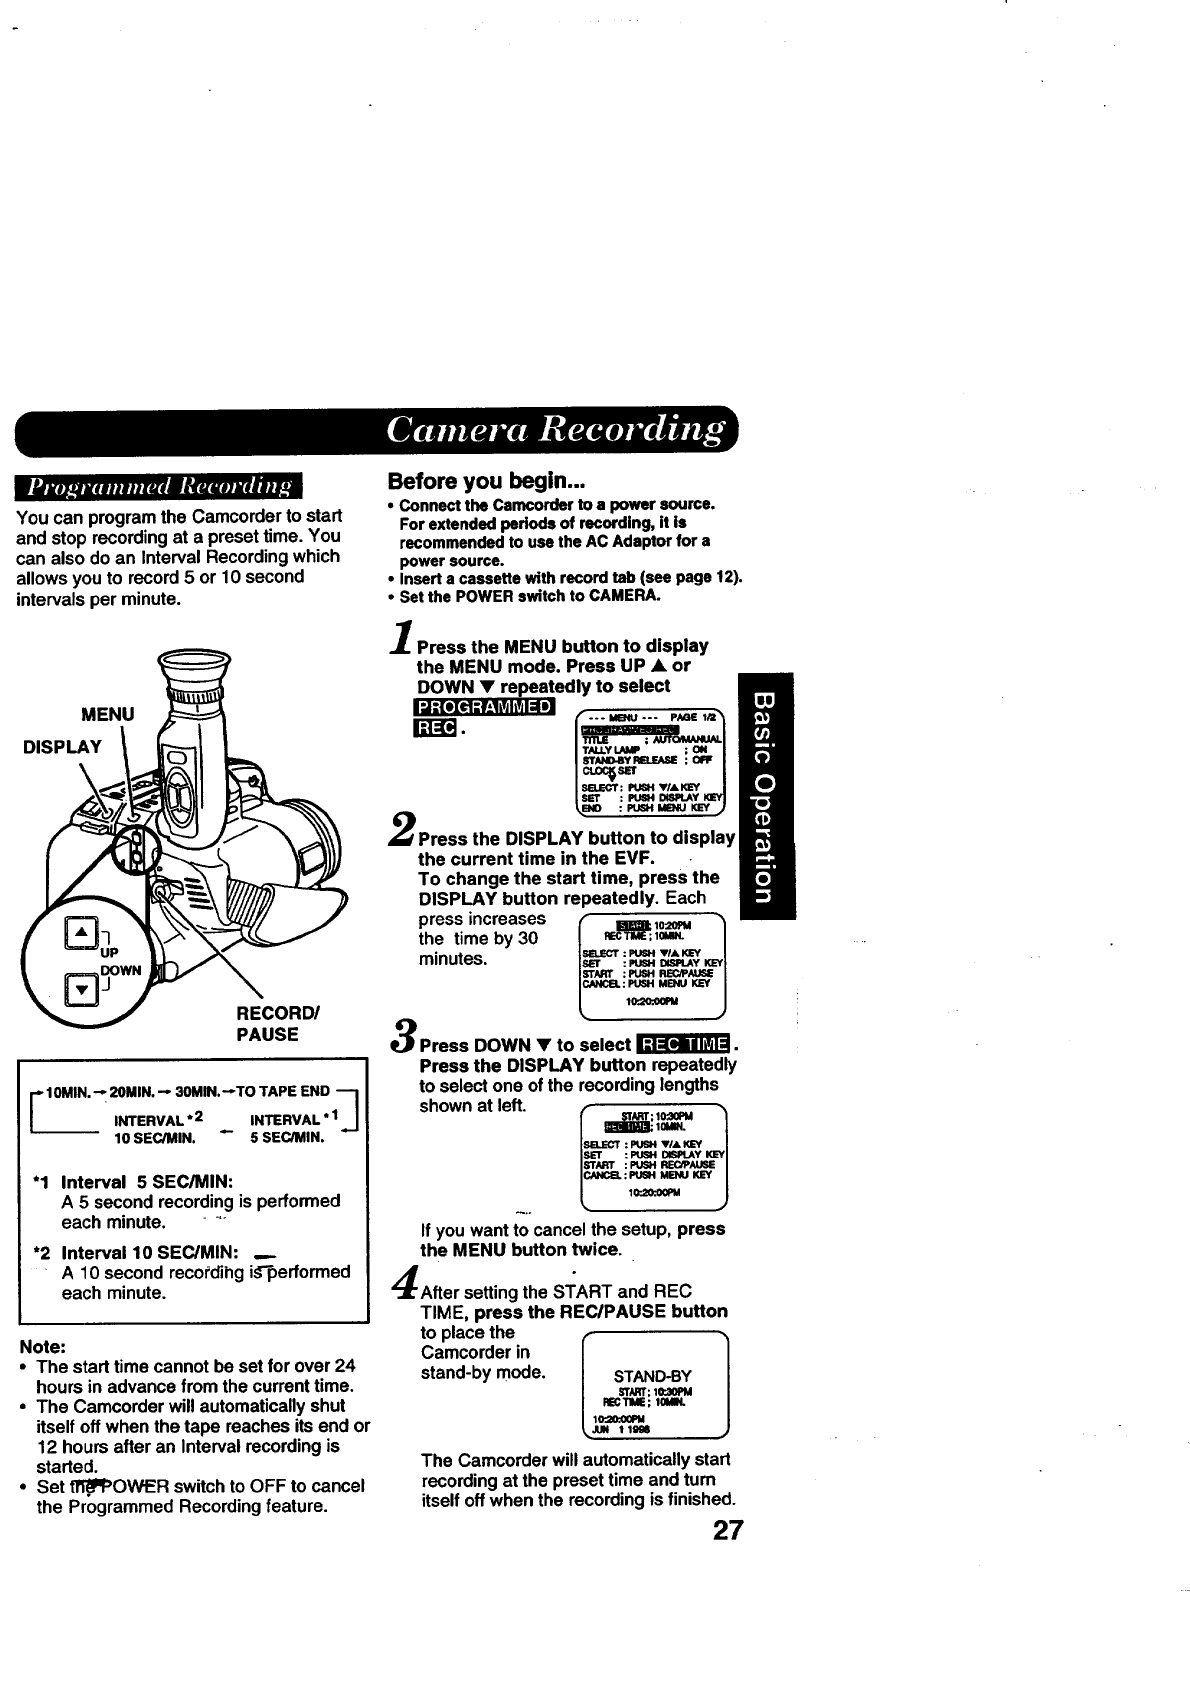
Youcan programthe Camcorderto start
andstop recordingat a presettime. You
can also doan IntervalRecordingwhich
allowsyouto record5 or 10 second
intervalsperminute.
MENU
DISPLAY
RECORD/
PAUSE
- 10MIN. _20MIN. -- 30MIN.--TO TAPE END "--1
INTERVAL * 2 INTERVAL * 1J
10 SEC/MIN. 5 SEC/MIN.
"1
*2
Interval 5 SEC/MIN:
A5 second recording is performed
each minute. _
Interval 10 SEC/MIN: p
A 10 second recordihg i_"performed
each minute.
Note:
• The start time cannot be set for over 24
hours in advance from the current time.
•The Camcorder will automatically shut
itself off when the tape reaches its end or
12 hours after an Interval recording is
started.
•Set .ffi_OWER switch to OFF to cancel
the Programmed Recording feature.
Before you begin...
•Connectthe Camcorderto a powersource.
For extendedperiodsof recording,it is
recommendedto usethe AC Adaptorfor a
power source.
• Inserta cassettewith recordtab(see page 12).
• Set the POWERswitchto CAMERA.
Press the MENU button to display
the MENU mode. Press UP •or
DOWN •repeatedly to select
r_. f... MB4u --- pAGE 1/2 "_
I "rm.E : AUTO_N_U_
I TALLY _; ON
I SI"N4D-BYRELEASE ; OFF
I,_'r : PU6H I_PLAY 1_
_ENO : pU_ MEN_ KEY
Press the DISPLAY button to display
the current time in the EVF.
To change the start time, press the
DISPLAY button repeatedly. Each
press increases f 1
the time by 30 p=cla_;l_
minutes, tse._r :PUSHVl,_=Y /
I_¢T :_DISIRLAY KEY t
ISTAWr:PUSHB_._P/_US_I
ICN_CB.:Pt,_H MENU KEY i
t, J
Press DOWN •to select _.
Press the DISPLAY button repeatedly
to select one of the recording lengths
shown at left.
: PUSN Vl- KEY |
:PUSH DISPt.AYI_'YI
:PUSH REC/P/CJ6E/
:_ MENU KEY |
,o==o_ ,)
If you want to cancel the setup, press
the MENU button twice.
g •
After setting the START and REC
TIME, press the REClPAUSE button
to place the [
Camcorder in
stand-by mode. STAND-BY
STN_T;tO:30PM
REC'nME; 10Mm.
IO'20"JX_M
JUN 11998
The Camcorder will automatically start
recording at the preset time and tum
itself off when the recording is finished.
27
lfimh'_|._*,---kmwehu.mlai,lnHi.--
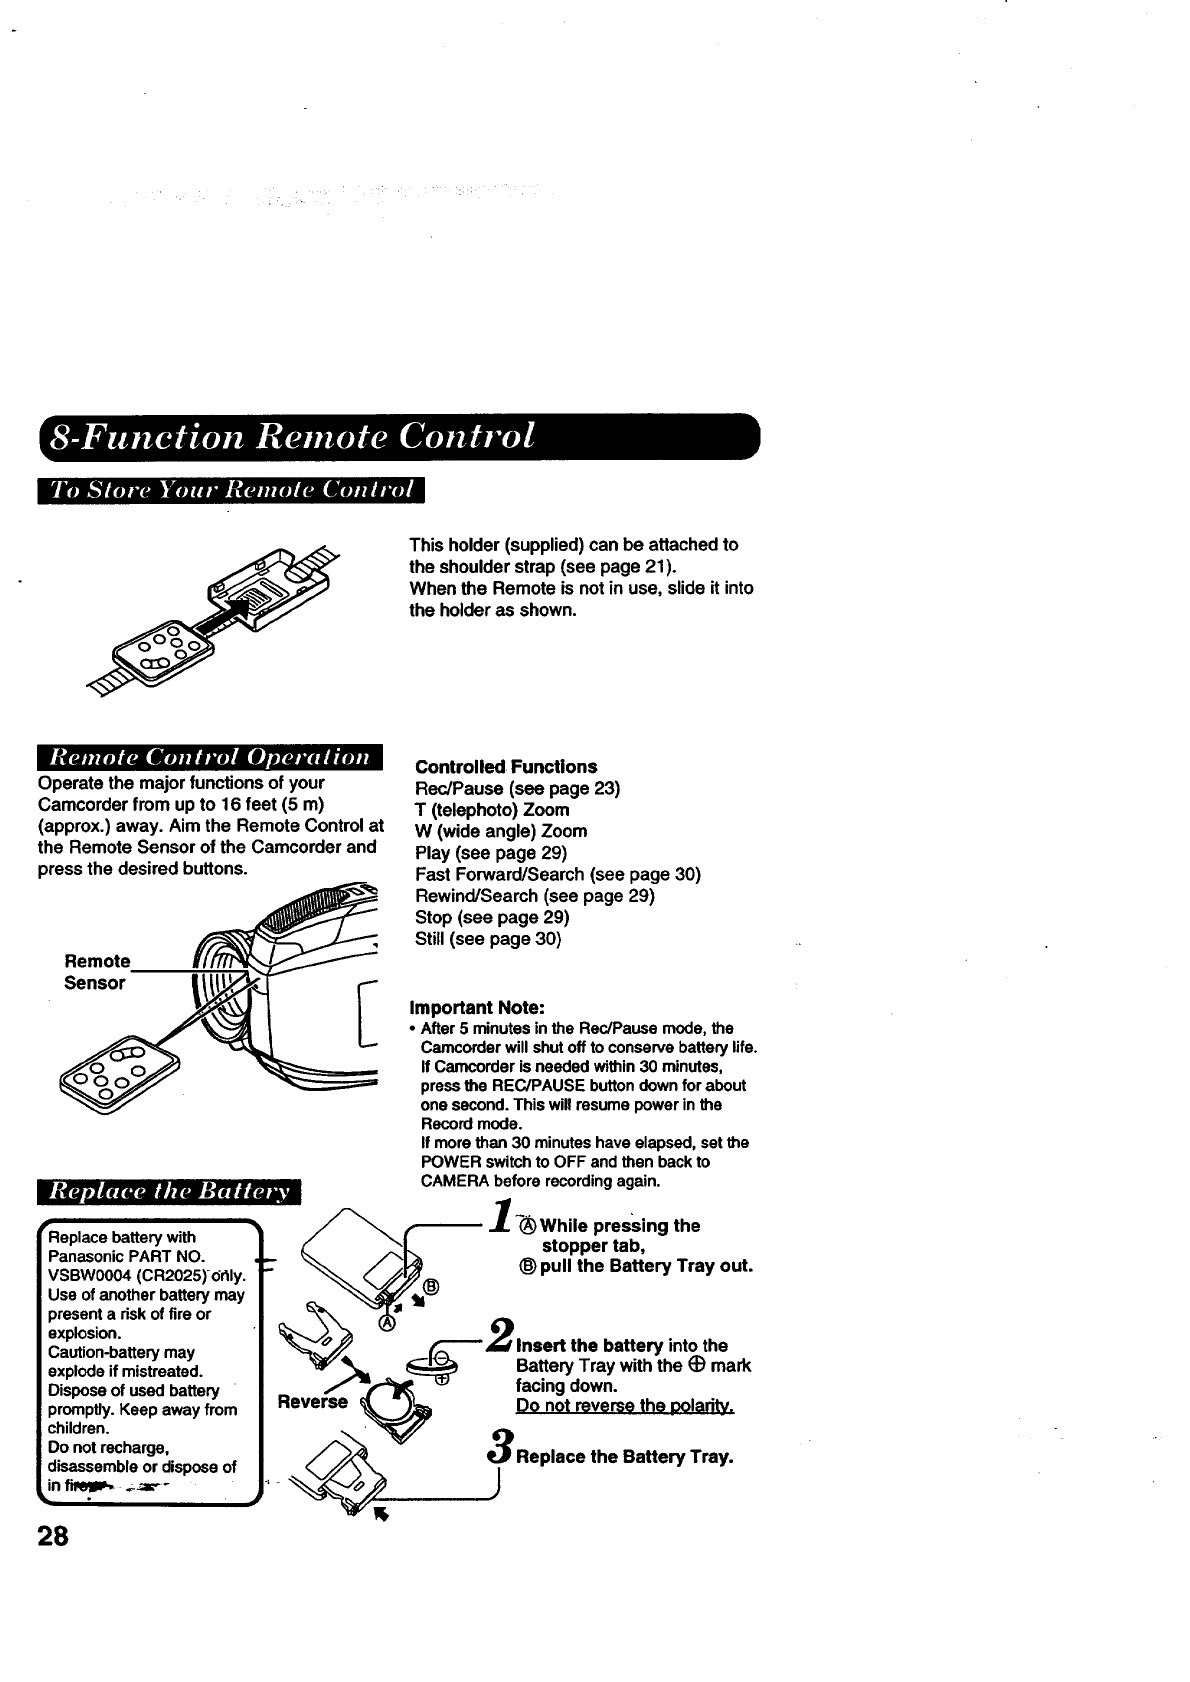
This holder (supplied) can be attached to
the shoulder strap (see page 21).
When the Remote is not in use, slide it into
the holder as shown.
ftTullmir_mnx.iP_xux._xm_
Operate the major functions of your
Camcorder from up to 16 feet (5 m)
(approx.) away. Aim the Remote Control at
the Remote Sensor of the Camcorder and
press the desired buttons.
Remote
Sensor
rReplace batterywith •
PanasonicPART NO.
VSBW0004 (CR2025)-(ir_ly.
Use of anotherbattery may
presenta riskof fireor
explosion.
Caution-batterymay
explodeif mistreated.
Disposeof used battery
promptly.Keep away from
children.
Do not recharge,
disassembleor disposeof
in_._._.--
28
Controlled Functions
Rec/Pause (see page 23)
T (telephoto) Zoom
W (wide angle) Zoom
Play (see page 29)
Fast Forward/Search (see page 30)
Rewind/Search (see page 29)
Stop (see page 29)
Still (see page 30)
Important Note:
• After5 minutesinthe Rec/Pause mode,the
Camcorderwillshutoffto conservebatterylife.
If Camcorderis neededwithin30 minutes,
pressthe REC/PAUSE buttondownforabout
onesecond.This willresumepowerinthe
Recordmode.
If morethan 30 minuteshave elapsed,set the
POWER switchto OFF andthen backto
CAMERAbefore recordingagain.
]-_)While pressing the
stopper tab,
(_)pull the Battery Tray out.
battery into the
Battery Tray with the (_ mark
facing down.
Do not reverse the _)ladty.
Replace the Battery Tray.
J
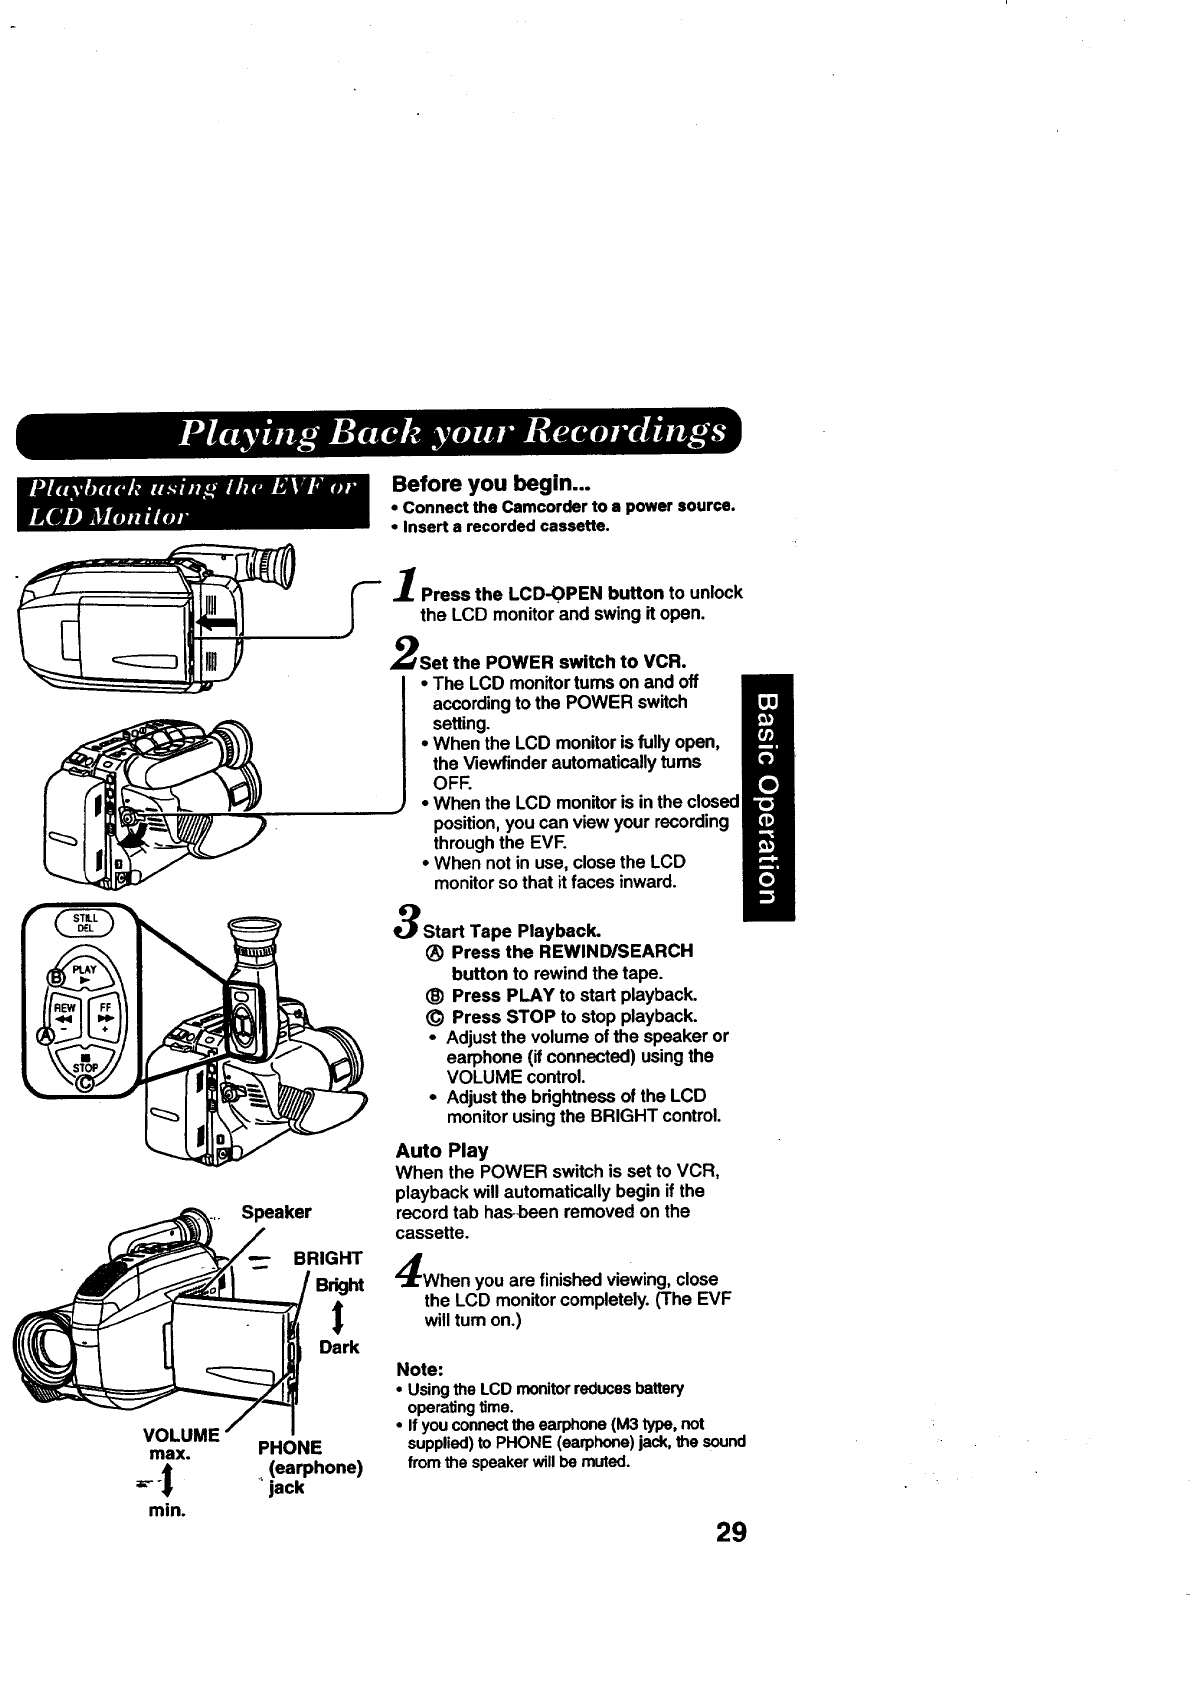
Before you begin...
• Connect the Camcorder to a power source.
• Insert a recorded cassette.
"_ 1Press the LCD-OPEN button to unlock
the LCD monitor and swing itopen.
Set the POWER switch to VCR.
•The LCD monitor turns on and off
BRIGHT
Bright
Dark
VOLUME
max. PHONE
_- o_ (earphone)
_'jack
min.
according to the POWER switch
setting.
• When the LCD monitor is fully open,
the Viewfinder automatically tums
OFF.
• When the LCD monitor is in the closed
position, you can view your recording
through the EVF.
• When not in use, close the LCD
monitor so that it faces inward.
Start Tape Playback.
(_ Press the REWIND/SEARCH
button to rewind the tape.
(H) Press PLAY to start playback.
(_ Press STOP to stop playback.
•Adjust the volume of the speaker or
earphone (if connected) using the
VOLUME control.
•Adjust the bdghtness of the LCD
monitor using the BRIGHT control.
Auto Play
When the POWER switch is set to VCR,
playback will automatically begin if the
record tab hasbeen removed on the
cassette.
When you are finished viewing, close
the LCD monitor completely. (The EVF
will tum on.)
Note:
• Using the LCD monitor reduces battery
operating time.
•If you connect the earphone (M3 type, not
supplied) to PHONE (earphone) jack. the sound
from the speaker will be muted.
29
IK,,=_ui-RmNt,=ruL'WU,,v,,u_.
FAST
FORWARD
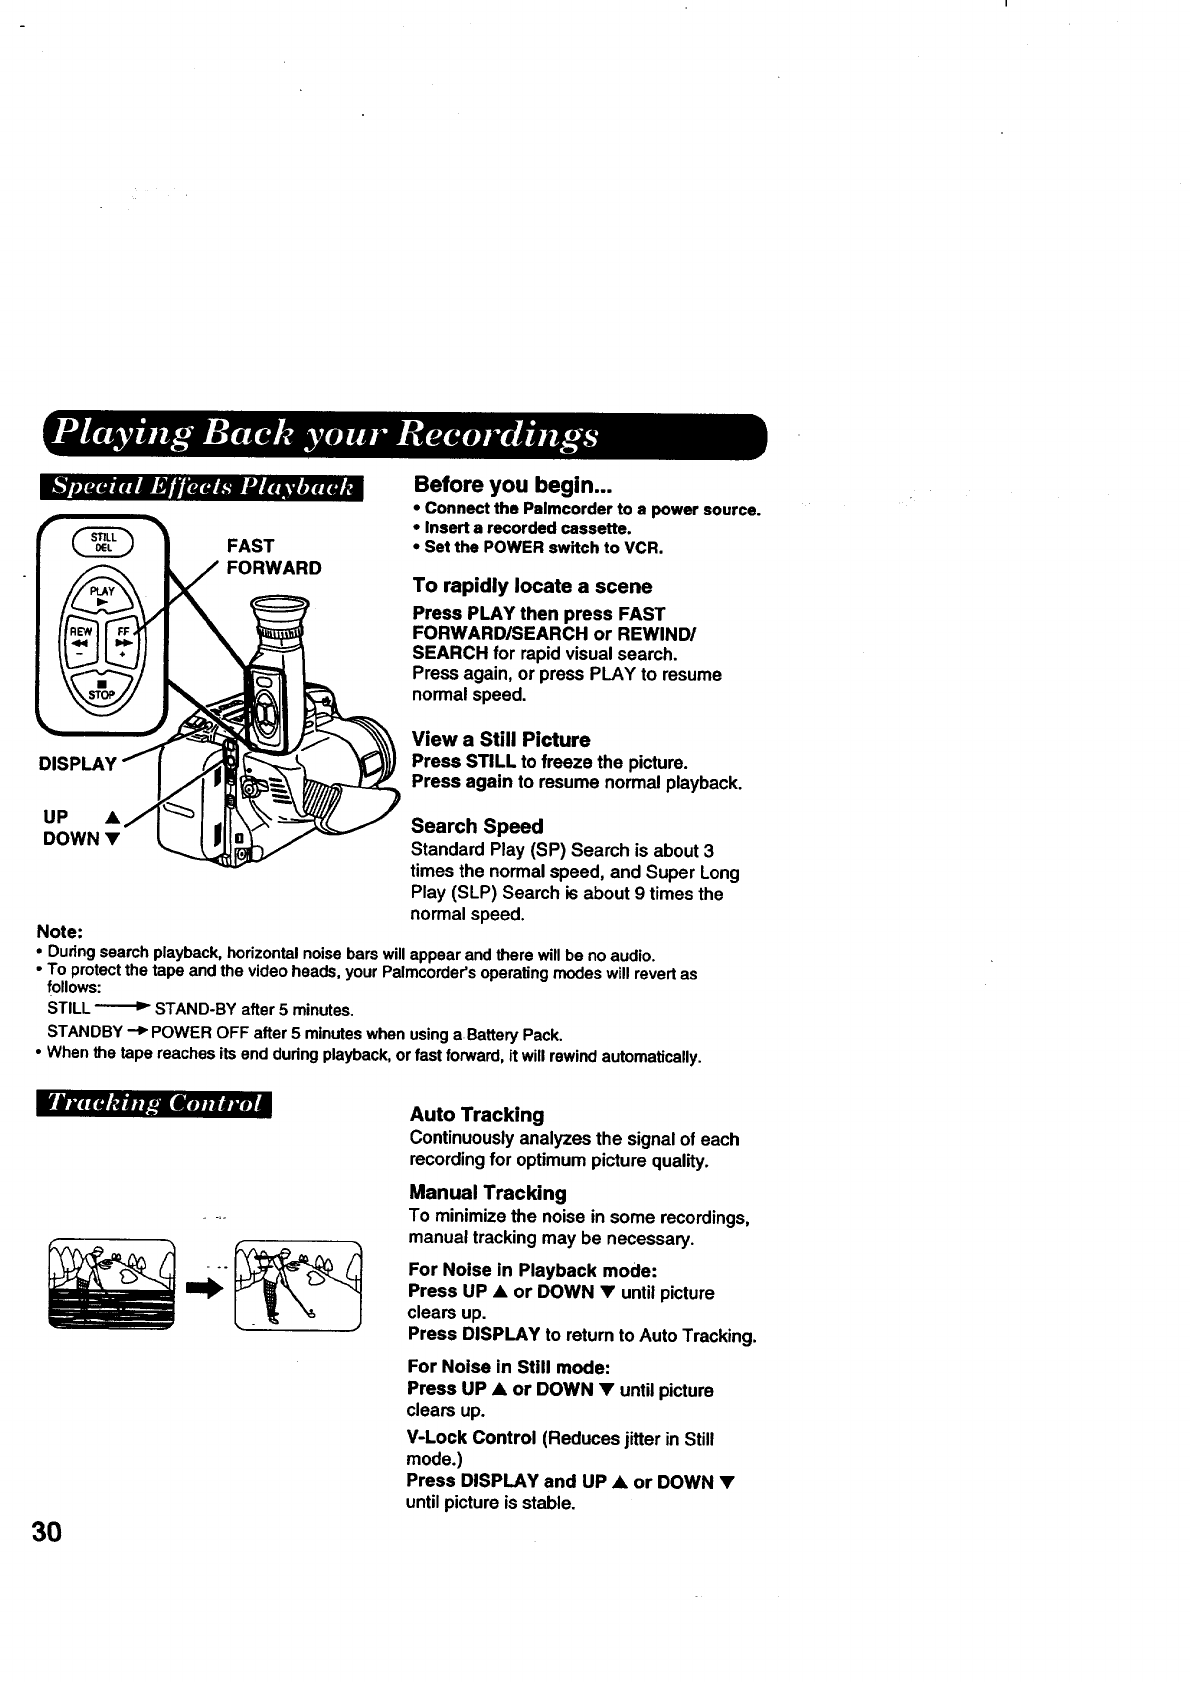
Before you begin...
• Connect the Palmcorder to a power source.
• Insert a recorded cassette.
•Set the POWER switch to VCR.
To rapidly locate a scene
Press PLAY then press FAST
FORWARD/SEARCH or REWIND/
SEARCH forrapidvisualsearch.
Pressagain,or pressPLAY to resume
normalspeed.
View a Still Picture
Press STILL to freeze the picture.
Press again to resumenormalplayback.
UP •Search Speed
DOWN • Standard Play (SP) Search is about 3
times the normal speed, and Super Long
Play (SLP) Search is about 9 times the
normal speed.
Note:
•Duringsearch playback,horizontalnoisebars willappear andthere willbe no audio.
•To protectthetape andthe videoheads, your Palmcorder'soperatingmodeswill revertas
follows:
STILL _STAND-BY after 5 minutes.
STANDBY "-_ POWER OFF after 5 minuteswhen usinga BatteryPack.
• When the tape reachesitsend duringplayback,orfast forward, it willrewindautomatically.
VJnamt_wl_ L&enlr_a
3O
Auto Tracking
Continuously analyzes the signal of each
recording for optimum picture quality.
Manual Tracking
To minimize the noise in some recordings,
manual tracking may be necessary.
For Noise in Playback mode:
Press UP •or DOWN •until picture
clears up.
Press DISPLAY to return to Auto Tracking.
For Noise in Still mode:
Press UP •or DOWN •until picture
clears up.
V-Lock Control (Reduces jitter in Still
mode.)
Press DISPLAY and UP •or DOWN •
until picture is stable.
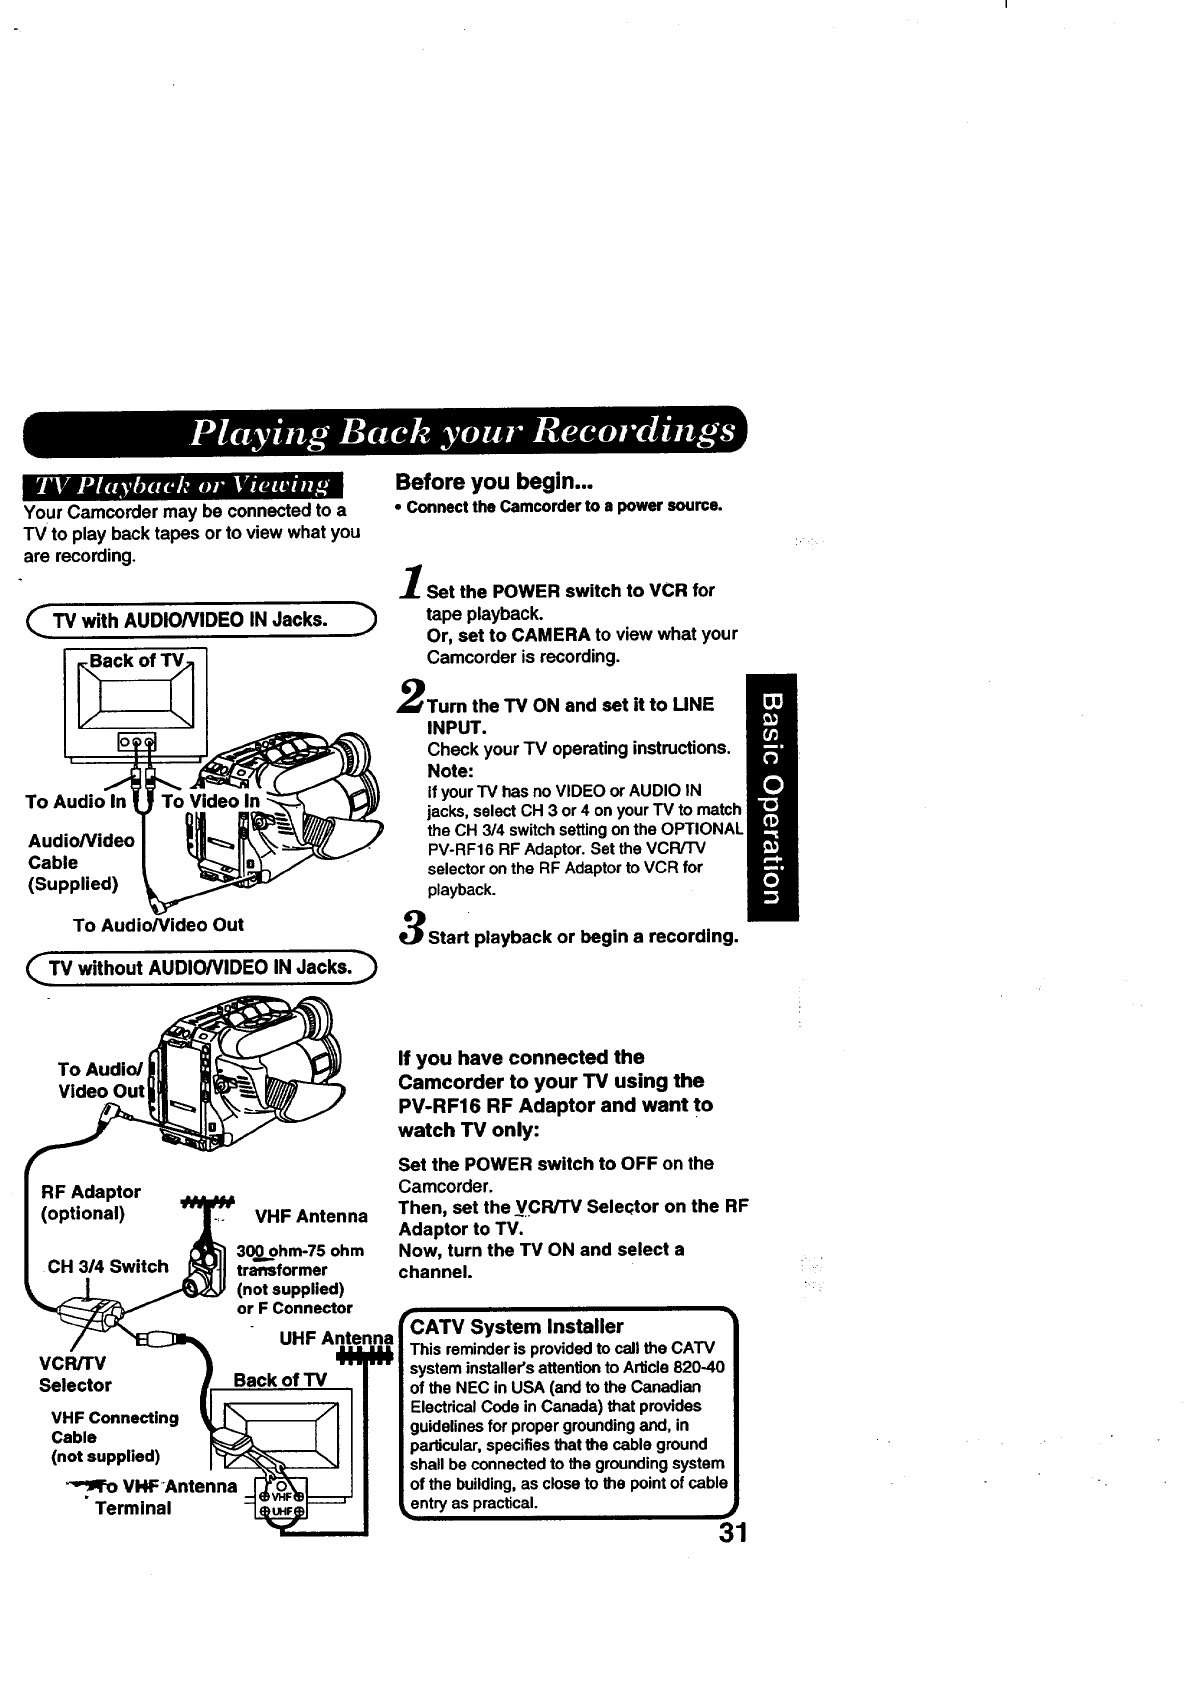
iril ftJ,t -_ez_,u_,miiArM_e_.
Your Camcorder may be connected t'o a
TV to play back tapes or to view what you
are recording.
_TV with AUDIO/VIDEO IN Jacks.
To Audio In
Cable
(Supplied)
To Audio/Video Out
_TV without AUDIO/VIDEO IN Jacks. j_
Before you begin...
• Connect the Camcorder to a power source.
Set the POWER switch to VCR for
tape playback.
Or, set to CAMERA to view what your
Camcorder is recording.
Turn the TV ON and set it to UNE
INPUT.
Check your TV operating instructions.
Note:
If your TV has no VIDEO or AUDIO IN
jacks, select CH 3 or 4 on your TV to match
the CH 3/4 switch setting on the OPTIONAL
PV-RF16 RF Adaptor. Set the VCR/TV
selector on the RF Adaptor to VCR for
playback.
Start playback or begin a recording.
To Audio/
Video Out
RF Adaptor
(optional)
CH 3/4 Switch
VHF Antenna
300. ohm-75 ohm
transformer
(not supplied)
or F Connector
VCR/TV .UHF Antenna
Selector ) BackofTV_
v. con..=,n0
Cable _I III
(no,.u..,,..)I ll
"-'_r-o VHF Antenna -J_'_l_,J I
Terminal
If you have connected the
Camcorder to your TV using the
PV-RF16 RF Adaptor and want to
watch TV only:
Set the POWER switch to OFF on the
Camcorder.
Then, set the VCR/TV Selec_tor on the RF
Adaptor to TV.
Now, turn the TV ON and select a
channel.
rCATV System Installer
This reminderis providedto callthe CATV
system installer'sattentionto Article820-4C
of the NECin USA (and to the Canadian
ElectricalCodein Canada) that provides
guidelinesfor propergroundingand, in
particular,specifiesthat the cable ground
shall be connectedto thegroundingsystem
of the building,as closeto the pointofcable
entry as practical. •
31
WUll,,,veIl_ru_ rtLwm_.=rhre.,lUltAv&F/'/M
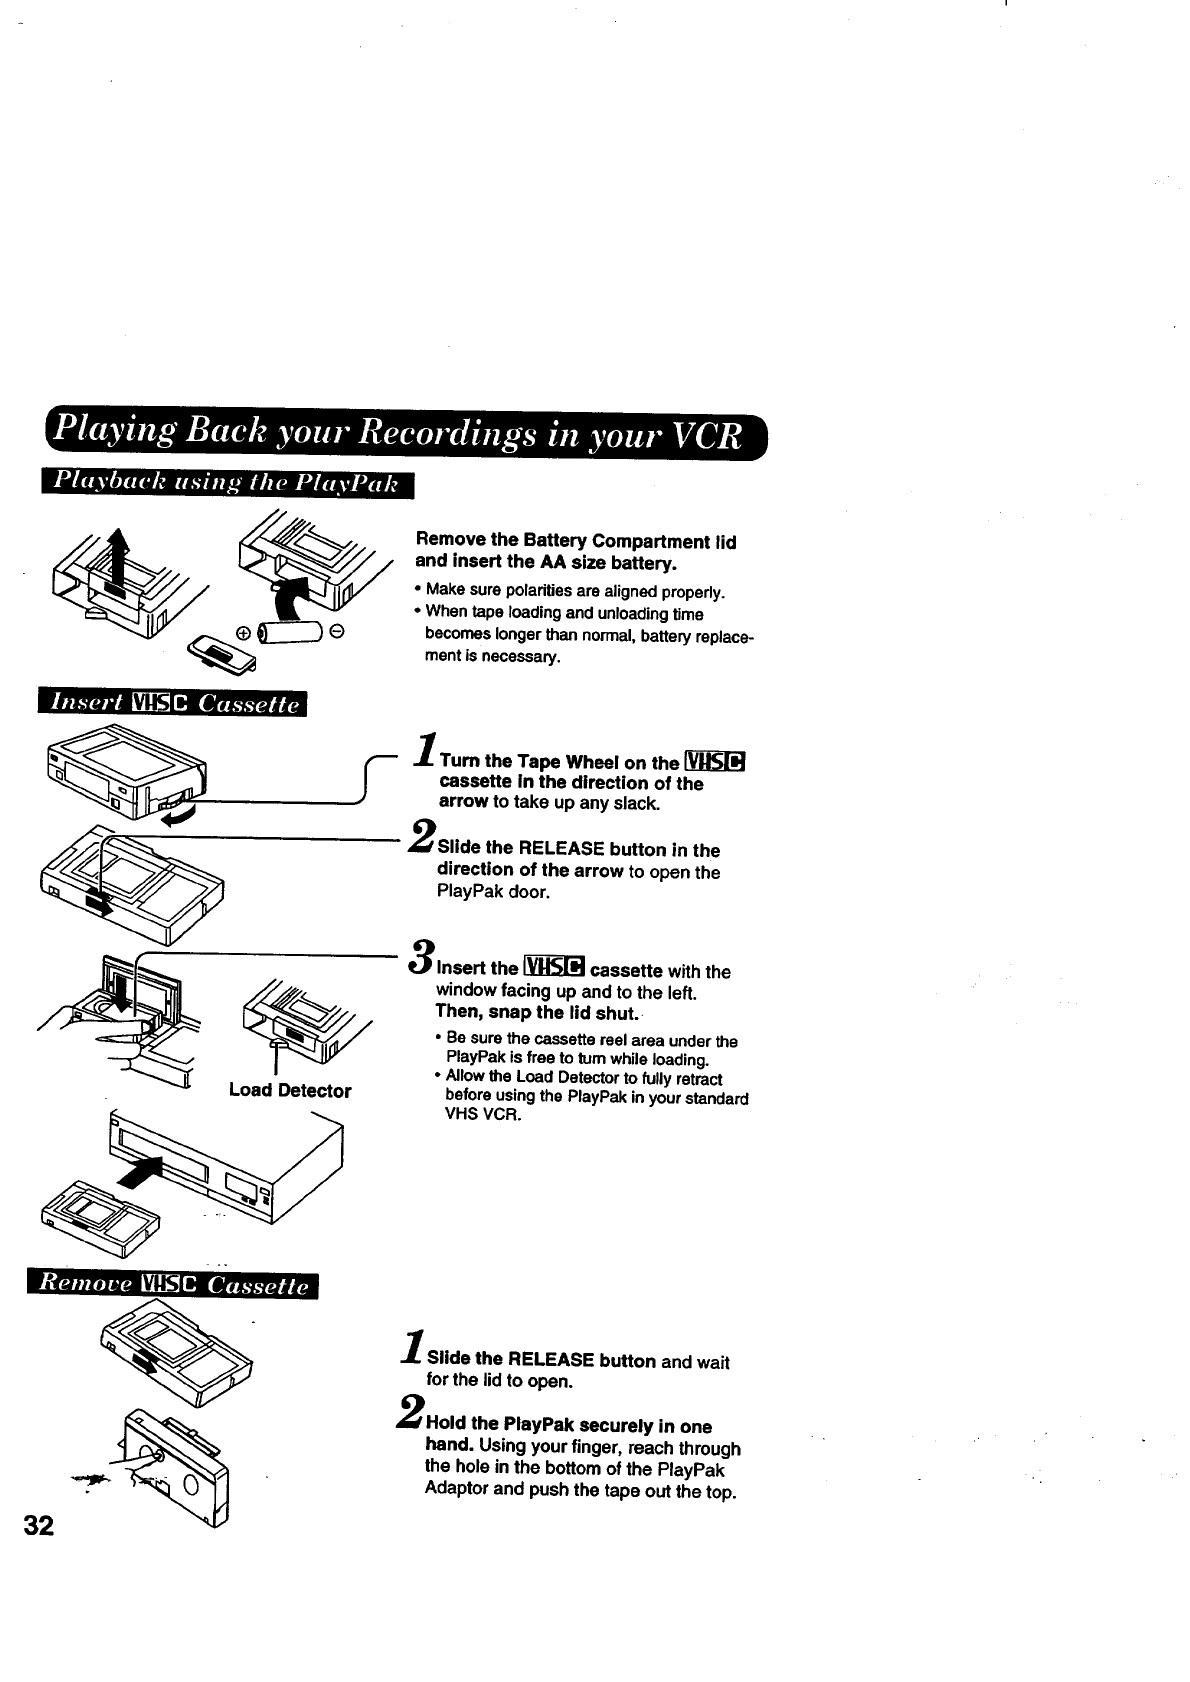
Remove the Battery Compartment lid
and insert the AA size battery.
• Make surepolaritiesare alignedproperly.
• Whentape loadingand unloadingtime
becomeslongerthannormal,batteryreplace-
mentIs necessary.
|#_._uxJ I_IS! Plfdht_,_utLd
Wt_r=inlel_=aVI_I H[k,_,_,._r_i_r=
32
Load Detector
'Turn the Tape Wheel on the
cassette in the direction of the
arrow to take up any slack.
Slide the RELEASE button in the
direction of the arrow to open the
PlayPak door.
Insert the _ cassette with the
window facing up and to the left.
Then, snap the lid shut.
• Be surethe cassettereel area under the
PlayPak Is free to tum while loading.
•Allowthe Load Detectorto fully retract
before usingthe PlayPakin yourstandard
VHS VCR.
Slide the RELEASE button and wait
for the lid to open.
Hold the PlayPak securely in one
hand. Using your finger, reach through
the hole in the bottom of the PlayPak
Adaptor and push the tape out the top.
W&e_tm_ ,xwwimkellwwmV_exeJ.i
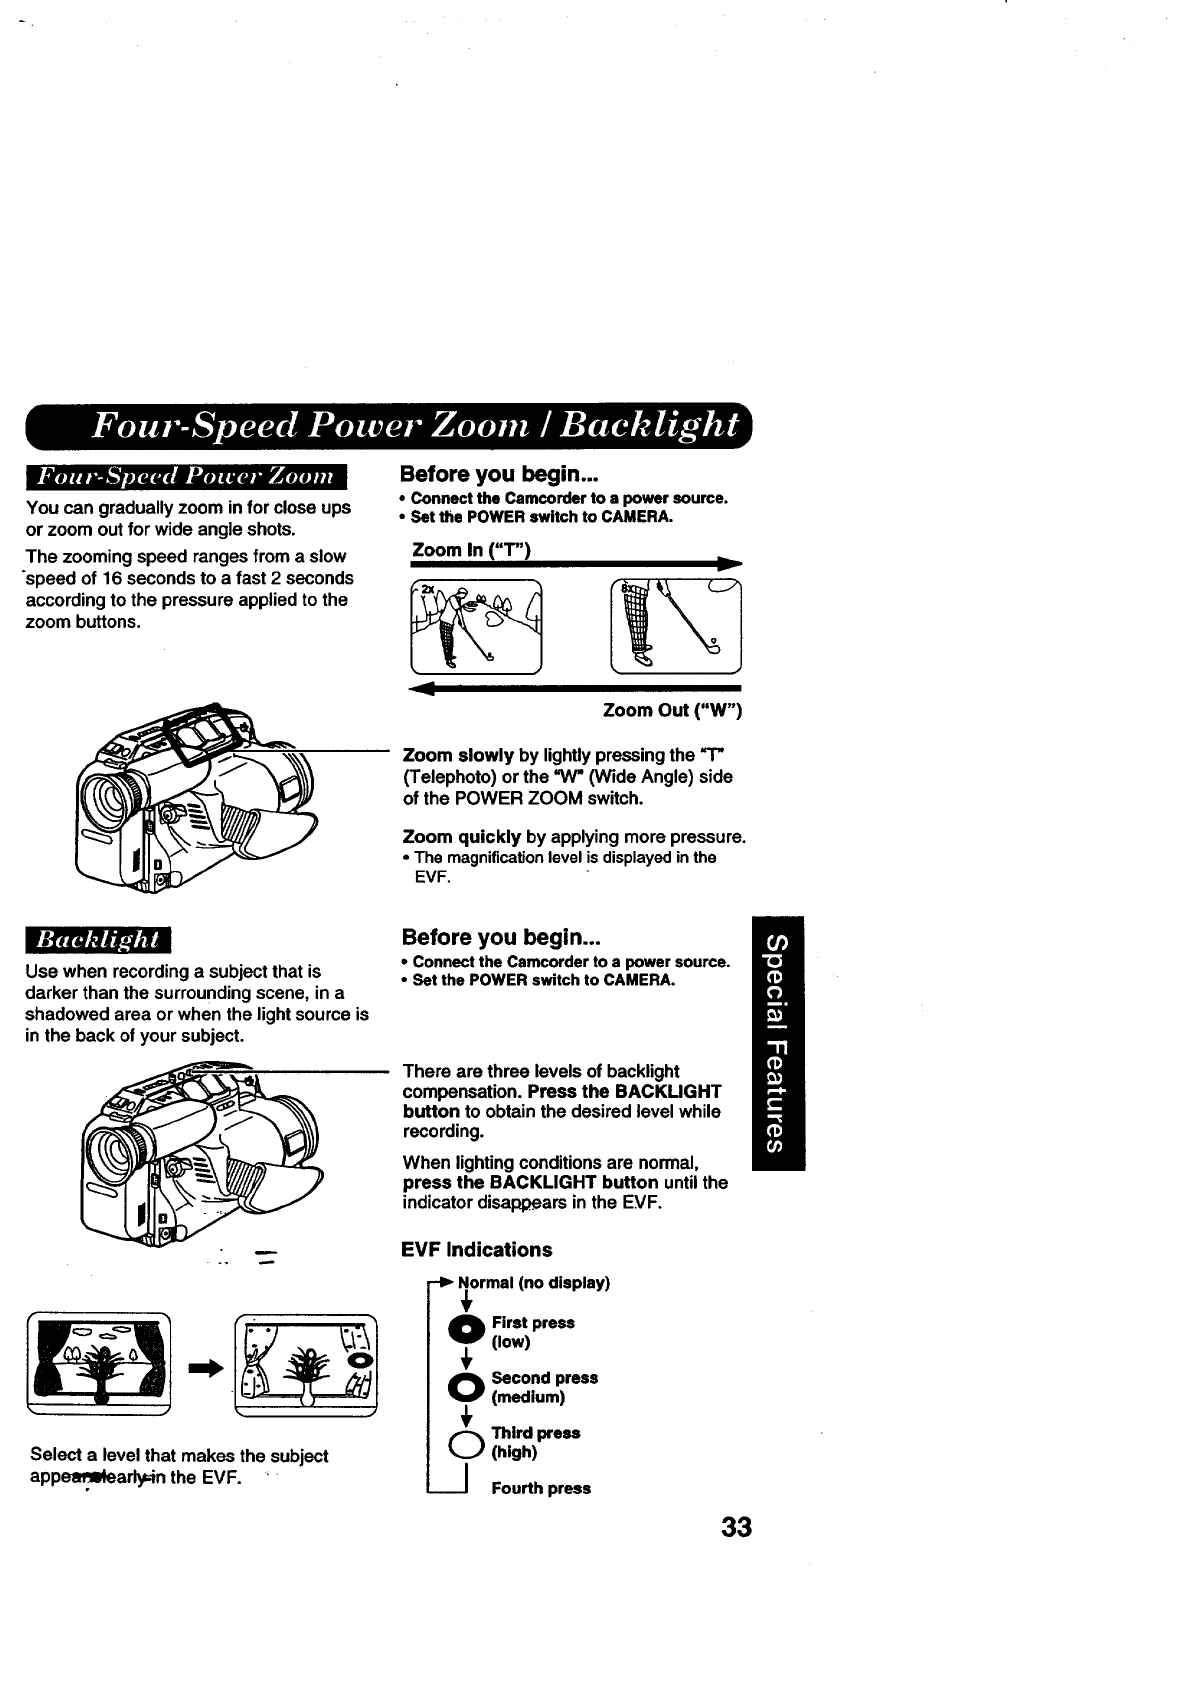
Youcan graduallyzoom inforcloseups
or zoom outfor wide angleshots.
The zoomingspeed rangesfrom a slow
"speedof 16 secondsto a fast 2 seconds
accordingto the pressureappliedto the
zoom buttons.
Before you begin...
• Connect the Camcorder to a power source.
•Set the POWER switch to CAMERA.
Zoom In ("T")
Zoom Out ("W")
Zoom slowly by lightly pressing the
(Telephoto) or the =W* (Wide Angle) side
of the POWER ZOOM switch.
Zoom quickly by applying more pressure.
•The magnificationlevel is displayedinthe
EVF.
Use when recording a subject that is
darker than the surrounding scene, in a
shadowed area or when the light source is
in the back of your subject.
Select a levelthat makes the subject
app.ea_arly;inthe EVF. _
Before you begin...
•Connectthe Camcorderto a power source.
•Set the POWERswitch to CAMERA.
There are three levelsof backlight
compensation.Press the BACKUGHT
button to obtainthe desiredlevelwhile
recording.
When lighting conditions are normal,
press the BACKLIGHT button until the
indicator disappears in the EVF.
EVF Indications
-I_ Normal (no display)
0 First press
(low)
O econd press
(medium)
---.J Fourth press
33
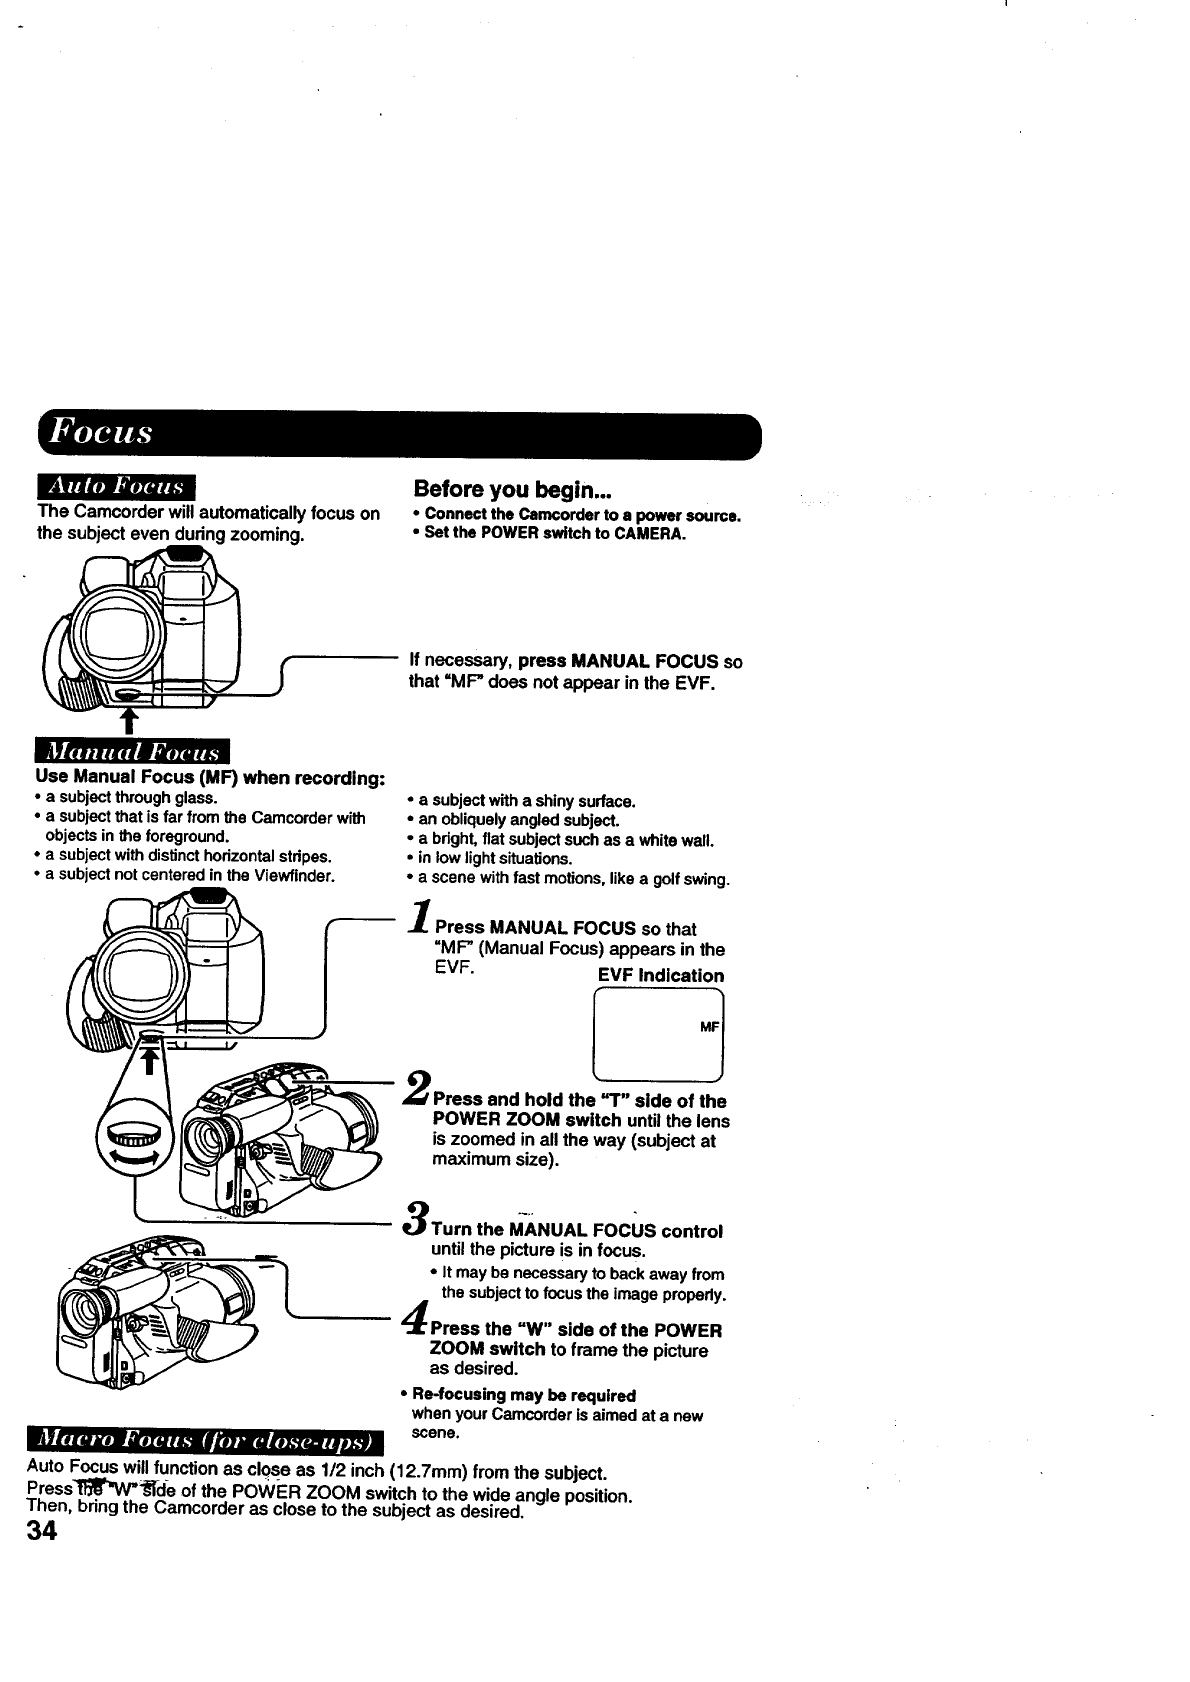
Before you begin...
The Camcorderwillautomaticallyfocuson
the subjecteven duringzooming.
• Connect the Camcorder to a power source.
• Set the POWER switch to CAMERA.
If necessary,press MANUAL FOCUS so
that =MF"does notappear inthe EVF.
IJrr_wt#,rllm,_arut_,'=
Use Manual Focus (MF) when recording:
• a subject through glass.
• a subject that is far from the Camcorder with
objects in the foreground.
•a subject with distinct horizontal stdpes.
• a subject not centered in the Viewfinder.
•asubject with ashiny surface.
• an obliquely angled subject.
•a bright, fiat subject such as a white wall.
•in low light situations.
• a scene with fast motions, like a golf swing.
1
IPress MANUAL FOCUS so that
=MF"(ManualFocus)appears inthe
EVF. EVF Indication
Press end hold the "T" side of the
POWER ZOOM switch until the lens
is zoomed in all the way (subject at
maximum size).
Turn the MANUAL FOCUS control
until the picture is in focus.
• It may be necessaryto back away from
the subjectto focusthe image properly.
Press the "W" side of the POWER
ZOOM switch to frame the picture
as desired.
• Re-focusing may be required
when yourCamcorderis aimedat a new
scene.
_TEI xo uo_ _oxo t_alkn a rull_m tao_
AutoFocuswillfunction as clqseas 1/2 inch(12.7mm) fromthe subject.
Press'l_'_/'_cle of the POWER ZOOM switch to the wide angle position.
Then, bring the Camcorder as close to the subject as desired.
34
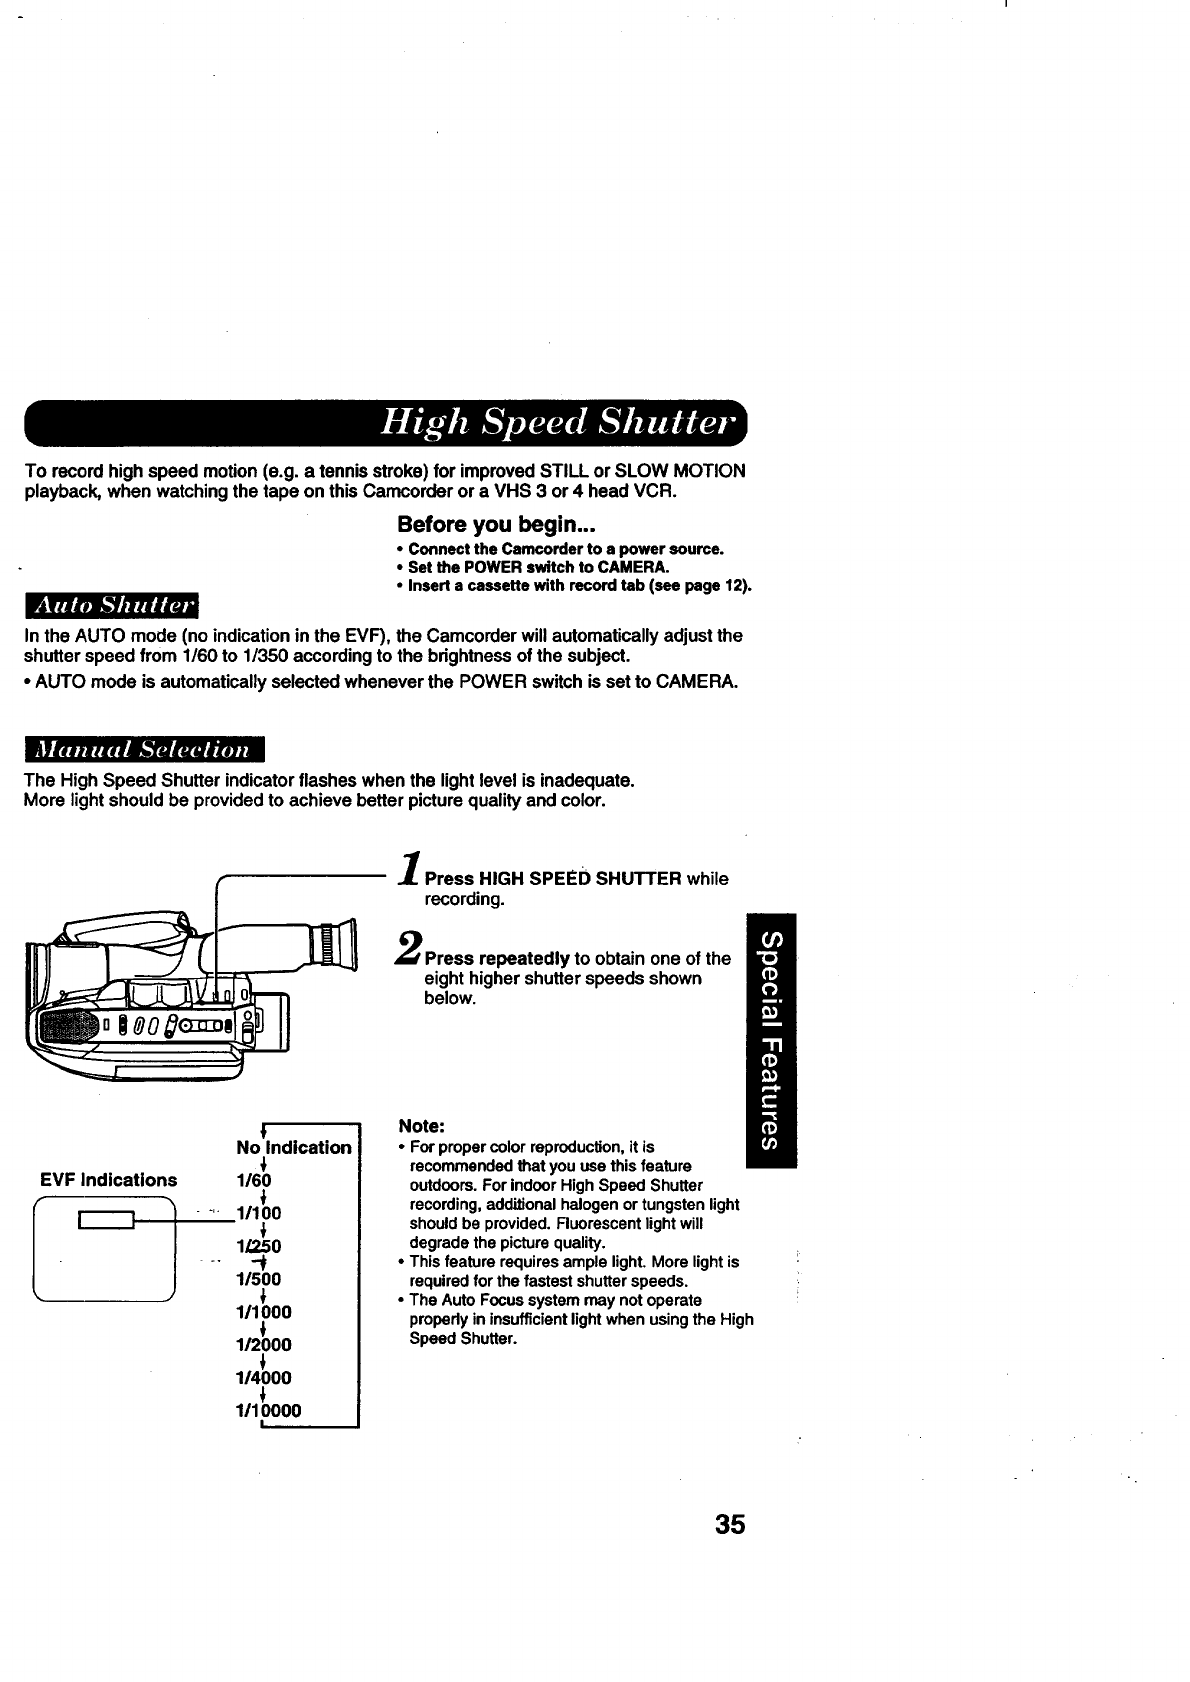
To record high speed motion (e.g. a tennis stroke) for improved STILL or SLOW MOTION
playback, when watching the tape on this Camcorder or a VHS 3 or 4 head VCR.
Before you begin...
• Connect the Camcorder to a power source.
• Set the POWER switch to CAMERA.
• Insert a cassette with record tab (see page 12).
_nIw/w
In the AUTO mode (no indication in the EVF), the Camcorder will automatically adjust the
shutter speed from 1/60 to 1/350 according to the brightness of the subject.
•AUTO mode is automatically selected whenever the POWER switch is set to CAMERA.
_li.llli_14_iUUJEelnA
The High Speed Shutter indicator flashes when the light level is inadequate.
More light should be provided to achieve better picture quality and color.
Press HIGH SPEED SHUTTER while
recording.
Press repeatedly to obtain one of the
eight higher shutter speeds shown
below.
EVF Indications
t
No Indication
1/60
_- 1/100
1/250
1/500
111000
1/2000
1/4000
1110000
I
Note:
• For proper color reproduction, it is
recommended that you use this feature
outdoors. For indoor High Speed Shutter
recording, additional halogen or tungsten light
should be provided. Fluorescent light will
degrade the picture quality.
•This feature requires ample light. More light is
required for the fastest shutter speeds.
•The Auto Focus system may not operate
proparly in insufficient light when using the High
Speed Shutter.
35
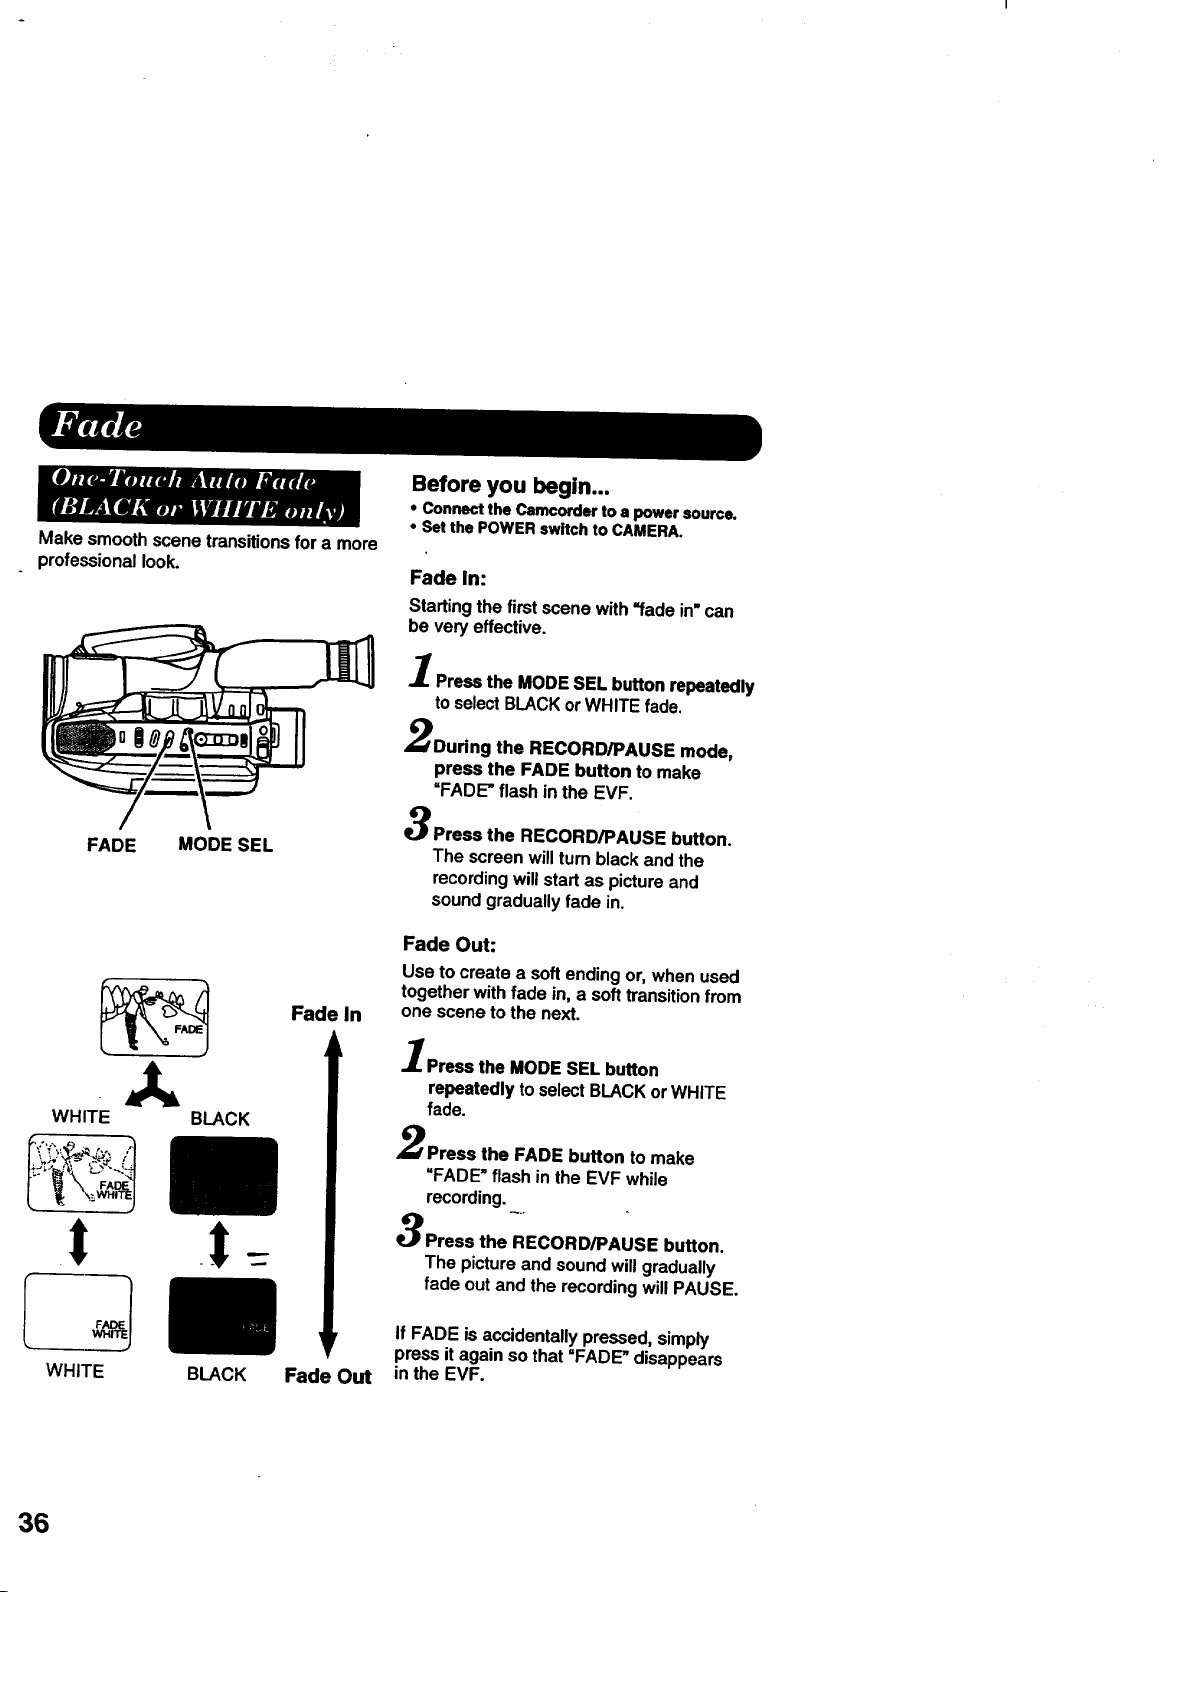
Make smoothscene transitionsfor a more
professionallook.
FADE MODE SEL
WHITE
t
WHITE
Fadq In
BLACK
BLACK Fade Out
Before you begin...
• Connect the Camcorder to a power source,
• Set the POWER switch to CAMERA.
Fade In:
Startingthe firstscene with=fadein"can
be very effective.
Press the MODE SEL button repeatedly
toselectBLACKorWHITEfade.
During the RECORD/PAUSE mode,
press the FADE button to make
=FADE-" flash in the EVF.
Press the RECORD/PAUSE button.
The screen will turn black and the
recording will start as picture and
sound gradually fade in.
Fade Out:
Use to create a soft ending or, when used
together with fade in, a soft transition from
one scene to the next.
Press the MODE SEL button
repeatedly to select BLACK or WHITE
fade.
Press the FADE button to make
=FADE" flash in the EVF while
recording,
Press the RECORD/PAUSE button.
The picture and sound will gradually
fade out and the recording will PAUSE.
If FADE is accidentally pressed, simply
press it again so that "FADE" disappears
in the EVF,
36
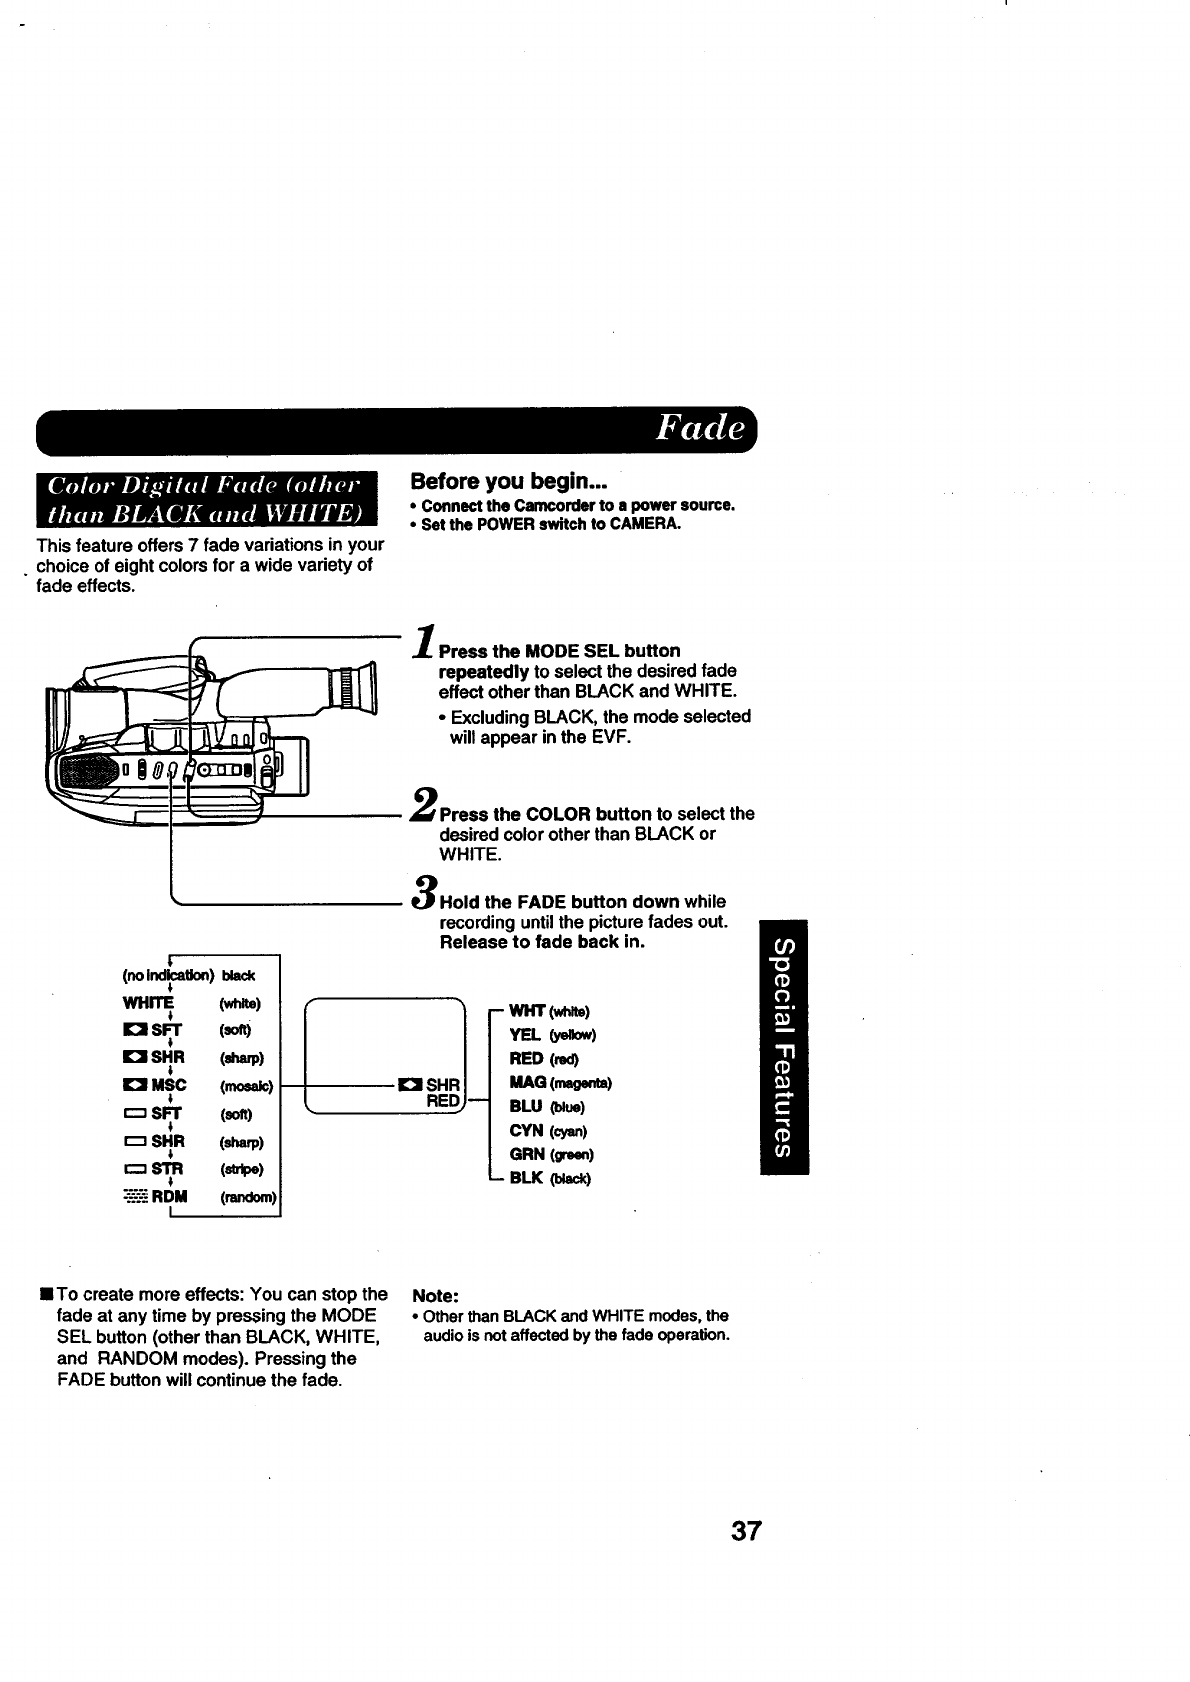
This feature offers 7 fade variations in your
. choice of eight colors for a wide variety of
fade effects.
Before you begin...
• Connect the Camcorder to a power source.
• Set the POWER switch to CAMERA.
1Press the MODE SEL button
repeatedly to select the desired fade
effect other than BLACK and WHITE.
•Excluding BLACK, the mode selected
will appear in the EVF.
(noindication)black
WHITE (whee)
4
IOl SFT (son)
IOI SHR (Jlarp)
4
IOI MSC (_)
4
r-_ SFr (soft)
4
SHR (sharp)
4
[::=STR (=rk_)
:---_RDM (random)
I
Press the COLOR button to select the
desired color other than BLACK or
WHITE.
Hold the FADE button down while
recording until the picture fades out.
Release to fade back in.
IIOI SHR1
REDJm
- WriT (whee)
YEL (ye.ow)
RED (red)
MAG (magenta)
BLU _ue)
CYN (cyan)
GRN (green)
-- BLK (Uack)
IITo create more effects: You can stop the
fade at any time by pressing the MODE
SEL button (other than BLACK, WHITE,
and RANDOM modes). Pressing the
FADE button will continue the fade.
Note:
•Other than BLACK and WHITE modes, the
audio is not affected by the fade operation.
37
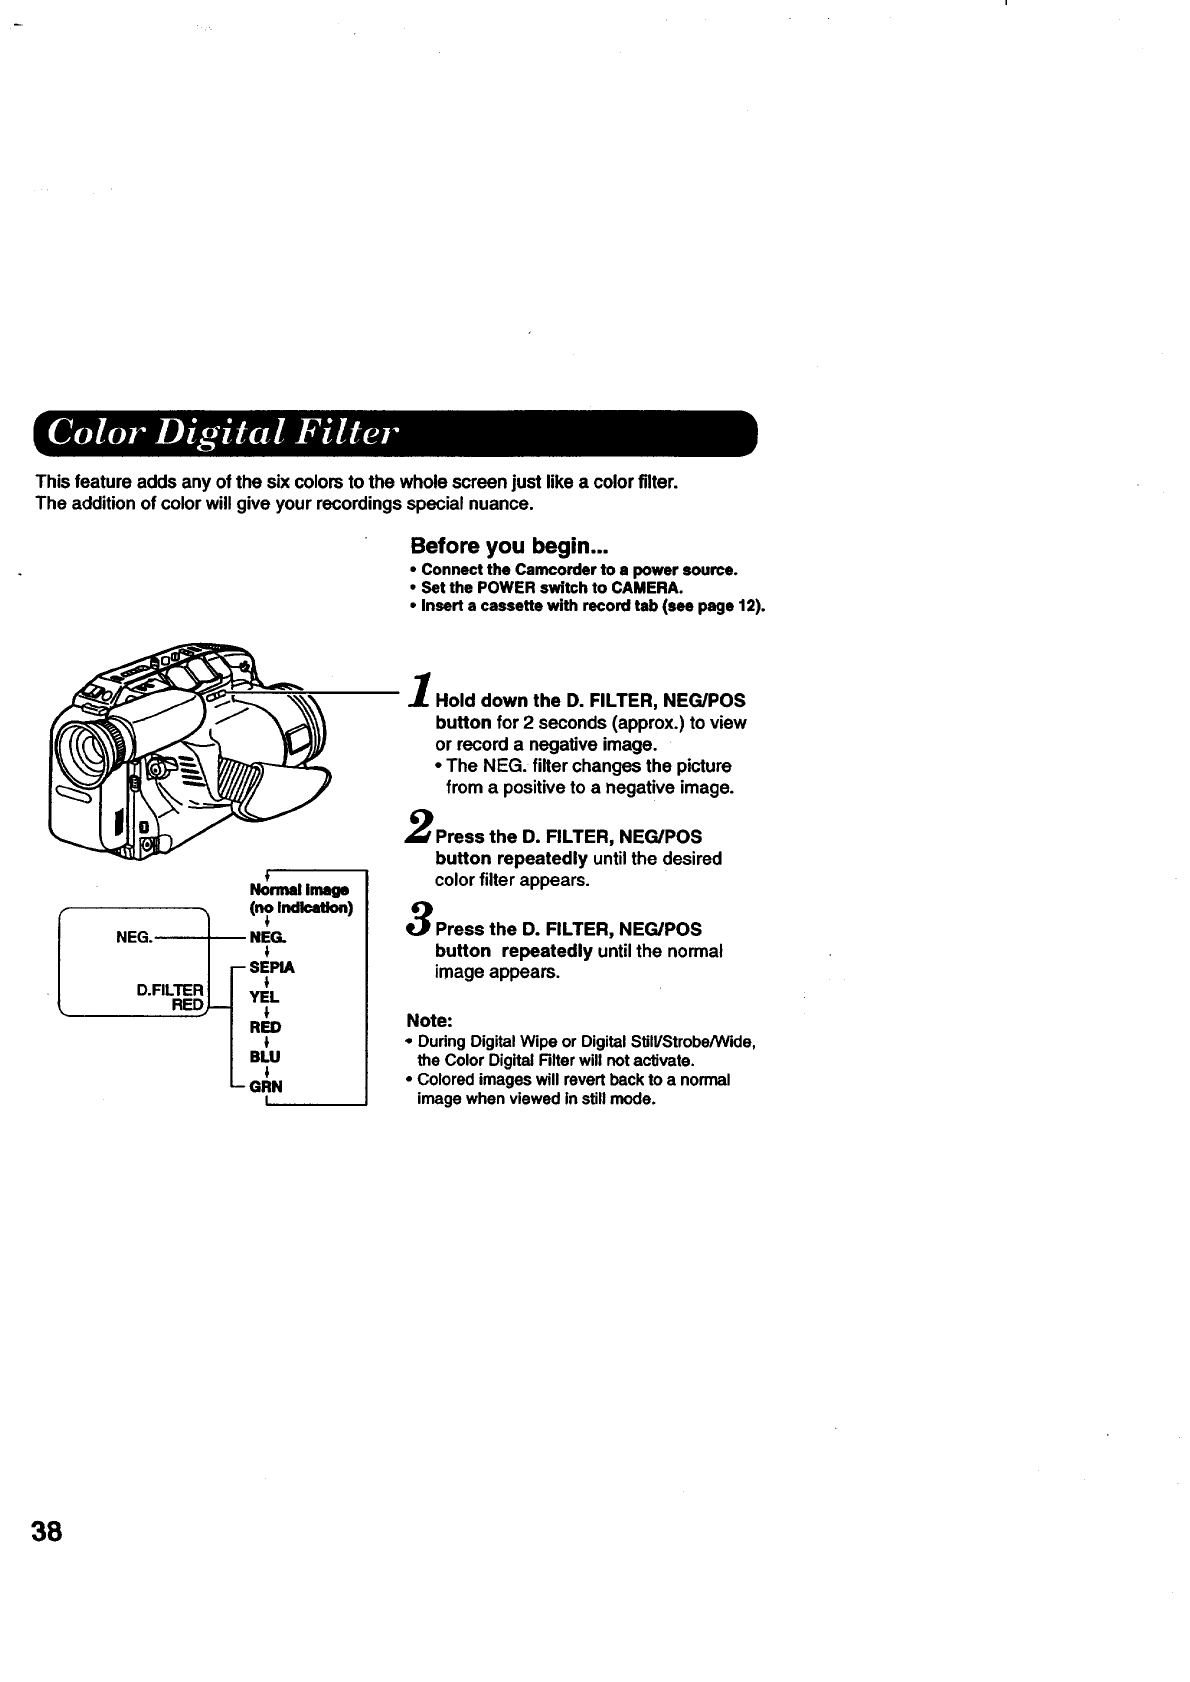
This feature adds any of the six colors to the whole screen just like a color filter.
The addition of color will give your recordings special nuance.
Before you begin...
• Connectthe Camcorderto s power source.
•Set the POWERswitchto CAMERA.
•Inserta cassettewith recordtab(see page 12).
Hold down the D. FILTER, NEG/POS
button for 2 seconds (approx.) to view
or record a negative image.
•The NEG. filter changes the picture
from a positive to a negative image.
Press the D. FILTER, NEG/POS
button repeatedly until the desired
color filter appears.
Press the D. FILTER, NEG/POS
button repeatedly until the normal
image appears.
Note:
° During Digital Wipe or Digital Still/Strobe/Wide,
the Color Digital Filter will not activate.
•Colored images will revert back to a normal
image when viewed in still mode.
38
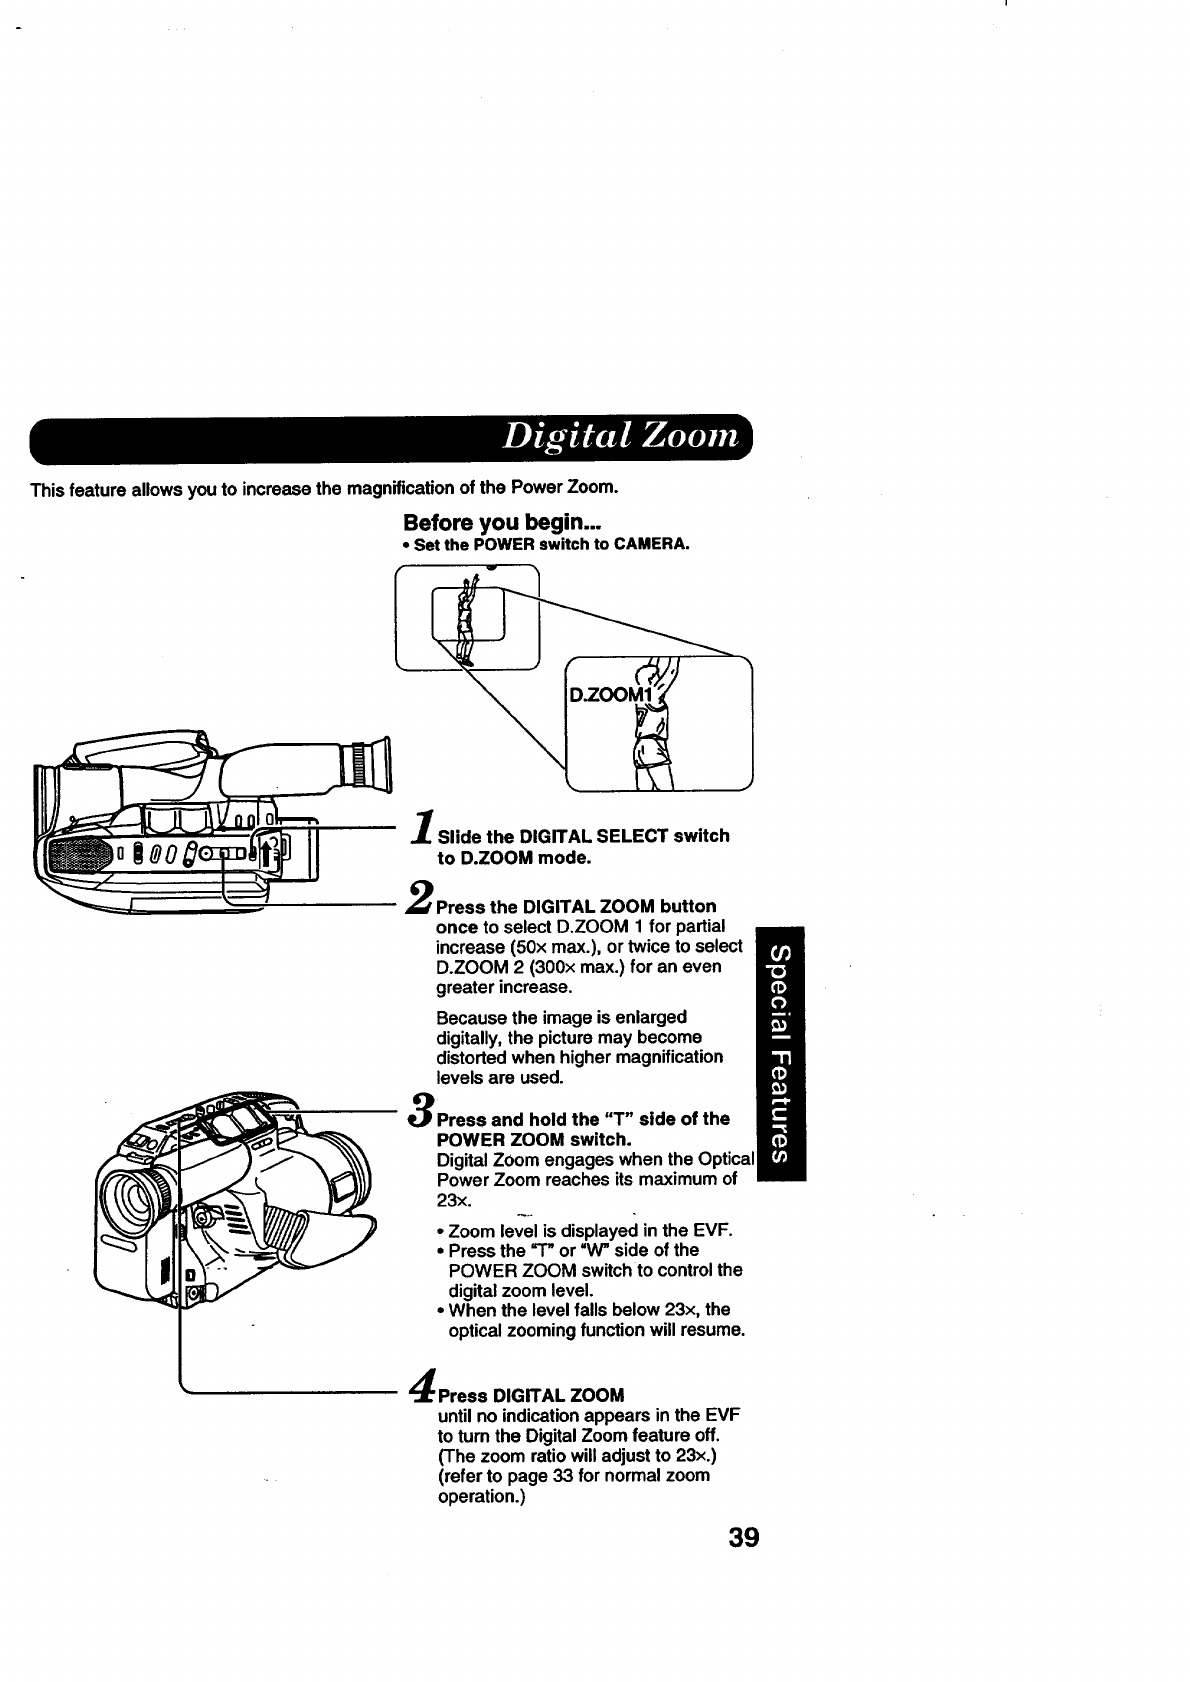
This feature allows you to increase the magnification of the Power Zoom.
Before you begin...
• Set the POWER switch to CAMERA.
Slide the DIGITAL SELECT switch
to D.ZOOM mode.
Press the DIGITAL ZOOM button
once to select D.ZOOM 1 for partial
increase (50x max.), or twice to select
D.ZOOM 2 (300x max.) for an even
greater increase.
Because the image is enlarged
digitally, the picture may become
distorted when higher magnification
levels are used.
Press and hold the "T" side of the
POWER ZOOM switch.
Digital ZOom engages when the Optical
Power Zoom reaches its maximum of
23x.
•Zoom level is displayed in the EVF.
•Press the ='1"or =W" side of the
POWER ZOOM switch to control the
digital zoom level.
•When the level falls below 23x, the
optical zooming function will resume.
Press DIGITAL ZOOM
untilno indicationappearsin the EVF
to tum the DigitalZoom feature off.
(The zoom ratiowilladjustto 23x.)
(referto page 33 for normalzoom
operation.)
39
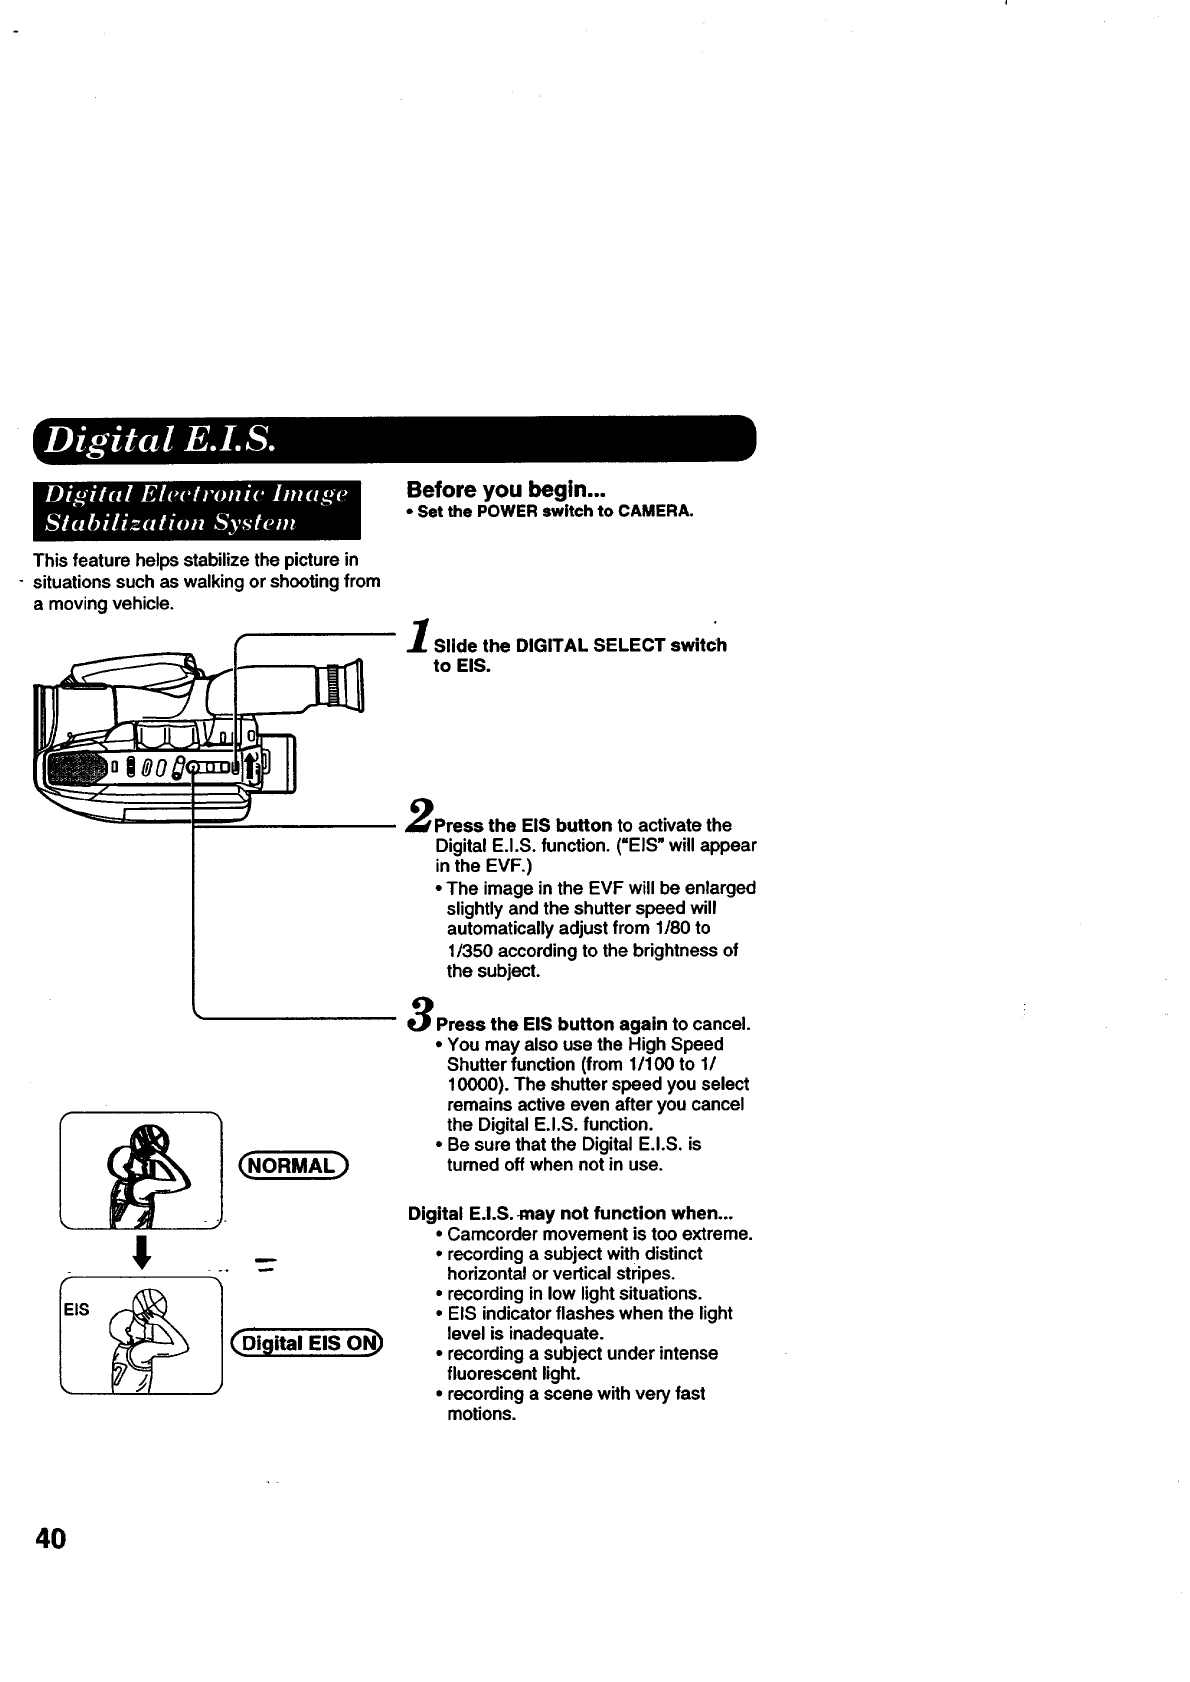
This feature helpsstabilizethe picturein
-situationssuchas walkingor shootingfrom
a movingvehicle.
Before you begin...
• Set the POWER switch to CAMERA.
Slide the DIGITAL SELECT switch
to EIS.
(_NORMAL)
Press the EIS button to activate the
Digital E.I.S. function. (=EIS" will appear
in the EVF.)
• The image in the EVF will be enlarged
slightly and the shutter speed will
automatically adjust from 1/80 to
1/350 according to the brightness of
the subject.
Press the EIS button again to cancel.
• You may also use the High Speed
Shutter function (from 1/100 to 1/
10000). The shutter speed you select
remains active even after you cancel
the Digital E.I.S. function.
• Be sure that the Digital E.I.S. is
tumed off when not in use.
Digital E.I.S. may not function when...
•Camcorder movement is too extreme.
°recording a subject with distinct
horizontal or vertical stripes.
•recording in low light situations.
° EIS indicator flashes when the light
level is inadequate.
•recording a subject under intense
fluorescent light.
•recording a scene with very fast
motions.
4O
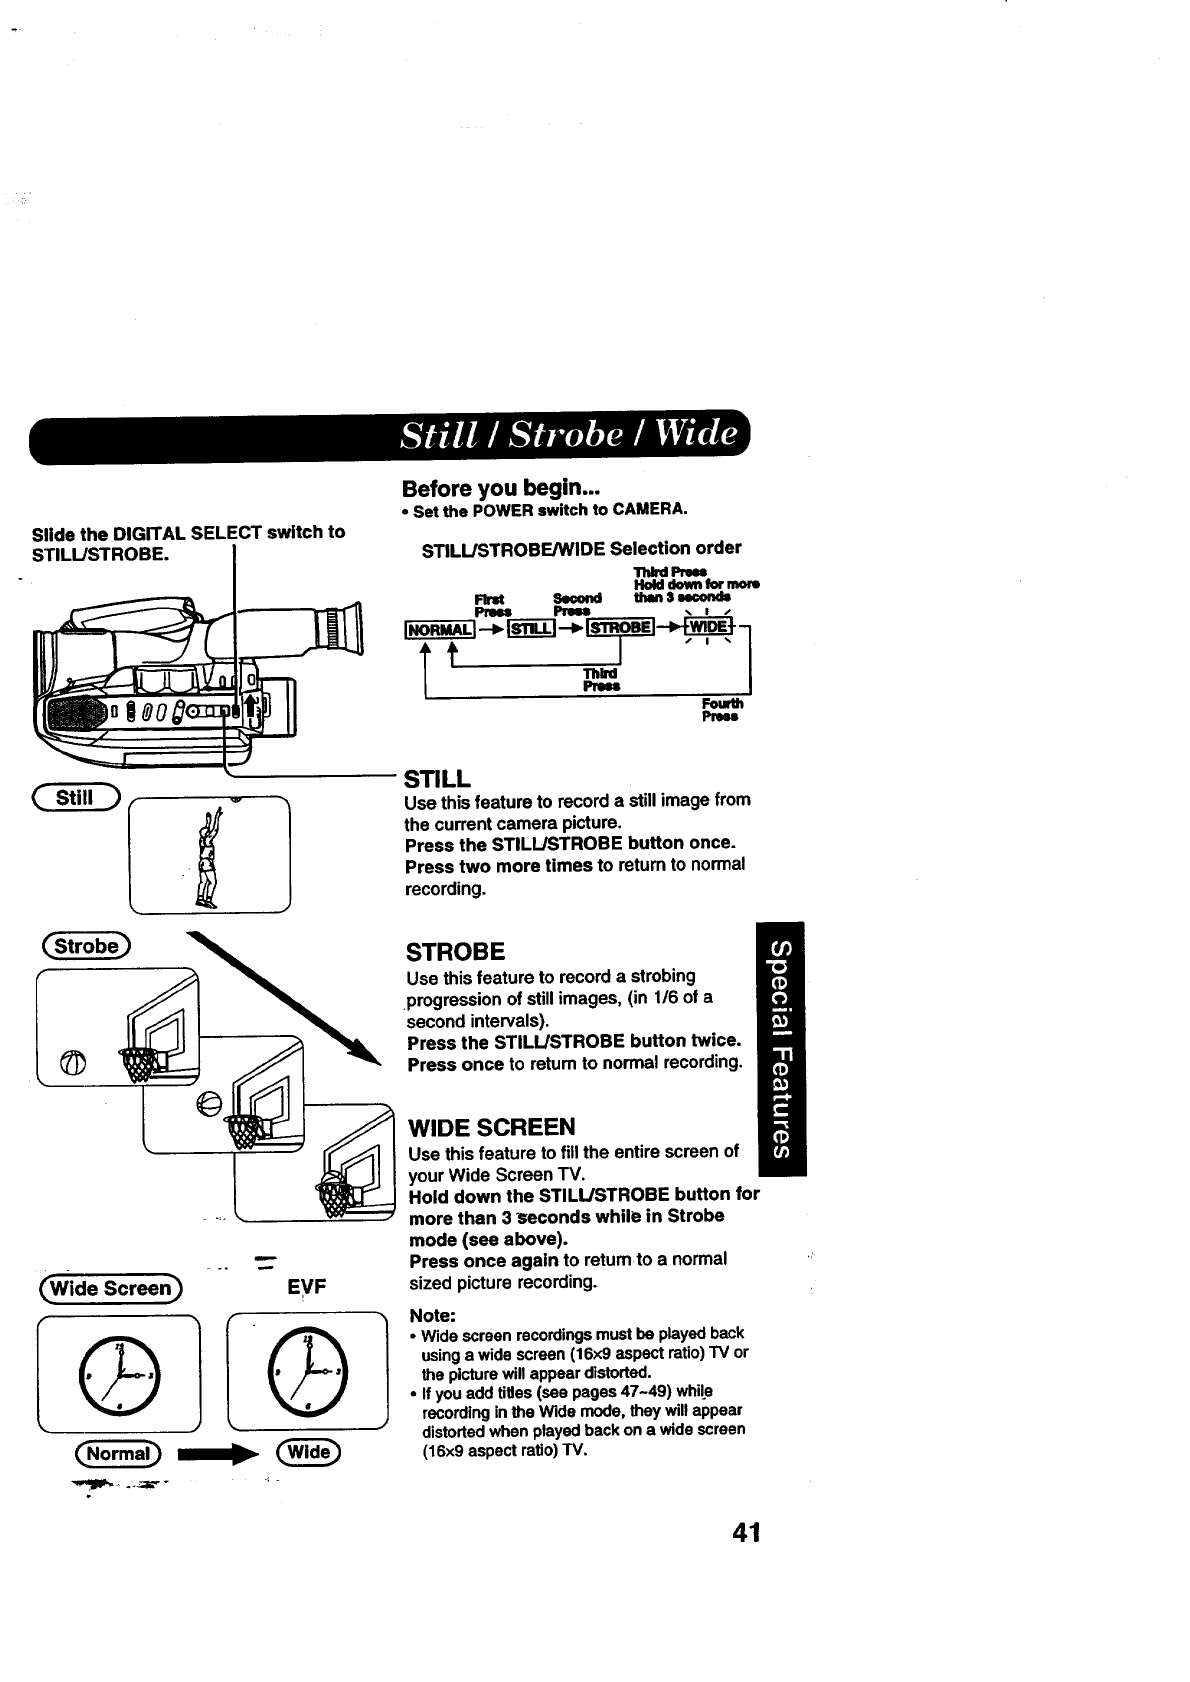
Slide the DIGITAL SELECT switch to
STILL/STROBE.
@
_Wide Screen_ E,VF
IGIIGI
Before you begin...
• Set the POWER switch to CAMERA.
STILL/STROBE/WIDE Selection order
"ndldPrmm
I.l_d downfor more
Fht Second than $ =eeend=
Plmm Pries ,, i ,-
t=
STILL
Use thisfeatureto recorda stillimagefrom
the currentcamera picture.
Press the STILL/STROBE button once.
Press two more times to returnto normal
recording.
STROBE
Use thisfeature to recorda strobing
.progression of still images, (in 1/6 of a
second intervals).
Press the STILL/STROBE button twice.
Press once to retum to normal recording.
WIDE SCREEN
Use this feature to fill the entire screen of
your Wide Screen TV.
Hold down the STILL/STROBE button for
more than 3 seconds while in Strobe
mode (see above).
Press once again to retum to a normal
sized picture recording.
Note:
• Wide screen recordings must be played back
using a wide screen (16x9 aspect ratio) TV or
the picture will appear distorted.
•If you add titles (see pages 47-49) while
recording in the Wide mode, they will appear
distorted when played back on a wide screen
(16x9 aspect ratio) TV.
41
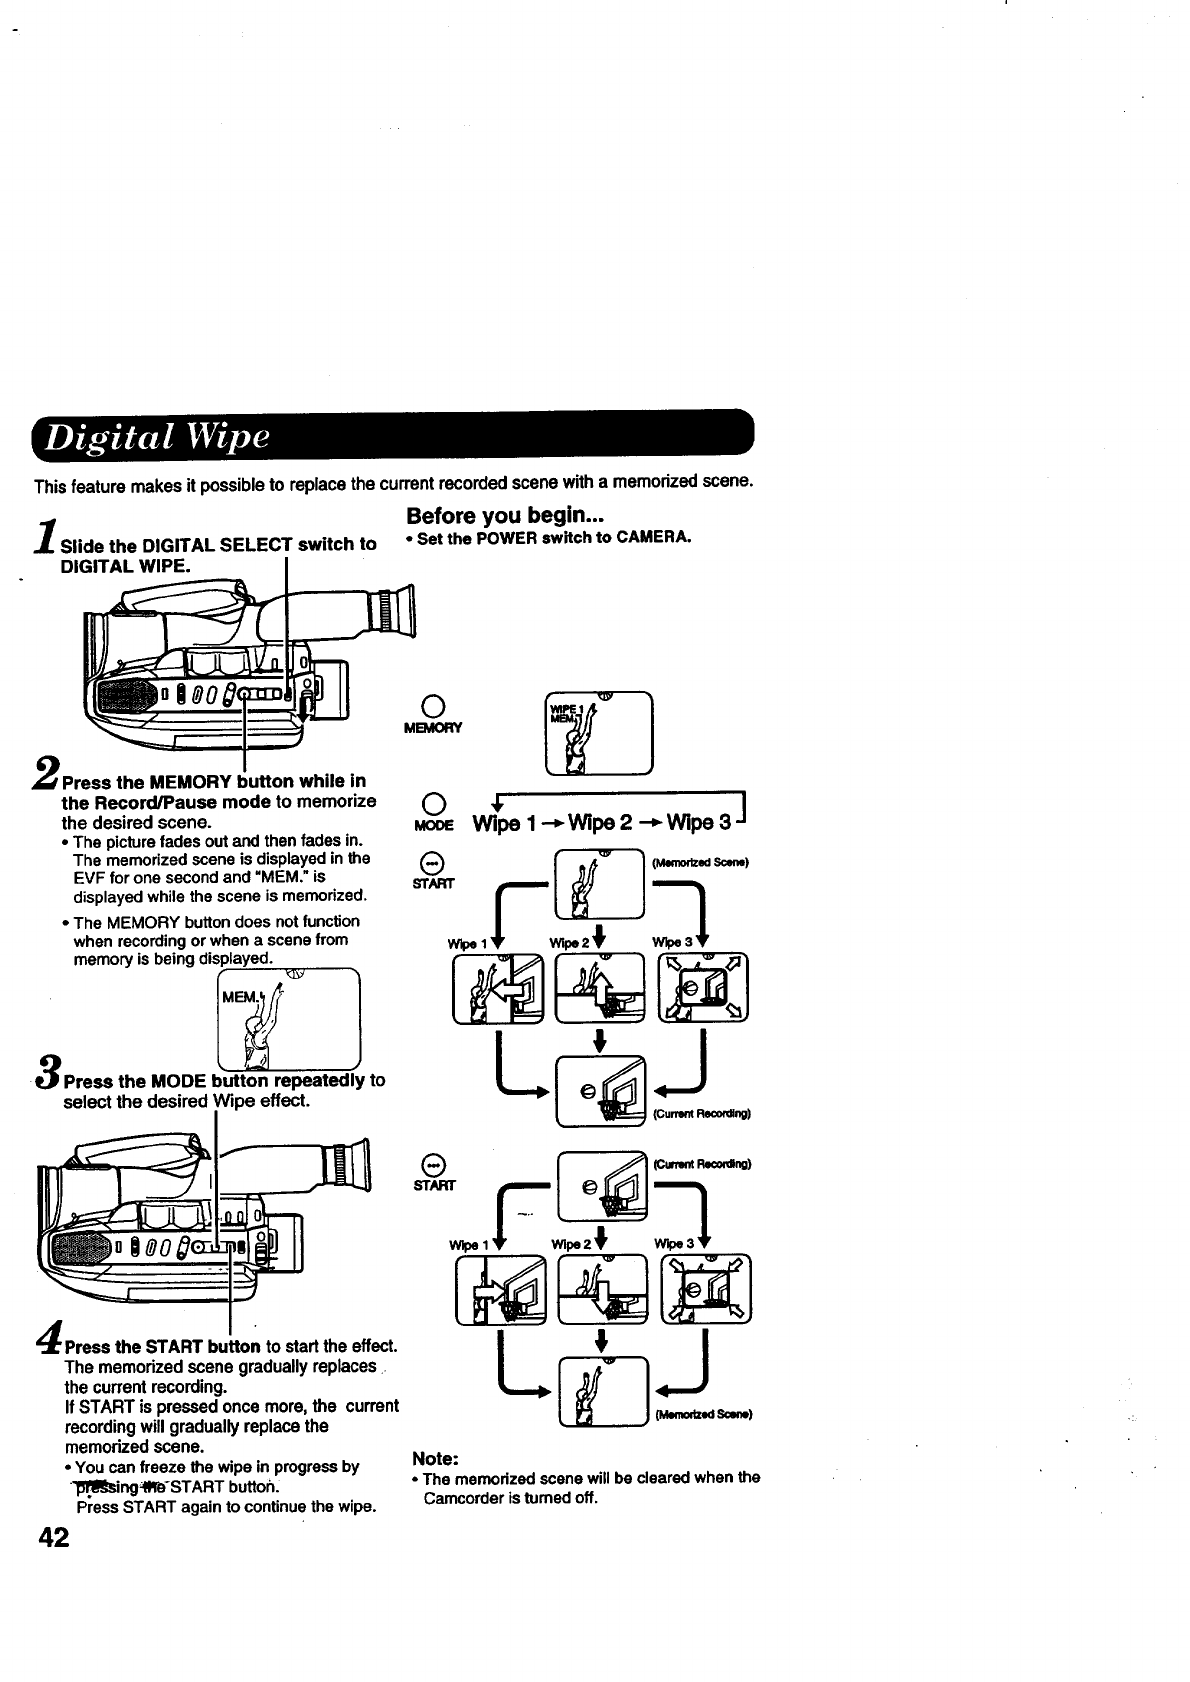
Thisfeaturemakesit possibleto replacethecurrentrecordedscenewitha memorizedscene.
Before you begin...
Slide the DIGITAL SELECT switch to •Set the POWER switch to CAMERA.
DIGITAL WIPE.
Press the MEMORY button while in
the Record/Pause mode to memorize
the desired scene.
• The picturefadesout and thenfades in.
The memorizedscene is displayedin the
EVF forone secondand "MEM."is
displayedwhile the scene is memorized.
• The MEMORY buttondoes notfunction
when recordingorwhen a scene from
memoryis beingdisplayed.
, •
Press the MODE button repeatedly to
select the desired Wipe effect.
MEMORY
0 _"
MooE Wipe 1 --_ Wipe 2 --_ Wipe 3 J
F!2_ _ (M=modz=4Scum)J2
L.l 'o ._1
(Current Recording)
Press the START button to startthe effect.
The memorized scene gradually replaces
the current recording.
If START is pressed once more, the current
recordingwill gradually replace the
memorized scene.
•You canfreeze the wipe inprogressby
_ng_II'(e-START button.
Press START again to continuethe wipe.
42
Note:
•The memorized scene will be cleared when the
Camcorder is turned off.
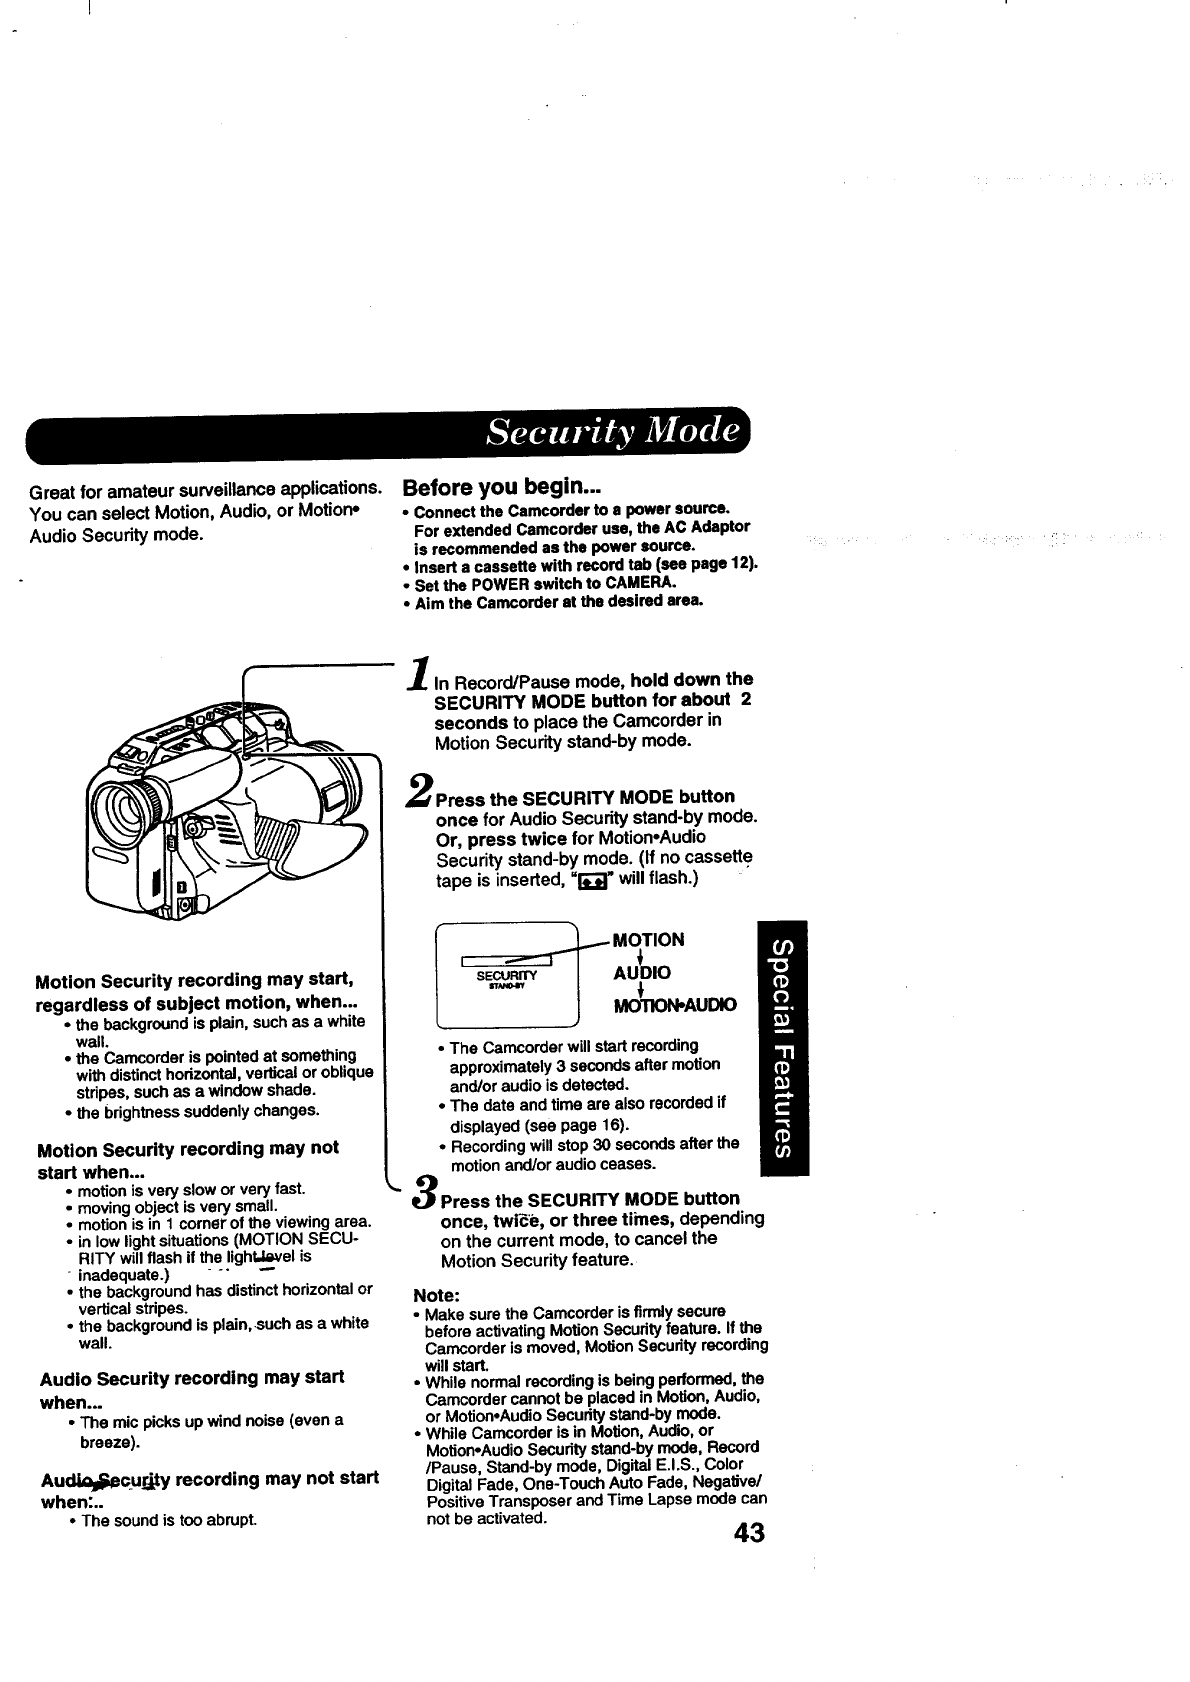
Great for amateur surveillance applications.
You can select Motion, Audio, or Motion*
Audio Security mode.
Before you begin...
• Connect the Camcorder to a power source.
For extended Camcorder use, the AC Adaptor
is recommended as the power source.
• Insert a cassette with record tab (see page 12).
•Set the POWER switch to CAMERA.
• Aim the Camcorder at the desired area.
Motion Security recording may start,
regardless of subject motion, when...
• the background is plain, such as a white
wall.
• the Camcorder is pointed at something
with distinct horizontal, vertical or oblique
stripes, such as a window shade.
• the bdghtness suddenly changes.
Motion Security recording may not
start when...
• motion is very slow or very fast.
•moving object Lsvery small.
• motion is in 1 corner of the viewing area.
•Jnlow light situations (MOTION SECU-
RITY will flash if th_e!ightJ_el is
inadequate.)
•the background has distinct horizontal or
vertical stripes.
• the background is plain,.such as a white
wall.
Audio Security recording may start
when...
•The micpicksup wind noise(even a
breeze).
Au_cur_y recording may not start
when:..
•The soundis tooabrupt.
1In Record/Pause mode, hold down the
SECURITY MODE button for about 2
seconds to place the Camcorder in
Motion Security stand-by mode.
Press the SECURITY MODE button
once for Audio Security stand-by mode.
Or, press twice for Motion.Audio
Security stand-by mode. (If no cassette
tape is inserted, "_" will flash.)
'sAUDIO
MOTION-AUDIO
•The Camcorder will start recording
approximately 3 seconds after motion
and/or audio is detected.
•The date and time are also recorded if
displayed (see page 16).
•Recording will stop 30 seconds after the
motion and/or audio ceases.
Press the SECURITY MODE button
once, twi_e, or three times, depending
on the current mode, to cancel the
Motion Security feature.
Note:
•Make sure the Camcorder is firmly secure
before activating Motion Secudty feature. If the
Carncorder is moved, Motion Security recording
will starL
•While normal recording is being performed, the
Camcorder cannot be placed in Motion, Audio,
or MotionoAudio Security stand-by mode.
•While Camcorder is in Motion, Audio, or
Motion•Audio Secudty stand-by mode, Record
/Pause, Stand-by mode, Digital E.I.S., Color
Digital Fade, One-Touch Auto Fade, Negative/
Positive Transposer and Time Lapse mode can
not be activated. 43
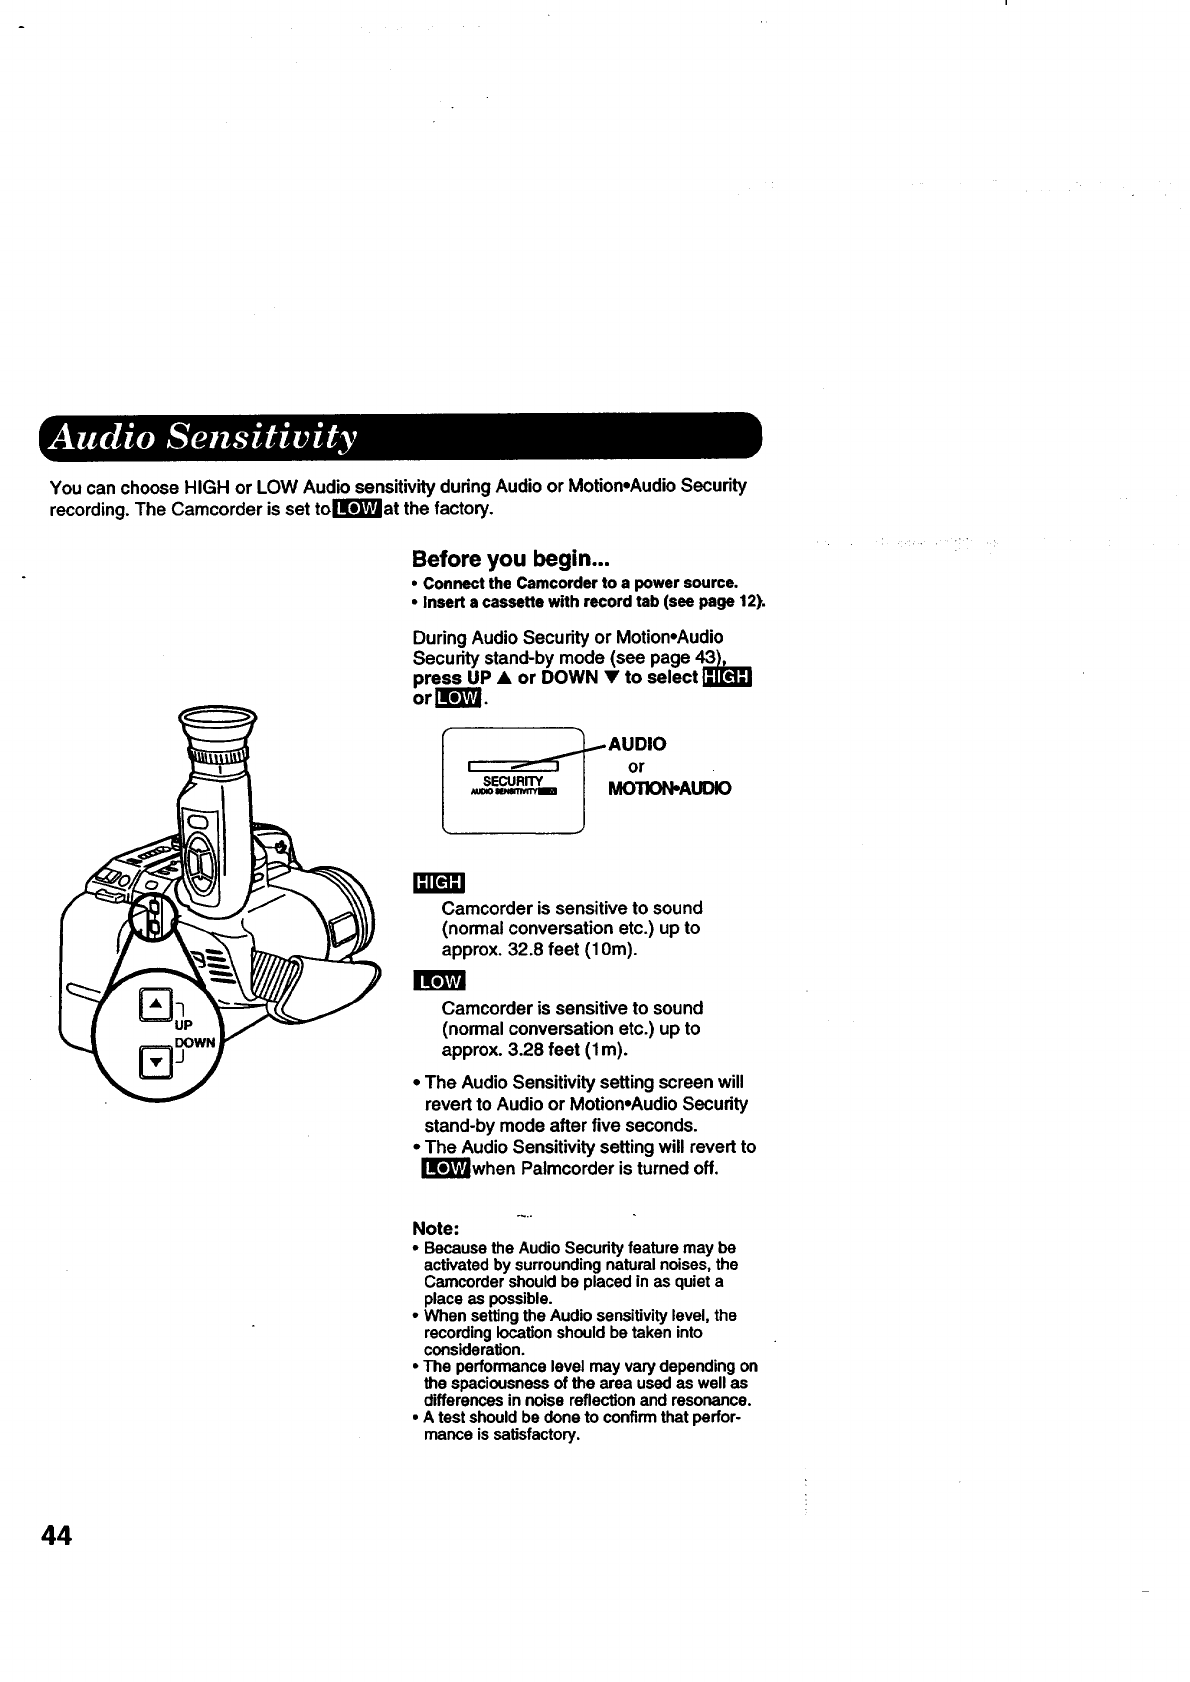
You can chooseHIGH or LOW AudiosensitivityduringAudioor Motion.AudioSecurity
recording.The Camcorderis set tollt'_'_at the factory.
Before you begin...
• Connect the Camcorder to a power source.
• Insert s cassette with record tab (see page 12).
During Audio Security or Motion.Audio
Security stand-by mode (see page 43),
press UP •or DOWN •to select
or ITr_'_.
J
IfI
SECURITY
..AUDIO
or
MOTION.AUDIO
l:l[e]=l
Camcorder is sensitive to sound
(normal conversation etc.) up to
approx. 32.8 feet (10m).
Camcorder is sensitive to sound
(normal conversation etc.) up to
approx. 3.28 feet (lm).
• The AudioSensitivitysettingscreenwill
revertto AudioorMotion.AudioSecurity
stand-bymodeafter five seconds.
•The AudioSensitivitysettingwillrevertto
Ilr_when Palmcorderis turnedoff.
Note:
•Becausethe AudioSecurityfeature may be
activatedby surroundingnatural noises,the
Camcordershouldbe placed inas quieta
placeas possible.
•When settingthe Audio sensitivitylevel,the
recordinglocationshouldbetaken into
consideration.
•The performancelevelmay varydependingon
the spaciousnessof the area usedas well as
differencesin noise reflectionand resonance.
•A testshouldbe done to confirmthat perfor-
manceis satisfactory.
44
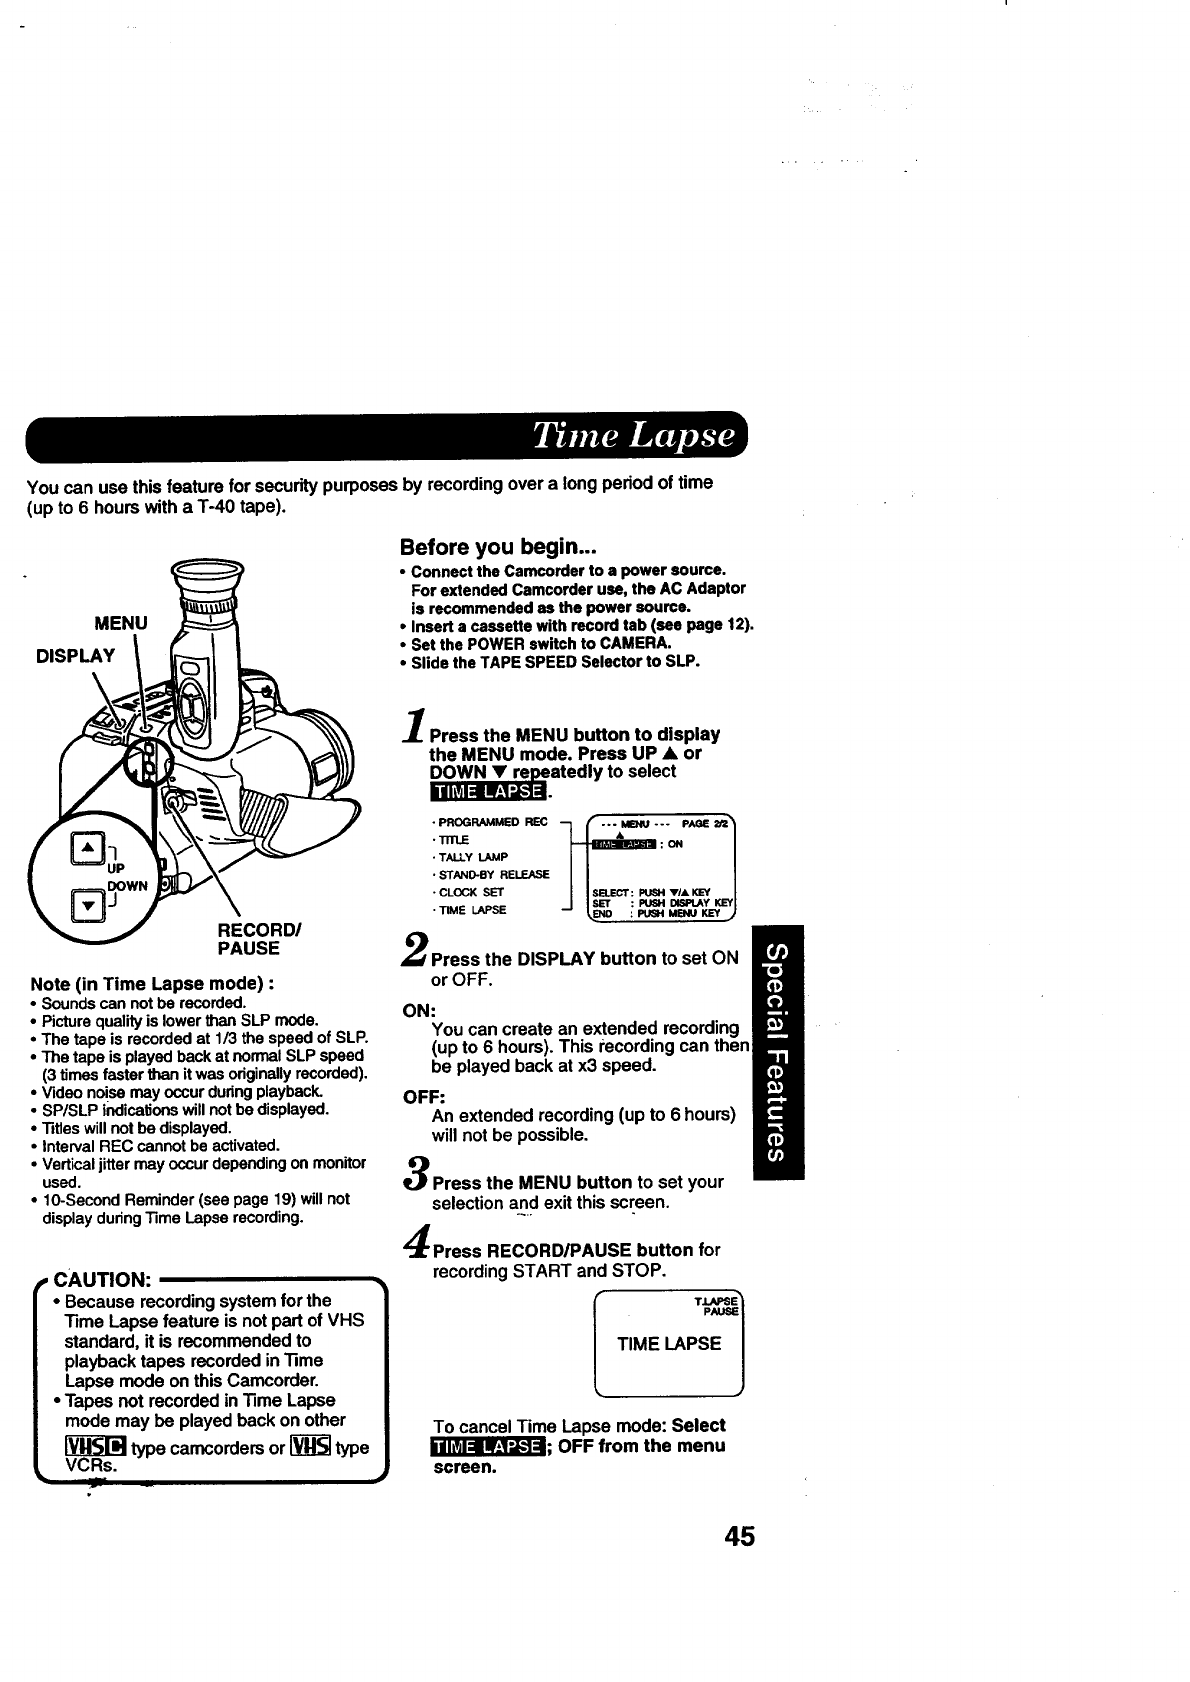
You can use this feature for security purposes by recording over a long period of time
(up to 6 hours with a %40 tape).
MENU
DISPLAY
Before you begin...
• Connect the Camcorder to a power source.
For extended Camcorder use, the AC Adaptor
is recommended as the power source.
•Insert a cassette with record tab (see page 12).
• Set the POWER switch to CAMERA.
• Slide the TAPE SPEED Selector to SLP.
RECORD/
PAUSE
Note (in Time Lapse mode) :
•Sounds can not be recorded.
•Picture quality is lower than SLP mode.
•The tape is recorded at 1/3 the speed of SLP.
•The tape is played back at normal SLP speed
(3 times faster than it was originally recorded).
•Video noise may occur during playback.
• SP/SLP indications will not be displayed.
•Titles will not be displayed.
• Interval REC cannot be activated.
• Vertical jitter may occur depending on monitor
used.
• 10-Second Reminder (see page 19) will not
display during _me Lapse recording.
_,CAUTION:
•Because recording system for the
"13meLapse feature is not part of VHS
standard, it is recommended to
playback tapes recorded in "13me
Lapse mode on this Camcorder.
•Tapes not recorded in "rime Lapse
mode may be played back on other
type camcorders or _type
• VCRs. •
Press the MENU button to display
the MENU mode. Press UP • or
atedly to select
•PROGRAMMED REC ... MBtU --- PAGE Zt2"_
•"RILE &__ON /
• TALLY LAMP
•STAND-BY RELEASE
•CLOCK SET 'ViA KEY
•I_-r : Pt_4 _Y ,_-Y[
•TIME LAPSE -- I,B_) : PUSH MENU K_rf )
Press the DISPLAY button to set ON
or OFF.
ON:You can create an extended recording
(up to 6 hours). This recording can then
be played back at x3 speed.
OFF:
An extended recording (up to 6 hours)
will not be possible.
Press the MENU button to set your
selection and exit this screen.
Press RECORD/PAUSE button for
recording START and STOP.
To cancel Time Lapse mode: Select
i'_; OFF from the menu
screen.
45
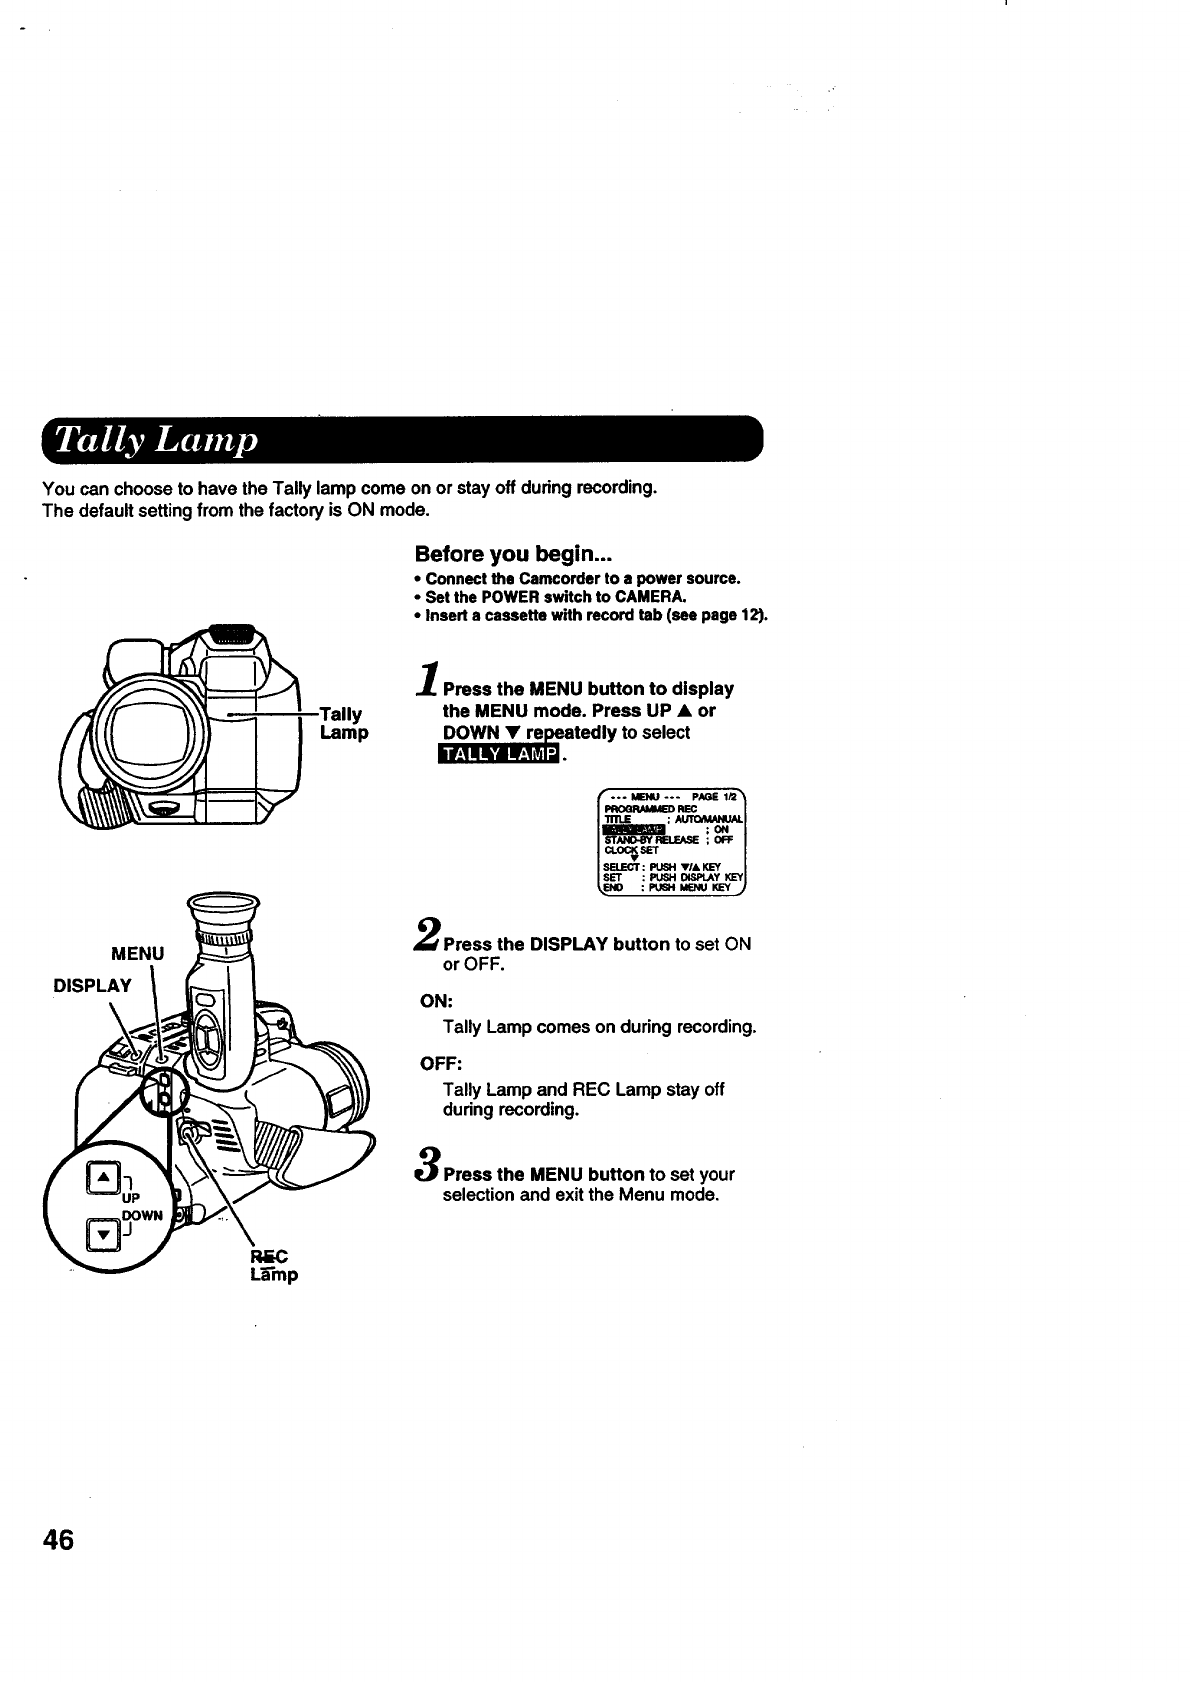
You can choose to have the Tally lamp come on or stay off during recording.
The default setting from the factory is ON mode.
Before you begin...
•Connectthe Camcorderto a power source.
•Set the POWERswitchto CAMERA.
•Inserta cassettewith recordtab (seepage 12).
MENU
DISPLAY
Lamp
Press the MENU button to display
the MENU mode. Press UP •or
atedly to select
m._---..,u --- P_,i 1_
TITLE ; AUTOAIA,NU_
;ON
i ST_C_eYRB.F.ASS;OFF/
I SBJECT: PUSH VIA KL=Y |
ISET : PUC,H OI,SPtJWKL='YI
Press the DISPLAY button to set ON
or OFF.
ON:
Tally Lamp comes on during recording.
OFF:
Tally Lamp and REC Lamp stay off
during recording.
Press the MENU button to set your
selection and exit the Menu mode.
46
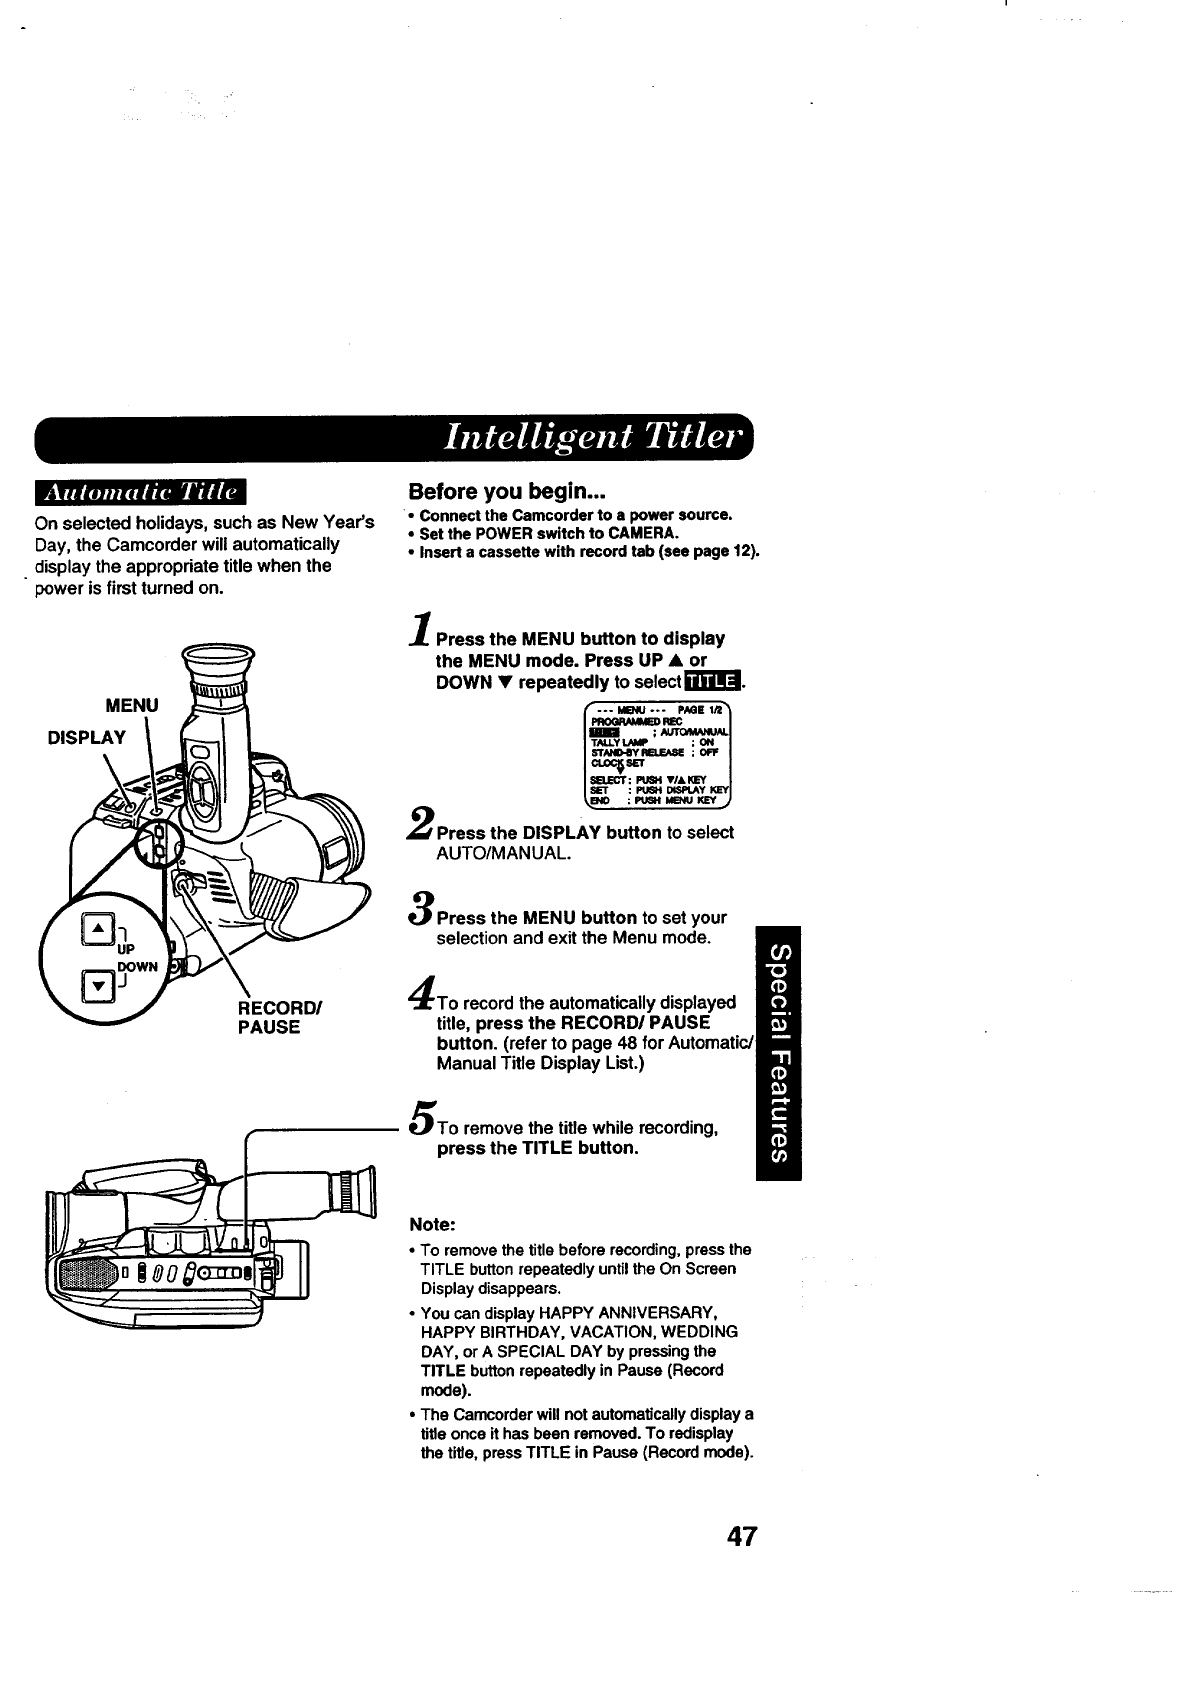
Before you begin...
I_tT/,e,H,I,m_Jf//_
On selected holidays, such as New Year's
Day, the Camcorder will automatically
display the appropriate title when the
power is first turned on.
MENU
DISPLAY
RECORD/
PAUSE
• Connect the Camcorder to a power source.
• Set the POWER switch to CAMERA.
•Insert a cassette with record tab (see page 12).
Press the MENU button to display
the MENU mode. Press UP •or
DOWN • repeatedly to selecti]B_.
REC
I TALLY lAMP ; ON
[ sl_=_r: _ VI&KEY
ISLET : _DISPlay KE_
_ENO , PUm-I MENU KEY
Press the DISPLAY button to select
AUTO/MANUAL.
Press the MENU button to set your
selection and exit the Menu mode.
To record the automatically displayed
title, press the RECORD/PAUSE
button. (refer to page 48 for
Manual Title Display List.)
To remove the title while recording,
press the TITLE button.
Note:
•To remove the title before recording, press the
TITLE button repeatedly until the On Screen
Display disappears.
•You can display HAPPY ANNIVERSARY,
HAPPY BIRTHDAY, VACATION, WEDDING
DAY, or A SPECIAL DAY by pressing the
TITLE button repeatedly in Pause (Record
mode).
•The Camcorder will not automatically display a
title once it has been removed. To redisplay
the title, press TITLE in Pause (Record mode).
47
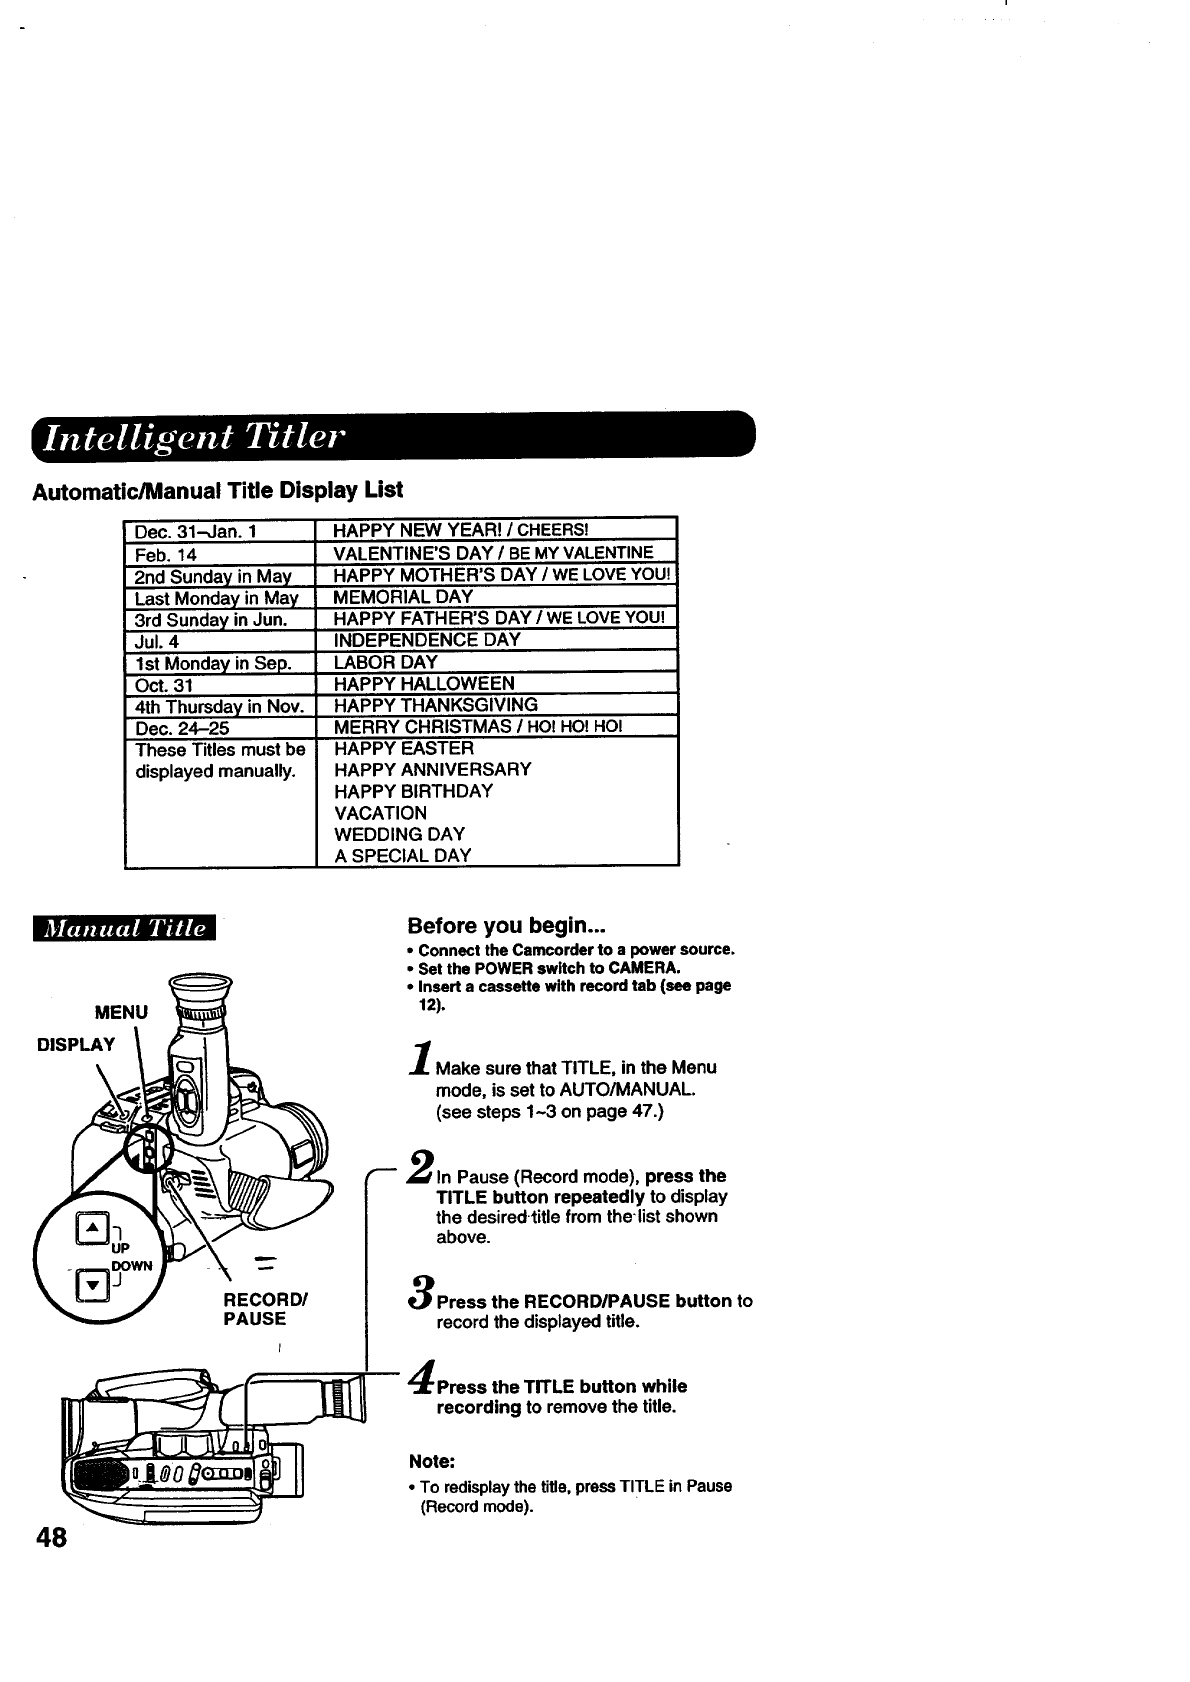
Automatic/Manual Title Display List
Dec. 31-Jan. 1
Feb. 14
2nd Sunday in May
Last Monday in May
3rd Sunday in Jun.
Jul. 4
1st Monday in Sep.
Oct. 31
4th Thursday in Nov.
Dec. 24-25
These Titles must be
displayed manually.
HAPPY NEW YEAR! /CHEERS!
VALENTINE'S DAY /BE MY VALENTINE
HAPPY MOTHER'S DAY /WE LOVE YOU!
MEMORIAL DAY
HAPPY FATHER'S DAY /WE LOVE YOU!
INDEPENDENCE DAY
LABOR DAY
HAPPY HALLOWEEN
HAPPY THANKSGIVING
MERRY CHRISTMAS /HO! HO! HO!
HAPPY EASTER
HAPPY ANNIVERSARY
HAPPY BIRTHDAY
VACATION
WEDDING DAY
A SPECIAL DAY
f4]r_alwtl_llJtrtAr_
MENU
DISPLAY
48
RECORD/
PAUSE
Before you begin...
• Connectthe Camcorderto a powersource.
• Set the POWERswitchto CAMERA.
• Inserta cassettewithrecordtab (seepage
12).
Make sure that TITLE, in the Menu
mode, is set to AUTO/MANUAL.
(see steps 1-3 on page 47.)
2In Pause (Record mode), press the
TITLE button repeatedly to display
the desired.titlefromthe-listshown
above.
Press the RECORDIPAUSE button to
record the displayed title.
Press the TITLE button while
recording to remove the title.
Note:
• To redisplay the title, press TITLE in Pause
(Record mode).
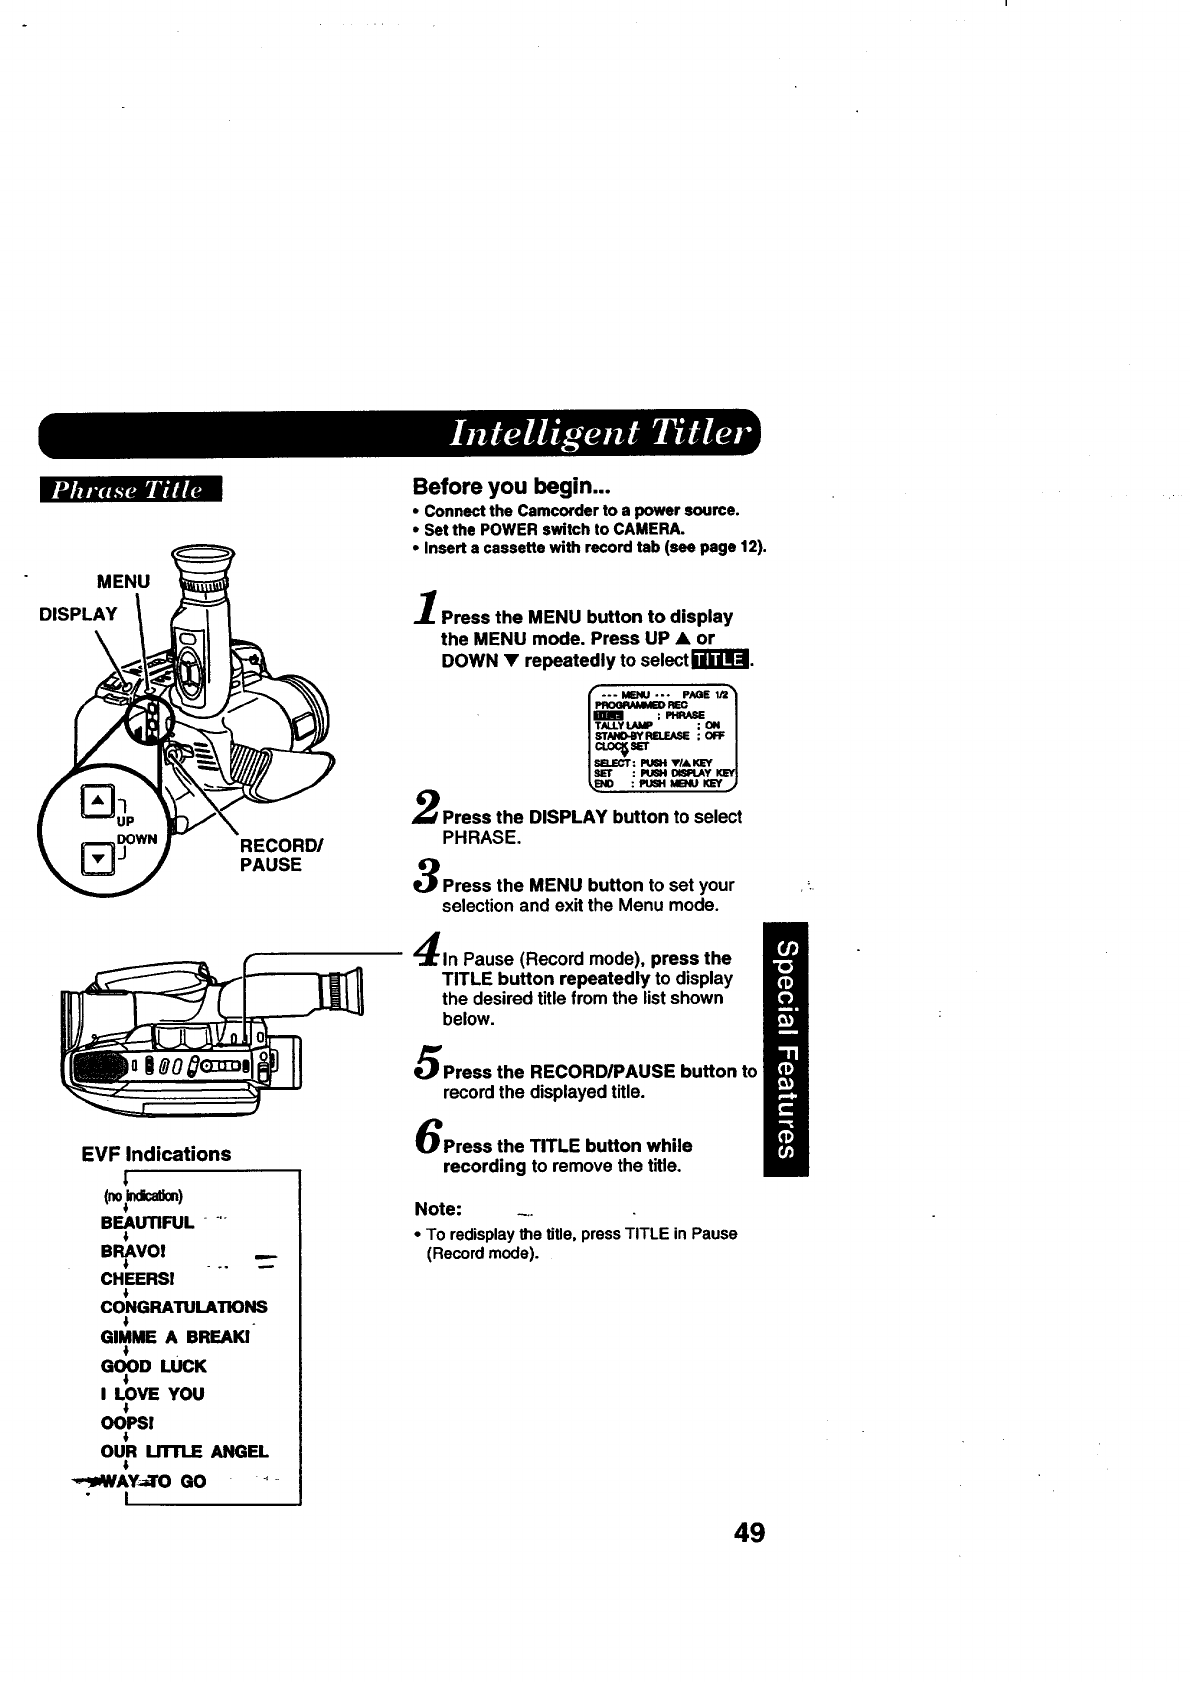
rUlIKr_'_w'JT/ia
MENU
DISPLAY
\
RECOR_
PAUSE
EVF Indications
BEAUTIFUL -_
BRAVOI
CHEERSI
,F
CONGRATULATIONS
,F
GiMME A BREAKI
,F
GOOD LUCK
I LOVE YOU
,F
OOPS!
OUR MI"rLE ANGEL
4
-"J_VAY-_.TO GO _-
I
Before you begin...
• Connect the Camcorder to a power source.
• Set the POWER switch to CAMERA.
•Insert a cassette with record tab (see page 12).
Press the MENU button to display
the MENU mode. Press UP •or
DOWN • repeatedly to select rA"_l-:l.
ilmm ;PHRASe/
I TNJ.Y_ :ON /
I SB.ECT: PUSH 'WA KEY/
Is[r : eusNolm.Ay K_q
Press the DISPLAY button to select
PHRASE.
Press the MENU button to set your
selection and exit the Menu mode.
In Pause (Record mode), press the
TITLE button repeatedly to display
the desired title from the list shown
below.
Press the RECORD/PAUSE button to
record the displayed title.
Press the TITLE button while
recording to remove the title.
Note: _..
• To redisplay the title, press TITLE in Pause
(Record mode).
49
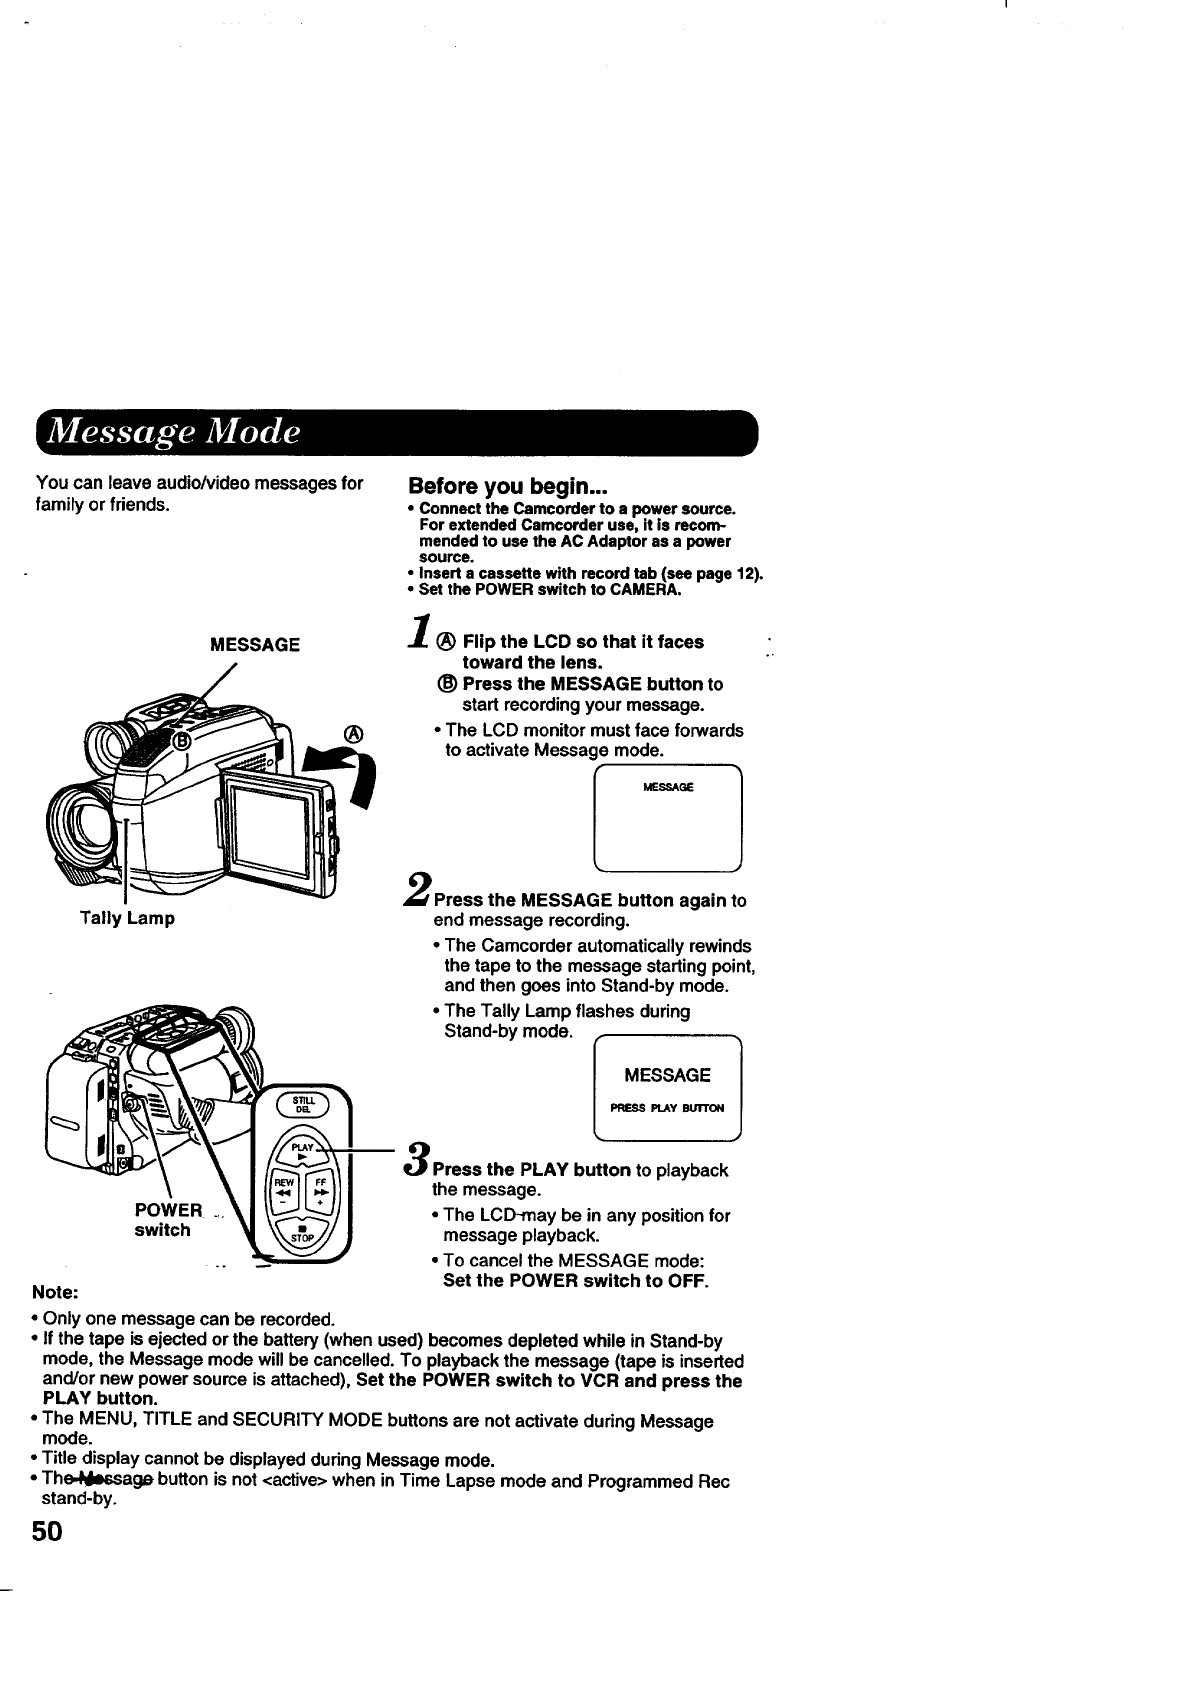
You can leave audio/videomessagesfor
familyor friends. Before you begin...
• Connect the Camcorder to a power source.
For extended Carncorder use, it is recom-
mended to use the AC Adaptor as a power
source.
• Insert a cassette with record tab (see page 12).
•Set the POWER switch to CAMERA.
MESSAGE
Tally Lamp
POWER
switch
®
®Flip the LCD so that it faces
toward the lens.
(_ Press the MESSAGE button to
start recording your message.
• The LCD monitor must face forwards
to activate Message mode.
MESSAGE 1
Press the MESSAGE button again to
end message recording.
• The Camcorder automatically rewinds
the tape to the message starting point,
and then goes into Stand-by mode.
•The Tally Lamp flashes during
Stand-by mode.
IMESSAGE
PRESS PLAy BUTTON
Press the PLAY button to playback
the message.
•The LCD_may be in any position for
message playback.
• To cancel the MESSAGE mode:
Set the POWER switch to OFF.
Note:
•Only one message can be recorded.
• If the tape is ejected or the battery (when used) becomes depleted while in Stand-by
mode, the Message mode will be cancelled. To playback the message (tape is inserted
and/or new power source is attached), Set the POWER switch to VCR and press the
PLAY button.
• The MENU, TITLE and SECURITY MODE buttons are not activate during Message
mode.
•Title display cannot be displayed during Message mode.
• The,qlessage button is not <active> when in Time Lapse mode and Programmed Rec
stand-by.
5O
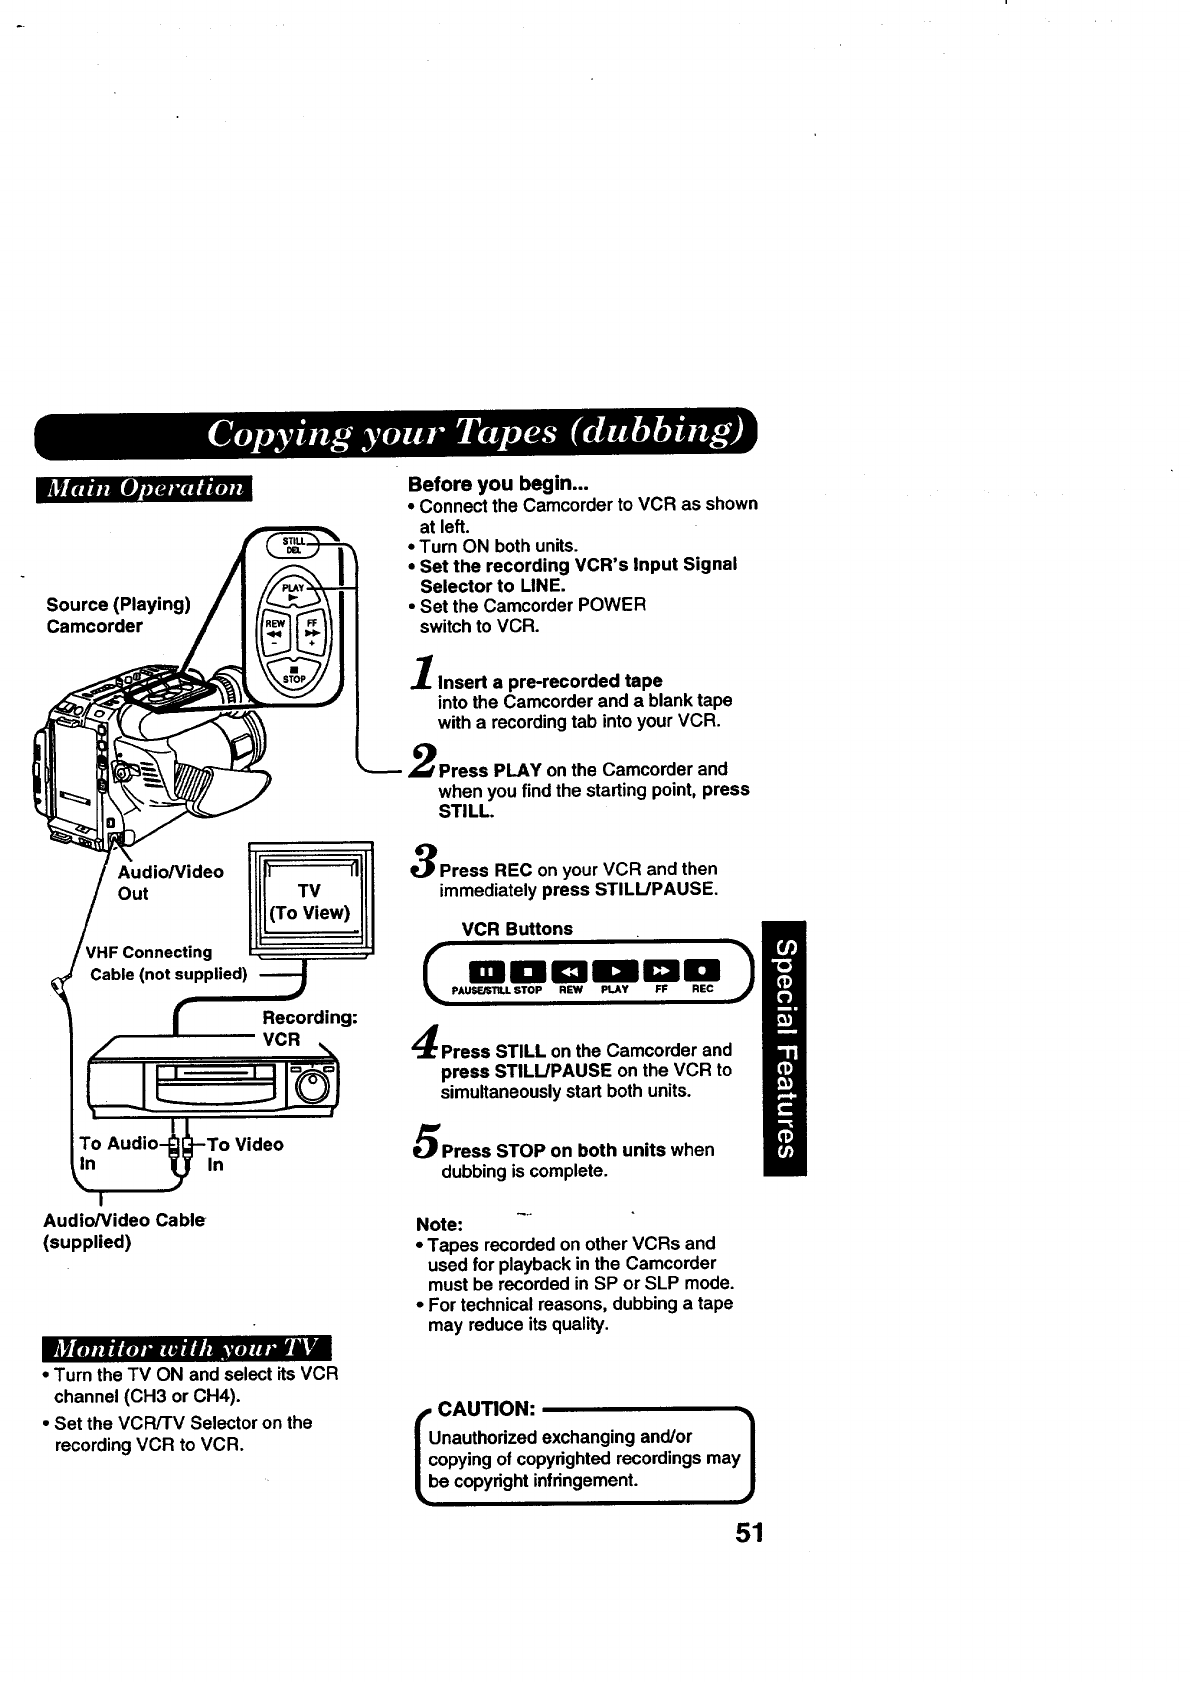
R_E_#niOAmzuYtmmton
Source (Playing)
Camcorder
Audio/Video _ I1
/
Out TV
[(To View)
Connecting
Cable (not supplied)
J
IT- Recording:
/VCR
°0°
I
To Audio-_--To Video
yln
I
Audio/Video Cable
(supplied)
IRJnj+Hm_mlll..vmE_&_m
•Turn the TV ON and select its VCR
channel (CH3 or CH4).
•Set the VCR/TV Selector on the
recording VCR to VCR.
Before you begin...
• Connect the Camcorder to VCR as shown
at left.
• Turn ON both units.
• Set the recording VCR's Input Signal
Selector to LINE.
•Set the Camcorder POWER
switch to VCR.
1Insert a pre-recorded tape
into the Camcorder and ablank tape
with a recording tab into your VCR.
Press PLAY on the Camcorder and
when you find the starting point, press
STILL.
Press REC on your VCR and then
immediately press STILL/PAUSE.
VCR Buttons
Press STILL on the Camcorder and
press STILL/PAUSE on the VCR to
simultaneously start both units.
Press STOP on both units when
dubbing is complete.
4..
Note:
•Tapes recorded on other VCRs and
used for playback in the Camcorder
must be recorded in SP or SLP mode.
•For technical reasons, dubbing a tape
may reduce its quality.
iCAUTION: 1
nauthorized exchanging and/or
opying of copydghted recordings may
e copydght infringement.
51
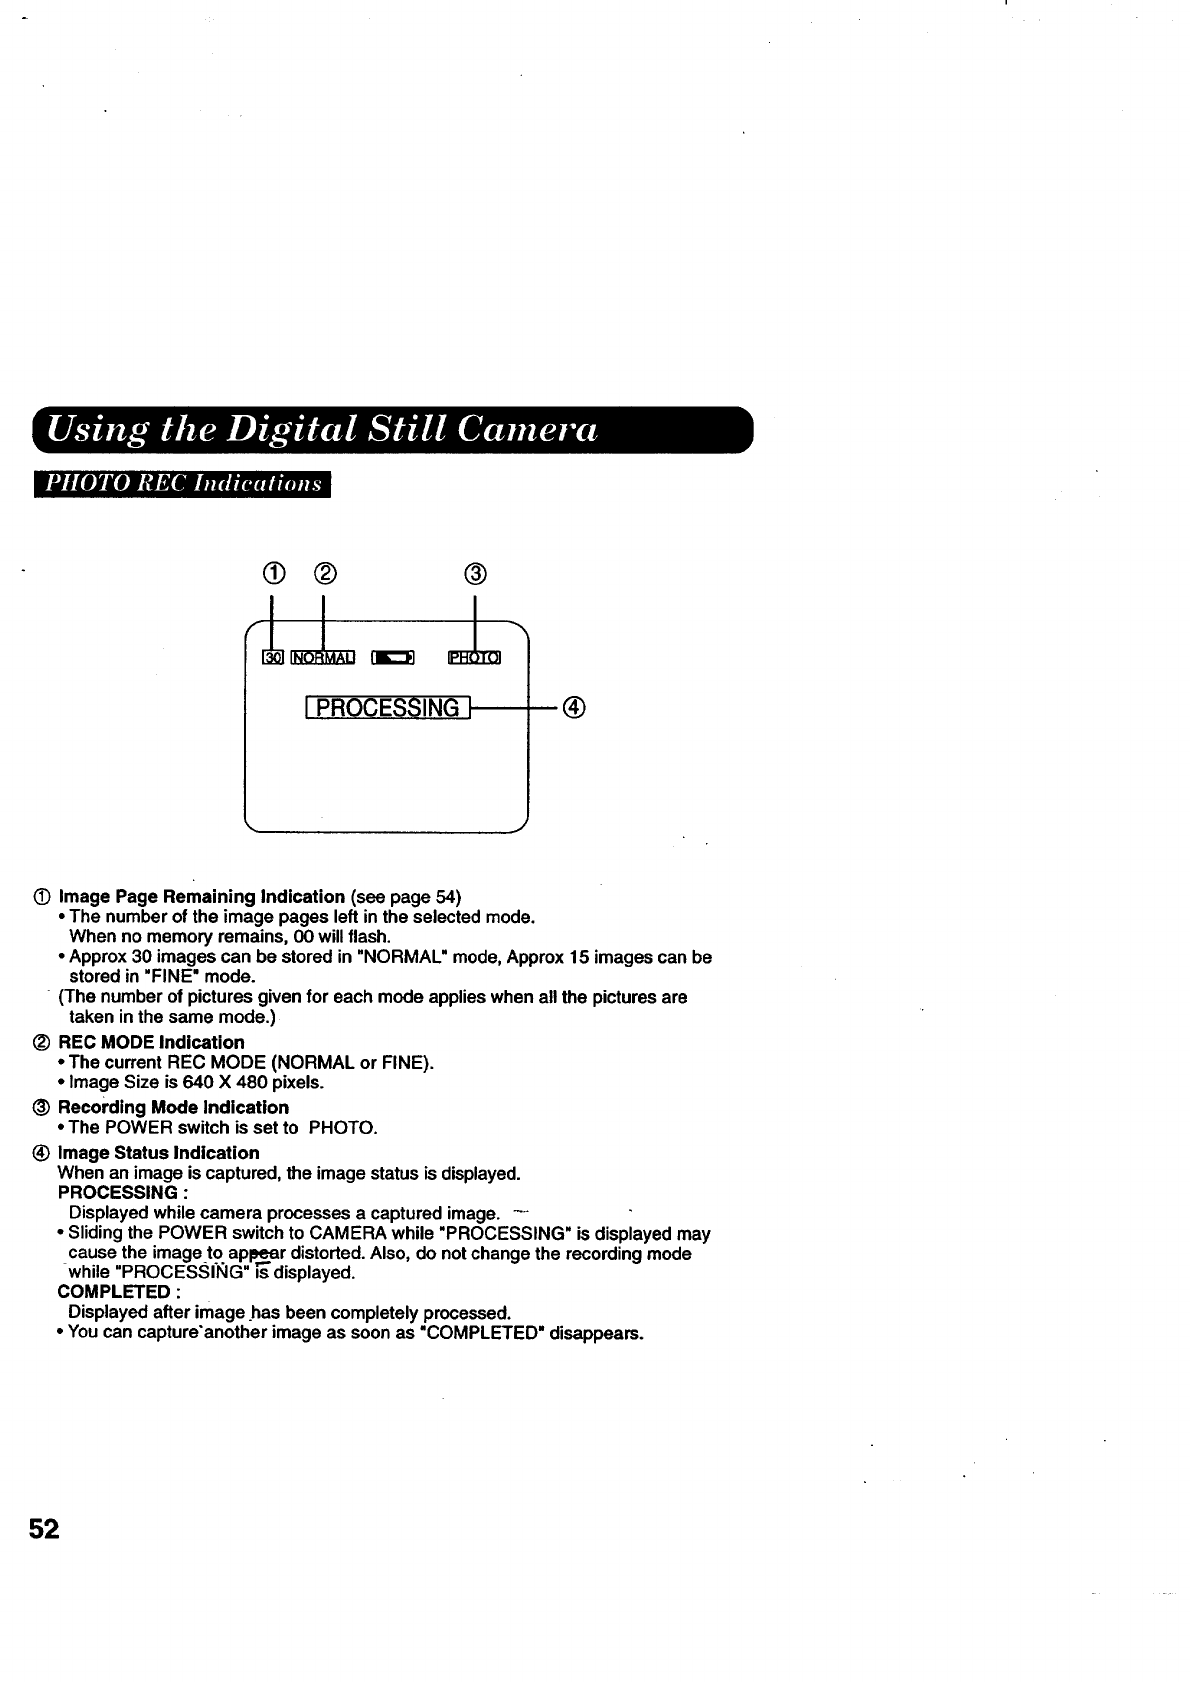
FUI[OKII_IKMn'_'_hm#Hm_
®
&
I PROCESSING I ®
OImage Page Remaining Indication (see page 54)
• The number of the image pages left in the selected mode.
When no memory remains, 00 will flash.
•Approx 30 images can be stored in "NORMAL" mode, Approx 15 images can be
stored in "FINE" mode.
(The number of pictures given for each mode applies when all the pictures are
taken in the same mode.)
(_) REC MODE Indication
• The current REC MODE (NORMAL or FINE).
•Image Size is 640 X 480 pixels.
(_) Recording Mode Indication
•The POWER switch is set to PHOTO.
(_) Image Status Indication
When an image is captured, the image status is displayed.
PROCESSING :
Displayed while camera processes a captured image. --
•Sliding the POWER switch to CAMERA while "PROCESSING" is displayed may
cause the image to apkk_=ardistorted. Also, do not change the recording mode
while "PROCESSING" _displayed.
COMPLETED :
Displayed after image has been completely processed.
•You can capture'another image as soon as "COMPLETED" disappears.
52
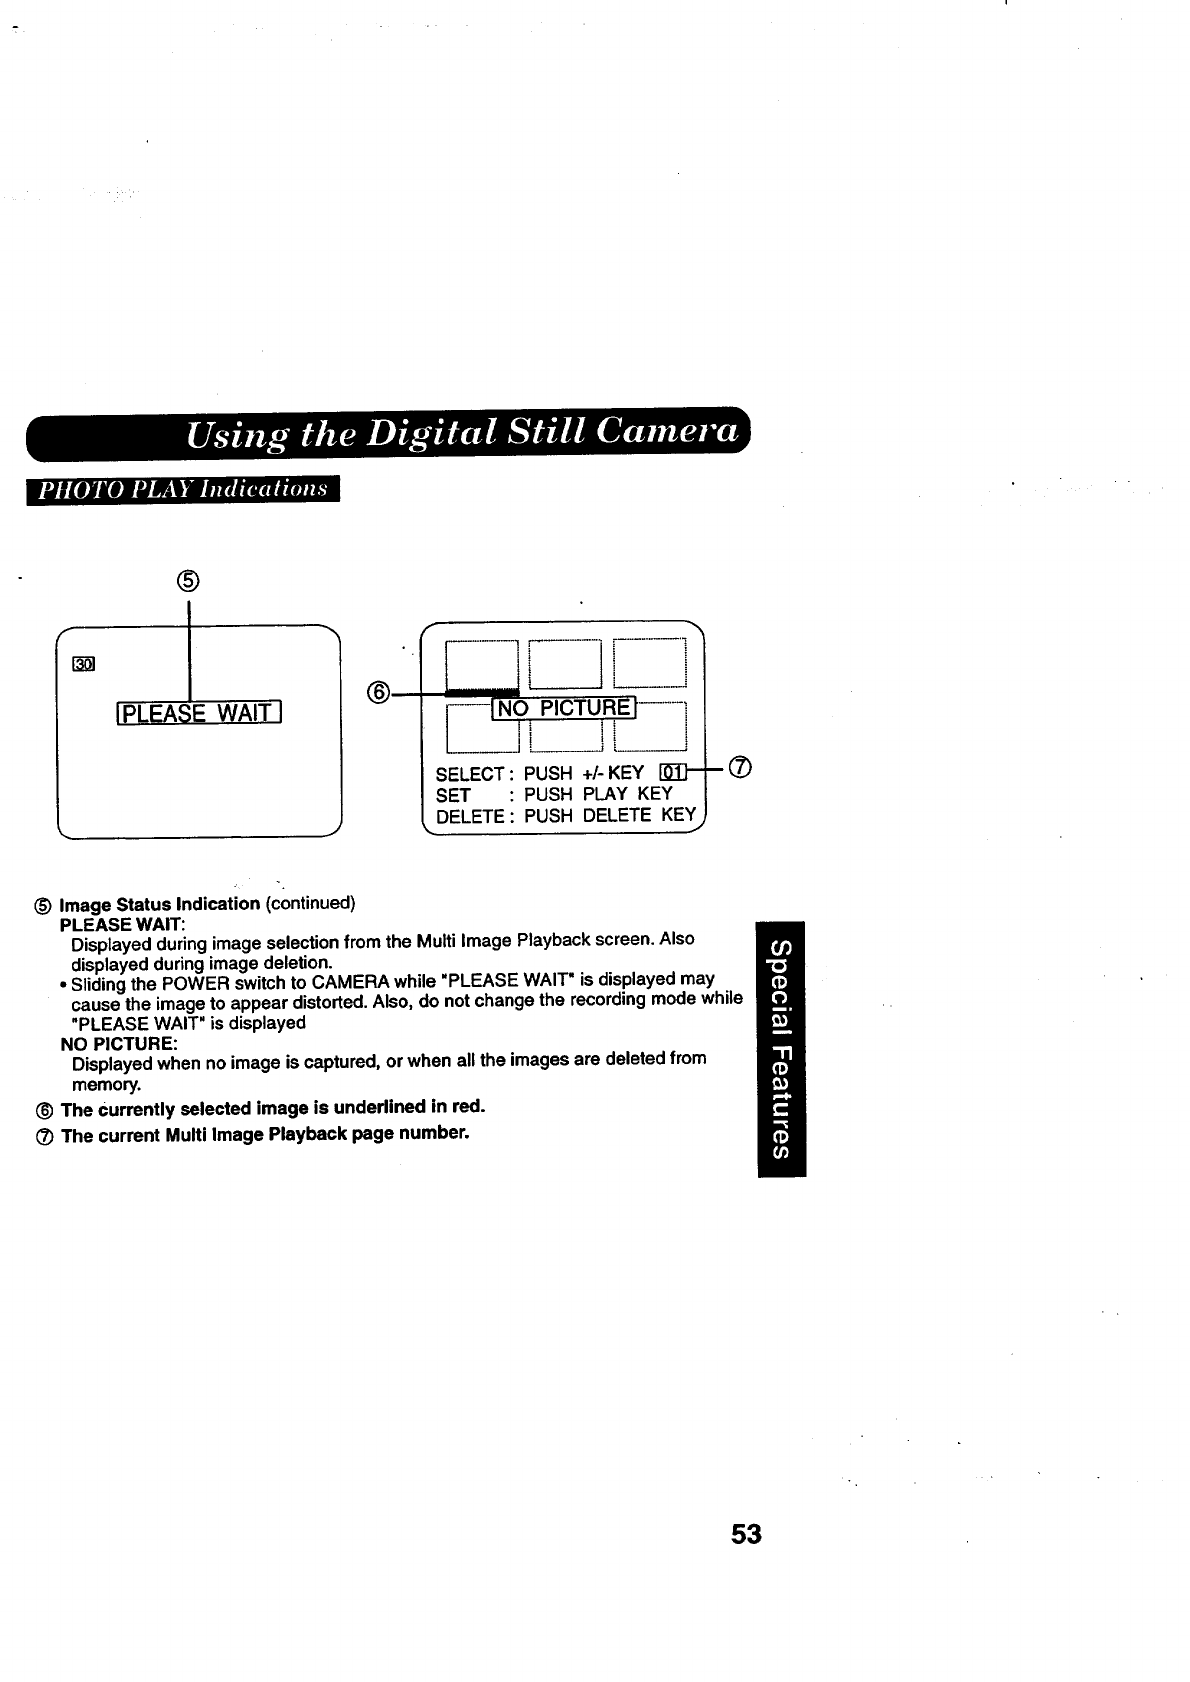
®
f
IPLEASE WAIT I
r
i---INOPICTURE/......1
j
SELECT : PUSH +/- KEY []_]-
SET : PUSH PLAY KEY
DELETE: PUSH DELETE KEY
-®
(_) Image Status Indication (continued)
PLEASE WAIT:
Displayed during image selection from the Multi Image Playback screen. Also
displayed during image deletion.
•Sliding the POWER switch to CAMERA while "PLEASE WAIT" is displayed may
cause the image to appear distorted. Also, do not change the recording mode while
"PLEASE WAIT" is displayed
NO PICTURE:
Displayed when no image is captured, or when all the images are deleted from
memory.
_) The Currently selected image is underlined in red.
(_) The current Multi Image Playback page number.
53
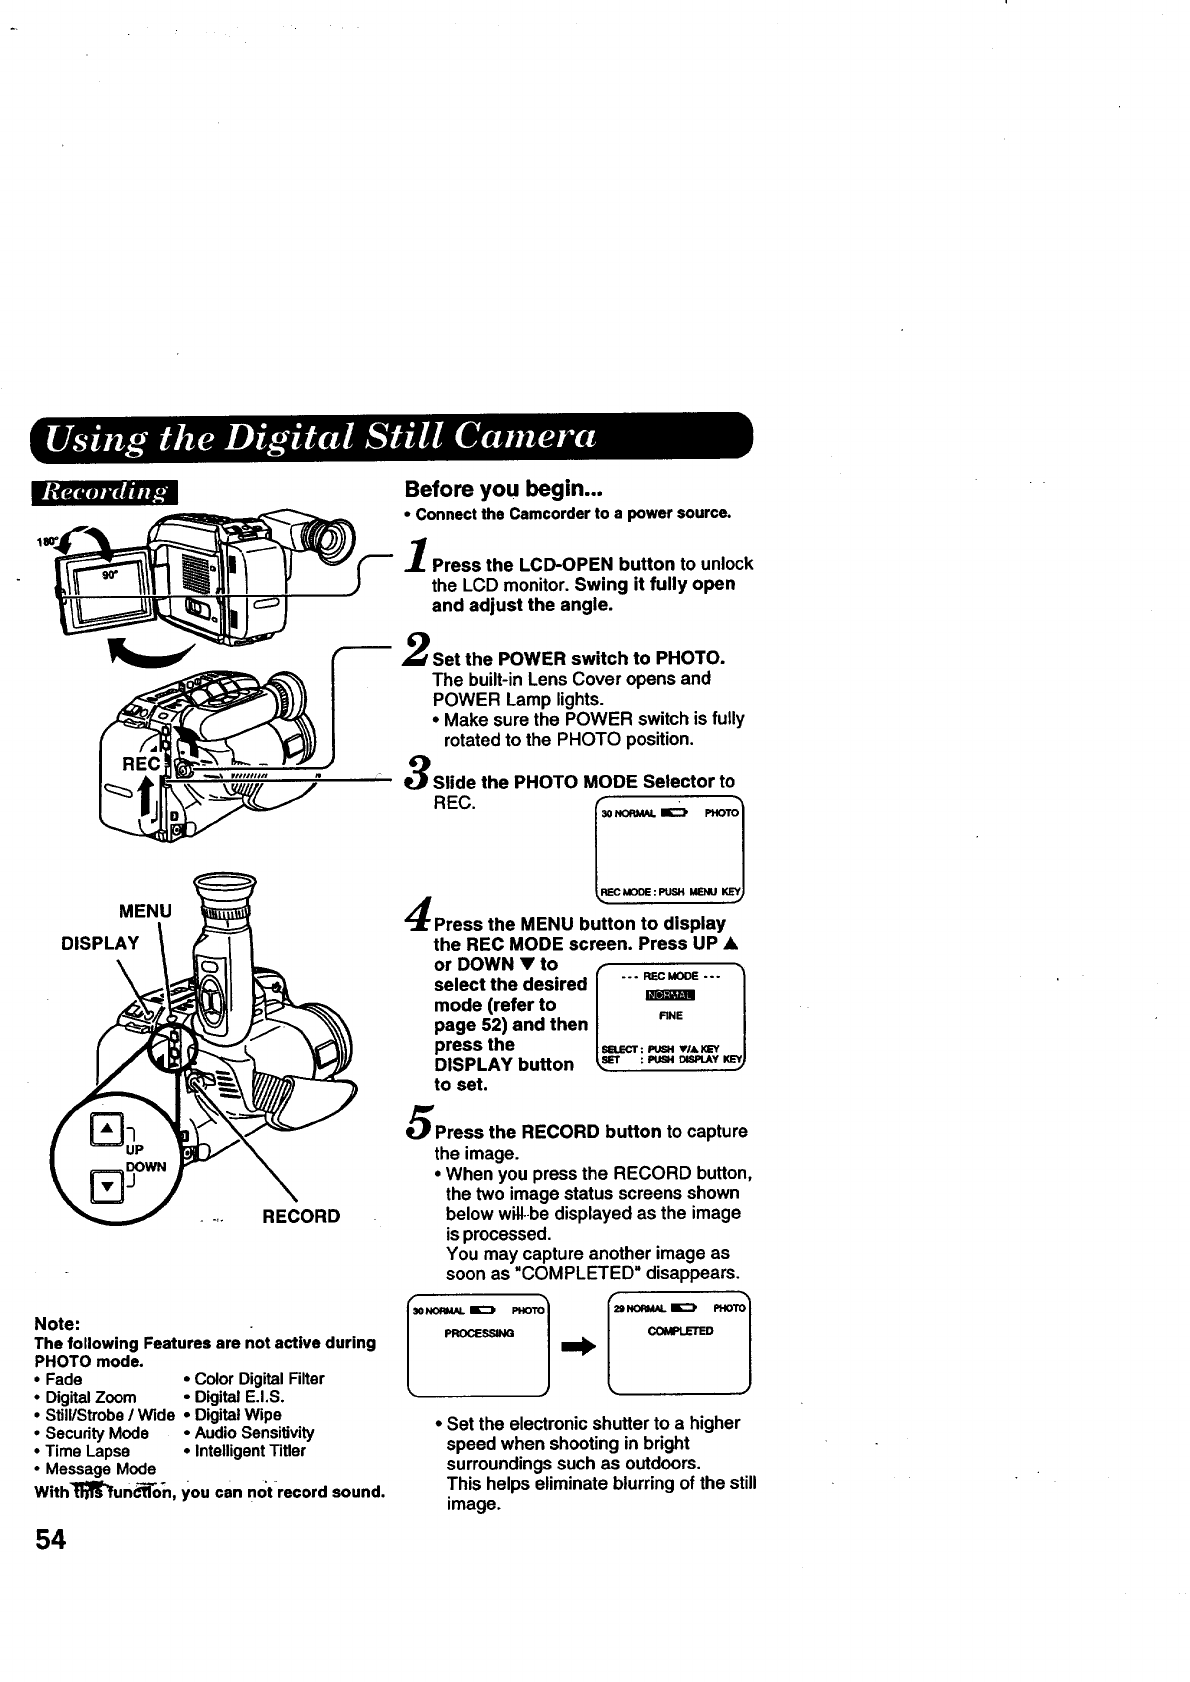
Before you begin...
• Connect the Camcorder to a power source.
Press the LCD-OPEN button to unlock
the LCD monitor. Swing it fully open
and adjust the angle.
MENU
DISPLAY
/
RECORD
Note:
The following Features are not active during
PHOTO mode.
•Fade • Color Digital Filter
•Digital Zoom °Digital E.I.S.
•Still/Strobe /Wide • Digital Wipe
•Secudty Mode • Audio Sensitivity
•Time Lapse • Intelligent TiBer
•Message Mode
With'_un_o'n, you can not-record sound.
F------ 2Set the POWER switch to PHOTO.
The built-in Lens Cover opens and
POWER Lamp lights.
*Make sure the POWER switch is fully
rotated to the PHOTO position.
Slide the PHOTO MODE Selector to
_o]
REC. so.o_._..-="'.
RECMODE:PUSH MENU KEY_
4"
Press the MENU button to display
the REC MODE screen. Press UP •
or DOWN •to
select the desired
mode (refer to
page 52) and then
press the
DISPLAY button
to set.
="ZL /
:_DISPLAYKEY_
Press the RECORD button to capture
the image.
• When you press the RECORD button,
the two image status screens shown
below will.be displayed as the image
is processed.
You may capture another image as
soon as "COMPLETED" disappears.
°Set the electronic shutter to ahigher
speed when shooting in bright
surroundings such as outdoors.
This helps eliminate blurring of the still
image.
54
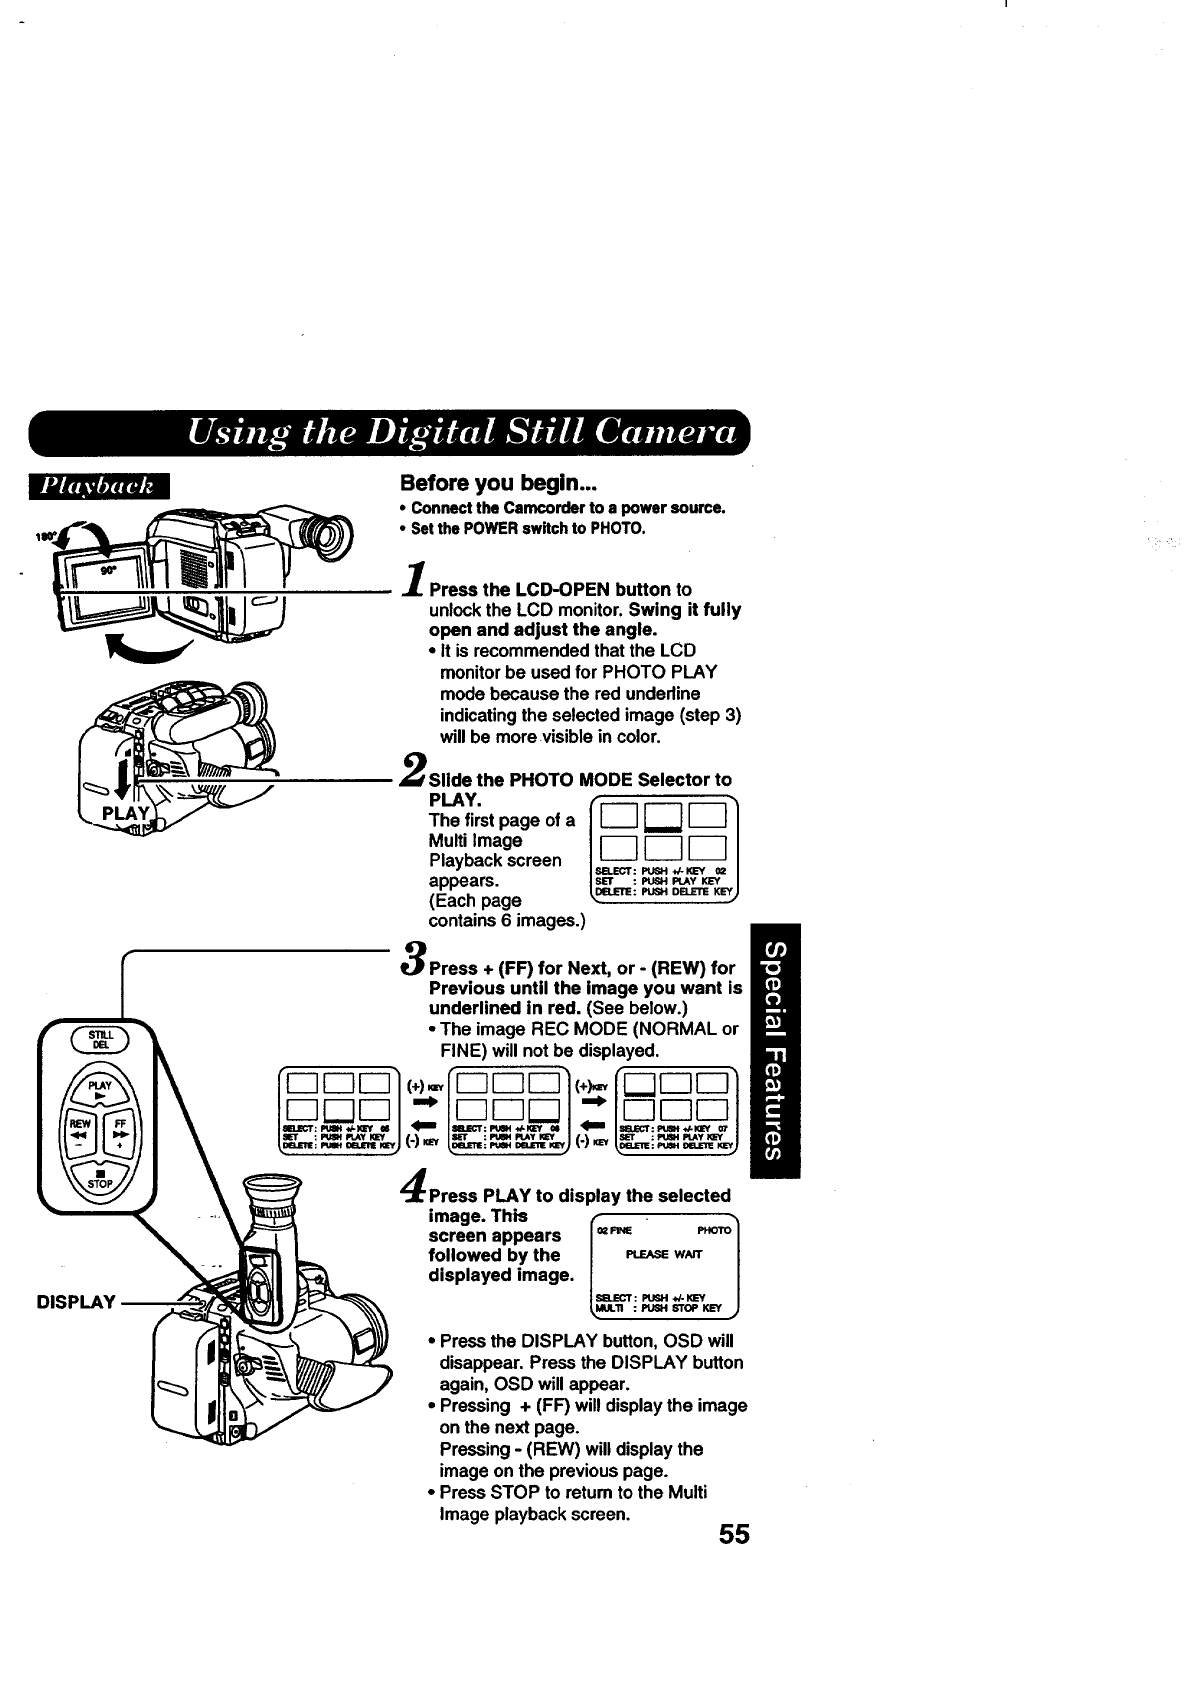
Before you begin...
• Connect the Camcorder to a power source.
•Set the POWER switch to PHOTO.
Press the LCD-OPEN button to
unlock the LCD monitor. Swing it fully
open and adjust the angle.
• It is recommended that the LCD
DISPLAY
monitor be used for PHOTO PLAY
mode because the red underline
indicating the selected image (step 3)
will be more visible in color.
Slide the PHOTO MODE Selector to
The first page of a
Multi Image [_ [_ I----]
Playback screen l_._! _ _,J
appears.
(Each page
contains 6 images.)
Press + (FF) for Next, or - (REW) for
Previous until the image you want is
underlined in red. (See below.)
•The image REC MODE (NORMAL or
FINE) will not be displayed.
F--IF--ll(+)-,rF---IF---IF--llr-IF---IF-11
DDD
Press PLAY to display the selected
screen appears _oTo
followed by the W_T
displayed image.
I SlL_CT : PU_ _,./.KEY
_MUL11 :_s'roP KEY
• Press the DISPLAY button, OSD will
disappear. Press the DISPLAY button
again, OSD will appear.
•Pressing + (FF) will display the image
on the next page.
Pressing -(REW) will display the
image on the previous page.
•Press STOP to retum to the Multi
Image playback screen. 55
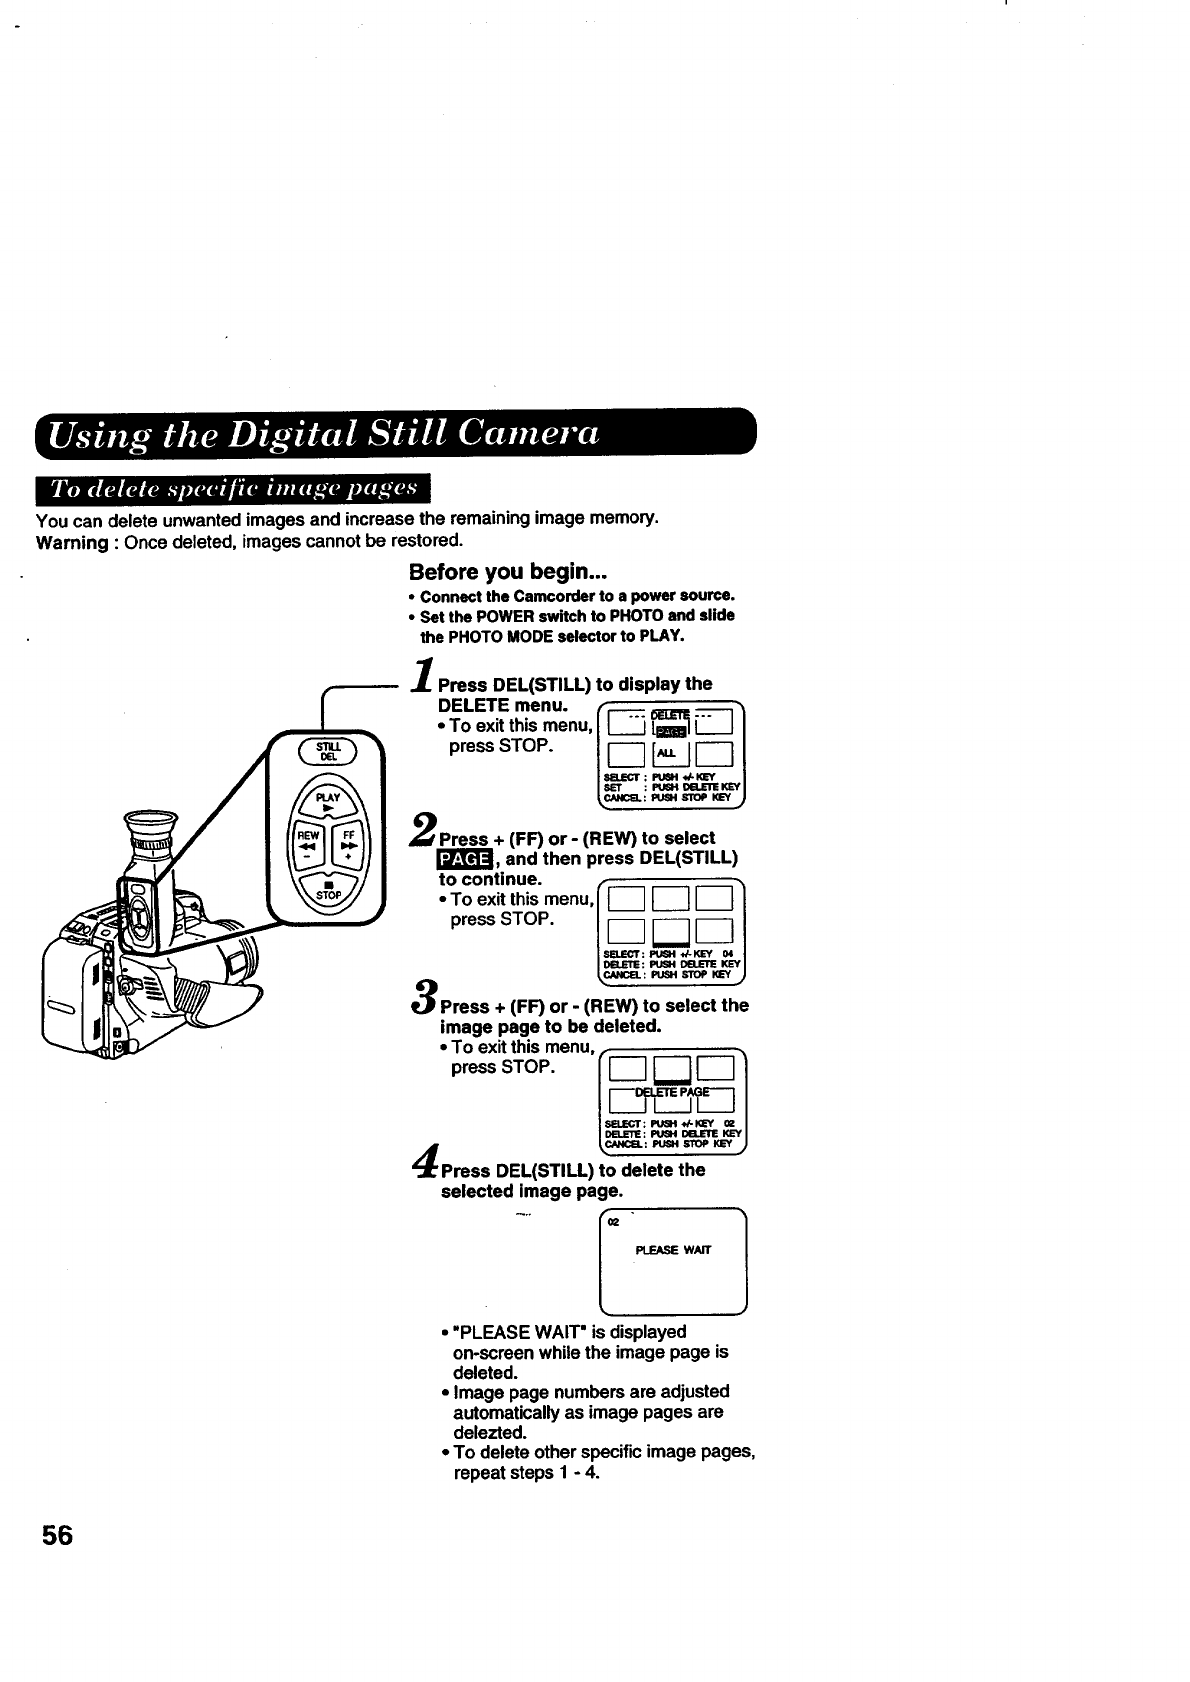
ikajr¢tntatL_s.._wxKuHi'_-_u.lc_r._ex_To.-_
You can delete unwanted images and increase the remaining image memory.
Warning : Once deleted, images cannot be restored.
Before you begin...
• Connect the Camcorder to a power source.
• Set the POWER switch to PHOTO and slide
the PHOTO MODE selector to PLAY.
1
Jr. Press DEL(STILL) to display the
DELETE menu. (['-"_ [_ [-:=--]1•To exit this menu,
pro. STOP. I[_ ___._._] 1•
ISET ; PUSM_n_-m KEYi
L=.==;,=. =_ _ j
Press + (FF_ or- (RE_ to select
r_, and then press DEL(STILL)
[_C°nxtilt_ies"menu,OF--1I_ 1=,,._1
press STOP. l_e.__ _]_ _[_i=
Press + (FF) or - (REW) to select the
image page to be deleted.
• To exit this menu,.
press STOP.
I SlE-CT: R_H _'Y '_/
I I)B.E_: Pt_l DO._E KL_'I
_CANCa: PU61t STOP KEY J
Press DEL(STILL) to delete the
selected image page.
_" I _ PLEASE WAIT
• "PLEASE WAIT" is displayed
on-screen while the image page is
deleted.
•Image page numbers are adjusted
automatically as image pages are
delezted.
•To delete other specific image pages,
repeat steps 1 -4.
56
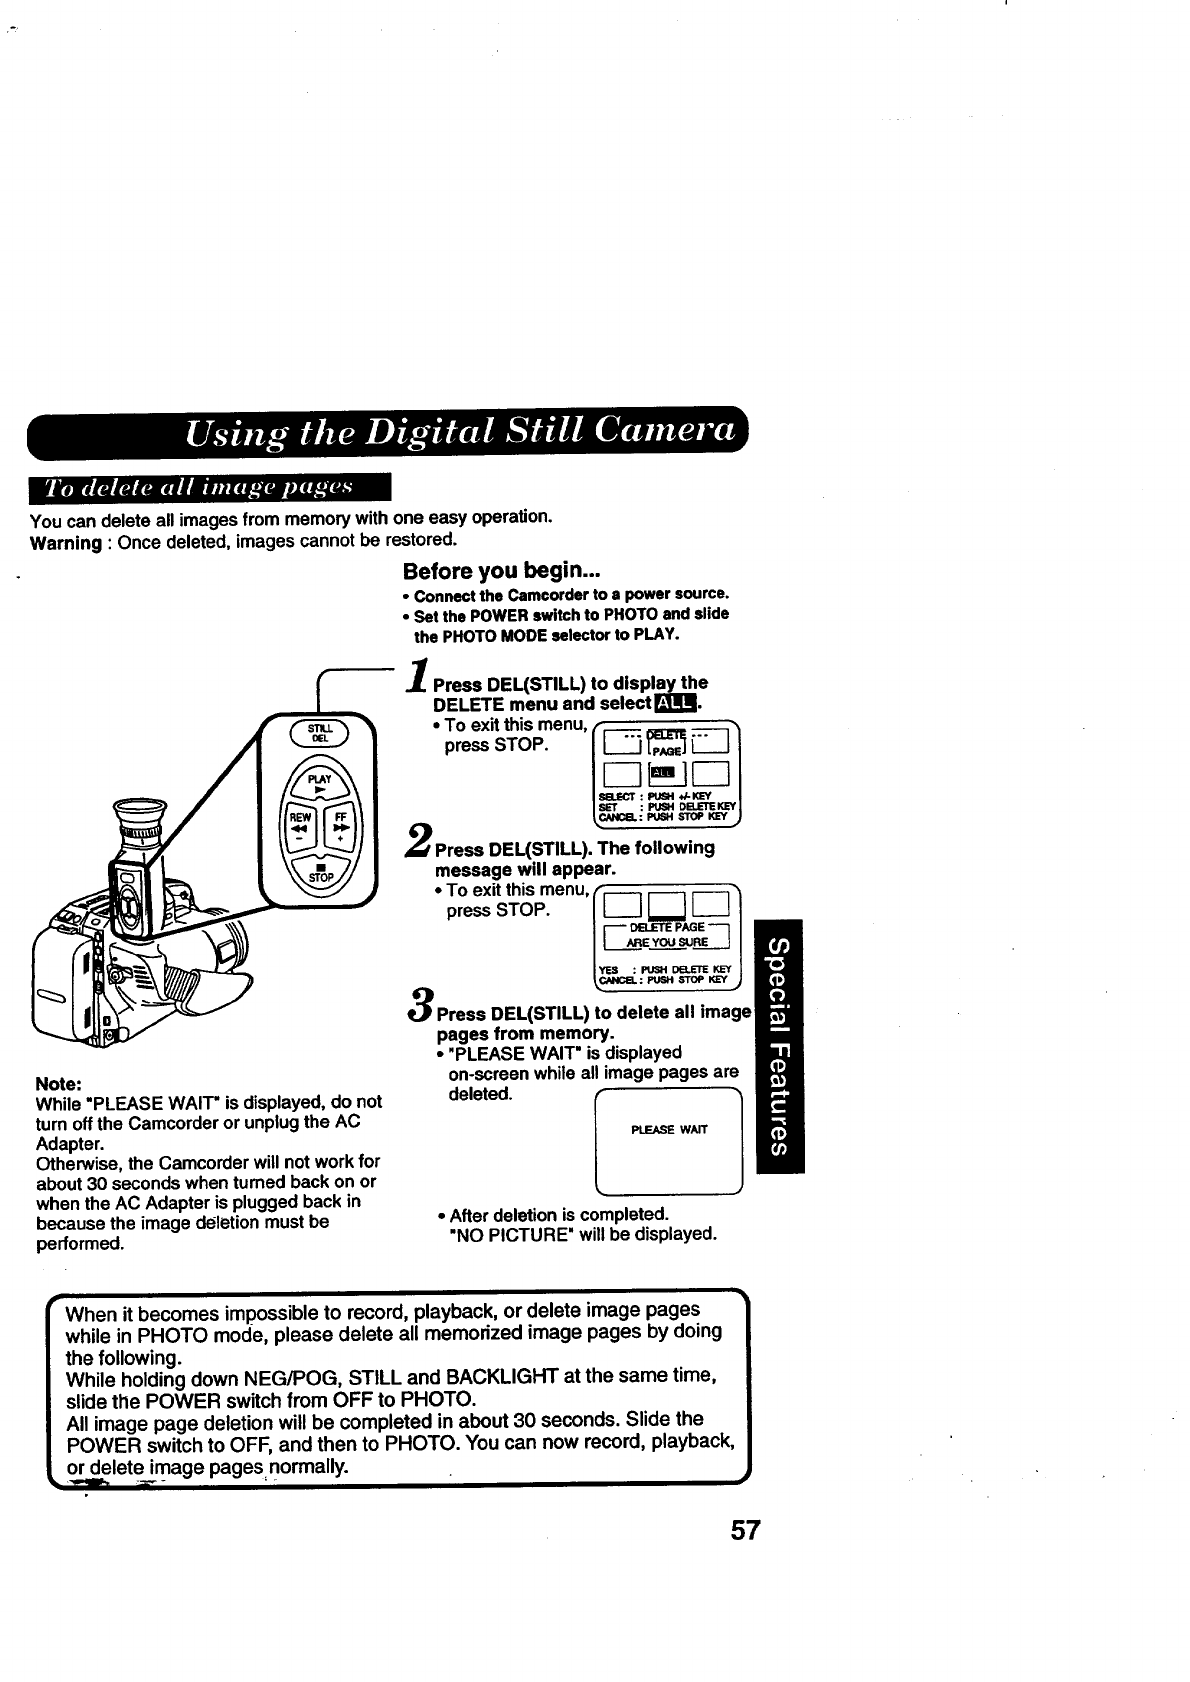
You can delete all images from memory with one easy operation.
Warning : Once deleted, images cannot be restored.
Before you begin...
• Connect the Camcorder to a power source.
•Set the POWER switch to PHOTO and slide
the PHOTO MODE selector to PLAY.
Note:
While "PLEASE WAIT" is displayed, do not
turn off the Camcorder or unplug the AC
Adapter.
Otherwise, the Camcorder will not work for
about 30 seconds when tumed back on or
when the AC Adapter is plugged back in
because the image d_letion must be
performed.
1Press DEL(STILL) to display the
DELETE menu end selectl_!!l.
• To exit this menu, ,- -,
pre=STOP
i SB.SCT: _JSH,h'-KEY /
ISLET : PUSH DB.ETE KEYI
_: PUSH STOP KEY J
Press DEL(STILL). The following
message will appear.
• To exit this menu, (-_ _ _-_
press STOP. /l__ll II I/
IYES : PUSH DB.ErE KEYI
_C/_l¢la.: PUGH STOP KEY J
Press DEL(STILL) to delete all image
pages from memory.
• "PLEASE WAIT" is displayed
on-screen while all image pages are
deleted.
IPLEASE WAIT
•After deletion is completed.
"NO PICTURE" will be displayed.
•['When it becomes impossible to record, playback, or delete image pages
while in PHOTO mode, please delete all memorized image pages by doing
the following.
While holding down NEG/POG, STILL and BACKLIGHT at the same time,
slide the POWER switch from OFF to PHOTO.
All image page deletion will be completed in about 30 seconds. Slide the
POWER switch to OFF, and then to PHOTO. You can now record, playback,
or delete image pages normally.
57
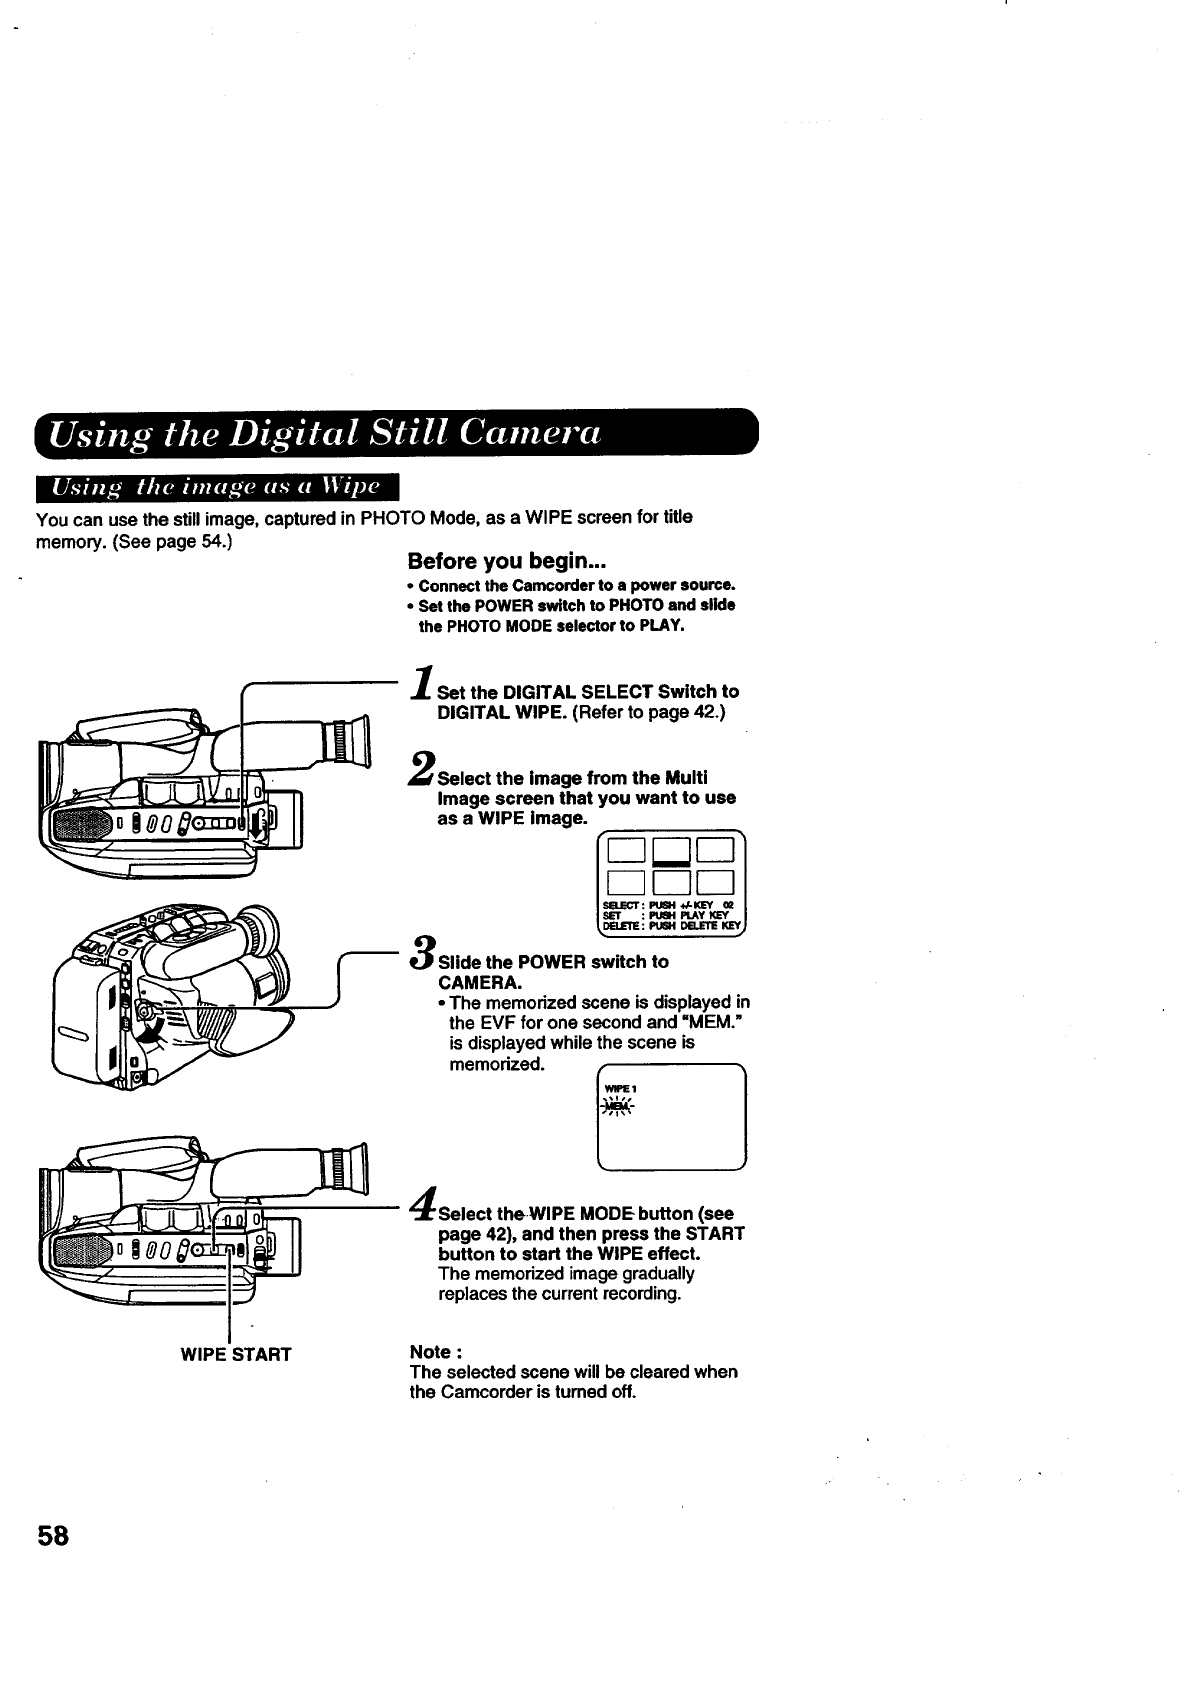
You can use the still image, captured in PHOTO Mode, as a WIPE screen for title
memory. (See page 54.) Before you begin...
• Connect the Camcorder to a power source.
• Set the POWER switch to PHOTO and slide
the PHOTO MODE selector to PLAY.
Set the DIGITAL SELECT Switch to
DIGITAL WIPE. (Refer to page 42.)
WIPE START
Select the image from the Multi
Image screen that you want to use
as a WIPE image.
Slide the POWER switch to
CAMERA.
• The memorized scene is displayed in
the EVF for one second and =MEM."
is displayed while the scene is
memorized.
Ji •
Select the.WIPE MODE button (see
page 42), and then press the START
button to start the WIPE effect.
The memorized image gradually
replaces the current recording.
Note :
The selected scene will be cleared when
the Camcorder is turned off.
58
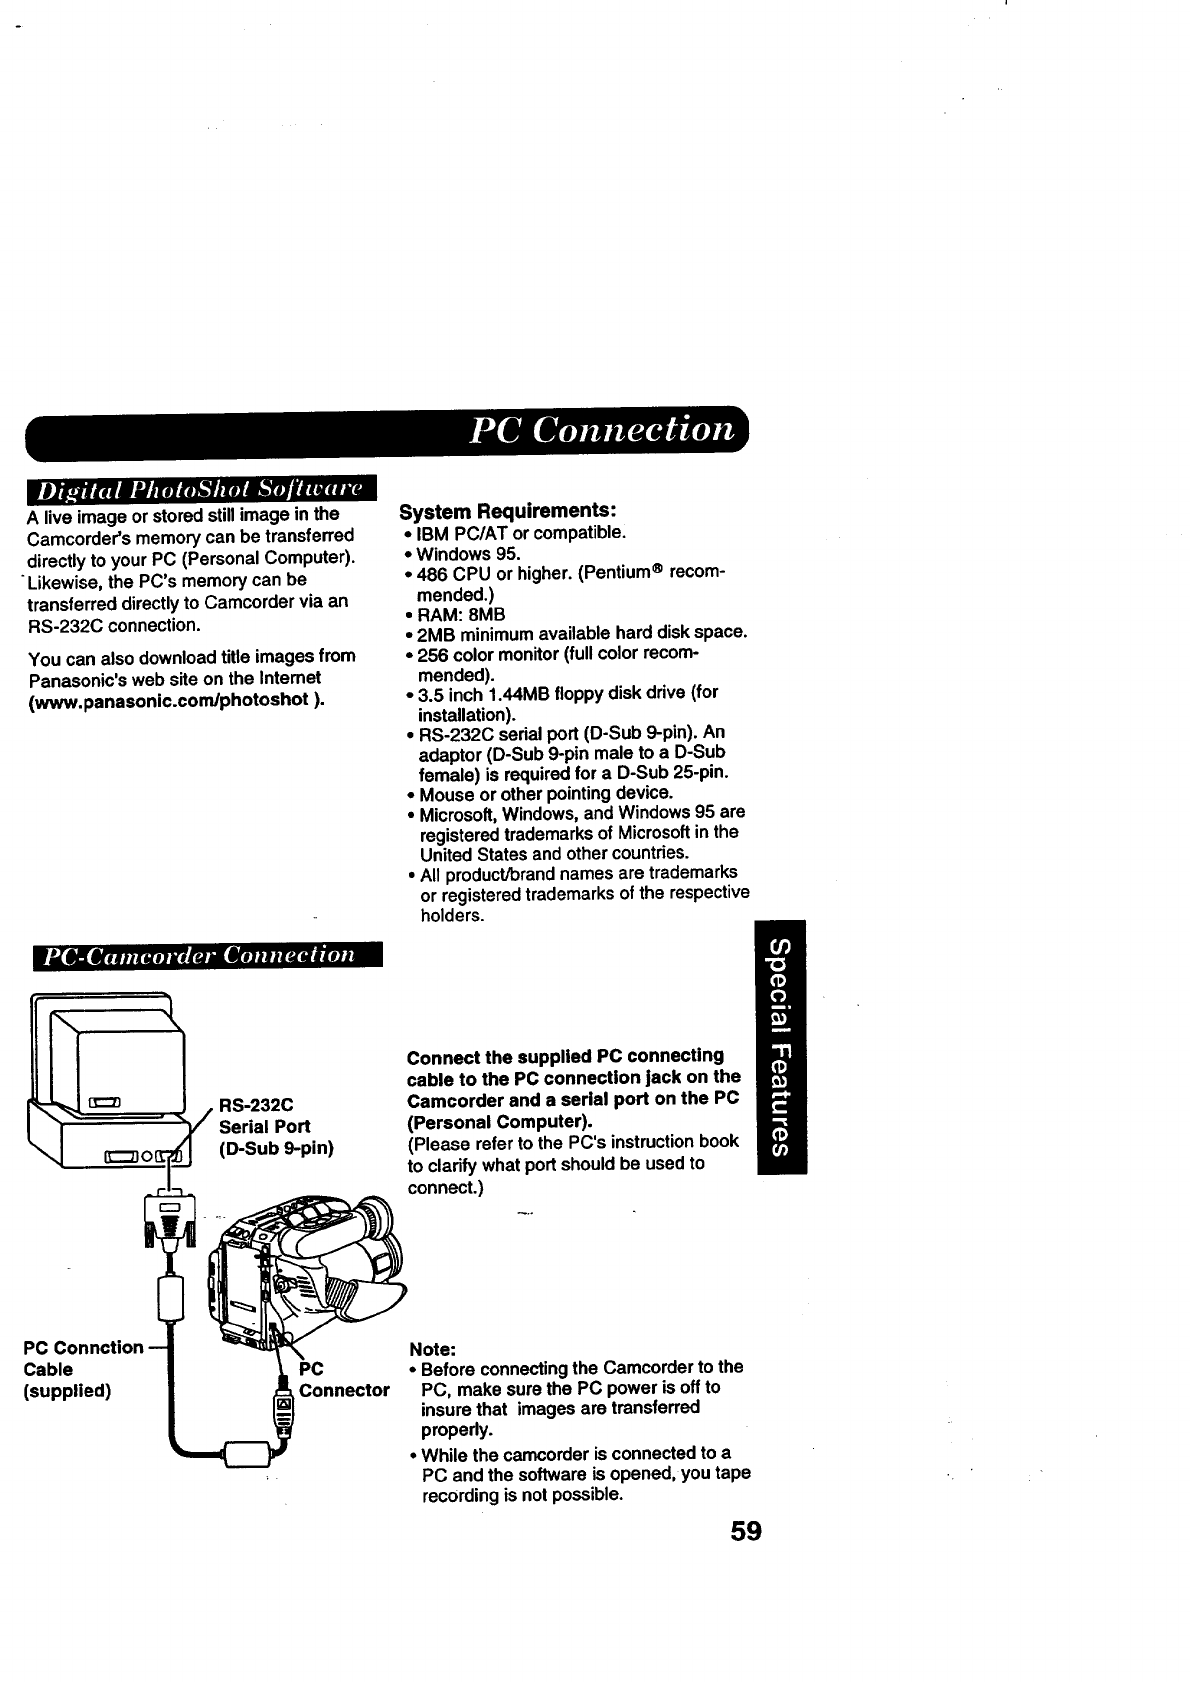
Mj_t irl mUil'tlm_'l m1_aK_h t _o _
A live imageorstoredstillimageinthe
Camcorder'smemorycan be transferred
directlyto yourPC (PersonalComputer).
Likewise, the PC'smemorycan be
transferreddirectlyto Camcordervia an
RS-232C connection.
You can alsodownloadtitle imagesfrom
Panasonic'sweb site on the Intemet
(www.panasonic.corrdphotoshot).
System Requirements:
• IBM PC/AT or compatible.
•Windows 95.
•486 CPU or higher. (Pentium ®recom-
mended.)
•RAM: 8MB
•2MB minimum available hard disk space.
• 256 color monitor (full color recom-
mended).
•3.5 inch 1.44MB floppy disk drive (for
installation).
•RS-232C serial port (D-Sub 9-pin). An
adaptor (D-Sub 9-pin male to a D-Sub
female) is required for a D-Sub 25-pin.
•Mouse or other pointing device.
•Microsoft, Windows, and Windows 95 are
registered trademarks of Microsoft in the
United States and other countries.
•All product/brand names are trademarks
or registered trademarks of the respective
holders.
RS-232C
Serial Port
(D-Sub 9-pin)
K::_o[I
connect.)
PC Connction mNote:
Cable
(supplied)
Connect the supplied PC connecting
cable to the PC connection Jack on the
Camcorder and a serial port on the PC
(Personal Computer).
(Please refer to the PC's instruction book
to clarify what port should be used to
•Before connectingthe Camcorderto the
PC, make surethe PC power is offto
insurethat imagesare transferred
properly.
•Whilethe camcorderis connectedto a
PC and the softwareis opened,youtape
recordingis notpossible.
59
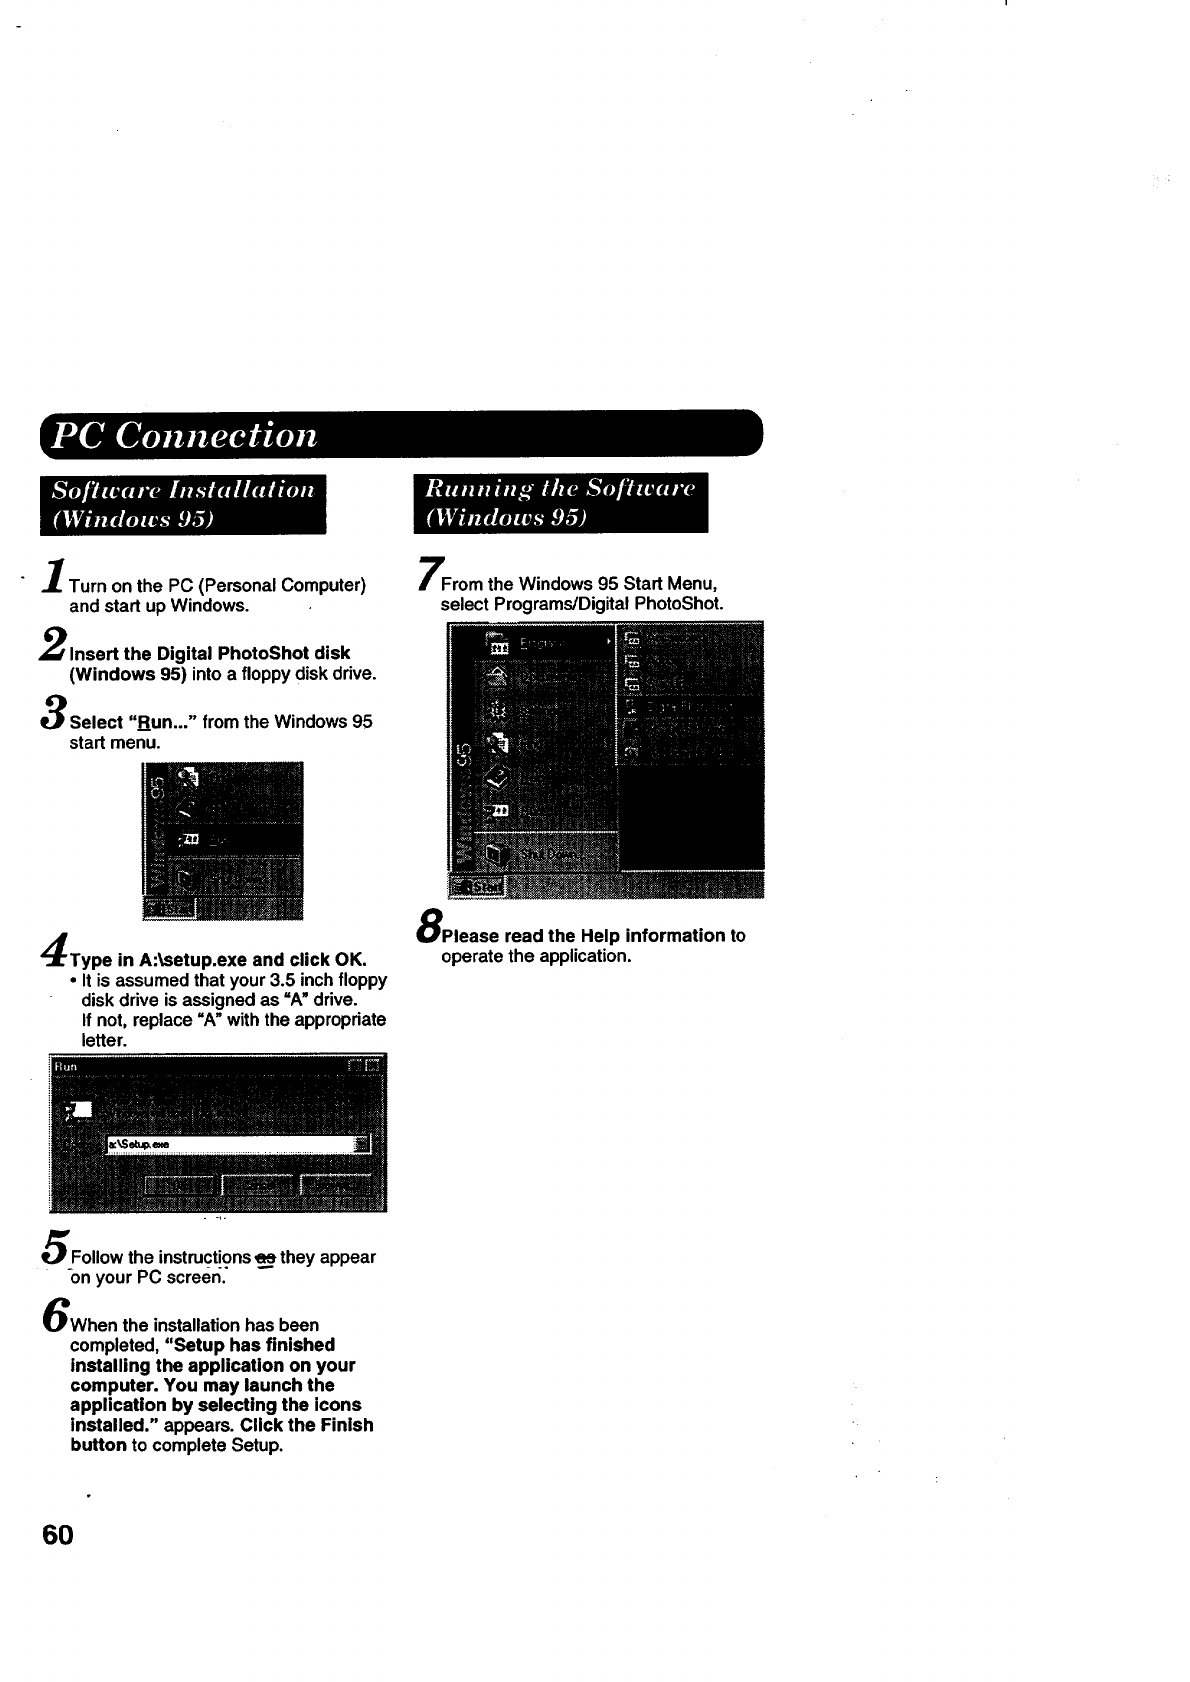
Turnon the PC (PersonalComputer)
and start upWindows.
Insert the Digital PhotoShot disk
(Windows 95) intoa floppy diskdrive.
Select "Run..." from the Windows95
start menu.
From the Windows 95 Start Menu,
select Programs/Digital PhotoShot.
Type in A:Lsetup.exe and click OK.
• It is assumed that your 3.5 inch floppy
disk drive is assigned as =A"drive.
If not, replace "A" with the appropriate
letter.
Please read the Help information to
operate the application.
Follow the instmct!ons ee they appear
-on your PC screen.
When the installation has been
completed, "Setup has finished
installing the application on your
computer. You may launch the
application by selecting the icons
installed." appears. Click the Finish
button to complete Setup.
6O
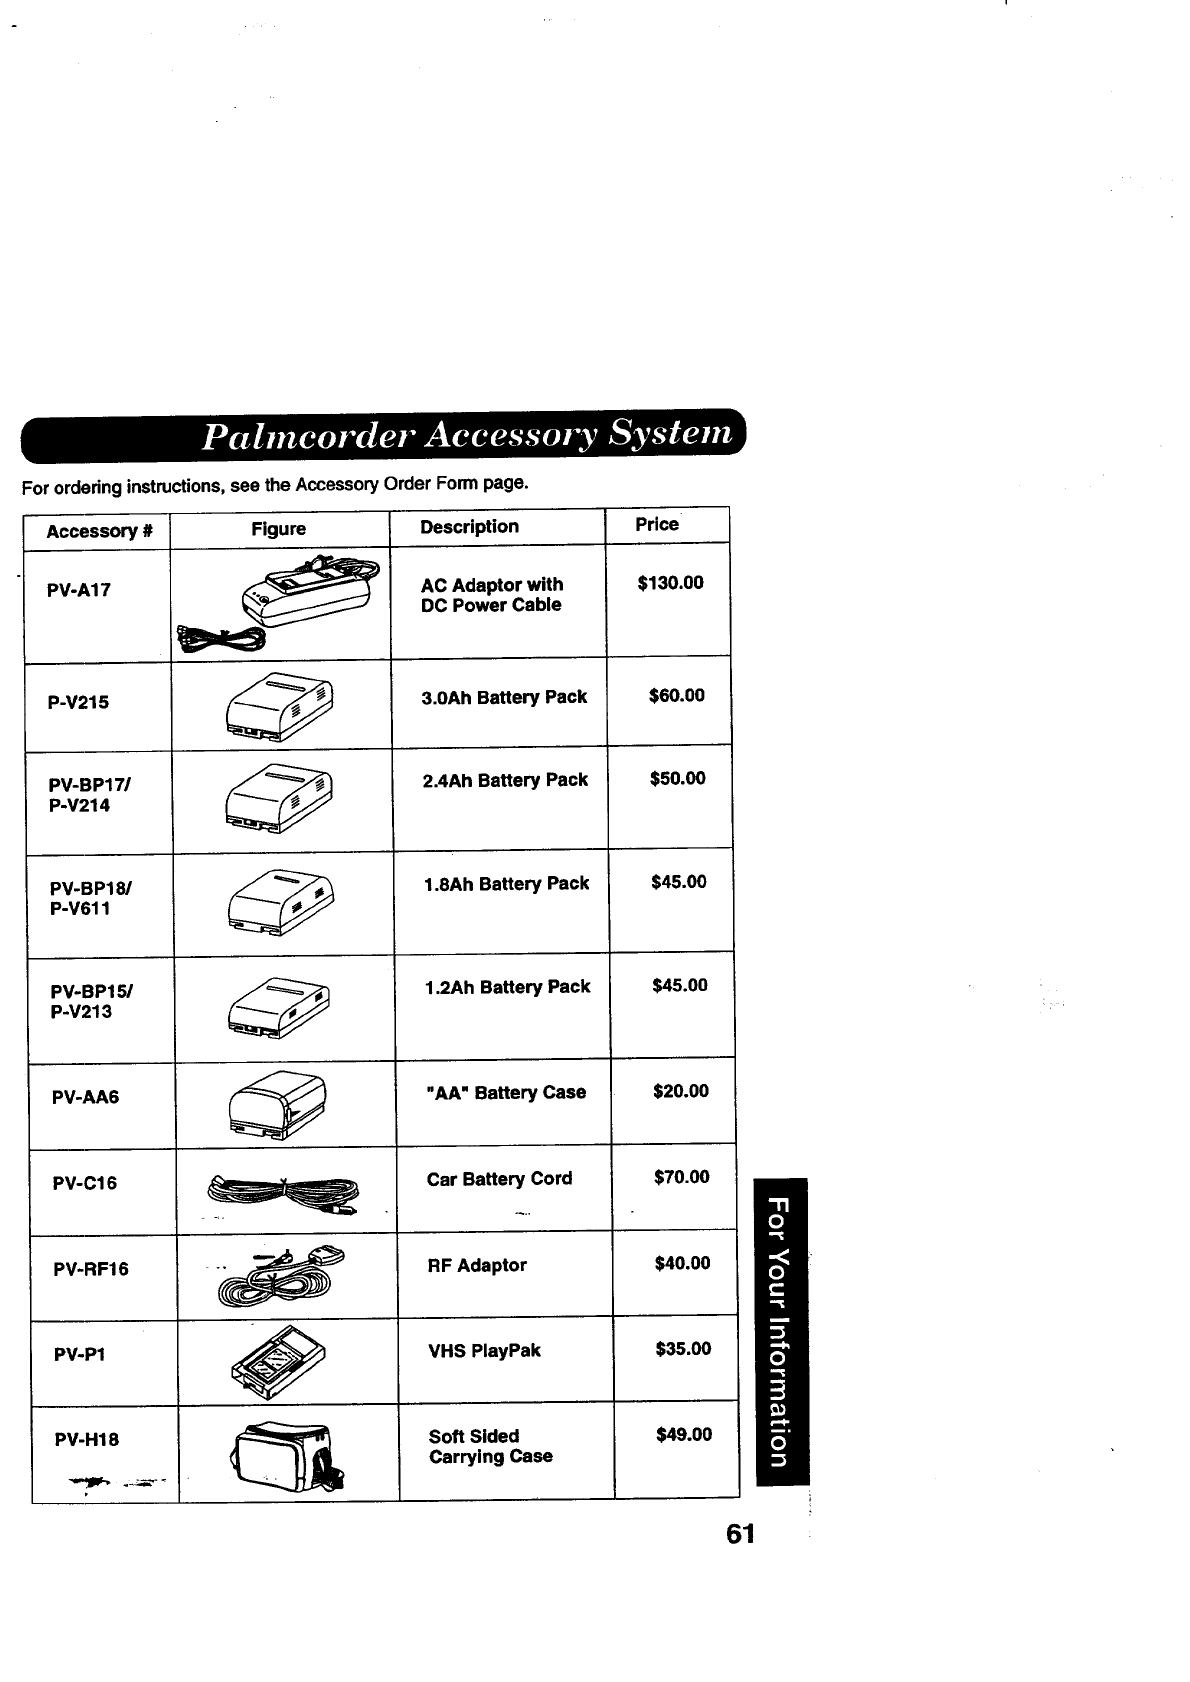
For ordedng instructions, see the Accessory Order Form page.
Figure Price
Accessory #
PV-A17
P-V215
PV-BP171
P-V214
PV-BP18/
P-V611
PV-BP151
P-V213
PV-AA6
PV-Cl 6
PV-RF16
PV-P1
PV-H18
Description
AC Adaptor with
DC Power Cable
3.0Ah Battery Pack
2.4Ah Battery Pack
1.8Ah Battery Pack
1.2Ah Battery Pack
"AA" Battery Case
Car Battery Cord
RF Adaptor
VHS PlayPak
Soft Sided
Carrying Case
$130.00
$60.00
$50.00
$45.00
$45.00
$20.00
$70.00
$40.00
$35.00
$49.00
61
:: r
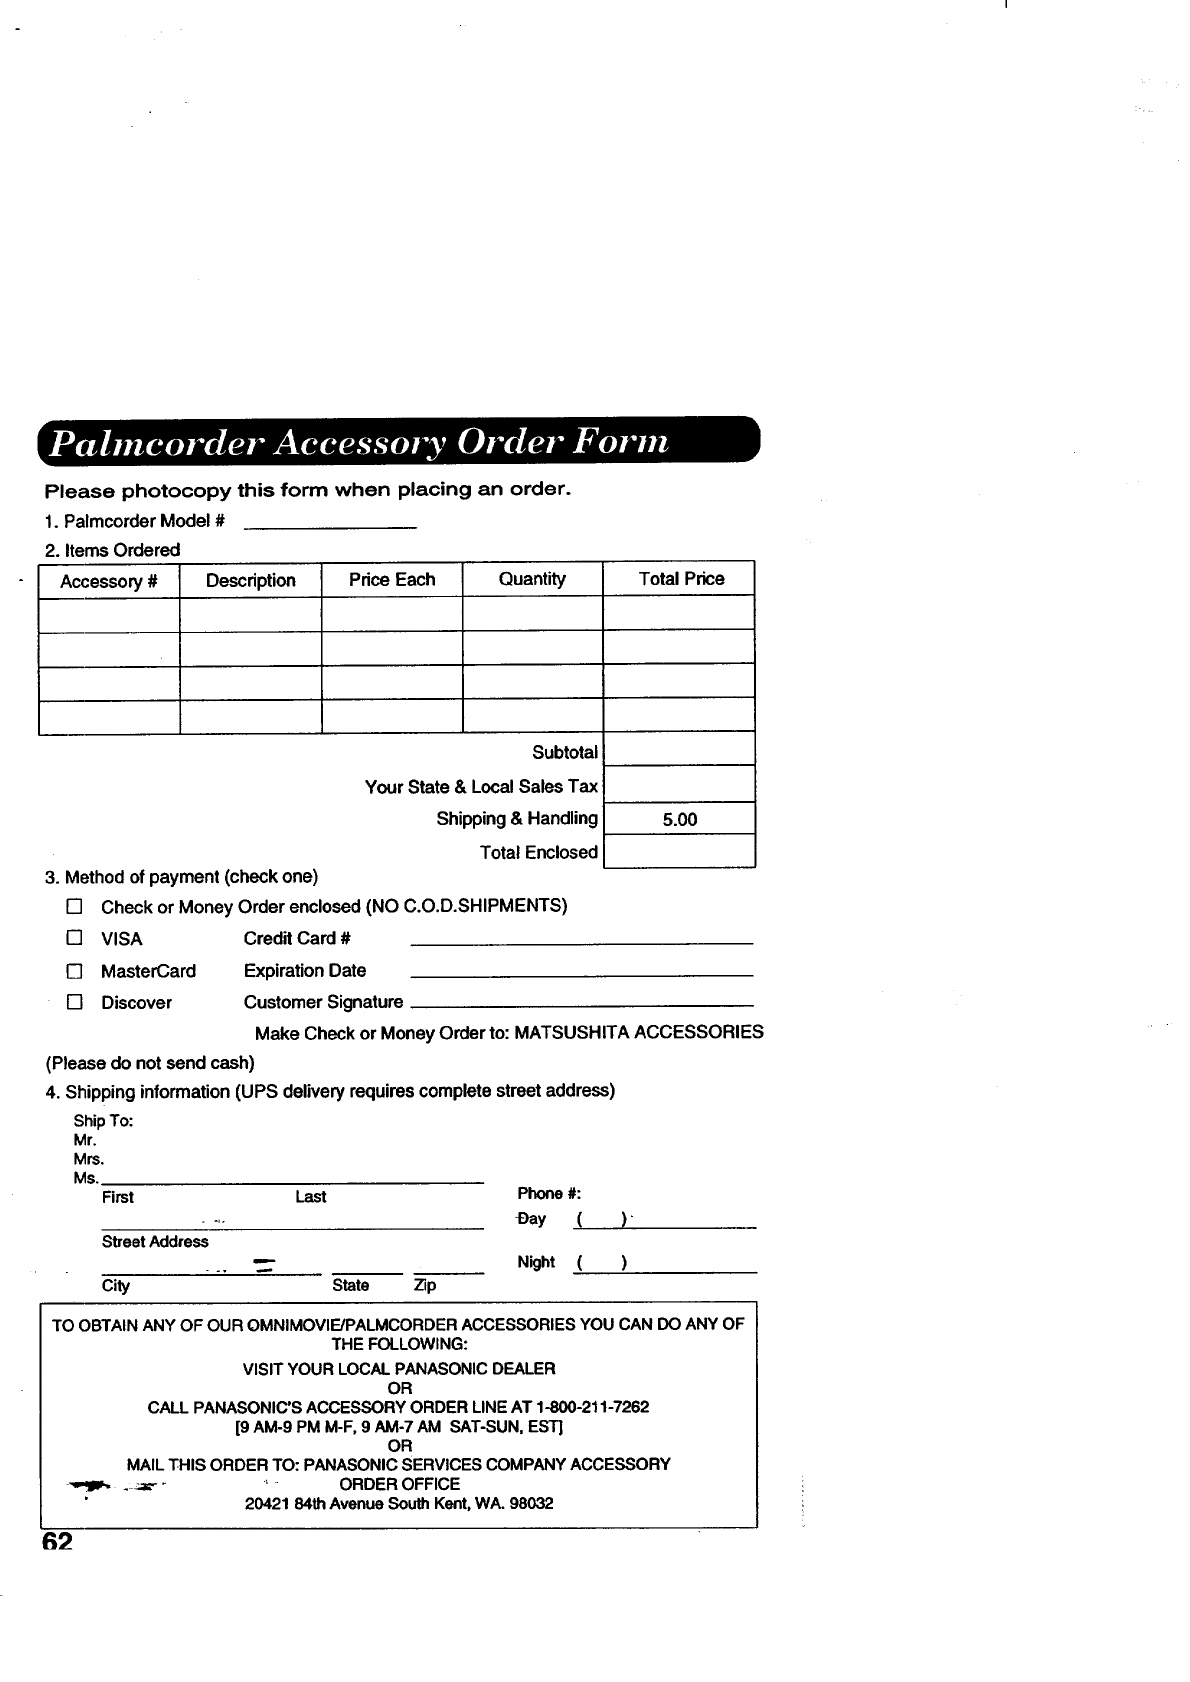
Please photocopy this form when placing an order.
1. PalmcorderModel#
2. Items Ordered
Accessory # Description Price Each Quantity Total Price
3. Method of payment (check one)
[]
[]
[]
[]
Subtotal
Your State & Local Sales Tax
Shipping & Handling
Total Enclosed
Check or Money Order enclosed (NO C.O.D.SHIPMENTS)
VISA Credit Card #
MasterCard
Discover
5.00
Expiration Date
Customer Signature
Make Check or Money Order to: MATSUSHITA ACCESSORIES
Phone#:
.... Bay ( )
StreetAddress
_. _Night ( )
City State Zip
(Please do not send cash)
4. Shipping information (UPS delivery requires complete street address)
ShipTo:
Mr.
Mrs.
Ms.
First Last
TO OBTAIN ANY OF OUR OMNIMOVIE/PALMCORDER ACCESSORIES YOU CAN DO ANY OF
THE FOLLOWING:
VISIT YOUR LOCAL PANASONIC DEALER
OR
CALL PANASONIC'S ACCESSORY ORDER LINE AT 1-800-211-7262
[9 AM-9 PM M-F, 9 AM-7 AM SAT-SUN, EST]
OR
MAIL THIS ORDER TO: PANASONIC SERVICES COMPANY ACCESSORY
.:._=,- -'-ORDER OFFICE
20421 84th Avenue South Kent, WA. 98032
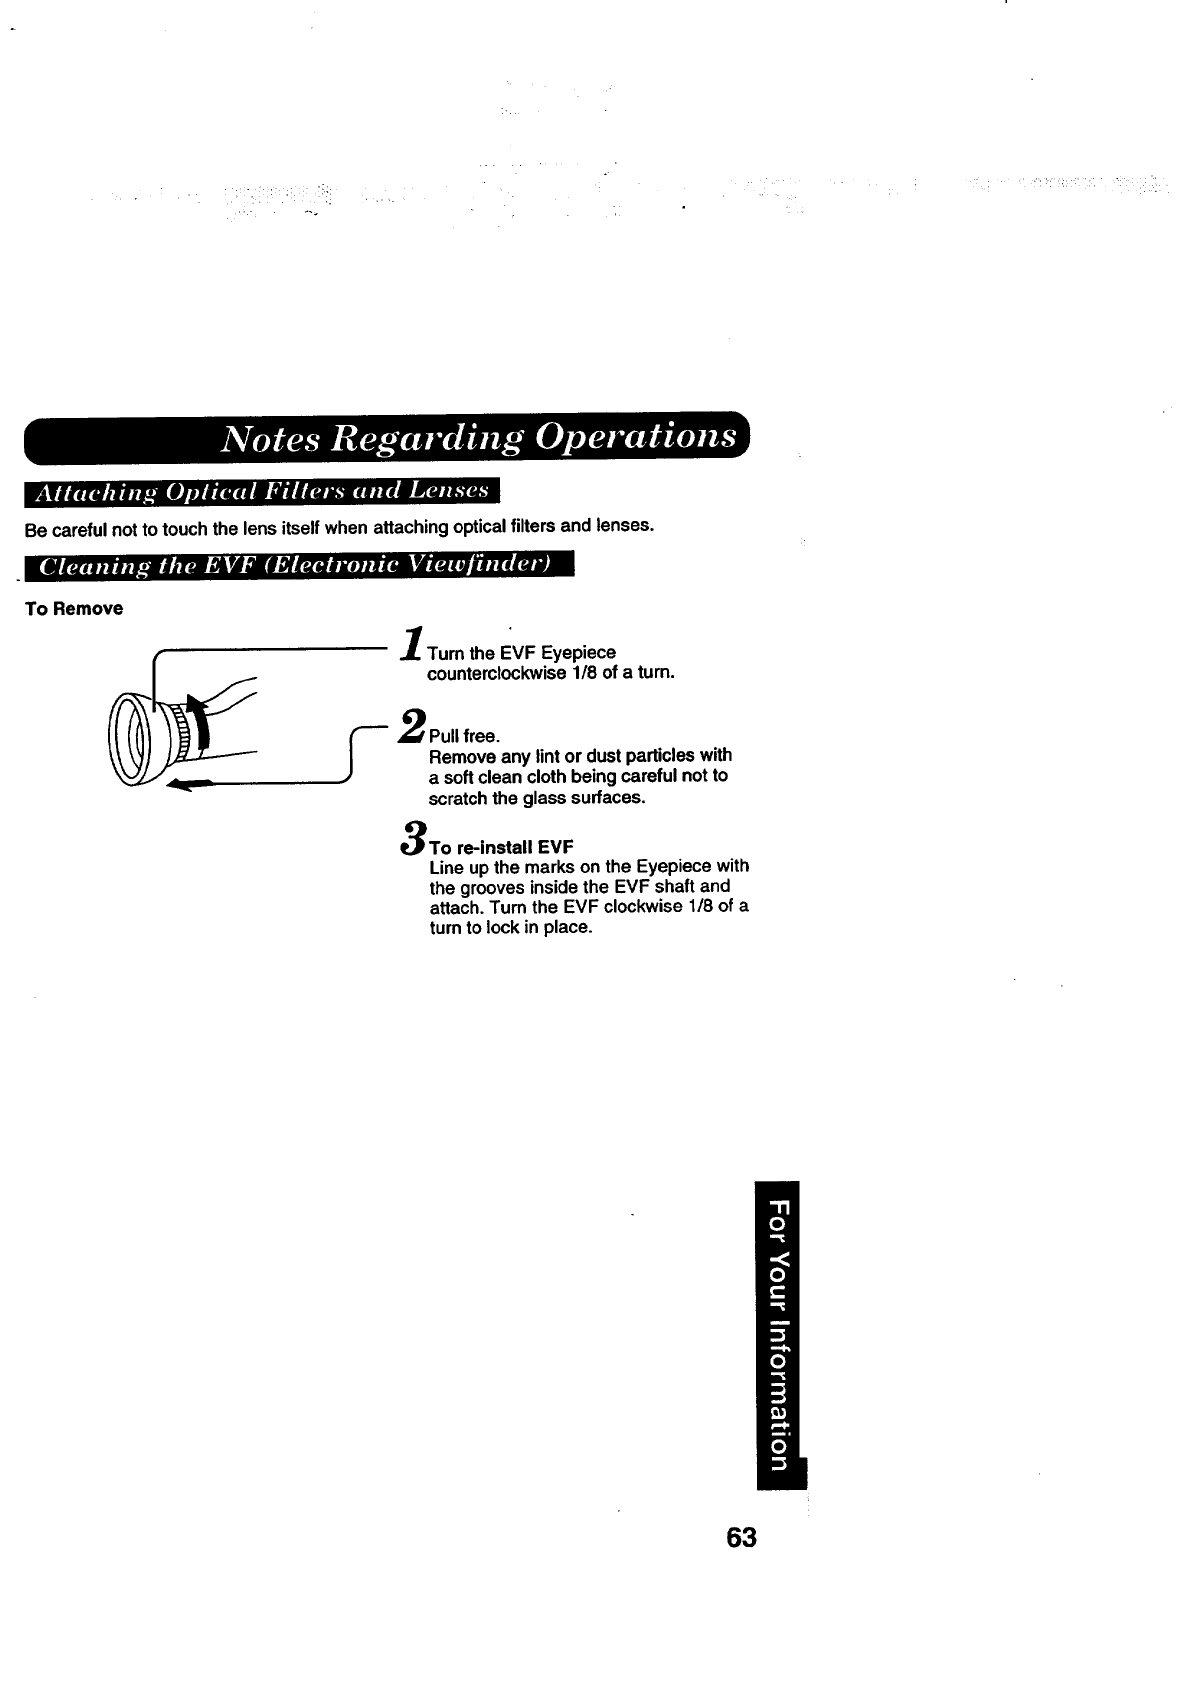
Be careful not to touch the lens itself when attaching optical filters and lenses.
I-
To Remove
Tum the EVF Eyepiece
counterclockwise 1/8 of a tum.
S2Pull free.Remove any lint or dust particles with
a softcleanclothbeingcareful notto
scratchthe glasssurfaces.
To re-install EVF
Line up the marks on the Eyepiece with
the grooves inside the EVF shaft and
attach. Turn the EVF clockwise 1/8 of a
turn to lock in place.
63
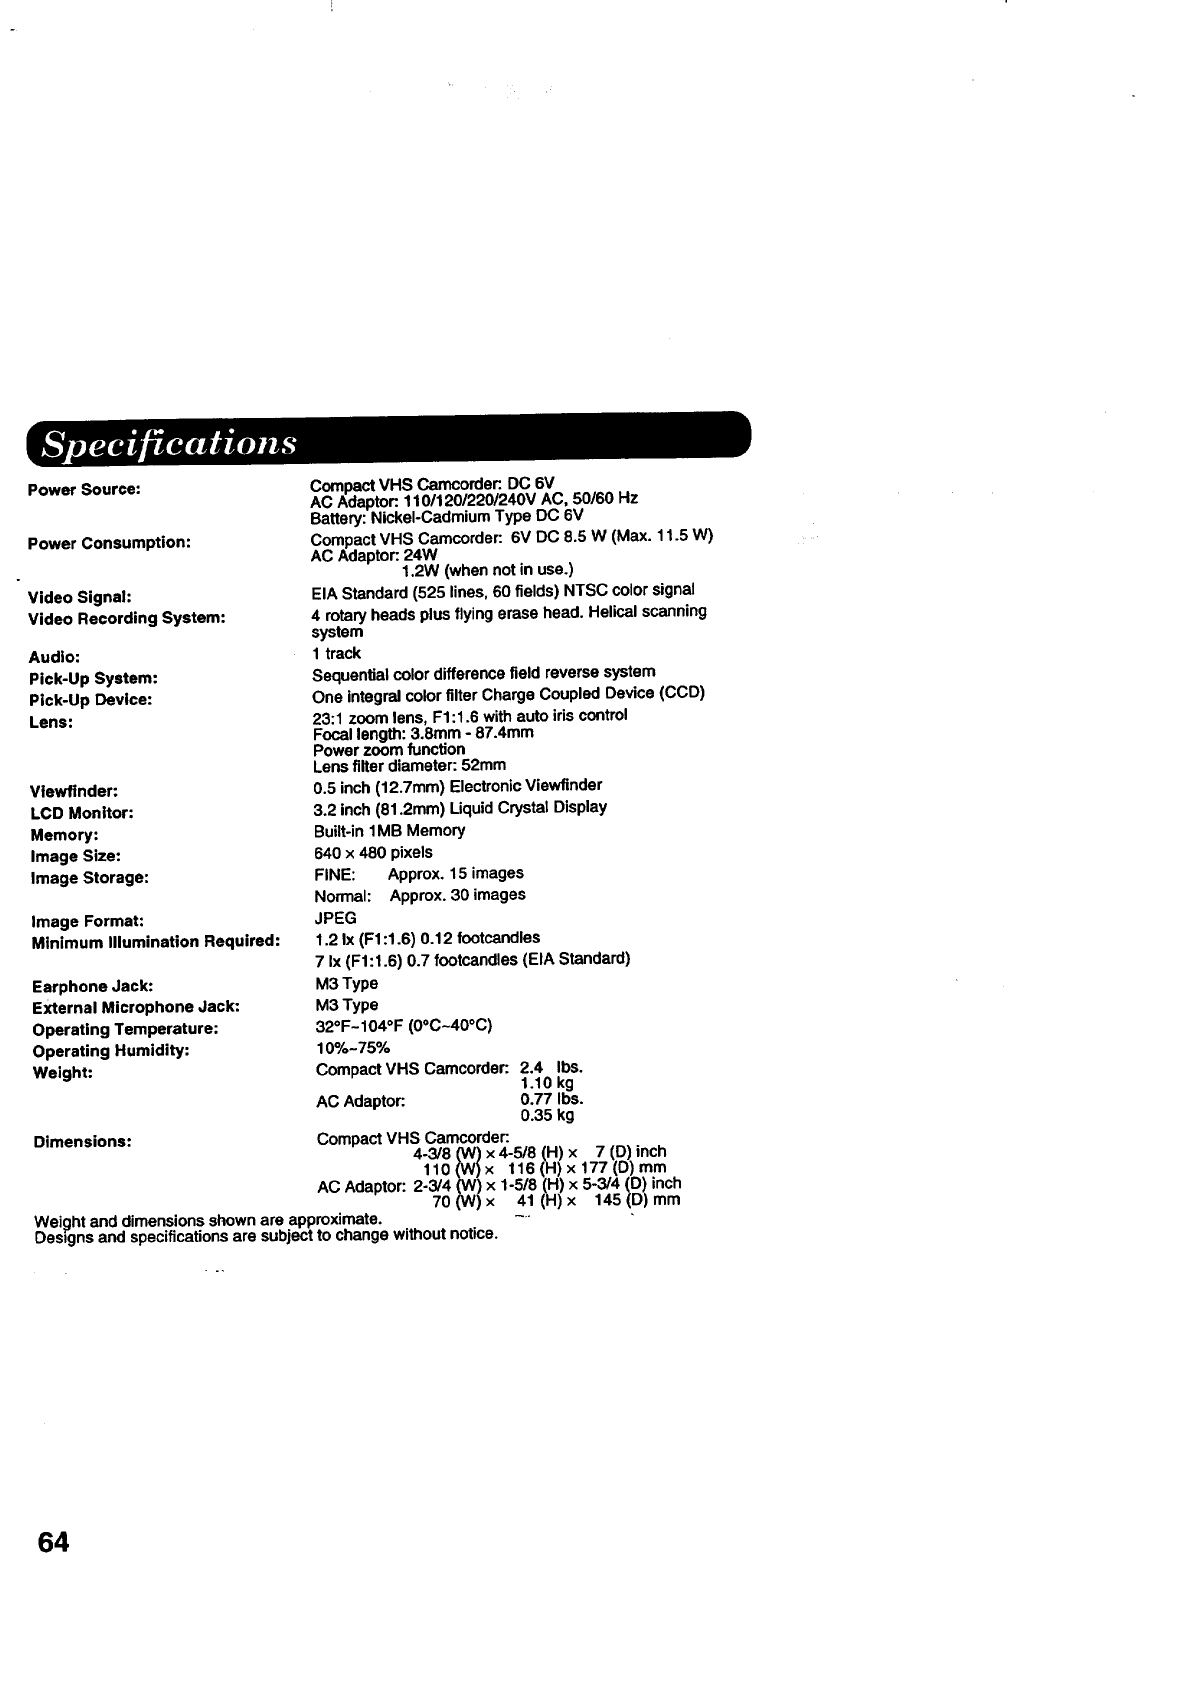
Power Source:
Power Consumption:
Video Signal:
Video Recording System:
Audio:
Pick-Up System:
Pick-Up Device:
Lens:
Viewflnder:
LCO Monitor:
Memory:
Image Size:
Image Storage:
Image Format:
Minimum Illumination Required:
Earphone Jack:
External Microphone Jack:
Operating Temperature:
Operating Humidity:
Weight:
Dimensions:
Weight and dimensions shown are approximate.
Designs and specifications are subject to change without notice.
Compact VHS Camcorder: DC 6V
AC Adaptor:. 1101120/220/240V AC, 50/60 Hz
Battery: Nickel-Cadmium Type DC 6V
Compact VHS Camcorder: 6V DC 8.5 W (Max. 11.5 W)
AC Adaptor:. 24W
1,2W (when not in use.)
EIA Standard (525 lines, 60 fields) NTSC color signal
4 rotary heads plus flying erase head. Helical scanning
system
1 track
Sequential color difference field reverse system
One integral color filter Charge Coupled Device (CCD)
23:1 zoom lens, F1:t .6 with auto iris control
Focal length: 3.8mm - 87.4mm
Power zoom function
Lens filter diameter: 52mm
0.5 inch (12.7mm) Electronic Viewfinder
3.2 inch (81.2mm) Liquid Crystal Display
Built-in 1MB Memory
640 x 480 pixels
FINE: Approx. 15 images
Normal: Approx. 30 images
JPEG
1.2 Ix (F1:1.6) 0.12 footcandles
7 Ix (F1:1.6) 0.7 footcandles (EIA Standard)
M3 Type
M3 Type
32OF- 104OF (0oc-40oc)
10%-75%
Compact VHS Camcorder: 2.4 Ibs.
1.10 kg
AC Adaptor: 0.77 Ibs.
0.35 kg
Compact VHS Camcorder:
4-3/8 (W) x 4-5/8 (H) x 7(D) inch
110 (W) x 116 (H) x 177 (O) mm
AC Adaptor: 2-3/4 (W) x 1-5/8 (H) x 5-3/4 (D) inch
70(W) x 41(H) x 145(D) mm
64
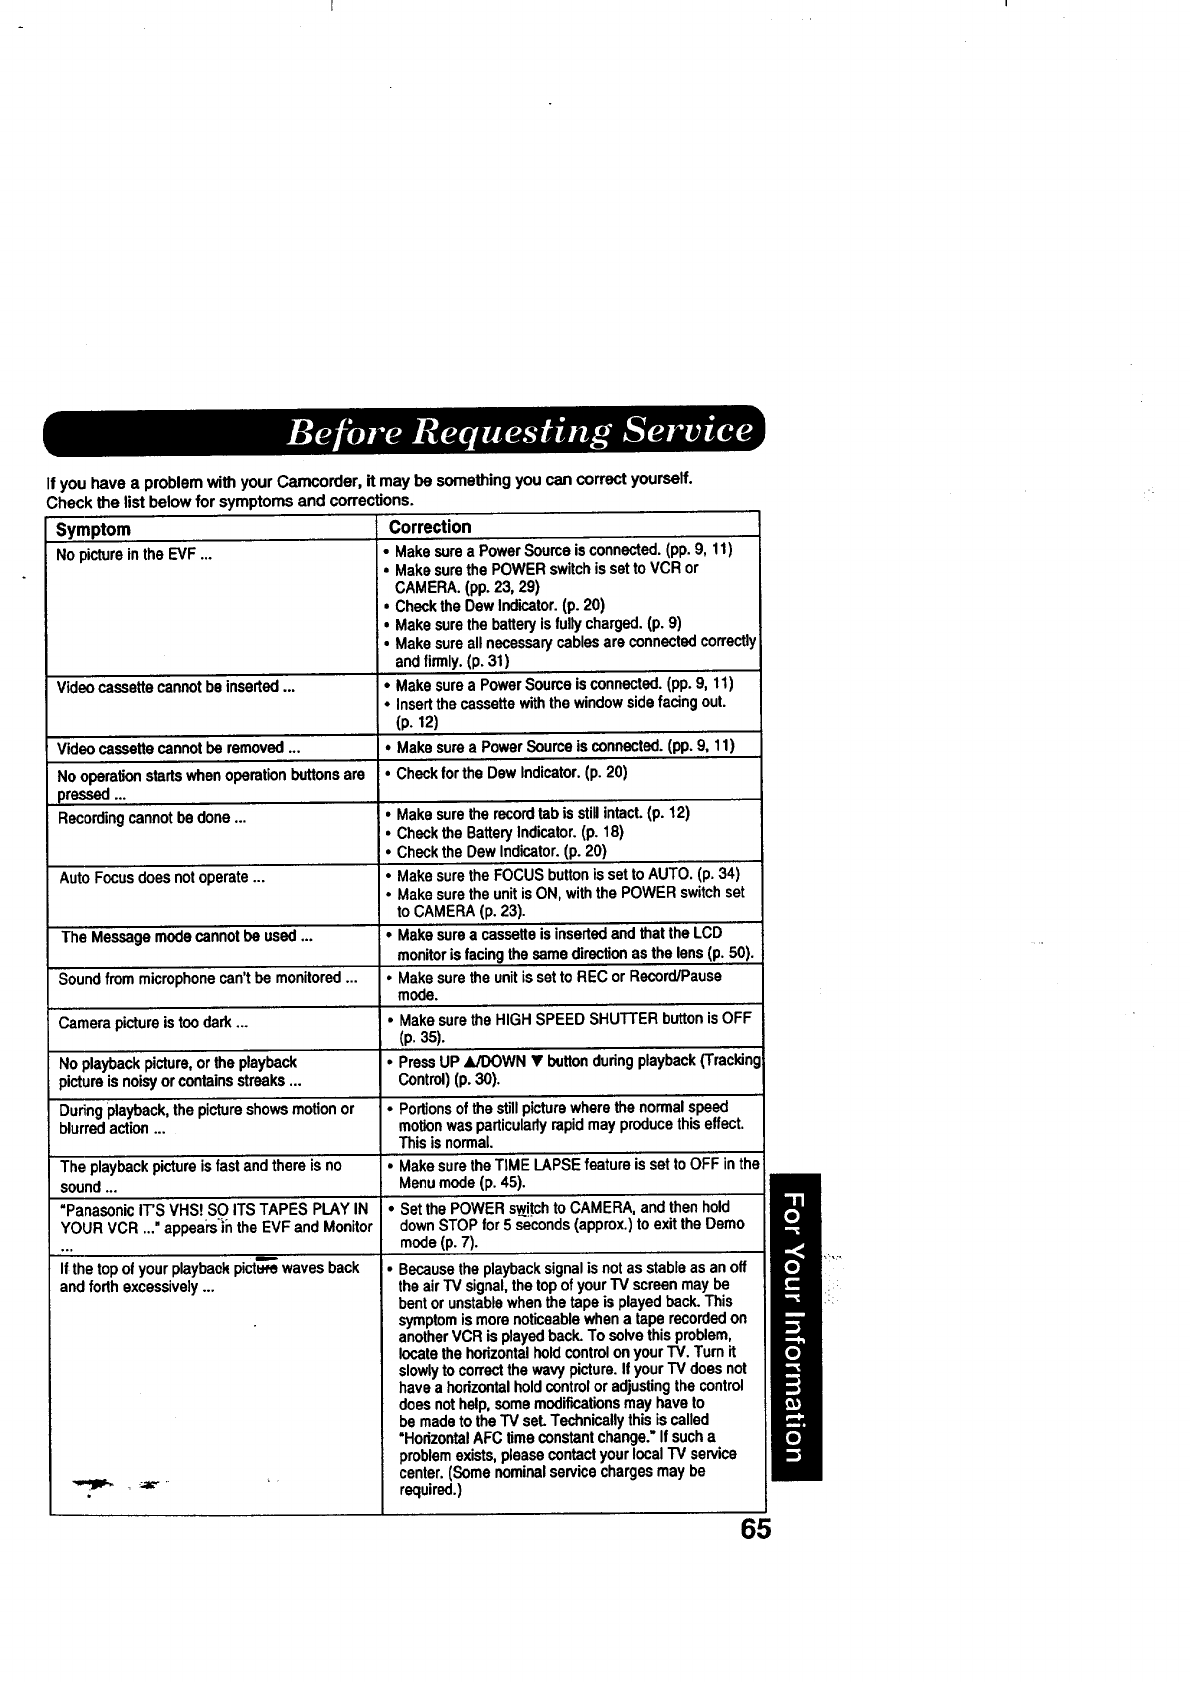
If you have a problem with your Camcorder, it may be something you can correct yourself.
,heck the list below for symptoms and corrections.
Symptom Correction
No picturein the EVF ... •Make sure a Power Source is connected. (pp. 9, 11)
•Make sure the POWER switch is sat to VCR or
Video cassettecannot be inserted...
Video cassette cannot be removed ...
No operationstartswhen operationbuttonsare
pressed ...
Recordingcannot be done ...
Auto Focus does notoperate ...
The Message mode cannot be used ...
Sound from microphonecan't be monitored...
Camera pictureis too dark ...
No playback picture,or the playback
pictureis noisyor containsstreaks...
Dudng playback, the pictureshows motionor
blurredaction ...
The playback pictureis fast and there is no
sound...
"PanasonicIT'S VHS! SO ITS TAPES PLAY IN
YOUR VCR ..." appeai's'_hthe EVF and Monitor
If the top of your playbackpi_ waves back
and forth excessively...
_ _Jk"," "¸
CAMERA. (pp. 23, 29)
•Check the Dew Indicator.(p. 20)
•Make sure the battery is fullycharged. (p. 9)
•Make sure all necessarycables are connected correctly
and firmly.(p. 31)
•Make sure a Power Source is connected. (pp. 9, 11)
•Insertthe cassette withthe window side facing out.
(p. 12)
•Make sure a Power Source is connected. (pp. 9, 11)
•Checkfor the Dew Indicator.(p. 20)
•Make sure the record tab is still intact. (p. 12)
•Checkthe Battery Indicator.(p. 18)
•Checkthe Dew Indicator.(p. 20)
•Make sure the FOCUS buttonis set to AUTO. (p. 34)
•Make sure the unit is ON, with the POWER switchset
to CAMERA (p. 23).
•Make sure acassette is insertedand that the LCD
monitor is facingthe same directionas the lens(p. 50).
•Make sure the unit is set to REC or Record/Pausa
mode.
•Make sure the HIGH SPEED SHUTTER buttonis OFF
(p. 35).
•PressUP AJDOWN • button duringplayback(Trackin(.
Control)(p. 30).
•Portionsofthe stillpicturewhere the normalspeed
motion was particularlyrapid may producethis effect.
This is normal.
•Make sure the TIME LAPSE feature is set to OFF in the
Menu mode (p. 45).
•Setthe POWER sw!.tchto CAMERA, and then hold
down STOP for 5 seconds (approx.)to exit the Demo
mode (p. 7).
•Because the playbacksignalis not as stableas an off
the air TV signal,the topof your TV screen may be
bent or unstablewhen the tape is playedback. This
symptom is morenoticeablewhen a tape recorded on
anotherVCR is played back. To solve this problem,
locatethe horizontalhold control on your TV. Turn it
slowlyto correctthe wavy picture. Ifyour TV does not
have a horizontalholdcontrol or adjustingthe control
does nothelp, some modifications may haveto
be madeto the TV seL Technicallythis is called
=Horizontal AFC time constant change." If sucha
problemexists, please contact your localTV service
center. (Some nominalservice charges may be
required.)
65
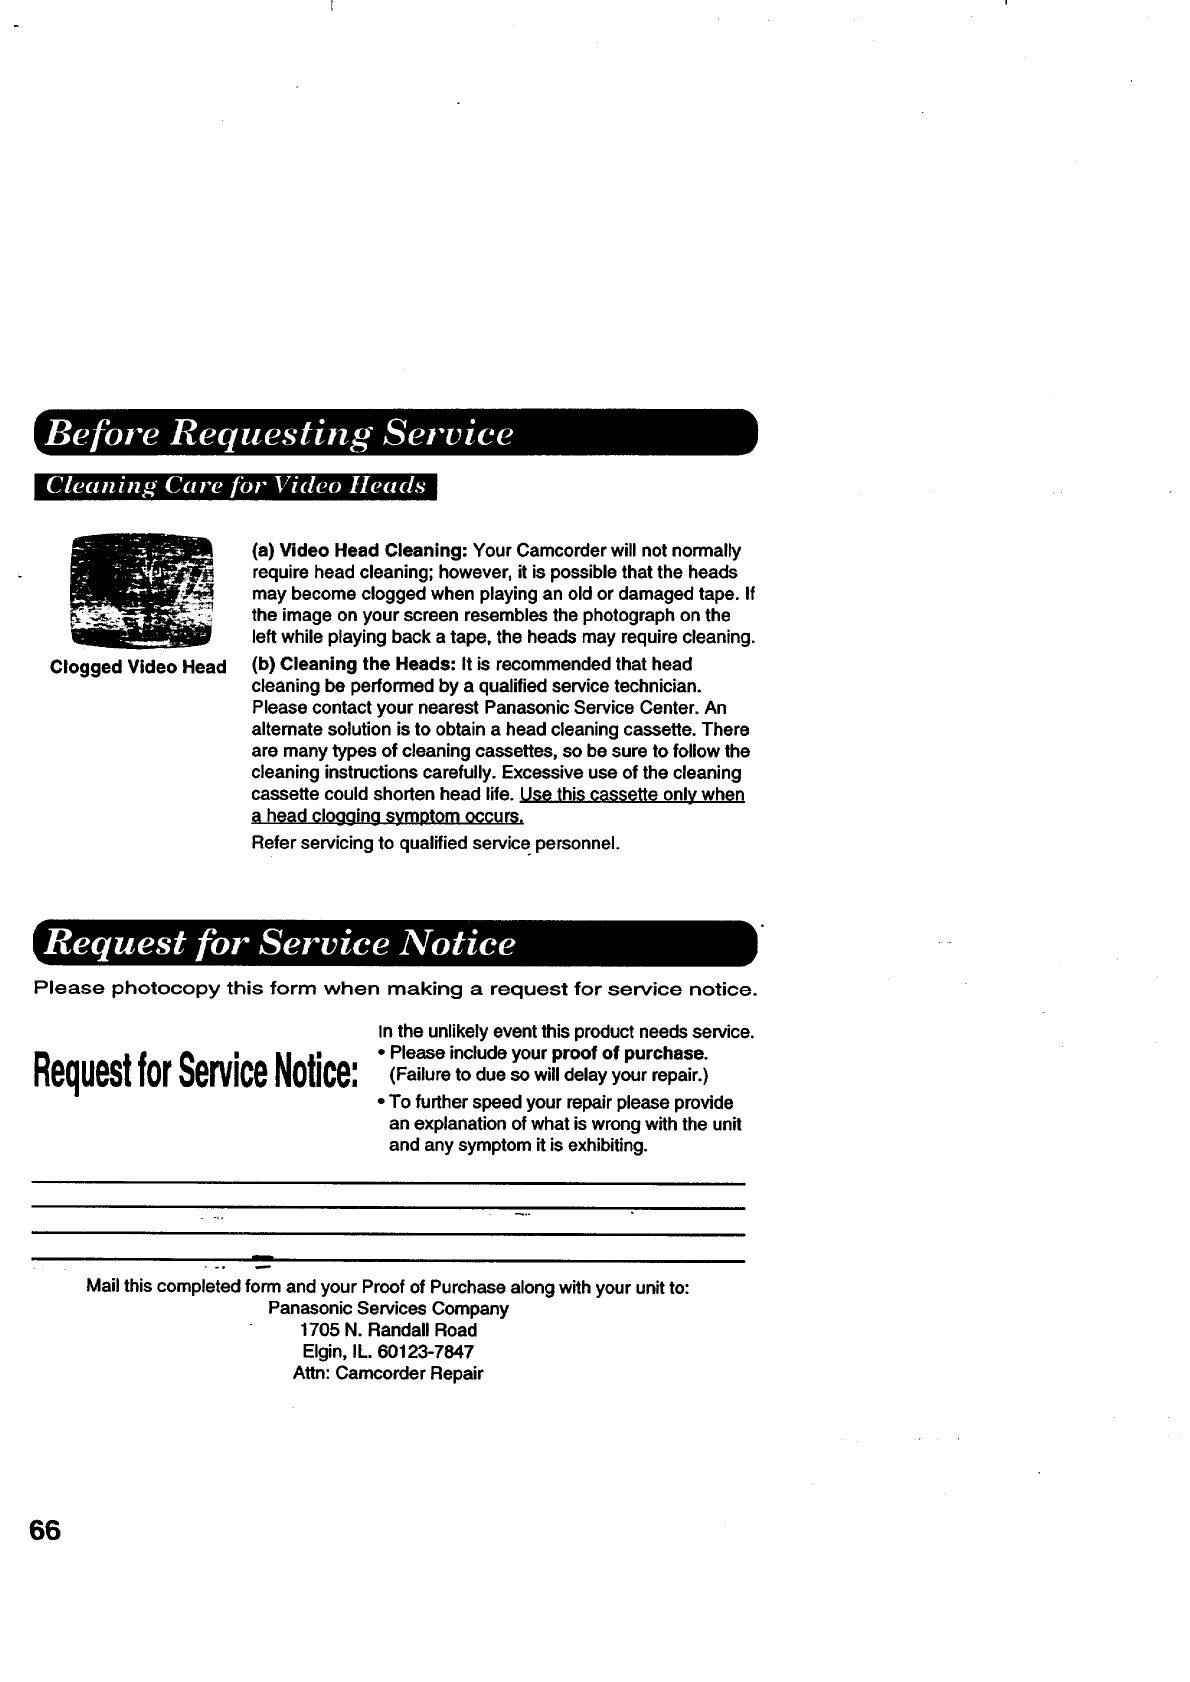
Clogged Video Head
(a) Video Head Cleaning: Your Camcorder will not normally
require head cleaning; however, it is possible that the heads
may become clogged when playing an old or damaged tape. If
the image on your screen resembles the photograph on the
left while playing back a tape, the heads may require cleaning.
(b) Cleaning the Heads: It is recommended that head
cleaning be performed by a qualified service technician.
Please contact your nearest Panasonic Service Center. An
altemate solution is to obtain a head cleaning cassette. There
are many types of cleaning cassettes, so be sure to follow the
cleaning instructions carefully. Excessive use of the cleaning
cassette could shorten head life. Use this cassette only when
a head cloagin9 symptom occurs.
Refer servicing to qualified service personnel.
Please photocopy this form when making a request for service notice.
RequestforServiceNotice:
In the unlikely event this product needs service.
•Please include your proof of purchase.
(Failure to due so will delay your repair.)
•To further speed your repair please provide
an explanation of what is wrong with the unit
and any symptom it is exhibiting.
m
Mail this completed form and your Proof of Purchase along with your unit to:
Panasonic Services Company
1705 N. Randall Road
Elgin, IL. 60123-7847
Attn: Camcorder Repair
66
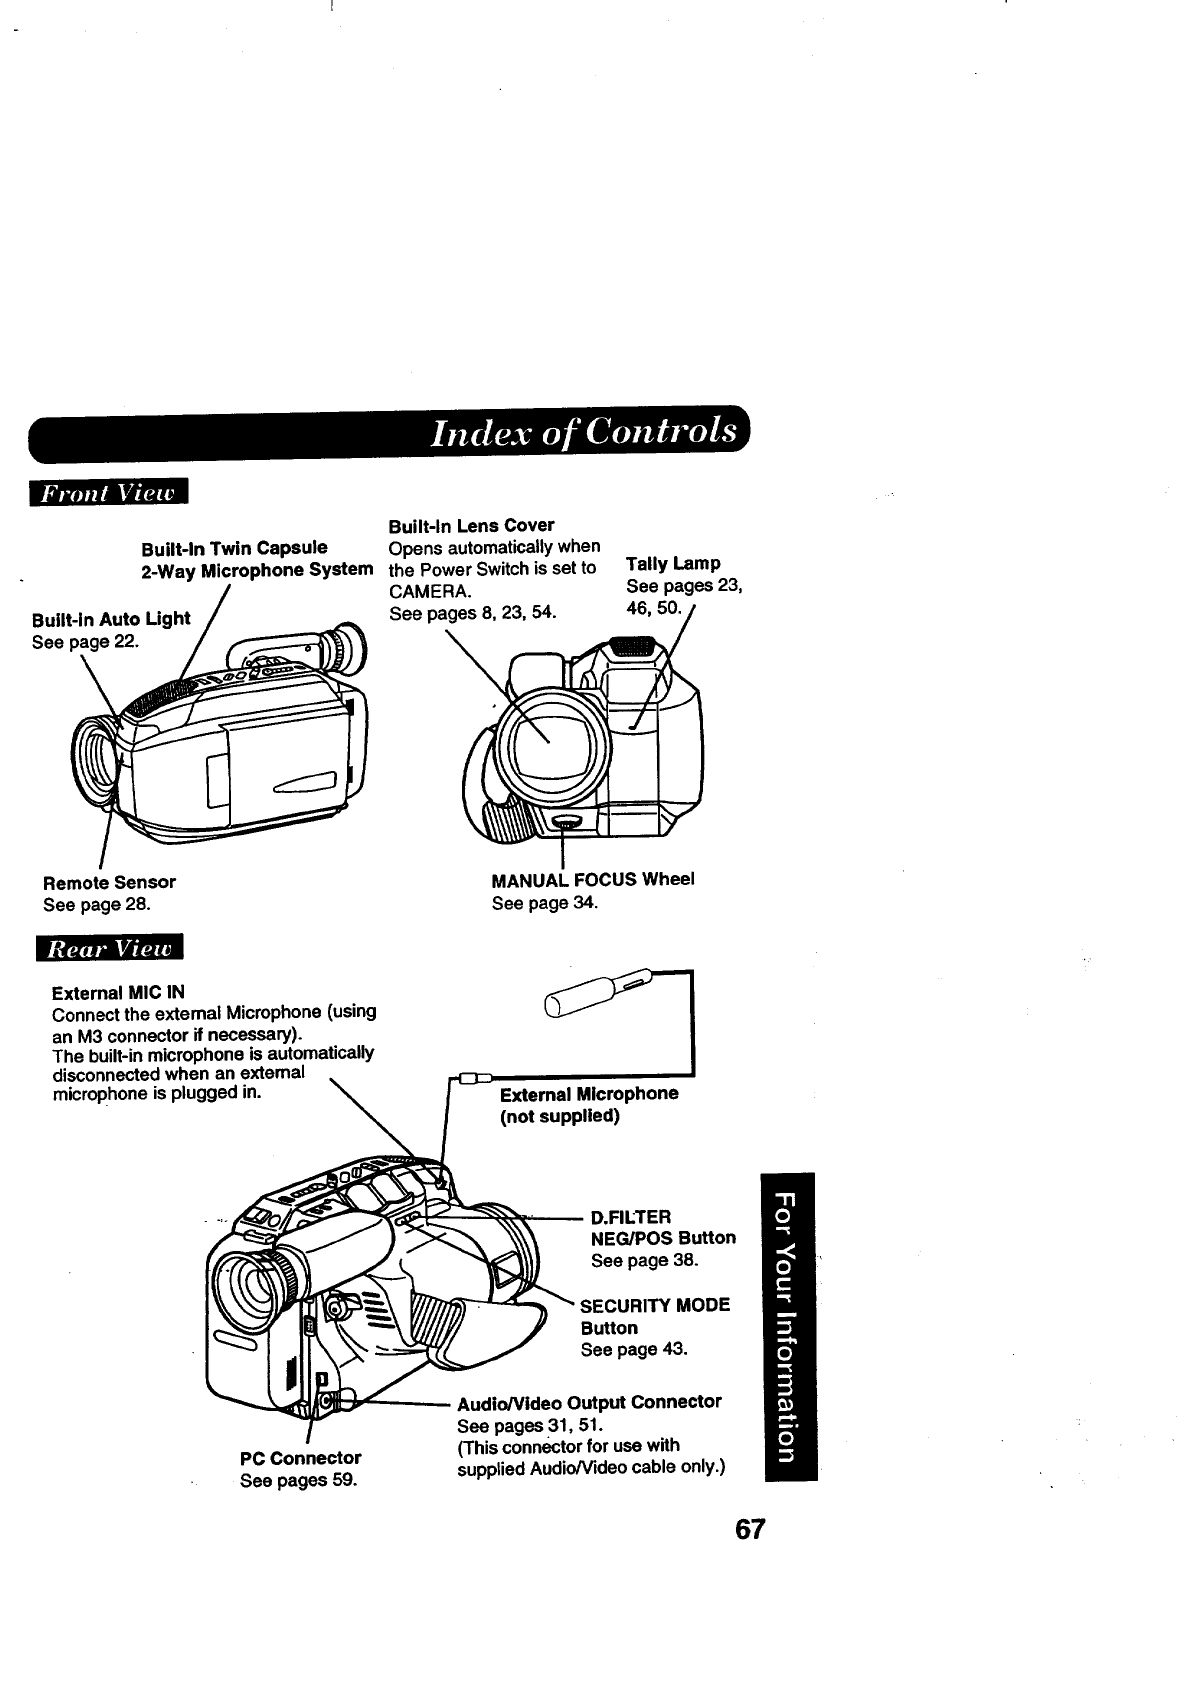
Rl_eJllA |_qa
Built-In Twin Capsule
2-Way Microphone System
Built-in Auto Light
See page 22.
Built-in Lens Cover
Opens automatically when
the Power Switch is set to
CAMERA.
See pages 8, 23, 54.
Tally Lamp
See pages 23,
46, 50.
Remote Sensor
See page 28.
MANUAL FOCUS Wheel
See page 34.
ft_ l_eJ'/1
External MIC IN
Connect the extemal Microphone (using
an M3 connector if necessary).
The built-in microphone is automatically
disconnected when an external
microphone is plugged in. External Microphone
(not supplied)
D.FILTER
NEG/POS Button
See page 38.
PC Connector
See pages 59.
BuRon
See page 43.
Audio/Video Output Connector
See pages 31, 51.
(This connector for use with
supplied Audio/Video cable only.)
67

/|U
POWER Lamp
Lights when the Power Switch is set
to VCR or CAMERA or PHOTO.
See pages 8, 19, 54.
UP •Button
See pages 13, 14, 15, 16,
25, 27, 30, 44, 45, 46, 47,
48, 49, 54.
(Tracking Control)
See page 30.
TAPE SPEED Selector
See pages 8, 12, 23. \
\
Strap Attachment
Rings
See page 21.
DC IN Connector
See page 11.
BATTERY
RELEASE Butt0r1'
See page 9. PH(_E£OMODE
Selector
See pages 54, 55.
REWIND/SEARCH Button
See pages 8, 26, 29, 30.
(- Button)
See pages 55, 56. PLAY Button
pages 8, 26, 29, 30,
50, 51, 55.
Button
See pages 26, 30, 51.
(DEL Button)
See pages 56, 57.
FAST FORWARD/
•SEARCH Button
See page 30.
(+ Button)
See pages 55, 56.
Button
See pages 7, 8, 18,
29, 51, 55, 56, 57.
Hand Strap
See page 21.
POWER Switch
See pages 7, 8, 18, 23, 24,
25, 26, 29, 31, 50, 54, 58.
RECORD/PAUSE Button with
REC Lamp
See pages 8,..23, 25, 26, 27, 36,
45, 46, 47, 48, 49, 54.
DOWN •Button
See pages 13, 14, 15, 16, 25, 27, 30,
44, 45, 46, 47, 48, 49, 54.
(Tracking Control)
See page 30.
68
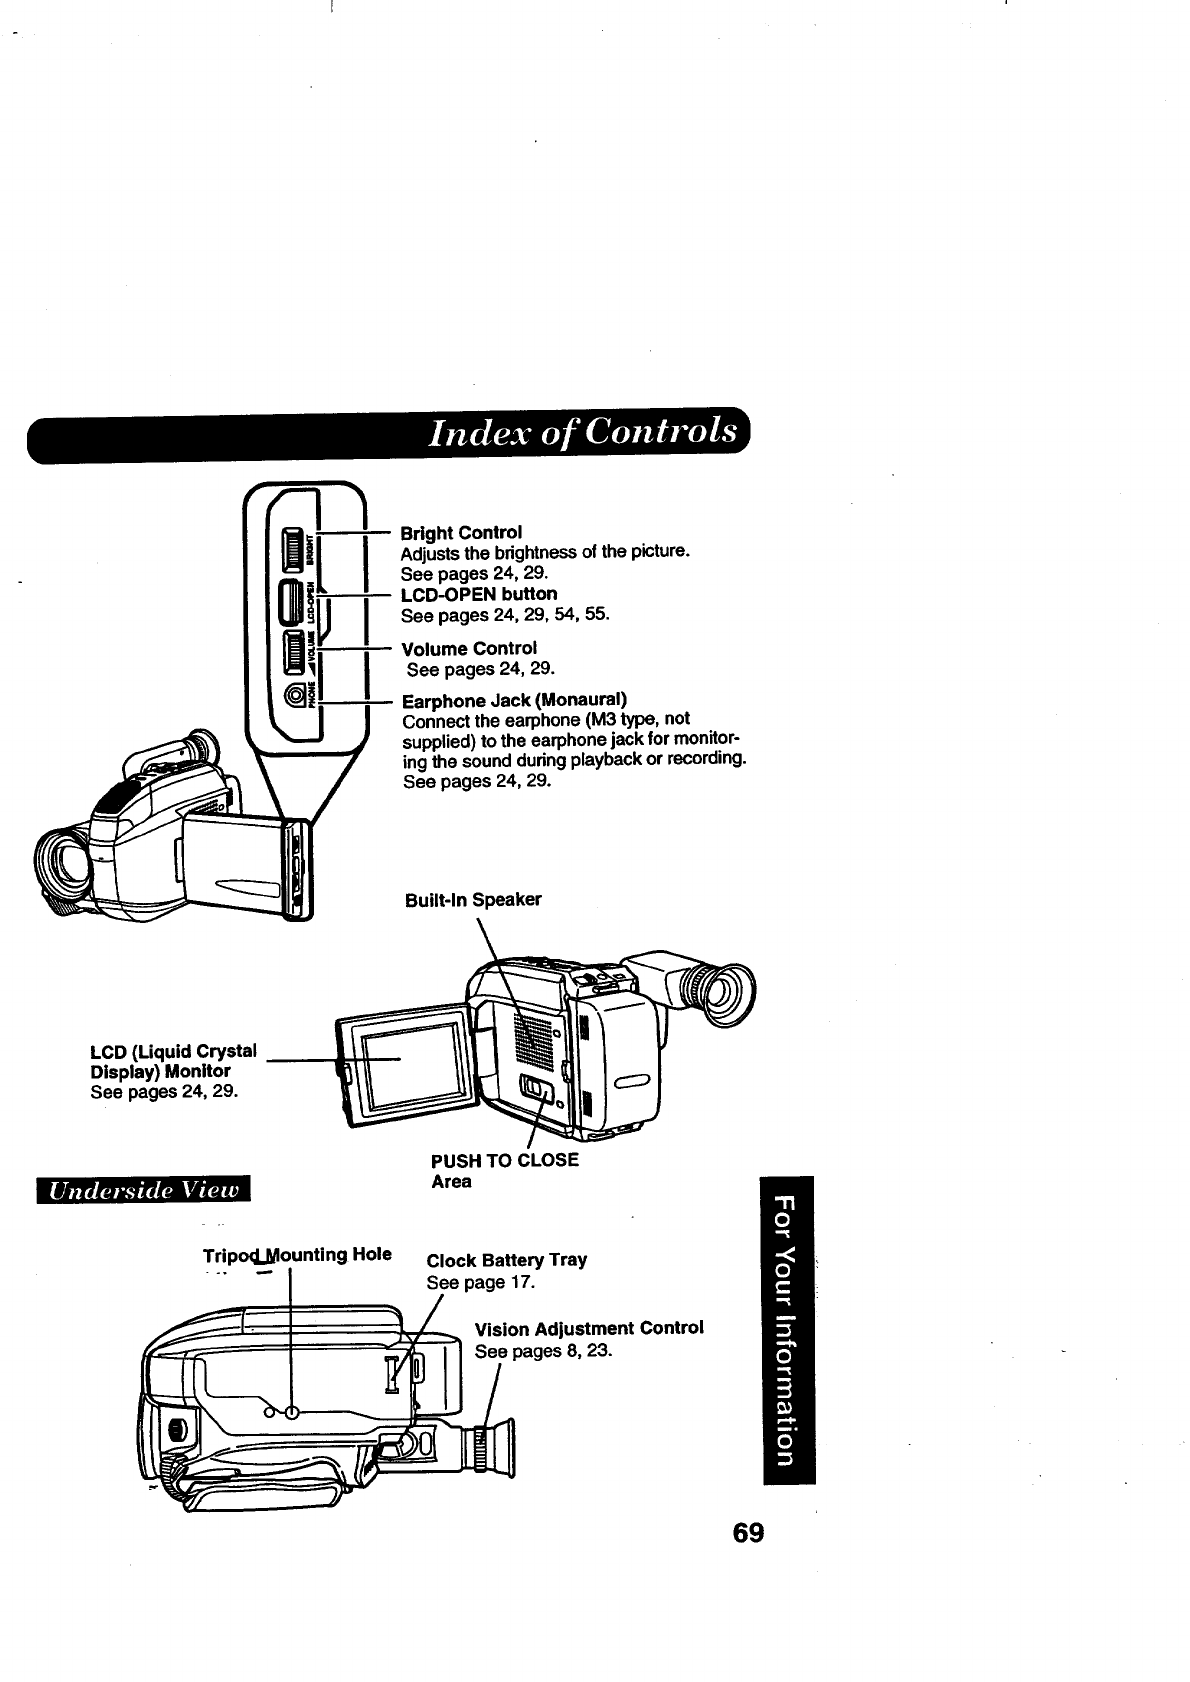
I
I
Bright Control
Adjusts the brightness of the picture.
See pages 24, 29.
LCD-OPEN button
See pages 24, 29, 54, 55.
Volume Control
See pages 24, 29.
Earphone Jack (Monaural)
Connect the earphone (M3 type, not
supplied) to the earphone jack for monitor-
ing the sound during playback or recording.
See pages 24, 29.
Built-In Speaker
LCD (Liquid Crystal
Display) Monitor
See pages 24, 29.
Tripod.Mounting Hole
PUSH TO CLOSE
Area
Clock Battery Tray
See page 17.
Vision Adjustment Control
See pages 8, 23.
69
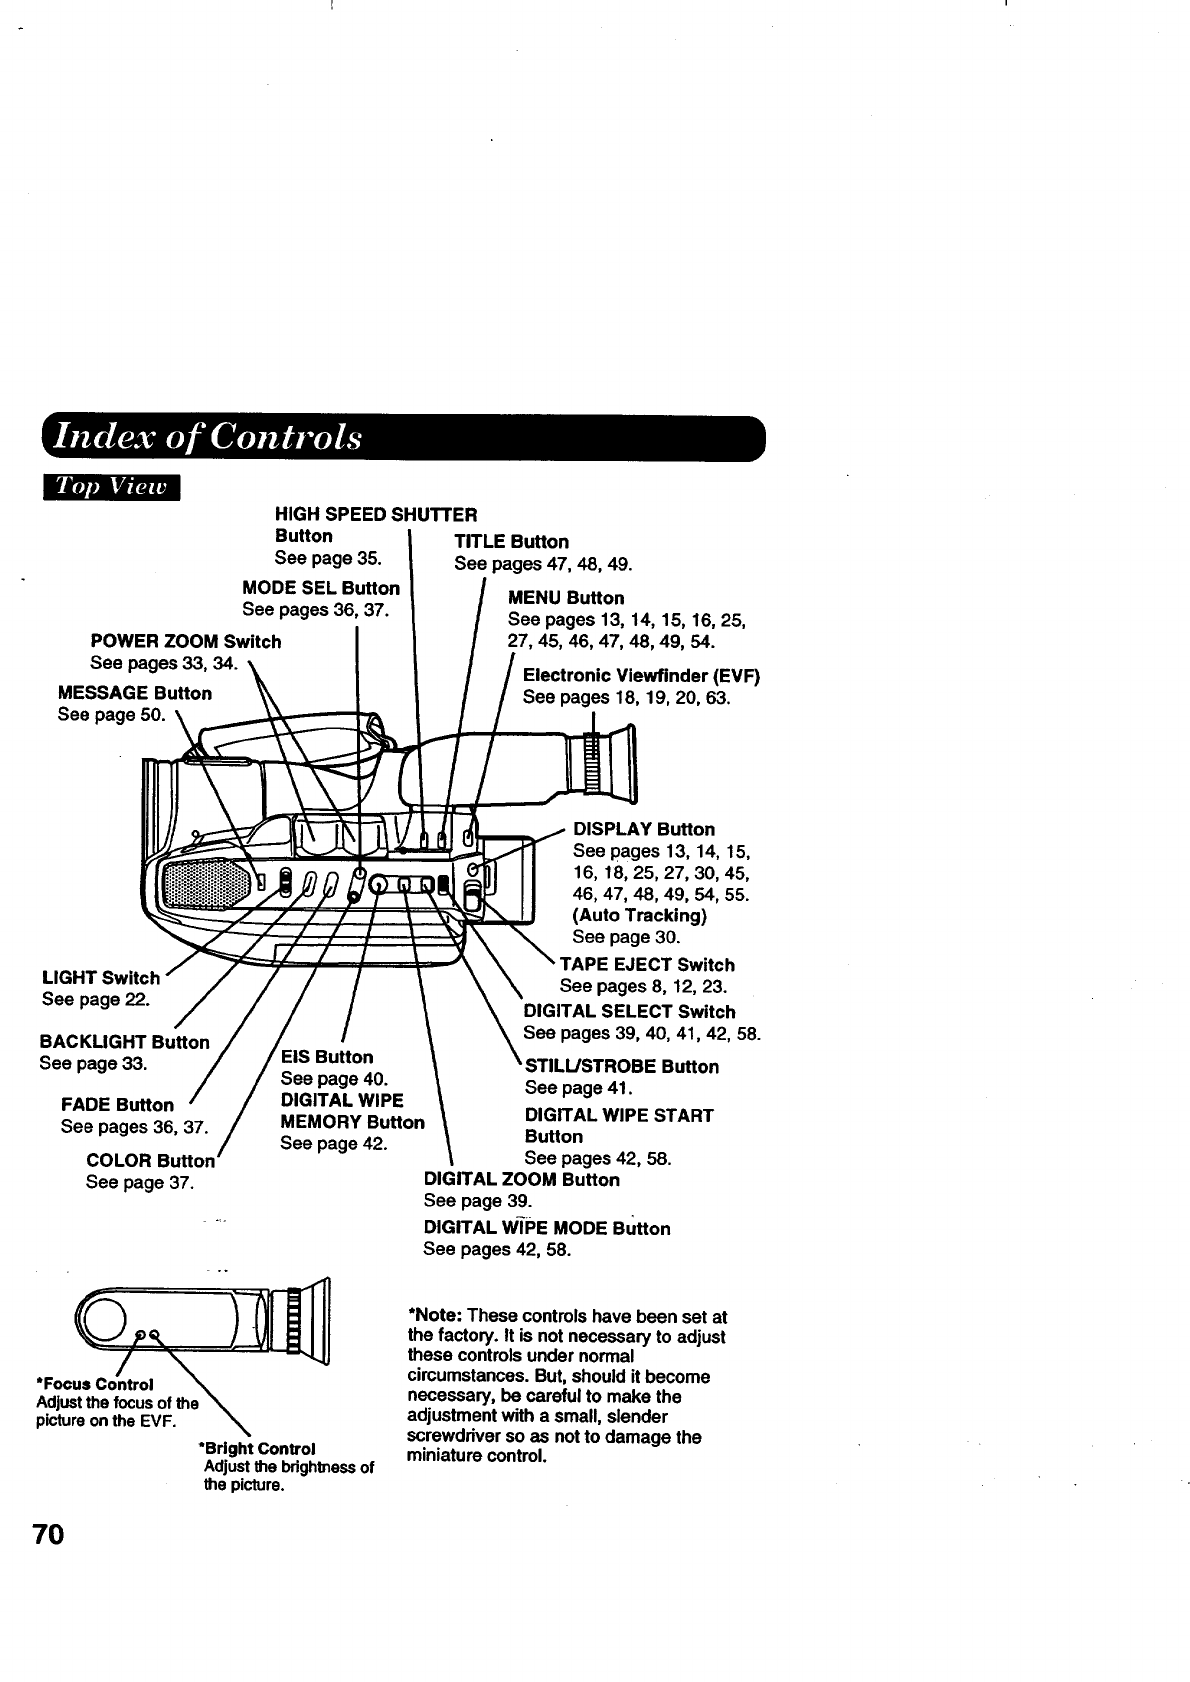
HIGH SPEED SHUTTER
Button
See page 35.
MODE SEL Button
See pages 36, 37.
POWER ZOOM Switch
See pages 33, 34.
MESSAGE Button
See page 50.
TITLE Button
See pages 47, 48, 49.
MENU Button
See pages 13, 14, 15, 16, 25,
27, 45, 46, 47, 48, 49, 54.
Electronic Viewfinder (EVF)
See pages 18, 19, 20, 63.
LIGHT Switch
See page 22.
BACKLIGHT Button
See page 33.
FADE Button
See pages 36, 37.
COLOR Buttor
Seepage 37.
EIS Button
See page 40.
DIGITAL WIPE
MEMORY Button
See page 42.
DISPLAY Button
Seepages 13,14,15,
16,18,25,27,30,45,
46,47,48,49,54,55.
(Auto Tracking)
See page 30.
EJECT Switch
See pages 8,12, 23.
DIGITAL SELECT Switch
Seepages 39, 40, 41, 42, 58.
STILL/STROBE Button
See page 41.
DIGITAL WIPE START
Button
See pages 42, 58.
DIGITAL ZOOM Button
See page 39.
DIGITAL WIPE MODE Button
See pages 42, 58.
*Focus Control
Adjust the focus of the
picture on the EVF.
*Bright Control
Adjust the brightness of
the picture.
*Note: These controls have been set at
the factory. It is not necessary to adjust
these controls under normal
circumstances. But, should it become
necessary, be careful to make the
adjustment with a small, slender
screwdriver so as not to damage the
miniature control.
7O
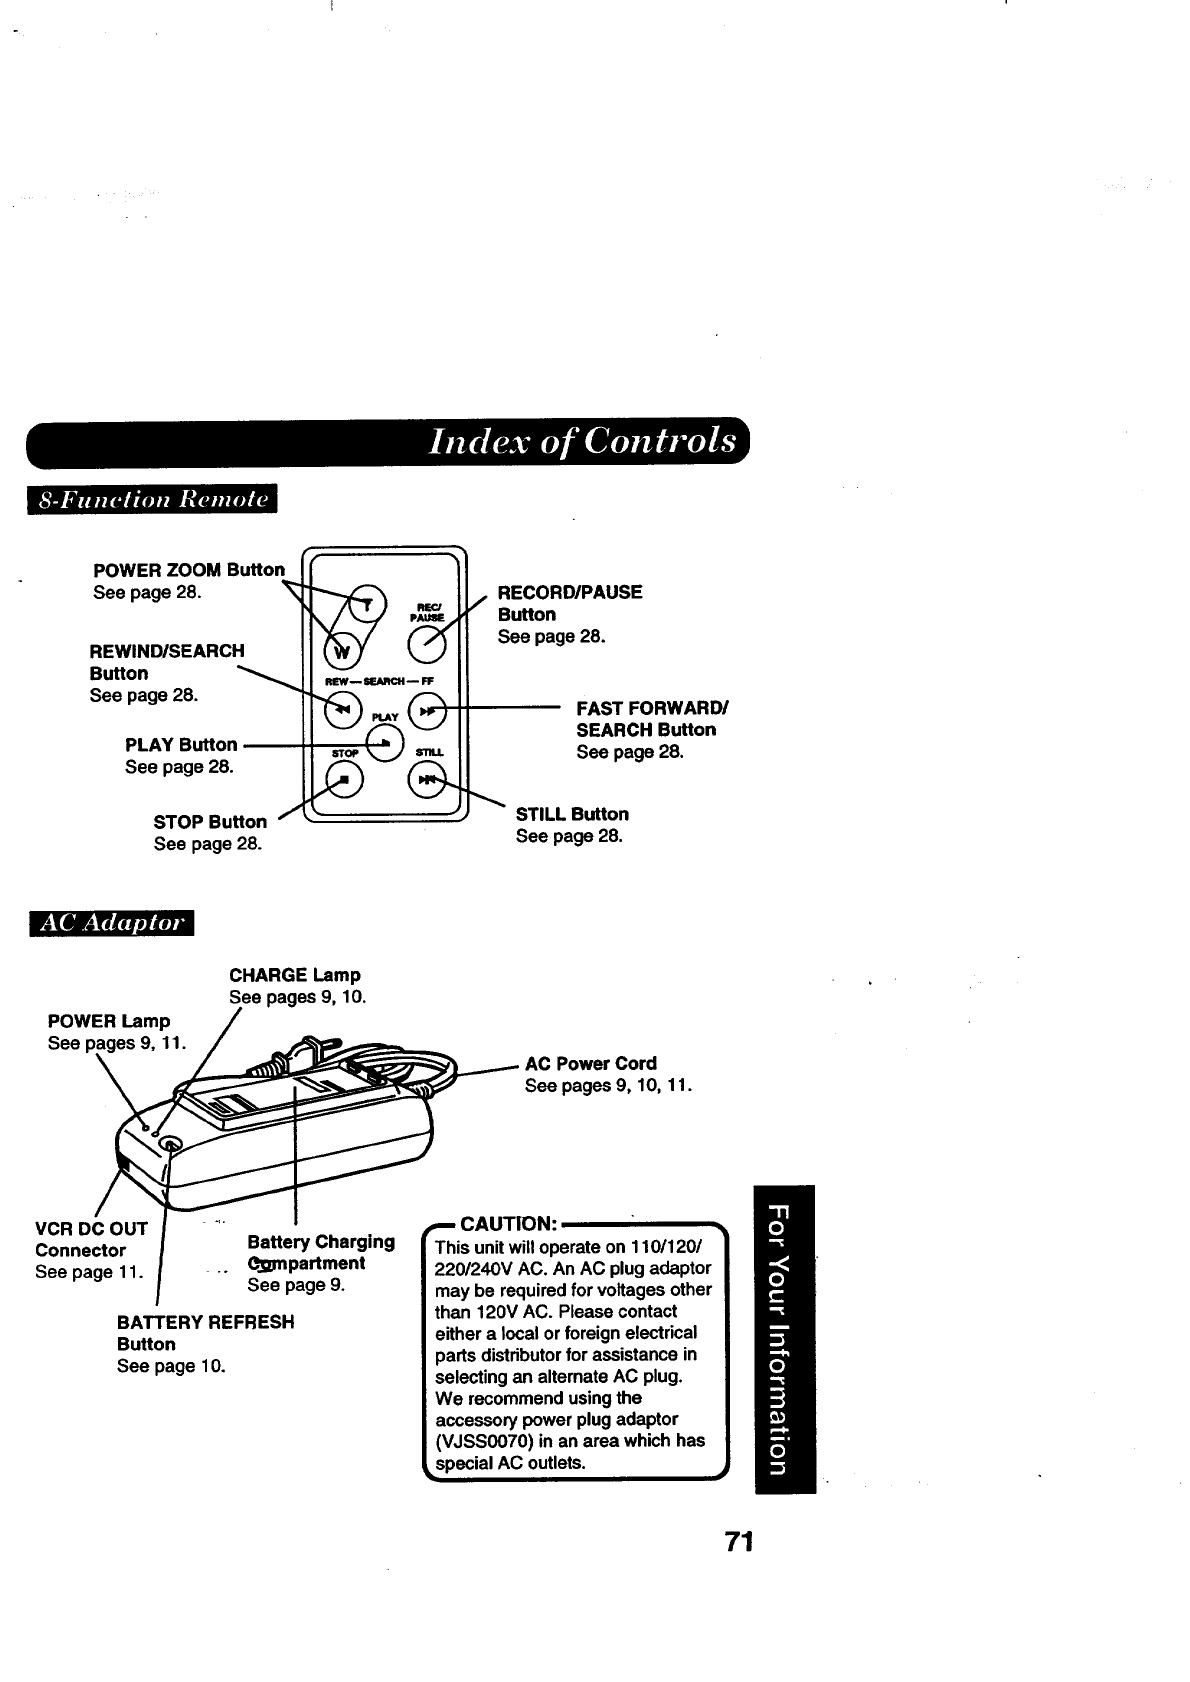
_,'B_taHumtul_hu.tezl_.
POWER ZOOM Button
See page 28.
REWlNDISEARCH
Button
See page 28.
PLAY Button
See page 28.
STOP Button
See page 28.
RECORD/PAUSE
Button
See page 28.
FAST FORWARD/
SEARCH Button
See page 28.
STILL Button
See page28.
mT_fl_..te_J
;OeWpEaResLa_,P11. / _,
CHARGE Lamp
See pages 9, 10.
.-.. AC Power Cord
See pages 9, 10, 11.
VCR DC OUT '
Connector Battery Charging
See page 11. .. _L_mpartment
See page 9.
BATTERY REFRESH
Button
See page 10o
CAUTION:
This unit will operate on 110/120/
220/240V AC. An AC plug adaptor
may be required for voltages other
than 120V AC. Please contact
either a local or foreign electrical
parts distributor for assistance in
selecting an alternate AC plug.
We recommend using the
accessory power plug adaptor
(VJSS0070) in an area which has
special AC outlets.
t=
71

A F
AC Adaptor 2, 11, 61 Fade 36, 37
Accessodes (Optional) 61
Accessories (Supplied) 2H
Audio Sensitivity 44
Audio/Video Cable High Speed Shutter 35
2, 31, 51 High Speed Shutter
Auto Daylight Saving Indicator 20, 35
Time 15 L
Auto Focus 34
B Light 22
M
Backlight 33
Battery Pack 2, 9, 10, 61 Macro Focus 34
Battery Remaining Manual Focus 34
Indication 18, 19 MENU Mode 13
Battery Warning 19 Message Mode 50
C O
Camera Recording
23, 24, 25, 26,
Car Battery Cord 11,
CH 3/4 Switch
Charging Battery
-Cleaning Care for Video
Heads
Clock Battery 2,
Clock Set 14, 15, 16,
Color Digital Fade
Color Digital Filter
Copying your Tapes
D
DC Power Cable 2, 11, 61
DEW Indication 20
Digital E.LS. _ " 40
Digital Still Camera
52, 53, 54, 55, 56, 57,5"-8
Digital Wipe 42
Digital Zoom 39
Display-off Mode " 18
E
Easy Edit Stand-by 26
Erase Protection Tab 12
EVF/LCD Monitor
Indications 18, 19, 20
F-_I .l_ophone jack 67
One-TouchAuto Fade
P
36
Stand-byQuickRelease 25
,Still/Strobe/Wide 41
StillPicture 30
Symptom/Correction 65
T
lO-SecondReminder 19
Tab 12
TallyLamp 46
Tape Speed 12
TapeWaming 19
Time Lapse 45
T_ler 47, 48, 49
TrackingControl 30
27
61
31 PC Connection 59, 60 Warranty
9 PHONE (earphone) jack
24, 29 Z
66 PLAY Indicator 19
17 Playback 29, 30, 31, 32 Zoom In/Out
17 PlayPak 2, 32, 61
37 Power Supply 9, 10, 11
38 Programmed Recording 27
51 R
VCR-MODE Indication 20
VHF Connecting Cable
31, 51
Video Cassettes (tapes) 12
Viewing 31
W
73, 74
33
REC Indicator 19
Remote Control 2, 28, 71
Remote Control Holder -..
2, 21, 28
Request for Service
Notice 66
RF Adaptor 31, 61
Safety Precautions 3
Seamh Speed 30
SecurityMode 43
Self Demo Mode 7
Shoulder Strap 2, 21
Special Effects Playback 30
Specifications 64
72
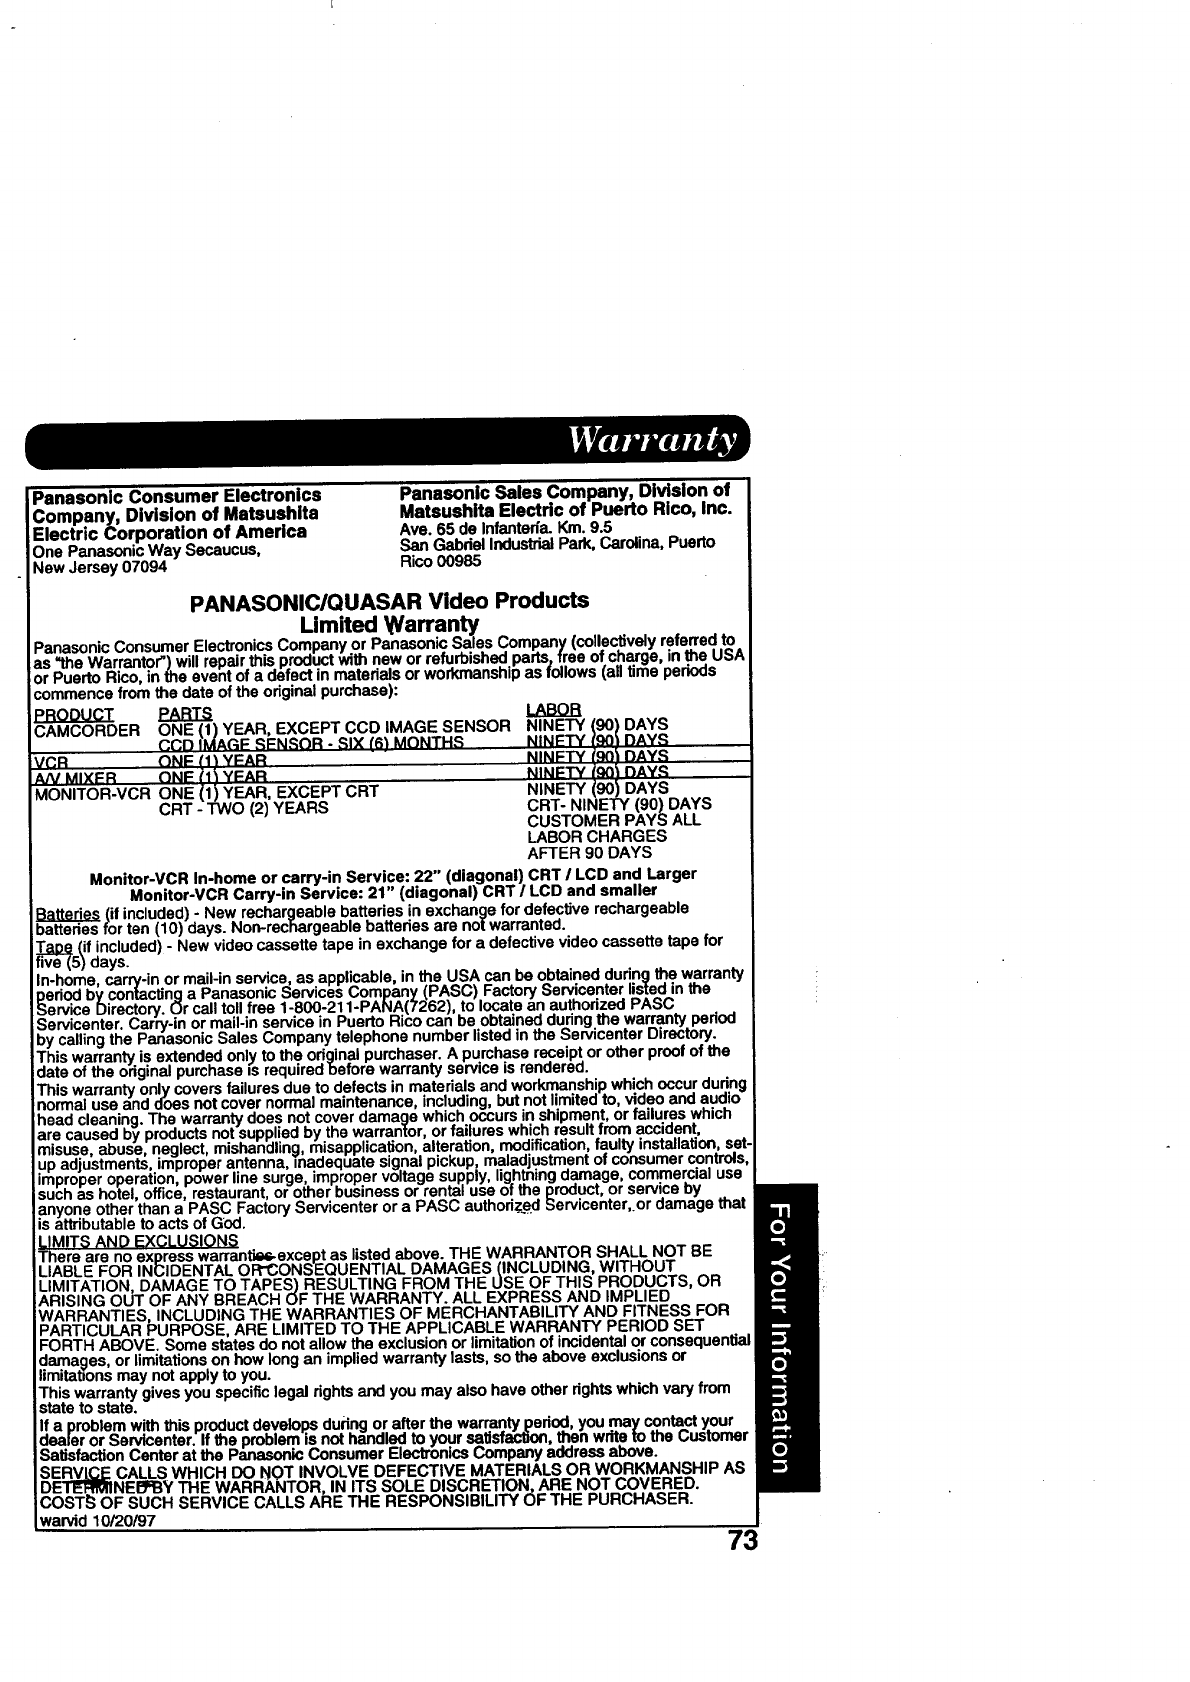
Panasonic Consumer Electronics
Company, Division of Matsushita
Electric Corporation of America
One PanasonicWay Secaucus,
New Jersey07094
Panasonic Sales Company, Division of
Matsushita Electric of Puerto Rico, Inc.
Ave. 65 de Infantada. Km. 9.5
San Gabdel Indusffiai Park, Carolina, Puerto
Rico 00985
PANASONIC/QUASAR Video Products
Limited Warranty
Panasonic Consumer Electronics Company or Panasonic Sales Company (collec.tively referred to
as =the Warrantor'). will repair.this,product With new or refu.rbishecl' parts, free ol cnarge, in the USA
or P'uerto Hico, in me event ova Defect in matada]s or worKmansnip as follows (all time periods
commence from the date of the odginai purchase):
PRODUCT PARTS LABOR
CAMCORDER ONE (1) YEAR, EXCEPT CCD iMAGE SENSOR NINETY I._)l DAYS
CCD IMAGF RE:NSOR -_IX f6_ MONTHS NINI=TY DAYS
VCR t')NF (1 _YFAR " "NINFTY Lqt31DAYS
A/V MIXFR ON[: tl_ YFAR NINFTY I.qoi DAYS
MONITOR-VCR ONE (1) YEAR, EXCEPT CRT NINETY (90) DAYS
CRT -TWO (2) YEARS CRT- NINETY (90) DAYS
CUSTOMER PAYS ALL
LABOR CHARGES
AFTER 90 DAYS
Monitor-VCR In-home or carry-in Service: 22" (diagonal) CRT /LCD and Larger
Monitor-VCR Carry-in Service: 21" (diagonal) CRT /LCD and smaller
(if included) -New rechargeable batteries in exchange for defective rechargeable
batteries for ten (10) days. Non-rechargeable batteries are not warranted.
f_v_e5)(ifincluded) -New video cassette tape in exchange for a defective video cassette tape for
days.
In-home, carry-in or mail-in service, as applicable, in the USA can be obtained during the warranty
geriod bycontacting a Panasonic Services Company (PASC) Factory Servicenter listed in the
Service Directory. Or call toll free 1-800-211-PANA(7262), to locate an authorized PASC
_ervicenter. Carry-in or mail-in service in Puerto Rico can be obtained during the warranty period
by calling the Panasonic Sales Company telephone number listed in the Servicenter Directory.
This warranty is extended only to the original purchaser. A purchase receipt or other proof of the
te of the original purchase msrequiredbefore warranty service is rendered.
This warranty only covers failures due.to defects in materials and workmanship which occur dun.'ng
norma= use and oDes not cover normaJ maintenance, including, but not limited to, viaeo and audio
head cleaning. The warranty does not cover damage which occurs in shipment, or failures which
are caused by products not supplied by the warrantor, or failures which result from accident,
misuse, abuse, neglect, mishandling, misapplication, alteration, modification, faulty installation, set-
up adjustments, improper antenna inadequate signal pickup maladjustment of consumer controls,
improperoperat!on, power line surge, improper voltage supply, lightning d.amage, commercial use
isucn as notel, omce, restaurant, or other business or rental use of the product, or service oy
anyone other than a PASC Factory Servicenter or a PASC authorized Servicenter, or damage that
s attributable to acts of God. "
LIMITS AND EXCLUSIONS
There are no express warrantkm.except as listed above. THE WARRANTOR SHALL NOT BE
LIABLE FOR INCIDENTAL OR-CONSEQUENTIAL DAMAGES(INCLUDING, WITHOUT
LIMITATION, DAMAGE TO TAPES) RESULTING FROM THE USE OF THIS PRODUCTS, OR
=ARISING OUT OF ANY BREACH OF THE WARRANTY. ALL EXPRESS AND IMPLIED
WARRANTIES, INCLUDING THE WARRANTIES OF MERCHANTABILITY AND FITNESS FOR
PARTICULAR PURPOSE, ARE LIMITED TO THE APPLICABLE WARRANTY PERIOD SET
FORTH ABOVE. Some states do not allow the exclusion or limitation of incidental or consequential
damages, or limitations on how long an implied warranty lasts, so the above exclusions or
limitations may not apply to you.
This warranty gives you specific legal rights and you may also have other rights which vary from
state to state.
a problem with _is product develops during or after the warranty pedod, you may contact your
a=e_.e.ror _er_center. If the problem isnot handled to your satisfabflon, then write to the Customer
_ausfaction uentar at the e'anasonic uonsumer Electronics uompany address above.
SERVLG.LECALLS WHICH DO NOT INVOLVE DEFECTIVE MATERIALS OR WORKMANSHIP AS
DE'FEI=I_NEI_Y THE WARRANTOR, IN ITS SOLE DISCRETION ARE NOT COVERED
COSTS OF SUCH SERVICE CALLS ARE THE RESPONSIBILITY OF THE PURCHASER."
warvid 10/20/97
73
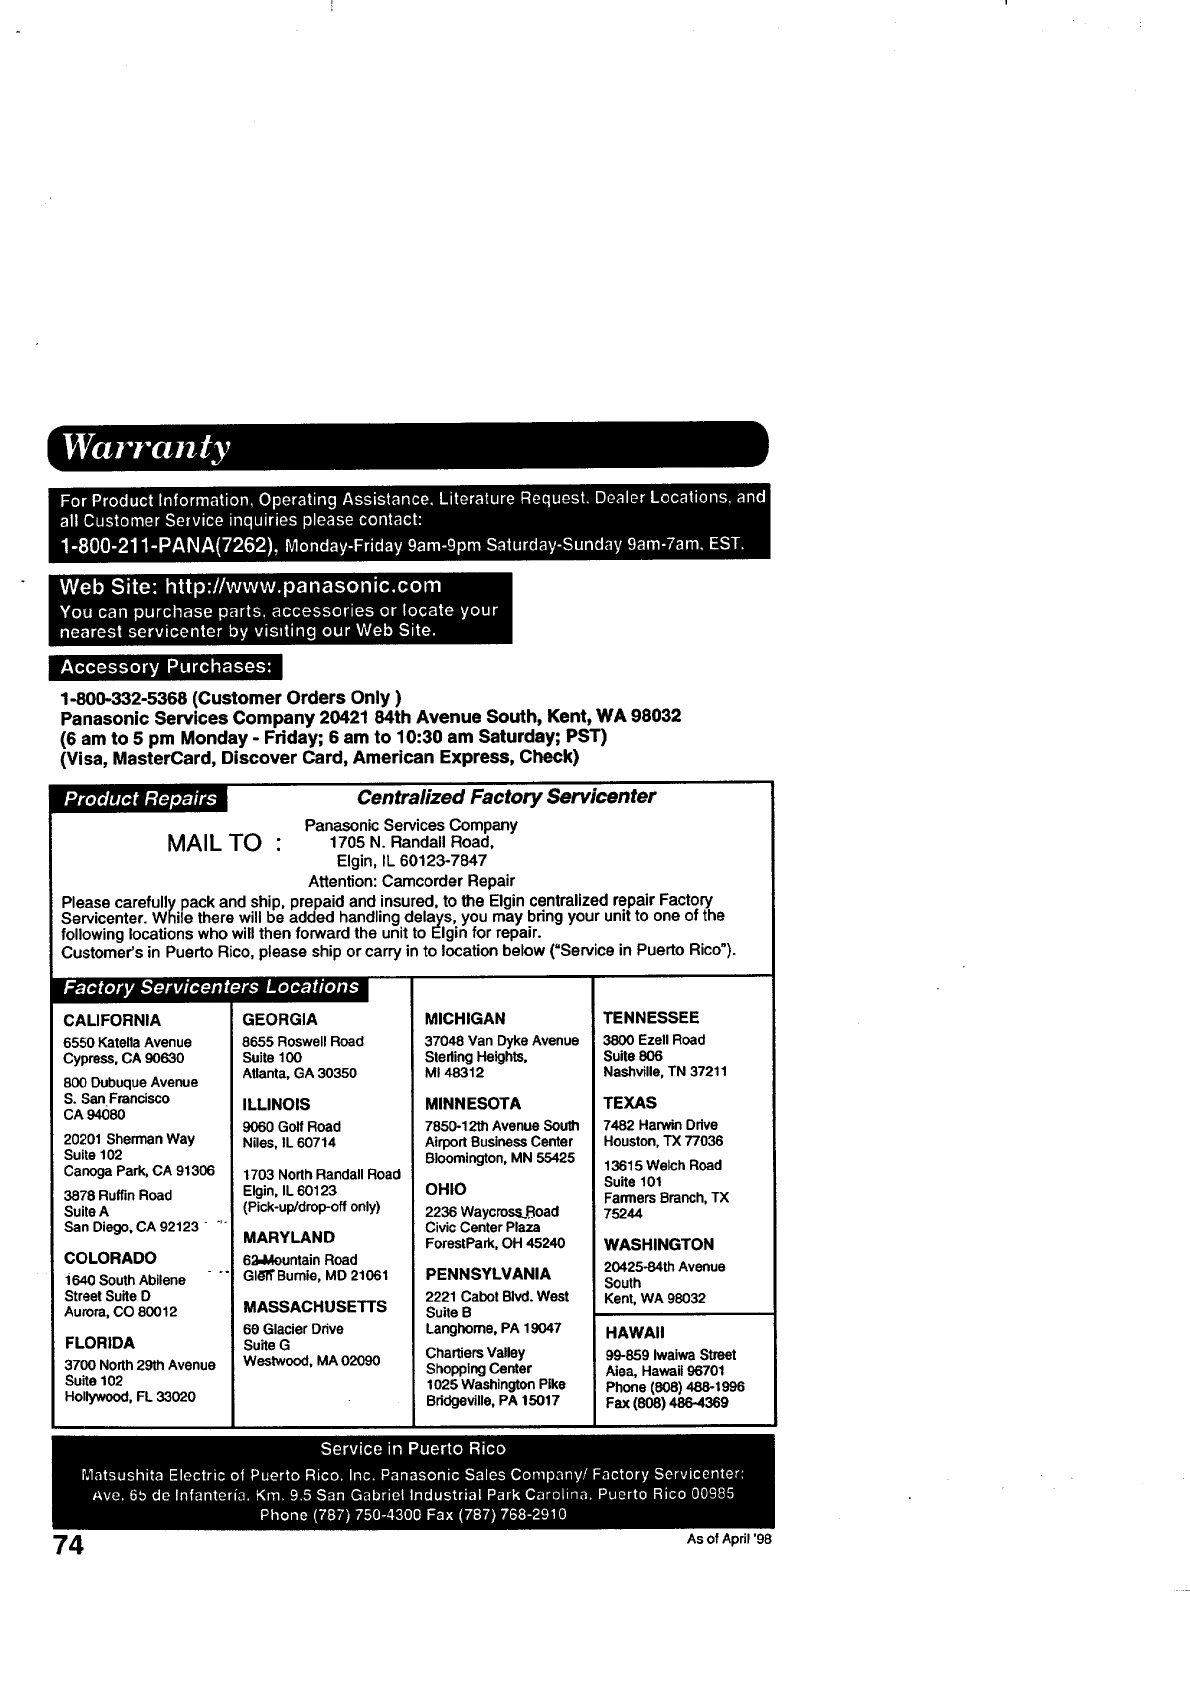
rL_[.(_[:].'tk.'l[.] iMJ _l! II[.! il':.l[..'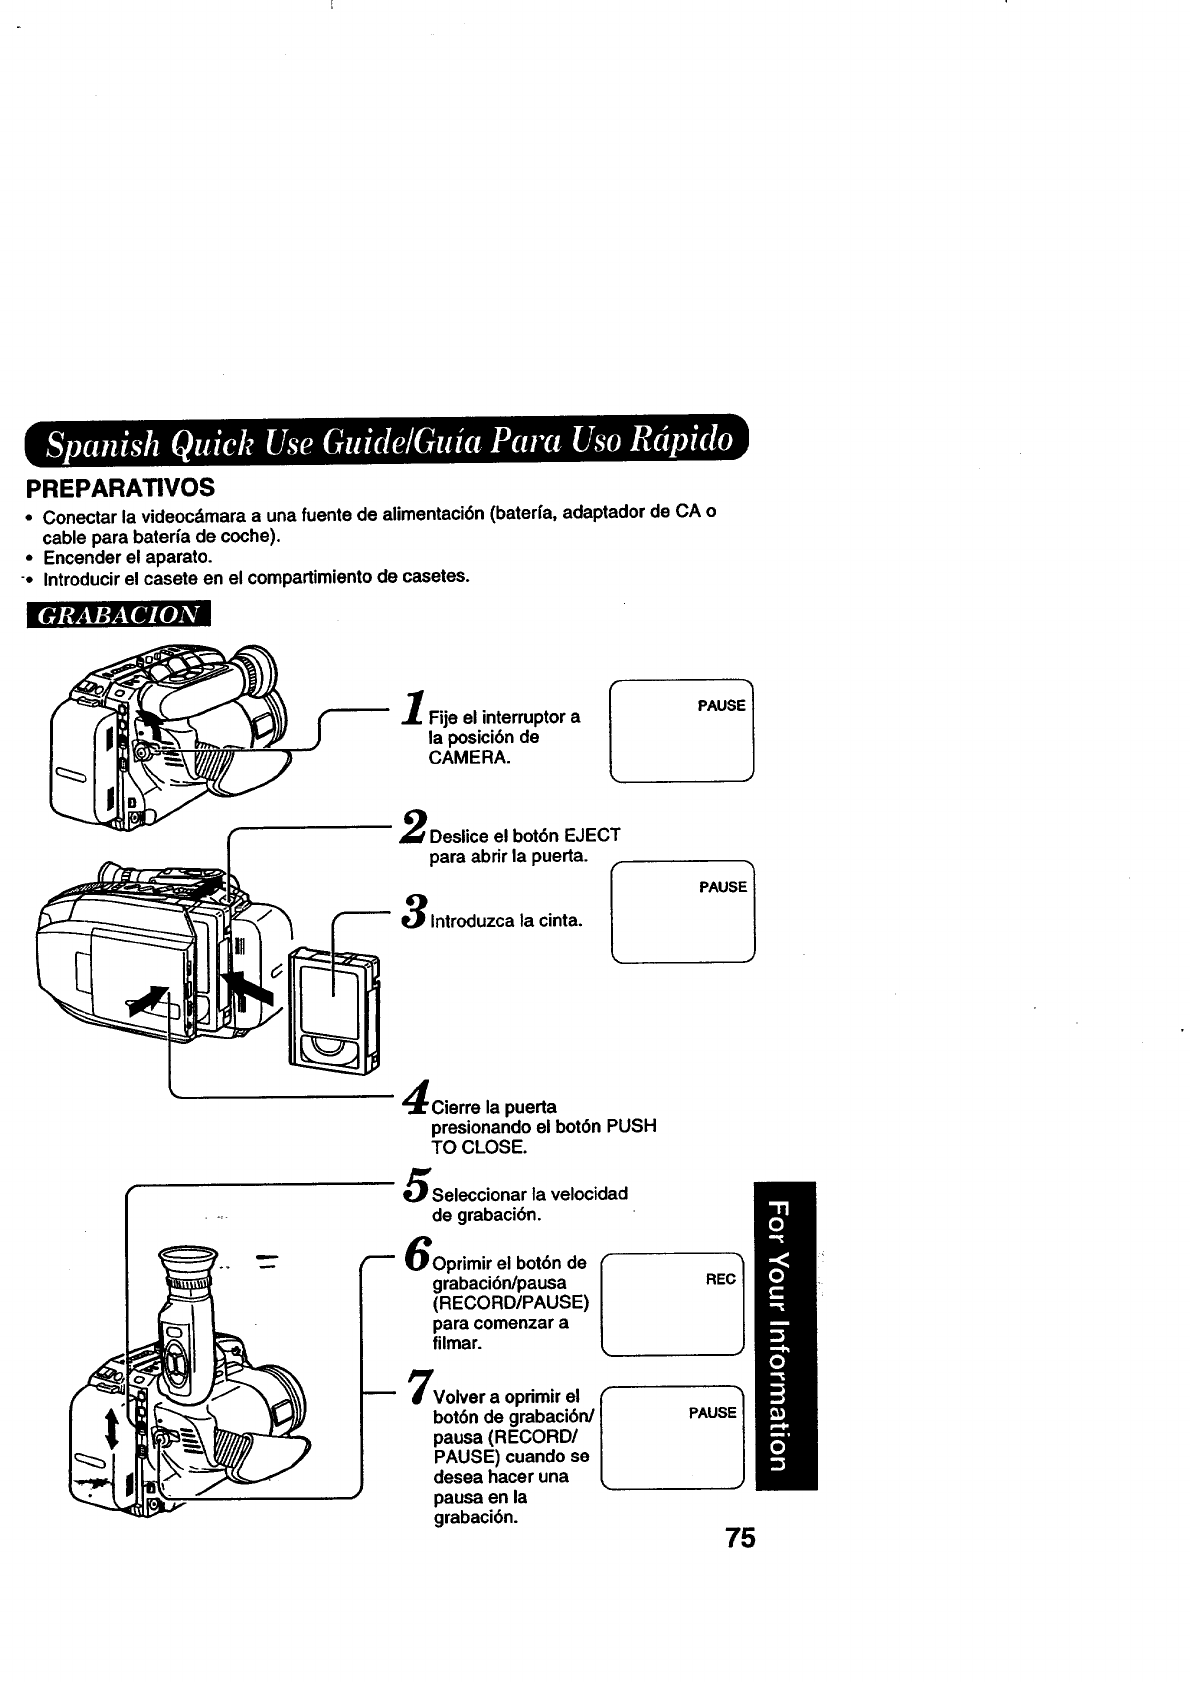
PREPARATIVOS
•Conectar la videocdmara a una fuente de alimentaci6n (bater[a, adaptador de CA o
cable para baterfa de coche).
•Encender el aparato.
-- Introducir el casete en el compartimiento de casetes.
Fije el interruptor a I
la posici6n de
CAMERA.
,_Deslice el bot6n EJECT
para abrir la puerta.
f'_--'- 3Introduzca la cinta. I
PAUSE
PAUSE 1
Cierre la puerta
presionando el bot6n PUSH
TO CLOSE.
Seleccionar la velocidad
de grabaci6n.
"--" lPOprimir el bot6n de
grabaci6n/pausa I
(RECORD/PAUSE)
para comenzar a
filmar.
Volver a oprimir el
bot6n de grabaci6n/
pausa (RECORD/
PAUSE) cuando se
desea hacer una
pausa en la
grabaci6n.
i •
PAUSE
75
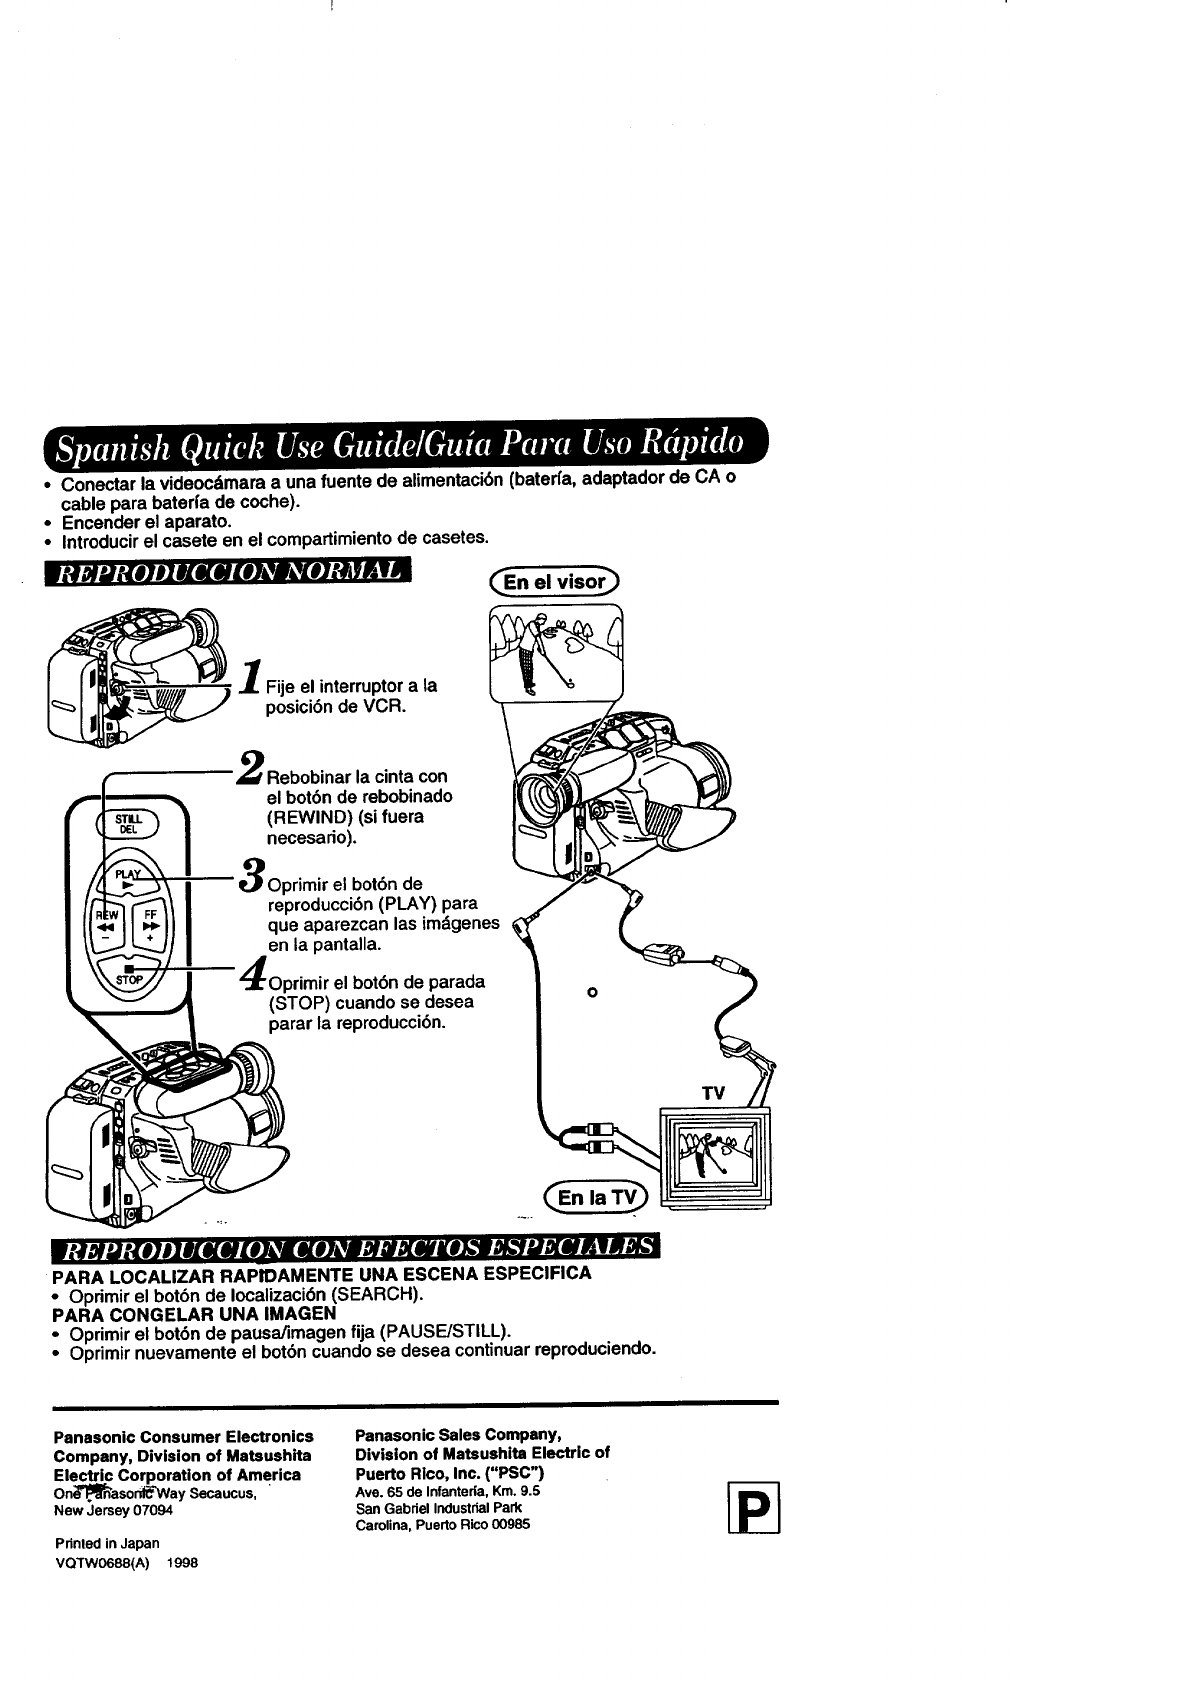
•Conectar la videocdmara a una fuente de alimentaci6n (baterfa, adaptador de CA o
cable para bateda de coche).
•Encender el aparato.
•Introducir el casete en el compartimiento de casetes.
•(#MMt{#JJ_Ke_SEel&W,YeJMYAIM
Fije el interruptor a la
posici6n de VCR.
_-En el visor_
Rebobinar la cinta con
el botbn de rebobinado
(REWIND) (si fuera
necesario).
e._Oprimir el bot6n de
reproducci6n (PLAY) para
que aparezcan las imdgenes
en la pantalla.
3primir el bot6n de parada
(STOP) cuando se desea
parar la reproducci6n.
(_n la TV_
PARA LOCALIZAR RAP-IDAMENTE UNA ESCENA ESPECIFICA
•Oprimir el bot6n de Iocalizaci6n (SEARCH).
PARA CONGELAR UNA IMAGEN
•Oprimir el bot6n de pausa/imagen fija (PAUSE/STILL).
• Oprimir nuevamente el botbn cuando se desea continuar reproduciendo.
Panasonic Consumer Electronics
Company, Division of Matsushita
Electric Corporation of America
On_'_'ason_-'Way Secaucus, "
New Jersey07094
Pdnled in Japan
VQTW0688(A) 1998
Panasonic Sales Company,
Division of Matsushita Electric of
Puerto Rico, inc. ("PSC")
Ave. 65 de Infanteda,Km.9.5
San GabrielIndustrialPark
Carolina,PuertoRico00985
