PANASONIC TV/VCR Or DVD Combo Manual 99040046
User Manual: PANASONIC PANASONIC TV/VCR or DVD Combo Manual PANASONIC TV/VCR or DVD Combo Owner's Manual, PANASONIC TV/VCR or DVD Combo installation guides
Open the PDF directly: View PDF ![]() .
.
Page Count: 41
Panasonic
Omnlvi8ion_H_Jl
Models
Combination VCR
Operating Instructions
PV-M1349/PV-M 1359W/
PV-M1369/PV-M 1379W
As an ENERGY STAFf' Partner, Matsushita f _
ElectricCorporation of America has determined
that this product or product model meets the
ENERGY STAR_guidelines for energy efficiency.
Please read these instructionscarefullybefore attemptingto connect, operate or adjust thisproduct.
Please save this manual.
Spanish Quick Use Guide is included. (Guia para r&pida consulta en espahol esta incluida.)
Important Safeguards and Precautions
IREAD AND RETAIN ALL SAFETY AND
OPERATING INSTRUCTIONS. HEED ALL
WARNINGS IN MANUAL AND ON UNIT
t INSTALLATION
1 POWER SOURCE CAUTION
Operateonlyfrompowersourceindicatedonunit
orinthismanual,If uncertain,haveanElectric
UitgtySaUce Companyor V'_o ProductsDealer
verifyyourhomepowersource.
2 POWER CORD PLUG
Fors_fety, this unitcomes with a polarized
type plug (one wide blade), or a three-wirs
groundingtype plug.
:- _ : I_ :% ] •
;e plugfits intooutletone way. If it cannotbe
RYinserted,try reversingit. If it stillwill notfit,
we an electri_ installthe properwall outlet.
Dnottempor with the plug.
_nding outlet.
nenesr_nj, have an elentdcten Install the
_nar outlet, Do_ot tamper withthe plug.
rest on
orbein the wayefd have
OUTDOOR ANTENNA INSTALLATION I
1 SAFE ANTENNA AND CABLE CONNECTION
An outside antenna or cable systemmust be _ _-
properlygrouodedto providesome protection .....__
against builtup staticcharges and voltage,_- _m=
Section810 of the National Electrical
Code, ANSI/NFPA 70 (InCanada, d/_ _ %
part 1 of the Canadian Electrical _/ J_-_,._
Code) providesinformation I !_ '/I ms==m_oN=_
regardingpropergroundingof the I _.T I :=._=e_,
mast and supportingstructure, _ _ IJ_=_ "*'_'
groundingof the lead-in wire to an _I_"
antenna discharge unit, size of _"'J_ _m/m_fm, a'_'mm
groundingconductors, locationof _.c .._,,_m_,.=_e== _*_t_**_
antenna dischargeunit,
connectionto groundingelectrodes,and requirementsfor the groundingelectrode.
2 KEEP ANTENNA CLEAR OF HIGH VOLTAGE POWER UNES OR CIRCUITS
Locate an outside antenna systemwell away from power linesand _tightor
power cimultsso itwill never touchthese power sourcesshouldIte_/_ fall. When
installing antenna, absolutelynever touch powerlines, circuitsorO0te_power
sources as thiscouldha fatal.
[ USING THE VIDEO UNIT I
Before unitis broughtout of storage ormoved to a new location refer_NpJ_to the
INSTALLATION sectionof these sefeguaros.
1 KEEP UNff WELL AWAY FROM WATER OR MOISTURE, such ascii_slhk,
bath tub, pool. ano en on.
2 IF EXPO6ED TO RAIN, MOISTURE, OR STRONG IMPAOT_unpl_ur_ and have
It inspectedby aquldtfladservice technicianbefore use.
8" ELECTRICAL STORMS
Dudnga _ghtnlngstorm,orbefore
disconnectallequtpn_ntfromthe
• Never expose to rai
|utions
_ti m 'H,< '
Only Usethose tj _mark. It is recommended that onlycassette tapes that have been tested and inspectedforUSelit2. 4, 6,
I_ 8hour VCR thachinsebe used.
This televisionreceiver provides displayof televisionclosedcaptioningin accordancewith §15.119 of the FCC rules.
FCC WARNING: Any unauthorized changes or modifications to this equipment would void the user's authority to _.
This symbolwarnsthe userthat uninsulatedvoltagewithinthe unitmay have
sufficientmagnitudeto cause electricshock. Therefore, itis dangerousto make any
kindof contact withany insidepartof this unit.
This symbolaterts the user that importantliteratureconcerning the operationand
maintenance of this unithas been included.
Therefore, it shouldbe read carefully in orderto avoidany problems.
2
Table of Contents
Important Safeguards and Precautions ................................ 2
Before Using ............................................................................ 4
•Accessories ................................ 4•Loading the Batteries .................. 4
•Record/Playback Time .............. 4•Prevent Accidental Tape Erasure ..4
Connections (OutdoorAntennaConnections,OSS/Cable Box Connections) .......... 5
One Time Setup (Language,Channel,Clock).................................... 6, 7
TV Operation
(NITE mode, Using the 100 key, RapidTune, AudioMute, Phones,SELF-DEMO mode) ...... 8
Picture Adjustment .................................................................. 9
Playback a Tape (slowMotion,StillPicture,Frame byFrame,Featuresfor Quality) ..1 0
Record On a Tape .................................................................. 11
•One Touch Recording ............ 11 •Selecting Input Mode ................ 11
Timer Recording .............................................................. 12, 13
•Timer Recording Using •Review, Replace or Clear
Combination VCR Buttons ...... 12 Program Contents ...................... 13
TV Timer Features .......................................................... 14, 15
•ON-TIMER with Alarm ............ 14 •INSTANT ALARM ...................... 15
• SLEEP TIMER ........................ 14
Closed Caption System .................................................. 16, 17
•Closed Caption Mode •Caption on Mute Feature ..........17
Feature .................................... 16
FM Radio .......................................................................... 18, 19
Tape Operation .............................................................. 20~ 23
•Tape Position Display .............. 20 •Auto Operation Functions .......... 21
•Zero Search ............................ 20 •One Minute Skip ........................ 21
•Repeat Play ............................ 21 •VHS Index Search System ..22, 23
Special VCR Features .................................................. 24 ~ 28
•Channel Caption ................ 24, 25 •Weak Signal Display ON/OFF ..28
•Time Stamp ...................... 26, 27 •VCR Lock .................................. 28
Copying Your Tapes (Dubbing) ............................................ 29
V-Chip Control Feature .................................................. 30 ~ 33
•Enter or Change Secret Code....30 •Setup TV PARENTAL Ratings ..32
•Setup MOTION PICT. Ratings _31 •Blocking Message ...................... 33
Reset Language, Channels, Clock ........................................ 34
On-Screen Display (OSD) ...................................................... 35
•VCR Status & Clock Display....35 • Warning and Instruction
• Channel & Function Display ....35 Displays .................................... 35
Unit Information ...................................................................... 36
•Reset all Combination VCR •Head Cleaning .......................... 36
Memory Functions .................. 36 •Specifications ............................ 36
•DST (Daylight Saving Time) ,,,,36
Before Requesting Service .................................................... 37
Service Center List ................................................................ 38
Spanish (Espabol) Quick Use Guide ............................ 39- 41
Location of Controls ........................................................ 42, 43
Warranty .................................................................. Back Cover3
Congratulations
on your purchase of one of the mostsophisticated and
reliableproductson the market today. Used properly,it will
bringyou and yourfamily years of enjoyment, Please fill in
the informationbelow.The serial number is onthe tag
located on the backof your CombinationVCR.
Date of Purchase
Dealer Purchased From
Dealer Address
Dealer Phone No.
Model No.
Serial No.
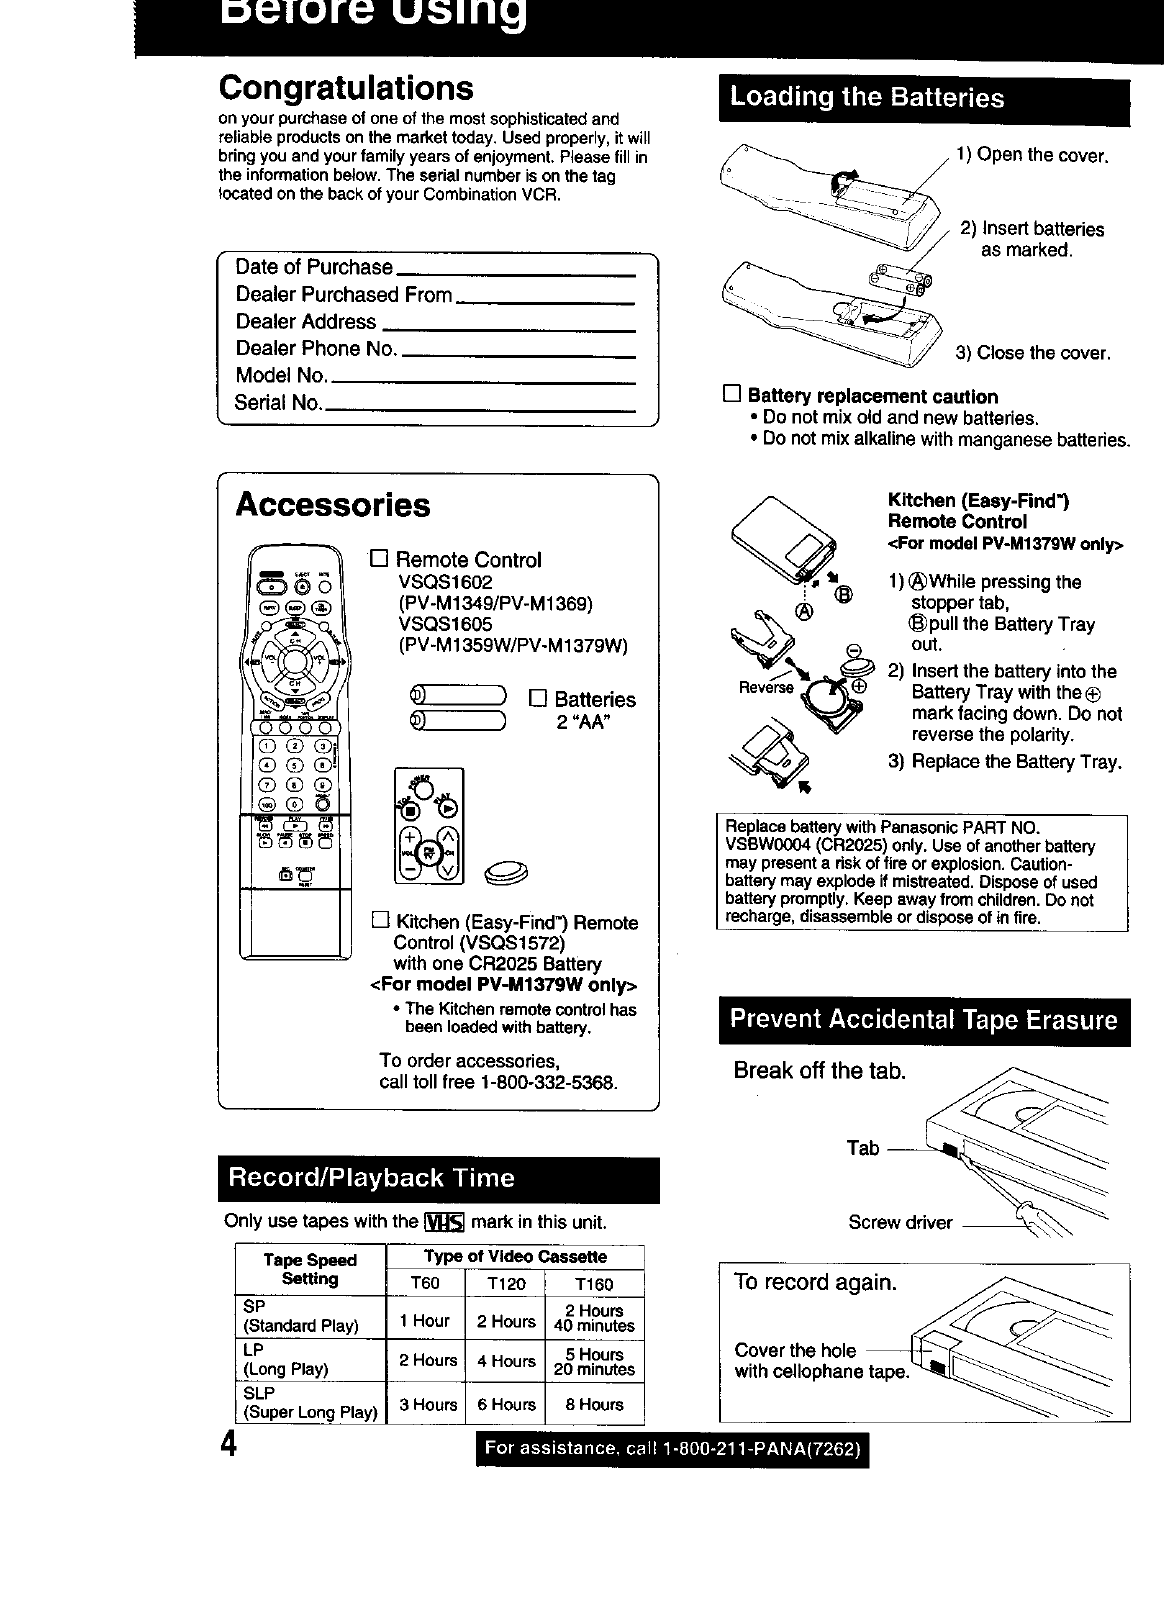
1) Open the cover.
2) Insert batteries
as marked.
3) Close the cover.
[] Battery replacement caution
• Do notmix old and new batteries.
•Do notmixalkalinewithmanganesebatteries.
Accessories
,P'9_.7o.
,4_1( ))71"4
@®®
N'_ NS_
[] Remote Control
VSQS1602
(PV-M1349/PV-M 1369)
VSQS1605
(PV-M 1359W/PV-M1379W)
[] Batteries
2"AA"
[] Kitchen(Easy-Find') Remote
Control (VSQS1572)
with one CR2025 Battery
<For model PV-M1379W only>
• TheKitchenremotecontrolhas
beenloadedwithbattery.
To order accessories,
calltoll free 1-800-332-5368.
Only use tapes withthe _ mark inthis unit.
__ Kitchen (Easy-Find')
Remote Control
<FormodalPV-M1379Wonly>
1) _)While pressingthe
stoppertab,
Rev_e_e,__(_pull the BatteryTray
out.
2) Insertthe battery intothe
BatteryTray withthe®
mark facing down. Do not
'_ reversethe polarity.
3) Replace the Battery Tray.
Replace battery withPanasonicPART NO.
VSBW0004 (CR2025) only. Use of anotherbattery
may present a risk of fire or explosion. Caution-
battery may explode if mistreated. Dispose of used
battery promptly. Keep away from children.Do not
recharge, disassemble or dispose of in fire.
Break off the tab.
Tab
4
IType of Video Cassette
Tape Speed
Setting IT60 T120 T160
I
SP 2 Hours
(StandardPlay) i1 Hour 2 Hours 40 minutes
LP i 5 Hours
(LongPlay) 2 Hours 4 Hours 20 minutes
SLP I 3 Hours 6 Hours 8 Hours
(Super Long Play) I
Screw driver
To record again.
Cover the hole --
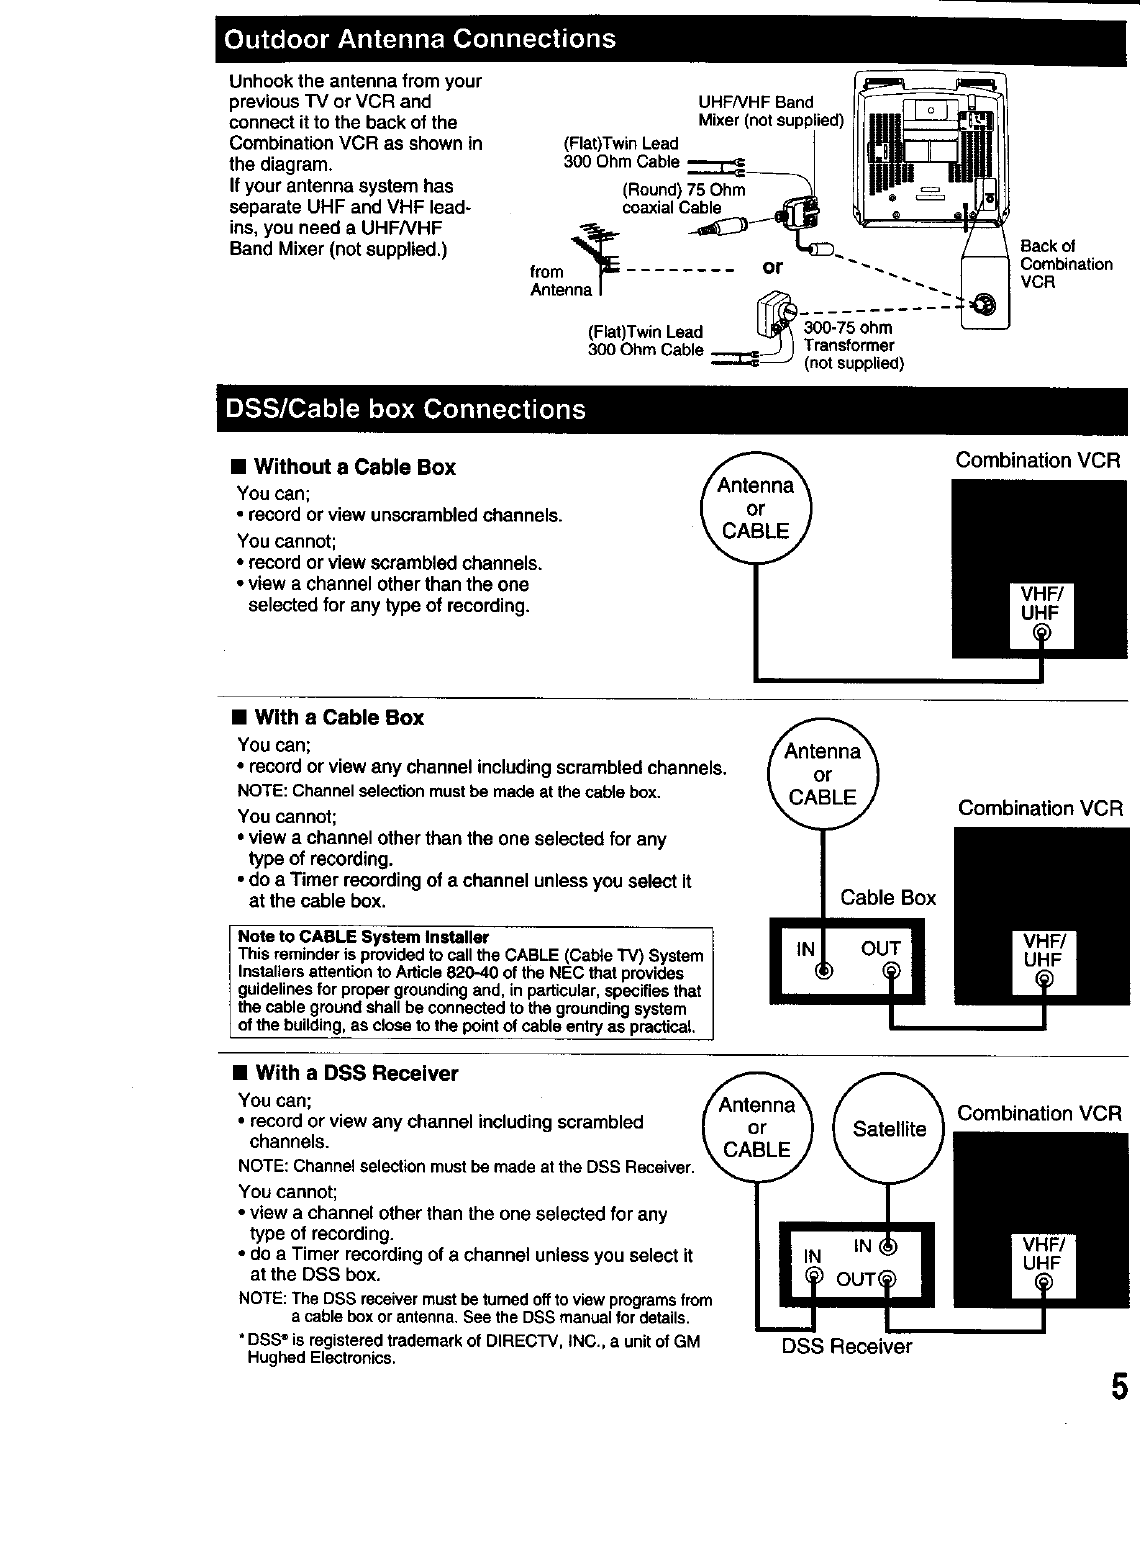
Unhook the antenna from your
previous TV or VCR and
connect it to the back of the
Combination VCR as shown in
the diagram.
If your antenna system has
separate UHF and VHF lead-
ins, you need a UHFNHF
Band Mixer (not supplied.)
UHFNHF Band
Mixer (not supplied)
(Flat)Twin Lead
300 Ohm Cable
(Round)75 Ohm
coaxialCabl,
from '_ or ""--..
AntennaI ""
(Flat)TwinLead [_ _0-750 hm
300OhmCable _J Transformer
(not supplied)
Back of
Combination
VCR
•Without a Cable Box
You can;
•recordor view unscrambledchannels.
You cannot;
• recordor view scrambledchannels,
•view achannel otherthan the one
selectedfor any type of recording,
Combination VCR
•With a Cable Box
You can;
•recordor view any channel includingscrambledchannels.
NOTE:Channelselectionmustbemadeatthecablebox.
You cannot;
•view a channel otherthan the one selectedfor any
type of recording.
•do a Timer recordingofa channel unlessyou select it
at the cable box.
Note to CABLE System Installer 7
This reminderis providedto call the CABLE (Cabte TV) System |
Instaflersattentionto Article820-40 of the NEC that provides |
guidelinesfor proper groundingand, inparticular,specifiesthat |
thecable groundshallbe connectedto the groundingsystem |
of the buUding,as close to the pointof cable entryas practical |
•With a DSS Receiver
You can;
•recordorview any channel includingscrambled
channels.
NOTE:Channelselectionmustbe madeattheDSS Receiver.
You cannot;
•view a channelother than the one selectedforany
type of recording.
• do a Timer recordingof a channel unlessyou select it
at the DSS box.
NOTE:TheDSSreceivermustbeturnedofftoviewprogramsfrom
acableboxorantenna.SeetheDSSmanualfordetails.
* DSS_isregisteredtrademarkof DIRECTV,INC.,a unitof GM
HughedElectronics. DSS Receiver
Combination VCR
Combination VCR
5
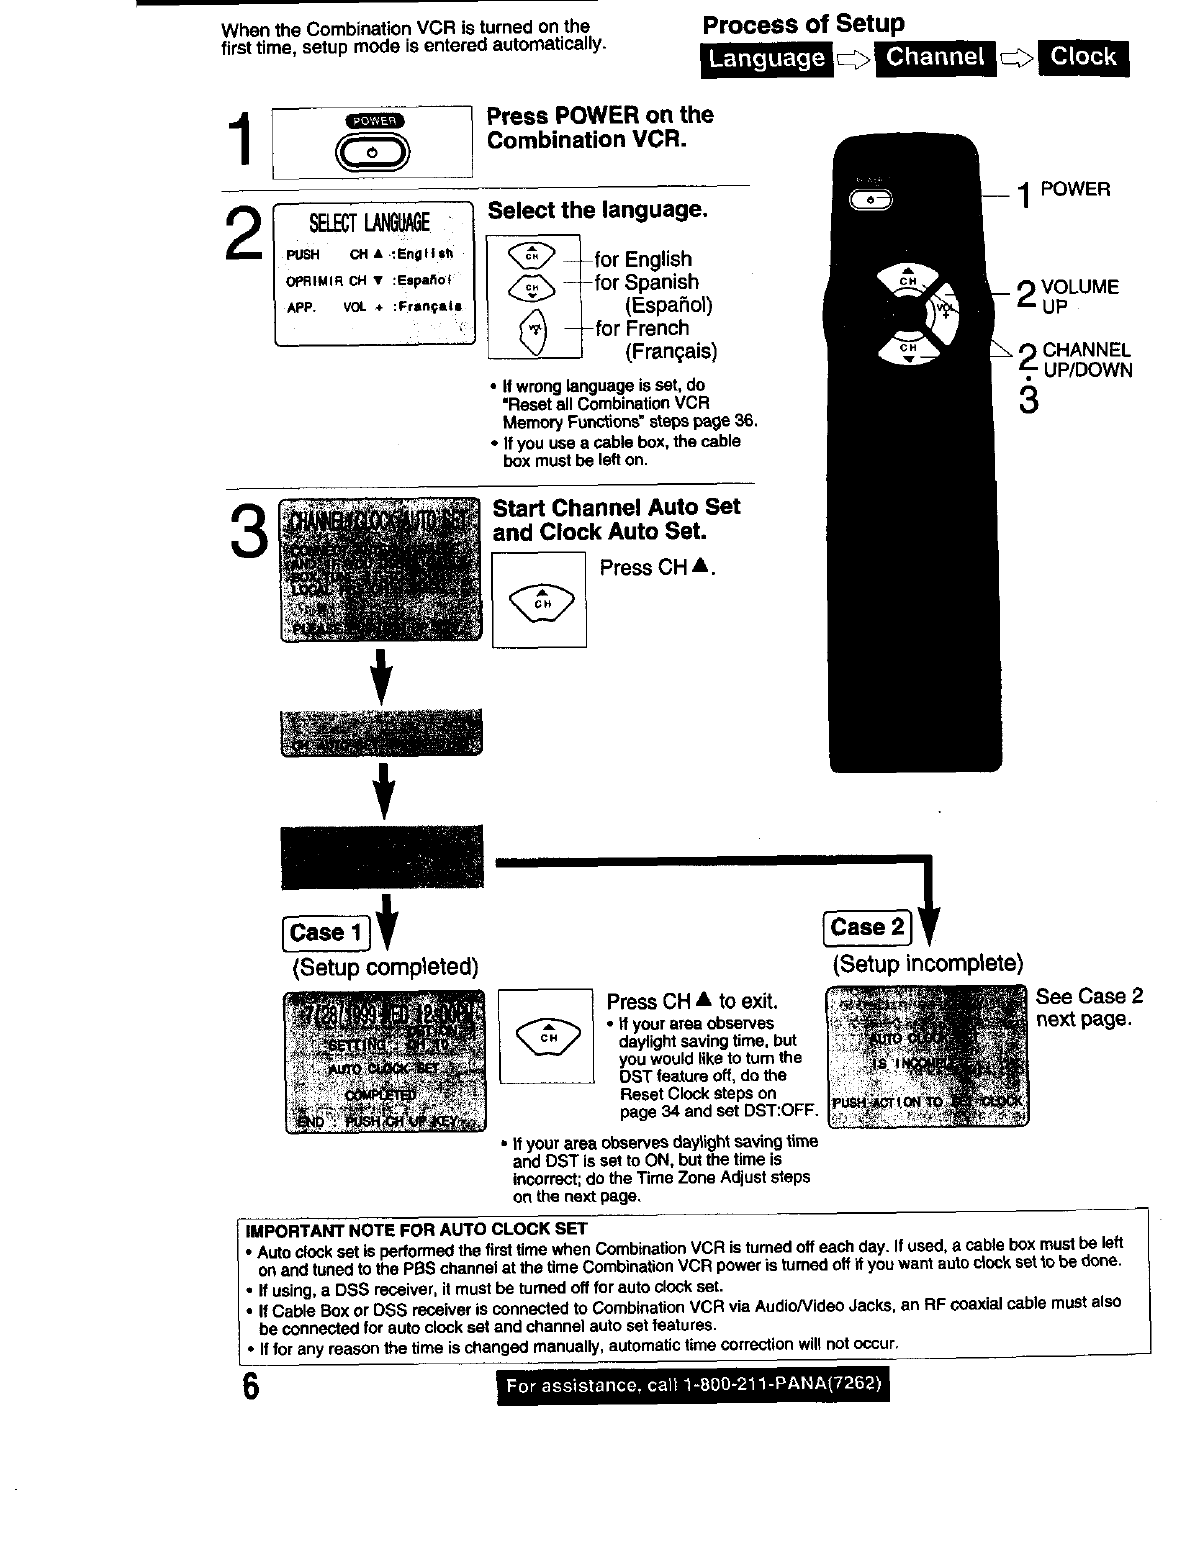
When the Combination VCR is turned on the
first time, setup mode is entered automatically. Process of Setup
Press POWER on the
Combination VCR.
Select the language.
<_ _-for English
_-for Spanish
_(EspaFiol)
_'_) _-for French
_-/_ (Fran_ais)
•If wronglanguageis set, do
"Resetall CombinationVCR
Memory Functions"stepsp_ge 36.
•If you use a cable box, the cable
box must be left on.
3Start Channel Auto Set
and Clock Auto Set.
Press CH A.
1POWER
VOLUME
2CHANNEL
UP/DOWN
3
(Setup completed) (Setup incomplete)
Press CH •to exit.
•if your area observes
daylightsaving time, but
youwouldlike to turn the
DST feature off, do the
Reset Clockstepson
page 34 and set DST:OFF.
See Case 2
next page.
• if your area observesdaylight savingtime
and DST is set to ON, butthe time is
incorrect;do the Time Zone Adjust steps
on the next page.
IMPORTANT NOTE FOR AUTO CLOCK SET
•Auto clockset is performedthe firsttime when CombinationVCR is turnedoffeach day. If used,a cable boxmustbe left
onand tuned to the P_S channelat the timeCombinationVCR power is turnedoffif you want autoclock setto be done.
•If using,a DSS receiver,itmust be turnedoff for auto clockset.
•If Cable Box or DSS receiver is connected to CombinationVCR via Audio/VideoJacks, an RF soaxial cable mustalso
be connected for auto clockset and channelauto set features.
•Iffor any reasonthe time ischanged manually,automatic time correctionwill notoccur.
6
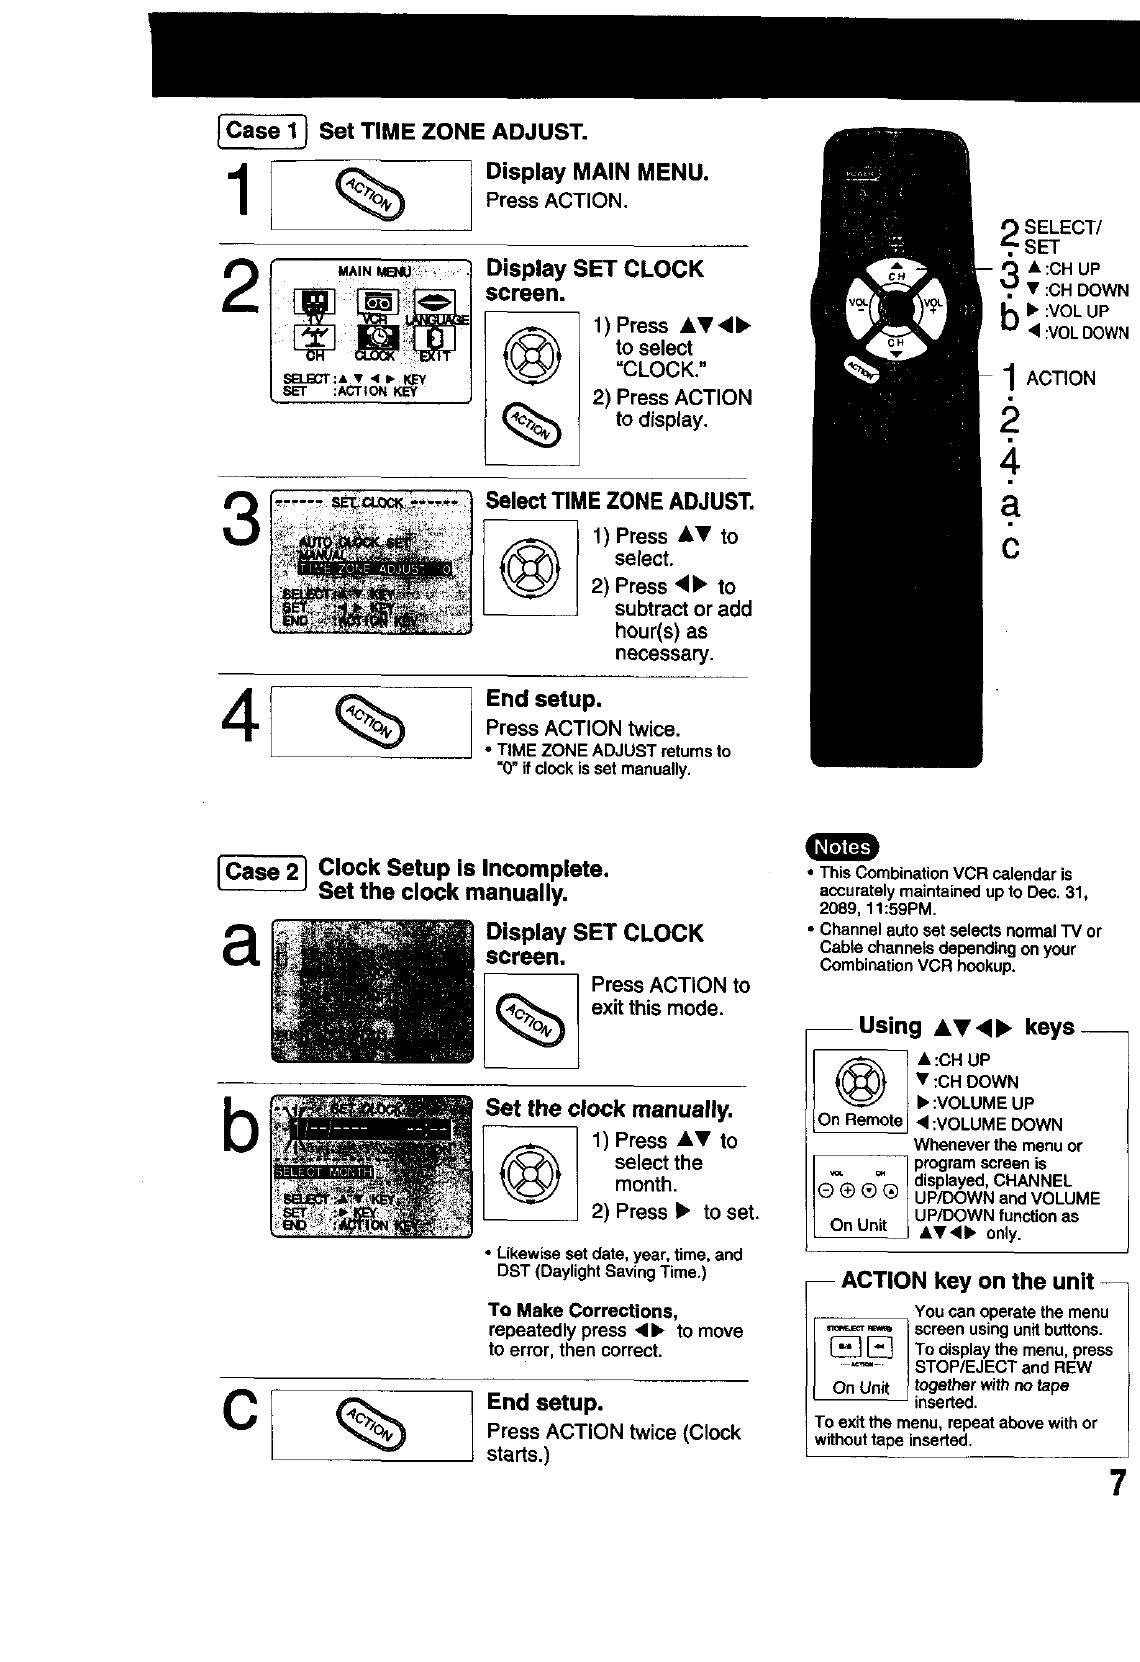
_Set TIME ZONE ADJUST.
1I %
2Display SET CLOCK
screen.
@
%
1) Press AT<I•
to select
"CLOCK."
SELECT/
SET
•:CHUP
• :CHDOWN
b• :VOLUP
• :VOLDOWN
1ACTION
2) Press ACTION
to display.
Select TIME ZONE ADJUST. a
1) Press AV to
Q select. C
2) Press 4• to
subtract or add
hour(s) as
necessary.
End setup.
Press ACTION twice.
• TIME ZONE ADJUST returns to
"0" if clock is set manually.
_Clock Setup is Incomplete.
Set the clock manually.
aDisplay SET CLOCK
screen.
Press ACTION to
exit this mode.
b
C
Set the clock manually,
1) Press AT to
Oselect the
month.
2) Press •to set.
• Likewiseset date, year, time, and
DST (Daylight Saving Time.)
To Make Corrections,
repeatedly press <11_to move
to error, then correct.
%End setup.
Press ACTION twice (Clock
starts,)
• This CombinationVCR calendar is
accuratelymaintainedup to Dec. 31,
2089, 11:59PM.
• Channel auto set selectsnormalTV or
Cable channelsdependingon your
Combination VCR hookup.
-- Using AV41_ keys--
Q ] •:CH UP
•:CH DOWN
•:VOLUME UP
On Remote •:VOLUME DOWN
Whenever the menu or
1programscreen is
= _displayed,CHANNEL
Q (_ ® _ ] UP/DOWN andVOLUME
A-,[ UP/DOWN functionas
unumt_ •V•• only.
ACTION key on the unit --
You can operatethe menu
'_='_"_'_ 1screen usingunitbuttons.
[_] | To displaythe menu, press
..... | STOP/EJECT and REW
On Unit _togetherwithnotape
inserted.
To exitthe menu, repeat abovewithor
withouttape inserted.
7
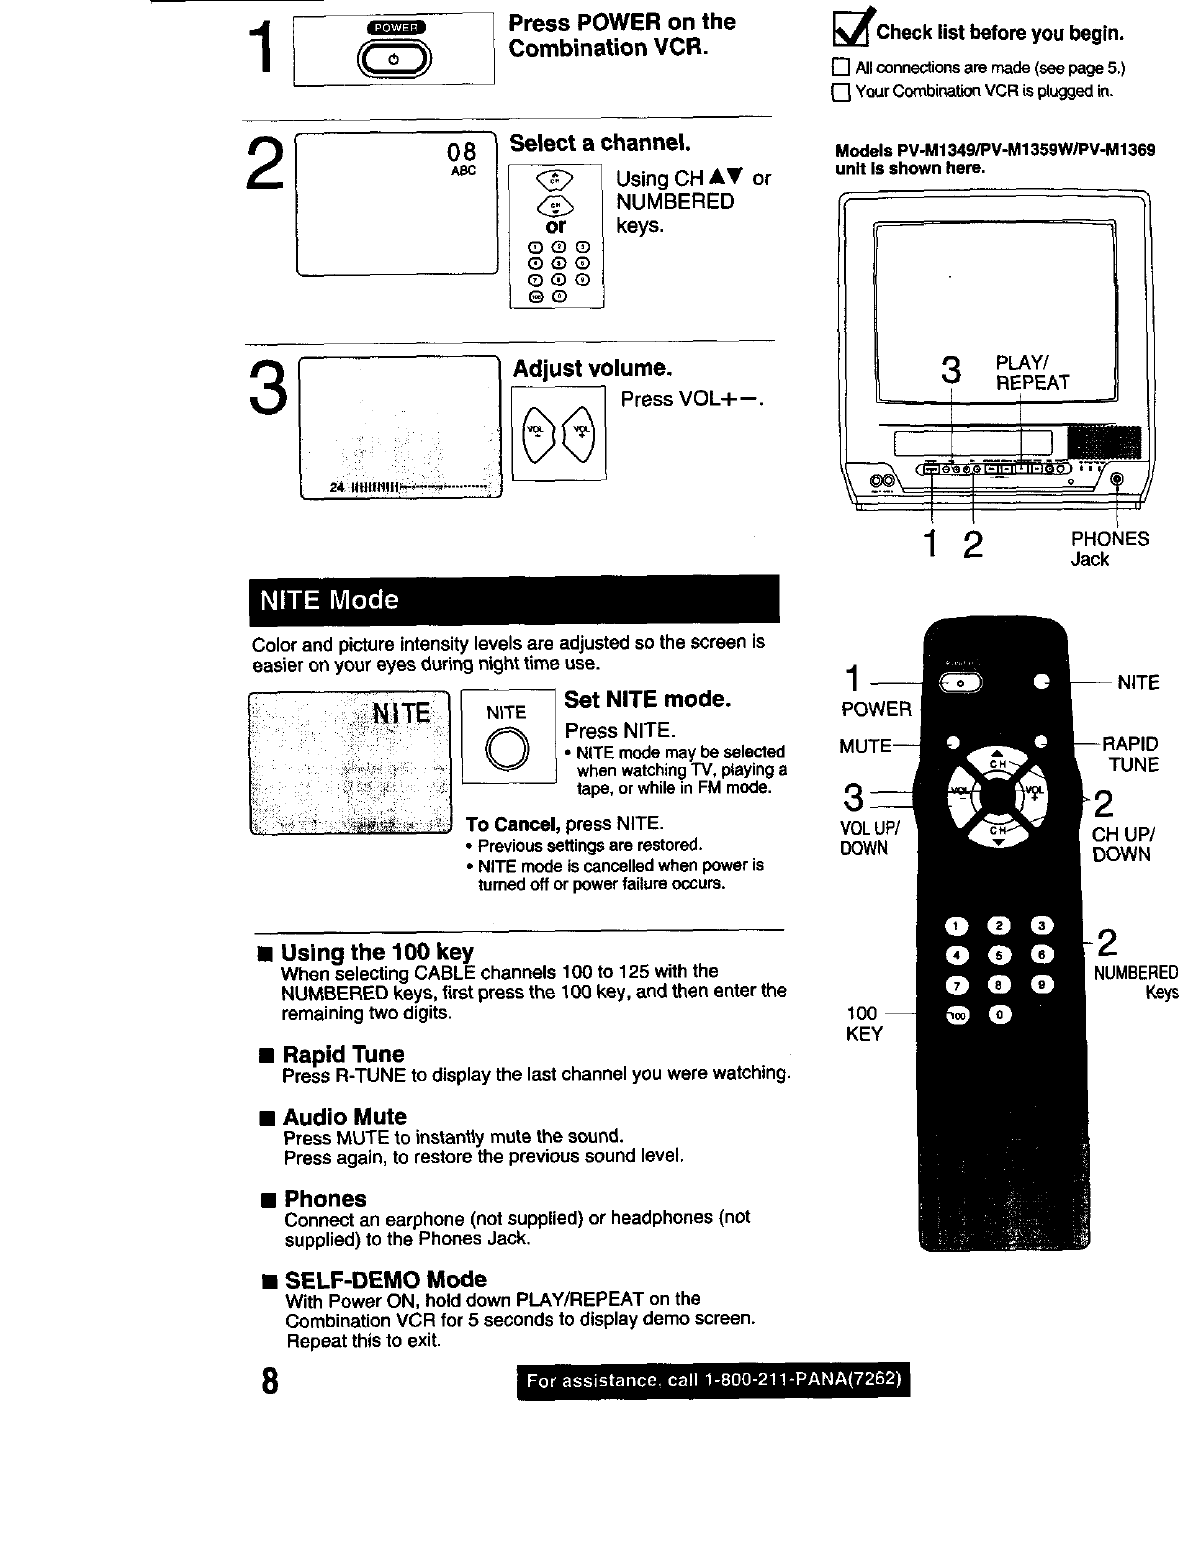
Press POWER on the_eITLTJ 1 =|
(_ CombinationVCR.
3
Select a channel.
<_> Using CH &V or
,_, NUMBERED
or keys.
oo(_
QoO
QQ(_
GO
Adjust volume.
t _- Press VOL+--.
_l_check list before you begin.
[] Allconnectionsaremade(see page5.)
[] YourCombinationVCR ispluggedin.
Models PV-M1349/PV-M1359W/PV-M1369
unit Is shown here.
3PLAY/
REPEAT
1 2 PHONES
Jack
Color and picture intensitylevels are adjustedso the screen is
easier on your eyes duringnight time use.
NITE
©Set NITE mode.
Press NITE.
•NITE modemaybe selected
when watchingTV, playinga
tape,or whilein FMmode.
To Cancel, press NITE.
•Previoussettingsare restored.
•NITE mode is cancelk3c_when power is
turnedoff or powerfailureoccurs.
__
POWER
TUNE
3
VOLUP/ CH UP/
DOWN DOWN
• Using the 100 key
When selectingCABLE channels 100 to 125 withthe
NUMBERED keys, firstpressthe 10(3key, and then enter the
remainingtwo digits,
•Rapid Tune
Press R-TUNE to displaythe last channelyou were watching.
•Audio Mute
Press MUTE to instantlymute the sound.
Press again, to restore the previoussound level.
•Phones
Connectan earphone (notsupplied)or headphones(not
supplied)to the Phones Jack,
•SELF-DEMO Mode
With Power ON, holddown PLAY/REPEAT on the
CombinationVCR for5 seconds to displaydemo screen.
Repeat thisto exit.
8
100
KEY
NUMBERED
Keys
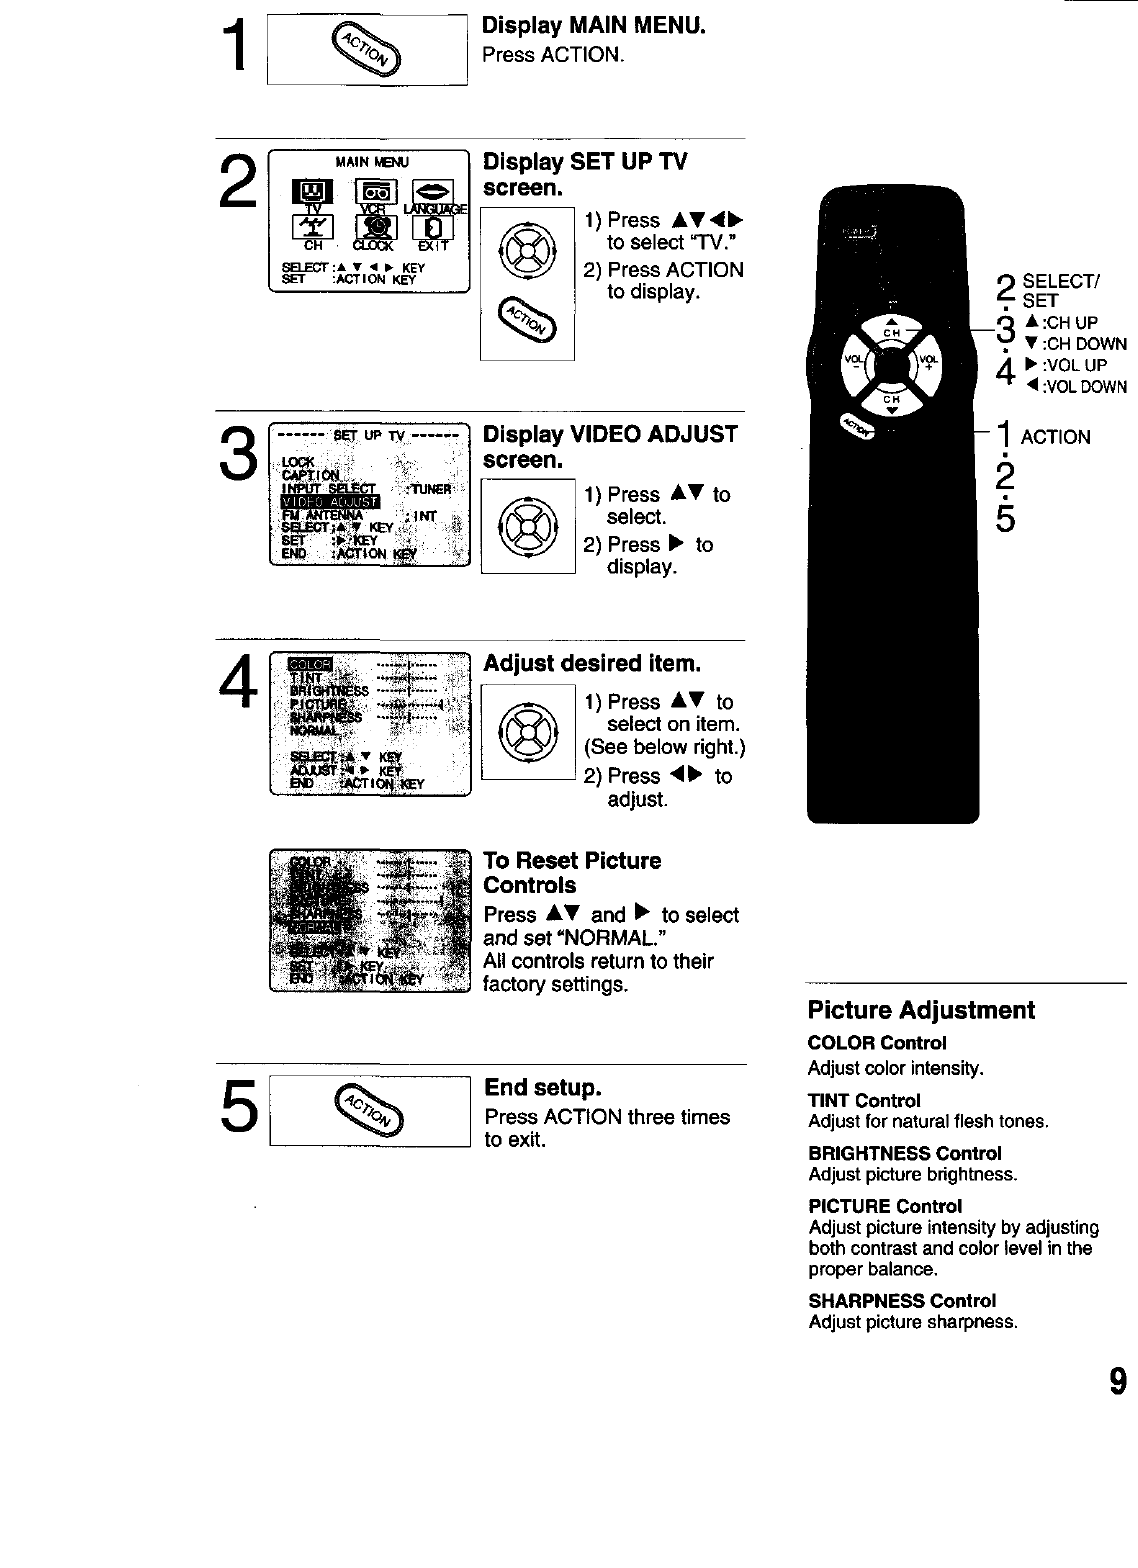
Display MAIN MENU.
Press ACTION.
V, Ib KEY
SET :ACTION KEY
Display SET UP TV
screen.
1) Press AT_I•
to select "TV."
2) Press ACTION
(_) to display.
3Display VIDEO ADJUST
screen.
1) Press AV to
select.
2) Press •to
display.
4 t _=,,m_,,_ .-_.,:i.i_:---._. '.i Adjust desired item.
l'_ _ _!'_ t @ ,)Press,, to
_:, select on item.
(See below right.)
tJ2) Press '<• to
adjust.
2 SELECT/
SET
_A :CH UP
•:CH DOWN
b":VOL UP
•:VOLDOWN
1ACTION
5
To Reset Picture
Controls
Press AT and • to select
and set "NORMAL."
All controls return to their
factory settings.
%End setup.
Press ACTION three times
to exit.
Picture Adjustment
COLOR Control
Adjustcolorintensity.
TINT Control
Adjust for natural flesh tones.
BRIGHTNESS Control
Adjustpicturebrightness.
PICTURE Control
Adjustpictureintensityby adjusting
both contrastand colorlevel in the
proper balance,
SHARPNESS Control
Adjustpicturesharpness.
9
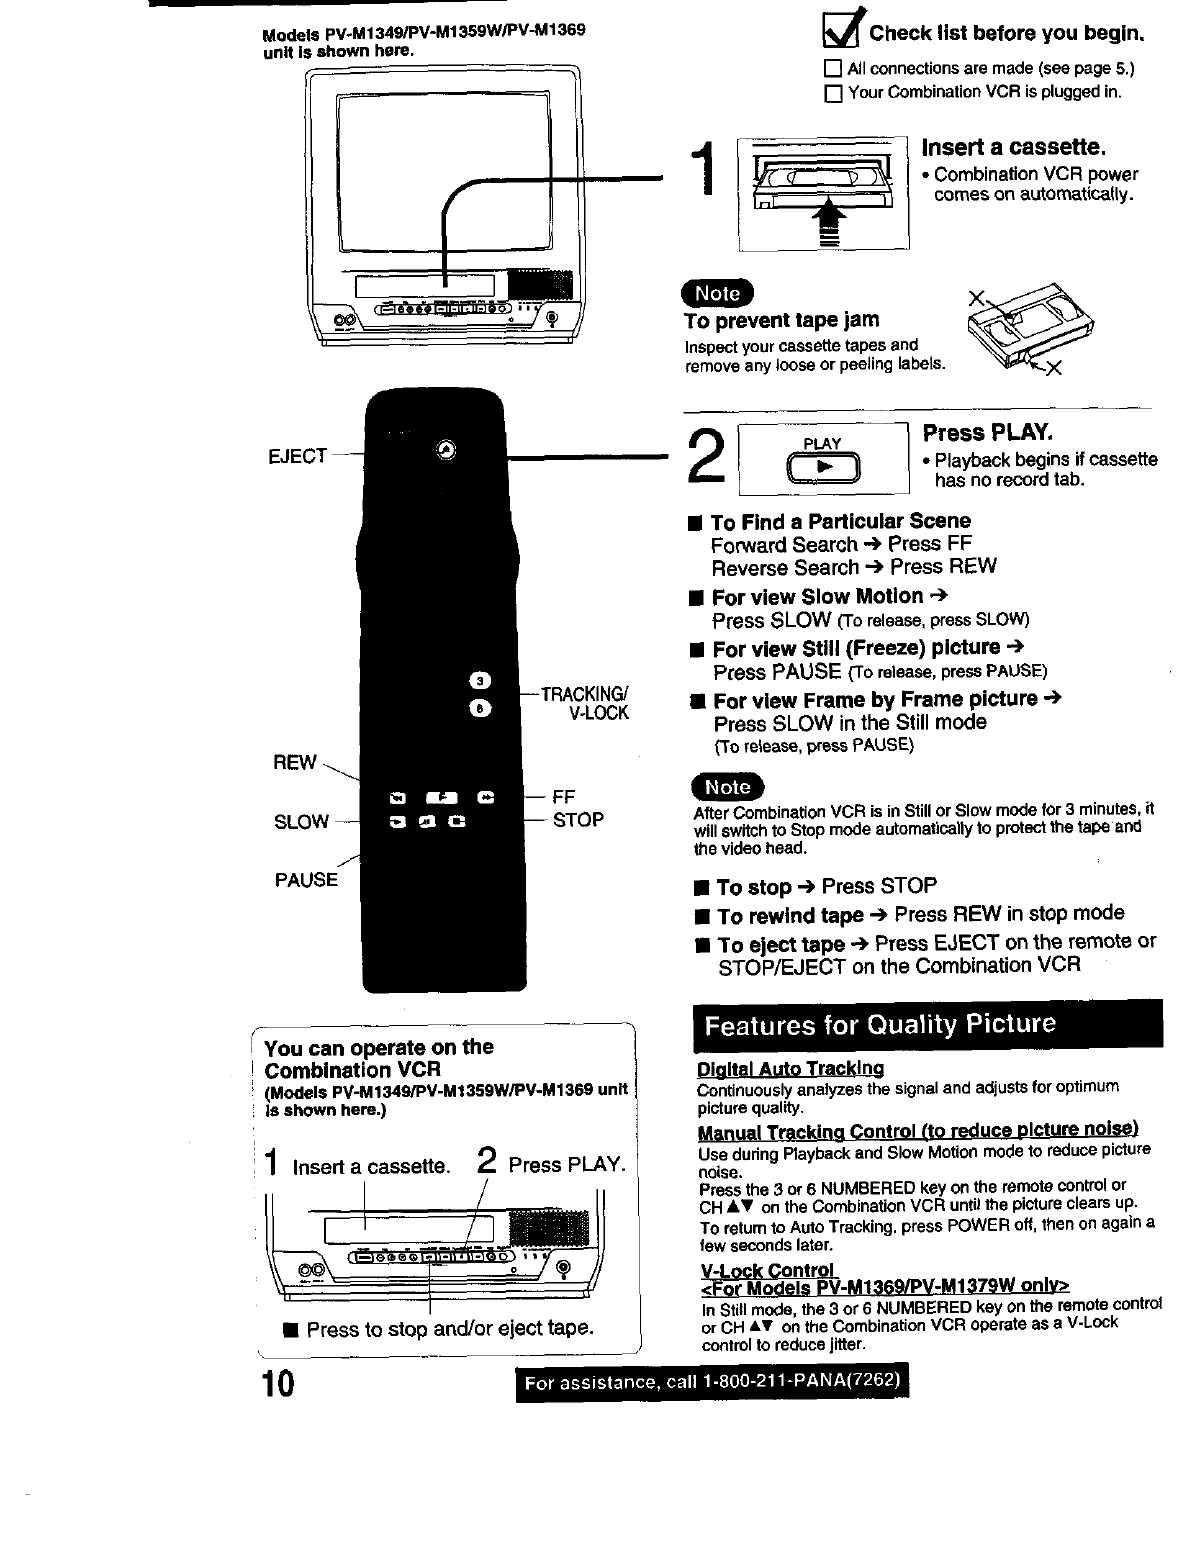
Models PV-M1349/PV-M1359W/PV-M 1369
unlt Is shown here. _f'Check list before you begin,
[] Allconnectionsare made(seepage5.)
[] YourCombinationVCRispluggedin,
Insert a cassette.
•Combination VCR power
comes on autom_t(ca((y.
Q
To prevent tape jam L_..-_ _-_
Inspectyourcassettetapes and
remove any loose or peelinglabels.
PAUSE
V-LOCK
21 Press PLAY.
•Playback begins if cassette
has no record tab.
• To Find a Particular Scene
Forward Search --) Press FF
Reverse Search "-')Press REW
•For view Slow Motion
Press SLOW (To release, pressSLOW)
• For view Still (Freeze) picture -'.)
Press PAUSE _ro release,pressPAUSE)
•For view Frame by Frame picture -')
Press SLOW in the Still mode
(To release, press PAUSE)
After CombinationVCR is in Stillor Slow mode for 3 minutes,it
will switchto Stop mode automatically to protect the tape and
the video head.
•To stop ") Press STOP
•To rewind tape -.) Press REW in stop mode
•To eject tape -') Press EJECT on the remote or
STOP/EJECT on the Combination VCR
_ou can operate on the
JCombination VCR
(Models PV-M1349/PV-M1359WiPV-M1369 unit
Is shown here.)
i
11Insert a cassette. 2Press PLAY.
•Press to stop and/or eject tape.
10
Dialtal Auto Tracklna
Continuouslyanalyzes the signaland adjusts for optimum
picturequality.
M_r_ua{ TrackJng Control Lto reduce DIcturo noise)
Use during Playback and Slow Motionmodeto reduce picture
noise.
Pressthe 3 or 6 NUMBERED key onthe remote controlor
CH &.V onthe CombinationVCR untilthe pictureclears up.
To returnto AutoTracking, press POWER off, thenon againa
few secondslater.
V-Lock Control
<For •odels PV-M1369/PV-M1379W onlY>
In Stillmode, the 3 or 6 NUMBERED key on the remotecontrol
orCH &V onthe CombinationVCR operateas a V-Lock
controlto reduce jitter.
ModelsPV-M1349/PV-M1359W/PV-M1369
unitisshownhere.
• :CHUP
• :CHDOWN
•:VOL UP
•:VOLDOWN
3
Q
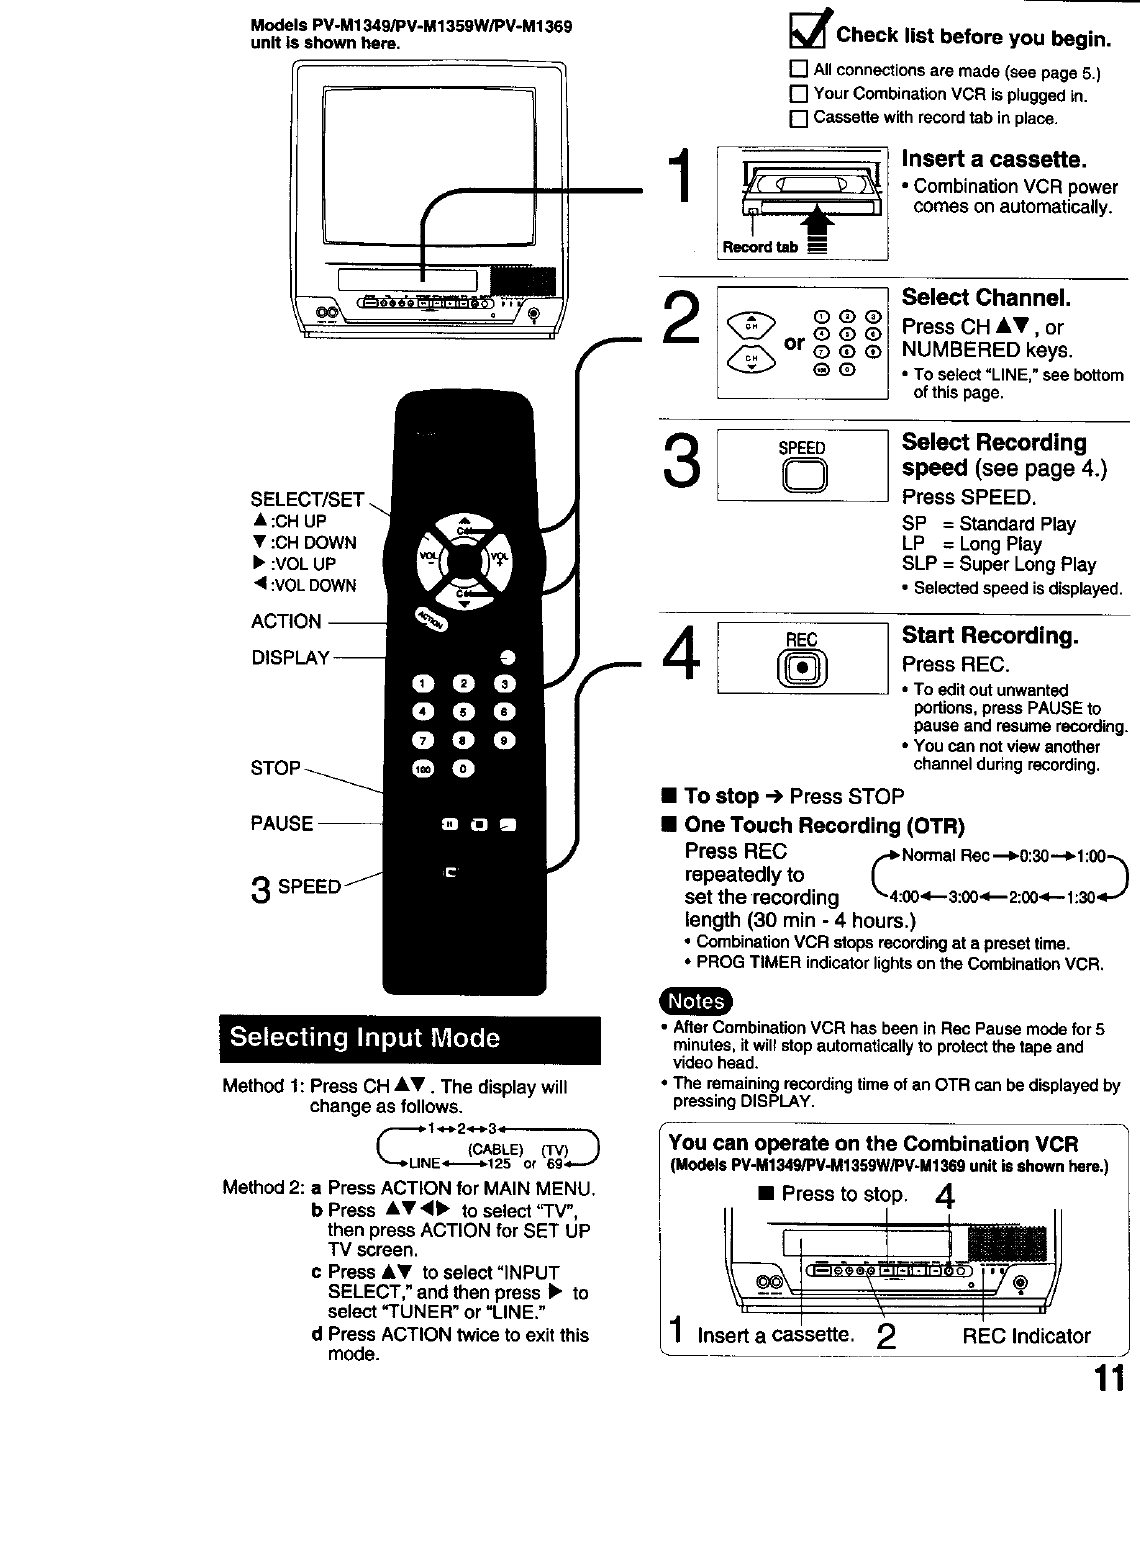
Method 1: Press CH AV. The displaywill
change as follows.
Method 2: a Press ACTION for MAIN MENU.
b Press &V<l• to select 'q'V",
then press ACTION for SET UP
TV screen.
c Press &Y to select "INPUT
SELECT," and then press •to
select "TUNER" or "LINE."
d Press ACTION twice to exit this
mode.
1
_t_l_check list before you begin.
[] Allconnectionsare made (see page 5.)
[] YourCombinationVCR is pluggedin.
[] Cassette withrecordtab inplace.
Recordtab
Insert a cassette.
• Combination VCR power
comes on automatically.
or©Q
Select Channel.
Press CH iT, or
NUMBERED keys.
•To select "LINE," see bottom
of this page.
3I Select Recording
speed (see page 4.)
Press SPEED.
SP = Standard Play
LP = Long Play
SLP = Super Long Play
•Selected speed is displayed.
4Start Recording.
Press REC.
• To editout unwanted
portions,press PAUSE to
pause and resume recording.
•You can notview another
channelduringrecording.
• To stop -.) Press STOP
•One Touch Recording (OTR)
Press REC c_Normal Rec.--1_0:30-.-_l:00-_
repeatedly to
set the recording _-4:00<---3:0o_2:00<--1:3o<.-_
length (30 rain - 4 hours.)
•CombinationVCR stopsrecordingat a presettime.
• PROG TIMER indicatorlightson the Combination VCR.
•After CombinationVCR has been in Rec Pause mode for 5
minutes,itwillstopautomaticallyto protectthe tape and
video head.
•The remainingrecordingtime of an OTR can be displayedby
pressingDISPLAY.
• Press to stop.
i
You can operate on the Combination VCR
(ModelsPV-M1349/PV-M1359W/PV-M1369unit is shownhere.)
4
l_lllnsert a cassette. 2 REC Indicator
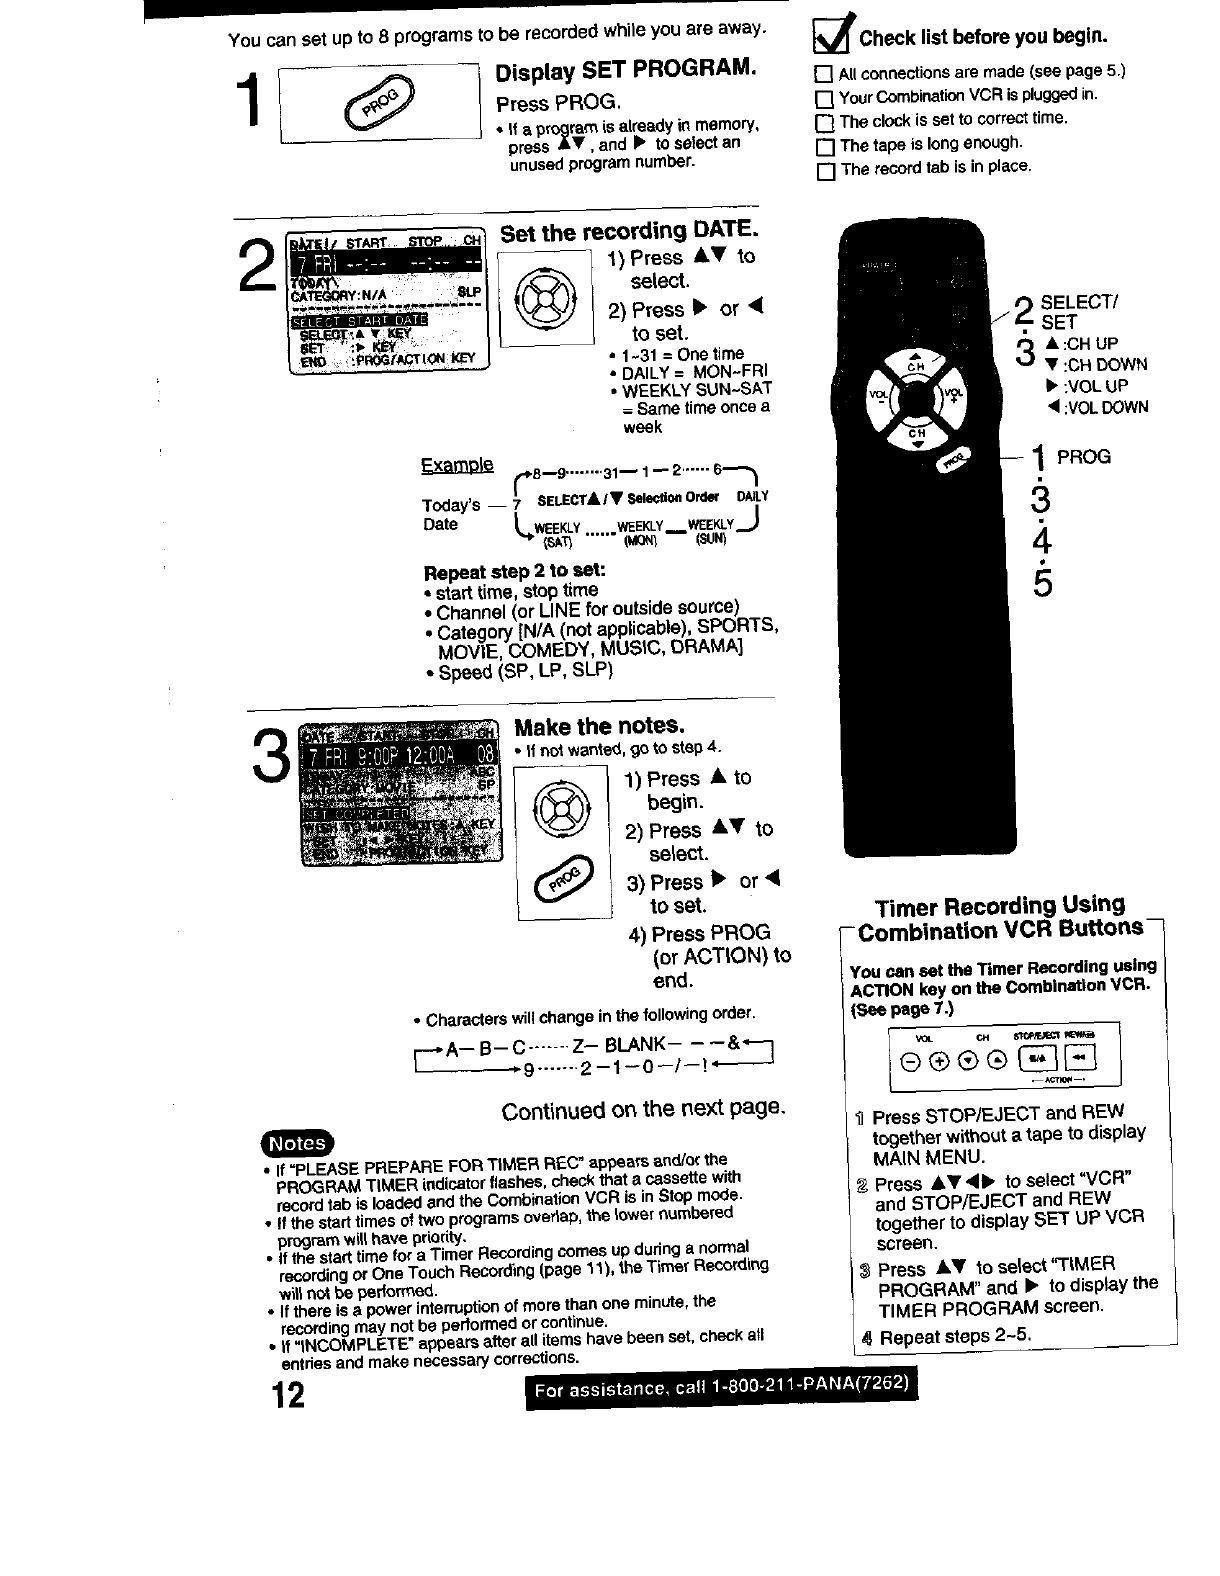
You can set upto 8 programs to be recorded while you are away.
Display SET PROGRAM.
Press PROG,
•if aprogram is already m memory,
press •V, and •to select an
unused programnumber.
_;_ll'Check list before you begin.
[] All connectionsare made (see page 5.)
[] YourCombinationVCR is pluggedin.
[] The clockis set to correcttime.
[] The tape is longenough.
[] The recordtab is inplace.
2Set the recording DATE.
1) Press AT to
Oselect.
2) Press •or •
to set.
•1-31 = One time
•DAILY = MON~FRI
•WEEKLY SUN-SAT
= Same time once a
week
t,._B--9 ........
/
Today's -- 7SELECTA/V SelectionOrder DAILY
Date _._E_-Y WEEKLY WEEKLY_.J
(SAT) ..... (MON_ (SUN)
Repeat step 2 to sat:
•start time, step time
•Channel (or LINE for outsidesource)
•Category[N/A (not applicable),SPORTS,
MOVIE, COMEDY, MUStC, DRAMA]
• Speed (SP, LP, SLP)
SELECT/
SET
•:CH UP
V:CH DOWN
•:VOL UP
< :VOLDOWN
1 PROG
4
Make the notes.
•tfnot wanted, go to step 4.
O1) Press • to
begin.
2) Press •V to
(_ select.3) Press •or •
to set.
4) Press PROG
(or ACTION) to
end.
•Characterswillchange inthe followingorder.
_-_C9 .......Z- BLANK- ---&*-I
....... 2--1--0--I--!"- "_
Continued on the next page.
•If=PLEASE PREPARE FOR TIMER REC" appears end/or the
PROGRAM TIMER indicatorflashes, check that acassettewith
record tab is loaded and the CombinationVCR is inStop mode.
• If the start times ot two pmgremsoverlap, the lower numbered
program willhave priority.
• If the start time for a Timer Recordingcomes up dudnga normal
recordingorOne Touch Recording(page 11),the Timer Recording
willnot be performed.
•Ifthere is a power interruptionof more than one minute,the
recordingmay not be pedormed or continue.
•If "INCOMPLETE" appears after all items have been set, check all
entriesand make necessarycorrections.
12
Timer Recording Using
- Combination VCR Buttons-
You can set the Timer Recording using
ACTION key on the Combination VCR.
(See page 7.)
'DPress STOP]EJECT and REW
together withouta tape to display
MAIN MENU.
Press AY4• to select "VCR"
and STOP/EJECT and REW
together to display SET UP VCR
screen.
Press J,Y to setsct"T|MER
PROGRAM" and • to display the
TIMER PROGRAM screen.
I_, Repeat steps 2-5,
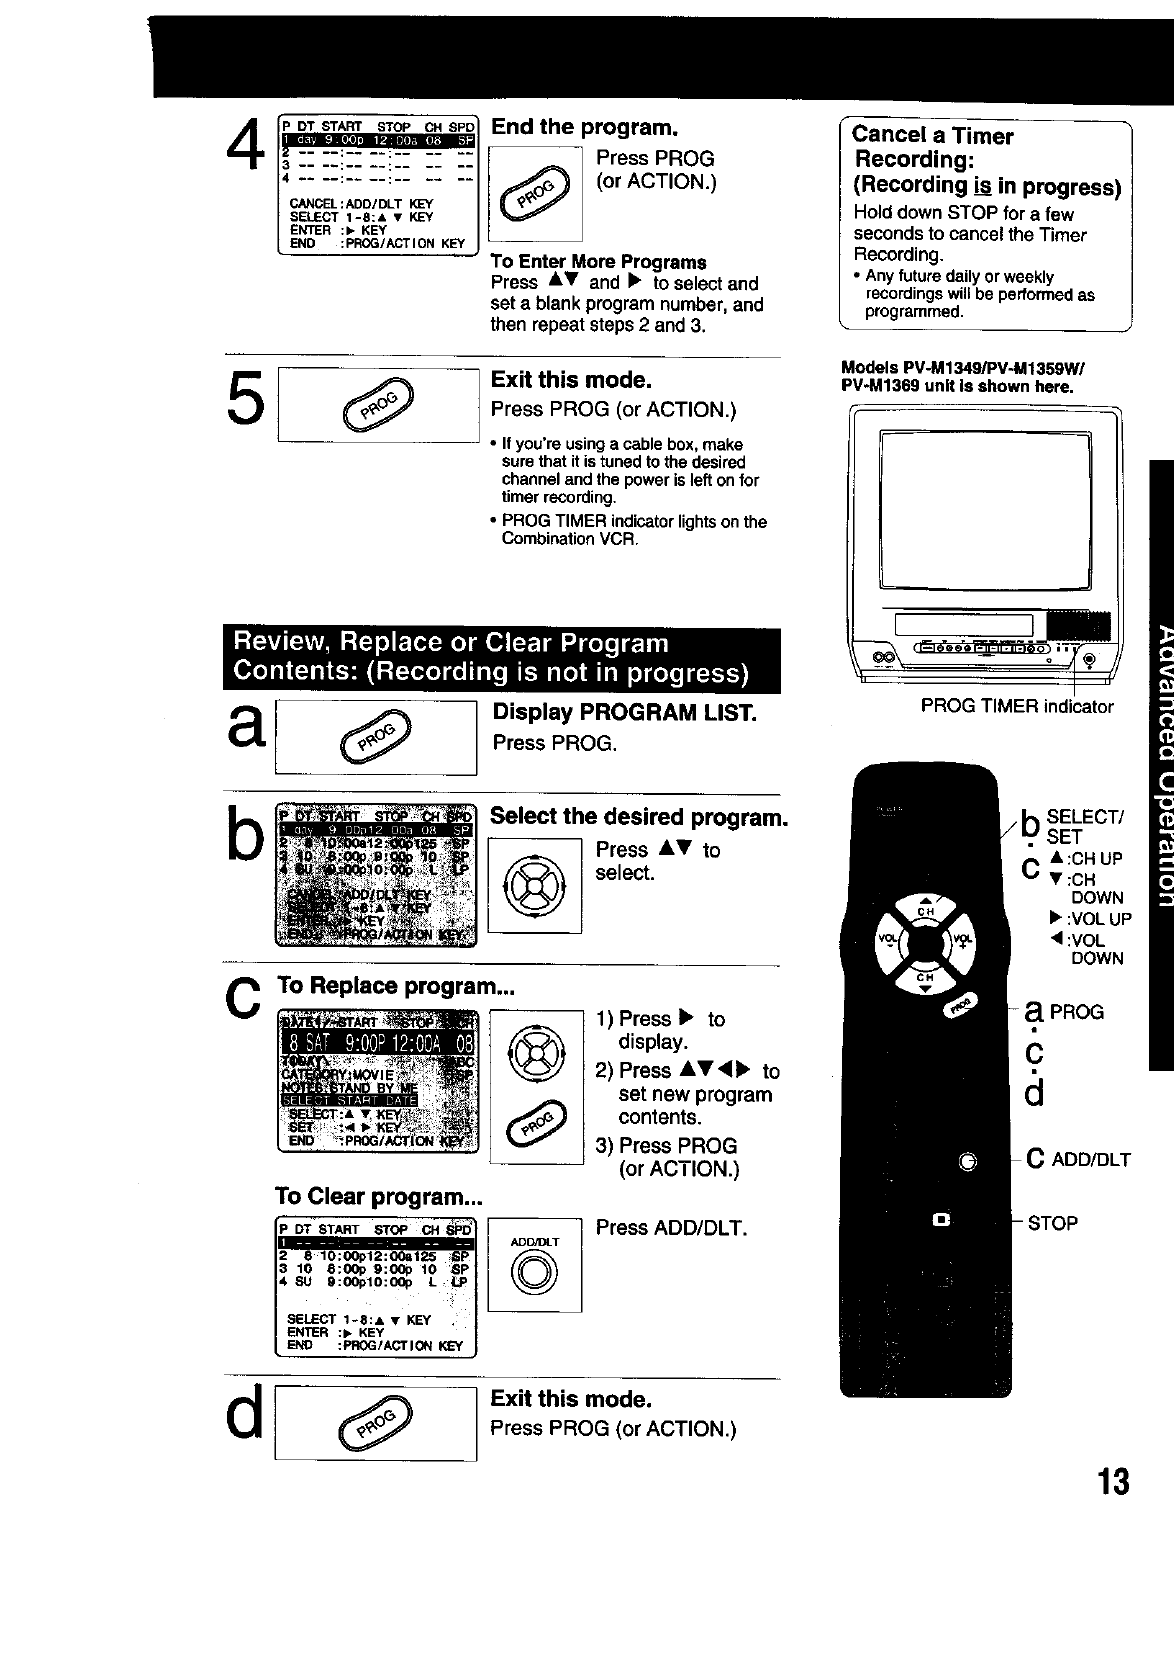
.oT.s:rA_.sT.o_c. sPoIEnd the program.
r .... :'_-:-_ ..... / _ Press PROG
_ --" ---::-- ---i--- --_ "--/[ _==_ t (or ACTION.)
= ,EY/
LENO :PROG/ACTION "J To Enter More Programs
Press &V and •to select and
set ablankprogram number,and
then repeat steps2 and 3.
5/ Exit this mode.
Press PROG (or ACTION.)
• if you're usin9 a cabk-=box, make
sure that it istuned to thedesired
channeland the power is left onfor
timer recording.
•PROG TIMER indicatorlightson the
CombinationVCR.
Cancel a Timer
Recording:
(Recording is in progress)
Hold down STOP for afew
seconds to cancel the Timer
Recording.
•Any future daily orweekly
recordingswillbe performedas
programmed.
Models PV-M1349/PV-M1359W/
PV-M1369 unit Is shown here.
-- I
al
b
Display PROGRAM LIST.
Press PROG.
Select the desired program.
Press A_' to
select.
C To Replace program... @
0
To Clear program...
1) Press • to
display.
2) Press &T,d• to
set new program
contents.
3) Press PROG
(or ACTION.)
Press ADD/DLT.
Exit this mode.
Press PROG (or ACTION.)
PROG TIMER indicator
SELECT/
SET
CA :OH UP
• :CH
DOWN
•:VOLUP
•:VOL
DOWN
-aPROG
c
d
C ADD/DLT
13
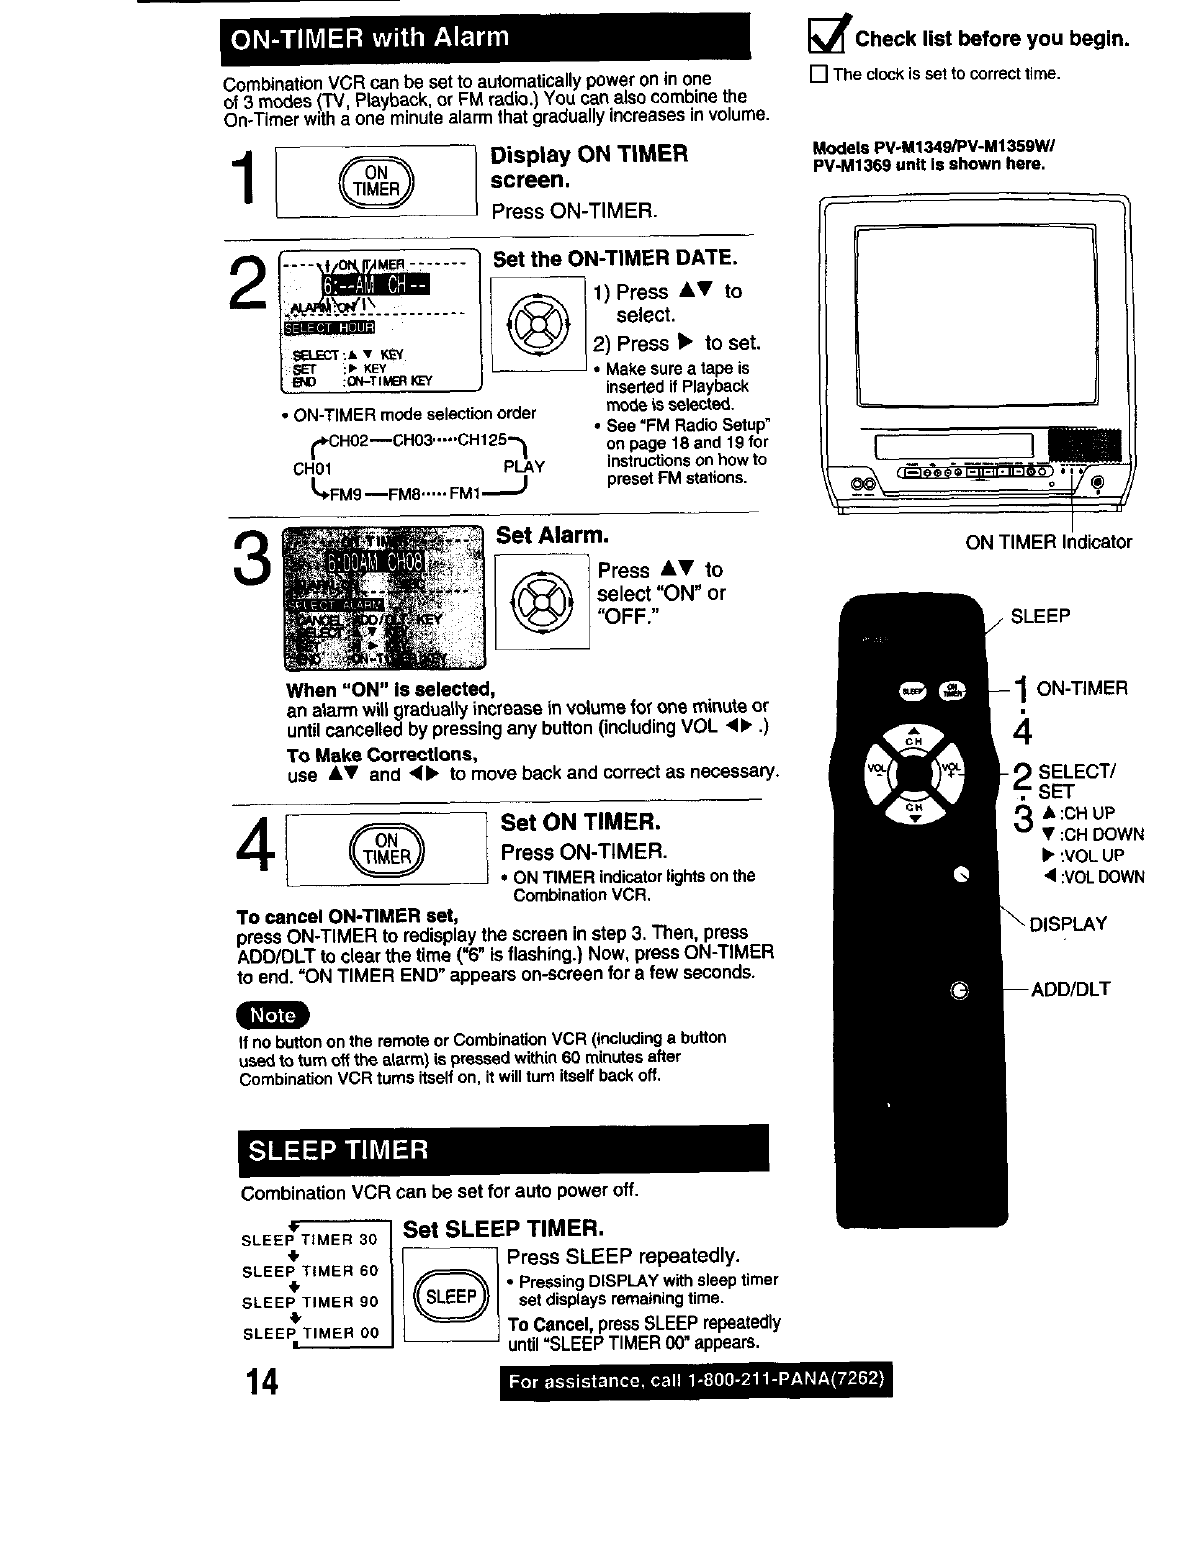
Combination VCRcan be setto automatically poweron in one
of 3modes ('IV Playback.or FM radio.)You canalsocombinethe
On-Timerwitha one minutealarmthat graduallyncreases n volume.
_ ] Display ON TIMER
screen.
-- Press ON-TIMER.
1 1) Press to
Bset U_ /select.
_ 2) Press • to set.• Makesurea tapeis
_'Y insertedif Playback
•ON-TIMERmodeselectionorder modeisselected.
• See"FMRadioSetup"
t_CH02_CH03"'"CH125-_ onpage18and19for
CH01= PLAY/ instructionsonhowto
_,FM9mFM8..... FM1_ presetFMstations.
3Set Alarm.
I Q Press i,Y to
select "ON" or
"OFF."
When "ON" is selected,
an alarmwill graduallyincrease in volumeforone minute or
untilcancelled by pressingany button(includingVOL •>" .)
To Make Corrections,
use &V and 41> to move back and correctas necessary.
4I ® so,o..,__
Press ON-TIMER.
•ON TIMERindicatorlightsonthe
CombinationVCR,
To cancel ON-TIMER set,
pressON-TIMER to redisplaythe screenin step 3, Then, press
ADD/DLT to clearthe time ("6"is flashing.) Now, pressON-TIMER
to end, "ON TIMER END" appearson-screenfor afew seconds.
I_Check list before you begin.
[] The clock is set to correct time.
Models PV-M1349/PV-M1359WI
PV-M1369 unlt Is shown here.
F-
ON TIMER Indicator
SLEEP
ON-TIMER
SELECT/
'SET
&:CHUP
•:CH DOWN
IP:VOLUP
•:VOLDOWN
m
If no button onthe remote or CombinationVCR (including a button
used to turn offthe alarm) is pressed within60 minutesafter
CombinationVCR tams itselfon, it will turn itself backoff.
CombinationVCR can be setfor auto power off.
,F
SLEEP TIMER 30
,I,
SLEEP TIMER 60
,I,
SLEEP TIMER 90
SLEEP TIMER O0
14
Set SLEEP TIMER.
_ press SLEEP repeatedly.
PressingDISPLAYwithsleeptimer
setdisplaysremainingtime.
To Cancel,pressSLEEPrepeatedly
until=SLEEPTIMER00"appears.
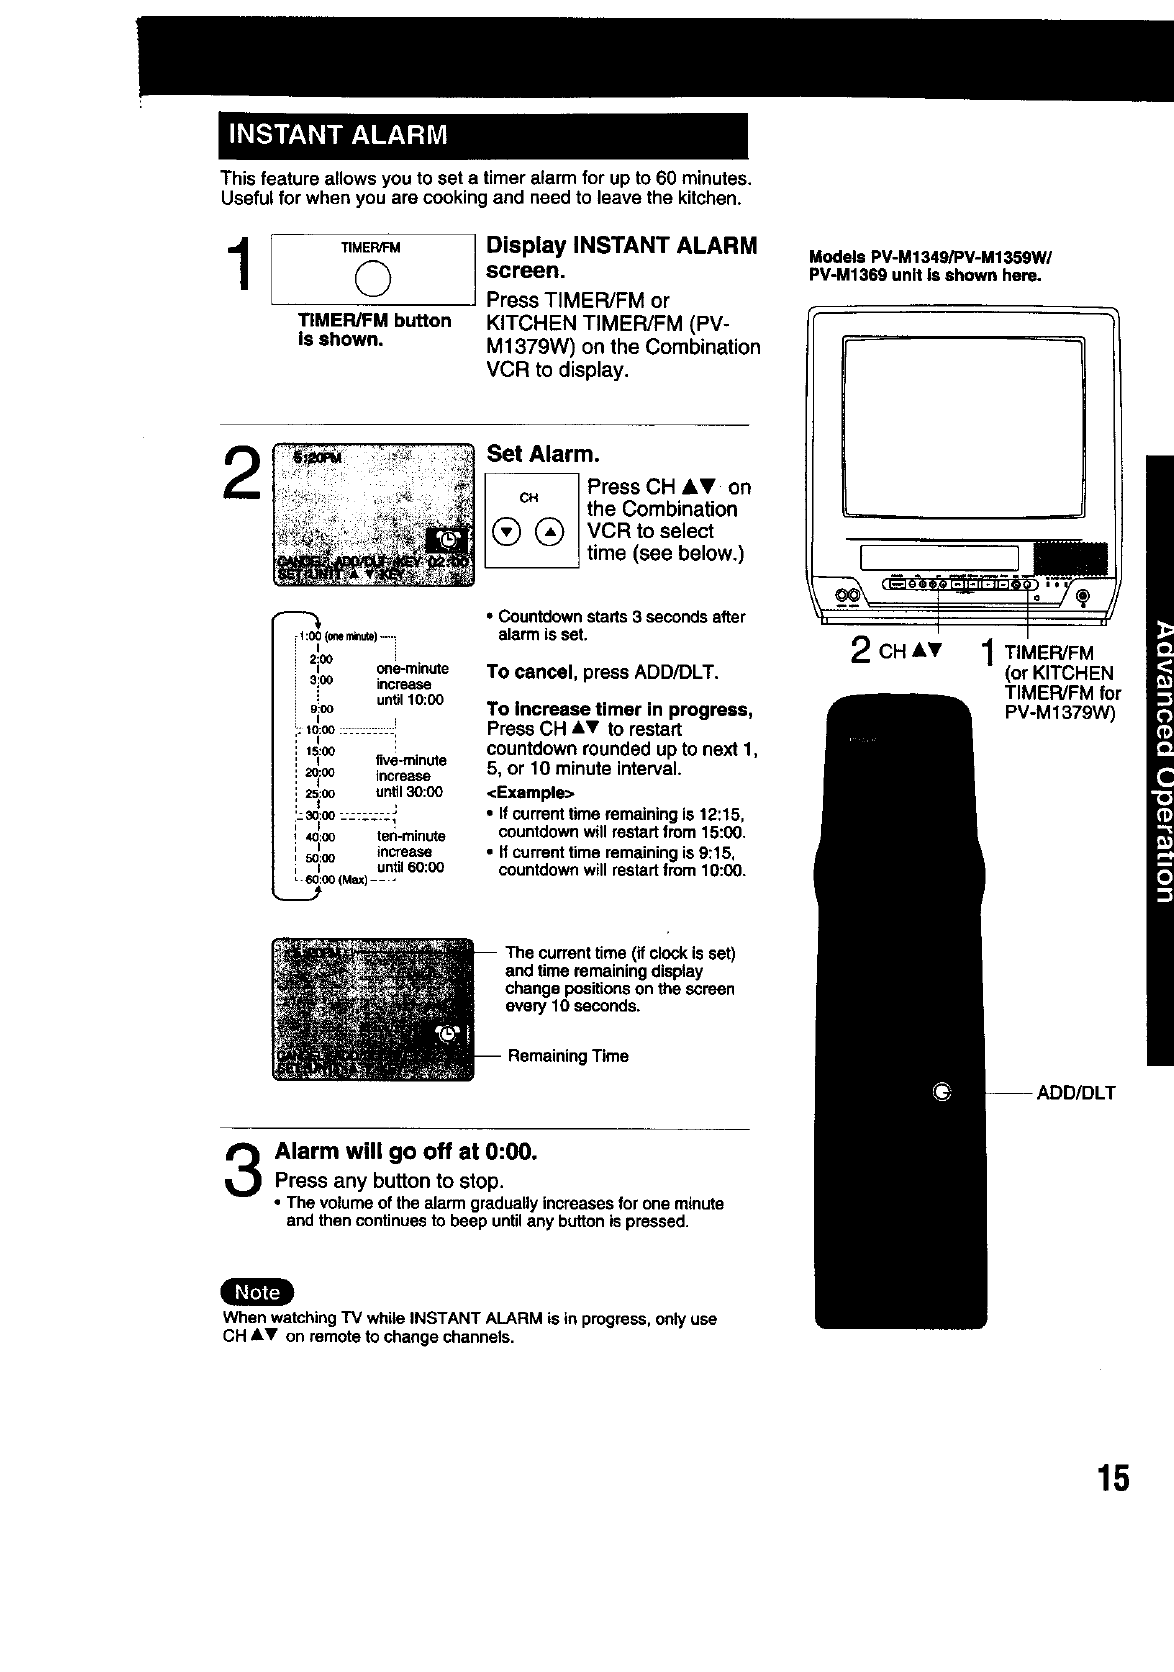
Thisfeatureallowsyoutosetatimeralarmfor upto 60 minutes.
Useful for whenyou are cookingand need to leave the kitchen.
11
TIMER/FM button
is shown.
Display INSTANT ALARM
screen.
Press TIMER/FM or
KITCHEN TIMER/FM (PV-
M1379W) on the Combination
VCR to display.
2Set Alarm.
[(_ Press CH AV on
cN the Combination
®VCR to select
time (see below.)
Models PV-M1349/PV-M1359W/
PV-M1369 unit Is shown here.
[ J
r1:00 (0_ ntnute).....
I
2:(;0
i one-minute
3i°° increase
: until 10:00
9_00
Ii
_:oo.......... i
15:t10
i five-minute
2_:00 increase
25:oo until30:00
I*
i--301:00=-- ::-=:: _
40:(_O ten-minute
i I increase
=50:(0
; I until60:00
J00 (Max) ....
• Countdownstarts 3 secondsafter
alarm is set.
To cancel, press ADD/DLT.
To increase timer in progress,
Press CH ,&1' to restart
countdown rounded up to next 1,
5, or 10 minute interval.
<Example>
•If currenttime remainingis 12:15,
countdownwill restartfrom 15:00.
•If currenttime remainingis 9:15,
countdownwill restartfrom 10:00.
2CH At' 1TIMER/FM
(or KITCHEN
TIMER/FM for
PV-M1379W)
(if clockis set)
and time remainingdisplay
change positionson the screen
every 10 seconds.
RemainingTime
Alarm will go off at 0:00.
Press any button to stop.
•The volume of the alarm graduallyincreases for one minute
and thencontinuesto beep untilany buttonis pressed.
Q
When watchingTV while INSTANT ALARMis in progress,only use
CH AV on remote to change channels,
15
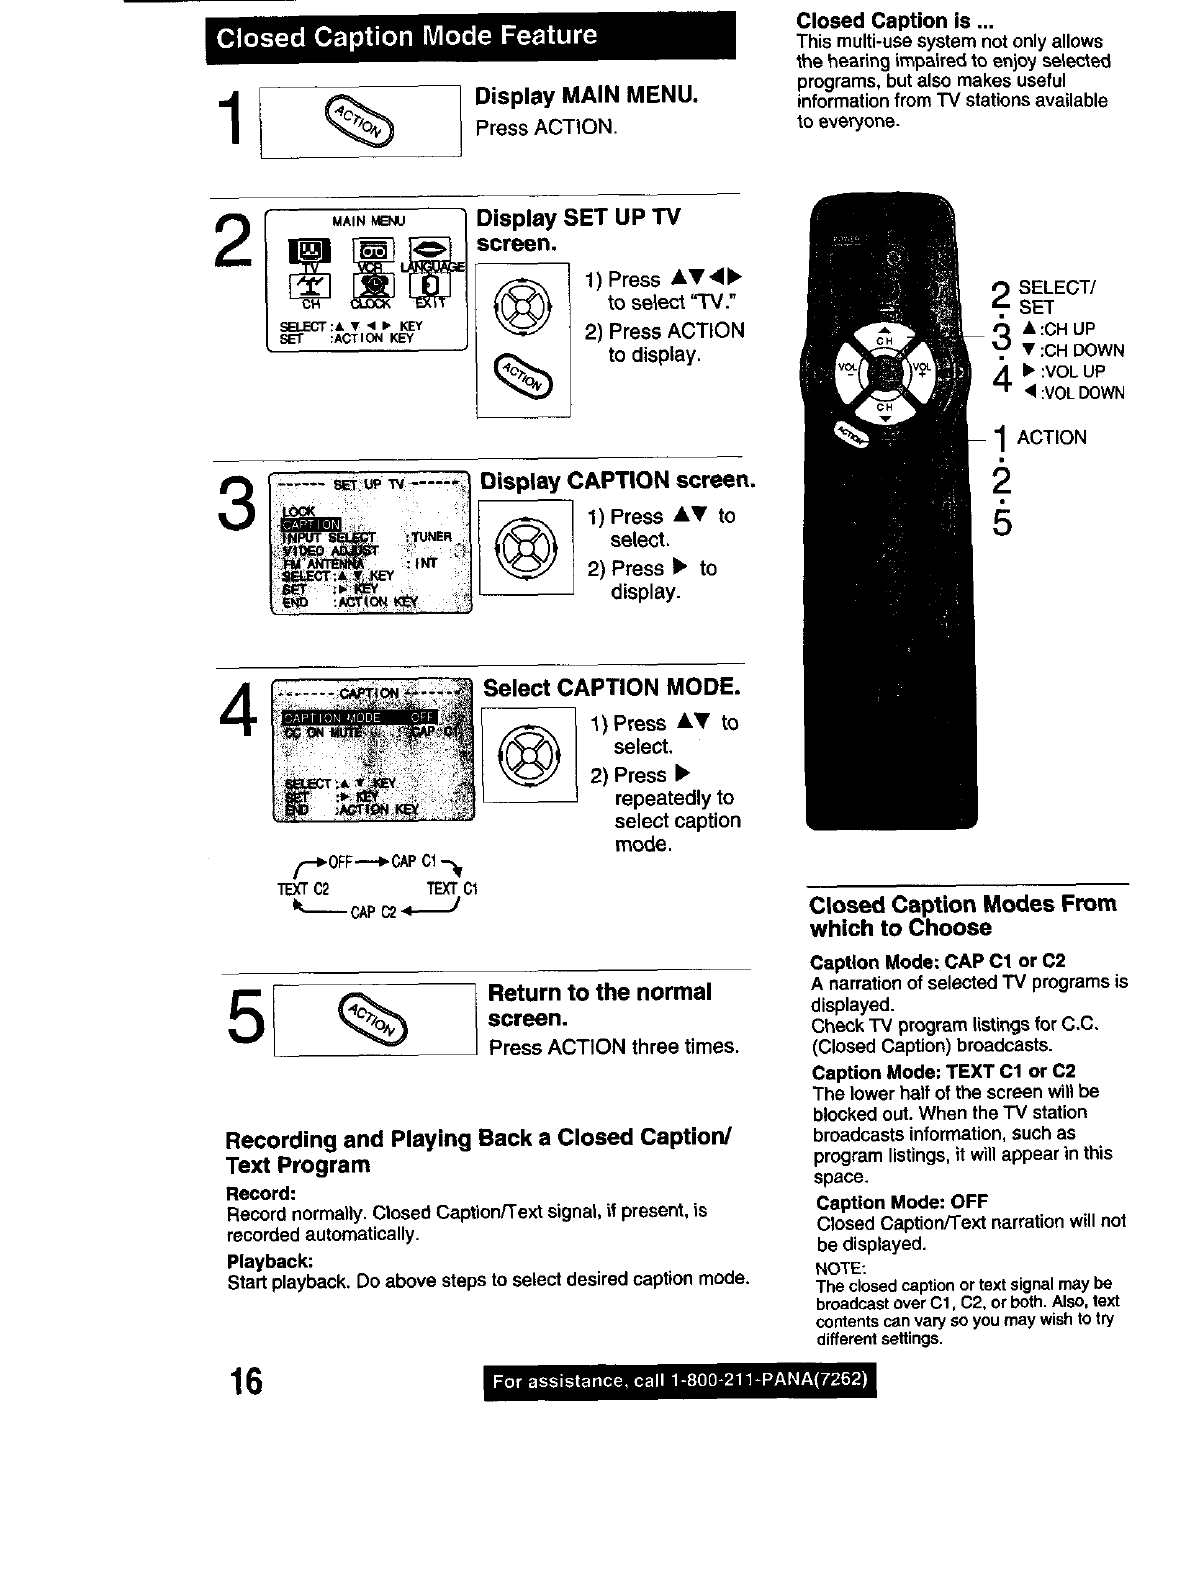
Display MAIN MENU.
Press ACTION,
Closed Caption is ...
This multi-usesystem notonlyallows
the hearing impaired to enjoy selected
programs, but also makes useful
informationfrom TV stations available
to everyone.
2
3
4
MAIN MENU
_a.ECT:&V <1_ KEY
SET :ACTION KEY
Display SET UP TV
screen.
1) Press ,&V4•
to select WV."
2) Press ACTION
to display.
Display CAPTION screen.
Q1) Press AV to
select.
2) Press • to
display.
(_0FF---_CAP Cl -_
TEXT02 TEXTC1
Select CAPTION MODE.
I 1)Press AY to
Qselect,
2) Press •
repeatedly to
select caption
mode.
5I % Return to the normal
screen.
Press ACTION three times.
Recording and Playing Back a Closed Caption
Text Program
Record:
Record normally.Closed CaptiorffText signat,if present, is
recorded automatically.
Playback:
Start playback.Do above stepsto select desiredcaptionmode.
16
SELECT/
SET
3 A :CH UP
•:CH DOWN
41_ :VOL UP
• :VOLDOWN
ACTION
Closed Caption Modes From
which to Choose
Caption Mode: CAP C1 or C2
A narration of selected TV programs is
displayed.
Cheek "IV program listings for C,C,
(Closed Caption) broadcasts.
Caption Mode: TEXT C1 or C2
The lower half of the screen win be
blocked out. When the TV station
broadcasts information, such as
program listings, it will appear in this
space.
Caption Mode: OFF
Closed Caption/Text narration will not
be displayed.
NOTE:
The closedcaptionor text signalmay be
broadcast over Cl, C2, or beth. Also, text
contentscan vary so you may wish to try
different settings.
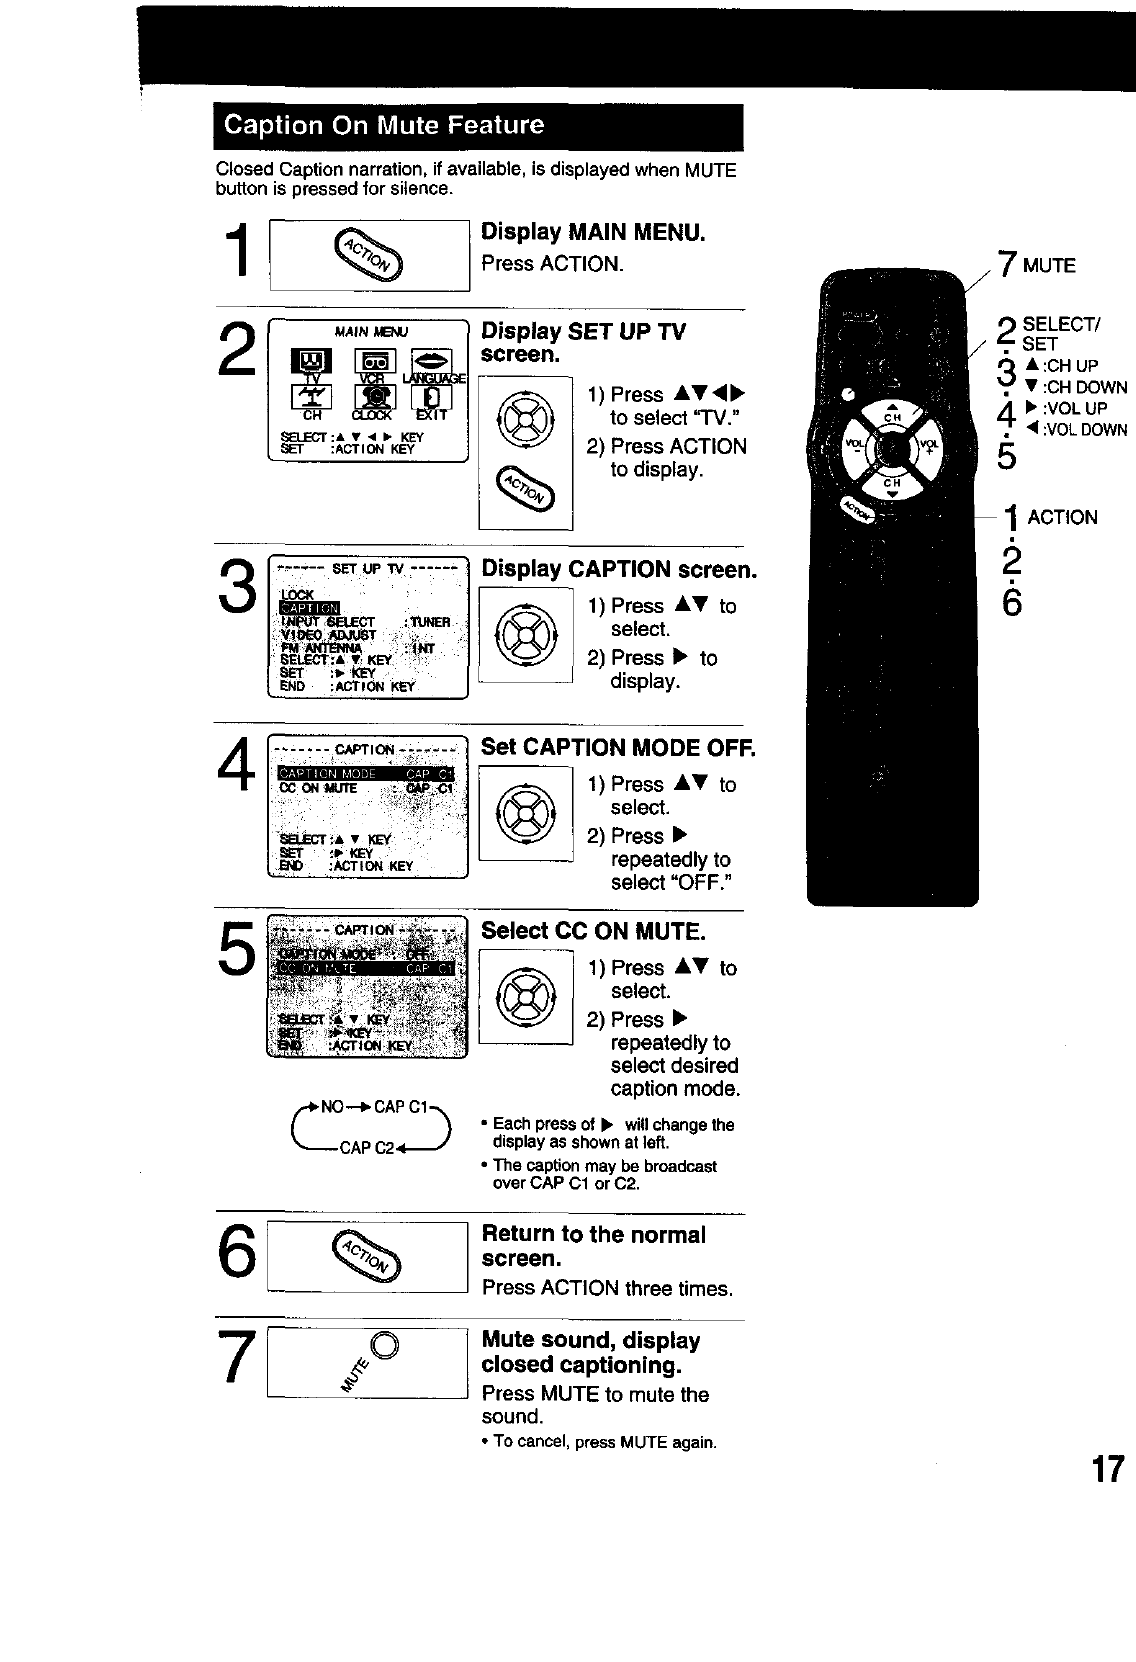
Closed Caption narration,if available, is displayed when MUTE
button is pressed for silence.
1
2
Display MAIN MENU.
Press ACTION. 7MUTE
SELECT/
Display SET UP TV _ SET
screen. _•:CH UP
1) Press AV<• _. V:CH DOWN
to select 'q'V." •:VOLUP
•:VOL DOWN
2) Press ACTION 5
(_ to display.
"_-'*-- SETUP 33/ ..... '= 1
i ii i_ _
I
ISET i_ _ I
L END :ACTION KEY /
Display CAPTION screen.
11)Press AV to
select.
2) Press •to
display.
4-~- .... CAPTION _Set CAPTION MODE OFF.
1 1) Press AV to
select.
2) Press •
repeatedly to
select "OFF."
1ACTION
5Select CC ON MUTE.
@j ,Press,-to
select.
2) Press •
repeatedly to
select desired
caption mode.
• Each press of •willchangethe
displayas shown at left.
•The captionmay be broadcast
overCAP C1 or C2.
6I Return to the normal
screen.
Press ACTION three times,
7[ Mute sound, display
closed captioning.
Press MUTE to mute the
sound.
•To cancel, press MUTE again. 17
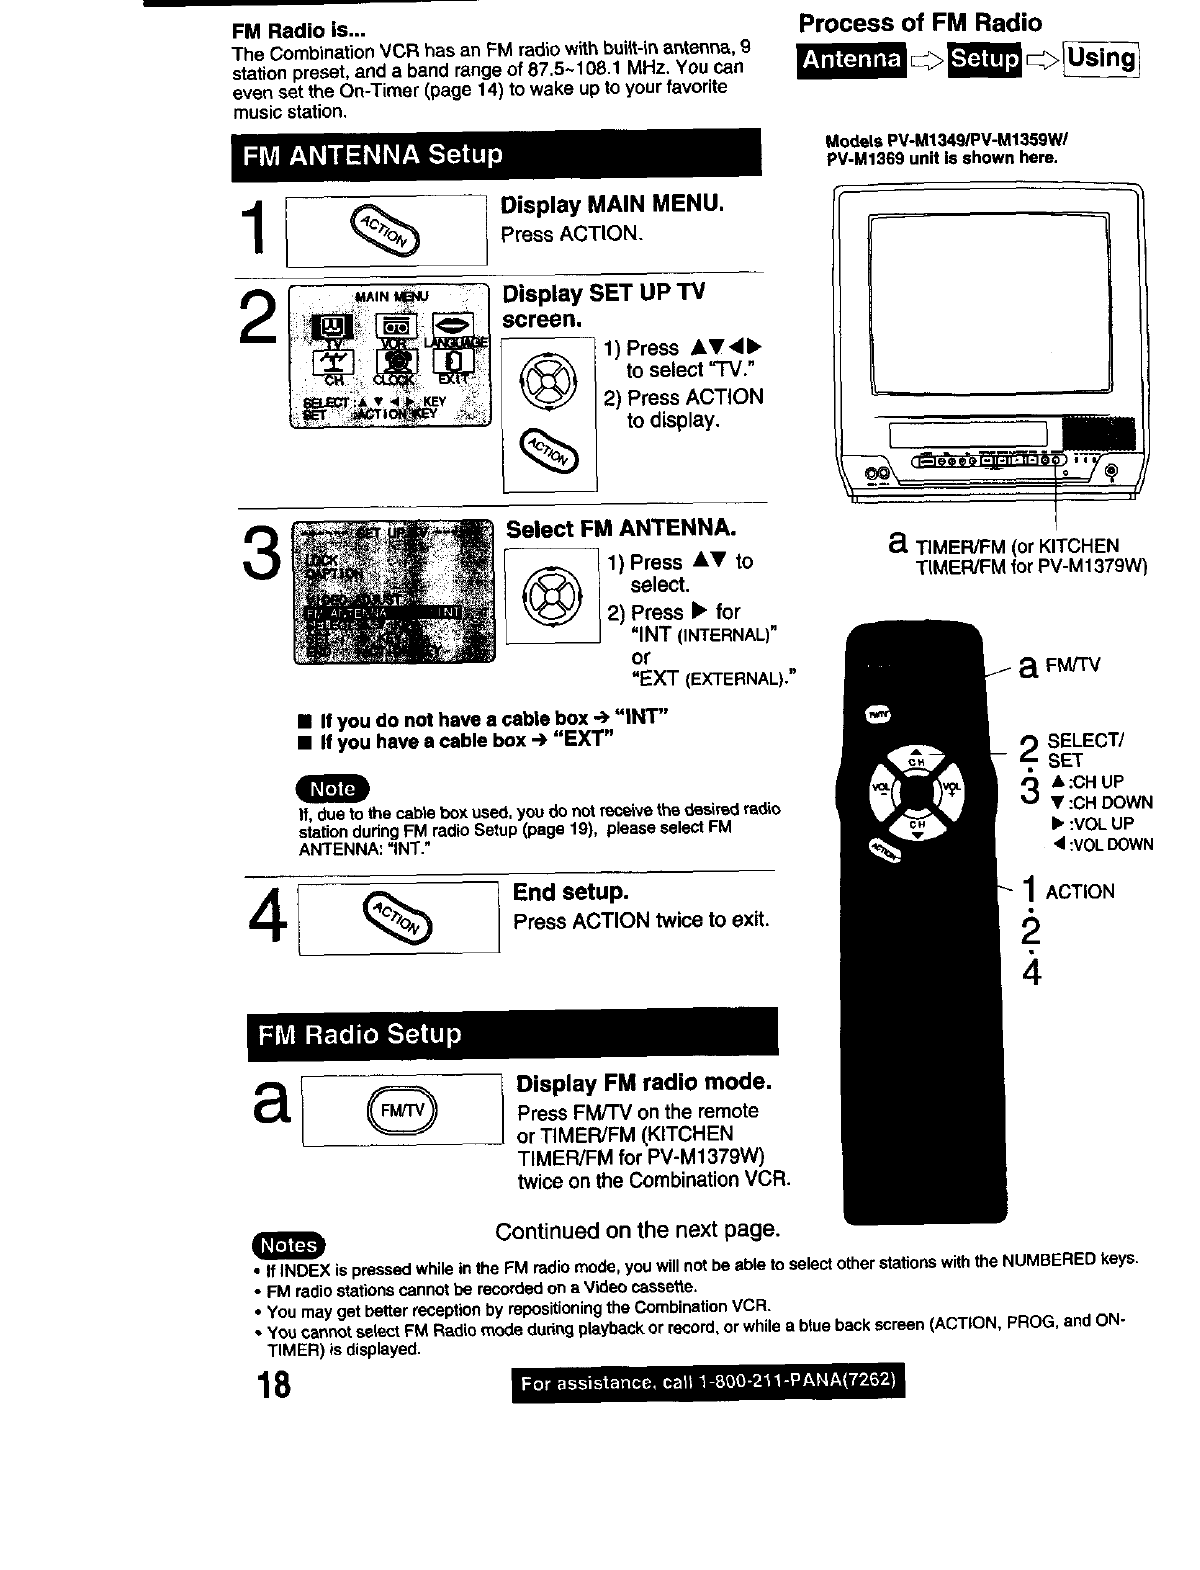
FM Radio is...
The CombinationVCR has an FM radiowith bui4t-inantenna, 9
station preset, and a band range of 87.5~108.1 MHz. You can
even set the On-Timer (page 14) to wake up to your favodte
music station.
Process of FM Radio
Models PV-M1349/PV-M1359Wi
PV-M1369 unit is shown here.
1F%
2
3
Display MAIN MENU.
Press ACTION.
Display SET UP TV
screen.
1) Press AV,•
Oto select "TV."
2) Press ACTION
to display.
%
Select FM ANTENNA.
1) Press AV to
select.
2) Press • for
"INT (INTERNAL)"
or
"F::XT(EXTERNAL)."
[
aTIMER/FM (or KITCHEN
TIMER/FM for PV-M1379W)
aFM/TV
•If you do not have e cable box -_ "INT"
•If you have a cable box .,,>"EXT"
m
If, due to the cable boxused, you do not receivethe desira_lradio
stationduring FM radio Setup (page 19), pleaseselect FM
ANTENNA: =INT."
4I %
a
End setup.
Press ACTION twiceto exit.
ODisplay FM radio mode.
Press FM/'rv on the remote
or TIMER/FM (KITCHEN
TIMER/FM for PV-M1379W)
twice on the Combination VCR.
SELECT/
SET
•:CH UP
• :CH DOWN
•:VOL UP
•:VOLDOWN
1ACTION
Continued on the next page.
m
• If INDEX is pressed while inthe FM radiomode, you willnot be able to select otherstationswiththe NUMBERED keyS.
•FM radio stationscannot be recordedon aVideo cassette.
•You may get better receptionby repositioningthe CombinationVCR.
• You cannot select FM Radio mode duringplaybackor record,or whilea blue back screen(ACTION, PROG, and ON-
TIMER) is displayed.
18
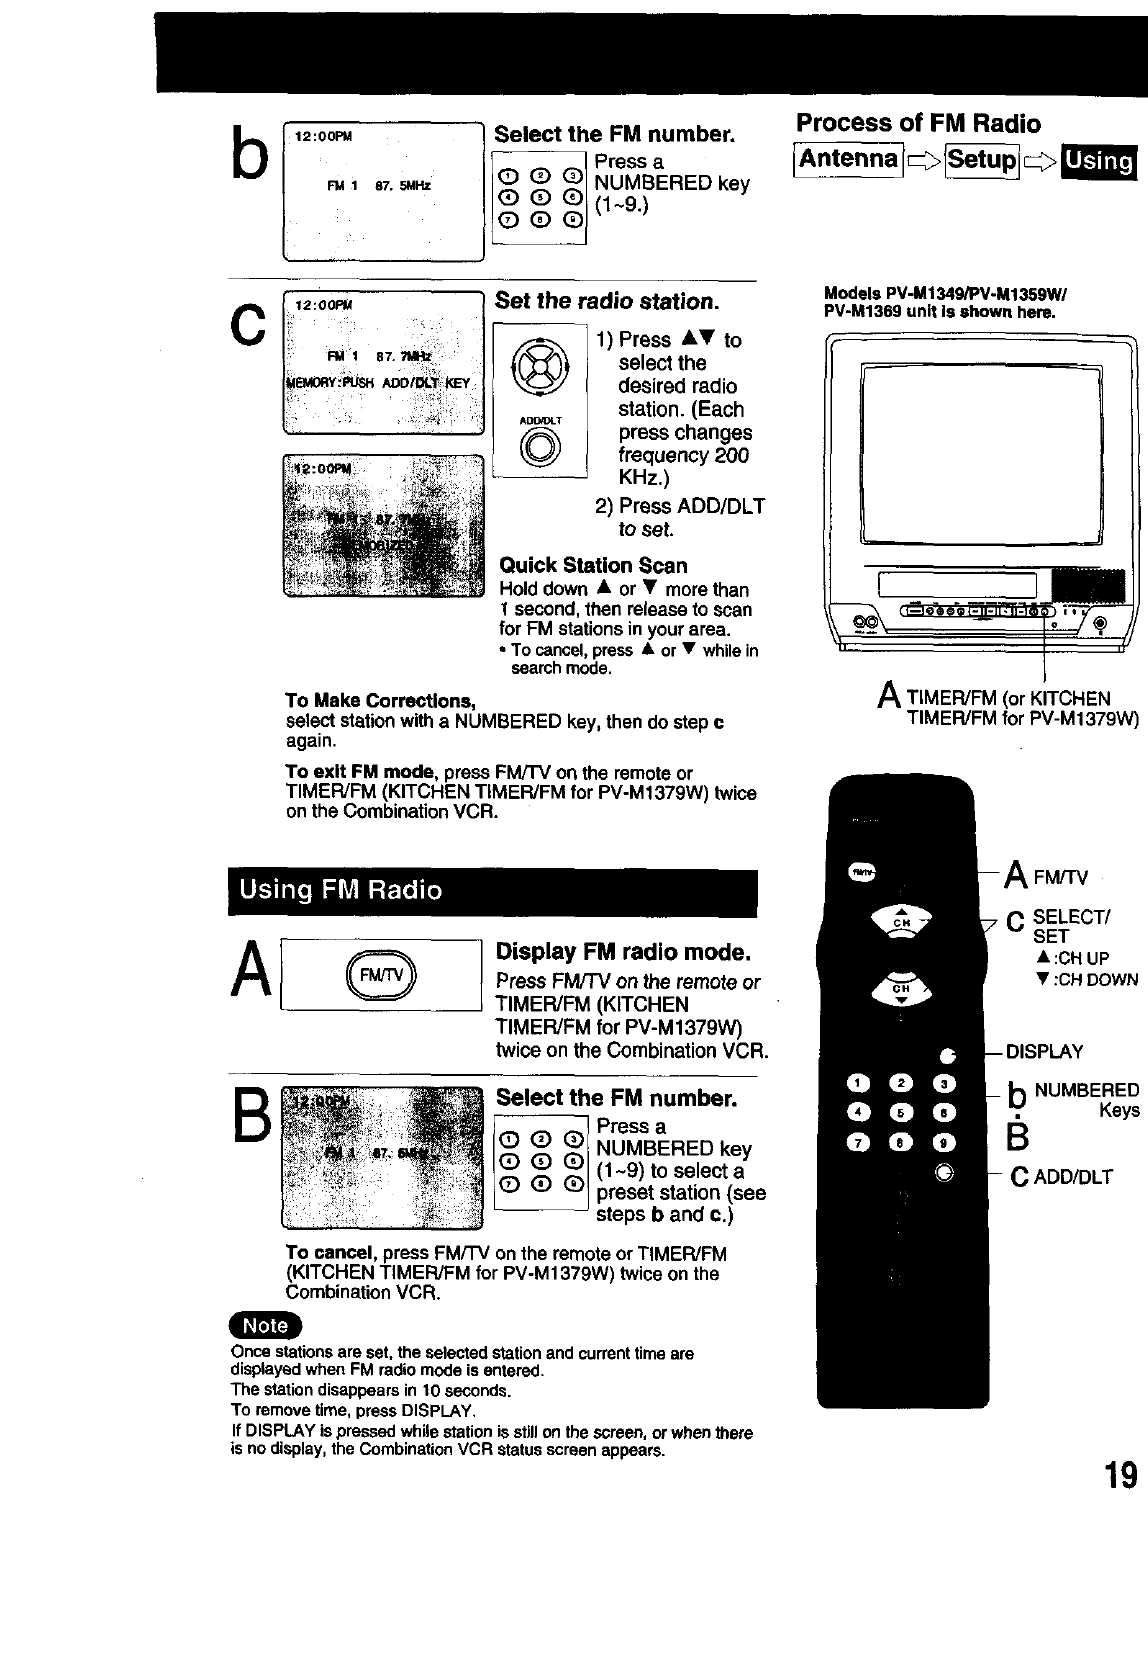
87. 5MHz
Select the FM number.
I_ -- _ Press a
I_,_ (_ _,-_]NUMBERED key
C12:O0Pt_
ili _!;
Set the radio station.
1)Press AT to
select the
desired radio
station. (Each
ADDfDLT
(_ press changes
frequency 200
KHz.)
2) Press ADD/DLT
to set.
Quick Station Scan
Holddown •or •morethan
Isecond,then release to scan
for FM stationsin yourarea.
* Tocancel,press• or •whilein
searchmode.
To Make Corrections,
select stationwitha NUMBERED key, then dostep c
again.
To exit FM mode, press FM/TV on the remote or
TIMER/FM (KITCHEN TIMER/FM for PV-M1379W) twice
onthe CombinationVCR.
Process of FM Radio
Antennal_fSetup_> W
Models PV-M1349/PV-M1359W/
PV-M1369 unit Is shown here.
! ]
ATIMER/FM (or KITCHEN
TIMER/FM for PV-M1379W)
A
B
Display FM radio mode.
Press FM/TV on the remote or
TIMER/FM (KITCHEN
TIMER/FM for PV-M1379W)
twice on the Combination VCR.
Select the FM number.
Q(_ A ! Press a
Q Q _) NUMBERED key
Q_ I (1 ~g) to select a
(D =(_.)preset station (see
steps b and c.)
To cancel, press FM/TV onthe remote orTIMER/FM
(KITCHEN TIMER/FM for PV-M1379W) twice on the
CombinationVCR.
FM/TV
7C SELECT/
SET
•:CHUP
•:CHDOWN
b NUMBERED
Keys
ADD/DLT
u
Once stationsare set,the selectedstationand currenttime are
displayedwhen FM radio mode is entered.
The stationdisappears in 10 seconds.
To remove time, press DISPLAY,
If DISPLAY ispressed whilestationis stillon the screen, orwhen there
is no display,the CombinationVCR statusscreen appears.
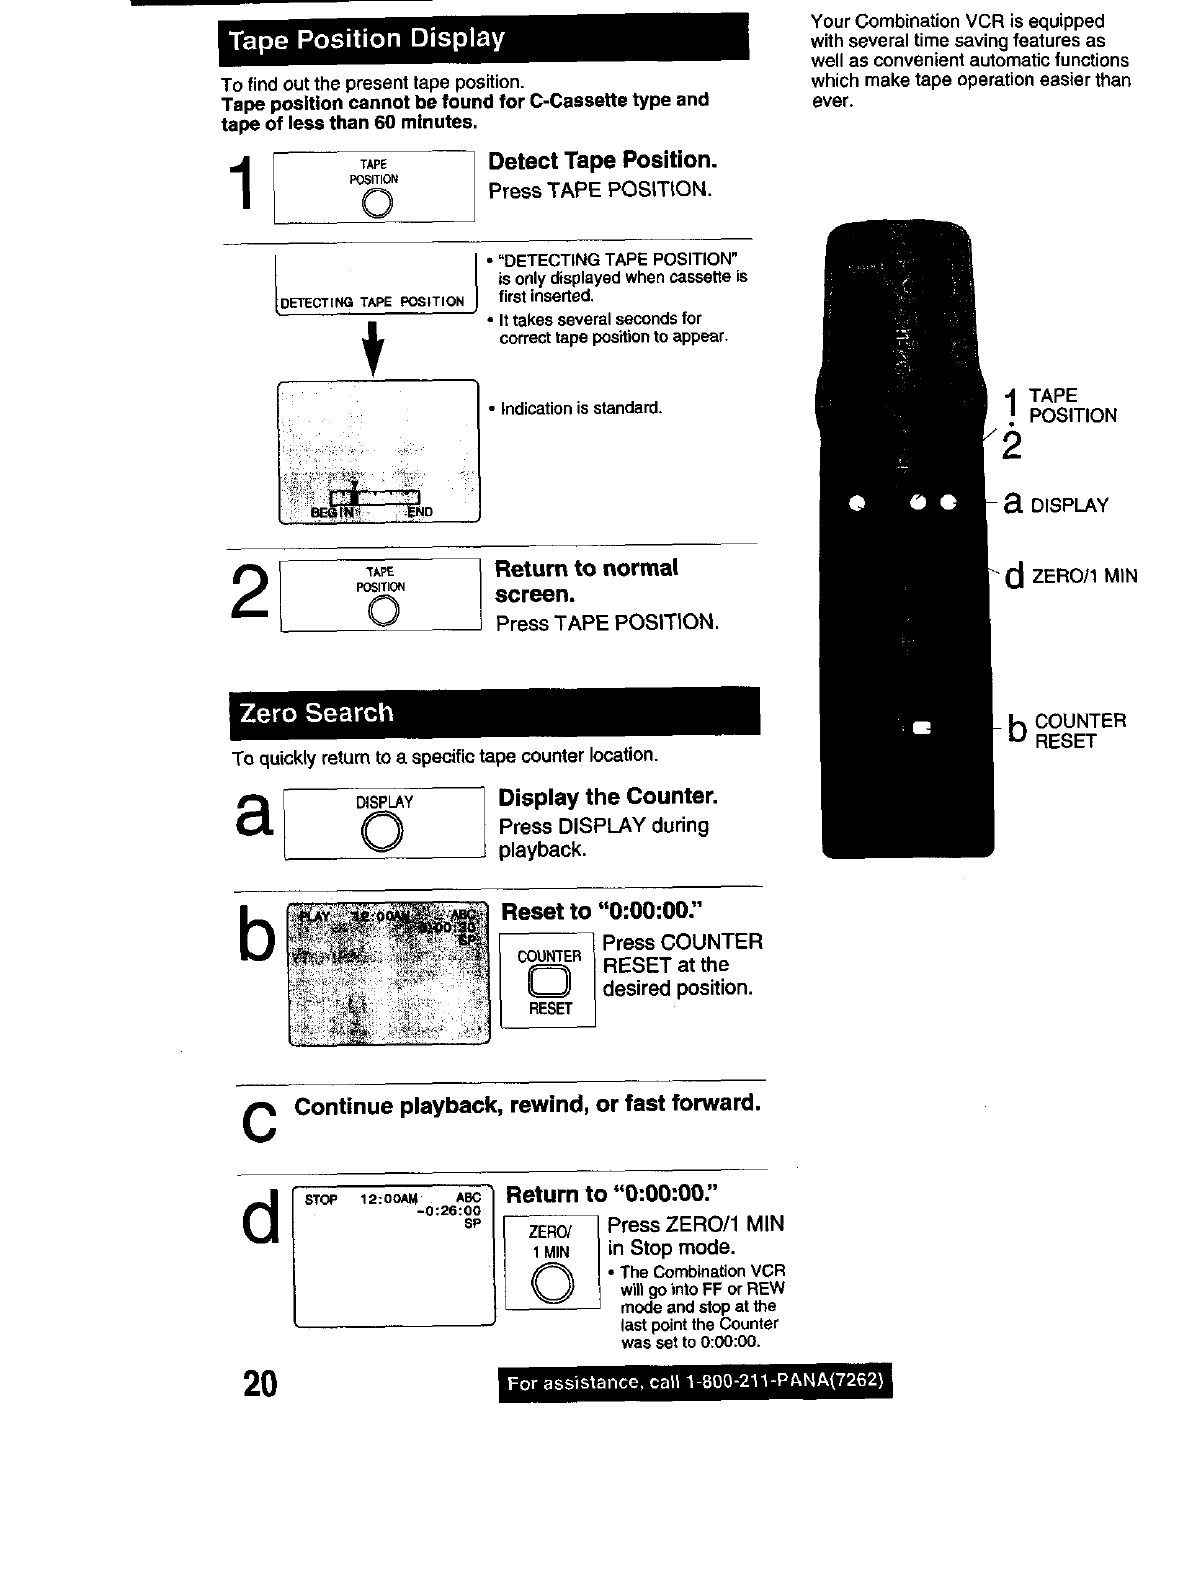
To find out the present tape position.
Tape position cannot be found for C-Cassette type and
tape of less than 60 minutes,
I TriPE
_SITION
©Detect Tape Position.
Press TAPE POSITION.
DETECTING TAPE POSITION
•"DETECTING TAPE POSITION"
is o_ly d;sp/ayedwhencassette is
first inserted.
• Ittakes several secondsfor
correcttape positionto appear.
•Indicationis standard,
Your Combination VCR is equipped
with several time saving features as
well as convenient automatic functions
which make tape operation easier than
ever.
TAPE
POSITION
- a DISPLAY
[ TAPE
POSITION
©Return to normal
screen.
Press TAPE POSITION.
To quickly returnto a specifictape counterlocation.
_d ZERO/1 MIN
aDISPLAY
©Display the Counter.
Press DISPLAY during
playback,
LbCOUNTER
RESET
bReset to "0:00:00"
u 1Press COUNTER
_-_" / RESET at the
/desired position.
RESET
C Continue playback, rewind, or fast forward.
Return to "0:00:00:'
d
2O
ZERO/ Press ZERO/1 MIN
1 MIN in Stop mode.
O• The CombinationVGR
willgointo FF orREW
mode and stopat the
last pointthe Counter
was set to 0:00:00.

Set to see a recordingoverand over.
1/% °'-'°--°
Press ACTION.
2MAIN MENU
SELECT:A T4_" KEY
SET :ACTION KEY
Display SET UP VCR
screen.
1) Press AV4•
to select =VCR."
2) Press ACTION
(_) to display.
SELECT/
SET
&:CH UP
•:CH DOWN
• :VOL UP
• :VOLDOWN
3Select REPEAT PLAY.
1) ress AY to
select.
2) Press • to set
"ON" or "OFF."
1ACTION
•Playback repealswhen tape end is reached or unrecorded
portionover 30 secondsis detected.
•Duringplayback,you may also pressPLAY/REPEAT
repeated(yon the CombinationVCR to select REPEAT "ON"
or "OFF,"
ZERO/
1MIN
4%End setup,
PressACTION twice.
• Auto Shut Off
No broadcast signalinTV, NITE or Playbackmodefor 5
minutes-._Turn Power off automatically
•Thisfeatureisdeactivatedifanybuttonispressedduringthe
abovemode.
•Auto Playback
Insert a tape in Power off mode--) Turn Power on
automatically
•Playbackbeginsautomaticaliyifa tapehasnorecordtab.
•Auto Rewind
A tape reachesits end --) Rewindbegins -> Stop
automatically
•Playback Auto Eject (Repeat Play is "OFF")
A tape has no recordtab reaches its end -->Rewindbegins
•-.) Eject automatically
•Memory Rewind off
Press POWER in REW mode-.>Rewind is completed
Turn Power off automatically
CombinationVCR fast forwardsover
60 secondsof recordedtape.
ZERO/ _Skip over 1 minute.
1MIR i Press ZERO/1 MIN inPlay mode.
21
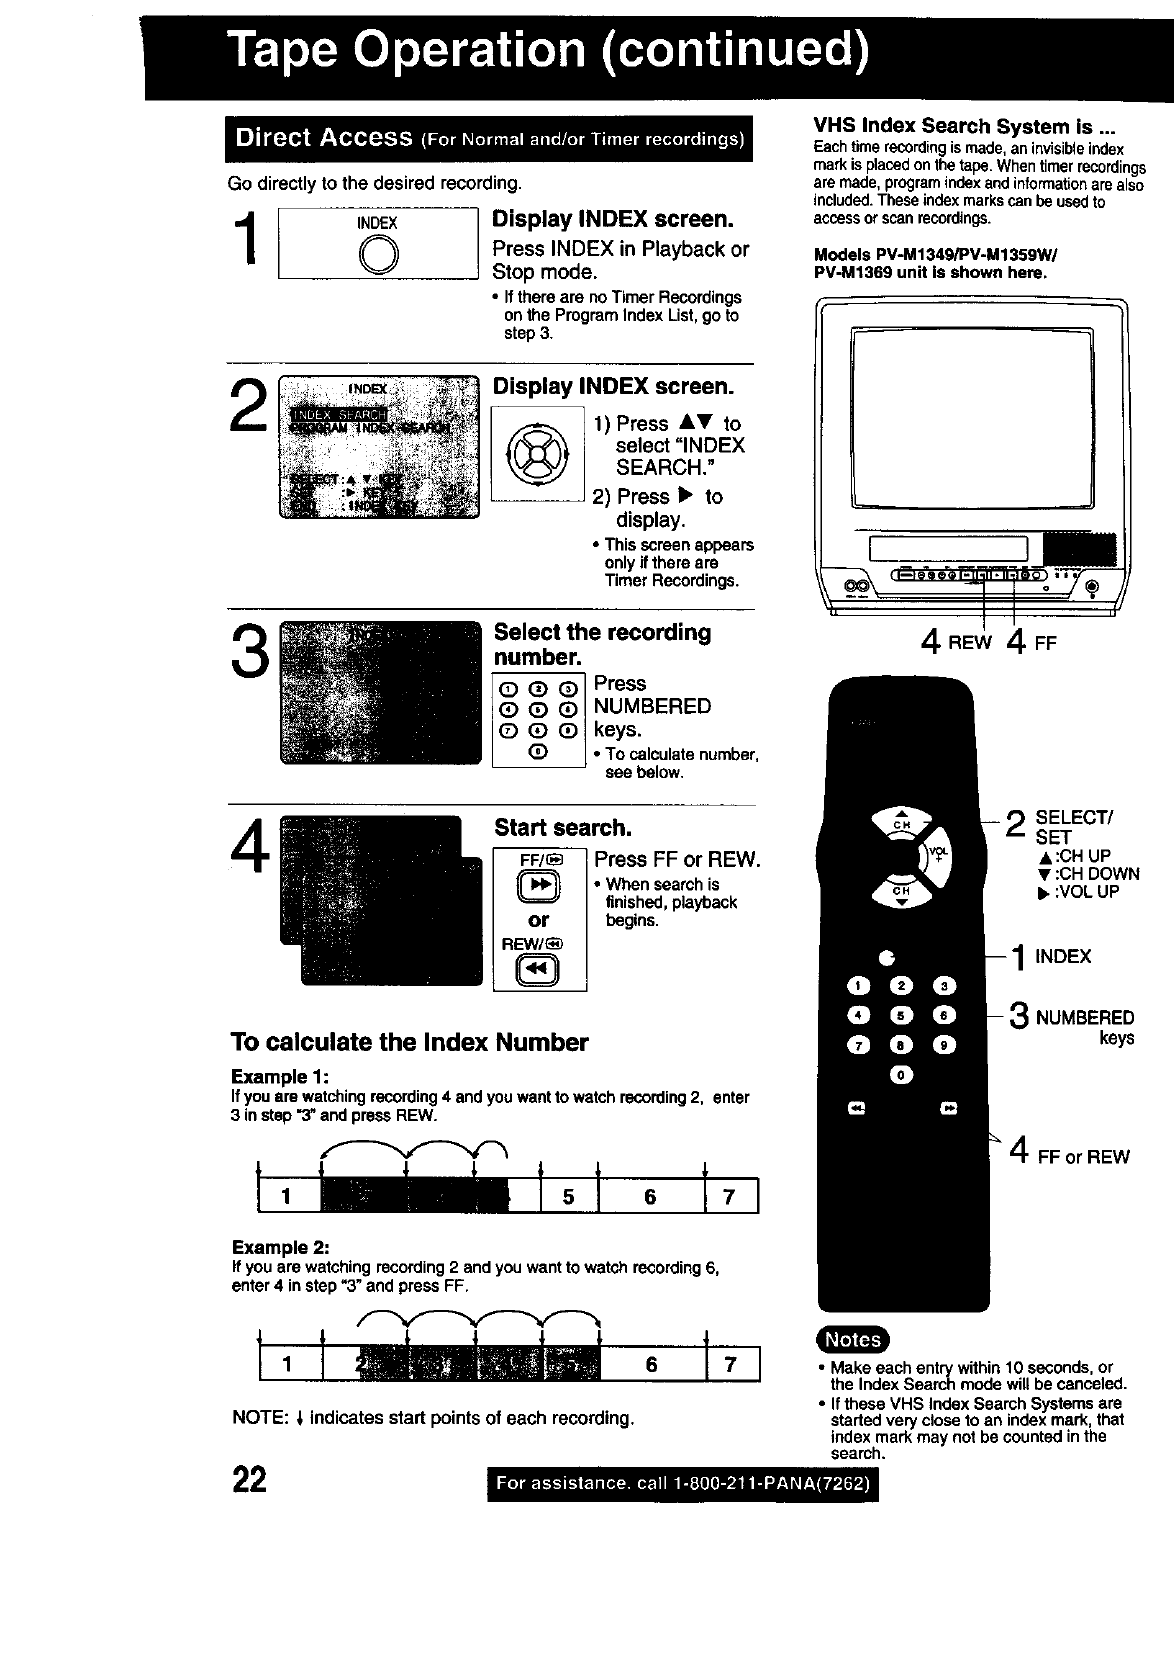
Go directlyto the desired recording.
INDEX
1®Display INDEX screen.
Press INDEX in Playback or
Stop mode.
• Ifthere are no Timer Recordings
onthe ProgramIndex List,goto
step 3.
2
3
Display INDEX screen.
Q1) Press &V to
select "INDEX
SEARCH."
2) Press I_ to
display.
•This screenappears
only if there are
Timer Recordings.
Select the recording
number.
(i) NUMBERED
Qkeys.
(_ • To calculatenumber,
see below.
4Start search.
FF/(_] Press FF or REW.
• When search is
finished,playback
or begins.
REW/_)
To calculate the Index Number
Example 1:
If youare watchingrecording4 and youwantto watch recording2, enter
3 instep "3"and pressREW.
Example 2:
ifyou are watching recording2 and you wantto watch recording6,
enter 4 instep "3"and press FF.
NOTE: _,indicatesstart points of each recording.
22
VHS Index Search System is ...
Eachtimerecordingis made,an invisibleindex
markis placedonthetape.Whentimerrecordings
aremade,programindexandinformationarealso
included.Theseindexmarkscanbeusedto
accessorscanrecordings.
Models PV-M1349/PV-M 1359W/
PV-M1369 unit Is shown here.
I
4FF
2SELECT/
SET
•:CH UP
•:CH DOWN
•:VOL UP
INDEX
NUMBERED
keys
4FF or REW
• Make each entry within10 seconds,or
the Index Search mode will be canceled.
•Ifthese VHS Index SearchSystemsare
started very closeto an indexmark, that
index markmay not be countedin the
search.
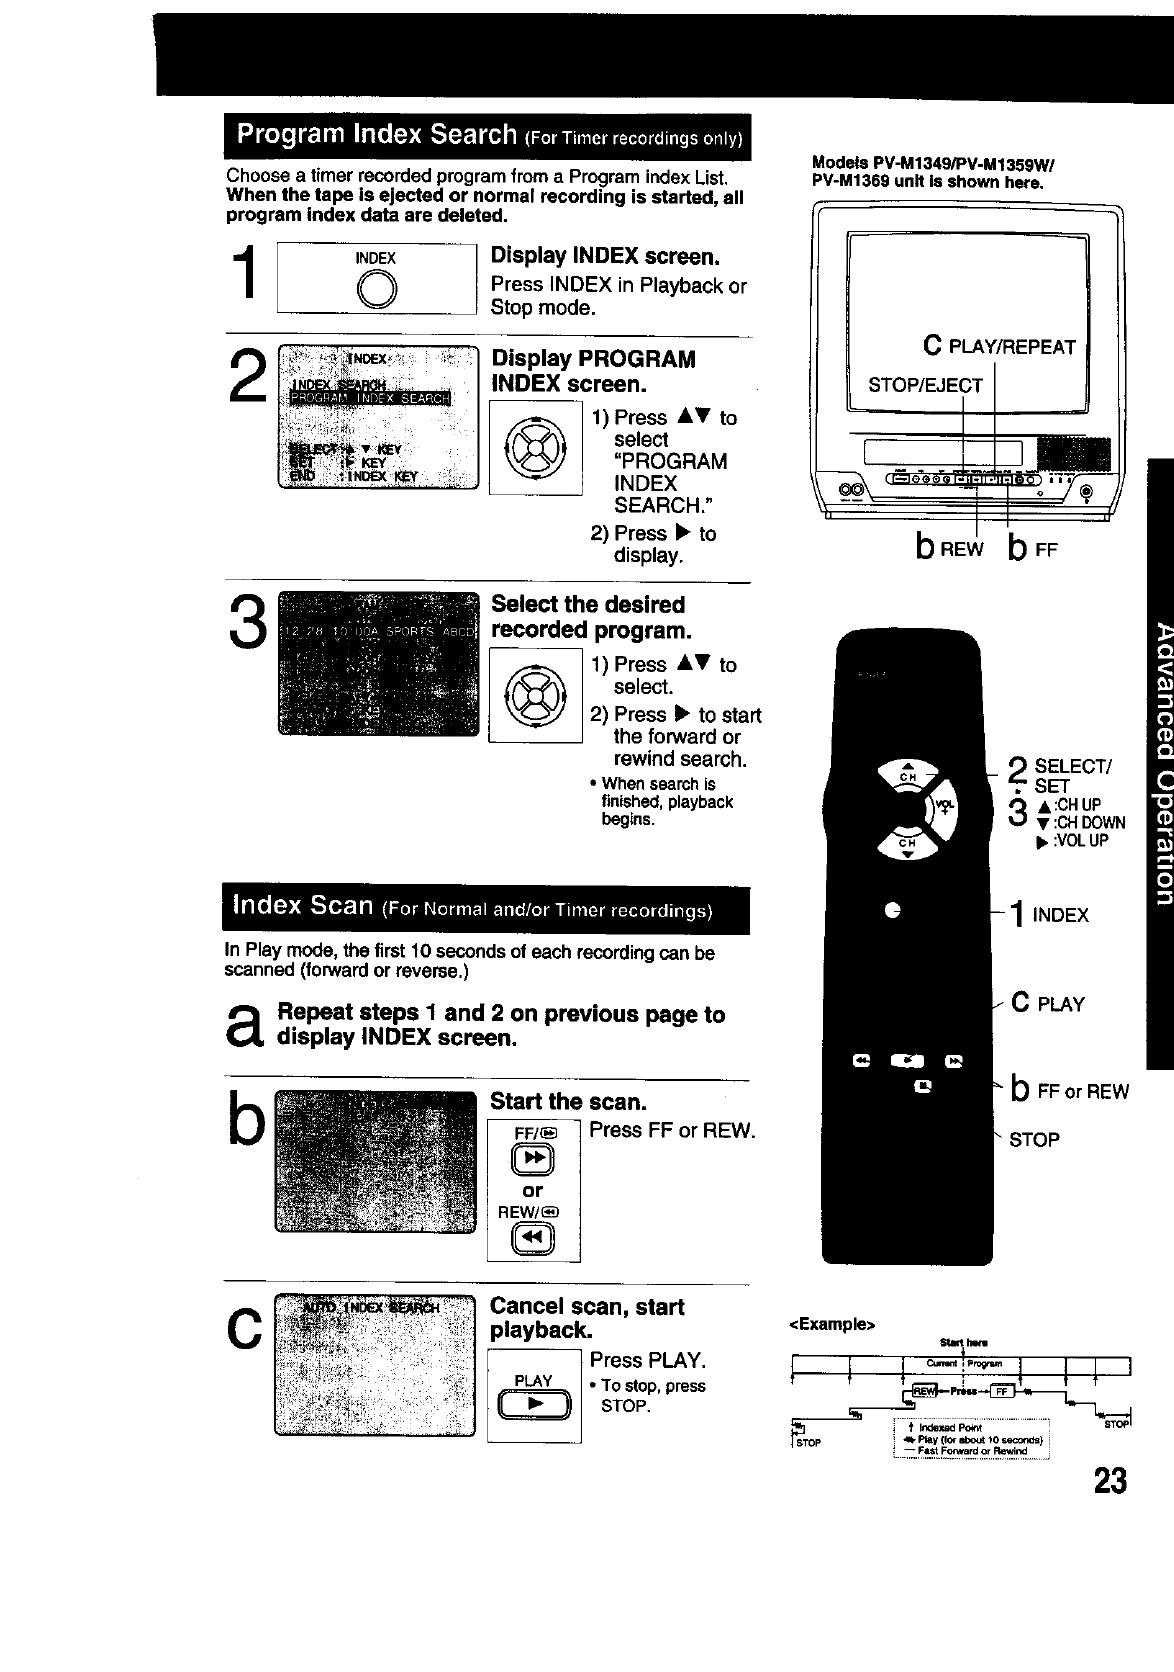
Choosea timer recordedprogramfroma ProgramindexList.
When the tape is ejected or normal recording is started, all
program index data are deleted.
Display INDEX screen.
Press INDEX in Playback or
Stop mode.
2Display PROGRAM
INDEX screen.
Q1) Press &_' to
select
"PROGRAM
INDEX
SEARCH."
2) Press • to
display,
Select the desired
recorded program.
1) Press &T to
select.
2) Press •to start
the forward or
rewind search.
•Whensearchis
finished,playback
begins.
Models PV-M1349/PV-M1359W/
PV-M1369 unit Is shown here.
C PLAY/REPEAT
STOP/EJECT
bREW
SELECT/
SET
3A :CH UP
•:CH DOWN
•:VOLUP
In Play mode, the first10 secondsof each recordingcan be
scanned (forwardor reverse.)
aRepeat steps I and 2 on previous page to
display INDEX screen.
bStart the scan.
FF/+ Press FF or REW.
®
or
REW/_
®
+1INDEX
"CPLAY
b FF or REW
STOP
CCancel scan, start
playback.
Press PLAY,
PLAY •TOstop,press
_STOP.
<Example> Start him
--
il Ii _ ] TT
ISTOp _Play(lo__o_ +0=_:onds)
:.F_ [o_.+.._r_,,_ .......... 23
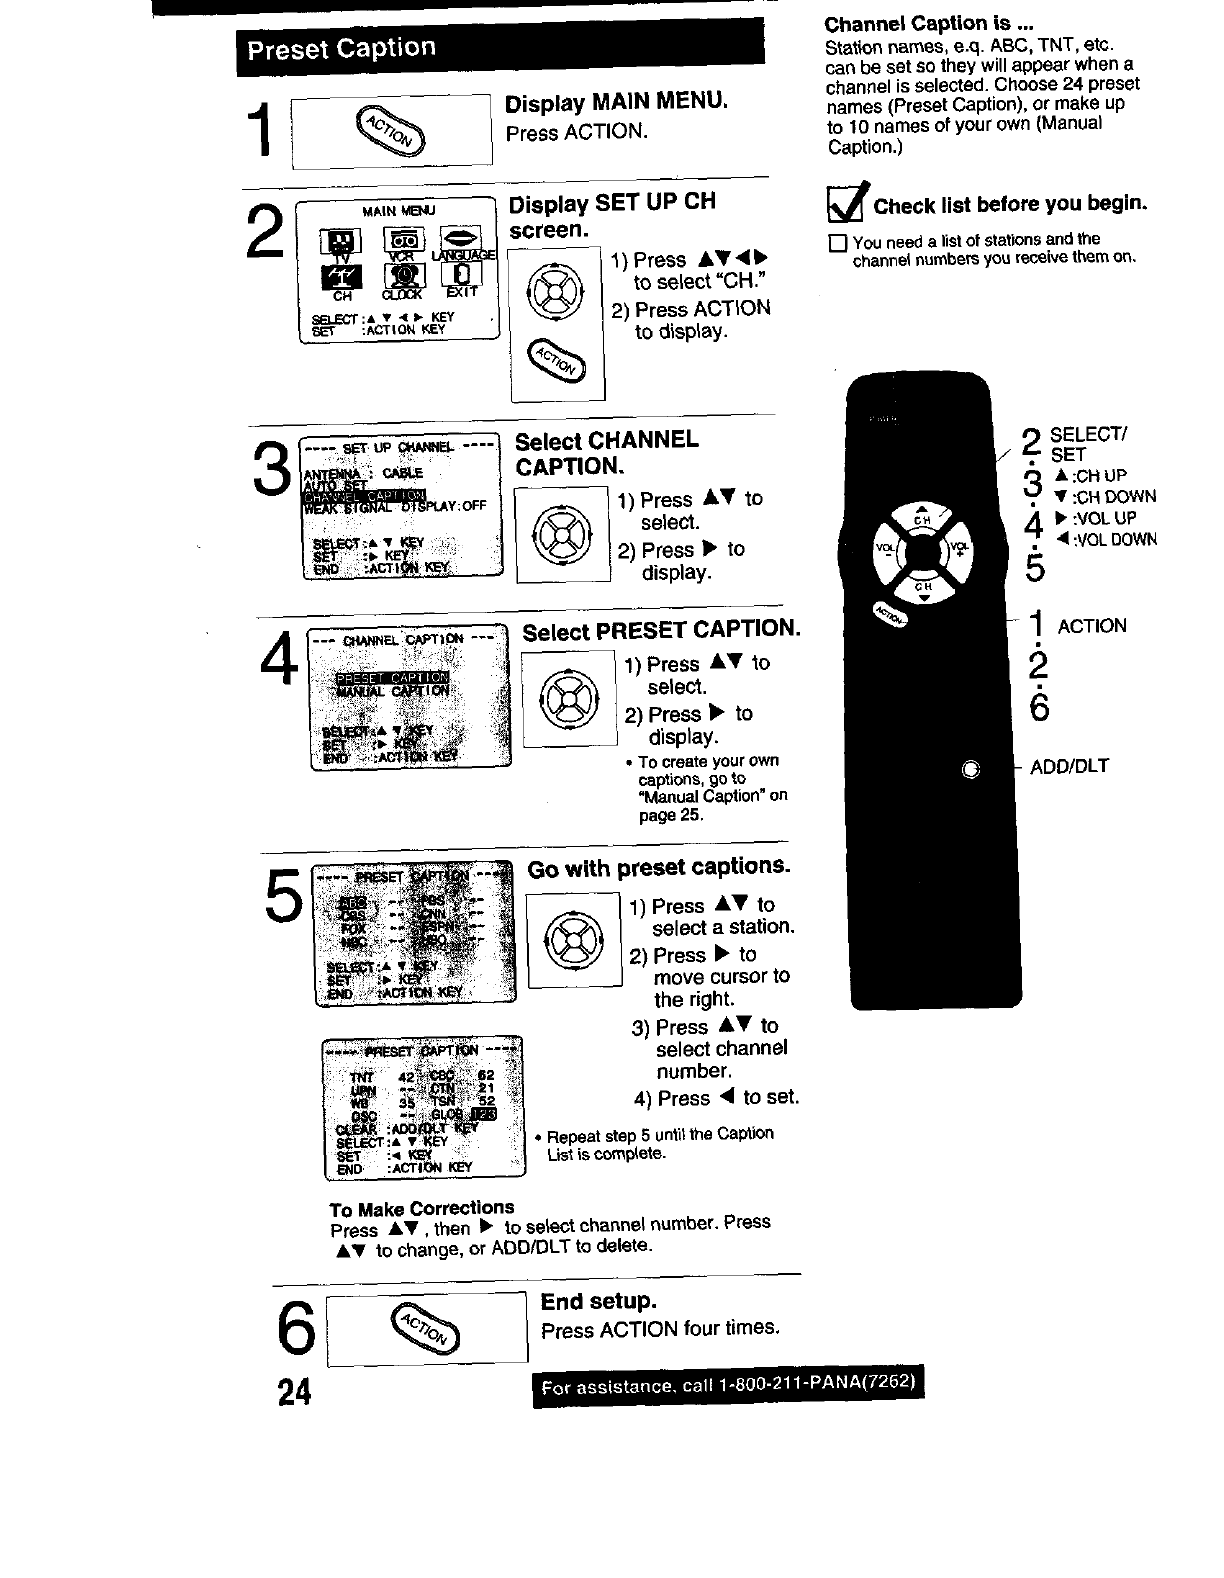
1I%
2
Display MAIN MENU.
Press ACTION.
Display SET UP CH
screeR,
1)Press A_'41•
to select "CH."
2) Press ACTION
to display.
Channel Caption is ...
Static_qnames, e.q. ABC, TNT, arc.
can be set so they willappear whena
channelis selected. Choose24 preset
names (Preset Caption), or make up
to 10 names of your own (Manual
Caption.)
[_f_Check list before you begin.
[_ You need a listof stationsand the
channelnumbers you receivethem on,
3Select CHANNEL
CAPTION.
@ 71) Press AT to
|select.
2) Press _to
Jdisplay.
t'" __ --'l
Select PRESET CAPTION.
1) Press &T to
select.
2) Press I_ to
display.
•Tocreateyourown
captions,90to
"ManualCaption"on
page25.
5
_ _-,_
4 2 _;_1
:< _'; :|
Go with preset captions,
1) Press &V to
select a station.
2) Press I_ to
move cursor to
the right.
3) Press &Y to
select channel
number.
4) Press _11to set.
•Repeat step 5 untilthe Caption
Listis compete.
To Make Corrections
Press ,kV, then • to select channelnumber. Press
•,_" to change, or ADD/DLT to delete.
6[ %]'n°'e'-
Press ACTION four times.
SELECT/
SET
_ •:GH UP
•:CH DOWN
41_ :VOLUP
4 :VOL13OWN
5
ACTION
2.
6
ADD/DLT
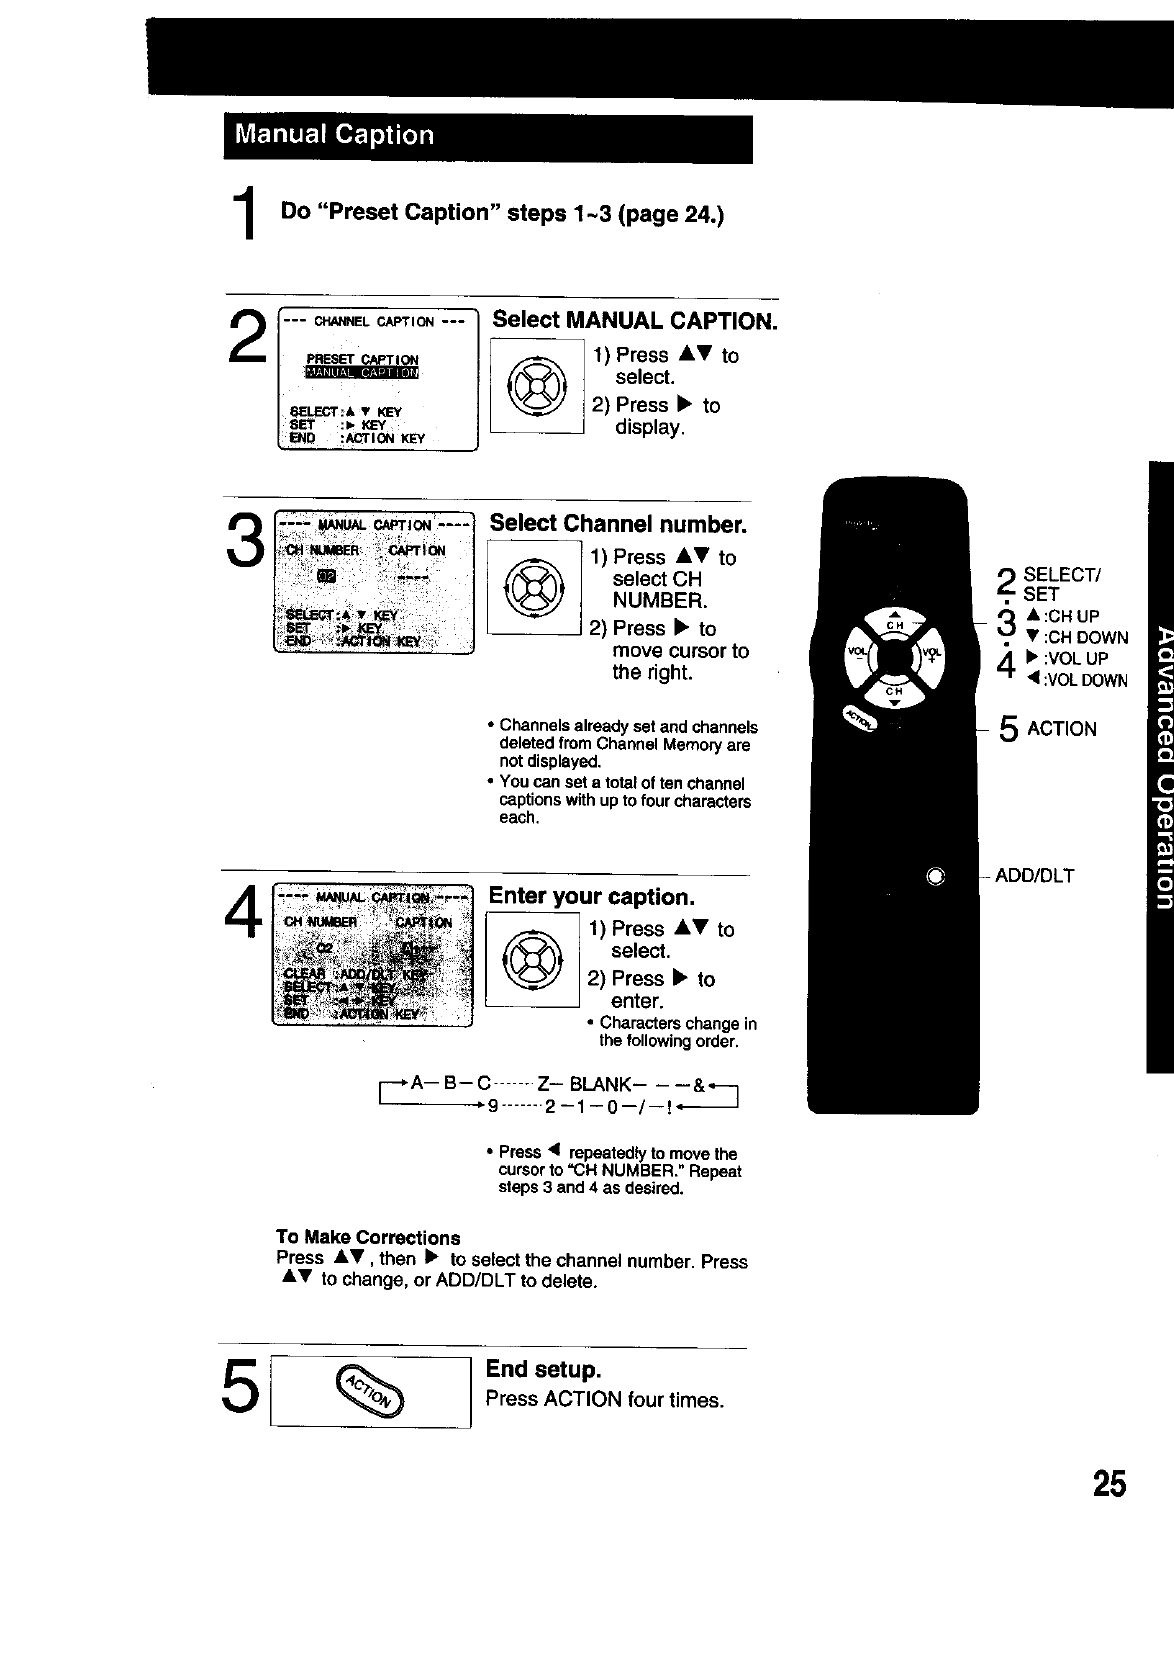
Do "Preset Caption" steps 1-3 (page 24.)
1"'" C_,_ELc_r,o_ --- Select MANUAL CAPTION.
1) Press AV to
se,ect
| _cr;*,, _ | 2) Press • to
[ _ _'r=m _, Jdisplay.
3Select Channel number.
1) Press At!' to
Qselect CHNUMBER.
2) Press • to
move cursor to
the right.
•Channels already set and channels
dete_edfrom Channel Memonj are
notdisplayed,
•You can set a totalof tenchannel
captions with up to four characters
each.
Enter your caption.
_1) Press to
AT
select.
2) Press •to
enter.
•Characterschangein
the followingorder.
r--*A-- B-- C ....... Z- BLANK-- -- &*----]
-*9 ....... 2-1--0--/--t _
• Press < repeatedlyto movethe
cursorto "CH NUMBER." Repeat
steps3 and 4 as desired.
SELECT/
SET
3A:CH UP
•:CH DOWN
b":VOL UP
4:VOLDOWN
5 ACTION
ADD/DLT
To Make Corrections
Press AV, then •to select the channel number. Press
AT to change, orADD/DLT to delete.
5[ %End setup.
Press ACTION four times.
25
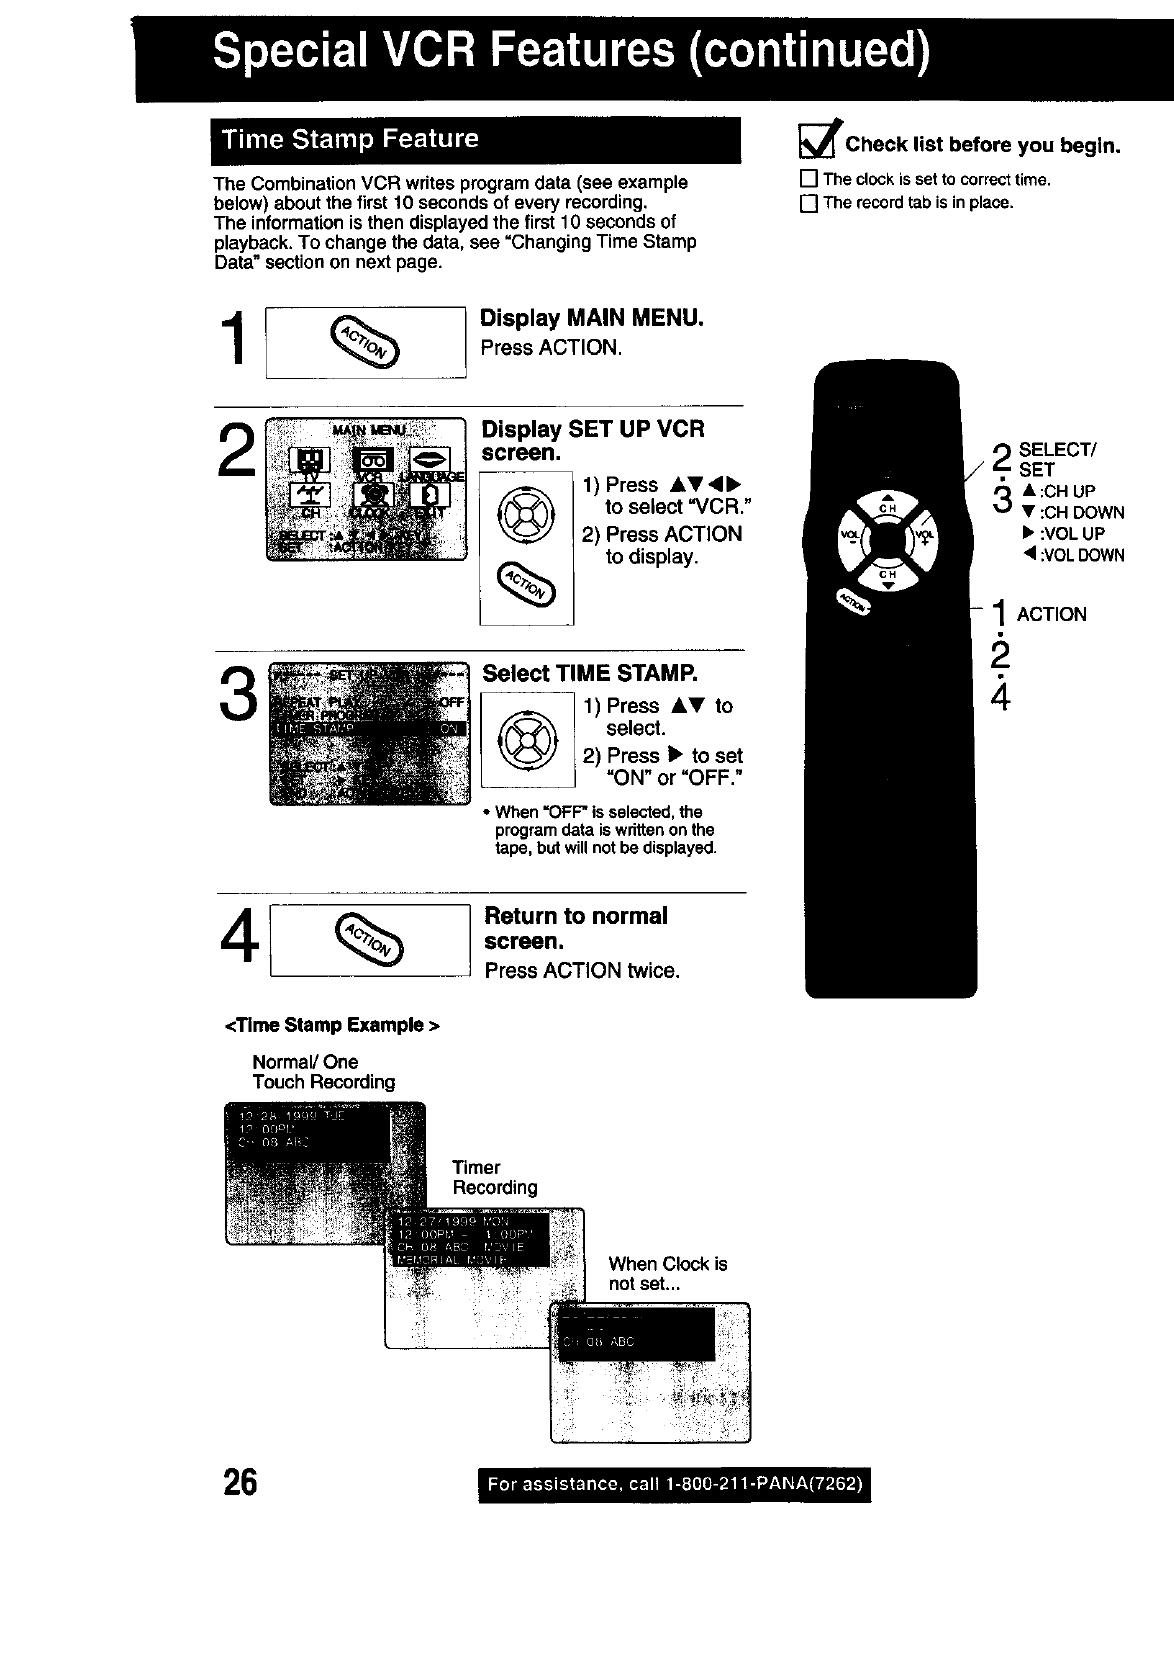
The Combination VCR writesprogram data (see example
below) about the first 10 secondsof every recording.
The informationis then displayedthe first 10 secondsof
playback.To change the data, see "Changing Time Stamp
Data"sectionon next page.
_l'Check list before you begin.
[] The clock is set to correct time.
[] The record tab is in place.
Display MAIN MENU.
Press ACTION,
3
4%
Display SET UP VCR
screen.
Q1) Press AT,I_
to select "VCR."
2) Press ACTION
(_) to display.
Select TIME STAMP.
1) Press &Y to
Qselect.
2) Press •to set
"ON" or "OFF."
•When =OFF"is selected,the
programdata is writtenonthe
tape, but willnot be displayed.
Return to normal
screen.
PressACTION twice.
SELECT/
SET
3A :CH UP
• :CH DOWN
•:VOL UP
<1:VOLDOWN
1 ACTION
<Time Stamp Example >
Normal/One
Touch Recording
Timer
Recording
When Clock is
not set...
26

You may change the time stamp data (Date, Time, Channel,
Category, and Notes) as desired.
Models PV-M1349/PV-M1359W/
PV-M1369 unit is shown here,
PLAY Display Time Stamp
Data.
1) Insertcassette with
recordtab.
2) Press PLAY.
2Display TIME STAMP
EDIT,
Press PROG
(_) while the data is
d_
p ayback mode.
L
1
1PLAY/REPEAT
3
4
Change Time Stamp Data.
1) Press &V to
Qselect.
2) Press • or •
to enter and
continue.
•Charactersin
NOTES willchange
in the following
order,
--*A-- B--C ....... Z- BLANK-- ---&*---]
+9 ....... 2-1--0--/--!"- J
3) Repeat 1) and
2) as needed.
To Make Corrections
Press <b, to move to the
incorrectentry, then press &V
to make the correction.
Write the new data,
(_ Press PROG.
•After the data is written,the
Combination VCR automatically
goes intoStop mode.
•You cannot use POWER or REC
buttonwhile=NOW WRITING
TIME STAMP" is displayed.
3SELECT/
SET
• :CH UP
•:CH DOWN
I_ :VOL UP
< :VOLDOWN
2 PROG
4
1 PLAY
27
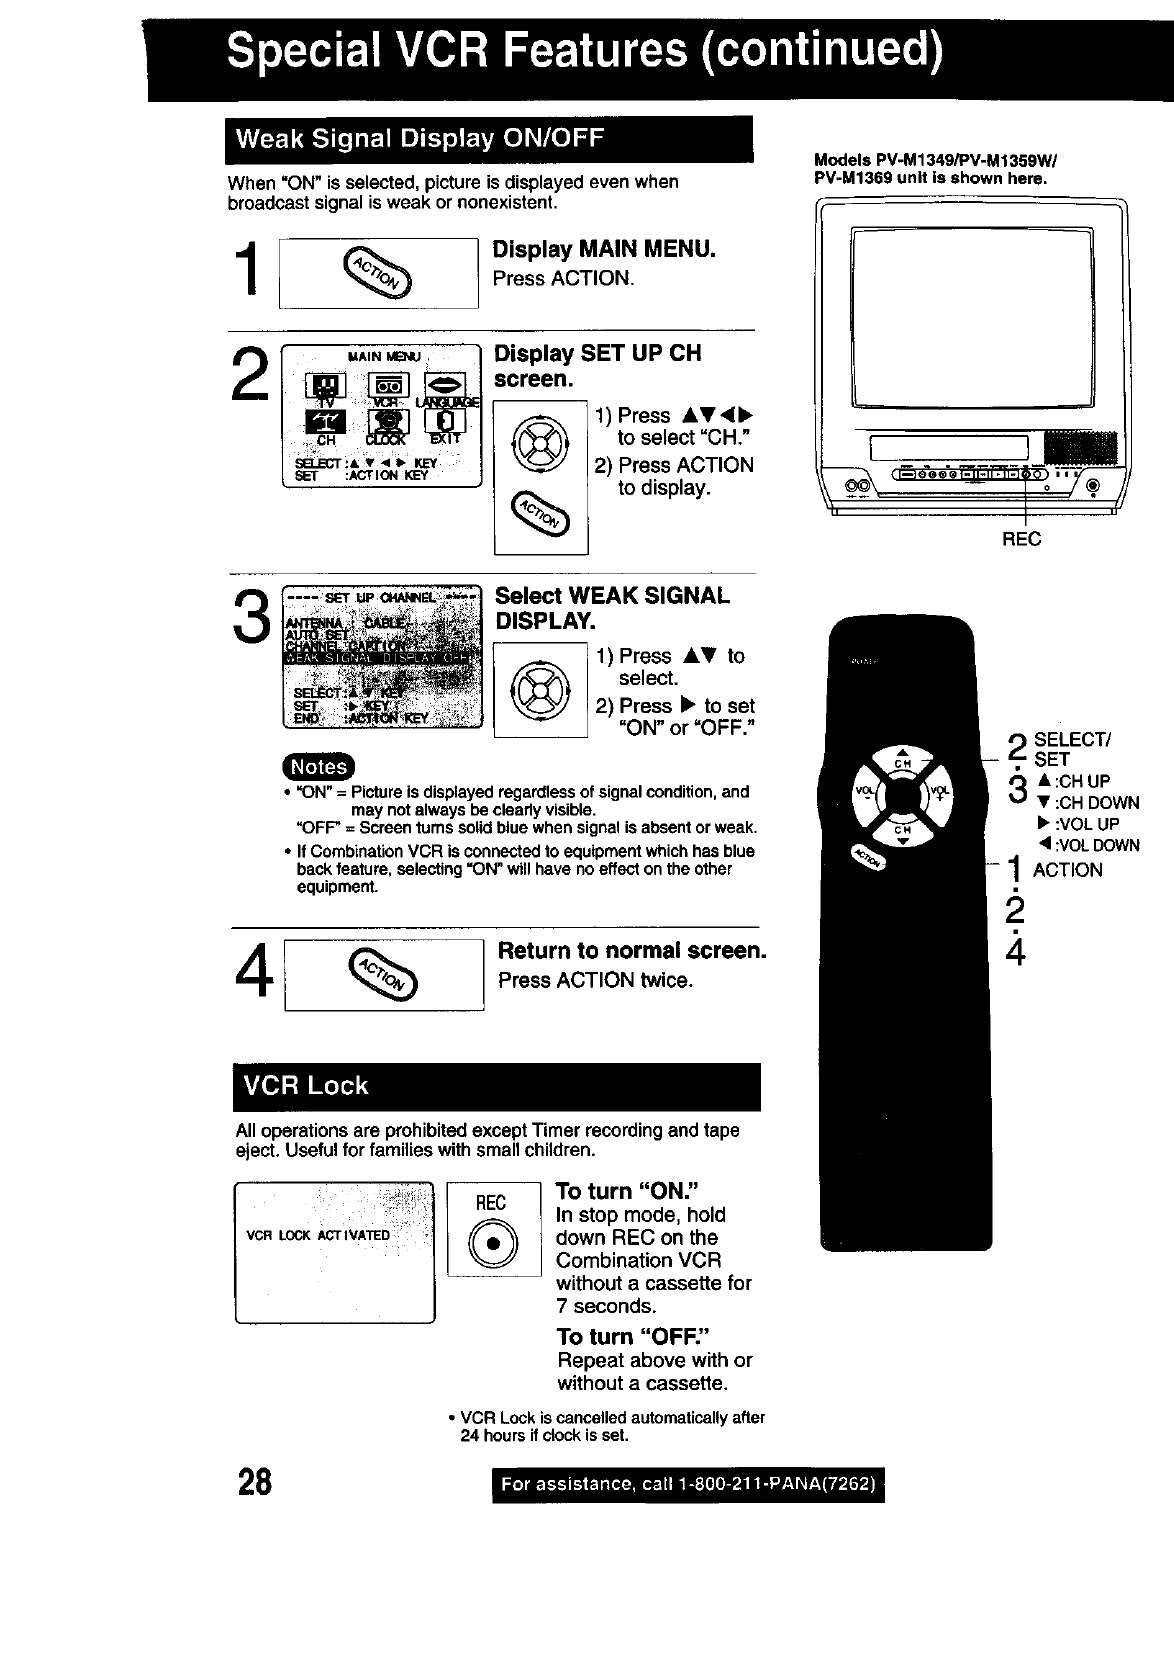
When "ON" is selected, picture is displayed even when
broadcast signal is weak or nonexistent.
% Display MAIN MENU.
Press ACTION.
.A,. Mmu, Display SET UP CH
screen.
KEY _
SET :ACTION KEY
Q 1) Press AT4•
to select "CH."
2) Press ACTION
to display.
Models PV-M1349/PV-M 1359w/
PV-M1369 unit Is shown here.
[ }
REC
3Select WEAK SIGNAL
DISPLAY.
11) Press AT to
Q/ select.
2) Press •to set
J"ON" or=OFF."
•"ON" = Pictureis displayed regardtessof signalcondition,and
may notalways be clearlyvisible.
"OFF' = Screen tumssolid blue when signal is absent or weak.
•If CombinationVCR is connectedto equipmentwhich has blue
back feature,selecting=ON"willhave noeffect onthe other
equipment.
% Return to normal screen.
Press ACTION twice.
All operationsare prohibited except Timer recordingand tape
eject. Useful for families with small children.
REC
®To turn "ON"
In stop mode, hold
down REC on the
Combination VCR
without a cassette for
7 seconds.
To turn "OFF"
Repeat above with or
without acassette,
• VCFI Lock is cancelled automatically after
24 hours if clock is set.
.SELECT/
SET
& :CH UP
• :CH DOWN
•:VOL UP
•:VOLDOWN
1ACTION
28
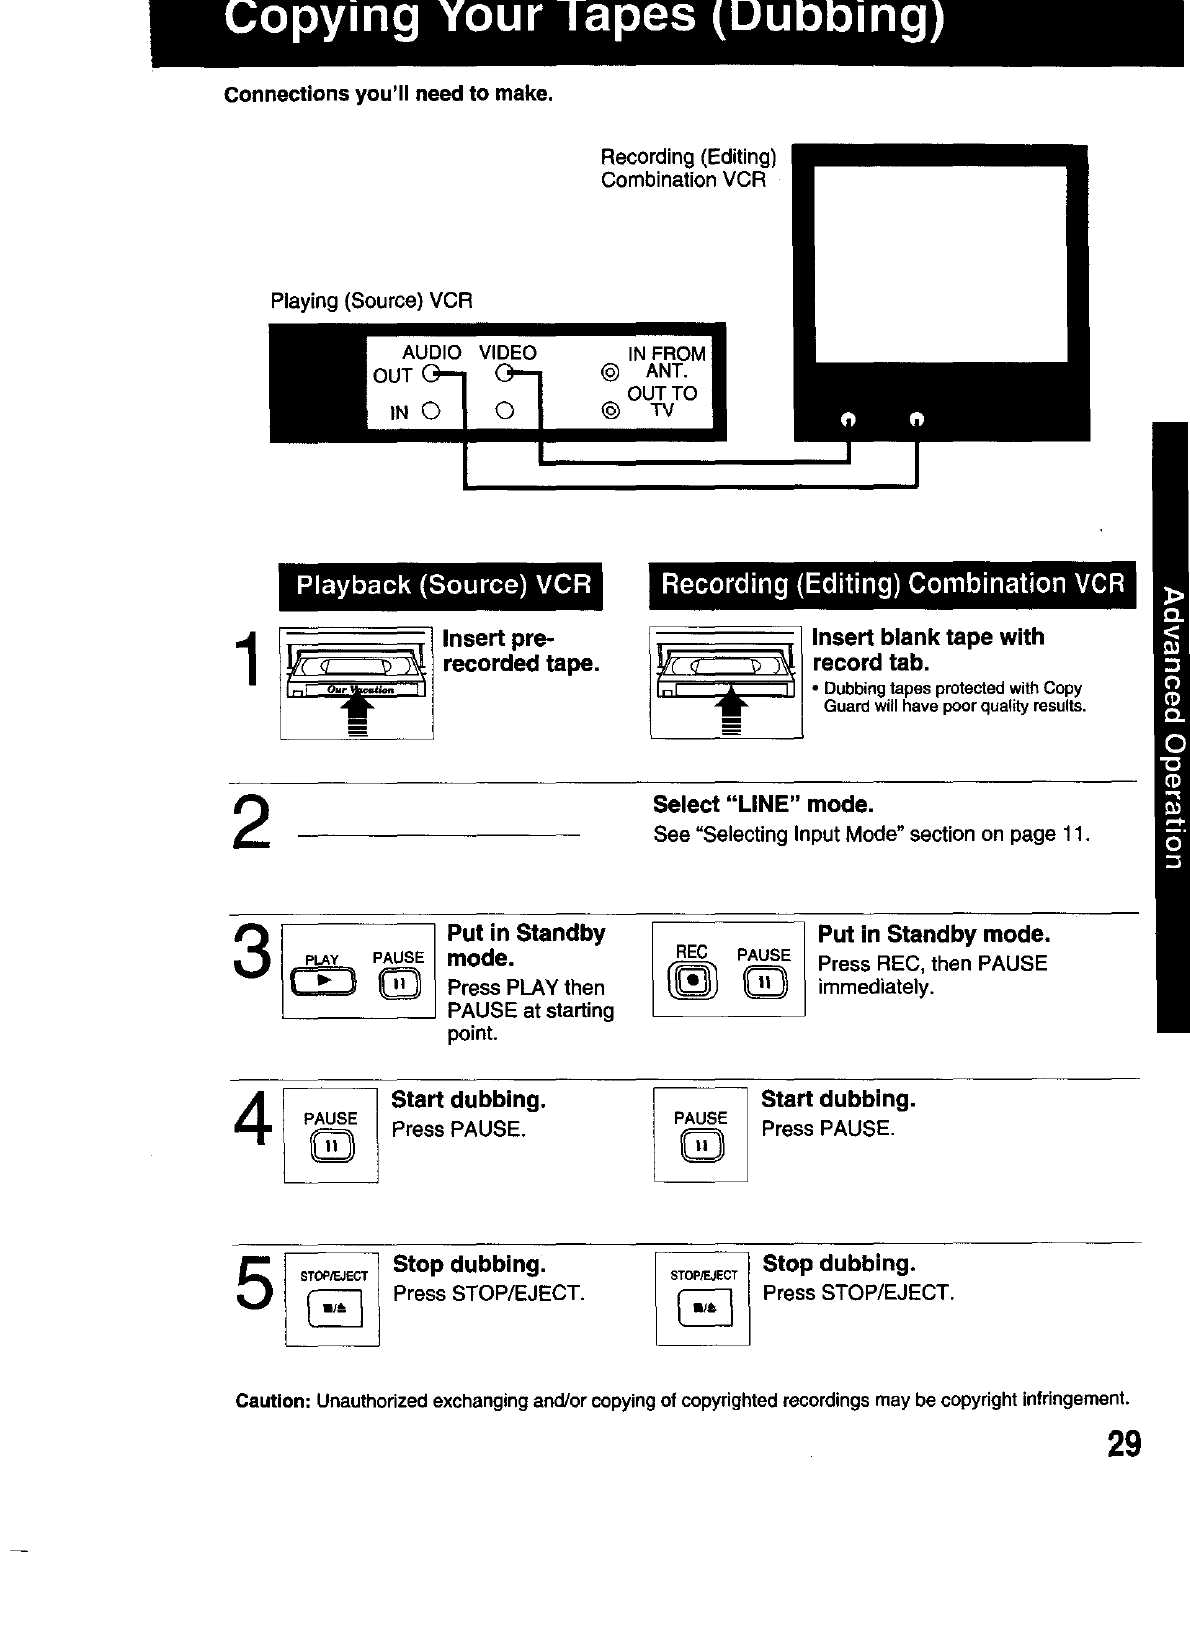
Connections you'll need to make.
Recording (Editing)
Combination VCR
Playing (Source) VCR
AUDIO
OUT
iN ©
VIDEO IN FROM
@ ANT.
OUT TO
TV
_Insert pre-
recorded tape. _! nsert blank tape with
record tab,
Dubbingtapes protected withCopy
Guard will have poorquality results.
/_. Select "LINE" mode.
See "Selecting InputMode" sectionon page 11.
3_ 1 Put in Standby
P@E mode.
Press PLAY then
PAUSE at starting
point.
REC PAUSE Put in Standby mode.
Press REC, then PAUSE
immediately.
Start dubbing.
Press PAUSE.
Start dubbing.
PAUSE
_Press PAUSE,
Press STOP/EJECT. STOP_ECrStop dubbing.
Press STOP/EJECT.
Caution: Unauthorized exchangingand/or copyingof copyrightedrecordings may be copyrightinfringement.
29
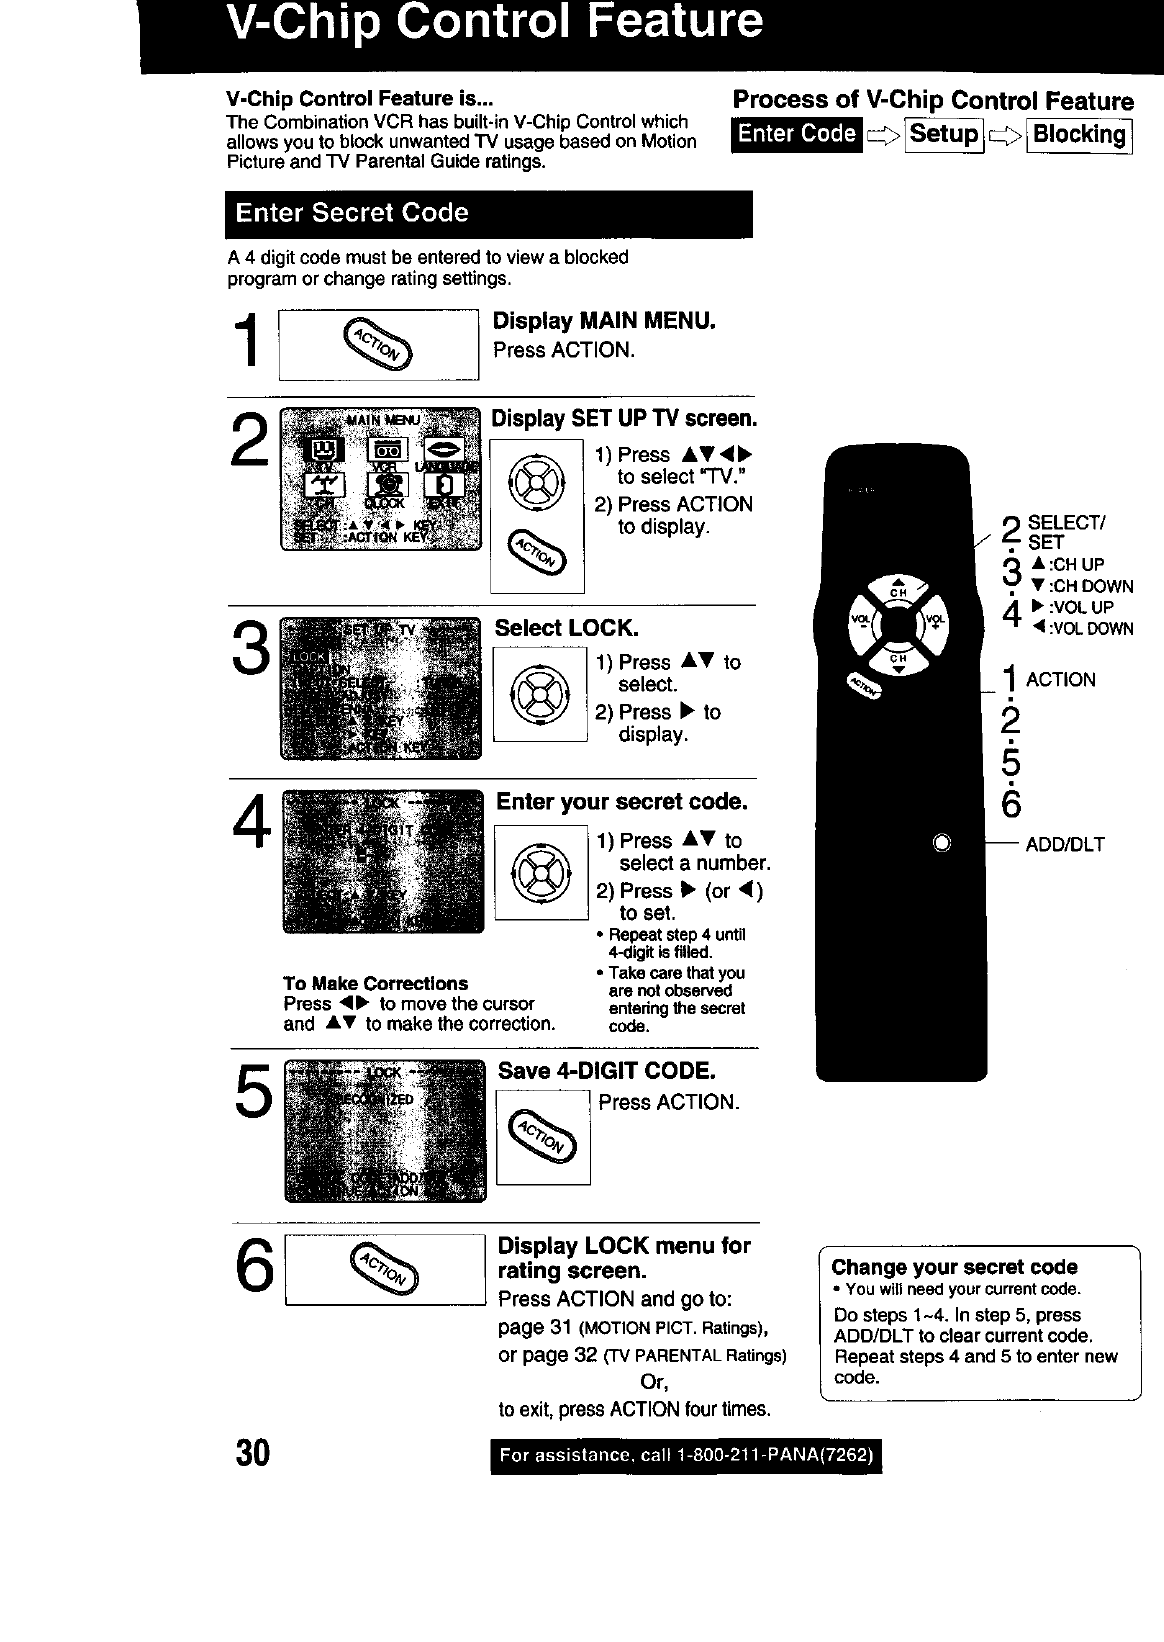
V-Chip Control Feature is...
The CombinationVCR has built-inV-Chip Controlwhich
allows you to block unwantedTV usage based on Motion
Pictureand TV Parental Guide ratings.
A 4 digit code must be entered to view a blocked
program orchange rating settings.
Process of V-Chip Control Feature
1I l D'sp'aYM""M "u.
Press ACTION.
2Display SET UP TV screen.
1) Press AVd•
to select _I'V."
2) Press ACTION
to display.
Select LOCK.
1)Press AT to
select.
SELECT/
SET
A:CH UP
• :CH DOWN
1. :VOL UP
<:VOLDOWN
1ACTION
2) Press • to
display.
Enter your secret code.
1) Press AY to
select a number.
2) Press •(or <)
to set.
•Repeatstep4until
4-digitisfilled.
•Takecarethatyou
are notobserved
enteringthesecret
code.
To Make Corrections
Press <lll_ to move the cursor
and &• to make the correction.
5Save 4-DIGIT CODE.
Press ACTION.
6l %
30
J
Display LOCK menu for
rating screen.
Press ACTION and go to:
page 31 (MOTION PICT. Ratings),
or page 32 (TVPARENTALRatings)
Or,
to exit, pressACTION four times.
Change your secret code
•You will need your current code,
Do steps 1-4, In step 5, press
ADD/DLT to clearcurrentcode.
Repeat steps4 and 5 to enter new
code.
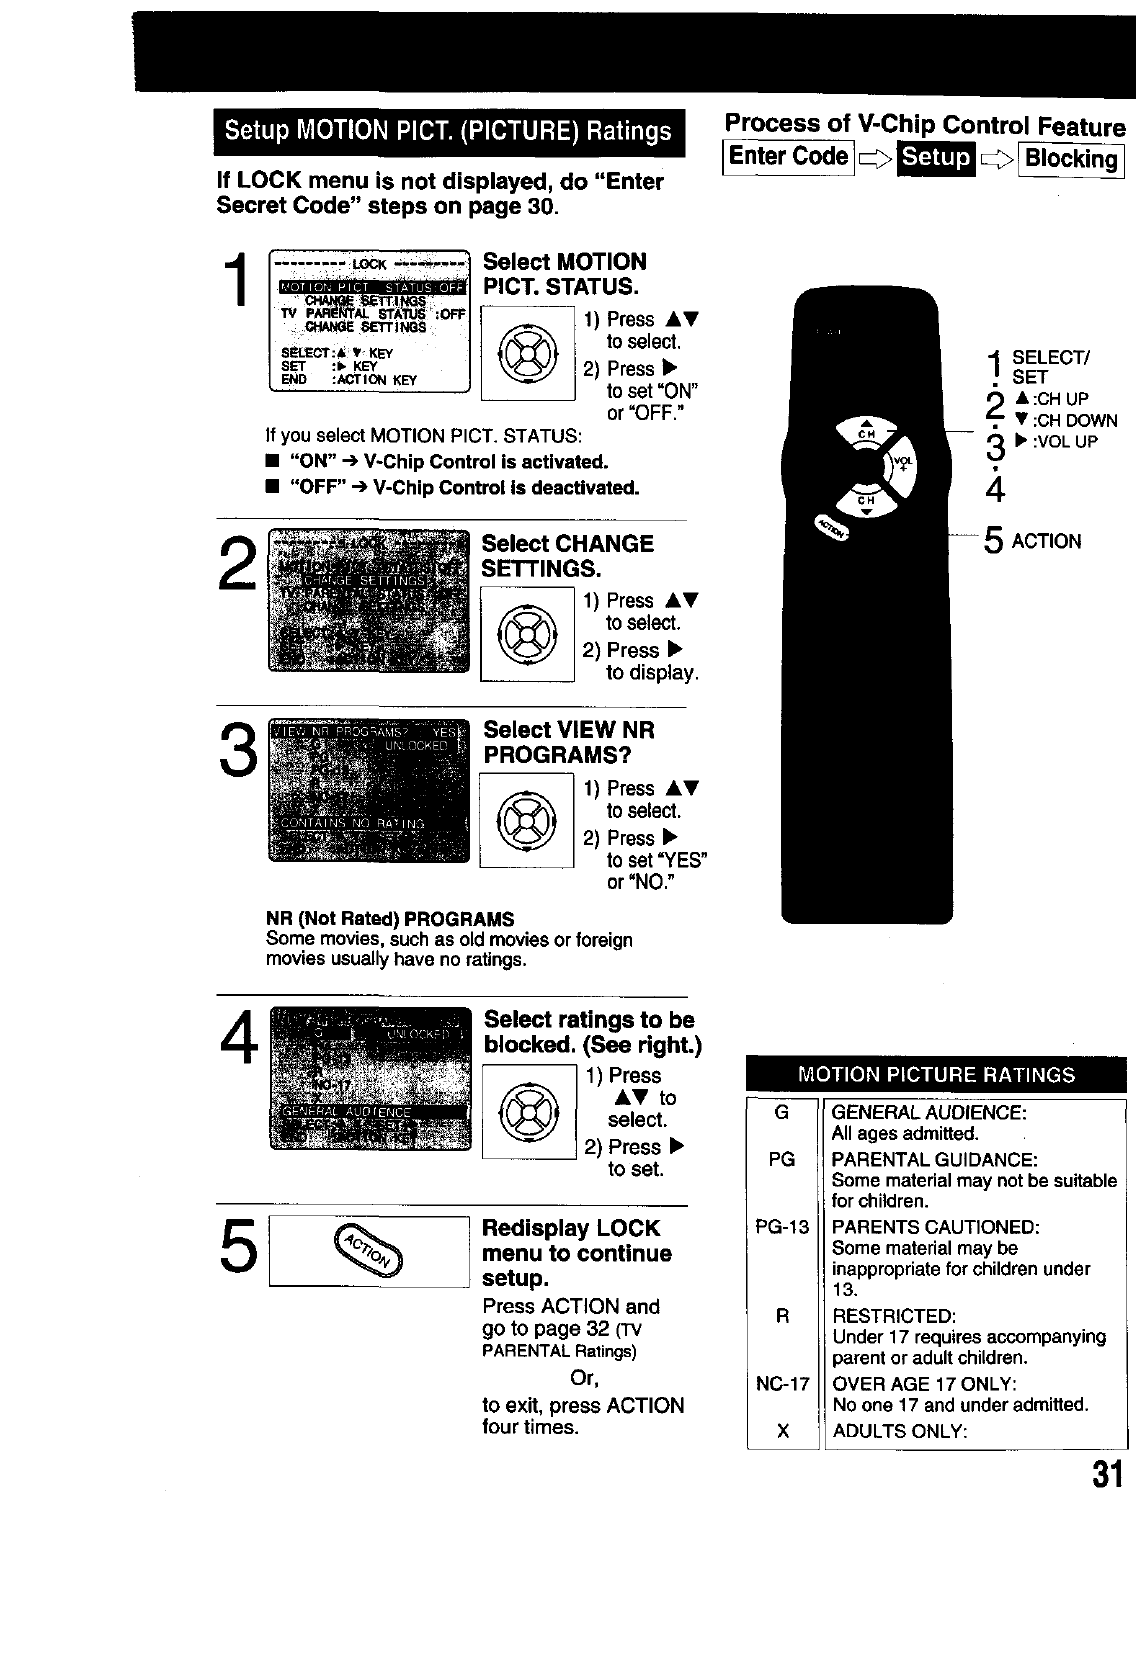
Process of V-Chip Control Feature
[Enter Code I_>i_> _
If LOCK menu is not displayed, do "Enter
Secret Code" steps on page 30.
1
2
3
Select MOTION
PICT. STATUS.
11) Press AT
,/'(_r_'_ /to select.
:, KEY __V_JJ | 2) Press •
:Acrlo_ KEY -- J to set "ON"
or "OFF."
If you select MOTION PLOT.STATUS:
• "ON" .--)V-Chip Control is activated.
• "OFF" .--)V-Chip Control Is deactivated.
Select CHANGE
SETTINGS.
Q] 1) Press AV
Ito select.
2) Press •
__J todspay.
Select VIEW NR
PROGRAMS?
1) Press AV
Qto select.
2) Press•
to set=YES"
or'NO."
NR (Not Rated) PROGRAMS
Some movies,such as old moviesor foreign
moviesusuallyhave no ratings.
.SELECT/
SET
.A:CHUP
•:CHDOWN
b':VOLUP
ACTION
4
5I %
Select ratings to be
blocked. (See right.)
1) Press
QAV to
select.
2) Press •
to set.
Redisplay LOCK
menu to continue
setup.
Press ACTION and
go to page 32 (TV
PARENTALRatings)
Or,
to exit, press ACTION
four times.
•G
PG
PG-13
R
NC-17
X
GENERAL AUDIENCE:
All ages admitted.
PARENTAL GUIDANCE:
Some material may not be suitable
for children.
PARENTS CAUTIONED:
Some materialmay be
inappropriatefor childrenunder
13.
RESTRICTED:
Under 17 requires accompanying
parent or adult children.
OVER AGE 17 ONLY:
No one 17 and under admitted.
ADULTS ONLY:
31
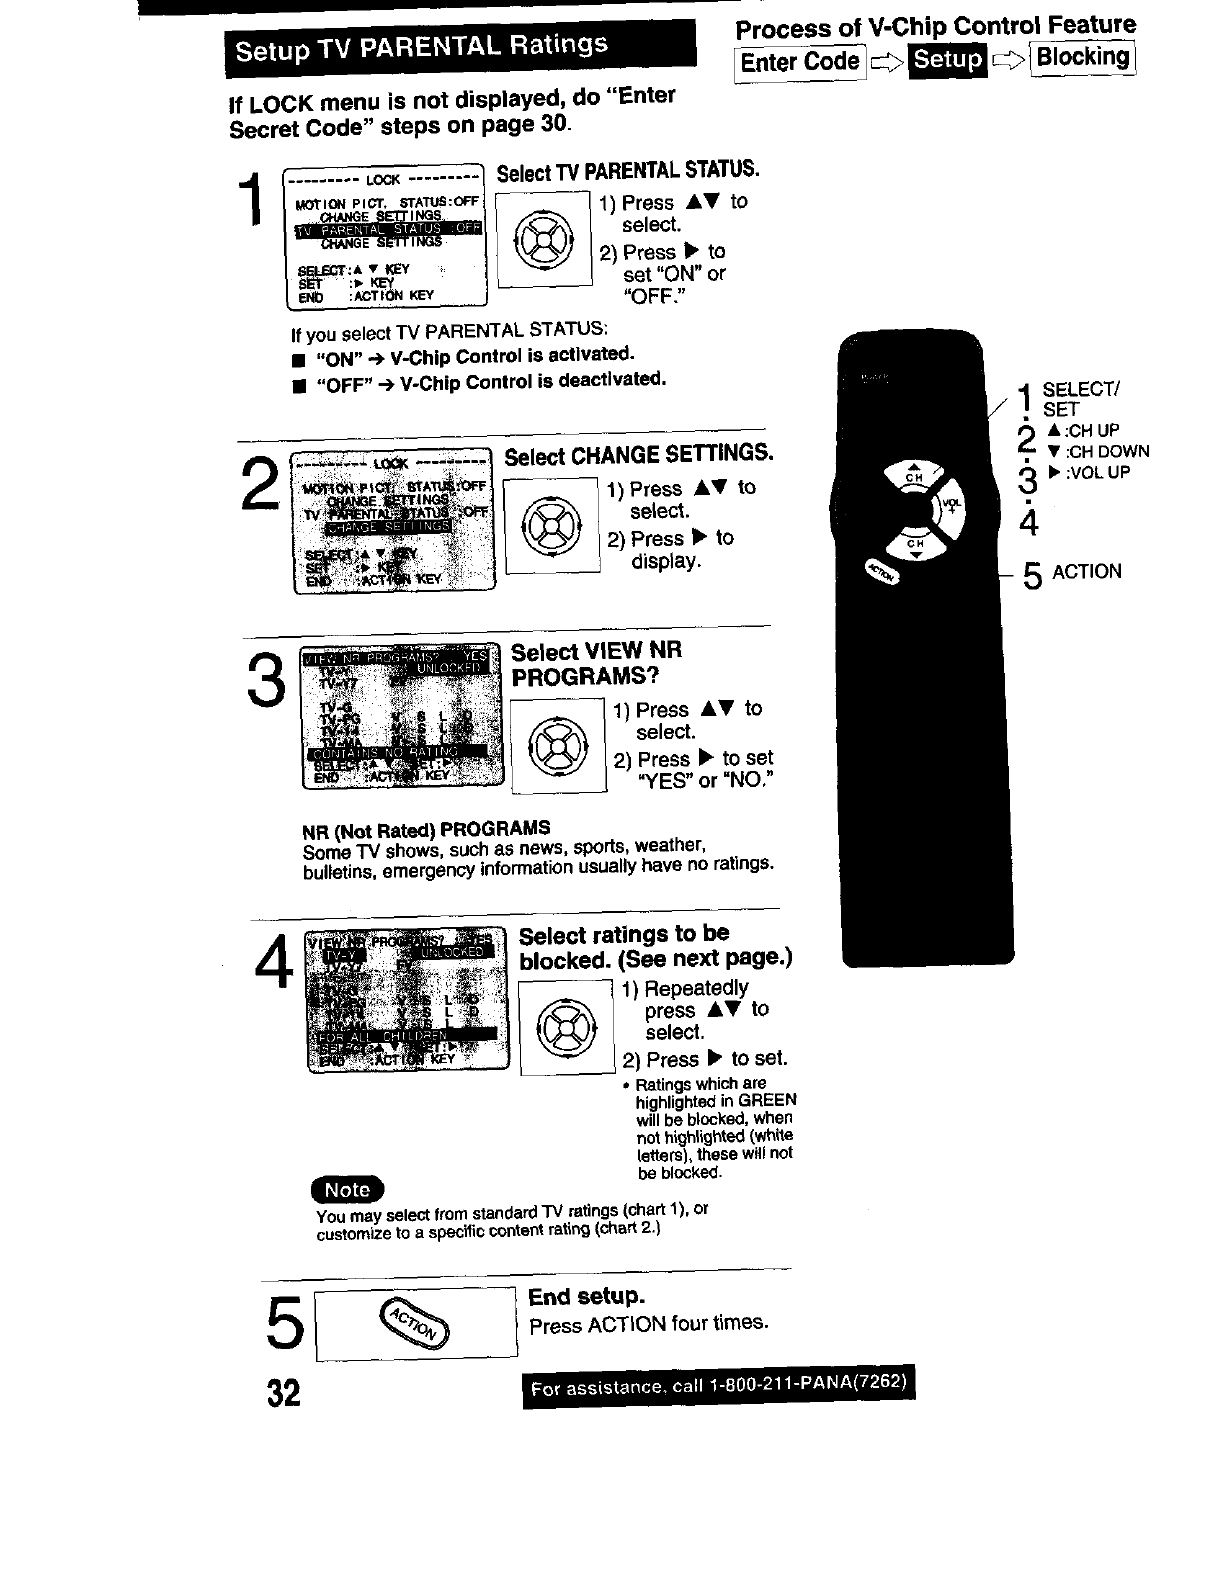
Process of V-Chip Control Feature
E_ter Code BlockingI
If LOCK menu is not displayed, do "Enter
Secret Code" steps on page 30.
1
3
4
......... Loc_ ......... Select TV PARENTAL STATUS.
.oT,o_ P,Cr. STA_US:O_F_ I 1) Press AY to
12) Press •to
--_ set "ON" or
"OFF."
If you select rv PARENTAL STATUS:
• "ON" _ V-Chip Control is activated.
• "OFF" --) V-Chip Control is deactivated.
Select CHANGE SETTINGS.
2) Press ,il,Vto
Oselect.
Press •to
display.
Select VIEW NR
PROGRAMS?
1) Press AY to
select.
2) Press • to set
"YES" or "NO."
NR (Not Rated) PROGRAMS
Some TV shows, suchas news, sports,weather,
bulletins,emergency informationusuallyhave no ratings.
Select ratings to be
blocked. (See next page.)
1) Repeatedly
O press &_" to
select.
2) Press • to set.
•Ratingswhich are
highlightedin GREEN
will be blocked, when
not highlighted(white
letters),thesewillnot
he blocked.
m
You may select from standard"IV ratings(chart 1), or
customizeto a specificcontent ratiP_(chart2.)
SELECT/
SET
2'i :CH UP
•:CH DOWN
3_" :VOL UP
4
5ACTION
5
32
%End setup.
Press ACTION fourtimes.
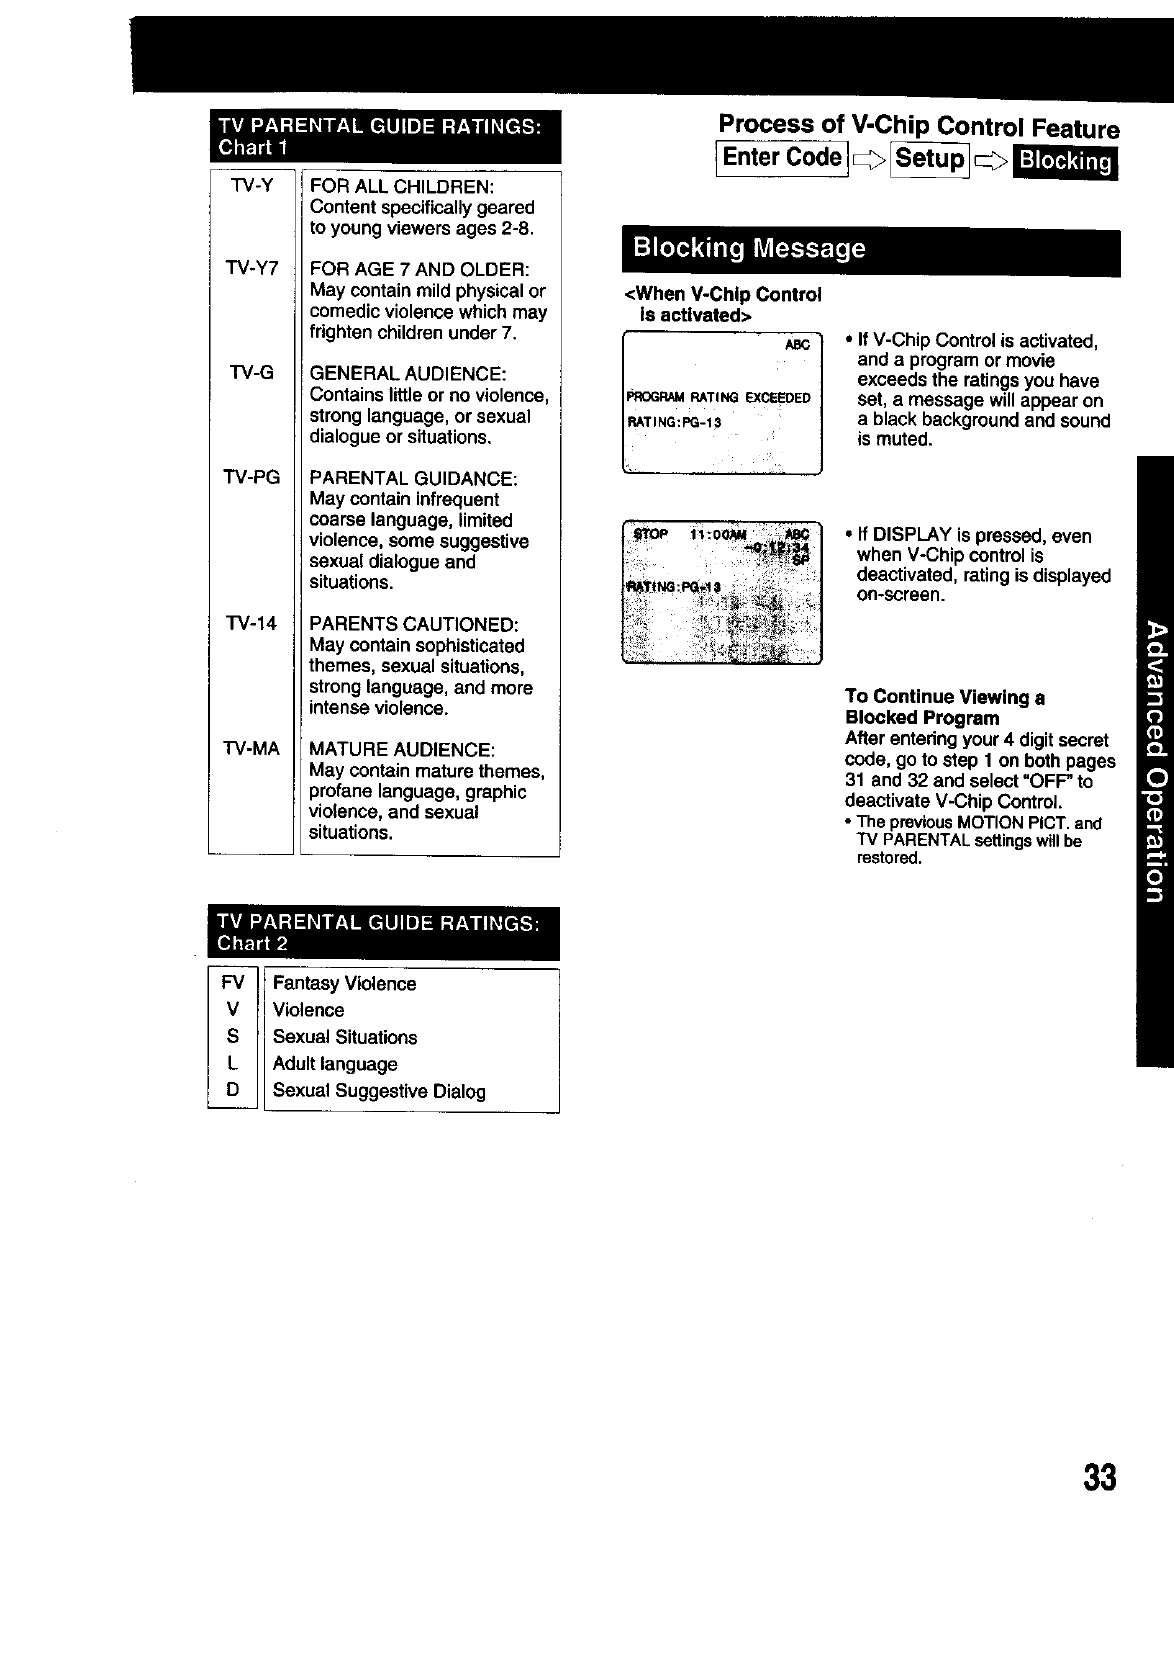
TV-Y
TV-Y7
TV-G
TV-PG
TV-14
"rV-MA
FOR ALL CHILDREN:
Content specificallygeared
to young viewersages 2-8.
FOR AGE 7 AND OLDER:
May contain mild physicalor
comedic violence which may
frighten children under 7.
GENERAL AUDIENCE:
Contains little or no violence,
strong language, or sexua_
dialogue or situations.
PARENTAL GUIDANCE:
May contain infrequent
coarse language, limited
violence, some suggestive
sexual dialogue and
situations.
PARENTS CAUTIONED:
May contain sophisticated
themes, sexual situations,
strong language, and more
intense violence.
MATURE AUDIENCE:
May containmaturethemes,
_rofane language, graphic
violence, and sexual
Isituations.
Process of V-Chip Control Feature
<When V-Chip Control
is activated>
•_OGRAM RATING EXCEEDED
•If V-Chip Control is activated,
and a program ormovie
exceeds the ratingsyou have
set, a message will appear on
ablack backgroundand sound
is muted.
• If DISPLAY is pressed,even
whenV-Chip controlis
deactivated,ratingis displayed
on-screen.
To Continue Viewing a
Blocked Program
After enteringyour 4 digitsecret
code, go tostep 1 on both pages
31 and 32 and select"OFP to
deactivateV-Chip Control.
• ThepreviousMOTIONPICT.and
TV PARENTALsettingswillbe
restored.
_LD antesy Violence
Violence
Sexual Situations
Adult language
Sexual Suggestive Dialog
33
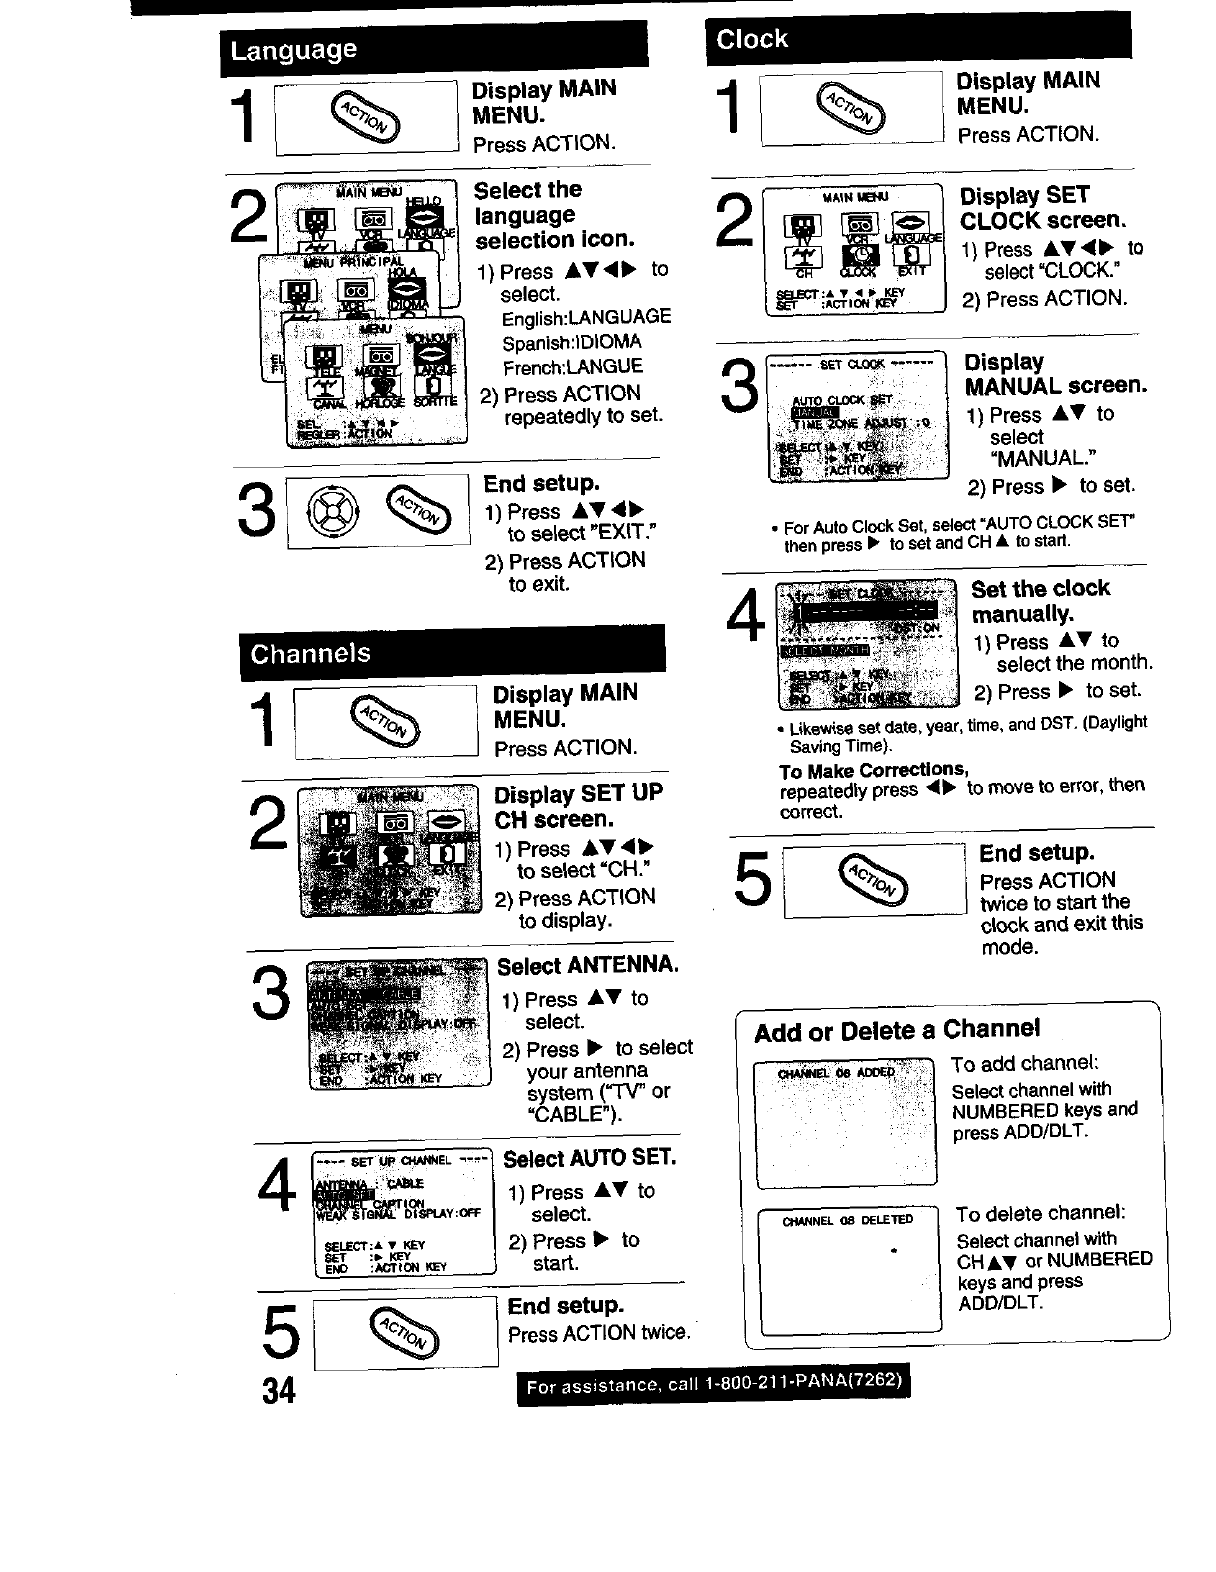
%Display MAiN
MENU.
Press ACTION. %Display MAIN
MENU.
Press ACTION.
2Select the
language
selection icon.
1) Press AY<I• to
select.
English:LANGUAGE
Spanish:lDIOMA
Frenoh:LANGUE
2) Press ACTION
repeatedly to set.
3 @ % l=n''°'"
1) Press AT_
to select "EXIT,"
2) Press ACTION
to exit.
1I%1 o,.*,.,,o.o.u
Press ACTION.
2Display SET UP
CH screen.
1) Press AT4_
to select =CH."
2) Press ACTION
to display.
3Select ANTENNA.
1) Press AV to
select.
2) Press •to select
your antenna
system (=TV" or
=CABLE").
(77,,_'r, -_=._ "-"/Select AUTO SET.
(li_=l_r_,_,~ I 1) Press AY to
i,_.=sm,_,: Bf's_.,y:o_I select.
IsF.u_cr:,,KEY I 2) Press •to
34
End setup.
PressACT ON twice.
2
3
4
Display SET
CLOCK screen,
1) Press AT4• to
select "CLOCK."
2) Press ACTION.
Display
MANUAL screen.
1) Press AT to
select
=MANUAL."
2) Press •to set.
• For Auto Clock Set, select "AUTO CLOCK SET"
thenpress I_ to set and CH • to start.
Set the clock
manually.
1) Press A_' to
select the month.
2) Press •to set.
•Likewiseset ds.te,year, time,and DST, (Daylight
Saving Time).
To Make Corrections,
repeatedtypress d• to move to error, then
correct.
5i %10.°.o,oo
Press ACTION
twice to start the
clock and exit this
mode.
Add or Delete a Channel
To add channel:
Select channelwith
NUMBERED keys and
press ADD/DLT.
To delete channel:
Select channelwith
CHAir or NUMBERED
keys and press
ADD/DLT.
DISPLAY
©
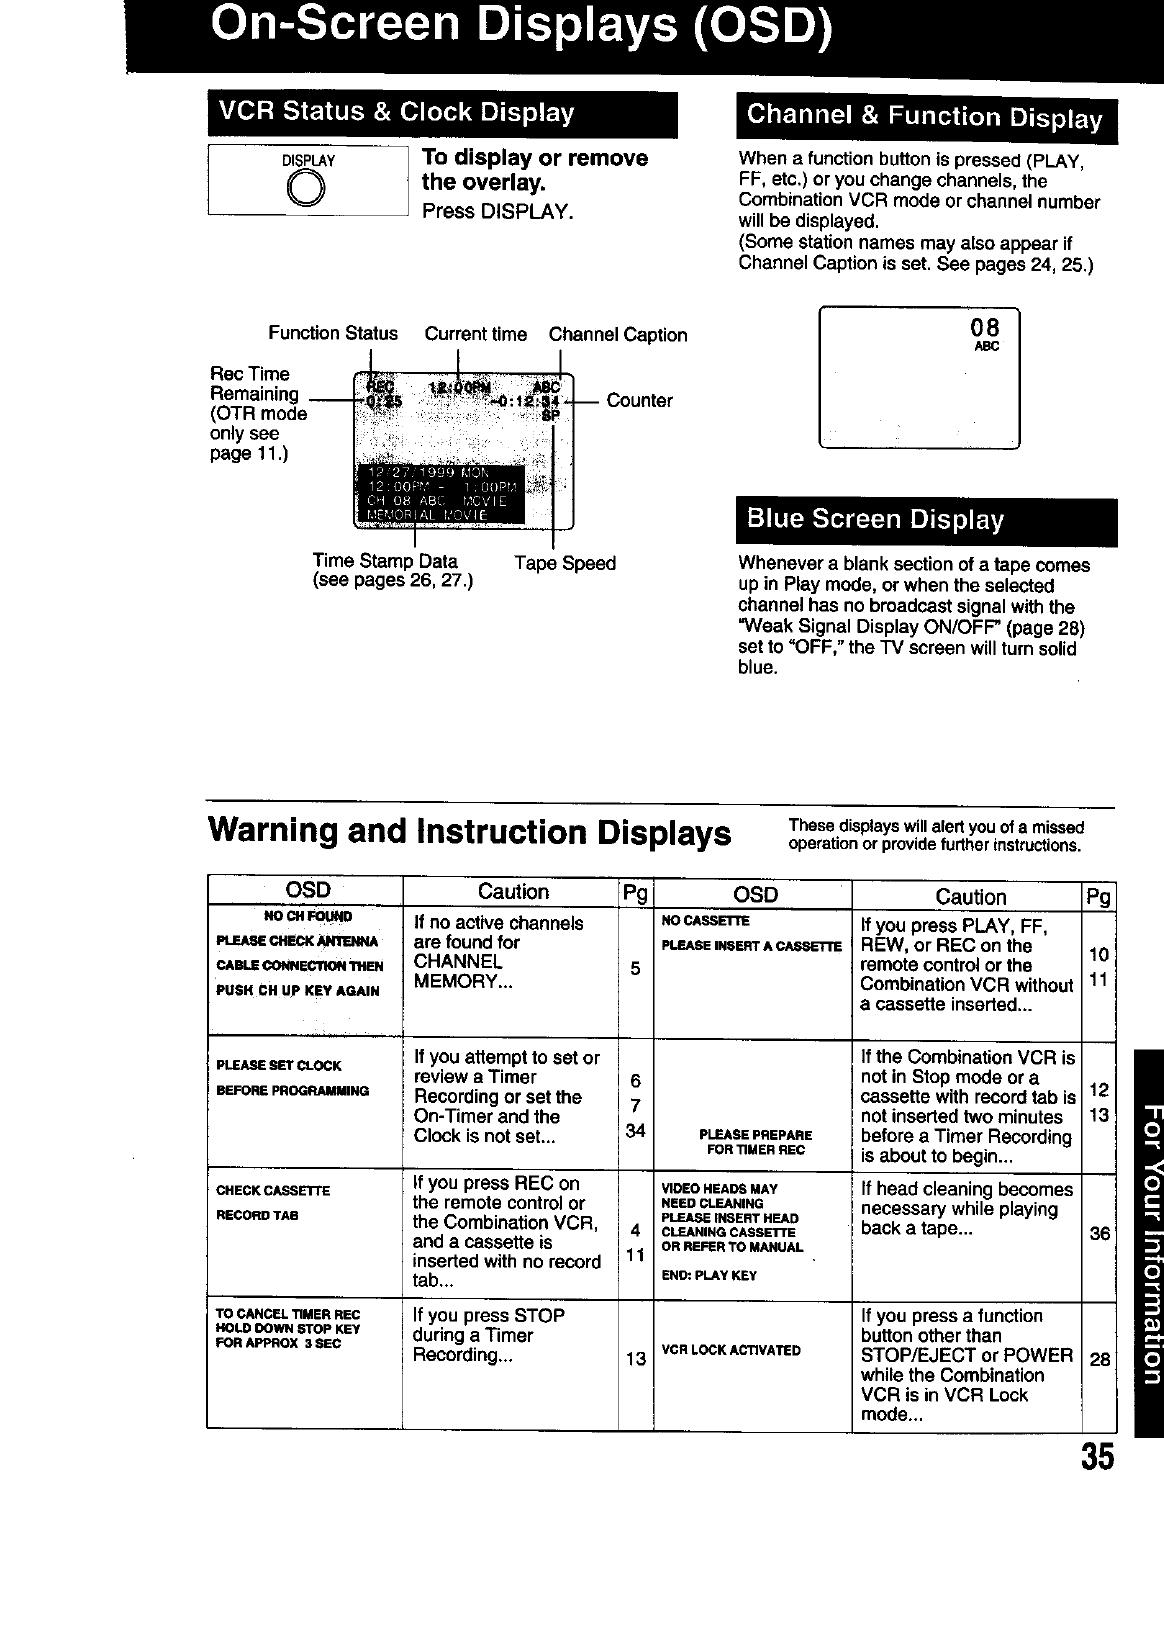
FunctionStatus
Rec Time
Remaining __
(OTR mode
onlysee
page 11.)
To display or remove
the overlay.
Press DISPLAY.
Currenttime Channel Caption
Counter
When a function button is pressed (PLAY,
FF, etc.) or you change channels, the
Combination VCR mode or channel number
will be displayed.
(Some station names may also appear if
Channel Caption is set. See pages 24, 25.)
Time Stamp Data
(see pages 26, 27.) Tape Speed Whenever a blank sectionof a tape comes
up in Play mode, or when the selected
channelhas no broadcastsignalwiththe
WVeakSignal Display ON/OFF" (page 28)
set to =OFF,"the "IV screen will turnsolid
blue.
Warning and Instruction Displays These displayswillalertyou of a missed
operationor providefurtherinstructions.
OSD
NOCHFOU_O
PLEASECHECK_--=mU_
CABLE CONNECTION THEN
PUSH CN Up KEY AGAIN
PLEASE SET CLOCK
BEFORE PROGRAMMING
CHECK CASSETTE
RECORD TAB
TO CANCEL TIMER REC
HOLD DOWN STOP KEY
FOR APPROX 3 SEC
Caution
Ifnoactivechannels
am _und_r
CHANNEL 5
MEMORY...
If you attempt to set or
reviewa Timer 6
Recordingor setthe 7
On-Timer and the
Clock is not set... 34
If you press REC on
the remotecontrolor
the CombinationVCR, 4
and a cassette is
insertedwithno record 11
tab...
If you press STOP
dudng aTimer
Recording... 13
Pg OSD
NO CASSE131_
PLEASE INSERT ACAS_:TrE
PLEASE PREPARE
FOR TIMER REC
VIDEO HEADS MAY
NEED CLEANING
PLEASE INSERT HEAD
CLEANING CASSETTE
OR REFER TO MANUAL
ENO: PLAY KEY
VCR LOCK ACTIVATED
Caution
If youpress PLAY, FF,
REW, or REC on the
remotecontrol or the
CombinationVCR without
a cassetteinserted...
Pg
10
11
If you pressa function
buttonother than
STOP/EJECT or POWER 28
while the Combination
VCR is in VCR Lock
mode...
35
If the CombinationVCR is
not in Stop mode ora
cassette withrecordtab is 12
jnot insertedtwo minutes 13
before a Timer Recording
is about to begin...
! If head cleaning becomes
Inecessarywhile playing
=back a tape... 36
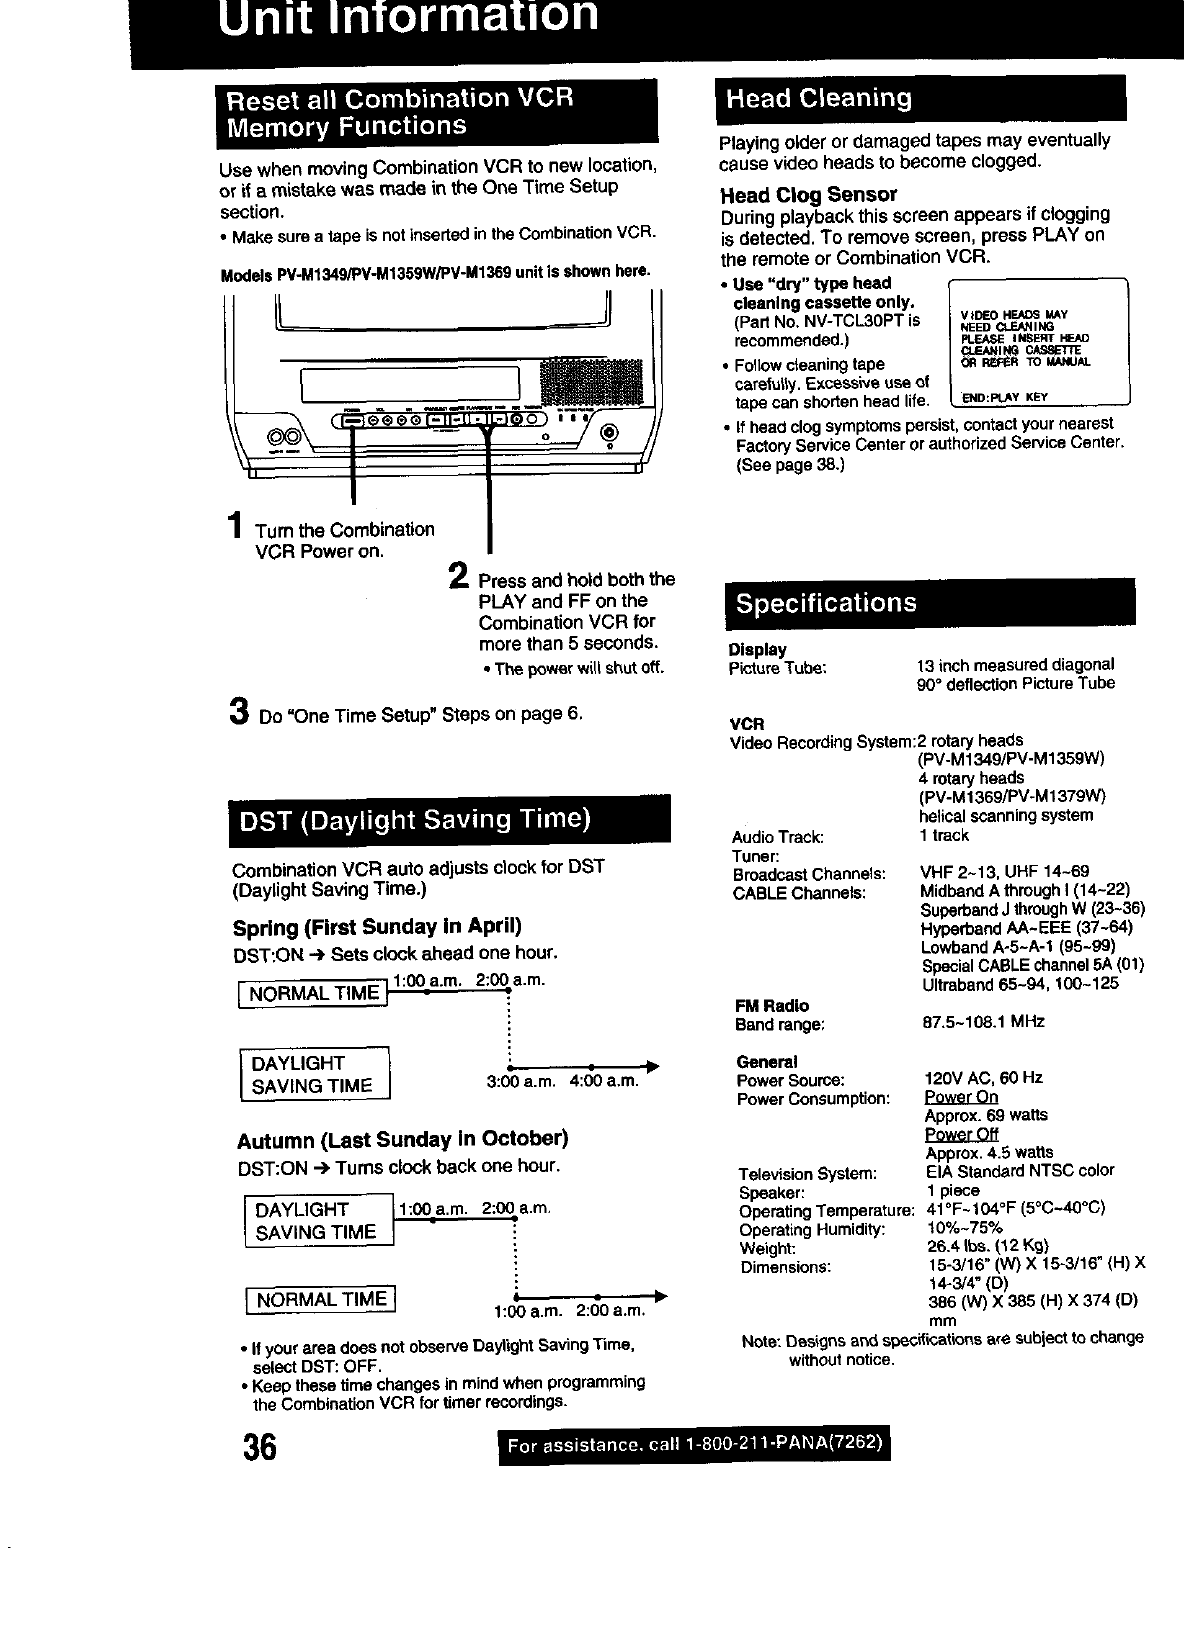
Usewhenmoving Combination VCR to new location,
or if a mistake was made in the One Time Setup
section.
•Makesure a tape is not insertedinthe CombinationVCR.
ModelsPV-M1349/PV-M1359W/PV-M1369unitis shownhere.
L II
4
/Turn the Combination
VCR Power on.
Press and holdboththe
PLAY and FF onthe
Combination VCR for
more then 5 seconds.
• Tt_ powerwillshutoff_
Do "One Time Setup"Steps on page 6.
Combination VCR auto adjusts clockfor DST
(Daylight Saving Time.)
Spring (First Sunday In April)
DST:ON _Sets clockahead one hour.
[NORMALTIME 1l:00--a'm"2:00__a.m.
I DAYLIGHT 1
SAVING TIME 3:0_a.m. 4:00a.m."_-
Autumn (Last Sunday in October)
DST:ON -->Turns clockback one hour.
DAYLIGHT 1:00a.m. 2:00a.m,
SAVING TIME
I NORMAL TIME I 1:00 a.m. 2:()0a.m.
• If your area does not observe DaylightSavingTime,
select DST: OFF.
•Keep these time changes in mindwhen programming
the CombinationVCR for timer recordings.
36
Playing older ordamaged tapes may eventually
cause video heads to become clogged.
Head Clog Sensor
Duringplaybackthisscreen appears if clogging
is detected. To removescreen, press PLAY on
the remoteor CombinationVCR.
• Use "dry" type head
cleaning cassette only.
(Part No. NV-TCL30PT is
recommended.)
•Followcleaningtape
carefully.Excessive use of
tape can shortenhead life.
VIDEO HEADS MAY
NEED CLEANING
PLEASE iNSERT HEAO
[ END:FtJ_Y KEY
• If head clog symptomspersist,contact yournearest
Factory Service Center or authorized Service Center.
(See page 38.)
Display
PictureTube: 13 inchmeasured diagonal
90°deflection PictureTube
VCR
Video RecordingSystem:2
Audio Track:
Tuner:
BroadcastChannels:
CABLE Channels:
FM Radio
Sand range:
rotary heads
(PV-M1349/PV-M1359W)
4rotaryheads
(PV-M1369/PV-M1379W)
helicalscanningsystem
1 track
VHF 2~13, UHF 14~69
Midband AthroughI(14~22)
SuperbandJthroughW (23-36)
HyperbaodAA~EEE (37~64)
LowbaodA-5-A-1 (95-99)
SpecialCABLEchannel5A (01)
Ultraband65-94, 100~125
87.5~108.1 MHz
General
Power Source:
PowerConsumption:
TelevisionSystem:
Speaker:
OperatingTemperature:
OperatingHumidity:
Weight:
Dimensions:
120V AC, 60 Hz
Approx.69 watts
Poweroff
Approx.4.5 watts
EIA Standard NTSC color
1 piece
41oF~104°F (5°C~40°C)
10%-75%
26.4 Ibs.(12 Kg)
15-3/16" (W) X 15-3/16" (H) X
14-3/4" (D)
356 (W) X385 (H) X 374 (D)
mm
Note: Designs and specificationsare subiectto change
withoutnotice.
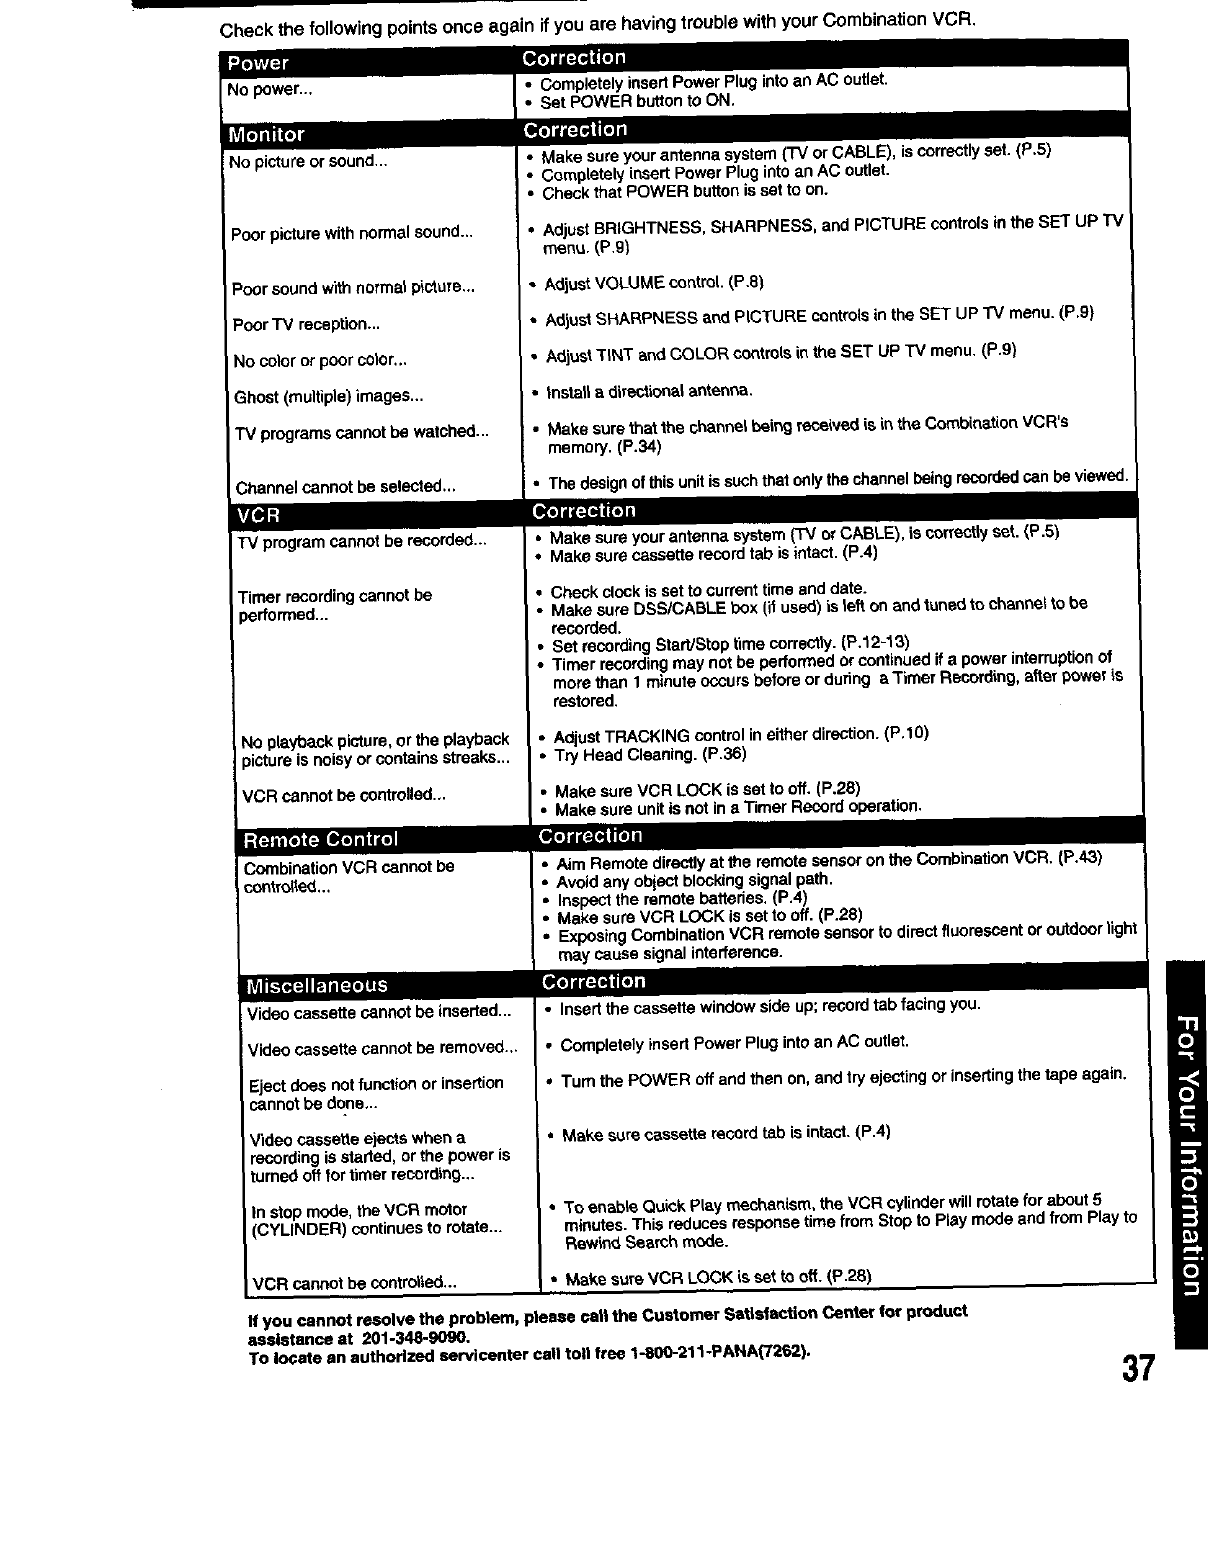
Check the following pointsonce a
No power..,
ILVA_.o]
No pictureor sound...
Poorpicture with normalsound...
Poorsound withnormalp_c_ure._
PoorTV reception...
No coloror poor color...
Ghost (multiple)images...
TV programscannotbe watched...
Channel cannot be selected...
|v/qi
TV program cannotbe recorded...
Timer recordingcannotbe
3erformed...
"40playbeckpicture,or the playback
picture is noisyor containsstreaks...
VCR cannotbe controlled...
I -'INHTo)(_l[If_]i r_
Combination VCR cannot be
contro_ed...
lideocassettecannotbe inserted...
Videocassette cannot be removed...
IEject does not functionor insertion
cannotbe done...
Video cassette elects when a
recordingis staded, or the power is
turnedoff for timer recording...
in stopmode, the VCR motor
CYLINDER) continuesto rotate...
/CR cannot be controlled...
aln if youare having troublewithyour CombinationVCR.
• Completelyinsert PowerPlug intoan AC outlet.
• Set POWER buttonto ON.
I_old_'._HI[a]l
•Make sureyourantenna system('IV or CABLE), is correctlyset. (P.5)
•Completelyinsert PowerPlug into an AC outlet.
ICheck that POWER buttonis set to on.
AdjustBRIGHTNESS, SHARPNESS, and PICTURE controlsinthe SET UP T_
menu. (P.g)
Adjust VOLUME control. (P.8)
Adjust SHARPNESS and PICTURE controlsin the SET UP "IV menu. (P.9)
AdjustTiNT and COLOR controlsinthe SET UP TV menu. (P.9)
installa directional antenna.
Make surethat 1hechannel being receivedis in the CombLr_tion VCR's
memory. (P.34)
Thedesignofthisunitissuchthatonlythechannelbeingrecordedcanbe viewed.
--']d'r=]111"]l
Makesureyour antennasystem(TVorCABLE),is cm'rectlyset. (P.5)
Makesurecassetterecordtab isintact.(P.4)
Check clock is set to currenttime and date.
• Make sure DSSICABLE box (ifused) is lefton and tuned to channe_to be
recorded.
•Set recordingStart/Stoptime correctly.(P.12-13)
•Timer recordingmay not be performedor continuedifa powerinterruptionof
more than t minute occursbefore ordudng a Timer Recording, afterpower is
restored.
•AdjustTRACKING controlineither direction.(P.10)
•Try Head Cleaning.(P.36)
•Make sureVCR LOCK is set to off. (P.28)
•Make sure unitis not in aTimer Recordoperation.
Re]ll[=Te41 [el i
•Aim Remote directlyat the remotesensoron the CombinationVCR. (P.43)
•Avoid anyobiectblocldngsignalpath.
•Inspectthe remote bettedes. (P.4)
•Make sureVCR LOCK is set to off. (P.28)
•ExposingCombinationVCR remote sensorto directfluorescent or outdoorlight
may cause signalinterference.
I_1] d |:_Ni[eJl
•Insertthe cassettewindowside up; recordtab facing you.
•Completelyinsert Power Pluginto an AC outlet.
i• Turnthe POWER off and then on, and tryejectingor insertingthe tape again,
Make sure cassette record tab is intact. (P.4)
To enabk_Quick Play mechsnLsm, the VCR cylinderwillrotatefor about 5
minutes.This reducesresponse time from Stop to Play mode and from Play to
Rewind Search mode.
Make sure VCR LOCK is set to off.(P.28)
If you cannot resolve the problem, please call the Customer Satlsfection Center for product
assistance at 201-348-9090.
To loCate an authorized servicenter catt toll tree 1-800-211-PANA('i262). 37

1-800-332-5368 (Customer Orders Only)
Panasonlc Services Company 20421 84th Avenue South, Kent, WA 98032
(8 am to 5 pm Monday-Frlday; 6 am to 10:30 am Saturday; PST)
(Visa, MasterCerd, Discover Card, Amerlcan Express, Check)
CALIFORNIA
6550 KatellaAvenue
Cypress,CA 90630
800 DubuqueAvenue
S. San Francisco,
CA 94080
20201 Sherman Way
Suite 102
Canoga Park, CA
91306
3878 Ruffin Road
Suite A
San Diego, CA 92123
COLORADO
1640 South Abiiene
Street
Suite D
Aurora, CO 80012
FLORIDA
3700 North 29"_Avenue
Suite 102
Hollywood,FL 33020
GEORGIA
8655 RoswellRoad
Suite 100
Atlanta,GA 30350
ILLINOIS
9060 Golf Road
Niles, IL 60714
1703 NorthRandall
Road Elgin, IL 60123
(Pick-up/Drop-offonly)
MARYLAND
62 MountainRoad
Glen Bumie, MD21061
MASSACHUSETTS
60 Glacier Drive,
Suite G
Westwood, MA 02090
MICHIGAN
37048 Van Dyke
Avenue
Sterling Heights,
M148312
MINNESOTA
7850-12=Avenue South
AirportBusinessCenter
Bloomington,MN 55425
OHIO
2236 Waycross Road
Civic Center Plaza
Forest Park, OH 45240
PENNSYLVANIA
2221 Cabot BlvdWest
Suite B
Langhorne,PA 19047
ChartiersValley
Shoppir).gCenter
1025 Washington Pike
Bridgsville,PA 15017
TENNESSEE
3800 Ezell Road Suite
806
Nashville,TN 37211
TEXAS
7482 Ha(win Drive
Houston,TX 77036
13615 Welch Road
Suite 101
Farmers Branch,
TX 75244
WASHINGTON
20425.84" Avenue
South Kent, WA 98032
HAWAII
99-859 Iwaiwa Street
Aiea, Hawaii 96701
Phone (808) 488-1996
Fax (808) 486-4389
As of April '98
38
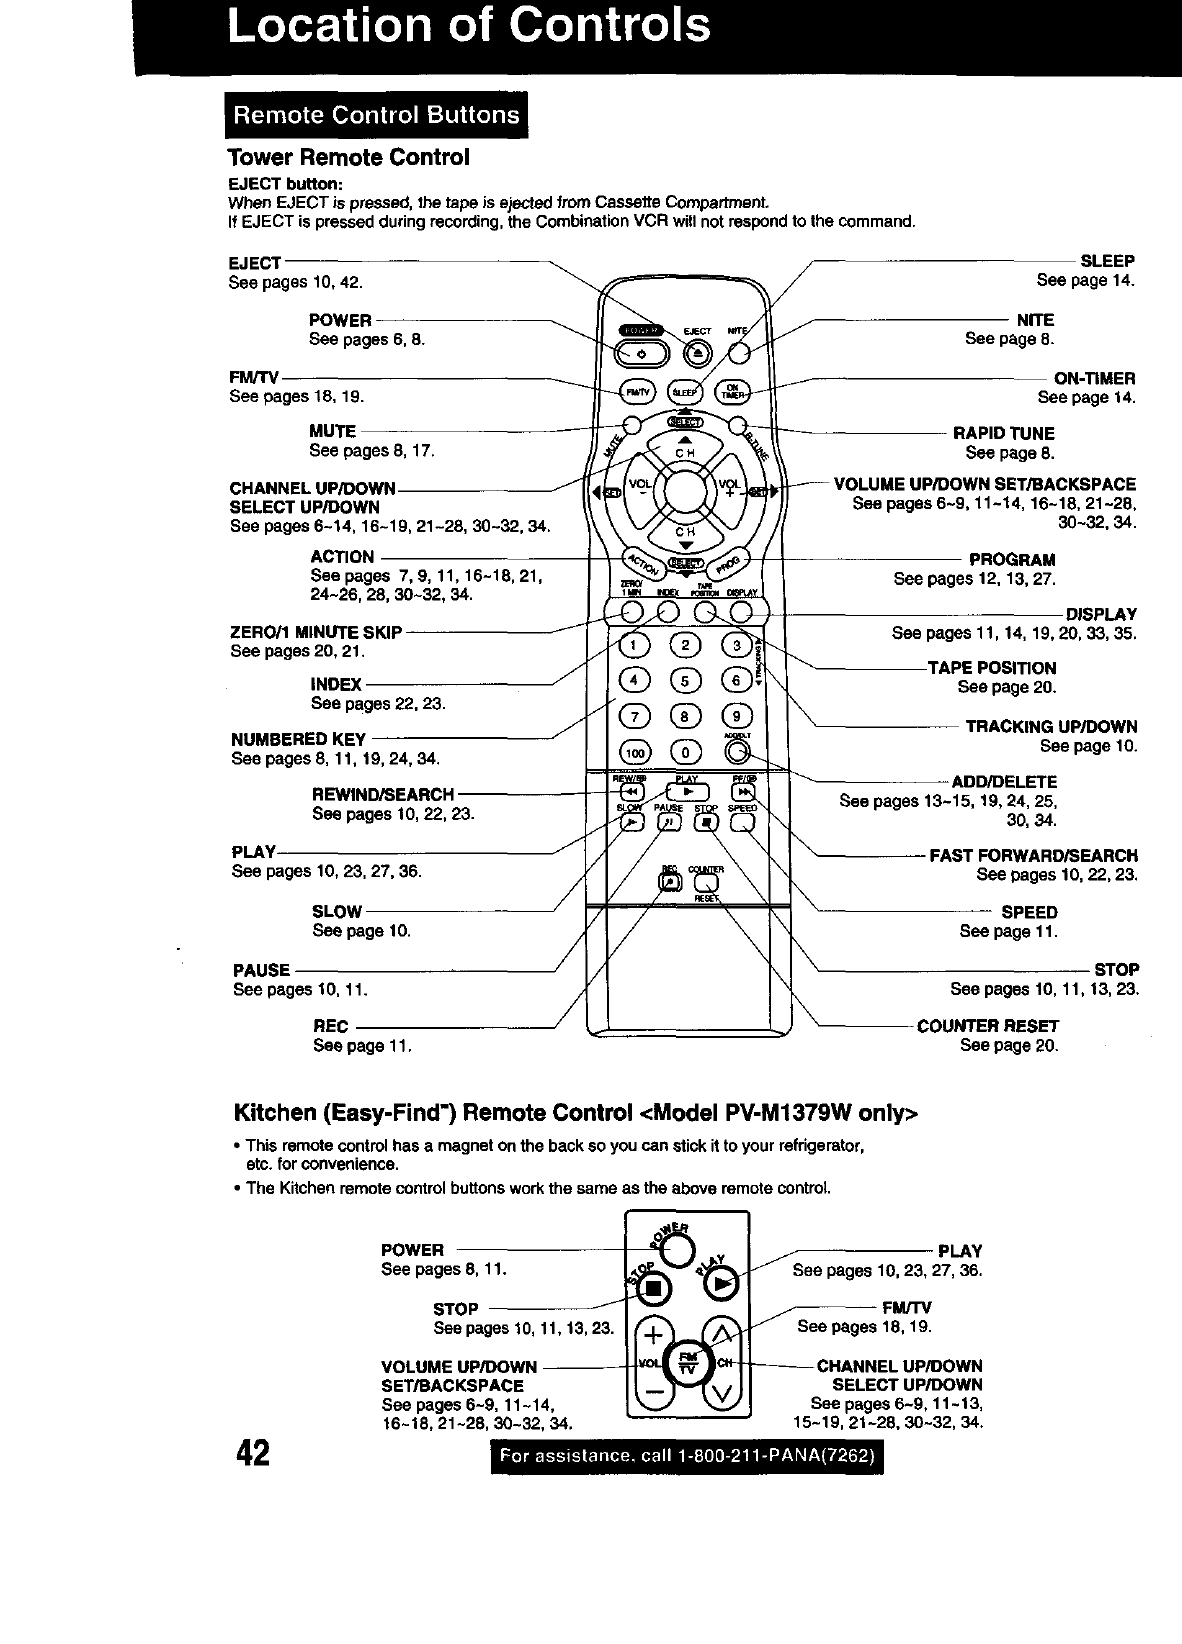
Tower Remote Control
EJECT button:
When EJECT is pressed, the tape is ejected fromCassette Compartment.
IfEJECT is pressed duringrecording,the CombinationVCR willnotrespondto the command.
EJECT /
See pages 10, 42. _/
G®G
®®®
"@®®
POWER
See pages 6, 8.
FM/TV
Seepages18, 19.
MUTE
See pages 8, 17.
CHANNEL UP/DOWN
SELECT UP/DOWN
Seepages 6-14, 16-19, 21-28,30-32,34.
ACTION
Seepages 7, 9,11,16-18,21,
24-26,28,30-32,34.
ZEROH MINUTE SKIP
See pages20, 21,
INDEX
See pages 22, 23.
NUMBERED KEY
See pages 8, 11, 19, 24,34.
REWIND/SEARCH
See pages 10, 22, 23.
PLAY
See pages 10, 23, 27, 36.
SLOW
See
PAUSE
Seepages 10, 11.
REC
Seepage11.
/
/
/
J
SLEEP
See page 14.
NITE
See page 8.
/ON-TIMER
See page 14.
RAPID TUNE
See page 8.
_- VOLUME UP/DOWN SET/BACKSPACE
See pages 6-9, 11-14, 16-18, 21-28,
30-32, 34.
PROGRAM
Seepages 12, 13, 27.
DISPLAY
See pages 11, 14, 19, 20, 33, 35.
_TAPE POSITION
See page 20.
XTRACKING UP/DOWN
See page 10.
ADD/DELETE
See pages 13-15, 19, 24, 25,
30, 34.
FAST FORWARD/SEARCH
See pages 10, 22, 23.
SPEED
See page 11.
STOP
See pages 10, 11, 13, 23.
COUNTER RESET
See page 20.
Kitchen (Easy-Find') Remote Control <Model PV-M1379W only>
• This remotecontrol has amagnet onthe backso you can stickitto your refrigerator,
etc. for convenience.
•The Kitchenremote control buttonsworkthe same as the above remote control.
42
POWER
See pages 8, 11.
STOP
See pages 10, 11, 13,23.
VOLUME UP/BOWN
SET/BACKSPACE
See pages6-9, 11-14,
16-18,21-28,30-32,34.
JS PLAY
eepages 10, 23, 27,36.
FM/TV
/
_" Seepages 18, 19.
CHANNEL UP/DOWN
SELECT UP/DOWN
See pages 6-9, 11-13,
15-19, 21-28, 30-32, 34.
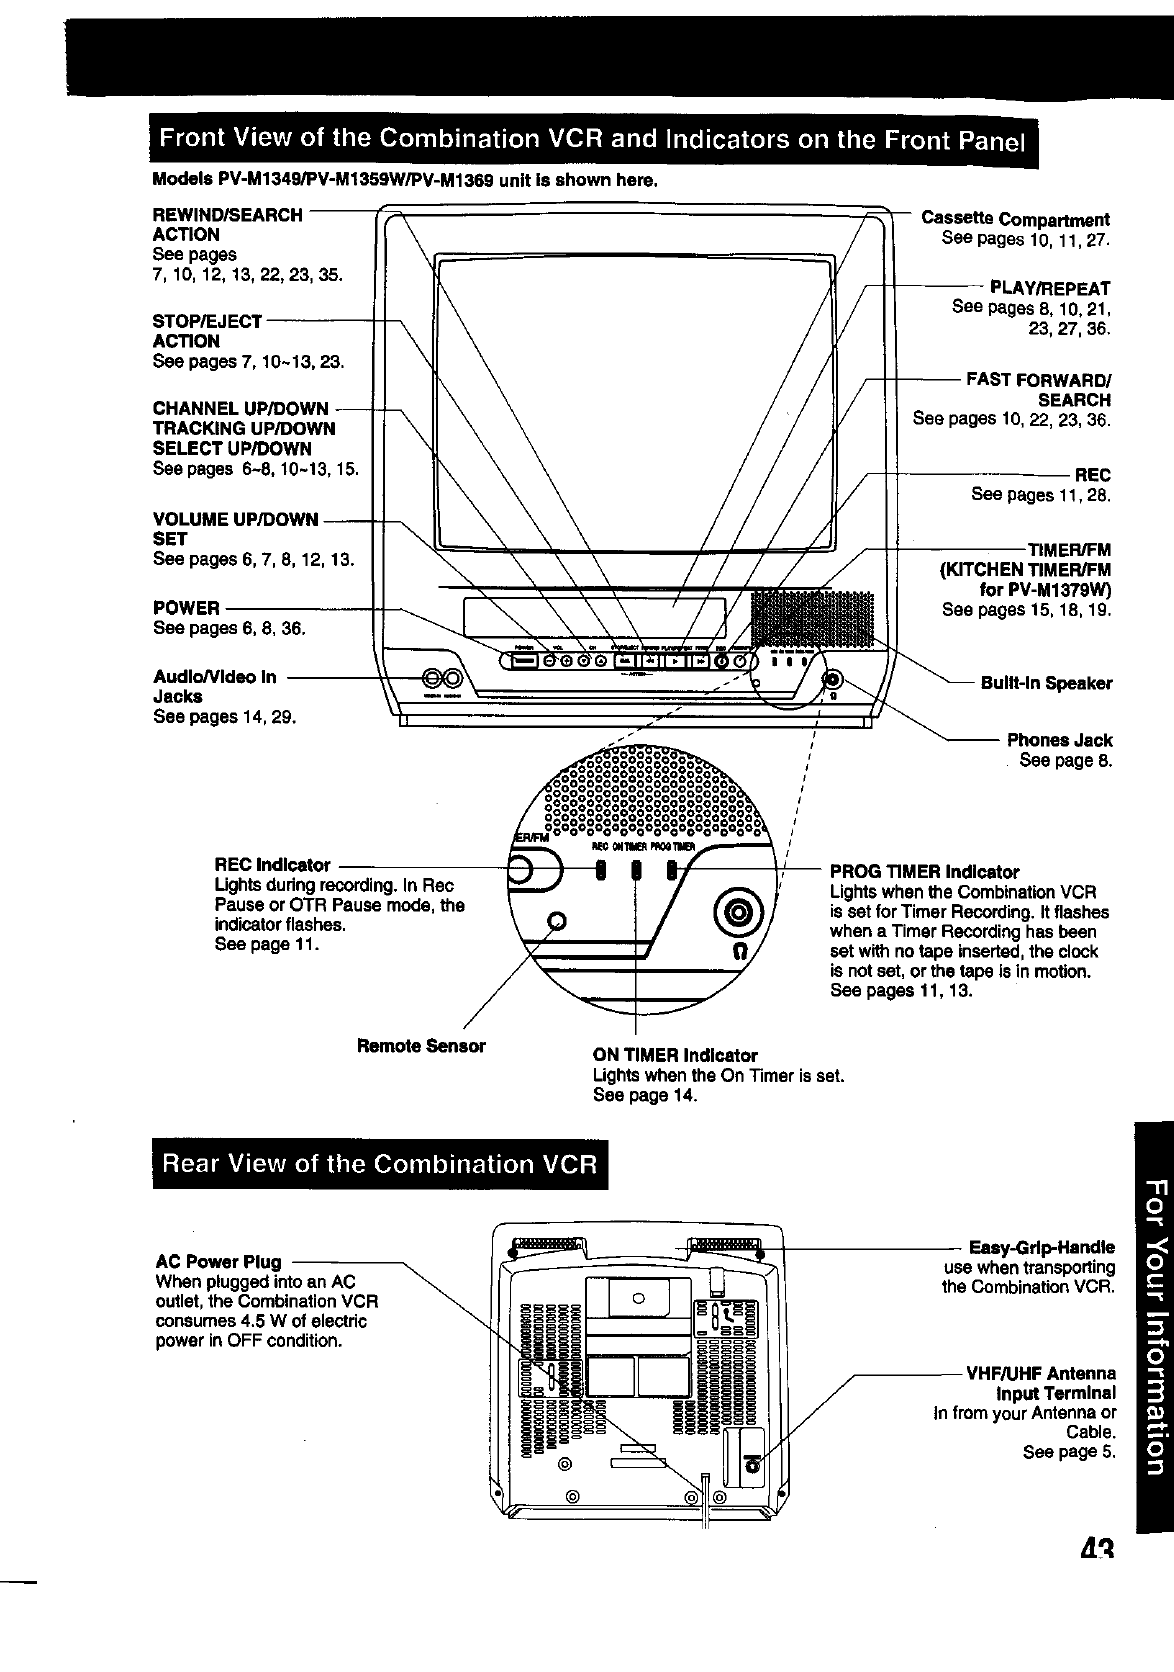
ModelsPV-M1349/PV-M1359W/PV-M1369unitIsshownhere.
ACTION
See pages
7, 10, 12, 13, 22, 23, 35.
STOP/EJECl
ACTION
See pages7, 10-13, 23.
CHANNEL UP/DOWN
TRACKING UP/DOWN
SELECT UP/DOWN
See pages 6-8, 10~13, 15.
SET
See pages 6, 7, 8, 12, 13.
POWER
See pages 6, 8, 36.
Audlo/Vldeoln
Jecks
Seepages 14, 29.
REC Indicator
Ughts dudng recording. In Rec
Pause or OTR Pause mode, the
indicatorflashes.
See page 11.
Casse_e Compa_ment
Seepages10,11,27.
PLAY/REPEAT
See Pages 8, 10, 21,
23,27,36.
-- FAST FORWARD/
SEARCH
See pages 10, 22, 23, 36.
REC
See pages11,28.
TIMER/FM
(KITCHENTIMER/FM
for PV-M1379W)
See pages15, 18, 19.
Built-In Speaker
Phones Jack
Seepage 8.
PROG TIMER Indicator
Lights when the Combination VCR
is set for Timer Recording. It flashes
when a Timer Recording has been
set with no tape inserted, the clock
is not set, or the tape is in motion.
See pages 11, 13.
Remote Sensor ON TIMER Indicator
Lightswhenthe On Timeris set.
See page14.
AC Power Plug
When plugged into an AC
outlet, the Combination VCR
consumes 4.5 W of electric
power in OFF condition.
@
@
Easy-Grip-Handle
use when transporting
the Combination VCR.
VHF/UHF Antenna
Input Terminal
In from your Antenna or
Cable.
See page 5,

Panasonic Consumer Electronics Company,
Division of Matsushita Electric Corporation of America,
One Panasonic Way
Secaucus, New Jersey 07094
Panasonic Sales Company,
Divisionof Matsushita Electric of Puerto Rico, Inc.
AVE. 65 de Infanteria, Km. 9.5 San Gabdel
Industrial Park Carolina, Puerto Rico 00985
Panasonic Video Products
Limited Warranty
Panasonic Consumer Electronics Company or Panasonic Sales Company (collectively referred to as "the
Warrantor") will repair this product with new or refurbished parts, free of charge, in the USA or Puerto Rico, in
the event of a defect in materials or workmanship as follows (all time periods commence from the date of the
original purchase):
CAMCORDER ONE (1) YEAR, EXCEPT CCD IMAGE SENSOR
CCD IMAGE SENSOR - SIX(6)MONTHS
ONE (1) YEAR
ONE !1! YEAR
ONE (1) YEAR, EXCEPT CRT
CRT- TWO (2) YEARS
VCR
A,'V MIXER
MONITORoVCR
NINETY (90) DAYS
NINETY (90) DAYS
NINETY (90) DAYS
NINETY (90 ! DAYS
NINETY (90) DAYS
CRT- NINETY (90) DAYS
CUSTOMER PAYS ALL LABOR
CHARGES AFTER 90 DAYS
Monitor-VCR In-home or carry-in Service: 22" (diagonal) CRT/LCD and Larger
Monitor-VCR Carry-in Service: 21" (diagonal) CRT /LCD and smaller
Ba_edes (if included) -New rechargeable battedes in exchange for defective rechargeable batteries for ten (10) days. Non-
rechargeable batteries are not warranted.
(if included) - New video cassette tape in exchange for a defective video cassette tape for five (5) days.
In-home, carry-in or maiHn service, as applicable, in the USA can be obtained during the warranty period by contacting a
Panasonic Services Company (PASC) Factory Servicenter listed in the Service Directory. Or call toll free 1-800-211-
PANA(7262), to locate an authodzed PASC Servicentar. Carry-in or mail-in service in Puerto Rico can be obtained dudng
the warranty period by calling the Panasonic Sales Company telephone number listed in the Servicanter Directory.
This warranty is extended only to the odginal purchaser. A purchase receipt or other proof of the date of the odginal
pumhass is required before warranty service is rendered.
This warranty only covers failures due to defects in materials and workmanship which occur dudng normal use and does
not cover normal maintenance, including, but not limited to, video and audio head cleaning. The warranty does not cover
damage which occurs in shipment, or failures which are caused by products not supplied by the warrantor, or failures which
result from accident, misuse, abuse, neglect, mishandling, misapplication, alteration, modification,faulty installation, set-up
adjustments, improper antenna, inadequate signal pickup, maladjustment of consumer controls, improper operation, power
linesurge, improper voltage supply, lightning damage, commercial use such as hotel, office, restaurant, or other business
or rental use of the product, or service by anyone other than a PASC Factory Servicenter or a PASC authodzed
Servicanter, or damage that is attributable to acts of God.
I IT
There are no express warranties except as listed above.
THE WARRANTOR SHALL NOT BE LIABLE FOR INCIDENTAL OR CONSEQUENTIAL DAMAGES (INCLUDING,
WITHOUT LIMITATION, DAMAGE TO TAPES) RESULTING FROM THE USE OF THIS PRODUCTS, OR ARISING OUT
OF ANY BREACH OF THE WARRANTY. ALL EXPRESS AND IMPLIED WARRANTIES, INCLUDING THE WARRANTIES
OF MERCHANTABILITY AND FITNESS FOR PARTICULAR PURPOSE, ARE LIMITED TO THE APPLICABLE
WARRANTY PERIOD SET FORTH ABOVE.
Some states do not allow the exclusion or limitationof incidental or consequential damages, or limitationson how long an
implied warranty lasts, so the above exclusions or limitations may not apply to you.
This warranty gives you specific legal dghts and you may also have other dghts which vary from state to state.
It a problem with this product develops during or after the warranty pedod, you may contact your dealer or Servicenter. It
the problem is not handled to your satisfaction, then wdte to the Customer Satisfaction Center at the Panasonic Consumer
Electronics Company address above.
SERVICE CALLS WHICH DO NOT INVOLVE DEFECTIVE MATERIALS OR WORKMANSHIP AS DETERMINED BY THE
WARRANTOR, IN ITS SOLE DISCRETION, ARE NOT COVERED. COSTS OF SUCH SERVICE CALLS ARE THE
RESPONSIBILITY OF THE PURCHASER.
warvid 10/20/'97
Panasonlc Consumer Electronics Company, Panasonlc Sales Company,
Division of Matsushita Electric Corporation of America Division of Matsushlta Electric of
One Panasonic way Secaucus, Puerto Rico, Inc. ("PSC")
New Jersey 07094 Ave. 65 de Infanteria. Kin. 9,5
San Gabriel Industrial Park, Carolina, inJ
Printed in Japan Puerto Rico 00985
VQTS3524B
