PANASONIC VCR Manual L0060260
User Manual: PANASONIC PANASONIC VCR Manual PANASONIC VCR Owner's Manual, PANASONIC VCR installation guides
Open the PDF directly: View PDF ![]() .
.
Page Count: 52
Omnivision IVffS]
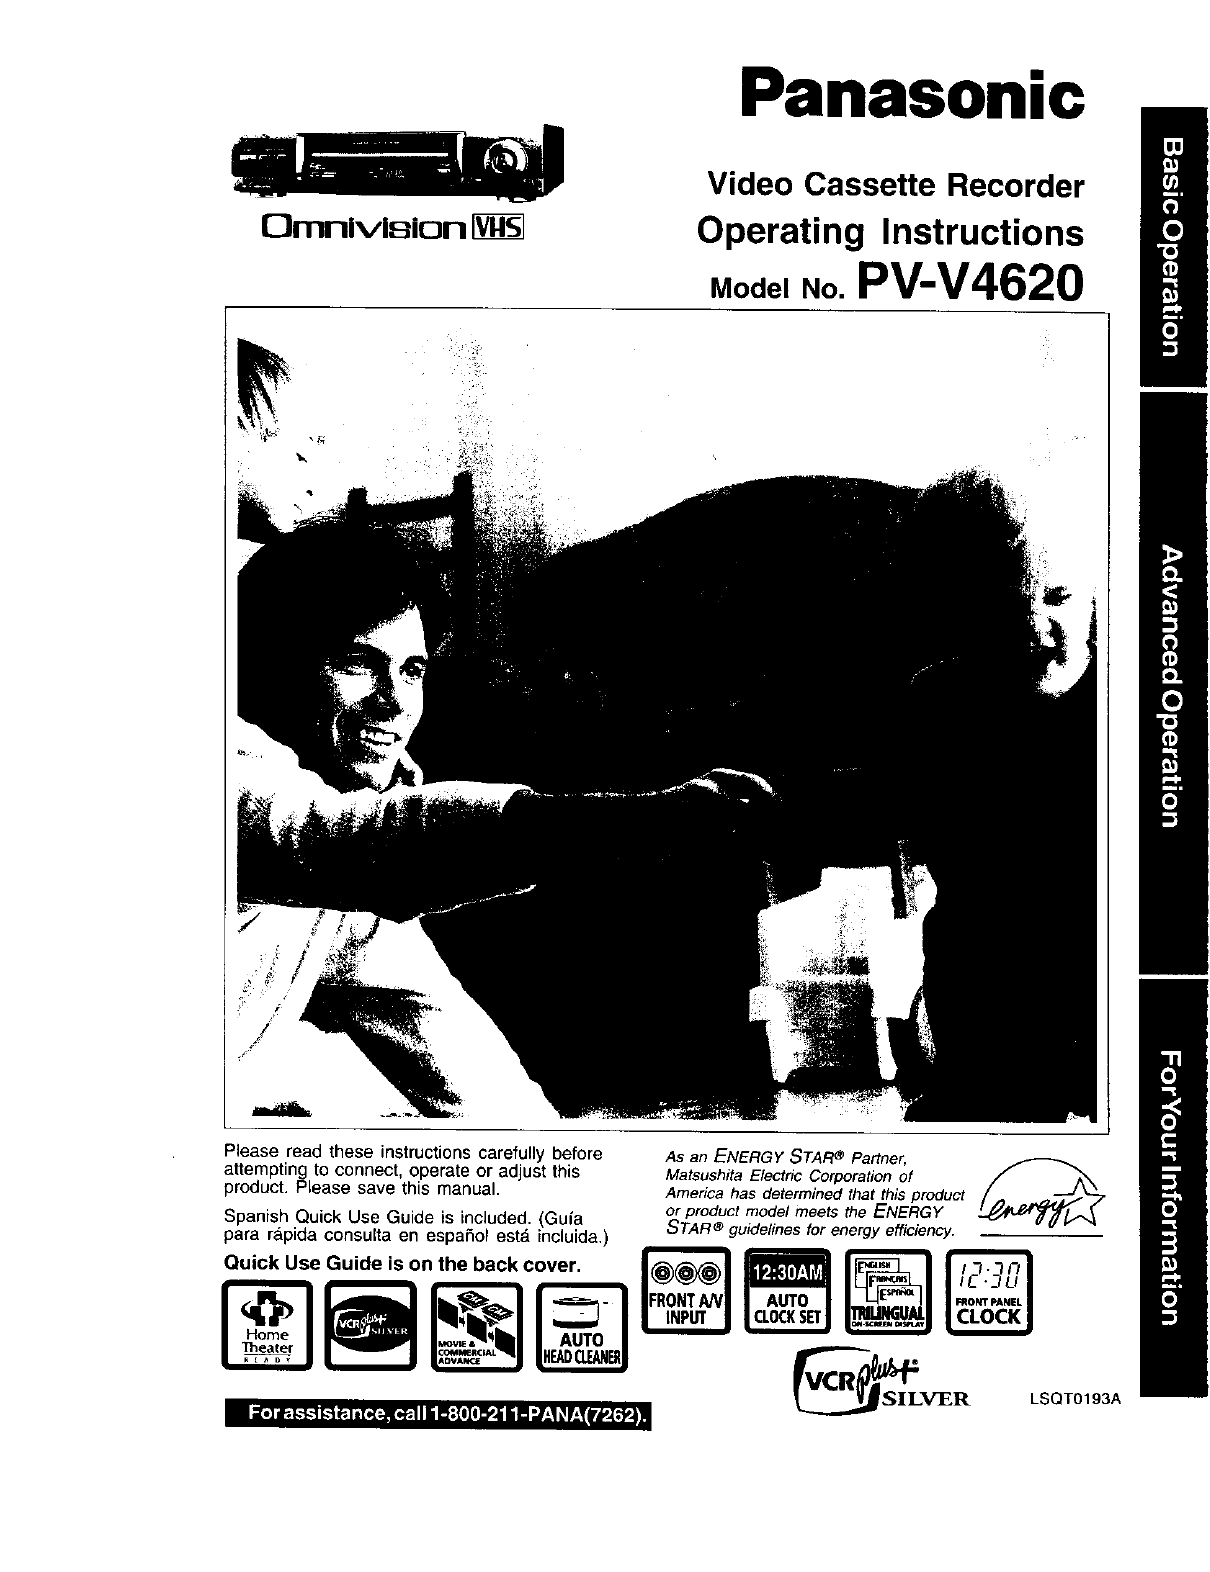
Panasonic
Video Cassette Recorder
Operating Instructions
Mode,No.PV-V4620
/
Please read these instructions carefully before
attempting to connect, operate or adjust this
product. Please save this manual.
Spanish Quick Use Guide is included. (Guia
para r&pida consulta en espafiol est,. incluida.)
Quick Use Guide is on the back cover.
Theate_
As an ENERGY STAR_Partner.
Matsushita Electric Corporation of f A_N
America has determined that this product
or product model meets the ENERGY
STAR ®guidelines for energy efficiency.
OSILV]ER LSQT0193A
Important Safeguards and Precautions
FOR YOUR SAFETY, READ AND
RETAIN ALL SAFETY AND OPERATING
INSTRUCTIONS. HEED ALL WARNINGS
IN THE MANUAL AND ON THE UNIT
I INSTALLATION
1 POWER SOURCE CAUTION
Operate only from a power source indicated on the unit or in
this manual. If necessary, have your Electbe Utility Service
Company or Video Products Dealer verify the power source
in your home.
2 POLARIZED OR GROUNDING PLUG
As asafety feature, this Video product comes with either
a polarized power cord plug (one blade is wider than the
other), or a three-wire grounding type plug.
POLARIZED PLUG CAUTION;
This plug will only fit into an outlet one way. If you cannot
fully insed the plug, try reversing it. If it still will not fit,
have an electrician install the proper wall outlet.
DO not defeat the safety feature by tampering with the plug.
GROUNDING PLUG CAUTION:
This plug will only fit into a three-hote grounding outlet.
If necessary, have an electrician install the proper outlet.
Do not defeat the safety feature by tampering with the plug.
3 POWER CORD
Make sure power cords are routed so that they are not likely
to have anything rest on them, roll over them, or be in the
way of walking traffic. If an extension cord is.used, make
sure it also has either a polarized or grounded plug and that
the cords can be securely connected. Frayed cords damaged
pugs, and damaged or cracked wire insulation are hazardous
and should be replaced by a qualified service technician.
Overloaded outlets and extension cords are fire hazards and
should be avoided.
4 DO NOT BLOCK VENTILATION HOLES
Ventilation openings in the cabinet release heat generated
during operation. If they are blocked, heat build-up inside the
unit can cause failures that may result in a fire hazard or
heat damage to cassettes.
For protection, follow these rules:
a. Never cover ventilation slots or the unit
while in use, or operate the unit when placed
on a bed, sofa, rug, or other soft sudace.
b. Avoid built-in installation, such as a book case
or rack, unless proper ventilation is provided.
5 AVOID EXTREMELY HOT LOCATIONS OR
SUDDEN TEMPERATURE CHANGES
Do not place the unit over or near any kind of heater
or regulator, in direct sunlight, inside a closed vehicle, etc..
DO not move the unit suddenly between areas of extreme
temperature vedation. If the unit is suddenly moved from a
cold place to a warm place, moisture may condense in the
unit and on the tape.
6 TO AVOID PERSONAL INJURY
• Do not place unsecured equipment on a sloping surface.
• Do not place this unit on any support
that is not firm, level, and adequately A
strong. The unit could fall causing
serious injury to a child or adult and
damage to the unit,
• An appliance and cart combination
should be moved with care.
Quick stops, excessive force, and
uneven surfaces may cause the
appliance and cart combination to overturn.
•Carefully follow all operating instructions and use
the manufacturer's recommended accessories when
operating this unit or connecting it to any other equipment.
IOUTDOOR ANTENNA INSTALLATION l
1 SAFE ANTENNA AND CABLE CONNECTION
If an outside antenna or cable system
is connected to the equipment, ,_c ._._.._=._=_
be sure the antenna °r cable system __1 "'_"
is grounded so as to provide some _=_'=
protection against built up static
charges and voltage surges.
Section 810 of the National o_.o_...=_,.
Electrical Code, ANSI/NFPA 70 _,=c.._,,_,=,
(in Canada, part 1 of the Canadian _ _=_._ [_ .L-_==_"_=----°_ °",
Electrical Code) provides information _ _._..Z.j.f_o=.,,,_,_
with respect to proper grounding of the ,,_=_0_,,=_
mast and supporting structure, groun_ng _"-......L._,,,_,,,,_.
of the lead-in wire to an antenna discharge unit, r-_,_,*_._
size of grounding conductors, location of antenna discharge unit, connection
to grounding electrodes and requirements for the grounding electrode.
2 KEEP ANTENNA CLEAR OF HIGH VOLTAGE POWER LINES
OR CIRCUITS
An outside antenna system should be located well away from power lines,
electric light or power circuits and where it will never come into contact with
these power sources if it should happen to fall. When installing an outside
antenna, extreme care should be taken to avoid touching power lines,
circuits or other power sources as this could be fatal. Because of the
hazards involved, antenna installation should be left to a professional
I US,NGTHEWDEOUN,T 1
If the unit has been in storage or moved to a new location,
refer first to the INSTALLATION section of these safeguards.
1 KEEP THIS VIDEO UNIT AWAY FROM WATER OR
MOISTURE OF ANY KIND.
2 IF EQUIPMENT IS EXPOSED TO RAIN, MOISTURE, OR
STRONG IMPACT, unplug the unit and have it inspected by a qualified
service technician before use.
3 DURING AN ELECTRICAL STORM
During a lightning storm, whether indoors or outdoors, or before leaving the
unit unused for extended periods of time, disconnect all equipment from the
power source as well as the antenna and cable system.
4 WHEN THE UNIT IS PLUGGED IN
•Never expose the unit to rain or water, DO NOT OPERATE
if liquid has been spilled into the unit. Immediately unplug the unit,
and have it inspected by a service technician. Fire and shock hazards
can result from electrical shorts caused by liquid contact inside.
•Never drop or push any cOjeotthrough openings in the unit. Some internalparts
carry hazardous voltages and co_tact can cause electric shock or fire hazard.
•Avoid placing the unit directly above or below your T'v"set as this may cause
electacal interference. Keep all magnets away from electronic equipment,
5 USING ACCESSORIES
Use only accessedes recommended by the manufacturer to avoid risk of fire,
shock, or other hazards,
6 CLEANING THE UNIT
Unplug the unit. Then, use a clean, dry. chemically untreated cloth to gently
remove dust or debris. DO NOT USE cleaning fluids aerosols or forced air
ha could over-spray, or seep oto the unit and cause electrical shock.
Any substance such as wax, edb_sLve tape, etc. may mar the cabinet surface.
Exposure to greasy, humid, or dusty areas may adversely affect internal parts.
ISERVICE J
1 DO NOT SERVICE THIS PRODUCT YOURSELF
If, after carefully following the detailed operating instructions this Video
product does not operate properly, do not attempt to open or remove
covers, or make an ad ustments not described in the manual.
Unplug he un t an_cootact a qualified service technician.
2 IF REPLACEMENT PARTS ARE REQUIRED
Make sure the se_ce technician uses only paris specified by the manufacturer,
or those having the same safety characten'stJcs as the odginalparts. The use of
unauthonzed substitutes may result n fire, eectric shock, or other hazards.
3 HAVE THE SERVICE TECHNICIAN PERFORM A SAFETY CHECK
• After any service or repairs to the unit, request the service technician to
Safetv Precaut,ons condoot a through safety check as described in the manufacture's service
•.w literature to insure that the video unit is in safe operating condition.
Wam,ng: To prevent fire or shock hazard, do not expose this equipment to rain or moisture.
CAUTION: To prevent electric shock, match wide blade of plug to wide slot, fully insert.
Attention: Pour dviter les chocs dlectdques, introduire la lame ta plus large de la fiche dans la
borne correspondante de la prise et pousser jusqu'au fond.
Z_,o_,Z_I _ _iss_l_lwamstheusern_tuninsul_ed_.tagewithinlheunitmayhavesufficient__
_I_ _ sl_ock. 331erefore, it is dangerocs to make any _nd of conlact with any inside paft of If,is unit.
.,,__, _ Th`syr_x_a_erts_heuserthat_mp_dantHteratu_ec_ncemingthe_perati_nandrnaintenar:_e_fthisu`
hasbeenincluded."i'hemfom,itshou!dbe readcare_u_inorderto avoidany prdd,ems.
2i_,] a_',._-_1_ e;.ia[o,[-.,Pi[o,P=tI|B:IO[O_P.I| B "J;1 _r:_ I'P_.'_4
Tableof Contents
Use
Now!
Important Safeguards and Precautions ....................................... 2
Accessories .............................................................................................4
Loading the Batteries ...........................................................................4
Basic Connections (Antenna,VCR, TV) ............................................. 4, 5
One Time VCR Setup (Language,VCR'sOut_ Channel,Channel,Clock).. 6, 7
Playback a Tape (Still picture,Frameby Framepicture,SlowMotion)......... 8
Record On a Tape ..................................................................................9
•One Touch Recording ................ 9
Enjoy
more!
Other
Information!
Advanced Connections (Cable/DSS) ....................................................10
Copying Your Tapes (Dubbing) .......................................................... 11
Timer Recording ...........................................................................12, 13
• Timer Recording • Review, Replace or Clear
Using VCR Buttons ................. 12 Program Contents .................... 13
Timer Recording Using VCR Plus+ ® System ............... 14 ~ 19
• Choose your connection type .. 14 • Manual VCR Plus+ System
• Cable Box Setup ...................... 15 Channel Setup ......................... 18
• Auto VCR Plus+ System • VCR Plus+ System
Channel Setup ................... 16, 17 Programming ........................... 19
Multi-Brand Control Feature .....................................................20, 21
Tape Operation ...........................................................................22 ~ 29
• CommercialAdvance ...... 22 - 24 * Auto Operation Functions ........ 27
• Movie Advance ........................ 25 • Direct Access .......................... 28
• Search System ................. 26 - 29 • Repeat Play ............................. 29
• Program End Search ............... 26 • Zero Search ............................. 29
• ProgramIndexSearch,IndexScan .. 27
MTS Broadcast/VHS Hi-Fi Stereo System .........................30, 31
• Stereo/SAP/Mono Broadcast .. 30 • Select Audio Mode .................. 31
Special VCR Features ..............................................................32 ~ 37
• ChanneICaption ................ 32,33 • VCR Lock ................................ 36
• Time Stamp ....................... 34, 35 • WeakSignalDisplayON/OFF .... 37
• Tape Position Display .............. 36 • Auto Shut-Off ........................... 37
• Remote Warning ON/OFF ........ 36
Reset Language, Channels, Clock, VCR's Output Channel. 38, 39
VCR & Cassette Information ........................................... 40, 41
• ResetAIIVCRMemoryFunclions ... 40 •HeadCleaning ......................... 41
• DST (Daylight Saving Time) .... 40 • Cleaningthe VCR .................... 41
• PreventAccidentalTape Erasure .. 40 Specifications .......................... 41
• Record/Playback Time ............ 40 • Features for a Quality Picture .. 41
On Screen Displays (OSD) .............................................. 42, 43
• Function & Channel Display .... 42 • Blank Tape/No Video Signal
• VCR Status & Clock Display ... 42 Indication ................................. 42
• Waming and InstructionDisplays .. 43
Before Requesting Service ................................................... 44
Service Center List ................................................................ 45
Warranty ............................................................................ 46, 47
Spanish (Espa_ol) Quick Use Guide .............................. 48, 49
Location of Controls ........................................................ 50, 51
Quick Use Guide (Playback, Recording)..................... Back Cover
3
Congratulations
on your purchase of one of the most sophisticated and
reliable products on the market today. Used properly,
it will bring you and your family years of enjoyment,
Please fill in the information below. The serial number
is on the tag located on the back of your VCR.
•Date of Purchase
•Dealer Purchased From
• Dealer Address
• Dealer Phone No.
•Model No.
• Serial No.
[] RemoteControl
LSSQ0204
[] Batteries 2 "AA"
@QQ
Fo " o
_ m _2
[] RF Coaxial Cable
VJAS0196
To order accessories, call toll free
1-800-332-5368.
1) Open the cover.
,Inse_ the
batteries as
marked.
3) Close the cover.
[] Battery replacement caution
• Do not mix old and new batteries.
• Do not mix alkaline with manganese batteries.
4
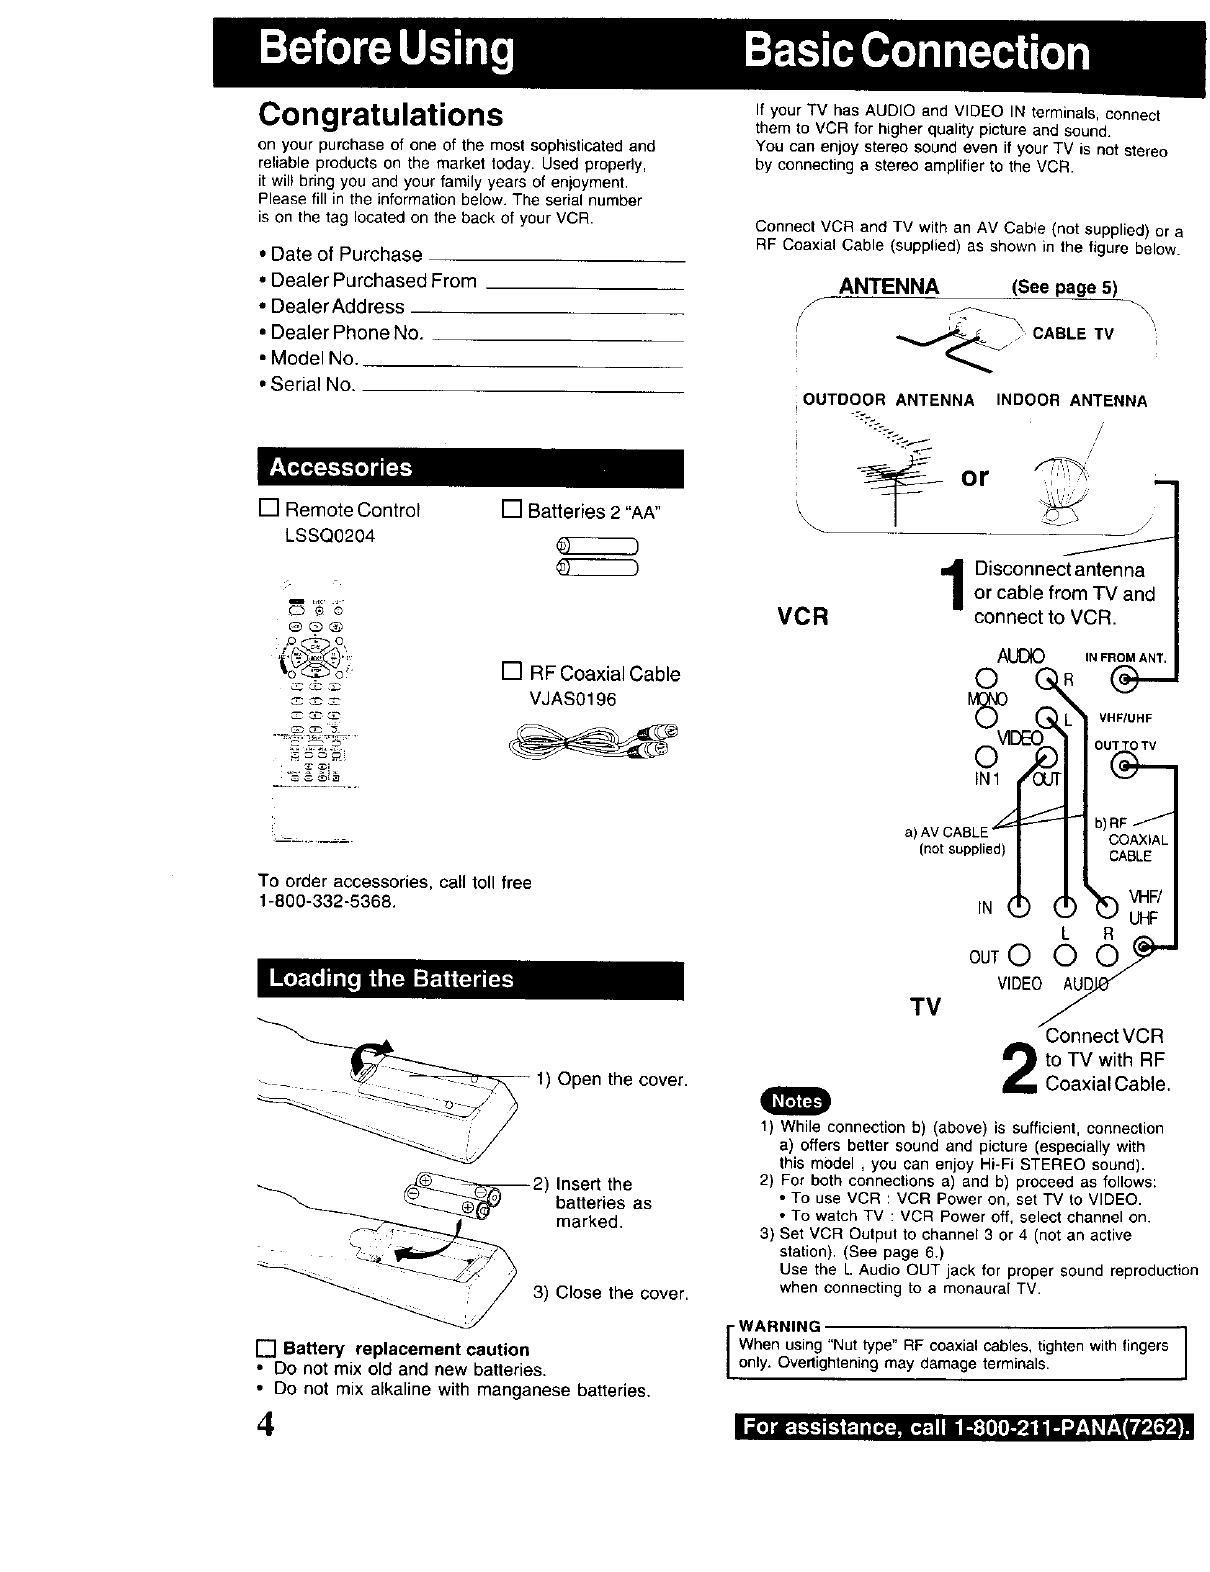
If your TV has AUDIO and VIDEO IN terminals, connect
them to VCR for higher quality picture and sound.
You can enjoy stereo sound even if your TV is not stereo
by connecting a stereo amplifier to the VCR.
Connect VCR and TV with an AV Cab{e (not supplied) or a
RF Coaxial Cable (supplied) as shown in the figure below.
ANTENNA (See page 5)
f
_ _._ _ CABLE TV
ivC-
\
VCR
OUTDOOR ANTENNA INDOOR ANTENNA
o r %
J
Disconnect antennaor cable from TV and
connect to VCR.
AUtO IN FROM ANT.
°
/
a)AVCASLE'_ -I ! b) RF
(not supplied) 1_ OAxlAkCABLEVHF!
IN _ _'_ UHF
t. R
ouTO 0 0..-
VIDEO_ /
TV Connect VCR
to TV with RF
Coaxial Cable,
1) While connection b) (above) is sufficient, connection
a) offers better sound and picture (especially with
this model , you can enjoy Hi-Fi STEREO sound).
2) For both connections a) and b) proceed as follows:
• To use VCR : VCR Power on, set TV to VIDEO.
• To watch TV : VCR Power off, select channel on.
3) Set VCR Output to channel 3 or 4 (not an active
station), (See page 6.)
Use the L Audio OUT jack for proper sound reproduction
when connecting to a monaural TV.
WARNING ]
When using "Nut type" RF coaxial cables, tighten with fingers
only. Overtightening may damage terminals.
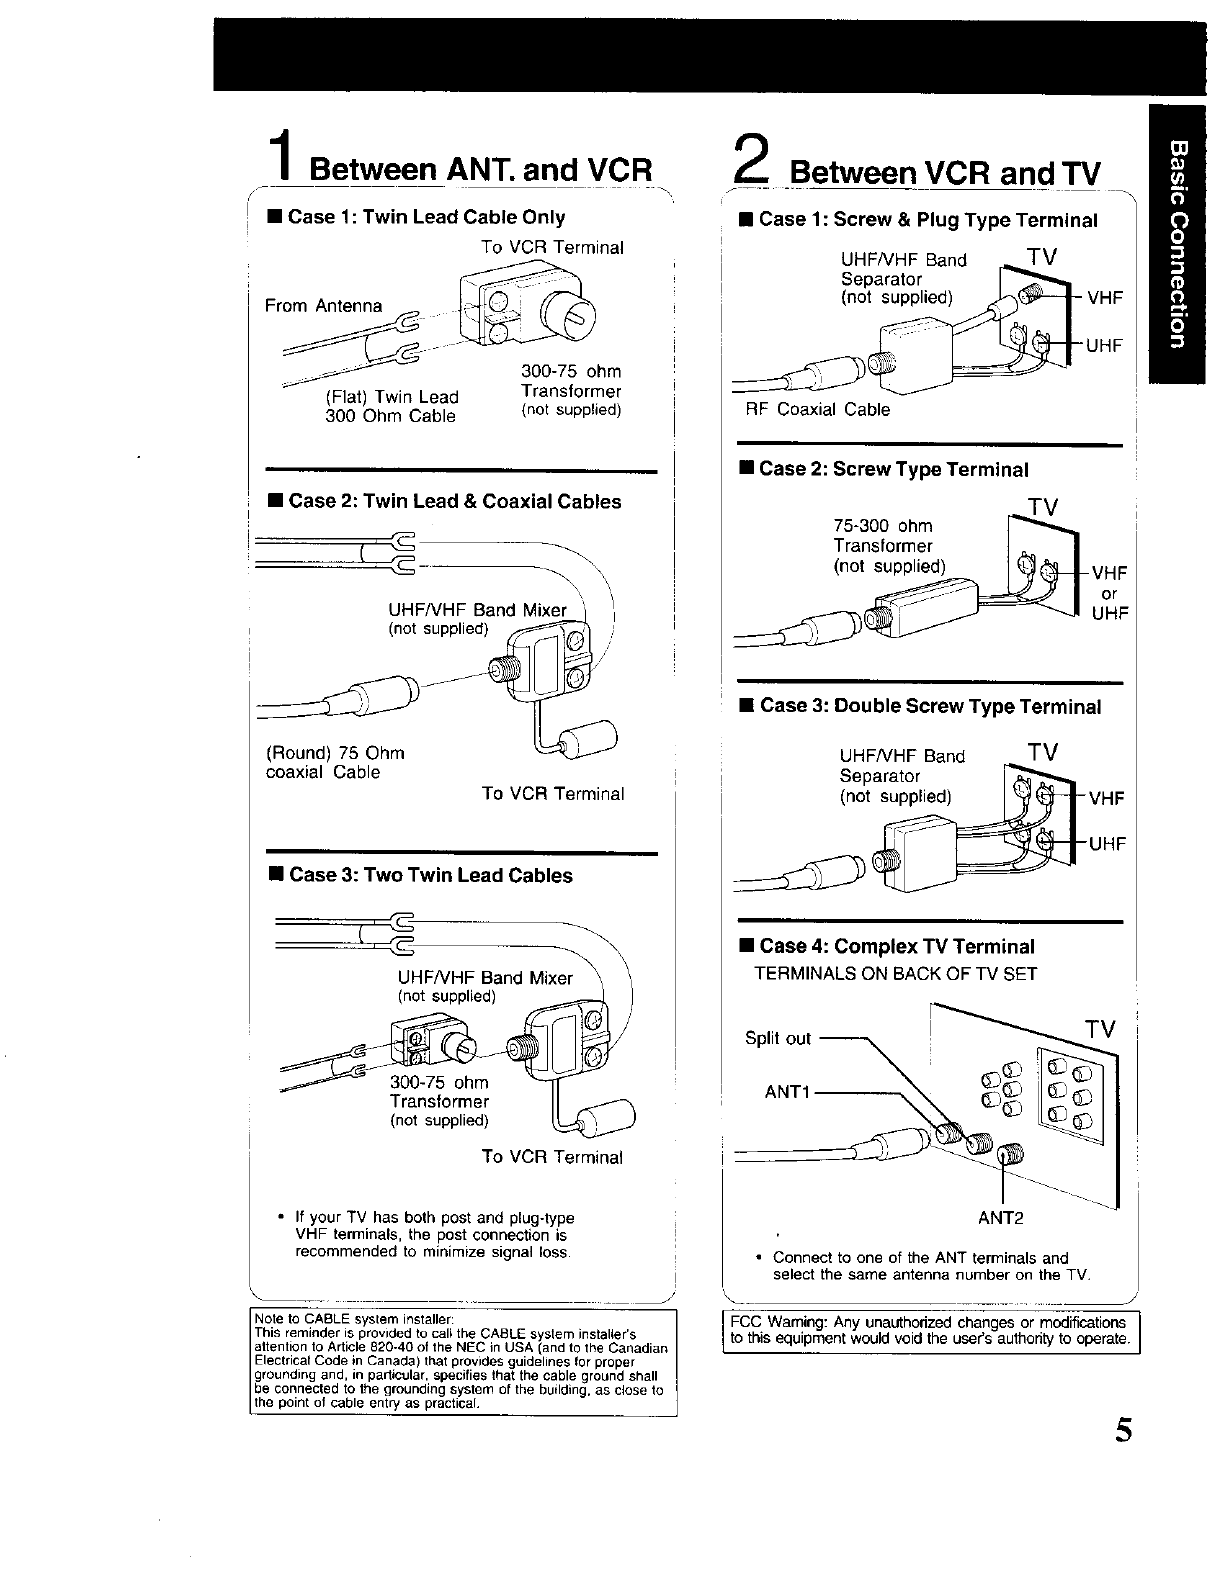
Between ANT. and VCR
• Case 1: Twin Lead Cable Only
To VCR Terminal
From Antenna _
300-75 ohm
(Flat) Twin Lead Transformer
300 Ohm Cable (not supplied)
• Case 2: Twin Lead & Coaxial Cables
UHF/VHF Band Mixer_j /I
(not
(Round) 75 Ohm
coaxial Cable
To VCR Terminal
• Case 3: Two Twin Lead Cables
)U'HFNHF Band Mixer_ _
Transformer II
(not supplied)
To VCR Terminal
• If your TV has both post and plug-type
VHF terminals, the post connection is
recommended to minimize signal loss.
Note to CABLE system installer:
attention to Article 820-40 ot the NEC inUSA _and to the Canadian
This reminder is provided to cal_ the CABLE system instal_er's
I Electrical Code in Canada) that provides guidelines for proper
!rounding and, in particular, specifies that the cable ground shall
be connected to the grounding system of the building, as close to
he point of cable entry as practical
Between VCR and TV
f
•Case 1: Screw & Plug Type Terminal
UHF/VHF Band TV
Separator
(not supplied)
BF Coaxial Cable
•Case 2: Screw Type Terminal
TV
75-300 ohm
Transfm'mer I ,_ _ I
(not,upp 7 I-V,orF
• Case 3: Double Screw Type Terminal
UHFNHF Band TV
Separator
(not s_VHF
•Case 4: Complex TV TermLnal
TERMINALS ON BACK OF TV SET
Split out _
ANT1 (_
ANT2
• Connect to one of the ANT terminalsand
select the same antenna number on theTV+
[-FCC Warning:Any unauthorizedchanges or modifications ]
I to this equipmentwouldvoid the user'seuthodtyto operate.I
5
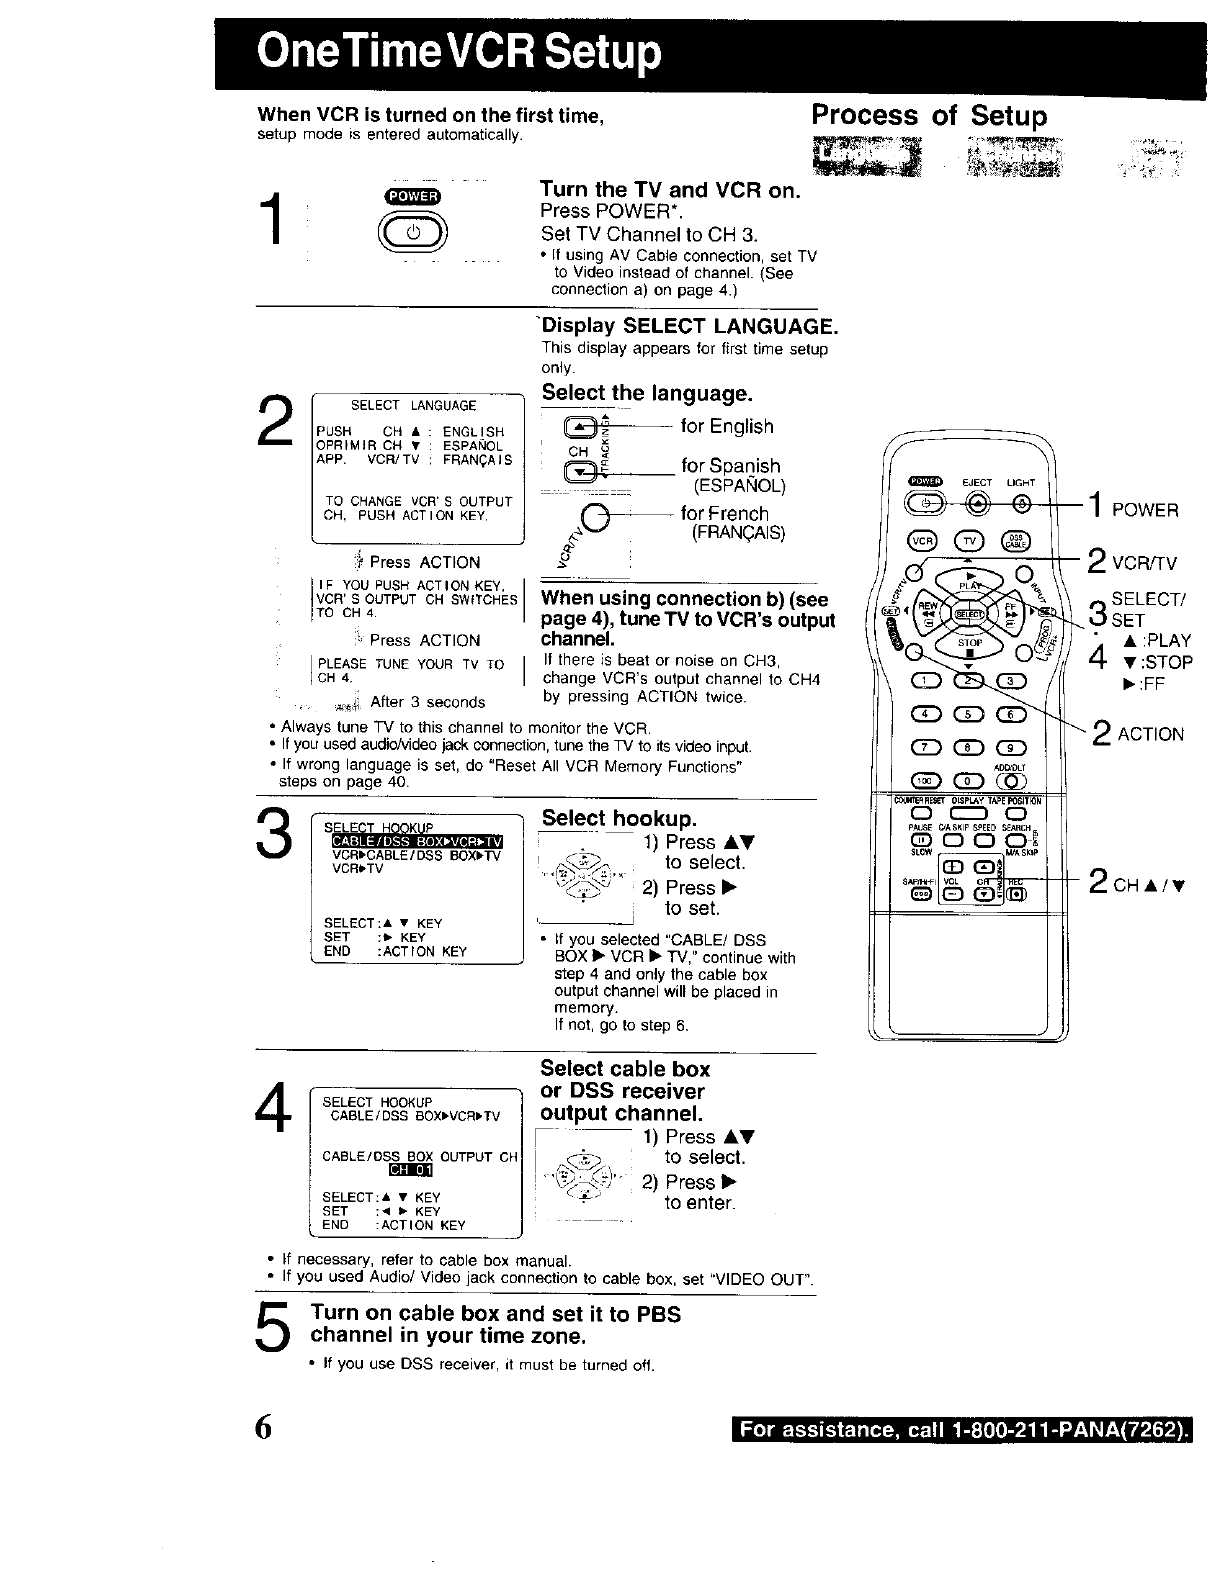
When VCR is turned on the first time,
setup mode is enteredautomatically.
1 O
Process of Setup
SELECT LANGUAGE
PUSH CH •ENGLISH
OPRIMIR CH • ESPANOL
APP. VCR/TV FRAN_AIS
TO CHANGE VCR'S OUTPUT
CH, PUSH ACTION KEY,
,4 Press ACTION
IF YOUPUSH ACTION KEY,
% UTeUTc.SW,,OHES
:i, Press ACTION
PLEASE4. TO lCH TUNE YOUR TV
_ After 3 seconds
Turn the TV and VCR on.
Press POWER*.
Set TV Channel to CH 3.
•If using AV Cable connection, set TV
to Video instead of channel. (See
connection a) on page 4.)
"Display SELECT LANGUAGE.
This display appears for first time setup
only.
Select the language.
for English
iCH
O-- for Spanish
_(ESPANOL)
2,z._.aO---_ for French
(FRAN_AIS)
When using connection b) (see
page 4), tune TV to VCR's output
channel.
If there is beat or noise on CH3,
change VCR's output channel to CH4
by pressing ACTION twice.
• Always tune TV to this channel to monitor the VCR.
• If you used audio/video jack connection, tune the TV to its video input.
• If wrong language is set, do "Reset All VCR Memory Functions"
steps on page 40.
VCRbCABLE/DSS BOXI_TV
VCRI-TV
SELECT:•• KEY
SET :_ KEY
END :ACTION KEY
Select hookup.
r 1) Press AY
to select,
2) Press •
to set.
• If you selected "CABLE/DSS
BOX • VCR • TV," continue with
step 4 and only the cable box
output channel will be placed in
memory.
If not, go to step 6.
3
SELECT HOOKUP
CABLE/DSS BOXPVCRPTV
CABLE/DSS BOX OUTPUT1
SELECT:• • KEY
SET :< • KEY
END :ACTION KEY
Select cable box
or DSS receiver
output channel.
- 1) Press A_!'
to select•
2) Press •
to enter.
• If necessary, refer to cable box manual.
• If you used Audio/Video jack connection to cable box, set "VIDEO OUT".
4
Turn on cable box and set it to PBS
channel in your time zone.
• If you use DSS receiver, it must be turned off.
EJECT
@@®
CD_
AD_DLT
OC22) O
1POWER
2VCR/TV
0 SELECT/
_ ,OSET
£_. • :PLAY
• :STOP
•:FF
'-2ACTION
2CH',/•
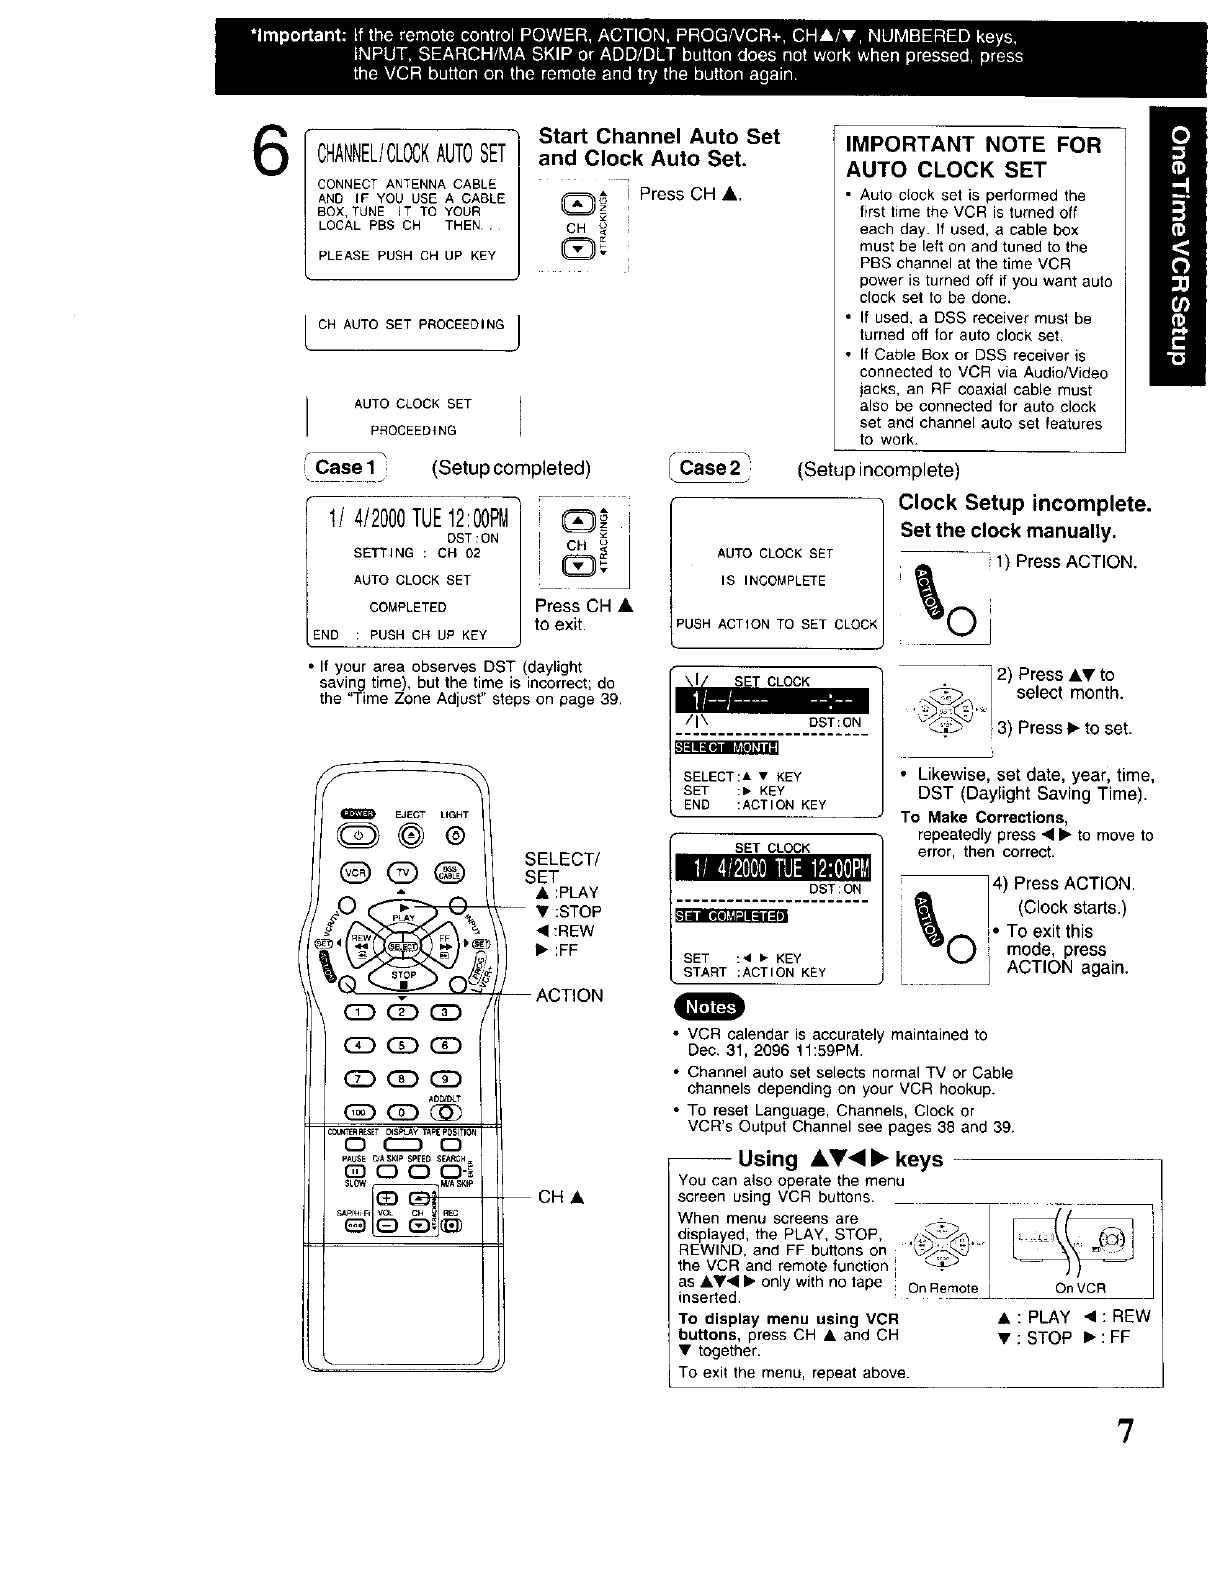
6CHANNEL/CLOCKAUTOSET
CONNECT ANTENNA CABLE
AND IF YOU USE A CABLE
BOX, TUNE IT TO YOUR
LOCAL PBS CH THEN
PLEASE PUSH CH UP KEY
Start Channel Auto Set
and Clock Auto Set.
(_ I Press CH A.
CH _
CH AUTO SET PROCEEDING J
I AUTO CLOCK SET
PROCEEDING
r
iCase1 ;
\ _J (Setup completed) r .....
CarCase 2j:
IMPORTANT NOTE FOR
AUTO CLOCK SET
•Auto clock set is performed the
first time the VCR is turned off
each day. If used, a cable box
must be left on and tuned to the
PBS channel at the time VCR
power is turned off if you want auto
clock set to be done,
• If used, a DSS receiver must be
turned off for auto clock set.
• If Cable Box or DSS receiver is
connected to VCR via Audio/Video
jacks, an RF coaxial cable must
also be connected for auto clock
set and channel auto set features
to work.
(Setup incomplete)
1/4/2000TUE12:00PM
DST:ON
SETTING : CH 02
AUTO CLOCKSET
COMPLETED
END : PUSHCH UP KEY
CH
Press CH •
to exit.
AUTO CLOCK SET
IS INCOMPLETE
PUSH ACTION TO SET CLOCK
SET CLOCK
DST:ON
SELECT:A • KEY
SET :• KEY
END :ACTION KEY
SET CLOCK
DST:ON
Clock Setup incomplete.
Set the clock manually.
1) Press ACTION.
• If your area observes DST (daylight
saving time), but the time is incorrect; do
the "Time Zone Adjust" steps on page 39.
f
EJECT LIGH_
SELECT/
@ @ _ SET
__ • :PLAY
-- • :STOP
• :nEW
ACTION
o CCD C)
SL_ M_ S_p
SET :4 • KEY
START :ACTION KEY
2) Press••to
select month.
3) Press•to set.
• Likewise, set date, year, time,
DST (Daylight Saving Time).
To Make Corrections,
repeatedly press • • to move to
error, then correct.
] 4) Press ACTION.
_J_ I(Clock starts.)
I _ i. To ext this
I 1mode, press
L._+ _ ACTION again.
O
• VCR calendar is accurately maintained to
Dec. 31, 2096 11:59PM.
• Channel auto set selects normal TV or Cable
channels depending on your VCR hookup.
• To reset Language, Channels, Clock or
VCR's Output Channel see pages 38 and 39.
-- Using AY'< • keys
You can also operate the menu
screen using VCR buttons.
When menu screens are
displayed, the PLAY, STOP,
REWIND, and FF buttons on
the VCR and remote function I
as ••• • only with no tape I On Remote
inserted.
To display menu using VCR
buttons, press CH • and CH
• together.
On VCR
• :PLAY •:nEW
• :STOP •:FF
To exit the menu, repeat above.
'7
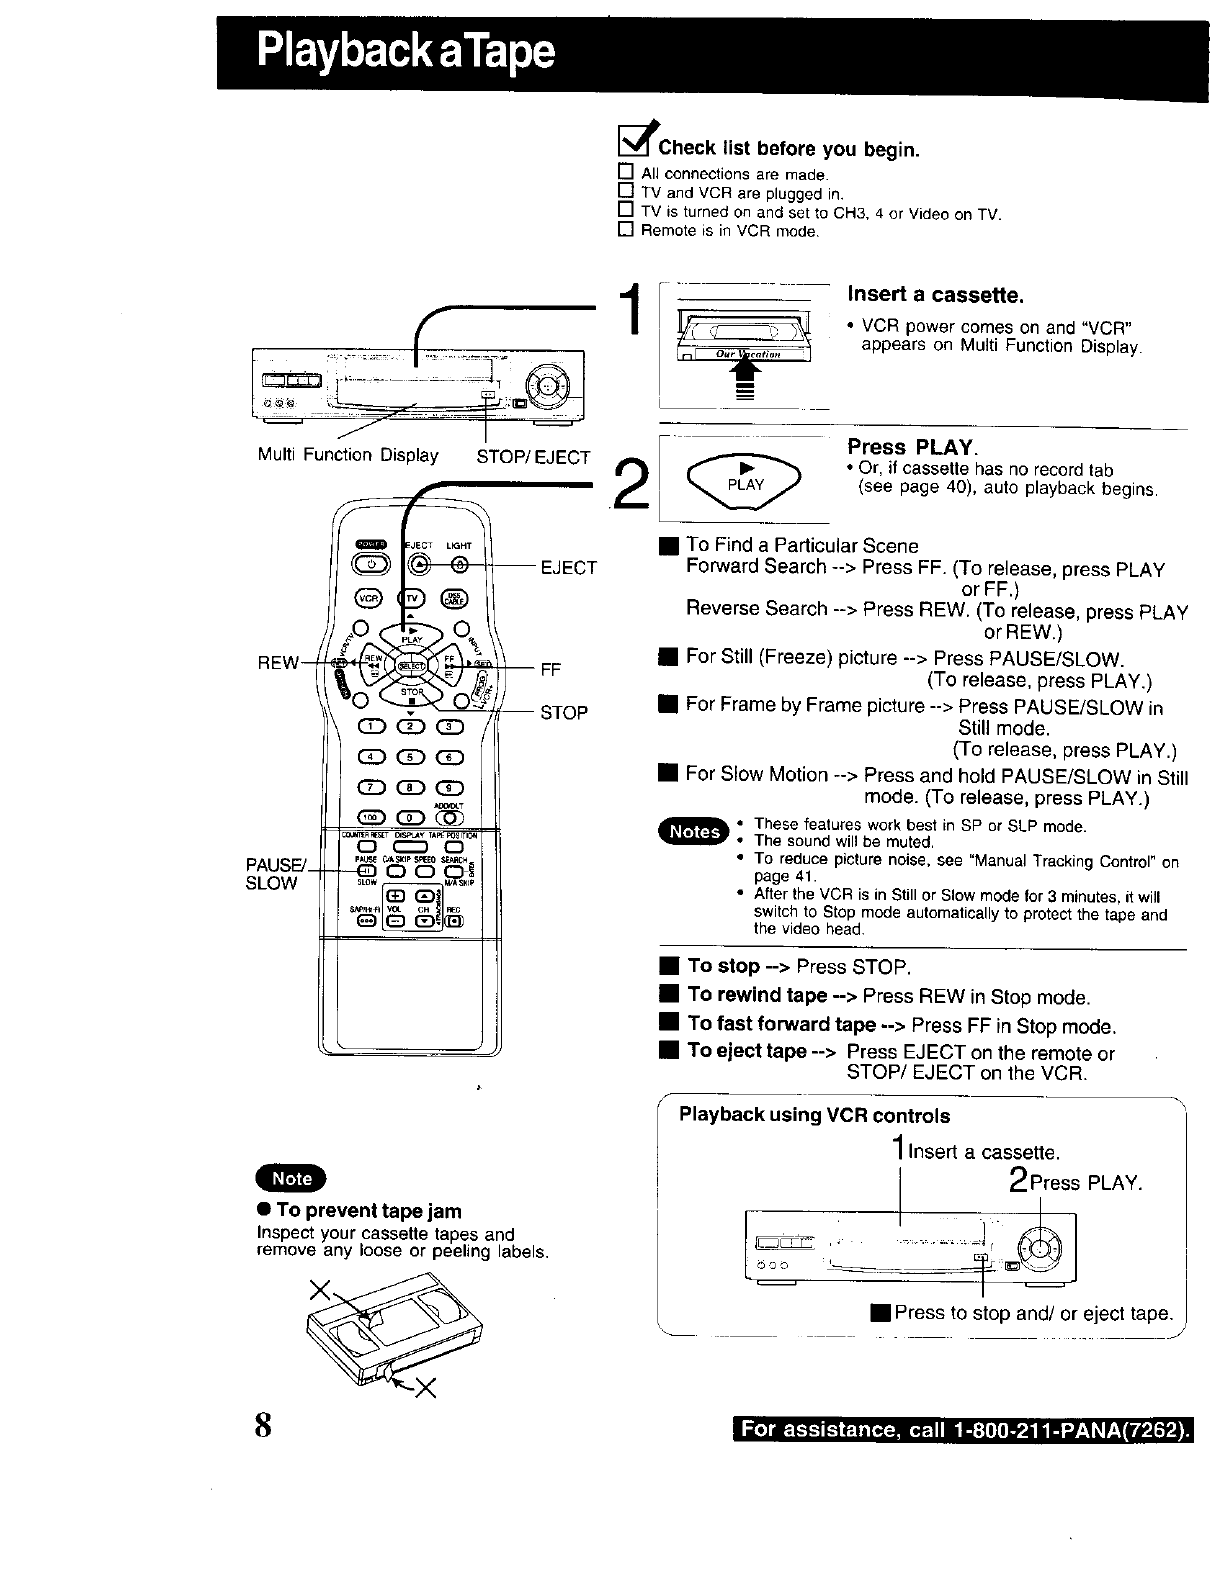
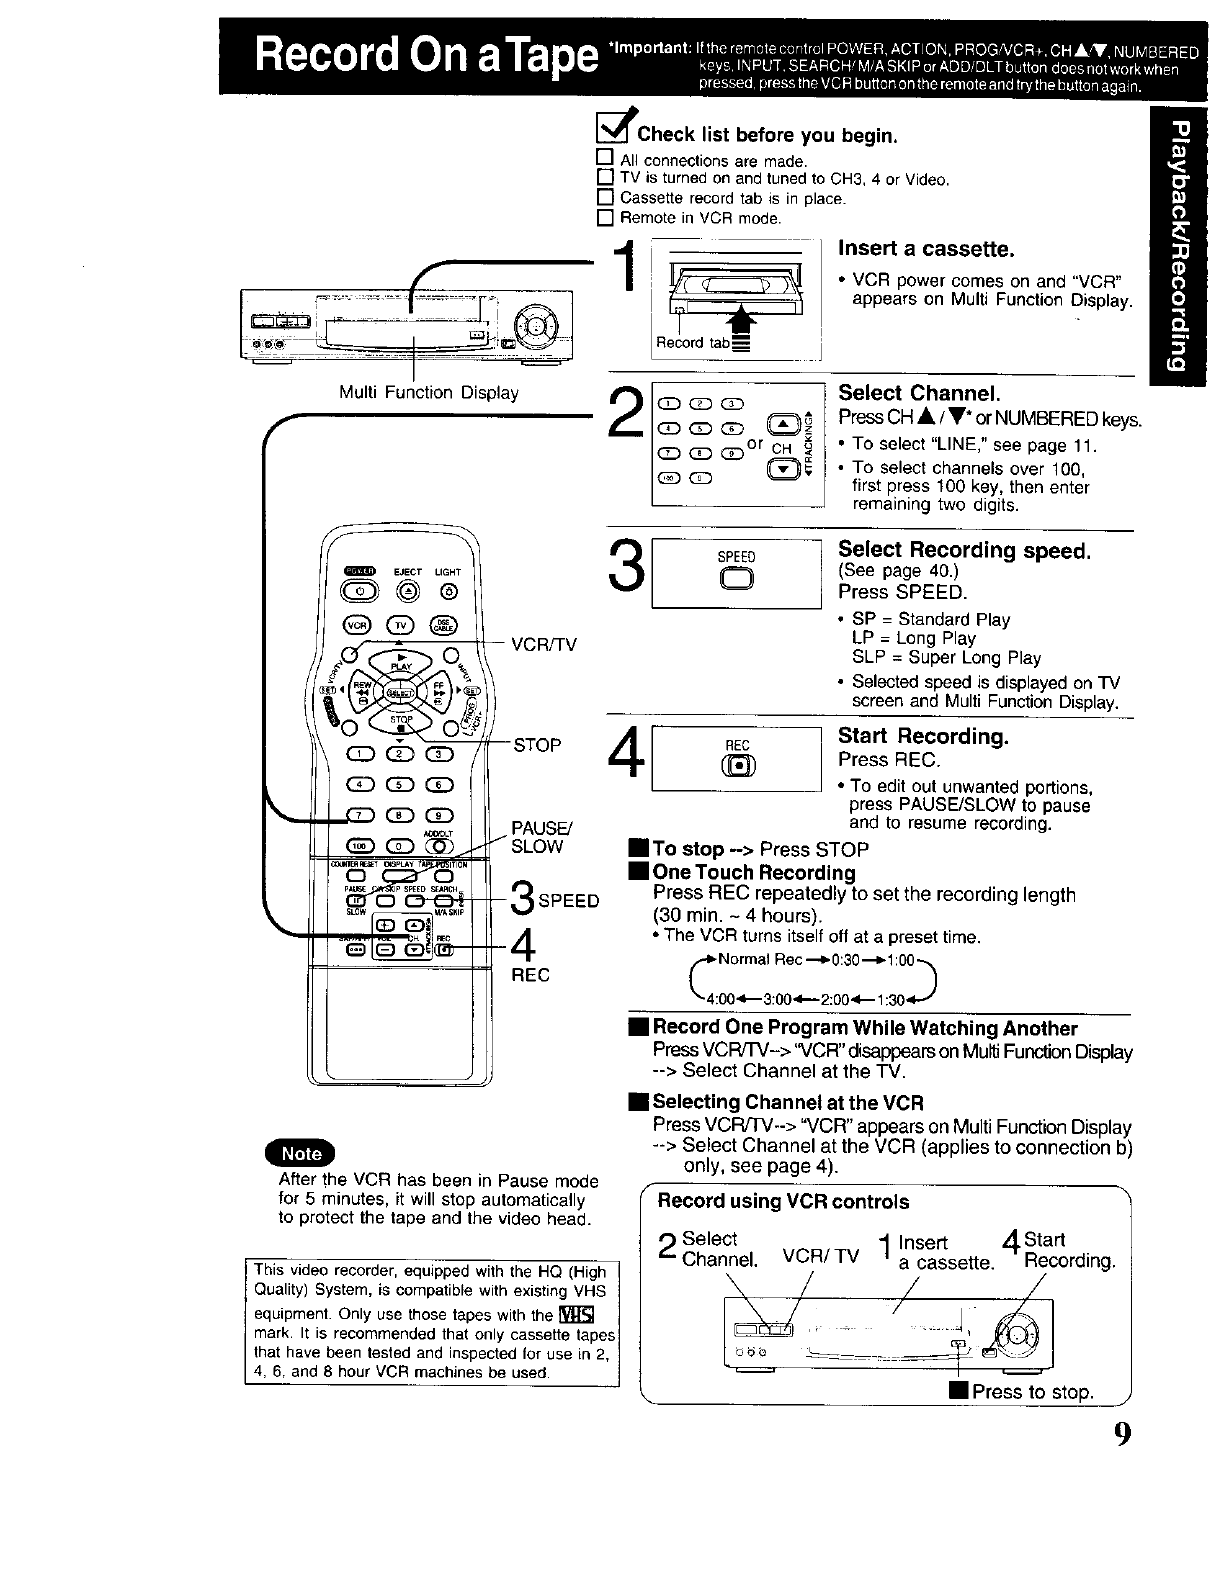
[_Check list before you begin.
[] All connections are made.
[] TV and VCR are plugged in.
[] TV is turned on and set to CH3, 4 or Video on TV.
[] Remote is in VCR mode
J I
Multi FunctionDisplay STOP/EJECT
REW--
PAUSE/_
SLOW
cD
(£) (2D (3D
(E] OD (3D
o(:=D o
eALF_ _ASI(IP _E0 SE,_C_
SLOW _A S_IP
EJECT
-- FF
-- STOP
O
•To prevent tape jam
Inspect your cassette tapes and
remove any loose or peeling labels.
8
Insert a cassette.
•VCR powercomes on and "VCR"
appears on MultiFunctionDisplay.
1 _ Press PLAY.
• Or, if cassettehas no record tab
(see page 40), auto playback begins.
R To Find a Particular Scene
Forward Search --> Press FF. (To release, press PLAY
or FF,)
Reverse Search --> Press REW. (To release, press PLAY
or REW.)
iFor Still (Freeze) picture --> Press PAUSE/SLOW.
(To release, press PLAY.)
• For Frame by Frame picture --> Press PAUSE/SLOW in
Still mode.
(To re_ease, press PLAY.)
• For Slow Motion --> Press and hold PAUSE/SLOW in Still
mode. (To release, press PLAY.)
O: These features work best in SP or SLP mode.
The sound will be muted.
• To reduce picture noise, see "Manual Tracking Control" on
page 41.
•After the VCR is in Still or Slow mode for 3minutes, it will
switch to Stop mode automatically to protect the tape and
the video head.
•To stop --> Press STOP.
•To rewind tape --> Press REW in Stop mode.
•To fast forward tape --> Press FF in Stop mode.
•To eject tape --> Press EJECT on the remote or
STOP/EJECT on the VCR.
Playback using VCR controls
Insert a cassette.
2Press PLAY.
• Press to stop and/or eject tape. /
I;[.1_-g-',--][.--_e-lnI.ial_.ll• If:Illl_,li[] ".,/-'1_V_'_I_P_W4,.,
L .. L
I
Multi Function Display
r
[_Check list before you begin,
[] All connectionsare made.
[] TV is turnedon andtuned to CH3, 4 or Video.
[] Cassette recordtab is in place.
[] Remotein VCR mode.
1 _ / Insert a cassette"
•VCR power comes on and "VCR"
tRecordtab_ ]
appears on Multi Function Display.
2I (E_)Q Q
C_ Cz)Or CH
Select Channel.
PressCH •/T* or NUMBERED keys.
• To setect _LtNE,"see page 11.
• To select channels over 100,
first press 100 key, then enter
remaining two digits.
OEJECT LIGHT
Q@®
Q®®
G:) (Z) _
_(_) (3D QD
A0C_
VCR_V
--STOP
PAUSE/
/SLOW
-3SPEED
-4
REC
I SPEED
O
4
After the VCR has been in Pause mode
for 5 minutes, it will stop automatically
to protect the tape and the video head.
This video recorder, equipped with the HQ (High 1
Quatity) System, is compatible with existing VHS /
equipment. Only use those tapes with the _ /
mark. It is recommended that only cassette tapes /
that have been tested and inspected for use in 2, /
4, 6, and 8 hour VCR machines be used. j
Select Recording speed.
(See page 40.)
Press SPEED.
• SP = Standard Play
LP = Long Play
SLP = Super Long Play
• Selected speed is displayed on TV
screen and Multi Function Display.
Start Recording.
(_ Press REC.
• To edit out unwanted portions,
press PAUSE/SLOW to pause
and to resume recording.
• To stop --> Press STOP
•One Touch Recording
Press REC repeatedly to set the recording length
(30 rain. -4 hours).
•The VCR turns itself off at a preset time.
•Record One Program While Watching Another
PressVCW'('V-> "VCR" disappearson Multi Function Display
--> Select Channel at the TV.
•Selecting Channel at the VCR
Press VCR/TV--> "VCR" appears on MultiFunction Display
--> Select Channel at the VCR (applies to connection b)
only, see page 4),
FRecord using VCR controls
setect 1Insert 4sta rt
Channel. VCR/TV a cassette. Recording.
• Press to stop. j
9
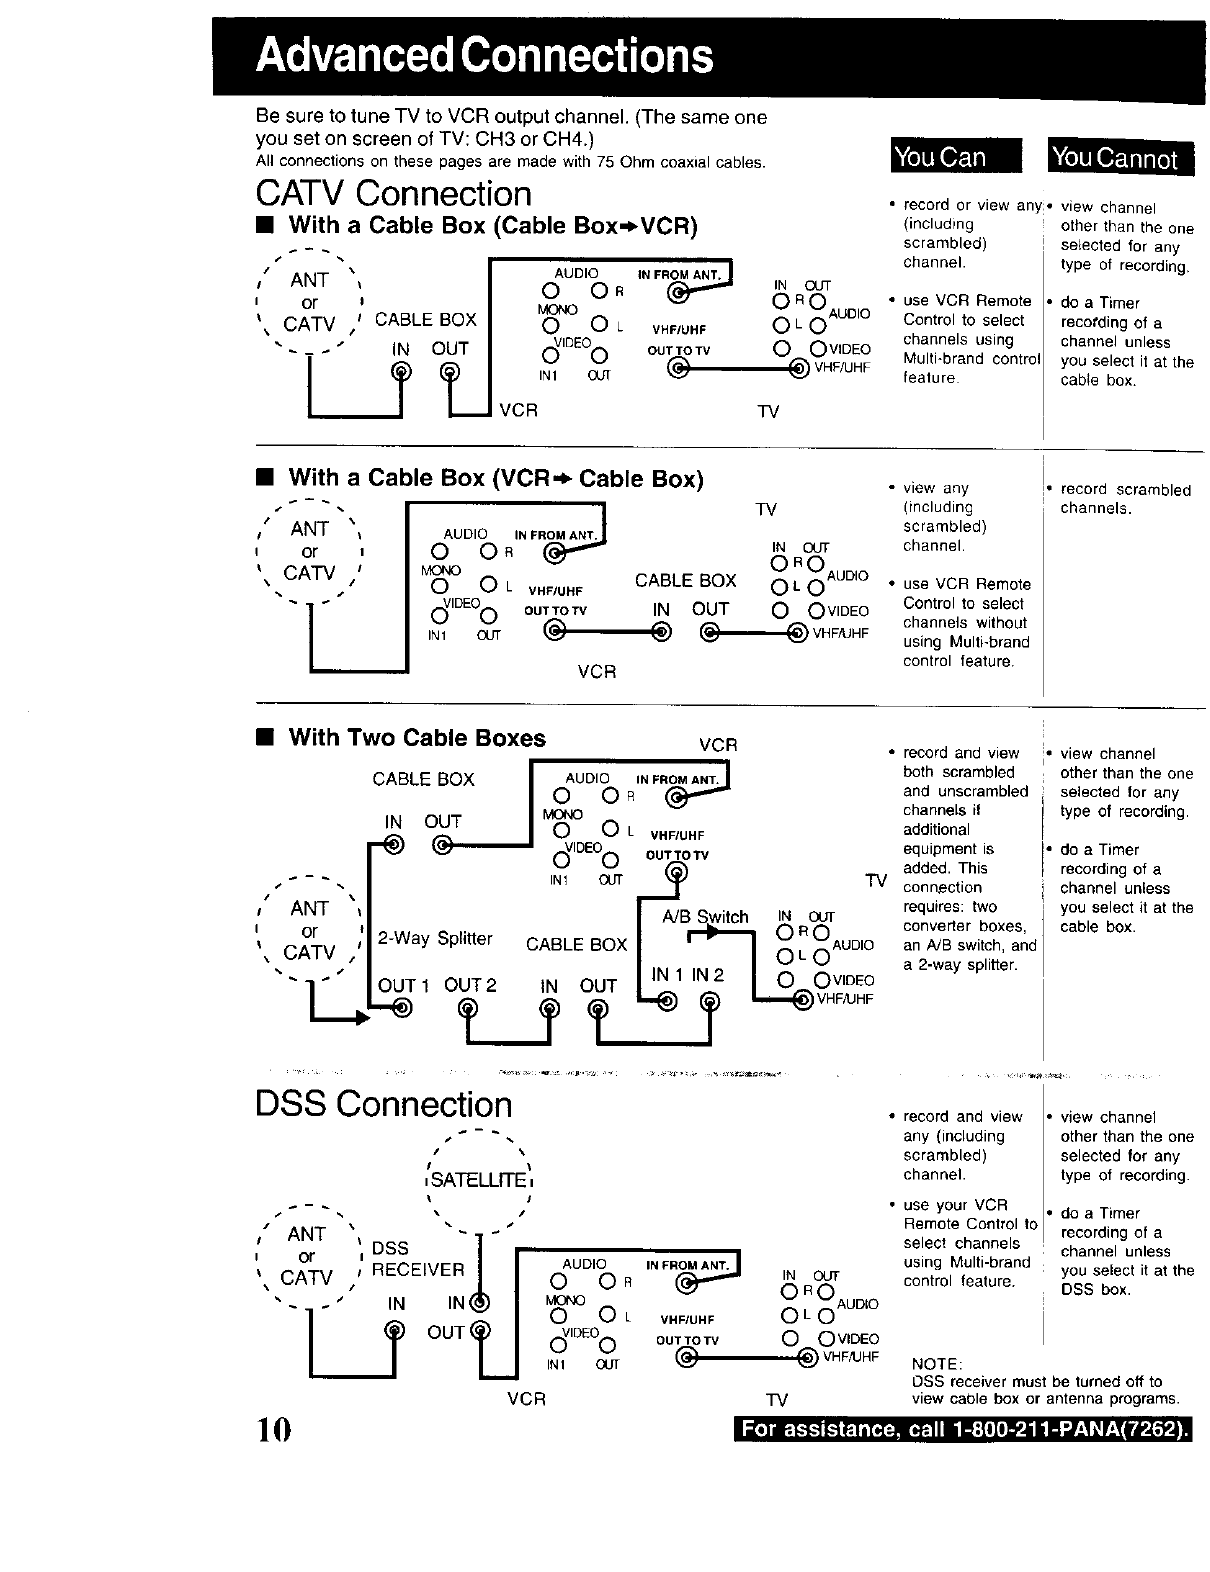
Be sure to tune TV to VCR output channel. (The same one
you set on screen of TV: CH3 or CH4.)
All connections on these pages are made with 75 Ohm coaxial cables.
CATV Connection
•With a Cable Box (Cable Box._VCR)
,- %
I" ANT _
i or l
_CATV I CABLE BOX
-_ IN OUT
__Jr
AUDIO INFR_O O R IN OUT
uo.o 0 R0 AUDIO
O O L VHF/UHF OLO
c_IOEOO OUT TO TV 0 O VIDEO
INI OUT @ 1_)VHFAJHF
VCR TV
• record or view any, view channel
(including other than the one
scrambled) selected for any
channel, type of recording.
• use VCR Remote
Control to select
channels using
Multi-brand eontro
feature
do a Timer
recording of a
channel unless
you select it at the
cable box.
•With a Cable Box (VCR._ Cable Box)
/%\I ANT
I or i
_ CATV /
t2__
AUDIO IN FROMA_,
O OR
M_ OLVHF/UHF
(_IDEOOOUTTOTV
IN1 OUT @-
TV
IN OUT
CABLE BOX O LRoOAuDIO
IN OUT O O VIDEO
VCR
• view any
(including
scrambled)
channel.
• use VCR Remote
Control to select
channels without
using Multi-brand
control feature.
I
,record scrambled
channels.
•With Two Cable Boxes VCR
,ANT
or
_ CATV
CABLE BOX I
IN 0(____ I
AUDIO IN FR_
0 OR
'DEO0
IN1 OUT
2-Way Splitter CABLE BOX
OUT1 OUT2 IN OUT
L._f
L VHFIUHF
OUTTOTV
I_B Switch IN OUT
TV
I '70 OAuD'°
IIN 1 IN 2I0 0 vIDEO
I,_ ?I,,,,,_ VHFAJHF
• record and view
both scrambled
and unscrambled
channels if
additional
equipment is I•
added. This r
connection
requfres: two
converter boxes,
an A/B switch, and
a 2-way splitter.
i• view channel
other than the one
selected for any
type of recording.
do a Timer
recording of a
channel unless
you select it at the
cable box.
DSS Connection
•%
/\
,SATELLITE,
\!
s _. \ i
,ANT _ "1
,i DSS I,
,,j;v,''ECE'VEBJI
"- ." IN IN_(_) I
!__tOUTLI
AUDIO
O OR
MONO
O OL
d,O Oo
IN1 OUr
VCR
_,]I1_.I..'!-'t!-'t_1,1_-._!_.111 il}:[IJl_.lil'l'./:l_r: _ rlre,[,_t.]
10
IN FR_
VHFIUHF
OUTTOTV
@
IN OUT
O OoAuD,o
O O VIDEO
VHF/UHF
TV
• record and view
any (including
scrambled)
channel.
view channel
other than the one
selected for any
type of recording.
• use your VCR do a Timer
Remote Control to recording of a
select channels channel unless
using Multi-brand you select it at the
control feature. DSS box.
NOTE:
OSS receiver must be turned off to
view cable box or antenna programs.
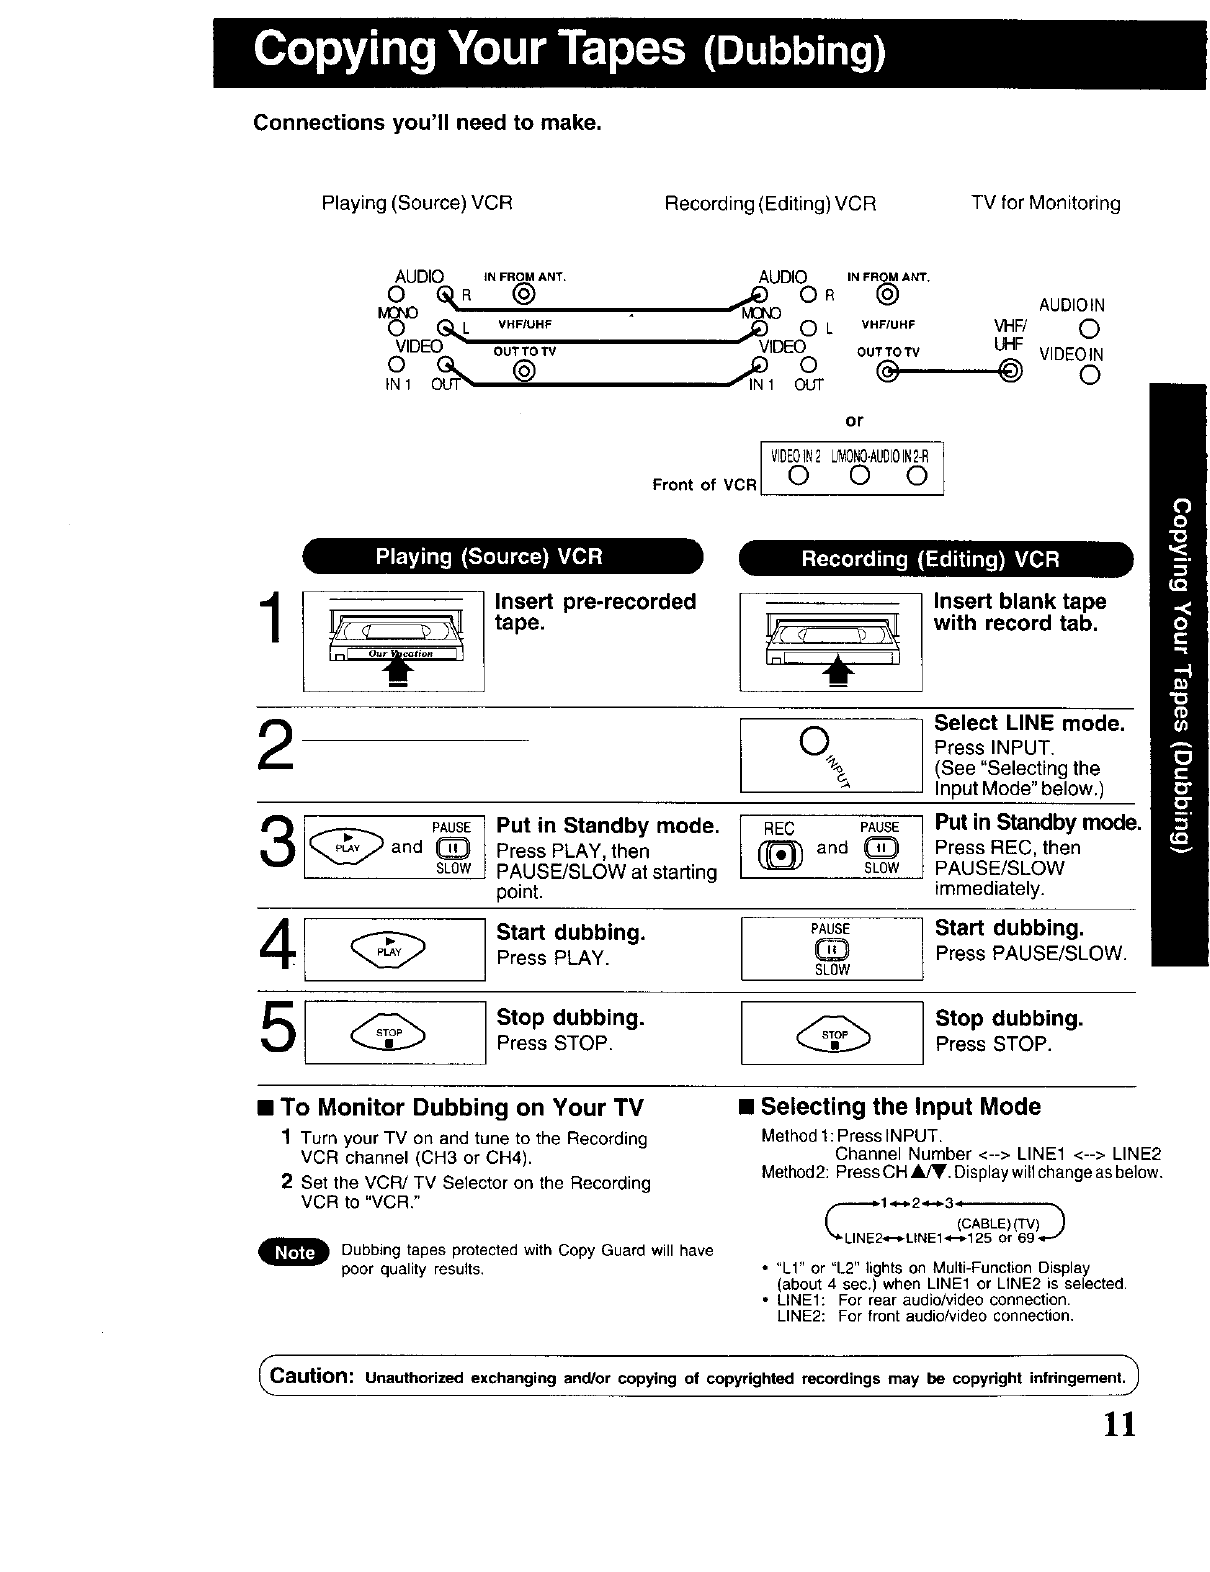
Connections you'll need to make.
Playing (Source) VCR Recording (Editing) VCR TV for Monitoring
AUDIO
o_R
© L
VIDEOG_
IN1
IN FROM ANT.
@
VHF/UHF
OUT TO TV
@
AUDIO IN FROM ANT.
0 R (_ AUDIOIN
_V 2LVHFIUHP VHF, 0
IDE OUTTOTV UHF VIDEOIN
t o ® o
OUT
or
VIDEOIN2L_ONO.AUOIOI,2-R
Front of VCR O O O
1Insert pre-recorded
tape.
t
2
3 and
4
PAUSE Put in Standby mode.
(_ Press PLAY, then
SLOW PAUSE/SLOW at starting
point.
Start dubbing.
Press PLAY.
Insert blank tape
with record tab.
Select LINE mode.
0_,%_ Press INPUT.
(See "Selecting the
Input Mode" below.)
REC PAUSE Put in Standby mode.
(_ and (_ Press REC, then
SLOW PAUSE/SLOW
immediately.
PAUSE Start dubbing.
Q Press PAUSE/SLOW.
SLOW
5Stop dubbing.
Press STOP. Stop dubbing.
Press STOP.
•To Monitor Dubbing on Your TV
1Turn your TV on and tune to the Recording
VCR channel (CH3 or CH4).
2Set the VCR/TV Selector on the Recording
VCR to "VCR."
Dubbing tapes protected with Copy Guard will have
poor quality results,
•Selecting the Input Mode
Method t: Press INPUT.
Channel Number <--> LINE1 <--> LINE2
Method2: Press CH _kJV, Display will change as below.
(_ (CABLE) (TV)_
"*'_LINE2,,t-_-LtNE1"0-_125 or 69 4-""
• "LI" or "L2" lights on Multi-Function Display
(about 4 sec.) when LINE1 or LINE2 is selected.
• LINE1: For rear audio/video connection.
LINE2: For front audio/video connection.
Caution: Unauthorized exchanging and/or copying of copyrighted recordings may be copyright infringement.)
]]
You can set up to 8 programs to be recorded while you are away.
1 _ ÷ Display SET PROGRAM-
O Press PROGNCR+.*
You can also display Program screen from Menu.
1) Press ACTION to display Menu.
• You can also set up using VCR buttons. See the bottom right of this page.
2) Press •V and • to select and set SET UP FEATURE.
3) Press • to display Program screen.
4) Go to step 3.
2
l[*[_
3
4
[_lPcheck list before you begin.
[] All connections are made,
(See pages 4-5.)
[] TV and VCR arepluggedin and turned on,
[] VCR/TV selector is set to "VCR."
[] Clock is set to correct time,
[] Record tab in place. (See page 40.)
[] Remote in VCR mode.
[] Use not in REC, REC TIME or
A!V Dubbing.
SET PROGRAM
VCR Plus+ PROGRAMMING
SELECT:A • KEY
SET :1_ KEY
END :PROG KEY
You may not use the VCR buttons
on "SET PROGRAM" screen.
Display Program screen.
1) Press AY to select
TIMER PROGRAMMING.
2) Press • to display.
•If a program is already in
memory, press _,V and
• to select an unused
program number•
CATEGORY:N/A SLP
SELECT:A •KEY
SET :, KEY
END :PROG/ACTION KEY
Set the recording DATE•
1) Press •V to select.
_._._ 2) Press • or • to set.
k_"_k_"l"_*- •1~31 = One time
• DAILY = MON-FRI
• WEEKLY = Same time
once a week
_."8--9 ........ 31- I -- 2.--.- 6"_'_ Repeat step 3 to set:
Today _ SELECTA/• SelectionOrder DAILYstart time, stop time
[_4_WEEKLY WEEKLY WEEKLY._JChannel (or LINE for outside
source), Category**, tape
-- (SAT) ...... (MON)-- (SUN) speed (SP, LP, SLP).
@®®
0 C::_ 0
6POWER
SELECT/
1SET
• :PLAY
_ • :STOP
• :REW
• :FF
\ 1PROG/
,_ VCR+
1ACTION
5
TODAY ABC
CATEGORY:MOVIE SP
........................
WISH TO MAKE NOTES:& KEY
SET :< _ KEY
END :PROG/ACTION KEY
DATE START STOP CH"
TODAY ABC
CATEGORY:MOV[E SP
SELECT:_ • KEY
SET :, KEY
"END :PROG/ACTION KEY
Make the notes.
•If not wanted, go to step 5.
1) Press • to begin.
,_,_,_,_ 2)Press •V to
select.
3) Press • to set.
•Characters will change in
the following order.
_ A"_ B•-- C• ÷Z_ BLANK,'_ _*&._q
_9 ...... 2-_1 _0 _/',_ !
4) Press PROG/VCR+
(or ACTION) to end.
Continued on the next page.
-- Important notes when using a DSS receiver --
•When recording programs via a DSS receiver, the DSS
receiver must be left on.
• When recording programs wa an antenna or cable, the DSS
receiver must be turned off.
** Category Items
N/A(not applicable), SPORTS,
MOVIE, COMEDY, MUSIC, DRAMA
-- Using •Y'_ • keys --
You can also operate the menu screen
using VCR buttons.
When menu screens are displayed, the
PLAy, STOP, REWIND, and FF buttons
on the VCR and remote function as •Y•
• only with no tape inserted.
_',_,, I _ _ J • : STOP
• • :REW
tOn Rem_ On vce • : FF
To display menu using VCR buttons,
press CH • and CH •together.
To exit the menu, repeat above.
5
6
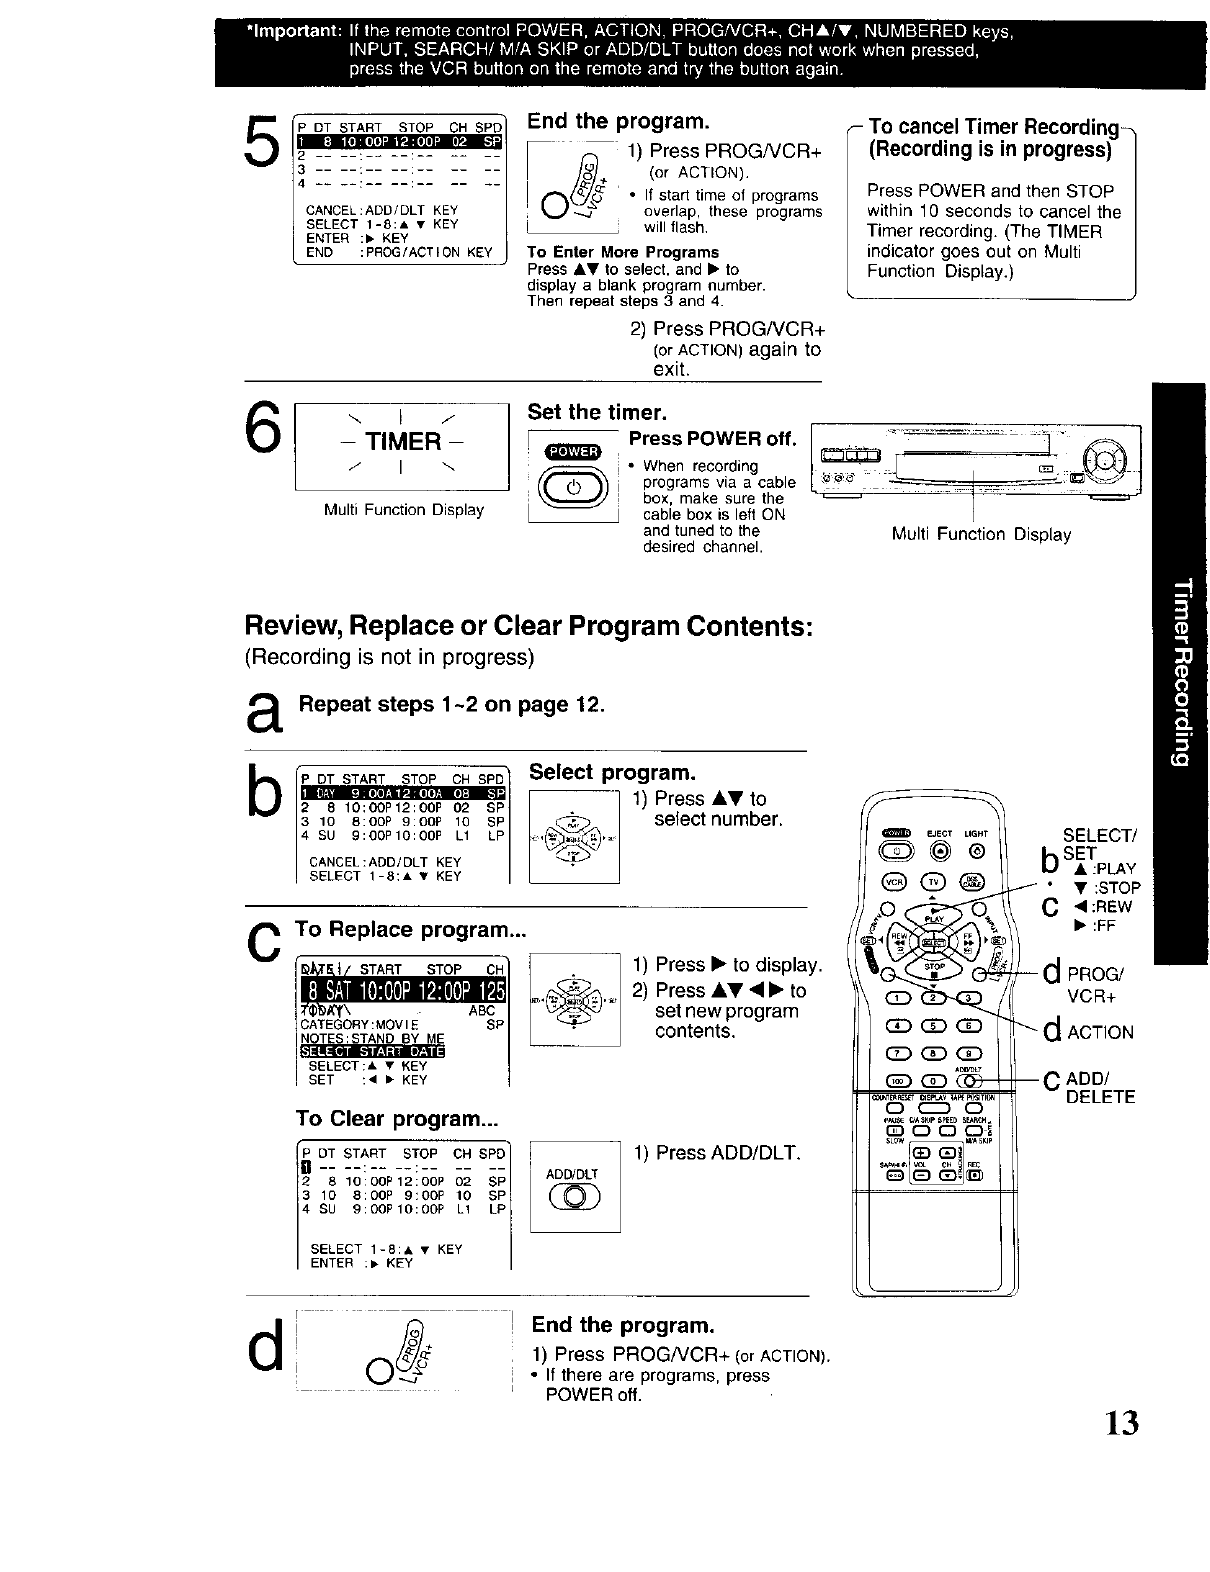
"P DT START STOP CH SPD
_a'ar_teM
4
# yliiiir#.l[oll#lBI'#
CANCEL:ADD/DLT KEY
SELECT 1-8:& • KEY
ENTER :• KEY
END :PROG/ACTION KEY
End the program.
1) Press PROG/VCR+
O/_/_ (orACTION).
• If start time of programs
overlap, these programs
] will flash.
To Enter More Programs
Press AV to select, and • to
display a blank program number.
Then repeat steps 3 and 4.
2) Press PROG/VCR+
(or ACTION) again to
exit.
"-. b /
-TIMER-
/I\
Multi Function Display
Set the timer.
[Press POWER off.
*When recording
programs via a cable
box, make sure the
[ cable box is left ON
and tuned to the
desired channel.
_- To cancel Timer Recording-
(Recording is in progress)
Press POWER and then STOP
within 10 seconds to cancel the
Timer recording. (The TIMER
indicator goes out on Multi
Function Display.)
k
Multi Function Display
Review, Replace or Clear Program Contents:
(Recording is not in progress)
aRepeat steps 1-2 on page 12.
b [P DT STA_ST?_, _ SPD1 Select program.
2810:OOP12:OOP 02 SP t_ @ 1) Press kVto
!ooocoos/select number.
4 SU 9:00P10:00P LI LP ....
CANCEL:ADD/DLT KEY
SELECT 1-8:A • KEY
cTo Replace program...
START STOP
CATEGORY:MOVIE" ABCp _'_'_
NOTES:STAND BY ME
SELECT:A • KEY
SET :,_1 • KEY
To Clear program...
[_ DT START STOP OH _i
.... • _= _. .... SPD
2sloiooP121ooPoe ;;
3 10 8:0OP 9:0OP 10
4 SU 9:00PIO:OOP L1
SELECT 1-8:A • KEY
ENTER :• KEY
ADD/DLT
1) Press • to display.
2) PressAY_l•to
set newprogram
contents.
1) Press ADD/DLT.
_) _ (?_--
SELECT/
bSET
•:PLAY
"• :STOP
C•:nEW
• :FF
- dPROG/
VCR+
dACTION
-- C ADD/
DELETE
r
d';oEnd the program.
1) Press PROG/VCR+ (orACTION).
• If there are programs, press
POWERoff. ]3
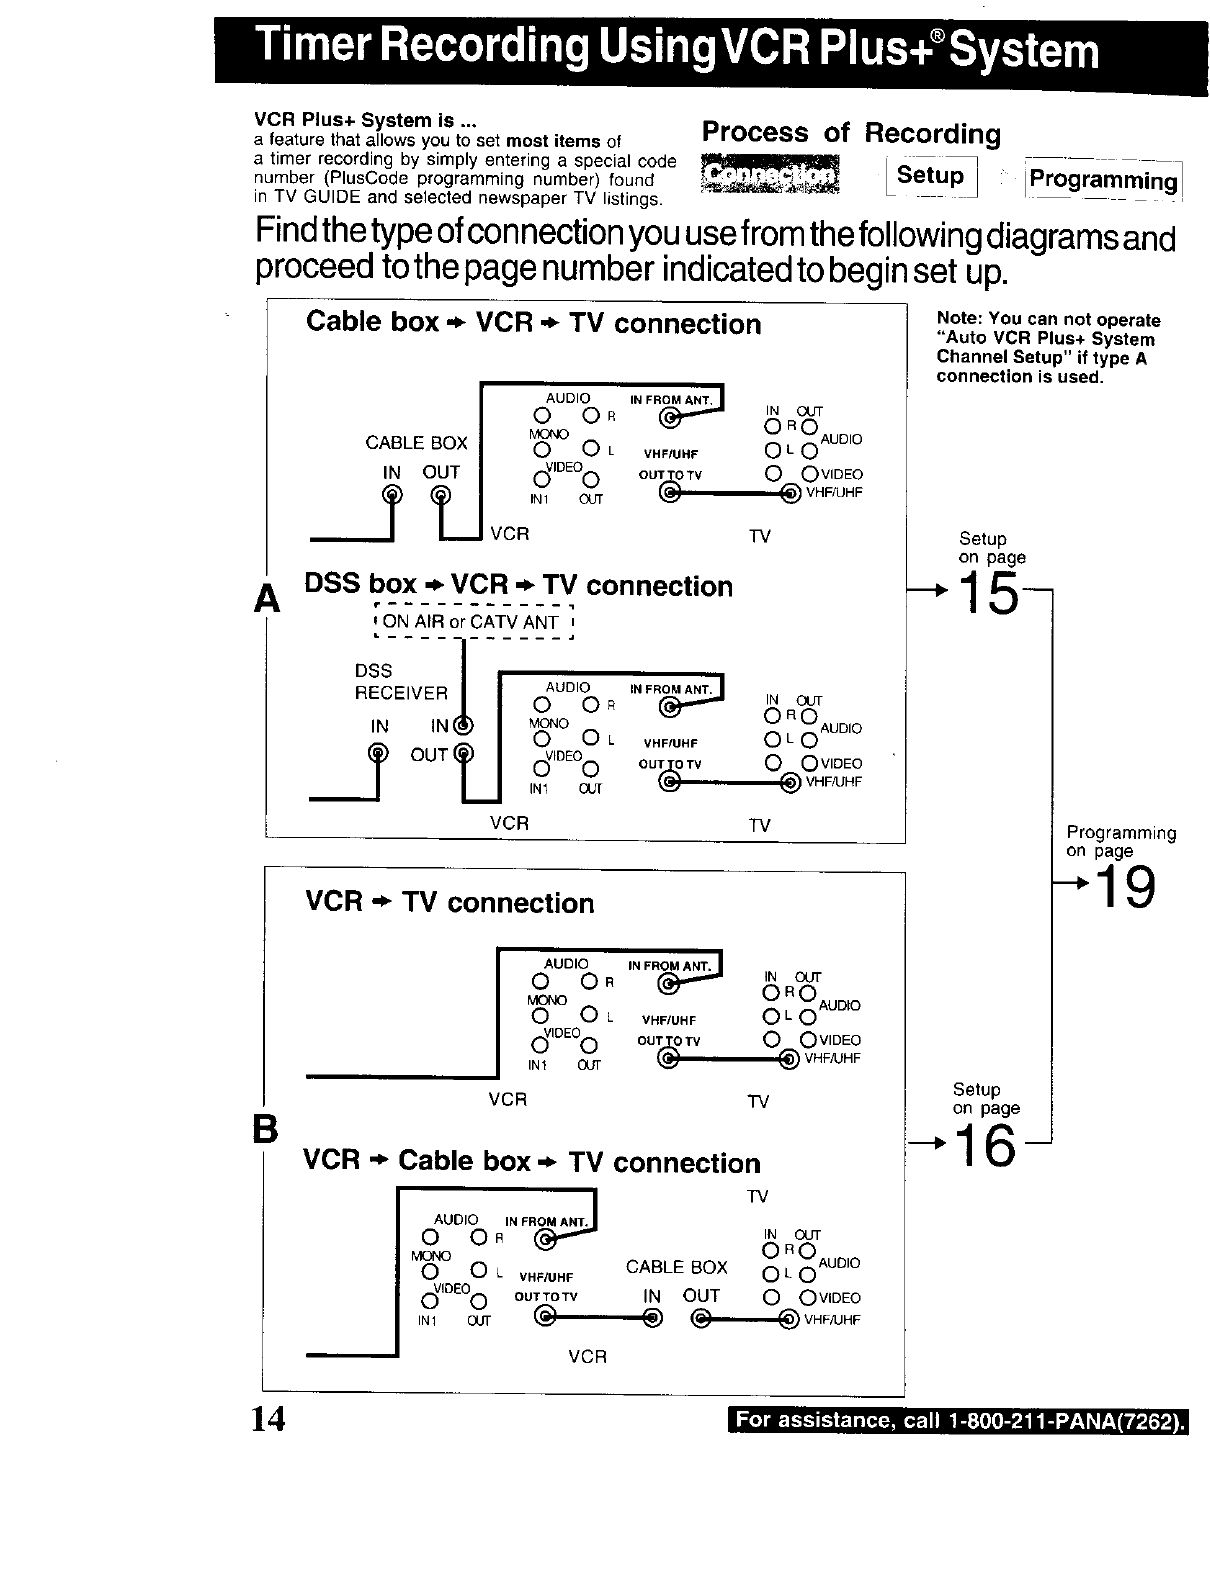
VCR Plus+ System is .., Process of Recording
a feature that arrows you to set most items of
a timer recording by simply entering a special code _ _ ip_ogrammi_gl
number (PlusCode programming number) found Setup_
in TV GUIDE and selected newspaper TV listings.
Findthe type ofconnection you usefromthe followingdiagramsand
)roceed to the page number indicated to begin set up.
A
B
Cable box -_ VCR .* TV connection
CABLE BOX
IN OUT
__Jl_
AUDIO IN FR(_
O O. IN out
O:OAuo,o
O O Lv._/uHF
d,OEOo oo__oTv O O,,,DRO
_ VHF/UHF
IN1 OUT
VCR TV
DSS box -_VCR -_ TV connection
_'ON AIR or CATV ANT
D S / |"AUDIO IN FROM ANT.J
RECE'VERII0 OR IN OUT
1. 1._ I .,_oeL v.,,u.,_ O_OAoD,O
ouz U 10'Oo OOv,DRO
VHFAJHF
IN1 OUT
VCR TV
VCR -_ TV connection
AUDIO IN FRO(_J
0 OR IN OUT
O oOAoo,o
O O L VHF/UHF
C_,°R°O oo_Tv 0Ov,o_o
@ VHFMHF
INI OUT
VCR TV
VCR -_ Cable box-_ TV connection
AUDIO RIN FROMA_. TV
0O IN OUT
O ROAUDIO
M_ O L. VHFIUHF CABLE BOX O L O
c_IDEO0 OUT TO TV IN OUT 0 0 VIDEO
VCR
Note: You can not operate
"Auto VCR Plus+ System
Channel Setup" if type A
connection is used.
Setup
on page
-'15-
Programming
on page
Setup
on page
16-
I_,]11_4.-t--1k-__.1=[_=_.[,_.111iB;[lIl_PJillm =/-1#F_IIr#.[,*PJ
14
Cable Box Setup Process of Recording
Connection / i,',Programming I
1Display MENU.
Press ACTION.*
2MENU
SET UP VCR
SET UP FEATURE
IDIOMA/LANGUE:ENGLISF
VCR'S OUTPUT CH:3
SELECt:" • KEY
SET :• KEY
END :ACTION KEY
SET UP CHANNEL
ANTENNA : CABLE
AUTO SET
CHANNEL CAPTION
DiS
Select SET UP CHANNEL.
1) Press kVto
_-_ select.
2) Press • to
display.
L_
4
SET UP
• KEY
SET :• KEY
END :ACTION KEY
: OFF
Select CABLE/DSS BOX
SET UP.
71) Press AYto
select.
"_"_ 2) Press•to
•display.
VCR_CABLE/OSS _Xb'_V
VCRpTV
SELECT:A •KEY
SET :• KEY
END :ACTION KEY
Select your hookup
method.
1) Press AT to
select.
2) Press •to set.
• I1 CABLE/OSS BOX I_VCR bTV,
go to step 5.
It other, press ACTION three
times and go to page 16.
5SELECT HOOKUP
CABLE/DSS BOX,VCR•TV
CABLE/DS_ OUTPUT Cl-
SELECT:A • KEY
SET :4 • KEY
ENO :ACTION KEY
Select cable box or DSS
receiver output channel.
1) Press AY to
_ select...... 2) Press • to
enter.
•(f necessary, refer to your Cable
Box/DSS manual.
• ff you e_e using AudioNideo iack
connections, select and set
"VIDEO OUT" as output channel,
End setup.
Press ACTION twice.
_JE¢I" t,tGHT
_C_T
_:) o c) c)l
Kow _s_P
2SELECT/
SET
• :pLAY
• :STOP
• :FF
! ACTION
6
VCR Plus+ _, PlusCode and ALL
SET are registered trademarks
of Gemstar Development
Corporation, The VCR Plus+
system is manufactured under
license from Gemstar
i Development Corporation.
15
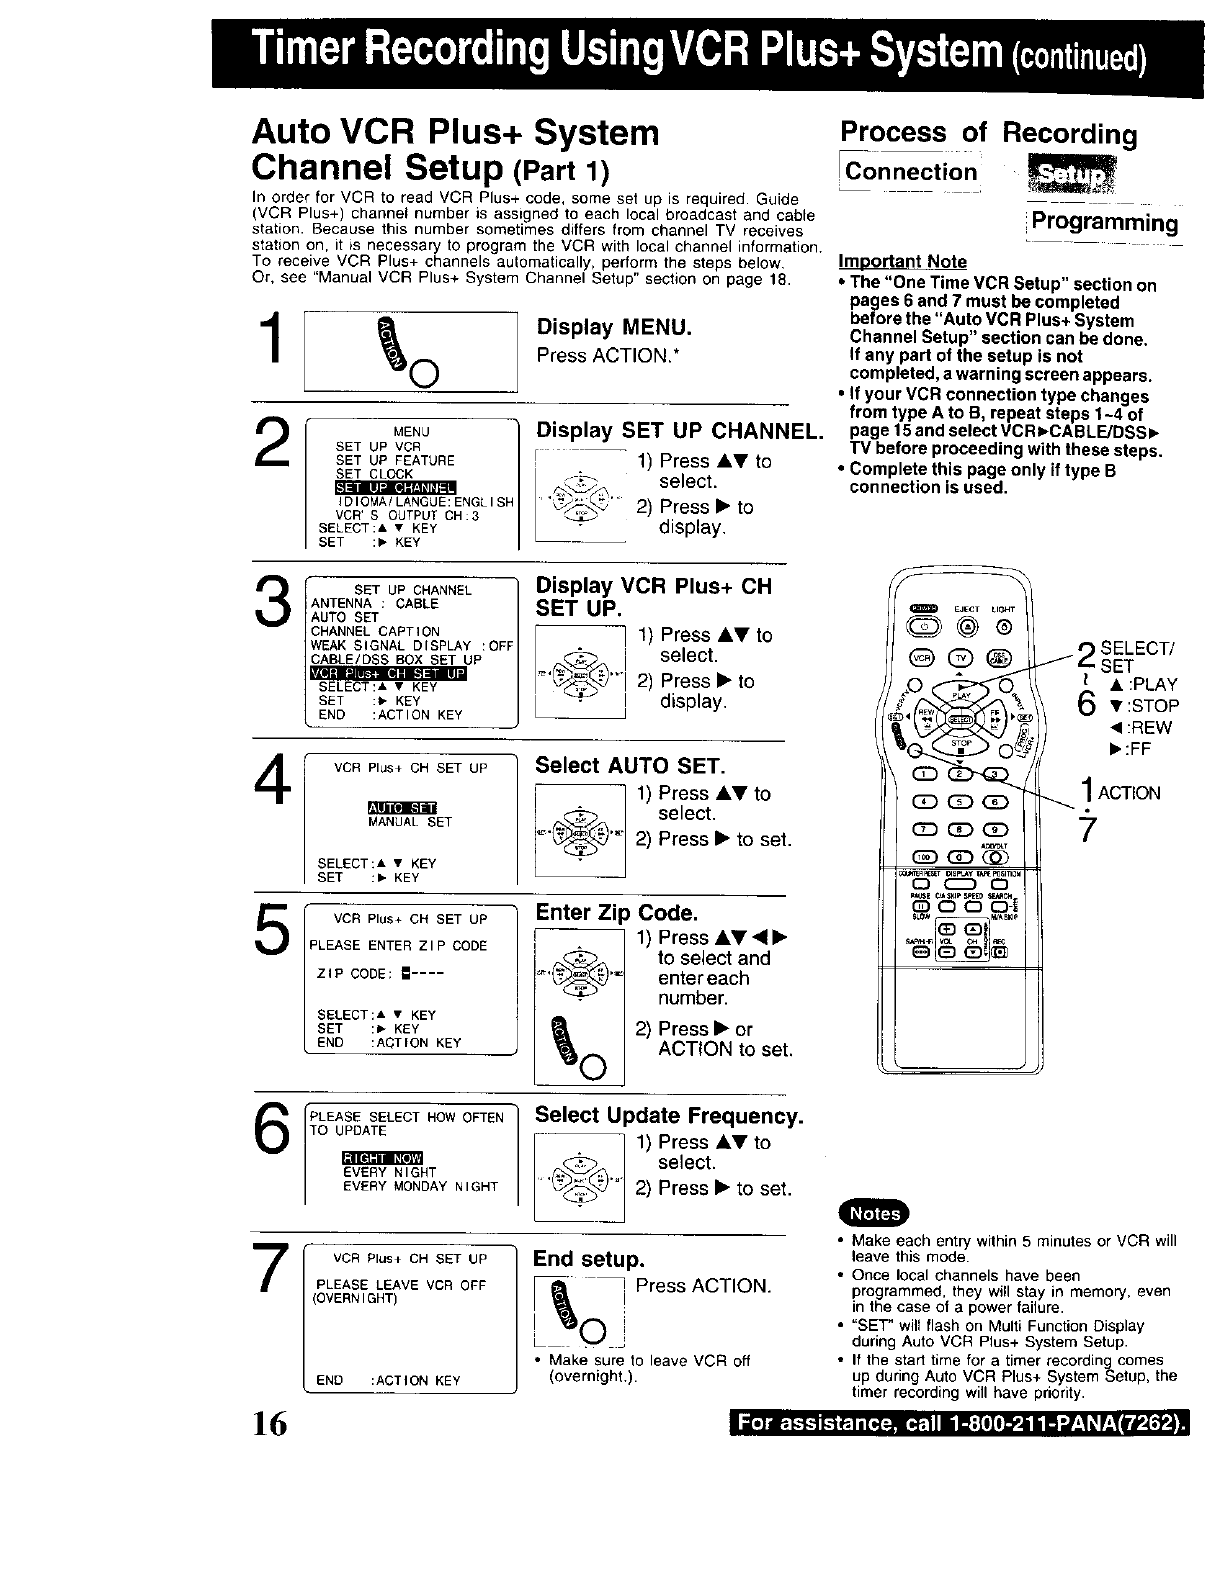
Auto VCR Plus+ System
Channel Setup (Part1)
in order for VCR to read VCR Plus+ code, some set up is required. Guide
(VCR Plus+) channel number is assigned to each local broadcast and cable
station. Because this number sometimes differs from channel TV receives
station on, it is necessary to program the VCR with local channel information.
To receive VCR Plus+ channels automatically, perform the steps below,
Or, see "Manual VCR Plus+ System Channel Setup" section on page 18.
1Display MENU.
Press ACTION.*
2
MENU /
SET UP VCR
SET UP FEATURE
SET CLOCK
LI]_i[_.="F,M_=III
IDIOMA/LANGUE:ENGLISH
VCR'S OUTPUT CH:3
SELECT:& • KEY
SET :, KEY
Display SET UP CHANNEL.
r -- 1) Press Ay to
"- _-_ select.
/_""_ .... 2) Press • to
display.
3SET UP CHANNEL
ANTENNA : CABLE
AUTO SET
CHANNEL CAPTION
WEAK SIGNAL DISPLAY :OFF
CABLE/DSS BOX SET UP
SELECT:A • KEY
SET :" KEY
END :ACTION KEY
Display VCR Plus+ OH
SET UP.
] 1) Press AT to
_ ! select.
...... 2) Press • to
display.
4VCR Plus+ CH SET UP
MANUALSET
SELECT:A •KEY
SET :_ KEY
Select AUTO SET.
1) PressAVto
_ select..... 2) Press•to set.
5VCR Plus+ CH SET UP
PLEASE ENTER ZIP CODE
ZIP CODE: _ ....
SELECT:A • KEY
SET :_ KEY
END :ACTION KEY
Enter Z _Code.
1) Press AY <•
to select and
.... entereach
number.
_0 2) Press•or
ACTION to set.
Select Update Frequency.
1) PressAYto
(_,_.@ select.
.... 2) Press•to set.
7VCR Plus+ CH SET UP
PLEASE LEAVE VCR OEF
(OVERNIGHT)
END :ACTION KEY
End setup.
,
[_ Press ACTION.
oi
• Make sure to leave VCR off
(overnight.).
16
Process of Recording
[Connection
Programm ng
Important N _ore_
• The "One Time VCR Setup" section on
pages 6 and 7 must be completed
before the "Auto VCR Plus+ System
Channel Setup" section can be done.
If any part of the setup is not
completed, a warning screen appears.
•If your VCR connection type changes
from type A to B, repeat steps 1-4 of
page 15 and select VCR _-CABLE/DSSI_
TV before proceeding with these steps.
•Complete this page only if type B
connection is used.
EJECT UC_T
_ SELECT/
@ (_ (_) _ SET
__ A :PLAY• :STOP
_':FF
_ 1ACTION
QD GD (_ _,
• Make each entry within 5 minutes or VCR will
leave this mode.
• Once local channels have been
programmed, they will stay in memory, even
in the case of a power failure.
•"SET" will flash on Multi Function Display
during Auto VCR Plus+ System Setup.
• If the start time for a timer recording comes
up during Auto VCR Plus+ System Setup, the
timer recording will have priority.

Auto VCR Plus+ System
Channel Setup (Part2)
Beforeyou performthe followingsteps,you shouldhave:
•completed "Auto VCR Plus+ System Channel
Setup (Part 1)" on page 16.
• left VCR off overnight, and turned it back on
after 9:00 AM the next day.
If channel uodatina was
successful...
VCR Plus+ CH SET UP
VCR Plus+ CM SET
COMPLETED
END :ACTION KEY
Exit this mode.
Press
_)O ACTION.
If VCR could not
distinauish channel maD...
VCR Plus+ CH SET UP
PLEASE SELECT
VCR Plus+ CHANNEL
NEXT :ACTION KEY
Display SELECT
VCR Plus+ CH.
_D _ 1) Press
| ACTION
O | 2) Continue
| to display.
• with step 2.
2SELECT VCR Plus+ CH
KMEX KCAL KWHY KVCR •
i_ ikl EEm
51 42 18 33
1 5 10 7
101 99 110 78
SELECT:A • • KEY
SET :ADO/DLT KEY
END :ACTION KEY
Select channel map
for your area.
,/Press,,
41_to
"'' select.
2) Press ADD/
_ ADD/DLT DLT to set.
3VCR Plus+ CH SET UP
PLEASE LEAVE VCR OFF
(OVERNIGHT)
END :ACTION KEY
End Setup.
Press
ACT,ON.
• Make sure to leave VCR off
(overnight.),
Channel map will be updated overnight
If it was successful, "VCR Plus+ CH SET COMPLETED"
appears on screen. And then, press ACTION to exit.
Repeat these steps as necessary.
If Auto Setup fails, do "Manual VCR Plus+ System
Channel Setup" section on page 18.
Process of Recording
IC0nnectioni gj
Programming
r 2 SELECT/
_,_c__, /SET
_ @ /• :PLAY
,sto
• :REW
, • :FF
1_ Pd
ACTION
_CC)_ 3
GD_
1_) G:_ --9ADD/
.......... ,_,_s,_,0. =" DELETE
0¢.-.-m o
Ausi c,ks_ppspE_as_Ac_
Q C3 0 (_
ToChangeor UpdateAutoVCR
Plus+SystemChannelSetup
(E.g. you selected the wrong channel
map, or your zip code channel.)
aDo "Auto VCR Plus+ System Channel
Setup (Part 1)" steps 1-4 on page 16.
SELECT VCR Plus+ CH
SELECT:I • KEY
SET :_" KEY
END :ACTION KEY
bPress AY to select UPDATE VCR Plus+
or SELECT VCR Plus+ CH, then press _'.
cIf you selected UPDATE VCR Plus+ CH,
perform steps 5-7 in the "Auto VCR Plus+
System Channel Setup (Par[ 1)" section
on page 16.
If you selected SELECT VCR Plus+ CH,
perform steps 2-3 in the "Auto VCR Plus+
System Channel Setup (Part 2)" section
on this page.
]"/
Manual VCR Plus+ System
Channel Setup
• Before you begin, complete "Channel Setup
Preparations" below right.
Imoortant Note
•If your VCR connection type changes from type A to B on
page 14, repeat steps 1-4 of page 15 and select VCR •
CABLE/DSS •TV before proceeding with these steps.
Do "Auto VCR Plus+ System Channel
Setup (Part 1)," steps 1-3 on page 16.
2VCR Plus+ CH SET UP
AUTO SET
_ra_[er.,ra [,.']_1
SELECT:& •KEY
SET :_ KEY
END :ACTION KEY
Select MANUAL SET.
1) Press &Y
_._i.. to select.
L2) Press •
to set.
3
IMPORTANT NOTE:
For step 3, use the list you prepared. You may leave
lines blank if you don't receive that station, or if the
GUIDE CH number and the RECEIVE CH numbers
are the same.
VCR Plus+ CH SET UP
GUIDE CH RECEIVE CH
02 --
SELECT:A • KEY
SET :_ KEY
END :ACTION KEY
VCR Plus+ CH SET UP
GUIDE CH RECEIVE CH
• 01 []
02 --
SELECT:A • KEY
SET :< KEY
END :ACTION KEY
Select VCR Plus+
channels.
i 1) Press •
,,_,_i to move
_ c ursor to
right
column.
2) Press AY to change
RECEIVE CH number.
3) Press • to set.
4) Press AY to scroll
up/down GUIDE CH
column.
• Repeat step 3 until list is
complete.
To make corrections,
Press Ay and •to move to error, then AY to change,
or ADD/DLT* to erase number.
4End setup.
Press ACTION
three times.
I
•Make each entry within 5 minutes or the VCR will exit this mode
•Once local channels have been programmed, they will stay in
memory, even _n the case of a power failure.
)8
Process of Recording
iConnection 1
L
[Programming!
S
Q EJECT LIGHT
G>@®
_G_GD
Q_ (2_ QD
RE_ C,S_y T
Q C_ O
I:_) 0 0 0-[
2SELECT/
• SET
J3 • :PLAY
• :STOP
<:nEW
/ • :FF
J
,' 4ACTION
ADD/
-- 3DELETE
Channel Setup Preparations
In order to complete step 3 left, make a
local channel list (see example below),
You will need the following:
• A line up of normal TV and/or Cable stations and
the channel number you receive them on.
• A list of Guide (VCR Plus+) channel numbers for
the stations you receive found in TV Guide and
selected newspapers.
1 Make a 3-column chart. In the left column, write
the name of all the stations you receive.
2In the middle column, write each station's Guide
(VCR Plus+) number from TV Guide.
3 In the right column, write the channel number
your TV receives the station on.
EXAMPLE ONLY
Broadcast or
Cable
Station Name
HBO
Nickelodeon
CBS
FOX
Assigned Channel no.
Guide your TV
(VCR Plus+) rsceivesthe
channel no. station on
33 15
38 2O
04 04
11
[_lPChecklist beforeyoubegin.
[] The clock is set. [
[] VCRPlus+SystemSetupiscomplete(seepages14-18). Connection
Process of Recording
VCR Plus+ System Programing
10_# / Display SET PROGRAM"
+Press PROGNCR+.*
SET PROGRAM
.• o.Q ,,*
TIMER PROGRAMMING
SELECT:A • KEY
SET :_ KEY
END :PRQG KEY
Display VCR Plus+
screen. 1) Press AV
_._ to select.'='" 2) Press •
-to display.
3VCR Plus+ SYSTEM
ENTER PLUSCODE NUMBER
USING 0-9 KEYS
To make corrections,
)tess ,11 repeatedly to delete the
PlusCode programming number.
Q_ G;3 _
Q_
nter PlusCode
}rogramming number.
1) Press
Numbered
keys.
2) Press PROG/
VCR+ to lock
in the program.
VCR Plus+ SYSTEM
DAILY(MON-FRI)
WEEKLY
SELECT:- •KEY
SET :, KEY
END :PROG KEY
Enter record frequency.
i _ _ 1) Press &_r to
Z-,_d_.."i type.Selectprogram
2) Press • to set.
4
5
6
7
START STOP
3ATEGORY:N/A
........ _-÷-_
SELECT:, • KEY
SET :< ,KEY
ENO :PROG/ACTtON KEY
Select Category.**
;.! 1) Press ._' to
_)'"i change.
2) Press • to set.
Change record speed.
Repeat 1) and 2).
Make notes. -----> Do step 4 on page 12.
•If not wanted, go to step 6.
_1PDT START STOP CH SPD
IZIII_Z_ZII_ZZ i
CANCEL:A_D/OLT KEY 1
SELECT 1-8:A • KEY
ENTER :_ KEY
END :PROG/ACTION KEY
-TIMER-
Multi Function Display
"" Setup
End programming.
O_o_l 1) Press PROGNCR+
+(or ACTION).
To cancel
press ADD/DLT.
,- 2) Press PROG/VCR+
(or ACTION) again to
exit.
Set timer.
! _[ Press POWER off.
(QDj
@@@
7POWER
SELECTI
SET
•:PLAY
• :STOP
:REW
• :FF
1PROG/
3VCR+
6
ACTION
NUMBERED
keys
ADD/
DELETE
"" Category Items
N/A not applicable), SPORTS,
MOVIE, COMEDY, MUS C, DRAMA
UsenormalTimer Recordingstepsif:
• the PlusCode programming number for
aprogram is not listed.
• you anticipate the program, such as
a sporting event, to run over the
scheduled stop time.
See page 13 to:
•cancel atimer recording in progress.
• replace program contents.
•review o_ c_ear program conte_ts o_ce
set.
Important notes for DSS/Cable Box users
•When recording via DSS, the receiver,
must be left on.
• When recording via cable or antenna,
DSS receiver must be off.
• Avoid overlapping program times.
•You can obtain unlisted PtusCode
numbers by calling 1 - 900 -454 - 7587.
Call costs approximately $.95 per minute.
19
The Remote Control may be set up to control some TV or Cable/DSS Receiver functions.
Find your TV, Cable or DSS Receiver BrandCode Number on following page.
Setup for TV
Q and (3D
CD_
I
Setup for Cable or DSS
QD_
Q and (3D _ _
GD_
Setup remote.
Hold down TV and enter code
with NUMBERED keys.
Hold down DSS/CABLE and
enter code with NUMBERED keys.
• For code 100 or greater, press the
100 key first, then remaining digit.
E.g. for 102, press 100, then press 0,
and then press 2.
3ae_r_
OConfirm code entry.
Press POWER to turn selected
unit on or off,
• See table below for list of
controllable functions in each mode.
_1. Please repeat Multi-Brand Control setup after replacing remote
control batteries.
• The remote control will not operate all TVs, Cable Boxes, and
DSS receivers made by manufacturers listed. If you get no
results, your particular brand cannot be controlled.
(_-/ EJECT UGH?
@®
@(zS
cD (z3
(3D (Z) G3
CD GD (£)
PAUS[ _A$KIP SPEED 5_CH
(_ C3 o 0-_
• \
3POWER
- 2Tvor
DSS/CABLE
t') NUMBERED
--_- keys
After remote control is setup, you can select VCR, TV, or DSS/CABLE for the desired function•
Press VCR or "FV or DSS/CABLE on the remote control.
This table shows which buttons are available for each mode.
ailable
VCR TV
VCR All Functions VOL UP/DOWN
TV
CABL_ DSS
VCR/TV, PLAY, STOP
EJECT, SAP/Hi-Fi,
DISPLAY, EF, REW,
PAUSE!SLOW, REC,
SPEED, COUNTER RESET
TAPE POSITION, C/A SKIP
VCR/TV, PLAY, STOP
EJECT, SAP/Hi-Fi,
DISPLAY,FF, REW,
PAUSE/SLOW, REC,
SPEED, COUNTER RESET
TAPE POSITION, C/A SKIP
POWER, INPUT,
NUMBERED keys,
ENTER, CH UP/DOWN,
VOL UP/DOWN
VOLUP/DOWN
CABLE/DSS
POWER, ENTER,
NUMBERED keys
(except lO0key),
CH UP/DOWN
_l In TV or DSS/CABLE mode, it may be necessary to press ENTER alter pressing NUMBERED keys for channel selection
I=r,] _, _-_-t _'*P.1*[ _z._,I,._.l i I Ii B; [I]l]PJi li E",__,__ r_,_t'#,[,"f4
2O

Panasonic ............................... 01,02
Quasar .................................... 01,02
RCA ............................................... 03
GE ................................................. 03
Zenith ............................................ 04
Magnavox ..................................... 05
Sylvania ........................................ 05
Sharp ....................................... 06, 07
Sony .............................................. 08
Toshiba ......................................... 09
Sanyo ............................................ 10
Fisher ............................................ 10
JVC ............................................... 11
Hitachi ........................................... 12
Mitsubishi ................................ 07, 13
Samsung ....................................... 14
Gold Star ........................... 15, 16, 17
[o.]_1]OL'_:1_- .] [o._['Zii_L'_,"_
Archer .................................. 05, 06, 01_ 44, 63, 91, 128
Cabletenna ....................................... 01, 44, 63, 91, 128
Cableview .................... 63, 44, 42, 30, 52, 04, 124, 128
Century ............................................. 51, 44, 59, 75, 126
Citizen .......................... 63, 44, 42, 30, 52, 04, 124, 126
Curtis .................................................. 08, 09, 61, 53, 87
Diamond ........................................... 01, 44, 63, 91, 126
Drake ........................................................................... 67
Eagle .............................. 13, 22, 58, 62, 20, 40, 26, 107
Eastern ................................................................ 28, 130
GC Brand .................... 63, 44, 42, 30, 52, 04, 124, 126
Gemini .................................................................. 04, 124
General Electric .................................................... 57, 01
General Instruments ,... 01, 02, 03, 04, 34, 55, 83, 106,
65, 67, 68, 118, 117, 118, 124, 91
Hamlin ............. 14, 15, 28, 41, 102, 103, 104, 108, 130
Hitachi .......................................................................... 31
Jasco ................................................................... 04, 124
Jerrold ........................... 01,02, 03, 04, 34, 55, 83, 106,
65, 67, 68, 115, 117, 118, 124, 91
Macom ......................................................................... 31
Magnavox ............................................................ 26, 112
Matsushita .............................................. 16, 17, 97, 109
Movietime ............................ 32, 39, 42, 44, 126, 38, 40
NEC ................................................................. 38, 40, 32
NOVAVISION ..................................... 08, 09, 61, 53, 87
NSC ................................................................. 38, 40, 32
Oak ............................................................... 46, 11, 129
Oak Sigma .................................................... 46, 11, 129
Panasonic ............................................... 16, 17, 97, 109
Philips ........................... 07, 13, 20, 23, 24, 50, 128, 129
Pioneer ................................................................... 05, 06
Pulsar ........................... 63, 44, 42, 30, 82, 04, 124, 126
Quest ..................................................................... 05, 06
Radio Shack ..................................... 51,44, 59, 75, 126
RCA ......................................................... 16, 17, 97, 109
Realistic ............................................ 51,44, 59, 75, 126
Recoton ............................................ 51,44, 59, 75, 126
Regal ............... 14, 15, 28, 41, 102, 103, 104, 108, 130
Regency .............................................................. 28, 130
Rembrandt ........................... 01, 32, 39, 42, 44, 83, 126
Salora ........................................................................... 68
Samsung ............................................ 05, 32, 40, 42, 06
Scientific Atlanta ................................. 08, 09, 61, 53, 87
Sheritech ..................................................................... 27
Signal ................................................................... 26, 112
SL Marx ................... 32, 40, 42, 06, 43, 44, 52, 63, 126
Sprucer ................................................... 16, 17, 97, 109
Standard Components ..................... 32, 39, 42, 44, 126
Stargate ....32, 40, 83, 44, 42, 30, 52, 04, 08, 124, 126
Sylvania ....................................................................... 19
Teknika ........................................................................ 74
Telecaption .......................................................... 77, 127
Teleview ................................................... 32, 40, 42, 06
Texscan ................................................................ 18, 19
Tocom ........................................... 33, 34, 01, 42, 66, 91
Toshiba ........................................................................ 36
Uniden Satelite ............................................................ 65
Unika ................................................. 01, 44, 63, 91, 126
Universal .................................... 42, 43, 44, 52, 63, 126
Videoway ................................................ 07, 23, 50, 129
Vid Tech ...................................................................... 64
Vidtek ........................................................................... 64
Viewstar ......................... 13, 22, 58, 62, 20, 40, 26, 107
Zenith ...................................................... 07, 23, 50, 129
I_'_ i_'_1 i_L'_"_'_"_.'_
•Due to changes in infra-red commands used by manufacturers, some brands have several codes.
If your unit does not respond to the first code, please try the next one,
•Some TV, Cable Box and DSS Box brands require you to turn on the power manually.
•Not all functions listed may be controlled by this remote control.
21
COMMERCIAL ®.--.M u..-
COMMERCIAL,,_m ®detects and marks the beginning and end points
of commercials on your tape for recordings over 15 minutes in length.
When COMMERC!AL,,AI_€£ _marked tape is played back, the VCR
automatically advances through the commercial segments at high speed.
You can also set this feature to Manual so as to have more control over
the advance process. The effectiveness of this system can vary due to
differences in the way television stations broadcast, See page 24 for
...answersto the most commonly asked questions about this feature. J
COMMERCIAL ",AII IrJ IVCE ® Marking
When C/A RECORD: ON, VCR automatically rewinds the tape after a
recording has been made and marks the beginning and end of any
detected commercial blocks. After marking is done, the tape is returned
to the end of recording. Commercials are net erased from the tape.
1Display MENU.
Press ACTION.*
2MENU
SET CLOCK
SET UP CHANNEL
IDIOMA/LANGUE:ENGLISP
VCR'S OUTPUT CH:3
SELECT:A •KEY
SET :_ KEY
END :ACTION KEY
Display SET UP FEATURE.
J l) Press AV to select.
2) Press •to display.
3SET UP FEATURE
TIMER PROGRAMMING
SELECT:A • KEY
SET :_ KEY
END :ACTION KEY
Display SET UP
COMMERCIAL ADV.
1) Press AY to select.
...._.p_)_,, 2) Press •to display.
[_Check list before you begin.
[] All connections are made,
[] One time Setup completed,
[] VCR is plugged in.
[] TV is turned on and set to CH3, 4 or Video
on TV.
rEJECT
Q®®
@(E)®
_t
Pl_aE ¢t_sKp SPEED _¢M
GO.O=
;Fi_; KIP
_ _ SELECT/
SET
• :PLAY
• ;STOP
• :FF
'- 1ACTION
5
NUMBERED
keys
4
5
22
SET UP COMMERCIAL ADV
: ON
C/A PLAYBACK : AUTO
SELECT:A • KEY
SET :_ KEY
END :ACTION KEY
Set ON or OFF.
1) Press AV to select.
2)
._) .... Press • to set. • When using the timer to record two
adjacent shows on the same channel,
better accuracy can be obtained by
programming each shows separately.
ON Timer, VCR Plus+ System, and One Touch recordings are marked automatically.
THE VCR IS WAITING TO
MARK COMMERCIALS IN THE
PROGRAM YOU RECORDED.
MARKING
NOW PUSH 1 KEY
LATER PUSH 2 KEY
CANCEL PUSH ACTION KEY
When STOP is pressed during normal recording, Select One of a) or b) or c).
a) Press 1 key to mark the recording now.
"NOW MARKING COMMERCIALS" appears.
b) Press 2 key to mark the recording later (after the power has been turned off).
• If the tape is rewound and another recording started before the power is
turned off, commercials may not be marked correctly.
c) Press ACTION to cancel the marking of this recording.
OFF The VCR will not mark commercials.
When you are editing or dubbing a tape, or when you do not wish to use this feature, off should be selecte,
I
Return to normal screen.
Press ACTION three times.
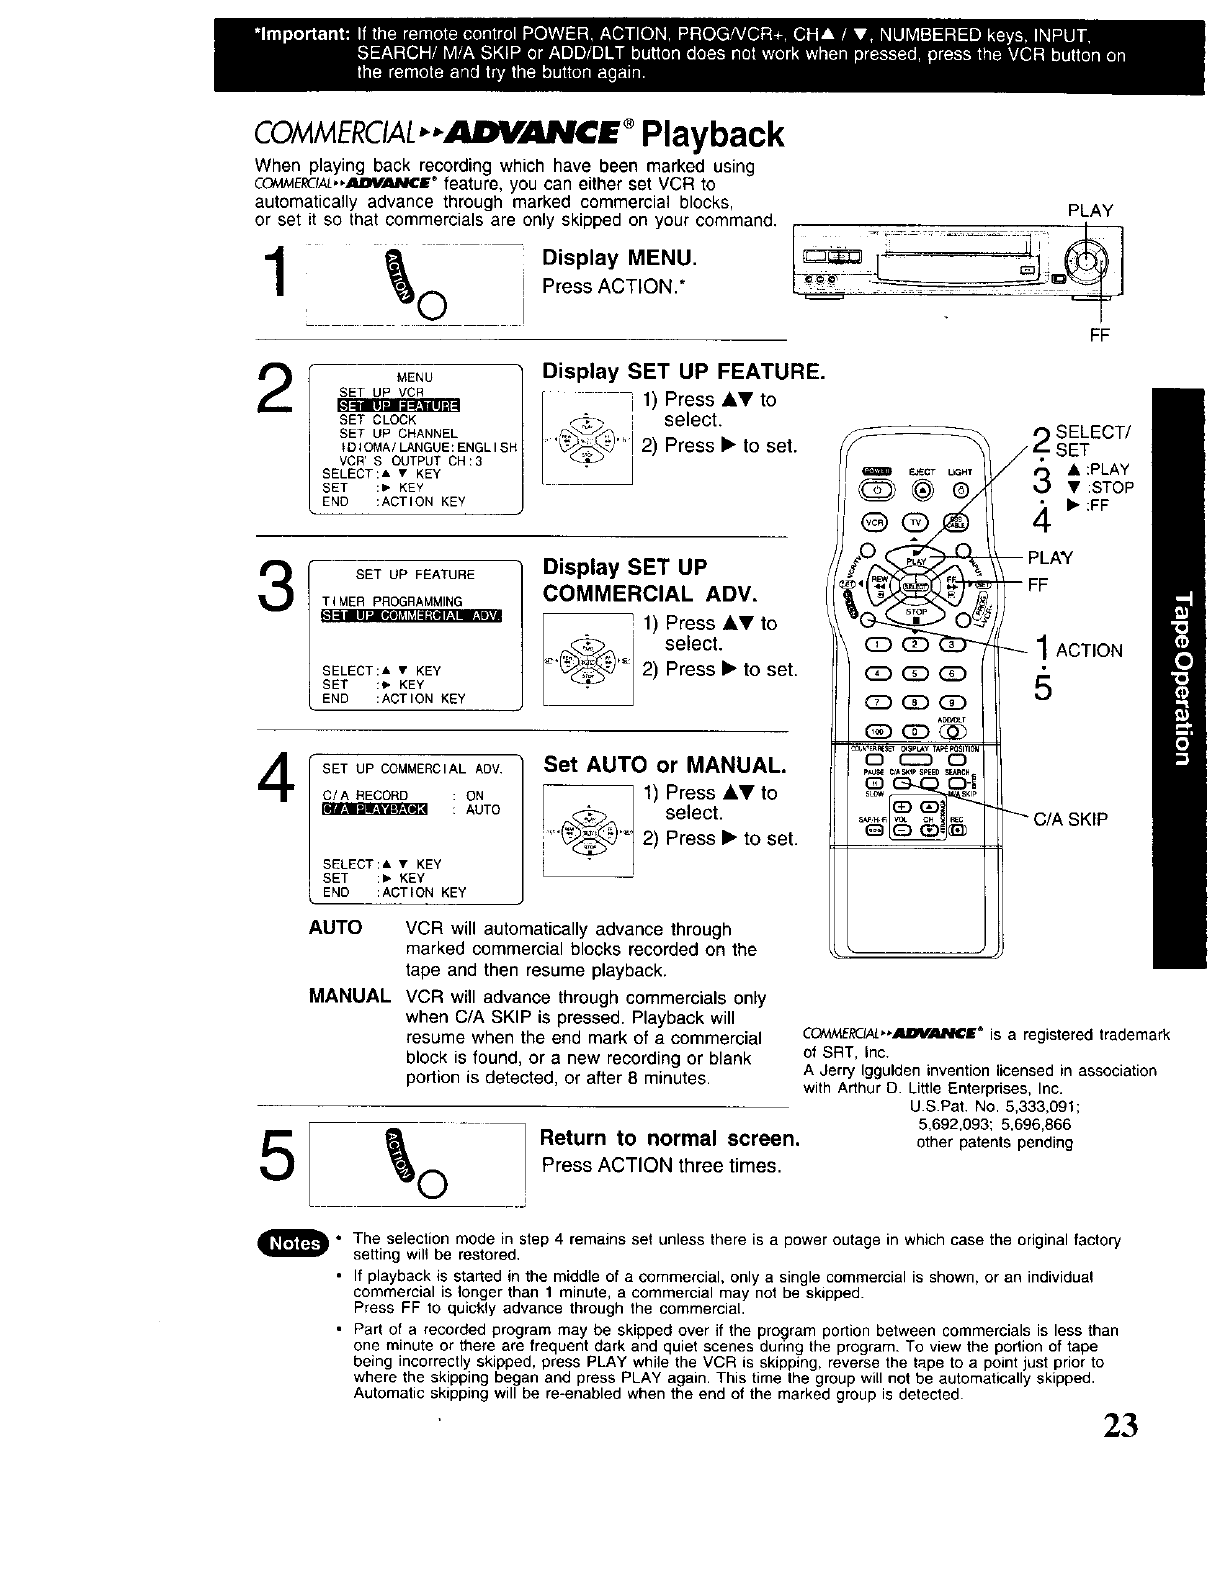
COMMERCIAL ®Playback
When playing back recording which have been marked using
COIWvlEL_IAL*._J_V._P_DE+ feature, you can either set VCR to
automatically advance through marked commercial blocks,
or set it so that commercials are only skipped on your command.
Display MENU.
Press ACTION.*
PLAY
FF
2
3_qll[d [_o['l]ll_lill_[_J'l_!llllo]
4
5
MENU
SET UP VCR
L_r-_-_lmr,za_tlR_
SET CLOCK
SET UP CHANNEL
ID;OMA/LANGUE:ENGLISF
VCR'S OUTPUTCH:3
SELECT:A • KEY
SET :, KEY
END :ACTION KEY
Display SET UP FEATURE.
i1) Press AV to
,,_>-_ _ select.
'_,_'_' 2)Press'to set,
SET UP FEATURE
TIMER PROGRAMMING
SELECT:A • KEY
SET :, KEY
END :ACTION KEY
Display SET UP
COMMERCIAL ADV.
! 1) Press AVto
_, select.
_)"' 2) Press l_to set.
SET UP COMMERCIAL ADV
C/A RECORD : ON
: AUTO
SELECT:& • KEY
SET :, KEY
END :ACTION KEY
Set AUTO or MANUAL.
1) Press AVto
(_+@ select.
...... 2) Press l_to set.
AUTO VCR will automatically advance through
marked commercial blocks recorded on the
tape and then resume playback.
MANUAL VCR will advance through commercials only
when C/A SKIP is pressed. Playback will
resume when the end mark of a commercial
block is found, or a new recording or blank
portion is detected, or after 8 minutes.
QE_CT L_HT
@ @g,,
g
C) _C)
N .........._5"-1
_sL_w smp
t_ SELECT/
/_- SET
/_-j • :PLAY
•:STOP
• :FF
-- PLAY
--FF
1 ACTION
"-'C/ASKIP
CO/W_ERC.IAL"4_B_4_M_E® is a registered trademark
of SRT, Inc.
A Jerry Iggulden invention licensed in association
with Arthur O. Little Enterprises, Inc.
US.Pat. No. 5,333,091;
5,692,093; 5,696,866
Return to normal screen, otherpatentspending
Press ACTION three times.
•The selection mode in step 4 remains set unless there is a power outage in which case the original factory
setting will be restored.
•If playback is started in the middle of a commercial, only a single commercial is shown, or an individual
commercial is longer than 1 minute, a commercial may not be skipped.
Press FF to quickly advance through the commercial.
• Part of a recorded program may be skipped over if the program portion between commercials is less than
one minute or there are frequent dark and quiet scenes during the program. To view the portion of tape
being incorrectly skipped, press PLAY while the VCR is skipping, reverse the tape to a point just prior to
where the skipping began and press PLAY again. This time the group will not be automatically skipped.
Automatic skipping will be re-enabled when the end of the marked group is detected.
23
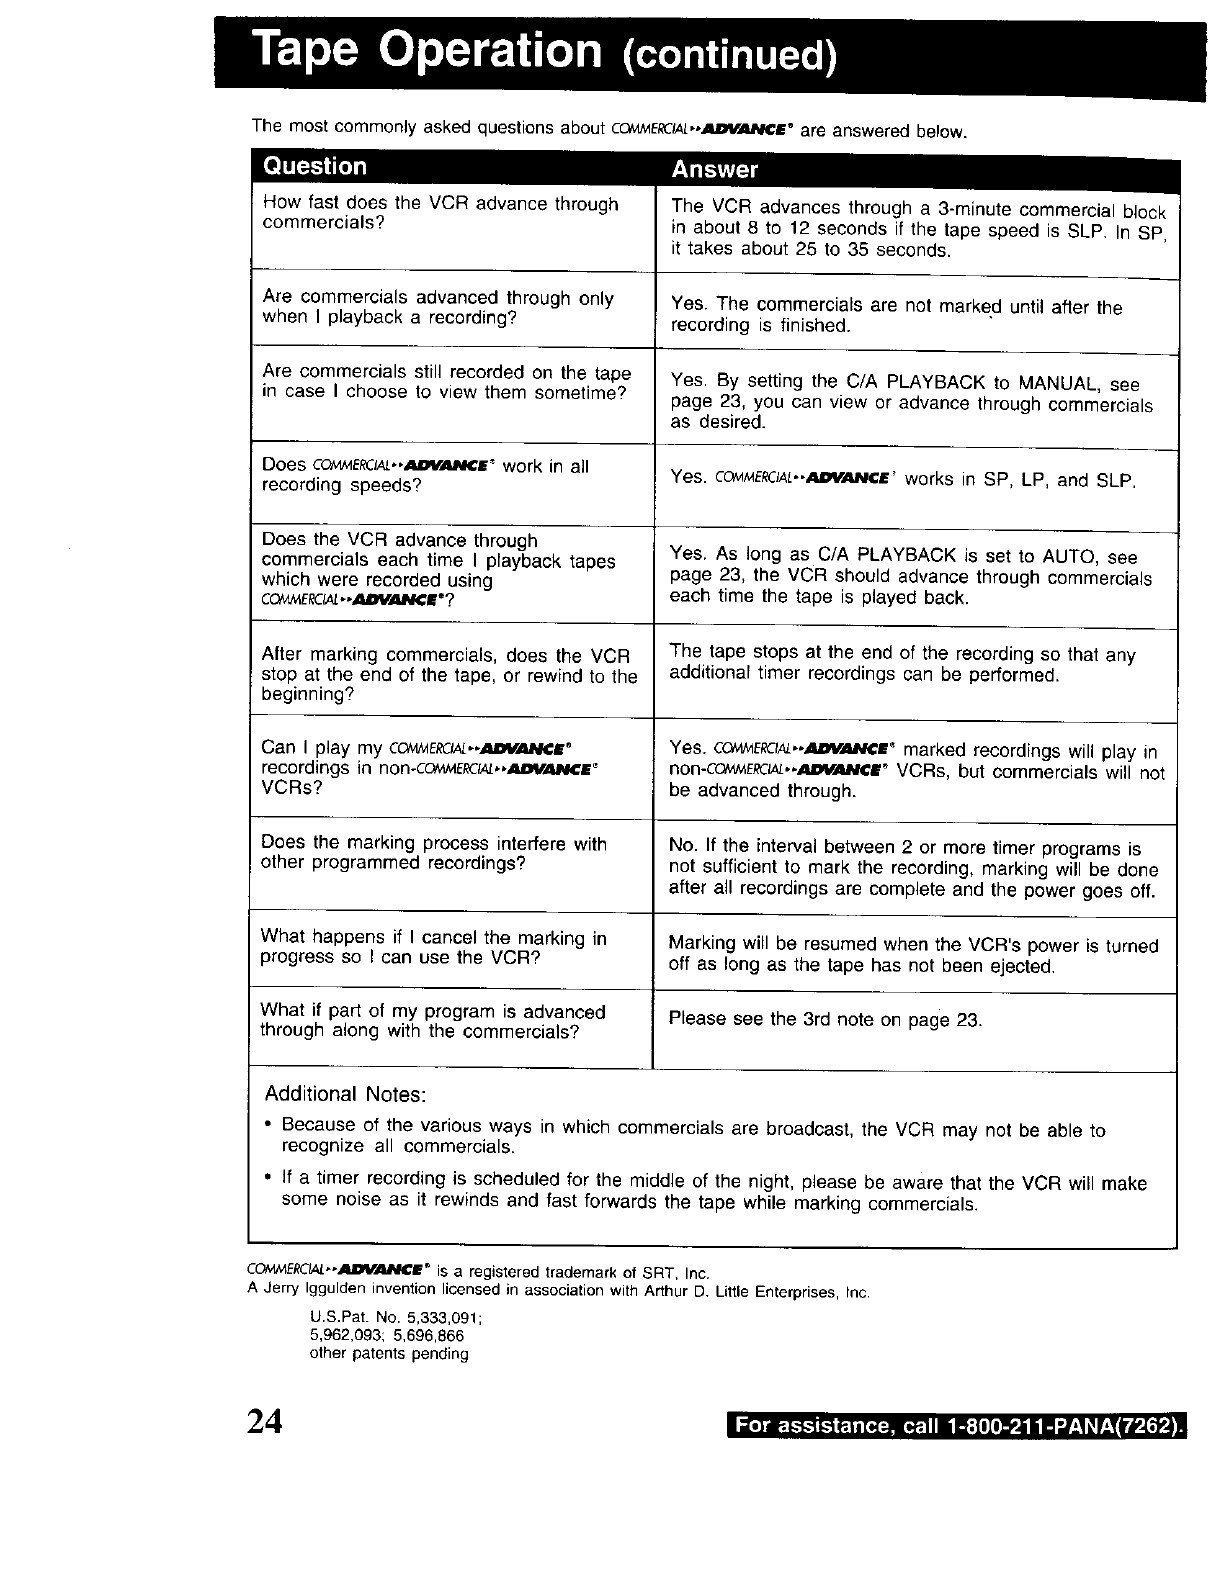
The most commonly asked questions about CC_AME_C_,-_ANCI ®are answered below.
How fast does the VCR advance through
commercials?
Are commercials advanced through only
when I playback a recording?
Are commercials still recorded on the tape
in case I choose to view them sometime?
Does COI¢_E_IA_...IIDYAJ_I¢|"work in all
recording speeds?
Does the VCR advance through
commercials each time I playback tapes
which were recorded using
COtv_ERCIAL..AI_FJ_ICle?
After marking commercials, does the VCR
stop at the end of the tape, or rewind to the
beginning?
Can I play my COt_tERCI_..AIDV._I¢Ir
recordings in non-Co,W_E_,,,_m#_E _
VCRs?
The VCR advances through a 3-minute commercial block
in about 8 to 12 seconds if the tape speed is SLP. In SP,
it takes about 25 to 35 seconds.
Yes. The commercials are not marked until after the
recording is finished.
Yes. By setting the C/A PLAYBACK to MANUAL, see
page 23, you can view or advance through commercials
as desired.
Yes. COtvlI_E,_CIAL..ADVI_hlC£_ works in SP, LP, and SLP.
Yes. As long as C/A PLAYBACK is set to AUTO, see
page 23, the VCR should advance through commercials
each time the tape is played back.
The tape stops at the end of the recording so that any
additional timer recordings can be performed.
Yes. CC_W_ERC_,*_E _ marked recordings will play in
non-CO/_E_.-._V.ANCE" VCRs, but commercials will not
be advanced through.
Does the marking process interfere with No. If the interval between 2 or more timer programs is
other programmed recordings? not sufficient to mark the recording, marking will be done
after all recordings are complete and the power goes off.
What happens if I cancel the marking in Marking will be resumed when the VCR's power is turned
progress so I can use the VCR? off as long as the tape has not been ejected.
What if part of my program is advanced Please see the 3rd note on page 23.
through along with the commercials?
Additional Notes:
• Because of the various ways in which commercials are broadcast, the VCR may not be able to
recognize all commercials.
• If a timer recording is scheduled for the middle of the night, please be aware that the VCR will make
some noise as it rewinds and fast forwards the tape while marking commercials.
COI,,_E,_//_--ADYANCi" is a registered trademark of SRT. Inc.
A Jerry Iggulden invention licensed in association with Arthur D. Little Enterprises, Inc.
L).S.Pat. No. 5,333,091;
5,962,093; 5,696,866
other patents pending
24 li[,]au_._._ll-'_e.lnT¢_. [_-lnl ilf;[l[lll'.lill'J'-l_ f:Tl*_i'_l,_-_
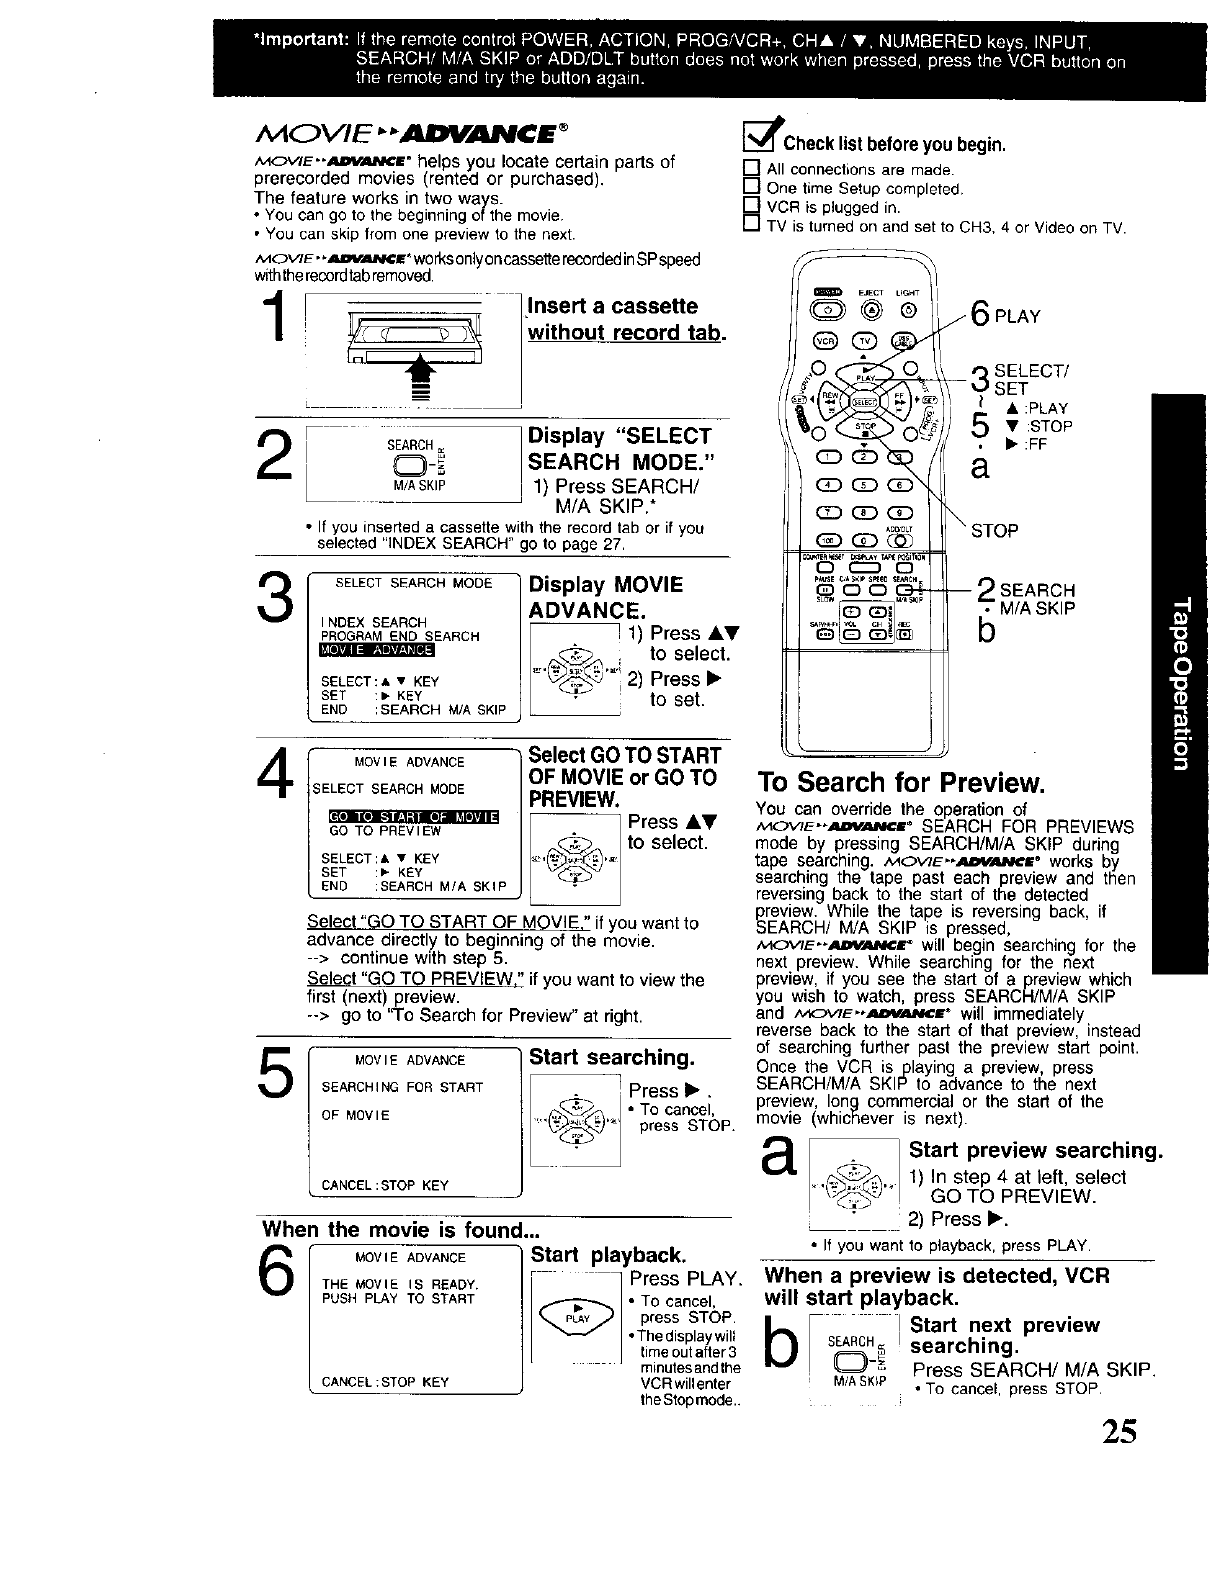
M O VIE ""AI;VAI_¢ E_
MOVlE"AmrANCr helps you locate certain parts of
prerecorded movies (rented or purchased).
The feature works in two ways.
• You can go to the beginning of the movie
• You can skip from one preview to the next.
MOVIE.*AOV_aV,¢=r_worksonlyoncassetterecordedinSPspeed
withtherecordtabremoved.
I _ llnsert a cassette
"without record tab.
2s_H__ 1Display "SELECT
SEARCH MODE."
M/ASKIP I 1) Press SEARCH/
M/A SKIP.*
• If you inserted a cassette with the record tab or if you
selected "INDEX SEARCH" go to page 27.
3SELECT SEARCH MODE
INDEX SEARCH
PROGRAM END SEARCH
SELECT:A • KEY
SET :, KEY
END :SEARCH M/A SKIP
Display MOVIE
ADVANCE.
i1) Press &V
ito select.
"_'._" '_'I2) Press I_
_F_ _ to set.
4
5
MOVI E ADVANCE
SELECT SEARCH MODE
GO TO PREVIEW
SELECT:& • KEY
SET :, KEY
END :SEARCH M/A SKIP
Select GO TO START
OF MOVIE or GO TO
PREVIEW.
Press JkV
_ /to select.
Select "GO TO START OF MOVIE." if you want to
advance directly to beginning of the movie.
--> continue with step 5.
Select "GO TO PREVIEW," if you want to view the
first (next) preview.
--> go to "To Search for Preview" at right.
MOVIE ADVANCE
SEARCHING FOR START
OF MOVIE
CANCEL:STOP KEY
Start searching.
. ! Press I_.
_-_ To cancel,
_,_._LL,_-"" press STOP.
When the movie is found...
MOV,EADVANCE Start playback.
MOWEIS READY. - _ Press PLAY.THE
PUSHPLAy TOSTART ,._'--Z-"_. I "To cancel,
press STOP.
•Thedisplaywilt
J timeoutafter3
minutesandthe
CANCEL :STOP KEY VCR willenter
rheS_epmode..
_lPCheck list before you begin.
[_ ALLconnectionsare made.
[] One time Setup completed.
[] VCR is plugged in.
[] TV is turned on and set to CH3. 4 or Video on TV.
To Search for Preview.
You can override the operation of
,,_ow_--A_y_=" SEARCH FOR PREVIEWS
mode by pressing SEARCH/M/A SKIP during
tape searching. MOWE,,_,_'at" works by
searching the tape past each preview and then
reversing back to the start of the detected
preview. While the tape is reversing back, if
SEARCH/ M/A SKIP is pressed,
,v_OWE-.,_m_r will begin searching for the
next preview. While searching for the next
preview, if you see the start of a preview which
you wish to watch press SEARCFI/M/A SKIP
and ,'_i(_V/E"',_`_'E® will immediately
reverse back to the start of that preview, instead
of searching further past the preview start point.
Once the VCR is playing a preview, press
SEARCH/M/A SKIP to advance to the next
preview, long commercial or the start of the
movie (whichever is next).
aStart preview searching.
_._) 1) In step 4 at left, select
.... GO TO PREVIEW.
2) Press _'.
• If you want to playback, press PLAY.
When a preview is detected, VCR
will start playback.
bison_ i Start next preview
M/A SKiP
searching.
Press SEARCH/M/A SKIP.
• To cancel, press STOP.
25
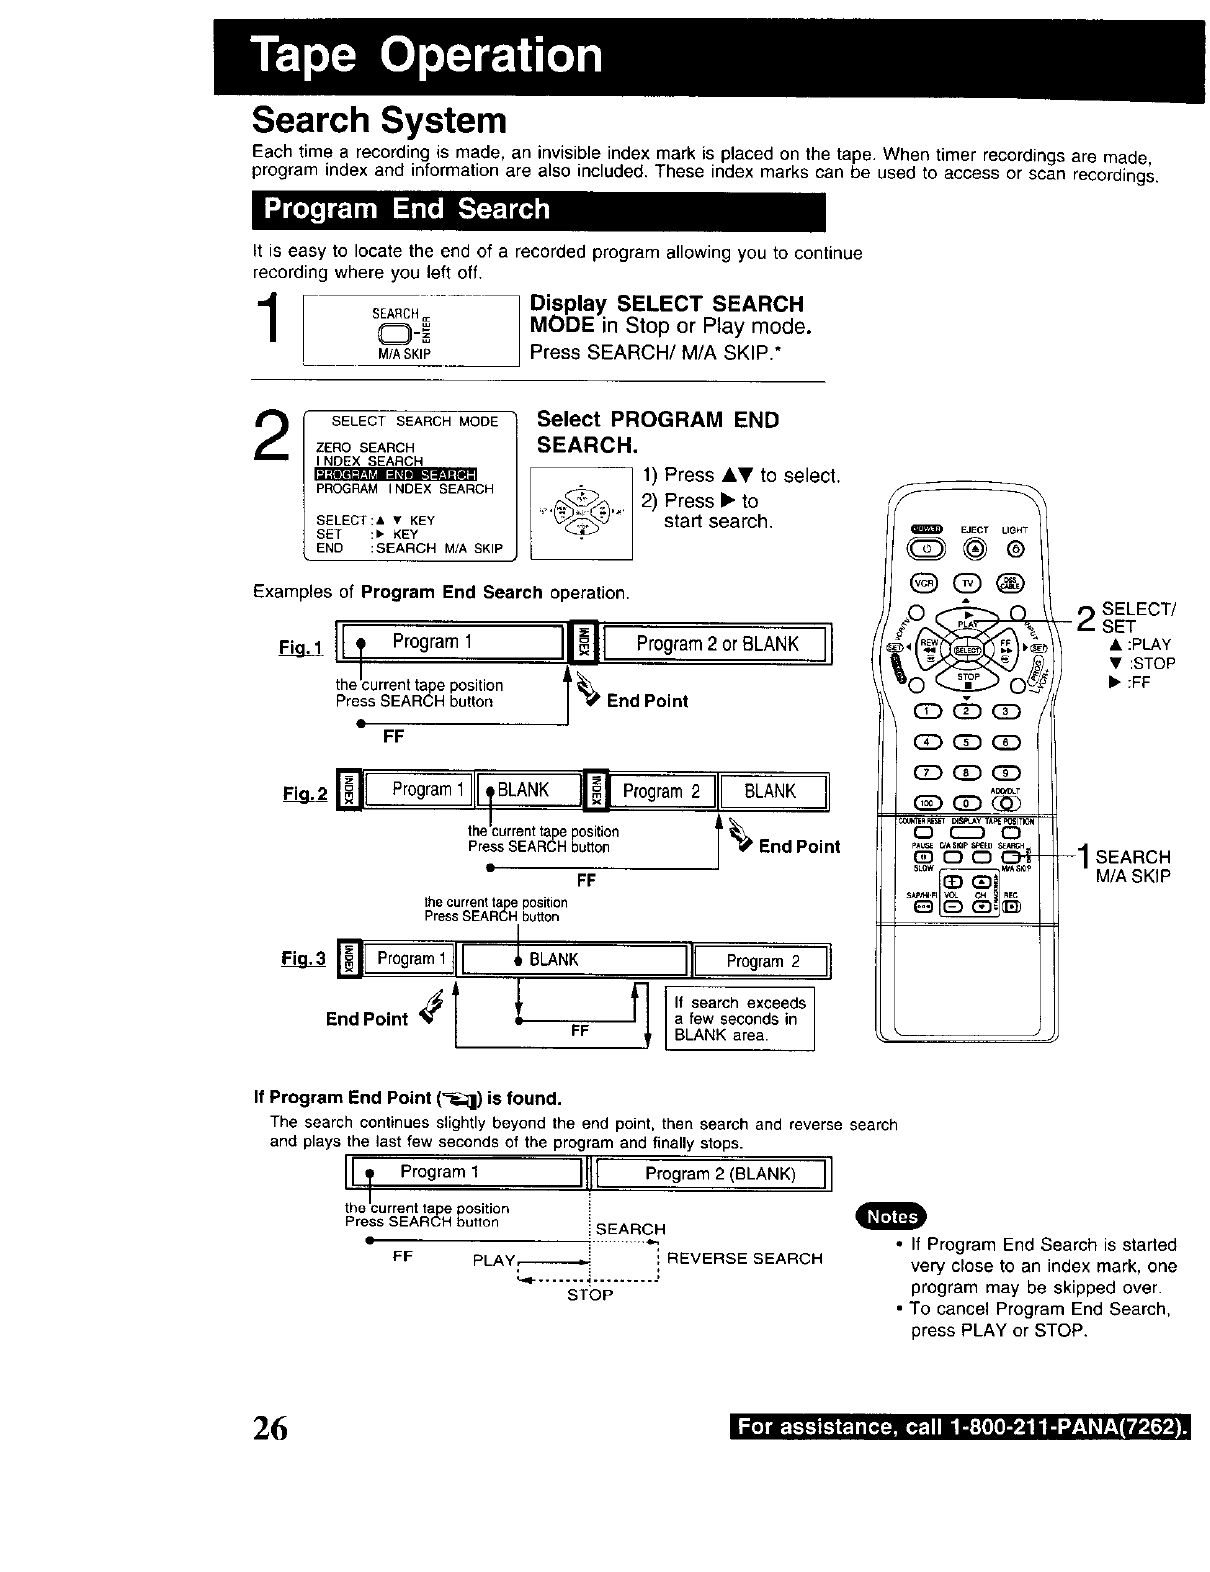
Search System
Each time a recording is made, an invisible index mark is placed on the tape. When timer recordings are made,
program index and information are also included. These index marks can be used to access or scan recordings.
It is easy to locate the end of a recorded program allowing you to continue
recording where you left off,
SEARCH= Display SELECT SEARCH
(_)_=_ MODE in Stop or Play mode.
M/ASKIP Press SEARCH/M/A SKIP.*
2SELECT SEARCH MODE
ZERO SEARCH
INDEX SEARCH
•.i.-Toill:ra_l :[_l] _-,[-.Lr_TI]
PROGRAM INDEX SEARCH
SELECT:& • KEY
SET :, KEY
END :SEARCH M/A SKIP
Select PROGRAM END
SEARCH,
1) Press &V to select.
_'_.'C-._>4_2) Press • to
start search.
Examples of Program End Search operation.
1ITPro0ramlI1_11Prc_ram2orB,ANK
the current tape position
Press SEARCH button End Point
FF
Pro0ramlIll'BLANKINP,o0ram2III_LANK
theicurrenttapeposition
PressSEARCHbutton
FF
the current ta e position
Press SEAR_°I_ button
Programllll _"* III Program2
qfsearch exceeds
a few seconds in
BLANK area.
iEJECT LIGHT
G>@®
@0@
cD d_ (D
_CD_
C2D_
A_T
*_XN_RRE_] B4_e,J_y 1_331TK_
0 E_) 0
- 2SELECT/
SET
• :PLAY
•:STOP
• :FF
-1SEARCH
M/A SKIP
If Program End Point ('_;il) is found.
The search continues slightly beyond the end point, then search and reverse search
and plays the last few seconds of the program and finally stops.
iiTProgram1 III1=Program 2 (BLANK) II
the current tape position i
Press SEARCH button i SEARCH
FF PLAY,_------_ ', REVERSE SEARCH
STOP
•If Program End Search is started
very close to an index mark, one
program may be skipped over.
• To cancel Program End Search,
press PLAY or STOP.
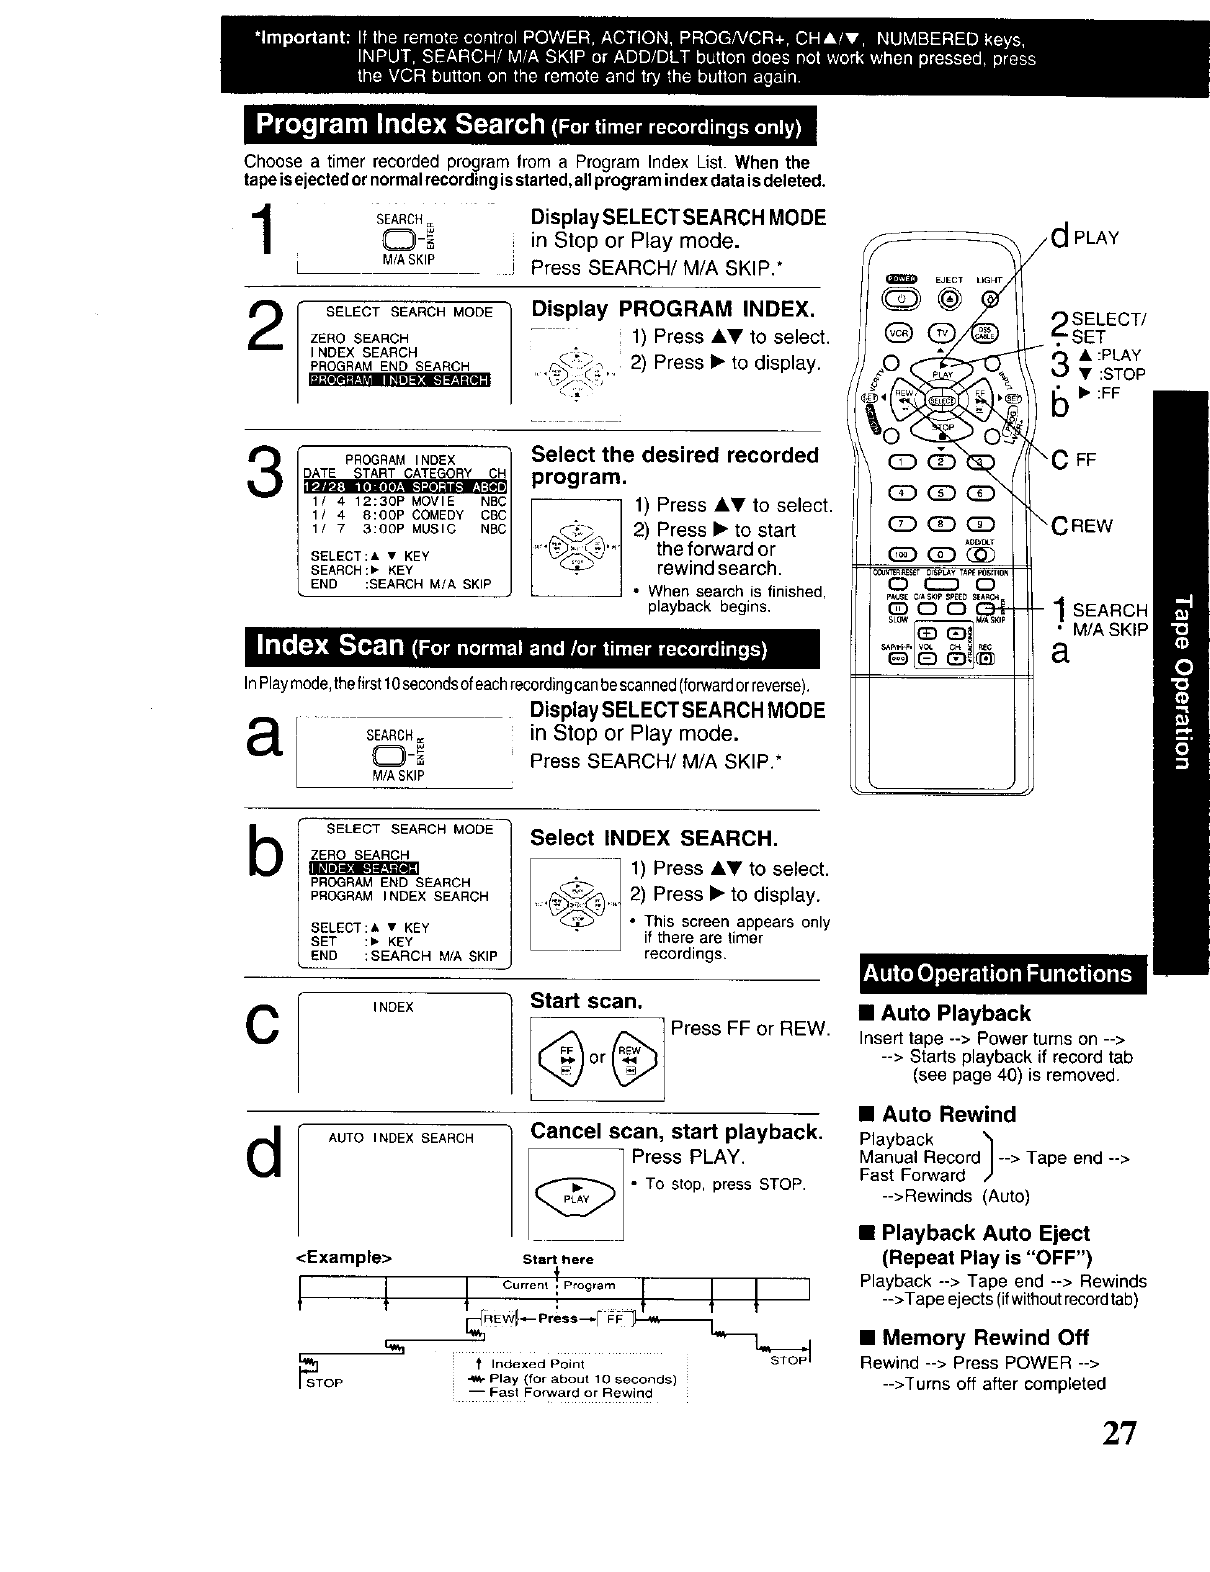
Chooseatimerrecordedprogramfroma ProgramIndexList.When the
tapeis ejectedor normalrecording isstarted,all program index data is deleted.
1SEARCH= Display SELECT SEARCH MODE
(Z)-_, = in Stop or Play mode.
M/ASKIP J Press SEARCH/M/A SKIP.*
SELECT SEARCH MODE 1
ZERO SEARCH
SEAR?
INDEX SEARCH
Display PROGRAM INDEX.
-'1) Press Jl,V to select.
2) Press • to display.
T
3PROGRAM INDEX
DAT %ffIO . 3ORV=C
1/ 4 12:30P MOVIE NBC
1/ 4 8:00P COMEDY CBC
1/ 7 3:eoP MUSIC NBC
SELECT:A • KEY
SEARCH:, KEY
END :SEARCH M/A SKIP
Select the desired recorded
program.
1) Press &_' to select.
,,_,._.,r,..h;_Z 2) Press • to start
the forward or
_Y_'_ rewind search.
• When search is finished,
playback begins,
InPlaymode,thefirst10secondsofeachrecordingcan bescanned(forwardorreverse),
a SEARCH=:
M/A SKIP
Display SELECT SEARCH MODE
in Stop or Play mode.
Press SEARCH/M/A SKIP.*
PLAY
SELECT/
SET
3& :PLAy
•:STOP
6b. :FF
"C FF
- ! SEARCH
M/A SKIP
a
b
C
d
SELECT SEARCH MODE
ZERO SEARCH
PROGRAM END SEARCH
PROGRAM INDEX SEARCH
SELECT:A • KEY
SET :, KEY
END :SEARCH M/A SKIP
Select INDEX SEARCH.
1) Press AY to select.
2) Press • to display.
• This screen appears only
if there are timer
recordings.
INDEX Start scan.
or_ Press FF or REW.
AUTOINDEXSEARCH Cancel scan, start playback.
_ Press PLAY.
•TD stop, press STOP.
<Example> Start here
1 1 Ourr°n' O'°O'°m1 1 1 I
_ST t Indexed Point
OP _ Play (for about 10 seconds)
-- East Forward or Rewind
•Auto Playback
Insert tape --> Power turns on -->
--> Starts playback if record tab
(see page 40) is removed.
•Auto Rewind
Playback _1
Manual Record| --> Tape end -->
Fast Forward /'
-->Rewinds (Auto)
•Playback Auto Eject
(Repeat Play is "OFF")
Playback--> Tape end --> Rewinds
-->Tapeejects (ifwithoutrecordtab)
•Memory Rewind Off
Rewind--> Press POWER -->
-->Turnsoft aftercompleted
2?
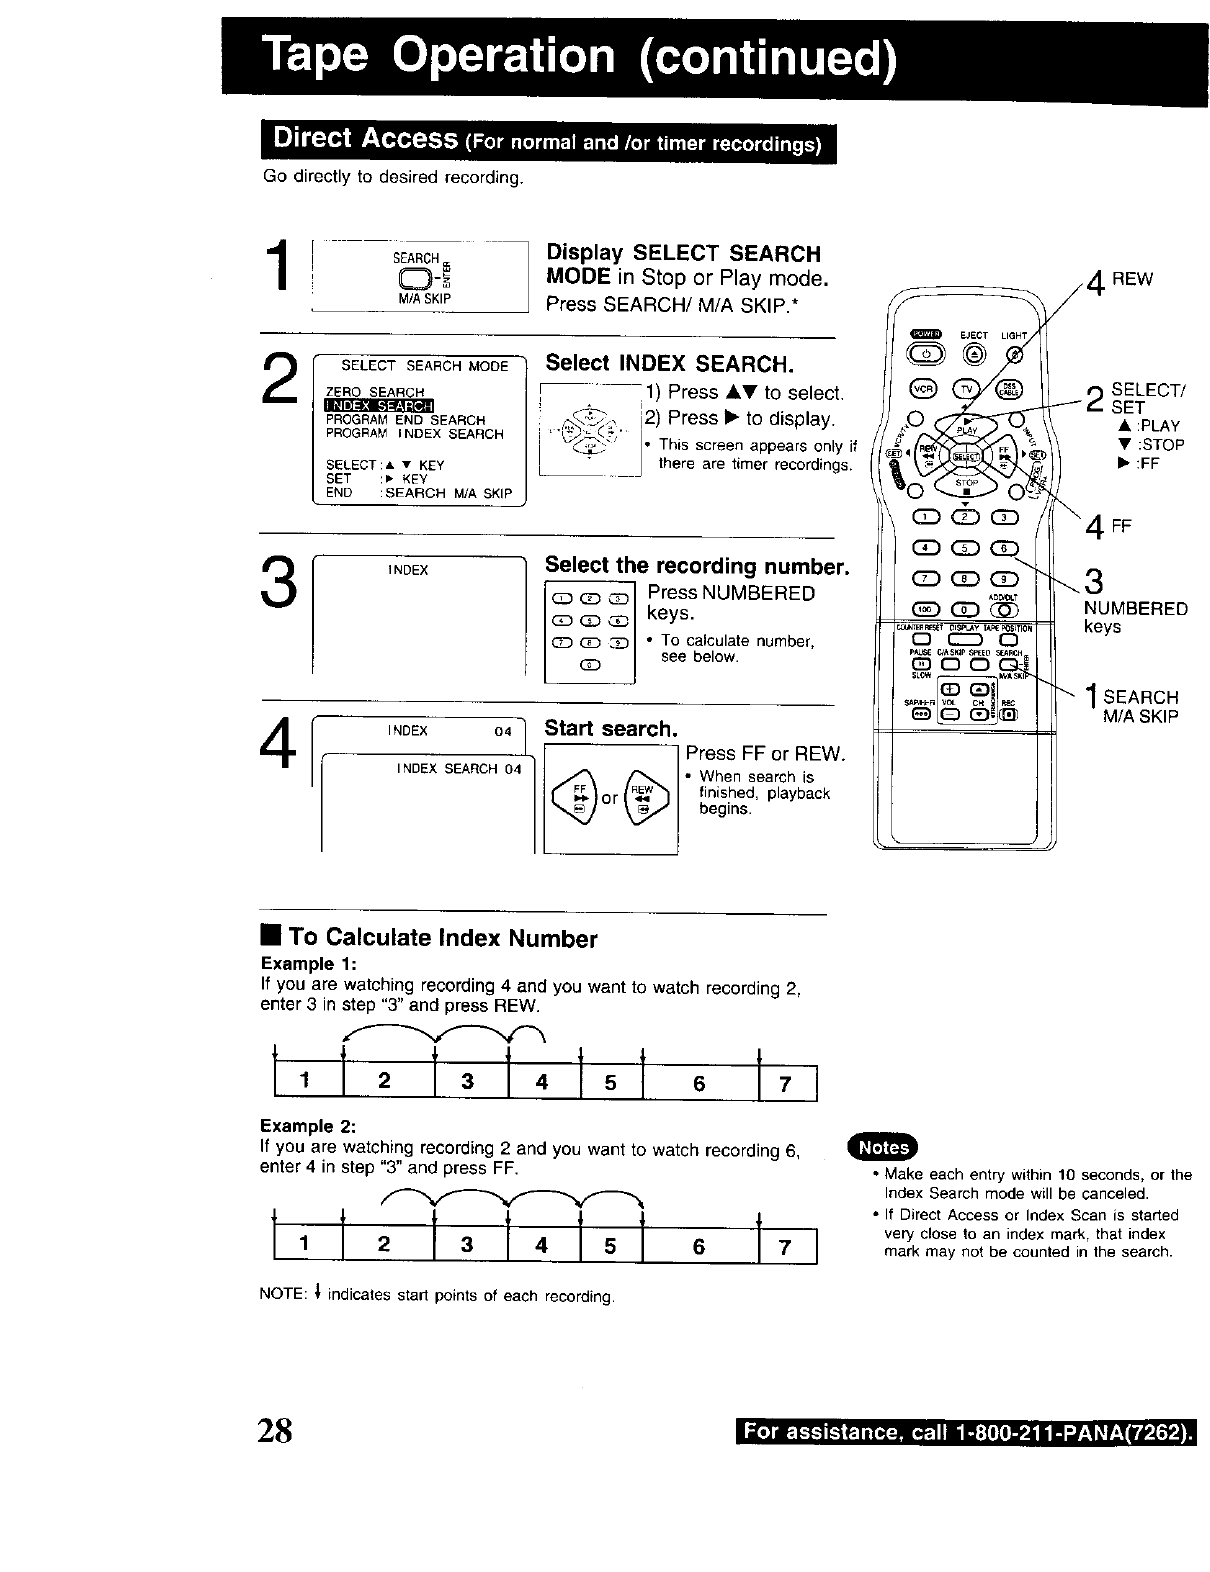
Go directly to desired recording.
1! - ,,A,O,Wo__.
M/ASKIP
SELECT SEARCH MODE
3
4
Display SELECT SEARCH
MODE in Stop or Play mode.
Press SEARCH/M/A SKIP.*
PROGRAMEND SEARCH
PROGRAMINDEX SEARCH
SELECT:& • KEY
SET :, KEY
END :SEARCH M/A SKIP
Select INDEX SEARCH.
I:1) Press AT to select.
!.
:_ [2} Press • to display.
i _ I• This screen appears only if
I;_ there are timer recordings.
INDEX Select the recording number.
a3 _ _ Press NUMBERED
!•TO calculate number,
see below.
INDEX 04"} Start search.
l/
INDEX SEARCH 04 • When search is
fir_ished, playback
begins.
E_.CT
G>®
(2_ G_ GD
ADrY0LT
_:) GD d_b
oCZ) O
4REW
_T
!_ 2 SELEC_
SET
• :PLAY
• :STOP
• :FF
\4 FF
".3
NUMBERED
keys
"_ 1 SEARCH
M/A SKIP
•To Calculate Index Number
Example 1:
If you are watching recording 4 and you want to watch recording 2,
enter 3 in step "3" and press REW.
1,1, 1 1,1ol °t,I
Example 2:
If you are watching recording 2 and you want to watch recording 6,
enter 4 in step "3" and press FF.
NOTE: _ indicates start points of each recording.
• Make each entry within 10 seconds, or the
Index Search mode will be canceled.
•)f Direct Access or Index Scan is started
very close to an index mark, that index
mark may not be counted in the search.
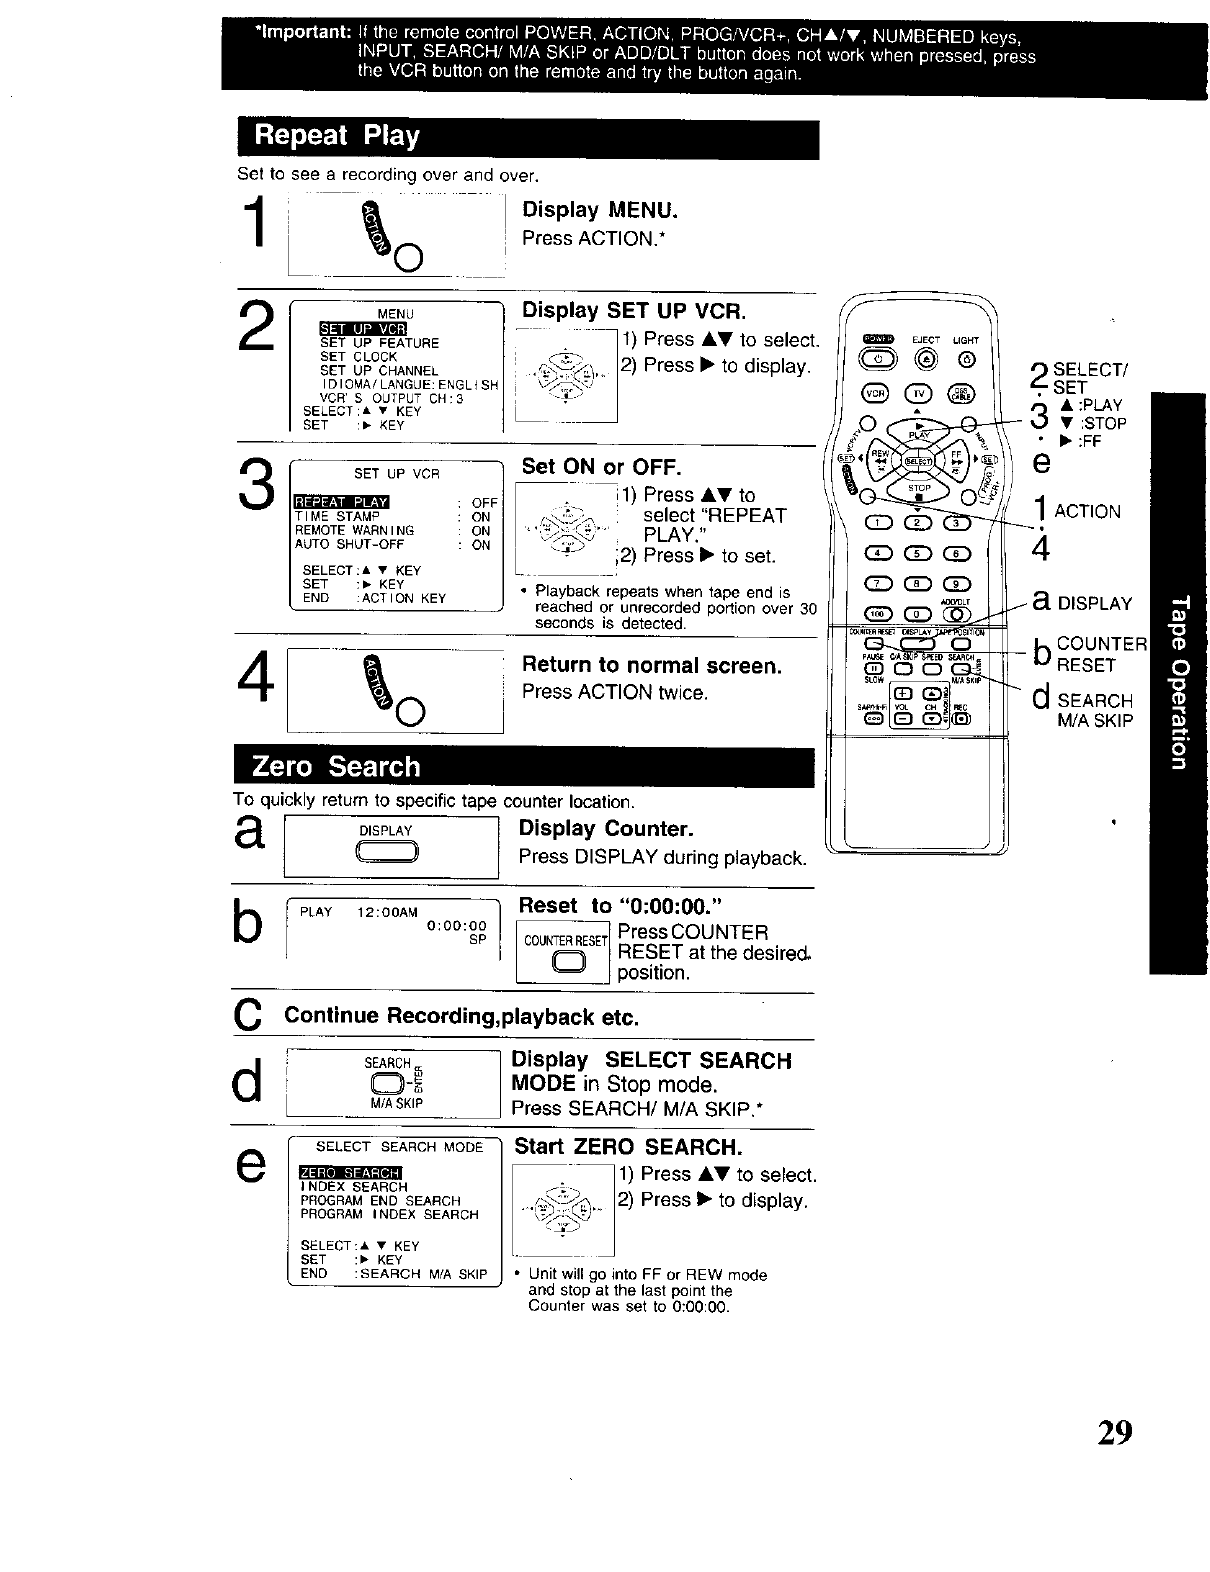
Set to see a recording over and over.
_0 Display MENU.
Press ACTION.*
2MENU "] Display SET UP VCR.
-_ t) Press &V to select,
n_-_ /2) Press •to display.
Ill ".,ivZe]l
SET UP FEATURE
SET CLOCK
SET UP CHANNEL
IDIOMA/LANGUE:ENGL{Sh
VCR' S OUTPUT CH:3
SELECT:A • KEY
SET :, KEY
3Illll'.] II.,_111IiII.'_
4
SET UP VCR
TIME STAMP
REMOTE WARNING ON
AUTO SHUT-OFF ON
SELECT:& • KEY
SET :" KEY
END :ACTION KEY
OFF
ON
Set ON or OFF.
11)Press&Vto
_-" select "REPEAT
PLAY."
i2) Press•to set.
Playback repeats when tape end is
reached or unrecorded portion over 30
seconds is detected.
_1 Return to normal screen.Press ACTION twice.
C) '
To quickly return to specific tape counter location.
aDISPLAY Display Counter.
Press DISPLAY during playback.
b f PLAY 12:0SAM O:O0:O0
SP
Reset to "0:00:00."
C0UNTERRESE1 Press COUNTER
RESET at the desired,
(_ position.
C Continue Recording,playback etc.
dSEARCH_ Display SELECT SEARCH
(Z)-== MODE in Stop mode.
M/ASKIP Press SEARCH/M/A SKIP.*
eSELECT SEARCH MODE
N=lIle]l."] =EIITe_
INDEX SEARCH
PROGRAM END SEARCH
PROGRAM INDEX SEARCH
SELECT:, • KEY
SET :_ KEY
END :SEARCH M/A SKIP
Start ZERO SEARCH.
1) Press AV to select.
2) Press •to display.
• Unit will go into FF or REW mode
and stop at the last point the
Counter was set to 0:00:00.
m EJECT LIGHT
O@®
_)0o_
SELECT/
SET
_ • :pLAy
• :STOP
• :FF
e
1ACTION
4
a DISPLAY
b COUNTER
RESET
"d SEARCH
M/A SKIP
29
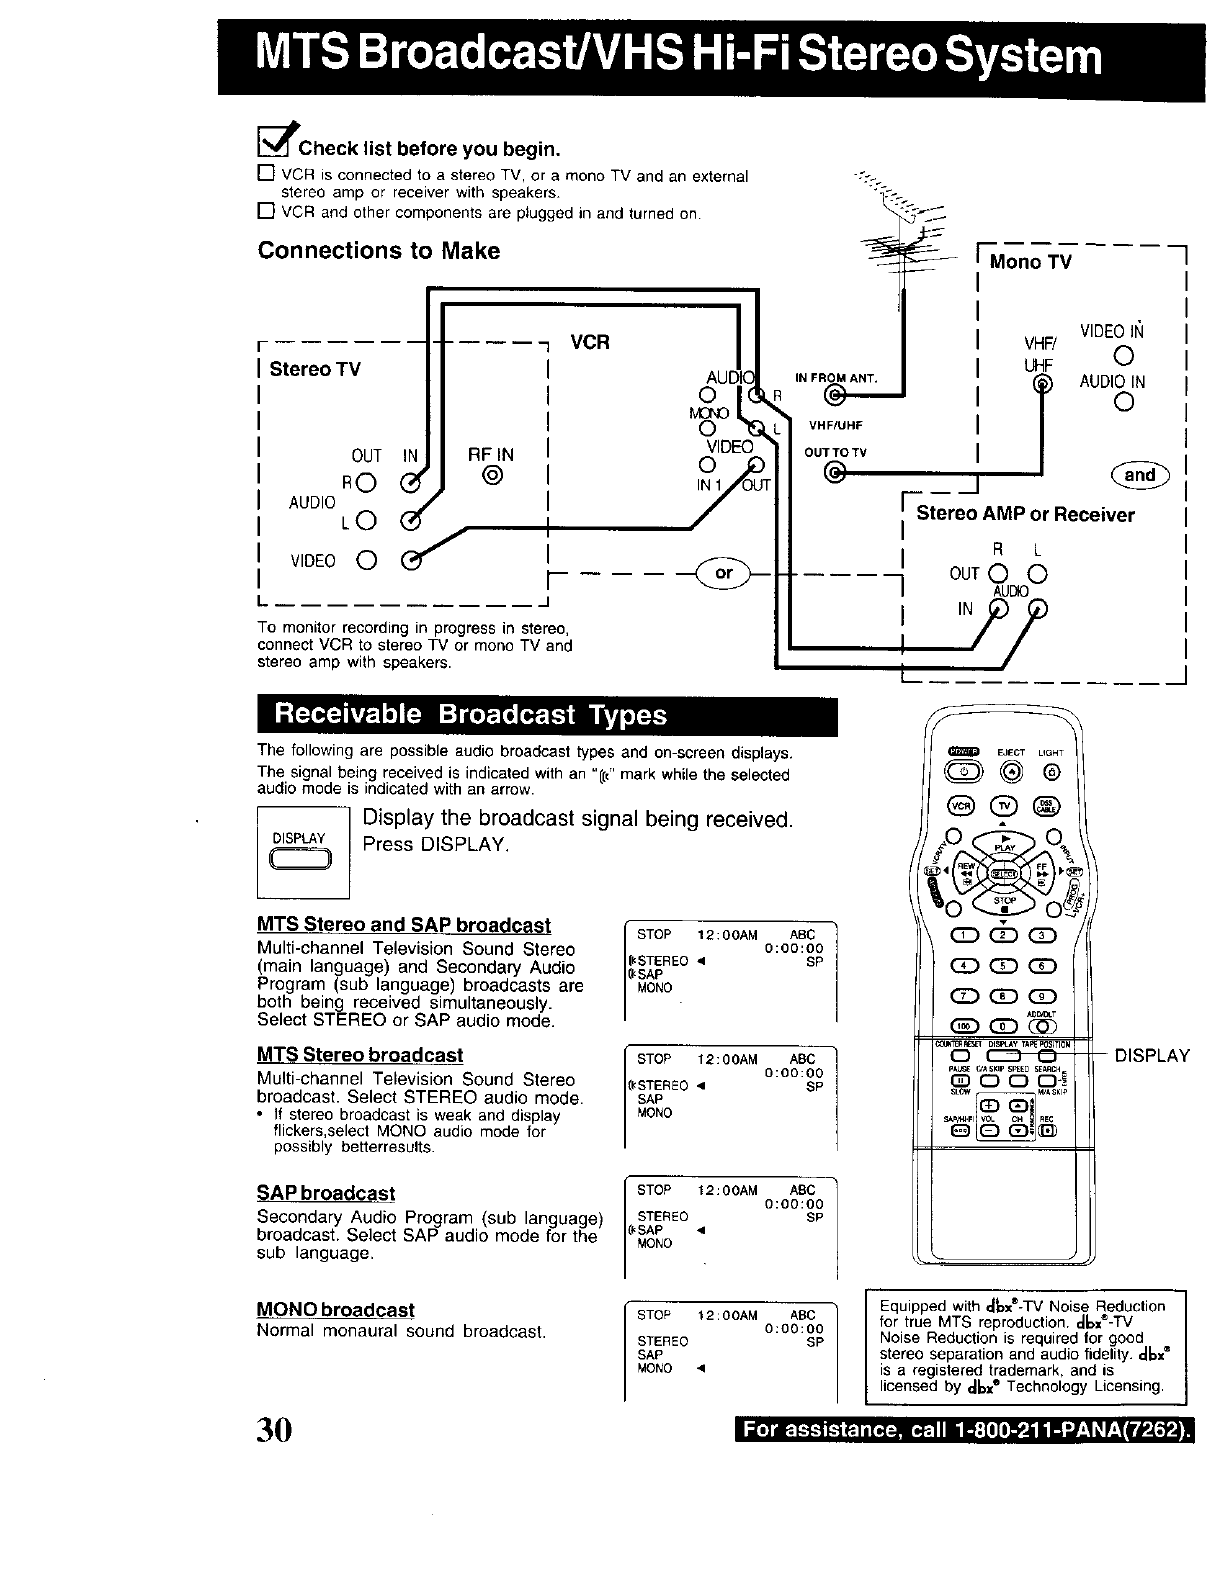
[_lPCheck list before you begin.
[] VCR is connected to a stereo TV, or a mono TV and an external
stereo amp or receiver with speakers.
[] VCR and other components are plugged in and turned on
Connections to Make
Stereo TV
OUT IN RF IN
RO @
AUDIO L Od
VIDEO 0
VOR I
AUDIO
0(
VIDEO
H
To monitor recording in progress in stereo,
connect VCR to stereo TV or mono TV and
stereo amp with speakers.
IN FROM ANT.
VHF/UHF
I
OUTTOTV
@
Wc%
-_ Mono TV
VIDEO IN
VHF/
UHF 0
l AUDIO IN
©
[ Stereo AMP or Receiver
I
I R L
] outoo
The following are possible audio broadcast types and on-screen displays.
The signal being received is indicated with an "((d' mark while the selected
audio mode is indicated with an arrow.
DISPLAY Display the broadcast signal being received.
Press DISPLAY.
MTS Stereo and SAP broadcast / STOP 12:00AM ABC
/O:O0:O0
Multi-channel Television Sound Stereo {_STEREO< SP
(main language) and Secondary Audio if,SAP
Program (sub language) broadcasts are MONO
both being received simultaneously.
Select STEREO or SAP audio mode.
MTS Stereo broadcast
Multi-channel Television Sound Stereo
broadcast. Select STEREO audio mode.
•if stereo broadcast is weak and display
flickers,select MONO audio mode for
possibly betterresults.
STOP 12:0SAM ABC
O:OO:O0
_STEREO • SP
SAP
MONO
(
SAP broadcast / STOP 12:00AM ABC
/O:O0:OO
Secondary Audio Program (sub language) STEREO SP
_SAP •
broadcast. Select SAP audio mode forthe MONO
sub language.
m El£_r UGH"
@@@
p_ _A_KIP S_ED SETH=
O 000-_
-DISPLAY
MONO broadcast
Normal monaural sound broadcast. STOP 12:00AM ABC
O:O0:O0
STEREO SP
SAP
MONO •
Equipped with _x®-TV Noise Reduction
for true MTS reproduction. ,.16x®-TV
Noise Reduction is required for good
stereo separation and audio fidelity..-Ib=®
is a registered trademark, and is
licensed by ¢lbx®Technology Licensing.
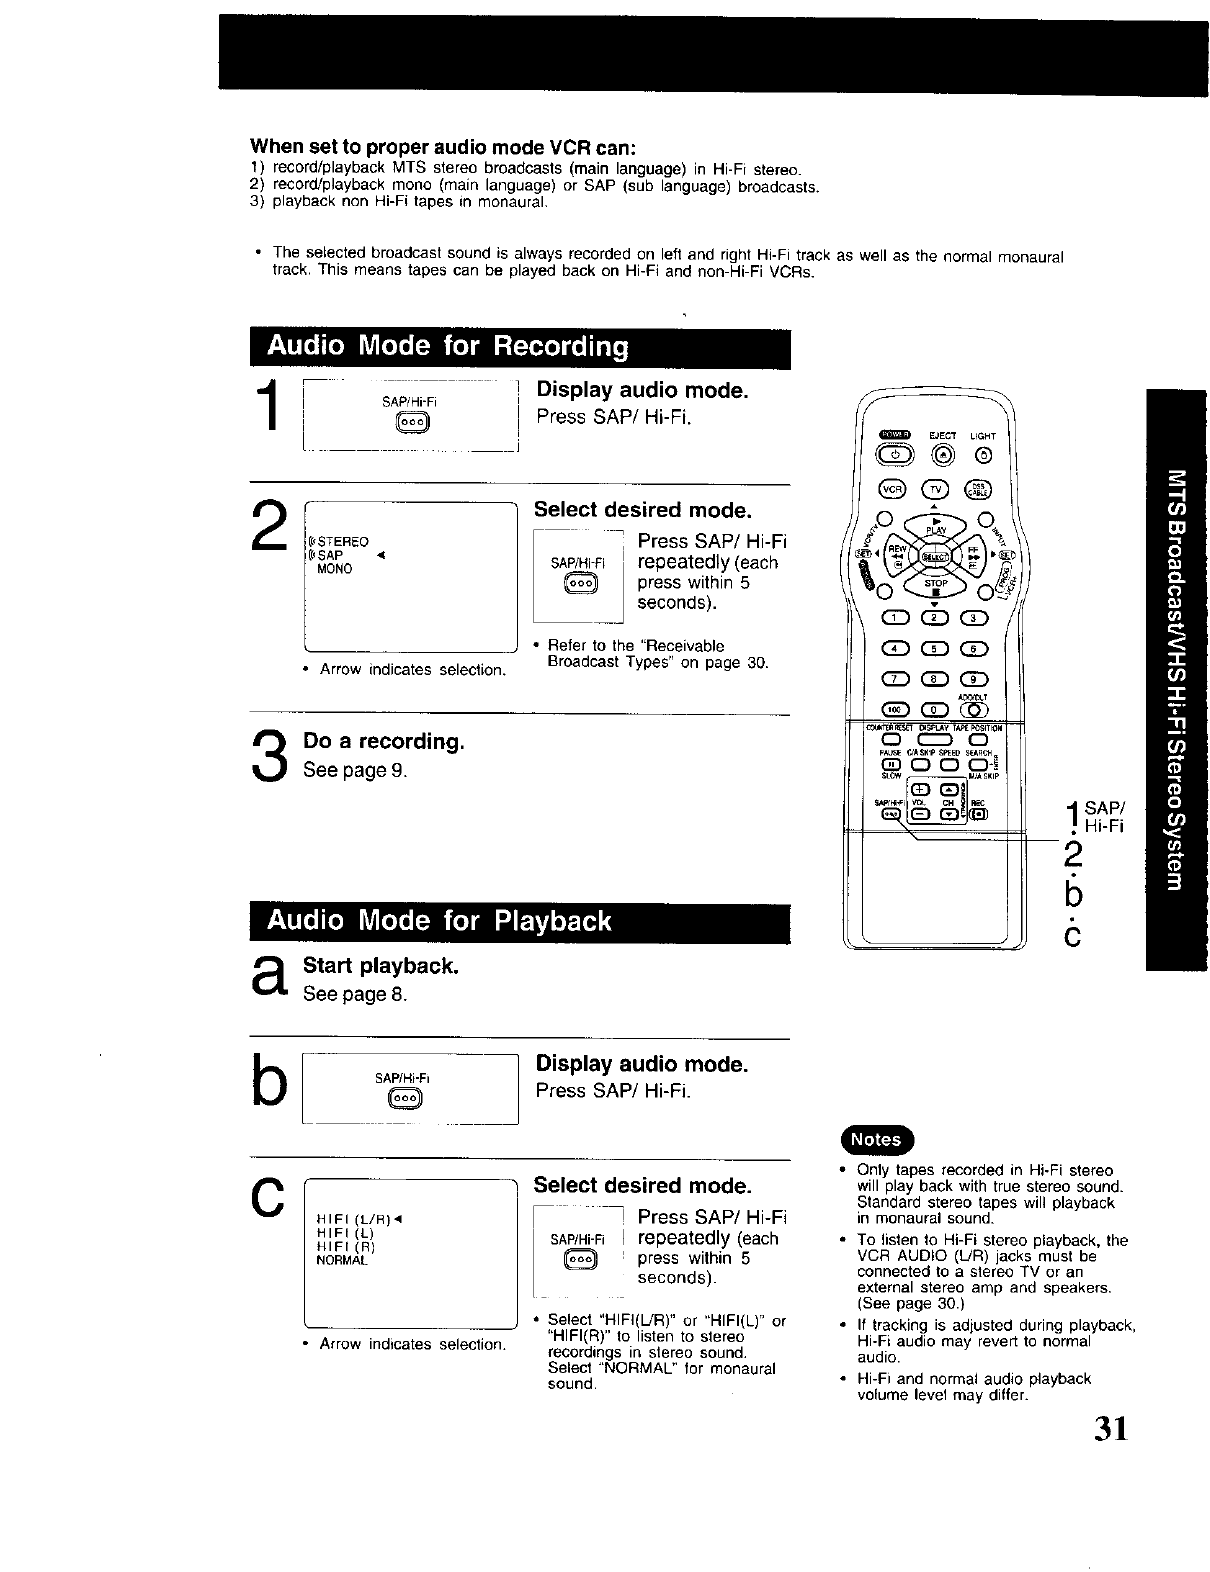
When set to proper audio mode VCR can:
1) record/playback MTS stereo broadcasts (main language) in Hi-Fi stereo.
2) record/playback mono (main language) or SAP (sub language) broadcasts.
3) playback non Hi-Fi tapes in monaural.
•The selected broadcast sound is always recorded on left and right Hi-Fi track as well as the normal monaural
track. This means tapes can be played back on Hi-Fi and non-Hi-Fi VCRs.
SAP/Hi-Fi Display audio mode.
Q Press SAP/Hi-Fi.
L
2_STEREO
_SAP •
MONO
• Arrow indicates selection.
Select desired mode.
Press SAP/Hi-Fi
SAP/Hi-Fi repeatedly (each
press within 5
seconds).
• Refer to the "Receivable
Broadcast Types" on page 30.
Do a recording.
See page 9.
aStart playback.
See page 8.
EJECT UGHT
@@®
_CD_
0 C_D 0
P_ _ASKIP _ED S_RCH_
_) 0 0 0-_
SAP/
Hi-Fi
2
6
6
b[ Display audio mode.
SAP/Hi'Fi Press SAP/Hi-Fi.
CHIFI (L/R),
HIFI(L)
HIFI(R)
NORMAL
Arrow indicates selection.
Select desired mode.
• ! Press SAP/Hi-Fi
SAP/Hi-FiI repeatedly (each
press within 5
seconds).
• Select "HIFI(L/R)" or "HIFI(L)" or
"HIFI(R)" to listen to stereo
recordings in stereo sound.
Select "NORMAL" for monaural
sound.
•Only tapes recorded in Hi-Fi stereo
will play back with true stereo sound.
Standard stereo tapes will playback
in monaural sound.
• To listen to Hi-Fi stereo playback, the
VCR AUDIO (L/R) jacks must be
connected to a stereo TV or an
external stereo amp and speakers.
(See page 30.)
• If tracking is adjusted during playback,
Hi-Fi audio may revert to normal
audio.
• Hi-Fi and normal audio playback
volume level may differ.
31
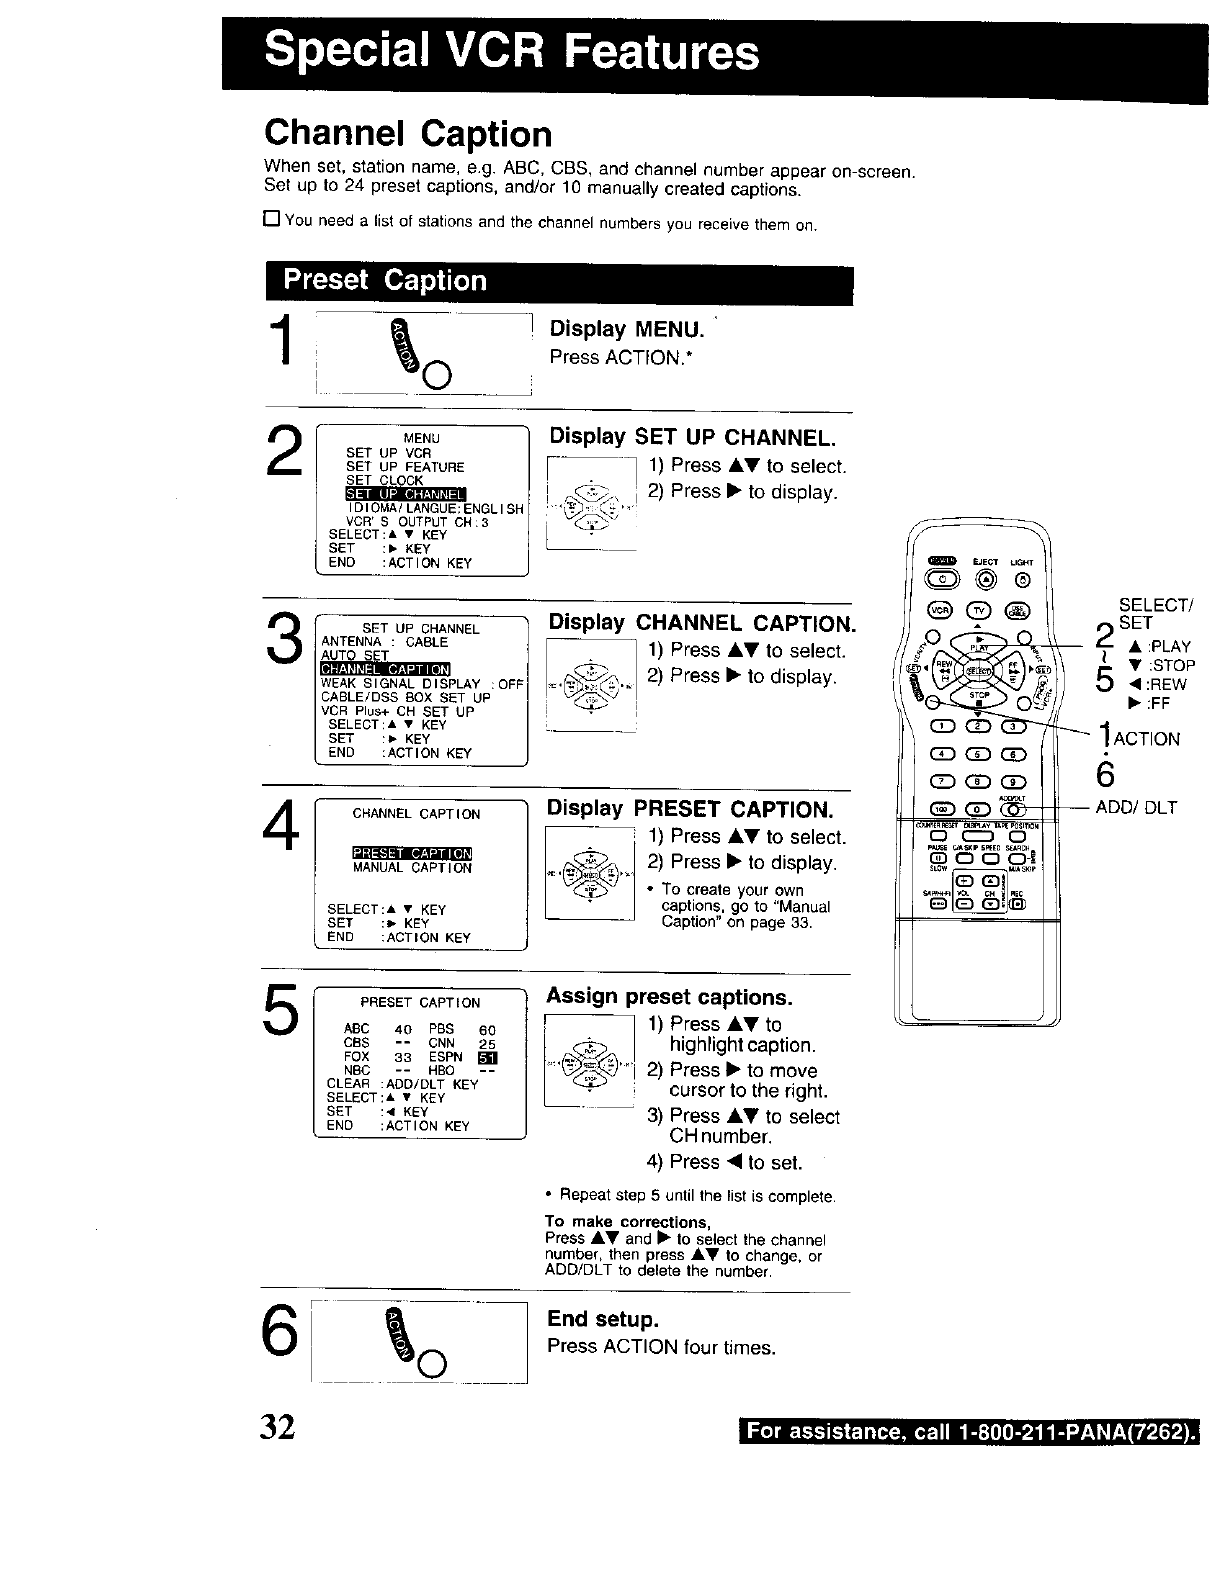
Channel Caption
When set, station name, e.g. ABC, CBS, and channel number appear on-screen,
Set up to 24 preset captions, and/or 10 manually created captions,
[] You need a list of stations and the channel numbers you receive them on.
1
2
3
4
5
MENU
SET UP VCR
SET UP FEATURE
SET CLOCK
(OlOMA/LANGUE:ENGLISH
VCR'S OUTPUT CN;3
SELECT:& • KEY
SET :, KEY
END :ACTION KEY
Display MENU.
Press ACTION.*
Display SET UP CHANNEL.
I.1 1) Press AV to select.
,.._b_ i 2) Press • to display.
SET UP CHANNEL
ANTENNA :CABLE
WEAK SIGNAL DISPLAY :OFf
CASLE/DSS BOX SET UP
VCR Plus+ CH SET UP
SELECT:A • KEY
SET :> KEY
END :ACTION KEY
Display CHANNEL CAPTION.
1) Press &Y to select.
._"_._ 2) Press •to display.
CHANNEL CAPTION
MANUAL CAPTION
SELECT:& • KEY
SET :_ KEY
END :ACTION KEY
Display PRESET CAPTION.
1) Press AT to select.
=
_._,, 2) Press • to display.
• To create your own
captions, go to "Manual
Caption" on page 33.
PRESET CAPTION
AEC 40 PBS eo
CBS -- CNN 25
FOX 33 ESPN
NBC -- HBO --
CLEAR :AOD/DLT KEY
SELECT:A • KEY
SET :4 KEY
END :ACTION KEY
Assign preset captions.
r _ 1) Press &T to
[_ highlight caption.
.... 2) Press • to move
cursor to the right.
3) Press kV to select
CH number.
4) Press • to set.
•Repeat step 5 until the list is complete.
To make corrections,
Press _,V and • to select the channel
number, then press A_r 1o change, or
ADD/DLT to delete the number.
EJECT L_
G>@®
@®®
CD_
_(_--
_EnM_ _Y y_ _SmON
or--._ o
_ r/A,_tP s_E0 _R_
G 0 0 0-_
SELECT/
SET
= _ • :PLAY
(
Y :STOP
'4 :REW
1ACTION
6
-- ADD/DLT
r _ End setup.
i _ ._ 0Press ACTION tour times.
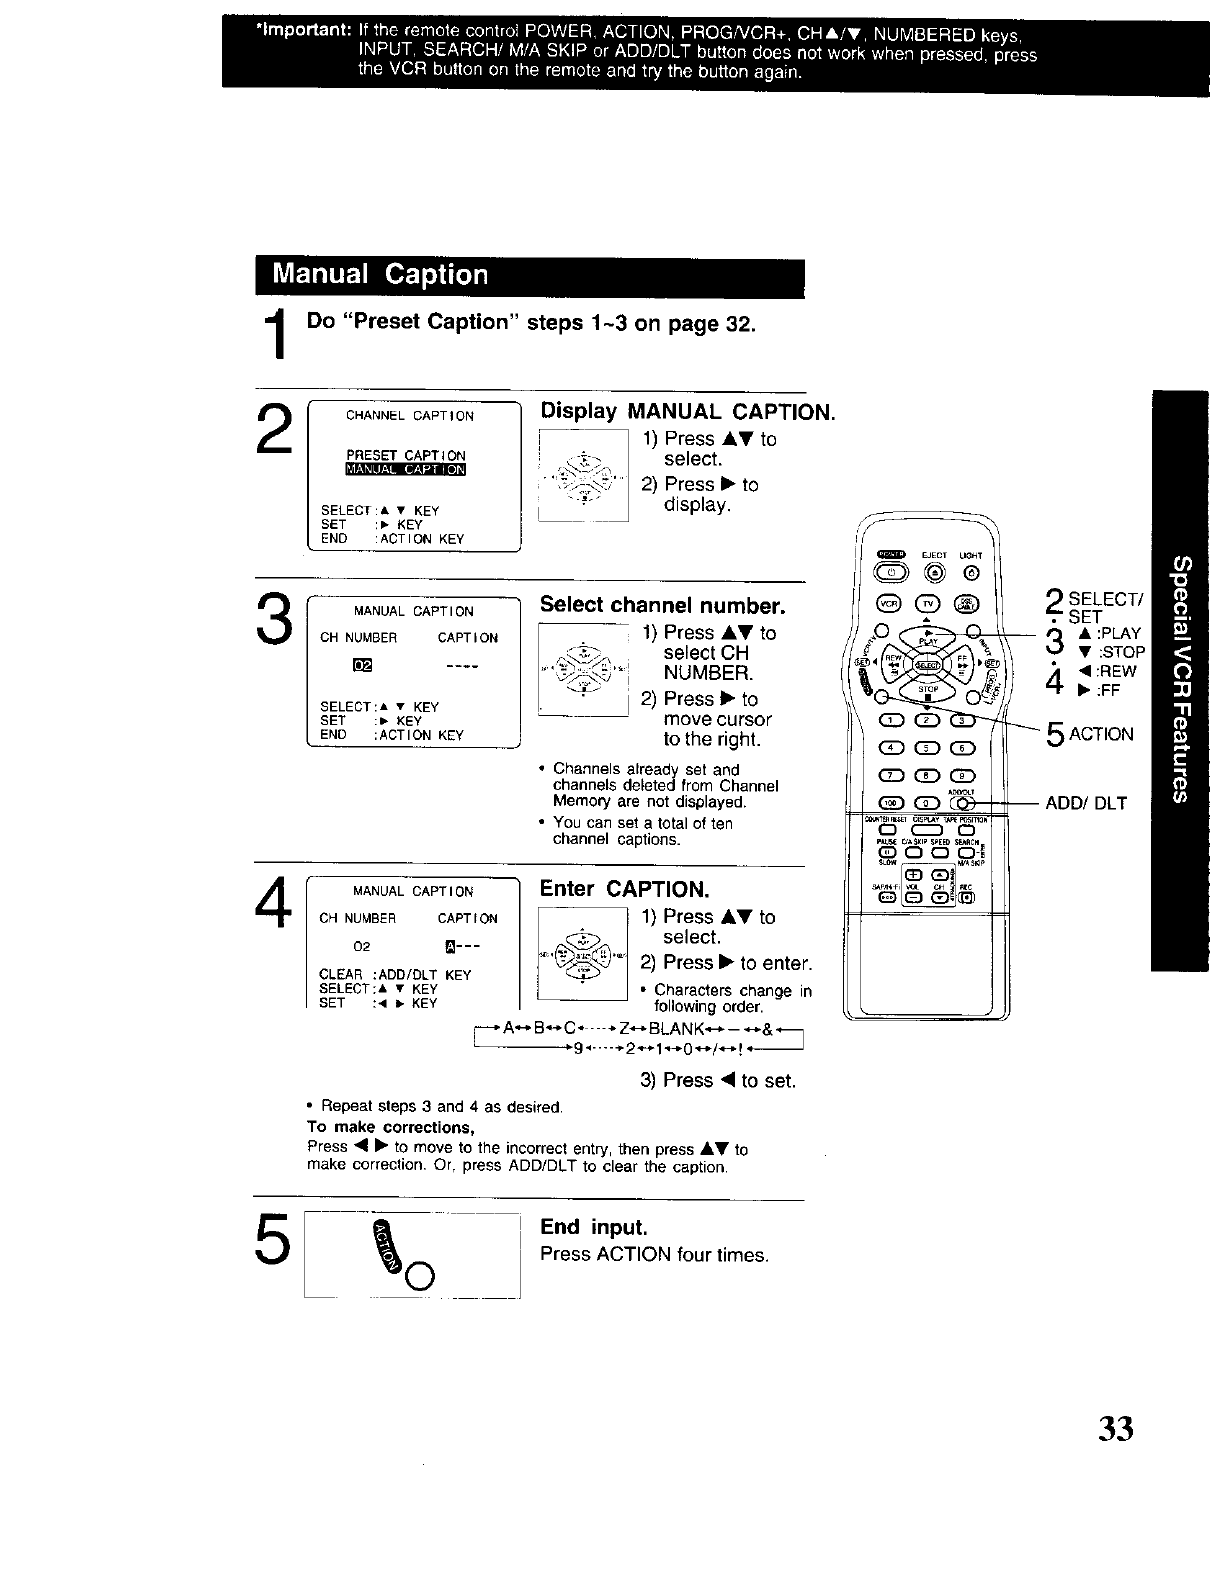
1
2
[I_q'.,imlb]I
3
4
Do "Preset Caption" steps 1-3 on page 32.
CHANNEL CAPTION
PRESET CAPTION
SELECT:A •KEY
SET :, KEY
END :ACTION KEY
Display MANUAL CAPTION.
1) Press ,Y to
select.
2) Press • to
:" display.
MANUAL CAPTION
CH NUMBER CAPTION
SELECT:A • KEY
SET :, BEY
END :ACTION KEY
Select channel number.
I--_, -1) Press 41,Vto
r.._._- select CH
_,_'_,,_,._'_i NUMBER.
"+ i 2) Press • to
move cursor
to the right.
•Channels already set and
channels deleted from Channel
Memory are not displayed.
• You can set a total of ten
channel captions.
MANUAL CAPTION
CH NUMBER CAPTION
02 _---
CLEAR :ADD/DLT KEY
SELECT:A • KEY
SET :< _ KEY
Enter CAPTION.
1) Press •Y to
•_,.'_".J_ select.
'--_'" 2) Press • to enter.
T• Characters change in
following order.
_* A--,. B*-* C ..... Z_-_-BLA N K.,--_- *_& _
.9 ...-- +2 _._1.,-._0 .,.-,.!.-.,.!÷ J
3) Press <to set.
• Repeat steps 3 and 4 as desired.
To make corrections,
Press • • to move to the incorrect entry, then press &,Y to
make correction, Or, press ADD/DLT to clear the caption.
EJECT UC,HT
_CD_
r,_ rJASKIp _EEO SL,_C_
QO001
SELECT/
SET
__ r_ • :PLAY
_J •:STOP
4 • :REW
• :FF
_ 5 ACTION
I ADD/DLT
_) End input.
O Press ACTION four times.
33
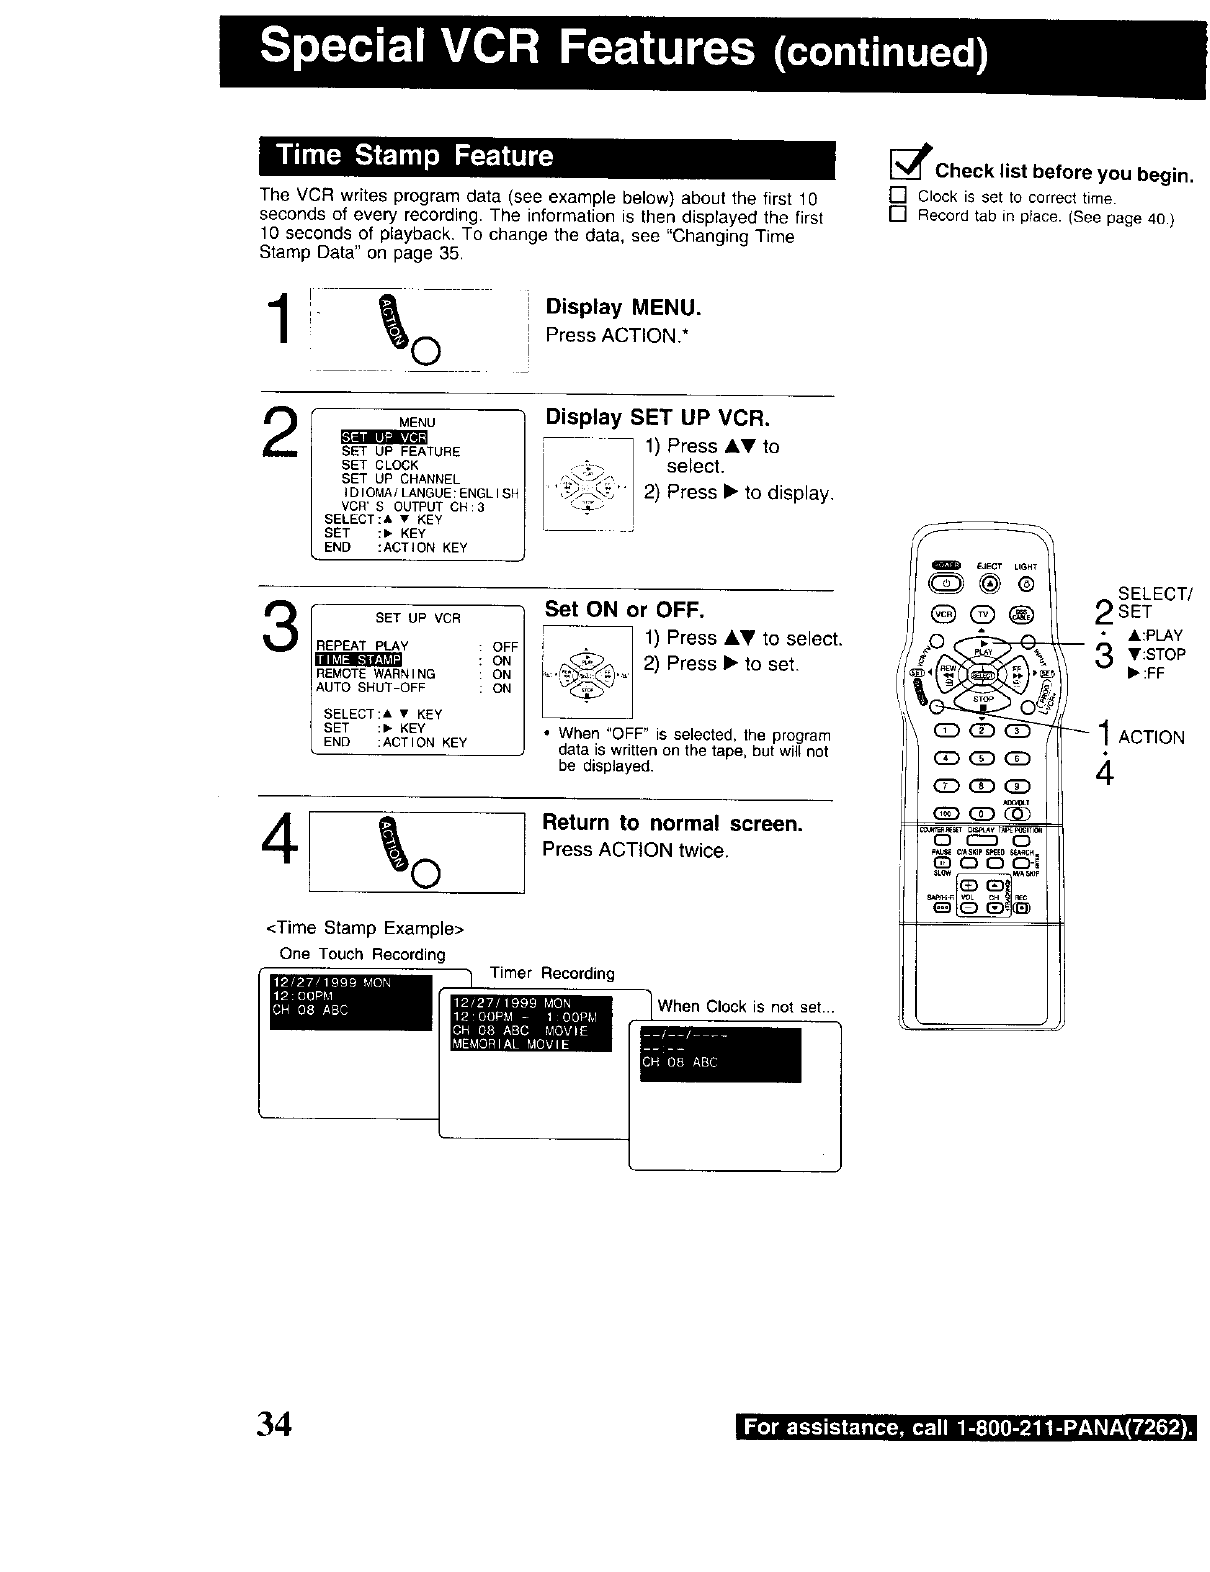
The VCR writes program data (see example below) about the first 10
seconds of every recording• The information is then displayed the first
10 seconds of playback. To change the data, see "Changing Time
Stamp Data" on page 35.
!- a i
:" iDisplay MENU.
0 i Press ACTION.*
[_Check list before you begin,
[] Clock is set to correct time•
[] Record tab in ptace. (See page 40.)
2MENU
SET UP FEATURE
SET CLOCK
SET UP CHANNEL
{GIO_AiU_NGUE:ENGLtSN
VCR'S OUTPUT CH:3
SELECT:& • KEY
SET :, KEY
END :ACTION KEY
Display SET UP VCR.
1) Press AV to
;'4 select.
,_,,_ 2) Press I_ to display.
3SET UP VCR
REPEAT PLAY _1
ON
ON
REMOTE WARNING
AUTO SHUT-OFF
SELECT:A • KEY
SET :, KEY
END :ACTION KEY
Set ON or OFF.
r 1) Press _,V to select•
J
[_._ _, ._ 2) Press_.toset.
• When "OFF" is selected, the program
data is written on the tape, but will not
be displayed.
4
<Time Stamp Example>
One Touch Recording
Return to normal screen.
Press ACTION twice.
Timer Recording
When Clock is not set...
f
m _ECT LIGHT
@@®
C_D_D _
CD_GD
_T
c) c_) o
_*_sE _ASKIpSF_E_S_
(_) 0 0 C)-I
SELECT
2SET
&:PLAY
- 3 V:STOP
II_:FF
1ACTION
34
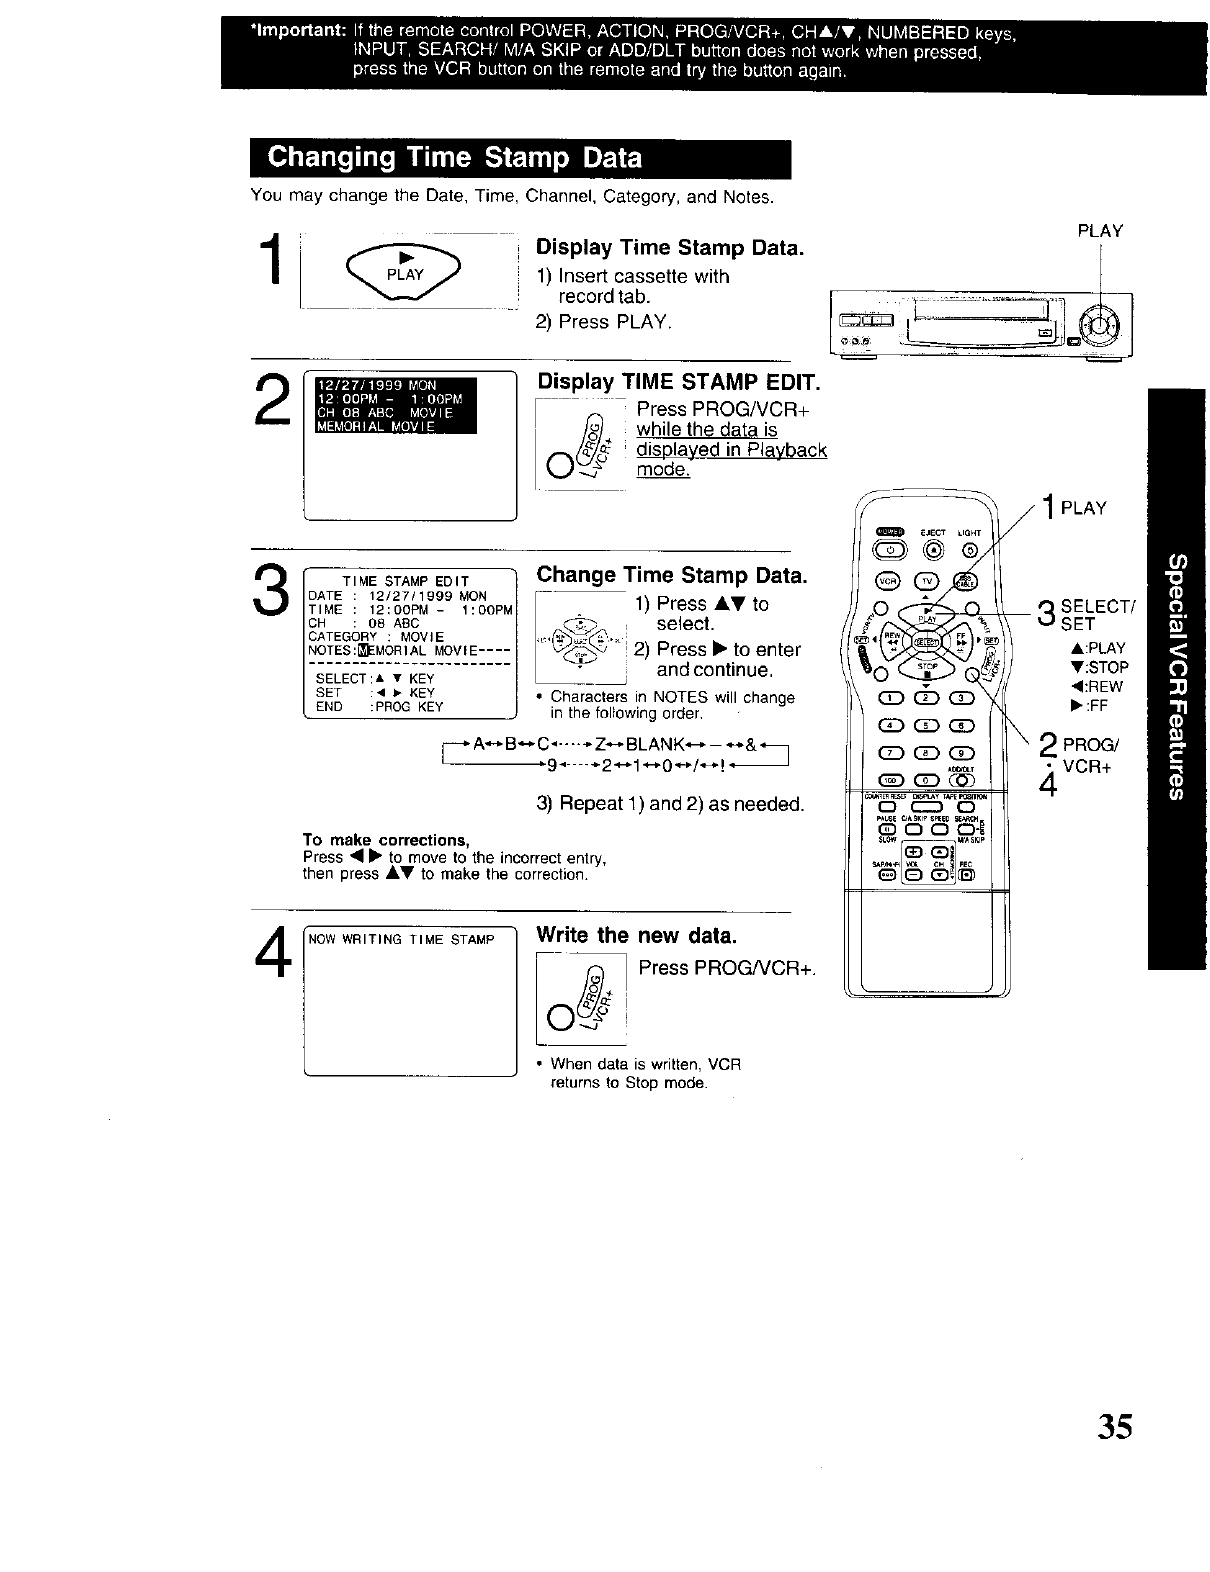
You may change the Date, Time, Channel, Category, and Notes.
2
3
4
Display Time Stamp Data.
1) Insert cassette with
record tab.
2) Press PLAY.
Display TIME STAMP EDIT.
Press PROG/VCR+
(/_J_ while the data is
displayed in Playback
mode.
TIME STAMP EDIT
DATE 12/27/1999 MON
TIME 12:00PM -I:0OP_
CH : OS ASC
CATEGORY : MOVIE
NOTES:_EMORIAL MOVIE ....
SELECT:& • KEY
SET :4 _ KEY
END :PROG KEY
Change Time Stamp Data.
,,(_,. ,_11) select.Press&T to
_:_ 2) Press, to enterand continue,
• Characters in NOTES will change
in the following order,
_*A_B_C ...... Z_BLANK_-_&_
_9 4 -÷2_1_0_/_!*
3) Repeat 1) and 2) as needed.
To make corrections,
Press ••to move to the incorrect entry,
then press A,V to make the correction.
NOW WRITING TIME STAMP Write the new data.
iO_o_ Press PROG/VCR+"+i
• When data is written, VCR
returns to Stop mode.
PLAY
_ j 1PLAY
@ @_ --3SELECT/
_O_ SET
V:STOP
<:REW
(_ _ _ \_':FF
_ _ \ 2 PRoG/
(Z_ (Z3 QD
"_* 4 VCR+
O CC30
35

To find out the present tape position.
Tape position cannot be found for C-Cassette type and tape
of less than 60 minutes.
I Detect Tape Position.
TAPEPOSITION
O I Press TAPE POSITION.
DETECTINGTAPEPosmoN /
• "DETECTING TAPE
POSITION" only appears the
first time a cassette is inserted.
• It takes several seconds for
correct indication to appear.
T
BEGIN END
[TAPEPOSITION
O
• The present tape position
indication is displayed.
Return to normal
screen.
Press TAPE POSITION.
[_Check list before you begin.
[] All connections are made. (See pages 4-5.)
[] VCR is plugged in.
[] TV is turned on and tuned to CH3, 4 or Video.
EJECT UGH_
O@®
@(E)®
C!D CD _
_CD
_ _,_sKJp SPIED SEARCH
OOOJ
SELECT/
bSET
• :PLAY
C•:STOP
• :FF
aACTION
a
1TAPE
-- *
2POSITION
If Multi-brand feature is used (page 20), and this feature is set to
on, a warning appears whenever an invalid key is pressed in TV,
DSS, or Cable mode.
Display MENU.
a _ll, O Press ACTION.
bMENU
SET UP FEATURE
SET CLOCK
SET UP CHANNEL
IDIOMA/LANGUE:ENGLI_
VCR'S OUTPUT CH:3
SELECT:A •KEY
SET :_ KEY
END :ACTION KEY
All operations are prohibited except timer
recording and tape eject. Useful for families
with small children.
Display SET UP VCR.
I
,IPress,, to I
'" '", select, vcRLOCKACTIVATED
j2) Press • to
display.
APress REC in
Stop mode.
To turn on:
in Stop mode,
hold down REC on
the VCR withouta
cassette inserted
for 7seconds.
C
d
36
SET UP VCR
_EPEAT PLAY : OFF
TIME STAMP ON
I;]=_O]l[= |rjrr;!;MI I_[_ : ON
AUTO SHUT-OFF : ON
SELECT:& • KEY
SET :_ KEY
END :ACTION KEY
Set ON or OFF.
I1) Press &_'to
r,(_./.i select.
_" 12) Press•to set.
• "OFF"--> remote warning will
not appear even if
invalid key is pressed.
Return to normal
screen.
Press ACTION twice.
ITo turn off:
Repeat above.
VCR LOCK OFF
•VCR Lock is canceled automatically after 24
hours if clock is set.
AREC
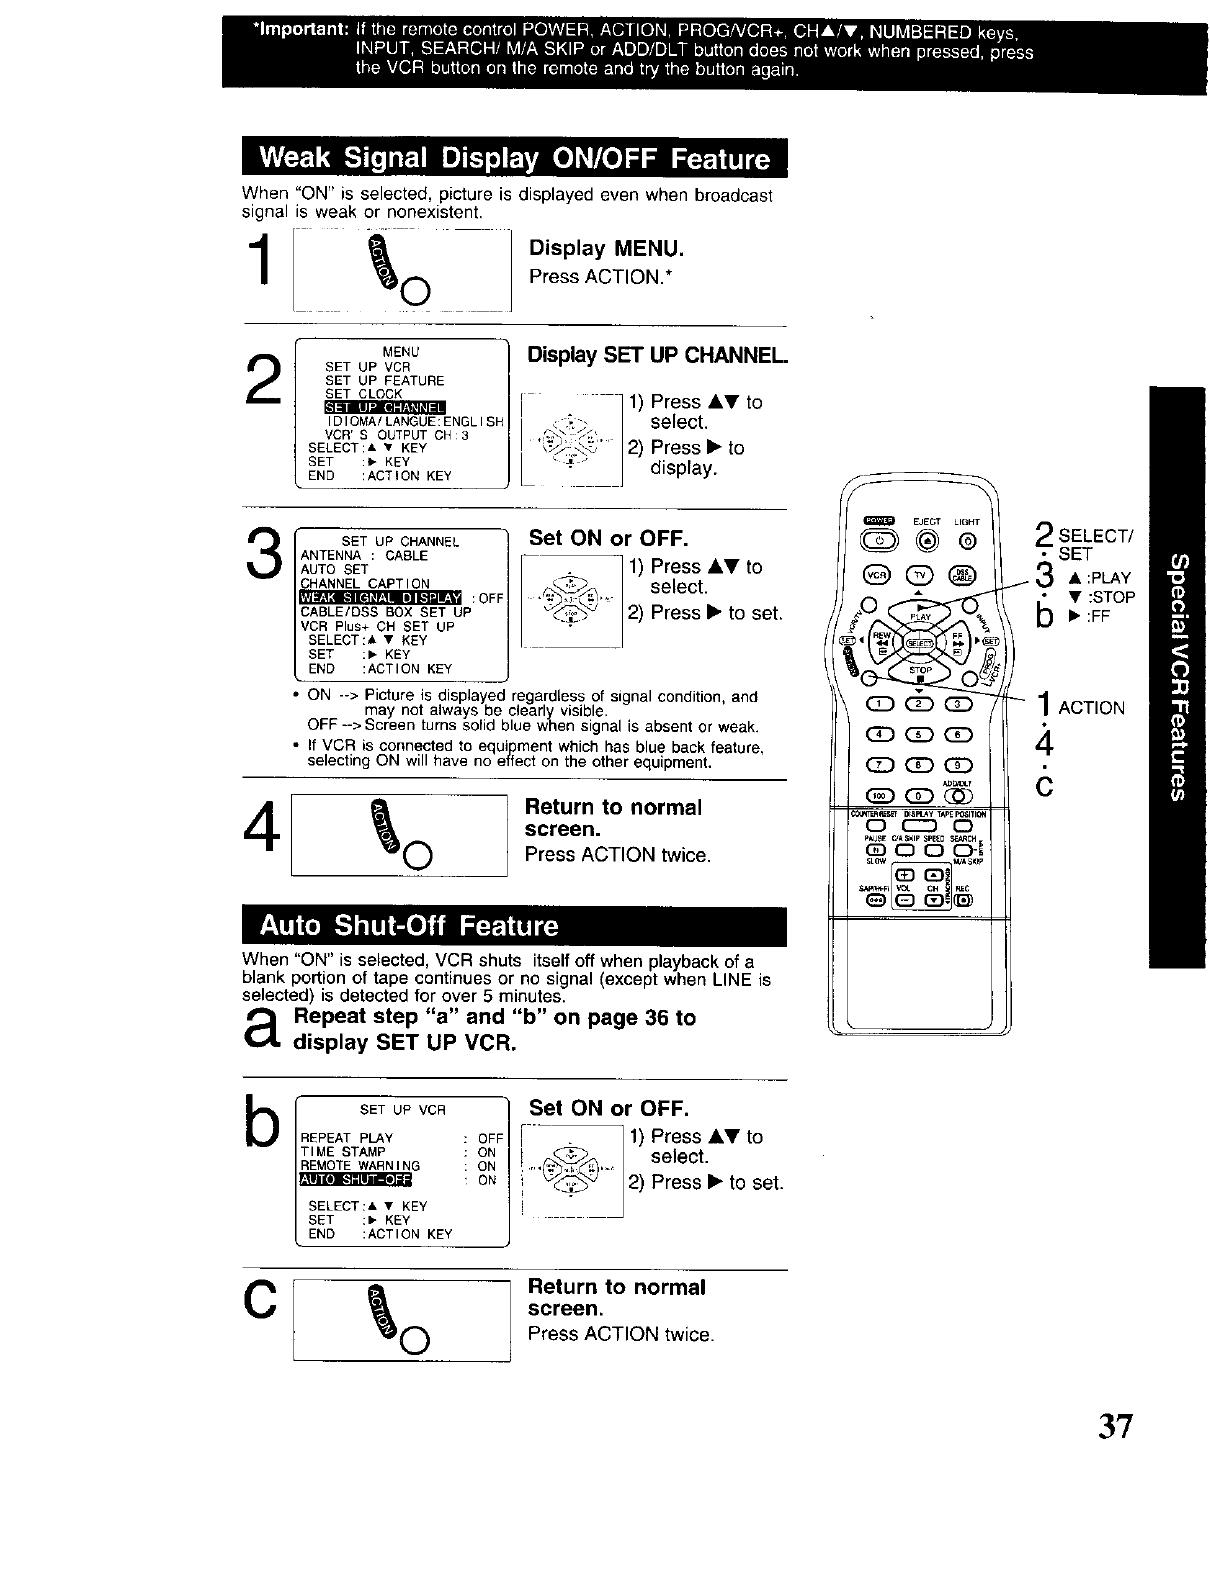
When"ON"isselected,pictureisdisplayedevenwhenbroadcast
signalisweakornonexistent,
111 oli]o+a,°+u
Press ACTION.*
Display SET UP CHANNEL.
2MENU
SET UP VCR
SET UP FEATURE
SET CLOCK
tlJ".l_: r;'Ml+l:ll
IDIOMA/LANGUE:ENGLISF
VCR'S OUTPUT CH:3
SELECT:A • KEY
SET :, KEY
END :ACTION KEY
3
4
SET UP CHANNEL
ANTENNA : CABLE
AUTO SET
CHANNEL CAPTION
• + e" ' :OFF
CABLE/OSS BOX SET UP
VCR Plus+ CH SET UP
SELECT:A • KEY
SET :, KEY
END :ACTION KEY
Set ON or OFF.
r,"_.._,_ 1) Press •V toselect.
'_'_'" 2) Press • to set.
ON --> Picture is displayed regardless of signal condition, and
may not always be clearly visible.
OFF--> Screen turns solid blue when signal is absent or weak.
• If VCR is connected to equipment which has blue back feature,
selecting ON will have no effect on the other equipment.
_(_) Return to normal
screen.
Press ACTION twice.
When "ON" is selected, VCR shuts itself off when playback of a
blank portion of tape continues or no signal (except when LINE is
selected) is detected for over 5 minutes.
a Repeat step "a" and "b" on page 36 to
display SET UP VCR.
EJECT LIGHT-_
@@®
(Z) GD (Z)
(Z) CD QD
(Z3 (Z3 (33
_nB_c_.T
(_3 (£) @
o (z30
p_USE_,_$KtE $p_B SEt_CH
(£) O C30-_
2SELECT/
•SET
X
i _,_ • :PLAY
•:STOP• :FF
1ACTION
4
bSET UP VCR
REPEAT PLAY OFF
TIME STAMP ON
REMOTE WARNING ON
ON
SELECT:& • KEY
SET :, KEY
END :ACTION KEY
Set ON or OFF.
i --I 1) Press _T to
_ 2) Press • to set.
Return to normal
screen.
Press ACTION twice.
3?
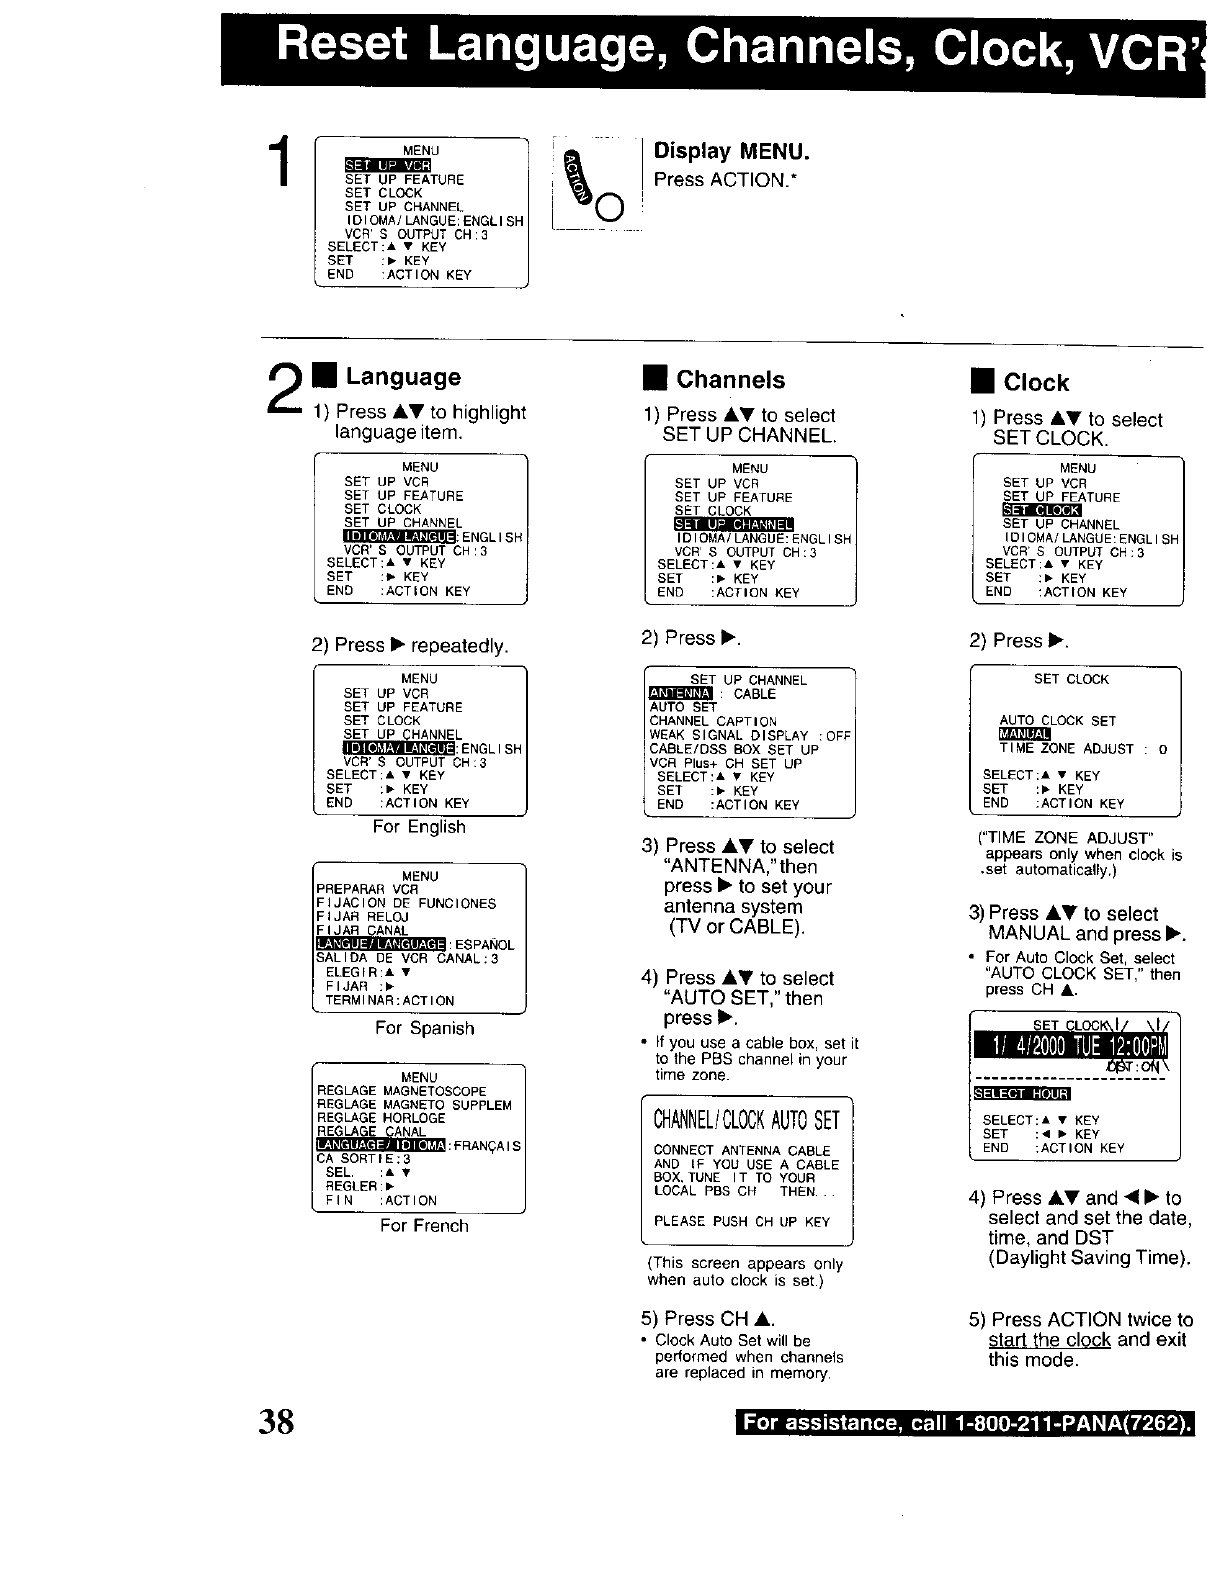
1MENU
_JRnl kV_=
SET UP FEATURE
SET CLOCK
SET UP CHANNEL
IDIOMA/LANGUE:ENGLISP
VCR' S OUTPUT CH:3
SELECT:A •KEY
SET :• KEY
END :ACTION KEY
IDisplay MENU.
Press ACTION.*
•Language
1) Press AY to highlight
language item.
MENU
SET UP VCR
SET UP FEATURE
SET CLOCK
SETUP CHANNEL
_:ENGLISH
VCR' S OUTPUT CH:3
SELECT:A • KEY
SET :_ KEY
ENe :ACTION KEY
2) Press • repeatedly.
MENU
SET UP VCR
SET UP FEATURE
SET CLOCK
SET UP CHANNEL
VCR'S OUTPUT OH:3
SELECT:A • KEY
SET :• KEY
END :ACTION KEY
For English
MENU
PREPARA_ VCR
FIJACION DE FUNCIONES
FIJAR RELOJ
FIJAR CANAL
SALIOA DE VCR CANAL:3
ELEGIR:A •
FIJAR :•
TERMINAR:ACTION
For Spanish
MENU
REGLAGE MAGNETOSCOPE
REGLAGE MAGNETO SUPPLEM
REGLAGE HORLOGE
REGLAG{ CANAL
_ _ I IV':FRAN_AIS
CA SORTIE:3
SEL. :A •
REGLER:_
FIN :ACTION
For French
• Channels
1) Press &Y to select
SET UP CHANNEL.
MENU
SET UP VCR
SET UP FEATURE
SET CLOCK
IDIOMA/LANGUE:ENGLISH
VCR'S OUTPUT CH:3
SELECT:A • KEY
SET :• KEY
END :ACTION KEY
2) Press•.
SET UP CHANNEL
&_TiR_I_I_II: CABLE
AUTO SET
CHANNEL CAPTION
WEAK SIGNAL DISPLAY :OFF
CABLE/DSS BOX SET UP
VCR Plus+ CH SET UP
SELECT:A • KEY
SET :• KEY
END :ACTION KEY
3) Press AT to select
"ANTENNA,"then
press • to set your
antenna system
(TV or CABLE).
4) Press &_' to select
"AUTO SET," then
press •.
•)f you use a cable box, set it
to the PBS channel in your
time zone.
CHANNEL/CLOCKAUTOSET
CONNECT ANTENNA CABLE
AND IF YOU USE A CABLE
BOX, TUNE IT TO YOUR
LOCAL PBS CH TEEN..
PLEASE PUSH CH UP KEY
This screen appears only
when auto clock is set.)
5) Press CH A.
•Clock Auto Set will be
performed when channels
are replaced in memory.
•Clock
1) Press ,&_' to select
SET CLOCK.
MENU
SET UP VCR
SET UP FEATURE
SET UP CHANNEL
IDIOMA/LANGUE:ENGLISH
VCR'S OUTPUT OH:3
SELECT:& • KEY
SET :• KEY
END :ACTION KEY
2) Press •.
SET CLOCK
AUTO CLOCK SET
TI_E ZONE ADJUST : O
SELECT:_ •KEY
SET :• KEY
END :ACTION KEY
("TIME ZONE ADJUST"
appears only when clock is
,set automatically.)
3) Press AV to select
MANUAL and press •.
• For Auto Clock Set, select
"AUTO CLOCK SET,_ then
press CH &.
SELECT:& • KEY
SET :_ •KEY
END :ACTION KEY
4) Press AV and _• to
select and set the date
time, and DST
(Daylight Saving Time).
5) Press ACTION twice t(
start the clock and exit
this mode.
38
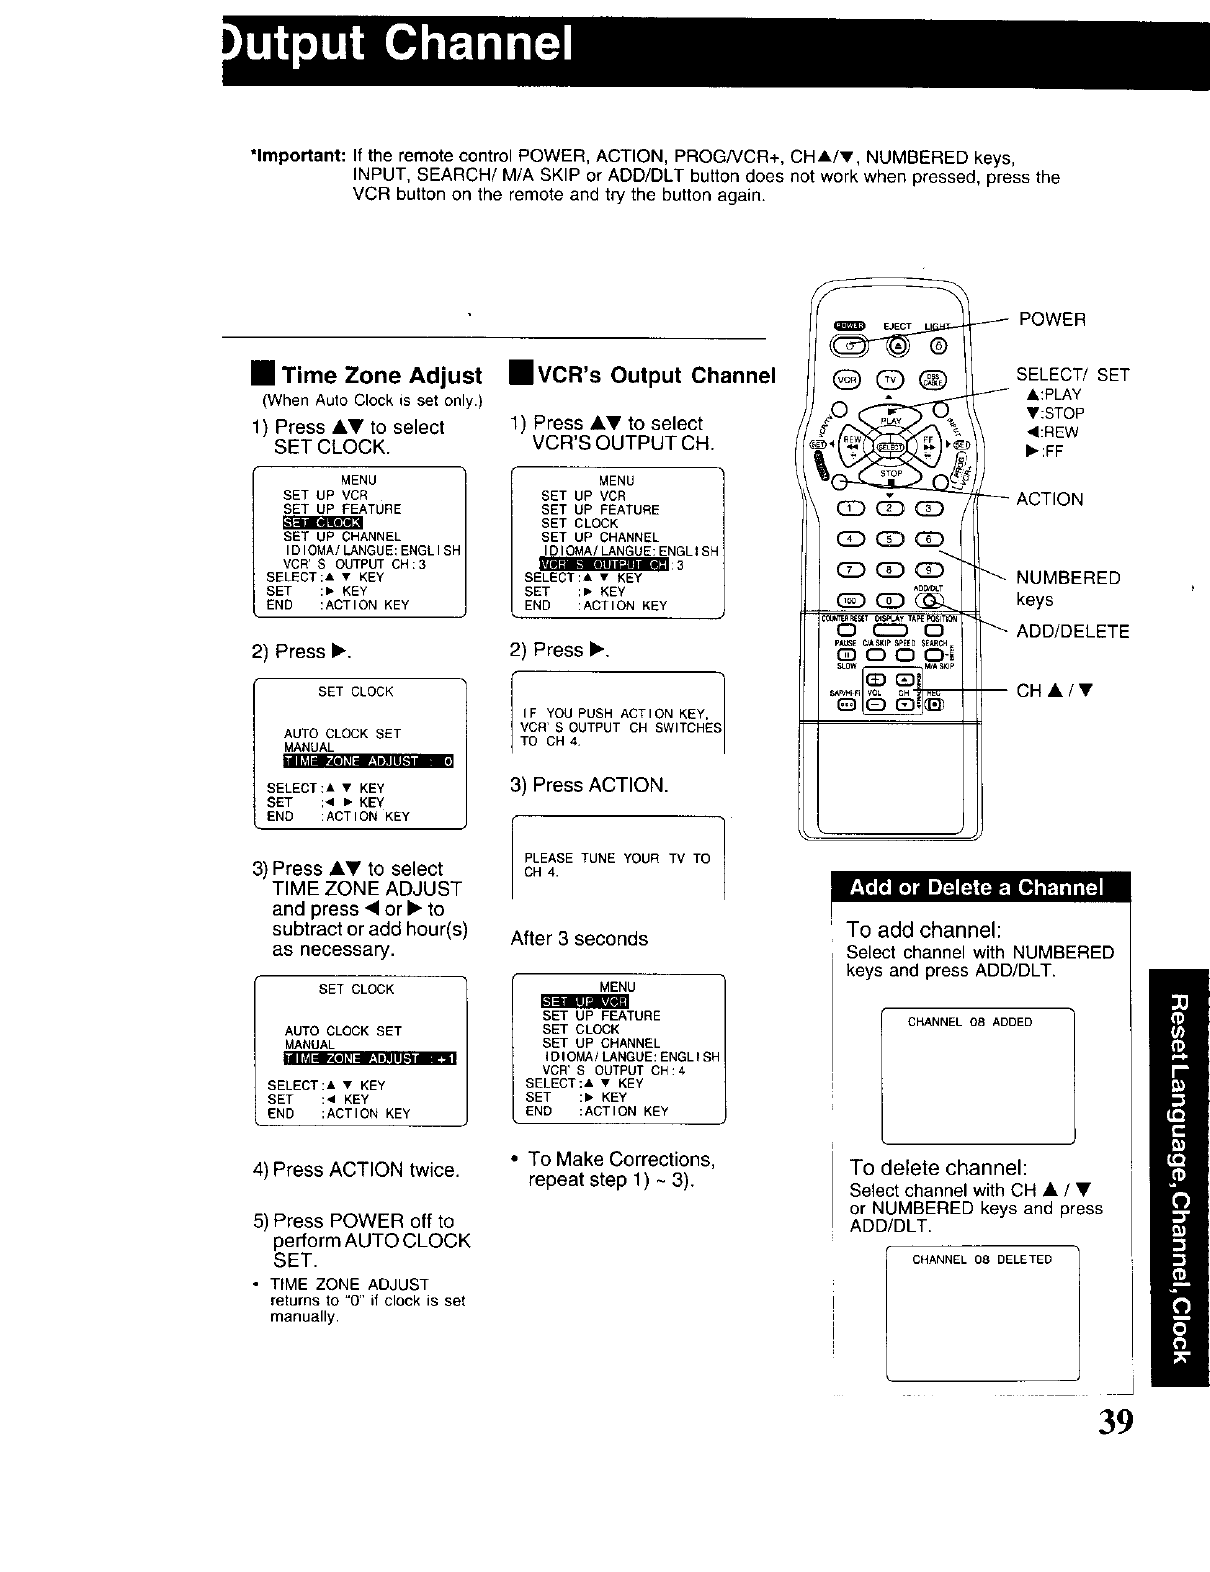
*Important: If the remote control POWER, ACTION, PROG/VCR+, CHA/V, NUMBERED keys,
INPUT, SEARCH/M/A SKIP or ADD/DLT button does not work when pressed, press the
VCR button on the remote and try the button again.
POWER
•Time Zone Adjust
(When Auto Clock is set only.)
1) Press •V to select
SET CLOCK.
MENU
SET UP VCR
SET UP FEATURE
SET UP CHANNEL
IDIOMA/LANGUE:ENGLISH
VCR'S OUTPUT CH:3
SELECT:A • KEY
SET :• KEY
END :ACTION KEY
2) Press •.
SET CLOCK
AUTO CLOCK SET
MANUAL
III _1:IB'_(I]#l:IF±!w]l/l_.1111m
SELECT:A • KEY
SET :4 • KEY
END :ACTION KEY
3) Press •Y to select
TIME ZONE ADJUST
and press • or • to
subtract or add hour(s)
as necessary.
SET CLOCK IN
AUTO CLOCK SET
MANUAL
SELECT:A • KEY
SET :4 KEY
END :ACTION KEY
4) Press ACTION twice.
5) Press POWER off to
perform AUTO CLOCK
SET.
•TIME ZONE ADJUST
returns to "0" if clock is set
manually.
•VCR's Output Channel
1) Press AV to select
VCR'S OUTPUT CH.
MENU
SET UP VCR
SET UP FEATURE
SET CLOCK
SET UP CHANNEL
IDIOMA/LANGUE:ENGLISh
SELECT:A • KEY
SET :• KEY
END :ACTION KEY
2) Press •.
I IF YOU PUSH ACTION KEY, ]
VCH'S OUTPUT CH SWITCHES
TO CH 4,
3) Press ACTION.
PLEASE TUNE YOUR TV TO ]/
CH 4.
After 3 seconds
MENU
SET UP FEATURE
SET CLOCK
SET UP CHANNEL
IDIOMA/LANGUE:ENGLISH
VCR'S OUTPUT CH:4
SELECT:A • KEY
SET :• KEY
END :ACTION KEY
• To Make Corrections,
repeat step 1) ~3).
Qcb
SELECT/ SET
k:PLAY
Y:STOP
,:REW
,:FF
ACTION
(E3 QD (]D
(Z_) (Z) _ _ NUMBERED
ADt_'_.T
_ _ keys
O (CC3 0 _ ADD/DELETE
(33 O O O-_
To add channel:
Select channel with NUMBERED
keys and press ADD/DLT.
CHANNEL 08 ADDED
To delete channel:
Select channel with CH • /•
or NUMBERED keys and press
ADD/DLT.
CHANNEL 08 DELETED
39
Use when moving VCR to new location, or if a mistake Break off the tab,
was made in the One Time VCR Setup section.
•Make sure a tape is not inserted in the VCR,
1Turn VCR
Power on. r
Pressand hold both PLAY
and CHANNEL • on the VCR
for more than 5 seconds,
•The power will shut off.
3Do "One Time VCR Setup" steps on page 6.
Record Tab
Screw driver
To record again
Cover the hole
with cellophane tape.
VCR auto adjusts clock for DST. (Page 7.)
Spring (First Sunday in April)
DST:ON --> sets clock ahead one hour.
Autumn (Last Sunday in October)
DST:ON --> Turns clock back one hour.
•If your area does not observe Daylight Saving
Time, select DST:OFF.
• Keep these time changes in mind when
programming the VCR for timer recordings.
Only use tapes with the _ mark in this unit.
i
Tape Speed IType of Video Casse_e
Setting i
!T60 T120 _Tt60
SP 2 Hours
(Standard Play) 1 Hour 2 Hours 40 Minutes
LP
(Long Play) 2 Hours 4 Hours 5Hours
20 Minutes
l
I
SLP I
(Super Long Play) 3 Hours 6Hours i 8 Hours
I I
40 nua .] dw"_-I,-"],-"]I,-1_ i lT¢_ 11| !_;|O_O_li i Ia _zl _,rzTIrW,[_..im
Playing older or damaged tapes may eventually
cause video heads to become clogged.
Video Head Clog Sensor
During playback this
screen appears if VIDEO HEADS MAY
clogging is detected. .EEOCLeANiNG
To remove screen, PLEASEiNSERTHEAD
CLEAN ING CASSETI E
press PLAY on the oRREFERTOMANUAL
remote or VCR.
END PLAY KEY
•Use "dry" type head cleaning cassette only.
(Part No. NV-TCL30PT is recommended.)
r,, -
I Cleaning pe II
•Follow cleaning tape instructions carefully.
Excessive use of tape can shorten head life.
• If head clog symptoms persist, contact your
nearest Factory Service Center or authorized
Service Center. (See page 45.)
A clean video head helps produce a clear
picture.
So, we have equipped your VCR with a built-
in, non-chemical head cleaning system that
helps prevent clogging of the video heads.
Cleaning is performed each time you load or
unload a video cassette.
• This feature is preventative only, If your video
heads are seriously clogged, consider the use
of a chemical non-abrasive head cleaning kit or
take your VCR to a Service Center.
Use a soft cloth or dusting attachment of
your vacuum cleaner to dust your VCR.
Remove dust from the ventilation holes on
the back sides and bottom of the cabinet.
Plastic surfaces are easily scratched and
can be marred by alcohol and various
solvents. Avoid excessive use of oil-based
furniture polishes since the materials used
in the cabinet will accumulate more dust.
We recommend using a nonabrasive,
antistatic cleaner and polisher.
Power Source: 120 V AC, 60 Hz
Power Consumption: Power On
Approx. 23 watts
Power Off
Approx. 3.3 watts
Video Signal: EIA Standard NTSC color
Video RecordingSystem: 4 rotary heads helical
scanning system
Audio Track: 1 track (Normal)
2 channel (Hi-Fi Audio Sound)
Tuner:
Broadcast Channels:
CABLE Channels: VHF 2-13, UHF 14~69
Midband A through I (14~22)
Superband J through W (23~36)
Hyperband AA~EEE (37~64)
Lowband A-5-A-1 (95-99)
Special CABLE channel 5 A
(01)
Ultraband 65-94, 100-125
Operating Temperature: 5 °C~40 °C (41 °F~104 °F)
Operating Humidity: 10 %-75 %
Weight: 3.4 kg (7.4 Ibs.)
Dimensions: 430 (W) x 98 (H) x 250 (D) mm
16-15/16" (W) x 3-7/8" (H) x
9-3/4" (D)
Note: Designs and specifications are subject to change
without notice.
Dieital Auto Picture
Automatically controls the video output signal for
less noise depending on the tape condition.
Dioital Auto Trackinq
Continuously analyzes the signal and adjusts for
optimum picture quality.
Manual Trackina Control ('to reduce picture
noise)
Use during Playback and Slow Motion mode to reduce
picture noise. Press CH (TRACKING) •/• buttons on
the remote control or on the VCR until the picture clears
up. To return to Auto Tracking, press POWER off, then
on again afew seconds later.
V-Lock Control (to reduce picture jitter)
In Still mode, CH (TRACKING) •/• buttons operate as
aV-Lock control.
41
O8
ABC
When a function button is pressed, e.g. PLAY, or
you change channels, a 4 second display appears
first in large and then small characters.(Some
Station names may also appear if Channel
Caption is set. See page 32, 33.)
To display or remove the overlay.
DISPLAY Press DISPLAY. Function Status
Rec Time Remaining
(OTR mode only,
see page 9.)
Current Time
I
_EC 12 :00AM ABC
0:25 -0:12:34-
_STEREO _ SP
_SAP
'MONO
Channel Caption
(See pages32, 33.)
Channel
)unter
Broadcast Audio
Being Received
(See page 30,)
, Tape Speed
(See page 40.)
Time Stamp Data
(See pages 34, 35.)
This is not displayed
in Rec mode.
Whenever a blank section of a tape comes up in Play mode, or when the
selected channel has no broadcast signal with the Weak Signal Display
Feature (page 37) set to OFF, the TV screen will turn solid blue.
These displays will alert you of a missed operation or
provide further instructions.
OSD
NO CH FOUND
PLEASE CHECK ANTENNA
CABLE CONNECTION THEN
PUSH VCR CH UP KEYAGAIN
PLEASESETCLOCK
BEFORE PROGRAMMING
TURN VCR OFF
FOR _MER RECORDING
CHECK CASSETTE
RECORD TAB
NO CASSETTE
PLEAEEiNSERTACASSETTE
Caution Pg OSD
If no active TOCANCELTIMERREC
channels PUSH POWER THEN STOP KEY
are found for
CHANNEL 6
MEMORY...
If you attempt
to set or review VIDEOHEADSMAY
a Timer NEEDCLEANING
Recording and 12 PLEASEINSERTHEAD
CLEANING CASSETTE
the Clock is not ORREFERTOMANUAL
set...
After a Timer
Program has
been set... 13
If you press REC
on the remote
control or VCR,
and a cassette is 40
inserted with no
record tab...
If you press
PLAY, FF, REW,
or REC on the 8
remote control or
VCR without a 9
cassette
inserted...
END:PLAY KEY
VCR LOCK AC_VATED
i REMOTE CONTROLIS SET
TO CABLE/DSS MODE
USE VCR: VCR KEY
USETV :TVKEY
REMOTECONTROLISSET
TOW MODE
USEVCR:VCRKEY
USE CABLE/DSS:CABLE/DSS
Caution
If you press POWER or
STOP during a Timer
Recording...
(visible in VCR mode
only)
If head cleaning
becomes
necessary while
playing
back a tape...
If you press a function
button other than
STOP/EJECT or
POWER while the
VCR is in VCR Lock
mode...
If you press any
invalid keys on the
remote while in
CABLE/DSS
mode...
If you press any
invalid keys on the
remote while in TV
mode...
pg-
13
41
36
2O
21
36
20
21
36
43
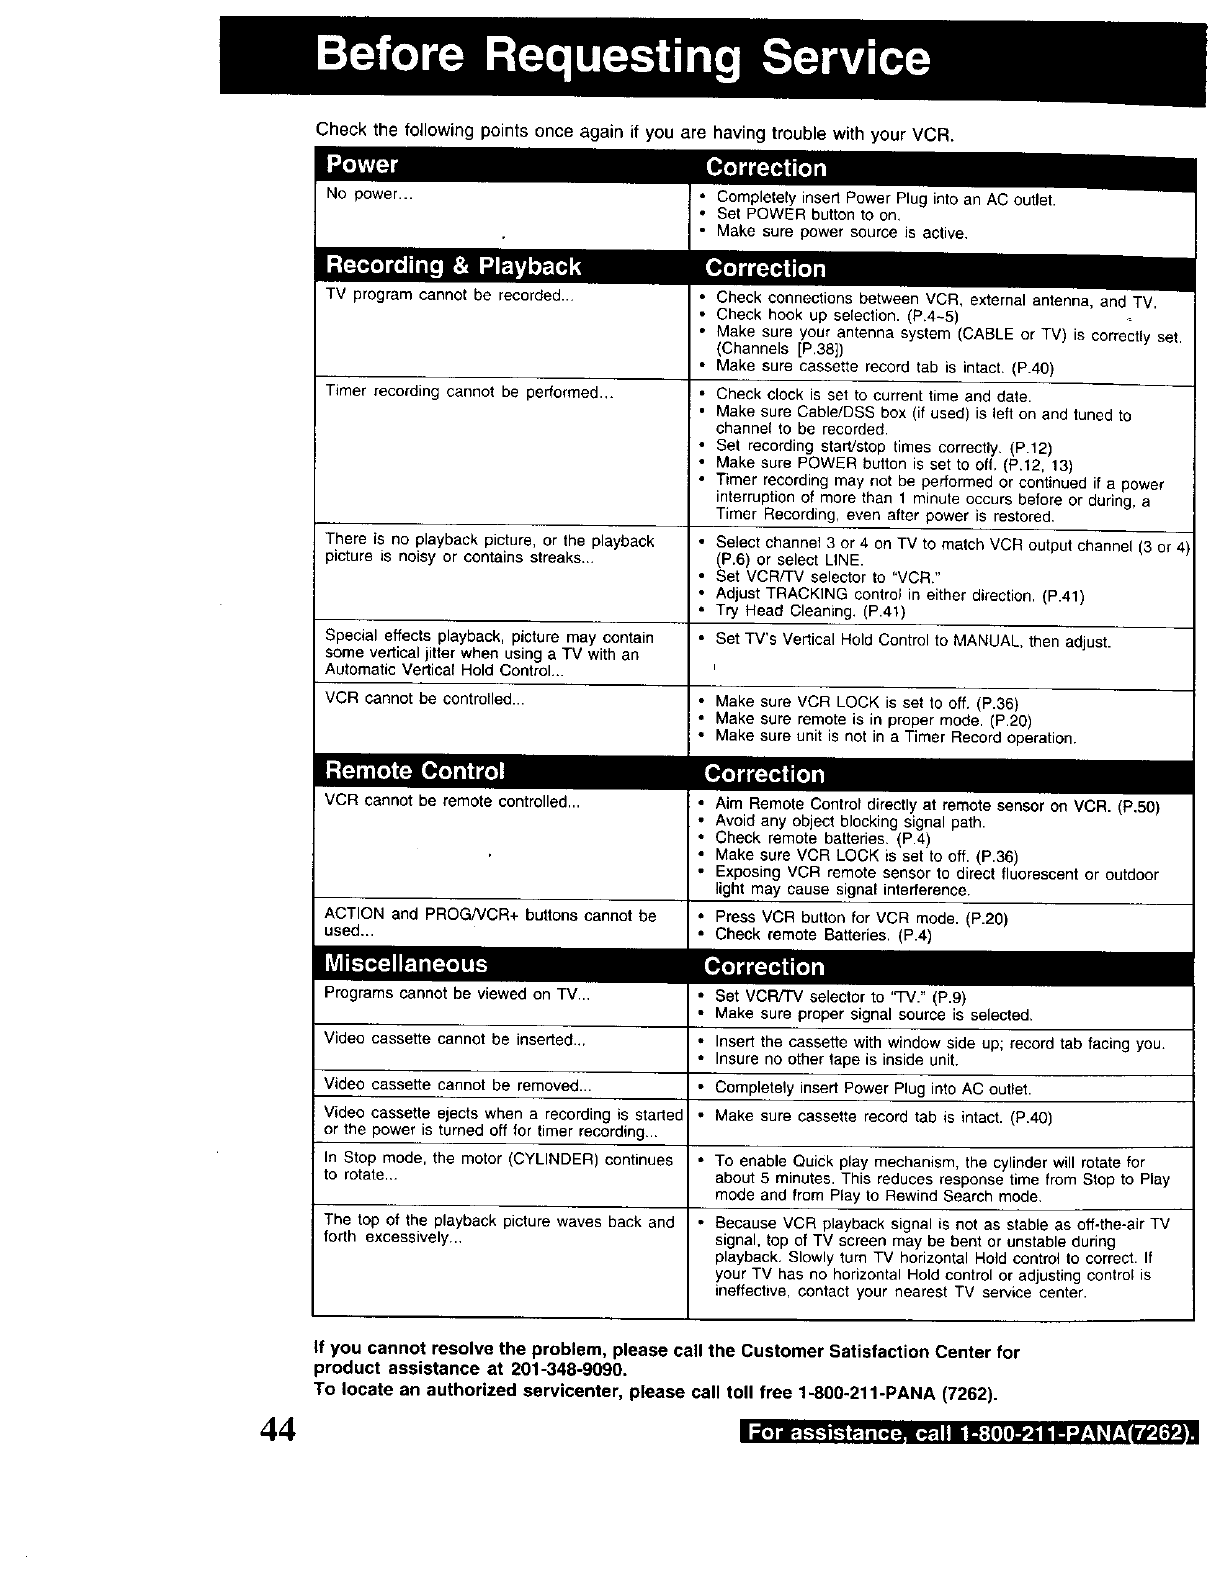
Check the following points once again if you are having trouble with your VCR.
TV program cannot be recorded..,
Timer recording cannot be performed.,.
• Check connections between VCR, external antenna, and TV.
• Check hook up selection. (P.4-5)
• Make sure your antenna system (CABLE or TV) is correctly set.
(Channels [P,38])
• Make sure cassette record tab is intact. (P.40)
• Check clock is set to current time and date.
• Make sure Cable/DSS box (if used) is left on and tuned to
channel to be recorded.
• Set recording start/stop times correctly. (P.12)
• Make sure POWER button is set to oft, (P.12, 13)
• Timer recording may not be performed or continued if a power
interruption of more than 1 minute occurs before or during, a
Timer Recording, even after power is restored,
There is no playback picture, or the playback • Select channel 3 or 4 on TV to match VCR output channel (3 or z
picture is noisy or contains streaks... (P.6) or select LINE.
• Set VCR/TV selector to "VCR/'
• Adjust TRACKING control in either direction. (P.41)
• Try Head Cleaning, (P.41)
Special effects playback, picture may contain • Set TV's Vertical Hold Control to MANUAL, then adjust.
some vertical jitter when using a TV with an
Automatic Vertical Hold Control...
VCR cannot be controlled .... Make sure VCR LOCK is set to off. (P.36)
• Make sure remote is in proper mode. (P.20)
• Make sure unit is not in a Timer Record operation.
VCR cannot be remote controlled... • Aim Remote Control directly at remote sensor on VCR. (P.50)
• Avoid any object blocking signal path.
• Check remote batteries. {P.4)
• Make sure VCR LOCK is set to off. (P.36)
• Exposing VCR remote sensor to direct fluorescent or outdoor
light may cause signal interference.
ACTION and PROG/VCR+ buttons cannot be • Press VCR button for VCR mode. (P.20)
used .... Check remote Batteries. (P.4)
Programs cannot be viewed on TV.., • Set VCR/TV selector to "TV." (P.9)
• Make sure proper signal source is selected.
Video cassette cannot be inserted... • Insert the cassette with window side up; record tab facing you.
• Insure no other tape is inside unit.
Video cassette cannot be removed .... Completely insert Power Plug into AC outlet.
Video cassette ejects when a recording is started • Make sure cassette record tab is intact. (P.40)
or the power is turned off for timer recording...
In Stop mode, the motor (CYLINDER) continues • To enable Quick play mechanism, the cylinder will rotate for
to rotate,., about 5 minutes. This reduces response time from Stop to Play
mode and from Play to Rewind Search mode.
The top of the playback picture waves back and • Because VCR playback signal is not as stable as off-the-air TV
forth excessively.., signal, top of TV screen may be bent or unstable during
playback, Slowly turn TV horizontal Hold control to correct. If
your TV has no horizontal Hold control or adjusting control is
ineffective, contact your nearest TV service center.
44
If you cannot resolve the problem, please call the Customer Satisfaction Center for
product assistance at 201-348-9090.
To locate an authorized servicenter, please call toll free 1-800-211-PANA (7262).
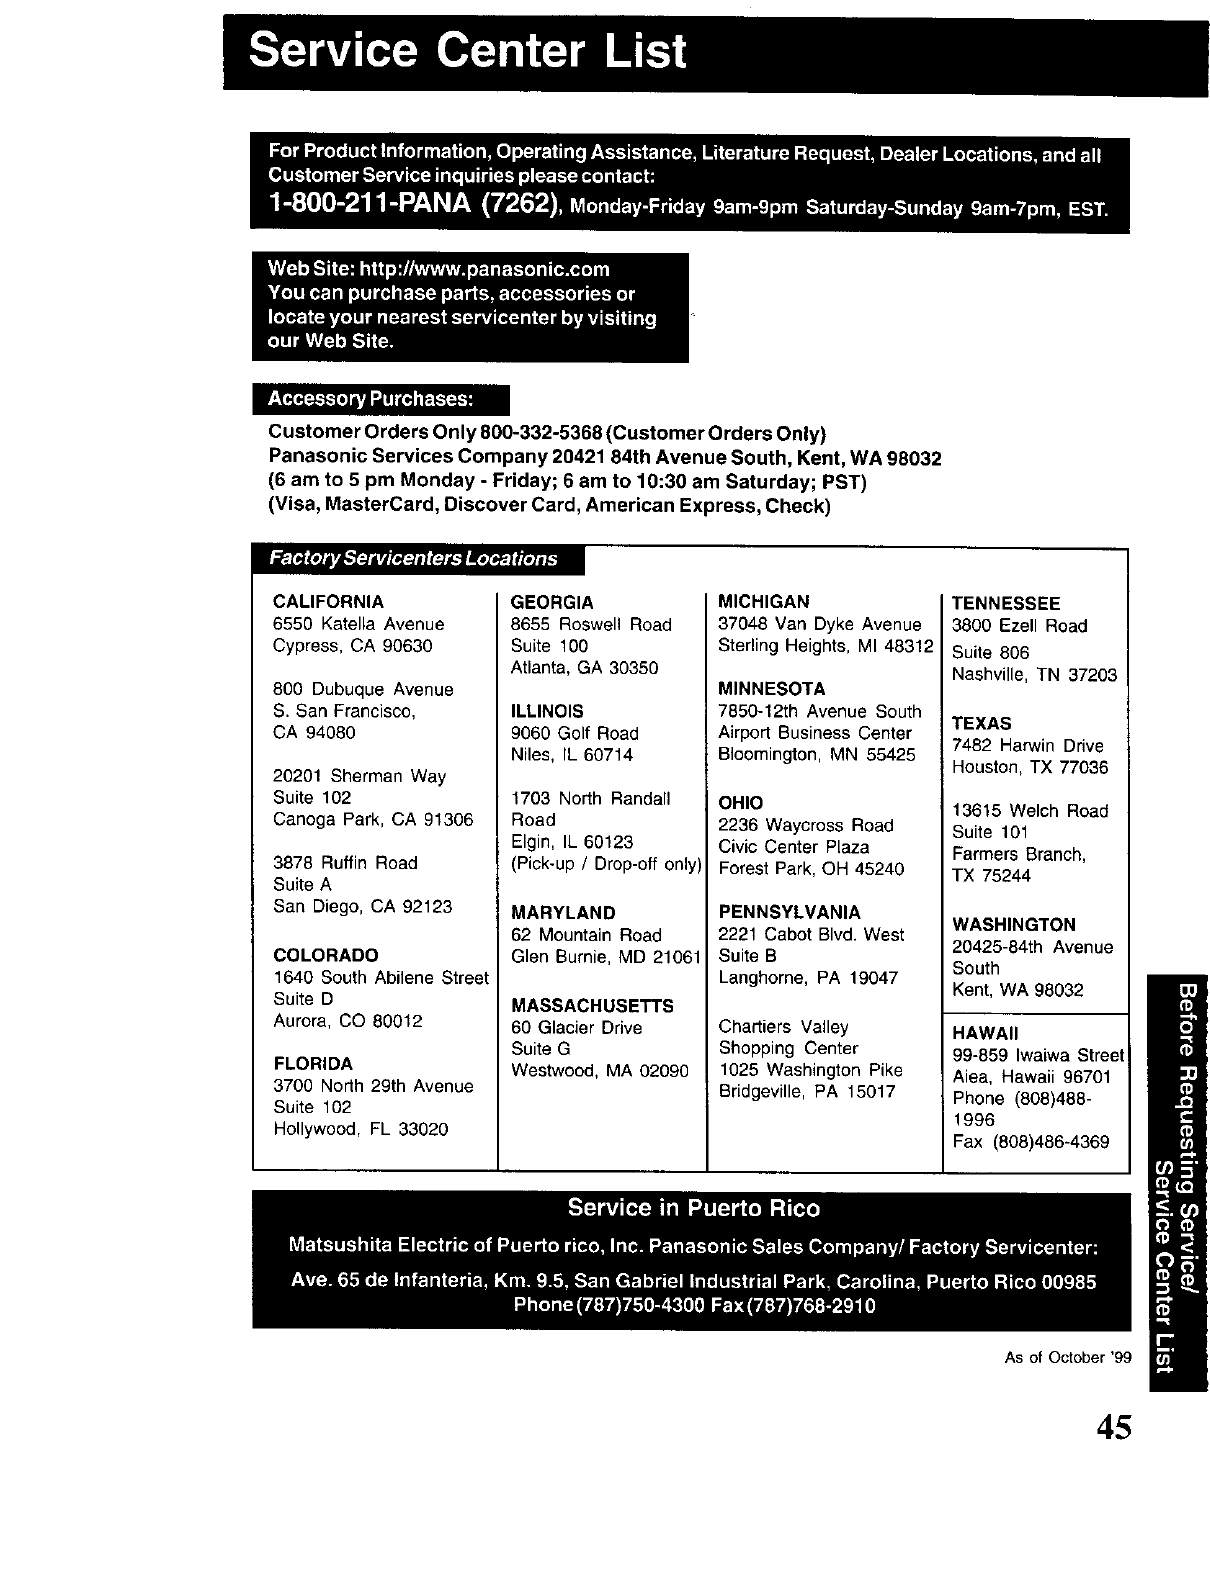
Customer Orders Only 800-332-5368 (Customer Orders Only)
Panasonic Services Company 20421 84th Avenue South, Kent, WA 98032
(6 am to 5 pm Monday - Friday; 6am to 10:30 am Saturday; PST)
(Visa, MasterCard, Discover Card, American Express, Check)
CALIFORNIA
6550 Katella Avenue
Cypress, CA 90630
800 Dubuque Avenue
S. San Francisco,
CA 94080
20201 Sherman Way
Suite 102
Canoga Park, CA 91306
3878 Ruffin Road
Suite A
San Diego, CA 92123
COLORADO
1640 South Abilene Street
Suite D
Aurora, CO 80012
FLORIDA
3700 North 29th Avenue
Suite 102
Hollywood, FL 33020
GEORGIA
8655 Roswell Road
Suite 100
Atlanta, GA 30350
ILLINOIS
9060 Golf Road
Niles, IL 60714
1703 North Randall
Road
Elgin, IL 60123
(Pick-up /Drop-off only)
MARYLAND
62 Mountain Road
Glen Burnie, MD 21061
MASSACHUSETTS
60 Glacier Drive
Suite G
Westwood, MA 02090
MICHIGAN
37048 Van Dyke Avenue
Sterling Heights, MI 48312
MINNESOTA
7850-12th Avenue South
Airport Business Center
Bloomington, MN 55425
OHIO
2236 Waycross Road
Civic Center Plaza
Forest Park, OH 45240
PENNSYLVANIA
2221 Cabot Blvd. West
Suite B
Langhorne, PA 19047
Chartiers Valley
Shopping Center
1025 Washington Pike
Bridgeville, PA 15017
TENNESSEE
3800 Ezell Road
Suite 806
Nashville, TN 37203
TEXAS
7482 Harwin Drive
Houston, TX 77036
13615Welch Road
Suite 101
Farme_ Branch,
TX 75244
WASHINGTON
20425-84th Avenue
South
Kent, WA 98032
HAWAII
99-859 Iwaiwa Street
Aiea, Hawaii 96701
Phone (808)488-
1996
Fax (808)486-4369
As of October '99
45
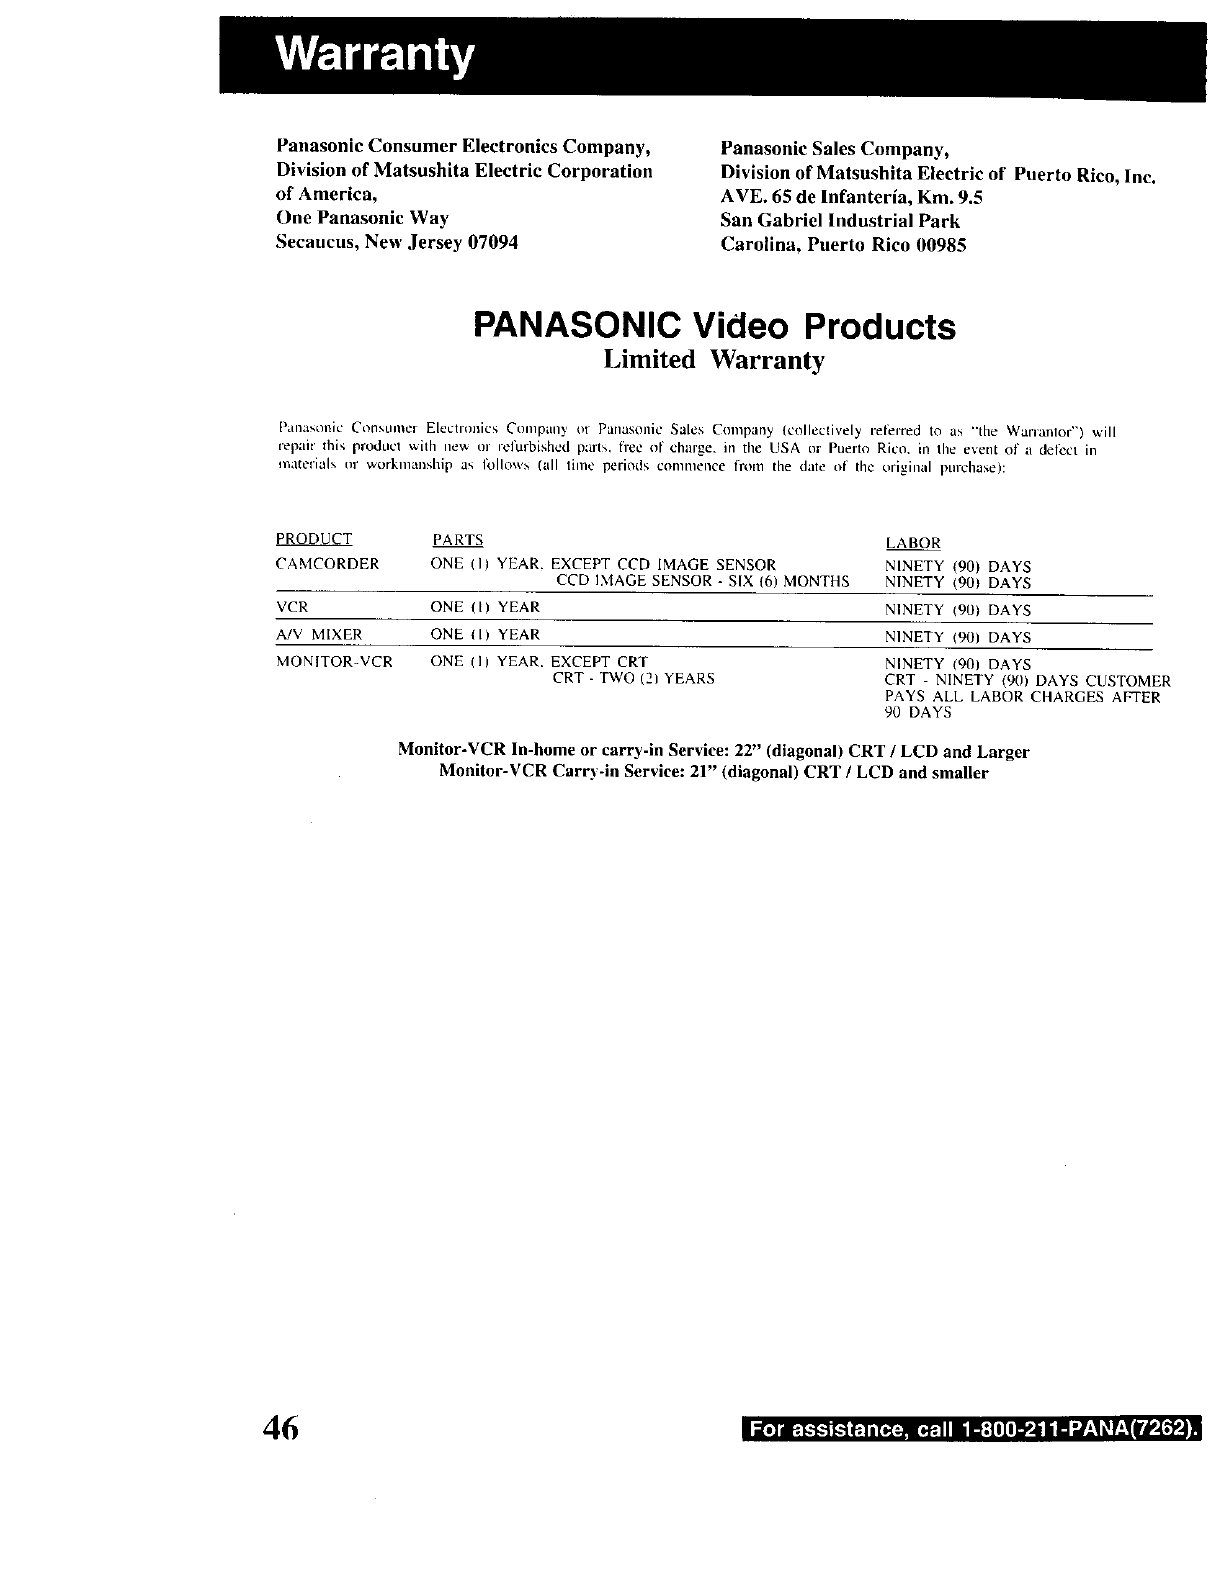
Panasonic Consumer Electronics Company,
Division of Matsushita Electric Corporation
of America,
One Panasonic Way
Secaucus, New Jersey 07094
Panasonic Sales Company,
Division of Matsushita Electric of Puerto Rico, Inc.
AVE. 65 de lnfanteria, Kin. 9.5
San Gabriel Industrial Park
Carolina, Puerto Rico 00985
PANASONIC Video Products
Limited Warranty
[)all:l_,ol_ic Cofl_,Llme[ Electronics Company ot Panasonlc Sales Company Icolleclively referred to as "'the Wanantor") will
repmr Ibis product with new or refurbished part_. I're¢ of chaise, in the USA or Puerto Rico. in the event of a deicer in
material, Ill' worknlanship as I()llo\\'_ (all thn¢ periods commence frOEll the date of the original purchase):
PRODU_T
CAMCORDER
PARTS LABOR
ONE (I) YEAR. EXCEPT CCD IMAGE SENSOR NINETY (90) DAYS
CCD DdAGE SENSOR - SIX (6) MONTHS NINETY (90) DAYS
VCR ONE (I) YEAR NINETY (90) DAYS
A/V MIXER ONE tl) YEAR NINETY (90) DAYS
MONITOR-VCR ONE 11) YEAR. EXCEPT CRT
CRT - TWO (21 YEARS NINETY (90) DAYS
CRT - NINETY (90) DAYS CUSTOMER
PAYS ALL LABOR CHARGES AFTER
90 DAYS
Monitor-VCR In-home or carry-in Service: 22" (diagonal) CRT /LCD and Larger
Monitor-VCR Carry-in Service: 21" (diagona) CRT /LCD and smaller
46 I _.] I_.t-$-11--I_.l_[,_:-_E*. ]Ii It:[lI0D'.i liII "J:N_1:!t'_4 N
Batteries (d" included) -New rechargcablc batteries m exchange t_r de/ecti\,e techurgeable batteries IOl ten (10) days
Non rechargeable batteries are not warranted¸
_(il" included] - New video cassette tape in exdmnge Ioi a det'ecti_e \ideo ca',_,ette tape I_lt fi\e !SI days
hl honlt', carr3* in or mail in selvice, as applicable, in tile USA can be obtained during tile warranty period by Ctultactlng a
Pana',onic Services Company IPASC/ Factory Servicentcr li,,ted in the Service Directory¸ Or call toll free 1-800-211 PANA
172621, to locate an authorized PASC Servicenter. Carry-in or mai! ill sCiViCe in Puerto Rico can bc obtained during the
wananty period by calling Ibe Panasonic Sales Conlpany telephone nunlber listed in the Sel\,icentet" Dil_ctory
This warranty is extended oldy to the olighlaI pulchaser A purchase leccipt oi otllel ptool ol the dale ol tile oliginai
purchase is i_quired before warranty service is i_ndered
This \_arranty only co_ers ]hilures due to del_cts ill nlatcrials and _orkmanship which occur duritlg normal use and does
not cover nornla] maintenance, illchlding, but not habited tcJ. video and audio head cleallillg, The wall'anty doex tlot cover
damage which occurs in _hipnlent. or _dlures which are caused by pix)_lttcts not supplied by the wauantor, ol¸ faihnes
which resuh lion1 accident, misuse, abuse, neglect, mishandling, ml_application, ahclation, modification, lauhy instalhttion.
set-up adjusttnents, imprtlpcr antenna, inadequate signal pickup, n_ahtdjustment of consumer controls, unproper operation.
power line surge, improper vohage supply, lightning damage, conunercial use stlch as hotel, tdTice, restaurant+ or other
business or rental use of thc product, or service by anyone other than it PASC Factory gervicenter or a PAge authorized
Servicenter, or damage that is attributable to acts of God.
LIMITS AND EXCLUSIONS
There are no express warranties except as listed above,
THE WARRANTOR SHALL NOT BE LIABLE FOR INCIDENTAL OR CONSEQUENTIAL DAMAGES (INCLUDING,
WITHOUT LIMITATION, DAMAGE TO TAPES) RESULTING FROM THE USE OF THIS PRODUCTS, OR ARISING
OUT OF ANY BREACH OF THE WARRANTY. ALL EXPRESS AND IMPLIED WARRANTIES, INCLUDING THE
WARRANTIES OF MERCHANTABILITY AND FITNESS FOR PARTICULAR PURPOSE, ARE LIMITED TO THE
APPLICABLE WARRANTY PERIOD SET FORTH ABOVE. Some slates do not allow the exclusion or limitation of
incidental or consequential damages, or limitations on how hmg an implied warranty lasts, so the above exclusions or
limitations may not apply to you.
This warranty gives you specific legal rights and you may also have other rights which vary from state to state.
If a problem with this product develops during or aRer the warranty peliod, you nmy contact your dealer or Servicenter. If
the problem is not handled to your satist3ctlon, then write to the Customer Satis+action Center at the Panasonic Consumer
Electronics Company address above.
SERVICE CALLS WHICH DO NOT INVOLVE DEFECTIVE MATERIALS OR WORKMANSHIP AS DETERMINED BY
THE WARRANTOR, IN ITS SOLE DISCRETION, ARE NOT COVERED COSTS OF SUCH SERVICE CALLS ARE THE
RESPONSIBILITY OF THE PURCHASER.
warvid 10/20197
47

1Encienda el televisor y la videograbadora.
Presione POWER.
•Si se utilize un cable de conexi6n AV, situe el TV en la posicion
Video en lugar de en la posicidn canal. (Vease el punto a, en la
pagina 4).
ISELECT £ANGLdAGE /
PUsH CH • ENGL I_H
OPRIMIR CH • ESPA'qOL
APP VCR/TV : FRAN_AIS
TO CHANGE VCR' S OUTPUT
= CH. PUSH ACTION KEy
;_ Presione ACTION
IF YQ[J pUSN N3TIQN K_Y,
ITO CH4VCR' S OUTPUT CH SWITCHES I
.g Presone ACTION
PLEASE YOUR TV TO
ICH4 TUNE I
_,,_ Oespues de 3
_ii:,,_ ,_ segundos
2Visualizac, idn de
SELECCION DE IDIOMA.
Esta visualizaci6n aparece s61o
cuando realice la configuracidn
pot pfimera vez.
Seleccione el idioma.
i¢=_='4_,_para Ingles
I OH _ I (ENGLISH)
I_ pare Esj_aflol
_ (ESPANOL)
'i _ para Frances
_'_" (FRAN_AIS)
Si se utilize la
conexibn b) (v_ase la
pdgina 4), sintonicelo
en el canal de salida
de VCR.
Si la imagen tiene oscilaciones o
ruido cuando el equipo este
situade en VCR OUTPUT CH3,
cambie a CH4 pulsando ACTION
dos veces.
Luego, sintonice el TV en el CH4.
•Sintonice siempre e_ TV a este canal pare monitodzar la video
_rabadora.
• Si utiliz6 la conexion del conector audio/video, sintonice el TV
a su entrade de video.
• Si se ajusta el idioma equivocado, realice los pasos de
"Reaiuste de todes Lasfur_ciones de memoria de la video
grabadora" en la pagina 40.
/ _ j)_ Comience elajuste
6FIJACIONAUTO.A/RELOautomdticodecanales
CO_ECTE_LCABleOEuAIE/ yel ajuste automdtico
ANTENA Y S I ESTA USANO0
UNA CaJA DE TV PO R CABLE del relol.'"
SINTONICE AL CANAL PBS
DE SU LOCAL LUEGO Presione
AUTOPROGRAMACION
EN PROCESO
FIJAC_ON AUTOMATICA
DEL RELOJ
EN PROCESO
_S01 _1 Ajuste _(_aso2_ (A uste sin
..... termnado --- term nar}..
1/ 4/2000MAR12:00PM
CANAL FIJADO ; CA 02
FIJACION AUTOMATICA
COMPLETO
TER_INAR:OPRIM_R CH UP
FIJACION AUTOMATICA
DEL RELOJ
INCOMPLETO
OPRIMIR ACTION
PARA FIJAR EL RELOJ
Presione CH • pare salir,
_El ajuste del reloj es incompleto.
Ajuste el reloj manualmente,
1) Presione ACTION,
2) Presione •V pare seleccionar el rues.
3) Presione _" para ajustar.
• De la misma manera, ajuste el dia, el ariD, la hora
y la hora de ahorro de energia (VERANO).
Para hacer correcciones, pres_one repetidamente
•_1• para moverse hasta el error, luego eorrijalo.
4) Presione ACTION. (El reloj se aetna.)
• Para salir de este modo, pulse la tecla
ACTION nuevamente.
3IE N
ELEGIR:& •
FIJAR :l.
TERI_ INAI_: ACTtON
Seleccione la conexi6n.
1)Presione•V pare
seleccionar.
2) Presione•para ajustar.
• Si ud. ha elegido CABLE/DSS • VCR • TV, continue
al paso 4 y s61o el canal de satida del cable ser&
memorizado.
Si no, veya al paso 6.
ELEGI_ LACQNEXION
CABLE/DSS_VCR_TV
SALIDA D_I_BLEIDSS
ELEGIR:& •
FIJAR _
TERMINAR:ACTfON
Seleccione la caja de TV
por cable o su receptor
el canal de salida.
1)Presione •V pare
seleccionar.
2) Presione • para fijar.
• Si es necesario, consulte su manual de la caja de
TV por cable,
• Siesta usando los terminales de audio/video para su
conexidn pare la caja de TV por cable, aluste
"SALIDA DE VIDEO".
5 Encienda la caja de TV por cable y fije la caja
de TV por cable al canal PBS de su zona.
48
1Presione ACTION pare exhiba el menO.
_ MENU
REPARAR VCR
I_ FUNCtONES
f lJAR CANAL
LANGOE/_NGUAGE:_SPANOL
SALIOA DE VCR CANAL:3
ELEGIR& •
FIJAR :_
TERMtNAR:ACT]ON
Presione ,Ik_' para
seleccionar "FIJAR
RELOJ" y luego
presione •.
3FIJAR RELOJ
F _JACION AUTOMAT I CA
AJUSTE ZONA HORA : 0
ELEGIR:_ •
FIjAR :_
TERMINAR:ACTtON
Presione •_ para
seleccionar MANUAL y
luego presione •.
Presione •V y <1• para
seleccionar y ajustar la
hora y la fecha.
5 Presione ACTION dos veces para
comience a funcionar y salir desde este modo.
I:,[.] i_,i,i. [, _TIIp,illl =.II_.I il_:{iTl_4ii _"-.I'I_f-_yif_'['_.-
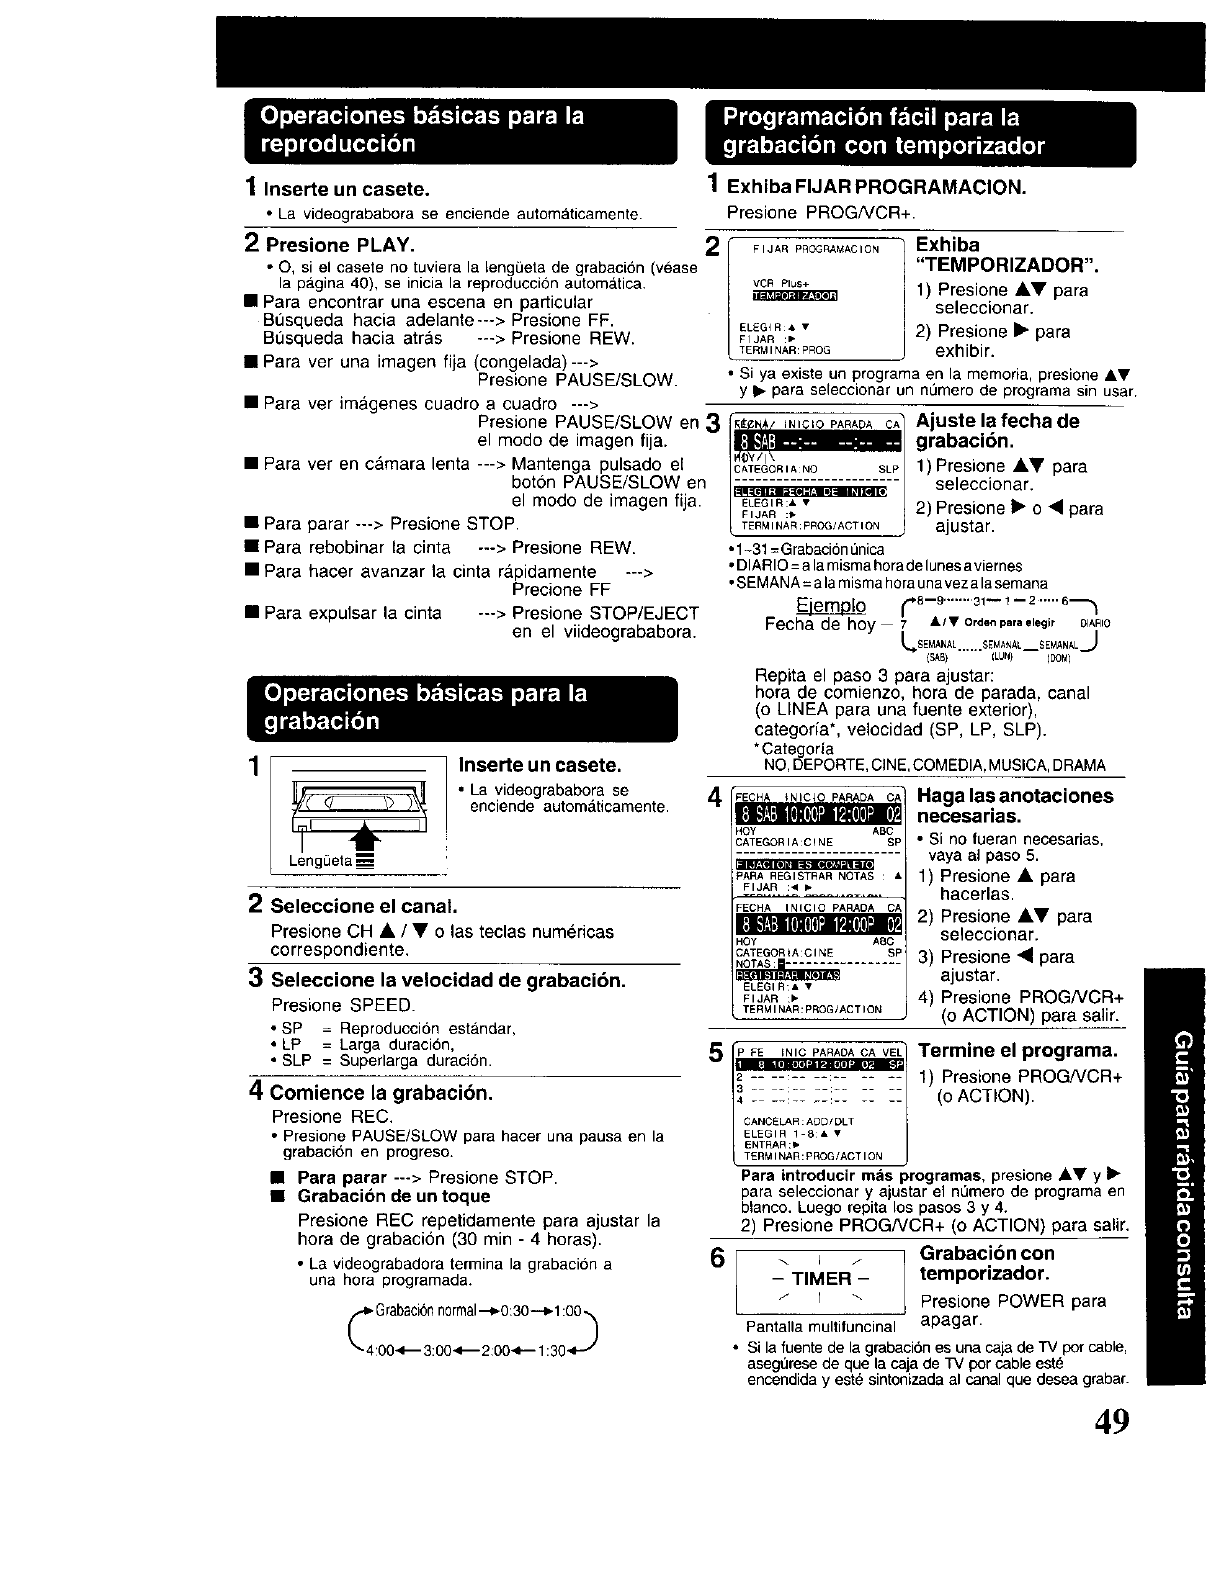
1 Inserte un casete,
•La videogrababora se enciende automaticamente.
2Presione PLAY.
• o. si el casete no tuviera la lengL_etade grabaci6n (vease
la pa.gina40), se inicia la reproduccion automatica.
• Para encontrar una escena en particular
Bt_squeda hacia adelante---> Presione FF.
Bflsqueda hacia atr&s ---> Presione REW.
• Para ver una imagen fija (congelada)--->
Presione PAUSE/SLOW.
• Para ver imagenes cuadro a cuadro --->
Presione PAUSE/SLOW en 3
el modo de imagen fija.
• Para ver en c_mara lenta ---> Mantenga pulsado el
boton PAUSE/SLOW en
el modo de imagen fija.
• Para parar ---> Presione STOP.
• Para rebobinar la cinta ---> Presione REW.
• Para hacer avanzar la cinta ra.pidamente --->
Precione FF
• Para expulsar la cinta ---> Presione STOP/EJECT
en el viideogrababora.
I t
Lengt3eta'____
Inserte un casete.
• La videogrababora se
enciende autom_.ticamente.
2Seleccione el canal.
Presione CH •/• o las teclas numericas
correspondiente.
3Seleccione la velocidad de grabacibn.
Presione SPEED.
• SP =Reproduccion estandar,
:LP = Larga duraci6n,
SLP Superlarga duracion.
4Comience la grabacibn.
Presione REC.
•PresionePAUSE/SLOW para hacer una pausa en la
grabaci6n en progreso.
• Para parar ---> Presione STOP.
• Grabacion de un toque
Presione REC repetidamente para ajustar la
hora de grabaci6n (30 min - 4 horas).
• La videograbadora termina la grabacion a
una hora programada.
_44G0r2ba¢ij_ii rma1:000:30<,_"_ii_.._
1 Exhiba FIJAR PROGRAMACION.
Presione PROG/VCR+.
FIJAR pROGRAMAC ION
VCR Plus+
ELEGIR, •
FIJAR :,
TERMINAR:PROG
4
Exhiba
"TEMPORIZADOR".
1) Presione •• para
seleccionar.
2) Presione •para
exhibir.
• Si ya existe un programa en la memoria, presione AV
y I_ para seleccionar un n0mero de programa sin usar.
_]_ INICIO PARADA CA
......:LPj
TERMINAR : pRQG]ACTION
• 1-31=Grabacion_nica
Ajuste la fecha de
grabacibn.
1) Presione A• para
seleccionar.
2) Presione • o • para
ajustar.
• DIARIO=a lamismahoradelunesaviernes
•SEMANA=a lamismahoraunaveza lasemana
1_"8 --9'""'" 31-- 1-- 2""'" 6"_
Fecha de hoy 7 At • Ordenparaelegir DIARIO
L,_SEMANAL......$EMANAL SEMANAL,,.._
{SAB} (LUN) (_3M)
Repita el paso 3 para ajustar:
hora de comienzo, hora de parada, canal
(o LINEA para una fuente exterior),
categoria*, velocidad (SP, LP, SLP).
*Categoria
NO,DEPORTE,CINE,COMEDIA,MUSlCA,DRAMA
HOY ABC
CATEGORIA:CqNE SP
,*e
=ARA REGISTRAR NOTAS : •
FIJAR :4
=ECHA INICIO PARADA CA"
4Oy ABC
3ATEGORIA:CINE SP
ELEGIR:_ •
FIJAR :_
TERMINAR:PROG/ACTION
Haga las anotaciones
necesarias.
• Si no fueran necesarias,
vaya al paso 5.
1) Presione • para
hacerlas.
2) Presione •• para
seleccionar.
3) Presione • para
ajustar.
4) Presione PROG/VCR+
(o ACTION) para salir.
5 [P _ _"_.C.P*".A?_.C.*W.L1Termine el programa.
1) Presione PROGNCR+
ii iiii i?ii ii ii <oACT ON)
TERMINAR:PROG/ACTION
6
Para introducir maisprogramas, presione AY y _
para seleccionar y ajustar el nOmerode programaen
blanco. Luego repita los pasos 3 y 4.
2) Presione PROG/VCR+ (o ACTION) para salir.
_Grabacibn con
-_TIMER - temporizador.
/I \ Presione POWER para
Pantallamultifuncinal apagar.
• Si la fuentede la grabaci6nes una caja de TV porcable,
asegflresede que lacaja de TV por cableeste
encendiday este sintonizadaal canalque deseagrabar.
49
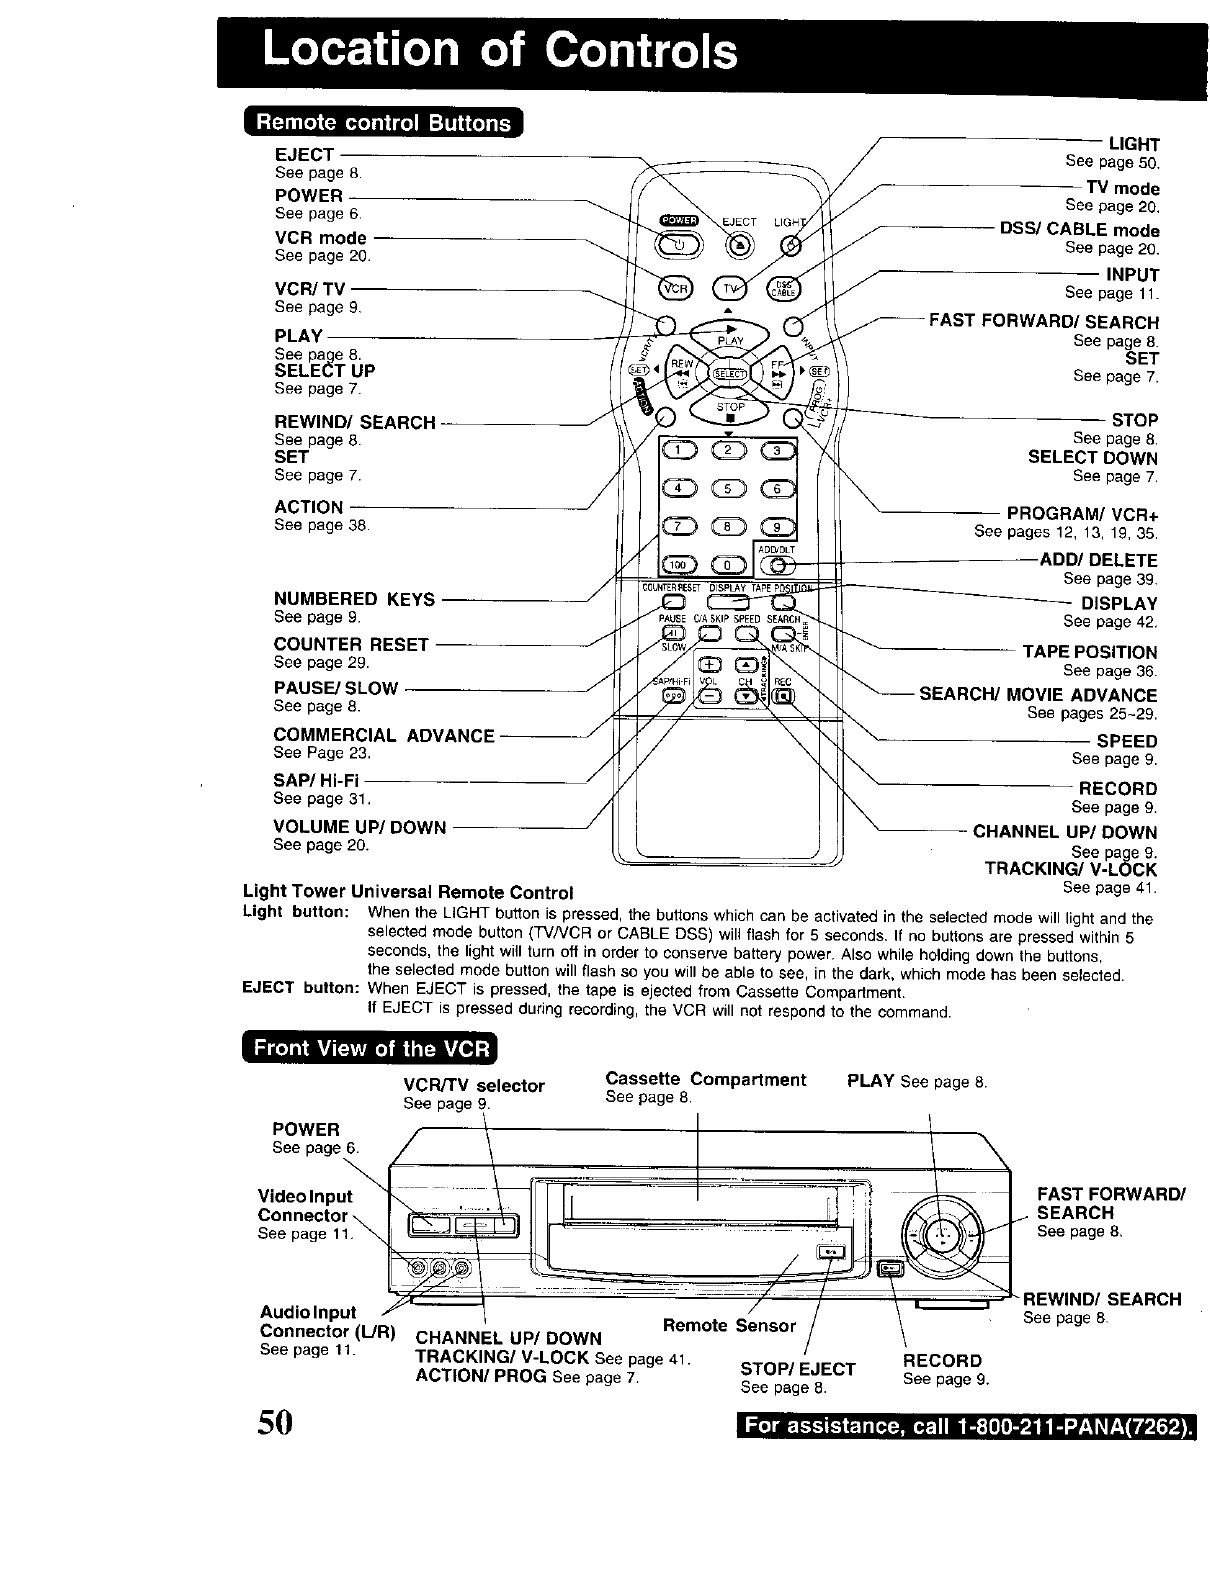
I;[_iJ[ll(_-i[_o]iti'_lll:l_i(o]il_
EJECT
See page 8.
POWER
See page 6
VCRmode
See page 20.
VCR/TV
See page 9.
PLAY
See page 8.
SELECT UP
See page 7.
EJECT
LIGHT
See page 50.
TV mode
See page 20,
DSS/CABLE mode
See page20.
INPUT
See page 11.
)RWARD/SEARCH
See page 8.
SET
See page 7.
REWIND/SEARCH
See page 8.
SET
See page 7.
ACTION
See page 38.
NUMBERED KEYS
See page 9.
COUNTER RESET J
See page 29.
PAUSE/SLOW J
See page 8.
COMMERCIAL ADVANCE
See Page 23.
SAP/Hi-Fi J
See page 31. /
VOLUME UP/DOWN /
See page 20.
Light Tower Universal Remote Control
(
/
/,
/
STOP
See page 8.
SELECT DOWN
See page 7.
-- PROGRAM/VCR+
See pages 12, 13, 19, 35.
ADD/DELETE
See page 39.
DISPLAY
See page 42,
--TAPE POSITION
See page 36.
SEARCH/MOVIE ADVANCE
See pages 25~29.
SPEED
See page 9.
RECORD
See page 9.
CHANNEL UP/DOWN
See page 9.
TRACKING/V-LOCK
See page 41.
Light button: When the LIGHT button is pressed, the buttons which can be activated in the selected mode will light and the
selected mode button (TV/VCR or CABLE DSS) will flash for 5 seconds. If no buttons are pressed within 5
seconds, the light will turn off in order to conserve battery power. Also while holding down the buttons,
the selected mode button will flash so you will be able to see, in the dark, which mode has been selected.
EJECT button: When EJECT is pressed, the tape is ejected from Cassette Compartment.
If EJECT is pressed during recording, the VCR will not respond to the command.
• i _o1lllifd [_vllile) •i I'I_TLI]; •
VCR/TV selector Cassette Compartment PLAY See page 8.
See page 9. See page 8.
See page 6.
Video Input_ __ I_==_ _
Connector \ I I
ConnectorAUdi°lnput_Remote Sensor /
(L/R) CHANNEL UP/DOWN /
See page 11. TRACKING/V-LOCK See page 41. /RECORD
ACTION/PROG See page 7. STOP/EJECT
See page 8. See page 9.
FAST FORWARD/
iSEARCH
See page 8.
"REWIND/SEARCH
See page8
5O
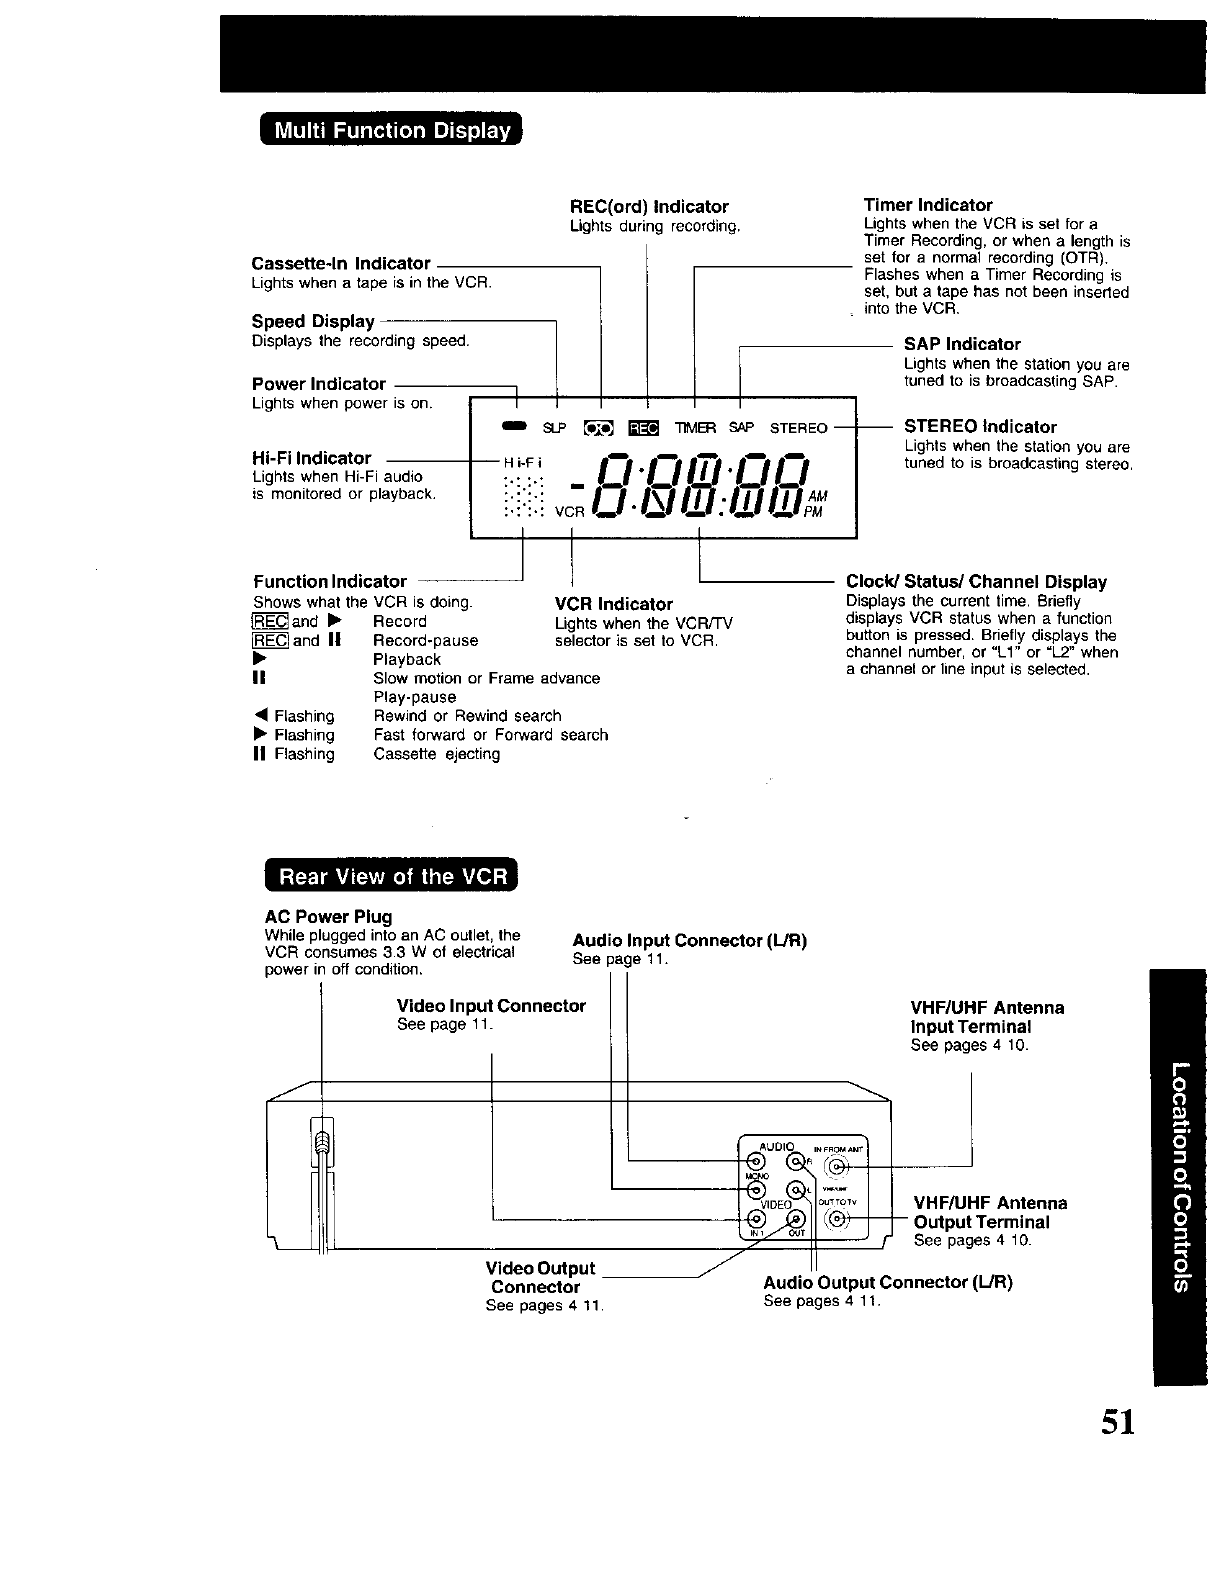
Cassette-In Indicator
Lights when a tape is in the VCR.
Speed Display
Displays the recordingspeed.
Power Indicator
Lightswhen poweris on.
REC(ord) Indicator
Lightsduring recording.
_ _ _ _ SAP STEREO----
Timer Indicator
Lights when the VCR is set for a
Timer Recording, or when a length is
set for a normal recording (OTR).
Flashes when a Timer Recording is
set, but a tape has not been inserted
.into VCR.
SAP Indicator
Lights when the station you are
tuned to is broadcasting SAP.
Hi-Fi Indicator
Lights when Hi-Fi audio
is monitored or playback,
Function Indicator
Shows what the VCR is doing.
_]and • Record
FRE_and II Record-pause
• Playback
II
• Flashing
•Flashing
II Flashing
.0.017_1.00
1 t
VCR Indicator
Lights when the VCR/TV
selector is set to VCR,
Slow motion or Frame advance
Play-pause
Rewind or Rewind search
Fast forward or Forward search
Cassette ejecting
STEREO Indicator
Lights when the station you are
tuned to is broadcasting stereo.
Clock/Status/Channel Display
Displays the current time. Briefly
displays VCR status when a function
button is pressed. Briefly displays the
channel number, or "LI" or "L2" when
a channel or line input is selected.
AC Power Plug
While plugged into an AC outlet, the
VCR consumes 3.3 W of electrical
power in off condition.
Audio Input Connector (L/R)
See pa e 11.
Video Input Connector
See page 11. VHF/UHF Antenna
Input Terminal
See pages 4 10.
I
Video Output _ f II "
Connector
See pages 4 t 1.
VHF/UHFAntenna
-- OutputTerminal
See pages 4 10.
Audio Output Connector (L!R)
See pages4 11.
5!
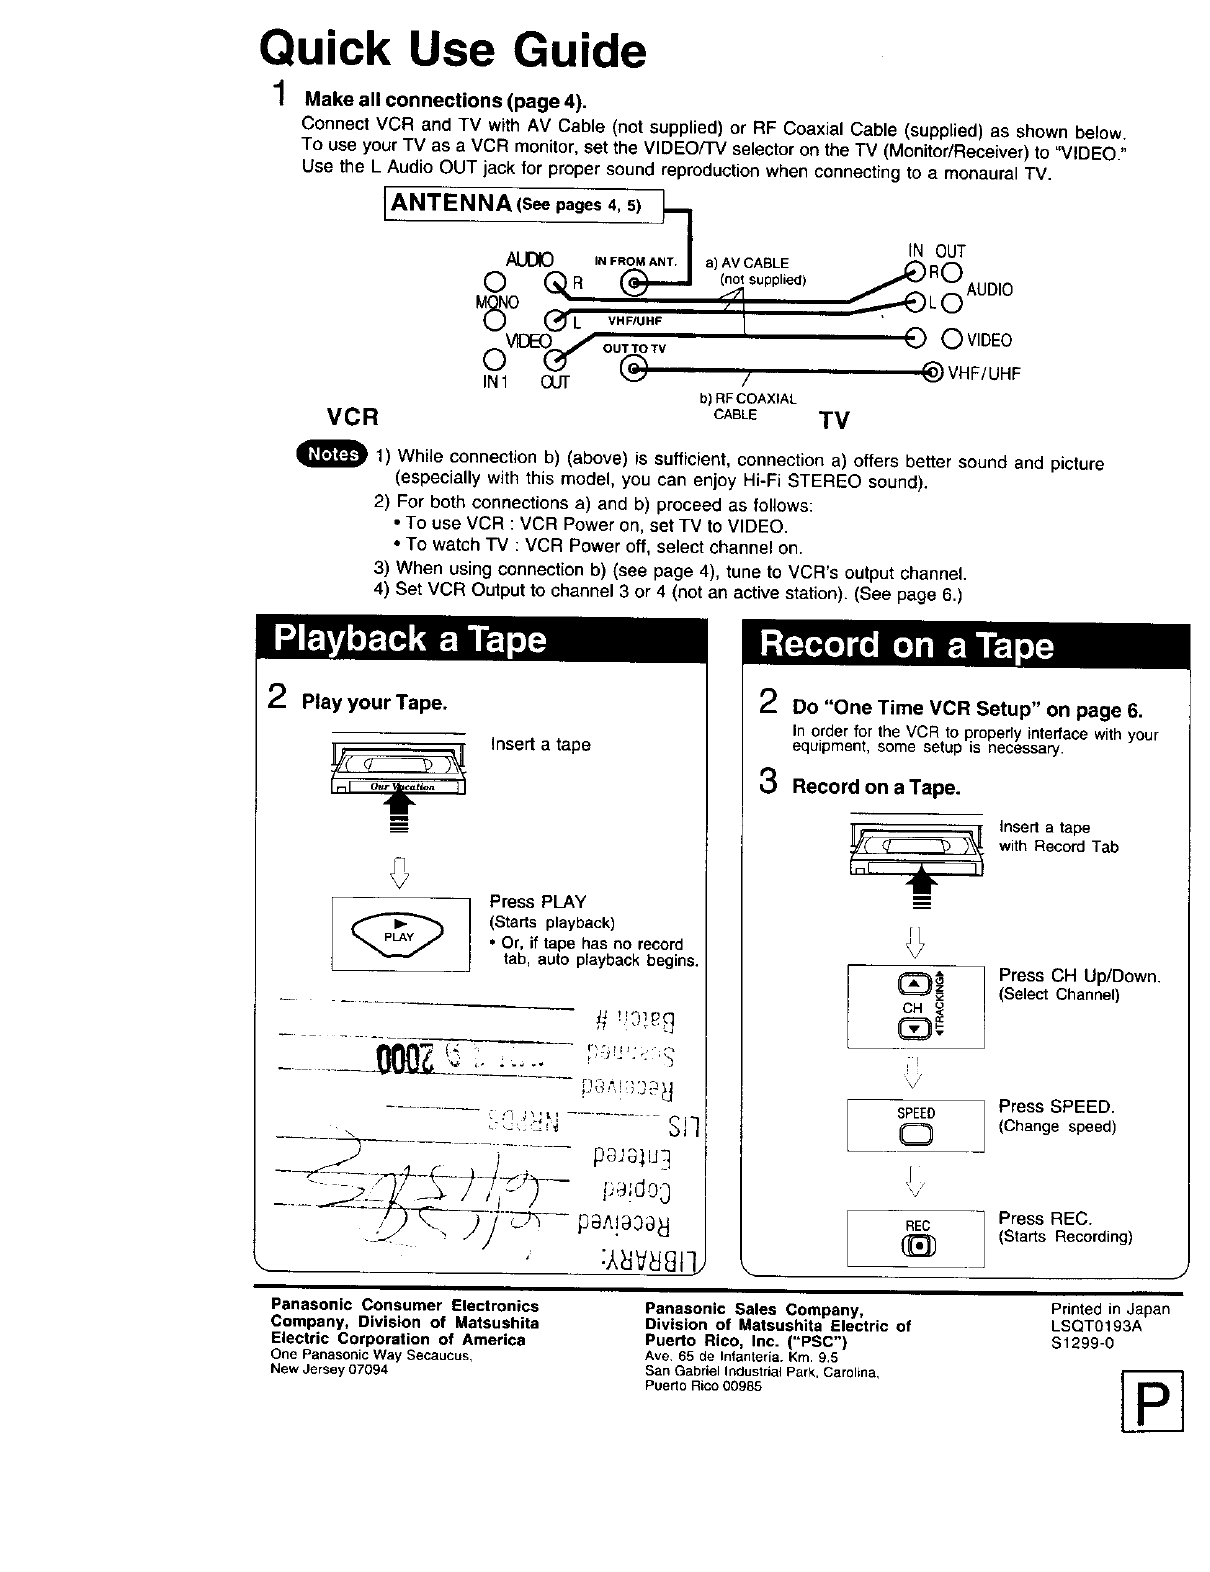
Quick Use Guide
1Make all connections (page 4).
Connect VCR and TV with AV Cable (net supplied) or RE Coaxial Cable (supplied) as shown below.
To use your TV as a VCR monitor, set the VIDEO/TV selector on the TV (Monitor/Receiver) to "VIDEO."
Use the L Audio OUT iack for proper sound reproduction when connecting to a monaural TV.
IANTENNA(see pages 4, 5) h
ALJOO I.F.O. Am.I
0QR
M(_O (_L VHFIUHF
oVl0E-O(_" ou_,v /
IN1 OUT b) RF COAXIAL
V C R CA_-E T V
tN OUT
a) (AnVotC(ApB_Eed) R 0
00W EO
@VHF/UHF
I_1 1) While connection b) (above) is sufficient, connection a) offers better sound and picture
(especially with this model, you can enjoy Hi-Fi STEREO sound).
2) For both connections a) and b) proceed as follows:
•To use VCR : VCR Power on, set TV to VIDEO.
•To watch TV : VCR Power off, select channel on.
3) When using connection b) (see page 4), tune to VCR's output channel.
4) Set VCR Output to channel 3 or 4 (not an active station). (See page 6.)
2Play your Tape.
m
m
insert a tape
Press PLAY
(Starts playback)
•Or, if tape has no record
tab, auto playback begins,
2Do "One Time VCR Setup" on page 6.
In order for the VCR to properlyinterface withyour
equipment, some setup is necessary.
3Record on aTape.
{nsert a tape
with Record Tab
11"
m
! ;
SPEED
0
\/
NED
Press CH Up/Down.
(Select Channet)
Press SPEED.
(Change speed)
Press REC.
(Starts Recording)
Panasonic Consumer Electronics
Company, Division of Matsushita
Electric Corporation of America
One PanasonicWay Secaucus,
New Jersey07094
Panasonic Sales Company,
Division of Matsushita Electric
Puerto Rico, Inc. ("PSC")
Ave 65 de Infanteria. Km.9,5
San Gabriel Ir_dustrialPark, Carolina,
PuertoRico 00985
of
Printed in Japan
LSQTO193A
$1299-0
