PANASONIC TV/VCR Or DVD Combo Manual L0312001
User Manual: PANASONIC PANASONIC TV/VCR or DVD Combo Manual PANASONIC TV/VCR or DVD Combo Owner's Manual, PANASONIC TV/VCR or DVD Combo installation guides
Open the PDF directly: View PDF ![]() .
.
Page Count: 40
13rnnlvlsIc]n
Panasonic
Combination VCR
Operating Instructions
Model No. PV-C1322/PV-C1332W
PV-C1342/PV-C 1352W H
• InitialSetup and Connection Procedures are on pages 8 and 9. I
As an ENERGY STAR" Partner,
Matsushita Electric Corporation of America has
determined that this product or product model meets
the ENERGY STAR •guidelines for energy efficiency.
Please read these instructions carefully before attempting to connect,
operate, or adjust this product. Please save this manual.
Spanish Quick Use Guide is included.
(Guua para r_.pida consulta en espaSol est& incluida.)
ImportantSafeguardsandPrecautions
READ AND RETAINALLSAFETY AND I
OPERATINGINSTRUCI'IONS.HEED ALL IWARNINGSINTHE MANUALAND ON UNIT
INSTALLATION I
POWER SOURCE CAUTION
Operate onlyfrom powersourceindicatedon unit
or inthismanual.If uncertain,have yourElectric
UtilityService CompanyorVideo ProductsDealer
verifyyour home powersource.
2 POWER CORD PLUG
Forsafety, thisunit has a polarizedtype plug (one
wideblade), ora three-wiregroundingtypeplug.
Alwaysholdthe plugfirmlyand make sure your
handsare dry when plugging in or unplugging the
AC power cord. Regularly remove dust, dirt, etc.
on the plug.
POLARIZED PLUG CAUTION:
The plug fits into outlet one way. If it cannot be fully
inserted,try reversing it. If it still will notfit, have an
electrician install the proper wall outlet. Do not
tamper withthe plug.
GROUNDING PLUG CAUTION:
The plug requires a three-bets grounding outlet.
If necessary, have an electrician install the proper
outlet. Do not tamper with the plug.
3 POWER CORD
Toavoidunitmalfunction, and to protectagainst
electricalshock,fireor personalinjury:
-Keep power cordaway from heatingappliances
and walkingtraffic.Do not rest heavy ob ectson,
or rollsuch objectsoverthe power cord.
-Do not tamper withthe cord many way.
-An extensioncord shouldhavethe same type
plug(polarizedorgrounding)and mustbe
securelyconnected.
-Overloaded wall outlets or extension cords is a
fire hazard.
- Frayed cords, damaged plugs, and damaged or
cracked wire insulation are hazardous and
should be replaced by aqualified electrician.
4 DO NOT BLOCKVENTILATION HOLES
Ventilation openings in thecabinetrelease heat
generatedduring operation. If blocked, heat
build-up may resultin a fire hazard or heat
damage to cassettes.
For yourprotection:
a. Never coverventilation slots while unit is ON,
or operate unit while placed on a bed, sofa,
rug, or other soft surface.
b. Avoid built-in installation, such as a book case
or rack, unless properly ventilated.
5 AVOID EXTREMELY HOT LOCATIONS OR
SUDDENTEMPERATURE CHANGES
Do not place unitoveror near a heater or
regulator,in directsunlight,etc. If unit is suddenly
movedfrom a cold placeto a warm place,
moisturemay condensein unitand on the tape
causing damage.
6TO AVOID PERSONAL INJURY
•Never place unit on supportor
standthat is not firm,level,
andadequately strong.
The unitcouldfall causing
seriousinjuryto a child or
adultand damage to theunit.
•Move anyappliance and cart
combinationwithcare. Quick
stops,excessiveforce, and uneven
surfacesmay cause objectsto overturn.
•Carefullyfollowall operafinginstructions.
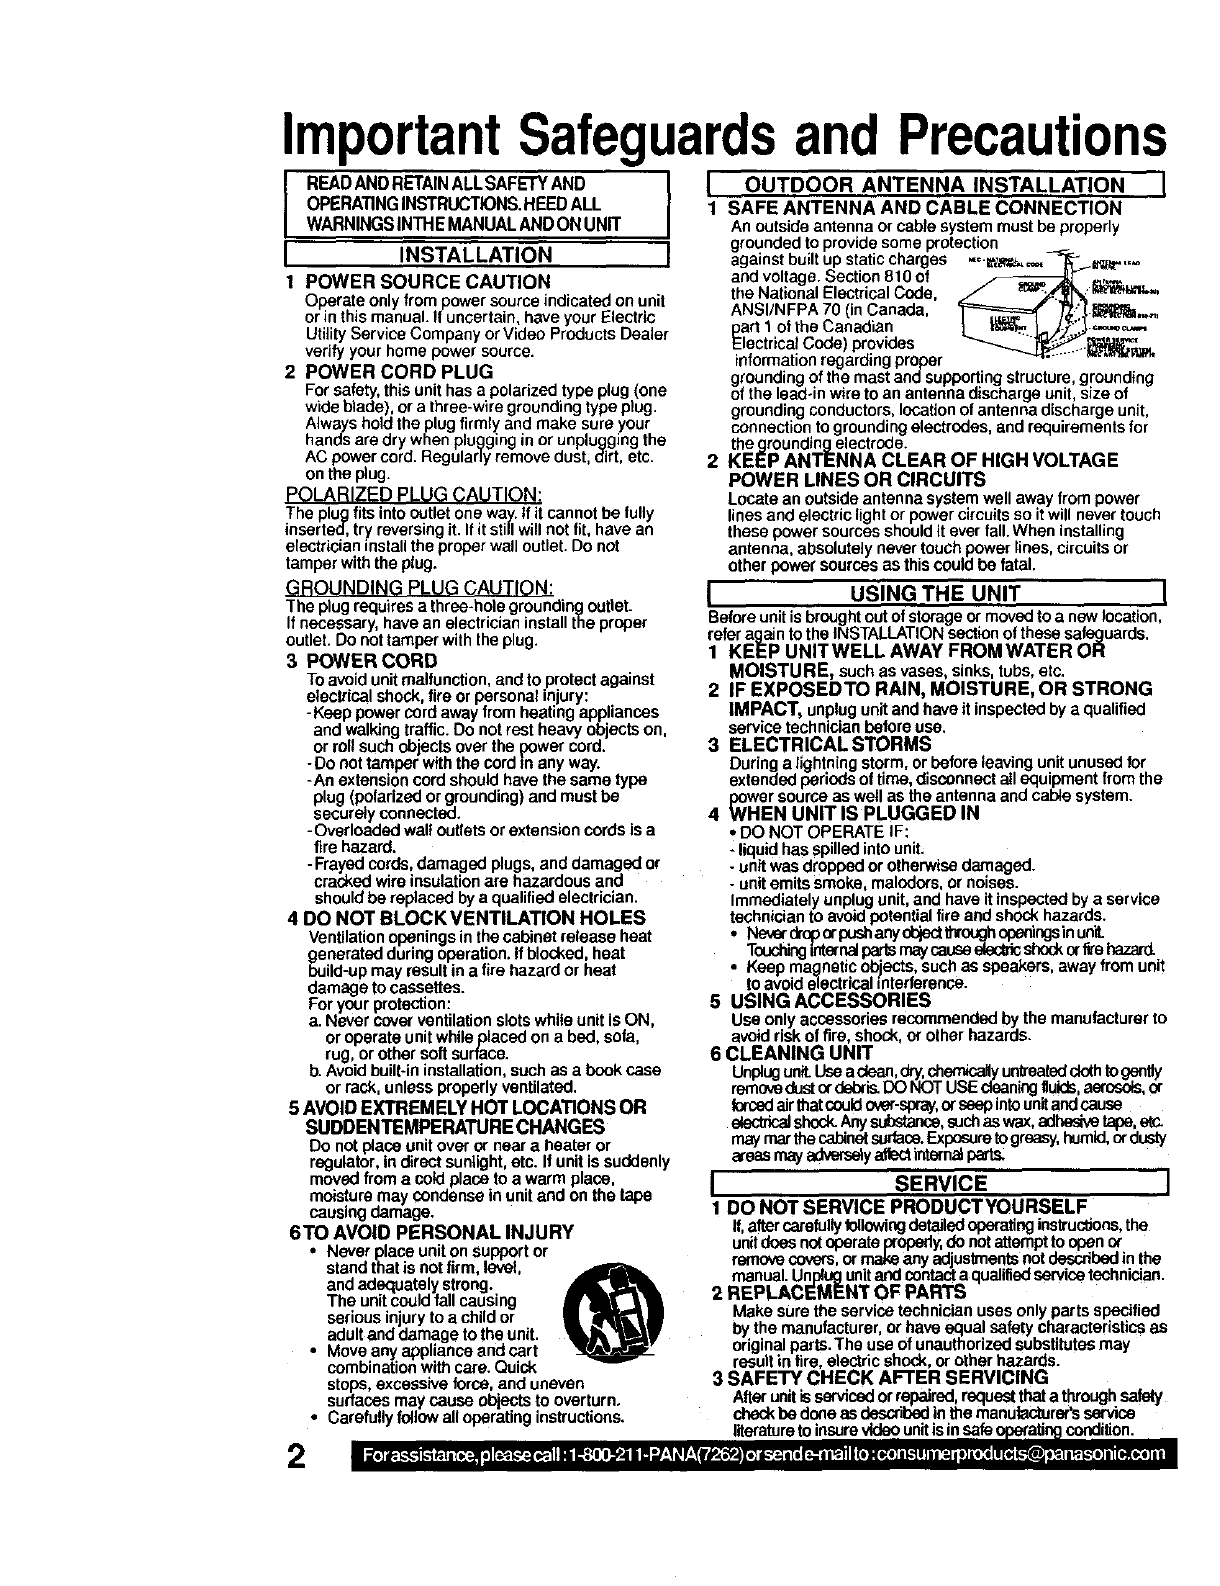
IOUTDOOR ANTENNA INSTALLATION I
1 SAFE ANTENNA AND CABLE CONNECTION
An outsideantenna orcable systemmust be properly
grounded to provide some protection
against built up static charges "_L';_.,=,_-_'_L';_.,=,=_,,,,,=
and voltage.Section 810 of _7_...
the NationalElectricalCode, f=_'_'_=_*",
ANSI/NFPA 70 (inCanada, '_P=========_"*_f.'__i_ _.,_,
part t of the Canadian
Electrical Code) provides _f _,1_
informationregardingproper
groundingof the mast andsupportingstructure,grounding
of the lead-inwire to an antenna dischargeunit, size of
grounding conductors, location of antenna discharge unit,
connection to grounding electrodes, and r_quirements for
thegroundingelectrode.
2 KEEP ANTENNA CLEAR OF HIGH VOLTAGE
POWER LINES OR CIRCUITS
Locate an outsideantenna systemwell away frompower
linesand electriclightor power circuitsso it willnevertouch
these power sourcesshould it everfall. When installing
antenna, absolutely nevertouch powerlines, circuitsor
otherpower sourcesas thiscould be fatal.
I USING THE UNIT I
Beforeunitis broughtoutof storageor movedto a new location,
referagain to the INSTALLATIONsectionof thesesafaguards.
1 KEEP UNITWELL AWAY FROMWATER OR
MOISTURE, such as vases, sinks,tubs,etc.
2 IF EXPOSEDTO RAIN, MOISTURE, OR STRONG
IMPACT, unplugunit andhave it inspectedby a qualified
service technicianbeforeuse.
3 ELECTRICAL STORMS
Duringa lightning storm, orbefore leaving unitunusedfor
extendedperiods of time, disconnectallequipment fromthe
power sourceas well as the antenna and cable system.
4 WHEN UNIT IS PLUGGED IN
•DO NOT OPERATE IF:
-liquidhas spilledintounit;
-unit wasdropped orotherwisedamaged.
-unitemitsSmoke,malodors,ornoises.
Immediatelyunplugunit,and haveitinspectedbya service
technicianto avoidpotentialfire and shockhazards.
i Nover.dropp"psshanyob)ectfflroug.h.q_.ags inonit..
Touching.,nternaJpsrB maycauseelect,_snoo_or_e nazaro.
Keep magnetic objects,such as speakers,away from unit
to avoid electrical mtarforecce.
5 USING ACCESSORIES
Use onlyaccessories recommendedbythe manufacturerto
avoid riskof fire, shock,or otherhazards.
6 CLEANING UNIT
Unplugunit.Use adean,dry,chemicallyuntreatedclothtogently
removedust ordebris.DO NOTUSEciaaningfluids,aerosuls,er
furcedairthatcouldavar-spray,ar seep intounitand cause
ek3ctdr_dshes_Anysut_dance,suchaswax,adbedvetape,e_c.
maymar thecabinetsurface.Exposuretogreasy,humid,cxdu_y
I SERVICE I
1 DO NOT SERVICE PRODUCTYOURSELF
If,aftercarefullyfollowingdetailedoperafinginstructions,the
unitdoes notoperate properly,do not attempt to open o_
removecovers,or makeany adjustmentsnotdescribedinthe
manual.Unplugunitandcontact a qualifiedservicetechnician.
2 REPLACEMENT OF PARTS
Make sure theservice technicianuses onlyparts specified
bythe manufacturer,or haveequal safetycharacteristicsas
originalparts.The use of unauthorizedsubstitutesmay
resultin fire, electricshock,or otherhazards.
3 SAFETY CHECK AFTER SERVICING
Afterunitisservicedorrepaired,requestthata throughsafety
checkbe doneas dsscribed in themanufactureYsservice
literaturetoinsurevideounitisinsafeccondition.
Safety Precautions/Mesures de securite
Warning :To prevent fire or shock hazard, do not expose this equipment to rain or moisture.
Caution : To prevent electric shock, match wide blade of plug to wide slot, fully insert.
Avertissement : Afin de prevenir tout risque d'incendie ou de chocs electriques, ne
pas exposer Get appareil a la pluie ou a une humidite excessive.
Attention :Pour eviter les chocs electdques, introduire la lame la plus large de la fiche
dans la borne correspondante de la pdse et pousser jusqu'au fond.
This video recorder, equipped with the HQ (High Quality.L_stem, is compatible with
existing VHS equipment. Only use those tapes with the _mark. It is recommended that
only cassette tapes that have been tested and inspected for use in 2, 4, 6, and 8 hour
VCR machines be used. This television receiver provides display of television closed
captioning in accordance with §15.119 of the FCC rules.
FCC WARNING : Any unauthorized changes or modifications to this
equipment would void the user's authority to operate.
This symbol warnsthe user that uninsulated voltage withinthe unit may
have sufficient magnitude to cause electric shock.Therefore, it is
dangerous to make any kind of contact with any insidepartof this unit.
This symbol alerts the user that important literature concerning the
operation and maintenance of this unit has been included.
Therefore, it should be read carefully in order to avoid any problems.
This product utilizes both a Cathode Ray Tube (CRT) and other components that contain lead.
Disposal of these materials may be regulated in your community due to environmental
considerations. For disposal or recycling information please contact your local authorities, or the
Electronics Industries Alliance: <http://www.eiae.ora.>
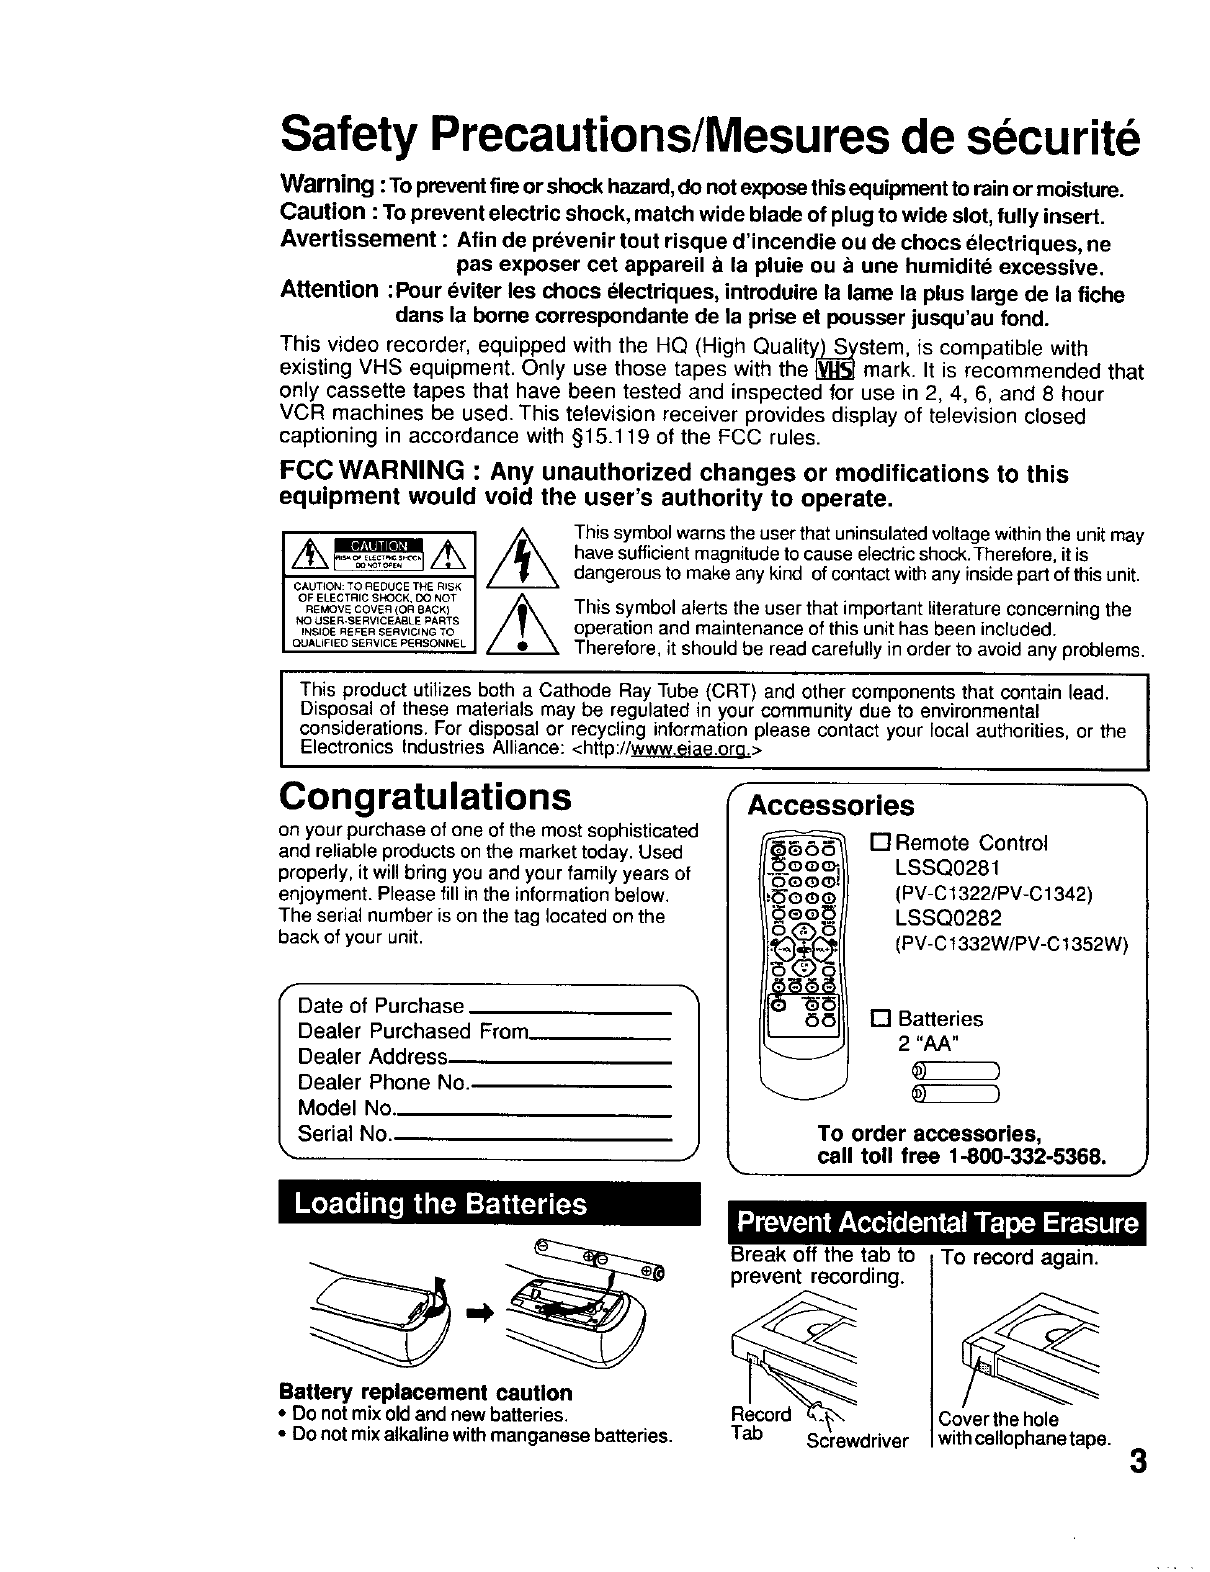
Gongratulations rAccessories
on your purchase of one of the most sophisticated
and reliable products on the market today. Used
properly, it will bring you and your family years of
enjoyment. Please fill inthe information below.
The serial number is on the tag located on the
back of your unit.
fDate of Purchase
Dealer Purchased From.
Dealer Address.
Dealer Phone No.,
Model No.
Serial No
OO0_
OQQ_
_QO0
_Oe_
I_Vfr2_
[] Remote Control
LSSQ0281
(PV-C1322/PV-C1342)
LSSQ0282
(PV-C t332W/PV-C f 352W)
[] Batteries
2 "AA"
TO order accessories,
call toll free 1-800-332-5368.
Battery replacement caution
•Do not mixold and new batteries.
•Do notmixalkaline withmanganese batteries,
Break off the tab to
prevent recording.
Record
Tab
To record again.
Cover the hole
withcellophanetape, 3
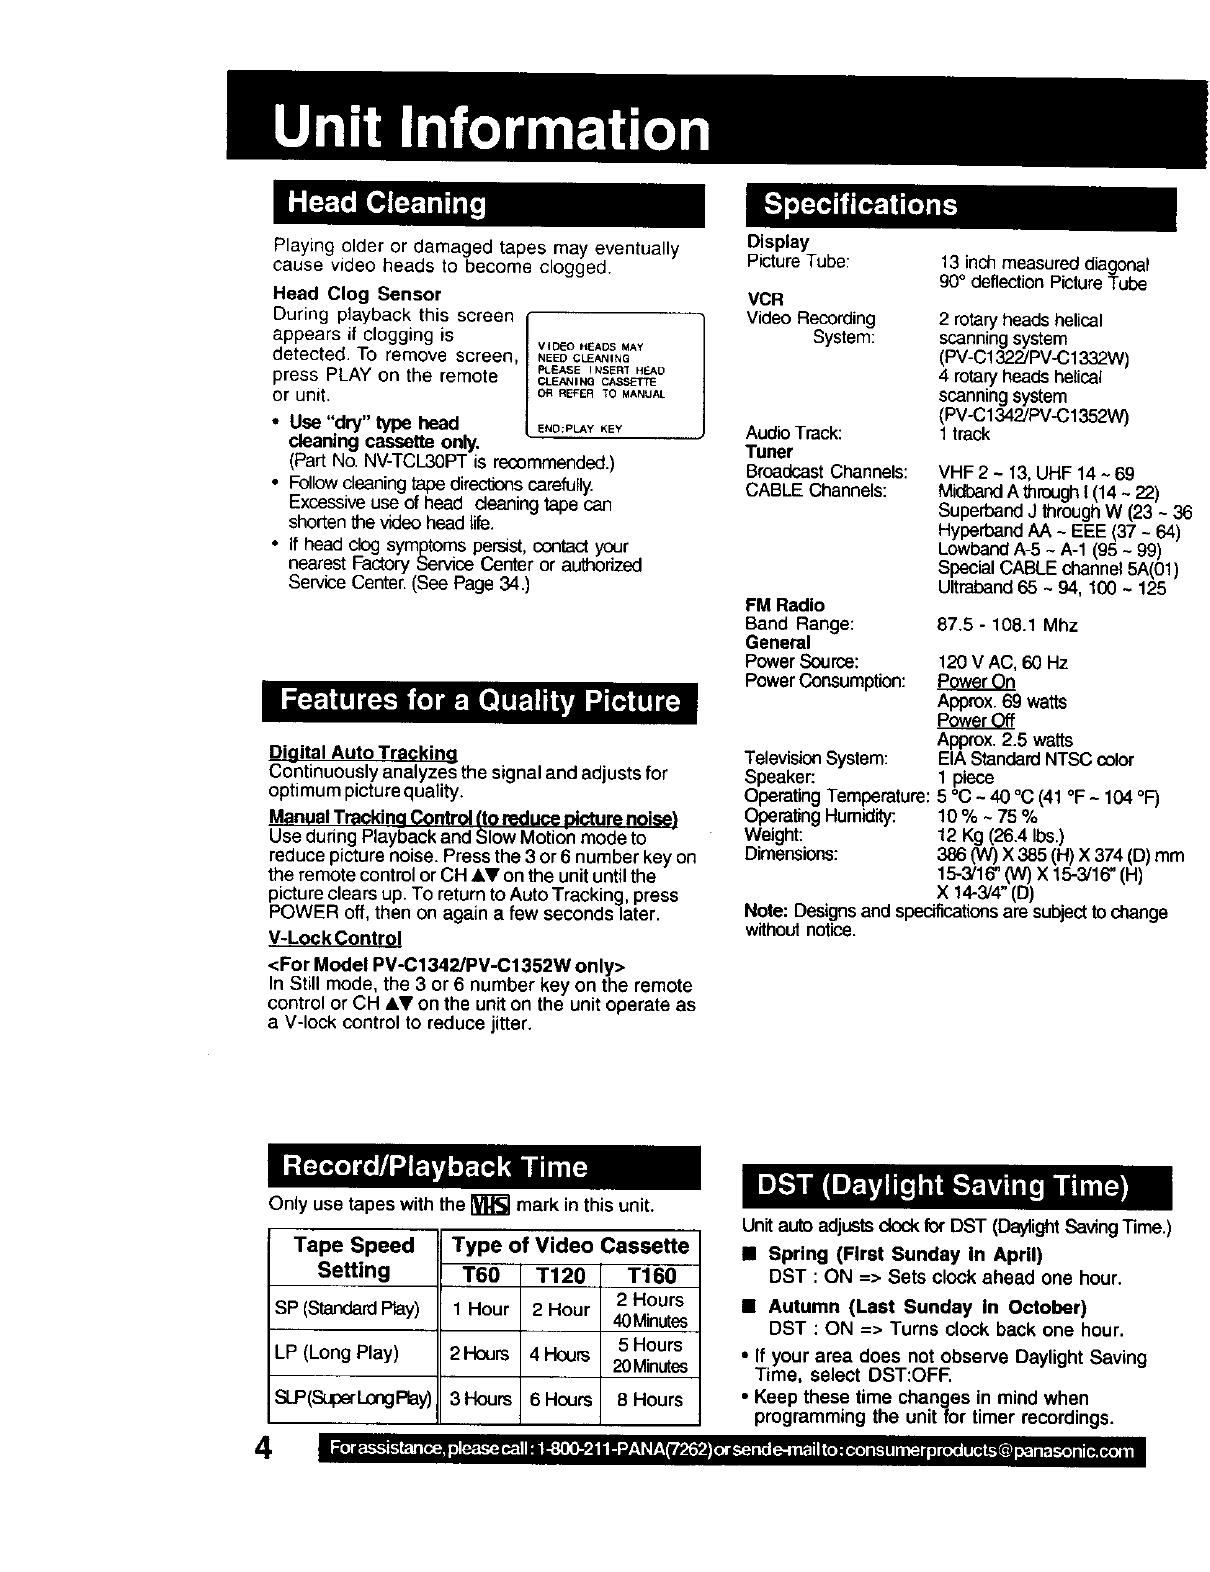
Playing older or damaged tapes may eventually
cause video heads to become clogged.
Head Clog Sensor
During playback this screen
appears if clogging is
detected. To remove screen,
press PLAY on the remote
or unit.
VIDEO HEADS MAY
NEED CLEANING
PLEASE I NSERT HEAD
CLEAN I NQ Ct_S_CTTE
OR REFER TO MANUAL
• Use "dry" type head ENO;PLAyKEY
cleaning cassette only.
(Part No. NV-TCL30PTis recommended.)
•Followcleaningtape directk_s carefully
Excessiveuse of head cleaningtape can
shortenthe video headlife.
• If head clog symptoms persist,contact your
nearest Factory Sennce Center or authorized
ServiceCenter.(See Page 34.)
Dioital Auto Trackin9
Continuously analyzes the signaland adjusts for
optimum picture quality.
ManualTraoldno Control I'toreduce olcture noise)
Use during Playback and Slow Motion mode to
reduce picture noise. Press the 3 or 6 number key on
the remote control or CH _I,Von the unit until the
picture clears up. To return to Auto Tracking, press
POWER off, then on again a few seconds later.
V-Lock Control
<For Model PV-C1342/PV-C1352W only>
In Still mode, the 3 or 6 number key on the remote
control or CH _I,Von the unit on the unit operate as
a V-lock control to reduce jitter.
Only use tapes with the _ mark in this unit.
Display
PictureTube:
VCR
Video Recording
System:
Audio Track:
Tuner
Broadcast Channels:
CABLE Channels:
FM Radio
Band Range:
General
Power Source:
Power Consumption:
13 inch measured diagonal
90° deflection Picture Tube
2 rotaryheads helical
scanningsystem
(PV-C1322JPV-C1332W)
4 rotaryheads helical
scanningsystem
(PV-C1342/PV-Cl352W)
1track
VHF2~ 13, UHF 14 -69
Middarid A through I (14 ~ 22)
Superband J through W (23 -36
Hyperband AA ~EEE (37 ~64)
Lowband A-5 ~A-1 (95 ~99)
Special CABLE channel 5A(01)
Ultraband 65 -94, 100 ~125
87.5 - 108.1 Mhz
120V AC, 60 Hz
Pw_.Q.w_e.LO_
Approx.69 watts
Approx.2.5 watts
TelevisionSystem: EIA StandardNTSCcolor
Speaker: 1 piece
Operating Temperature: 5 °C ~ 40 °C (41°F ~ 104°F)
OperatingHumidity: 10 % ~75 %
Weight: 12 Kg (26.4 Ibs.)
Dimensions: 386ON)X 385 (H)X 374 (D) mm
15-3/16"(W) X15-3/16"(H)
X 14-3/4"(D)
Note: Designsand specificationsare subjectto change
without notice.
Tape Speed Type of Video Cassette
Setting T60 T120 T160
sP (StandardPlay) 1 Hour 2 Hour 2 Hours
40Minutes
LP (Long Play) 2Hours 4 Hours 5 Hours
20Minutes
SLP(Sq0erLongRay)
Unitautoadjustsclockfor DST (DaylightSavingTime.)
•Spring (First Sunday In April)
DST : ON => Sets clock ahead one hour.
4
•Autumn (Last Sunday In October)
DST :ON => Turns clock back one hour.
• If your area does not observe Daylight Saving
Time, select DST:OFF.
3 Hours 6 Hours 8 Hours • Keep these time changes in mind when
programming the unit for timer recordings.
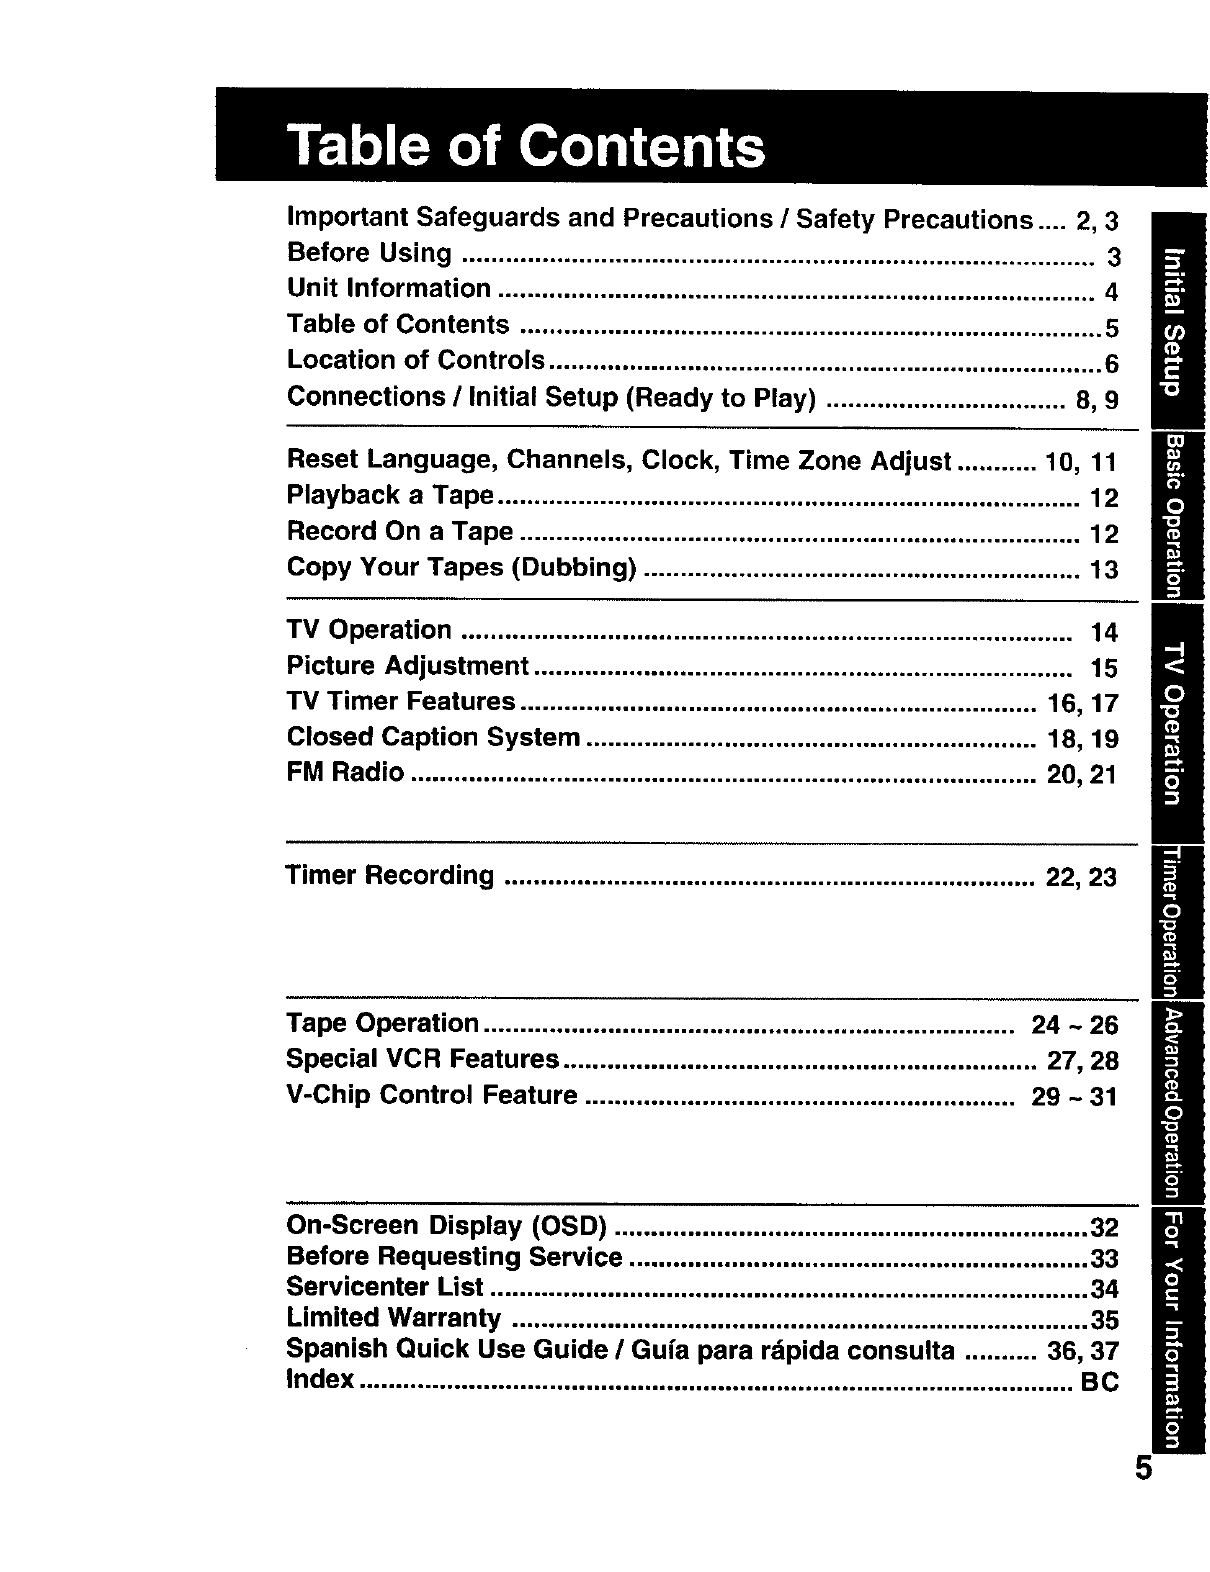
Important Safeguards and Precautions /Safety Precautions .... 2, 3
Before Using ....................................................................................... 3
Unit Information .................................................................................. 4
Table of Contents ................................................................................ 5
Location of Controls ............................................................................ 6
Connections /Initial Setup (Ready to Play) ................................. 8, 9
R
Reset Language, Channels, Clock, Time Zone Adjust ........... 10, 11
Playback a Tape ................................................................................ 12 H
Record On a Tape ............................................................................. 12
Copy Your Tapes (Dubbing) ............................................................ 13
TV Operation .................................................................................... 14
Picture Adjustment .......................................................................... 15
TV Timer Features ....................................................................... 16, 17
Closed Caption System .............................................................. 18, 19
FM Radio ...................................................................................... 20, 21
Timer Recording ......................................................................... 22, 23
Tape Operation ......................................................................... 24 ~26
Special VCR Features ................................................................. 27, 28
V-Chip Control Feature ........................................................... 29 ~ 31
On-Screen Display (OSD) ................................................................. 32
Before Requesting Service ............................................................... 33
Servicenter List .................................................................................. 34
Limited Warranty ............................................................................... 35
Spanish Quick Use Guide IGufa para rdpida consulta .......... 36, 37
Index .................................................................................................. BC
5

EJECT button:
When EJECT is pressed, the tape is ejected from Cassette Compartment.
If EJECT is pressed during recording, the unit will not respond to the command.
EJECT
Ejects tape.
POWER
Turn on or off the unit.
DISPLAY
Displays the VCR
status and clock.
TAPE POSITION
Finds out present tape
position and amount of
tape remaining.
COUNTER RESET
Resets to "0:00:00" at
the desired position.
RAPID TUNE
Displays the last channel
you were watching.
MUTE
Mutes the sound instantly.
VOLUME UP/DOWN
Adjusts volume.
SET/BACK SPACE
Sets a selected menu,
or goes back to correct.
ACTION
Displays main menu.
STOP
Stops recording or playback.
REC
Records the program.
REWIND/SEARCH
Rewinds tape, and searches
reverse scene.
FM/TV
Receives FM radio signal.
REWII_ PLAY FFI_
Color and picture intensity level
are adjusted during night time use,
Turns off the unit autmatically.
TRACKING UP/DOWN
Reduces picture noise during
Playback and Slow Motion.
;ER keys
Selects a channel directly.
Adds or deletes a channel.
Goes directly to the desired
recording. Locates end point
of recording.
UP/DOWN
Selects a channel.
SELECT UP/DOWN
Control the navigation around
on-screen menu,
Displays SET PROGRAM screen.
You can set Timer Program and
On-Timer.
FAST FORWARD/SEARCH
Fast forwards tape, and
searches forward scene.
In Stop mode, goes to the
counter "0:00:00" In Play mode,
1 to 3 minutes of tape.
Selects recording speed.
Begins playback.
PAUSE/SLOW
Pauses and slow motion
and frame advance picture.
I
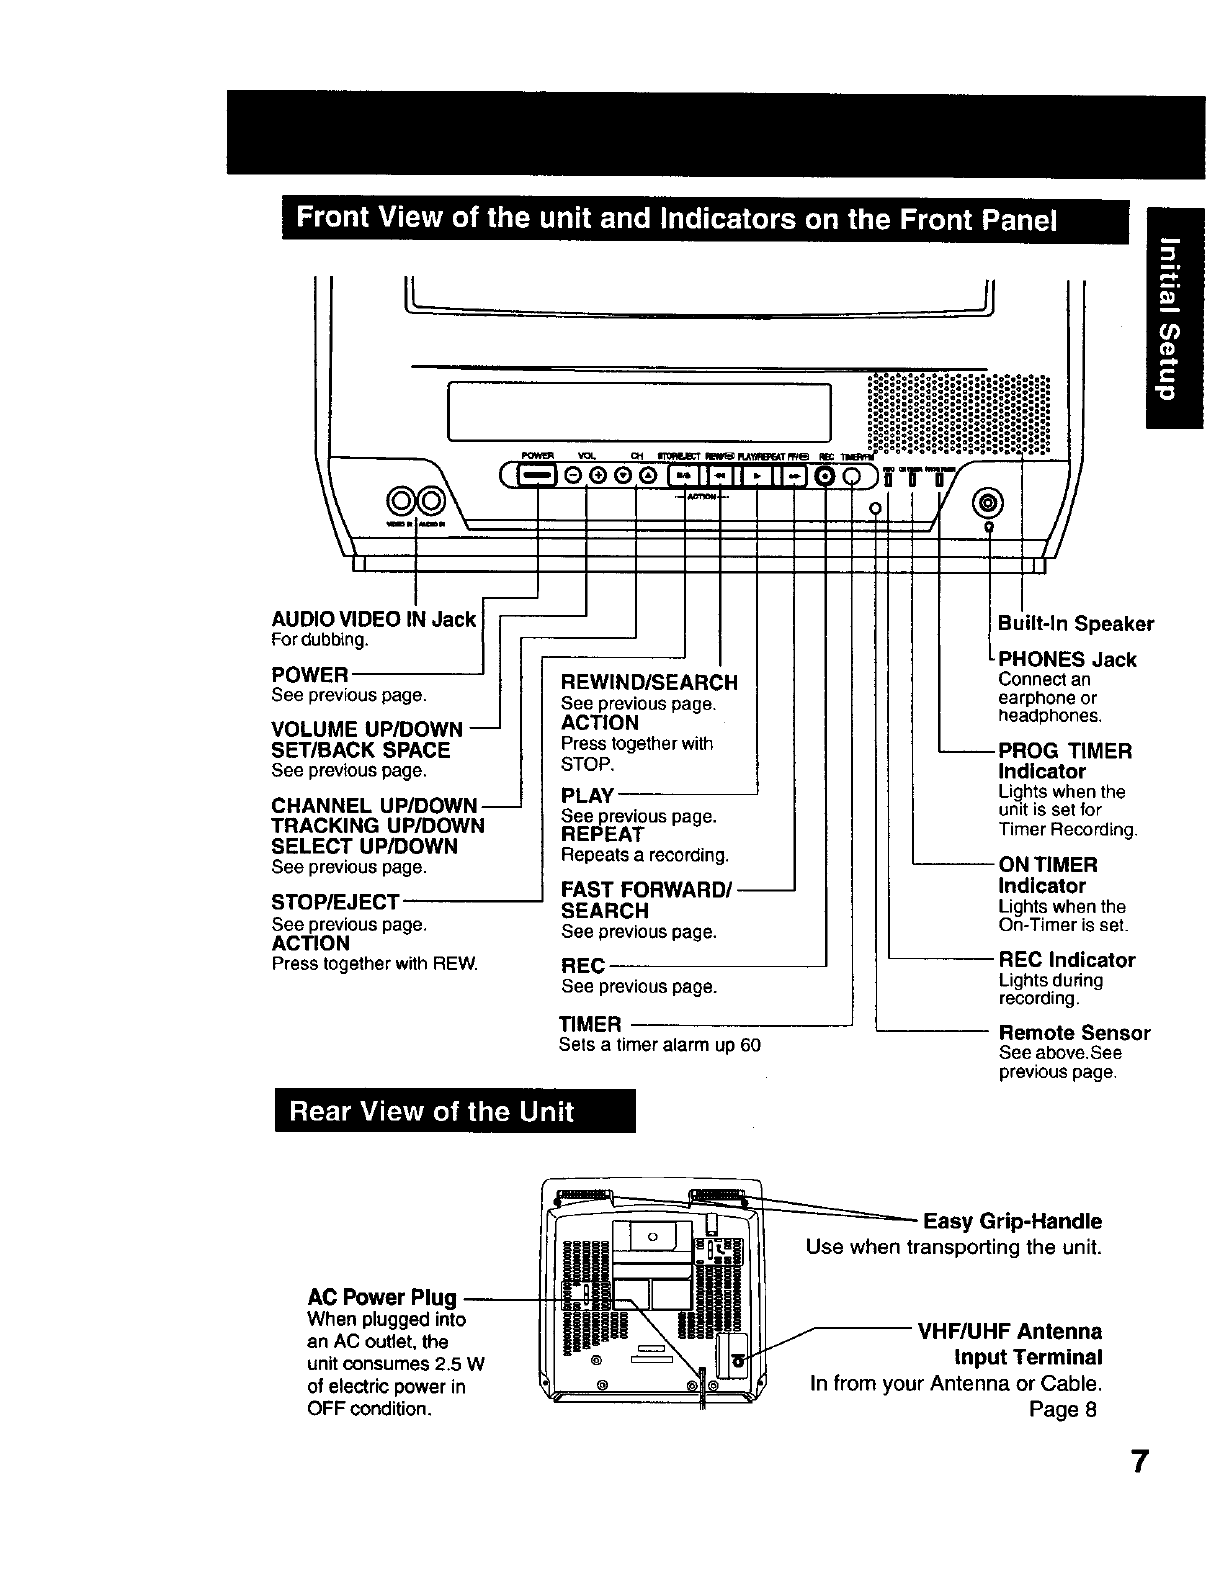
AUDIO VIDEO IN Jack
Fordubbing.
POWER
See previouspage.
VOLUME UP/DOWN --
SETIBACK SPACE
See previouspage.
CHANNEL UP/DOWN-
TRACKING UP/DOWN
SELECT UP/DOWN
See previouspage,
STOP/EJECT
See previous page.
ACTION
PresstogetherwithREW.
REWINDISEARCH
See previous page.
ACTION
Press together with
STOP,
PLAY
See previouspage,
REPEAT
Repeatsa recording.
FAST FORWARD/-
SEARCH
See previous page.
REC
See previous page.
TIMER
Sets a timeralarm up 60
Built-In Speaker
-PHONES Jack
Conne_ an
earphone or
headphones.
--PROG TIMER
Indicator
Lightswhen the
unitis setfor
Timer Recording.
ON TIMER
Indicator
Lightswhen the
On-Timer is set.
REC Indicator
Lights during
recording.
Remote Sensor
See above.See
previous page.
AC Power Plug
When pluggedinto
an AC outlet,the
unit consumes 2,5 W
of electric power in
OFF condition. _In from your Antenna or Cable.
Page 8
7
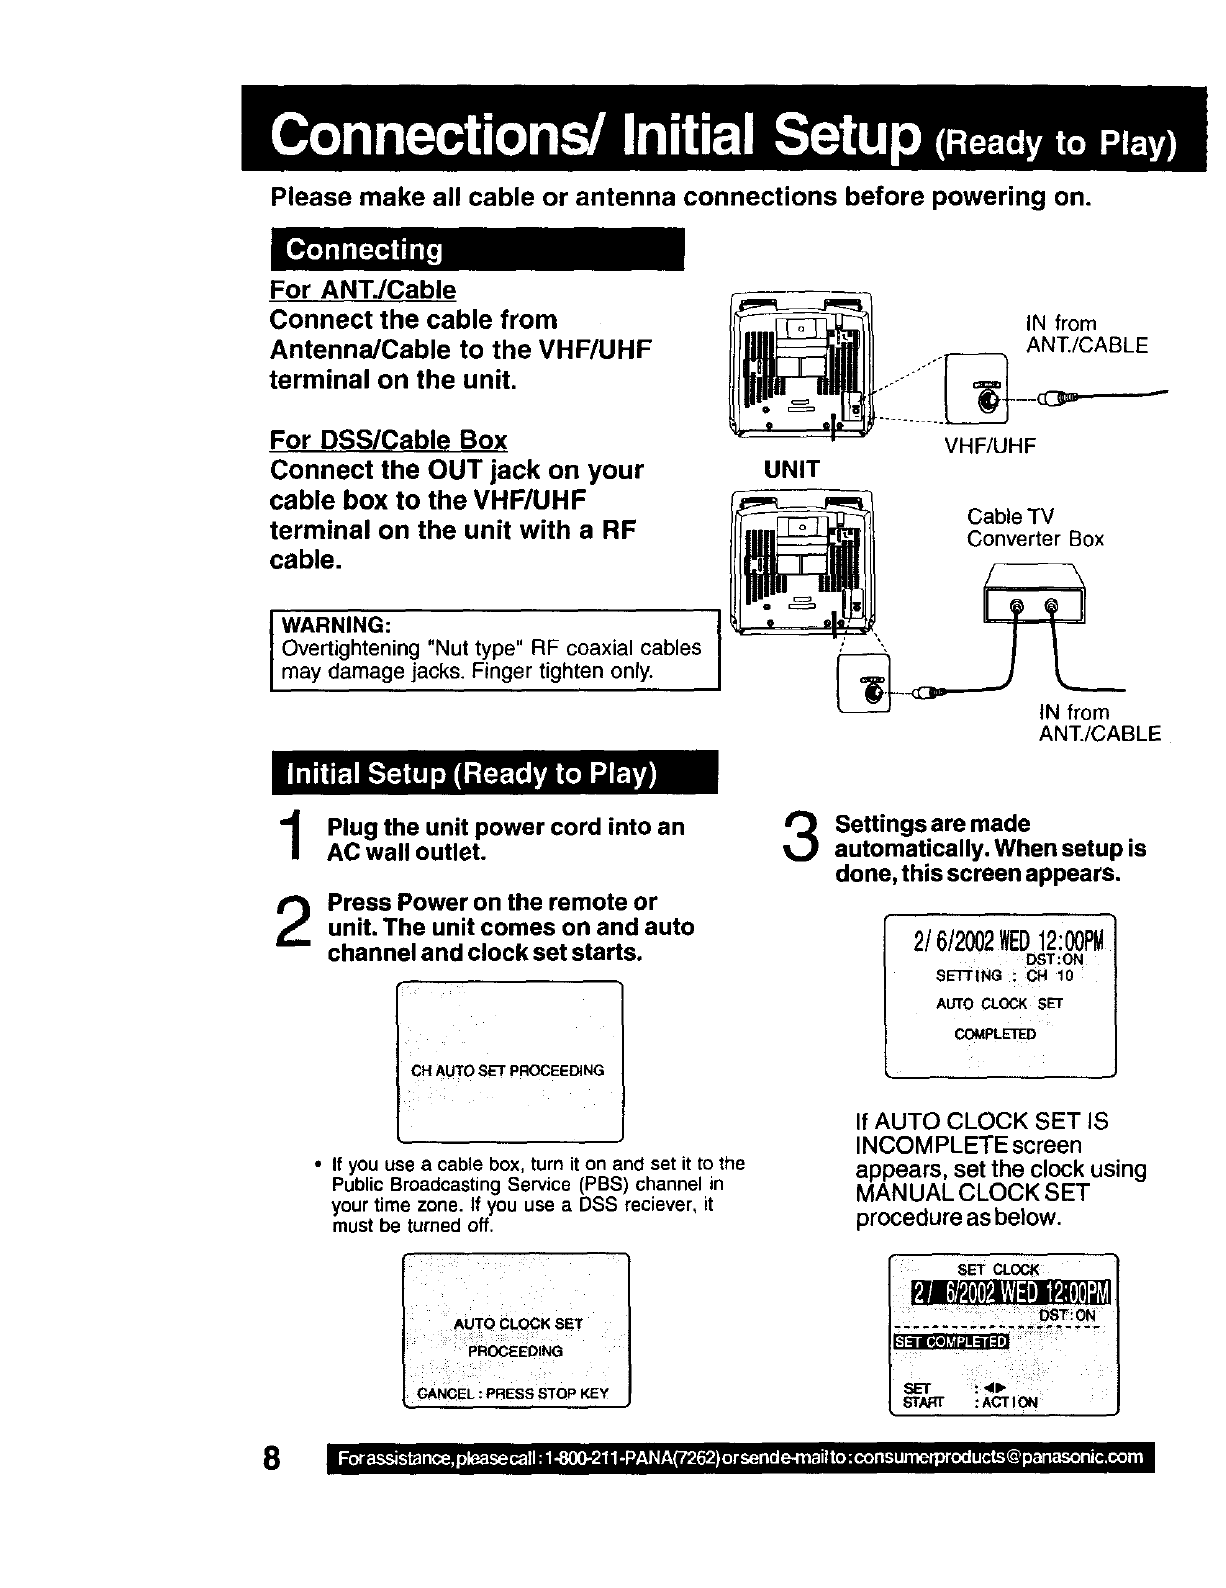
Please make all cable or antenna connections before powering on.
For ANT./Cable
Connect the cable from
Antenna/Cable to the VHF/UHF
terminal on the unit.
IN from
ANT./CABLE
For DSS/Cable Box
Connect the OUT jack on your
cable box to the VHF/UHF
terminal on the unit with a RF
cable.
I WARNING:
Overtightening "Nut type" RF coaxial cables
may damage jacks. Finger tighten only.
UNIT VHF/UHF
Cable "IV
Converter Box
ANT./CABLE
1
2
Plug the unit power cord into an
AC wall outlet.
Press Power on the remote or
unit. The unit comes on and auto
channel and clock set starts.
_ET PROCEEDING
• If you use a cable box, turn it on and set it to the
Public Broadcasting Service (PBS) channel in
your time zone. If you use a DSS reciever, it
must be turned off.
Settingsare made
automatically. When setup is
done, this screen appears.
2/6/2002WED12:00PM
DST:ON
SETTING _CH 10
AUTO CLOCK SET
COMPLETED
If AUTO CLOCK SET IS
INCOMPLETE screen
appears, set the clock using
MANUAL CLOCK SET
procedure as below.
AUTO CLOCK SET
PROCEEDING
CANCEL : PRESS STOP KEY
set c_oc_
...... _ DST! 0N
,STAK¢ :ACTION
• _'e_i";-_,,'!-,'_k")_,l l [_ _e][__. k"__,,,]I;';,}1Ji I_;[l:l ]_li i i! ..iT!| _,_!_J_.'__.,I [i] I[-"_".,11[e[_Ii_111(ll]l( I,:111_-'tIll i :,I,_Iil ] I[l:i ]sr_j k'_1_ i_,, }l _=.L--_I]i r[i,]( i_1 }i i I
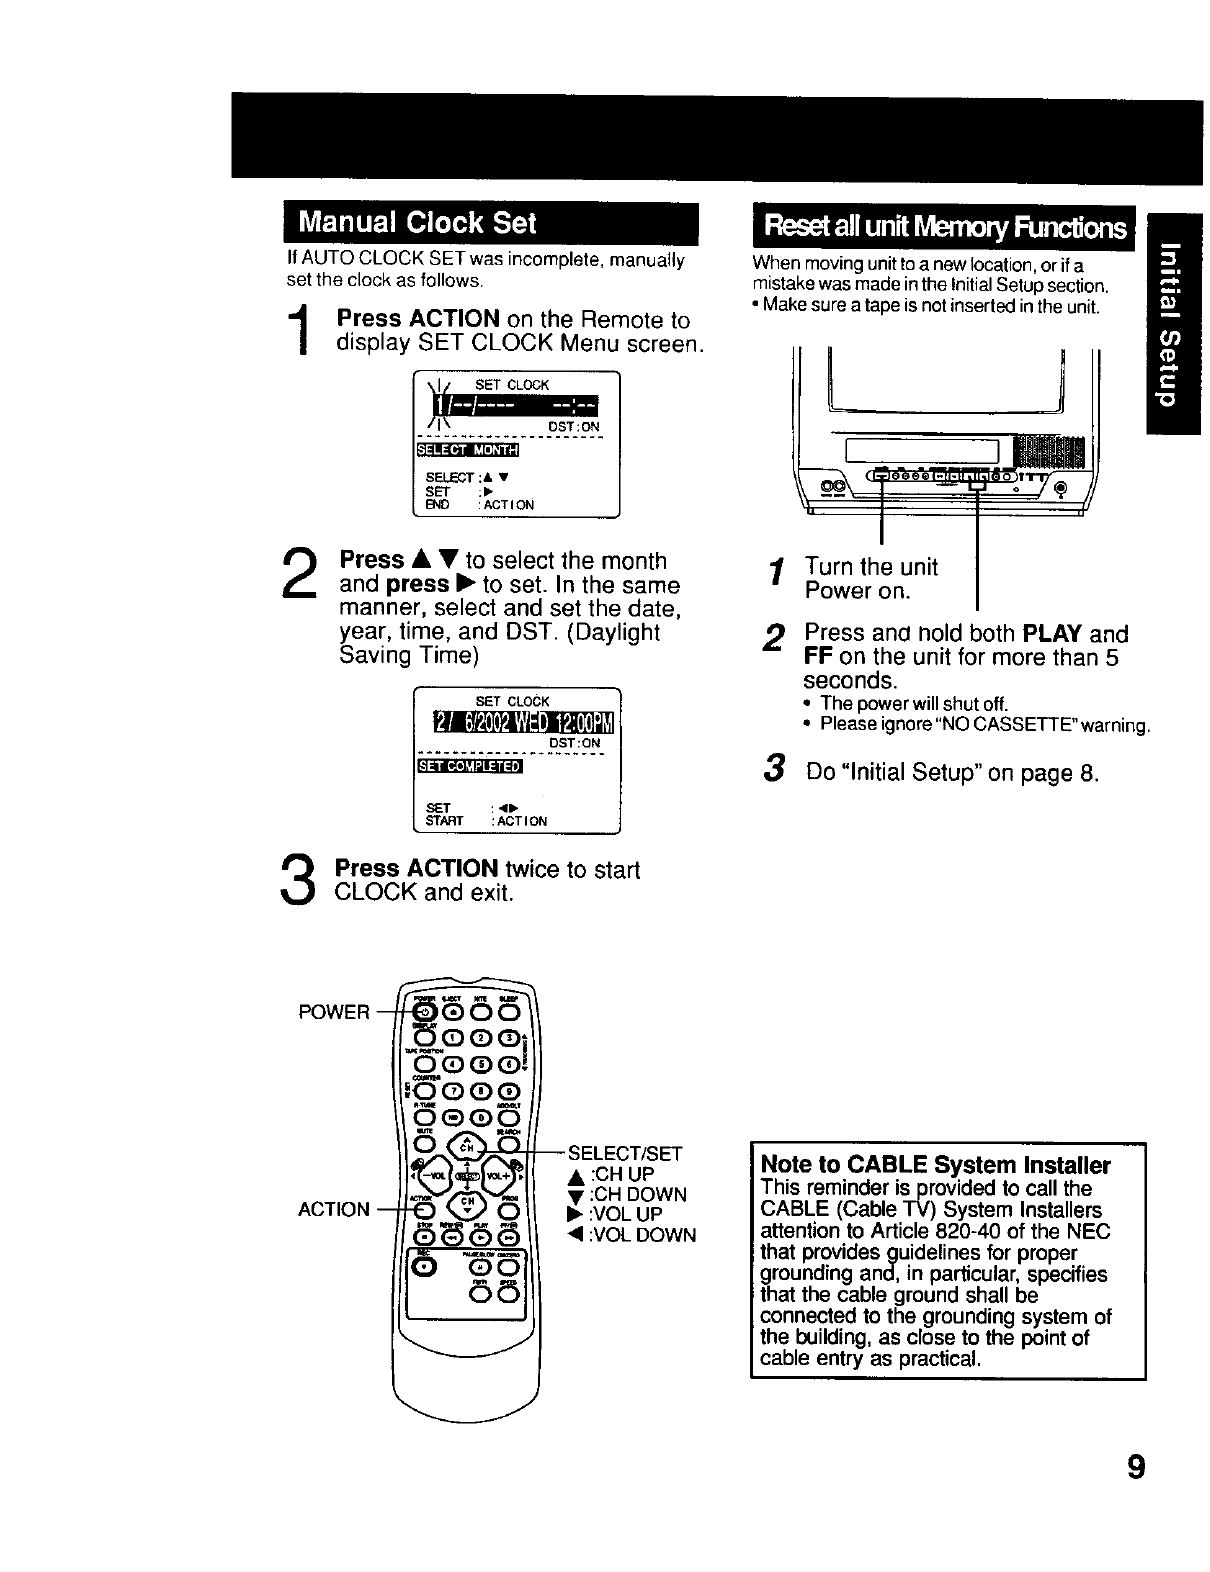
IfAUTO CLOCK SET was incomplete, manually
set the clock as follows.
2
Press ACTION on the Remote to
display SET CLOCK Menu screen.
SET CLOCK
OST:ON
SELECT :& •
SET :1_
END :ACTION
Press • • to select the month
and press •to set. In the same
manner, select and set the date,
year, time, and DST. (Daylight
Saving Time)
SET CLOCK
DST:ON
START : ACT ION
Press ACTION twice to start
CLOCK and exit.
When moving unitto a new location, orif a
mistakewas made inthe InitialSetup section.
• Make sure a tape is not inserted in the unit.
1Turn the unit
Power on.
2Press and hold both PLAY and
FF on the unit for more than 5
seconds.
• The power will shut off.
• Please ignore"NO CASSETTE"warning
3Do "Initial Setup" on page 8.
POWER
ACTION
• :CH UP
• :CH DOWN
• :VOL UP
• :VOL DOWN
Note to CABLE System Installer
This reminder is provided to call the
CABLE (Cable TV) System Installers
attention to Article 820-40 of the NEC
that providesguidelines for proper
grounding and, in particular, specifies
that the cable ground shall be
connected to the grounding system of
the building, as close to the point of
cable entry as practical,
9
I MAIN k_U
1
::_o_,o_."
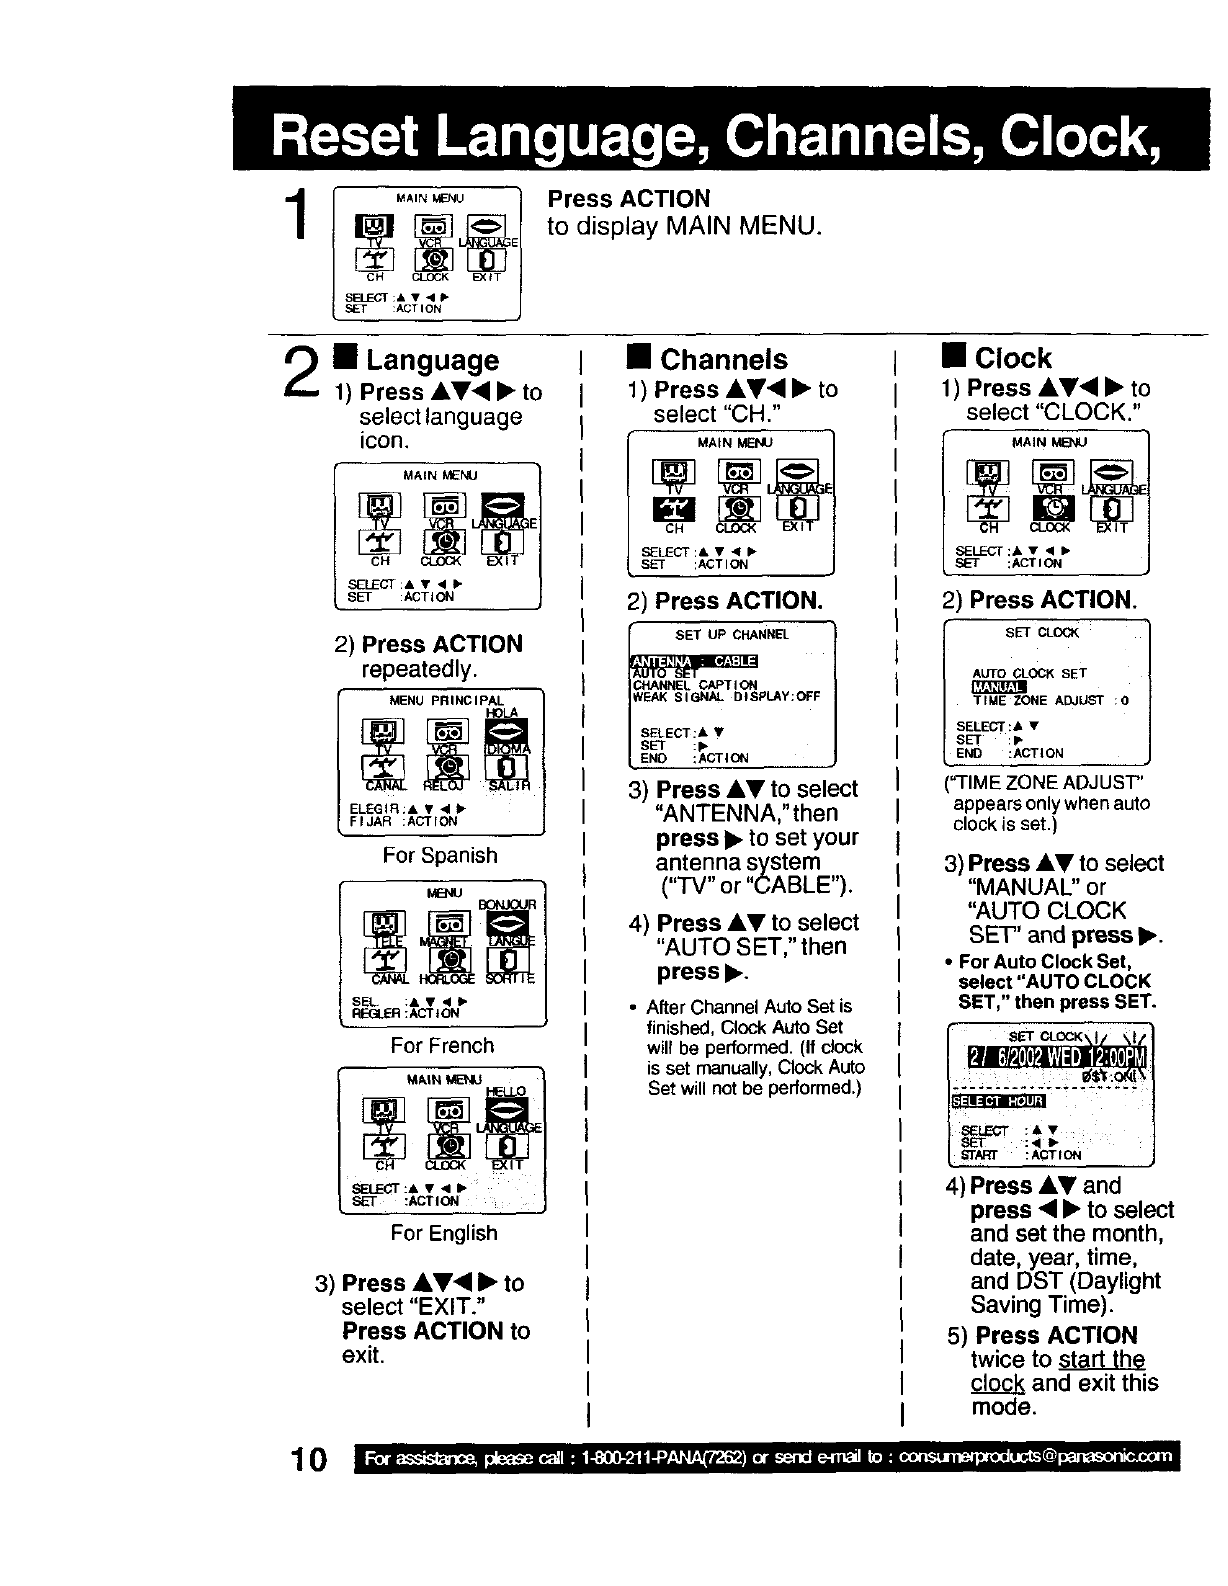
Press ACTION
to display MAIN MENU.
11 Language
1) Press AV• • to
select language
icon.
MAIN MENU
CH CLOCK EXI
SELECT :A •"_1•
SET :ACTION
2) Press ACTION
repeatedly.
MENU PRINCIPAL
ELEGIR:A • • II_
FIJAR :ACTION
For Spanish
SEL :& • • I_.
_ :ACTION
For French
For English
3) Press AV• • to
select "EXIT."
Press ACTION to
exit.
•Channels
1) Press ,kY• •to
select "CH."
MAIN MENU
SELECT:& ••I_
SET :ACTION
2) Press ACTION.
SET UP CHANNEL
CHANNEL CAPTION
WEAI_ SIGNAL DISPt.AY:_F
SELECT :A •
SET :1_
END :ACTION
3) Press AV to select
"ANTENNA," then
press •to set your
antenna system
('"IV" or "CABLE").
4) Press AY to select
"AUTO SET," then
press •.
•After Channel Auto Set is
finished, Clock Auto Set
will be performed. (If clock
is set manually, Clock Auto
Set will not be performed.)
•Clock
1) Press AV• • to
select "CLOCK."
MAIN
SEL_:CF :, •'9 •
SET, :ACTION
2) Press ACTION.
SET,CLOO<
AUTO CLOCK SET
TIME ZONE ADJUST :0
SELECT:, •
SET :p
END :ACTION
"TIME ZONE ADJUST'
appears only when auto
clock is set.)
3) Press &V to select
"MANUAL" or
"AUTO CLOCK
SET' and press •.
•For Auto Clock Set,
select "AUTO CLOCK
SET," then press SET.
SELECT :,,
START :ACTION
4) Press AV and
press • • to select
and set the month,
date, year, time,
and DST (Daylight
Saving Time).
5) Press ACTION
twice to start the
clock and exit this
mode.
10
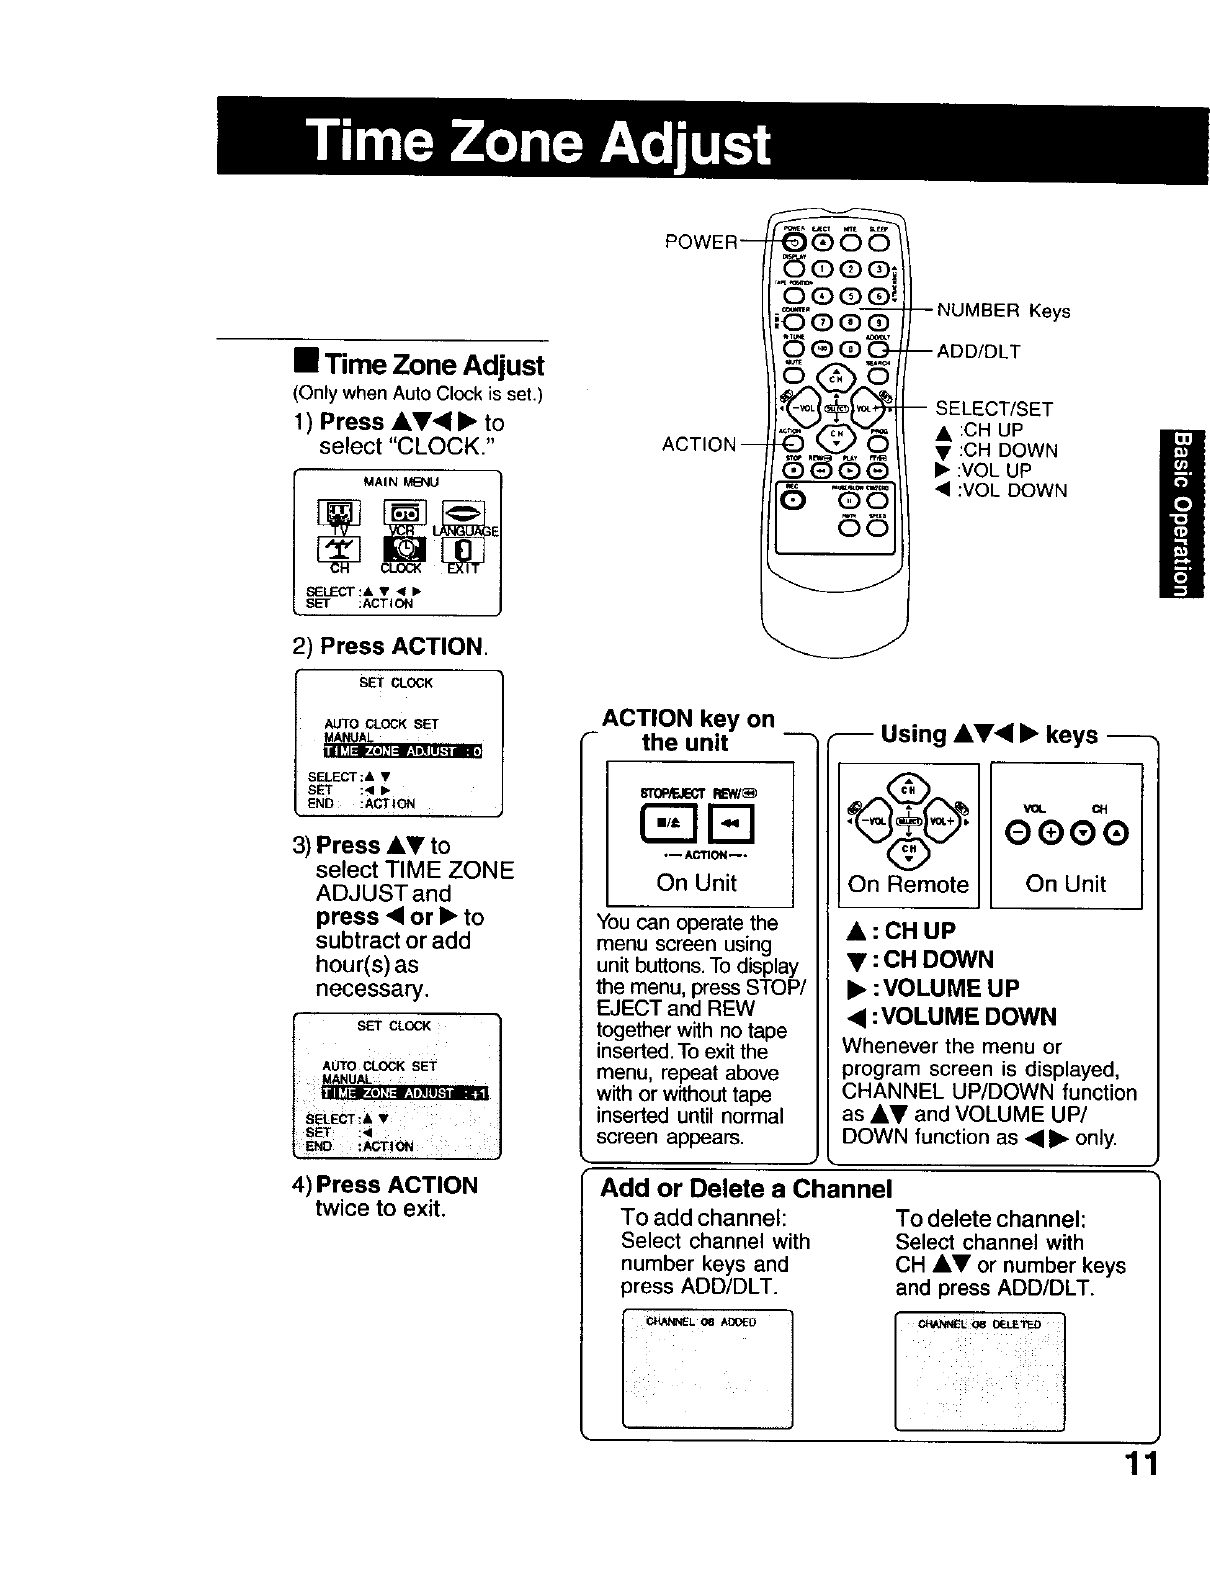
•Time Zone Adjust
(Only when Auto Clock is set.)
1) Press AV<I • to
select "CLOCK."
MAIN
SELECT :A • <l •
SET ;ACTION
2, Press ACTION.
SET CLOCK
AUTO CLOCK SET
SELECT ;& •
SET :<1 I_
END :ACTION
3) Press &V to
select TIME ZONE
ADJUSTand
press •or • to
subtract or add
hour(s) as
necessary.
ISET CLOCK
AUTO cLocK SET
_SELECT :8, •
SET :<
_No :ACTmN
4) Press ACTION
twice to exit.
POWER--
ACTION I
co*=_p
;OG)QO
<5N 3
6 -6" 5
--NUMBER Keys
I ADD/DLT
-- SELECT/SET
• :CH UP
• :CH DOWN
• :VOL UP
• :VOL DOWN
ACTION key on
_- the unit __ I Using A•<I • keys
s'r0P_JECTREWI_
•_ACTION_o
On Unit
You can operate the
menu screen using
unit buttons. To display
the menu, press STOP/
EJECT and REW
together with no tape
inserted. To exit the
menu, repeat above
with or without tape
inserted until normal
screen appears.
VOL CH
OQ®Q
On Remote On Unit
A:CHUP
• : CH DOWN
•:VOLUME UP
:VOLUME DOWN
Whenever the menu or
program screen is displayed,
CHANNEL UP/DOWN function
as A• and VOLUME UP/
DOWN function as • • only,
Add or Delete a Channel
To add channel:
Select channel with
number keys and
press ADD/DLT.
To delete channel:
Select channel with
CH kV or number keys
and press ADD/DLT.
11
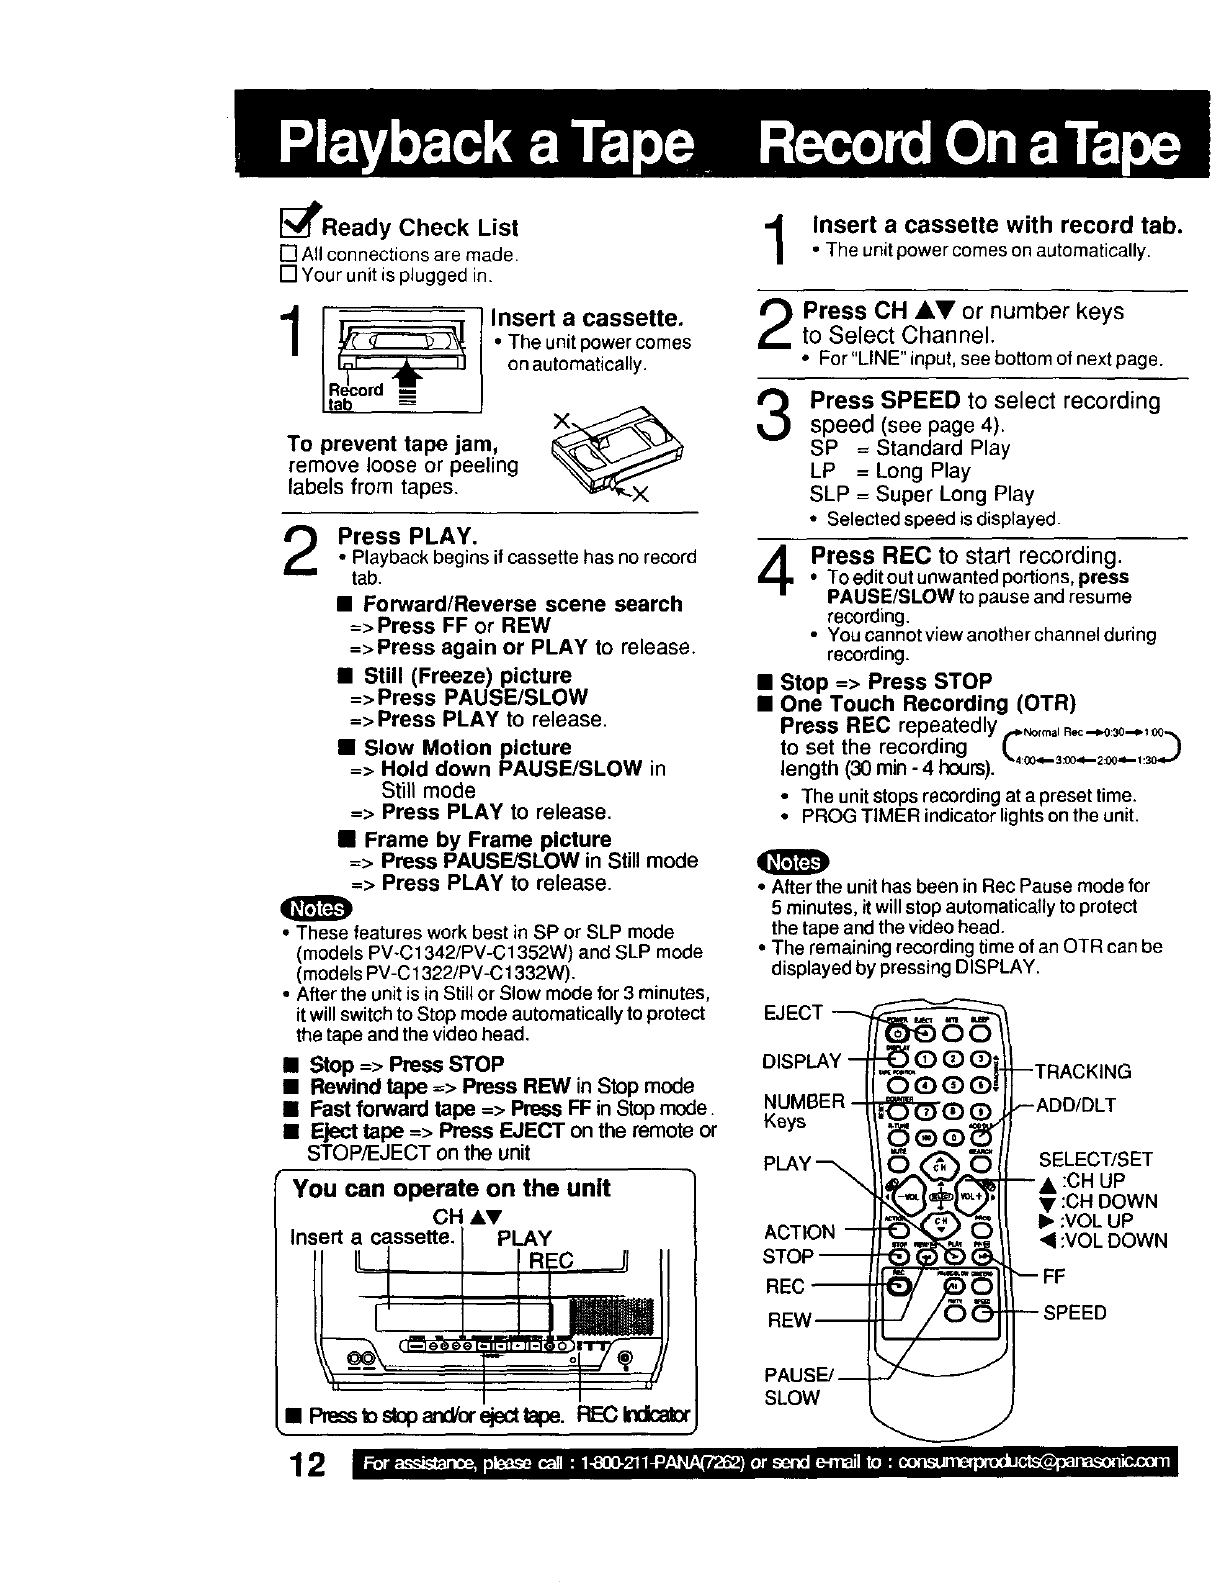
_l_Ready Check List
[] All connections are made.
[] Your unit is plugged in.
To prevent tape jam,
remove loose or peeling
labels from tapes.
Insert a cassette.
•The unit power comes
on automatically.
2Press PLAY.
• Playback begins if cassette has no record
tab.
•Forward/Reverse scene search
=>Press FF or REW
=>Press again or PLAY to release.
•Still (Freeze) picture
=>Press PAUSE/SLOW
=> Press PLAY to release.
•Slow Motion picture
=> Hold down PAUSE/SLOW in
Still mode
=> Press PLAY to release.
•Frame by Frame picture
=> Press PAUSF.JSLOW in Still mode
=> Press PLAY to release.
•These features work best in SP or SLP mode
(models PV-C1342/PV-C1352W) and SLP mode
(models PV-C 1322/PV-C1332W).
• After the unit is in Still or Slow mode for 3 minutes,
it will switch to Stop mode automatically to protect
the tape and the video head.
Insert a cassette with record tab.
• The unit power comes on automatically.
Press OH AVor number keys
to Select Channel.
3•For"LINE" input, see bottom of next page.
Press SPEED to select recording
speed (see page 4),
SP = Standard Play
LP = Long Play
SLP -- Super Long Play
• Selected speed is displayed.
Press REC to start recording.• To edit out unwanted portions, press
PAUSE/SLOW to pause and resume
recording.
•You cannot view another channel during
recording.
•Stop => Press STOP
• One Touch Recording (OTR)
Press REC repeatedly ..*.o,.,., R._.-.o_-.. _.
to set the recording (,., -- ]
length (30 min-4hours). 4oo.,,-3:0o4-2oo.-,:_..-
• The unit stops recording at a preset time.
• PROG TIMER indicator lights on the unit,
• After the unit has been in Rec Pause mode for
5 minutes, it will stop automatically to protect
the tape and the video head.
• The remaining recording time of an OTR can be
displayed by pressing DISPLAY.
EJECT
•Stop => Press STOP DISPLAY
•Rewind tape => Press REW in Stop mode
•Fast forward tape => Press FF in Stop mode.
•Eject tape => Press EJECT on the remote or Keys
STOP/EJECT on the unit pLA,
You can operate on the unit
CH &V
Insert a cassette. PLAY
• Presstostopa'£Vorejecttape. FL_31ndca_
ACTION
SELECT/SET
:CH UP
_:CH DOWN
:VOL UP
_1:VOL DOWN
FF
=EED
SLOW
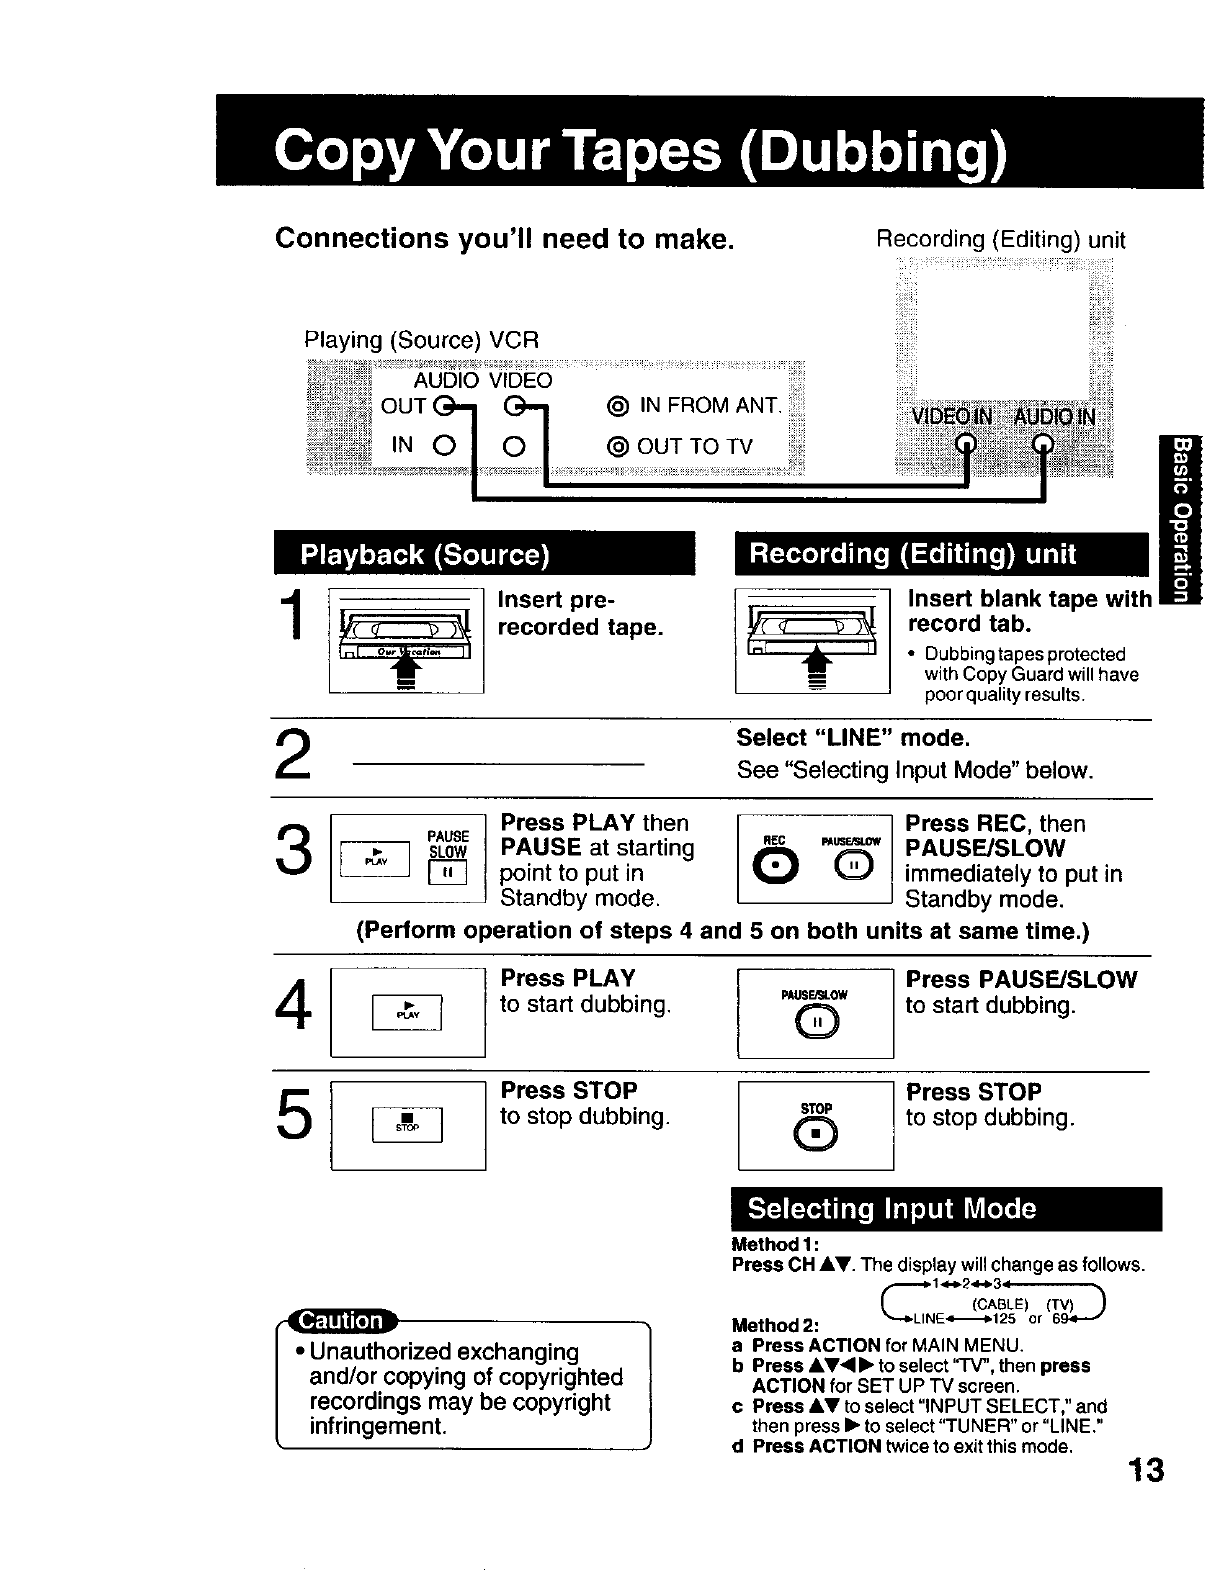
Connections you'll need to make.
Playing (Source) VCR
AUDIO VIDEO ................................
Recording (Editing) unit
i!!i_!:ii_i
Insert pre-
recorded tape.
ti
Insert blank tape with
record tab.
• Dubbing tapes protected
with Copy Guard will have
poor quality results.
2Select "LINE" mode.
See "Selecting Input Mode" below.
[_ Press PLAY then 6 _ Press REC, then
PAUSE
i_ PAUSE at starting _PAUSE/SLOW
point to put in immediately to put in
Standby mode. Standby mode.
(Perform operation of steps 4 and 5 on both units at same time.)
Press PLAY Press PAUSE/SLOW
4 [_ to start dubbing. _u=6°w to start dubbing.
to stop dubbing. ,€_ to stop dubbing.
Method 1:
Press CH AV. The display willchange as follows.
• Unauthorized exchanging
and/or copying of copyrighted
recordings may be copyright
infringement.
Method2: %--_LIN(_125 or 69_ -J
a Press ACTION for MAIN MENU.
b Press AV<I • to select 'q'V",then press
ACTION for SET UP TV screen.
c Press &V to select "INPUT SELECT," and
then press •to select "TUNER" or "LINE."
d Press ACTION twice to exit thismode, 13
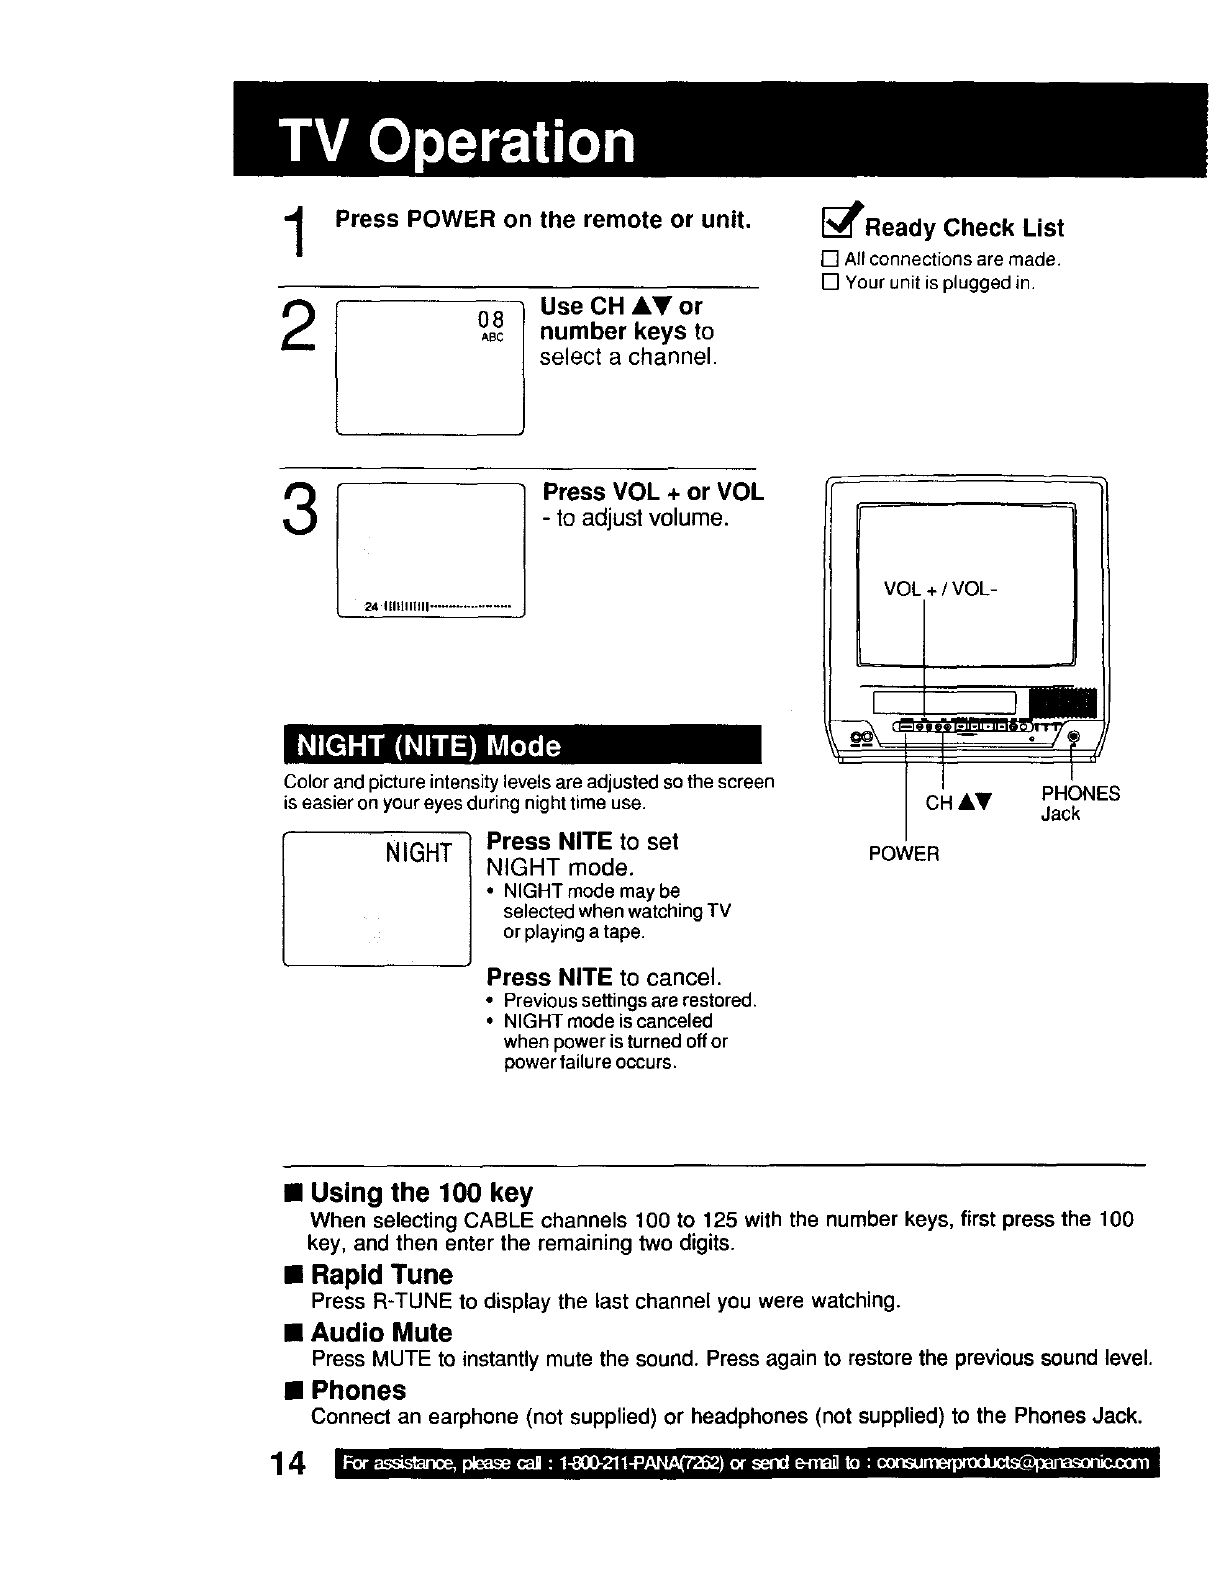
1
2
Press POWER on the remote or unit.
Use CH AY or
08
,Bc number keys to
select a channel.
_PReady Check List
[] All connections are made.
[] Your unit is plugged in.
3
24 IIli]llllll .................
Press VOL + or VOL
- to adjust volume.
VOL + /VOL-
T
Color and picture intensity levelsare adjusted so the screen
is easier on your eyes during night time use.
NIGHT Press NITE to set
NIGHT mode.
• NIGHTmode maybe
selected when watching TV
or playing a tape.
Press NITE to cancel.
• Previous settings are restored.
• NIGHT mode is canceled
when power is turned off or
power failure occurs.
CH AV PHONES
Jack
POWER
•Using the 100 key
When selecting CABLE channels 100 to 125 with the number keys, first press the t00
key, and then enter the remaining two digits.
•Rapid Tune
Press R-TUNE to display the last channel you were watching.
•Audio Mute
Press MUTE to instantly mute the sound. Press again to restore the previous sound level.
•Phones
Connect an earphone (not supplied) or headphones (not supplied) to the Phones Jack.
14
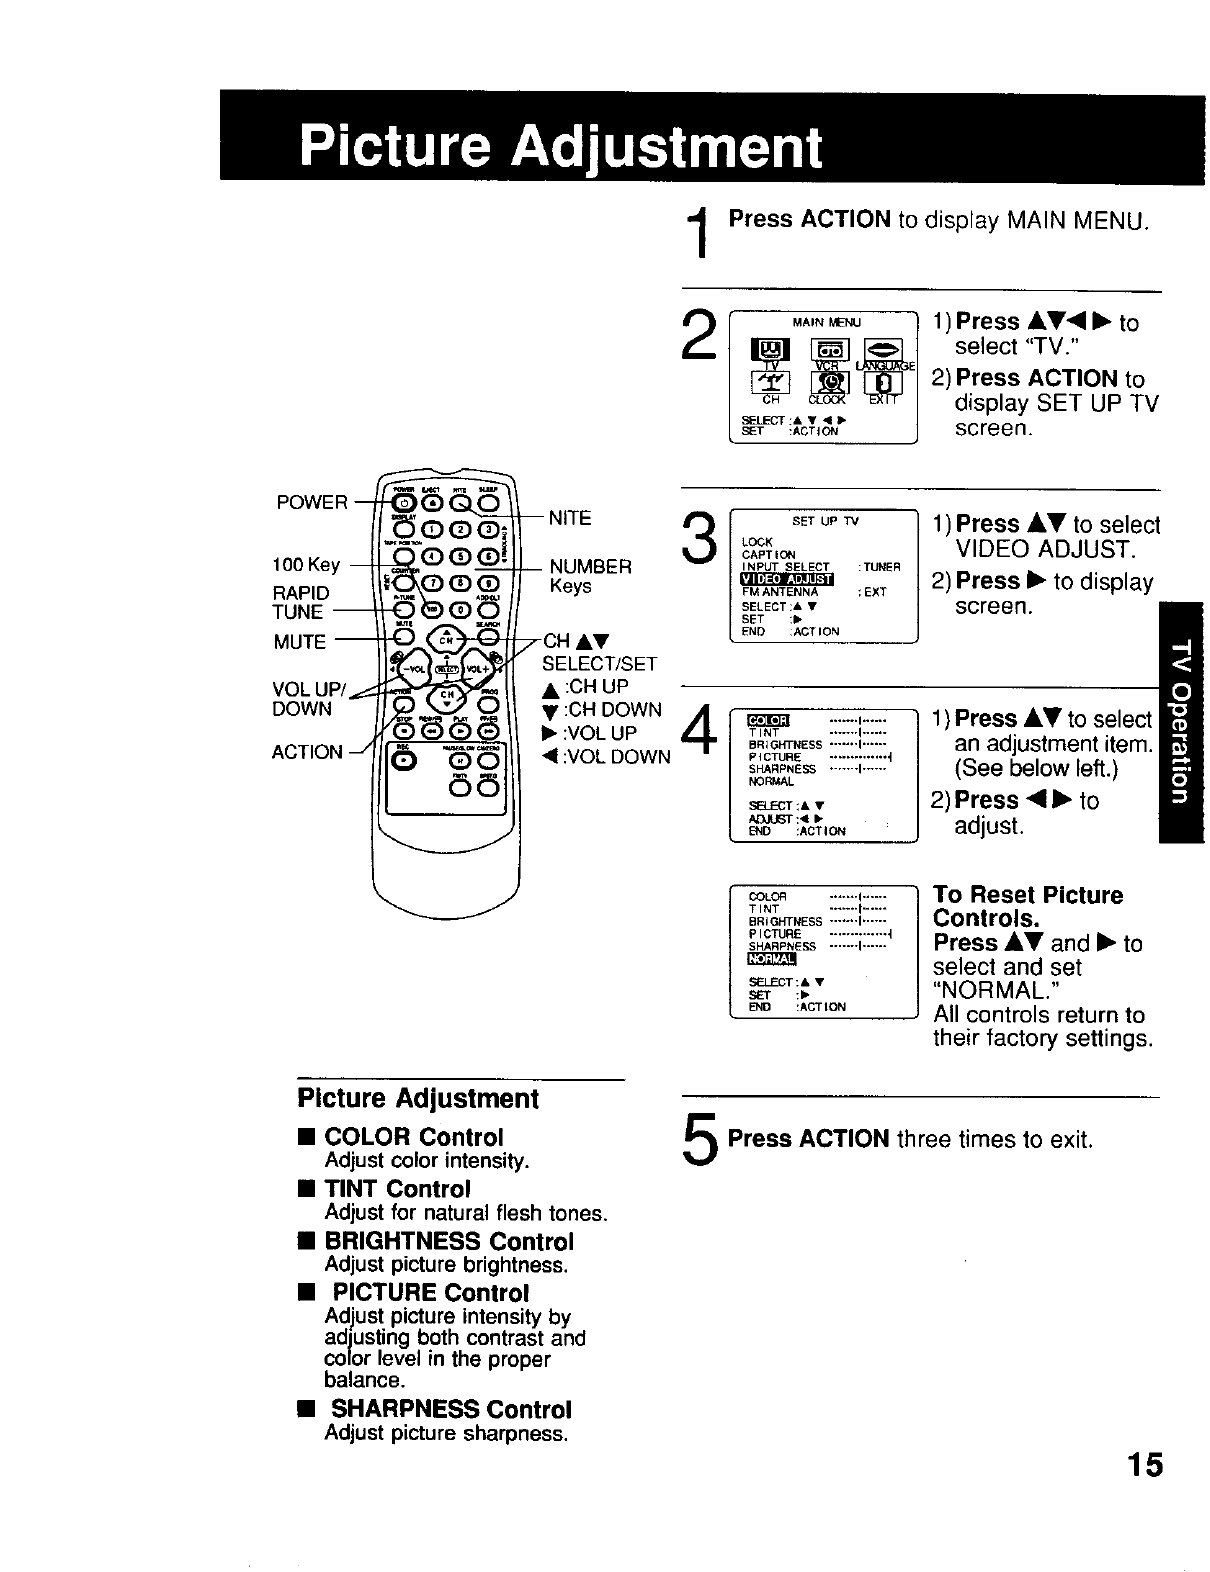
Press ACTION to display MAIN MENU.
POWER --
100 Key --
RAPID •Jll[d_]lr=Ti'w_ i
TUNE--
MUTE
VOL UP/
DOWN
,,_ (3 _ __ NITE
_,OQ(_! __ NUMBER
iOkO 0 _ Keys
-O®_O
SELECT/SET
• :CH UP
• :CH DOWN
• :VOL UP
(2) O "1 :VOL DOWN
2
3
4
MAIN MENU
SFLECT :& Y 4I_
SET fACTION
1) Press A_'• • to
select "TV."
2) Press ACTION to
display SET UP TV
screen.
SET UP TV
LOCK
CAPTION
INPUT SELECT :TUNER
FM ANTENNA :EXT
SELECT:& •
SET :•
END :ACTION
1) Press •V to select
VIDEO ADJUST.
2) Press • to display
screen.
....... I......
TINT ....... I......
BRIGHTNESS ....... I......
PICTURE ..............
SHARPNESS ....... I......
NORMAL
SB_-CT;& •
ADJUST:< •
END :ACTION
COLOR ....... I......
TINT ....... I......
BRIGHTNESS ....... I......
PICTURE ..............
SHARPNESS ....... I......
SELECT:& •
I_ :ACTION
1) Press AV to select
an adjustment item.
(See below left.)
2) Press • I_ to
adjust.
To Reset Picture
Controls.
Press _I,V and I_ to
select and set
"NORMAL."
All controls return to
their factory settings.
Picture Adjustment
•COLOR Control
Adjust color intensity.
•TINT Control
Adjust for natural flesh tones.
•BRIGHTNESS Control
Adjust picture brightness.
•PICTURE Control
Adjust picture intensity by
adjusting both contrast and
color level in the proper
balance.
•SHARPNESS Control
Adjust picture sharpness.
Press ACTION three times to exit.
15
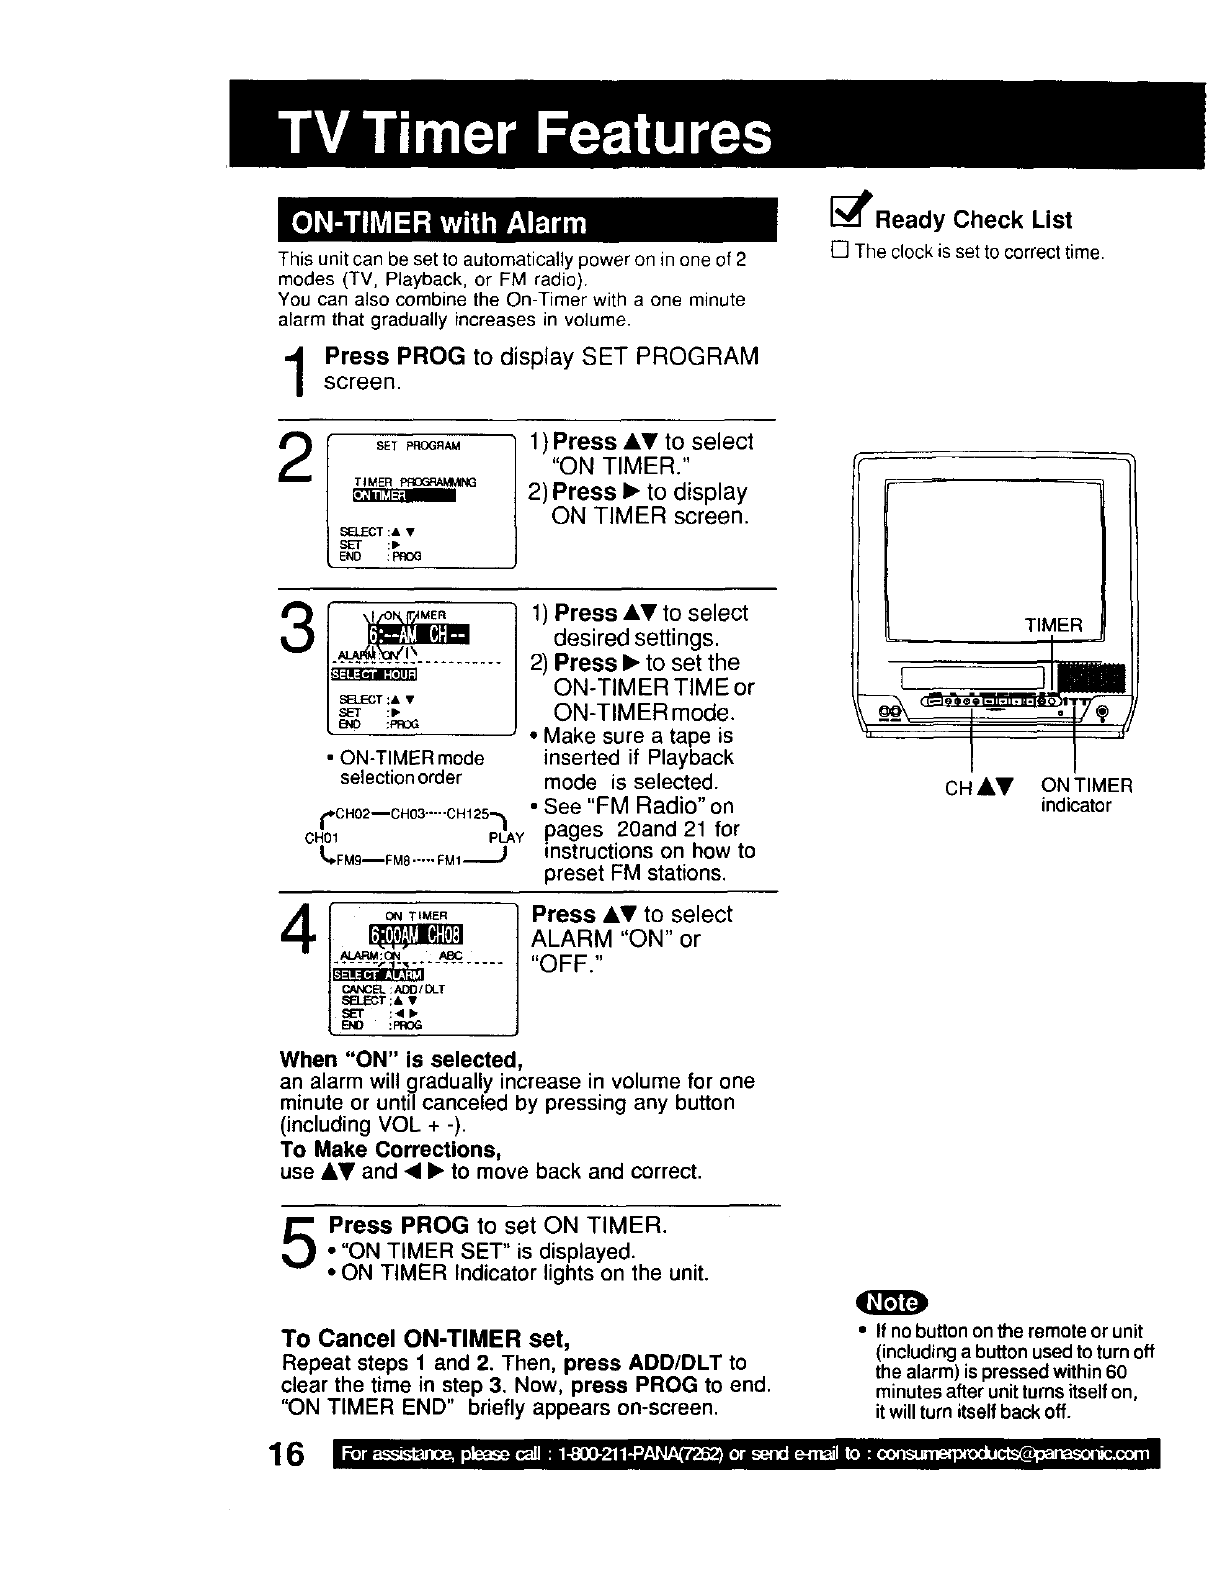
This unit can be set to automatically power on in one of 2
modes (TV, Playback, or FM radio).
You can also combine the On-Timer with a one minute
alarm that gradually increases in volume.
1Press PROG to display SET PROGRAM
screen.
SELECT :i •
:lb
:PROG
1 ) Press iV to select
"ON TIMER."
2) Press • to display
ON TIMER screen.
..........
• ON-TIMER mode
selection order
i_*C H02--CH03"°'"C H125"_
OH01 PLAY
t, FMg--FMS.-.-.FM1----J
1) Press iV to select
desired settings.
2) Press • to set the
ON-TIMER TIME or
ON-TIMER mode.
• Make sure a tape is
inserted if Playback
mode is selected.
• See "FM Radio" on
pages 20and 21 for
instructions on how to
preset FM stations.
Press &T to select
ALARM "ON" or
"OFF."
When "ON" is selected,
an alarm will gradually increase in volume for one
minute or until canceled by pressing any button
(including VOL + -).
To Make Corrections,
use &V and ••to move back and correct.
[_Ready Check List
[] The clock is set to correct time.
TIMER
c ...... jill
CH i,V ON TIMER
indicator
Press PROG to set ON TIMER.
• "ON TIMER SET" is displayed.
• ON TIMER Indicator lights on the unit.
To Cancel ON-TIMER set,
Repeat steps 1 and 2. Then, press ADD/DLT to
clear the time in step 3. Now, press PROG to end.
"ON TIMER END" briefly appears on-screen.
O
• If no button onthe remote or unit
(includinga button used to turn off
the alarm) is pressed within 60
minutes after unit turns itself on,
it will turn itseff back off.

;LEEP
SELECT/SET
• :CH UP
• :CH DOWN
• :VOL UP
• :VOL DOWN
This unit can be set for auto power off.
Press SLEEP repeatedly SLEEPTIMER30
to set SLEEP TIMER.
• Pressing DISPLAYwith SLEEPTIMER60
sleep timer set displays _,
remaining time. SLEEP TIMER 90
Press SLEEP repeatedly
until "SLEEP TIMER 00" SLEEPTIMER00
appears to cancel.
:1:O0 (one minute)....
I
2:00
Ione-minute
3i00 increase
until 10:00
9i00 )
15:00 five-minute
20:00 increase
until30:00
25:00 ,
_-30:00 -- _._:.-= :.-.:
40:00 ten-minute
increase
50:00 until 60:00
_0:00 (Max).... =
O
•While timer function is in progress,
you can change channelson the unit
with CH AV while "CANCEL/SET"
screen is not displayed.
You can set a timer alarm up to 60 rain. Useful when you are
cooking, etc.
Press TIMER/FM _to display the
instant alarm CANCEL/SET screen.
f ":="
IRemaining Time
Press OH AV on the
uni__.!with CAN(
screen displayed to set
alarm. (Time changes in
the order shown left.)
• Pressing TIMER/FM repeatedly on the unit
will change display as follows.
TV(or LINE) _I FM Jl
To cancel, press TIMER/FM then press ADD/DLT on
the remote while CANCEL/SET screen is displayed.
To increase timer in progress, repeat step 2. Time
will be rounded up to next 1, 5, or 10 minute interval.
(See chart left.)
<Example>
•If current time remaining is 12:15, countdown will
restart from 15:00.
• If current time remaining is 9:15, countdown will
restart from 10:00.
3Alarm will sound at 0: 00.
Press any button to stop
•The volume of the alarm gradually increases
for one minute and then continues to beep
until any button is pressed, 17
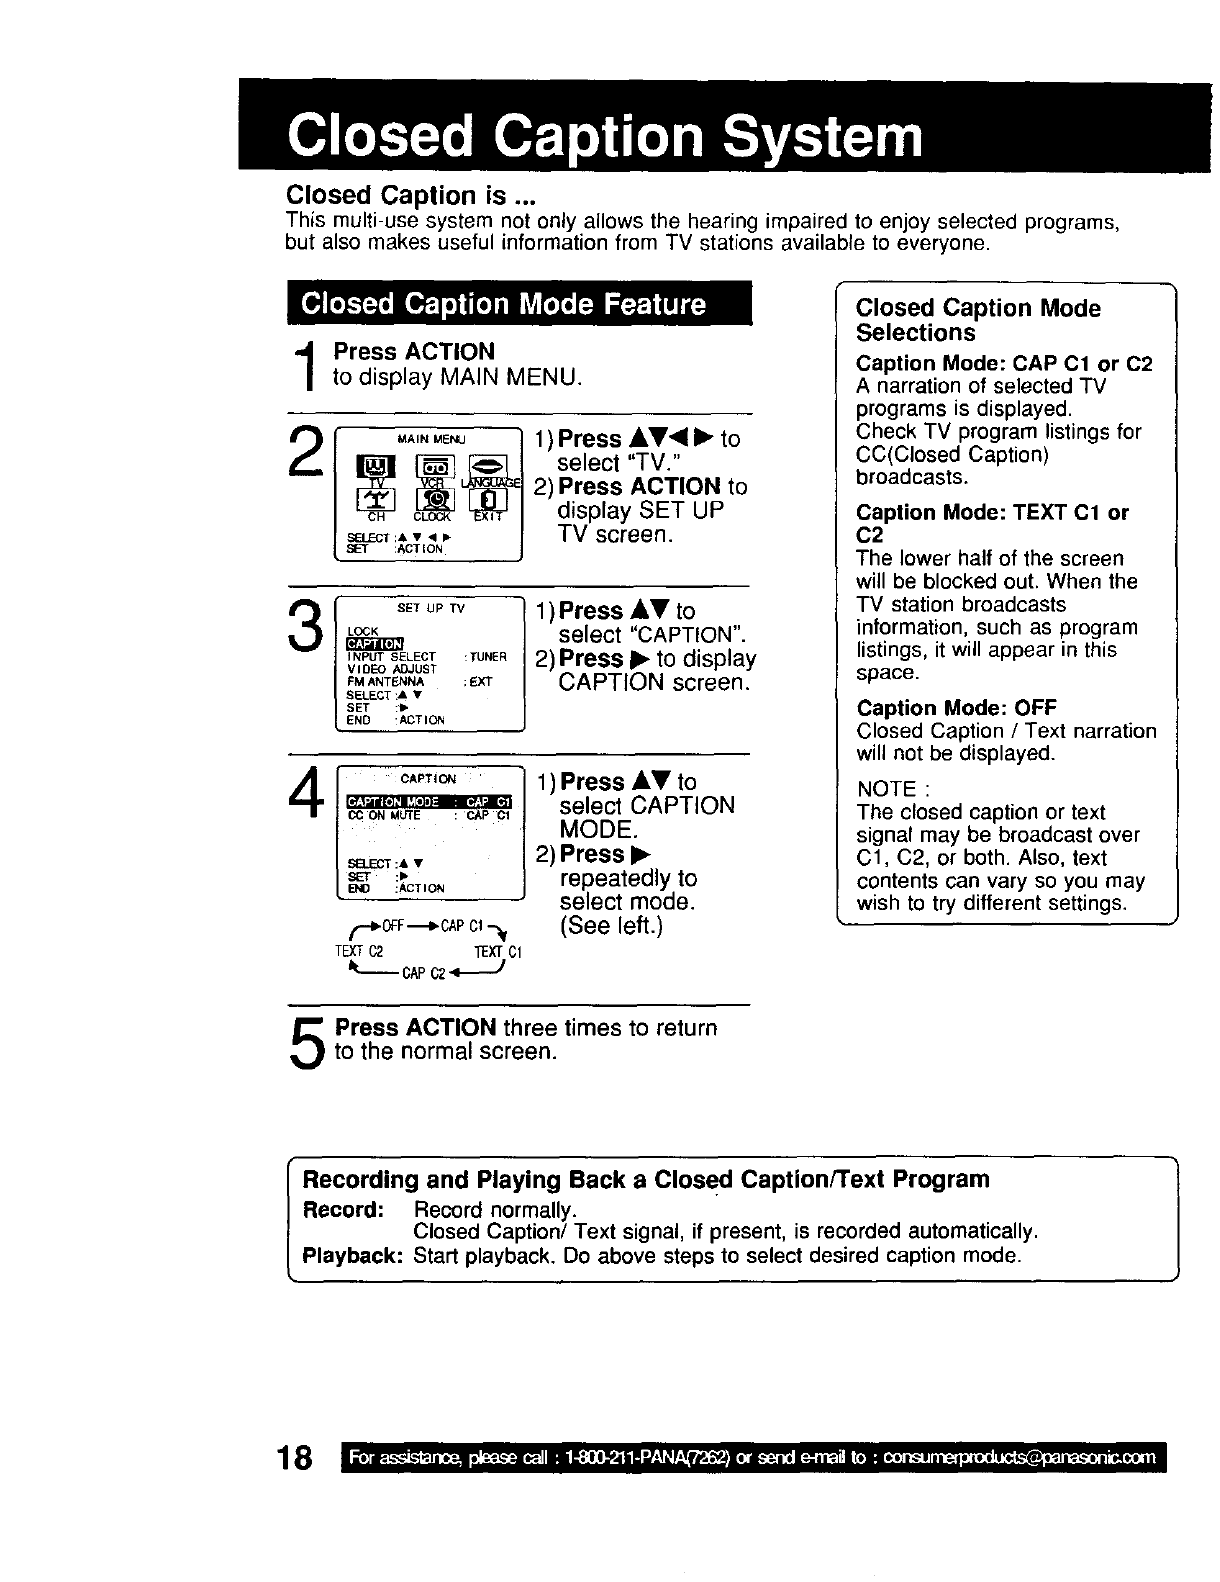
Closed Caption is ...
This multi-use system not only allows the hearing impaired to enjoy selected programs,
but also makes useful information from TV stations available to everyone.
1Press ACTION
to display MAIN MENU.
1) Press _I,V, •to
select "TV."
2) Press ACTION to
display SET UP
TV screen.
3SET UP TV
LOCK
INPUT SELECT : TUNER
VIDEO ADJUST
FM ANTP_NNA : EXT
SELECT :& •
SET :b-
END :ACTION
1) Press AV to
select "CAPTION".
2) Press •to display
CAPTION screen.
CAPTION
St_ECT _A •
I_ _,_T,ON
_-N_O_F-_CAP C1"-_
TEXTC2 TEXTC1
CAPC2
1) Press AV to
select CAPTION
MODE.
2) Press •
repeatedly to
select mode.
(See left.)
Closed Caption Mode
Selections
Caption Mode: CAP Ct or C2
A narration of selected TV
programs is displayed.
Check TV program listings for
CC(Closed Caption)
broadcasts.
Caption Mode: TEXT Cl or
C2
The lower half of the screen
will be blocked out. When the
TV station broadcasts
information, such as program
listings, it will appear in this
space.
Caption Mode: OFF
Closed Caption /Text narration
will not be displayed.
NOTE :
The closed caption or text
signal may be broadcast over
C1, C2, or both. Also, text
contents can vary so you may
wish to try different settings.
Press ACTION three times to returnto the normal screen.
Recording and Playing Back a Closed Caption/Text Program
Record: Record normally.
Closed Caption/Text signal, if present, is recorded automatically.
Playback: Start playback. Do above steps to select desired caption mode.

00(!)0;
_n
--MUTE
_ SELECT/SET
• :CH UP
• :CH DOWN
I_ :VOL UP
• :VOL DOWN
--ACTION
Closed Caption narration, if available, isdisplayed
when MUTE button is pressed for silence.
Press ACTION to display MAIN MENU.
2MAIN MENU
SELECT :& T"d I_
SET :ACT ION
1) Press AV4 • to
select "TV."
2) Press ACTION to
display SET UP TV
screen.
I SETUPTV "J 1) Press A_' to
LOCK | select "CAPTION".
,NPUTSELECT:TU,E,| 2)Press • to display
VIDEO ADJUST
FMANTENNA:EXT 1 CAPTION screen.
SELECT :& •
SET :1_
END :ACTION
4CAPTION
O(3 ON MUTE :CAP GI
SS.E:CT :& •
SET :le.
ElkI_ :ACTION
1) Press AT' to
select CAPTION
MODE.
2) Press •
repeatedly to
select "OFF."
/CAPTION
CAPTION MOOE : OFF
SB.Ecr:A V
END :ACTION
1) Press &V to select
CC ON MUTE.
2) Press •repeatedly
to select desired
mode.
• Each pressof _will
change the displayas
shownleft.
•The captionmaybe
broadcastover CAP C1
or C2.
Press ACTION three times to return tothe normal screen.
Press MUTE to mute the sound and
display closed captioning.
•To cancel, pressMUTE again. 19
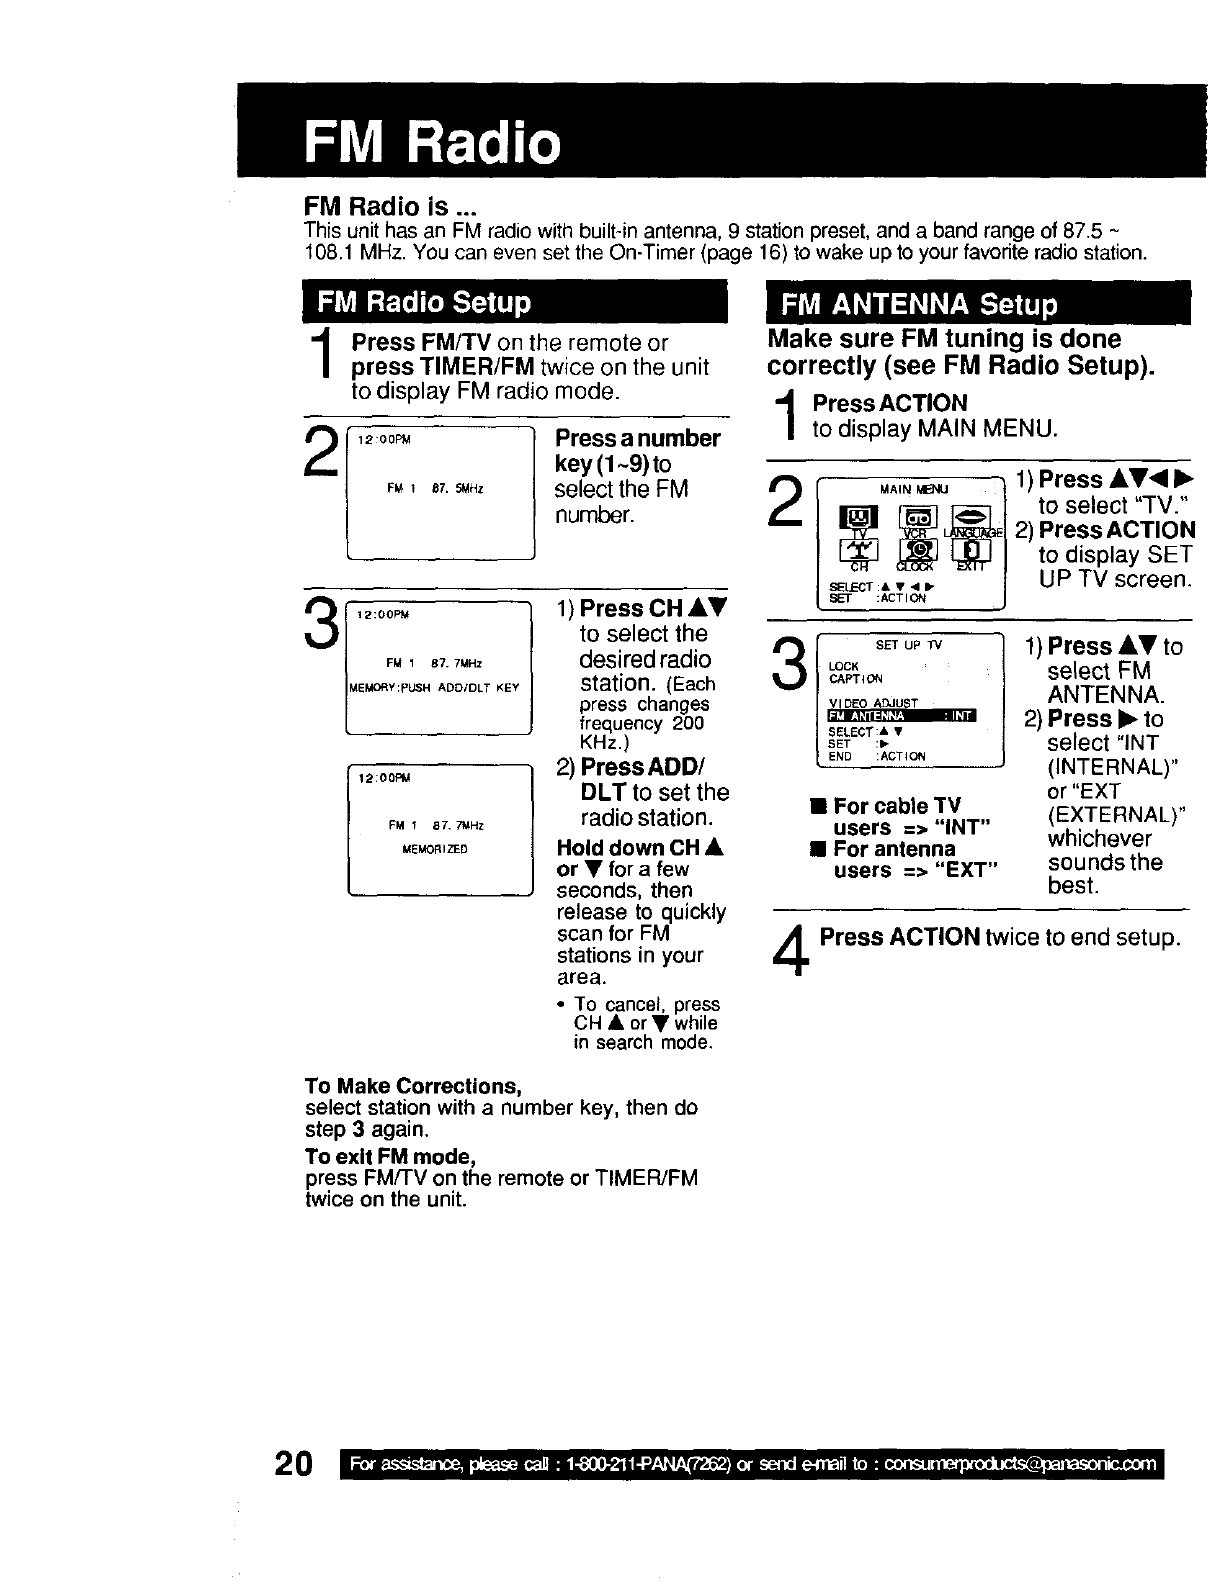
FM Radio is ...
This unit has an FM radio with built-in antenna, 9 station preset, and a band range of 87.5 ~
108.1 MHz. You can even set the On-Timer (page 16) to wake up to your favorite radio station.
1Press FM/TV on the remote or
press TIMER/FM twice on the unit
to display FM radio mode.
Press ACTION
Press a number to display MAIN MENU.
key(l~9)to /_
select the FM MA,N_u
number.
to select the _ f SETuPTv
desired radio _ [ LOC*
station. (Each CAPTION
press changes VlDEOADJUST
frequency 200 'S;LE"_T:=_"',
SET :1_"
KHz.) END ;ACTION
Make sure FM tuning is done
correctly (see FM Radio Setup).
12;OOFM
FM I 87. 7MHz
MEMORIZED
SELECT :k , 411P
V IDEe ADJUST
2) Press ADD/
DLT to set the
radio station. •For cable TV
users => "INT"
Hold down CH • • For antenna
or • for afew users => "EXT"
seconds, then
release to quickly
scan for FM
stations in your
area.
1) Press AV_I •
to select "TV."
2) Press ACTION
to display SET
UP TV screen.
1) Press &T to
select FM
ANTENNA.
2) Press •to
select "INT
(INTERNAL)"
or "EXT
(EXTERNAL)"
whichever
sounds the
best.
Press ACTION twice to end setup.
•To cancel, press
CH • or•while
in search mode,
To Make Corrections,
select station with a number key, then do
step 3 again.
To exit FM mode,
press FMFrV on the remote or TIMER/FM
twice on the unit.
20
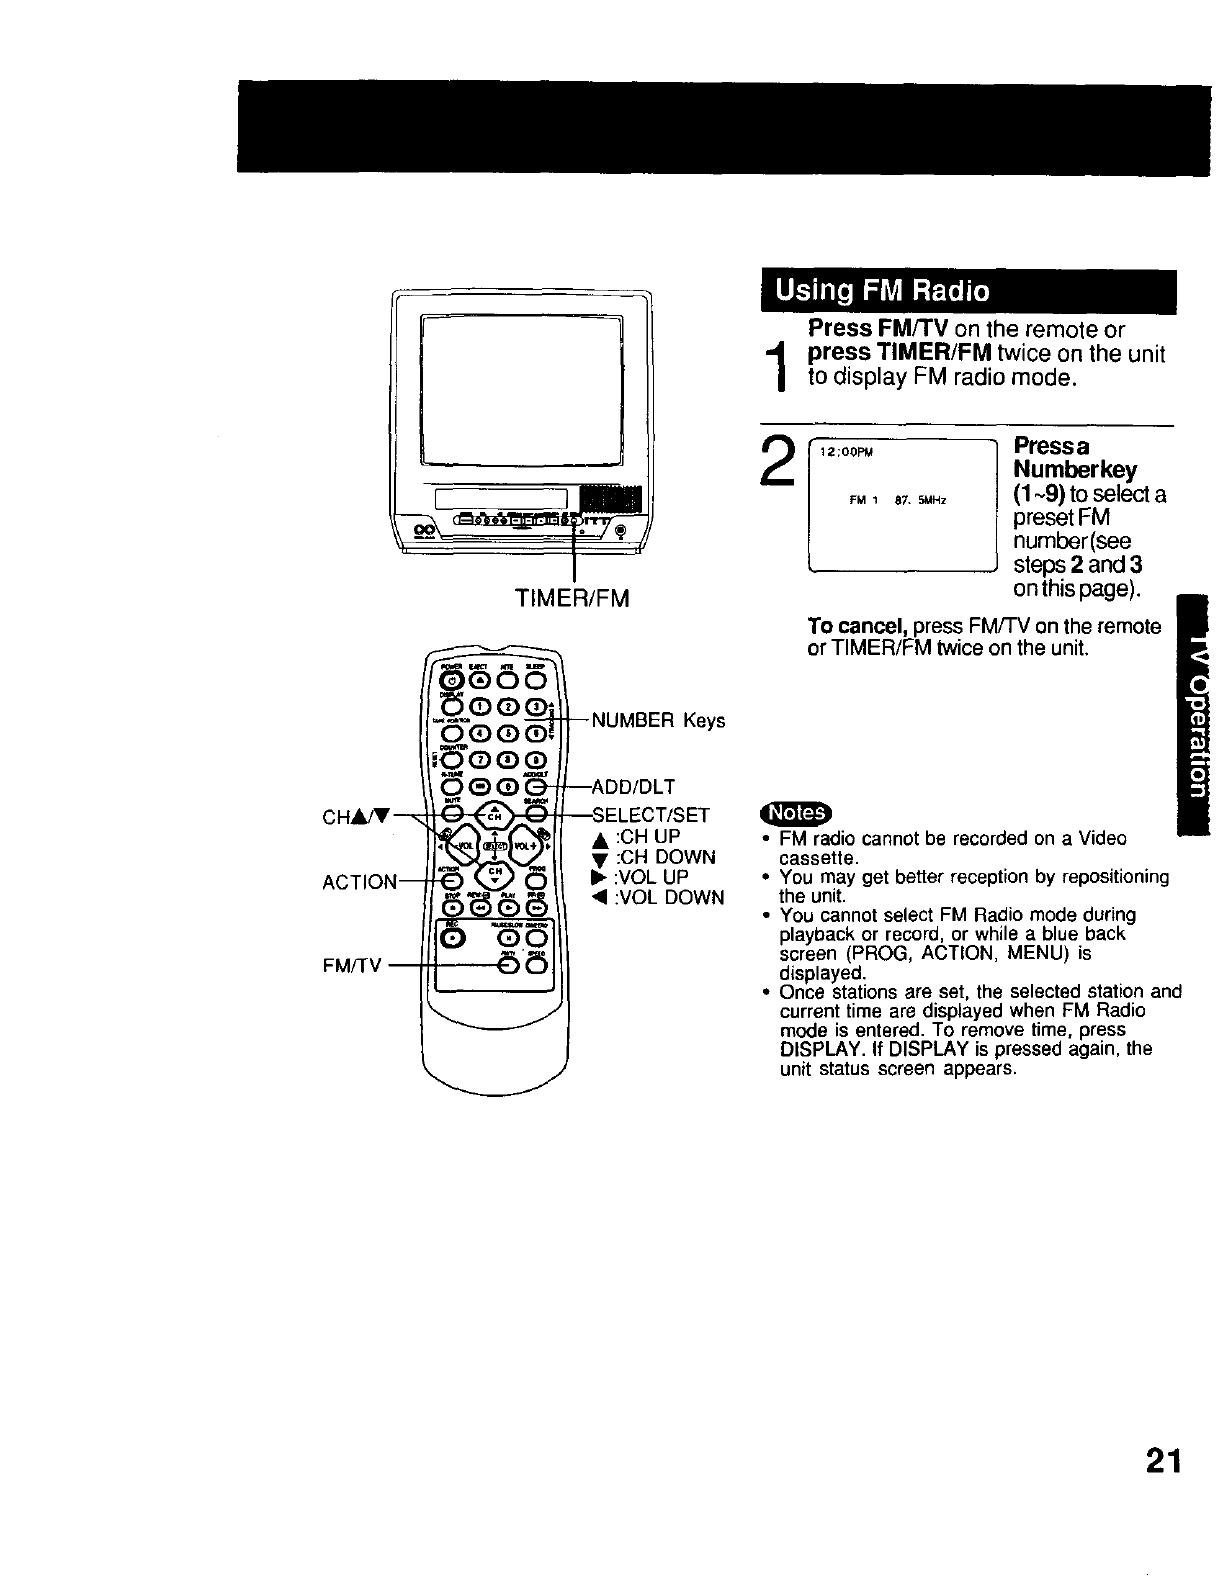
Press FM/TV on the remote or
press TIMER/FM twice on the unit
to display FM radio mode.
TIMER/FM
Keys
• :CH UP
• :CH DOWN
I_ :VOL UP
• :VOL DOWN
212;00PM
FM 1 87, 5MHz
Press a
Numberkey
(1-9) to select a
preset FM
number(see
steps 2 and 3
on this page).
To cancel, press FM/TV on the remote
or TIMER/FM twice on the unit.
O
•FM radio cannot be recorded on a Video
cassette.
• You may get better reception by repositioning
the unit.
• You cannot select FM Radio mode during
playback or record, or while a blue back
screen (PROG, ACTION, MENU) is
displayed.
•Once stations are set, the selected station and
current time are displayed when FM Radio
mode is entered. To remove time, press
DISPLAY. If DISPLAY is pressed again, the
unit status screen appears.
21
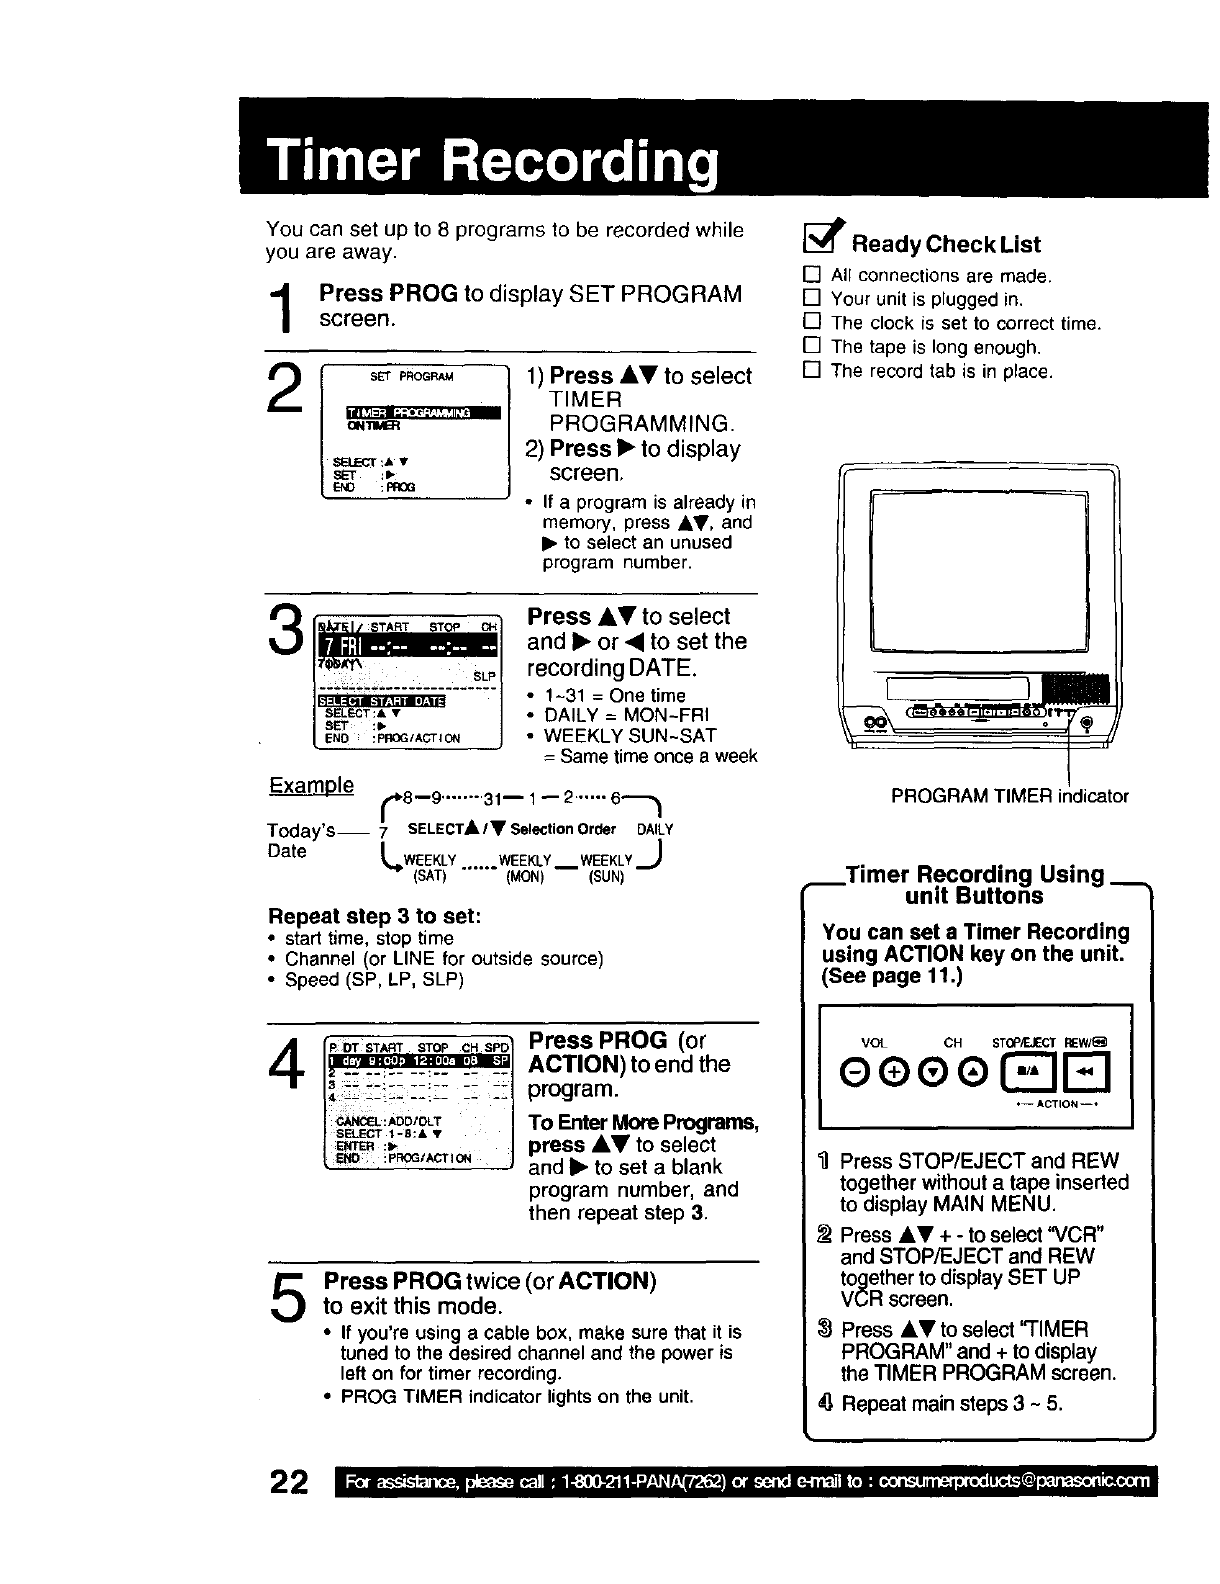
You can set up to 8 programs to be recorded while
you are away.
Press PROG to display SET PROGRAM
screen.
s_ P_oG,_ 1) Press &V to select
TIMER
_:'_':'_ _""' PROGRAMMING.
2) Press • to display
_:AT ,,- screen,
r=NO :moa • If a program is already in
memory, press AT, and
• to select an unused
program number.
31 :1
SELI_-*CT:& •
EEr :l-
lEND : pROG/ACT I ON 1
Press AV to select
and • or • to set the
recording DATE.
• 1-31 = One time
• DAILY = MON~FRI
• WEEKLY SUN-SAT
= Same time once a week
Exa___.__.__le(_8-9 ........ 31m 1 _ 2 ...... 6.-_,_ I
/
Today's-- 7 SELECTk/VSelecti°nOrder DAILY
Date L.WEEKLY .... WEEKLY WEEKLYJ
-- (SAT) " MON SUN
Repeat step 3 to set:
•start time, stop time
•Channel (or LINE for outside
•Speed (SP, LP, SLP) source)
4 PressPROG(o,
•. ACTION) to end the
CANCI_LIADDIDLT To Enter More Programs,
SELECT l-B:& •
:=, press A, to select
_ :_P,oQl^cr_o, and • to set a blank
program number, and
then repeat step 3.
5Press PROG twice (or ACTION)
to exit this mode.
•If you're using a cable box, make sure that it is
tuned to the desired channel and the power is
left on for timer recording.
•PROG TIMER indicatorlights on the unit.
_Ready Check List
[] All connections are made.
[] Your unit is plugged in,
[] The clock is set to correct time.
[] The tape is long enough,
[] The record tab is in place.
[
PROGRAM TIMER indicator
__Timer Recording Using
unit Buttons
You can set a Timer Recording
using ACTION key on the unit.
(See page 11.)
IVOL OH STOPFJECT REW/_
eee e F:IIE]
•-- ACTIO N --.
'_ Press STOP/EJECT and nEW
together without a tape inserted
to display MAIN MENU.
Press AV + - to select '_/CR"
and STOP/EJECT and nEW
together to display SET UP
VCR screen.
Press &V to select "TIMER
PROGRAM" and + to display
the TIMER PROGRAM screen.
Repeat main steps 3 ~ 5.
22

r-
Cancel a Timer Recording:
(Recording is in progress)
Hold down STOP for a few seconds
to cancel the Timer Recording.
• Any future daily or weekly recordings
will be performed as programmed.
SELECT/SET
• :CH UP
• :CH DOWN
• :VOL UP
• :VOL DOWN
;TOP
1
2
Repeat steps I and 2 on page 22.
I! 8 lO:OOa12:OOp125 5P /
310 8:00p 9:00p 10 SP
SU 9:OOplO:OOp L LP
CANCEL :ADDI DLT }
SELECT 1-8:,1, •
ENTER :lp
END :PROQ/ACTI ON
Press A,V to select
the desired program.
3To Replace program...
sToP 1) Press I_ to display.
2) Press &V to select
and press <or I_
to set new program
SELECT • •
sE+ .,, contents.
E.O _P.CQ,AOT,O. 3) Press PROG (or
ACTION).
To Clear program...
iOT START STOP CH SFO ress'O0+'+-
p+o++o:+
Press PROG twice(or ACTION)
to exit this mode.
•2 minutes before Timer recording is performed,
"PLEASE PREPARE FOR TIMER REC" appears and/
or the PROG TIMER Indicator flashes. Be sure a
cassette with record tab is loaded and the unit is in
Stop mode.
•If the start times of two programs overlap, the lower
numbered program will have priority.
• If the start time for a Timer Recording comes up during
a normal recording or One Touch Recording (page 12),
the Timer Recording will not be performed.
•If there is a power interruption of more than one minute,
the recording may not be performed or continued.
• If "INCOMPLETE" appears after all items have been
set, check all entries and make necessary corrections.
23

Search System is ...
Each time a recording is made, an invisible index mark is placed on the tape.
When timer recordings are made, program index and information are also included.
These index marks can be used to access or scan recordings.
Go directly to the desired recording.
1INDEX SFJkRCH
ENTER INDEX NUMBER:I
USING 1-9 KEYS
FORWARG SEARCH:FF
iREVERSE SEARCH:REW
NEXT :S_ARCH
EXIT:STOP
PressSEARCH*
in Playback or
Stop mode to
display INDEX
SEARCH screen,
and then press
NUMBER Keysto
select the
recordingnumber.
•To calculate number,
see below.
Press FF or REW
to startsearch•
Play begins at
search end. To
search forward or
back I index,
press FF or REW
while screen left in
displayed (10 sec.).
•To calculate the Index Number
Example 1:
To goto rec.2 fromrec.4, enter3 andpress REW.
Ii, 1,I, I,I ,l,i
Example 2:
To go to ree. 6from n_:. 2, enter 4 and press FF.
NOTE: _,indicates start points of each recording.
Locatesendpoint of recording for continuity.
Press SEARCH twi_e in Playback
or Stop mode to display
PROGRAM END SEARCH screen
ool resF to
start search.
SEARCH ETART:FE
Example of Program End Search operation.
PLAYBACKDIRECTION
IIT Proof.m, im prograrr120reLANK H
Press•SEARCHbutton
FF
IIP"_"' II _BLANKI_mProgram 2Ill BLANKII
Press SEARCH button
FF
IfsearchexceedsafewsecondsinBLANKarea.
BLANK [_ i,,=_,..= I
I_]_'t' Press SEARCH butt°n
Upon locating end point...
The unit searches slightly past end point,
reverse searches, and plays the last few
seconds of the program, then stops•
I I
PressSEARCHbutton ISEARCH
FF I ........... _ REVERS E
O
• Make each entrywithin10seconds,orthe Index
Search modewillbe canceled.
•If Index Search is startedvery closeto an index
mark,that index mark may notbe countedinthe
seamh.
O
•If ProgramEnd Search is startedvery
closeto an indexmark, that mark may be
skippedover.
•To cancel, press PLAY orSTOP.
-- -_ FF
REW
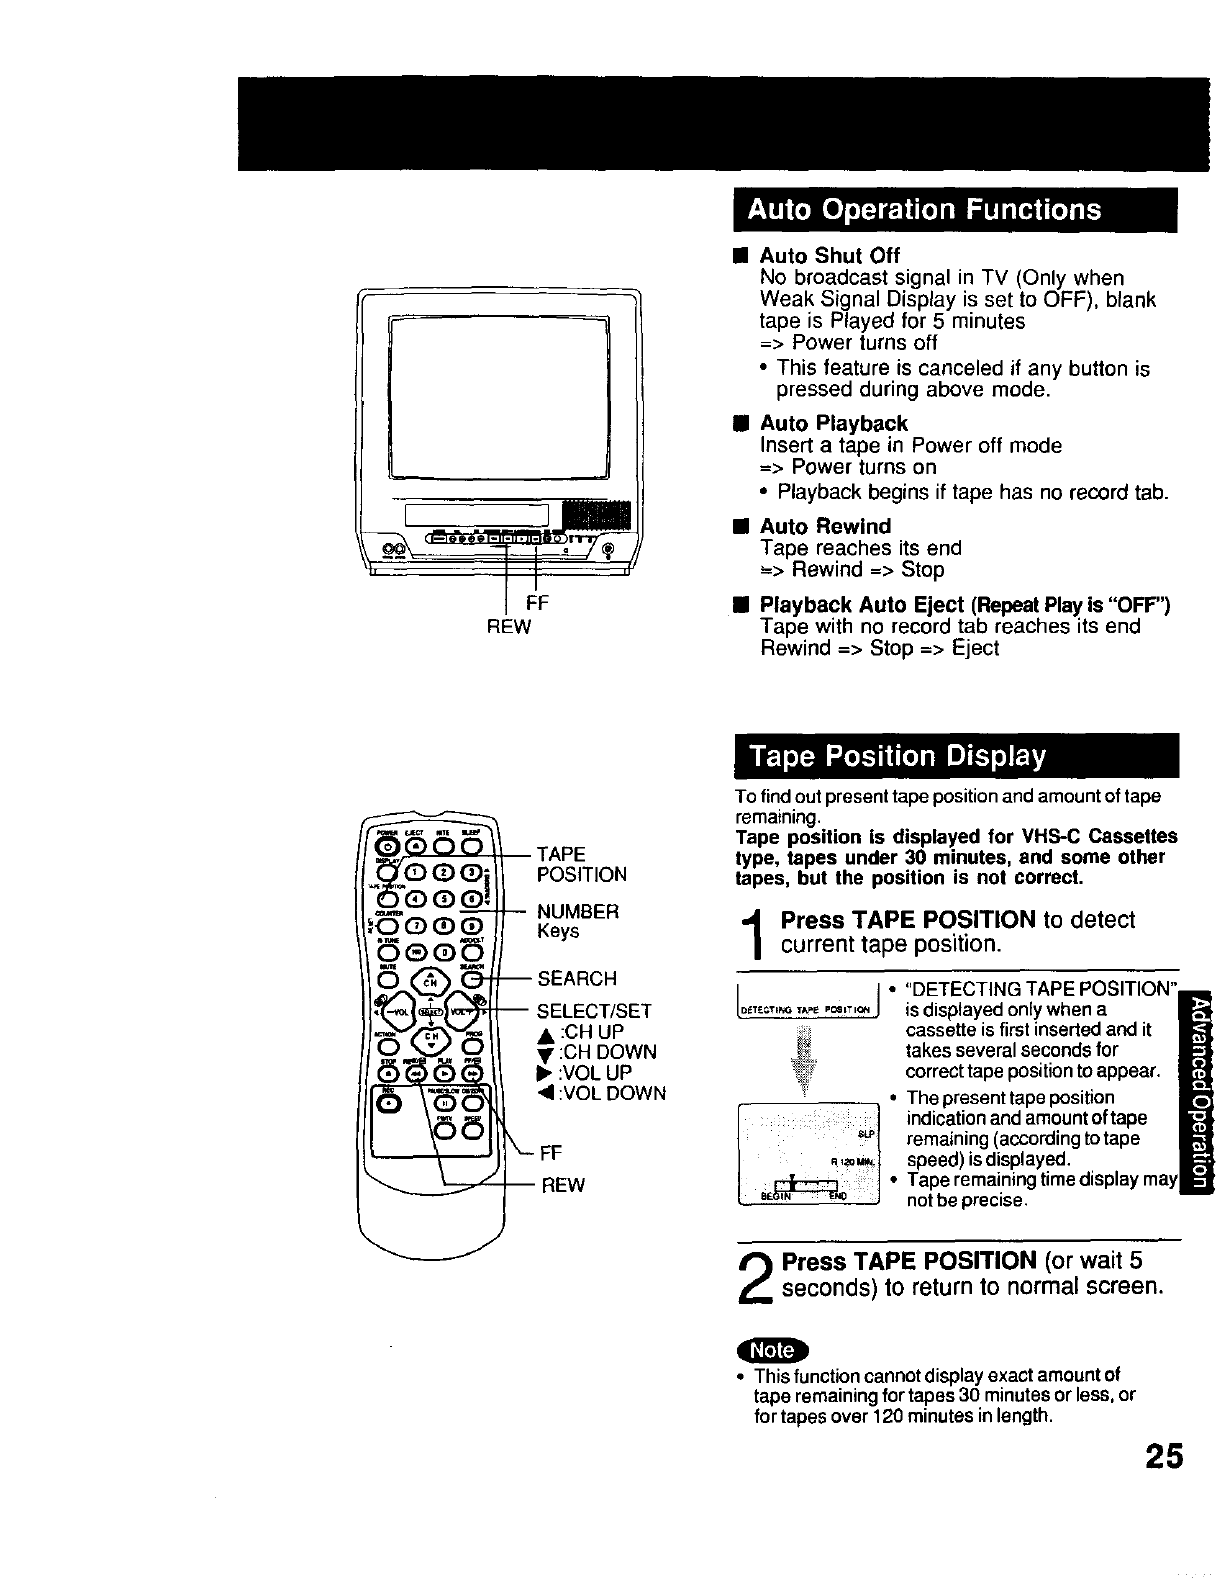
IAuto Shut Off
No broadcast signal in TV (Only when
Weak Signal Display is set to OFF), blank
tape is Played for 5 minutes
=> Power turns off
• This feature is canceled if any button is
pressed during above mode.
II Auto Playback
Insert a tape in Power off mode
=> Power turns on
•Playback begins if tape has no record tab.
•Auto Rewind
Tape reaches its end
_> Rewind --> Stop
II Playback Auto Eject (Repeat Play is "OFF")
Tape with no record tab reaches its end
Rewind => Stop => Eject
.o oooi
rO _ Q Q=
;OOQO
-- TAPE
POSITION
-- NUMBER
Keys
-- SEARCH
-- SELECT/SET
• :CH UP
• :CH DOWN
I_ :VOL UP
:VOL DOWN
k_
-- EW
To find out present tape position and amount of tape
remaining.
Tape position is displayed for VHS-C Cassettes
type, tapes under 30 minutes, and some other
tapes, but the position is not correct,
Press TAPE POSITION to detect
current tape position.
[D_T£GT_GIAp_ P_ITIGt4J •
iR120 M_:
"DETECTING TAPE POSITION"
is displayed only when a
cassette is first inserted and it
takes several seconds for
correct tape position to appear.
The present tape position
indication and amount of tape
remaining (according to tape
speed) is displayed.
Tape remaining time displa
not be precise.
Press TAPE POSITION (or wait 5
seconds) to return to normal screen.
O
•This functioncannotdisplayexact amountof
tape remaining fortapes 30 minutes or less, or
for tapes over 120 minutesinlength.
25
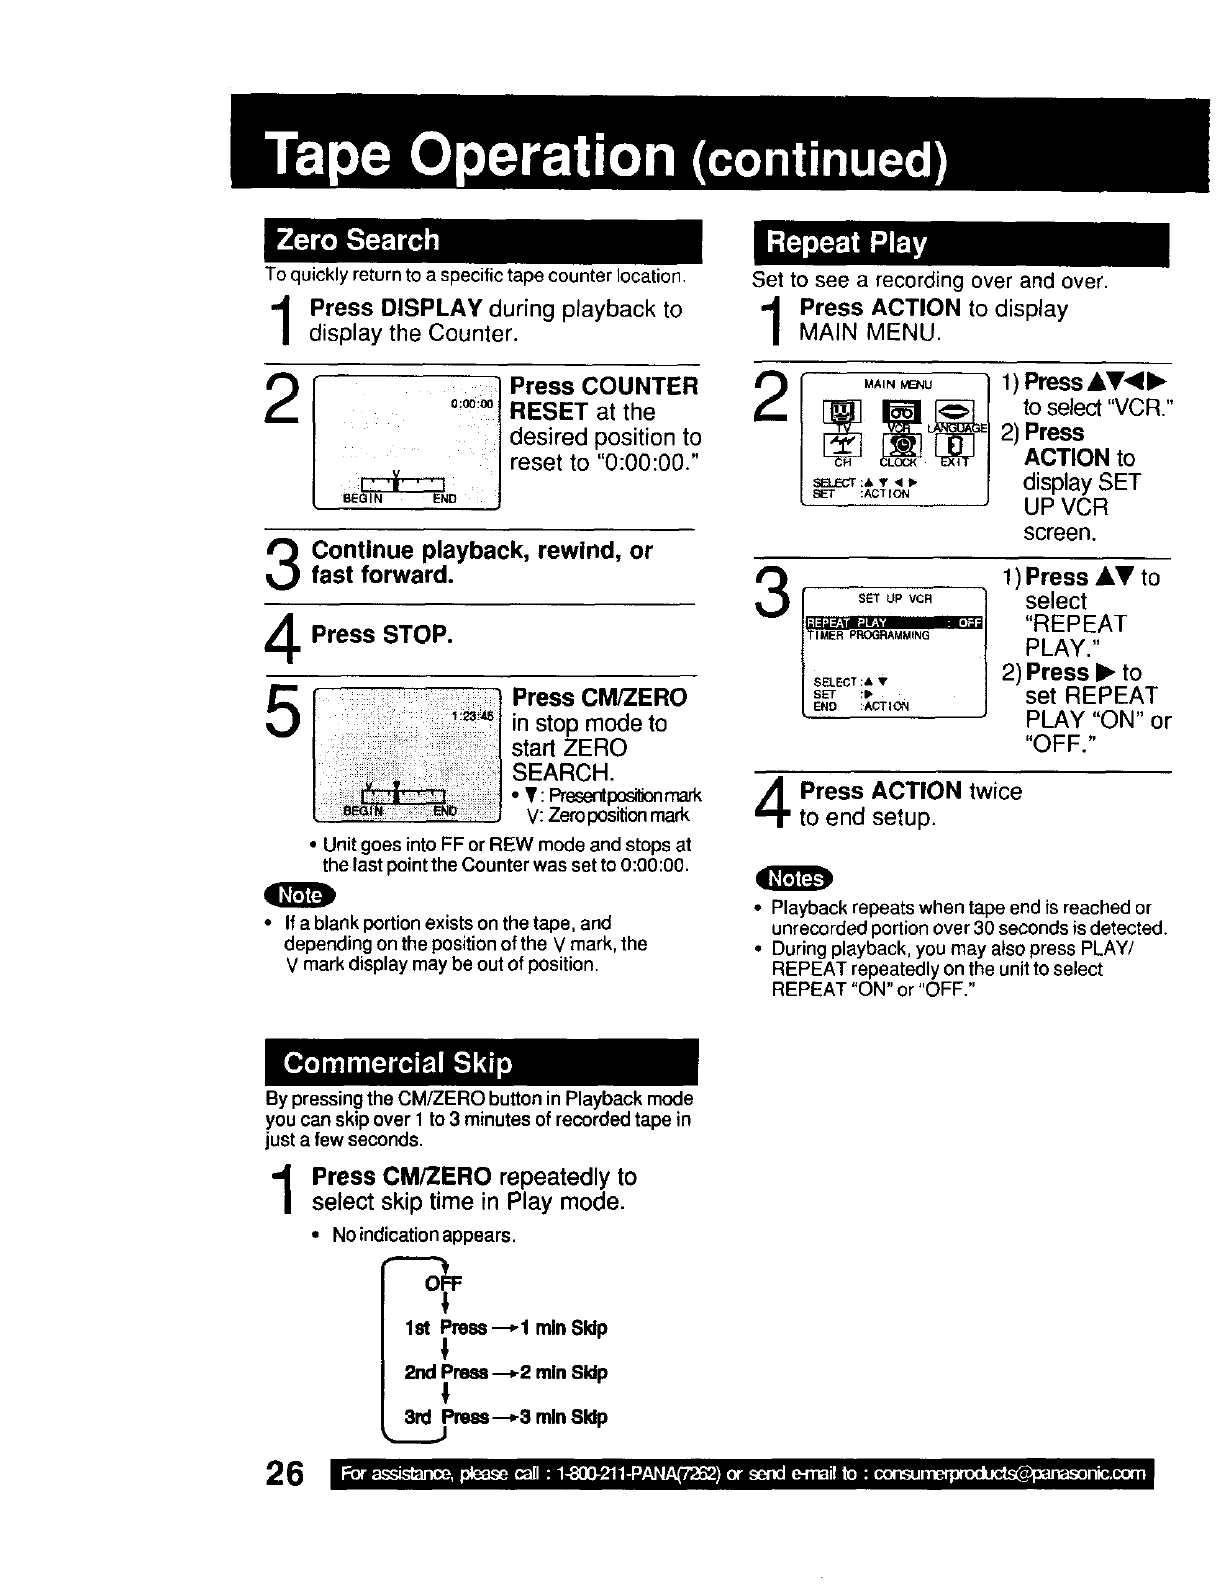
To quickly return to a specific tape counter location.
2
Press DISPLAY during playback to
display the Counter.
IPress COUNTER
o:oo.ooR
' I ESET at the
I desired position to
8i_ Ii reset to "0:00:00.'
Continue playback, rewind, or
fast forward.
Press STOP.
fPress CMiZERO
l in stop mode to
start ZERO
I SEARCH.
_tN _ V: Zeroposition mark
•Unit goes into FF or nEW mode and stops at
the last point the Counter was set to 0:00:00.
• If ablank portion exists on the tape, and
depending on the position of the V mark, the
V mark display may be out of position.
Set to see a recording over and over.
Press ACTION to display
MAIN MENU.
2MAIN MBNU
SET :ACTION
1) Press AV,< I_
to select "VCR."
2) Press
ACTION to
display SET
UP VCR
screen.
SET UPVC---_'_
TIMER PR_IRAMM_NG
END :ACTION
1) Press AI,V to
select
"REPEAT
PLAY."
2) Press I_ to
set REPEAT
PLAY "ON" or
"OFF."
Press ACTION twice
to end setup.
• Playback repeats when tape end is reached or
unrecorded portion over 30 seconds is detected.
• During playback, you may also press PLAY/
REPEAT repeatedly on the unit to select
REPEAT "ON" or "OFF."
By pressing the CM/ZERO button in Playback mode
you can skipover 1to 3 minutes of recorded tape in
just a few seconds.
Press CM/ZERO repeatedly to
select skip time in Play mode.
• No indication appears.
OFF
I
Ist Press--.-1 mlnSldp
!
2nd Press --_2 mlnSkip
3rd Press--,-8 mln Sldp

COUNTER
RESET
SELECT/SET
• :CH UP
• :CH DOWN
• :VOL UP
• :VOL DOWN
[ I
REC
When "ON" is selected, the picture is displayed even
when a broadcast signal is weak or non-existent.
Press ACTION to display MAIN
MENU.
21) Press •V<I I_
to select "CH."
2) Press ACTION
to display SET
UP CHANNEL
screen.
s_ up_*.._L 1) Press &V to
,._ : c_E select WEAK
_,_o_ SIGNAL
S_.E=r:,_,, 2) Press I_ to set
SET:,. "ON" or "OFF."
• "ON" =Picture is displayed regardless of signal
condition,and may notalways be clearly
visible.
"OFF" =Screen turnssolid blue when signalis
absent orweak.
•If unitis connectedto equipmentwhich has blue
back feature, selecting"ON" willhave no effecton
theother equipment.
Press ACTION twice
to return to the normal screen.
Alloperations are prohibitedexcept Timer recording
and tape eject, "Auto power on" is not prohibited
when VCR lock is activated. Useful for families with
small children.
LOCK AGTtVATED
_RL_KO_
In stop mode, hold
down REC on the unit
without a cassette
inserted for 7 seconds
Io turn "ON." Please
ignore NO CASSETTE
warning.
Repeat above with or
without cassette to
turn "OFF."
•VCR Lock is canceled automatically
after about 24 hours if clock is set.
• "Auto Power On" is not prohibited when
VCR Lock is activated. 27
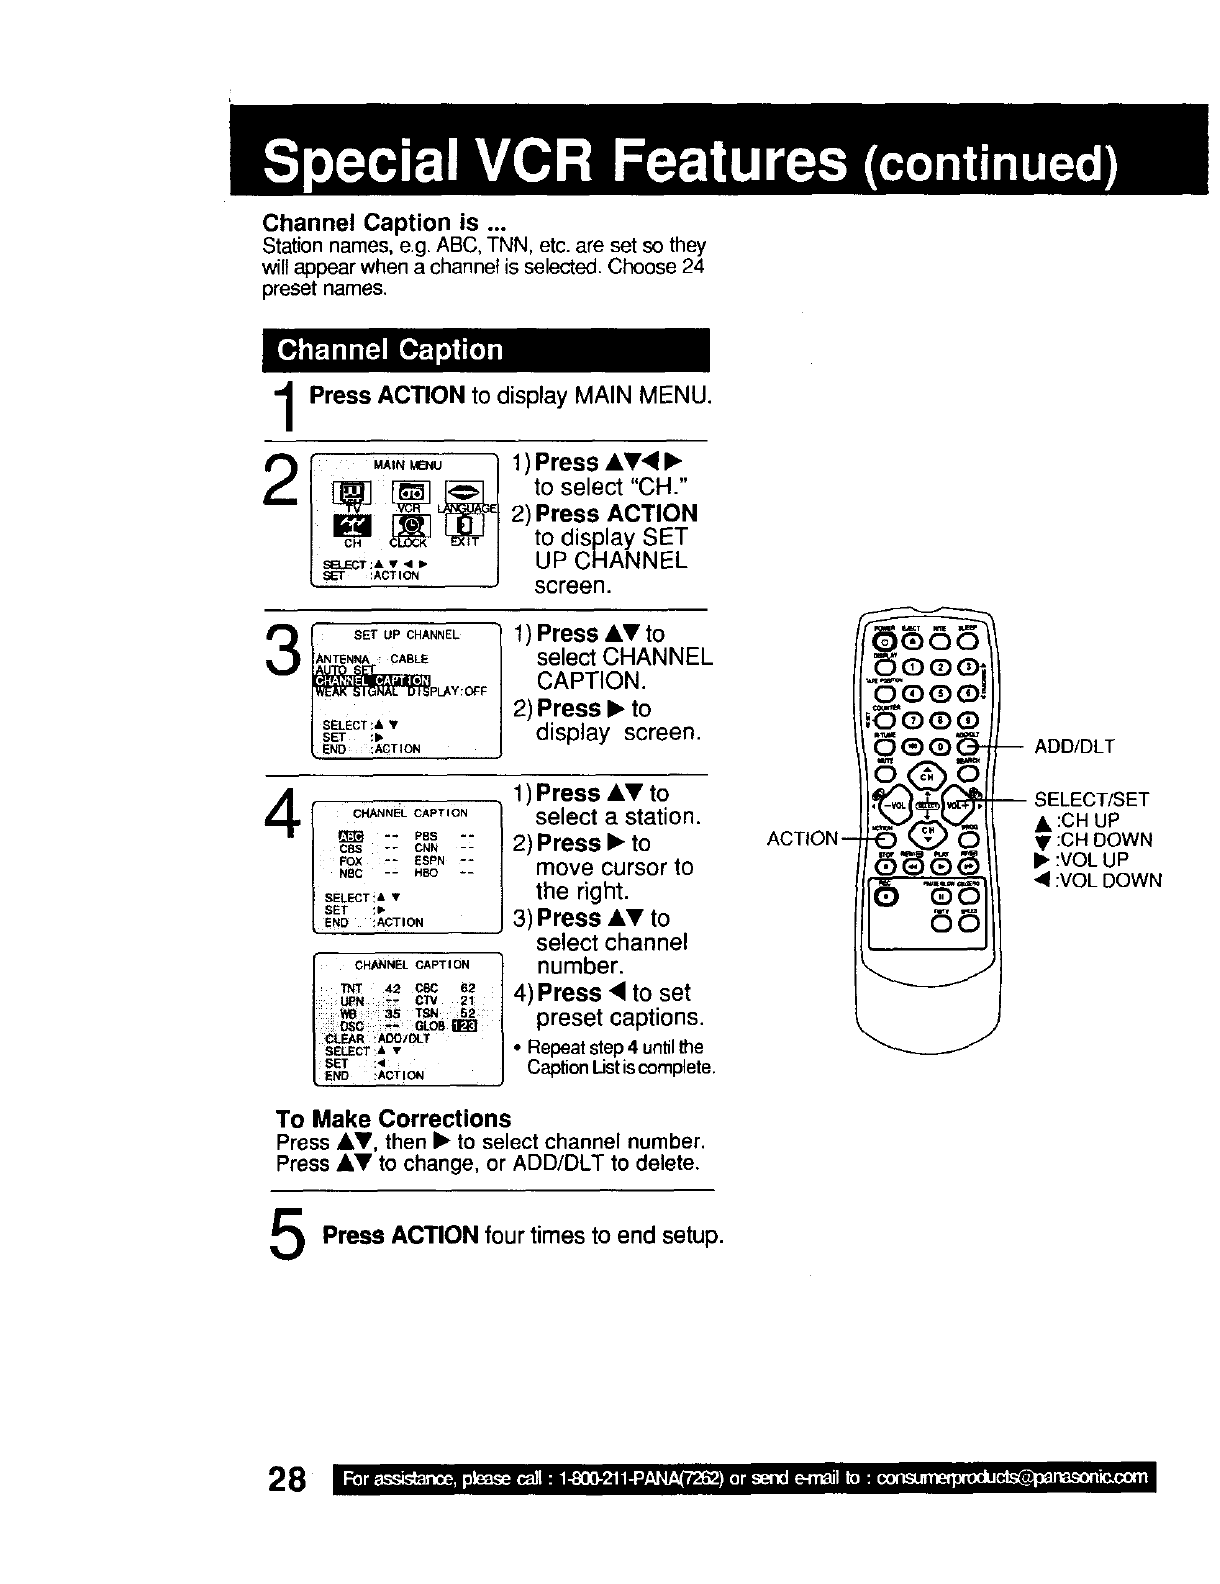
Channel Caption is ...
Station names, e.g. ABC, TNN, etc. are set so they
will appear when a channel is selected. Choose 24
preset names.
Press ACTION to display MAIN MENU.
2[ ,)Press AT,•
J_E] to select "CH."
/ _ _ _j 2)Press ACTION
to display SET
L_-r :AcT,oN j UP CHANNEL
screen.
SEI" UP CHANNEL "_ 1) Press AT to
A._EN.A_CABLE J select CHANNEL
PL,_:OFF CAPTION.
2) Press • to
SELEcTs*•
SET :, display screen.
4[ /1) Press &V to
CH_NELO.PT.ON select astation.
- - PBS - -
c=-- ON, - 2)Press•to
FOX -- ESPN °-
,,c -._ -- move cursor to
SELECT!* _1' the right.
SET :, 3) Press &T toEND ;_TION select channel
cHANNEL CAPTION }
/
TNT 42 C6C 62
CW 21
TSN
_*-GlOB
I CLEAR:ADO/OLT I
SELECT :& •
SET :_1
END :ACTION
number.
4) Press, to set
preset captions.
=Repeat step4 until the
Caption Listis complete.
To Make Corrections
Press &Y, then •to select channel number.
Press &_l' to change, or ADD/DLT to delete.
Press ACTION four times to end setup.
ADD/DLT
;ELECT/SET
• :CH UP
V :CH DOWN
I_ :VOL UP
•,4 :VOL DOWN

Process of V-Chip Control V-Chip Control Feature is...
This unit has a built-in V-Chip Control which allows
you to block unwanted TV usage based on US
MOVIES and US TV PROGRAMS Ratings.
A 4-digit code must be entered to view a blocked program or
change rating settings.
Press ACTION to display MAIN MENU.
21 ) Press &_'< •to
select "TV."
2) Press ACTION to
display SET UP TV
screen.
31 : /
SELEC'riS*_
1) Press &Y to select
LOCK.
2) Press I_ to display
screen.
NUMBER Keys
ADD/DLT
SELECT/SET
• :CH UP
• :CH DOWN
I_ :VOL UP
• :VOL DOWN
ACTION
'I....;;1
_ J_,X_ keysto enteryour
secret code.
2) Enter same code
ENTER :o- 9
/ ENO_ACT,O. again for confirmation.
To Make Corrections
Press • repeatedly to
move the cursor. Press
number keys to make
the correction.
•Step 2) not necessary
when changing rating
or secret code.
• Take care that you are
not observed entering
the secret code.
I I Press •to display US
....... **_* (see page 30).menu
REcoGNIZED
_ _10LT: ..... Or
CON'r JNLIE:I_ :
[ I Press ACTION
three times to exit.
Changing your secret code
•You will need your current
code. Do steps I ~4. In step
5, press ADD/DLT to clear
current code, Repeat steps 4
and 5 to enter new code.
0
•DO NOT forget your secret code.
• Once ratings are set, restricted tapes
or programs cannot be accessed
unless the secret code is entered.
29
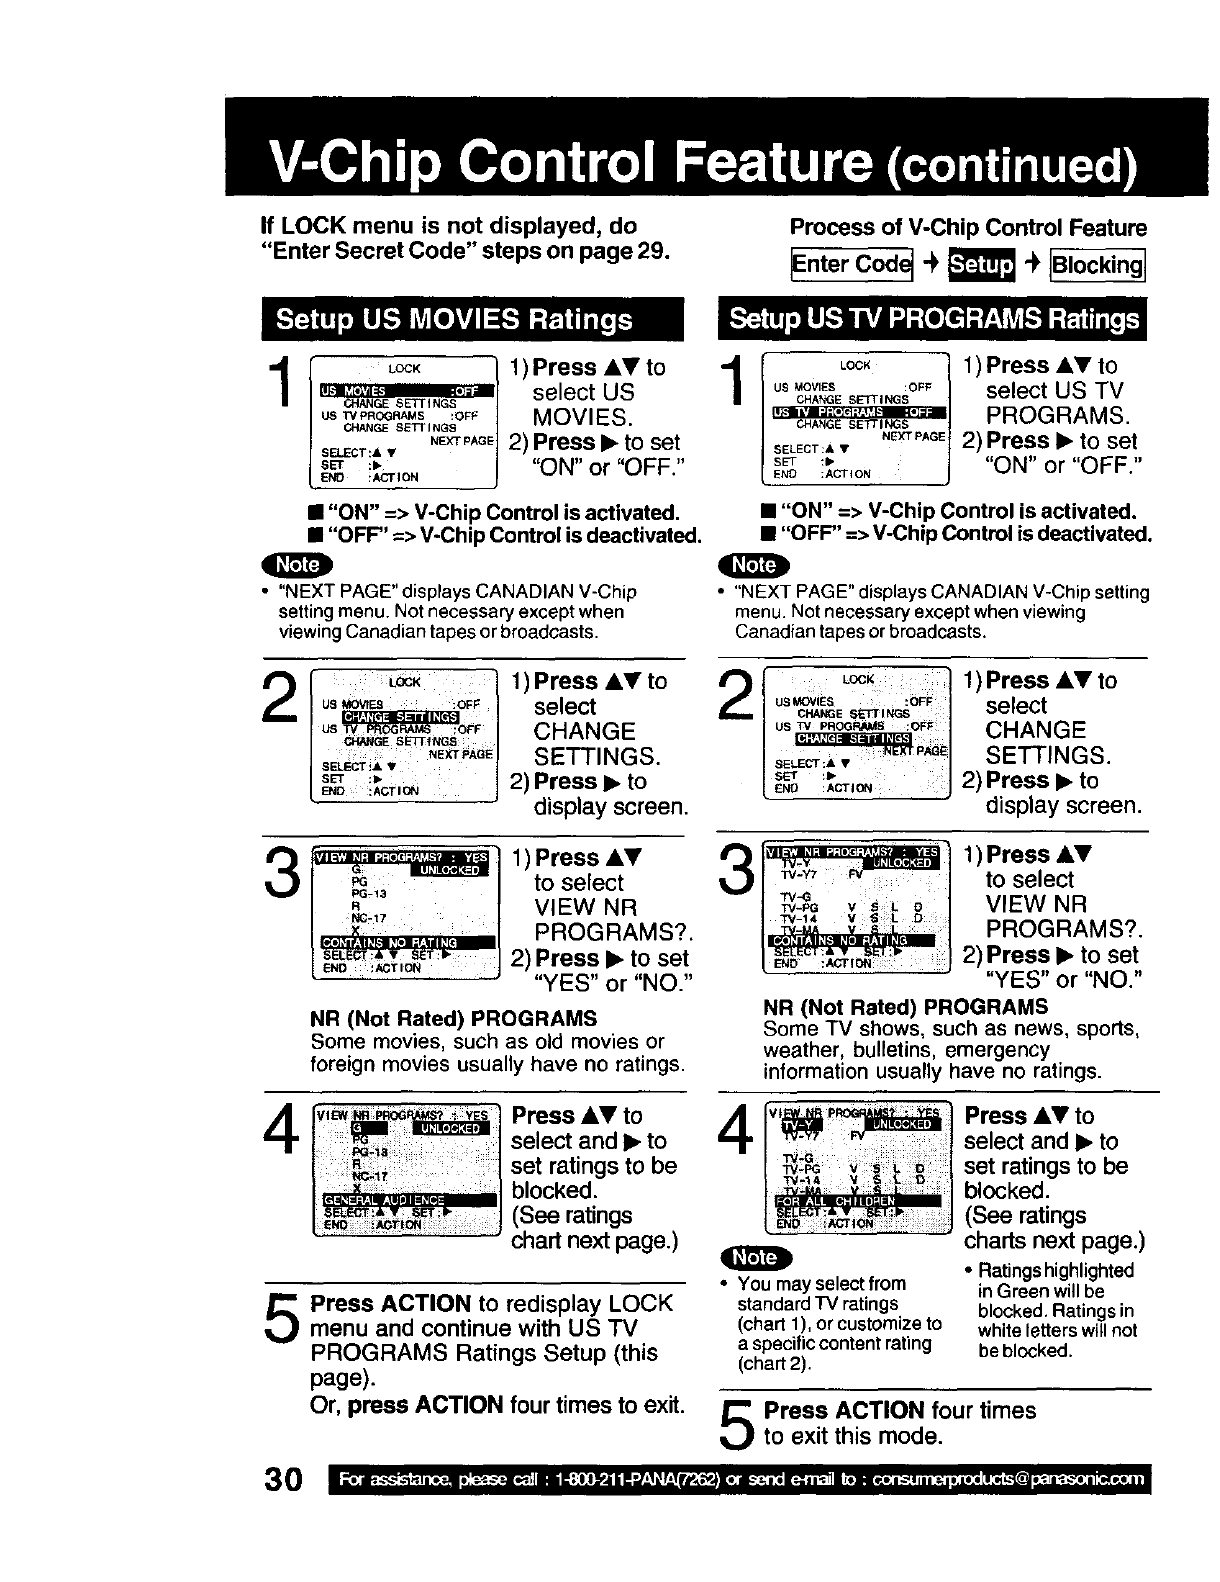
If LOCK menu is not displayed, do
"Enter Secret Code" steps on page 29. Process of V-Chip Control Feature
[Enter Code] -_ [L'JPaJ_I_-)
," selectUS1 us,or,e,
CHANGE SETTINGS
US TV PROGRAMS :OFF _/_ (_/I _:_ _,
CHANGE SETTINGS
.E_rPAGE2) Press •to set .E_AGEJ
SEL_T:A•"ON OFF SELECT:A•
SET :_- or SET :_-
ENO !ACTION • ENO :ACTION
1) Press AT to
select US TV
PROGRAMS.
2) Press • to set
"ON" or "OFF."
• "ON" => V-Chip Control is activated.
• "OFF" => V-Chip Control is deactivated.
•"NEXT PAGE" displays CANADIAN V-Chip
setting menu. Not necessary except when
viewing Canadian tapes or broadcasts.
• "ON" => V-Chip Control is activated.
• "OFF" =>V-Chip Control is deactivated.
•"NEXT PAGE" displays CANADIAN V-Chip setting
menu. Not necessary except when viewing
Canadian tapesorbroadcasts,
IL_K 1
NEXT PAGE
SELECT AV
SET :_
END _ACTION
1 ) Press &_' to
select
CHANGE
SETTINGS.
2) Press • to
display screen.
3_] 1)PressAV
to select
VIEW NR
,_._,,,:,,._.....,,:,,,,, ,PROGRAMS?.
s_L_:* •GE_:_ 2) Press •to set
j "YES"or"NO."
NR (Not Rated) PROGRAMS
Some movies, such as old movies or
foreign movies usually have no ratings.
Press AT to
select and • to
set ratings to be
blocked.
(See ratings
chart nextpage.)
5Press ACTION to redisplay LOCK
menu and continue with US "IV
PROGRAMS Ratings Setup (this
page).
Or, press ACTION four times to exit.
_.l:il_.:-.*'_.'l;'{,ll_e._alle;:::¢_{ [P,]lli_:![l_.JiP'./_*1_r:r{_t,?,l: [e:l _l_el._ln_]lltOlll'.l.l..._.lill_._il:[e:eLr_k--'4[_Ji_;li_..'_l:ll:Cfl*.*:ll3O
LOCK 1)Press &V tous_iEs select
CHANGESE_r INGS
us_v_o_,_s :o_ CHANGE
1__'_1 SETTINGS.
SELECT:A •1
s_ "2) Press • to
END :ACTION display screen.
I_/ 1)Press AV
to select
3 VIEW NR
2)Press • to set
"YES" or "NO."
NR (Not Rated) PROGRAMS
Some TV shows, such as news, sports,
weather, bulletins, emergency
informationusually have no ratings.
4
•You may selectfrom
standard TV ratings
(chart 1), or customize to
a specific content rating
(chart 2).
Press &V to
select and • to
set ratings to be
blocked.
(See ratings
charts next page.)
•Ratingshighlighted
inGreen willbe
blocked. Ratings in
whiteletterswillnot
be blocked.
Press ACTION four times
to exit this mode.
Process of V-Chip Control Feature
JEnter Code] "_
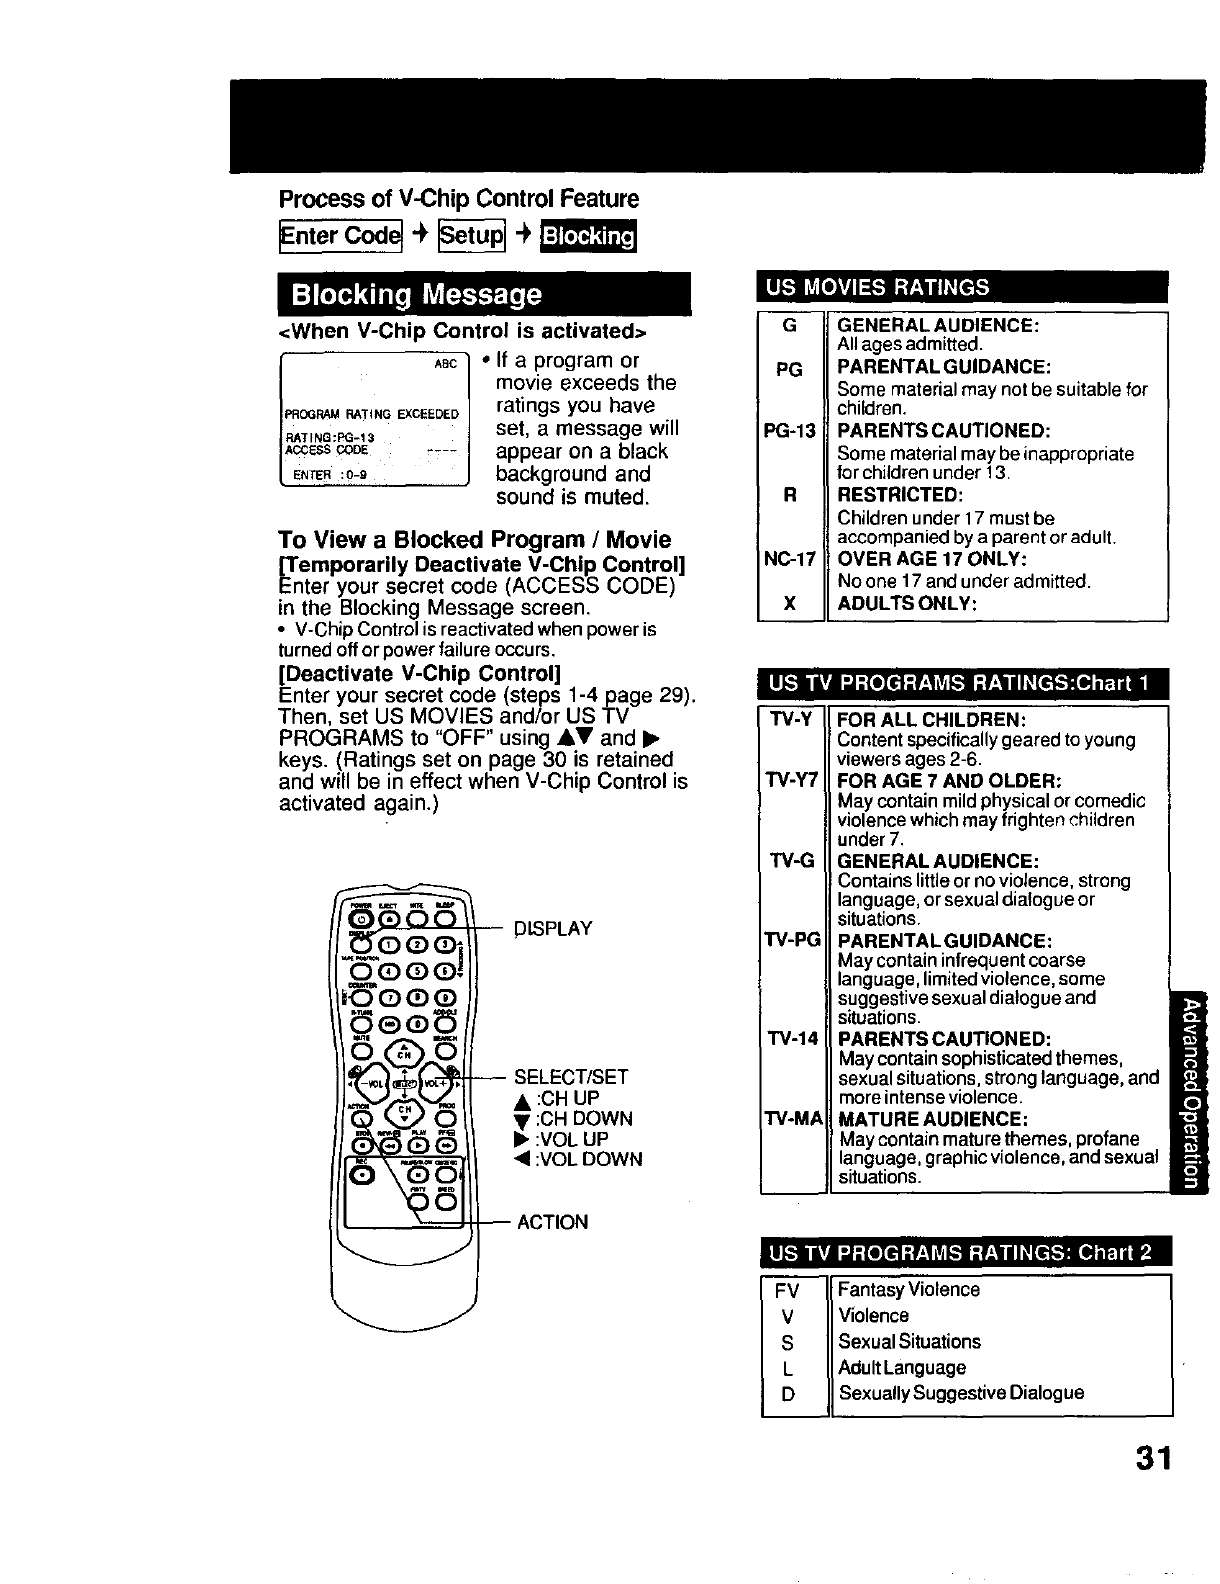
<When V-Chip Control is activated>
I E, ,EDJ
PROG,_ RATING EXCEEDED
RATING:PG-13
ACCESS CODE ....
•If a program or
movie exceeds the
ratings you have
set, a message will
appear on a black
background and
sound is muted.
To View a Blocked Program /Movie
[Temporarily Deactivate V-Chip Control]
Enter your secret code (ACCESS CODE)
in the Blocking Message screen.
• V-Chip Control is reactivated when power is
turned off or power failure occurs.
[Deactivate V-Chip Control]
Enter your secret code (steps 1-4 page 29).
Then. set US MOVIES and/or US TV
PROGRAMS to "OFF" using J,V and I_
keys. (Ratings set on page 30 is retained
and will be in effect when V-Chip Control is
activated again.)
DISPLAY
SELECT/SET
• :CH UP
•:CH DOWN
• :VOL UP
• :VOL DOWN
G
PG
PG-13
R
NC-17
X
GENERAL AUDIENCE:
All ages admitted.
PARENTAL GUIDANCE:
Some material may notbe suitable for
children.
PARENTS CAUTIONED:
Some materialmay be inappropriate
forchildrenunder 13.
RESTRICTED:
Childrenunder 17 mustbe
accompaniedbya parent oradult.
:OVER AGE 17 ONLY:
No one 17 andunder admitted.
ADULTS ONLY:
II I J,.-ll|t| -J={l[_l .-rz1_rjI,.-! --Wz|I I_.[€,_."]KI,J_m i
TV-Y
TV-Y7
TV-G
TV-PG
TV-14
I"V-MA
FOR ALL CHILDREN:
Content specifically geared to young
viewersages 2-6.
FOR AGE 7 AND OLDER:
May containmildphysicalorcomedic
violencewhichmay frighten children
under7.
GENERAL AUDIENCE:
Containslittleornoviolence, strong
language,orsexualdialogueor
situations.
PARENTAL GUIDANCE:
May containinfrequentcoarse
language,limitedviolence,some
suggestivesexualdialogueand
situations.
PARENTS CAUTIONED:
Maycontainsophisticatedthemes,
sexualsituations, stronglanguage, and
moreintenseviolence.
MATURE AUDIENCE:
May containmaturethemes, profane
language,graphicviolence,and sexual
situations.
!11.',11|vii "J:[oIc.1:f:l Lvjkl _]r_,lI I_.[€*k'fill a"_iiV'4m
FV Fantasy Violence
V Violence
SSexualSituations
L Adult Language
D Sexua ly Suggestive D a ogue
31
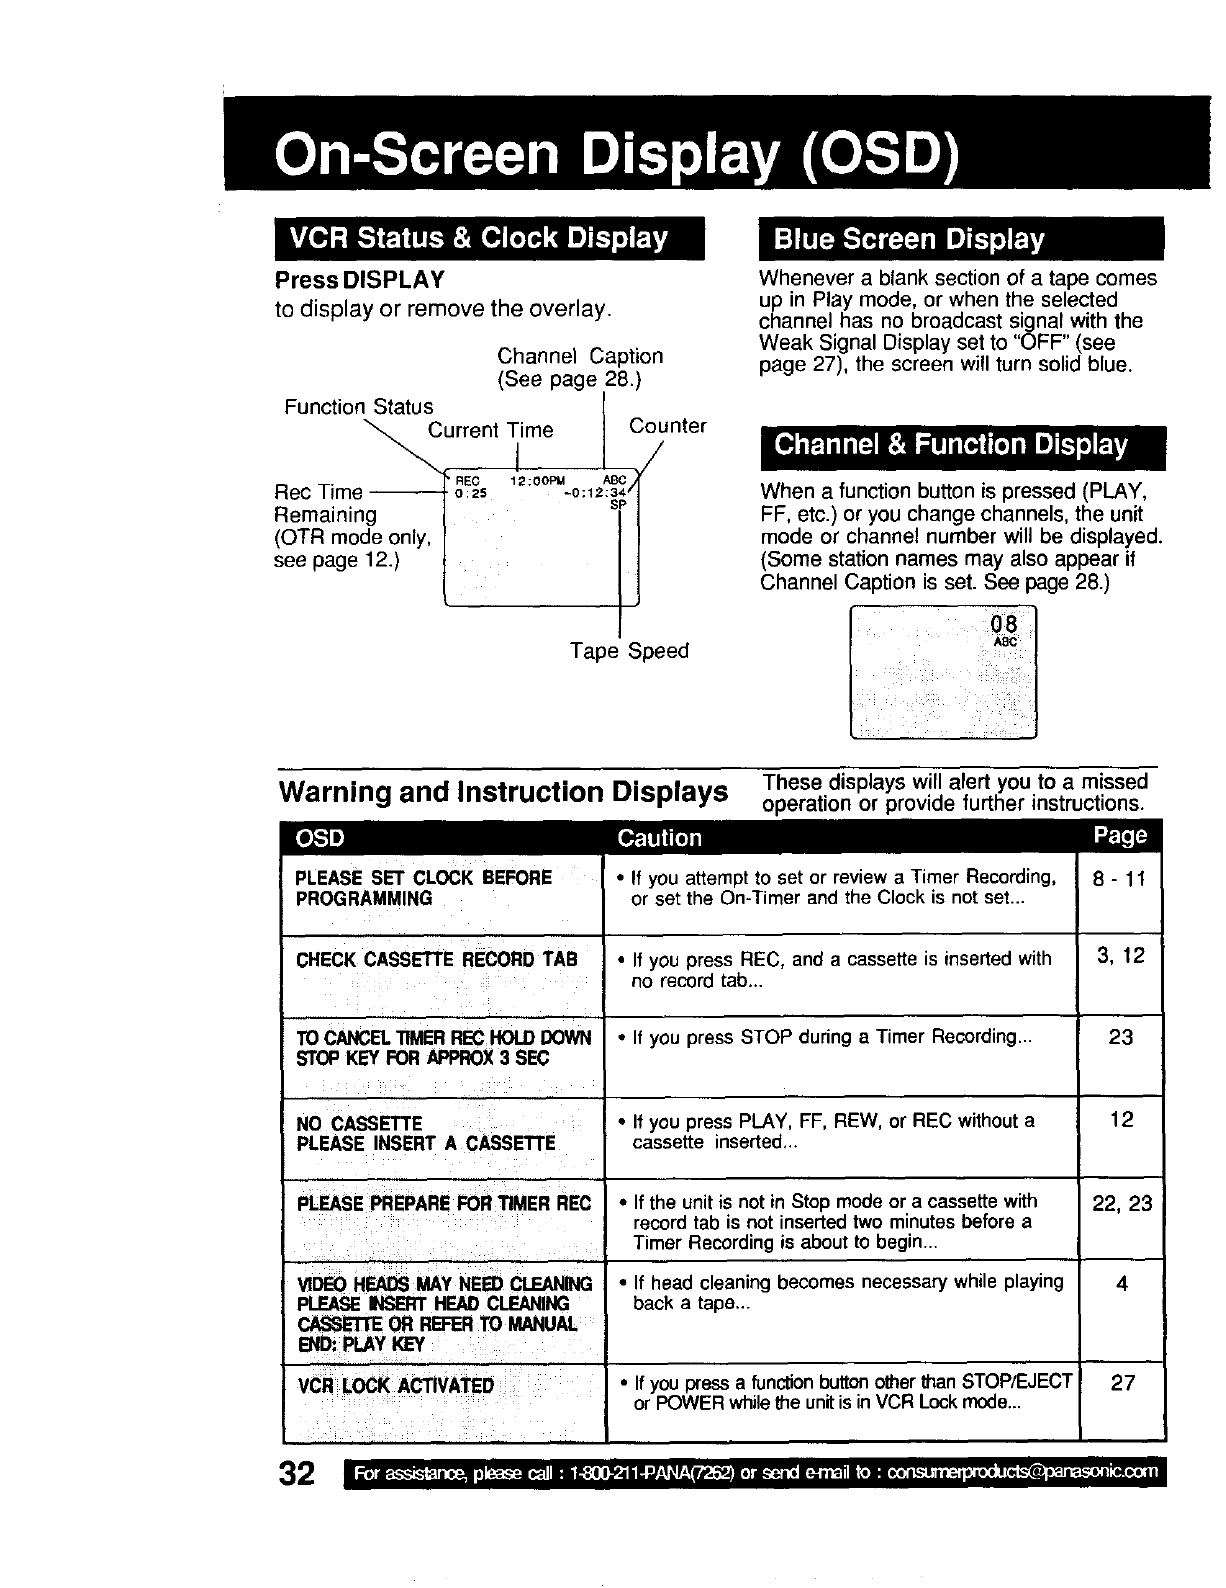
Press DISPLAY
to display or remove the overlay.
Channel Caption
(See page 28.)
Function Status
"_urrent Time Counter
I/
12;0OPM ABC
aec Time -_---_ o_c, -o:,2:3,=/
Remaining I sP
(OTR mode only, I
see page 12) |
[
Tape Speed
Whenever a blank section of a tape comes
up in Play mode, or when the selected
channel has no broadcast signal with the
Weak Signal Display set to "OFF" (see
page 27), the screen will turn solid blue.
When a function button is pressed (PLAY,
FF, etc.) or you change channels, the unit
mode or channel number will be displayed.
(Some station names may also appear if
Channel Caption is set. See page 28.)
Warning and Instruction Displays These displays will alert you to a missed
operation or provide further instructions.
PLEASE SET CLOCK BEFORE
PROGRAMMING
CHECK CASSETTERECORDTAB
TO CANCELTIMERRECHOLDDOWN
STOPKEYFOR APPROX3 SEC
NO CASSETTE
PLEASE INSERT A CASSETTE
PLEASEPREPAREFORTIMER REC
•If you attempt to set or review aTimer Recording,
or set the On-Timer and the Clock is not set...
• If you press REC, and acassette is inserted with 3, 12
no record tab...
• If you press STOP during a Timer Recording... 23
•If you press PLAY, FF, REW, or REC withouta
cassette inserted,.. 12
•If the unit is not in Stop mode or acassette with 22, 23
record tab is not inserted two minutes before a
Timer Recording is about to begin...
VIDEOHEADSMAYNEEDCLEANING • If head cleaning becomes necessary while playing 4
PLEASEINSERTHEADCLEANING back a tape...
• If you press a function button other than STOP/EJECT 27
or POWER while the unit is in VCR Lock mode...
32

Check the following points once again if you are having trouble with your unit.
No picture or sound...
Poor picturewithnormal sound...
Poor sound wit_ normal picture...
Poor TV reception...
No color or poor color...
Ghost (multiple) images...
TV programscannot be watched..
Channel cannot be selected...
TV program cannot be
recorded...
Timer recording cannot be
_erformed...
_oplaybackp_re, orthe_yba_
_ictureis noisyor contans sVeaks_.
¢CR cannot be controlled...
Unit cannot be controlled...
ACTION, PROG and FM/TV
buttons cannot be selected...
V_eo cassettecannotbe ins_ted...
Vldse cassettecannotbe removed...
Tapecannotbe ejectedorinseded...
:Video cassette ejects when a
recordingis started,ol"the power
is tumed off for timer recording...
n Stop mode,the VCR moor
CYUNDER) contino,_ to rotate...
/CR cannot be controlled...
• Completely insert Power Plug into an AC outlet.
•Set POWER button to ON.
: Makesureycorantennasystem_ orCABLE),iscorrectlyset.(P.8)
Completely insert Power Plug into an AC outlet.
•Set POWER button to ON.
• Adjust BRIGHTNESS, SHARPNESS, and PICTURE controls in
the SET UP TV menu. (P. 15)
i djust VOLUME control. (P. 14)
AdjustSHARPNESSandPICTUREconsolsinthe SETUP TV menu.(P. 15)
Adjust TINT and COLOR controls in the SET UP TV menu. (P. 15)
•Install a directional antenna.
• Make sure the selected channel is in unit's memory. (P. 10, 11)
• Only the channel being recorded can be viewed on this unit.
• Makesure your antennasystem (TV or CABLE), is correctlysot. (P. 8)
• Make sure cassette record tab is intact. (P.3)
• Check that clock is set to current time and date.
• Make sure DSS/CABLE box (if used) is left on and tuned to
channel to be recorded.
: Set recording Start/Stop times correctly. (P. 22-23)
Timer recording may not be performed or continued if a power
interruption of more than 1 minute occurs before or during a Timer
recording even after power is restored.
• Adjust TRACKING control in either direction. (P. 4)
• Try Head Cleaning. (P. 4)
• Make sure VCR LOCK is set to off. (P. 27)
• Make sure unit is not in a Timer Record operation.
• Aim remote at remote sensor on unit (P. 7) so that signal is
unobstructed.
• Inspect the remote batteries. (P. 3)
Make sure VCR LOCK is set to off. (P. 27)
• Exposing unit remote sensor to direct fluorescent or outdoor light
may cause signal interference.
• Check remote batteries.
•Insert the cassette window side up; record tab facing you.
• Completely insert Power Plug into an AC outlet.
• Try ejec_ngor insertingthetape againafterlurningPOWERoff,thenbackon.
• Make sure cassette record tab is intact. (P. 3)
• To enable Quick Play mechanism, the VCR cylinder will rotate for
about 3 minutes. This reduces response time from Stop to Play
mode and from Play to Rewind Search mode.
• Make sure VCR LOCK is set to off. (P. 27)
If you cannot resolve the problem, please call the Customer Satisfaction Center for
product assistance at 1-800-211-PANA(7262).
To locate an authorized servicenter call toll free 1-800-211-PANA(7262)
or send e-mail to : consumerproducts@panasonic.com. 33
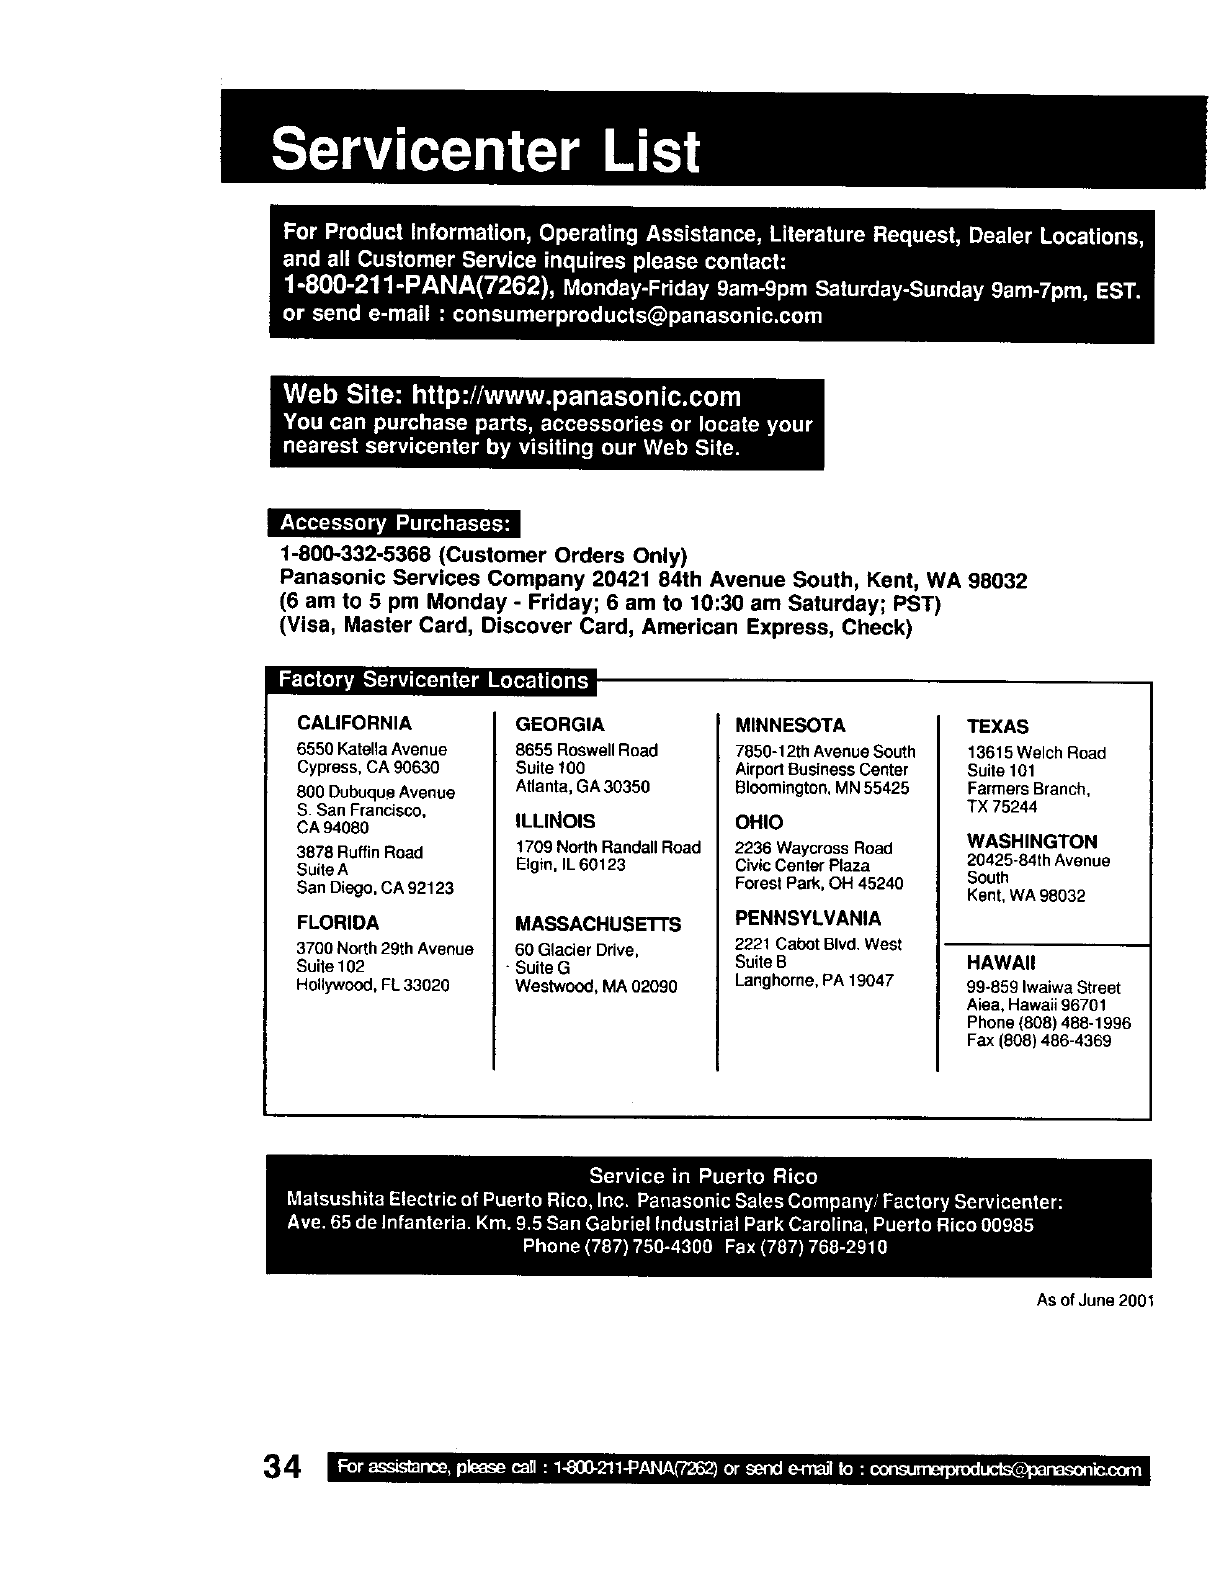
1-800-332-5368 (Customer Orders Only)
Panasonic Services Company 20421 84th Avenue South, Kent, WA 98032
(6 am to 5 pm Monday -Friday; 6 am to 10:30 am Saturday; PST)
(Visa, Master Card, Discover Card, American Express, Check)
I Fr_ (,]i,i_-_:l l,i [_--1i| {:_i _,l_.li 1,|ii_I
CALIFORNIA
6550 Katella Avenue
Cypress, CA 90630
800 Dubuque Avenue
S. San Francisco,
CA 94080
3878 Ruffin Road
Suite A
San Diego, CA 92123
FLORIDA
3700 North29th Avenue
Suite102
Hollywood. FL 33020
GEORGIA
8655 Roswell Road
Suite 100
Atlanta, GA30350
ILLINOIS
1709 NorthRandall Road
Elgin, IL60123
MASSACHUSETTS
60 Glacier Drive,
•Suite G
Westwood, MA 02090
MINNESOTA
7850-12th Avenue South
AirportBusinessCenter
Bloomington, MN 55425
OHIO
2236 WaycrossRoad
CivicCenter Plaza
Forest Park, OH 45240
PENNSYLVANIA
2221 Cabot BIvd, West
Suite B
Langhorne,PA 19047
TEXAS
13615 Welch Road
Suite 101
Farmers Branch,
TX 75244
WASHINGTON
20425-84th Avenue
South
Kent,WA 98032
HAWAII
99-859 IwaiwaStreet
Aiea, Hawaii96701
Phone (808) 488-1996
Fax (808) 486-4389
As of June 2001
Panasonic Consumer Electronics Company, Panasonic Sales Company,
Division of Matsushita Electric Corporation Division of Matsushita Electric of Puerto Rico, Inc.
of America, One Panasonic Way AVE. 65 de Infanterfa, Km. 9.5 San Gabriel
Secaucus, New Jersey 07094 Industrial Park Carolina, Puerto Rico 00985
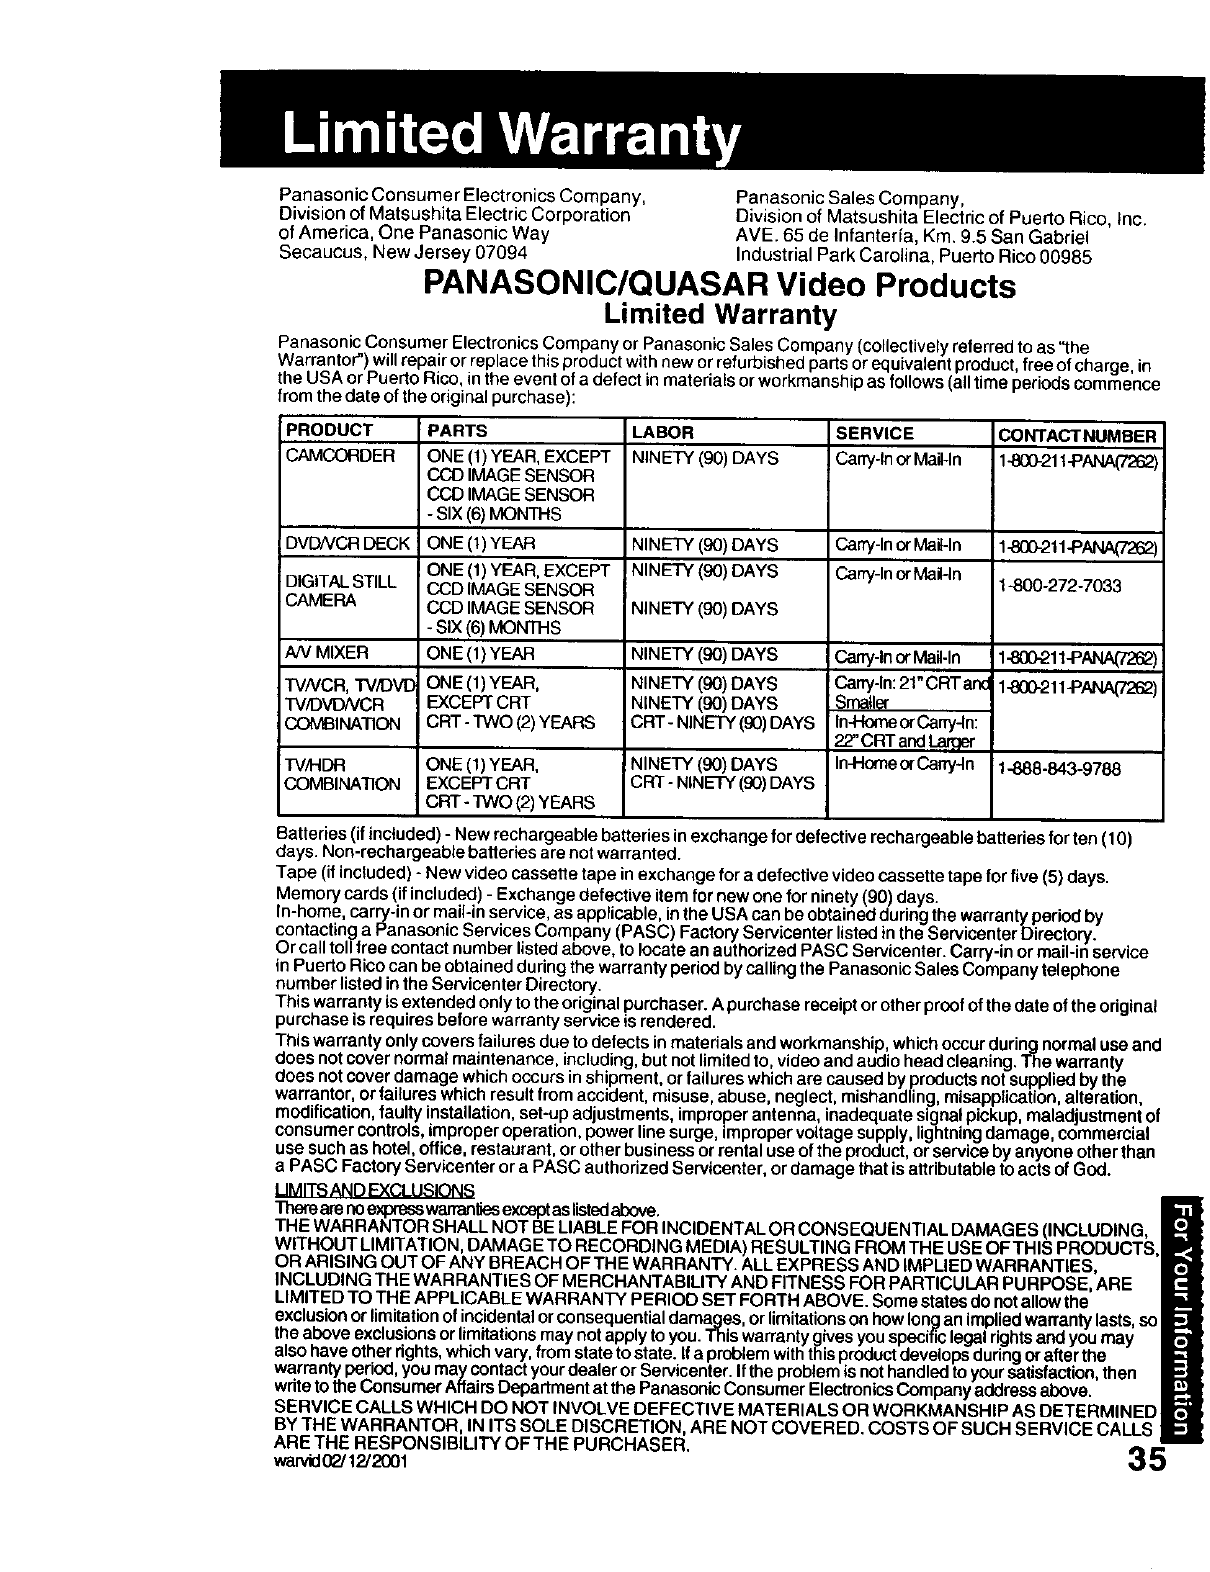
PANASONIC/QUASAR Video Products
Limited Warranty
Panasanic Consumer Electronics Company or Panasonic Sales Company (collectively referred to as "the
Warrantor") will repair or replace this product with new or refurbished parts or equivalent product, free of charge, in
the USA or Puerto Rico, in the event of a defect in materials or workmanship as follows (all time periods commence
from the date of the original purchase):
PRODUCT
CAMCORDER
DVDNCR DECK
DIGITAL STILL
CAMERA
NV MIXER
TVNCR, "FV./DVD
TV/DVDNCR
COMBINATION
TV_DR
COMBINATION
PARTS
ONE(t)YEAR, EXCEPT
CCDIMAGESENSOR
CCDIMAGESENSOR
-SiX (_ MONTHS
ONE (1)YEAR
ONE (1) YEAR, EXCEPT
CCD IMAGE SENSOR
CCD IMAGE SENSOR
- SIX (6) MONTHS
ONE (1)YEAR
ONE (1)YEAR,
EXCEPT CRT
CRT - TWO (2) YEARS
ONE(1)YEAR,
EXCEPTCRT
CRT-TINO(2)YEARS
LABOR
NINETY (90) DAYS
NINe(gO)DAYS
NINETY(90)DAYS
NINETY(90)DAYS
NINETY(90)DAYS
NINETY(90)DAYS
NINETY(90)DAYS
CRT-NINETY(90)DAYS
NINETY(90)DAYS
CR'I--NINETY(90)DAYS
SERVICE
Carry-Inor Mail-In
Carry-ln or Mai_-In
Can'y-inor Mail-ln
Cany-ln or Mail-In
Cany-In: 21" CRT an(
Smaller
In4-tomeor Cany-ln:
22" CRT and t.erger,
In-HomeorCany4n
CONTACTNUMBEF
1-800-21f -PANA(7262)
1-800_.t1-P/_)
t -800-272-7033
1-800-2114°ANA(7'26_
1-800-211-PANA(7262)
1-888-843-9788
Batteries (if included) -New rechargeable batteries in exchange for defective mchargeable batteries for ten (10)
days. Non-rechargeable batteries are not warranted.
Tape (if included) -New video cassette tape inexchange for a defective video cassette tape for five (5) days.
Memory cards (if included) - Exchange defective item for new one for ninety (90) days.
In-home, carry-in or mail-in service, as applicable, inthe USA can be obtained during the warranty period by
contacting a Panasonic Services Company (PASC) Factory Servicenter listedin the Servicenter Directory
Or call tollfree contact number listedabove, to locate an authorized PASC Servicenter. Carry-in or mail-in service
in Puerto Rico can be obtained during the warranty period by calling the Panasonic Sales Company telephone
number listed in the Servicenter Directory.
This warranty is extended only to the original purchaser. A purchase receipt orother proof of the date of the original
purchase is requires before warranty service is rendered.
This warranty only covers failures due to defects in materials and workmanship which occur during normal usa and
does not cover normal maintenance, ncluding, but not limitedto, video and audio head cleaning. The warranty
does not cover damage which occurs in shipment, or failures which are caused by products not supplied by the
warrantor, or failures which result from accident, misuse, abuse, neglect, mishandling, misapplication, alteration,
modification, faulty installation, set-up ad ustments improper antenna, inadequate signal pickup, maladjustment of
consumer controls, improper operat on, power line surge, improper voltage supply, lightningdamage, commercial
use such as hotel, office, restaurant, or other business or rental useof the product, or service by anyone other than
a PASC Factory Servicenter or a PASC authorized Servicenter, ordamage that is attributable to acts of GOd.
are noexpresswarrantiesexceptas listedabove.
THE WARRANTOR SHALL NOT BE LIABLE FOR INCIDENTAL OR CONSEQUENTIAL DAMAGES (INCLUDING,
WITHOUT LIMITATION, DAMAGE TO RECORDING MEDIA) RESULTING FROM THE USE OFTHI',
OR ARISING OUT OF ANY BREACH OF THE WARRANTY. ALL EXPRESS AND IMPLIED WARRANTIES,
INCLUDING THE WARRANTIES OF MERCHANTABILITY AND FITNESS FOR PARTICULAR PURPOSE, ARE
LIMITED TO THE APPLICABLE WARRANTY PERIOD SET FORTH ABOVE. Some statesdo not allowthe
exclusionor limitationof incidentalor consequential damaqss or limitationsonhow longan impliedwarrant
the above exclusionsor limitationsmay not apply to you. This warranty gives youspecificlegal rightsand you may
also have other rights,which vary, from state to state. If a problem withthis productdevelops during orafter the
warranty period, you may contact your dealer or Servicenter. If the problem is not handled to your satisfaction, then
wdte to the Consumer Affairs Department at the Panasonic Consumer Electronics Company address above.
SERVICE CALLS WHICH DO NOT INVOLVE DEFECTIVE MATERIALS OR WORKMANSHIP AS DETERMINED
BY THE WARRANTOR, IN ITS SOLE DISCRETION, ARE NOT COVERED. COSTS OF SUCH SERVICE CALLS
ARE THE RESPONSIBILITY OF THE PURCHASER. 35
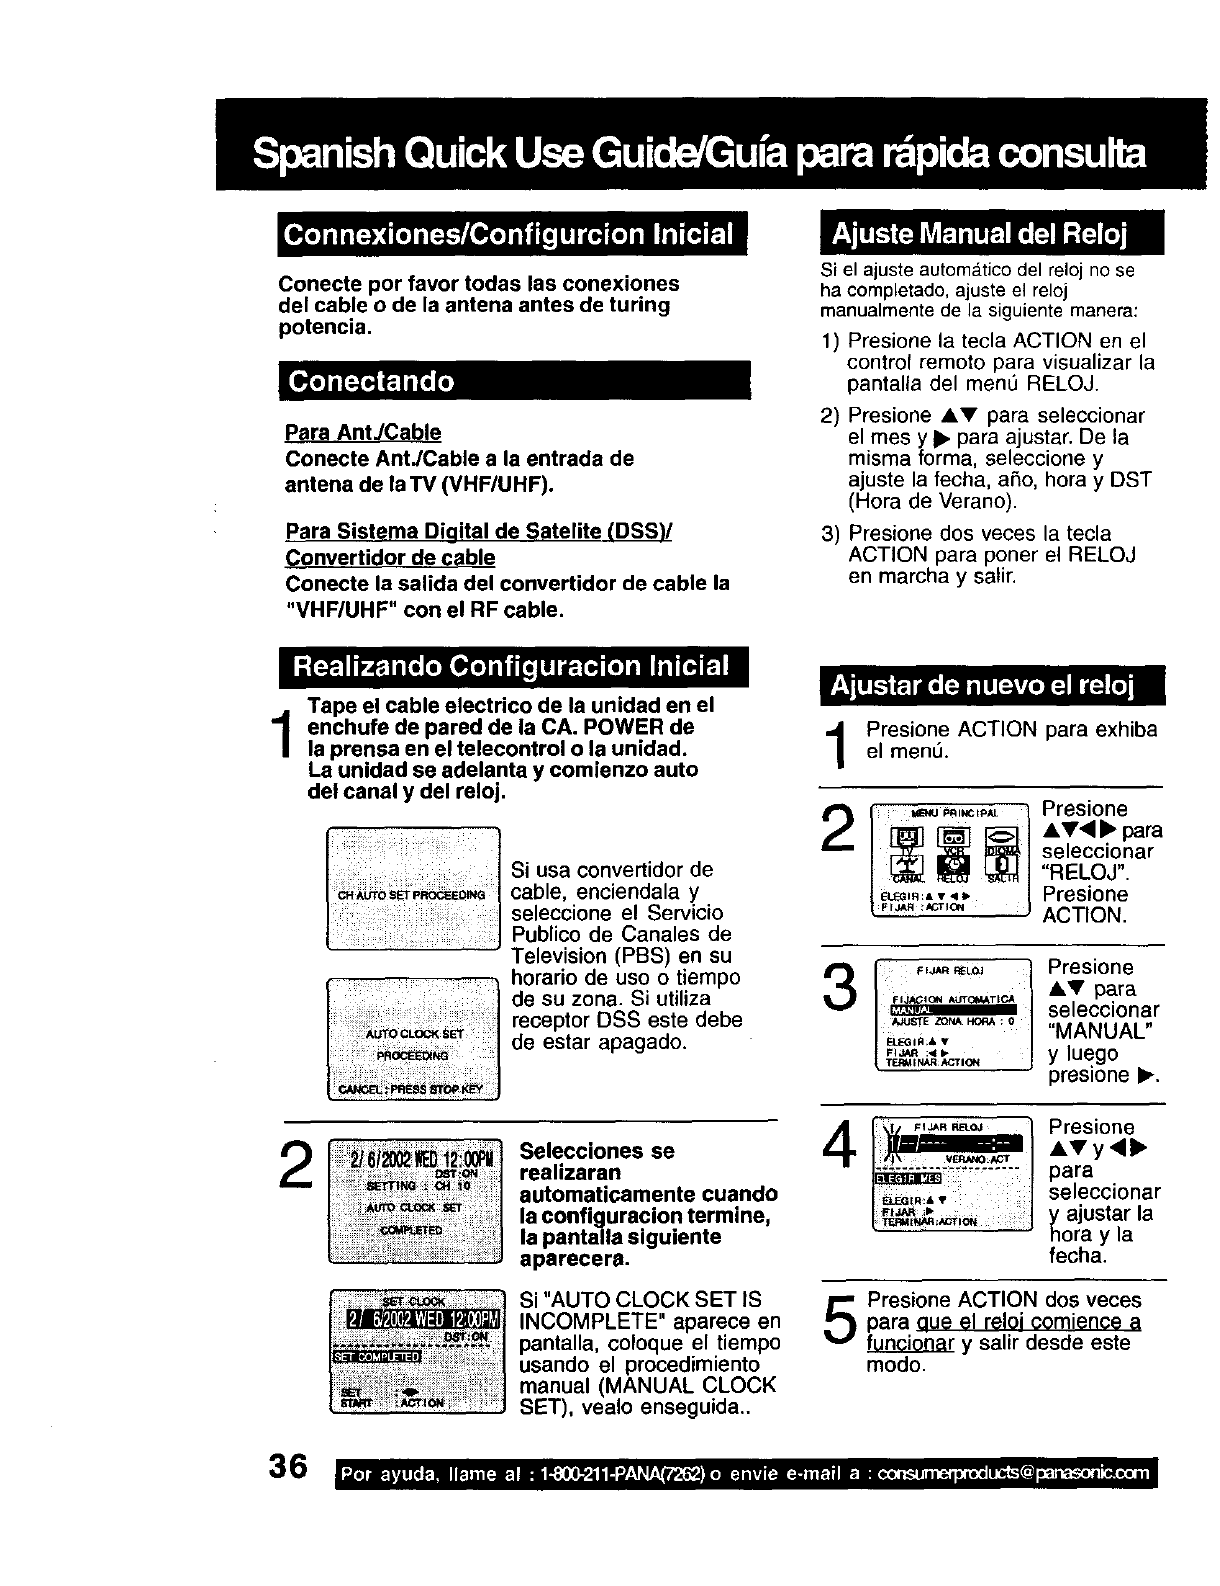
Conecte por favor todas las conexiones
del cable o de la antena antes de turing
potencia.
para AntJCable
Conecte AntJCable a la entrada de
antena de la TV (VHF/UHF).
Para Sistema Digital de Satelite fDSS)/
Convertidor de cable
Conecte la salida del convertidor de cable la
"VHF/UHF" con el RF cable.
Si el ajuste automatico del reloj no se
ha completado, ajuste el reloj
manualmente de la siguiente manera:
1) Presione la tecla ACTION en el
control remoto para visualizar la
pantalla del men5 RELOJ.
2) Presione ,li,Vpara seleccionar
el mes y • para ajustar. De la
misma forma, seleccione y
ajuste la fecha, afio, hora y DST
(Hora de Verano).
3) Presione dos veces la tecla
ACTION para poner el RELOJ
en marcha y salir.
Tape el cable electrico de la unidad en el
enchufe de pared de la CA. POWER de
la prensa en el telecontrol o la unidad.
La unidad se adelanta y comienzo auto
del canal y del reloj.
Si usa convertidor de
cable, enciendala y
seleccione el Servicio
Publico de Canales de
Television (PBS) en su
horario de uso o tiempo
LIde su zona" Si utiliza,.
......... ...................receptor DSS este debe
de estar apagado.
2Selecciones se
realizaran
automaticamente cuando
la configuracion termine,
la pantalla siguiente
aparecera.
Si "AUTO CLOCK SET IS
INCOMPLETE" aparece en
pantalla, coloque el tiempo
usando el procedimiento
manual (MANUAL CLOCK
SET), vealo enseguida..
Presione ACTION para exhibael menl3.
..,.ctp,_ Presione
seleccionar
"RELOJ".
_'_ ";'_'_'_"_ IPresione
/
tF'._ ACTION.
FIj_l (_l AUTO_I, AT ICA
1_,1.1_11 j.
AJUSTE ZONA I-I_ :0
Presione
kV para
seleccionar
"MANUAL"
y luego
prestone I_.
4"_F'_"_°_ I Presioney
_._.. AT <•
para
_" _ .... yajustar la
hora y la
fecha.
Presione ACTION dos veces
para aue el reloi comience a
y salir desde este
modo.
Inserte un casete.•El videograbador combinado se enciende
automaticamente.
Presione PLAY.
Lareproducci6ncomienza
automaticamente si el casete no tiene la
leng0eta para prevenci6nde grabaci6n.
• Para encontrar una escena en particular
B,',squedahacia adelante => Presione FF
B0squeda hacia atras => Presione REW
• Para ver una imagen fiia (congelada) => Presione
PAUSE/SLOW
• Paravet en camara lenta => Mantenga pulsado el
bot6n PAUSE/SLOW en el modo de imagen ilia
•Para ver irn&genescuadro a cuadro => Presione
PAUSE/SLOW en el modo de imagen fija
• Para parar => Presione STOP
• Para rebobinar la cinta => Presione REW
• Para hacer avanzar la cinta r&pidamente=>
Presione FF
• Para expulsar la cinta => Presione EJECT
en el control remoto o STOP/EJECT en el
videograbadorcombinado
Inserte un casete con la leng0eta
para prevenci6n de grabado,
• El videograbadorcombinadose enciende
automdticamente,
Seleccione el canal.
Presione CH A'V o las teclas
numericas correspondiente.
3Seleccione la velocidad de grabaci6n.
PresioneSPEED.
SP = reproduccibnnormal
LP = reproducci6n larga
SLP= reproducci6nsuper larga
•La velocidadseleccionada debe aparecer
en la pantalla.
4Comience la grabaci6n.
Presione REC.
•Para editar partes nodeseadas de una
grabaci6n,presionePAUSE/SLOW para
haceruna pausadurante la grabaci6n.
•No podr_,ver otro canaldurante la
grabaci6n.
•Para parar => Presione STOP.
•El videograbador combinado deja
de grabar a una hora prefijada.
(Grabacibn de un toque)
Presione REC repetidamente para
ajustar la hora de grabaci6n (30 rain
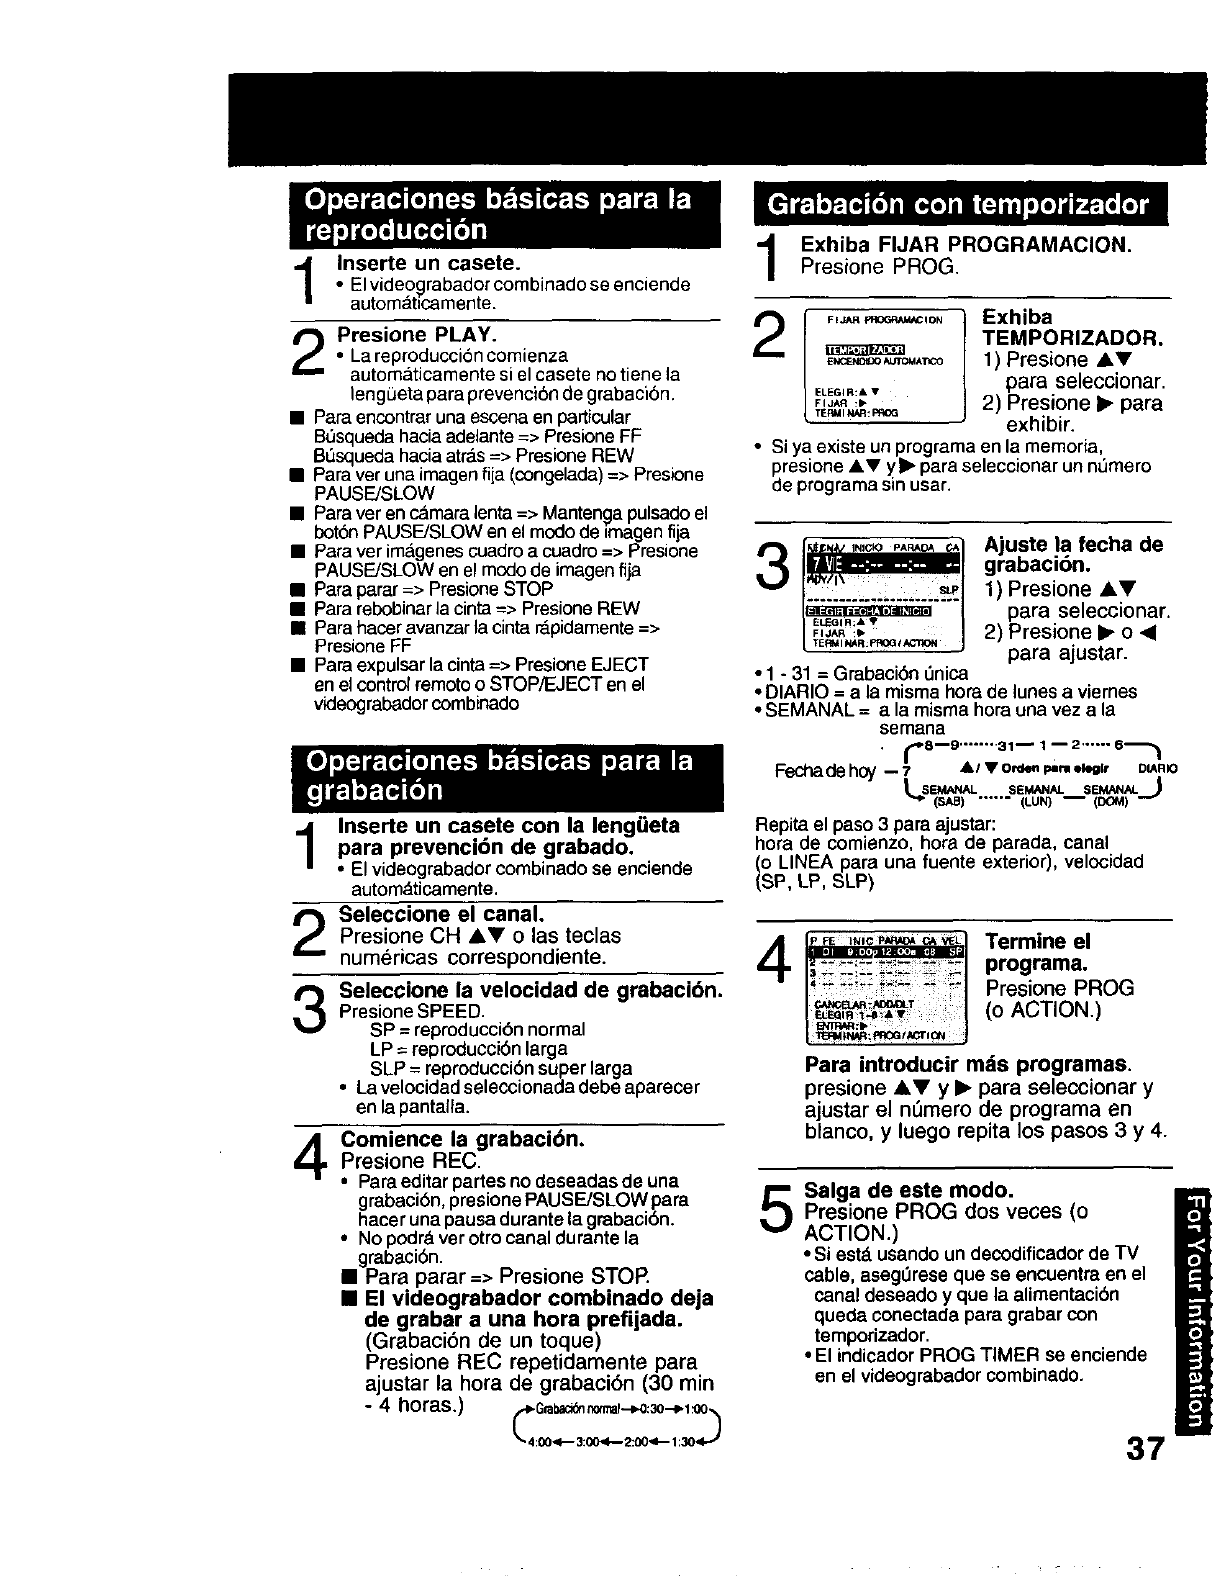
Exhiba FIJAR PROGRAMACION.
Presione PROG.
iFI "_R _ION
ENCFJ4D_OALROMAi"_CO
ELEGI R:A •
FIJAR :1_
TEF_I NAR!PROG
Exhiba
TEMPORIZADOR.
1) Presione AV
para seleccionar.
2) Presione •para
exhibir.
• Si ya existe un programa en la memoria,
presione AV y• para seleccionar un n0mero
de programa sin usar,
3( 1
• 1 -31 =Grabacibn Onica
Ajuste la fecha de
grabaci(_n.
1) Presione AV
para seleccionar.
2) Presione •o_1
para ajustar.
• DIARIO = a la misma hora de lunes a viemes
• SEMANAL =ala misma hora una vez a la
semana
("P8 --9 ........ 31- 1 , 2".--- 6"_1
Fechadehoy -- 7 • /•ord_nImrlleleg(r DIARIO
L SEM_V,L SEWiNg-SE_W_._,,J
(SAB) ...... (LUN) -- (_)
Repita el paso 3para ajustar:
hora de comienzo, hora de parada, canal
(o LINEA para una fuente exterior), velocidad
(SP, LP, SLP)
4p_,, p_Ao,c* Termine el
__.___:_ _-;; 3 programa.
'_ _'_ _:- _ Presione PROG
_T (o ACTION.)
ELE_IR
Para introducir mds programas.
presione &V y •para seleccionar y
ajustar el n0mero de programa en
blanco, y luego repita los pasos 3 y 4.
Salga de eate modo.
Presione PROG dos veces (o
ACTION.)
•Si estd usando un decodificador de TV
cable, aseg0rese qua se encuentraen el
canal deseado y que la alimentacibn
queda conectada para grabarcon
temporizador.
•El indicadorPROG TIMER se enciende
en el videograbadorcombinado.
37

NOTES

NOTES
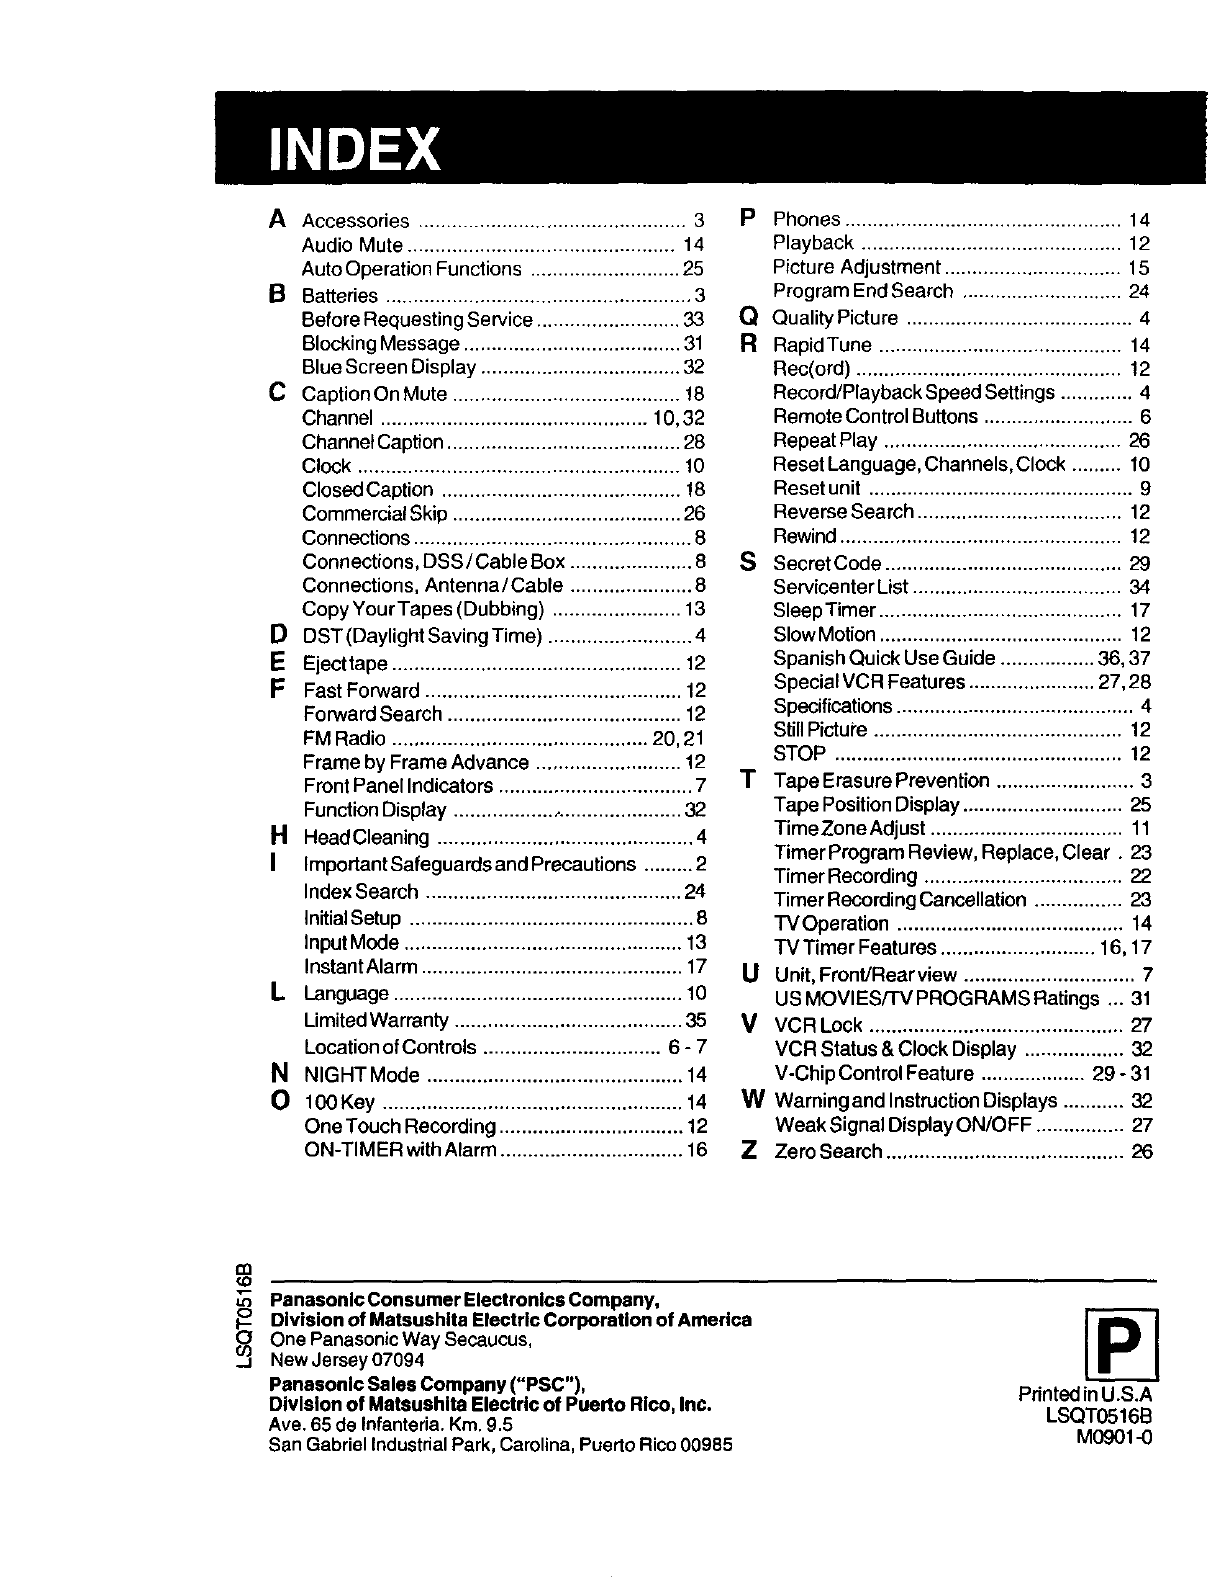
AAccessories ................................................ 3
Audio Mute ................................................ 14
Auto Operation Functions ........................... 25
B Batteries ....................................................... 3
Before Requesting Service .......................... 33
Blocking Message ....................................... 31
Blue Screen Display .................................... 32
C CaptionOn Mute ......................................... !8
Channel ................................................ 10, 32
Channel Caption .......................................... 28
Clock .......................................................... 10
Closed Caption ........................................... t 8
Commercial Skip ......................................... 26
Connections .................................................. 8
Connections, DSS/Cable Box ...................... 8
Connections, Antenna/Cable ...................... 8
Copy Your Tapes (Dubbing) ....................... 13
DDST (Daylight Saving Time) .......................... 4
EEject tape .................................................... 12
FFast Forward .............................................. 12
Forward Search .......................................... 12
FM Radio .............................................. 20, 21
Frame by Frame Advance .......................... 12
Front Panel Indicators ................................... 7
Function Display ......................................... 32
HHeadCleaning .............................................. 4
J ImportantSafeguardsandPrecautions ......... 2
Index Search .............................................. 24
Initial Setup ................................................... 8
InputMode .................................................. 13
Instant Alarm ............................................... 17
LLanguage .................................................... 10
Limited Warranty ......................................... 35
Location of Controls ................................ 6 - 7
N NIGHT Mode .............................................. 14
O 100 Key ...................................................... 14
One Touch Recording ................................. 12
ON-TIMER with Alarm ................................. 16
PPhones .................................................. 14
Playback ............................................... 12
Picture Adjustment ................................ 15
Program End Search ............................. 24
QQuality Picture ......................................... 4
a Rapid Tune ............................................ 14
Rec(ord) ................................................ !2
Record/Playback Speed Settings ............. 4
Remote Control Buttons ........................... 6
Repeat Play ........................................... 26
Reset Language, Channels, Clock ......... 10
Reset unit ................................................ 9
Revepse Search ..................................... 12
Rewind ................................................... 12
S Secret Code ........................................... 29
Servicenter List ...................................... 34
SleepTimer ............................................ 17
SlowMotion ............................................ 12
Spanish Quick Use Guide ................. 36, 37
Special VCR Features ....................... 27, 28
Specifications ........................................... 4
Still Picture ............................................. 12
STOP .................................................... 12
T Tape Erasure Prevention ......................... 3
Tape Position Display ............................. 25
TimeZone Adjust ................................... 11
Timer Program Review, Replace, Clear. 23
Timer Recording .................................... 22
Timer Recording Cancellation ................ 23
TVOperation ......................................... 14
TV Timer Features ............................ 16, 17
Uunit, Front/Rearview ............................... 7
US MOVIES/TV PROGRAMS Ratings ... 31
V VCR Lock .............................................. 27
VCR Status & Clock Display .................. 32
V-Chip Control Feature ................... 29 - 31
W Wamingand Instruction Displays ........... 32
Weak Signal Display ON/OFF ................ 27
Z Zero Search ........................................... 26
m
,J3
"- Ele Ics C pau_ PanasonlcConsumer ctron om ny,
(_ Division of Matsushlta Electric Corporation of America
One PanasonicWay Secaucus,
.J New Jersey07094
Panasonlc Sales Company ("PSC"),
Division of Matsuahtta Electric of Puerto Rico, Inc.
Ave. 65 de lefanteria. Kin.g.5
San Gabriel Industrial Park, Carolina, Puerto Rico00985
Printed inU.S.A
LSQT0516B
M0901-0
