PANASONIC Home Theatre Manual L0312003
User Manual: PANASONIC PANASONIC Home Theatre Manual PANASONIC Home Theatre Owner's Manual, PANASONIC Home Theatre installation guides
Open the PDF directly: View PDF ![]() .
.
Page Count: 44
The illustration shows SC-HT900.
Panasonic °
m
T
DVD Home Theater Sound System
Operating Instructions
ModelNo.SC-HT900
SC-HT700/SC-HT690
|
Before connecting, operating or adjusting this product,
please read these instructions completely.
Please keep this manual for future reference.
Region number supported by this player
Region numbers are allocated to DVD players and software
according to where they are sold.
!;r_llm
|_;_11 J_.*_*_W_I i p. i 0_ !_. i illll i ill i k,l_,l i i i1 "..)iIG'jTf_i3[; ir#_ll _i [=ibm (_ it _ i_ :_ lit ll[o I
eThe region number of this player is "1". Example:
•The player will play DVD-Video _ _ _
marked with labels containing
"1" or "ALL".
• The region number of this player is "4". Example:
• The player will play DVD-Video _ _ _
marked with labels containing
"4" or "ALL".
AUDIO/VIDEO {DIGITALVIDEO_
AS an ENERGY STAF_ Partner, Panasonic
has determined that this product meets the
ENERGY STAR _ guidelines for energy
efficiency.
The warranty can be found on page 43. I
[_ [_ [_ _ RQT6750-4P
!
RQT6750
Dear customer el_ese operaUng instructions are applicable to models
SC-HTg00, SC-HT700 and SC-HT690.
•Uniees otherwise Indlcatsd, illustrations In these operating
Inn'uctlons are of SC-HTg00 for U.S.A. and Canada.
eOperatloms in these InsWuctions are described mainly
with the remote €ontrol, but you can do the opefldk)ns on
the main unit If the conb'ols are the same.
Thank you for purchasing this product.
For optimum performance and safety, please read these instructions
carefully.
: indicates features applicable to SC-HTg00 only.
: SC-HTT00 only.
: SC-HT690 only.
System SC-HT900 SC-H'rT00 SC-HT690
Main unit SA-HT900 SA-HT700 SA-HT690
Front speakers SB-FS900 SB-FS803A SB-FS803A
Center speaker SB-PC701 SB-PC703 SB-PC703
Surround speakers SB-FS900 SB-FS803A SB-FS803A
Active subwoofer SB-WA350 SB-WA340 SB-WA342
CAUTION!
THIS PRODUCT UTlUZES A LASER.
USE OF CONTROLS OR ADJUSTMENTS OR PERFORMANCE
OF PROCEDURES OTHER THAN THOSE SPEClRED HEREIN
MAY RESULT IN HAZARDOUS RADIATION EXPOSURE.
DO NOT OPEN COVERS AND DO NOT REPAIR YOURSELF.
REFER SERVICING TO QUALIFIED PERSONNEL
WARNING:
TO REDUCE THE RISK OF FIRE, ELECTRIC SHOCK
OR PRODUCT DAMAGE, DO NOT EXPOSE THIS
APPARATUS TO RAIN, MOISTURE, DRIPPING OR
SPLASHING AND THAT NO OBJECTS FILLED WITH
LIQUIDS, SUCH AS VASES, SHALL BE PLACED ON
THE APPARATUS.
THE FOLLOWING APPLIES ONLY IN THE U.S.A. AND CANADA:
CAUTION:
TO PREVENT ELECTRIC SHOCK MATCH WIDE
BLADE OF PLUG TO WIDE SLOT, FULLY INSERT.
CAUTION!
eDO NOT INSTALL OR PLACE THIS UNIT IN A BOOKCASE,
BUILT-IN CABINET OR IN ANOTHER CONFINED SPACE.
ENSURE THE UNIT IS WELL VENTILATED. TO PREVENT
RISK OF ELECTRIC SHOCK OR FIRE HAZARD DUE TO
OVERHEATING, ENSURE THAT CURTAINS AND ANY OTHER
MATERIALS DO NOT OBSTRUCT THE VENTILATION VENTS.
eDO NOT OBSTRUCT THE UNIT'S VENTILATION OPENINGS
WITH NEWSPAPERS, TABLECLOTHS, CURTAINS, AND
SIMILAR ITEMS.
eDO NOT PLACE SOURCES OF NAKED FLAMES, SUCH AS
MGHTED CANDLES, ON THE UNIT.
eDISPOSE OF BATTERIES IN AN ENVIRONMENTALLY
FRIENDLY MANNER.
For units with PX printed on the outer packaging
THIS UNIT IS INTENDED FOR USE IN MODERATE CLIMATES.
For Latin America
THIS UNIT IS INTENDED FOR USE IN TROPICAL CLIMATES.
For areas except U.S.A. and Canada
CAUTION:
The AC voltage is different according to the area.
Be sure to set the proper voltage in your area before use.
(For details, please refer to page 10.)
(fuside of product)
THE FOLLOWING APPUES ONLY IN THE U.S.A.:
CAUTION:
This equipment has been tested and found to comply with the
limits for a Class B digital device, pursuant to Part 15 of the FCC
Rules.
These limits are designed to provide reasonable protection
against harmful interference in a residenUal installation. This
equipment generates, uses and can radiate radio frequency
energy and, if not installed and used in accordance with the
instructions, may cause harmful interference to radio
communications. However, there is no guarantee that
interference will not occur in a particular installation, if this
equipment does cause harmful interference to radio or television
reception, which can be determined by turning the equipment off
and on, the user is encouraged to try to correct the interference
by one or more of the foflowing measures:
eReodent or relocate the receiving antenna.
elncreasa the separation between the equipment and receiver.
eConnect the equipment into an outlet on a cimuit different from
that to which the receiver is connected.
eConsult the dealer or an experienced radio/TV technician for
help.
Any unauthorized changes or modifications to this equipment
would void the user's authority to operate this device.
This device complies with Part 15 of the FCC Rules. Operation is
subject to the following two conditions: (1) This device may not
cause harmful interference, and (2) this device must accept any
interference received, including interference that may cause
undesired operation.
THE FOLLOWING APPUES ONLY IN THE U.S.A. AND CANADA:
CAUTION
The lightning flash with arrowhead symbol, within
Aan equilateral is to alert thetriangle, intended user
• _. to the presence of uninsulated dangerous voltage"
_1_ il. within the product's enclosure that may be of suffi-
i_. cient magnitude to constitute a risk of electric shock
_to persons.
The exclamation point within an equilateral triangle
is intended to alert the user to the presence of
important operating and maintenance (servicing)
instructions in the literature accompanying the ap-
pliance.
CAUTION: TO REDUCE THE RISK OF ELECTRIC
SHOCK, DO NOT REMOVE SCREWS.
NO USER-SERVICEABLE PARTS
INSIDE.
REFER SERVICING TO QUALIFIED
SERVICE PERSONNEL.

Accessories
Please check and Identify the supplied accessories.
Use numbers indicated In parentheses when asking
for replacement parts,
(Only for U.S.A.)
TO order accessories contact 1-800-332-5368 or web site (httpdl
www.panasoelc.com).
(For other areas)
To order accassorles, call the dealer from whom you have made
your purchase.
[] 1 Remote control [] 1
I=i_IIId
(EUR7623X70)
(EUR7623X60)
[] 2 Batteries
for remote control
[] 1 AC power supply cord
(RJAOO65-1D)
(RJAOO19-2X)
[] 1 Video cable
(RJL1 P016B15A)
|;il_llS]
[] 1 Power plug adaptor
($3P5213-2)
[]1
[]1
[]5
Accessories .................................... 3
IMPORTANT SAFETY INSTRUCTIONS .............. 4
Disc information ................................ 5
Simple setup
STEP1 _Assembly and connection of front
and surround speakers ........... 6
AM loop antenna Locating ....................... 7
[_ Locating .................. 7
(NIDADYY00002) STEP2 _Connecting speakemwith the
sub.,ofer..................... 8
_Connecting speakers with
the subwoofer ............. 8
Z:
[] 1 Sheet of speaker-cable
stickers
[] 8 Silver screws
(XSNS+16FN)
STEP3 Television ........................... 9
FM indoor antenna STEP4 Connecting the subwoofer, antennas, and
AC power supply cord ................ 10 r_
(RSA0006-J) STEP5 The remote control ................... 10
Other speaker setup options .................. 11
STEP6 QUICK SETUP ....................... 12
Control reference guide ......................... 13
System cable
(KIHA25HA0001)
Discs--Basic play .............................. 14
Sequerdlal play/Changing the disc in the play position ....... 15
Changing other discs during play/Position Memory function... 15
Speaker cables Replaying a scene--QUICK REPLAY ..................... 15
(RFA2163-J) Starting play from a selected item ....................... 16
3×4-m (13-foot) cables Seles_ng stillpictures--Page Skip ...................... 16
Skipping items/Fast forward and rewind--SEARCH ......... 16
2× 10-m (33-foot) cables Slow-motion play/Frame-by-frame viewing ................ 16
Discs--Convenient functions ..................... 17
Selecting groups to play/Repeat play/A-B repeat play........ 17
Soundtracks/Su btities ................................ 18
All group play/Program play/Random play ................. 19
Marking places to play again/Variable Zoom function ........ 20
Playing the programs or play lists on DVD-RAM ..... 21
Selecting aprogram to play--DIRECT NAVIGATOR ........ 21
Using the play listmenu ............................... 21
WMA/MP3, CD text and JPEG navigation menus ..... 22
Playing HighMAT discs ............................... 23
Using On-Screen Menu Icons ..................... 24
Common procedures/Progress indicator .................. 24
Disc information/Unit information ........................ 25
[] 4 Black screws
(XTB3+ 10J FZ)
?
[] 4 Clips
(QWBGO02AA)
The included AC power supply cord is for use with this unit only Do
not use it with other equipment.
The radio ...................................... 27
Manualtuning/Presettuning ........................... 27
Sound field .................................... 28
Dolby Digital and DTS/Dolby Pro Logic or Dolby Pro Logic li..28
Speaker level adjustments ............................. 28
Super Surround/Sound Field Control/Center Focus ......... 29
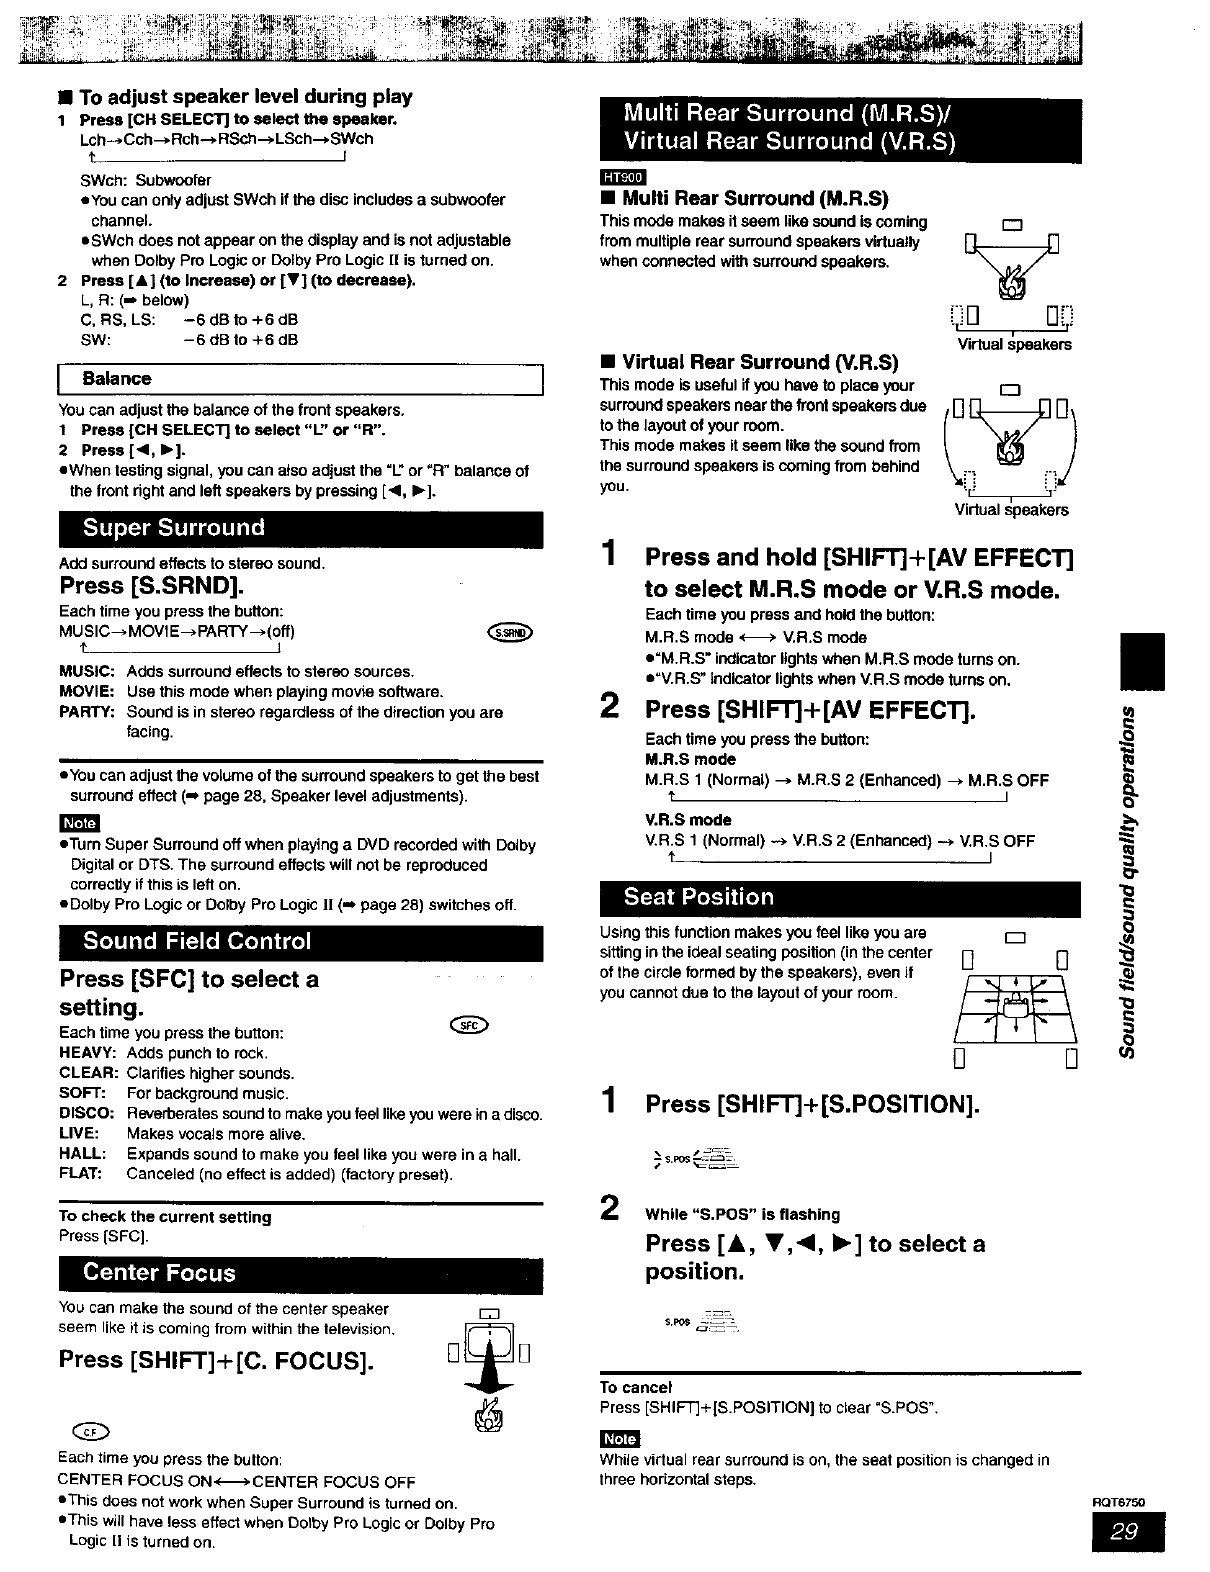
Multi Rear Surround (M.R.S)/Virlual Rear Surmend (V.R.S) ..... 29
Seat Position........................................ 29
Custom Sound Memory--Store the sound settings .......... 30
Changing the delay time .............................. 30
Sound quality .................................. 31
Adjusting the bass ................................... 31
Double re-master--Enjoying more natural sound ........... 31
DR COMP--Dynamic range compression ................. 31
For areas except U.S.A, and Canada
l
CLASS1
LASERPRODUCT
(Back of product)
Convenient functions ........................... 31
Mutingthevolume/Dimmingthedisplay .................. 31
Thesleep timer/Usingheadphones...................... 31
Operating other equipment ....................... 32
Changing settings .............................. 34
Optional antenna connections .................... 36
Glossary ...................................... 37
Specifications ................................. 38
Troubleshooting guide .......................... 40 ROTS750
Product Service (U.S.A. and Canada) .............. 42
Maintenance ................................... 42
Limited Warranty (U.S.A.) ........................ 43
Readtheseoperatinginstructionscarefullybeforeusingtheunit.Followthesafetyinstructionsontheunitand the applicablesafetyinstructions
listedbelow.Keep these operatingInstructionshandy for futurereference.
1) Read these instructions.
4)
_7)
8)
9)
Keep these instructions.
Heed all warnings.
Follow all instructions.
Do notuse this apparatusnearwater,
Clean only with dry cloth.
Do notblock any ventllaUon openings. Install in accordance with
the manufacturers instructions.
Do not install near any heat sources such as radiators, heat
registers, stoves, or other apparatus (including amplifiers) that
produce heat.
Do not defeat the safety purpose of the polarized or grounding-
type plug. Apolarized plug has two biades with one wider than
the other. A grounding-type plug has two blades and a third
grounding prong. The wide blade or the third prong are
provided for your safety. If the provided plug does not fit into
your outlet, consult an electrician for replacement of the
obsolete outlet.
11) Onty use attachments/ancesaodes specified by the
manufacturer.
12) Use only with the cart, stand, stped, brecket, or
table sbecitled by the manufacturer, or sold with
the apparatus. When a cart is used, use caution
when moving the cart/apparatus combination to
avoid injury from tip-over.
13) Unplugthisapparatusdudnglighthingstormsor whenunused
for longperiodsof time.
14. Refer all servicing to qualified service personnel. Servicing is
required when the apparatus has been damaged In any way,
such as bewer-suppty cord or plug is damaged, liquid has been
spilled or objects have fallen into the apparatus, the apparatus
has been exposed to rain or moisture, does not operate normally,
or has been dropped.
10) Protect the power cord from being walked on or pinched
particularly at plugs, convenience receptacles, and the point
where they exit from the apparatus.
RQT6750
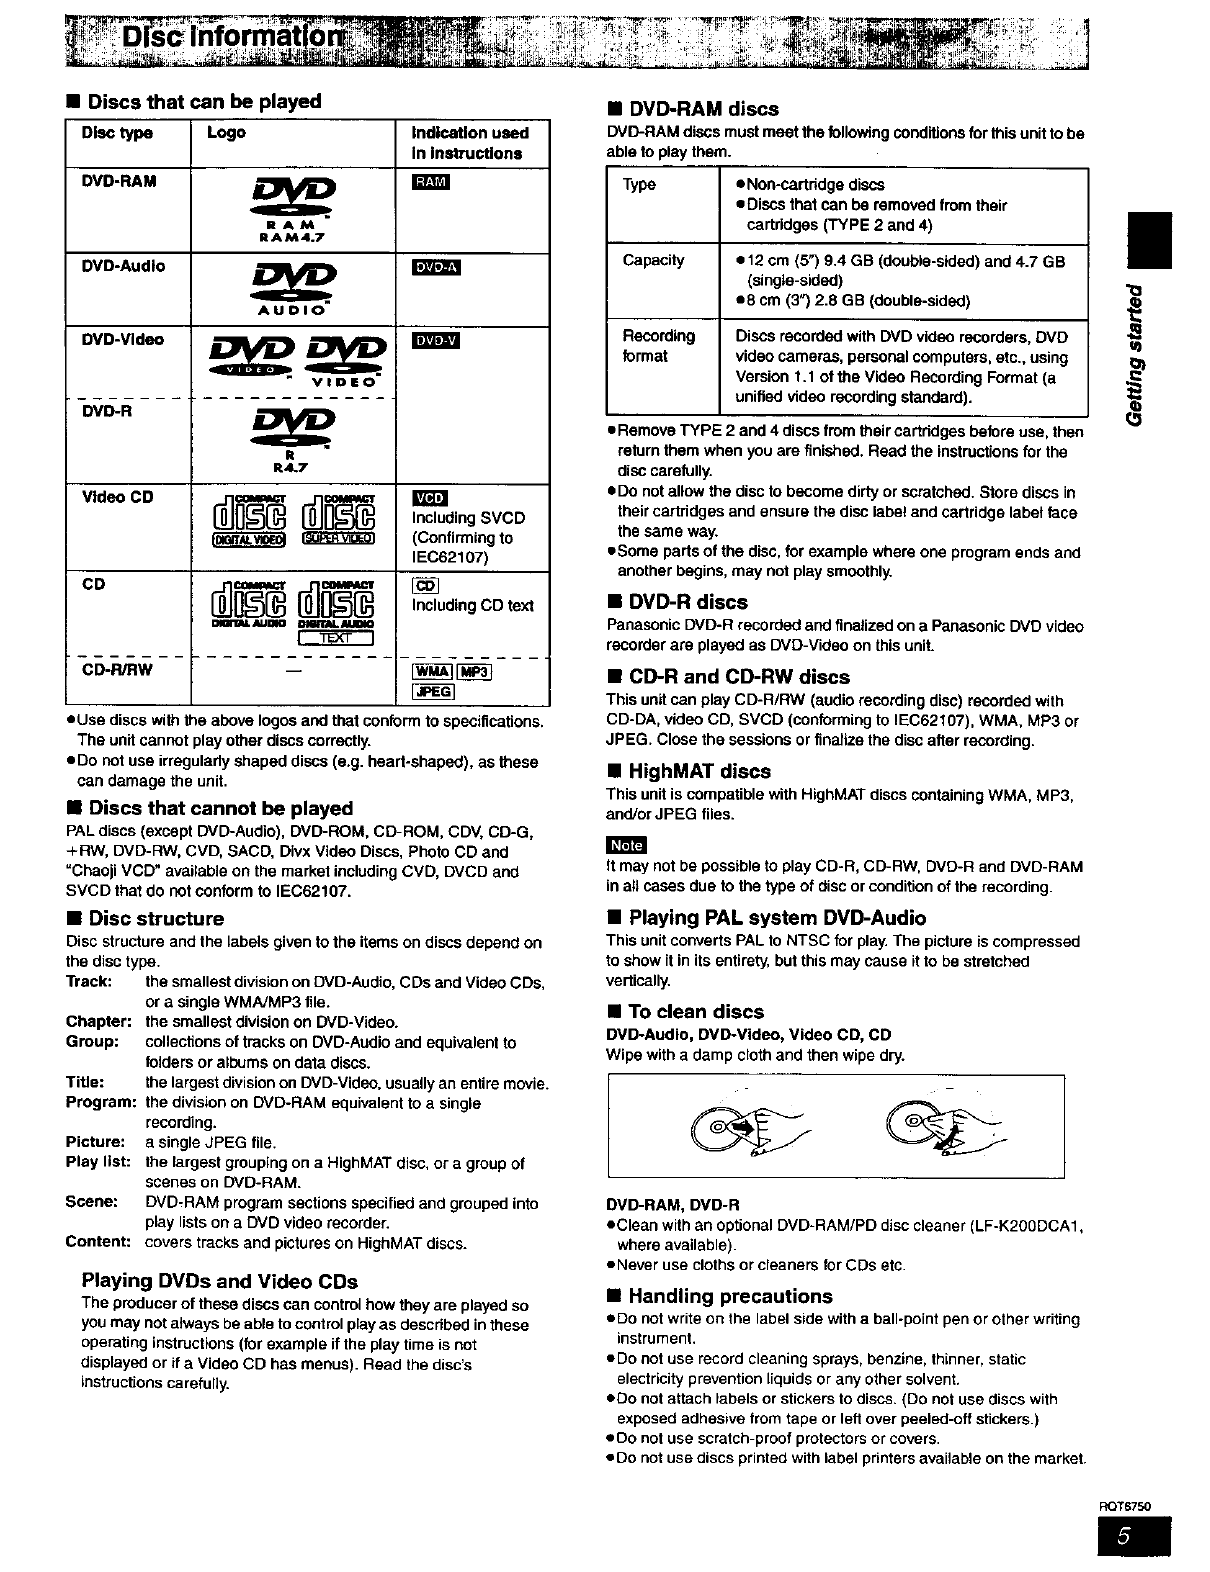
• Discs that can be played
Disctype Logo Indication used
In Instructions
DVD-RAM _.
RAtA
It AM4.7
DVD-Audlo
DVD-Video
DVD-R
ll].t|l_
e
R4.7
E
V,d CD , ,ud,ngSVCD
I_ _ (Confirming to
IEC62107)
co d]0" Including CD text
_i11G_. AUgAO
CD-R/RW -- {_
• Use discs with the above Iogos and that conform to specifications.
The unit cannot play other discs correctly.
• Do not use irregularly shaped discs (e,g. heart-shaped), as these
can damage the unit.
•Discs that cannot be played
PAL discs (except DVD-Audfo), DVD-ROM, CD-ROM, CDV, CD-G,
+RW, DVD-RW, CVD, SACD. Divx Video Discs, Photo CD and
"Cheoji VCD" available on the market including CVD, DVCD and
SVCD that do not conform to IEC62107.
•Disc structure
Disc structure and the labels given to the items on discs depend on
the disc type.
Track: the smallest division on DVD-Audio, CDs and Video CDs,
or a single WMNMP3 file.
Chapter: the smallest division on DVD-Video.
Group: collections of tracks on DVD-Audio and equivalent to
folders or albums on data discs.
Title: the largest division on DVD-Video, usually an entire movie.
Program: the division on DVD-RAM equivalent to a single
recording.
Picture: a single JPEG file.
Play list: the largest grouping on a HighMAT disc, or a group of
scenes on DVD-RAM.
Scene: DVD,RAM program sections specified and grouped into
play lists on a DVD video recorder.
Content: covers tracks and pictures on HighMAT discs.
Playing DVDs and Video CDs
The producer of these discs can control how they are played so
you may not always be able to control play as described in these
operating instructions (for example if the play time is not
displayed or if a Video CD has menus). Read the disc's
instructJoos caretully.
•DVD-RAM discs
DVD-RAMdiscsmustmeetthefollowing conditionsfor this unitto be
ableto playthem.
Type eNon-cartddge discs
eDisos that can be removed from their
cartridges (TYPE 2 and 4)
Capacity • t 2 cm (5") 9.4 GB (double-sided) and 4.7 GB
(single-sided)
• 8 cm (3") 2.8 GB (double-sided)
Recording Discs recorded with DVD video recorders, DVD
format video cameras, personal computers, etc., using
Version 1.1 of the Video Recording Format (a
unified video recording standard).
•Remove TYPE 2 and 4 discs from their cartddges before use, then
return them when you are finished. Read the instructions for the
disc carefully.
• Do not allow the disc to become dirty or scratched. Store discs in
their cartridges and ensure the disc label and cartridge label face
the same way.
• Some parts of the disc, for example where one program ends and
another begins, may not play smoothly.
•DVD-R discs
PanasonicDVD-Rrecordedand finalizedona PanasonieDVDvideo
recorderare playedas END-Videoonthis unit.
•CD-R and CD-RW discs
This unitconplayCD-WRW (audiorecording disc)recordedwith
CD-DA,videoCD, SVCD (conformingto IEC62107), WMA, MP3 or
JPEG. Closethe sessionsorfinalizethe disc afterrecording.
•HighMAT discs
This unitis compatible withHighMATdiscs containingWMA, MP3,
and/orJPEG files.
It may not be possible to play CD-R, CD-RW, DVD-R and DVD-RAM
in all cases due to the type of disc or condition of the recording.
•Playing PAL system DVD-Audio
This unit converts PAL to NTSC for play. The picture is compressed
to show it in its entirety, but this may cause it to be stretched
verticolly.
•To clean discs
DVDoAudio, DVD-Video, Video CD, CD
Wipe with a damp cloth and then wipe dry.
DVD-RAM, DVD-R
• Clean with an optional DVD-RAM/PD disc cleaner (LF-K200DCA1,
where available).
• Never use cloths or cleaners for CDs etc.
•Handling precautions
•Do not write on the label side with a ball-point pen or other writing
instrument.
•Do not use record cleaning sprays, benzine, thinner, static
electricity prevention liquids or any other solvent.
•Do not attach labels or stickers to discs. (Do not use discs with
exposed adhesive from tape or left over peeled-off stickers.)
•Do not use scratch-proof protectors or covers.
•Do not use discs printed with label printers available on the market.
II
==
RQT6750
Simple setup
STEP_ JITi'_;TR
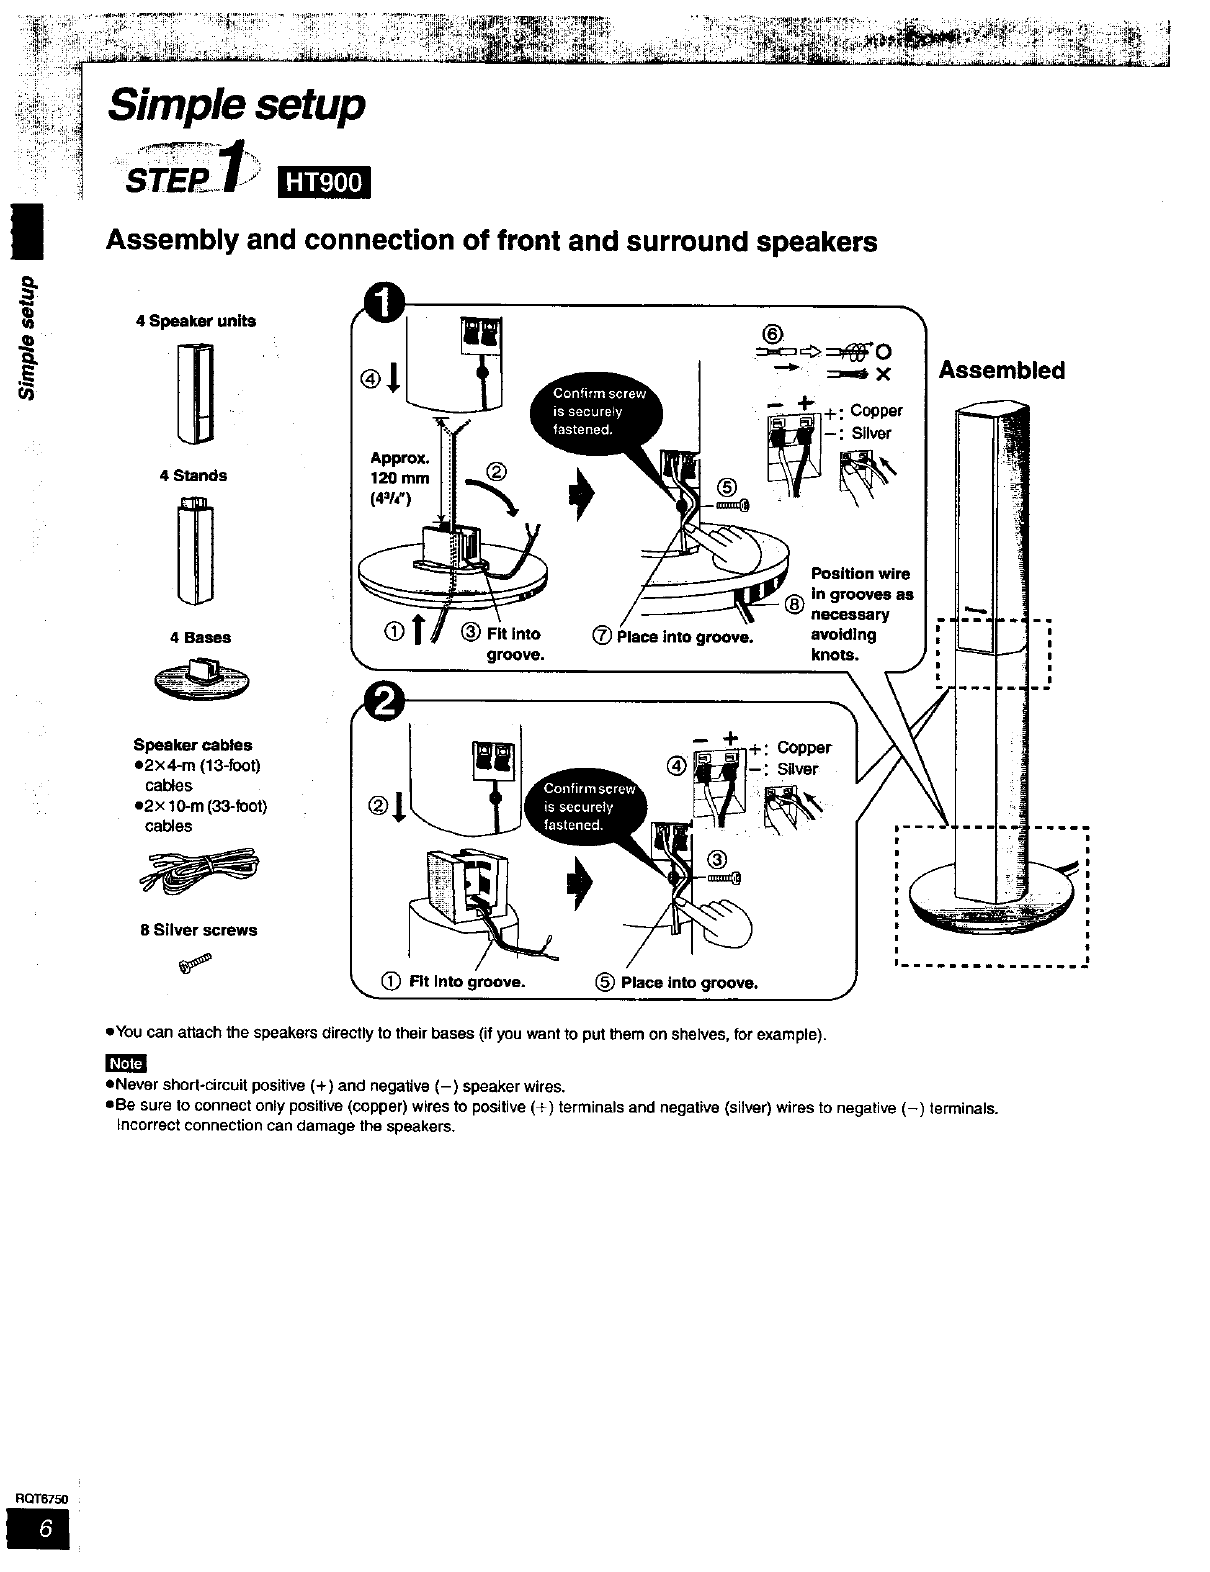
Assembly and connection of front and surround speakers
q_ 4 Speaker units
4 Stands
4 Bases
Speaker cables
e2×4-m (13-foot)
cables
e2× 10-m (33-foot)
cables
8 Silver screws
Approx.
120 mm
(4=/£)
®!
®
groove.
®
_Plece into groove,
+: Copper
Position wire
8_ln grooves as
necessary
avoiding
knots.
-----i C,,°vPePrer
(_) Rt Into groove. _) Place into groove.
•You can attach the speakers directly to their bases (if you want to put them on shelves, for example).
D----.
Assembled
I
I
I
|
|
• Never short-circuit positive (+) and negative (-) speaker wires.
eBe sure to connect only positive (copper) wires to positive (+) terminals and negative (silver) wires to negative (-) terminals.
Incorrect connection can damage the speakers.
RQT6750
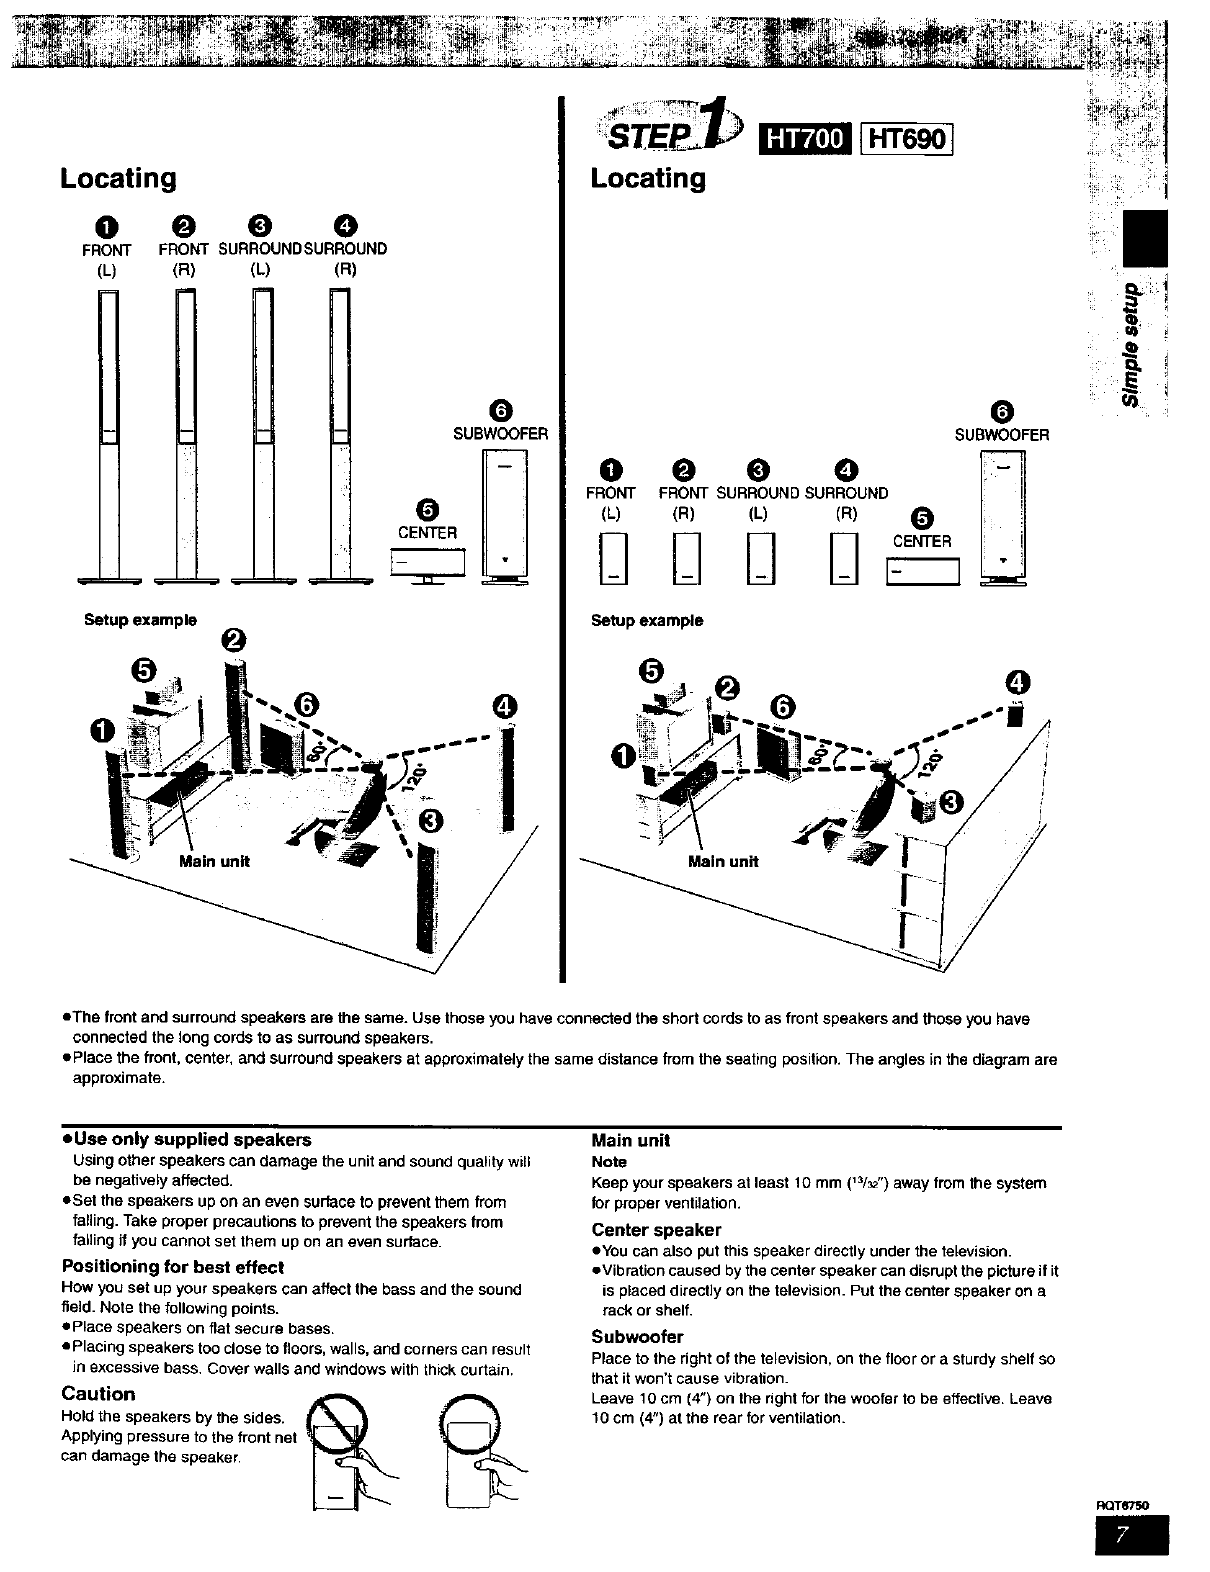
Locating
O0 0 O
F FRONT SURROUNDSURROUND
O
SUBWOOFER
CENTER
Setup example O
O
OQ
Setup example
• The front and surround speakers are the same. Use those you have connected the short cords to as front speakers and those you have
connected the long cords to as surround speakers.
ePlace the front, center, and surround speakers at approximately the same distance from the seating position. The angles in the diagram are
approximate.
• Use only supplied speakers
Using other speakers can damage the unit and sound quality will
be negatively affected.
eSet the speakers up on an even surface to prevent them from
falling. Take proper precautions to prevent the speakers from
falling if you cannot set them up on an even surface.
Positioning for best effect
How you set up your speakers can affect the bass and the sound
field. Note the following points.
ePlace speakers on flat secure bases.
• Placing speakers too close to floors, walls, and corners can result
in excessive bass. Cover walls and windows with thick curtain.
Caution
Holdthe speakersby thesides.
Applyingpressureto thefront net
candamage thespeaker,
Main unit
Note
Keep your speakers at least 10 mm (_3/_-) away from the system
for proper ventilation.
Center speaker
eYou can also put this speaker directly under the television.
eVibration caused by the center speaker can disrupt the picture if it
is placed direcfly on the television. Put the center speaker on a
rack or shelf.
Subwoofer
Place to the right of the television, on the floor or a sturdy shelf so
that it won't cause vibration.
Leave 10 cm (4") on the right for the woofer to be effective. Leave
10 cm (4") at the rear for ventilation.
RQT6750
=
RQT6750
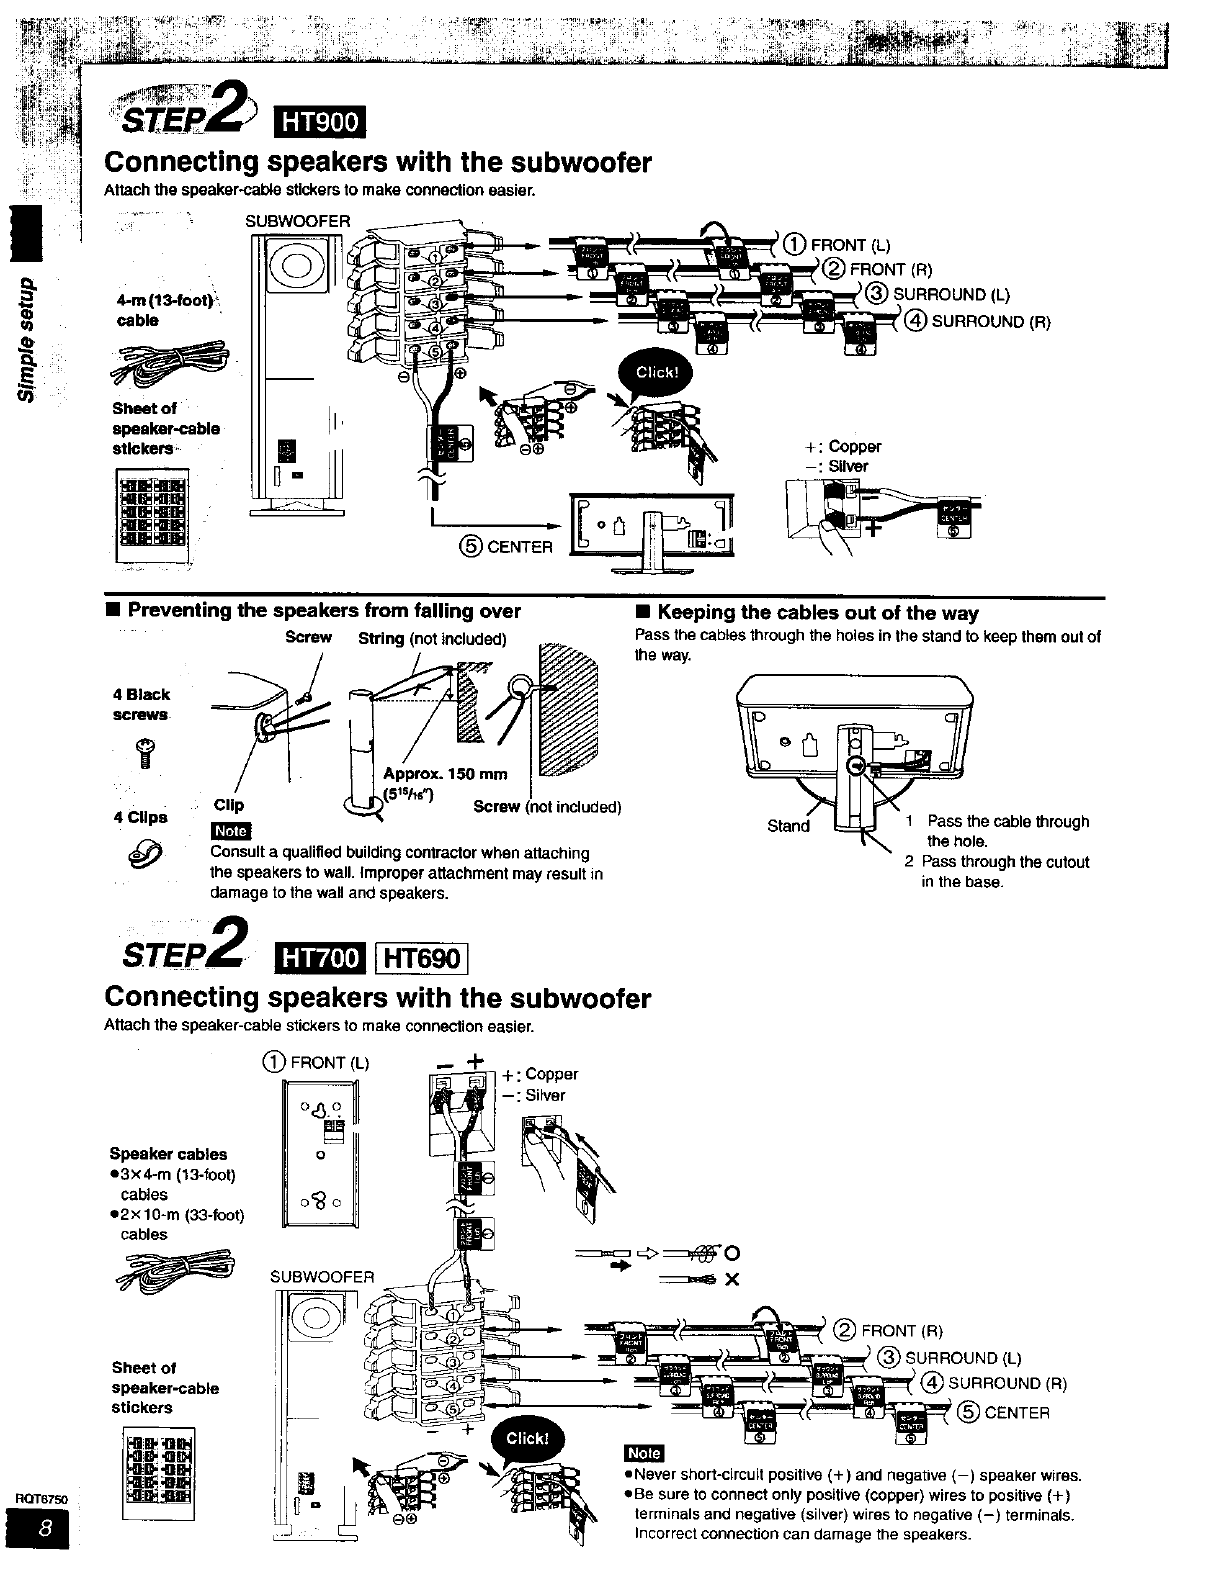
Connecting speakers with the subwoofer
Attach the speaker-cable stickers to make connection easier.
4-m (13-foot)_
cable
SUBWOOFER
I(_)CENTE;
•Preventing the speakers from falling over
Screw
4 Black
screws
?
4 Clips Clip
I_JFJ
String (not included)
Screw (not included)
Consult aqualified building contractor when attaching
the speakers to wall. Improper attachment may result in
damage to the wall and speakers,
STEP2 [HT6901
Connecting speakers with the subwoofer
Attach the speaker-calVe stickers to make connection easier.
(_ FRONT (L) -- -P
+coe
--: Silver
Speaker cables o
e3x4-m (13-foot)
cables
e2×10-m (33-foot)
cables
SUBWOOFER
Sheet of
speaker-cable
stickers
=:::_ _0=::::::_ X
'(_) FRONT (L)
)
'SURROUND(L)
SURROUND(R)
+: Copper
-: Silver
•Keeping the cables out of the way
Pass the cables through the holes in the stand to keep them out of
the way,
°_he cable _hrough
I_ the hole.
2 Pass through the cutout
in the base.
I(_)FRONT(R)
ISURROUND(L)
@SURROUND(R)
(_CENTER
=Never short-circuit positive (+) and negative (-) speaker wires.
=Be sure to connect only positive {copper) wires to positive (+)
terminals and negative (silver) wires to negative (-) terminals.
Incorrect connection can damage the speakers.
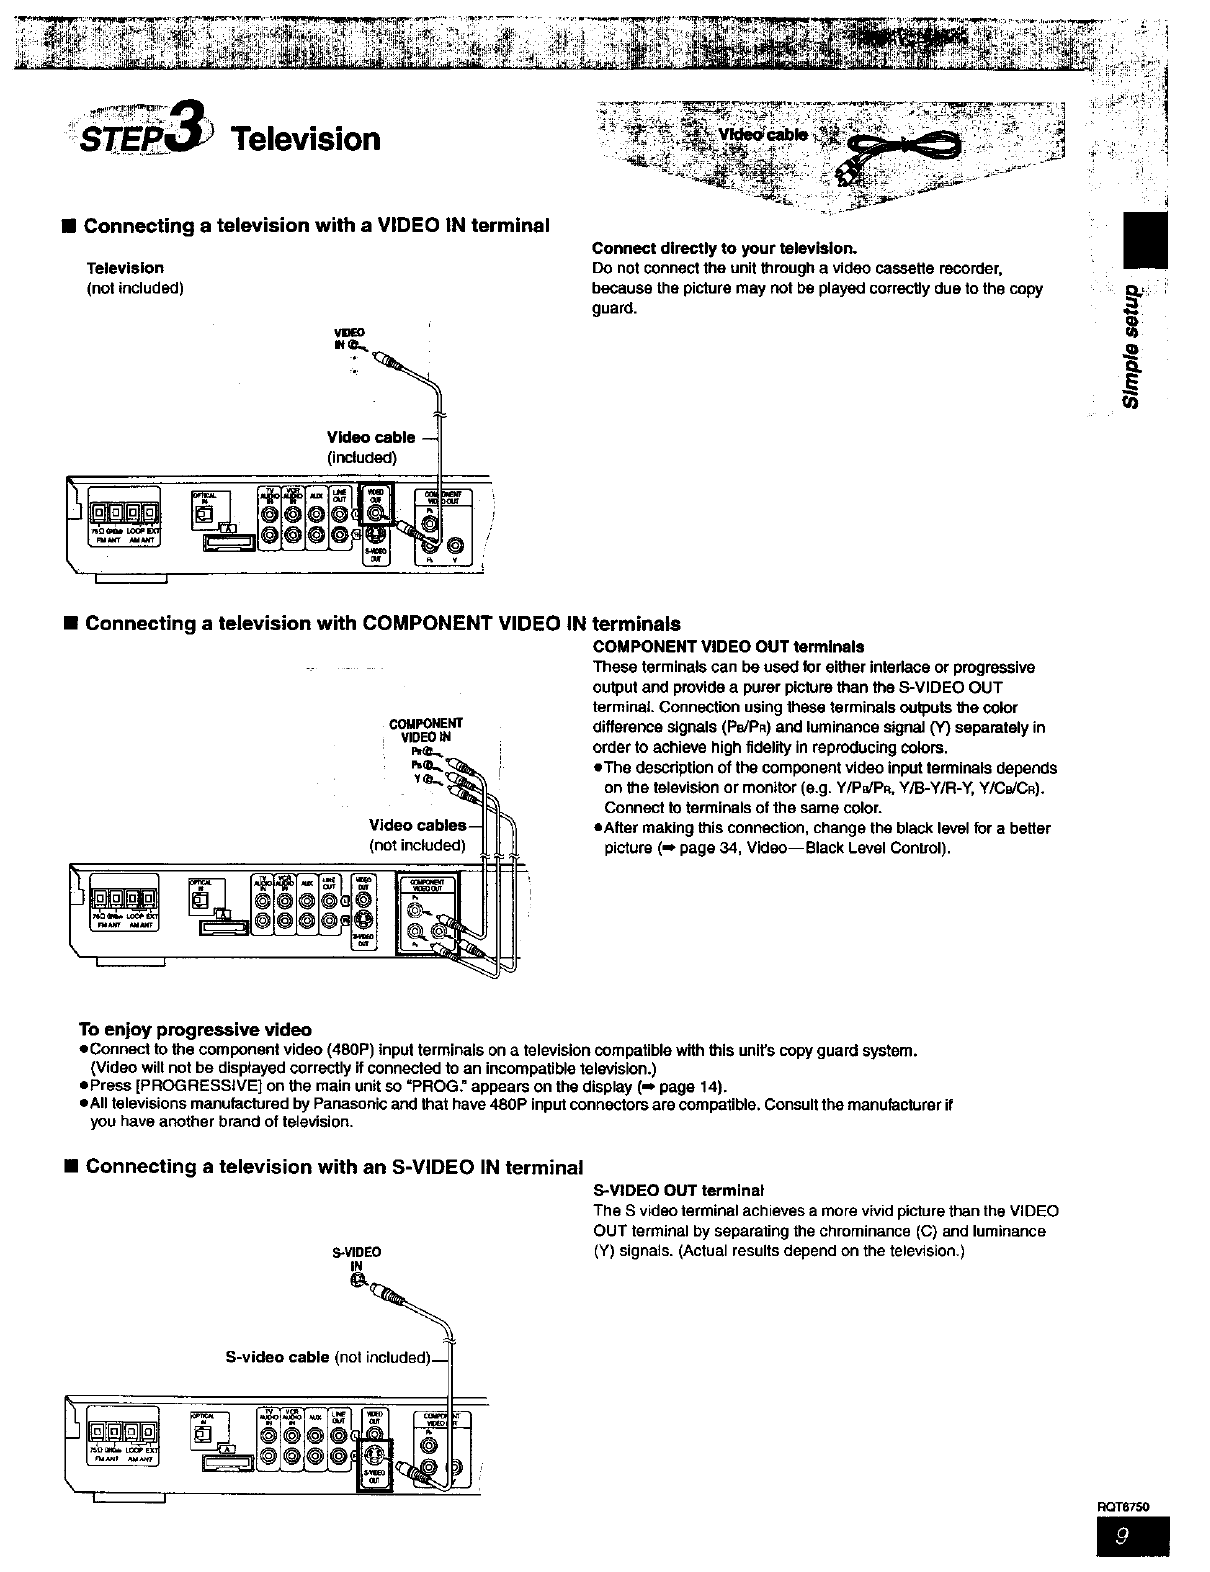
•Connecting a television with a VIDEO IN terminal
Television
(not included)
Video cable -
(included)
Connect directly to your television.
Do not connect the unit through a video cassette recorder,
because the picture may not be played correctly due to the copy
guard.
•Connecting a television with COMPONENT VIDEO IN terminals
COMPONENT VIDEO OUT terminals
-- +
COMPONENT
tVIDEO
VZdeocablos_l II
___ _(n°t included)
These terminals can be used for either interlace or progressive
output and provide a purer picture than the S-VIDEO OUT
terminal Connection using these terminals outputs the color
difference signals (PB/P_) and luminance signal (Y) separately in
order to achieve high fidelity in reproducing colors.
eTha description of the component video input terminals depends
on the television or monitor (e.g. Y/PPJPR.Y/B-Y/R-Y, Y/CB/CR).
Connect to terminals of the same color.
eAfter making this connection, change the black level for a better
picture (-, page 34, Video--Black Level Control).
I/
To enjoy progressive video
eConnect to the component video (480P) input terminals on atelevision compatible with this unit's copy guard system.
(Video will not be disptayed correctly if connected to an incompatible television.)
ePress [PROGRESSIVE] on the main unit so =PROG." appears on the display (m page 14).
eAII televisions manufactured by Panasonic and that have 480P input connectors are compatible, Consult the manufacturer if
you have another brand of television.
•Connecting a television with an S-VIDEO IN terminal
S-VIDEO
S-VIDEO OUT terminal
The S video terminal achieves a more vivid picture than the VIDEO
OUT terminal by separating the chmminance (C) and luminance
(Y) signals. (Actual results depend on the television.)
S-video cable (not included)_
eoT6750

ut
RQT8750
Connectingthesubwoofer,antennas,andACpowersupplycord
Power plug adaptor
System cable AM loop FM Indoor AC powor supply cord.
antenna antenna . . .- - • ....
Connect the AC power supply cord after
a|l other connections are complete.
FM Indoor antenna
Adhesive tape Subwoofer
jt Fix the other end of the antenna
F _ where reception is best.
ar_ pull out. |
J
Conserving power
AM loop antenna _, ,. .
Stand the antenna up on _IBefore connecting the AC
_Seeb;_se antanna cord -- t power supply cord
,away from other wires and ISet the voltage.
cords I I I (Back of subwoofer)
....".. 127V_ 110V_ 220V-230V_240 V
@ '" VOLT ADJ
_1'___ (F_ _'-- / / [ Use aflat-head screwdriver to turn
• _ \_.-_ ,/ \/| | I the voltage selector on the back of
_._ _ \ | | Ithe subwoofor to the appropriate
_'_ / / Iposition for the area in whiCh this
L ""_ | / I system is used.
--- _:_\ _ | | I If the power supply in your area is
_' 115Vor120V, please set the
vstem e _ _ voltage selector as follows:
S cabl
"AIR nII I I eFor115V:SettollOV.
!/ -_,='11"U TIf{ L'F°r _2ov:settot27v.
Catch to the right L ____J_ "
TO disconnect _l _J'_l
Press the catch _AC power supply cord
Iandpu,_t. I
_..-.L._ _ To household AC outlet
If the power plug will not fit your AC outlet
Use the power plug adaptor (included).
If itstill doesn't fit, contact an electrical parts distributor
for assistance.
The unit consumes power (For U.S.A. and Canada: approx. 0.5 W or for
units with PX printed on the outer packaging and Latin America: approx.
0.9 W) even when itIs turned off with [_]. To save power when the unit is
not to be used for a long time, unplug it from the household AC outlet.
Remember to reset the radio stations and any other memory items
before using the unit again.
Information you enter into the unit's memory remains intact for up to
2 weeks after the AC power supply cord is disconnected.
STEP5 The remote control
Remote contrat _Batteries
R6/LR6, AA, UM-3
• thsert so the pores (+ and
-) match those in the
remote control.
eDo not use rechargeable
type batteries.
Do not;
emix old and new battedes.
=use different types at the same time.
•heat or expose to flame.
etake apart or short circuit.
•attempt to recharge alkaline or manganese batteries.
euse batteries if the covering has been peeled off.
Mishandling of batteries can cause electrolyte leakage which
can damage items the fluid contacts and may cause a fire.
Remove if the remote control is not going to be used for along
period of time. Stere in a cool, dark place.
•Use
Aim at the sensor, avoiding obstacles, at a maximum range of
7 m (23 feet) directly in front of the unit.
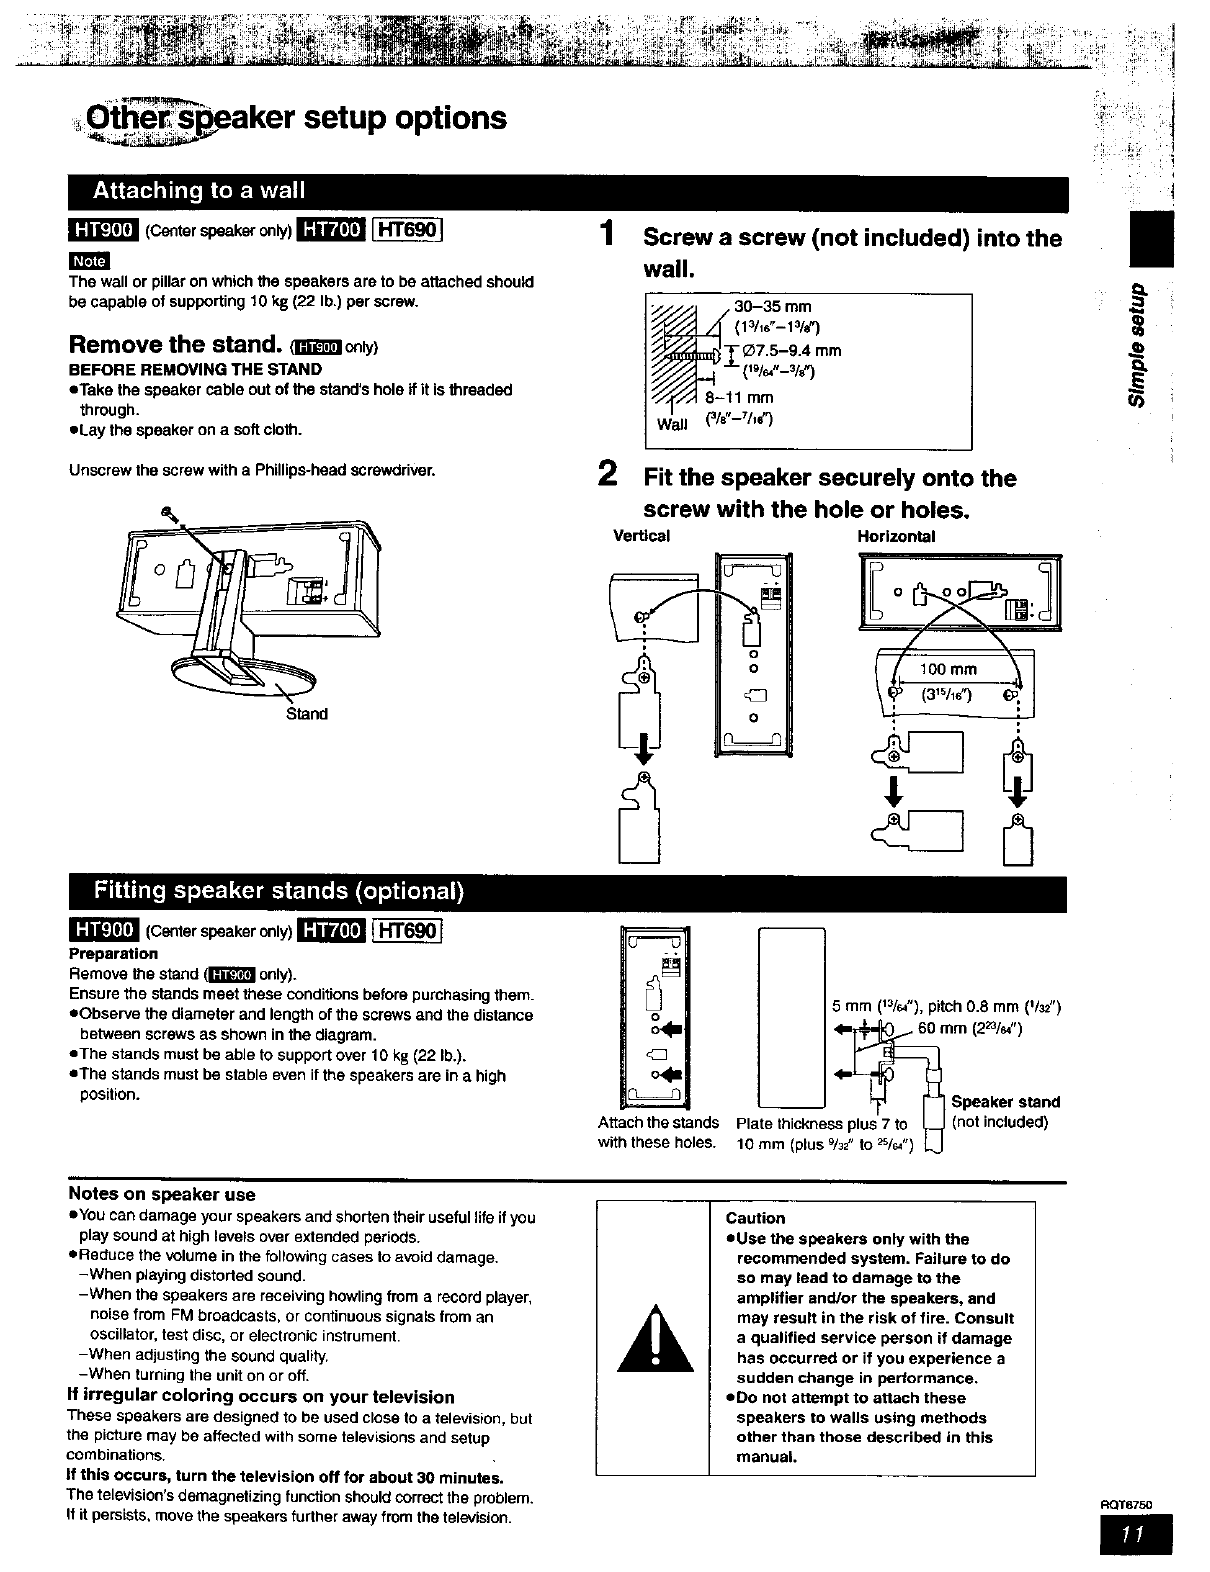
:, Otherspeaker setup options
(Center speaker only) _
The wall or pillar on which the speakers are to be attached should
be capable of supporting 10 kg (22 Ib.) per screw.
Remove the stand. _coly)
BEFORE REMOVING THE STAND
eTake the speaker cable out of the stand's hole if it is threaded
through.
eLay the speaker on a soft cloth.
Unscrew the screw with a Phillips-head screwdriver.
Stand
1
2
Screw a screw (not included) into the
wall.
30-35 mm
Fit the speaker securely onto the
screw with the hole or holes.
Vertical Horizontal
IIo oll
l
(Center speaker only) _
Preparation
Remove the stand (l_'J._'_lonly).
Ensure the stands meet these conditions before purchasing them.
eObserve the diameter and length of the screws and the distance
between screws as shown in the diagram.
oThe stands must be able to support over 10 kg (22 lb.).
eThe stands must be stable even if the speakers are in a high
position.
m
n_
o
o4=
co4=
Attach the stands
with these holes.
m
5 mm (13/r_"),pitch 0.8 mm ('/_")
<l=_mm (2_/_ ")
__ <I=L_ [_ Speaker stand
Plate thickness plu_s7,to _ (not included)
t0mm(plusg/32 to_/_ ") _J
Notes on speaker use
eYou can damage your speakers and shorten their useful life ifyou
play sound at high levels over extended periods.
eReduce the volume in the following cases to avoid damage.
-When pJayingdistorted sound.
-When the speakers are receiving howling from a record player,
noise from FM broadcasts, or continuous signals from an
oscillator, test disc, or electronic instrument•
-When adjusting the sound quality.
-When turning the unit on or off.
If irregular coloring occurs on your television
These speakers are designed to be used close to a television, but
the picture may be affected with some televisions and setup
combinations.
If this occurs, turn the television off for about 30 minutes.
The television's demagnetizing function should correct the problem.
If it persists, move the speakers further away from the television.
Caution
eUse the speakers only with the
recommended system. Failure to do
so may lead to damage to the
amplifier and/or the speakers, and
may result in the risk of fire. Consult
a qualified service person if damage
has occurred or if you experience a
sudden change in performance.
eDo not attempt to attach these
speakers to walls using methods
other than those described in this
manual.
FIQT6750
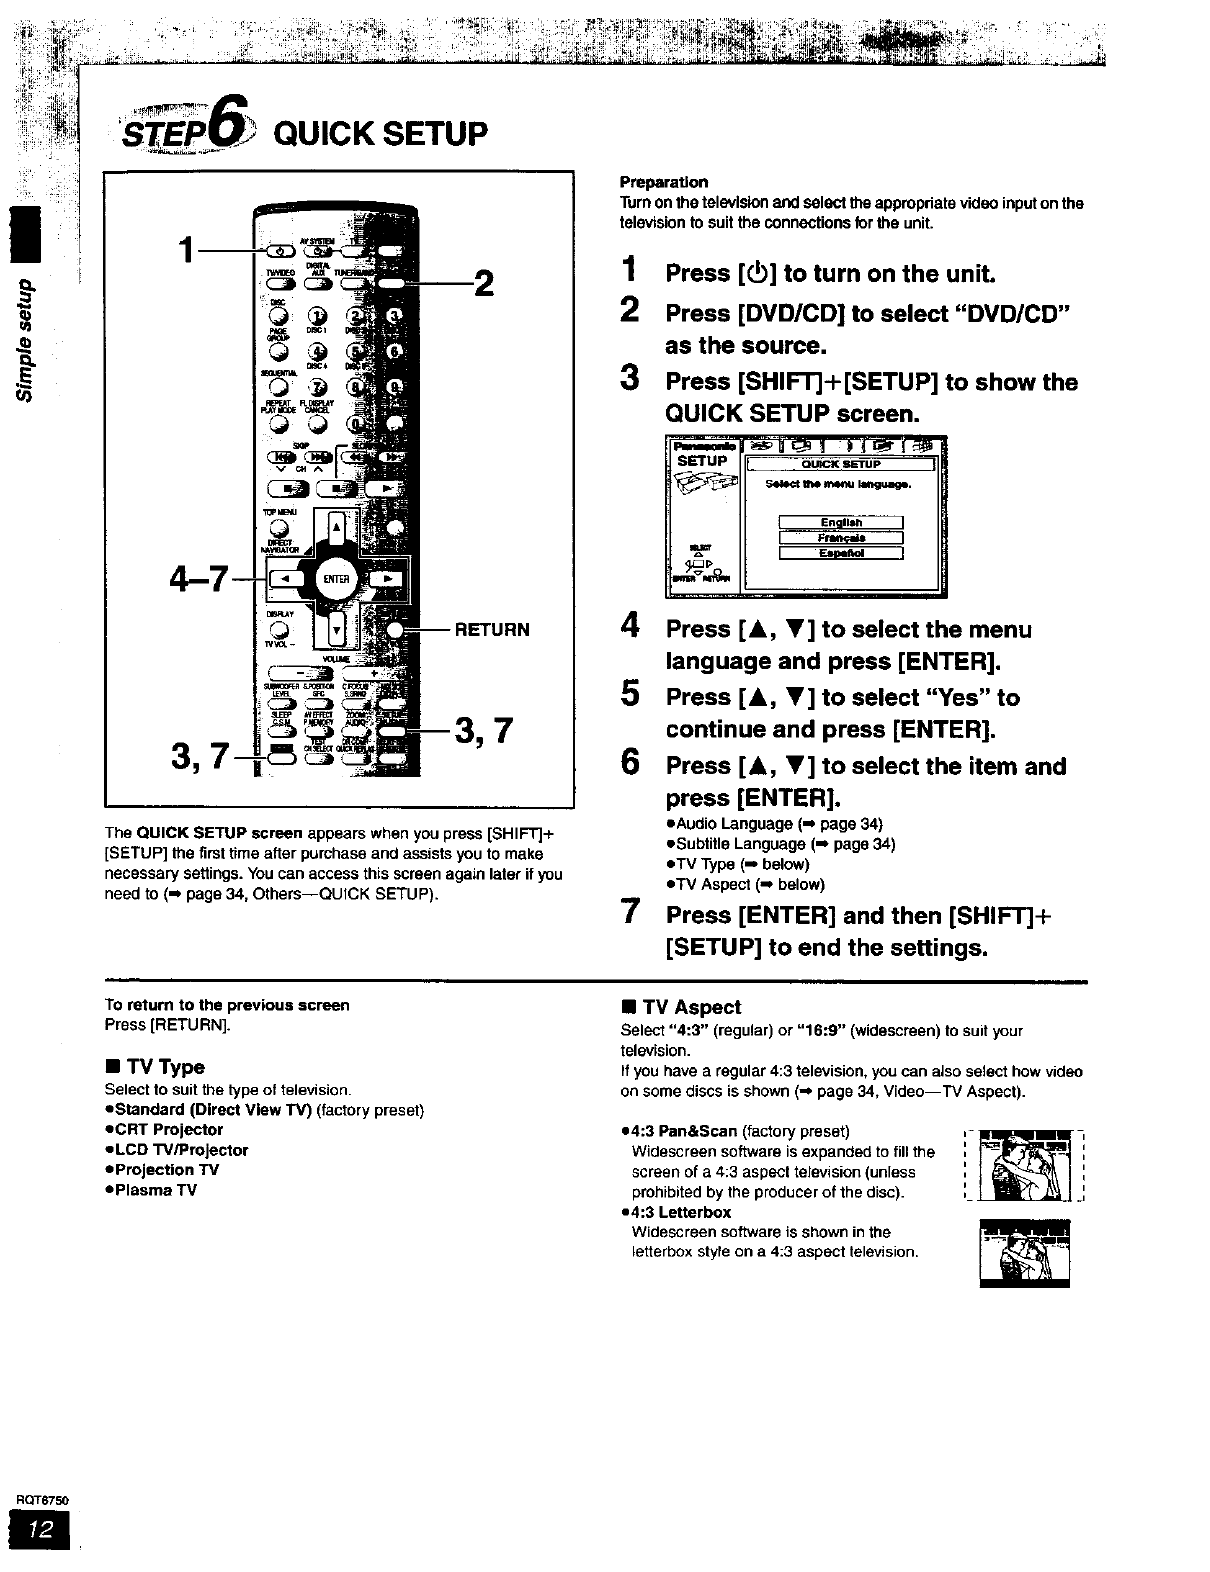
STEPI,IJ QUICK SETUP
7
The QUICK SETUP screen appears when you press [SHIFT]+
[SETUP] the first time after pumhase and assists you to make
necessary settings. You can access this screen again later if you
need to (=, page 34, Others--QUICK SETUP).
Preparation
Turnonthetelevisionand selecttheappropriatevideoinputonthe
televisionto suittheconnectionsfor the unit.
1
2
3
Press [_] to turn on the unit.
Press [DVD/CD] to select "DVD/CD"
as the source.
Press [SHIF'rJ+[SETUP] to show the
QUICK SETUP screen.
SETUP QUICK SETUp
_the m_ langu_.
IEnglish J
4Press [A, V] to select the menu
language and press [ENTER].
5 Press [A, V] to select "Yes" to
continue and press [ENTER].
6Press [A, V] to select the item and
press [ENTER].
7
• Audio Language (=_ page 34)
eSubtitle Language (=_page 34)
eTV Type (J below)
eTV Aspect (-, below)
Press [ENTER] and then [SHIFT]+
[SETUP] to end the settings.
To return to the previous screen
Press [RETURN].
•TV Type
Select to suit the type of television.
eStandard (Direct View TV) (factory preset)
eCRT Projector
eLCD W/Projector
• Prejection TV
ePlasma TV
•TV Aspect
Select "4:3" (regular) or "16:9" (wioascroen) to suit your
television.
If you have a regular 4:3 television, you can also select how video
on some discs is shown (-P page 34, Video--TV Aspect).
e4:3 Pan&Scan (factory preset)
Widescreen software is expanded to fill the
screen of a 4:3 aspect television (unless
prohibited by the producer of the disc).
e4:3 Letterbox
Widescreen software is shown in the
letterbox style on a 4:3 aspect television.
RQT6750
m ,
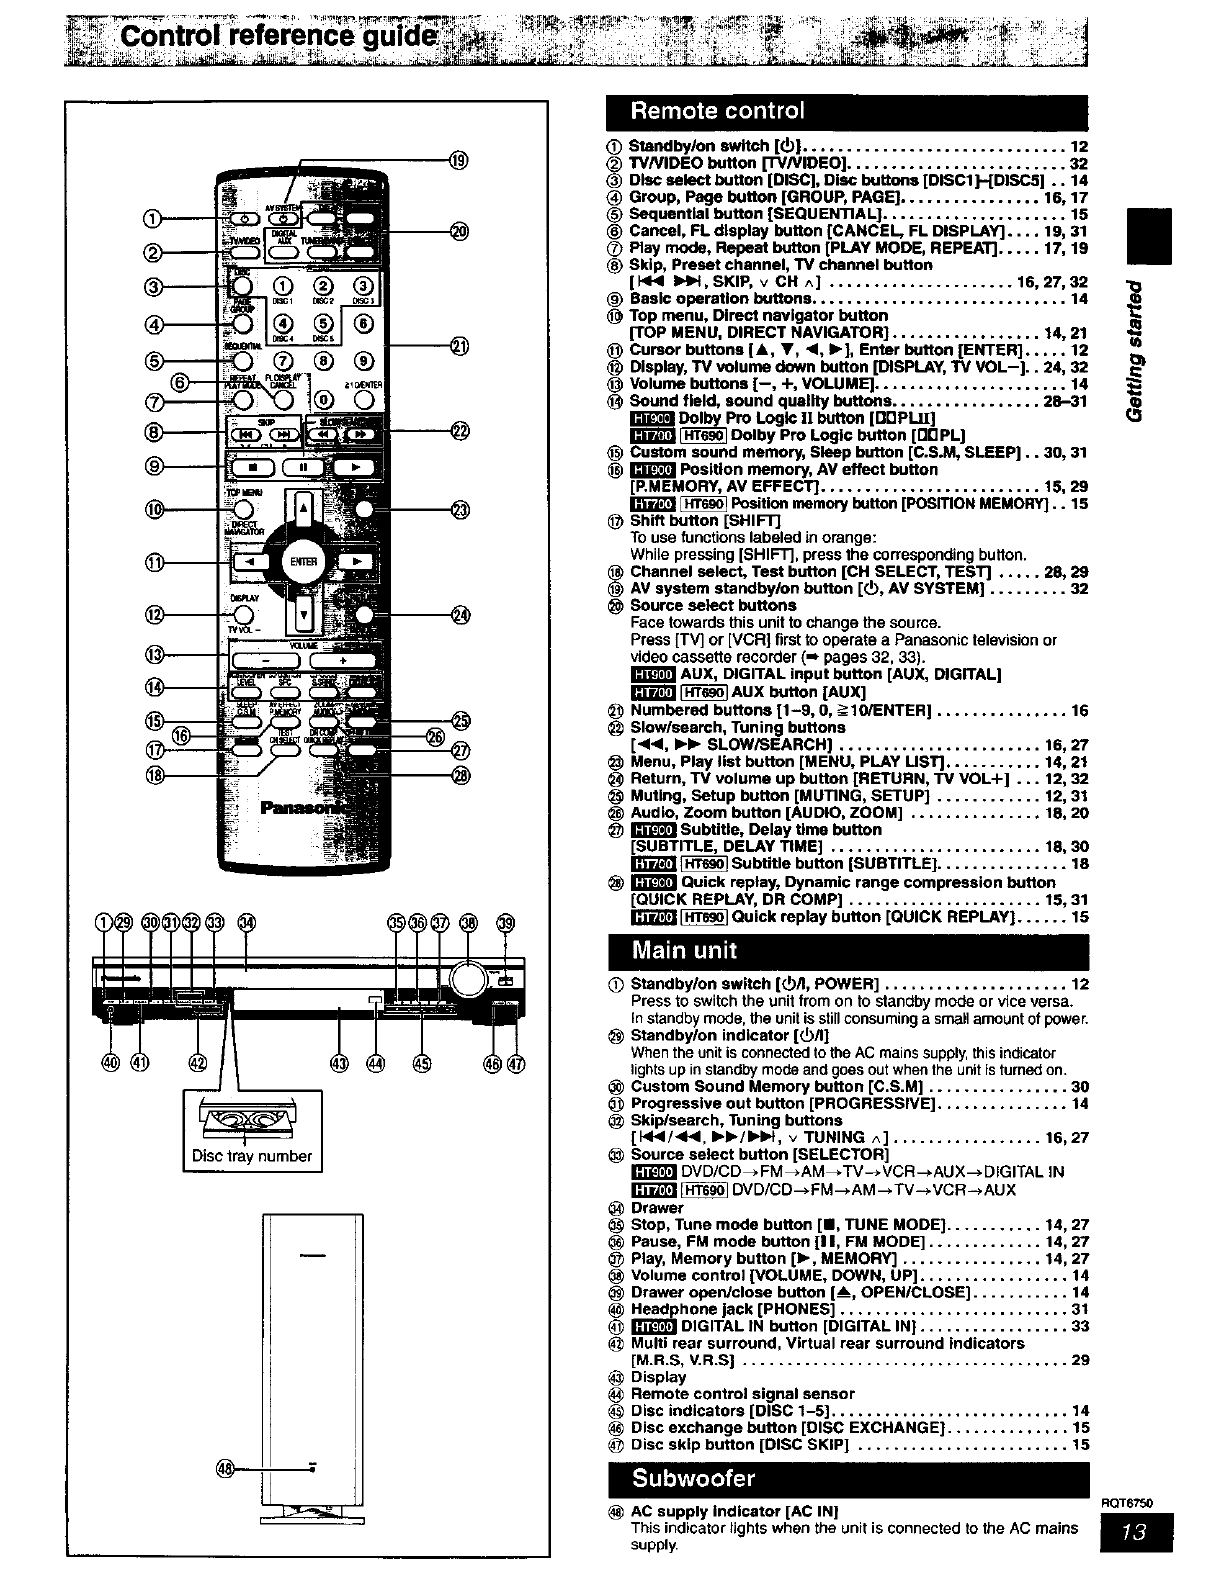
@(_ Standby/on switch [_)[ .............................. 12
_) TV/VIDEO button ['rv/VIDEO] ......................... 32
_) Disc select button [DISC[, Disc buttons [DISC1]--[DISCS] .. 14
_) Group, Page button [GROUP, PAGE] ................ 16, 17
_) Sequential button [SEQUENTIAL] ..................... 15
_) Cancel, FL display button [CANCEL, FL DISPLAY] .... 19, 31
_) Play mode, Repeat button [PLAY MODE, REPEAT] ..... 17, 19
_) Skip, Preset channel, TV channel button
] HI_ IHIH, SKIP, v CH ^] ..................... 16, 27, 32
(_ Basic operation buttons ............................. 14
Top menu, Direct navigator button
[TOP MENU, DIRECT NAVIGATOR[ ................. 14, 21
_) Cursor buttons [&, V, <1, I_], Enter button [ENTER] ..... 12
Display, "iV volume down button [DISPLAY, TV VGL--].. 24, 32
Volume buttons [--, -I-, VOLUME] ...................... 14
Sound field, sound quality buttons ................. 28-31
Dolby Pro Logic t! button [00PLII]
_Dolby Pro Logic button [0OPL]
_) Custom sound memory, Sleep button [C.SoM, SLEEP].. 30, 31
_Position memory, AV effect button
[P.MEMORY, AV EFFECT] ......................... 15, 29
_Position memory button [POSITION MEMORY].. 15
Shift button [SHIFT]
To use functions labeled in orange:
While pressing [SHIFT], press the corresponding button.
Channel select, Test button [CH SELECT, TEST] ..... 28, 29
AV system atandbylon button [(]), AV SYSTEM] ......... 32
Source select buttons
Face towards this unit to change the source.
Press ['rv] or [VCR] first to operate a Panasonic television or
video cassette recorder (-, pages 32, 33).
AUX, DIGITAL input button [AUX, DIGITAL]
_ AUX button [AUX]
_) Numbered buttons [1-9, tt, =>10/ENTER[ ............... 16
Slow/seareh, Tuning buttons
[411<1,I_1_ SLOW/SEARCH[ ....................... 16, 27
Menu, Play list button [MENU, PLAY UST] ........... 14, 21
Return, TV volume up button [RETURN, TV VOL+] ... 12, 32
Muting, Setup button [MUTING, SETUP] ............ 12, 31
Audio, Zoom button [AUDIO, ZOOM] ............... 18, 20
_Subtitle, Delay time button
[SUBTITLE, DELAY TIME[ ........................ 18, 30
_Subtitle button [SUBTITLE] ............... 18
_Quick replay, Dynamic range compression button
[QUICK REPLAY, DR COMP] ...................... 15, 31
_Quick replay button [QUICK REPLAY] ...... 15
(_ Standby/on switch [(_/I, POWER] ..................... 12
Press to switch the unit from on to standby mode or vice versa.
In standby mode, the unit is still consuming a small amount of power.
Standbylon indicator [(_/I]
When the unit is connected to the AC mains supply, thisindicator
lights up in standby mode and goes out when the unit is turned on.
Custom Sound Memory button [C.S.M] ................ 30
_) Progressive out button [PROGRESSIVE] ............... 14
Skip/search, Tuning buttons
[HI_I/_I<I, IH_/IHmH, v TUNING ^] ................. 16,27
Source select button [SELECTOR]
DVD/CD _ FM _AM_.TV-_ VCR -* AU X--_ DIGITAL IN
_ DVD/CD --_FM --_AM --, TV ---*VCR -_ AUX
Drawer
Stop, Tune mode button [M, TUNE MODE] ........... 14, 27
Pause, FM mode button [11, FM MODE] ............. 14, 27
Play, Memory button [1_, MEMORY] ................ 14, 27
Volume control [VOLUME, DOWN, UP] ................. 14
Drawer open/close button [__, OPEN/CLOSE[ ........... 14
Headphone jack [PHONES] .......................... 31
(_ _] DIGITAL IN button [DIGITAL IN[ ................. 33
(_ Multi rear surround, Virtual rear surround indicators
[M.R.S, V.R.S] ..................................... 29
Display
Remote control signal sensor
Disc indicators [DISC 1-5] ........................... 14
Disc exchange button [DISC EXCHANGE] .............. 15
Disc skip button [DISC SKIP] ........................ 15
AC supply indicator [AC IN[
This indicator lights when the unit is connected to the AC mains
supply
RQT6750
|/¢J
!_lli¢IS(
RQT675Q
m
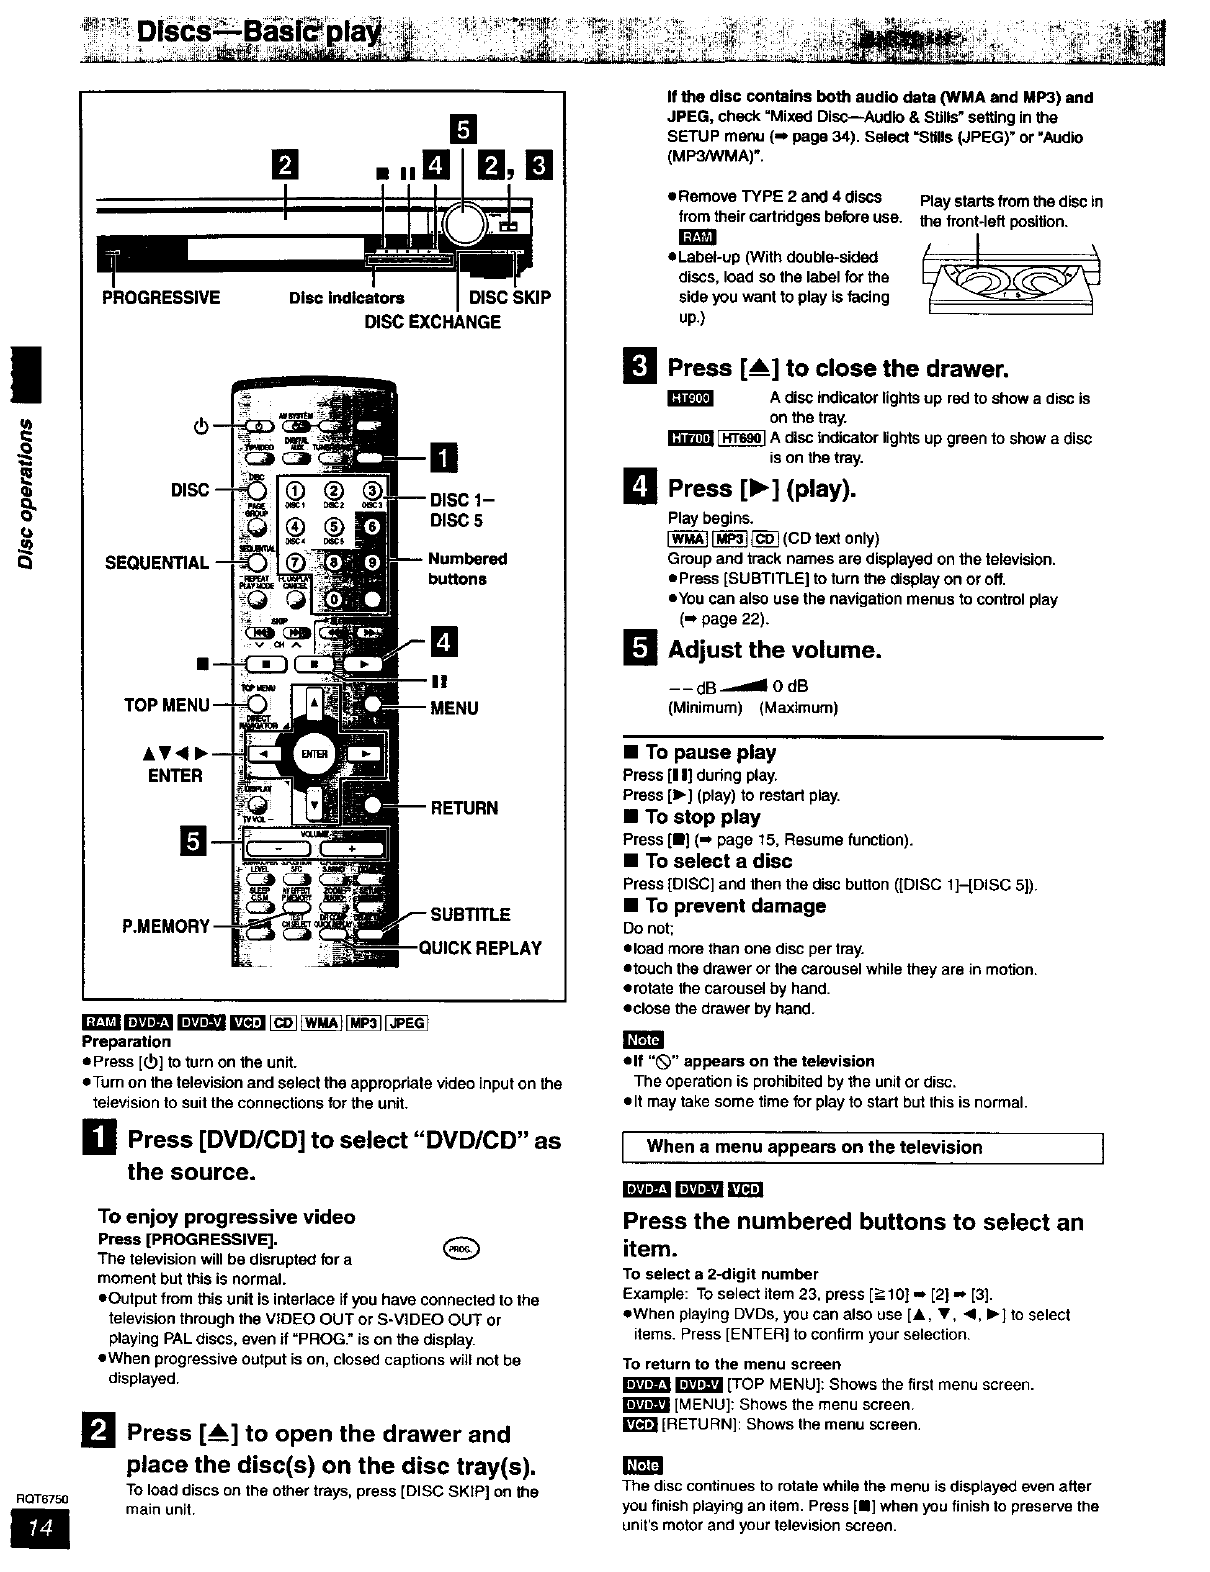
[] ,,, ula•, []
PROGRESSIVE Disc Indicators DISC SKIP
DISC EXCHANGE
DISC 5
buUons
II
ENTER
Preparation
ePress [(b] to turn on the unit.
eTurn on the television and select the appropriate video input on the
television to suit the connections for the unit.
HPress [DVD/CD] to select "DVD/CD" as
the source.
To enjoy progressive video
Press [PROGRESSIVE]. @
The television will be disrupted for a
moment but this is normal.
• Output from this unit is interlace if you have connected to the
television through the VIDEO OUT or S-VIDEO OUT or
playing PALdiscs, even if "PROG." is on the display.
• When progressive output is on, closed captions will not be
displayed.
I_1 Press [_] to open the drawer and
place the disc(s) on the disc tray(s).
TOload discs on the other trays, press [DISC SKIP] on the
main unit.
If the disc contains both audio data ONMA and UP3) and
JPEG, check =Mixed Disc--Audio & Stills" setting in the
SETUP menu (-P page 34). Select "Stills (JPEG)" or "Audio
(MP3/WMA)".
•Remove TYPE 2 and 4 discs Play starts from the disc in
from their cartddgas before use. the front-left position.
=
• Label-up (With double-sided
discs, load so the label for the
side you want to play is facing
up.)
MPress [_] to close the drawer.
A disc indicator lights up red to show a disc is
on the tray.
_Adisc indicator lights up green to show adisc
is on the tray.
[] Press [1_] (play).
Play begins.
[_ _(CD text only)
Group and track names are displayed on the television.
• Press [SUBTITLE] to turn the display on or off.
• You can also usa the navigation menus to control play
(-, page 22).
I_ Adjust the volume.
__dB _.dlOdB
(Minimum) (Maximum)
• To pause play
Press [I I] during play.
Press [1_] (play) to restart play.
• To stop play
Press [11] (-. page 15, Resume function).
• To select a disc
Press [DISC] and then the disc button ([DISC 1]-[DISC 5]).
•To prevent damage
Do not;
• load more than one disc per tray.
• touch the drawer or the carousal while they are in motion.
• rotate the carousel by hand.
• close the drawer by hand.
elf "_" appears on the television
The operation is prohibited by the unit or disc.
•It may take some time for play to start but this is normal.
I When a menu appears on the television I
Press the numbered buttons to select an
item.
To select a 2-digit number
Example: TOselect item 23, press [_->10],,J [2] -, [3].
•When playing DVDs, you can also use [A, V<, I=-] to select
items. Press [ENTER] to confirm your selection.
To return to the menu screen
_[TOP MENU]: Shows the first menu screen.
[MENU]: Shows the menu screen.
I_l [RETURN]: Shows the menu screen.
The disc continues to rotate while the menu is displayed even after
you finish playing an item. Press [11] when you finish to preserve the
unit's motor and your television screen.
Theunit usually plays the disc in the play position and then stops.
Turn sequential play on to play all loaded discs, except for DVDs and
JPEG discs.
While stopped
Press [SEQUENTIAL].
Each time you press the button:
SEQ on*_*SEQ off
eHighMAT menus and video CD playback control are disabled.
eOnly audio tracks can be played on HighMAT discs.
eYou cannot change the mode during program or random play.
eSequantial Mode turns off when you switch the unit to standby.
eRepeat function does not work when using Sequential Mode.
rm_lim'a_ r_'mi LTt=_I_ _ _ _
MaJlumlLoa_
1Press [DISC EXCHANGE].
The drawer opens and the disc in the play position comes to
the front-left position.
2 Change the disc in the front-left
position.
3Press [DISC EXCHANGE].
IBlVJDl,rJ
The drawer closes.
You can change the other discs without interrupting play.
1Press [__] to open the drawer.
2Press [DISC SKIP] to rotate the
carousel.
The carousel moves one tray clockwise and each subsequent
press moves it two trays in alternate directions.
3 Change the disc and press [_] to
close the drawer.
During play
Press [P,MEMORY] (or [POSITION
MEMORY]) to memorize a position.
Press again to replace the position.
This position is saved even if you turn the unit off, change the source
or change discs. When you turn the unit on, rsselect =DVD/CD" or
reinsort the disc whose position you memorized, "RESUME" lights
on the display. Press [1_] (play) to start play from the memorized
position. The position is cleared.
eYou can memorize positions on up to five different discs at a time.
When you msmodze another position, the earliest position is
replaced.
eYou cannot recall the position in Sequential Mode.
I Resume function
"RESUME" lights on the display when the unit has recorded the
position at which you stopped play.
Press [1_] (play) to start play from that position,
eThe posif_on is cleared when you:
--Turn the unit off.
--Select another source or change discs.
ePrass [11]to clear the position.
I Chapter Preview I
The following message appears
immediately after you press [1_] (play)
when "RESUME" is displayed.
Press [1_] (play) while the message is
displayed and the beginning portions of
each chapter up to the current one are
played.
Full play resumes from the point where you pressed [11] or
[_MEMORY[ (or [POSITION MEMORY]).
(This feature works only within a title.)
if you do not press [1_] (play), the message disappears and play
starts from where you pressed [11] or [P.MEMORY] (or [POSITION
MEMORY]).
rm_!mr_rmiw,r__ _ _
Skip back a few seconds within the current item (program, track or
title).
Skip back afew pictures.
During play
Press [QUICK REPLAY].
II
This feature may not work while playing some parts of a disc or at all
with some discs.
RQT6750
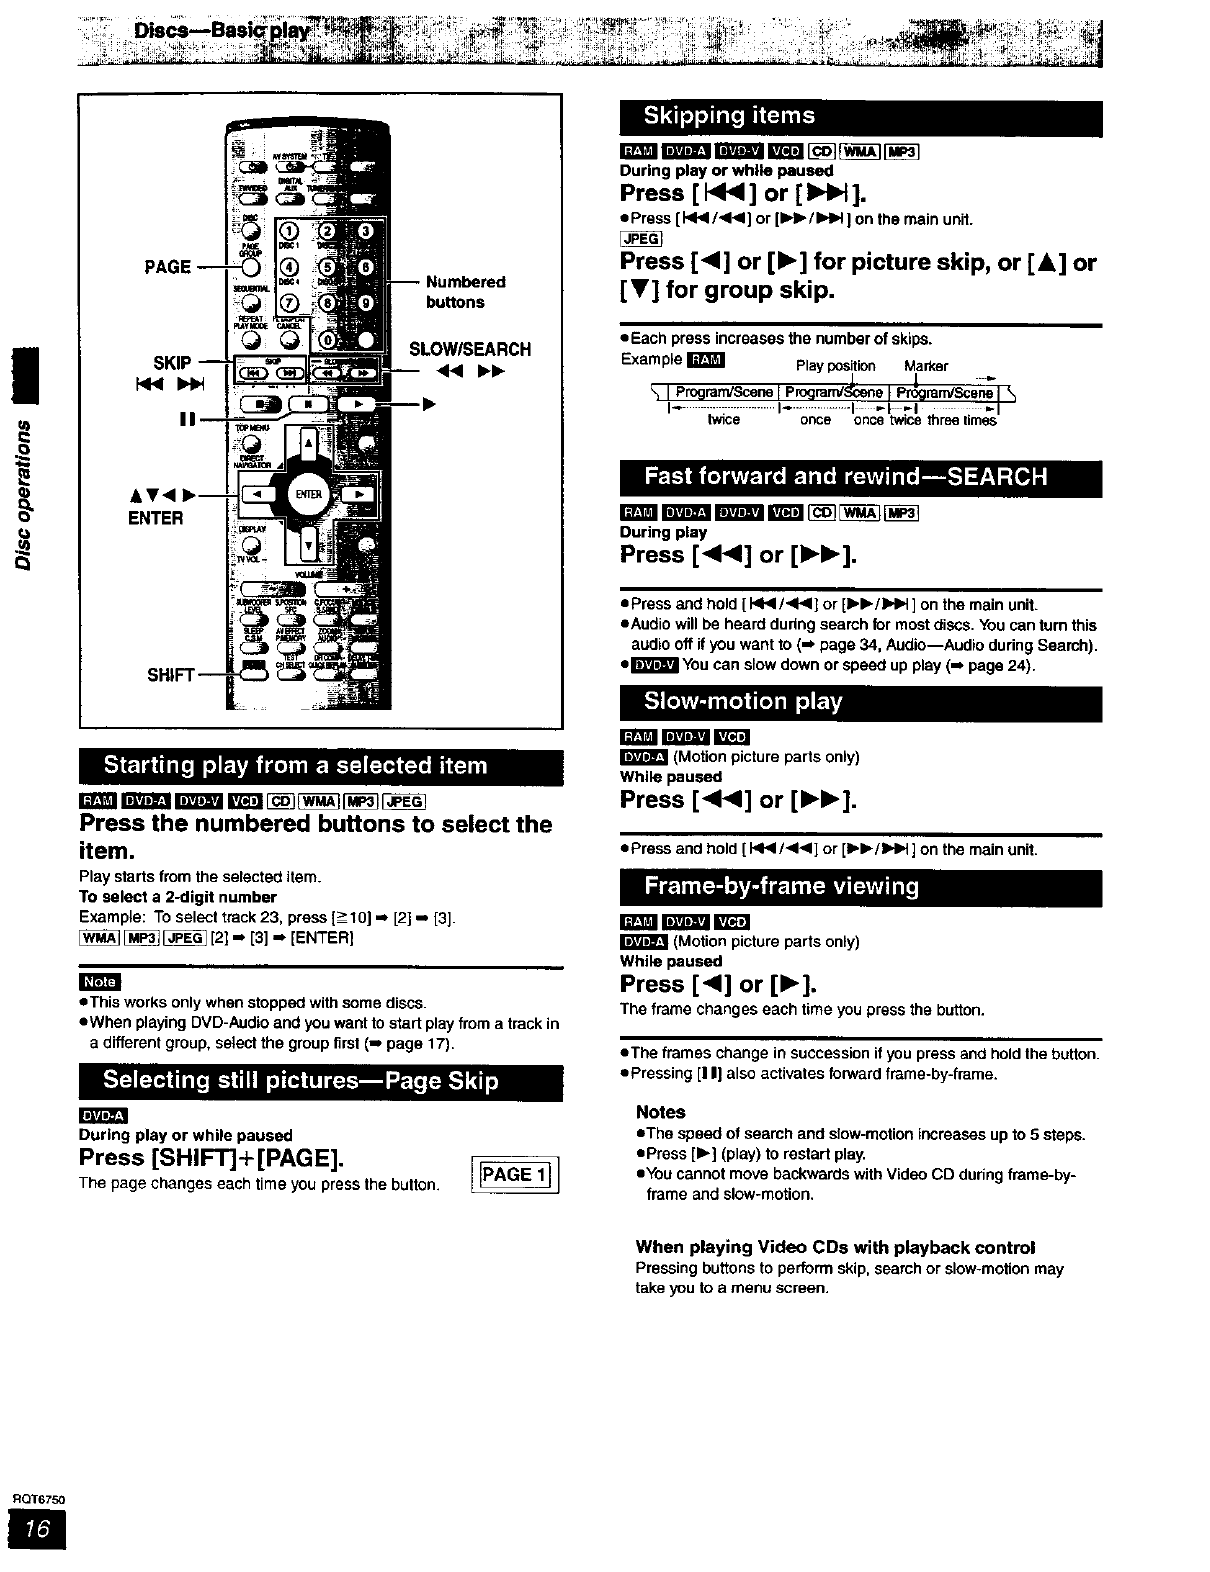
ENTER
Numbered
buttons
SLOWISEARCH
-4<I l,,k,
During play or while paused
Press [ I<1< ] or [ _].
• Press [ HI.4/<,4] or [_.1_/IHI,.I ] on the main unit.
Press [<1] or [1_] for picture skip, or [&] or
[V] for group skip.
• Each press increases the number of skips.
Example WPlayposition Marker
I Program/Scene[ Program/ e ram/Scene
I............... I.................... I -I "-I
twice once once twice threetrnes
During play
Press [<1<1] or [IH_].
•Press and hold [ I<1_1/<1<1]or [l_b./k,l_ ] on the main unit.
• Audio will be heard during seamh for most discs. You can turn this
audio off if you want to (m page 34, Audio--Audio during Search).
el_ You can slow down or speed up play (m page 24).
Press the numbered buttons to select the
item.
Play starts from the selected item.
To select a 2-digit number
Example: To select track 23, press [:>10] =,,[2] -, [3].
[_ _ _ [2] -, [3] -, [ENTER]
oThis works only when stopped with some discs.
•When playing DVD-Audio and you want to start play from a track in
adifferent group, select the group first (-, page 17).
I;ltAo_:l
During play or while paused
Press [SHIFT]+ [PAGE].
Thepagechan0eseachtJmoyooprossthebotton
I'_1 i I_._ _
(Motion picture parts only)
While paused
Press [<<1] or [IH_].
• Press and hold [ I<1<1/_1<1]or [IH_/b.l_ ] on the main unit.
(Motion picture parts only)
While paused
Press [<] or [1_].
The frame changes each time you press the button.
• The frames change in succession if you press and hold the button.
• Pressing [I I] also activates forward frame-by-frame.
Notes
• The speed of seamh and slow-motion increases up to 5 steps.
• Press [1_] (play) to restart play,
•You cannot move backwards with Video CD during frame-by-
frame and slow-motion,
When playing Video CDs with playback control
Pressing buttons to perform skip, search or slow-motion may
take you to a menu screen.
RQT6750

"_tldM
IDIVJD]L_
&T<
ENTER
bunona
1 Press [GROUP].
2
3
Exampe I
_Tmck number in group
Group number
Press the numbered buttons to select
the group and press [ENTER].
Press the numbered buttons to select
the track/picture number and press
[ENTER].
Playing all the groups in succession (m Page 19, All group play)
Playing bonus groups
Some discs contain bonus groups, if a password screen appears
after selecting a group, enter the password with the numbered
buttons. Refer also to the disc's jacket.
[j_ [_ [_ (There is no on-scroen display.)
During play
Press [SHIFT]+ [REPEAT].
Each time you press the button:
PG REPEAT-->ALL REPEAT (Entire disc)-->REPEAT OFF
eDudng play list play
SCENE REPEAT---> PL REPEAT-->REPEAT OFF
CHAPTER REPEAT-->TITLE REPEAT'-_REPEAT OFF
TRACK REPEAT-->ALL REPEAT (Entire dlsc)-->REPEAT OFF
TRACK REPEAT--_'GROUP REPEAT=--->REPEAT OFF
GROUP REPEAT---*REPEAT OFF
_Durtng all group (li'AR'_I_, program and random play
"ALL REPEAT" is displayed.
eYou can also repeat play of content and group on HighMAT discs.
•To repeat only your favorite tracks/chapters
Startprogramplay(- page 19) and press[SHIFT]+[REPEAT]to
selectthe repeatmode,
You can repeat a section between points A and B within a program,
title or track.
During play
Press [DISPLAY] until the unit
information screen is displayed
(-- page 25).
2Press [A, T] to select the play menu.
3
Example li'A_'_ i"_ll_l(_.. _ _ [_ _I_1
A-B Repeat
Press [<, I_] to select "A-B Repeat" and
QPress [ENTER] at the starting point
[A).
(_ Press [ENTER] at the finishing
point (B).
A-B repeat starts.
To return to the normal play
Press [ENTER] again.
To clear the menus
Press [RETURN] until the menu disappears.
A-B repeat is canceled when you press [QUICK REPLAY].
II
t=
RQT6750
RQT6750
m
DISC 5
buttons
o"-" or "--" is displayed instead of the language number in
cimumstances such as when no language is recorded on the disc.
(SVCD only)
Soundtreck and subtitle numbers may change even if corresponding
soundtracks are not recorded.
rtmTr_-a_ m _ra
(Discs with multiple soundtracks)
During play
Press [AUDIO].
The number changes each time you press the button.
_solected
Soundtrack playing
r_
LR_L--*R
+___J
Signal type/data
(.., right)
r of
Audio language channels (-. right)
•You can also use this button to turn the vocals on and off on
karaoke discs. Read the disc's instructions for details.
• play restarts from the beginning of the soundtrack when changing
soundtracks that are accompanied by still pictures,
eEven if a second soundtrack isn't recorded, two soundtrack
numbers will normally be shown when you press [AUDIO]. The
soundtrsck currently playing is number 1.
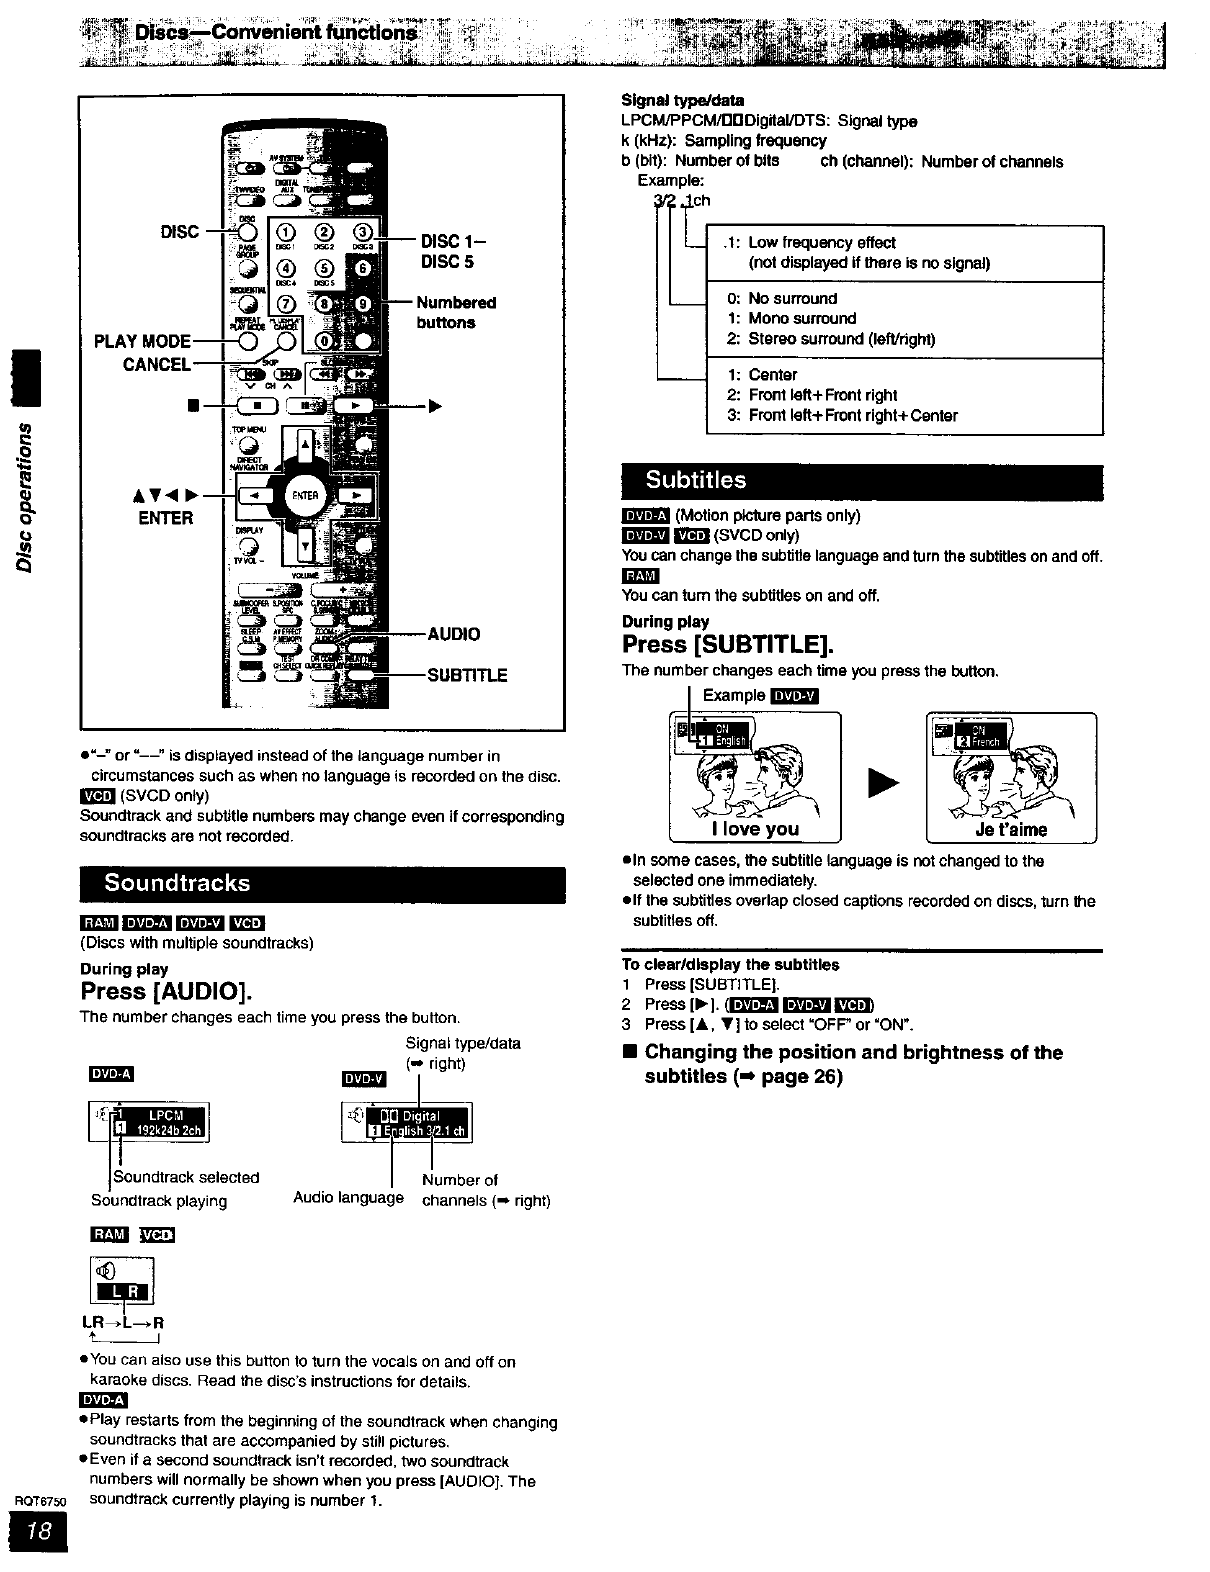
Signal type/data
LPCM/PPCM/DDDigtial/DTS: Signal type
k [kHz): Sampling frequency
b (bit): Number of bits ch (channel): Number of channels
Example:
h.1: Low frequency effect
(not displayed tf there is no signal)
0: No surround
1: Mono surroued
2: Stereo surround (left/dght)
1: Center
2: Front left+Front right
3: Front left+Front right+Center
(Motion picture parts only)
_(SVCD only)
You can change the subtitle language and turn the subtitles on and off.
You can tum the subtitles on and off.
During play
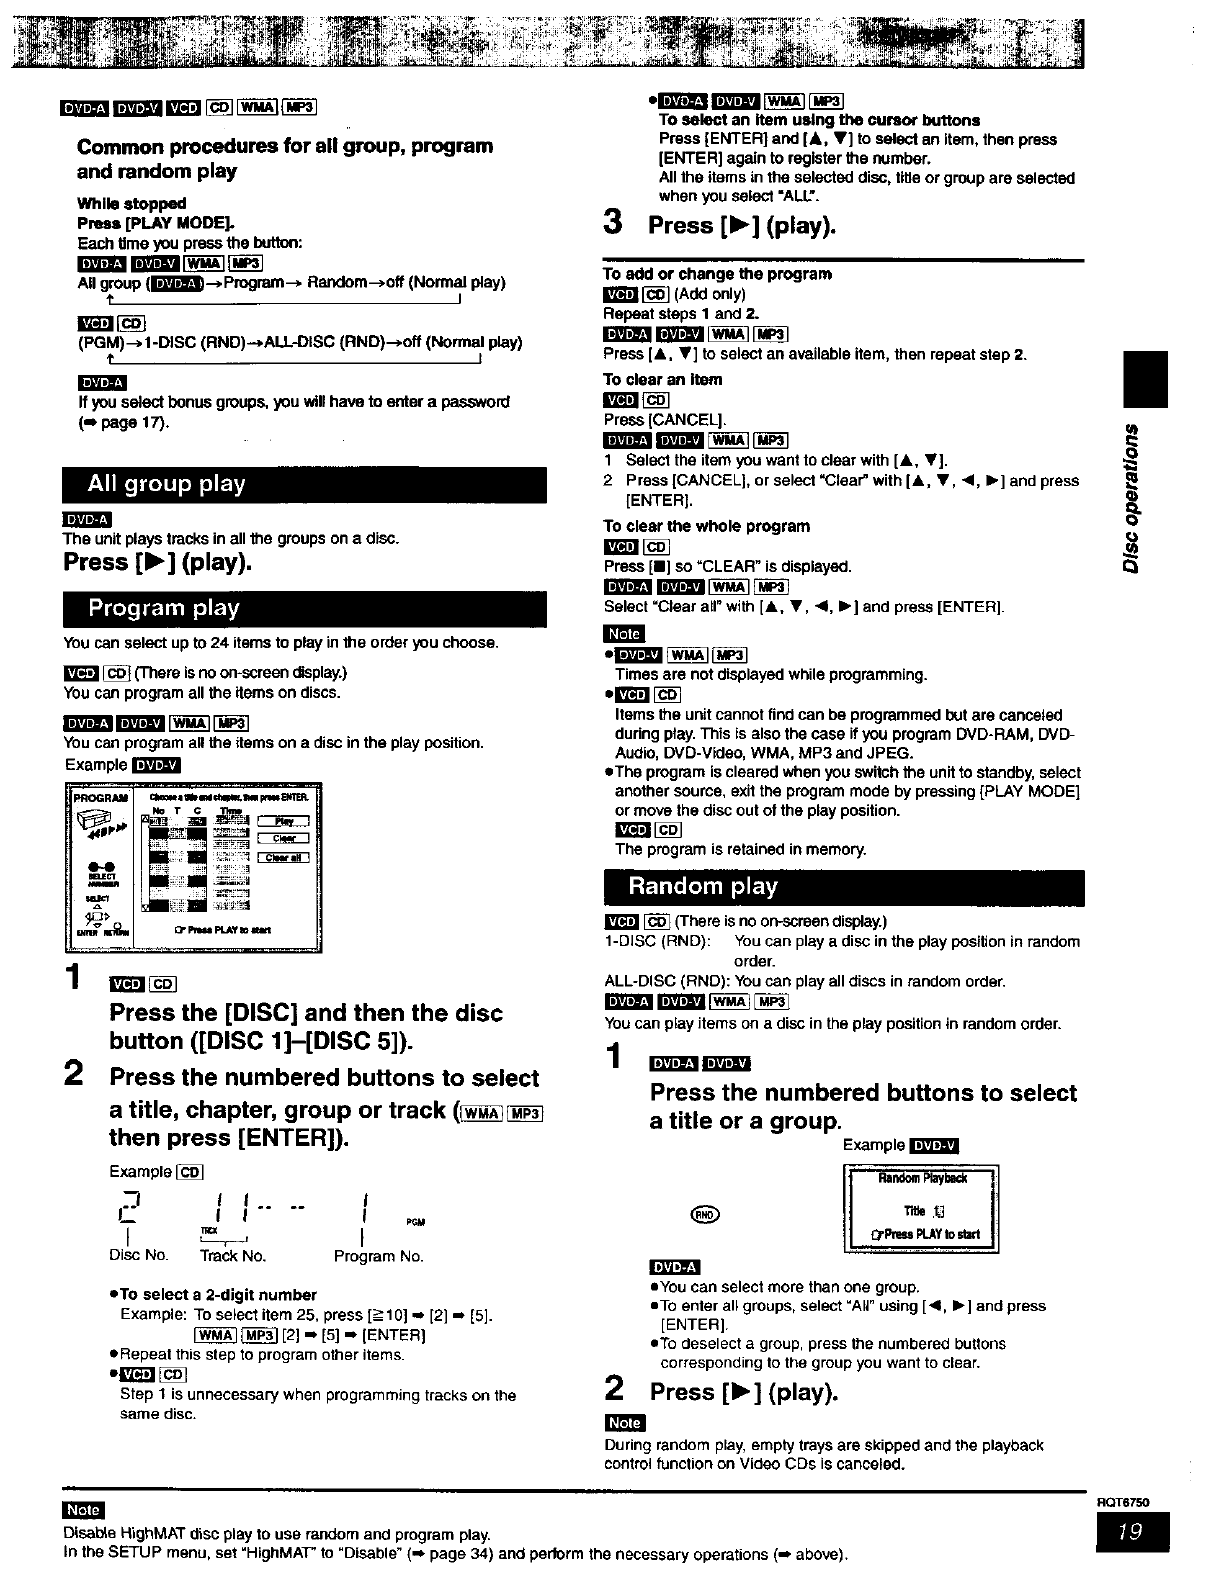
Press [SUBTITLE].
The number changes each time you press the button.
•In some cases, the subtitle language is not changed to the
selected one immediately.
elf the subtitles overlap closed captions recorded on discs, turn the
subtitles off.
To clearldlaplay the subtitles
1 Press [SUBTITLE].
2Press[l=,.]. (r_t_l'_gilF_J'_l_
3 Press[&, T] to select =OFF" or=ON ".
•Changing the position and brightness of the
subtitles (-_ page 26)
Common procedures for all group, program
and random play
While stopped
Press [PLAY MODE].
Each Ume you press the butlon:
All group (li'_'vJ'_--> Program--> Random-->off (Normal play)
tI
(PGM)--> 1-DISC (RND)--*ALL_ISC (RND)-->off (Normal play)
t I
Ifyouselectbonusgroups,youwillhaveto entera password
(.Bpage 17).
IDIVJD_±I
The unit plays tracks in all the groups on a disc.
Press [1_] (play).
Jl_r_J_
You can select up to 24 items to play in the order you choose.
_('['here is no on-screen display.)
You can program all the items on discs.
i-_-mtravam_ _
You can program all the items on a disc in the play position.
Example
l'Ir
PROGRAM ctralei tilemdme¢ IkelmI_1_
_uE_ ........
• • i.
Press the [DISC] and then the disc
button ([DISC 1]-[DISC 5]).
2Press the numbered buttons to select
a title, chapter, group or track (_
then press [ENTER]).
ExampleJ_]
2II .... I
Disc No. Track No. Program No. [ID.]_IbJ_J
• To select a 2-digit number
Example: To select item 25, press [_>10] ,= [2] .o [5].
[_ _ [2] "[5] " [ENTER]
eRepeat this step to program other items•
Step 1 is unnecessary when programming tracks on the
same disc.
TO select an item using the cursor buttons
Press [ENTER] and [&, V] to select an item, then press
[ENTER] again to register the number.
All the items in the selected disc, title or group are selected
when you select =ALL".
3Press [1_] (play).
To add or change the program
g'/_l [_] (Add only)
Repeat stops 1 and 2.
Press [&, Y] to select an available item, then repeat step 2.
To clear an item
Press [CANCEL],
1 Select the item you want to clear with [&, ,].
2 Prass [CANCEL], or select =Clear" with [&, 'V, 41, I=,] and prass
[ENTER].
To clear the whole program
Press [11]so =CLEAR" is displayed.
Select =Clear all"with [&, Y, <1, I_] and press [ENTER].
Times are not displayed while programming.
Items the unit cannot find can be programmed but are canceled
during play. This is also the case if you program DVD-RAM, DVD-
Audio, DVD-VIdeo, WMA, MP3 and JPEG.
eThe program is cleared when you switch the unit to standby, select
another soume, exit the program mode by pressing [PLAY MODE]
or move the disc out of the play position.
The program is retained in memory.
J_ _(There is no on-scraan display.)
1-DISC (RND): You can play adisc in the play position in random
order.
ALL-DISC (RND): You can play all discs in random order.
You can play items on a disc in the play position in random order.
Press the numbered buttons to select
a title or a group.
Example
RandomRayback
Tee t_
_'Pr_ F_Y tost_'l
2
• You can select more than one group.
eTo enter all groups, select "Ag" using [<, I_] and press
[ENTER].
eTo deselect a group, press the numbered buttons
corresponding to the group you want to clear.
Press [1_] (play).
During random play, empty trays are skipped and the playback
control function on Video CDs is canceled.
II
m
Disabte RighMAT disc play to use random and program play.
In the SETUP menu, set H_ghMAT" to D=sable ( page 34) and perform the necessary operations (-- above).
RQT6750
ENTER
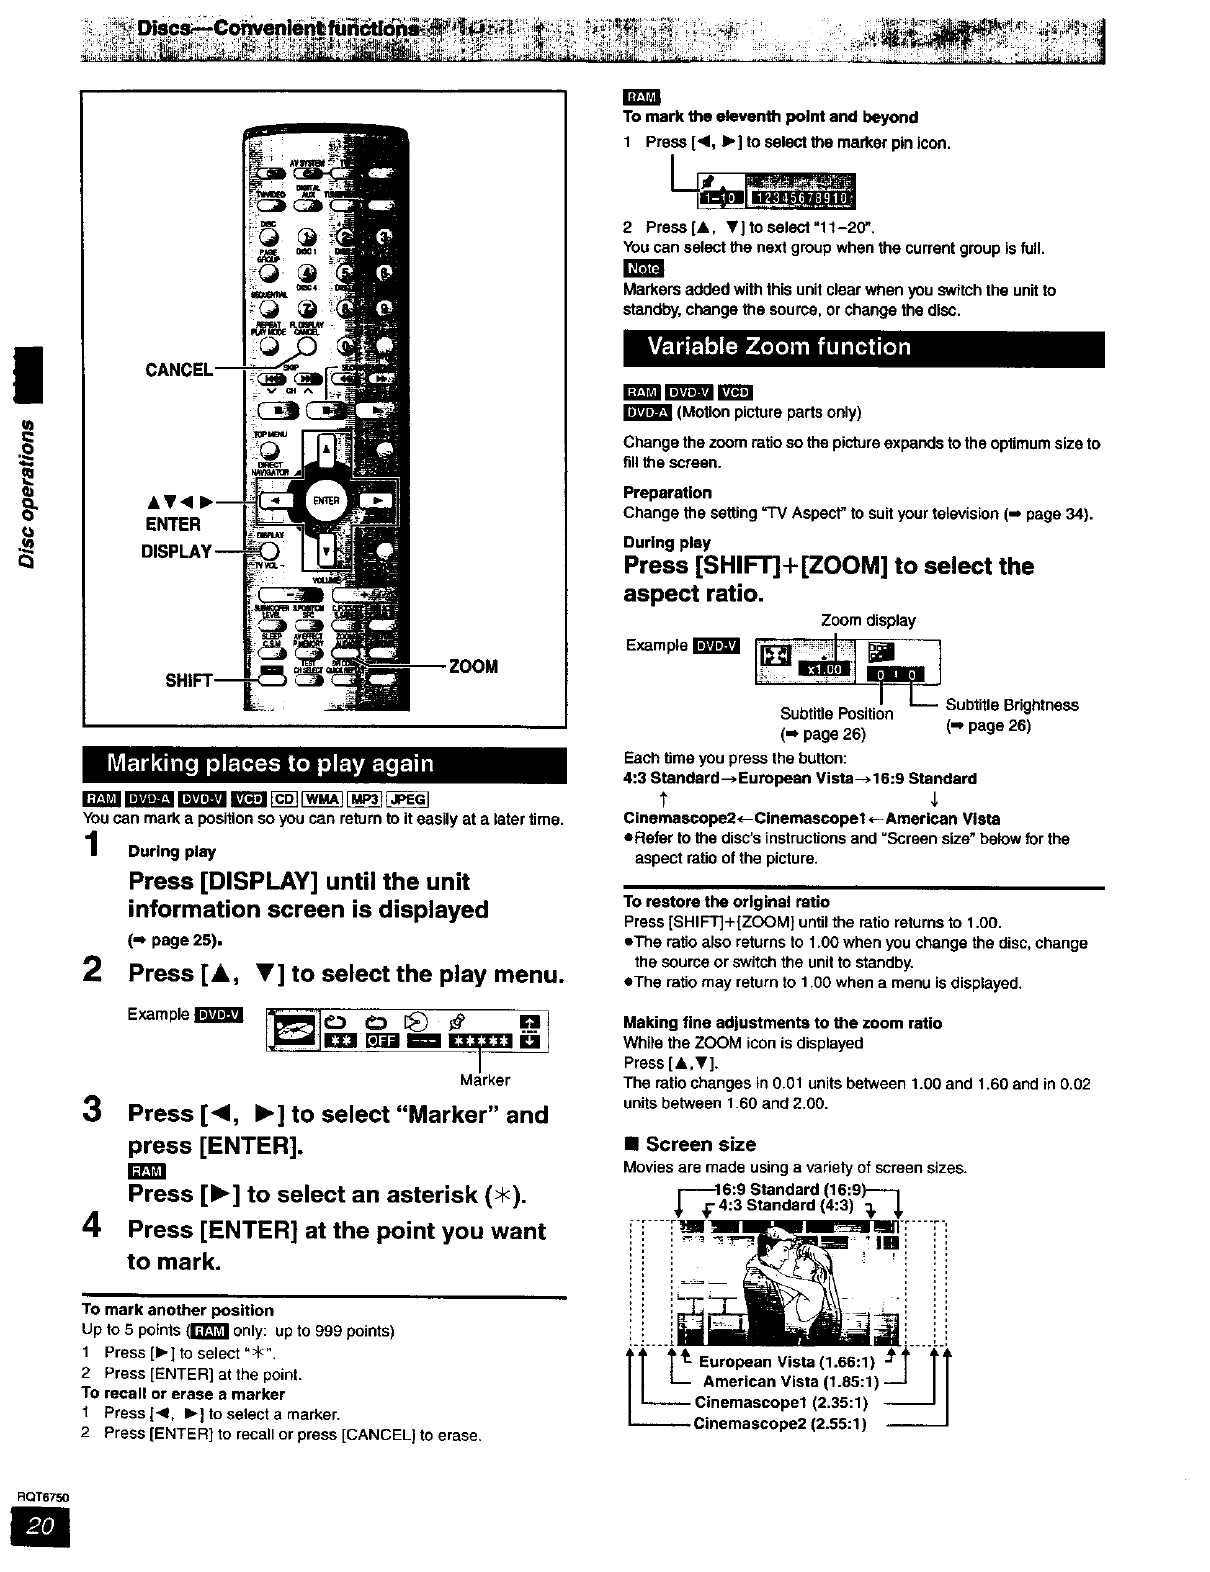
You can mark a position so you can return to it easily at a later time.
During pl_
Press [DISPLAY] until the unit
information screen is displayed
(m page 25),
2Press [A, V] to select the play menu.
3
ExampleI
Marker
Press [<1, I_] to select "Marker" and
press [ENTER].
E
Press [1_] to select an asterisk (_).
4Press [ENTER] at the point you want
to mark.
To mark another position
Up to 5 points (I'_P_I only: up to g99 points)
1 Press [b-] to select "_<".
2 Press [ENTER] at the point.
TO recall or erase a marker
1 Press 1<1, I_] to select a marker.
2 Press [ENTER] to recall or press [CANCEL) to erase.
To mark the eleventh point and beyond
Press [<1, I_] to select the marker pin icon.
2 Prass[A, V] to select "11-20",
You can select the next group when the current group is full.
Markers added with this unit clear when you switch the unit to
standby, change the source, or change the disc.
mr_mi iv_
I(Motion picture parts only)
Change the zcom ratio so the picture expands to the optimum size to
fill the screen.
Preparation
Change the setting ='I'V Aspect" to suit your television (m page 34).
During play
Press [SHIFT]+ [ZOOM] to select the
aspect ratio.
Zoom display
Subtitle Position Subtitle Brightness
(-' page 26) (-, page 26)
Each time you press the button:
4:3 Standard->European Vista-*16:9 Standard
Cinemascope2*-Cinemascopet*-American Vista
eRefer to the disc's instructions and =Screen size" below for the
aspect ratio of the picture.
To restore the original ratio
Press [SHIFT]+[ZOOM] until the ratio returns to 1.00.
*The ratio also returns to 1.00 when you change the disc, change
the source or switch the unit to standby.
eThe ratio may return to 1.00 when a menu is displayed.
Making fine adjustments to the zoom ratio
While the ZOOM icon is displayed
Press [&,V].
The ratio changes in 0.01 units between 1.00 and 1.60 and in 0.02
units between 1.60 and 2.00.
•Screen size
Movies are made using a variety of screen sizes.
_-_146:9 Standard (16:9)----i
:3 Standard (4:3) _J,
....._.lI__ .. _ _:
iii ii
i! i i !!
American Vista 11.85:1)
-- Cinemascopel (2.35:1) --
--Cinemascope2 (2.55:1) --
RQT6750
I

NAVIGATOR
ENTER
bu_ons
You can play a group of scenes, a play list, created on other
equipment such as aDVD video recorder.
1Press [PLAY LIST].
|
• You can select play lists with the numbered buttons.
To select a 2-digit number
Exampte 23: 1=>10]-* 12],,, [3]
2press [A, V] to select the play list. o_
q_
3Press [ENTER] to start play.
To clear the play list screen
Press [PLAY LISTJ.
rm_
Use the program listto find programs to play.
1 Press [DIRECT NAVIGATOR].
2Press [A, T] to select the program.
The selected program plays in the background.
eYou can select programs with the numbered buttons.
To select a 2-digit number
Example 23: [_->10]-, [2] -, [3]
3Press [ENTER].
The program being played in the background continues.
To clear the program list
Press [DIRECT NAVIGATOR].
•Titles appear only if you have entered them.
eYou cannot change program and disc titles.
RQT6750
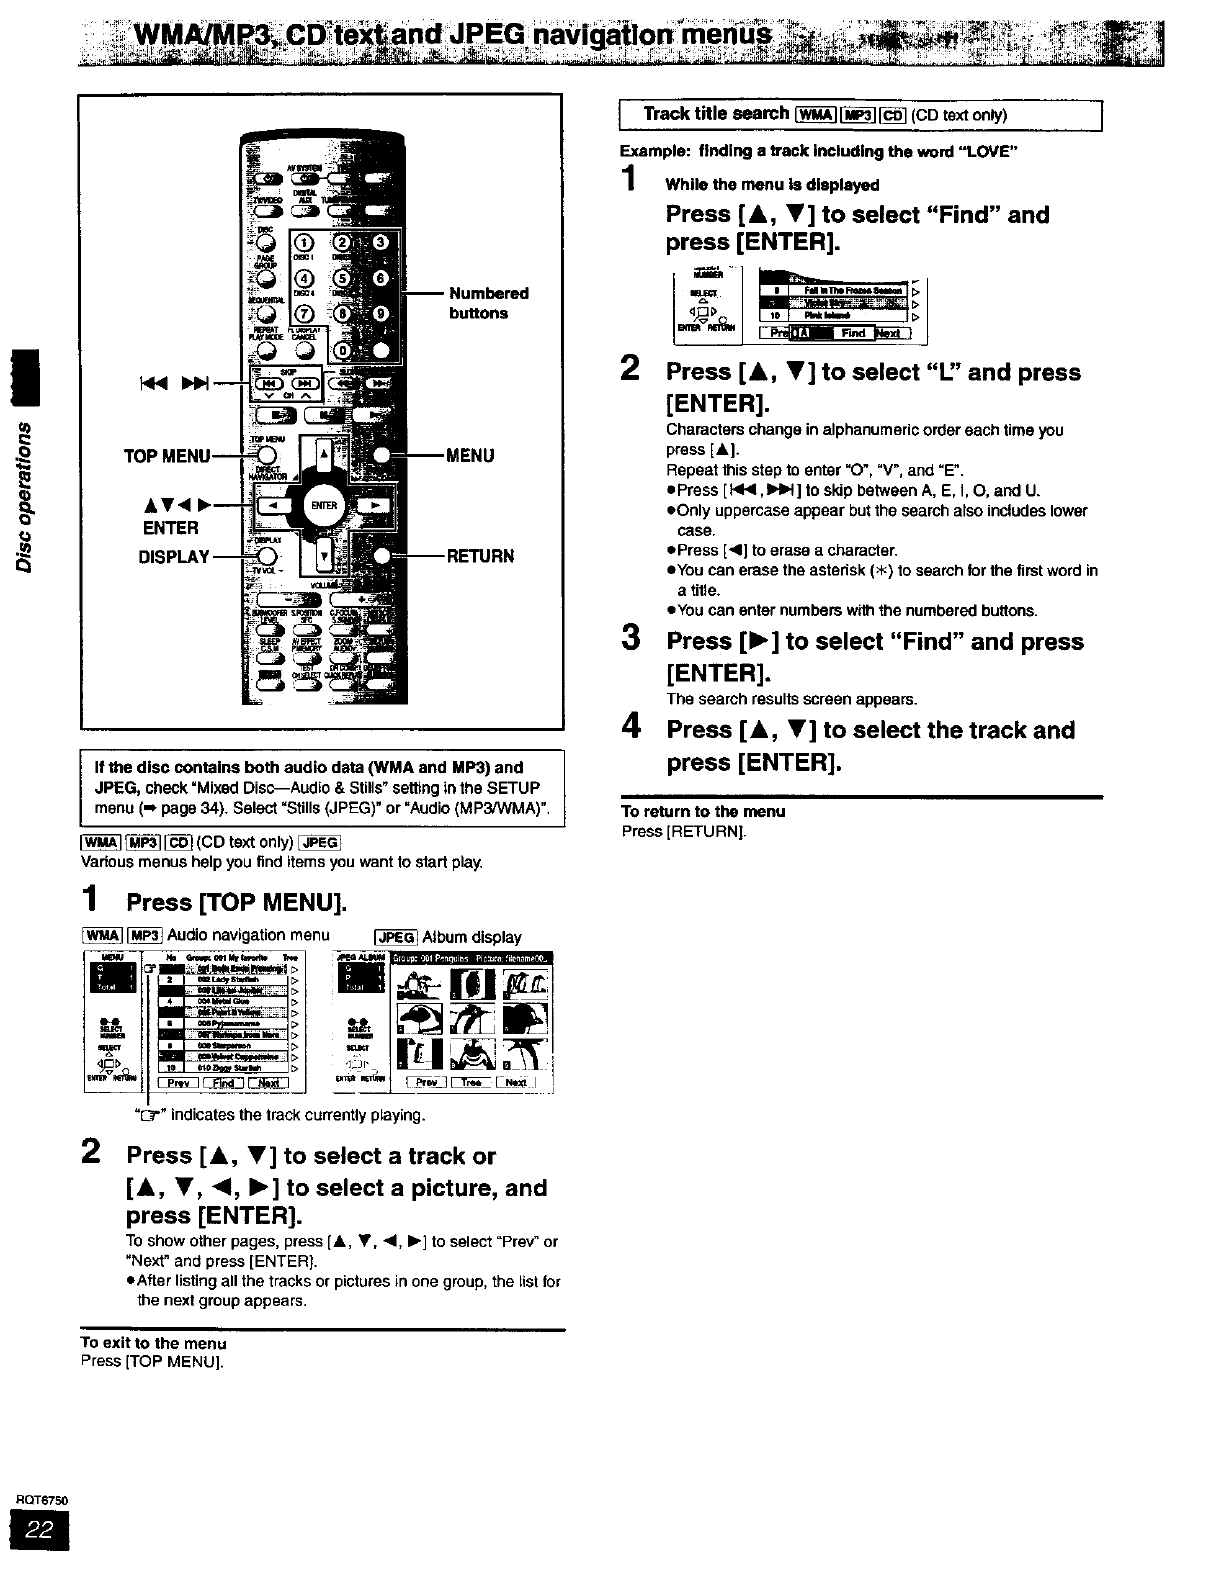
Numbered
buttons
If the disc contains both audio data (WMA and MP3) and
JPEG, check "Mixed Disc--Audio & St,is" setting in the SETUP
menu (-_ page 34). Select "Stills (JPEG)" or "Audio (MP3P_/MA)".
_ _ (CD text only)
Vadous menus help you find items you want to start play.
1Press [TOP MENU].
[_ [_ Audio navigation menu Album display
"0" indicates the track currently playing.
2Press [A, V] to select a track or
[A, Y, <1, I_] to select a picture, and
press [ENTER].
To show other pages, press [&, Y, 4, b.] to select "Prey" or
"Next" and press [ENTER).
eAfter listing all the tracks or pictures in one group, the lisl for
the next group appears.
To exit to the menu
Press [TOP MENU].
ITrack title search [_] [_ [_ (CD text only)
Example: finding a track including the word "LOVE"
While the menu Is displayed
Press [&, V] to select "Find" and
press [ENTER].
2
3
4
D
Press [A, V] to select "L" and press
[ENTER].
Characters change in alphanumeric order each time you
press [&].
Repeat this step to enter "0% "V', and "E".
=Press [HIll ,IHH] to skip between A, E, I, O, and U.
eOnly uppercase appear but the search also includes lower
case.
ePress [,<] to erase a character.
eYou can erase the astedsk (>_) to search for the flint word in
a title.
eYou can enter numbers with the numbered buttons.
Press [1_] to select "Find" and press
[ENTER].
The search results screen appears.
Press [A, _'] to select the track and
press [ENTER].
I
To return to the menu
Press [RETURN[.
RQT6750
m
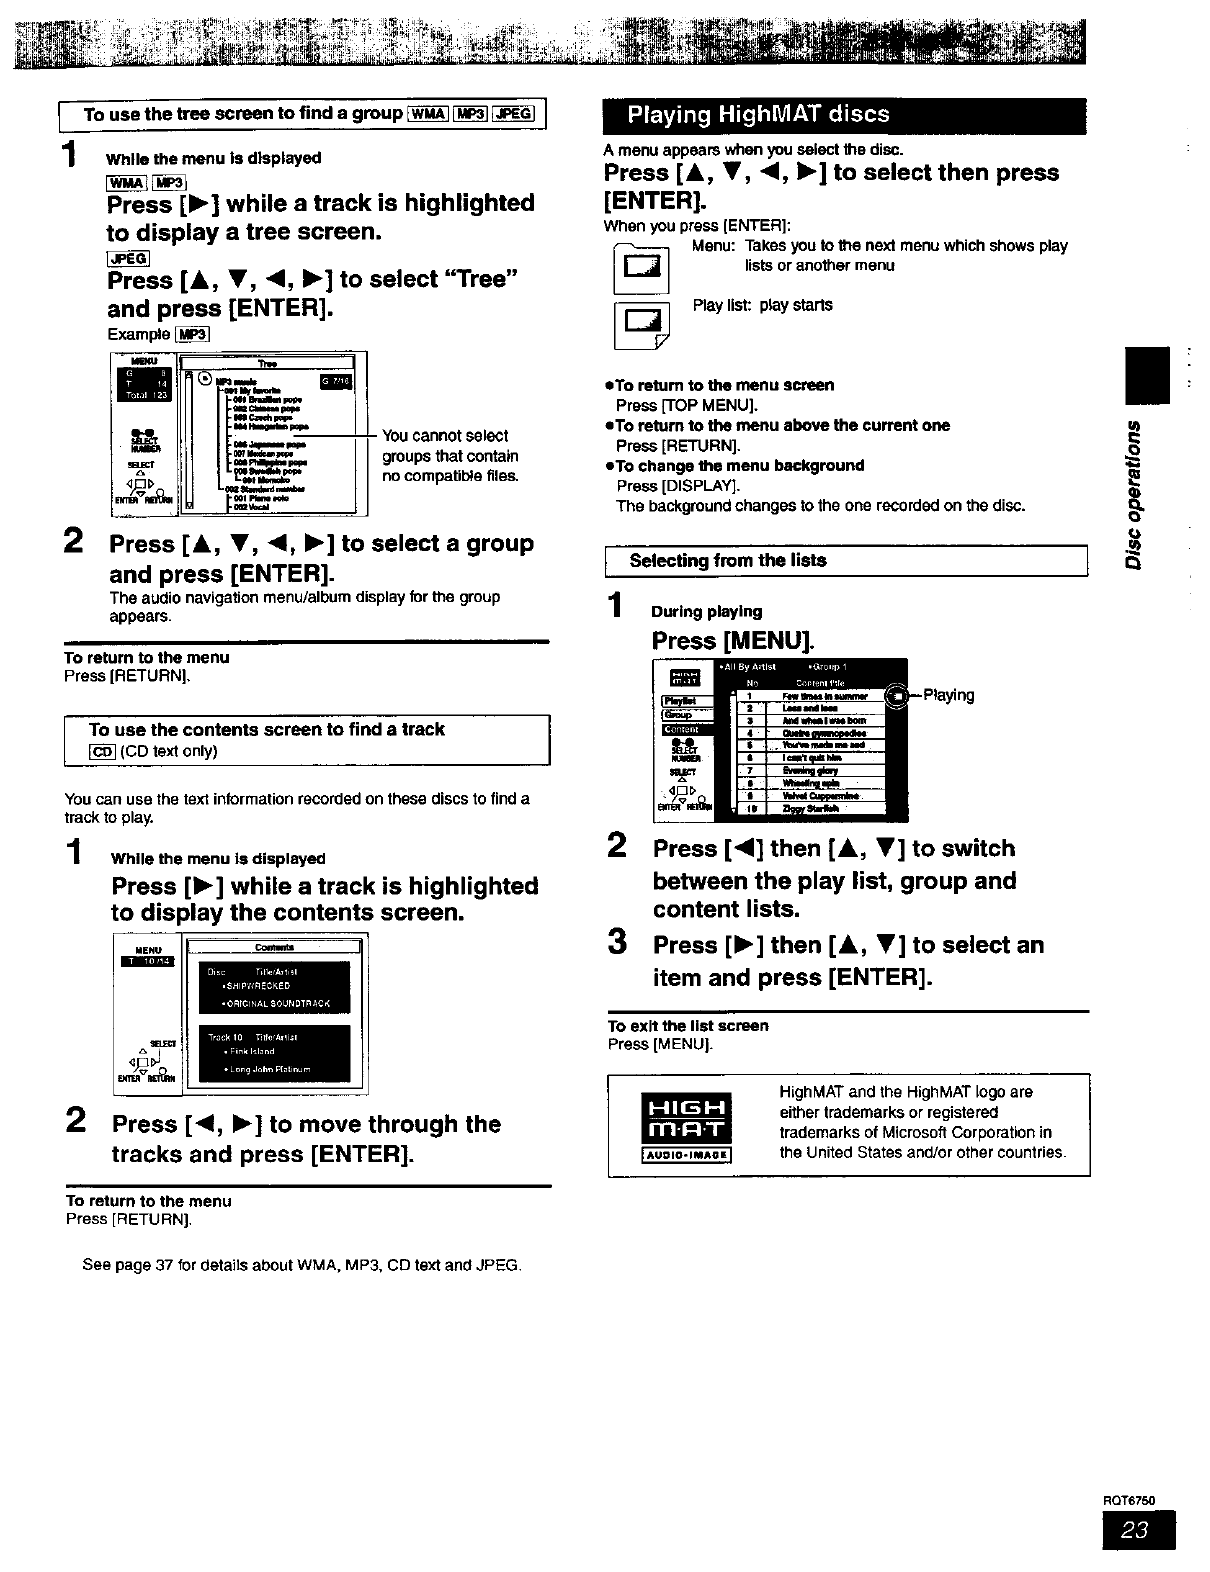
To use the tree screen to find a group _ _ _ I
While the menu is displayed
Press [1_] while a track is highlighted
to display a tree screen.
Press [&, V, 4, I_] to select "Tree"
and press [ENTER].
Example
tm ctdmm _
2
- You cannot select
groups that contain
no compatit_e files.
Press [k, V, "4, I_] to select a group
and press [ENTER].
The audio navigation menu/album display for the group
appears.
To return to the menu
Press [RETURN].
To use the contents screen to find a track
(CD textonly)
You can use the text information recorded on these discs to find a
track to play.
While the menu is displayed
Press [1_] while a track is highlighted
to display the contents screen.
MENU
2Press [<, I_] to move through the
tracks and press [ENTER].
To return to the menu
Press [RETURN].
See page 37 for details about WMA. MP3. CD text and JPEG.
A menu appears when you select the disc.
Press [&, T, <, ,] to select then press
[ENTER].
When you press [ENTER]:
Menu: Takes you to the next menu which shows play
lists or another menu
Play list: play starts
oTo return to the menu screen
Press [TOP MENU].
oTo return to the menu above the current one
Press [RETURN].
eTo change the menu background
Press [DISPLAY].
The background changes to the one recorded on the disc.
ISelecting from the lists
During playing
Press [MENU].
2
3
Press [<1] then [A, T] to switch
between the play list, group and
content lists.
Press [1_] then [A, V] to select an
item and press [ENTER].
To exit the list screen
Press [MENU].
HighMAT and the HighMAT logo are
either trademarks or registered
trademarks of Microsoft Corporation in
the United States and!or other countries.
RQT6750
|
i
R(_T6750
m
bu_ons
&V41
ENTER
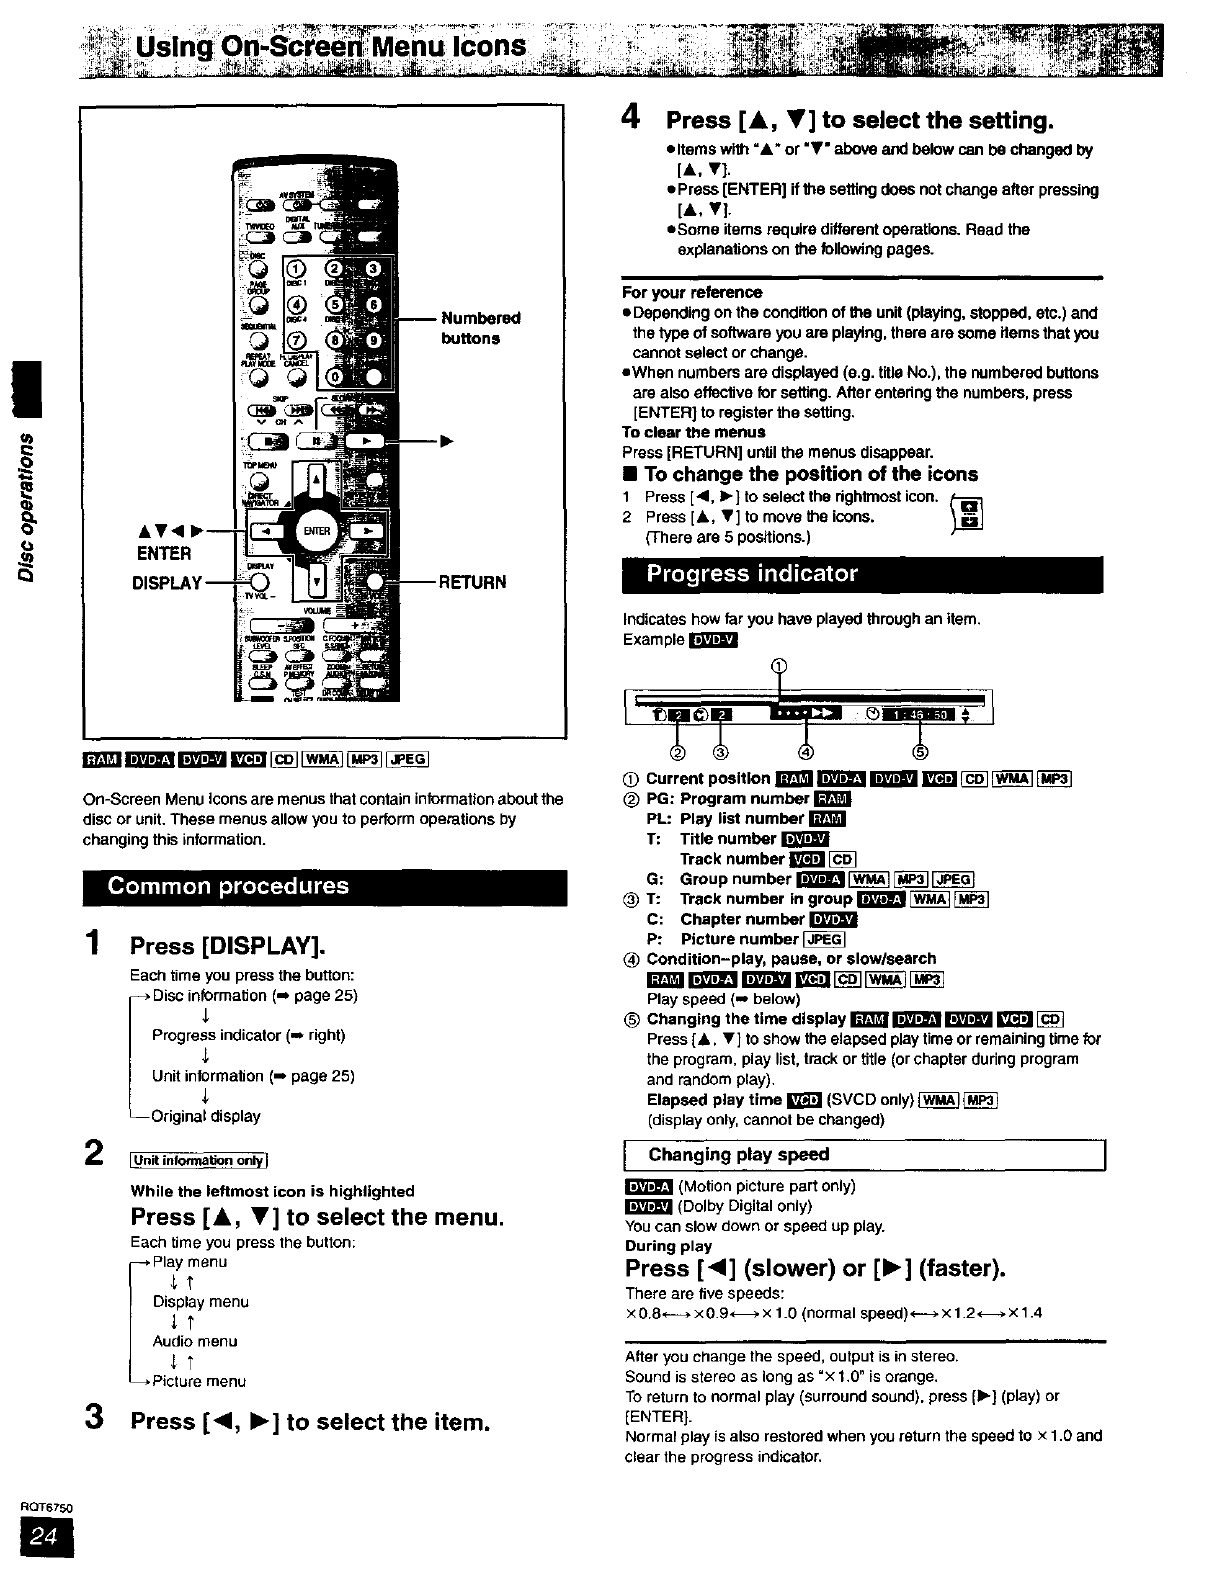
On-Scraen Menu icons are menus that contain information about the
disc or unit. These menus allow you to perform operations by
changing this information.
1Press [DISPLAY].
Each time you press the button:
i isc in_rmatJon (-* page 25)
Progress indicator (m right)
_iiii,;a_rdm:tl,_ ,.o page 25)
[Unit infomlation on_
While the leftmost icon is highlighted
Press [A, V] to select the menu.
Each time you press the button:
* Play menu
it
Display menu
Audio menu
_T
Picture menu
3Press [41, I_] to select the item.
4Press [A, V] to select the setting.
• Items with "&" or "V" above and below can be changed by
[A, V].
• Press [ENTER] if the setting does not change after pressing
[A, V].
• Some items require different operations. Read the
explanations on the following pages.
For your reference
• Depending on the condition of the unit (playing, stopped, etc.) and
the type of software you are playing, there are some items that you
cannot select or change.
• When numbers are displayed (e.g. title No.), the numbered buttons
are also effective for setting. After entedng the numbers, press
[ENTER] to register the setling,
To clear the menus
Press [RETURN] until the menus disappear.
•To change the position of the icons
1 Press [.11,•] to select the dghtmost icon,
2 Press [A, V] to move the icons.
(There are 5 positions.)
Indicates how far you have played through an item.
Example
OCurrent position _ _ _ _ _ _
(_) PG: Program number
PL: Play list number
T: Title number IRFttlFJ
Track number _
G: Group number _ _
(_T: Track number in group It_'vt_11E_ _]
C: Chapter number
P: Picture number [_
_) Condition-play, pause, or slowlsearch
Play speed (-, below)
(_ Changing the time display _ _ _ _
Press [A, V] to show the elapsed play time or remaining time far
the program, play list, track or title (or chapter during program
and random play).
Elapsed play time _(SVCD only) _
(display only, cannot be changed)
Changing speed
play
(Motion picture part only)
(Dolby Digital only)
You can slow down or speed up play.
During play
Press [<1] (slower) or [1_] (faster).
There are five speeds:
×0.8 _ x 0.9 _ x 1.0 (normal speed) _ x 1.2 _ x 1.4
After you change the speed, output is in stereo.
Sound is stereo as long as =x 1.0" is orange.
To return to normal play (surround sound), press [1_] (play) or
[ENTER].
Normal play is also restored when you return the speed to ×1.0 and
clear the progress indicator.
Unless otherwise indicated, select items with [4, Ib] and change with [A, V].
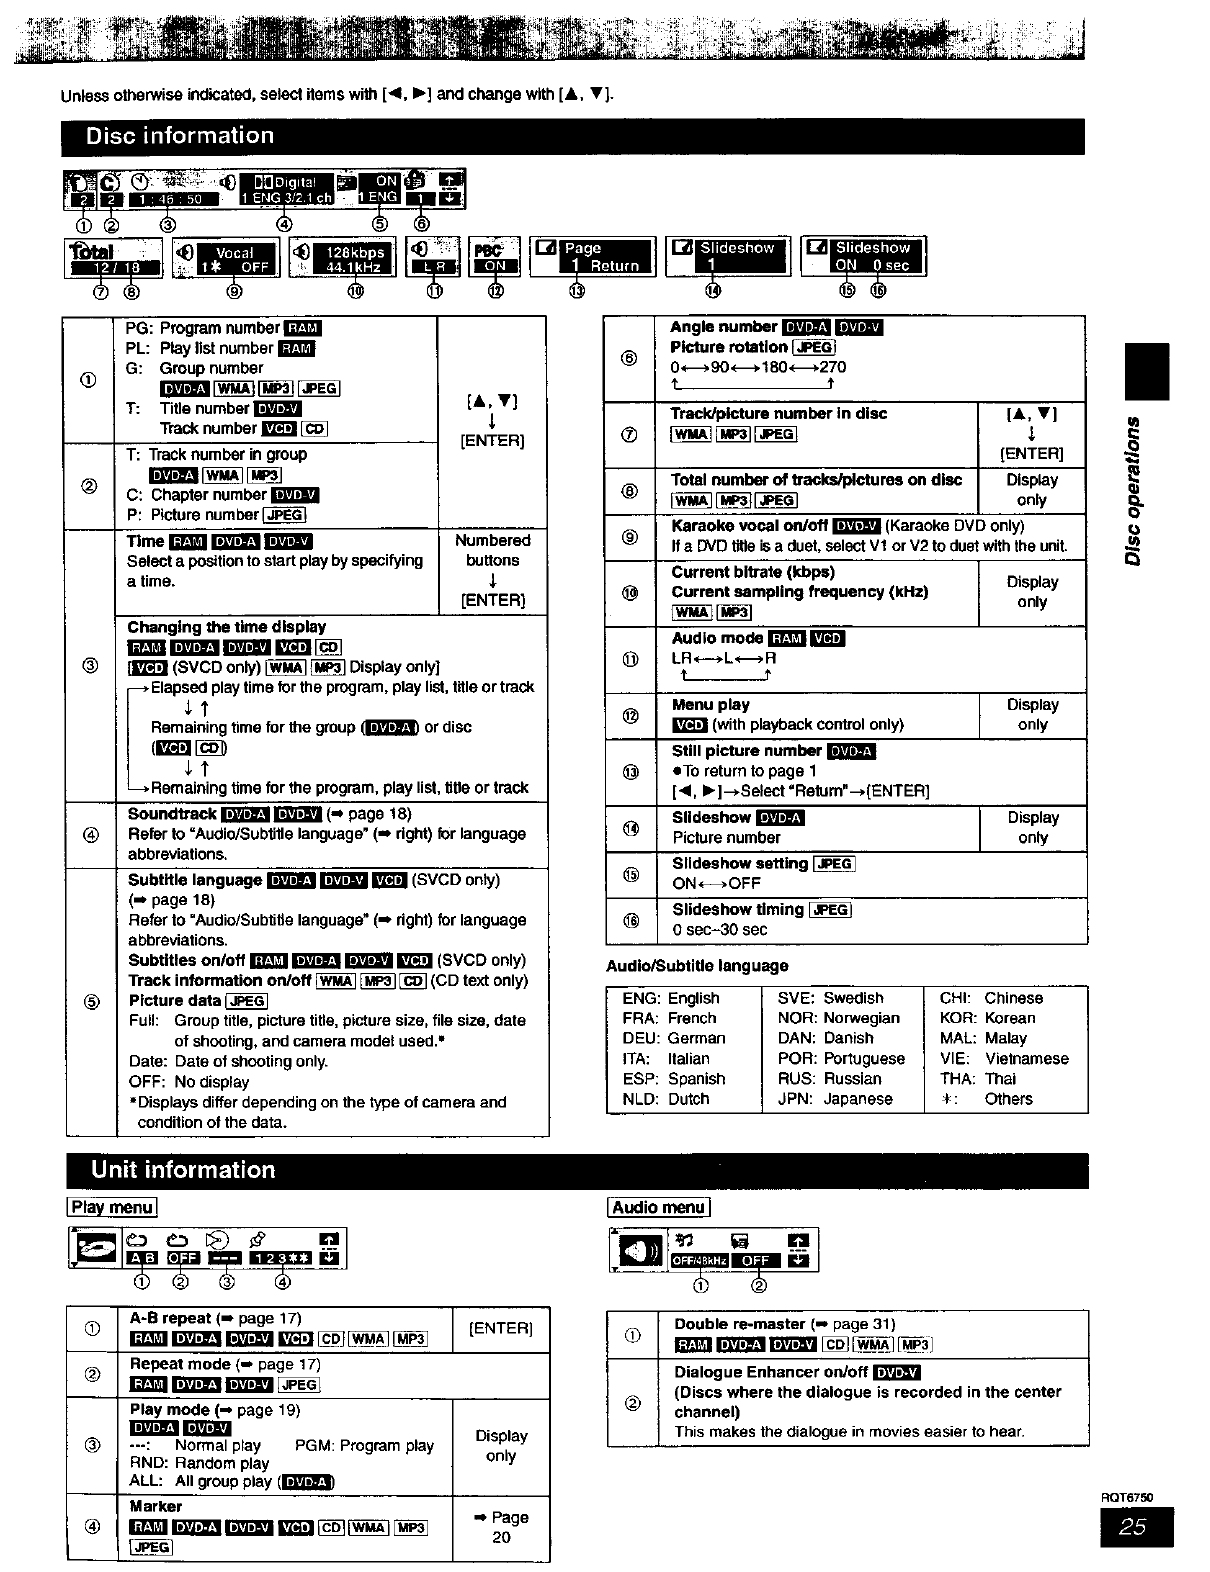
_(_ ®<_ :_mmi_ _
Qm W w-_u!==l
®® ® ®®
PG: Program number m_l
PL: Play list number B
®G: Group number
T: Title number _[&, T]
Track number I_] _ )ENTER]
T: Track number in group
r;mw_IW_31_7
®C: Chapter number Ir;tIT_FJ
P: Picture number_
Time B _ r;t31wJ Numbered
Select aposition to start play by specifying buttons
a time. _.
)ENTER]
Changing the time display
rain rmra_ Ill I_ [_
® _ (SVCD only) _ _ Display only]
--_Elapsed play time for the program, play list, title or track
St
Remaining time for the group _or disc
St
-->Remaining time for the program, play list, tibe or track
Soundttack _Ir;t_;tgJ(._ page 18)
Refer to =Audio/Subtitle language" (I. dght) for language
abbreviations,
®
®
Subtitle language __gt;i';11(SVCD onty)
(-- page 18)
Refer to "Audio/Subtitle language" (_* right) for language
abbreviations.
Subtitles on/off _ _ r;F_FJ _(SVCD only)
Track information on/off [_ _[_] (CD text only)
Picture data
Full: Group title, picture title, picture size, file size, date
of shooting, and camera model used.=
Date: Date of shooting only.
OFF: No display
•Displays differ depending on the type of camera and
condition of the data.
®
®
®
®
@
@
@
@
@
@
@
Angle number _
picture rotation
O*_* 90 *-_ 180 *_270
Treck/pfotura number in disc [&, V]
)ENTER)
Total number of traclagplctures on disc Display
[_ [i_][_ only
Karaoke vocal on/off _(Karaoke DVD only)
If a DVD title is a duet, select Vt or V2 to duet with the unit.
Current bltrate (kbps)
Currant sampling frequency (kHz)
Audio mode _
LR_--+L_R
Display
only
Menu play Display
(with playback control only) only
Still picture number
eTo return to page 1
[<, I_]--_Select "Retum"--_[ENTER]
Slldeshow _Display
Picture number only
Slldeshow setting
ON*-_.OFF
Slidesbow timing [_
0sec-30 sec
Audio/Subtitle language
ENG: English SVE: Swedish CHh Chinese
FRA: French NOR: Norwegian KOR: Korean
DEU: German DAN: Danish MAL: Malay
ITA: Italian POR: Portuguese VIE: Vietnamese
ESP: Spanish RUS: Russian THA: Thai
NLD: Dutch JPN: Japanese *: Others
I
E
•
A-B repeat (-- page 17) )ENTER]
Repeat mode (I page 17)
Play mode (-- page 19)
_Display
®---: Normal play PGM: Program play
RND: Random play only
ALL: All group play (r_'_l_
Marker
@iTl&,_ti rA_._iI_ [_5]E_] D_ ] m Page
20
[Audio menu I
Double re-master (m page 31)
Dialogue Enhancer on/off
(Discs where the dialogue is recorded in the center
®channel)
This makes the dialogue in movies easier to hear.
RQT6750
|
u}
@
®
@
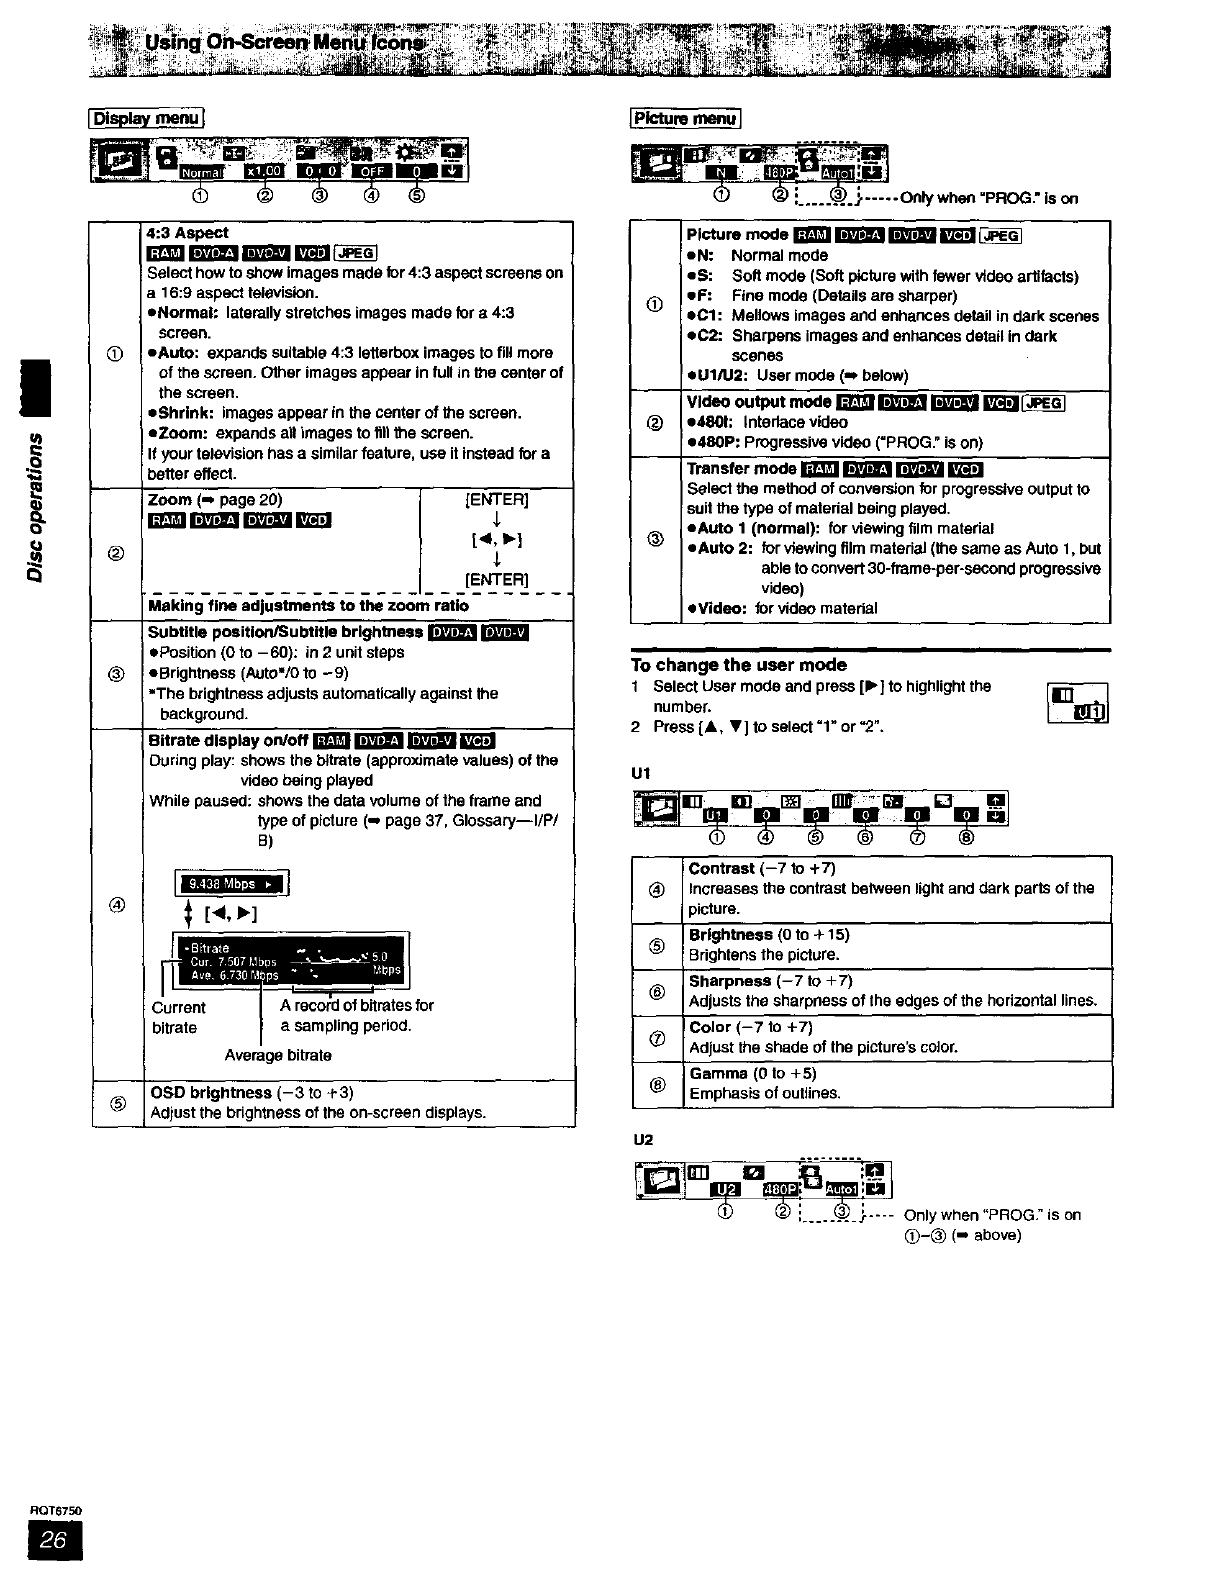
4:3 Aspect
r_m r_r_ r_r_ wm _
Select how to show imagos mado for 4:3 aspect screens on
a 16:9 aspect television.
eNormol: laterally stretches images made for o 4:3
screen.
eAuto: expands suitable 4:3 lederbox imagos to fill more
of the screen. Other images appear in full in _o center of
the screen.
eShrlnk: images appear in the center of the screen.
eZoom: expands an images to fillthe screen.
If your television has a similar feature, use it instead for a
better effect.
Zoom (-, page 20) [ENTER]
[ENTER]
Making fine adjustments to the zoom ratio
Subtitle position/Subtitle brightness _
ePosition (0 to -60): in 2unit steps
eBrightness (Auto'/0 to -9)
• The brightness adjusts automatically against the
background.
Bitrate display on/off _ _ _
During play: shows the bttrate (approximate values) of the
video being played
While paused: shows the data volume of the frame and
type of picture (J page 37, Glossary--I/P/
B)
®', [4, _]
Current
bitrate
P._l.... W
A record of bitmtes for
asampling period.
Average bitrate
OSD brightness (-3 to ÷3)
_) Adiust the brightness of the on-screen displays•
[Picture menu]
LK..,I_;IBm ii_umm.B!
® ® L....@._..... oe_wh,,'_oGr iso.
Picturemodera_ rm'm_rmm=_ra
eN: Normal mode
eS: Soft mode (Soft picture with fewer video artifacts)
(_) eF: Fine mode (Details are sharper)
eCl: Mellows images and enhances detail in dark scenes
eC2: Sharpens images and enhances detail in dark
scenes
egl/U2: User mode (m below)
Video output mode _ _ _ _
_) e480h Interlace video
e480P: Progressive video ("PROG." is on)
Transfer mode I_ _ _
Select the method of conversion for progressive output to
suit the type of matedal being played.
eAuto I (normal): for viewing film material
@eAuto 2: for viewing film material (the same as Auto 1, but
able to convert 30-frame-per-seoond progressive
video)
eVidoo: for video matehal
To change the user mode
1 Select User mode and press [!_] to highlight the
number.
2 Press[A, _]tosslect=l"or"2 ",
UI
.-:j
® ® ® ® ® ®
Contrast (-7 to +7)
®Increases the contrast belween light and dark parts of the
_ictura.
Brightness (0 to + 15)
@Brightens the picture.
Sharpness (-7 to +7)
@Adjusts the sharpness of the edges of the horizontal lines.
Color (-7 to +7)
® Adjust the shade of the picture's color.
Gamma (0 to +5)
@Emphasis of outlines.
U2
(_ i.. _ .._._ :r_- - Only when "PROG." is on
_)-@ (-. above)
RQT6750
SELECTOR VOLUM_
v TUNING^TUNEMODE MEMORY
FMMODE
_D
buttons
ENTER
VOLUME
+
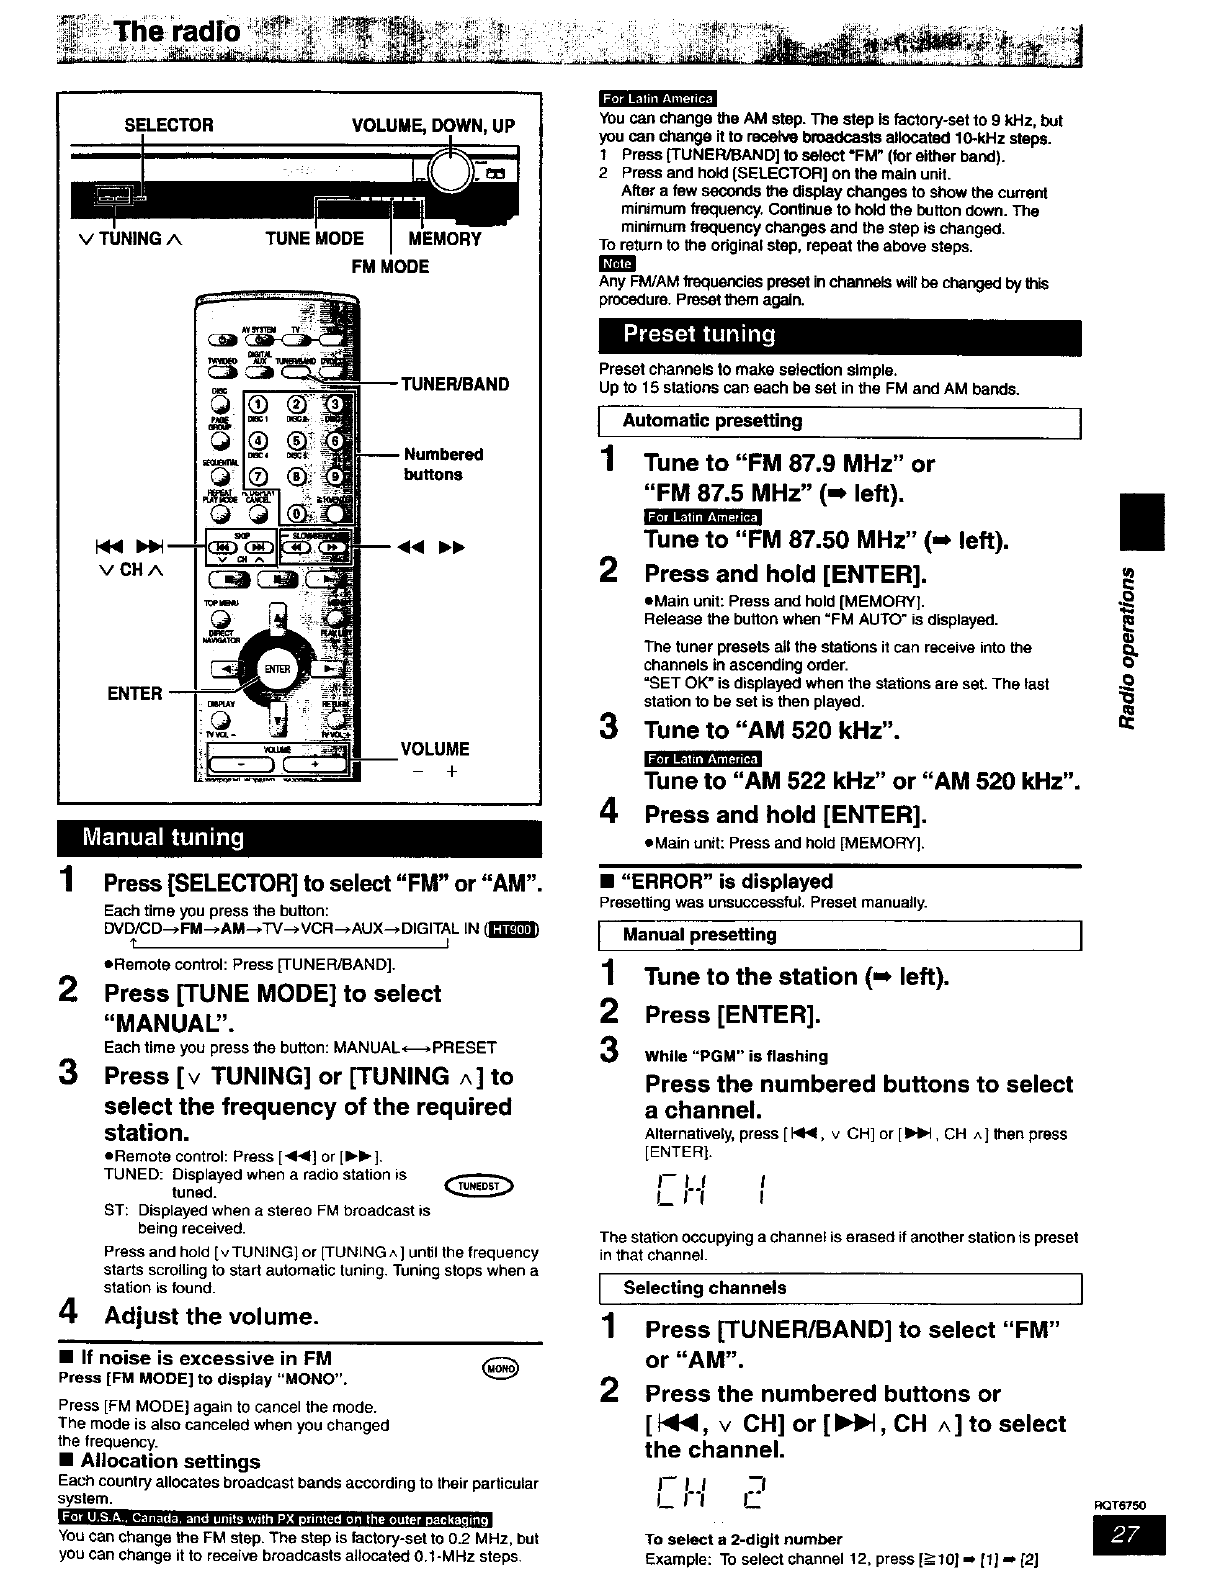
1Press [SELECTOR] to select "FM" or "AM".
Each time you press the button:
DVD/CD-->FM-->AM-->TV-->VCR-->AUX-->DIGITAL IN _
eRemote control: Press [TUNER/BAND[.
2Press [TUNE MODE] to select
"MANUAL".
Each time you press the button: MANUAL_m*PRESET
3Press [v TUNING] or [TUNING ^] to
select the frequency of the required
station.
eRemote control: Press [<1_] or [IH_],
TUNED: Displayed when a radio station is
tuned.
ST: Displayed when a stereo FM broadcast is
being received.
Press and hold [v TUNING[ or [TUNING ^] until the frequency
starts scrolling to start automatic tuning. Tuning stops when a
station is found.
4Adjust the volume.
•If noise is excessive in FM
Press [FM MODE] to display "MONO",
Press [FM MODE] again to cancel the mode.
The mode is also canceled when you changed
the frequency.
•Allocation settings
Each country allocates broadcast bands according to their particular
system.
lid,, illlt,.llV,'_lm i ip. [it= _l i Kiii ini i i ,_llq,T_ i i i n _.! I}11 i|_, ih] iiiI i[ ;jh] i i ( _ m o_[ N ;_ Li n n,l |
You can change the FM step. The step is factory-set to 0.2 MHz, but
you can change it to receive broadcasts allocated 0.1-MHz steps.
You can change the AM step. The step is factory-set to 9 kHz, but
you can change itto receive broadcasts allocated 10-kHz steps.
tPress (TUNER/BAND[ to select "FM" (for either band).
2 Press and hold [SELECTOR] on the main unit.
After a few seconds the display changes to show the current
minimum frequency, Conitnue to hold the button down. The
minimum frequency changes and the step is changed.
To return to the odginel step, repeat the above steps.
Any FM/AM frequencies preset in channels w;ll be changed by this
procedure. Preset them again.
Preset channels to make selection simple.
Up to 15 stations can each be set in the FM and AM bands.
Automatic presetting
1 Tune to "FM 87.9 MHz" or
"FM 87.5 MHz" (=, left).
Tune to "FM 87.50 MHz" (-_ left). II
• Main unit: Press and hold [MEMORY].
Release the button when "FM AUTO" is displayed.
The tuner presets all the stations it can receive into the
channels in ascending o_ler.
=SET OK" is displayed when the stations are set. The last
station to be set is then played.
Tune to "AM 520 kHz".
2Pressand hold [ENTER].
0J
3
Tune to "AM 522 kHz" or "AM 520 kHz".
Press and hold [ENTER].
•Main unit: Press and hold [MEMORY].
4
• "ERROR" is displayed
Presetting was unsuccessful. Preset manually.
I Manual presetting
1Tune to the station (-_ left).
2Press [ENTER].
3While "PGM" is flashing
Press the numbered buttons to select
a channel.
Alternatively, press [1<_, v CH] or [IHI.t, CH ^] then press
[ENTER].
l--If I
I,_ I"1 I
The station occupying a channel is erased if another station is preset
in that channel.
I Selecting channels I
1Press [TUNER/BAND[ to select "FM"
or "AM".
2Press the numbered buttons or
[_1<, vCH] or [ll_H, CH ^] to select
the channel.
I--II --I
i_ ]"l
To select a 2-digft number
Example: TO select channel 12, press [_->10[-* It[ -, [2J
peee
RQT6750
ENTER
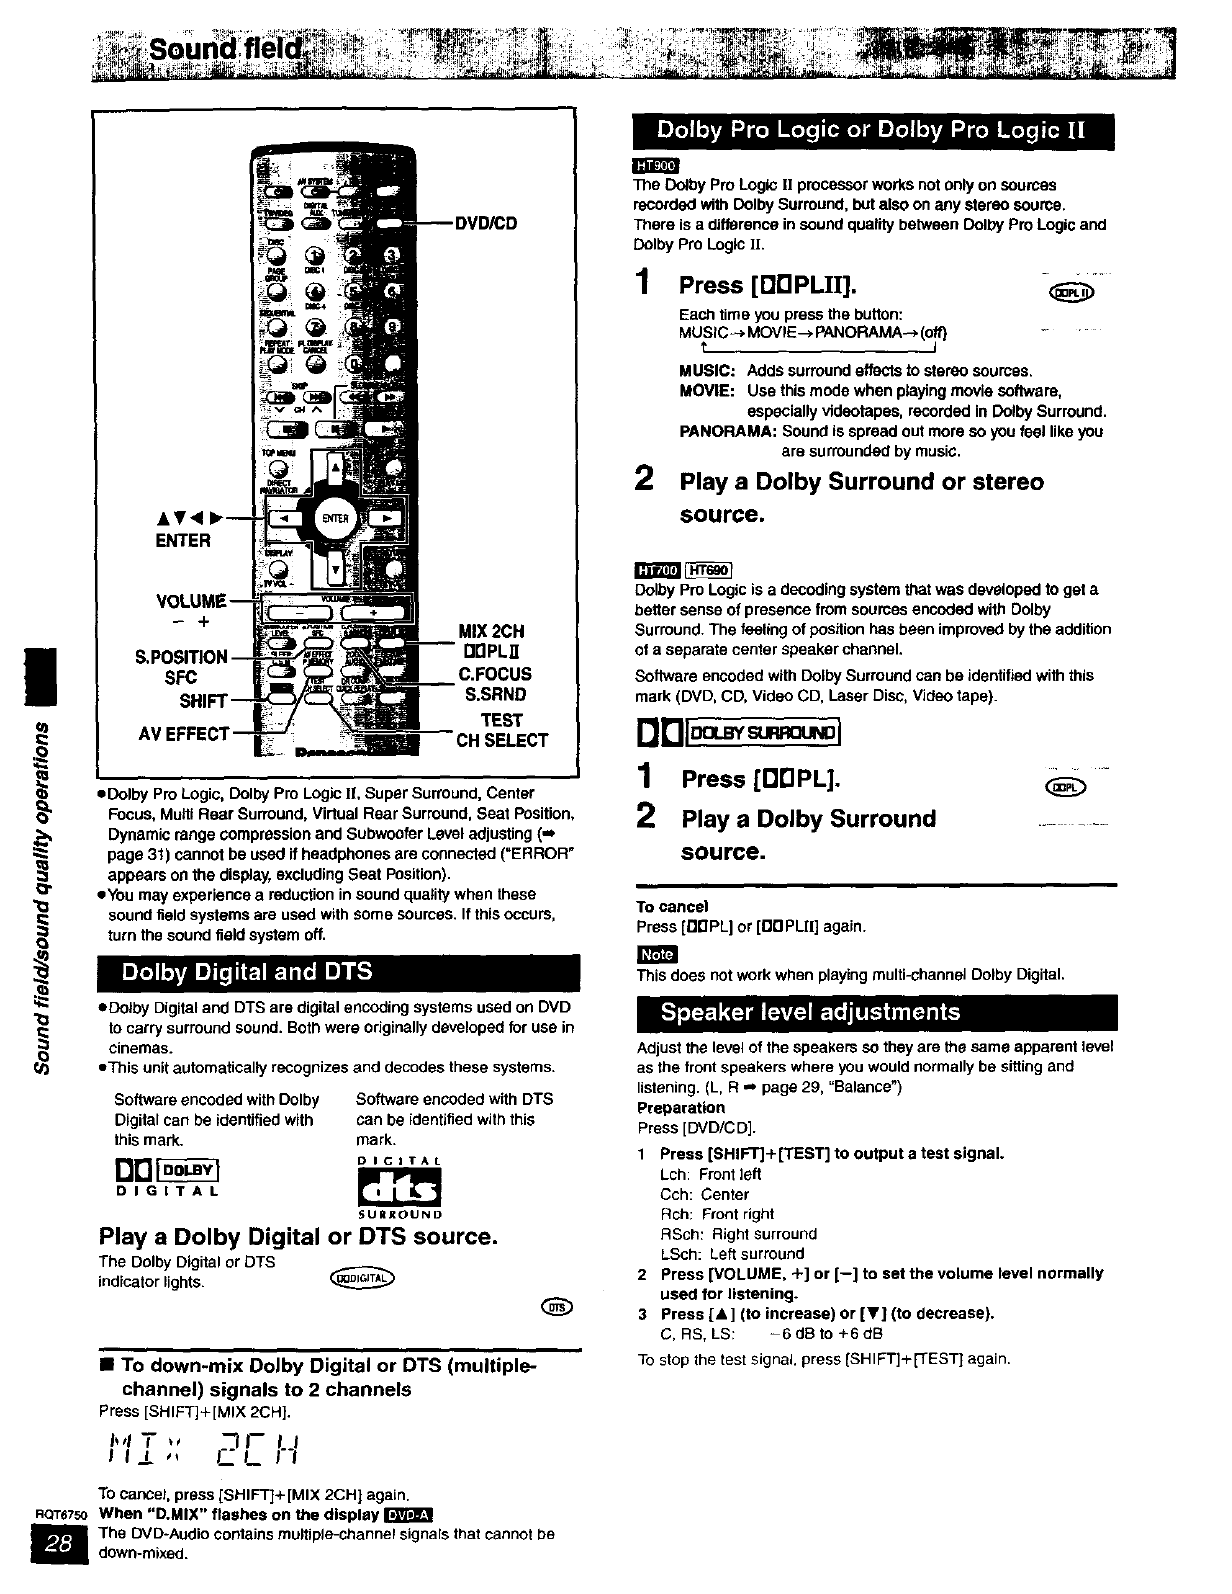
The Dolby Pro Logk_ l] processor works not only on sources
recorded with Dolby Surround, but also on any stereo source.
There is a difference in sound quality between Dolby Pro Logic and
Dolby Pro Logic ]I.
1 Press [DDPLII]. -_
Each time you press the button:
MUSlC MOV,E- PANORA A-.[o -
MUSIC: Adds surrouod effects to sterao soumes.
MOVIE: Use this mode when playing movie software,
especially videotapes, recorded in Oolby Surround.
PANORAMA: Sound is spread out more so you feel like you
are surrounded by music.
2Play a Dolby Surround or stereo
source.
Dolby Pro Logic is a decoding system that was developed to get a
better sense of presence from soumes encoded with Dolby
MIX 2CH Surround. The feeling of position has been improved by the addition
IlrtPLII of a separate center speaker channel.
SFC C.FOCUS Software encoded with Dolby Surround can be identified with this
SH S.SRND mark (DVD, CD, Video CD, Laser Disc, Video taps).
TEST
AV EFFECT L- C.SELECT 1Press [DnPL]. _-
2Play a [ ........
source.
oDolby Pro Logic, Dolby Pro Logic I], Super Surround, Center
Focus, Multi Rear Surround, Virtual Rear Surround, Seat Position, Play a golby Surround
Dynamic range compression and Subwoofer Level adjusting (,,J
page 31) cannot be used if headphones are connected ("ERROR"
appears on the display, excluding Seat Position].
eyou may experience a reduction in sound quality when these
sound field systems are used with some sources. If this occurs, To cancel
turn the sound field system off. Press [nDPL] or [DDPLII] again.
eDolby Digital and DTS are digital encoding systems used on DVD
to carry surround sound. Both were originally developed for use in
cinemas.
eThis unit automatically recognizes and decodes these systems.
Software encoded with Dolby Software encoded with DTS
Digital can be identified with can be identified with this
this mark. mark.
Dr_ OI G IT A L
DIGITAL _
SURROUND
Play a Dolby Digital or DTS source.
The Dolby Digital or DTS
indicator lights.
_D
• To down-mix DoJby Digital or DTS (multiple-
channel) signals to 2 channels
Press[SHIFTJ+[MIX 2CH],
I_'1T _, "_1"- I I
I I_l ,_ I_ I... I"l
To cancel, press [SHIFT]+ [MIX 2CH] again.
When "D.MIX" flashes on the display
The DVD-Audio contains multiple-channel signals that cannot be
down-mixed.
This does not work when playing multi-channel Dolby Digital.
Adjust the level of the speakers so they are the same apparent level
as the front speakers where you would normally be sitting and
listening. (L, R _ page 29, "Balance")
Preparation
Press [DVD/C D].
1 Press [SHIFT]+[TEST] to output a test signal.
Lch: Front left
Cch: Center
Bch: Front right
RSch: Bight surround
LSch: Left surround
2 Press [VOLUME, +] or [--] to set the volume level normally
used for listening.
3 Press [A] (to increase) or [Y] (to decrease).
C, RS, LS: -6dB to +6dB
To stop the test signal, press [SHIFT]+[]EST} again.
•To adjust speaker level during play
1 Press [CH SELECT] to select the speaker.
Lch-_ Cch--* Rch--> RSch--* LSch--* SWch
t I
SWch: Subwoofer
eYou can only adjust SWch if the disc includes asubwoofer
channel.
eSWch does not appear on the display and is not adjustable
when Dolby Pro Logic or Dolby Pro Logic [l is turned on.
2 Press [At (to Increase) or [V] (to decrease).
L, R: (m below)
C, RS, LS: -6dSto +6dB
SW: -6 dB to +6 dB
I Balance
You can adjust the balance of the front speakers.
1 Press [CH SELECT] to select "L" or "R".
2 Press[<, b.].
eWhen testing signal, you can atso adjust the "L"or "R" balance of
the front dght and left speakers by pressing [<1, Ib].
Add surround effects to stereo sound.
Press [S.SRND].
Each time you press the button:
MU SIC-_ MOVIE--> PARTY--> (off)
tJ
MUSIC: Adds surround effects to stereo sources.
MOVIE: Usa this mode when playing movie software.
PARTY: Sound is in stereo regardless of the direction you are
facing.
• You can adjust the volume of the surround speakers to get the best
surround effect (-, page 28, Speaker level adjustments).
i,,r_l
• Turn Super Surround off when playing a DVD recorded with Doiby
Digital or DTS. The surround effects will not be reproduced
correctly if this is left on.
eDolby Pro Logic or Dolby Pro Logic tI (-, page 28) switches off.
Press [SFC] to select a
setting.
Each time you press the button:
HEAVY: Adds punch to rock.
CLEAR: Clarifies higher sounds.
SOFT: For background music.
DISCO: Reverberstss sound to make you fael like you were in adisco.
LIVE: Makes vocals more alive.
HALL: Expands sound to make you feel like you were in a hall.
FLAT: Canceled (no effect is added) (factory preset).
To check the current setting
Press [SFC].
You can make the sound of the center speaker
seem like it is coming from within the television.
Press [SHIFT]+[C. FOCUS].
Q
Each time you press the button:
CENTER FOCUS ON<-_*CENTER FOCUS OFF
E_3
r_rtJF3
•This does not work when Super Surround is turned on.
eThis will have less effect when Dotby Pro Logic or Dolby Pro
Logic [1 is turned on.
• Mufti Rear Surround (M.R.S)
Thismode makesit seem likesoundis coming
frommultiplerearsurroundspeakersvirtually
whenconnectedwithsurroundspeakers,
•Virtual Rear Surround (V.R.S)
This mode is useful if you have to place your
surround speakers near the front speakers due
to the layout of your room.
This mode makes itseem like the sound from
the surround speakers is coming from behind
you.
r-]
i
Virtual speakers
r'_
Virtual speakers
1Press and hold [SHIFT]+[AV EFFECT]
to select M.R.S mode or V.R.S mode.
Each time you press and hold the button:
M.R.S mode _V,R,S mode
e=M.R.S" indicator tighfa when M.R.S mode turns on.
e"V.R.S" Indicator lights when V.R.S mode turns on,
2Press [SHIFT]+[AV EFFECT].
Each time you press the button:
M.R.S mode
M.R.S 1 (Normal) --> M.R.S 2 {Enhanced) --* M.R.S OFF
J
V.R.S mode
V.R.S 1 (Normal) -_ V.R.S 2 (Enhanced) -* V.R.S OFF
Using this function makes you feel like you are
sitting in the ideal seating position (in the center
of the circle formed by the speakers), even if
you cannot due to the layout of your morn.
rl El
1Press [SHIFT]+[S.POSITION].
While "S.POS" is flashing
Press [A, V,<I, I_] to select a
position.
2
To cancel
Press [SHIFT]+[S.POSITION] to clear "S.POS".
While virtual rear surround is on, the seat position is changed in
three horizontal steps.
O
o
u_
RQT6750
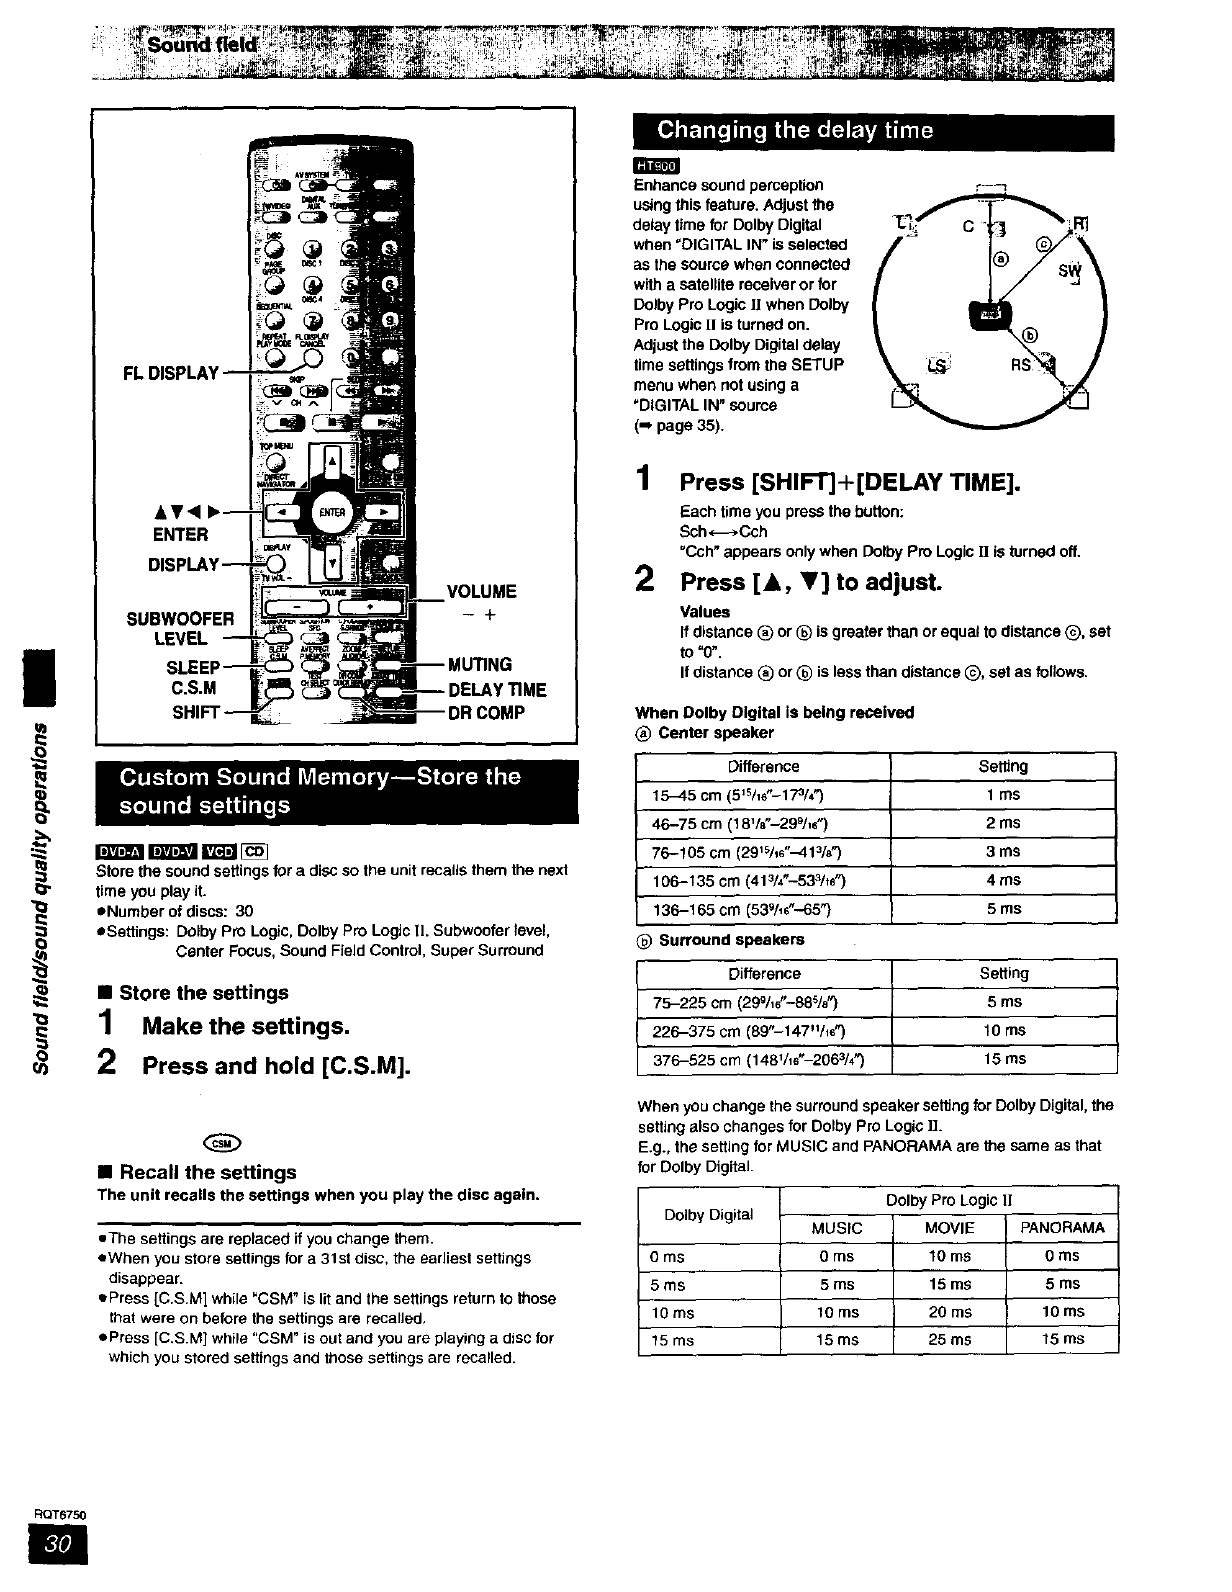
|SUBWOOFER
LEVEL
VOLUME
-+
C.S.M
i
0
1
2
mmmra[_
S_re the sound settings for a disc so the unit recalls them the next
time you play it.
eNumber of discs: 30
eSettings: Dolby pro Logic, Dolby Pro Logic IL Subwoofer level,
Center Focus, Sound Field Control, Super Surround
•Store the settings
Make the settings,
Press and hold [C.S.M].
•Recall the settings
The unit recalls the settings when you play the disc again.
•The settings are replaced if you change them.
eWhen you store settings for a 31st disc, the earliest settings
disappear.
oPress [C.SM] while "CSM" is lit and the settings return to those
that were on before the settings are recalled,
ePress [C.S.M] while "CSM" is out and you are playing a disc for
which you stored settings and those settings are recalled.
Enhance sound peroep_on
using this feature. Adjust the
delay time for Dolby Digital
when "DIGITAL IN" is seleCted
as the source when connected
with a satellite receiver or for
Dolby Pro Logic ]t when Dolby
Pro Logic II is turned on.
Adjust the Dolby Digital delay
time settings from the SETUP
menu when not using a
"DIGITAL IN" source
(=_page 35).
1Press [SHIFT]+[DELAY TIME].
Each time you press the button:
Sch_Cch
"Cch" appears only when Dothy Pro Logic [1 is turned off.
2Press [A, _'] to adjust.
Values
if distance (_ or _) is greater than or equal to distance _), set
to"O".
If distance _) or (_) is less than distance Q, set as follows.
When Dolby Digital is being received
(_ Center speaker
Difference
15--45 cm (51s/1_"-17_/4")
46-75 cm (18V8"-299/,6 ")
76-105 cm (291sAs"-413/e")
106-135 cm (413/4_.-533/ts")
136-165 cm (539As"-65")
_) Surround speakers
Difference
75-225 cm (299/,s_'-88%")
226-375 cm (89"-147"A8")
376-525 cm (148V, s"-2063/._
Semng
1ms
2ms
3ms
4ms
5 ms
Setting
5ms
10 ms
15 ms
When you change the surround speaker seffing for Dolby Digital, the
setting also changes for Dolby Pro Logic )).
E.g., the setting for MUSIC and PANORAMA are the same as that
for Dolby Digital.
Dolby Digital
0 ms
5ms
10ms
15 ms
MUSIC
0ms
5ms
10 ms
15ms
Dolby Pro Logic 11
MOVIE
10 ms
15 ms
20 ms
25 ms
PANORAMA
0 ms
5 ms
10 ms
15 ms
RQT6750
R
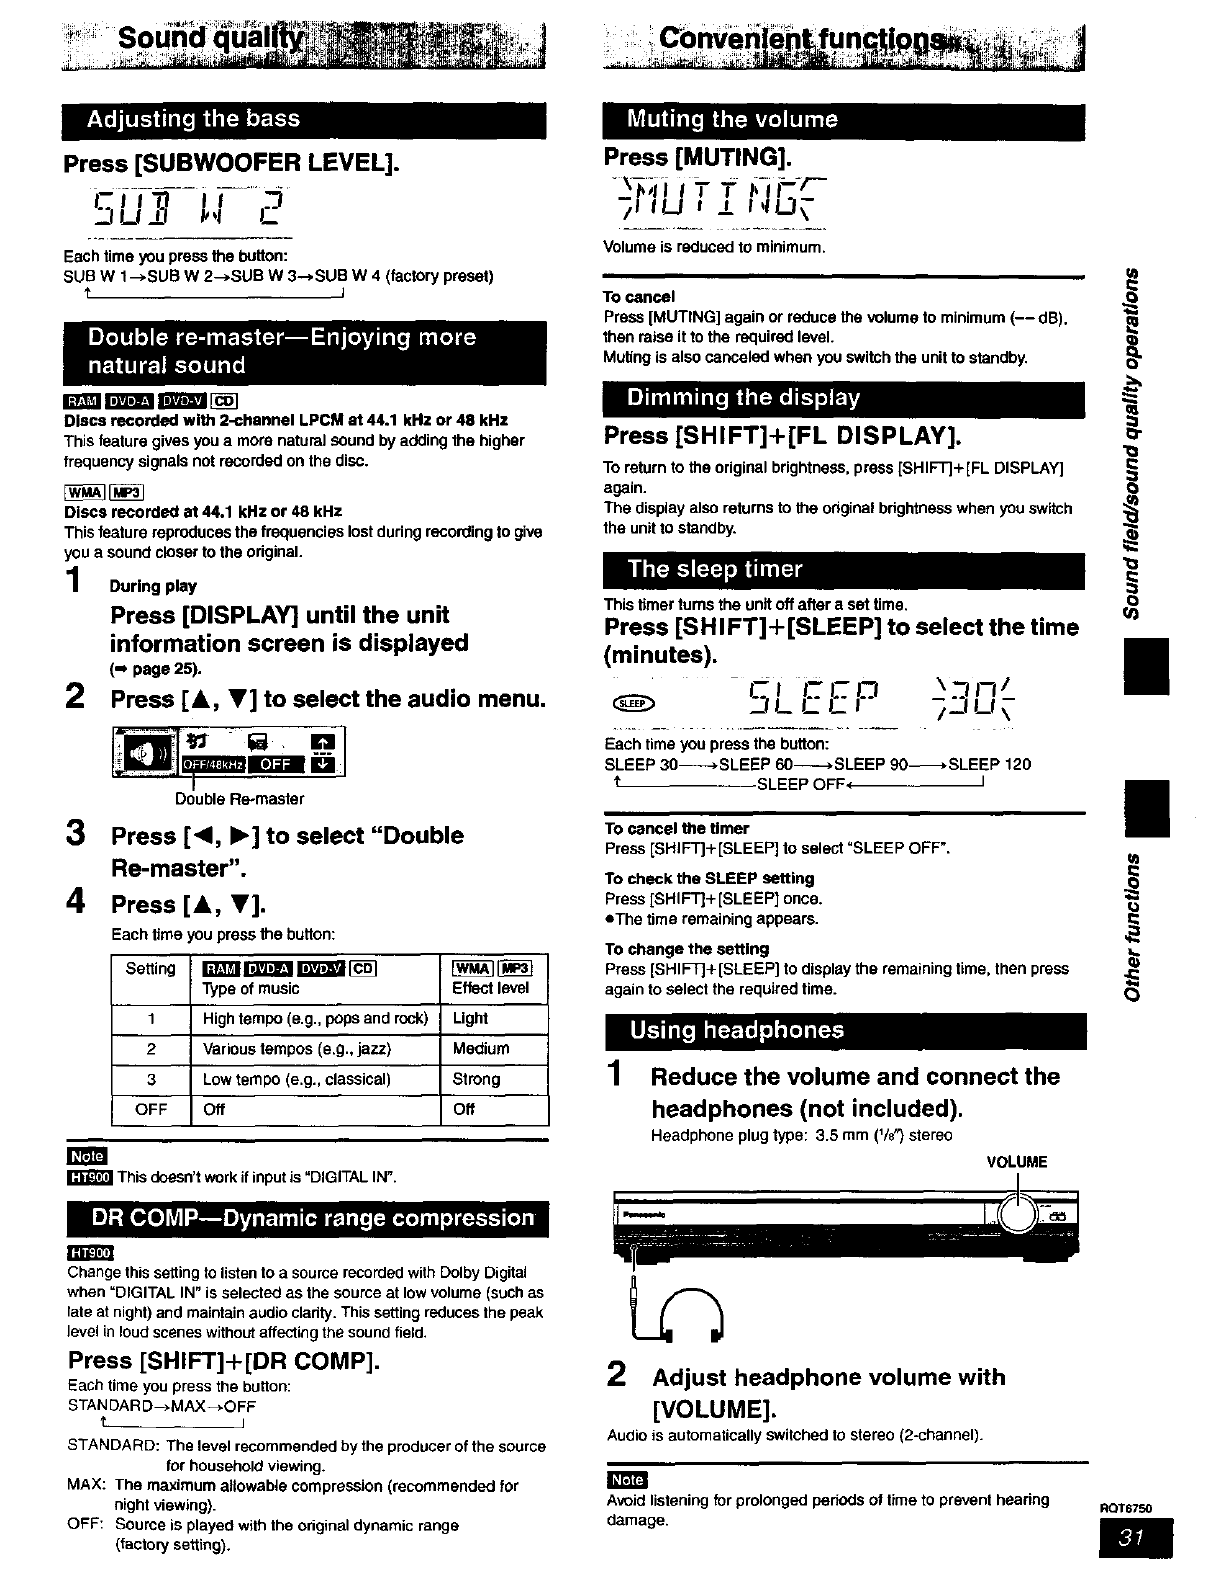
Press [SUBWOOFER LEVEL]. Press [MUTING].
._11_1_[I I_,1 C /! ILl t _f I,I!.._\
Volume is reduced to minimum,
Each time you press the button:
SUB W 1--*SUB W 2--*SUB W 3-->SUB W 4 (factory preset)
tITo cancel ,_
Press [MUTING] again or reduce the volume to minimum (-- dB), Q
then raise it to the required level.
Muting is also canceled when you switch the unit to standby.
Discs R=corded with 2-channel LPCM at 44.1 kHz or 48 kHz
This feature gives you a more natural sound by adding the higher
frequency signals not recorded on the disc.
Discs recorded at 44.1 kHz or 48 kHz The display also returns to the original brightness when you switch
This feature reproduces the frequencies lost during recording to give the unit to standby.
you a sound closer to the original.
During play O
Press [SHIFT]+[FL DISPLAY].
To return to the original brightness, press [SHIFT]+[FL DISPLAY]
This timer turns the unit off after a set time,
Press [SHIFT]+[SLEEP] to select the time
Press [DISPLAY] until the unit
information screen is displayed
(-, page 25).
2Press [&, V] to select the audio menu,
_D],,rJ 5a, ._o..1
Bl_mr_'-_Jm0 /
(minutes). B
-SLEEP
Each time you press the button:
SLEEP 30---_-*SLEEP 60-----*SLEEP 90-_*SLEEP 120
I _ SLEEP OFF (I
Double Re-master ii
3Press [<1, I_] to select "Double Tocancelthetimer
Press [SHIFT]+[SLEEP] to select "SLEEP OFF".
4Re-master".
Press [&, V].
Each time you press the button:
Setting m _ _ [_ [_
Type of music Effect level
1 High tempo (e.g., pops and rock) Light
2 Various tempos (e.g., jazz) Medium
3 Low tempo (e.g., classical) Strong
OFF Off Off
To check the SLEEP setting
Press [SHIFT]+ [SLEEP] once.
eThe time remaining appears.
To change the setting
Press [SHIFT]+[SLEEP] to display the remaining time, then press
again to select the required time.
1Reduce the volume and connect the
headphones (not included).
Headphone plug type: 3.5 mm (1/8_) stereo
VOLUME
This doesn't work if input is "DIGITAL IN".
Change this settingto listen to a source recorded with Colby Digital
when =DIGITAL IN" is selected as the source at low volume (such as
late at night) and maintain audio cladty. This setting reduces the peak
level in loud scenes without affecting the sound field.
Press [SHIFT]+[DR COMP].
Each time you press the button:
STAN DAR D-->MAX->OFF
t. I
STANDARD: The level recommended by the producer of the source
for household viewing.
MAX: The maximum allowable compression (recommended for
night viewing).
OFF: Source is played with the odginal dynamic range
(factory setting).
2Adjust headphone volume with
[VOLUME].
Audio is automatically switched to stereo (2-channel).
Avoid listening for prolonged periods of time to prevent hearing
damage. RQT6750
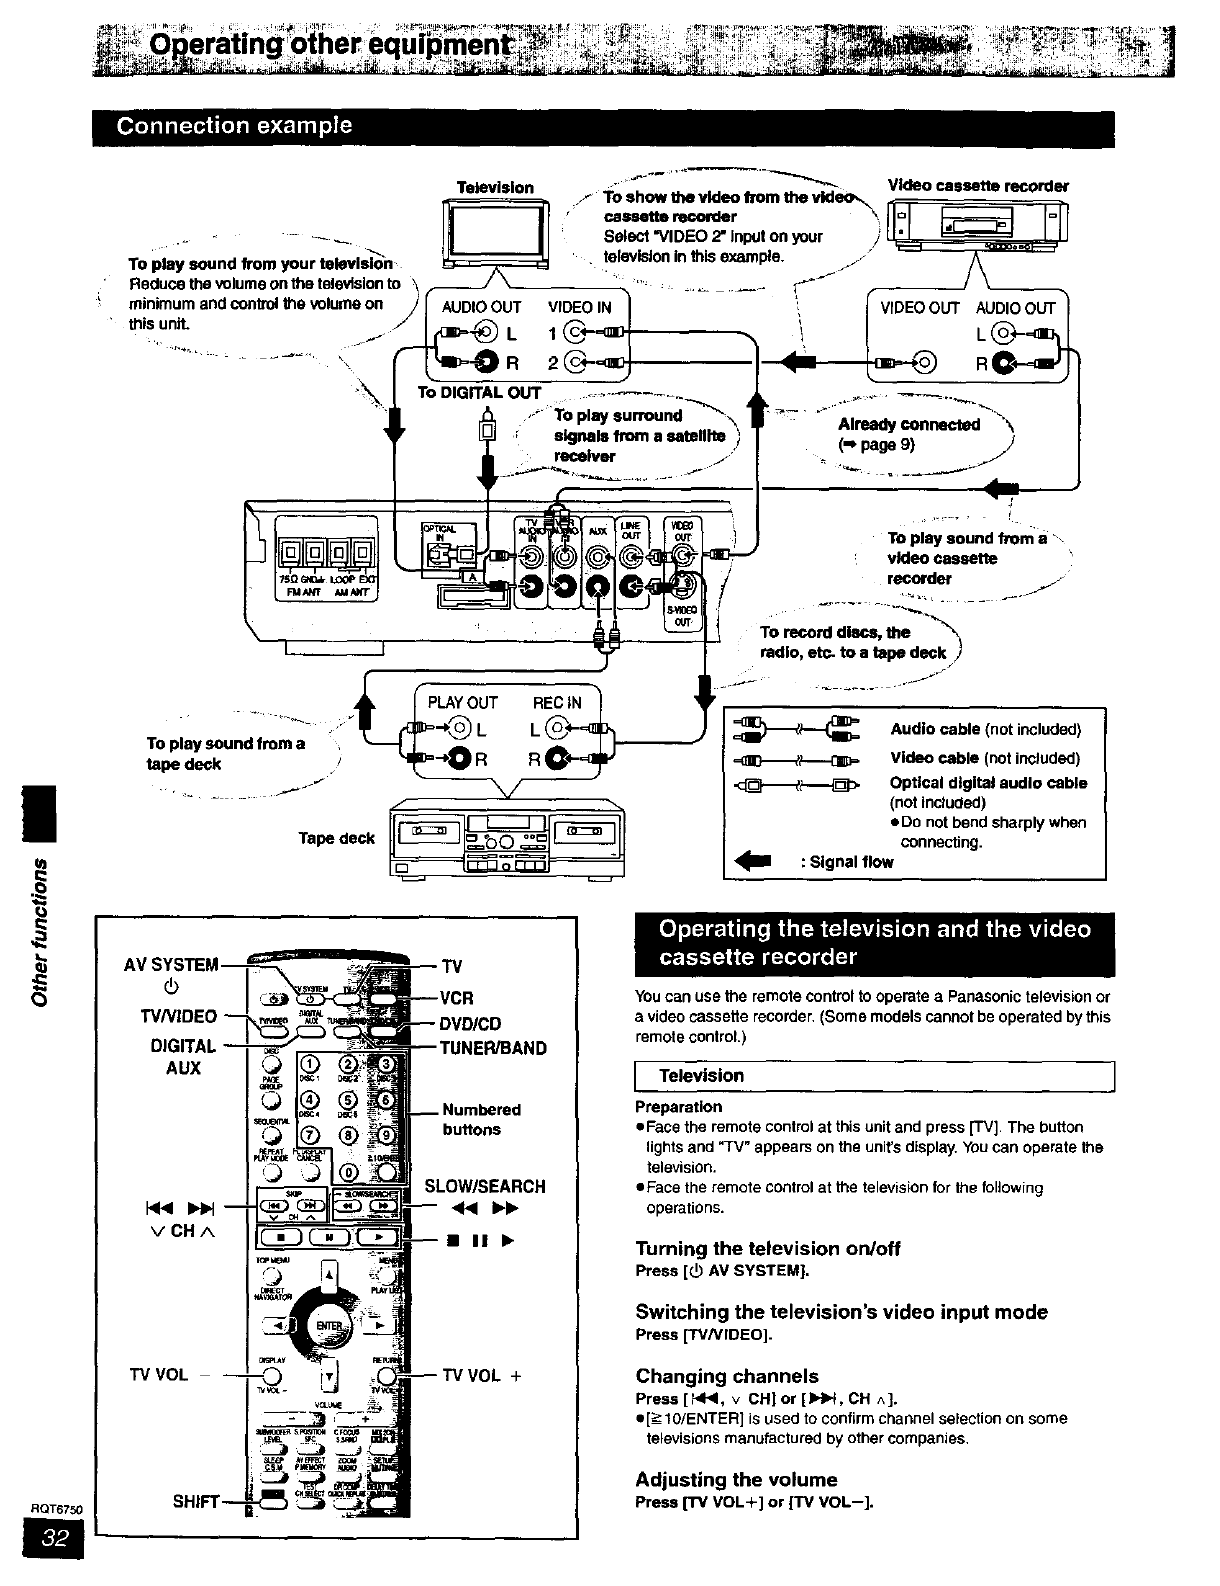
|
0
RQT6750
TO play sound from a
tape de_k /
Tape deck
Audio cable (not included)
Video cable (not included)
Optical digital audio cable
(not Included)
aDo not bend sharply when
connecting.
: Signal flow
AUX
VCHA
TV VOL
buttons
SLOW/SEARCH
B II I_
+
You can use the remote control to operate a Panasonic television or
a video cassette recorder. (Some models cannot be operated by this
remote control.)
[Television ]
Preparation
eFace the remote control at this unit and press [TV] The button
lights and "TV" appears on the unit's display. You can operate the
television•
eFace the remote control at the television for the following
operations.
Turning the television on/off
Press [(_ AV SYSTEM].
Switching the television's video input mode
Press [TV/VIDEO].
Changing channels
Press [HI<I, v CH] or [IHIH, CH ^].
e[>-IO/ENTER] is used to confirmchannel selection on some
televisionsmanufactured by othercompanies.
Adjusting the volume
Press ['rv VOL+] or ['rv VOL--].
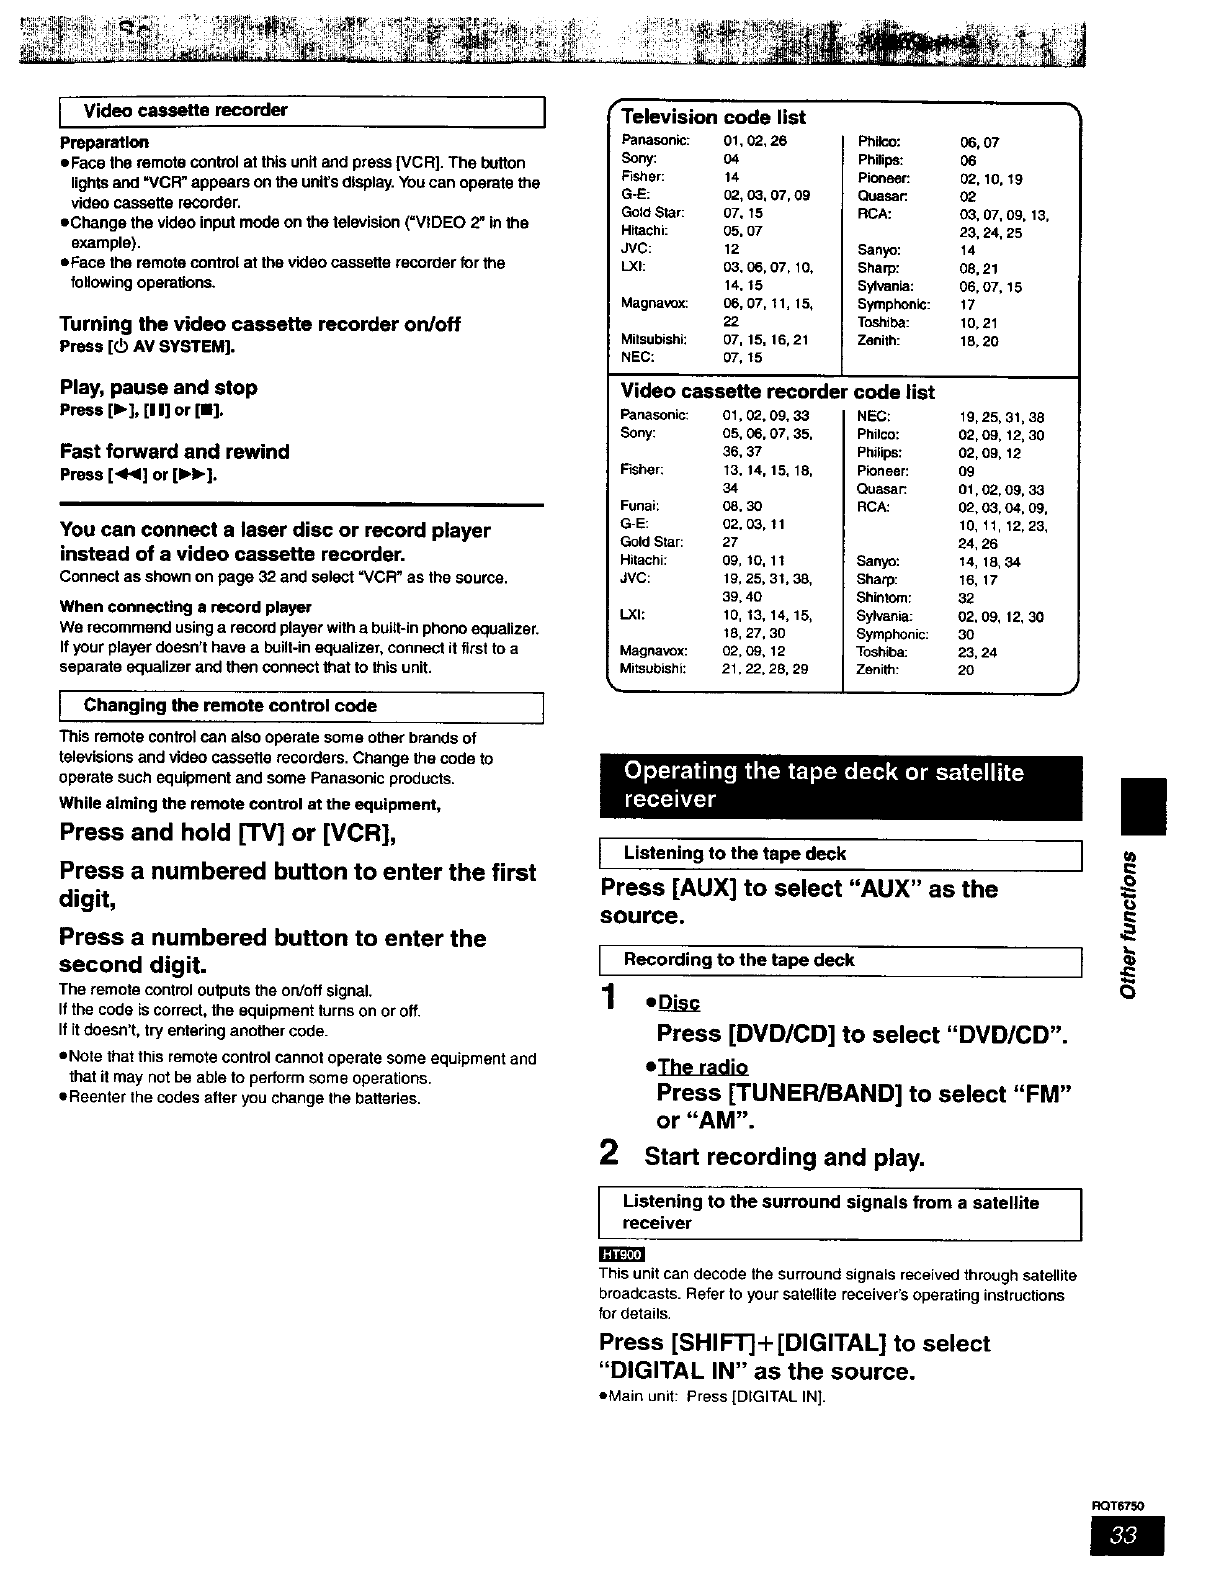
Video cassette recorder ]
Preparation
eFaca the remote control at this unit and press [VCR]. The button
lights and =VCFi" appears on the unit's display. You can operate the
video cassette recorder.
eChange the video input mode on the television (=VIDEO 2" in the
example).
eFaca the remote control at the video cassette recorder for the
foflowing operations.
Turning the video cassette recorder on/off
Press [3 AV SYSTEM].
Play, pause and stop
Press [1_], [11]or [1].
Fast forward and rewind
Press[<1<]or[IH_].
You can connect a laser disc or record player
instead of a video cassette recorder.
Connect as shown on page 32 and select =VCR" as the source.
When connecting a record player
We recommend using a record player with a built-in phono equalizer.
If your player doesn't have a built-in equalizer, connect it first to a
separate equalizer and then connect that to this unit.
IChanging the remote control code J
This remote control can also operate some other brands of
televisions and video cassette recorders. Change the code to
operate such equipment and some Panasonic products.
While aiming the remote control at the equipment,
Press and hold [TV] or [VCR],
Press a numbered button to enter the first
digit,
Press a numbered button to enter the
second digit.
The remote control outputs the on/off signal.
If the code is correct, the equipment turns on or off.
If itdoesn't, try entering another code.
eNote that this remote control cannot operate some equipment and
that it may not be able to perform some operations.
eReenter the codes after you change the batteries.
Telev sron code hst
Panasonic: 01, 02, 26
Sony: 04
Fisher: 14
G-E: 02, 03, 07, 09
GoldStar: 07, 15
Hitachi: 05, 07
JVC: 12
LXh 03, 06, 07, 10,
14, 15
Magnavox: 06, 07, 11, 15,
22
Mitsubiahk 07, 15, 16, 21
NEC: 07, 15
Philco: 06, 07
Philips: 06
Pioneer: 02, 10, 19
Cuasar: 02
RCA: 03, 07, 09, 13,
23, 24, 25
Sanyo: 14
Sharp: 08, 21
Sylvania: 06, 07, 15
Symphonic: 17
Toshiba: 10,21
Zenith: 18, 20
Video cassette recorder code list
Panasonic:
Sony:
Fisher:
Funai:
G-E:
Gold Star:
Hitachi:
JVC:
LXh
01, 02, 09t 33 NEC:
05, 06, 07, 35, Philco:
36, 37 Philips:
13, 14, 15, 18, Pioneer:
34 Quasar:
08, 30 RCA:
02,03,11
27
09, t0, 11 Sanyo:
19, 25, 31, 38, Sharp:
39, 40 Shintom:
10, 13, 14, 15, Sylvania:
18, 27, 30 Symphonic:
Magnavox: 02, 09, 12 Toshiba:
Mitsubiahi: 21,22.28, 29 Zenith:
1g, 25,31,38
02,09,12,30
02,09,12
09
01,02,09,33
02,03,04,09,
10,11,12,23,
24,26
14,18,34
16,17
32
02,09,12,30
30
23,24
2O
IListening to the tape deck
Press [AUX] to select "AUX" as the
source.
1
1
2
Recording to the tape deck
oD_L_
Press [DVD/CD] to select "DVD/CD".
e_
Press [TUNER/BAND] to select "FM"
or "AM".
Start recording and play.
Listening to the surround signals from a satellite ]
receiver ]
This unit can decode the surround signals received through satellite
broadcasts. Refer to your satellite receiver's operating instructions
for details.
Press [SHIFT]+[DIGITAL] to select
"DIGITAL IN" as the source.
aMain unit: Press [DIGITAL IN].
II
J u)
O
RQT6750
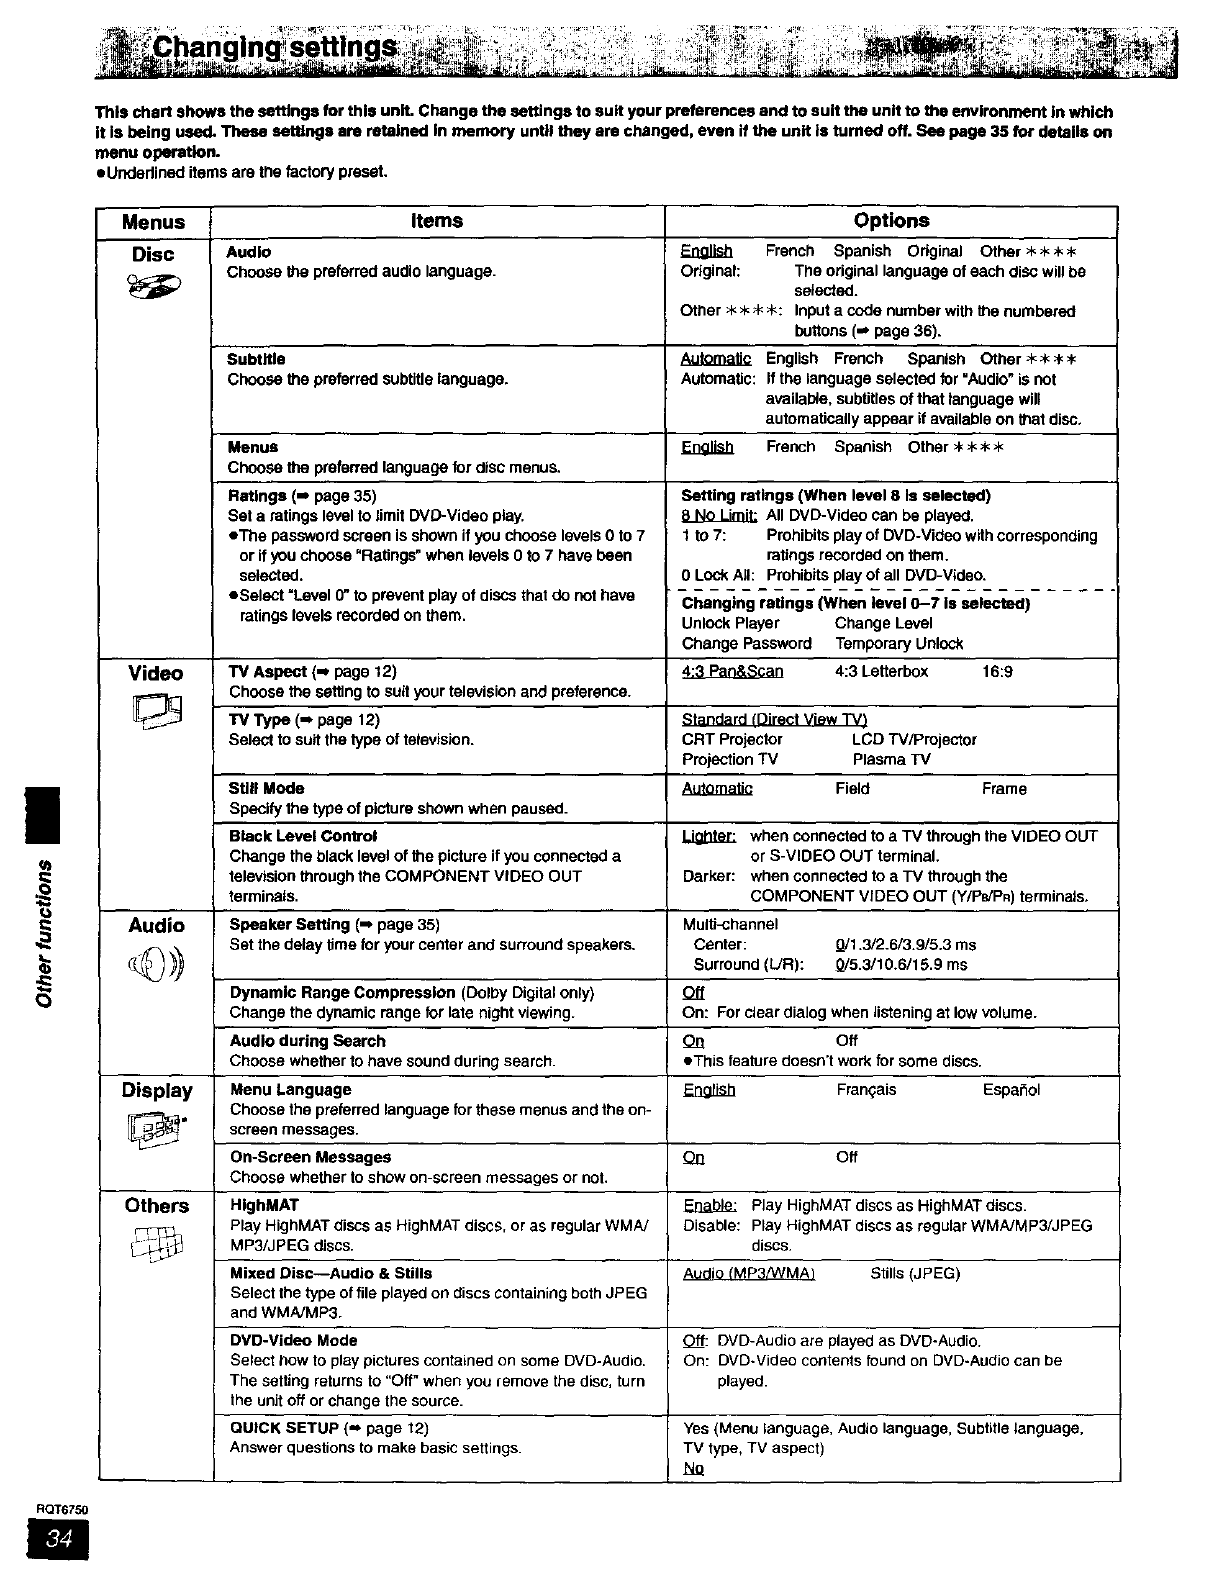
This chart shows the settings for this unit. Change the settings to suit your preferencesand to suit the unit to the environment In which
it Is being used. These settings are r_talned In memory until they are changed,even if the unit Is turned off. See page 35 for details on
menu operation.
eUndedined itemsare thefactorypreset.
|
€3
Menus Items Options
Disc Audio Enalish French Spanish Odginal Other>k_<_<
Choose the preferred audio language. Odginsl: The original language of each diSC will be
selectad.
Other >k>k;k _k: Input a code number with the numbered
buttons (-* page 36).
Subtitle _English French Spanish Othar_H<_<,k
Choose the preferred subtitle language. Automatic: If the language selected for "Audio" is not
availai_e, subtitles of that language will
automatically appear if available on that disc.
Menus EDg_ French Spanish Othar>k:_k_
Choose the preferred language for disc menus.
Ratings (-- page 35)
Set a ratings level to limit DVD-Video play.
eThe password screen is shown if you choose levels 0 to 7
or if you choose "Ratings" when levels 0 to 7 have been
selected.
eSelect "Level 0" to prevent play of diSCsthat do not have
ratings levels recorded on them.
Setting ratings (When level 8 Is selected)
All DVD-Video can be played.
1 to 7: Prohibits play of DVD-Video with corresponding
ratings recorded on them.
0 Lock Ait: Prohibits play of all DVD-Video.
Changing ratings (When level 0-7 is selected)
Unlock Player Change Level
Change Password Temporary Unlock
Video TV Aspect (m page 12) _ 4:3 Letterbox 16:9
Choose the seitlng to suit your television and preference.
"IV l_/pe (=_page 12) Standard tDirect View TVt
Select to suit the type of television. CRT Projector LCD W/Projector
projection TV Plasma TV
Sttll Mode _Field Frame
Specify the type of picture shown when paused.
Black Level Control _when connected to a TV through the VIDEO OUT
Change the black level of the picture if you connected a or S-VIDEO OUT terminal.
television through the COMPONENT VIDEO OUT Darker: when connected to a TV through the
terminals. COMPONENT VIDEO OUT (Y/Pe/PR) terminals.
Audio Speaker Setting (=, page 35) Multi-channel
Set the delay time for your center and surround speakem. Center: _1.3/2.6/3.9/5.3 ms
}} Surround (L/R): _/5.3/10.6/15.9 ms
Dynamic Range Compression (Dolby Digital only) Off
Change the dynamic range for late night viewing. On: For clear dialog when listening at low volume.
Audio during Search On Off
Choose whether to have sound during search, eThJs feature doesn't work for some discs.
Display Menu Language _Franqais Espahol
Choose the preferred language for these menus and the on-
e" screen messages,
On-Scr_n Messages On Off
Choose whether to show on-seraen messages or not.
Others HlghMAT _Play HighMAT discs as HighMAT discs.
Play HighMAT discs as HighMAT discs, or as regular WMA/ Disable: Play HighMAT discs as regular WMA/MP3/JPEG
MP3/JPEG discs, discs.
Mixed Disc--Audio & Stills _ Stills (JPEG)
Select the type of file played on discs containing both JPEG
and WMA/MP3.
DVD-Video Mode Off: DVD-Audio are played as DVD-Audio.
Select bow to play pictures contained on some DVD-Audio. On: DVD-Video contents found on DVD-AudJo can be
The setting returns to "Off" when you remove the disc, turn played.
the unit off or change the source.
QUICK SETUP (,- page 12) Yes (Menu language, Audio language, Subtitle language,
Answer questions to make basic settings. TV type, TV aspect)
t_Q
RQT6750
I
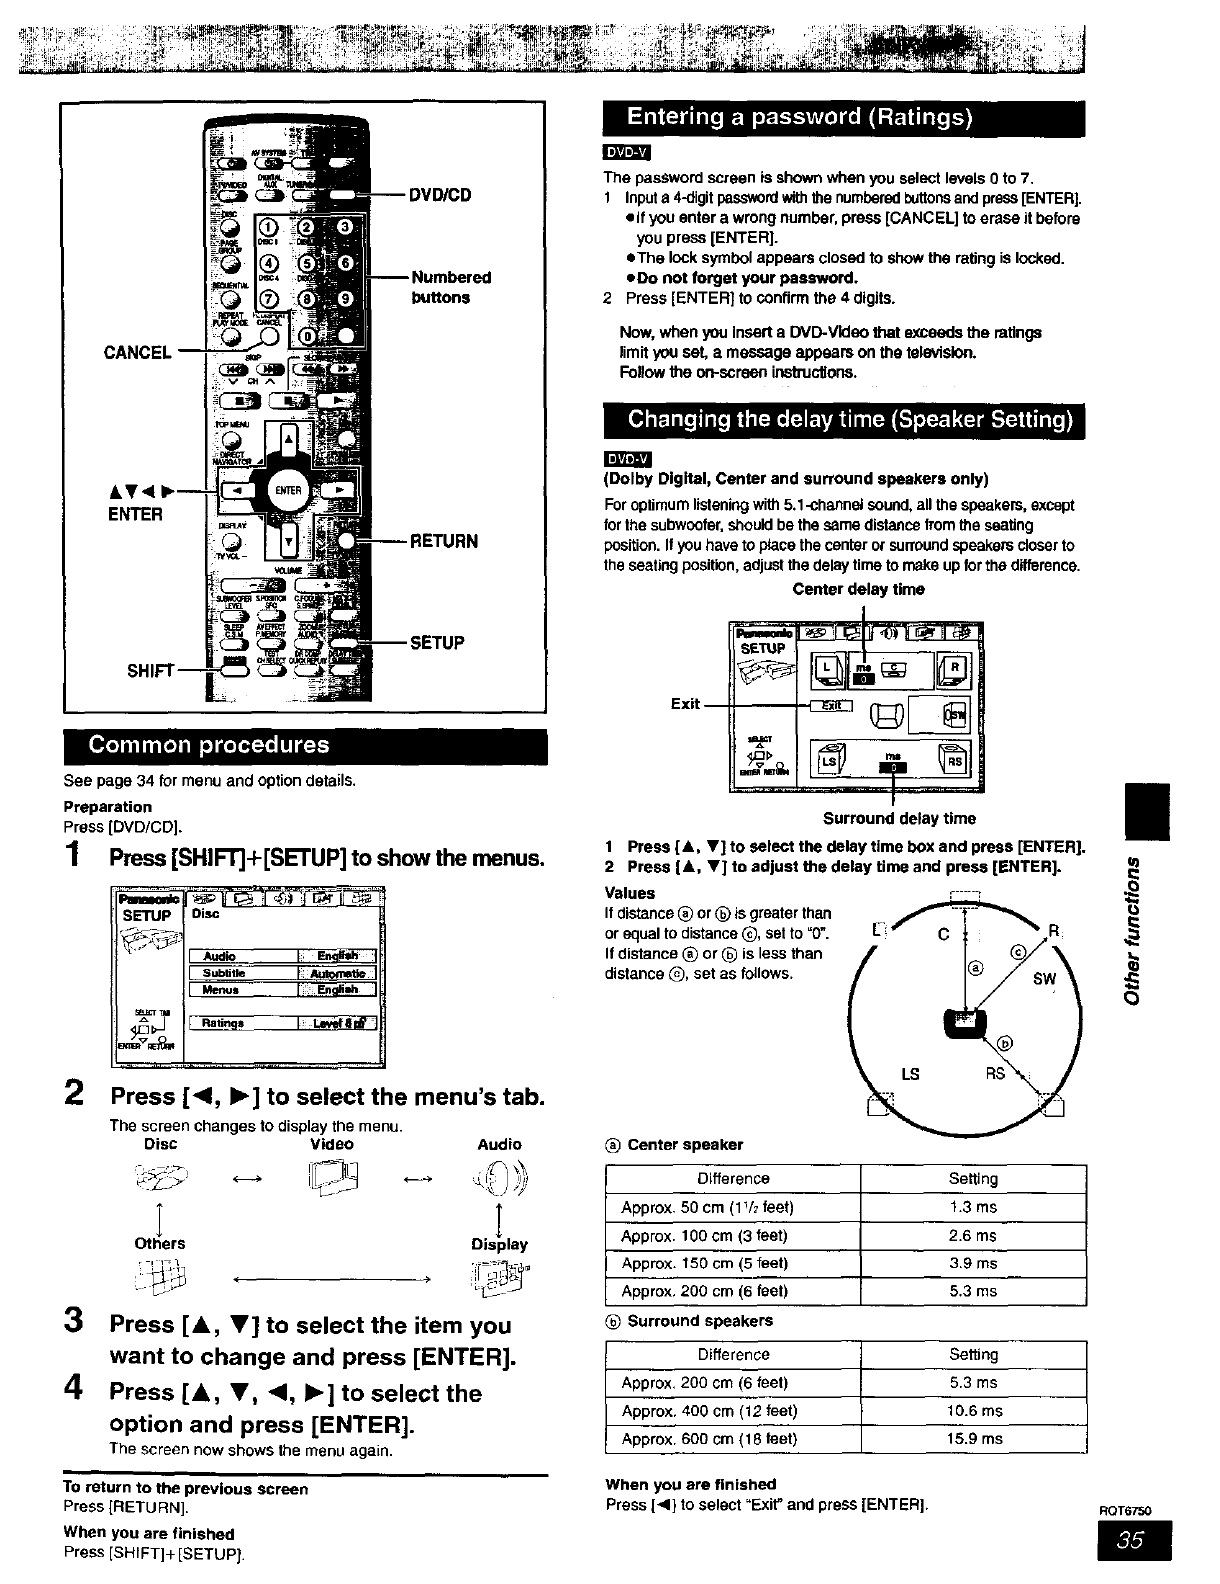
iD]al_,!
buttons
CANCEL
I IITl_lILT|
AV<
ENTER
SETUP
See page 34 for menu and option details.
Preparation
Press [DVD/CD].
1 Pm._ [SHIR]+[SETUP] to show the menus,
2Press [<1, I_] to select the menu's tab.
The screen changes to display the menu.
Disc Video
I
Others
,i1_1
Audio
oil
isp ay
3Press [&, V] to select the item you
want to change and press [ENTER].
4Press [&, V, <, I_] to select the
option and press [ENTER].
The screen now shows the menu again.
To return to the previous screen
Press [RETURN].
When you are finished
Press [SHIFT]+ [SETUP).
The password screen is shown when you select levels Oto 7.
1 Inputa 4-digitpasswordwiththe numberedbuttonsand press [ENTER].
• if you enter a wrong number, press [CANCEL] to erase it before
you press [ENTER].
• The Icck symbol appears closed to show the rating is locked.
• Do not forget your password.
2 Press [ENTER] to centirm the 4 digits.
Now, when you insert a DVD-Vldeo that exceeds the ratings
limit you set, amessage appeam on the tele_dsfon.
Follow the on-ssreen instru_ons.
(Dolby Digital, Center and surround speakers only)
For optimum listeningwith 5.1-cha_nel sound, all the speakers, except
forthe subwoofar, should be the same distance from the seating
position. Ifyou have to place the center or surround speakers closer to
the seating position,adjust the delay time to make up forthe difference.
Center delay time
Ex.--
"t ?®l
Surround delay time
1 Press [&, V] to select the delay time box and press [ENTER].
2 Press [&, V] to adjust the delay time and press [ENTER].
Values
If distance _) or _) is greater than
or equal to distance @, set to =0".
If distance (_) or _) is less than
distance _), set as follows.
r---_
Center speaker
Difference
Approx. 59 cm (1V_ feet)
Approx. 100 cm (3 feet)
Approx. 150 cm (5 feet)
Apprax. 200 cm (6 feet)
Surround speakerS
Difference
Approx. 200 cm (6 feet)
Approx. 400 cm (12 feet)
Approx. 600 cm (18 feet)
Setting
1.3 ms
2.6 ms
3.9 ms
5.3 ms
Setting
5.3 ms
10.6 ms
15.9 ms
When you are finished
Press [<1} to select "Exit" and press [ENTER].
(3
RQT6750

Language code list
Abkhazian: 6566 Chinese:
Afar: 6565 Corsican:
Afrikaans: 6570 Croatian:
Albanian: 8381 Czech:
Ameharic: 6577 Danish:
Arabic: 6582 Dutch:
Armenian: 7289 English:
Assamese: 6583 Esperanto:
Aymara: 6588 Estonian:
Azerbaijani: 6590 Faroese:
Bashkir: 6665 Fiji:
Basque: 6985 Finnish:
Bengali; Bangia:6678 French:
Bhutani: 6890 Fdsian:
Bibad: 6672 Galician:
Breton: 6682 Georgian:
Bulgarian: 6671 German:
Burmese: 7789 Greek:
Byelorussian: 6669 Green_andic:
Cambodian: 7577 Guarani:
Catalan: 6765 Gujarati:
9072
6779
7282
6783
6865
7676
6978
6979
6984
7079
70_
7073
7082
7089
7176
7565
6869
6976
7576
71_
7185
Hausa: 7265
Hebrew: 7387
Hindi: 7273
Hungadan: 7285
Icelandic: 7383
Indonesian: 7378
Intedingua: 7365
Irish: 7166
Italian: 7384
Japanese: 7465
Javanese: 7487
Kannaba: 7578
Kashmid: 7583
Kazakh: 7575
Kirghiz: 7589
Korean: 7579
Kurdiah: 7585
Laotian: 7679
Latin: 7665
Latvian, Lettish: 7686
Lingaia: 7678
Lithuanian:
Macedonian:
Malagasy:
Malay:
Maiayalam:
Maltese:
Maori: 7773
Mararbi: 7782
Moldavian: 7779
Mongolian: 7778
Nauru: 7865
Nepali: 7869
Norwegian: 7879
Odya: 7982
Pashto, Pushto: 8083
Persian: 7065
Polish: 8076
Portuguese: 8084
Punjabi: 8065
Ouechua: 8185
RhaetmR_nance: 8277
7684 Rotarian: 8279
7775 Russian: 8285
7771 Samoan: 8377
7783 Sanskrit: 8365
7776 Scots Gaelic: 7t 68
7784 Serbian: 8382
Serbo-Croatian: 8372
Shona: 8378
Sindhi: 8368
Singhalese: 8373
Slmrak: 8375
Slovenian: 8376
Somali: 8379
Spanish: 6983
Sunbanese: 8385
Swahili: 8387
Swedish: 8386
Tagalog: 8476
Tajik: 8471
Tamil: 8465
Tatar: 8484
Telugu: 84es
_ai: 8472
Tibetan: 6679
Tlgdnya: 8473
Tonga: 8479
Turldsh: 8482
Turkmen: 8475
Twi: 8487
Ukrainian: 8575
Urdu: 8582
Uzbelc 859O
Vietnamese: 8673
VoiapOk: 8679
Welsh: 6789
Wok)f: 8779
Xhosa: 8872
Y_dish: 7473
Yoruba: 8979
Zulu: 9O85
an' azenncoeczzo -nn-" ns ' ...... ....."
Optional o2
i
Use outdOOr antennas if radio reception is poor.
Disconnectthe antennawhenthe unitis notin use.
Do not usethe outdoorantennaduringan electricalstorm.
!1
Leave the lOOpantenna connected,
(_ Remove a piece of
the outer vinyl
insulator.
H
30 mm (13/16")
_) Twist the shield braid.
_-_ Shield braid
(_ Expose the core wire,
15 mm (%")
_"_ Core wire
AM outdoor antenna (Using a
vinyl wire)
Run apiece of vinyl wire horizontaJly across a
window or other convenient location.
5-12 m
(16-39 feet)
LOOP
ANT AM ANT
_tFMeO u:d::r atJ:;:)a (Using a
_[_ eOisconnect the FM indoor antenna.
eThe antenna should be installed by a
Icompetent technician.
75 Qcoaxial cable
(not included)
RQT6750
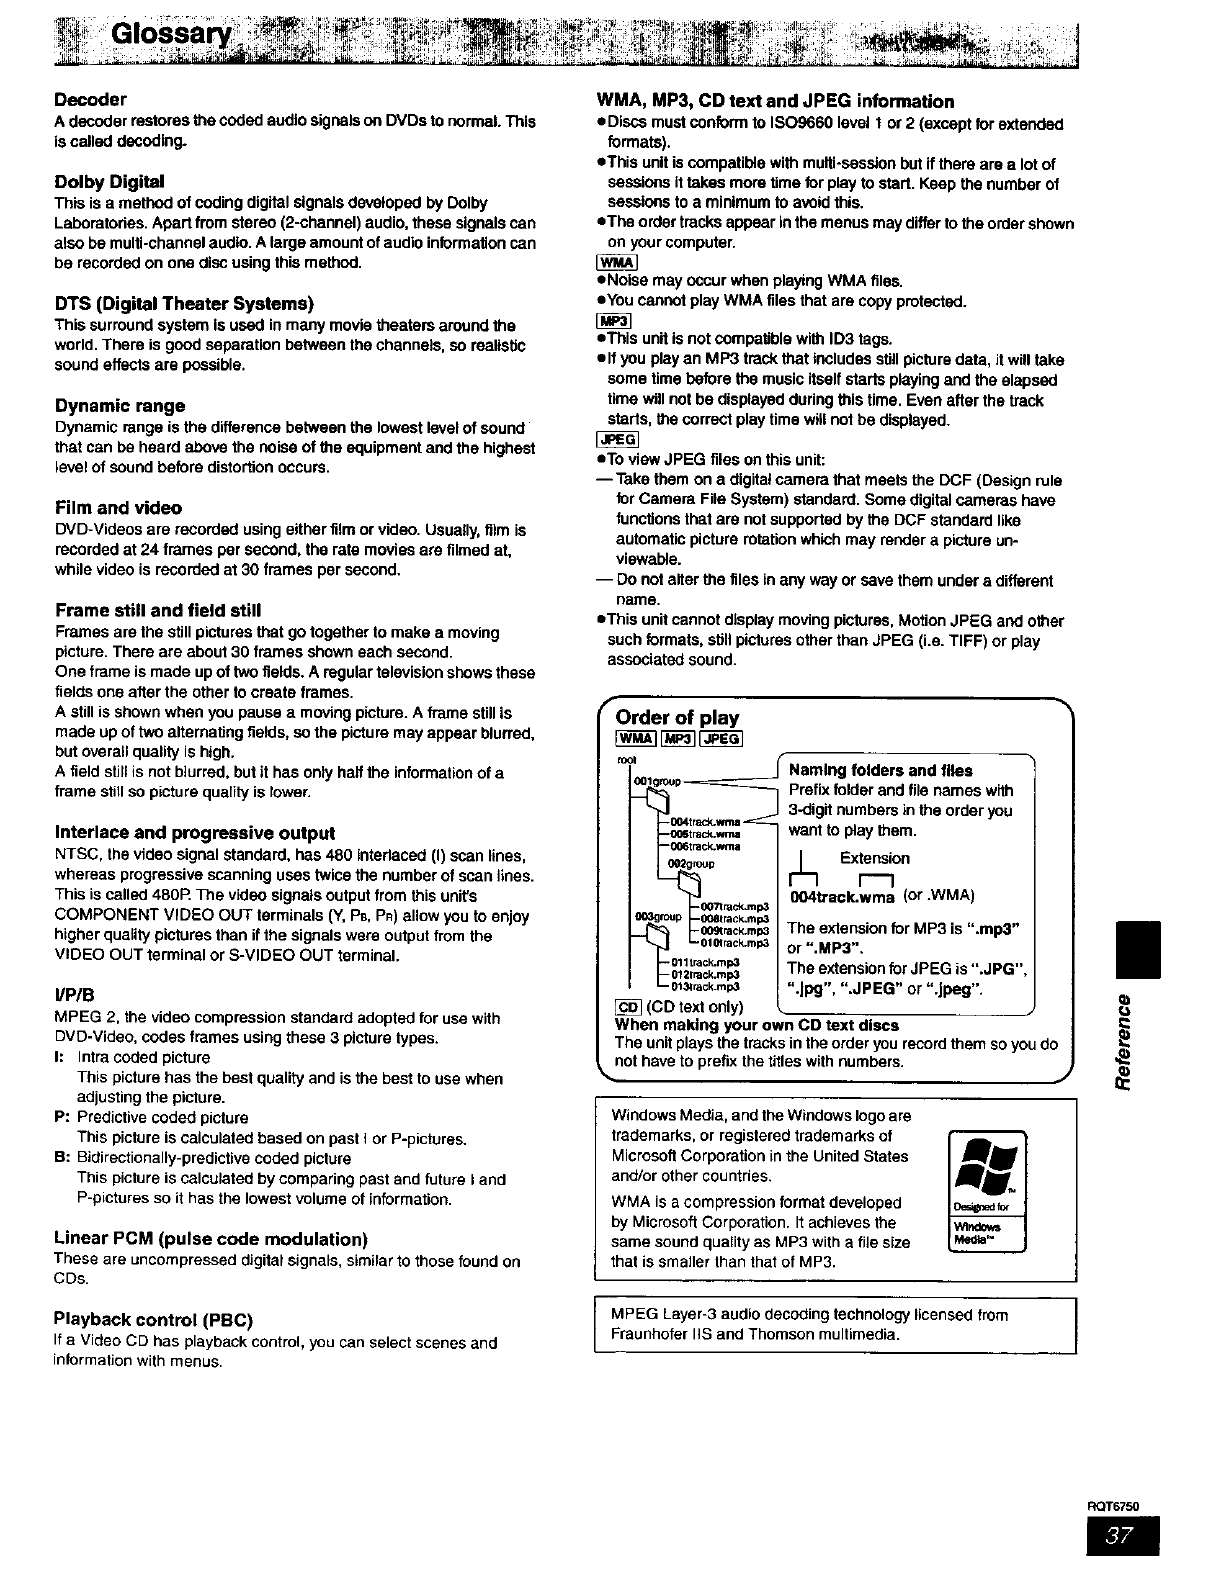
Decoder
Adecoderrestoresthecodedaudio signalson DVDsto normal.This
iscalled decoding.
Dolby Digital
This is a method of coding digital signals developed by Dolby
Laboratories. Apart from stereo (2-channel) audio, these signals can
also be multi-channel audio. A large amount of audio information nan
be recorded on one disc using this method.
DTS (Digital Theater Systems)
This surround system is used in many movie theaters around the
world. There is good separation between the channels, so reaitsfic
sound effects are possible,
Dynamic range
Dynamic range is the difference between the lowest level of sound
that can be heard above the noise of the equipment and the highest
level of sound before distortion occurs.
Film and video
DVD-Videos are recorded using either film or video. Usually, film is
recorded at 24 frames per second, the rate movies are filmed at,
while video is recorded at 30 frames per second.
Frame still and field still
Frames are the still pictures that go together to make a moving
picture. There are about 30 frames shown each second.
One frame is made up of two fields. A regular television shows these
fields one after the other to create frames.
A still is shown when you pause a moving picture. A frame stillis
made up of two alternating fields, so the picture may appear blurred,
but overall quality is high.
A field stiltis not blurred, but it has only halt the information of a
frame still so picture quality is lower.
Interlace and progressive output
NTSC, the video signal standard, has 480 interlaced (I) scan lines,
whereas progressive scanning uses twice the number of scan lines.
This is called 480R The video signals output from this unit's
COMPONENT VIDEO OUT terminals (Y, PB,PR) allow yOUto enjoy
higher quality pictures than ifthe signals were output from the
VIDEO OUT terminal or S-VIDEO OUT terminal.
IIPIB
MPEG 2, the video compression standard adopted for use with
DVD-Video, codes frames using these 3 picture types.
h Intra coded picture
This picture has the best quality and is the best to use when
adjusting the picture.
P: Predictive coded picture
This picture is calculated based on past I or P-pictures.
B: Bidiractionally-predictive coded picture
This picture is calculated by comparing past and future I and
P-pictures so it has the lowest volume of information.
Linear PCM (pulse code modulation)
These are uncompressed digital signals, similar to those found on
CDs.
Playback control (PBC)
If aVideo CD has playback control, you can select scenes and
information with menus,
WMA, MP3, CD text and JPEG information
eDiscs must conform to ISO9660 level 1 or 2 (except for extended
formats).
eThis unit is compatible with multi-session but if there are a lot of
sessions it takes more time for play to start. Keep the number of
sessions to a minimum to avoid this.
eThe order tracks appear in the menus may differ to the order shown
on your computer.
eNoise may occur when playing WMA files.
eYou cannot play WMA files that are copy protected.
eThis unit is not COmpatiblewith ID3 tags.
elf you play an MP3 track that includes still picture data, it will take
some time before the music itself starts playing and the elapsed
time will not be displayed during this time. Even after the track
starts, the correct play time will not be displayed.
eTo view JPEG files on this unit:
-- Take them on a digital camera that meets the DCF (Design rule
for Camera File System) standard. Some digital cameras have
functions that are not supported by the DCF standard like
automatic picture rotation which may render a picture un-
viewable.
-- Do not alter the files in any way or save them under a different
name.
eThis unit cannot display moving pictures, Motion JPEG and other
such formats, still pictures other than JPEG (i.e. TIFF) or play
associated sound.
fOrder of play
fool folders and files
Prefix folder and file names with
3-digit numbers in the order you
want to p_ay them.
_Extension
r---1
004track.wma (or .WMA)
-0O_rack.m_ The extension for MP3 is ".mp3"
-010track.rap3 or ".MP3".
-0_=lrack.mp3 The extension for JPEG is ".JPG"
- 0t 31rack-mp3 "oJpg", ".JPEG" or ".Jpeg".
_] (CD text only)
When making your own CD text discs
The unit plays the tracks in the order you record them so you do
_not have to prefix the titles with numbers.
Windows Media, and the Windows logo are
trademarks, or registered trademarks of
Microsoft Corporation in the United States
and/or other countries.
WMA is a compression format developed
by Microsoft Corporation. It achieves the
same sound qustity as MP3 with a file size
that is smaller than that of MP3.
]
MPEG Layer-3 audio decoding technology licensed from J
Fraunhofer IIS and Thomson multimedia.
II
RQT6750
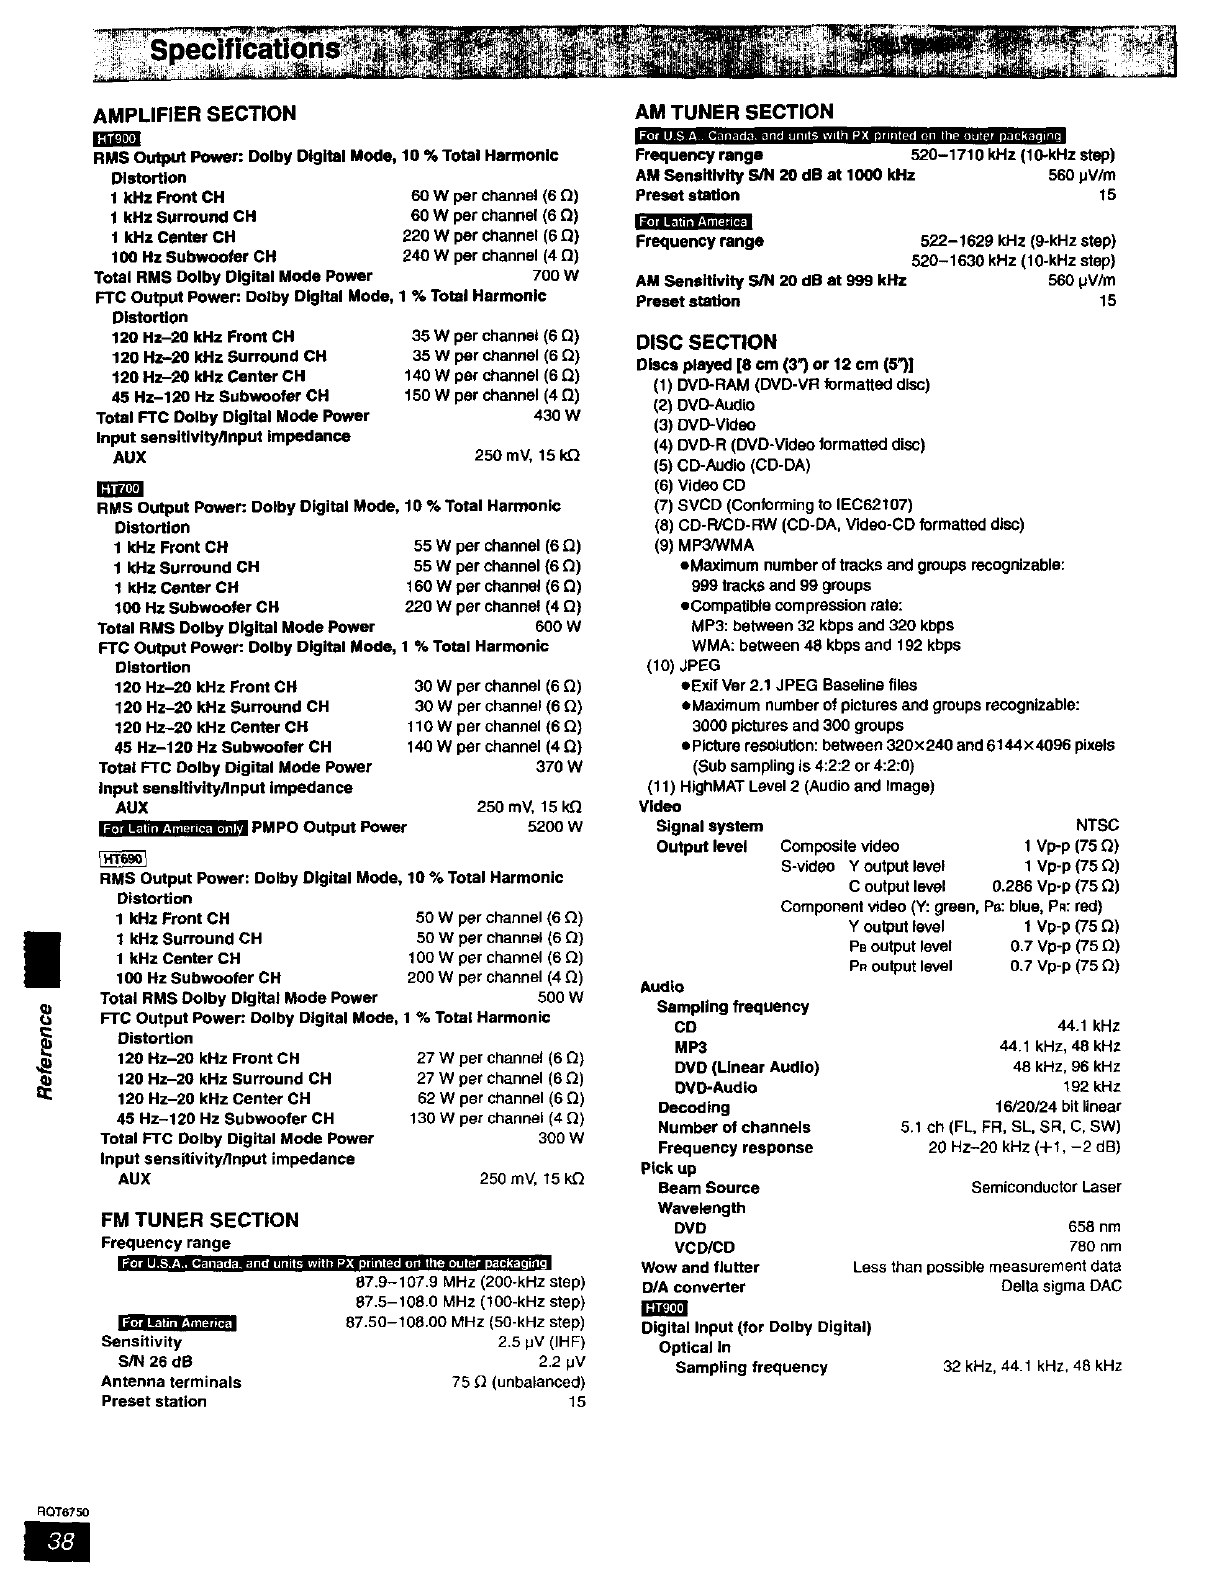
1
I_ iFgl-_',=l-_=3iT4
|
AMPLIFIER SECTION
RMS Output Power: DoIby Digital Mode, 10 % Total Harmonic
Distortion
1 kHz Front CH 60 W per channel (6 0)
1 kHz Surround CH 60 W per channel (6 Q)
1 kHz Center OH 220 W per channel (6 Q)
100 Hz Subwoofer CH 240 W per channel (4 Q)
Total RMS Dolby Digital Mode Power 700 W
FTC Output Power: Dolby Digital Mode, 1% Total Harmonic
Distortion
120 Hz-20 kHz Front CH
120 Hz-20 kHz Surround CH
120 Hz-20 kHz Center CH
45 HZ-120 Hz Subwoofer CH
Total FTC Dolby Digital Mode Power
Input aensttlvity/input impedance
AUX
35 W per channel (6 Q)
35 w per channel (6 Q)
140 W per channel (6 Q)
150 W per channel (4 Q)
430 W
250 mV, 15k_
RMS Output Power: Dolby Digital Mode, 10 % Total Harmonic
Distortion
1 kHz Front CH
1 kHz Surround CH
1 kHz Center CH
100 Hz Subwoofer CH
Total RMS Oolby Digital Mode Power
FTC Output Power: Dolby Digital Mode,
Distortion
120 Hz-20 kHz Front CH
120 Hz-20 kHz Surround CH
120 Hz-20 kHz Centar CH
45 Hz-120 Hz Subwoofer CH
Total FTC Dolby Digital Mode Power
Input eansltivity/Input impedance
AUX
PMPO Output Power
55 W per channel (6 Q)
55 W per channel (6 Q)
160 W per channel (6 O)
220 W par channel (4 Q)
600 W
t% Total Harmonic
30 W per channel (6 Q)
30 W per channel (6 Q)
110 W per channel (6 Q)
140 W per channel (4 Q)
370 W
250 mV, 15 kQ
5200 w
RMS Output Power: Dolby Digital Mode, 10 % Total Harmonic
Distortion
1 kHz Front CH 50 W pe_channel (6 O)
1 kHz Surround CH 50 W par channel (6 O)
1 kHz Center CH 100 W per channel (6 _)
100 Hz Subwoofer CH 200 W per channel (4 Q)
Total RMS Dolby Digital Mode Power 500 W
FTC Output Power: Dolby Digital Mode, 1% Total Harmonic
Distortion
120 Hz-2O kHz Front CH
120 Hz-20 kHz Surround CH
120 Hz-20 kHz Center CH
45 Hz-120 Hz Subwoofer CH
Total FTC Do,by Digital Mode Power
Input sensitivity/Input impedance
AUX
27Wperehannal(6 O)
27Wperchannal(6 Q)
62Wperchannel(6 Q)
130Wperchannal(4 _)
300W
250m_ 15k_
Sensitivity
S/N 26 dB
Antenna terminals
Preset station
FM TUNER SECTION
Frequency range
87.9-107.9 MHz (200-kHz step)
87.5-108.0 MHz (100-kHz step)
87.50-108.00 MHz (50-kHz step)
"_1 m_RFJRt_
2.5 pV (IHF)
2.2 pV
75 _(unbalanced)
15
AM TUNER SECTION
Frequency range 520-1710 kHz (10-kHz step)
AM Sensitivity S/N 20 dB at 1000 kHz 560 pV/m
preset station 15
Frequency range 522-1629 kHz (9-kHz step)
520-1630 kHz (10-kHz step)
AM Sensitivity S/N 20 dB at 999 kHz 560 pV/m
preset staSon 15
DISC SECTION
DIscs played [8 cm (3") or 12 cm (5")]
(1) DVD-RAM (DVD-VR formatted disc)
(3) DVD-Video
(4) DVD-R (DVD-Video formatted disc)
(5) CD-Audfo (CD-DA)
(6) Video CD
(7) SVCD (Conforming to IEC62107)
(8) CD-R/CD-RW (CD-DA, Video-CD formatted disc)
(9) MP3/WMA
eMaximum number of tracks and groups recognizable:
999 tracks and 99 groups
eCompaUbla compression rate:
MP3: between 32 kbps and 320 kbpS
WMA: between 48 kbps and 192 kbps
(10) JPEG
eExif Ver 2.1 JPEG Baseline files
eMaximum number of pictures and groups recognizable:
3000 pictures and 300 groups
ep_ra resOtUtk_n:betwee_'t 320x240 and 6144x4096 pixels
(Sub sampling is 4:2:2 or 4:2:0)
(11) HighMAT Level 2(Audio and Image)
Video
Signal system
Output level
NTSC
Compositevideo 1 Vp-p (75 Q)
S-videO Y outputlevel 1 Vp-p (75 Q)
C outputlevel 0.286 Vp-p (75 O)
Componentvideo (Y: green,P_:blue,Pn: red)
Y outputlevel 1 Vp-p (75 B)
PBoutputlevel 0.7 Vp-p(75 0)
Pnoutputlevel 0.7 Vp-p (75 O)
Audio
Sampling frequency
CD
MP3
DVD (Linear Audio)
O_4_-Audio
Decoding
Number of chennels
Frequency response
pick up
Beam Source
Wavelength
DVD
VCD/CD
Wow and flutter
D/A converter
44.1 kHz
44.1 kHz, 48 kHz
48 kHz, 96 kHz
192 kHz
16120/24 bit linear
5.1 ch (FL, FR, SL, SR, C, SW)
20 HZ-20 kHz (+1, -2 riB)
Semiconductor Laser
658 nm
780 nm
Less than possible measurement data
Delta sigma DAC
Digital Input (for Dolby Digital)
Optical In
Sampling frequency 32 kHz, 44.1 kHz, 48 kHz
RQT6750
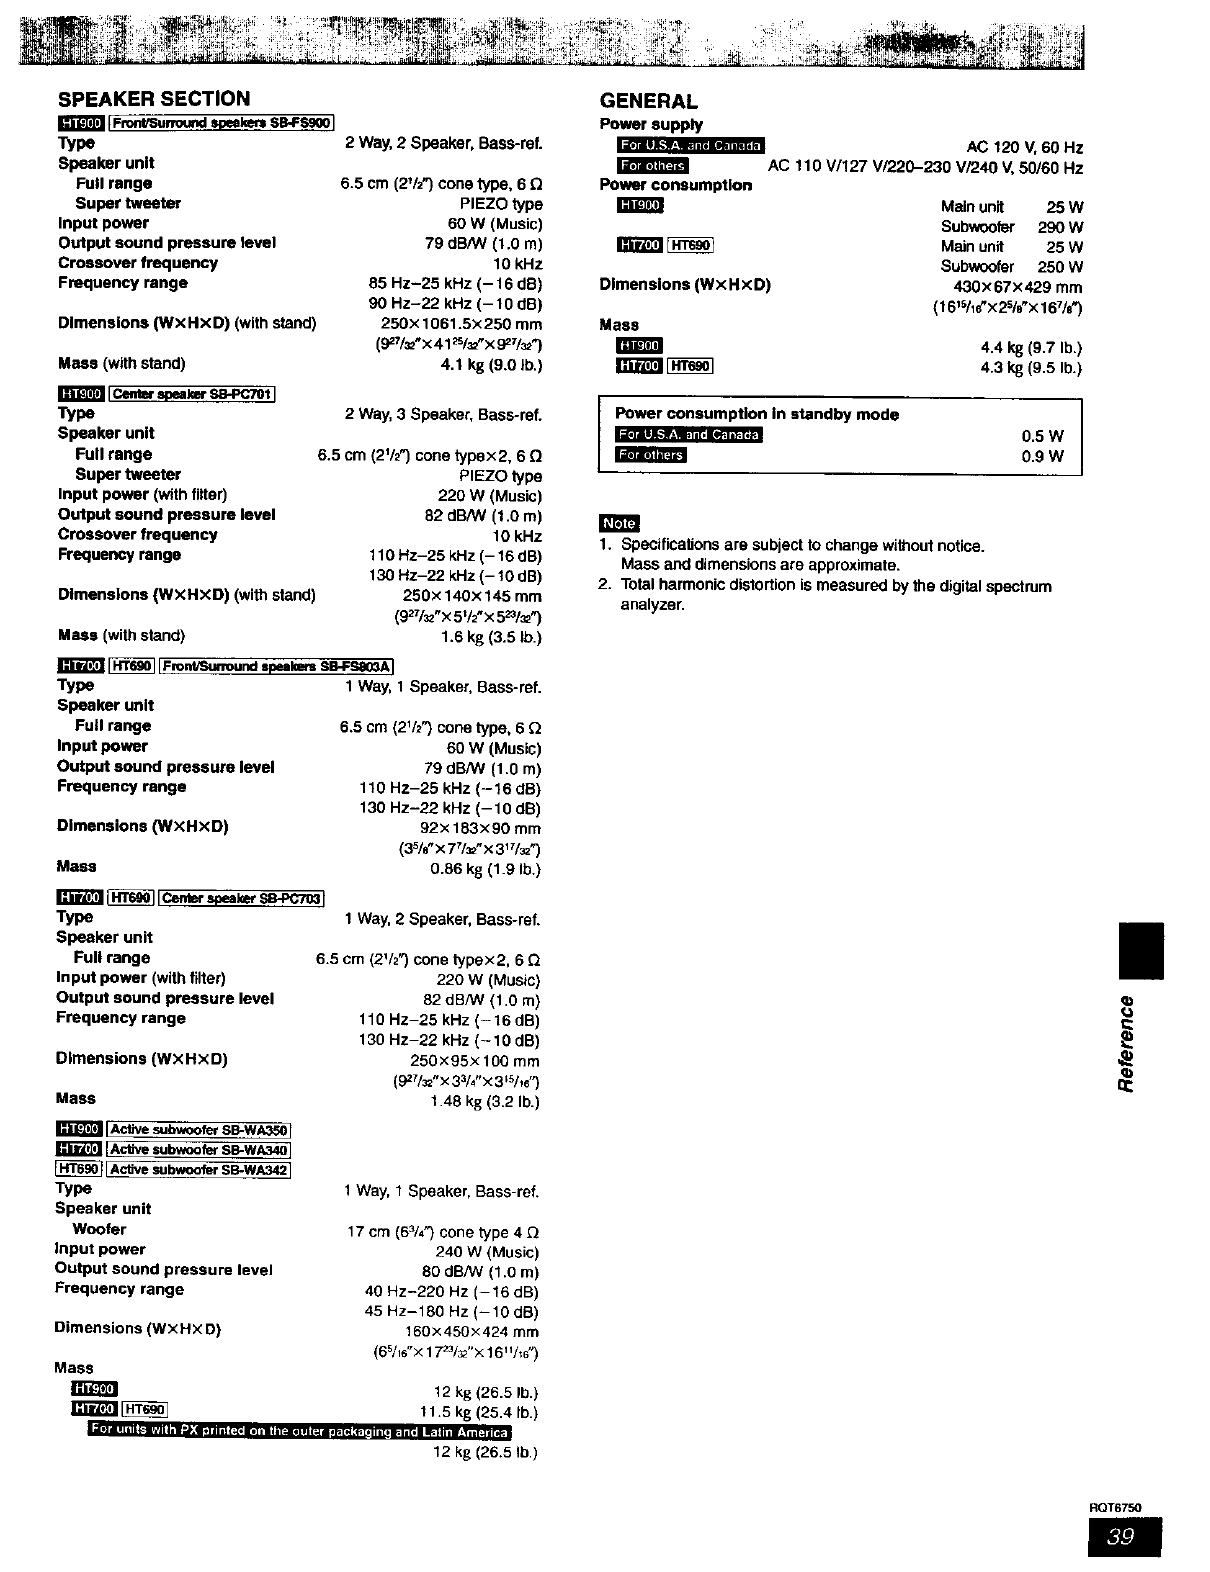
SPEAKER SECTION
m:al:imaiF_ntiSur_urKI ipeake_ SB-FS_OI
_pe
Speaker unit
Full range
Super tweeter
Input power
Output sound pressure level
Crossover frequency
Frequency range
I_'_11 Ik-_lliC'l'k1"i11_ F
Dimensions (WxHxD) (with stand)
Mass (with stand)
2 Way,2 Speaker,Bass-re[
6.5 cm (2t/2") cone type, 6
PIEZO type
60 W (Music)
79 dB/W (1.0 m)
10 kHz
85 Hz-25 kHz (-16 dE})
90 Hz-22 kHz (-10 dB)
250× 1061.5x 250 mm
(927/_"X 41 _s/=t'x 927/_z")
4.1 kg (9.0 lb.)
_m sa4,cTotj
Type
Speaker unit
Full range
Super tweeter
Input power (with filter)
Output sound pressure level
Crossover frequency
Frequency range
Dimensions (WXHXD) (with stand)
Mass (with stand)
2 Way, 3 Speaker, Bass-rat
6.5 cm {2112_) cone typex2, 6 Q
PIEZO type
220 W (Music)
82 dB/W (1.0 m)
10 kHz
110 Hz-25 kHz (- 16 dB)
130 Hz-22 kHz (- 10 dB)
250x140x145 mm
(927/_"x 5V2"x 5_1_ ")
1.6 kg (3.5 lb.)
_IFror_vSu.our_s_=_ SB-FSaO_AI
Type
Speaker unit
Full range
Input power
Output sound pressure level
Frequency range
Dimensions (WXHXD)
Mass
rzr_'ml8_] iCer,__r sa-_re3I
Type
Speaker unit
Full range
Input power (with filter)
Output sound pressure level
Frequency range
Dimensions (WXHXD)
Mass
I_U_esubwooferSB-W_Or
[_ s.b_o_ se-wA34O]
[Active subwoofer SB-WA342]
Type
Speaker unit
Woofer
Input power
Output sound pressure level
Frequency range
Dimensions (WXHXD)
Mass
1 Way, 1 Speaker, Bass-reL
63 cm (2V2") cone type, 6
60 W (Music)
79 dB/W (1.0 m)
110 Hz-25 kHz (-16 dB)
130 Hz-22 kHz (-10 dS)
92x 183x90 mm
(35/8-x 77/_,,x 3II/_)
0.86 kg (1.9 lb.)
1 Way, 2 Speaker, Bass-ref.
6.5 cm (2'/2") cone typex2, 6Q
220 W (Music)
82 dB/W (1.0 m)
110 Hz-25 kHz (-16 dB)
130 Hz-22 kHz (-10 dB)
250x95x 100 turn
(927/_"X 33/_"x 3_Shd')
1.48 k8 (3.2 lb.)
1Way, 1 Speaker, Bass-ref.
17 cm (63/4") cone type 4
240 W (Music)
80 dB/W (1.0 m)
40 Hz-220 Hz (-16 dB)
45 Hz-180 Hz (-10 dB)
160x450x424 turn
(65/_6"x 1723/_"X16 "/_6")
12 kg (26.5 lb.}
_ 11.5 kg (25.4 lb.)
Imill i I I i]l_._[_]] 111 =_J_t_l ( t_o le] iii |]_111i11411 _[,N _t= [iiii[I _; i i [ t i _ _il, 1111 _I[ _i
12 kg (26.5 lb.)
GENERAL
Powersupply
Power consumption
AC 120 V, 60 Hz
AC 110 W127 V/220-230 V/240 V, 50/60 Hz
Main unit 25 w
Subwoofer 290 w
_Main unit 25 W
Subwoofer 250 W
Dimensions (WXHXD) 430x67x429 mm
(16_%_"X2%"X 167/S")
Mass
I;ll_ItI* 4.4 I_ (9.7 lb.)
ITF_T_ [_] 4.3 k8 (9.5 lb.)
IPower consumption In standby mode 0.5 W
0.9 W
1. Specifications are subject to change without notice.
Mass and dimensions are approximate.
2. Total harmonic distortion is measured by the digital spectrum
analyzer.
II
RQT6750
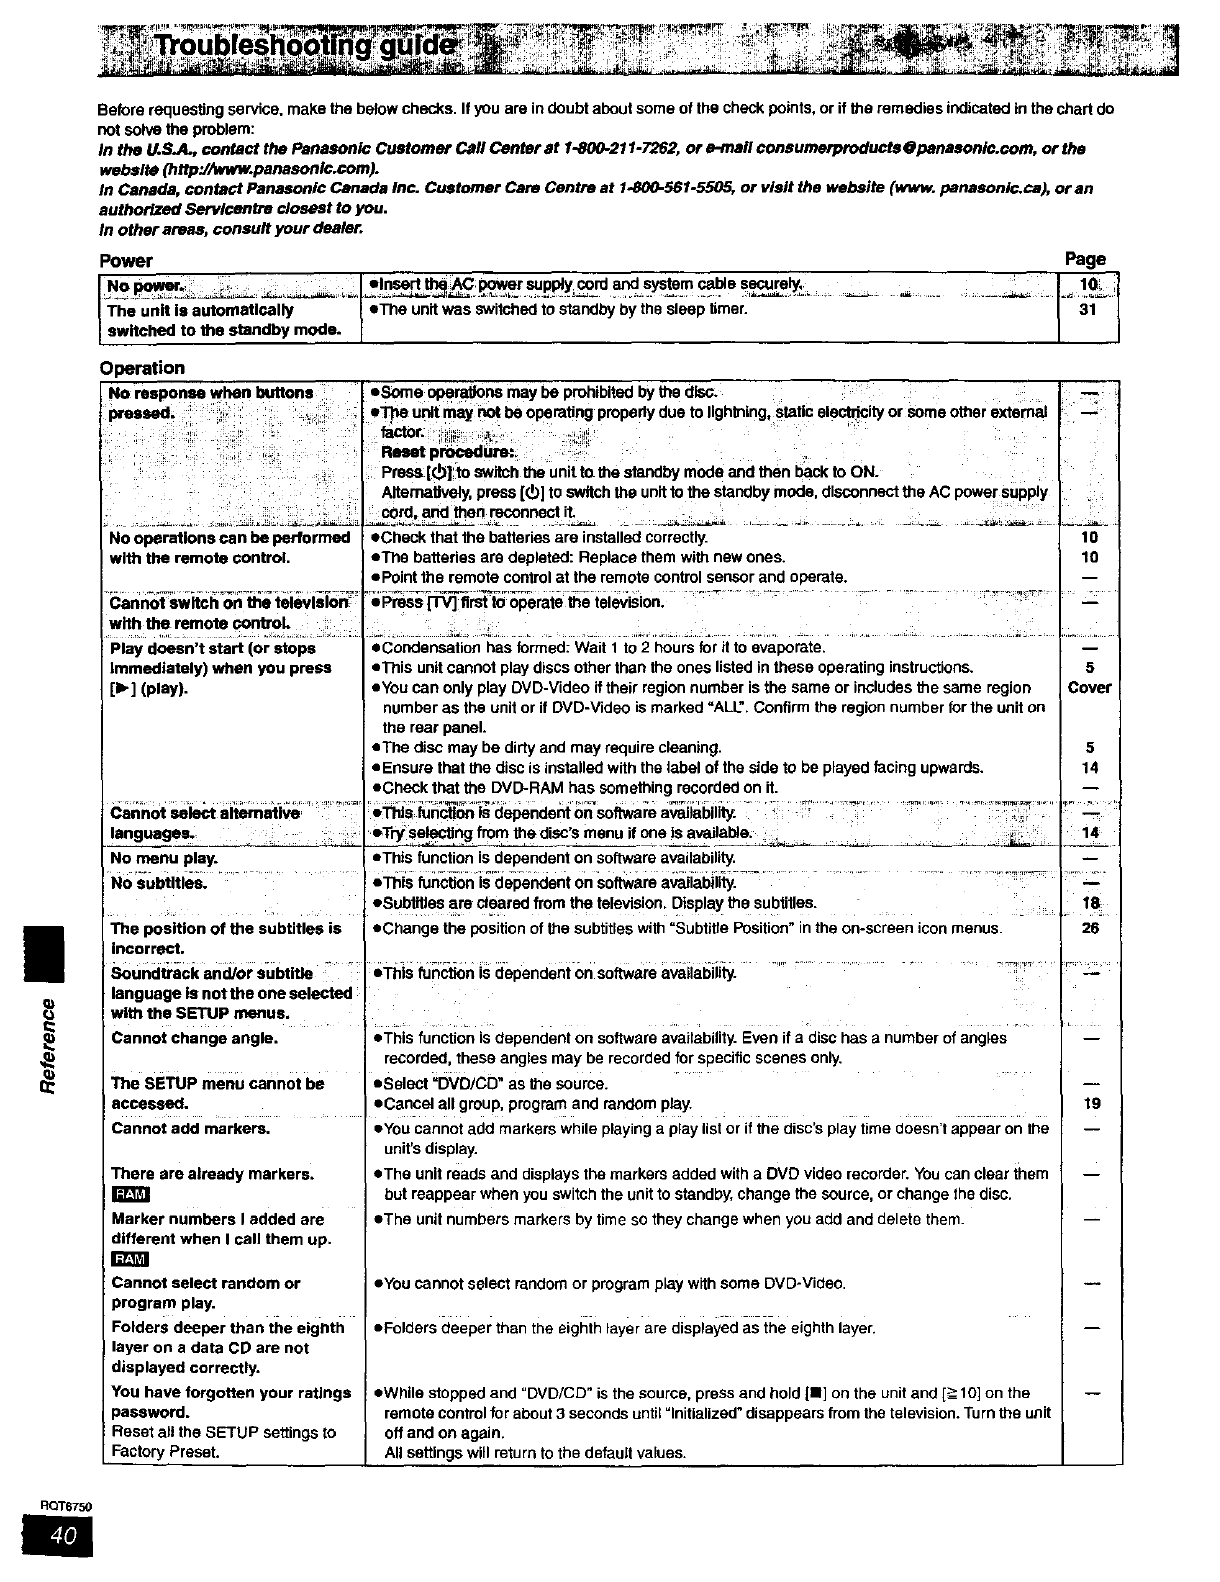
i
Before requesting service, make the below chscks. If you are indoubt about some of the check points, or if the remedies indicated in the chart do
not solve the problem:
In the U.S.A., contact the Panasonic Customer Call Canter at 1-800-211-7262, or e-mail consumerproducts@panasonlc.com, or the
webslte (http'J/www.panaconlc.com).
in Canada, contact Panasonlc Canada Inc. Customer Care Centre at 1_0-561.5505, or visit the webslte (www. panasonic.ca), or an
sutherfzed Servlcentre closest to you.
In other areas, consult your dealer.
Power
No power. :,,...... elnsert the AC; _supply card and systam cable securely,
Iswitched to the standby mode. /
Operation
Page
•Some opera_lons may be prohibitad by the disc:
e_ urdtmay _be operating properly due to Ilghthing, stati€ clarity orsome other ex_rnal
factor. :'
Reset procedure:,
Press [_] ;toswitch the unit to the standby mode and then back to ON.
Alternatively, press [(_] to switch the unit to the standby mode, disconnect the AC power supply
cojd arid therl reconnect it,
No operations can be portormed eCheck that the hattaries ars installed corrsctly.
with the remote control, eThe batteries are depleted: Replace them with new ones.
ePotht the remote control at the remote control sensor and operate.
-_an_sw_ch'_'r;'_ _i_orl +_ '_,_+__'+_"_'_Press[l"V]firsttooperate+-theta syrian."'_; .....":-_ + '+: ....... :_ - ' .......... _'_'_...._:'_
with the remote oontroL ;
Play doesn't start (or steps
Immediately) when you press
[1_] (play).
Cannot select alternative :
languages.
No menu play.
...... ,eSubtit!es are cleared from the television. Display the subtitles. ..........
The position of the subtitles is eCbange the position of the subtitlas with "Subtitle Position" in the on-screen icon menus.
incorrect.
Sound_ck and/or subtltta : eThis run,fan is dependent on software availabiJi_ty. 'lr' ................ :_' '_
tano°aOo,snottheoneso,
with the SETUP menus, .... i..................
Cannot change angle, eThis function is dependent on software availability. Even if a disc has a number of angles
recorded, these angles may be recorded for specific scenes only.
The SETUP menu cannot be eSelect _DVD/CD" as the source.
accessed, eCancel all group, program and random play.
Cannot add markers, eYou cannot add markem while playing a play list or if the disc's play time doesn't appear on the
i'ii
10
10
i
•Condensation has formed: Wait 1 to 2 hours for it to evaporate.
eThis unit cannot play discs other than the ones listed in these operating instructions. 5
eYou can only play DVD-Video if their region number is the same or includes the same region Cover
number as the unit or if DVD-Video is marked "ALL". Confirm the region number for the unit on
the rear panel.
eThe disc may he dirty and may require cleaning. 5
cEnsure that the disc is installed with the label of the side to be played facing upwards. 14
eCheCk that the DVD-RAM has something recorded on it.
eTtdafunctlonladependentonsoftwareavaiab ty: : _--
•Try selecting from the d sc's menu if one Is available; _i4
eThla function is dependent on software availability.
unit's display.
eThe unit reads and displays the markers added with aDVD video recorder. You can clear them
but reappear when you switch the unit to standby, change the source, or change the disc.
eThe unit numbers markers by time so they change when you add and delete them.
i8
26
I
19
There are already markers.
!r n
Marker numbers I added are
different when I call them up.
Cannot select random or
program play.
Folders deeper than tile eighth
Jlayer on a data CD are not
displayed correctly.
You have forgotten your ratings
)assword.
Reset all the SETUP settings to
Factory Preset.
•You cannot select random or program play with some DVD-Video.
eFolders deeper than the eighth layer are displayed as the eighth layer.
•While stopped and "DVD/CD" is the source, press and hold [I] on the unit and [_->10]on the
remote control for about 3 seconds until =Initialized" disappears from the television. Turn the unit
off and on again.
All settings will return to the default values.
RQT6750
m
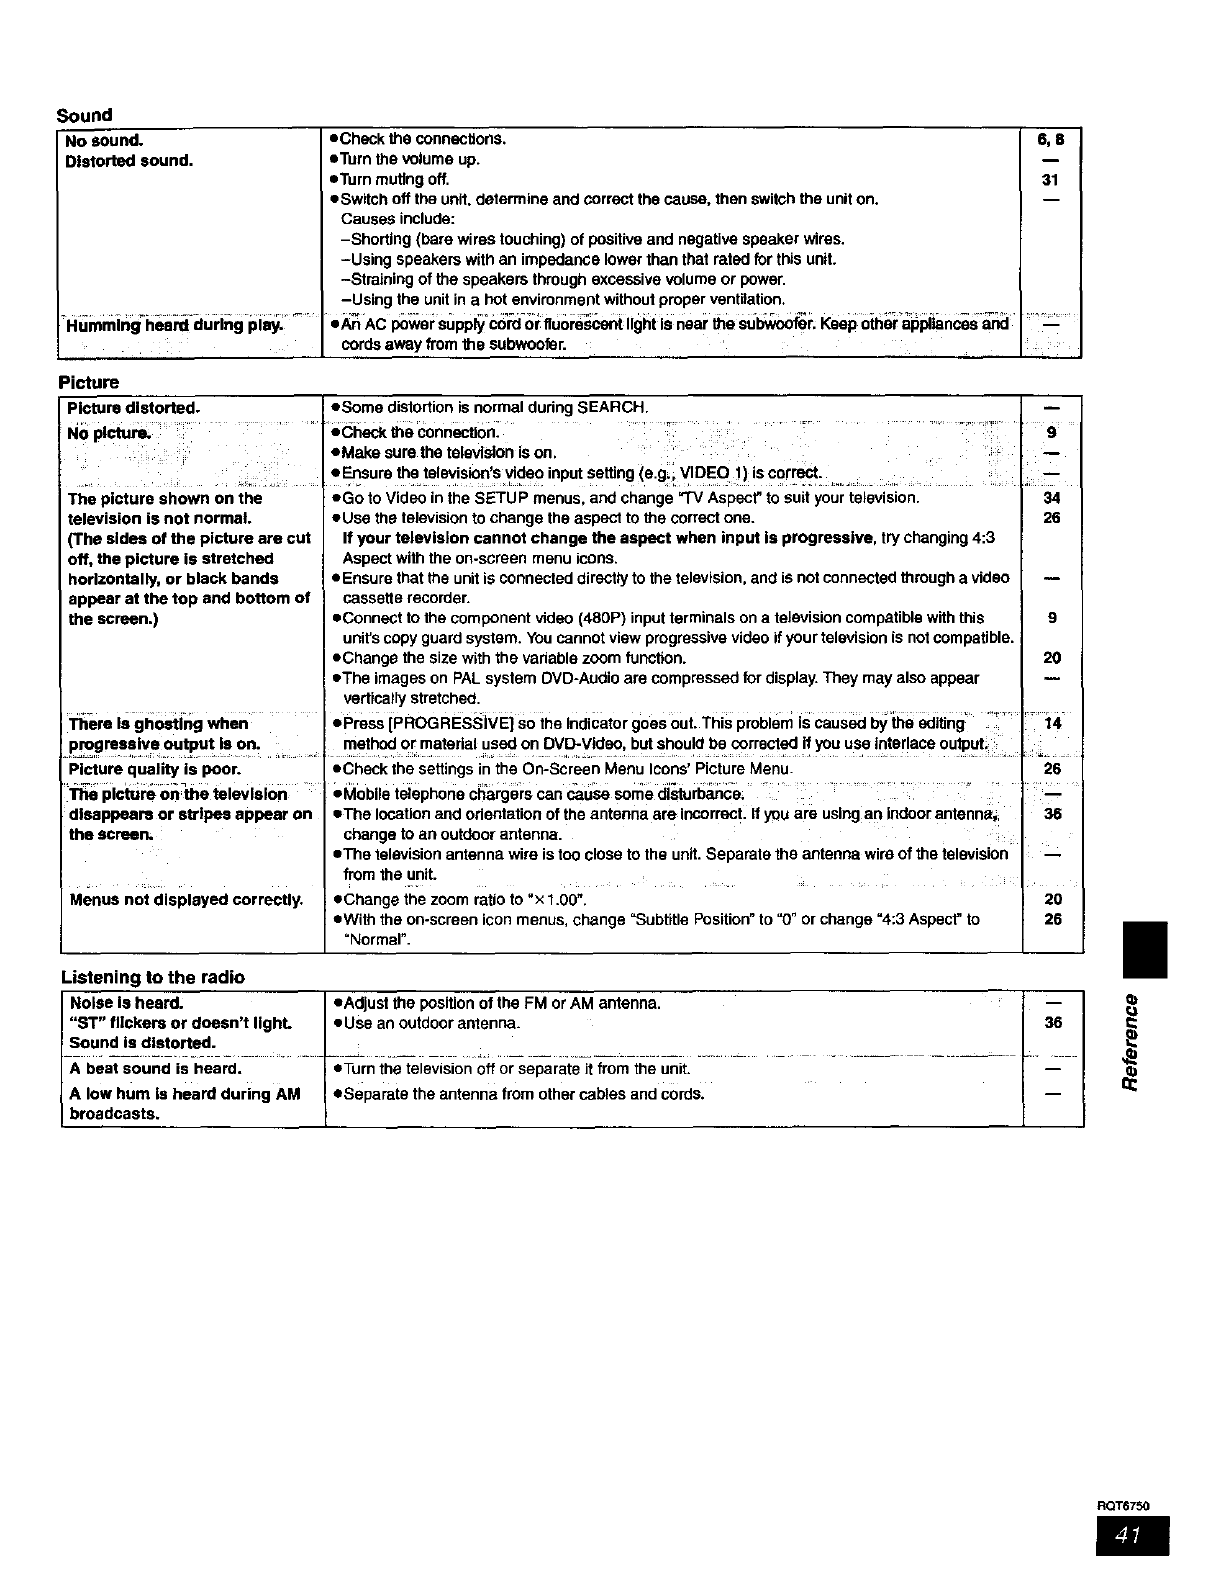
Sound
No sound.
Distorted sound.
H_rnmin_'ilU_ cluring_Pi_,
• Check the connections. 6, 8
• Turn the volume up. 1
-,Turn muting off. 31
• Switch off the unit. determine and correct the cause, then switch the unit on.
Causes include:
-Shorting (bare wires touching) of positive and negative speaker wires.
-Using speakers with an impedance lower than that rated for this unit.
-Straining of the speakers through excessive volume or power.
-Using the unit in a hot environment without proper ventilation.
•_AC p0wei: Supply"c0"l_l-orffuore_,,enHight is heal__e su_r; Keeg oihe'r'a_pHances_ ..................--
cords away from the subwoofer.
Picture
Picture distorted. •Some distortion is normal dudng SEARCH.
t•Check the connecti0n: .... _ _ ......
television is not normal.
(The sides of the picture are cut
off, the picture is stretched
horizontally, or black bands
appear at the top and bottom of
the screen.)
There Is ghosting when
p_gress!ve?u_ut!son- ..............
Picture quality is poor.
::_ Pl_m on_ television
dlsappears or stripes appear on
the screen.
Menus not displayed correctly.
...........:_: 9
•Make sure the television is on.
Ensure the televis'on s wdso input setting (e.g VIDEO !) 's €or_: ...........................
eGo to Video in the SETUP menus, and change "TV Aspect" to suit your television. 34
• Use the television to change the aspect to the correct one. 26
If your television cannot change the aspect when input Is progressive, try changing 4:3
Aspect with the on-ecreen menu icons.
• Ensure that the unit is connected directly to the television, and is not connected through a video --
cassette recorder.
•Connect to the component video (480P) input terminals on a television compatible with this 9
unit_scopy guard system. You cannot view progressive video if your television is not compatible.
• Change the size with the vadable zoom function. 20
•The images on PAL system OVD-Audio are compressed for display. They may also appear
vertically stretched.
• Press [PROGRE_]vEJ so the indicator goes out. This probiern is caus_ by _e _iting !
method 0[ material used on DVD-Vidsc, but should be corrected ff you use inte r ace output_ ;
•Check the settings in the On-Screen Menu Icons' Picture Menu. 26
eM0bile telephone c_rgers can cause some d_-e_ ............... .......
•The location and odentation of the antenna are incorrect: If you are using an indoor antenn_ 36
change to an outdoor antenna.
•The television antenna wire is too close to the unit. Separate the antenna wire of the television
from the unit.
• Change the zoom ratio to "× 1.00". 20
• With the on-screen icon menus, change =Subtitle Position" to =0" or change %:3 Aspect" to 26
"Normal".
Listening to the radio
"ST" flickers or doesn't lighL I•Use an outdoor antenna.
-S°u rid--I-s-dI-st°_- ............... k _ .......... - '.............................. _ ..........
A beat sound is heard. I.Turn the television off or separate it from the unit. = " '_
A low hum is heard during AM I •Separate the antenna from other cables and cords. I_
broadcasts, |
I
RQT6750
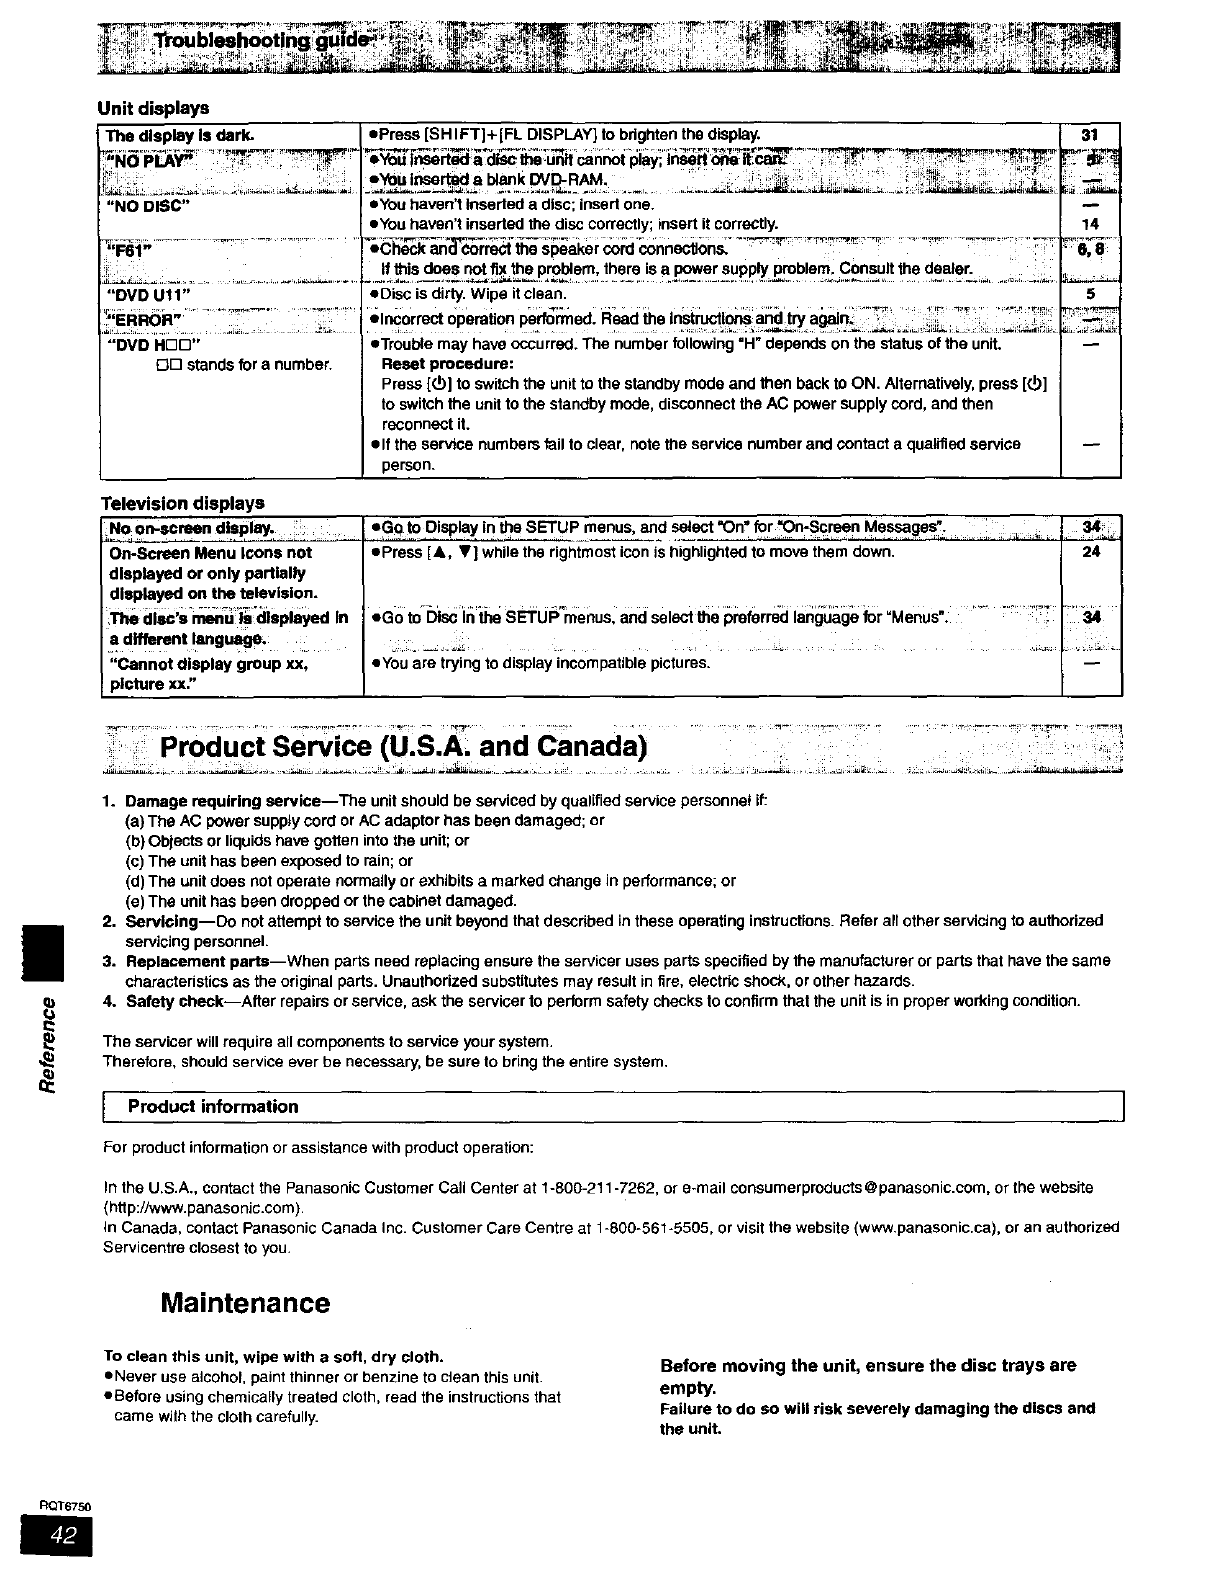
Unit displays
The display Is dark.
"NO DISC"
"DVD U11"
,_,_._..- _._............... _...........
,_rln_Jn _;
"DVD HDD"
_D stands for a number.
• Press [SH IFT]+[FL DISPLAY] to bdgbten _e disp_y, i
eYo_t_:_rt_adlsctheunllcannotpla_,lnsertone:it_cm'_ : _
eyou haven't inserted a disc; insert one.
eYou haven't inserted the disc correctly; insert it correctly.
eChac_ and corre_ the speaker cord connections.
eDisc is dirty. Wipe it clean•
elncormct operation performed. Read the In=n_l_,_t_ a_ln_ _ _
eTrouble may have occurred. The number following "H" depends on the status of the unit.
Reset procedure:
Press [_] to switch the unit to the standby mode and then back to ON. Alternatively, press [(_]
to switch the unit to the standby mode, disconnect the AC power supply cord, and then
reconnect it.
elf the service numpers fail to clear, note the service number and contact a qualified service
person.
31
14
,6,8¸¸
5
Television displays
On-Screen Menu Icons not
dlaplayed or only partially
displayed on the television.
di_'S _ll_=nu_i__diSplayed In
a different language.
"Cannot display group xx,
picture xx."
eGq fo Display in the SETUP menus and sslact *On, for "On-Screen Messages".
epress [&, V] while the rightmost icon is highlighted to move them down. 24
ego to_[3faci" _SETUPs'menus: and select the preferrecllenguagefor =Menus". ...... :_: :,_r:
eYsu are trying to display incompatible pictures•
|
1. Damage requiring earvice--The unit should be serviced by qualified service personnel if:
(a) The AC power supply cord or AC adaptor has been damaged; or
(b) Objects or liquids have gotten into the unit; or
(c) The unit has been exposed to rain; or
(d) The unit does not operate normally or exhibits a marked change in performance; or
(e) The unit has been dropped or the cabinet damaged•
2. Servicing--Do not attempt to service the unit beyond that described in these operating instructions. Refer all other servicing to authorized
servicing personnel.
3. Replacement parts--When parts need replacing ensure the servicer uses parts specified by the manufacturer or parts that have the same
characteristics as the original parts. Unauthorized substitutes may result in fire, electric shock, or other hazards.
4. Safety check--After repairs or service, ask the servicer to perform safely checks to confirm thai the unit is in proper working condition.
The servicer will require all components to service your system•
Therefore, should service ever be necessary, be sure to bring the entire system.
IProduct information
For product information or assistance withproduct operation:
In the U.S.A., contact the Panasonic Customer Call Center at 1-800-211-7262, or e-mail consumerpmducts@panasonic.com, or the website
(htt p://www.panasonic.com).
in Canada, contact Panasonic Canada Inc. Customer Care Centre at 1-800-861-6505, or visit the website (www.panasonic.ca), or an authorized
Servicentre closest to you•
Maintenance
To clean this unit, wipe with a soft, dry cloth.
eNever use alcohol, paint thinner or benzine to clean this unit.
eBefore using chemically treated cloth, read the instructions that
came with the cloth carefully.
Before moving the unit, ensure the disc trays are
empty.
Failure to do so will risk severely damaging the discs and
the uniL
RQT6750
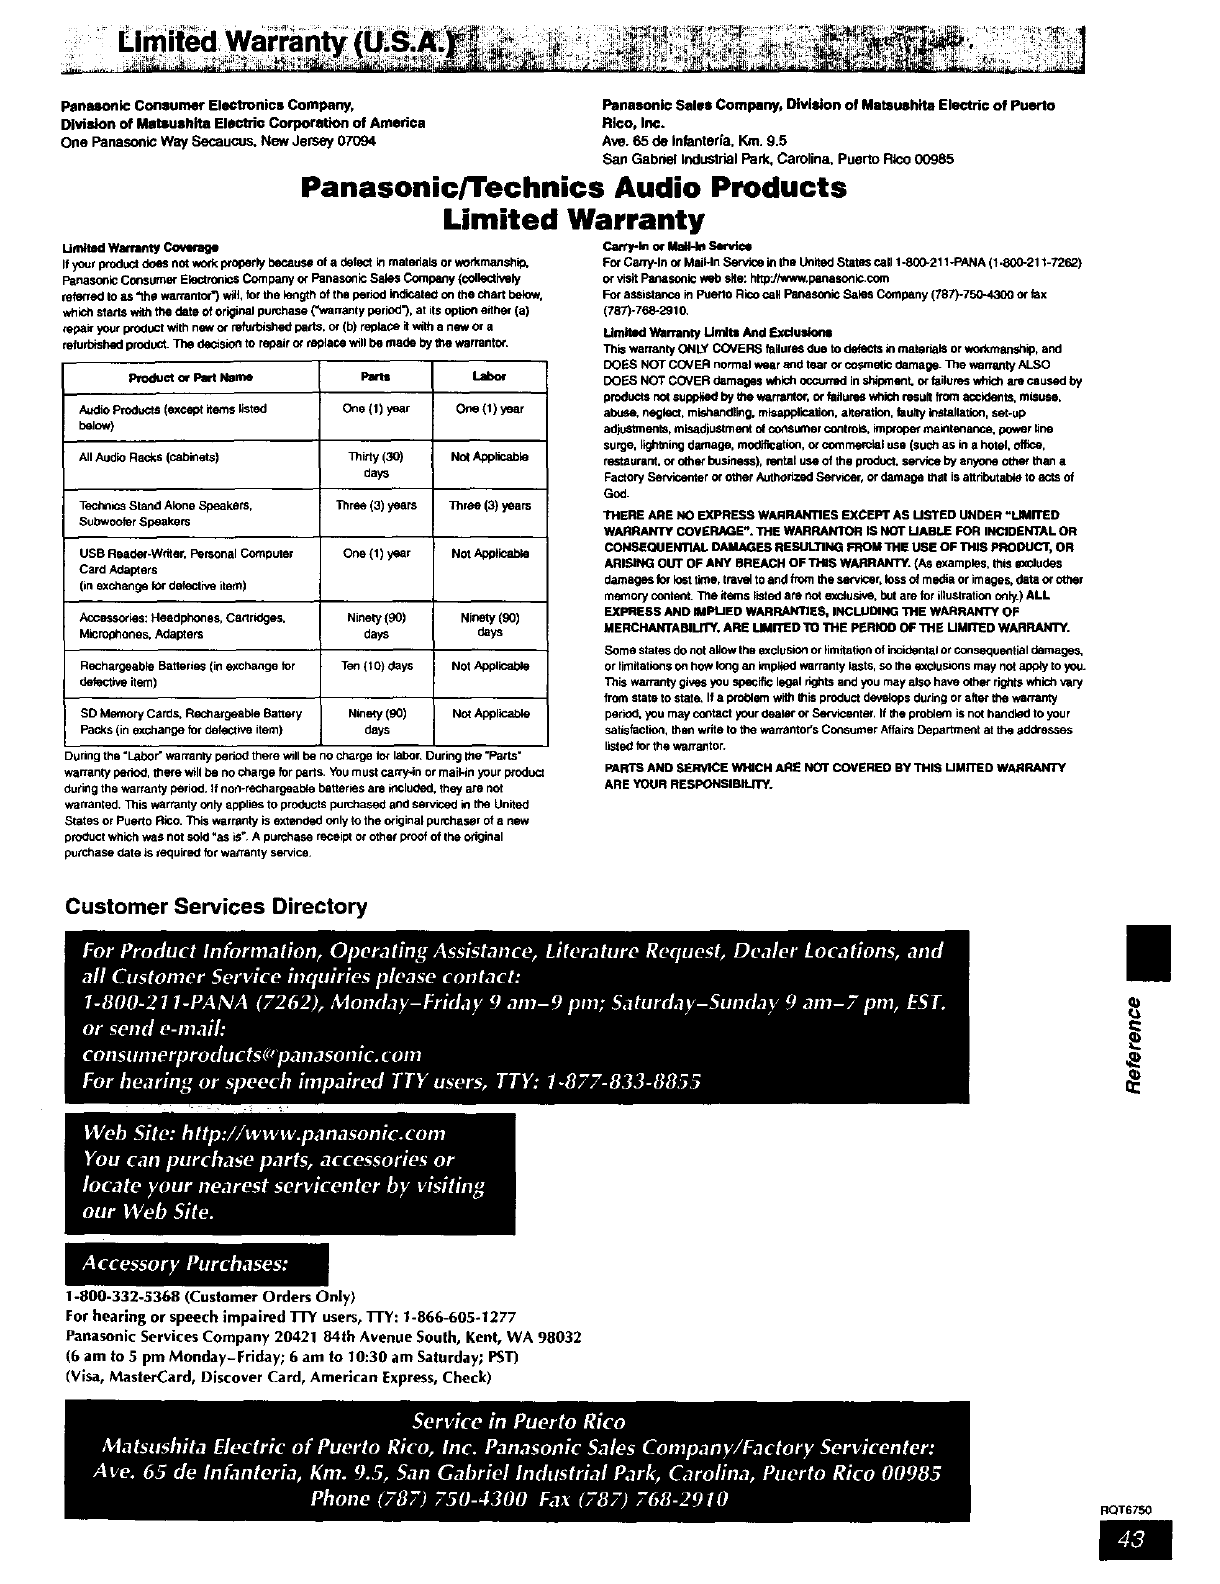
Panasonic Consumer EleCtronics Company, Panasonic Sales Company, Division of Matsushita Electric of Puerto
Division of Malsush8a Electric Corporation of Amedca Rico, Inc.
One PanasonicWaySecaucus,New Jersey07094 Ave.65 de Infanteds,Kin.9.5
San GabrielIndustrialPark,Carotin& Puer_ Rfoo00985
Panasonic/Technics Audio Products
Limited Warranty
UmNed Warranty Coverage
If yourproductdoes not workproperlybecauseof a defectinmate_ialsor workmanship,
PanasonicConsumerElectrof_icsCompanyor FanasonicSalasCompany(collectively
refe_ed to as "thewarrantor*)wlil, forthe kmgthof the period indicatedonthe chartbelow,
whichstartswiththe date oforiginalpumhase (*'warrantyperiod'), at its optioneithe¢(a)
,_ai¢ yourpreductwith n_ or refufoished gaffs, or (b) replace_ _ a n_ _a
refurbishedproduct.The decisionto repairor replace willbe made by the warrantor.
Product o¢ Part Name Parts Labor
AudioProducts(exceptitemslisted One (1) y_ar One (I) year
beJow)
AllAudioRacks (cabinets) _irty (3O) No_App_able
days
TechnicsStand AloneSpeakers, Three (3)years Three (3)years
Sut_voofer Speakers
USB Reader-W_er. PersonalComputer One 11)y_ar NOtApplicable
Card Adapters
(in exchangefor defectiveitem)
Ascessories: Headphones,Cartr_ges. Ninety(90) Ninety(90)
M,cre_ones_ Adapters days days
RechargeableBatteries(in exchangefor Ten(10) days Not Applicable
defecm_eitem)
SD MemoryCards.Recha_geableBattery Ninety(90) Not ApplicaJ01e
Packs(in exchangefor dethc_h,eitem) days
During the "Labor" warranly period there wlli be no charge for labor. Curing _e "Parts"
warranty period, _ece will be no charge for parts. YOU must carry*in or mail-in your produc_
during tho warranty period. If no_-reChargeable baRer_s are included, they are not
warranted+ _lis w_rranty only applies to prcdu_s purchased and serviced io the United
States or Pueblo Rico. This warranty is extended only to the original purchaser of a new
product which "_as not sold "as is_ A purchase receipt or other woof of the original
purchase date Js required for warranty service.
_th o€ MaE-kt Service
For Carry-In o_ MaiHn Service in the United States Call 1-800-211 -PANA (1.800-211-7262)
or visit Panaso_ic web site: http-JAw_w.panasonic.com
For assistance in Puerto Rico call Fanasonfo Sabes Company (787)-750-4300 or fax
(787p76_291_
Undmd Warranty Umit= And F._du_oa_
Th_ warranty ONLY COVERS failures due to defects in materials or v,_anship, and
DOES NOT COVER normal t.,_r a_d tear or cocanedc damage. ]]le wananty ALSO
DOES NOT COVER damages which occuned in sldpment, or failures which are caused by
products not supplied by _v,arrantor, o_ foifoms v_ich result from accidents, misuse.
abuse, neglect, mishandling, misapplication, alt en_tion. _u_y _staliation. set-up
a_r_lments, misadjustrnent o_consumer controls, improper maintenance, power line
surge, lighthing damage, mo_mat fort, o_ _t_ _¢lal use (SUC_ as in a hotel, office,
restaurant, or other business), reotal use of the product. _by anyone other than a
Factory Servicenter or other Authorized Serv_er. or damage that is attributable to acts of
God.
THERE ARE NO EXPRESS WARRANTIES EXCEPT AS USTED UNDER "LIMITED
WARRANTY COVERAGE_. THE WARRANTOR IS NOT UABLE FOR INCIDENTALOR
CONSEQUENTIAL _ES RESULTING FROM THE USE OF THIS PRODUCT, OR
ARISING OUT OF ANY BREACH OF TH_SWARRANTY.(As examples,this=_Judas
damagesforlosttime,traw_toand fromthe servicer,losso_media or images,data or other
me*nor'/contentTt)e itms listed are notexcfoshe,butare for illustrationonly) ALL
EXPRESS AND IMPLIEDWARRANTIES, INCLUDING THE WARRANTY OF
MERCHANTABILITY,ARE LIMITED TO THE PERIOO OFTHE UMITED WARRANTY.
Some stares do not aliow tho exclusion or limitatioo of incide,tal or conseque_ltial damages.
or limitations on hoW long an implied _mrranty lasts, so the e_cluSmns may not apply to you.
This warranty gives you specific legal rights and you may also have other rigtds whictt vary
from state to stat_ If a p_o_em with this product develops duling or after the warranty
period, you may co_tact your dealer or Se_vicenter. If the prol:4em is not h_ndk_l to your
satisfaction, then write to the warrantoYs Consumer Affairs Department at the addresses
listed for the warranton
PARTS AND SERVICE _I"NCH ARE NOT COVERED BY THIS UMITED WARRANTY
ARE YOUR RESPONSIBILrliY.
Customer Services Directory
q)
a
1-800-332-5368(Customer Orders Only)
For hearing or speech impaired TFY users, TrY: 1-866-605.1277
Panasonlc Services Company 20421 84th Avenue South, Kent, WA 98032
(6 am to ,5 pm Monday-Friday; 6 am to t0:30 am Saturday; PST)
(Visa, MasterCard, Discover Card, American Express,Check)
RQT6750
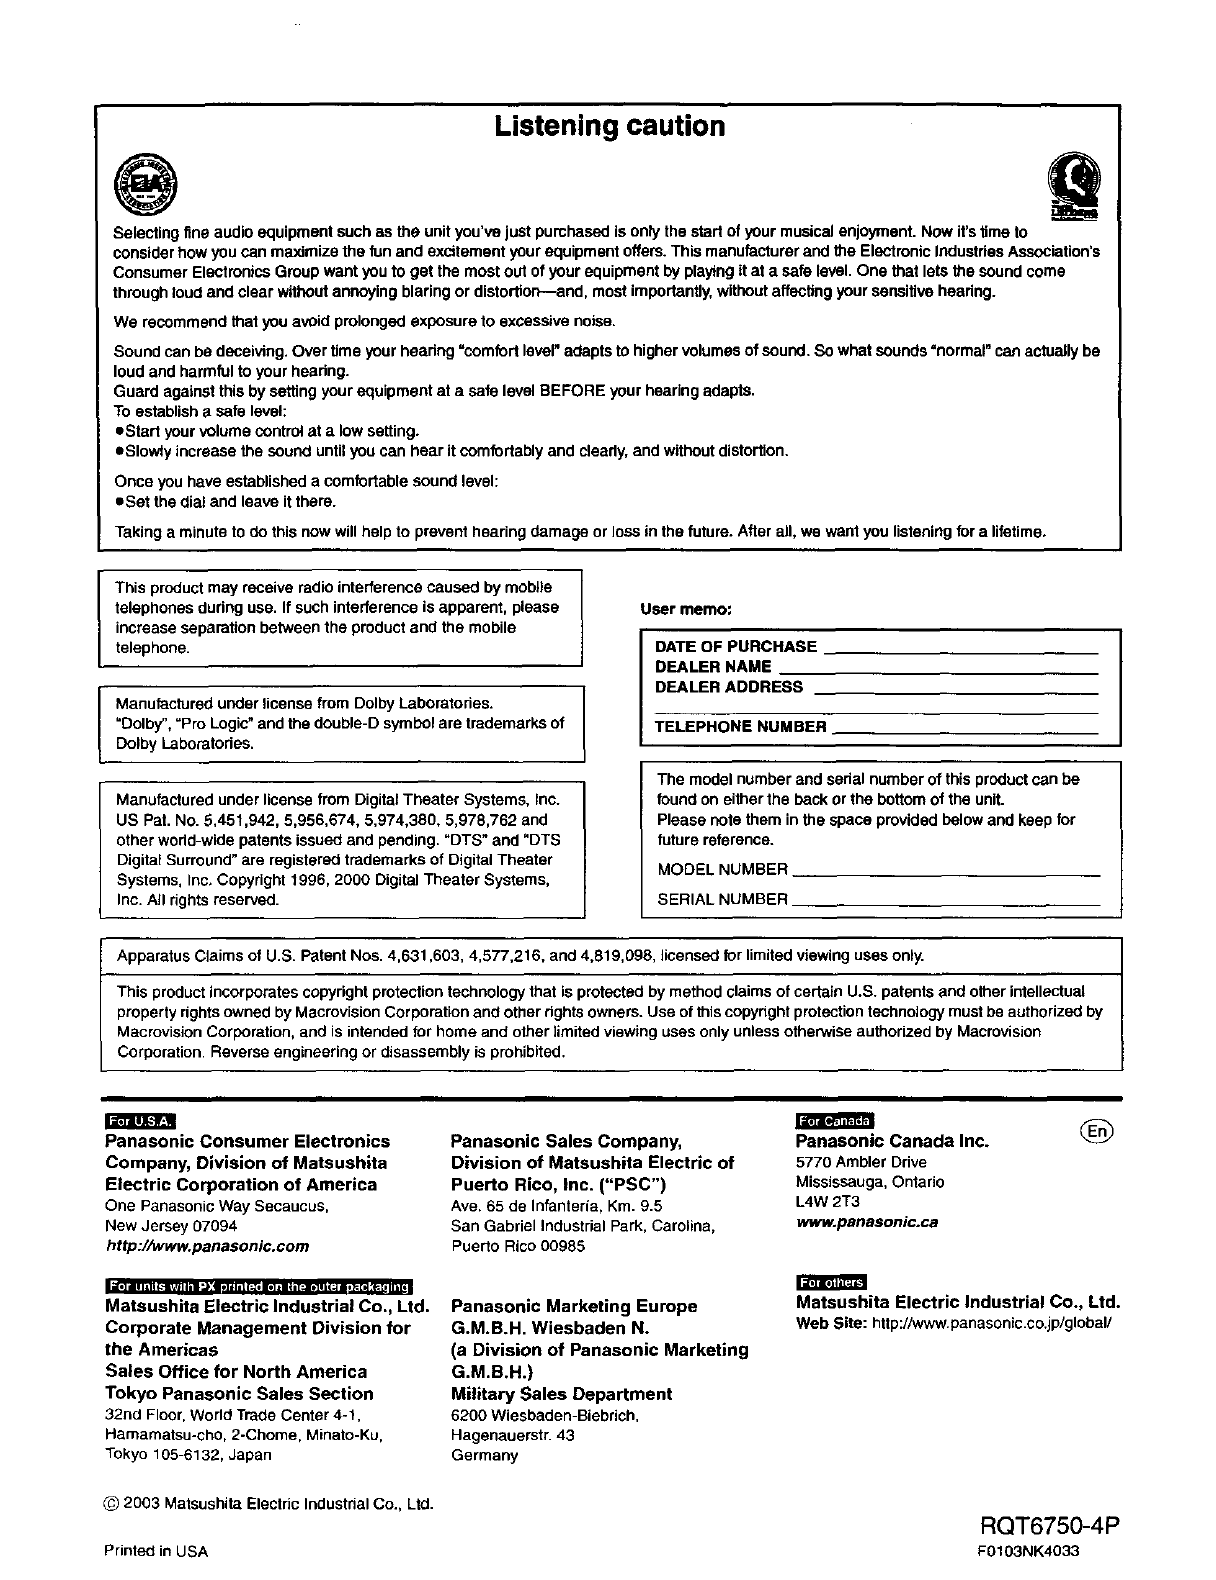
Listening caution
Selecting fine audio equipment such as the unit you've just pumhosod is only the start of your musical enjoyment. Now it's time to
consider how you can maximize the fen and excitement your equipment offers. This manufacturer sod the Electronic Industdes Association's
Consumer Electronics Group want you to get the most out of your equipment by playing it at a safe level. One that lets the sound come
through lood and clear without annoying blaring or distortion--and, most importantly, without affecting your sensitive heating.
We recommend that you avoid prolonged exposure to excessive noise.
Sound can be deceiving. Over time your hearing =comfort level"adapts to higher volumes of sound. So what sounds "normal" can actually be
loud and harmful to your hearing.
Guard against this by sating your equipment at a safe level BEFORE your hearing adapts.
To establish a safe level:
eStart your volume control at a low setting.
eSIowiy increase the sound until you can hear it comfortably and clearly, and without distortion.
Once you have established a comfortable sound level:
oSet the dial and leave it them.
Taking a minute to do this now will help to prevent hearing damage or loss in the future. After all, we want you listening for a lifetime.
This product may receive radio interference caused by mobtle
telephones during use. If such interference is apparent, please
increase separation between the product and the mobile
telephone.
Manufactured under license from Dolby Laboratories.
=Dolby", =Pro Logic"and the double-D symbol are trademarks of
Dolby Laboratories.
Manufactured under license from Digital Theater Systems, Inc.
US Pat. No. 5,451,942, 5,956,674, 5,974,380, 5,978,762 and
other worid-wida patents issued and pending. "DTS" and "DTS
Digital Surround" are registamd trademarks of Digital Theater
Systems, Inc, Copyright 1996, 2000 Digital Theater Systems,
Inc. All rights reserved.
User memo:
JATE OF PURCHASE
DEALER NAME
DEALER ADORESS
TELEPHONE NUMBER
The model number and serial number of this product can be
found on either the back or the bottom of the unit.
Please cote them in the space provideq below and keep for
future reference.
MODEL NUMBER
SERIAL NUMBER
Apparatus Claims of U.S. Patent Nos. 4,631,603, 4,577,216. and 4,819,098, licensed for limited viewing uses only.
This product incorporates copyright protection technology that is protected by method claims of certain U.S. patents and other intellectual
property rights owned by Macrovision Corporation and other rights owners. Use of this copynght protection technology must be authorized by
Macrovision Corporation, and is intended for home and other limited viewing uses only unless otherwise authorized by Macrovision
Corporation. Reverse engineering or disassembly is prohibited.
Panasonic Consumer Electronics
Company, Division of Matsushita
Electric Corporation of America
One PanasonicWay Secaucus,
New Jersey07094
http://www.panasonic.corn
|.1o] mi i_11_:i_Jl ill ".);q_T(_l i;._ IW_E _i[_t]l i_;410 p.[ N:_.Ii ill[Q i
Matsushita Electric Industrial Co., Ltd.
Corporate Management Division for
the Americas
Sales Office for North America
Tokyo Panasonic Sales Section
32rid Floor, World Trade Center 4-1,
Hamamatsu-cho, 2-Chome, Minato-Ku,
Tokyo 105-6132, Japan
_) 2003 Matsushita Electric Industrial Co., Ltd.
Panasonic Sales Company,
Division of Matsushita Electric of
Puerto Rico, Inc. ("PSC")
Ave.65 de Infanteria,Kin. 9.5
San Gabriel Industrial Park, Caroline,
Puerto Rico 00985
Panasonic Marketing Europe
G.M.B.H. Wiesbaden N.
(a Division of Panasonic Marketing
G.M.B.H.)
Military Sales Department
6200 Wiesbaden-Biebrich,
Hagenauerstr.43
Germany
Panasonic Canada Inc.
5770 Ambler Drive
Mississauga, Ontario
L4W 2T3
www.panasonic.ca
Matsushita Electric Industrial Co., Ltd.
Web Site: http://www.panasonicco.jp/global/
RQT6750-4P
Printed in USA F0103NK4033
