PANASONIC Plasma Television Manual L0904485
User Manual: PANASONIC PANASONIC Plasma Television Manual PANASONIC Plasma Television Owner's Manual, PANASONIC Plasma Television installation guides
Open the PDF directly: View PDF ![]() .
.
Page Count: 134 [warning: Documents this large are best viewed by clicking the View PDF Link!]
Panasonic
Operating Instructions
42"/46"/50"/54" Class 1080p Plasma HDTV
(41.6/46.0/49.9/54.1 inches measured diagonally)
Manual de instrucciones
Television de alta definicion de 1080p y clase 42"146"150"154"de Plasma
(41,6/46,0/49,9/54,1 pulgadas medidas diagonalmente)
ModoINoTC P42G10Nt]mero de modelo
(Image: TC-P50G10)
TC-P46G10
TC-P50G10
TC-P54G10
©uick Srf Guid+
(See page 8-18)
Guia de in o pido
(vea la pagina 8-18)
For assistance (U.S.A./Puerto Rico), please call:
1-877-95-VlERA (958-4372)
or visit us at www.panasonic.com/contactinfo
For assistance (Canada), please call:
1-866-330-0014
or visit us at www.vieraconcierge.ca
Para solicitar ayuda (EE.UU./Puerto Rico), Ilame al:
1-877-95-VlERA (958-4372)
0 visitenos en www.panasonic.com/contactinfo
AVCHD+ VletACAST M
(English 1 .....................................(LT_F_ y"
Please read these instructions before operating your set and retain them for future reference,
The images shown in this manual are for illustrative purposes only,
Espafiol
Lea estas instrucciones antes de utilizar su televisor y gu(Jrdelas para consultarlas en el futuro.
Las ima_genesmostradas en este manual tienen solamente fines ilustrativos,
VIEtA TM
IMAGEVIEWER
TQB2AA0808-1

Turn your own living room into amovie theater!
Experience an amazing level of multimedia excitement
V! l I"Jt I.illt( r°
VIERA Link TM is a trademark of Panasonic
Corporation.
[ VIfI'J_CAST
TM
VlERACAST is a trademark of
Panasonic Corporation. SDHC Logo is a trademark.
i..11.-,,_i,!,,111TM
HDMI, the HDMI logo and High-Definition Multimedia Interface
are trademarks or registered trademarks of HDMI Licensing
LLC.
Manufactured under license from Dolby Laboratories.
Dolby and the double-D symbol are
trademarks of Dolby Laboratories.
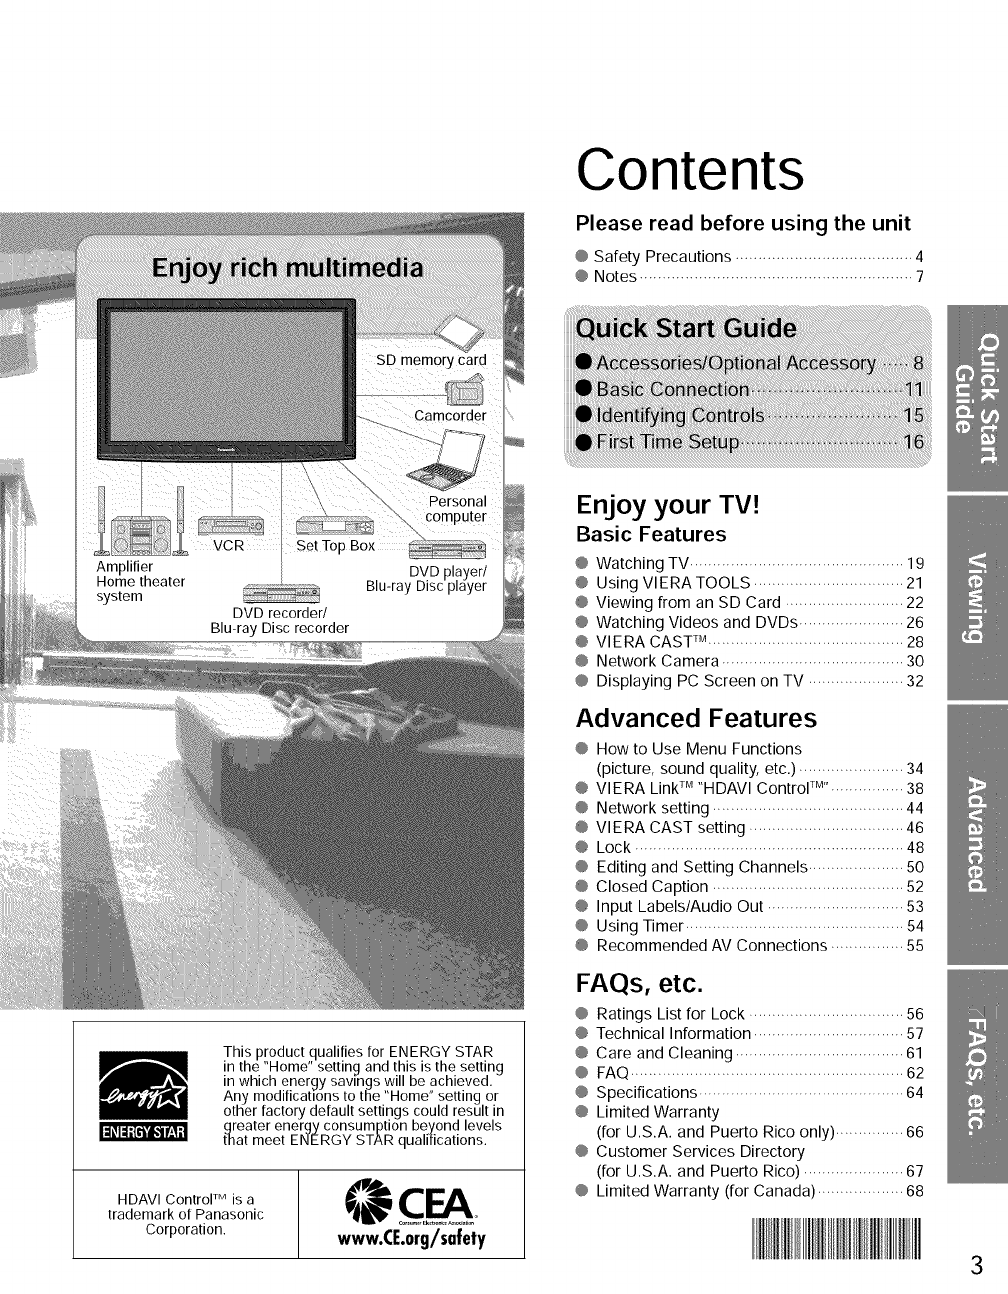
Contents
Please read before using the unit
@ Safety Precautions ....................................... 4
@ Notes ............................................................ 7
This product qualifies for ENERGY STAR
in the "Home" setting and this is the setting
in which energy savings will be achieved.
Any modifications to the "Home" setting or
other factory default settings could result in
greater energy consumption be£ond levels
that meet ENERGY STAR qualifications.
IdOldIlli'l,_l t'._Ii
HDAVI Control TM is a
trademark of Panasonic
Corporation. www.CE.org/safety
Enjoy your TV!
Basic Features
@ Watching TV ............................................... 19
@ Using VIERATOOLS ................................. 21
@ Viewing from an SD Card .......................... 22
@ Watching Videos and DVDs ....................... 26
@ VlERA CAST _M........................................... 28
@ Network Camera ........................................ 30
@ Displaying PC Screen on TV ..................... 32
Advanced Features
@ How to Use Menu Functions
(picture, sound quality, etc.) ....................... 34
@ VlERA Link rM"HDAVl Control TM'................ 38
@ Network setting .......................................... 44
@ VlERA CAST setting .................................. 46
@ Lock ........................................................... 48
@ Editing and Setting Channels ..................... 50
@ Closed Caption .......................................... 52
@ Input Labels/Audio Out .............................. 53
@ Using Timer ................................................ 54
@ Recommended AV Connections ................ 55
FAQs, etc.
@ Ratings List for Lock .................................. 56
@ Technical Information ................................. 57
@ Care and Cleaning ..................................... 61
@ FAQ ............................................................ 62
@ Specifications ............................................. 64
@ Limited Warranty
(for U.S.A. and Puerto Rico only) ............... 66
@ Customer Services Directory
(for U.S.A. and Puerto Rico) ...................... 67
@ Limited Warranty (for Canada) ................... 68
3

Safety Precautions
th0,igh*ning*,ashwi*h
arrowheadwithinatriangleis
CAU T IO N intendedtotelltheuserthat
partsinsidetheproductarea
riskofelectricshocktopersons,
Theexclamationpointwithin
atriangleis intendedto
telltheuserthatimportant
WARNING: To reduce the risk of electric shock, do not remove cover or back. operatingandservicing
No user-serviceable parts inside. Refer servicing to qualified service personnel, instructionsareinthe
paperswiththeappliance.
WARNING: To reduce the risk of fire or electric shock, do not expose this apparatus to rain or moisture.
Do not place liquid containers (flower vase, cups, cosmetics, etc.) above the set
(including on shelves above, etc.).
iiil.:o_,,_4,t_"_'1_4_,][1_,. [,.],[o_,[..
1) Read these instructions.
2) Keep these instructions.
3) Heed all warnings.
4) Follow all instructions.
5) Do not use this apparatus near water.
6) Clean only with dry cloth.
7) Do not block any ventilation openings. Install in
accordance with the manufacturer's instructions.
8) Do not install near any heat sources such as radiators,
heat registers, stoves, or other apparatus (including
amplifiers) that produce heat.
9) Do not defeat the safety purpose of the polarized or
grounding-type plug. A polarized plug has two blades with
one wider than the other. A grounding type plug has two
blades and a third grounding prong. The wide blade or the
third prong are provided for your safety. If tile provided
plug does not fit into your outlet, consult an electrician for
replacement of the obsolete outlet.
10) Protect the power cord from being walked on or pinched
particularly at plugs, convenience receptacles, and the
point where they exit from the apparatus.
11) Only use attachments /accessories specified by the
manufacturer.
12) Use only with the cart, stand, tripod,
bracket, or table specified by the
manufacturer, or sold with the
apparatus. When a cart is used,
use caution when moving the cart /
apparatus combination to avoid injury
from tip-over.
13) Unplug this apparatus during lightning storms or when
unused for long periods of time.
14) Refer all servicing to qualified service personnel. Servicing
is required when the apparatus has been damaged in any
way, such as power-supply cord or plug is damaged, liquid
has been spilled or objects have fallen into the apparatus,
the apparatus has been exposed to rain or moisture, does
not operate normally, or has been dropped.
15) To prevent electric shock, ensure the grounding pin on the
AC cord power plug is securely connected.
This equipment has been tested and found to comply with the limits for a Class B digital device, pursuant to Part 15 of the FCC
Rules. These limits are designed to provide reasonable protection against harmful interference in a residential installation.
This equipment generates, uses and can radiate radio frequency energy and, if not installed and used in accordance with the
instructions, may cause harmful interference to radio communications, However, there is no guarantee that interference will not occur in
a particular installation. If this equipment does cause harmful interference to radio or television reception, which can be determined by
turning the equipment off and on, the user is encouraged to try to correct the interference by one or more ofthe following measures:
• Reorient or relocate the receiving antenna.
• Increase the separation between the equipment and receiver.
• Connect the equipment into an outlet on a circuit different from that to which the receiver is connected.
• Consult the dealer or an experienced radio/TV technician for help,
This device complies with Part15 of the FCC Rules. Operation is subject to the following two conditions: (1) This device may not cause
harmful interference, and (2) this device must accept any interference received, including interference that may cause undesired operation,
FCC Caution:
To assure continued compliance, follow the attached installation instructions and use only shielded interface cables
when connecting to computer or peripheral devices. Any changes or modifications not expressly approved by Panasonic
Corp. of North America could void the user's authority to operate this device.
FCC Declaration of Conformity
Model No. TC-P42G10, TC-P46G10, TC-P5OGIO, TC-P54G10
Responsible Party:
Contact Source:
email:
Panasonic Corporation of North America
One Panasonic Way, Secaucus, NJ 07094
Panasonic Consumer Electronics Company
1-877-95-VIE RA (958-4372)
consumerproducts@panasonic.com
CANADIAN NOTICE:
For Model TC-P42G10, TC-P46G10, TC-P5OG1 O, TC-P54G10
This Class B digital apparatus complies with Canadian ICES-O03.
!_Vl;1"| _Ih_[_{of;_ll / [o] _
LwA....G1
Small parts can present choking hazard if accidentally
swallowed.
Keep small parts away from young children.
Discard unneeded small parts and other objects, including
packaging materials and plastic bags/sheets to prevent
them from being played with by young children, creating
the potential risk of suffocation.
•Set up
This Plasma TV may fall and can cause personal injury or
even death if not installed correctly, To prevent personal injury
or death, follow these warnings:
• Install the Plasma TV in accordance with the
manufacturer's recommended pedestal or stand,
corresponding hardware and installation instructions.
This Plasma TV is for use only with the following optional
accessories, Use with any other type of optional accessories
may cause instability. The following accessories are
manufactured by Panasonic Corporation,
• Wall-hanging bracket (Angled)
TY-WK4P1 RW (TC-P42G10, TC-P46G10, TC-PS0G10)
TY-WKSP1 RW (TC-P54G10)
• Be sure to ask a qualified technician to carry out the
installation and set-up.
Two or more people are required to install or remove the
television.
• Some wall mounts (wall-hanging brackets) are not
designed to be mounted to walls with steel studs or old
cinder block constructions.
Ask your dealer or licensed contractor to properly secure the
wall-hanging bracket.
• Do not place the Plasma TV or its stand on a sloped or
unstable surface.
The Plasma TV may fall or tip over.
• Do not support the Plasma TV on a non-specified
pedestal.
• Do not place the Plasma TV on furniture that can easily
be used as steps, such as a chest of drawers.
• Do not climb or allow children to climb on the Plasma TV
• Place or install the Plasma TV where it cannot be pushed,
pulled over or knocked down.
• Route all cords and cables such that they cannot be
tripped over or pulled by curious children.
• Do not place any objects on top of the Plasma TV.
If water spills onto the Plasma TV or foreign objects get
inside it, a short-circuit may occur which could result in fire
or electric shock. If any foreign objects get inside the Plasma
TV, please consult an Authorized Service Center.
• AC Power Supply Cord
To prevent fire or electric shock:
• The Plasma TV is designed to operate on a 120 V AC,
60 Hz service. Insert the power cord plug as far as it will
go into the wall socket.
If the plug is not fully inserted, heat may generate, which
could cause a fire.
• The included power cord is for use with this unit only.
• Do not use any power cord other than that provided with
this TV.
• Do not handle the power cord plug with wet hands.
• Do not do anything that might damage the power supply
cord.
• When disconnecting the power supply cord, hold the
plug, not the cord.
• Do not use the power supply cord if the plug or cord is
damaged.
Replace the cord or contact your Authorized Service Center
• Handling the power supply cord
• Insert the power plug fully into the socket outlet. (If the
power plug is loose, it could generate heat and cause fire.)
• Ensure that the power plug is easily accessible.
• Ensure the earth pin on the power plug is securely
connected to prevent electrical shock.
• An apparatus with CLASS I construction shall be connected to
a power socket outlet with a protective earthing connection.
• Do not touch the power plug with a wet hand. (This may
cause electrical shock.)
• Do not use any power cord other than that provided with
this TV. (This may cause fire or electrical shock.)
• Do not damage the power cord. (A damaged cord may
cause fire or electrical shock.)
• Do not move the TV with the cord plugged in the socket outlet.
• Do not place a heavy object on the cord or place the cord
near a high-temperature object.
• Do not twist the cord, bend it excessively, or stretch it.
• Do not pull on the cord. Hold onto the power plug body
when disconnecting cord.
• Do not use a damaged power plug or socket outlet.
•If Problems Occur During Use
•If a problem occurs (such as no picture or no sound),
or if smoke or an abnormal odor is detected from the
Plasma TV, unplug the power supply cord immediately.
Continued use of the TV under these conditions might cause
a fire or permanent damage to the TV. Have the TV evaluated
by an Authorized Service Center. Servicing of the TV by
unauthorized personnel is strongly discouraged due to its
high voltage,
• If water or an object gets inside the Plasma TV, if the
Plasma TV is dropped, or if the enclosure becomes
damaged, unplug the power supply cord immediately.
A short-circuit may occur, which could cause a fire, Contact
an Authorized Service Center for an evaluation,
c u ,o.]
• Do not cover the ventilation holes.
Doing so may cause the Plasma TV to overheat, which can
cause a fire or damage to the Plasma TV.
• Leave a space of 3 15/16" (10 cm) or more at the top, left
and right, and 2 3/4" (7 cm) or more at the rear.
• When using the pedestal, keep the space between the
bottom of the TV and the pedestal or stand surface clear
from objects that may obstruct ventilation.
• When Moving the Plasma TV
• Be sure to disconnect all cables before moving the
Plasma TV.
Moving the TV with its cables attached might damage the
cables which, in turn, can cause fire or electric shock
• To prevent an electric shock, disconnect the power
plug from the wall outlet as a safety precaution before
carrying out any cleaning.
5

Safety Precautions (Continued)
•Transport only in upright position
Transporting the unit with its display panel facing upright or
downward may cause damage to the internal circuitry,
• Using a dry cloth, clean any dust from the power supply
cord and plug regularly.
Build-up of dust on the power cord plug can increase
humidity, which might damage the insulation and cause a fire,
This Plasma TV radiates infrared rays;
therefore, it may affect other infrared communication
equipment. Install your infrared sensor in a place away from
direct or reflected light from your Plasma TV.
The TV will still consume some power as long as the power
supply cord is connected to the wall outlet.
• Display panel is made of glass. Do not apply strong force
or impact to the display panel.
This may cause damage resulting in injury,
• The TV is heavy. TV should be handled by 2 or more
people. Support as shown to avoid injury by the TV
tipping or falling.
CEA CHILD SAFETY NOTICES: Flat panel displays are not always supported on the proper stands or
installed according to the manufacturer's recommendations. Flat panel displays that are inappropriately
situated on dressers, bookcases, shelves, desks, speakers, chests or carts may fall over and may cause
personal injury or even death,
The consumer electronics industry (of which Panasonic is a member) is committed to making home
entertainment enjoyable and safe, To prevent personal injury or death, be sure to follow the following safety
guidelines:
TUNE INTO SAFETY:
• One size does NOT fit all. Follow the manufacturer's recommendations for the safe installation and use
of your flat panel display.
• Carefully read and understand all enclosed instructions for proper use of this product,
• Don't allow children to climb on or play with furniture and television sets.
• Don't place flat panel displays on furniture that can easily be used as steps, such as a chest of drawers,
• Remember that children can become excited while watching a program, especially on "larger than life"
flat panel displays, Care should be taken to install the display where it cannot be pushed, pulled over,
or knocked down.
• Care should be taken to route all cords and cables connected to the flat panel display so that they
cannot be pulled or grabbed by curious children.
WALL MOUNTING: IF YOU DECIDE TO WALL MOUNT YOUR FLAT PANEL DISPLAY, ALWAYS:
• Use a mount that has been recommended by the display manufacturer and/or listed by an independent
laboratory (such as UL, CSA, ETL).
• Follow all instructions supplied by the display and wall mount manufacturers.
• If you have any doubts about your ability to safely install your flat panel display, contact your retailer
about professional installation,
• Make sure the wall where you are mounting the display is appropriate. Some wall mounts are not
designed to be mounted to walls with steel studs or old cinder block construction. If you are unsure,
contact a professional installer.
• A minimum of two people are required for installation. Flat panel displays can be heavy.
Panasonic recommends that a qualified installer perform the wall-mount
installation. See page 5.
6
Notes
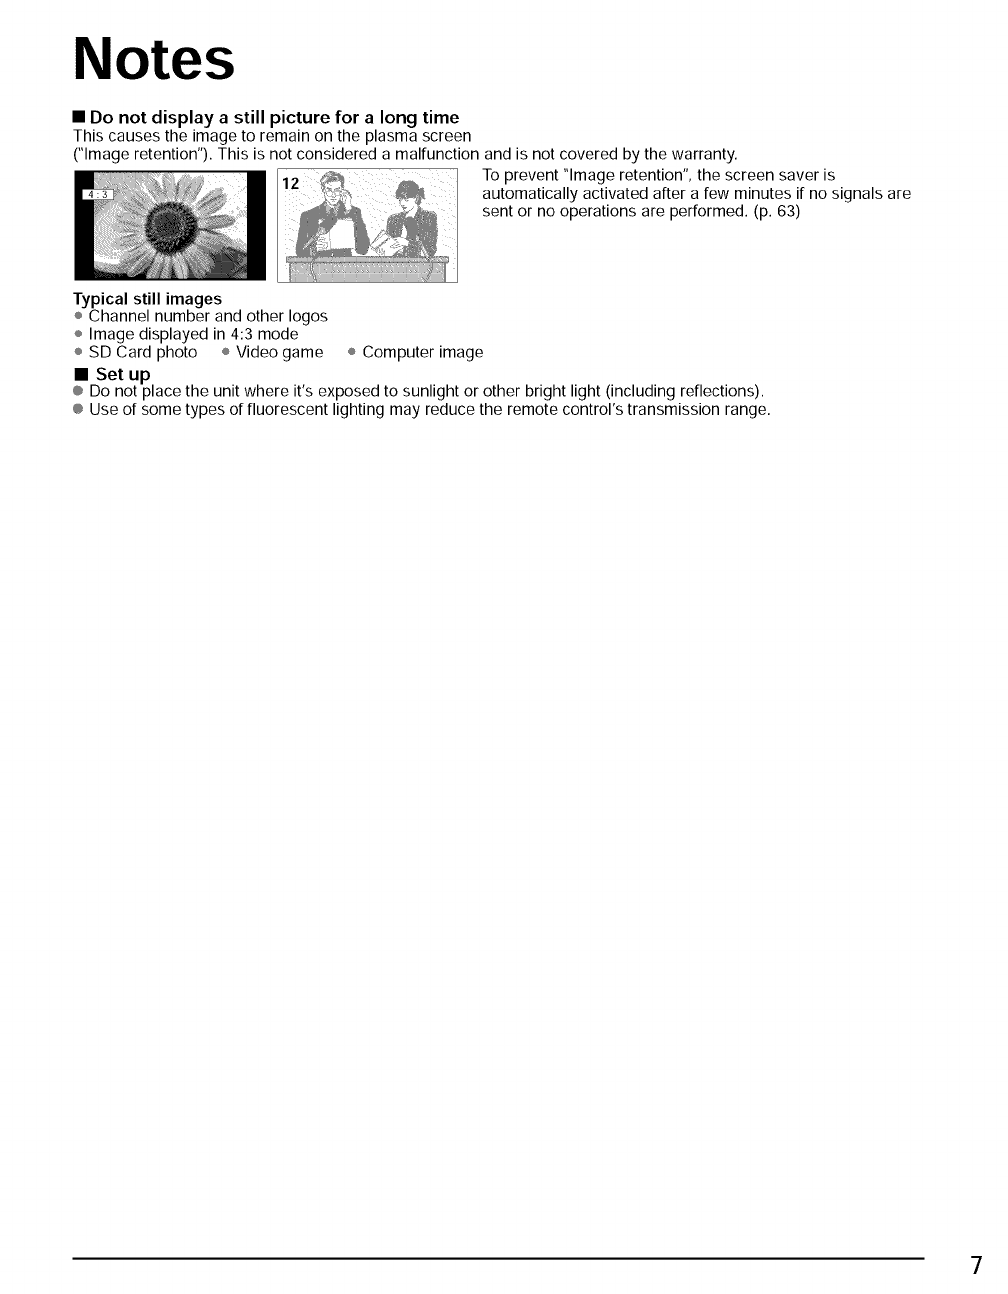
• Do not display a still picture for a long time
This causes the image to remain on the plasma screen
("Image retention"). This is not considered a malfunction and is not covered by the warranty.
To prevent "Image retention", the screen saver is
automatically activated after a few minutes if no signals are
sent or no operations are performed. (p. 63)
Typical still images
÷ Channel number and other Iogos
÷ Image displayed in 4:3 mode
÷ SD Card photo ÷ Video game ÷ Computer image
• Set up
® Do not place the unit where it's exposed to sunlight or other bright light (including reflections).
® Use of some types of fluorescent lighting may reduce the remote control's transmission range.
7
Accessories/Optional Accessory
iI,_,_,i-I-I,IIl_i,
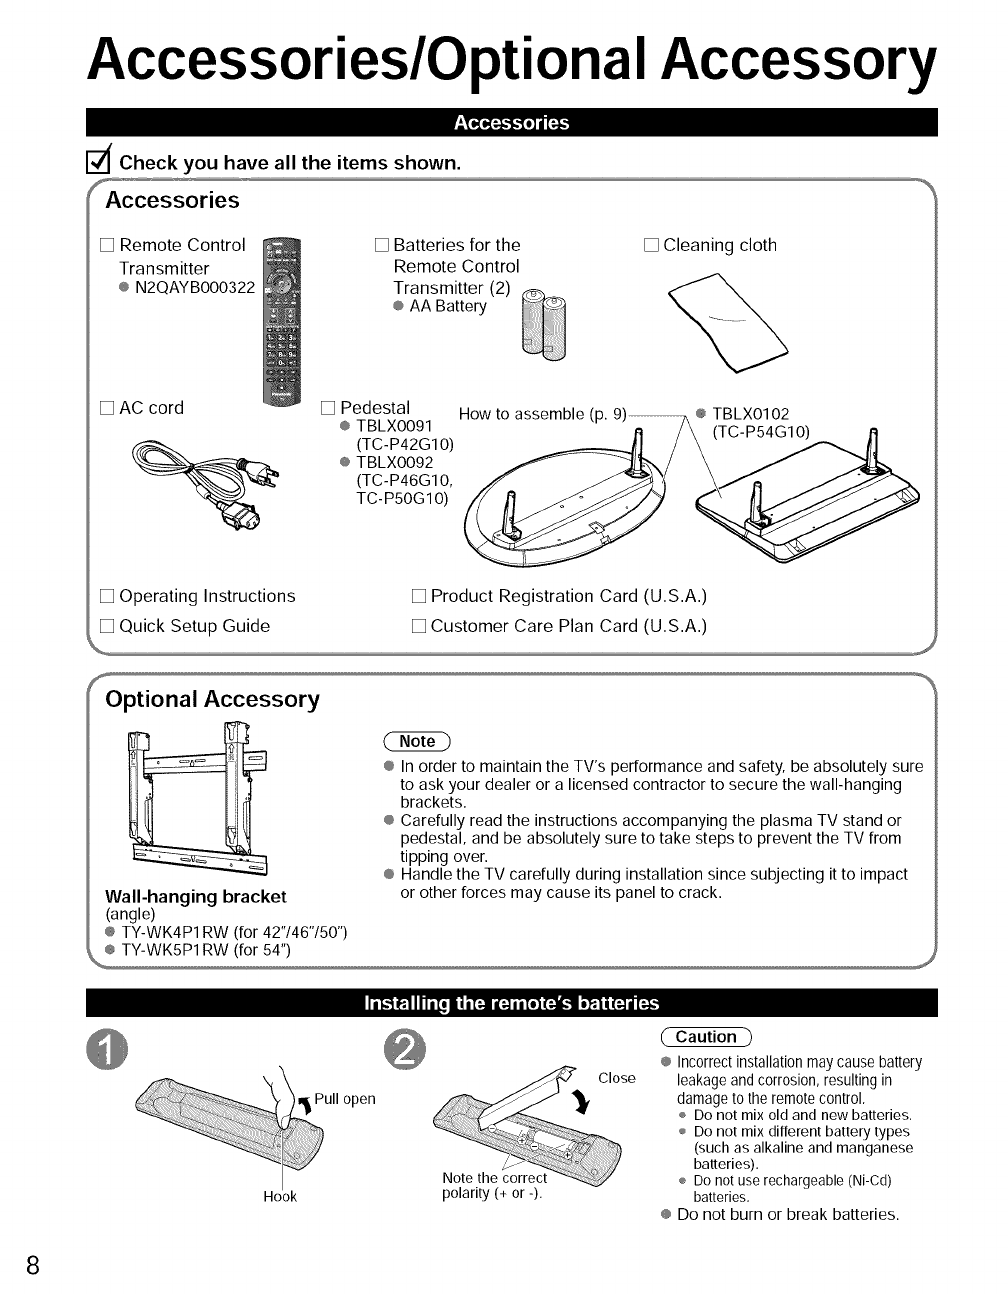
dCheck you have all the items shown.
Accessories
[] Remote Control
Transmitter
® N2QAYBO00322
[] Batteries for the
Remote Control
Transmitter (2)
® AA Battery
[] Cleaning cloth
[] AC cord [] Pedestal
® TBLXO091
{__ (TC-P42G1 O)
® TBLXO092
(TC-P46G10,
TC- P50G 1O)
How to assemble (p. 9)_® TBLX0102
[] Operating Instructions [] Product Registration Card (U.S.A.)
[] Quick Setup Guide [] Customer Care Plan Card (U.S.A.)
,,_
SOptional Accessory
Wall-hanging bracket
(angle)
® TY-WK4P1 RW (for 42"146"150")
® In order to maintain the TV's performance and safety, be absolutely sure
to ask your dealer or a licensed contractor to secure the wall-hanging
brackets.
® Carefully read the instructions accompanying the plasma TV stand or
pedestal, and be absolutely sure to take steps to prevent the TV from
tipping over.
® Handle the TV carefully during installation since subjecting it to impact
or other forces may cause its panel to crack.
[T_"__'1111,,Toii i[4 i_ ai[ol F._t o'_'Ii (_ d[_,.
ull open
Hook
Note the correct
polarity (+ or -).
Close
Caution )
® Incorrect installation may cause battery
leakage and corrosion, resulting in
damage to the remote control,
÷ Do not mix old and new batteries.
÷ Do not mix different battery types
(such as alkaline and manganese
batteries).
÷ Do not use rechargeable (Ni-Cd)
batteries,
® Do not burn or break batteries.
8
-_IiRT_ _Ii[o II i [:-]1oI:-:oF._ R'lli_ll |!
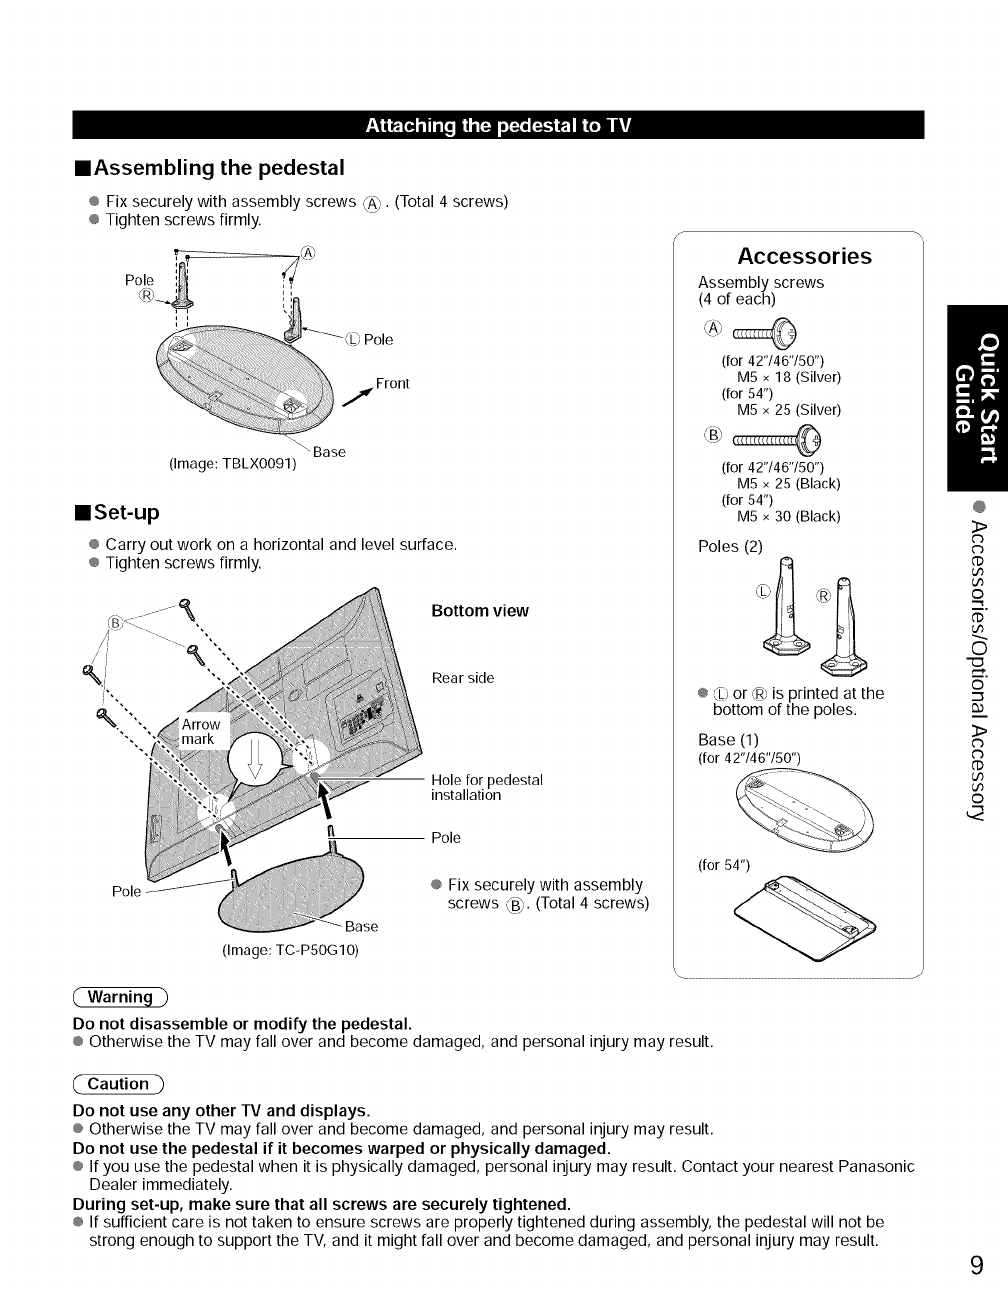
==Assembling the pedestal
®Fix securely with assembly screws _A) (Total 4 screws)
® Tighten screws firmly.
Polo
)Pole
j Front
"'\ Base
(Image: TBLX0091)
llSet-up
® Carry out work on a horizontal and level surface.
® Tighten screws firmly.
Bottom view
Rear side
Hole for pedestal
installation
Pole
Pole
Base
(Image: TC-PSOG10)
Do not disassemble or modify the pedestal.
® Fix securely with assembly
screws ,%. (Total 4 screws)
Accessories
Assembly screws
(4 of each)
(for 42"/46"/50")
M5 x 18 (Silver)
(for 54")
M5 x 25 (Silver)
(for 42"/46"/50")
M5 × 25 (Black)
(for 54")
M5 x 30 (Black)
Poles (2)
k '
SI, F_,h
®Lb or ,_ is printed at the
bottom of the poles.
Base (1)
(for 42"146"150")
(for 54")
® Otherwise the TV may fall over and become damaged, and personal injury may result.
@
3>
@
U3
U3
o
@
O
m,
©
3>
U3
U3
©
(" Caution -)
Do not use any other TV and displays.
® Otherwise the TV may fall over and become damaged, and personal injury may result.
Do not use the pedestal if it becomes warped or physically damaged.
® If you use the pedestal when it is physically damaged, personal injury may result. Contact your nearest Panasonic
Dealer immediately.
During set-up, make sure that all screws are securely tightened.
® If sufficient care is not taken to ensure screws are properly tightened during assembly, the pedestal will not be
strong enough to support the TV, and it might fall over and become damaged, and personal injury may result. 9
Accessories/OptionalAccessory
.%_q_a{o]afolie{o] il i [_a,]lnl[o] i
(Continued)
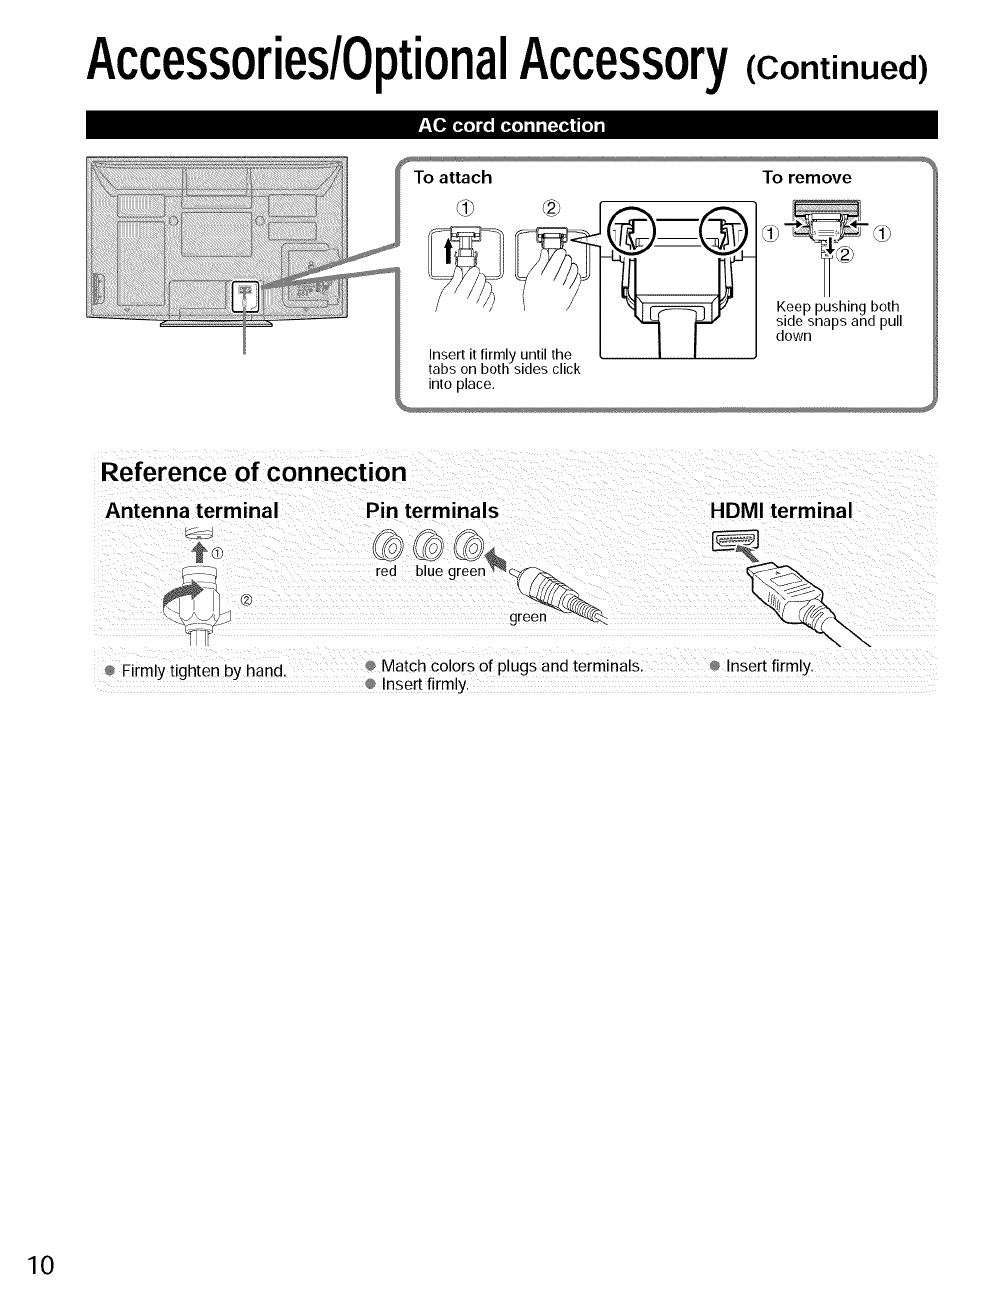
To attach
intoplace.
To remove
Keep pushing both
side snaps and pull
down
Reference of connection
Antenna terminal Pin terminals HDMI terminal
_: -J green _'-'_
Firmly tighten by hand Match colors of plugs and terminals, Insert firmly.
Insert firmly.
10
Basic Connection
TV
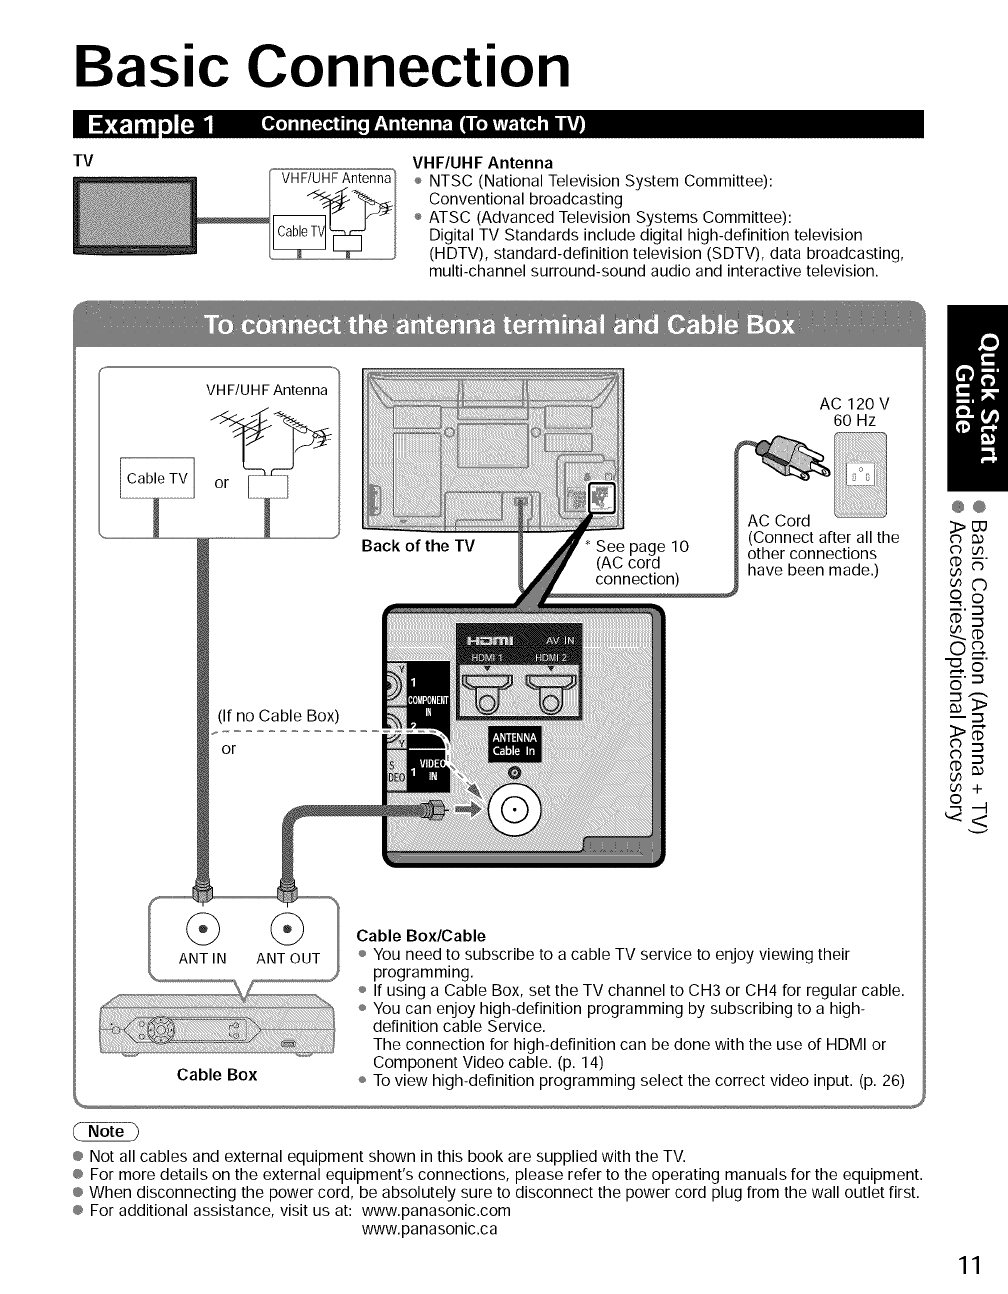
VH F/UHF Antenna VHF/UHF Antenna
÷ NTSC (National Television System Committee):
Conventional broadcasting
÷ ATSC (Advanced Television Systems Committee):
Digital TV Standards include digital high-definition television
(HDTV), standard-definition television (SDTV), data broadcasting,
multi-channel surround-sound audio and interactive television.
VH F/UHFAntenna
(If no Cable Box)
or
AC 120 V
60 Hz
AC Cord
(Connect after all the
other connections
have been made.)
ANT IN ANT OUT
Cable Box/Cable
÷ You need to subscribe to a cable TV service to enjoy viewing their
programming.
÷ If using a Cable Box, set the TV channel to CH3 or CH4 for regular cable.
÷ You can enjoy high-definition programming by subscribing to a high-
definition cable Service.
The connection for high-definition can be done with the use of HDMI or
Component Video cable. (p. 14)
Cable Box ÷ To view high-definition programming select the correct video input. (p. 26)
® Not all cables and external equipment shown in this book are supplied with the TV.
® For more details on the external equipment's connections, please refer to the operating manuals for the equipment.
® When disconnecting the power cord, be absolutely sure to disconnect the power cord plug from the wall outlet first.
® For additional assistance, visit us at: www.panasonic.com
www.panasonic.ca
@@
3>UU
cb u3
cnC)
o o
___.--_
CD
o_
_5
_.-_
11
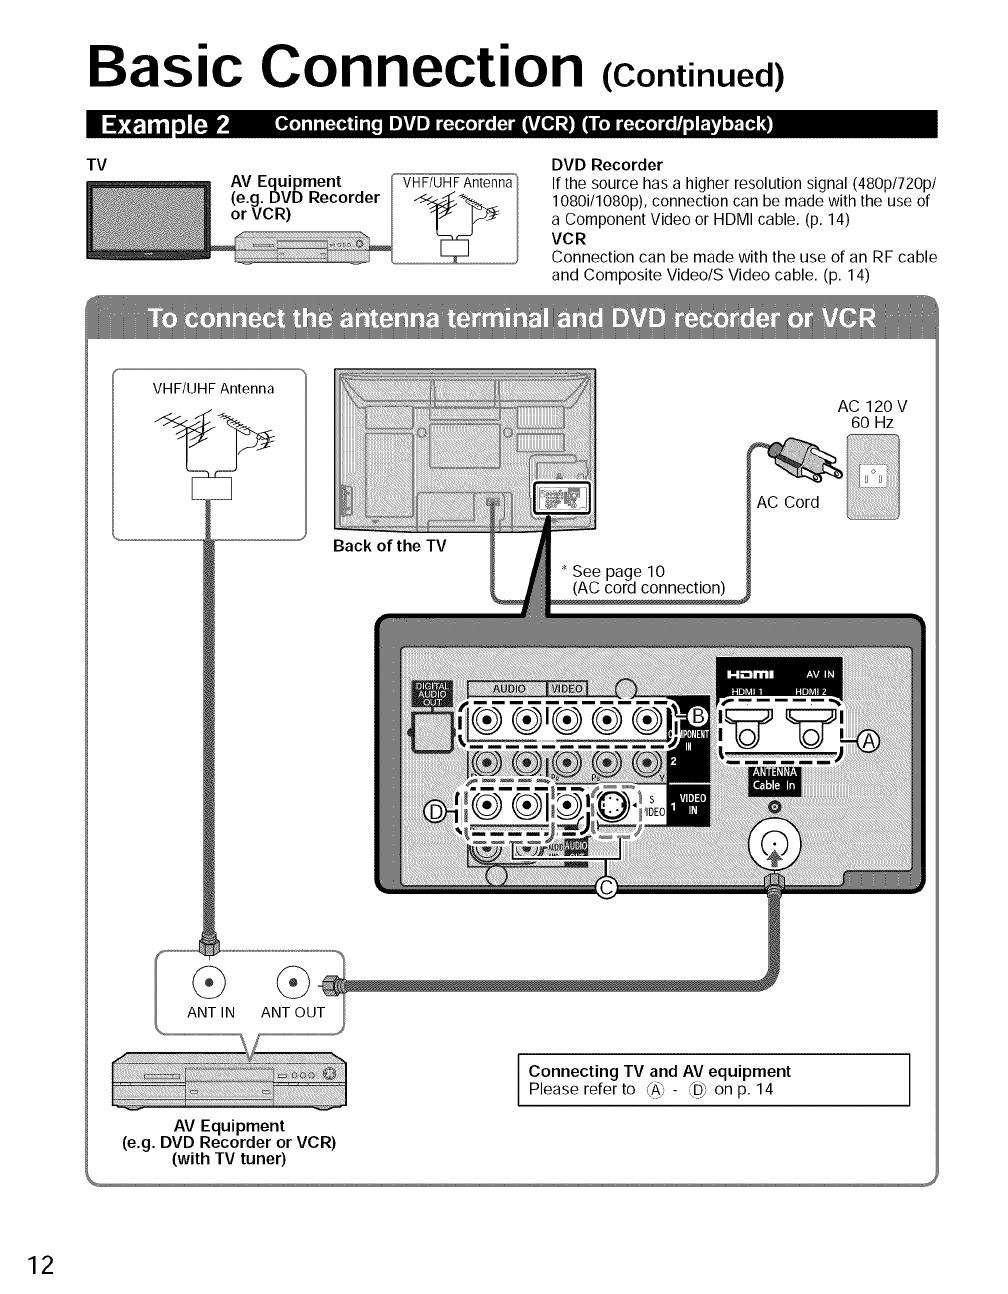
Basic Connection (Continued)
TV
AV Equipment
(e.g. DVD Recorder
or VCR)
VHF/UH F Antenna
DVD Recorder
If the source has a higher resolution signal (480p/720p/
1080i/1080p), connection can be made with the use of
a Component Video or HDMI cable. (p. 14)
VCR
Connection can be made with the use of an RF cable
and Composite Video/S Video cable. (p. 14)
VHF/UHF Antenna AC 120V
60 Hz
Back ofthe TV
See page 10
(AC cord connection)
AC Cord
ANT IN ANT OUT
i Connecting TV and AV equipmentPlease refer to ',AJ_×- _'-',_D_on p. 14
AV Equipment
(e.g. DVD Recorder or VCR)
(with TV tuner)
12

•_1_I iilm]['_.
TV
_o]m)m[:.(o_(im[om J_T(|Jma[:.(_o]a[o_lkT(®] ,'_Ime:.)mTom...i.:.i_Irl(:.]m(_ kVZ_
Satellite
DVD Recorderor Receiver_
VeR
You can enjoy high-definition
programming by subscribing to
high-definition satellite service.
Connection can be done with the
use of HDMI or Component Video
cable. (p. 14)
VHF/UHF Antenna
Back of the TV
AC 120V
60 Hz
(_) ]Please refer to ,(A_- ,_D]on p. 14.
ANT OUT I ent
L
Satellite Receiver DVD Recorder or VCR
(with TV tuner)
® For details of external equipment connections, please refer to the operating manuals for the equipment.
@
O
o
.-_
'-5
('D
0
+ +
('D ('D
0 0
S.S.
<<
©©
+
('3
<
13
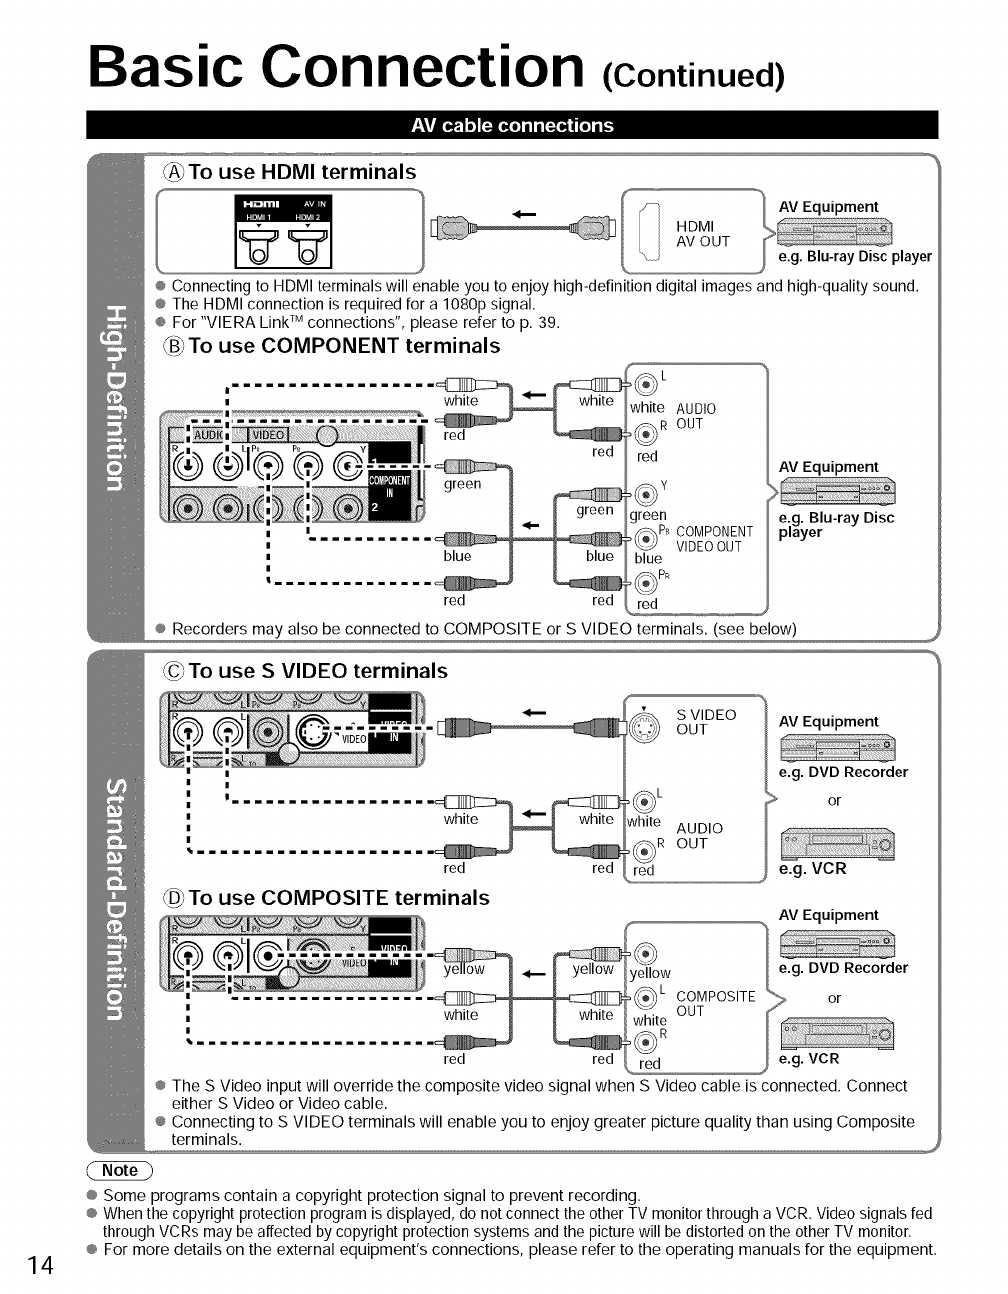
Basic Connection (Continued)
-'_¥1*._, 1o_ [=-lifo] il i [_O.]lll [o] i_.
_To use HDMI terminals IHDMI
AV OUT
® Connecting to HDMI terminals will enable you to enjoy high-definition digital images and high-quality sound.
® The HDMI connection is required for a 1080p signal.
® For "VIERA Link _uconnections", please refer to p. 39.
_B_To use COMPONENT terminals
L
white AUDIO
red I_R OUT
red AV Equipment
green
_PB COMPONENT
VIDEOOUT
blue
red red red
® Recorders may also be connected to COMPOSITE or S VIDEO terminals. (see below)
@To use SVIDEO terminals
|_mmmmmm_mmmm_
red red
To use COMPOSITE terminals
S VIDEO
OUT
white AUDIO
OUT
red
AV Equipment
e.g. DVD Recorder
> or
e.g. VCR
AV Equipment
14
red red
® The S Video input will override the composite video signal when S Video cable is connected. Connect
either S Video or Video cable.
® Connecting to S VIDEO terminals will enable you to enjoy greater picture quality than using Composite
terminals.
® Some programs contain a copyright protection signal to prevent recording.
® When the copyright protection program is displayed, do not connect the other TV monitor through a VCR. Video signals fed
through VCRs may be affected by copyright protection systems and the picture will be distorted on the other TV monitor.
® For more details on the external equipment's connections, please refer to the operating manuals for the equipment.
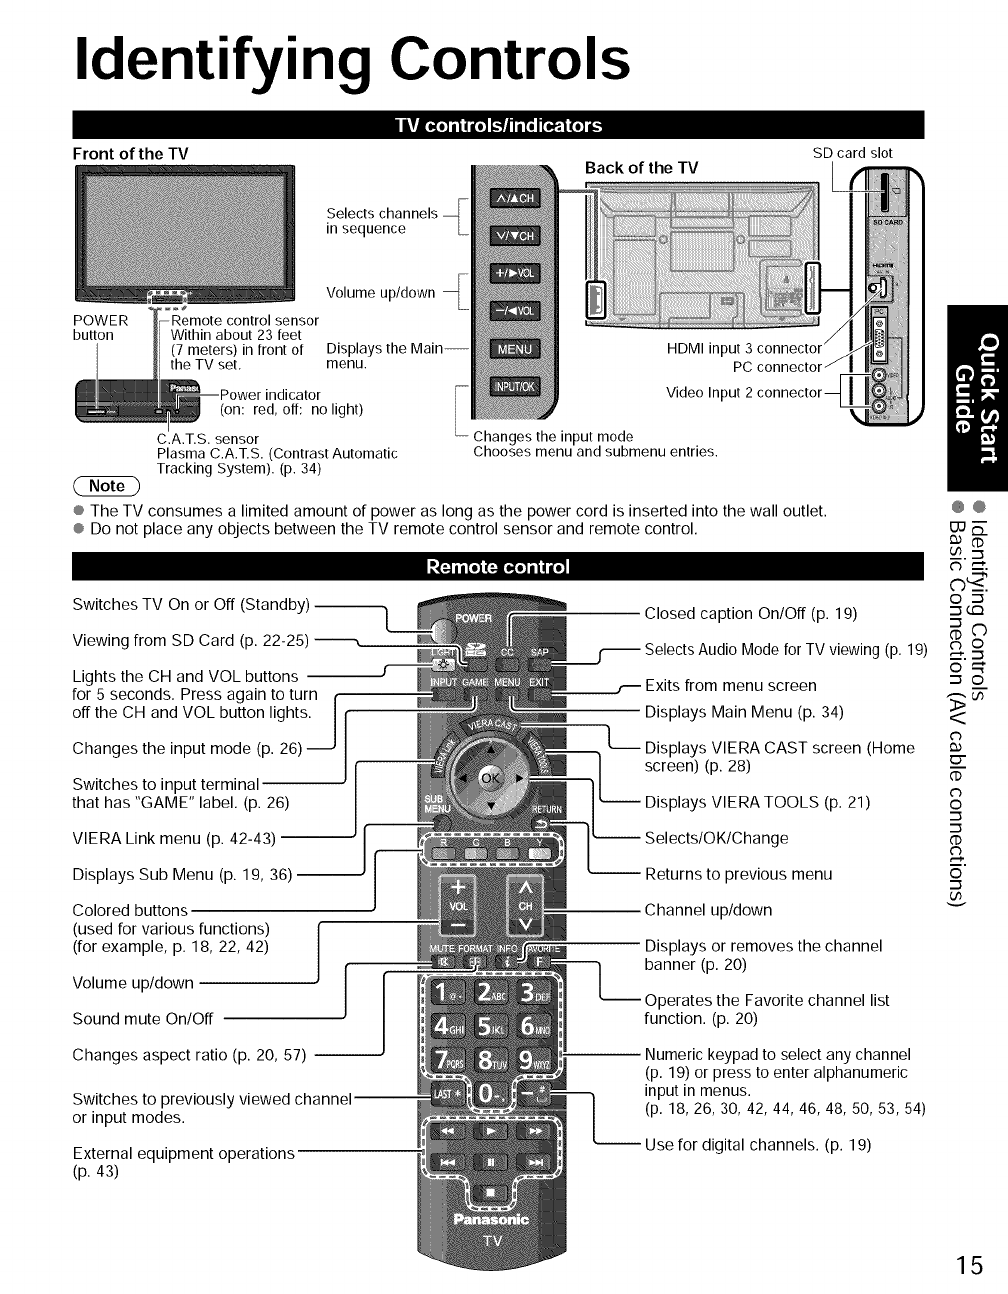
Identifying Controls
Front of the TV Back of the TV SD card slot
Selects channels
in sequence
Volume up/down
POWER control sensor
button Within about 23 feet
(7 meters) in front of Displays the Main-- HDMI input 3
the TV set, menu. PC
indicator Video Input 2
(on: red, off: no light)
C.A.T.S. sensor Changes the input mode
Plasma C.A.T.S. (Contrast Automatic Chooses menu and submenu entries.
Tracking System). (p. 34)
® The TV consumes a limited amount of power as long as the power cord is inserted into the wall outlet.
® Do not place any objects between the TV remote control sensor and remote control.
_ a|[o](_o] i I _"_
Switches TV On or Off (Standby)
Viewing from SD Card (p. 22-25)
Lights the CH and VOL buttons --
for 5 seconds. Press again to turn f
off the CH and VOL button lights. If]
Changes the input mode (p. 26)
Switches to input terminal
that has "GAME" label. (p. 26)
Closed caption On/Off (p. 19)
Mode for TV viewing (p. 19)
Exits from menu screen
Displays Main Menu (p. 34)
L__.. Displays VIERA CAST screen (Home
screen) (p. 28)
-- Displays VIERA TOOLS (p. 21)
VIERA Link menu (p. 42-43) ,ge
Displays Sub Menu (p. 19, 36) -- -- Returns to previous menu
Colored buttons
(used for various functions)
(for example, p. 18, 22, 42)
Volume up/down
Sound mute On/Off
Channel up/down
Displays or removes the channel
banner (p. 20)
perates the Favorite channel list
function. (p. 20)
Changes aspect ratio (p. 20, 57) --
Switches to previously
or input modes.
External equipment operations
(p. 43)
-- Numerickeypadto select any channel
(p. 19) or press to enter alphanumeric
input in menus.
(p. 18,26, 30, 42, 44, 46, 48, 50, 53, 54)
Use for digital channels. (p. 19)
@@
uJ_.
__..'_
C) --_'.
o _
_____-_-.--_
o_
_ o
0.)
o
o
_,-_.
o
15
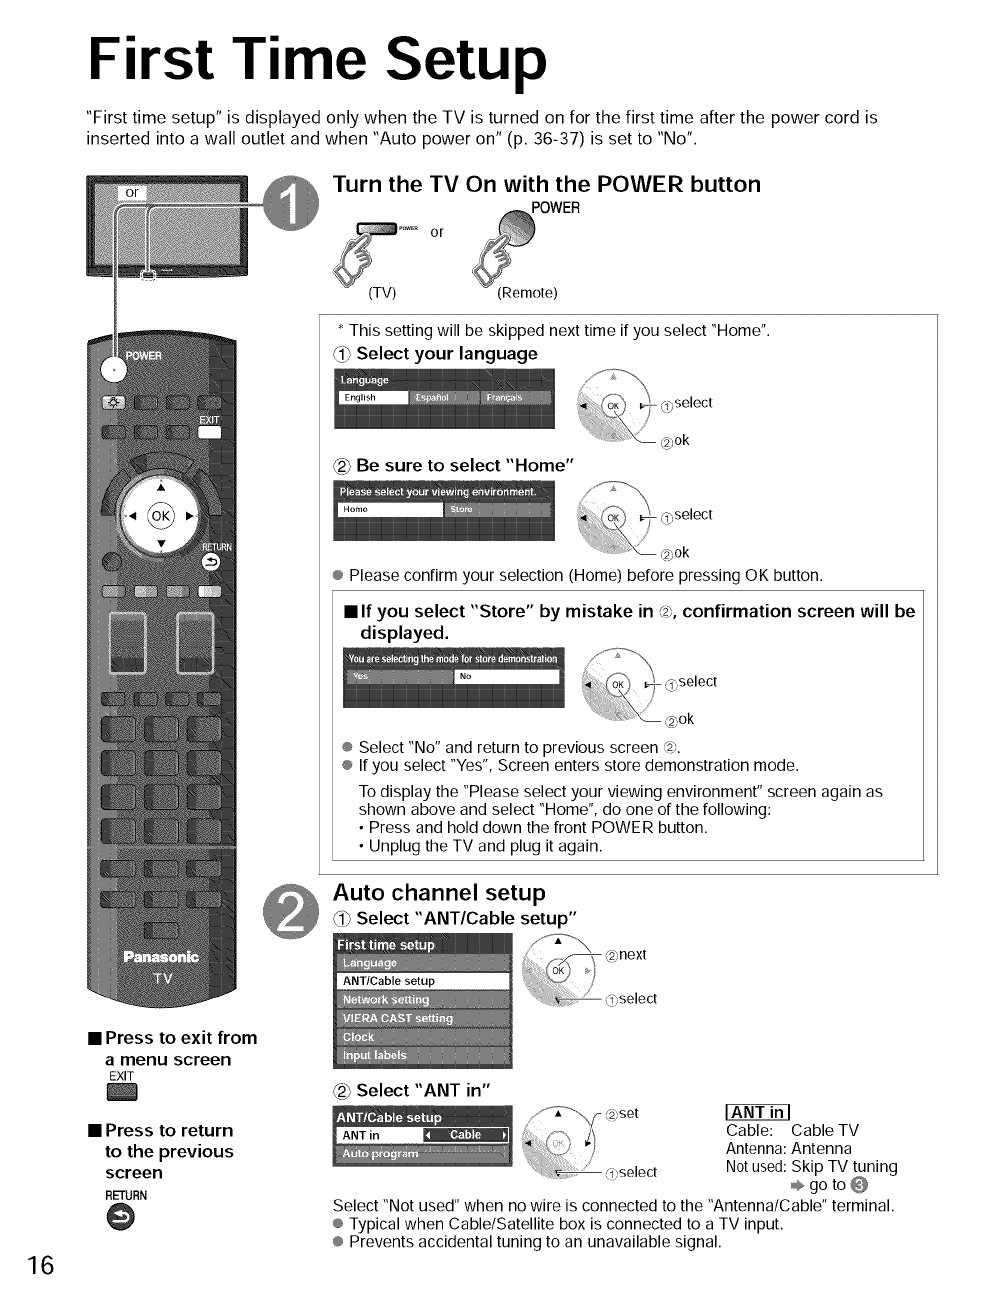
First Time Setup
"First time setup" is displayed only when the TV is turned on for the first time after the power cord is
inserted into a wall outlet and when "Auto power on" (p. 36-37) is set to "No".
Turn the TV On with the POWER button
POWER
or
(TV) :Remote)
* This setting will be skipped next time if you select "Home".
<_ Select your language
select
_2)ok
_ Be sure to select "Home"
® Please confirm your selection (Home) before pressing OK button.
•If you select "Store" by mistake in @, confirmation screen will be
displayed.
® Select "No" and return to previous screen @.
® If you select "Yes", Screen enters store demonstration mode.
To display the "Please select your viewing environment" screen again as
shown above and select "Home", do one of the following:
• Press and hold down the front POWER button.
• Unplug the TV and plug it again.
Auto channel setup
Select "ANT/Cable setup"
16
• Press to exit from
amenu screen
EXIT
• Press to return
to the previous
screen
RETURN
@
Select "ANT in"
:; " Zi Cable: Cable TV
)Antenna: Antenna
____ ......... Not used: Skip TV tuning
i(<select _ go to @
Select "Not used" when no wire is connected to the "Antenna/Cable" terminal.
® Typical when Cable/Satellite box is connected to a TV input.
® Prevents accidental tuning to an unavailable signal.
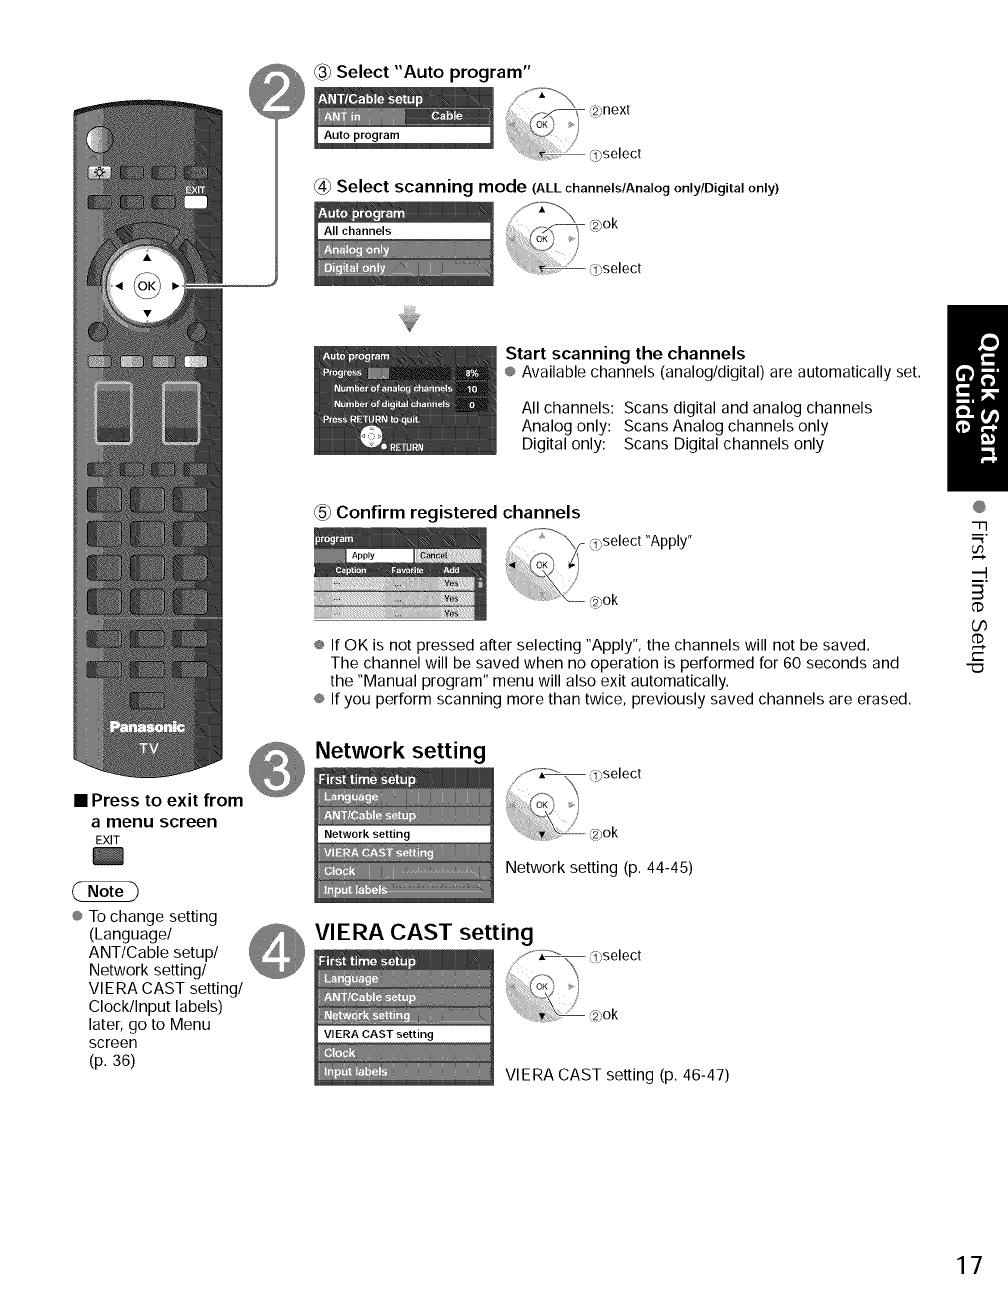
Select"Autoprogram"
@ Select scanning mode (ALLchannels/Analogonly/Digitalonly)
• Press to exit from
amenu screen
EXIT
¢ To change setting
(Language/
ANT/Cable setup/
Network setting/
VIERA CAST setting/
Clock/Input labels)
later, go to Menu
screen
(p. 36)
Start scanning the channels
® Available channels (analog/digital) are automatically set.
All channels: Scans digital and analog channels
Analog only: Scans Analog channels only
Digital only: Scans Digital channels only
_5_Confirm registered channels
"Apply"
® If OK is not pressed after selecting "Apply", the channels will not be saved.
The channel will be saved when no operation is performed for 60 seconds and
the "Manual program" menu will also exit automatically.
® If you perform scanning more than twice, previously saved channels are erased.
Network setting
Network setting (p. 44-45)
VIERA CAST setting
VIERA CAST setting (p. 46-47)
@
"77
m,
3
dD
O0
GD
t-
17
First Time Setup (Continued)
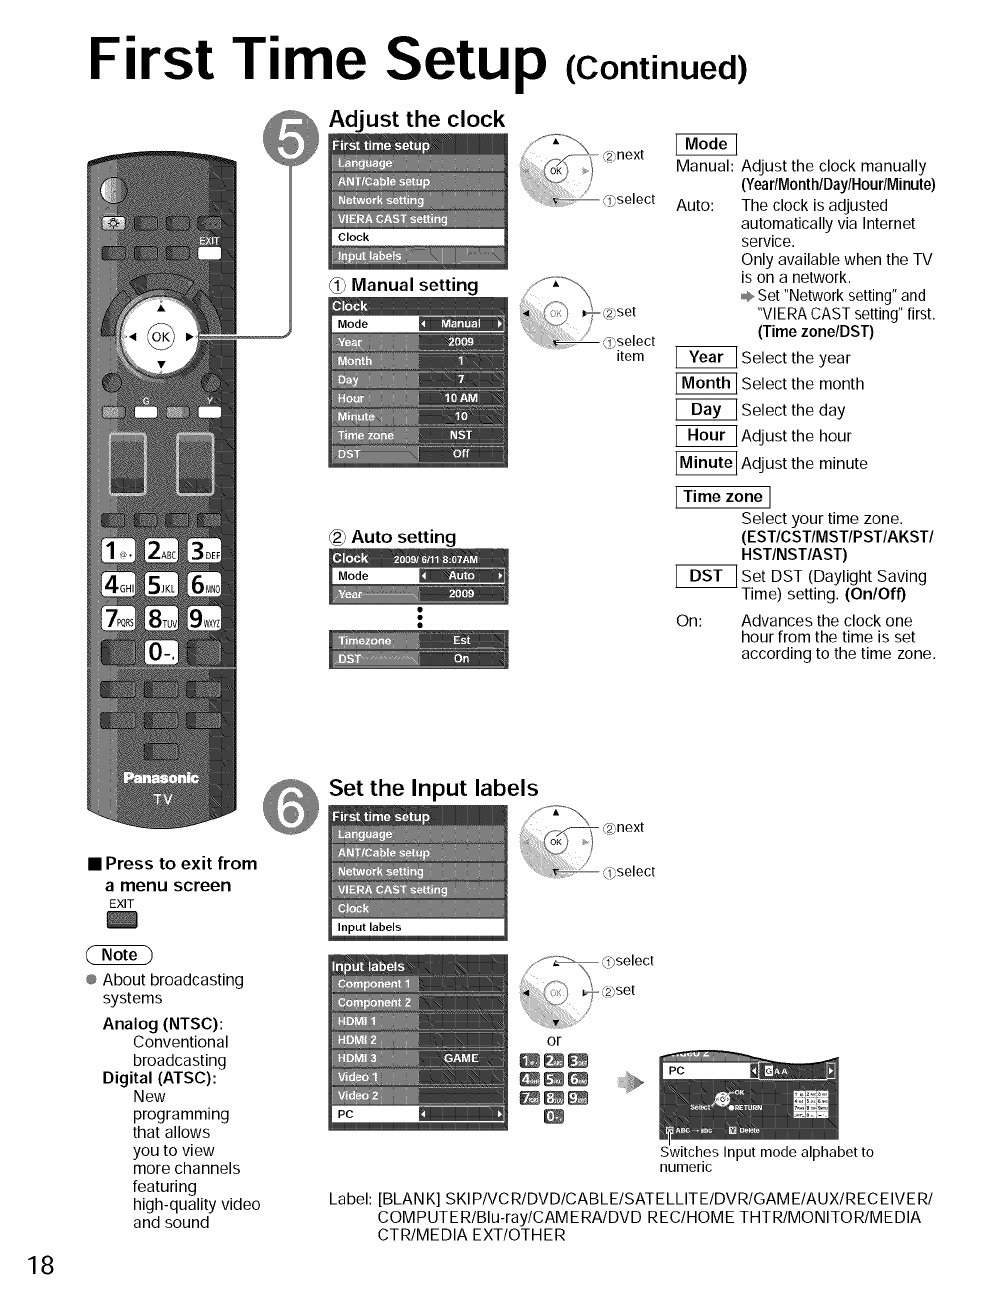
_ AdJust the clock
_i} Manual setting
(_ Auto setting
item
Manual: Adjust the clock manually
(YeadMonthlDaylHoudMinute)
Auto: The clock is adjusted
automatically via Internet
service.
Only available when the TV
is on a network.
÷ Set "Network setting" and
"VIE RA CAST setting" first.
(Time zone/DST)
Select the year
Select the month
Select the day
Adjust the hour
_ Adjust the minute
I Time zone I
Select your time zone.
(EST/CST/MST/PST/AKST/
HST/NST/AST)
Set DST (Daylight Saving
--Time) setting. (On/Off)
On: Advances the clock one
hour from the time is set
according to the time zone.
Set the Input labels
18
• Press to exit from
a menu screen
EXIT
(2ND
® About broadcasting
systems
Analog (NTSC):
Conventional
broadcasting
Digital (ATSC):
New
programming
that allows
you to view
more channels
featuring
high-quality video
and sound
Switches Input mode alphabet to
numeric
Label: [BLANK] SKIPIVCRIDVDICABLEISATELLITEIDVRIGAMEIAUXIRECEIVERI
COMPUTERIBlu-raylCAMERAIDVD REC/HOME THTR/MONITOR/MEDIA
CTR/MEDIA EXT/OTHER

Watching TV
Connect the TV to a cable box/cable, set-top-box, satellite box or antenna cable (p. 11-14)
I[oiVir_Tli_'_=Jnln _fJl.:1i [o_Ii[=..]alNII Ii [a,]lnl[o]i I_
Turn power on
POWER
or
(TV)
Select a channel number
(TV)
or _
INPUT
®If the mode is not TV, press _ and
select TV. (p. 26)
• To directly input the digital
channel number
When tuning to a digital
channel, press the button to
enter the minor number in a
compound channel number.
example: CH15-1:R_
® Reselect "Cable" or "Antenna" in "ANT in" of "ANT/Cable setup" to switch the
signal reception between cable TV and antenna. (p. 16, 51)
® The channel number and volume level remain the same even after the TV is
turned off.
• Select Audio Mode for watching TV
SAP ® Digital mode
Press SAP to select the next audio track (if available) when receiving a digital
channel.
® Analog mode
Press SAP to select the desired audio mode.
• Each press of SAP will change the audio mode. (Stereo/SAP/Mono)
• Switches Closed caption mode On or Off
cc
• Press SUB MENU to show sub menu screen. (p. 36)
This menu consists of shortcuts to convenient functions.
SUB
MENU
@@
_--!._
r-
"(D
19
Watching TV
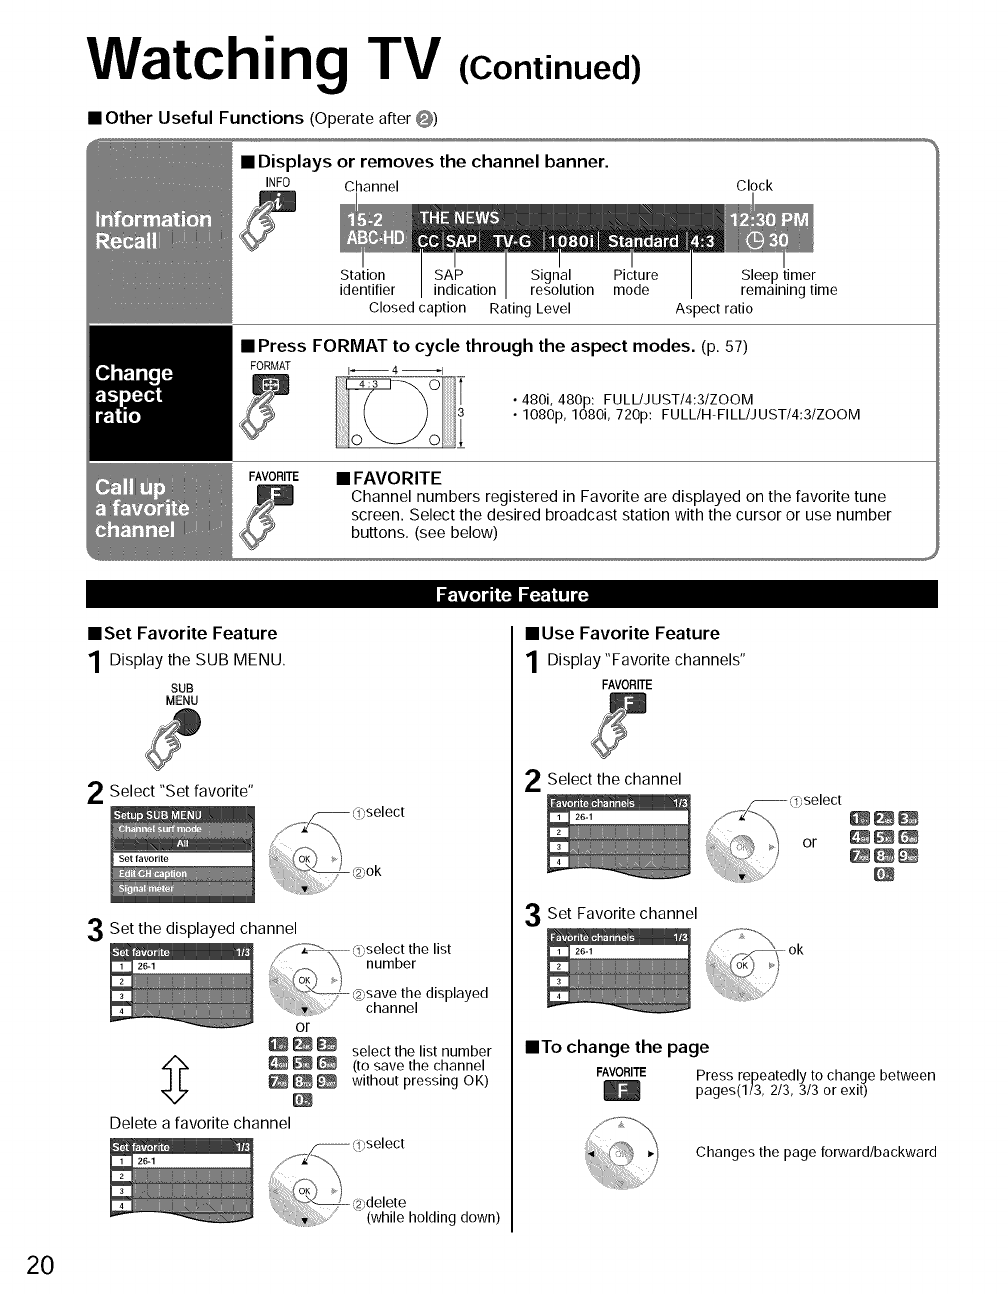
• Other Useful Functions (Operate after O)
(Continued)
•Displays or removes the channel banner.
INFO Channel Clock
Station SAP Signal Picture
identifier indication resolution mode
Closed caption Rating Level
Sleep timer
remaining time
Aspect ratio
•Press FORMAT to cycle through the aspect modes. (p. 57)
FORMAT (_ 4 _1
•480i, 480p: FULL/JUST/4:3/ZOOM
• 1080p, 1080i, 720p: FULL/H-FILL/JUST/4:3/ZOOM
FAVORITE • FAVORITE
Channel numbers registered in Favorite are displayed on the favorite tune
screen. Select the desired broadcast station with the cursor or use number
buttons. (see below)
it=iv(o] III 1";.! il=-_,l I I I (;
mSet Favorite Feature
1Display the SUB MENU.
SUB
MENU
2Select "Set favorite"
3Set the displayed channel
or
Delete a favorite channel
select the list number
(to save the channel
without pressing OK)
• Use Favorite Feature
1Display"Favorite channels"
FAVORITE
2Select the channel
Set Favorite channel
/
mTo change the page
FAVORITE Press repeatedly to change between
pages(I/3, 2/3, 3/3 or exit)
Changes the page forward/backward
20
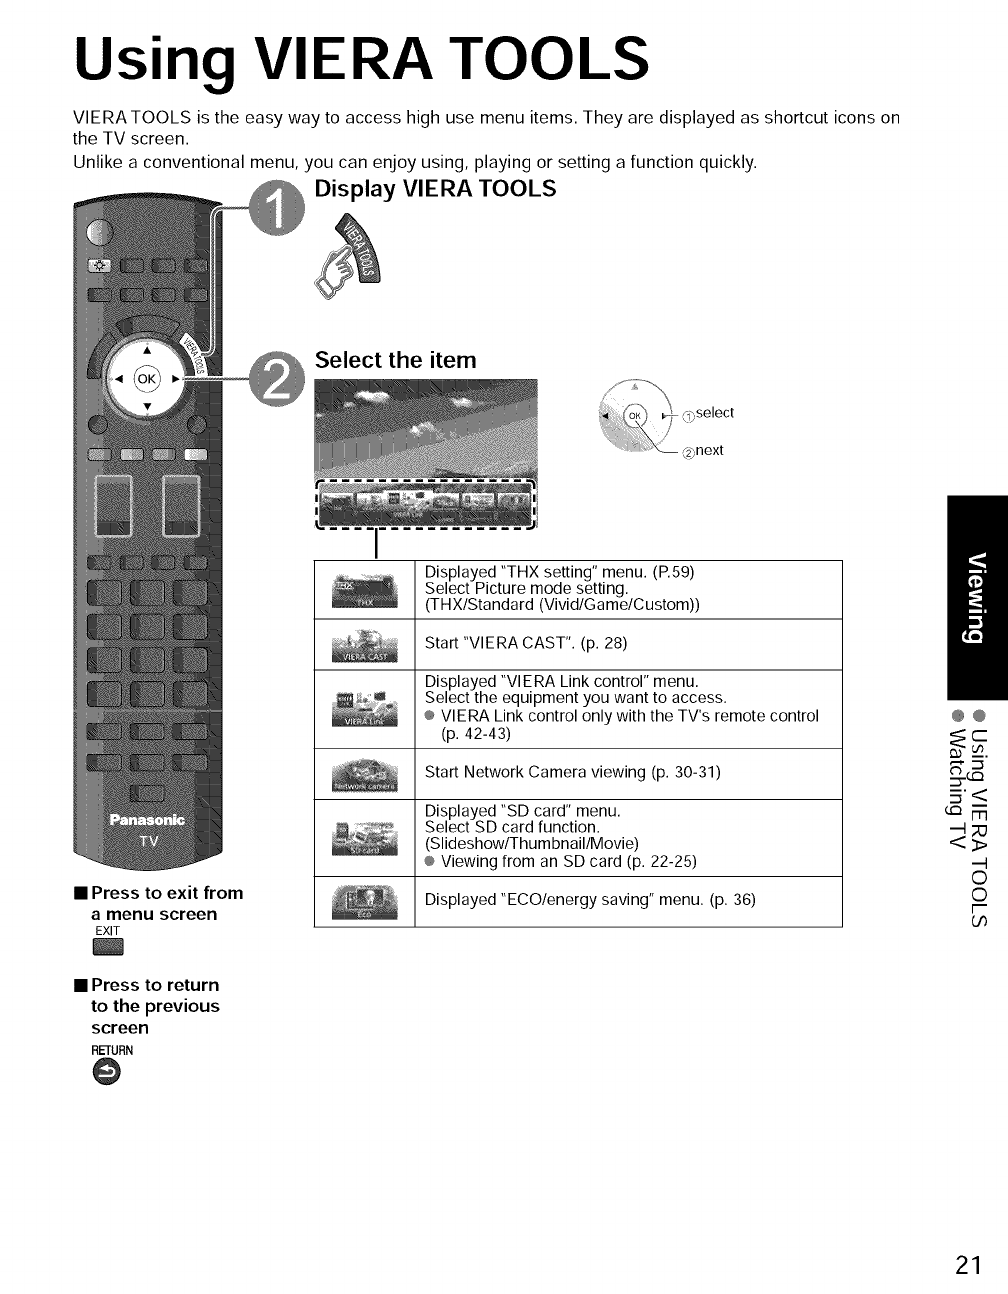
Using VIERA TOOLS
VIERATOOLS is the easy way to access high use menu items. They are displayed as shortcut icons on
the TV screen.
Unlike a conventional menu, you can enjoy using, playing or setting a function quickly.
Display VIERA TOOLS
Select the item
•Press to exit from
a menu screen
EXIT
• Press to return
to the previous
screen
RETURN
@
Displayed "THX setting" menu. (P.59)
Select Picture mode setting.
(THX/Standard (Vivid/Game/Custom))
Start "VIERA CAST". (p. 28)
Displayed "VlERA Link control" menu.
Select the equipment you want to access.
® VlERA Link control only with the TV's remote control
(p. 42-43)
Start Network Camera viewing (p. 30-31)
Displayed "SD card" menu.
Select SD card function.
(Slideshow/Thum bnail/Movie)
® Viewing from an SD card (p. 22-25)
Displayed "ECO/energy saving" menu. (p. 36)
@@
=j'<
©
©
F
Go
21
Viewing from an SD Card
You can view movies and photos taken with a digital camera or digital video camera and saved on an SD
card. (Media other than SD Cards may not be reproduced properly.)
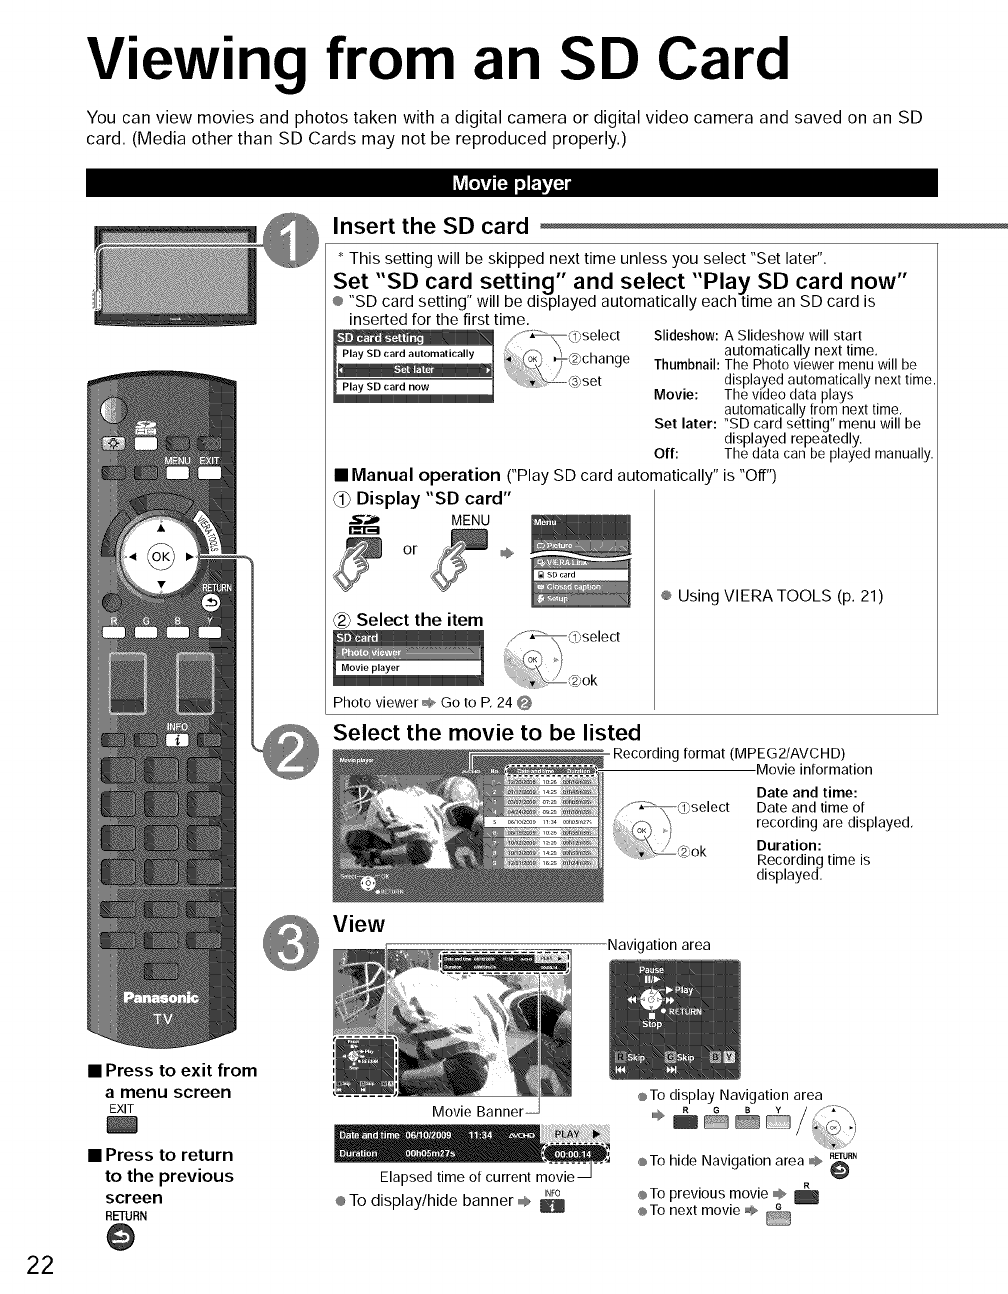
Insert the SD card
* This setting will be skipped next time unless you select "Set later".
Set "SD card setting" and select "Play SD card now"
® "SD card setting" will be displayed automatically each time an SD card is
inserted for the first time. Slideshow: A Slideshow will start
automatically next time,
Thumbnail:The Photo viewer menu will be
displayed automatically next time
Movie: The video data plays
automatically from next time,
Set later: "SD card setting" menu will be
displayed repeatedly.
Off: The data can be played manually,
•Manual operation ("Play SD card automatically" is "Off")
_) Display "SD card"
5",_ MENU
or _÷
_-2_Select the item
........._<_)select
l"°viep'a'o' J .....[: @ok
Photo viewer _ Go to P, 24 @
Select the movie to be listed
View
® Using VIERATOOLS (p. 21)
Recording format (MPEG2/AVCHD)
-Movie information
Date and time:
_!_Q]select Date and time of
,, recording are displayed,
£2_,ok Duration:
Recording time is
displayed.
22
• Press to exit from
amenu screen
EXIT
• Press to return
to the previous
screen
RETURN
@
Movie Banner
Elapsed time of current movie
INFO
® To display/hide banner ,®, B
Navigation area
®To display Navigation area
RETUP,_
®To hide Navigation area @
®To previous movie _
®To next movie _
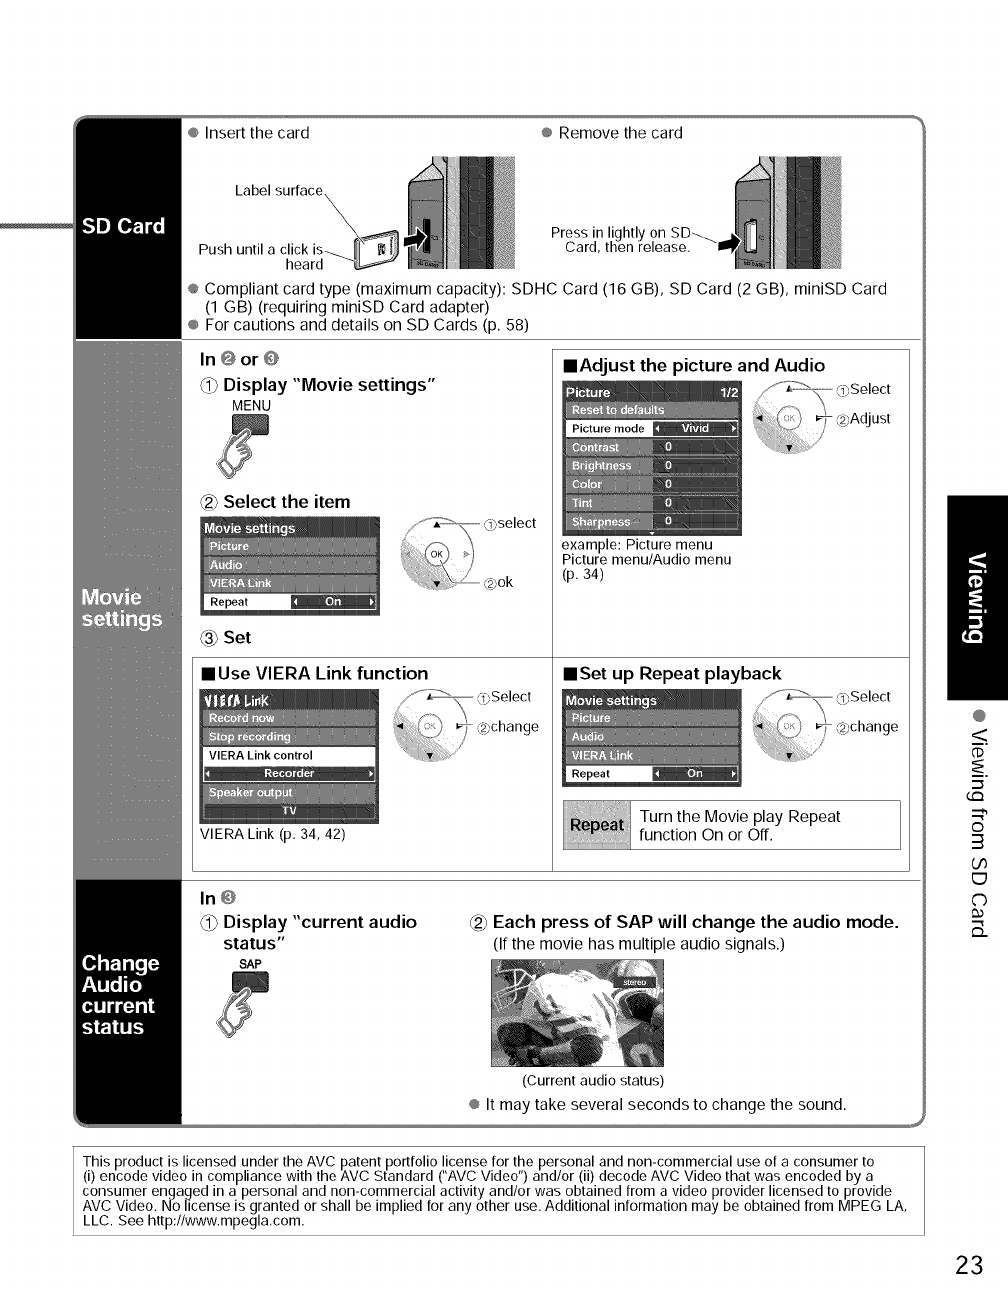
®Insertthecard ®Removethecard
Label surface
Press in
Card,
heard
® Compliant card type (maximum capacity): SDHC Card (16 GB), SD Card (2 GB), miniSD Card
(1 GB) (requiring miniSD Card adapter)
® For cautions and details on SD Cards (p. 58)
In @ or @
@Display "Movie settings"
MENU
Select the item
Set
• Use VIERA Link function
@select
VIERA Link (p, 34, 42)
mAdjust the picture and Audio
,/'°" _ (oSelect
Pict..... de _ _ @Adjust
example: Picture menu
Picture menu/Audio menu
(p. 34)
mSet up Repeat playback
Turn the Movie play Repeat
function On or Off.
In@
_1_Display "current audio
status"
SAP
Each press of SAP will change the audio mode.
(If the movie has multiple audio signals.)
(Current audio status)
® It may take several seconds to change the sound.
This product is licensed under the AVC patent portfolio license for the personal and non-commercial use of a consumer to
(i) encode video in compliance with the AVC Standard ("AVC Video") and/or (ii) decode AVC Video that was encoded by a
consumer engaged in a personal and non-commercial activity and/or was obtained from a video provider licensed to provide
AVC Video. No license is granted or shall be implied for any other use. Additional information may be obtained from MPEG LA,
LLC. See http://www.mpegla,com.
@
<
dD
"-5
tm
©
3
(./3
E9
C)
B_
23
Viewing from an SD Card
li_j_'|'| i=i'i'|=]
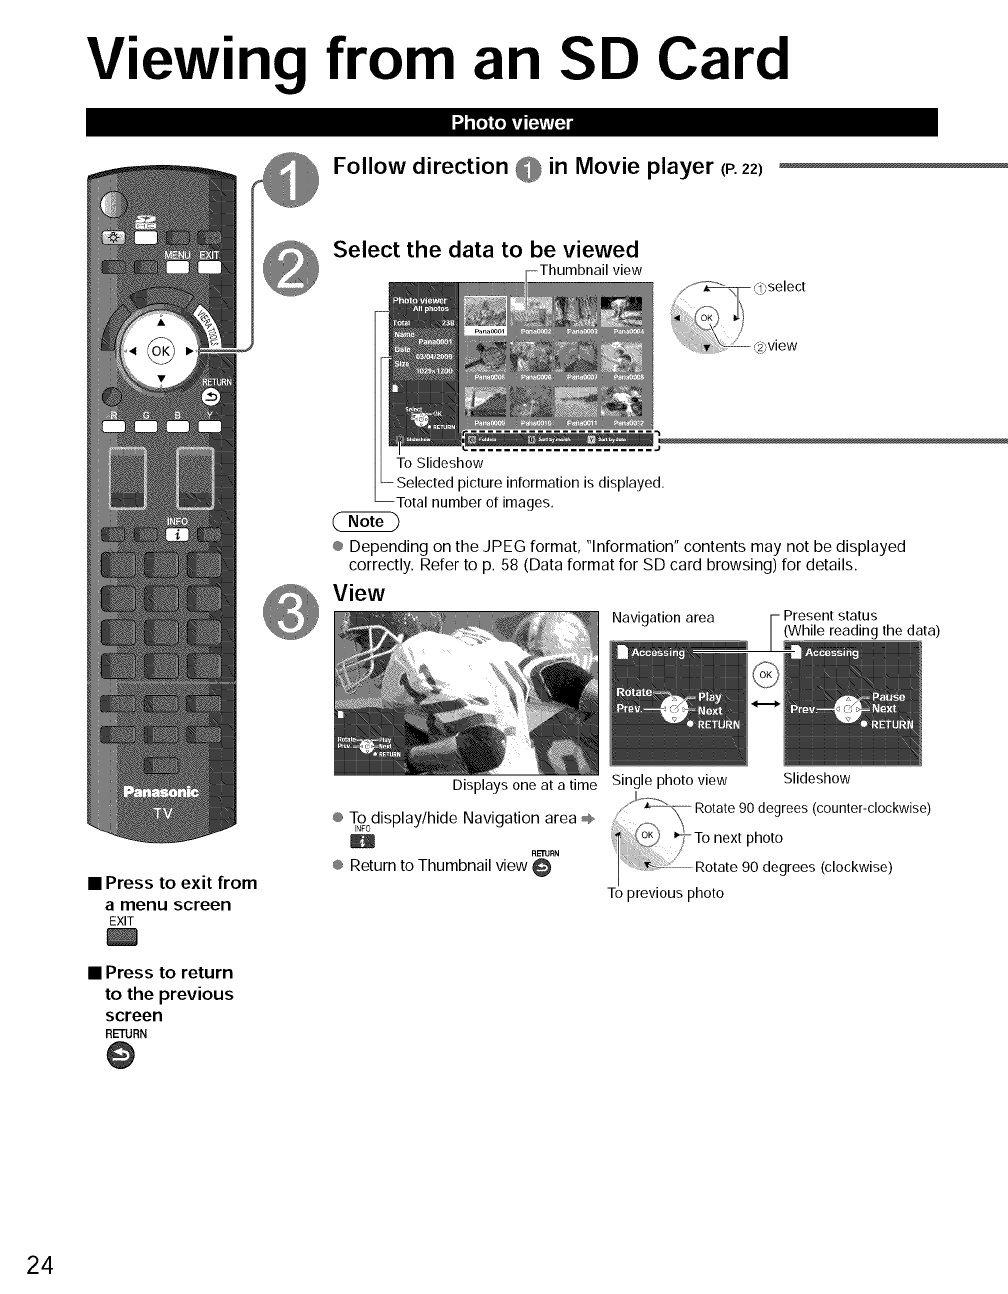
Follow direction @in Movie player (P. 22)
Select the data to be viewed
view
To Slideshow
picture information is displayed.
rotal number of images,
® Depending on the JPEG format, "Information" contents may not be displayed
correctly. Refer to p. 58 (Data format for SD card browsing) for details.
View
Navigation area Present status
(While reading the data)
• Press to exit from
amenu screen
EXIT
• Press to return
to the previous
screen
RETURN
Slideshow
Displays one at a time Single photo view
_, \\ Rotate 90 degrees (counter-clockwise)
® T°°display/hideH Navigation area @ __To next photo
® Return to Thumbnail view '_" Rotate 90 degrees (clockwise)
To previous photo
24
(Continued)
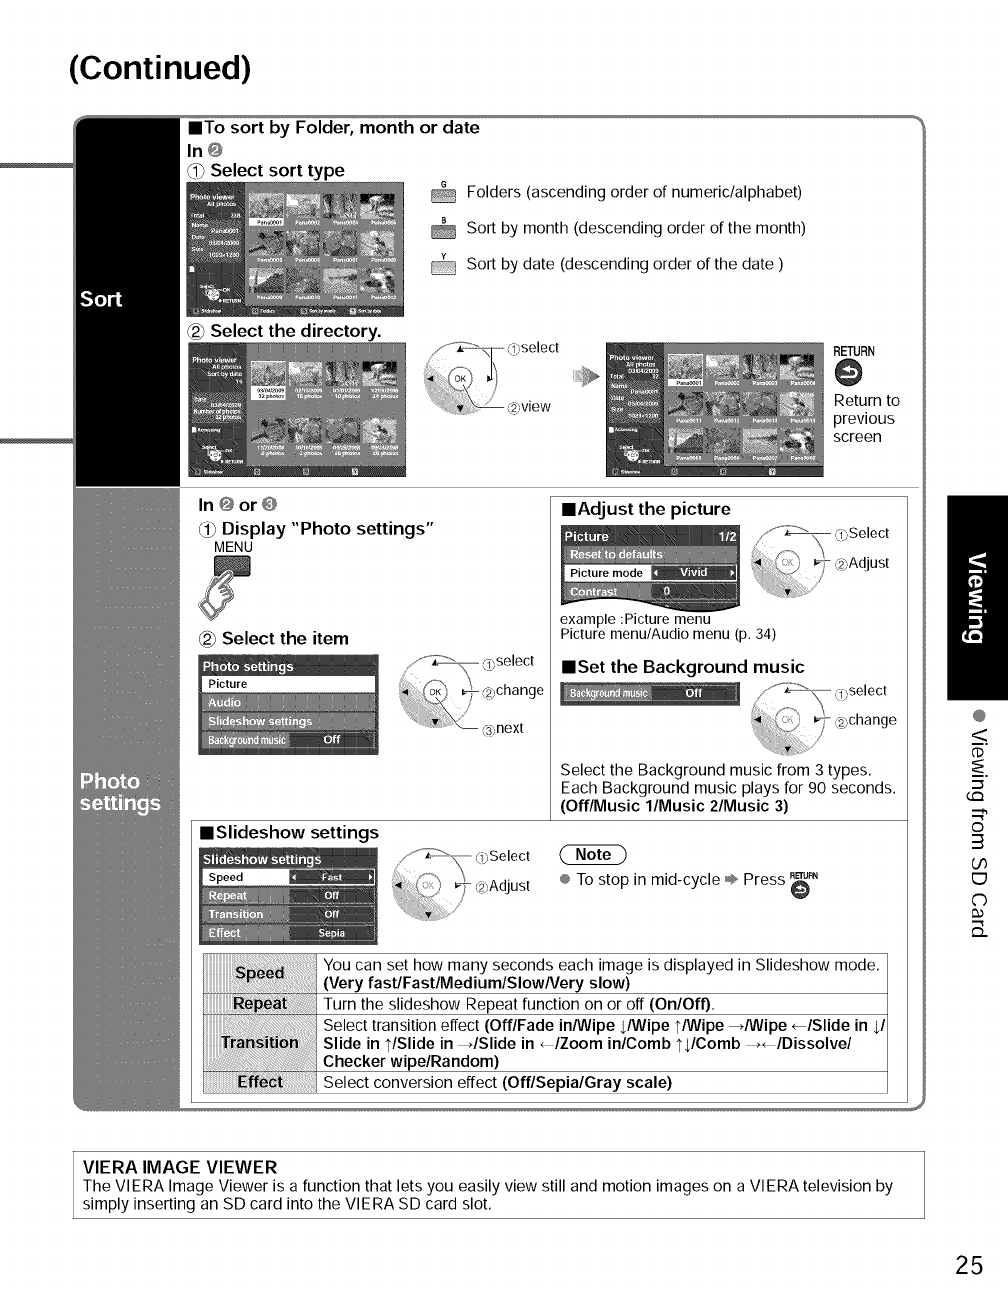
==To sort by Folder, month or date
In@
_Select sort type
Folders (ascending order of numeric/alphabet)
Sort by month (descending order of the month)
@ Sort by date (descending order of the date )
Select the directory.
RETURN
Return to
previous
screen
In@or@
_) Display "Photo settings"
MENU
Select the item
Picture
mSlideshow settings
Speed [_
mAdjust the picture
_""__ 0",Select
_,Ad ust
Picture mode ,/ _ IJ
,I,, .......
example :Picture menu
Picture menu/Audio menu (p. 34)
Select the Background music from 3 types.
Each Background music plays for 90 second
(Off/Music l/Music 2/Music 3)
® To stop in mid-cycle ÷ Press _"
You can set how many seconds each image is displayed in Slideshow mode.
(Very fastlFastlMediumlSIowNery slow)
Turn the slideshow Repeat function on or off (On/Off).
Select transition effect (Off/Fade in/Wipe JWipe t/Wipe -,/Wipe _/Slide in $/
Slide in t/Slide in _/Slide in _/Zoom in/Comb tJComb _/Dissolve/
Checker wipe/Random)
Select conversion effect (Off/Sepia/Gray scale)
VIERA IMAGE VIEWER
The VIERA Image Viewer is a function that lets you easily view still and motion images on a VIERA television by
simply inserting an SD card into the VIERA SD card slot.
@
<
dD
"--5
tm
©
3
b0
E9
C)
B_
25
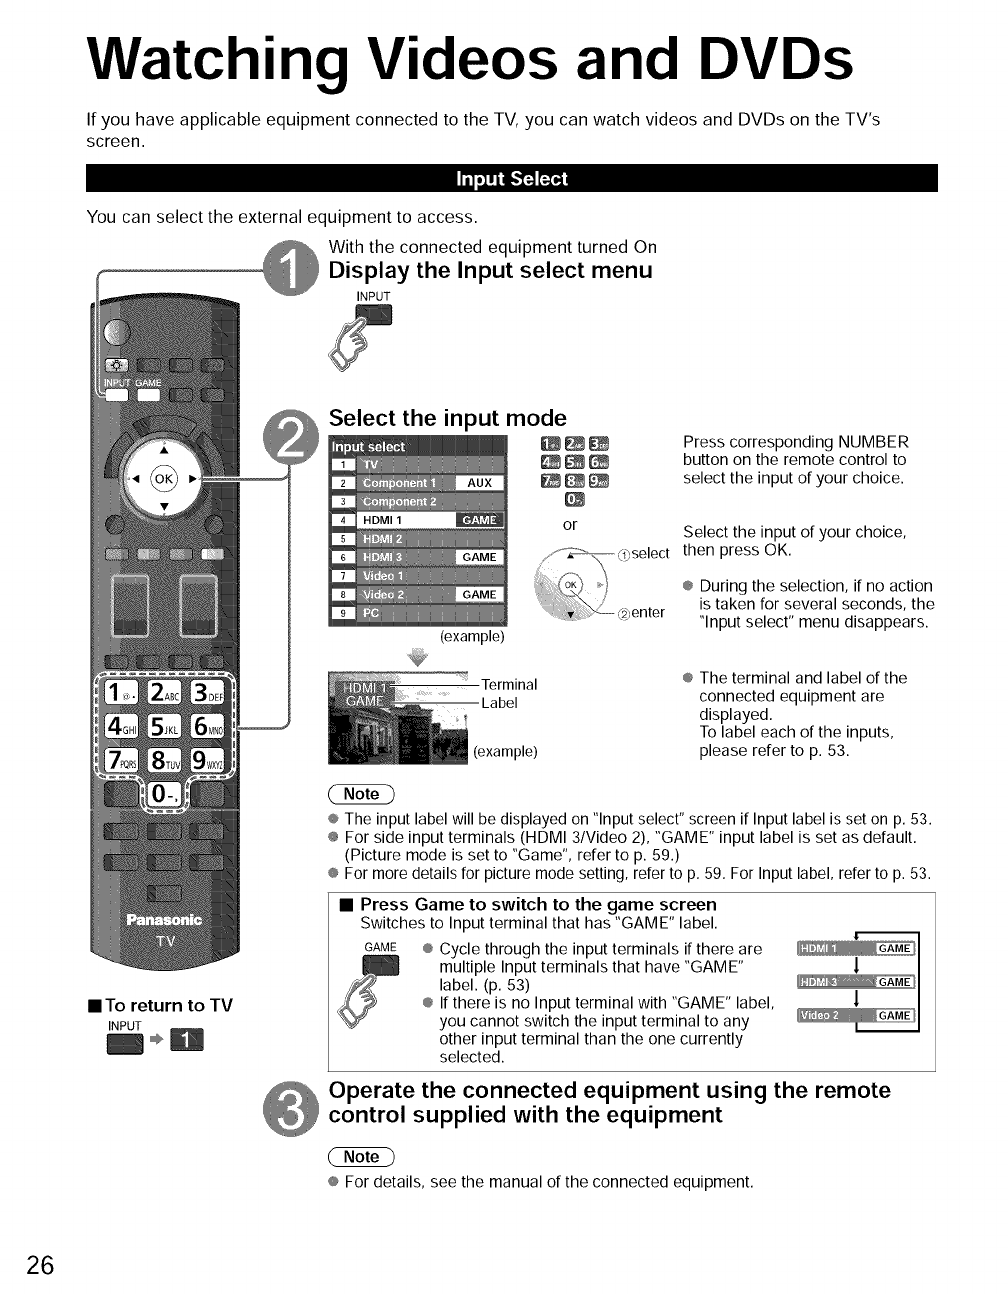
Watching Videos and DVDs
If you have applicable equipment connected to the TV, you can watch videos and DVDs on the TV's
screen.
Ill.],,+.'F4 r_
You can select the external equipment to access.
With the connected equipment turned On
Display the Input select menu
INPUT
Select the input mode
1 _
2
3
4 HDMI 1
5
6
7
8
9
(example)
or
Press corresponding NUMBER
button on the remote control to
select the input of your choice.
Select the input of your choice,
then press OK.
® During the selection, if no action
is taken for several seconds, the
"Input select" menu disappears.
• To return to TV
INPUT
Terminal
Label
(example)
®The terminal and label of the
connected equipment are
displayed.
To label each of the inputs,
please refer to p. 53.
® The input label will be displayed on "Input select" screen if Input label is set on p. 53.
÷ For side input terminals (HDMI 3/Video 2), "GAME" input label is set as default.
(Picture mode is set to "Game", refer to p. 59.)
® For more details for picture mode setting, refer to p. 59. For Input label, refer to p. 53.
• Press Game to switch to the game screen
Switches to Input terminal that has "GAME" label.
GAME @Cycle through the input terminals if there are
multiple Input terminals that have "GAME"
label. (p. 53)
® If there is no Input terminal with "GAME" label,
you cannot switch the input terminal to any
other input terminal than the one currently
selected.
1
!
Operate the connected equipment using the remote
control supplied with the equipment
® For details, see the manual of the connected equipment.
26
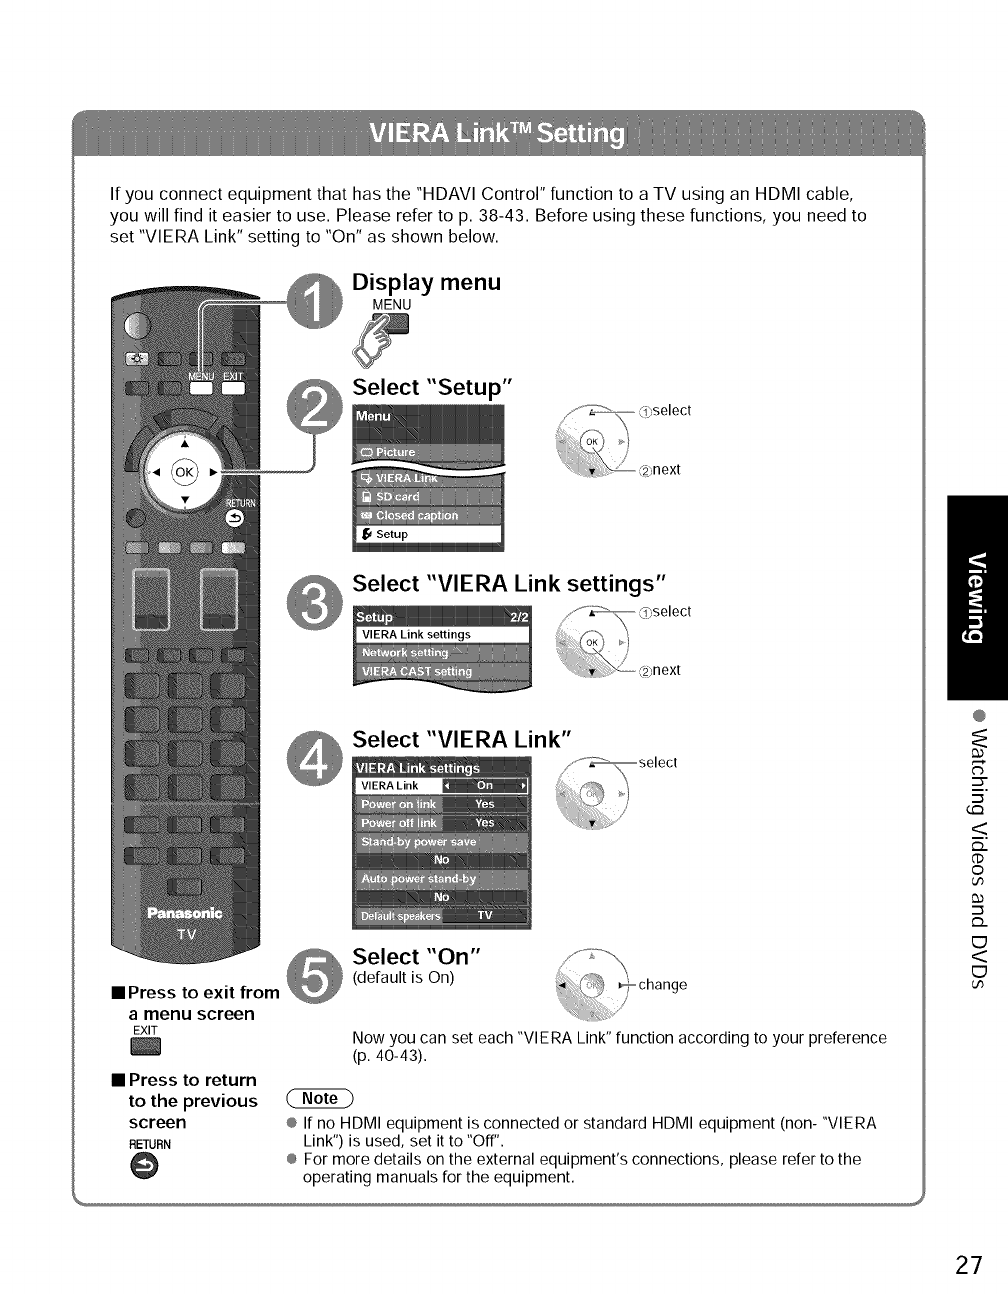
If you connect equipment that has the "HDAVI Control" function to a TV using an HDMI cable,
you will find it easier to use. Please refer to p. 38-43. Before using these functions, you need to
set "VIERA Link" setting to "On" as shown below.
Display menu
MENU
Select "Setup"
next
Select "VIERA Link settings"
Select "VIERA Link"
•Press to exit from
Select "On"
(default is On)
a menu screen
EXIT
• Press to return
to the previous
screen
RETURN
@
Now you can set each "VIERA Link" function according to your preference
(p. 40-43).
® If no HDMI equipment is connected or standard HDMI equipment (non- "VIERA
Link") is used, set it to "Off".
® For more details on the external equipment's connections, please refer to the
operating manuals for the equipment.
@
s'
"--5
G:3
<
_..
dD
O
.-_
_..
E3
<
E3
27
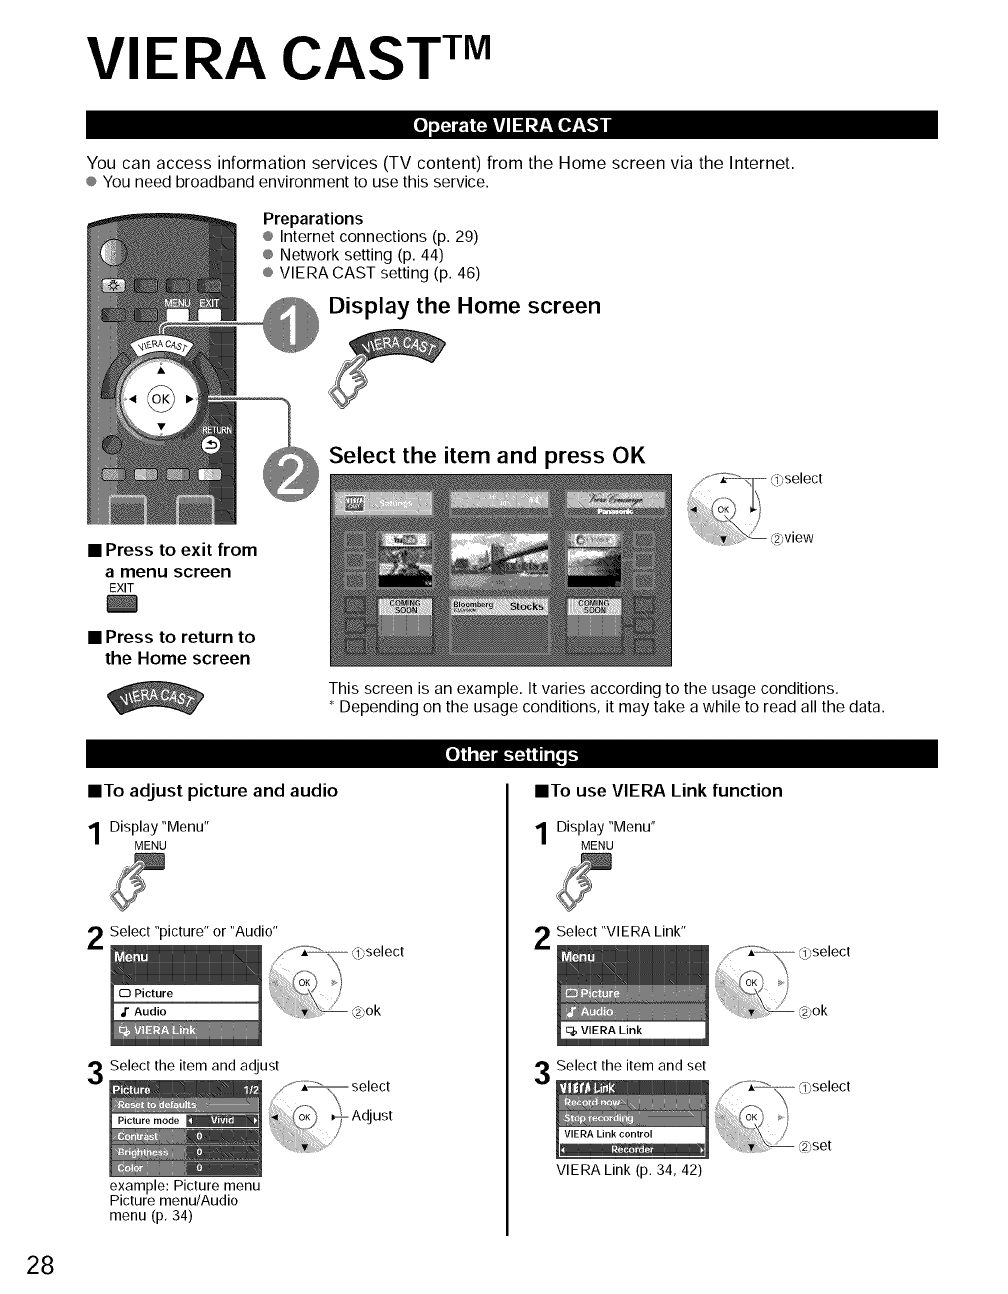
VIERA CAST TM
I_oi_ t=i!il!i II! ll__l[I,#__!,,1
You oan aooess information servioes (TV oontent) from the Home soreen via the Internet.
® You need broadband environment to use this service.
Preparations
® Internet connections (p. 29)
® Network setting (p. 44)
® VIERA CAST setting (p. 46)
@Display the Home screen
B
Select the item and press OK
•Press to exit from
amenu screen
EXIT
• Press to return to
the Home screen
•To adjust picture and audio
Display "Menu"
MENU
Select "picture" or "Audio"
Select the item and adjust
example: Picture menu
Picture menu/Audio
menu (p, 34)
This screen is an example. It varies according to the usage conditions.
* Depending on the usage conditions, it may take a while to read all the data.
select
- Adjust
/
II!,[_ I.-I_tiqi,[. 1_
•To use VIERA Link function
Display "Menu"
MENU
Select "VIERA Link"
Select the item and set
VIERA Link (p. 34, 42)
select
set
28
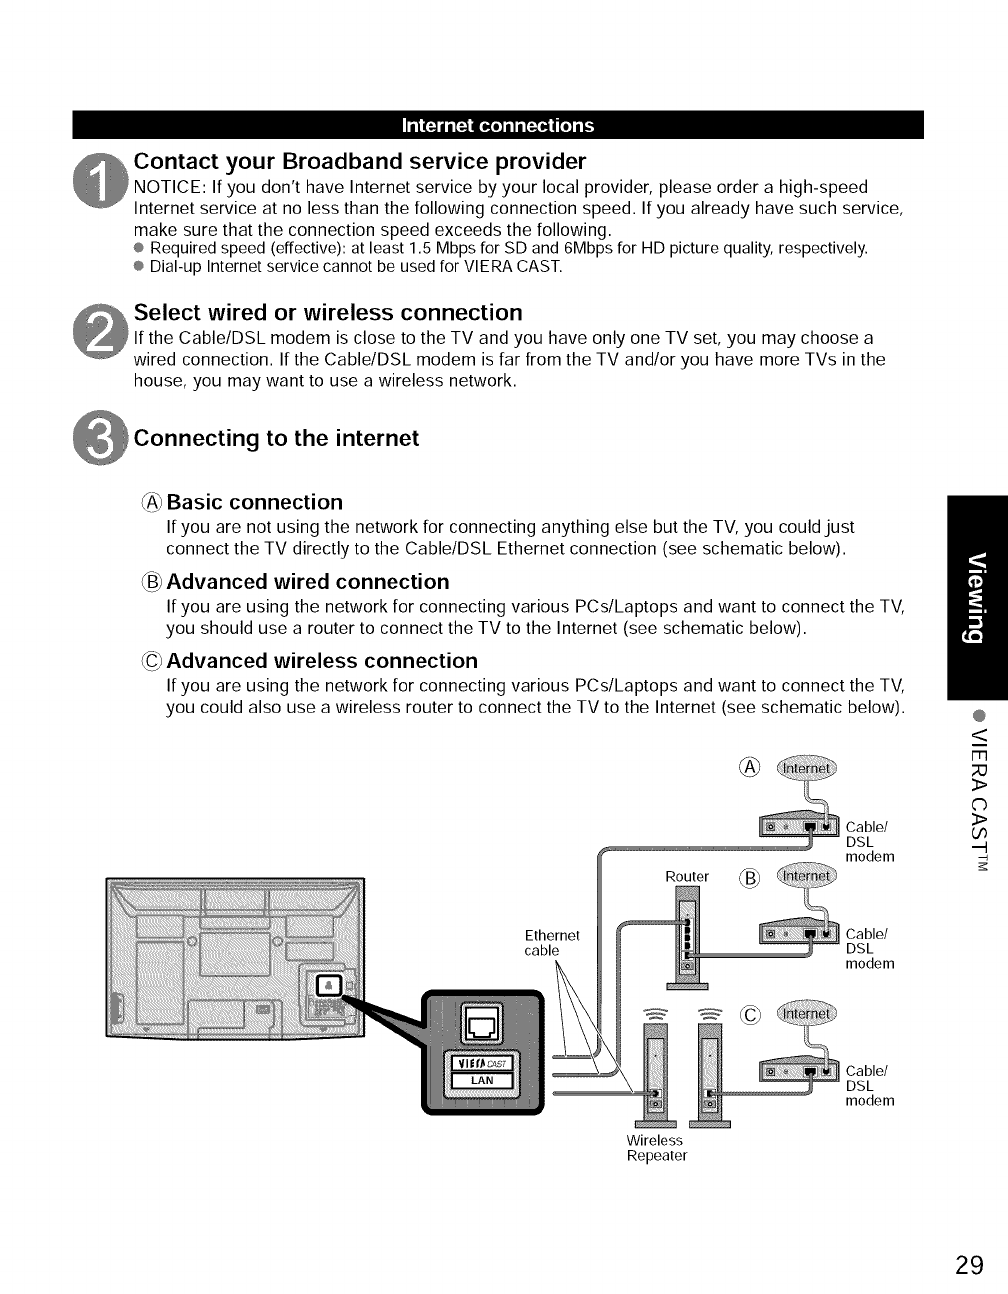
n'_"ln[_adi [_ _o] i 1i [_a,31nl[o] i T,,,
Contact your Broadband service provider
NOTICE: If you don't have Internet service by your local provider, please order a high-speed
Internet service at no less than the following connection speed. If you already have such service,
make sure that the connection speed exceeds the following.
® Required speed (effective): at least 1.5 Mbps for SD and 6Mbps for HD picture quality, respectively.
® Dial-up Internet service cannot be used for VIERA CAST.
Select wired or wireless connection
If the Cable/DSL modem is close to the TV and you have only one TV set, you may choose a
wired connection. If the Cable/DSL modem is far from the TV and/or you have more TVs in the
house, you may want to use a wireless network.
to the internet
_A_Basic connection
If you are not using the network for connecting anything else but the TV, you could just
connect the TV directly to the Cable/DSL Ethernet connection (see schematic below).
_B_Advanced wired connection
If you are using the network for connecting various PCs/Laptops and want to connect the TV,
you should use a router to connect the TV to the Internet (see schematic below).
_C_Advanced wireless connection
If you are using the network for connecting various PCs/Laptops and want to connect the TV,
you could also use a wireless router to connect the TV to the Internet (see schematic below).
Ethernet
cable
Router (_
Wireless
Repeater
Cable/
DSL
modem
Cable/
DSL
modem
Cable/
DSL
modem
@
<
3>
C)
3>
oo
.-t
29
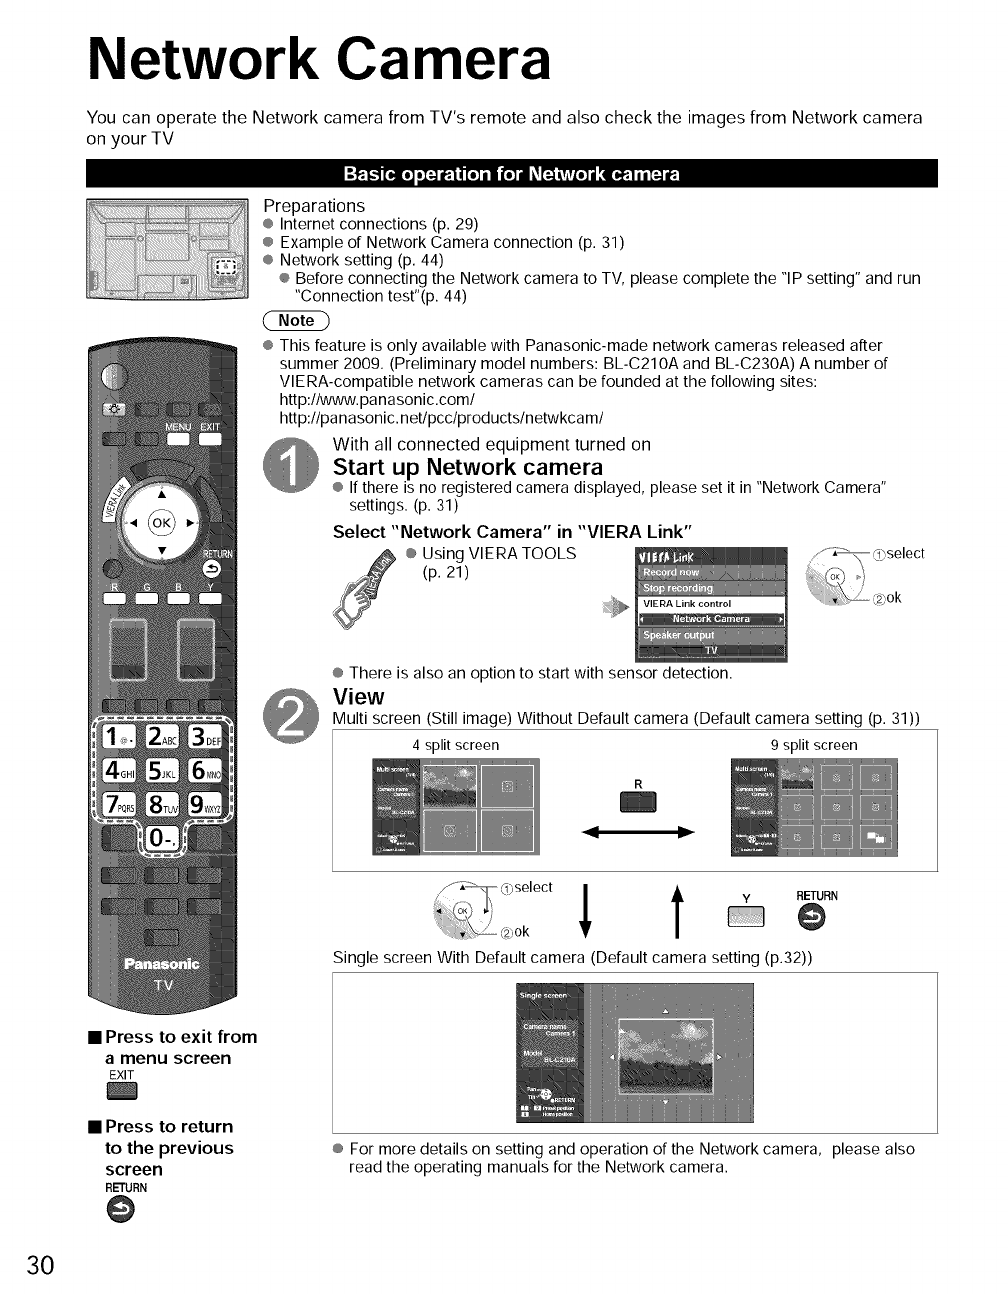
Network Camera
You can operate the Network camera from TV's remote and also check the images from Network camera
on your TV
w_. j,._ [I.][O] IIN l_.J |[O] i •(o]d,_m LV**:O]j [.a,_, 11i [N I_,
Preparations
® Internet connections (p. 29)
® Example of Network Camera connection (p. 31)
® Network setting (p. 44)
® Before connecting the Network camera to TV, please complete the "IP setting" and run
"Connection test"(p. 44)
® This feature is only available with Panasonic-made network cameras released after
summer 2009. (Preliminary model numbers: BL-C210A and BL-C230A) A number of
VlERA-compatible network cameras can be founded at the following sites:
http:llwww.panasonic.coml
http:llpanasonic.netlpcclproductslnetwkcaml
With all connected equipment turned on
Start up Network camera
® If there is no registered camera displayed, please set it in "Network Camera"
settings. (p. 31)
Select "Network Camera" in "VIERA Link"
® Using VlERA TOOLS
(p. 21)
VIERA Link control
® There is also an option to start with sensor detection.
View
Multi screen (Still image) Without Default camera (Default camera setting (p. 31))
4 split screen 9 split screen
Single screen With Default camera (Default camera setting (p.32))
• Press to exit from
a menu screen
EXIT
•Press to return
to the previous
screen
RETURN
@
® For more details on setting and operation of the Network camera, please also
read the operating manuals for the Network camera.
30
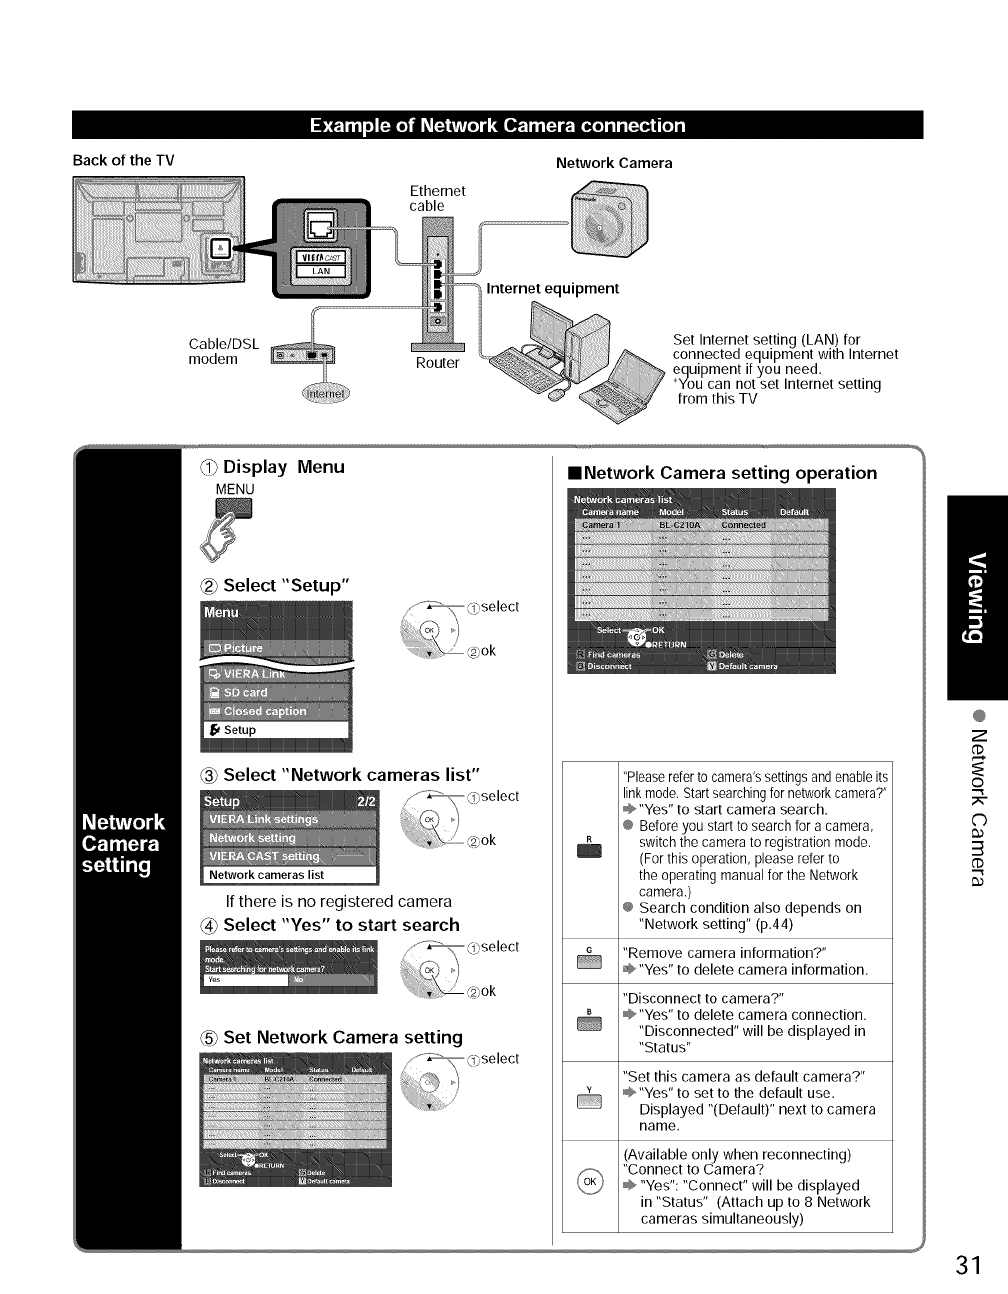
Back of the TV
Cable/DSL
modem
Network Camera
Ethernet
cable
Router
Internet equipment
Set Internet setting (LAN) for
connected equipment with Internet
equipment if you need.
*You can not set Internet setting
from this TV
Display Menu
MENU ==Network Camera setting operation
Select "Network cameras list"
Network cameras list
If there is no registered camera
@Select "Yes" to start search
_5_Set Network Camera setting
"Please refer to camera's settings and enable its
link mode. Start searching for network camera?"
"Yes" to start camera search.
® Before you start to search for a camera,
switch the camera to registration mode.
(For this operation, please refer to
the operating manual for the Network
camera.)
@ Search condition also depends on
"Network setting" (p.44)
"Remove camera information?"
=_,"Yes" to delete camera information.
"Disconnect to camera?"
@"Yes" to delete camera connection.
"Disconnected" will be displayed in
"Status"
"Set this camera as default camera?"
"Yes" to set to the default use.
Displayed "(Default)" next to camera
name.
(Available only when reconnecting)
"Connect to Camera?
"Yes": "Connect" will be displayed
in "Status" (Attach up to 8 Network
cameras simultaneously)
@
Z
o
C)
3
31
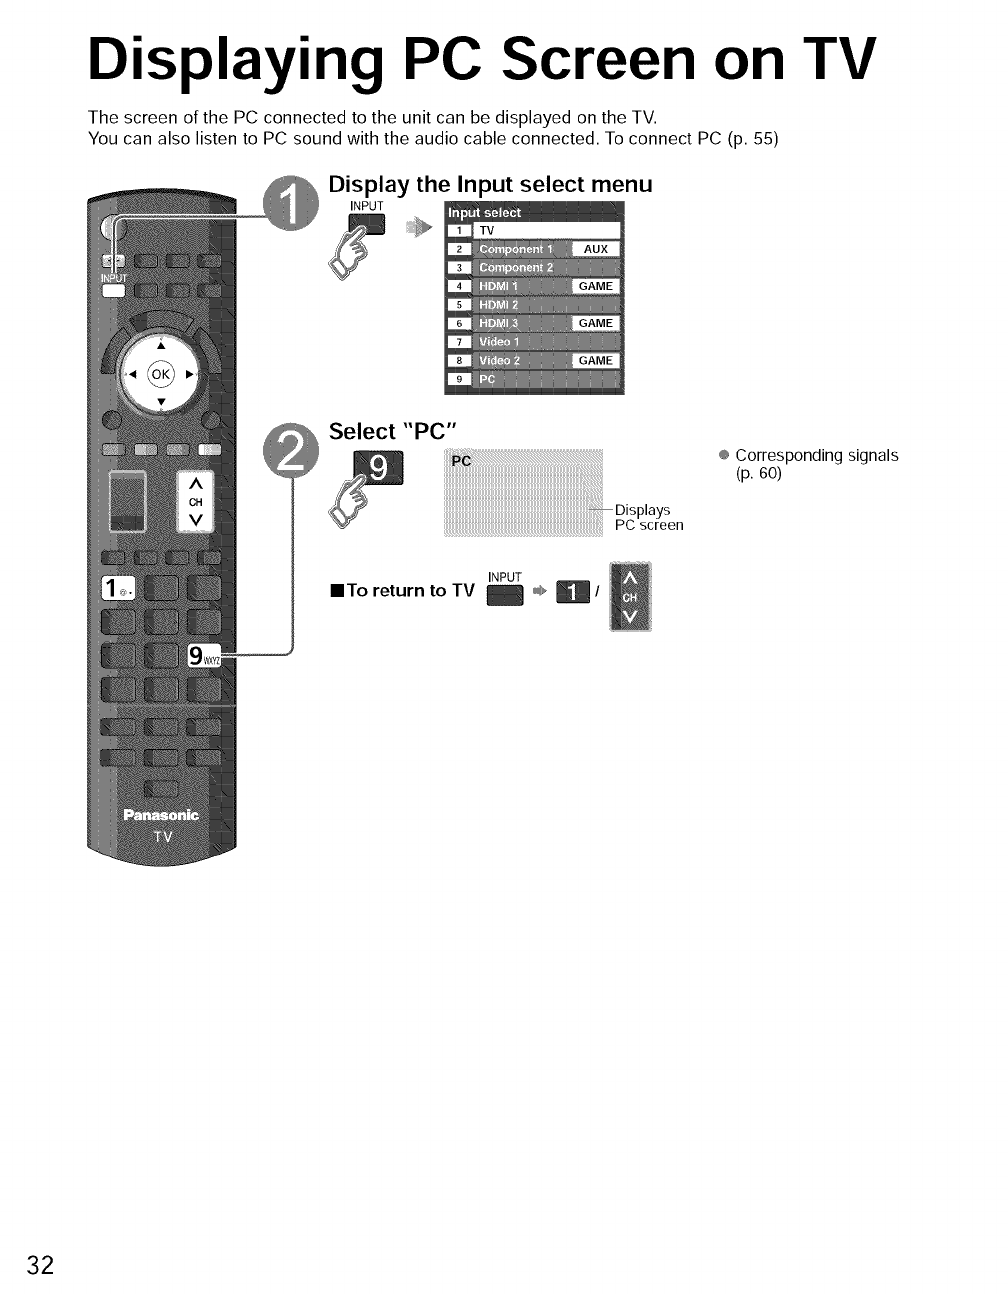
Displaying PC Screen on TV
The screen of the PC connected to the unit can be displayed on the TV.
You can also listen to PC sound with the audio cable connected. To connect PC (p. 55)
@Display the Input select menu
INPUT
Select "PC"
Disp,ays
PC screen
®Correspondingsignals
(p. 60)
INPUT
IITo return to TV _ ,,,,_,El /
32

• PC menu setting (change as desired)
¢ Makingsettings_ "Howto UseMenuFunctions"@ to O (P,34)
Menu I Item' AdjustmentslConfigurations (options)
Reset to
defaults Resets PC adjust
@ H 8,V: The H and V sync signals are input from the HD/VD connector. (p. 61)
Sync @ On green: Uses a synchronized signal on the Video G signal, which is input from the G
connector. (p. 61)
Dot clock Alleviates the problem if a picture appears to be vertically-striped, flickers partially or is
blurred.
Adjusts the horizontal position. O ,". ....._,\_ , ',iO
H-position ' _'
i
Of ......................O
PC v-position © _
adJustments
Alleviates the problem if the whole picture appears to flicker or is blurred.
First adjust the Dot Clock to get the best possible picture, then adjust the
Clock Phase so that a clear picture appears.
Clock phase
It may not be possible to display a clear picture due to poor input signals.
Switches to wide display.
Input @ Input signal switched from 640×480 to 852×480
resolution @ Input signal switched from 1024x768 to 1280x768 or 1366x768
Displays the 14(Horizontal)IV (Vertical) frequencies.
H-frequency @ Display range
V-frequency l,lorizontah 15 110 kHz
Vertical: 48 - 120 Hz
@Audio menu (p. 34)
@
E_
G:3
C)
b0
('3
.-_
o
.-_
33
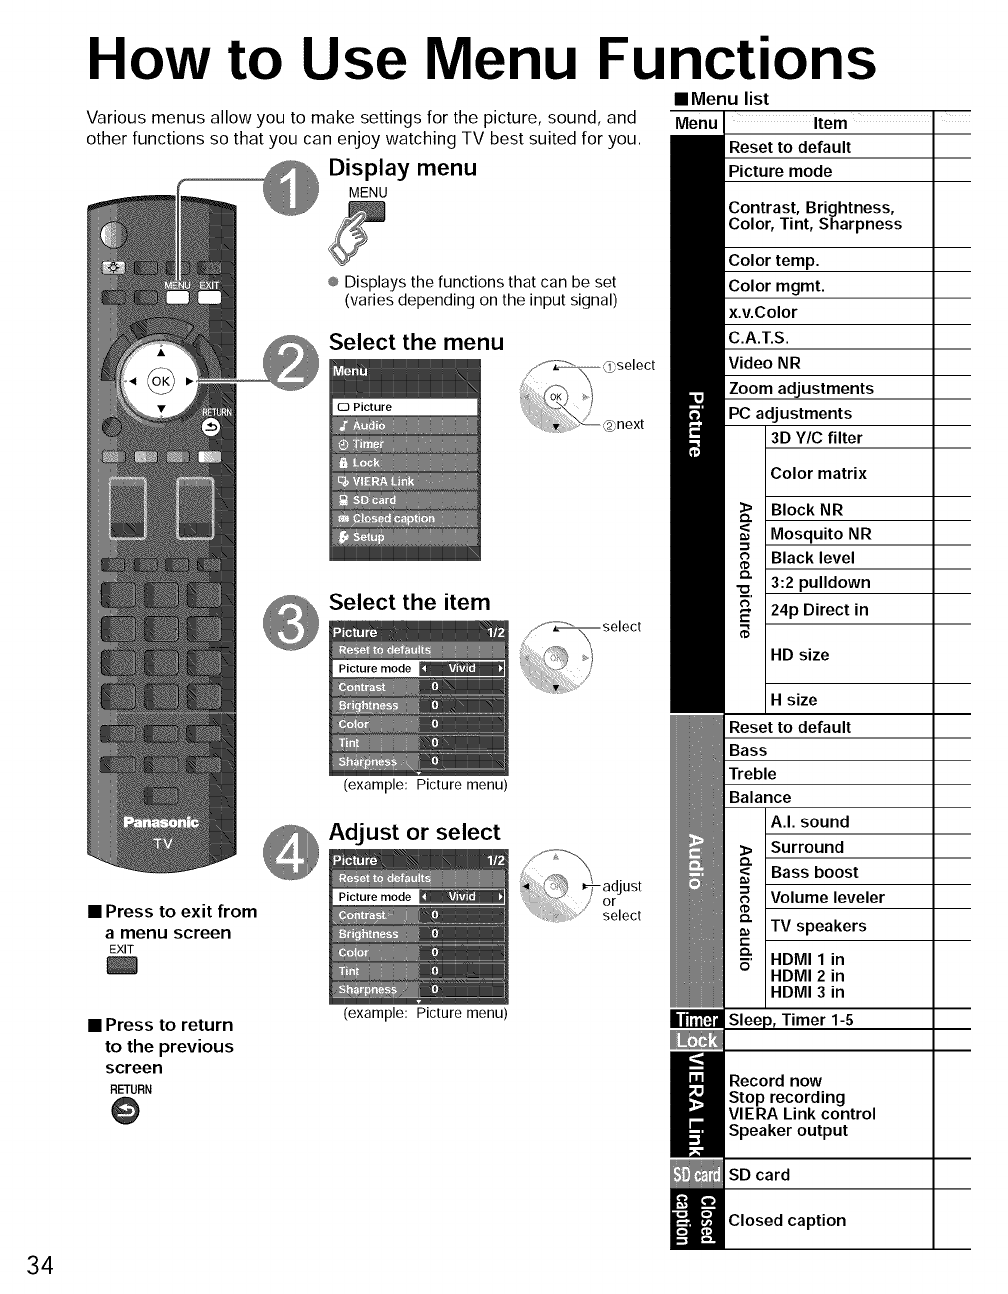
How to Use Menu Functions
Various menus allow you to make settings for the picture, sound, and
other functions so that you can enjoy watching TV best suited for you.
Display menu
MENU
® Displays the functions that can be set
(varies depending on the input signal)
Select the menu
•Press to exit from
a menu screen
EXIT
Select the item
,,-'Y_ select
}/
Pict ..... de _ ")
(example: Picture menu)
• Press to return
to the previous
screen
RETURN
@
.i......°o_ ,,,i,ii_
(example: Picture menu)
•Menu list
Menu Item "
Reset to default
Picture mode
Contrast, Brightness,
Color, Tint, Sharpness
Color temp.
Color regret.
x.v.Color
C.A.T.S.
Video NR
Zoom adjustments
PC adjustments
3D Y/C filter
Color matrix
Block NR
Mosquito NR
Black level
3:2 pulldown
24p Direct in
HD size
Hsize
Reset to default
Bass
Treble
Balance
A.I. sound
Surround
Bass boost
Volume leveler
TV speakers
HDMI 1 in
HDMI 2 in
HDMI 3 in
Timer 1-5
I ecord now
Stop recording
VIERA Link control
Speaker output
SD card
Closed caption
34
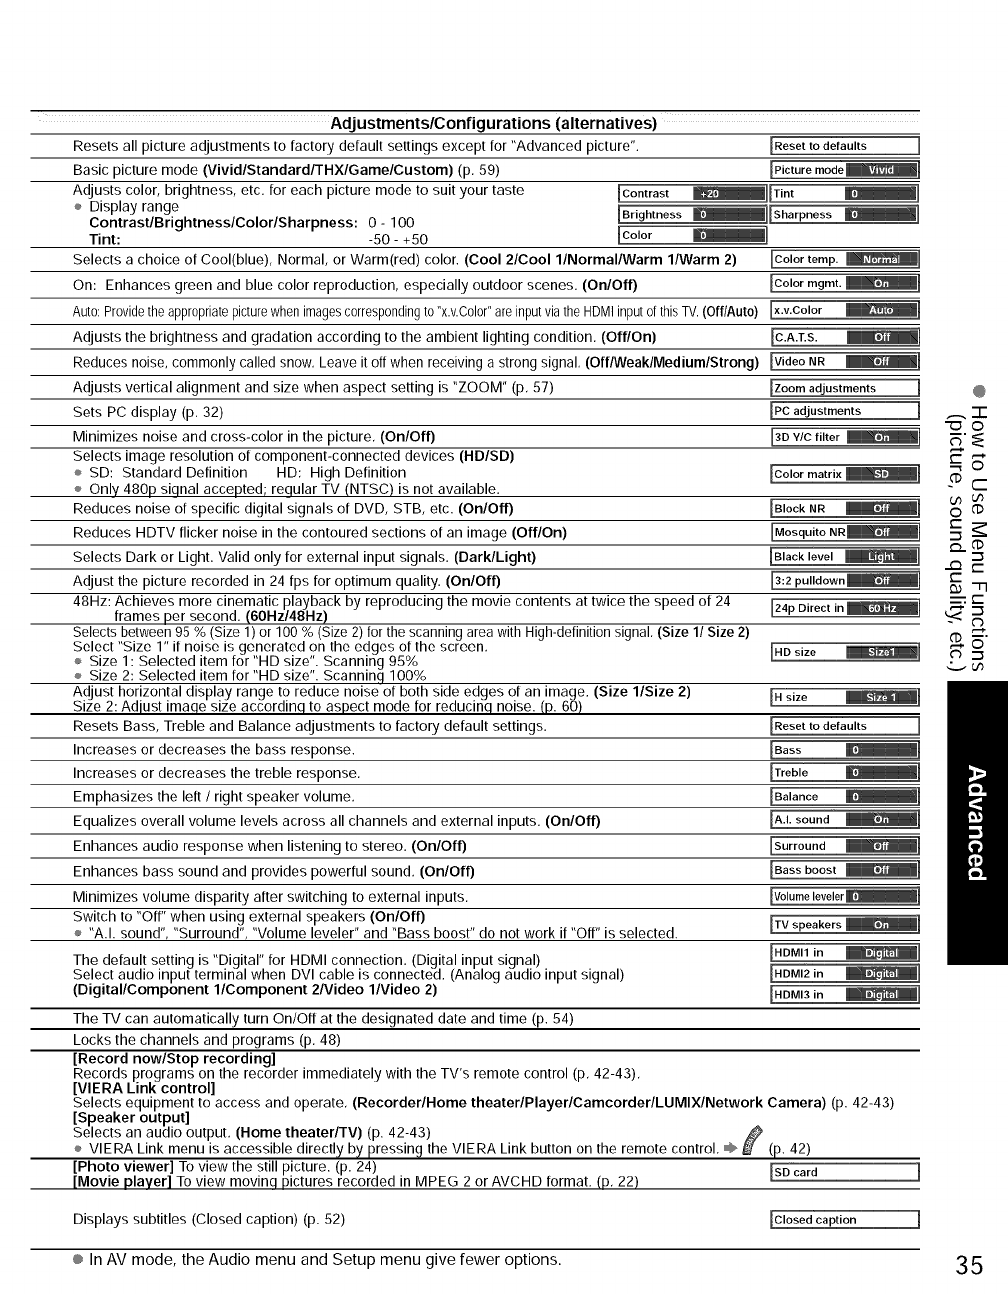
Adj ustments/Configurations (alternatives)
Resets all picture adjustments to factory default settings except for "Advanced picture". IReset to defaults ]
Basic picture mode (VividlStandardlTHXlGamelCustom) (p, 59) IPicture mode_]
Adjusts color, brightness, etc. for each picture mode to suit your taste [Contrast
÷ Display range [Bright.... _l[Sharp .... _]
Contrast/BrightnesslColorlSharpness: 0 - I00
Tint: -50 - +50 [Color
Selects a choice of Cool(blue), Normal, or Warm(red) color. (Cool 2/Cool l/Normal/Warm l/Warm 2)
On: Enhances green and blue color reproduction, especially outdoor scenes. (On/Off)
Auto: Providethe appropriate picture when images corresponding to "x.v.C01or"are input via the HDMI input of this TV. (Off/Auto)
Adjusts the brightness and gradation according to the ambient lighting condition, (Off/On)
Reduces noise, commonly called snow, Leave it off when receiving a strong signal, (Off/Weak/Medium/Strong)
Adjusts vertical alignment and size when aspect setting is "ZOOM" (p, 57)
Sets PC display (p, 32)
Minimizes noise and cross-color in the picture, (On/Off)
Selects image resolution of component-connected devices (HD/SD)
÷ SD: Standard Definition HD: High Definition
÷ Only 480p siqnal accepted; reqular TV (NTSC) is not available,
Reduces noise of specific digital signals of DVD, STB, etc. (On/Off)
Reduces HDTV flicker noise in the contoured sections of an image (Off/On)
Selects Dark or Light. Valid only for external input signals, (Dark/Light)
Adjust the picture recorded in 24 fps for optimum quality, (On/Off)
48Hz: Achieves more cinematic playback by reproducing the movie contents at twice the speed of 24
frames per second. (60Hz/48Hz)
Selects between 95 % (Size 1) or 100 % (Size 2) for the scanning area with High-definition signal, (Size 1/Size 2}
Select "Size 1" if noise is generated on the edges of the screen, IHD size
÷ Size 1: Selected item for "HD size". Scanning 95%
÷ Size 2: Selected item for "HD size". Scanninq 100%
Adjust horizontal display range to reduce noise of both side edges of an image. (Size l/Size 2) IH size
Size 2: Adiust imaqe size accordinq to aspect mode for reducinq noise. (p. 60)
Resets Bass, Treble and Balance adjustments to factory default settings, IReset to defaults ]
Increases or decreases the bass response. IBass
Increases or decreases the treble response, ITreble
Emphasizes the left /right speaker volume. IBalance
Equalizes overall volume levels across all channels and external inputs. (On/Off) IA.L sound
Enhances audio response when listening to stereo, (On/Off) [Surround
Enhances bass sound and provides powerful sound, (On/OfO IBass boost _]
Minimizes volume disparity after switching to external inputs,
Switch to "Off" when using external speakers (On/Off) ITV speakers _]
÷ "A.I. sound", "Surround", "Volume leveler" and "Bass boost" do not work if "Off" is selected.
IHDMI1 in
The default setting is "Digital" for HDMI connection. (Digital input signal)
Select audio input terminal when DVI cable is connected. (Analog audio input signal) IHDMI2 in
(Digital/Component l/Component 2Nideo l/Video 2) IHDMI3 in
The TV can automatically turn On/Off at the designated date and time (p. 54)
Locks the channels and programs (p, 48)
[Record now/Stop recording]
Records programs on the recorder immediately with the TV's remote control (p, 42-43),
[VIERA Link control]
Selects equipment to access and operate, (Recorder/Home theaterlPlayerlCamcorderlLUMIXlNetwork Camera) (p. 42-43)
[Speaker output]
Selects an audio output, (Home theater/TV) (p. 42-43)
÷ VIERA Link menu is accessible directly by pressing the VIERA Link button on the remote control, _ _ (p. 42)
]Photo viewer] To view the still picture. (p. 24) ISD card ]
[Movie player] To view movinq pictures recorded in MPEG 2 or AVCHD format. (p, 22)
lColor temp. _]
lColorregret._]
x.v.Color
lVideo NR
IZ.... djustments ]
IPC adjustments ]
13DY/C filter _1
lCol .... trix _]
IBIock NR
[Black level _]
124p Direct in_l
@
,,_-F
_'_
-_r-
=:r"
Displays subtitles (Closed caption) (p. 52) lClosed caption ]
® In AV mode, the Audio menu and Setup menu give fewer options. 35
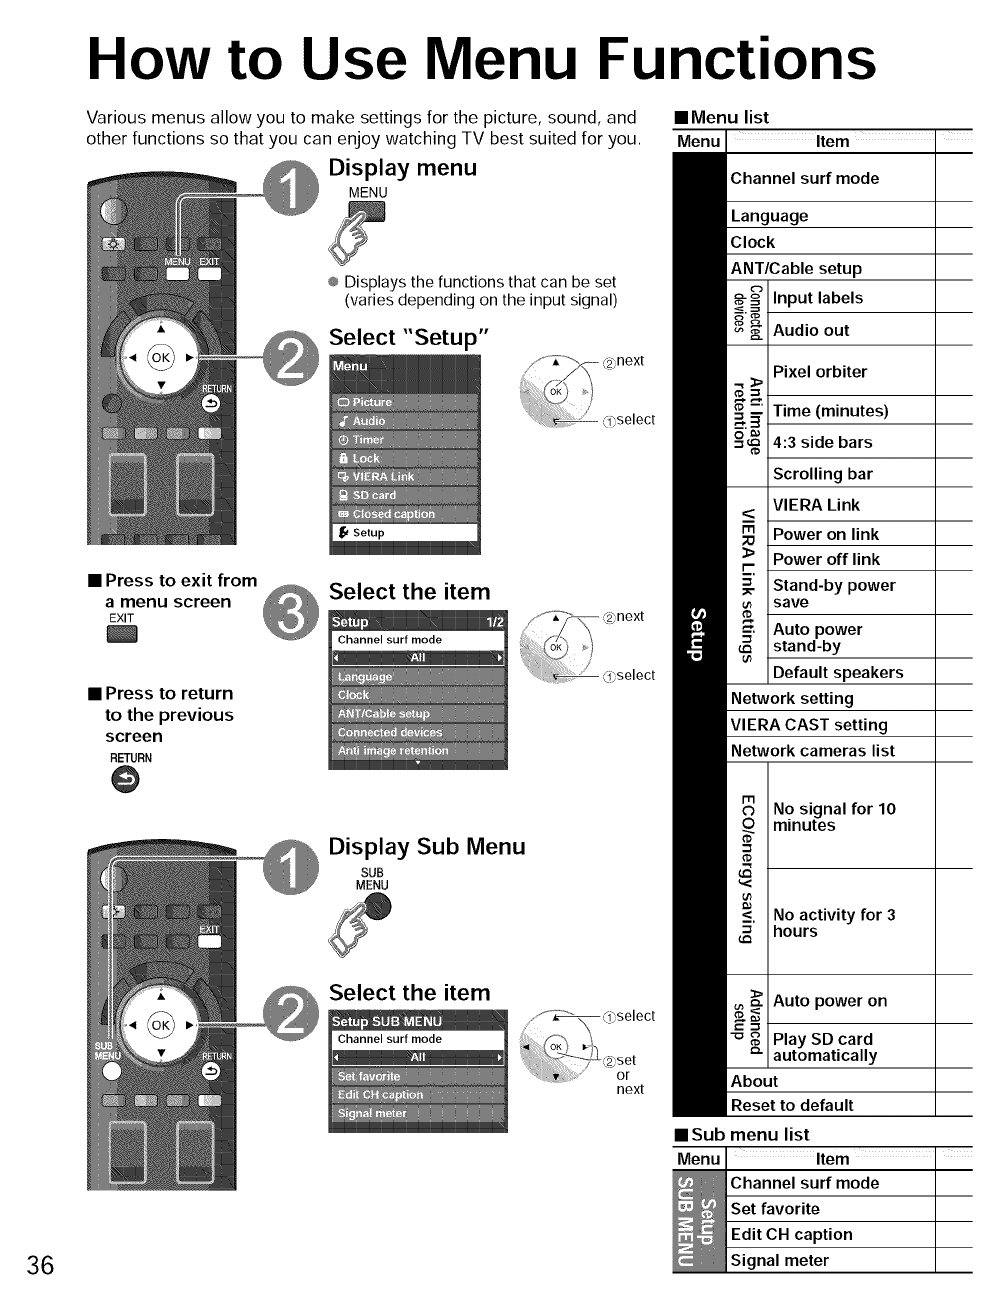
How to Use Menu Functions
Various menus allow you to make settings for the picture, sound, and
other functions so that you can enjoy watching TV best suited for you.
Display menu
MENU
® Displays the functions that can be set
(varies depending on the input signal)
Select "Setup"
•Menu list
Menu Item
Channel surf mode
Language
Clock
ANT/Cable setup
Input labels
Audio out
Pixel orbiter
• Press to exit from
amenu screen
EXIT
®
• Press to return
to the previous
screen
RETURN
0
Select the item
@Display Sub Menu
SUB
MENU
Time (minutes)
4:3 side bars
Scrolling bar
VIERA Link
Power on link
Power off link
Stand-by power
save
Auto power
stand-by
Default speakers
Network setting
VIERA CAST setting
Network cameras list
No signal for 10
minutes
No activity for 3
hours
Auto power on
36
Select the item
next
mSub
Menu
(
Play SD card
automatically
About
Reset to default
menu list
Item I
Channel surf mode
Set favorite
Edit CH caption
Signal meter
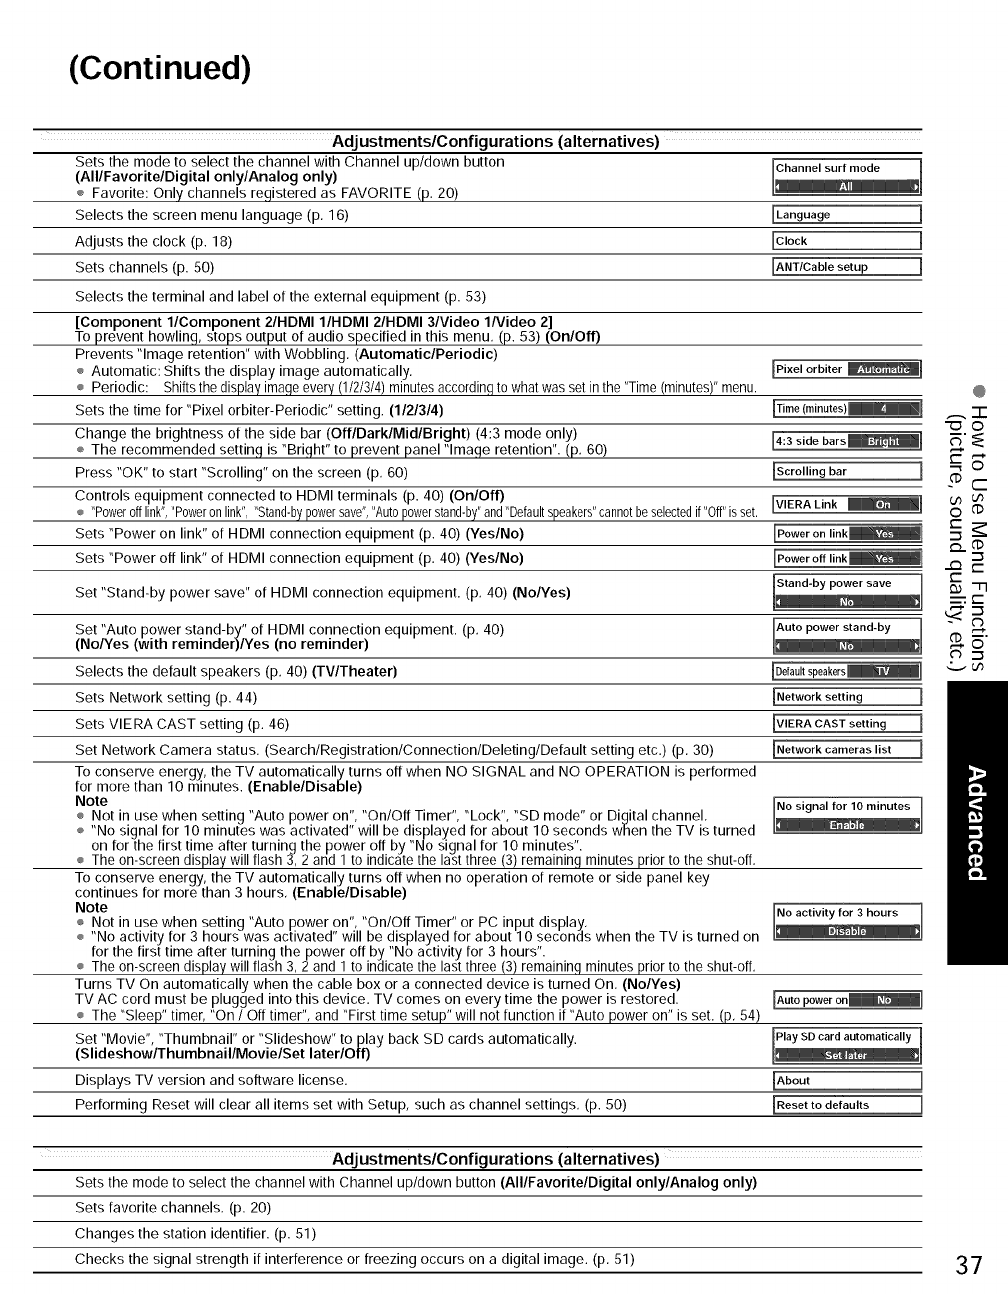
(Continued)
Adj ustments/Configurations (alternatives)
Sets the mode to select the channel with Channel up/down button
(All/Favorite/Digital only/Analog only)
÷ Favorite: Only channels registered as FAVORITE (p, 20)
Selects the screen menu language (p, 16) [Language
Adjusts the clock (p. 18) [Clock
Sets channels (p. 50) [ANT/Cable setup
Selects the terminal and label of the external equipment (p. 53)
[Component l/Component 2/HDMI I/HDMI 2/HDMI 3/Video 1Nideo 2]
To prevent howling, stops output of audio specified in this menu, (p. 53) (On/Off)
Prevents "Image retention" with Wobbling. (Automatic/Periodic)
÷ Automatic: Shifts the display image automatically. [Pixel orbiter _1
÷ Periodic: Shiftsthe displayimageevery(1/2/3/4)minutesaccordinqto whatwas setinthe "Time(minutes)"menu.
Sets the time for "Pixel orbiter-Periodic" setting. (1121314)
Change the brightness of the side bar (Off/Dark/Mid/Bright) (4:3 mode only) [4:3 side bars_i
÷ The recommended setting is "Bright" to prevent panel "Image retention". (p, 60)
Press "OK" to start "Scrolling" on the screen (p, 60) [Scrolling bar ]
Controls equipment connected to HDMI terminals (p. 40) (On/Off)
÷ "Powerofflink","Poweronlink","Stand-bypowersave","Autopowerstand-by"and"Defaultspeakers"cannotbeselectedif"Off"isset. [VIERALink _i
Sets "Power on link" of HDMI connection equipment (p. 40) (Yes/No)
Sets "Power off link" of HDMI connection equipment (p, 40) (Yes/No)
Set "Stand-by power save" of HDMI connection equipment. (p, 40) (No/Yes)
Set "Auto power stand-by" of HDMI connection equipment. (p, 40)
(NoNes (with reminder)/Yes (no reminder)
Selects the default speakers (p, 40) (TV/Theater)
Sets Network setting (p. 44)
Sets VIERA CAST setting (p. 46)
Network setting ]
[VIERA CAST setting ]
[Network cameras list ]Set Network Camera status. (Search/Registration/Connection/Deleting/Default setting etc,) (p, 30)
To conserve energy, the TV automatically turns off when NO SIGNAL and NO OPERATION is performed
for more than 10 minutes. (Enable/Disable)
Note
÷ Not in use when setting "Auto power on", "On/Off Timer", "Lock", "SD mode" or Digital channel,
÷ "No signal for 10 minutes was activated" will be displayed for about 10 seconds when the TV is turned
on for the first time after turning the power off by "No signal for 10 minutes".
÷ The on-screendisplay will flash 3, 2 and 1 to indicate the last three (3) remaining minutes prior to the shut-off,
To conserve energy, the TV automatically turns off when no operation of remote or side panel key
continues for more than 3 hours, (Enable/Disable)
Note b activi,: f.or03hours ]
÷ Not in use when setting "Auto power on", "On/Off Timer" or PC input display,
÷ "No activity for 3 hours was activated" will be displayed for about 10 seconds when the TV is turned on .
for the first time after turning the power off by "No activity for 3 hours".
÷ The on-screendisplay will flash 3, 2 and 1 to indicate the last three (3) remaining minutes prior to the shut-off,
Turns TV On automatically when the cable box or a connected device is turned On. (No/Yes)
TV AC cord must be plugged into this device. TV comes on every time the power is restored, [Autopower en_]
÷ The "Sleep" timer, "On /Off timer", and "First time setup" will not function if "Auto power on" is set. (p. 54)
Set "Movie", "Thumbnail" or "Slideshow" to play back SD cards automatically.
(Slideshow/Thumbnail/Movie/Set later/Off)
Displays TV version and software license.
Performing Reset will clear all items set with Setup, such as channel settings, (p. 50)
About ]
[Reset to defaults ]
@
,_'-F
_'_
-_r-
Adj ustments/Configurations (alternatives)
Sets the mode to select the channel with Channel up/down button (All/Favorite/Digital only/Analog only)
Sets favorite channels, (p. 20)
Changes the station identifier. (p. 51)
Checks the signal strength if interference or freezing occurs on a digital image. (p, 51) 37
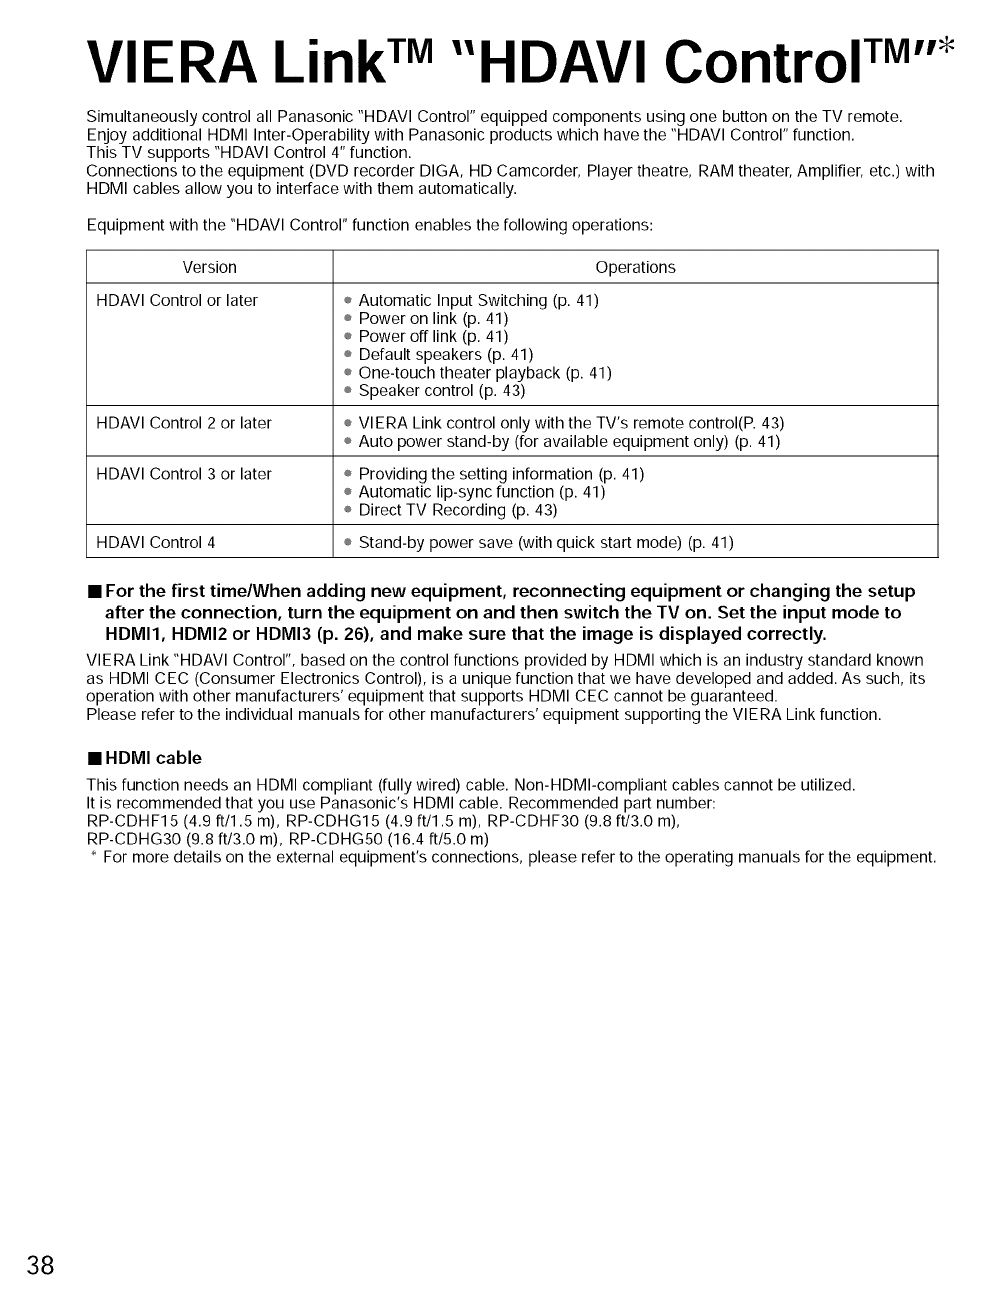
VIERA LinkTM"HDAVI Control TM''*
Simultaneously control all Panasonic "HDAVI Control" equipped components using one button on the TV remote.
Enjoy additional HDMI Inter-Operability with Panasonic products which have the "HDAVI Control" function.
This TV supports "HDAVI Control 4" function.
Connections to the equipment (DVD recorder DIGA, HD Camcorder, Player theatre, RAM theater, Amplifier, etc.) with
HDMI cables allow you to interface with them automatically.
Equipment with the "HDAVI Control" function enables the following operations:
Version
HDAVI Control or later
Operations
÷ Automatic Input Switching (p. 41)
÷ Power on link (p. 41)
÷ Power off link (p. 41)
÷ Default speakers (p. 41)
÷ One-touch theater playback (p. 41)
÷ Speaker control (p. 43)
HDAVI Control 2 or later ÷ VIERA Link control only with the TV's remote control(P. 43)
÷ Auto power stand-by (for available equipment only) (p. 41)
HDAVl Control 3 or later ÷ Providing the setting information (p. 41)
÷ Automatic lip-sync function (p. 41)
÷ Direct TV Recording (p. 43)
HDAVl Control 4 ÷ Stand-by power save (with quick start mode) (p. 41)
• For the first time/When adding new equipment, reconnecting equipment or changing the setup
after the connection, turn the equipment on and then switch the TV on. Set the input mode to
HDMI1, HDMI2 or HDMI3 (p. 26), and make sure that the image is displayed correctly.
VIERA Link "HDAVI Control", based on the control functions provided by HDMI which is an industry standard known
as HDMI CEC (Consumer Electronics Control), is a unique function that we have developed and added. As such, its
operation with other manufacturers' equipment that supports HDMI CEC cannot be guaranteed.
Please refer to the individual manuals for other manufacturers' equipment supporting the VIERA Link function.
•HDMI cable
This function needs an HDMI compliant (fully wired) cable. Non-HDMI-compliant cables cannot be utilized.
It is recommended that you use Panasonic's HDMI cable. Recommended part number:
RP-CDHF15 (4.9 ft/1.5 m), RP-CDHG15 (4.9 ft/1.5 m), RP-CDHF30 (9.8 ft/3.0 m),
RP-CDHG30 (9.8 ft/3.0 m), RP-CDHG50 (16.4 ft/5.0 m)
For more details on the external equipment's connections, please refer to the operating manuals for the equipment.
38
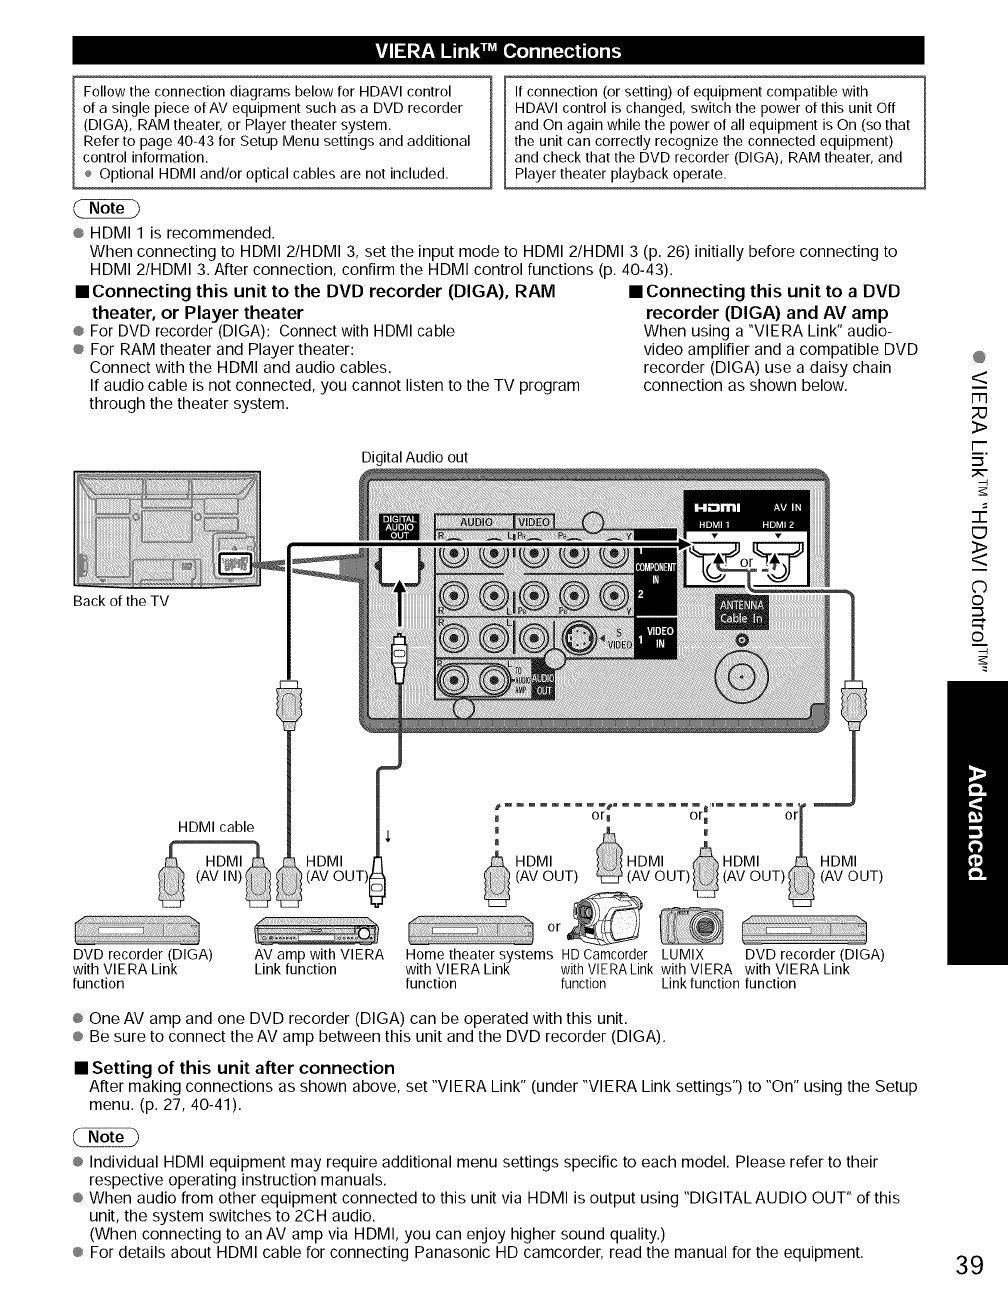
li Iil ;_._1_ _ e"="l,_o]il i [_a,31nl[o]i [,,,.
Follow the connection diagrams below for HDAVI control
of a single piece of AV equipment such as a DVD recorder
(DIGA), RAM theater, or Player theater system.
Refer to page 40-43 for Setup Menu settings and additional
control information.
Optional HDMI and/or optical cables are not included.
If connection (or setting) of equipment compatible with
HDAVI control is changed, switch the power of this unit Off
and On again while the power of all equipment is On (so that
the unit can correctly recognize the connected equipment)
and check that the DVD recorder (DIGA), RAM theater, and
Player theater playback operate.
® HDMI 1 is recommended.
When connecting to HDMI 2/HDMI 3, set the input mode to HDMI 2/HDMI 3 (p. 26) initially before connecting to
HDMI 2/HDMI 3. After connection, confirm the HDMI control functions (p. 40-43).
• Connecting this unit to the DVD recorder (DIG.&), RAM
theater, or Player theater
® For DVD recorder (DIGA): Connect with HDMI cable
® For RAM theater and Player theater:
Connect with the HDMI and audio cables.
If audio cable is not connected, you cannot listen to the TV program
through the theater system.
• Connecting this unit to aDVD
recorder (DIGA) and AV amp
When using a "VIERA Link" audio-
video amplifier and a compatible DVD
recorder (DIGA) use a daisy chain
connection as shown below.
Digital Audio out
Back of the TV
@
<
m
3>
I'-
=_.
EJ
<>
C)
©
'-I
©
HDMI cable
(AV IN)
_HDMI I'
(AV OUT)
DVD recorder (DIGA)
with VIERA Link
function
AV amp with VIERA
Link function Home theater systems HDCamcorder LUMIX DVD recorder (DIGA)
with VIERA Link withVlERALink with VIERA with VIERA Link
function function Link function function
® One AV amp and one DVD recorder (DIGA) can be operated with this unit.
® Be sure to connect the AV amp between this unit and the DVD recorder (DIGA).
• Setting of this unit after connection
After making connections as shown above, set "VIERA Link" (under "VIERA Link settings") to "On" using the Setup
menu. (p. 27, 40-41).
® Individual HDMI equipment may require additional menu settings specific to each model. Please refer to their
respective operating instruction manuals.
® When audio from other equipment connected to this unit via HDMI is output using "DIGITAL AUDIO OUT" of this
unit, the system switches to 2CH audio.
(When connecting to an AV amp via HDMI, you can enjoy higher sound quality.)
® For details about HDMI cable for connecting Panasonic HD camcorder, read the manual for the equipment. 39
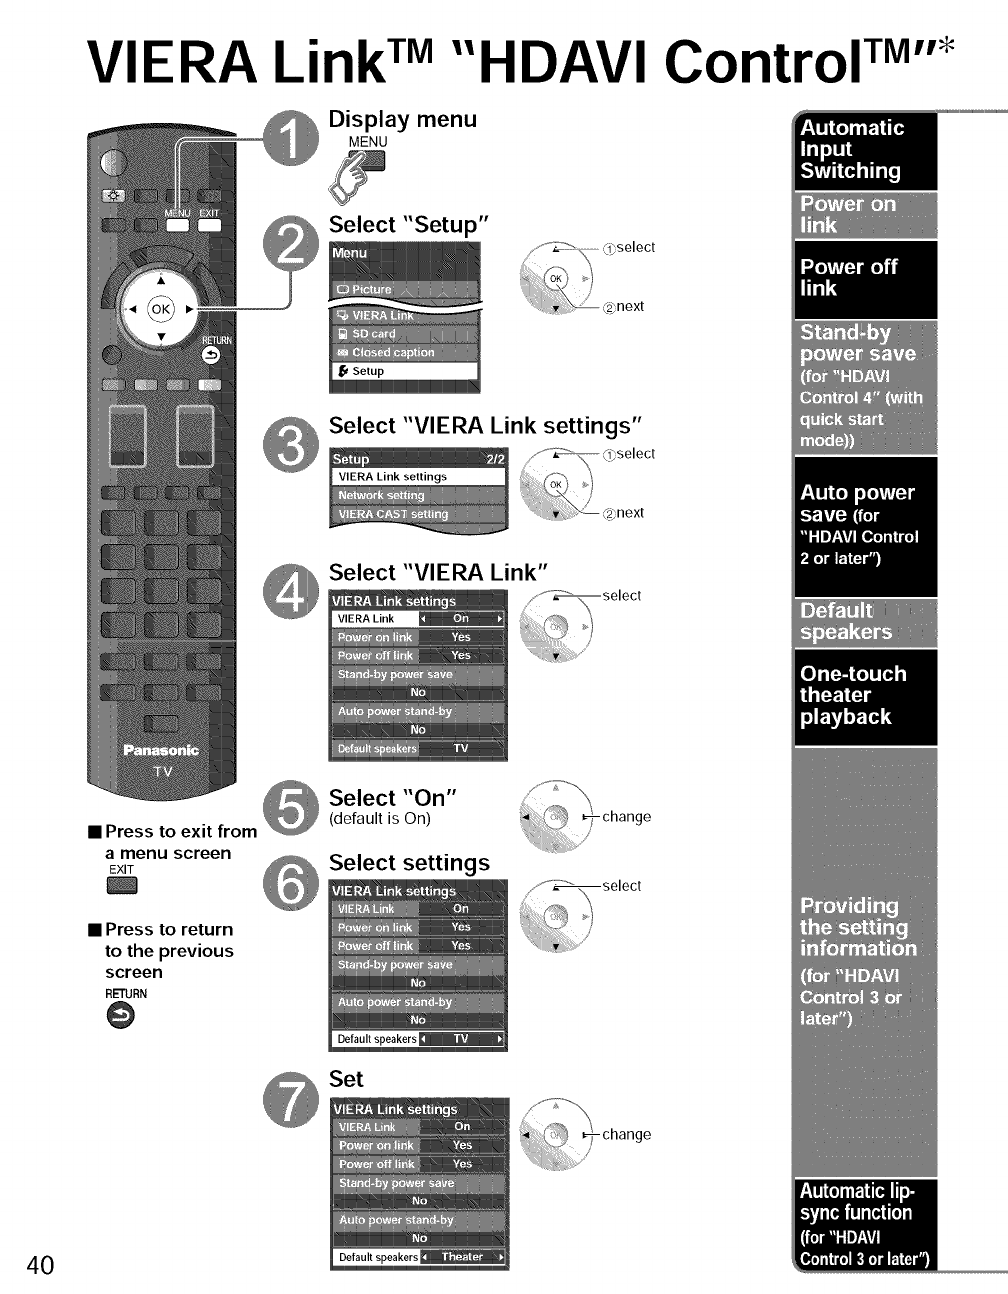
VIERA LinkTM"HDAVI Control TM''_
Display menu
MENU
Select "Setup"
Select "VIERA Link settings"
Select "VIERA Link"
•Press to exit from
amenu screen
EXIT
• Press to return
to the previous
screen
RETURN
@
Select "On"
(default is On)
Select settings
Set
40
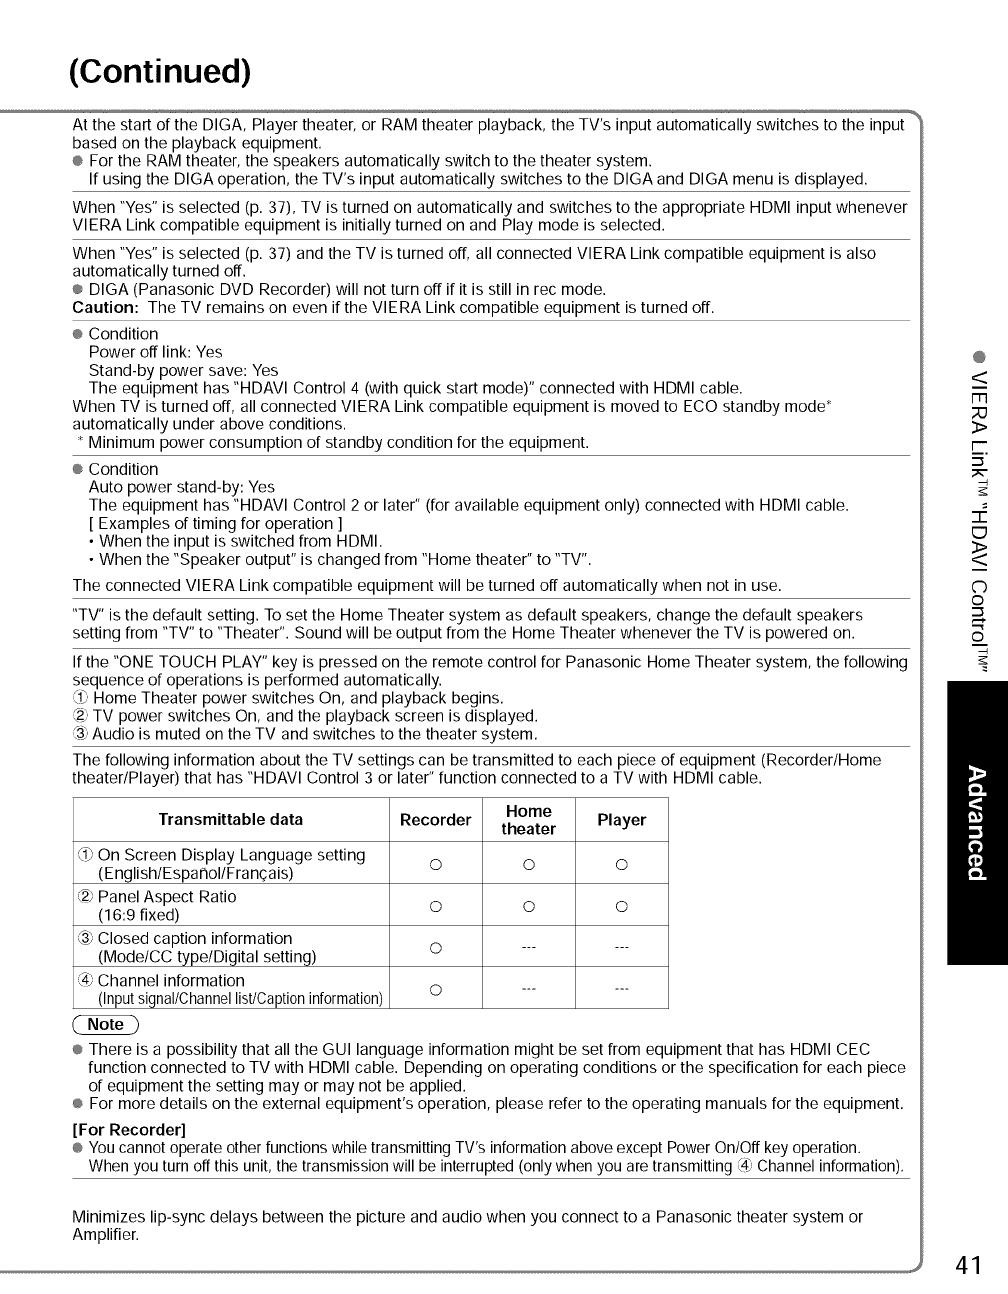
(Continued)
At the start of the DIGA, Player theater, or RAM theater playback, the TV's input automatically switches to the input
based on the playback equipment.
® For the RAM theater, the speakers automatically switch to the theater system.
If using the DIGA operation, the TV's input automatically switches to the DIGA and DIGA menu is displayed.
When "Yes" is selected (p. 37), TV is turned on automatically and switches to the appropriate HDMI input whenever
VlERA Link compatible equipment is initially turned on and Play mode is selected.
When "Yes" is selected (p. 37) and the TV is turned off, all connected VIERA Link compatible equipment is also
automatically turned off.
® DIGA (Panasonic DVD Recorder) will not turn off if it is still in rec mode.
Caution: The TV remains on even if the VlERA Link compatible equipment is turned off.
® Condition
Power off link: Yes
Stand-by power save: Yes
The equipment has "HDAVl Control 4 (with quick start mode)" connected with HDMI cable.
When TV is turned off, all connected VlERA Link compatible equipment is moved to ECO standby mode _
automatically under above conditions.
Minimum power consumption of standby condition for the equipment.
® Condition
Auto power stand-by: Yes
The equipment has "HDAVI Control 2 or later" (for available equipment only) connected with HDMI cable.
[ Examples of timing for operation ]
• When the input is switched from HDMI.
• When the "Speaker output" is changed from "Home theater" to "TV".
The connected VlERA Link compatible equipment will be turned off automatically when not in use.
"TV" is the default setting. To set the Home Theater system as default speakers, change the default speakers
setting from "TV" to "Theater". Sound will be output from the Home Theater whenever the TV is powered on.
If the "ONE TOUCH PLAY" key is pressed on the remote control for Panasonic Home Theater system, the following
sequence of operations is performed automatically.
(19Home Theater power switches On, and playback begins.
_2_TV power switches On, and the playback screen is displayed.
_3)Audio is muted on the TV and switches to the theater system.
The following information about the TV settings can be transmitted to each piece of equipment (Recorder/Home
theater/Player) that has "HDAVI Control 3 or later" function connected to a TV with HDMI cable.
Home
Transmittable data Recorder theater Player
s_
(lj On Screen Display Language setting O O O
(English/Espa ¢lol/Fra n_:ais)
@ Panel Aspect Ratio O O O
(16:9 fixed)
(39Closed caption information
(Mode/CC type/Digital setting) O ......
:4_ Channel information
(Input signal/Channel list/Caption information) O ......
® There is a possibility that all the GUI language information might be set from equipment that has HDMI CEC
function connected to TV with HDMI cable. Depending on operating conditions or the specification for each piece
of equipment the setting may or may not be applied.
® For more details on the external equipment's operation, please refer to the operating manuals for the equipment.
[For Recorder]
® You cannot operate other functions while transmitting TV's information above except Power On/Off key operation.
When you turn off this unit, the transmission will be interrupted (only when you are transmitting @ Channel information).
Minimizes lip-sync delays between the picture and audio when you connect to a Panasonic theater system or
Amplifier.
@
<
m
3>
i--
=_.
ED
<>
C)
©
©
41
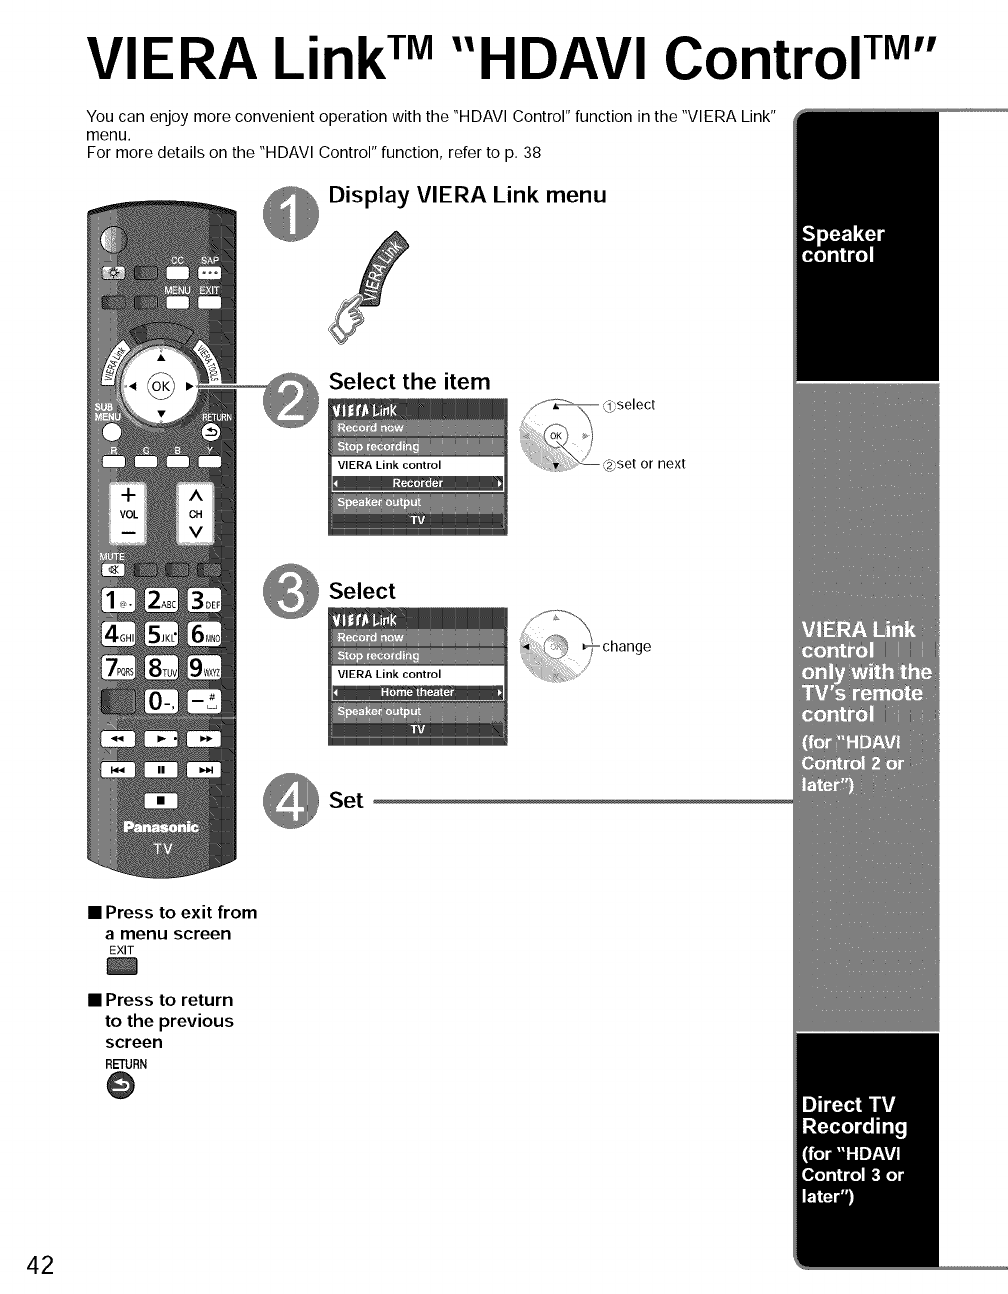
VIERA LinkTM"HDAVI Control TM''
You can enjoy more convenient operation with the "HDAVI Control" function in the "VIERA Link"
menu.
For more details on the "HDAVl Control" function, refer to p. 38
Display VIERA Link menu
Select the item
next
Select
Set
•Press to exit from
amenu screen
EXIT
• Press to return
to the previous
screen
RETURN
@
42

(Continued)
You can select Home theater or TV speakers for audio output.
Control theater speakers with the TV's remote control.
This function is available only when Panasonic Amplifier or
Player theater is connected.
_1_Select "Speaker output"
_2_Select "Home theater" or "TV"
mHome theater: Adjustment for equipment
Volume up /down °_,,
MUTE
Mute ÷ D
® The sound of the TV is muted.
® When the equipment is turned off, the TV speakers take over.
® Selecting "Home theater" turns the equipment on
automatically if it is in standby mode.
NTV: The TV speakers are on.
In the VIERA Link menu, you can select HDMI connected equipment and access it quickly. Continue using your
TV's remote control to operate the equipment, pointing it at the TV.
_1_Select "VIERA Link control"
_2_Select the equipment you want to access.
(Recorder/Home theater/Player/Camcorder/LUMIX/
Network Camera)
® Using VIERATOOLS (p. 21)
VIERA Link control
You can select available items
only.
mAvailable TV's remote control buttons
® If there is more than one equipment item, a number
after the name indicates the number of items. (e.g.
Recorder I/Recorder 2/Recorder 3...)
® The number of equipment items that can be connected
is three for recorders, and a total of three for Home
theater/Player/Camcorder/LUMIX.
® There is a limit to the number of HDMI connectors.
Operate the equipment with the TV's remote
control, pointing it at the TV.
® To operate the equipment, read the manual of the
equipment.
Whether an operation is available differs depending on the connected equipment,
SUB
MENU
Move the cursor/Select
Set/Access
Return to previous menu
Display the functions
menu on the equipment
Available when the purpose of the keys is
displayed on screen
Exit
Channel Up/Down
0-9
CC
Play
Stop
Reverse/Forward
Skip Reverse/Forward
Pause
Closed caption
SAP (Select Audio Mode)
Select digital subchannel
Records the current program on the recorder immediately.
Select "Record now" _ Select"Stop recording", when you want to stop recording
® For optimal recording, the settings of the recorder might ® Recording will not stop automatically when the
be required: For de!a!!s: read !he manua! of !he recorder: program is finished: _
@
<
m
23
>
i--
=_.
<>
C)
©
©
43
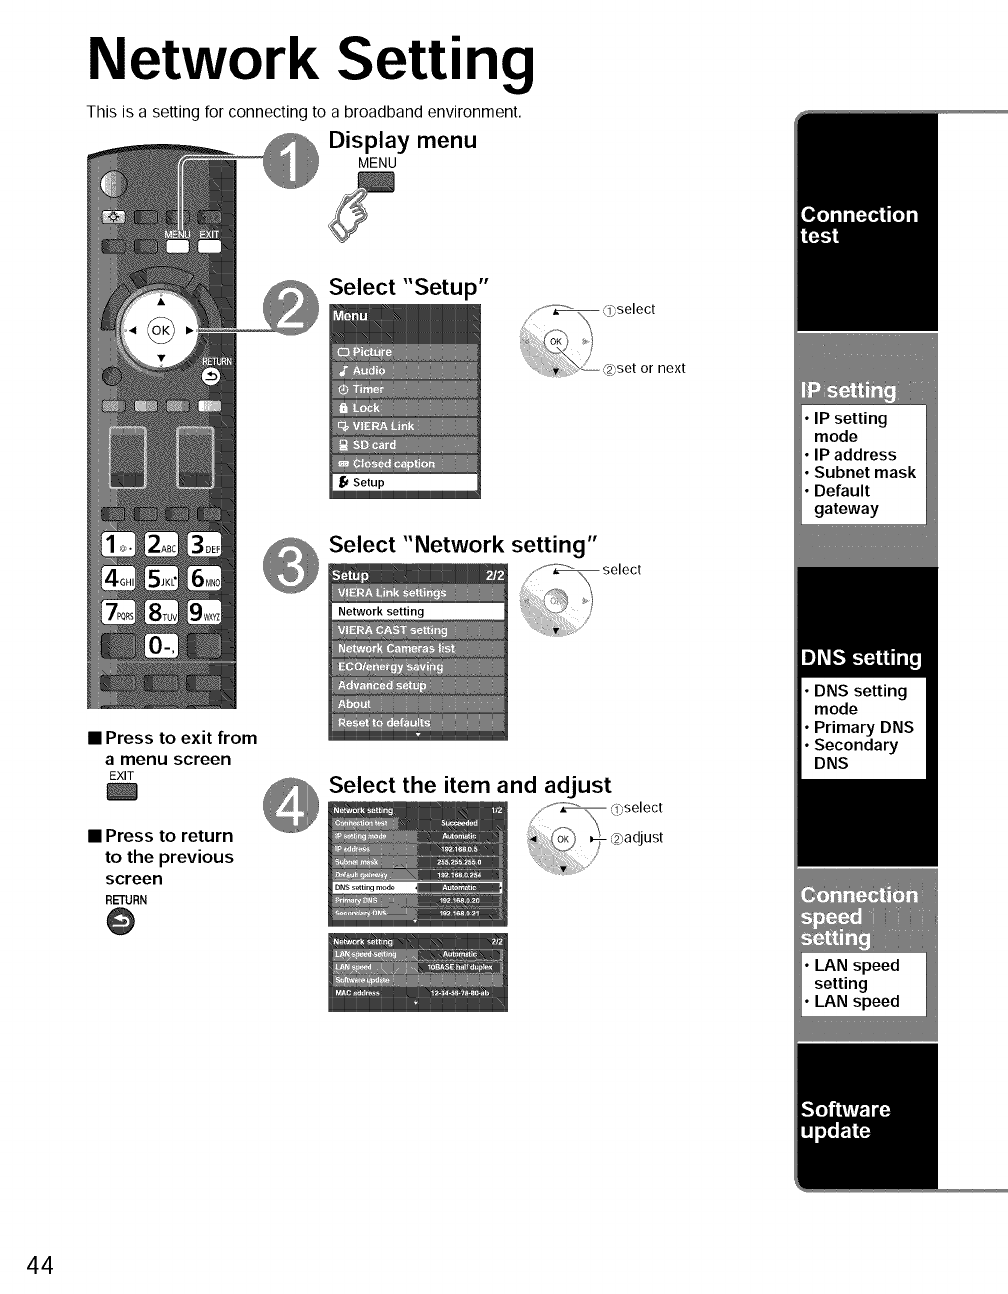
Network Setting
This is a setting for connecting to a broadband environment.
Display menu
MENU
Select "Setup"
next
Select "Network setting"
•Press to exit from
amenu screen
EXIT
l
• Press to return
to the previous
screen
RETURN
@
Select the item and adjust
44
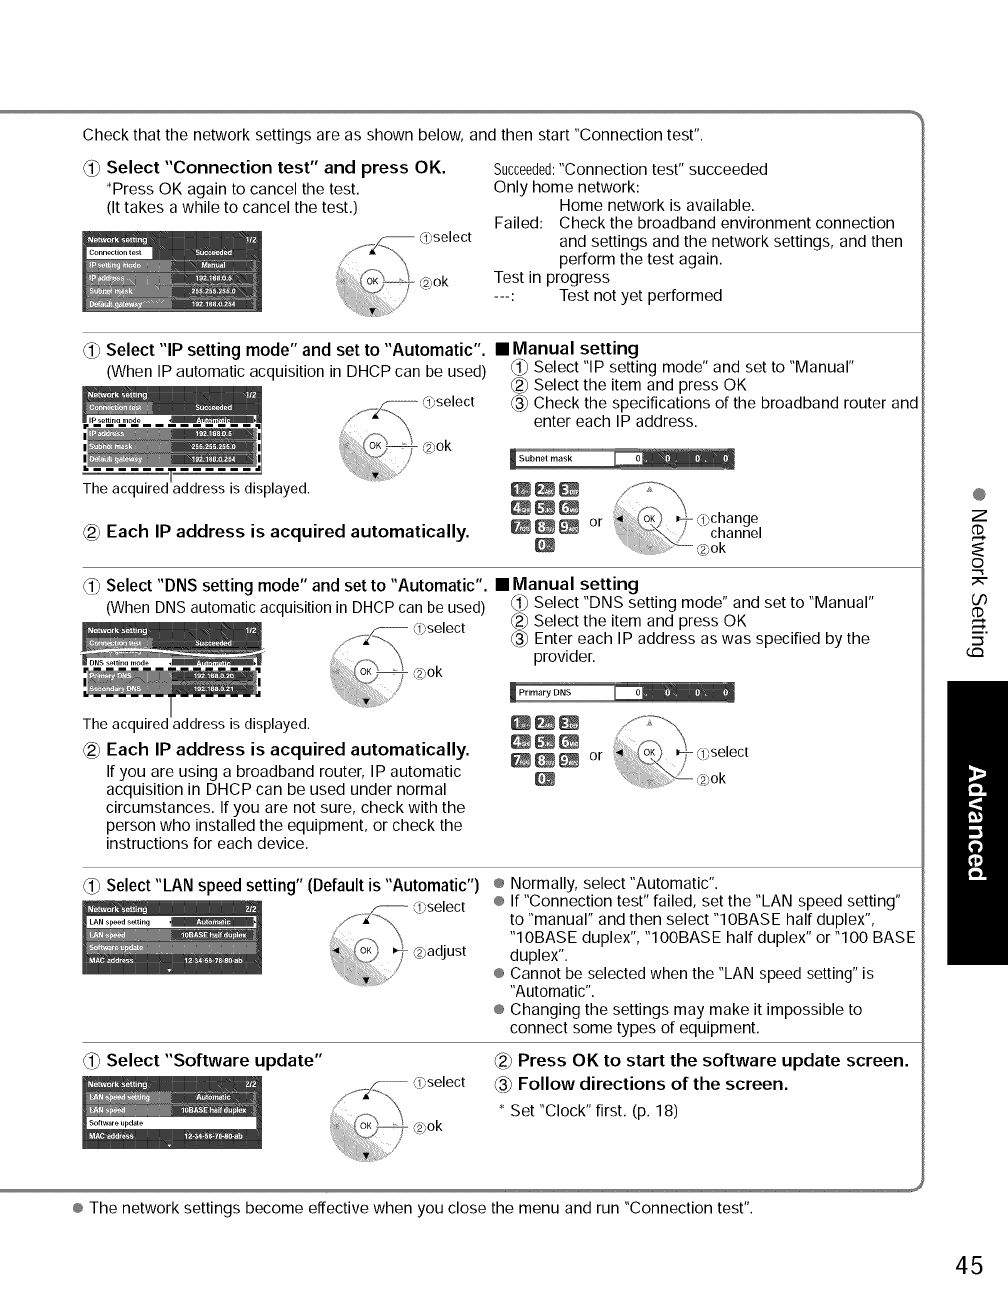
Check that the network settings are as shown below, and then start "Connection test".
_1_Select "Connection test" and press OK.
_Press OK again to cancel the test.
(It takes a while to cancel the test.)
-- (l_select
@ok
Succeeded:"Connection test" succeeded
Only home network:
Home network is available.
Failed: Check the broadband environment connection
and settings and the network settings, and then
perform the test again.
Test in progress
---: Test not yet performed
_ Select "IP setting mode" and set to "Automatic". • Manual setting
(When IP automatic acquisition in DHCP can be used) _i_Select "IP setting mode" and set to "Manual"
The acq ;played.
O)select
_2_ok
Each IP address is acquired automatically.
_ Select the item and press OK
_3_Check the specifications of the broadband router and
enter each IP address.
Select "DNS setting mode" and set to "Automatic". • Manual setting
(When DNS automatic acquisition in DHCP can be used) _i_ Select "DNS setting mode" and set to "Manual"
The acquired address is displayed.
@ Each IP address is acquired automatically,
If you are using a broadband router, IP automatic
acquisition in DHCP can be used under normal
circumstances. If you are not sure, check with the
person who installed the equipment, or check the
instructions for each device.
_2_Select the item and press OK
_3) Enter each IP address as was specified by the
provider.
_or
d) Select "LAN speed setting" (Default is "Automatic") ® Normally, select "Automatic".
® If "Connection test" failed, set the "LAN speed setting"
to "manual" and then select "10BASE half duplex",
"10BASE duplex", "100BASE half duplex" or "100 BASE
duplex".
® Cannot be selected when the "LAN speed setting" is
"Automatic".
® Changing the settings may make it impossible to
connect some types of equipment.
Select "Software update" Press OK to start the software update screen.
_3_Follow directions of the screen.
Set "Clock" first. (p. 18)
@
Z
d)
o
O0
d)
_3
® The network settings become effective when you close the menu and run "Connection test".
45
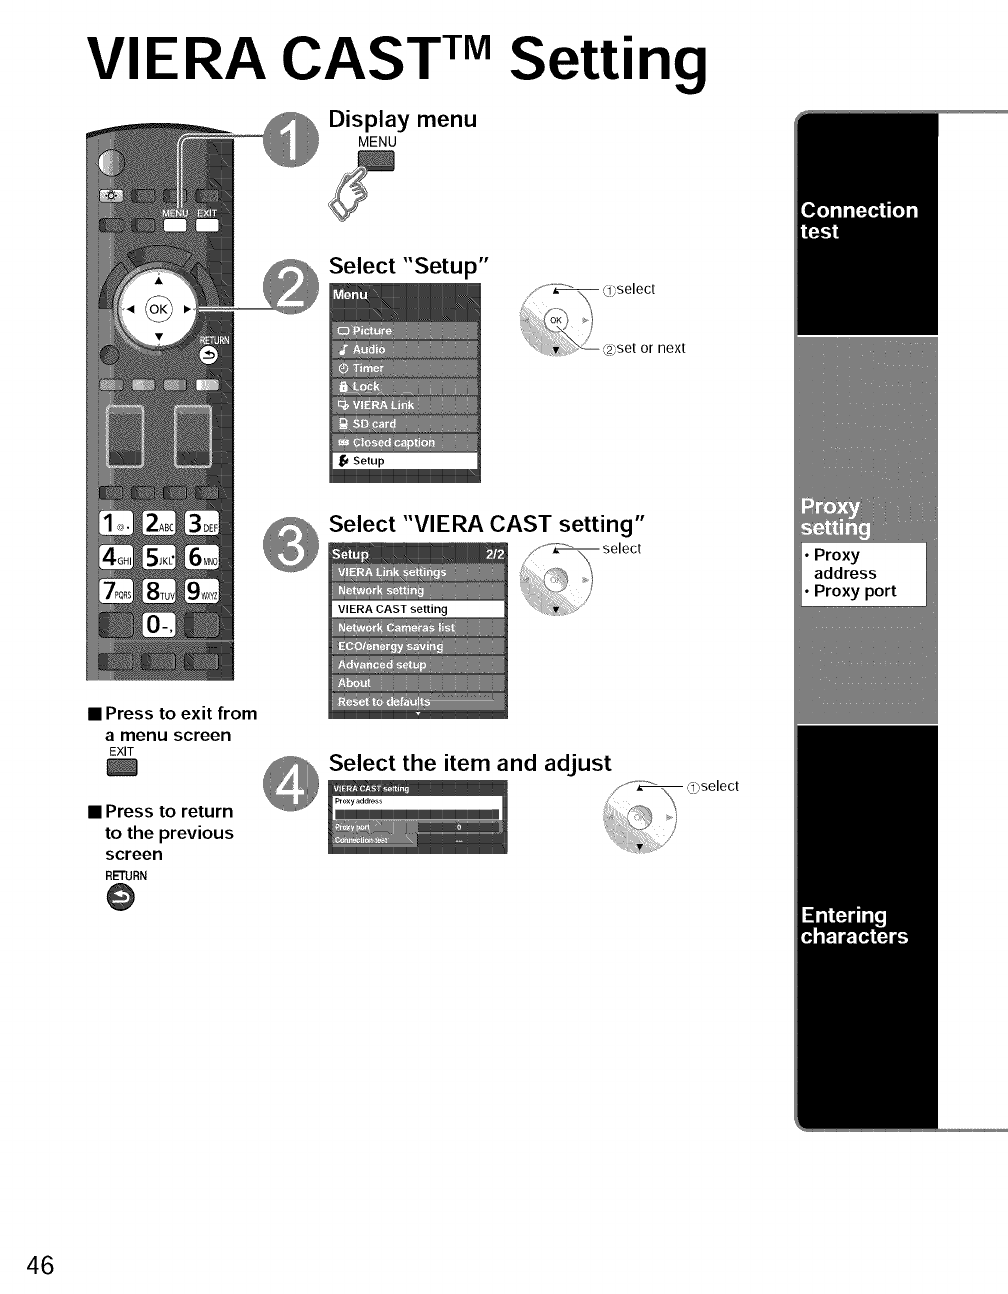
VIERA CAST TM Setting
Display menu
MENU
Select "Setup"
next
Select "VIERA CAST setting"
•Press to exit from
a menu screen
EXIT
•Press to return
to the previous
screen
RETURN
@
_ Select the item and adjust .....
Y_"_ 09select
/
Proxy port
46
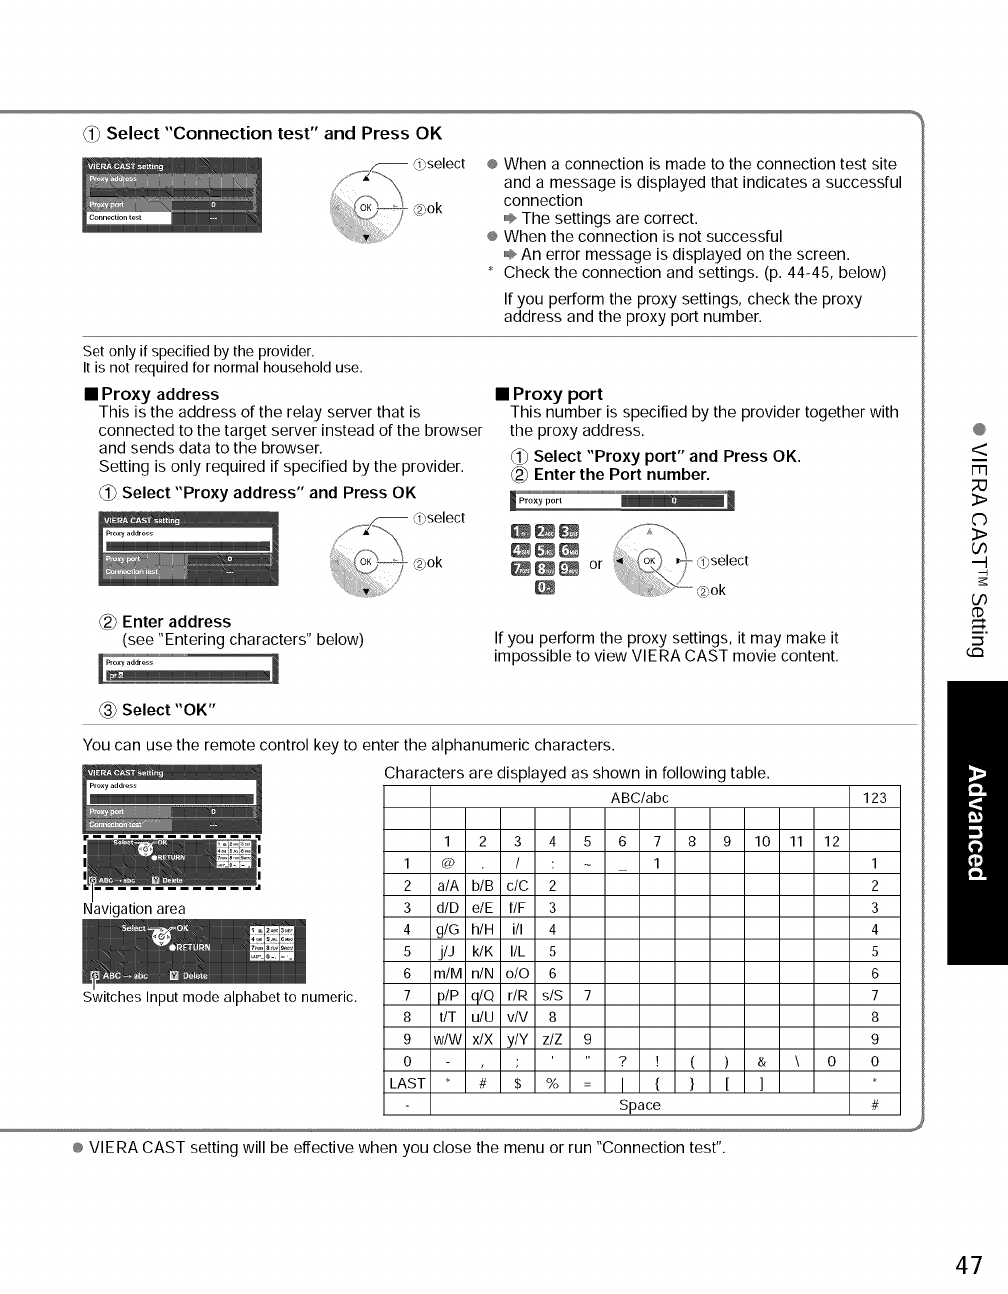
Select "Connection test" and Press OK
÷ When a connection is made to the connection test site
and a message is displayed that indicates a successful
connection
,,®The settings are correct.
® When the connection is not successful
÷ An error message is displayed on the screen.
* Check the connection and settings. (p. 44-45, below)
If you perform the proxy settings, check the proxy
address and the proxy port number.
Set only if specified by the provider.
It is not required for normal household use,
• Proxy address
This is the address of the relay server that is
connected to the target server instead of the browser
and sends data to the browser.
Setting is only required if specified by the provider.
Select "Proxy address" and Press OK
• Proxy port
This number is specified by the provider together with
the proxy address.
_1_Select "Proxy port" and Press OK.
_2_Enter the Port number.
_or
_2_Enter address
(see "Entering characters" below) If you perform the proxy settings, it may make it
impossible to view VIERA CAST movie content.
Select "OK"
You can use the remote control key to enter the alphanumeric characters.
Characters are displayed as shown in following table.
ABC/abc
Navigation area
Switches Input mode alphabet to numeric,
123
1 2 3 4 5 6 7 8 9 10 11 12
1 @ /: 1 1
2 a/A b/B c/C 2 2
3 d/D e/E f/F 3 3
4 g/G h/H i/I 4 4
5 j/J k/K I/L 5 5
6 m/M n/N o/O 6 6
7 p/P q/Q r/R s/S 7 7
8 t/T u/U v/V 8 8
9 w/W x/X y/Y z/Z 9 9
0 ; ? ! ( ) & \ 0 0
LAST * # $ % I { } [ ] *
Space #
® VIERA CAST setting will be effective when you close the menu or run "Connection test".
@
<
m
23
3>
C)
3>
O0
(./3
5"
47
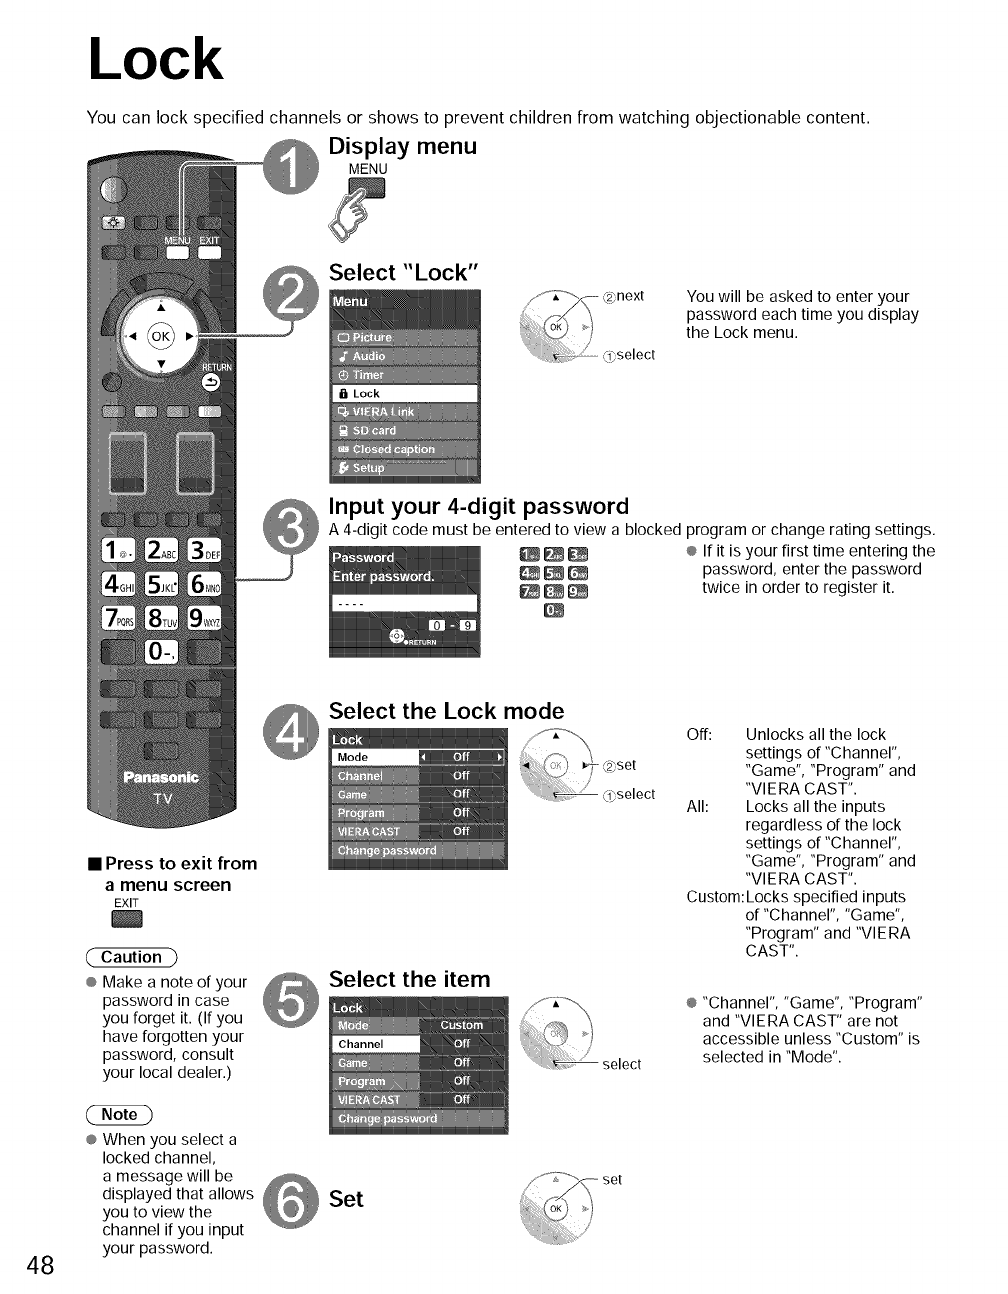
Lock
You can lock specified channels or shows to prevent children from watching objectionable content.
Display menu
MENU
Select "Lock"
a Lock
You will be asked to enter your
password each time you display
the Lock menu.
Input your 4-digit password
A 4-digit code must be entered to view a blocked program or change rating settings.
_ _ ® If it is your first time entering the
_ _ password, enter the password
_ _ twice in order to register it.
48
•Press to exit from
a menu screen
EXIT
Caution
® Make a note of your
password in case
you forget it. (If you
have forgotten your
password, consult
your local dealer.)
® When you select a
locked channel,
a message will be
displayed that allows
you to view the
channel if you input
your password.
Select the Lock mode
Select the item
Set
Off: Unlocks all the lock
settings of "Channel",
"Game", "Program" and
"VlERA CAST".
All: Locks all the inputs
regardless of the lock
settings of "Channel",
"Game", "Program" and
"VlERA CAST".
Custom: Locks specified inputs
of "Channel", "Game",
"Program" and "VlERA
CAST".
® "Channel", "Game", "Program"
and "VIERA CAST" are not
accessible unless "Custom" is
selected in "Mode".
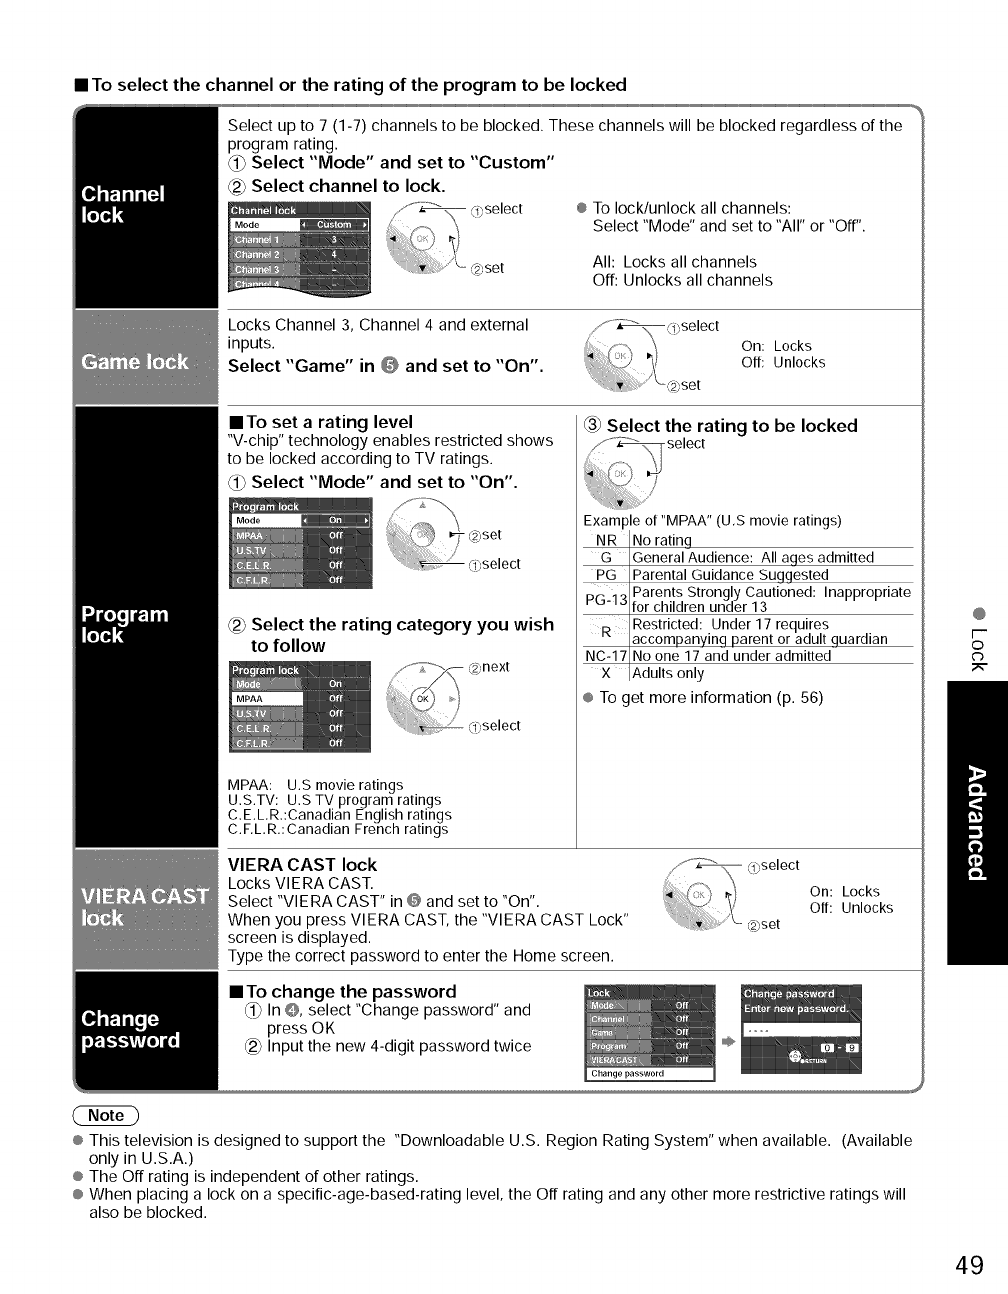
=inToselect the channel or the rating of the program to be locked
Select up to 7 (1-7) channels to be blocked. These channels will be blocked regardless of the
program rating.
_i_Select "Mode" and set to "Custom"
_2_Select channel to lock.
® To lock/unlock all channels:
Select "Mode" and set to "All" or "Off".
All: Locks all channels
Off: Unlocks all channels
Locks Channel 3, Channel 4 and external
inputs.
Select "Game" in @ and set to "On".
On: Locks
Off: Unlocks
• To set a rating level
"V-chip" technology enables restricted shows
to be locked according to TV ratings.
Select "Mode" and set to "On".
_2_Select the rating category you wish
to follow
@next
@select
MPAA: U.S movie ratings
U.S.TV: U.S TV program ratings
C.E.L,R.:Canadian English ratings
C.F,L,R.: Canadian French ratings
Select the rating to be locked
Example of "MPAA" (U,S movie ratings)
NR INo rating
c4 IGeneralAudience: All ages admitted
PG IParental Guidance Suggested
p ..... Parents Strongly Cautioned: Inappropriate
b! Jlfor children under 13
R IRestricted: Under 17 requires
,accompanying parent or adult guardian
NC-171No one 17 and under admitted
x IAdults only
® To get more information (p. 56)
VIERA CAST lock
Locks VIERA CAST,
Select "VIERA CAST" in @ and set to "On".
When you press VIERA CAST, the "VIERA CAST Lock"
screen is displayed.
Type the correct password to enter the Home screen.
@select
_2_set
On: Locks
Off: Unlocks
• To change the password
_ In 0, select "Change password" and
press OK
_2_.Input the new 4-digit password twice @
@
[--
©
c_
® This television is designed to support the "Downloadable U.S. Region Rating System" when available. (Available
only in U.S.A.)
® The Off rating is independent of other ratings.
® When placing a lock on a specific-age-based-rating level, the Off rating and any other more restrictive ratings will
also be blocked.
49
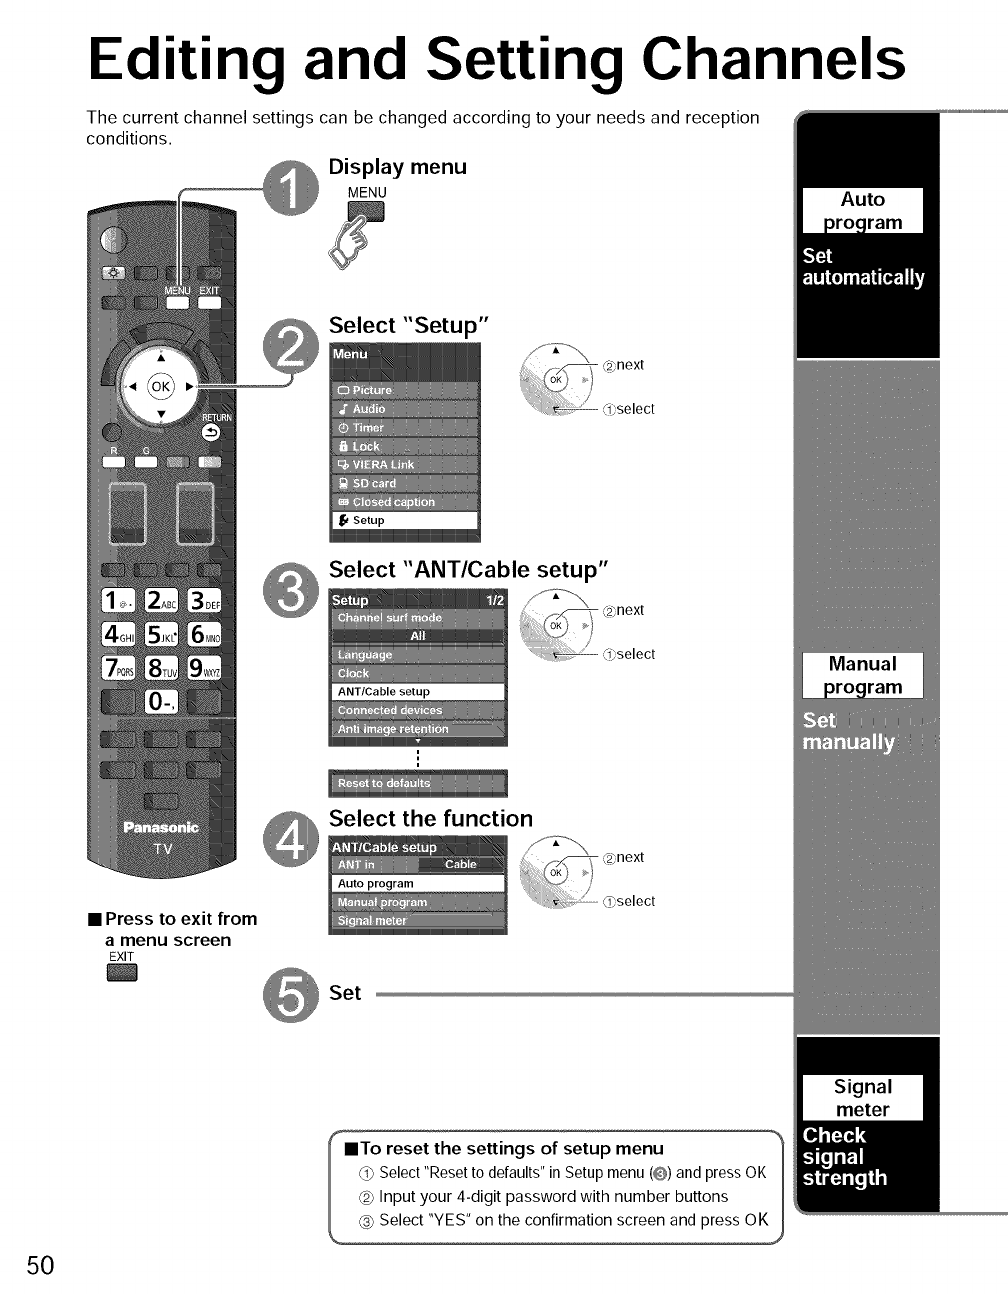
Editing and Setting Channels
The current channel settings can be changed according to your needs and reception
conditions.
Display menu
MENU
Select "Setup"
Select "ANTICable setup"
ANT/Cable setup
Select the function
• Press to exit from
amenu screen
EXIT
Set
50
ImTo reset settings setup menu
the of
Select "Reset to defaults" in Setup menu (@) and press OK_
(_ Input your 4-digit password with number buttons

Automaticallysearchesandaddsavailablechannelstothememory.
Select"ANTin" _3_Selectascanning mode (p. 17)
÷ Select Cable or Antenna
Or select "Not used" (p. 16). - @ok
Select "Auto program" select
Settings are made automatically
÷ After the scanning is completed, select "Apply".
(see below @).
® All previously saved channels are erased.
Use this procedure when changing the channel setup or
changing the channel display.
Also, use this to add or skip channels from the channel
list manually.
You can select a channel tuning mode (Digital only/
Analog only) in "Channel surf mode" (p. 36)
Select "Edit"
(2) Select the item to be edited
Caption Add Changes the station identifier
Favorite:
Registers channel to Favorite
List
L_ ÷ Add:
_ Proceed to Adds or skips channels
next page
Go back to previous page
(3) Edit
® Caption
Select the station identifier (maximum 7 characters available)
® Favorite
/_select <:,next
Set favorite] Select the number
® Add RETURN
Press OK to select "Yes (add)" or "No (skip)"
(4) Move cursor to channel number
Select
To cancel the Edit
Check the signal strength if an interference is found or freezing occurs on a digital image.
_ _ /'" ;:--®, ® If the signal is weak, check the antenna.
_ _ _,:,, _ If no problem is found, consult your local dealer.
oK _ ,ybcnanae
_ _ or L _) ....channel
® Not available if "Cable" is selected in "ANT in"
Signal intensity (see above).
® Available only for digital antenna channels.
® If "Lock" (p. 48) is activated and "ANT/Cable setup" is selected, "Enter password." will be displayed.
51
@
m
m,
5"
G:3
.m
00
d)
5"
G:3
C)
::Y
"m
"m
d)
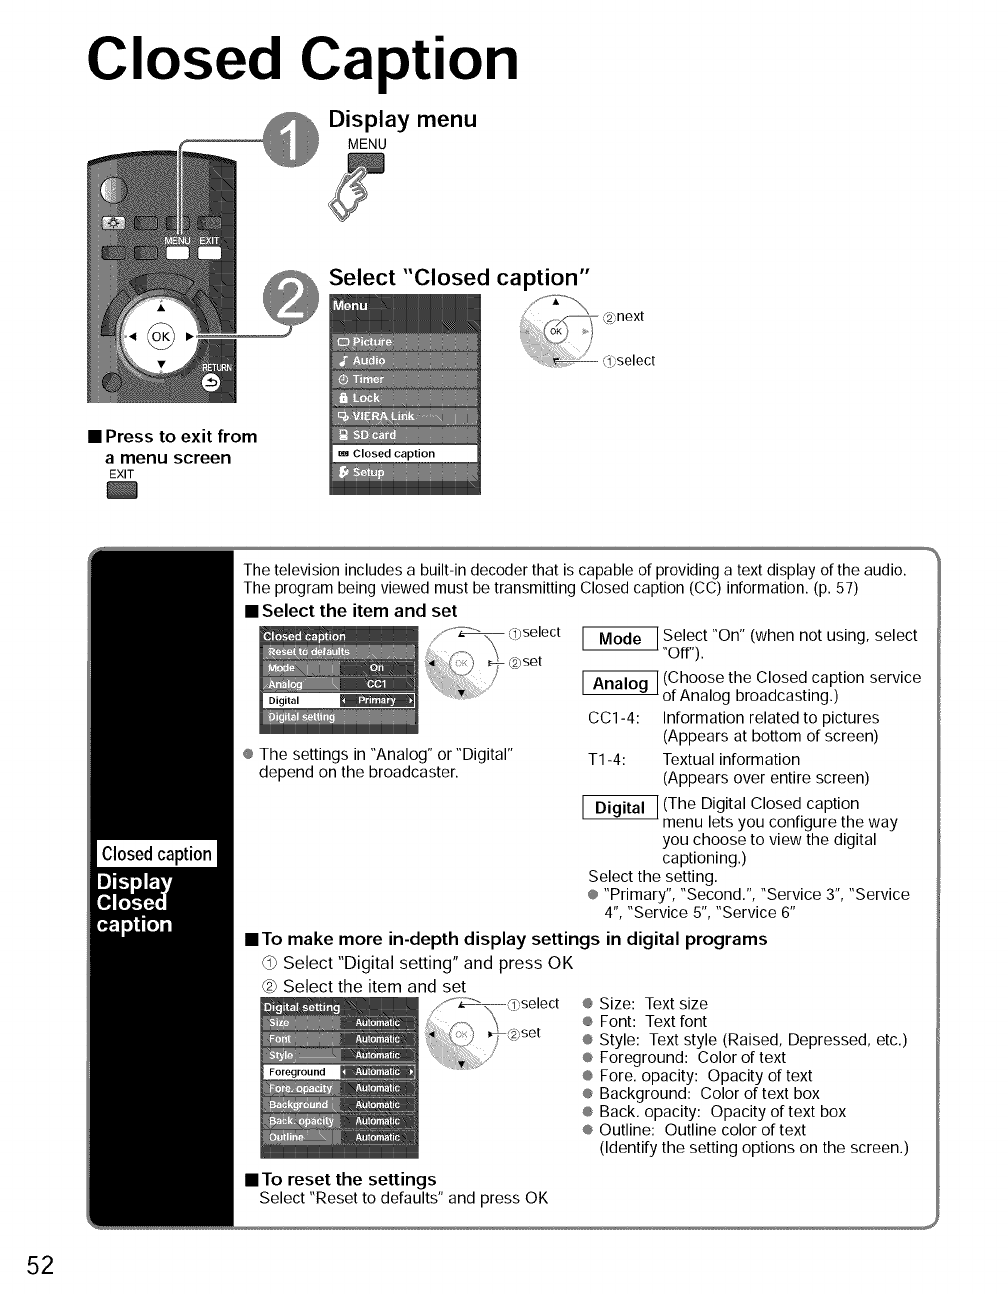
Closed Caption
Di_Eplflymenu
g
Select "Closed caption"
•Press to exit from
amenu screen
EXIT
The television includes a built-in decoder that is capable of providing a text display of the audio.
The program being viewed must be transmitting Closed caption (CC) information. (p. 57)
• Select the item and set
_ Select "On" (when not using, select
"Off").
_g_ (Choose the Closed caption service
of Analog broadcasting.)
CC1-4: Information related to pictures
(Appears at bottom of screen)
® The settings in "Analog" or "Digital" T1-4: Textual information
depend on the broadcaster. (Appears over entire screen)
(The Digital Closed caption
menu lets you configure the way
you choose to view the digital
captioning.)
Select the setting.
® "Primary", "Second.", "Service 3", "Service
4", "Service 5", "Service 6"
• To make more in-depth display settings in digital programs
Select "Digital setting" and press OK
_2)Select the item and set ® Size: Text size
® Font: Text font
® Style: Text style (Raised, Depressed, etc.)
® Foreground: Color of text
® Fore. opacity: Opacity of text
® Background: Color of text box
® Back. opacity: Opacity of text box
® Outline: Outline color of text
(Identify the setting options on the screen.)
•To reset the settings
Select "Reset to defaults" and press OK
52
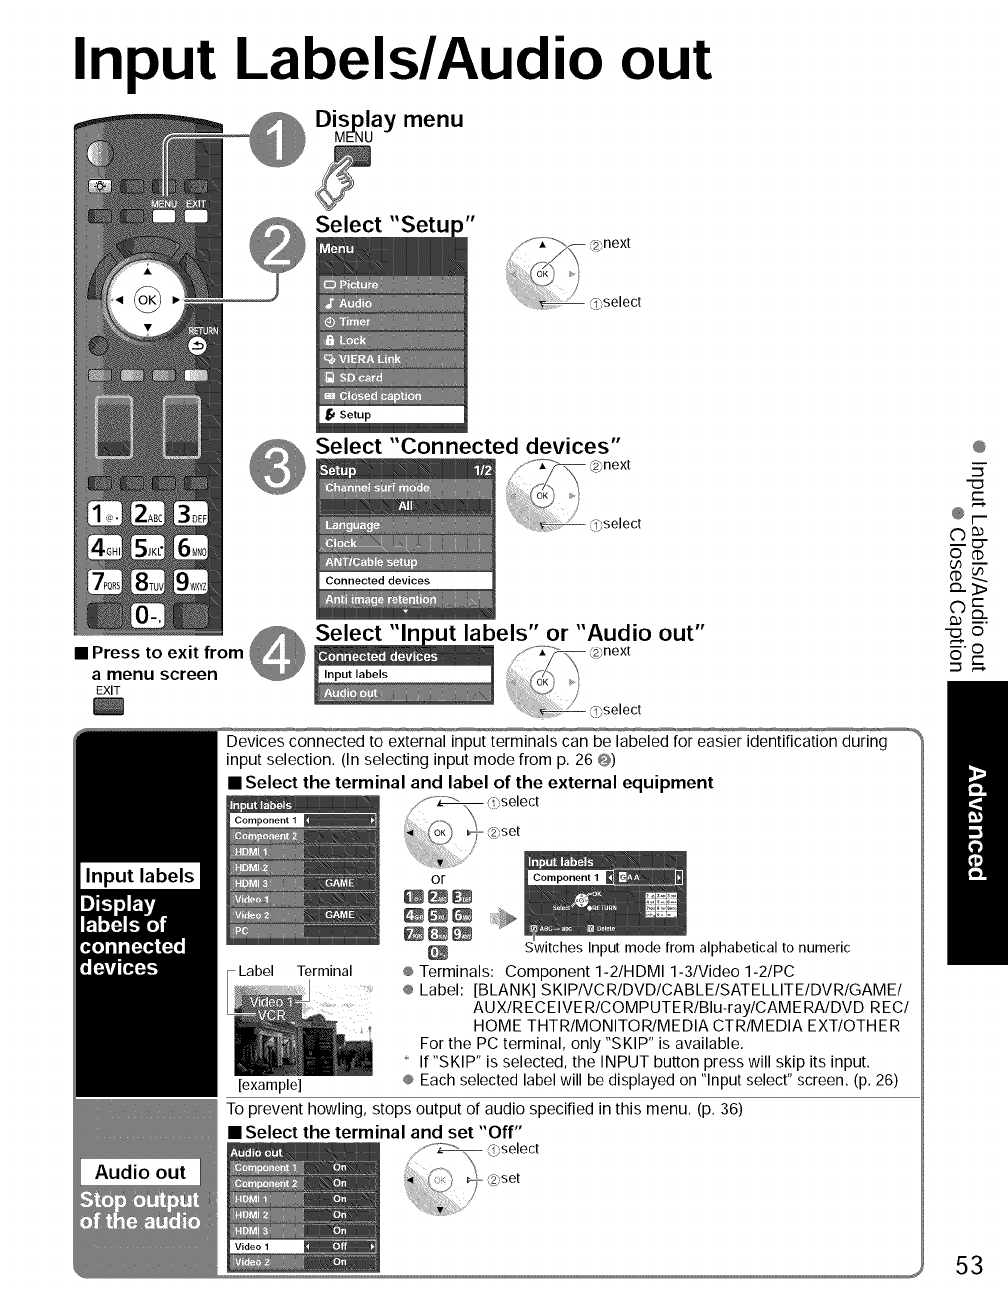
Input Labels/Audio out
Display menu
MENU
Select "Setu
Select "Connected devices"
_ Selec_t -'ln_bels" or "Audio out"
•Press to exit from _ 'JJ_i_ _2_next
amenu screen _ Input labels i'_ (_OK'_ _'/
EXIT __ .... <_select
Devices connected to external input terminals can be labeled for easier identification during
input selection. (In selecting input mode from p. 26 @)
• Select the terminal and label of the external equipment
Label Terminal
[example]
or
Switches Input mode from alphabetical to numeric
® Terminals: Component 1-2/HDMI 1-3/Video 1-2/PC
® Label: [BLANK] SKIPIVCRIDVDICABLEISATELLITEIDVRIGAMEI
AUXlRECEIVERICOMPUTERIBlu-raylCAMERAIDVD REC/
HOME THTR/MONITOR/MEDIA CTR/MEDIA EXT/OTHER
For the PC terminal, only "SKIP" is available.
If "SKIP" is selected, the INPUT button press will skip its input.
® Each selected label will be displayed on "Input select" screen. (p. 26)
To prevent howling, stops output of audio specified in this menu. (p. 36)
• Select the terminal and set "Off"
@
5"
"o
t-
too-
"o ©
oo
53
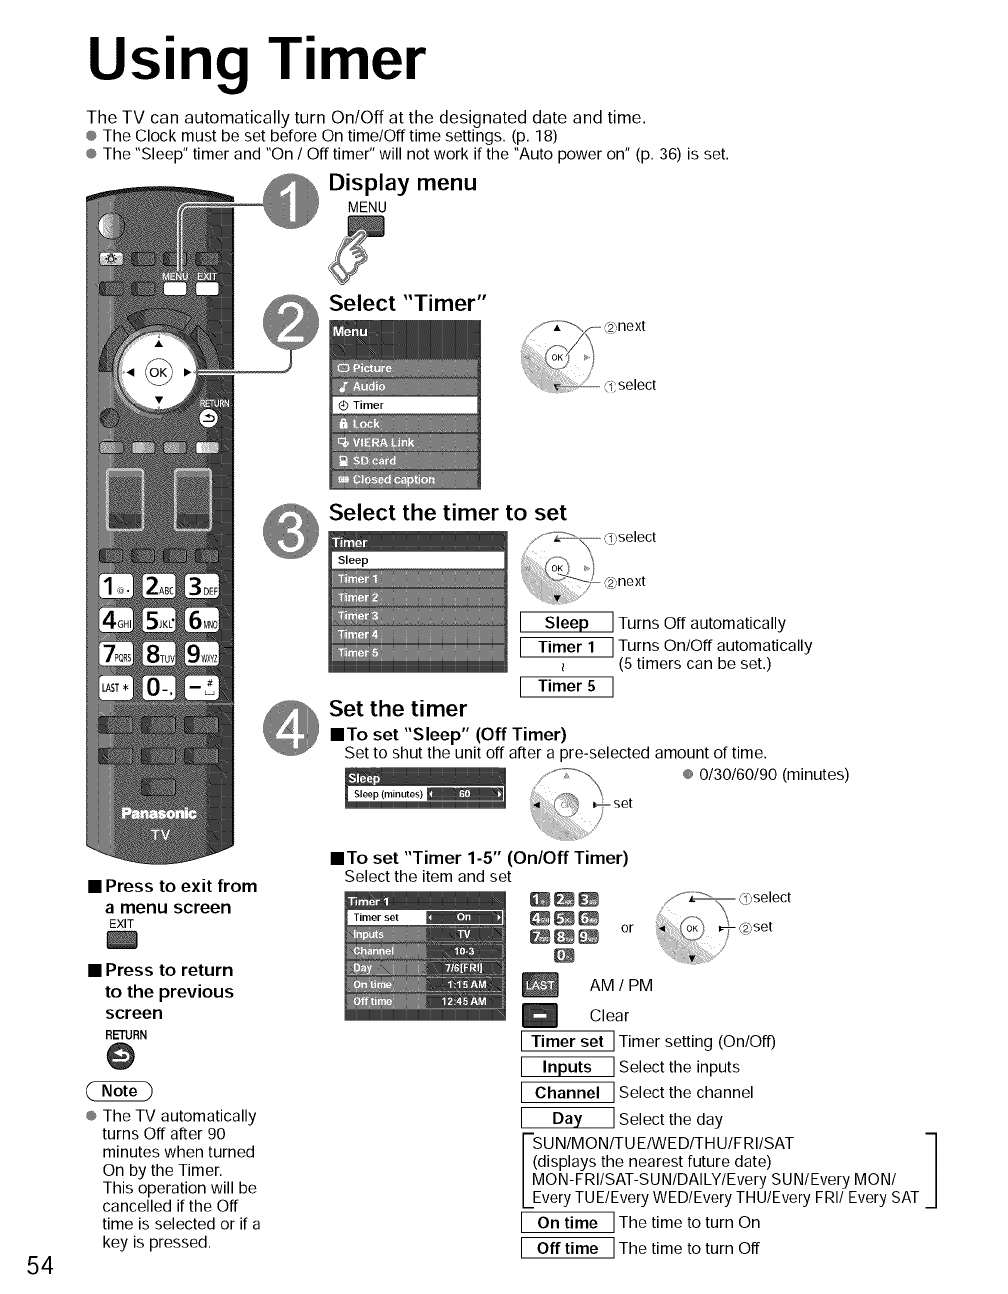
Using Timer
The TV can automatically turn On/Off at the designated date and time.
® The Clock must be set before On time/Off time settings. (p. 18)
® The "Sleep" timer and "On /Off timer" will not work if the "Auto power on" (p. 36) is set.
Display menu
MENU
Select "Timer"
next
,q;select
Select the timer to set
[Sleep
[ Timer 1
[ Timer 5
Set the timer
ITo set "Sleep" (Off Timer)
1Turns Off automatically
]Turns On/Off automatically
(5 timers can be set.)
]
Set to shut the unit off after a pre-selected amount of time.
® 0130160190 (minutes)
54
•Press to exit from
amenu screen
EXIT
•Press to return
to the previous
screen
RETURN
@
® The TV automatically
turns Off after 90
minutes when turned
On by the Timer.
This operation will be
cancelled if the Off
time is selected or if a
key is pressed.
•To set "Timer 1-5" (On/Off Timer)
Select the item and set
_E_ or
AM /PM
Clear
[ Timer set ] Timer setting (On/Off)
I Inputs ]Select the inputs
[ Channel ] Select the channel
IDay ] Select the day
UN/MON/TU E/WE D/TH U/F RI/SAT -I
isplays the nearest future date) J
ON-FRIISAT-SUNIDAILYIEvery SUN/Every MON/
very TUE/Every WED/Every THU/Every FRI/Every SAT
[ On time ] The time to turn On
[ Off time ] The time to turn Off
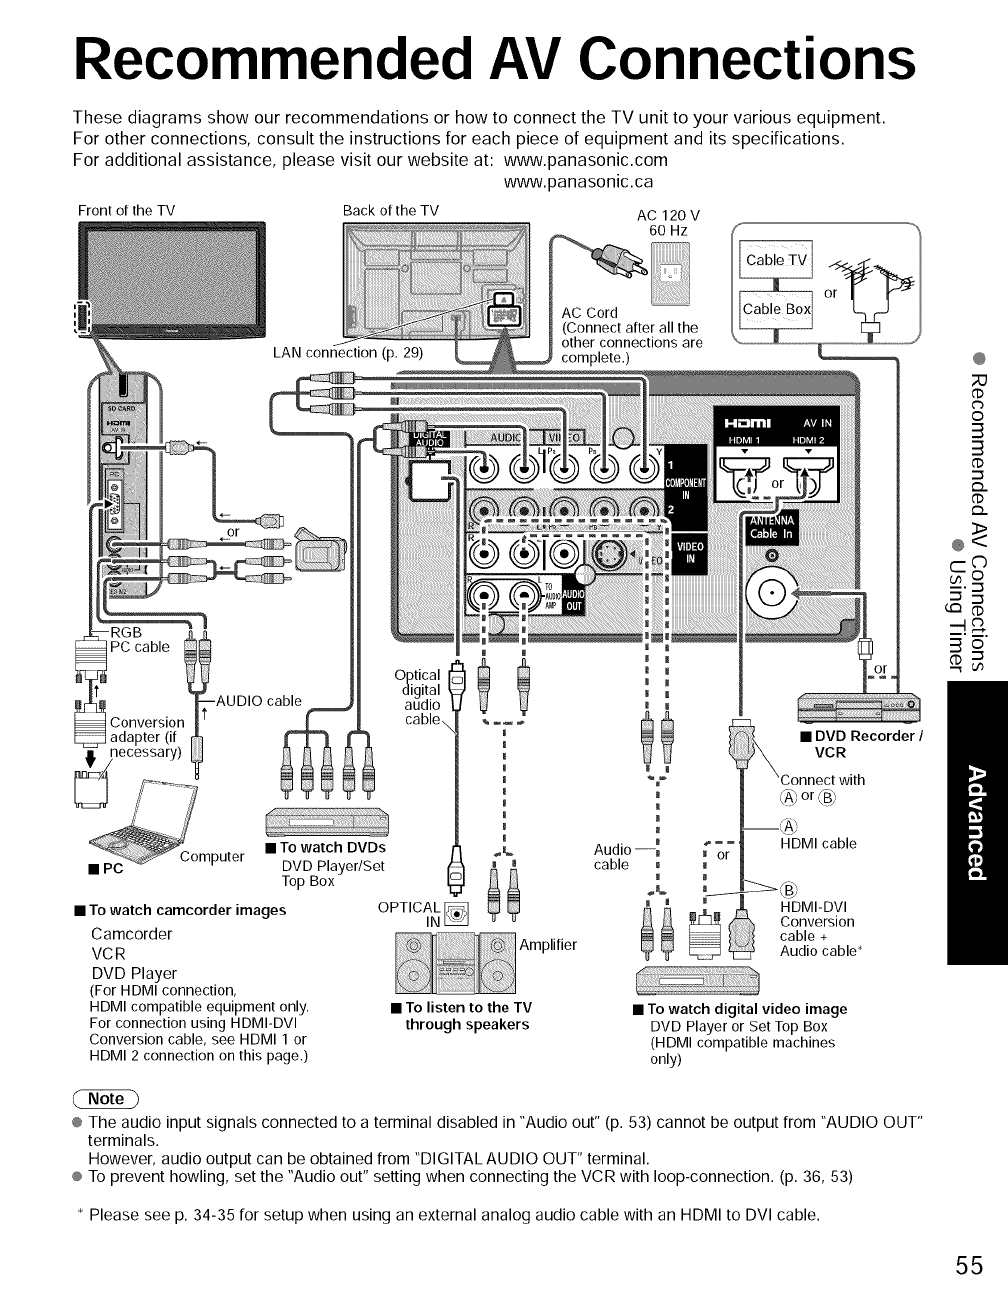
Recommended AV Connections
These diagrams show our recommendations or how to connect the TV unit to your various equipment.
For other connections, consult the instructions for each piece of equipment and its specifications.
For additional assistance, please visit our website at: www.panasonic.com
www.panasonic.ca
Front of the TV Back of the TV AC 120 V
60 Hz
AC Cord
(Connect after all the
other connections are
AUDIO cable
Conversion
adapter (if
,_ necessary)
_mputer
• PC
•To watch DVDs
DVD Player/Set
Top Box
• To watch camcorder images
Camcorder
VCR
DVD Player
(For HDMI connection,
HDMI compatible equipment only.
For connection using HDMI-DVI
Conversion cable, see HDMI 1 or
HDMI 2 connection on this page.)
O_tical
gital
audio
cable
OPTICALIN_
Amplifier
• To listen to the TV
through speakers
• DVD Recorder /
VCR
_A_or '_B_
_ HDMI cable
_"or
!
_ \Dj
HDMI-DVI
_ Conversion
cable +
Audio cable*
• To watch digital video image
DVD Player or Set Top Box
(HDMI compatible machines
only)
® The audio input signals connected to a terminal disabled in "Audio out" (p. 53) cannot be output from "AUDIO OUT"
terminals.
However, audio output can be obtained from "DIGITAL AUDIO OUT" terminal.
® To prevent howling, set the "Audio out" setting when connecting the VCR with loop-connection. (p. 36, 53)
* Please see p. 34-35 for setup when using an external analog audio cable with an HDMI to DVI cable.
@
d)
©
3
3
GD
"7
d)
@<>
c-C)
3o
55
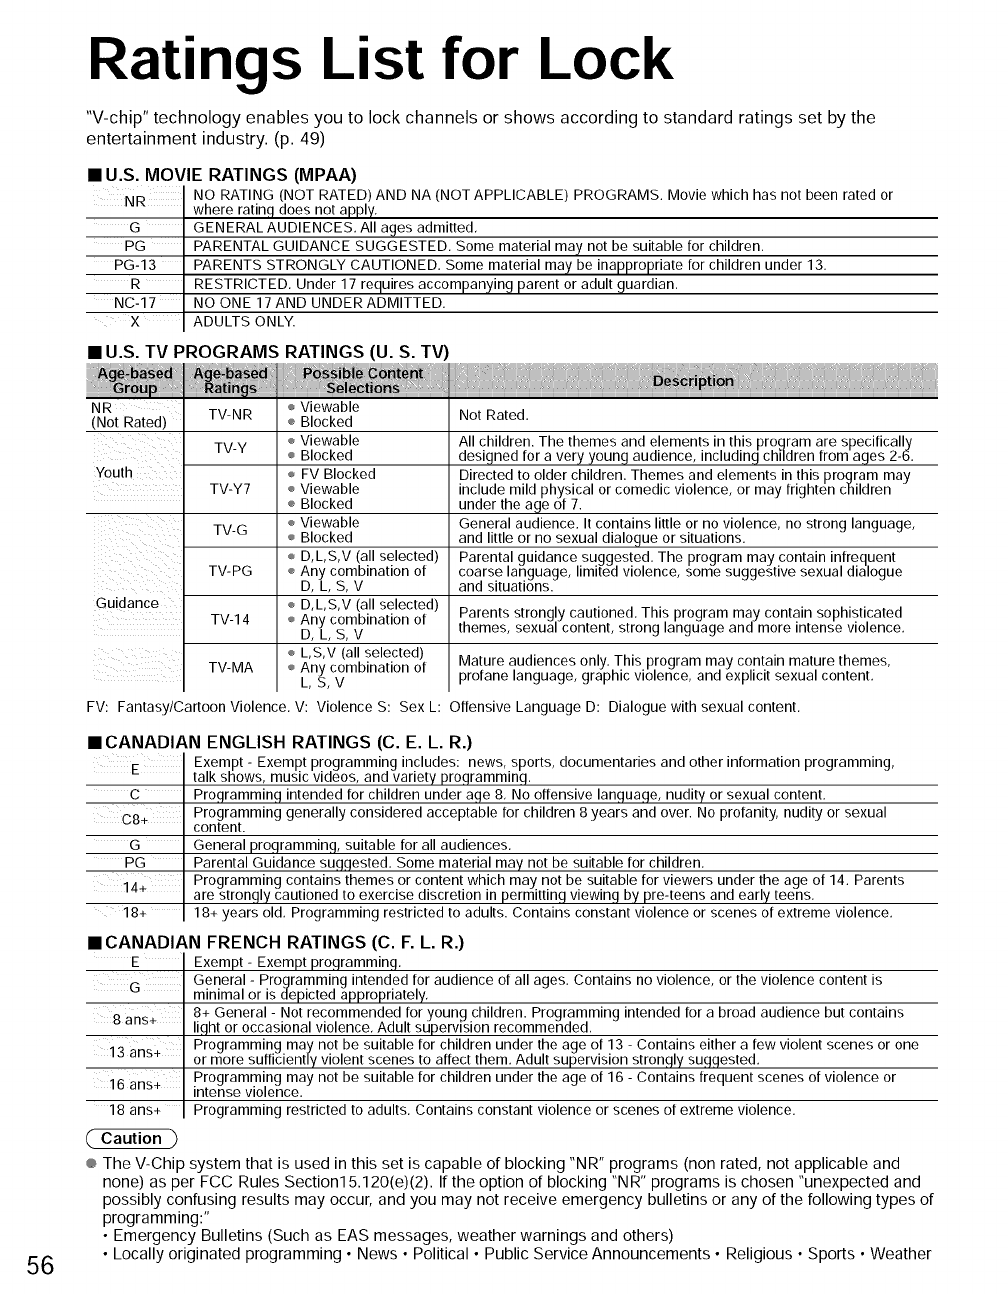
Ratings List for Lock
"V-chip" technology enables you to lock channels or shows according to standard ratings set by the
entertainment industry. (p. 49)
•U.S. MOVIE RATINGS (MPAA)
NR
G
PG
PG-13
R
NC-17
X
NO RATING (NOT RATED) AND NA (NOT APPLICABLE) PROGRAMS. Movie which has not been rated or
where ratinq does not apply,
GENERAL AUDIENCES, All ages admitted,
PARENTAL GUIDANCE SUGGESTED, Some material may not be suitable for children,
PARENTS STRONGLY CAUTIONED, Some material may be inappropriate for children under 13.
RESTRICTED, Under 17 requires accompanying parent or adult quardian.
NO ONE 17AND UNDER ADMITTED.
ADULTS ONLY.
•U.S. TV PROGRAMS RATINGS (U. S. TV)
56
NR
(Not Rated) TV-NR
TV-Y
Youth
TV-Y7
TV-G
TV-PG
Guidance
TV-14
TV-MA
÷ Viewable
÷ Blocked
÷ Viewable
÷ Blocked
÷ FV Blocked
÷ Viewable
÷ Blocked
÷ Viewable
÷ Blocked
÷ D,L,S,V (all selected)
÷ Any combination of
D, L, S,V
÷ D,L,S,V (all selected)
÷ Any combination of
D, L, S,V
÷ L,S,V (all selected)
÷ Any combination of
L,S,V
Not Rated,
All children. The themes and elements in this program are specifically
designed for a very young audience, including children from ages 2-6,
Directed to older children. Themes and elements in this program may
include mild physical or comedic violence, or may frighten children
under the age of 7.
General audience. It contains little or no violence, no strong language,
and little or no sexual dialogue or situations.
Parental guidance suggested, The program may contain infrequent
coarse language, limited violence, some suggestive sexual dialogue
and situations.
Parents strongly cautioned. This program may contain sophisticated
themes, sexual content, strong language and more intense violence,
Mature audiences only. This program may contain mature themes,
profane language, graphic violence, and explicit sexual content,
FV: Fantasy/Cartoon Violence. V: Violence S: Sex L: Offensive Language D: Dialogue with sexual content.
• CANADIAN ENGLISH RATINGS (C. E. L. R.)
E
c
c8.
G
PG
14÷
18+
E ¸
iLi!iG¸LIII
8 ans+
13 ans+
16 ans+
18 ans+
Caution
Exempt - Exempt programming includes: news, sports, documentaries and other information programming,
talk shows, music videos, and variety programming,
Programming intended for children under age 8, No offensive language, nudity or sexual content.
Programming generally considered acceptable for children 8 years and over. No profanity, nudity or sexual
content.
General programming, suitable for all audiences,
Parental Guidance suggested, Some material may not be suitable for children,
Programming contains themes or content which may not be suitable for viewers under the age of 14. Parents
are strongly cautioned to exercise discretion in permitting viewing by pre-teens and early teens,
18+ years old, Programming restricted to adults. Contains constant violence or scenes of extreme violence,
• CANADIAN FRENCH RATINGS (C. F. L. R.)
Exempt- Exempt programming,
General - Programmingintended for audience of all ages, Contains no violence, or the violence content is
minimal or is depicted appropriately,
8+ General - Not recommended for young children. Programming intended for a broad audience but contains
light or occasional violence, Adult supervision recommended,
Programming may not be suitable for children under the age of 13 - Contains either a few violent scenes or one
or more sufficiently violent scenes to affect them, Adult supervision strongly suggested,
Programming may not be suitable for children under the age of 16 - Contains frequent scenes of violence or
intense violence,
Programming restricted to adults, Contains constant violence or scenes of extreme violence.
® The V-Chip system that is used in this set is capable of blocking "NR" programs (non rated, not applicable and
none) as per FCC Rules Section15.120(e)(2). If the option of blocking "N R" programs is chosen "unexpected and
possibly confusing results may occur, and you may not receive emergency bulletins or any of the following types of
programming:"
• Emergency Bulletins (Such as EAS messages, weather warnings and others)
• Locally originated programming • News • Political • Public Service Announcements • Religious • Sports • Weather
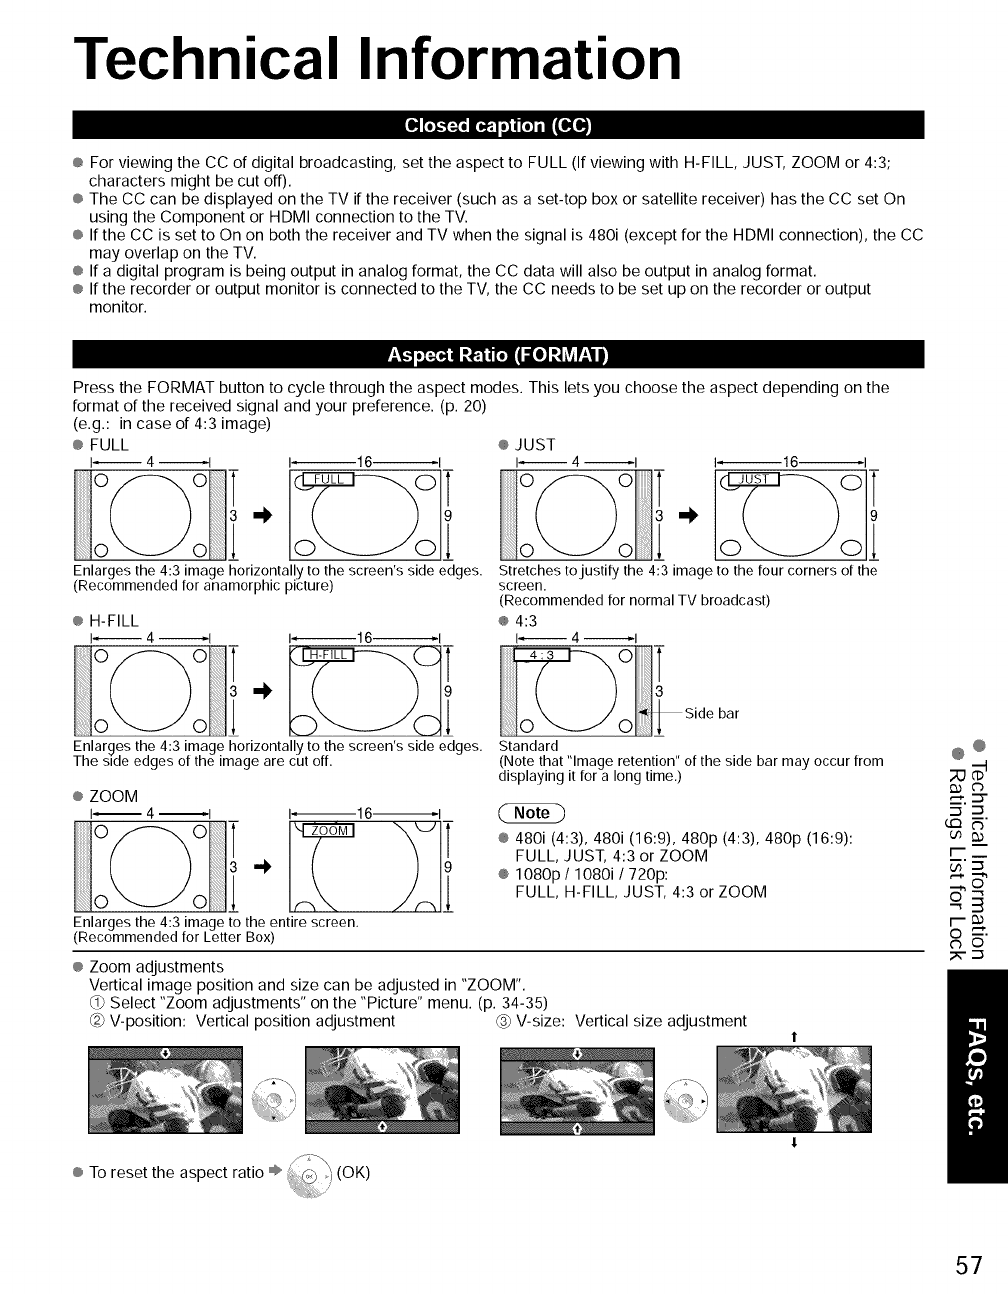
Technical Information
[o],,:'I_oE®':I o]nl[o] |•IEII'[_
® For viewing the CC of digital broadcasting, set the aspect to FULL (If viewing with H-FILL, JUST, ZOOM or 4:3;
characters might be cut off).
® The CC can be displayed on the TV if the receiver (such as a set-top box or satellite receiver) has the CC set On
using the Component or HDMI connection to the TV.
® If the CC is set to On on both the receiver and TV when the signal is 480i (except for the HDMI connection), the CC
may overlap on the TV.
® If a digital program is being output in analog format, the CC data will also be output in analog format.
® If the recorder or output monitor is connected to the TV, the CC needs to be set up on the recorder or output
monitor.
il.l,_:_®i-a_ i_il =o]-l_,,r:l i
Press the FORMAT button to cycle through the aspect modes. This lets you choose the aspect depending on the
format of the received signal and your preference. (p. 20)
(e.g.: in case of 4:3 image)
® FULL
I_ 4 _1 1_16_1
® JUST
I_ 4 _1 1_16_1
Enlarges the 4:3 image horizontally to the screen's side edges. Stretches to justify the 4:3 image to the four corners of the
(Recommended for anamorphic picture) screen.
(Recommended for normal TV broadcast)
® H-FILL ® 4:3
I_ 4 I 1_16_1 I_ 4 _1
bar
Enlarges the 4:3 image horizontally to the screen's side edges. Standard
The side edges of the image are cut off. (Note that "Image retention" of the side bar may occur from
displaying it for a long time,)
® ZOOM
i-- 4 --I I--16--1
Enlarges the 4:3 image to the entire screen,
(Recommended for Letter Box)
® 480i (4:3), 480i (16:9), 480p (4:3), 480p (16:9):
FULL, JUST, 4:3 or ZOOM
® 1080p /1080i /720p:
FULL, H-FILL, JUST, 4:3 or ZOOM
® Zoom adjustments
Vertical image position and size can be adjusted in "ZOOM".
Select "Zoom adjustments" on the "Picture" menu. (p. 34-35)
@ V-position: Vertical position adjustment @ V-size: Vertical size adjustment
,'_'. C$"
•-I "-I
CQ_"
r--_
o 3
O -'_'.
¢b O
_- "-I
® To reset the aspect ratio ÷ (OK)
57
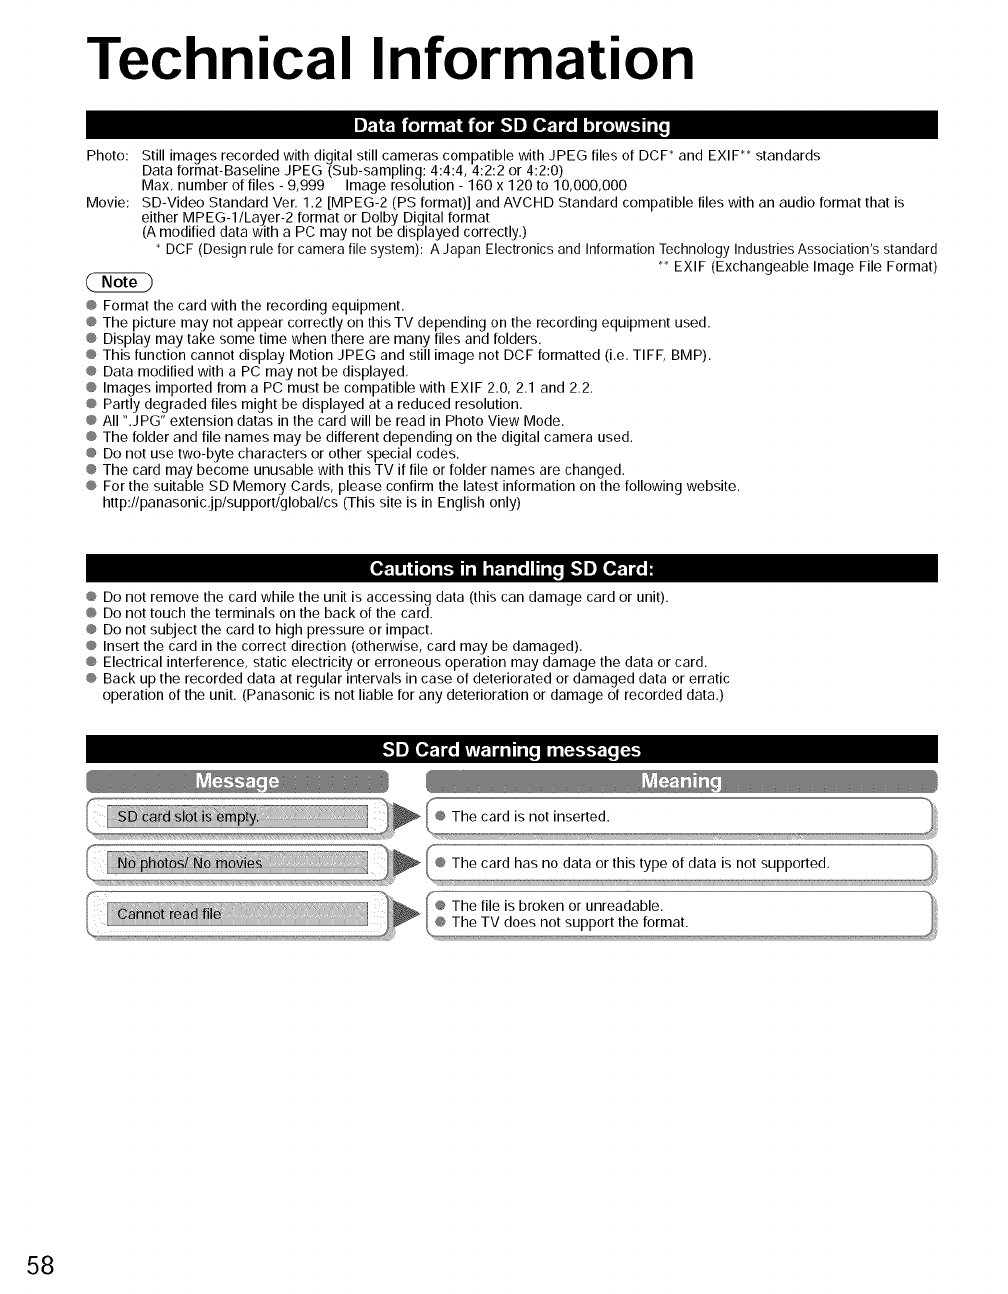
Technical Information
|_ _1 (e] jI JP.I• (e] _|I_.l le | e]lelvir_ I! [_
Photo: Still images recorded with digital still cameras compatible with JPEG files of DCP and EXIP _ standards
Data format-Baseline JPEG (Sub-sampling: 4:4:4, 4:2:2 or 4:2:0)
Max, number of files - 9,999 Image resolution - 160 x 120 to 10,000,000
Movie: SD-Video Standard Ver. 1.2 [MPEG-2 (PS format)] and AVCHD Standard compatible files with an audio format that is
either MPEG-1/Layer-2 format or Dolby Digital format
(Amodified data with a PC may not be displayed correctly.)
DCF (Design rule for camera file system): A Japan Electronics and Information TechnologyIndustries Association's standard
_ EXlF (Exchangeable Image File Format)
® Format the card with the recording equipment.
® The picture may not appear correctly on this TV depending on the recording equipment used.
® Display may take some time when there are many files and folders.
® This function cannot display Motion JPEG and still image not DCF formatted (i,e, TIFF, BMP),
® Data modified with a PC may not be displayed,
® Images imported from a PC must be compatible with EXIF 2.0, 2.1 and 2.2.
® Partly degraded files might be displayed at a reduced resolution.
® All ".JPG" extension datas in the card will be read in Photo View Mode.
® The folder and file names may be different depending on the digital camera used.
® Do not use two-byte characters or other special codes.
® The card may become unusable with this TV if file or folder names are changed.
® For the suitable SD Memory Cards, please confirm the latest information on the following website,
http://panasonic,jp/support/global/cs (This site is in English only)
II,i_'Tllq[o]i 1.1 Id i F:I i To// IiToIbm]IXlf:l a[oi
® Do not remove the card while the unit is accessing data (this can damage card or unit).
® Do not touch the terminals on the back of the card.
® Do not subject the card to high pressure or impact,
® Insert the card in the correct direction (otherwise, card may be damaged).
® Electrical interference, static electricity or erroneous operation may damage the data or card,
® Back up the recorded data at regular intervals in case of deteriorated or damaged data or erratic
operation of the unit. (Panasonic is not liable for any deterioration or damage of recorded data,)
IlIIIf:] i[a IiVivf,1II illi[o • il[:-_.'1.I: Tof:i_
58
VAI:I 2;-'I I'm ?'"_ =IeT-'\vl[s_o],li'_1llv'[ll
HDMI connections to some Panasonic equipment allow you to interface automatically. (p, 38)
® This function may not work normally depending on the equipment condition.
® The equipment can be operated by other remote controls with this function on even if TV is in Standby mode,
® Image or sound may not be available for the first few seconds when the playback starts.
® Image or sound may not be available for the first few seconds when Input mode is switched.
® Volume function will be displayed when adjusting the volume of the equipment,
@ If you connect the same kind of equipment at once (for example: one DIGA to HDMI 1 /another DIGA to HDMI 2), VIERA LinkTM
is available for the terminal with the smaller number.
® #you connect equipment that has "HDAVI Control 2" (or more) function to the TV with HDMI cable, the sound from DIGITAL
AUDIO OUT terminal can be output as multi channel surround.
@"HDAVI Control 4" is the newest standard (current as of December, 2008) for the HDAVI Control compatible equipment.
This standard is compatible with the conventional HDAVI equipment,
=Il]_V_l=,_o],],[_z,_,[o],
HDMI (high-definition multimedia interface) allows you to enjoy high-definition digital images and high-quality sound by connecting
the TV unit and the devices.
HDMI-compatible equipment ('1) with an HDMI or DVI output terminal, such as a set-top box or a DVD player, can be connected
to the HDMI connector using an HDMI compliant (fully wired) cable.
@ HDMI is the world's first complete digital consumer AV interface complying with a non-compression standard.
@ #the external equipment has only a DVI output, connect to the HDMI terminal via a DVI to HDMI adapter cable (*2).
@When the DVI to HDMI adapter cable is used, connect the audio cable to the audio input terminal.
® Audio settings can be made on the "HDMI 1 in", "HDMI 2 in" or "HDMI 3 in" menu screen, (p. 34)
Applicable audio signal sampling frequencies (L,PCM): 48 kHz, 44.1 kHz, 32 kHz
('1): The HDMI logo is displayed on an HDMI-compliant device.
( Caution -_ ('2): Enquire at your local digital equipment retailer shop.
/
@ Use with a PC is not assumed.
® All signals are reformatted before being displayed on the screen.
@ If the connected device has an aspect adjustment function, set the aspect ratio to "16:9",
® These HDMI connectors are "type A".
@These HDMI connectors are compatible with HDCP (High-Bandwidth Digital Content Protection) copyright protection.
® A device having no digital output terminal may be connected to the input terminal of either "COMPONENT", % VIDEO", or
"VIDEO" to receive analog signals,
® The HDMI input terminal can be used with only the following image signals: 480i, 480p, 720p, 1080i and 1080p,
Match the output setting of the digital device,
® For details of the applicable HDMI signals, see p. 60,
I] [_ / f_*1!_'11] l] [OXO]II ni (:_iaill ip:.n_.
You can enjoy your home theater by connecting a Dolby Digital (5,1 channel) decoder and "Multi Channel" amplifier to the
DIGITAL AUDIO OUT terminals.
Caution
® Depending on your DVD player and DVD-Audio software the copyright protection function may operate and disable optical output.
® When an ATSC channel is selected, the output from the DIGITAL AUDIO OUT jack will be Dolby Digital, When an NTSC
channel is selected, the output will be PCM.
@When playing movie on SD Card Movie player, when the sound has been recorded in Dolby Digital, the output from the
DIGITAL AUDIO OUT terminal will be Dolby Digital, When the sound is recorded in the other formats, the output will be PCM,
See pages 48-49 for more information
@
C_
CY
©
m,
©
® Vivid: Provides enhanced picture contrast and sharpness for viewing in a well-lit room.
® Standard: Recommended for normal viewing conditions with subdued room lighting.
® THX: Faithfully reproduces the image quality that the movie makers intended in order to provide the ultimate
cinematic experience at home.
@Game: For playing video game. This mode will be set automatically if "GAME" is selected from Input label setting (p, 53)
® Custom (Photo): Customizes each item according to your taste,
Photo is displayed in JPEG menu.
@ Picture mode will be automatically set to "Standard" if you change the Input label from "GAME" to other labels.
@ Picture mode will be automatically set to "Game" if you change from an Input label other than "GAME" to "GAME" label,
59

Technical Information (Continued)
®Aspect Ratio: 4:3
, Size 2
i
®Aspect Ratio: FULL/JUST(H-FILL/ZOOM)
ilRr '
® The width will be decreased on both sides to
reduce noise.
® The width will be increased on both sides to
reduce noise.
See pages 34-35 for more information
Do not display a picture in 4:3 mode for an extended period, as this can cause Side Bar
"Image retention" to remain on either or both sides of the display field.
Toreduce the risk of such "Image retention", change the brightness of the side 4:3
bars. Screen
See pages 36-37 for more information Display
® The side bar may flash (alternate black/white) depending on the picture. Using
Cinema mode will reduce such flashing (See below).
............... .............
-_l']lh"L'l'i_l
Scrolling bar: To prevent "Image retention", scrolls white vertical bar from top to bottom on a black screen.
® Press any key except the POWER key to return to previous screen.
® You will return to the previous screen if no key operation has been performed for 15 minutes.
See pages 36-37 for more information
[Scrolling bar]
60
liI.], iL'1[., ,mil ,"_ ,_,_.l,a.I_. i_i,|_.
* Mark: Applicable input signal for Component (Y, PB, PR),HDMI and PC
525 (480) /60i 15.73 59.94
525 (480)/60p " 31.47 " 59.94 ' _ ' _ '
750 (720)/60p 45.00 59.94 _
1,125 (1,080)/60i ' 33.75 " 59.94 ' _ ' _ '
1,125 (1,080)/60p 67.43 59.94
1,125 (1,080)/60p ' 67.50 ' 60.00 ' ' _ '
1,125 (1,080)/24p 26.97 23.98
1,125 (1,080)/24p ' 27.00 ' 24.00 ' ' _ '
640 x 400 @70 31.47 70.08
640 x 480 @60 " 31.47 " 59.94 ' ' '
Macintosh13" (640 x 480) 35.00 66.67
640 x 480 @75 " 37.50 ' 75.00 ' ' '
852 x 480 @60 31.47 59.94
800 x 600 @60 ' 37.88 ' 60.32 ' ' ' _'
800 x 600 Cm.75 46.88 75.00
800 x 600 @85 " 53.67 " 85.08 ' ' '
Macintosh16" (832 x 624) 49.73 74.55
1,024 x 768 @60 ' 48.36 " 60.00 ' ' '
1,024 x 768 @70 56.48 70.07
1,024 x 768 @75 ' 60.02 ' 75.03 ' ' '
1,024 x 768 @85 68.68 85.00
Macintosh 21" (1,152 x 870) 68.68 " 75.06 ' ' '
1,280 x 1,024 @60 63.98 60.02
1,366 x 768 @60 48.36 60.00
® Signals other than above may not be displayed properly.
® The above signals are reformatted for optimal viewing on your display.
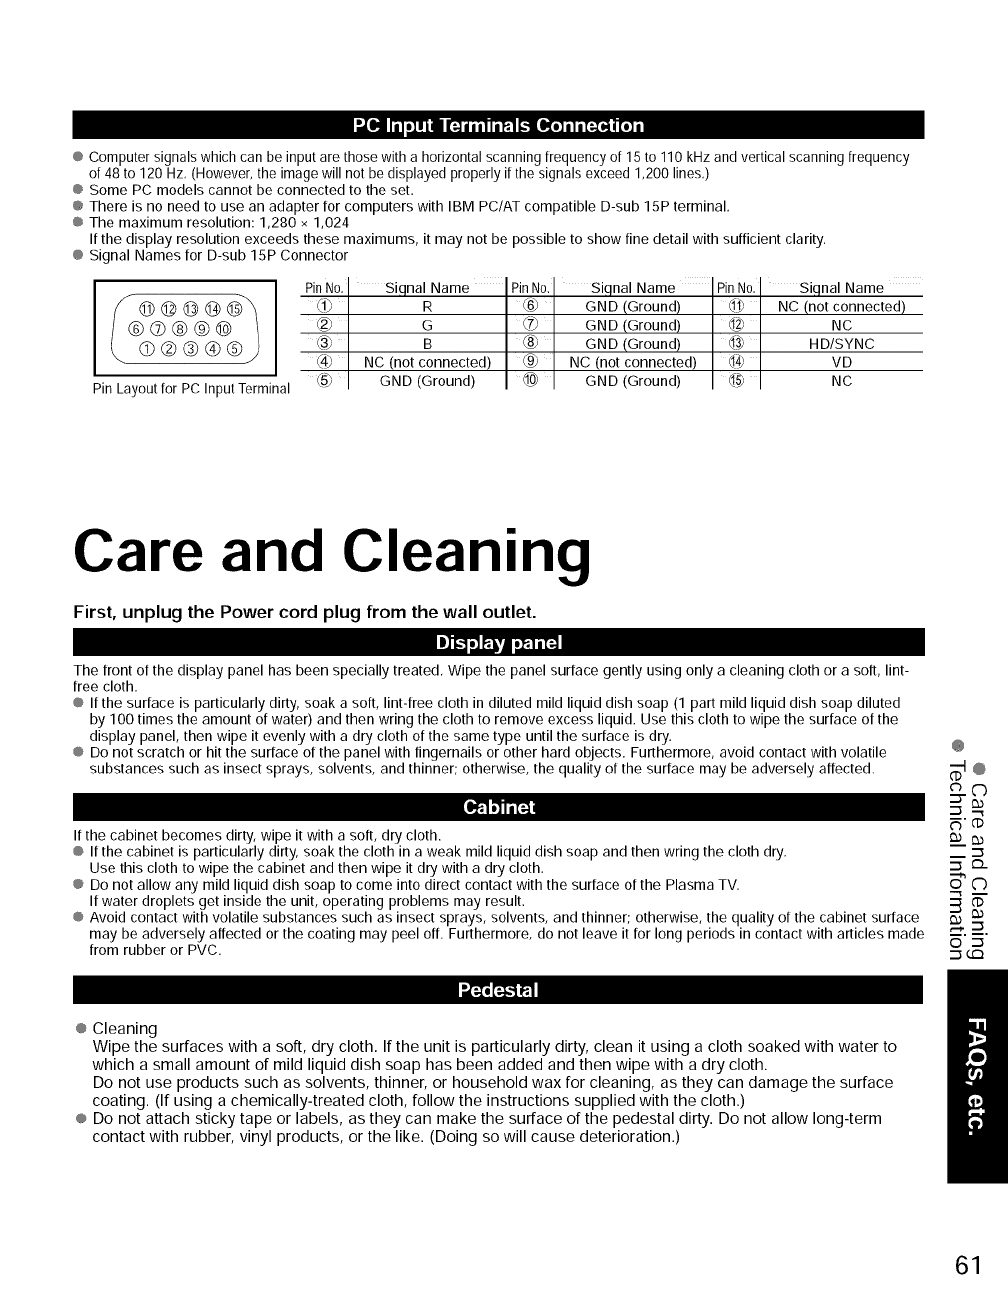
D._Oll il oil ii [;_ i ill I_ _lO_o) il i[_[_q [o] i
@Computer signals which can be inputare those with a horizontal scanning frequency of 15 to 110 kHzand vertical scanningfrequency
of 48 to 120 Hz, (However, the image will not be displayed properly if the signals exceed 1200 lines,)
@Some PC models cannot be connected to the set.
@There is no need to use an adapter for computers with IBM PC/AT compatible D-sub 15P terminal,
@The maximum resolution: 1,280 x 1,024
If the display resolution exceeds these maximums, it may not be possible to show fine detail with sufficient clarity.
@Signal Names for D-sub 15P Connector
Pin Layout for PC Input Terminal
Siqnal Name Siqnal Name Siqnal Name
f.l_ R @ GND (Ground) @ NC (not connected)
_) G ,.._,(7_ GND (Ground) @ NC
_3_ B _8_ GND (Ground) @ HD/SYNC
@ NC (not connected) @ NC (not connected) _ VD
GND (Ground) GND (Ground) NC
Care and Cleaning
First, unplug the Power cord plug from the wall outlet.
The front of the display panel has been specially treated, Wipe the panel surface gently using only a cleaning cloth or a soft, lint-
free cloth.
@ If the surface is particularly dirty, soak a soft, lint-free cloth in diluted mild liquid dish soap (1 part mild liquid dish soap diluted
by 100 times the amount of water) and then wring the cloth to remove excess liquid. Use this cloth to wipe the surface of the
display panel, then wipe it evenly with a dry cloth of the same type until the surface is dry.
@ Do not scratch or hit the surface of the panel with fingernails or other hard objects. Furthermore, avoid contact with volatile
substances such as insect sprays, solvents, and thinner; otherwise, the quality of the surface may be adversely affected.
_11_
If the cabinet becomes dirty, wipe it with a soft, dry cloth.
@ If the cabinet is particularly dirty, soak the cloth in a weak mild liquid dish soap and then wring the cloth dry.
Use this cloth to wipe the cabinet and then wipe it dry with a dry cloth.
@ Do not allow any mild liquid dish soap to come into direct contact with the surface of the Plasma TV.
If water droplets get inside the unit, operating problems may result.
@Avoid contact with volatile substances such as insect sprays, solvents, and thinner; otherwise, the quality of the cabinet surface
may be adversely affected or the coating may peel off. Furthermore, do not leave it for long periods in contact with articles made
from rubber or PVC.
@ Cleaning
Wipe the surfaces with a soft, dry cloth. If the unit is particularly dirty, clean it using a cloth soaked with water to
which a small amount of mild liquid dish soap has been added and then wipe with a dry cloth.
Do not use products such as solvents, thinner, or household wax for cleaning, as they can damage the surface
coating. (If using a chemically-treated cloth, follow the instructions supplied with the cloth.)
@ Do not attach sticky tape or labels, as they can make the surface of the pedestal dirty. Do not allow long-term
contact with rubber, vinyl products, or the like. (Doing so will cause deterioration.)
@
_'rp
o '_
'_G:3
61
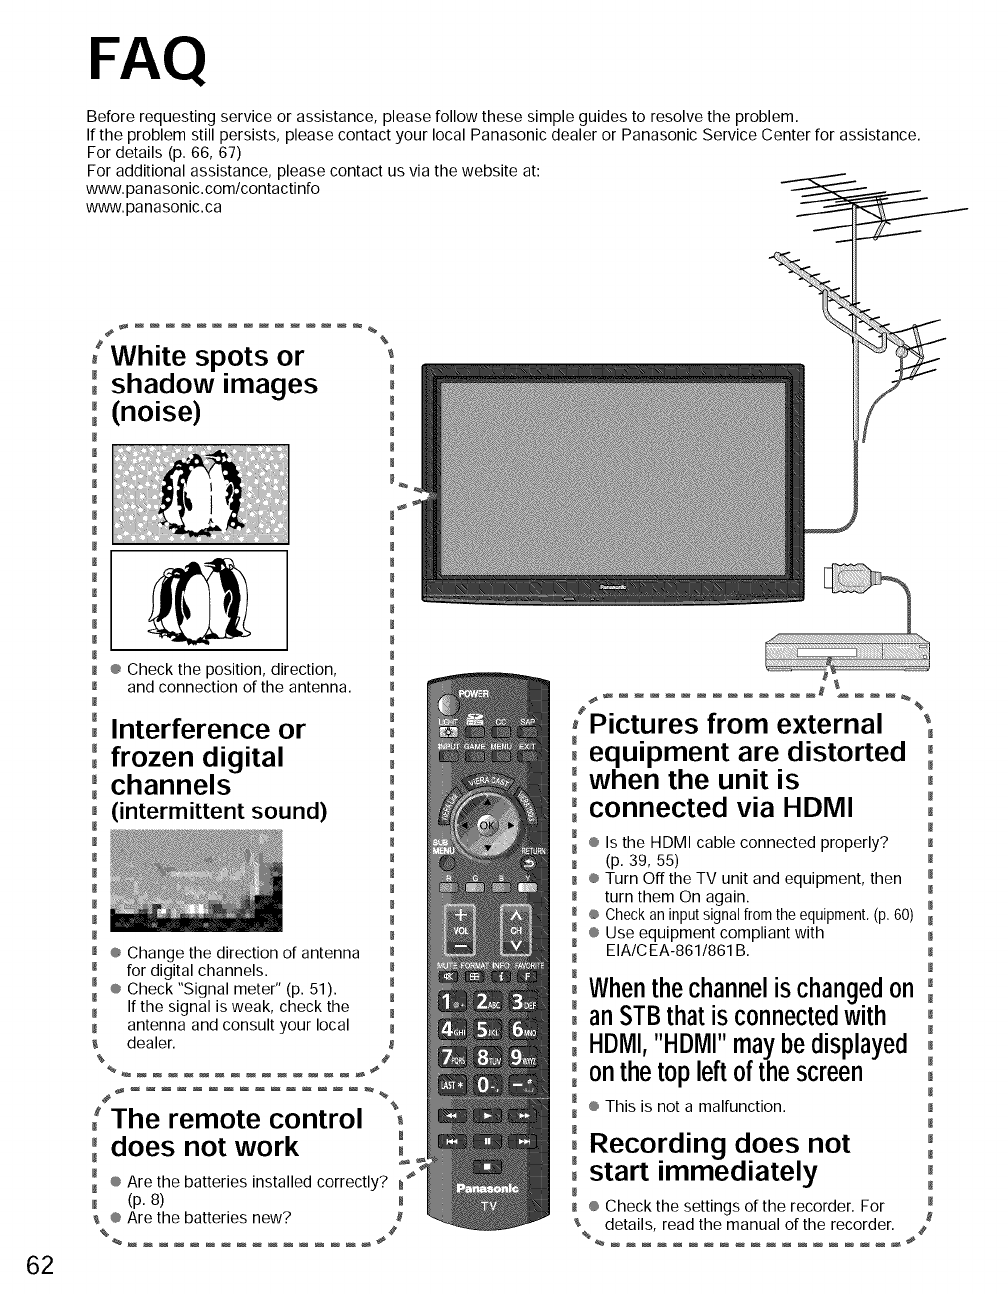
FAQ
Before requesting service or assistance, please follow these simple guides to resolve the problem.
If the problem still persists, please contact your local Panasonic dealer or Panasonic Service Center for assistance.
For details (p. 66, 67)
For additional assistance, please contact us via the website at:
www. panasonic.com/contactinfo
www.panasonic.ca
62
[White spots or
,shadow images
,'(noise)
00,0°[
, ® Check the position, direction,
, and connection of the antenna.
,Interference or
,' frozen digital
' channels
,(intermittent sound)
' ® Change the direction of antenna
' for digital channels.
' ® Check "Signal meter" (p. 51).
, If the signal is weak, check the
, antenna and consult your local
dealer.
%%
%
M
m
M
m
M
#
_ _%
The remote control
' does not work '
M
, ® Are the batteries installed correctly?
, (p. 8)
® Are the batteries new?
%
,Pictures from external '
m
0equipment are distorted ,
° when the unit is
M
° connected via HDMI '
M
, ® Is the HDMI cable connected properly? ,
(p. 39, 55)
, ® Turn Off the TV unit and equipment, then
m turn them On again.
® Check an input signal from the equipment. (p. 60) ,
m ® Use equipment compliant with
EIA/CEA-861/861B.
M
,When the channel is changed on ,
M
, an STBthat is connected with ,
° HDiMII,"HDiMII"maybe displayed ,
onthe top left ofthe screen ,
® This is not a malfunction.
Recording does not ,
° ly ,
, start immediate
, ® Check the settings of the recorder. For
details, read the manual of the recorder. #
%

If there is a problem with your TV, please refer to the table below to determine the symptoms, then carry out the
suggested check. If this does not solve the problem, please contact your local Panasonic dealer, quoting the model
number and serial number (both found on the rear of the TV).
Check nearby electrical products
instead of images
Neither image nor
sound is produced
Black Box appears
No sound is produced
Sound is unusual
Check the channel settings. (p. 50)
_° Are the speakers' cables connected correctly? (p. 55) "_
_ Is "Sound Mute" active? (p. 15)
_ Is the volume set to the minimum?
_ Is "TV speakers" set to "Off"? (p. 34)
_ Change "SAP" settings. (p. 19)
L_heck_, I_HDMI 2 in" or "HDMI 3 in" settings. (p. 34)_
® Set "SAP" setting to "Stereo" or "Mono."
® Check the HDMI device connected to the unit.
@
"-m
m
t--
dD
3>
U3
dD
C)
t--
dD
5.
©
u_
Unknown sound heard
1- Sounds from TV
cabinet
2- Whirring sound
3- Tick/Click sound
1- Changes in the temperature and humidity of the room may cause
the TV's cabinet to expand or contract and produce metallic
sounds. This is not a sign of faulty operation or a malfunction.
2- The TV may have a cooling fan that makes a soft whir.
This is not a sign of faulty operation or a malfunction.
3- WhentheTVis poweredon,anelectricalcomponentintheTVactivates
producinga tick/clicksound.Thisis nota signoffaultyoperationora malfunction.
4- Electrical circuits are active while the TV set is on.
This is no_aulty o_0n,,,0_altunctio_ I _ _
Even when the temperature of parts of the front, top and
rear panels has risen, these temperature rises will not
pose any problems in terms of performance or quality.
63
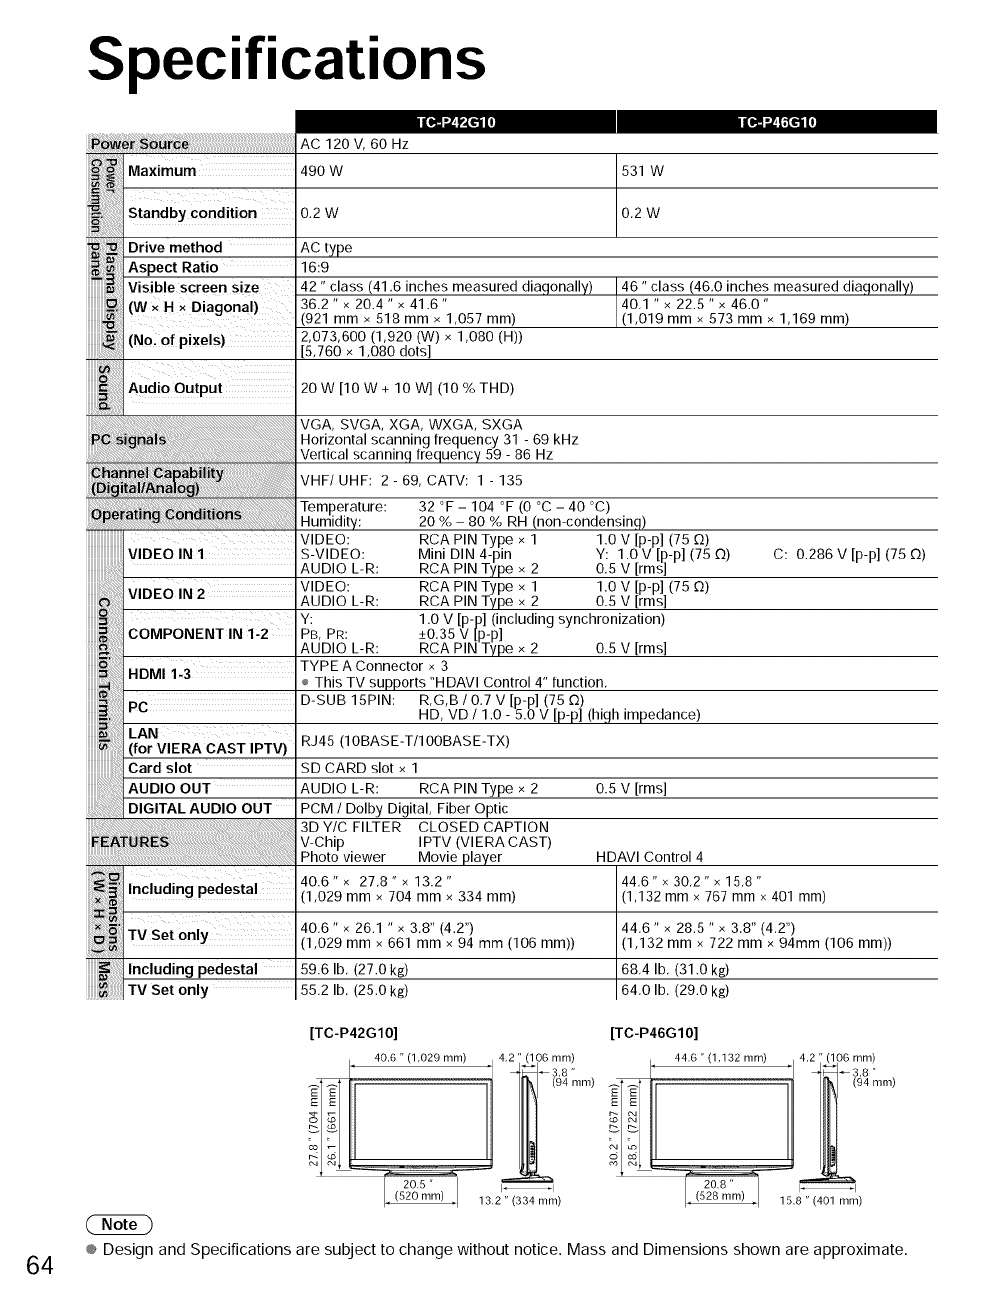
Specifications
64
_ow_ _ _ AC120V, 60Hz
Maximum 490 W
Standby Condition 0.2 W
Drive method AC type
Aspect Ratio 16:9
Visible screen size
(W x H x Diagonal)
(NoI of pixels)
531 W
O,2W
42 "class (41,6 inches measured diagonally)
36.2 "x 20.4 " x 41.6"
921 mmx 518 mmx 1,057 ram)
2,073,600 (1,920 (W) x 1,080 (H))
x 1,080 dots]
46 "class (46,0 inches measured diagonally)
40,1 "x 22.5 "x 46.0"
(1,019 mmx 573 mm x 1,169 ram)
20 W [10 W + lOW] (10 % THD)
VGA, SVGA, XGA, WXGA, SXGA
Horizontal scanning frequency 31 - 69 kHz
Vertical scanninq frequency 59 - 86 Hz
VHF/UHF: 2 - 69, CATV: 1 - 135
Temperature:
Humidity:
32 °F - 104 °F (0 °C - 40 °C)
20 % - 80 % RH (non-condensinq)
iiiiiiiiiiiiiiiiiiiiiii ........ VIDEO:
iiiiiiiiiiiiiiiiiiiiiiiVIDEO IN IS-VIDEO:
iiiiiiiii!!!!!!iiiii ii ii ii ii ..... AUD,OLR:
iiiiiiiii iii!iiiiiii
iiiiiiiii_
iiiiiiiii=
!!!!!!!!_i_
iiiiiiiii_
iiiiiiiii_
iiiiiiiii_
iiiiiiiii_
iiiiiiiii_
iiiiiiiiiN
iiiiiiiii_
iiiiiiiiiN
iiiiiiiii_iil,
RCA PIN Type x 1 1.0 v [p-p] (75 0)
Mini DIN 4-pin Y: 1.0 V [p-p] (75 O)
RCA PIN Type x 2 0.5 V [rms]
VIDE0 IN 2 VIDEO: RCA PIN Type x 1 1.0 V [p-p] (750)
AUDIO L-R: RCA PIN Type x 2 0.5 V [rms]
COMPONENT IN i:2 Y: 1.0 V [p-p] (including synchronization)
PB, PR: _+0.35 V [p-p]
AUDIO L-R: RCA PIN Type x z 0.5 V [rms]
TYPE A Connector x 3
HDMI 1-3 ÷ This TV supports "HDAVI Control 4" function,
PC D-SUB 15PIN: R,G,B /0,7 V [p-p] (75 O)
HD, VD /1.0 - 5.0 V [p-p](high impedance)
LAN
for VlERA CAST IPTV) RJ45 (IOBASE-T/IOOBASE-TX)
Card slot SD CARD slot x 1
AUDIO OUT AUDIO L-R: RCA PIN Type x 2 0.5 v [rms]
DIGITAL AUDIO OUT PCM /Dolby Digital, Fiber Optic
3DY/CFILTER CLOSED CAPTION
V-Chip IPTV (VIERA CAST)
Photo viewer Movie player
40.6" x 27,8" x 13.2 "
(1,029 mmx 704 mmx 334 ram)
40.6" x 26.1 " x 3,8" (4.2")
(1,029 mm x 661 mm x 94 mm (106 mm))
Including pedestal 59.6 Ib, (27.0 kg)
TV Set only 55.2 Ib, (25.0 kg)
C: 0.286 V [p-p] (75 0)
HDAVI Control 4
44,6" x 30,2" x 15,8"
(1,132 mmx 767 mmx 401 mm)
44,6" x 28.5 "x 3.8" (4.2")
(1,132 mm x 722 mm x 94mm (106 mm))
68,4 lb, (31.0 kg)
64,0 lb, (29.0 kg)
[TC-P42G10] [TC-P46G10]
40.6"(1 029 mm) 4.2"(106mm) 44,6"(1 132 ram) 4.2 "(106 mm)
I' '1 -_3.8" I' '1 d_4-38"
I_1
2 ) (528 ram) 15.8 " (401 mm)
® Design and Specifications are subject to change without notice. Mass and Dimensions shown are approximate.

AC120V,60Hz
Maximum 589 W
'"Sin Standby condition 0.2 W
Drive method AC type
Aspect Ratio 16:9
Visible screen size 50" class (49,9 inches measured diagonally)
(W x H x Diagonal) 43.5 "x 24.4 " x 49.9"
1,105 mmx 622 mm x 1,268 mm)
(NoI Of pixels)2,073,600 (1,920 (w) x 1,080 (H))
5,760 x 1,080 dots]
COMPONENT IN 1-2
Including pedestal
_]TV Set only
Including pedestal 75.0 lb. (34,0 kg)
TV Set only 70.6 lb. (32,0 kg)
604 W
0,2W
54 "class (54,1 inches measured diagonally)
47,1 "x 26,5" x 54.1 "
(1,198 mmx 673 mmx 1,374 ram)
HDAVI Control 4
51,7 "x 34,8" x 15.3 "
20 W [10 W + lOW] (10 % THD)
VGA, SVGA, XGA, WXGA, SXGA
Horizontal scanning frequency 31 - 69 kHz
Vertical scanning frequency 59 - 86 Hz
VHF/UHF: 2 - 69, CATV: 1 - 135
)erature: 32 °F - 104 °F (0 °C - 40 °C)
20 % - 80 % RH (non-condensinq)
VIDEO: RCA PIN Type x 1 1.0 V [p-p] (75 O)
S-VIDEO: Mini DIN 4-pin Y: 1.0 V [p-p] (75 D)
AUDIO L-R: RCA PIN Type x 2 0.5 V [rms]
VIDEO: RCA PIN Type x 1 1.0 V [p-p] (75 O)
AUDIO L-R: RCA PIN Type x 2 0.5 V [rms]
Y: 1.0 V [p-p] (including synchronization)
PB, PR: -+0.35 V [p-p] ..........
AUDIO L-R: RCA PiN Type x z u.o v [IIII)J
TYPE A Connector x 3
÷ This TV supports "HDAVI Control 4" function,
D-SUB 15PIN: R,G,B /0,7 V [p-p] (75 C2)
HD, VD /1.0 - 5.0 V [p-p](high impedance)
RJ45 (IOBASE-T/IOOBASE-TX)
SD CARD slot x 1
AUDIO L-R: RCA PIN Type x 2 0.5 V [rms]
PCM /Dolby Digital, Fiber Optic
3DY/C FILTER CLOSED CAPTION
V-Chip IPTV (VIERA CAST)
Photo viewer Movie player
48.0" x 32.1 " x 15.8"
1,218 mm x 814 mmx 401 ram)
C: 0.286 V [p-p] (75 O)
(1,313 mmx 882 mm x 387 ram)
51,7 "x 32,8" x 3.8" (4.3 ")
(1,313 mm x 832 mm x 96 mm (107 mm))
90,4 Ib, (41.0 kg)
83,8 lb, (38.0 kg)
48.0" x 30.3 " x 3,8" (4.2")
1,218 mmx 769 mm x 94 mm (106 mm))
@
oo
"(:D
C_
i,
o
.-_
[TC-P50G10]
4.2 " (106 mm)
I' 48.0 " (1,218 ram) '1 _3.8 "
15.6 " (401 ram)
[TC-P54G10]
, 51.7 "(1,313 mm) ,4.3 " (107 ram)
' ' _3.8 "
_1 _ -- (96 mm)
22.4" I_1
(567 mm) 15.3" (387 mm)
® Design and Specifications are subject to change without notice. Mass and Dimensions shown are approximate. 65

LimitedWarranty
PANASONIC CONSUMER ELECTRONICS COMPANY,
DIVISION OF
PANASONIC CORPORATION OF NORTH AMERICA
One Panasonic Way
Secaucus, New Jersey 07094
(forU.S.A.andPuertoRicoonly)
Panasonic Plasma Television
Limited Warranty
Limited Warranty Coverage
If your product does not work properly because of a defect in materials or workmanship, Panasonic Consumer
Electronics Company (referred to as "the warrantor") will, for the length of the period indicated on the chart below,
which starts with the date of original purchase ("Limited Warranty period"), at its option either (a) repair your product
with new or refurbished parts, or (b) replace it with a new or a refurbished product. The decision to repair or replace
will be made by the warrantor.
PLASMA TV CATEGORIES
Up to 37' (diagonal)
42" (diagonal) and larger
PARTS
1 (ONE) YEAR
LABOR
I (ONE) YEAR
SERVICE
Carry-In
On-Site
66
During the "Labor" Limited Warranty period there will be no charge for labor. During the "Parts" Limited Warranty
period, there will be no charge for parts.
You must carry-in your product or arrange for on-site service during the Limited Warranty period. If non-rechargeable
batteries are included, they are not warranted. This Limited Warranty only applies to products purchased and
serviced in the United States or Puerto Rico. This Limited Warranty is extended only to the original purchaser and
only covers product purchased as new. A purchase receipt or other proof of the original purchase date is required for
Limited Warranty service.
On-Site or Carry-in Service
For On-Site or Carry-In Service in the United States and Puerto Rico call 1-877-95-VIERA (1-877-958-4372).
On-site service where applicable requires clear, complete and easy access to the product by the authorized servicer
and does not include removal or re-installation of an installed product. It is possible that certain on-site repairs will not
be completed on-site, but will require that the product or parts of the product, at the servicer's discretion be removed
for shop diagnosis and/or repair and then returned.
Limited Warranty Limits And Exclusions
This Limited Warranty ONLY COVERS failures due to defects in materials or workmanship, and DOES NOT COVER
normal wear and tear or cosmetic damage, nor does it cover markings or retained images on the glass panel
resulting from viewing fixed images (including, among other things, non-expanded standard 4:3 pictures on wide
screen TV's, or onscreen data in a stationary and fixed location). The Limited Warranty ALSO DOES NOT COVER
damages which occurred in shipment, or failures which are caused by products not supplied by the warrantor, or
failures which result from accidents, misuse, abuse, neglect, bug infestation, mishandling, misapplication, alteration,
faulty installation, set-up adjustments, misadjustment of consumer controls, improper maintenance, power line surge,
lightning damage, modification, or commercial use (such as in a hotel, office, restaurant, or other business), rental
use of the product, service by anyone other than a Factory Service Center or other Authorized Servicer, or damage
that is attributable to acts of God.
THERE ARE NO EXPRESS WARRANTIES EXCEPT AS LISTED UNDER "LIMITED WARRANTY COVERAGE".
THE WARRANTOR IS NOT LIABLE FOR INCIDENTAL OR CONSEQUENTIAL DAMAGES RESULTING FROM
THE USE OF THIS PRODUCT, OR ARISING OUT OF ANY BREACH OF THIS LIMITED WARRANTY. (As
examples, this excludes damages for lost time, cost of having someone remove or re-install an installed unit if
applicable, or travel to and from the servicer. The items listed are not exclusive, but are for illustration only.) ALL
EXPRESS AND IMPLIED WARRANTIES, INCLUDING THE LIMITED WARRANTY OF MERCHANTABILITY, ARE
LIMITED TO THE PERIOD OF THE LIMITED WARRANTY.
Some states do not allow the exclusion or limitation of incidental or consequential damages, or limitations on how
long an implied Limited Warranty lasts, so the exclusions may not apply to you.
This Limited Warranty gives you specific legal rights and you may also have others rights which vary from state
to state. If a problem with this product develops during or after the Limited Warranty period, you may contact your
dealer or Service Center. If the problem is not handled to your satisfaction, then write to the warrantor's Consumer
Affairs Department at the addresses listed for the warrantor.
PARTS AND SERVICE (INCLUDING COST OF AN ON-SITE SERVICE CALL, WHERE APPLICABLE) WHICH
ARE NOT COVERED BY THIS LIMITED WARRANTY ARE YOUR RESPONSIBILITY.
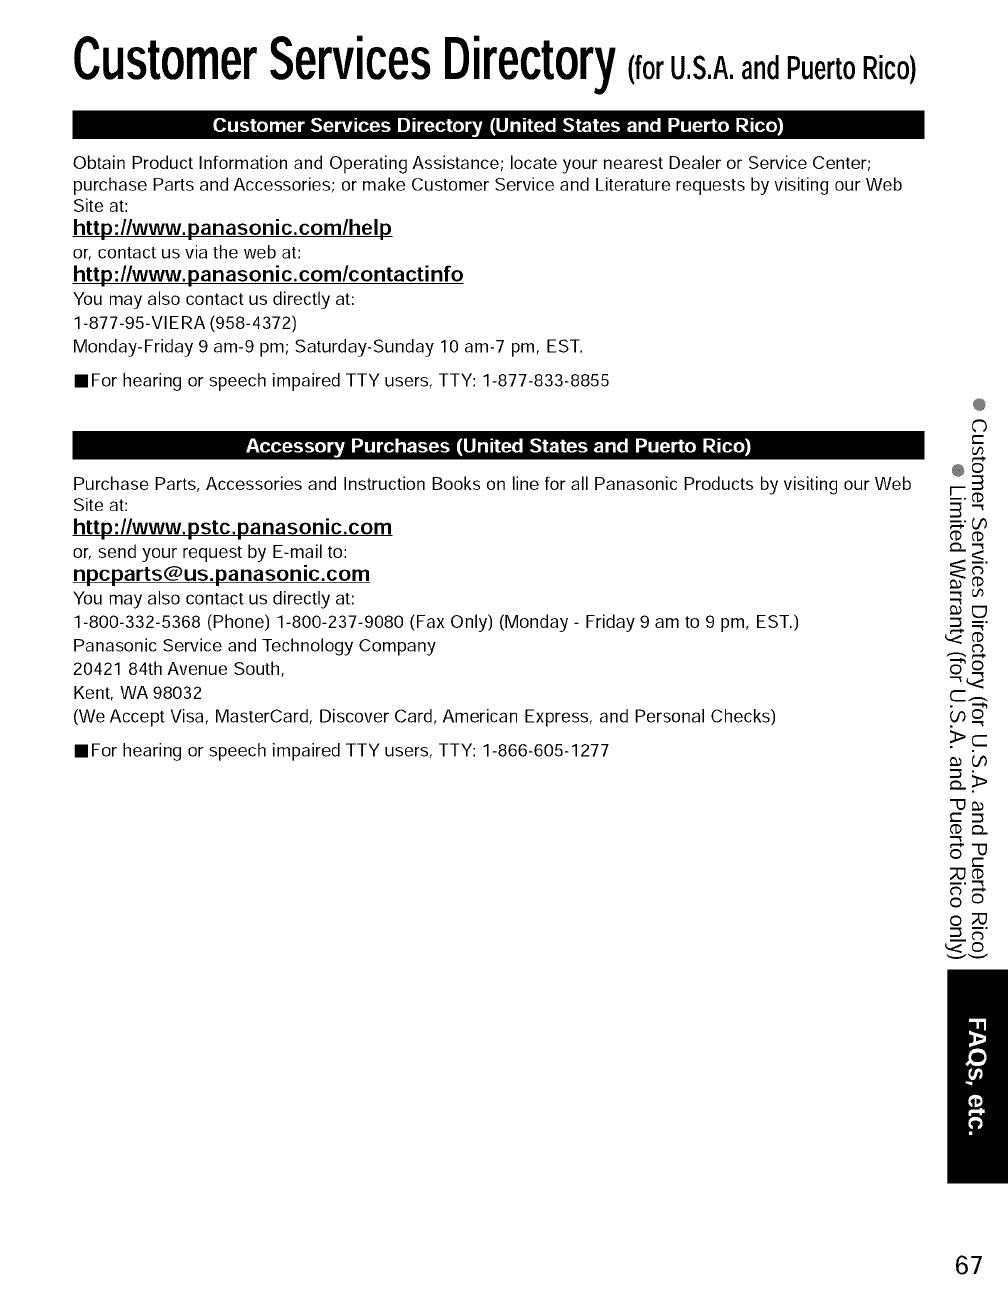
CustomerServicesDirectory(forU.S.A.andPuertoRico)
(o] ii [:aim_'l:aivd[_:,.],.1Ill li[_ (o]ivlEILIJ_1"i_i_"lR"ui[:,.],:t:!l[eI:d_[:_i ZT! :_ [_]
Obtain Product Information and Operating Assistance; locate your nearest Dealer or Service Center;
purchase Parts and Accessories; or make Customer Service and Literature requests by visiting our Web
Site at:
http:llwww.panasonic.comlhelp
or, contact us via the web at:
http:llwww.panasonic.comlcontactinfo
You may also contact us directly at:
1-877-95-VIE RA (958-4372)
Monday-Friday 9 am-9 pm; Saturday-Sunday 10 am-7 pm, EST.
• For hearing or speech impaired TTY users, TTY: 1-877-833-8855
-"T_:..].:tF,."_o]IkVl _Ilia.] l _I.,."I,_"]1 |llJ'_l'l i_ i,,,_jR"i ( :..].:'!_.1i [o I_d_[:_i_! :_[_o]
@
0
(-
u')
e--_
@o
Purchase Parts, Accessories and Instruction Books on line for all Panasonic Products by visiting our Web r-
Site at: _i-"
http://www.pstc.panasonic.com _
C).. "-_
or, send your request by E-mail to: _<.
npcparts@us.panasonic.com _
You may also contact us directly at:
1-800-332-5368 (Phone) 1-800-237-9080 (Fax Only) (Monday - Friday 9 am to 9 pm, EST.)
Panasonic Service and Technology Company
20421 84th Avenue South, "_ o
Kent, WA 98032
(We Accept Visa, MasterCard, Discover Card, American Express, and Personal Checks)
•For hearing or speech impaired TTY users, TTY: 1-866-605-1277
(,no
.>r-
c "-_
XJ_
o_
_._ ©
67

Limited Warranty (forCanada)
Panasonic Canada Inc.
PANASONIC PRODUCT- LIMITED WARRANTY
Panasonic Canada Inc. warrants this product to be free from defects in material and workmanship and agrees to
remedy any such defect for a period as stated below from the date of original purchase.
tPlasma rv /Monitor _ _ (1) year, parts (including Plasma Panel) and labour.
/
/
LCD TV (42 in. &over) I In-home service IOne (1) year, parts (including LCD Panel) and labour.
In-home Service will be carried out only to locations accessible by roads and within 50 km of an authorized
Panasonic service facility.
LIMITATIONS AND EXCLUSIONS
This warranty does not apply to products purchased outside Canada or to any product which has been improperly
installed, subjected to usage for which the product was not designed, misused or abused, damaged during shipping,
or which has been altered or repaired in any way that affects the reliability or detracts from the performance, nor
does it cover any product which is used commercially. Dry cell batteries are also excluded from coverage under this
warranty.
This warranty is extended to the original end user purchaser only. A purchase receipt or other proof of date of original
purchase is required before warranty service is performed.
THIS EXPRESS, LIMITED WARRANTY IS IN LIEU OFALL OTHER WARRANTIES, EXPRESS OR IMPLIED,
INCLUDING ANY IMPLIED WARRANTIES OF MERCHANTABILITY AND FITNESS FOR A PARTICULAR PURPOSE.
IN NO EVENT WILL PANASONIC CANADA INC. BE LIABLE FOR ANY SPECIAL, INDIRECT OR CONSEQUENTIAL
DAMAGES.
In certain instances, some jurisdictions do not allow the exclusion or limitation of incidental or consequential
damages, or the exclusion of implied warranties, so the above limitations and exclusions may not be applicable.
In-home service requires clear, complete and easy access to the product by the Authorized Servicentre and does not
include removal or re-installation of an installed product. If removal is required to service the product, it will be at the
discretion of the Servicentre and in no event will Panasonic Canada Inc. or the Servicentre be liable for any special,
indirect or consequential damages.
WARRANTY SERVICE
For product operation and information assistance, please contact:
Our Customer Care Centre: 1-800 #: 1-866-330-0014
Email link: www.vieraconcierge.ca
FOR PRODUCT REPAIRS, please contact Viera Customer Care Agent using the above contact info.
IF YOU SHIP THE PRODUCT TO A SERVICENTRE
Carefully pack and send prepaid, adequately insured and preferably in the original carton.
Include details of the defect claimed, and proof of date of original purchase.
68
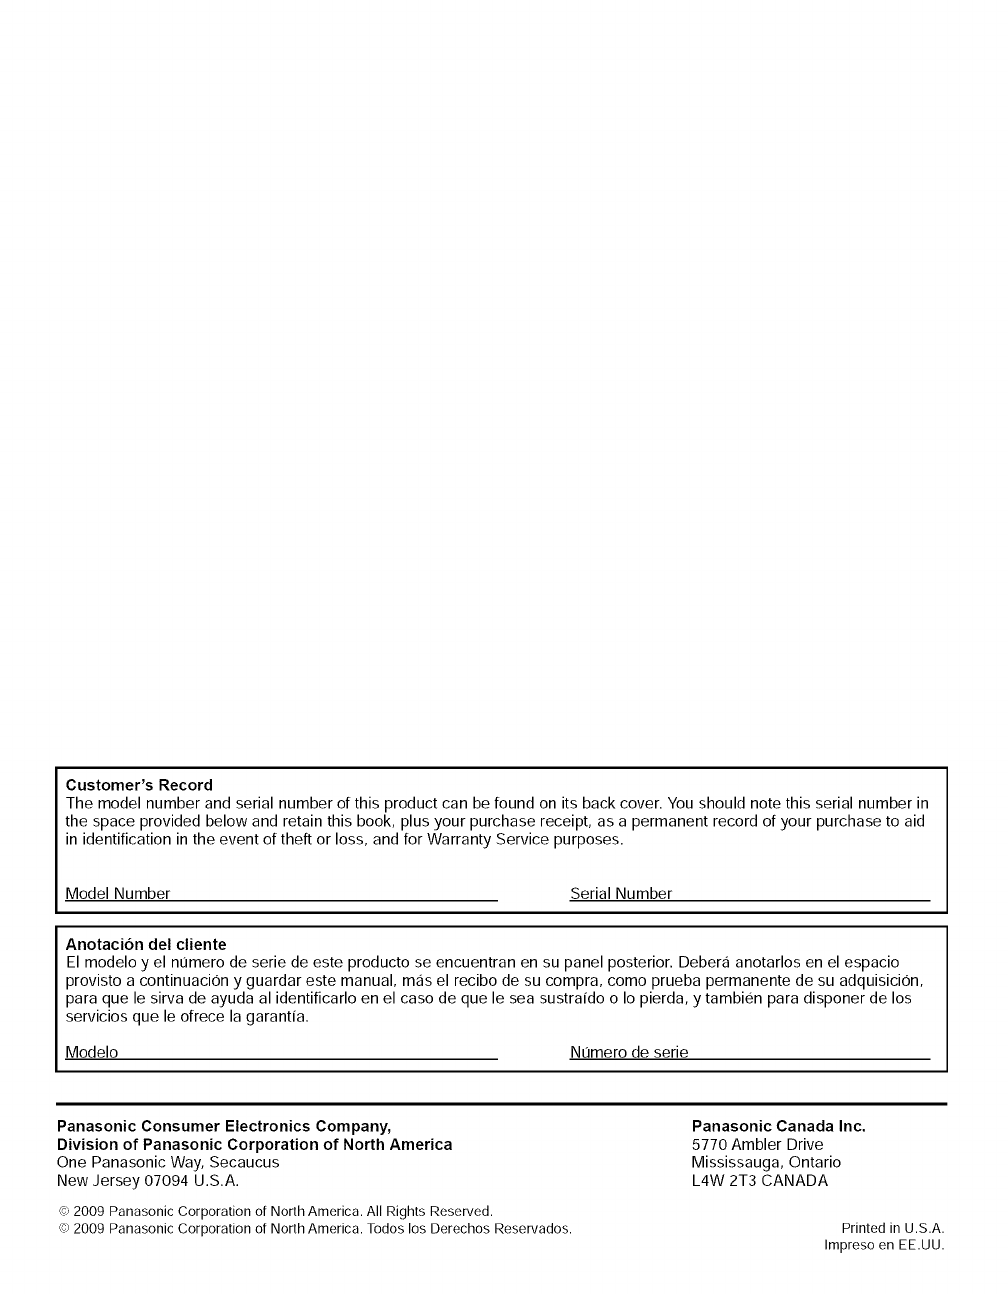
Customer's Record
The model number and serial number of this product can be found on its back cover. You should note this serial number in
the space provided below and retain this book, plus your purchase receipt, as a permanent record of your purchase to aid
in identification in the event of theft or loss, and for Warranty Service purposes.
Model Number Serial Number
Anotaci6n del cliente
El modelo y el nt]mero de serie de este producto se encuentran en su panel posterior. Debera anotarlos en el espacio
provisto a continuacion y guardar este manual, mas el recibo de su compra, como prueba permanente de su adquisicion,
para que le sirva de ayuda al identificarlo en el caso de que le sea sustraido o Io pierda, y tambien para disponer de los
servicios que le ofrece la garantia.
Modelo Nt]mero de serie
Panasonic Consumer Electronics Company,
Division of Panasonic Corporation of North America
One Panasonic Way, Secaucus
New Jersey 07094 U.S.A.
Panasonic Canada Inc.
5770 Ambler Drive
Mississauga, Ontario
L4W 2T3 CANADA
cc_2009 Panasonic Corporation of North America. All Rights Reserved.
cc_2009 Panasonic Corporation of North America. Todos los Derechos Reservados. Printed in U.S.A.
Impreso en EE.UU.
Instrucciones en Espa_ol
Televisibn de alta definicibn de 1080p y
clase 42"/46"/50"/54" de Plasma
Ndmero de modelo TC-P42G10
TC-P46G10
TC-P50G10
TC-P54G10
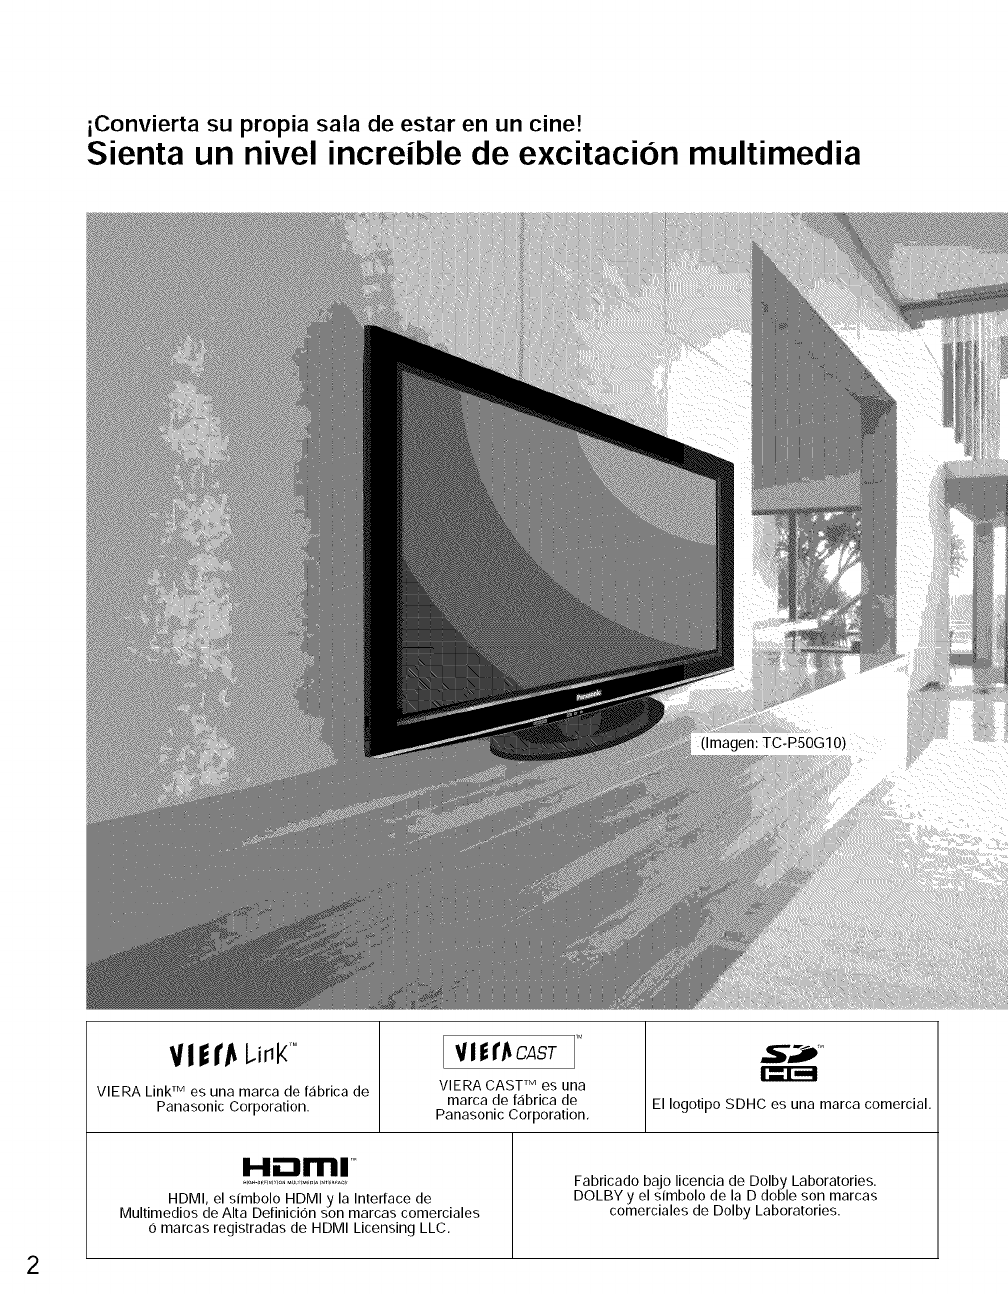
iConvierta su propia sala de estar en un cine!
Sienta un nivel increible de excitacion multimedia
V! l I"Jt I.illt( r°
VIERA Link TM es una marca de fEibrica de
Panasonic Corporation.
[ VI|I'_CAST
VlERA CAST TM es una
marca de fabrica de
Panasonic Corporation, El Iogotipo SDHC es una marca comercial.
I-,!ii:::111'111TM
HDMI, el simbolo HDMI y la Interface de
Multimedios de Alta Definicion son marcas comerciales
6 marcas registradas de HDMI Licensing LLC,
Fabricado bajo licencia de Dolby Laboratories.
DOLBY y el sfmbolo de la D doble son marcas
comerciales de Dolby Laboratories.
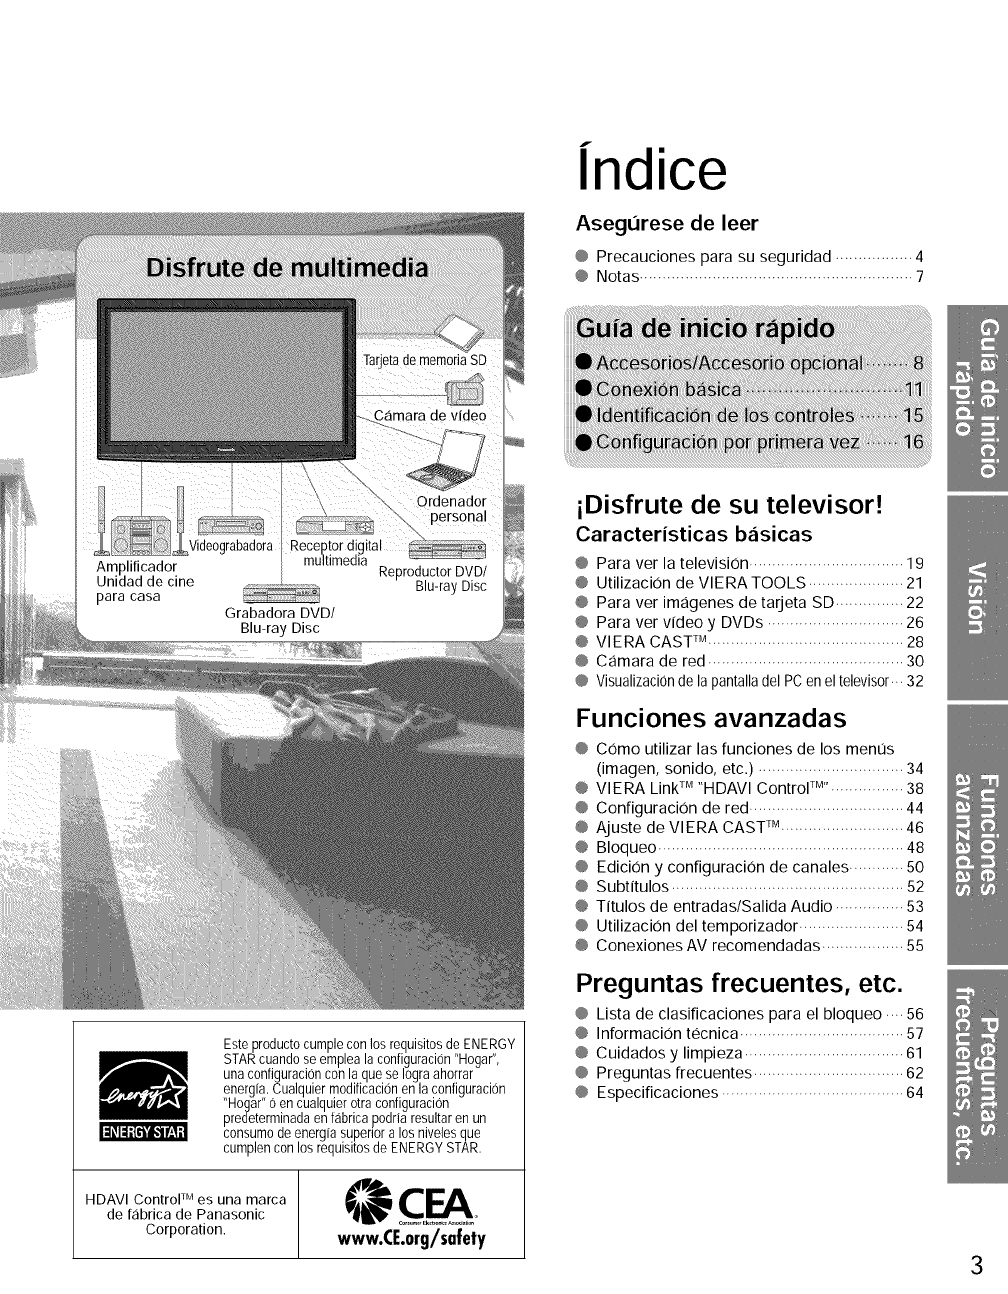
f
Indice
Asegt_rese de leer
@ Precauciones para su seguridad ................. 4
@ Notas ............................................................ 7
Este producto cumple con los requisitos de ENERGY
STAR cuando se emplea la configuracion "Hogar",
una configuracion con la que se Iogra ahorrar
energfa. Cualquier modificacion en la configuracion
"Hogar" 0 en cualquier otra configuracion
predeterminada en fabrica podrla resultar en un
consumo de energfa super+ora los niveles que
cumplen con los requisitos de ENERGY STAR.
I d_1d;TC'i'J,,_e'._1Z
TM
HDAVI Control es una marca
de f_ibrica de Panasonic
Corporation. www.CE.org/safety
iDisfrute de su televisor!
Caracteristicas b_isicas
@ Para ver la television .................................. 19
@ Utilizacion de VlERA TOOLS ..................... 21
@ Para ver imagenes de tarjeta SD ............... 22
@ Para ver video y DVDs .............................. 26
@ VlERA CAST _M........................................... 28
@ Camara de red ........................................... 30
@ Visualizaci0nde la pantalladel PC en el televisor... 32
Funciones avanzadas
@ Como utilizar las funciones de los ment]s
(imagen, sonido, etc.) ................................ 34
@ VlERA Link TM "HDAVl Control +rM'................ 38
@ ConfiguraciOn de red .................................. 44
@ Ajuste de VlERA CAST _u........................... 46
@ Bloqueo ...................................................... 48
@ EdiciOn y configuraciOn de canales ............ 50
@ Subtitulos ................................................... 52
@ Titulos de entradas/Salida Audio ............... 53
@ Utilizacion del temporizador ....................... 54
@ Conexiones AV recomendadas .................. 55
Preguntas frecuentes, etc.
@ Lista de clasificaciones para el bloqueo .... 56
@ InformaciOn tecnica .................................... 57
@ Cuidados y limpieza ................................... 61
@ Preguntas frecuentes ................................. 62
@ Especificaciones ........................................ 64
3
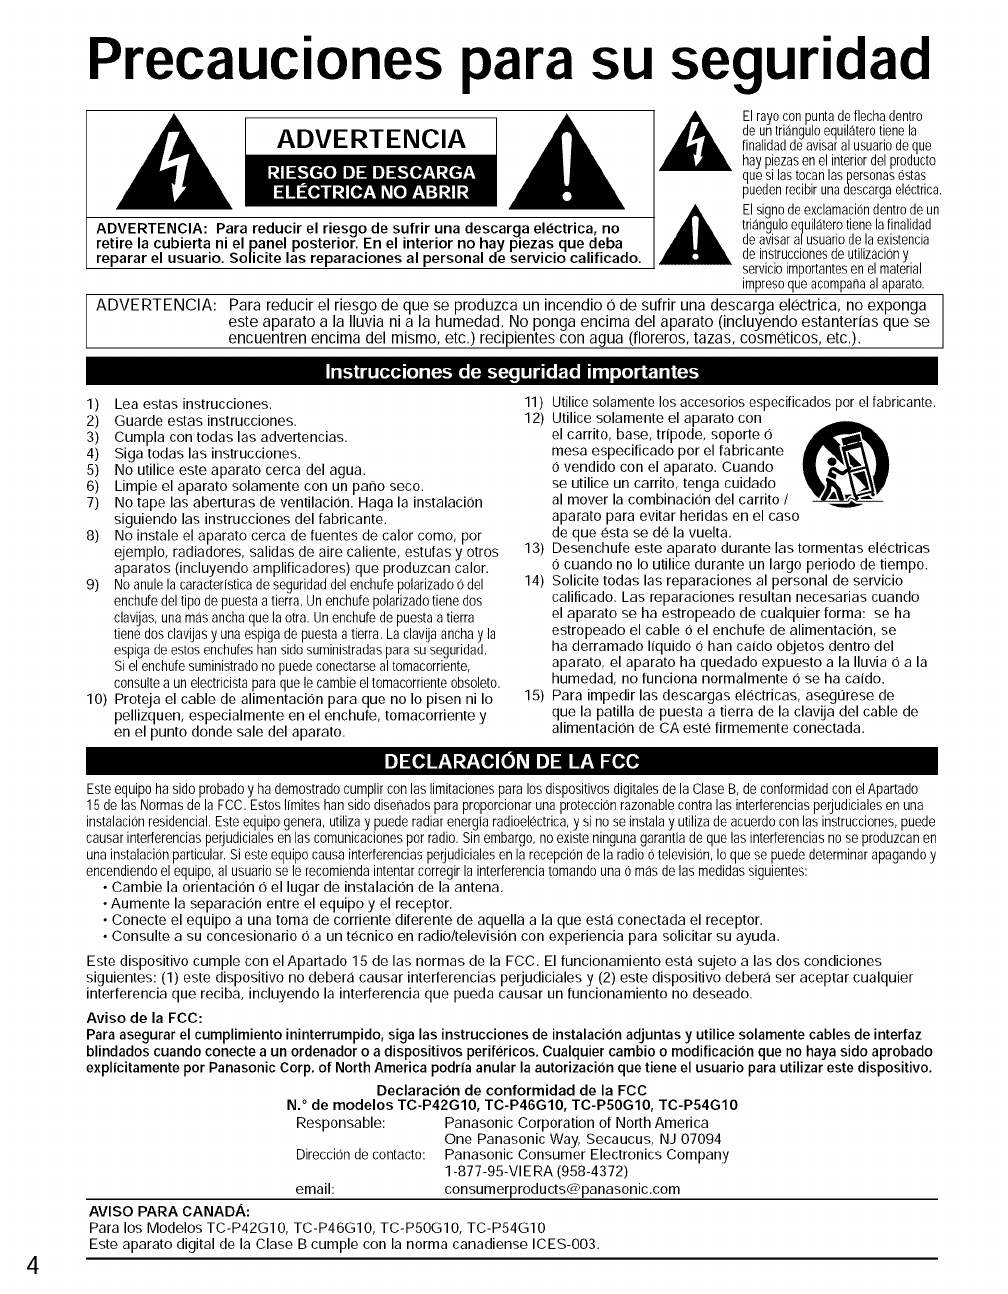
Precauciones para su seguridad
_,_ El rayocon punta de flecha dentro
de un triangulo equilatero tiene la
ADVE RT ENCIA finalidaddeavisaralusuari0deque
hay piezasen el interiordel pr0ducto
quesi las tocan laspers0nas estas
pueden recibir una descarga electrica.
,_ El sign0de exclamaci0n dentr0 de un
ADVERTENClA: Para reducir el riesgo de sufrir una descarga electrica, no triangulo equilaterotiene la finalidad
retire la cubierta ni el panel posterior. En el interior no hay piezas que deba de avisar al usuario de la existencia
reparar el usuario. Solicite las reparaciones al personal de servicio calificado, de instrucciones de utilizaciony
servicioimp0rtantes en el material
impres0que ac0mpana al aparato.
ADVERTENCIA: Para reducir el riesgo de que se produzca un incendio 0 de sufrir una descarga electric& no exponga
este aparato a la Iluvia ni a la humedad. No ponga encima del aparato (incluyendo estanterias que se
encuentren encima del mismo, etc.) recipientes con agua (floreros, tazas, cosmeticos, etc.).
_'_'_ll dI[o{o] (o] i[:-_lto [:-]l,.'[_o l I I d_ _'_ i I i |l o[o] il (':.1il (:-_
1) Lea estas instrucciones.
2) Guarde estas instrucciones.
3) Cumpla con todas las advertencias.
4) Siga todas las instrucciones.
5) No utilice este aparato cerca del agua.
6) Limpie el aparato solamente con un pano seco.
7) No tape las aberturas de ventilacion. Haga la instalacion
siguiendo las instrucciones del fabricante.
8) No instale el aparato cerca de fuentes de calor como, por
ejemplo, radiadores, salidas de aire caliente, estufas y otros
aparatos (incluyendo amplificadores) que produzcan calor.
9) No anule la caracteristica de seguridad del enchufe polarizado 0 del
enchufe del tipo de puesta a tierra. Un enchufe polarizado tiene dos
clavijas, una mas ancha que la otra. Un enchufe de puesta a tierra
tiene dos clavijas y una espiga de puesta a tierra. La clavija ancha y la
espiga de estos enchu[es ban sido suministradas para su seguridad.
Si el enchufe suministrado no puede conectarse al tomacorriente,
consulte a un electricista para que le cambie el tomacorriente obsoleto.
10) Proteja el cable de alimentacion para que no Io pisen ni Io
pellizquen, especialmente en el enchufe, tomacorriente y
en el punto donde sale del aparato.
11) Utilice solamente los accesorios especificados por el fabricante.
12) Utilice solamente el aparato con
el carrito, base, tripode, soporte O
mesa especificado por el fabricante
O vendido con el aparato. Cuando
se utilice un carrito, tenga cuidado
al mover la combinacion del carrito /
aparato para evitar heridas en el caso
de que esta se de la vuelta.
13) Desenchufe este aparato durante las tormentas el(_ctricas
O cuando no Io utilice durante un largo periodo de tiempo.
14) Solicite todas las reparaciones al personal de servicio
calificado. Las reparaciones resultan necesarias cuando
el aparato se ha estropeado de cualquier forma: se ha
estropeado el cable O el enchufe de alimentacion, se
ha derramado Itquido O ban catdo objetos dentro del
aparato, el aparato ha quedado expuesto a la Iluvia O a la
humedad, no funciona normalmente O se ha caido.
15) Para impedir las descargas el(_ctricas, asegt]rese de
que la patilla de puesta a tierra de la clavija del cable de
alimentacion de CA este firmemente conectada.
i] :[o]!__I-/__to][o]_,_I i] 1!__1:[o,[a
Este equipo ha sido probado y ha demostrado cumplir con las limitaciones para los dispositivos digitales de la Clase B, de conformidad con el Apartado
15 de las Normas de la FCC. Estos Ifmites han sido disenados para proporcionar una proteccion razonable contra las interferencias perjudiciales en una
instalacion residencial. Este equipo genera, utiliza y puede radiar energla radioelectrica, y si no se instala y utiliza de acuerdo con las instrucciones, puede
causar interferencias perjudiciales en las comunicaciones por radio. Sin embargo, no existe ninguna garantia de que las interferencias no se produzcan en
una instalacion particular. Si este equipo causa interferencias perjudiciales en la recepcion de la radio 0 television, Io que se puede determinar apagando y
encendiendo el equipo, al usuario se le recomienda intentar corregir la interferencia tomando una 0 mas de las medidas siguientes:
• Cambie la orientacion O el lugar de instalacion de la antena.
• Aumente la separacion entre el equipo y el receptor.
• Conecte el equipo a una toma de corriente diferente de aquella a la que esta conectada el receptor.
• Consulte a su concesionario O a un t(_cnico en radio/television con experiencia para solicitar su ayuda.
Este dispositivo cumple con el Apartado 15 de las normas de la FCC. El funcionamiento est,1 sujeto a las dos condiciones
siguientes: (1) este dispositivo no debera causar interferencias perjudiciales y (2) este dispositivo deber_i ser aceptar cualquier
interferencia que reciba, incluyendo la interferencia que pueda causar un funcionamiento no deseado.
Aviso de la FCC:
Para asegurar el cumplimiento ininterrumpido, siga las instrucciones de instalacion adjuntas y utilice solamente cables de interfaz
blindados cuando conecte a un ordenador o a dispositivos perifericos. Cualquier cambio o modificacion que no haya sido aprobado
explicitamente pot Panasonic Corp. of North America podria anular la autorizacion que tiene el usuario para utilizar este dispositivo.
Declaracion de conformidad de la FCC
N. ° de modelos TC-P42G10, TC-P46G10, TC-P5OGIO, TC-P54G10
Responsable: Panasonic Corporation of North America
One Panasonic Way, Secaucus, NJ 07094
Direccion de contacto: Panasonic Consumer Electronics Company
1-877-95-VIE RA (958-4372)
email: consumerproducts@panasonic,com
AVISO PARA CANADA:
Para los Modelos TC-P42G1 O, TC-P46G10, TC-P5OGIO, TC-P54G10
Este aparato digital de la Clase B cumple con la norma canadiense ICES-O03,
I_ ADVERTENCIA J
Las piezas pequenas pueden presentar un peligro de asfixia si
se tragan por accidente. •
Guarde las piezas pequenas donde no puedan alcanzarlas los
nitros pequenos.
Tire las piezas pequenas y otros objetos que no sean
necesarios, incluyendo los materiales de embalaje y las •
bolsas/hojas de plastico, para impedir que los nitros pequenos •
jueguen con elias corriendo el riesgo de que puedan asfixiarse.
•Instalacion •
Si no se instala correctamente, el televisor de plasma podria •
caer y provocar danos personales e incluso la muerte.
Respete las siguientes advertencias para evitar posibles
danos personales o incluso la muerte:
•Instale el televisor de plasma correctamente utilizando el •
pedestal o la base recomendada por el fabricante, el hardware
apropiado y de acuerdo con las instrucciones de instalacion. •
Esta la televisor de plasma puede utilizarse solo con los
siguientes accesorios opcionales. El uso con otros tipos •
de accesorios opcionales puede provocar inestabilidad.
Panasonic Corporation fabrica todos los accesorios siguientes.
• Abrazadera de suspension de pared (Anglado):
TY-WK4P1 RW (TC-P42G10, TC-P46G10, TC-P5OG1 O)
TY-WK5P1 RW (TC-P54G10)
• AsegLirese de que un tecnico cualificado se encargue de
la instalacion y la configuracion.
Es necesaria la ayuda de dos o mas personas para instalar y
desmontar el televisor.
• Algunos soportes de pared (soportes de suspension) no
est_in disenados para la instalacion en paredes utilizando •
esp_irragos de acero o estructuras cillndricas antiguas. •
Solicite a su distribuidor o contratista autorizado que sujete el
soporte de pared correctamente.
• No coloque el televisor de plasma ni la base del mismo
sobre superficies inclinadas o inestables.
La televisor de plasma puede caerse O darse vuelta.
• No monte el televisor de plasma en un pedestal inapropiado.
• No coloque el televisor de plasma en muebles que se puedan
utilizar facilmente como escal0n, como pot ejemplo una estanteria. •
• No se suba sobre el televisor de plasma ni permita que Io
hagan los ninos.
• Coloque o instale el televisor de plasma en un lugar
donde no se pueda empujar, volcar o golpear y caer.
No haga nada que pueda danar el cable de alimentacion de electrico.
Cuando desenchufe el cable de alimentacion de
electrico, sujete del enchufe y no el cable.
No utilice el cable de alimentacion si la clavija o el propio
cable estan dar_ados.
Cambie el cable o pongase en contacto con un centro de
servicio t(_cnico autorizado.
Manejo del cable de alimentacion
Inserte el enchufe de alimentacion completamente en la toma de corriente.
(Si el enchufe estuviese flojo, podria generar calory causar un incendio.)
Cerciorese de que el enchufe este facilmente accesible.
Cerciorese de que el terminal de puesta a tierra del enchufe de alimentaci(_n
este conectado con seguridad para evitar descargas electricas.
• Un aparato con construccion CLASE I deber,J conectarse a
una toma de corriente con conexion de proteccion a tierra.
No toque el enchufe de alimentacion con las manos
ht_medas. (Esto podr|a causar una descarga electrica.)
No utilice ningtJn cable de alimentacion que no sea el suministrado
con este TV. (Esto podria causar una descarga electric&)
No darle el cable de alimentacion. (Un cable darlado
podr|a causar un incendio o descarga electrica.)
• No mueva el TV con el cable de alimentacion enchufado en
una toma de corriente.
• No coloque ningun objeto pesado sobre el cable de alimentacion,
ni coloque este cerca de un objeto de gran temperatura,
• No retuerza el cable, no Io doble excesivamente, ni Io estire,
• No tire del cable. Sujetelo por el enchufe de alimentacion
cuando vaya a desconectarlo.
• No utilice un enchute de alimentacion ni una toma de corriente danados.
Si se producen problemas durante el uso
si se produce un problema (porejemplo falta la imagen 0 sonido),
0 si sale humo 0 hayolores no normales de la televisor de plasma,
desenchufeinmediatamenteel cable electrico del tomacorriente.
Elusocontinuadodeltelevisorbajoestascondicionespuedecausarun
incendio0 un danopermanenteen la unidad.Lleveel televisora que
Io revisenen un centrode servicioautorizado.Debidoa laaltatension
que soportael televisor,serecomiendaevitarlasintervenciones
tecnicasen el mismoporparte depersonalnoautorizado.
En caso de penetrar agua o algt_n objeto en el televisor de
plasma, si se cae al suelo o si la carcasa resulta darlada,
desconecte el cable de alimentacion de forma inmediata.
Podria producirse un cortocircuitoy provocarun incendio.
Encarguesu inspecciona un centro de servicio tecnico autorizado.
• Coloque todos los cables de forma que nadie pueda tropezar y que no /A/
atraigan la atencion de nii_os curiosos, ya que podrian tirar de ellos. //l.'k PRECAUCION /
• No coloque objetos encima de la televisor de plasma. LJ
Si se derrama agua en la televisor de plasma 0 entran objetos extranos •
en su interior, se puede provocar un cortocircuito que causara fuego
0 descarga electrica. Si entran objetos extranos en el interior de la
televisor de plasma, consulte con su tienda local de Panasonic. •
• Cable de alimentacion de CA
Para prevenir que se produzca un incendio o una descarga electrica: •
• El televisor de plasma est_i diserlado para trabajar en una
red de 120 V CAy 60 Hz. Inserte la clavija del cable de
alimentacion al m_iximo en la toma de corriente. •
Si el enchufe no ha entrado completamente puede generar •
calory ser el origen de un incendio.
• El cable de alimentacion de CA suministrado es para ser
utilizado con este aparato solamente.
• No utilice ningtJn otro cable de alimentacion que no sea •
el suministrado con este televisor.
• No toque el enchufe del cable electrico con las manos mojadas.
No cubra los orificios de ventilacion.
La televisor de plasma puede calentarse excesivamente
provocado fuego 0 danos en la televisor de plasma.
Deje un espacio de 3 15116" (10 cm) o mas en las partes superior,
izquierda y derecha, y 2 3/4" (7 cm) o m_is en la parte posterior.
Siempre que utilice el pedestal, asegtJrese de que no haya ningt_n
objeto que pueda obstruir la ventilaci0n en el espacio entre la parte
inferior del televisor y la superficie del pedestal o la base.
Cuando utilice la televisor de plasma
Desconecte todos los cables antes de mover la televisor de plasma.
Si fuera necesario mover la televisor de plasma a otro lugar y
se dejan algunos cables conectados, estos pueden danarse,
provocar un incendio O una descarga el(_ctrica.
A fin de evitar que se produzca una descarga electrica,
desconecte la clavija de red de la toma de corriente
como medida de precaucion antes de limpiar el televisor. 5
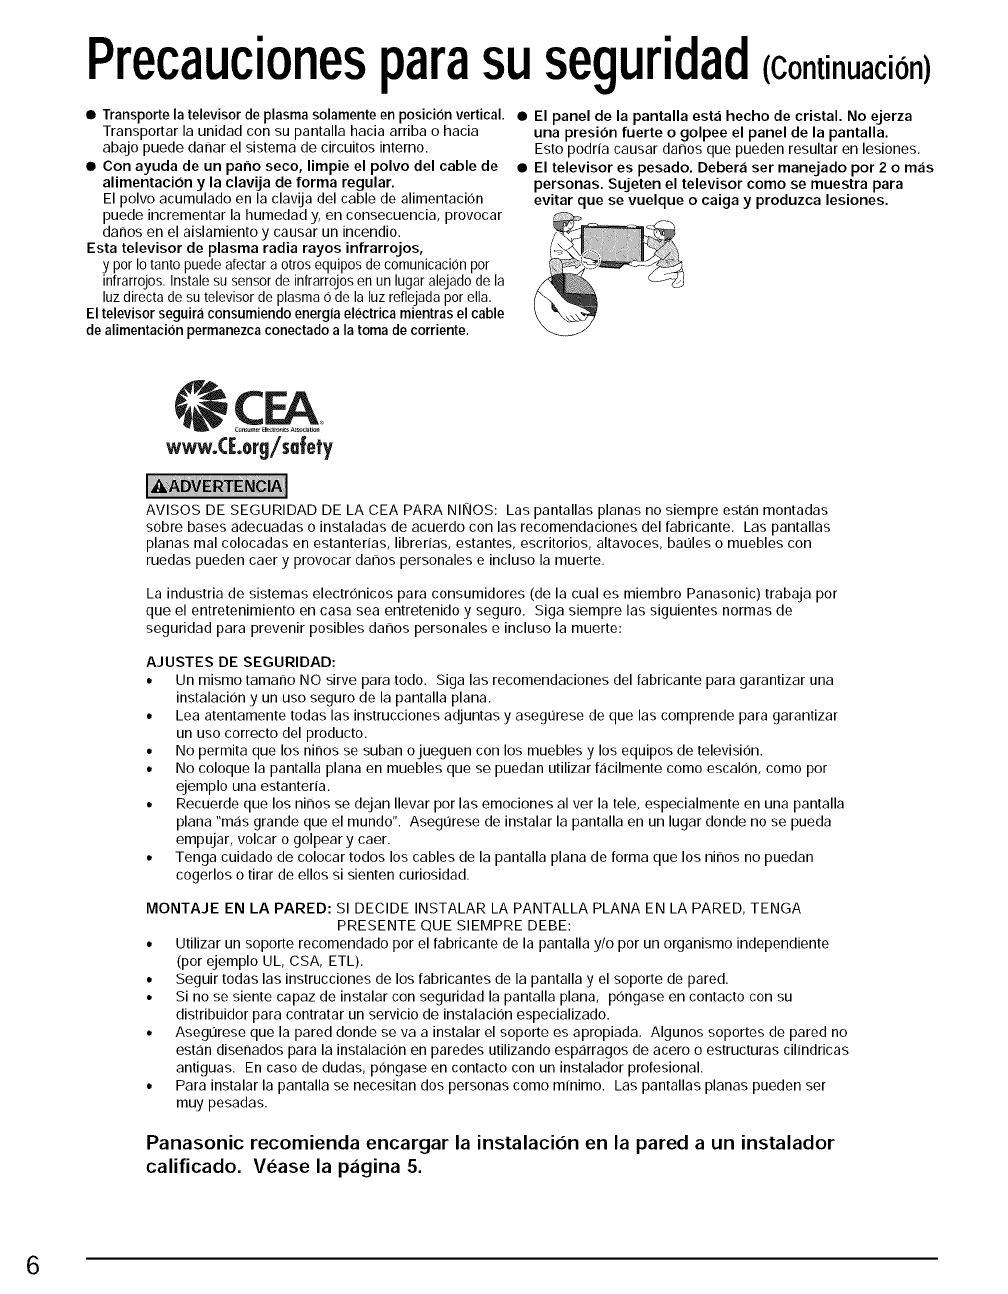
Precaucionesparasuseguridad(Continuacion)
ITransporte la televisor de plasma solamente en posicion vertical.
Transportar la unidad con su pantalla hacia arriba o hacia
abajo puede danar el sistema de circuitos interno.
• Con ayuda de un patio seco, limpie el polvo del cable de
alimentacion y la clavija de forma regular.
El polvo acumulado en la clavija del cable de alimentacion
puede incrementar la humedad y, en consecuencia, provocar
danos en el aislamiento y causar un incendio.
Esta televisor de plasma radia rayos infrarrojos,
y por Io tanto puede afectar a otros equipos de comunicacion por
infrarrojos. Instale su sensor de infrarrojos en un lugar alejado de la
luz directa de su televisor de plasma O de la luz reflejada por ella,
El televisor seguira consumiendo energia electrica mientras el cable
de alimentacion permanezca conectado a la toma de corriente.
• El panel de la pantalla est_i hecho de cristal. No ejerza
una presion fuerte o golpee el panel de la pantalla.
Esto podria causar danos que pueden resultar en lesiones.
• El televisor es pesado. Deber_i ser manejado por 2 o m_is
personas. Sujeten el televisor como se muestra para
evitar que se vuelque o caiga y produzca lesiones.
CEA
www.([.org/salety
AVISOS DE SEGURIDAD DE LA CEA PARA NINOS: Las pantallas planas no siempre est,:in montadas
sobre bases adecuadas o instaladas de acuerdo con las recomendaciones del fabricante, Las pantallas
planas mal colocadas en estanterias, librerias, estantes, escritorios, altavoces, baules o muebles con
ruedas pueden caer y provocar danos personales e incluso la muerte.
La industria de sistemas electronicos para consumidores (de la cual es miembro Panasonic) trabaja por
que el entretenimiento en casa sea entretenido y seguro. Siga siempre las siguientes normas de
seguridad para prevenir posibles danos personales e incluso la muerte:
AJUSTES DE SEGURIDAD:
* Un mismo tamano NO sirve para redo. Siga las recomendaciones del fabricante para garantizar una
instalacion y un uso seguro de la pantalla plana.
, Lea atentamente tedas las instrucciones adjuntas y asegL_resede que las comprende para garantizar
un uso correcto del producte.
, No permita que los ninos se suban ojueguen con los muebles y los equipos de television.
, No coloque la pantalla plana en muebles que se puedan utilizar facilmente como escalon, como por
ejemplo una estanteria.
, Recuerde que los ninos se dejan Ilevar por las emociones al ver la tele, especialmente en una pantalla
plana "mas grande que el mundo'. AsegL_resede instalar la pantalla en un lugar donde no se pueda
empujar, volcar o golpear y caer.
, Tenga cuidado de colocar tedos los cables de la pantalla plana de forma que los ninos no puedan
cogerlos o tirar de ellos si sienten curiosidad.
MONTAJE EN LA PARED: SI DECIDE INSTALAR LA PANTALLA PLANA EN LA PARED, TENGA
PRESENTE QUE SIEMPRE DEBE:
• Utilizar un soporte recomendado por el fabricante de la pantalla y/o por un organismo independiente
(per ejemplo UL, CSA, ETL).
• Seguir todas las instrucciones de los fabricantes de la pantalla y el soporte de pared.
• Si no se siente capaz de instalar con seguridad la pantalla plana, pongase en contacto con su
distribuidor para contratar un servicio de instalacion especializado.
• Aseg0rese que la pared donde se va a instalar el soporte es apropiada. Algunos soportes de pared no
estan disenados para la instalacion en paredes utilizando esparragos de acero o estructuras cilindricas
antiguas. En caso de dudas, pongase en contacto con un instalador profesional.
• Para instalar la pantalla se necesitan dos personas como minimo. Las pantallas planas pueden ser
muy pesadas.
Panasonic recomienda encargar la instalacion en la pared aun instalador
calificado. Vease la p_igina 5.
6
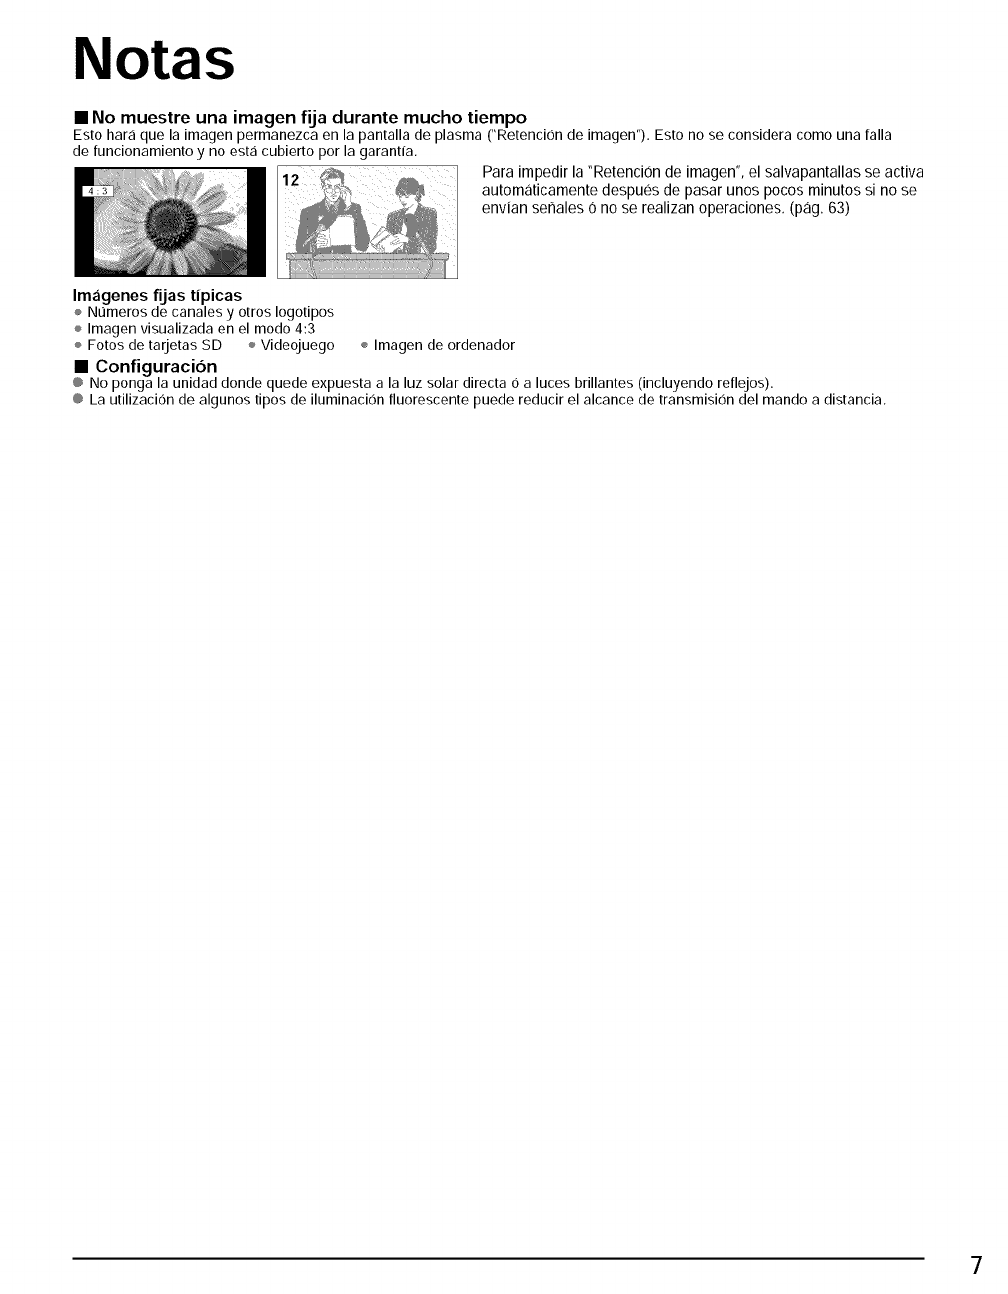
Notas
• No muestre una imagen fija durante mucho tiempo
Esto hara que la imagen permanezca en la pantalla de plasma CRetencion de imagen'), Esto no se considera como una falla
de funcionamiento y no esta cubierto por la garantfa,
Para impedir la "Retenci0n de imagen', el salvapantallas se activa
automaticamente despu6s de pasar unos pocos minutos si no se
envian senales 0 no se realizan operaciones. (pag. 63)
Im_igenes fljas tipicas
÷ Nt]meros de canales y otros Iogotipos
÷ Imagen visualizada en el modo 4:3
Fotos de tarjetas SD ÷ Videojuego ÷ Imagen de ordenador
•Configuracion
@ No ponga la unidad donde quede expuesta a la luz solar directa 6 a luces brillantes (incluyendo reflejos).
@ La utilizacion de algunos tipos de iluminacion fluorescente puede reducir el alcance de transmision del mando a distancia,
7
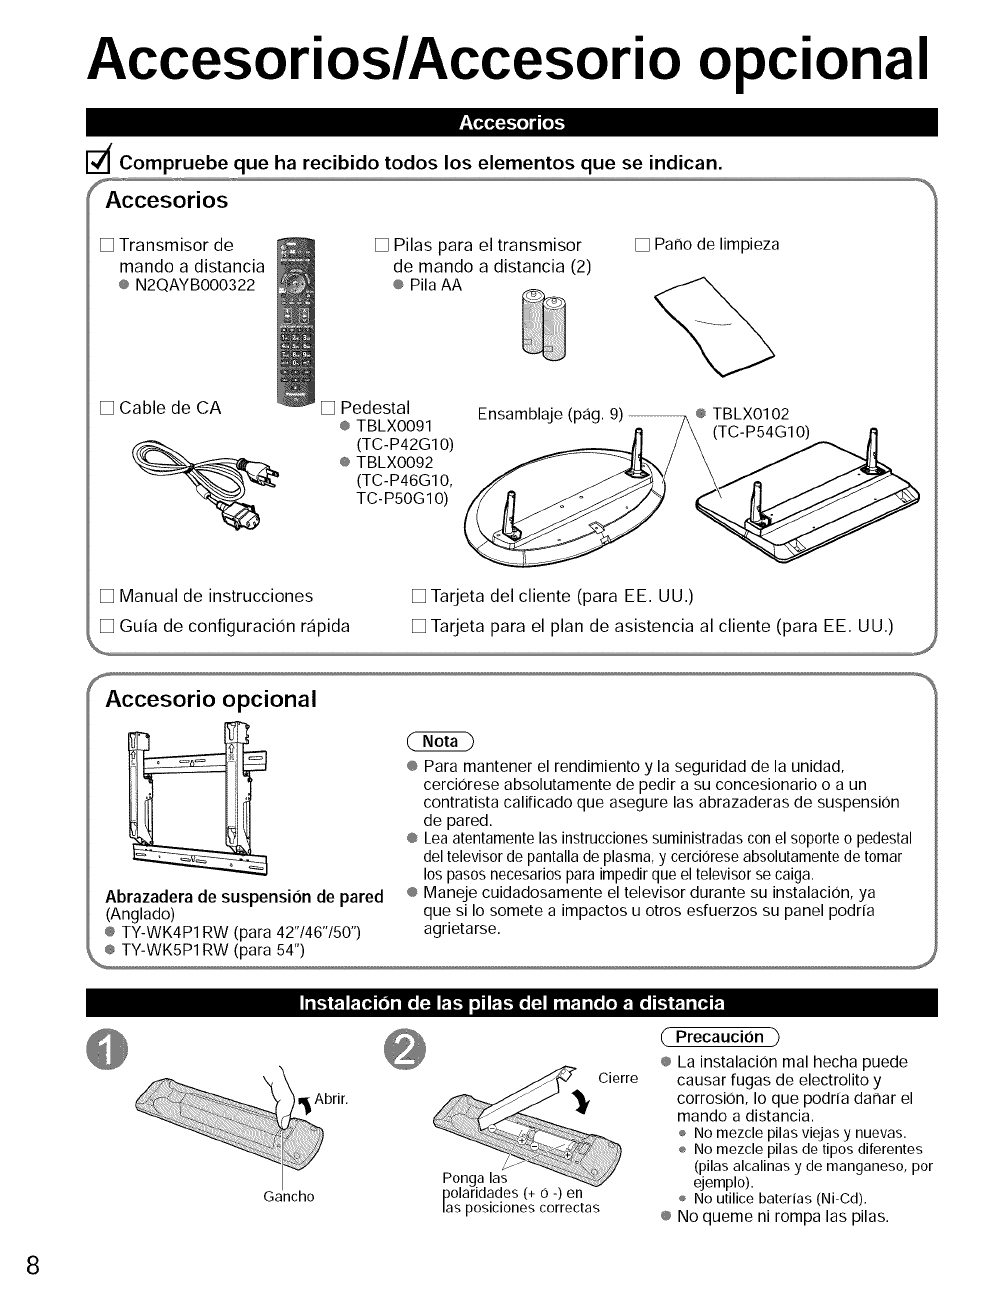
Accesorios/Accesorio opcional
i_,i,i_i-lolI Iol_
dCompruebe que ha recibido todos los elementos que se indican.
_'_
Accesorios
[] Transmisor de
mando a distancia
® N2QAYB000322
[] Pilas para el transmisor
de mando a distancia (2)
® Pila AA
[] Patio de limpieza
[] Cable de CA [] Pedestal
® TBLX0091
(TC-P42G10)
® TBLX0092
(TC-P46G10,
TC- P50G 10)
Ensamblaje (pag. 9) _ ® TBLX0102
[] Manual de instrucciones [] Tarjeta del cliente (para EE. UU.)
[] Guia de configuracion rapida [] Tarjeta para el plan de asistencia al cliente (para EE. UU.)
fAccesorio opcional
Abrazadera de suspension de pared
(Anglado)
® TY-WK4P1 RW (para 42"/46"/50")
® Para mantener el rendimiento y la seguridad de la unidad,
cerci0rese absolutamente de pedir a su concesionario o a un
contratista calificado que asegure las abrazaderas de suspension
de pared.
® Lea atentamente las instrucciones suministradas con el soporte o pedestal
del televisor de pantalla de plasma, y cerciorese absolutamente de tomar
los pasos necesarios para impedir que el televisor se caiga.
® Maneje cuidadosamente el televisor durante su instalaci0n, ya
que si Io somete a impactos u otros esfuerzos su panel podria
agrietarse.
_i_'1_._ [o] i [o {'_'.'.'.'.'.'.'.'._l_ I,,."]1o] i_l,,."l[o{'_'._iI|_l i To[o_ [o _ _ 1i [o,]_
brir
Gancho
Cierre
Ponga las
polaridades (+ 0 -) en
las poslclones correctas
Precaucion
® La instalaci0n real hecha puede
causar fugas de electrolito y
corrosion, Io que podrfa dar_ar el
mando a distancia.
÷ No mezcle pilas viejas y nuevas.
÷ No mezcle pilas de tipos diterentes
(pilas alcalinas y de manganeso, por
ejemplo).
÷ No utilice baterias (Ni-Cd).
® No queme ni rompa las pilas.
8
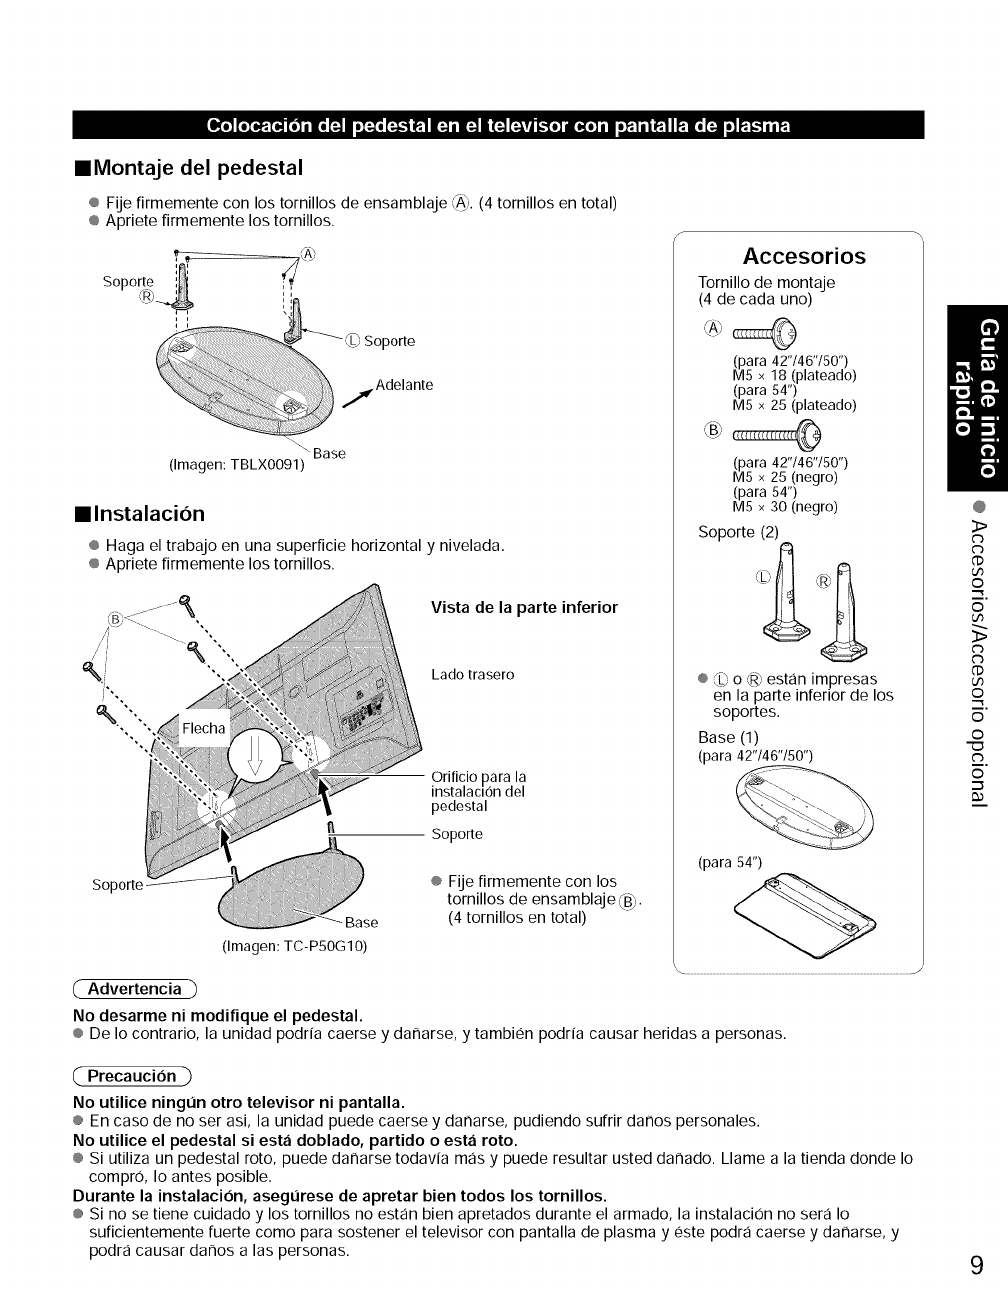
I_ [oIO_.[o_ [o] i[o _IoI_o _'_j _1 [1_ i[:] | _'_ [_] l."[o] I[O{o] iIo_1 i |_l IP:.[o [1.]1o] P:.I,.'Iai_
•Montaje del pedestal
® Fije firmemente con los tornillos de ensamDlaje __,. (4 tornillos en total)
® Apriete firmemente los tornillos.
Soporte ;;I_
,porte
,..._ Adelante
Base
(Imagen: TBLX0091)
•Instalacion
® Haga el trabajo en una superficie horizontal ynivelada.
® Apriete firmemente los tornillos.
Vista de la parte inferior
Lado trasero
Orificio para la
instalaclon del
pedestal
Soporte
Soporte
Base
(Imagen: TC-P50G10)
® Fije firmemente con los
tornillos de ensamblaje,,_B',.
(4 tornillos en total)
Accesorios
Tornillo de montaje
(4 de cada uno)
(para 42"/46"/50")
M5 × 18 (plateado)
(para 54")
M5 × 25 (plateado)
,\B_
(para 42"/46"/50")
M5 × 25 (negro)
(para 54")
M5 × 30 (negro)
Soporte (2)
® _E_o @ estan impresas
en la parte inferior de los
soportes.
Base (1)
(para 42"/46"/50")
(para 54")
............................................................................................................................................................J
Advertencia
No desarme ni modifique el pedestal.
® De Io contrario, la unidad podria caerse y daffarse, y tambien podria causar heridas a personas.
@
>
U3
©
m.
©
>
G)
U3
©
m.
©
©
c_
©
Precaucion
No utilice ningOn otro televisor ni pantalla.
® En caso de no ser asi, la unidad puede caerse y daffarse, pudiendo sufrir daffos personales.
No utilice el pedestal siesta doblado, partido o esta roto.
® Si utiliza un pedestal roto, puede daffarse todavia mas y puede resultar usted daffado. Llame a la tienda donde Io
compro, Io antes posible.
Durante la instalacion, asegOrese de apretar bien todos los tornillos.
® Si no se tiene cuidado y los tornillos no estan bien apretados durante el armado, la instalacion no sera Io
suficientemente fuerte como para sostener el televisor con pantalla de plasma y este podra caerse y daffarse, y
podra causar daffos alas personas. 9
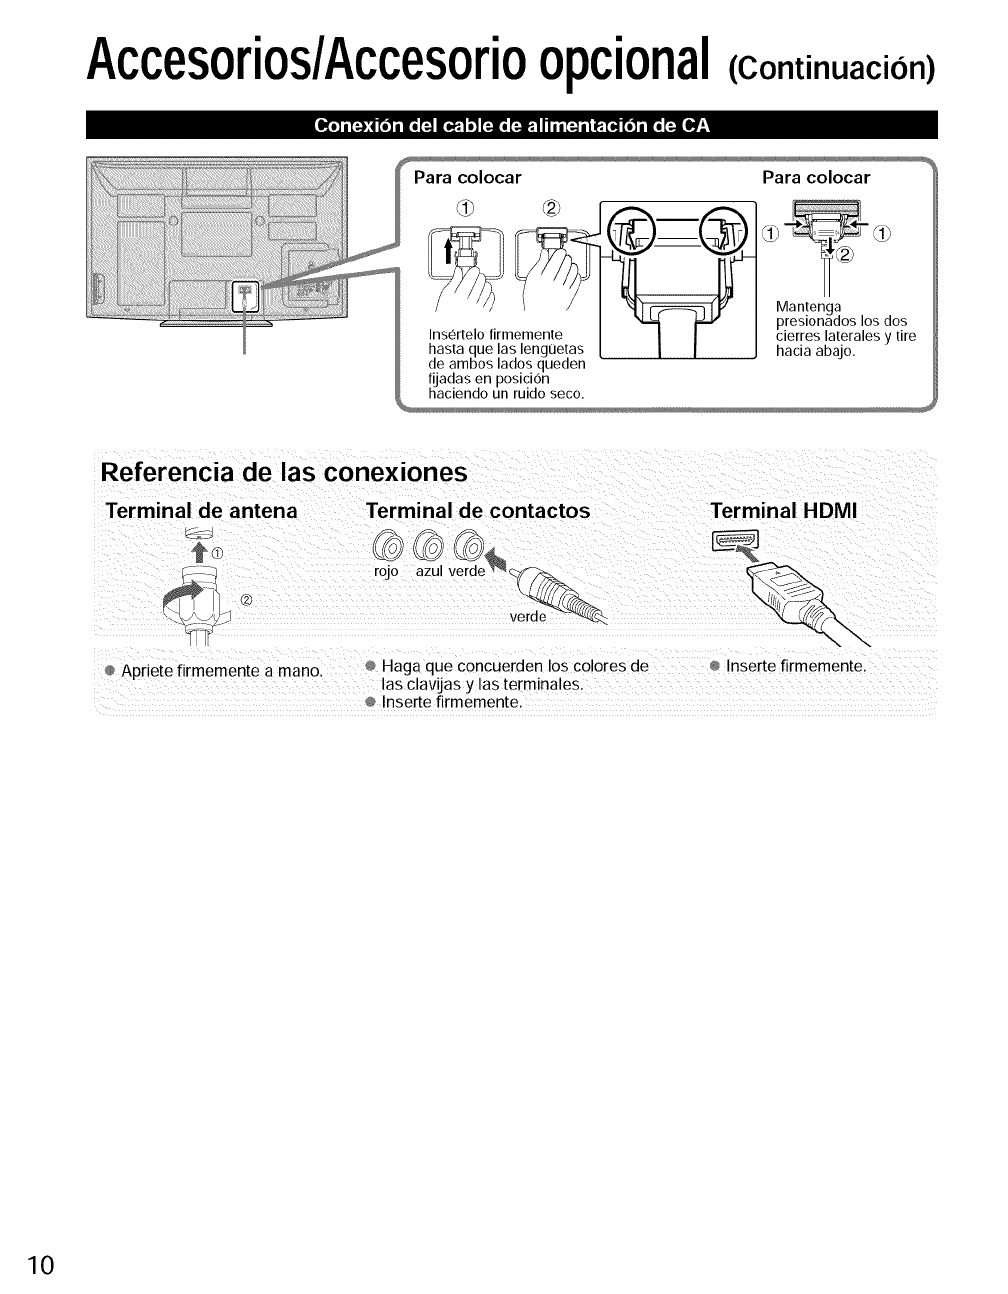
Accesorios/Accesorioopcional
I_o] i [_:q [o]i lo ['_ I[o,_:,l_ [:,,lo [_I.:,! ha| [_ i I _[o,] [o] i lo _@]r_
(Continuacicin)
Para colocar
fiJadasen posicion
haciendo un ruido seco.
Para colocar
Mantenga
presionados los dos
cierres laterales y tire
hacia abajo.
Referencia de las conexiones
Terminal de antena Terminal de contactos Terminal HDMI
__: -J verde_,_:::
Apriete firmemente a mano. Haga que concuerden los colores de Inserte firmemente,
las clavijas y las terminales.
Inserte firmemente.
10
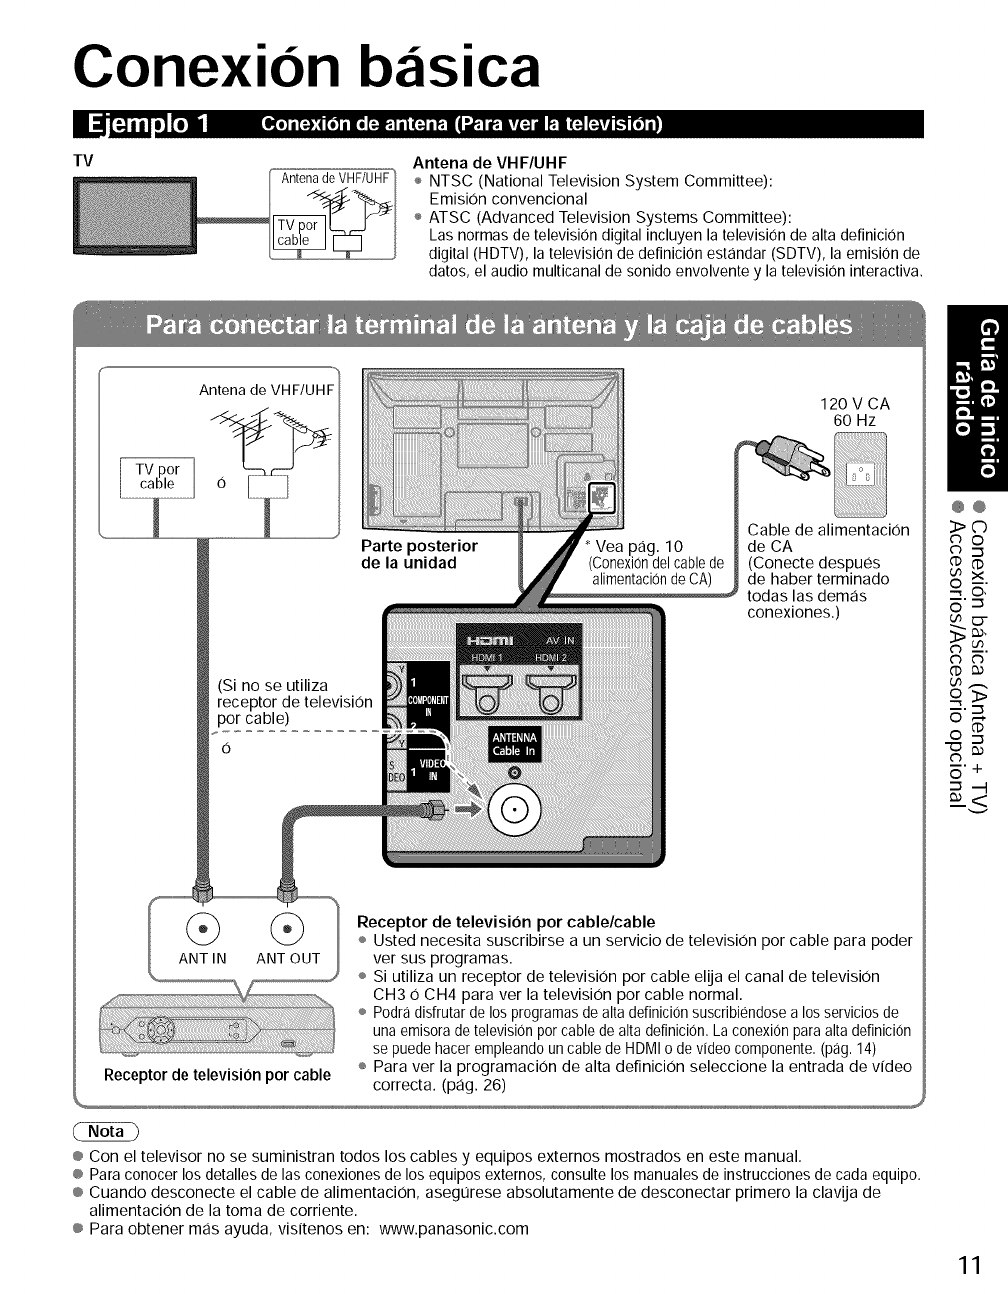
Conexion bzisica
II dl:=_,,l,]l_
TV
_o] i [_;t [o] i Ilo [_11'_,1i I (_ i _N / _,#:1I-:ivL_ am'_'11t'_'.'.l_ _ [o_
Antena de VHF/UHF Antena de VHF/UHF
÷ NTSC (National Television System Committee):
Emision convencional
÷ ATSC (Advanced Television Systems Committee):
Las normas de television digital incluyen la television de alta d@inicion
digital (HDTV), la television de d@inicion estandar (SDTV), la emision de
datos, el audio multicanal de sonido envolvente y la television interactiva.
Antena de VHF/UHF
Y
o
120 V CA
60 Hz
Cable de alimentacion
de CA
(Conecte despues
de haber terminado
todas las demas
conexiones.)
(_ (_) Receptor de television por cable/cable
÷ Usted necesita suscribirse a un servicio de television por cable para poder
ANT IN ANT OUT versus programas.
÷ Si utiliza un receptor de television por cable elija el canal de television
CH3 0 CH4 para ver la television por cable normal.
÷ Podra disfrutar de los programas de alta definicion suscribiendose a los servicios de
una emisora de television por cable de alta definici0n. La conexion para alta definicion
se puede hacer empleando un cable de HDMI o de video componente. (pag. 14)
÷ Para ver la programacion de alta definicion seleccione la entrada de video
correcta. (pag. 26)
Receptor de television por cable
® Con el televisor no se suministran todos los cables y equipos externos mostrados en este manual.
® Para conocer los detalles de las conexiones de los equipos externos, consulte los manuales de instrucciones de cada equipo.
® Cuando desconecte el cable de alimentacion, asegtJrese absolutamente de desconectar primero la clavija de
alimentacion de la toma de corriente.
® Para obtener mas ayuda, visitenos en: www.panasonic.com
@@
3>O
no
E7
_,
_---.
_ m
0,--*
_'+
11

Conexion basica (Continuacion)
TV
Equipo de AV
(ej. Grabadora DVD
0 Videograbadora)
Antena de VHF/UHF
Grabadora DVD
Si la fuente tiene una serial de resolucion mas alta
(480p/720p/1080i/1080p), la conexion se puede hacer
usando un cable de video componente o de HDMI. (pag. 14)
Videograbadora
La conexion se puede hacer utilizando un cable RF
0 video compuesto/S Video. (pag. 14)
Antena de VHF/UHF
120 V CA
60 Hz
Parte posterior
de la unidad * Vea pag. 10
(Conexion del cable de
alimentacion de CA)
Cable de
alimentaciOn
de CA
ANT IN ANT OUT
IConexion del televisor y el equipo AV I
I
Consulte /' F,-,
_A) - en pag._D) la 14 I
Equipo de AV
(ej. Grabadora DVD 0 Videograbadora)
(con sintonizador de television)
12
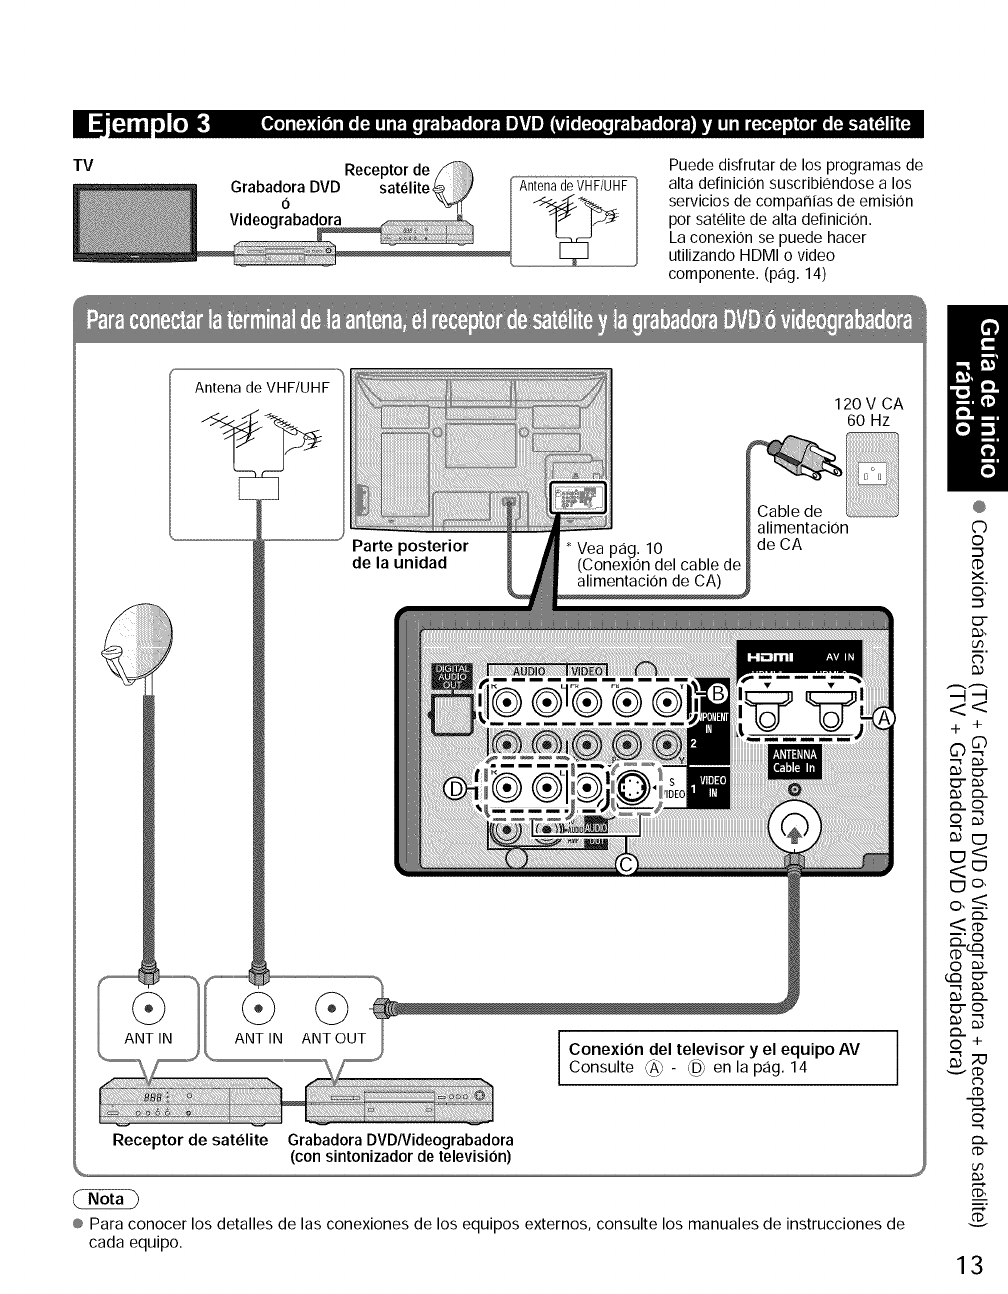
TV
I_o] i[:}_t [o_o [:I! Ii_[o I f,| o_'_ [o] 1_,! i_V_ |_ [:[oIo I I_,| o_ [o] 1_,1NV|! Iil _:[o_:_ o| (o] |o [:I,._,| _ _ (_
Receptor de
Grabadora DVD satelite
0
Videograbadora
Antena de VHF/UHF
Puede disfrutar de los programas de
alta definicion suscribiendose a los
servicios de companias de emision
pot satelite de alta definicion.
La conexiOn se puede hacer
utilizando HDMI o video
componente. (pag. 14)
Antena de VHF/UHF
Parte posterior
de la unidad
alimentacion
de CA
120 V CA
60 Hz
Receptor de satelite
ANT_OUT ipo AV
Consulte CA)- _ en la pag. 14
Grabadora DVDNideograbadora
(con sintonizador de television)
® Para conocer los detalles de las conexiones de los equipos externos, consulte los manuales de instrucciones de
cada equipo.
@
C)
o
.-_
('D
X
O,
0"
U3
+ +
D..©
o,_
_'o
_.-©
© +
¢D
©
¢D
¢D_,
13
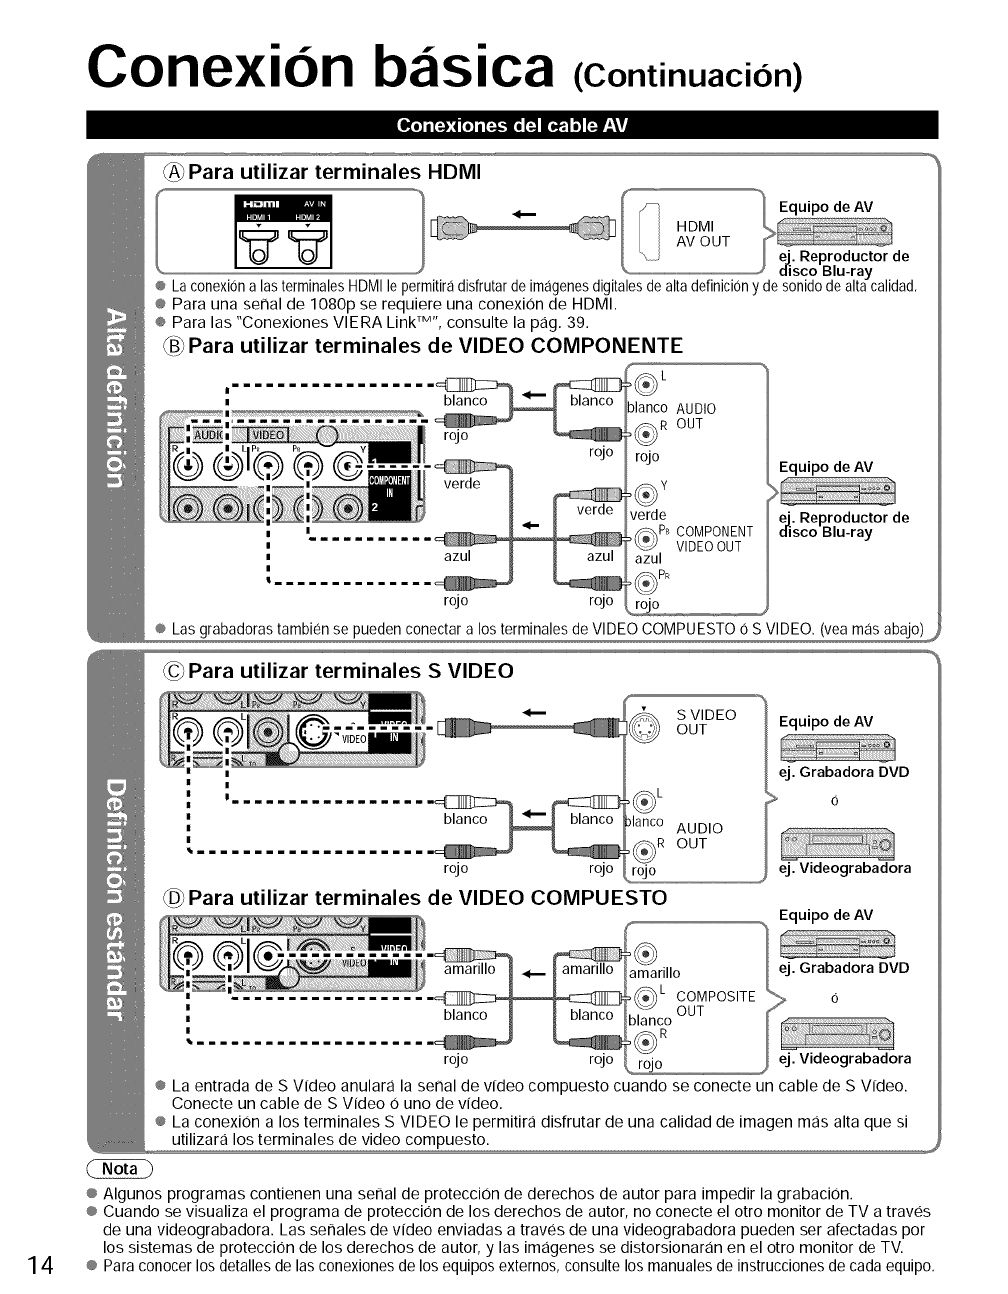
Conexion bzisica (Continuacion)
_0] =[=-):4[0]=[_-_0 m m_,]_ ['_lr_'\!
Para utilizar terminales HDMI
_ _ S-i Equipo de AV
....
,, J e. Reproductor de
_lisco Blu-ray
® La conexion alas terminales HDMI le permitiraidisfrutar de imaigenesdigitales de alta definiciony de sonido de altacalidad,
® Para una seClal de 1080p se requiere una conexion de HDMI.
® Para las "Conexiones VlERA Link TM', consulte la pag. 39.
_B_Para utilizar terminales de VIDEO COMPONENTE
?lanco AUDIO
rojo I_R OUT
rojo Equipo de AV
,_ Y
verde ej. Reproductor de
!_PB COMPONENT disco Blu-ray
VIDEOOUT
azul
,_PR
rojo rojo rojo __,
® Las grabadoras tambien se pueden conectar a los terminales de VIDEO COMPUESTO 0 S VIDEO. (vea mas abajo)
© Para utilizar terminales S VIDEO
S VIDEO
OUT
i .................. _ 31anco
•,== _R
rojo rojo rojo
Para utilizar terminales de VIDEO COMPUESTO
AUDIO
OUT
Equipo de AV
ej. Grabadora DVD
>6
ej. Videograbadora
14
blanco
r_o rojo
® La entrada de S Video anulara la senal de video compuesto cuando se conecte un cable de S Video.
Conecte un cable de S Video O uno de video.
® La conexion a los terrninales S VIDEO le perrnitira disfrutar de una calidad de irnagen rnas alta que si
ut!!!zara !os term!na!es de v!deo compuesto: ,_
® Algunos prograrnas contienen una senal de proteccion de derechos de autor para irnpedir la grabacion.
® Cuando se visualiza el prograrna de proteccion de los derechos de autor, no conecte el otto monitor de TV a traves
de una videograbadora. Las senales de video enviadas a traves de una videograbadora pueden set afectadas por
los sisternas de proteccion de los derechos de autor, y las irnagenes se distorsionaran en el otto monitor de TV.
® Para conocer los detalles de las conexiones de los equipos externos, consulte los manuales de instrucciones de cada equipo,
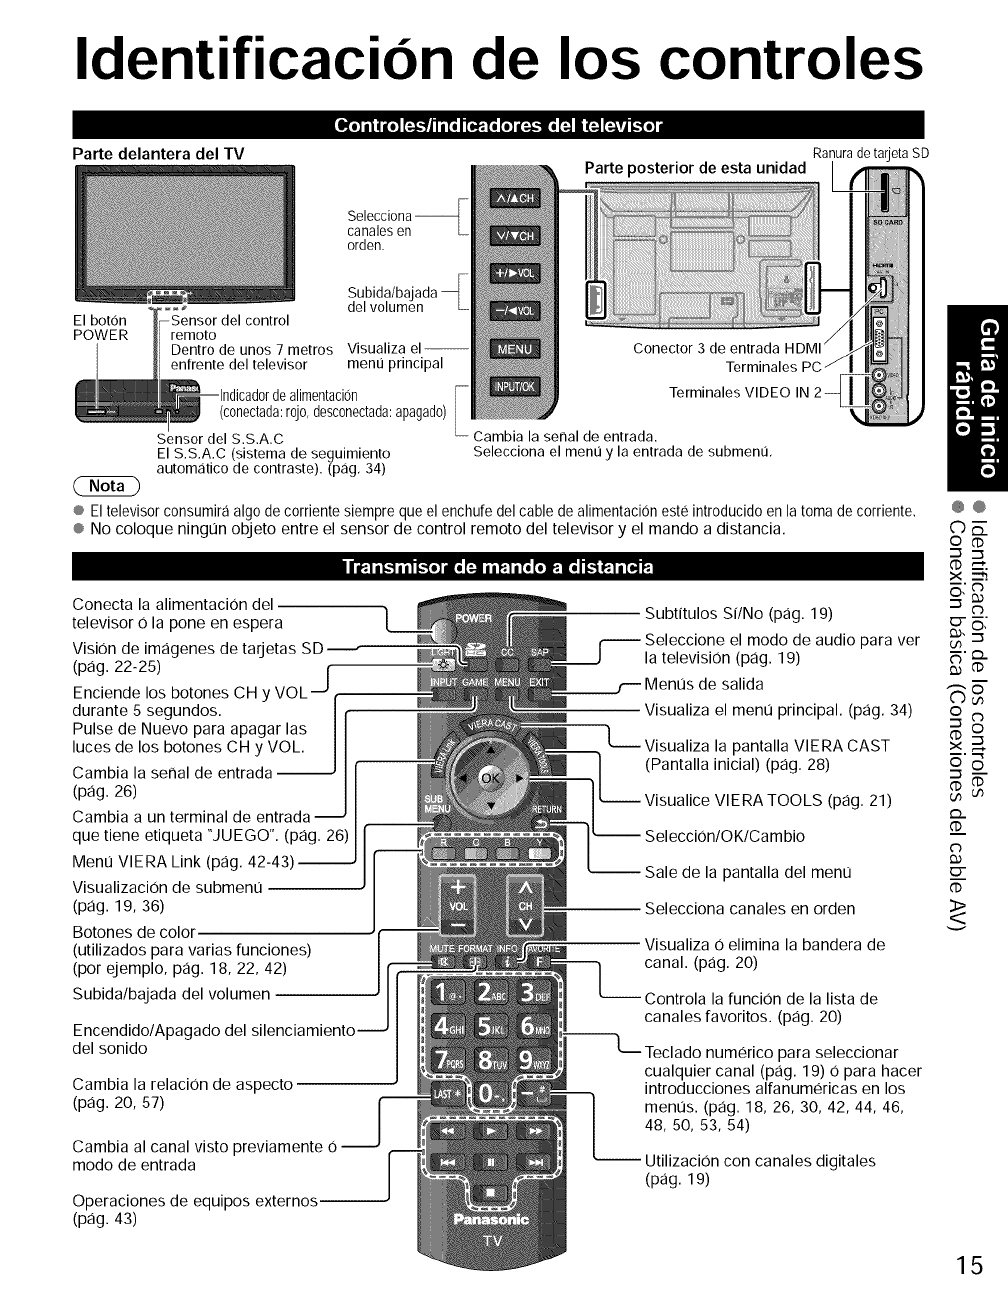
Identificacion de los controles
Parte delantera del TV
canales en
orden.
El boron
POWER
Subida/ba
del
remoto
Dentro de unos 7 metros Visualiza el--
enfrente del televisor menu principal
dealimentacion Terminales VIDEO
(conectada:rojo,desconectada:apagado)
Sensor del S.S.A.C Cambia la senal de entrada.
El S.S.A.C (sistema de seguimiento Selecciona el menu y la entrada de submenu,
autom,:itico de contraste). (p,:ig, 34)
® El televisor consumira algo de corriente siempre que el enchufe del cable de alimentaci0n este introducido en la toma de corriente.
® No coloque ningun objeto entre el sensor de control remoto del televisor y el mando a distancia.
I I[':,l i I,,,"]l l I l,,"[o] |o [:-]111 _l i [o (o_llo _ !':,l l [O,]_
Conecta la alimentaci0n del
televisor 0 la pone en espera
VisiOn de imagenes de tarjetas SD
(pag. 22-25) I
Enciende los botones CH y VOL _p r
durante 5 segundos. |
Pulse de Nuevo para apagar las J
luces de los botones CH y VOL.
Cambia la serial de entrada
(pag. 26)
Cambia a un terminal de entrada --
que tiene etiqueta "JUEGO". (pag. 26)
Menu VlERA Link (pag.
Visualizaci0n de submenu
(pag. 19, 36)
Botones de colol
(utilizados para varias funciones)
(por ejemplo, pag. 18, 22, 42)
Subida/bajada del volumen
Encendido/Apagado del
del sonido
Cambia la relaci0n de aspecto
(pag. 20, 57)
Cambia al canal visto previamente 0
modo de entrada
Operaciones de equipos externos
(pag. 43)
Subtitulos Si/No (pag. 19)
el modo de audio para ver
la television (pag. 19)
Visualiza el menu principal. (pag. 34)
L_. Visualiza la pantalla VlERA CAST
(Pantalla inicial) (pag. 28)
VIERA TOOLS (pag. 21)
-- Sale de la pantalla del menu
Selecciona canales en orden
Visualiza 0 elimina la bandera de
canal. (pag. 20)
la funci0n de la lista de
canales favoritos. (pag. 20)
para seleccionar
cualquier canal (pag. 19) 0 para hacer
introducciones alfanumericas en los
menus. (pag. 18, 26, 30, 42, 44, 46,
48, 50, 53, 54)
Utilizaci0n con canales digitales
(pag. 19)
@@
©E.
o
.-_ .-_
_D __'.
X
_,-_
N'_..
og
D..
0.)
O"
<>
15
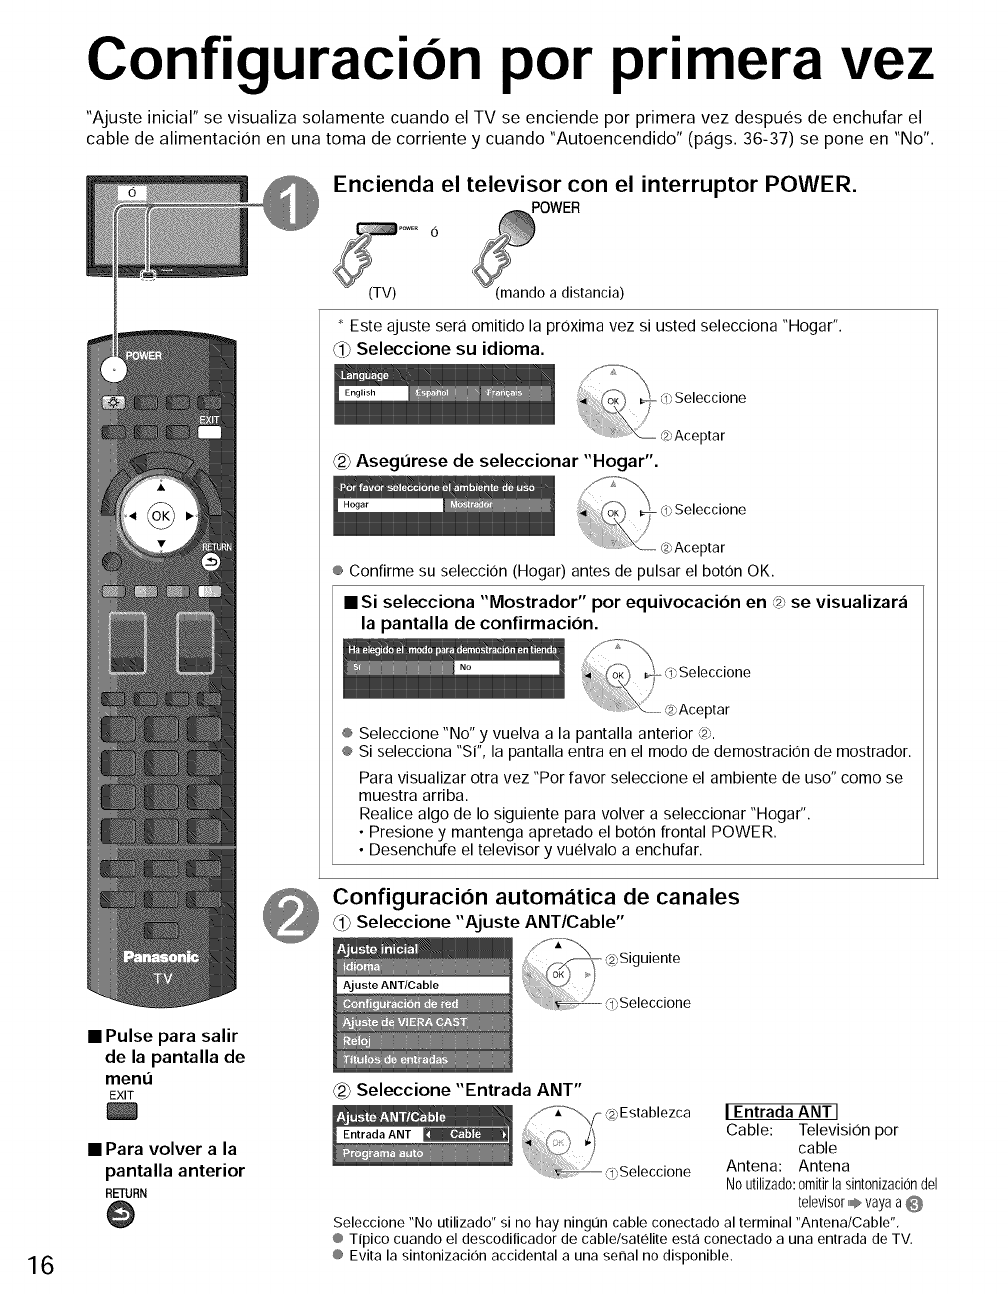
Configuracion por primera vez
"Ajuste inicial" se visualiza solamente cuando el TV se enciende por primera vez despues de enchufar el
cable de alimentacion en una toma de corriente y cuando "Autoencendido" (pags. 36-37) se pone en "No".
Encienda el televisor con el interruptor POWER.
POWER
6
(TV) a distancia)
* Este ajuste sera omitido la prOximavez si usted selecciona "Hogar".
_1_Seleccione su idioma.
Asegt]rese de seleccionar "Hogar".
/
-<0Seleccione
@Aceptar
® Confirme su selecciOn(Hogar) antes de pulsar el boton OK.
• Si selecciona "Mostrador" por equivocacion en <2_se visualizara
la pantalla de confirmacion.
_ ¢!)Seleccione
Aceptor
® Seleccione "No" y vuelva a la pantalla anterior @.
® Si selecciona "Si", la pantalla entra en el modo de demostracbn de mostrador.
Para visualizar otra vez "Por favor seleccione el ambiente de uso" como se
muestra arriba.
Realice algo de Io siguiente para volver a seleccionar "Hogar'.
• Presione y mantenga apretado el boton frontal POWER.
• Desenchufe el televisor y vuelvalo a enchufar.
Configuracion autom_itica de canales
_1_Seleccione "Ajuste ANT/Cable"
16
•Pulse para salir
de la pantalla de
men,',
EXIT
• Para volver a la
pantalla anterior
RETURN
@
@ Seleccione "Entrada ANT"
if Z°'-\/- @Establezca
coSeleccione
IEntrada ANT I
Cable: TelevisiOn por
cable
Antena: Antena
Noutilizado:0mitirla sintonizaci0ndel
televisor,,,,,,#,_vayaa @
Seleccione "No utilizado" si no hay ning0n cable conectado al terminal "Antena/Cable".
® Tipico cuando el descoditicador de cable/satelite est<i conectado a una entrada de TV,
® Evita la sintonizacion accidental a una senal no disponible.
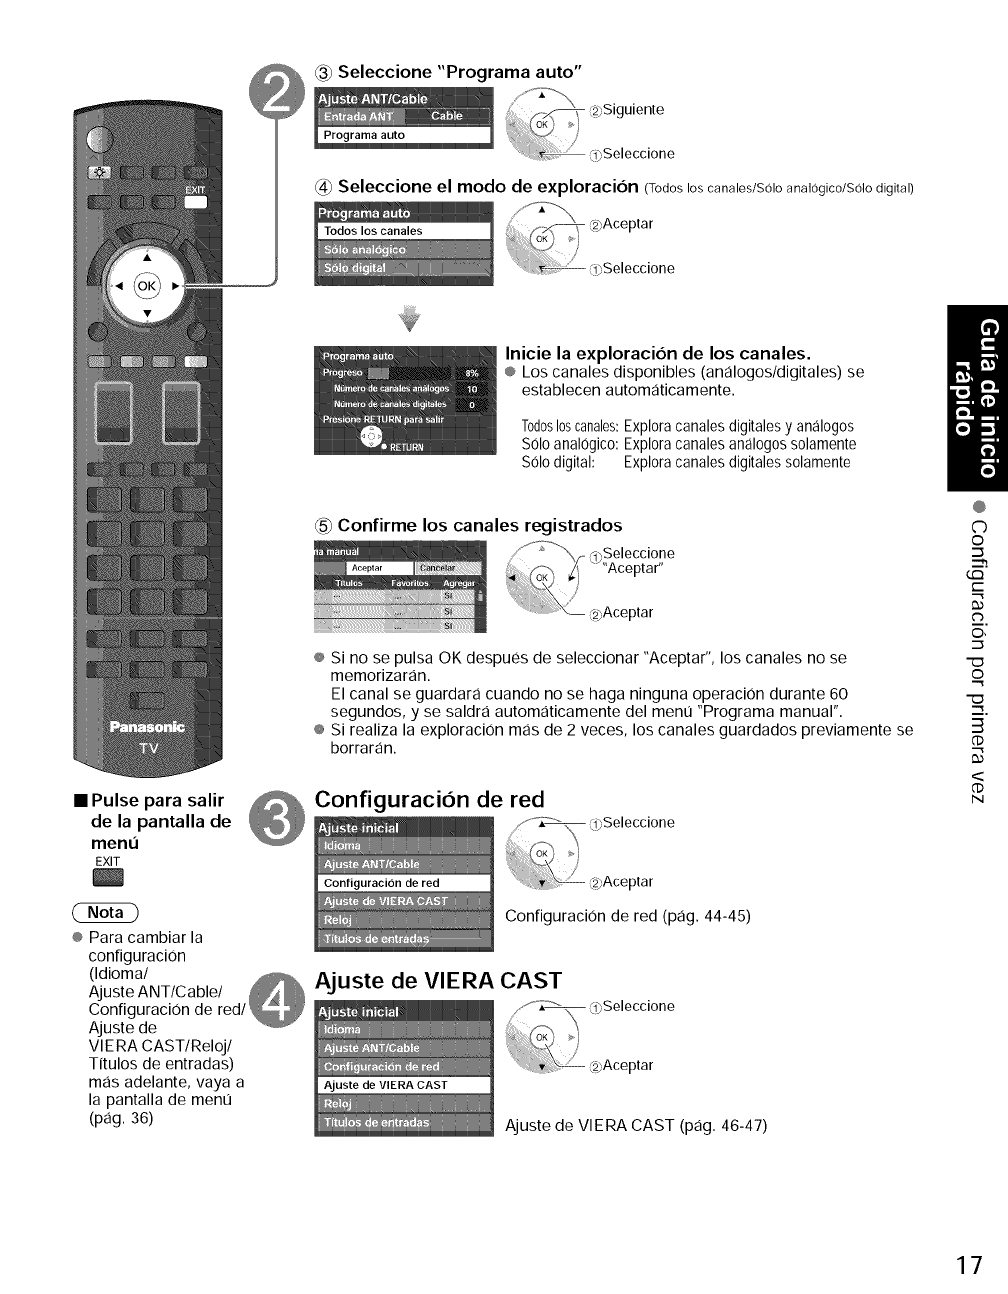
Seleccione "Programa auto"
@ Seleccione el modo de exploracion (Todoslos canales/Solo analogico/SoIodigital)
Inicie la exploracibn de los canales.
® Los canales disponibles (analogos/digitales) se
establecen automaticamente.
Todos10scanal®s:Explora canales digitales y analogos
S01oanal0gico: Explora canales analogos solamente
S01odigital: Explora canales digitales solamente
Confirme los canales registrados
® Si no se pulsa OK despues de seleccionar "Aceptar", los canales no se
memorizaran.
El canal se guardara cuando no se haga ninguna operaci0n durante 60
segundos, y se saldra automaticamente del ment] "Programa manual".
® Si realiza la exploracion mas de 2 veces, los canales guardados previamente se
borraran.
• dePUlSelapantallaParasalirde @ Configuracion de red
ment]
EXIT
Configuraci0n de red (pag. 44-45)
® Para cambiar la
configuraci0n
(Idioma/
AjusteANT/Cable/ _ Ajuste de VIERA CAST
Configuraci0n de red/!
Ajuste de
Vl ERA CAST/Reloj/
Titulos de entradas)
mas adelante, vaya a
la pantalla de ment]
(pag. 36) Ajuste de VlERA CAST (pag. 46-47)
@
C)
©
G:3
t--
C_
©,
o
3
<
N
17
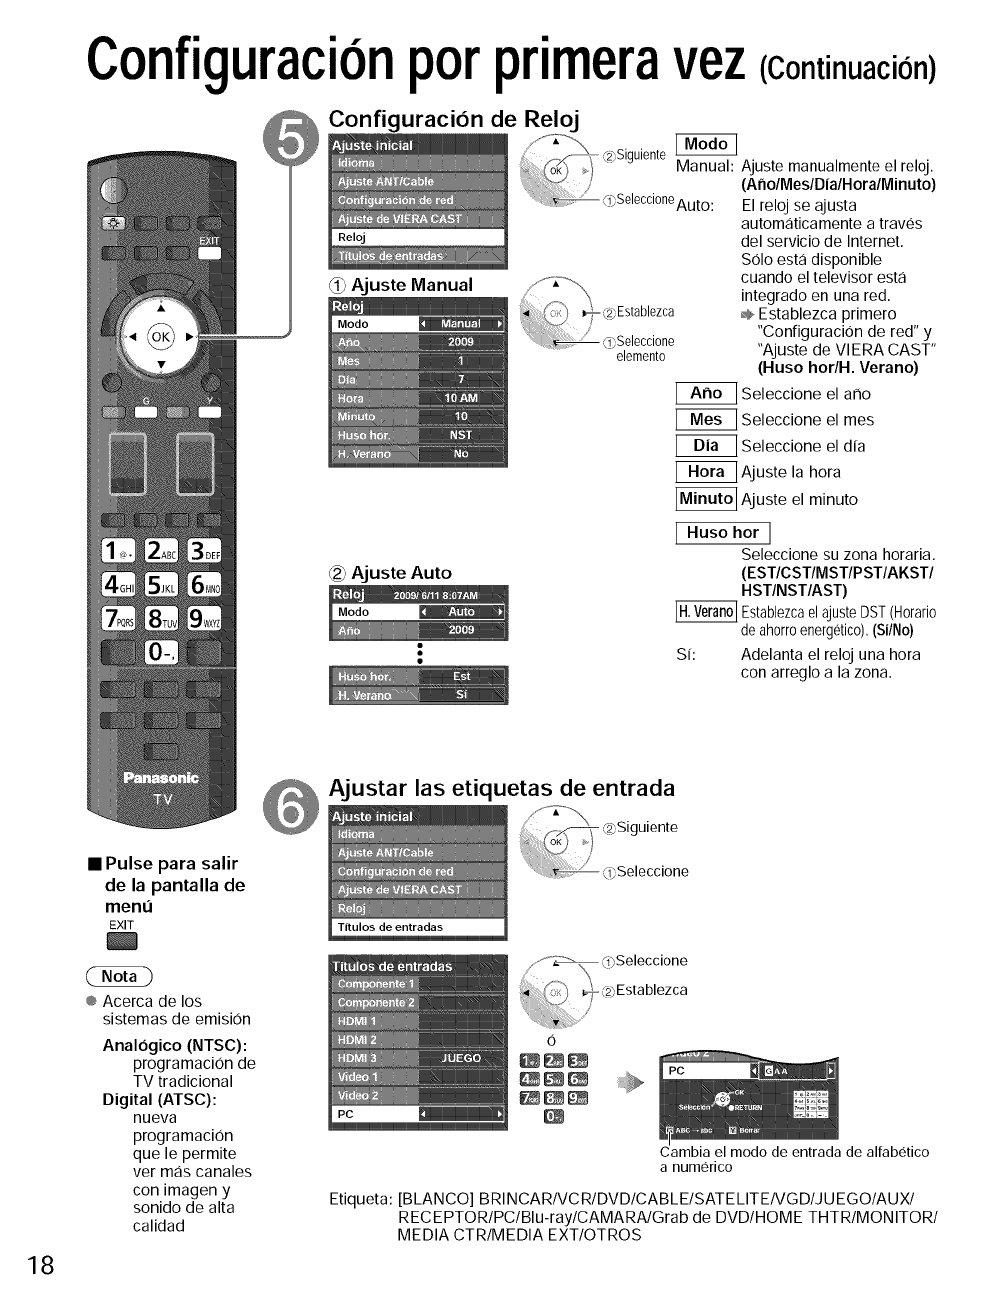
Configuracionporprimeravez(Continuacion)
_ Configuraci6n de Reloj
_j " Manual: Ajuste manualmente el reloj.
/(AnoIMesID|aIHoraIMinuto)
i_ @Seeccone I I
............ Auto E re oj se ajusta
_i_Ajuste Manual
elemento
Ajuste Auto
automaticamente a traves
del servicio de Internet.
S01o esta disponible
cuando el televisor esta
integrado en una red.
=_Establezca primero
"Configuraci0n de red" y
"Ajuste de VlERA CAST"
(Huso hor/H. Verano)
Seleccione el arlo
Seleccione el rues
Seleccione el dia
[_ Ajuste la hora
_ Ajuste el minuto
lHusohor l
Seleccione su zona horaria.
(ESTICSTIMSTIPSTIAKSTI
HSTINSTIAST)
Establezcael ajuste DST(Horatio
de ahorroenergetico),(Si/No)
Si: Adelanta el reloj una hora
con arreglo a la zona.
18
•Pulse para salir
de la pantalla de
menu
EXIT
® Acerca de los
sistemas de emision
Analogico (NTSC):
programaci0n de
TV tradicional
Digital (ATSC):
nueva
programacion
que le permite
ver mas canales
con imagen y
sonido de alta
calidad
_ Ajustar las etiquetas de entrada
Cambia el modo de entrada de alfabetico
a numerico
Etiqueta: [BLANCO] BRINCARIVCRIDVDICABLEISATELITEIVGDIJUEGOIAUXI
RECEPTORIPClBlu-raylCAMARAIGrab de DVD/HOME THTR/MONITOR/
MEDIA CTR/MEDIA EXT/OTROS
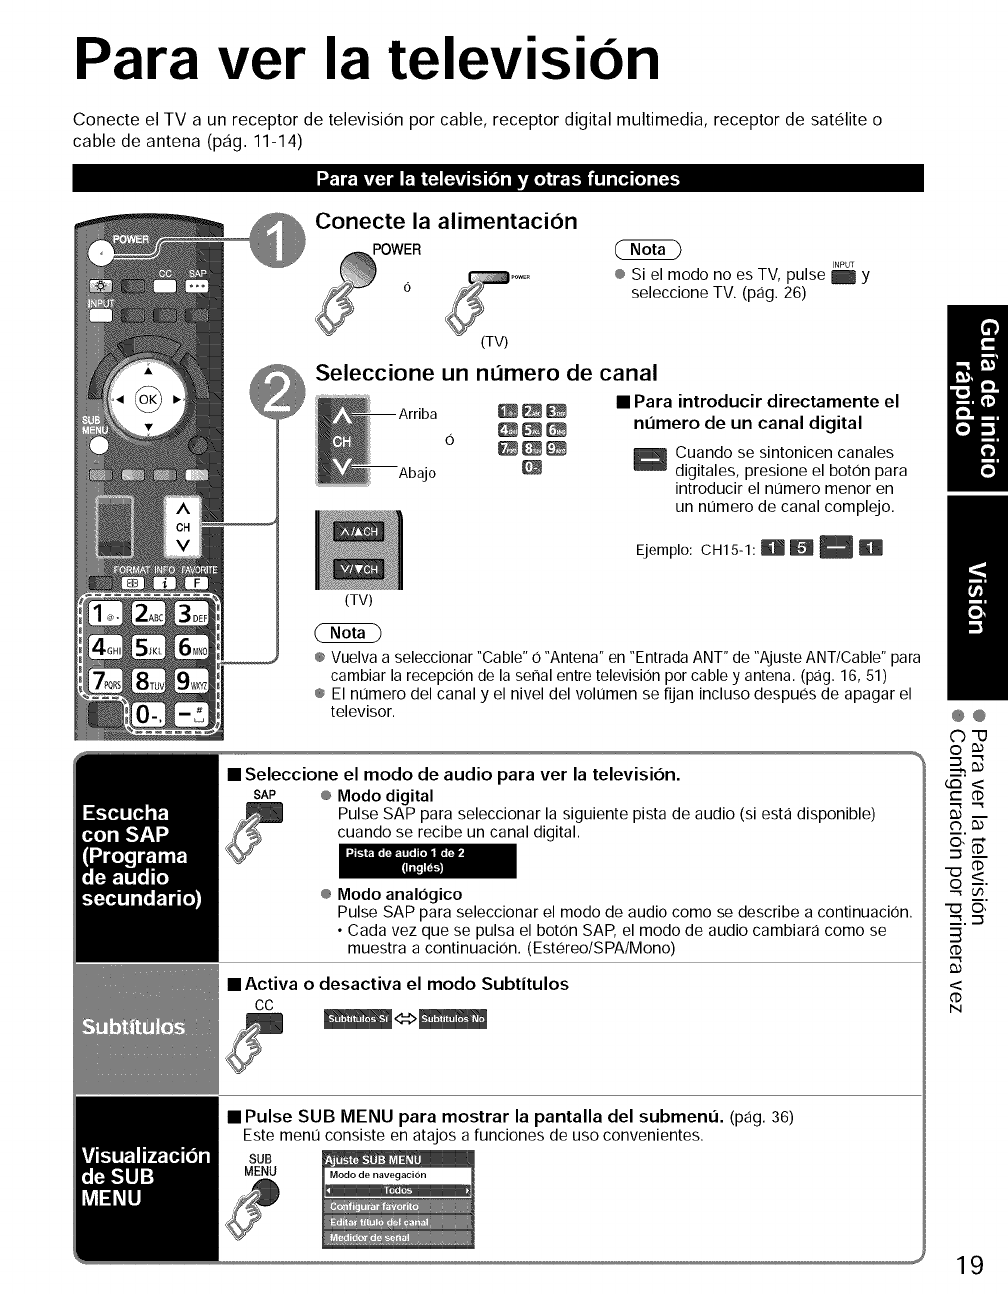
Para ver la television
Conecte el TV a un receptor de television por cable, receptor digital multimedia, receptor de satelite o
cable de antena (pag. 11-14)
_=r-;,1af:iv_[N gIN[_'lJ_ _ _ [o]i Iviol i af:I,,,1111 i [o,][o]i [_
Conecte la alimentaci6n
INPUT
® Si el modo no es TV, pulse E Y
seleccione TV. (pag. 26)
(TV)
Seleccione un numero de canal
(TV)
•Para introducir directamente el
nL_mero de un canal digital
Cuando se sintonicen canales
digitales, presione el boton para
introducir el nt]mero menor en
un nt]mero de canal complejo.
Ejemplo: CH15-1: R R _
® Vuelva a seleccionar "Cable" 0 "Antena" en "Entrada ANT" de "Ajuste ANT/Cable" para
cambiar la recepcion de la serial entre television pot cable y antena. (pag. 16, 51)
® El nt]mero del canal y el nivel del volt]men se fijan incluso despues de apagar el
televisor.
• Seleccione el modo de audio para ver la television.
SAP ®Modo digital
Pulse SAP para seleccionar la siguiente pista de audio (siesta disponible)
cuando se recibe un canal digital.
® Modo analogico
Pulse SAP para seleccionar el modo de audio como se describe a continuacion.
• Cada vez que se pulsa el boton SAP, el modo de audio cambiara como se
muestra a continuaciOn. (Estereo/SPA/Mono)
• Activa o desactiva el modo Subtitulos
CC
• Pulse SUB MENU para mostrar la pantalla del submenu. (pag. 36)
Este ment] consiste en atajos a funciones de uso convenientes.
SUB
MENU
@@
©u
o
.-_ .-_
__.._
r" ('D
.._ _"
•"_ ©,
--_. --_
3
NI
19
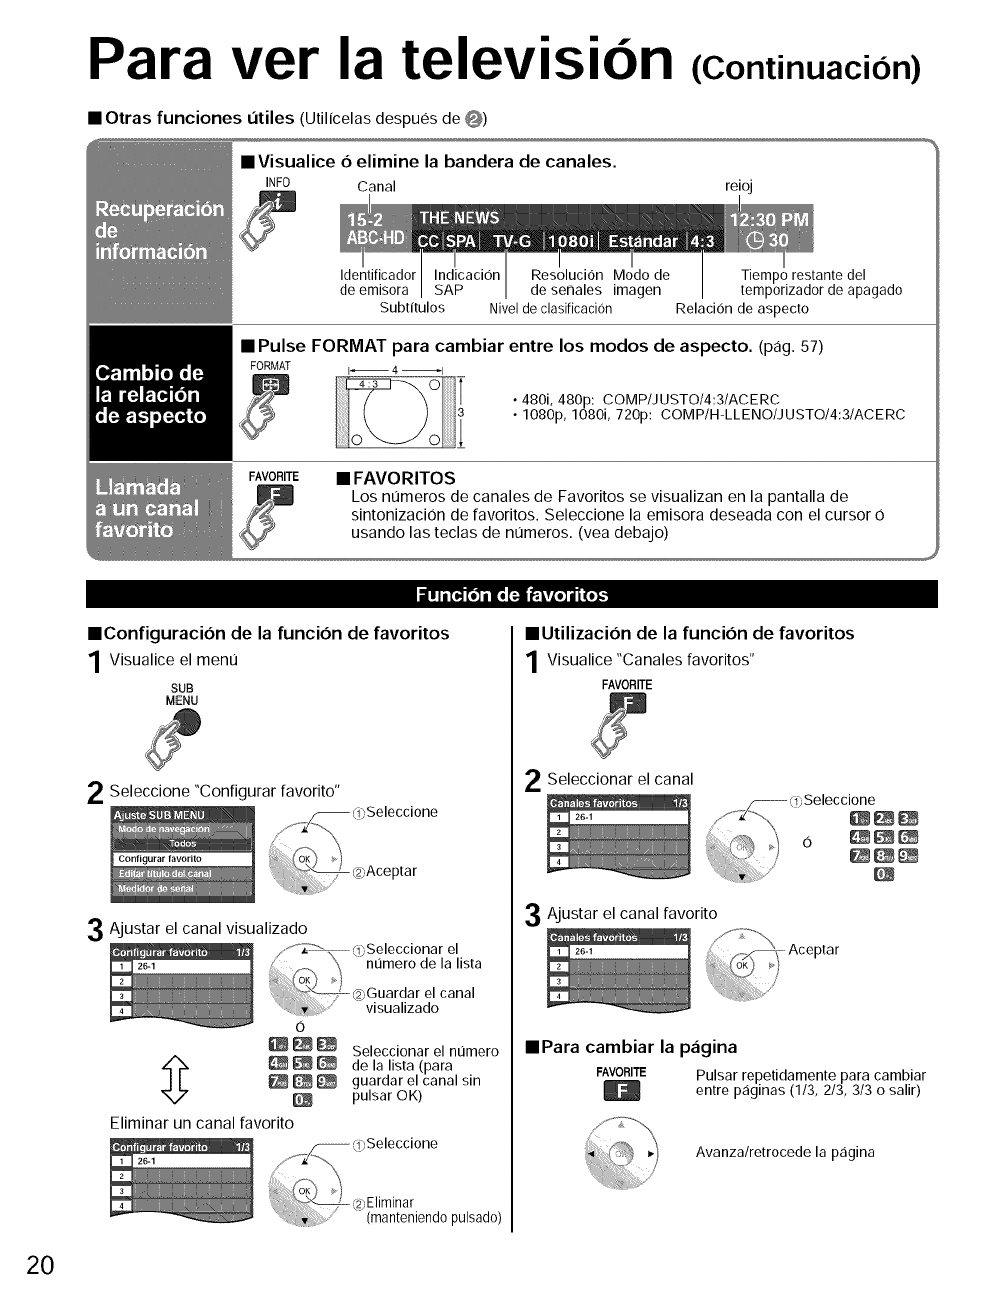
Para ver la television (Continuacion)
•Otras funciones L_tiles (Utilicelas despues de O)
• Visualice O elimine la bandera de canales.
INFO Canal reioj
Identificador Indicacion Resolucion Modo de Tiempo restante del
de emisora SAP de senales imagen temporizador de apagado
Subtitulos Nivel de clasificaci0n Relacion de aspecto
• Pulse FORMAT para cambiar entre los modos de aspecto. (pag. 57)
FORMAT I_ 4 _1
• 480i, 480p: COMP/JUSTO/4:3/ACERC
• 1080p, 1080i, 720p: COMP/H-LLENO/JUSTO/4:3/ACERC
FAVORITE • FAVORITOS
Los numeros de canale5 de Favoritos se visualizan en la pantalla de
sintonizaciOn de favoritos. Seleccione la emisora deseada con el cursor 0
usando la5 tecla5 de numeros. (yea debajo)
i IIi[o_ [o]i lo F.! {':,itLo] I i(o]_
• Configuracion de la funcion de favoritos
1Visualice el ment]
SUB
MENU
2 Seleccione "Configurar favorito"
3Ajustar el canal visualizado
0
_ Seleccionar el nt]mero
_ delalista(para
_ _ guardar el canal sin
pulsar OK)
Eliminar un canal favorito
• Utilizacion de la funcion de favoritos
1 Visualice "Canales favoritos"
FAVORITE
2Seleccionar el canal
3Ajustar el canal favorito
/
• Para cambiar la pagina
FAVORITE Pulsar repetidamente para cambiar
entre p_iginas (1/3, 2/3, 3/3 osalir)
Avanza/retrocede la pagina
20
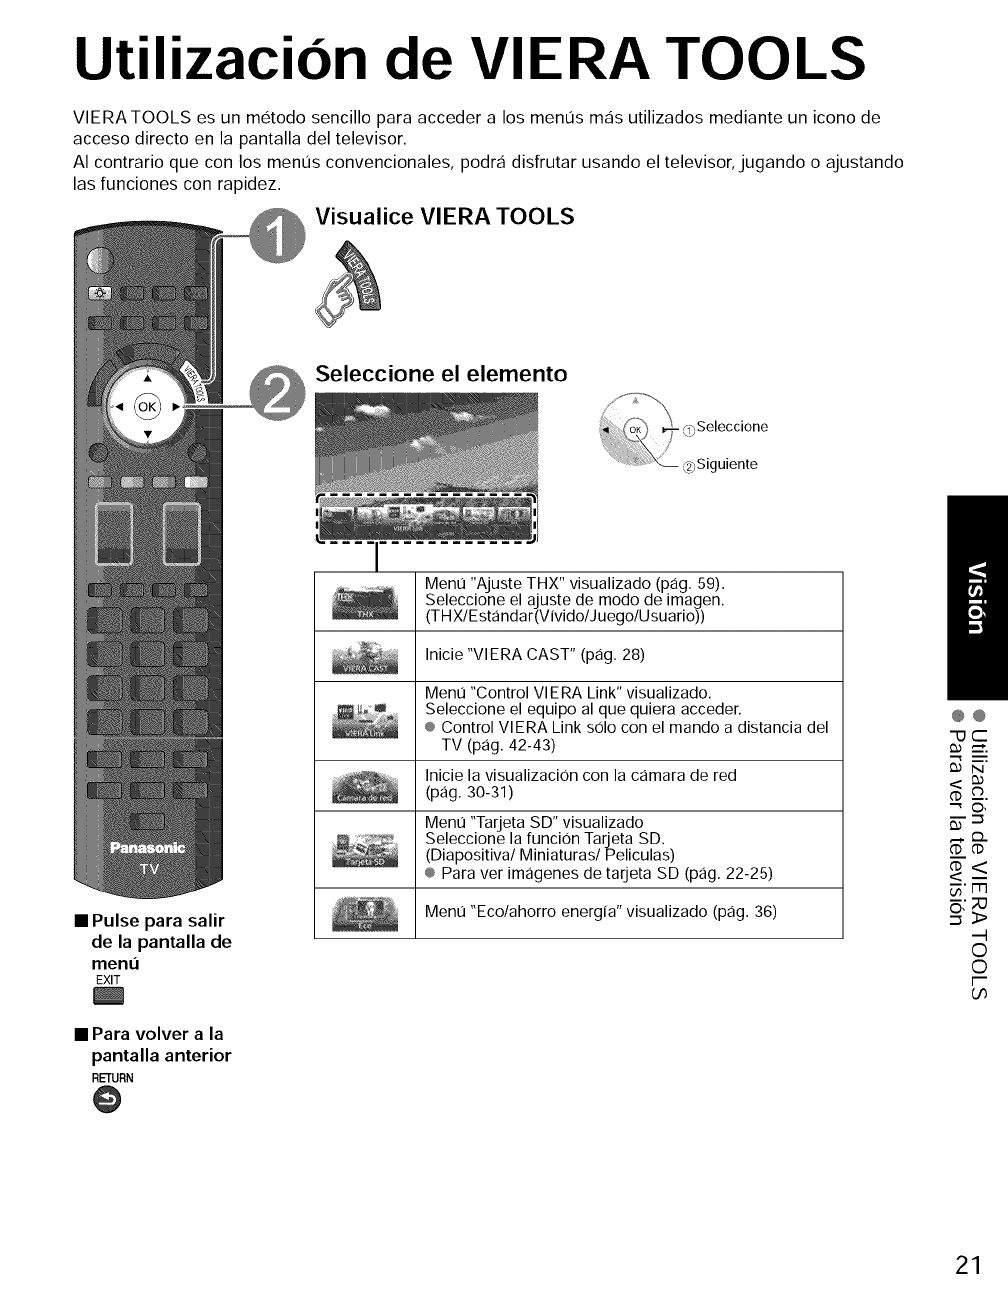
Utilizacion de VIERA TOOLS
VIERATOOLS es un metodo sencillo para acceder a los menus mas utilizados mediante un icono de
acceso directo en la pantalla del televisor.
AI contrario que con los menus convencionales, podra disfrutar usando el televisor, jugando o ajustando
las funciones con rapidez.
Visualice VIERA TOOLS
Seleccione el elemento
•Pulse para salir
de la pantalla de
ment_
EXIT
• Para volver ala
pantalla anterior
RETURN
@
Menu "Ajuste THX" visualizado (pag. 59).
Seleccione el ajuste de modo de imagen.
(THXlEstandar(VividolJuegolUsuario))
Inicie "VIERA CAST" (pag. 28)
Menu "Control VlERA Link" visualizado.
Seleccione el equipo al que quiera acceder.
® Control VlERA Link solo con el mando a distancia del
TV (pag. 42-43)
Inicie la visualizacion con la camara de red
(pag. 30-31 )
Menu "Tarjeta SD" visualizado
Seleccione la funcion Tarjeta SD.
(Diapositiva/Miniaturas/Peliculas)
® Para ver imagenes de tarjeta SD (pag. 22-25)
Menu "Eco/ahorro energia" visualizado (pag. 36)
@@
('_ __,
'-_ O,
m
_'ITI
©
©
F-
U_
21
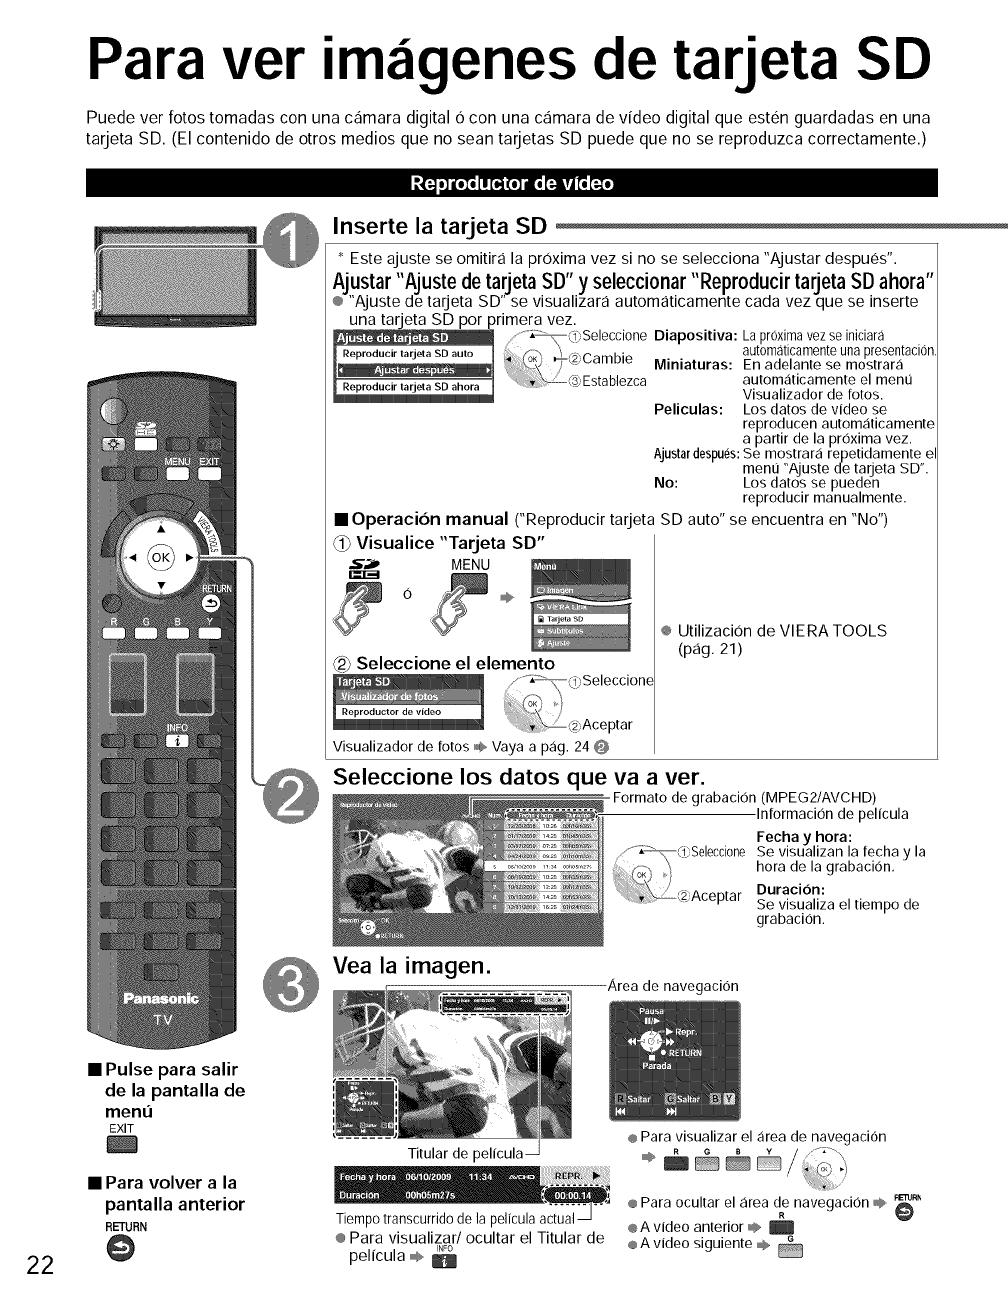
Para ver im igenes de tarjeta SD
Puede ver fotos tomadas con una camara digital Ocon una camara de video digital que esten guardadas en una
tarjeta SD. (El contenido de otros medios que no sean tarjetas SD puede que no se reproduzca correctamente.)
Inserte la tarjeta SD
* Este ajuste se omitira la prOxima vez si no se selecciona "Ajustar despues".
Ajustar "Ajuste de tarjeta SD" y seleccionar "Reproducir tarjeta SD ahora"
® "Ajuste de tarjeta SD" se visualizara automaticamente cada vez que se inserte
una tarjeta SD por primera vez.
Diapositiva: La pr0xima vez se iniciara
automaticamente una presentacion
Miniaturas: En adelante se mostrar,:fi
automaticamente el men0
Visualizador de fotos.
Peliculas: Los datos de video se
reproducen automaticamente
a partir de la proxima vez.
Ajustar despues:Se mostrara repetidamente e
men0 "Ajuste de tarjeta SD".
No: Los datos se pueden
reproducir manualmente.
•Operacion manual CReproducir tarjeta SD auto" se encuentra en "No")
_I_Visualice "Tarjeta SD"
,5"_ MENU
0
(2_Seleccione el elemento
............_oSeleccione
_(2)Aceptar
Visualizador de fotos 0® Vaya a pag. 24 O
® UtilizaciOn de VIERA TOOLS
(pag. 21)
Seleccione los datos que va a ver.
Formato de grabacion (MPEG2/AVCHD)
Informaci0n de pelicula
Fecha y hora:
, _O_Seleccione Se visualizan la fecha y la
.... ......................... _ _°_' '_'i hora de la grabacion.
(2#Aceptar Duracion:
Se visualiza el tiempo de
grabacion.
Vea la imagen. Area de navegacion
22
• Pulse para salir
de la pantalla de
menu
EXIT
• Para volver a la
pantalla anterior
RETURN
@
Titular de pelicula
Tiempo transcurrido de la pelicula actual
® Para visualizar/ocultar el Titular de
INFO
pelicula ÷
® Para visualizar el area de navegacion
÷ _ (!;o ,
® Para ocultar el area de navegacion m$_,.RL-ruR_
® A video anterior _ E @
® A video siguiente _
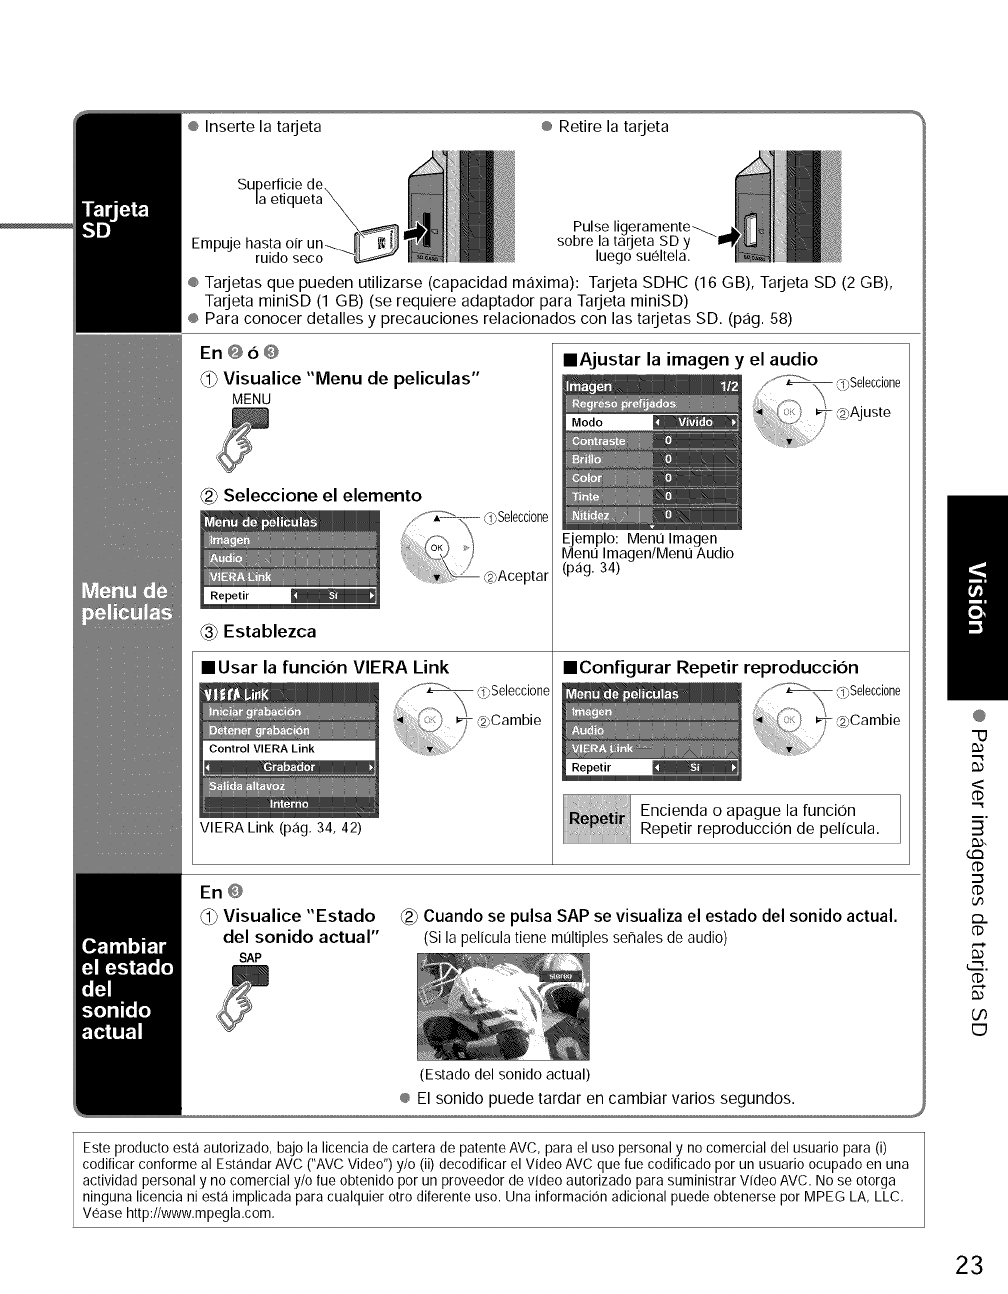
® Inserte la tarjeta ® Retire la tarjeta
Empuje hasta oir
ruido seco
Pulse ligeramente-_.
sobre la tarjeta SD y
luego sueltela,
® Tarjetas que pueden utilizarse (capacidad maxima): Tarjeta SDHC (16 GB), Tarjeta SD (2 GB),
Tarjeta miniSD (1 GB) (se requiere adaptador para Tarjeta miniSD)
® Para conocer detalles y precauciones relacionados con las tarjetas SD. (pag. 58)
En@6@
@ Visualice "Menu de peliculas"
MENU
Seleccione el elemento
Establezca
IlUsar la funcion VIERA Link
VIERA Link (pag, 34, 42)
0bSelecci0ne
_2_Aceptar
IIAjustar la imagen y el audio
Ejemplo: Ment] Imagen
Ment] Imagen/Ment] Audio
(pag. 34)
::(f_@Selecci0ne
_-_2pAjuste
Z
IIConfigurar Repetir reproduccion
Encienda o apague la funci0n
Repetir reproduccion de pelicula.
En @
_1_Visualice "Estado
del sonido actual"
SAP
_2_Cuando se pulsa SAP se visualiza el estado del sonido actual.
(Sila peliculatienemultiplesse_alesdeaudio)
(Estado del sonido actual)
@
"U
<
(1)
m,
3
tm
.-_
dD
dD
_.__..
O0
[:3
Este producto esta autorizado, bajo la licencia de cartera de patente AVC, para el uso personal y no comercial del usuario para (i)
codificar conforme al Estandar AVC ("AVC Video") y/o (ii) decodificar el Video AVC que rue codificado por un usuario ocupado en una
actividad personal y no comercial y/o rue obtenido por un proveedor de video autorizado para suministrar Video AVC. No se otorga
ninguna licencia ni esta implicada para cualquier otro diferente uso. Una informaci6n adicional puede obtenerse pot MPEG LA, LLC,
Vease http://www.mpegla.com,
23
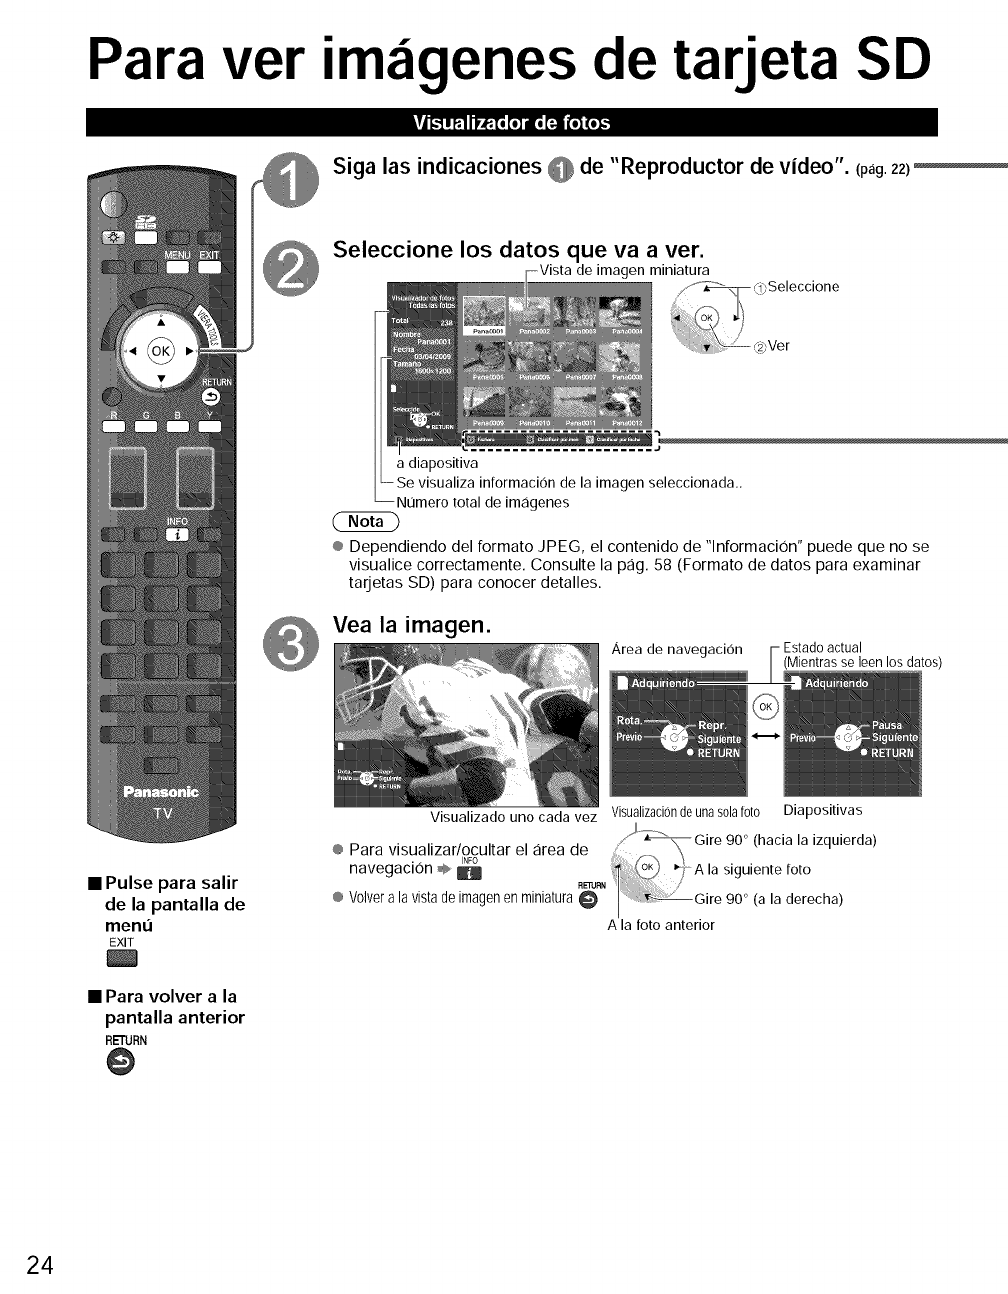
Para ver imagenes de tarjeta SD
Tj!.II P:!Ir_To[o]alEor_JJ[_ (o]_
Siga las indicaciones @de "Reproductor de video". (pag.22)
Seleccione los datos que va a ver.
de _genminiatura
a diapositiva
la imagen seleccionada.,
Numero total de imagenes
® Dependiendo del formato JPEG, el contenido de "lnformaci0n" puede que no se
visualice correctamente. Consulte la pag. 58 (Formato de datos para examinar
tarjetas SD) para conocer detalles.
Vea la imagen.
Area de navegacion Estadoactual
(Mientrasseleen los datos)
•Pulse para salir
de la pantalla de
ment]
EXIT
• Para volver a la
pantalla anterior
RETURN
@
Visualizado uno cada vez Visualizacionde una sola foto
® Para visualizar/ocultar el area de
•.INFO
navegaclon @ B
® Volvera lavistade imagenen miniatura
Diapositivas
90 ° (a la derecha)
A la foto anterior
24
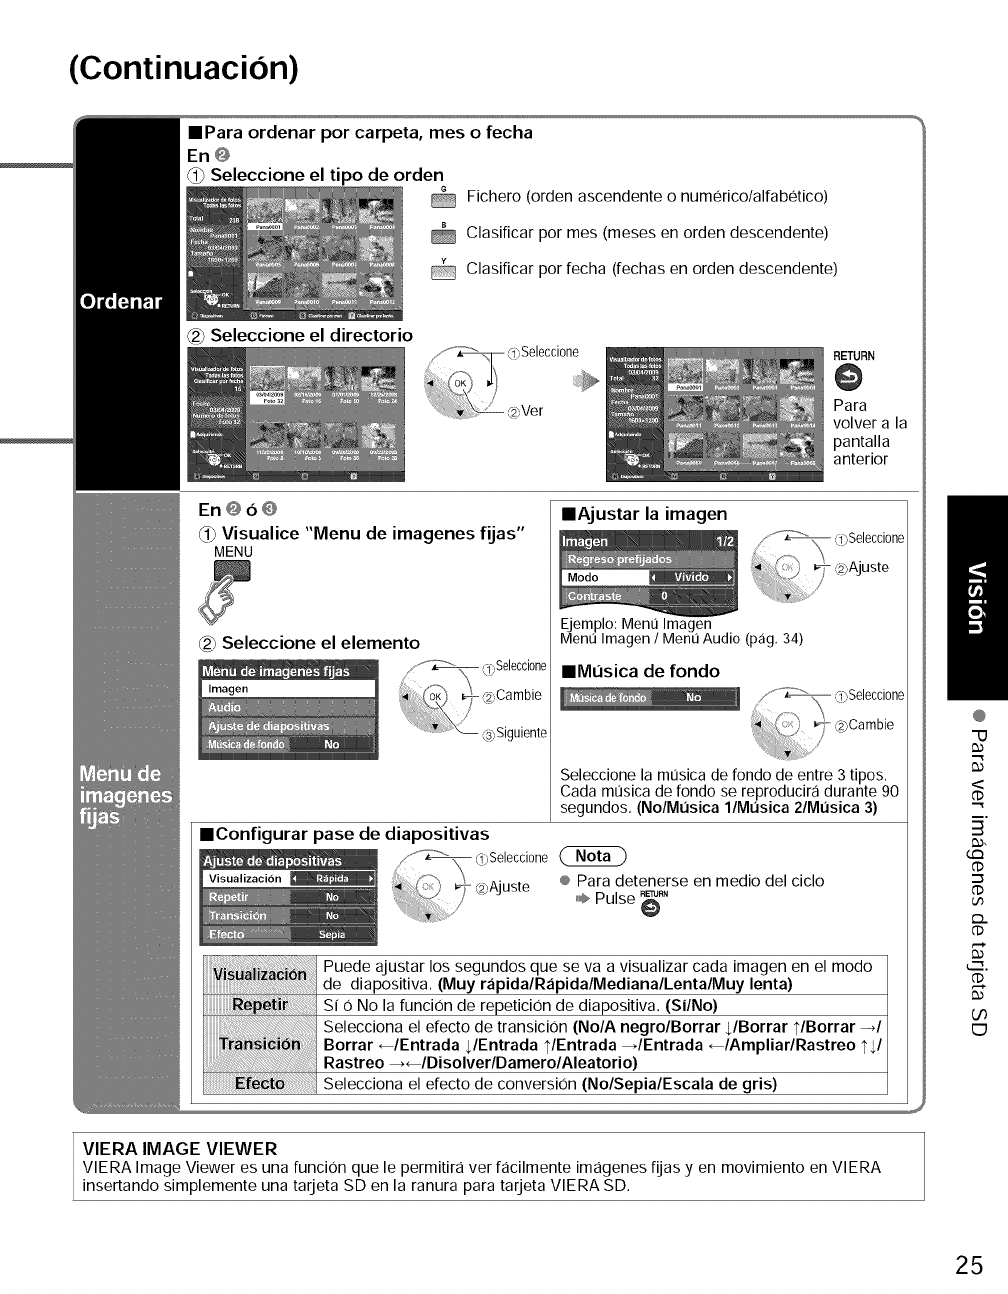
(Continuacion)
IPara ordenar por carpeta, mes o fecha
En @
Seleccione el tipo de orden
Fichero (orden ascendente o numerico/alfabetico)
Clasificar por mes (meses en orden descendente)
@ Clasificar por fecha (fechas en orden descendente)
_2_Seleccione el directorio
RETURN
@
Para
volver a la
pantalla
anterior
En@o@
_) Visualice "Menu de imagenes fijas"
MENU
_2_Seleccione el elemento
IlAjustar la imagen
f,7_ d@eleccione
(2)Ajuste
Ejemplo: Ment] Imagen
Ment] Imagen /Ment] Audio (pag, 34)
IlML_sica de fondo
/""_ _ 3)Seleccione
Seleccione la musica de rondo de entre 3 tipos.
Cada musica de rondo se reproducira durante 90
segundos. (No/Mt)sica l/Mt)sica 2/Mt)sica 3)
IlConfigurar pase de diapositivas
/" _ o@eleccione
,y @ @Ajuste ® Para detenerse en medJo del cJclo
/,,,,,,I_Pulse _RN
Puede ajustar los segundos que se va a visualizar cada imagen en el modo
de diapositiva. (Muy rapidalRapidalMedianalLentalMuy lenta)
SI 0 No la funciOn de repeticiOn de diapositiva. (Si/No)
Selecciona el efecto de transiciOn (No/A negro/Borrar JBorrar ?/Borrar -d
Borrar _/Entrada $/Entrada ?/Entrada _/Entrada _/Ampliar/Rastreo I'$/
Rastreo _lDisolverlDamerolAleatorio)
_fe_i6 Selecciona el efecto de conversion (No/Sepia/Escala de gris)
@
"13
<
dD
m,
3
G:3
-7
_..
_.__.
U3
E_
VIERA IMAGE VIEWER
VIERA Image Viewer es una funcJon que le permitira ver facilmente imagenes fijas y en movimiento en VIERA
insertando simplemente una tarjeta SD en la ranura para tarjeta VIERA SD.
25

Para ver video yDVDs
Si tiene algun equipo conectado al televisor, usted podra ver la reproduccion de videos y DVDs en la
pantalla del televisor.
Puede seleccionar el equipo externo al que quiera acceder.
Con el equipo conectado encendido
Visualizaci6n del menu de selecci6n de entrada
INPUT
26
• Para volver al TV
INPUT
Seleccione el modo de entrada
1
2
3
4HDMI 1
5
6
7
8
9
(ejemplo)
0
/f_ Q)Seleccione
J @lntroducir
Terminal
Etiqueta
!
(ejemplo)
Pulse la tecla de nt]mero
correspondiente en el mando
a distancia para seleccionar la
entrada de su eleccion.
Pulse la flecha ascendente/
descendente para seleccionar la
entrada de su elecci0n, y luego
pulse OK.
® Durante la seleccion, el
ment] "Seleccionar entrada"
desaparece si no se realiza
ninguna accion durante varios
segundos.
® El terminal y el tftulo del equipo
conectado se visualizan.
Para cambiar la etiqueta de
entrada (pag. 53)
® Cuando se establezca el tftulo de entrada (consulte la pag. 53), el tftulo de
entrada se visualizara en la pantalla "Seleccionar entrada".
® Para terminales de entrada laterales (HDMI 3/Video 2), el tftulo de entrada
"JUEGO" se establece de forma predeterminada. (El modo de imagen se pone
en "Juego". Consulte la pag. 59.)
® Para conocer detalles del ajuste "Modo de Imagen", consulte la pag. 59.
Para "Tftulos de entradas", consulte la pag. 53.
• Pulse GAME para cambiar a la pantalla dejuegos
Cambia al terminal de entrada que tiene etiqueta "JUEGO".
GAME ® Cambie entre los terminales de entrada si |
hay varios terminales de entrada que tienen
etiqueta "JUEGO". (Pag. 53) l
® Si no hay terminal de entrada con etiqueta
"JUEGO", siga con el terminal de entrada
actual.
Utilice el equipo conectado empleando el mando a
distancia del mismo.
® Para conocer detalles, vea el manual del equipo conectado.
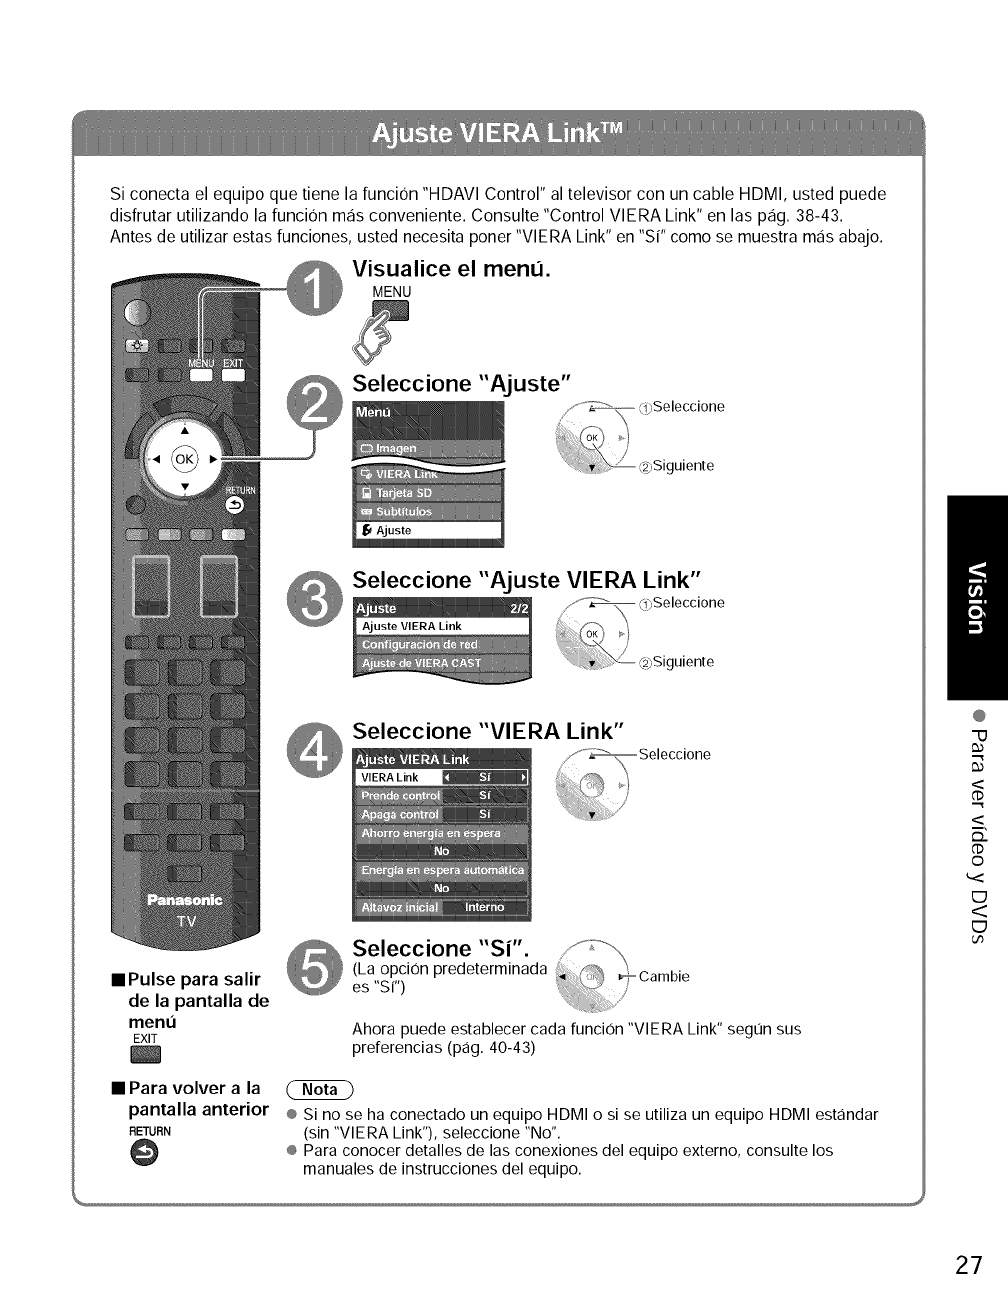
Si conecta el equipo que tiene la funcion "HDAVI Control" al televisor con un cable HDMI, usted puede
disfrutar utilizando la funcion mas conveniente. Consulte "Control VlERA Link" en las pag. 38-43.
Antes de utilizar estas funciones, usted necesita poner "VlERA Link" en "Si" como se muestra mas abajo.
Visualice el menu.
MENU
Seleccione "Ajuste"
Seleccione "Ajuste VIERA Link"
Seleccione "VIERA Link"
_ Seleccione
==Pulse para salir
de la pantalla de
menu
EXIT
l
Seleccione "sr'. i_,_--_ -(La opcion predeterminada Cambie
es "Sl") /
Ahora puede establecer cada funcion "VlERA Link" segtJn sus
preferencias (pag. 40-43)
• Para volver a la
pantalla anterior
RETURN
@
(NND
® Si no se ha conectado un equipo HDMI o si se utiliza un equipo HDMI estandar
(sin "VlERA Link"), seleccione "No".
® Para conocer detalles de las conexiones del equipo externo, consulte los
manuales de instrucciones del equipo.
@
"O
<
<
m_
©
E)
<
E)
27
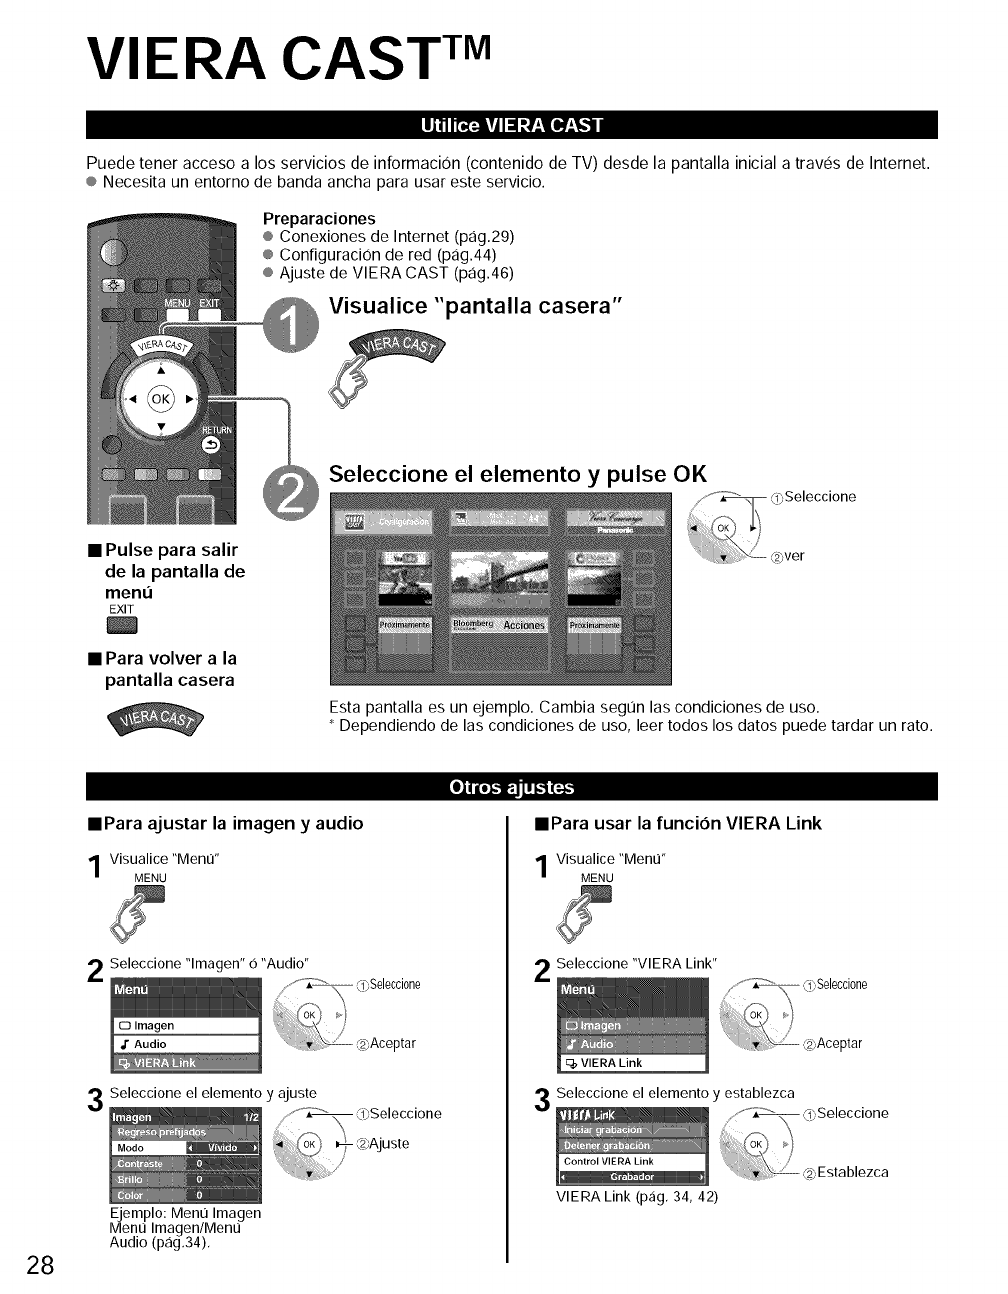
VIERA CAST TM
I1!11[,,i_,i!JI! llL'l[ll_'l,,,"l
Puede tener acceso a los servicios de informacion (contenido de TV) desde la pantalla inicial a traves de Internet.
® Necesita un entorno de banda ancha para usar este servicio.
Preparaciones
® Conexiones de Internet (pag.29)
® Configuracion de red (pag.44)
@Ajuste de VIERA CAST (pag.46)
Visualice "pantalla casera"
Seleccione el elemento y pulse OK
•Pulse para salir
de la pantalla de
ment_
EXIT
• Para volver a la
pantalla casera
Esta pantalla es un ejemplo. Cambia seg0n las condiciones de uso.
* Dependiendo de las condiciones de uso, leer todos los datos puede tardar un rato.
• Para ajustar la imagen y audio
Visualice "Men0"
MENU
Seleccione "lmagen" O "Audio"
Seleccione el elemento y ajuste
Ejemplo: Ment] Imagen
Ment] Imagen/Ment]
Audio (pag.34).
il, l,t."l'i, i I I _1 ll-_
• Para usar la funcion VIERA Link
visualice "Ment]"
MENU
Seleccione "VIERA Link"
0),Seleccione
f
OK_ _,
_\o,,
,(23Aceptar
q_ VIERA Link
Seleccione el elemento y establezca
/:," :_ Lq0Seleccione
VIERA Link (pag, 34, 42)
28

P6ngase en contacto con su proveedor de servicios de banda ancha
AVISO: Si no tiene el servicio de Internet con su proveedor local, solicite el servicio de Internet
a alta velocidad a no menos de la siguiente velocidad de conexion. Si ya tiene dicho servicio,
asegurese de que la velocidad de conexion supera la siguiente.
® Velocidad requerida (efectiva): al menos 1,5 Mbps para calidad de imagen SD y 6 Mbps para calidad de
imagen HD, respectivamente.
® El servicio telef0nico por Internet no se puede utilizar para VIERA CAST.
Seleccione la conexi6n al_imbrica o inalambrica
Si el modem de cable/DSL esta cerca del televisor y usted solo tiene un televisor podria elegir la
conexion alambrica. Si el modem de cable/DSL esta lejos del televisor y/o usted tiene mas de un
televisor en casa podria elegir utilizar una red inalambrica.
®
©
Si no esta usando la red para conectar otra cosa que no sea el TV podra conectar
directamente el televisor al conector Ethernet de cable/DSL (vea el dibujo esquematico de
abajo).
Conexion al_imbrica avanzada
Siesta usando la red para conectar muchos PC/ordenadores portatiles y quiere conectar el TV deberfa
usar un enrutador para conectar el televisor a Internet (vea el dibujo esquematico de abajo).
Conexion inal_imbrica avanzada
Siesta usando la red para conectar muchos PC/ordenadores portatiles y quiere conectar el
TV tambien podria usar un enrutador inalambrico para conectar el televisor a Internet (vea el
dibujo esquematico de abajo).
®
Enrutador _B_
Modem
cable
o modem
de DSL
Cable
Ethernet Modem
cable
o modem
de DSL
@
<
m
;O
_>
C)
_>
Repetidor
inal_imbrico
Modem
cable
o modem
de DSL
29
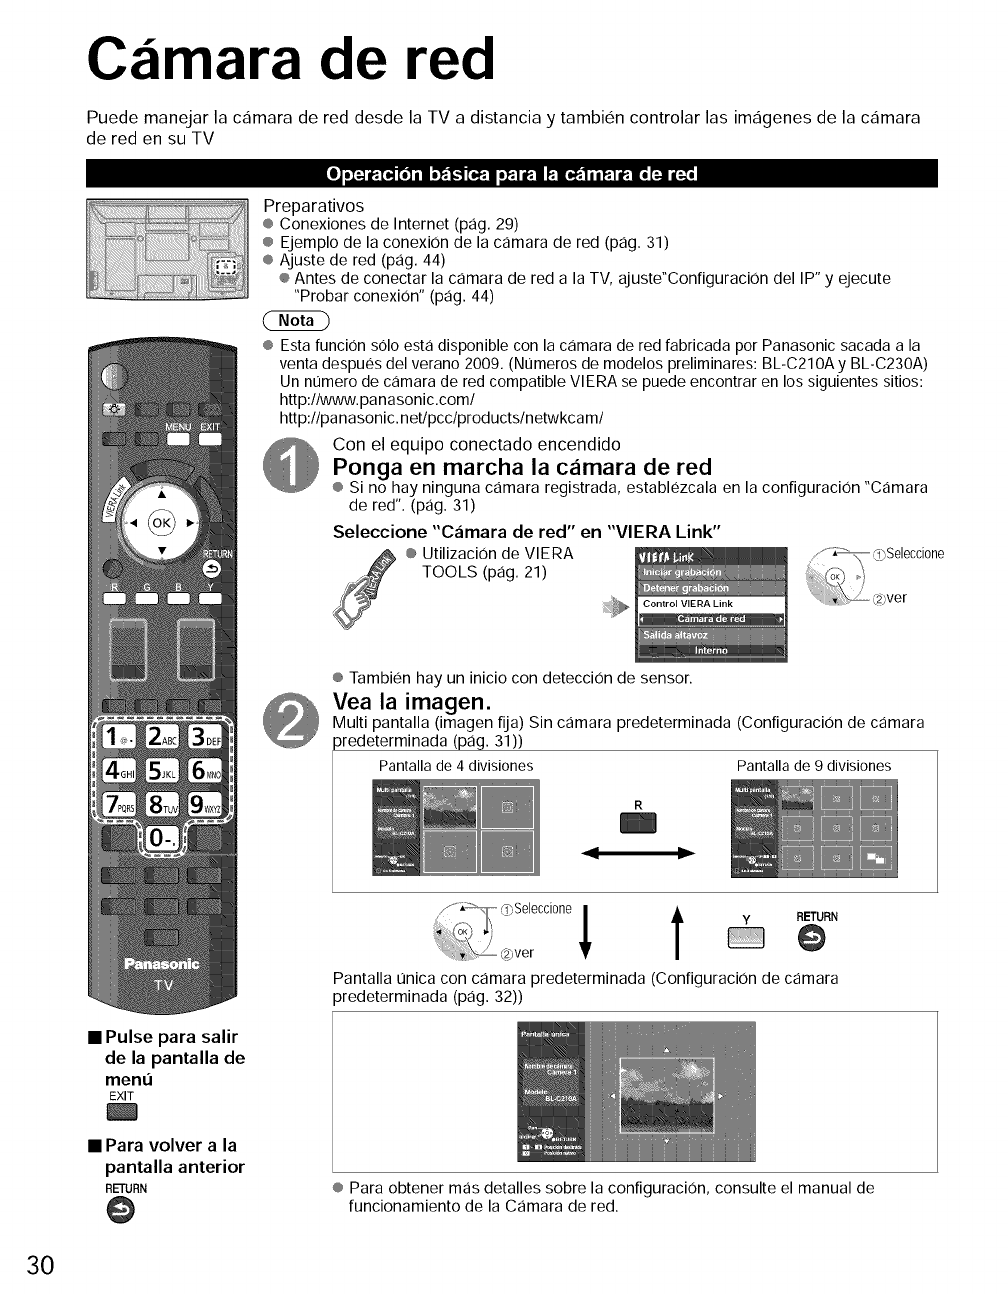
C imara de red
Puede manejar la c_imara de red desde la TV a distancia y tambien controlar las imagenes de la c_imara
de red en su TV
•Pulse para salir
Preparativos
® Conexiones de Internet (pag. 29)
® Ejemplo de la conexi0n de la camara de red (pag. 31)
® Ajuste de red (pag. 44)
® Antes de conectar la camara de red a la TV, ajuste"Configuraci0n del IP" y ejecute
"Probar conexi0n" (pag. 44)
® Esta funcion s01oesta disponible con la camara de red fabricada pot Panasonic sacada a la
venta despues del verano 2009. (Numeros de modelos preliminares: BL-C210A y BL-C230A)
Un nt]mero de camara de red compatible VIERA se puede encontrar en los siguientes sitios:
http://www.panasonic.com/
http://pa nasonic, netJpcc/products/netwkca m/
Con el equipo conectado encendido
Ponga en marcha la camara de red
® Si no hay ninguna camara registrada, establezcala en la configuration "Camara
de red". (pag. 31)
Seleccione "Camara de red" en "VIERA Link"
® Utilizacion de VIERA
TOOLS (pag. 21)
Control VIERA Link
® Tambien hay un inicio con detecci0n de sensor.
Vea la imagen.
Multi pantalla (imagen fija) Sin camara predeterminada (Configuraci0n de camara
)redeterminada (pag. 31))
Pantalla de 4 divisiones Pantalla de 9 divisiones
_[,! y RETURN
....7, (2_ver
Pantalla t_nica con camara predeterminada (Configuraci0n de camara
)redeterminada (pag. 32))
de la pantalla de
ment_
EXIT
• Para volver a la
pantalla anterior
RETURN ® Para obtener mas detalles sobre la configuraci0n, consulte el manual de
funcionamiento de la Camara de red.
30
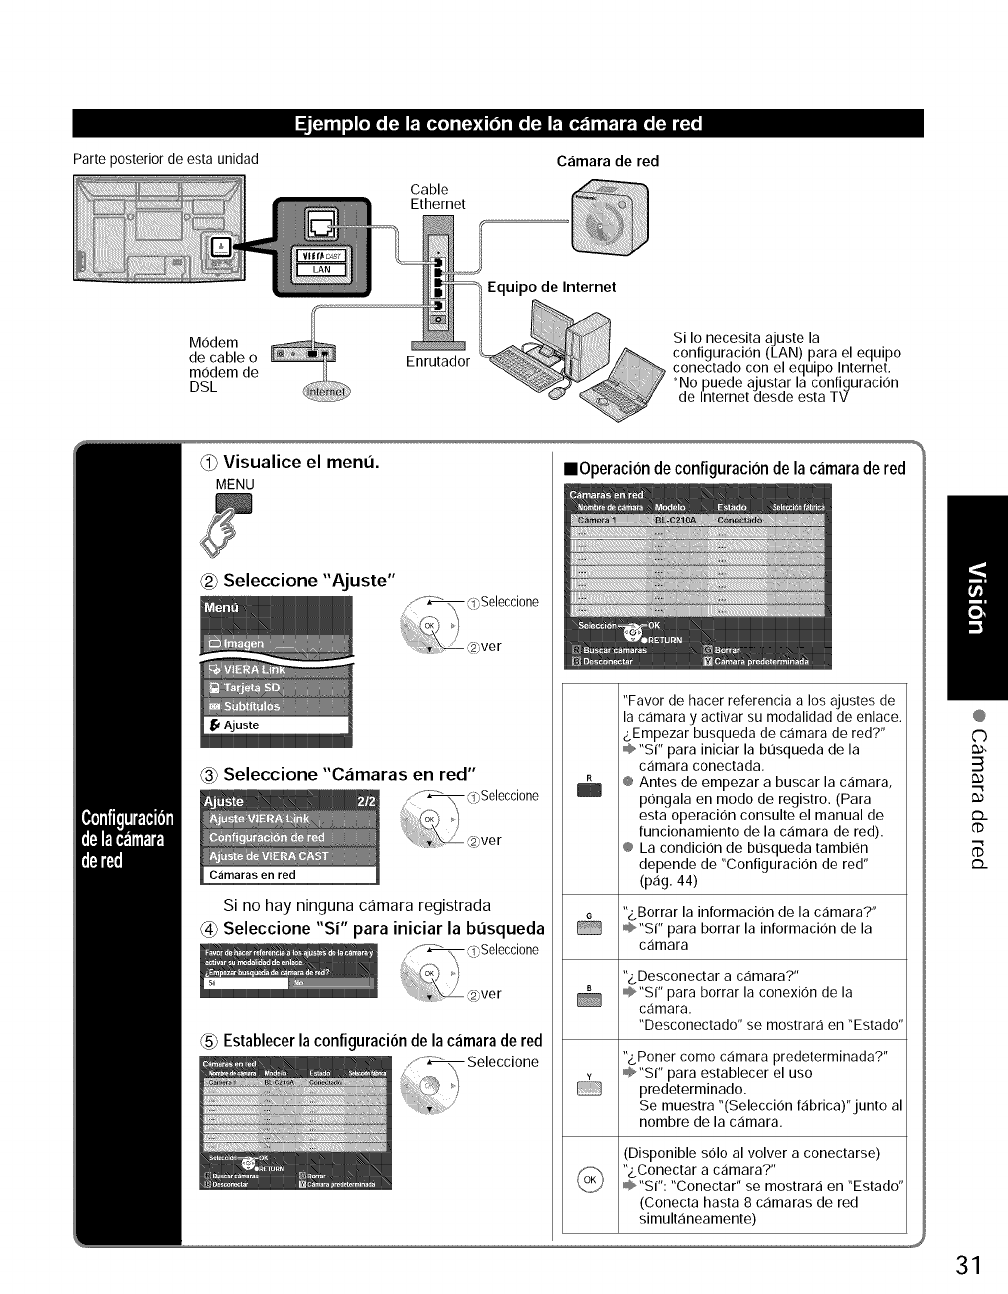
Parte posterior de esta unidad
Modem
de cable o
modem de
DSL
[_ I|] o] [OIO _ _[_O] i[ _,,-):|[O] ilo _ _la,J':,11|_t If:,lo [4 lifo
C_imara de red
Cable
Ethernet
Enrutador
Equipo de Internet
Si Io necesita ajuste la
configuraciOn (LAN) para el equipo
conectado con el equipo Internet.
*No puede ajustar la configuracion
de Internet desde esta TV
(_) Visualice el menu.
MENU
_ Seleccione "Ajuste"
_ Seleccione "C,imaras en red"
Carnaras en red
Si no hay ninguna carnara registrada
_4_Seleccione "Si" para iniciar la busqueda
_5_Establecerlaconfiguraci6n de lac_imaradered
mOperaci6n de configuracion dela camaradered
"Favor de hacer referencia a los ajustes de
la camara y activar su modalidad de enlace.
_.Empezar busqueda de camara de red?"
'%¢ para iniciar la bt]squeda de la
camara conectada.
¢ Antes de empezar a buscar la camara,
pongala en modo de registro. (Para
esta operacion consulte el manual de
funcionamiento de la c,:imara de red).
@ La condicion de bt]squeda tambien
depende de "Configuracion de red"
(pag. 44)
"&Borrar la informacion de la camara?"
"Si" para borrar la informacion de la
c,:imara
"z.Desconectar a c_imara?"
_'"Si" para borrar la conexion de la
c_imara.
"Desconectado" se mostrara en "Estado"
"&Poner como camara predeterminada?"
'%¢ para establecer el uso
predeterminado.
Se muestra "(Seleccion fabrica)"junto al
nombre de la c,:imara.
(Disponible s01o al volver a conectarse)
"&Conectar a camara?"
"Si": "Conectar" se mostrara en "Estado"
(Conecta hasta 8 c_imaras de red
simult,:ineamente)
@
C)
3
m
('D
m
31
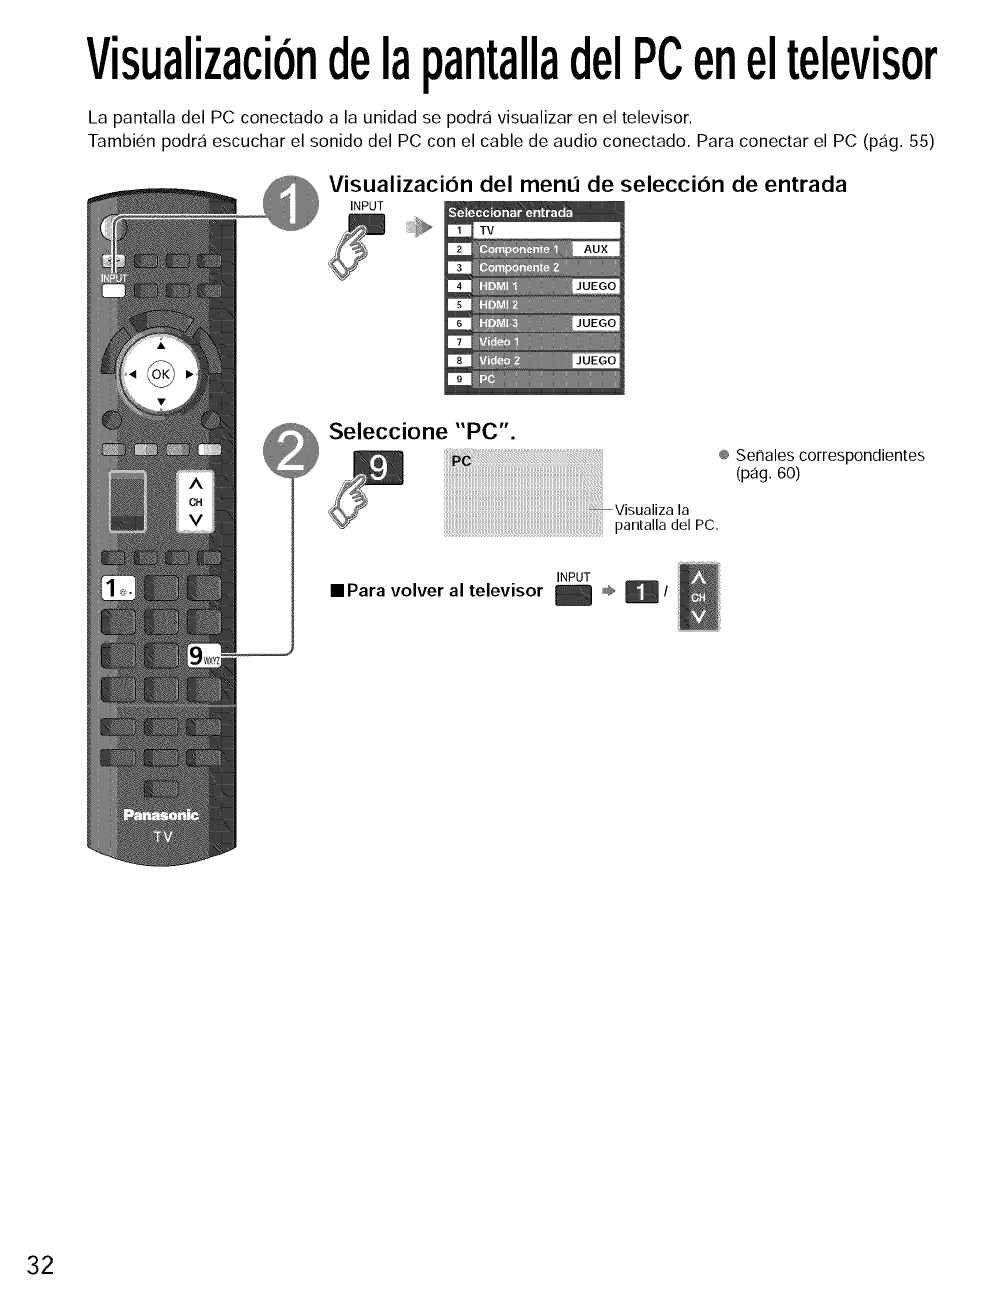
VisualizaciondelapantalladelPCeneltelevisor
La pantalla del PC conectado a la unidad se podra visualizar en el televisor.
Tambien podra escuchar el sonido del PC con el cable de audio conectado. Para conectar el PC (pag. 55)
Visualizaci6n del menu de selecci6n de entrada
INPUT
Seleccione "PC".
® Serlales correspondientes
(pag. 60)
Visualiza la
pantalladel PC.
INPUT
• Para volver al televisor __ ,,¢,_ /
32
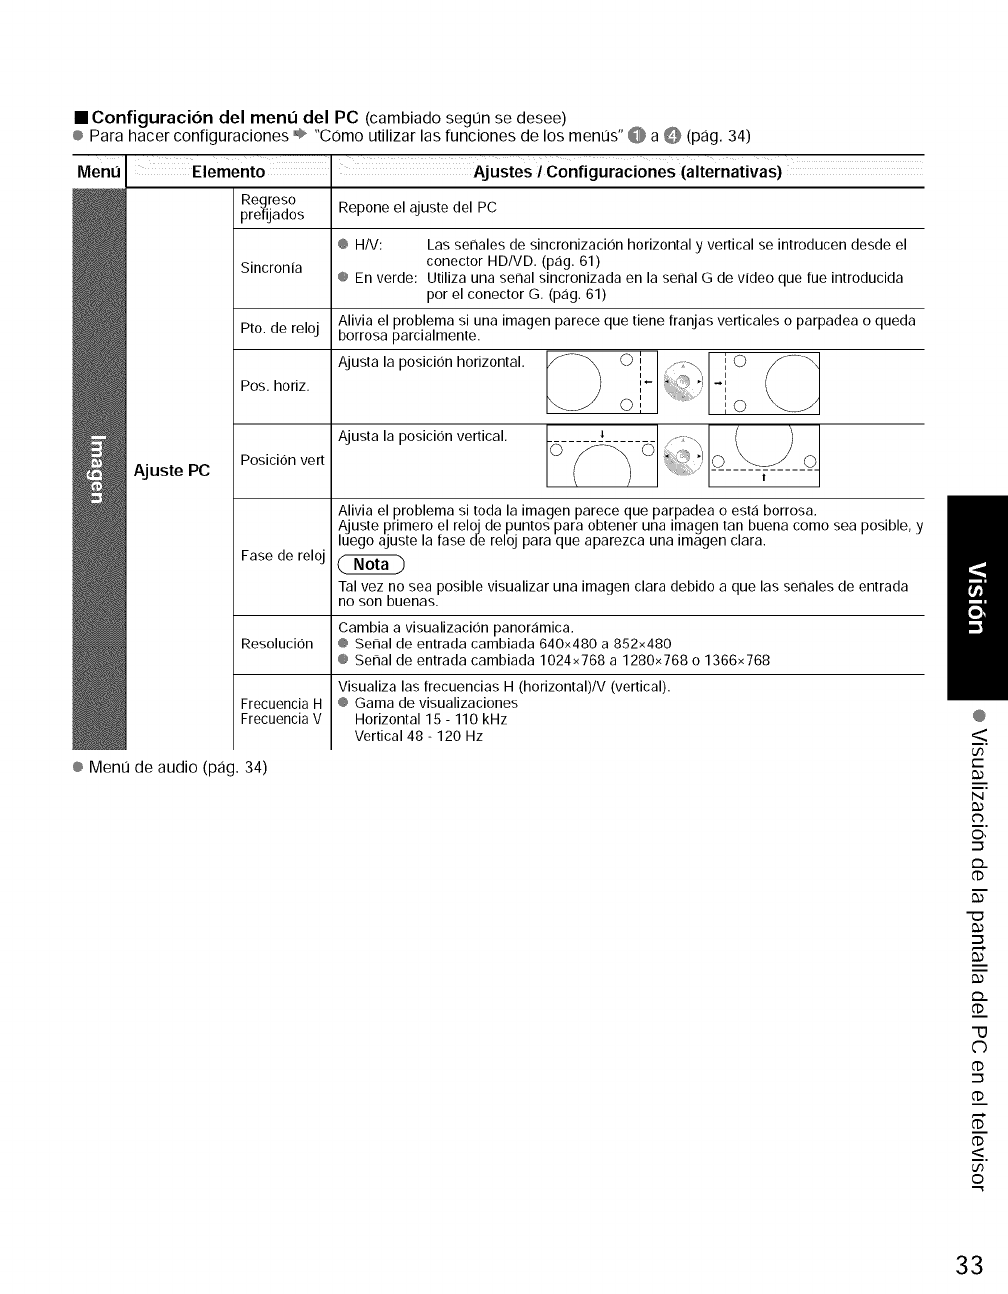
•Configuracion del menn del PC (cambiado segt]n se desee)
® Para hacer configuraciones ®" "Como utilizar las funciones de los ment]s" @ a _ (pag. 34)
Repone el ajuste del PC
@ H/V: Las set, ales de sincronizacion horizontal y vertical se introducen desde el
Sincronia conector HD/VD. (p,:ig. 61)
@ En verde: Utiliza una seC_al sincronizada en la senal G de video que rue introducida
por el conector G. (p_ig. 61)
Pro. de reloj
Menu Elemento
Regreso
prefijados
Pos. horiz.
Posicion vert
Fase de relo
Alivia el problema si una imagen parece que tiene franjas verticales o parpadea o queda
borrosa parcialmente.
Ajusta la posicion horizontal. O i 1
O i
Aj uste PC
Ajusta la posicion vertical.
Alivia el problema si toda la imagen parece que parpadea o est,:i borrosa.
Ajuste primero el reloj de puntos para obtener una imagen tan buena como sea posible, y
luego ajuste la fase de reloj para que aparezca una imagen clara.
(2ND
Tal vez no sea posible visualizar una imagen clara debido a que las set, ales de entrada
no son buenas.
Cambia a visualizacion panoramic&
Resolucion @ Sei_al de entrada cambiada 640x480 a 852x480
@ SeC_al de entrada cambiada 1024x768 a 1280x768 o 1366x768
Frecuencia H
Frecuencia V
Visualiza las ffecuencias H (horizontal)IV (vertical).
@ Gama de visualizaciones
Horizontal 15 - 110 kHz
Vertical 48 - 120 Hz
@Ment] de audio (pag. 34)
@
<
7
t--
N
C_
O,
_..
"U
c)
_<.
U3
0
33
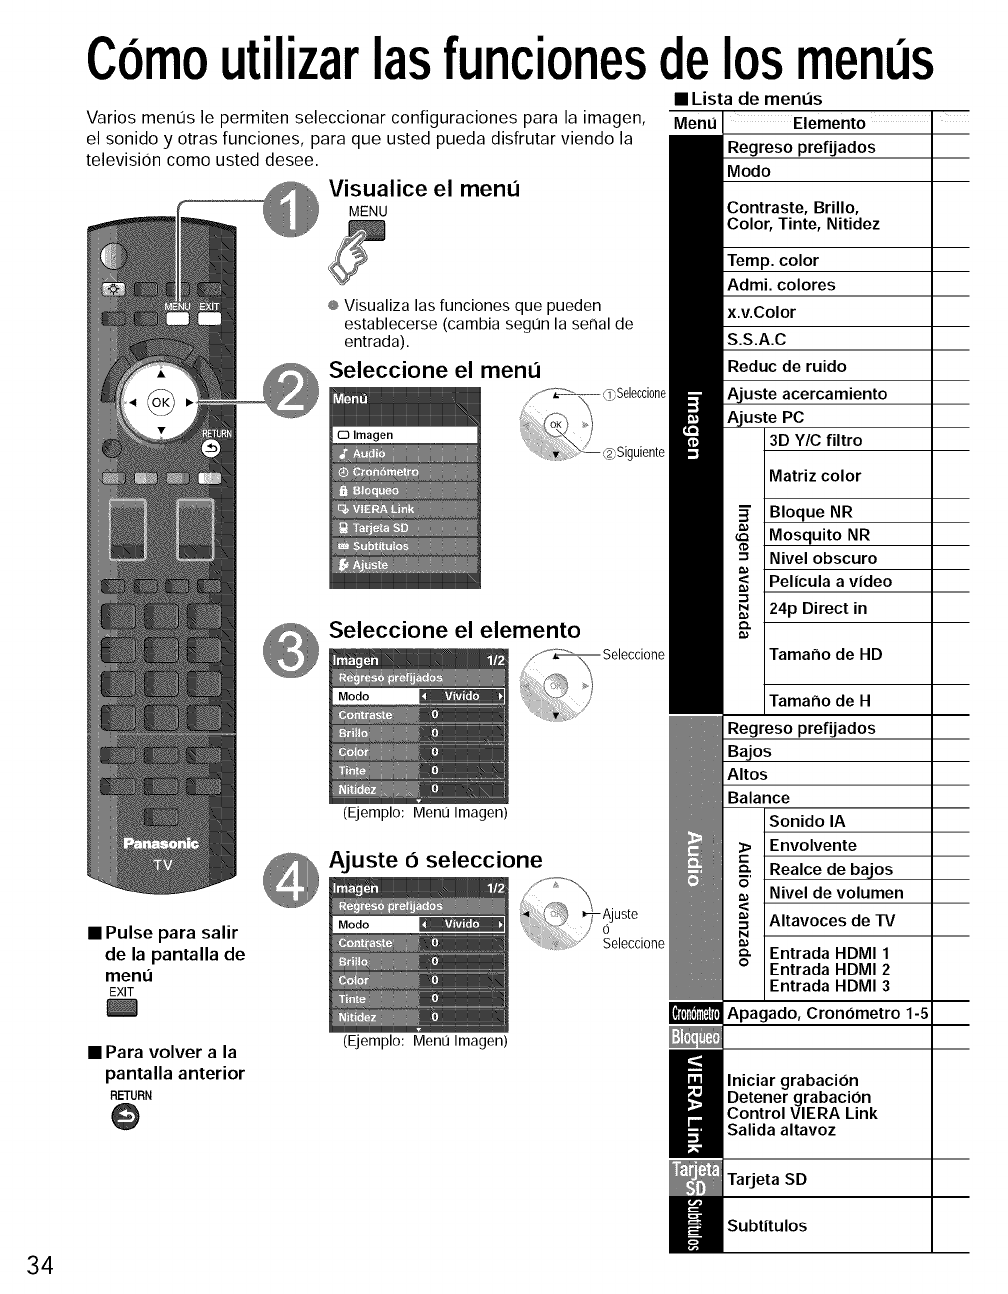
Comoutilizarlasfuncionesdelosmenus
• Lista de menus
Varios menos le permiten seleccionar configuraciones para la imagen,
el sonido y otras funciones, para que usted pueda disfrutar viendo la
television como usted desee.
Visualice el menu
MENU
® Visualiza las funciones que pueden
establecerse (cambia segOn la serial de
entrada).
Seleccione el menu
Seleccione el elemento
/,_ Seleccione
• Pulse para salir
de la pantalla de
menu
EXIT
• Para volver ala
pantalla anterior
RETURN
@
(Ejemplo: Ment] Imagen)
O seleccione
_7-Ajuste
'ii J Seleccione
(Ejemplo: Ment] Imagen)
Menu
Regreso prefijados
Modo
Contraste,Brillo,
Color,Tinte,Nitidez
Temp. color
Admi. colores
x.v.Color
S.S.A.C
Reduc de ruido
Ajuste acercamiento
Ajuste PC
3D Y/C filtro
Matriz color
Bloque NR
Mosquito NR
Nivel obscuro
Pelicula a video
24p Direct in
Tamar_o de HD
Tamano de H
Regreso prefijados
Bajos
Altos
Balance
Sonido IA
Envolvente
Realce de bajos
Nivel de volumen
Altavoces de rv
Entrada HDMI 1
Entrada HDMI 2
Entrada HDMI 3
Apagado, Cronometro 1-5
lniciar grabacion
Detener grabacion
Control VIERA Link
Salida altavoz
Tarjeta SD
Subtitulos
34
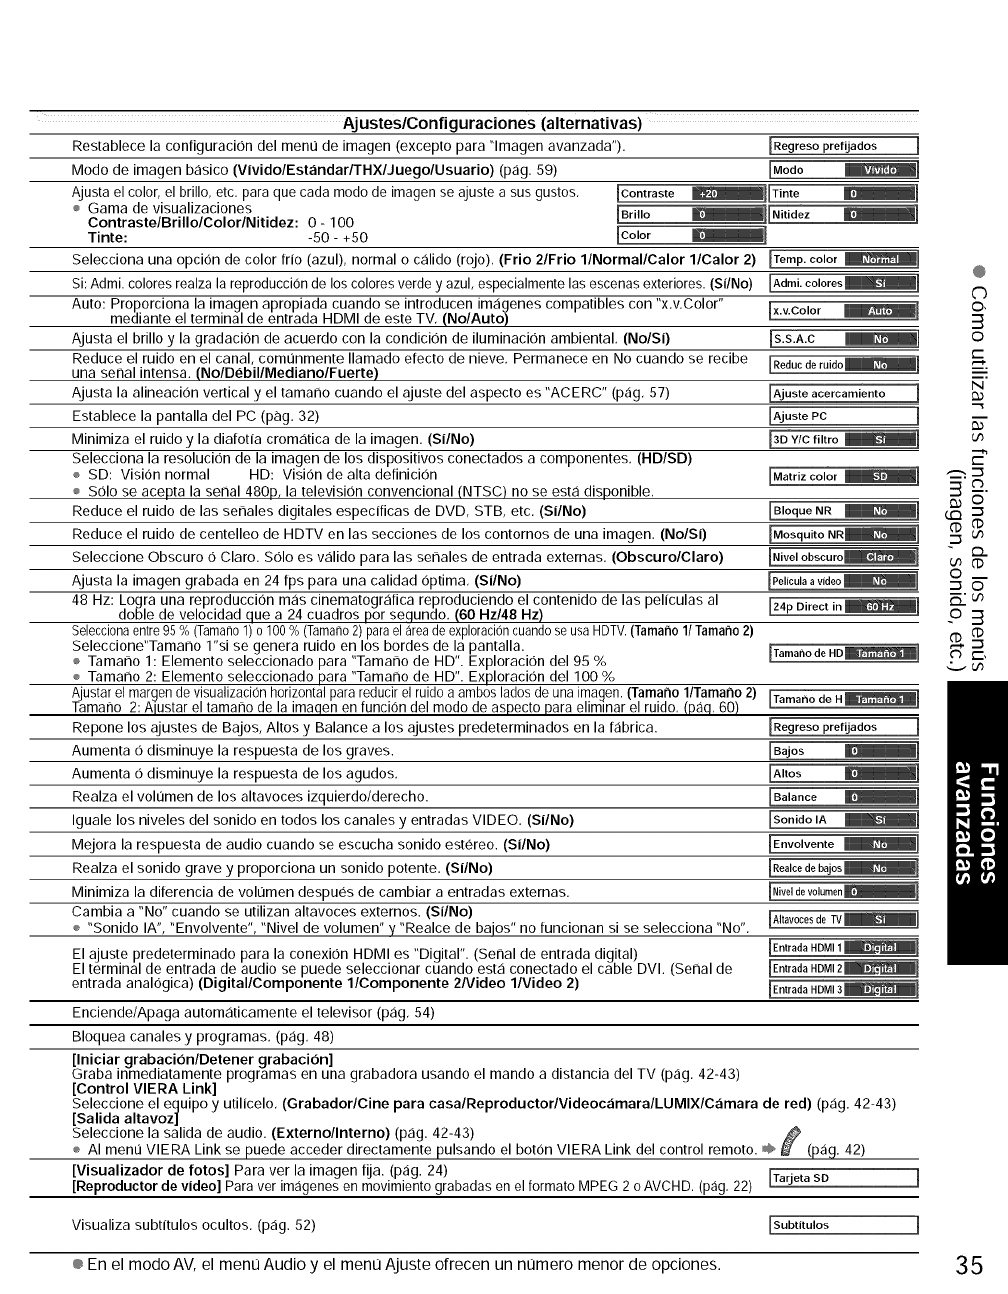
Aj ustes/Configuraciones (alternativas)
Restablece la configuracion del ment] de imagen (excepto para "lmagen avanzada"). [Regreso prerijados ]
Modo de imagen b_isico (V|vidolEstandarlTHXlJuegolUsuario) (p_ig. 59) [Modo
Ajusta el color, el brillo, etc. para que cada modo de imagen se ajuste a sus gustos, IContraste
÷ Gama de visualizaciones IBrillo
ContrastelBrillolColorlNitidez: 0 - 100
Tinte: -50 - +50 Ic°l°r
Selecciona una opci6n de color frio (azul), normal o c_ilido (rojo), (Frio 2/Frio l/Normal/Calor l/Calor 2) [Temp. color _]
Si:Admi. coloresrealza lareproducci6nde los coloresverde y azul, especialmente las escenasexteriores.(S|/No)
Auto: Proporciona la imagen apropiada cuando se introducen imageries compatibles con "x,v.Color" ix.v.Color
mediante el terminal de entrada HDMI de este TV, (No/Auto)
Ajusta el brillo y la gradaci6n de acuerdo con la condicion de iluminacion ambiental, (No/S|) Is.s.A.C
Reduce el ruido en el canal, comt]nmente Ilamado efecto de nieve, Permanece en No cuando se recibe
una senal intensa. (NolDebillMedianolFuerte)
Ajusta la alineacion vertical y el tamarlo cuando el ajuste del aspecto es "ACERC" (pag, 57) [Ajusteacercamiento 1
Establece la pantalla del PC (pag, 32) [AjustePC
Minimiza el ruido y la diafotfa crom_itica de la imagen. (S|/No) [3D Y/C filtro _]
Selecciona la resolucion de la imagen de los dispositivos conectados a componentes, (HD/SD)
÷ SD: Vision normal HD: Vision de alta definicion [Matrizcolor _1
÷ Solo se acepta la serial 480p, la television convencional (NTSC) no se est,1disponible,
Reduce el ruido de las serlales digitales especificas de DVD, STB, etc, (S|/No) [Bloque NR _]
Reduce el ruido de centelleo de HDTV en las secciones de los contornos de una imagen, (No/S|)
Seleccione Obscuro O Claro. Solo es v_ilido para las serlales de entrada externas. (Obscuro/Claro)
Ajusta la imagen grabada en 24 fps para una calidad Optima, (S|/No)
48 Hz: Logra una reproducci6n m_is cinematogr_ifica reproduciendo el contenido de las pelfculas al
doble de velocidad que a 24 cuadros por sequndo, (60 Hz/48 Hz)
Seleccionaentre95%(Taman01)0100%(Tamano2)paraelareadeexpl0raci6ncuandoseusaHDTV.(Tamarlo1/Tamano2)
Seleccione"Tamarlo l"si se genera ruido en los bordes de la pantalla.
÷ Tamarlo 1: Elemento seleccionado para "Tamarlo de HD'. Exploracion del 95 %
÷ Tamarlo 2: Elemento seleccionado para "Tamarlo de HD". Exploracion de1100 %
Ajustarel margende visualizacionhorizontalparareducirel ruidoa ambos ladosde unaimagen.(Tamarlo1/ramarlo 2) [Tarnar_o de H_]
Tamano 2: Alustar el tamano de la imaqen en funcion del modo de aspecto para eliminar el ruido, (paq, 60)
Repone los ajustes de Bajos, Altos y Balance a los ajustes predeterminados en la f_ibrica. [Regresoprefijados
Aumenta Odisminuye la respuesta de los graves. [gajos
Aumenta Odisminuye la respuesta de los agudos, [Altos
Realza el volt]men de los altavoces izquierdo/derecho.
Iguale los niveles del sonido en todos los canales y entradas VIDEO. (Si/No} [Sonido IA
Mejora la respuesta de audio cuando se escucha sonido estereo. (Si/No} [Envolvente
Realza el sonido grave y proporciona un sonido potente. (Si/No)
Minimiza la diferencia de volt]men despues de cambiar a entradas externas.
Cambia a "No" cuando se utilizan altavoces externos. (Si/No)
÷ "Sonido IA","Envolvente", "Nivel de volumen" y "Realce de baios" no funcionan si se selecciona "No". [Altavoces de TV_]
El ajuste predeterminado para la conexion HDMI es "Digital", (Senal de entrada digital) [Entrada HDMI1_]
El terminal de entrada de audio se puede seleccionar cuando est,1conectado el cable DVI. (Serial de [EntradaHDMI2_]
entrada analogica) (Digital/Componente l/Componente 2Nideo l/Video 2) [Entrada HDMI3_]
Enciende/Apaga autom_iticamente el televisor (p_ig, 54)
Bloquea canales y programas, (pag, 48)
[Iniciar grabacion/Detener grabacion]
Graba inmediatamente programas en una grabadora usando el mando a distancia del TV (p_ig,42-43)
[Control VIERA Link]
Seleccione el ecjuipo y utilicelo, (Grabador/Cine para casalReproductorlVideocamaralLUMIXlCamara de red) (p_ig.42-43)
[Salida altavoz]
Seleccione la salida de audio. (Externo/Interno) (p,:ig. 42-43)
÷ AI ment] VlERA Link se puede acceder directamente pulsando el bot6n VlERA Link del control remoto. 0_¢,,_ (pag. 42)
[Visualizador de fotos] Para ver la imagen fija. (pag. 24)
[Reproductor de video] Para ver imagenesen movimiento grabadasen el formato MPEG 2 o AVCHD. (pag, 22) [Tarjeta SD ]
Visualiza subtftulos ocultos, (pag. 52) Subtitulos
@
C)
©,
3
©
m.
N
m
E"
3o.
o3
C> t-',
,.L..,cn
® En el modo AV, el ment] Audio y el ment] Ajuste ofrecen un nL]mero menor de opciones. 35
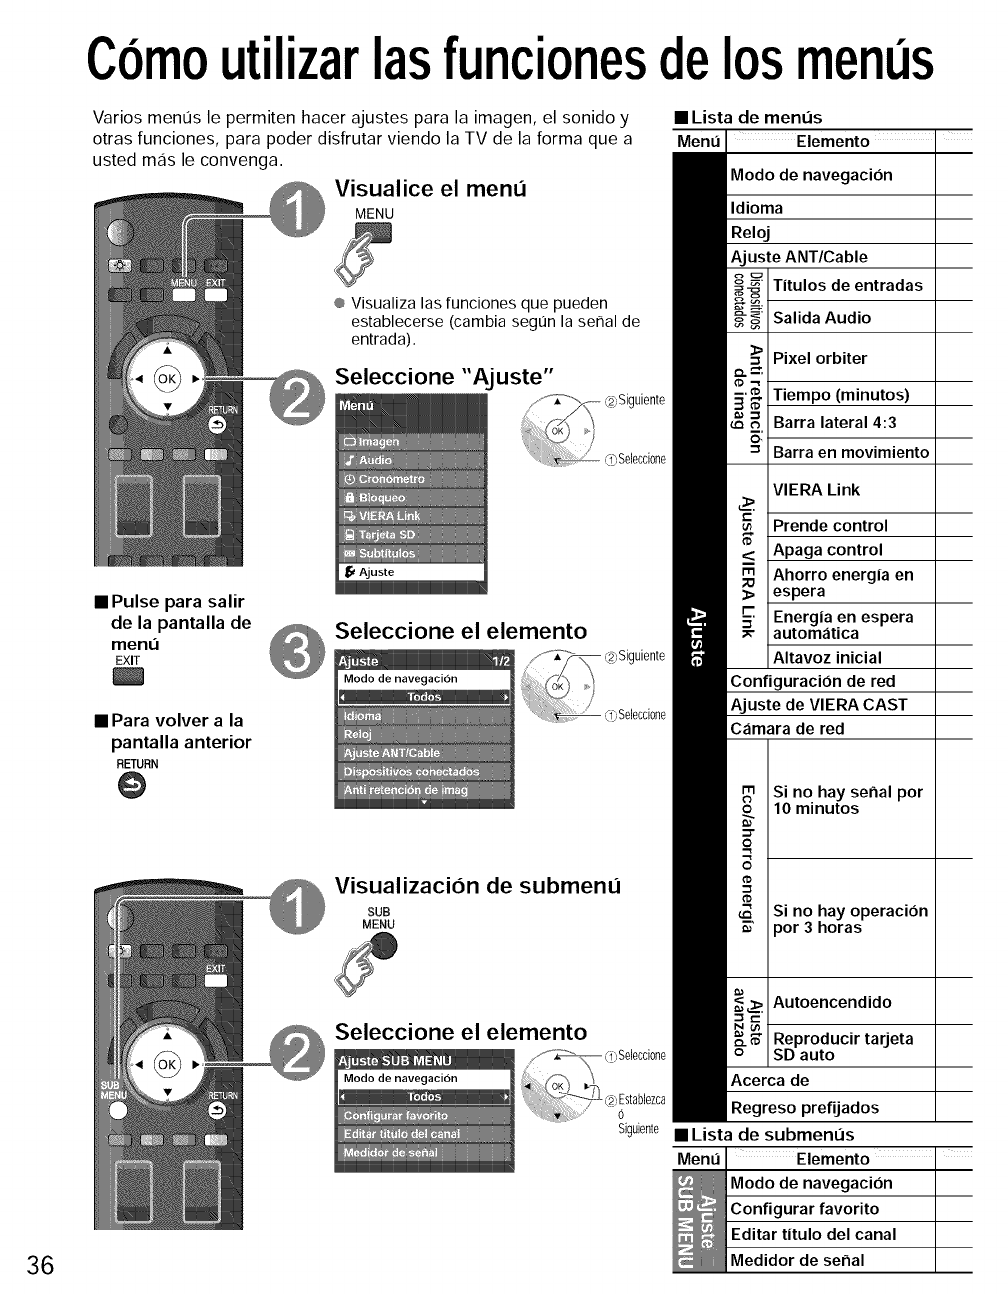
Comoutilizarlasfuncionesdelosment s
Varios ment]s le permiten hacer ajustes para la imagen, el sonido y
otras funciones, para poder disfrutar viendo la TV de la forma que a
usted mas le convenga.
Visualice el menu
MENU
÷ Visualiza las funciones que pueden
establecerse (cambia segt]n la serial de
entrada).
Seleccione "Ajuste"
• Pulse para salir
de la pantalla de
men,',
EXIT
• Para volver a la
pantalla anterior
RETURN
@
Seleccione el elemento
• Lista de ment]s
Ment_ Elemento
Modo de navegacion
Idioma
Reloj
Ajuste ANT/Cable
Titulos de entradas
Salida Audio
Pixel orbiter
Tiempo (minutos)
Barra lateral 4:3
Barra en movimiento
VIERA Link
Prende control
Apaga control
Ahorro energia en
espera
Energia en espera
automatica
Altavoz inicial
ConfiguraciOn de red
Ajuste de VIERA CAST
Camara de red
Si no hay senal por
10 minutos
Visualizacion de submenu
SUB
MENU Si no hay operacion
por 3 horas
36
Seleccione el elemento
Siguiente
Autoencendido
Reproducir tarjeta
SD auto
Acerca de
Regreso prefijados
• Lista de submenus
Menu Elemento •
Modo de navegacion
Configurar favorito
Editar titulo del canal
Medidor de serial
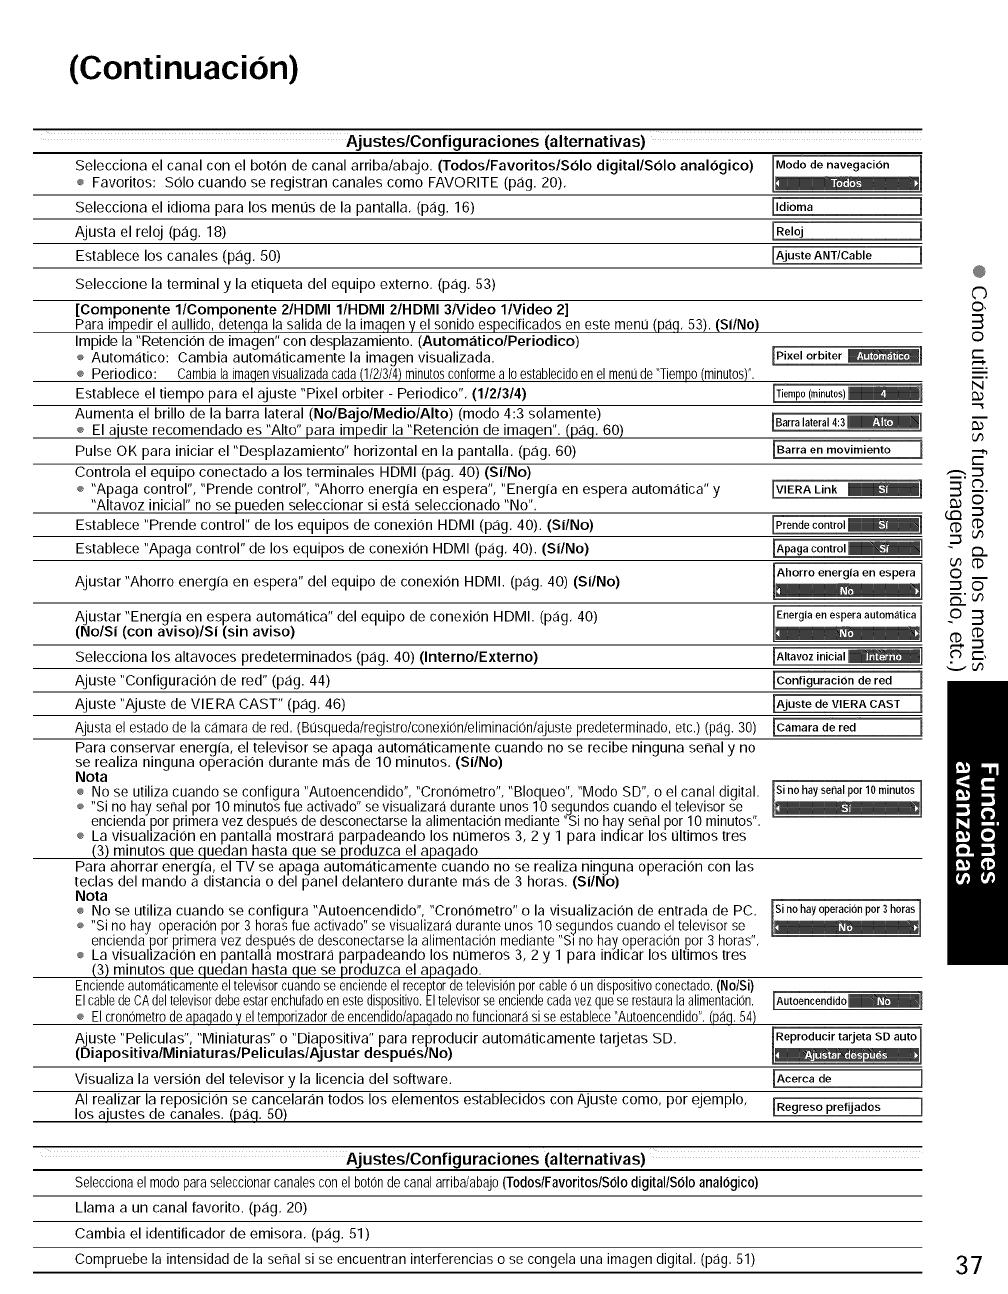
(Continuacion)
Ajustes/Configuraciones (alternativas)
Selecciona el canal con el boron de canal arriba/abajo. (TodoslFavoritoslSolo digital/Solo analogico)
÷ Favoritos: S01ocuando se registran canales como FAVORITE (p_ig.20),
Selecciona el idioma para los menL_sde la pantalla, (p_ig. 16) ildioma
Ajusta el reloj (p_ig. 18) [Reloj
Establece los canales (p_ig, 50) _AjusteANT/Cable
Seleccione la terminal y la etiqueta del equipo externo. (p_ig, 53)
[Componente l/Componente 2/HDMI I/HDMI 2/HDMI 3Nideo l/Video 2]
Para impedir el aullido, detenfla la salida de la imaqen y el sonido especificados en este menu (pag. 53). (Si/No)
Impide la "Retencion de imagen" con desplazamiento. (Autom_itico/Periodico)
÷ Automatico: Cambia automaticamente la imagen visualizada.
÷ Periodico: Cambia la imaqenvisualizadacada (1/2/3/4)minutosconformea Ioestablecidoen el menude "Tiempo (minutos)".
Establece el tiempo para el ajuste "Pixel orbiter - Periodico". (1121314)
Aumenta el brillo de la barra lateral (NolBajolMediolAIto) (modo 4:3 solamente)
÷ El aiuste recomendado es "Alto" para impedir la "Retencion de imaqen". (p_iq. 60)
Pulse OK para iniciar el "Desplazamiento" horizontal en la pantalla. (p_ig. 60)
Controla el equipo conectado a los terminales HDMI (p,:ig. 40) (Si/No)
÷ "Apaga control", "Prende control", "Ahorro energia en espera", "Energia en espera automatica" y
"Altavoz inicial" no se pueden seleccionar siesta seleccionado "No".
Establece "Prende control" de los equipos de conexion HDMI (p_ig. 40). (Si/No)
Establece "Apaga control" de los equipos de conexion HDMI (pag. 40). (Si/No)
_Pixel orbiter _i
Barra en movimiento ]
[VIERA Link _i
Ajustar "Ahorro energia en espera" del equipo de conexion HDMI. (p_ig.40) (Si/No)
,justar "Energia en espera autom,:itica" del equipo de conexion HDMI. (p,:ig. 40)
No/Si (con aviso)/Si (sin aviso)
Selecciona los altavoces predeterminados (p,:ig. 40) (Interno/Externo)
Ajuste "Configuraci0n de red" (pag. 44) [Configuracion de red 1
Ajuste "Ajuste de VlERA CAST" (p,3g. 46) [Ajuste de VIERA CAST ]
Ajusta el estado de la c_lmara de red. (Busquedalregistrolconexionleliminacionlajuste predeterminado, etc.) (pag. 30) [Camara de red
Para conservar energia, el televisor se apaga autom,3ticamente cuando no se recibe ninguna senal y no
se realiza ninguna operacion durante m,3s de 10 minutos. (Si/No)
Nota
÷ No se utiliza cuando se configura "Autoencendido", "Cronometro", "Bloqueo", "Modo SD", o el canal digital. [si nohaysenalpor10minutosi
÷ "Si no hay senal pot 10 minutos rue activado" se visualizara durante unos 10 segundos cuando el televisor se
enciendaporprimera vez despues de desconectarse la alimentacion mediante "Si no hay senal pot 10 minutos".
÷ La visuahzacion en pantalla mostrara parpadeando los numeros 3, 2 y 1 para indicar los L_ltimos tres
(3) minutos que quedan hasta que se produzca el apaqado
Para ahorrar energia, el TV se apaga automaticamente cuando no se realiza ninguna operacion con las
teclas del mando a distancia odel panel delantero durante mas de 3 horas. (Si/No)
Nota
÷ No se utiliza cuando se configura "Autoencendido", "Cronometro" o la visualizacion de entrada de PC.
÷ "Si no hay operacion por 3 horas fue activado" se visualizara durante unos 10 segundos cuando el televisor se
encienda por primera vez despu0s de desconectarse la alimentacion mediante %1 no hay operacion por 3 horas".
÷ La visuahzacion en pantalla mostrara parpadeando los numeros 3, 2 y 1 para indicar los L_ltimos tres
(3) minutos que quedan hasta que se produzca el apaqado.
Enciende automaticamente el televisor cuando se enciende el receptor de television por cable 0 un dispositivo conectado. (No/Si)
El cabledeCA deltelevisordebeestarenchufadoen estedispositiv0.Eltelevisorse enciendecadavez queserestaurala alimentacion.
÷ Elcronometro de apaqado V el temporizador de encendido/apaqado no funcionara si se establece "Autoencendido". (paq. 54)
,juste "Peliculas", "Miniaturas" o "Diapositiva" para reproducir automaticamente tarjetas SD.
DiapositivalMiniaturaslPeliculaslAjustar despues/No)
Visualiza la version del televisor y la licencia del software.
AI realizar la reposicion se cancelar,:in todos los elementos establecidos con Ajuste como, por ejemplo,
los aiustes de canales. (p,:iq. 50)
Acerca de
[Regreso prefijados
]
]
Ajustes/Configuraciones (alternativas)
Seleccionael m0doparaseleccionarcanalesconel b0t0ndecanalarriba/abaj0(Todos/Favoritos/Solodigital/Soloanalogico)
Llama aun canal favorito. (pag, 20)
Cambia el identificador de emisora, (pag. 51)
Compruebe la intensidadde la senal si se encuentran interferenciaso se congela una imagen digital, (pag,51)
@
C)
©,
3
©
m,
N
m
u_
o..
-_ ©
o3
C') t-,
37
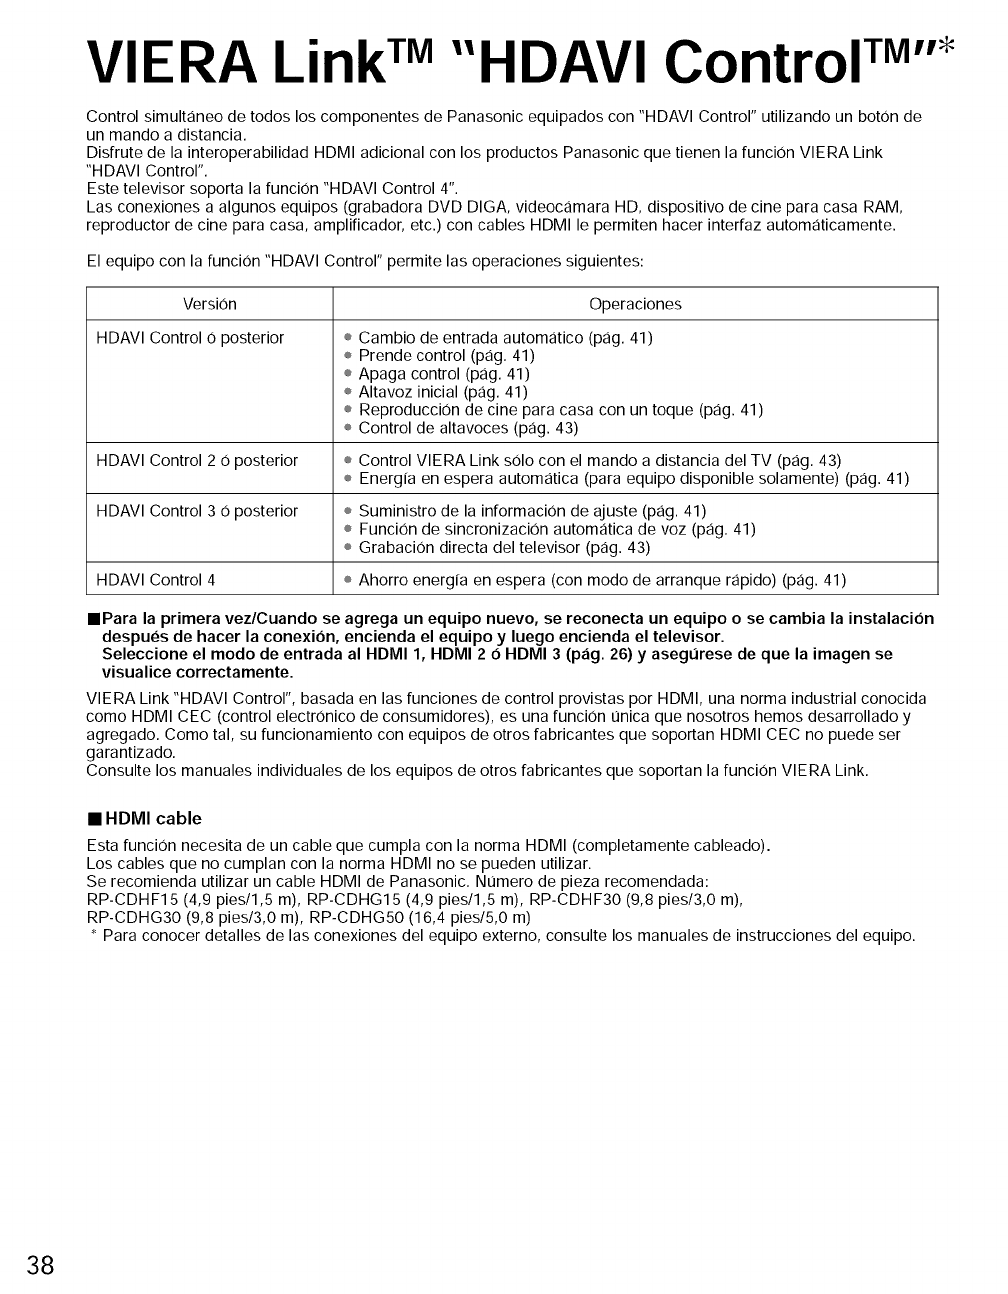
VIERA LinkTM"HDAVI Control TM''
Control simultaneo de todos los componentes de Panasonic equipados con "HDAVI Control" utilizando un boron de
un mando a distancia.
Disfrute de la interoperabilidad HDMI adicional con los productos Panasonic que tienen la funci0n VIERA Link
"H DAVI Control".
Este televisor soporta la funci0n "HDAVI Control 4".
Las conexiones a algunos equipos (grabadora DVD DIGA, videocamara HD, dispositivo de cine para casa RAM,
reproductor de cine para casa, amplificador, etc.) con cables HDMI le permiten hacer interfaz automaticamente.
El equipo con la funcion "HDAVI Control" permite las operaciones siguientes:
VersiOn
HDAVI Control 0 posterior
Operaciones
÷ Cambio de entrada automatico (pag. 41)
÷ Prende control (pag. 41)
÷ Apaga control (pag. 41)
÷ Altavoz inicial (pag. 41)
÷ Reproduccion de cine para casa con un toque (pag. 41)
÷ Control de altavoces (pag. 43)
HDAVI Control 2 0 posterior ÷ Control VIERA Link s01o con el mando a distancia del TV (pag. 43)
÷ Energfa en espera automatica (para equipo disponible solamente) (pag. 41)
HDAVI Control 3 0 posterior ÷ Suministro de la informacion de ajuste (pag. 41)
÷ Funcion de sincronizacion automatica de voz (pag. 41)
÷ Grabacion directa del televisor (pag. 43)
HDAVI Control 4 ÷ Ahorro energfa en espera (con modo de arranque rapido) (pag. 41)
IPara la primera vez/Cuando se agrega un equipo nuevo, se reconecta un equipo ose cambia la instalacion
despues de hacer la conexion, encienda el equipo y luego encienda el televisor.
Seleccione el modo de entrada al HDMI 1, HDMI 2 6HDMI 3 (p_ig. 26) y asegL_rese de que la imagen se
visualice correctamente.
VIERA Link "HDAVI Control", basada en las funciones de control provistas por HDMI, una norma industrial conocida
como HDMI CEC (control electronico de consumidores), es una funcion t]nica que nosotros hemos desarrollado y
agregado. Como tal, su funcionamiento con equipos de otros fabricantes que soportan HDMI CEC no puede ser
garantizado.
Consulte los manuales individuales de los equipos de otros fabricantes que soportan la funcion VIERA Link.
•HDMI cable
Esta funcion necesita de un cable que cumpla con la norma HDMI (completamente cableado).
Los cables que no cumplan con la norma HDMI no se pueden utilizar.
Se recomienda utilizar un cable HDMI de Panasonic. Nt]mero de pieza recomendada:
RP-CDHF15 (4,9 pies/l,5 m), RP-CDHG15 (4,9 pies/l,5 m), RP-CDHF30 (9,8 pies/3,0 m),
RP-CDHG30 (9,8 pies/3,0 m), RP-CDHG50 (16,4 pies/5,0 m)
* Para conocer detalles de las conexiones del equipo externo, consulte los manuales de instrucciones del equipo.
38
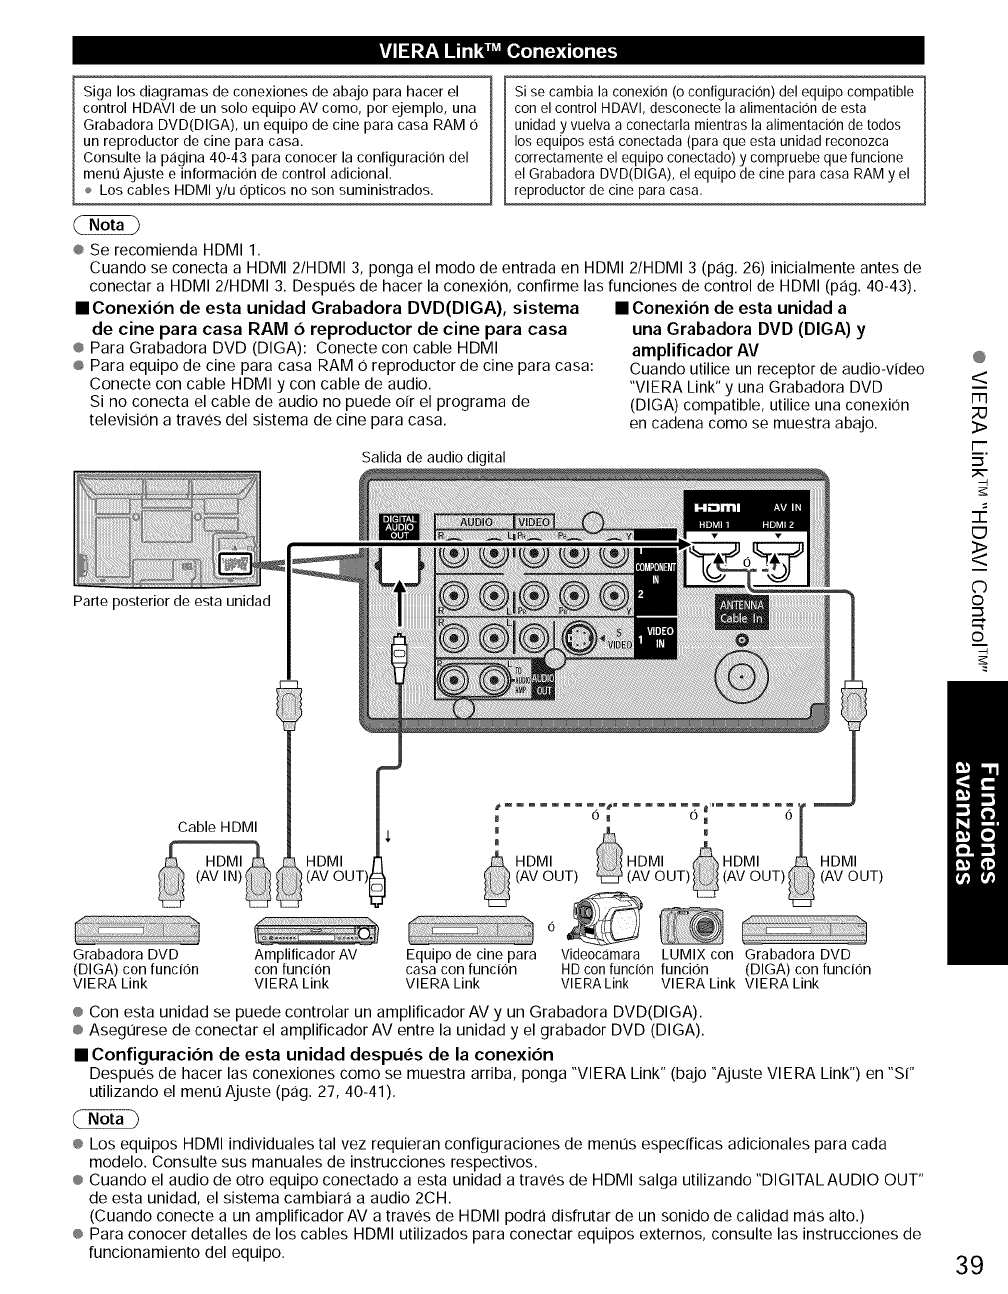
Siga los diagramas de conexiones de abajo para hacer el
control HDAVl de un solo equipo AV como, pot ejemplo, una
Grabadora DVD(DIGA), un equipo de cine para casa RAM 0
un reproductor de cine para casa.
Consulte la p,:igina 40-43 para conocer la contiguracion del
ment] Ajuste e intormacion de control adicional.
Los cables HDMI y/u opticos no son suministrados.
Sise cambia la conexiOn(oconfiguracion) del equipo compatible
con el control HDAVl, desconecte la alimentacion de esta
unidad y vuelva a conectarla mientras la alimentacion de todos
losequipos esta conectada (paraque esta unidad reconozca
correctamente el equipo conectado) y compruebe que funcione
el Grabadora DVD(DIGA), el equipo de cine paracasa RAM y el
reproductor de cine para casa,
® Se recomienda HDMI 1.
Cuando se conecta a HDMI 2/HDMI 3, ponga el modo de entrada en HDMI 2/HDMI 3 (pag. 26) inicialmente antes de
conectar a HDMI 2/HDMI 3. Despues de hacer la conexi0n, confirme las funciones de control de HDMI (pag. 40-43).
• Conexion de esta unidad Grabadora DVD(DIGA), sistema
de cine para casa RAM 0 reproductor de cine para casa
®Para Grabadora DVD (DIGA): Conecte con cable HDMI
®Para equipo de cine para casa RAM 0 reproductor de cine para casa:
Conecte con cable HDMI y con cable de audio.
Si no conecta el cable de audio no puede oir el programa de
television a traves del sistema de cine para casa.
• Conexion de esta unidad a
una Grabadora DVD (DIGA) y
amplificador AV
Cuando utilice un receptor de audio-video
"VlERA Link" y una Grabadora DVD
(DIGA) compatible, utilice una conexi0n
en cadena como se muestra abajo.
Salida de audio digital
Parte posterior de esta unidad
@
m
;;o
3>
i-"
=_.
ED
<>
C)
©
.m
©
Cable HDMI
(AV IN) _
_HDMI I'
(AV OUT)
Grabadora DVD Amplificador AV Equipo de cine para Videocamara LUMIX con Grabadora DVD
(DIGA) con funcion con funcion casa con funcion HD con funci0n funcion (DIGA) con funcion
VlERA Link VlERA Link VlERA Link VlERA Link VlERA Link VlERA Link
eCon esta unidad se puede controlar un amplificador AV y un Grabadora DVD(DIGA).
® Asegurese de conectar el amplificador AV entre la unidad y el grabador DVD (DIGA).
•Configuracion de esta unidad despues de la conexion
Despues de hacer las conexiones como se muestra arriba, ponga "VIERA Link" (bajo "Ajuste VIERA Link") en "Si"
utilizando el ment] Ajuste (pag. 27, 40-41).
® Los equipos HDMI individuales tal vez requieran configuraciones de ment]s especificas adicionales para cada
modelo. Consulte sus manuales de instrucciones respectivos.
® Cuando el audio de otro equipo conectado a esta unidad a traves de HDMI salga utilizando "DIGITALAUDIO OUT"
de esta unidad, el sistema cambiara a audio 2CH.
(Cuando conecte a un amplificador AV a traves de HDMI podra disffutar de un sonido de calidad mas alto.)
ePara conocer detalles de los cables HDMI utilizados para conectar equipos externos, consulte las instrucciones de
funcionamiento del equipo. 39
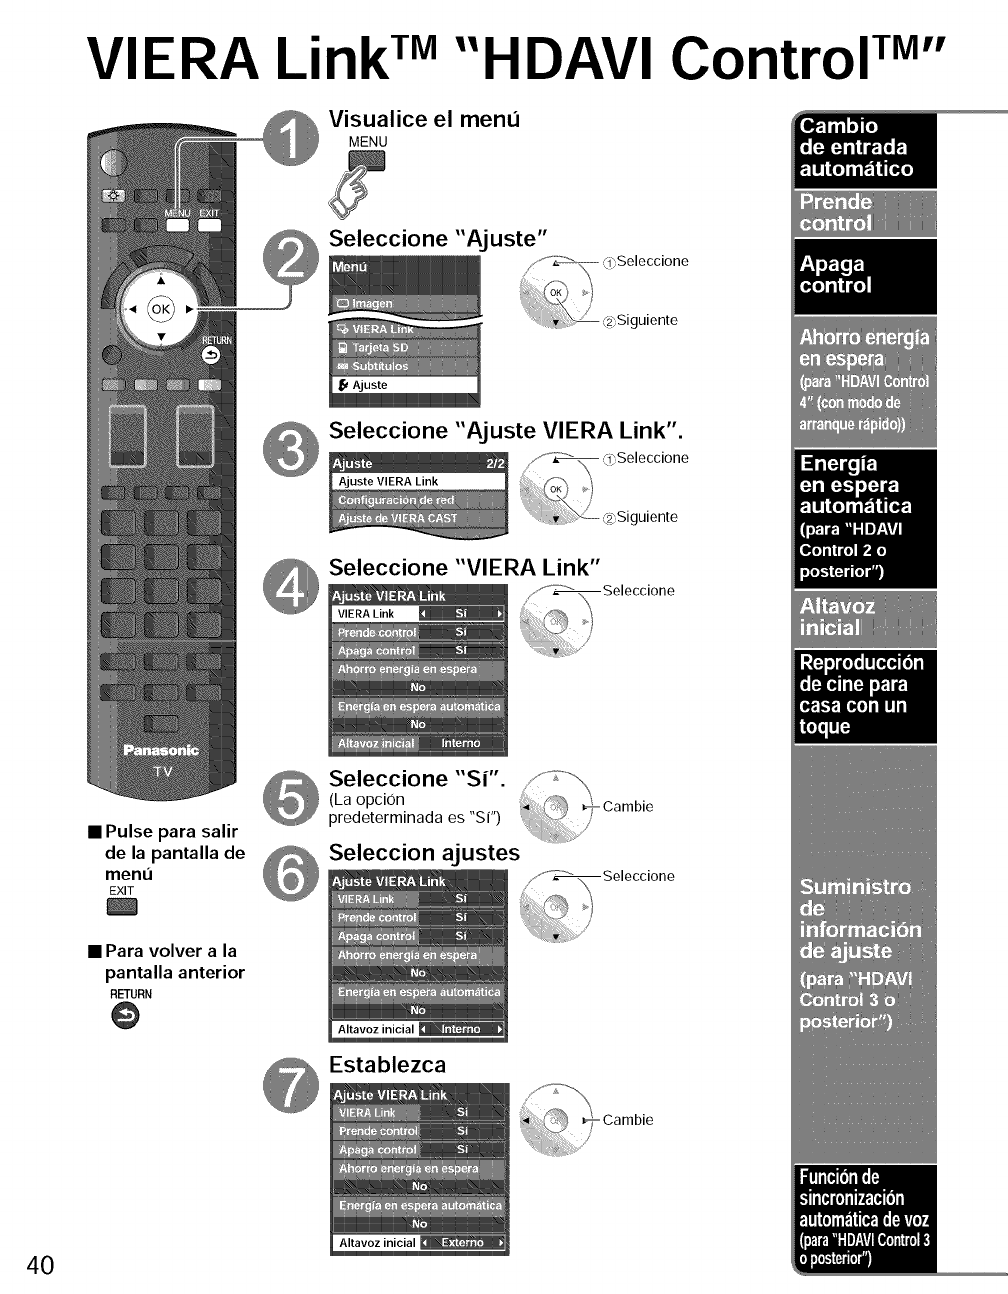
VIERA Link TM"HDAVI Control TM''
Visualice el menu
MENU
Seleccione "Aj uste"
........._ _<l>Seleccione
Seleccione "Ajuste VIERA Link".
Seleccione "VIERA Link"
•Pulse para salir
de la pantalla de
ment3
EXIT
Seleccione "S|".
(La opci0n
predeterminada es "Si")
Seleccion ajustes
Establezca
Cambie
• Para volver ala
pantalla anterior
RETURN
@
Cambie
40
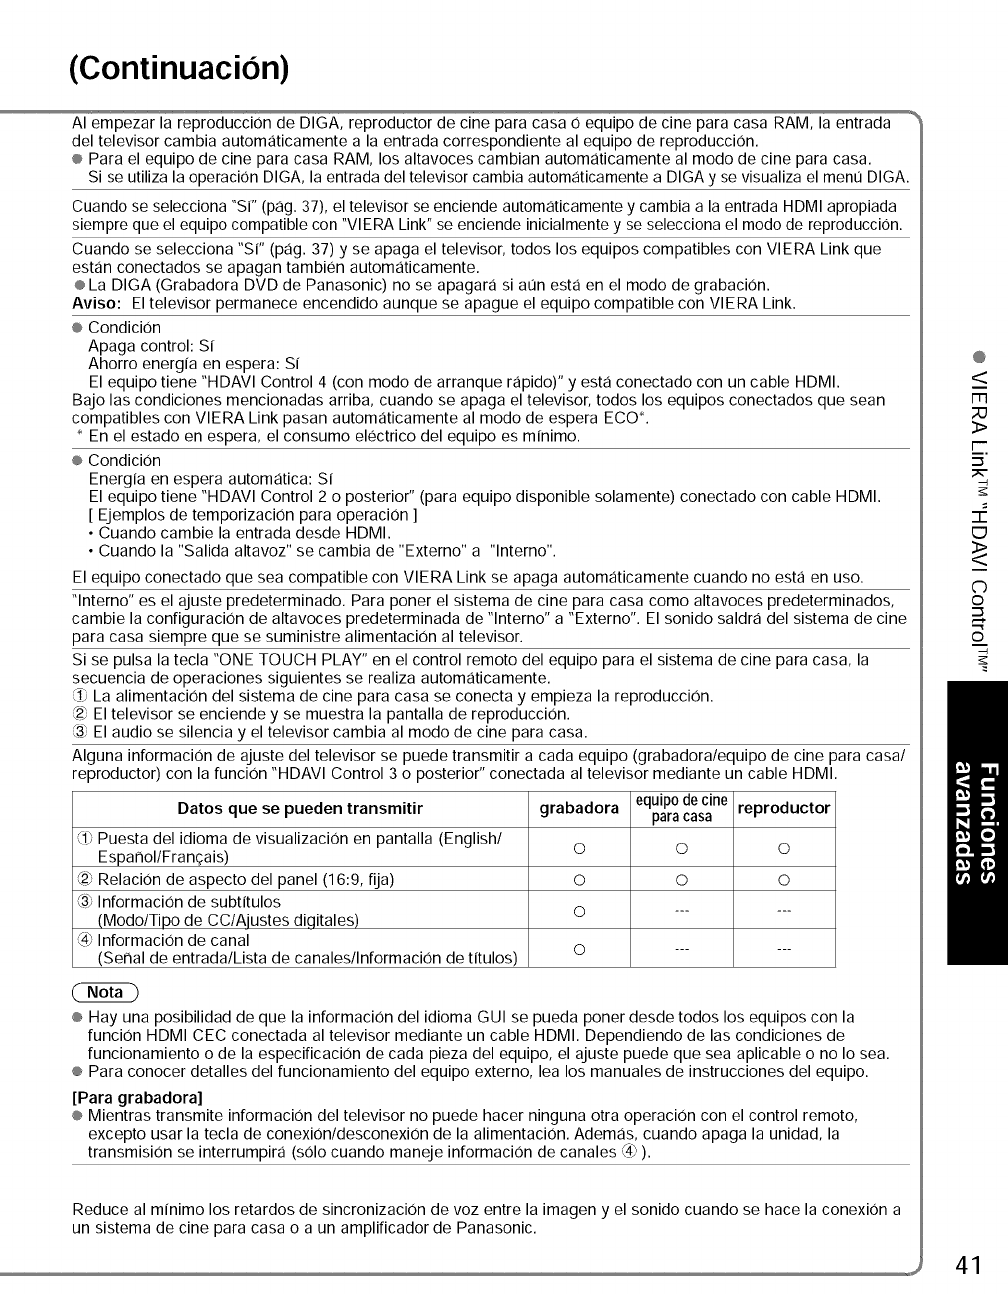
(Continuacion)
AI empezar la reproducci0n de DIGA, reproductor de cine para casa 0 equipo de cine para casa RAM, la entrada "_
del televisor cambia automaticamente a la entrada correspondiente al equipo de reproduccion.
® Para el equipo de cine para casa RAM, los altavoces cambian automaticamente al modo de cine para casa.
Si se utiliza la operaci0n DIGA, la entrada del televisor cambia automaticamente a DIGA y se visualiza el ment] DIGA.
Cuando se selecciona "Si" (pag. 37), el televisor se enciende automaticamente y cambia a la entrada HDMI apropiada
siempre que el equipo compatible con "VlERA Link" se enciende inicialmente y se selecciona el modo de reproducci0n.
Cuando se selecciona "Si" (pag. 37) y se apaga el televisor, todos los equipos compatibles con VlERA Link que
estan conectados se apagan tambien automaticamente.
® La DIGA (Grabadora DVD de Panasonic) no se apagara si at]n esta en el modo de grabaci0n.
Aviso: El televisor permanece encendido aunque se apague el equipo compatible con VlERA Link.
® Condicion
Apaga control: Si
Ahorro energia en espera: Si
El equipo tiene "HDAVl Control 4 (con modo de arranque rapido)" y esta conectado con un cable HDMI.
Bajo las condiciones mencionadas arriba, cuando se apaga el televisor, todos los equipos conectados que sean
compatibles con VlERA Link pasan automaticamente al modo de espera ECO *.
* En el estado en espera, el consumo electrico del equipo es minimo.
® Condicion
Energia en espera automatica: Si
El equipo tiene "HDAVl Control 2 o posterior" (para equipo disponible solamente) conectado con cable HDMI.
[ Ejemplos de temporizaci0n para operaci0n ]
• Cuando cambie la entrada desde HDMI.
• Cuando la "Salida altavoz" se cambia de "Externo" a "lnterno".
El equipo conectado que sea compatible con VlERA Link se apaga automaticamente cuando no esta en uso.
"lnterno" es el ajuste predeterminado. Para poner el sistema de cine para casa como altavoces predeterminados,
cambie la configuracion de altavoces predeterminada de "lnterno" a "Externo". El sonido saldra del sistema de cine
para casa siempre que se suministre alimentacion al televisor.
Si se pulsa la tecla "ONE TOUCH PLAY" en el control remoto del equipo para el sistema de cine para casa, la
secuencia de operaciones siguientes se realiza automaticamente.
_) La alimentaci0n del sistema de cine para casa se conecta y empieza la reproducci0n.
_2; El televisor se enciende y se muestra la pantalla de reproducci0n.
{3; El audio se silencia y el televisor cambia al modo de cine para casa.
Alguna informaci0n de ajuste del televisor se puede transmitir a cada equipo (grabadora/equipo de cine para casa/
reproductor) con la funcion "HDAVl Control 3 o posterior" conectada al televisor mediante un cable HDMI.
Datos que se pueden transmitir grabadora equipo de cine reproductor
para casa
_kbPuesta del idioma de visualizaci0n en pantalla (English/ O O O
Esparlol/Fran_:ais)
(2_'.Relaci0n de aspecto del panel (16:9, fija) O O O
(3_Informaci0n de subtitulos
(Modo/Tipo de CC/Aiustes di.qitales) O ......
_3; Informaci0n de canal
(Serial de entrada/Lista de canales/Informacion de titulos) O ......
® Hay una posibilidad de que la informaciOn del idioma GUIse pueda poner desde todos los equipos con la
funcion HDMI CEC conectada al televisor mediante un cable HDMI. Dependiendo de las condiciones de
funcionamiento o de la especificaciOn de cada pieza del equipo, el ajuste puede que sea aplicable o no Io sea.
® Para conocer detalles del funcionamiento del equipo externo, lea los manuales de instrucciones del equipo.
[Para grabadora]
® Mientras transmite informaciOn del televisor no puede hacer ninguna otra operaciOn con el control remoto,
excepto usar la tecla de conexion/desconexiOn de la alimentaciOn. Ademas, cuando apaga la unidad, la
transmisiOn se interrumpira (solo cuando maneje informaciOn de canales @ ).
Reduce al minimo los retardos de sincronizacion de voz entre la imagen y el sonido cuando se hace la conexion a
un sistema de cine para casa o a un amplificador de Panasonic.
@
<
m
3>
I--
=_.
EJ
<>
C)
©
©
j 41
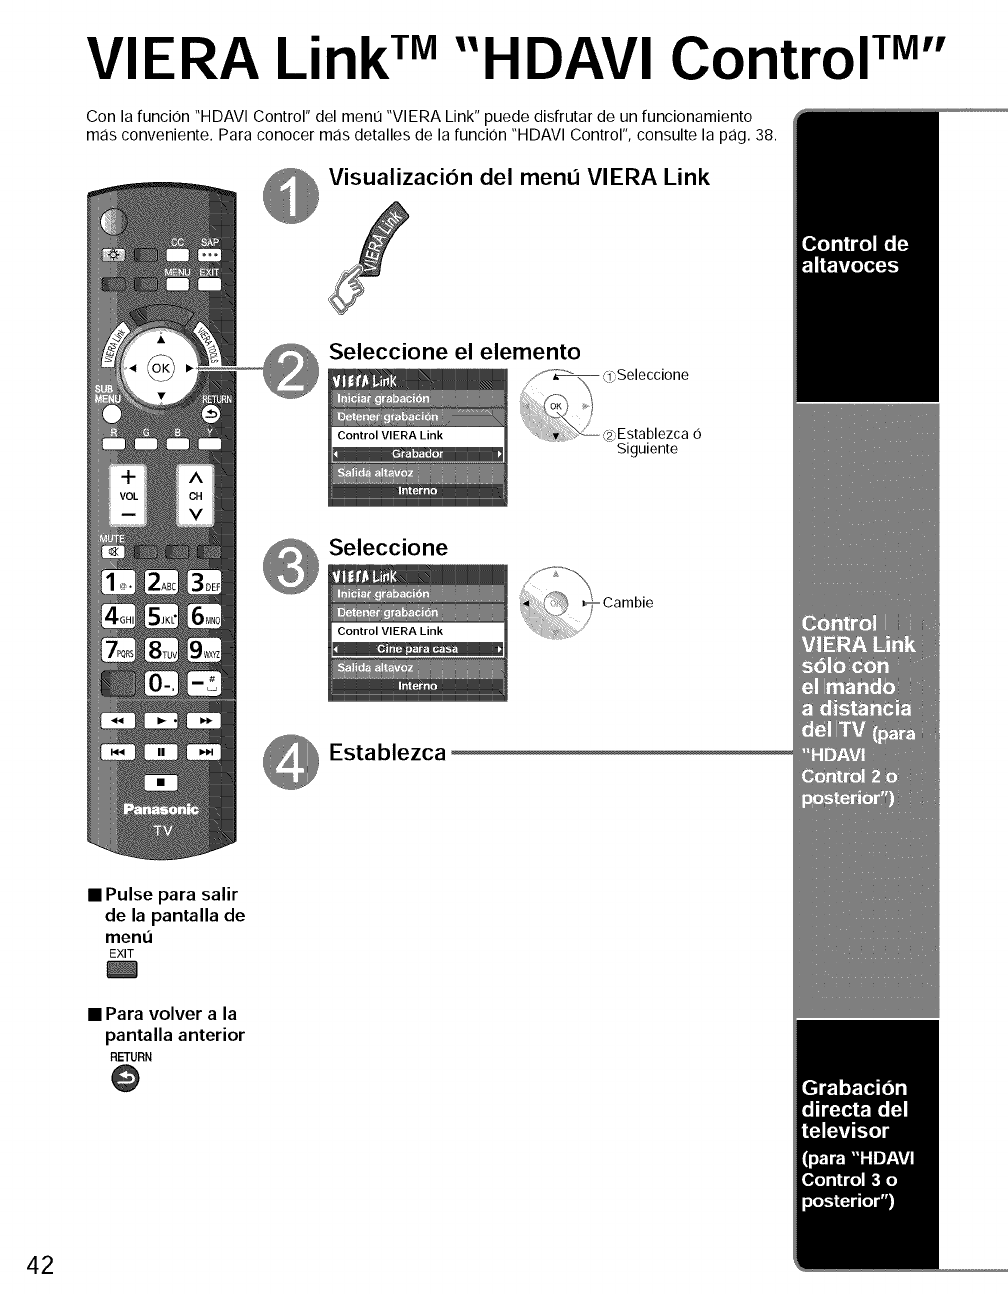
VIERA Link TM"HDAVI Control TM''
Con la funcion "HDAVI Control" del menu "VIERA Link" puede disfrutar de un runcionamiento
mas conveniente. Para conocer mas detalles de la funcion "HDAVI Control", consulte la pag. 38.
Visualizacion del menu VlERA Link
Seleccione el elemento
J_.'_ _l_Se,eccione
{23,EstablezcaO
$iguiente
Seleccione
Cambie
Establezca
•Pulse para salir
de la pantalla de
ment_
EXIT
• Para volver ala
pantalla anterior
RETURN
O
42
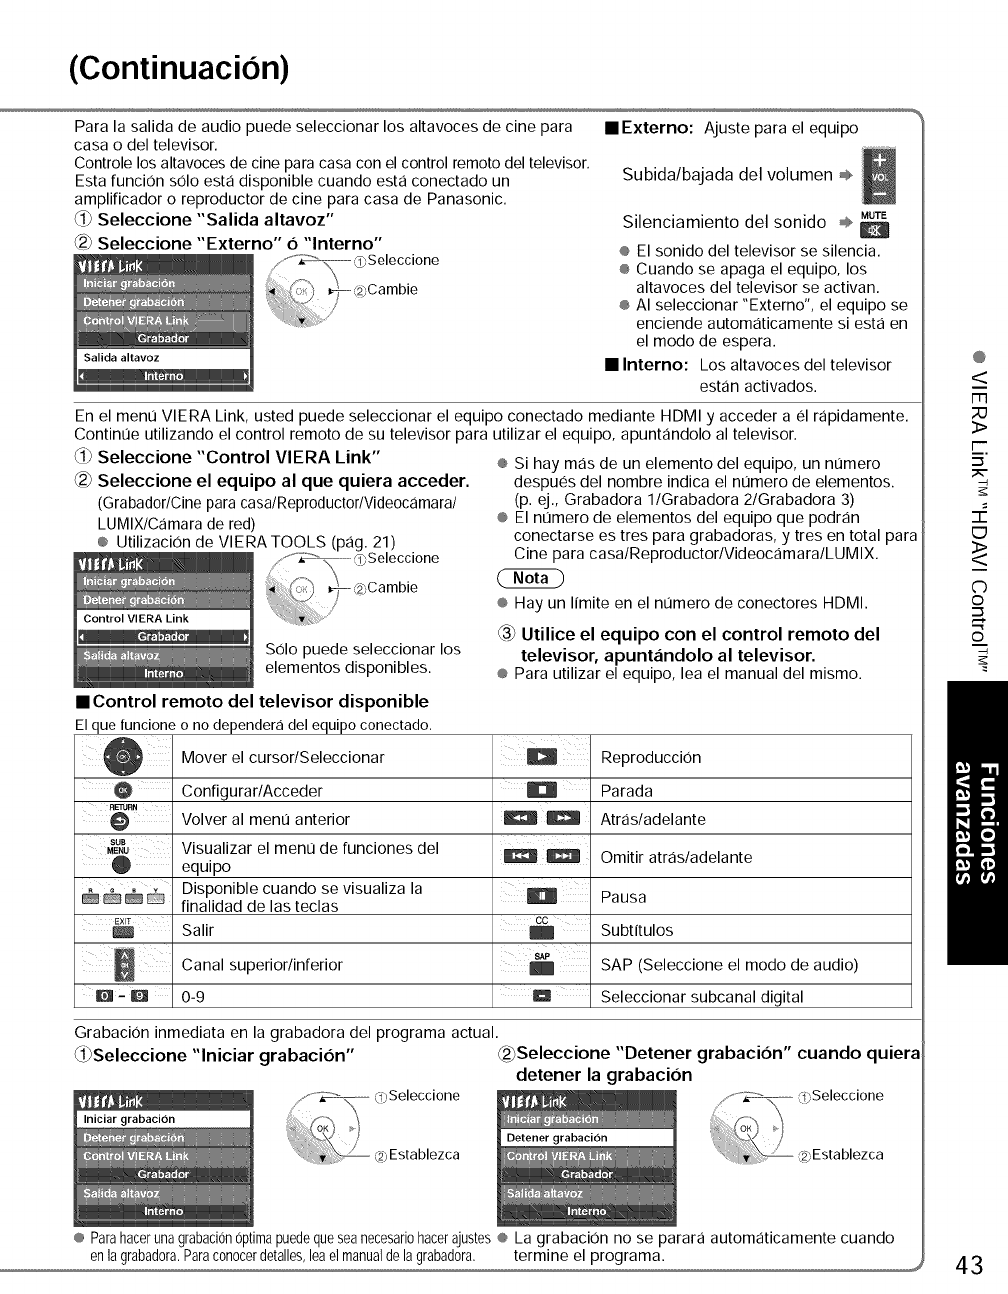
(Continuacion)
Para la salida de audio puede seleccionar los altavoces de cine para
casa odel televisor.
Controle los altavoces de cine para casa con el control remoto del televisor.
Esta funcion s01o esta disponible cuando esta conectado un
amplificador o reproductor de cine para casa de Panasonic.
Seleccione "Salida altavoz"
Seleccione "Externo" 6 "lnterno"
• Externo: Ajuste para el equipo
Subida/bajada del volumen ®,
Silenciamiento del sonido ÷_
o El sonido del televisor se silencia.
o Cuando se apaga el equipo, los
altavoces del televisor se activan.
o AI seleccionar "Externo", el equipo se
enciende automaticamente siesta en
el modo de espera.
•Interno: Los altavoces del televisor
estan activados.
En el ment] VIERA Link, usted puede seleccionar el equipo conectado mediante HDMI y acceder a el rapidamente.
Continue utilizando el control remoto de su televisor para utilizar el equipo, apuntandolo al televisor.
d_ Seleccione "Control VIERA Link"
Seleccione el equipo al que quiera acceder.
(Grabad0r/Cineparacasa/Repr0duct0r/Vide0camara/
LUMIX/Camarade red)
o Utilizaci0n de VIERA TOOLS (pag. 21)
Control VIERA Link
Solo puede seleccionar los
elementos disponibles.
• Control remoto del televisor disponible
Elque funcioneo no depender<idel equipoconectado,
o Si hay mas de un elemento del equipo, un numero
despues del nombre indica el nlJmero de elementos.
(p. ej., Grabadora l/Grabadora 2/Grabadora 3)
o El numero de elementos del equipo que podran
conectarse es tres para grabadoras, y tres en total para
Cine para casa/Reproductor/Videocamara/LUMIX.
o Hay un limite en el nt_mero de conectores HDMI.
_ Utilice el equipo con el control remoto del
televisor, apunt,indolo al televisor.
o Para utilizar el equipo, lea el manual del mismo.
SUB
MENU
EXIT
Q
Mover el cursor/Seleccionar
Configurar/Acceder
Volver al ment] anterior
Visualizar el ment] de funciones del
equipo
Disponible cuando se visualiza la
finalidad de las teclas
Salir
Canal superior/inferior
0-9
ii ii
8N_
Reproducci0n
Parada
Atras/adelante
Omitir atras/adelante
Pausa
Subtitulos
SAP (Seleccione el modo de audio)
Seleccionar subcanal digital
Grabaci0n inmediata en la grabadora del programa actual.
_i_Seleccione "lniciar grabacion" ®Seleccione "Detener grabacion" cuando quiera
detener la grabacion
o Parahacerunagrabaci0nOptimapuedequeseanecesari0hacerajusteso La grabaci0n no se parara automaticamente cuando
@
<
m
;;O
3>
i--
=_.
EJ
<>
C)
©
"-I
©
43
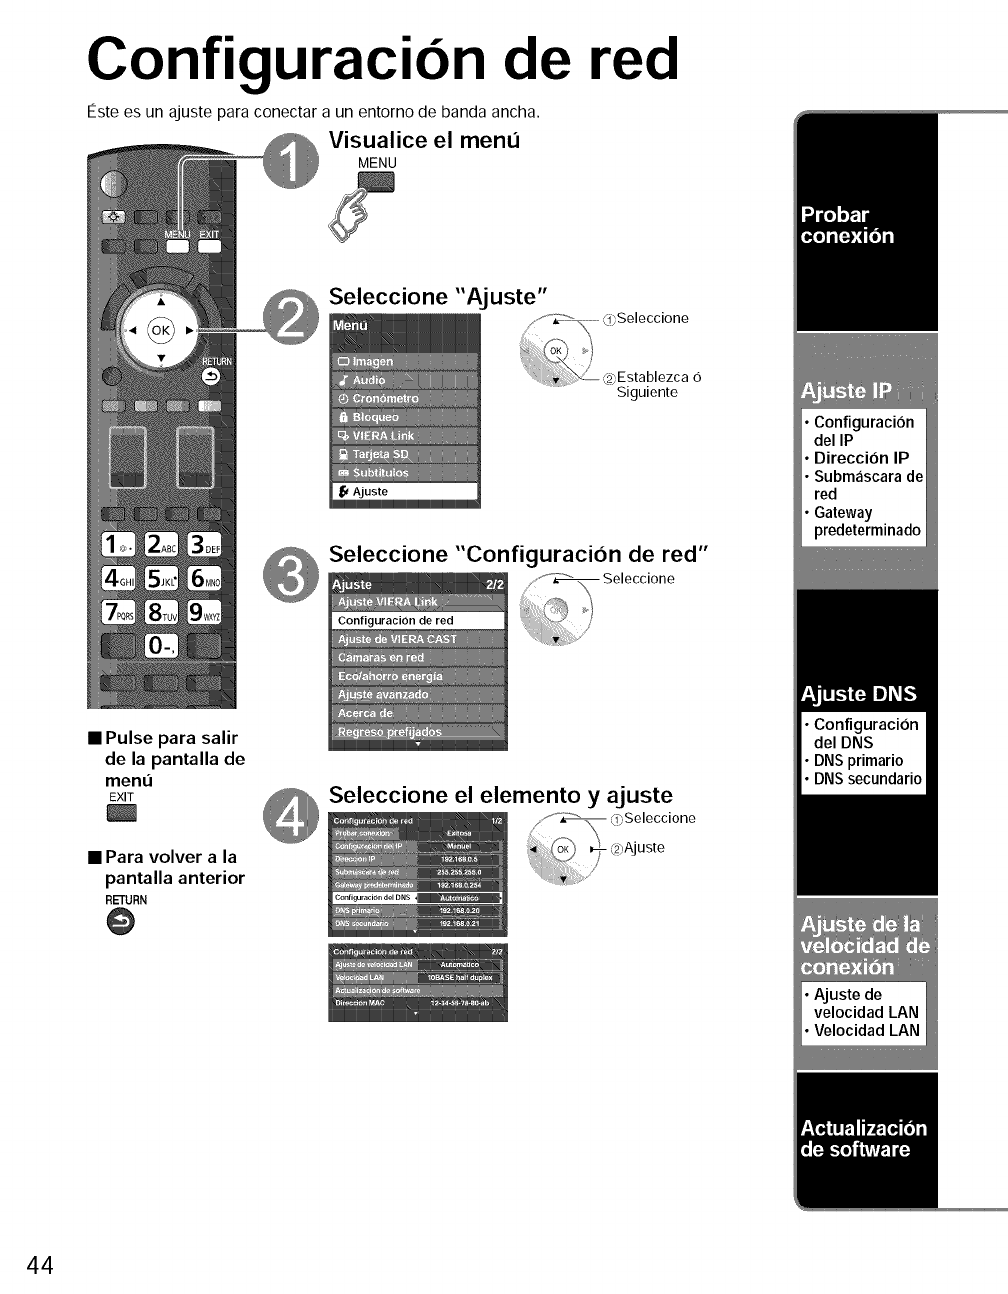
Configuracion de red
Este es un ajuste para conectar a un entorno de banda ancha.
Visualice el menu
MENU
Seleccione "Ajuste"
/ ,_<°_ <_Seleccione
.... s
_2>Establezca6
Siguiente
•Pulse para salir
de la pantalla de
ment_
EXIT
• Para volver ala
pantalla anterior
RETURN
@
Seleccione "Configuraci6n de red"
Seleccione
Seleccione el elemento y ajuste
44
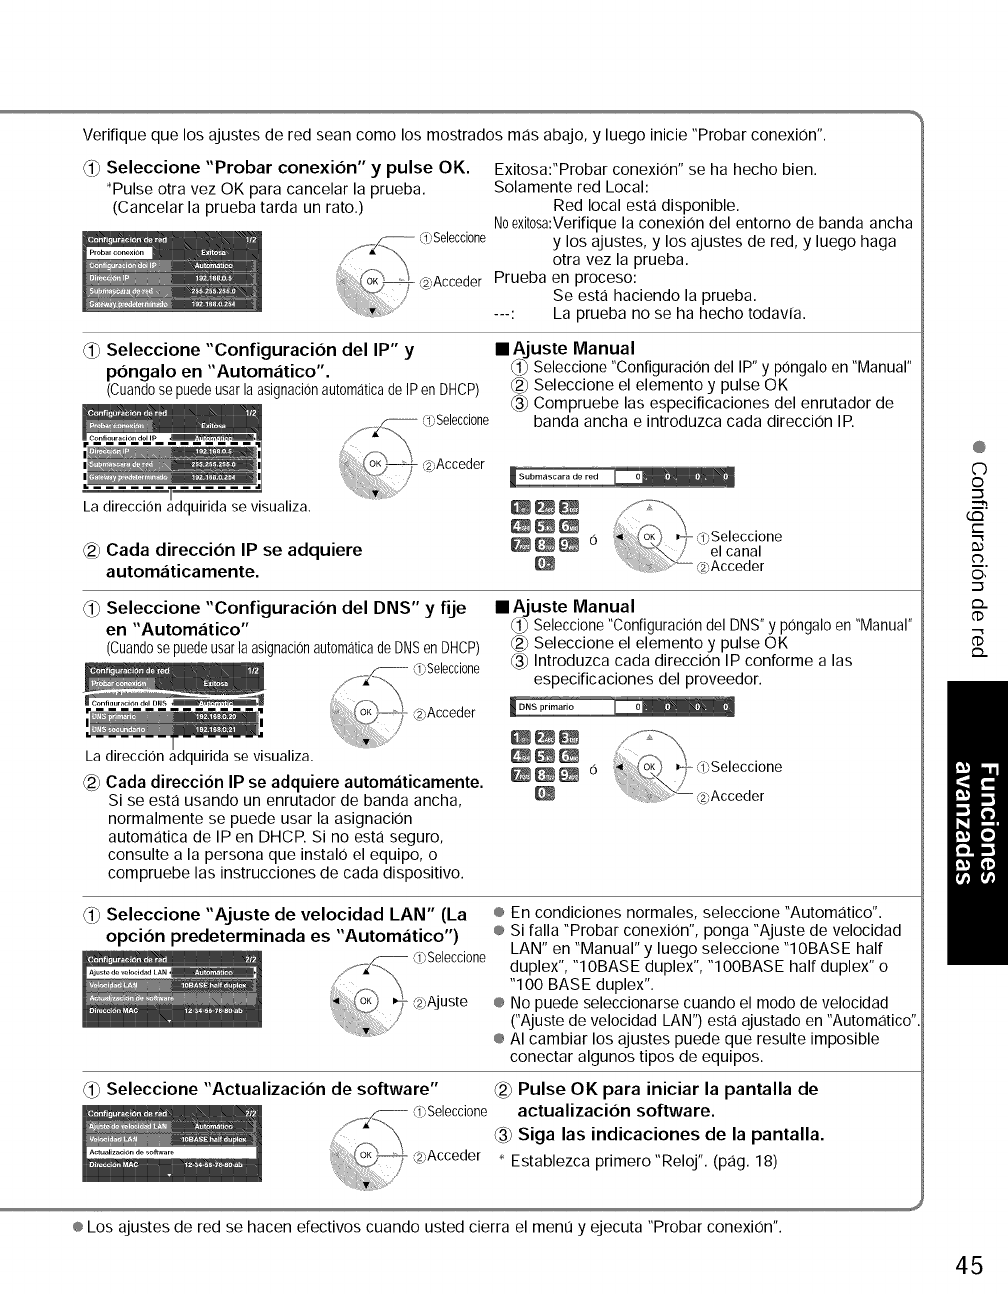
Verifique que los ajustes de red sean como los mostrados mas abajo, y luego inicie "Probar conexi0n".
0_ Seleccione "Probar conexi6n" y pulse OK. Exitosa:"Probar conexi0n" se ha hecho bien.
_Pulse otra vez OK para cancelar la prueba. Solamente red Local:
(Cancelar la prueba tarda un rato.) Red local esta disponible.
Noexit0sa:Verifique la conexi0n del entorno de banda ancha
-- _¢Selecci0ne y los ajustes, y los ajustes de red, y luego haga
otra vez la prueba.
@Acceder Prueba en proceso:
Se esta haciendo la prueba.
---: La prueba no se ha hecho todavia.
Seleccione "Configuraci6n del IP" y
p6ngalo en "Automatico".
(Cuand0se puedeusarla asignacionautomaticade IPen DHCP)
y1_ LlbSelecci0ne
,_ ,f2_Acceder
La direccion luirida se visualiza.
_2_Cada direcci6n IP se adquiere
automaticamente.
•Ajuste Manual
_i_ Seleccione "ConfiguraciOn del IP" y pongalo en "Manual"
_2_Seleccione el elemento y pulse OK
_3_Compruebe las especificaciones del enrutador de
banda ancha e introduzca cada direccion IP.
d_ Seleccione "Configuraci6n del DNS" y fije
en "Automatico"
(Cuand0sepuedeusarlaasignaci6naut0maticade DNSen DHCP)
Cada direccion IP se adquiere autom,_ticamente.
Si se esta usando un enrutador de banda ancha,
normalmente se puede usar la asignacion
automatica de IP en DHCP. Si no esta seguro,
consulte a la persona que instalo el equipo, o
compruebe las instrucciones de cada dispositivo.
•Ajuste Manual
_i_ Seleccione "ConfiguraciOn del DNS" y pOngalo en "Manual"
_2_Seleccione el elemento y pulse OK
Introduzca cada direcciOn IP conforme alas
especificaciones del proveedor.
O_ Seleccione "Ajuste de velocidad LAN" (La
opci6n predeterminada es "Automatico")
® En condiciones normales, seleccione "Automatico".
® Si falla "Probar conexi0n', ponga "Ajuste de velocidad
LAN" en "Manual" y luego seleccione "10BASE half
duplex", "10BASE duplex", "100BASE half duplex" o
"100 BASE duplex".
® No puede seleccionarse cuando el modo de velocidad
CAjuste de velocidad LAN') esta ajustado en "Automatico'.
® AI cambiar los ajustes puede que resulte imposible
conectar algunos tipos de equipos.
Seleccione "Actualizacion de software" _2_Pulse OK para iniciar la pantalla de
actualizaci6n software.
_3_Siga las indicaciones de la pantalla.
Establezca primero "Reloj'. (pag. 18)
@
C)
©
G:3
t-"
C_
O,
.-_
_..
d)
{=2.
® Los ajustes de red se hacen efectivos cuando usted cierra el ment] y ejecuta "Probar conexi0n".
45
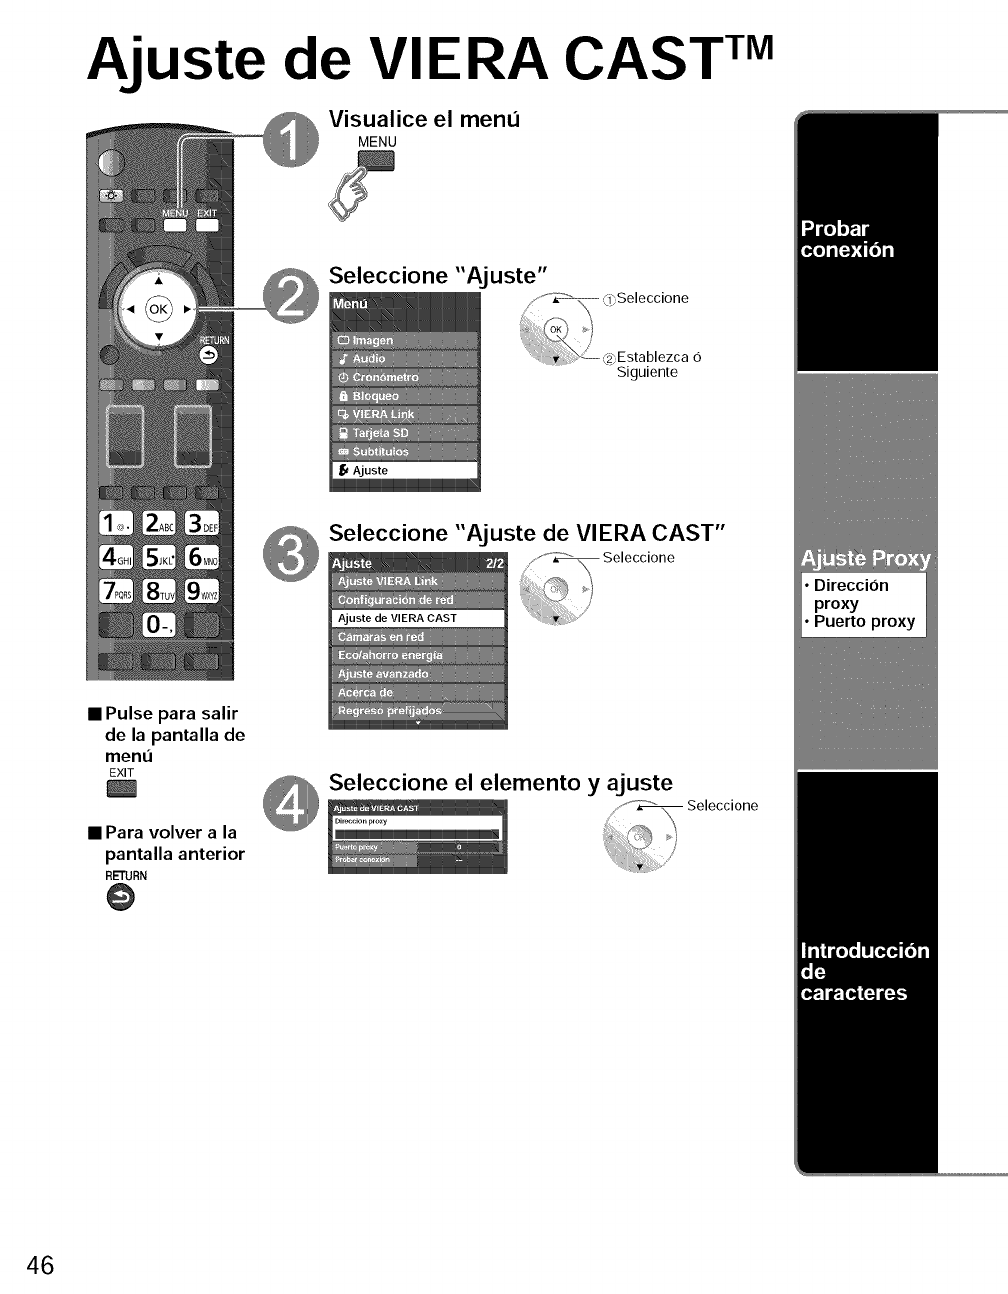
Ajuste de VIERA CAST TM
Visualice el menu
MENU
Seleccione "Ajuste"
f_ _<l?,Seleccione
q
_2_,Establezca 6
Siguiente
•Pulse para salir
de la pantalla de
ment]
EXIT
• Para volver a la
pantalla anterior
RETURN
@
Seleccione "Ajuste de VIERA CAST"
Seleccione
_ Seleccione el elemento y ajuste
"_ Seleccione
Dir_cion _lo×v
46
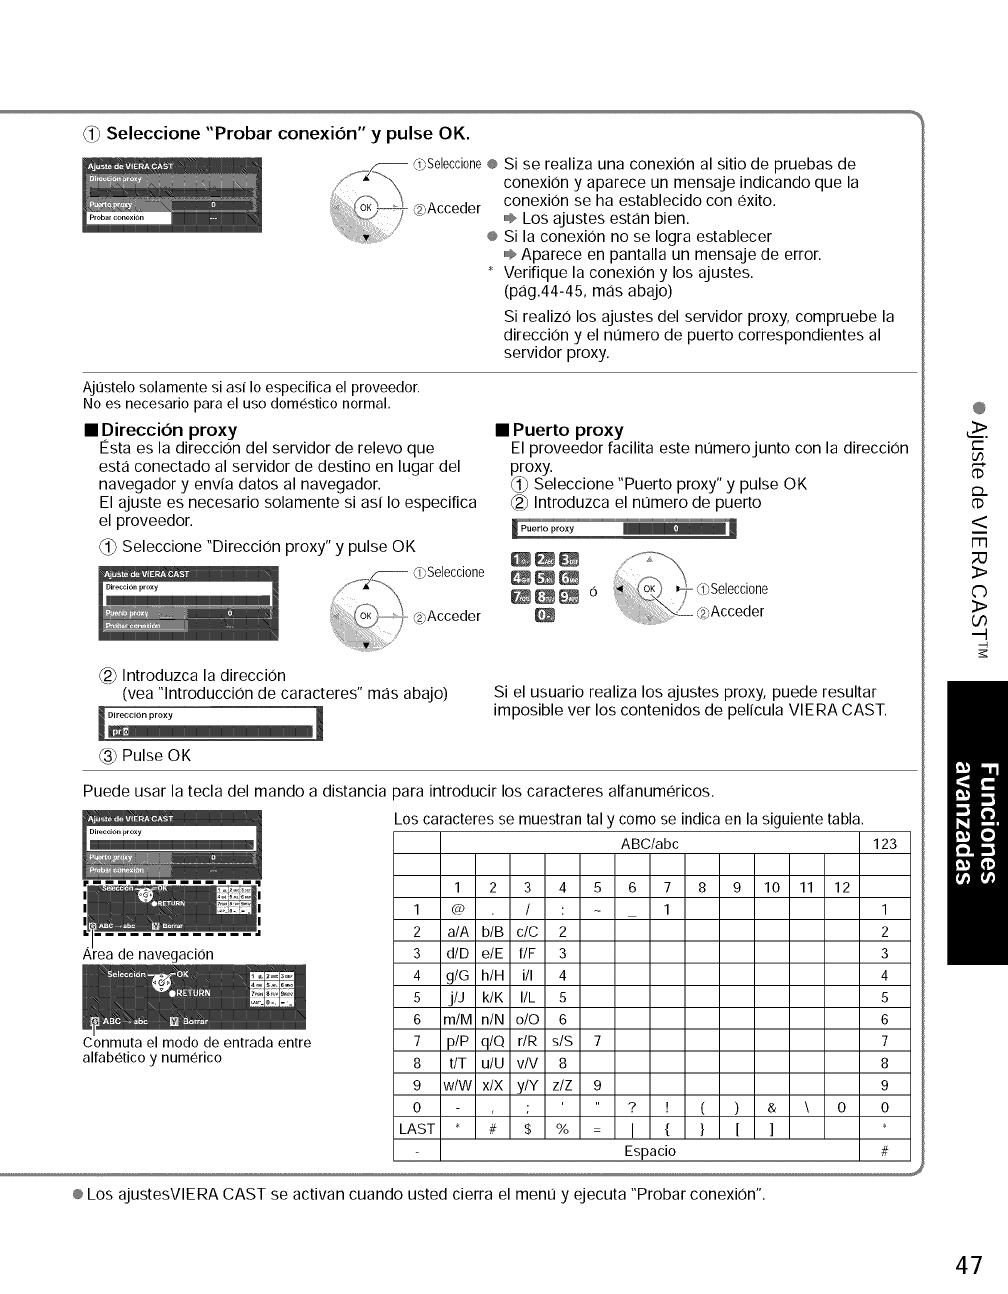
Seleccione "Probar conexion" y pulse OK,
__.._ _Selecci0ne@
2 Acceder
÷
Si se realiza una conexion al sitio de pruebas de
conexi0n y aparece un mensaje indicando que la
conexion se ha establecido con exito.
ii® Los ajustes estan bien.
Si la conexion no se Iogra establecer
÷ Aparece en pantalla un mensaje de error.
Verifique la conexi0n y los ajustes.
(pag.44-45, mas abajo)
Si realiz0 los ajustes del servidor proxy, compruebe la
direcci0n y el numero de puerto correspondientes al
servidor proxy.
Aj0stelo solamente si as{ Io especifica el proveedor.
No es necesario para el uso domestico normal,
• Direccion proxy
Esta es la direcciOn del servidor de relevo que
esta conectado al servidor de destino en lugar del
navegador y envia datos al navegador.
El ajuste es necesario solamente si asi I0 especifica
el proveedor.
_1) Seleccione "Direcci0n proxy" y pulse OK
Seleccione- _23Acceder
• Puerto proxy
El proveedor facilita este numerojunto con la direcci0n
proxy.
Seleccione "Puerto proxy" y pulse OK
_2_Introduzca el numero de puerto
@_Introduzca la direccion
(vea "lntroducci0n de caracteres" mas abajo) Si el usuario realiza los ajustes proxy, puede resultar
irnposible ver los contenidos de pelicula VlERA CAST.
_3_Pulse OK
Puede usar la tecla del mando a distancia para introducir los caracteres alfanumericos.
Los caracteres se muestran tal y como se indica en la siguiente tabla.
ABC/abc
Area de navegaci0n
Conmuta el modo de entrada entre
alfabetico y numerico
123
1 2 3 4 5 6 7 8 9 10 11 12
1 @ /: ~ 1 1
2 a/A b/B c/C 2 2
3 d/D e/E f/F 3 3
4 g/G h/H i/I 4 4
5 j/J k/K I/L 5 5
6 m/M n/N o/O 6 6
7 p/P q/Q r/R s/S 7 7
8 t/T u/U v/V 8 8
9 w/W x/X y/Y z/Z 9 9
0 ; ? [ ( ) & \ 0 0
LAST * # $ % = I{ } [ ] *
Espacio #
® Los ajustesVlERA CAST se activan cuando usted cierra el menu y ejecuta "Probar conexi0n".
@
t-"
U3
<
m
23
3>
C)
3>
O0
47
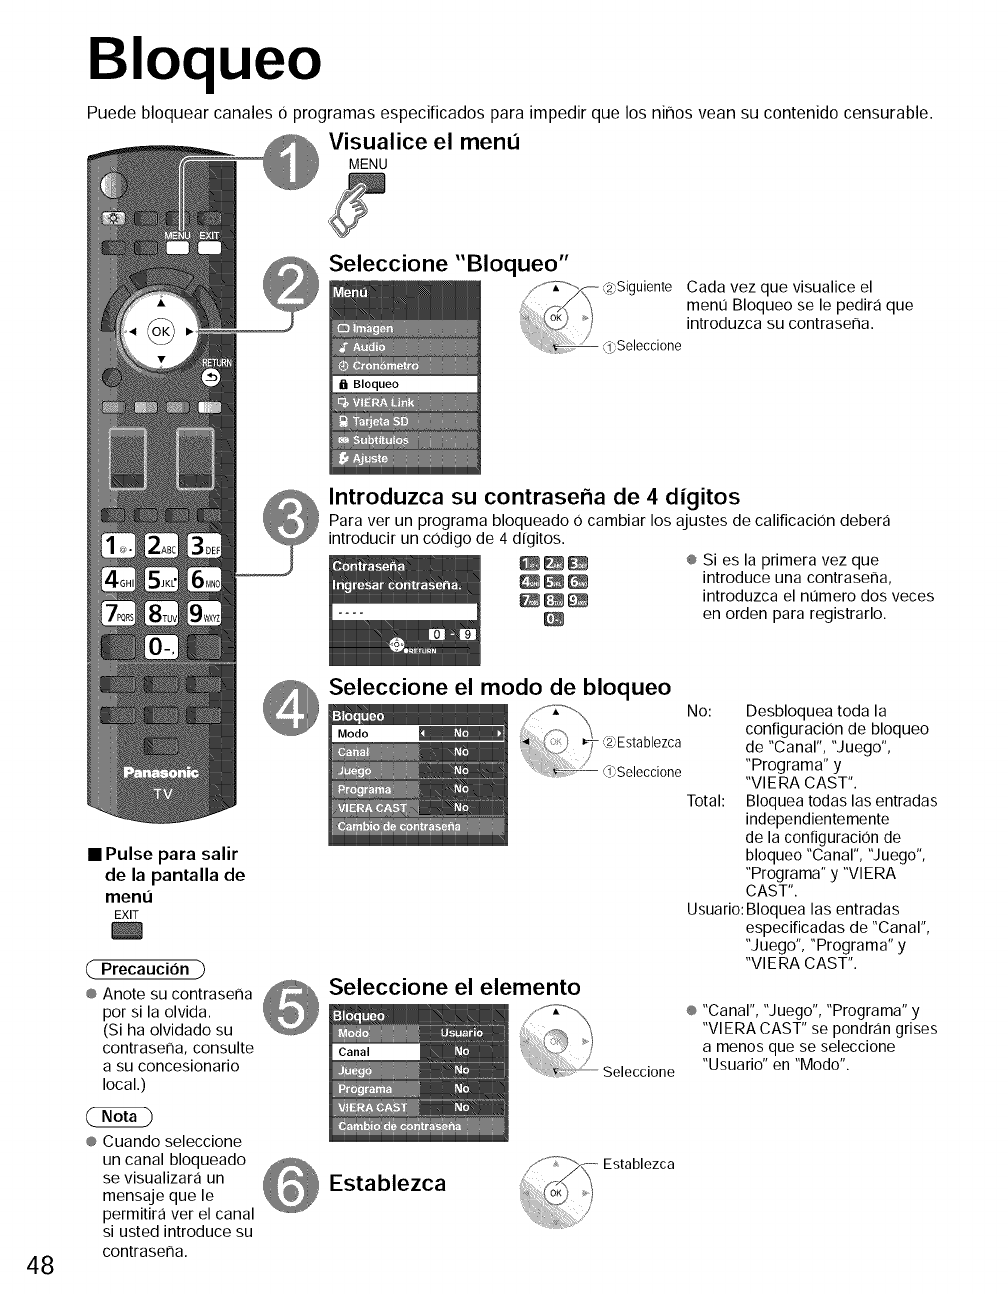
Bloqueo
Puede bloquear canales O programas especificados para impedir que los ninos vean su contenido censurable.
Visualice el menu
MENU
Seleccione "Bloqueo"
IBI Bloqueo
Jiente Cada vez que visualice el
menu Bloqueo se le pedira que
introduzca su contraser_a.
Seleccione
Introduzca su contraseha de 4digitos
Para ver un programa bloqueado 0 cambiar los ajustes de calificaciOn debera
introducir un codigo de 4 digitos.
_ _ ® Si es la primera vez que
_ _ introduce una contraserla,
_ _ introduzca el numero dos veces
en orden para registrarlo.
48
•Pulse para salir
de la pantalla de
menl3
EXIT
{ Precaucion )
® Anote su contraserla
por si la olvida.
(Si ha olvidado su
contraserla, consulte
a su concesionario
local.)
® Cuando seleccione
un canal bloqueado
se visualizara un
mensaje que le
permitira ver el canal
si usted introduce su
contraserla.
Seleccione el modo de bloqueo
Seleccione el elemento
Seleccione
Establezca Establezca
No: Desbloquea toda la
configuraci0n de bloqueo
de "Canal", "Juego",
"Programa" y
"VlERA CAST".
Total: Bloquea todas las entradas
independientemente
de la configuraci0n de
bloqueo "Canal", "Juego",
"Programa" y "VlERA
CAST".
Usuario: Bloquea las entradas
especificadas de "Canal",
"Juego", "Programa" y
"VlERA CAST".
® "Canal", "J uego", "Programa" y
"VIERA CAST" se pondran grises
a menos que se seleccione
"Usuario" en "Modo".
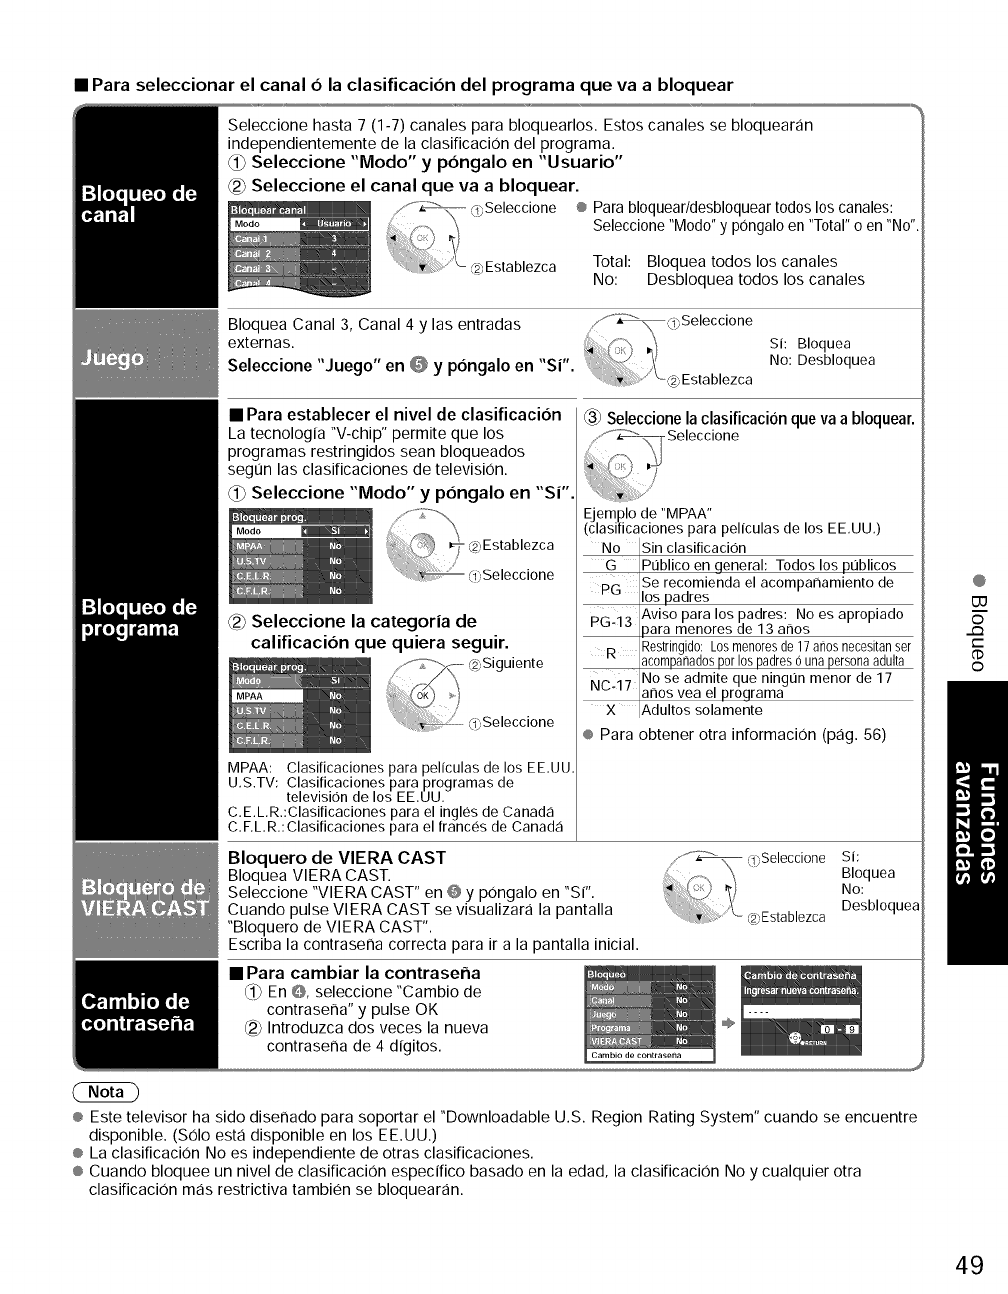
• Paraseleccionarelcanal6 la clasificacion del programa que va a bloquear
Seleccione hasta 7 (1-7) canales para bloquearlos. Estos canales se bloquearan
independientemente de la clasificaci0n del programa.
Seleccione "Modo" y pongalo en "Usuario"
Seleccione el canal que va a bloquear.
® Para bloquear/desbloquear todos los canales:
Seleccione "Modo" y pongalo en "Total" o en "No".
Total: Bloquea todos los canales
No: Desbloquea todos los canales
Bloquea Canal 3, Canal 4 y las entradas ,.""-_@Seleccione
externas. *, _/ si: Bloquea
Seleccione "Juego" en _ y pongalo en "sr'. ,,\ No: Desbloquea
Establezca
• Para establecer el nivel de clasificacion
La tecnologia "V-chip" permite que los
programas restringidos sean bloqueados
segiJn las clasificaciones de television.
_ Seleccione "Modo" y p6ngalo en "sr'.
0bSeleccione
@_Seleccione la categoria de
calificacion que quiera seguir.
/
.....i <0Seleccione
MPAA: Clasificaciones para peNculas de los EE,UU
U,S.TV: Clasiticaciones para programas de
television de los EE.UU.
C.E.LR.:Clasiticaciones para el ingles de Canada
C,F,L,R.: Clasiticaciones para el trances de Canada
Seleccionela clasificacion queva a bloquear.
_jemplo de "MPAA"
clasiticaciones para peliculas de los EE,UU,)
No [Sin clasificacion
G [Publico en general: Todos los publicos
Se recomienda el acompaframiento de
PG Ilos padres
p ..... Aviso para los padres: No es apropiado
u-iJ [para menores de 13 anos
R _Restringido:Losmenoresde17afiosnecesitanser
[acompafiadosporlospadresOunapersonaadulta
Nr- 17 iNo se admite que ningt]n menor de 17
.... [afros yea el programa
X IAdultos solamente
® Para obtener otra informaci0n (pag. 56)
Bloquero de VIERA CAST
Bloquea VlERA CAST.
Seleccione "VlERA CAST" en @ y p0ngalo en "SP'.
Cuando pulse VlERA CAST se visualizara la pantalla
"Bloquero de VlERA CAST".
Escriba la contraseffa correcta para ira la pantalla inicial.
• Para cambiar la contraseffa
_ En 0, seleccione "Cambio de
contrasena" y pulse OK
_2_Introduzca dos veces la nueva
contrasena de 4 digitos.
Si:
Bloquea
No:
Desbloquea
® Este televisor ha sido diseffado para soportar el "Downloadable U.S. Region Rating System" cuando se encuentre
disponible. (S01o esta disponible en los EE.UU.)
® La clasificacion No es independiente de otras clasificaciones.
® Cuando bloquee un nivel de clasificacion especifico basado en la edad, la clasificacion No y cualquier otra
clasificaci0n mas restrictiva tambien se bloquearan.
@
133
o
..Q
C
o
49
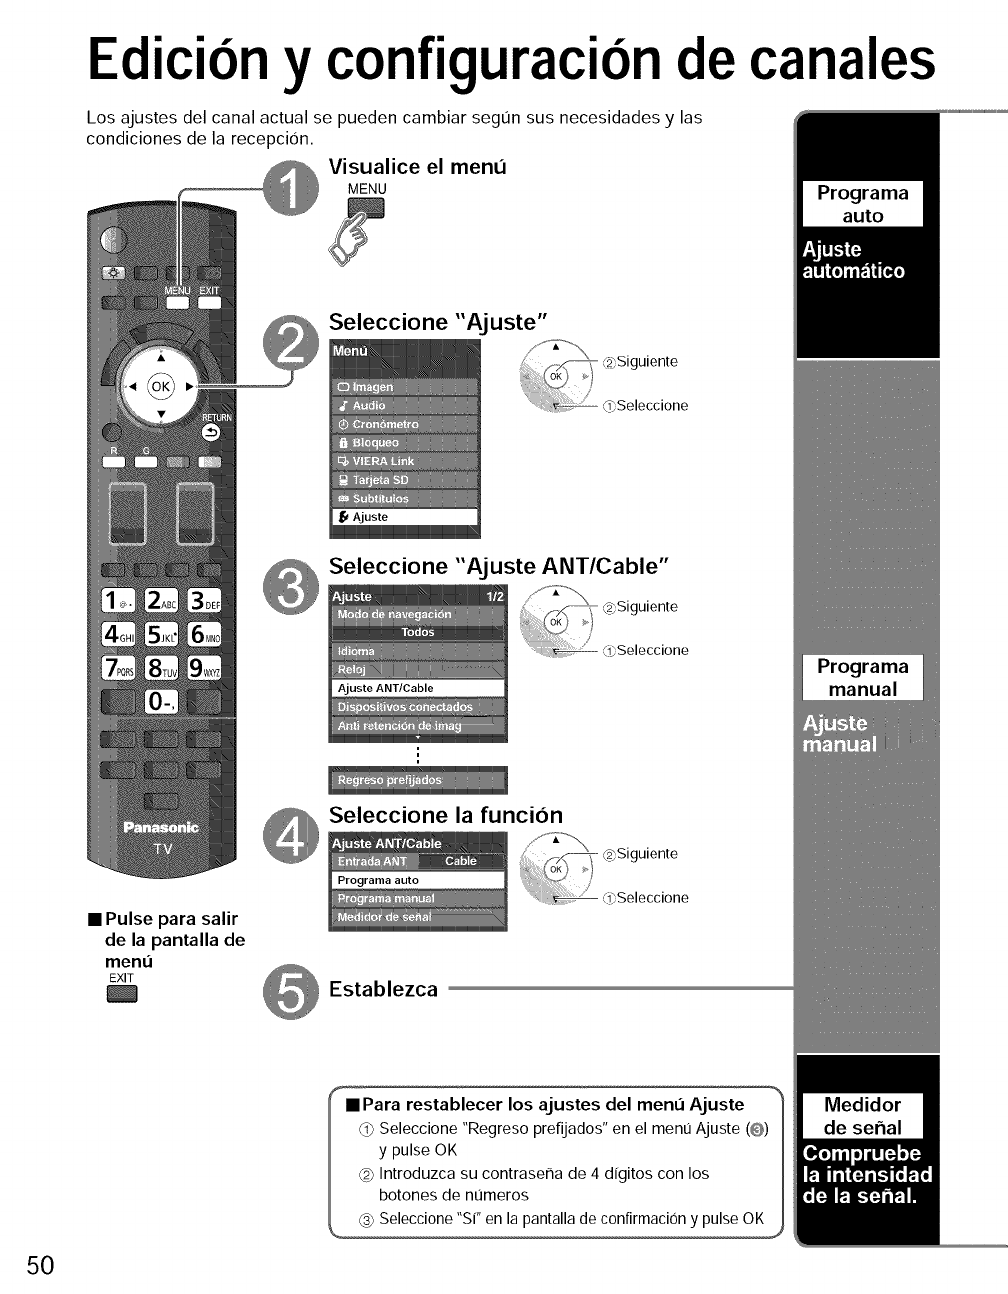
Edici6ny configuracionde canales
Los ajustes del canal actual se pueden cambiar segt]n sus necesidades y las
condiciones de la recepcion.
Visualice el men(i
MENU
Seleccione "Aj uste"
Seleccione "Ajuste ANT/Cable"
Ajuste ANT/Cable
Seleccione la funcion
•Pulse para salir
de la pantalla de
menu
EXIT Establezca
50
• Para restablecer los ajustes del menu Ajuste
Seleccione "Regreso prefijados" en el ment] Ajuste (@)
y pulse OK
@ Introduzca su contraseFla de 4 dlgitos con los
botones de nt]meros
(_ Seleccione "sr' en la pantalla de confirmacion y pulse OK
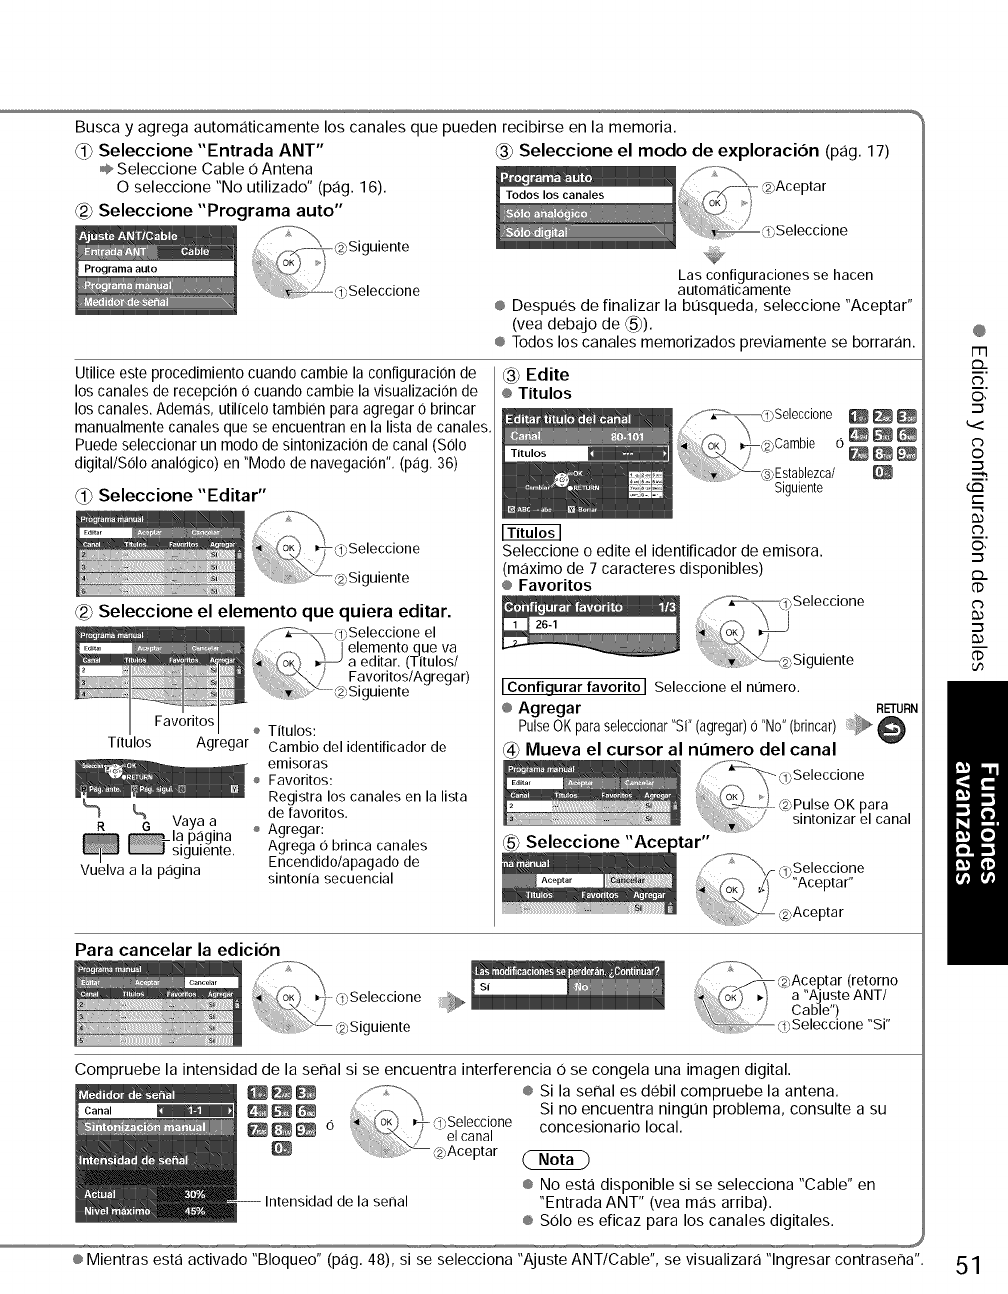
Buscayagregaautomaticamenteloscanalesquepuedenrecibirseenlamemoria.
Seleccione"EntradaANT" _3_SeleccioneelmododeexpIoracion(pag.17)
÷ SeleccioneCable0Antena
Oseleccione"Noutilizado"(pag.16). -@Aceptar
Seleccione"Programaauto" Seleccione
Utiliceesteprocedimientocuandocambielaconfiguraci0nde
loscanalesderecepcion0cuandocarnbielavisualizacionde
loscanales.Ademas,utilicelotarnbienparaagregar0brincar
manualmentecanalesqueseencuentranenlalistadecanales.
Puedeseleccionarunrnododesintonizaci0ndecanal(S01o
digital/Soloanal0gico)en"Mododenavegacion".(pag.36)
(_ Seleccione "Editar"
_2) Seleccione el elemento que quiera editar.
Tltulos Agregar
%L
8 vayaa
la pa.glna
smgumente.
Vuelva a la p,:igina
Cambio del identificador de
- emisoras
÷ Favoritos:
Registra los canales en la lista
de favoritos,
÷ Agregar:
Agrega 0 brinca canales
Encendido/apagado de
sintonia secuencial
Las configuraciones se hacen
automaticamente
÷ Despues de finalizar la busqueda, seleccione "Aceptar"
(vea debajo de _).
® Todos los canales memorizados previamente se borraran.
_3_Edite
®Titulos
Seleccione o edite el identificador de emisora.
(maximo de 7 caracteres disponibles)
® Favoritos
/"" _3;.Seleccione
@Siguiente
IConfiqurar favoritoJ Seleccione el numero.
® Agregar RETURN
PulseOKparaselecci0nar"S("(agregar)0 "No"(brincar) @
@Mueva el cursor al nl3mero del canal
Para cancelar la edicion
_5_Seleccione "Ace
Compruebe la intensidad de la serial si se encuentra interferencia Ose congela una imagen digital.
Intensidad de la serial
® Si la serial es debil compruebe la antena.
Si no encuentra ningun problema, consulte a su
concesionario local.
® No esta disponible si se selecciona "Cable" en
"Entrada ANT" (vea mas arriba).
® Solo es eficaz para los canales digitales.
® Mientras esta activado "Bloqueo" (pag. 48), si se selecciona "Ajuste ANTICable", se visualizara "lngresar contraserla".
@
1-13
©,
©
tm
t-
O,
,,_
,..m
51
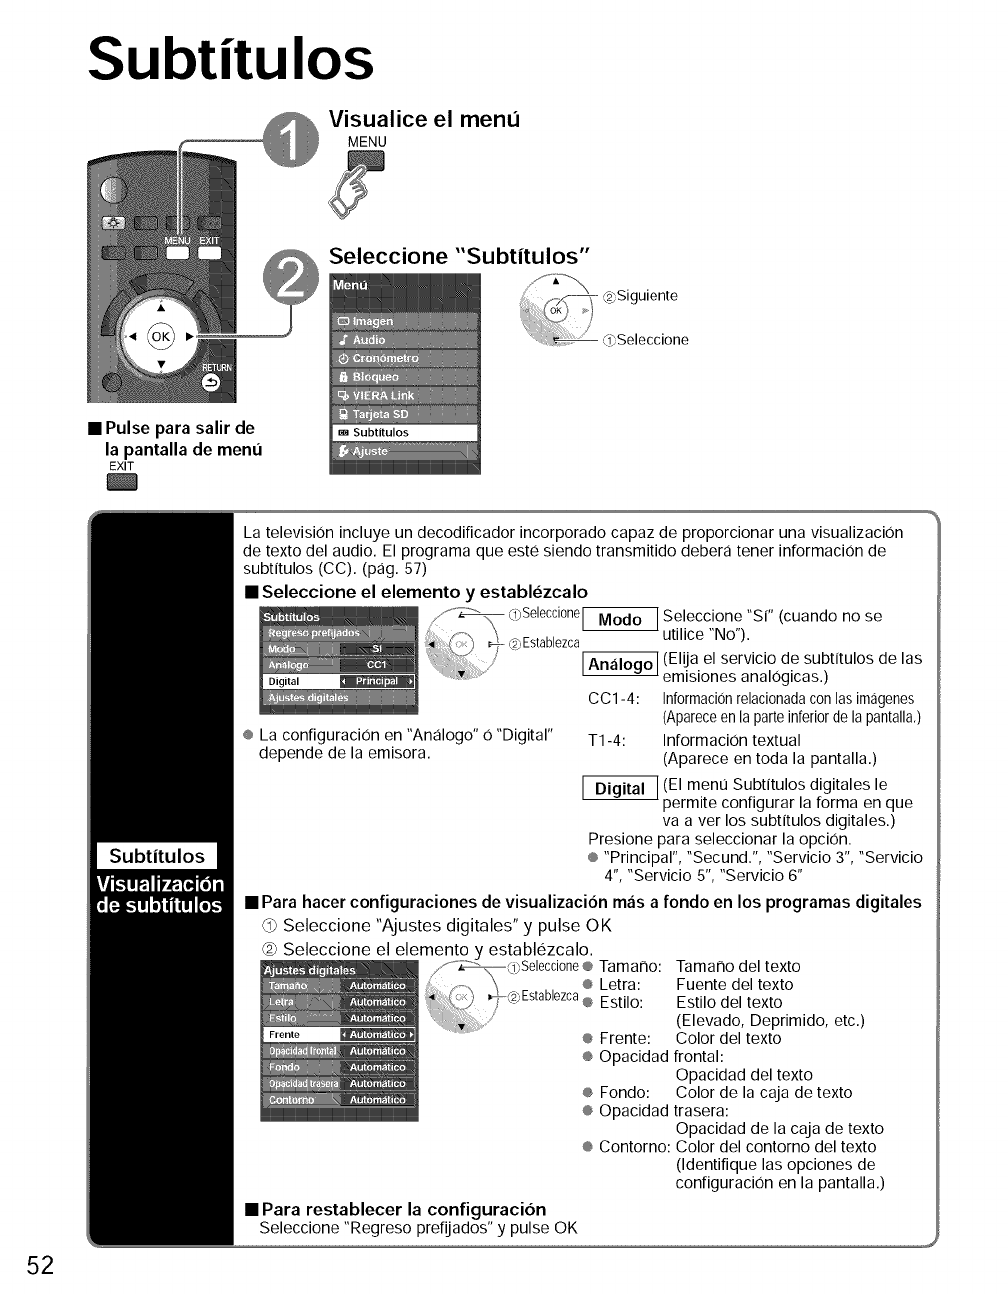
Subtitulos
Visualice el menu
MENU
Seleccione "Subtitulos"
•Pulse para salir de
la pantalla de meno
EXIT
52
Subtitulos
La television incluye un decodificador incorporado capaz de proporcionar una visualizacion
de texto del audio. El programa que este siendo transmitido debera tener informaciOn de
subtitulos (CC). (pag. 57)
• Seleccione el elemento y establezcalo
f,-'_ 0)Selecci0ne_ Seleccione "Si" (cuando no se
_ , _ ,_,Establezca utilice "No").
./ J
' _ (Elija el servicio de subtitulos de las
emisiones analogicas.)
CC1-4: Informacionrelacionadacon lasimagenes
(Apareceen la parte inferior de la pantalla.)
® La configuracion en "Analogo" 0 "Digital" T1-4: Informacion textual
depende de la emisora. (Aparece en toda la pantalla.)
(EI meno Subtitulos digitales le
permite configurar la forma en que
va aver los subtitulos digitales.)
Presione para seleccionar la opciOn.
® "Principal", "Secund.", "Servicio 3", "Servicio
4", "Servicio 5", "Servicio 6"
• Para hacer configuraciones de visualizacion mas a fondo en los programas digitales
Seleccione "Ajustes digitales" y pulse OK
@ Seleccione el elemento y establezcalo.
_ _ /f_Seleccione ® Tamano:
_ _ ,_ '_ ..............._ _ ® Letra
_ _ _7-2"Establezca® Estilo
Yrente _ ........' ':"'..... ® Frente:
® Opacidad
Tama¢lo del texto
Fuente del texto
Estilo del texto
(Elevado, Deprimido, etc.)
Color del texto
frontal:
Opacidad del texto
® Fondo: Color de la caja de texto
® Opacidad trasera:
Opacidad de la caja de texto
® Contorno: Color del contorno del texto
(Identifique las opciones de
configuraciOn en la pantalla.)
• Para restablecer la configuracion
Seleccione "Regreso prefijados" y pulse OK
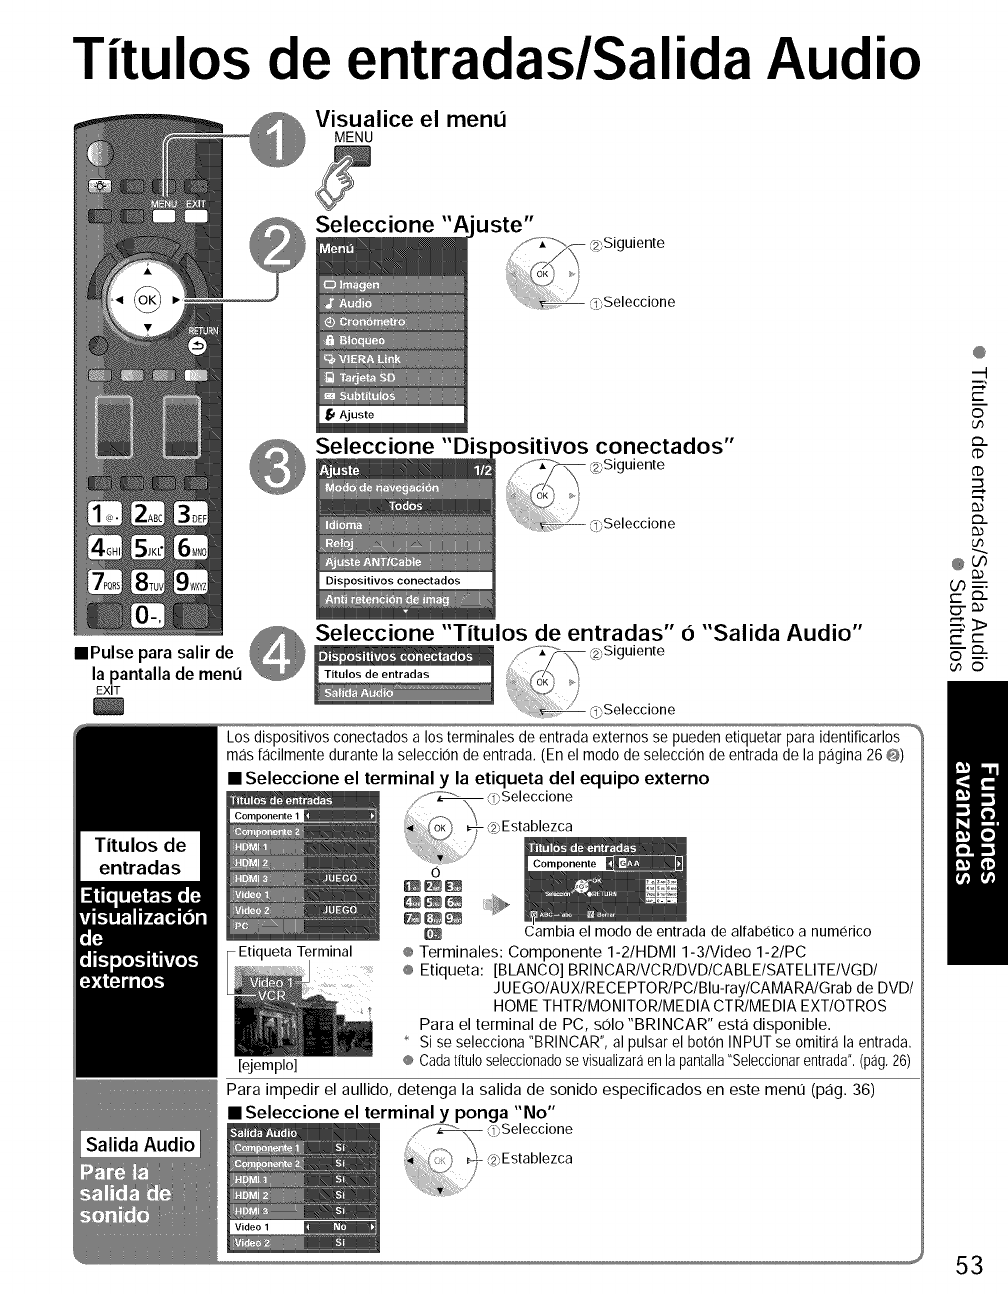
Titulos de entradas/Salida Audio
Visualice el menu
MENU
Seleccione "A uste"
Seleccione "Dis _ositivos conectados"
_ Seleccione "Titulos de entradas" 6"Salida Audio"
==Pulse para salir de /_z_ @siguiente
la pantalla de menti ,_/x \,_/
EXIT //(2Seleccione
Los dispositivos conectados a los terminales de entrada externos se pueden etiquetar para identificarlos
mas tacilmente durante la seleccion de entrada. (En el modo de seleccion de entrada de la pagina 26 @)
• Seleccione el terminal y la etiqueta del equipo externo
ueta Terminal
[ejemplo]
0
Cambia el modo de entrada de alfabetico a num(_rico
® Terminales: Componente 1-2/HDMI 1-3/Video 1-2/PC
® Etiqueta: [BLANCO] BRINCAR/VCR/DVD/CABLE/SATELITE/VGD/
JUEGO/AUX/RECEPTOR/PC/Blu-ray/CAMARA/Grab de DVD,
HOME THTR/MONITOR/MEDIA CTR/MEDIA EXT/OTROS
Para el terminal de PC, solo "BRINCAR" esta disponible.
* Si se selecciona "BRINCAR", al pulsar el boron INPUT se omitira la entrada.
® Cadatitulo seleccionadosevisualizaraen la pantalla"Seleccionarentrada",(pag. 26)
Para impedir el aullido, detenga la salida de sonido especificados en este ment] (pag. 36)
• Seleccione el terminal y ponga "No"
@
n_
E'
m
©
L,9
(1)
('D
Ep-_
r-
53
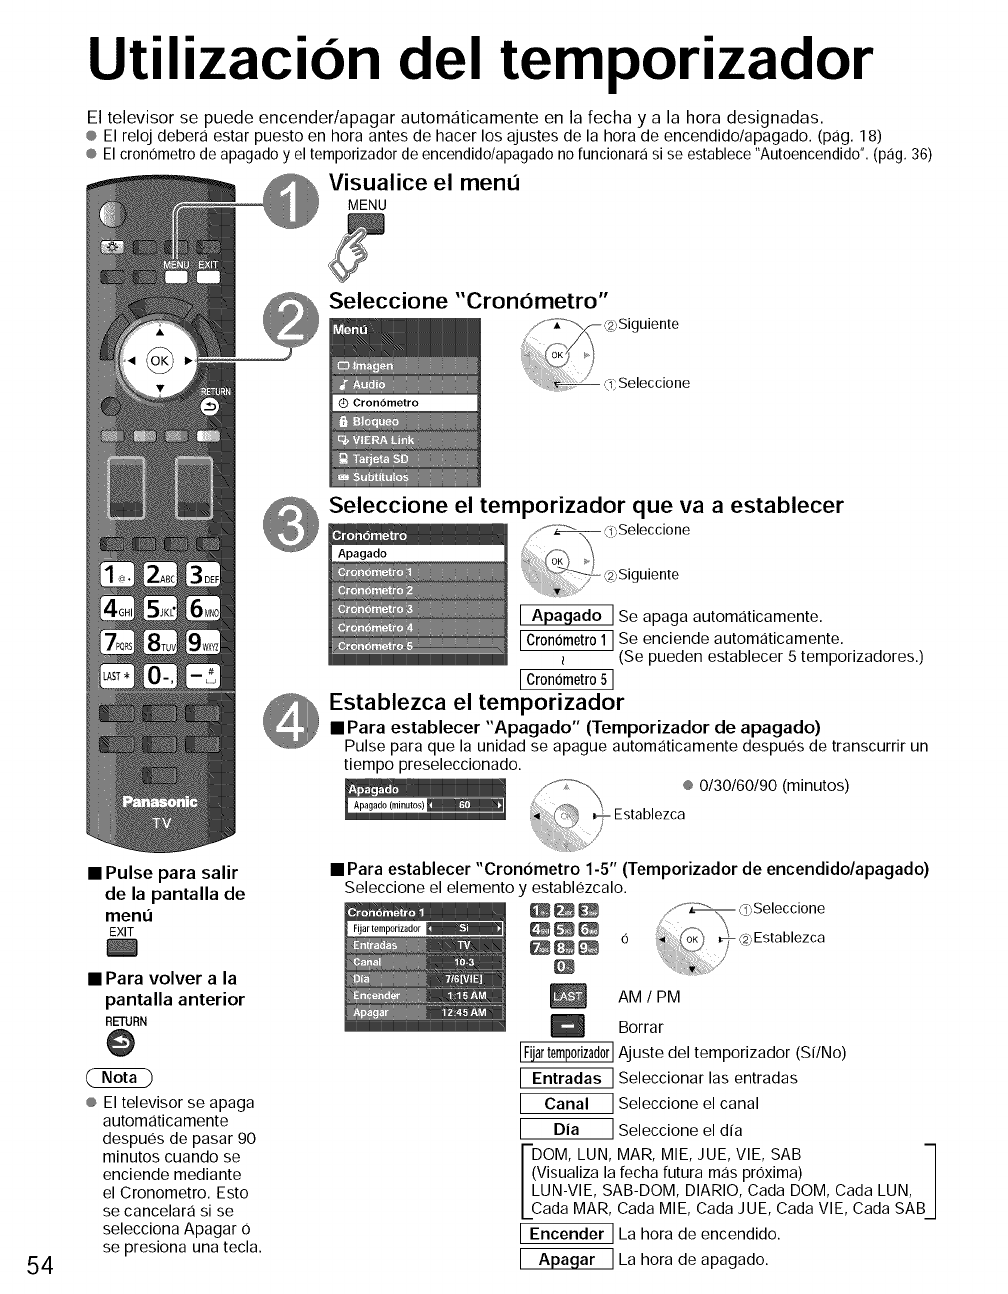
Utilizacion del temporizador
El televisor se puede encender/apagar automaticamente en la fecha y a la hora designadas.
® El reloj debera estar puesto en hora antes de hacer los ajustes de la hora de encendido/apagado. (pag. 18)
¢ El cronOmetro de apagado y el temporizador de encendido/apagado no funcionara si se establece "Autoencendido". (pag. 36)
Visualice el menu
MENU
•Pulse para salir
Seleccione "Cron6metro"
Seleccione el temporizador que va a establecer
Seleccione
uiente
Se apaga automaticamente.
[Cron6metro 1 ] Se enciende automaticamente.
(Se pueden establecer 5 temporizadores.)
[ Cronometro5 ]
Establezca el temporizador
• Para establecer "Apagado" (Temporizador de apagado)
Pulse para que la unidad se apague automaticamente despues de transcurrir un
tiempo preseleccionado.
® 0/30/60/90 (minutos)
54
de la pantalla de
ment]
EXIT
•Para volver a la
pantalla anterior
RETURN
® El televisor se apaga
automaticamente
despues de pasar 90
minutos cuando se
enciende mediante
el Cronometro. Esto
se cancelara si se
selecciona Apagar O
se presiona una tecla.
• Para establecer "Cron6metro 1-5" (Temporizador de encendido/apagado)
Seleccione el elemento y establezcalo.
6
AM /PM
Borrar
IFUartemp0rizad0rIAjuste del temporizador (Sf/No)
[ Entradas ] Seleccionar las entradas
[ Canal ]Seleccioneelcanal
[ Dia ] Seleccione el dfa
ivOM, LUN, MAR, MIE, JUE, VIE, SAB -_
isualiza la fecha futura mas proxima) /
UN-VIE, SAB-DOM, DIARIO, Cada DOM, Cada LUN, |
ada MAR, Cada MIE, Cada JUE, Cada VIE, Cada SAB/
[ Encender ] La hora de encendido.
La hora de apagado.
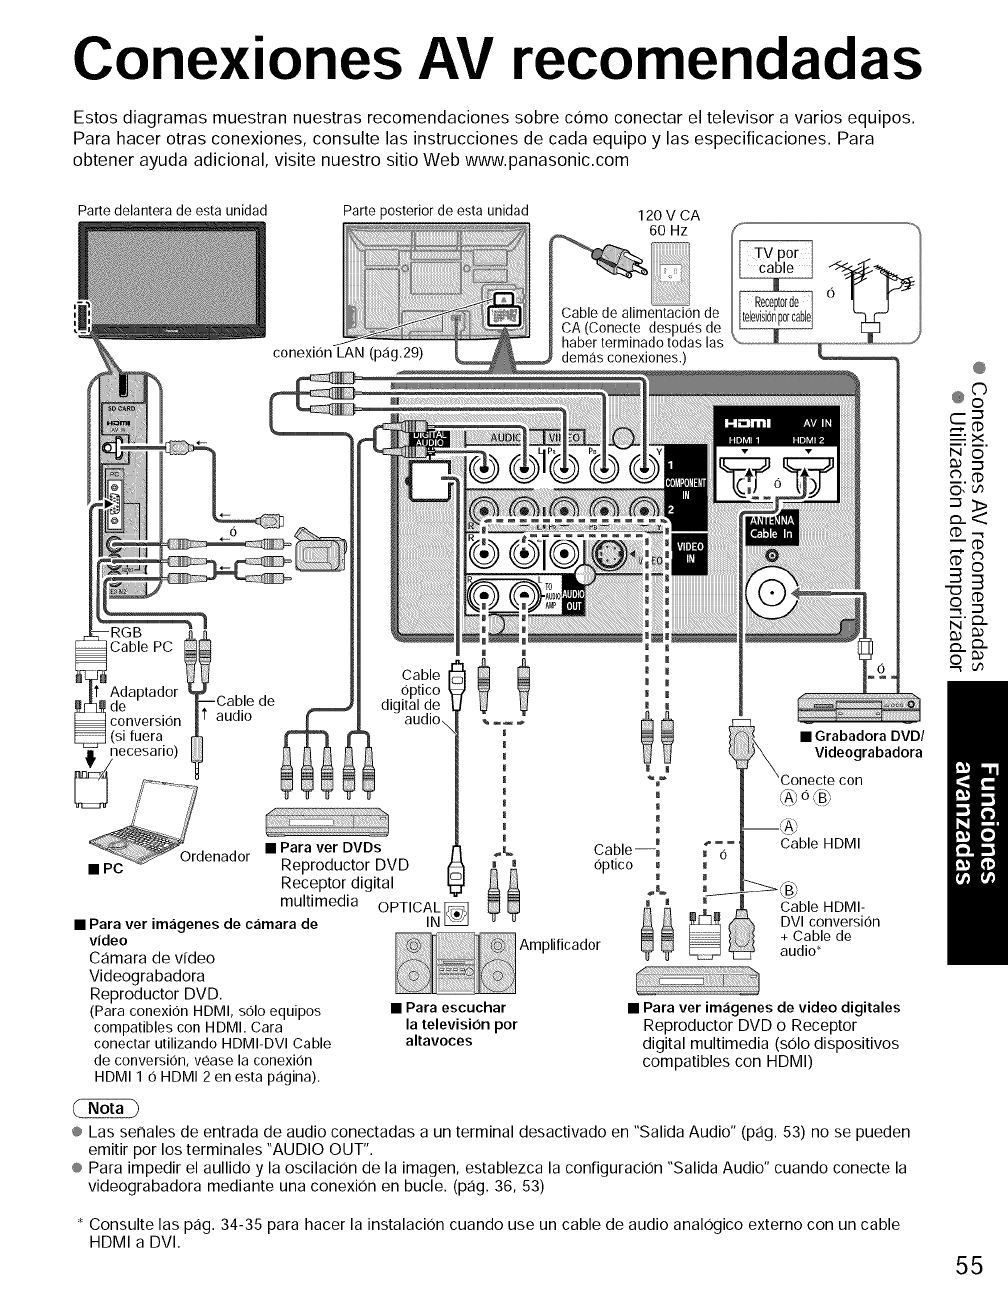
Conexiones AV recomendadas
Estos diagramas muestran nuestras recomendaciones sobre como conectar el televisor a varios equipos.
Para hacer otras conexiones, consulte las instrucciones de cada equipo y las especificaciones. Para
obtener ayuda adicional, visite nuestro sitio Web www.panasonic.com
Parte delantera de esta unidad Parte posterior de esta unidad
conexion LAN (pag.29)
120 V CA
o.zCable de alimentacion de
CA (Conecte despues de
haber terminado todas las
demas conexiones.) _
Cable PC
Adaptador
I de --Cable
conversion audio
_, necesario)
_enad0r
• PC
de
• Para ver im_igenes de c_imara de
video
Camara de video
Videograbadora
Reproductor DVD.
(Para conexion HDMI, solo equipos
compatibles con HDMI. Cara
conectar utilizando HDMI-DVl Cable
de conversion, vease la conexion
HDMI 1 O HDMI 2 en esta pagina).
Cable
optico
digital de
audio
®
• Para ver DVDs _,
Reproductor DVD i i
Receptor digital
multimedia OPTICALIN_
i
!
I
Cable m
optico I
Amplificador i i
to"
m
i
•Grabadora DVD/
Videograbadora
Cable HDMI
\bj
Cable HDMI-
DVI conversion
+Cable de
audio*
• Para escuchar
la television por
altavoces
• Para ver im_igenes de video digitales
Reproductor DVD o Receptor
digital multimedia (solo dispositivos
compatibles con HDMI)
® Las serlales de entrada de audio conectadas a un terminal desactivado en "Salida Audio" (pag. 53) no se pueden
emitir por los terminales "AUDIO OUT".
® Para impedir el aullido y la oscilacion de la imagen, establezca la configuracion "Salida Audio" cuando conecte la
videograbadora mediante una conexiOn en bucle. (pag. 36, 53)
* Consulte las pag. 34-35 para hacer la instalacion cuando use un cable de audio analogico externo con un cable
HDMI a DVl.
@
@o°
_X
N O
O,_ 'm
___._
O, (.f_
_'o..
(_.. o..
55
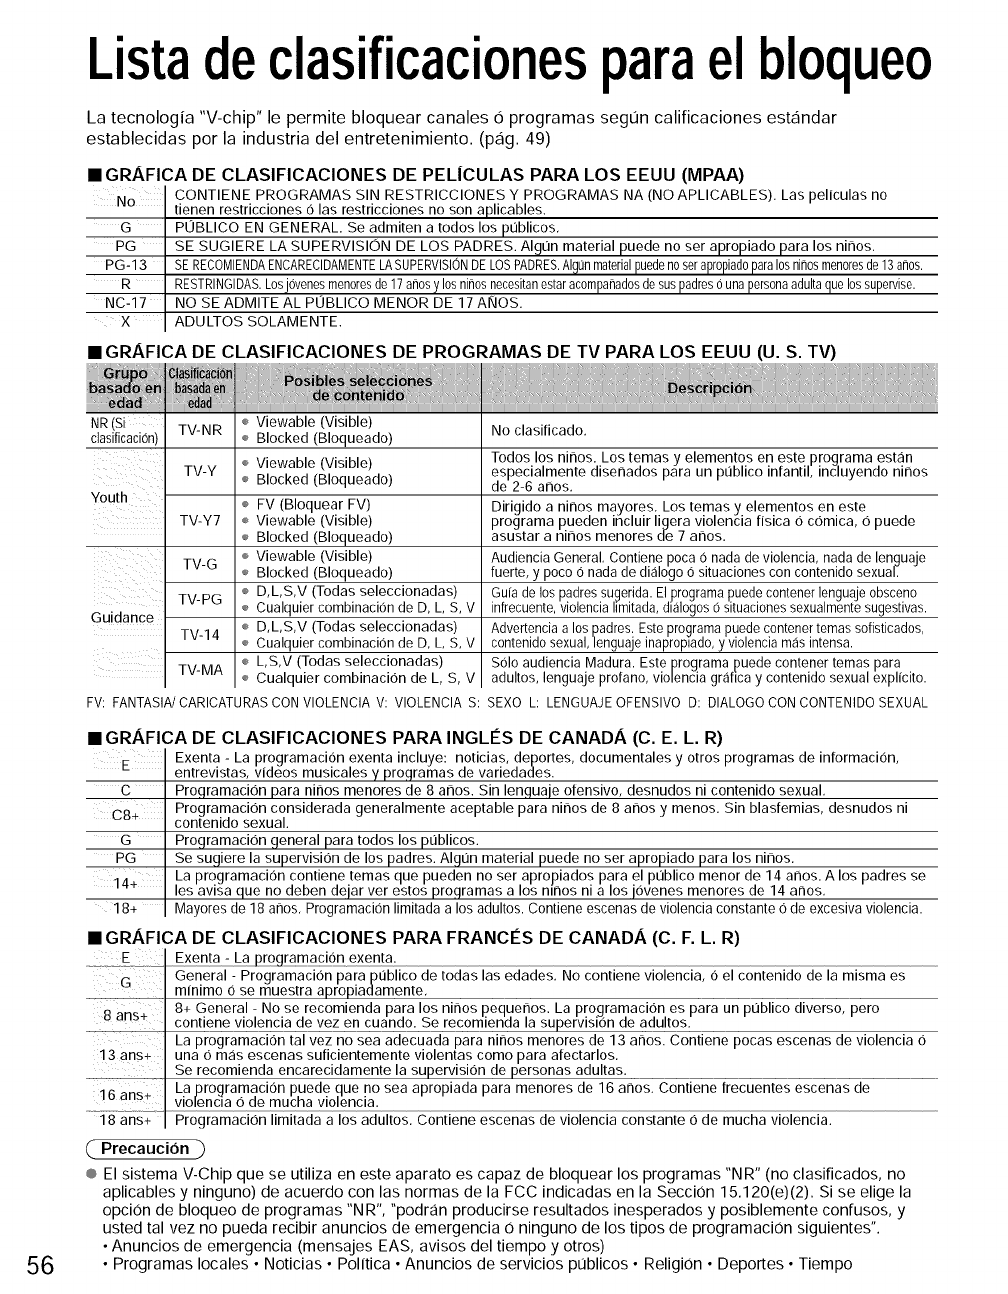
Listadeclasificacionesparaelbloqueo
La tecnologia "V-chip" le permite bloquear canales O programas segt_n calificaciones estandar
establecidas por la industria del entretenimiento. (pag. 49)
IGRAFICA DE CLASIFICACIONES DE PEL|CULAS PARA LOS EEUU (MPAA)
NO
G
PG
PG-13
R
NC-17
X
CONTIENE PROGRAMAS SIN RESTRICCIONES Y PROGRAMAS NA (NO APLICABLES). Las peliculas no
tienen restricciones O las restricciones no son aplicables.
POBLICO EN GENERAL, Se admiten a todos los publicos.
SE SUGIERE LA SUPERVISION DE LOS PADRES. Algun material puede no ser apropiado para los ninos.
SE RECOMIENDAENCARECIDAMENTELASUPERVISIONDELOSPADRES.AIgQnmaterialpuedeno serapropiad0para10snitrosmenoresde 13 argos.
RESTRINGIDAS.Losjovenes menoresde 17 anosy 10sninos necesitanestarac0mparladosde suspadres0una personaadultaque los supervise.
NO SE ADMITE AL POBLICO MENOR DE 17 AKIOS.
ADULTOS SOLAMENTE.
• GRAFICA DE CLASIFICACIONES DE PROGRAMAS DE TV PARA LOS EEUU (U. S. TV)
56
NR TV-NR ÷ Viewable (Visible) No clasificado,
clasificaci6n) ÷ Blocked (Bloqueado)
Viewable (Visible) Todos los ninos, Los temas y elementos en este programa est,:in
TV-Y ÷ especialmente disenados para un puiblico infant& incluyendo nirlos
÷ Blocked (Bloqueado) de 2-6 athos,
Youth e FV (Bloquear FV) Dirigido a ninos mayores, Los temas y elementos en este
TV-Y7 e Viewable (Visible) programa pueden incluir ligera violencia fisica Ocomica, O puede
÷ Blocked (Bloqueado) asustar a nirlos menores de 7 arlos,
TV-G ÷ Viewable (Visible) AudienciaGeneral, Contiene poca0 nada de violencia, nadade lenguaje
÷ Blocked (Bloqueado) fuerte, y poco 0 nada de dialogo 0 situaciones concontenidosexual.
TV-PG e D,L,S,V (Todas seleccionadas) Gufade lospadressugerida.El,0rogramapuedecontenerlenguajeobsceno
÷ Cualquiercombinacion de D, L, S, V infrecuente,violenciahmitada,dkilogos6 situacionessexualmentesugestivas.
Guidance TV-14 ÷ D,L,S,V (Todas seleccionadas) Advertenciaa lospadres.Esteprogramapuedecontenertemassofisticados,
÷ Cualquiercombinaci0nde D, L, S, V contenidosexual,lenguajeinaproplado,y violenciamasintensa.
L,S,V (Todas seleccionadas) S01oaudiencia Madura. Este programa puede contenertemas para
Cualquier combinacion de L, S, V adultos, lenguaje profano, violenciagrafica y contenido sexual explicito.
FV: FANTASIA/CARICATURASCONVlOLENCIAV: VIOLENCIAS: SEXO L: LENGUAJEOFENSIVOD: DIALOGOCONCONTENIDOSEXUAL
• GRAFICA DE CLASIFICACIONES PARA INGLI_S DE CANADA (C. E. L. R)
E Exenta - La programacion exenta incluye: noticias, deportes, documentales y otros programas de informaci0n,
entrevistas, videos musicales y programas de variedades.
C Programacion para ninos menores de 8 arlos. Sin lenguaje ofensivo, desnudos ni contenido sexual,
C8+ Programacion considerada generalmente aceptable para nirlos de 8 anos y menos. Sin blasfemias, desnudos ni
contenido sexual.
G Programacion general para todos los pt]blicos.
PG Se sugiere la supervision de los padres. Algt]n material puede no ser apropiado para los nirlos,
La programacion contiene temas que pueden no ser apropiados para el pt]blico menor de 14 arlos. A los padres se
14+ es avisa que no deben dejar ver estos programas a los nmos ni a los j0venes menores de 14 anos,
18+ Mayores de 18 anos, Programacion limitadaa los adultos. Contiene escenasde violenciaconstante 0 de excesivaviolencia.
• GRAFICA DE CLASIFICACIONES PARA FRANCES DE CANADA (C. F. L. R)
E Exenta -La programacion exenta.
G General - Programacion parapt]blico de todas las edades, No contiene violencia, 0 el contenido de la misma es
mfnlmo 0 se muestra en[e:...............................................................................................................................................................................................................................................................................................................................................................
-2 ........ 8+ General - No se recomienda para los ninos pequenos. La programacion es para un pt]blico diverso, pero
8 ans÷ .... ..........................................................
La programacion tal vez no sea adecuada para ninos menores de 13 anos. Contiene pocas escenas de violencia O
i3 ans+ una O mas escenas suficientemente violentas como para afectarlos.
Se recomienda encarecidamente la supervision de personas adultas,
16 ans+ La programacion puede flue no sea apropiada para menores de 16 anos. Contiene frecuentes escenas de
violencla Ode mucha violencia.
--;i8ans+-: Programacion limitada a los adultos, Contiene escenas de violencia constante Ode mucha violencia.
( Precaucion )
® El sistema V-Chip que se utiliza en este aparato es capaz de bloquear los programas "NR" (no clasificados, no
aplicables y ninguno) de acuerdo con las normas de la FCC indicadas en la Secci0n 15.120(e)(2). Si se elige la
opci0n de bloqueo de programas "N R", "podran producirse resultados inesperados y posiblemente confusos, y
usted tal vez no pueda recibir anuncios de emergencia 0 ninguno de los tipos de programaci0n siguientes".
• Anuncios de emergencia (mensajes EAS, avisos del tiempo y otros)
• Programas locales • Noticias • Politica • Anuncios de servicios pt_blicos • ReligiOn • Deportes • Tiempo
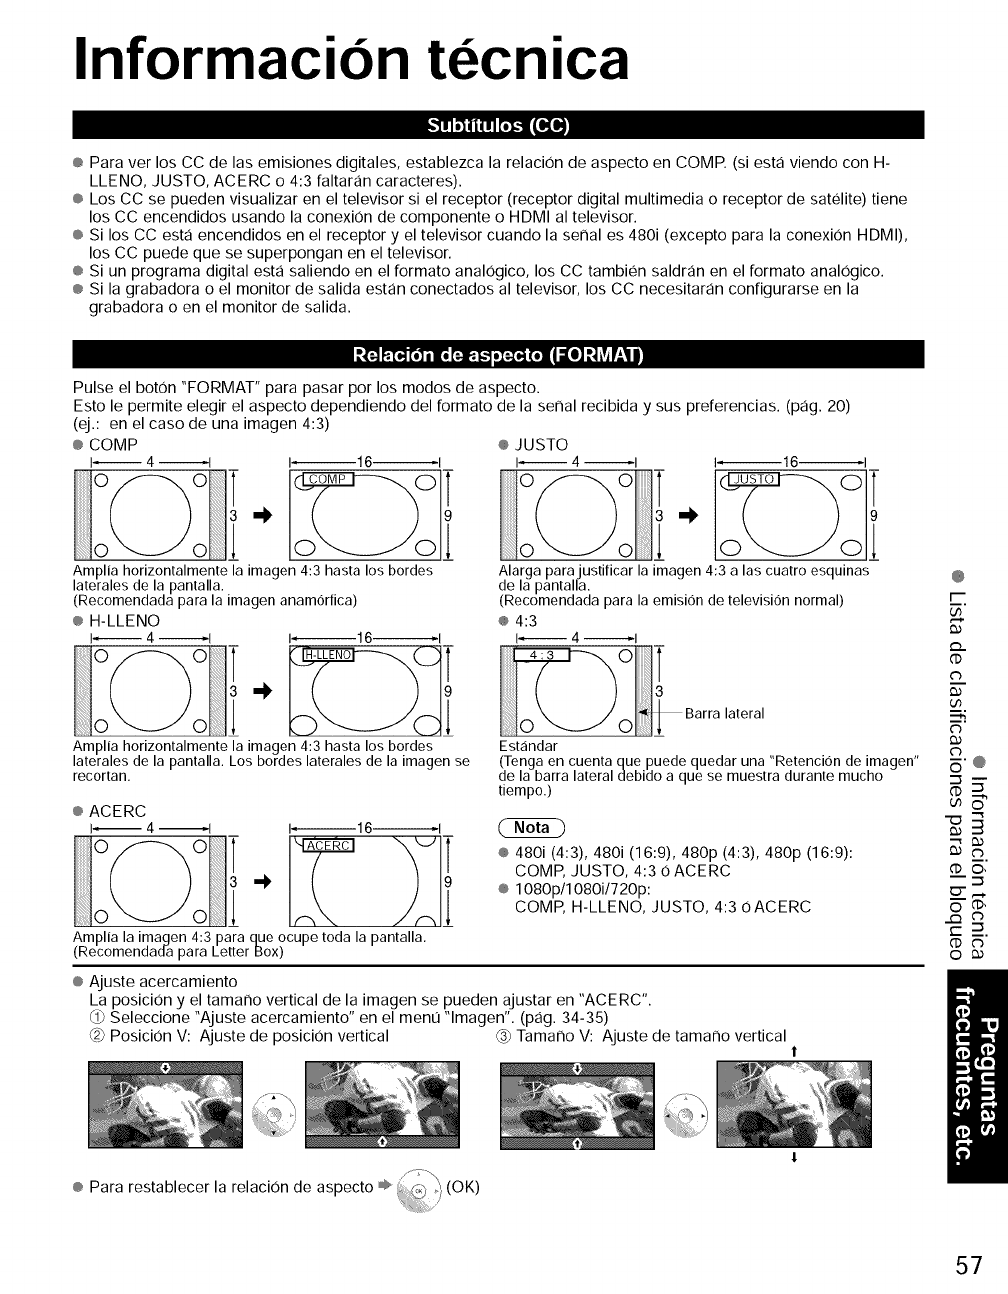
Informacion tecnica
_!t!lrl[o]._m(IKe,]
® Para ver los CC de las emisiones digitales, establezca la relaciOn de aspecto en COME (siesta viendo con H-
LLENO, JUSTO, ACERC o 4:3 faltaran caracteres).
® Los CC se pueden visualizar en el televisor si el receptor (receptor digital multimedia o receptor de satelite) tiene
los CC encendidos usando la conexiOn de componente o HDMI al televisor.
® Si los CC esta encendidos en el receptor y el televisor cuando la serial es 480i (excepto para la conexiOn HDMI),
los CC puede que se superpongan en el televisor.
® Si un programa digital esta saliendo en el formato analogico, los CC tambien saldran en el formato analogico.
® Si la grabadora o el monitor de salida estan conectados al televisor, los CC necesitaran configurarse en la
grabadora o en el monitor de salida.
,'_'_4v._ [o]i n[o[=.]e:.i.-toi=_®_!!1 =[o]=NtvtP'_'Ii
Pulse el boton "FORMAT" para pasar por los modos de aspecto.
Esto le permite elegir el aspecto dependiendo del formato de la serial recibida y sus preferencias. (pag. 20)
(ej.: en el caso de una imagen 4:3)
® COMP
l_ 4 _1 I, 16 q
Amplia horizontalmente la imagen 4:3 hasta los bordes
laterales de la pantalla.
(Recomendada para la imagen anamorfica)
® H-LLENO
1_4 I I, 16 ,I
Amplia horizontalmente la imagen 4:3 hasta los bordes
laterales de la pantalla. Los bordes laterales de la imagen se
recortan.
®JUSTO
1_4_1 1_16_1
Alarga para justificar la imagen 4:3 a las cuatro esquinas
de la pantalla.
(Recomendada para la emision de televisi6n normal)
® 4:3
I_ 4 _1
Est_indar
(Tenga en cuenta que puede quedar una "Retenci6n de imagen"
de la barra lateral debido a que se muestra durante mucho
tiempo.)
® ACERC
l-- 4 --I I, 16 ,I
® 480i (4:3), 480i (16:9), 480p (4:3), 480p (16:9):
COMP, JUSTO, 4:3 OACERC
® 1080p/1080i/720p:
COMP, H-LLENO, JUSTO, 4:3 oACERC
Amplia la imagen 4:3 para que ocupe toda la pantalla.
(Recomendada para LetterBox)
® Ajuste acercamiento
La posicion y el tamarlo vertical de la imagen se pueden ajustar en "ACERC".
_1_Seleccione "Ajuste acercamiento" en el ment] "lmagen". (pag. 34-35)
@ Posici0n V: Ajuste de posici0n vertical @ Tamarlo V: Ajuste de tamarlo vertical 1
@
5
d3
d3
_'@
O,
---_
(:D",_.
_'_,O
r-__.
O
® Para restablecer la relaci0n de aspecto ÷ _ (OK)
57
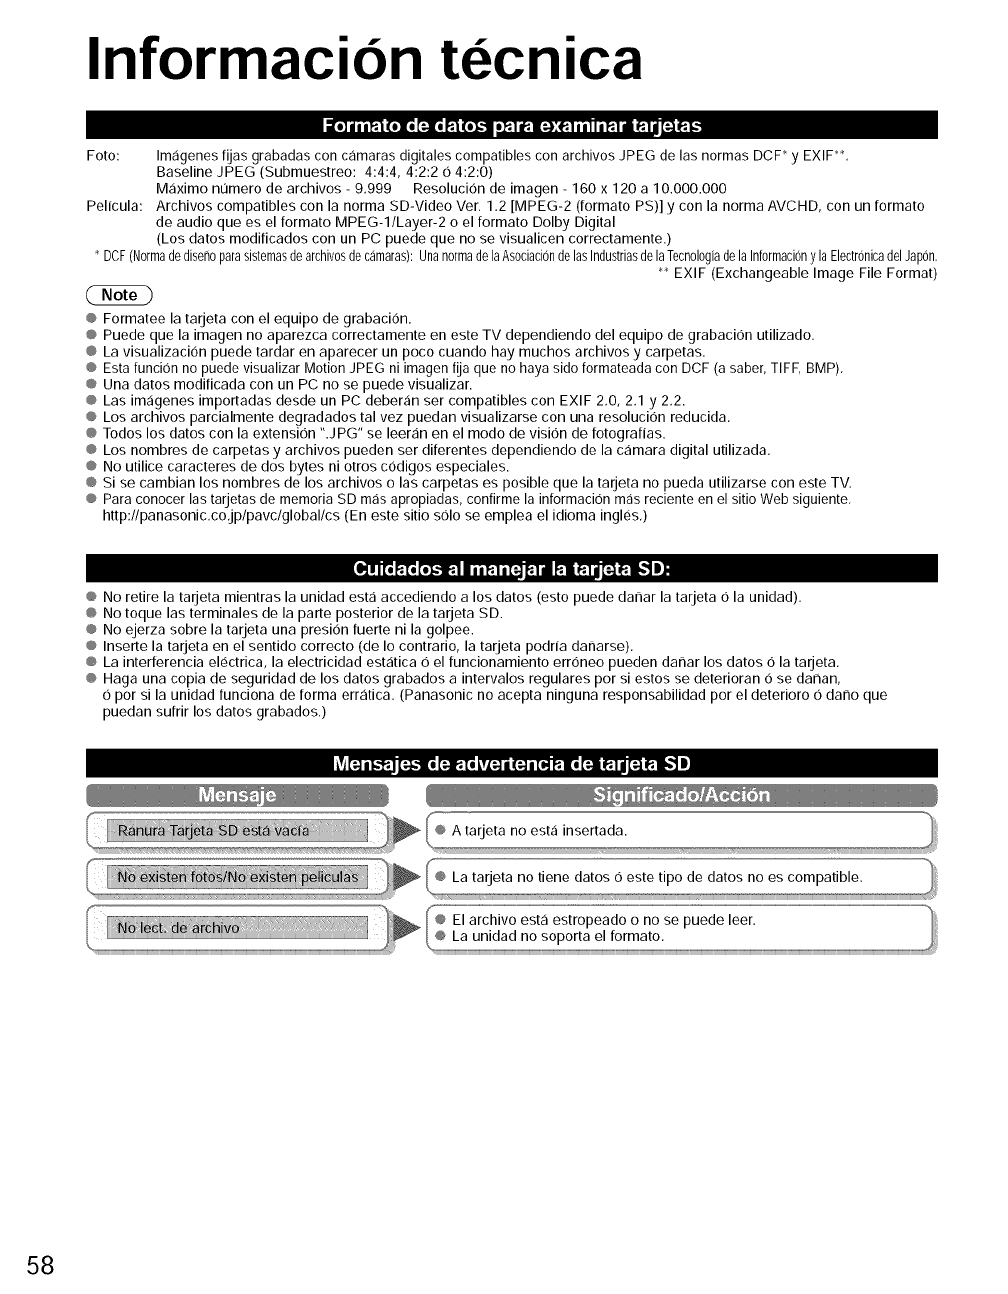
Informacion tecnica
=,]J,,_.l_,x,_.lt;I__,_.-s,_.l_.==_:_.l,,,._.l,-_.l,[=i?=i.
Foto: Imagenes fijas grabadas con camaras digitales compatibles con archivos JPEG de las normas DCP y EXIF**.
Baseline JPEG (Submuestreo: 4:4:4, 4:2:2 O 4:2:0)
M,:iximo n0mero de archivos - 9.999 Resolucion de imagen - 160 x 120 a 10.000.000
Pelicula: Archivos compatibles con la norma SD-Video Vet. 1.2 [MPEG-2 (formato PS)] y con la norma AVCHD, con un formato
de audio que es el formato MPEG-1/Layer-2 o el formato Dolby Digital
(Los datos modificados con un PC puede que no se visualicen correctamente.)
DCF(Normadedisenoparasistemasde archiv0sde camaras):Una normade laAsociacionde las Industriasdela Tecnologiade la Inf0rmaciony la ElectronicadelJap0n.
_ EXlF (Exchangeable Image File Format)
@ Formatee la tarjeta con el equipo de grabacion.
@ Puede que la imagen no aparezca correctamente en este TV dependiendo del equipo de grabacion utilizado.
@ La visualizacion puede tardar en aparecer un poco cuando hay muchos archivos y carpetas.
@ Esta funcion no puede visualizar Motion JPEG ni imagen fija que no haya sido formateada con DCF (a saber, TIFF, BMP).
¢ Una datos modificada con un PC no se puede visualizar.
@ Las imagenes importadas desde un PC deberan set compatibles con EXIF 2.0, 2.1 y 2.2.
@ Los archivos parcialmente degradados tal vez puedan visualizarse con una resolucion reducida.
@ Todos los datos con la extension ".JPG" se leeran en el modo de vision de fotografias.
@ Los nombres de carpetas y archivos pueden set diferentes dependiendo de la c_imara digital utilizada.
@ No utilice caracteres de dos bytes ni otros codigos especiales.
@ Si se cambian los nombres de los archivos o las carpetas es posible que la tarjeta no pueda utilizarse con este TV.
@ Para conocer las tarjetas de memoria SD mas apropiadas, confirme la informacion mas reciente en el sitio Web siguiente.
http:flpanasonic.co.jplpavclgloballcs (En este sitio solo se emplea el idioma ingles.)
@ No retire la tarjeta mientras la unidad esta accediendo a los datos (esto puede daP_ar la tarjeta O la unidad).
@ No toque las terminales de la parte posterior de la tarjeta SD.
@ No ejerza sobre la tarjeta una presion fuerte ni la golpee.
@ Inserte la tarjeta en el sentido correcto (de Io contrario, la tarjeta podria danarse).
@ La interferencia electrica, la electricidad estatica O el funcionamiento erroneo pueden danar los datos 0 la tarjeta.
@ Haga una copia de seguridad de los datos grabados a intervalos regulates pot si estos se deterioran 0 se daP_an,
O por si la unidad funciona de forma err_itica. (Panasonic no acepta ninguna responsabilidad por el deterioro O dano que
puedan sufrir los datos grabados.)
A tarjeta no est,:i insertada.
La tarjeta no tiene datos O este tipo de datos no es compatible.
58

(Continuacion)
rj I_I2;-,IIlrlT1.,'41-=IiT_,\vj[e.z-_ _I lli'ill
Las conexiones HDMI para algunos equipos Panasonic le permiten hacer interfaz automaticamente, (pag, 38)
® Esta funcion puede no funcionar normalmente dependiendo de la condicion del equipo.
® Con esta funcion activada, aunque el televisor este en el modo de espera, el equipo podra ser controlado por otros mandos a distancia,
® Cuando empieza la reproduccion puede que no se disponga de imagen ni sonido durante los primeros segundos.
® Cuando se cambia el modo de entrada puede que no se disponga de imagen ni sonido durante los primeros segundos,
® Cuando se ajuste el volt]men del equipo se visualizara la funcion del volt]men.
® Si conecta la misma clase de equipo al mismo tiempo (por ejemplo: una DIGAa HDMI 1/otra DIGAa HDMI 2),
VIERA Link estara disponible para el terminal que tiene el nt]mero mas pequeno,
® Si conecta el equipo que tiene la funcion "HDAVI Control 2 0 posterior" al televisor con un cable HDMI, el sonido procedente del
terminal DIGITAL AUDIO OUT podra salir como sonido ambiental multicanal.
® "HDAVI Control 4" es la norma mas reciente (valida a partir de Diciembre de 2008) para el equipo compatible con HDAVI Control.
Esta norma es compatible con el equipo HDAVI convencional,
HDMI (interfaz multimedia de alta definici6n) le permite disfrutar de imagenes digitales de alta definicion y de sonido de alta
calidad conectando el televisor y los dispositivos.
El equipo compatible con HDMI ('1) que tenga un terminal de salida HDMI 0 DVI, como, por ejemplo, un receptor digital multimedia
O un reproductor DVD, podra ser conectado al terminal HDMI utilizando un cable que cumpla con HDMI (funcion completa).
® HDMI es la primera interfaz AV completamente digital del mundo para el consumidor que cumple con un estandar de no compresion.
® Si el dispositivo externo solo tiene una salida DVI, conecte al terminal HDMI mediante un cable adaptador DVI a HDMI (*2).
® Cuando se utiliza el cable adaptador DVI a HDMI, conecte el cable de audio al terminal de entrada de audio.
® Los ajustes de audio se pueden hacer en la pantalla del menu "Entrada HDMI 1", "Entrada HDMI 2" O "Entrada HDMI 3". (pag. 34)
Frecuencias de muestreo de la senal de audio aplicable (LPCM): 48 kHz, 44,1 kHz, 32 kHz
('1): El Iogotipo HDMI se visualiza en un equipo compatible con HDMI.
(" Precaucion '_ ('2): Pregunte en el establecimiento del vendedor de equipos digitales local.
/
® No se asume el funcionamiento con un PC.
® Todas las senales se reformatean antes de visualizarse en la pantalla.
® Si el equipo conectado tiene una funcion de ajuste de relacion de aspecto, ajuste la relacion de aspecto a "16:9".
® Estos conectores HDMI son de "tipo A".
® Estos conectores HDMI son compatibles con la proteccion de los derechos de autor de HDCP (proteccion de contenido digital
de elevado ancho de banda).
® Un dispositivo que no tenga terminal de salida digital podra conectarse al terminal de entrada de "COMPONENT", % VIDEO" 6
"VIDEO" para recibir senales anal6gicas.
® El terminal de entrada HDMI s01o puede utilizarse con las senales de imagen siguientes: 480i, 480p, 720p, 1080i y 1080p.
Procure que concuerde con el ajuste de salida del dispositivo digital.
® Para conocer detalles de las senales HDMI aplicables, consulte la pag. 60.
[:_i,it iT_ 1_1 i] [_ / I:I 11'.'I,111][e][e]ll
Puede disfrutar de su equipo de cine para casa conectando un decodificador Dolby Digital (5,1 canales) y un amplificador "Multi
Canal" a los terminales DIGITAL AUDIO OUT.
Precaucion
® Dependiendo de su reproductor DVD y del software DVD-Audio, la funcion de proteccion del copyright tal vez se active y
apague la salida 6ptica.
® Cuando se seleccione un canal ATSC, la salida procedente de la toma DIGITAL AUDIO OUT sera Dolby Digital.
Cuando se seleccione un canal NTSC, la salida sera PCM.
® Cuando reproduzca pelfculas en el visor de peliculas de tarjetas SD, cuando el sonido haya sido grabado en Dolby Digital, la
salida del terminal DIGITAL AUDIO OUT sera Dolby Digital, Cuando el sonido se grabe en otros formatos, la salida sera PCM.
Vea las paginas 48-49 para obtener mas informaci0n
[iF#i'
® Vfvido: Provee un contraste y una nitidez de imagen realzados para ver programas en una habitacion bien iluminada,
® Estandar: Recomendado para ver bajo condiciones normales en una habitacion con iluminaci6n atenuada.
® THX: Reproduce fielmente la calidad de imagen que los directores de cine desean ofrecer, para proporcionar
asi la maxima experiencia cinematografica en casa.
® Juego: Para jugar con videojuegos. Este modo se establecera automaticamente si se selecciona "JUEGO" para el
ajuste del titulo de entrada. (pag. 53)
® Usuario (Fotografico): Personaliza cada elemento segt]n sus preferencias.
La foto se visualiza en el ment] Jpeg.
® El modo de imagen se pondra automaticamente en "Estandar" si usted cambia el titulo de entrada de "JUEGO" a otros titulos.
® El modo de imagen se pondra automaticamente en "Juego" si usted cambia de un titulo de entrada que no es "JUEGO" al tftulo "JUEGO",
@
©
3
c_
©,
('D,
C_
59
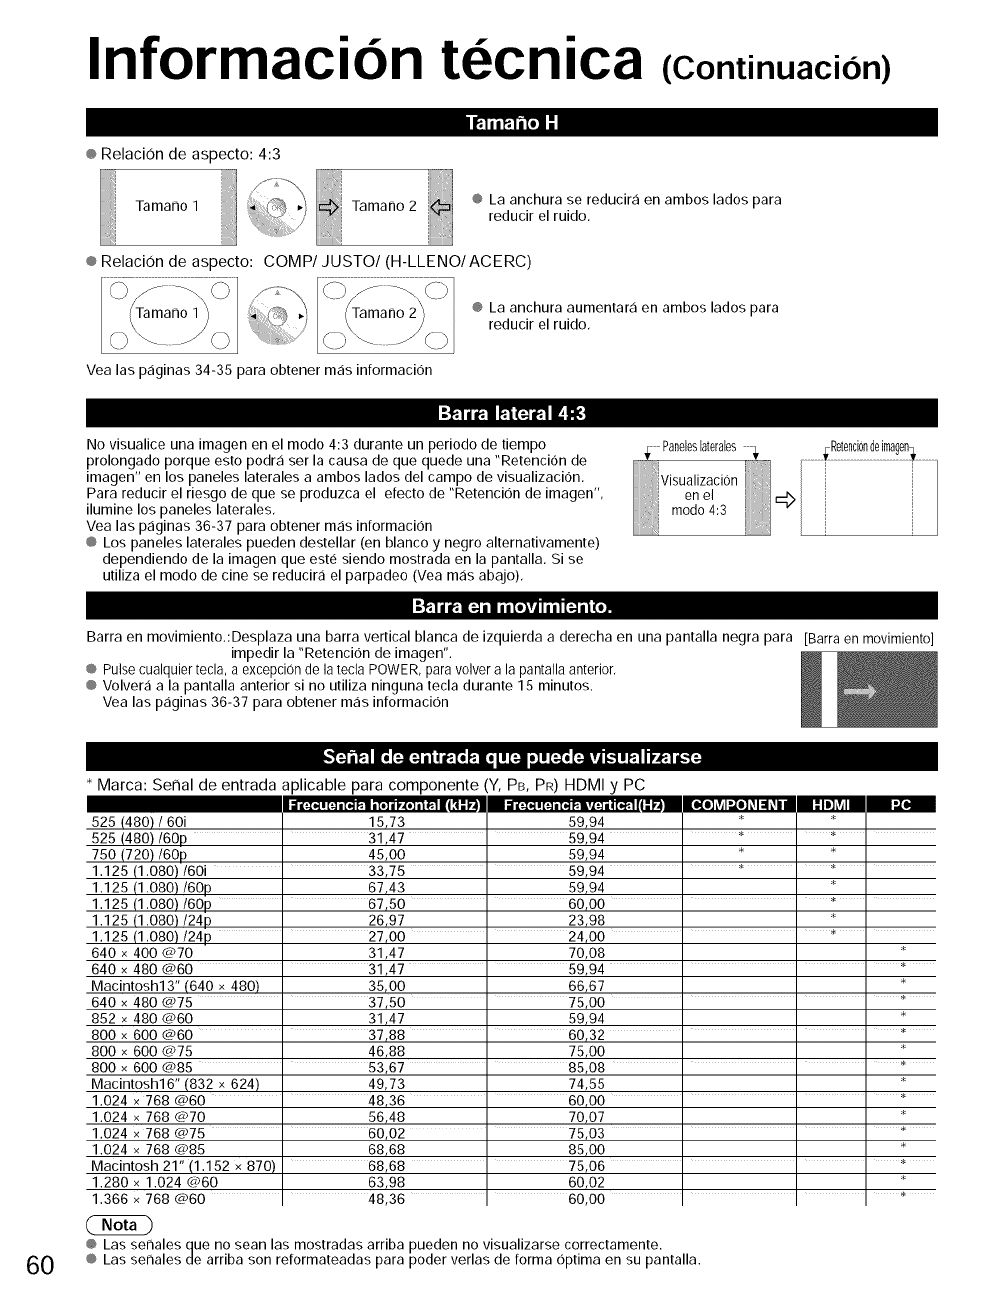
Informacion tecnica (Continuacion)
rliiHl i
® RelaciOn de aspecto: 4:3
Tamat_o 1 _<::_ ® ka anchura se reducira en ambos lados para
,-; Tamano 2 reducir el ruido.
® RelaciOn de aspecto: COMP/JUSTO/(H-LLENO/ACERC)
® La anchura aumentar,:i en ambos lados para
reducir el ruido.
Vea las paginas 34-35 para obtener mas informacion
No visualice una imagen en el modo 4:3 durante un periodo de tiempo
prolongado porque esto podr_i ser la causa de que quede una "Retencion de
imagen" en los paneles laterales a ambos lados del campo de visualizacion.
Para reducir el riesgo de que se produzca el efecto de "Retencion de imagen",
ilumine los paneles laterales.
Vea las p,:iginas 36-37 para obtener m,:is informacion
® Los paneles laterales pueden destellar (en blanco y negro alternativamente)
dependiendo de la imagen que este siendo mostrada en la pantalla. Si se
utiliza el modo de cine se reducira el parpadeo (Vea m,:is abajo).
ifiiiiifiiiiiiiii!i_i=b
-=_1i _IN || aiToivi _ IN |l(o.
Barra en movimiento.:Desplaza una barra vertical blanca de izquierda a derecha en una pantalla negra para [Barraen movimiento]
impedir la "Retencion de imagen".
® Pulsecualquiertecla, a excepcionde la tecla POWER,paravolvera la pantallaanterior.
® Volvera a la pantalla anterior si no utiliza ninguna tecla durante 15 minutos.
Vea las p,:iginas 36-37 para obtener m_is informacion
60
* Marca: Serial de entrada aplicable para componente (Y, PB, PR) HDMI y PC
525 (480) /60i *
525 (480)/60p " 31,47 " 59,94 ' * ' * '
750 (720)/60p 45,00 59,94 * *
1.125 (1.080)/60i ' 33,75 " 59,94 " * ' * '
1.125 (1.080)/60p 67,43 59,94 *
1.125 (1.080)/60p ' 67,50 ' 60,00 ' ' * '
1.125 (1.080)/24p 26,97 23,98 *
1.125 (1.080)/24p ' 27,00 ' 24,00 ' ' * '
640 x 400 din.70 31,47 70,08 *
640 x 480 @60 " 31,47 " 59,94 ' ' ' *
Macintosh13" (640 x 480) 35,00 66,67 *
640 480 @75 " 37,50 ' 75,00 ' ' ' *
852 x 480 @60 31,47 59,94 *
800 600 @60 ' 37,88 ' 60,32 ' ' ' *
800 x 600 @75 46,88 75,00 *
800 x 600 @85 " 53,67 " 85,08 ' ' ' *
Macintosh16" (832 x 624) 49,73 74,55 *
1.024 x 768 @60 ' 48,36 ' 60,00 ' ' ' *
1.024 x 768 @70 56,48 70,07 *
1.024 x 768 @75 ' 60,02 ' 75,03 ' ' ' *
1.024 x 768 @85 68,68 85,00 *
Macintosh 21" (1.152 x 870) 68,68 " 75,06 ' ' ' *
1.280 x 1.024 @60 63,98 60,02 *
1.366 x 768 @60 48,36 60,00 *
@ Las serlales que no sean las mostradas arriba pueden no visualizarse correctamente.
® Las sermles de arriba son reformateadas para poder verlas de forma Optima en su pantalla.

@Lassenalesdeordenadorquepuedenentrarsonlasquetienenunafrecuenciadeexploracionhorizontalde15a110kHzyuna
frecuenciadeexploracionverticalde48a120Hz,(Sinembargo,lassenalesqueexceden1,200Iineasnosevisualizarancorrectamente.)
@AlgunosrnodelosdePCnopuedenconectarsealapantalladeplasma.
@NoesnecesariounadaptadorparaconterminalD-sub15patinascompatiblesconIBMPC/AT.
@Laresolucionmaxima:1.280x1,024
Silaresoluciondelapantallasuperaestosmaximos,puedenosetposiblemostrarlosdetallesfinosconsuficientenitidez.
@NombresdelassenalesdelconectorD-sub15patinas
Forma de las patillas para el
terminal de entrada PC
Nombre de la senal Nombre de la senal Nombre de la senal
_1) R _6) GND (tierra) _1_ NC (no conectado)
_-_ G _7_ GND (tierra) @ NC
(3_ B _ GND (tierra) @ HD/SYNC
@ NC (no conectado) _9_ NC (no conectado) _4_ VD
GND (tierra) GND (tierra) NC
Cuidados y limpieza
Desenchufe primero la clavija del cable de alimentacion de CA del toma de corriente.
Elfrente del panel de la pantalla ha recibido un tratamiento especial, Limpie suavemente la superficie del panel utilizando un pano suave.
@ Si la superficie esta muy sucia, ernpape un pano blando y sin pelusa en una solucion de agua yjabon liquido suave de los
empleados para lavar vajillas (1 parte dejabon por cada 100 partes de agua) y luego escurralo para quitar el exceso de agua,
frote uniforrnernente con un patio seco del rnismo tipo hasta que la superficie quede completarnente seca.
@ No raye 0 golpee la superficie del panel con sus unas u otros objetos duros ya que la superficie puede danarse. Adern,:is, evite
el contacto con sustancias volcitiles tales corno rociadores de insecticida, disolventes y diluyentes de pintura, de Io contrario
puede verse afectada la calidad de la superficie. @@
© o..
h'Jl "li' &
Si el mueble se ensucia, lirnpie con un pano suave y seco. _ O
@ Si la caja esta rnuy sucia, ernpape el pano en una solucion de agua yjabon liquido suave de los empleados para lavar vajillas y _..Q.
luego esct]rralo para quitar el agua. Utilice el pano para lirnpiar el rnueble y seque frotando con un pano seco, O,,,<
@ No permita que eljabon liquido suave de los empleados para lavar vajillas toque directamente la superficie del TV de plasma, "7 _--:
Si las gotas de agua entran en el interior del aparato, pueden surgir problernas en el funcionarniento. _,, =_
@ Evite el contacto con sustancias vol,:itiles tales corno rociadores de insecticida, disolventes y diluyentes de pintura debido a que _ "o
puede verse afectada la superficie del mueble y puede desprenderse el revestimiento. Tarnpoco deje la superficie por rnucho _. _"
C) N
tiempo en contacto con articulos de caucho OPVC. _
@ Limpieza
Limpie las superficies pasando un parTo blando y seco. Si la unidad esta muy sucia, limpiela con un parTo
ernpapado en agua a la que se haya arTadido una pequerTa cantidad dejabon liquido suave de los ernpleados para
lavar vajillas y luego pase un parTo seco. No utilice productos tales corno disolventes, diluyente 0 cera del hogar
para la lirnpieza ya que pueden darTar el revestirniento de la superficie.
(Si utiliza un parTo con tratarniento quirnico, siga las instrucciones que vienen con el parTo.)
@ No pegue cinta adhesiva 0 etiquetas ya que pueden ensuciar la superficie del pedestal. No permita el contacto
durante mucho tiempo con productos de goma, vinilo 0 similares. (Hacerlo puede causar deterioros.)
61
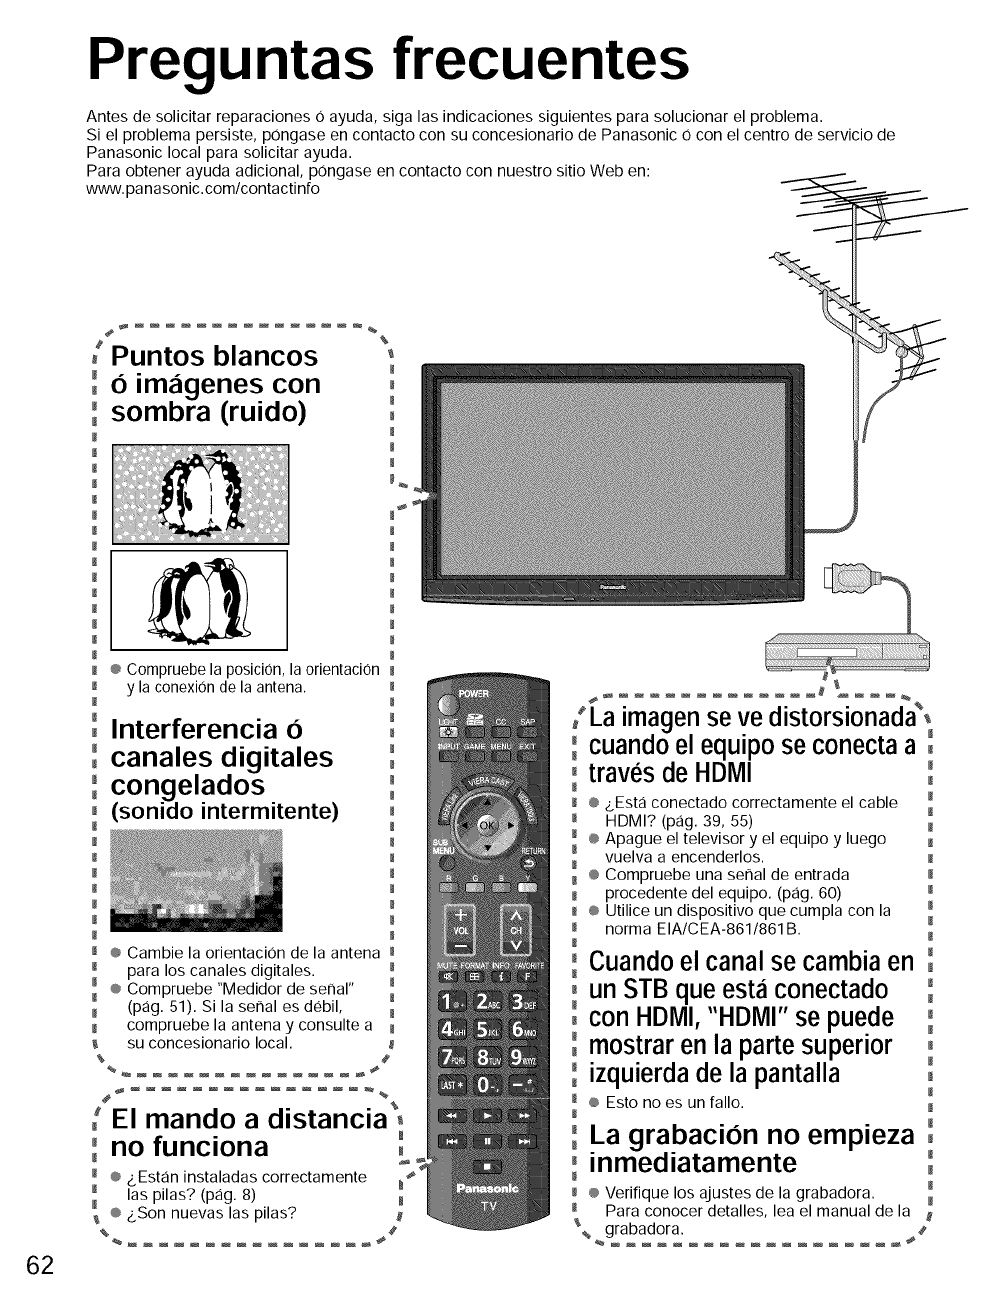
Preguntas frecuentes
Antes de solicitar reparaciones 0 ayuda, siga las indicaciones siguientes para solucionar el problema.
Si el problema persist®, pongase en contacto con su concesionario de Panasonic 0 con el centro de servicio de
Panasonic local para solicitar ayuda.
Para obtener ayuda adicional, pongase en contacto con nuestro sitio Web en:
www. pa nasonic.com/contactinfo
62
[Puntos blancos "
°oimagenes con 0
m
°°sombra (ruido) 0
M
m
m M
m
_ ® ComFuebe la posiciOn, la orientaciOn
_ y la conexiOn de la antena.
°Interferencia 6
°canales digitales
°°congelados
(sonido intermitente)
m
® Cambie la orientaci0n de la antena
m para los canales digitales. M
® Compruebe "Medidor de serial"
m m
(pag. 51). Si la serial es debil,
compruebe la antena y consulte a
su concesionario local.
%#
_ e%
El mando adtstancta
'no funciona '
M
® &Estan instaladas correctamente
las pilas? (pag. 8)
® &Son nuevas las pilas?
• • %
/La imagen se ve dtstorstonada,
°°cuando el equipo se conecta a °
0traves de HDMI '
M
M ® _.Esta conectado correctamente el cable
HDMI? (pag. 39, 55)
® Apague el televisor y el equipo y luego
vuelva a encenderlos.
® Compruebe una serial de entrada
procedente del equipo. (pag. 60)
® Utilice un dispositivo que cumpla con la
norma EIA/CEA-861/861B.
° Cuando el canal se cambia en °
0 un STB queest_iconectado '
0con HDMI,"HDMI" se puede 0
0mostrar en la parte superior °
izquierda de la pantalla °
® Esto no es un fallo.
La grabacion no empieza °°
0inmediatamente °
®Verifique los ajustes de la grabadora.
Para conocer detalles, lea el manual de la
_% grabadora.
Sihayunproblemaconsutelevisor,consultelatabladeabajoparadeterminarlossintomas,yluegoefectuela
comprobacionsugerida.Siesonoresuelveelproblem&pongaseencontactoconsuconcesionarioPanasonic,
indicandoleelnumerodelmodeloyelnumerodeseriedeltelevisor(ambossituadosenlaparteposteriordeltelevisor).
Elpaneldeplasmaestaformadoporunospocosmillonesde
causaranningt]nimpactosobreelfuncionamientodeltelevisor,
CompruebeelmenuImagen(pag.34)
Compruebelosajustesdeloscanales.(pag.50)
gEstaelcabledealimentaciOndeCAenchufadoenla
en lugar de im_igenes
® Verifique que se haya seleccionado la entrada correcta. (pag. 26)
li Sonidos procedentes
dela caja del televisor
2, Sonido de runruneo
4' Sonido de zumbido
que se ca lienta n,
Cambie los ajustes de los subtitulos (CC). (pag. 57)
I_ _Estanconectadoscorrectamentelos cablesde los altavoces?(pag.°5_"_
&Esta activo "Silenciamiento del sonido"? (pag. 15)
&Esta ajustado al minimo el volumen?
&Esta "Altavoces de TV" en "No"? (pag. 34)
Cambie los ajustes "SPA". (pag. 19)
L_® Cornpruebe........ 10sajustes"Entrada,,,_HDMl,_,,l""Entrada,...... HDMI2"0"EntradaHDMI3",(pag,34),,_
Ponga "SPA" en "Estereo" O "Mono".
seleccione la conexion de sonido analoqico.
1- Loscambiosen latemperaturayen la humedadde lahabitaci0npuedenser
lacausadequela cajadeltelevisorseexpandao contraigaproduciendoun
ruidometalico.Estono indicaque elfuncionamientoseadetectuoso.
2- El televisor puedetenet un ventiladorque produceun suave runruneo.
Estono indicaque el funcionamientoseadefectuoso,
3- Cuandoseenciendeeltelevisorseactivauncomponenteelectricodelmismoque
produceunsonidotic/clic.Estonoindicaqueelfuncionamientoseadefectuoso.
4- Los circuitos electricos estan activos mientras est,1encendido el
, televisor, Esto no indica que el funcionamiento sea defectuoso.
Aunque suba la temperatura de partes de los paneles delantero,
superior y trasero, este aumento de temperatura no causara
@
..g
G:3
t-
('D
t-
dP
('D
63
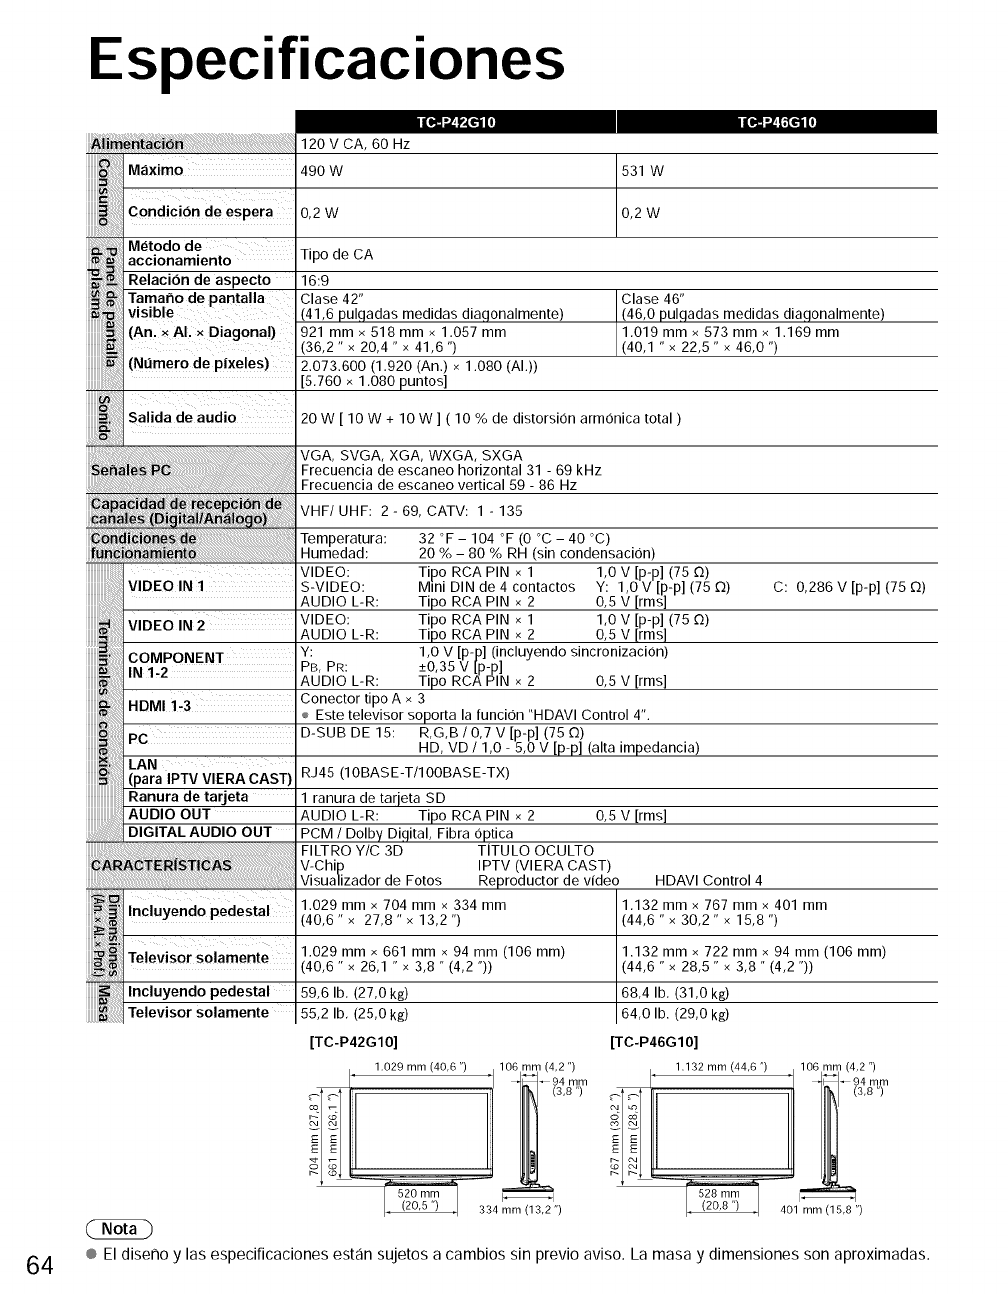
Especificaciones
64
DEO IN 1
120 V CA, 60 Hz
490 W 531 W
0,2W 0,2W
Metodo de
accionamiento Tipo de CA
Relacion de aspecto 16:9
Tamarlo de pantalla Clase 42"
visible (41,6 pulgadas medidas diagonalmente)
(Anl X ALX Diagonal)921 mmx 518 mmx 1.057 mm
36,2" x 20,4 " x 41,6 ")
(Nt]mero de p!xeles) 2.073.600 (1.920 (An.) x 1.080 (AI.))
5,760 x 1,080 puntos]
Salida de audio 20 W [ 10 W + 10 W ] ( 10 % de distorsion armonica total )
VGA, SVGA, XGA, WXGA, SXGA
Frecuencia de escaneo horizontal 31 - 69 kHz
Frecuencia de escaneo vertical 59 - 86 Hz
VHF/UHF: 2 - 69, CATV: 1 - 135
Temperatura: 32 °F -104 °F (0 °C - 40 °C)
Humedad: 20 % - 80 % RH (sin condensacion)
VIDEO: Tipo RCA PIN x 1 1,0 V [p-p] (75 O)
S-VIDEO: Mini DIN de 4 contactos Y: 1,0 V [p-p] (75 _)
Tipo RCA PIN x 2 0,5 V [rms]
Tipo RCA PIN x 1 1,0 V [p-p] (75 O)
Tipo RCA PIN x 2 0,5 V [rms]
1,0 V [p-p] (incluyendo sincronizacion)
+0,35 V [p-p]
Tipo RCA PIN x 2 0,5 V [rms]
HDMI 1,3 Conector tipo A x 3
÷ Este televisor soporta la funcion "HDAVI Control 4".
PC D-SUB DE 15: R,G,B /0,7 V [p-p] (75 £2)
HD, VD /1,0 - 5,0 V [p-p] (alta impedancia)
RJ45 (IOBASE-T/IOOBASE-TX)
ranura de tarjeta SD
AUDIO L-R: Tipo RCA PIN x 2 0,5 V [rms]
Clase 46"
(46,0 pulgadas medidas diagonalmente)
1.019 mmx 573 mmx 1.169 mm
(40,1 " x 22,5" x 46,0 ")
Televisor solamente
C: 0,286 V [p-p] (75 _)
FILTRO Y/C 3D TITULO OCULTO
V-Chip IPTV (VlERA CAST)
Visualizador de Fotos Reproductor de video HDAVl Control 4
1.029 mmx 704 mmx 334 mm
_10,6" x 27,8 " x 13,2 ")
1.029 mm x 661 mmx 94 mm (106 mm)
_10,6" x 26,1 " x 3,8 "(4,2 "))
59,6 lb. (27,0 kg)
55,2 lb. (25,0 kg)
[TC-P42610]
1.029 mm (406 ") 106 mm (4 2")
I' '1 4_-94 mm
I _ (3,8")
")
® Eldiseno y las especificaciones estan sujetos a cambios sin previo aviso. La masa y dimensiones son aproximadas.
1.132 mmx 767 mm x 401 mm
(44,6 " x 30,2 " x 15,8 ")
1.132 mmx 722 mm x 94 mm (106 ram)
(44,6 "x 28,5 " x 3,8 " (4,2 "))
68,4 Ib, (31,0 kg)
64,0 lb. (29,0 k&)
[TC-P46G10]
1.132 mm (446") 106 mm (4 2 ")
I' '/ 4_--94 m,m
r--_ ,8)
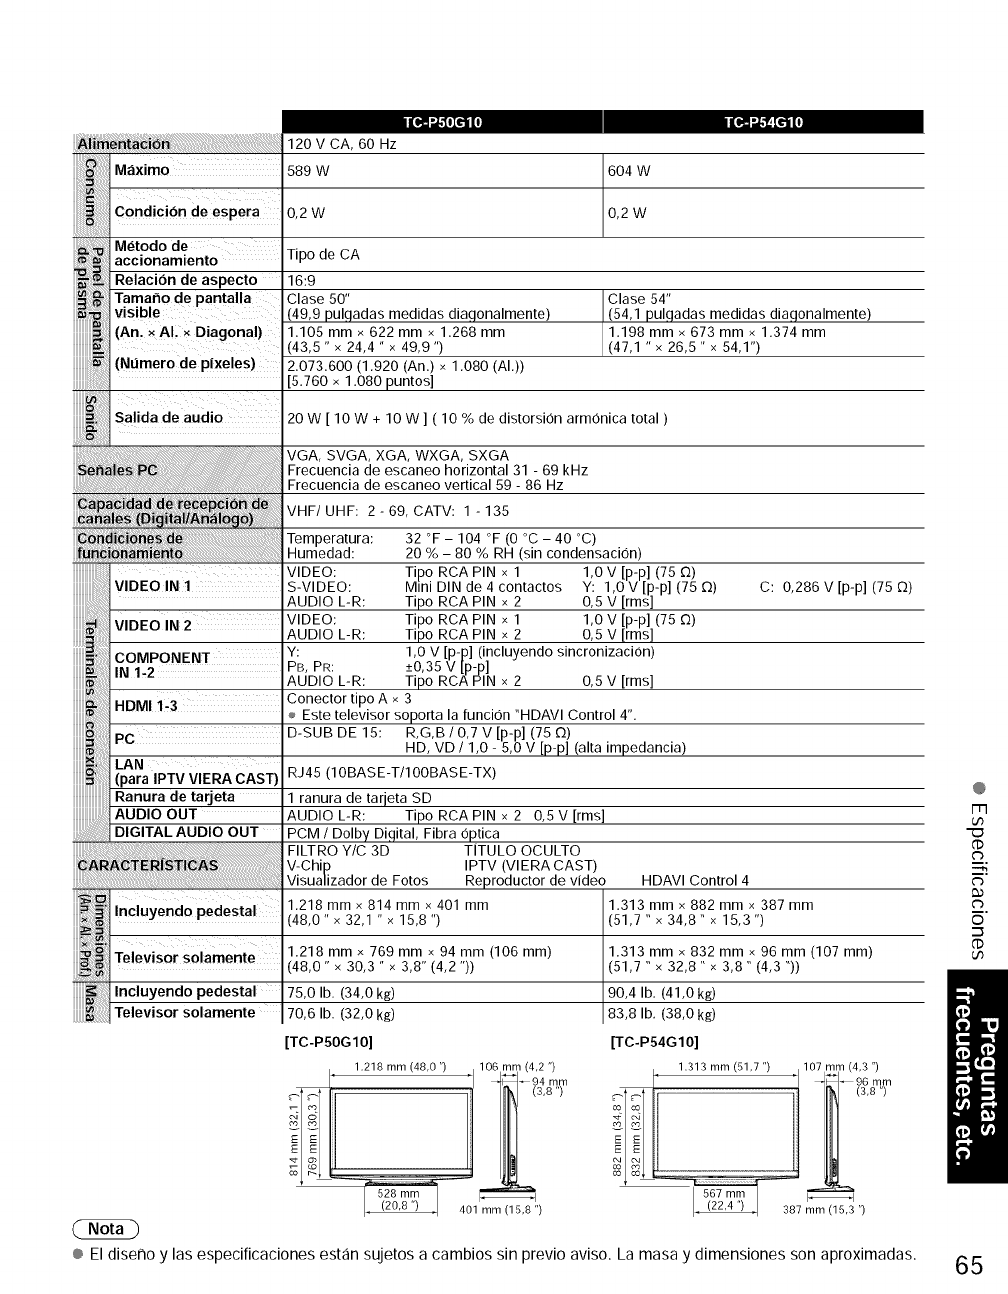
120VCA,60Hz
Maximo 589 W 604 W
iiiiiiii!_i_iiiiiiiiiiiiiiiii:!
Condicibn de esPera 0,2 W
iiiiiiiiiiiiQiiiiiiiiiiill
iiiiiiiiiiiiiiii
iiiiiiiii
iiiiiiiii_
iiiiiiiii=ii:
iiiiiiiii_!i
iiiiiiiiiB;
iiiiiiiii=i,,,
iiiiiiiiiiiiiiiiiii
iiiiiiiiiiiiiiiiiii
Metodo de
accionamiento
Relacion de aspecto
Tamaho depantalla
visible
0,2W
Tipo de CA
16:9
Clase 50"
(49,9 pulgadas medidas diagonalmente)
An. XA!,X Diagonal) .105 mmx 622 mm x 1.268 mm
43,5" x 24,4 " x 49,9 ")
2.073.600 (1.920 (An.)x 1,080 (AI,))
[5,760 x 1.080 puntos]
Clase 54"
(54,1 pulgadas medidas diagonalmente)
1.198 mmx 673 mmx 1.374 mm
(47,1 " x 26,5" x 54,1")
20 W [ 10 W + 10 W ] ( 10 % de distorsion armonica total )
VGA, SVGA, XGA, WXGA, SXGA
Frecuencia de escaneo horizontal 31 - 69 kHz
Frecuencia de escaneo vertical 59 - 86 Hz
VHF/UHF: 2 - 69, CATV: 1 - 135
Temperatura: 32 °F - 104 °F (0 °C - 40 °C)
Humedad: 20 % - 80 % RH (sin condensacion)
VIDEO: Tipo RCA PIN x 1 1,0 V [p-p] (75 £2)
VIDEOIN! S-VIDEO: MmiDINde4contactos Y: 1,0V[p-p](75_) C: 0,286 V [p-p] (75 0)
AUDIO L-R: Tipo RCA PIN x 2 0,5 V [rms]
VIDEO IN 2 VIDEO: tipo RCA PIN x 1 1,0 V [p-p] (75 O)
AUDIO L-R: Tipo RCA PIN x 2 0,5 V [rms]
COMPONENT Y: 1,0 V [p-p] (incluyendo sincronizaci0n)
IN 1-2 PB, PR: +0,35 V [p-p]
AUDIO L-R: Tipo RCA PIN x 2 0,5 V [rms]
HDMI 1..3 Conector tipo A x 3
÷ Este televisor soporta la funcion "HDAVl Control 4".
PC D-SUB DE 15: R,G,B /0,7 V [p-p] (75 £2)
HD, VD /1,0 - 5,0 V [p-p] (alta impedancia)
LAN
(para IPTVVIERACAST) RJ45 (IOBASE-T/IOOBASE-TX)
Ranura de tarjeta
AUDIO OUT
DIGITAL AUDIO OUT
1 ranura de tarieta SD
AUDIO L-R: Tipo RCA PIN x 2 0,5 V [rms]
PCM /Dolby Digital, Fibra optica
FILTRO Y/C 3D TiTULO OCULTO
V-Chip IPTV (VlERA CAST)
Visualizador de Fotos Reproductor de video HDAVI Control 4
.218 mm x 814 mmx 401 mm
48,0" x 32,1 " x 15,8 ")
1.218 mm x 769 mm x 94 mm (106 ram)
(48,0" x 30,3 " x 3,8" (4,2 "))
75,0 lb. (34,0 kg)
70,6 lb. (32,0 k8)
Incluyendo pedestal
re ev sor so amente
Incluyendo pedestal
Televisor solamente
1.313 mm x 882 mm x 387 mm
(51,7 " x 34,8" x 15,3 ")
1.313 mmx 832 mm x 96 mm (107 ram)
(51,7 "x 32,8 "x 3,8" (4,3 "))
90,4 lb. (41,0 kg)
83,8 lb. (38,0 kg)
TC-P50G10]
1,218 mm (48 o ") lO6 mm (4 2 ")
I' 'I 4_J-e4 mn_
E
1 ')
[TC-P54G10]
1.313mm (51 7") lO7 mm (43 ")
' 'I _-IF_96 mm
567 mm I_I
@
FIq
u3
('D
C_
i,
c_
o
.-_
('D
® El diseno y las especificaciones estan sujetos a cambios sin previo aviso. La masa y dimensiones son aproximadas. 65
