PASLODE Nailer Manual L0410029
IM200F-18 IM200F-18 PASLODE CORDLESS FINISH NAILER - Manuals and Guides L0410029 View the owners manual for your PASLODE CORDLESS FINISH NAILER #IM200F18. Home:Tool Parts:Paslode Parts:Paslode CORDLESS FINISH NAILER Manual
User Manual: PASLODE PASLODE Nailer Manual PASLODE Nailer Owner's Manual, PASLODE Nailer installation guides
Open the PDF directly: View PDF ![]() .
.
Page Count: 21
Paslode
CORDLESS
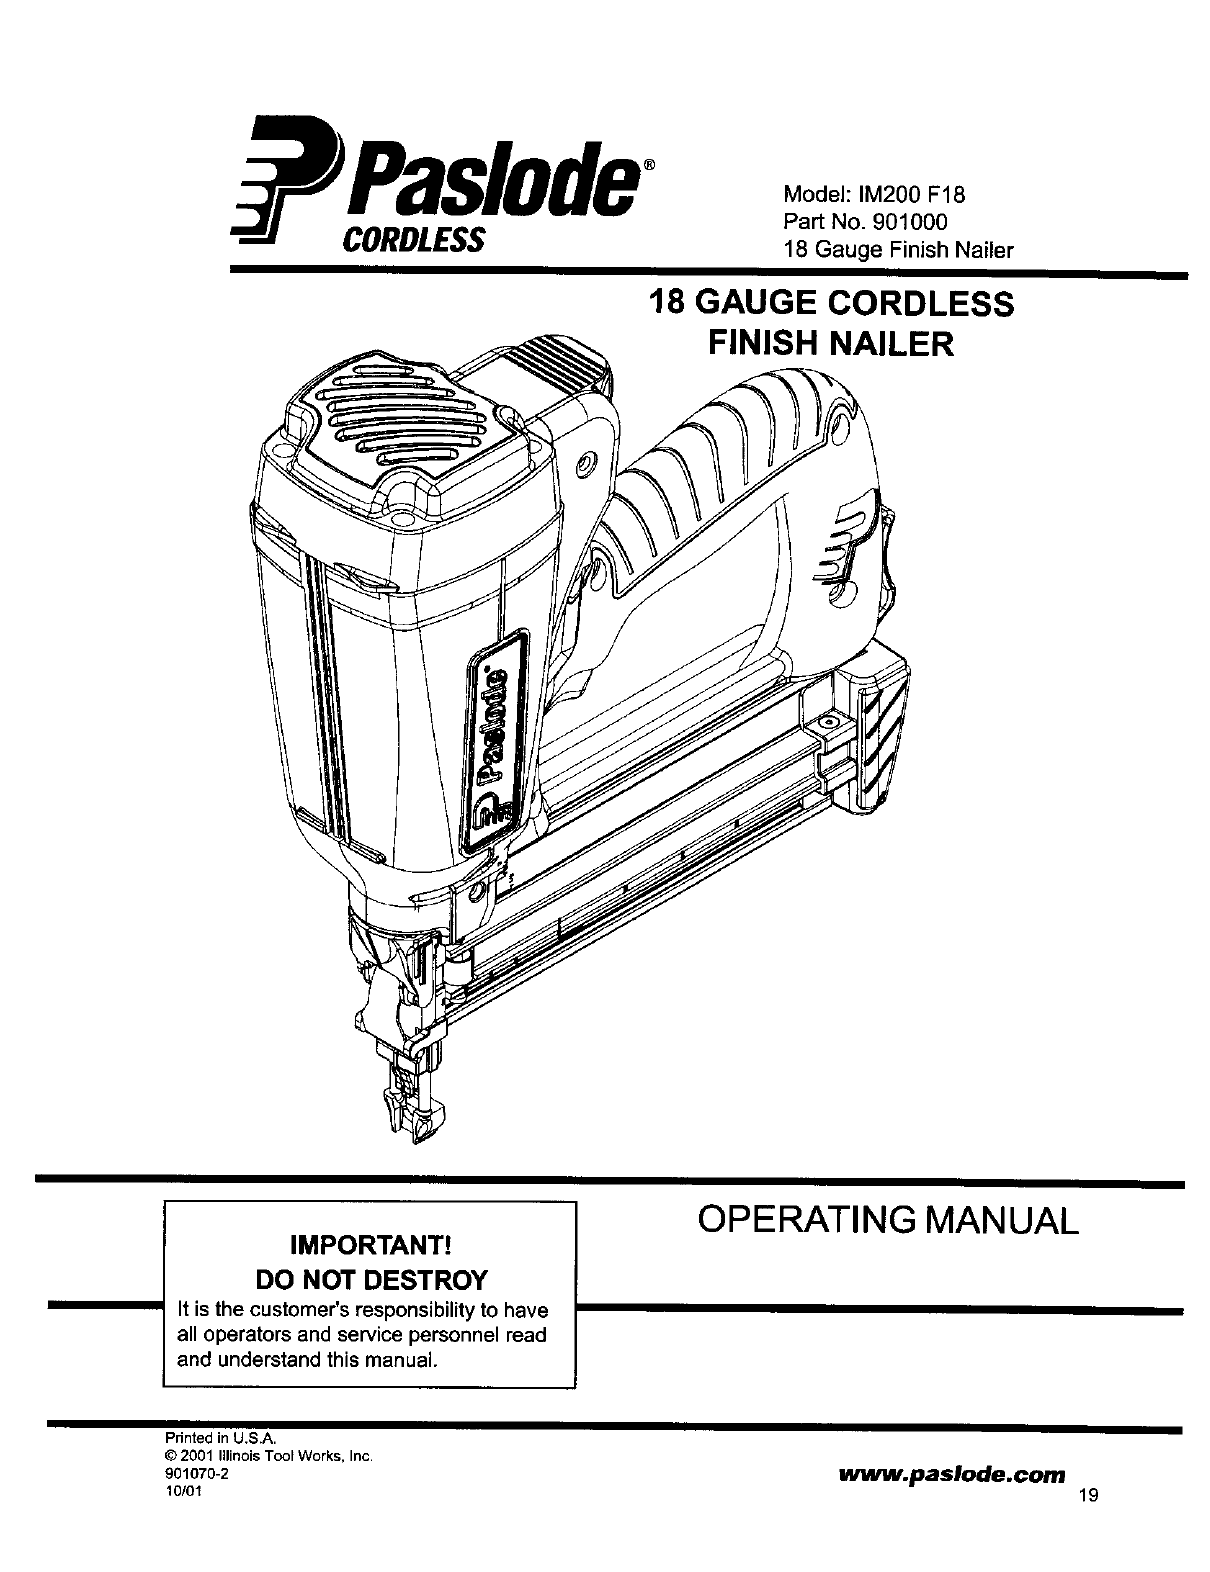
Model: IM200 F18
Part No. 901000
18 Gauge Finish Nailer
18 GAUGE CORDLESS
FINISH NAILER
IMPORTANT!
DO NOT DESTROY
It is the customer's responsibility to have
all operators and service personnel read
and understand this manual.
OPERATING MANUAL
Pdnted in U.S.A.
© 2001 IllinoisTool Works, Inc.
901070-2
10101 www.paslode.com 19
Contents
Subject Page
Introductionand Warranty ............................................... 2
An Overview of TdmMaster18 TM Finish Nailer ............... 3
Safety Instructions ........................................................... 4
Battery and Charger ........................................................ 7
Fuel Cell and Metering Valve .......................................... 9
Preparing TrimMaster 18"r" Finish Nailer for Use ......... 12
TrimMaster 18T" Finish Nailer Operation ...................... 13
Fasteners and Applications ........................................... 14
Servicing ....................................................................... 15
Troubleshooting ............................................................ 17
The Impulse ® battery charger system meets all safety
requirements for power tools.
®°®
. Pas/ode° a ,tor de emark
CORDLE._ An IlinoisTool Works Company
888 Forest Edge Drive
Vernon Hills, Illinois 60061
www.paslode,com
Power Nailers are made in the U.S.A. and are
protected by one or more of the following U.S. patents:*
4,403,722 4,483,280 4,483,474 4,522,162
*Other patentsissued and pending.
Paslode®is a member of:
"'"
ISAHTA
Introduction and Warranty
TrimMaster 18 TMFinish Nailer
Operating Manual
This manual is intended to acquaintyou with the Paslode
Cordless 18 Finish Nailer. Unlike other power fastening
tools, the Cordless 18 Finish Nailer is powered by an
internal combustion linear motor. In simpler terms, your
Cordless 18 Finish Nailer is powered by a motor similar to
the one that powers an automobile. The Cordless 18 Finish
Nailer ignites afuel and air mixture to produce the energy to
drive the motor, which in turn ddves the fastener. The
Cordless 18 Finish Nailer is totally self-contained. It carries
its own fuel supply and battery, along with a supply of
fasteners.
For ease of use, this manual is divided into sections (see
Contents). Each section of the manual is written with you,
the tool operator, in mind. We have left out many of the
technical terms so that you can easily understand how to get
the maximum performance from your Cordless 18 Finish
Nailer, and how to avoid damaging the tool or injuring
yourself. But, to accomplish this, we need you to do two
things:
1. READ THE MANUAL FROM COVER TO COVER
BEFORE USING THE TOOL.
2. FOLLOW ALL INSTRUCTIONS IN THE MANUAL.
The Finish nailer should be handled like other power
fastening tools that you use. Like most tools, when used
improperly injury could result. If you are going to allow
others to use the Finish nailer, it is your responsibility to
make sure that they also read and comply with the
instructions in this manual before attempting to operate
the tool.
Should you have questions about the Finishnailer, orwish
to obtain additional copies of this manual, please contact
your Paslode®representative. The space below is provided
so that you may record your representative's name,
address, and telephone number.
For the nearest Paslode representative call 1-800-
682-3428
Name
Address
City State Zip
Telephone Number
Cordless Warranty and Limitations
Paslode warranties that new Cordless power fastening tools,
partsand accessories will be free from defects in matadal and
workmanship for the bedod shown below, after the date of
delivery to the odginaluser.
ONE-YEAR LIMITED WARRANTY
Aone-year warranty will apply to all parts, except those listed
below as normal wearing parts, or pans which are specifically
covered by an extended warranty.
FIVE-YEAR EXTENDED LIMITED WARRANTY
Afive-year warranty will apply to all molded nylon pans:
Cap and Grille
Handle Halves and Actuator
•Trigger
9g-DAY LIMITED WARRANTY
A 9O_lay warranty applies to the following pans, which are
considered normal wear pans:
• Bumper
• Driver Blades
• O-Rings
WARRANTY STATEMENT
Paslede's sole liability hereunderwill be to replace any pan oraccessory
whichprovestobedefectivewithinthespecifictirneperiod.Anyreplacement
pan or accessory provided in accordance with this warranty will carry a
warranty for the balance of the peded of warranty applicableto the pan it
replaces. This warranty does not apply to pan replacement required due
to normal wear.
This warranty is void on any tool which has been subjected to misuse,
abuse' accidentalorintenti°nal damage' usewithfasteners' fuel' bettades'
or battery chargers not meeting Paslode specification, size, or quantity,
improperly maintained, repaired with other than genuine Paslode
replacement parts,damaged in transitor handling,or which, in Paslode's
opinion,has been altered or repaired ina way that affects or detractsfrom
the performance of the tool.
PASLODE MAKES NO WARRANTY, EXPRESSED OR IMPLIED,
RELATING TO MERCHANTABILITY, FITNESS, OR OTHERWISE,
EXCEPT AS STATED ABOVE, andPaslede'sliabiJityAS STATED ABOVE
AND AS ASSUMED ABOVE isin lieuof all other warranties adsingout of,
or in connection with, the use and performance of the tool, except to the
extent other wise provided by applicable law. PASLODE SHALL IN NO
EVENT BE LIABLEFORANY DIRECT, INDIRECT, OR CONSEQUENTIAL
DAMAGES, INCLUDING, BUT NOT LIMITED TO, DAMAGES WHICH
MAY ARISE FROM LOSS OF ANTICIPATED PROFITS OR
PRODUCTION, SPOILAGE OF MATERIALS,, INCREASED COST OF
OPERATION, OR OTHERWISE.
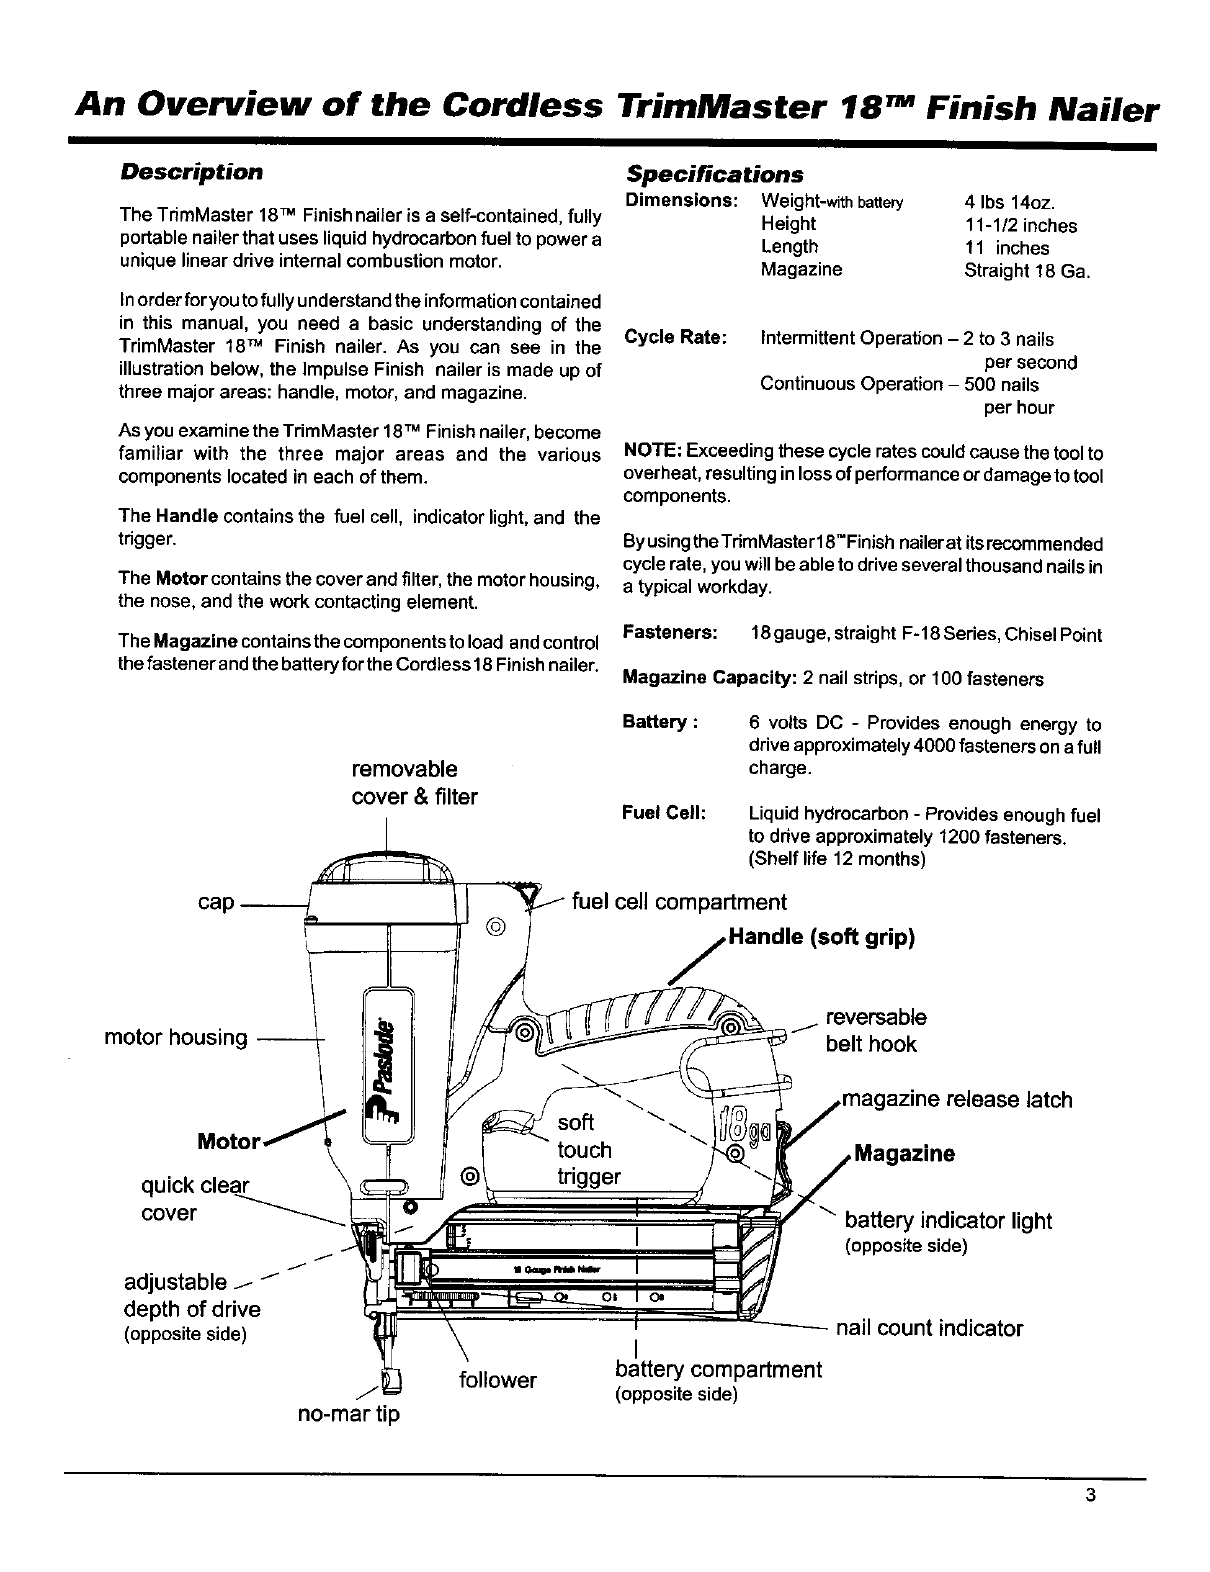
An Overview of the Cordless TrimMaster 18" Finish Nailer
Description
The TrimMaster 18TM Finish nailer is a self-contained, fully
portable nailer that uses liquid hydrocarbon fuel to power a
unique linear drive internal combustion motor.
Inorder foryou to fully understand the information contained
in this manual, you need a basic understanding of the
TrimMaster 18TM Finish nailer. As you can see in the
illustration below, the Impulse Finish nailer is made up of
three major areas: handle, motor, and magazine.
As you examine the TrimMaster 18TM Finish nailer, become
familiar with the three major areas and the various
components located in each of them.
The Handle contains the fuel cell, indicator light, and the
trigger.
The Motor contains the cover and filter, the motor housing,
the nose, and the work contacting element.
The Magazine containsthe componentsto load and control
the fastener and the battery for the Cordless18 Finish nailer.
Specifications
Dimensions: Weight-withbattery 4 Ibs 14oz.
Height 11-1/2 inches
Length 11 inches
Magazine Straight18 Ga.
Cycle Rate: Intermittent Operation -2to 3 nails
per second
Continuous Operation - 500 nails
per hour
NOTE: Exceeding these cycle rates could cause the tool to
overheat, resulting in loss of performance or damage to tool
components.
By using theTrimMaster18"Finish nailerat its recommended
cycle rate, you will be able to drive several thousand nails in
a typical workday.
Fasteners: 18gauge, straightF-18 Series, Chisel Point
Magazine Capacity: 2 nail strips, or 100 fasteners
removable
cover & filter
Battery :
Fuel Cell:
6 volts DC - Provides enough energy to
driveapproximately 4000 fasteners ona full
charge.
Liquidhydrocarbon- Provides enough fuel
to drive approximately1200 fasteners.
(Shelf life 12 months)
cal fuel cell compartment
Handle (soft grip)
motor housing -- reversable
belt hook
azine release latch
quick clear
cover
adjustable .//-
depth of drive
(opposite side)
no-mar tip
follower
I
battery compartment
(opposite side)
azine
battery indicator light
(oppositeside)
nail count indicator
Safety Instructions
The following safety instructions have been included in this
booklet to provide you with basic information necessary for
safe operation of the TrimMaster 18TM Finish Nailer. DO NOT
ATTEMPT TO OPERATE THIS TOOL UNTIL YOU HAVE
READAND UNDERSTAND ALL SAFETY PRECAUTIONS
AND MANUAL INSTRUCTIONS.
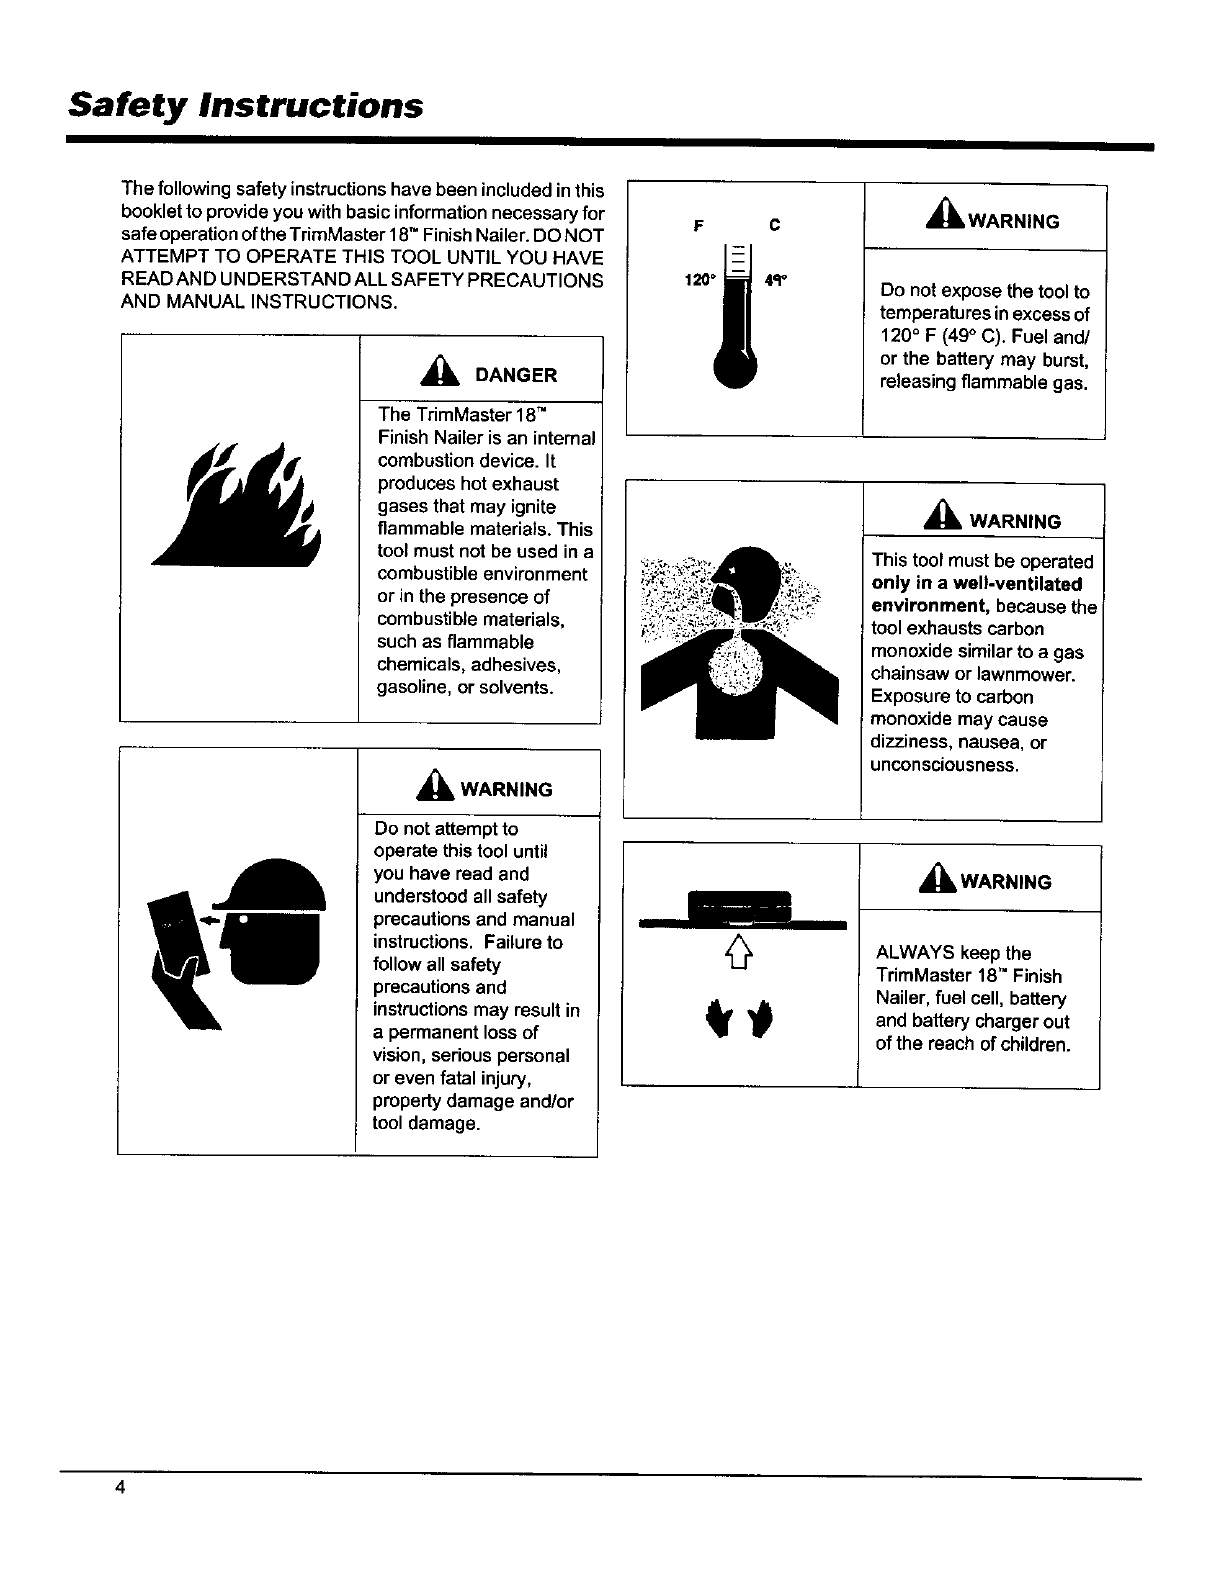
DANGER
The TrimMaster 18"
Finish Nailer is an internal
combustion device. It
produces hot exhaust
gases that may ignite
flammable materials. This
tool must not be used in a
combustible environment
or in the presence of
combustible materials,
such as flammable
chemicals, adhesives,
gasoline, or solvents.
,_k WARNING
Do not attempt to
operate this tool until
you have read and
understood all safety
precautions and manual
instructions. Failure to
follow all safety
precautions and
instructions may result in
a permanent loss of
vision, serious personal
or even fatal injury,
property damage and/or
tool damage.
F C _k, WARNING
Do not expose the tool to
temperatures in excess of
120° F (49° C). Fuel and/
or the battery may burst,
releasing flammable gas.
_lk WARNING
This tool must be operated
only in a well-ventilated
environment, because the
tool exhaustscarbon
monoxidesimilarto a gas
chainsaw or lawnmower
Exposure to carbon
monoxide may cause
dizziness, nausea, or
unconsciousness.
,_kWARNING
ALWAYS keep the
TrimMaster 18TM Finish
Nailer, fuel cell, battery
and battery charger out
of the reach of children.
Safety Instructions
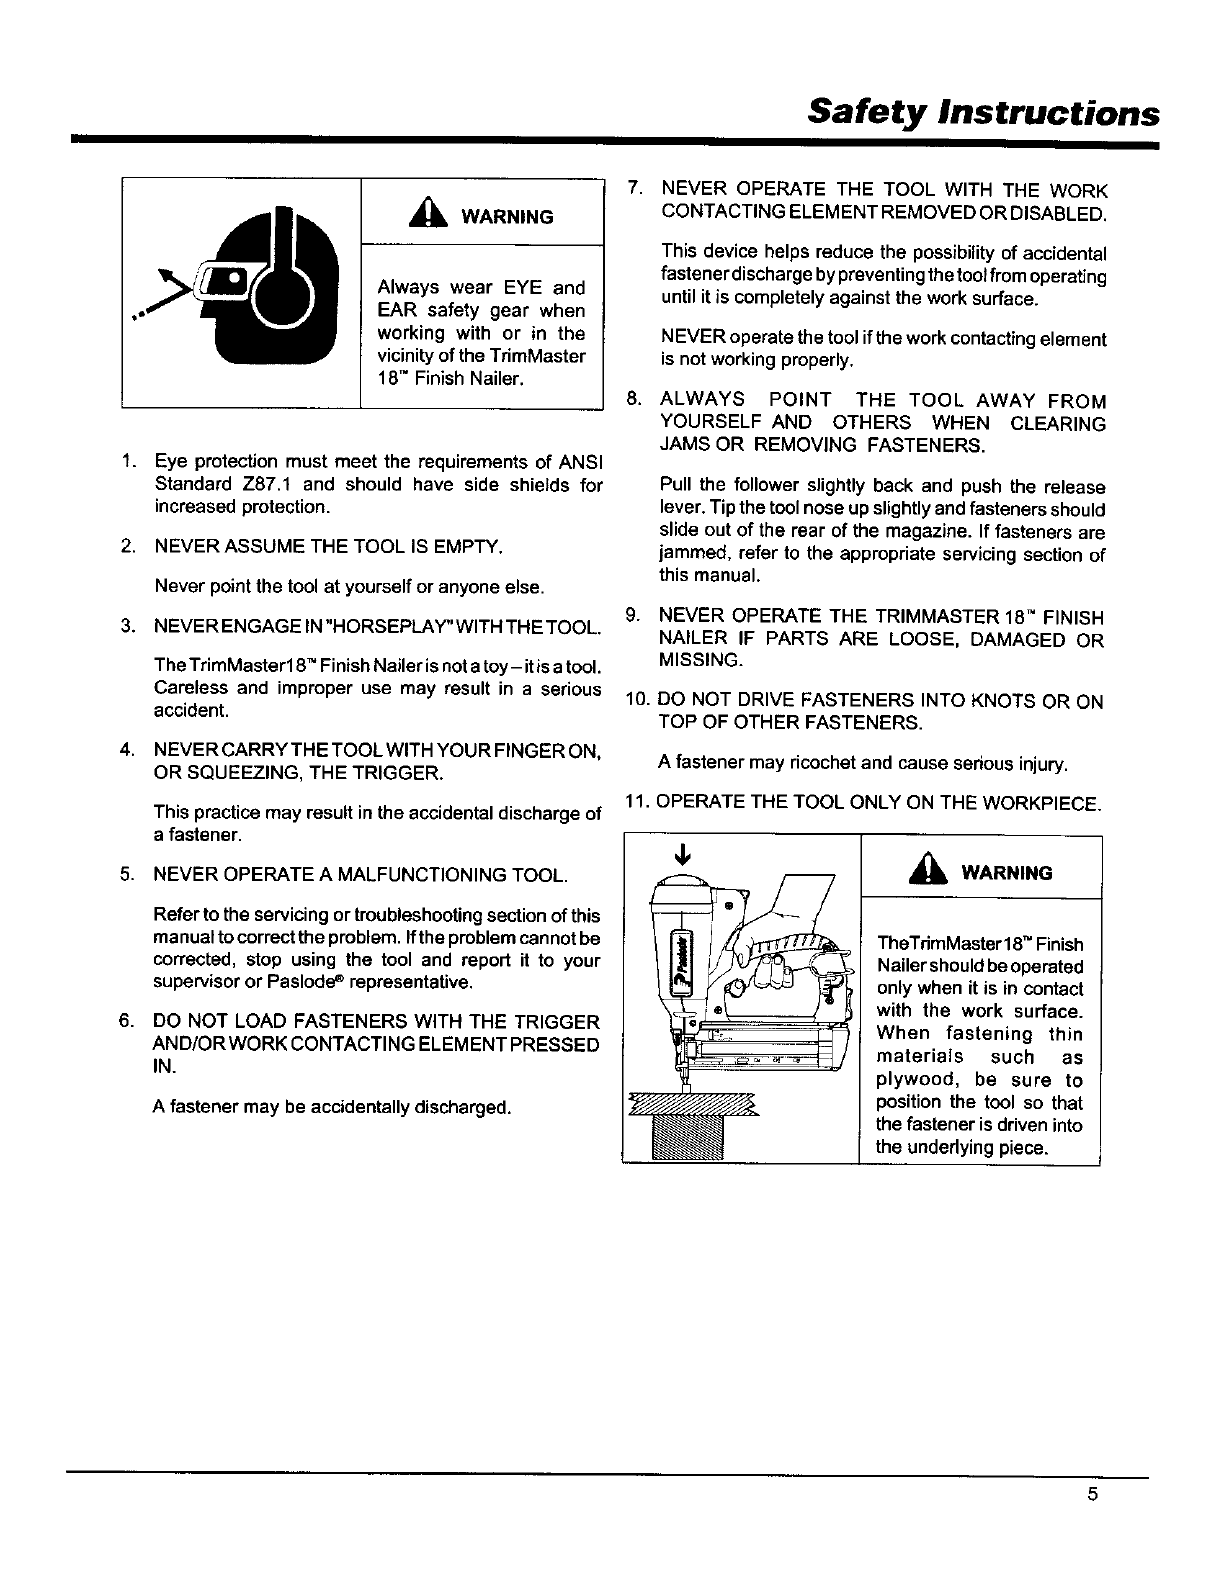
WARNING
Always wear EYE and
EAR safety gear when
working with or in the
vicinity of the TrimMaster
18TM Finish Nailer.
1. Eye protection must meet the requirements of ANSI
Standard Z87.1 and should have side shields for
increased protection.
2. NEVER ASSUME THE TOOL IS EMPTY.
Never point the tool at yourself or anyone else.
3. NEVER ENGAGE IN"HORSEPLAY"WlTH THE TOOL.
The TrimMaste rl 8TM Finish Nailer is not atoy - it is atool.
Careless and improper use may result in a serious
accident.
4. NEVER CARRYTHE TOOL WITH YOUR FINGER ON,
OR SQUEEZING, THE TRIGGER.
This practice may result in the accidentaldischarge of
a fastener.
5. NEVER OPERATE AMALFUNCTIONING TOOL.
Refer to the servicingor troubleshooting sectionof this
manual to correct the problem. Ifthe problem cannot be
corrected, stop using the tool and report it to your
supervisor or Paslode _ representative.
6. DO NOT LOAD FASTENERS WITH THE TRIGGER
AND/ORWORK CONTACTING ELEMENT PRESSED
IN.
A fastener may be accidentally discharged.
7. NEVER OPERATE THE TOOL WITH THE WORK
CONTACTING ELEMENT REMOVED OR DISABLED.
This device helps reduce the possibility of accidental
fastener discharge by preventing the tool from operating
until it is completely against the work surface.
NEVER operate the tool if the work contacting element
is not working properly.
8. ALWAYS POINT THE TOOL AWAY FROM
YOURSELF AND OTHERS WHEN CLEARING
JAMS OR REMOVING FASTENERS.
Pull the follower slightly back and push the release
lever. Tip the tool nose up slightly and fasteners should
slide out of the rear of the magazine. If fasteners are
jammed, refer to the appropriate servicing section of
this manual.
9. NEVER OPERATE THE TRIMMASTER 18" FINISH
NAILER IF PARTS ARE LOOSE, DAMAGED OR
MISSING.
10. DO NOT DRIVE FASTENERS INTO KNOTS OR ON
TOP OF OTHER FASTENERS.
A fastener may ricochet and cause seriousinjury.
11. OPERATE THE TOOL ONLY ON THE WORKPIECE.
WARNING
TheTrimMaster 18TM Finish
Nailershouldbe operated
only when it is in contact
with the work surface.
When fastening thin
materials such as
plywood, be sure to
position the tool so that
the fastener is driven into
the underlying piece.
5
Safety Instructions
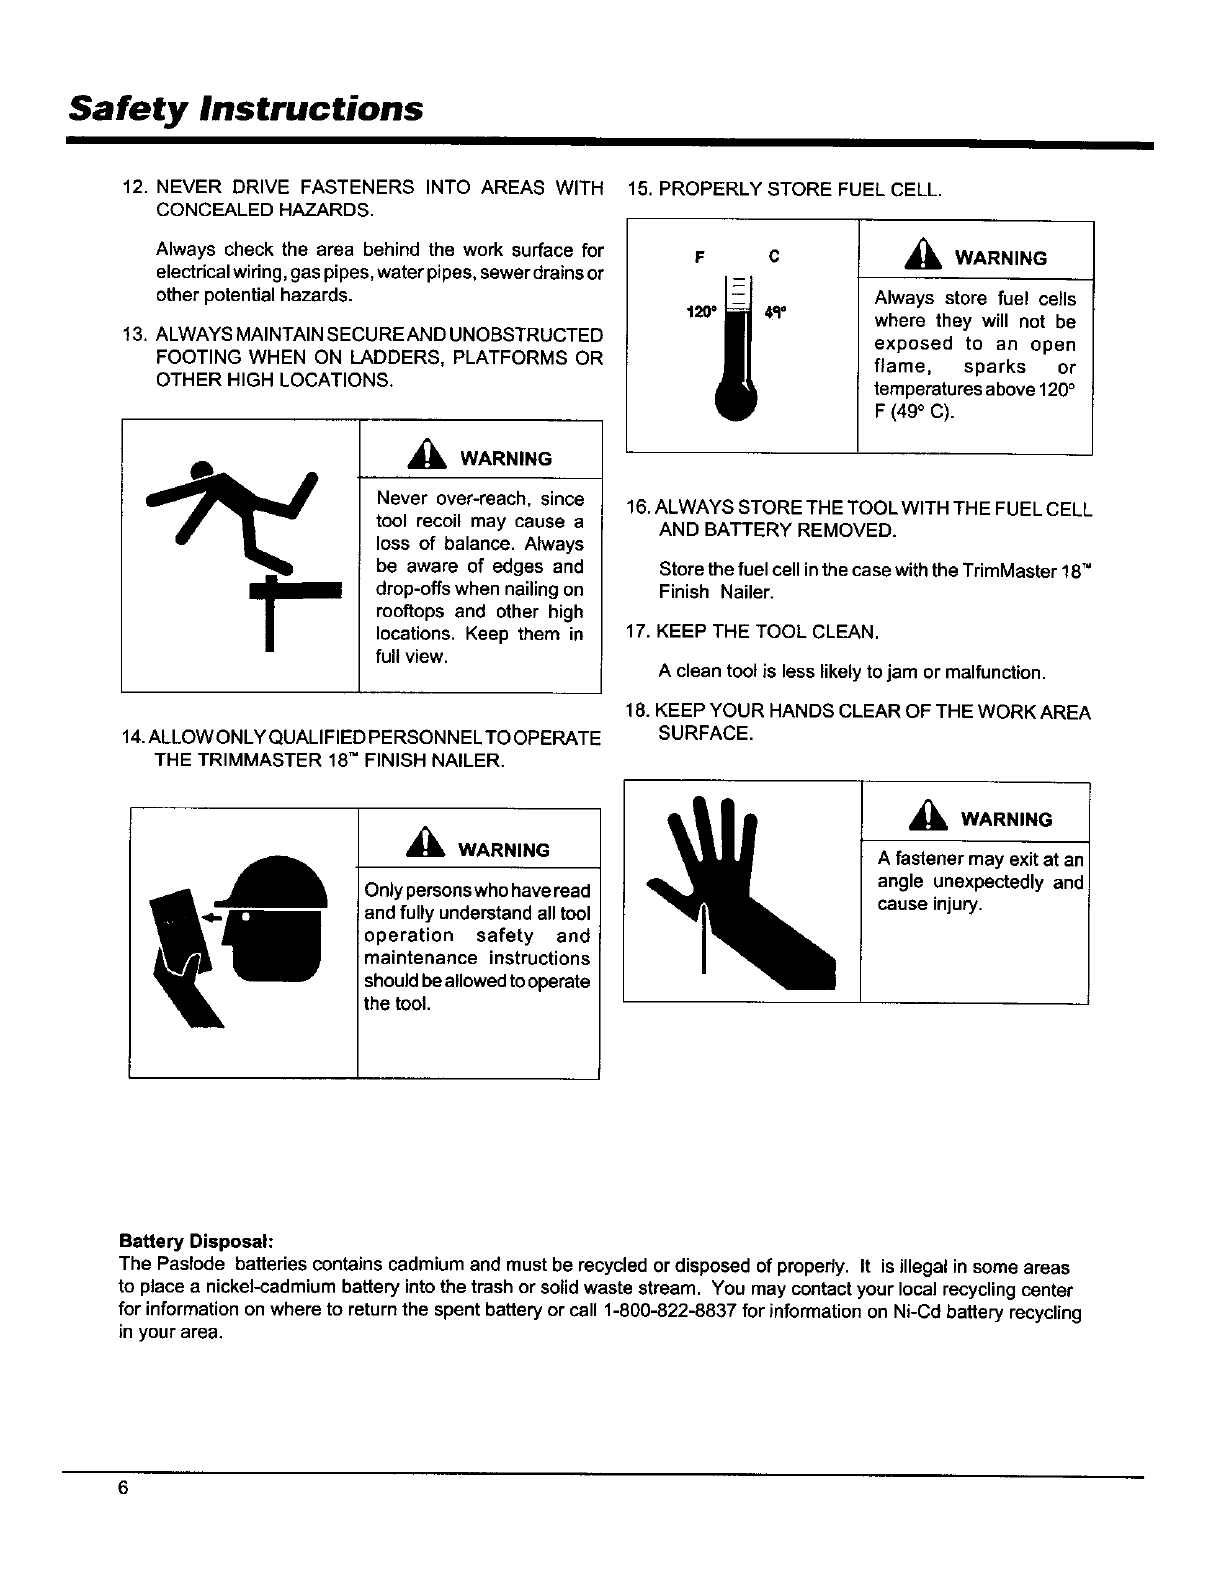
12. NEVER DRIVE FASTENERS INTO AREAS WITH
CONCEALED HAZARDS.
Always check the area behind the work surface for
electrical wiring, gas pipes, water pipes, sewer drains or
other potential hazards.
13. ALWAYS MAINTAIN SECURE AND UNOBSTRUCTED
FOOTING WHEN ON LADDERS, PLATFORMS OR
OTHER HIGH LOCATIONS.
I1_11
,_ WARNING
Never over-reach, since
tool recoil may cause a
loss of balance. Always
be aware of edges and
drop-offs when nailing on
rooftops and other high
locations. Keep them in
full view.
14.ALLOW ONLYQUALIFIED PERSONNEL TO OPERATE
THE TRIMMASTER 18" FINISH NAILER.
'_ WARNING
Only personswho have read
and fully understand all tool
operation safety and
maintenance instructions
should be allowed to operate
the tool.
15. PROPERLY STORE FUEL CELL.
F C A WARNING
Always store fuel cells
where they will not be
exposed to an open
flame, sparks or
temperatures above 120°
F (49° C).
16. ALWAYS STORE THE TOOL WITH THE FUEL CELL
AND BATTERY REMOVED.
Store the fuel cell inthe case with the TrimMaster 18TM
Finish Nailer.
17. KEEP THE TOOL CLEAN.
A clean toot is less likely to jam or malfunction.
18. KEEP YOUR HANDS CLEAR OF THE WORK AREA
SURFACE.
_'_ WARNING
Afastener may exit at an
angle unexpectedly and
cause injury.
Battery Disposal:
The Paslode batteries contains cadmium and must be recycledor disposed of properly. It is illegal in some areas
to place a nickel-cadmiumbatteryintothe trash or solidwaste stream. You may contactyour localrecyclingcenter
for informationon where to returnthe spentbatteryor call 1-800-822-8837 for informationon Ni-Cd batteryrecycling
in your area.
6
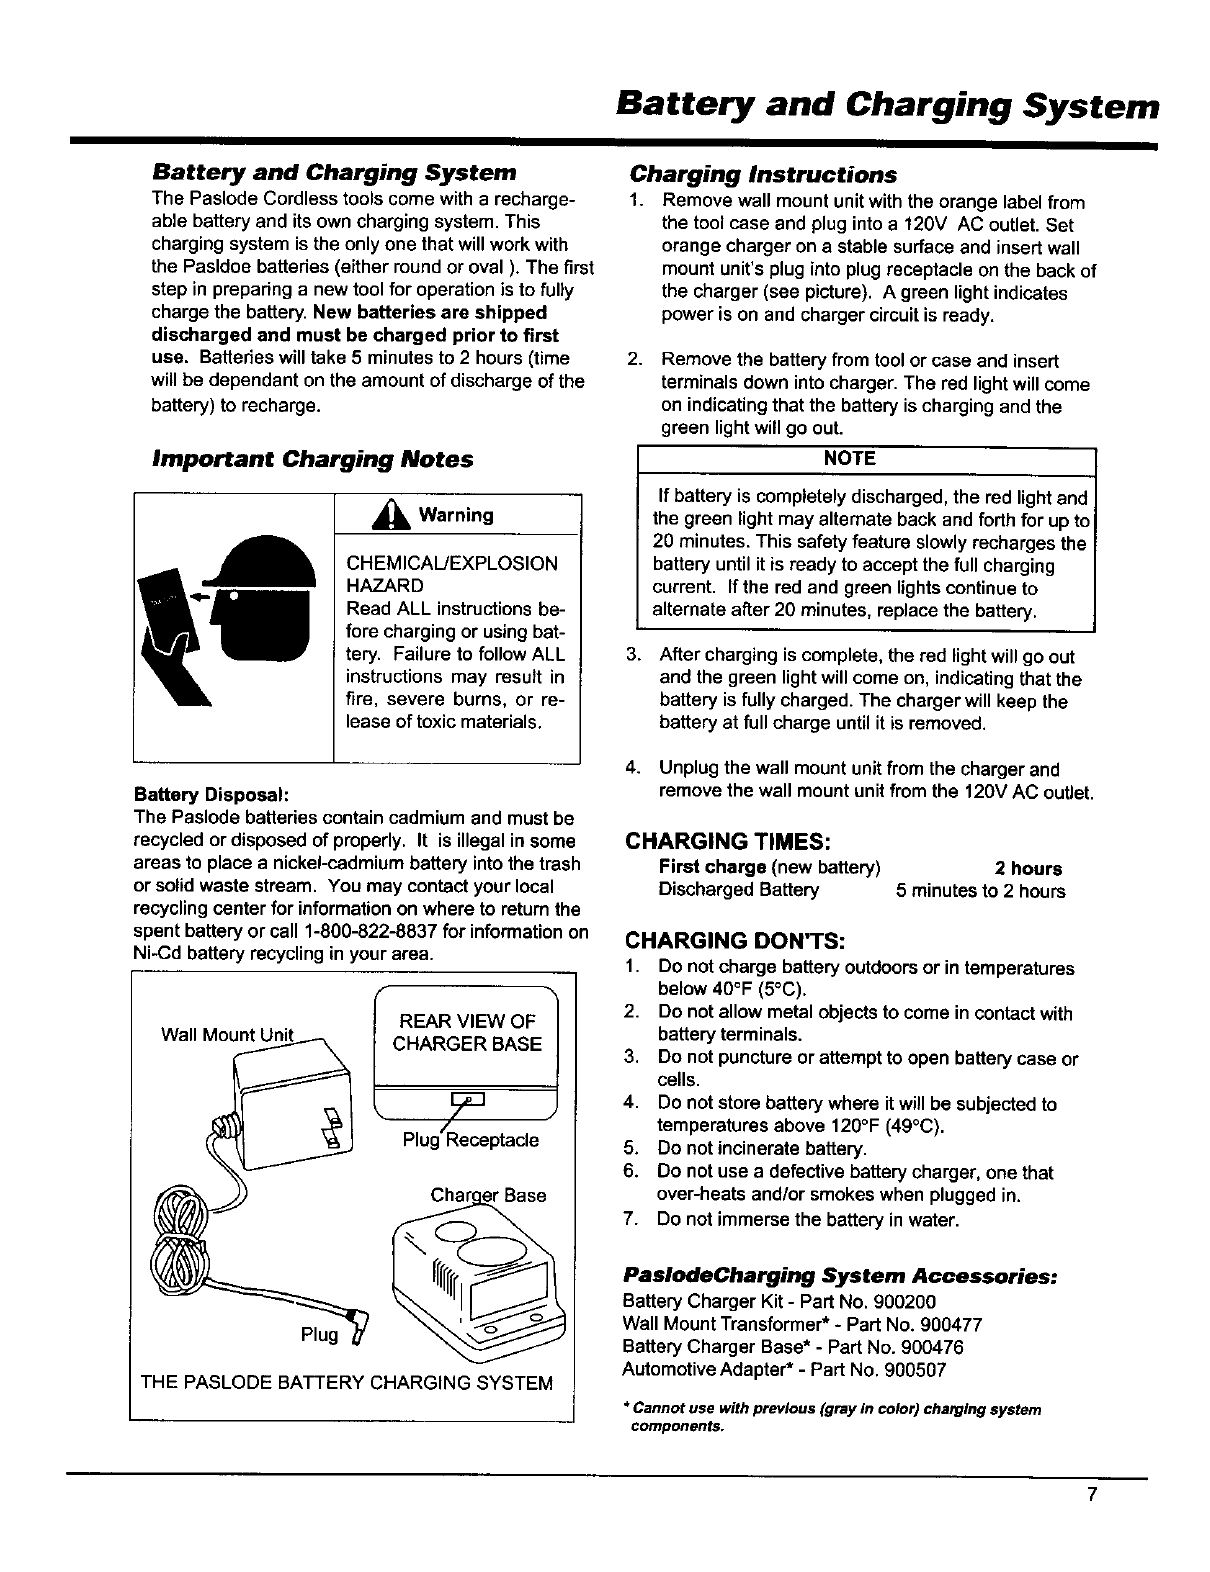
Battery and Charging System
Battery and Charging System
The Paslode Cordless tools come with a recharge-
able battery and its own charging system. This
charging system is the only one that will work with
the Pasldoe batteries (either round or oval ). The first
step in preparing a new tool for operation is to fully
charge the battery. New batteries are shipped
discharged and must be charged prior to first
use, Batteries will take 5 minutes to2 hours (time
will be dependant on the amount of dischargeof the
battery) to recharge.
Important Charging Notes
,_i, Warning
CHEMICAL/EXPLOSION
HAZARD
Read ALL instructionsbe-
fore charging or using bat-
tery. Failure to follow ALL
instructions may result in
fire, severe burns, or re-
lease of toxic materials.
Battery Disposal:
The Paslode batteries contain cadmium and must be
recycled or disposed of properly. It is illegal insome
areas to place a nickel-cadmiumbattery intothe trash
or solidwaste stream. You may contactyour local
recyclingcanter for informationon where to returnthe
spentbattery or call 1-800-822-8837 for informationon
Ni-Cd battery recyclinginyour area.
_" REAR VIEW OF "_l
Wall _ _ Plug Receptacle
Chal
Plug
THE PASLODE BATTERY CHARGING SYSTEM
Charging Instructions
1. Remove wall mount unit withthe orange label from
the tool case and plug into a 120V AC outlet. Set
orange charger on a stable surface and insert wall
mount unit's plug into plug receptacle on the back of
the charger (see picture). A green light indicates
power is on and charger circuit is ready.
2. Remove the battery from tool or case and insert
terminals down into charger. The red light will come
on indicating that the battery is charging and the
green light will go out.
NOTE
tf battery is completely discharged,the red light and
the green light may alternate back and forth for up to
20 minutes. This safety feature slowly recharges the
battery until it is ready to accept the full charging
current. If the red and green lights continue to
alternate after 20 minutes, replace the battery.
3. After charging is complete, the red light will go out
and the green light will come on, indicating that the
battery is fully charged. The charger will keep the
battery at full charge until it is removed.
4. Unplug the wall mount unit from the charger and
remove the wall mount unit from the 120V AC outlet.
CHARGING TIMES:
First charge (new battery) 2 hours
DischargedBattery 5 minutesto 2 hours
CHARGING DON'TS:
1. Do notcharge batteryoutdoorsor in temperatures
b_ow 40°F (6°C).
2. Do notallow metal objects to come in contact with
battery terminals.
3. Do not puncture or attempt to open battery case or
cells.
4. Do notstore battery where it will be subjectedto
temperatures above 120°F (49°C).
5. Do not incinerate battery.
6. Do not use a defective battery charger, one that
over-heats and/or smokes when plugged in,
7. Do not immerse the battery in water.
PaslodeCharging System Accessories:
BatteryCharger Kit -Part No. 900200
Wall MountTransformer* - Part No. 900477
BatteryCharger Base* - Part No. 900476
Automotive Adapter* - Part No. 900507
* Cannot use with previous (gray in color) charging system
components.
Battery and Charging System
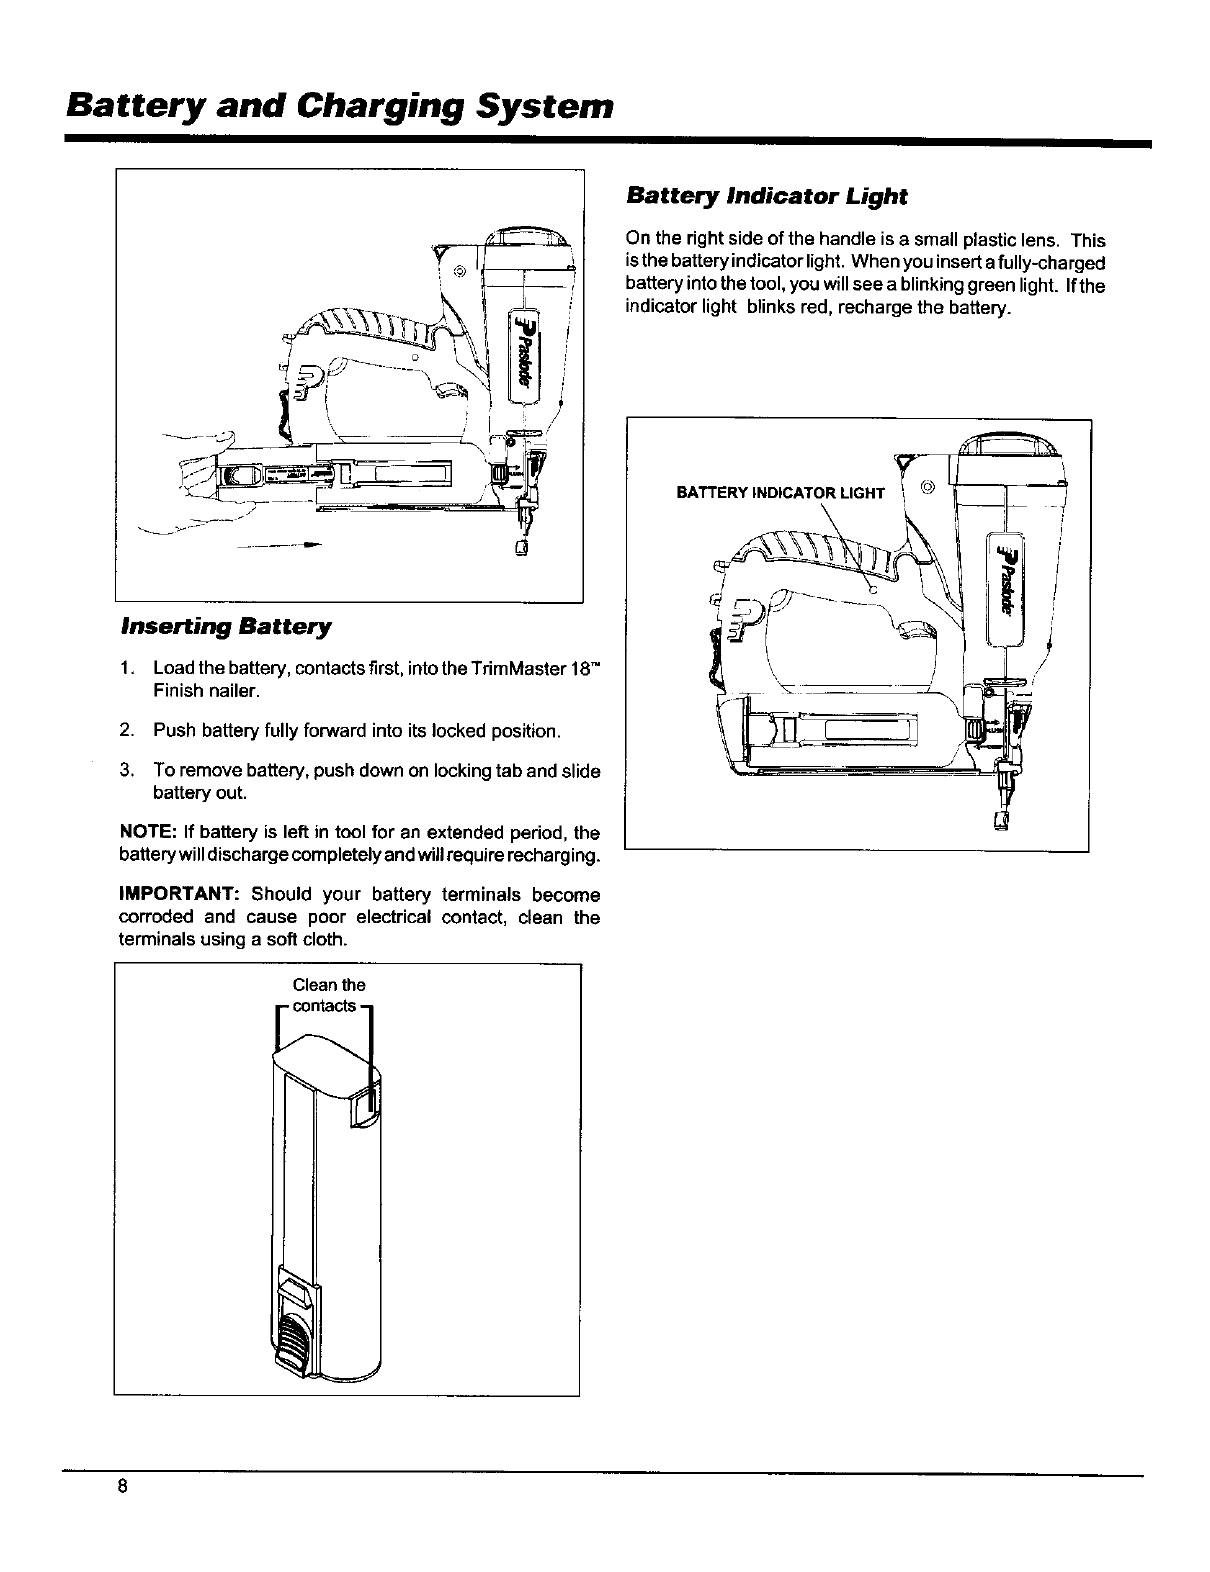
Inserting Battery
1. Loadthe battery, contacts first, into the TrimMaster 18TM
Finish nailer.
2. Push battery fully forward into its locked position.
3. To remove battery, push down on locking tab and slide
battery out.
NOTE: If battery is left in tool for an extended period, the
batterywilldischargecompletelyandwillrequire recharging.
IMPORTANT: Should your battery terminals become
corroded and cause poor electrical contact, clean the
terminalsusinga soft cloth.
Cleanthe
Battery Indicator Light
On the rightside of the handle is a smallplastic lens. This
is the battery indicator light. When you insert afully-charged
battery into the tool, you will see a blinking green light. Ifthe
indicator light blinks red, recharge the battery.
BATTERY INDICATOR LIGHT
/
Fuel Cell and Metering Valve
Fuel Cell
F C
120°_ 4_
_k, DANGER
EXPLOSION/FIRE
HAZARD
Read ALL safety
instructions before using
or handling the fuel cell.
Failure to follow ALL
instructions may result in
explosion or fire. This may
cause severe personal
injuries or property
damage.
Keep the fuel cell away
from heat, sparks and
open flame.
Exposure totemperatures
above 120°F (49°C) may
cause the fuel cell to burst,
releasing flammable gas.
There is a second container inside the fuel cell. The inner
container holds the fuel. The space between the inner
container and the outer cylinder is filled with a gas, called the
propellant, which is under pressure.
To eject the fuel, propellant pressure squeezes the inner
fuel container, much as you squeeze a tube of toothpaste.
This squeezing action ensures that all the fuel is used, and
that the Paslode Cordless Finish nailer can operate in any
position.
Because of this container-within-a-container design, you
might hear the sound of fluid when shaking the fuel cell after
all the fuel has been used. This is the propellant, which
remains between the containers even after all the fuel has
been expelled.
If you expose the empty fuel cell to extreme temperatures,
the propellant gas will expand and could cause the container
to burst, releasing flammable gases.
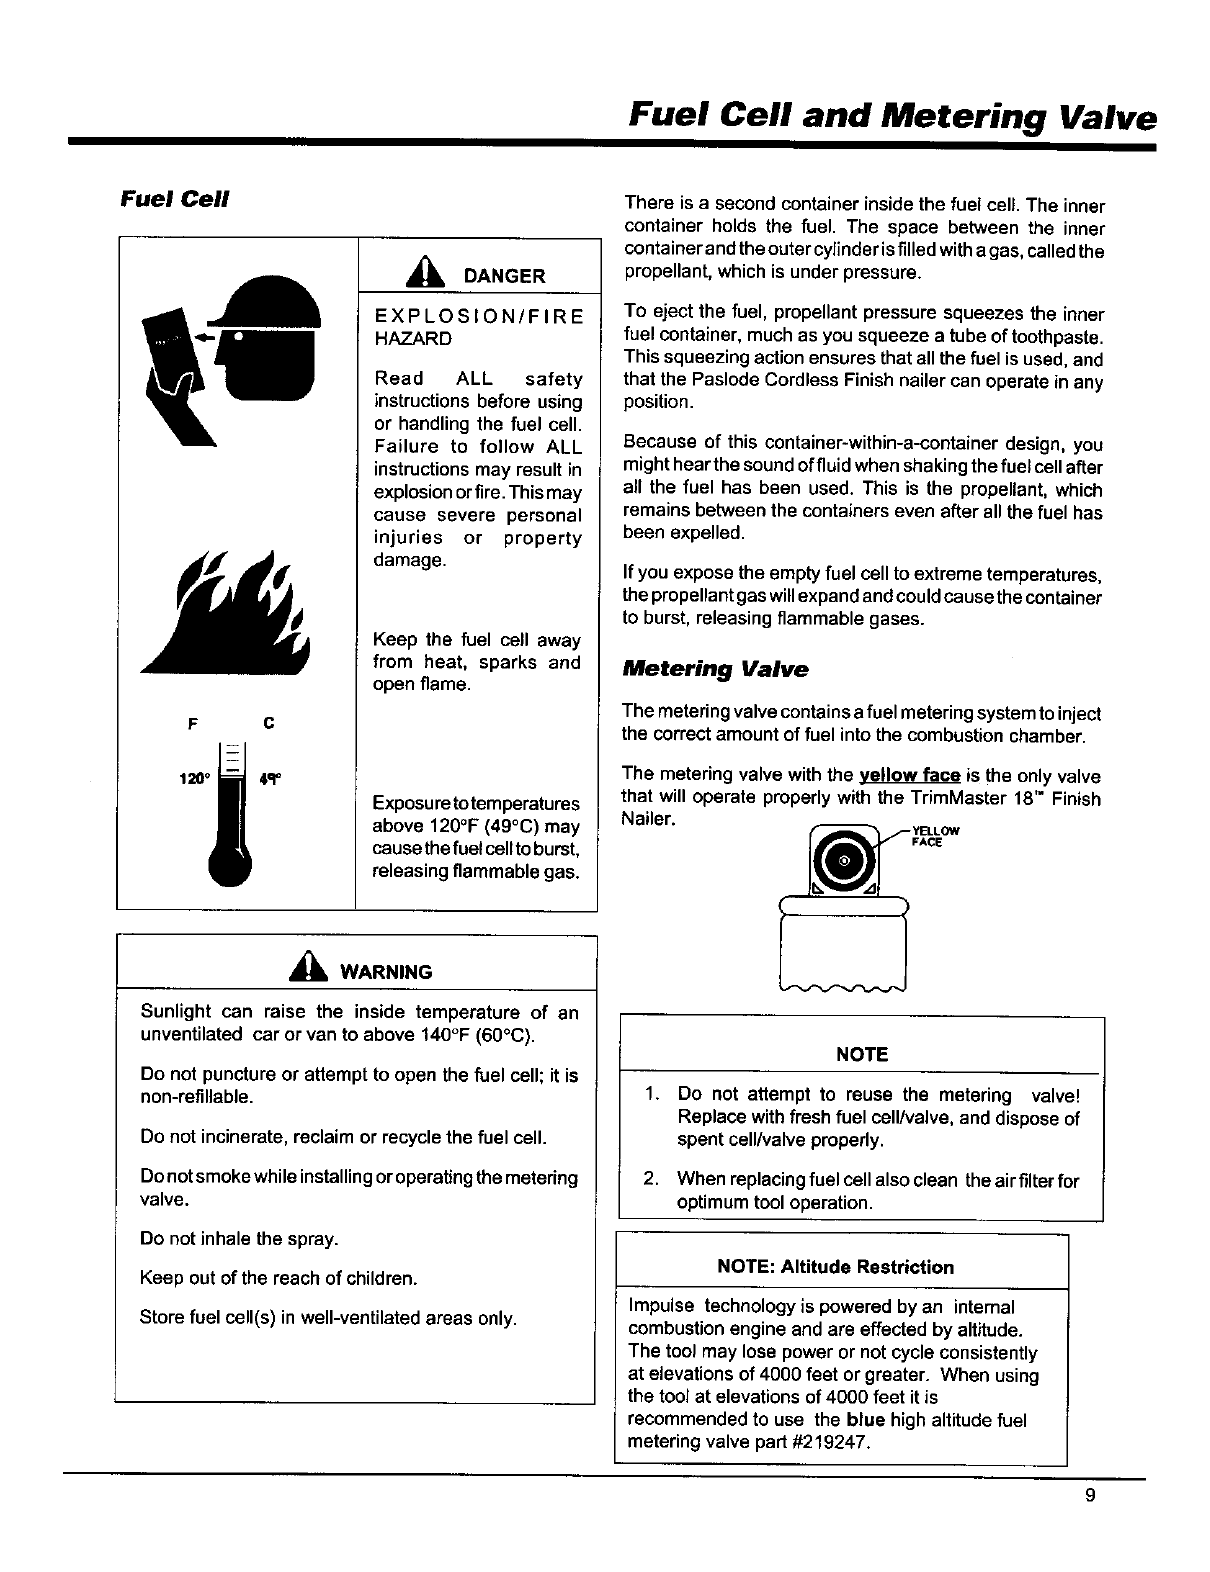
Metering Valve
The metering valve contains a fuel metering system to inject
the correct amount of fuel into the combustion chamber.
The metering valve with the yellow face is the only valve
that will operate properly with the TrimMaster 18" Finish
Nailer.
FACE
_kWARNING
Sunlight can raise the inside temperature of an
unventilated car or van to above 140°F (60°C).
Do not puncture or attempt to open the fuel cell; it is
non-refillable.
Do not incinerate, reclaim or recycle the fuel cell.
Do not smoke while installing or operating the metering
valve.
Do not inhale the spray.
Keep out of the reach of children.
Store fuel cell(s) in well-ventilated areas only.
NOTE
1. Do not attempt to reuse the metering valve!
Replace with fresh fuel cell/valve, and dispose of
spent cell/valve properly.
2. When replacing fuel cell also clean the air filter for
optimum tool operation.
NOTE: Altitude Restriction
Impulse technologyis powered by an internal
combustion engine and are effected by altitude.
The tool may lose power or not cycle consistently
at elevations of 4000 feet or greater. When using
the tool at elevations of 4000 feet it is
recommended to use the blue high altitude fuel
metering valve part #219247.
Fuel Cell and Metering Valve
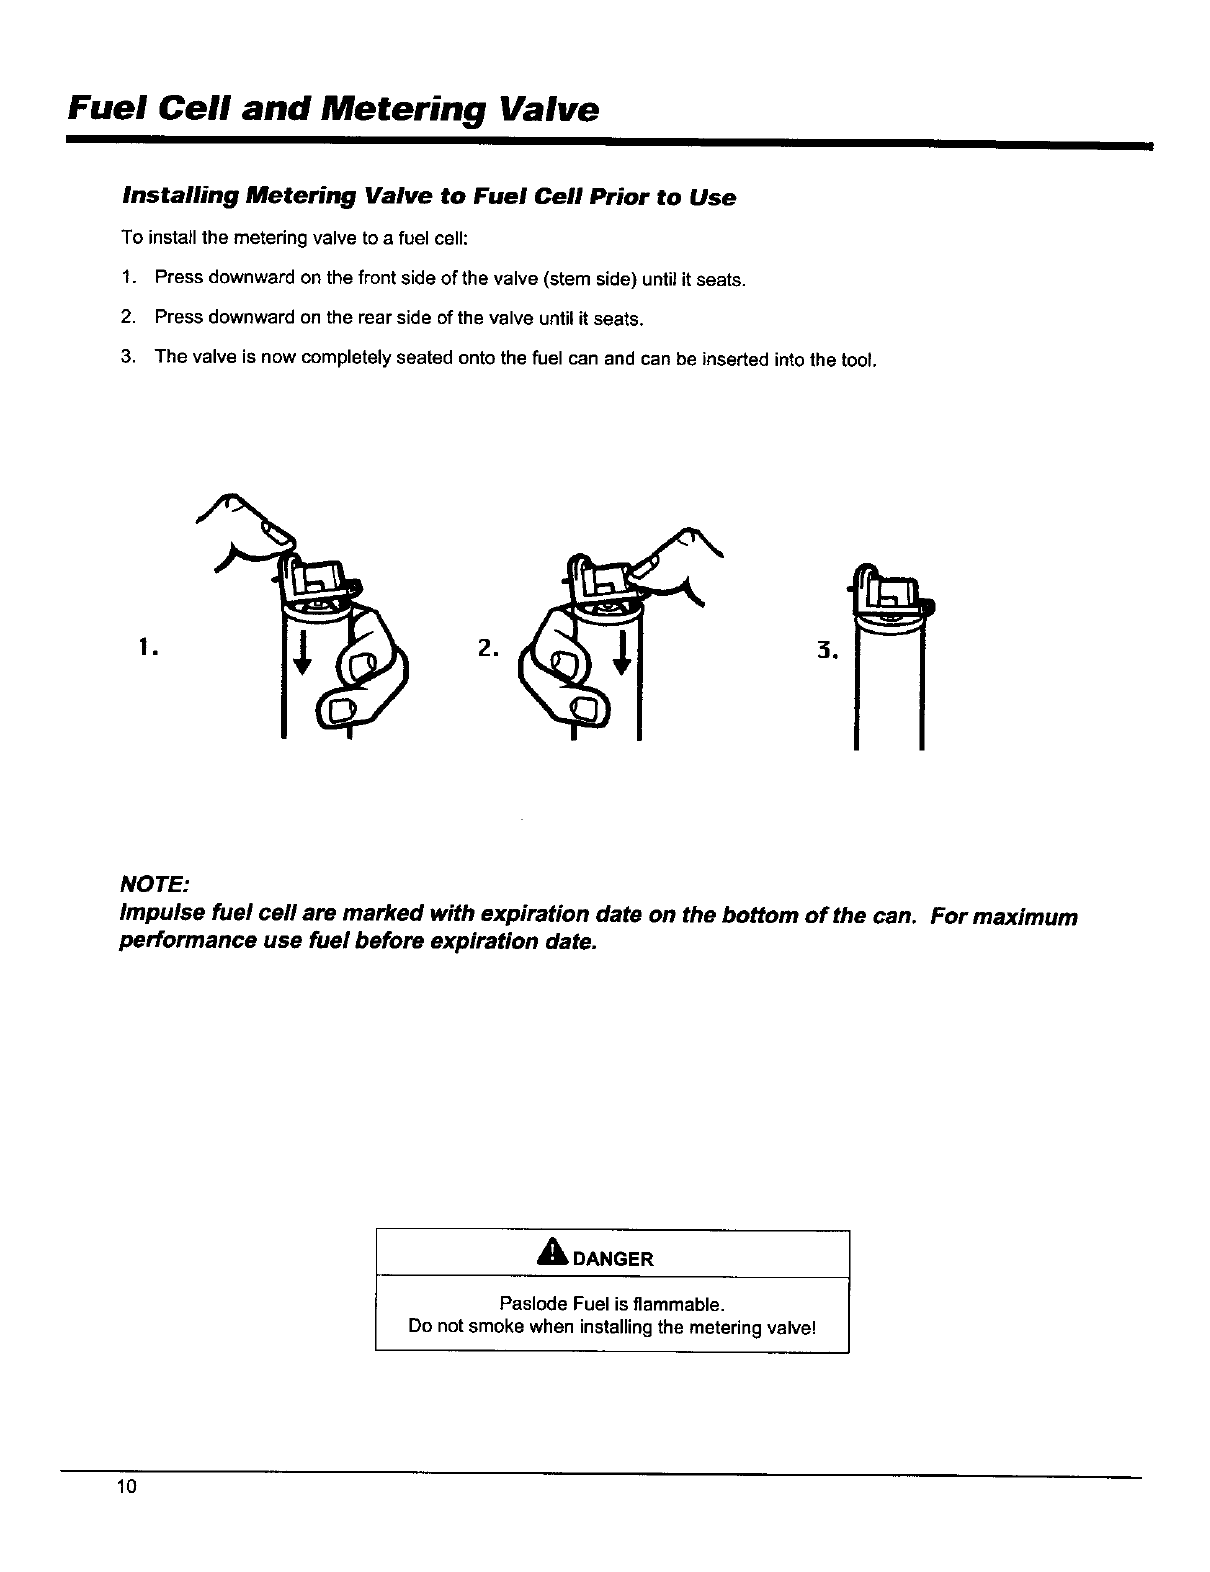
Installing Metering Valve to Fuel Cell Prior to Use
To install the metering valve to a fuel cell:
1. Press downward on the front side of the valve (stem side) until it seats.
2. Press downward on the rear side of the valve until it seats.
3. The valve is now completely seated onto the fuel can end can be inserted into the tool.
NOTE:
Impulse fuel ceil are marked with expiration date on the bottom of the can. For maximum
performance use fuel before expiration date.
A. DANGER
Paslode Fuel is flammable,
Do not smoke when installingthe meteringvalve!
10
Fuel Cell and Metering Valve
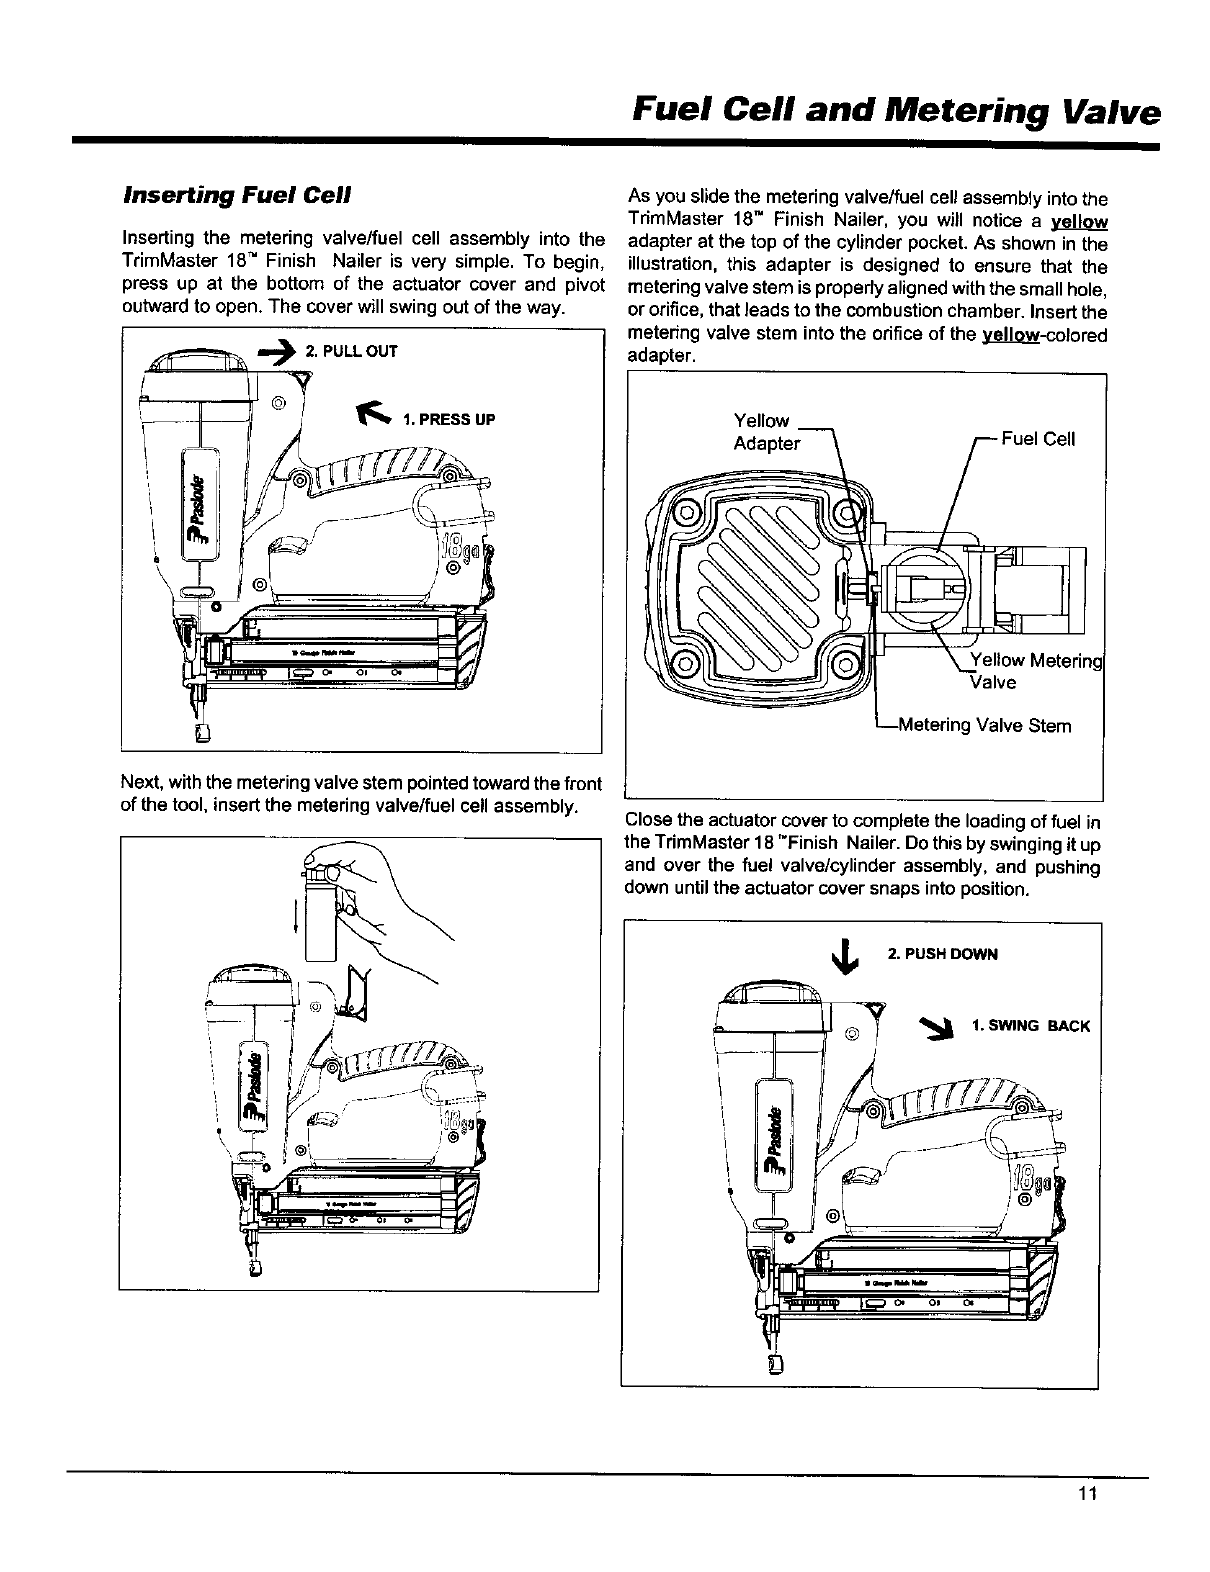
Inserting Fuel Cell
Inserting the metering valve/fuel cell assembly into the
TrimMaster 18TM Finish Nailer is very simple. To begin,
press up at the bottom of the actuator cover and pivot
outward to open. The cover will swing out of the way.
m,_2. PULL OUT
j_1. PRESS UP
Next, withthe metering valve stem pointedtowardthe front
of the tool, insert the metering valve/fuel cell assembly.
As you slide the meteringvalve/fuel cell assemblyintothe
TnmMaster 18" Finish Nailer, you will notice a yellow
adapter at the top of the cylinder pocket. As shown in the
illustration, this adapter is designed to ensure that the
metering valve stem is property aligned with the small hole,
or orifice, that leadsto the combustion chamber. Insert the
metering valve stem into the orifice of the ely---colored
adapter.
Yellow
Adapter Cell
Yellow Meterim
Valve
ig Valve Stem
Close the actuator cover to complete the loading of fuel in
the TrimMaster 18"Finish Nailer. Do this by swinging it up
and over the fuel valve/cylinder assembly, and pushing
down until the actuator cover snaps into position.
2. PUSHDOWN
q_ 1. SWING BACK
11
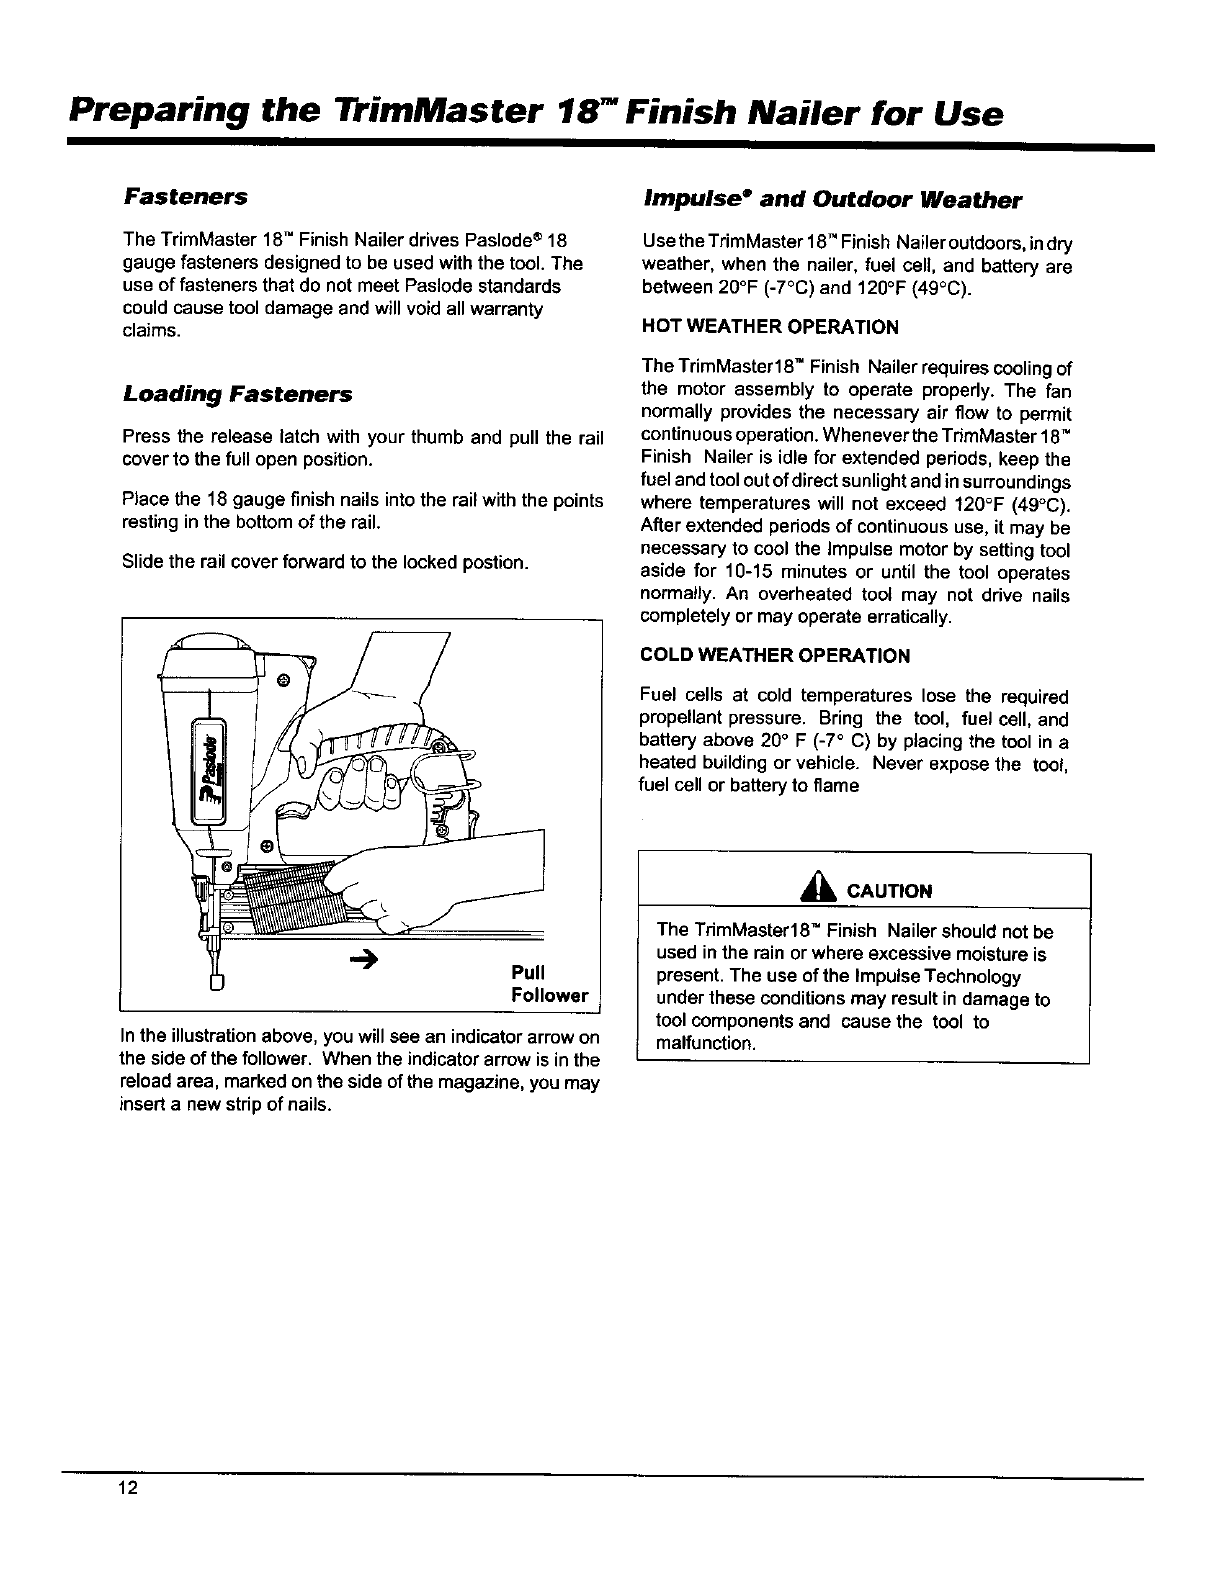
Preparing the TrimMaster 18- Finish Nailer for Use
Fasteners
The TrimMaster 18TM Finish Nailer drives Paslode®18
gauge fasteners designed to be used with the tool. The
use of fasteners that do not meet Pasloda standards
could cause tool damage and will void all warranty
claims.
Loading Fasteners
Press the release latch with your thumb and pull the rail
cover to the full open position.
Place the 18 gauge finish nails into the rail with the points
resting in the bottom of the rail.
Slide the rail cover forward to the locked postion.
"_ Pull
Follower i
In the illustration above, you will see an indicator arrow on
the side of the follower. When the indicator arrow is in the
reload area, marked on the side of the magazine, you may
insert a new strip of nails.
Impulse" and Outdoor Weather
Use the TrimMaster 18TM Finish Nailer outdoors, in dry
weather, when the nailer, fuel cell, and battery are
between 20°F (-7°C) and 120°F (49°C).
HOT WEATHER OPERATION
The TrimMaster18" Finish Nailerrequirescooling of
the motor assembly to operate properly. The fan
normally provides the necessary air flow to permit
continuousoperation.Wheneverthe TdmMaster 18TM
Finish Nailer is idle for extended pedods, keep the
fuel andtooloutofdirectsunlightandin surroundings
where temperatures will not exceed 120°F (49°C).
Afterextended pedodsof continuoususe, it may be
necessaryto cool the Impulse motor by settingtool
aside for 10-15 minutes or until the tool operates
normally. An overheated toot may not drive nails
completelyor may operate erratically.
COLD WEATHER OPERATION
Fuel cells at cold temperatures lose the required
propellant pressure. Bring the tool, fuel cell, and
battery above 20°F (-7° C) by placing the tool in a
heated buildingor vehicle. Never expose the tool,
fuel cell or batteryto flame
A CAUTION
The TrimMaster18TM Finish Nailer should notbe
used inthe rain or where excessive moistureis
present.The use of the ImpulseTechnology
under these conditionsmay result indamage to
tool componentsand cause the tool to
malfunction.
12
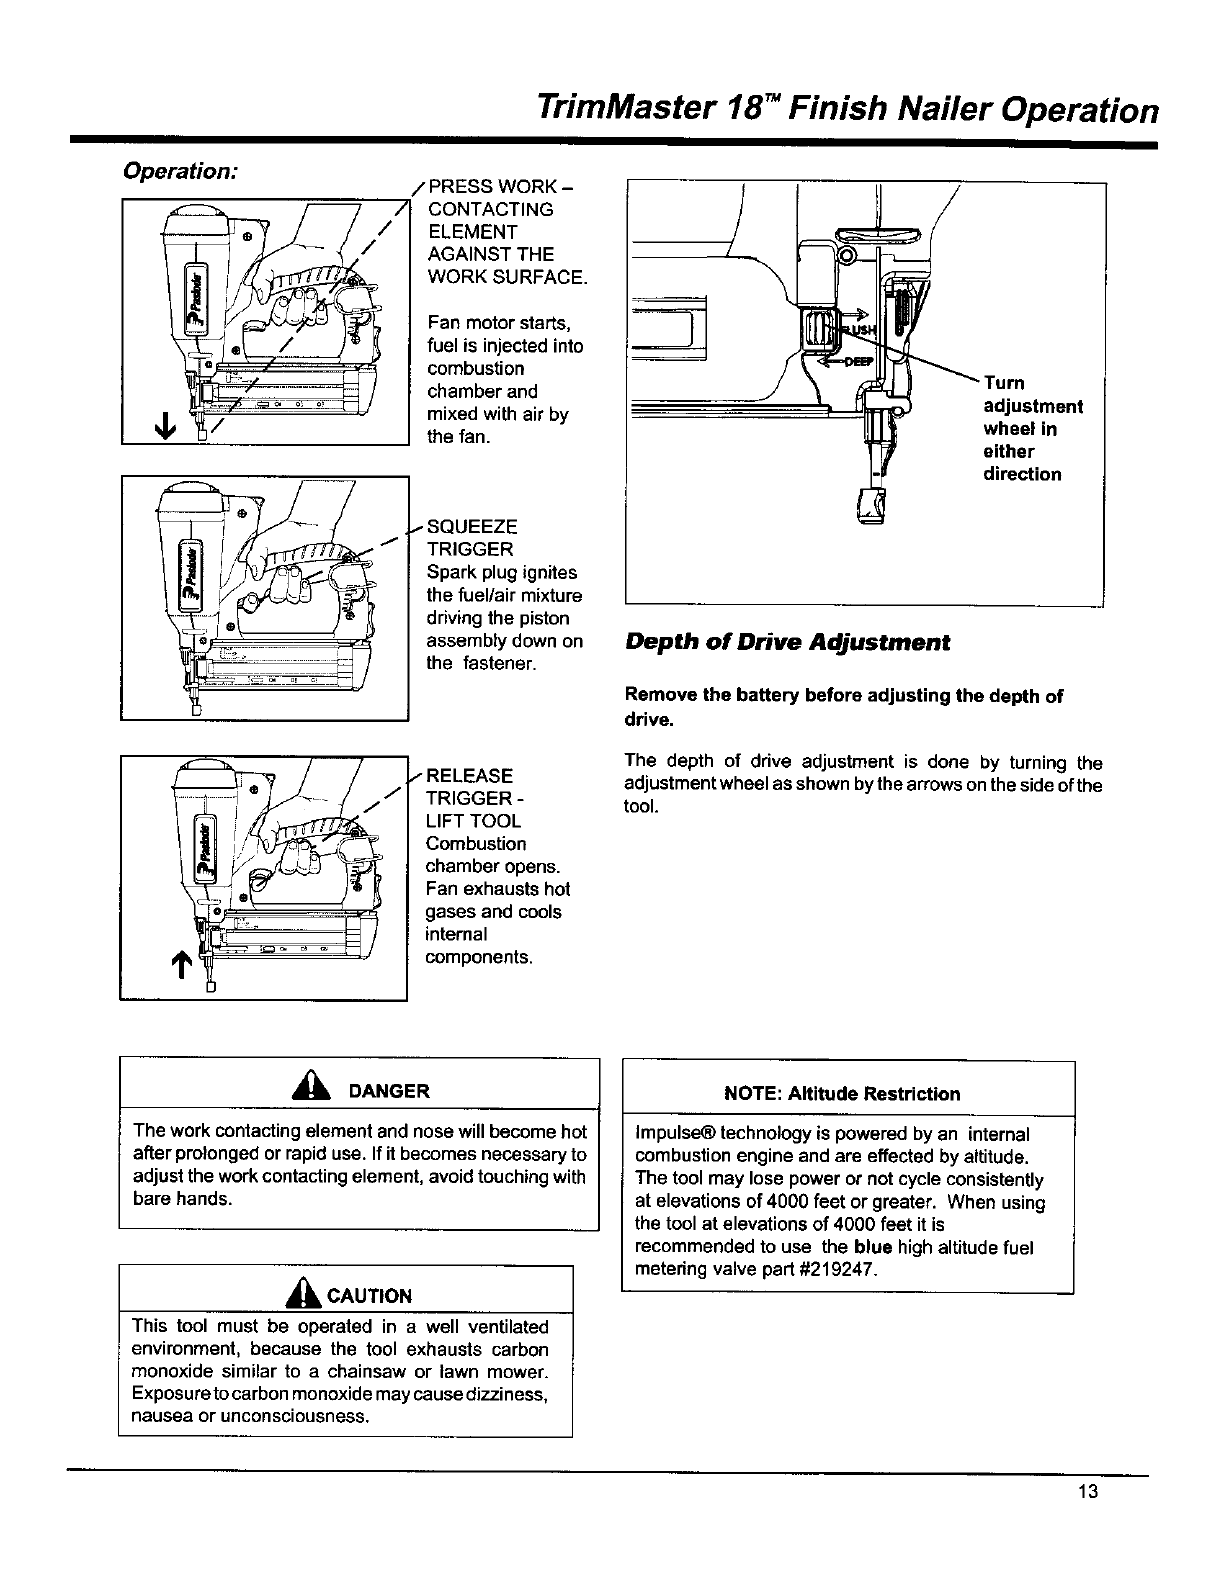
TrimMaster 18" Finish Nailer Operation
Operation:
7
/
/
/
•PRESS WORK -
CONTACTING
ELEMENT
AGAINST THE
WORK SURFACE.
Fan motor starts,
fuel is injected into
combustion
chamber and
mixed with air by
the fan.
--SQUEEZE
TRIGGER
Spark plug ignites
the fuel/air mixture
driving the piston
assembly down on
the fastener.
/RELEASE
TRIGGER -
LIFT TOOL
Combustion
chamber opens.
Fan exhausts hot
gases and cools
internal
components.
adjustment
wheel in
either
direction
Depth of Drive Adjustment
Remove the battery before adjusting the depth of
drive.
The depth of drive adjustment is done by turning the
adjustment wheel as shown by the arrows on the side of the
tool.
,_ DANGER
The work contactingelement and nosewillbecome hot
after prolongedorrapiduse. If it becomesnecessaryto
adjustthe workcontactingelement, avoidtouchingwith
bare hands.
A CAUTION
This tool must be operated in a well ventilated
environment, because the tool exhausts carbon
monoxide similar to a chainsaw or lawn mower.
Exposure to carbon monoxide may cause dizziness,
nausea or unconsciousness.
NOTE: Altitude Restriction
Impulse_ technology is powered by an internal
combustionengine and are effected by altitude.
The tool may lose power or not cycle consistently
at elevations of 4000 feet or greater. When using
the tool at elevations of 4000 feet it is
recommended to use the blue high altitude fuel
metering valve part #219247.
13
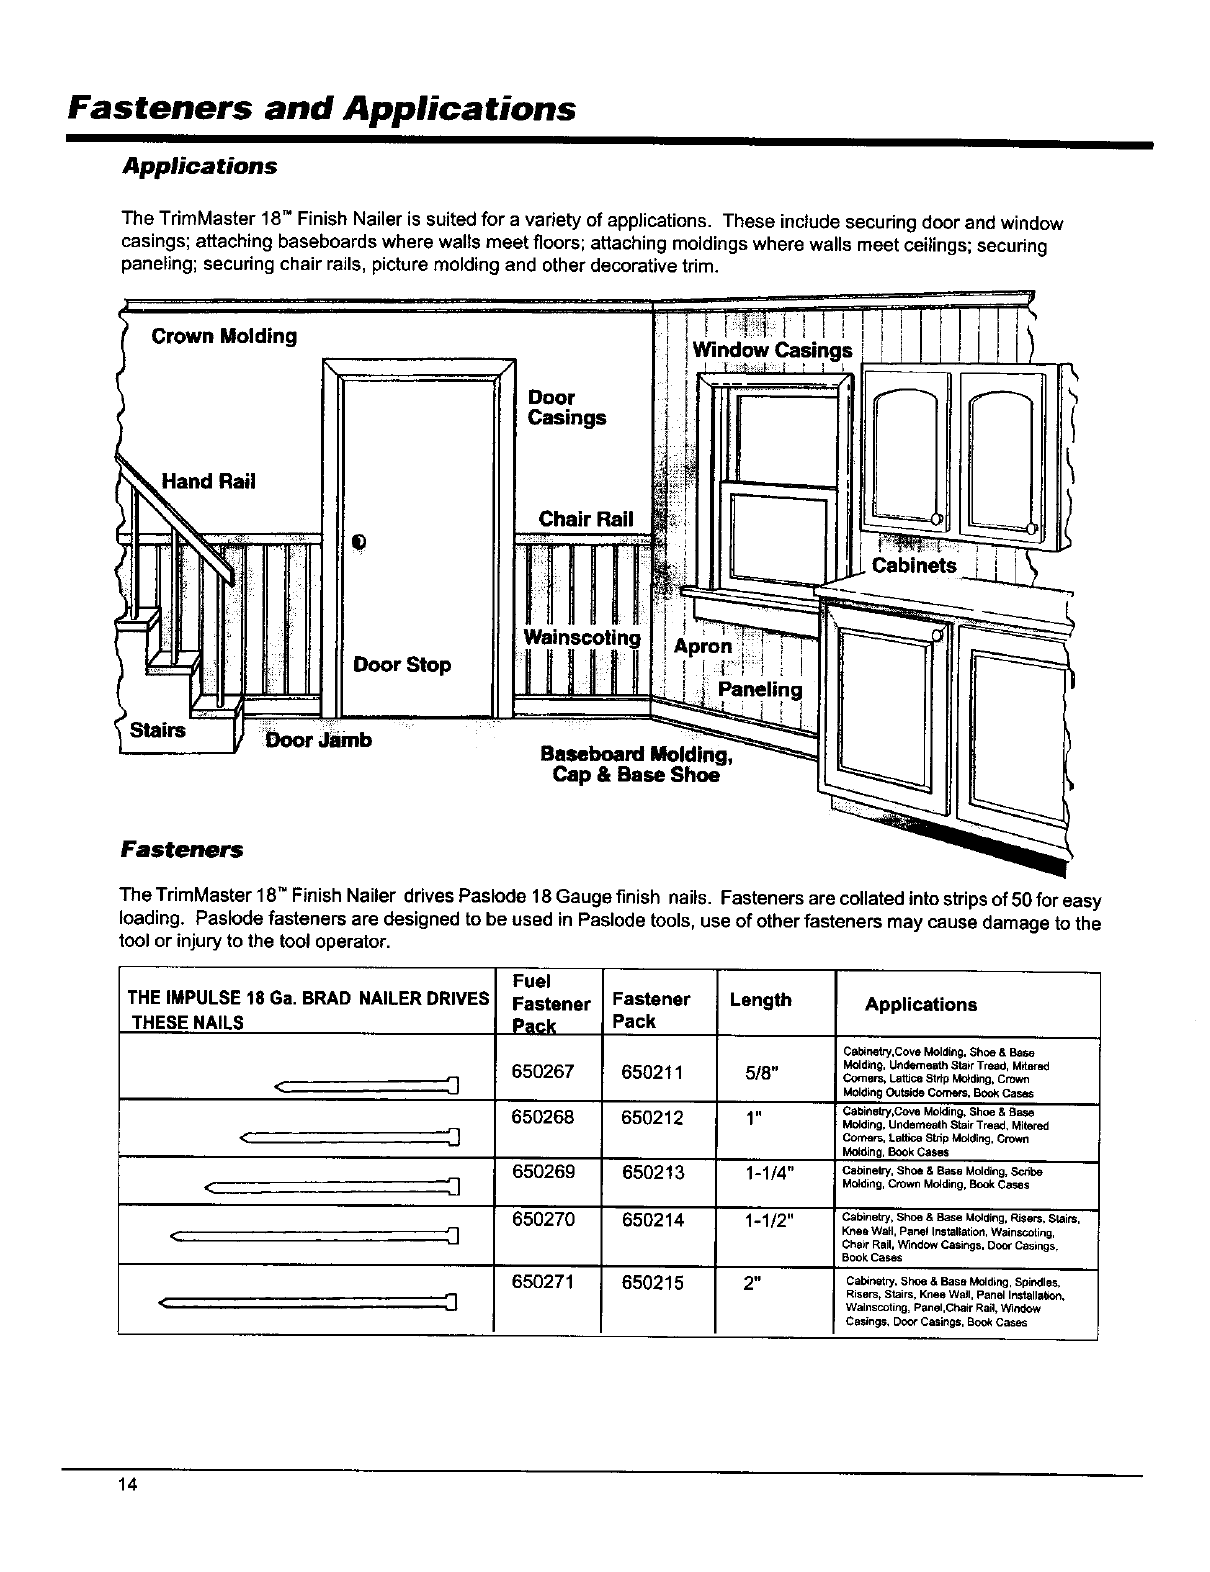
Fasteners and Applications
Applications
The TrimMaster 18TM Finish Nailer is suited for a variety of applications. These include securingdoor and window
casings; attaching baseboards where walls meet floors; attaching moldings where walls meet ceilings; securing
paneling; securing chair rails, picture molding and other decorative tdm.
Door
Casings
Door Stop
Baseboard Molding,
Cap & Base Shoe
Fasteners
The TrimMaster 18" Finish Nailer drives Paslode 18Gauge finish nails. Fasteners are collated into strips of 50 for easy
loading. Paslode fasteners are designed to be used in Paslode tools, use of other fasteners may cause damage to the
tool or injury to the tool operator.
THE IMPULSE18 Ga. BRAD NAILERDRIVES
THESENAILS
• q
3
3
Fuel
Fastener
P_;k
650267
650268
650269
650270
650271
Fastener
Pack
650211
650212
650213
650214
650215
Length
5/8"
1"
1-1/4"
1-1/2"
2 ,I
Applications
Cabi_tnj,Cove Molding, Shoe & Base
Mc_ding, Underneath Stair Tread, M_etad
Comers, Lance Strip Molding, Crown
Mbid_ngOutside Come_s, Book Cases
Cabinetry,Cove Molding, Shoe & Base
Mc4ding, Underneath Stair Trend, Mitered
Comers, Lal_,e Strip Mclding, Crown
Molding, Book Case_
Cabinetry, Shoe & Base Molding, Scdbe
Mbid_ng,Crown Mc4ding, Book Cases
Cabinetry, Shoe & Base Mclding, Risers, Stairs,
Knee Wall, Pane_ Installation, Wainscoting,
Chair Rail, V_ndow Casings, Door Casings,
Book Cases
Cabinetry, Shoe &Base Mbiding, Spindles,
Risers, Stairs, Knee Wbil, Panel Installabon,
Wainscoting, Panel,Chair Rail, W3ndow
Casings, Dcor Casings, Book Cases
14
Servicing
Restrict Field Service to the Following
[] CHECKING THE ENERGY LEVEL OF THE BATTERY
[] RECHARGING THE BATTERY
[] CHECKING THE FUEL CELLAND METERING VALVE
[] REPLACING THE FUEL CELL
[] CLEANING/REPLACING THE AIR FILTER
[] CLEARING A JAM
[] CLEANING THE TOOL (See cleaning manual)
Attempts to go beyond these procedures could result in
serious personal injury or damage to the TrimMaster 18"
Finish Nailer and voiding the warranty.
There are certain problems you may encounter when you
are using the TrimMaster 18" Finish Nailer that you will be
able to correct on the work site. The following field service
procedures are the only service procedures you should
attempt. Anything else that may appear wrong with the
TrimMaster 18TM Finish Nailer should only bediagnosed and
repaired by afully trained service technician. Ifyou have any
reason to believe that your problem is beyond the service
procedures in this manual, contact your Paslode ®
representative immediately.
A DANGER
Never attempt any maintenance of a Paslode Cordless
tool without first removing the fuel cell and battery,
Maintenance should be started only after the tool is
completely inoperative.
Battery Check
Periodically check on the battery indicator light (the light
in the handle) of the TrimMaster 18" Finish Nailer. When
encountering a problem, the first step should always be to
make sure the battery has enough charge to operate the
tool.
When the work contacting element is depressed on work
piece, the fan motor will turn on and the blinking green
indicator light will turn solid green. Ifthe indicator light blinks
red or glows red, recharge the battery.
Fuel CeH Check
If the Impulse® 18 Ga. Brad Nailer's fan operates and the
indicator light is green, but the tool will not cycle or does not
drive fasteners completely, check the fuel cell. With the fuel
cell out of the tool, check to see if the cell still contains fuel
and that the metering valve is working. To determine if there
is any fuel left in thefuel cell, hold inthe upright position and
simply place the metering stem against a solid object, and
gently push about three orfour times. A small amount of fuel
should be released each time.
DANGER
Wear safety glasses when performingthistest. Never
perform this test near an open flame or sparks, while
smoking,or where the fuel may get into youreyes.
If fuel is not released with each operation of the metering
valve, this indicates that there is no more fuel left in the
cylinder and it must be replaced. Dispose of the empty fuel
cell properly. (see page 16.)
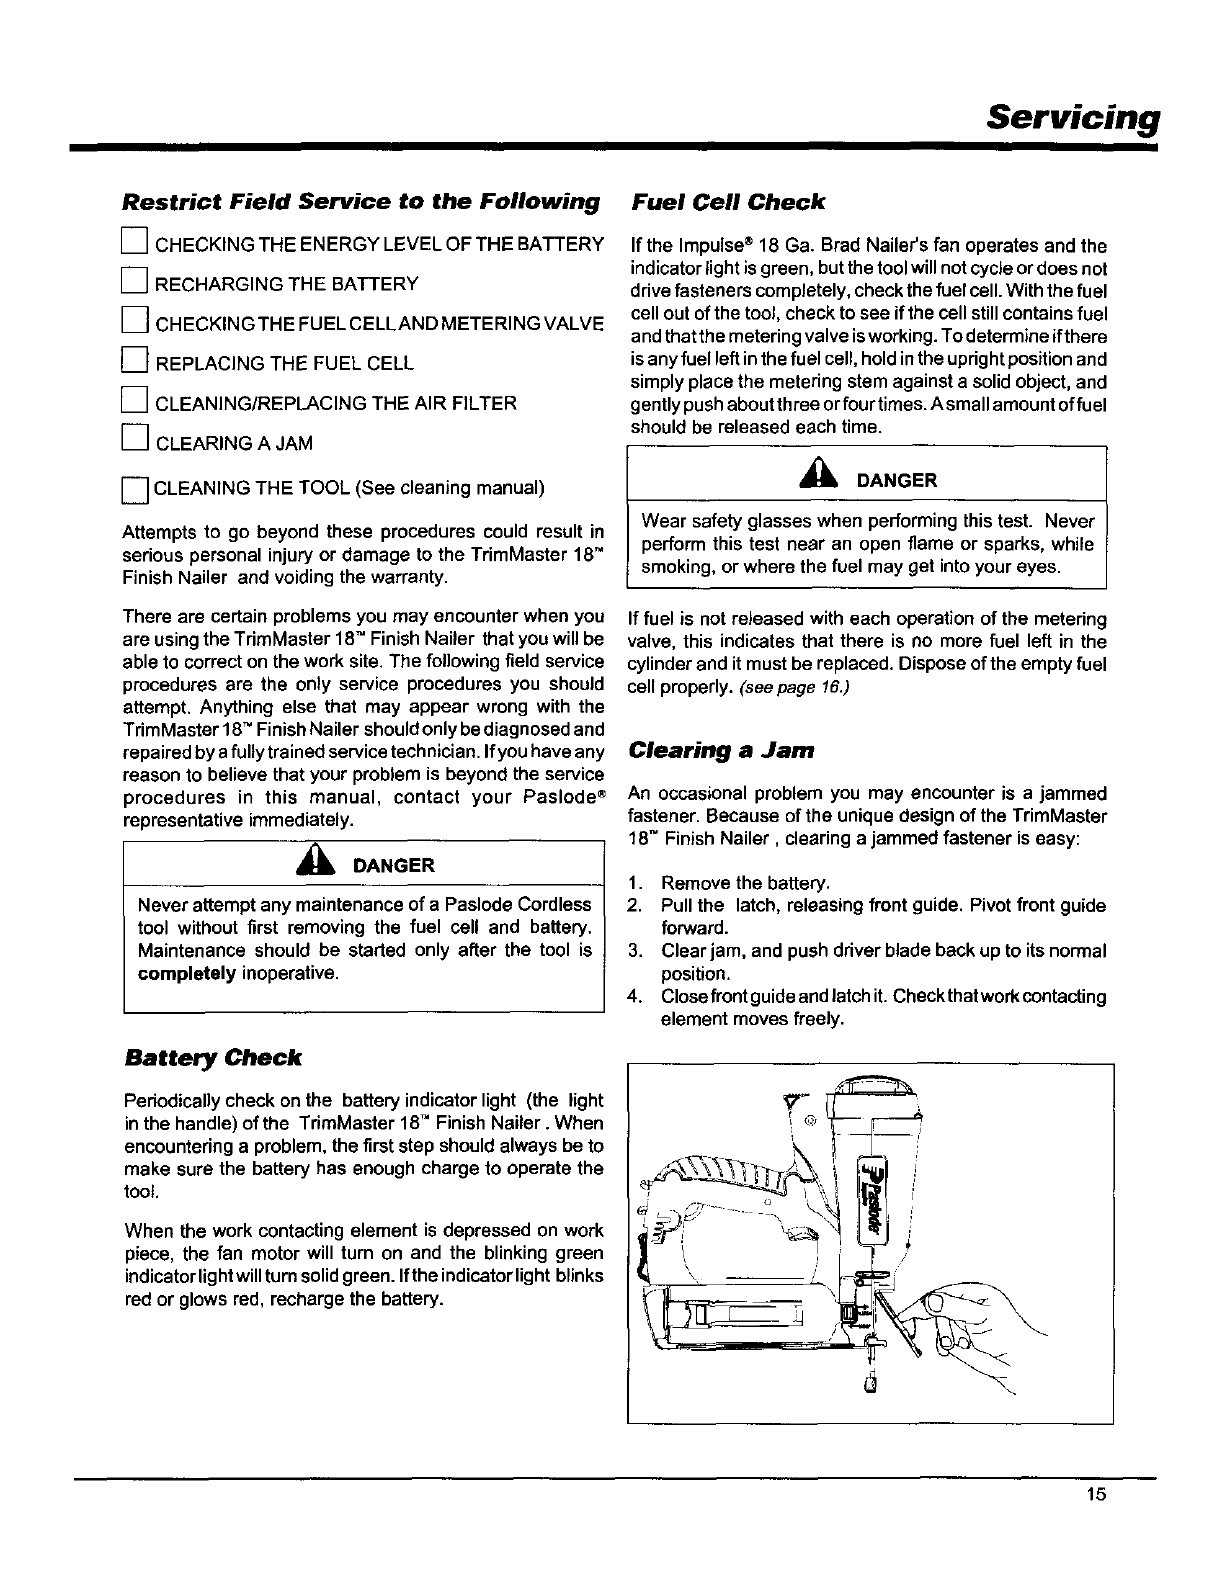
Clearing a Jam
An occasional problem you may encounter is a jammed
fastener. Because of the unique design of the TrimMaater
18TM Finish Nailer, clearing a jammed fastener is easy:
1. Remove the battery.
2. Pull the latch, releasing front guide. Pivot front guide
forward.
3. Clear jam, and push driver blade back up to its normal
position.
4. Closefrontguideandlatchit. Checkthatworkcontacting
element moves freely.
15
Servicing
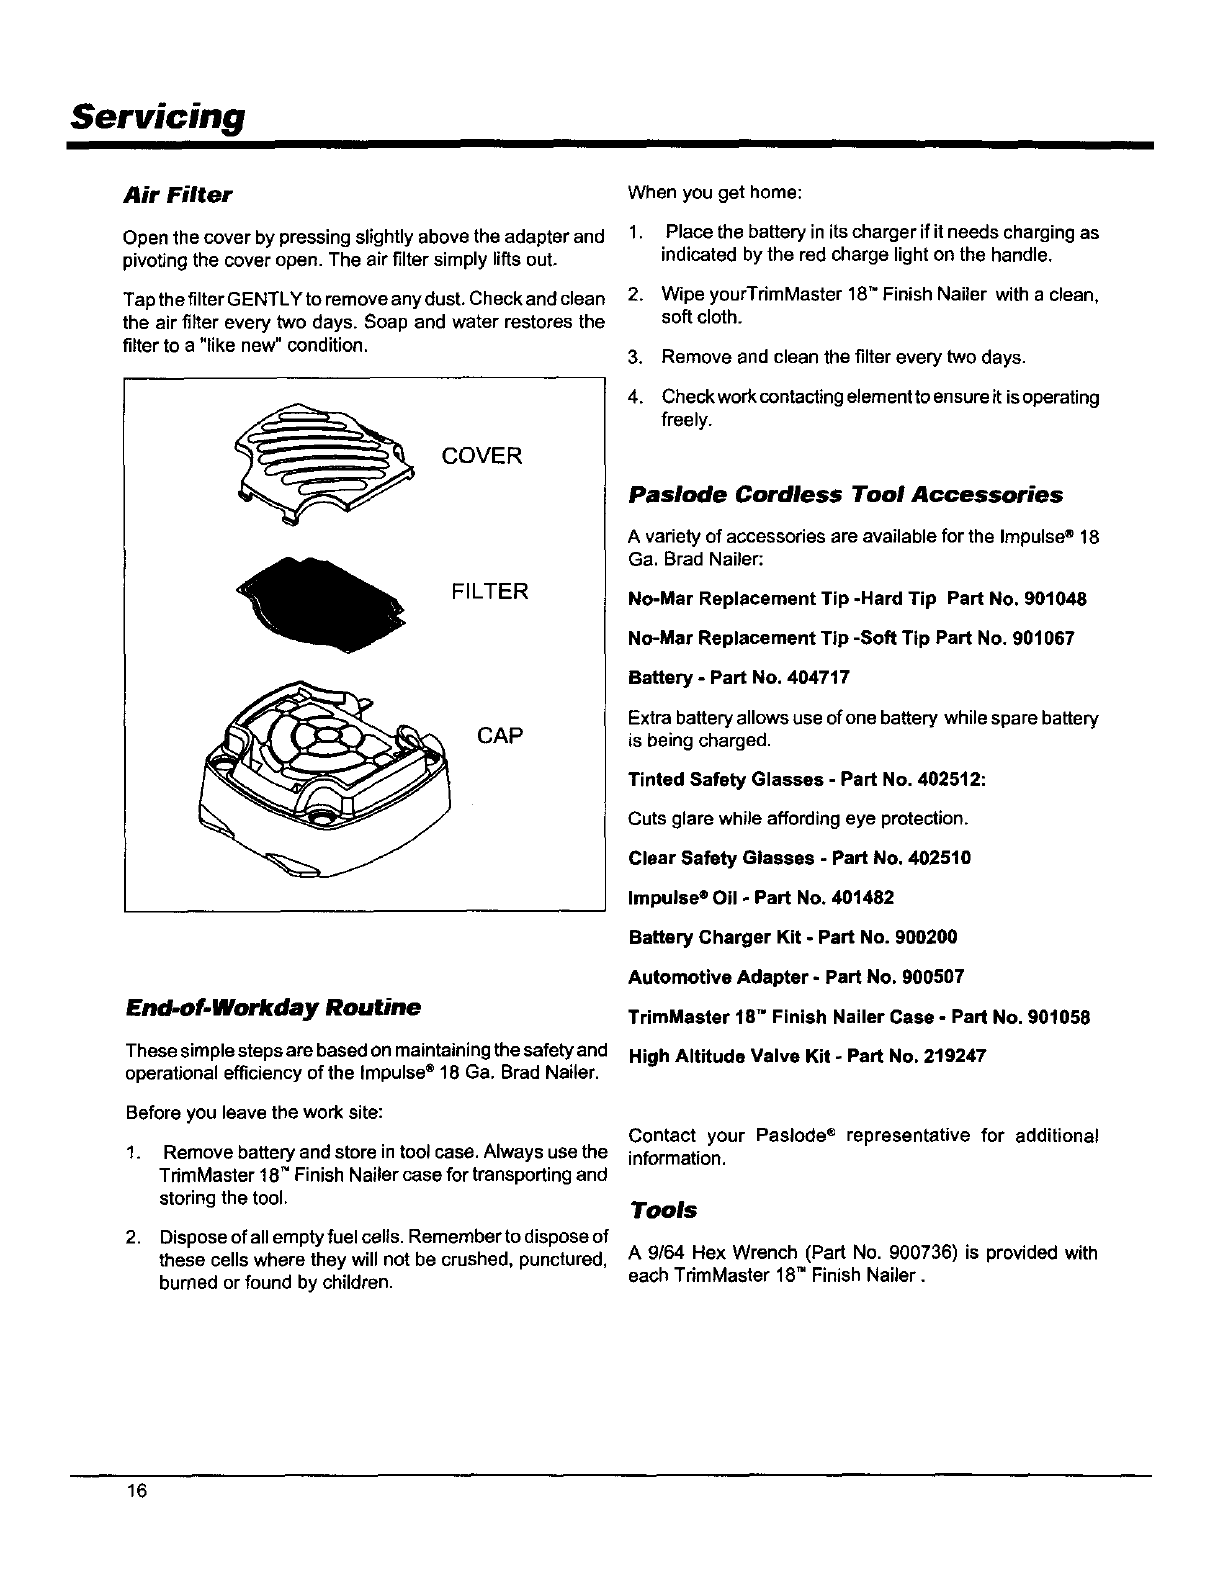
Air Filter
Open the cover by pressingslightlyabovethe adapter and
pivoting the cover open. The air filter simply lifts out.
Tap the filter GENTLY to remove any dust. Check and clean
the air filter every two days. Soap and water restores the
filter to a "like new" condition.
COVER
FILTER
CAP
End.of.Workday Routine
These simplestepsare based on maintainingthe safetyand
operationalefficiencyof the Impulse®18 Ga. Brad Nailer.
Before you leave the work site:
1. Removebatteryand storeintool case. Always use the
TdmMaster 18_'FinishNailer casefor transportingand
storingthe tool.
2. Disposeof allemptyfuel cells. Remember to disposeof
these cellswhere they will not be crushed, punctured,
burned or found by children.
When you get home:
1. Place the batteryinitscharger ifit needs chargingas
indicated bythe red charge lighton the handle.
2. Wipe yourTrimMaster 18" FinishNailer witha clean,
soft cloth.
3. Remove and cleanthe filterevery two days.
4. Checkworkcontacfingelementtoensureit isoperating
freely.
Paslode Cordless Tool Accessories
A varietyof accessoriesare available for the Impulse®18
Ga. Brad Nailer:
No-Mar Replacement Tip -Hard Tip Part No. 901048
No-Mar Replacement Tip -Soft Tip Part No. 901067
Battery -Part No. 404717
Extra batteryallowsuse ofone batterywhile sparebattery
is being charged,
Tinted Safety Glasses -Part No, 402512:
Cuts glare while affordingeye protection.
Clear Safety Glasses -Part No. 402510
Impulse®Oil - Part No. 401482
Battery Charger Kit -Part No. 900200
Automotive Adapter -Part No. 900507
TrimMaster 18" Finish Nailer Case -Part No, 901058
High Altitude Valve Kit -Part No. 219247
Contact your Paslode ® representative for additional
information.
Tools
A 9/64 Hex Wrench (Part No. 900736) is provided with
each TdmMaster 18" Finish Nailer.
16
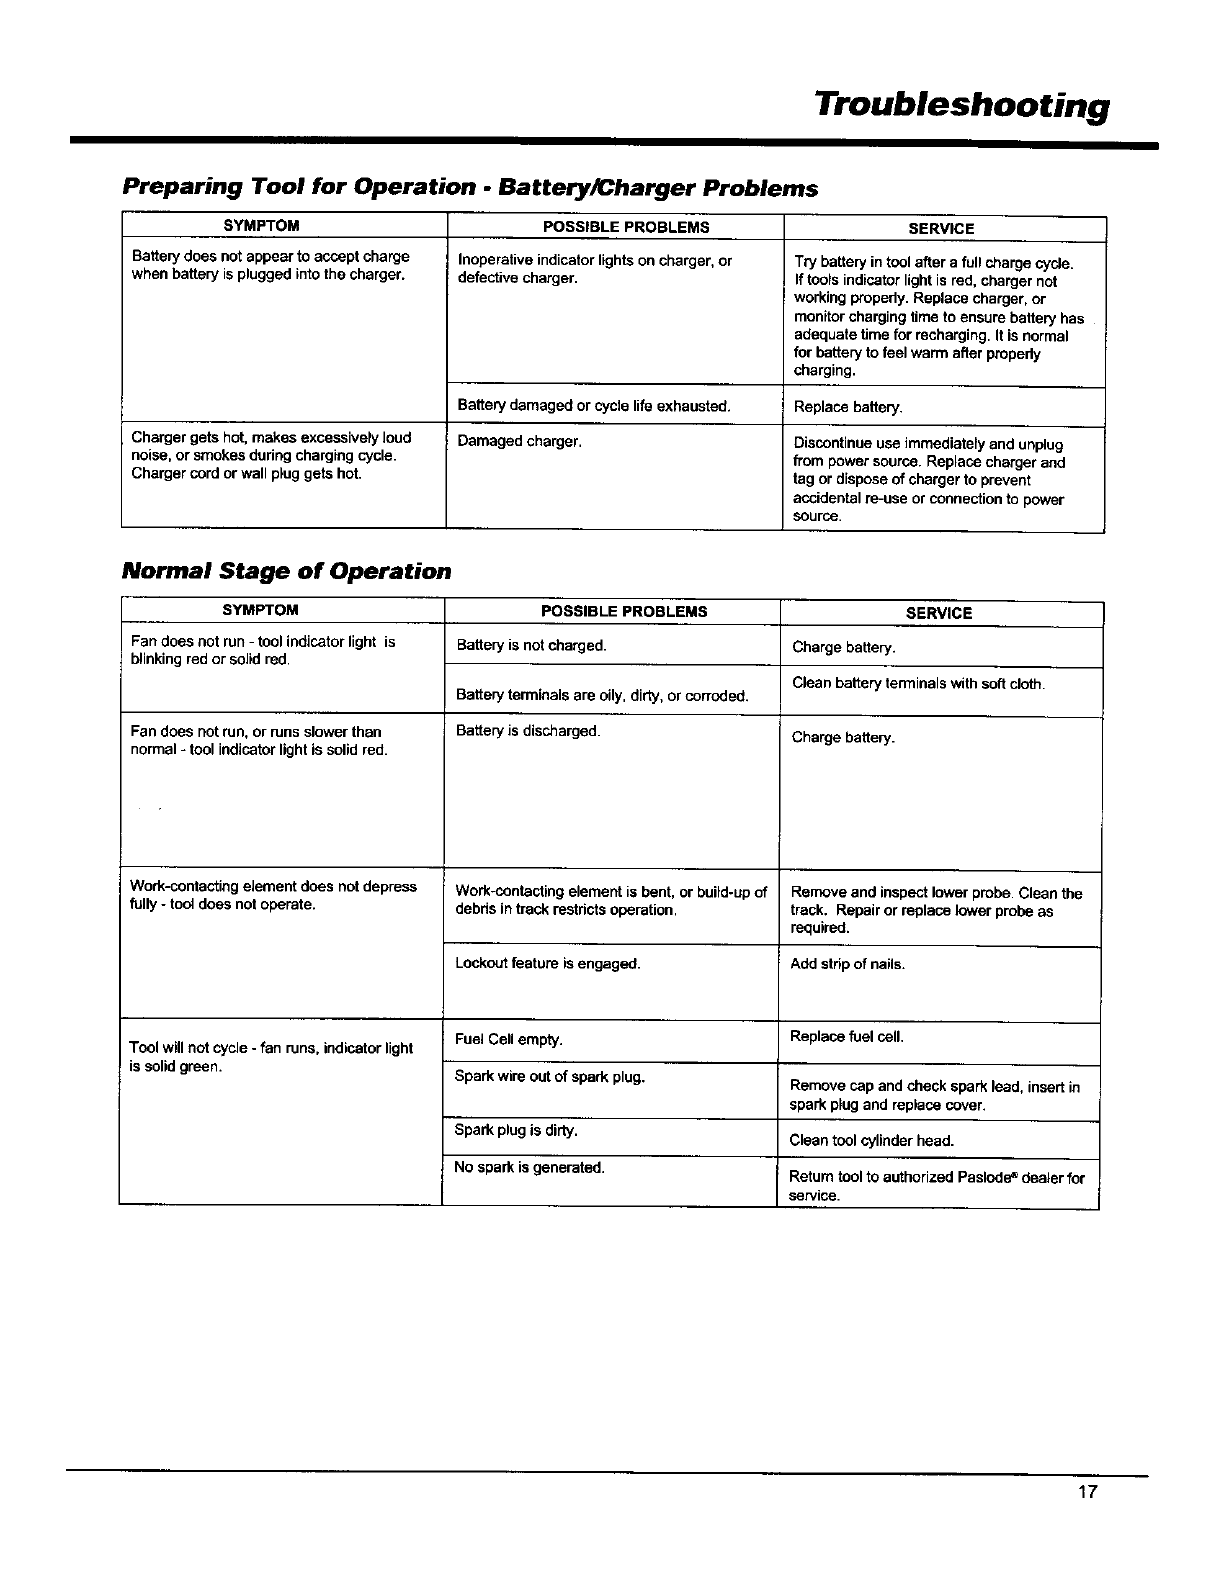
Troubleshooting
Preparing Tool for Operation. Battery/Charger Problems
SERVICE
SYMPTOM
Batterydoes not appear to accept charge
when battery is plugged into the charger.
POSSIBLE PROBLEMS
Inoperative indicator lightson charger, or
defective charger. Try battery intool after a full charge cycle.
If tools indicator light is red, charger not
working properly.Replace charger, or
monitorchargJngtime to ensure battery has
adequate hme for recharging. It is normal
for battery to feel warm after propedy
charging.
Battery damaged or cycle life exhausted. Replace battery.
Charger gets hot, makes excessively loud Damaged charger. Discontinue use immediately and unplug
noise, or smokes dudng charging cycle, from power source. Replace charger and
Charger cord or wall pluggets hot. tag or dispose of charger to prevent
accidental re-use or connectionto power
SOUrCe.
Normal Stage of Operation
SYMPTOM POSSIBLE PROBLEMS
Fan does not run -tool indicator light is Battery is not charged.
blinking red or solid red,
Fan does not run, or runsslower than
normal -tool indicatorlight is solid red.
Work-contacting element does not depress
fully -tool does not operate.
Tool willnot cycle - fan runs, indicatorlight
is solidgreen.
Batteryterminals are oily, dirty, or corroded.
Batteryis discharged.
Work-contacting element is bent, or build-upof
debris intrack restrictsoperation.
Lockoutfeature is engaged.
SERVICE
Charge battery.
Clean battery terminalswith soft cloth.
Charge battery.
Remove and inspect lower probe. Clean the
track. Repair or replace lower probe as
required.
Add stripof nails.
Fue_Cell empty. Replace fuel cell.
Spark wire out of spark plug.
Spark plug is dirty.
No spark is generated.
Remove cap and check spark lead, insert in
spark plug and replace cover.
Clean tool cylinder head.
Return tool to authorized Paslode_dealer for
service.
17
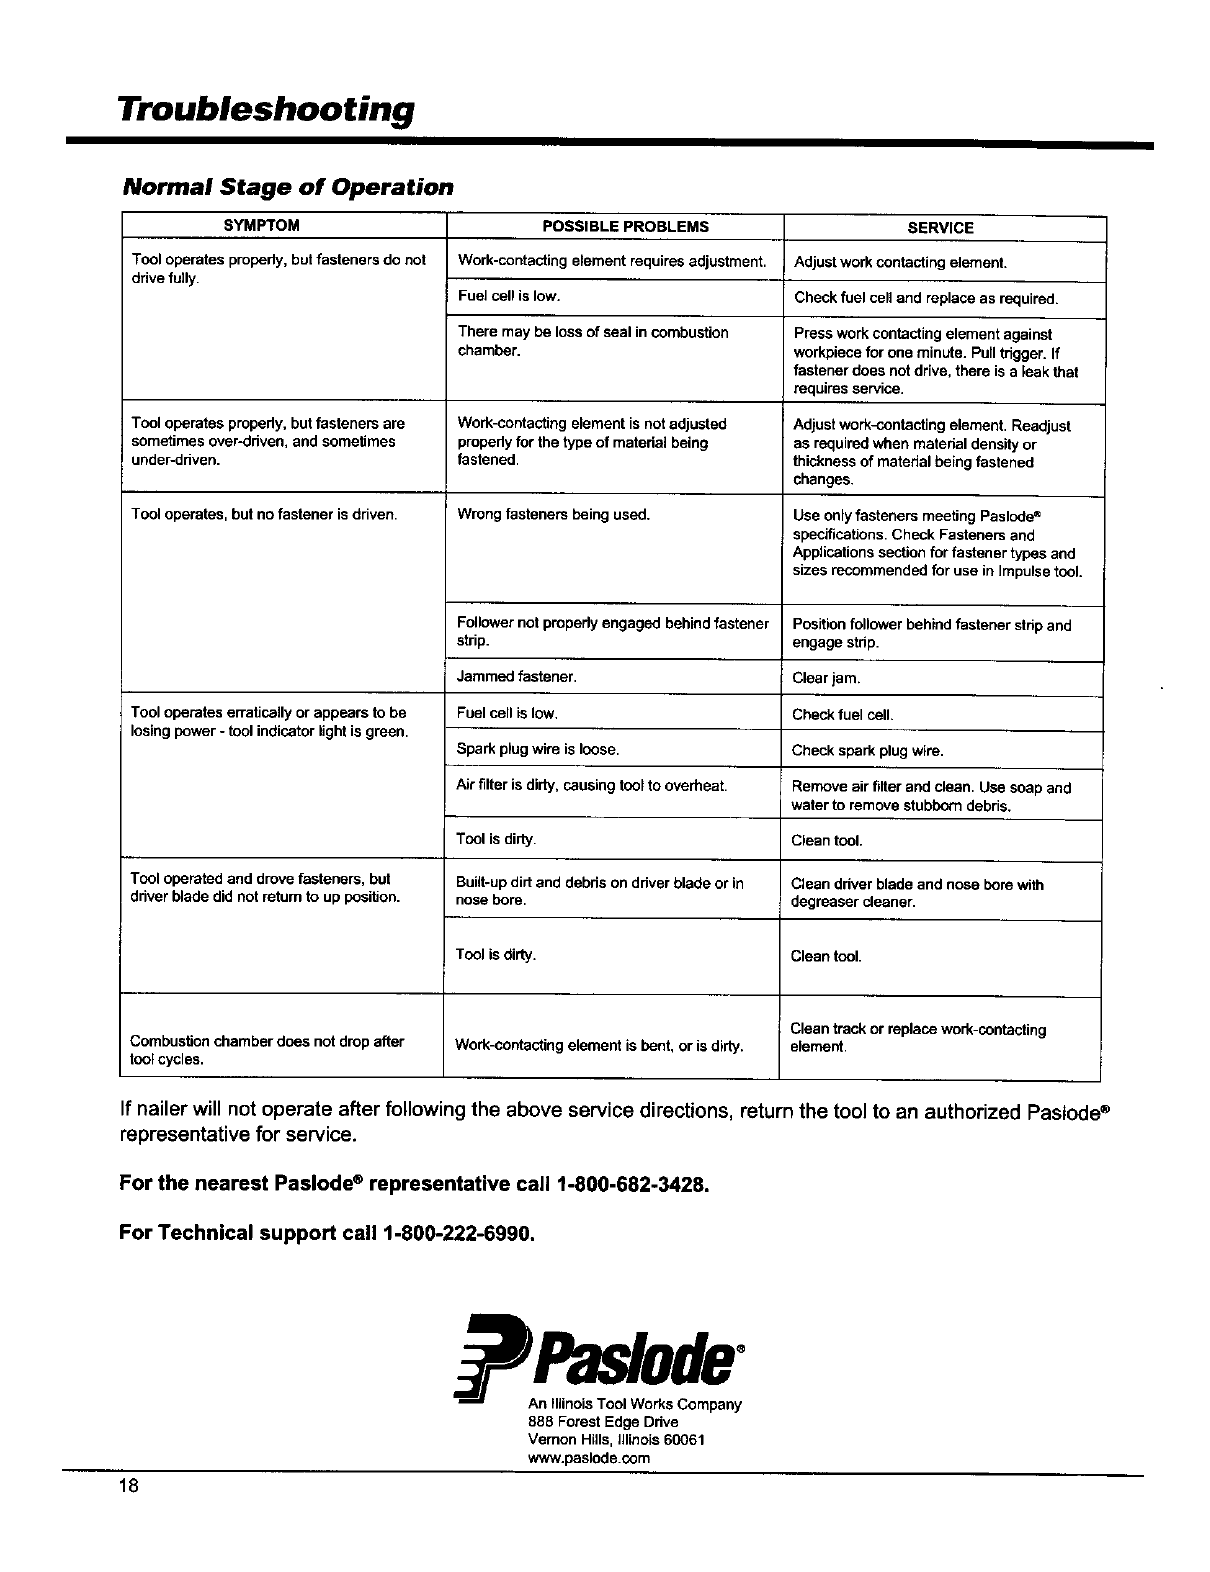
Troubleshooting
Normal Stage of Operation
SYMPTOM
Tool operates properly, but fasteners do net
ddve fully.
POSSIBLE PROBLEMS
Work-contacting element requires adjustment.
Fuel cell is low.
There may be less of seal in combustion
chamber.
SERVICE
Adjust work contacting element.
Check fuel cell and replace as required.
Presswork contacting element against
workpiece for one minute. Pull trigger. If
fastener does not drive, there is a leak that
requires service.
Tool operates propady, but fasteners are Work-contacting element is not adjusted Adjust werk-confacting element. Readjust
som_imes over-ddven, and sometimes propedy for the type of matadal being as required when matedal density or
under-driven, fastened, thicknessof matadal being fastened
changes.
Tool operates, but no fastener is driven. Wrong fasteners being used.
Follower net propedy engaged behind fastener
stdp.
Jammed fastener.
Fuel cell is low.
Spark plug wire is loose.
Air filter is dirty, causing tool to overheat.
Tool operates erraticallyor appears to be
losing power - tool indicator lightisgreen.
Tool eperated and drove fasteners, but
ddver blade did not returnto up position.
Tool is dirty.
Built-updirtand debds on ddver blade or in
nose bore.
Use only fasteners meeting Paslede®
specifications.Check Fasteners and
Applicationssection for fastener types and
sizes recommended for use inImpulse tool.
Positionfollower behindfastener stdp and
engage stdp.
Clear jam.
Checkfuel cell.
Check spark plug wire.
Remove air filter and clean. Use soap and
water to remove stubborn debris.
Clean tool.
Clean ddver blade and nose bore with
degreaser cleaner.
Tool is dirty. Clean tool.
Clean track or replace work-contacting
Combustion chamber does not drop after Work-contactingelement is bent, or is dirty, element.
tool cycles.
If nailer will not operate after following the above service directions, return the tool to an authorized Paslode ®
representative for service.
For the nearest Paslode ®representative call 1-800-682-3428.
For Technical support call 1-800-222-6990.
18
888 Forest Edge Drive
Vernon Hills, Illinois 60061
www.paslode.com

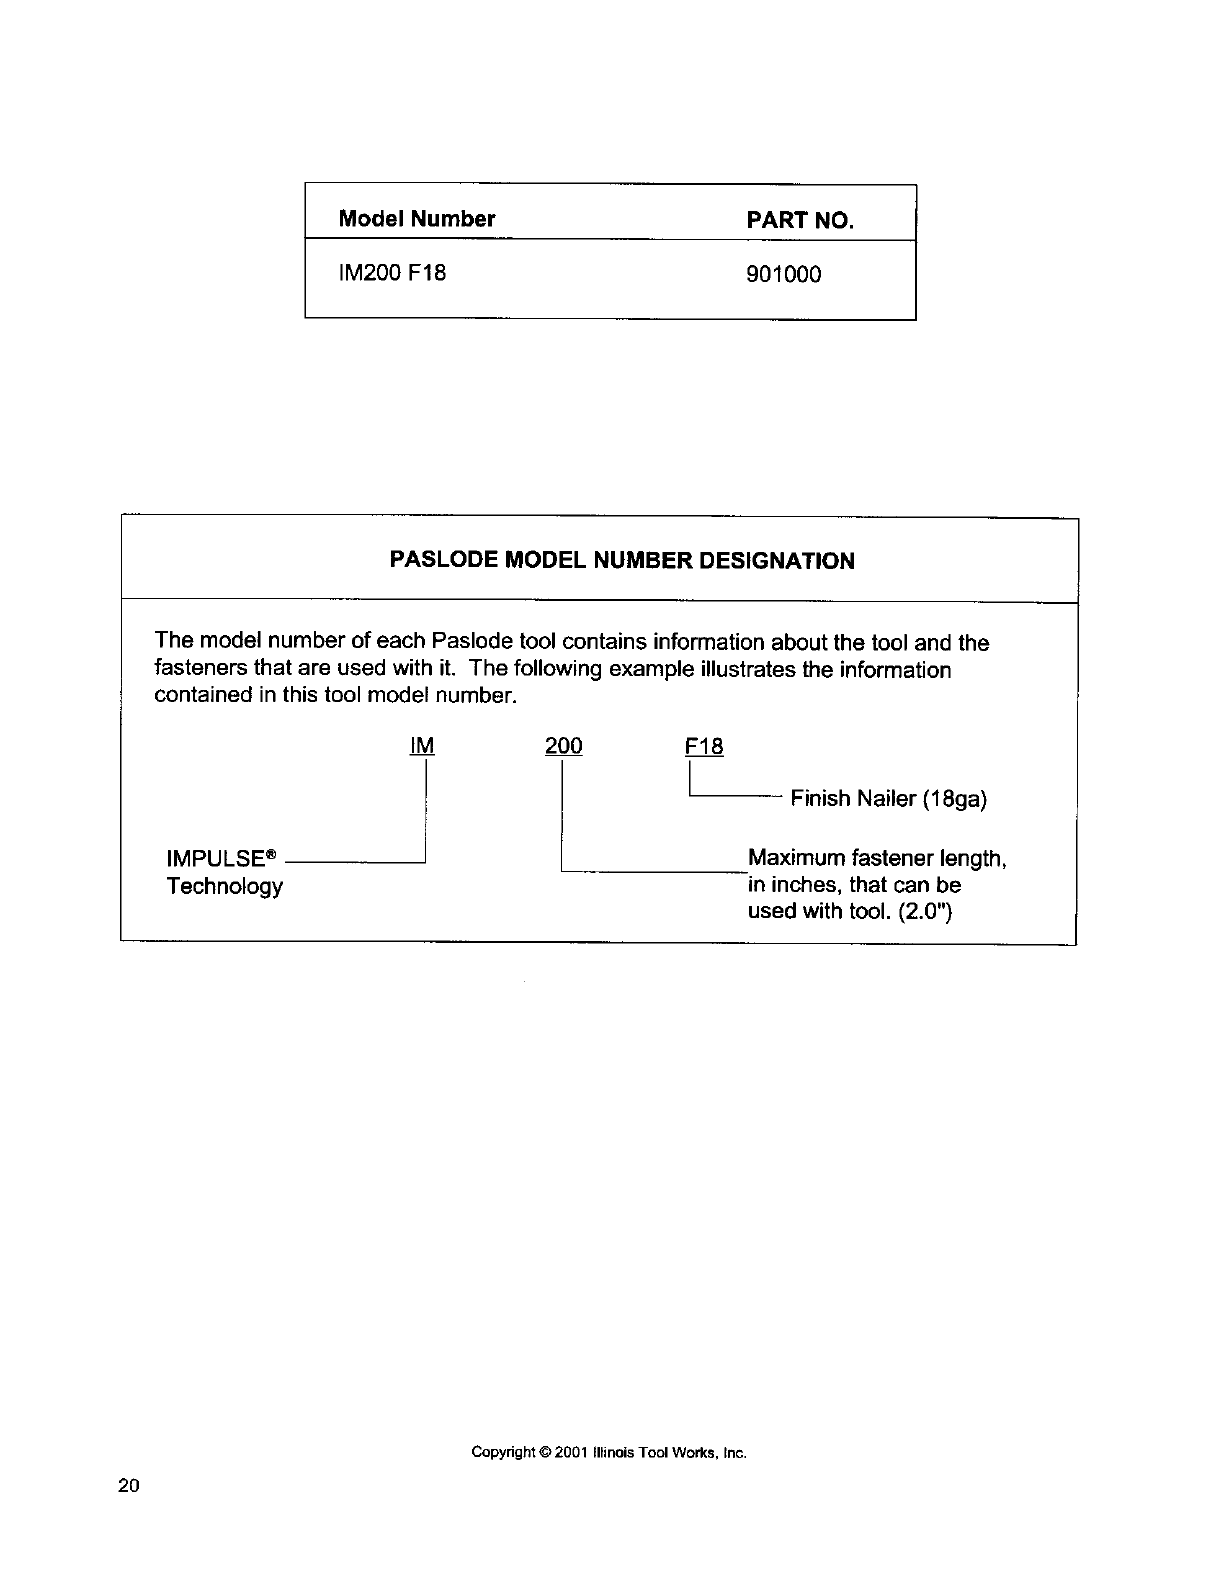
Model Number PART NO.
IM200 F18 901000
PASLODE MODEL NUMBER DESIGNATION
The model number of each Paslode tool contains information about the tool and the
fasteners that are used with it. The following example illustrates the information
contained in this tool model number.
IMPULSE ®
Technology
IM 200 F18
lFinish Nailer (18ga)
Maximum fastener length,
in inches, that can be
used with tool. (2.0")
2O
Copyright © 2001 Illinois Tool Works, Inc.
