User Guide Pantech Breakout
User Manual: PDF User Guide Pantech User Guides
Open the PDF directly: View PDF ![]() .
.
Page Count: 430 [warning: Documents this large are best viewed by clicking the View PDF Link!]
- BASIC INSTRUCTIONS
- 1. GETTING STARTED
- GETTING STARTED
- CHECKING PACKAGE
- REMOVING THE BACK COVER
- REPLACING THE BACK COVER
- INSTALLING THE 4G SIM CARD
- REMOVING THE 4G SIM CARD
- INSTALLING THE microSD™ CARD
- REMOVING THE microSD™ CARD
- INSTALLING THE BATTERY
- REMOVING THE BATTERY
- CHARGING THE BATTERY
- POWERING YOUR PHONE ON/OFF
- MANAGING SCREEN
- OVERVIEWING PRODUCT
- GRIPPING Breakout™
- ACTIVATING Breakout™
- BACKING-UP DATA
- UNDERSTANDING HOME SCREEN
- CUSTOMIZING HOME SCREEN
- MANAGING APPLICATIONS SCREEN
- GETTING STARTED
- 2. CALLS AND MESSAGES
- 3. PERSONAL INFORMATION
- 4. COMMUNICATION
- 5. ENTERTAINMENT
- 6. CONNECTIVITY
- 7. LOCATION-BASED SERVICES
- 8. WEB-BASED SERVICES
- 9. TOOLS
- 10. STORAGE
- 11. SETTINGS
- 12. APPENDIX
- 110907_APACHE(ADR8995)_Manual_SP_HYI-1.pdf
- INSTRUCCIONES BASICAS
- 1. INICIAR
- INICIAR
- VERIFICACION DEL EMBALAJE
- REMOCION DE LA TAPA TRASERA
- RECOLOCACION DE LA TAPA TRASERA
- INSTALACION DE LA TARJETA SIM DE 4G
- REMOCION DE LA TARJETA SIM DE 4G
- INSTALACION DE LA TARJETA microSD™
- REMOCION DE LA TARJETA microSD™
- INSTALACION DE LA BATERIA
- REMOCION DE LA BATERIA
- CARGA DE LA BATERIA
- PARA ENCENDER/APAGAR SU TELEFONO
- ADMINISTRACION DE LA PANTALLA
- VISION GENERAL DEL PRODUCTO
- PARA SUJETAR EL Breakout™
- PARA ACTIVAR EL Breakout™
- BACKUP DE DATOS
- COMPRENSION DE LA PANTALLA DE INICIO
- PERSONALIZACION DE LA PANTALLA DE INICIO
- ADMINISTRACION DE LA PANTALLA DE APLICACIONES
- INICIAR
- 2. LLAMADAS Y MENSAJES
- 3. INFORMACIONES PERSONALES
- 4. COMUNICACION
- 5. ENTRETENIMIENTO
- 6. CONECTIVIDAD
- 7. SERVICIOS BASADOS EN LA LOCALIZACION
- 8. SERVICIOS BASADOS EN INTERNET
- 9. HERRAMIENTAS
- 10. STORAGE
- 11. AJUSTES
- 12. APENDICE

5U000504C0A REV.00
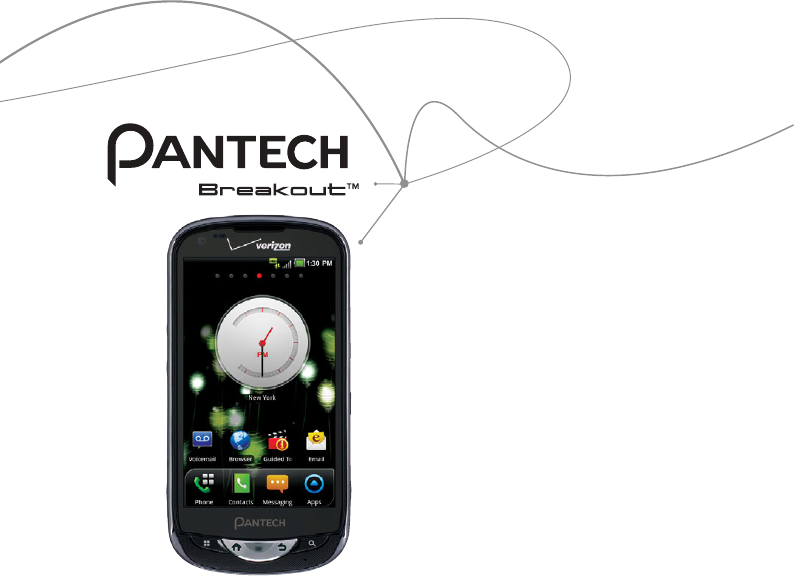
User Guide for Breakout ™
Thank you for choosing the Pantech Breakout™,
our latest smartphone.
The Pantech Breakout™ has many features
designed to enhance your mobile experience.
With its unique, stylish design, you will enjoy the
entire Breakout™ experience.
This User Guide contains important and useful
information that will maximize your familiarity
with all that the Pantech Breakout™ has to offer.
2
BASIC INSTRUCTIONS
BASIC INSTRUCTIONS
USEFUL TIPS USING Breakout™
To understand information contained in this user guide and activities that you can do with the
Breakout™, please keep in mind the following tips:
xIt is assumed that you start operating applications of the Breakout™ from the Applications menu.
1 Touch Apps from the Home screen to access the Applications menu.
2 Swipe the screen left or right and run the application you want to use.
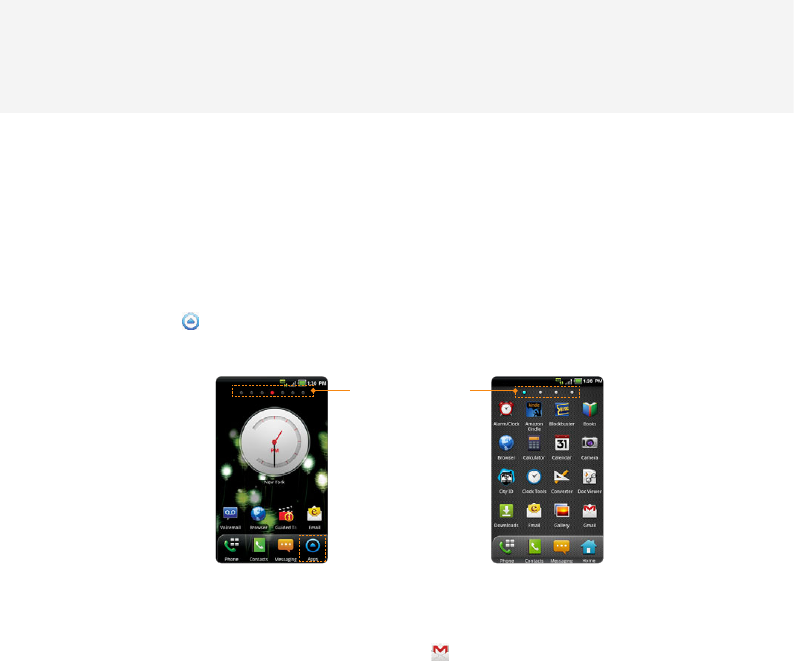
Screen Indicators
Accessing Applications Navigating Applications
xWords in bold fonts refer to the relevant action on the screen. For example, “Touch Gmail” means
that you have to touch Gmail below the Gmail icon . Words might be placed below or next to an
icon or included in the text.
xThe symbol “>” refers to the next action. For example, “Touch Settings > Language & keyboard”
means that you should touch Settings first and then Language & keyboard next.
3
BASIC INSTRUCTIONS
xApplications screen refers to the screen where all applications of the Breakout™ appear.
xHome screen refers to the screen that appears first when you unlock the screen.
xIdle mode refers to the status when you stay on the Home screen ready to run an application.
xChannels through which you can share items, e.g. contacts and pictures, increase as you subscribe
to services. For example, if you sign up for Facebook or Twitter, you can also share information with
others through Facebook or Twitter.
xCaptured images in this manual might change according to the relevant software upgrade.
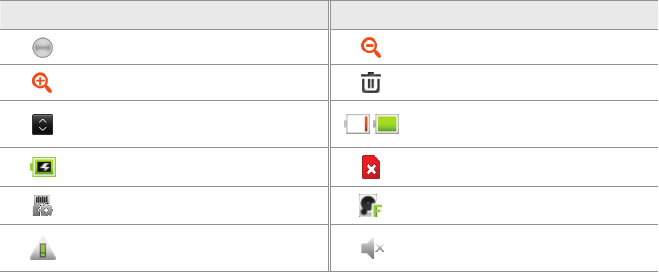
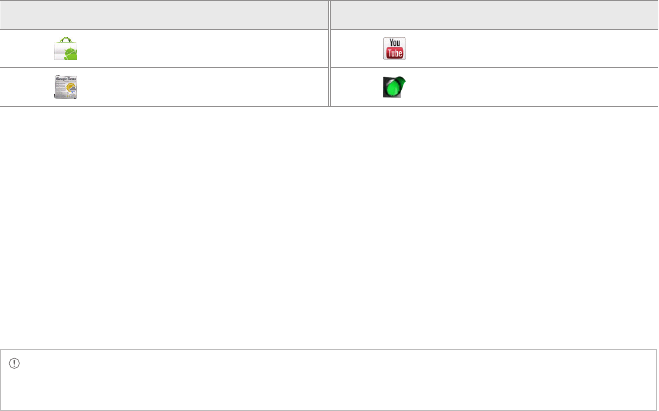
COMMON ICONS
Icon Selected to Icon Selected to
Adjust value Zoom out
Zoom in Delete the selected item
Rearrange the selected item Strength of battery: The greener,
the more it is charged
The battery is charging There is no SIM/USIM card
SD card prepared The memory disk is full
There is an error The phone will not ring when there
is an incoming call
ABOUT BATTERY USAGE
Your phone is powered by a Lithium Ion (Li-Ion) battery. Therefore, you can recharge the battery while
some charge remains without reducing your phone’s autonomy. For safe use of the battery:
xDo not use a damaged battery or charger.
4
BASIC INSTRUCTIONS
xDo not disassemble, open, crush, bend, deform, puncture or shred the battery.
xDo not modify or remanufacture, insert foreign objects into the battery, immerse or expose to water
or other liquids, expose to fire, explosion or other hazard.
xDo not put your battery in contact with conductive objects.
xDispose of and recycle used batteries in accordance with local regulations. Do not dispose of
batteries by burning; they may explode.
xDo not use an unauthorized charger or battery.
xUse the battery only for the device for which it is specified.
xUse the battery with a charging device that has been qualified for the device per this standard. Use
of an unqualified battery or charger may present a risk of fire, explosion, leakage, or other hazard.
xDo not short circuit a battery or allow metallic conductive objects to contact battery terminals.
xReplace the battery only with another battery that has been qualified with the device per this
standard, IEEEStd-1725-2006.
xChildren should be supervised when they use the battery.
xAvoid dropping the phone or the battery. If the phone or the battery is dropped, especially on a
hard surface, and the user suspects damage, take it to a service center for inspection.
xUse your battery for the specified purpose only.
xThe closer you move to your network’s base station, the longer you can use your phone because
less battery power is required for connection.
xThe battery recharging time varies depending on the remaining battery capacity and the battery
and charger type.
xBattery life inevitably shortens over time.
xSince overcharging may shorten battery life, remove the phone from its charger once it is fully
charged. Unplug the charger once charging is complete. Leaving the battery in hot or cold places,
especially inside a car in summer or winter, may reduce its capacity and life.
xTo prevent injury or burns, ensure that no metal objects come into contact with the + and –
terminals of the battery.

5
TABLE OF CONTENTS
BASIC INSTRUCTIONS ..................................................................................................................... 2
BASIC INSTRUCTIONS .......................................................................................................................................................................................2
TABLE OF CONTENTS ....................................................................................................................... 5
1. GETTING STARTED
GETTING STARTED .........................................................................................................................12
CHECKING PACKAGE ....................................................................................................................................................................................... 12
REMOVING THE BACK COVER .................................................................................................................................................................... 13
REPLACING THE BACK COVER ...................................................................................................................................................................13
INSTALLING THE 4G SIM CARD ................................................................................................................................................................. 14
REMOVING THE 4G SIM CARD ..................................................................................................................................................................14
INSTALLING THE microSD™ CARD .......................................................................................................................................................... 15
REMOVING THE microSD™ CARD ...........................................................................................................................................................15
INSTALLING THE BATTERY............................................................................................................................................................................ 16
REMOVING THE BATTERY ............................................................................................................................................................................. 16
CHARGING THE BATTERY ............................................................................................................................................................................. 17
POWERING YOUR PHONE ON/OFF ........................................................................................................................................................ 17
MANAGING SCREEN........................................................................................................................................................................................ 18
OVERVIEWING PRODUCT ............................................................................................................................................................................ 20
GRIPPING Breakout™ ...................................................................................................................................................................................... 23
ACTIVATING Breakout™ .................................................................................................................................................................................24
BACKING-UP DATA ........................................................................................................................................................................................... 26
6
TABLE OF CONTENTS
UNDERSTANDING HOME SCREEN .......................................................................................................................................................... 28
CUSTOMIZING HOME SCREEN ................................................................................................................................................................. 32
MANAGING APPLICATIONS SCREEN ..................................................................................................................................................... 37
2. CALLS AND MESSAGES
CALLS AND MESSAGES .................................................................................................................40
CALLING .................................................................................................................................................................................................................40
MESSAGING .......................................................................................................................................................................................................... 47
CONTACTS ............................................................................................................................................................................................................ 55
Google TALK.........................................................................................................................................................................................................60
3. PERSONAL INFORMATION
PERSONAL INFORMATION ...........................................................................................................63
CALENDAR ............................................................................................................................................................................................................ 63
4. COMMUNICATION
COMMUNICATION ..........................................................................................................................67
EMAIL ....................................................................................................................................................................................................................... 67
GMAIL ......................................................................................................................................................................................................................70
SOCIAL NET WIDGET ...................................................................................................................................................................................... 72
7
TABLE OF CONTENTS
5. ENTERTAINMENT
ENTERTAINMENT ............................................................................................................................74
LISTENING TO MUSIC ......................................................................................................................................................................................74
USING CAMERA ................................................................................................................................................................................................. 80
USING CAMERA AS CAMCORDER...........................................................................................................................................................87
USING GALLERY ................................................................................................................................................................................................. 91
ENJOYING YOUTUBE .......................................................................................................................................................................................93
USING VIDEO PLAYER .....................................................................................................................................................................................96
NET MEDIA ............................................................................................................................................................................................................98
6. CONNECTIVITY
CONNECTIVITY ............................................................................................................................. 104
USING A Wi-Fi NETWORK ...........................................................................................................................................................................104
CONNECTING TO A 3G/4G NETWORK ...............................................................................................................................................107
USING Bluetooth .............................................................................................................................................................................................109
MAKING Breakout™ A MODEM ..............................................................................................................................................................111
7. LOCATION-BASED SERVICES
LOCATION-BASED SERVICES .................................................................................................... 115
USING Google MAPS ....................................................................................................................................................................................115
USING PLACES ..................................................................................................................................................................................................116
USING LATITUDE .............................................................................................................................................................................................118
8
TABLE OF CONTENTS
NAVIGATION .......................................................................................................................................................................................................121
NEWS & WEATHER ..........................................................................................................................................................................................123
8. WEB-BASED SERVICES
WEB-BASED SERVICES................................................................................................................ 127
WEB SURFING ....................................................................................................................................................................................................127
Google SEARCH ...............................................................................................................................................................................................132
VOICE SEARCH ..................................................................................................................................................................................................134
ANDROID MARKET .........................................................................................................................................................................................135
9. TOOLS
TOOLS .............................................................................................................................................. 139
CALCULATOR .....................................................................................................................................................................................................139
TIP CALCULATOR .............................................................................................................................................................................................141
ALARM/CLOCK .................................................................................................................................................................................................141
CLOCK TOOLS ...................................................................................................................................................................................................144
CONVERTER ........................................................................................................................................................................................................148
DOC VIEWER ......................................................................................................................................................................................................148
HANDY MEMO..................................................................................................................................................................................................150
RECORDER ...........................................................................................................................................................................................................153
WEATHER .............................................................................................................................................................................................................156
9
TABLE OF CONTENTS
10. STORAGE
STORAGE ......................................................................................................................................... 160
MANAGING THE MEMORY CARD ..........................................................................................................................................................160
CONNECTING TO A PC ...............................................................................................................................................................................161
USING Breakout™ AS MASS STORAGE ...............................................................................................................................................162
TRANSFERRING FILES THROUGH WINDOW MEDIA SYNC .....................................................................................................163
11. SETTINGS
SETTINGS ........................................................................................................................................ 165
WIRELESS & NETWORKS .............................................................................................................................................................................165
CALL SETTINGS ................................................................................................................................................................................................166
SOUND ..................................................................................................................................................................................................................168
DISPLAY.................................................................................................................................................................................................................170
LOCATION & SECURITY ................................................................................................................................................................................171
APPLICATIONS ..................................................................................................................................................................................................175
ACCOUNTS & SYNC .......................................................................................................................................................................................177
PRIVACY ................................................................................................................................................................................................................177
STORAGE ..............................................................................................................................................................................................................178
LANGUAGE & KEYBOARD ..........................................................................................................................................................................178
VOICE INPUT & OUTPUT .............................................................................................................................................................................179
ACCESSIBILITY ...................................................................................................................................................................................................180
DATE & TIME .......................................................................................................................................................................................................180
ABOUT PHONE .................................................................................................................................................................................................182

10
TABLE OF CONTENTS
12. APPENDIX
APPENDIX ....................................................................................................................................... 185
SAFETY AND WARRANTY ...........................................................................................................................................................................185
UPnP AND DLNA.............................................................................................................................................................................................203
SPECIFICATIONS...............................................................................................................................................................................................204
LOCATION-BASED SERVICES ....................................................................................................................................................................205
END USER LICENSE AGREEMENT (EULA) ..........................................................................................................................................206
LEGAL NOTICE ..................................................................................................................................................................................................206
TROUBLESHOOTING CHECKLIST ...........................................................................................................................................................206
Index .......................................................................................................................................................................................................................208

CHECKING PACKAGE
REMOVING THE BACK COVER
REPLACING THE BACK COVER
INSTALLING THE 4G SIM CARD
REMOVING THE 4G SIM CARD
INSTALLING THE
microSD™
CARD
REMOVING THE microSD™ CARD
INSTALLING THE BATTERY
REMOVING THE BATTERY
CHARGING THE BATTERY
POWERING YOUR PHONE ON/OFF
MANAGING SCREEN
OVERVIEWING PRODUCT
GRIPPING Breakout™
ACTIVATING Breakout™
BACKING-UP DATA
UNDERSTANDING HOME SCREEN
CUSTOMIZING HOME SCREEN
MANAGING APPLICATIONS SCREEN
1. GETTING STARTED
1
GETTING STARTED
This chapter provides important information to know
before using the Breakout™, including:
12
GETTING STARTED
CHECKING PACKAGE
Check if the package contains the following items:
xHandset
xStandard Lithium Ion Battery
xWall/USB Charger
xQuick Start Guide
xUser Guide
xProduct Safety & Warranty Brochure
x8GB microSD™ card (pre-installed)
Note You can purchase the Wireless Charging Inductive Battery Cover (FCC ID: JYCAPACHE) from the Verizon
stores. It must be used with the Wireless Charging Pad certified by Wireless Power Consortium (WPC).
It is recommended that you purchase the following accessories for a safe and convenient use of the
Breakout™.
xLCD protective film
xExternal memory card adaptor

13
GETTING STARTED
REMOVING THE BACK COVER
1 Make sure to turn off your phone and hold it securely with both hands with the front facing out.
2 Pull down the back cover with both thumbs.
REPLACING THE BACK COVER
1 Place the back cover over the battery compartment, slide it upward until it clicks into place.

14
GETTING STARTED
INSTALLING THE 4G SIM CARD
1 Make sure to turn off your phone and remove the back cover and battery.
2 Insert the 4G SIM card into the slot. Make sure that the gold contacts of the card go against the
metal contacts of your phone.
REMOVING THE 4G SIM CARD
1 Make sure to turn off your phone and remove the back cover and battery.
2 Hold the 4G SIM card carefully and slide it out from the slot.
ABOUT 4G SIM CARD
When you subscribe to your network operator, you receive the Subscriber Identity Module (SIM) card
or RUIM (Re-Usable Identification Module) card that houses your registration information, PIN code,
etc. Keep it secure and handle carefully like a credit card. Do not bend, scratch or expose it to moisture.
Avoid static electricity.

15
GETTING STARTED
INSTALLING THE microSD™ CARD
1 Make sure to turn off your phone and remove the back cover and battery.
2 Insert the microSD™ card into the slot. Ensure that the gold contacts of the card go against the
metal contacts of the phone.
3 Replace the back cover by sliding it up until you hear “CLICK.”
REMOVING THE microSD™ CARD
1 Make sure to turn off your phone and remove the back cover and battery.
2 Hold the microSD™ card carefully and slide it out from the slot.
ABOUT microSD™ CARD
A microSD™ card is a removable flash memory card where you can save data. Save pictures and
contacts, and download applications to the SD card. You can expand the external memory up to
32GB. It is recommended that you format the microSD™ card before using the Breakout™. For more
information on erasing microSD™ card, refer to page 178.

16
GETTING STARTED
INSTALLING THE BATTERY
1 Hold your phone tightly after removing the back cover.
2 Align the battery contacts (1) with the terminals in the battery compartment.
3 Press the battery down (2) until it clicks into place.
4 Replace the back cover over the battery compartment, slide it upward until it clicks into place.
REMOVING THE BATTERY
1 Hold your phone tightly after removing the back cover.
2 Remove the battery from the battery compartment by lifting the top of the battery using the
fingertip cutout.
ABOUT BATTERY
The Breakout™ uses a Lithium Ion (Li-Ion) battery. Make sure to use the authorized battery and charger
only. Maximum hours to use the battery might vary depending on service types offered by the service
provider and temperatures. For more details, inquire at your nearest dealer.
17
GETTING STARTED
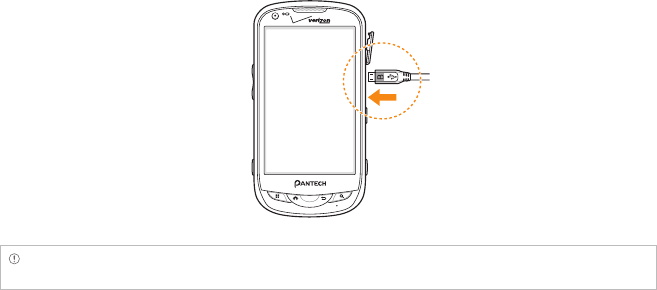
CHARGING THE BATTERY
1 Connect the USB cable into the Wall/USB Charger.
Note Make sure to align the connector as indicated in the image. Otherwise, the charging connector will be
damaged and the battery will not be charged.
2 Plug the USB cable into the phone’s Charging Port. Plug the Wall/USB Charger into an electrical
outlet. The battery starts charging.
3 Disconnect the charger when the battery is fully charged.
POWERING YOUR PHONE ON/OFF
It’s important to fully charge the battery before turning on your phone.
1 Ensure that the 4G SIM card and the battery are safely installed in your phone.
2 Press and hold the Power/Lock Key F E for a few seconds until the screen lights up.
3 To turn off the phone, press and hold the Power/Lock Key F E until the pop-up menu appears.
18
GETTING STARTED
4 Touch Power off in the pop-up menu.
5 Touch OK to confirm that you want to turn off the phone.
MANAGING SCREEN
UNLOCKING THE SCREEN
The screen is locked by default when you turn on power. To unlock the screen:
1 Press the Power/Lock Key F E.
2 Drag the lock to the right. Draw a pattern if the screen is protected by a
pattern lock. Enter a PIN or a password if the screen is locked by a PIN or
a password.
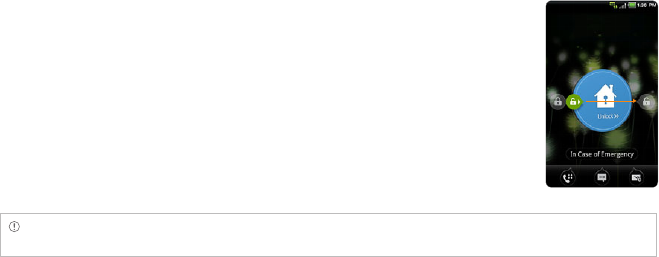
Note You can check missed calls, messages or emails quickly when the screen is locked: Drag the icon for call,
message or email to the clock located in the middle of the screen.
LOCKING THE SCREEN
To lock the screen, press the Power/Lock Key F E. If you want to make the Breakout™ lock the screen
automatically in a predetermined time, refer to page 171 for screen timeout.
It is recommended to lock the screen to protect information contained in the Breakout™ and to
conserve battery power.
19
GETTING STARTED
USING THE TOUCHSCREEN
Your touchscreen provides an excellent way to interact with and use your Android phone. With the
touch of your finger, you can download and use available applications, make menu selections, and
access data saved to your phone.
The following terms are used for describing the different available actions using the touchscreen:
xTouch: A single finger touch selects items. For example, touch an icon (e.g., Application menu
item), touch words (e.g., menu selection or to answer an on-screen question), or touch letters and
numbers to type on the virtual QWERTY keypad.
xTouch and hold: Touch and hold an item on the screen by touching it and not lifting your finger
until an action occurs. For example, to open a pop-up menu for customizing the Home Screen,
touch and empty area on the Home screen until the pop-up menu appears.
xDrag: Touch and hold an item for a moment and then, without lifting your finger, move your
finger on the screen until you reach the target position. You can drag items on the Home screen to
reposition them.
xPinch: Place two fingers on the screen and move them apart to zoom in on a picture, a document
or a web page, or move them together to zoom out.
xSwipe or slide: Quickly move your finger across the surface of the screen, without pausing when
you first touch it (so you don’t drag an item instead). For example, you can slide (move) the screen
up or down to scroll through a list, or browse through the different Home screens by swiping from
left to right (and vice versa).
Note Use one finger at a time except when you deal with a picture or a document. The Breakout™ will not
recognize when you use more than two fingers.
CAUTION
xDo not use sharp tools that can scratch the touch screen.
xDo not allow the touch screen to come in contact with water or chemicals. The touch screen may
malfunction in humid conditions or in chemicals.
xDo not sit on the Breakout™. The touch screen can be damaged.
20
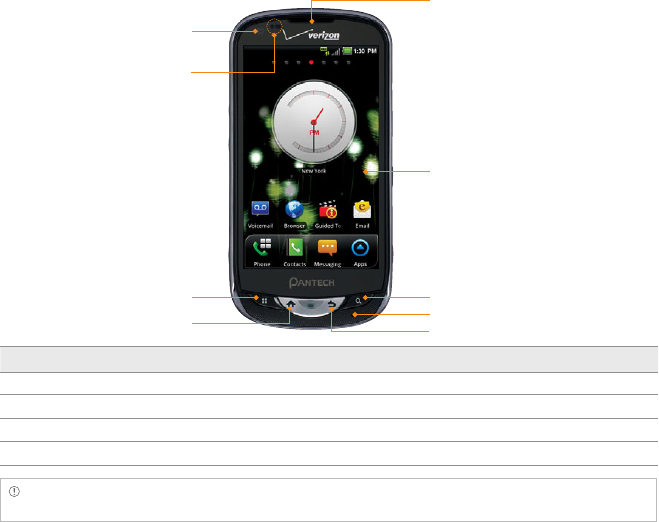
GETTING STARTED
OVERVIEWING PRODUCT
FRONT VIEW
Key Function
MENU BDisplays options available; rearranges the Home screen
HOME A
Moves to the Home screen; runs the task manager when you press and hold this key
BACK CEnds an application; returns to the previous menu
SEARCH DOpens a search window
Note Make sure not to cover the proximity sensor with the LCD protection film. If the sensor is covered, you
might experience difficulties using the touch screen.
FRONT CAMERA
TOUCH SCREEN
HOME KEY
MENU KEY SEARCH KEY
BACK KEY
MICROPHONE
EARPIECE
PROXIMITY SENSOR
21
GETTING STARTED
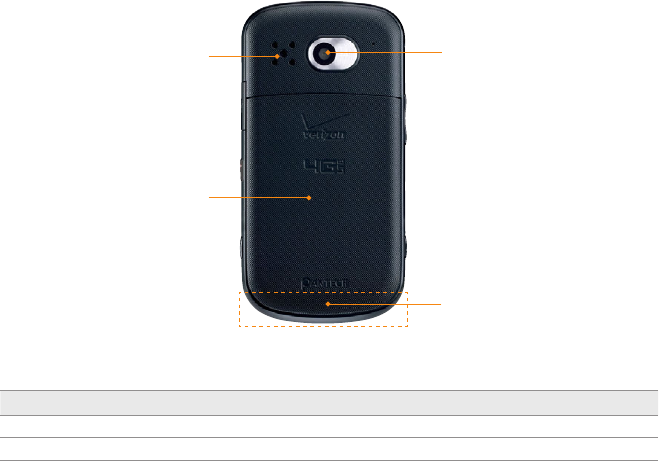
REAR VIEW
Name Description
SPEAKER Sends sound
CAMERA LENS Takes pictures and records video through this lens
CAMERA LENS
INTERNAL ANTENNA
AREA
SPEAKER
BACK COVER
22
GETTING STARTED
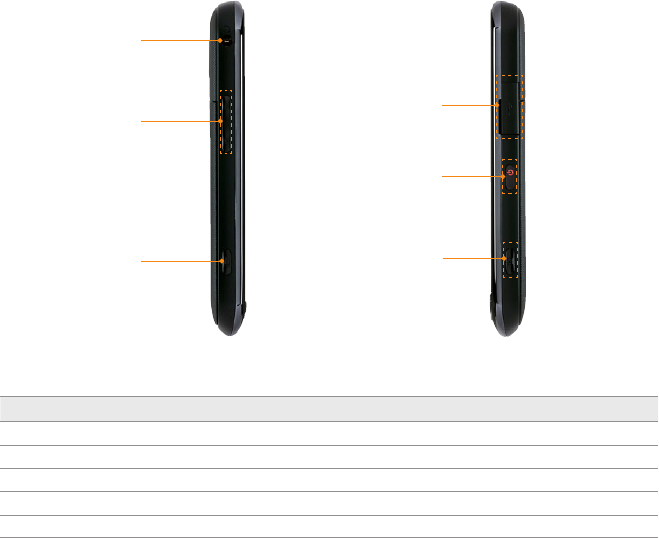
Key Function
VOLUME Adjusts all sound volumes; adjusts the ring mode
VOICE COMMANDS Runs the Voice Commands menu
CHARGING PORT
Connects the Breakout™ and your PC via the USB cable; provides power
CAMERA/VIDEO Runs the camera and camcorder
POWER/LOCK Locks the screen; turns the screen on/off
SIDE VIEW
VOLUME KEYS
VOICE
COMMANDS
KEY
HEADSET
JACK
POWER/
LOCK KEY
CAMERA/
VIDEO KEY
CHARGING
PORT
23
GETTING STARTED
USING THE HEADSET JACK
You can control your device’s accessories by inserting the connector into the 3.5mm Headset Jack on
your phone.
Note Stereo earphones that support common call management features including making and answering calls
may not have been standardized. Therefore the phone may not be compatible with some stereo earphones.
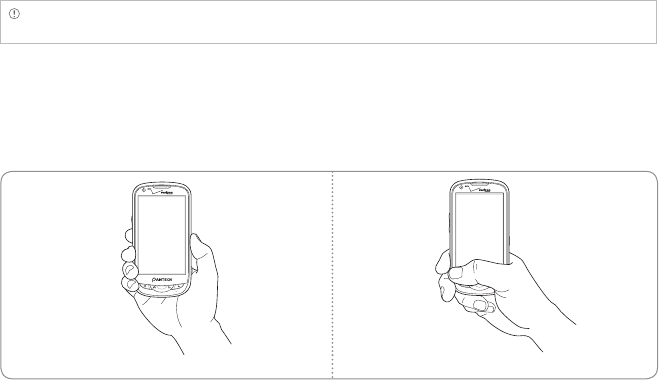
GRIPPING Breakout™
It is strongly recommended that you hold the Breakout™ in the right position for a call as indicated
below:
Correct Incorrect
xMake sure not to block the antenna embedded in the Breakout™. Check the location of the antenna
on the illustration on page 21.
xDo not wear metal accessories on your hand: it can affect the quality of calls.

24
GETTING STARTED
ACTIVATING Breakout™
You will go through a few processes when you turn on the Breakout™ for the first time after inserting
the battery.
INITIAL SET-UP
1 Press and hold the Power/Lock Key F E to turn on the Breakout™.
2 Select and touch the language for the Breakout™ and touch Next.
3 In the Backup Assistant screen, touch Next if you want to register your account with the Backup
Assistant. Touch Skip if you want to register accounts later.
4 In the Setup Google account screen, touch Next and follow the instructions or Sign In if you
already have an account. Touch Skip if you want to set up the a Google account later. For creating a
Google account, refer to page 25.
5 In the Setup email screen, select and touch an account that you want to set up. Refer to page 67.
Touch Next if you want to set up the email account later.
6 In the Privacy Caution screen, touch Next.
7 In the Location Consent screen,
xTouch VZW Location Services > Agree.
xTouch Standalone GPS Services > Agree.
xTouch Google Location Services > Agree.
Touch Next when you finish selecting the location consent option.
8 Touch Basic Setup and Usage Videos and watch Guided Tours. If you finish checking it, touch
Done. Or you can touch My Verizon Mobile and see the related video.
9 Touch Finish and the first process to set up the Breakout™ is done.
Note You can do all of these steps later by touching Setup Wizard from the Applications menu.
25
GETTING STARTED
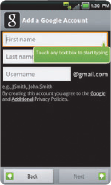
CREATING A Google ACCOUNT
It is recommended that you have a Google account to use a few applications of the Breakout™.
1 From the Applications menu, touch Settings > Accounts & sync > Add account.
2 Touch Google > Next > Create.
3 Enter your first name, last name and user name for the account, and touch Next. The user name
should be 6–30 characters long. You can select an alternative.
4 Touch Next > Connect to Wi-Fi if you have not connected the Breakout™ to the Wi-Fi network and
follow the instructions.
5 Enter a password and enter it again to confirm. You should enter at least 8 characters.
6 Touch Next.
7 Select and touch a security question and enter an answer.
8 Enter a secondary email address and touch Create.
9 Touch I agree, Next for the Google Terms of Service.
10 Touch Try again if your password is too weak for a password or contains invalid characters.
11 Repeat the steps 5 to 9.
12 Type the characters that appear on screen and touch Next.
13 Touch Sync Contacts if you want to synchronize your contacts. Touch Sync Gmail if you want to
synchronize Gmail.

26
GETTING STARTED
BACKING-UP DATA
Back-up important data saved in the Breakout™ using Backup Assistant.
REGISTERING ACCOUNTS
1 Touch Contacts from the Home screen.
2 Press the Menu Key B, and touch Backup Assistant. Or from the Applications menu you can touch
Settings > Accounts & sync > Backup Assistant.
3 Touch Next. Backup Assistant starts to connect to the server.
4 Type a 4-8 digit PIN, and touch Re-enter PIN.
5 Type the PIN again for confirmation and touch Next. It takes some time before registration is
completed.
BACKINGUP ACCOUNTS
1 Touch Contacts from the Home screen.
2 Press the Menu Key B, and touch Backup Assistant. Or from the Applications menu you can touch
Settings > Accounts & sync > Backup Assistant.
3 Touch Backup Now. If you want to stop backing-up, touch Stop Backup.
RESTORING DATA
1 Touch Contacts from the Home screen.
2 Press the Menu Key B, and touch Backup Assistant. Or from the Applications menu you can touch
Settings > Accounts & sync > Backup Assistant.
3 Touch Restore.
27
GETTING STARTED
RECURRING SYNC
1 Touch Contacts from the Home screen.
2 Press the Menu Key B, and touch Backup Assistant. Or from the Applications menu you can touch
Settings > Accounts & sync > Backup Assistant.
3 Touch Recurring Sync.
4 Select and touch the time for sync and touch OK.
CHANGING PIN NUMBER
1 Touch Contacts from the Home screen.
2 Press the Menu Key B, and touch Backup Assistant. Or from the Applications menu you can touch
Settings > Accounts & sync > Backup Assistant.
3 Touch PIN.
4 Type the current PIN.
5 Type a new PIN and type it again.
6 Touch Next.
CHECKING AT THE WEBSITE
1 Touch Contacts from the Home screen.
2 Press the Menu Key B, and touch Backup Assistant. Or from the Applications menu you can touch
Settings > Accounts & sync > Backup Assistant.
3 Touch www.verizonwireless.com/backupassistant on the bottom of the screen and check your
data online.

28
GETTING STARTED
UNDERSTANDING HOME SCREEN
The Home screen is the starting point to use applications on the Breakout™. Navigate the Home screen
and use the basic functions of the Breakout™. Press the Home Key A if you want to move to the Home
screen any time.
Sample Home screens 3D View Screen
LAUNCHER BAR ICONS
The following icons represent applications that are placed in the launcher bar by default. Rearrange
them if you want.
Icon Description Icon Description
Makes calls Moves to the Home screen; runs the
task manager
Opens Contacts Moves to the Applications screen
Opens Messaging
29
GETTING STARTED
NAVIGATING HOME SCREEN
The Breakout™ provides seven different screens where you can arrange items for your preferences.
Change the number of the Home screens if you want. Refer to page 32 for more information.
1 Swipe the screen from the left to the right or vice versa.
2 Touch a desired application or widget to run.
CHECKING APPLICATIONS WITH TASK MANAGER
Manage applications using Task Manager and enhance efficiency.
1 Touch and hold the Home Key A from idle mode. You can check applications in the order of use.
You can see up to eight applications on the screen.
2 Touch Task Manager. You can see applications that are running, system status and useful tips.
3 Touch an application. You can see the CPU and the RAM that the application is using currently. Or
touch the X next to the application that you want to stop.
4 Touch Systems. You can see information on CPU, Internal/External Memory, and Network.
5 Touch Tips and check useful information that might help you manage applications of the
Breakout™.

30
GETTING STARTED
Running Task Manager Ending applications
Note Make sure to press the Back Key C and move to the Home screen if you want to finish using an
application. Otherwise, the application continues to run and will use memory and battery.
SETTING STATUS BAR AND EASYSETTING
The status bar offers quick access to Easy Setting and ongoing events.
1 Touch on the top of the Home screen and drag the status bar down.
2 Touch an icon in Easy Setting that you want to run. The icon turns to light green when the function
is on.
3 Touch Clear if you want to remove notifications in the bar.
31
GETTING STARTED
Opening Notifications Checking the status bar
EASYSETTING ICONS
Icon Description Icon Description
Mutes the sound Activates Bluetooth
Activates Wi-Fi Activates GPS
Activates data network Adjusts sound settings
Adjusts Bluetooth settings Adjusts Mobile Hotspot settings
Adjusts display settings Turns Airplane Mode on/off
32
GETTING STARTED
USING EVENT NOTIFICATION WIDGET
1 Touch and hold on the empty space on the screen, or press the Menu Key B from idle mode and
touch Widget.
2 Touch Pantech Widgets.
3 Touch and hold Event Notification on the bottom of the screen and place it on the screen where
you want to.
4 Touch an icon for recent calls, messages or emails, and take necessary steps.
CUSTOMIZING HOME SCREEN
Place shortcuts, widgets or folders, and create wallpaper for your preferences. Make sure to secure
enough space on the screen before adding a shortcut, widget or folder. If there is insufficient space,
options for adding items on the Home screen will not appear.
ADDING A SHORTCUT
1 Touch and hold on the empty space of the Home screen or press
the Menu Key
B from idle mode
and touch Add.
2 Touch Shortcuts.
3 Select and touch an item among those that can be added as a shortcut.
33
GETTING STARTED
SHORTCUTS LIST
Icon Description Icon Description
Applications Gmail label
Bookmark Latitude
Contact Music Playlist
Direct dial Settings
Direct message VZ Navigator
Directions & Navigation
Note You can also make a shortcut to an application by pressing and holding it in the Applications menu.
ADDING A WIDGET
1 Touch and hold on the empty space of the screen or press the Menu Key B from idle mode.
2 Touch Pantech Widgets or Android Widgets. Types of widgets may increase as you install
applications on the Breakout™. Refer to the relevant chapter for more information about widgets.
xTouch and hold the widget to add, and select a style if you have touched Pantech Widgets.
xSelect and touch the widget to add if you have touched Android Widgets.
34
GETTING STARTED
PANTECH WIDGETS LIST
Icon Description Icon Description
Task Manager Contacts
Memo Calendar
Event Notification Bookmark
Weather Clock
Music Email
Social Net Web Space
Integrated Clock
ANDROID WIDGETS LIST
Icon Description Icon Description
Calendar Picture frame
Data Usage Power Control
Google Search Rate Places
Home screen tips Slacker Radio
Latitude TuneWiki
35
GETTING STARTED
Icon Description Icon Description
Market YouTube
News & Weather Traffic
CREATING WALLPAPER FOR HOME SCREEN
1 Touch and hold on the empty space of the screen and touch Wallpapers, or press the Menu Key B
from idle mode and touch Wallpaper.
2 Touch Gallery, Live wallpapers or Wallpapers:
xSelect and touch a picture from Gallery, adjust the size and touch Save if you have touched
Gallery.
xSelect and touch a live wallpaper and touch Set wallpaper if you have touched Live wallpapers.
You can touch Settings and adjust settings for your preference.
xSelect and touch a wallpaper and touch Set wallpaper if you have touched Wallpapers.
Note Remember that Maps among Live wallpapers consumes battery relatively quickly. If you want to save the
battery consumption, it is recommended to end the live wallpaper by force (Settings > Applications > Running
services).
ADDING A FOLDER
1 Touch and hold on the empty space of the Home screen or press
the Menu Key
B from idle mode
and touch Add.
2 Touch Folders.
3 Select and touch a folder type. Once a folder is created on the Home screen, you can add items into
it by pressing and holding them and dragging them into the folder.
36
GETTING STARTED
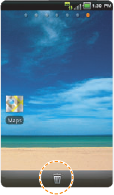
DELETING ITEMS FROM HOME SCREEN
1 Touch and hold a shortcut, widget or folder you want to delete.
2 Drag it to the trash icon on the bottom of the screen.
CHANGING HOME SCREEN MODE
1 Press the Menu Key B from idle mode and touch Mode.
2 Touch Default if you want to use one of the Home screen modes that are pre-determined, swipe
the screen to the right or left and touch Save.
3 Touch User > Save and enter the name for the mode and touch OK. Note the user mode would not
be available if you have not edited the Home screen. Refer to the paragraph below on editing the
Home screen.
37
GETTING STARTED
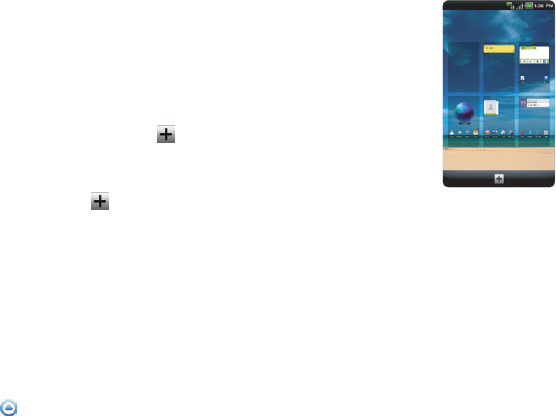
EDITING HOME SCREEN
1 Press the Menu Key B from idle mode and touch Edit.
2 While screens are displayed on the screen,
xIf you want to rearrange the Home screen, touch and hold a Home
screen and drag it to the desired location.
xIf you want to delete a Home screen, drag it to the trash on the
bottom of the screen. You can delete the Home screens until there
are two Home screens left. Touch on the bottom of the screen if
you want to add an empty screen.
3 Press the Menu Key B and touch Save if you finish editing the Home
screen. You can also touch or press the Back Key C to save the
changes.
MANAGING APPLICATIONS SCREEN
The Applications screen is the screen where all applications of the Breakout™ are displayed. Search
applications and personalize it with a different background.
EDITING APPLICATIONS SCREEN
1 Touch Apps from the Home screen.
2 Press the Menu Key B and touch Edit.
3 Drag an application that you want to change the location of to your preferred space. You can also
change applications on the launcher bar. If you want to hide an application, drag it to the icon on
the left bottom of the screen.
4 Press the Menu Key B and touch Exit Mode when you are done editing.

38
GETTING STARTED
SEARCHING FOR APPLICATIONS
1 From the Applications menu, press the Menu Key B and touch Search to find an application.
2 Type the name of the application.
REARRANGING APPLICATIONS BY NAME
1 From the Applications menu, press the Menu Key B and touch Sort by name. You can view
applications by name.
CHANGING BACKGROUND
1 From the Applications menu, press the Menu Key B and touch Background.
2 Select and touch a background.
3 Touch Save.

2. CALLS AND MESSAGES
CALLING
MESSAGING
CONTACTS
Google TALK
2
CALLS AND MESSAGES
This chapter provides important information
about using key functions of the Breakout™ including:
40
CALLS AND MESSAGES
CALLING
MAKING A CALL
1 Touch Phone from the Home screen.
2 Enter the area code and the phone number. Touch to delete the previous number. Touch and
hold to delete the whole number.
3 Touch to dial the number.
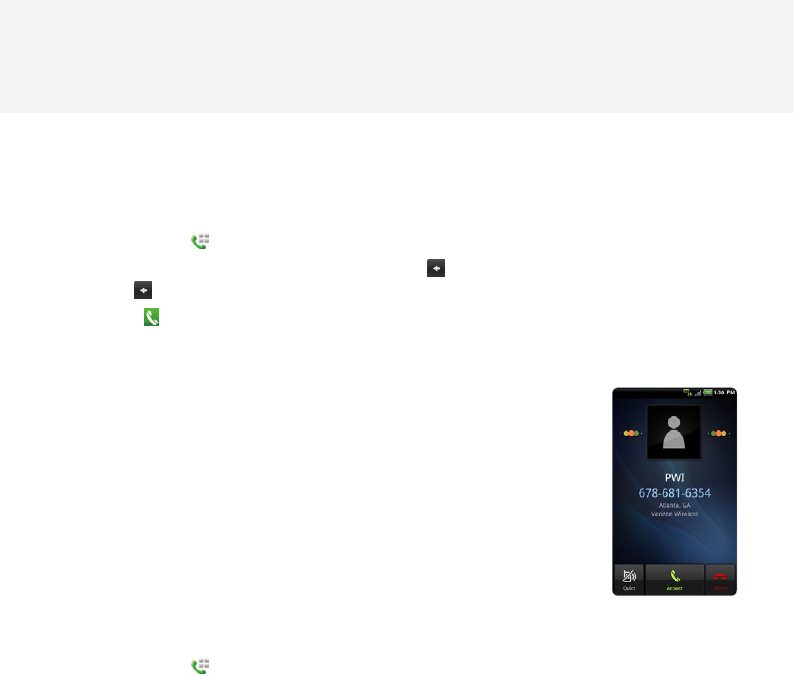
ANSWERING AND ENDING A CALL
1 Touch Answer to answer the call.
2 Touch Quiet if you want the Breakout™ to make no sound or vibration
from the incoming call.
3 Touch Ignore if you do not want to answer the call.
4 Touch End to end the call during the conversation. After ending a call, a
call summary appears.
MAKING A CALL USING SPEED DIALING
1 Touch Phone from the Home screen.
2 Touch and hold a number to which you have assigned a telephone number as a speed dial entry.
Refer to page 56 for more information.
41
CALLS AND MESSAGES
MAKING AN INTERNATIONAL CALL
1 Touch Phone from the Home screen.
2 Press the Menu Key B and touch Assisted dialing.
3 Touch the check box next to Assisted dialing status.
4 Touch Reference country and touch the country you want to call.
5 Enter the area code and the phone number.
6 Touch to dial the number.
ADJUSTING VOLUME
1 During a call, press the Volume Keys up to increase the speaker volume. Press the Volume Keys
down to decrease the volume.
2 From idle mode, press the Volume Keys up to increase the ringer volume. Press the Volume Keys
down to decrease the volume. If you want the Breakout™ to make vibrations when there is an
incoming call or message, press the Volume Keys all the way down until the mode changes.
ICONS FOR CALLING
Icon Description
The speakerphone is active
Strength of signal: The bar becomes bigger when the signal is stronger.
There is no signal.
A call is under way.
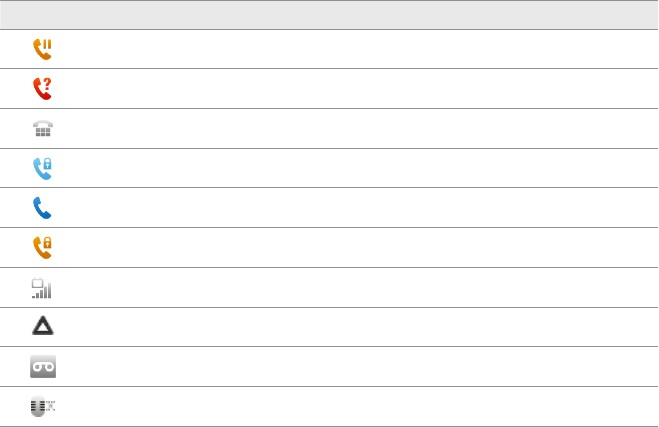
42
CALLS AND MESSAGES
Icon Description
There is a call on hold.
There is a missed call.
TTY is active.
A privacy call is under way.
A call is under way through Bluetooth.
There is a privacy call on hold.
Strength of received signal: The bar becomes bigger when the signal is stronger.
Phone is in roaming mode.
New voicemail
The other party cannot listen to you during a call.
43
CALLS AND MESSAGES
SWAPPING A CALL FOR A MULTIPARTY CALL
1 Touch Accept when there is an incoming call while on call. The first party will hear a waiting sound.
2 Touch Swap to change the calling party.
3 Touch End to finish the call.
MAKING A CONFERENCE CALL
1 Touch Phone from the Home screen.
2 Enter the area code and the phone number.
3 Touch Add call to invite a third party to the call.
4 Touch Merge if you want to allow all the parties to participate in the conversation.
ADDING A CALL
1 Touch Add call to make a call to another party during a call with a party.
2 Enter the telephone number and touch .
Note The current call is held when you make a call with another party.
MAKING A CALL FROM THE ADDRESS BOOK
1 Touch Phone from the Home screen.
2 Touch Contacts, select and touch a contact to call.
3 Touch Home, Mobile, or Work.

44
CALLS AND MESSAGES
MAKING AN EMERGENCY CALL
1 Touch Emergency call when the SIM card is not inserted in the Breakout™.
2 Touch Phone and dial 911 or other numbers for emergency calls.
CHECKING CALL HISTORY
1 Touch Phone from the Home screen.
2 Touch Call log.
3 Touch the search box, and touch All Calls, Missed Calls, Received Calls, or Dialed Calls.
xTouch All Calls if you want to see the whole calling history.
xTouch Missed Calls if you want to see the list of calls that you have missed.
xTouch Received Calls if you want to see the list of calls that you have received.
xTouch Dialed Calls if you want to see the list of contacts that you have called.
Note You can also check if there is a missed call by dragging the status bar down. Touch the contact if you want
to make a call back to the number.
RECEIVING VISUAL VOICEMAIL
1 Touch Voicemail from the Home screen.
2 Touch the received visual voicemail in the inbox, then it plays automatically.
xTouch *86 in the keypad if you have not subscribed to the monthly Visual Voicemail service.
3 Touch Call Back if you want to make a call back to the contact.
4 Touch and hold a contact if you want to see details of the contact and touch View Contact.

45
CALLS AND MESSAGES
SENDING VISUAL VOICEMAIL
1 Touch Voicemail from the Home screen.
2 Touch Menu > New Voicemail.
3 Enter the contact number.
4 Touch . The voicemail starts to be recorded.
5 Touch Mark as Urgent or Mark as Private, and touch Send.
Note If you have not subscribed to the voicemail service, touch Call Voicemail and follow the next steps.
SAVING A NEW CONTACT
1 Touch Phone from the Home screen.
2 Enter a telephone number and touch Save in the middle of the screen. If there is contact for the
number, it appears below.
3 Touch Create new contact.
4 Touch Phone or your Google account. If you touch Phone, the contact will be saved in the internal
memory of the Breakout™. If you touch your Google account, the contact will be saved in your
Google account.
5 Enter additional information as needed for the contact and touch Save.
46
CALLS AND MESSAGES
ADDING NEW INFORMAITON TO EXISTING CONTACT
1 Touch Phone from the Home screen.
2 Enter a telephone number and touch Save in the middle of the screen.
3 Touch Select a contact, and select and touch a contact to add information.
4 Touch the number or Add more field:
xTouch the number that appears on the top of the list if you want to replace the number with
one that you have entered.
xTouch Add more field if you want to add the number that you have entered, in an additional
field.
5 Touch Save when you finish editing contact.
TALKING THROUGH THE SPEAKER
1 Touch Speaker during a call. A red bar appears under Speaker when the function is on. The speaker
does not work when a headset it connected to the Breakout™.
2 Touch Speaker if you want to stop using the function.
Note If the proximity sensor is working, speakerphone would run automatically when you take your face off the
Breakout™ for a few seconds.
TALKING WITH Bluetooth TECHNOLOGY
1 Touch Bluetooth during a call. A red bar appears under Bluetooth when the function is on.
2 Touch Bluetooth if you want to stop using the function.
Note Refer to the relevant manual of the Bluetooth headset for more information.
47
CALLS AND MESSAGES
MUTING THE PHONE
1 Touch Mute during a call. A red bar appears under Mute when the function is on.
2 Touch Mute if you want to turn off the function.
ADDING SHORTCUTS TO FAVORITE CONTACTS
1 Touch and hold on the empty space on the Home screen or press
the Menu Key
B from idle mode
and touch Add.
2 Touch Shortcuts > Contact.
3 Select and touch your favorite shortcut that you want to add to the Home screen.
MESSAGING
SENDING A NEW MESSAGE
1 Touch Messaging from the Home screen.
2 Touch New message at the top of the screen.
3 Enter a mobile phone number or email address in the To field. As you type, matching contacts
appear. You can touch a suggested contact or continue typing. Or touch , and touch a contact.
4 Enter a message in the Tap to compose field.
5 Touch Send.
Note A failed message remains in the list. If you want to delete it, touch and hold the message and tap Delete.
48
CALLS AND MESSAGES
ENTERING A MESSAGE USING VOICE
1 Touch Messaging from the Home screen.
2 Touch New message at the top of the screen.
3 Enter a mobile phone number or email address in the To field. As you type, matching contacts
appear. You can touch a suggested contact or continue typing. Or touch , and touch a contact.
4 Touch the Tap to compose field. Touch the Voice Commands Key H in the virtual keyboard and
speak your message.
5 Touch Send.
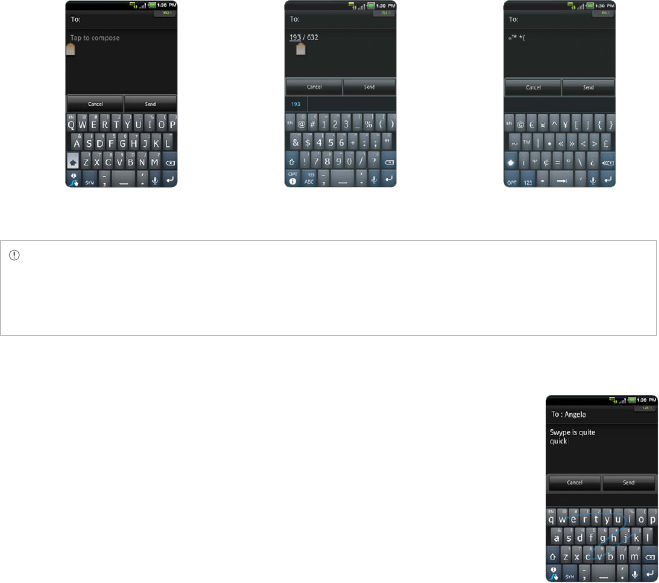
ENTERING A TEXT USING THE KEYBOARD
Use different keyboard settings for different characters. Swype is the method for entering text by
default.
1 Touch Messaging from the Home screen.
2 Touch New message at the top of the screen.
3 Enter a mobile phone number or email address in the To field. As you type, matching contacts
appear. You can touch a suggested contact or continue typing. Or touch , and touch a contact.
4 Touch the Tap to compose field. Touch to select and enter letters for the message.
xWhen is selected, the next letter entered is capitalized.
xWhen is selected, all letters entered are capitalized.
5 Touch to enter numbers, and touch to enter symbols.
6 Touch Send.
49
CALLS AND MESSAGES
Capital letters Numbers and common
symbols
Complicated symbols
Note
If you want to enter a number or/and common symbol in between common letters for a message:
xTouch and hold a key for one second and you can enter the secondary character on the right of each key.
For example, touch and hold y for one second and you can enter the number “3.”
xTouch and hold a key for two seconds and you can enter additional characters assigned for each key.
For example, touch and hold y for two seconds and you can enter “¥” in addition to “y” and 3.
ABOUT SWYPE
Swype is a fast and easy way to enter a message. For example, drag your
finger on the screen keyboard as shown and input “Quick” rather than
touching all the letters individually.
Entering “Quick”
50
CALLS AND MESSAGES
CREATING A MESSAGE USING SWYPE
1 Touch Messaging from the Home screen.
2 Touch New message at the top of the screen.
3 Enter a mobile phone number or email address in the To field. As you type, matching contacts
appear. You can touch a suggested contact or continue typing. Or touch , and touch a contact.
4 Touch the Tap to compose field. Drag your finger on the screen to enter the message. If you fail
to drag your finger in the right way, alternative words appear. Select and touch an alternative if
available.
CHANGING INPUT METHOD TO THE ANDROID KEYBOARD
1 Touch and hold on the screen while you enter a message.
2 Touch Input method > Android keyboard. Now you can create a message by touching on the
virtual keyboard.
SETTING SWYPE OPTIONS
1 Touch > Options.
2 Touch Language if you want to change the language for Swype.
3 Touch Word suggestion if you want to see predicted words while you enter a word.
4 Touch Enable tip indicator if you want to see the flashing indicator for quick help.

51
CALLS AND MESSAGES
ICONS FOR MESSAGES
Icon Description Icon Description
There is a message that is not sent. There is an incoming message from
the email server.
There is an incoming message. There is an error with the message
A new message with a picture has
arrived. A new email has arrived.
Messages have been successfully
sent. There is a missed message.
There is an urgent message. The memory is full. Unable to
receive messages.
DELETING MESSAGES
1 Touch Messaging from the Home screen.
2 Press the Menu Key B and touch Delete.
3 Touch K next to the message(s) to delete. If you want to delete all messages, press the Menu Key B
and touch Select all.
4 Touch Done > OK.
ADDING SHORTCUTS FOR DIRECT MESSAGES
1 Press and hold on the empty space of the Home screen, or press
the Menu Key
B from idle mode,
and touch Add.
2 Touch Shortcuts > Direct message.
3 Select and touch a contact in the list that you want to create a shortcut on the Home screen for a
direct message.

52
CALLS AND MESSAGES
USING A QUICK TEXT
1 Touch Messaging from the Home screen.
2 Press the Menu Key B and touch Quick text.
3 Select and touch a text.
4 Press the Menu Key B and touch Send message.
5 Enter the contact of the recipient.
6 Touch Send.
ADDING A QUICK TEXT
1 Touch Messaging from the Home screen.
2 Press the Menu Key B and touch Quick text.
3 Press the Menu Key B and touch Add new.
4 Enter a quick text.
5 Touch Save.
ATTACHING PICTURES
1 Touch Messaging from the Home screen.
2 Touch New message at the top of the screen.
3 Enter a mobile phone number or email address in the To field. As you type, matching contacts
appear. You can touch a suggested contact or continue typing.
4 Touch the Tap to compose field to start entering your message.
5 Press the Menu Key B and touch Attach > Picture.
53
CALLS AND MESSAGES
6 Select and touch a picture from Take a Picture, Gallery or Handy Memo (Drawing).
7 Take a picture to attach if you have selected Take a Picture. Or select and touch a picture to attach.
8 Touch Send.
SETTING STORAGE LIMITS
1 Touch Messaging from the Home screen.
2 Press the Menu Key B and touch Settings > Delete old messages if you want old messages to be
deleted when the storage limit is reached.
3 Touch Text message limit, set the maximum number of messages and touch Set.
4 Touch Multimedia message limit, set the maximum number of messages and touch Set. Make sure
to delete old messages before setting the maximum number of messages.
Note Make sure to secure enough internal memory space: you might experience difficulties receiving or
sending messages when the memory space is low.
SETTING SIGNATURE
1 Touch Messaging from the Home screen.
2 Press the Menu Key B and touch Settings.
3 Touch Signature auto-append if you want to add signature automatically, type your signature and
touch Save.
CHECKING USED SPACE
1 Touch Messaging from the Home screen.
2 Press the Menu Key B and touch Used space.

54
CALLS AND MESSAGES
SEARCHING FOR MESSAGES
1 Touch Messaging from the Home screen.
2 Press the Search Key D.
3 Enter a word to search messages and touch .
TEXT MESSAGE SETTINGS
1 Touch Messaging from the Home screen.
2 Press the Menu Key B and touch Settings.
3 Touch Delivery reports if you want to receive a report from the recipient that your message has
been delivered.
MULTIMEDIA MESSAGE SETTINGS
1 Touch Messaging from the Home screen.
2 Press the Menu Key B and touch Settings.
3 Touch Delivery reports if you want to receive a report from the recipient that your message has
been delivered.
4 Touch Auto-retrieve if you want to take back messages automatically.
5 Touch Roaming auto-retrieve if you want to take back messages automatically while roaming. The
function will not run if the Auto-retrieve function is not operating.
SETTING THE NOTIFICATIONS
1 Touch Messaging from the Home screen.
2 Press the Menu Key B and touch Settings.
55
CALLS AND MESSAGES
3 Touch Notifications if you want to see in the status bar when a message is delivered.
4 Touch Select ringtone and select and touch a ringtone for the message that you receive, and touch
OK.
5 Touch Vibrate and select Always, Only when silent or Never, and touch OK.
CONTACTS
VIEWING CONTACTS INFORMATION
1 Touch Contacts from the Home screen.
2 Select and touch a contact for more information.
CREATING CONTACTS
1 Touch Contacts from the Home screen.
2 Press the Menu Key B and touch New contact.
3 Touch Phone or your Gmail account. The Gmail account will not be available if you have not
synchronized the account with your device.
4 Enter related information, such as name, phone number, email address, postal address, organization,
etc.
xTouch , touch Select photo from Gallery or Take photo and take the necessary steps if you
want to assign a photo for the contact.
xTouch Group and assign a group for the contact if you want to include the contact in the group.
5 Touch Save when you finish entering information for the contact.
Note You can create a contact by entering the telephone number first. Touch Phone , enter a telephone
number, and touch Save in the middle of the screen. Refer to page 45 for more information.

56
CALLS AND MESSAGES
CREATING GROUPS FOR CONTACTS
1 Touch Contacts from the Home screen.
2 Touch Group on the top of the screen, touch Phone or your Gmail account, and touch New group.
3 Enter the group name and touch Save. The contacts will also be saved through Backup Assistant.
If you have not subscribed to the Backup Assistant service, touch OK in the registration screen and
take necessary steps. Refer to page 26 for more information.
ADDING MEMBERS FOR CONTACTS GROUP
1 Touch Contacts from the Home screen.
2 Touch Group on the top of the screen.
3 Select Phone or your Gmail account, and touch a group where you want to add members.
4 Press the Menu Key B and touch Add new member.
5 Touch Select from contacts or New contact:
xSelect and touch contacts that you want to add for the group if you have touched Select from
contacts, and touch Done.
xFollow the necessary steps for creating new contacts and assign the group if you have touched
New contact.
SETTING SPEED DIALS
1 Touch Contacts from the Home screen.
2 Touch Speed on the top of the screen.
3 Touch Add for a speed dialing number from 1 to 99, then select and touch contacts and their
desired number for the speed dial. The following speed dial entries are already assigned to your
Verizon Wireless Account Information:
x1 - Voicemail
57
CALLS AND MESSAGES
x95 - Warranty Center
x96 - Data Usage
x97 - Account Balance
x98 - Calling Minutes
x99 - Payment.
Note You cannot assign two speed dialing numbers for one telephone number. In case you select the mobile
phone number of the contact, you can choose Voice call or Message for the speed dialing number.
RESERVING CONTACTS WITH BACKUP ASSISANT
1 Touch Contacts from the Home screen.
2 Press the Menu Key B and touch Backup Assistant. You can check the current status of saved
contacts.
EDITING CONTACTS
1 Touch Contacts from the Home screen.
2 Touch and hold a contact to edit, and touch Edit contact.
3 Edit information and touch Save.
DELETING CONTACTS
1 Touch Contacts from the Home screen.
2 Touch and hold a contact to delete and touch Delete contact.
3 Touch OK to confirm deletion.
IMPORTING/EXPORTING CONTACTS INFORMATION
1 Touch Contacts from the Home screen.

58
CALLS AND MESSAGES
2 Press the Menu Key B and touch More > Import/Export.
3 Touch Import from SD card then select and touch the account to create your contact under.
4 Touch Export to SD card and touch OK if you want to export contacts to SD card.
SEARCHING FOR CONTACTS INFORMATION
1 Touch Contacts from the Home screen.
2 Press the Menu Key B and touch Search.
3 Enter the name of the desired contact. The search result appears instantly.
SETTING DISPLAY OPTIONS
1 Touch Contacts from the Home screen.
2 Press the Menu Key B and touch More, and touch Display options.
3 Touch Only contacts with phones if you want to see only contacts with phone numbers.
4 Touch Sort list by and touch First name or Last name.
5 Touch View contact names as and touch First name first or Last name first.
6 Touch your Google account, select and touch the category for system group.
7 Touch Done when you are finished.
SENDING CONTACT DETAILS
1 Touch Contacts from the Home screen.
2 Touch and hold a contact to share and touch Send contact.
3 Touch Bluetooth, Gmail, Email or Messaging.
59
CALLS AND MESSAGES
SETTING CONTACT OPTIONS
1 Touch Contacts from the Home screen.
2 Touch and hold a contact, and touch Options.
3 Touch Ringtone, select and touch a ringtone for the contact and press the Back Key C.
4 Touch Incoming calls if you want to send incoming calls from the contact to voicemail directly.
MANAGING ACCOUNTS AND SYNC
1 Touch Contacts from the Home screen.
2 Press the Menu Key B and touch More > Accounts.
3 Touch Background data to allow applications to sync, send, and receive data at any time.
4 Touch Auto-sync if you want to sync data automatically.
5 Touch Add account if you want to add an account and follow the steps for creating accounts.
ADDING PEOPLE WIDGET
1 Touch and hold on the empty space of the screen, or press the Menu Key B from idle mode and
touch Widget.
2 Touch Pantech Widgets.
3 Touch and hold Contacts on the bottom of the screen and place it on the Home screen.
4 Select a style.
5 Touch the widget and assign a contact for the widget.
Note You cannot add two People widgets on the same Home screen at the same time.
60
CALLS AND MESSAGES
Google TALK
SETTING YOUR STATUS
1 Touch Apps from the Home Screen. Touch Talk .
2 Touch on the top of the screen where your Gmail address is displayed.
3 Touch the status bar on the top of the screen.
4 Touch Available, Busy or Invisible.
Note The status message will not be displayed if your status is Invisible.
5 Enter the status message.
6 Touch if you want to insert a photo.
7 Select and touch a picture from your gallery, adjust the size of the picture and touch Save.
8 Touch Done. Your status is displayed at the top of the screen.
INVITING A FRIEND TO CHAT
1 Touch Apps from the Home Screen. Touch Talk .
2 Press the Menu Key B and touch Add friend.
3 Enter the user name of the friend you want to add.
4 Touch Send invitation.
CHATTING WITH FRIENDS
1 Touch Apps from the Home Screen. Touch Talk .
2 Select and touch one of the friends that appear on the screen.

61
CALLS AND MESSAGES
3 Enter a message and touch Send.
4 Press the Menu Key B and touch Add to chat if you want another friend to join the conversation.
5 Press the Menu Key B and touch More > Insert smiley, and select and touch one.
6 Press the Menu Key B and touch End chat if you want to stop chatting with your friend.
MANAGING YOUR FRIENDS LIST
1 Touch Apps from the Home Screen. Touch Talk .
2 Press the Menu Key B and touch More.
3 Touch Invites. You can check pending invitations.
SETTING THE TALK ENVIRONMENT
1 Touch Apps from the Home Screen. Touch Talk .
2 Press the Menu Key B and touch Settings.
3 Touch Automatically sign in if you want to remain signed-in for Talk.
4 Touch Mobile indicator if you want your friends to see that you are on a mobile device.

3. PERSONAL INFORMATION
CALENDAR
3
PERSONAL INFORMATION
This chapter provides important information
about using the Breakout™ including:

63
PERSONAL INFORMATION
CALENDAR
ADDING AN ACCOUNT
You should have an account to use the calendar. For details on Google account, refer to the page 25.
CREATING AN EVENT
1 Touch Apps from the Home Screen. Touch Calendar .
2 Touch a day in the calendar.
3 Double-touch an hour that you want to add an event.
4 Enter necessary information. Press the Menu Key B and touch Show
extra options if you need more options.
5 Touch Done.
Note You can also create an event by pressing the Menu Key B and touching More > New event.
64
PERSONAL INFORMATION
CHECKING EVENTS
1 Touch Apps from the Home Screen. Touch Calendar .
2 Touch a day that you want to view events for the day. A blue dot indicates an event for a day.
3 Press the Menu Key B and touch Day, Week or Month if you want to see events for a daily or
weekly basis. Month view is displayed by default.
4 Touch Today if you want to see events for today.
5 Touch Agenda if you want to see events in text mode.
Month view Agenda
CALENDAR ICONS
Icon Description Icon Description
Today Focus
Day with events Focus with events

65
PERSONAL INFORMATION
EDITING EVENTS
1 Touch Apps from the Home Screen. Touch Calendar .
2 Touch the day that you want to edit events.
3 Touch the event that you want to edit.
4 Press the Menu Key B and touch Edit event.
5 Edit the event and touch Done.
Note If the event is synced to your phone, you cannot edit the event.
SETTING THE REMINDER
1 Touch Apps from the Home Screen. Touch Calendar .
2 Press the Menu Key B and touch More > Settings.
3 Touch Set alerts & notifications and select an option if you want to change the notification
method.
4 Touch Select ringtone if you want to select a specific ringtone for the calendar.
ADDING CALENDAR WIDGET
1 Touch and hold on the empty space on the Home screen, or press the Menu Key B from idle mode
and touch Widget.
2 Touch Pantech Widgets.
3 Touch and hold Calendar on the bottom of the screen and place it on the Home screen.
4 Select a style for the day, week or month. You can also add the calendar widget provided by Google.

4. COMMUNICATION
EMAIL
GMAIL
SOCIAL NET WIDGET
4
COMMUNICATION
This chapter provides important information
about using the Breakout™ including:
67
COMMUNICATION
EMAIL
SETTING UP AN EMAIL ACCOUNT
1 Touch Apps from the Home Screen. Touch Email .
2 Enter your email address and password for the first use.
3 Touch Manual setup or Next. If you touch Manual setup, touch POP3, IMAP or Exchange, set
necessary options and touch Next.
4 Enter a name for the account.
5 Enter the name that will be displayed on the outgoing messages.
6 Touch Done.
Note The screen varies depending on the email service provider.
ADDING A NEW EMAIL ACCOUNT
1 Touch Apps from the Home Screen. Touch Email .
2 Touch your account on the top of the inbox screen and touch Add
account.
3 Select and touch an email service provider.
4 Follow the steps to set up an email account.
68
COMMUNICATION
VIEWING INCOMING MESSAGES
1 Touch Apps from the Home Screen. Touch Email .
2 Select and touch an account, and touch a message you want to check.
SENDING AN EMAIL
1 Touch Apps from the Home Screen. Touch Email .
2 Press the Menu Key B and touch Compose.
Note If you have added more than two email accounts, the first one is designated as the primary account for
sending an email.
3 Enter the recipient’s email address, or touch , Contacts, Recent or Group and follow the
instructions.
4 Enter the subject of the email and the message.
5 Touch Send.
ADDING ATTACHMENTS TO AN EMAIL
1 Touch Apps from the Home Screen. Touch Email .
2 Press the Menu Key B and touch Compose. Touch Attach in the composed message.
3 Touch Document, Picture, Video, Capture picture, Capture Video or Record audio and take
necessary steps.
4 Touch Send when you are finished.

69
COMMUNICATION
DESIGNATING EMAILS AS FAVORITES
1 Touch Apps from the Home Screen. Touch Email .
2 In the Inbox screen, select the check box before the email(s) and touch Add star. A red star icon
appears next to the message.
MARKING EMAILS AS READ/UNREAD
1 Touch Apps from the Home Screen. Touch Email .
2 In the Inbox screen:
xIf you want to mark an email as read without checking it, select the check box in front of the
email and touch Mark read. Touch Mark unread if you want to mark the email as unread.
xIf you want to check an email first, touch the email, press the Menu Key B and touch Mark as
unread.
REMOVING THE EMAIL ACCOUNT
1 Touch Apps from the Home Screen. Touch Email .
2 Press the Menu Key B and touch Accounts.
3 Touch and hold the account that you want to remove.
4 Touch Remove account > OK.
EMAIL SETTINGS
1 Touch Apps from the Home Screen. Touch Email .
2 Touch an account.
3 Press the Menu Key B and touch More > Account settings.

70
COMMUNICATION
4 Touch Inbox check frequency and set the time interval to check email.
5 Touch Default account if you want to set the email account as the basic account by default.
ADDING EMAIL WIDGET
1 Touch and hold on the empty space on the Home screen, or press the Menu Key B from idle mode
and touch Widget.
2 Touch Pantech Widgets.
3 Touch and hold Email on the bottom of the screen and place it on the Home screen.
4 Select a style.
5 Select and touch the account that you want to display through the widget.
GMAIL
ADDING A GMAIL ACCOUNT
1 Touch Apps from the Home Screen. Touch Gmail .
2 Touch Next.
3 Touch Sign in if you have a Gmail account.
4 Enter your user name and password.
5 Touch Sign in.
71
COMMUNICATION
READING INCOMING MESSAGES
1 Touch Apps from the Home Screen. Touch Gmail .
2 Select and touch the message to read.
3 Touch Archive if you want to preserve the message in a separate folder.
4 Touch Delete if you want to delete the message.
Note If you have added more than two email accounts, the first one is designated as the primary account for
sending an email.
SENDING AN EMAIL THROUGH GMAIL
1 Touch Apps from the Home Screen. Touch Gmail .
2 Press the Menu Key B and touch Compose.
3 Enter the recipient’s email address, the subject and the message.
4 Touch or press the Menu Key B and touch Send.
DESIGNATING EMAILS AS SPAM
1 Touch Apps from the Home Screen. Touch Gmail .
2 Select and touch an email.
3 Press the Menu Key B and touch More.
4 Touch Report spam if you want to report the email and delete it from your inbox.

72
COMMUNICATION
SETTING GMAIL OPTIONS
1 Touch Apps from the Home Screen. Touch Gmail .
2 Press the Menu Key B and touch More > Settings.
3 Touch Confirm actions, touch Archive, Delete or Send to see the confirmation message for each
action, and touch OK.
4 Touch Reply all if you want to make it default to reply all to incoming messages.
5 Touch Email notifications if you want to see if a new mail arrives. The check box is selected by
default.
SOCIAL NET WIDGET
Use Social Networking Services easily with the Social Net widget. Check updates in Twitter, MySpace or
Facebook at a glance and post your messages.
ADDING THE SOCIAL NET WIDGET
1 Touch and hold on the empty space on the Home screen, or press the Menu Key B from idle mode
and touch Widget.
2 Touch Pantech Widgets.
3 Touch and hold Social Net on the bottom of the screen and place it on the Home screen.
4 Select a style. You can check updated news from the widget.

5. ENTERTAINMENT
LISTENING TO MUSIC
USING CAMERA
USING CAMERA AS CAMCORDER
USING GALLERY
ENJOYING YOUTUBE
USING VIDEO PLAYER
NET MEDIA
5
ENTERTAINMENT
This chapter provides important information
about using the Breakout™ including:
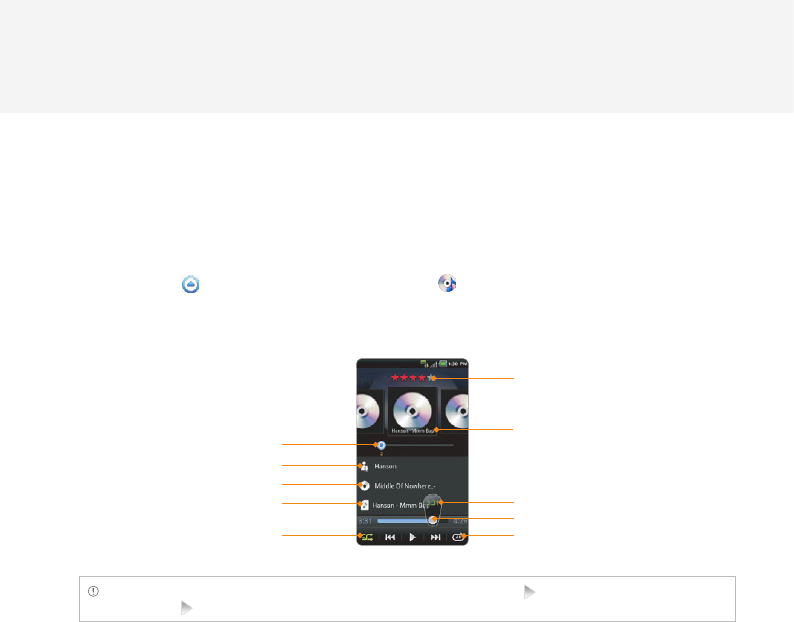
74
ENTERTAINMENT
LISTENING TO MUSIC
You can enjoy music on your Breakout™. Make sure to insert a microSD™ card to transfer music files to
the Breakout™ and listen to them.
PLAYING MUSIC
1 Touch Apps from the Home Screen. Touch Music .
2 Select and touch a file from the list sorted by the alphabetic order. Touch Play All if you want to
listen to all files.
Song rating
Album cover
Current playing time
Progress bar
Repeating options
Artist name
Now-playing list bar
Album title
Song title
Shuffling options
Note Music would run in the background if you do not end the application. indicates that music is being
played. Touch if you want to stop it or listen to another music file.
75
ENTERTAINMENT
NAVIGATING THE PLAYING SONG
1 Touch Apps from the Home Screen. Touch Music .
2 Select a song or album to play. Drag to the right or left in the bar. Numbers in indicates the
current playing time.
xTouch and hold if you want to fast-forward the file.
xTouch and hold if you want to rewind the file.
3 Touch if you want to move to the next file. Touch if you want to move to the previous file. Or
swipe the album cover to the right or left to change the playing music.
ADJUSTING VOLUME
1 Touch Apps from the Home Screen. Touch Music .
2 Press the Volume Keys up if you want to increase volume. Press the Volume Keys down if you want
to decrease volume. As you adjust volume, the Media Volume on the screen changes its color.
CHECKING SONGS’ INFORMATION
1 Touch Apps from the Home Screen. Touch Music .
2 Touch and hold the song that you want to see the related information. in front of a file indicates
that it is being played.
3 Touch Properties and scroll up or down to view its information.
Note If you want to search for related information while a song is playing, press and hold the artist name, album
title or song, and touch Amazon MP3, Brower, YouTube or Music, and take necessary actions.
76
ENTERTAINMENT
SETTING MUSIC FILE AS RINGTONE
1 Touch Apps from the Home Screen. Touch Music .
2 Touch and hold the song that you want to set as ringtone of the Breakout™.
3 Touch Set as ringtone.
ADDING A SONG TO A PLAYLIST
1 Touch Apps from the Home Screen. Touch Music .
2 Touch and hold the song that you want to add to a playlist.
3 Touch Add to playlist.
CREATING A PLAYLIST
1 Touch Apps from the Home Screen. Touch Music .
2 Touch Song in the top of the screen and touch Playlist.
3 Press the Menu Key B and touch New Playlist.
4 Enter the name of the playlist and touch OK.
5 Touch the check box next to the song(s) that you want to add to the playlist and touch Add.
MANAGING PLAYLISTS
1 Touch Apps from the Home Screen. Touch Music .
2 Touch Song in the top of the screen and touch Playlist.
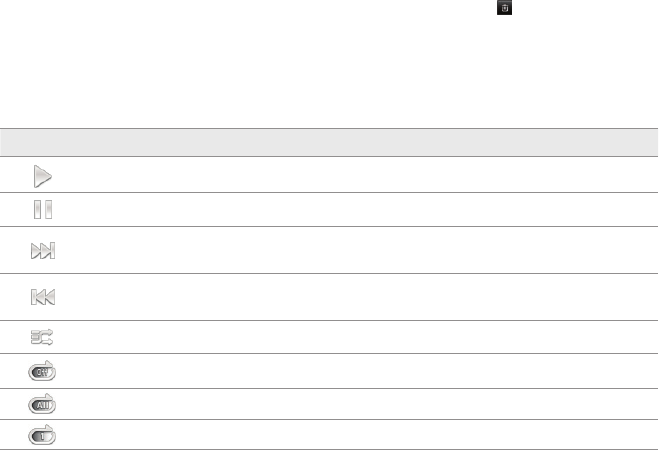
77
ENTERTAINMENT
3 Touch and hold a playlist that you want to manage.
xIf you want to listen to all songs of the playlist, touch Play all.
xIf you want to delete the playlist, touch Delete.
xIf you want to add tracks to the list, touch Add tracks, select songs and touch Add.
xIf you want to remove tracks from the list, touch Remove tracks, touch next to the song to
remove and touch Done.
xIf you want to create a new name for the playlist, touch Rename, enter the new name and
touch OK.
MUSIC PLAYER ICONS
Icon Description
Play: Plays a file
Pause: Pauses the song
Fast-forward: Fast-forwards the song (touch and hold)
Next file: Moves to the next file (touch)
Rewind: Rewinds the song (touch and hold)
Previous file: Moves to the previous file (touch)
Shuffle: Shuffles songs (green); Shuffle is off (white)
Repeat is off
Repeat: Repeats all songs
Repeats current song
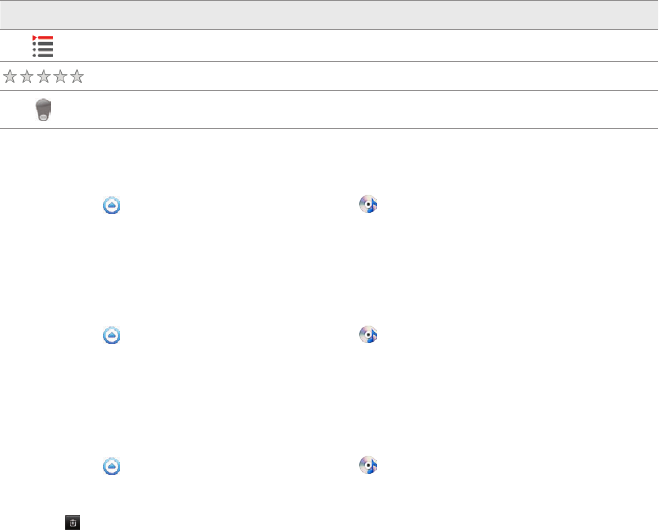
78
ENTERTAINMENT
Icon Description
Playing songs’ list: Shows the list of files that are being played
Rate: Rates the file
Current time: Shows the current playing time
SORTING MUSIC FILES BY TYPE
1 Touch Apps from the Home Screen. Touch Music .
2 Touch Song on the top of the screen, and select and touch Song, Album, Artist, Genre, Playlist,
Folder, Rating, Mood or Most Played. A list of music files for the type appears.
LISTENING TO MUSIC FILES BY MOOD
1 Touch Apps from the Home Screen. Touch Music .
2 Touch Song on the top of the screen and touch Mood. Songs are automatically sorted by the
metadata value of each file. Touch Play All if you want to listen to all music files.
DELETING MUSIC FILES
1 Touch Apps from the Home Screen. Touch Music .
2 Press the Menu Key B and touch Delete.
3 Touch next to the song to delete. If you want to delete all music files, press the Menu Key B and
touch Select All.
4 Touch Done. Selected files will be deleted from the Breakout™.
79
ENTERTAINMENT
RATING MUSIC FILES
1 Touch Apps from the Home Screen. Touch Music .
2 Select and touch a file to rate.
3 Touch while the file is playing and rate from one to five stars.
SHARING MUSIC FILES
1 Touch Apps from the Home Screen. Touch Music .
2 Touch and hold a music file to share with your friends, and touch Send.
3 Touch Bluetooth, Email, Gmail, Messaging, Net Media or V CAST Media Manager and follow
necessary steps.
MUSIC PLAYER SETTINGS
1 Touch Apps from the Home Screen. Touch Music .
2 Press the Menu Key B and touch Settings.
3 Touch Shuffle if you want to listen to music files randomly in the playlist. If you want to change the
repeat the repetition option, touch O or P and select Repeat All, Repeat One or Repeat Off.
ADDING MUSIC PLAYER WIDGET
1 Touch and hold on the empty space on the Home screen, or press the Menu Key B from idle mode
and touch Widget.
2 Touch Pantech Widgets.
3 Touch and hold Music on the bottom of the screen and place it on the Home screen.
4 Select a style. You can play songs with single touch.
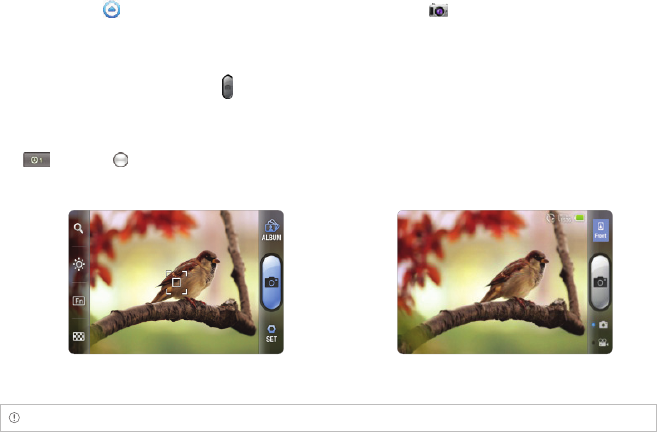
80
ENTERTAINMENT
USING CAMERA
Take pictures and record videos with the built-in camera. They can be saved in the Breakout™ and sent
via multimedia messages.
TAKING PICTURES
1 Touch Apps from the Home Screen and then touch Camera . Or, press and hold the Camera/
Video Key G on the right side of the phone. The screen changes to landscape mode by default.
2 Touch on the screen and select options if necessary. Option buttons disappear in a few seconds.
3 Focus on the object and touch or press the Camera/Video Key G. The picture is saved
automatically.
4 Touch Share, Set as or Delete and take necessary steps. If you want to zoom in the picture, touch
and drag to the right.
5 Press the Back Key C if you want to take another picture.
Selecting options Focusing on the object
Note The screen moves to Applications if you do not touch the screen or use the camera for two minutes.

81
ENTERTAINMENT
ZOOMING IN/OUT
1 Touch on the screen or press the Menu Key B while in the camera mode.
2 Touch .
3 Drag to the left to zoom out, or to the right to zoom in.
4 Focus on the object and touch or press the Camera/Video Key G.
ADJUSTING BRIGHTNESS
1 Touch on the screen or press the Menu Key B while in the camera mode.
2 Touch .
3 Drag to the left to reduce brightness, or to the right to increase brightness.
ADDING SPECIAL EFFECTS
1 Touch on the screen or press the Menu Key B while in the camera mode.
2 Touch and select special effects.
xFor White Balance, touch AU Auto and select from Auto, Outdoor, Cloudy, Fluorescent or Glow.
xFor Filter, touch Normal and select from Mono, Negative or Sepia.
3 Press the Back Key C or touch on the empty screen to take a picture.
TAKING PICTURES USING TIMER
1 Touch on the screen or press the Menu Key B while in the camera mode.
2 Touch .
3 Touch Timer and set the timer for 3, 5 or 10 seconds. After the camera focuses on the object, a
picture will be taken automatically in the set time.

82
ENTERTAINMENT
TAKING INSTANT PICTURES
1 Touch on the screen or press the Menu Key B while in the camera mode.
2 Touch and touch Instant. Instant on the top of the screen indicates the
instant camera mode.
3 Focus on the object and touch or press the Camera/Video Key G. The
picture starts to appear in ten seconds. Touch on the screen or shake the
Breakout™ if you want to see the picture quickly.
4 Touch if you want to erase some part of the picture. Or touch if you
want to write on the picture.
5 Touch Done.
TAKING MULTISHOT
1 Touch on the screen or press the Menu Key B while in the camera mode.
2 Touch and touch Multi Shot.
3 Focus on the object and touch or press the Camera/Video Key G. The camera will take four
photos (nine for 640x480) in a row.
TAKING DIVISION SHOT
1 Touch on the screen or press the Menu Key B while in the camera mode.
2 Touch and touch Division Shot.
3 Select and touch Auto 4 cut or Auto 9 cut, or Split 2 cut, Split 4 cut or Split 6 cut.
83
ENTERTAINMENT
USING FRONT/BACK CAMERA
1 Touch Apps from the Home Screen and then touch Camera . Or, press and hold the Camera/
Video Key G on the right side of the phone. The camera placed in the back side is activated by
default.
2 Touch . Now you can take a picture using the front camera, including yourself. Features for the
front camera might differ from those of the back camera.
3 Touch if you want to take a picture using the back camera.
CHANGING RESOLUTION
1 Touch on the screen or press the Menu Key B while in the camera mode.
2 Touch SET > Resolution.
3 Select and touch a resolution that you want to apply to the picture. The maximum number of
pictures that you can take will increase as you reduce the resolution for pictures.
4 Touch Done.
CHANGING SCENE MODE
1 Touch on the screen or press the Menu Key B while in the camera mode.
2 Touch SET > Scene.
3 Select and touch a scene mode that you want to apply to the picture.
4 Touch Done.
84
ENTERTAINMENT
CHANGING SETTINGS
1 Touch on the screen or press the Menu Key B while in the camera mode.
2 Touch SET > Settings.
3 To change camera settings:
xTouch ON or OFF for View after Saving. If you touch ON, the picture will appear after saved.
xTouch ON or OFF for Anti Shake. If you touch ON, you can prevent pictures from being shaken
when they are taken.
xTouch WIDE or CENTER for Photometry. If you touch WIDE, the light will be distributed to the
picture equally. If you touch CENTER, the light will be focused mainly on the center of the
picture.
xTouch ON or OFF for GPS Receive. If you touch ON, geo-information will be attached to the
picture.
CAMERA MENU OPTIONS
Icon Description
Shutter: Takes a picture
Function: Adds special effects: White Balance, Filter; and sets timer and focus mode
Shot: Selects shot modes: Single Shot, Multi Shot, Instant, Division Shot
Brightness: Adjusts brightness
Zoom: Zooms the object in or out
Album: Views saved pictures
85
ENTERTAINMENT
Icon Description
Setting: Changes settings: Resolution, Scene, View after Saving, Anti Shake, Photometry,
GPS Receive
Front camera: Uses the front camera
Back camera: Uses the back camera
Video mode: Changes to the camcorder mode
SHARING PICTURES
1 Touch on the screen and touch while in the camera mode, or touch Apps from the Home
Screen. Touch Gallery .
2 Touch and hold a picture to share. If you want to share all pictures, touch Select All. You can also
select a few pictures.
3 Touch Share.
4 Touch Bluetooth, Picasa, Online Album, Net Media, Gmail, V CAST Media Manager, Email,
or Messaging and take necessary steps. If you have selected more than one picture, Picasa,
Messaging, Bluetooth and Gmail are available.
SETTING A PICTURE AS WALLPAPER
1 Touch on the screen and touch while in the camera mode, or
touch Apps from the Home
Screen. Touch Gallery
.
2 Select and touch a picture to set as wallpaper.
86
ENTERTAINMENT
3 Touch Menu > More > Set as > Wallpaper.
4 Adjust the size of the picture and touch Save.
CROPPING A PICTURE
1 Touch on the screen and touch while in the camera mode, or touch Apps from the Home
Screen. Touch Gallery .
2 Select and touch a picture to crop.
3 Touch Menu > More > Crop.
4 Adjust the size of the picture and touch Save.
ASSIGNING A PICTURE TO PHOTO SETTING
1 Touch on the screen and touch while in the camera mode, or touch Apps from the Home
Screen. Touch Gallery .
2 Select and touch a picture to assign to a contact.
3 Touch Menu > More > Set as > Photo setting.
4 Select and touch a contact to set the picture for its icon.
5 Adjust the size of the picture and touch Save.
DELETING PICTURES
1 Touch while in the camera mode, or touch Apps from the Home Screen. Touch Gallery .
2 Touch and hold a picture to delete. If you want to delete all pictures, touch Select All. You can also
select a few pictures.
3 Touch Delete > Confirm Delete.
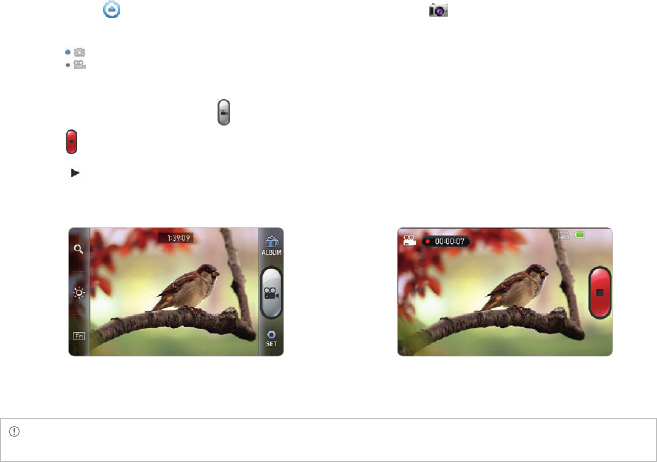
87
ENTERTAINMENT
USING CAMERA AS CAMCORDER
RECORDING VIDEOS
1 Touch Apps from the Home Screen and then touch Camera . Or, press and hold the Camera/
Video Key G on the right side of the phone. The screen changes to landscape mode by default.
2 Touch .
3 Touch on the screen and select options if necessary. Option buttons disappear in a few seconds.
4 Focus on the object and press . Press the Back Key C if you want to cancel recording.
5 Touch if you want to stop recording. The recorded video would be saved automatically.
6 Touch if you want to see the recorded video. Or touch Share or Delete and take necessary steps.
7 Press the Back Key C if you want to record another video.
Selecting options Recording a video
Note The screen moves to the Applications menu if you do not touch the screen or run an application for two
minutes.

88
ENTERTAINMENT
ADJUSTING BRIGHTNESS
1 Touch on the screen or press the Menu Key B while in camcorder mode.
2 Touch .
3 Drag to the left to reduce brightness, or to the right to increase brightness.
ZOOMING IN/OUT
1 Touch on the screen or press the Menu Key B while in camcorder mode.
2 Touch .
3 Drag to the left to zoom out, or to the right to zoom in.
CHANGING RESOLUTION
1 Touch on the screen or press the Menu Key B while in camcorder mode.
2 Touch SET > Resolution.
3 Select and touch a resolution that you want to apply to the video.
4 Touch Done.
CHANGING SETTINGS
1 Touch on the screen or press the Menu Key B while in camcorder mode.
2 Touch SET > Settings.
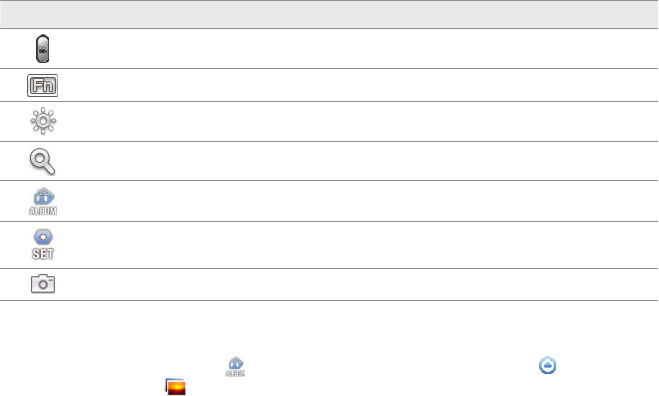
89
ENTERTAINMENT
3 To change camcorder settings:
xTouch ON or OFF for View after Saving. If you touch ON, the video will appear after saved.
xTouch ON or OFF for Voice Recording. If you touch ON, the video will be recorded with voice
included.
xTouch NOR or MMS for Recording Time. The recording time will increase as you reduce the
resolution for videos from NOR to MMS.
CAMCORDER MENU OPTIONS
Icon Description
Video: Records a video
Function: Uses functions: White Balance, Filter, Timer
Brightness: Adjusts brightness
Zoom: Zooms the object in or out
Album: Views saved videos
Settings: Changes settings: Resolution, View after Saving, Voice Recording, Recording
Time
Camera mode: Changes to the camera mode
SHARING VIDEOS
1 Touch on the screen and touch while in the camcorder mode, or touch Apps from the Home
Screen. Touch Gallery .
2 Touch on the first video on the screen.
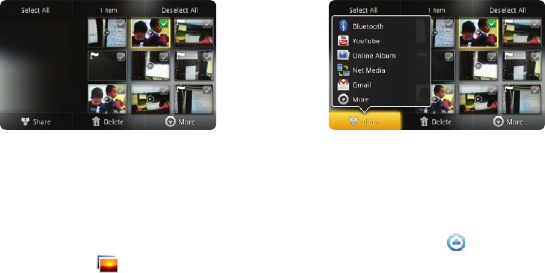
90
ENTERTAINMENT
3 Touch and hold a video to share. If you want to share all videos, touch Select All. You can also select
a few videos.
4 Touch Share.
5 Touch Bluetooth, YouTube, Online Album, Net Media, Gmail, V CAST Media Manager or Messaging.
Selecting a video Sharing a video
DELETING VIDEOS
1 Touch on the screen and touch while in the camcorder mode, or touch Apps from the Home
Screen. Touch Gallery .
2 Touch on the first video on the screen.
3 Touch and hold a video to delete. If you want to delete all videos, touch Select All. You can also
select a few videos.
4 Touch Delete > Confirm Delete.
91
ENTERTAINMENT
USING GALLERY
VIEWING PICTURES
1 Touch Apps from the Home Screen. Touch Gallery .
2 Select and touch a picture to view. If you have downloaded images from external sources, e.g.
websites, pictures are saved in different folders. Then, select and touch the folder where pictures
you want to see are saved.
3 Double-touch on the screen to zoom in the picture to the maximum. Double-touch on the screen
again to zoom out the picture to the minimum.
4 Swipe the screen to the left or right if you want to see other pictures.
Note Functions of the gallery disappear in a few seconds. Touch on the screen if you want to see functions
available.
ADDING PICTURE FRAME
1 Touch and hold on the empty space on the Home screen and touch Android Widgets.
2 Touch Picture frame.
3 Select and touch a picture that you want to display through the widget.
4 Adjust the size of the picture and touch Save.
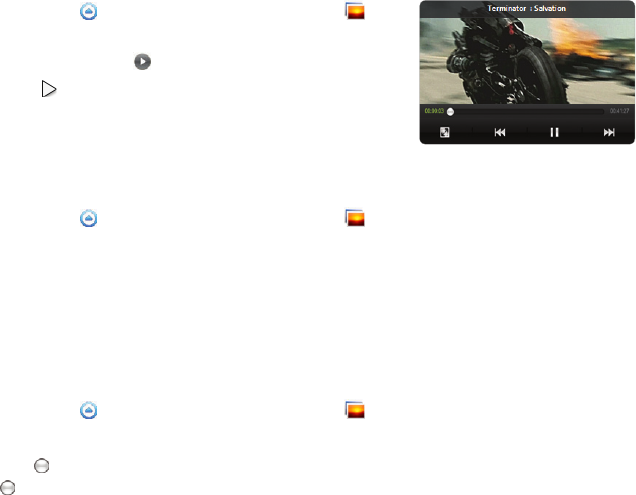
92
ENTERTAINMENT
VIEWING VIDEOS
1 Touch Apps from the Home Screen. Touch Gallery .
2 Select a video to view. Video Player is run by default to play
videos. An item with is a video.
3 Touch to play the video. The screen turns to the landscape
view by default.
VIEWING PICTURES IN A SLIDESHOW
1 Touch Apps from the Home Screen. Touch Gallery .
2 Select and touch the pictures that you want to view in a slideshow.
3 Touch Slideshow.
4 Touch on the screen if you want to stop the slideshow.
5 Touch on the screen and touch Slideshow if you want to resume the slideshow.
ARRANGING PICTURES
1 Touch Apps from the Home Screen. Touch Gallery .
2 Select and touch a folder.
3 Drag to the right if you want to see pictures with information including date and location. Drag
to the left if you want to see pictures by the order of date.

93
ENTERTAINMENT
ENJOYING YOUTUBE
WATCHING VIDEOS
1 Touch Apps from the Home Screen. Touch YouTube .
2 Select and touch a video to watch.
3 Double-touch the screen to watch the video in full screen.
UPLOADING VIDEOS
1 Touch Apps from the Home Screen. Touch YouTube .
2 Press the Menu Key B and touch Upload.
3 Select and touch a video to upload.
4 Set a title for the video and touch Upload.
CHECKING UPLOAD STATUS
1 Touch on the top of the screen and drag it down while the video is being uploaded.
2 Touch Uploading. You can see the status of the upload.
3 Press the Menu Key B and touch Pause uploads if you want to pause uploading. Press the Menu
Key B and touch Resume uploads if you want to resume upload.
4 Touch the video on the top of the screen and touch Cancel if you want to cancel the upload.
94
ENTERTAINMENT
CREATING A YOUTUBE ACCOUNT
1 Touch Apps from the Home Screen. Touch YouTube .
2 Press the Menu Key B and touch My Channel > Add account.
3 Touch here on the bottom of the YouTube sign-in screen.
4 Follow the steps to create an account.
WATCHING VIDEOS BY CATEGORY
1 Touch Apps from the Home Screen. Touch YouTube .
2 Press the Menu Key B and touch Browse.
3 Select and touch a category.
4 Swipe the screen to scroll, select and touch a video to watch.
WATCHING VIDEOS BY UPLOAD DATE
1 Touch Apps from the Home Screen. Touch YouTube .
2 Press the Menu Key B and touch Browse.
3 Select and touch a category.
4 Touch This week on the top of the screen.
5 Select and touch one among time intervals.

95
ENTERTAINMENT
VIEWING MY ACCOUNT INFORMATION
1 Touch Apps from the Home Screen. Touch YouTube .
2 Press the Menu Key B and touch My Channel.
3 Touch your Google account. You can touch Add account and add an account for YouTube.
4 Touch each item for your account including Uploads, Favorites, Playlists and Subscriptions.
YOUTUBE SETTINGS
1 Touch Apps from the Home Screen. Touch YouTube .
2 Press the Menu Key B and touch Settings.
3 Touch High quality on mobile if you want to watch high-quality videos.
4 Touch Caption font size and select and touch the font size if you want to adjust the size of the font.
5 Touch Clear search history if you want to remove search history from the search box and touch OK.
6 Touch SafeSearch filtering if you want to block videos that contain restricted content, and select
and touch the filtering option.
ADDING YOUTUBE WIDGET
1 Touch and hold on the empty space on the Home screen, or press the Menu Key B from idle mode
and touch Widget.
2 Touch Android Widgets.
3 Touch YouTube in the list. You can view video clips with singe touch.
96
ENTERTAINMENT
USING VIDEO PLAYER
VIEWING VIDEOS
1 Touch Apps from the Home Screen. Touch Video Player . All video files are displayed by
default. Touch Folder if you want to check videos by folder.
2 Select and touch a video to see.
xIf you want to view the video from where you left off, touch OK. Otherwise, the video runs from
the beginning.
xIf you want to select several videos in a row, press the Menu Key B and touch Play Selected
Items, touch the check box next to the videos that you want to see, and touch Done.
CHECKING INFORMATION OF VIDEOS
1 Touch Apps from the Home Screen. Touch Video Player .
2 Touch the video that you want to see related information.
3 Press the Menu Key B and touch Properties while the video is being played. You can see
information of the video, including file size, duration, format, resolution, date created and protection
info.
Note The video stops playing when you see its information.
ADJUSTING CAPTIONS
1 Touch on the screen while a video is playing through Video Player.
2 Touch On on the left side of the screen. If there are captions for the video, On is selected by default.
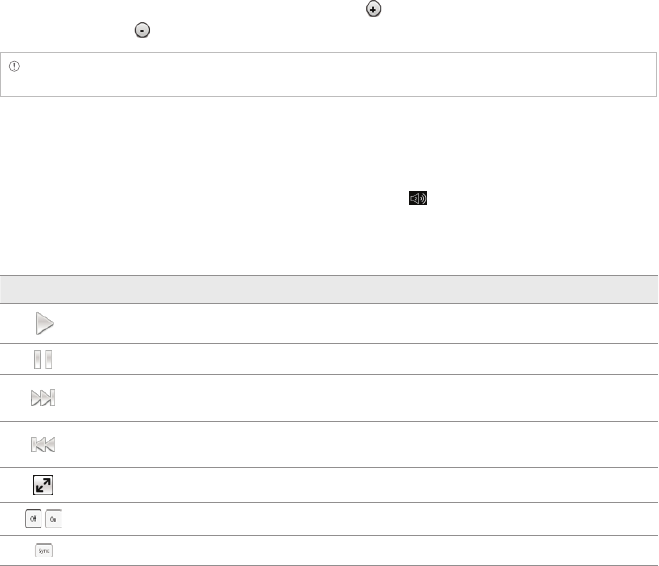
97
ENTERTAINMENT
3 Touch Sync on the right side of the screen and touch if you want to make captions faster by 0.5
second, or touch if you want to make captions slower by 0.5 second.
Note This function is for a video with captions. If the video contains no captions, On/Off and Sync options will
not appear.
ADJUSTING VOLUME
1 Touch on the screen while a video is playing through Video Player.
2 Press the Volume Keys to increase or decrease volume. Once appears on the screen, you can
adjust volume by dragging the bar to the left or right.
VIDEO PLAYER ICONS
Icon Description
Play: Plays the video
Pause: Pauses the video
Fast-forward: Fast-forwards the video (touch and hold)
Next file: Moves to the next file (touch)
Rewind: Rewinds the video (touch and hold)
Previous file: Moves to the previous file (touch)
Full view: Turns the screen to full view
Caption: Displays caption
Caption sync: Adjusts sync time

98
ENTERTAINMENT
VIDEO PLAYER SETTINGS
1 Press the Menu Key B while a video is playing through Video Player.
2 Touch Settings.
3 In order to adjust settings:
xTouch O or P for Caption Language and select the language. If there is no caption for the video,
you can only select the option for Repeat.
xTouch O or P for Repeat and select the option.
NET MEDIA
Net Media enables you to use, share and enjoy media files between DLNA-enabled devices while the
Wi-Fi feature is activated. Make sure to activate the Wi-Fi network first.
ABOUT DIGITAL LIVING NETWORK ALLIANCE DLNA
The Digital Living Network Alliance (DLNA) is a new collaborative organization who leads
commercialization of global home network services. Its goal is to build compatible platforms by using
standards-based technology in order to make it easier for DLNA-certified device users to share media
contents through the home network.
INITIATING NET MEDIA
1 Touch Apps from the Home Screen. Touch Net Media . The server is automatically linked.
2 Press the Menu Key B and touch Server list to check the available servers list.
3 Touch the desired server from the list to download.
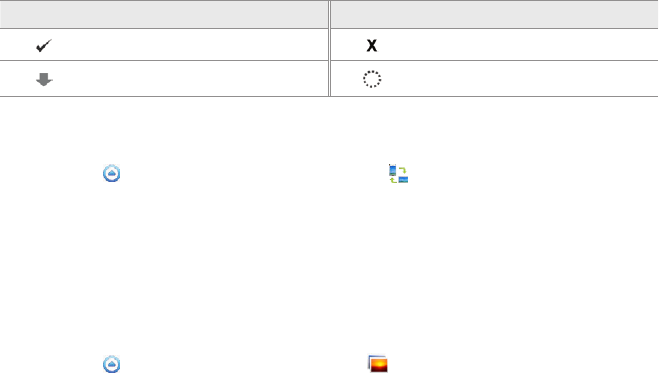
99
ENTERTAINMENT
ICONS FOR DOWNLOAD STATUS DISPLAY
Icon Selected to Icon Selected to
A file is completely downloaded A file is not downloaded
A file is being downloaded A file is waiting for download
PLAYING MEDIA FILES ON ANOTHER DEVICE
1 Touch Apps from the Home Screen. Touch Net Media .
2 Touch My phone. You can see the player list that includes devices which can play contents.
3 Select a device and touch Save. Now the selected device is set as a player.
4 Touch Photos, Songs or Videos that you want to play.
5 Touch the media file to play.
PLAYING FILES FROM MY PHONE ON ANOTHER DEVICE
1 Touch Apps from the Home Screen. Touch Gallery .
2 Touch and hold files to share and touch Share.
3 Touch Net Media.
4 In the list:
xTouch Remote if you want to play files on another device such as TV, PC, and laptop.
xTouch Upload if you want to upload files to another device, touch the upload server and follow
the instructions.
xTouch Print if you want to print files using another device and follow the instructions.
100
ENTERTAINMENT
DOWNLOADING/UPLOADING FILES
1 Touch Apps from the Home Screen. Touch Net Media .
2 Press the Menu Key B and touch Multi select.
3 Touch the checkbox above the file to download or upload.
4 Press the Menu Key B and touch Download or Upload. A popup window appears showing the
downloading or uploading progress.
SETTING THE NAME OF MEDIA SERVER
1 Touch Apps from the Home Screen. Touch Net Media .
2 Press the Menu Key B and touch Settings.
3 Touch Media server name. Default name is name of device model.
4 Edit the server name and touch OK.
SELECTING DEVICES TO SHARE MEDIA FILES
1 Touch Apps from the Home Screen. Touch Net Media .
2 Press the Menu Key B and touch Settings.
3 Touch Accept Share Request.
4 Select From all devices or From trusted devices only.
xIf you want to share media files from all devices, touch From all devices.
xIf you want to share media files only from devices you trusted, touch From trusted devices only.
5 Touch the checkbox before Enable notification if you want to be notified when there is any access
request.

101
ENTERTAINMENT
PERMITTING UPLOAD TO MY PHONE
1 Touch Apps from the Home Screen. Touch Net Media .
2 Press the Menu Key B and touch Settings.
3 Touch Upload to my phone to allow other device to upload media files to your phone.
ENABLING UPLOAD REQUEST
1 Touch Apps from the Home Screen. Touch Net Media .
2 Press the Menu Key B and touch Settings.
3 Touch Enable upload notification to get notification when there is any access request.
MANAGING DEVICE LIST
1 Touch Apps from the Home Screen. Touch Net Media .
2 Press the Menu Key B and touch Settings.
3 Touch Device list management.
4 Touch the device to move from the Unclassified devices, and touch Move to Trusted or Move to
Banned. The device moves to the changed category.
CHECKING Wi-Fi NETWORK STATUS
1 Touch Apps from the Home Screen. Touch Net Media .
2 Press the Menu Key B and touch Settings.
3 Touch Wi-Fi network status to check the Wi-Fi network status and available Wi-Fi network. For Wi-Fi
connection, refer to page 104 .

102
ENTERTAINMENT
DESIGNATING MEDIA FILE TYPES THAT CAN BE SHARED
1 Touch Apps from the Home Screen. Touch Net Media .
2 Press the Menu Key B and touch Settings.
3 Touch Share media files.
4 Select Share photo, Share music or Share video, and touch OK.
SERVER SETTINGS
1 Touch Apps from the Home Screen. Touch Net Media .
2 Press the Menu Key B and touch Settings.
3 Touch Server settings.
4 Touch Preferred server, touch next to the server to set as preferred media server and touch OK.
5 Touch Hidden server, touch the checkbox next to the server to hide it when there is a device
search and touch OK.
6 Touch Preferred player, select the player from the list to set as preferred media player and touch
OK.

6. CONNECTIVITY
USING A Wi-Fi NETWORK
CONNECTING TO A 3G/4G NETWORK
USING Bluetooth
MAKING Breakout™ A MODEM
6
CONNECTIVITY
This chapter provides important information about getting
connected to network to use the Breakout™ including:
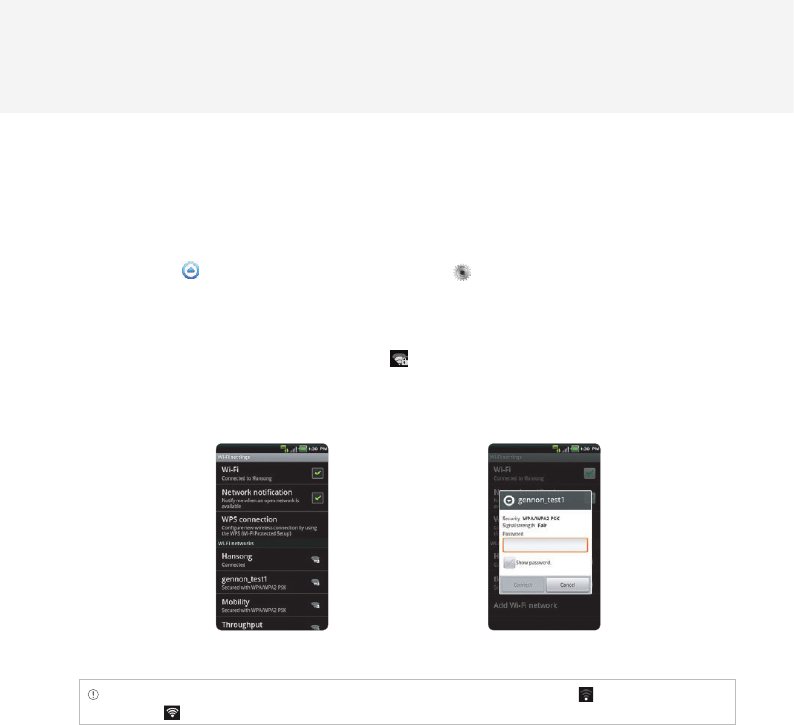
104
CONNECTIVITY
USING A Wi-Fi NETWORK
Connect the Breakout™ to a Wi-Fi network and enjoy the wireless Internet connection. Depending on
your data plan or the area where you stay, you should pay for connection to the Wi-Fi network.
CONNECTING TO A Wi-Fi NETWORK
1 Touch Apps from the Home Screen. Touch Settings .
2 Touch Wireless & networks > Wi-Fi settings.
3 Touch Wi-Fi to activate the technology.
4 Select and touch a network to connect.
5 Enter the password if the network is secured. indicates a secured Wi-Fi network. Touch Show
password if you want the password to be displayed.
6 Touch Connect. Once the network is remembered, the Breakout™ will automatically connect to it when in
range.
Activating Wi-Fi Connecting to a Wi-Fi network
Note The icon next to each network indicates the strength of the signal. For example, indicates the signal is
poor while indicates the signal is strong.
105
CONNECTIVITY
ABOUT NETWORK NOTIFICATIONS
You are informed by default when a Wi-Fi network is available around you. The icon in the status bar
indicates a network is available. Touch Network notification in the Wi-Fi settings if you do not want to
be informed the availability of the network.
USING THE EASY SETTING
1 Touch on the top of the Home screen and drag it down.
2 Touch Easy Setting. The icon turns light green when the function is on.
SETTING Wi-Fi NETWORKS
1 Touch Apps from the Home Screen. Touch Settings .
2 Touch Wireless & networks > Wi-Fi settings.
3 Touch Wi-Fi to activate the technology.
4 Touch WPS connection if you want to establish a new wireless connection automatically using the
Wi-Fi Protected Setup (WPS). You should press WPS on your Wi-Fi access point within two minutes.
xTouch Button connection. You should press WPS button on your Wi-Fi access point within 2
minutes.
xTouch PIN connection. You should enter PIN at your Wi-Fi access point within 2 minutes.
SEARCHING FOR Wi-Fi NETWORKS
1 Touch Apps from the Home Screen. Touch Settings .
2 Touch Wireless & networks > Wi-Fi settings.
3 Touch Wi-Fi to activate the technology.
4 Press the Menu Key B and touch Scan. The Breakout™ scans networks automatically every six
seconds. The newly found networks appear on the bottom of the list.
106
CONNECTIVITY
ADDING A Wi-Fi NETWORK
1 Touch Apps from the Home Screen. Touch Settings .
2 Touch Wireless & networks > Wi-Fi settings.
3 Touch Wi-Fi to activate the technology.
4 Touch Add Wi-Fi network.
5 Enter Network SSID and select the security type among Open, WEP, WPA/WPA2 PSK and 802.1x
EAP. Aside from Open, you must enter a password for the network.
6 Touch Save.
DISCONNECTING TO A Wi-Fi NETWORK
1 Touch the network that is connected to the Breakout™.
2 Touch Forget to disconnect with the network.
Note You can also disconnect to the Wi-Fi network by pressing and holding the network and touching Forget
network.
SETTING ADVANCED FEATURES
1 Touch Apps from the Home Screen. Touch Settings .
2 Touch Wireless & networks > Wi-Fi settings.
3 Touch Wi-Fi to activate the technology.
4 Press the Menu Key B and touch Advanced.
5 For advanced settings,
xTouch Regulatory domain, and select and touch channels for the domain.
xTouch Wi-Fi sleep policy and specify when the Breakout™ should switch from the Wi-Fi network
to mobile network.
107
CONNECTIVITY
For IP settings, touch Use static IP first.
xTouch IP address, enter the address and touch OK.
xTouch Gateway, enter the gateway and touch OK. You can also adjust settings for Netmask, DNS
1 and DNS 2.
ICONS FOR Wi-Fi AND 3G/4G
Icon Description
Connected to a Wi-Fi network
The GPS is active.
Data is being transferred through the 4G network.
Data is being transferred through the 3G network.
Data is being transferred through the 1xRTT network.
CONNECTING TO A 3G/4G NETWORK
Make sure to turn off the Wi-Fi network connection: Wi-Fi network and the mobile hotspot cannot run
at the same time.
CONNECTING TO MOBILE HOTSPOT FOR 3G NETWORK
1 Touch Apps from the Home Screen. Touch Mobile Hotspot .
2 Touch Activate to activate the function. If a Wi-Fi network is active, it will be turned off.
3 Touch Continue in the screen on the 3G mobile hotspot feature. Touch the check box if you do not
want to see the screen in the future.
4 Touch Continue in the screen on the calling plan.
5 Touch Turn on Mobile Hotspot. You can also touch the check box if you do not want to see the
screen in the future.
108
CONNECTIVITY
CONNECTING TO MOBILE HOTSPOT FOR 4G NETWORK
1 Touch Apps from the Home Screen. Touch Mobile Hotspot .
2 Touch Activate to activate the function. If a Wi-Fi network is active, touch Turn Wi-Fi off.
CONNECTING TO 4G BROADBAND
1 Touch Apps from the Home Screen. Touch Settings .
2 Touch Wireless & networks.
3 Touch Mobile Broadband Connect.
4 Touch the check box next to Activate to activate 4G broadband.
CONFIGURING AUTOMATIC CONNECTION
1 Touch Apps from the Home Screen. Touch Mobile Hotspot .
2 Touch Activate to activate the function.
CONFIGURING MANUAL CONNECTION
1 Touch Apps from the Home Screen. Touch Mobile Hotspot .
2 Touch Configure Mobile Hotspot.
3 For each option:
xTouch Network SSID and type the network name and touch OK.
xTouch Security, select and touch a security type and take necessary steps.
MANAGING DEVICES
1 Touch Apps from the Home Screen. Touch Mobile Hotspot .
109
CONNECTIVITY
2 Touch Activate to activate the function.
3 Touch Manage devices.
4 For each option:
xTouch Connected devices. You can see devices that are connected to the Breakout™.
xTouch Blocked devices if you want to see devices that are blocked to connect to your phone.
USING Bluetooth
Bluetooth technology enables wireless connections between electronic devices. Using this technology,
you can send images, text, and business cards.
With Bluetooth technology, the Breakout™ provides:
xConnection to hands-free devices
xConnection to electronic devices
PAIRING WITH DEVICES
1 Touch Apps from the Home Screen. Touch Settings .
2 Touch Wireless & networks > Bluetooth settings.
3 Touch Bluetooth to activate the technology.
4 Touch Scan for devices.
5 Select and touch a device from the list.
6 Touch Pair to pair with and connect to the device.
DEVICE ICONS
PC Headset Mono Headset Phone LAPTOP Unknown
device
110
CONNECTIVITY
ICONS FOR Bluetooth
Icon Description Icon Description
Bluetooth is connected Bluetooth is active but not
connected to other device
A file is ready to be delivered from
other device
USING THE EASY SETTING
1 Touch on the top of the Home screen and drag it down.
2 Touch Bluetooth. The icon turns light green when the function is on.
Bluetooth SETTINGS
1 Touch Apps from the Home Screen. Touch Settings .
2 Touch Wireless & networks > Bluetooth settings.
3 Touch Bluetooth to activate the technology.
4 Touch Discoverable if you want to let other people pair their devices with the Breakout™. The status
lasts for 60 seconds.
SHARING A PICTURE USING Bluetooth
1 Touch Apps from the Home Screen. Touch Gallery .
2 Select and touch a picture to share.
3 Touch Menu > Share > Bluetooth.
111
CONNECTIVITY
4 Select and touch a device among those paired with the Breakout™. The other party will receive a
message to accept the file.
RENAMING THE DEVICE
1 Touch Apps from the Home Screen. Touch Settings .
2 Touch Wireless & networks > Bluetooth settings.
3 Touch Bluetooth to activate the technology.
4 Touch Device name and enter a new name.
5 Touch OK.
MAKING Breakout™ A MODEM
The Breakout™ provides other devices with an Internet connection by becoming a Wi-Fi hotspot.
ACTIVATING THE MOBILE BROADBAND
1 Connect the Breakout™ with an electronic device using the USB cable.
2 Touch Apps from the Home Screen. Touch Settings .
3 Touch Wireless & networks > Mobile Broadband Connect.
4 Touch Activate to activate the technology. The electronic device that is connected to the
Breakout™ can now access the Internet.
Note You cannot use a few applications that require Internet connection while using the mobile broadband
technology.

112
CONNECTIVITY
BECOMING A MOBILE HOTSPOT
1 Touch Apps from the Home Screen. Touch Settings .
2 Touch Wireless & networks.
3 Touch Mobile Hotspot. The Breakout™ can offer the Internet connection to other devices around
you.
SETTING OPTIONS FOR MOBILE HOTSPOT
1 Touch Apps from the Home Screen. Touch Settings .
2 Touch Wireless & networks > Mobile Hotspot.
3 Touch Configure Mobile Hotspot.
4 Enter a name for Network SSID and select the Security type.
xTouch Open if you want to make an open network.
xTouch Open and touch WPA2(AES), WPA(TKIP), WPA/WPA2, WEP or Open and enter the
related items if you want to allow limited devices to access the Internet through the Breakout™.
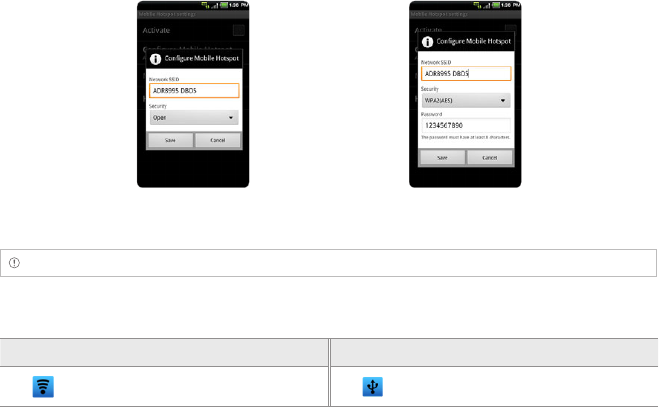
113
CONNECTIVITY
5 Touch Save.
Mobile Hotspot for Open Mobile Hotspot for WPA2(AES)
Note Security type for Mobile Hotspot is WPA2 PSK and the password is “MDN (Phone number)” by default.
MOBILE BROADBAND AND HOTSPOT ICONS
Icon Description Icon Description
Mobile Hotspot is active Mobile Broadband is active

7. LOCATION-BASED SERVICES
USING Google MAPS
USING PLACES
USING LATITUDE
NAVIGATION
NEWS & WEATHER
7
LOCATION-BASED SERVICES
This chapter provides important information
about using the Breakout™ including:
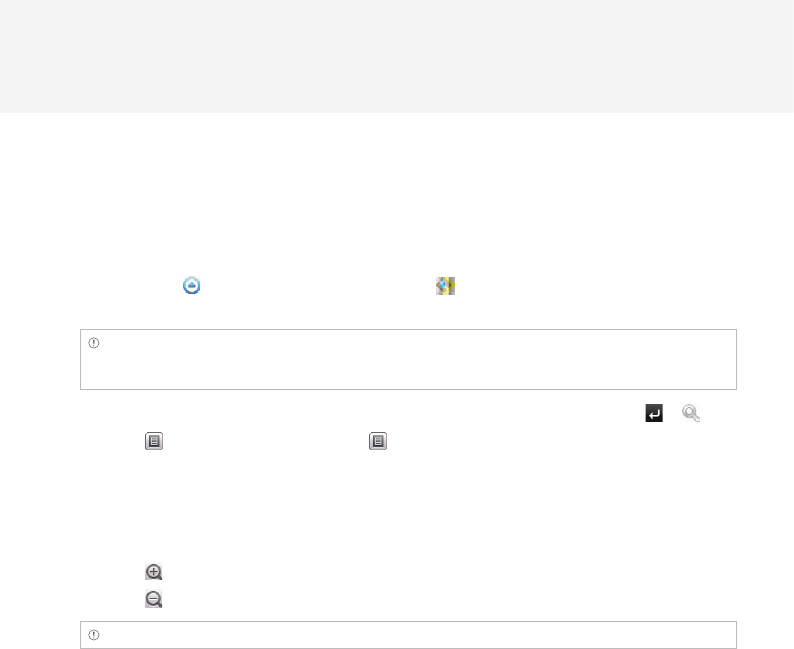
115
LOCATIONBASED SERVICES
USING Google MAPS
Google Maps offers useful information based on your region. Make sure to connect the Breakout™ to a
Wi-Fi, 3G or 4G network. If you turn on the GPS function, you can obtain more accurate information.
FINDING PLACES
1 Touch Apps from the Home Screen. Touch Maps . You can see your current location on the
map.
Note Make sure to connect to wireless networks or GPS satellites by touching Apps > Settings > Location &
security and touching VZW Location Services, Standalone GPS Services or/and Google Locations Services >
Agree.
2 Touch on the search box and type the keyword using the virtual keyboard and touch or .
3 Touch if you want to see the result list. appears when there are many results that match your
search.
4 Select and touch the location that you want to see, and check the related information.
ZOOMING IN AND OUT OF THE MAP
1 Touch to zoom in the map.
2 Touch to zoom out of the map.
Note You can double-touch the screen to zoom in the map.
116
LOCATION-BASED SERVICES
FINDING DIRECTIONS
1 Touch Apps from the Home Screen. Touch Maps .
2 Press the Menu Key B and touch Directions.
3 Enter the name of the place you want to visit.
4 Decide whether you want to go to the end point by car, public transportation or foot.
5 Touch Get directions.
FINDING CURRENT LOCATION ON THE MAP
1 Touch Apps from the Home Screen. Touch Maps .
2 Touch . Your location is indicated as .
USING PLACES
FINDING PLACES
1 Touch Apps from the Home Screen. Touch Places .
2 Enter a keyword in the search box, or touch Restaurants, Coffee, Bars, Attractions, ATMs, Gas
Stations or Explore Nearby.
3 Select and touch a place in the search results.
Note If you want to sort the result by distance or ratings by customers, touch Distance or Rating in the search
results.
117
LOCATION-BASED SERVICES
VIEWING PLACES AT A GLANCE
1 Touch Apps from the Home Screen. Touch Places .
2 Select and touch a category.
3 Press the Menu Key B in the search results and touch See map. You can see related places in the
map.
ADDING A CATEGORY FOR PLACES
1 Touch Apps from the Home Screen. Touch Places .
2 Touch Add on the bottom of the screen and enter a category to add. The category appears on the
screen.
ADDING STARRED PLACES
1 Touch Apps from the Home Screen. Touch Places .
2 Select and touch a category.
3 Select and touch a place that you want to see.
4 Touch the star icon for each place. When selected, the icon turns yellow.
Note You can see stared places by pressing the Menu Key B and touching Starred Places in the first screen of Places.
ADDING PLACES WIDGET
1 Touch and hold on the empty space on the Home screen, or press the Menu Key B from idle mode
and touch Widget.
2 Touch Android Widgets.
3 Touch Rate Places in the list. Information on places around your locations will be displayed
automatically.
118
LOCATION-BASED SERVICES
USING LATITUDE
Share your location with your friends or check those of your friends. Make sure to have a Google
account to use Latitude.
JOINING LATITUDE
1 Touch Apps from the Home Screen. Touch Latitude .
2 Touch OK for the tip on the updated map.
3 Touch Allow & Share if you want to share your location with your friends.
The Latitude screen appears shortly where your personal information is
displayed.
4 Press the Back Key C if you want to see your location in the map.
ADDING FRIENDS FROM CONTACTS
1 Touch Apps from the Home Screen. Touch Latitude .
2 Press the Menu Key B and touch Add friends.
3 Touch Select from Contacts.
4 Select and touch the contact you want to add as your friend.
Note All contacts are displayed by default. If you want to classify contacts, touch All Contacts on the top of the
screen, and select and touch a category of contacts.
5 Touch Yes if you want to send sharing requests.
119
LOCATION-BASED SERVICES
ADDING FRIENDS FROM EMAIL ADDRESSES
1 Touch Apps from the Home Screen. Touch Latitude .
2 Press the Menu Key B and touch Add friends.
3 Touch Add via email address.
4 Enter the email address of your friend and touch Add friends.
5 Touch Yes if you want to send sharing requests.
ACCEPTING INVITATION FROM FRIENDS
1 Touch Apps from the Home Screen. Touch Latitude .
2 Touch 1 new sharing request on the top of the screen.
3 Touch Accept and share back. You can see the location of your friend shortly.
MANAGING FRIENDS
1 Touch Apps from the Home Screen. Touch Latitude .
2 Touch one of the friends on the screen.
3 Touch Real-time updating, and select and touch the time interval for refreshing locations.
4 Touch Sharing options, and select and touch an option.
5 Touch Remove this friend and touch OK if you want to remove the friend from Latitude.
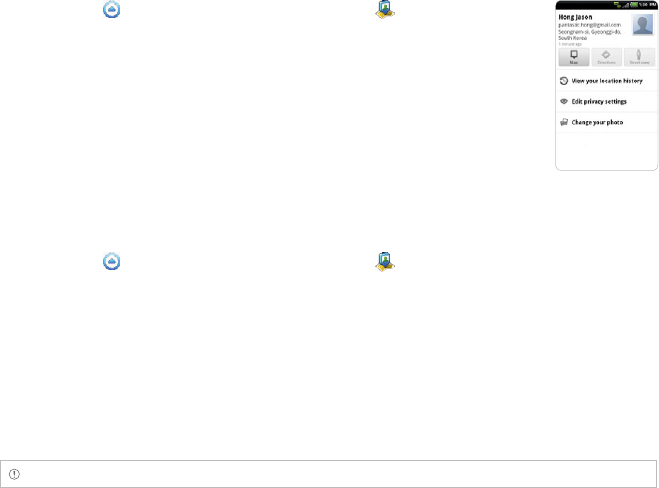
120
LOCATION-BASED SERVICES
CHECKING PERSONAL SETTINGS
1 Touch Apps from the Home Screen. Touch Latitude .
2 Touch your name on the top of the screen. You can see your name,
Gmail account and your current location.
3 Touch View your location history if you want to save your past Latitude
history, and follow the instructions.
4 Touch Edit privacy settings if you want to adjust settings for privacy.
5 Touch Change your photo if you want to change the photo for Latitude,
and touch Take a photo or Pick from gallery and follow the instructions.
ADJUSTING PRIVACY SETTINGS
1 Touch Apps from the Home Screen. Touch Latitude .
2 Press the Menu Key B and touch Settings.
3 Touch Detect your location, Set your location or Do not update your location for a location
reporting. Detect your location is selected by default.
4 Touch Enable location history if you want to store your locations in the past and view them on the
Latitude website.
5 Touch Sign out of Latitude if you do not want to use Latitude. If you want to join Latitude again,
press the Menu Key B and touch Join Latitude.
Note For more information on the map, refer to Using Google Maps on page 115.
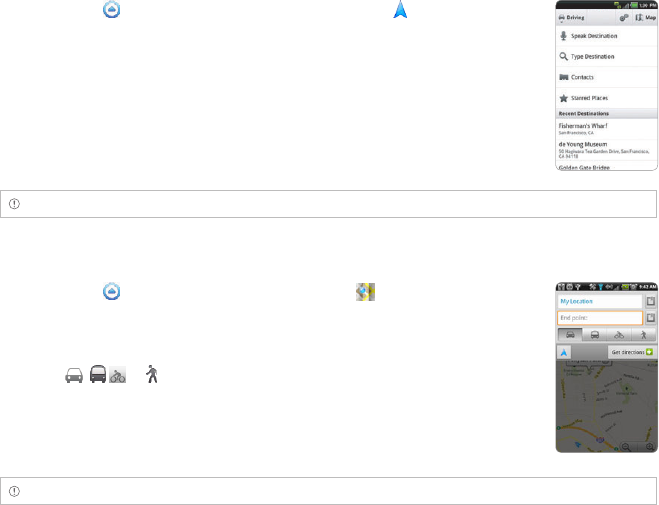
121
LOCATION-BASED SERVICES
NAVIGATION
SEARCHING FOR THE DESTINATION BY VOICE
1 Touch Apps from the Home Screen. Touch Navigation .
2 Touch Speak Destination and speak your destination into the Breakout™.
3 Select and touch a destination in the list when there are many
destinations.
Note You can also search the destination by typing it or selecting it in the contacts.
FINDING DIRECTIONS USING Google MAPS
1 Touch Apps from the Home Screen. Touch Maps .
2 Press the Menu Key B and touch Directions.
3 Enter the name of the end point.
4 Touch , or , and touch Get directions.
5 Select and touch a place in the results.
Note For more information on Google Maps, refer to Using Google Maps on page 115.
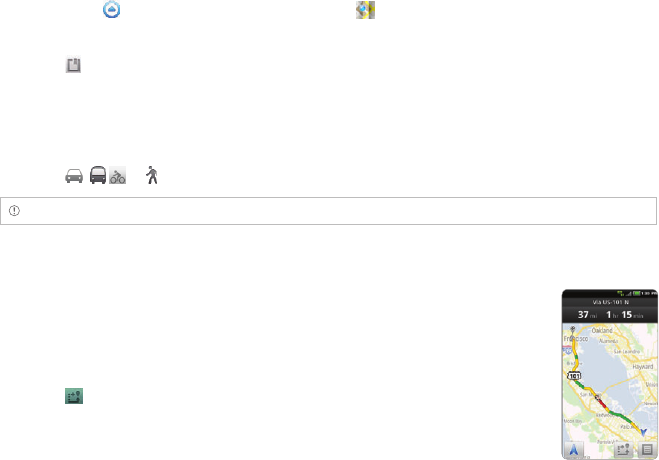
122
LOCATION-BASED SERVICES
SETTING THE END POINT MANUALLY
1 Touch Apps from the Home Screen. Touch Maps .
2 Press the Menu Key B and touch Directions.
3 Touch to the right of End point.
4 Touch Point on map if you want to set the end point.
5 Touch a point on the map.
6 Touch Tap to select this point.
7 Touch , or , and touch Get directions.
Note You can also set your location following the same process.
CHECKING THE TRAFFIC CONDITIONS
1 Press the Menu Key B and touch Route Info while Navigation is running.
2 Swipe the screen along the suggested route to the destination.
Depending on the traffic conditions, the road appears in green (good),
yellow (congested) or red (jammed).
3 Touch and touch the route if you want to set an alternative route.
123
LOCATION-BASED SERVICES
NEWS & WEATHER
News and Weather offers news in various fields and weather information in your region.
Viewing weather information
1 Touch Apps from the Home Screen. Touch News & Weather . Information on your current
region for the moment is provided by default.
2 Touch on the weather information in the middle of the screen if you want to check the weather
forecast throughout the day.
3 Touch on the chart and drag the vertical bar on the screen to the left or right if you want to see
weather information for a certain time of the day.
SELECTING WEATHER SETTINGS
1 Touch Apps from the Home Screen. Touch News & Weather .
2 Press the Menu Key B and touch Settings.
3 Touch Weather settings.
4 Touch Use my location if you want to see information of your region automatically.
5 Touch Use metric if you want to change the unit for weather information.
CHANGING MY LOCATION
1 Touch Apps from the Home Screen. Touch News & Weather .
2 Press the Menu Key B and touch Settings.
3 Touch Weather settings.
4 Deselect Use my location.
5 Touch Set location and enter the name or postal code of a city you want.
124
LOCATION-BASED SERVICES
READING NEWS ARTICLES
1 Touch Apps from the Home Screen. Touch News & Weather .
2 Touch Top Stories on the top of the screen.
3 Select and touch an article if you want to see the full story.
4 Swipe the screen to the left or right if you want to see articles by category.
CUSTOMIZING NEWS TOPICS
1 Touch Apps from the Home Screen. Touch News & Weather .
2 Press the Menu Key B and touch Settings.
3 Touch News settings > Select news topics.
4 Select and touch the topic you want to see. Touch it again if you want to delete the topic.
ADDING NEWS TOPICS
1 Touch Apps from the Home Screen. Touch News & Weather .
2 Press the Menu Key B and touch Settings.
3 Touch News settings > Select news topics.
4 Touch Custom topic, enter the title and touch OK. You can see articles related to the title.
SELECTING NEWS SETTINGS
1 Touch Apps from the Home Screen. Touch News & Weather .
2 Press the Menu Key B and touch Settings.
3 Touch News Settings.

125
LOCATION-BASED SERVICES
4 Touch Prefetch articles if you want to shorten time to access articles. Remember this increases
data usage and consumes more battery. Touch Prefetch images if you also want to make it short to
access images.
5 Touch News terms of service if you want to check Terms of Use for news.
6 Touch Mobile privacy policy if you want to see the latest mobile privacy policy.
SETTING REFRESH OPTIONS
1 Touch Apps from the Home Screen. Touch News & Weather .
2 Press the Menu Key B and touch Settings.
3 Touch Refresh settings.
4 Touch Auto-refresh if you want to update weather and news automatically. The check box is
selected by default.
5 Touch Refresh interval, select and touch an interval to refresh. Refresh status shows the last refresh
date and time.

8. WEB-BASED SERVICES
WEB SURFING
Google SEARCH
VOICE SEARCH
ANDROID MARKET
8
WEB-BASED SERVICES
This chapter provides important information
about using the Breakout™ including:
127
WEBBASED SERVICES
WEB SURFING
SEARCHING FOR INFORMATION IN THE INTERNET
1 Touch Browser from the Home screen.
2 Touch on the search box and type the keyword.
3 Touch .
4 Pinch two fingers apart on the screen if you want to zoom in the web page.
FINDING WORDS IN THE CURRENT PAGE
1 Press the Menu Key B and touch More > Find on page while a web page is open.
2 Enter a word that you want to see in the current page. The screen moves to the place that includes
the word as you type it.
3 Touch to move to the next sentence that contains the word. Touch to move to the previous
sentence.
COPYING TEXT IN THE CURRENT PAGE
1 Press the Menu Key B and touch More > Select text while a web page is open.
2 Drag text on the screen, and touch the dragged text to copy to clipboard. You can paste the copied
text.
VISITING A NEW PAGE
1 Touch Browser from the Home screen.
128
WEB-BASED SERVICES
2 Touch the address bar and enter a new URL.
3 Touch next to the address bar or touch in the virtual keyboard.
REFRESHING A PAGE
1 Touch Browser from the Home screen.
2 Press
the Menu Key
B and touch to refresh the page when a page is open. Or touch Q to stop
refreshing the page.
CHANGING HOME PAGE
1 Touch Browser from the Home screen.
2 Press the Menu Key B and touch More.
3 Touch Settings > Set home page.
4 Enter a new URL if you want to change the home page, and touch OK.
5 Touch Use current page if you want to use the current page as the home page.
VIEWING BROWSER HISTORY
1 Touch Browser from the Home screen.
2 Press the Menu Key B and touch Bookmarks.
3 Touch Most visited if you want to see web pages that you visit the most. Touch next to the
website if you want to add it to bookmarks.
4 Touch History if you want to see past browsing activity. Press the Menu Key B and touch Clear
history if you want to delete the browsing history.
129
WEB-BASED SERVICES
OPENING A NEW WINDOW
1 Touch Browser from the Home screen.
2 Press the Menu Key B and touch New window. Another window appears.
MANAGING MANY WINDOWS
1 Touch Browser from the Home screen.
2 Press the Menu Key B and touch Windows.
3 Select and touch a window that you want to see. Or Touch Q next to the window that you want to
delete.
ADDING BOOKMARKS
1 Touch Browser from the Home screen.
2 Press the Menu Key B and touch Bookmarks while you are visiting a web page.
3 Touch +Add.
4 Enter the name and location of the website and touch OK.
OPENING BOOKMARKED PAGES
1 Touch Browser from the Home screen.
2 Press the Menu Key B and touch Bookmarks.
3 Touch and hold a bookmark of a web page:
xTouch Open if you want to open the web page in the current window.
xTouch Open in new window if you want to open the web page in a new window.
130
WEB-BASED SERVICES
ADDING BOOKMARK WIDGET
1 Touch and hold on the empty space on the Home screen, or press the Menu Key B from idle mode
and touch Widget.
2 Touch Pantech Widgets.
3 Touch and hold Bookmark on the bottom of the screen and place it on the Home screen.
4 Select a style. You can access the bookmarked website with singe touch.
MANAGING BOOKMARKS
1 Touch Browser from the Home screen.
2 Press the Menu Key B and touch Bookmarks.
3 Touch and hold a bookmark:
xIf you want to edit the bookmark, touch Edit bookmark, change the name or location, and
touch OK.
xIf you want to make its shortcut in the Home screen, touch Add shortcut to Home.
xIf you want to share the bookmark as a link, touch Share link, touch Bluetooth, Email, Gmail,
Messaging or V CAST Media Manager and take necessary steps.
xIf you want to copy the URL, touch Copy link URL and paste it to a message.
REARRANGING BOOKMARKS
1 Touch Browser from the Home screen.
2 Press the Menu Key B and touch Bookmarks.
3 Press the Menu Key B and touch Rearrange bookmarks.
4 Touch and hold a bookmark to move and drag it to other place.
131
WEB-BASED SERVICES
DELETING BOOKMARKS
1 Touch Browser from the Home screen.
2 Press the Menu Key B and touch Bookmarks.
3 Touch and hold a bookmark and touch Delete bookmark.
4 Touch OK.
SETTING THE DISPLAY OPTIONS
1 Touch Browser from the Home screen.
2 Press the Menu Key B and touch More > Settings.
3 Touch Text size, select and touch your preferred text size.
4 Touch Default zoom, select and touch your preferred zoom mode.
5 Touch Block pop-up windows if you want to prevent pop-up windows from appearing. The check
box is selected by default.
SETTING PRIVACY OPTIONS
1 Touch Browser from the Home screen.
2 Press the Menu Key B and touch More.
3 Touch Settings.
4 Touch Clear all cookie data > OK if you want to delete all cookie data.
5 Touch Clear form data > OK if you want to delete all form data.
132
WEB-BASED SERVICES
ADDING WEB WIDGET
1 Touch and hold on the empty space on the Home screen, or press the Menu Key B from idle mode
and touch Widget.
2 Touch Pantech Widgets.
3 Touch and hold Web space on the bottom of the screen and place it on the Home screen.
4 Enter the URL and touch Go.
5 Touch Next on the top right side of the screen.
6 Select a style.
7 Move the box in pink where you want to place and touch Done. You can check the web page and
update it by touching .
Google SEARCH
SEARCHING FOR INFORMATION WITH Google
1 Touch Apps from the Home Screen. Touch Google Search , or press the Search Key D in idle
mode.
2 Enter a keyword in the search box and touch or . You can also touch the Voice Commands Key
H and say it on the phone.
SETTING SEARCH OPTIONS
1 Touch Apps from the Home Screen. Touch Google Search .
2 Press the Menu Key B and touch Search settings.
3 Touch Google search.
133
WEB-BASED SERVICES
4 Touch Show web suggestions if you want to see suggestions from Google as you search through
Google. The check box is selected by default.
5 Touch Use My Location if you allow your location to be used for Google search results.
SELECTING ITEMS THAT CAN BE SEARCHED
1 Touch Apps from the Home Screen. Touch Google Search .
2 Press the Menu Key B and touch Search settings.
3 Touch Searchable items.
4 Select and touch items you want to include for the search result. Touch Clear shortcuts if you want
to clear shortcuts to recently chosen search items.
MANAGING SEARCH HISTORY
1 Touch Apps from the Home Screen. Touch Google Search .
2 Press the Menu Key B and touch Manage search history.
Note Make sure to touch Search history first if you want to use Manage search history.
3 Enter the email address and password for your Google account.
4 Select and touch search history in the list and touch Remove if you want to remove the search
history.

134
WEB-BASED SERVICES
ADDING Google SEARCH WIDGET
1 Touch and hold on the empty space on the Home screen, or press the Menu Key B from idle mode
and touch Widget.
2 Touch Android Widgets.
3 Touch Google Search in the list.
4 Select the item that should be included for search. You can edit the items later.
VOICE SEARCH
Search the Internet by speaking on the phone.
1 Touch Apps from the Home Screen. Touch Voice Search , or touch and hold the Search Key D.
2 Say a keyword on the mic.
3 Select and touch the result. Speak again when no matches are found for the keyword.
Voice search Search results

135
WEB-BASED SERVICES
ANDROID MARKET
Download useful applications from the Android Market and use them for your purposes.
DOWNLOADING APPLICATIONS
1 Touch
Apps
from the Home Screen. Market
.
2 Touch Next and follow the necessary steps for adding a Google account if you do not have a
Google account.
3 Touch Accept on the Android Market Terms of Service if you are accessing the Android Market for
the first time.
4 Touch Apps, Games or other options in the middle of the screen. You can also touch one of the
images that are rotating in the top of the screen. Or press the Menu Key B and select My Apps.
xTouch Apps if you want to download applications that provide useful functions for your
purposes.
xTouch Games if you want to download and enjoy games.
xTouch My apps if you want to check applications that you have downloaded and manage them.
5 Select and touch a category.
6 Touch Top paid, Top free or Just in.
xFor Top paid applications, touch the price, touch OK and take the necessary steps.
xFor Top free applications, touch FREE > OK. The selected applications will be downloaded
instantly.
xFor Just in applications, touch an application and follow the necessary steps depending on
whether it is a paid or free application.

136
WEB-BASED SERVICES
SEARCHING FOR APPLICATIONS
1 Touch
Apps
from the Home Screen. Touch Market
.
2 Touch and enter the name or the keyword of the application that you want to install and touch
Go or .
3 Select and touch the application and install it.
RUNNING DOWNLOADED APPLICATIONS
1 Touch on the top of the Home screen, drag the notifications down.
2 Touch the application that you have downloaded from the Android Market. indicates that an
application is completely downloaded. You can also run the application in the Applications menu.
ADDING ANDROID MARKET WIDGET
1 Touch and hold on the empty space on the Home screen, or press the Menu Key B from idle mode
and touch Widget.
2 Touch Android Widgets.
3 Touch Market in the list. Applications that Market suggests are displayed through the widget.
DELETING APPLICATIONS FROM THE ANDROID MARKET
1 Touch
Apps
from the Home Screen. Touch Market
.
2 Press the Menu Key B and touch My apps.
3 Touch and hold the application to delete and touch Uninstall > OK.
Note You cannot uninstall applications that are installed by the manufacturer.

137
WEB-BASED SERVICES
DELETING APPLICATIONS FROM SETTINGS
1 Touch Apps from the Home Screen. Touch Settings .
2 Touch Applications > Manage applications.
3 Select and touch an application to delete.
4 Touch Uninstall > OK.
5 Touch OK.

9. TOOLS
CALCULATOR
TIP CALCULATOR
ALARM/CLOCK
CLOCK TOOLS
CONVERTER
DOC VIEWER
HANDY MEMO
RECORDER
WEATHER
9
TOOLS
This chapter provides important information
about using the Breakout™ including:

139
TOOLS
CALCULATOR
Perform basic mathematical calculations with the calculator in the Breakout™.
DOING CALCULATIONS
1 Touch Apps from the Home Screen. Touch Calculator .
2 Enter a number and touch a mathematical sign you want to use.
3 Touch C to delete a number. Touch and hold C to delete the whole
number.
SAVING CALCULATIONS
1 Touch Apps from the Home Screen. Touch Calculator .
2 Press the Menu Key B during a calculation and touch Save.
3 Enter a name and touch Save. The final value appears under the name by default.

140
TOOLS
EDITING SAVED CALCULATIONS
1 Touch Apps from the Home Screen. Touch Calculator .
2 Press the Menu Key B and touch List.
3 Touch and hold the calculation to edit and touch Edit.
4 Touch the calculation and edit it.
5 Press the Menu Key B and touch Save, or press the Back Key C.
DELETING CALCULATIONS
1 Touch Apps from the Home Screen. Touch Calculator .
2 Press the Menu Key B and touch List.
3 In order to delete calculations:
xIf you want to delete a calculation, touch and hold the calculation to delete, and touch Delete.
xIf you want to delete several calculations, press the Menu Key B, touch Delete, touch the check
box next to calculations to delete and touch Done in the top of the screen.
4 Touch OK.

141
TOOLS
TIP CALCULATOR
CALCULATING TIPS
1 Touch Apps from the Home Screen. Touch Tip Calculator .
2 Type the amount of the bill.
3 Type the percentage for Tip. If you want to divide the tip, type the
number of persons for Split. Touch J to delete a number. Touch and
hold J to delete the whole number.
4 Touch Done. The calculated value appears below.
RESETTING CALCULATION
1 Touch Apps from the Home Screen. Touch Tip Calculator .
2 Press the Menu Key B and touch Reset.
ALARM/CLOCK
Alarm/Clock helps set the alarm and see basic information on your region including time and weather.
ADDING NEW ALARMS
1 Touch Apps from the Home Screen. Touch Alarm/Clock .
2 Touch and touch Add alarm. You can also press the Menu Key B and touch Add alarm.
3 Touch the check box next to Turn alarm on.
142
TOOLS
4 In order to add an alarm:
xTouch Time, enter the hour and minute and touch Save.
xTouch Repeat, touch the check box next to each day for a week and touch OK.
xTouch Ringtone and touch a ringtone for the alarm. You can listen to each ringtone when you
touch it.
xTouch the check box next to Vibrate if you do not want the Breakout™ to make vibrations for
alarm. It is selected by default.
xTouch Label, enter a name for the alarm and touch OK.
5 Touch Done. A blue bar appears under the new alarm.
EDITING ALARMS
1 Touch Apps from the Home Screen. Touch Alarm/Clock .
2 Touch and touch the alarm to edit.
3 Touch each option and change the setting.
4 Touch Done.
DEACTIVATING ALARMS
1 Touch Apps from the Home Screen. Touch Alarm/Clock .
2 Touch and touch of the alarm to deactivate. A blue bar indicates that the alarm is on. The
color disappears when the alarm is turned off.
DELETING ALARMS
1 Touch Apps from the Home Screen. Touch Alarm/Clock .
2 Touch and touch the alarm to delete. In order to delete alarms:
xIf you want to delete an alarm, touch the alarm to delete, and touch Delete.
143
TOOLS
xIf you want to delete several alarms at once, press the Menu Key B, touch Delete alarm, touch
the check box next to the alarms to delete and touch Done.
3 Touch OK.
ALARM SETTINGS
1 Touch Apps from the Home Screen. Touch Alarm/Clock and touch .
2 Press the Menu Key B and touch Settings.
3 In order to set alarms:
xTouch Alarm in silent mode if you want to play the alarm even when the Breakout™ is in silent
mode. The check box is selected by default.
xTouch Alarm volume if you want to adjust the volume, set the volume and touch OK.
xTouch Snooze duration if you want to adjust the snooze duration, select and touch the
duration.
xTouch Volume button effect if you want to assign a button action for the volume key during an
alarm, select and touch an option.
ENJOYING MUSIC ON DESK CLOCK
1 Touch Apps from the Home Screen. Touch Alarm/Clock .
2 Touch and touch music files to listen to.
DISPLAYING PICTURES ON DESK CLOCK
1 Touch Apps from the Home Screen. Touch Alarm/Clock .
2 Touch . You can see pictures saved in the Breakout™.

144
TOOLS
SETTING OPTIONS FOR DOCK
1 Touch Apps from the Home Screen. Touch Alarm/Clock .
2 Press the Menu Key B and touch Desk clock.
3 Press the Menu Key B and touch Dock settings.
4 Touch Audio and select options for Audio.
5 Touch Dock insertion sound if you want the Breakout™ to make sound when inserting or removing
it from the dock.
ADDING INTERGRATED CLOCK WIDGET
1 Touch and hold on the empty space on the Home screen, or press the Menu Key B from idle mode
and touch Widget.
2 Touch Pantech Widgets.
3 Touch and hold Integrated Clock on the bottom of the screen and place it on the Home screen.
4 Select a style. You can see time, upcoming events of Calendar and weather information at a glance.
CLOCK TOOLS
Clock Tools offers the current time in major cities and time zones around the world. World time is
displayed first by default. You can also use the timer and the stopwatch.
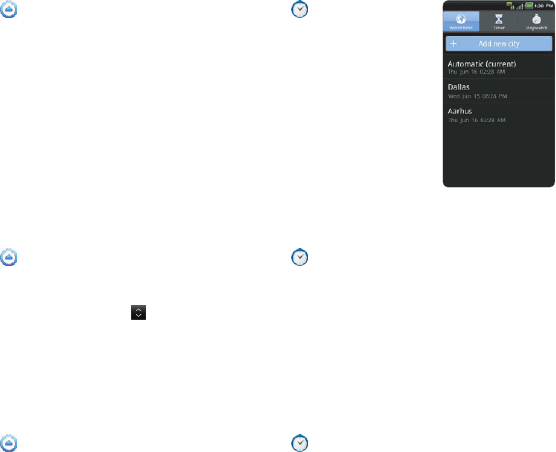
145
TOOLS
VIEWING THE WORLD TIME
1 Touch Apps from the Home Screen. Touch Clock Tools .
2 Touch Add new city and enter the name of a city. Type the first letter and
you can find the city easily.
3 Select and touch the city. The time for the newly added city appears
below the current time.
REARRANGING THE ORDER OF CITIES
1 Touch Apps from the Home Screen. Touch Clock Tools .
2 Press the Menu Key B and touch Rearrange.
3 Select a city to relocate and drag up or down to rearrange the order. You cannot move the
location of the current city.
4 Touch Done.
DELETING A CITY
1 Touch Apps from the Home Screen. Touch Clock Tools .
2 In order to delete cities:
xIf you want to delete one or more than one cities, press the Menu Key B and touch Delete, and
touch the check box next to the city.
xIf you want to delete all cities at once, press the Menu Key B and touch Delete, press the Menu
Key B and touch Select All.
3 Touch Done > Yes.

146
TOOLS
ADDING CLOCK WIDGET
1 Touch and hold on the empty space on the Home screen, or press the Menu Key B from idle mode
and touch Widget.
2 Touch Pantech Widgets.
3 Touch and hold Clock on the bottom of the screen and place it on the Home screen.
4 Select a style.
5 Select a city for the clock. You can see the time for the city on the screen.
6 Touch the widget if you change the city.
APPLYING SUMMER TIME
1 Touch Apps from the Home Screen. Touch Clock Tools .
2 Press the Menu Key B and touch DST.
3 Touch the check box next to the city where you want to apply summer time. You can add an hour
or two hours.
4 Touch Done.
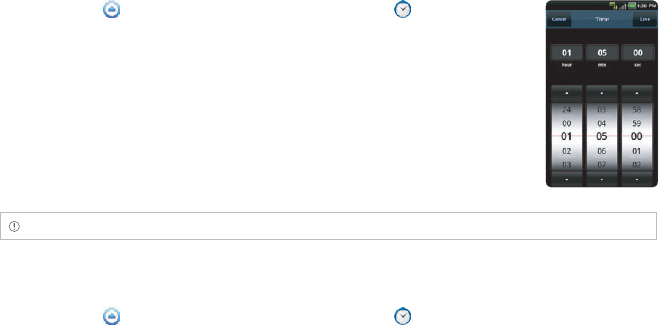
147
TOOLS
USING TIMER
1 Touch Apps from the Home Screen. Touch Clock Tools .
2 Touch Timer.
3 Press the Menu Key B and touch Set for setting the time.
4 Set the hour, minute and second and touch Save.
5 Touch Start. Timer begins to run and makes sound when time is up even
when the vibration mode is set for the Breakout™.
Note You can reset the time by touching Reset while timer is running.
USING STOPWATCH
1 Touch Apps from the Home Screen. Touch Clock Tools .
2 Touch Stopwatch.
3 In order to use stopwatch:
xTouch Lap on the top of the screen and touch Start. This function is used when you want to
measure time that takes to run for a certain distance.
xTouch Lap > Split on the top of the screen and touch Start. This function is used when you
want to measure the accumulated time. You can split it up to 100 times.
4 Touch Reset to restart the stopwatch.
148
TOOLS
CONVERTER
Converter helps convert values for length, volume, weight, temperature, area and speed.
CONVERTING VALUES
1 Touch Apps from the Home Screen. Touch Converter .
2 Select a unit type. Length is selected by default. Change the unit type by touching O or P.
3 Touch on the box below the unit type and enter a value.
4 Select the original unit by dragging the wheel in the middle of the screen.
5 Select a target unit. The changed value promptly appears below. Values are rounded off the to three
decimal places.
RESETTING A CONVERSION
1 Touch Apps from the Home Screen. Touch Converter .
2 Press the Menu Key B during a conversion and touch Reset.
DOC VIEWER
Read documents that are stored in a variety of formats in the Breakout™.
READING DOCUMENTS
1 Touch Apps from the Home Screen. Touch Doc Viewer .
2 Select and touch a folder where you have stored documents.
3 Select and touch a document to read. Press the Menu Key B and touch Sort if you want to
rearrange stored documents by Alphabet, Type, Date or Size.
149
TOOLS
4 Touch anywhere on the screen while a document is open.
5 In order to read a document:
xTouch and touch to zoom in or touch to zoom out in landscape mode. In the portrait
mode, drag downwards or upwards to zoom in or out. You can also zoom in by pinching your
fingers apart, and zoom out by pinching your fingers together.
xTouch if you want to fit the document to width. Or touch if you want to fit the document
to height.
Full view Selecting options
SEARCHING FOR WORDS IN A DOCUMENT
1 Touch Apps from the Home Screen. Touch Doc Viewer .
2 Open a document.
3 Press the Menu Key B and touch Word search.
4 Enter a word to search for and touch Done in the virtual keyboard.
5 Touch to see the word that you have searched for in the next
sentence or page.
6 Touch Done if you want to stop searching for the word.
150
TOOLS
MOVING TO A PAGE IN A DOCUMENT
1 Touch Apps from the Home Screen. Touch Doc Viewer .
2 Open a document.
3 Touch to move to the previous page. Touch to move to the next
page.
4 Press the Menu Key B and touch Go to page.
5 Enter the page to go to and touch .
HANDY MEMO
Write a memo with your finger or the keypad. Make sure to insert a microSD™ card to use Handy
Memo.
WRITING TEXT MEMOS
1 Touch Apps from the Home Screen. Touch Handy Memo .
2 Touch Create new > Text memo. If there are no memos saved in the
memory card, the screen appears first by default where you can type in
a text memo.
3 Type in text.
4 Touch Save. The memo appears in full view. Press the Back Key C if you
want to return to the first screen of Handy Memo.

151
TOOLS
DRAWING A HANDY MEMO
1 Touch Apps from the Home Screen. Touch Handy Memo .
2 Touch Create new > Hand drawing memo.
3 Draw a memo with your finger.
4 Touch to select effects.
5 Adjust the thickness of the pencil and the eraser.
6 Touch Save. The memo appears in full view. Press the Back Key C if you
want to return to the first screen of Handy Memo.
EDITING MEMOS
1 Touch Apps from the Home Screen. Touch Handy Memo .
2 Before editing a memo:
xIf you want to edit a memo without checking it in full view, touch and hold the memo to edit
and touch Edit.
xIf you want to check a memo in full view before editing, touch the title first. Then, touch on the
screen.
3 Edit the memo and touch Save.
SHARING MEMOS
1 Touch Apps from the Home Screen. Touch Handy Memo .
2 Before sharing a memo:
xIf you want to send a memo to your friends without checking it, touch and hold the memo to
share and touch Share.
xIf you want to check the memo before sending it to your friends, touch the title, press the Menu
Key B and touch Share.

152
TOOLS
3 Touch Bluetooth, Email, Gmail, Messaging, Net Media, Online Album, Picasa, or V CAST Media
Manager.
4 Follow necessary steps for each service.
Note If you choose to use Messaging, text memos are sent as the Short Message Service (SMS) and hand
drawing memos are sent as the Multimedia Messaging Service (MMS).
CHANGING MEMO TYPE
1 Touch Apps from the Home Screen. Touch Handy Memo .
2 Touch Create new and touch Text memo or Hand drawing memo.
3 For each option:
xPress the Menu Key B and touch Hand drawing memo if you want to draw a memo with hand.
xPress the Menu Key B and touch Text memo if you want to type a memo.
4 Touch OK for saving the memo if you were in the middle of creating a memo. If you do not write or
draw any memo, the memo type will change instantly.
ADDING MEMO WIDGET
1 Touch and hold on the empty space on the Home screen, or press the Menu Key B from idle mode
and touch Widget.
2 Touch Pantech Widgets.
3 Touch and hold Memo on the bottom of the screen and place it on the Home screen.
4 Select a style. Remember that the memo widget would not be available if there are no memos
saved in the Breakout™.
5 Touch a memo or memos that would be displayed on the screen and touch Done.
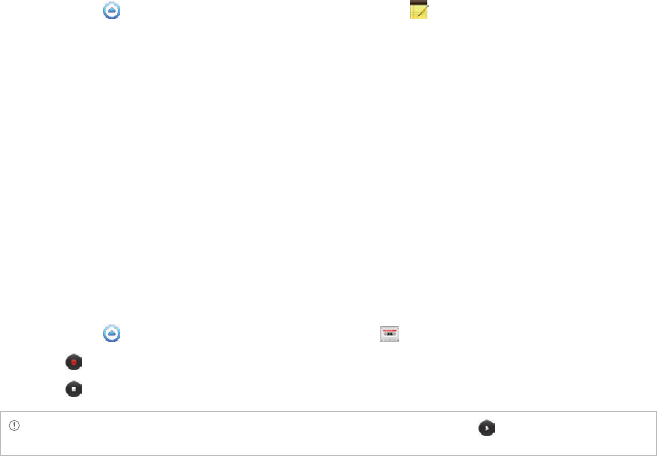
153
TOOLS
DELETING MEMOS
1 Touch Apps from the Home Screen. Touch Handy Memo .
2 Before deleting a memo:
xIf you want to delete a memo without checking it, touch and hold the memo to delete and
touch Delete.
xIf you want to check the memo before deleting, touch the title, press the Menu Key B and
touch Delete.
xIf you want to delete several memos at once, press the Menu Key B and touch Delete, touch
the check box next to memos to delete and touch Done. If you want to all memos, press the
Menu Key B and touch Select all and touch Done.
3 Touch OK.
RECORDER
RECORDING YOUR VOICE
1 Touch Apps from the Home Screen. Touch Recorder .
2 Touch to start recording your voice.
3 Touch to stop recording your voice.
Note Once you have recorded a voice memo, the screen to play it appears. Touch to replay the recorded
voice memo. Press the Back Key C if you want to record a new voice memo.
154
TOOLS
LISTENING TO RECORDED VOICES
1 Touch Apps from the Home Screen. Touch Recorder .
2 Press the Menu Key B and touch List.
3 Touch and hold a memo to listen and touch Play.
4 Touch . If you want to go back to the list, press the Back Key C, or press the Menu Key B and
touch List.
SHARING VOICE MEMOS
1 Touch Apps from the Home Screen. Touch Recorder .
2 Press the Menu Key B and touch List.
3 Before sending memos to your friends:
xIf you want to send a memo, touch and hold a memo to share, and touch Share.
xIf you want to send several memos, press the Menu Key B, touch Share, select the checkbox
next to memos to share, and touch Done.
4 Touch Bluetooth, Gmail, Messaging, Net Media, or V CAST Media Manager, and take necessary
steps.
155
TOOLS
RENAMING MEMO
1 Touch Apps from the Home Screen. Touch Recorder .
2 Press the Menu Key B and touch List.
3 Touch and hold a memo to rename and touch Rename.
4 Change the name of the memo and touch Save.
SETTING A MEMO AS RINGTONE
1 Touch Apps from the Home Screen. Touch Recorder .
2 Press the Menu Key B and touch List.
3 Touch and hold a memo to use as a ringtone, and touch Set as Ringtone.
DELETING VOICE MEMOS
1 Touch Apps from the Home Screen. Touch Recorder .
2 Press the Menu Key B and touch List.
3 Before deleting voice memos:
xIf you want to delete a memo, touch and hold a memo to delete, and touch Delete > OK.
xIf you want to delete several memos, press the Menu Key B, touch Delete, select the checkbox
next to memos to delete and touch Done.
4 Touch OK.
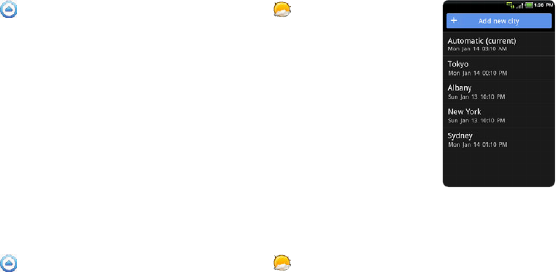
156
TOOLS
WEATHER
CREATING LIST OF CITIES
1 Touch Apps from the Home Screen. Touch Weather .
2 Touch Add new city.
3 Type the name of the city you want, or swipe the screen upwards while
you type and touch a city. Weather information of the city appears in the
list. You can add up to 15 cities in the list.
VIEWING WEATHER INFORMATION
1 Touch Apps from the Home Screen. Touch Weather .
2 Select and touch a city in the list you want to see.
3 If you want to see more information:
xTouch Update if you want to see the current weather information.
xPress the Menu Key B and touch Forecast, and you can see weather forecast for the next five
days including today.
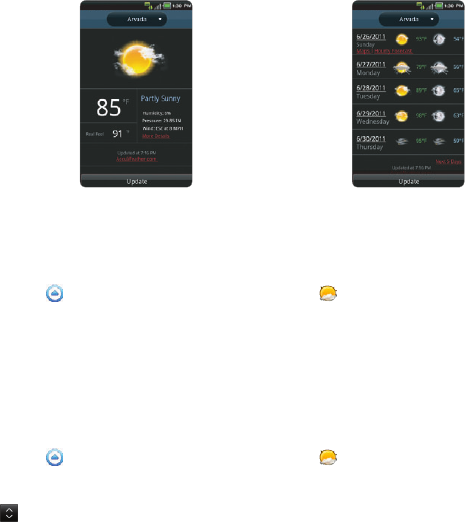
157
TOOLS
Current weather Weather forecast
CHANGING THE TEMPERATURE UNIT
1 Touch Apps from the Home Screen. Touch Weather .
2 Press the Menu Key B and touch Settings.
3 Touch O or P. The temperature changes from Fahrenheit to Celsius.
4 Press the Back Key C when you finish changing the unit.
REARRANGING THE ORDER OF CITIES
1 Touch Apps from the Home Screen. Touch Weather .
2 Press the Menu Key B and touch Rearrange.
3 Drag next to the city to move upward or downward.
4 Touch Save.

158
TOOLS
DELETING A CITY
1 Touch Apps from the Home Screen. Touch Weather .
2 Press the Menu Key B and touch Delete.
3 Touch K next to the city to delete. If you want to delete all cities, press the Menu Key B and touch
Select All.
4 Touch Done.
5 Touch OK.
ADDING WEATHER WIDGET
1 Touch and hold on the empty space on the Home screen, or press the Menu Key B from idle mode
and touch Widget.
2 Touch Pantech Widgets.
3 Touch and hold Weather on the bottom of the screen and place it on the Home screen.
4 Select a style. Remember that no information will be displayed if you have not set cities for Weather.

10. STORAGE
MANAGING THE MEMORY CARD
CONNECTING TO A PC
USING Breakout™ AS MASS STORAGE
TRANSFERRING FILES THROUGH WINDOW MEDIA SYNC
10
STORAGE
This chapter provides important information
about using the Breakout™ including:
160
STORAGE
MANAGING THE MEMORY CARD
Manage the microSD™ card carefully. If you do not follow the steps described below to manage the
memory card, you can incur serious damage to the card.
VIEWING AVAILABLE MEMORY
1 Touch Apps from the Home Screen. Touch Settings .
2 Touch Storage.
3 Swipe the screen and check the status of the SD card and internal phone storage.
UNMOUNTING THE SD CARD
1 Touch Apps from the Home Screen. Touch Settings .
2 Touch Storage > Unmount SD card.
3 Read the warning on unmounting the SD card and touch OK.
4 Touch and hold the Power/Lock Key F E.
5 Touch Power off > OK.
6 Open the back cover.
7 Remove the battery.
8 Now you can remove the SD card safely.
Note If you want to mount the SD card, touch Apps > Settings > Storage > Mount SD card.
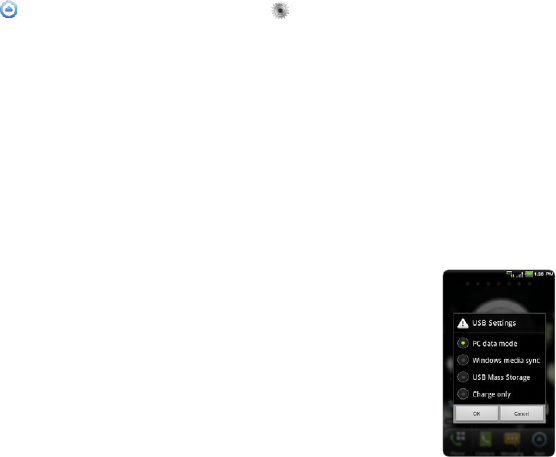
161
STORAGE
ERASING THE microSD™ CARD
1 Touch Apps from the Home Screen. Touch Settings .
2 Touch Storage > Unmount SD card > OK.
3 Touch Erase SD card > Erase SD Card > Erase everything. All data stored in the card will be
deleted.
CONNECTING TO A PC
Synchronize files and exchange data with a computer using the PC data cable. Keep in mind that you
cannot transfer media files if you turn on the USB debugging mode (Apps > Settings > Applications >
Development > USB debugging).
SELECTING THE USB MODE
1 Connect the USB cable to the Breakout™.
2 Connect the other end of the cable to your computer.
3 Select and touch a USB mode for your purposes:
xTap PC data mode > OK if you want to transfer files between the
Breakout™ and PC when they are connected. You can also use your
Breakout™ as a PC when PC data mode is on.
xTouch Windows media sync > OK if you want to transfer media files
between the Breakout™ and your PC.
xTap USB Mass Storage > OK if you want to save mass files in the
Breakout™. USB Mass Storage mode will not appear if there is no
memory card in the Breakout™. It is selected as a default mode.
xTouch Charge only > OK if you only want to connect the USB cable
to charge the Breakout™. Remember that the Breakout™ continues to
be charged as long as it is connected to PC through the cable even if
you have not selected the Charge only mode.
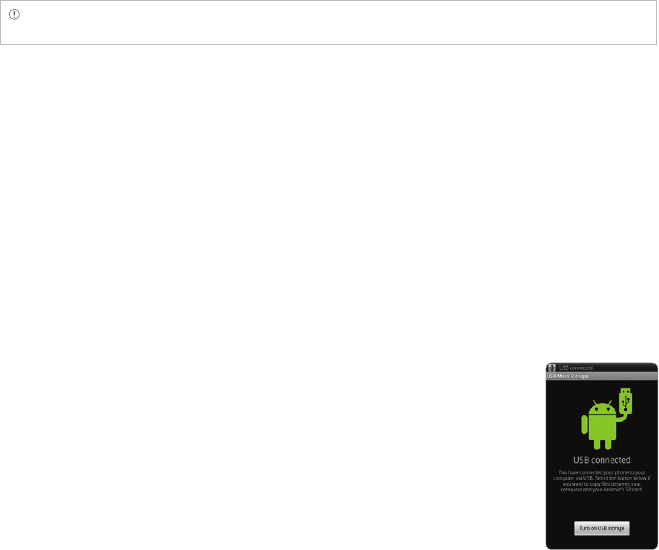
162
STORAGE
Note If you do not want to see the window any more, select the checkbox before Do Not Ask on Plug and touch
OK.
CHANGING THE USB MODE IN THE STATUS BAR
1 Connect the Breakout™ to your computer using the USB cable.
2 Touch on the top of the screen and drag down the status bar.
3 Touch USB Settings and touch a USB mode for your purposes and touch OK.
USING Breakout™ AS MASS STORAGE
Copy files between your computer and the microSD™ card in the Breakout™. If you turn on USB storage,
some of currently using applications (Handy Memo, Recorder, Music, Camera, Doc Viewer, etc.) may be
stopped or unavailable until you turn off USB storage.
COPYING FILES
1 Set the USB mode for mass storage.
2 Touch on the top of the screen, drag the status bar down and touch USB
connected > Turn on USB storage > OK. A window appears where you
can see what is saved in the Breakout™. These steps appear only when
you have selected the USB mass storage mode.
3 Select and copy files to transfer between the Breakout™ and your PC.
4 Paste files to your PC or the Breakout™. The status of transferred files is
displayed in the status bar.
5 Touch Turn off USB storage in the status bar if you want to turn off the
function, and touch Turn off USB storage.

163
STORAGE
USB MODE ICONS
Icon Description Icon Description
USB debugging is connected USB Switch connected: Change the
USB mode
USB is connected: Turn on/off USB
storage mode
TRANSFERRING FILES THROUGH WINDOW MEDIA SYNC
1 Set the USB mode for Window Media Sync. A window appears where you can see what is saved in
the Breakout™.
2 Select and copy files to transfer between the Breakout™ and your PC.

11. SETTINGS
WIRELESS & NETWORKS
CALL SETTINGS
SOUND
DISPLAY
LOCATION & SECURITY
APPLICATIONS
ACCOUNTS & SYNC
PRIVACY
STORAGE
LANGUAGE & KEYBOARD
VOICE INPUT & OUTPUT
ACCESSIBILITY
DATE & TIME
ABOUT PHONE
11
SETTINGS
This chapter provides important information
about setting options to use the Breakout™ including:

165
SETTINGS
WIRELESS & NETWORKS
SETTING AIRPLANE MODE
1 Touch Apps > Settings > Wireless & networks > Airplane mode. If you turn on Airplane mode,
Wi-Fi, Bluetooth, and Data functions are turned off at once. However, you can turn on each function
for your preference.
2 Touch Airplane mode again to reactivate other functions. However, Data function will not be
reactivated automatically unlike Wi-Fi and Bluetooth functions.
SETTING MOBILE NETWORKS
1 Touch Apps > Settings > Wireless & networks.
2 Touch Mobile networks to manage the mobile network.
SETTING MOBILE BROADBAND CONNECT
1 Touch Apps > Settings > Wireless & networks > Mobile Broadband Connect.
2 Touch Mobile Broadband Connect to share your phone’s Internet connection with your computer
via USB.
3 Touch Activate to activate the technology.
SETTING MOBILE HOTSPPOT
1 Touch Apps > Settings > Wireless & networks > Mobile Hotspot.
166
SETTINGS
2 Touch Mobile Hotspot to share your phone’s Internet connection as a wireless access point.
3 Touch Activate to activate the technology. Refer to page 112 for more information.
SETTING Wi-Fi NETWORKS
1 Touch Apps > Settings > Wireless & networks.
2 Touch Wi-Fi settings to manage the wireless network.
SETTING Bluetooth
1 Touch Apps > Settings > Wireless & networks.
2 Touch Bluetooth settings to manage the wireless technology option.
SETTING VPN SETTINGS
1 Touch Apps > Settings > Wireless & networks > VPN settings > Add VPN.
2 Touch Add PPTP VPN, Add L2TP VPN, Add L2TP/IPSec PSK VPN or Add L2TP/IPSec CRT VPN.
3 Set up the network by entering necessary information.
CALL SETTINGS
SETTING VOICEMAIL SERVICE
1 Touch Apps > Settings > Call settings > Voicemail service.
2 Touch My carrier.
167
SETTINGS
SETTING VOICEMAIL SETTINGS
1 Touch Apps > Settings > Call settings > Voicemail settings.
2 Touch Voicemail number.
3 Enter the voicemail number and touch OK.
SETTING AUTO ANSWER
1 Touch Apps > Settings > Call settings > Auto Answer.
SETTING ASSISTED DIALING
1 Touch Apps > Settings > Call settings > Assisted dialing.
2 Touch Assisted dialing status.
3 Touch Reference country, select and touch a country.
SETTING AUTO RETRY
1 Touch Apps > Settings > Call settings > Auto Retry.
2 Select and touch the time for automatic retry.
SETTING TTY MODE
1 Touch Apps > Settings > Call settings > TTY mode.
2 Touch TTY Off, TTY Full, TTY HCO or TTY VCO.
168
SETTINGS
SETTING DTMF TONES
1 Touch Apps > Settings > Call settings > DTMF Tones.
2 Touch Normal or Long.
SETTING VOICE PRIVACY
1 Touch Apps > Settings > Call settings > Voice Privacy.
SETTING DIALPAD
1 Touch Apps > Settings > Call settings > Show dialpad.
2 Touch Service number, Custom phone number or All calls.
3 Touch Entered custom number, type the custom phone number and touch OK.
SOUND
SETTING SILENT MODE
1 Touch Apps > Settings > Sound > Silent mode. All other functions except the media volume and
alarms are silenced if you select this option.
2 Touch Silent mode again to activate all functions.
SETTING TO VIBRATE
1 Touch Apps > Settings > Sound > Vibrate.
2 Touch Always, Never, Only in Silent mode or Only when not in Silent mode.
169
SETTINGS
SETTING VOLUME
1 Touch Apps > Settings > Sound > Volume. Make sure to deselect Silent mode.
2 Adjust the volume for ringtone, media and alarm. Touch Use incoming call volume for
notifications if you want to use this function. Otherwise, deselect it and adjust the volume for
notifications.
3 Touch OK.
SETTING PHONE RINGTONE
1 Touch Apps > Settings > Sound > Phone ringtone.
2 Select and touch a ringtone in the list.
3 Touch OK.
SETTING NOTIFICATION RINGTONE
1 Touch Apps > Settings > Sound > Notification ringtone.
2 Select and touch a ringtone for notifications.
3 Touch OK.
SETTING FEEDBACK OPTIONS
1 Touch Apps > Settings > Sound.
2 Touch Audible touch tones if you want to play tones when using the dial pad. It is selected by
default.
3 Touch Audible selection if you want to play sound when making a selection on the screen. It is
selected by default.
170
SETTINGS
4 Touch Screen lock sounds if you want to play sound when locking and unlocking the screen.
5 Touch Haptic feedback if you want the Breakout™ to vibrate when you press soft keys. It is selected
by default.
SETTING EMERGENCY TONE
1 Touch Apps > Settings > Sound > Emergency tone.
2 Touch Off, Alert or Vibrate.
SETTING ROAMING SOUND
1 Touch Apps > Settings > Sound > Roaming Sound if you want to be indicated by sound when
you are roaming.
DISPLAY
SETTING BRIGHTNESS
1 Touch Apps > Settings > Display > Brightness.
2 Drag the vertical bar to the right to increase brightness. Drag it to the left to decrease brightness.
3 Touch Automatic brightness if you let brightness to be adjusted automatically.
4 Touch OK.
SETTING AUTOROTATE SCREEN
1 Touch Apps > Settings > Display > Auto-rotate screen if you want to make the screen rotate
automatically when you move the Breakout™ horizontally or vertically.
171
SETTINGS
SETTING ANIMATION OPTIONS
1 Touch Apps > Settings > Display > Animation.
2 Touch No animations, Some animations or All animations.
SETTING SCREEN TIMEOUT
1 Touch Apps > Settings > Display > Screen timeout.
2 Select and touch the time interval to turn off the screen.
SETTING ROAMING BANNER
1 Touch Apps > Settings > Display > Roaming Banner if you want to be visually notified when your
phone is roaming.
LOCATION & SECURITY
SETTING VERIZON LOCATION SERVICES
1 Touch Apps > Settings > Location & security > VZW Location Services.
2 Touch Agree.
SETTING STANDALONE GPS SERVICES
1 Touch Apps > Settings > Location & security > Standalone GPS Services.
2 Touch Agree.
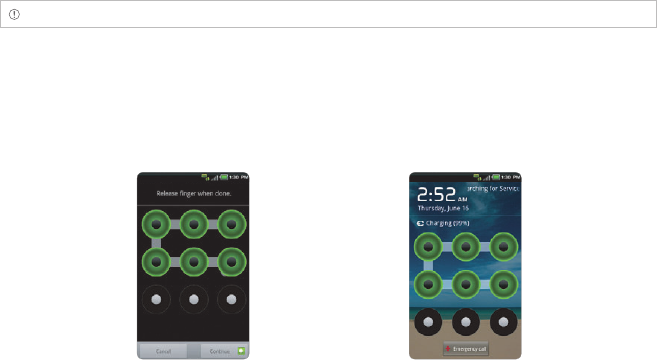
172
SETTINGS
SETTING Google LOCATION SERVICES
1 Touch Apps > Settings > Location & security > Google Location Services.
2 Touch Agree.
SETTING SCREEN LOCK WITH A PATTERN KEY
1 Touch Apps > Settings > Location & security > Set up screen lock > Pattern.
2 Read “Securing your phone” page and touch Next.
3 Watch how to set up the pattern and touch Next.
Note Steps 2–3 appear only when you set up the pattern lock for the first time.
4 Drag your pattern on the screen and touch Continue. Make sure to connect the pattern with at
least four dots. Touch Retry and draw another pattern if you want to set up one.
5 Touch Continue.
6 Drag the pattern again and touch Confirm. If you want to see your pattern as you draw, touch Use
visible pattern.
Setting the pattern lock Unlocking the pattern lock

173
SETTINGS
Note If you fail to drag the correct pattern to unlock the screen for five consecutive times, you have to wait for
30 seconds before you can try it again. If you forget your pattern lock, touch Forgot pattern, enter your account
name and password for Google and create a new pattern lock. However, Forgot pattern will not appear if you
have no Google account for the Breakout™.
FORGOT YOUR PASSWORD FOR Google ACCOUNT?
If you have forgotten your password for Google account, reset it at the Google website.
1 Open your web browser on your computer and go to
https://www.google.com/accounts/recovery.
2 Enter the email address or username that you use to sign in to your Google account and click
Submit.
3 Enter the characters that you see on the screen and click Continue.
4 Select an option about recovering your account and click Continue.
5 Take necessary steps for each option:
xEnter the answer for security questions if you have selected Answer your security question. This
option will not be available if you have signed in to your Google account within last five days.
xCheck your email account you provided when you created your Google Account and follow the
instructions if you have selected Email to @****.
xFill in the form for Google Accounts Help if you have selected I no longer have access to these,
and click Submit on the bottom of the window.
Note Do not select Text message to 30: You cannot receive a code to reset your password on
your mobile phone.

174
SETTINGS
SETTING SCREEN LOCK WITH A PASSWORD
1 Touch Apps > Settings > Location & security > Set up screen lock > Password.
2 Enter your password and touch Continue. The password should be at least 4 characters.
3 Enter the password again to confirm.
4 Touch OK. If you want to set vibration as you touch your password, touch Use tactile feedback.
Note Touch Apps > Settings > Location & security > Visible passwords if you want to see passwords as you type.
SETTING SCREEN LOCK WITH A PIN
1 Touch Apps > Settings > Location & security > Set up screen lock > PIN.
2 Enter numbers as PIN and touch Continue. The PIN should be at least 4 characters.
3 Enter the numbers again to confirm.
4 Touch OK. If you want to set vibration as you touch your PIN, touch Use tactile feedback.
Note Touch Apps > Settings > Location & security > Set up screen Lock > None if you do not want to set up
an additional process to unlock the screen.
SETTING THE TIME INTERVAL TO LOCK
1 Touch Apps > Settings > Location & security > Lock phone after.
2 Select and touch the time interval you want.
175
SETTINGS
SETTING SIM CARD LOCK
1 Touch Apps > Settings > Location & security > Set up SIM card lock.
2 Touch Lock SIM card and enter the SIM PIN if you want to require a PIN to use the phone.
3 Touch Change SIM PIN and enter the old SIM PIN and a new SIM PIN if you want to change the SIM
PIN.
SETTING THE CREDENTIAL STORAGE PASSWORD
1 Touch Apps > Settings > Location & security > Set password.
2 Enter a new password and enter it again to confirm.
3 Touch OK.
APPLICATIONS
INSTALLING UNKNOWN APPLICATIONS
1 Touch Apps > Settings > Applications.
2 Touch Unknown sources if you want to allow non-Android Market applications to be installed on
the Breakout™.
MANAGING APPLICATIONS
1 Touch Apps > Settings > Applications > Manage applications > Downloaded.
2 Touch an application and touch Force stop if you want to stop its operation by force. Touch
Uninstall if you want to uninstall the application.
3 Touch Running on the top of the screen and touch an application to manage its operation.
176
SETTINGS
VIEWING RUNNING SERVICES AND APPLICATIONS
1 Touch Apps > Settings > Applications > Running services.
2 Touch a service or an application to stop its operation or to edit its options.
3 Touch Stop if you want to stop its operation.
CHECKING HOW STORAGE IS USED
1 Touch Apps > Settings > Applications.
2 Touch Storage use.
3 Touch All in the top of the screen if you want to see all applications.
DEBUGGING USB
1 Touch Apps > Settings > Applications > Development.
2 Touch USB debugging to allow the debug mode when the USB cable is connected.
3 Read and touch OK on the USB debugging information page.
MAINTAINING THE STAYING CONDITION
1 Touch Apps > Settings > Applications > Development.
2 Touch Stay awake to keep the Breakout™ awake while it is being charged.
ALLOWING MOCK LOCATIONS
1 Touch Apps > Settings > Applications > Development.
2 Touch Allow mock locations if you want to pretend to be in another location for development
purposes.
177
SETTINGS
ACCOUNTS & SYNC
MANAGING BACKGROUND DATA
1 Touch Apps > Settings > Accounts & sync.
2 Touch Background data if you want to sync, send and receive data any time.
ALLOWING BACKGROUND DATA TO SYNC AUTOMATICALLY
1 Touch Apps > Settings > Accounts & sync.
2 Touch Auto-sync if you want to sync data automatically.
RUNNING BACKUP ASSISTANT
1 Touch Apps > Settings > Accounts & sync.
2 Touch Backup Assistant.
PRIVACY
BACKING UP DATA
1 Touch Apps > Settings > Privacy.
2 Touch Back up my data if you want to back up your data.
3 Touch Automatic restore if you want to restore backed-up data for an application.

178
SETTINGS
RESETTING Breakout™
1 Touch Apps > Settings > Privacy.
2 Touch Factory data reset if you want to erase all data from the phone.
3 Touch Reset phone.
4 Touch Erase everything.
STORAGE
VIEWING THE STATUS OF SPACE
1 Touch Apps > Settings > Storage. The status of space available for the Breakout™ is displayed.
ERASING THE microSD™ CARD
1 Touch Apps from the Home Screen. Touch Settings .
2 Touch Storage > Unmount SD card > OK.
3 Touch Erase SD card > Erase SD card > Erase everything All data stored in the card will be deleted.
LANGUAGE & KEYBOARD
SELECTING THE LANGUAGE
1 Touch Apps > Settings > Language & keyboard > Select language.
2 Select and touch a language to use for the Breakout™.
179
SETTINGS
SETTING ANDROID KEYBOARD
1 Touch Apps > Settings > Language & keyboard > Android keyboard.
2 Touch Vibrate on keypress if you want the Breakout™ to vibrate when you touch keys on the virtual
keyboard.
VOICE INPUT & OUTPUT
SETTING INPUT OPTIONS
1 Touch Apps > Settings > Voice input & output > Voice recognizer settings.
2 Touch Language, select and touch a language that will be used for the input language.
3 Touch SafeSearch, and touch Off, Moderate or Strict for filtering input language.
4 Touch Block offensive words if you want to hide recognized offensive voice results. It is selected by
default.
SETTING OUTPUT OPTIONS
1 Touch Apps > Settings > Voice input & output > Text-to-speech settings.
2 Touch Install voice data that is required for speech synthesis.
3 Select and touch a related application from the Android Market and install it. Once you have
downloaded voice data from the Android Market, Install voice data is not available.
4 Touch Listen to an example if you want to check an example.
5 Touch Always use my settings if you want to make your settings the default settings for the
Breakout™.
6 Touch Speech rate, and select and touch an option.
7 Touch Language, select and touch a language.

180
SETTINGS
ACCESSIBILITY
SETTING THE ACCESSIBILITY OPTION
1 Touch Apps > Settings > Accessibility.
2 Touch Cancel when a popup asks to install the screen reader.
3 Touch Power button ends call if you want to end a call by pressing the Power/Lock Key F E.
DATE & TIME
ALLOWING DATE AND TIME TO BE SET AUTOMATICALLY
1 Touch Apps > Settings > Date & time.
2 Touch Automatic.
Note Set date, Select time zone and Set time will not work if you touch Automatic.
SETTING DATE
1 Touch Apps > Settings > Date & time > Set date.
2 Deselect Automatic and enter month, day and year for the Breakout™.
3 Touch Set.
181
SETTINGS
SETTING TIME ZONE
1 Touch Apps > Settings > Date & time > Select time zone.
2 Select and touch a time zone in the list.
SETTING TIME
1 Touch Apps > Settings > Date & time > Set time.
2 Enter the minute and the hour.
3 Touch Set.
SELECTING TIME FORMAT
1 Touch Apps > Settings > Date & time > Use 24-hour format if you want to see time in a 24-hour
format.
2 Touch Use 24-hour format again if you prefer the 12-hour format.
SELECTING DATE FORMAT
1 Touch Apps > Settings > Date & time > Select date format.
2 Select a preferred date format.
182
SETTINGS
ABOUT PHONE
UPDATING SOFTWARE
1 Touch Apps > Settings > About phone.
2 Touch Software Update.
3 Touch Status if you want to see the current status of the software and touch OK.
4 Touch Check New if you want to check the latest software and download it on your phone.
CHECKING THE STATUS OF THE PHONE
1 Touch Apps > Settings > About phone.
2 Touch Status if you want to check the current status of the phone, including battery status, battery
level and your phone number.
CHECKING BATTERY USE
1 Touch Apps > Settings > About phone.
2 Touch Battery use if you want to check how the battery is being used.
SEEING LEGAL INFORMATION
1 Touch Apps > Settings > About phone.
2 Touch Legal information if you want to see the open source licenses and Google’s legal
information.
183
SETTINGS
RESETTING Breakout™
Solve repeated problems by resetting the Breakout™. Make sure to turn off the Breakout™ first to
protect information and software in the Breakout™.
1 Remove the back cover and battery without turning off the Breakout™.
2 Insert the battery to the Breakout™ right away.
3 Turn on the Breakout™.

SAFETY AND WARRANTY
UPnP AND DLNA
SPECIFICATIONS
LOCATION-BASED SERVICES
END USER LICENSE AGREEMENT (EULA)
LEGAL NOTICE
TROUBLESHOOTING CHECKLIST
INDEX
12
APPENDIX

185
APPENDIX
SAFETY AND WARRANTY
SAFETY INFORMATION FOR WIRELESS HANDHELD PHONES
EXPOSURE TO RADIO FREQUENCY SIGNALS
Your wireless handheld portable telephone is a low power radio transmitter and receiver. When it is ON,
it receives and also sends out radio frequency (RF) signals. In August 1996, the Federal Communications
Commission (FCC) adopted RF exposure guidelines with safety levels for handheld wireless phones.
Those guidelines are consistent with the safety standards previously set by both U.S. and international
standards bodies:
ANSI C951 (1992) *
NCRP Report 86 (1986) **
ICNIRP (1996) ***
Those standards were based on comprehensive and periodic evaluations of the relevant scientific
literature. For example, over 120 scientists, engineers, and physicians from universities, government
health agencies, and industry reviewed the available body of research to develop the ANSI Standard
(C951).
The design of your phone complies with the FCC guidelines (and those standards).
* American National Standards Institute.
** National Council on Radiation Protection and Measurements.
*** International Commission on Non-Ionizing Radiation Protection.
ANTENNA SAFETY
Use only the supplied or an approved replacement antenna. Unauthorized antennas, modifications,
or attachments could impair call quality, damage the phone, or result in violation of FCC regulations.
Please contact your local dealer for replacement antenna.
Do not use the phone with a damaged antenna. If a damaged antenna comes into contact with the
skin, a minor burn may result. Please contact your local dealer for replacement antenna.
12. APPENDIX

186
APPENDIX
DRIVING SAFETY
Talking on the phone while driving is extremely dangerous and is illegal in some states. Remember,
safety comes first. Check the laws and regulations on the use of phones in the areas where you drive.
Always obey them. Also, if using your phone while driving, please:
xGive full attention to driving. Driving safely is your first responsibility.
xUse hands-free operation, if available.
xPull off the road and park before making or answering a call, if driving conditions so require.
If you must use the phone while driving, please use one-touch, speed dialing, and auto answer modes.
An airbag inflates with great force. DO NOT place objects, including both installed or portable wireless
equipment, in the area over the airbag or in the air bag deployment area. If in-vehicle wireless
equipment is improperly installed and the air bag inflates, serious injury could result.
WARNING Failure to follow these instructions may lead to serious personal injury and possible property damage.
ELECTRONIC DEVICES
Your wireless handheld portable telephone is a low power radio transmitter and receiver. When it is
ON, it receives and also sends out radio frequency (RF) signals. Most modern electronic equipment is
shielded from RF energy. However, certain electronic equipment may not be shielded against the RF
signals from your wireless phone. Therefore, use of your phone must be restricted in certain situations.
PACEMAKERS
The Health Industry Manufacturers Association recommends that a minimum separation of six (6”)
inches be maintained between a handheld wireless phone and a pacemaker to avoid potential
interference with the pacemaker. These recommendations are consistent with the independent
research by and recommendations of Wireless Technology Research. Persons with pacemakers:
xALWAYS keep the phone more than six inches from your pacemaker when the phone is turned on.
xDo not carry the phone in a breast pocket.
xUse the ear opposite the pacemaker to minimize the potential for interference.
187
APPENDIX
xIf you have any reason to suspect that interference is taking place, turn your phone OFF
immediately.
HEARING AIDS
Some digital wireless phones may interfere with some hearing aids. In the event of such interference,
you may want to consult your service provider (or call the customer service line to discuss alternatives).
OTHER MEDICAL DEVICES
If you use any other personal medical device, consult the manufacturer of your device to determine
if they are adequately shielded from external RF energy. Your physician may be able to assist you in
obtaining this information. Turn your phone OFF in healthcare facilities when any regulations posted in
these areas instruct you to do so. Hospitals or healthcare facilities may be using equipment that could
be sensitive to external RF energy.
VEHICLES
RF signals may affect improperly installed or inadequately shielded electronic systems in motor
vehicles. Check with the manufacturer or its representative regarding your vehicle. You should also
consult the manufacturer of any equipment that has been added to your vehicle.
POSTED FACILITIES
Turn your phone OFF where posted notices so require.
OTHER SAFETY GUIDELINES
AIRCRAFT
FCC regulations prohibit using your phone while in the air. Turn your phone OFF before boarding an
aircraft. Always request and obtain prior consent and approval of an authorized airline representative
before using your phone aboard an aircraft. Always follow the instructions of the airline representative
whenever using your phone aboard an aircraft, to prevent any possible interference with airborne
electronic equipment.
188
APPENDIX
BLASTING AREAS
To avoid interfering with blasting operations, turn your phone OFF when in a “blasting area” or in areas
posted: “Turn off two-way radio.” Obey all signs and instructions.
POTENTIALLY EXPLOSIVE ATMOSPHERES
Turn your phone OFF when in any area with a potentially explosive atmosphere and obey all signs
and instructions. Sparks in such areas could cause an explosion or fire resulting in bodily injury or even
death.
Areas with a potentially explosive atmosphere are often, but not always, clearly marked. They include
fueling areas such as gas stations; below deck on boats; fuel or chemical transfer or storage facilities;
vehicles using liquefied petroleum gas (such as propane or butane); areas where the air contains
chemicals or particles, such as grain, dust, or metal powders; and any other area where you would
normally be advised to turn off your vehicle’s engine.
PRECAUTIONS
Your Handheld Portable Telephone is a high quality piece of equipment. Before operating, read all
instructions and cautionary markings on (1) USB AC Adapter (2) Battery and (3) Product Using Battery.
Failure to follow the directions below could result in serious bodily injury and/or property damage due
to battery liquid leakage, fire or rupture.
xDO NOT use this equipment in an extreme environment where high temperature or high humidity
exists.
xDO NOT abuse the equipment. Avoid striking, shaking or shocking. When not using, lay down the
unit to avoid possible damage due to instability.
xDO NOT expose this equipment to rain or spilled beverages.
xDO NOT use unauthorized accessories.
xDO NOT disassemble the phone or its accessories. If service or repair is required, return unit to an
authorized PCD cellular service center. If unit is disassembled, the risk of electric shock or fire may
result.
xDO NOT short-circuit the battery terminals with metal items etc.
189
APPENDIX
SAFETY INFORMATION FOR FCC RF EXPOSURE
WARNING! READ THIS INFORMATION BEFORE USING
CAUTIONS
In August 1996 the Federal Communications Commission (FCC) of the United States with its action
in Report and Order FCC 96-326 adopted an updated safety standard for human exposure to radio
frequency electromagnetic energy emitted by FCC regulated transmitters. Those guidelines are
consistent with the safety standard previously set by both U.S. and international standards bodies. The
design of this phone complies with the FCC guidelines and these international standards.
BODY-WORN OPERATION
This device was tested for typical body-worn operations with the back of the phone kept 2 cm. from
the body. To maintain compliance requirements, use only belt-clips, holsters or similar accessories that
maintain a 2 cm separation distance between the user’s Body and the back of the phone, including the
antenna.
The use of belt-clips, holsters and similar accessories should not contain metallic components in its
assembly. The use of accessories that do not satisfy these requirements may not comply with FCC RF
exposure requirements, and should be avoided.
For more information about RF exposure, please visit the FCC website at http://www.fcc.gov.
SAR INFORMATION
THIS MODEL PHONE MEETS THE GOVERNMENT’S REQUIREMENTS FOR EXPOSURE TO RADIO
WAVES.
Your wireless phone is a radio transmitter and receiver. It is designed and manufactured not to exceed
the emission limits for exposure to radiofrequency (RF) energy set by the Federal Communications
Commission of the U.S. Government. These limits are part of comprehensive guidelines and establish
permitted levels of RF energy for the general population. The guidelines are based on standards that
were developed by independent scientific organizations through periodic and thorough evaluation of
scientific studies. The standards include a substantial safety margin designed to assure the safety of all
persons, regardless of age and health.
190
APPENDIX
The exposure standard for wireless mobile phones employs a unit of measurement known as the
Specific Absorption Rate, or SAR. The SAR limit set by the FCC is 1.6 W/kg. * Tests for SAR are conducted
with the phone transmitting at its highest certified power level in all tested frequency bands. Although
the SAR is determined at the highest certified power level, the actual SAR level of the phone while
operating can be well below the maximum value. This is because the phone is designed to operate at
multiple power levels so as to use only the power required to reach the network. In general, the closer
you are to a wireless base station antenna, the lower the power output.
Before a phone model is available for sale to the public, it must be tested and certified to the FCC that
it does not exceed the limit established by the government adopted requirement for safe exposure.
The tests are performed in positions and locations (e.g., at the ear and worn on the body) as required
by the FCC for each model. The highest SAR value for this model phone when tested for use at the
ear is 1.05W/Kg and when worn on the body, as described in this user guide, is 0.8W/Kg. (Body-
worn measurements differ among phone models, depending upon available accessories and FCC
requirements). While there may be differences between the SAR levels of various phones and at various
positions, they all meet the government requirement for safe exposure.
The SAR testing for Body-worn operation was performed with a belt clip that provided a 20mm
separation. The User’s Manual indicates that any holsters/clips used with this device should contain no
metallic components.
The FCC has granted an Equipment Authorization for this model phone with all reported SAR levels
evaluated as in compliance with the FCC RF exposure guidelines.
SAR information on this model phone is on file with the FCC and can be found under the Display Grant
section of http://www.fcc.gov/oet/ea after searching on JYCAPACHE.
Additional information on Specific Absorption Rates (SAR) can be found on the Cellular
Telecommunications Industry Association (CTIA) web-site at http://www.ctia.org.
* In the United States and Canada, the SAR limit for mobile phones used by the public is 1.6 watts/kg
(W/kg) averaged over one gram of tissue. The standard incorporates a substantial margin of safety to
give additional protection for the public and to account for any variations in measurements.

191
APPENDIX
HEARING AID COMPATIBILITY (HAC) FOR WIRELESS TELECOMMUNICATIONS DEVICES
PCD’S COMMITMENT
PCD believes that all of our customers should be able to enjoy the benefits of digital wireless
technologies.
We are committed to providing a selection of compatible devices for our customers who wear hearing
aids.
THIS PHONE HAS A HAC RATING OF M4/T4
WHAT IS HEARING AID COMPATIBILITY?
The Federal Communications Commission has implemented rules and a rating system designed to
enable people who wear hearing aids to more effectively use these wireless telecommunications
devices. The standard for compatibility of digital wireless phones with hearing aids is set forth in
American National Standard Institute (ANSI) standard C6319. There are two sets of ANSI standards with
ratings from one to four (four being the best rating): an “M” rating for reduced interference making it
easier to hear conversations on the phone when using the hearing aid microphone, and a “T” rating
that enables the phone to be used with hearing aids operating in the telecoil mode thus reducing
unwanted background noise.
HOW WILL I KNOW WHICH WIRELESS PHONES ARE HEARING AID COMPATIBLE?
The Hearing Aid Compatibility rating is displayed on the wireless phone box.
A phone is considered Hearing Aid Compatible for acoustic coupling (microphone
mode) if it has an “M3” or “M4” rating. A digital wireless phone is considered Hearing
Aid Compatible for inductive coupling (telecoil mode) if it has a “T3” or “T4” rating.
This phone has been tested and rated for use with hearing aids for some of the
wireless technologies that it uses. However, there may be some newer wireless
technologies used in this phone that have not been tested yet for use with hearing
aids. It is important to try the different features of this phone thoroughly and in
different locations, using your hearing aid or cochlear implant, to determine if
you hear any interfering noise. Consult your service provider about its return and
exchange policies and for information on hearing aid compatibility.

192
APPENDIX
HOW WILL I KNOW IF MY HEARING AID WILL WORK WITH A PARTICULAR DIGITAL
WIRELESS PHONE?
You’ll want to try a number of wireless phones so that you can decide which works the best with your
hearing aids. You may also want to talk with your hearing aid professional about the extent to which
your hearing aids are immune to interference, if they have wireless phone shielding, and whether your
hearing aid has a HAC rating.
MORE INFORMATION ABOUT HEARING AIDS AND DIGITAL WIRELESS PHONE
xFor FCC Hearing Aid Compatibility and Volume Control,
Visit http://www.fcc.gov/cgb/dro/hearing.html
xFor Hearing Loss Association of America,
Visit http://www.hearingloss.org/learn/cellphonetech.asp
xFor CTIA,
Visit http://www.accesswireless.org/Disability-Categories/Hearing.aspx
xFor Gallaudet University, RERC,
Visit http://www.gallaudet.edu/hearing_speech_and_language_sciences/research/rehabilitation_
engineering_research_center_(rerc)_on_hearing_enhancement.html
FDA CONSUMER UPDATE
U.S. FOOD AND DRUG ADMINISTRATION – CENTER FOR DEVICES AND
RADIOLOGICAL HEALTH CONSUMER UPDATE ON WIRELESS PHONES
1. Do wireless phones pose a health hazard?
The available scientific evidence does not show that any health problems are associated with using
wireless phones. There is no proof, however, that wireless phones are absolutely safe. Wireless phones
emit low levels of radiofrequency energy (RF) in the microwave range while being used. They also emit
very low levels of RF when in the Home screen. Whereas high levels of RF can produce health effects
(by heating tissue), exposure to low level RF that does not produce heating effects causes no known
adverse health effects. Many studies of low level RF exposures have not found any biological effects.
Some studies have suggested that some biological effects may occur, but such findings have not been
confirmed by additional research. In some cases, other researchers have had difficulty in reproducing
those studies, or in determining the reasons for inconsistent results.
193
APPENDIX
2. What is FDA’s role concerning the safety of wireless phones?
Under the law, FDA does not review the safety of radiation-emitting consumer products such as
wireless phones before they can be sold, as it does with new drugs or medical devices. However, the
agency has authority to take action if wireless phones are shown to emit radiofrequency energy (RF)
at a level that is hazardous to the user. In such a case, FDA could require the manufacturers of wireless
phones to notify users of the health hazard and to repair, replace or recall the phones so that the
hazard no longer exists. Although the existing scientific data do not justify FDA regulatory actions, FDA
has urged the wireless phone industry to take a number of steps, including the following:
xSupport needed research into possible biological effects of RF of the type emitted by wireless
phones;
xDesign wireless phones in a way that minimizes any RF exposure to the user that is not necessary
for device function; and
xCooperate in providing users of wireless phones with the best possible information on possible
effects of wireless phone use on human health.
FDA belongs to an interagency working group of the federal agencies that have responsibility for
different aspects of RF safety to ensure coordinated efforts at the federal level. The following agencies
belong to this working group:
xNational Institute for Occupational Safety and Health
xEnvironmental Protection Agency
xFederal Communications Commission
xOccupational Safety and Health Administration
xNational Telecommunications and Information Administration
The National Institutes of Health participates in some inter-agency working group activities, as
well. FDA shares regulatory responsibilities for wireless phones with the Federal Communications
Commission (FCC). All phones that are sold in the United States must comply with FCC safety
guidelines that limit RF exposure. FCC relies on FDA and other health agencies for safety questions
about wireless phones. FCC also regulates the base stations that the wireless phone networks rely
upon. While these base stations operate at higher power than do the wireless phones themselves,
the RF exposures that people get from these base stations are typically thousands of times lower than
194
APPENDIX
those they can get from wireless phones. Base stations are thus not the subject of the safety questions
discussed in this document.
3. What kinds of phones are the subject of this update?
The term “wireless phone” refers here to hand-held wireless phones with built-in antennas, often called
“cell,” “mobile,” or “PCS” phones. These types of wireless phones can expose the user to measurable
radiofrequency energy (RF) because of the short distance between the phone and the user’s head.
These RF exposures are limited by Federal Communications Commission safety guidelines that were
developed with the advice of FDA and other federal health and safety agencies. When the phone is
located at greater distances from the user, the exposure to RF is drastically lower because a person’s RF
exposure decreases rapidly with increasing distance from the source. The so-called “cordless phones,”
which have a base unit connected to the telephone wiring in a house, typically operate at far lower
power levels, and thus produce RF exposures far below the FCC safety limits.
4. What are the results of the research done already?
The research done thus far has produced conflicting results, and many studies have suffered from
flaws in their research methods. Animal experiments investigating the effects of radiofrequency energy
(RF) exposures characteristic of wireless phones have yielded conflicting results that often cannot
be repeated in other laboratories. A few animal studies, however, have suggested that low levels of
RF could accelerate the development of cancer in laboratory animals. However, many of the studies
that showed increased tumor development used animals that had been genetically engineered or
treated with cancer-causing chemicals so as to be predisposed to develop cancer in the absence of
RF exposure. Other studies exposed the animals to RF for up to 22 hours per day. These conditions are
not similar to the conditions under which people use wireless phones, so we don’t know with certainty
what the results of such studies mean for human health. Three large epidemiology studies have been
published since December 2000. Between them, the studies investigated any possible association
between the use of wireless phones and primary brain cancer, glioma, meningioma, or acoustic
neu-roma, tumors of the brain or salivary gland, leukemia, or other cancers. None of the studies
demonstrated the existence of any harmful health effects from wireless phone RF exposures. However,
none of the studies can answer questions about long-term exposures, since the average period of
phone use in these studies was around three years.
195
APPENDIX
5. What research is needed to decide whether RF exposure from wireless phones poses a health
risk?
A combination of laboratory studies and epidemiological studies of people actually using wireless
phones would provide some of the data that are needed. Lifetime animal exposure studies could be
completed in a few years. However, very large numbers of animals would be needed to provide reliable
proof of a cancer promoting effect if one exists. Epidemiological studies can provide data that is directly
applicable to human populations, but 10 or more years’ follow-up may be needed to provide answers
about some health effects, such as cancer. This is because the interval between the time of exposure
to a cancer-causing agent and the time tumors develop - if they do -may be many, many years. The
interpretation of epidemiological studies is hampered by difficulties in measuring actual RF exposure
during day-to-day use of wireless phones. Many factors affect this measurement, such as the angle at
which the phone is held, or which model of phone is used.
6. What is FDA doing to find out more about the possible health effects of wireless phone RF?
FDA is working with the U.S. National Toxicology Program and with groups of investigators around
the world to ensure that high priority animal studies are conducted to address important questions
about the effects of exposure to radiofrequency energy (RF). FDA has been a leading participant in
the World Health Organization International Electromagnetic Fields (EMF) Project since its inception
in 1996 An influential result of this work has been the development of a detailed agenda of research
needs that has driven the establishment of new research programs around the world. The Project
has also helped develop a series of public information documents on EMF issues. FDA and the
Cellular Telecommunications & Internet Association (CTIA) have a formal Cooperative Research and
Development Agreement (CRADA) to do research on wireless phone safety. FDA provides the scientific
oversight, obtaining input from experts in government, industry, and academic organizations. CTIA-
funded research is conducted through contracts to independent investigators. The initial research
will include both laboratory studies and studies of wireless phone users. The CRADA will also include
a broad assessment of additional research needs in the context of the latest research developments
around the world.
7. How can I find out how much radiofrequency energy exposure I can get by using my wireless
phone?
All phones sold in the United States must comply with Federal Communications Commission (FCC)
guidelines that limit radiofrequency energy (RF) exposures. FCC established these guidelines in
196
APPENDIX
consultation with FDA and the other federal health and safety agencies. The FCC limit for RF exposure
from wireless telephones is set at a Specific Absorption Rate (SAR) of 1.6 watts per kilogram (1.6 W/
kg). The FCC limit is consistent with the safety standards developed by the Institute of Electrical and
Electronic Engineering (IEEE) and the National Council on Radiation Protection and Measurement. The
exposure limit takes into consideration the body’s ability to remove heat from the tissues that absorb
energy from the wireless phone and is set well below levels known to have effects. Manufacturers
of wireless phones must report the RF exposure level for each model of phone to the FCC. The FCC
website (http://www.fda.gov (under “c” in the subject index, select Cell Phones > Research).) gives
directions for locating the FCC identification number on your phone so you can find your phone’s RF
exposure level in the online listing.
8. What has FDA done to measure the radiofrequency energy coming from wireless phones?
The Institute of Electrical and Electronic Engineers (IEEE) is developing a technical standard for
measuring the radiofrequency energy (RF) exposure from wireless phones and other wireless handsets
with the participation and leadership of FDA scientists and engineers. The standard, “Recommended
Practice for Determining the Spatial-Peak Specific Absorption Rate (SAR) in the Human Body Due
to Wireless Communications Devices: Experimental Techniques,” sets forth the first consistent test
methodology for measuring the rate at which RF is deposited in the heads of wireless phone users. The
test method uses a tissue-simulating model of the human head. Standardized SAR test methodology
is expected to greatly improve the consistency of measurements made at different laboratories on
the same phone. SAR is the measurement of the amount of energy absorbed in tissue, either by the
whole body or a small part of the body. It is measured in watts/kg (or milliwatts/g) of matter. This
measurement is used to determine whether a wireless phone complies with safety guidelines.
9. What steps can I take to reduce my exposure to radiofrequency energy from my wireless phone?
If there is a risk from these products—and at this point we do not know that there is—it is probably
very small. But if you are concerned about avoiding even potential risks, you can take a few simple
steps to minimize your exposure to radiofrequency energy (RF). Since time is a key factor in how much
exposure a person receives, reducing the amount of time spent using a wireless phone will reduce RF
exposure.
xIf you must conduct extended conversations by wireless phone every day, you could place
more distance between your body and the source of the RF, since the exposure level drops off
dramatically with distance.
197
APPENDIX
For example, you could use a headset and carry the wireless phone away from your body or use a
wireless phone connected to a remote antenna. Again, the scientific data do not demonstrate that
wireless phones are harmful. But if you are concerned about the RF exposure from these products, you
can use measures like those described above to reduce your RF exposure from wireless phone use.
10. What about children using wireless phones?
The scientific evidence does not show a danger to users of wireless phones, including children and
teenagers. If you want to take steps to lower exposure to radiofrequency energy (RF), the measures
described above would apply to children and teenagers using wireless phones. Reducing the time
of wireless phone use and increasing the distance between the user and the RF source will reduce
RF exposure. Some groups sponsored by other national governments have advised that children
be discouraged from using wireless phones at all. For example, the government in the United
Kingdom distributed leaflets containing such a recommendation in December 2000. They noted
that no evidence exists that using a wireless phone causes brain tumors or other ill effects. Their
recommendation to limit wireless phone use by children was strictly precautionary; it was not based
on scientific evidence that any health hazard exists.
11. What about wireless phone interference with medical equipment?
Radiofrequency energy (RF) from wireless phones can interact with some electronic devices. For this
reason, FDA helped develop a detailed test method to measure electromagnetic interference (EMI)
of implanted cardiac pacemakers and defibrillators from wireless telephones. This test method is now
part of a standard sponsored by the Association for the Advancement of Medical instrumentation
(AAMI). The final draft, a joint effort by FDA, medical device manufacturers, and many other groups,
was completed in late 2000. This standard will allow manufacturers to ensure that cardiac pacemakers
and defibrillators are safe from wireless phone EMI. FDA has tested hearing aids for interference from
handheld wireless phones and helped develop a voluntary standard sponsored by the Institute of
Electrical and Electronic Engineers (IEEE). This standard specifies test methods and performance
requirements for hearing aids and wireless phones so that that no interference occurs when a person
uses a “compatible” phone and a “compatible” hearing aid at the same time. This standard was approved
by the IEEE in 2000. FDA continues to monitor the use of wireless phones for possible interactions with
other medical devices. Should harmful interference be found to occur, FDA will conduct testing to
assess the interference and work to resolve the problem.
198
APPENDIX
12. Where can I find additional information?
For additional information, please refer to the following resources:
xFor FDA web page on wireless phones, Visit http://www.fda.gov/Radiation-EmittingProducts/
RadiationEmittingProductsandProcedures/HomeBusinessandEntertainment/CellPhones/default.
htm)
xFor Federal Communications Commission (FCC) RF Safety Program,
Visit http://www.fcc.gov/oet/rfsafety
xFor International Commission on Non-Ionizing Radiation Protection,
Visit http://www.icnirp.de
xFor World Health Organization (WHO) International EMF Project,
Visit http://www.who.int/peh-emf/en/
xFor National Radiological Protection Board (UK),
Visit http://www.hpa.org.uk/radiation/
AVOID POTENTIAL HEARING LOSS
Prolonged exposure to loud sounds is the most common cause of preventable hearing loss. Some
scientific research suggests that using portable audio devices, and cellular telephones, at high volume
settings for long durations may lead to permanent noise-induced hearing loss. This includes the use of
headphones (including headsets, earbuds and Bluetooth® or other wireless devices). Exposure to very
loud sound has also been associated in some studies with tinnitus (a ringing in the ear), hypersensitivity
to sound and distorted hearing. Individual susceptibility to noise-induced hearing loss and other
potential hearing problems varies.
The amount of sound produced by a portable audio device varies depending on the nature of the
sound, the device, the device settings and the headphones. You should follow some commonsense
recommendations when using any portable audio device:
xSet the volume in a quiet environment and select the lowest volume at which you can hear
adequately.
xWhen using headphones, turn the volume down if you cannot hear the people speaking near you
or if the person sitting next to you can hear what you are listening to.
199
APPENDIX
xDo not turn the volume up to block out noisy surroundings. If you choose to listen to your portable
device in a noisy environment, use noise-cancelling headphones to block out background
environmental noise.
xLimit the amount of time you listen. As the volume increases, less time is required before your
hearing could be affected.
xAvoid using headphones after exposure to extremely loud noises, such as concerts, that might
cause temporary hearing loss. Temporary hearing loss might cause unsafe volumes to sound
normal.
xDo not listen at any volume that causes you discomfort. If you experience ringing in your ears, hear
muffled speech or experience any temporary hearing difficulty after listening to your portable
audio device, discontinue use and consult your doctor.
YOU CAN OBTAIN ADDITIONAL INFORMATION ON THIS SUBJECT FROM THE FOLLOWING
SOURCES:
AMERICAN ACADEMY OF AUDIOLOGY
11730 Plaza America Drive, Suite 300
Reston, VA 20190
Voice: 800-AAA-2336
Email: infoaud@audiology.org
Internet: http://www.audiology.org/Pages/default.aspx
NATIONAL INSTITUTE ON DEAFNESS AND OTHER COMMUNICATION DISORDERS
NATIONAL INSTITUTES OF HEALTH
31 Center Drive, MSC 2320
Bethesda, MD USA 20892-2320
Voice: (301) 496-7243
Email: nidcdinfo@nidcd.nih.gov
Internet: http://www.nidcd.nih.gov/health/hearing

200
APPENDIX
NATIONAL INSTITUTE FOR OCCUPATIONAL SAFETY AND HEALTH
1600 Clifton Rd
Atlanta GA 30333 USA
Voice: 1-800-CDC-INFO (1-800-232-4636)
Internet: http://www.cdc.gov/niosh/topics/noise/default.html
FCC COMPLIANCE INFORMATION
This device complies with Part 15 of FCC Rules.
Operation is subject to the following two conditions:
(1) This device may not cause harmful interference, and
(2) This device must accept any interference received. Including interference that may cause undesired
operation.
INFORMATION TO THE USER
This equipment has been tested and found to comply with the limits for a Class B digital device
pursuant to Part 15 of the FCC Rules. These limits are designed to provide reasonable protection against
harmful Interference in a residential installation. This equipment generates, uses, and can radiate radio
frequency energy and, if Not installed and used in accordance with the instructions, may cause harmful
Interference to radio communications. However, there is no guarantee that interference will not occur
in a particular Installation. If this equipment does cause harmful interference to radio or television
reception, which can be determined by turning the equipment off and on, the user is encouraged to
try to correct the interference by one or more of the following measures:
xReorient or relocate the receiving antenna.
Increase the separation between the equipment and receiver.
xConnect the equipment into an outlet of a circuit different from that to which the receiver is
connected.
xConsult the dealer or an experienced radio/TV technician for assistance.
CAUTION Changes or modification not expressly approved by the party responsible for Compliance could void the
user’s authority to operate the equipment. Connecting of peripherals requires the use of grounded shielded signal
cables.
201
APPENDIX
12-MONTH LIMITED WARRANTY
Personal Communications Devices, LLC. (the “Company”) warrants to the original retail purchaser of
this handheld portable cellular telephone, that should this product or any part thereof during normal
consumer usage and conditions, be proven defective in material or workmanship that results in
product failure within the first twelve (12) month period from the date of purchase, such defect(s) will
be repaired or replaced (with new or rebuilt parts) at the Company’s option, without charge for parts or
labor directly related to the defect(s).
The antenna, keypad, display, rechargeable battery and battery charger, if included, are similarly
warranted for twelve (12) months from date of purchase.
This Warranty extends only to consumers who purchase the product in the United States or Canada
and it is not transferable or assignable.
This Warranty does not apply to:
(a) Product subjected to abnormal use or conditions, accident, mishandling, neglect, unauthorized
alteration, misuse, improper installation or repair or improper storage;
(b) Product whose mechanical serial number or electronic serial number has been removed, altered or
defaced.
(c) Damage from exposure to moisture, humidity, excessive temperatures or extreme environmental
conditions;
(d) Damage resulting from connection to, or use of any accessory or other product not approved or
authorized by the Company;
(e) Defects in appearance, cosmetic, decorative or structural items such as framing and non-operative
parts;
(f) Product damaged from external causes such as fire, flooding, dirt, sand, weather conditions, battery
leakage, blown fuse, theft or improper usage of any electrical source.
The Company disclaims liability for removal or reinstallation of the product, for geographic coverage,
for inadequate signal reception by the antenna or for communications range or operation of the
cellular system as a whole.
When sending your wireless device to Personal Communications Devices for repair or service, please
note that any personal data or software stored on the device may be inadvertently erased or altered.
Therefore, we strongly recommend you make a back up copy of all data and software contained on
202
APPENDIX
your device before submitting it for repair or service. This includes all contact lists, downloads (i.e. third-
party software applications, ringtones, games and graphics) and any other data added to your device.
In addition, if your wireless device utilizes a SIM or Multimedia card, please remove the card before
submitting the device and store for later use when your device is returned, Personal Communications
Devices is not responsible for and does not guarantee restoration of any third-party software, personal
information or memory data contained in, stored on, or integrated with any wireless device, whether
under warranty or not, returned to Personal Communications Devices for repair or service.
To obtain repairs or replacement within the terms of this Warranty, the product should be delivered
with proof of Warranty coverage (e.g. dated bill of sale), the consumer’s return address, daytime phone
number and/or fax number and complete description of the problem, transportation prepaid, to the
Company at the address shown below or to the place of purchase for repair or replacement processing.
In addition, for reference to an authorized Warranty station in your area, you may telephone in the
United States (800) 229-1235, and in Canada (800) 465-9672 (in Ontario call 416-695-3060).
THE EXTENT OF THE COMPANY’S LIABILITY UNDER THIS WARRANTY IS LIMITED TO THE REPAIR OR
REPLACEMENT PROVIDED ABOVE AND, IN NO EVENT, SHALL THE COMPANY’S LIABILITY EXCEED THE
PURCHASE PRICE PAID BY PURCHASER FOR THE PRODUCT.
ANY IMPLIED WARRANTIES, INCLUDING ANY IMPLIED WARRANTY OF MERCHANTABILITY OR FITNESS
FOR A PARTICULAR PURPOSE, SHALL BE LIMITED TO THE DURATION OF THIS WRITTEN WARRANTY.
ANY ACTION FOR BREACH OF ANY WARRANTY MUST BE BROUGHT WITHIN A PERIOD OF 18 MONTHS
FROM DATE OF ORIGINAL PURCHASE. IN NO CASE SHALL THE COMPANY BE LIABLE FOR AN SPECIAL
CONSEQUENTIAL OR INCIDENTAL DAMAGES FOR BREACH OF THIS OR ANY OTHER WARRANTY, EXPRESS
OR IMPLIED, WHATSOEVER. THE COMPANY SHALL NOT BE LIABLE FOR THE DELAY IN RENDERING
SERVICE UNDER THIS WARRANTY OR LOSS OF USE DURING THE TIME THE PRODUCT IS BEING REPAIRED
OR REPLACED.
No person or representative is authorized to assume for the Company any liability other than expressed
herein in connection with the sale of this product. Some states or provinces do not allow limitations
on how long an implied warranty lasts or the exclusion or limitation of incidental or consequential
damage so the above limitation or exclusions may not apply to you. This Warranty gives you specific
legal rights, and you may also have other rights, which vary from state to state or province to province.
IN USA: Personal Communications Devices.

203
APPENDIX
555 Wireless Blvd.
Hauppauge, NY 11788
1-800-229-1235
IN CANADA: PCD Communications Canada LLC.
5535 Eglinton Avenue West, Suite 234
Toronto, Ontario
M9C 5K5
1-800-465-9672
UPnP AND DLNA
UIVERSAL PLUG AND PLAY (UPnP)
Universal Plug and Play (UPnP) technology targets home networks,
proximity networks and networks in small businesses and
commercial buildings. It enables data communication between
any two devices under the command of any control device on
the network. UPnP technology is independent of any particular
operating system, programming language, or network technology.
DIGITAL LIVING NETWORK ALLIANCE (DLNA)
You’ll find the DLNA Certified™ logo on all kinds of new digital
devices for your home and on the go – TVs, PCs, mobile phones, you
name it. But they aren’t the same TVs, PCs and mobile phones you’re
used to. They may look familiar, but they have new capabilities of
DLNA Device Classes.

204
APPENDIX
SPECIFICATIONS
DESIGN
Slim bar
DISPLAYS
colors TFT with 4.o’’ display, 480*800 (WVGA) pixels in resolution
MELODIES
AAC, AAC+, eAAC+, MP3, AMR-(NB/WB), MIDI, OGG, WAV, (QCELP/ EVRC)
CAMERA
Integrated 5M CMOS Camera
xResolution up to 2560 x 1920 (4,915,200 pixels)
xMPEG4 Video recording up to 20f/s; playing up to 30f/s (WVGA size)
xSelf-timer function (3, 5 or 10 seconds)
xPhoto album and video album
DIMENSIONS & WEIGHT
xWeight: 136g/4.78oz (with battery cell)
xDimensions: 127 x 64.4 x 12.09mm (5” x 2.54” x 0.48”)
POWER MANAGEMENT (PERFORMANCE)
Battery Type Capacity Standby Time Talk Time
Standard Lithium-Ion
(Li-ion) 1,500 mAh Up to 303.19 hrs Up to 347 mins
205
APPENDIX
OPERATING FREQUENCY
xGSM/GPRS/EDGE 850/900/1800/1900 MHz, UMTS/HSDPA 850/1900 MHz networks in North
America, South America, Europe, Africa, and Asia-Pacific where these networks are supported.
xAutomatic band switching
LOCATION-BASED SERVICES
Your wireless device can determine its (and your) physical, geographical location (“Location
Information”). Certain applications and services can access, collect and use Location Information and
disclose the information to others. Use caution and discretion when you make Location Information
available to them.
To limit potential unauthorized access to your Location Information, Verizon Wireless devices are preset
to "E911" which only allows authorized emergency response personnel to locate you when you dial
9-1-1 from your wireless device.
When you select “VZW Location Services” or ”Standalone GPS Services” or “Google Location Services”
you allow third party access to Location Information. Any software, widget or peripheral components
or service you choose to download, add or attach to your wireless device or otherwise access or use
can use this information.
Check your wireless device periodically and only use software, widgets, peripheral components and
services from reliable sources. Verizon Wireless makes no representation of accuracy, completeness or
timeliness of any location data, product or service.
When you use your mobile browser or other services and applications, you authorize Verizon Wireless
to collect, use and disclose your Location Information to provide you with any location services.
Verizon Wireless does not retain Location Information longer than necessary to provide the services to
you. We will not knowingly disclose your Location Information to third parties without your consent,
except as required by law.
Carefully review the privacy policies of application providers and third parties who have access to your
Location Information. Significant risks can be associated with disclosing your Location Information to
others.
206
APPENDIX
END USER LICENSE AGREEMENT (EULA)
Your use of Visual Voicemail confirms that you are the account owner, you are authorized to sign up for
this service and you agree to pay the monthly subscription fee. Basic Voicemail and V CAST coverage
areas are required to use Visual Voicemail. Visual Voicemail may not support all traditional Voicemail
features which will remain accessible by dialing *86 from your handset. Standard messaging rates apply
to any messages initiated from Visual Voicemail.
Accessing Voicemail, Call Forwarding, Call Return, Personal Operator and other features are subject to
airtime, long distance, roaming charges and taxes and IN Calling minutes do not apply. Visual Voicemail
and traditional Voicemail may not always be synchronized and if you cancel Visual Voicemail you may
lose all stored Voicemails and information.
Visual Voicemail can only use the Verizon Wireless network rather than the available Wi-Fi connection.
Standard data usage charges shall apply.
I understand that by selecting OK my password will be automatically stored and will allow anyone
in possession of this device to have access to my Voicemail. I further understand that my Voicemail
messages may be stored in electronic format on this device.
LEGAL NOTICE
Bluetooth is a trademark of Bluetooth SIG, Inc. Wi-Fi is a trademark of the Wi-Fi Alliance. Google,
YouTube, Picasa, Gmail, Google Maps and Android Market are trademarks of Google, Inc.
TROUBLESHOOTING CHECKLIST
WHEN AUDIO QUALITY IS POOR:
End a call and try again.
WHEN THE OTHER PARTY CANNOT HEAR YOU SPEAKING:
Your phone may be set to MUTE. Disable the MUTE function. Or your hand may be covering the
microphone.
207
APPENDIX
WHEN BATTERY LIFE IS SHORTER THAN USUAL:
This may happen when you are in an area with low signal strength. Turn off your phone when it is not
in use. Change the battery when battery energy is exhausted.
WHEN YOU CANNOT TURN ON YOUR PHONE:
Make sure your battery is charged. Check to see if your phone works while recharging the battery.
WHEN YOU ARE UNABLE TO SEND A MESSAGE:
Either you are not registered to receive an SMS service, or you may be in an area where your network
service provider cannot provide such a service.
WHEN YOU ARE UNABLE TO MAKE A CALL:
Your phone may be set to “fixed dial.” Cancel the “fixed dial” function.
208
APPENDIX
Index
Symbols
4G SIM CARD 14
A
ACCESSIBILITY 180
ACCOUNTS & SYNC 177
AIRPLANE MODE 165
ALARM/CLOCK 141
ANDROID MARKET 135
APPLICATIONS 2
AUTOMATIC RESTORE 177
AUTOROTATE SCREEN 170
B
BACKGROUND DATA 177
BATTERY USE 182
Bluetooth 109
BOOKMARKS 129
BRIGHTNESS 170
BROWSER 127
C
CALCULATOR 139
CALENDAR 63
CALL LOG 44
CAMERA 80
CLOCK TOOLS 144
CONTACTS 55
CONVERTER 148
D
DATE FORMAT 181
DATE & TIME 180
DISPLAY 170
DLNA 98,203
DOC VIEWER 148
DTMF TONES 168
E
EMAIL 67
ERASE EVERYTHING 161
209
APPENDIX
F
FACTORY DATA RESET 178
FORCE STOP 175
G
GALLERY 91
GMAIL 70
Google Maps (See Maps) 115
Google SEARCH 132
Google TALK (See Talk) 60
GPS SATELLITES 115
H
HANDY MEMO 150
HOME SCREEN 28
K
KEYBOARD 48
L
LANGUAGE & KEYBOARD 178
LATITUDE 118
LEGAL INFORMATION 182
LITHIUM ION LIION BATTERY 3
LOCATION & SECURITY 171
M
MAPS 115
MASS STORAGE 162
MESSAGING 47
microSD™ CARD 15
MOBILE BROADBAND & HOTSPOT 111
MOBILE NETWORKS 165
MOCK LOCATIONS 176
MODEM 111
MOUNT SD CARD 160
MUSIC 74
N
NAVIGATION 121
NET MEDIA 98
NEWS & WEATHER 123
P
PASSWORD 173
PATTERN LOCK 172
PC 161
PIN 174
PLACES 116
PLAYLISTS 76
POWER BUTTON ENDS CALL 180
210
APPENDIX
POWER/LOCK KEY 24
PRIVACY 177
Q
QUICK TEXT 52
R
RECORDER 153
RESET PHONE 178
RINGTONE 55
S
SAFETY INFORMATION 185
SCREEN LOCK 172
SCREEN TIMEOUT 171
SET DATE 180
SETTINGS 165
SHORTCUTS 32
SILENT MODE 168
SOCIAL NET WIDGET 72
SOUND 168
STOPWATCH 147
STORAGE 160
SWYPE 49
T
TALK 60
TIMER 147
TIME ZONE 181
TOUCH SCREEN 19
TTY MODE 167
U
UNINSTALL 175
UNMOUNT SD CARD 178
UPnP 203
USB DEBUGGING 176
USE MY LOCATION 133
V
VIBRATE 168
VOICE COMMANDS KEY 22
VOICEMAIL 45
VOICE SEARCH 134
VOLUME 169
VPN 166
W
WALLPAPER 35
WARRANTY 185
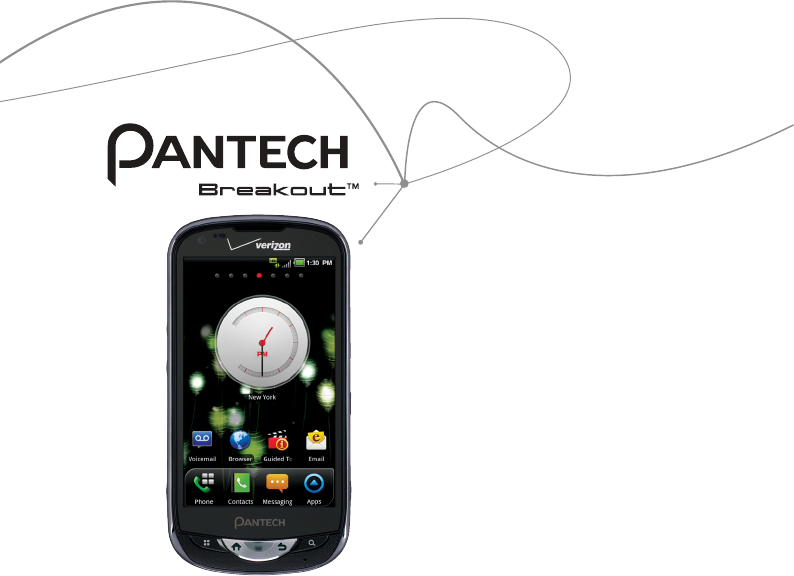
Guía de Usuario para Breakout ™
Gracias por seleccionar el Pantech Breakout™, su
smartphone mas reciente.
Pantech Breakout™ tiene diferentes características
proyectadas para perfeccionar su experiencia
móvil. Con su diseño exclusivo y con estilo, usted
disfrutará de la completa experiencia Breakout™.
Esta Guía de Usuario contiene informaciones
importantes y útiles que maximizarán su
familiaridad con todo lo que Pantech Breakout™
tiene por ofrecer.
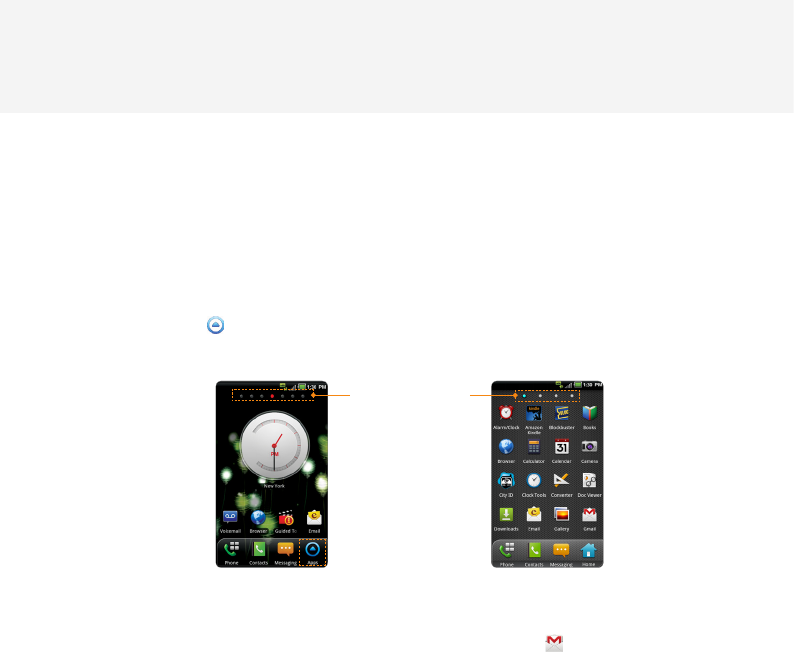
2
INSTRUCCIONES BASICAS
INSTRUCCIONES BASICAS
CONSEJOS UTILES PARA LA UTILIZACION DEL Breakout™
Para comprender las informaciones contenidas en esta guía de usuario y las actividades que usted
puede realizar con el Breakout™, por favor, tenga en mente los consejos a continuación:
xSe presume que usted inicie la operación de las aplicaciones del Breakout™ a partir del menú
Aplicaciones.
1 Toque en Menú a partir de la pantalla de Inicio para acceder el menú Aplicaciones.
2 Arrastre la pantalla hacia la izquierda o hacia la derecha y ejecute la aplicación deseada.
Indicadores de la
Pantalla
Acceso a las Aplicaciones Navegación por las Aplicaciones
xLas palabras en negrilla se refieren a la acción relevante en la pantalla. Por ejemplo, “Toque en
Gmail” significa que usted debe tocar en Gmail abajo del ícono Gmail . Las palabras pueden ser
posicionadas abajo o cerca de un ícono o incluidas en el texto.
xEl símbolo “>” se refiere a la acción siguiente. Por ejemplo, “Toque en Config. > Idioma y teclado”
significa que usted debe tocar en Ajustes primeramente y enseguida en Idioma y teclado.
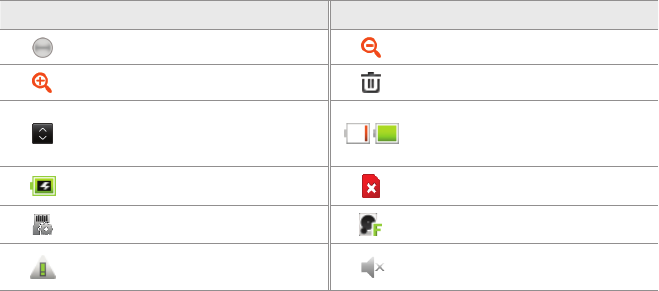
3
INSTRUCCIONES BASICAS
xLa pantalla Aplicaciones se refiere a la pantalla en la cual todas las aplicaciones de Breakout™ son
exhibidas.
xLa pantalla de Inicio es la primera a ser exhibida cuando usted desbloquea la pantalla.
xEl modo Inactivo se refiere al estado cuando usted permanece en la pantalla de Inicio lista para
ejecutar una aplicación.
xLos canales a través de los cuales usted comparte ítems, por ejemplo, contactos y imágenes,
aumentan a medida que usted suscribe los servicios. Por ejemplo, si usted suscribe el Facebook o
Twitter, podrá también compartir informaciones con otras personas a través de Facebook o Twitter.
xLas imágenes capturadas en este manual pueden ser cambiadas de acuerdo con la actualización de
software relevante.
ICONOS COMUNES
Icono Seleccionado para Icono Seleccionado para
Valor de ajuste Zoom de alejamiento
Zoom de acercamiento Borrar ítem seleccionado
Reposicionar el ítem seleccionado
Carga de la batería: Cuanto más
verde, mayor es la carga de la
batería
La batería está siendo cargada No hay tarjeta SIM/USIM
Tarjeta SD preparada La memoria del disco está llena
Hay un error El teléfono no sonará cuando una
llamada sea recibida
4
INSTRUCCIONES BASICAS
SOBRE EL USO DE LA BATERIA
Su teléfono es alimentado por una batería de Ion Litio (Li-Ion). Por lo tanto, usted puede recargarla
mientras permanezca alguna carga, sin reducir la autonomía de su teléfono. Para utilizar la batería con
seguridad:
xNo utilice una batería o cargador dañado.
xNo desarme, abra, comprima, doble, deforme, dañe ni quiebre la batería.
xNo modifique o altere, inserte objetos extraños en la batería, sumerja o exponga al agua u otros
líquidos, exponga al fuego, explosión u otros peligros.
xNo coloque su batería en contacto con objetivos conductores.
xDeseche y recicle las baterías usadas de acuerdo con los reglamentos locales. No deseche las
baterías en el fuego ya que ellas pueden explotar.
xNo utilice un cargador o batería no autorizada.
xUtilice la batería solamente para el dispositivo al cual fue especificada.
xUtilice la batería con un dispositivo de carga que haya sido calificado para el dispositivo de acuerdo
con el estándar. El uso de una batería o cargador no calificado puede representar un riesgo de
fuego, explosión, vaciado u otros peligros.
xNo aplique cortocircuito a una batería ni permita que objetos conductores metálicos entren en
contacto con los terminales de la batería.
xSustituya la batería solamente por una batería calificada con el dispositivo de acuerdo con su
estándar, IEEEStd-1725-2006.
xLos niños deben ser supervisados cuando utilicen la batería.
xEvite dejar caer el teléfono y la batería. Si el teléfono o la batería se caen, especialmente en una
superficie rígida y el usuario sospeche de daños, consulte el servicio técnico para la inspección.
xUtilice su batería solamente para la finalidad especificada.
xCuanto más usted se mueva hacia su estación base de red, más durará su teléfono porque menos
carga será exigida para la conexión.
5
INSTRUCCIONES BASICAS
xEl tiempo de recarga de la batería varía dependiendo de la capacidad remanente y del tipo de
batería y de cargador.
xLa vida útil de la batería será inevitablemente reducida con el tiempo.
xConsiderando que la sobrecarga puede reducir la vida útil de la batería, remueva el teléfono del
cargador cuando estuviere plenamente cargado. Desconecte el cargador cuando la carga estuviere
concluida. Dejar la batería en locales calientes o fríos, especialmente dentro de un automóvil en un
día de verano o invierno puede reducir su capacidad y vida útil.
xPara prevenir heridas o quemaduras, asegúrese que ningún objeto metálico entre en contacto con
los terminales + y – de la batería.

6
INDICE
INSTRUCCIONES BASICAS ............................................................................................................. 2
INSTRUCCIONES BASICAS ..............................................................................................................................................................................2
INDICE ................................................................................................................................................... 6
1. INICIAR
INICIAR................................................................................................................................................13
VERIFICACION DEL EMBALAJE ..................................................................................................................................................................13
REMOCION DE LA TAPA TRASERA ...........................................................................................................................................................14
RECOLOCACION DE LA TAPA TRASERA ...............................................................................................................................................14
INSTALACION DE LA TARJETA SIM DE 4G ...........................................................................................................................................15
REMOCION DE LA TARJETA SIM DE 4G ................................................................................................................................................ 15
INSTALACION DE LA TARJETA microSD™ ...........................................................................................................................................16
REMOCION DE LA TARJETA microSD™.................................................................................................................................................16
INSTALACION DE LA BATERIA ....................................................................................................................................................................17
REMOCION DE LA BATERIA ......................................................................................................................................................................... 17
CARGA DE LA BATERIA ..................................................................................................................................................................................18
PARA ENCENDER/APAGAR SU TELEFONO ......................................................................................................................................... 18
ADMINISTRACION DE LA PANTALLA .....................................................................................................................................................19
VISION GENERAL DEL PRODUCTO .........................................................................................................................................................21
PARA SUJETAR EL Breakout™ .....................................................................................................................................................................24
PARA ACTIVAR EL Breakout™ ..................................................................................................................................................................... 25
BACKUP DE DATOS .......................................................................................................................................................................................... 27
7
TABLE OF CONTENTS
COMPRENSION DE LA PANTALLA DE INICIO ................................................................................................................................... 29
PERSONALIZACION DE LA PANTALLA DE INICIO ..........................................................................................................................33
ADMINISTRACION DE LA PANTALLA DE APLICACIONES ..........................................................................................................38
2. LLAMADAS Y MENSAJES
LLAMADAS Y MENSAJES ..............................................................................................................41
REALIZACION DE LLAMADAS ................................................................................................................................................................... 41
MENSAJERIA ........................................................................................................................................................................................................ 48
CONTACTOS .........................................................................................................................................................................................................56
Google TALK.........................................................................................................................................................................................................61
3. INFORMACIONES PERSONALES
INFORMACIONES PERSONALES.................................................................................................65
CALENDARIO ....................................................................................................................................................................................................... 65
4. COMUNICACION
COMUNICACION .............................................................................................................................69
E-MAIL ..................................................................................................................................................................................................................... 69
GMAIL ......................................................................................................................................................................................................................72
WIDGET RED SOCIAL ...................................................................................................................................................................................... 74
8
TABLE OF CONTENTS
5. ENTRETENIMIENTO
ENTRETENIMIENTO ........................................................................................................................76
PARA ESCUCHAR MUSICA ...........................................................................................................................................................................76
UTILIZACION DE LA CAMARA ................................................................................................................................................................... 82
UTILIZACION DE LA CAMARA COMO FILMADORA ..................................................................................................................... 89
UTILIZACION DE LA GALERIA .................................................................................................................................................................... 93
UTILIZACION DE YOUTUBE ......................................................................................................................................................................... 95
UTILIZACION DEL REPRODUCTOR DE VIDEO ..................................................................................................................................98
MEDIA NET ..........................................................................................................................................................................................................100
6. CONECTIVIDAD
CONECTIVIDAD ............................................................................................................................ 106
UTILIZACION DE UNA RED Wi-Fi ...........................................................................................................................................................106
CONEXION A UNA RED 3G/4G ...............................................................................................................................................................109
UTILIZACION DE Bluetooth ......................................................................................................................................................................111
UTILIZACION DEL Breakout™ COMO UN MODEM .....................................................................................................................113
7. SERVICIOS BASADOS EN LA LOCALIZACION
SERVICIOS BASADOS EN LA LOCALIZACION ..................................................................... 117
UTILIZACION DEL SERVICIO Google MAPS .....................................................................................................................................117
UTILIZACION DEL SERVICIO PLACES ...................................................................................................................................................118
UTILIZACION DEL SERVICIO LATITUDE ..............................................................................................................................................120
9
TABLE OF CONTENTS
NAVEGACION ....................................................................................................................................................................................................123
NOTICIAS Y CLIMA ..........................................................................................................................................................................................125
8. SERVICIOS BASADOS EN INTERNET
SERVICIOS BASADOS EN INTERNET ...................................................................................... 130
NAVEGACION EN LA INTERNET ..............................................................................................................................................................130
Google SEARCH ...............................................................................................................................................................................................135
BUSQUEDA POR VOZ ...................................................................................................................................................................................137
ANDROID MARKET .........................................................................................................................................................................................138
9. HERRAMIENTAS
HERRAMIENTAS ............................................................................................................................ 142
CALCULADORA ................................................................................................................................................................................................142
CALCULADORA DE PROPINAS ...............................................................................................................................................................144
ALARMA/RELOJ ................................................................................................................................................................................................144
HERRAMIENTAS DEL RELOJ ......................................................................................................................................................................148
CONVERTIDOR ..................................................................................................................................................................................................151
VISUALIZADOR DE DOCUMENTOS ......................................................................................................................................................151
ANOTACION MANUSCRITA .......................................................................................................................................................................153
GRABADORA .....................................................................................................................................................................................................157
CLIMA .....................................................................................................................................................................................................................159
10
TABLE OF CONTENTS
10. STORAGE
ALMACENAMIENTO .................................................................................................................... 163
ADMINISTRACION DE LA TARJETA DE MEMORIA ........................................................................................................................163
CONEXION A UNA PC .................................................................................................................................................................................164
UTILIZACION DEL Breakout™ COMO DISPOSITIVO DE ALMACENAMIENTO EN LOTES .......................................165
TRANSFERENCIA DE ARCHIVOS A TRAVES DEL WINDOW MEDIA SYNC .......................................................................166
11. AJUSTES
AJUSTES .......................................................................................................................................... 168
INALAMBRICOS Y REDES ............................................................................................................................................................................168
AJUSTES DE LLAMADAS .............................................................................................................................................................................170
SONIDO ................................................................................................................................................................................................................171
EXHIBICION .........................................................................................................................................................................................................173
LOCALIZACION Y SEGURIDAD ................................................................................................................................................................175
APLICACIONES .................................................................................................................................................................................................179
CUENTAS Y SINCRONIZACION ................................................................................................................................................................181
PRIVACIDAD .......................................................................................................................................................................................................182
ALMACENAMIENTO ......................................................................................................................................................................................182
IDIOMA Y TECLADO .......................................................................................................................................................................................183
ENTRADA Y SALIDA DE VOZ .....................................................................................................................................................................183
ACCESIBILIDAD ................................................................................................................................................................................................184
FECHA Y HORA .................................................................................................................................................................................................185
SOBRE EL TELEFONO ....................................................................................................................................................................................186
11
TABLE OF CONTENTS
12. APENDICE
APENDICE ....................................................................................................................................... 189
SEGURIDAD Y GARANTIA ...........................................................................................................................................................................189
UPnP y DLNA .....................................................................................................................................................................................................210
ESPECIFICACIONES ........................................................................................................................................................................................210
SERVICIOS BASADOS EN LA LOCALIZACION .................................................................................................................................212
CONTRATO DE LICENCIA DEL USUARIO FINAL (EULA) ............................................................................................................213
AVISO LEGAL ......................................................................................................................................................................................................213
LISTA DE VERIFICACION DE SOLUCION DE PROBLEMAS ........................................................................................................213
Índice .....................................................................................................................................................................................................................215

VERIFICACION DEL EMBALAJE
REMOCION DE LA TAPA TRASERA
RECOLOCACION DE LA TAPA TRASERA
INSTALACION DE LA TARJETA SIM DE 4G
REMOCION DE LA TARJETA SIM DE 4G
INSTALACION DE LA TARJETA
microSD™
REMOCION DE LA TARJETA microSD™
INSTALACION DE LA BATERIA
REMOCION DE LA BATERIA
CARGA DE LA BATERIA
PARA ENCENDER/APAGAR SU TELEFONO
ADMINISTRACION DE LA PANTALLA
VISION GENERAL DEL PRODUCTO
PARA SUJETAR EL Breakout™
PARA ACTIVAR EL Breakout™
BACKUP DE DATOS
COMPRENSION DE LA PANTALLA DE INICIO
PERSONALIZACION DE LA PANTALLA DE INICIO
ADMINISTRACION DE LA PANTALLA DE APLICACIONES
1. INICIAR
1
INICIAR
Este capítulo provee informaciones importantes que usted debe saber
antes de utilizar el Breakout™, incluyendo:
13
INICIAR
VERIFICACION DEL EMBALAJE
Verifique si el embalaje contiene los ítems a continuación:
xTeléfono
xBatería de Ion Litio Estándar
xCargador de Pared/USB
xGuía de Inicio Rápido
xGuía de Usuario
xFolleto de Seguridad y Garantía del Producto
xTarjeta microSD™ de 8GB (pre-instalado)
Nota Usted puede adquirir la Tapa de la Batería Inductiva de Carga Inalámbrica (IDENTIFICACION FCC: JYC
APACHE) en las tiendas Verizon. Ella debe ser utilizada con el Dispositivo de Carga Inalámbrico certificado por
Wireless Power Consortium (WPC).
Se recomienda que usted adquiera los siguientes accesorios para el uso seguro y conveniente del
Breakout™.
xPelícula de protección del LCD
xAdaptador para tarjeta de memoria externa
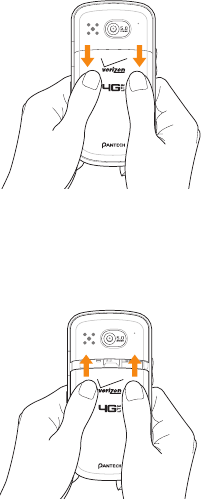
14
INICIAR
REMOCION DE LA TAPA TRASERA
1 Certifíquese de apagar su teléfono y sujetarlo firmemente con las dos manos con la parte frontal
volcada hacia afuera.
2 Tire la tapa trasera con los dos pulgares.
RECOLOCACION DE LA TAPA TRASERA
1 Coloque la tapa trasera encima del compartimiento de la batería, desplácela hacia arriba hasta oír
que se encajó.
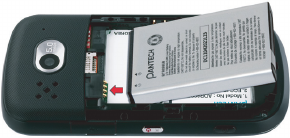
15
INICIAR
INSTALACION DE LA TARJETA SIM DE 4G
1 Certifíquese de apagar su teléfono y remueva la tapa trasera y la batería.
2 Inserte la tarjeta 4G SIM en la ranura. Certifíquese que los contactos de oro de la tarjeta estén en
contacto con los contactos metálicos de su teléfono.
REMOCION DE LA TARJETA SIM DE 4G
1 Certifíquese de apagar su teléfono y remueva la tapa trasera y la batería.
2 Sujete la tarjeta SIM de 4G cuidadosamente y deslícela hacia afuera de la ranura.
SOBRE LA TARJETA SIM DE 4G
Cuando usted se inscriba junto a su operadora de red, recibirá la tarjeta Suscriber Identity Module (SIM)
o la tarjeta RUIM (Re-Usable Identification Module) que contienen sus informaciones de registro, el
código PIN, etc. Manténgalo en seguridad y manipúlelo cuidadosamente de la misma forma que una
tarjeta de crédito. No doble, raye o exponga a la humedad. Evite la carga estática.
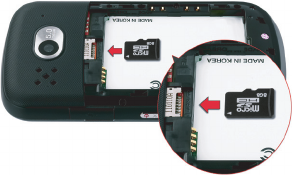
16
INICIAR
INSTALACION DE LA TARJETA microSD™
1 Certifíquese de apagar su teléfono y remueva la tapa trasera y la batería.
2 Inserte la tarjeta microSD™ en la ranura. Asegúrese que los contactos de oro de la tarjeta estén en
contacto con los contactos metálicos del teléfono.
3 Recoloque la tapa trasera deslizándola hacia arriba hasta escuchar que se encajó.
REMOCION DE LA TARJETA microSD™
1 Certifíquese de apagar su teléfono y remueva la tapa trasera y la batería.
2 Sujete la tarjeta microSD™ cuidadosamente y deslícela hacia afuera de la ranura.
SOBRE LA TARJETA microSD™
Una tarjeta microSD™ es una tarjeta de memoria flash amovible donde usted graba los datos. Grabe
imágenes y contactos y descargue aplicaciones a la tarjeta SD. Usted puede expandir la memoria
externa hasta 32GB. Se recomienda que usted formatee la tarjeta microSD™ antes de utilizar el
Breakout™. Para mayores informaciones sobre el borrado de los datos de la tarjeta microSD™, refiérase
a la página 183.
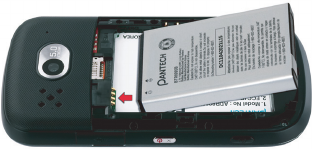
17
INICIAR
INSTALACION DE LA BATERIA
1 Sujete su teléfono con firmeza después remueva la tapa trasera.
2 Alinee los contactos de la batería (1) con los terminales en el compartimiento de la batería.
3 Presione la batería (2) hasta escuchar que se encajó.
4 Recoloque la tapa en el compartimiento de la batería, deslícela hacia arriba hasta escuchar que se
encajó.
REMOCION DE LA BATERIA
1 Sujete su teléfono con firmeza después remueva la tapa trasera.
2 Remueva la batería de compartimiento levantando su parte superior con la uña.
SOBRE LA BATERIA
El Breakout™ utiliza una batería de Ion-Litio (Li-Ion). Certifíquese de utilizar solamente la batería y el
cargador autorizados. El total de horas de uso de la batería puede variar dependiendo de los tipos
de servicio ofrecidos por el proveedor de servicio y temperaturas. Para mayores detalles, consulte el
servicio técnico.
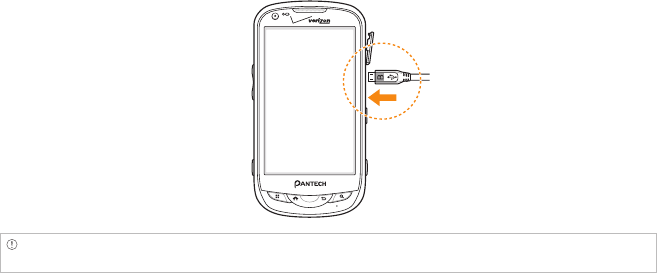
18
INICIAR
CARGA DE LA BATERIA
1 Conecte el cable USB al Cargador USB/de Pared.
Nota Certifíquese de alinear el conector como está indicado en la figura. En caso contrario, el conector de carga
será dañado y la batería no será cargada.
2 Conecte el cable USB al Puerto de Accesorios/Carga de teléfono. Conecte el cargador USB/de Pared
a una toma de corriente. La carga de la batería será iniciada.
3 Desconecte el cargador cuando la batería estuviere completamente cargada.
PARA ENCENDER/APAGAR SU TELEFONO
Es importante cargar completamente la batería antes de encender su teléfono.
1 Asegúrese de que la tarjeta SIM de 4G y la batería este instalada con seguridad en su teléfono.
2 Presione y mantenga presionada la Tecla Encender-Apagar/Bloquear F E durante algunos
segundos hasta que la luz de la pantalla sea encendida.
3 Para apagar el teléfono, presione y mantenga presionada la Tecla Encender-Apagar/Bloquear F E
hasta que el menú pop-up sea exhibido.
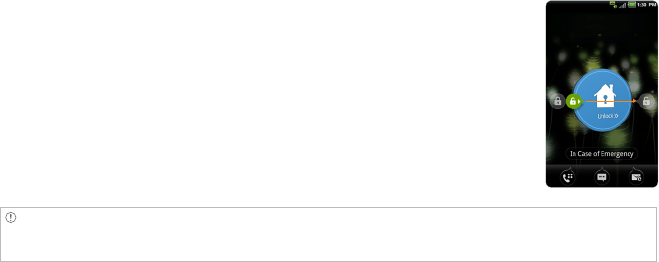
19
INICIAR
4 Toque en Apagar en el menú pop-up.
5 Toque en Aceptar para confirmar que desea apagar el teléfono.
ADMINISTRACION DE LA PANTALLA
DESBLOQUEO DE LA PANTALLA
La pantalla es bloqueada como estándar cuando usted enciende el teléfono. Para desbloquear la
pantalla:
1 Presione la Tecla Encender-Apagar/Bloquear F E.
2 Arrastre la traba hacia la derecha. Trace un estándar si la pantalla
estuviere protegida por una traba estándar. Inserte un código PIN o una
contraseña si la pantalla estuviere bloqueada por un código PIN o una
contraseña.
Nota Usted puede verificar llamadas no contestadas, mensajes o e-mails repetidamente cuando la pantalla
estuviere bloqueada. Arrastre el icono para realizar una llamada, enviar un mensaje o e-mail hasta la imagen
localizada en la parte intermediaria de la pantalla.
BLOQUEO DE LA PANTALLA
Para bloquear la pantalla, presione la Tecla Encender-Apagar/Bloquear F E. Si usted desea que el
Breakout™ bloquee la pantalla automáticamente en un horario pre-determinado, refiérase a la página 175
para el límite de tiempo de exhibición de la pantalla.
Se recomienda bloquear la pantalla para proteger las informaciones contenidas en el Breakout™ y para
conservar la carga de la batería.
20
INICIAR
UTILIZACION DE LA PANTALLA DE TOQUE
Su pantalla de toque provee una excelente manera de interactuar y utiliza su teléfono Android. Con el
toque de su dedo, usted puede descargar y utilizar aplicaciones disponibles, seleccionar sus opciones
en el menú y acceder datos grabados en su teléfono.
Los términos a continuación son utilizados para describir las diferentes acciones disponibles utilizando
la pantalla de toque:
xToque: Un único toque de dedo selecciona ítems. Por ejemplo, toque en un icono (p. ej., ítem del
menú Aplicaciones), toque en palabras (p. ej., selección del menú o para responder una pregunta
en la pantalla), o toque en letras y números para digitar en el teclado QWERTY virtual.
xTocar y mantener presionada: y mantenga presionado un ítem en la pantalla tocándolo y no
sacando el dedo hasta que una acción sea realizada. Por ejemplo, para abrir el menú pop-up para
personalizar la pantalla de Inicio, toque en un área vacía en la pantalla de Inicio hasta que al menú
pop-up sea exhibido.
xArrastrar: Toque y mantenga presionado un ítem durante un instante y enseguida, sin sacar el
dedo, muévalo hasta lograr la posición deseada. Usted puede arrastrar ítems en la pantalla de Inicio
para reposicionarlos.
xJuntar: Juntar dos dedos en la pantalla y muévalos separadamente para aplicar el zoom de
acercamiento en una imagen, un documento o una página de Internet, o muévalos juntos para
aplicar el zoom de alejamiento.
xPasar o deslizar: Mueva rápidamente el dedo en la superficie de la pantalla, sin pausar cuando
toque por primer vez (para no arrastrar un ítem). Por ejemplo, usted puede deslizar (mover) la
pantalla hacia arriba o hacia abajo para desplazar una lista, o navegar a través de las diferentes
pantallas de Inicio pasando de la izquierda hacia la derecha (y viceversa).
Nota Utilice un dedo cada vez excepto cuando manipule una imagen o documento. El Breakout™ no reconocerá
cuando utilice más de dos dedos.
CUIDADO
xNo utilice objetos finos que puedan rayar la pantalla de toque.
xNo deje que la pantalla de toque se contacte con el agua o productos químicos. La pantalla de toque puede
presentar defectos en condiciones húmedas o si fuere sometido a productos químicos.
xNo se siente sobre el Breakout™. La pantalla de toque puede ser dañada.
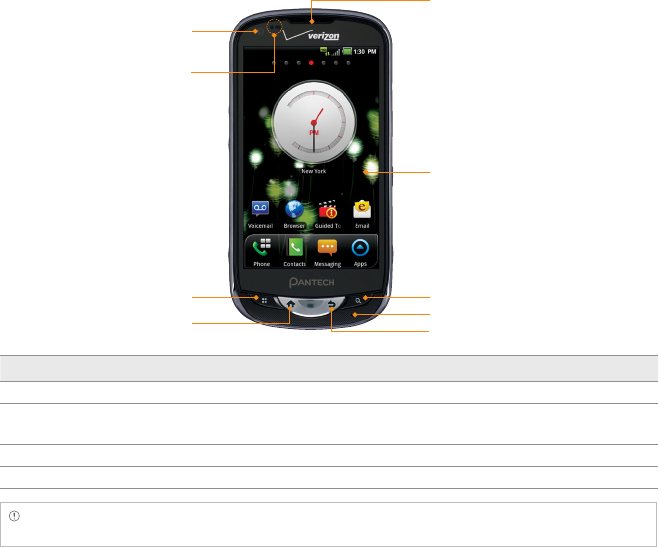
21
INICIAR
VISION GENERAL DEL PRODUCTO
VISTA FRONTAL
Tecla Función
MENU BExhibe las opciones disponibles; reorganiza la pantalla de Inicio
INICIO A
Accede la pantalla de Inicio; ejecuta el administrador de tareas cuando usted
presiona y mantenga esta tecla presionada
VOLVER CFinaliza una aplicación; retorna al menú anterior
BUSQUEDA DAbre una ventana de búsqueda
Nota Certifíquese de no tapar el sensor de acercamiento con la película de protección del LCD. Si el sensor está
tapado, podrá tener dificultades para utilizar la pantalla de toque.
CAMARA FRONTAL
PANTALLA DE TOQUE
TECLA INICIO
TECLA MENU TECLA DE BUSQUEDA
TECLA VOLVER
MICROFONO
AURICULAR
SENSOR DE ACERCAMIENTO
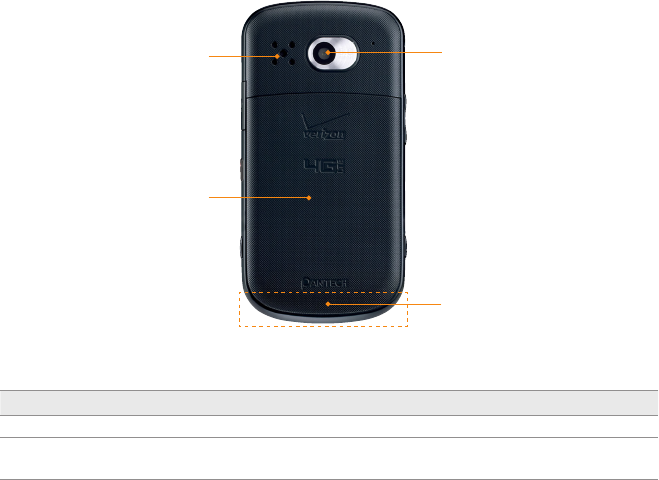
22
INICIAR
VISTA TRASERA
Nombre Descripción
PARLANTE Emite los sonidos
LENTE DE LA
CAMARA
Captura imágenes y graba vídeo a través de esta lente
LENTE DE LA CAMARA
AREA DE LA ANTENA
INTERNA
PARLANTE
TAPA TRASERA
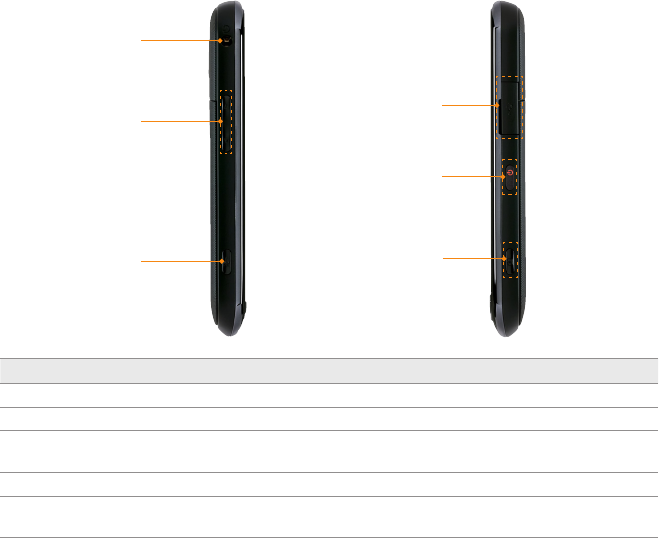
23
INICIAR
Tecla Función
VOLUMEN Ajusta los volúmenes de todos los sonidos; ajusta el modo de toque
COMANDOS DE VOZ Ejecuta el menú Comandos de Voz
PUERTO DE ACCESORIOS /
CARGA
Conecta el Breakout™ y su PC a través del cable USB; suministra
alimentación
CAMARA / VIDEO Activa la cámara y la filmadora
ENCENDER-APAGAR /
BLOQUEAR
Bloquea la pantalla; activa/desactiva la pantalla
VISTA LATERAL
TECLAS DE VOLUMEN
TECLA COMANDOS
DE VOZ
CONECTOR PARA
AUDIFONOS
TECLA ENCENDER-
APAGAR / BLOQUEAR
TECLA CAMARA
/ VIDEO
PUERTO DE
ACCESORIOS /
CARGA
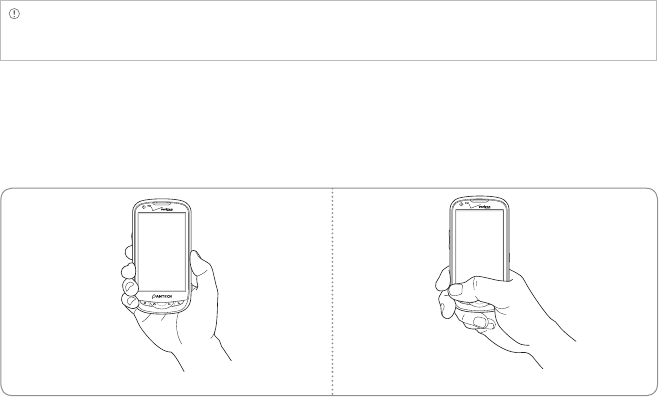
24
INICIAR
UTILIZACION DEL CONECTOR PARA AUDIFONOS
Usted puede controlar los accesorios de su dispositivo insertando el conector en el Conector para
Audífonos de 3,5 mm en su teléfono.
Nota Los audífonos estéreo que soportan funciones de administración de llamadas comunes incluyendo la
realización y contestado de llamadas no son estandarizados. Por lo tanto, el teléfono puede no ser compatible
con algunos audífonos estéreo.
PARA SUJETAR EL Breakout™
Se recomienda fuertemente que usted sujete el Breakout™ en la posición correcta para una llamada
como está indicado a continuación:
Correcto Incorrecto
xCertifíquese de no bloquear la antena incorporada al Breakout™. Verifique la localización de la
antena en la figura de la página 22.
xNo utilice accesorios metálicos en la mano: Ellos pueden afectar la calidad de las llamadas.

25
INICIAR
PARA ACTIVAR EL Breakout™
Usted deberá realizar algunos procesos cuando encienda el Breakout™ por primera vez, después
inserte la batería.
CONFIGURACION INICIAL
1 Presione y mantenga presionada la Tecla Encender-Apagar/Bloquear F E para encender el
Breakout™.
2 Seleccione y toque en el idioma para el Breakout™ y toque en Siguiente.
3 En la pantalla Asistente de Backup, toque en Siguiente si usted desea registrar su cuenta en el
Asistente de Backup. Toque en Saltar si desea registrar cuentas posteriormente.
4 En la pantalla Configuración de cuentas Google, toque en Siguiente y siga las instrucciones o en
Suscripción si usted ya tuviere una cuenta. Toque en Saltar si usted desea configurar una cuenta
Google posteriormente. Para crear una cuenta Google, refiérase a la página 26.
5 En la pantalla Configuración de e-mail, seleccione y toque en una cuenta que usted desea
configurar. Refiérase a la página 69. Toque en Siguiente si usted desea configurar la cuenta de e-mail
posteriormente.
6 En la pantalla Cuidados con Privacidad, toque en Siguiente.
7 En la pantalla Consentir Localización,
xToque en Servicios de Localización VZW > Si está de Acuerdo.
xToque en Servicios de GPS Individual > Si está de Acuerdo.
xToque en Servicios de Localización Google > Si está de Acuerdo.
Toque en Siguiente cuando finalice la selección de la opción de consentimiento de localización.
8 Toque en Configuración Básica y Uso de Vídeos y verifique los Tours Orientados. Si usted finaliza la
verificación, toque en Hecho. O puede tocar en Mi Celular Verizon y visualice el vídeo relacionado.
9 Toque en Finalizar y el primer proceso para configurar el Breakout™ está realizado.
Nota Usted puede realizar todos estos pasos posteriormente tocando en Asistente de Configuración en el
menú Aplicaciones.
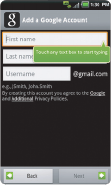
26
INICIAR
CREACION DE UNA CUENTA Google
Se recomienda que usted tenga una cuenta Google para utilizar algunas aplicaciones del Breakout™.
1 En el menú Aplicaciones, toque en Ajustes > Cuentas y sincronización > Agregar cuenta.
2 Toque en Google > Siguiente > Crear.
3 Inserte su nombre, apellido y nombre de usuario para la cuenta y toque en Siguiente. El nombre de
usuario debe contener 6 a 30 caracteres. Usted puede seleccionar una alternativa.
4 Toque en Siguiente > Conectar a Wi-Fi si usted no conectó el Breakout™ a la red Wi-Fi y siga las
instrucciones.
5 Inserte y reinserte la contraseña para confirmar. Usted debe insertar por lo menos 8 caracteres.
6 Toque en Siguiente.
7 Seleccione y toque en una pregunta de seguridad y inserte una respuesta.
8 Inserte una dirección de e-mail secundaria y toque en Crear.
9 Toque en Yo estoy de acuerdo, Siguiente para los Términos de Servicio Google.
10 Toque en Intentar nuevamente si su contraseña sea insuficiente para los requisitos de contraseña o
contuviere caracteres inválidos.
11 Repita los pasos 5 a 9.
12 Digite los caracteres exhibidos en la pantalla y toque en Siguiente.
13 Toque en Sincronizar Contactos si usted desea sincronizar sus contactos. Toque en Sincronizar
Gmail si desea sincronizar Gmail.

27
INICIAR
BACKUP DE DATOS
Genere backup de datos grabados en el Breakout™ utilizando el Asistente de Backup.
REGISTRO DE CUENTAS
1 Toque en Contactos en la pantalla de Inicio.
2 Presione la Tecla Menú B y toque en Asistente de Backup. O en el menú Aplicaciones usted puede
tocar en Ajustes > Cuentas y sincronización > Asistente de Backup.
3 Toque en Siguiente. El Asistente de Backup inicia la conexión con el servidor.
4 Digite un código PIN de 4 a 8 dígitos y toque en Reinsertar código PIN.
5 Digite el código PIN nuevamente para confirmación y toque en Siguiente. Tardará algún tiempo
antes que el registro sea concluido.
BACKUP DE CUENTAS
1 Toque en Contactos en la pantalla de Inicio.
2 Presione la Tecla Menú B y toque en Asistente de Backup. O en el menú Aplicaciones usted puede
tocar en Ajustes > Cuentas y sincronización > Asistente de Backup.
3 Toque en Backup Ahora. Si usted desea interrumpir el backup, toque en Parar Backup.
RECUPERACION DE DATOS
1 Toque en Contactos en la pantalla de Inicio.
2 Presione la Tecla B y toque en Asistente de Backup. O en el menú Aplicaciones usted puede tocar
en Ajustes > Cuentas y sincronización > Asistente de Backup.
3 Toque en Recuperar.
28
INICIAR
SINCRONIZACION RECURRENTE
1 Toque en Contactos en la pantalla de Inicio.
2 Presione la Tecla Menú B y toque en Asistente de Backup. O en el menú Aplicaciones usted puede
tocar en Ajustes > Cuentas y sincronización > Asistente de Backup.
3 Toque en Sincronización Recurrente.
4 Seleccione y toque en el horario para sincronización y toque en OK.
CAMBIO DE NUMERO PIN
1 Toque en Contactos en la pantalla de Inicio.
2 Presione la Tecla Menú B y toque en Asistente de Backup. O en el menú Aplicaciones usted puede
tocar en Ajustes > Cuentas y sincronización > Asistente de Backup.
3 Toque en PIN.
4 Digite el PIN actual.
5 Digite y reinserte el nuevo código PIN.
6 Toque en Siguiente.
VERIFICACION EN EL SITIO WEB
1 Toque en Contactos en la pantalla de Inicio.
2 Presione la Tecla Menú B y toque en Asistente de Backup. O en el menú Aplicaciones usted puede
tocar en Ajustes > Cuentas y sincronización > Asistente de Backup.
3 Toque en www.verizonwireless.com/backupassistant en la parte inferior de la pantalla y verifique
sus datos en línea.

29
INICIAR
COMPRENSION DE LA PANTALLA DE INICIO
La pantalla de Inicio es el punto de partida para utilizar las aplicaciones en el Breakout™. Navegue en
la pantalla de Inicio y utilice las funciones básicas de Breakout™. Presione la Tecla de Inicio A si usted
desea acceder la pantalla de Inicio en cualquier momento.
Muestra de Pantallas de Inicio Pantalla de una Visualización 3D
ICONOS DE LA BARRA DE APLICACIONES
Los íconos a continuación representan las aplicaciones posicionadas en la barra de aplicaciones como
ajuste estándar. Reposiciónelos conforme su preferencia.
Icono Descripción Icono Descripción
Realiza llamadas Accede la pantalla de Inicio; ejecuta
la administración de tareas
Abre Contactos Accede la pantalla Aplicaciones
Abre la Central de Mensajes
30
INICIAR
NAVEGACION EN LA PANTALLA DE INICIO
El Breakout™ suministra siete pantallas diferentes en las cuales usted puede posicionar los ítems de
acuerdo con su preferencia. Cambie el número de las pantallas de Inicio si desea. Refiérase a la página 33
para mayores informaciones.
1 Pase la pantalla de la izquierda hacia la derecha o viceversa.
2 Toque en una aplicación deseada o widget a ser ejecutado.
VERIFICACION DE APLICACIONES CON EL ADMINISTRADOR DE TAREAS
Administre las aplicaciones utilizando el Administrador de Tareas para mejorar la eficiencia.
1 Toque y mantenga presionada la Tecla de Inicio A en el modo inactivo. Usted puede verificar las
aplicaciones en el orden de uso. Usted puede visualizar hasta ocho aplicaciones en la pantalla.
2 Toque en Administrador de Tareas. Usted puede visualizar aplicaciones en ejecución, estado de
sistema y datos útiles.
3 Toque en una aplicación. Usted puede visualizar la CPU y la memoria RAM que la aplicación está
utilizando actualmente. O toque en X cerca de la aplicación que desea interrumpir.
4 Toque en Sistemas. Usted puede visualizar informaciones sobre la CPU, Memoria Interna/Externa y
Red.
5 Toque en Consejos y verifique las informaciones útiles que puedan ayudarlo a administrar
aplicaciones del Breakout™.
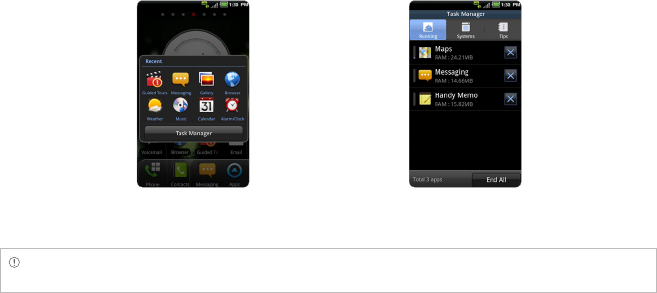
31
INICIAR
Ejecución de Administrador de Tareas Finalización de aplicaciones
Nota Certifíquese de presionar la Tecla Volver C y acceder la pantalla de Inicio si desea finalizar el uso de una
aplicación. En caso contrario, la aplicación seguirá en operación y utilizará la memoria y batería.
AJUSTES DE LA BARRA DE ESTADO Y AJUSTE FACIL
La barra de estado ofrece acceso rápido a la función Ajuste Fácil y eventos en curso.
1 Toque en la parte superior de la pantalla de Inicio y arrastre la barra de estado hacia abajo.
2 Toque en icono en Ajuste Fácil que desea ejecutar. El icono será encendido en verde cuando la
función estuviere activada.
3 Toque en Borrar si usted desea remover las notificaciones en la barra.
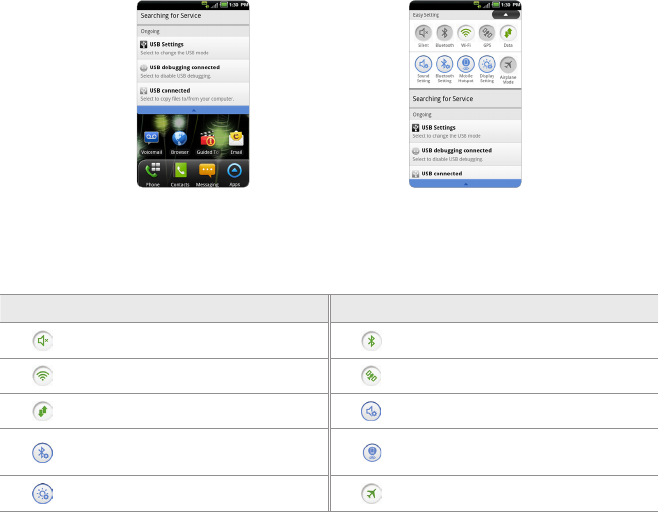
32
INICIAR
Apertura de Notificaciones Verificación de la barra de notificación
ICONOS DE AJUSTE FACIL
Icono Descripción Icono Descripción
Silencia el sonido Activa el Bluetooth
Activa el Wi-Fi Activa el GPS
Activa la red de datos Ajusta el sonido
Ajusta las funciones de Bluetooth Ajusta las funciones de Hotspot
Móvil
Ajusta la exhibición Activa/Desactiva el Modo Avión
33
INICIAR
UTILIZACION DE WIDGETS DE NOTIFICACION DE EVENTOS
1 Toque y mantenga presionado el espacio vacío en la pantalla o presione la Tecla Menú B en el
modo inactivo y toque en Widget.
2 Toque en Pantech Widgets.
3 Toque y mantenga presionada Notificación de Eventos en la parte inferior de la pantalla y
posiciónelo en el punto deseado en la pantalla.
4 Toque en un ícono para llamadas, mensajes o e-mails recientes y realice los pasos necesarios.
PERSONALIZACION DE LA PANTALLA DE INICIO
Posicione accesos rápidos, widgets o carpetas y críe un papel de pared de acuerdo con sus
preferencias. Certifíquese de asegurar espacio suficiente en la pantalla antes de agregar un acceso
rápido, widget o carpeta. Si el espacio esa insuficiente, las opciones para agregar ítems en la pantalla de
Inicio no serán exhibidas.
AGREGUE UN ACCESO RAPIDO
1 Toque y mantenga presionado un espacio vacío de la pantalla de Inicio o presione la Tecla Menú B
en el modo inactivo y toque en Agregar.
2 Toque en Accesos Rápidos.
3 Seleccione y toque un ítem entre los que pueden ser agregados como acceso rápidos.
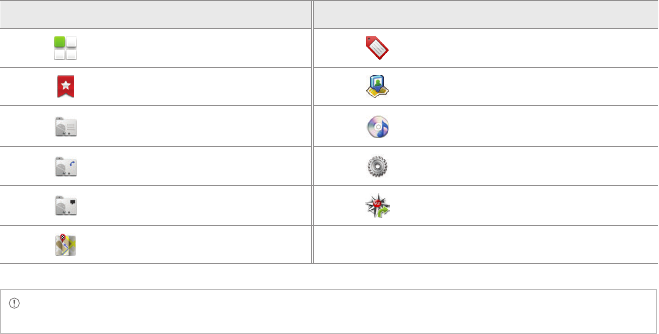
34
INICIAR
LISTA DE ACCESOS RAPIDOS
Icono Descripción Icono Descripción
Aplicaciones Etiqueta de Gmail
Marcador Latitude
Contacto Lista de Reproducción de
Música
Marcado directo Configurac.
Mensaje directo VZ Navigator
Indicaciones y navegación
Nota Usted puede también crear un acceso rápido para una aplicación presionando y manteniendo presionado
el icono correspondiente en el menú Aplicaciones.
ADICION DE UN WIDGET
1 Toque y mantenga presionado un espacio vacío de la pantalla o presione la Tecla Menú B en el
modo inactivo.
2 Toque en Pantech Widgets o Android Widgets. Los tipos de widgets pueden aumentar a medida
que usted instale aplicaciones en el Breakout™. Refiérase al capítulo relevante para mayores
informaciones sobre widgets.
xToque y mantenga presionado el widget a ser agregado y seleccione un estilo si hubiere tocado
en Pantech Widgets.
xSeleccione y toque el widget a ser agregado si usted hubiere tocado en Android Widgets.
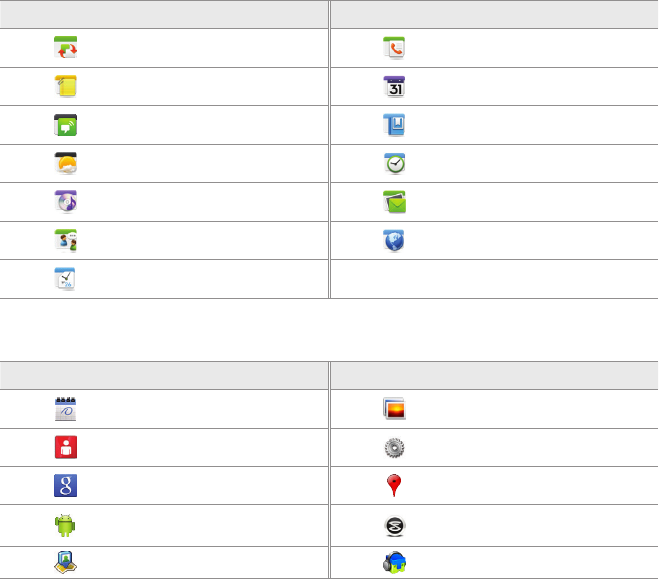
35
INICIAR
LISTA DE WIDGETS PANTECH
Icono Descripción Icono Descripción
Administrad... Contactos
Memo Calendario
Notificación... Favorito
Clima Reloj de
Música Correo electr...
Red social Espacio Web
Reloj Integrado
LISTA DE WIDGETS ANDROID
Icono Descripción Icono Descripción
Calendario Marco
Data Usage Control de energía
Búsqueda de Google Puntuar sitios
Consejos acerca de la
pantalla principal Slacker Radio
Latitude TuneWiki

36
INICIAR
Icono Descripción Icono Descripción
Tienda YouTube
Noticias & Clima Tráfico
CREACION DE UN PAPEL DE PARED PARA LA PANTALLA DE INICIO
1 Toque y mantenga presionado un espacio vacío de la pantalla y toque en Papeles de Pared o
presione la Tecla Menú B en el modo inactivo y toque en Papel de Pared.
2 Toque en Galería, Papeles de pared en vivo o Papeles de Pared:
xSeleccione y toque en una imagen en Galería, ajuste el tamaño y toque en Grabar si usted
hubiere tocado en Galería.
xSeleccione y toque en un papel de pared en vivo y toque en Definir papel de pared si usted
hubiere tocado en Papeles de pared en vivo. Usted puede tocar en Ajustes y ajuste conforme
sus preferencias.
xSeleccione y toque en un papel de pared y toque en Definir papel de pared si usted hubiere
tocado en Papeles de Pared.
Nota Recuérdese que Mapas en Papeles de Pared En Vivo consumen energía de la batería en velocidad
relativamente rápida. Si usted desea reducir el consumo de batería, se recomienda finalizar la función Papel de
Pared En Vivo inmediatamente (Config. > Aplicaciones > Servicios en Operación).
ADICION DE UNA CARPETA
1 Toque y mantenga presionado un espacio vacío en la pantalla de Inicio o presione la Tecla Menú B
en el modo inactivo y toque en Agregar.
2 Toque en Carpetas.
3 Seleccione y toque en un tipo de carpeta. Una vez que una carpeta sea creada en la pantalla Inicio,
usted puede agregar ítems presionando y manteniéndolos presionados y arrestándolos hacia la
carpeta.

37
INICIAR
BORRADO DE ITEMS DE LA PANTALLA DE INICIO
1 Toque y mantenga presionado un acceso rápido, widget o carpeta que
usted desea borrar.
2 Arrástrelo al icono Papelera en la parte inferior de la pantalla.
CAMBIO DE MODO DE LA PANTALLA DE INICIO
1 Presione la Tecla Menú B en el modo inactivo y toque en Modo.
2 Toque en Estándar si usted desea utilizar uno de los modos de la pantalla de Inicio
predeterminados, desplace la pantalla hacia la derecha o izquierda y toque en Grabar.
3 Toque en Usuario > Grabar y inserte el nombre del modo y toque en OK. Note que el modo
de usuario no será disponible si no haya editado la pantalla de Inicio. Refiérase al párrafo a
continuación sobre la edición de la pantalla de Inicio.

38
INICIAR
EDICION DE LA PANTALLA DE INICIO
1 Presione la Tecla Menú B en el modo inactivo y toque en Editar.
2 Mientras las pantallas son exhibidas,
xSi usted desea reposicionar la pantalla de Inicio, toque y mantenga
presionada una pantalla de Inicio y arrástrela para la localización
deseada.
xSi usted desea borrar una pantalla de Inicio, arrástrela hacia la
papelera en la parte inferior de la pantalla. Usted puede borrar
pantallas de Inicio hasta que dos pantallas de Inicio permanezcan.
Toque en la parte inferior de la pantalla si usted desea agregar una
pantalla vacía.
3 Presione la Tecla Menú B y toque en Guardar se finalizará la edición de
la pantalla de Inicio. Usted puede también tocar en o presione la Tecla
Volver C para grabar las modificaciones.
ADMINISTRACION DE LA PANTALLA DE APLICACIONES
La pantalla de Aplicaciones es donde todas las aplicaciones de Breakout™ son exhibidas. Realice
búsqueda de aplicaciones y personalícelas con un plan de fondo diferente.
EDICION DE LA PANTALLA DE APLICACIONES
1 Toque en Menú en la pantalla de Inicio.
2 Presione la Tecla Menú B y toque en Editar.
3 Arrastre una aplicación cuja localización usted desea cambiar hacia un espacio deseado. Usted
puede también cambiar las aplicaciones en la barra de aplicaciones. Si usted desea ocultar una
aplicación, arrástrela hacia el ícono en la parte inferior izquierda de la pantalla.
4 Presione la Tecla Menú B y toque en Salir del Modo cuando se lleva a cabo la edición.
39
INICIAR
BUSQUEDA DE APLICACIONES
1 En el menú Aplicaciones, presione la Tecla Menú B toque en Buscar para localizar una aplicación.
2 Digite el nombre de la aplicación.
REPOSICIONAMIENTO DE LAS APLICACIONES POR NOMBRE
1 En el menú Aplicaciones, presione la Tecla Menú B y toque en Tipo. Usted puede visualizar las
aplicaciones por nombre.
CAMBIO DE PLAN DE FONDO
1 En el menú Aplicaciones, presione la Tecla Menú B y toque en Antecedente.
2 Seleccione y toque en un plan de fondo.
3 Toque en Guardar.

2. LLAMADAS Y MENSAJES
REALIZACION DE LLAMADAS
MENSAJERIA
CONTACTOS
Google TALK
2
LLAMADAS Y MENSAJES
Este capítulo suministra informaciones importantes sobre la
utilización de funciones claves de Breakout™ incluyendo:
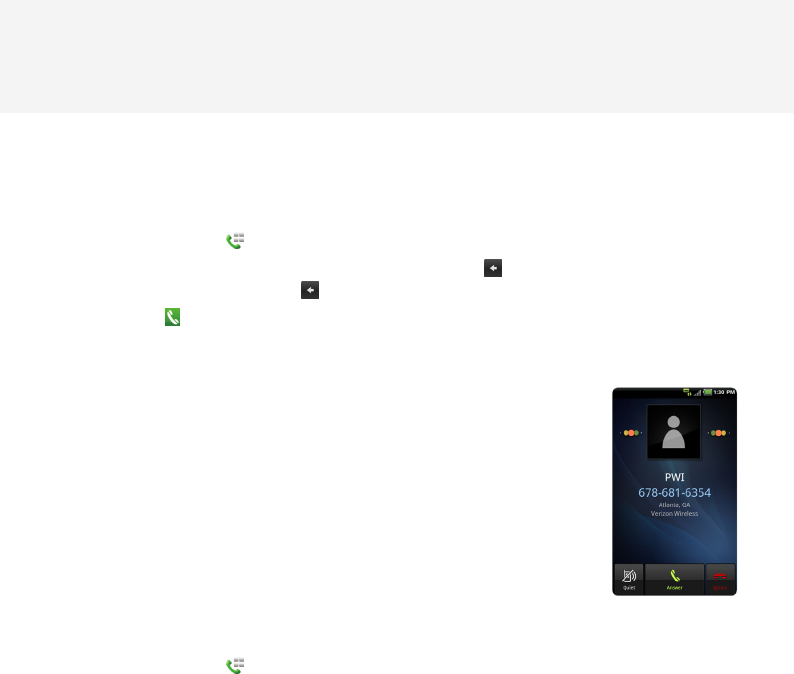
41
LLAMADAS Y MENSAJES
REALIZACION DE LLAMADAS
REALIZACION DE UNA LLAMADA
1 Toque en Teléfono en la pantalla de Inicio.
2 Inserte el código de área y el número de teléfono. Toque en para borrar el número anterior.
Toque y mantenga presionado para borrar todo el número.
3 Toque en para llamar al número.
CONTESTAR Y TERMINO DE UNA LLAMADA
1 Toque en Contestar para contestar la llamada.
2 Toque en Silencioso si usted desea que el Breakout™ no emita sonido o
vibración al recibir una llamada.
3 Toque en Ignorar si usted no desea contestar la llamada.
4 Toque en Finalizar para encerrar la llamada durante la conversación.
Después de finalizar una llamada, se exhibirá un resumen de la llamada.
REALIZACION DE UNA LLAMADA UTILIZANDO MARCADO RAPIDO
1 Toque en Teléfono en la pantalla de Inicio.
2 Toque y mantenga presionado el número que usted desea atribuir a un número de teléfono como
una inserción de marcado rápido. Refiérase a la página 41 para mayores informaciones.
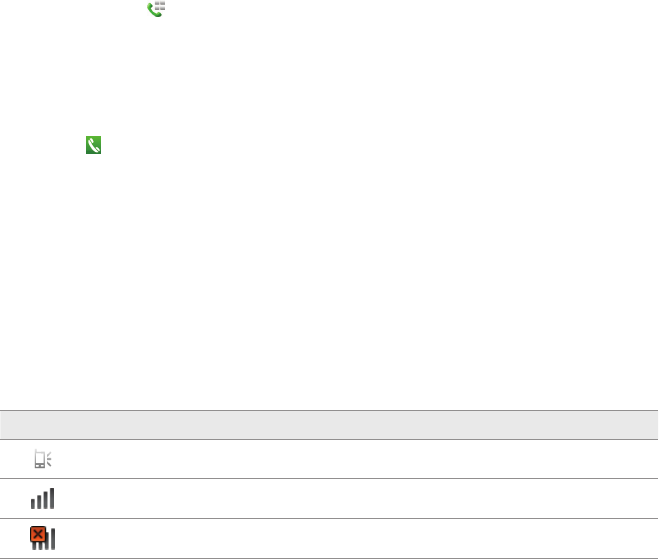
42
LLAMADAS Y MENSAJES
REALIZACION DE UNA LLAMADA INTERNACIONAL
1 Toque en Teléfono en la pantalla de Inicio.
2 Presione la Tecla Menú B y toque en Marcado asistido.
3 Toque en la caja de verificación cerca de Estado de marcado asistido.
4 Toque en el País de referencia y toque en el país de número a ser llamado.
5 Inserte el código de área y el número de teléfono.
6 Toque en para marcar el número.
AJUSTE DEL VOLUMEN
1 Durante una llamada, presione las Teclas de Volumen hacia arriba para subir el volumen del
parlante. Presione las Teclas de Volumen hacia abajo para bajar el volumen.
2 En el modo inactivo, presione las Teclas de Volumen hacia arriba para subir el volumen de la
campanilla. Presione las Teclas de Volumen hacia abajo para bajar el volumen. Si usted desea que
el Breakout™ active el modo de vibración cuando una llamada o mensaje sea recibido, presione las
Teclas de Volumen completamente hacia abajo hasta que el modo sea cambiado.
ICONOS PARA LLAMADAS
Icono Descripción
El altavoz está activado.
Intensidad de señal: La barra aumenta de acuerdo con la intensidad de señal.
No hay señal.
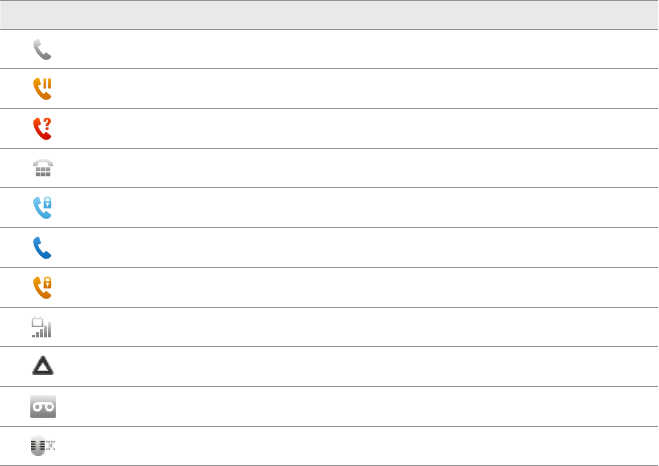
43
LLAMADAS Y MENSAJES
Icono Descripción
Una llamada está en curso.
Hay una llamada en espera.
Hay una llamada no contestada.
TTY activado.
Una llamada privada está en curso.
Una llamada está en curso a través de un dispositivo Bluetooth.
Hay una llamada privada en espera.
Intensidad de señal recibida: La barra aumenta conforme la intensidad de señal.
El teléfono está en el modo roaming.
Nuevo correo de voz
El interlocutor no puede escucharlo durante una llamada.
44
LLAMADAS Y MENSAJES
TRANSFIRIENDO UNA LLAMADA A UNA LLAMADA DE MULTIPLES INTERLOCUTORES
1 Toque en Aceptar cuando una llamada sea recibida durante otra llamada. El primer interlocutor
escuchara un tono de espera.
2 Toque en Transferir para cambiar el interlocutor.
3 Toque en Finalizar para finalizar la llamada.
REALIZACION DE UNA LLAMADA EN CONFERENCIA
1 Toque en Teléfono en la pantalla de Inicio.
2 Inserte el código de área y el número de teléfono.
3 Toque en Agregar llamada para invitar a un interlocutor a la llamada.
4 Toque en Mezclar si desea permitir que todos los interlocutores participen de la conversación.
ADICION DE UNA LLAMADA
1 Toque en Agregar llamada para realizar una llamada para otro interlocutor durante una llamada
con un interlocutor.
2 Inserte el número del teléfono y toque en .
Nota La llamada actual será mantenida cuando usted haga una llamada con otro interlocutor.
REALIZACION DE UNA LLAMADA A PARTIR DE LA AGENDA TELEFONICA
1 Toque en Teléfono en la pantalla de Inicio.
2 Toque en Contactos, seleccione y toque en un contacto para llamar.
3 Toque en Residencia, Móvil o Trabajo.

45
LLAMADAS Y MENSAJES
REALIZACION DE UNA LLAMADA DE EMERGENCIA
1 Toque en Llamada de Emergencia cuando la tarjeta SIM no estuviera insertada en el Breakout™.
2 Toque en Teléfono y llame 911 u otro número para llamadas de emergencia.
VERIFICACION DEL HISTORIAL DE LLAMADAS
1 Toque en Teléfono en la pantalla de Inicio.
2 Toque en Registro de llamadas.
3 Toque en la caja de búsqueda y toque en Todas las Llamadas, Llamadas No Contestadas,
Llamadas Recibidas o Llamadas Marcadas.
xToque en Todas las Llamadas si desea visualizar todo el historial de llamadas.
xToque en Llamadas No Contestadas si usted desea visualizar la lista de llamadas no
contestadas.
xToque en Llamadas Recibidas si usted desea visualizar la lista de llamadas recibidas.
xToque en Llamadas Marcadas si usted desea visualizar la lista de contactos llamados.
Nota Usted puede también verificar si hay una llamada no contestada arrastrando la barra de notificación hacia
abajo. Toque en contacto si usted desea realizar una llamada nuevamente al número.
RECEPCION DE UN CORREO DE VOZ VISUAL
1 Toque en Correo de Voz en la pantalla de Inicio.
2 Toque en Correo de Voz visual recibido en la bandeja de entrada para que sea reproducido
automáticamente.
xToque en *86 en el teclado si usted no estuviere inscrito en el servicio de Correo de Voz Visual
mensual.
3 Toque en Retorno de Llamada si desea realizar una llamada de retorno al contacto.
4 Toque y mantenga presionado un contacto si usted desea visualizar detalles de contacto y toque
en Visualizar Contacto.
46
LLAMADAS Y MENSAJES
ENVIO DE UN CORREO DE VOZ VISUAL
1 Toque en Correo de Voz en la pantalla de Inicio.
2 Toque en Menú > Nuevo Correo de Voz.
3 Inserte el número de contacto.
4 Toque en . La grabación de correo de voz será iniciada.
5 Toque en Marcar como Urgente o Marcar como Privativa y toque en Enviar.
Nota Si usted no estuviere inscrito en el servicio de correo de voz, toque en Llamar Correo de Voz y siga los
pasos subsiguientes.
GRABADO DE UN NUEVO CONTACTO
1 Toque en Teléfono en la pantalla de Inicio.
2 Inserte un número de teléfono y toque en Grabar en la parte intermediaria de la pantalla. Se
hubiere contacto atribuido al número, éste será exhibido.
3 Toque en Crear nuevo contacto.
4 Toque en Teléfono o en su cuenta Google. Si usted toca en Teléfono, el contacto será grabado en
la memoria interna de Breakout™. Si usted toca en su cuenta Google, el contacto será grabado en
su cuenta Google.
5 Inserte las informaciones adicionales conforme la necesidad para el contacto y toque en Grabar.
47
LLAMADAS Y MENSAJES
ADICION DE NUEVAS INFORMACIONES A LOS CONTACTOS EXISTENTES
1 Toque en Teléfono en la pantalla de Inicio.
2 Inserte un número de teléfono y toque en Grabar en la parte intermediaria de la pantalla.
3 Toque en Seleccionar un contacto, seleccione y toque en un contacto para agregar informaciones.
4 Toque en el número o Agregar más campos:
xToque en el número exhibido en la parte superior de la lista si usted desea sustituir el número
por el número que usted insertó.
xToque en Agregar más campos si usted desea agregar el número insertado en un campo
adicional.
5 Toque en Grabar cuando finalice la edición de contacto.
PARA HABLAR A TRAVES DEL PARLANTE
1 Toque en Parlante durante una llamada. Una barra roja será exhibida abajo del Parlante cuando
la función estuviere activada. El parlante no operará cuando un audífono estuviere conectado al
Breakout™.
2 Toque en el Parlante si usted desea interrumpir el uso de la función.
Nota Si el sensor de proximidad estuviere activado, el altavoz operará automáticamente cuando se toma la cara
afuera del Breakout™ durante algunos segundos.
PARA HABLAR UTILIZANDO LA TECNOLOGIA Bluetooth
1 Toque en Bluetooth durante una llamada. Una barra roja será exhibida abajo de Bluetooth cuando
la función estuviere activada.
2 Toque en Bluetooth si usted desea interrumpir el uso de la función.
Nota Refiérase al manual correspondiente al audífono Bluetooth para mayores informaciones.

48
LLAMADAS Y MENSAJES
SILENCIADO DEL TELEFONO
1 Toque en Silenciar durante una llamada. Una barra roja será exhibida abajo de Silenciar cuando esta
función estuviere activada.
2 Toque en Silenciar si usted desea desactivar la función.
ADICION DE ACCESOS RAPIDOS PARA CONTACTOS FAVORITOS
1 Toque y mantenga presionado el espacio vacío en la pantalla de Inicio o presione la Tecla Menú B en
el modo inactivo y toque en Agregar.
2 Toque en Accesos rápidos > Contacto.
3 Seleccione y toque en su acceso rápido favorito que desea agregar a la pantalla de Inicio.
MENSAJERIA
ENVIO DE UN NUEVO MENSAJE
1 Toque en Mensajería en la pantalla de Inicio.
2 Toque en Mensaje nuevo en la parte superior de la pantalla.
3 Inserte un número de teléfono móvil o dirección de e-mail en el campo Para. A medida que digita,
los contactos correspondientes serán exhibidos. Usted puede tocar en un contacto sugerido o
seguir digitando. O toque en y toque en un contacto.
4 Inserte un mensaje en el campo Tocar para componer.
5 Toque en Enviar.
Nota Un mensaje con falla permanecerá en la lista. Si usted desear borrar, toque y mantenga presionado el
mensaje y toque en Borrar.
49
LLAMADAS Y MENSAJES
INSERCION DE UN MENSAJE UTILIZANDO LA VOZ
1 Toque en Mensajería en la pantalla de Inicio.
2 Toque en Mensaje nuevo en la parte superior de la pantalla.
3 Inserte un número de teléfono móvil o dirección de e-mail en el campo Para. A medida que usted
digita, los contactos correspondientes serán exhibidos. Usted puede tocar un contacto sugerido o
seguir digitando. O toque en y toque en un contacto.
4 Toque en el campo Tocar para componer. Toque en la Tecla Comandos de Voz H en el teclado
virtual y pronuncie el mensaje.
5 Toque en Enviar.
INSERCION DE UN TEXTO UTILIZANDO EL TECLADO
Utilice diferentes ajustes de teclado para diferentes caracteres. Pasar al método estándar de inserción
de texto.
1 Toque en Mensajería en la pantalla de Inicio.
2 Toque en Mensaje nuevo en la parte superior de la pantalla.
3 Inserte un número de teléfono móvil o dirección de email en el campo Para. A medida que usted
digita, los contactos correspondientes serán exhibidos. Usted puede tocar en un contacto sugerido
o seguir digitando. O toque en y toque en un contacto.
4 Toque en el campo Tocar para componer. Toque en para seleccionar y inserte las letras de texto
del mensaje.
xCuando sea seleccionado, la letra siguiente insertada será mayúscula.
xCuando sea seleccionado, todas las letras insertadas serán mayúsculas.
5 Toque en para insertar números y toque en para insertar símbolos.
6 Toque en Enviar.

50
LLAMADAS Y MENSAJES
Letras mayúsculas Números y símbolos comunes Símbolos complejos
Nota
usted desea insertar un número y/o símbolo común entre letras normales de un mensaje:
xToque y mantenga presionada una tecla durante un segundo y usted podrá insertar un carácter secundario a
la derecha de cada tecla. Por ejemplo, toque y mantenga y presionado por un segundo y usted podrá insertar
el número “3”.
xToque y mantenga presionada una tecla por dos segundos y usted podrá insertar caracteres adicionales
atribuidos a cada tecla. Por ejemplo, toque y mantenga y presionado por dos segundos y usted podrá insertar
“¥” además de “y” y 3.
SOBRE EL PASO
Paso es una manera rápida y fácil de insertar un mensaje. Por ejemplo,
arrastre el dedo en el teclado de la pantalla conforme indicado y inserte
“Rápido” envés de tocar en todas las letras individualmente.
Inserción “Rápido”

51
LLAMADAS Y MENSAJES
CREACION DE UN MENSAJE UTILIZANDO EL MODO PASO
1 Toque en Mensajería en la pantalla de Inicio.
2 Toque en Mensaje nuevo en la parte superior de la pantalla.
3 Inserte un número de teléfono móvil o dirección de e-mail en el campo Para. A medida que usted
digita, los contactos correspondientes serán exhibidos. Usted puede tocar en un contacto sugerido
o seguir digitando. O toque en y toque en un contacto.
4 Toque en el campo Tocar para componer. Arrastre el dedo sobre la pantalla para insertar el
mensaje. Si usted no arrastra el dedo de la forma correcta, palabras alternativas serán exhibidas.
Seleccione y toque en una alternativa si estuviere disponible.
CAMBIO DE METODO DE INSERCION PARA EL TECLADO ANDROID
1 Toque y mantenga presionada la pantalla mientras inserta un mensaje.
2 Toque en Método de inserción > Teclado Android. Ahora usted puede crear un mensaje tocando
en el teclado virtual.
AJUSTE DE LAS OPCIONES DE PASO
1 Toque en > Opciones.
2 Toque en Idioma si usted desea cambiar el idioma a Paso.
3 Toque en Sugerencia de palabra si desea visualizar las palabras previstas mientras usted empieza a
insertar una palabra.
4 Toque en Habilitar el indicador de consejo si usted desea visualizar el indicador luz intermitente
para ayuda rápida.
52
LLAMADAS Y MENSAJES
ICONOS PARA MENSAJES
Icono Descripción Icono Descripción
Hay un mensaje no enviado. Hay un mensaje recibido del
servidor de e-mail.
Hay un mensaje recibido. Hay un error con el mensaje.
Un nuevo mensaje con una imagen
fue recibido. Un nuevo e-mail fue recibido.
Los mensajes fueron enviados con
éxito. Hay un mensaje no contestado.
Hay un mensaje urgente. La memoria está llena. Imposible
recibir mensajes.
BORRADO DE MENSAJES
1 Toque en Mensajería en la pantalla de Inicio.
2 Presione la Tecla Menú B y toque en Borrar.
3 Toque en K siguiente al (los) mensaje(s) por borrar. Si usted desea borrar todos los mensajes,
presione la Tecla Menú B y toque en Seleccionar todos.
4 Toque en Hecho > OK.
ADICION DE ACCESOS RAPIDOS PARA MENSAJES DIRECTOS
1 Presione y mantenga presionado un espacio vacío en la pantalla de Inicio o presione la Tecla Menú
B en el modo inactivo y toque en Agregar.
2 Toque en Acceso Rápidos > Mensaje directa.
3 Seleccione y toque en un contacto en la lista para el cual usted desea crear un acceso rápido en la
pantalla de Inicio para un mensaje directo.

53
LLAMADAS Y MENSAJES
UTILIZACION DE UN TEXTO RAPIDO
1 Toque en Mensajería en la pantalla de Inicio.
2 Presione la Tecla Menú B y toque en Texto rápido.
3 Seleccione y toque en un texto.
4 Presione la Tecla Menú B y toque en Enviar mensaje.
5 Ingrese el destinatario.
6 Toque en Enviar.
ADICION DE UN TEXTO RAPIDO
1 Toque en Mensajería en la pantalla de Inicio.
2 Presione la Tecla Menú B y toque en Texto rápido.
3 Presione la Tecla Menú B y toque en Agregar nuevo.
4 Ingrese un texto rápido.
5 Toque en Grabar.
ADJUNTADO DE IMAGENES
1 Toque en Mensajería en la pantalla de Inicio.
2 Toque en Mensaje nuevo en la parte superior de la pantalla.
3 Ingrese un número de teléfono móvil o dirección de e-mail en el campo Para. A medida que usted
digita, los contactos correspondientes serán exhibidos. Usted puede tocar en un contacto sugerido
o seguir digitando.
4 Toque en el campo Tocar para componer para comenzar a insertar su mensaje.
5 Presione la Tecla Menú B y toque en Adjuntar > Imagen.
54
LLAMADAS Y MENSAJES
6 Seleccione y toque en una imagen en Capturar una Imagen, Galería o Nota Manuscrita (Dibujo).
7 Capture una imagen para ser adjuntada, si usted hubiere seleccionado Capturar una Imagen.
O seleccione y toque en una imagen para ser adjuntada.
8 Toque en Enviar.
AJUSTE DE LOS LIMITES DE ALMACENAMIENTO
1 Toque en Mensajería en la pantalla de Inicio.
2 Presione la Tecla Menú B y toque en Configuración > Borrar mensajes antiguos si usted desea
que los mensajes antiguos sean borrados cuando el límite de almacenamiento sea alcanzado.
3 Toque en Límite de mensaje de texto, ajuste el número máximo de mensajes y toque en
Confirmar.
4 Toque en Límite de mensaje multimedia, ajuste el número máximo de mensajes y toque en
Confirmar. Certifíquese de borrar todos los mensajes antiguos antes de ajustar el número máximo
de mensajes.
Nota Certifíquese de dejar espacio suficiente en la memoria interna. Podrán ocurrir dificultades de recepción o
envío de mensajes cuando el espacio en la memoria sea pequeño.
AJUSTE DE LA FIRMA
1 Toque en Mensajería en la pantalla de Inicio.
2 Presione la Tecla Menú B y toque en Configuración.
3 Toque en Adjuntar firma automáticamente si desea agregar la firma automáticamente, digite su
firma y toque en Grabar.
VERIFICACION DEL ESPACIO USADO
1 Toque en Mensajería en la pantalla de Inicio.
2 Presione la Tecla Menú B y toque en Espacio usado.

55
LLAMADAS Y MENSAJES
BUSQUEDA DE MENSAJES
1 Toque en Mensajería en la pantalla de Inicio.
2 Presione la Tecla Búsqueda D.
3 Ingrese una palabra para buscar mensajes y toque en .
AJUSTES DE MENSAJES DE TEXTO
1 Toque en Mensajería en la pantalla de Inicio.
2 Presione la Tecla Menú B y toque en Configuración.
3 Toque en Informes de entrega si usted desea recibir un informe del destinatario informando que
su mensaje fue entregado.
AJUSTES DE MENSAJE MULTIMEDIA
1 Toque en Mensajería en la pantalla de Inicio.
2 Presione la Tecla Menú B y toque en Configuración.
3 Toque en Informes de entrega si usted desea recibir un informe del destinatario informando que
su mensaje fue entregado.
4 Toque en Recuperación automática si usted desea recuperar los mensajes automáticamente.
5 Toque en Recuperar automáticamente en roaming si usted desea recuperar mensajes
automáticamente mientras está en el estado de roaming. La función no será activada si la función
Recuperación automática no estuviera activada.
AJUSTE DE LAS NOTIFICACIONES
1 Toque en Mensajería en la pantalla de Inicio.
2 Presione la Tecla Menú B y toque en Configuración.
56
LLAMADAS Y MENSAJES
3 Toque en Notificaciones si usted desea visualizar en la barra de estado cuando el mensaje fue
entregado.
4 Toque en Seleccionar campanilla y seleccione y toque una campanilla para el mensaje recibido y
toque en OK.
5 Toque en Vibrar y seleccione Siempre, Solamente cuando esté en el modo silencioso o Nunca y
toque en OK.
CONTACTOS
VISUALIZACION DE LAS INFORMACIONES DE CONTACTOS
1 Toque en Contactos en la pantalla de Inicio.
2 Seleccione y toque en un contacto para mayores informaciones.
CREACION DE CONTACTOS
1 Toque en Contactos en la pantalla de Inicio.
2 Presione la Tecla Menú B y toque en Nuevo contacto.
3 Toque en Teléfono o en su cuenta Gmail. La cuenta Gmail no será disponible si usted no hubiere
sincronizado la cuenta con su dispositivo.
4 Ingrese las informaciones relacionadas como por ejemplo, nombre, número de teléfono, dirección
de e-mail, dirección postal, empresa, etc.
xToque en , toque en Seleccionar foto de la Galería o Capturar foto y realice los pasos
necesarios si usted desea atribuir una foto al contacto.
xToque en Grupo y atribuya un grupo al contacto si usted desea incluir el contacto en el grupo.
5 Toque en Grabar cuando finalice la inserción de informaciones para el contacto.
Nota Usted puede crear un contacto insertando primeramente el número de teléfono. Toque en Teléfono
ingrese un número de teléfono y toque en Grabar en la parte intermediaria de la pantalla. Refiérase a la página 46
para mayores informaciones.

57
LLAMADAS Y MENSAJES
CREACION DE GRUPOS PARA CONTACTOS
1 Toque en Contactos en la pantalla de Inicio.
2 Toque en Grupo en la parte superior de la pantalla, toque en Teléfono o en su cuenta Gmail y
toque en Nuevo grupo.
3 Ingrese el nombre del grupo y toque en Grabar. Los contactos también serán gravados a través
del Asistente de Backup. Si usted no estuviere inscrito en el servicio Asistente de Backup, toque
en OK en la pantalla de registro y realice los pasos necesarios. Refiérase a la página 27 para mayores
informaciones.
ADICION DE MIEMBROS AL GRUPO CONTACTOS
1 Toque en Contactos en la pantalla de Inicio.
2 Toque en Grupo en la parte superior de la pantalla.
3 Seleccione Teléfono o su cuenta Gmail y toque en un grupo al cual usted desea agregar miembros.
4 Presione la Tecla Menú B y toque en Agregar nuevo miembro.
5 Toque en Seleccionar de contactos o Nuevo contacto:
xSeleccione y toque en los contactos que usted desea agregar al grupo si hubiere tocado en
Seleccionado de contactos y toque en Hecho.
xSiga los pasos necesarios para crear nuevos contactos y atribuya el grupo si usted hubiere
tocado en Nuevo contacto.
AJUSTE DE MARCADOS RAPIDOS
1 Toque en Contactos en la pantalla de Inicio.
2 Toque en Rápido en la parte superior de la pantalla.
3 Toque en Agregar para un número de marcado rápido de 1 a 99 y enseguida seleccione y toque
en contactos y su número deseado para el marcado rápido. Las inserciones de marcado rápido a
continuación ya están atribuidas a sus Informaciones de Cuenta Verizon Wireless:
58
LLAMADAS Y MENSAJES
x1 – Correo de voz
x95 – Centro de Garantía
x96 – Uso de Datos
x97 – Saldo de la Cuenta
x98 – Minutos de Llamada
x99 – Pago
Nota Usted no puede atribuir dos números de marcado rápido a un número de teléfono. En el caso que usted
seleccione el número de teléfono móvil del contacto, usted puede seleccionar Llamada de Voz o Mensaje para el
número de marcado rápido.
RESERVA DE CONTACTOS CON EL ASISTENTE DE BACKUP
1 Toque en Contactos en la pantalla de Inicio.
2 Presione la Tecla Menú B y toque en Asistente de Backup. Usted puede verificar el estado actual
de los contactos grabados.
EDICION DE CONTACTOS
1 Toque en Contactos en la pantalla de Inicio.
2 Toque y mantenga presionado un contacto para ser editado y toque en Editar contacto.
3 Edite las informaciones y toque en Grabar.
ORRADO DE CONTACTOS
1 Toque en Contactos en la pantalla de Inicio.
2 Toque y mantenga presionado un contacto para ser borrado y toque en Borrar contacto.
3 Toque en OK para confirmar el borrado.

59
LLAMADAS Y MENSAJES
INFORMACIONES SOBRE IMPORTACION / EXPORTACION DE CONTACTOS
1 Toque en Contactos en la pantalla de Inicio.
2 Presione la Tecla Menú B y toque en Más > Importación/Exportación.
3 Toque en Importar de la Tarjeta SD y seleccione y toque en una cuenta para crear un contacto.
4 Toque en Exportar para Tarjeta SD y toque en OK si usted desea exportar contactos a la tarjeta SD.
BUSQUEDA PARA INFORMACIONES SOBRE CONTACTOS
1 Toque en Contactos en la pantalla de Inicio.
2 Presione la Tecla Menú B y toque en Buscar.
3 Ingrese el nombre del contacto deseado. El resultado de la búsqueda será exhibido
instantáneamente.
AJUSTE DE LAS OPCIONES DE EXHIBICION
1 Toque en Contactos en la pantalla de Inicio.
2 Presione la Tecla Menú B y toque en Más y enseguida toque en Opciones de exhibición.
3 Toque en Solamente contactos con teléfonos si usted desea visualizar solamente contactos con
números de teléfono.
4 Toque en Clasificar lista por y toque en Nombre y Apellido.
5 Toque en Visualizar nombres de contacto y toque en Nombre primero o Apellido primero.
6 Toque en su cuenta Google, seleccione y toque en la categoría para el grupo del sistema.
7 Toque en Hecho cuando finalice.

60
LLAMADAS Y MENSAJES
ENVIO DE DETALLES DEL CONTACTO
1 Toque en Contactos en la pantalla de Inicio.
2 Toque y mantenga presionado un contacto para ser compartido y toque en Enviar contacto.
3 Toque en Bluetooth, Gmail, Correo electronico o Mensajeria.
AJUSTE DE LAS OPCIONES DE CONTACTO
1 Toque en Contactos en la pantalla de Inicio.
2 Toque y mantenga presionado un contacto y toque en Opciones.
3 Toque en Campanilla, seleccione y toque en una campanilla para el contacto y presione la Tecla
Volver C.
4 Toque en Llamadas Recibidas si usted desea enviar llamadas recibidas del contacto al correo de
voz directamente.
ADMINISTRACION DE CUENTAS Y SINCRONIZACION
1 Toque en Contactos en la pantalla de Inicio.
2 Presione la Tecla Menú B y toque en Más > Cuentas.
3 Toque en Datos en el plan de fondo para permitir que las aplicaciones sincronicen, envíen y
reciban datos en cualquier momento.
4 Toque en Auto-sincronización si desea sincronizar datos automáticamente.
5 Toque en Agregar cuenta si usted desea agregar una cuenta y siga los pasos para la creación de
cuentas.
61
LLAMADAS Y MENSAJES
ADICION DEL WIDGET PEOPLE
1 Toque y mantenga presionado el espacio vacío en la pantalla o presione la Tecla Menú B en el
modo inactivo y toque en Widget.
2 Toque en Pantech Widgets.
3 Toque y mantenga presionado Contactos en la parte inferior de la pantalla y colóquelo en la
pantalla de Inicio.
4 Seleccione un estilo.
5 Toque en el widget y atribuya un contacto a este widget.
Nota Usted no puede agregar dos widgets People en la misma pantalla de Inicio al mismo tiempo.
Google TALK
AJUSTE DE SU ESTADO
1 Toque en Menú en la Pantalla de Inicio. Toque en Hablar .
2 Toque en la parte superior de la pantalla donde su dirección Gmail es exhibida.
3 Toque en la barra de estado en la parte superior de la pantalla.
4 Toque en Disponible, Ocupado o Invisible.
Nota El mensaje de estado no será exhibido si su estado estuviere invisible.
5 Ingrese el mensaje de estado.
6 Toque en si usted desea insertar una foto.
7 Seleccione y toque en una imagen de su galería, ajuste el tamaño de la imagen y toque en Grabar.
8 Toque en Hecho. Su estado será exhibido en la parte superior de la pantalla.
62
LLAMADAS Y MENSAJES
INVITE A UN AMIGO AL CHAT
1 Toque en Menú en la Pantalla de Inicio. Toque en Hablar .
2 Presione la Tecla Menú B y toque en Agregar amigo.
3 Ingrese el nombre de usuario del amigo que usted desea agregar.
4 Toque en Enviar invitación.
CHAT CON AMIGOS
1 Toque en Menú en la Pantalla de Inicio. Toque en Hablar .
2 Seleccione y toque en uno de los amigos que aparecen en la pantalla.
3 Ingrese un mensaje y toque en Enviar.
4 Presione la Tecla Menú B y toque en Agregar para chat si usted desea que otro amigo participe de
la conversación.
5 Presione la Tecla Menú B y toque en Más > Insertar Emoction y seleccione y toque en un
emoction.
6 Presione la Tecla Menú B y toque en Finalizar chat si usted desea interrumpir el chat con su amigo.
ADMINISTRACION DE SU LISTA DE AMIGOS
1 Toque en Menú en la Pantalla de Inicio. Toque en Hablar .
2 Presione la Tecla Menú B y toque en Más.
3 Toque en Invitación. Usted puede verificar invitaciones pendientes.

63
LLAMADAS Y MENSAJES
AJUSTE DE AMBIENTE DE CONVERSACION
1 Toque en Menú en la Pantalla de Inicio. Toque en Hablar .
2 Presione la Tecla Menú B y toque en Configuración.
3 Toque en Suscrito automáticamente si usted desea permanecer inscrito para Hablar.
4 Toque en Indicador de Móvil si usted desea que sus amigos vean que usted está en un dispositivo
móvil.

3. INFORMACIONES PERSONALES
CALENDARIO
3
INFORMACIONES PERSONALES
Este capítulo suministra informaciones importantes sobre
el uso del Breakout™ incluyendo:
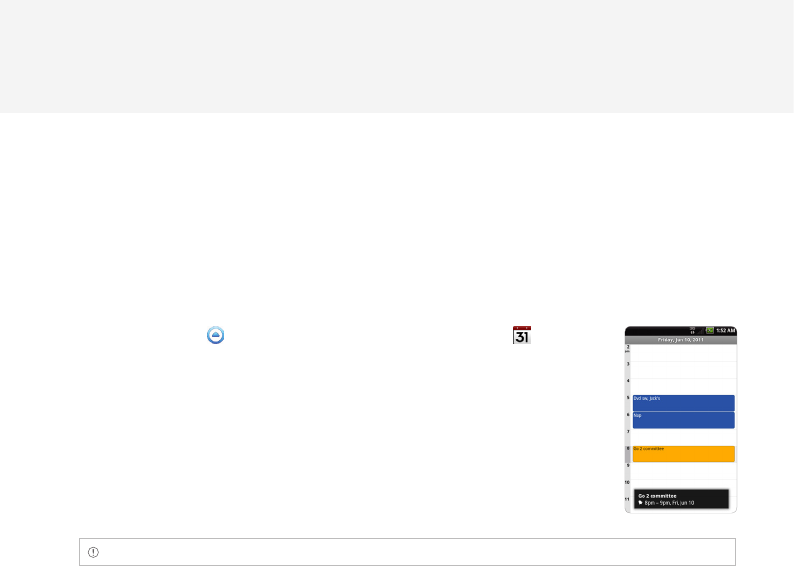
65
INFORMACIONES PERSONALES
CALENDARIO
ADICION DE UNA CUENTA
Usted debe tener una cuenta para utilizar el calendario. Para detalles sobre la cuenta Google, refiérase
a la página 26.
CREACION DE UN EVENTO
1 Toque en Menú en la Pantalla de Inicio. Toque en Calendario .
2 Toque en un día en el calendario.
3 Toque dos veces en una hora en la cual usted desea agregar un evento.
4 Ingrese las informaciones necesarias. Presione la Tecla Menú B y toque
en Exhibir opciones adicionales si necesita de más opciones.
5 Toque en Hecho.
Nota Usted también puede crear un evento presionando la Tecla Menú B y toque en Más > Nuevo evento.
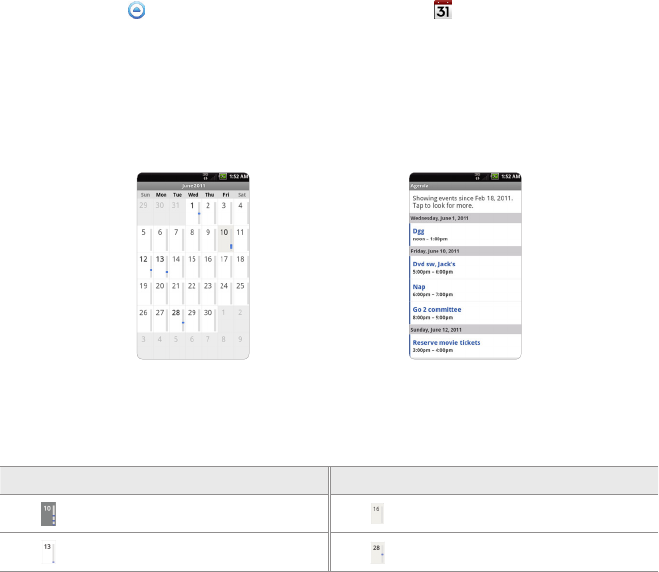
66
INFORMACIONES PERSONALES
VERIFICACION DE EVENTOS
1 Toque en Menú en la Pantalla de Inicio. Toque en Calendario .
2 Toque en un día cuyos eventos usted desea visualizar. Un punto azul indica un evento para un día.
3 Presione la Tecla Menú B y toque en Día, Semana o Mes si usted desea visualizar eventos
diariamente o semanalmente. La pantalla del mes es exhibida por estándar.
4 Toque en Hoy si usted desea visualizar eventos del día.
5 Toque en Agenda si usted desea visualizar eventos en el modo texto.
Pantalla de mes Agenda
ICONOS DEL CALENDARIO
Icono Descripción Icono Descripción
Hoy Foco
Día con eventos Foco con eventos
67
INFORMACIONES PERSONALES
EDICION DE EVENTOS
1 Toque en Menú en la Pantalla de Inicio. Toque en Calendario .
2 Toque en el día cuyos eventos usted desea editar.
3 Toque en el evento que usted desea editar.
4 Presione la Tecla Menú B y toque en Editar evento.
5 Edite el evento y toque en Hecho.
Nota Si el evento es sincronizado para su teléfono, usted no podrá editarlo.
AJUSTE DEL MEMBRETE
1 Toque en Menú en la Pantalla de Inicio. Toque en Calendario .
2 Presione la Tecla Menú B y toque en Más > Ajustes.
3 Toque en Ajuste de alertas y notificaciones y seleccione una opción si usted desea cambiar el
método de notificación.
4 Toque en Seleccionar campanilla si usted desea seleccionar una campanilla específica para el
calendario.
ADICION DEL WIDGET CALENDARIO
1 Toque y mantenga presionado el espacio vacío en la pantalla de Inicio o presione la Tecla Menú B
en el modo inactivo y toque en Widget.
2 Toque en Pantech Widgets.
3 Toque y mantenga presionado Calendario en la parte inferior de la pantalla y posiciónelo en la
pantalla de Inicio.
4 Seleccione un estilo para el día, semana o mes. Usted puede también agregar el widget calendario
suministrado por Google.

4. COMUNICACION
E-MAIL
GMAIL
WIDGET RED SOCIAL
4
COMUNICACION
Este capítulo suministra informaciones importantes
sobre la utilización del Breakout™ incluyendo:
69
COMUNICACION
E-MAIL
CONFIGURACION DE UNA CUENTA DE EMAIL
1 Toque en Menú en la Pantalla de Inicio. Toque en Correo electrónico .
2 Ingrese su dirección de e-mail y la contraseña para utilizar por primera vez.
3 Toque en Configuración manual o Siguiente. Si usted toca en Configuración manual, toque en
POP3, IMAP o Exchange, ajuste las opciones necesarias y toque en Próximo.
4 Ingrese un nombre para la cuenta.
5 Ingrese el nombre para ser exhibido en los mensajes transmitidos.
6 Toque en Hecho.
Nota La pantalla varía dependiendo del proveedor de servicio de e-mail.
ADICION DE UNA NUEVA CUENTA DE EMAIL
1 Toque en Menú en la Pantalla de Inicio. Toque en Correo electrónico
.
2 Toque en su cuenta en la parte superior de la pantalla de la bandeja de
entrada y toque en Agregar cuenta.
3 Seleccione y toque en un proveedor de servicio de e-mail.
4 Siga los pasos para configurar una cuenta de e-mail.
70
COMUNICACION
VISUALIZACION DE LOS MENSAJES RECIBIDOS
1 Toque en Menú en la Pantalla de Inicio. Toque en Correo electrónico .
2 Seleccione y toque en una cuenta y toque en un mensaje que usted desea verificar.
ENVIO DE UN EMAIL
1 Toque en Menú en la Pantalla de Inicio. Toque en Correo electrónico .
2 Presione la Tecla Menú B y toque en Componer.
Nota Si usted hubiere agregado más de dos cuentas de e-mail, la primera será designada como la primera
cuenta de envío de e-mail.
3 Ingrese la dirección de e-mail del destinatario o toque en Contactos, Reciente o Grupo y siga las
instrucciones.
4 Ingrese el asunto del e-mail y el mensaje.
5 Toque en Enviar.
ADICION DE ANEXOS A UN EMAIL
1 Toque en Menú en la Pantalla Inicio. Toque en Correo electrónico .
2 Presione la Tecla Menú B y toque en Crear. Toque en Adjuntar en el mensaje creado.
3 Toque en Documento, Imagen, Vídeo, Capturar imagen, Capturar vídeo o Grabar audio y realice
los pasos necesarios.
4 Toque en Enviar cuando finalice.
71
COMUNICACION
DEFINICION DE EMAILS COMO FAVORITOS
1 Toque en Menú en la Pantalla de Inicio. Toque en Correo electrónico .
2 En la pantalla Bandeja de Entrada, seleccione la caja de verificación antes de (los) e-mail(s) y toque
en Agregar estrella. Un icono de estrella roja será exhibido cerca del mensaje.
MARCACION DE EMAILS COMO LEIDOS / NO LEIDOS
1 Toque en Menú en la Pantalla de Inicio. Toque en Correo electrónico .
2 En la pantalla Bandeja de Entrada:
xSi usted desea marcar un e-mail como leído sin verificarlo, seleccione la caja de verificación en la
parte frontal del e-mail y toque en Marcar como leído. Toque en Marcar como no leído si usted
desea marcar el e-mail como no leído.
xSi usted desea verificar un e-mail primero, toque en el e-mail, presione la Tecla Menú B y toque
en Marcar como no leído.
REMOCION DE LA CUENTA DE EMAIL
1 Toque en Menú en la Pantalla de Inicio. Toque en Correo electrónico .
2 Presione la Tecla Menú B y toque en Cuentas.
3 Toque y mantenga presionada la cuenta que usted desea remover.
4 Toque en Remover cuenta > OK.
AJUSTES DE EMAIL
1 Toque en Menú en la Pantalla de Inicio. Toque en Correo electrónico .
2 Toque en una cuenta.
3 Presione la Tecla Menú B y toque en Más > Ajustes de cuentas.

72
COMUNICACION
4 Toque en Frecuencia de verificación de la Bandeja de Entrada y ajuste el intervalo de tiempo para
verificar e-mails.
5 Toque en Cuenta estándar si usted desea ajustar la cuenta de e-mail como cuenta básica estándar.
ADICION DE UN WIDGET DE EMAIL
1 Toque y mantenga presionado el espacio vacío en la pantalla de Inicio o presione la Tecla Menú B
en el modo inactivo y toque en Widget.
2 Toque en Pantech Widgets.
3 Toque y mantenga presionado E-mail en la parte inferior de la pantalla y posiciónelo en la pantalla de
Inicio.
4 Seleccione un estilo.
5 Seleccione y toque la cuenta que usted desea exhibir a través del widget.
GMAIL
ADICION DE UNA CUENTA DE GMAIL
1 Toque en Menú en la Pantalla de Inicio. Toque en Gmail .
2 Toque en Siguiente.
3 Toque en Suscripción si usted tuviere una cuenta Gmail.
4 Ingrese su nombre de usuario y la contraseña.
5 Toque en Suscripción.
73
COMUNICACION
LECTURA DE LOS MENSAJES RECIBIDOS
1 Toque en Menú en la Pantalla de Inicio. Toque en Gmail .
2 Seleccione y toque en el mensaje para ser leído.
3 Toque en Archivar si usted desea preservar el mensaje en una carpeta separada.
4 Toque en Borrar si usted desea borrar el mensaje.
Nota Si usted hubiere agregado más de dos cuentas de e-mail, la primera cuenta será determinada como la
cuenta principal para el envío de un e-mail.
ENVIO DE UN EMAIL A TRAVES DEL GMAIL
1 Toque en Menú en la Pantalla de Inicio. Toque en Gmail .
2 Presione la Tecla Menú B y toque en Componer.
3 Ingrese la dirección de e-mail del destinatario, el asunto y el mensaje.
4 Toque en o presione la Tecla Menú B y toque en Enviar.
DEFINICION DE EMAILS COMO SPAM
1 Toque en Menú en la Pantalla de Inicio. Toque en Gmail .
2 Seleccione y toque en un e-mail.
3 Presione la Tecla Menú B y toque en Más.
4 Toque en Reportar spam si usted desea reportar el e-mail y borrarlo de su bandeja de entrada.

74
COMUNICACION
AJUSTE DE LAS OPCIONES DEL GMAIL
1 Toque en Menú en la Pantalla de Inicio. Toque en Gmail .
2 Presione la Tecla Menú B y toque en Más > Ajustes.
3 Toque en Confirmar acciones, toque en Archivar, Borrar o Enviar para visualizar el mensaje de
confirmación para cada acción y toque en OK.
4 Toque en Responder todos, si usted desea hacer estándar la respuesta a todos los mensajes
recibidos.
5 Toque en Notificaciones de e-mail si usted desea confirmar si un nuevo e-mail fue recibido. El
ajuste estándar es la caja de verificación seleccionada.
WIDGET RED SOCIAL
Utilice fácilmente los Servicios de Red Social con el widget Red Social. Verifique las actualizaciones en el
Twitter, MySpace o Facebook rápidamente y ingrese sus mensajes.
ADICION DEL WIDGET RED SOCIAL
1 Toque y mantenga presionado el espacio vacío en la pantalla de Inicio o presione la Tecla Menú B
en el modo inactivo y toque en Widget.
2 Toque en Pantech Widgets.
3 Toque y mantenga presionado Red Social en la parte inferior de la pantalla y colóquelo en la
pantalla de Inicio.
4 Seleccione un estilo. Usted puede verificar las noticias actualizadas a partir del widget.

5. ENTRETENIMIENTO
PARA ESCUCHAR MUSICA
UTILIZACION DE LA CAMARA
UTILIZACION DE LA CAMARA COMO UNA FILMADORA
UTILIZACION DE LA GALERIA
UTILIZACION DE YOUTUBE
UTILIZACION DEL REPRODUCTOR DE VIDEO
MEDIA NET
5
ENTRETENIMIENTO
Este capítulo suministra informaciones importantes sobre
el uso del Breakout™ incluyendo:
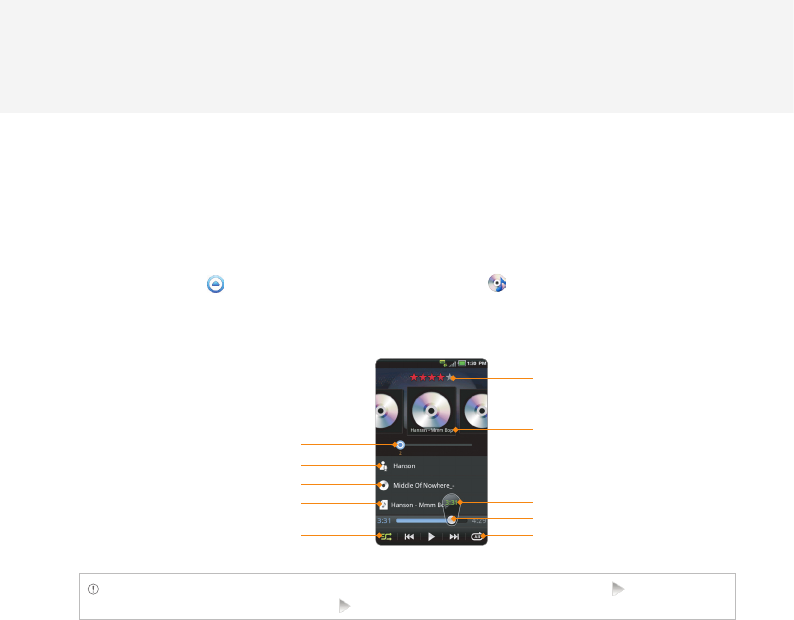
76
ENTRETENIMIENTO
PARA ESCUCHAR MUSICA
Usted puede escuchar música en su Breakout™. Certifíquese de insertar una tarjeta microSD™ para
transferir archivos de música para el Breakout™ para escucharlas.
REPRODUCCION DE MUSICAS
1 Toque en Menú en la Pantalla de Inicio. Toque en Música .
2 Seleccione y toque en un archivo en la lista clasificada en orden alfabético. Toque en Reproducir
Todos si usted desea escuchar todos los archivos de música.
Clasificación de la música
Carátula del álbum
Tiempo de reproducción actual
Barra de progreso
Opciones de repetición
Nombre del artista
Barra de la lista de reproducción actual
Título del álbum
Título de la música
Opciones de mezcla
Nota La música puede ser reproducida en el plan de fondo si usted no finaliza la aplicación. indica que la
música está siendo reproducida. Toque en si usted desea interrumpirla o escuchar otro archivo de música.
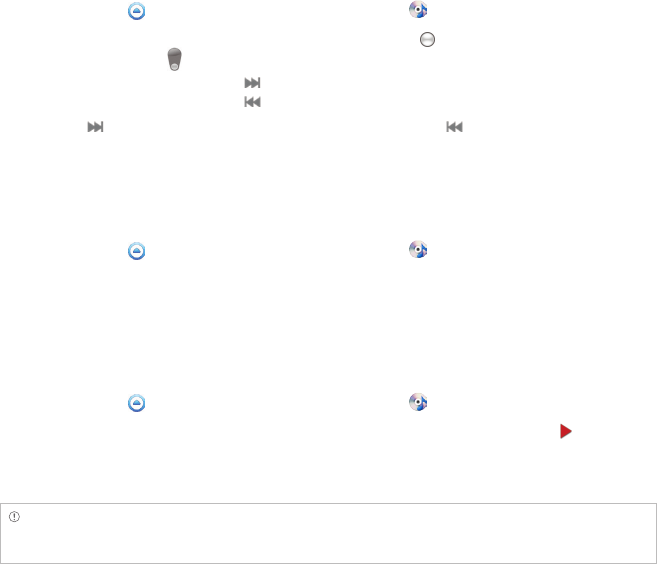
77
ENTRETENIMIENTO
NAVEGACION POR LAS MUSICAS REPRODUCIDAS
1 Toque en Menú en la Pantalla de Inicio. Toque en Música .
2 Seleccione una música o álbum para ser reproducido. Arrastre hacia la derecha o izquierda en la
barra. Los números en indica el tiempo de reproducción actual.
xToque y mantenga presionada si usted desea avanzar rápidamente el archivo.
xToque y mantenga presionada si usted desea retroceder el archivo.
3 Toque en si usted desea acceder al archivo siguiente. Toque en si usted desea acceder el
archivo anterior. O pase a la carpeta del álbum para la derecha o izquierda para trocar la música
reproducida.
AJUSTE DEL VOLUMEN
1 Toque en Menú en la Pantalla de Inicio. Toque en Música .
2 Presione las Teclas de Volumen hacia arriba si usted desea aumentar el volumen. Presione las Teclas
de Volumen hacia abajo si desea reducir el volumen. A medida que usted ajusta el volumen, la
indicación Volumen de la Media en la pantalla cambia de color.
VERIFICACION DE LAS INFORMACIONES SOBRE LAS MUSICAS
1 Toque en Menú en la Pantalla de Inicio. Toque en Música .
2 Toque y mantenga presionada la música cuyas informaciones usted desea visualizar. en el frente
de un archivo indica que el está siendo reproducido.
3 Toque en Propiedades y desplace hacia arriba o hacia abajo para visualizar las informaciones.
Nota Si usted desea buscar informaciones relacionadas mientras una música está siendo reproducida, presione
y mantenga presionado el nombre del artista, título del álbum o música y toque en Amazon MP3, Brower,
YouTube o Music y realice las acciones necesarias.

78
ENTRETENIMIENTO
AJUSTE DE UN ARCHIVO DE MUSICA COMO UNA CAMPANILLA
1 Toque en Menú en la Pantalla Inicio. Toque en Música .
2 Toque y mantenga presionada la música que usted desea ajustar como campanilla del Breakout™.
3 Toque en Definir como campanilla.
ADICION DE UNA MUSICA A UNA LISTA DE REPRODUCCION
1 Toque en Menú en la Pantalla de Inicio. Toque en Música .
2 Toque y mantenga presionada la música que usted desea agregar a una lista de reproducción.
3 Toque en Agregar a la lista de reproducción.
CREACION DE UNA LISTA DE REPRODUCCION
1 Toque en Menú en la Pantalla de Inicio. Toque en Música .
2 Toque en Música en la parte superior de la pantalla y toque en Lista de reproducción.
3 Presione la Tecla Menú B y toque en Nueva Lista de Reproducción.
4 Ingrese el nombre de la lista de reproducción y toque en OK.
5 Toque en la caja de verificación cerca de la(s) música(s) que usted desea agregar a la lista de
reproducción y toque en Agregar.
ADMINISTRACION DE LISTAS DE REPRODUCCION
1 Toque en Menú en la Pantalla de Inicio. Toque en Música .
2 Toque en Música en la parte superior de la pantalla y toque en Lista de reproducción.
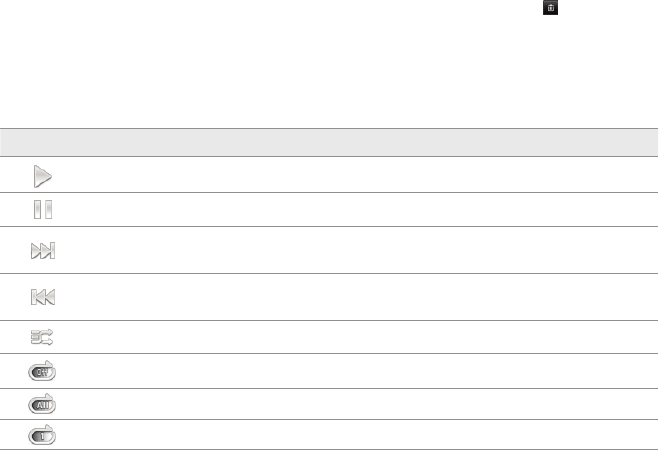
79
ENTRETENIMIENTO
3 Toque y mantenga presionada una lista de reproducción que usted desea administrar.
xSi usted desea escuchar todas las músicas de la lista de reproducción, toque en Reproducir
todas.
xSi usted desea borrar la lista de reproducción, toque en Borrar.
xSi usted desea agregar bandas a la lista, toque en Agregar bandas, seleccione las músicas y
toque en Agregar.
xSi usted desea remover pistas de la lista, toque en Remover bandas, toque en cerca de la
música para remover y toque en Hecho.
xSi usted desea crear un nuevo nombre para la lista de reproducción, toque en Renombrar,
ingrese el nuevo nombre y toque en OK.
ICONOS DE REPRODUCTOR DE MUSICA
Icono Descripción
Reproducción: Reproduce un archivo
Pausa: Pausa la música
Avance rápido: Avanza rápidamente la música (toque y mantenga presionado)
Archivo siguiente: Accede el archivo siguiente (toque)
Retroceso: Retrocede la música (toque y mantenga presionado)
Archivo anterior: Accede el archivo anterior (toque)
Aleatoria: Mezcla las músicas (verde); La mezcla es desactivada (blanco)
Repetición desactivada
Repetición: Repite todas las músicas
Repite la música actual
80
ENTRETENIMIENTO
Icono Descripción
Reproducción de la lista de músicas: Exhibe la lista de archivos que están siendo
reproducidos.
Clasificación: Clasifica el archivo
Tiempo: Exhibe el tiempo de reproducción actual
CLASIFICACION DE ARCHIVOS DE MUSICA POR TIPO
1 Toque en Menú en la Pantalla de Inicio. Toque en Música .
2 Toque en Música en la parte superior de la pantalla y seleccione y toque en Música, Álbum, Artista,
Género, Lista de Reproducción, Carpeta, Clasificación, Humor o Más Reproducidos. Una lista de
archivos de música para el tipo será exhibida.
ESCUCHA DE LOS ARCHIVOS DE MUSICA POR HUMOR
1 Toque en Menú en la Pantalla de Inicio. Toque en Música .
2 Toque en Música en la parte superior de la pantalla y toque en Humor. Las músicas serán
automáticamente clasificadas por el valor de metadatos de cada archivo. Toque en Reproducir
Todos si usted desea escuchar todos los archivos de música.
BORRADO DE ARCHIVOS DE MUSICA
1 Toque en Menú en la Pantalla de Inicio. Toque en Música .
2 Presione la Tecla Menú B y toque en Borrar.
3 Toque en cerca de la música para que sea borrada. Si usted desea borrar todos los archivos de
música, presione la Tecla Menú B y toque en Seleccionar Todos.
4 Toque en Hecho. Los archivos seleccionados serán borrados del Breakout™.
81
ENTRETENIMIENTO
CLASIFICACION DE LOS ARCHIVOS DE MUSICA
1 Toque en Menú en la Pantalla de Inicio. Toque en Música .
2 Seleccione y toque en un archivo para ser clasificado.
3 Toque en mientras el archivo está siendo reproducido y clasifique de uno a cinco
estrellas.
COMPARTIDO DE LOS ARCHIVOS DE MUSICA
1 Toque en Menú en la Pantalla de Inicio. Toque en Música .
2 Toque y mantenga presionado un archivo de música para ser compartido con sus amigos y toque
en Enviar.
3 Toque en Bluetooth, Correo electronico, Gmail, Mensajeria, Media Net o V CAST Media Manager
y siga los pasos necesarios.
AJUSTES DEL REPRODUCTOR DE MUSICA
1 Toque en Menú en la Pantalla de Inicio. Toque en Música .
2 Presione la Tecla Menú B y toque en Configuración.
3 Toque en Aleatorio si usted desea escuchar los archivos de música aleatoriamente en la lista de
reproducción. Si usted desea cambiar la opción de repetición, toque en O o P y seleccione Repetir
Todos, Repetir Uno o Desactivar Repetición.
ADICION DEL WIDGET REPRODUCTOR DE MUSICA
1 Toque y mantenga presionado un espacio vacío en la pantalla de Inicio o presione la Tecla Menú B
en el modo inactivo y toque en Widget.
2 Toque en Pantech Widgets.
3 Toque y mantenga presionado Música en la parte inferior de la pantalla y posiciónela en la pantalla
de Inicio.
4 Seleccione un estilo. Usted puede reproducir sonidos con un único toque.
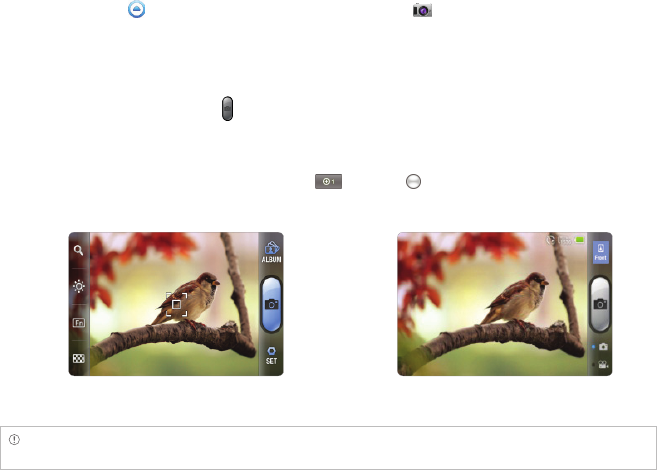
82
ENTRETENIMIENTO
UTILIZACION DE LA CAMARA
Capture imágenes y grabe vídeos con la cámara interna. Ellas pueden ser grabadas en el Breakout™ y
enviadas a través de mensajes multimedia.
CAPTURA DE IMAGENES
1 Toque en Menú en la Pantalla de Inicio. Toque en Cámara o presione la Tecla Cámara/Vídeo
G. La pantalla será cambiada automáticamente para el modo paisaje como estándar.
2 Toque en la pantalla y seleccione opciones se necesario. Los botones de opciones desaparecerán
en algunos segundos.
3 Enfoque el objetivo y toque en o presione la Tecla Cámara/Vídeo G. La imagen será grabada
automáticamente.
4 Toque en Compartir, Ajustar como o Borrar y realice los pasos necesarios. Si usted desea aplicar el
zoom de acercamiento a la imagen, toque en y arrastre hacia la derecha.
5 Presione la Tecla Volver C si usted desea capturar otra imagen.
Selección de opciones Focalización en el objetivo
Nota La pantalla se moverá para Aplicaciones si usted no tocar en la pantalla o utiliza la cámara durante dos
minutos.

83
ENTRETENIMIENTO
ZOOM DE ACERCAMIENTO / ALEJAMIENTO
1 Toque en la pantalla o presione la Tecla Menú B en el modo cámara.
2 Toque en .
3 Arrastre hacia la izquierda para aplicar el zoom de alejamiento o hacia la derecha para aplicar el
zoom de acercamiento.
4 Enfoque el objetivo y toque en o presione la Tecla Cámara/Vídeo G.
AJUSTE DEL BRILLO
1 Toque en la pantalla o presione la Tecla Menú B en el modo cámara.
2 Toque en .
3 Arrastre para la izquierda para reducir el brillo o hacia la derecha para aumentar el brillo.
ADICION DE EFECTOS ESPECIALES
1 Toque en la pantalla o presione la Tecla Menú B en el modo cámara.
2 Toque en y seleccione los efectos especiales.
xPara Balance de Blanco, toque en AU Auto y seleccione Auto, Exterior, Nublado, Fluorescente
o Brillo.
xPara el Filtro, toque y seleccione Normal, Mono, Negativo o Sepia.
3 Presione la Tecla Volver C o toque en la pantalla vacía para capturar una imagen.
CAPTURA DE IMAGENES UTILIZANDO EL TIMER
1 Toque en la pantalla o presione la Tecla Menú B en el modo cámara.
2 Toque en .
3 Toque en Timer y ajuste el timer en 3, 5 ó 10 segundos. Después que la cámara enfoque un
objetivo, una imagen será capturada automáticamente en el momento ajustado.
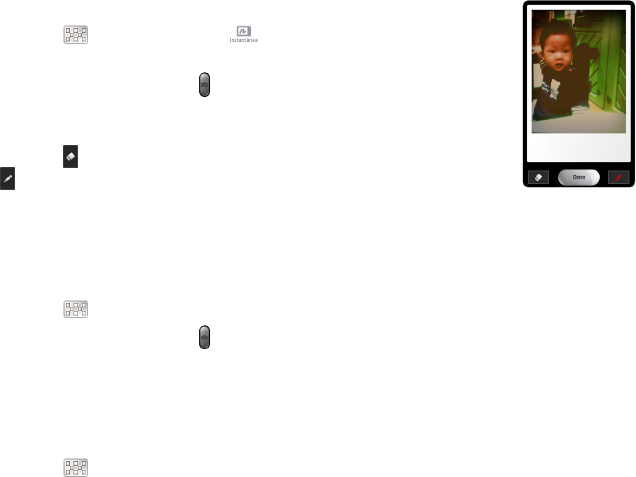
84
ENTRETENIMIENTO
CAPTURA DE IMAGENES INSTANTANEAS
1 Toque en la pantalla o presione la Tecla Menú B en el modo cámara.
2 Toque en y toque Instantáneo. en la parte superior de la
pantalla indica el modo de cámara instantánea.
3 Enfoque el objetivo y toque en o presione la Tecla Cámara/Vídeo G. La
imagen será exhibida en diez segundos. Toque en la pantalla o agite el
Breakout™ si usted desea visualizar la imagen rápidamente.
4 Toque en si usted desea borrar alguna parte de la imagen. O toque en
si usted desea escribir en la imagen.
5 Toque en Hecho.
CAPTURA MULTIPLE DE IMAGENES
1 Toque en la pantalla o presione la Tecla Menú B en el modo cámara.
2 Toque en y toque en Captura Múltiple.
3 Enfoque el objetivo y toque en o presione la Tecla Cámara/Vídeo G. La cámara capturará cuatro
fotos (nueve para 640x480) en una fila.
CAPTURA DIVIDIDA
1 Toque en la pantalla o presione la Tecla Menú B en el modo cámara.
2 Toque en y toque en Captura Dividida.
3 Seleccione y toque en 4 cortes automáticos o 9 cortes automáticos o Corte de 2 Divisiones,
Corte de 4 Divisiones o Corte de 6 Divisiones.
85
ENTRETENIMIENTO
UTILIZACION DE LA CAMARA FRONTAL/TRASERA
1 Toque en Menú en la Pantalla de Inicio. Toque en Cámara o presione la Tecla Cámara/Vídeo
G. La cámara posicionada en la parte trasera será activada automáticamente.
2 Toque en . Ahora usted puede capturar una imagen utilizando la cámara frontal, incluyendo su
propia imagen. Las funciones para la cámara frontal pueden diferir de las funciones de la cámara
trasera.
3 Toque en si usted desea capturar una imagen utilizando la cámara trasera.
CAMBIO DE RESOLUCION
1 Toque en la pantalla o presione la Tecla Menú B en el modo cámara.
2 Toque en CONFIRMAR > Resolución.
3 Seleccione y toque en una resolución que usted desea aplicar a la imagen. El número máximo de
imágenes que usted puede capturar aumentará a medida que usted reduce la resolución de las
imágenes.
4 Toque en Hecho.
CAMBIO DE MODO DE ESCENA
1 Toque en la pantalla o presione la Tecla Menú B en el modo cámara.
2 Toque en CONFIRMAR > Escena.
3 Seleccione y toque en un modo de cena que usted desea aplicar a la imagen.
4 Toque en Hecho.
86
ENTRETENIMIENTO
CAMBIO DE LOS AJUSTES
1 Toque en la pantalla o presione la Tecla Menú B en el modo cámara.
2 Toque en CONFIRMAR > Ajustes.
3 Para cambiar los ajustes de la cámara:
xToque en ACTIVAR o DESACTIVAR para Visualizar después de Grabar. Si usted toca en ACTIVAR,
la imagen será exhibida después de grabar.
xToque en ACTIVAR o DESACTIVAR para Anti-temblado. Si usted tocar en ACTIVAR, puede
prevenir que las imágenes sean tembladas cuando sean capturadas.
xToque en AMPLIA o CENTRAL para Fotometría. Si usted tocar en AMPLIA, la luz será distribuida
uniformemente en la imagen. Si usted tocar en CENTRAL, la luz será enfocada principalmente
en el centro de la imagen.
xToque en ACTIVAR o DESACTIVAR para Recepción GPS. Si usted tocar en ACTIVAR, las
informaciones geográficas serán acopladas a la imagen.
OPCIONES DEL MENU CAMARA
Icono Descripción
Disparador: Captura una imagen.
Función: Agrega efectos especiales: Balance de Blanco, Filtro; y ajusta el timer y el modo
de foco.
Captura: Selecciona los modos de captura: Captura Única, Captura Múltiple, Instantánea,
Captura Dividida
Brillo: Ajusta el brillo
Zoom: Aplica el zoom de acercamiento o alejamiento al objetivo
Álbum: Visualiza las imágenes grabadas
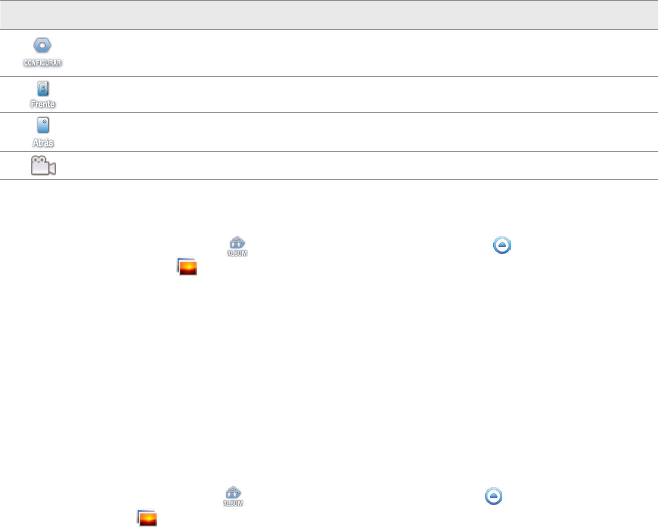
87
ENTRETENIMIENTO
Icono Descripción
Ajuste: Troca los ajustes: Resolución, Escena, Visualización después de Grabar, Anti-
temblado, Fotometría, Recepción GPS
Cámara frontal: Utiliza la cámara frontal
Cámara trasera: Utiliza la cámara trasera
Modo vídeo: Troca para el modo filmadora
COMPARTIDO DE IMAGENES
1 Toque en la pantalla y toque en en el modo cámara o toque en Menú en la Pantalla de
Inicio. Toque en Galería .
2 Toque y mantenga presionada una imagen para ser compartida. Si usted desea compartir todas las
imágenes, toque en Seleccionar Todas. Usted también puede seleccionar algunas imágenes.
3 Toque en Compartir.
4 Toque en Álbum En línea, Picasa, Mensajeria, Gmail, Media Net o Bluetooth y realice los pasos
necesarios. Si usted hubiere seleccionado más de una imagen, las funciones Picasa, Mensajeria,
Bluetooth y Gmail estarán disponibles.
DEFINICION DE UN IMAGEN COMO PAPEL DE PARED
1 Toque en la pantalla y toque en en el modo cámara o toque en Menú
en la Pantalla de Inicio.
Toque en Galería
.
2 Seleccione y toque en una imagen para definir como papel de pared.
3 Toque en Menú > Más > Definir como > Papel de Pared.
4 Ajuste el tamaño de la imagen y toque en Grabar.
88
ENTRETENIMIENTO
RECORTE DE UNA IMAGEN
1 Toque en la pantalla y toque en en el modo cámara, o toque en Menú en la Pantalla de
Inicio. Toque en Galería .
2 Seleccione y toque en una imagen para recortar.
3 Toque en Menú > Más > Recortar.
4 Ajuste el tamaño de la imagen y toque en Grabar.
ATRIBUCION DE UNA IMAGEN PARA AJUSTE DE FOTO
1 Toque en la pantalla y toque en el modo cámara o toque en Menú en la Pantalla de Inicio.
Toque en Galería .
2 Seleccione y toque en una imagen para ser atribuida a un contacto.
3 Toque en Menú > Más > Definir como > Ajuste de foto.
4 Seleccione y toque en un contacto para ajustar la imagen para su icono.
5 Ajuste el tamaño de la imagen y toque en Grabar.
BORRADO DE IMAGENES
1 Toque en en el modo cámara o toque en Menú en la Pantalla de Inicio. Toque en Galería .
2 Toque y mantenga presionada una imagen para ser borrada. Si usted desea borrar todas las
imágenes, toque en Seleccionar Todas. Usted también puede seleccionar algunas imágenes.
3 Toque en Borrar > Confirmar Borrado.
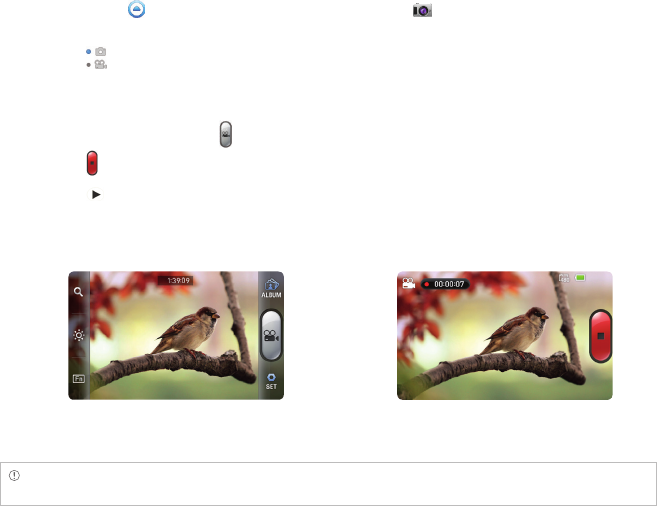
89
ENTRETENIMIENTO
UTILIZACION DE LA CAMARA COMO FILMADORA
GRABACION DE VIDEOS
1 Toque en Menú en la Pantalla de Inicio. Toque en Cámara o presione la Tecla Cámara/Vídeo
G. La pantalla será cambiada para el modo paisaje como estándar.
2 Toque en .
3 Toque en la pantalla y seleccione opciones si es necesario. Los botones de opciones desaparecerán
en algunos segundos.
4 Enfoque el objetivo y presione . Presione la Tecla Volver C si usted desea cancelar la grabación.
5 Toque en si usted desea parar la grabación. El vídeo grabado será grabado automáticamente.
6 Toque en si usted desea visualizar el vídeo grabado. O toque en Compartir o Borrador y realice
los pasos necesarios.
7 Presione la Tecla Volver C si usted desea grabar otro vídeo.
Selección de opciones Grabación de un vídeo
Nota La pantalla se moverá hacia el menú Aplicaciones si usted no cambia en la pantalla o ejecutar una
aplicación durante dos minutos.
90
ENTRETENIMIENTO
AJUSTE DEL BRILLO
1 Toque en la pantalla o presione la Tecla Menú B en el modo filmadora.
2 Toque en .
3 Arrastre el icono para la izquierda para reducir el brillo o hacia la derecha para aumentar el brillo.
ZOOM DE ACERCAMIENTO / ALEJAMIENTO
1 Toque en la pantalla o presione la Tecla Menú B en el modo filmadora.
2 Toque en .
3 Arrastre el icono hacia la izquierda para zoom de alejamiento o hacia la derecha para zoom de
acercamiento.
CAMBIO DE LA RESOLUCION
1 Toque en la pantalla o presione la Tecla Menú B en el modo filmadora.
2 Toque en CONFIRMAR > Resolución.
3 Seleccione y toque una resolución que usted desea aplicar al vídeo.
4 Toque en Hecho.
CAMBIO DE LOS AJUSTES
1 Toque en la pantalla o presione la Tecla Menú B en el modo filmadora.
2 Toque en CONFIRMAR > Ajustes.
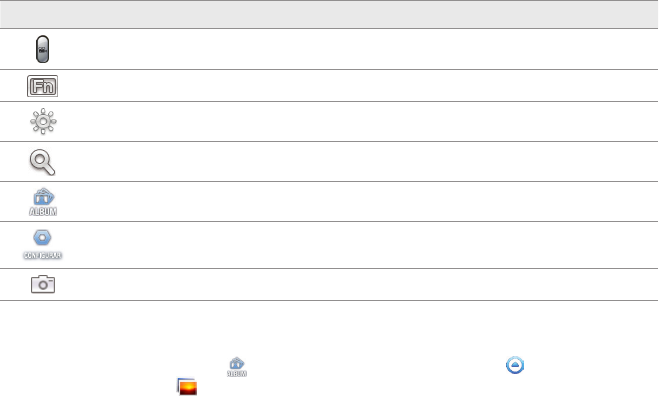
91
ENTRETENIMIENTO
3 Para cambiar los ajustes de la filmadora:
xToque en ACTIVAR o DESACTIVAR para Visualizar después de Grabar. Si usted tocar en ACTIVAR,
el vídeo será exhibido después de grabado.
xToque en ACTIVAR o DESACTIVAR para Grabación de Voz. Si usted tocar en ACTIVAR, el vídeo
será grabado con la voz incluida.
xToque en NOR o MMS para el Tiempo de Grabación. El tiempo de grabación aumentará
conforme usted reduce la resolución para vídeos de NOR para MMS.
OPCIONES DEL MENU FILMADORA
Icono Descripción
Vídeo: Graba un vídeo
Función: Utilice las funciones: Balance de Blanco, Filtro, Timer
Brillo: Ajusta el brillo
Zoom: Aplica el zoom de acercamiento o alejamiento del objetivo
Álbum: Visualiza los vídeos grabados
Ajustes: Cambia los ajustes: Resolución, Visualizar después de Grabar, Grabación de Voz,
Tiempo de Grabación
Modo Cámara: Cambia para el modo cámara
COMPARTIDO DE VIDEOS
1 Toque en la pantalla y toque en en el modo filmadora o toque en Menú en la Pantalla de
Inicio. Toque en Galería .
2 Toque en el primer vídeo en la pantalla.
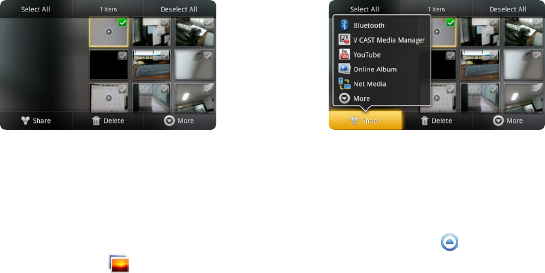
92
ENTRETENIMIENTO
3 Toque y mantenga presionado un vídeo para ser compartido. Si usted desea compartir todos los
vídeos, toque en Seleccionar Todos. Usted también puede seleccionar algunos vídeos.
4 Toque en Compartir.
5 Toque en Bluetooth, YouTube, Álbum En Línea, Media de Red, Gmail, V CAST Media Manager o
Mensajeria.
Selección de un vídeo Compartido de un vídeo
BORRADO DE VIDEOS
1 Toque en la pantalla y toque mientras en el modo cámara o toque en Menú en la Pantalla de
Inicio. Toque en Galería .
2 Toque en el primer vídeo en la pantalla.
3 Toque y mantenga presionado un vídeo para ser borrado. Si usted desea borrar todos los vídeos,
toque en Seleccionar Todos. Usted también puede seleccionar algunos vídeos.
4 Toque en Borrar > Confirmar Borrado.
93
ENTRETENIMIENTO
UTILIZACION DE LA GALERIA
VISUALIZACION DE IMAGENES
1 Toque en Menú en la Pantalla de Inicio. Toque en Galería .
2 Seleccione y toque en una imagen para visualizar. Si usted hubiera descargado imágenes de
fuentes externas, por ejemplo, sitios web, las imágenes serán grabadas en carpetas diferentes.
Enseguida, seleccione y toque en la carpeta donde las imágenes que usted desea visualizar serán
grabadas.
3 Toque dos veces en la pantalla para aplicar el zoom de acercamiento en la imagen hasta el máximo.
Toque dos veces en la pantalla nuevamente para aplicar el zoom de alejamiento a la imagen hasta
el mínimo.
4 Pase la pantalla para la izquierda o derecha si desea visualizar otras imágenes.
Nota Las funciones de la galería desaparecerán en algunos segundos. Toque en la pantalla si usted desea
visualizar las funciones disponibles.
ADICION DE UN CUADRO DE IMAGEN
1 Toque Y mantenga presionado un espacio vacío en la Pantalla de Inicio y toque en Android
Widgets.
2 Toque en Cuadro de imagen.
3 Seleccione y toque una imagen que usted desea exhibir a través del widget.
4 Ajuste el tamaño de la imagen y toque en Grabar.
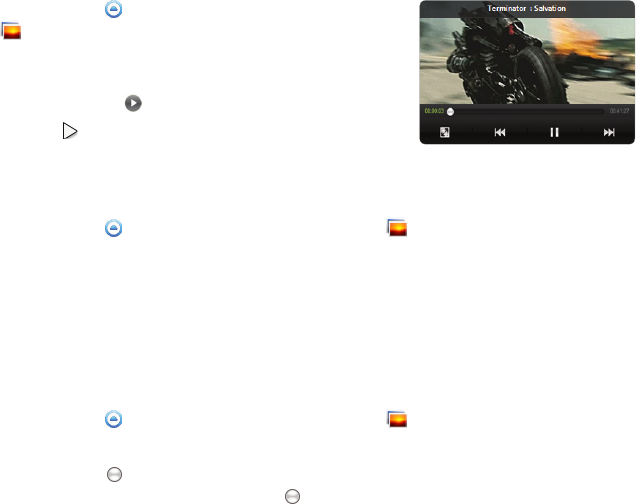
94
ENTRETENIMIENTO
VISUALIZACION DE VIDEOS
1 Toque en Menú en la Pantalla de Inicio. Toque en Galería
.
2 Seleccione un vídeo que desea visualizar. El ajuste estándar es
la activación del Vídeo Player para reproducir vídeos. Todos los
ítems conteniendo son vídeos.
3 Toque en para reproducir el vídeo. El ajuste estándar es la
exhibición de la pantalla en el formato pasaje.
VISUALIZACION DE IMAGENES EN EL MODO SLIDESHOW
1 Toque en Menú en la Pantalla de Inicio. Toque en Galería .
2 Seleccione y toque en las imágenes que usted desea visualizar en el modo slideshow.
3 Toque en Slideshow.
4 Toque en la pantalla si desea interrumpir el slideshow.
5 Toque en la pantalla y toque en Slideshow si desea reiniciar la exhibición en el modo Slideshow.
ORGANIZACION DE LAS IMAGENES
1 Toque en Menú en la Pantalla de Inicio. Toque en Galería .
2 Seleccione y toque en una carpeta.
3 Arrastre el icono hacia la derecha si usted desea visualizar imágenes con informaciones
incluyendo la fecha y la localización. Arrastre para la izquierda si usted desea visualizar las
imágenes en orden de fecha.

95
ENTRETENIMIENTO
UTILIZACION DE YOUTUBE
PARA VER VIDEOS
1 Toque en Menú en la Pantalla de Inicio. Toque en YouTube .
2 Seleccione y toque en un vídeo para ver el vídeo.
3 Toque dos veces en la pantalla para ver el vídeo en pantalla completa.
CARGA DE VIDEOS
1 Toque en Menú en la Pantalla de Inicio. Toque en YouTube .
2 Presione la Tecla Menú B y toque en Cargar.
3 Seleccione y toque en un vídeo para ser cargado.
4 Ajuste un título para el vídeo y toque en Cargar.
VERIFICACION DEL ESTADO DE CARGA
1 Toque en la parte superior de la pantalla y arrástrela hacia abajo mientras el vídeo está siendo
cargado.
2 Toque en Cargando. Usted puede visualizar el estado de la carga.
3 Presione la Tecla Menú B y toque en Pausar cargas si usted desea pausar la carga. Presione la Tecla
Menú B y toque en Reiniciar cargas si usted desea reiniciar la carga.
4 Toque en el vídeo en la parte superior de la pantalla y toque en Cancelar si usted desea cancelar la
carga.

96
ENTRETENIMIENTO
CREACION DE UNA CUENTA EN EL YOUTUBE
1 Toque en Menú la Pantalla de Inicio. Toque en YouTube .
2 Presione la Tecla Menú B y toque en Mi Canal > Agregar cuenta.
3 Toque en aquí en la parte inferior de la pantalla de subscrición de YouTube.
4 Siga los pasos indicados para crear una cuenta.
PARA VER VIDEOS POR CATEGORIA
1 Toque en Menú en la Pantalla de Inicio. Toque en YouTube .
2 Presione la Tecla Menú B y toque en Navegar.
3 Seleccione y toque en una categoría.
4 Pase la pantalla para desplazar, seleccione y toque un vídeo para ver.
PARA VER VIDEOS POR FECHA DE CARGA
1 Toque en Menú en la Pantalla de Inicio. Toque en YouTube .
2 Presione la Tecla Menú B y toque en Navegar.
3 Seleccione y toque en una categoría.
4 Toque en Esta semana en la parte superior de la pantalla.
5 Seleccione y toque en uno de los intervalos de tiempo.

97
ENTRETENIMIENTO
VISUALIZACION DE LAS INFORMACIONES DE MI CUENTA
1 Toque en Menú en la Pantalla de Inicio. Toque en YouTube .
2 Presione la Tecla Menú B y toque en Mi Canal.
3 Toque en su cuenta Google. Usted puede tocar en Agregar cuenta y agregue una cuenta en el
servicio YouTube.
4 Toque en cada ítem para su cuenta incluyendo Cargas, Favoritos, Listas de Reproducción y
Subscriciones.
AJUSTES EN EL YOUTUBE
1 Toque en Menú en la Pantalla de Inicio. Toque en YouTube .
2 Presione la Tecla Menú B y toque en Configuración.
3 Toque en Alta calidad en el celular si usted desea ver videos de alta calidad.
4 Toque en Tamaño de fuente del subtítulo y seleccione y toque en el tamaño de la fuente si desea
ajustar el tamaño de la fuente.
5 Toque en Borrar historial de búsqueda si usted desea remover el historial de búsqueda en la caja
de búsqueda y toque en OK.
6 Toque en Filtro de Búsqueda segura si usted desea bloquear vídeos que contienen tenor
restringido y seleccione y toque en la opción de filtrado.
ADICION DEL WIDGET YOUTUBE
1 Toque y mantenga presionado un espacio vacío en la Pantalla de Inicio, o presione la Tecla Menú B
en el modo inactivo y toque en Widget.
2 Toque en Android Widgets.
3 Toque en YouTube en la lista. Usted puede visualizar vídeo clips con un único toque.
98
ENTRETENIMIENTO
UTILIZACION DEL REPRODUCTOR DE VIDEO
VISUALIZACION DE VIDEOS
1 Toque en Menú en la Pantalla de Inicio. Toque en Reproductor . Todos los archivos de vídeo
serán exhibidos como estándar. Toque en Carpeta si desea verificar vídeos por carpeta.
2 Seleccione y toque un vídeo para ser visualizado.
xSi usted desea visualizar el vídeo a partir del punto de parada, toque en OK. Encaso contrario, el
vídeo será reproducido desde el inicio.
xSi usted desea seleccionar varios vídeos en una fila, presione la Tecla Menú B y toque en
Reproducir Ítems Seleccionados, toque en la caja de verificación próximo a los vídeos que
desea visualizar y toque en Hecho.
VERIFICACION DE INFORMACIONES DE VIDEOS
1 Toque en Menú en la Pantalla de Inicio. Toque en Reproductor .
2 Toque en el vídeo cuyas informaciones usted desea visualizar.
3 Presione la Tecla Menú B y toque en Propiedades mientras el vídeo está siendo reproducido. Usted
puede visualizar las informaciones del vídeo, incluyendo tamaño de archivo, duración, formato,
resolución, fecha de creación y informaciones de protección.
Nota La reproducción del vídeo será interrumpida cuando usted visualice su información.
AJUSTE DE SUBTITULOS
1 Toque en la pantalla mientras un vídeo está siendo reproducido a través del Reproductor de Vídeo.
2 Toque en Activar en el lado izquierdo de la pantalla. Si hubiere subtítulos para el vídeo, esta opción
será automáticamente activada como estándar.

99
ENTRETENIMIENTO
3 Toque en Sincronizar en el lado derecho de la pantalla y toque en si usted desea acelerar los
subtítulos en 0,5 segundos, o toque en si usted desea reducir la velocidad de los subtítulos en
0,5 segundo.
Nota Esta función se destina a vídeos con subtítulos. Si el vídeo no contiene subtítulos. Las opciones Encendido/
Apagado y Sincronizar no se exhibirán.
AJUSTE DEL VOLUMEN
1 Toque en la pantalla mientras un vídeo está siendo reproducido a través del Reproductor de Vídeo.
2 Presione las Teclas de Volumen para aumentar o disminuir el volumen. Cuando sea exhibido en
la pantalla, podrá ajustar el volumen arrastrando la barra hacia la izquierda o derecha.
ICONOS DEL REPRODUCTOR DE VIDEO
Icono Descripción
Reproducir: Reproduce el vídeo
Pausa: Pausa el vídeo
Avance rápido: Avanza rápidamente el vídeo (toque y mantenga presionado)
Próximo archivo: Accede al archivo siguiente (toque)
Retroceso: Retrocede el vídeo (toque y mantenga presionado)
Archivo anterior: Accede el archivo anterior (toque)
Visualización en pantalla completa: Activa el modo de pantalla completa.
Subtítulos: Exhibe los subtítulos
Sincronización de subtítulos: Ajusta el tiempo de sincronización

100
ENTRETENIMIENTO
AJUSTES DEL REPRODUCTOR DE VIDEO
1 Presione la Tecla Menú B mientras un vídeo está siendo reproducido a través del Reproductor de
Vídeo.
2 Toque en Ajustes.
3 Para configurar los ajustes:
xToque en O o P para el Idioma del Subtítulo y seleccione un idioma. Si no hubiera subtítulos
para el vídeo, usted puede seleccionar solamente la opción para Repetición.
xToque en O o P para Repetir y seleccione la opción.
MEDIA NET
Media Net permite la utilización, compartido y reproducción de archivos de media entre dispositivos
habilitados para DLNA mientras la función WiFi está activada. Certifíquese de activar la red Wi-Fi
primeramente.
SOBRE DIGITAL LIVING NETWORK ALLIANCE DLNA
DLNA es una nueva organización colaborativa que lidera la comercialización de los servicios de red
doméstica global. Su objetivo es construir plataformas compatibles utilizando la tecnología basada
en los estándares para hacerla más fácil para que usuarios de dispositivos certificados para DLNA para
compartir contenidos de media a través de la red de su residencia.
INICIALIZACION DEL MEDIA NET
1 Toque en Menú en la Pantalla de Inicio. Toque en Media Net . El servidor será
automáticamente conectado.
2 Presione la Tecla Menú B y toque en Lista de servidores para verificar la lista de los servidores
disponibles.
3 Toque en el servidor deseado en la lista para download.
101
ENTRETENIMIENTO
ICONOS PARA EXHIBICION DEL ESTADO DE DOWNLOAD
Icono Seleccionado para Icono Seleccionado para
Un archivo completamente descargado Un archivo no descargado
Un archivo siendo descargado Un archivo aguardando download
REPRODUCCION DE ARCHIVOS DE MEDIA EN OTRO DISPOSITIVO
1 Toque en Menú en la Pantalla de Inicio. Toque en Media Net .
2 Toque en Mi teléfono. Usted puede visualizar la lista de reproductores que incluye dispositivos
capaces de reproducir contenidos.
3 Seleccione un dispositivo y toque en Grabar. Seleccione el dispositivo seleccionado como un
reproductor.
4 Toque en Fotos, Músicas o Vídeos que usted desea reproducir.
5 Toque en el archivo de media para ser reproducido.
REPRODUCCION DE ARCHIVOS DE MI TELEFONO HACIA OTRO DISPOSITIVO
1 Toque en Menú en la Pantalla de Inicio. Toque en Galería .
2 Toque y mantenga presionados los archivos para ser compartidos y toque en Compartir.
3 Toque en Media Net.
4 En la lista:
xToque en Remoto si usted desea reproducir archivos en otro dispositivo como, por ejemplo, TV,
PC y laptop.
xToque en Cargar si usted desea cargar archivos para otro dispositivo, toque en el servidor de
carga y siga las instrucciones.
xToque en Imprimir si usted desea imprimir archivos utilizando otro dispositivo y siga las
instrucciones.
102
ENTRETENIMIENTO
DOWNLOAD/CARGA DE ARCHIVOS
1 Toque en Menú en la Pantalla de Inicio. Toque en Media Net .
2 Presione la Tecla Menú B y toque en Seleccionar múltiples.
3 Toque en la caja de verificación arriba del archivo para descargar o cargar.
4 Presione la Tecla Menú B y toque en Download o Cargar. Una ventana pop-up será exhibida
indicando que el download o la carga está en progreso.
AJUSTE DEL NOMBRE DEL SERVIDOR DE MEDIA
1 Toque en Menú en la Pantalla de Inicio. Toque en Media Net .
2 Presione la tecla Menú B y toque en Configuración.
3 Toque en Nombre del servidor de media. El nombre estándar es el nombre de modelo del
dispositivo.
4 Edite el nombre de servidor y toque en OK.
SELECCION DE DISPOSITIVOS PARA COMPARTIDO DE ARCHIVOS DE MEDIA
1 Toque en Menú en la Pantalla de Inicio. Toque en Media Net .
2 Presione la Tecla Menú B y toque en Configuración.
3 Toque en Aceptar Solicitación de Compartido.
4 Seleccione De todos los dispositivos o Solamente de dispositivos confiables.
xSi usted desea compartir archivos de media de todos los dispositivos, toque en De todos los
dispositivos.
xSi usted desea compartir archivos de media solamente de dispositivos confiables, toque en
Solamente de dispositivos confiables.
103
ENTRETENIMIENTO
5 Toque en la caja de verificación antes de Habilitar notificación si usted desea ser notificado cuando
hubiere cualquier solicitud de acceso.
PERMISO DE CARGA PARA MI TELEFONO
1 Toque en Menú en la Pantalla de Inicio. Toque en Media Net .
2 Presione la Tecla Menú B y toque en Configuración.
3 Toque en Cargar para mi teléfono para permitir que otro dispositivo cargue archivos de media para
su teléfono.
HABILITACION DE LA SOLICITUD DE CARGA
1 Toque en Menú en la Pantalla de Inicio. Toque en Media Net .
2 Presione la Tecla Menú B y toque en Configuración.
3 Toque en Habilitar notificación de carga para obtener notificación cuando hay cualquier solicitud
de acceso.
ADMINISTRACION DE LA LISTA DE DISPOSITIVOS
1 Toque en Menú en la Pantalla de Inicio. Toque en Media Net .
2 Presione la Tecla Menú B y toque en Configuración.
3 Toque en Administración de la Lista de Dispositivos.
4 Toque en el dispositivo para a ser movidos de Dispositivos no clasificados y toque en Mover para
Confiables o Mover para Prohibidos. El dispositivo será movido para la categoría modificada.
104
ENTRETENIMIENTO
VERIFICACION DEL ESTADO DE LA RED Wi-Fi
1 Toque en Menú en la Pantalla de Inicio. Toque en Media Net .
2 Presione la Tecla Menú B y toque en Configuración.
3 Toque en Estado de la red Wi-Fi para verificar el estado de la red Wi-Fi y la red Wi-Fi disponible. Para
la conexión Wi-Fi, refiérase a la página 106 .
DESIGNACION DE LOS TIPOS DE ARCHIVO DE MEDIA QUE PUEDEN SER COMPARTIDOS
1 Toque en Menú en la Pantalla de Inicio. Toque en Media Net .
2 Presione la Tecla Menú B y toque en Configuración.
3 Toque en Compartir archivos de media.
4 Seleccione Compartir foto, Compartir música o Compartir vídeo y toque en OK.
AJUSTES DEL SERVIDOR
1 Toque en Menú en la Pantalla de Inicio. Toque en Media Net .
2 Presione la Tecla Menú B y toque en Configuración.
3 Toque en Ajustes del servidor.
4 Toque en Servidor preferido, toque en próximo al servidor para ser definido como servidor de
media preferencial y toque en OK.
5 Toque en Servidor oculto, toque en la caja de verificación próxima al servidor para ocultarlo
cuando hubiere una búsqueda de dispositivo y toque en OK.
6 Toque en Reproductor preferido, seleccione el reproductor en la lista para ajustar como
reproductor de media preferido y toque en OK.

6. CONECTIVIDAD
UTILIZACION DE UNA RED Wi-Fi
CONEXION A UNA RED 3G/4G
UTILIZACION DE Bluetooth
UTILIZACION DEL Breakout™ COMO UN MODEM
6
CONECTIVIDAD
Este capítulo suministra informaciones importantes sobre la conexión
a la red para utilización del Breakout™ incluyendo:
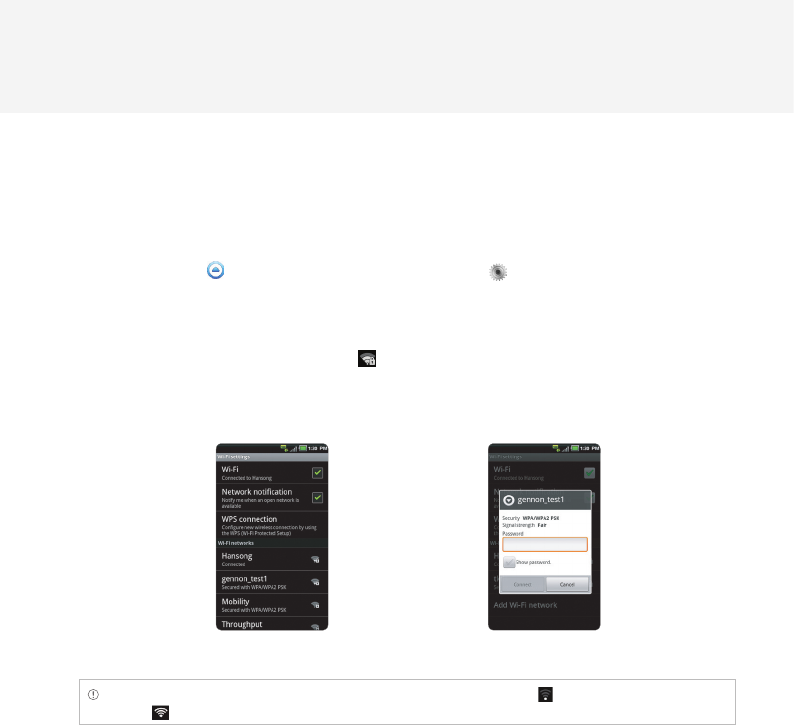
106
CONECTIVIDAD
UTILIZACION DE UNA RED Wi-Fi
Conecte el Breakout™ a una red Wi-Fi y utilice la conexión Internet inalámbrica. Dependiendo de su
plan de datos o del área donde usted está, tal vez sea necesario pagar por la conexión a la red Wi-Fi.
CONEXION A UNA RED Wi-Fi
1 Toque en Menú en la Pantalla de Inicio. Toque en Ajustes .
2 Toque en Inalámbrica y redes > Ajustes Wi-Fi.
3 Toque en Wi-Fi para activar la tecnología.
4 Seleccione y toque en una red para conectar.
5 Ingrese la contraseña si la red es segura. indica una red Wi-Fi segura. Toque en Mostrar
contraseña si desea que la contraseña sea exhibida.
6 Toque en Conectar. Cuando la red sea recuperada, el Breakout™ será automáticamente conectado a ella
cuando estuviera en el rango de alcance.
Activación de la Red Wi-Fi Conexión a una red Wi-Fi
Nota El icono próximo a cada red indica la intensidad de la señal. Por ejemplo, indica que la señal está débil
mientras indica que la señal está fuerte.
107
CONECTIVIDAD
SOBRE NOTIFICACIONES DE RED
Usted será informado por estándar cuando una red Wi-Fi está disponible. El icono en la barra de
estado indica que una red está disponible. Toque en Notificación de red en los ajustes Wi-Fi si usted no
desea ser informado sobre la disponibilidad de la red.
UTILIZACION DEL AJUSTE FACIL
1 Toque en la parte superior de la pantalla Inicio y arrástrela hacia abajo.
2 Toque en Ajuste Fácil. El icono será encendido en verde claro cuando la función sea activada.
AJUSTE DE LAS REDES Wi-Fi
1 Toque en Menú en la Pantalla de Inicio. Toque en Ajustes .
2 Toque en Inalámbrica y redes > Ajustes Wi-Fi.
3 Toque en Wi-Fi para activar la tecnología.
4 Toque en Conexión WPS si usted desea establecer una nueva conexión inalámbrica utilizando
automáticamente la Configuración Protegida Wi-Fi (WPS). Usted debe presionar WPS en su punto
de acceso Wi-Fi dentro de dos minutos.
xToque en Conexión por el botón. Usted debe presionar el botón WPS en su punto de acceso
Wi-Fi dentro de 2 minutos.
xToque en Conexión PIN. Usted debe ingresar el código PIN en su punto de acceso Wi-Fi dentro
de 2 minutos.
BUSQUEDA DE REDES Wi-Fi
1 Toque en Menú en la Pantalla de Inicio. Toque en Ajustes .
2 Toque en Inalámbrica y redes > Ajustes Wi-Fi.
3 Toque en Wi-Fi para activar la tecnología.
4 Presione la Tecla Menú B y toque en Barrido. El Breakout™ ejecutará el barrido de las redes
automáticamente cada seis segundos. Las redes encontradas serán exhibidas en la parte inferior de
la lista.

108
CONECTIVIDAD
ADICION DE UNA RED Wi-Fi
1 Toque en Menú en la Pantalla de Inicio. Toque en Ajustes .
2 Toque en Inalámbrica y redes > Ajustes Wi-Fi.
3 Toque en Wi-Fi para activar la tecnología.
4 Toque en Agregar red Wi-Fi.
5 Ingrese la identificación SSID de red y seleccione el tipo de seguridad entre Abierta, WEP, WPA/
WPA2 PSK y 802.1xEAP. Al lado de Abierta, usted debe ingresar una contraseña para la red.
6 Toque en Grabar.
DESCONEXION DE UNA RED Wi-Fi
1 Toque en la red conectada al Breakout™.
2 Toque en Desconsiderar para desconectarse de la red.
Nota Usted también puede desconectarse de la rede Wi-Fi presionando y manteniendo presionado el icono de
la red y tocando en Desconsiderar la red.
AJUSTE DE FUNCIONES AVANZADAS
1 Toque en Menú en la Pantalla de Inicio. Toque en Ajustes .
2 Toque en Inalámbrica y redes > Ajustes Wi-Fi.
3 Toque en Wi-Fi para activar la tecnología.
4 Presione la Tecla Menú B y toque en Avanzado.
5 Para ajustes avanzados,
xToque en Dominio reglamentar y seleccione y toque en los canales para el dominio.
xToque en Política Wi-Fi sleep y especifique cuando el Breakout™ deberá cambiar la red Wi-Fi
para la red móvil.
109
CONECTIVIDAD
Para ajustes IP, toque en Utilizar IP estático primero.
xToque en Dirección IP, ingrese la dirección y toque en OK.
xToque en Portal, ingrese al portal y toque en OK. Usted también puede configurar los ajustes
para Netmask, DNS 1 y DNS 2.
ICONOS PARA Wi-Fi y 3G/4G
Icono Descripción
Conectado a una red Wi-Fi
El GPS está activo.
Los datos están siendo transferidos a través de la red 4G.
Los datos están siendo transferidos a través de la red 3G.
Los datos están siendo transferidos a través de la red 1xRTT
CONEXION A UNA RED 3G/4G
Certifíquese de desactivar la conexión a la red Wi-Fi: La red Wi-Fi y el hotspot móvil no pueden operar al
mismo tiempo.
CONEXION A UN HOTSPOT MOVIL PARA RED 3G
1 Toque en Menú en la Pantalla de Inicio. Toque en Hotspot Móvil .
2 Toque en Activar para activar la función. Si una red Wi-Fi estuviera activa, ella será desactivada.
3 Toque en Seguir en la pantalla en la función hotspot móvil 3G. Toque en la caja de verificación si
usted no desea visualizar la pantalla en el futuro.
4 Toque en Seguir en la pantalla en el plan de llamada.
5 Toque en Activar el Hotspot Móvil. Usted también puede tocar en la caja de verificación si desea
visualizar la pantalla en el futuro.
110
CONECTIVIDAD
CONEXION AL HOTSPOT MOVIL PARA RED 4G
1 Toque en Menú en la Pantalla de Inicio. Toque en Hotspot Móvil .
2 Toque en Activar para activar la función. Si una red Wi-Fi estuviera activa, toque en Desactivar Wi-Fi.
CONEXION A BANDA ANCHA 4G
1 Toque en Menú en la Pantalla de Inicio. Toque en Ajustes .
2 Toque en Inalámbrica y redes.
3 Toque en Conexión a la Banda Ancha Móvil.
4 Toque en la caja de verificación próxima a Activar para activar la banda ancha 4G.
CONFIGURACION DE LA CONEXION AUTOMATICA
1 Toque en Menú en la Pantalla de Inicio. Toque en Hotspot Móvil .
2 Toque en Activar para activar la función.
CONFIGURACION DE LA CONEXION MANUAL
1 Toque en Menú en la Pantalla de Inicio. Toque en Hotspot Móvil .
2 Toque en Configurar Hotspot Móvil.
3 Para cada opción:
xToque en SSID de Red y digite el nombre de la red y toque en OK.
xToque en Seguridad, seleccione y toque un tipo de seguridad y realice los pasos necesarios.
111
CONECTIVIDAD
ADMINISTRACION DE DISPOSITIVOS
1 Toque en Menú en la Pantalla de Inicio. Toque en Hotspot Móvil .
2 Toque en Activar para activar la función.
3 Toque en Administrar dispositivos.
4 Para cada opción:
xToque en Dispositivos conectados. Usted puede visualizar los dispositivos conectados al
Breakout™.
xToque en Dispositivos bloqueados si desea visualizar dispositivos bloqueados a la conexión
con su teléfono.
UTILIZACION DE Bluetooth
La tecnología Bluetooth habilita conexiones inalámbricas entre dispositivos electrónicos. Utilizando
esta tecnología usted puede enviar imágenes, texto y tarjetas de visita.
Con la tecnología Bluetooth, el Breakout™ suministra:
xConexión a dispositivos altavoz
xConexión a dispositivos electrónicos
PAREO CON DISPOSITIVOS
1 Toque en Menú en la Pantalla de Inicio. Toque en Ajustes .
2 Toque en Inalámbrica y redes > Ajustes Bluetooth.
3 Toque en Bluetooth para activar la tecnología.
4 Toque en Ejecutar Barrido de dispositivos.
5 Seleccione y toque en un dispositivo en la lista.
6 Toque en Parear para realizar el pareo y conectar el dispositivo.
112
CONECTIVIDAD
ICONOS DE DISPOSITIVOS
PC Audífonos Mono Headset Teléfono LAPTOP Dispositivo
desconocido
ICONOS PARA Bluetooth
Icono Descripción Icono Descripción
Bluetooth conectado Bluetooth activo pero no conectado
a otro dispositivo
Un archivo de otro dispositivo está
listo para ser entregado
UTILIZACION DE AJUSTE FACIL
1 Toque en la parte superior de la pantalla Inicio y arrástrela hacia abajo.
2 Toque en Bluetooth. El icono será encendido en verde claro cuando la función estuviere activada.
AJUSTES Bluetooth
1 Toque en Menú en la Pantalla de Inicio. Toque en Ajustes .
2 Toque en Inalámbrica y redes > Ajustes Bluetooth.
3 Toque en Bluetooth para activar la tecnología.
4 Toque en Detectable si usted desea dejar que otras personas realicen el pareo de sus dispositivos
con su Breakout™. El estado dura 60 segundos.
113
CONECTIVIDAD
COMPARTIDO DE UNA IMAGEN UTILIZANDO Bluetooth
1 Toque en Menú en la Pantalla de Inicio. Toque en Galería .
2 Seleccione y toque en una imagen para ser compartida.
3 Toque en Menú > Compartir > Bluetooth.
4 Seleccione y toque en un dispositivo entre los dispositivos pareados con el Breakout™. La otra parte
recibirá un mensaje para aceptar el archivo.
RENOMBRADO DE DISPOSITIVO
1 Toque en Aparatos en la Pantalla de Inicio. Toque en Ajustes .
2 Toque en Inalámbrica y redes > Ajustes Bluetooth.
3 Toque en Bluetooth para activar la tecnología.
4 Toque en Nombre del dispositivo y ingrese un nuevo nombre.
5 Toque en OK.
UTILIZACION DEL Breakout™ COMO UN MODEM
El Breakout™ suministra a otros dispositivos una conexión a la Internet tornándose un hotspot Wi-Fi.
ACTIVACION DE LA BANDA ANCHA MOVIL
1 Conecte el Breakout™ a un dispositivo electrónico utilizando el cable USB.
2 Toque en Menú en la Pantalla de Inicio. Toque en Ajustes .
3 Toque en Inalámbrica y redes > Conexión a la Banda Ancha Móvil.
4 Toque en Activar para activar la tecnología. El dispositivo electrónico conectado al Breakout™
pudiera ahora acceder a Internet.
114
CONECTIVIDAD
Nota Usted no puede utilizar algunas aplicaciones que exigen la conexión a la Internet mientras utiliza la
tecnología de banda ancha móvil.
UTILIZANDO COMO UN HOTSPOT MOVIL
1 Toque en Menú en la Pantalla de Inicio. Toque en Ajustes .
2 Toque en Inalámbrica y redes.
3 Toque en Hotspot Móvil. El Breakout™ puede ofrece la conexión a la Internet a otros dispositivos
próximos a usted.
AJUSTE DE LAS OPCIONES PARA HOTSPOT MOVIL
1 Toque en Menú en la Pantalla de Inicio. Toque en Ajustes .
2 Toque en Inalámbrica y redes > Hotspot Móvil.
3 Toque en Configurar Hotspot Móvil.
4 Ingrese un nombre para la SSID de Red y seleccione el tipo de seguridad.
xToque en Abierta si usted desea utilizar una rede abierta.
xToque en Abierta y toque en WPA2(AES), WPA(TKIP) o WPA/WPA2 y ingrese los ítems
relacionados si usted desea permitir que dispositivos limitados accedan a la Internet a través del
Breakout™.
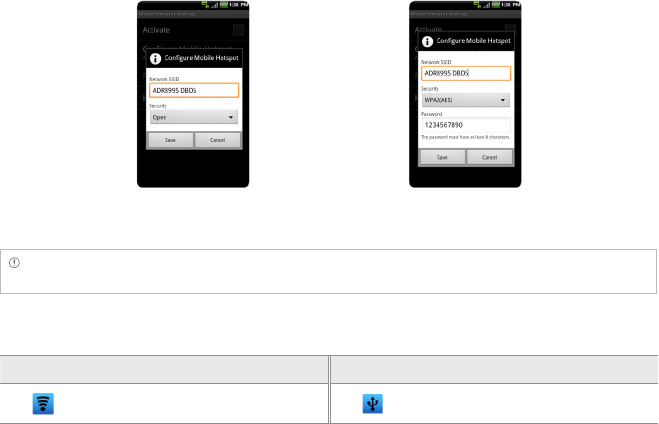
115
CONECTIVIDAD
5 Toque en Grabar.
Hotspot Wi-Fi para Abierta Hotspot Wi-Fi para WPA2(AES)
Nota El tipo de seguridad estándar para Hotspot Móvil es WPA2 PSK y la contraseña es “MDN (número del
teléfono)” como estándar.
ICONOS DE BANDA ANCHA Y HOTSPOT MOVIL
Icono Descripción Icono Descripción
Hotspot Móvil activo Banda Ancha Móvil activa

7. SERVICIOS BASADOS EN LA LOCALIZACION
UTILIZACION DEL SERVICIO Google MAPS
UTILIZACION DEL SERVICIO PLACES
UTILIZACION DEL SERVICIO LATITUDE
NAVEGACION
NOTICIAS Y CLIMA
7
SERVICIOS BASADOS EN LA LOCALIZACION
Este capítulo suministra informaciones importantes sobre
la utilización del Breakout™ incluyendo:
117
SERVICIOS BASADOS EN LA LOCALIZACION
UTILIZACION DEL SERVICIO Google MAPS
Google Maps ofrece informaciones útiles con base en su región. Certifíquese de conectar el Breakout™
a una red Wi-Fi, 3G o 4G. Si usted activar la función GPS, podrá obtener informaciones más exactas.
PARA ENCONTRAR LOCALIDADES
1 Toque en Menú en la Pantalla de Inicio. Toque en Maps . Usted puede visualizar su
localización actual en el mapa.
Nota Certifíquese de conectar las redes inalámbrica o satélites GPS tocando en Aplicaciones > Config. >
Localización y seguridad y tocando en Servicios de Localización VZW, Servicios de GPS Independientes y/o
Servicios de Localización Google > Estar de acuerdo.
2 Toque en la caja de búsqueda y digite la contraseña utilizando el teclado virtual y toque en o .
3 Toque en si usted desea visualizar la lista de resultados. El icono será exhibido cuando
muchos resultados correspondieren a su búsqueda.
4 Seleccione y toque en la localización que usted desea visualizar y verifique las informaciones
relacionadas.
ZOOM DE ACERCAMIENTO Y ALEJAMIENTO EN EL MAPA
1 Toque en para aplicar el zoom de acercamiento en el mapa.
2 Toque en para aplicar el zoom de alejamiento en el mapa.
Nota Usted puede tocar dos veces en la pantalla para aplicar el zoom de acercamiento en el mapa.
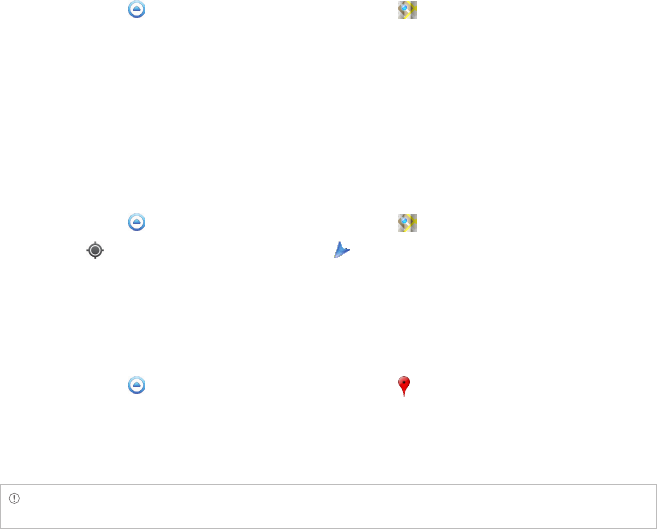
118
SERVICIOS BASADOS EN LA LOCALIZACION
LOCALIZACION DE DIRECCIONES
1 Toque en Menú en la Pantalla de Inicio. Toque en Maps .
2 Presione la Tecla Menú B y toque en Direcciones.
3 Ingrese el nombre del lugar que usted desea visitar.
4 Seleccione el medio de locomoción hasta el punto deseado por automóvil, transporte público o a
pié.
5 Toque en Ir.
LOCALIZACION ACTUAL EN EL MAPA
1 Toque en Menú en la Pantalla de Inicio. Toque en Maps .
2 Toque en . Su localización será indicada como .
UTILIZACION DEL SERVICIO PLACES
BUSQUEDA DE LUGARES
1 Toque en Menú en la Pantalla de Inicio. Toque en Sitios .
2 Ingrese una contraseña en la caja de búsqueda o toque en Restaurantes, Café, Bares, Atracciones,
Cajeros Electrónicos, Puestos de Combustibles o Explorar Proximidades.
3 Seleccione y toque en un lugar en los resultados de búsqueda.
Nota Si usted desea clasificar los resultados por distancia o clasificación por clientes, toque en Distancia o
Clasificación en los resultados de la búsqueda.
119
SERVICIOS BASADOS EN LA LOCALIZACION
VISUALIZACION DE LUGARES RAPIDAMENTE
1 Toque en Menú en la Pantalla de Inicio. Toque en Sitios .
2 Seleccione y toque en una categoría.
3 Presione la Tecla Menú B en los resultados de búsqueda y toque en Visualizar mapa. Usted puede
visualizar los lugares relacionados en el mapa.
ADICION DE UNA CATEGORIA EN LUGARES
1 Toque en Menú en la Pantalla de Inicio. Toque en Sitios .
2 Toque en Agregar en la parte inferior de la pantalla y ingrese una categoría para ser agregada. La
categoría será exhibida en la pantalla.
ADICION DE LUGARES ESTRELLADOS
1 Toque en Menú en la Pantalla de Inicio. Toque en Sitios .
2 Seleccione y toque en una categoría
3 Seleccione y toque en un lugar que desea visualizar.
4 Toque en el icono estrella para cada lugar. Cuando seleccione, el icono se hará amarillo.
Nota Usted puede visualizar los lugares con estrellados presionando la Tecla Menú B y tocando en Lugares Estrellados
en la primera pantalla de Lugares.
ADICION DEL WIDGET PLACES
1 Toque y mantenga presionado en el espacio vacío en la Pantalla de Inicio, o presione la Tecla Menú
B en el modo inactivo y toque en Widget.
2 Toque en Android Widgets.
3 Toque en Lugares Clasificados en la lista. Las informaciones sobre los lugares próximos serán
exhibidos automáticamente.
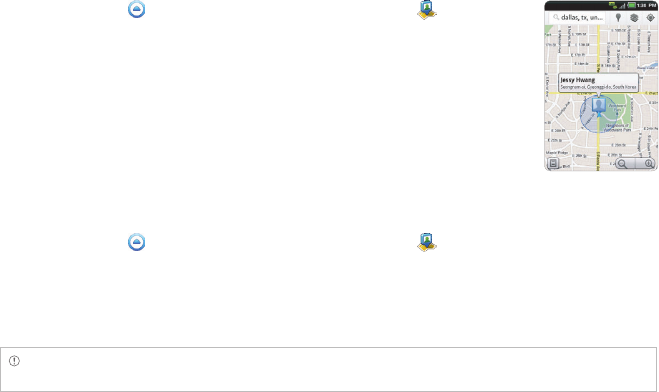
120
SERVICIOS BASADOS EN LA LOCALIZACION
UTILIZACION DEL SERVICIO LATITUDE
Comparta su localización con sus amigos o verifique la localización de ellos. Certifíquese de mantener
una cuenta Google para utilizar el servicio Latitude.
INSCRIPCION EN EL SERVICIO LATITUDE
1 Toque en Menú en la Pantalla de Inicio. Toque en Latitude .
2 Toque en OK para dato sobre el mapa actualizado.
3 Toque en Permitir y Compartir si usted desea compartir su localización
con sus amigos. La pantalla Latitude será exhibida rápidamente donde
sus informaciones personales son exhibidas.
4 Presione la Tecla Volver C si usted desea visualizar su localización en el
mapa.
ADICION DE AMIGOS A PARTIR DE CONTACTOS
1 Toque en Menú en la Pantalla de Inicio. Toque en Latitude .
2 Presione la Tecla Menú B y toque en Agregar amigos.
3 Toque en Seleccionar de Contactos.
4 Seleccione y toque en contacto que desea agregar como su amigo.
Nota Como ajuste estándar todos los contactos serán exhibidos. Si usted desea clasificar contactos, toque en
Todos los Contactos en la parte superior de la pantalla y seleccione y toque en una categoría para los contactos.
5 Toque en Sí si usted desea enviar solicitudes de compartido.
121
SERVICIOS BASADOS EN LA LOCALIZACION
ADICION DE AMIGOS A PARTIR DE DIRECCIONES DE EMAIL
1 Toque en Menú en la Pantalla de Inicio. Toque en Latitude .
2 Presione la Tecla Menú B y toque en Agregar amigos.
3 Toque en Agregar vía dirección de e-mail.
4 Ingrese la dirección de e-mail de su amigo y toque en Agregar amigos.
5 Toque en Sí si usted desea enviar solicitudes de compartido.
ACEPTACION DE INVITACIONES DE AMIGOS
1 Toque en Menú en la Pantalla de Inicio. Toque en Latitude .
2 Toque en 1 nueva solicitud de compartido en la parte superior de la pantalla.
3 Toque en Aceptar y compartir. Usted puede visualizar la localización de sus amigos dentro de poco
tiempo.
ADMINISTRACION DE LOS AMIGOS
1 Toque en Menú en la Pantalla de Inicio. Toque en Latitude .
2 Toque en el icono de uno de los amigos en la pantalla.
3 Toque en Actualización en tiempo real y seleccione y toque en el intervalo de tiempo para
actualización de las localizaciones.
4 Toque en Opciones de compartido y seleccione y toque en una opción.
5 Toque en Remover este amigo y toque en OK si usted desea remover su amigo del servicio
Latitude.
122
SERVICIOS BASADOS EN LA LOCALIZACION
VERIFICACION DE LOS AJUSTES PERSONALES
1 Toque en Menú en la Pantalla de Inicio. Toque en Latitude .
2 Toque en su nombre en la parte superior de la pantalla. Usted puede
visualizar su nombre, cuenta Gmail y su localización actual.
3 Toque en Visualizar el historial de su localización si desea grabar el
historial de Latitude pasado y siga las instrucciones.
4 Toque en Editar ajustes de privacidad si usted desea configurar los
ajustes de privacidad.
5 Toque en Trocar su foto si usted desea cambiar la foto para Latitude
y toque en Capturar una imagen o Extraer de la galería y siga las
instrucciones.
CONFIGURACION DE LOS AJUSTES DE PRIVACIDAD
1 Toque en Menú en la Pantalla de Inicio. Toque en Latitude .
2 Presione la Tecla Menú B y toque en Configuración.
3 Toque en Detectar su localización, Ajustar su localización o No actualizar su localización para
informes de la localización. La detección de su localización será seleccionada por estándar.
4 Toque en Habilitar el historial de la localización si usted desea almacenar sus localizaciones en el
pasado y visualizarlas en el sitio web del servicio Latitude.
5 Toque en Salir del servicio Latitude si usted no desea utilizar el servicio. Si usted desea activar el
servicio nuevamente, presione la Tecla Menú B y toque en Activar Servicio Latitude.
Nota Para mayores informaciones sobre el mapa, refiérase a la sección Utilización del servicio Google Maps en la
página 117.
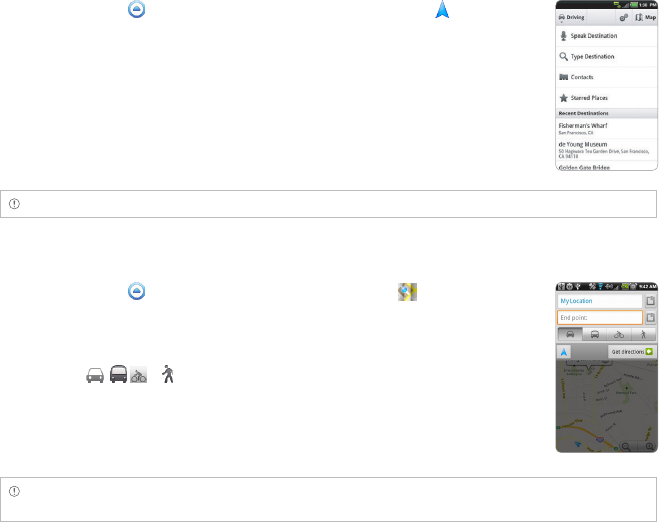
123
SERVICIOS BASADOS EN LA LOCALIZACION
NAVEGACION
BUSQUEDA DEL DESTINO POR VOZ
1 Toque en Menú en la Pantalla de Inicio. Toque en Navigation .
2 Toque en Pronunciar Destino y pronuncie su destino en el Breakout™.
3 Seleccione y toque en un destino en la lista cuando hubiere diversos
destinos
Nota Usted también puede buscar el destino digitándolo o seleccionándolo en Contactos.
LOCALIZACION DE DIRECCIONES UTILIZANDO EL GOOGLE MAPS
1 Toque en Menú en la Pantalla de Inicio. Toque en Maps .
2 Presione la Tecla Menú B y toque en Direcciones.
3 Ingrese el nombre del punto final.
4 Toque en , o y toque en Ir.
5 Seleccione y toque en un lugar en los resultados.
Nota Para mayores informaciones sobre el servicio Google Maps, refiérase a la sección Utilización del Servicio
Google Maps en la página 117.
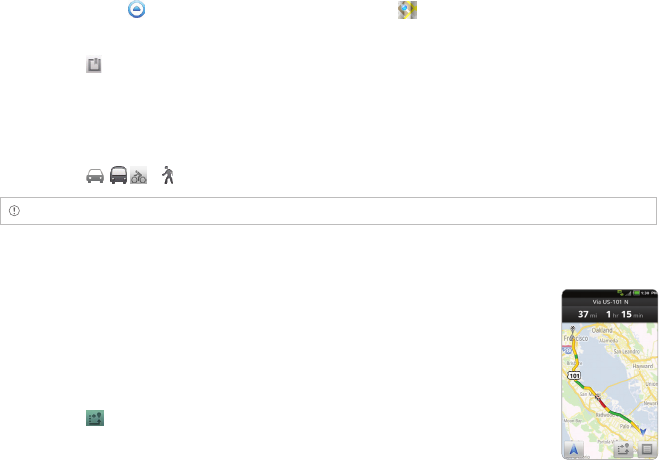
124
SERVICIOS BASADOS EN LA LOCALIZACION
AJUSTE DEL PUNTO FINAL MANUALMENTE
1 Toque en Menú en la Pantalla de Inicio. Toque en Maps .
2 Presione la Tecla Menú B y toque en Direcciones.
3 Toque en a la derecha del Punto Final.
4 Toque en Punto en el mapa si usted desea ajustar el punto final.
5 Toque en un punto en el mapa.
6 Toque en Tocar para seleccionar este punto.
7 Toque en , o y toque en Ir.
Nota Usted también puede ajustar su localización siguiendo el mismo proceso.
VERIFICACION DE LAS CONDICIONES DE TRAFICO
1 Presione la Tecla Menú B y toque en Informaciones de Ruta mientras la
función de navegación es ejecutada.
2 Pase su dedo en la pantalla por la ruta sugerida hasta el destino.
Dependiendo de las condiciones de transito, la carretera será exhibida
en el color verde (bueno), amarilla (congestionada) o roja (paralizada).
3 Toque en y toque en la ruta si usted desea ajustar una ruta alternativa.

125
SERVICIOS BASADOS EN LA LOCALIZACION
NOTICIAS Y CLIMA
El servicio Noticias y Clima ofrecen noticias sobre varios campos y informaciones meteorológicas en su
región.
VISUALIZACION DE LAS INFORMACIONES SOBRE EL CLIMA
1 Toque en Menú en la Pantalla de Inicio. Toque en Noticias & Clima . Como ajuste estándar, las
informaciones sobre la región en que usted se encuentra en el momento serán suministradas.
2 Toque en las informaciones sobre el clima en la parte intermediaria de la pantalla si usted desea
verificar la previsión del tiempo para el día.
3 Toque en el cuadro y arrastre la barra vertical en la pantalla hacia la izquierda o derecha si desea
visualizar las informaciones sobre el clima para una determinada hora del día.
SELECCION DE LOS AJUSTES PARA EL CLIMA
1 Toque en Menú en la Pantalla de Inicio. Toque en Noticias & Clima .
2 Presione la Tecla Menú B y toque en Configuración.
3 Toque en Ajustes para el Clima.
4 Toque en Utilizar mi localización si usted desea visualizar informaciones sobre su región
automáticamente.
5 Toque en Utilizar métrica si usted desea cambiar la unidad para informaciones climáticas.
126
SERVICIOS BASADOS EN LA LOCALIZACION
TROCA DE MI LOCALIZACIÓN
1 Toque en Menú en la Pantalla de Inicio. Toque en Noticias & Clima .
2 Presione la Tecla Menú B y toque en Configuración.
3 Toque en Ajustes para el Clima.
4 Desmarque Utilizar mi localización.
5 Toque en Ajustar localización y ingrese el nombre o código postal de una ciudad deseada.
LECTURA DE ARTICULOS DE NOTICIAS
1 Toque en Menú en la Pantalla de Inicio. Toque en Noticias & Clima .
2 Toque en Principales Acontecimientos en la parte superior de la pantalla.
3 Seleccione y toque en un artículo si usted desea visualizar todo el texto.
4 Pase la pantalla hacia la izquierda o derecha si usted desea visualizar artículos por categoría.
PERSONALIZACION DE LOS TOPICOS DE NOTICIAS
1 Toque en Menú en la Pantalla de Inicio. Toque en Noticias & Clima .
2 Presione la Tecla Menú B y toque en Configuración.
3 Toque en Ajustes para noticias > Seleccionar tópicos de noticias.
4 Seleccione y toque en el tópico que desea visualizar. Tóquelo nuevamente si usted desea borrar el
tópico.

127
SERVICIOS BASADOS EN LA LOCALIZACION
ADICION DE TOPICOS DE NOTICIAS
1 Toque en Menú en la Pantalla de Inicio. Toque en Noticias & Clima .
2 Presione la Tecla Menú B y toque en Configuración.
3 Toque en Ajustes de noticias > Seleccionar tópicos de noticias.
4 Toque en Personalizar tópico, ingrese el título y toque en OK. Usted visualizará los artículos
relacionados al título.
SELECCION DE AJUSTES DE NOTICIAS
1 Toque en Menú en la Pantalla de Inicio. Toque en Noticias & Clima .
2 Presione la Tecla Menú B y toque en Configuración.
3 Toque en Ajustes de Noticias.
4 Toque en Artículos prefetch si usted desea reducir el tiempo para acceder artículos. Recuerde que
este procedimiento aumenta el uso de datos y consume más batería. Toque en Imágenes prefetch
si usted desea reducir el acceso a las imágenes.
5 Toque en Términos de servicio para noticias si usted desea verificar los Términos de Uso para
noticias.
6 Toque en Política de privacidad móvil si usted desea visualizar la política de privacidad móvil más
reciente.

128
SERVICIOS BASADOS EN LA LOCALIZACION
AJUSTE DE LAS OPCIONES DE ACTUALIZACION
1 Toque en Menú en la Pantalla de Inicio. Toque en Noticias & Clima .
2 Presione la Tecla Menú B y toque en Configuración.
3 Toque en Ajustes de actualización.
4 Toque en Actualización automática si usted desea actualizar la previsión del tiempo y noticias
automáticamente. Como ajuste estándar la caja de verificación es seleccionada.
5 Toque en Intervalo de Actualización, seleccione y toque en un intervalo para actualización. La
función Estado de actualización muestra la fecha y la hora de la última actualización.

8. SERVICIOS BASADOS EN INTERNET
NAVEGACION EN LA INTERNET
BUSQUEDA EN EL Google
BUSQUEDA POR VOZ
ANDROID MARKET
8
SERVICIOS BASADOS EN INTERNET
Este capítulo suministra informaciones importantes sobre
la utilización de Breakout™ incluyendo:
130
SERVICIOS BASADOS EN INTERNET
NAVEGACION EN LA INTERNET
BUSQUEDA DE INFORMACIONES EN LA INTERNET
1 Toque en Navegador en la Pantalla de Inicio.
2 Toque en la caja de búsqueda y digite la palabra clave.
3 Toque en .
4 Unir dos dedos además en la pantalla si usted desea aplicar un zoom de acercamiento a la página
web.
LOCALIZACION DE PALABRAS EN LA PAGINA ACTUAL
1 Presione la Tecla Menú B y toque en Más > Localizar en la página mientras una página web está
abierta.
2 Ingrese una palabra que desea visualizar en la página actual. La pantalla se mueve hacia el lugar
que incluye la palabra que usted digito.
3 Toque en para acceder la próxima frase que contiene la palabra. Toque en para acceder la frase
anterior.
COPIA DE TEXTO EN LA PAGINA ACTUAL
1 Presione la Tecla Menú B y toque en Más > Seleccionar texto mientras una página web está
abierta.
2 Arrastre el texto en la pantalla y toque en el texto arrastrado para copiarlo para el área de
transferencia. Usted puede pegar el texto copiado.
131
SERVICIOS BASADOS EN INTERNET
VISITA UNA NUEVA PAGINA
1 Toque en Navegador en la Pantalla de Inicio.
2 Toque en la barra de direcciones y ingrese un nuevo URL.
3 Toque en próximo a la barra de dirección o toque en en el teclado virtual.
ACTUALIZACION DE UNA PAGINA
1 Toque en Navegador en la Pantalla de Inicio.
2 Presione la Tecla Menú B y enseguida toque en para actualizar la página cuando esté abierta. O
toque en Q para interrumpir la actualización de la página.
CAMBIO DE LA HOME PAGE
1 Toque en Navegador en la Pantalla de Inicio.
2 Presione la Tecla Menú B y toque en Más.
3 Toque en Ajustes > Definir Home Page.
4 Ingrese un nuevo URL si desea cambiar la home page y toque en OK.
5 Toque en Utilizar página actual si usted desea utilizar la página actual como la home page.
VISUALIZACION DEL HISTORIAL DEL NAVEGADOR
1 Toque en Navegador en la Pantalla de Inicio.
2 Presione la Tecla Menú B y toque en Marcadores.
3 Toque en Más visitadas si usted desea páginas de la Internet más visitadas. Toque en próximo al
sitio web si usted desea agregarla a los marcadores.
4 Toque en Historial si usted desea visualizar la actividad de navegación pasada. Presione la Tecla
Menú B y toque en Borrar historial si usted desea borrar el historial de navegación.
132
SERVICIOS BASADOS EN INTERNET
APERTURA DE UNA NUEVA VENTANA
1 Toque en Navegador en la Pantalla de Inicio.
2 Presione la Tecla Menú B y toque en Nueva ventana. Otra ventana será exhibida.
ADMINISTRACION DE DIVERSAS VENTANAS
1 Toque en Navegador en la Pantalla de Inicio.
2 Presione la Tecla Menú B y toque en Ventanas.
3 Seleccione y toque en una ventana que desea visualizar. O toque en Q próximo a la ventana que
desea borrar.
ADICION DE MARCADORES
1 Toque en Navegador en la Pantalla de Inicio.
2 Presione la Tecla Menú B y toque en Marcadores mientras visita la página web.
3 Toque en +Agregar.
4 Ingrese el nombre y la localización de sitio web y toque en OK.
APERTURA DE LAS PAGINAS MARCADAS
1 Toque en Navegador en la Pantalla de Inicio.
2 Presione la Tecla Menú B y toque en Marcadores.
3 Toque y mantenga presionado un marcador de una página web:
xToque en Abrir si usted desea abrir la página web en la ventana actual.
xToque en Abrir en la nueva ventana si desea abrir la web page en una nueva ventana.
133
SERVICIOS BASADOS EN INTERNET
ADICION DE UN WIDGET DE MARCADOR
1 Toque y mantenga presionado un espacio vacío en la Pantalla de Inicio o presione la Tecla Menú B
en el modo inactivo y toque en Widget.
2 Toque en Pantech Widgets.
3 Toque y mantenga presionado Marcador en la parte inferior de la pantalla y seccione en la Pantalla
de Inicio.
4 Seleccione un estilo. Usted puede acceder un sitio web marcado con un único toque.
ADMINISTRACION DE MARCADORES
1 Toque en Navegador en la Pantalla de Inicio.
2 Presione la Tecla Menú B y toque en Marcadores.
3 Toque y mantenga presionado un marcador:
xSi usted desea editar el marcador, toque en Editar marcador, cambie el nombre o localización y
toque en OK.
xSi usted desea crear este acceso rápido en la Pantalla de Inicio, toque en Agregar acceso rápido
en la Pantalla de Inicio.
xSi usted desea compartir el marcador como un link, toque en Compartir link, toque en
Bluetooth, Correo electronico, Gmail, Mensajeria o V CAST Media Manager y realice los pasos
necesarios.
xSi usted desea copiar el URL, toque en Copiar link URL y péguelo en un mensaje.
REPOSICIONAMIENTO DE LOS MARCADORES
1 Toque en Navegador en la Pantalla de Inicio.
2 Presione la Tecla Menú B y toque en Marcadores.
3 Presione la Tecla Menú B y toque en Reposicionar marcadores.
4 Toque y mantenga presionado un marcador para moverlo y arrastrarlo para otro lugar.
134
SERVICIOS BASADOS EN INTERNET
BORRADO DE MARCADORES
1 Toque en Navegador en la Pantalla de Inicio.
2 Presione la Tecla Menú B y toque en Marcadores.
3 Toque y mantenga presionado un marcador y toque en Borrar marcador.
4 Toque en OK.
AJUSTE DE LAS OPCIONES DE EXHIBICION
1 Toque en Navegador en la Pantalla de Inicio.
2 Presione la Tecla Menú B y toque en Más > Ajustes.
3 Toque en Tamaño del texto, seleccione y toque en el tamaño de texto deseado.
4 Toque en Zoom estándar, seleccione y toque en su modo de zoom preferido.
5 Toque en Bloquear ventanas pop-up si usted desea impedir la exhibición de las ventanas pop-up.
Como ajuste estándar, la caja de verificación será seleccionada por estándar.
AJUSTE DE OPCIONES DE PRIVACIDAD
1 Toque en Navegador en la Pantalla de Inicio.
2 Presione la Tecla Menú B y toque en Más.
3 Toque en Ajustes.
4 Toque en Borrar todos los datos cookie > OK si desea borrar todos los datos cookie.
5 Toque en Borrar datos de formulario > OK si usted desea borrar todos los datos de formulario.
135
SERVICIOS BASADOS EN INTERNET
ADICION DE UM WIDGET WEB
1 Toque y mantenga presionado el espacio vacío en la Pantalla de Inicio, o presione la Tecla Menú B
en el modo inactivo y toque en Widget.
2 Toque en Pantech Widgets.
3 Toque y mantenga presionado Espacio web en la parte inferior de la pantalla y posiciónelo en la
Pantalla de Inicio.
4 Ingrese el URL y toque en Ir.
5 Toque en Próximo en la parte superior derecha de la pantalla.
6 Seleccione un estilo.
7 Mueva la caja de color rosa de posicionamiento y toque en Hecho. Usted puede verificar la página
web y actualizarla tocando en .
Google SEARCH
BUSQUEDA DE INFORMACIONES CON EL GOOGLE
1 Toque en Menú en la Pantalla de Inicio. Toque en Búsqueda de Google o presione la Tecla
Búsqueda D en el modo inactivo.
2 Ingrese una palabra clave en la caja de búsqueda y toque en o . Usted también puede tocar
en la tecla Comandos de Voz H y pronuncie los comandos junto al teléfono.
AJUSTE DE LAS OPCIONES DE BUSQUEDA
1 Toque en Menú en la Pantalla de Inicio. Toque en Búsqueda de Google .
2 Presione la Tecla Menú B y toque en Ajustes de búsqueda.
3 Toque en Búsqueda Google.
136
SERVICIOS BASADOS EN INTERNET
4 Toque en Exhibir sugestiones de Internet si usted desea visualizar sugestiones de Google a
la medida de su búsqueda a través del Google. Como ajuste estándar la caja de verificación es
seleccionada.
5 Toque en Utilizar Mi Localización si usted permitir que su localización sea utilizada para resultados
de búsqueda en el Google.
SELECCION DE ITEMS QUE PUEDEN SER BUSCADOS
1 Toque en Menú en la Pantalla de Inicio. Toque en Búsqueda de Google .
2 Presione la Tecla Menú B y toque en Ajustes de búsqueda.
3 Toque en Ítems pasibles de búsqueda.
4 Seleccione y toque en los ítems que usted desea incluir para el resultado de la búsqueda. Toque
en Borrar accesos rápidos si usted desea borrar los accesos rápidos para ítems de búsqueda más
recientes.
ADMINISTRACION DEL HISTORIAL DE BUSQUEDA
1 Toque en Menú en la Pantalla de Inicio. Toque en Búsqueda de Google .
2 Presione la Tecla Menú B y toque en Administración del historial de búsquedas.
Nota Certifíquese de tocar en Historial de búsqueda primeramente si desea utilizar la función Administración
del historial de búsqueda.
3 Ingrese la dirección de e-mail y la contraseña para su cuenta Google.
4 Seleccione y toque en el historial de búsqueda en la lista y toque en Remover si usted desea
remover el historial de búsqueda.
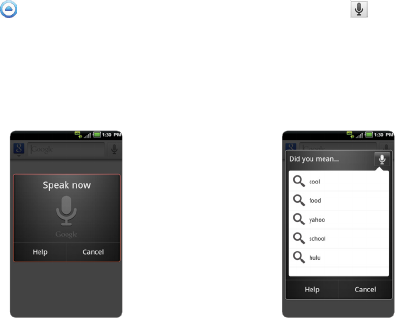
137
SERVICIOS BASADOS EN INTERNET
ADICION DEL WIDGET GOOGLE SEARCH
1 Toque y mantenga presionado el espacio vacío en la Pantalla de Inicio, o presione la Tecla Menú B
en el modo inactivo y toque en Widget.
2 Toque en Android Widgets.
3 Toque en Búsqueda Google en la lista.
4 Seleccione el ítem que debe ser incluido para búsqueda. Usted puede borrar los ítems
posteriormente.
BUSQUEDA POR VOZ
Búsqueda en la Internet a través de hablar al teléfono.
1 Toque en Menú en la Pantalla de Inicio. Toque en Búsqueda por voz o toque y mantenga
presionada la Tecla Búsqueda D.
2 Pronuncie una palabra clave al micrófono.
3 Seleccione y toque en el resultado. Pronuncie nuevamente cuando ninguna correspondencia sea
encontrada para la palabra clave.
Búsqueda por voz Resultados de la búsqueda

138
SERVICIOS BASADOS EN INTERNET
ANDROID MARKET
Descargue las aplicaciones útiles a partir del Servicio Android Market y utilícelos para los fines
deseados.
DOWNLOAD DE APLICACIONES
1 Toque en Menú
en la Pantalla de Inicio. Toque en Tienda
.
2 Toque en Próximo y siga los pasos necesarios para agregar una cuenta Google si usted aun no
posee una.
3 Toque en Aceptar en los Términos del Servicio Android Market si estuviera accedido el servicio
Android Market por primera vez.
4 Toque en Aplicaciones, Juegos u otras opciones en la parte intermediaria de la pantalla. Usted
también puede tocar en una de las imágenes girando en la parte superior de la pantalla. O presione
la Tecla Menú B y seleccione Mis Aplicaciones.
xToque en Aplicaciones si usted desea descargar aplicaciones que suministran funciones útiles
para sus finalidades.
xToque en Juegos si desea descargar y reproducir juegos.
xToque en Mis aplicaciones si desea verificar aplicaciones descargadas y administrarlas.
5 Seleccione y toque en una categoría.
6 Toque en Top paid, Top free o Just in.
xPara aplicaciones Top paid, toque en el precio, toque en OK y realice los pasos necesarios.
xPara aplicaciones Top free, toque en SIN CUSTOS > OK. Las aplicaciones seleccionadas serán
descargadas instantáneamente.
xPara aplicaciones Just in, toque en una aplicación y siga los pasos necesarios dependiendo si la
aplicación es pagada o gratuita.
139
SERVICIOS BASADOS EN INTERNET
BUSQUEDA DE APLICACIONES
1 Toque en Menú
en la Pantalla de Inicio. Toque en Tienda
.
2 Toque en y ingrese el nombre o la palabra clave de la aplicación que usted desea instalar y
toque en Ir o .
3 Seleccione y toque en la aplicación y instálela.
EJECUCION DE LAS APLICACIONES DESCARGADAS
1 Toque en la parte superior de la pantalla Inicio, arrastre las notificaciones hacia abajo.
2 Toque en la aplicación descargada del servicio Android Market. indica que una aplicación fue
completamente descargado. Usted también puede ejecutar la aplicación en el menú Aplicaciones.
ADICION DEL WIDGET ANDROID MARKET
1 Toque y mantenga presionado el espacio vacío en la Pantalla de Inicio, o presione la Tecla Menú B
en el modo inactivo y toque en Widget.
2 Toque en Android Widgets.
3 Toque en Mercado en la lista. Las aplicaciones sugeridas por el servicio Market Android serán
exhibidas a través del widget.
BORRADO DE APLICACIONES DEL SERVICIO ANDROID MARKET
1 Toque en Menú
en la Pantalla de Inicio. Toque en Tienda
.
2 Presione la Tecla Menú B y toque en Mis aplicaciones.
3 Toque y mantenga presionada la aplicación para borrar y toque en Desinstalar > OK.
Nota Usted no puede desinstalar aplicaciones instalados por el fabricante.

140
SERVICIOS BASADOS EN INTERNET
BORRADO DE LAS APLICACIONES DE LA SECCION AJUSTES
1 Toque en Menú en la Pantalla de Inicio. Toque en Ajustes .
2 Toque en Aplicaciones > Administrar aplicaciones.
3 Seleccione y toque en una aplicación para borrarla.
4 Toque en Desinstalar > OK.
5 Toque en OK.

9. HERRAMIENTAS
CALCULADORA
CALCULADORA DE PROPINAS
ALARMA/RELOJ
HERRAMIENTAS DE RELOJ
CONVERTIDOR
VISUALIZADOR DE DOCUMENTOS
ANOTACION MANUSCRITA
GRABADORA
CLIMA
9
HERRAMIENTAS
Este capítulo suministra informaciones importantes sobre
la utilización del Breakout™ incluyendo:

142
HERRAMIENTAS
CALCULADORA
Realice los cálculos matemáticos básicos con la calculadora en el Breakout™.
REALIZACION DE CALCULOS
1 Toque en Menú en la Pantalla de Inicio. Toque en Calculadora .
2 Ingrese un número y toque en un símbolo matemático que desea
utilizar.
3 Toque en C para borrar un número. Toque y mantenga presionada la
tecla C para borrar el número entero.
PARA GRABAR CALCULOS
1 Toque en Menú en la Pantalla de Inicio. Toque en Calculadora .
2 Presione la Tecla Menú B durante un cálculo y toque en Grabar.
3 Ingrese un nombre y toque en Grabar. Como ajuste estándar, el valor del resultado será exhibido
abajo del nombre por estándar.

143
HERRAMIENTAS
EDICION DE LOS CALCULOS GRABADOS
1 Toque en Menú en la Pantalla de Inicio. Toque en Calculadora .
2 Presione la Tecla Menú B y toque en Lista.
3 Toque y mantenga presionado el cálculo para ser editado y toque en Editar.
4 Toque en el cálculo y edítelo.
5 Presione la Tecla Menú B y toque en Grabar o presione la Tecla Volver C.
BORRADO DE CALCULOS
1 Toque en Menú en la Pantalla de Inicio. Toque en Calculadora .
2 Presione la Tecla Menú B y toque en Lista.
3 Para borrar los cálculos:
xSi usted desea borrar un cálculo, toque y mantenga presionado el cálculo para ser borrado y
toque en Borrar.
xSi usted desea borrar varios cálculos, presione la Tecla Menú B, toque en Borrar, toque en la
caja de verificación próxima a los cálculos para borrarlos y toque en Hecho en la parte superior
de la pantalla.
4 Toque en OK.
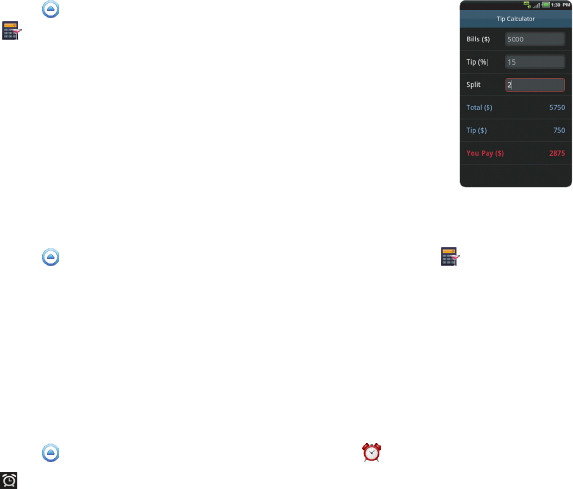
144
HERRAMIENTAS
CALCULADORA DE PROPINAS
CALCULO DE PROPINAS
1 Toque en Menú en la Pantalla de Inicio. Toque en Calculadora de
propina... .
2 Digite la cantidad de la boleta.
3 Digite el porcentaje de la Propina. Si usted desea dividir la propina,
digite el número de personas para División. Toque en J para borrar un
número. Toque y mantenga presionada la tecla J para borrar el número
entero.
4 Toque en Hecho. El valor calculado será exhibido abajo.
REINICIALIZACION DEL CALCULO
1 Toque en Menú en la Pantalla de Inicio. Toque en Calculadora de propina... .
2 Presione la Tecla Menú B y toque en Reiniciar.
ALARMA/RELOJ
Alarma/Reloj ayuda a ajustar la alarma y visualizar informaciones básicas en su región incluyendo
horario y clima.
ADICION DE NUEVAS ALARMAS
1 Toque en Menú en la Pantalla de Inicio. Toque en Reloj/Alarma .
2 Toque en y toque en Agregar alarma. Usted también puede presionar la Tecla Menú B ay toque
en Agregar alarma.

145
HERRAMIENTAS
3 Toque en la caja de verificación próxima para Activar alarma.
4 Para agregar una alarma:
xToque en Hora, ingrese la hora y los minutos y toque en Grabar.
xToque en Repetir, toque en la caja de verificación próxima a cada día para una semana y toque
en OK.
xToque en Campanilla y toque en una campanilla toque para la alarma. Usted puede escuchar
cada campanilla cuando lo toca.
xToque en la caja de verificación próxima a Vibrar si usted no desea que el Breakout™ para vibrar
al entrar en alarma. Este es el ajuste estándar.
xToque en Identificación, ingrese un nombre para la alarma y toque en OK.
5 Toque en Hecho. Una barra azul será exhibida debajo de la nueva alarma.
EDICION DE ALARMAS
1 Toque en Menú en la Pantalla de Inicio. Toque en Reloj/Alarma .
2 Toque en y toque en lo alarma para ser editada.
3 Toque en cada opción y cambie el ajuste.
4 Toque en Hecho.
DESACTIVACION DE ALARMAS
1 Toque en Menú en la Pantalla de Inicio. Toque en Reloj/Alarma .
2 Toque en y toque en de la alarma para desactivarla. Una barra azul indica que la alarma está
activado. El color desaparece cuando la alarma estuviera desactivada.
146
HERRAMIENTAS
BORRADO DE ALARMAS
1 Toque en Menú en la Pantalla de Inicio. Toque en Reloj/Alarma .
2 Toque en y toque en la alarma para borrar. Para borrar alarmas:
xSi usted desea borrar una alarma, toque en la alarma para ser borrado y toque en Borrar.
xSi usted desea borrar varias alarmas de una vez, presione la Tecla Menú B, toque en Borrar
Alarma, toque en la caja de verificación próxima a las alarmas para ser borradas y toque en
Hecho.
3 Toque en OK.
AJUSTES DE ALARMA
1 Toque en Menú en la Pantalla de Inicio. Toque en Reloj/Alarma y toque en .
2 Presione la Tecla Menú B y toque en Configuración.
3 Para ajustar las alarmas:
xToque en Alarma en el modo silencioso si usted desea reproducir la alarma aun cuando el
Breakout™ estuviera en el modo silencioso. Como ajuste estándar la caja de verificación será
seleccionada.
xToque en Volumen de alarma si usted desea ajustar el volumen, ajuste el volumen y toque en
OK.
xToque en Duración de siestecita si usted desea ajustar la duración de la siestecita, seleccione y
toque en la duración.
xToque en Efecto del botón del volumen si usted desea atribuir una acción del botón para la
tecla de volumen durante una alarma, seleccione y toque en una opción.
REPRODUCIR MUSICA EN EL RELOJ DE MESA
1 Toque en Menú en la Pantalla de Inicio. Toque en Reloj/Alarma .
2 Toque en y toque en los archivos de música para escucharlas.
147
HERRAMIENTAS
EXHIBICION DE LAS IMAGENES EN EL RELOJ DE MESA
1 Toque en Menú en la Pantalla de Inicio. Toque en Reloj/Alarma .
2 Toque en . Usted puede visualizar imágenes grabadas en el Breakout™.
AJUSTE DE LAS OPCIONES PARA DOCK
1 Toque en Menú en la Pantalla de Inicio. Toque en Reloj/Alarma .
2 Presione la Tecla Menú B y toque en Reloj de Mesa.
3 Presione la Tecla Menú B y toque en Ajustes del dock.
4 Toque en Audio y seleccione opciones para audio.
5 Toque en Sonido de inserción del dock si usted desea que el Breakout™ genere el sonido cuando
inserte o remueve el dispositivo del dock.
ADICION DE UN WIDGET RELOJ INTEGRADO
1 Toque y mantenga presionado el espacio vacío en la Pantalla de Inicio o presione la Tecla Menú B
en el modo inactivo y toque en Widget.
2 Toque en Pantech Widgets.
3 Toque y mantenga presionado Reloj Integrado en la parte inferior de la pantalla y posiciónelo en la
Pantalla de Inicio.
4 Seleccione un estilo. Usted puede visualizar la hora, eventos futuros de Calendario y informaciones
climáticas rápidamente.
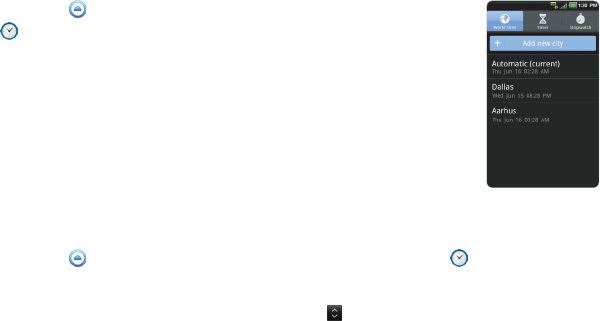
148
HERRAMIENTAS
HERRAMIENTAS DEL RELOJ
La función Herramientas de Reloj ofrece el horario actual en las ciudades importantes y zonas horarias
en el mundo. Como ajuste estándar el horario mundial es exhibido primeramente. Usted también
puede utilizar el timer y el cronometro.
VISUALIZACION DEL HORARIO MUNDIAL
1 Toque en Menú en la Pantalla de Inicio. Toque en Herramientas del
Reloj .
2 Toque en Agregar nueva ciudad y ingrese el nombre de una ciudad.
Digite la primera letra y la ciudad será encontrada fácilmente.
3 Seleccione y toque en la ciudad. El horario de la nueva ciudad agregada
será exhibida abajo del horario actual.
REPOSICIONAMIENTO DEL ORDEN DE LAS CIUDADES
1 Toque en Menú en la Pantalla de Inicio. Toque en Herramientas de Reloj .
2 Presione la Tecla Menú B y toque en Reposicionar.
3 Seleccione una ciudad para reposicionamiento y arrastre hacia arriba o hacia abajo para
reorganizar. Usted no puede mover la localización de la ciudad actual.
4 Toque en Hecho.
149
HERRAMIENTAS
BORRADO DE UNA CIUDAD
1 Toque en Menú en la Pantalla de Inicio. Toque en Herramientas de Reloj .
2 Para borrar ciudades:
xSi usted desea borrar una o más ciudades, presione la Tecla Menú B y toque en Borrar y toque
en la caja de verificación próxima a la ciudad.
xSi usted desea borrar todas las ciudades de una vez, presione la Tecla Menú B y toque en
Borrar, presione la Tecla Menú B y toque en Seleccionar Todas.
3 Toque en Hecho > Si.
ADICION DE UN WIDGET RELOJ
1 Toque y mantenga presionado un espacio vacío en la Pantalla de Inicio, o presione la Tecla Menú B
en el modo inactivo y toque en Widget.
2 Toque en Pantech Widgets.
3 Toque y mantenga presionado el Reloj en la parte inferior de la pantalla y posiciónelo en la Pantalla
de Inicio.
4 Seleccione un estilo.
5 Seleccione una ciudad para el reloj. Usted puede visualizar el horario de la ciudad en la pantalla.
6 Toque en el widget si usted cambiar la ciudad.
APLICACION DEL HORARIO DE VERANO
1 Toque en Menú en la Pantalla de Inicio. Toque en Herramientas de Reloj .
2 Presione la Tecla Menú B y toque en DST.
3 Toque en la caja de verificación próxima a la ciudad donde usted desea aplicar el horario de verano.
Usted puede agregar una hora o dos horas.
4 Toque en Hecho.
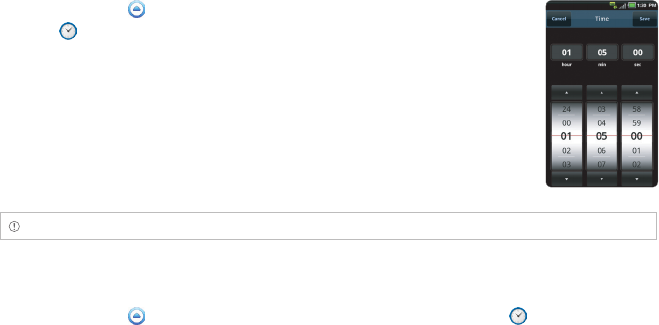
150
HERRAMIENTAS
UTILIZACION DEL TIMER
1 Toque en Menú en la Pantalla de Inicio. Toque en Herramientas de
Reloj .
2 Toque en Timer.
3 Presione la Tecla Menú B y toque en Confirmar para ajustar el horario.
4 Ajuste la hora, minutos y segundos y toque en Grabar.
5 Toque en Inicio. El timer será iniciado y emitirá un tono cuando la hora
marcada llegar aun cuando el modo vibración estuviera activado en el
Breakout™.
Nota Usted puede reinicializar el horario tocando en Reiniciar mientras el timer está en operación.
UTILIZACION DEL CRONOMETRO
1 Toque en Menú en la Pantalla de Inicio. Toque en Herramientas de Reloj .
2 Toque en Cronometro.
3 Para utilizar el cronometro:
xToque en Circuito en la parte superior de la pantalla y toque en Iniciar. Esta función es utilizada
cuando usted desea medir el tiempo necesario para recurrir una determinada distancia.
xToque en Circuito > Dividir en la parte superior de la pantalla y toque en Iniciar. Esta función es
utilizada cuando usted desea medir el tiempo acumulado. Usted puede dividirlo en hasta 100
tiempos.
4 Toque en Reiniciar para reiniciar el cronometro.

151
HERRAMIENTAS
CONVERTIDOR
El convertidor ayuda a convertir valores para medidas de extensión, volumen, peso, temperatura, área
y velocidad.
CONVERSION DE VALORES
1 Toque en Menú en la Pantalla de Inicio. Toque en Convertir .
2 Seleccione un tipo de unidad. Como ajuste estándar, la extensión es seleccionada. Cambie el tipo
de unidad tocando en O o P.
3 Toque en la caja abajo del tipo de unidad y ingrese un valor.
4 Seleccione la unidad original arrastrando el control circular en la parte intermediaria de la pantalla.
5 Seleccione una unidad objeto. El valor cambiado será exhibido inmediatamente abajo. Los valores
son redondeados para tres unidades decimales.
REINICIACION DE UNA CONVERSION
1 Toque en Menú en la Pantalla de Inicio. Toque en Convertir .
2 Presione la Tecla Menú B durante una conversión y toque en Reiniciar.
VISUALIZADOR DE DOCUMENTOS
Lea los documentos almacenados en una variedad de formatos en el Breakout™.
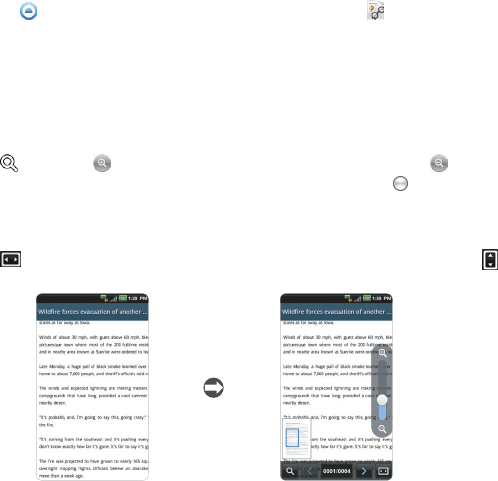
152
HERRAMIENTAS
LECTURA DE DOCUMENTOS
1 Toque en Menú en la Pantalla de Inicio. Toque en Visor de estación .
2 Seleccione y toque en una carpeta en la cual usted almaceno documentos.
3 Seleccione y toque en un documento para ser leído. Presione la Tecla Menú B y toque en Clasificar
si usted desea reposicionar los documentos clasificados en orden alfabético, tipo, fecha o tamaño.
4 Toque en cualquier punto en la pantalla mientras un documento está abierto.
5 Para leer un documento:
xToque en y toque en para aplicar el zoom de acercamiento o toque en para aplicar
el zoom de alejamiento en el modo paisaje. En el modo retrato, arrastre hacia abajo o hacia
arriba para aplicar el zoom de acercamiento o de alejamiento. Usted puede también aplicar
el zoom de acercamiento al pellizcar sus dedos separados o aplicar el zoom de alejamiento
pellizcando sus dedos juntos.
xToque en usted desea adecuar el documento a lo largo de la pantalla. O toque en si usted
desea adecuar el documento a la altura.
Visualización completa Selección de opciones
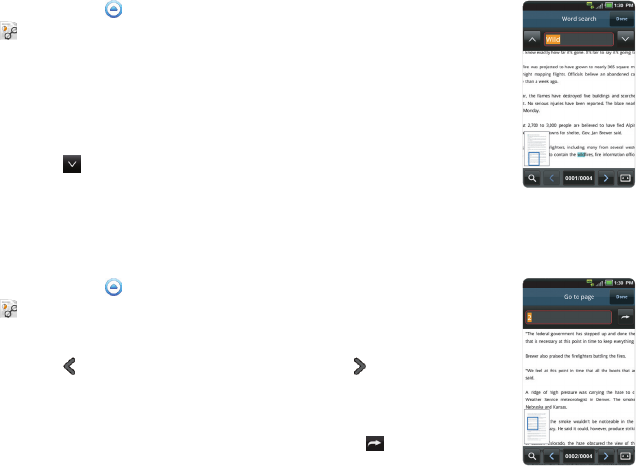
153
HERRAMIENTAS
BUSQUEDA DE PALABRAS EN UN DOCUMENTO
1 Toque en Menú en la Pantalla de Inicio. Toque en Visor de estación
.
2 Abra un documento.
3 Presione la Tecla Menú B y toque en Buscar palabra.
4 Ingrese una palabra para ser localizada y toque en Hecho en el teclado
virtual.
5 Toque en para visualizar la palabra seleccionada para localización en
la próxima frase o página.
6 Toque en Hecho si usted desea parar la búsqueda de la palabra.
PARA ACCEDER UNA PAGINA EN UN DOCUMENTO
1 Toque en Menú en la Pantalla de Inicio. Toque en Visor de estación
.
2 Abra un documento.
3 Toque en para acceder a la página anterior. Toque en para acceder a
la próxima página.
4 Presione la Tecla Menú B y toque en Vaya hacia la página.
5 Ingrese el número de la página a ser accedida y toque en .
ANOTACION MANUSCRITA
Escriba una anotación con el dedo o utilizando el teclado. Certifíquese de insertar una tarjeta microSD™
para utilizar la función conveniente.
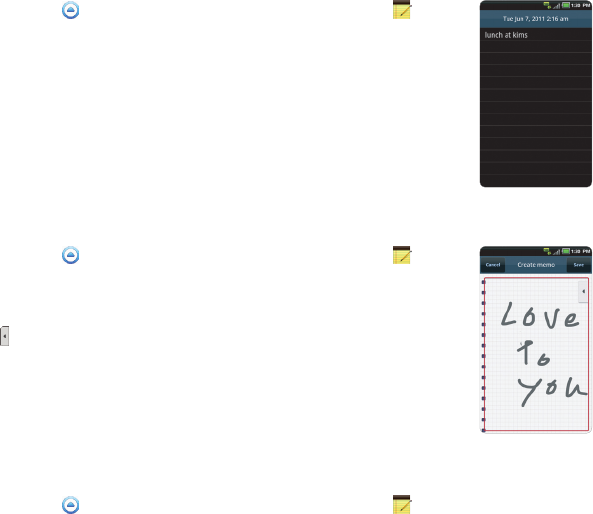
154
HERRAMIENTAS
PARA ESCRIBIR ANOTACIONES DE TEXTO
1 Toque en Menú en la Pantalla de Inicio. Toque en Memo manual .
2 Toque en Crear nueva > Anotación de texto. Si no hubiere
anotaciones grabadas en la tarjeta de memoria, la pantalla será exhibida
primeramente donde usted puede digitar una anotación de texto.
3 Digite el texto.
4 Toque en Grabar. La anotación será exhibida en una visualización
completa. Presione la Tecla Volver C si usted desea volver a la primera
pantalla de Anotación Manuscrita.
DIBUJO DE UNA ANOTACION MANUSCRITA
1 Toque en Menú en la Pantalla de Inicio. Toque en Memo manual .
2 Toque en Crear nueva > Anotación Manuscrita.
3 Escriba una anotación con el dedo.
4 Toque para seleccionar efectos.
5 Ajuste la espesura del lápiz y del borrador.
6 Toque en Grabar. La anotación será exhibida en pantalla completa.
Presione la Tecla Volver C si usted desea volver a la primera pantalla de
Anotación Manuscrita.
EDICION DE ANOTACIONES
1 Toque en Menú en la Pantalla de Inicio. Toque en Memo manual .
2 Antes de editar una anotación:
xSi usted desea editar una anotación sin verificarla en visualización completa, toque y mantenga
presionada la anotación para ser editada y toque en Editar.
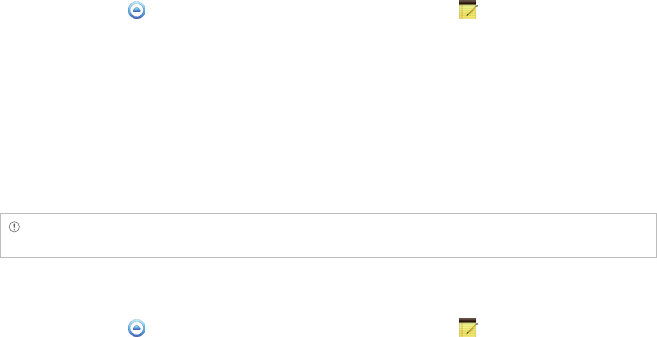
155
HERRAMIENTAS
xSi usted desea verificar una para ser en visualización completa antes de la edición, toque en el
título primero. enseguida, toque en la pantalla.
3 Edite la anotación y toque en Grabar.
COMPARTIDO DE ANOTACIONES
1 Toque en Menú en la Pantalla de Inicio. Toque en Memo manual .
2 Antes de compartir una anotación:
xSi usted desea enviar una anotación a sus amigos sin verificarla, toque y mantenga presionada la
anotación para ser compartida y toque en Compartir.
xSi usted desea verificar la anotación antes de enviarla a sus amigos, toque en el título, presione
la Tecla Menú B y toque en Compartir.
3 Toque en Bluetooth, Correo electronico, Gmail, Mensajeria, Media Net, Álbum En línea, Picasa o
V CAST Media Manager.
4 Siga los pasos necesarios para cada servicio.
Nota Si usted utiliza la Mensajeria, las anotaciones de texto serán enviados como SMS (Short Message Service)
y las anotaciones manuscritas serán enviadas como MMS (Multimedia Messaging Service).
CAMBIO DEL TIPO DE ANOTACION
1 Toque en Menú en la Pantalla de Inicio. Toque en Memo manual .
2 Toque en Crear nueva y toque en Anotación de texto o Anotación manuscrita.
3 Para cada opción:
xPresione la Tecla Menú B y toque en anotación manuscrita si usted desea escribir una
anotación manualmente.
xPresione la Tecla Menú B y toque en Anotación de texto si usted desea digitar una anotación.
4 Toque en OK para grabar la anotación durante su creación. Si usted no escribe o diseña cualquier
anotación, el tipo de anotación será cambiada instantáneamente.

156
HERRAMIENTAS
ADICION DE UN WIDGET DE ANOTACION
1 Toque y mantenga presionado el espacio vacío en la Pantalla de Inicio, o presione la Tecla Menú B
en el modo inactivo y toque en Widget.
2 Toque en Pantech Widgets.
3 Toque y mantenga presionada Anotación en la parte inferior de la pantalla y posiciónela en la
Pantalla de Inicio.
4 Seleccione un estilo. Acuérdese que el widget de anotación no será disponible si no hubiere
anotaciones grabadas en el Breakout™.
5 Toque en una anotación o anotaciones que serian exhibidas en la pantalla y toque en Hecho.
BORRADO DE ANOTACIONES
1 Toque en Menú en la Pantalla de Inicio. Toque en Memo manual .
2 Antes de borrar una anotación:
xSi usted desea borrar una anotación sin verificarla, toque y mantenga presionada la anotación
para ser borrada y toque en Borrar.
xSi usted desea verificar la anotación antes de borrarla, toque en el título, presione la Tecla Menú
B y toque en Borrar.
xSi usted desea borrar varias anotaciones de una vez, presione la Tecla Menú B y toque en
Borrar, toque en la caja de verificación próxima a las anotaciones para ser borradas y toque en
Hecho. Si usted desea todas las anotaciones, presione la Tecla Menú B y toque en Seleccionar
Todas y toque en Hecho.
3 Toque en OK.

157
HERRAMIENTAS
GRABADORA
GRABACION DE SU VOZ
1 Toque en Menú en la Pantalla de Inicio. Toque en Grabadora .
2 Toque en para iniciar la grabación de su voz.
3 Toque en para parar la grabación de su voz.
Nota Una vez que usted tenga grabado una anotación de voz, la pantalla de reproducción será exhibida. Toque
en para reproducir la anotación de voz grabada. Presione la Tecla Volver C si usted desea grabar una nueva
anotación de voz.
PARA ESCUCHAR LAS VOCES GRABADAS
1 Toque en Menú en la Pantalla de Inicio. Toque en Grabadora .
2 Presione la Tecla Menú B y toque en Lista.
3 Toque y mantenga presionada una anotación para ser escuchada y toque en Reproducir.
4 Toque en . Si usted desea volver a la lista, presione la Tecla Volver C, o presione la Tecla Menú B
y toque en Lista.
COMPARTIDO DE NOTAS DE VOZ
1 Toque en Menú en la Pantalla de Inicio. Toque en Grabadora .
2 Presione la Tecla Menú B y toque en Lista.
3 Antes de enviar las notas a sus amigos:
xSi usted desea enviar una anotación, toque y mantenga presionada una anotación para ser
compartida y toque en Compartir.
158
HERRAMIENTAS
xSi usted desea enviar varias anotaciones, presione la Tecla Menú B, toque en Compartir,
seleccione la caja de verificación próxima a las anotaciones para ser compartidas y toque en
Hecho.
4 Toque en Bluetooth, Correo electronico, Gmail, Mensajeria, Media Net, o V CAST Media Manager
y realice los pasos necesarios.
RENOMBRADO DE ANOTACIONES
1 Toque en Menú en la Pantalla de Inicio. Toque en Grabadora .
2 Presione la Tecla Menú B y toque en Lista.
3 Toque y mantenga presionada una nota para ser renombrada y toque en Renombrar.
4 Cambie el nombre de la anotación y toque en Grabar.
AJUSTE DE UNA ANOTACION COMO CAMPANILLA
1 Toque en Menú en la Pantalla de Inicio. Toque en Grabadora .
2 Presione la Tecla Menú B y toque en Lista.
3 Toque y mantenga presionada una anotación para ser utilizada como campanilla y toque en Definir
como Campanilla.
BORRADO DE ANOTACIONES DE VOZ
1 Toque en Menú en la Pantalla de Inicio. Toque en Grabadora .
2 Presione la Tecla Menú B y toque en Lista.
3 Antes de borrar anotaciones de voz:
xSi usted desea borrar una anotación, toque y mantenga presionada una anotación para ser
borrada y toque en Borrar > OK.

159
HERRAMIENTAS
xSi usted desea borrar varias anotaciones, presione la Tecla B, toque en Borrar, seleccione la caja
de verificación próxima a las anotaciones para ser borradas y toque en Hecho.
4 Toque en OK.
CLIMA
CREACION DE LA LISTA DE CIUDADES
1 Toque en Menú en la Pantalla de Inicio. Toque en Clima .
2 Toque en Agregar nueva ciudad.
3 Digite el nombre de la ciudad deseada, o pase la pantalla hacia arriba
mientras usted digita y toque en una ciudad. Las informaciones
climáticas de la ciudad serán exhibidas en la lista. Usted puede agregar
hasta 15 ciudades a la lista.
VISUALIZACION DE LAS INFORMACIONES SOBRE EL CLIMA
1 Toque en Menú en la Pantalla de Inicio. Toque en Clima .
2 Seleccione y toque en una ciudad en la lista que desea visualizar.
3 Si usted desea mayores informaciones:
xToque en Actualizar si usted desea visualizar las informaciones meteorológicas actuales.
xPresione la Tecla Menú B y toque en Previsión y usted podrá visualizar la previsión
meteorológica para los próximos cinco días incluyendo el día actual.

160
HERRAMIENTAS
Clima actual Previsión meteorológica
CAMBIO DE LA UNIDAD DE TEMPERATURA
1 Toque en Menú en la Pantalla de Inicio. Toque en Clima .
2 Presione la Tecla Menú B y toque en Configuración.
3 Toque en O o P. La temperatura será cambiada de grados Fahrenheit para grados Celsius.
4 Presione la Tecla Volver C cuando finalice el cambio de la unidad.
REPOSICIONAMIENTO DEL ORDEN DE LAS CIUDADES
1 Toque en Menú en la Pantalla de Inicio. Toque en Clima .
2 Presione la Tecla Menú B y toque en Reposicionar.
3 Arrastre para próximo de la ciudad para ser movida hacia arriba o hacia abajo.
4 Toque en Grabar.

161
HERRAMIENTAS
BORRADO DE UNA CIUDAD
1 Toque en Menú en la Pantalla de Inicio. Toque en Clima .
2 Presione la Tecla Menú B y toque en Borrar.
3 Toque en K próximo a la ciudad para ser borrada. Si usted desea borrar todas las ciudades, presione
la Tecla Menú B y toque en Seleccionar todas.
4 Toque en Hecho.
5 Toque en OK.
ADICION DE UN WIDGET DE CLIMA
1 Toque y mantenga presionado un espacio vacío en la Pantalla de Inicio, o presione la Tecla Menú B
en el modo inactivo y toque en Widget.
2 Toque en Pantech Widgets.
3 Toque y mantenga presionada Clima en la parte inferior de la pantalla y posiciónela en la Pantalla
de Inicio.
4 Seleccione un estilo. Recuérdese que ninguna información será exhibida si usted no hubiera
ajustado ciudades para el Clima.

10. STORAGE
ADMINISTRACION DE LA TARJETA DE MEMORIA
CONEXION A UNA PC
UTILIZACION DEL Breakout™ COMO DISPOSITIVO DE ALMACENAMIENTO EN LOTES
TRANSFERENCIA DE ARCHIVOS A TRAVES DEL WINDOWS MEDIA SYNC
10
ALMACENAMIENTO
Este capítulo suministra informaciones importantes sobre
el uso del Breakout™ incluyendo:
163
ALMACENAMIENTO
ADMINISTRACION DE LA TARJETA DE MEMORIA
Administre la tarjeta microSD™ cuidadosamente. Si usted no sigue los pasos descritos abajo para
administrar la tarjeta de memoria, podrá provocar graves daños a la tarjeta.
VISUALIZACION DE LA MEMORIA DISPONIBLE
1 Toque en Menú en la Pantalla de Inicio. Toque en Ajustes .
2 Toque en Almacenamiento.
3 Pase la pantalla y verifique el estado de la tarjeta SD y la capacidad de almacenamiento interno del
teléfono.
DESMONTAJE DE LA TARJETA SD
1 Toque en Menú en la Pantalla de Inicio. Toque en Ajustes .
2 Toque en Almacenamiento > Desmontar tarjeta SD.
3 Lea la advertencia sobre desmontaje de la tarjeta SD y toque en OK.
4 Toque y mantenga presionada la Tecla Encender-Apagar /Bloqueo F E.
5 Toque en Apagar > OK.
6 Abra la tapa trasera.
7 Remueva la batería.
8 Ahora usted puede remover la tarjeta SD con seguridad.
Nota Si usted desea montar la tarjeta SD, toque en Aplicaciones > Ajustes > Almacenamiento > Montaje de
Tarjeta SD.
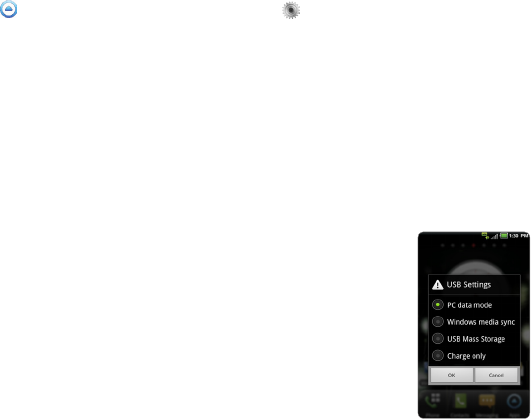
164
ALMACENAMIENTO
BORRADO DE LA TARJETA microSD™
1 Toque en Menú en la Pantalla de Inicio. Toque en Ajustes .
2 Toque en Almacenamiento > Desmontaje de la tarjeta SD > OK.
3 Toque en Borrar tarjeta SD > Borrar Tarjeta SD > Borrar todo. Todos los datos almacenados en la
tarjeta serán borrados.
CONEXION A UNA PC
Sincronice los archivos y cambie datos con una computadora utilizando el cable de datos para la PC.
Recuérdese que usted no puede transferir archivos de media si usted activar el modo de depuración
USB (Aplicaciones > Ajustes > Aplicaciones > Desarrollo > Depuración USB).
SELECCION DEL MODO USB
1 Conecte el cable USB al Breakout™.
2 Conecte la otra extremidad del cable a su computadora.
3 Seleccione y toque en un modo USB de acuerdo con sus finalidades:
xToque en Modo de datos de la PC > Aceptar si usted desea
transferir archivos entre el Breakout™ y la PC cuando los dos equipos
estuvieren conectados. Usted también puede utilizar su Breakout™
como un PC cuando el modo Datos de la PC estuviera activado.
xToque en Sincronización de Windows media > Aceptar si usted
desea transferir archivos de media entre el Breakout™ y su PC.
xToque en Almacenamiento masivo USB > Aceptar si usted desea
grabar archivos en lotes en el Breakout™. El modo Almacenamiento
en Lotes USB no será exhibido si no hubiere tarjeta de memoria
insertada en el Breakout™. Como ajuste estándar este modo es
seleccionado.
xToque en Solamente carga > Aceptar si usted desea solamente
conectar el cable USB para cargar el Breakout™. Recuérdese que el
Breakout™ continua siendo cargado desde que esté conectado a la
PC a través del cable, aunque usted no haya seleccionado el modo
Solamente cargar.

165
ALMACENAMIENTO
Nota Si usted no desea más visualizar la ventana, seleccione la caja de verificación antes de No Preguntar al
Conectar y toque en OK.
CAMBIO DEL MODO USB EN LA BARRA DE ESTADO
1 Conecte el Breakout™ a su PC utilizando el cable USB.
2 Toque en la parte superior de la pantalla y arrastre la barra de estado hacia abajo.
3 Toque en Ajustes de USB y toque en un modo USB para sus finalidades y toque en OK.
UTILIZACION DEL Breakout™ COMO DISPOSITIVO DE
ALMACENAMIENTO EN LOTES
Copie los archivos entre su computadora y la tarjeta microSD™ en el Breakout™. Si usted activar la
función de almacenamiento USB, algunos de las aplicaciones utilizadas actualmente (Anotación
Manuscrita, Grabadora, Música, Cámara, Visualizador de Documentos, etc.) pueden ser interrumpidas o
no disponibles hasta que la función de almacenamiento USB sea desactivada.
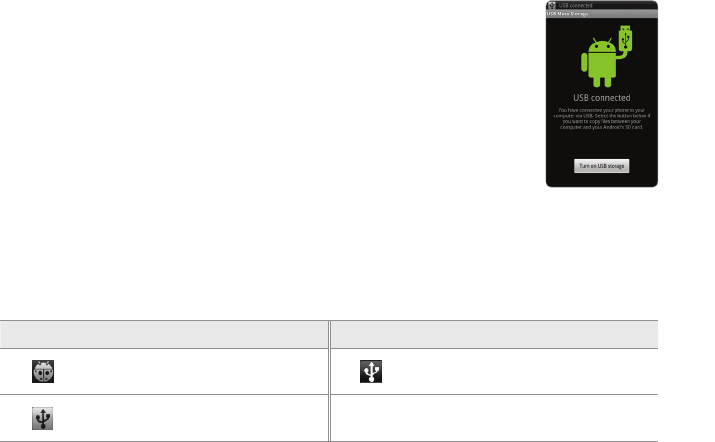
166
ALMACENAMIENTO
COPIA DE ARCHIVOS
1 Ajuste el modo USB para almacenamiento en lotes.
2 Toque en la parte superior de la pantalla, arrastre la barra de estado
hacia abajo y toque en Ajustes USB > Activar el almacenamiento USB
> Aceptar. Una ventana será exhibida exhibiendo lo que está grabado
en el Breakout™. Estos pasos serán exhibidos solamente cuando usted
hubiere seleccionado el modo de almacenamiento en lotes USB.
3 Seleccione y copie los archivos para ser transferidos entre el Breakout™
y su PC.
4 Pegue los archivos en su PC o Breakout™. El estado de los archivos
transferidos será exhibido en la barra de estado.
5 Toque en Desactivar el almacenamiento USB en la barra de estado
si usted desea desactivar la función y toque en Desactivar el
almacenamiento USB.
ICONOS DEL MODO USB
Icono Descripción Icono Descripción
Depuración USB conectada Switch USB conectado: Cambie el
modo USB
USB conectado: Active/desactive el
modo de almacenamiento USB
TRANSFERENCIA DE ARCHIVOS A TRAVES DEL WINDOW MEDIA SYNC
1 Ajuste el modo USB para Window Media Sync. Una ventana será exhibida para exhibir el contenido
grabado en el Breakout™.
2 Seleccione y copie archivos para ser transferidos entre el Breakout™ y su PC.

11. AJUSTES
INALAMBRICOS Y REDES
AJUSTES DE LLAMADAS
SONIDO
EXHIBICION
LOCALIZACION Y SEGURIDAD
APLICACIONES
CUENTAS Y SINCRONIZACION
PRIVACIDAD
ALMACENAMIENTO
IDIOMA Y TECLADO
ENTRADA Y SALIDA DE VOZ
ACCESIBILIDAD
FECHA Y HORA
SOBRE EL TELEFONO
11
AJUSTES
Este capítulo suministra informaciones importantes sobre las opciones de ajuste para
utilización del Breakout™ incluyendo:

168
AJUSTES
INALAMBRICOS Y REDES
AJUSTE DEL MODO AVION
1 Toque en Aplicaciones > Ajustes > Inalámbricos y redes > Modo Avión. Si usted activar el modo
Avión, las funciones Wi-Fi, Bluetooth y Datos serán desactivadas al mismo tiempo. Sin embargo,
usted podrá activar cada función de acuerdo con su preferencia.
2 Toque en Modo Avión nuevamente para reactivar otras funciones. Sin embargo la función Datos
no será reactivada automáticamente al contrario de las funciones Wi-Fi y Bluetooth.
AJUSTE DE LAS REDES MOVILES
1 Toque en Aplicaciones > Ajustes > Inalámbricos y redes.
2 Toque en Redes móviles para administrar la red móvil.
AJUSTE DE LA CONEXION DE BANDA ANCHA MOVIL
1 Toque en Aplicaciones > Ajustes > Inalámbricos y redes > Conexión de Banda Ancha Móvil.
2 Toque en Conexión de Banda Ancha Móvil para compartir la conexión a la Internet de su teléfono
con su computadora vía USB.
3 Toque en Activar para activar la tecnología.
AJUSTE DEL HOTSPOT MOVIL
1 Toque en Aplicaciones > Ajustes > Inalámbricos y redes > Hotspot Móvil.
169
AJUSTES
2 Toque en Hotspot Móvil para compartir la conexión a la Internet de su teléfono como un punto de
acceso inalámbrico.
3 Toque en Activar para activar la tecnología. Refiérase a la página 114 para mayores informaciones.
AJUSTE DE LAS REDES Wi-Fi
1 Toque en Aplicaciones > Ajustes > Inalámbricos y redes.
2 Toque en Ajustes Wi-Fi para administrar la red inalámbrica.
AJUSTES Bluetooth
1 Toque en Aplicaciones > Ajustes > Inalámbricos y redes.
2 Toque en Ajustes de Bluetooth para administrar la opción de la tecnología inalámbrica.
CONFIGURACION DE LOS AJUSTES VPN
1 Toque en Aplicaciones > Ajustes > Inalámbricos y redes > Ajustes VPN > Agregar VPN.
2 Toque en Agregar PPTP VPN, Agregar L2TP VPN, Agregar L2TP/IPSec PSK VPN o Agregar L2TP/
IPSec CRT VPN.
3 Configure la red insertando las informaciones necesarias.
170
AJUSTES
AJUSTES DE LLAMADAS
AJUSTE DEL SERVICIO DE CORREO DE VOZ
1 Toque en Aplicaciones > Ajustes > Ajustes de llamadas > Servicio de correo de voz.
2 Toque en Mi portadora.
CONFIGURACION DE LOS AJUSTES DE CORREO DE VOZ
1 Toque en Aplicaciones > Ajustes > Ajustes de llamadas > Ajustes de Correo de Voz.
2 Toque en Número del correo de voz.
3 Ingrese el número del correo de voz y toque en OK.
AJUSTE DE CONTESTAR AUTOMATICO
1 Toque en Aplicaciones > Ajustes > Ajustes de llamadas > Contestar Automático.
AJUSTE DEL MARCADO ASISTIDO
1 Toque en Aplicaciones > Ajustes > Ajustes de llamadas > Marcado asistido.
2 Toque en Estado de marcado asistido.
3 Toque en País de referencia, seleccione y toque en un país.
AJUSTE DE REMARCADO AUTOMATICO
1 Toque en Aplicaciones > Ajustes > Ajustes de llamadas > Remarcado automático.
2 Seleccione y toque en el número de veces de remarcado automático.
171
AJUSTES
AJUSTE DEL MODO TTY
1 Toque en Aplicaciones > Ajustes > Ajustes de llamadas > Modo TTY.
2 Toque en Desactivar TTY, TTY Full, TTY HCO o TTY VCO.
AJUSTE DE LOS TONOS DTMF
1 Toque en Aplicaciones > Ajustes > Ajustes de llamadas > Tonos DTMF.
2 Toque en Normal o Largo.
AJUSTE DE LA PRIVACIDAD DE VOZ
1 Toque en Aplicaciones > Ajustes > Ajustes de llamadas > Privacidad de Voz.
AJUSTE DEL TECLADO DE MARCADO
1 Toque en Aplicaciones > Ajustes > Ajustes de llamadas > Exhibir teclado de marcado.
2 Toque en Número de servicio, Número de teléfono personalizado o Todas las llamadas.
3 Toque en Número personalizado insertado, digite el número de teléfono personalizado y toque
en OK.
SONIDO
AJUSTE DEL MODO SILENCIOSO
1 Toque en Aplicaciones > Ajustes > Sonido > Modo silencioso. Todas las otras funciones excepto el
volumen de la media y alarmas serán silenciadas si usted selecciona esta opción.
2 Toque en Modo silencioso nuevamente para activar todas las funciones.
172
AJUSTES
AJUSTE PARA VIBRACION
1 Toque en Aplicaciones > Ajustes > Sonido > Vibración.
2 Toque en Siempre, Nunca, Solamente en el modo silencioso o Solamente cuando no estuviera
en el modo silencioso.
AJUSTE DEL VOLUMEN
1 Toque en Aplicaciones > Ajustes > Sonido > Volumen. Certifíquese de cancelar la selección del
modo Silencioso.
2 Ajuste el volumen para la campanilla, media y alarma. Toque en Utilizar volumen de llamada
recibida para notificaciones si usted desea utilizar esta función. En caso contrario, cancele la
selección y ajuste el volumen para notificaciones.
3 Toque en OK.
AJUSTE DE LA CAMPANILLA DEL TELEFONO
1 Toque en Aplicaciones > Ajustes > Sonido > Campanilla del teléfono.
2 Seleccione y toque en una campanilla en la lista.
3 Toque en OK.
AJUSTE DE LA CAMPANILLA DE NOTIFICACION
1 Toque en Aplicaciones > Ajustes > Sonido > Campanilla de Notificación.
2 Seleccione y toque en una campanilla para notificaciones.
3 Toque en OK.
173
AJUSTES
AJUSTE DE LAS OPCIONES DE FEEDBACK
1 Toque en Aplicaciones > Ajustes > Sonido.
2 Toque en Campanillas audibles si usted desea reproducir tonos cuando utilice el teclado de
marcado. El ajuste estándar es la reproducción de los tonos.
3 Toque en Selección audible si usted desea reproducir el sonido cuando realice una selección en la
pantalla. Este es el ajuste estándar.
4 Toque en Sonidos de bloqueo de la pantalla si usted desea reproducir el sonido cuando bloquea y
desbloquea la pantalla.
5 Toque en Haptic feedback si usted desea que el Breakout™ vibre cuando usted presione teclas de
función. Este es el ajuste estándar.
AJUSTE DEL TONO DE EMERGENCIA
1 Toque en Aplicaciones > Ajustes > Sonido > Tono de Emergencia.
2 Toque en Desactivar, Alertar o Vibrar.
AJUSTE DEL SONIDO DE ROAMING
1 Toque en Aplicaciones > Ajustes > Sonido > Sonido de Roaming si usted desea ser alertado por
el sonido cuando estuviera en una llamada roaming.
EXHIBICION
AJUSTE DEL BRILLO
1 Toque en Aplicaciones > Ajustes > Exhibición > Brillo.
2 Arrastre la barra vertical hacia la derecha para aumentar el brillo. Arrástrela hacia la izquierda para
reducir el brillo.
174
AJUSTES
3 Toque en Brillo automático si usted desea dejar el brillo ajustado automáticamente.
4 Toque en OK.
AJUSTE DE LA PANTALLA AUTOROTATIVA
1 Toque en Aplicaciones > Ajustes > Exhibición > Pantalla auto-rotativa si usted desea que
la pantalla gire automáticamente cuando usted mueve el Breakout™ horizontalmente o
verticalmente.
AJUSTES DE LAS OPCIONES DE ANIMACION
1 Toque en Aplicaciones > Ajustes > Exhibición > Animación.
2 Toque en Ninguna animación, Algunas animaciones o Todas las animaciones.
AJUSTE DEL LIMITE DE TIEMPO DE LA PANTALLA
1 Toque en Aplicaciones > Ajustes > Exhibición > Límite de tiempo de la pantalla.
2 Seleccione y toque en el intervalo de tiempo para desactivación de la pantalla.
AJUSTE DEL BANNER DE ROAMING
1 Toque en Aplicaciones > Ajustes > Exhibición > Banner de Roaming si usted desea una alerta
visual cuando su teléfono estuviera en roaming.

175
AJUSTES
LOCALIZACION Y SEGURIDAD
AJUSTE DE LOS SERVICIOS DE LOCALIZACION VERIZON
1 Toque en Aplicaciones > Ajustes > Localización y seguridad > Servicios de Localización VZW.
2 Toque en Estoy de acuerdo.
AJUSTES DE LOS SERVICIOS DE GPS INDEPENDIENTES
1 Toque en Aplicaciones > Ajustes > Localización y seguridad > Servicios de GPS Independientes.
2 Toque en Estoy de acuerdo.
AJUSTE DE LOS SERVICIOS DE LOCALIZACION Google
1 Toque en Aplicaciones > Ajustes > Localización y seguridad > Servicios de Localización Google.
2 Toque en Estoy de acuerdo.
AJUSTE DEL BLOQUEO DE LA PANTALLA CON UNA CLAVE PATRÓN
1 Toque en Aplicaciones > Ajustes > Localización y seguridad > Configuración de bloqueo de la
pantalla > Patrón.
2 Lea la página “Protegiendo su teléfono” y toque en Próximo.
3 Verifique el modo de configuración patrón y toque en Próximo.
Nota Los pasos 2 y 3 son exhibidos solamente cuando usted configura el bloqueo patrón por primera vez.
4 Arrastre el patrón en la pantalla y toque en Seguir. Certifíquese de conectar el estándar con por lo
menos, cuatro puntos. Toque en Reintentar y diseñe otro patrón si desea configurar.
5 Toque en Seguir.
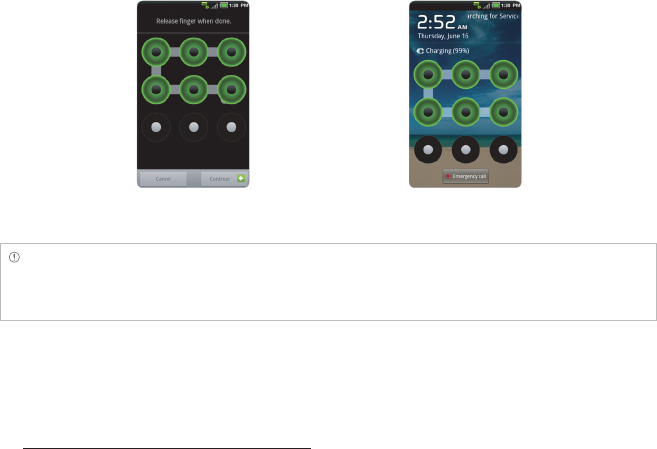
176
AJUSTES
6 Arrastre el patrón nuevamente y toque en Confirmar. Si usted desea visualizar su patrón a la
medida que diseña, toque en Utilizar patrón visible.
Definición de bloqueo Desbloqueo patrón
Nota Si usted no arrastra el patrón correcto para desbloquear la pantalla por cinco veces consecutivas, deberá
aguardar 30 segundos antes de intentar nuevamente. Si usted olvida el bloqueo patrón, toque en Olvide el
patrón, ingrese el nombre de su cuenta y la contraseña Google y cree un nuevo bloqueo patrón. Sin embargo,
la opción Olvide el patrón no será exhibida si usted no tuviera cuenta en el Google para su teléfono Breakout™.
USTED OLVIDO SU CONTRASEÑA DE LA CUENTA Google?
Si usted olvido la contraseña de su cuenta Google, reinicie en el sitio web Google.
1 Abra su navegador de Internet en su computadora y ingrese a
https://www.google.com/accounts/recovery.
2 Ingrese la dirección de e-mail o el nombre de usuario que usted utilizo para inscribir su cuenta
Google y pulse en Presentar.
3 Ingrese los caracteres exhibidos en la pantalla y pulse en Seguir.
4 Seleccione una opción sobre la recuperación de su cuenta y pulse en Seguir.

177
AJUSTES
5 Realice los pasos necesarios para cada opción:
xIngrese la respuesta para las preguntas de seguridad si usted hubiera seleccionado la opción
Responder pregunta de seguridad. Esta opción no será suministrada si usted se hubiere
suscrito a su cuenta Google dentro de los últimos cinco días.
xVerifique su cuenta de e-mail suministrada cuando usted creo su Cuenta Google y siga las
instrucciones si hubiera seleccionado E-mail para ••••••@***.
xRellene el formulario en Ayuda para Cuentas Google si usted hubiera seleccionado No tengo
más acceso a estos datos y pulse en Presentar en la parte inferior de la ventana.
Nota No seleccione Mensaje de texto para •••••••••••30: Usted no puede recibir un código para reiniciación de su
contraseña en su teléfono celular.
AJUSTE DEL BLOQUEO DE LA PANTALLA CON UNA CONTRASEÑA
1 Toque en Aplicaciones > Ajustes > Localización y seguridad > Configuración de bloqueo de la
pantalla > Contraseña.
2 Ingrese su contraseña y toque en Seguir. La contraseña deberá contener por lo menos 4 caracteres.
3 Ingrese la contraseña nuevamente para confirmar.
4 Toque en OK. Si usted desea activar la vibración a la medida que toca en su contraseña, toque en
Utilizar feedback táctil.
Nota Toque en Aplicaciones > Ajustes > Localización y seguridad > Contraseñas visibles si desea visualizar la
contraseña a la medida que digita.

178
AJUSTES
AJUSTE DEL BLOQUEO DE LA PANTALLA CON UN CODIGO PIN
1 Toque en Aplicaciones > Ajustes > Localización y seguridad > Configuración de bloqueo de la
pantalla > PIN.
2 Ingrese los números como código PIN y toque en Seguir. El código PIN debe contener por lo
menos 4 caracteres.
3 Ingrese los números nuevamente para confirmar.
4 Toque en OK. Si usted desea definir vibración como toque en su código PIN, toque en Utilizar
feedback táctil.
Nota Toque en Aplicaciones > Ajustes > Localización y seguridad > Configuración de bloqueo de la pantalla
> Ninguno si usted no desea configurar un proceso adicional para desbloquear la pantalla.
AJUSTE DEL INTERVALO DE TIEMPO PARA BLOQUEO
1 Toque en Aplicaciones > Ajustes > Localización y seguridad > Bloquear teléfono después.
2 Seleccione y toque en el intervalo de tiempo deseado.
AJUSTE DEL BLOQUEO DE LA TARJETA SIM
1 Toque en Aplicaciones > Ajustes > Localización y seguridad > Configuración del bloqueo de la
tarjeta SIM.
2 Toque en Bloquear tarjeta SIM y ingrese el código PIN SIM si usted desea que sea exigido el código
PIN para que el teléfono sea utilizado.
3 Toque en Cambiar PIN SIM y ingrese el código PIN SIM antiguo y un nuevo código PIN SIM si usted
desea cambiar el código PIN SIM.
179
AJUSTES
AJUSTE DE LA CONTRASEÑA DE ALMACENAMIENTO DE CREDENCIAL
1 Toque en Aplicaciones > Ajustes > Localización y seguridad > Definir contraseña.
2 Ingrese una nueva contraseña dos veces para confirmar.
3 Toque en OK.
APLICACIONES
INSTALACION DE APLICACIONES DESCONOCIDAS
1 Toque en Aplicaciones > Ajustes > Aplicaciones.
2 Toque en Fuentes desconocidas si desea permitir que aplicaciones que no sean Android Market
sean instaladas en su teléfono Breakout™.
ADMINISTRACION DE APLICACIONES
1 Toque en Aplicaciones > Ajustes > Aplicaciones > Administración de aplicaciones >
Descargados.
2 Toque en una aplicación y toque en Parada forzada si usted desea parar la operación de forma
forzada. Toque en Desinstalar si usted desea desinstalar la aplicación.
3 Toque en Ejecución en la parte superior de la pantalla y toque en una aplicación para administrar
su operación.
180
AJUSTES
VISUALIZACION DE LA EJECUCION DE SERVICIOS Y APLICACIONES
1 Toque en Aplicaciones > Ajustes > Aplicaciones > Ejecución de servicios.
2 Toque en un servicio o en una aplicación para interrumpir su operación o editar sus opciones.
3 Toque en Parar si usted desea parar su operación.
VERIFICACION DEL MODO DE USO DE LA FUNCION DE ALMACENAMIENTO
1 Toque en Aplicaciones > Ajustes > Aplicaciones.
2 Toque en Uso de almacenamiento.
3 Toque en Todos en la parte superior de la pantalla si usted desea visualizar todas las aplicaciones.
DEPURACION DEL DISPOSITIVO USB
1 Toque en Aplicaciones > Ajustes > Aplicaciones > Desarrollo.
2 Toque en Depuración del dispositivo USB para permitir el modo de depuración cuando el cabo
USB estuviere conectado.
3 Lea y toque en OK en la página de informaciones sobre depuración del dispositivo USB.
MANTENIMIENTO DE LAS CONDICIONES PERMANENTES
1 Toque en Aplicaciones > Ajustes > Aplicaciones > Desarrollo.
2 Toque en Permanecer activo para mantener el Breakout™ activo mientras está siendo cargado.
181
AJUSTES
PERMISO DE SIMULACION DE LOCALES
1 Toque en Aplicaciones > Ajustes > Aplicaciones > Desarrollo.
2 Toque en Permitir simulación de locales si usted pretende estar en otro lugar para fines de
desarrollo.
CUENTAS Y SINCRONIZACION
ADMINISTRACION DE DATOS EN EL PLAN DE FONDO
1 Toque en Aplicaciones > Ajustes > Cuentas y sincronización.
2 Toque en Datos en el plan de fondo si usted desea sincronizar, enviar y recibir datos en cualquier
momento.
PERMISO PARA SINCRONIZACION AUTOMATICA DE DATOS EN EL PLAN DE FONDO
1 Toque en Aplicaciones > Ajustes > Cuentas y sincronización.
2 Toque en Sincronización automática si usted desea sincronizar datos automáticamente.
OPERACION DEL ASISTENTE DE BACKUP
1 Toque en Aplicaciones > Ajustes > Cuentas y sincronización.
2 Toque en Asistente de Backup.
182
AJUSTES
PRIVACIDAD
BACKUP DE DATOS
1 Toque en Aplicaciones > Ajustes > Privacidad.
2 Toque en Generar backup de mis datos si usted desea generar backup de sus datos.
3 Toque en Recuperación automática si usted desea recuperar los datos de backup para una
aplicación.
REINICIACION DEL Breakout™
1 Toque en Aplicaciones > Ajustes > Privacidad.
2 Toque en Reiniciación de los datos para los ajustes de fábrica si usted desea borrar todos los
dados del teléfono.
3 Toque en Reiniciar el teléfono.
4 Toque en Borrar todo.
ALMACENAMIENTO
VISUALIZACION DEL ESTADO DEL ESPACIO DISPONIBLE
1 Toque en Aplicaciones > Ajustes > Almacenamiento. El estado de espacio disponible para el
Breakout™ será exhibido.

183
AJUSTES
BORRADO DE LA TARJETA microSD™
1 Toque en Menú en la Pantalla de Inicio. Toque en Ajustes .
2 Toque en Almacenamiento > Desmontar tarjeta SD > OK.
3 Toque en Borrar tarjeta SD > Borrar tarjeta SD > Borrar todo. Todos los datos almacenados en la
tarjeta serán borrados.
IDIOMA Y TECLADO
SELECCION DEL IDIOMA
1 Toque en Aplicaciones > Ajustes > Idioma y Teclado > Seleccionar Idioma.
2 Seleccione y toque en un idioma para ser utilizado para el Breakout™.
AJUSTE DEL TECLADO ANDROID
1 Toque en Aplicaciones > Ajustes > Idioma y teclado > Teclado Android.
2 Toque en Vibrar al presionar teclas si usted desea que el Breakout™ vibre cuando toca las teclas en
el teclado virtual.
ENTRADA Y SALIDA DE VOZ
AJUSTE DE LAS OPCIONES DE ENTRADA
1 Toque en Aplicaciones > Ajustes > Entrada y salida de voz > Ajustes de reconocimiento de voz.
2 Toque en Idioma, seleccione y toque en un idioma que será utilizado para insertar el idioma.
3 Toque en Búsqueda segura y toque en Desactivada, Moderada o Restringida para filtro de idioma
de inserción.
184
AJUSTES
4 Toque en Bloquear palabras ofensivas si usted desea ocultar resultados de voz ofensivos
reconocidos. Este es el ajuste estándar.
AJUSTE DE LAS OPCIONES DE SALIDA
1 Toque en Aplicaciones > Ajustes > Entrada y salida de voz > Ajustes de texto-para-voz.
2 Toque en Instalar datos de voz necesarios para síntesis de hablar.
3 Seleccione y toque en una aplicación relacionada en Android Market y instálelo. Cuando usted
hubiere descargado datos de voz de Android Market, la instalación de datos de voz no será
disponible.
4 Toque en Escuchar un ejemplo si desea verificar un ejemplo.
5 Toque en Siempre utilizar mis ajustes si usted desea configurar sus ajustes como estándar para el
Breakout™.
6 Toque en Velocidad de hablar y seleccione y toque en una opción.
7 Toque en Idioma, seleccione y toque en un idioma.
ACCESIBILIDAD
AJUSTE DE LA OPCION DE ACCESIBILIDAD
1 Toque en Aplicaciones > Ajustes > Accesibilidad.
2 Toque en Cancelar cuando un mensaje pop-up solicita la instalación del lector de pantalla.
3 Toque en Botón Enciende-Apaga finaliza la llamada si usted desea finalizar una llamada
presionando Enciende-Apaga/Bloquear F E.

185
AJUSTES
FECHA Y HORA
PERMISO PARA AJUSTE AUTOMATICO DE FECHA Y HORA
1 Toque en Aplicaciones > Ajustes > Fecha y hora.
2 Toque en Automático.
Nota Las funciones Ajustar fecha, Seleccionar zona horaria y Ajustar hora no operará si usted tocar en
Automático.
AJUSTE DE LA FECHA
1 Toque en Aplicaciones > Ajustes > Fecha y hora > Ajustar fecha.
2 Desmarque el ajuste Automático y ingrese el mes, día y año para el Breakout™.
3 Toque en Confirmar.
AJUSTE DE LA ZONA HORARIA
1 Toque en Aplicaciones > Ajustes > Fecha y hora > Seleccionar zona horaria.
2 Seleccione y toque en una zona horaria en la lista.
AJUSTE DE LA HORA
1 Toque en Aplicaciones > Ajustes > Fecha y Hora > Ajustar hora.
2 Ingrese los minutos y la hora.
3 Toque en Confirmar.
186
AJUSTES
SELECCION DEL FORMATO DE LA HORA
1 Toque en Aplicaciones > Ajustes > Fecha y hora > Utilizar el formato 24 horas si usted desea
visualizar la hora en el formato 24 horas.
2 Toque en Usar el formato 24 horas nuevamente se usted prefiere el formato 12 horas.
SELECCION DEL FORMATO DE LA FECHA
1 Toque en Aplicaciones > Ajustes > Fecha y hora > Seleccionar formato de fecha.
2 Seleccione un formato de fecha preferido.
SOBRE EL TELEFONO
ACTUALIZACION DEL SOFTWARE
1 Toque en Aplicaciones > Ajustes > Sobre el teléfono.
2 Toque en Actualización del Software.
3 Toque en Estado si usted desea visualizar el estado actual del software y toque en OK.
4 Toque en Verificar Nuevo si usted desea verificar el software más reciente y descárguelo para su
teléfono.
VERIFICACION DEL ESTADO DEL TELEFONO
1 Toque en Aplicaciones > Ajustes > Sobre el teléfono.
2 Toque en Estado si usted desea verificar el estado actual del teléfono, incluyendo el estado de la
batería, el nivel de carga de la batería y el número de su teléfono.
187
AJUSTES
VERIFICACION DEL USO DE LA BATERIA
1 Toque en Aplicaciones > Ajustes > Sobre el teléfono.
2 Toque en Uso de la batería si usted desea verificar como la batería está siendo utilizada.
VISUALIZACION DE INFORMACIONES LEGALES
1 Toque en Aplicaciones > Ajustes > Sobre el teléfono.
2 Toque en Informaciones legales si usted desea visualizar las licencias de fuente abierta y las
informaciones legales sobre el Google.
REINICIACION DEL Breakout™
Solucione problemas repetidos reiniciando el Breakout™. Certifíquese de apagar el teléfono
primeramente para proteger las informaciones y el software en el Breakout™.
1 Remueva la tapa trasera y la batería sin apagar el Breakout™.
2 Inserte la batería en el Breakout™ de la forma correcta.
3 Encienda el Breakout™.

SEGURIDAD Y GARANTIA
UPnP y DLNA
ESPECIFICACIONES
SERVICIOS BASADOS EN LA LOCALIZACION
CONTRATO DE LICENCIA DE USUARIO FINAL (EULA)
AVISOS LEGALES
LISTA DE VERIFICACION DE SOLUCION DE PROBLEMAS
INDICE REMISIVO
12
APENDICE

189
APENDICE
SEGURIDAD Y GARANTIA
INFORMACIONES DE SEGURIDAD PARA TELEFONOS PORTATILES INALAMBRICOS
EXPOSICION A LAS SEÑALES DE RADIOFRECUENCIA
Su móvil es un transmisor y receptor de radio de baja potencia. Cuando está ENCENDIDO, recibe
y también envía señales de radiofrecuencia (RF). En agosto de 1996, la Comisión Federal de
Comunicaciones (FCC) adoptó las directrices de exposición a RF con niveles de seguridad para móviles.
Esas directrices están de acuerdo con las normas de seguridad establecidas por organismos
estandarizadores internacionales y de Estados Unidos:
ANSI C95.1 (1992) *
Informe 86 NCRP (1986) *
ICNIRP (1996) *
Esas normas fueron basadas en evaluaciones abarcadoras y periódicas de la literatura científica
relevante. Por ejemplo, más de 120 científicos, ingenieros y médicos de universidades, sectores
gubernamentales de salud y de la industria consultaron la entidad de investigación disponible para
desarrollar la norma ANSI (C951).
El diseño de su móvil está en conformidad con las directrices de FCC (y esas normas).
* American National Standards Institute.
** National Council on Radiation Protection and Measurements.
*** International Commission on Nonionizing Radiation Protection.
SEGURIDAD DE LA ANTENA
Utilice solamente la antena provista o una antena de sustitución aprobada. Antenas, modificaciones,
o conexiones no autorizadas podrán perjudicar la calidad de la llamada, dañar el móvil o resultar en la
violación de las reglas FCC. Por favor, contáctese con su revendedor local para reemplazo de la antena.
No utilice el móvil con una antena dañada. Si una antena dañada mantiene contacto con la piel, podrá
ocurrir una quemadura. Por favor, contáctese con la Asistencia Técnica Autorizada para reemplazar la
antena.
12. APENDICE

190
APENDICE
SEGURIDAD AL CONDUCIR
Hablar por móvil mientras conduce el automóvil es extremamente peligroso y es ilegal en algunos
estados. Acuérdese que, la seguridad viene en primer lugar. Verifique las leyes y reglamentos sobre la
utilización de teléfonos en áreas donde usted conduce automóviles. Siempre las obedezca. También, si
usted utiliza su móvil al conducir, por favor:
xDe completa atención al manubrio. La dirección segura es su primera responsabilidad.
xUtilice la operación altavoz si fuere disponible.
xSalga de la carretera y estacione antes de hacer o contestar una llamada, si las condiciones de
dirección lo exijan.
Si usted necesita utilizar el móvil al conducir, se ruega, utilizar los modos de una tecla, marcado rápido
y atención automática.
Dispositivos airbag son accionados con gran fuerza. NO coloque objetos incluyendo equipos
inalámbricos instalados o portátiles, en el área sobre el airbag o en el área de activación del airbag. Si
un equipo inalámbrico dentro del vehículo fuere instalado inadecuadamente y el airbag inflar, podrán
ocurrir heridas graves.
ADVERTENCIA La no obediencia a estas instrucciones podrá conducir a graves heridas personales y posibles daños a la
propiedad.
DISPOSITIVOS ELECTRONICOS
Su teléfono móvil es un radio transmisor y receptor baja potencia. Cuando está encendido (ON), recibe
y también envía señales de radio frecuencia (RF). La mayoría de los equipos electrónicos modernos
están protegidos contra la energía de RF. Sin embargo, puede que algunos equipos electrónicos no
están protegidos contra las señales de RF de su móvil. Por lo tanto su teléfono debe restringirse a
ciertas situaciones.
191
APENDICE
MARCA PASOS
La Asociación de la Industria de la Salud Manufacturera recomienda que se debe mantener una
separación mínima entre un móvil y un marcapasos de por lo menos 15 centímetros para evitar una
potencial interferencia con el marcapasos. Estas recomendaciones son consistentes con el estudio
independiente y por las recomendaciones de la Investigación de Tecnología Inalámbrica. A las
personas con marcapasos:
xSIEMPRE mantenga el móvil a más de 15 centímetros de su marcapasos cuando el teléfono esté
encendido.
xNo porten el teléfono en una bolsa frontal del pecho.
xUtilice el oído opuesto al marcapasos para minimizar el potencial de interferencia.
xSi usted tiene sospechas sobre una posible interferencia, APAGUE (OFF) inmediatamente su
teléfono.
APARATOS DE AUDICION
Algunos móviles pueden interferir con algunos aparatos de audición. En caso de tal interferencia, tal
vez usted debe consultar su proveedor de servicio (o comunicarse con la línea de servicio al cliente
para discutir otras alternativas).
OTROS DISPOSITIVOS MEDICOS
Si usted utiliza otro dispositivo médico personal, consulte al fabricante de su dispositivo para
determinar si están debidamente protegidos de energía de RF externa. Su médico también puede
asistirlo en obtener esta información. APAGUE (OFF) su teléfono en instalaciones de salud cuando
así lo indiquen las normas anunciadas en éstas áreas. Los hospitales o centros de salud pueden estar
utilizando equipos que pueden ser sensibles a la energía de RF externa.
192
APENDICE
VEHICULOS
Las señales de RF pueden afectar sistemas electrónicos indebidamente protegidos en vehículos de
motor. Verifique con su fabricante o representante respecto a su vehículo. También debe consultar al
fabricante de cualquier equipo que ha sido agregado a su vehículo.
DISPOSICIONES EN INSTALACIONES
APAGUE (OFF) su teléfono en lugares donde por medio de anuncios así lo dispone.
OTROS LINEAMIENTOS DE SEGURIDAD
AERONAVES
Las regulaciones de la FCC prohíben utilizar el teléfono cuando se está en el aire. APAGUE (OFF)
su teléfono antes de abordar una aeronave. Siempre solicita y obtenga consentimiento previo y
aprobación del representante autorizado de la aerolínea antes de utilizar su teléfono a bordo de una
aeronave. Siempre siga las instrucciones del representante de la aerolínea cuando utilice su teléfono a
bordo de una aeronave pare prevenir cualquier posible interferencia con equipo electrónico aéreo.
AREAS DE FUNDICION
Para evitar la interferencia con operaciones de fundición, APAGUE (OFF) su teléfono cuando se
encuentre en una fundidora o en áreas con la disposición “Apagar el teléfono de dos vías.” Obedezca las
señales y las instrucciones.
ATMOSFERAS POTENCIALMENTE EXPLOSIVAS
APAGUE (OFF) su teléfono cuando se encuentre en un área de atmósfera potencialmente explosiva y
obedezca todas las señales y las instrucciones. Las chispas en tales áreas pueden causar una explosión
o incendio provocando daño corporal o inclusive la muerte.
En las áreas con una atmósfera potencialmente explosiva, por lo regular, pero no siempre se indica esto
claramente. Estas incluyen áreas de carga de combustible, tales como gasolinera, bajo cubierta en los
barcos, en instalaciones de transferencia o almacenamiento, vehículos que utilizan gas petróleo líquido
(como el butano o propano) áreas donde el aire contiene químicos o partículas, tales como grano,
polvo o talco de metal y cualquier otra área donde a usted normalmente se le indique que apague el
motor de su vehículo.
193
APENDICE
PRECAUCIONES
Su móvil es una pieza de equipo de alta calidad. Antes de operar, lea todas las instrucciones y
advertencias de precaución en el Adaptador AC USB (1) la Batería (2) y el Producto Utilizando la Batería
(3).
El incumplimiento de las indicaciones siguientes puede resultar en daño corporal y/o daño al aparato
como consecuencia del vaciado, incendio o ruptura de las baterías.
xNO utilice este equipo en ambientes extremos, donde la alta temperatura o alta humedad son
predominantes.
xNO maltrate el equipo. Evite golpes, agitaciones o colisiones. Cuando no esté utilizándolo, deje la
unidad en posición plana para evitar posibles daños causados por la inestabilidad.
xNO exponga este aparato a lluvia o al derrame de bebidas.
xNO utilice accesorios no autorizados.
xNO desarme el móvil ni sus accesorios. En el caso que sean necesarios asistencia técnica o
reparación, encamine la unidad a un centro de asistencia técnica de móviles autorizado por PCD. Si
esta unidad fuere desarmada, podrá generar el riesgo de choque eléctrico o incendio.
xNO provoque cortocircuito en los terminales de la batería con objetos metálicos, etc
INFORMACIONES DE SEGURIDAD SOBRE LA EXPOSICION A LA RADIOFRECUENCIA SEGUN LA
FCC
¡ADVERTENCIA! LEA ESTAS INFORMACIONES ANTES DE UTILIZAR LA UNIDAD
CUIDADOS
En Agosto de 1996 la Federal Communications Commission (FCC) de Estados Unidos, con su acción
en el Informe y Orden FCC 96-326 adopto y actualizo la norma de seguridad para exposición humana
a la radiofrecuencia electromagnética emitida por los transmisores reglamentados por FCC. Aquellas
directrices son consistentes con el estándar de seguridad anteriormente establecido tanto por Estados
Unidos como por los organismos de normas internacionales. El proyecto de este móvil atiende las
directrices FCC y las normas internacionales.
194
APENDICE
OPERACION DE LA UNIDAD CERCA DEL CUERPO
Este dispositivo fue probado en cuanto a operaciones de la unidad cerca del cuerpo con la parte
trasera del móvil, mantenga distancia de 2 cm del cuerpo. Para mantener la conformidad con los
requisitos de FCC sobre la exposición a la Radiofrecuencia, solamente utilice prendedores de cinturón,
coldres o accesorios similares que mantienen una distancia de 2 cm entre el cuerpo del usuario y la
parte trasera del móvil, incluyendo la antena.
La utilización de prendedores de cinturón, coldres y accesorios similares no deben contener
componentes metálicos en su conjunto. La utilización de accesorios que no satisfacen estos requisitos
puede que no atienda los requisitos de FCC en cuanto a la exposición a la radiofrecuencia y deben
evitarse.
Para más informaciones sobre la exposición a la RF, se ruega acceder el sitio de FCC en www.fcc.gov.
INFORMACIONES SOBRE SAR
EL MODELO DE ESTE TELEFONO CUMPLE LOS REQUERIMIENTOS DEL GOBIERNO REFERENTES A
LA EXPOSICION DE ONDAS DE RADIOFRECUENCIA.
Su teléfono inalámbrico es un radio transmisor y receptor. Está diseñado y fabricado para no exceder
los límites de exposición de radiofrecuencia (RF) por la Comisión Federal de Comunicaciones del
Gobierno de los EEUU. Estos límites son parte de extensas normas que establecer los límites permitidos
de energía de RF para la población en general. Estas normas están basadas en estándares que fueron
desarrollados por organizaciones científicas independientes a través de la evaluación periódica y a
fondo de los estudios científicos. Los estándares incluye un margen de seguridad substancial diseñado
para asegurar la seguridad de todas las personas, sin importar la edad y su salud.
La exposición estándar para los teléfonos móviles emplea una unidad de medida conocida como tasa
de absorción específica o SAR. El límite SAR definido por la FCC es de 1,6W/kg.* Las pruebas de SAR se
conducen cuando el teléfono transmite a su mayor nivel de energía certificado en todas las bandas
de frecuencia donde se ha probado. Aunque la SAR se determina por el más alto nivel de energía
certificado, el nivel real de SAR mientras se opera puede estar muy por debajo del nivel máximo. Esto es
porque el teléfono está diseñado para operar en múltiples niveles de energía como para sólo requerir
la energía necesaria para alcanzar la red. En general, entre más cerca se encuentre de una estación de
base de antena inalámbrica, menor será la salida de energía.
195
APENDICE
Antes de que un modelo de teléfono esté disponible para su venta al público, se le deben efectuar
pruebas y debe certificarse por la FCC de que no exceda el límite establecido y adoptado por el
gobierno referente a la exposición segura. Las pruebas se llevan a cabo en posiciones y ubicaciones
(ej., en el oído y portado en el cuerpo) tal como lo requiere la FCC para cada modelo. El valor más alto
de SAR para este modelo de teléfono cuando se utiliza cerca del oído es de 1,05W/kg y cuando es
portado en el cuerpo tal y como se describe en esta guía de usuario es de 0,797W/kg. (Las medidas
cuando se porta en el cuerpo pueden diferir entre modelos de teléfono dependiendo de los accesorios
disponibles y los requerimientos de la FCC). Aunque pueden existir diferencias de los niveles de SAR
entre varios teléfonos y varias posiciones, todos ellos cumplen con las normas gubernamentales
referentes a la exposición segura.
Las pruebas SAR para la operación junto al cuerpo fueron ejecutadas con un prendedor de cinturón
que posibilitaba una separación de 20 mm. El Manual del Usuario indica que cualesquier holsters/
prendedores utilizados con este dispositivo no deben contener cualesquier componentes metálicos.
La FCC ha otorgado una Autorización de Equipo para este modelo de teléfono con todos los niveles de
SAR reportados como en cumplimiento con los normas de exposición de RF de la FCC.
La información de SAR en este modelo de teléfono se encuentra archivada en la página de Búsqueda
de ID de la FCC http://www.fcc.gov/oet/ea al ingresar en JYCAPACHE.
Es posible encontrar más informaciones sobre tasas de absorción específicas (SAR) en el sitio de la
Asociación de la Industria de Telecomunicación Celular (CTIA) en http://www.ctia.org.
* En Estados Unidos y en Canadá, el límite de SAR para móviles utilizados por el público es de 1,6
vatios/kg (W/kg) en media un gramo más de tejido. La norma incorpora una margen sustancial de
seguridad para dar protección adicional al público y para aclarar cualquier variación en las mediciones.
196
APENDICE
COMPATIBILIDAD CON APARATOS DE AUDICION (HAC) PARA DISPOSITIVOS DE
TELECOMUNICACIONES INALAMBRICOS
COMPROMISO DE PCD
PCD cree que todos nuestros clientes estén habilitados a usufructuar de los beneficios de las
tecnologías digitales inalámbricas.
Estamos comprometidos en proporcionar una selección de dispositivos compatibles a nuestros
clientes que utilizan aparatos de audición.
ESTE MOVIL TIENE UNA CLASIFICACION HAC DE M4/T4.
¿QUE SIGNIFICA LA COMPATIBILIDAD CON APARATOS DE AUDICION?
La Federal Communications Commission (Comisión Federal de Comunicaciones) implementó reglas
y un sistema de clasificación proyectado para habilitar las personas que utilizan aparatos de audición
para utilizar más eficientemente estos dispositivos de telecomunicación inalámbricos. El estándar
para compatibilidad de móviles digitales con los aparatos de audición fue establecido por American
National Standard Institute (ANSI) (Instituto Nacional de Estandarización Americana) C6319. Hay
dos conjuntos de estándares ANSI con clasificaciones de uno a cuatro (siendo 4 (cuatro) la mejor
clasificación): una clasificación “M” para interferencia reducida facilita la escucha de diálogos en el
teléfono cuando es utilizado el micrófono del aparato de audición y una clasificación “T” que permite
que el teléfono sea utilizado con aparatos de audición operando en modo Telecoil, reduciendo así los
ruidos de fondo indeseados.

197
APENDICE
¿COMO PUEDO SABER CUALES TELEFONOS INALAMBRICOS SON COMPATIBLES CON APARATOS
DE AUDICION?
La clasificación Hearing Aid Compatibility (Compatibilidad con Aparatos de Audición) está exhibida en
la caja del teléfono inalámbrico.
Un teléfono está considerado Hearing Aid Compatible (Compatible con
Aparatos de Audición) para acoplamiento acústico (modo micrófono) si tiene
una clasificación “M3” ó “M4”. Un móvil digital está considerado Compatible con
Aparatos de Audición para acoplamiento inductivo (modo Telecoil) si tiene una
clasificación “T3” ó “T4”.
Este teléfono fue probado y clasificado para uso con aparatos auditivos para
algunas de las tecnologías inalámbricas utilizadas por él. Sin embargo, puede
haber algunas nuevas tecnologías inalámbricas utilizadas en este teléfono que
no hayan sido probados aun para uso con aparatos auditivos. Es importante
probar las distintas funcionalidades del teléfono completamente y en diferentes
lugares usando su aparato auditivo o implante coclear para determinar si usted
escucha cualquier ruido de interferencia. Consulte su proveedor de servicios
sobre su retorno y las políticas de cambio y para lograr informaciones sobre la
compatibilidad con aparatos auditivos.
Rango de compatibilidad
con aparatos de audición
¿COMO SABER SI MI APARATO DE AUDICION OPERARA CON UN MOVIL DIGITAL
ESPECIFICO?
Usted tal vez desee probar varios móviles para que seleccione aquel que mejor opera con su aparato
de audición. Usted también podrá desear hablar con su médico sobre hasta que punto sus aparatos de
audición están inmunes a interferencia, si tienen algún blindaje (protección) y si el aparato de audición
tiene una clasificación HAC.
PARA INFORMACIONES ADICIONALES SOBRE TELEFONOS MOVILES DIGITALES Y APARATOS DE
AUDICION
xPara FCC Hearing Aid Compatibility and Volume Control, Visite http://www.fcc.gov/cgb/dro/
hearing.html
xPara Hearing Loss Association of America, Visite http://www.hearingloss.org/learn/cellphonetech.asp

198
APENDICE
xPara CTIA,
Visite http://www.accesswireless.org/Disability-Categories/Hearing.aspx
xPara Gallaudet University, RERC,
Visite http://www.gallaudet.edu/hearing_speech_and_language_sciences/research/rehabilitation_
engineering_research_center_(rerc)_on_hearing_enhancement.html
ACTUALIZACION DEL CONSUMIDOR SEGUN LA FDA
FDA U.S. FOOD AND DRUG ADMINISTRATION – CENTRO DE DISPOSITIVOS Y
REPORTES ACTUALIZADOS DE SALUD RADIOLOGICA ACERCA DE TELEFONOS
MOVILES PARA EL CONSUMIDOR
1. ¿Acaso es verdad que los teléfonos presentan un problema de salud?
La evidencia científica disponible no muestra que cualquier problema de salud esté asociado con
la utilización de teléfonos inalámbricos. Sin embargo, no existen pruebas de que los teléfonos
inalámbricos son absolutamente seguros. Los teléfonos inalámbricos emiten bajos niveles de energía
de radiofrecuencia (RF) en el rango de las microondas cuando se utiliza. También emiten niveles muy
bajos de RF en modo inactivo. Aunque los niveles altos de RF pueden ocasionar repercusiones en la
salud (al calentar el tejido), la exposición de bajos niveles de RF no produce efectos de calentamiento
que ocasionen repercusiones adversas para la salud. Muchos estudios de exposición a niveles bajos de
RF no han encontrado repercusión biológica alguna. Algunos estudios sugieren que estos a biológicos
pueden ocurrir, pero tales conclusiones no han sido confirmadas por investigación adicional.
En algunos casos, otros investigadores han tenido dificultades en reproducir tales estudios o en
determinar las razones de los resultados tan inconsistentes.
2. ¿Cuál es el papel de la FDA en lo que concierne la seguridad de los teléfonos inalámbricos?
Bajo ley, la FDA no revisa la seguridad de productos del consumidor de emisión de radiación antes de
ponerlos a la venta, tal como lo hace con nuevas medicinas o dispositivos médicos. Sin embargo, la
agencia tiene autoridad de tomar medidas de acción si es que los teléfonos inalámbricos muestran la
emisión de energía (RF) en un nivel que es peligroso para el usuario. En tal caso, la FDA puede exigir
a los fabricantes de teléfonos inalámbricos que notifiquen a los usuarios del peligro a la salud y de
reparar o reemplazar o requisar los teléfonos para que el peligro ya no exista. Aunque la existencia de
datos científicos no justifiquen las acciones normativas de la FDA, está le ha insistido a la industria de
199
APENDICE
telefonía inalámbrica a tomar un número de precauciones que incluyen lo siguiente:
xApoyar la investigación necesaria de las posibles repercusiones biológicas de RF del tipo que
emiten los teléfonos inalámbricos;
xDiseñar teléfonos inalámbricos de manera que minimicen cualquier exposición a RF al usuario que
no es necesaria para la función del dispositivo; y
xCooperar con los usuarios de teléfonos inalámbricos con la mejor información posible acerca de los
efectos secundarios del uso del teléfono inalámbrico en la salud humana.
La FDA pertenece a un grupo de trabajo entre agencias federales que son responsables de diferentes
aspectos de seguridad de RF para asegurarse de los esfuerzos conjuntos a nivel federal. Las siguientes
agencias pertenecen a este grupo de trabajo:
xNational Institute for Occupational Safety and Health
xEnvironmental Protection Agency
xFederal Communications Commission
xOccupational Safety and Health Administration
xNational Telecommunications and Information Administration
Los Institutos Nacionales de Salud también participan en actividades de algunas actividades de grupos
de trabajo a nivel inter agencia. La FDA comparte responsabilidades normativas sobre teléfonos
inalámbricos con la Comisión Federal de Comunicaciones (FCC). Todos los teléfonos que se venden
en los Estados Unidos, primero deben cumplir con las normas de seguridad de la FCC que limitan
la exposición a RF. La FCC también regula las estaciones de base de que dependen los proveedores
de servicio de telefonía inalámbrica. Aunque tales estaciones operan a un nivel mayor de energía
que los teléfonos inalámbricos mismos, las exposiciones de RF a que la gente está expuesta en estas
estaciones de base son por lo general, miles de veces menos que las que pueden recibir de teléfonos
inalámbricos. Por lo tanto, las estaciones de base no están sujetas a las dudas de seguridad que se
discuten en este documento.
3. ¿Qué tipos de teléfono están sujetos a este reporte actualizado?
El término “teléfono inalámbrico” se refiere a teléfonos inalámbricos portátiles con antena incluida, a
menudo llamados teléfonos “cel,” “móvil,” o “PCS.” Este tipo de teléfonos inalámbricos pueden exponer
al usuario a energía de radiofrecuencia cuantificable (RF) por la corta distancia entre el teléfono y la
200
APENDICE
cabeza del usuario. Estas exposiciones de RF están delimitadas por las normas de la Comisión Federal
de Comunicaciones que fueron desarrolladas con el consejo de la FDA y otras normas de agencias de
salud y seguridad. Cuando el teléfono se encuentra a distancias más alejadas del usuario, la exposición
de RF es drásticamente menos ya que la exposición de RF de una persona se reduce rápidamente al
incrementar la distancia de la fuente. Los llamados “teléfonos sin cables,” los cuales tienen una unidad
de base conectada al cable del teléfono en una casa, operan por lo general a niveles de energía mucho
menores, y por lo tanto producen exposiciones de RF muy por debajo de los límites de seguridad de la
FCC.
4. ¿Cuáles son los resultados de la investigación ya realizada?
La investigación realizada ha producido resultados conflictivos, y muchos estudios han sufrido por
fallas en sus métodos de investigación. Los experimentos en animales que investigan los efectos
de exposición de energía de radiofrecuencia (RF) características de los teléfonos inalámbricos han
producido resultados conflictivos que a menudo no pueden repetirse en otros laboratorios. Sin
embargo, algunos estudios realizados en animales sugieren que los niveles bajos de RF pueden
acelerar el desarrollo de cáncer en animales de laboratorio. Sin embargo, muchos de los estudios
que muestran un incremento en el crecimiento de tumores, utilizaron animales que habían sido
genéticamente modificados o tratados con químicos causantes de cáncer como para predisponer al
desarrollo de cáncer en ausencia de exposición a la RF. Otros estudios expusieron a los animales a RF
por hasta 22 horas al día. Estas condiciones no son similares a las condiciones en las que la gente utiliza
los teléfonos inalámbricos, así que no sabemos con certeza el significado de lo que estos estudios
tienen para la salud humana. Se han publicado tres amplios estudios epidemiológicos desde diciembre
del 2000. Entre ellos, los estudios investigaron cualquier posible asociación entre el uso de teléfonos
inalámbricos y cáncer cerebral primario, glioma meningioma, o neuroma acústico, tumores cerebrales
o de las glándulas salivales, leucemia, u otros canceres. Ninguno de los estudios demostraron
la existencia de ningún efecto dañino para la salud por la exposición de de RF de los teléfonos
inalámbricos. Sin embargo, ninguno de los estudios puede contestar dudas sobre los efectos a largo
plazo, ya que el período promedio de uso del teléfono en estos estudios fue de tres años.
5. ¿Qué investigación se necesita para decidir si la exposición de RF de teléfonos inalámbricos
representa un riesgo de salud?
Una combinación de estudios de laboratorio y epidemiológicos en personas que efectivamente
utilizan teléfonos inalámbricos debe ofrecer algo de la información necesaria. La exposición animal
201
APENDICE
de por vida a la RF de teléfonos inalámbricos puede completarse en unos pocos años. Sin embargo,
se necesitarían grandes números de animales para ofrecer una prueba confiable del efecto de
promoción de cáncer, si es que lo existe. Los estudios epidemiológicos pueden ofrecer datos que
aplican directamente a poblaciones humana, pero en 10 o más años, un seguimiento se hará necesario
para ofrecer respuestas sobre algunos repercusiones de salud, tales como el cáncer. Esto es porque
el intervalo entre el tiempo de exposición a un agente causante de cáncer y el tiempo en que se
desarrolla el tumor –en caso de que sea el caso- pueden pasar muchos, muchos años. La interpretación
de los estudios epidemiológicos está obstaculizada por dificultades en la medición real de exposición a
RF durante el uso diario de teléfonos inalámbricos. Muchos factores afectan esta medición, tales como
el ángulo en el cual el teléfono se sostiene, o que modelo de teléfono se utiliza.
6. ¿Qué está haciendo la FDA para encontrar más información sobre los posibles efectos salud del
la RF de teléfonos inalámbricos?
La FDA está trabajando conjuntamente con al Programa Nacional de Toxicología de los EEUU y con
grupos de investigadores en todo el mundo para asegurarse de que estudios de prioridad animal
se llevan a cabo para tratar preguntas importantes sobre los efectos de la exposición a energía de
radiofrecuencia (RF). La FDA ha sido un participante líder del Proyecto de Campos Electromagnéticos
de la Organización Mundial de Salud (EMF) desde su inauguración en 1996. Un resultado influyente
de este trabajo ha sido el desarrollo de una agenda de investigación detallada que ha dirigido el
establecimiento de nuevos programas de investigación alrededor del mundo. El proyecto también
ha ayudado a desarrollar una serie de documentos de información pública sobre asuntos de EMF.
La FDA y la Asociación de Telecomunicaciones Celulares y Internet (CTIA) tienen un Acuerdo de
Investigación y Desarrollo Cooperativo (CRADA) para investigar la seguridad inalámbrica. La FDA ofrece
la supervisión científica, obteniendo aportaciones de los expertos en organizaciones gubernamentales,
industriales y académicas. El estudio patrocinado por la CTIA es conducido a través de contratistas de
los investigadores independientes. La investigación inicial incluirá tanto estudios de laboratorio como
estudios de usuarios de teléfonos inalámbricos. El CRADA también incluirá una amplia evaluación de lo
que la investigación adicional necesita en el contexto del desarrollo de investigación reciente alrededor
del mundo.
7. ¿Cómo puedo investigar a qué tanta energía de radiofrecuencia estoy expuesto al utilizar mi
teléfono inalámbrico?
Todos los teléfonos que se venden en los Estados Unidos deben cumplir con las normas de la Comisión
202
APENDICE
Federal de Comunicaciones (FFC) que limitan la exposición a la energía de radiofrecuencia (RF). La FCC
establece estas normas al consultar con la FDA y otras agencias de salud y seguridad federales. El límite
de la FCC de exposición a RF de teléfonos inalámbricos está definido a una Tasa de Absorción Específica
SAR de 1.6 vatios por kilogramo (1.6W/kg). El límite de la FCC es consistente con los estándares de
seguridad desarrollados por el Instituto de Ingeniería Eléctrica y Electrónica (IEEE) y el Consejo Nacional
de Protección y Medición de Radiación. La exposición límite toma en consideración la habilidad
del cuerpo para eliminar calor del tejido que absorbe energía del teléfono inalámbrico y que está
definida muy por debajo de los niveles conocidos que puedan causar repercusiones. Los fabricantes
de teléfonos inalámbricos deben reportar el nivel de exposición de RF para cada modelo de teléfono
a la FCC. El sitio Web de la FCC (http://www.fda. gov) (bajo “c” en el ítem asunto del índice, seleccione
Cell Phones > Research (Teléfonos móviles > Búsqueda)) da indicaciones para localizar el número de
identificación en su teléfono para buscar el nivel de exposición de RF de su teléfono del listado en línea.
8. ¿Qué ha hecho la FDA para medir la energía de radiofrecuencia proveniente de teléfonos
inalámbricos?
El Instituto de Ingeniería Eléctrica y Electrónica (IEEE) está desarrollando un estándar técnico para medir
la exposición de radiofrecuencia (RF) de teléfonos inalámbricos y otros aparatos inalámbricos con la
participación y liderazgo de científicos y ingenieros de la FDA. El estándar de la “Práctica Recomendada
para Determinar la Punta-Espacio de la Tasa de Absorción Especifica (SAR) en el Cuerpo Humano por
Dispositivos de Comunicaciones Inalámbricos: Técnicas Experimentales,” pone enfrente la primera
prueba consistente de metodología para medir la tasa en la cual la RF se deposita en la cabeza de los
usuarios de teléfono. El método de prueba utiliza un modelo de tejido simulado de la cabeza humana.
Se espera que la prueba de metodología estandarizada de SAR mejore notablemente la consistencia
de las mediciones realizadas en diferentes laboratorios sobre el mismo teléfono. La SAR es la medida
de la cantidad de energía que absorbe el tejido, ya sea por todo el cuerpo o sólo una parte del cuerpo.
Se mide en vatios/kg (o millivatios/g) de materia. Esta medida se utiliza para determinar si un teléfono
inalámbrico cumple con las normas de seguridad.
9. ¿Qué precauciones se pueden tomar para reducir mi exposición a la energía de radiofrecuencia
de mi teléfono inalámbrico?
Si existe un riesgo proveniente de estos productos –y en este punto no sabemos que lo haya- es
probablemente muy pequeño. Pero si a usted le preocupa el evitar aún riesgos potenciales, usted
puede tomar unos cuantos pasos sencillos para minimizar su exposición a la energía de radiofrecuencia
(RF). Ya que el tiempo es un factor clave en cuánta exposición recibe una persona, el reducir el tiempo
203
APENDICE
de uso del teléfono inalámbrico reducirá la exposición a RF.
xSi usted debe conducir conversaciones extensas por teléfono inalámbrico todos los días, puede
usted poner más distancia entre su cuerpo y la fuente de RF, ya que nivel de exposición baja
dramáticamente con la distancia.
Por ejemplo, usted puede utilizar un audífono y cargar el teléfono inalámbrico lejos de su cuerpo o
utilice un teléfono inalámbrico conectado a una antena remota. Una vez más, los datos científicos no
demuestran que los teléfonos inalámbricos son perjudiciales. Pero si a usted le preocupa la exposición
de RF de estos productos, puede tomar medidas como las descritas anteriormente para reducir su
exposición a RF del uso del teléfono inalámbrico.
10. ¿Y qué de los niños que utilizan teléfonos inalámbricos?
La evidencia científica no muestra un peligro a usuarios de teléfonos inalámbricos, incluyendo a niños
y adolescentes. Si quiere tomar precauciones para reducir la exposición a la energía de radiofrecuencia
(RF), las medidas descritas arriban también aplican a niños y adolescentes que utilizan teléfonos
inalámbricos. El reducir el tiempo de uso del teléfono inalámbrico y incrementando la distancia entre
el use y la fuente de RF reducirá la exposición a RF. Algunos grupos patrocinados por otros gobiernos
nacionales, desalientan el uso de teléfonos inalámbricos por los niños del todo. Por ejemplo, el
gobierno del Reino Unido distribuye panfletos que contienen tal recomendación en Diciembre del
2000. Ellos observaron que no existe evidencia de que el uso de un teléfono inalámbrico sea la causa
de tumores cerebrales y otras causas de enfermedad. Su recomendación de limitar el uso a niños fue
estrictamente precautoria, no estaba basada en evidencia científica de que existe algún peligro a la
salud.
11. ¿Qué hay acerca de la interferencia del teléfono inalámbrico con equipo médico?
La energía de radiofrecuencia (RF) de teléfonos inalámbricos puede interactuar con algunos
dispositivos electrónicos. Por tal razón, la FDA ayudó a desarrollar un método de prueba detallado
para medir la interferencia electromagnética (EMI) en implantes de marcapasos cardiacos y des-
fibriladores de teléfonos inalámbricos. Este método de prueba es ahora parte de un estándar
patrocinado por la Asociación del Avance de Instrumentación Médica (AAMI). El borrador final, un
esfuerzo conjunto con la FDA, fabricantes de aparatos médicos y muchos otros grupos, se completó a
finales del 2000. Este estándar les permitirá a los fabricantes asegurarse que los pacientes cardiacos y
los des-fibriladores estén a salvo de EMI del teléfono inalámbrico. La FDA ha probado aparatos para la
204
APENDICE
sordera y medir la interferencia de teléfonos inalámbricos portátiles y ayudó a desarrollar un estándar
voluntario patrocinado por el Instituto de Ingeniería Eléctrica y Electrónica (IEEE). Este estándar
especifica métodos de prueba y requerimientos de desempeño de aparatos auditivos y de teléfonos
inalámbricos de manera que no ocasionen interferencia cuando una persona utiliza un teléfono o un
aparato auditivo “compatibles” al mismo tiempo. Este estándar fue aprobado por el (IEEE) en el 2000.
La FDA continúa monitoreando el uso de teléfonos inalámbricos por posibles interacciones con otros
dispositivos médicos. Si llegara ocurrir una interferencia perjudicial, la FDA conducirá una investigación
para evaluar la interferencia y trabajar sobre cómo resolver el problema.
12. ¿Dónde puedo encontrar información adicional?
Para información adicional, favor de referirse a los siguientes recursos:
xEn la página Web de la FDA sobre teléfonos inalámbricos, Visite
http://www.fda.gov/Radiation-EmittingProducts/ RadiationEmittingProductsandProcedures/
HomeBusinessandEntertainment/CellPhones/default.htm)
xEn el Programa de Seguridad de RF de la Comisión Federal de Comunicaciones (FCC), Visite
http://www.fcc.gov/oet/rfsafety
xEn la Comisión Internacional de Protección contra Radiación No Iónica, Visite
http://www.icnirp.de
xEn el Proyecto EMF Internacional de la Organización Mundial de la Salud (WHO) , Visite
http://www.who.int/peh-emf/en/
xJunta Nacional de Protección Radiológica (UK) , Visite
http://www.hpa.org.uk/radiation/
PARA EVITAR PERDIDA POTENCIAL DE LA AUDICION
La exposición prolongada a sonidos altos (incluyendo música) es la causa más común de la pérdida de
audición que puede evitarse. Algunos estudios científicos sugieren que la utilización de dispositivos
portátiles de audio como por ejemplo, reproductores de música, portátiles y móviles, con ajustes
en altos volúmenes durante largos períodos de tiempo puede llevar a la pérdida permanente de
la audición inducida por ruido. Esto incluye el uso de audífonos (incluyendo diferentes modelos y
Bluetooth® u otros dispositivos inalámbricos). La exposición a sonidos muy altos también está asociada
en algunos estudios, al zumbido (un chillido en el oído), hipersensibilidad al sonido y audición
distorsionada. La susceptibilidad individual a la pérdida de audición inducida por ruidos y otros
205
APENDICE
potenciales problemas de audición varía.
La cantidad del sonido producido por un dispositivo de audio portátil varía dependiendo de la
naturaleza del sonido, del dispositivo, de los ajustes del dispositivo y de los audífonos. Usted puede
seguir algunas recomendaciones de sentido común cuando utilice cualquier dispositivo de audio
portátil:
xAjuste el volumen en un ambiente silencioso y seleccione el volumen más bajo que se puede oír
adecuadamente.
xCuando utilice audífonos, reduzca el volumen si no puede oír a las personas hablando cerca de
usted o si la persona que se sienta cerca de usted puede oír lo que usted está escuchando.
xNo suba el volumen para bloquear ruidos adyacentes. Si usted selecciona oír su dispositivo
portátil en un ambiente ruidoso, utilice audífonos supresores de ruidos para bloquear los ruidos
adyacentes.
xLimite el período de tiempo de escucha. Conforme el volumen sube, menos tiempo será necesario
para que su audición sea afectada.
xEvite utilizar audífonos después de la exposición a ruidos extremamente altos como por ejemplo,
en conciertos, que pueden causar la pérdida temporal de la audición. La pérdida temporal de la
audición puede hacer con que volúmenes no seguros de sonido parezcan normales.
xNo oiga a cualquier nivel de volumen que causa incomodidad. Si escucha un zumbido, si nota que
la voz parece encubierta o cualquier dificultad temporal de audición después de oír su dispositivo
de audio portátil, interrumpa el uso y consulte un médico.
USTED PUEDE LOGRAR INFORMACIONES ADICIONALES SOBRE ESTE ASUNTO A TRAVES DE LAS
SIGUIENTES FUENTES DE INFORMACION:
AMERICAN ACADEMY OF AUDIOLOGY
11730 Plaza American Drive, Suite 300
Reston, VA 20190
Voz: 800-AAA-2336
Email: infoaud@audiology.org
Internet: http://www.audiology.org/Pages/default.aspx
206
APENDICE
NATIONAL INSTITUTE ON DEAFNESS AND OTHER COMMUNICATION DISORDERS (INSTITUTO
NACIONAL DE LA SORDERA Y OTROS TRASTORNOS DE LA COMUNICACION)
NATIONAL INSTITUTES OF HEALTH (INSTITUTOS DE SALUD NACIONALES)
31 Center Drive, MSC 2320
Bethesda, MD USA 20892-2320
Voz: (301) 496-7243
Email: nidcdinfo@nidcd.nih.gov
Internet: http://www.nidcd.nih.gov/health/hearing
NATIONAL INSTITUTE FOR OCCUPATIONAL SAFETY AND HEALTH
(INSTITUTO NACIONAL DE SALUD Y SEGURIDAD OCUPACIONAL)
HUBERT H. HUMPHREY BLDG.
1600 Clifton Rd
Atlanta GA 30333, USA
Voz: 1-800-CDC-INFO (1-800-232-4636)
Internet: http://www.cdc.gov/niosh/topics/noise/default.html
INFORMACIONES DE CONFORMIDAD CON LA FCC
Este dispositivo cumple con el artículo 15 de las normas de la FCC.
Su operación está sujeta a las siguientes dos condiciones:
(1) Este dispositivo puede no causar interferencias dañinas, y
(2) Este dispositivo debe aceptar cualquier interferencia recibida. Incluyendo interferencias que
puedan causar operación indeseada.
INFORMACION AL USUARIO
Este equipo ha sido probado y cumple con los límites establecidos para un aparato digital de Clase B
según el Artículo 15 de las normas de la Comisión Federal de Comunicaciones (FCC). Estos límites están
diseñados para proveer una protección razonable contra interferencias dañinas en una instalación
residencial. Este equipo genera, usa y puede irradiar energía de radiofrecuencia y, si no se instala y usa

207
APENDICE
de acuerdo con las instrucciones, puede causar interferencias dañinas a las comunicaciones por radio.
Sin embargo, no hay garantías de que no ocurrirán interferencias en una instalación particular. Si este
equipo causa interferencia dañina a la recepción de radio o televisión, lo que puede determinarse
mediante el apagado y encendido del equipo, se le aconseja al usuario que intente corregir la
interferencia mediante una o más de las siguientes medidas:
xReorientar o relocalizar la antena receptora. Aumentar la separación entre el equipo y el receptor.
xConectar el equipo a un enchufe o circuito diferente del aquél al que el receptor está conectado.
xConsultar a su vendedor o a un técnico de radio/televisión con experiencia para ayuda.
ADVERTENCIA El usuario que realice cambios o modificaciones a la unidad sin la aprobación expresa del fabricante
invalidará su autoridad para usar el equipo. La conexión de periféricos requiere el uso de cables con conexión de tierra y
señales blindadas.
GARANTIA LIMITADA DE 12 MESES
Personal Communications Devices, LLC. (la Compañía) garantiza al comprador original de este teléfono
celular móvil portátil, que en el evento de que este producto o cualesquiera de sus partes durante el
uso y condiciones normales del consumidor probara ser defectuosa en material, mano de obra que
resultara en mala operación del producto durante los primeros doce (12) meses del periodo de fecha
de compra, tal(es) defecto(s) serán reparados o reemplazados según la opción de la Compañía (con
refacciones nuevas o reconstruidas) sin cargo de refacciones, mano de obra directamente relacionados
con los defecto(s).
La antena, teclado, pantalla, batería recargable y el cargador de la batería, si lo incluye, están
igualmente garantizados por doce (12) meses de la fecha de compra.
Esta garantía se extiende solamente para consumidores que adquieran el producto en los Estados
Unidos y Canadá y no es transferible o asignable.
Esta garantía no aplica a:
(a) Si el producto ha sido sujeto a uso y condiciones anormales, accidentes, mal manejo, descuido,
alteraciones no autorizadas, mal uso, instalación inadecuada, reparación o almacenamiento
inapropiado.
(b) Producto cuyo número de serie mecánico o electrónico ha sido removido, alterado o borrado.
(c) Daño por exposición a la humedad, temperaturas excesivas o condiciones medioambientales
extremas;
208
APENDICE
(d) Daño resultante de la utilización o conexión de otros productos y accesorios no autorizados por la
Compañía.
(e) Defectos en elementos cosméticos, decorativos, estructurales o de apariencia tales como las
cubiertas y partes no operativas.
(f) Producto dañado por causas externas como un incendio, inundación, suciedad, arena, condiciones
del clima, fuga de baterías, quema de fusible, robo o uso inapropiado de cualquier fuente de
electricidad.
La Compañía no declara su responsabilidad para la remoción o reinstalación del producto para
cobertura geográfica, por recepción de señal inadecuada de la antena o por rango de comunicaciones
u operaciones del sistema celular como un todo.
Cuando envíe su dispositivo inalámbrico a Personal Communications Devices para reparación o
servicio, por favor observe que cualquier información personal o software instalado en el dispositivo
puede ser alterado o borrado inadvertidamente. Por lo tanto, recomendamos rotundamente que
realice un respaldo de toda la información y del software contenido en su dispositivo antes de enviarlo
a servicio o reparación. Esto incluye todas listas de contacto, descargas (aplicaciones de software
de terceros, campanillas, juegos y gráficas) y cualquier otra información agregada a su dispositivo.
Adicionalmente, si el dispositivo inalámbrico utiliza una tarjeta SIM o Multimedia, favor de remover la
tarjeta antes de enviar el dispositivo y almacenar para uso posterior cuando se le regrese su dispositivo.
Personal Communications Devices no se hace responsable ni garantiza la reinstauración de software
de terceros, información personal o datos de memoria contenidos, almacenados o integrados con
cualquier dispositivo inalámbrico, ya sea que esté dentro de garantía o no cuando se regresa a Personal
Communications Devices para reparación o servicio.
Para obtener reparaciones o reemplazo dentro de los términos de esta garantía, el producto debe ser
entregado con prueba de la cobertura de la Garantía con (ej., el recibo fechado de venta), la dirección
del consumidor remitente, número de teléfono y/o fax en horas y días hábiles y una descripción
completa del problema, el envío prepagado, en la Compañía a la dirección en la parte inferior o al lugar
donde se adquirió para realizar el proceso de reparación o reemplazo. Adicionalmente, para dirigirse a
una estación de servicio de Garantía en su área, puede llamar en los Estados Unidos al (800) 229-1235, y
en Canadá al (800) 465-9672 (en Ontario llame al 416-695-3060).
209
APENDICE
LA EXTENSION DE LA RESPONSABILIDAD DE LA COMPAÑIA DENTRO DE ESTA GARANTIA SE LIMITA A
LA REPARACION O REPOSICION PROVISTAS Y EN NINGUNO MOMENTO, DEBE LA RESPONSABILIDAD DE
LA COMPAÑIA EXCEDER EL PRECIO DE COMPRA POR EL PRODUCTO PAGADO POR EL COMPRADOR.
CUALQUIERA DE LAS GARANTIAS IMPLICADAS, INCLUYENDO GARANTIA DE MERCABILIDAD O
ADAPTACION CON UN PROPOSITO PARTICULAR, DEBE LIMITARSE A LA DURACION DE ESTA GARANTIA
ESCRITA. CUALQUIER ACCION REFERENTE AL INCUMPLIMIENTO DE ESTA GARANTIA DEBE SER
MENCIONADA DENTRO DE UN PERIODO DE 18 MESES DE LA FECHA DE COMPRA ORIGINAL. DE
NINGUNA MANERA ES LA COMPAÑIA RESPONSABLE POR DANOS CONSECUENCIALES O INCIDENTALES
ESPECIALES POR EL INCUMPLIMIENTO DE ESTA U OTRA GARANTÍA, EXPRESA O IMPLICITA. SIN
EMBARGO, LA COMPAÑIA NO ES RESPONSABLE DE LA TARDANZA DE LA PROVISION DE SERVICIOS
BAJO ESTA GARANTIA O LA PERDIDA DE USO DURANTE EL TIEMPO QUE EL PRODUCTO ESTE EN
REPARACION O ESTE SIENDO REEMPLAZADO.
Ninguna persona o representante está autorizado para asumir, de parte de la Compañía,
responsabilidad alguna más que la expresada aquí en conexión con la venta de este producto.
Algunos estados o provincias no permiten limitaciones en relación a cuánto tiempo dura una garantía
implicada, o de cómo no aplican a usted las exclusiones o limitaciones de daño consecuencial o
incidental, las exclusiones o limitaciones antes indicadas tal vez no se apliquen a usted. Esta garantía le
ofrece a usted derechos legales específicos y usted también puede tener otros derechos, que varían de
estado a estado o de provincia a provincia.
EN ESTADOS UNIDOS: Personal Communications Devices, LLC.
555 Wireless Blvd.
Hauppauge, NY 11788
(800) 229-1235
EN CANADA: PCD Communications Canada LLC.
5535 Eglinton Avenue West, Suite 234
Toronto, Ontario
M9C 5K5
1-800-465-9672

210
APENDICE
UPnP y DLNA
UNIVERSAL PLUG AND PLAY (UPnP)
La tecnología Universal Plug and Play (UPnP) visa redes domésticas,
redes de proximidad y redes en pequeños negocios y edificios
comerciales. Ella habilita la comunicación de datos entre cualesquier
dos dispositivos bajo el comando de cualquier dispositivo de control
en la red. La tecnología UPnP es independiente de cualquier sistema
operativo, lenguaje de programación o tecnología de red.
DIGITAL LIVING NETWORK ALLIANCE (DLNA)
Usted localizará el logotipo DLNA CertifiedTM en todos los tipos de
nuevos dispositivos digitales para su hogar y para otros usos – TVs,
PCs, teléfonos celulares, de la forma con que son llamados. Pero no
son las mismas TVs, PCs y teléfonos celulares utilizados antes. Ellos
pueden parecer familiares, pero poseen nuevas funcionalidades de
las Clases de Dispositivos DLNA.
ESPECIFICACIONES
DISEÑO
Barra delgada
PANTALLAS
TFT colorido con pantalla 4.o’’, 480x800 (WGA) píxeles de resolución
MELODIAS
AAC, AAC+, eAAC+, MP3, AMR-(NB/WB), MIDI, OGG, WAV, (QCELP/EVRC)

211
APENDICE
CAMARA
Cámara 5M CMOS integrada
xResolución de hasta 2560 x 1920 (4.915.200 píxeles)
xGrabación de vídeo MPEG4 hasta 20c/s; reproducción de hasta 30c/s (tamaño WVGA)
xFunción de timer automático (3,5 ó 10 segundos)
xÁlbum de fotos y álbum de vídeos
DIMENSIONES Y PESO
xPeso: 136g (con célula de batería)
xDimensiones: 127 x 64,4 x 12,09 mm
ADMINISTRACION DE ENERGIA (DESEMPEÑO)
Tipo de batería Capacidad Tiempo en Espera Tiempo de conversación
Ion-litio Estándar (Li-ion) 1.500 mAh Hasta 303.19 hrs Hasta 347 mins
FRECUENCIA OPERATIVA
xRedes GSM/GPRS/EDGE 850/900/1800/1900 MHz, UMTS/HSDPA 850/1900 MHz en América del
Norte, América del Sur, Europa, África y Asia del Pacífico donde estas redes son soportadas.
xConmutación automática de banda.
212
APENDICE
SERVICIOS BASADOS EN LA LOCALIZACION
Su dispositivo inalámbrico puede determinar la localización (suya y del teléfono) física y geográfica
(“Informaciones de Localización”). Determinadas aplicaciones y servicios pueden acceder, recolectar y
utilizar Informaciones de Localización y revelar estas informaciones a otros. Tenga cuidado y discreción
cuando suministra sus informaciones de localización.
Para limitar el potencial acceso no autorizado a sus Informaciones de Localización, los dispositivos
Verizon Wireless son pre-ajustados para “E911” que permite que apenas personas de respuesta a
emergencias autorizadas lo localicen cuando usted disca 9-1-1 en su dispositivo inalámbrico.
Cuando usted selecciona “Servicios de Localización VZW” o “Servicios GPS Independientes” o “Servicios
de Localización Google”, permitirá que terceros accedan a las Informaciones de Localización.
Cualquier software, widget o componentes periféricos o servicio que usted opta por download,
agregar o adjuntar a su dispositivo inalámbrico o de otra forma acceder o utilizar pueden utilizar estas
informaciones.
Verifique su dispositivo inalámbrico periódicamente y utilice solamente softwares, widgets,
componentes periféricos y servicios provenientes de fuentes confiables. Verizon Wireless no hace
ninguna representación de precisión, integridad u oportunidad de cualesquier datos, producto o
servicios de localización.
Cuando usted utilice su navegador móvil u otros servicios y aplicaciones, estará autorizando a Verizon
Wireless a recolectar, utilizar y divulgar sus Informaciones de Localización para suministrar cualesquier
servicios de localización.
Verizon Wireless no retiene informaciones de Localización además de tiempo necesario para
suministrar servicios al usuario. Nosotros no revelamos conscientemente sus Informaciones de
Localización a terceros sin su consentimiento, excepto cuando exigido por cuestiones legales.
Revise cuidadosamente las políticas de privacidad de los proveedores de la aplicación y terceros que
tendrían acceso a sus Informaciones de Localización. Riesgos significativos pueden ser asociados a la
divulgación de sus Informaciones de Localización a otras personas.
213
APENDICE
CONTRATO DE LICENCIA DEL USUARIO FINAL (EULA)
Su uso del Correo de Voz Visual confirma que usted es el propietario de la cuenta, autorizado a firmar
este servicio y que concuerda en pagar la tasa de inscripción mensual. Las áreas de cobertura del
Correo de Voz y V Cast básicos son necesarias para la utilización del Correo de Voz Visual. El servicio de
Correo de Voz Visual puede no soportar todas las funciones tradicionales del Correo de Voz tradicional
que permanecerán accesibles marcándose *86 en su teléfono. Las tasas de mensaje estándar se aplican
a cualesquier mensajes iniciados a partir del Correo de Voz Visual.
Al acceder el Correo de Voz, las funciones de Encaminado de Llamadas, Retorno de Llamada, Operador
Personal y otras funciones están sujetas a las tarifas y tasas de tiempo de conexión, larga distancia,
roaming y los minutos IN Calling no se aplican. El Correo de Voz Visual y el Correo de Voz tradicional
no siempre podrán ser sincronizados y, si usted cancela el Correo de Voz Visual podrá perder todos los
Correos de Voz almacenados y las respectivas informaciones almacenadas.
El Correo de Voz Visual solo puede utilizar la red Verizon Wireless al envés de la conexión Wi-Fi
disponible. Las tarifas de uso de datos estándar serán aplicables.
Comprendo que al seleccionar OK mi contraseña será automáticamente almacenada y permitirá que
cualquier persona en posee este dispositivo tenga acceso a mi Correo de Voz. Entiendo aun que mis
mensajes del Correo de Voz pueden ser almacenados en el formato electrónico en este dispositivo.
AVISO LEGAL
Bluetooth es una marca comercial de Bluetooth SIG, Inc. Wi-Fi es una marca comercial de Wi-Fi Alliance.
Google, YouTube, Picasa, Gmail, Google Maps y Android Market son marcas comerciales de Google, Inc.
LISTA DE VERIFICACION DE SOLUCION DE PROBLEMAS
CUANDO LA CUALIDAD DEL AUDIO SEA BAJA:
Finalice la llamada y intente nuevamente.
CUANDO EL INTERLOCUTOR NO PUEDE ESCUCHAR SU VOZ
Su teléfono puede estar ajustado para SILENCIOSO. Deshabilite la función SILENCIOSO. O su mano
puede estar cubriendo el micrófono.
214
APENDICE
CUANDO LA VIDA UTIL DE LA BATERIA SEA INFERIOR A LA NORMAL:
Esto puede ocurrir cuando estuviera en un área con señal débil. Apague su teléfono cuando no
estuviera en uso. Cambie la batería cuando la carga sea agotada.
CUANDO USTED NO PUEDA ENCENDER SU TELEFONO:
Certifíquese de que su batería sea cargada. Verifique si su teléfono funciona mientras recarga la batería.
CUANDO USTED NO PUEDA ENVIAR UN MENSAJE:
Usted puede no estar registrado para recibir un servicio SMS, o puede estar en un área donde su
proveedor de servicio de red no puede suministrar el servicio.
CUANDO NO SEA POSIBLE REALIZAR UNA LLAMADA:
Su teléfono puede estar ajustado para “marcado fijo”. Cancele la función “marcado fijo”.
215
Índice
Índice
A
ACCESIBILIDAD 184
ACCESOS RAPIDOS 34
AJUSTE DE LA FECHA 185
AJUSTES 168
ALARMA/RELOJ 144
ALMACENAMIENTO 163
ALMACENAMIENTO EN LOTES 165
ANCHO DE BANDA MOVIL Y
HOTSPOT 114
ANDROID MARKET 138
ANOTACION MANUSCRITA 153
APLICACIONES 2
B
BATERIA DE IONLITIO 4
BLOQUEO DE LA PANTALLA 175
BLOQUEO ESTANDAR 175
Bluetooth 111
BORRAR TODO 164
BOTON ENCIENDEAPAGA PARA
FINALIZAR LLAMADA 184
BRILLO 173
BUSQUEDA POR VOZ 137
C
CALCULADORA 142
CALENDARIO 65
CAMARA 82
CAMPANILLA 78
CLIMA 159
CONTACTOS 56
CONTRASEÑA 176
CONVERTIDOR 151
CORREO DE VOZ 45
CRONOMETRO 150
CUENTAS Y SINCRONIZACION 181
D
DATOS EN EL PLAN DE FONDO 181
DEPURACION USB 180
DESINSTALACION 179
DESMONTAJE DE LA TARJETA SD 163
DLNA 100, 210
216
Índice
E
EMAIL 69
EXHIBICION 173
F
FECHA Y HORA 185
FORMATO DE FECHA 186
G
GALERIA 93
GARANTIA 189
GMAIL 72
Google Maps vea Mapas 117
Google SEARCH 135
Google TALK vea Hablar 61
GRABADORA 157
H
HABLAR 61
HERRAMIENTAS DE RELOJ 148
HORARIO MUNDIAL 148
I
IDIOMA Y TECLADO 183
INALAMBRICOS Y REDES 168
INFORMACIONES DE SEGURIDAD 189
INFORMACIONES LEGALES 187
L
LATITUDE 120
LIMITE DE TIEMPO DE LA
PANTALLA 174
LISTAS DE REPRODUCCION 78
LOCALIZACIONES SIMULADAS 181
LOCALIZACION Y SEGURIDAD 175
M
MAPAS 117
MARCADORES 132
MEDIA NET 100
MENSAJERIA 48
MODEM 113
MODO AVION 168
MODO SILENCIOSO 171
MODO TTY 171
MONTAJE DE TARJETA SD 163
MUSICA 76
217
Índice
N
NAVEGACION 123
NAVEGADOR 130
NOTICIAS Y CLIMA 125
P
PANTALLA AUTOROTATIVA 174
PANTALLA DE TOQUE 20
PAPEL DE PARED 36
PARADA FORZADA 179
PASO 50
PC 164
PIN 28
PLACES 118
PRIVACIDAD 182
R
RECUPERACIÓN AUTOMÁTICA 182
REDES MOVILES 168
REDE Wi-Fi 108
REGISTRO DE LLAMADAS 45
REINICIACIÓN A LOS DATOS
DE FABRICA 182
REINICIACION DEL TELEFONO 182
S
SATELITES GPS 117
SONIDO 171
T
TARJETA microSD™ 16
TARJETA SIM 4G 15
TECLA COMANDOS DE VOZ 23
TECLADO 49
TECLA
ENCIENDEAPAGA/BLOQUEAR 23
TELA INICIO 29
TEXTO RAPIDO 53
TIMER 150
TONALIDADES DTMF 171
U
UPnP 210
USO DE LA BATERIA 187
UTILIZAR MI LOCALIZACION 136
