user manual

1
RW205 Wireless
PROGRAMMABLE THERMOSTAT
OWNER’S MANUAL
TW205
3
CONTENTS Page
The PECO Wave Wireless System ................................................................................... 5
Front Panel Reference ...................................................................................................... 6
Display Reference ............................................................................................................. 7
Saving Changes ................................................................................................................ 11
UP and DOWN Button Operation ...................................................................................... 12
System Button Operation .................................................................................................. 12
Fan Button Operation ........................................................................................................ 14
Program Button Operation ................................................................................................. 15
Function Overview ................................................................................................ 15
Setting the Clock and Day ...................................................................................... 16
Setting the Temperature Display ............................................................................. 16
Programming Time & Temperature Settings ............................................................. 17
Factory Program ................................................................................... 17
Custom Program ................................................................................... 18
Copy Feature ........................................................................ 19
Time & Temperature Programming Example ............................ 20
Overriding the Program ......................................................................................... 21
Setting up a Temporary Hold .................................................................. 21
Setting up a Permanent Hold .................................................................. 22
Turning off a Hold.................................................................................... 22
Custom Program Worksheet ............................................................................................. 23

4
CAUTION!
• FOLLOW TW206 AND RW205 INSTALLATION INSTRUCTIONS BEFORE PROCEEDING.
• READ THESE INSTRUCTIONS CAREFULLY BEFORE ATTEMPTING TO OPERATE THIS
THERMOSTAT.
• Retain these instructions for future reference. This product, when installed, will be part of an
engineered system whose specications and performance characteristics are not designed or
controlled by PECO.
• If at any time your system does not operate properly, contact a qualied service person.
• Care should be used to avoid static discharge to the thermostat.
IMPORTANT NOTE
This thermostat was shipped with factory default settings. Your thermostat’s installer may have
congured the thermostat differently from the factory-default settings, and may have modied or
disabled certain features. Contact the installer or a service technician if you have questions about
the thermostat’s conguration.
!
5
THE PECO WAVE WIRELESS SYSTEM
The PECO Wave Wireless System is comprised of the TW206 wireless thermostat paired with a
RW205 receiver. Optional accessories to the system are the SW205 wireless occupancy sensor
and SW206 wireless door switch. The Wave Wireless System is intended for use primarily in
2- or 4-Pipe Fan Coil Units, PTAC, PTHP, and on/off control applications.
The TW206 thermostat is a wireless programmable thermostat that may be powered by battery,
24 VAC, or both. It can be set for 7-day, 5/2-day, 5/1/1-day, or 1-day programmable operation,
with 4 time periods per day. The thermostat also features separate heating and cooling
setpoints, auto changeover, fan control functions, and wireless communication with the RW205
receiver. The RW205 receiver is wired to the HVAC equipment and controls all outputs. The
optional SW205 occupancy sensor and SW206 door switch also communicate wirelessly with
the RW205 receiver to signal occupancy status.
Any changes or modifications not expressly approved by the party responsible for
compliance could void the user's authority to operate this equipment.
Operation is subject to the following two conditions: (1) this device may not cause
interference, and (2) this device must accept any interference, including interference that
may cause undesired operation of the device.
6
1
2
3
4
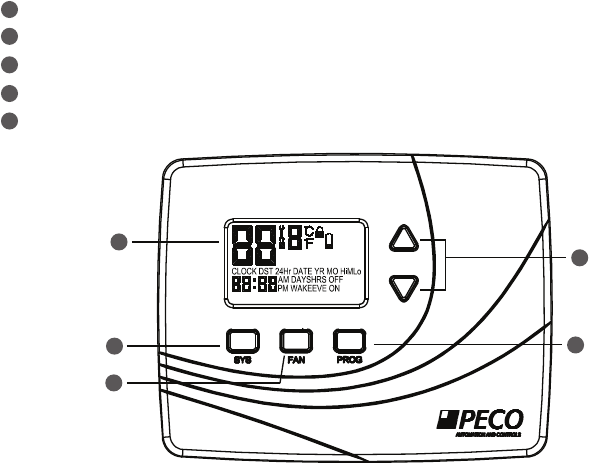
FRONT PANEL REFERENCE
Liquid Crystal Display with a Blue Backlight
UP ▲and DOWN ▼Buttons
SYSTEM Button
FAN Button
PROGRAM Button
5
1
2
3
4
5
SETBACK
MTUWTHFSASU DFLTSLEEP
OFF
HEAT
COOL
AUTO
FAN
Auto ON
SET
HOLD
COPY
Aux
7
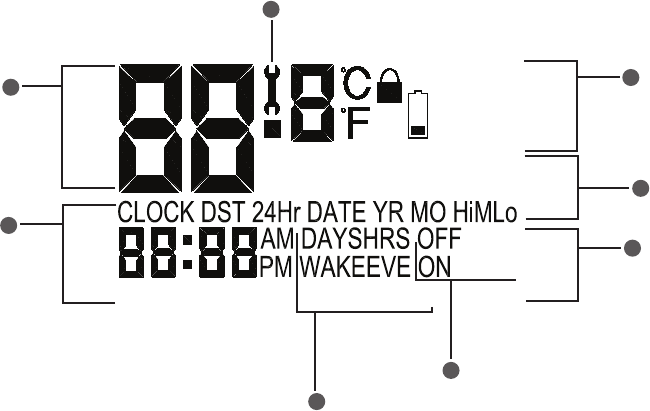
DISPLAY REFERENCE
SETBACK
MTUWTHFSASU DFLTSLEEP
OFF
HEAT
COOL
AUTO
FAN
Auto ON
SET
HOLD
COPY
Aux
1
2
3
4
5
6
7
8

8
System Mode Display
HEAT – indicates the system is in heating mode.
COOL – indicates the system is in cooling mode.
AUTO – indicates the system will automatically changeover between heating and cooling modes
as the room temperature varies.
OFF – turns off the entire system.
SETBACK – indicates the heating or cooling system is operating in setback mode. Setback mode
is an energy saving feature that can be either manually activated by the thermostat’s user or
automatically activated by an occupancy sensor or door switch.
Temperature Display
Default display: Digits display the current room temperature.
During programming: Digits are used to set the desired temperatures.
Time and Day Display
Default display: Digits indicate the current time and day abbreviations indicate the current day.
During programming: Digits and days are used to program time periods.
CLOCK – lights up during programming when the clock is being set.
24Hr – lights up during programming to indicate time will be displayed in 24-hour clock format.
AM / PM – indicates 12-hour clock format.
1
2
3

9
DISPLAY REFERENCE (cont.)
Programming Commands
SET – enters thermostat into custom program mode which allows you to specify a unique times
and temperatures for a particular day or group of days.
COPY – simplies programming by allowing you to copy all of an individual day’s settings to
another day or group of day.
DFLT – restores the thermostat to the factory program.
Time Period Indicators
WAKE, DAY, EVE, and SLEEP are the names given to the four time periods per day. Each time
period has its own unique setpoint temperatures.
Fan Operation Indicators
FAN – “FAN” will be always be lit in conjunction with “ON” or “AUTO”.
ON – indicates constant, continuous fan operation.
Auto – indicates fan is only on with heating or cooling demand.
Hi – indicates high speed fan; always lit in conjunction with “ON” or “AUTO”.
M – indicates medium speed fan; always lit in conjunction with “ON” or “AUTO”.
Lo – indicates low speed fan; always lit in conjunction with “ON” or “AUTO”.
4
5
6

10
Program Override Commands
HOLD – indicates thermostat is in manual operation. (Programmed settings are off, but not lost.)
HOLD HRS – during programming, lights up in conjunction with clock digits; allows program to be
put on hold for up to 24 hours.
HOLD DAYS – during programming, lights up in conjunction with the clock digits; allows program
to be put on hold for up to 99 days.
HOLD ON – indicates thermostat is in permanent manual operation.
OFF – turns off the hold and resumes programmed settings.
Service Indicator
The wrench symbol is displayed when there is a temperature sensor error. It indicates there is an
open or a short connection to the sensor. When this occurs, the thermostat will disable all outputs
and illuminate the wrench symbol. A service technician should be called to determine the cause
of the error.
7
8

11
SAVING CHANGES
As you navigate your thermostat, be aware of the thermostat’s save and exit protocol:
• The thermostat automatically saves all the changes you make, as you make them.
• When you are in the SYSTEM or FAN menus:
– If you push a button that is not applicable to the current menu, all changes are saved and
the thermostat goes to the menu associated with the button that was pushed.
– If the thermostat is idle for ve seconds, the thermostat times out, saves all changes, and
returns to the thermostat’s default display.
• When you are in the PROGRAM menu:
– If you push a button that is not applicable to the current menu, nothing happens (your
programming is not interrupted).
– If the thermostat is idle for fteen seconds, the thermostat times out, saves all changes,
and returns to the thermostat’s default display.
– When you have nished the last step of programming a setting, pressing PROGRAM
saves your setting and returns the thermostat to the default display.

12
▲AND ▼BUTTON OPERATION
The ▲and ▼buttons function in two ways:
• When you are in the default display, you can press ▲to increase, or ▼to decrease, the
current temperature setpoint. This will override programmed temperature settings until the next
programmed time period (Wake, Day, Evening, or Sleep).
• When you are in the PROGRAM menu, you can press ▲to scroll up, or ▼to scroll down,
through the menu, time, and temperature options.
SYSTEM BUTTON OPERATION
Pressing SYSTEM will light up the ve system mode options described below. Press SYSTEM
to scroll through the options. As you scroll, the current option will be blinking. To select the
blinking option, wait for the ve-second timeout, which saves your option and returns you to the
thermostat’s default display.
MENU DESCRIPTION
HEAT The thermostat operates as a Heating Only thermostat.
COOL The thermostat operates as a Cooling Only thermostat.
AUTO The thermostat automatically selects the appropriate Heat or Cool mode
depending upon the setpoint (desired temperature) and zone temperature
(actual temperature).
OFF Turns the system off by disabling all thermostat outputs.

13
SYSTEM BUTTON OPERATION (cont.)
MENU DESCRIPTION
SETBACK Setback mode is an energy saving feature that minimizes the heating and
cooling when the room is not occupied. Setback mode overrides the
programmed time and temperature settings by telling the thermostat to
instead use the setback setpoint for heating and cooling. The setback
setpoint temperatures are factory default or installer-selected during
installation. During setback mode, when a demand for heating or cooling
exists, the fan will run at the lowest speed.
• Automatic setback mode: If your thermostat is connected to an occupancy
sensor or door switch, setback mode is automatically turned on and off by
the sensor or door switch.
• Manual setback mode: Select SETBACK in the SYSTEM menu. Setback
temperature settings will remain in effect until you manually turn off
setback mode. Selecting HEAT, COOL, or AUTO in the SYSTEM menu
will turn off setback and resume your programmed time and temperature
settings.
Note: SETBACK appears on your menu only if this feature was enabled by
your thermostat’s installer.

14
FAN BUTTON OPERATION
Pressing FAN will light up the six fan mode options described below. Press FAN to scroll through
the options. As you scroll, the current option will be blinking. To select the blinking option, wait
for the ve-second timeout, which saves your option and returns you to the thermostat’s default
display.
MENU DESCRIPTION
ON Hi High speed fan is on continuously, even if no demand for heating or cooling
exists.
ON M Medium speed fan is on continuously, even if no demand for heating or
cooling exists.
ON Lo Low speed fan is on continuously, even if no demand for heating or cooling
exists.
AUTO Hi High speed fan cycles with active demand for heating and cooling.
AUTO M Medium speed fan cycles with active demand for heating and cooling.
AUTO Lo Low speed fan cycles with active demand for heating and cooling.

15
PROGRAM BUTTON OPERATION
Function Overview
Pressing PROGRAM lights up ve program mode options, described below. Press ▲or ▼buttons
to scroll through the options. As you scroll, the current option will be blinking. To select the blinking
option, press PROGRAM again and you will be taken to the menu associated with that option.
MENU DESCRIPTION
CLOCK Sets the current time and day. (See “Setting the Clock & Day”)
°F / °C Use this option to change the temperature display to Fahrenheit or Celsius.
Your thermostat’s default temperature display setting is Fahrenheit. (See
“Setting the Temperature Display”)
SET Use to specify the time and temperature programming for a particular day
or group of days. Also allows you to reset the thermostat to the factory
default ENERGY STAR program. (See “Programming Time & Temperature
Settings”)
COPY Simplies programming by allowing you to copy a particular day’s program
to another day or group of days. (See “Programming Time & Temperature
Settings”)
HOLD Puts the thermostat in manual operation for a permanent or temporary
time period. Overrides your programmed settings, but does not lose them.
(See “Overriding the Program”)

16
Setting the Clock & Day
1. Press PROGRAM once.
2. Press ▲or ▼to scroll until “CLOCK” is blinking. To select, press PROGRAM once.
3. Press ▲or ▼to scroll through “24Hr”, “AM”, “PM” options. “24Hr” sets your thermostat to a 24-
hour clock. “AM” and “PM” sets your thermostat to a 12-hour clock. To select your preference,
press PROGRAM once.
4. Press ▲or ▼to scroll to the current hour. To select, press PROGRAM once.
5. Press ▲or ▼to scroll to the current minute. To select, press PROGRAM once.
6. Press ▲or ▼to scroll to the current day. To select, press PROGRAM once.
Your selections have been saved and you have exited program mode. Your thermostat is ready
to function with the factory preprogrammed ENERGY STAR program. If you want to change the
program for your particular needs, follow the instructions in the “Programming Your Thermostat”
section.
Setting the Temperature Display
1. Press PROGRAM once.
2. Press ▲or ▼to scroll until “°F °C” is blinking. To select, press PROGRAM once.
3. Both “°F” and “°C” will be lit, but only one will be blinking. Press ▲or ▼to scroll so that the
preferred option is blinking. To select, press PROGRAM once.
Your selection has been saved and you have exited program mode.

17
Programming Time & Temperature Settings
Your thermostat’s programming feature allows you to divide up a 24-hour day into four time
periods (referred to as Wake, Day, Evening, and Sleep), and give each time period its own setpoint
temperatures. Your Heat Setpoint Temperature tells your heating system the room temperature to
maintain during cold weather. The Cool Setpoint Temperature tells your cooling system the room
temperature to maintain during hot weather.
Factory Program
Your thermostat comes from the factory preprogrammed with all seven days of the
week set to the times and temperatures shown below.
Time Period Start Time Heat Setpoint
Temperature
Cool Setpoint
Temperature
Wake 6:00 am 70° F (21.0° C) 78° F (25.0° C)
Day 8:00 am 62° F (17.0° C) 85° F (28.5° C)
Evening 6:00 pm 70° F (21.0° C) 78° F (25.0° C)
Sleep 10:00 pm 62° F (17.0° C) 82° F (27.0° C)
If the factory program meets your needs, simply follow the “Setting the Clock & Day”
instructions, and you’re done. If you want to change the preprogrammed times and/or
temperatures, follow the instructions under “Custom Program”.

18
Custom Program
Begin by planning your program. Use the “Custom Program Worksheet” to plan your
program time periods and temperatures you want during each period. You must program
four periods for each day. Fill in the complete table, as it will serve as a record of your
programs, then follow this procedure:
1. Press PROGRAM once.
2. Press ▲or ▼to scroll until “SET” is blinking. To select, press PROGRAM once.
3. Press ▲or ▼to scroll to the day or group of days you want to program. To select
your preference, press PROGRAM once.
Day / Group of Days options are:
• To program each day individually, the abbreviations are: “M” is Monday,
“TU” is Tuesday, “W” is Wednesday, “TH” is Thursday, “F” is Friday, “SA” is
Saturday, and “SU” is Sunday.
• “MTUWTHFSASU” allows you to give all 7 days of the week the identical
heating & cooling program.
• “MTUWTHF” allows you to give all 5 weekdays the identical heating &
cooling program.
• “SASU” allows you to give both weekend days the identical heating &
cooling program.
• “DFLT” restores all seven days of the week to the original factory
19
preprogrammed ENERGY STAR program.
4. Press ▲or ▼to scroll through the four time periods. To select your preference, press
PROGRAM once.
5. Press ▲or ▼to scroll to the desired starting hour. To select, press PROGRAM
once.
6. Press ▲or ▼to scroll to the desired starting minute. To select, press PROGRAM
once.
7. Press ▲or ▼to scroll to the desired Heat Setpoint Temperature. To select, press
PROGRAM once.
8. Press ▲or ▼to scroll to the desired Cool Setpoint Temperature. To select, press
PROGRAM once.
You’re now done with one time period. Your selections have been saved and you have
exited program mode. Repeat steps 1 through 8 for remaining day(s) and time periods.
You may also use the thermostat’s “COPY” command to copy all of an individual day’s
settings to another day or group of days.
Copy Feature
1. Press PROGRAM once.
2. Press ▲or ▼to scroll until “COPY” is blinking. To select, press PROGRAM once.
3. Press ▲or ▼to scroll to the individual day you want to copy from. “DFLT” (the
default Factory Program) is also a copy option. To select your preference, press

20
PROGRAM once.
4. Press ▲or ▼to scroll to the day or group of days you want to copy to. To select,
press PROGRAM once.
Your selection has been saved and you have exited program mode.
Time & Temperature Programming Example
In this example, the thermostat user wants to program the weekend with a different
schedule from the Factory Program. The user wants the Saturday and Sunday program
to be identical.
1. Press PROGRAM once.
2. Press ▲or ▼to scroll until “SET” is blinking. To select, press PROGRAM once.
3. Press ▲or ▼to scroll until “SASU” is blinking. To select, press PROGRAM once.
4. Press ▲or ▼to scroll until “WAKE” is blinking. To select, press PROGRAM once.
5. Press ▲or ▼to scroll hours to “8: ”. To select, press PROGRAM once.
6. Press ▲or ▼to scroll minutes to “ :30”. To select, press PROGRAM once.
7. User wants to keep same Heat Setpoint Temperature. To keep unchanged, press
PROGRAM once.
8. User wants to keep same Cool Setpoint Temperature. To keep unchanged, press
PROGRAM once.

21
Now you’re done setting up the Wake period, and ready to set up the other three time
periods for Saturday and Sunday:
• Program the Day period for SASU by repeating steps 1 through 8, but in Step 4, select
“DAY”.
• Program the Evening period for SASU by repeating steps 1 through 8, but in Step 4,
select “EVE”.
• Program the Sleep period for SASU by repeating steps 1 through 8, but in Step 4,
select “SLEEP”.
Now you’re done setting up all four time periods for SASU.
Overriding the Program
Your thermostat’s HOLD feature allows you to put the thermostat in manual operation for either
a specied or indenite length of time. HOLD will override your programmed settings, but does
not lose them.
Setting up a Temporary Hold
You may set up a temporary hold by hours or days.
1. Press PROGRAM once.
2. Press ▲or ▼to scroll until “HOLD” is blinking. To select, press PROGRAM once.
3. Press ▲or ▼to scroll through options. “DAYS” allows you to specify 0-99 days

22
hold; “HRS” allows you to specify 0-24 hours hold. To select your preference, press
PROGRAM once.
4. Press ▲or ▼to scroll to the desired length of time. To select, press PROGRAM
once.
The thermostat is now on hold for the time period you selected, unless you decide to
turn it off earlier. (See “Turning off a Hold”.)
Setting up a Permanent Hold
1. Press PROGRAM once.
2. Press ▲or ▼to scroll until “HOLD” is blinking. To select, press PROGRAM once.
3. Press ▲or ▼to scroll to “ON”. To select, press PROGRAM once.
The thermostat is now on hold until you manually turn off the hold. (See “Turning off a
Hold”.)
Turning off a Hold
1. Press PROGRAM once.
2. Press ▲or ▼to scroll until “HOLD” is blinking. To select, press PROGRAM once.
3. Press ▲or ▼to scroll to “OFF”. To select, press PROGRAM once.
The thermostat will now resume your programmed time and temperature settings.

23
CUSTOM PROGRAM WORKSHEET
Day Time Period Start Time Heat Setpoint
Temperature
Cool Setpoint
Temperature
Monday
Wake
Day
Evening
Sleep
Tuesday
Wake
Day
Evening
Sleep
Wednesday
Wake
Day
Evening
Sleep

24
Thursday
Wake
Day
Evening
Sleep
Friday
Wake
Day
Evening
Sleep
Saturday
Wake
Day
Evening
Sleep
Sunday
Wake
Day
Evening
Sleep

25
© Copyright 2009. PECO, Inc. All Rights Reserved. P/N 69511 0250-9001 REV 0
PECO is a registered trademark of PECO, Inc. The PECO logo is a trademark and/or service mark of PECO, Inc.
Automation and Controls
Division of PECO, Inc.
PO Box 82189, Portland, OR 97282
Phone: 503-233-6401
Email: sales@pecomanufacturing.com
www.pecomanufacturing.com
This device complies with part 15 of the FCC rules. Operation is subject to the following two
conditions: (1) this device may not cause harmful interference, and (2) this device must accept
any interference received, including interference that may cause undesired operation.
RW205