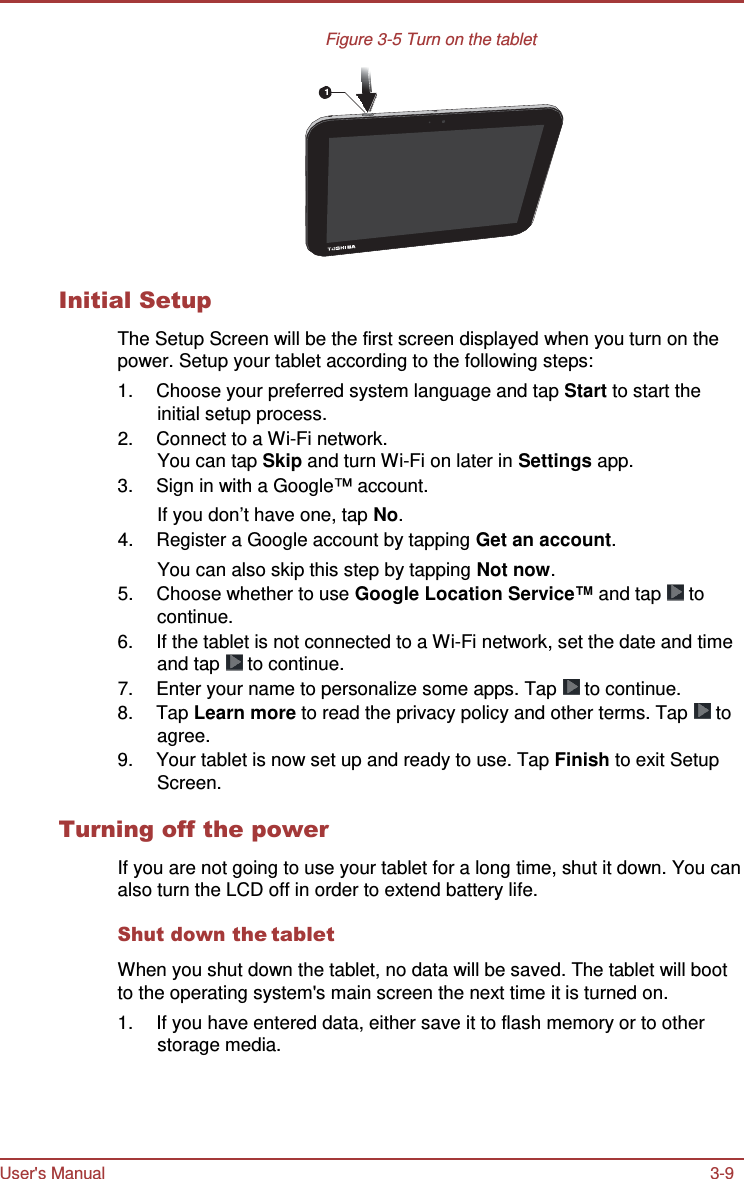
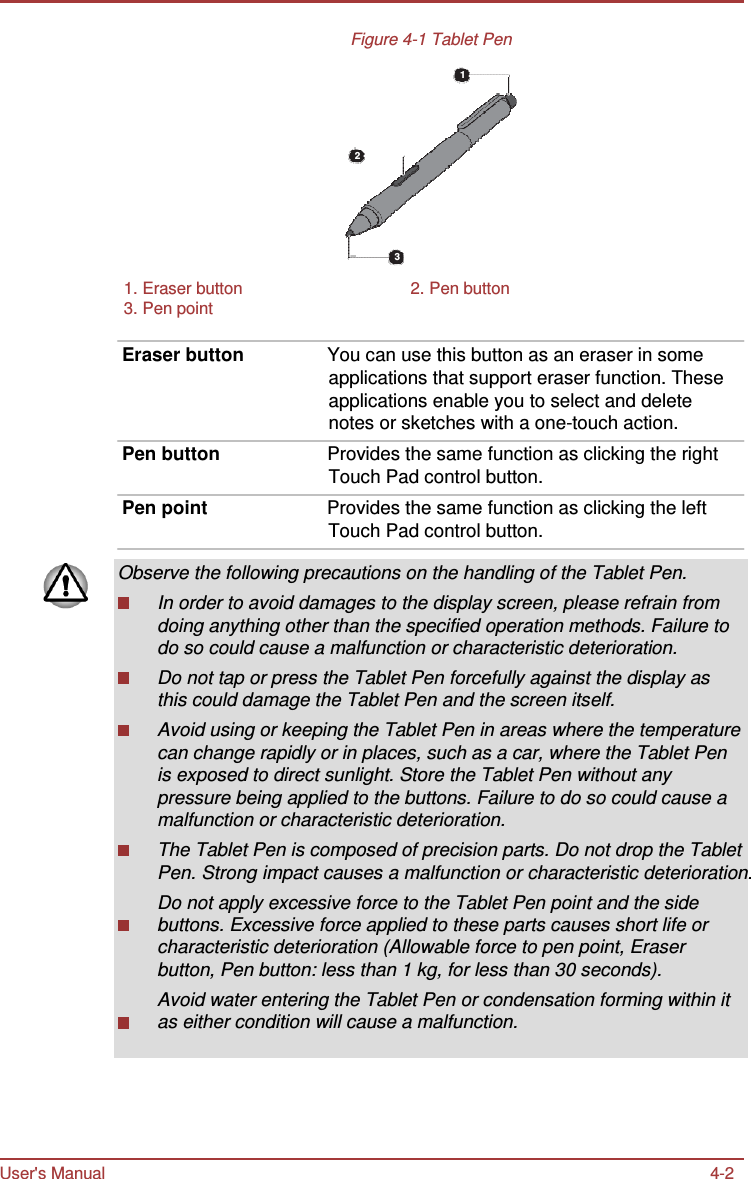
PEGATRON PDAPDAAT10-A TABLET User Manual

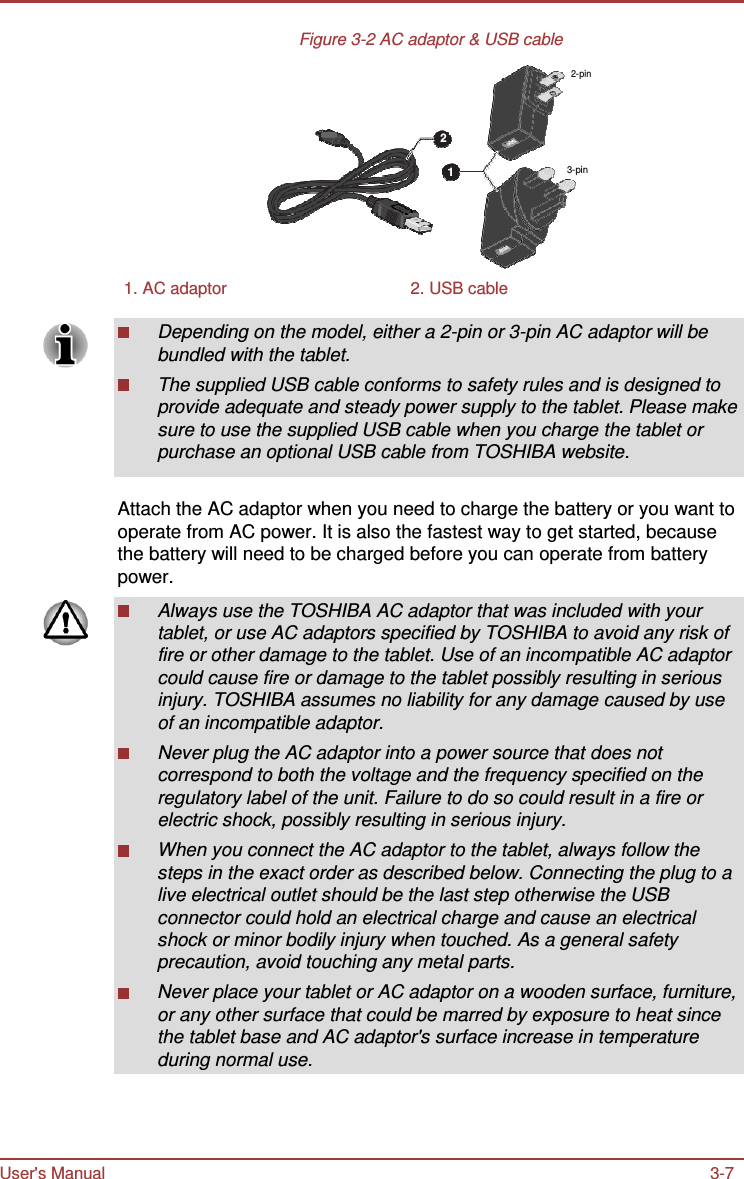
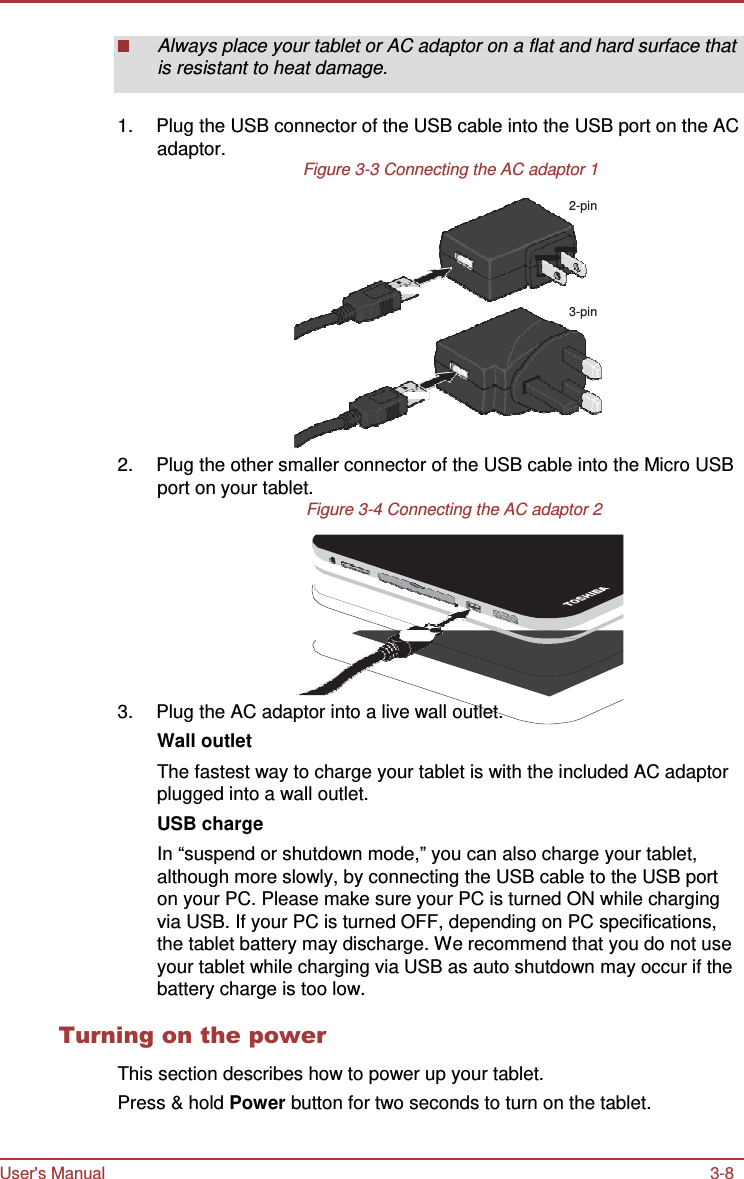
PEGATRON CORPORATION TABLET

User Manual

          User's Manual     TOSHIBA AT10-A REGZA Tablet AT502  series
User's Manual ii    Table of Contents  Chapter 1 Legal & Regulatory Copyright ................................................................................................ 1-1 Disclaimer  .............................................................................................. 1-1 Trademarks  ............................................................................................ 1-2 H.264/AVC, VC-1 and MPEG-4 License Notice  ................................... 1-2 FCC information  .................................................................................... 1-3 CE compliance ....................................................................................... 1-4 Working environment ............................................................................ 1-4 Additional environments not related to EMC ...................................... 1-5 REACH - Compliance Statement .......................................................... 1-5 Following information is only valid for EU-member States:  ............. 1-6 Following information is only for India  ............................................... 1-7 Canadian regulatory information (Canada only) ................................ 1-7 Canada - Industry Canada (IC)  ............................................................. 1-7 Following information is only for Turkey: ........................................... 1-7  Chapter 2 Introduction About the guide  ..................................................................................... 2-1 Instruction Manual for Safety and Comfort ......................................... 2-1 Safety icons  ........................................................................................... 2-1  Chapter 3 Getting Started Check the components ......................................................................... 3-1 Grand tour .............................................................................................. 3-1 Hardware  ................................................................................................ 3-4 Using the tablet for the first time  ......................................................... 3-6 Care and use of the battery  ................................................................ 3-10 Charging the battery  ........................................................................... 3-11  Chapter 4 Basics Using the touch screen ......................................................................... 4-1 Using the Tablet Pen ............................................................................. 4-1 Getting to know the Home screen  ....................................................... 4-4 Opening and switching applications ................................................... 4-5 Monitoring your tablet’s status ............................................................ 4-6 Quick Settings  ....................................................................................... 4-6 Managing Notifications ......................................................................... 4-7 Locking your screen  ............................................................................. 4-8
User's Manual 3    Capturing your screen  .......................................................................... 4-8 Customizing the Home screen ............................................................. 4-8 Changing the Screen Orientation  ...................................................... 4-10 Managing Tasks and Applications ..................................................... 4-10 Connecting to a computer .................................................................. 4-10 Factory Reset ....................................................................................... 4-11  Chapter 5 Applications Analog clock  .......................................................................................... 5-1 Browser  .................................................................................................. 5-1 Calculator ............................................................................................... 5-3 Calendar  ................................................................................................. 5-3 Camera  ................................................................................................... 5-4 Clock ....................................................................................................... 5-5 Downloads  ............................................................................................. 5-7 Email ....................................................................................................... 5-7 Gallery  .................................................................................................... 5-8 Play Music .............................................................................................. 5-9 People ................................................................................................... 5-10 Service Station  .................................................................................... 5-11 TOSHIBA Media Player  ....................................................................... 5-13 TOSHIBA File Manager  ....................................................................... 5-14 Online Manual ...................................................................................... 5-17  Chapter 6 Settings Wireless & networks  ............................................................................. 6-1 Device ..................................................................................................... 6-7 Personal  ............................................................................................... 6-13 Accounts  .............................................................................................. 6-16 System .................................................................................................. 6-16  Chapter 7 Optional Accessories Memory media slot ................................................................................ 7-1 SIM card slot  .......................................................................................... 7-3 USB device ............................................................................................. 7-4 HDMI device  ........................................................................................... 7-5 Optional TOSHIBA Accessories  .......................................................... 7-6  Chapter 8 Troubleshooting Problem solving process ...................................................................... 8-1
User's Manual 4    Hardware and system checklist ........................................................... 8-2 TOSHIBA Support .................................................................................. 8-3  Chapter 9 Specifications Physical Dimensions  ............................................................................ 9-1 Environmental Requirements  .............................................................. 9-1  Chapter 10 Information for Wireless Devices Wireless Technology Interoperability  ............................................... 10-1 CAUTION about Wireless Devices ..................................................... 10-1 Wireless Devices and your health  ..................................................... 10-2 Radio Regulatory Information ............................................................ 10-2 Device Authorization ........................................................................... 10-7 Radio approvals for wireless devices  ............................................... 10-7
User's Manual 1-1    Chapter 1   Legal & Regulatory Copyright © 2013 by TOSHIBA Corporation. All rights reserved. Under the copyright laws, this manual cannot be reproduced in any form without the prior written permission of TOSHIBA. No patent liability is assumed, with respect to the use of the information contained herein. First edition March 2013  Disclaimer This manual has been validated and reviewed for accuracy. The instructions and descriptions it contains are accurate for this device at the time of this manual’s production. However, succeeding devices and manuals are subject to change without notice. TOSHIBA assumes no liability for damages incurred directly or indirectly from errors, omissions or discrepancies between this device and the manual. This product incorporates copy protection technology that is protected by U.S. and foreign patents, including patent numbers 5,315,448; 5,583,936; 6,836,549; and 7,050,698 and other intellectual property rights. The use of Rovi Corporation's copy protection technology in the product must be authorized by Rovi Corporation. Reverse engineering or disassembly is prohibited. TO THE MAXIMUM EXTENT PERMITTED BY APPLICABLE LAW, TOSHIBA CORPORATION, ITS AFFILIATES AND/OR SUPPLIERS (“TOSHIBA”) DISCLAIM ALL WARRANTIES WITH REGARD TO THE SOFTWARE, EITHER EXPRESSLY -IMPLIED, OR STATUTORY, INCLUDING, BUT NOT LIMITED TO, THE WARRANTY OF NONINFRINGEMENT OF THIRD PARTY RIGHTS, AND THE IMPLIED WARRANTIES AND CONDITIONS OF MERCHANTABILITY AND FITNESS FOR A PARTICULAR PURPOSE. THE ENTIRE RISK AS TO THE QUALITY AND PERFORMANCE OF THE SOFTWARE IS WITH YOU. TOSHIBA SHALL NOT WARRANT THAT THE FUNCTIONS CONTAINED IN THE SOFTWARE WILL MEET YOUR REQUIREMENTS OR THAT THE OPERATION OF THE SOFTWARE WILL BE UNINTERRUPTED OR ERROR-FREE. Notwithstanding the above, portions of the software include software files subject to certain open source license agreements, and such open source software files are subject to the notices and additional terms and conditions that are referenced in the End User License Agreement (“EULA”) shown in “Toshiba Legal Information” section of the “Legal information” available
User's Manual 1-2    under the “About tablet” in the “Settings” app. (EULA document is also in this package.) Such open source software files are provided on an “AS IS” basis to the maximum extent permitted by applicable law. Please carefully read “Open source licenses” section of the “Legal Information” available under the “About tablet” in the “Settings” app for the relevant copyright and licensing terms. If there is any discrepancy between the terms and conditions of the applicable open source license agreement and the EULA, the terms and conditions of the applicable open source license agreement prevail with respect to the applicable open source software. Until the date that is three years after you acquired the Software, you may obtain a copy of the source code corresponding to the binaries for GPL- licensed file by sending a request to TOSHIBA customer service at [http:// support.toshiba-tie.co.jp/android/index_e.htm], and TOSHIBA will send you a link to such source code.  Trademarks Android, Google, Google Play, Chrome, Google Talk, Google Maps and other marks are trademarks of Google Inc. Availability of Google applications, services, and features may vary by country, carrier, phone model, and manufacturer. Bluetooth is a trademark owned by its proprietor and used by TOSHIBA under license. Wi-Fi is a registered trademark of the Wi-Fi Alliance. Secure Digital and SD are trademarks of SD Card Association. Adobe, Adobe PDF and Reader are either registered trademarks or trademarks of Adobe Systems Incorporated in the United States and/or other countries. SRS and SRS logo are trademarks or registered trademarks of SRS Labs, Inc. SRS technology is incorporated under license from SRS Labs, Inc. SRS Premium Voice PRO technology is incorporated under license from SRS Labs, Inc. TouchSense is a trademark of Immersion Corporation. Other trademarks and registered trademarks not listed above may be used in this manual.  H.264/AVC, VC-1 and MPEG-4 License Notice THIS PRODUCT IS LICENSED UNDER THE AVC, THE VC-1 AND MPEG-4 VISUAL PATENT PORTFOLIO LICENSE FOR THE PERSONAL AND NON-COMMERCIAL USE OF A CONSUMER TO (i)ENCODING VIDEO IN COMPLIANCE WITH THE AVC STANDARD ("VIDEO") AND/ OR (ii)DECODING AVC, VC-1 AND MPEG-4 VIDEO THAT WAS ENCODED BY A CONSUMER ENGAGED IN A PERSONAL AND NON- COMMERCIAL ACTIVITY AND/OR WAS OBTAINED FROM A VIDEO
User's Manual 1-3    PROVIDER LICENSED BY MPEG LA TO PROVIDE SUCH VIDEO. NO LICENSE IS GRANTED OR SHALL BE IMPLIED FOR ANY OTHER USE. ADDITIONAL INFORMATION INCLUDING THAT RELATING TO PROMOTIONAL, INTERNAL AND COMMERCIAL USES AND LICENSING MAY BE OBTAINED FROM MPEG LA,L.L.C. SEE http:// www.mpegla.com  FCC information FCC notice "Declaration of Conformity Information"  This equipment has been tested and found to comply with the limits for a Class B digital device, pursuant to part 15 of the FCC rules. These limits are designed to provide reasonable protection against harmful interference in a residential installation. This equipment generates, uses and can radiate radio frequency energy and, if not installed and used in accordance with the instructions, may cause harmful interference to radio communications. However, there is no guarantee that interference will not occur in a particular installation. If this equipment does cause harmful interference to radio or television reception, which can be determined by turning the equipment off and on, the user is encouraged to try to correct the interference by one or more of the following measures: Reorient or relocate the receiving antenna. Increase the separation between the equipment and receiver. Connect the equipment into an outlet on a circuit different from that to which the receiver is connected. Consult the dealer or an experienced radio/TV technician for help.  Only peripherals complying with the FCC class B limits may be attached to this equipment. Operation with non-compliant peripherals or peripherals not recommended by TOSHIBA is likely to result in interference to radio and TV reception. Shielded cables must be used between the external devices and the device’s Universal Serial Bus (USB 2.0) ports and microphone/ headphone combo jack. Changes or modifications made to this equipment, not expressly approved by TOSHIBA or parties authorized by TOSHIBA could void the user’s authority to operate the equipment.   FCC conditions  This device complies with part 15 of the FCC Rules. Operation is subject to the following two conditions: 1.  This device may not cause harmful interference. 2.  This device must accept any interference received, including interference that may cause undesired operation.
User's Manual 1-4    Contact  Address:  TOSHIBA America Information Systems, Inc. 9740 Irvine Boulevard Irvine, California 92618-1697 Telephone:  (949) 583-3000  Caution: Exposure to Radio Frequency Radiation.  The radiated output power of the Wireless LAN is far below the FCC radio frequency exposure limits. Nevertheless, the Wireless LAN shall be used in such a manner that the potential for human contact during normal operation is minimized. In the usual operating configuration, the distance between the antenna and the user should not be less than 20cm. Please refer to the "Grand Tour" section in this manual for the details regarding antenna location. The installer of this radio equipment must ensure that the antenna is located or pointed such that it does not emit RF field in excess of Health Canada limits for the general population; consult Safety Code 6, obtainable from Health Canada’s website.  CE compliance  This product is carrying the CE-Mark in compliance with the related European Directives. Responsible for CE- Marking is Toshiba Europe GmbH, Hammfelddamm 8, 41460 Neuss, Germany. The complete and official EU Declaration of Conformity can be found on TOSHIBA’s web site http://epps.toshiba-teg.com on the Internet.   Working environment The Electromagnetic Compliance (EMC) of this product has been verified typically for this product category for a so called Residential, Commercial & Light Industry Environment. Any other working environment has not been verified by Toshiba and the use of this product in these working environments is maybe restricted or cannot be recommended. Possible consequences of the use of this product in non verified working environments can be: Disturbances of other products or of this product in the nearby surrounding area with temporarily malfunction or data loss/ corruption as result. Example of non verified working environments and related advices: Industrial environment (e.g. where 3-phase 380V mains is being used mainly): Danger of disturbances of this product due to possible strong electromagnetic fields especially near to big machinery or power units.
User's Manual 1-5    Medical environment: The compliance to the Medical Product Directive has not been verified by Toshiba, therefore this product cannot be used as a medical product without further verification. The use in usual office environments e.g. in hospitals should be no problem if there is no restriction by the responsible administration. Automotive environment: Please search the owner instructions of the related vehicle for advices regarding the use of this product (category). Aviation environment: Please follow the instructions of the flight personnel regarding restrictions of use.  Additional environments not related to EMC Outdoor use: As a typical home/office equipment this product has no special resistance against ingress of moisture and is not strong shock proofed. Explosive atmosphere: The use of this product in such special working environment (Ex) is not allowed.  REACH - Compliance Statement The new European Union (EU) chemical regulation, REACH (Registration, Evaluation, Authorization and Restriction of Chemicals), entered into force on 1 June 2007. Toshiba will meet all REACH requirements and is committed to provide our customers with information about the chemical substances in our products according to REACH regulation. Please consult the following website www.toshiba-europe.com/computers/ info/reach for information about the presence in our articles of substances included on the candidate list according to article 59(1) of Regulation (EC) No 1907/2006 („REACH“) in a concentration above 0.1% weight by weight.
User's Manual 1-6    Following information is only valid for EU- member States: Disposal of products  The crossed out wheeled dust bin symbol indicates that products must be collected and disposed of separately from household waste. Integrated batteries and accumulators can be disposed of with the product. They will be separated at the recycling centres. The black bar indicates that the product was placed on the market after August 13, 2005. By participating in separate collection of products and batteries, you will help to assure the proper disposal of products and batteries and thus help to prevent potential negative consequences for the environment and human health. For more detailed information about the collection and recycling programmes available in your country, please visit our website (http://eu.computers.toshiba-europe.com) or contact your local city office or the shop where you purchased the product.   Disposal of batteries and/or accumulators  The crossed out wheeled dust bin symbol indicates that batteries and/or accumulators must be collected and disposed of separately from household waste.    If the battery or accumulator contains more than the specified values of lead (Pb), mercury (Hg), and/or cadmium (Cd) defined in the Battery Directive (2006/66/ EC), then the chemical symbols for lead (Pb), mercury (Hg) and/or cadmium (Cd) will appear below the crossed out wheeled dust bin symbol. By participating in separate collection of batteries, you will help to assure the proper disposal of products and batteries and thus help to prevent potential negative consequences for the environment and human health. For more detailed information about the collection and recycling programmes available in your country, please visit our website (http://eu.computers.toshiba-europe.com) or contact your local city office or the shop where you purchased the product.
User's Manual 1-7     These symbols may not stick depending on the country and region where you purchased.   Following information is only for India  The use of this symbol indicates that this product may not be treated as household waste. By ensuring this product is disposed of correctly, you will help prevent potential negative consequences for the environment and human health, which could otherwise be caused by inappropriate waste handling of this product. For more detailed information about recycling of this product, please visit our website (http://www.toshiba- india.com) or contact call center (1800-200-8674).   Canadian regulatory information (Canada only) This digital apparatus does not exceed the Class B limits for radio noise emissions from digital apparatus as set out in the Radio Interference Regulation of the Canadian Department of Communications. Note that Canadian Department of Communications (DOC) regulations provide, that changes or modifications not expressly approved by TOSHIBA Corporation could void your authority to operate this equipment. This Class B digital apparatus meets all requirements of the Canadian Interference-Causing Equipment Regulations. Cet appareil numérique de la class B respecte toutes les exgences du Règlement sur le matériel brouileur du Canada.  Canada - Industry Canada (IC) This device complies with RSS 210 of Industry Canada. Operation is subject to the following two conditions: (1) this device may not cause interference, and (2) this device must accept any interference, including interference that may cause undesired operation of this device. The term "IC" before the equipment certification number only signifies that the Industry Canada technical specifications were met.  Following information is only for Turkey: Compliant with EEE Regulations: Toshiba meets all requirements of Turkish regulation 26891 “Restriction of the use of certain hazardous substances in electrical and electronic equipment”.
User's Manual 1-8    The number of possible pixel failures of your display is defined according to ISO 9241-307 standards. If the number of pixel failures is less than this standard, they will not be counted as defect or failure. Battery is a consumption product, since the battery time depends on the usage of your tablet. If the battery can not be charged at all, then it is a defect or failure. The changes in battery time is not a defect or failure.
Chapter 2 User's Manual 2      Introduction  Welcome and thank you for choosing a TOSHIBA product.  About the guide For your convenience, your TOSHIBA product is furnished with two guides: a Quick Start Guide, and this comprehensive PDF User’s Manual We recommend making a backup of this User's Manual in case of future reference. Please backup your personal data saved in the internal storage before updating the platform.  Instruction Manual for Safety and Comfort All important information on the safe and proper use of this tablet is described in the enclosed Instruction Manual for Safety and Comfort. Be sure to read it before using the tablet.  Safety icons Safety icons are used in this manual to bring important information to your attention. Each type of icon and its implication are identified as shown below.  Indicates a potentially hazardous situation, which could result in death or serious injury, if you do not follow instructions.   Pay attention! A caution informs you that improper use of equipment or failure to follow instructions may cause data loss or damage your equipment.   Please read. A note is a hint or advice that helps you make best use of your equipment.
User's Manual 3 Chapter 3      Getting Started  This chapter provides a general overview of your tablet and some basics before using your tablet.  Some of the features described in this manual may not function properly if you use an operating system that was not pre-installed by TOSHIBA.   Check the components Check to make sure you have all of the following items:  Hardware  TOSHIBA Tablet AC adaptor (2-pin or 3-pin) USB cable Tablet Pen (provided with some models)  Documentation  Quick Start Guide Instruction Manual for Safety and Comfort If any of the items is missing or damaged, contact your dealer immediately.  Grand tour  Please handle your product carefully to avoid scratching or damaging the surface.   The following figure shows each important part of your tablet.
User's Manual 3-2    Figure 3-1 Grand tour of the tablet  4   5  4   3   2  1  6 7  8 9 10  11  14 12 13  13    15 16          1. Display screen  2. Web Camera (front) 3. Ambient light sensor (not shown)  4. Microphone 5. Power button  6. Headphone/Microphone combo jack 7. Volume down/up button  8. Micro HDMI port * 9. SIM card slot *  10. Memory media slot 11. Micro USB port  12. Interface Protection cover 13. Speakers  14. Strap hole for pen 15. Wireless communication antennas (not shown) 16. Camera (back)  * Provided with some models. Product appearance depends on the model you purchased.  Display screen  Display screen brightness can be adjusted either manually or automatically.  Under certain operating conditions, e.g., very high ambient temperatures, your tablet might automatically dim the LCD brightness in order to maintain a reasonable system temperature. This is a normal protective feature and you might not be able to manually adjust the LCD brightness during the auto dimming period.   Camera  Your tablet is equipped with a front Web Camera and a back camera used for recording video or taking photographs.
User's Manual 3-3    Ambient light sensor    Ambient light sensor can detect the light quality and intensity outside and can use this information to automatically adjust the display screen brightness.  Microphone  A built-in microphone allows you to import and record sounds for your application.  Power button  Press & hold this button to turn on/off the tablet.   Headphone/ Microphone combo jack A 3.5 mm mini headphone/microphone combo jack enables connection of a monaural microphone or stereo headphone.  The external microphone will be disabled if you use a 4-pin headset other than the type as shown below.  Mic Ground Right Left    Volume down/up button Press either of the buttons to decrease or increase the volume. Micro HMDI port  Micro HDMI port can connect to HDMI cable with Type D connector. An HDMI cable sends video and audio signals. In addition to this, it can send and receive control signals. Please refer to the HDMI device section in "Optional Accessories" chapter for details.  SIM card slot  This slot lets you insert a single SIM card which enables a high-speed access to the Internet, corporate Intranet and your email while you are away from office.  Memory media slot  This slot lets you insert a micro SD™ Card which enables you to transfer data from devices, such as digital camera, onto your tablet. Please refer to the Memory media slot section in "Optional Accessories" chapter for details.
User's Manual 3-4     Keep foreign metal objects, such as screws, staples and paper clips, out of the memory media slot. Foreign metal objects can create a short circuit, which can cause damage and fire, possibly resulting in serious injury.   Micro USB port  The tablet acts both as a host and a client via this port. It allows you to connect the tablet to a computer for transferring data. When acting as a host, the tablet can fast and directly communicate with other portable devices without the assistance of a computer. Please refer to the USB device section in "Optional Accessories" chapter for details.  Interface protection cover The interface protection cover provides protections to your port and slot. Speakers  The speakers emit sound generated by your software as well as audio alarms, such as low battery condition, generated by the system. Strap hole for pen  This hole is used for hanging your tablet pen with a rope. Wireless communication antennas The tablet is equipped with a Wireless LAN/ Bluetooth antenna.  Hardware This section identifies various components and the hardware of the tablet - it is recommended that you become familiar with each before you operate the tablet. The actual specifications may vary depending on the model you purchased.  This tablet does not support CD/DVD/Blu-ray Disc™. Content that is copyright protected or has limited access rights, cannot be played on this tablet.   Processor  CPU  Your tablet is equipped with an NVIDIA® Tegra™ 3 Mobile Processor.
User's Manual 3-5    Memory  Memory on board  This tablet is equipped with a 1GB memory on board. The actual amount of usable system memory will be less than the installed memory modules. This tablet does not support memory expansion. Flash Memory  This tablet is equipped with a flash memory.  Power  Battery  The tablet is powered by one lithium-ion battery. AC adaptor  The AC adaptor provides power to the system and charges the battery when it is low. As the AC adaptor is universal, it can receive a range of AC voltages from 100 to 240 volts, however you should note that the output current varies among different models. Using the wrong adaptor might damage your tablet.  Display  The tablet's internal display panel supports high-resolution video graphics and can be set to a wide range of viewing angles for maximum comfort and readability.  Display panel  25.7cm (10.1") LCD screen configured with the following resolution: 1280 horizontal x 800 vertical pixels Graphics controller  The graphics controller maximizes display performance.  Multimedia  Web Camera  Web Camera is a device that allows you to record video or take photographs with your tablet. You can use it for video chatting or video conferences by using a communication tool.
User's Manual 3-6    Communications  Bluetooth  Bluetooth wireless communication function eliminates the need for cables between electronic devices such as computers, printers and mobile phones. When it is enabled, Bluetooth will provide the wireless personal area network environment which is safe and trustworthy, that is quick and easy. Wireless LAN  The tablet is equipped with a Wireless LAN/ Bluetooth combo module that is compatible with other Wireless LAN systems based on Direct Sequence Spread Spectrum/Orthogonal Frequency Division Multiplexing radio technology that complies with the IEEE 802.11 Standard. 3G  Some models are equiped with a 3G module.  Using the tablet for the first time This section provides basic information about how to start using your tablet. It covers below steps followed by the details. Connecting the AC adaptor Turning on the power Initial Setup Turning off the power Use a virus-check program and make sure it is updated regularly. Never format storage media without checking its content - formatting destroys all stored data. It is a good idea to periodically backup internal storage of the tablet to an external media. General storage media is not durable or stable over long periods of time and under certain conditions may result in data loss.   Connecting the AC adaptor  When battery power becomes low, you must charge it.  Use only the tablet connected to an AC power source to charge the battery. Never attempt to charge the battery with any other charger.   The AC adaptor can automatically adjust to any voltage ranging from 100 to 240 volt and to a frequency of either 50 or 60 hertz, enabling you to use this product in almost any country/region. The adaptor converts AC power to DC power and reduces the voltage supplied to this tablet.
User's Manual 3-7    Figure 3-2 AC adaptor & USB cable  2-pin   2  1  3-pin      1. AC adaptor  2. USB cable  Depending on the model, either a 2-pin or 3-pin AC adaptor will be bundled with the tablet. The supplied USB cable conforms to safety rules and is designed to provide adequate and steady power supply to the tablet. Please make sure to use the supplied USB cable when you charge the tablet or purchase an optional USB cable from TOSHIBA website.   Attach the AC adaptor when you need to charge the battery or you want to operate from AC power. It is also the fastest way to get started, because the battery will need to be charged before you can operate from battery power.  Always use the TOSHIBA AC adaptor that was included with your tablet, or use AC adaptors specified by TOSHIBA to avoid any risk of fire or other damage to the tablet. Use of an incompatible AC adaptor could cause fire or damage to the tablet possibly resulting in serious injury. TOSHIBA assumes no liability for any damage caused by use of an incompatible adaptor. Never plug the AC adaptor into a power source that does not correspond to both the voltage and the frequency specified on the regulatory label of the unit. Failure to do so could result in a fire or electric shock, possibly resulting in serious injury. When you connect the AC adaptor to the tablet, always follow the steps in the exact order as described below. Connecting the plug to a live electrical outlet should be the last step otherwise the USB connector could hold an electrical charge and cause an electrical shock or minor bodily injury when touched. As a general safety precaution, avoid touching any metal parts. Never place your tablet or AC adaptor on a wooden surface, furniture, or any other surface that could be marred by exposure to heat since the tablet base and AC adaptor's surface increase in temperature during normal use.
User's Manual 3-8    Always place your tablet or AC adaptor on a flat and hard surface that is resistant to heat damage.   1.  Plug the USB connector of the USB cable into the USB port on the AC adaptor. Figure 3-3 Connecting the AC adaptor 1  2-pin     3-pin       2.  Plug the other smaller connector of the USB cable into the Micro USB port on your tablet. Figure 3-4 Connecting the AC adaptor 2          3.  Plug the AC adaptor into a live wall outlet. Wall outlet The fastest way to charge your tablet is with the included AC adaptor plugged into a wall outlet. USB charge In “suspend or shutdown mode,” you can also charge your tablet, although more slowly, by connecting the USB cable to the USB port on your PC. Please make sure your PC is turned ON while charging via USB. If your PC is turned OFF, depending on PC specifications, the tablet battery may discharge. We recommend that you do not use your tablet while charging via USB as auto shutdown may occur if the battery charge is too low.  Turning on the power  This section describes how to power up your tablet. Press & hold Power button for two seconds to turn on the tablet.
User's Manual 3-9    Figure 3-5 Turn on the tablet   1          Initial Setup  The Setup Screen will be the first screen displayed when you turn on the power. Setup your tablet according to the following steps: 1.  Choose your preferred system language and tap Start to start the initial setup process. 2.  Connect to a Wi-Fi network. You can tap Skip and turn Wi-Fi on later in Settings app. 3.  Sign in with a Google™ account. If you don’t have one, tap No. 4.  Register a Google account by tapping Get an account. You can also skip this step by tapping Not now. 5.  Choose whether to use Google Location Service™ and tap   to continue. 6.  If the tablet is not connected to a Wi-Fi network, set the date and time and tap   to continue. 7.  Enter your name to personalize some apps. Tap   to continue. 8.  Tap Learn more to read the privacy policy and other terms. Tap   to agree. 9.  Your tablet is now set up and ready to use. Tap Finish to exit Setup Screen.  Turning off the power  If you are not going to use your tablet for a long time, shut it down. You can also turn the LCD off in order to extend battery life.  Shut down the tablet  When you shut down the tablet, no data will be saved. The tablet will boot to the operating system's main screen the next time it is turned on. 1.  If you have entered data, either save it to flash memory or to other storage media.
User's Manual 3-10    Never turn off the power while an application is running. Doing so could cause loss of data. Never turn off / disconnect the power , or remove external storage media during data read/write. Doing so can cause data loss.  2.  Turn off or remove any peripheral devices connected to the tablet. 3.  Press & hold Power button for two seconds and select Power off and then OK to turn off the tablet.  In any emergency case, you can also press & hold Power button for about 6 seconds to force power off. Do not turn the tablet back on immediately - wait a short period to avoid any potential damage.   Turning the LCD off/on  You can turn the LCD off (while the system is still running) in one of the following ways: Press Power button. Set the sleep timeout in Settings app. To turn the LCD on: Press Power button once again.  Unlocking your screen  After turning on the LCD, the screen remains locked. You can unlock the screen in the following way: Press & hold the lock icon (   ) and slide it across the unlock icon (   ). You can also slide across other icons to allow quick and easy access from the lock screen.  If you have set up a screen lock through one of the following ways as Pattern, PIN, Face Unlock or Password, the method of unlocking the screen will be different. See Security section for other ways to protect your tablet and privacy.   Care and use of the battery This section provides the important safety precautions in order to handle your battery properly. Refer to the enclosed Instruction Manual for Safety and Comfort for detailed precautions and handling instructions.
User's Manual 3-11     The lithium ion battery can explode if not handled or disposed of properly. Dispose of the battery as required by local ordinances or regulations. Charge the battery only in an ambient temperature between 5 and 35 degrees Celsius. Otherwise, the electrolyte solution might leak, battery performance might deteriorate and the battery life might be shortened. Never try to remove or replace the battery by yourself which may possibly result in serious injury. Please contact an authorized Toshiba service provider, if necessary.   Charging the battery When the battery power becomes low, you must charge it to avoid losing any data.  Procedure  You can charge the battery when the tablet is either on or off by connecting the AC adaptor. Off An icon shaped like an actual battery - a battery meter with flashing borders appears in the center of the screen allowing you to keep track of the battery level. When the battery is fully charged, the meter reaches its full capacity. On Likewise, a battery meter on the right side of the System Bar indicates the battery level.  Battery charging time  The following table shows the approximate time required to fully charge a discharged battery when the AC adaptor is connected to the tablet.  Battery type                                     Charging time  Battery (2 cell, 25Wh)                       about 8 hours  Please be aware that the charging time when the tablet is on is affected by ambient temperature, the temperature of the tablet and how you are using the tablet - for example if you make heavy use of external devices then the battery might get scarcely charged up.   Battery exhausted time  The following table shows the approximate exhausted time of a fully charged battery.
User's Manual 3-12    Battery type  Time  Battery (2 cell, 25Wh)  about 10 hours (in use) about 9 days (sleep mode)  Please be aware that the battery exhausted time will be affected by how you are using the tablet.   Battery charging notice  The battery may not begin charging immediately under the following conditions: The battery is extremely hot or cold (if the battery is extremely hot, it might not charge at all). To ensure the battery charges to its full capacity, you should charge it at room temperature of between 5°C to 35°C (41°F to 95°F). The battery is nearly completely discharged. In this instance, the tablet can’t be turned on immediately. You should leave the AC adaptor connected for a few minutes and the battery should begin charging. A battery meter icon (   ) will appear indicating the charging status. The indicator may show a rapid decrease in battery operating time when you try to charge a battery under the following conditions: The battery has not been used for a long time. The battery has completely discharged and been left unattended for a long time. In such cases you should follow the steps as detailed below: 1.  Fully discharge the battery when powered on until the system automatically turns the tablet off. 2.  Connect the AC adaptor to the Micro USB port on the tablet, and to a wall outlet that is supplying power. 3.  Charge the battery until the battery meter reaches its full capacity. Repeat these steps two or three times until the battery recovers normal capacity.
User's Manual 4-1    Chapter 4   Basics  This chapter describes the basic operations of your tablet and the Home screen.  Using the touch screen You can use your finger to manipulate icons, buttons, menu items, the onscreen keyboard, and other items on the touch screen. Tap Simply tap your finger on the touch screen to act on items on the screen, such as application and settings icons, to type letters and symbols using the onscreen keyboard, or to tap onscreen buttons. Press & hold Press & hold an item on the screen until an action occurs. It functions like the right-click on a standard mouse. Drag Press & hold an item for a moment and then, without lifting your finger, move your finger on the screen until you reach the target position. You can drag items on the Home screen to reposition them. Swipe or slide To swipe or slide, you quickly move your finger across the surface of the screen, without pausing when you first touch it (so you don’t drag an item instead). For example, you slide the screen up or down to scroll a list. Double tap Tap quickly twice on a webpage, map or other screen to zoom. Pinch In some apps (such as Browser and Gallery), you can zoom in/out by placing two fingers on the screen at once and pinching them together or spreading them apart.  Using the Tablet Pen Some models are equipped with a digitizer screen to allow the use of a Tablet Pen. You can use the Tablet Pen to execute actions and enter data. Hold the Tablet Pen in a natural position and tap, press or trace on the screen lightly.
User's Manual 4-2    Figure 4-1 Tablet Pen  1    2     3  1. Eraser button  2. Pen button 3. Pen point  Eraser button  You can use this button as an eraser in some applications that support eraser function. These applications enable you to select and delete notes or sketches with a one-touch action. Pen button  Provides the same function as clicking the right Touch Pad control button. Pen point  Provides the same function as clicking the left Touch Pad control button.  Observe the following precautions on the handling of the Tablet Pen. In order to avoid damages to the display screen, please refrain from doing anything other than the specified operation methods. Failure to do so could cause a malfunction or characteristic deterioration. Do not tap or press the Tablet Pen forcefully against the display as this could damage the Tablet Pen and the screen itself. Avoid using or keeping the Tablet Pen in areas where the temperature can change rapidly or in places, such as a car, where the Tablet Pen is exposed to direct sunlight. Store the Tablet Pen without any pressure being applied to the buttons. Failure to do so could cause a malfunction or characteristic deterioration. The Tablet Pen is composed of precision parts. Do not drop the Tablet Pen. Strong impact causes a malfunction or characteristic deterioration. Do not apply excessive force to the Tablet Pen point and the side buttons. Excessive force applied to these parts causes short life or characteristic deterioration (Allowable force to pen point, Eraser button, Pen button: less than 1 kg, for less than 30 seconds). Avoid water entering the Tablet Pen or condensation forming within it as either condition will cause a malfunction.
User's Manual 4-3    Do not disassemble the Tablet Pen. It causes maladjustment or short life. Do not stain the Tablet Pen with cosmetics or chemicals as this will cause a deterioration in appearance. Use a glass wiping cloth or dry cloth to clean the Tablet Pen. Do not use volatile liquids such as alcohol, thinner or petroleum benzine to clean the Tablet Pen. Do not apply excessive force to the Tablet Pen point as a bent ordeformed pen point will cause a malfunction. Keep the small parts of the Tablet Pen, such as the pen point or the knob of the side buttons, away from infants and small children to prevent the accidental ingestion by them. Do not use a ball point pen instead of the Tablet Pen included with the product. Do not continue to use a broken pen tip as this may result in scratching of the display panel. The pen tip cannot be replaced if it is worn. It is recommended that you keep another pen set as a spare. You can purchase a new pen set from a TOSHIBA authorized dealer.   TOSHIBA is not liable for any problems arising on the products due to the use of the Tablet Pen in an environment where the above conditions are not satisfied or because of its use by unspecified number of users.   Pen actions  You can use the Tablet Pen to enter data, start programs, move objects and execute other actions.  Single tap  Lightly tap the tip of the Tablet Pen on an object and lift it immediately to execute an action. A single tap is similar to left clicking the mouse once.  Double tap  Lightly tap the tip of the Tablet Pen twice on an object and lift it immediately to execute an action. A double-tap is similar to left clicking the mouse twice.  Press and hold  Touch the tip of the Tablet Pen to the display screen and hold it there to display a pop-up menu or other action. Press and hold is similar to right clicking the mouse.
User's Manual 4-4    Drag  Touch the Tablet Pen on the screen. Without lifting the Tablet Pen, drag it across the screen to select text or objects.  Drag and drop  Touch the Tablet Pen on the screen to select an object. Without lifting the Tablet Pen, drag it across the screen. Lift the Tablet Pen to drop the object to a new location.  Getting to know the Home screen The Home screen is your starting point for using all the installed apps on your tablet. You can customize the Home screen to display the widgets, app shortcuts, wallpapers and other shortcuts you prefer. Figure 4-2 Home screen        1      2     3   4   5  6  1. System bar  2. App shortcuts 3. All Apps  4. Back 5. Home  6. Recent apps  Item  Description  System bar  The System bar is located permanently at the top of the screen. The notifications icons and notification panel are on the left, and the status icons and quick settings panel are on the right.  App shortcuts  Tap to open an app.   All Apps  Tap to see all your apps, widgets, my favorite and my recent apps.  Back  Return to the previous screen.
User's Manual 4-5    Item  Description   Home  Return to the default Home screen.  Recent apps  Tap to see the thumbnails of your recently used apps.  The Back, Home and Recent apps icons may fade away or shrink into dots after a short period of time without operation, depending on which apps you are using. To bring them back, tap their locations.   Swipe left or right to see more Home screen panels. Use panels to organize your widgets and app shortcuts. See Customizing the Home screen section for the details.  Opening and switching applications The All Apps main screen holds icons for all the apps and widgets on your tablet. Tap WIDGETS tab to view widgets that you have downloaded and installed. Widgets show you the latest updates of apps. Tap MY FAVORITES tab to view the applications that are freguently used. This tab can hold 24 applications in total. Tap MY RECENT tab to view the applications that are recently used. This tab can hold 24 applications in total. To manage all your apps and widgets, tap Settings -> Apps under DEVICE.  Opening an application  You may open an application by: Tapping its icon on the Home screen. Tapping its icon from the All Apps main screen.  Switch to a recently used application  You may switch to recently used application by: Tap Recent apps (  ) and select an application that you want to switch to. To remove an application, swipe the thumbnail sideways. You can find more recently used applications by tapping MY RECENT tab on the All Apps main screen.
User's Manual 4-6    Monitoring your tablet’s status The left and right side of the System bar displays icons indicating that you’ve received notifications, the current time, and icons indicating the tablet’s status.  Status icons  The icons in the right of the system bar indicate the status of your tablet, such as current time.  Notification icons  The icons in the left of the system bar indicate different types of notifications. In addition to system notification icons, applications you installed on your tablet may use their own notification icons.  Quick Settings You can use Quick Settings to change frequently used settings. Tap the status icons area till a flashing line appears, and then roll down the flashing line to open Quick Settings panel. Tap the area outside of the Quick Settings panel to close it. The current user is shown in Quick Settings panel. You can also find the following settings: Brightness Tap to set the brightness of the display. Settings Tap to open Settings app main screen. Wi-Fi Tap to open Wi-Fi option in Settings app. Auto rotate Tap to lock or unlock the auto-rotatation of the screen orientation as you turn your tablet sideways. Battery Tap to open Battery option in Settings app. Airplane mode Tap to turn on/off airplane mode. All wireless radios are disabled when it is turned on. Bluetooth Tap to open Bluetooth option in Settings app. Power management Tap to switch to Power save to enable power saving. More settings could be shown in Quick Settings panel depending on your use of the tablet, such as Alarm.
User's Manual 4-7     You can also open the Quick Settings panel in the lock screen if Screen lock is set to Slide.   Managing Notifications Notification icons report the arrival of new messages, calendar events, and alarms, as well as ongoing events. When you receive a notification, its icon appears in the left of System bar. You can open the Notifications panel to view a list of all your notifications. Depending on your settings and the model of your tablet, you may also hear a notification sound. Adjusting sound volume and other general notification settings is described in Sound section in "Settings" chapter. Applications that produce notifications, such as Email, have their own settings, which you can use to configure whether and how they send notifications. See the sections describing those applications for details.  Opening the notifications panel  Tap the notification icons area till a flashing line appears, and then roll down the flashing line to open notifications panel that lists the current notifications. Notifications of ongoing activities are listed first, followed by notifications of events, such as a new mail notification.  You can also open the notifications panel in the lock screen if Screen lock is set to Slide.   Responding to a notification  To respond to a notification, follow the below steps: 1.  Open the notifications panel. Your current notifications are listed in the panel, each with a brief description. 2.  Tap a notification to respond to it. The notifications panel closes. What happens next depends on the notification.  Dismissing a notification  You can dismiss a notification by sliding it sideways.  Closing the notifications panel  Tap the area out of the notifications panel to close the notifications panel.
User's Manual 4-8    Locking your screen You can lock your screen so that only you can unlock it to access your data, run applications and so on. See Security section for other ways to protect your tablet and privacy.  Locking your screen with a Pattern lock  For example, you can use a Pattern lock to lock your screen with following steps. 1.  Open the security settings by tapping All Apps -> Settings -> Security. 2.  Tap Screen lock -> Pattern. The first time you open it, a short tutorial about creating an unlock pattern will appear. Then you’re prompted to draw and redraw your own pattern. Follow the onscreen instructions to finish the creation. The next time you turn on your tablet or wake up the screen, you will be prompted to draw your unlock pattern to unlock the screen.  Capturing your screen You can capture a screenshot by simultaneously pressing and holding Power and Volume down button for about 2 seconds. The tablet will show the preview for a few seconds and save it. All the screenshots you captured can be viewed in Gallery or TOSHIBA File Manager. For more information, please refer to Chapter 5, Applications.  Customizing the Home screen You can add application shortcuts or widgets to Home screens. You can also change the wallpaper.  Adding an item to the Home screen  To add an item to the Home screens, follow the steps listed below: 1.  Tap All Apps on the Home screen. 2.  Tap APPS, WIDGETS, MY FAVORITES or MY RECENT tab. You can also swipe left or right to move between screens. 3.  Press & hold an item and the Home screen will appear. Drag it to the place you want. Settings may be required before you can operate a Widget. You can tap widgets to open them. You can resize some widgets on the Home screen by following below steps: 1.  Press & hold the widget until it moves upward and a resize handle will appear on each side.
User's Manual 4-9    2.  Drag the resize handle to resize the widget.  The number of widgets you can add depends on the size of each widget. If there is not enough room, the widget can’t be added.   Moving an item on the Home screen  To move an item on the Home screen, follow the steps below: 1.     Press & hold the item you want to move until its icon is magnified. Don’t lift your finger from the screen. 2.     Drag the item to a new location on the screen. It will pause at the left or right edge of the screen to drag the item onto extended Home screen. 3.    When the item is at expected place, lift your finger.  Removing an item from the Home screen  To remove an item from the Home screen, follow the steps below: 1.     Press & hold the item you want to remove until its icon moves upward. × Remove appears on the top. 2.     Drag the item to × Remove. 3.    When the item icon glows red, lift your finger.  Changing the wallpaper  Wallpaper is an image used to replace the default background of your Home screen. 1.     Press & hold anywhere on the Home screen that is not occupied. 2.     Tap an option to select a wallpaper source. 3.     Select a wallpaper. 4.     Tap Set wallpaper.  Creating a grouped folder  Folders provide an easy way to organize and manage your apps shortcuts. You can group several app icons into a folder. Drag and drop app icons on top of each other to automatically create a grouped folder. To rename the created folder, tap to open it and tap its name at the bottom to enter a new one. Press & hold an icon in the folder and drag it to the Home screen. When the folder has only one app icon, this folder will be automatically ungrouped leaving the last icon on the Home screen.
User's Manual 4-10    Changing the Screen Orientation You can change the screen orientation to Portrait mode by rotating the tablet sideways. The screen orientation automatically changes according to the rotation angle detected. You can also lock the auto rotation and use the tablet always in Portrait or Landscape mode. These settings can be performed in the Quick Settings. Please refer to the Quick Settings section for details.  In the Portrait mode, installation/uninstallation operation may not work for some of the drivers/utilities. If it occurs, switch to the Landscape mode.   Managing Tasks and Applications You can manage some of the running applications, please follow the steps below: 1.  Tap All Apps -> Settings -> Apps. 2.  Tap an item you want to manage from DOWNLOADED/RUNNING/ ALL tab.  Please refer to Apps section in Settings chapter for details. In order to improve the performance of your tablet, close some of the running applications.   Connecting to a computer With a micro USB port on the tablet, you can connect your tablet to a computer for data transfer. To connect to a computer: 1.  Plug the Micro USB connector of the USB cable into the Micro USB port on this tablet. Figure 4-3 Connecting an USB cable       1  2  1. Micro USB port  2. Micro USB connector 2.  Plug the other end of the USB cable into the USB port on the computer.
User's Manual 4-11    Depending on your settings, your tablet will be recognized as a removable MTP (Media Transfer Protocol) device or PTP (Picture Transfer Protocol) device allowing you to access its contents from a computer.       If your computer does not support MTP, try using PTP for connection.  To remove this tablet from a computer: 1.  Make sure all file operations are finished. 2.  Unplug the tablet from your computer.  Make sure the connector is properly aligned with the socket. Do not try to force the connection, doing so can damage the connecting pins.   Factory Reset The tablet provides you with the function to reset it. Before executing the reset, you need to backup the system settings, application settings, user installed applications and data in the internal storage. To perform the factory data reset, please follow the steps below: 1.     Tap All Apps -> Settings -> Backup & reset -> Factory data reset - > Reset tablet -> Erase everything. 2.     The factory data reset will be done.  Please note that the following data will be erased: System settings and application settings User installed applications Internal storage files, such as music or photos Data in the removable media will not be erased.
User's Manual 5-1    Chapter 5   Applications  This chapter describes the usage of applications & widgets. Your tablet has some Google Mobile services installed and the availability of the applications may vary depending on your country or region. Some applications will be automatically hidden after the first power on.  Analog clock Analog clock is a widget to display a clock on the Home screen based on the system time so that you can watch time directly from the clock. You can also use it to set an alarm clock, timer and stopwatch. For details, please refer to the Clock section.  Browser Browser is used to view webpages and to search for information on the web. To open the Browser, tap All Apps -> Browser. Browser can also open when you tap a web link, for example, in an email or text message. When you open Browser, the last webpage you viewed is displayed. If you have not used Browser recently, your home page will open.  Go to a webpage  1.  Tap the URL box on the top of the Browser screen. If the URL box isn’t visible, drag the page down until the URL box comes into view. 2.  Enter the address (URL) of the webpage by using the onscreen keyboard. 3.  Tap a suggestion or enter an address and tap Go with the onscreen keyboard.  The Browser may not display some webpages correctly if the web page has a complicated layout. This is dependent on the web page. The Browser does not support file uploading function. The Browser might connect to a “mobile” website by default rather than a “PC” web site. Depending on the website, if you want to access the PC website, please tap Menu (   ) and check Request desktop site.
User's Manual 5-2    Zoom in or zoom out on a webpage  You can zoom in or out a webpage in either of the following ways. Double tap at the area where you want to zoom. Pinch two fingers together or apart to zoom out or zoom in on a webpage.  Multiple Browser tabs  You can open up to sixteen tabs and switch between them. Pages you view in incognito tabs will not leave any traces like browser history or search history on your tablet, however any files you downloaded will be saved.  Open a new Browser window  You may open a new Browser window in either of the following ways: Tap Menu (   ) and select New tab or New incognito tab. Tap   beside the last tab. New window will open your home page.  Switch between Browser windows  You may switch between different Browser windows by tapping the tabs of browser windows.  Close a Browser window  You may tap the cross on the tab to close the current browser window.  Bookmarks  You may bookmark webpages to open it conveniently. 1.  Tap the pentagram icon (   ) besides the URL bar. 2.  Enter a Label for the website or use the default Label. 3.  Tap OK to add it to Bookmarks. You can also add it to Home screen or Other folder by tapping and choosing from Add to menu. You may open the website from the bookmarks. 1.  Tap the bookmark icon (   ) at the upper right corner of the screen to go to bookmarks. 2.  Tap a page in the list to open it.  View your Browser history  As you browse the web, Browser will keep track of the pages you visit, to help you find your way back later.
User's Manual 5-3    1.  Tap the bookmark icon (   ) at the upper right corner of the screen. 2.  Tap the HISTORY tab. The pages you’ve visited are grouped chronologically. Bookmarked pages have a star. 3.  Tap a time period to view the pages you’ve visited. 4.  Tap a page in the history to reopen it.  View your Saved Pages  Pages you viewed in Browser can be saved for future reading. This is especially useful when your tablet stays offline. 1.  Tap the bookmark icon (   ) at the upper right corner of the screen. 2.  Tap the SAVED PAGES tab. The pages are grouped chronologically. 3.  Tap a page you want to open.  Web page options  By tapping Menu (   ), you can access a number of browser options like: Stop , Forward , New tab, New incognito tab, Find on page, Share page, Request desktop site , Save for offline reading, Page info, Settings.  Browser settings  You can configure a number of Browser settings, including some that you can use to manage your privacy. To open the Browser settings screen, tap Menu (   ) -> Settings. There are six tabs: General, Privacy & security, Accessibility, Advanced , Bandwidth management and Labs.  Calculator You can use Calculator to solve simple arithmetical problems or use its advanced operators to solve more complex equations. 1.  Open Calculator by tapping All Apps -> Calculator. 2.  Enter numbers and arithmetical operators on the basic screen. 3.  Press & hold the Calculator’s display to select Copy or Cut the numbers. 4.  Tap Clear icon (   ) to delete the last number or operator you entered. Press & hold this icon to delete everything in the display. 5.  Tap CLR to clear the display after calculation.  Calendar You can use Calendar to remind your date.
User's Manual 5-4    Add events to Calendar  You can add events to Calendar by following these steps: 1.  Tap any blank period on your calendar or the New Events icon (   ) on the top right corner of Calendar screen. 2.  Enter Event name and set details for this date. You can add guests by entering their email addresses. 3.  Tap Done to save.  Camera Camera is a combination of camera and camcorder that you can use to shoot and share pictures/videos. Pictures and videos can be viewed in the Gallery.  Open Camera and take pictures/videos  You can take pictures and shoot videos with the Camera. To open the Camera, tap All Apps -> Camera. Camera will open, ready to take a still picture. You can switch Camera to video or panorama mode anytime by tapping the proper icon in option 3 of the following figure. The back camera is set for default. You can switch to front camera by tapping   icon in option 1 of the following figure when in the Photo mode. Figure 5-1 Camera screen    1   2    3      1. Photo/Video options  2. Take a photo/video 3. Choose photo, video or panorama mode
User's Manual 5-5    Panorama mode  Panorama mode allows you to take multiple subsequent photos and the tablet automatically join them together to create a single image with a wide- angle view. After the camera is set to panorama mode, you will select how shots will be stitched - slowly move the camera left to right or right to left.  Review your pictures/videos  You can review the pictures/videos you’ve taken in Camera. On the Camera screen, swipe left to open the Gallery. For details, refer to the Gallery section.  Photo options  Several options are available by tapping the Photo/Video options icon (   ). White balance ( ): Adjust the lighting conditions. Exposure ( ): Choose the value to change the exposure rate. Quick settings (   ): Adjust the Scene mode, Store location and Picture size. Scene mode:Choose your environment. Store location: Switch to ON to add location information to pictures you take. Picture size: Choose the size of the pictures you take.  Video options  Similarly, in Video mode, video options are available on video record screen. White balance ( ): Adjust for lighting conditions. Time lapse: Choose a time interval for time lapse recording. Video quality: Tap to select the quality of the videos you take. Store location: Switch to ON to add location information to pictures you take.  Clock   In addition to displaying the date and time, you can also use Clock to set an alarm, timer and stopwatch. To open Clock, tap All Apps -> Clock.  Working with clock  You can operate the following settings for Clock:
User's Manual 5-6    Tap the icon (   ) to display a list of cities with different time. Check to show the Clock of a city on the Clock screen. You can check more than one city. Tap the icon (   ) to find more settings for Clock: Night mode: Select to view the local time with customized clock. Settings: The following options are displayed: Style: Tap to open a dialog where you can choose the style of the Clock as Analog or Digital. Automatic home clock: Check to add a Clock for home when travelling in an area with different time zone. Home time zone: Tap to open a list of time zones. Check to select a time zone for your home.  Setting an alarm  1.  Tap the icon ( ) at the left bottom of the screen. 2.  Tap an existing alarm clock to change its time and other settings. Or tap the icon (   ) to add a new one.  Tap the icon (   ) to find more settings for alarms: Silence after: Select the time when you want your alarm to stop ringing. Snooze length: Select how long your alarm will snooze after your turned it off. Alarm volume: Tap to open a dialog where you can drag a slider to adjust the volume for alarm. Volume buttons: Tap to open a dialog where you can set the alarm volume by the following shortcuts: Snooze: Select to snooze the alarm event for 10 minutes. Dismiss: Select to turn off the alarm. Do nothing:  Setting the timer  1.  Tap the timer icon (   ). 2.  Enter the time you want. Tap Clear icon (   ) to delete the last number you entered. Press & hold this icon to delete everything in the display.
User's Manual 5-7    3.  Tap Start to start. After starting a timer, you can work with it as follows: Enter a name: Tap (   ). Pause timer: Tap STOP. Tap (   ) to add one minute to the current set time. One minute can be added with each tap. You can tap several times to add more minutes. Delete timer: Tap (  ). Repeat timer: Tap (    ). Tap (   ) to add more timers. The timer beeps when the time is up. It will keep beeping until you tap STOP.  Using the stopwatch  1.  Tap the icon (   ) to open the stopwatch. 2.  Tap START to start time counting. You can add more laps when the stopwatch is running by tapping the icon (   ). 3.  Tap STOP to stop. Then you can either tap START to continue or tap the icon (   ) to open a new stopwatch. Tap (   ) to sahre the results via Bluetooth, email, and more.  Downloads You can use the Downloads application to view and manage downloaded files. To open the Downloads, tap All apps -> Downloads.  Email   You can use the Email application to read and send emails. Email includes a wizard that makes it easy to configure it for several popular email service providers. To open the Email, tap All Apps -> Email. After you add an email account, next time when you open Email it will open to the last screen you were viewing. If you have not used Email recently, it will display the contents of your Inbox (if you have only one account) or the Accounts screen (if you have multiple accounts). If you have configured Email to send and receive emails from more than one account, you can view all emails sent to all accounts in your Combined Inbox.  Read an email  You can read emails in the Inbox or other folders for individual accounts.
User's Manual 5-8    1.  Open the combined Inbox, an account’s Inbox or another folder of emails. 2.  Tap the email to read. The email opens in a screen with information about who sent it, the date it was sent and related information on the top, followed by the contents of the email.  Send an email  You can send an email to your contacts or to other people. To send an email: 1.  Tap (  ) and enter the recipient, subject and message. 2.  Tap (  ) to add attachments. When you enter text in the To: field, your tablet shows possible matches from your Contacts list, if any exist.  Respond to an email  You can reply to or forward an email that you’ve received. You can also delete emails and manage them in other ways. While reading an email, tap one of the icons (   ) on the top to execute Reply, Reply all, or Forward operations.  Manage email accounts  The Email application enables you to add email accounts from popular web-based email service providers. You can also delete an email account or edit an email account settings. To add an email account:  Tap the icon (   ) and select Settings. On the Settings screen, tap ADD ACCOUNT. To delete an email account:  1. Tap the icon (   ) and select Settings. 2. Tap the account you want to delete. On the options menu, tap Remove account and then tap OK. To edit an email account settings: Tap the icon (   ) and select Settings. You can make any changes to general, notification or server settings from this screen.  Gallery   You can use Gallery to view pictures and play videos that you’ve taken with the Camera, downloaded or copied onto your tablet.
User's Manual 5-9    Open Gallery  To open Gallery to view your pictures and videos, tap All apps -> Gallery. Gallery presents the pictures and videos on your tablet, including those you’ve taken with Camera and those you downloaded from the web or other locations.  If you have a large number of pictures or videos on your tablet, it may take Gallery a few minutes when you open it to discover and organize them. Gallery will display all images and videos without distinction of internal or external storage.   View and browse pictures/videos  All the albums are displayed in the screen. 1.  Tap an album to open it and view its contents. The pictures and videos in the album are displayed in chronological order. You can view the pictures and videos in your albums in stacks, sorted by Albums,Locations,Times, People and Tags. 2.  Tap a picture or video in an album to view it. You can pinch the picture by two fingers or apart to zoom in or zoom out. Slide left or right to view other pictures/videos. You can also return to the previous screen at any time by tapping Gallery icon (   ) on the top left of the screen.  Take pictures/videos  You can also tap the camera icon on the top right corner of the screen to take pictures or videos directly. Please refer to the Camera section for more information.  Work with pictures/videos  After opening a picture or a video, you can work with it as follows: Share photo or video: Tap   to send the photo or video in a message, transfer it using Bluetooth, email, or post it online. Tap the icon (   ) on a photo screen to see details, delete, slideshow, edt, crop, or set as a contact photo or wallpaper. When tap it on a video screen, you will see details and can delete and trim your video.  Play Music You can use the Google Play Music app to organize and listen to music and other audio files that are in your tablet, SD card or USB storage.
User's Manual 5-10    The app supports a wide variety of audio files formats so it can play music that you purchase from online stores, or copied from external storage and so on. For the details of supported formats, please refer to TOSHIBA Media Player in this chapter. To open the Music screen, tap All Apps -> Play Music. The Music library screen will open with tabs that you can tap to view your music library organized by Recent, Albums, Artists, Songs, Playlists, Genres, All music, or On device only.  Playing music  You can listen to music by using your tablet’s built-in speakers. To play music: Tap a song in your library to listen to it.  Working with playlists  You can create playlists to organize your music files into sets of songs, which you can play in the order you set or in a shuffle. To create a playlist: 1.  Tap sort tab on the Music library screen and choose Playlists tab. 2.  Tap the icon (   ) and select New playlist to add a new playlist. 3.  Enter a name and tap OK to save. The new playlist is added to the Playlist library. You can add other songs that are playing in the Now playing screen in a playlist by tapping Menu and tapping Add to playlist. Choose an existing playlist, or tap New playlist to create a new playlist. To play, add to queue, delete and rename a playlist, press & hold the playlist.  People   People gives you quick and easy access to the people you want to reach. Information about your contacts is shared with other applications, such as Gallery (for sharing photos and videos) and so on. If you have more than one account with contact information, People merges duplicate contacts into a single entry. You can also manage that process manually.  Open People  To open your contact, tap All Apps -> People. All of your contacts are displayed alphabetically in a scrolling list. Tap a contact to view the details. Entries for communicating with the contact are followed by details. Tap a communication method to start
User's Manual 5-11    texting or emailing the contact by using the listed number, address and so on.  Import and export contacts  If you have contacts stored in vCard format in the Internal storage, you can import them into Contacts on your tablet. You can also copy contacts from SD card by TOSHIBA File Manager. You can export contacts in vCard format to the internal storage for backup using TOSHIBA File Manager. You can also send a contact via email or Bluetooth.  Search for a contact  You can search for a contact by name. 1.  Tap Find contacts (  ). The search box appears. 2.  Start entering the name or number of the contact you’re searching for. As you type, contacts with matching names appear below the search box. 3.  Tap a matching contact in the list to open its details screen.  Service Station The Service Station utility is used to provide you with updates for both application and system software. It will notify you when a new version of software is available, also it initiates for download & installation. To open Service Station: Tap All Apps -> Service Station. When you run the Service Station for the first time, you are prompted to accept the access agreement. The agreement authorizes the utility to collect certain basic information about your tablet and send it to the TOSHIBA servers as part of the process of obtaining updates. Accept or Decline the agreement by tapping the buttons. While it is possible to decline the agreement, it is not recommended, as this means the Service Station utility will not run, and you will not be notified of new software updates for your tablet.  Main Window  The main window of this application includes three areas: Header, Buttons, and Information. Header This section runs along the top of the screen, and contains basic information about your system such as the version of the operating system, the tablet part number and serial number. Buttons Buttons are displayed on the screen. These buttons will change, depending on what actions you have available on the current screen.
User's Manual 5-12    Information The main part of the screen displays information such as the list of available updates, or more detailed information about a specific update.  Check for Updates  During normal operations, the Service Station will periodically check to see if there are any updates for your system. This is done automatically. If there are new updates available, you will be notified with the Service Station icon in the System bar of your tablet. While the Service Station will periodically check for updates in the background, you can request that it check for updates immediately. Tap the Check for Updates button, and the application will refresh the list of available updates.  It is not normally necessary to check for updates manually, as the utility checks for them automatically and informs you when one is available. Please connect the AC adaptor before updating.   Downloading Updates  When an update is available, it will appear on the information area of the screen. Tap the item displayed. More details for that item are displayed on the screen. To download the update, tap the Download button. This will begin the download process. A progress indicator is displayed.  Tapping Home (  ) allows the download to continue while you use your tablet. A notification of the download completion will appear in the system status bar. Tapping Back (  ) will abort the download process.   Installing Updates  Once an update has been downloaded, it can be installed. If you are not able to see the information in System bar, go to the screen by launching the Service Station utility, or by tapping the download completion notice on the system status bar. Tap the Install button. This will launch the application installer. Continue with installation.
User's Manual 5-13    Downloading and Installing System Updates  Service Station will download both application and system updates. System updates require that your tablet is rebooted during the update. Downloading a system update is the same as an application update. Installing a system update is similar to an application update, but you will be reminded that the tablet will be rebooted during the installation process. Make sure to close any other applications and save all work prior to installing a system update.  It is important that a system update is not interrupted once it has begun. Make sure the AC power is plugged in before beginning the installation and don’t turn the tablet off while the installation is in progress.   Note that the system may reboot more than once during an system update, depending on the update itself.  This application only updates system area in the internal storage. User data area is retained after the system is updated.   TOSHIBA Media Player TOSHIBA Media Player is a multimedia player where user can experience and enjoy outstanding multimedia playback. TOSHIBA Media Player supports common multimedia playback such as video (e.g. H.264/AVC, MPEG-4), music (e.g. MP3, AAC-LC) and photo (e.g. JPEG, PNG). To open TOSHIBA Media Player, tap All Apps -> Media Player from the Home screen.  TOSHIBA does not guarantee that all the audio/video files with the above coding will be played correctly.   TOSHIBA Media Player has five panels: Music, Videos, Photos, Podcasts and File Transfer. You can switch between these panels by swiping left/right. TOSHIBA Media Player supports home network functions such as DMS (Digital Media Server), DMC (Digital Media Controller) and DMP (Digital Media Player). Connectable Digital Media Servers TOSHIBA Media Player supports browsing DMS that has search function only. That is, it only supports Windows Media Player Network Sharing Service in Microsoft® Windows® 7.
User's Manual 5-14    Connectable Digital Media Renderers Toshiba Media Player is connectable with the following DMRs. Microsoft Windows Media Player 12 in Microsoft Windows 7 Toshiba TV with DMR functions  Do not eject (or unmount) external media during contents search as this will cause music playback to stop. Some "double-byte" characters might not be displayed correctly. This is the Operating System limitation.   TOSHIBA File Manager TOSHIBA File Manager is a featured application that manages files and folders. It allows you to create, rename, copy, cut, paste or delete files and folders stored in both internal and external storage. To open TOSHIBA File Manager, tap All Apps -> File Manager from the Home screen. System files cannot be accessed by TOSHIBA File Manager. TOSHIBA File Manager may not be able to open a file without its associated application.   Navigation  The main window of TOSHIBA File Manager is divided into four panels. Each panel’s function is described as below. Device panel Device panel lists icons of available storage devices. By default you will see Internal Storage and Screen Capture icon. You are also allowed to add folder shortcut into this panel. Address panel Address panel shows you the current device name followed by relative (not full) path of current folder. Control panel Control panel contains several functional icons for file and folder operations. Files and folders panel Explore files and folders with optional layout in this panel. You can easily read and collect additional information such as size, thumbnail of the files, name and last modified date and time of the folders. When items are selected, they are tagged with a tick.
User's Manual 5-15    Operations on Files & Folders Basic operations  Basic file and folder operations include Cut, Copy, Paste and Delete. Press & hold an item to select it while enabling the multi-selection mode, therefore these command buttons will be visible in the Control panel. Select All Tap   to open the menu and tap Select All. Deselect All Tap   to open the menu and tap Deselect All. Cancel Selection Tap Done to cancel selection. Copy, Cut and Paste Tap Copy(   ) or Cut(   ) in the Control panel. After TOSHIBA File Manager exits the multi-selection mode, you can redirect to a folder where to paste the selected items. Tap Paste (   ) in the Control panel to complete the operation. Delete Tap Delete(   ) in the Control panel to delete the item(s) you have selected. Confirm the operation by tapping OK.  Grid/List view  You can change how files and folders appear by simply tapping Grid/List view switching icon(   ) in the Control panel. Grid view(   ) By default, files and folders are shown in a gird. List view(   ) Files and folders are shown in a scrolling list enabling you to view detailed information about an item.  Creating a folder  You can create a folder by following below steps: 1.  Navigate to the directory where to create a new folder. 2.  Tap   in the Control panel. 3.  A dialog will appear, enter the folder name and tap OK.  Renaming a file or a folder  You can rename a file or folder by following the steps below: 1.  Press & hold a file or folder you want to rename. 2.  Tap   to open the menu and tap Rename. 3.  A dialog will appear. Enter a new folder name and tap OK.
User's Manual 5-16    Sorting files and folders  You can sort and view files and folders by name, time, size and type. 1.  Tap   in the Control panel. 2.  Tap By name, By size, By time or By type as you want. By default, items are arranged in ascending order. Simply tap the option to switch to descending order.  Adding folder shortcut  Folder shortcut makes it faster to access the folder. TOSHIBA File Manager is designed to create folder shortcut in the Device panel. 1.  Press & hold a folder and   to open the menu. 2.  Tap Add to shortcut to add it to the Device panel.  The operation is only applicable to folders saved in the internal storage. To remove a folder shortcut from the Device panel, simply press & hold the shortcut and tap OK. However, the storage device icon cannot be removed.   Storage Structure  The following table lists the description of each storage device icon in the Device panel.  TOSHIBA File Manager only shows the storage device connected to the tablet.   Name  Description  Internal Storage  All contents (excluding system files) in the tablet’s internal storage are shown.          SD card  All contents in SD card are shown.        USB Storage (0-7)  Supporting up to eight USB storage devices connected to tablet.        Screen Capture  Screenshots image files are shown. Please refer to the Capturing your screen section for more information.
User's Manual 5-17    Online Manual Online Manual is an application to launch the pre-installed online manual (this manual) for this tablet.
User's Manual 6-1    Chapter 6   Settings  This chapter describes the Settings app - a quick and easy access to the global options that allows you to configure how your tablet communicates and functions.  A scrollbar is displayed on the right side of the screen. This scrollbar is only used to show the position of the displaying area. You can scroll the screen using your fingers.   Wireless & networks Your tablet can connect to a variety of networks and devices, mobile networks for voice and data transmission, Wi-Fi data networks and Bluetooth devices, such as headsets. Options under WIRELESS & NETWORKS, which are briefly described below, are used to configure and manage these connections. You can tap More to find out the hidden options. Please refer to the following sections in this chapter for more details. Wi-Fi Tap to see available Wi-Fi networks when Wi-Fi is turned on. Bluetooth Tap to see available Bluetooth devices when Bluetooth is turned on. Data usage Tap to monitor your current or historical data using. Airplane mode Check to enable Airplane mode. All wireless communications that transmit data are disabled when in Airplane mode. VPN Tap to set up and manage Virtual Private Networks (VPNs).  Wi-Fi networks  Wi-Fi is a wireless networking technology that can provide Internet access at distances of up to 100 meters, depending on the Wi-Fi router and your surroundings.
User's Manual 6-2    To use Wi-Fi on your tablet, you need to access a wireless access point, or “hotspot”. If access points are open you can simply connect to them. Others are hidden or implement other security features, so you must configure your tablet so it can connect to them. There are numerous systems for securing Wi-Fi connections, including some that rely on secure certificates or other schemes to ensure that only authorized users can connect. Turn off Wi-Fi when you are not using it to extend the life of your battery. The Status bar displays icons that indicate Wi-Fi status.                   Connected to a Wi-Fi network (waves indicate the wireless connection strength)  Notification that an open Wi-Fi network is in range   Turning Wi-Fi on and connecting to a Wi-Fi network  You can turn on and connect to a Wi-Fi network by following steps: 1.  Open the Settings app from All Apps. 2.  Under WIRELESS & NETWORKS, tap Wi-Fi. 3.  Slide the Wi-Fi switch to the ON position. The tablet scans for available Wi-Fi networks and displays the names of those it finds. Secured networks are indicated with a lock icon.  If the tablet finds a network that you connected to previously, it will connect to it automatically.  4.  Tap a network name to see more details. If the network is open, you are prompted to confirm that you want to connect to that network by tapping Connect. If the network is secured, you’re prompted to enter a password or other credentials. (Ask your network administrator for details.) When you have connected to a network, tap on the network name for details about the status, signal strength, link speed, security type and IP address.  Adding a Wi-Fi network  You can add a Wi-Fi network so the tablet will remember it, along with any security credentials, and connect to it automatically when it is in range. You must also add a Wi-Fi network to connect to it, if it does not broadcast its name (SSID), or to add a Wi-Fi network when you are out of range. To join a secured network, you need to contact the network’s administrator to learn what security system is deployed and to obtain the password or other required security credentials. 1.  Turn on Wi-Fi if it is not already on.
User's Manual 6-3    2.  In the Wi-Fi settings screen, tap the plus (+) icon. 3.  Enter the Network SSID (name). If the network is secured, tap Security and then tap the type of security deployed on the network. 4.  Enter the required security credentials. 5.  Tap Save. The tablet will connect to the wireless network. Any credentials that you enter will be saved, so you can connect automatically the next time you come within range of this network.  Forgetting a Wi-Fi network  You can make your tablet forget about the details of a Wi-Fi network that you added. For example, if you don’t want the tablet to connect to it automatically or if it is a network that you no longer use. 1.  Turn on Wi-Fi if it’s not already on. 2.  In the Wi-Fi settings screen, tap the network name. 3.  Tap Forget in the dialog that opens.  Modifying a Wi-Fi network  You can modify each connected Wi-Fi network settings including credentials, proxy server settings and IP settings. Proxy server settings may be required for some internal or external network connection. By default, the Wi-Fi networks you add are not configured to connect via a proxy server, but you can change that for each Wi-Fi network you've added.       Proxy settings are used by Browser and may not be used by other apps.  1.  In the Wi-Fi settings screen, press & hold the network name you have added. 2.  Tap Modify network. 3.  Check Show advanced options. 4.  If the network has no proxy settings, tap None and select Manual. 5.  Enter the required proxy settings you have obtained. 6.  Tap Save. A static IP address may also be manually configured for some network. By default, the Wi-Fi networks you add are configured for automatic IP assignment. You can change it for each Wi-Fi network you've added. 1.  In the Wi-Fi settings screen, press & hold the network name you have added. 2.  Tap Modify network. 3.  Check Show advanced options. 4.  If the network has no manual IP settings, tap DHCP and select Static. 5.  Enter the required IP address you have obtained. 6.  Tap Save.
User's Manual 6-4    Advanced Wi-Fi settings  Advanced Wi-Fi settings are available following the steps below. 1.  Turn on Wi-Fi if it is not already on. 2.  In the Wi-Fi settings screen, tap the Menu icon (   ) and tap Advanced. Several options are described below. Network notifications By default, when Wi-Fi is on, you receive notifications in the Status bar when your tablet detects an open Wi-Fi network. Uncheck this option to turn off notifications. Keep Wi-Fi on during sleep By default, your tablet stays connected to Wi-Fi when the screen goes to sleep. Tap this option to change this default setting: either to stay connected to Wi-Fi only when the tablet is connected to the AC adaptor or never to stay connected to Wi-Fi during sleep. The latter choice is likely to increase mobile data usage. You may want to revisit this setting if you receive a notification that you're approaching your specified mobile data limit. Wi-Fi optimization Check this option to minimize battery usage when Wi-Fi is turned on.  Wi-Fi Direct  Wi-Fi direct allows you to directly connect to devices nearby via Wi-Fi for much higher-speed wireless communication. You can share files or streaming videos/audios from other compatible devices. Tap the Menu icon (   ) and tap Wi-Fi Direct to enable Wi-Fi direct. Tap SEARCHING FOR DEVICE to find the nearby available devices whose names will be listed under PEER DEVICE for connection.  Wi-Fi should be connected before using Wi-Fi direct. Wi-Fi direct may fail to work when both devices have connected to a different hotspot.   Bluetooth  Bluetooth is a short-range wireless communications technology that devices can use to exchange information over a distance of about 8 meters. The most common Bluetooth devices are headphones for listening to the music and other portable devices, including cell phones.  This tablet does not support Bluetooth connections via ad-hoc network.
User's Manual 6-5    To connect to a Bluetooth device, you must turn on your tablet’s Bluetooth radio. The first time you use a new Bluetooth device, you must “pair” it with your tablet so that they connect securely to each other. After that, you can simply connect to a paired device. Turn off Bluetooth when you’re not using it, to extend the life of your battery between charges. You may also be required to turn Bluetooth off in some locations. Bluetooth is turned off in Airplane mode. Status bar icons indicate Bluetooth status.  Turning Bluetooth on or off  1.  Open the Settings app from All Apps. 2.  Under WIRELESS & NETWORKS, tap Bluetooth. 3.  Slide the Bluetooth switch to the ON position.  Changing your tablet’s Bluetooth name  Your tablet has a generic Bluetooth name by default, which is visible to other devices when your connect them. You can change the name so that it is more recognizable. 1.  Open the Settings app from All Apps. 2.  Make sure that the Bluetooth is turned on. 3.  In the Bluetooth settings screen, Tap the Menu icon (   ) and tap Rename tablet. 4.  Enter a new name for your tablet. 5.  Tap Rename to complete the operation.  Pairing your tablet with a Bluetooth device  You must pair your tablet with another device before you can connect to it. Once you pair your tablet with another device, they stay paired unless you unpair them. 1.  Open the Settings app from All Apps. 2.  Make sure that the Bluetooth is turned on. Your tablet will scan for and display the names of all available Bluetooth devices in range. If the device you want to pair with is not included in the list, make it discoverable. See the documentation that came with your device to learn how to make it discoverable by your tablet, and for other instructions for pairing. 3.  If your tablet stops scanning before you make the other device discoverable, tap SEARCH FOR DEVICES.
User's Manual 6-6    4.  Tap on the name of the Bluetooth device in the list to pair it. The devices pair with each other. If you’re prompted to enter a passkey, try entering 0000 or 1234 (the most common default passkeys), or consult the documentation that came with the device to learn its passkey. If the pairing is successful, that means your tablet is connected to the device.  Connecting to a Bluetooth device  Once paired, you can connect to a Bluetooth device. For example, to switch between devices or to reconnect after your tablet and this device come back into range. 1.  Open the Settings app from All Apps. 2.  Make sure that the Bluetooth is turned on. 3.  In the list of Bluetooth devices, tap a paired but unconnected device. If the device you expected isn’t displayed, tap SEARCH DEVICES. When your tablet and this device are connected, this device is shown as connected in the Paired Devices list.  Configuring a Bluetooth device  Some Bluetooth devices have multiple profiles. Profiles can include the ability to transmit your conversations, play music in stereo, or transfer files or other data. You can select profiles you want to use with your tablet. You can also change the name of the Bluetooth device as it appears on your tablet. 1.  Make sure that the Bluetooth is turned on. 2.  Tap the Quick Settings icon (  ) beside a paired Bluetooth device. A screen opens that allows you change the device profile or unpair it.  Data usage  Data usage refers to the amount of data uploaded or downloaded by your tablet during a given period. Additional fees may be charged when the data usage exceeds the limit depending on your wireless service provider’s plan. Data usage settings allow you to: View data usage by apps Enable or disable app auto-sync data Enable or disable app data transfer in the background for mobile hotspots It is suggested that you check your wireless service provider’s plan and determine what data usage limit may apply before adjusting the data usage settings.
User's Manual 6-7                               Device   The information displayed on the data usage settings screen is measured by your tablet. Your wireless service provider’s data usage accounting may differ. Steep overage charge is possible in excess of your wireless service provider’s data limits. Data usage can help you to view and track data usage but it is not guaranteed to prevent additional charges.   Setting data usage  Data usage of Wi-Fi is illustrated. Tap Data usage cycle to choose a different cycle. This date range is the period for which data usage is displayed in the graph below. The vertical white lines on the graph show a period of time within the data usage cycle. You can drag the lines to change the period which determines the total data usage amount below the graph.  Managing data usage by app  Some apps transfer data in the background and managing background data usage for individual apps can sometimes be a useful way to reduce your overall data usage (however, this may also affect the app's performance or cause it to malfunction). Check whether data usage can be managed from the app's own settings before manaing it here.    Options under DEVICE allow you to fine tune your tablet hardware.  Sound  Your tablet uses sounds and vibrations to communicate with you. You can configure and customize any of those including notifications, ringtones, alarms and feedback on your navigations. Sound contains the following options: Volumes Tap to open a dialog where you can drag a slider to set the volume separately for music, video, games, multimedia, notifications and alarms.
User's Manual 6-8    System Default notification Tap to open a dialog where you can set the default notification tone when you receive a notification. Touch sounds Check this option to play sound when tapping the screen. Screen lock sound Check this option to play sound when locking and unlocking the screen. Audio Enhancement You can adjust audio enhancement powered by SRS Technologies.  Some contents and applications may not be supported by the audio enhancement function. Battery life may be affected by the configuration of the audio enhancement function.   SRS Premium Voice PRO information  SRS Premium Voice PRO™ provides a superior voice communication and multimedia experience for the PC.   Display  You can use Display settings to configure the brightness and other screen settings. Display contains the following options: Brightness Tap to open a dialog and drag the slider left or right to adjust the screen brightness. Check Automatic brightness to disable manual brightness control. Wallpaper Tap to select a wallpaper source and change wallpaper. Sleep Tap to open a dialog where you can set the time of inactivity before the tablet goes to sleep.
User's Manual 6-9   Daydream Slide the Daydream switch to the ON position. You can choose one of the following options to be shown on the screen when the tablet is docked or in sleep mode. Clock Tap to select the Clock to show on the screen. Tap Quick settings icon (  ) Colors Tap to select the Colors to show on the screen. Photo Frame Tap to select the photoes to be shown on the screen one by one. Tap Quick settings icon (  ) to open a screen where you can select the photo source. Photo Table Tap to select the photo table to be shown on the screen. All the photoes will show on the photo table. Tap Quick settings icon ( ) to open a screen where you can select the photo source. When you have selected an option, you can tap START NOW on the top of the screen to start DAYDREAM immediately. You can also tap WHEN TO DAYDREAM to set when you want DAYDREAM to start. You can select from While docked, While charging or Either. For more details, you can tap icon (   ) for Help. Font size Tap to open a dialog where you can select the font size on the user interface.  Some apps may not display texts properly if font size which is set as Normal by default is changed.   Storage  Storage shows your internal storage and external storage status.  Internal storage  Internal storage contains the following options: Total Space Shows the total memory space of internal storage in your tablet. Available Shows the free space of internal storage. The following options will be displayed under the current user:
User's Manual 6-10    Apps The amount of application data of internal storage. Pictures, Videos The amount of picture and video data of internal storage. Audio (music, ringtones, podcasts etc.) The amount of audio data of internal storage. Downloads The amount of downloaded data of internal storage. Cached data The amount of cached data for all apps of internal storage. Misc. The amount of miscellaneous data of internal storage. You can also find the total storage amount of the other user. SD card  SD card contains the following options after you insert an SD card. Unmount SD card Tap to unmount the SD card for safe removal.  USB storage  USB storage contains the following options depending on the devices that you have inserted: Unmount USB0 - Unmount USB7 Tap to unmount the USB memory device for safe removal.  USB computer connection  You can choose how the USB port works by tapping the Menu icon (   ) and select USB computer connection. Please refer to the Connecting to a computer section for more details.  Battery  Battery allows you to check what is using the battery and the battery usage data. Tap to open a list of the applications and operating system components you have used since you last connected the tablet to a power source, sorted by the amount of power they have used. Tap REFRESH on the top of the screen to reload the list.
User's Manual 6-11    Power Management  You can use the Power management to change the settings of the following items that affect power comsuption: Keep Wi-Fi on during sleep, Wi-Fi optimization, Sleep, Brightness and System Performance. You can change the settings under three tabs. Default The default settings are displayed. Tap Apply to change to such settings. Power save The settings for power saving are displayed. Tap Apply to change to such settings. Custom Tap Capture, the present setting values are imported into the list. Tap Apply, your custom settings is applied.  Apps  You can use the Apps settings to view details about the applications installed on your tablet, to manage their data and force them to stop. Swipe between the three tabs at the top of the screen, each displaying a list of apps or their components. Downloaded Tap to open a list of all downloaded applications installed on your tablet, along with their size. They are sorted by name alphabetically by default. Running Tap to open a list of all applications, services (applications or parts of applications that provide services to other applications or that run even when their main application isn’t running), processes that are currently running and how much memory they are using. Depending on the service, when you tap it in the list it will either open a dialog where you can stop it or open its Settings screen. All Tap to open a list of all applications that you downloaded and all applications that came with your tablet. You can tap the Menu icon (   ) and select Sort by size to switch the order of the lists in Downloaded or All tabs.  This tablet does not support another Operating System. TOSHIBA cannot guarantee or support applications that are installed by a user.
User's Manual 6-12    Users  Your can share your tablet with family and friends. Each new user you set up here can use a separate space on the tablet with its own Home screens, accounts, apps, settings and so on. You can create up to eight users on a tablet. Each user’s image appears on the lock screen along with the tablet owner’s image. To use the tablet, touch your image and unlock your own lock screen.  Add a user  To add a user, you must be the owner. Tap the ADD USER on the top right of the users screen. A dialog will appear, tap OK to continue: If the person is available, tap Set up now and ask the person to set up the Google account and other settings. If the person is not available, tap Not now. A new user appears in the list. When you can hand over the tablet to the person for setup, tap the user image in Device -> Users under Settings app, or on the lock screen.  Modify user information  Each user can modify their own image and information shown on the lock screen: Change image: tap the user name. Change nickname: tap Nickname. Add or change additional text: tap User info.  Delete a user  The tablet’s owner can delete any user’s space. To do so, tap the Trash icon (   ) beside the user’s name. Other users can only delete their own space. To do so, tap Menu icon (   ) on the top right of the screen and select Delect from this device.  Switch users  Each user’s image and nickname appears on the lock screen along with the tablet owner’s. To enter your own space, tap your image and unlock the screen with your screen lock. Alternatively, swipe down from the top right of any screen to open Quick Settings panel, and then tap your image near the top left. This returns you to the lock screen, from which each user can unlock their own space.
User's Manual 6-13    Personal Options under PERSONAL allow you to manage personal accounts, data backup and security.  Location access  You can use Location access settings to configure location related settings. Location access contains the following options: Location access Slide the Access to my location switch to the ON position to allow the apps that have asked your permission to use your location information. Location sources GPS satellites Check this option to find your location via GPS satellites. Wi-Fi & mobile network location Check this option to let your apps use Google’s location service to estimate your location faster.  Security  You can use Security settings to configure settings that help secure your tablet and its data. Security contains the following options: Screen Security Screen lock Tap to open a screen where you can configure the tablet to lock screen with a Slide, Face Unlock, Pattern, PIN or Password. You can also choose None to disable screen lock. Owner info Tap to open a dialog where you can enter text to display on the lock screen. Encryption Encrypt tablet Tap to open a dialog where you can set numeric PIN or password to decrypt your tablet each time you power it on.  A PIN or password must be set (using Screen lock option) before encrypting your tablet.
User's Manual 6-14    Passwords Make passwords visible Check this option to show each password character as you enter them, so that you can see what you enter. Device Administration Device administrators Tap to open a screen where you can view and manage device administrators. Unknown sources Check this option to permit installation of applications that are not downloaded from or available on the Google Play™ Store app. Verify apps Check this option to disallow or warn before installation of applications that coud be harmful to your tablet. Credential Storage Trusted credentials Tap to open a screen where you can allow applications to access your tablet’s encrypted store of secure certificates and related passwords and other credentials. You can use credential storage to establish some kinds of Wi-Fi connections. If you have not set a password for credential storage, this setting is grayed. Install from SD card Tap to install a secure certificate from the SD card. Clear credentials Tap to delete all secure certificates and related credentials and erases the secure storage’s own password, after prompting you to confirm that you want to do this.  Language & input  You can use Language & input settings to select the language for the text, voice input and voice output on your tablet and for configuring the onscreen keyboard, including words that you’ve added to its dictionary. Language Tap to select the system language from a list. Spell checker Tap to enable automatic spell check to fix misspelled words more easily. Tap the Quick settings icon (  ) besides the option to select the target language. Personal dictionary Tap to open your personal dictionary. To add your words, tap ADD on the top right of the screen.
User's Manual 6-15   Keyboard & Input Methods Default Tap to open a dialog where you can select the default input method you want to use, if you have more than one installed, tap Set up input methods to open the screen where you can configure each input method. Physical Keyboard When a physical keyboard is connected, settings will be available. Tap on the name of the connected keyboard to configure the keyboard layout. Speech Voice Search Tap to open a screen where you can set the voice search function. Text-to-speech output Tap to open a screen where you can set the text-to-speech engine required for text-to-speech function. Mouse/Trackpad Pointer speed Tap to configure the mouse pointer speed by dragging the slider left or right.  Backup & reset  You can use the Backup & reset settings to manage your personal data.        This option is shown only when the current user of tablet is Owner.  Backup & Restore Back up my data Check this option to back up application data, Wi-Fi passwords, and other settings to Google servers. Backup account Tap to display the Google account that your settings and other data are backed up with. Automatic restore Check this option to restore backup settings or other data when you reinstall an application.
User's Manual 6-16            Accounts Personal Data Factory data reset Tap to erase all user data in the internal storage. Follow the on- screen instructions to reset it. Please note that data in the removable media won’t be erased. Please refer to the section Factory Reset in "Basic" chapter for details. You can tap an account to edit account settings which may vary with different account type.  Add account  You can add a mail account or an exchange account and sync your contacts, calendar or other applications data via an exchange account.  System Date & time  You can use Date & time settings to set your preferences for how dates are displayed. You can also use these settings to set your own time and time zone, rather than obtaining the current time from the mobile network. Automatic date & time Uncheck this option to set the date & time on the tablet manually rather than obtaining the current time from the network. Automatic date & time Settings Setup an NTP server address and the interval for automatic date & time synchronization. Set date If Automatic date & time is unchecked, tapping it will open a dialog where you can manually set the date.       The system date cannot be set beyond Dec/31/2100.  Set time Tap to open a dialog where you can manually set the time. Select time zone Tap to open a dialog where you can set the time zone. Use 24-hour format Check this option to display the time using 24-hour time format - for example, 13:00 rather than 1:00 pm.
User's Manual 6-17   Choose date format Tap to open a dialog where you can select the format for displaying dates.  Accessibility  You can use Accessibility settings to enable accessibility functions, such as reading or enlarging text on the screen. TalkBack Slide the switch to the ON position to enable TalkBack which provides spoken feedback to help blind and low-vision users. Magnification gestures Slide the switch to the ON position to turn on this feature. Then you can temporarily magnify what’s on your screen or use magnification mode to easily zoom and pan your screen. This feature is to help the low-vision users. Temporarily magnify: Triple-tap & hold Magnify & pan: Triple-tap & hold, then drag your finger. Toggle magnification mode in or out: Triple tap & release, or enter or exit an application to get out of magnification mode. When you are in magnification mode, you can: Pan: Drag two or more fingers across the screen. Adjust zoom level: Pinch or expand using two or more fingers.  Triple-tap for magnification works everywhere except for the keyboard and navigation buttons.  Large text Check to increase the default font size used across the system for better readability. Auto-rotate screen Check to make automatic screen rotation available as you turn your tablet sideways. Speak passwords Check to enable this function that allows the tablet to speak the passwords while you are typing.
User's Manual 6-18   Accessibility shortcut Slide the switch to the ON position to turn on this feature, which allows you to touch your tablet’s screen and hear what’s under your finger via spoken feedback. This feature is helpful to blind users. When this feature is turned on, you can quickly enable accessibility features by the following steps: 1. Press and hold the power button until you hear a sound or feel a vibration. 2. Touch and hold two fingers until you hear audio confirmation.  If the tablet has multiple users, use this shortcut on the lock screen temporarily enables accessibility until the tablet is unlocked.  Text-to-speech output Tap to select and set up speech engine that converts text into spoken voice. Touch & hold delay Tap to select the delay required for your tablet to notice that you are pressing and holding an item. Enhance web accessibility Tap to allow apps to install scripts from Google.  Developer options  Developer options are useful for developing applications.  About tablet  About tablet includes information about your tablet. System updates Tap to open the screen to check your system for update. Status Tap to open the Status screen with a long list of information about your battery, mobile network connection and other details. System information Tap to open a screen that displays some basic information of your tablet, such as Manufacture, Product name, Product version and Serial number, etc. Legal information Tap to open a screen where you can obtain legal information about the softwares included with your tablet. Model number Display the model number of your tablet. Android™ version Display the current version of Android installed on your tablet.
User's Manual 6-19    Kernel version Display the kernel version. Build number Display the build number.
User's Manual 7-1    Chapter 7   Optional Accessories  Optional devices can expand the tablet's capability and its versatility. This section describes the connection or installation of the following devices: Cards Memory media slot Secure Digital™ (SD) Card (microSD/SDHC/SDXC card) SIM card Peripheral devices USB device HDMI device Bluetooth keyboard  Memory media slot The tablet is equipped with a Memory media slot that can accommodate some kinds of memory media with various memory capacities so that you can easily transfer data from devices, such as digital cameras and Personal Digital Assistants.  This Memory media slot supports the following memory media Secure Digital (SD) Card (microSD/SDHC/SDXC Card). Please note that not all memory media have been tested and verified to work correctly. Therefore, it is not possible to guarantee that all memory media will operate properly.   Memory media  This section provides the important safety precautions in order to handle your memory media.  Points to note about microSD/SDHC/SDXC memory cards  microSD/SDHC/SDXC memory cards comply with SDMI (Secure Digital Music Initiative), which is a technology adopted to prevent unlawful copy or playback of digital music. For this reason, you cannot copy or playback protected material on other device, and you may not reproduce any copyrighted material except for your personal enjoyment. The supported maximum capacity of memory card is 64GB.
User's Manual 7-2    Memory media format  New media cards are formatted according to specific standards. If you wish to reformat a media card, be sure to do so with a device that uses media cards.  Formatting microSD/SDHC/SDXC memory cards  microSD/SDHC/SDXC memory cards are sold already formatted in conformity to specific standards. If you reformat an microSD/SDHC/SDXC memory card, be sure to reformat it with a device such as digital camera or digital audio player that uses microSD/SDHC/SDXC memory cards, not with the format command provided within Windows.  Should you need to format all areas of the memory card, including the protected area, you will need to obtain an appropriate application that applies the copy protection system.   Media care  Observe the following precautions when handling the card. Do not twist or bend cards. Do not expose cards to liquids or store in humid areas or lay media close to containers of liquid. Do not touch the metal part of a card or expose it to liquids or let it get dirty. After using card, return it to its case. The card is designed so that it can be inserted only one way. Do not try to force the card into the slot. Do not leave a card partially inserted in the slot. Press the card until you hear it click into place. Set the write-protect switch to the lock position, if you do not want to record data. Memory cards have a limited lifespan, so it is important to backup important data. Do not write to a card if the battery power is low. Low power could affect writing accuracy. Do not remove a card while read/write is in progress.  For more details on using memory cards, see manuals accompanying the cards.   Inserting a memory media  The following instructions apply to all types of supported media devices. To insert a memory media, follow the steps as detailed below:
User's Manual 7-3    1.  Turn the memory media so that the contacts (metal areas) are facing down. 2.  Insert the memory media into the memory media slot on the tablet. 3.  Push the memory media gently until you hear a click. Figure 7-1 Inserting a memory media         1  2  1. Memory media slot  2. Memory media  Make sure memory media is oriented properly before you insert it. If you insert the media in wrong direction, you may not be able to remove it. When inserting memory media, do not touch the metal contacts. You could expose the storage area to static electricity, which can destroy data. Do not turn the tablet off or switch to Sleep Mode while files are being copied - doing so may cause data loss   Removing a memory media  The following instructions apply to all types of supported media devices. To remove a memory media, follow the steps as detailed below: 1.  Make sure all file operations are finished. 2.  Tap All Apps -> Settings -> Storage -> Unmount SD card. 3.  Push the memory media until you hear a click to partially release it. 4.  Grasp it and pull it out of the slot.  Do not remove the memory media while the tablet is in Sleep mode. The tablet could become unstable or data in the memory media could be lost.   SIM card slot Some models are equipped with a SIM card slot that allows you to assemble a SIM card from your wireless service provider to use your provider’s mobile networks for transmitting data.
User's Manual 7-4     This section only applies to models with 3G modules.    Inserting a SIM card  To insert a SIM card, follow the steps as detailed below:  Do not carry out the following operations when the tablet is powered on, otherwise the SIM card may be damaged.   1.  Turn the SIM card so that the contacts (metal areas) are facing down. 2.  Remove the slot cover and insert the SIM card into the SIM card slot on the tablet and push it until you hear a click. Figure 7-2 Inserting a SIM card         1  2  1. SIM card slot  2. SIM card  Now you can power on your tablet to use your provider’s mobile networks.  Please always keep a minimum of 1.5cm distance away from the antennas area during operation.   Removing a SIM card  To remove a SIM card, follow the steps as detailed below:  Do not carry out the following operations when the tablet is powered on, otherwise the SIM card may be damaged.   1.  Remove the slot cover and push the SIM card until you hear a click to partially release it. 2.  Grasp it and pull it out of the slot.  USB device This tablet is equipped with a Micro USB port supporting USB host function. This allows you to connect the following USB devices to the tablet: USB flash drives, USB HDDs (only FAT file system), USB Hubs
User's Manual 7-5    powered by an AC adapter, game controllers and other USB accessories for Android-powered devices. This port complies with USB 2.0 standard.  Support of HIDs (Keyboards and Mouse) connection will only be available by the latest software. Please upgrade the software to the latest version after your purchase of the tablet.   To connect a USB device, you must purchase a Micro A plug - A receptacle cable. This item is available from your reseller or TOSHIBA dealer.  Make sure the connector is properly aligned with the socket. Do not try to force the connection, doing so can damage the connecting pins.   This tablet does not support a printer. As the port operation of all USB devices has not been confirmed, some USB devices may not function properly.   HDMI device The tablet is equipped with a Micro HDMI port that can send video by connecting with external devices. 1080p and 720p signal formats are supported, but actually available signal format depends on each HDMI device. Your tablet supports two output modes: Mirror & Video area only. Mirror The external display device copies the image on the tablet screen. Video area only The external display device shows the playback when you open a multimedia. Please refer to Display section in "Settings" chapter for details. To connect external devices, follow the steps as detailed below: As the port operation of all HDMI (High-Definition Multimedia Interface) display devices have not been confirmed, some HDMI display devices may not function properly.   1.  Plug Type D connector of the HDMI cable into the Micro HDMI port on your tablet. 2.  Plug the other end of the HDMI cable into the HDMI port of the HDMI device.
User's Manual 7-6    Figure 7-3 Connecting an HDMI cable          1  2  1. Micro HDMI port  2. Micro HDMI (Type D) connector  Please do not plug/unplug an HDMI device when the tablet is in Sleep Mode. When you connect a television or external monitor to the HDMI port, set the display output device is set to HDMI. When you unplug the HDMI cable and re-plug it, please wait at least 5 seconds before you re-plug the HDMI cable.   Optional TOSHIBA Accessories You can add a number of options and accessories in order to make your tablet even more powerful and convenient to use. For reference, the following list details some of the items that are available from your reseller or TOSHIBA dealer:  AC Adaptor  If you frequently use your tablet at more than one site, it may be convenient to purchase an additional AC adaptor to be kept at each site.  Tablet pen  The pen tip cannot be replaced if it is worn. If your tablet pen is used freguqently, it is recommended to purchase an additional tablet pen as a spare.
User's Manual 8-1    Chapter 8   Troubleshooting  TOSHIBA have designed this tablet for durability, however, should problems occur you are able to use the procedures detailed in this chapter to help determine the cause. All users should become familiar with this chapter as knowing what might go wrong can help prevent problems from occurring in the first place.  Problem solving process Resolving problems will be much easier if you observe the following guidelines: Stop immediately when you recognize a problem exists as taking further action may result in data loss or damage, or you may destroy valuable problem related information that can help solve the problem. Observe what is happening - write down what the system is doing and what actions you performed immediately before the problem occurred. Make a screenshot of the current display. Please also be aware that the questions and procedures described in this chapter are meant only as a guide, they are not definitive problem solving techniques. In reality many problems can be solved simply, but a few may require help from TOSHIBA Support - if you find you need to consult others, be prepared to describe the problem in as much detail as possible.  Preliminary checklist  You should always consider the simplest solution first - the items detailed in this checklist shall provide easy fixes for issues which appear to be serious problems. Make sure you turn on all peripheral devices before you turn on the tablet. Before you attach an external device you should first turn the tablet off, then when you turn the tablet back on again it will recognize the new device. Make sure all optional accessories are configured properly in the tablet's setup program and that all required driver software has been loaded (please refer to the documentation included with the optional accessories for further information on its installation and configuration). Check all cables to ensure they are correctly and firmly attached to the tablet - loose cables can cause signal errors.
User's Manual 8-2    Inspect all connecting cables for loose wires and all connectors for loose pins. Always try to make detailed notes of your observations and keep them in a permanent error log - this will help you to describe your problems to TOSHIBA Support. In addition, if a problem recurs, the log you have made will help to identify the problem faster.  Hardware and system checklist This section discusses problems caused by your tablet’s hardware or attached peripherals. Basic problems may occur in the following areas:  Internal display panel Memory Media Card Wireless LAN Sound system  USB device Bluetooth   Internal display panel  Apparent tablet's display panel problems may be related to the tablet's setup and configuration.  Problem  Procedure  Problems above remain unresolved or other problems occur  You should initially refer to the documentation supplied to you with the software to understand the cause of the problems. If you are still unable to resolve the problem, contact your reseller, dealer or service provider.   Memory Card  Problem  Procedure  Memory media card error occurs      You cannot read a file  Remove the memory media card from the tablet and then reinsert it in order to ensure it is firmly connected. If the problem persists, then you should refer to the documentation supplied with your memory media card for further information.  Check to ensure the required file is actually on the memory media card that is inserted into the tablet. If you are still unable to resolve the problem, contact TOSHIBA Support.
User's Manual 8-3    USB device  In addition to the information in this section, please also refer to the documentation supplied with your USB device.  Problem  Procedure  USB device does not work  Remove the USB device from the convert cable and reconnect it to ensure it is firmly attached.   Sound system  In addition to the information in this section, please also refer to the documentation supplied with your audio device.  Problem  Procedure  No sound is heard  Adjust the volume. Check the software volume settings. Please check to see if system sound is muted. Check to make sure the headphone connection is secure.   Wireless LAN  If the following procedures do not restore LAN access, consult your LAN administrator.  Problem  Procedure  Cannot access Wireless LAN  Make sure the tablet's Wireless communication function is on. If problems persist, contact your LAN administrator.   Bluetooth  Problem  Procedure  Cannot access Bluetooth device  Check to ensure the tablet's Bluetooth functionality is set to on in All Apps -> Settings -> Wireless & networks -> Bluetooth.   TOSHIBA Support If you require any additional help using your tablet or if you are having problems operating the tablet, you may need to contact TOSHIBA for additional technical assistance.
User's Manual 8-4    Before you call  Some problems you experience may be related to software or the operating system so it is important that you investigate other sources of assistance first. Before contacting TOSHIBA, try the following: Review troubleshooting sections in the documentation supplied with your software and/or peripheral devices. If a problem occurs when you are running software applications, consult the software documentation for troubleshooting suggestions and consider calling the software company's technical support department for assistance. Consult the reseller or dealer from where you purchased your tablet and/or software - they are your best resource for current information and support.  TOSHIBA technical support  If you are still unable to solve the problem and suspect that it is hardware related, visit TOSHIBA technical support website http://www.toshiba.co.jp/ worldwide/.
Chapter 9 User's Manual 9      Specifications  This chapter summarizes the tablet’s technical specifications.  Physical Dimensions  Size  Approximately 261 (w) x 179 (d) x 10.2 (h) millimeters (not including parts that extend beyond the main body).   Environmental Requirements  Conditions  Ambient temperature    Relative humidity  Operating  5°C (41°F) to 35°C (95°F)  Non-operating  -20°C (-4°F) to 60°C (140°F)  Wet-bulb temperature   29°C maximum  20% to 90% (noncondensing)  10% to 95% (noncondensing)  Conditions  Altitude (from sea level) Operating  0 to 6,561 feet (2,000 meters) Non-operating  0 to 40,000 feet (12,192 meters)   Power Requirements  AC adaptor  100-240V AC 50 or 60 Hz (cycles per second)  Tablet  5V DC
User's Manual 10 Chapter 10      Information for Wireless Devices Wireless Technology Interoperability The Wireless LAN is compatible with other LAN systems Direct Sequence Spread Spectrum (DSSS) /Orthogonal Frequency Division Multiplexing (OFDM) radio technology, and is compliant to: The IEEE 802.11 Standard on Wireless LANs (Revision a/b/g/n, b/g/n or ac/a/b/g/n), as defined and approved by the Institute of Electrical and Electronics Engineers. The Wireless Fidelity (Wi-Fi®) certification as defined by the Wi-Fi Alliance®. The Wi-Fi CERTIFIED™ logo is a certification mark of the Wi-Fi Alliance®. Bluetooth™ Cards are designed to be interoperable with any product with Bluetooth wireless technology that is based on Frequency Hopping Spread Spectrum (FHSS) radio technology, and is compliant to: Bluetooth Specification (depending on the model you purchased), as defined and approved by the Bluetooth Special Interest Group. Logo certification with Bluetooth wireless technology as defined by the Bluetooth Special interest Group.  Please note that it is not possible to confirm the operation of all functions of all Bluetooth devices that are available. In view of this it may be noted that some functions associated with a specific device might not operate properly.   CAUTION about Wireless Devices  The wireless devices have not completed verification of connection and operation with all devices which are using the Wireless LAN or Bluetooth radio technology. Bluetooth and Wireless LAN devices operate within the same radio frequency range and may interfere with one another. If you use Bluetooth and Wireless LAN devices simultaneously, you may occasionally experience a less than optimal network performance or even lose your network connection. If you experience any such problem, immediately turn off either one of your Bluetooth or Wireless LAN.
User's Manual 10-2    Please visit http://www.pc.support.global.toshiba.com, if you have any questions about using Wireless LAN or Bluetooth Card from TOSHIBA. In Europe visit http://www.toshiba-europe.com/computers/tnt/bluetooth.htm This Bluetooth product is not compatible with devices using Bluetooth Version 1.0B specifications.   Wireless Devices and your health Wireless products, like other radio devices, emit radio frequency electromagnetic energy. The level of energy emitted by wireless products however is far much less than the electromagnetic energy emitted by wireless devices like for example mobile phones. Because wireless products operate within the guidelines found in radio frequency safety standards and recommendations, TOSHIBA believes Wireless products is safe for use by consumers. These standards and recommendations reflect the consensus of the scientific community and result from deliberations of panels and committees of scientists who continually review and interpret the extensive research literature. In some situations or environments, the use of wireless products may be restricted by the proprietor of the building or responsible representatives of the organization. These situations may for example include: Using the wireless products on board of airplanes, or In any other environment where the risk of interference to other devices or services is perceived or identified as harmful. If you are uncertain of the policy that applies on the use of wireless devices in a specific organization or environment (e.g. airports), you are encouraged to ask for authorization to use the wireless device prior to turning on the equipment.  Radio Regulatory Information The wireless device must be installed and used in strict accordance with the manufacturer’s instructions as described in the user documentation that comes with the product. This product complies with the following radio frequency and safety standards.  Europe Restrictions for Use of 2400.0-2483.5MHz Frequencies in Europe  France:  Outdoor use limited to 10mW e.i.r.p. within the band 2454-2483.5MHz Military Radiolocation use. Refarming of the 2.4GHz band has been ongoing in recent years to allow current relaxed regulation Full implementation planned in 2012.
User's Manual 10-3    Italy:  -  For private use, a general authorization is required if WAS/ RLAN’s are used outside own premises. For public use, a general authorization is required.  Luxembourg:  Implemented  General authorization required for network and service supply.  Norway:  Implemented  This subsection does not apply for the geographical area within a radius of 20 km from the centre of Ny-Alesund.  Russian Federation:  -  Only for indoor applications.   Restrictions for Use of 5150-5350MHz Frequencies in Europe  Italy:  -  For private use, a general authorization is required if WAS/ RLAN’s are used outside own premises.  Luxembourg:  Implemented  General authorization required for network and service supply.  Russian Federation:  Limited  e.i.r.p 100mW. Permitted to use only for indoor applications, closed industrial and warehouse areas, and on board aircraft. 1.  Permitted to use for local networks of aircraft crew service communications on board aircraft in area of the airport and at all stages of flight. 2.  Permitted to use for public wireless access local networks on board aircraft during a flight at the altitude not less than 3000m.   Restrictions for Use of 5470-5725MHz Frequencies in Europe  Italy:  -  For private use, a general authorization is required if WAS/ RLAN’s are used outside own premises.
User's Manual 10-4    Luxembourg:  Implemented  General authorization required for network and service supply  Russian Federation:  Limited  e.i.r.p 100mW. Permitted to use only for indoor applications, closed industrial and warehouse areas, and on board aircraft. 1.  Permitted to use for local networks of aircraft crew service communications on board aircraft in area of the airport and at all stages of flight. 2.  Permitted to use for public wireless access local networks on board aircraft during a flight at the altitude not less than 3000m.  To remain in conformance with European spectrum usage laws for Wireless LAN operation, the above 2.4GHz and 5GHz channel limitations apply for outdoor usage. The user should use the wireless LAN utility to check the current channel of operation. If operation is occurring outside of the allowable frequencies for outdoor use, as listed above, the user must contact the applicable national spectrum regulator to request a license for outdoor operation.  Canada - Industry Canada (IC)  This device complies with RSS 210 of Industry Canada. Operation is subject to the following two conditions: (1) this device may not cause interference, and (2) this device must accept any interference, including interference that may cause undesired operation of this device. The term “IC” before the equipment certification number only signifies that the Industry Canada technical specifications were met.  USA-Federal Communications Commission (FCC)  This equipment has been tested and found to comply with the limits for a Class B digital device, pursuant to Part 15 of FCC Rules. These limits are designed to provide reasonable protection against harmful interference in a residential installation. Refer to the FCC information section for the detailed information.  Caution: Exposure to Radio Frequency Radiation  The radiated output power of the wireless device is far below the FCC radio frequency exposure limits. Nevertheless, the wireless device shall be used
User's Manual 10-5    in such a manner that the potential for human contact during normal operation is minimized. In the usual operating configuration, the distance between the antenna and the user should not be less than 20cm. Please refer to the tablet user’s manual for the details regarding antenna location. The installer of this radio equipment must ensure that the antenna is located or pointed in such a way that it does not emit RF field in excess of Health Canada limits for the general population; consult Safety Code 6, obtainable from Health Canada’s website www.hc-sc.gc.ca  Caution: Radio Frequency Interference Requirements  This device is restricted to indoor use due to its operation in the 5.15 to 5.25GHz frequency range.  Taiwan  Article 12  Without permission granted by the NCC, any company, enterprise, or user is not allowed to change frequency, enhance transmitting power or alter original characteristic as well as performance to an approved low power radio frequency devices.  Article 14  The low power radio-frequency devices shall not influence aircraft security and interfere legal communications; If found, the user shall cease operating immediately until no interference is achieved. The said legal communications means radio communications is operated in compliance with the Telecommunications Act. The low power radio-frequency devices must be susceptible with the interference from legal communications or ISM radio wave radiated devices.   Using this equipment in Japan  In Japan, the frequency bandwidth of 2,400MHz to 2,483.5MHz for second generation low-power data communication systems such as this equipment overlaps with that of mobile object identification systems (premises radio station and specified low-power radio station).  1. Important notice  The frequency bandwidth of this equipment may operate within the same range as industrial devices, scientific devices, medical devices, microwave ovens, licensed radio stations and non-licensed specified low-power radio
User's Manual 10-6    stations for mobile object identification systems (RFID) used in factory production lines (Other Radio Stations). 1.  Before using this equipment, ensure that it does not interfere with any of the equipment listed above. 2.  If this equipment causes RF interference to other radio stations, promptly change the frequency being used, change the location of use, or turn off the source of emissions. 3.  Contact an authorized TOSHIBA service provider if you have problems with interference caused by this product to Other Radio Stations.  2. Indication for Wireless LAN  The indication shown below appears on this equipment.    1.  2.4 : This equipment uses a frequency of 2.4GHz. 2.  DS : This equipment uses DS-SS modulation. 3.  OF : This equipment uses OFDM modulation. 4.  4 : The interference range of this equipment is less than 40m. 5.    : This equipment uses a frequency bandwidth from 2,400MHz to 2,483.5MHz. It is possible to avoid the band of mobile object identification systems.  3. Indication for Bluetooth  The indication shown below appears on this equipment.    1.  2.4 : This equipment uses a frequency of 2.4 GHz. 2.  FH : This equipment uses FH-SS modulation. 3.  1 : The interference range of this equipment is less than 10 m. 4.   : This equipment uses a frequency bandwidth from 2,400 MHz to 2,483.5 MHz. It is impossible to avoid the band of mobile object identification systems.  4. About the JEITA  5GHz Wireless LAN supports W52/W53/W56 Channel.
User's Manual 10-7    Device Authorization This device obtains the Technical Regulation Conformity Certification and it belongs to the device class of radio equipment of low-power data communication system radio station stipulated in the Telecommunications Business Law of Japan. The following restrictions apply: Do not disassemble or modify the device. Do not install the embedded wireless module into other device.  Radio approvals for wireless devices Approved Countries/Regions  This equipment is approved to the radio standard by the countries/regions in the following table.  Do not use this equipment in the countries/regions which are not listed in the table below.   As of February 2013  Austria  Belgium  Bulgaria  Canada Cyprus  Czech Rep  Denmark  Estonia Finland  France  Germany  Greece Hong Kong  Hungary  Iceland  India Indonesia  Ireland  Italy  Japan Korea  Latvia  Liechtenstein  Lithuania Luxemburg  Malta  Monaco  Netherlands Norway  Philippines  Poland  Portugal Romania  Slovak Republic Slovenia  Spain Sweden  Switzerland  UK  USA

Navigation menu