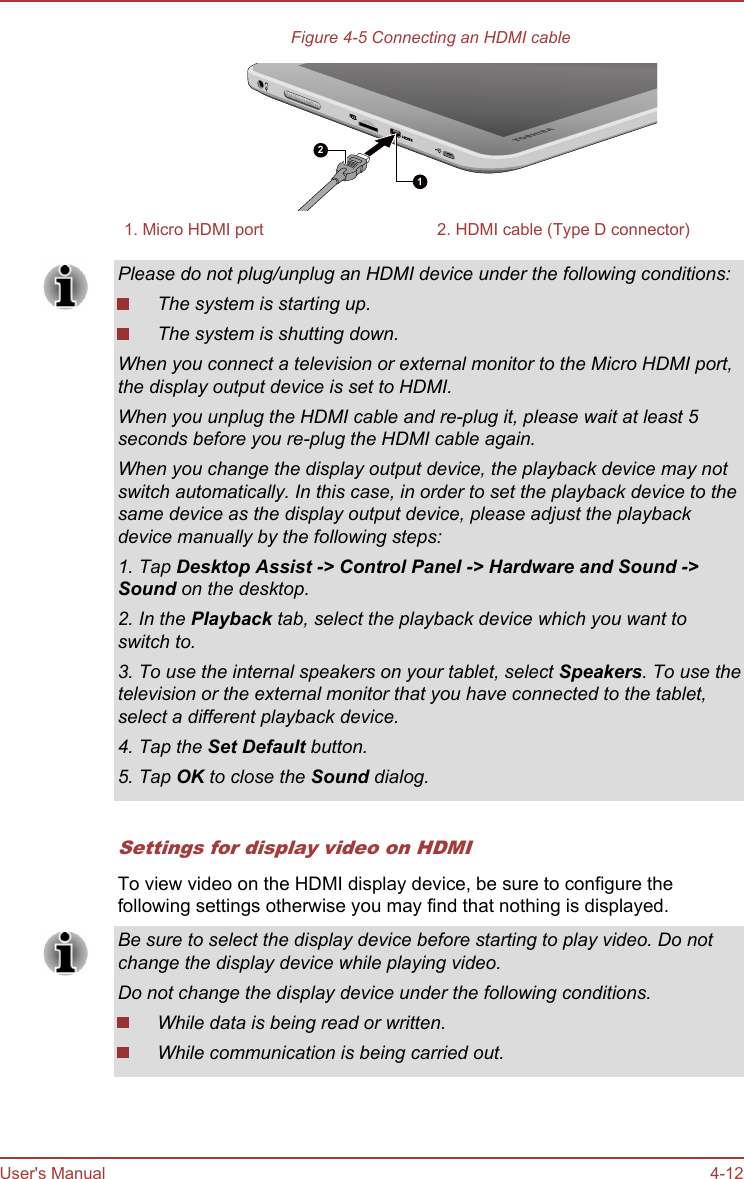
PEGATRON PDAWT10-A Tablet Computer User Manual Toshiba TOSHIBA WT10 A WT8 BEncore 2 Series

PEGATRON CORPORATION Tablet Computer Toshiba TOSHIBA WT10 A WT8 BEncore 2 Series

User manual

User's ManualWT10-A/WT8-BEncore 2Series
Table of ContentsChapter 1 TOSHIBA Legal, Regulatory and SafetyCopyright, Disclaimer and Trademarks  .............................................. 1-1Regulatory Information ......................................................................... 1-2Video Standard Notice  .......................................................................... 1-7OpenSSL Toolkit License Issues ......................................................... 1-8FreeType License Issues .................................................................... 1-10ENERGY STAR® Program  .................................................................. 1-14Disposing of the computer and the computer's batteries ............... 1-14General Precautions  ........................................................................... 1-14Safety Icons  ......................................................................................... 1-17Chapter 2 Getting StartedEquipment checklist  ............................................................................. 2-1Conventions ........................................................................................... 2-1Using your tablet for the first time ....................................................... 2-2Getting to know Windows ..................................................................... 2-7Turning off the power ............................................................................ 2-8Chapter 3 The Grand TourThe Grand Tour for WT10-A  ................................................ 3-1The Grand Tour for WT8-B  .................................................. 3-4Internal Hardware Components  ........................................................... 3-7Chapter 4 Operating BasicsUsing the Touch Screen  ....................................................................... 4-13D Playback on an External 3D Device  ............................................... 4-2Battery  .................................................................................................... 4-3GPS Function ......................................................................................... 4-6Memory media  ....................................................................................... 4-7USB device ........................................................................................... 4-10External Display  .................................................................................. 4-11Optional TOSHIBA Accessories  ........................................................ 4-13Sound System and Video mode ......................................................... 4-14Chapter 5 Utilities and Advanced UsageUtilities and Applications ...................................................................... 5-1Special features ..................................................................................... 5-2TruCapture  ............................................................................................. 5-3User's Manual ii
TOSHIBA Setup Utility  .......................................................................... 5-3System Recovery  .................................................................................. 5-4Chapter 6 TroubleshootingProblem solving process ...................................................................... 6-1Hardware and system checklist ........................................................... 6-4TOSHIBA support .................................................................................. 6-9Chapter 7 AppendixSpecifications  ........................................................................................ 7-1AC Power Cord and Connectors .......................................................... 7-2Information for Wireless Devices  ........................................................ 7-3Legal Footnotes ................................................................................... 7-11Glossary  ............................................................................................... 7-13IndexUser's Manual iii
User's Manual iv
Chapter 1TOSHIBA Legal, Regulatory andSafetyThis chapter states the Legal, regulatory and safety information applicableto TOSHIBA computers.Copyright, Disclaimer and TrademarksCopyright© 2014 by TOSHIBA Corporation. All rights reserved. Under the copyrightlaws, this manual cannot be reproduced in any form without the priorwritten permission of TOSHIBA. No patent liability is assumed, with respectto the use of the information contained herein.First edition May 2014Copyright authority for music, movies, computer programs, databases andother intellectual property covered by copyright laws belongs to the authoror to the copyright owner. Copyrighted material can be reproduced only forpersonal use or use within the home. Any other use beyond that stipulatedabove (including conversion to digital format, alteration, transfer of copiedmaterial and distribution on a network) without the permission of thecopyright owner is a violation of copyright or author's rights and is subjectto civil damages or criminal action. Please comply with copyright laws inmaking any reproduction from this manual.DisclaimerThis manual has been validated and reviewed for accuracy. Theinstructions and descriptions it contains are accurate for your computer atthe time of this manual’s production. However, succeeding computers andmanuals are subject to change without notice. TOSHIBA assumes noliability for damages incurred directly or indirectly from errors, omissions ordiscrepancies between the computer and the manual.TrademarksIntel, Intel SpeedStep, Intel Core and Centrino are trademarks or registeredtrademarks of Intel Corporation.Windows, Microsoft and Windows logo are registered trademarks ofMicrosoft Corporation.User's Manual 1-1
The Bluetooth® word mark and logos are registered trademarks owned byBluetooth SIG, Inc. and any use of such marks by Toshiba Corporation andits affiliates is under license.The terms HDMI and HDMI High-Definition Multimedia Interface, and theHDMI Logo are trademarks or registered trademarks of HDMI LicensingLLC in the United States and other countries.Secure Digital and SD are trademarks of SD Card Association.Dolby and the double-D symbol are trademarks of Dolby Laboratories.All other product names and service names in this manual may betrademarks or registered trademarks of their respective companies.Regulatory InformationFCC informationFCC notice "Declaration of Conformity Information"This equipment has been tested and found to comply with the limits for aClass B digital device, pursuant to part 15 of the FCC rules. These limitsare designed to provide reasonable protection against harmful interferencein a residential installation. This equipment generates, uses and canradiate radio frequency energy and, if not installed and used in accordancewith the instructions, may cause harmful interference to radiocommunications. However, there is no guarantee that interference will notoccur in a particular installation. If this equipment does cause harmfulinterference to radio or television reception, which can be determined byturning the equipment off and on, the user is encouraged to try to correctthe interference by one or more of the following measures:Reorient or relocate the receiving antenna.Increase the separation between the equipment and receiver.Connect the equipment into an outlet on a circuit different from that towhich the receiver is connected.Consult the dealer or an experienced radio/TV technician for help.Only peripherals complying with the FCC class B limits may be attached tothis equipment. Operation with non-compliant peripherals or peripherals notrecommended by TOSHIBA is likely to result in interference to radio andTV reception. Shielded cables must be used between the external devicesand the computer’s Micro HDMI port, Universal Serial Bus (USB 2.0 and3.0) ports as well as Headphone/Microphone combo jacks. Changes ormodifications made to this equipment, not expressly approved byTOSHIBA or parties authorized by TOSHIBA could void the user’s authorityto operate the equipment.User's Manual 1-2
FCC conditionsThis device complies with part 15 of the FCC Rules. Operation is subject tothe following two conditions:1. This device may not cause harmful interference.2. This device must accept any interference received, includinginterference that may cause undesired operation.ContactAddress: TOSHIBA America Information Systems, Inc.  9740 Irvine Boulevard  Irvine, California 92618-1697Telephone: (949) 583-3000This information is only applicable for the countries/regions where it isrequired.EU Declaration of ConformityThis product is carrying the CE-Mark inaccordance with the related European Directives.Responsible for CE-Marking is TOSHIBA EUROPEGMBH, Hammfelddamm 8, 41460 Neuss,Germany. The complete and official EUDeclaration of Conformity can be found onTOSHIBA’s web sitehttp://epps.toshiba-teg.com on the Internet.CE complianceThis product is labeled with the CE Mark in accordance with the applicableEuropean Directives, notably RoHS Directive 2011/65/EU, RadioEquipment and Telecommunications Terminal Directive 1999/5/EC,Ecodesign Directive 2009/125/EC (ErP) and the related implementingmeasures.This product and the original options are designed to observe the relatedEMC (Electromagnetic Compatibility) and safety standards. However,TOSHIBA cannot guarantee that this product still observes these EMCstandards if options or cables not produced by TOSHIBA are connected orimplemented. In this case the persons who have connected/implementedthose options/cables have to provide assurance that the system (PC plusoptions/cables) still fulfils the required standards. To avoid general EMCproblems, the following guidance should be noted:User's Manual 1-3
Only CE marked options should be connected/implementedOnly best shielded cables should be connectedWorking environmentThis product was designed to fulfil the EMC (Electromagnetic Compatibility)requirements to be observed for so-called “Residential, commercial andlight industry environments”. TOSHIBA do not approve the use of thisproduct in working environments other than the above mentioned“Residential, commercial and light industry environments”.For example, the following environments are not approved:Industrial Environments (e.g. environments where a mains voltage of380 V three-phase is used)Medical EnvironmentsAutomotive EnvironmentsAircraft EnvironmentsAny consequences resulting from the use of this product in workingenvironments that are not approved are not the responsibility of TOSHIBA.The consequences of the use of this product in non-approved workingenvironments may be:Interference with other devices or machines in the near surroundingarea.Malfunction of, or data loss from, this product caused by disturbancesgenerated by other devices or machines in the near surrounding area.Therefore TOSHIBA strongly recommend that the electromagneticcompatibility of this product should be suitably tested in all non-approvedworking environments before use. In the case of automobiles or aircraft,the manufacturer or airline respectively should be asked for permissionbefore use of this product.Furthermore, for general safety reasons, the use of this product inenvironments with explosive atmospheres is not permitted.VCCI Class B Information (Japan Only)この装置は、クラスB情報技術装置です。この装置は、家庭環境で使用することを目的としていますが、この装置がラジオやテレビジョン受信機に近接して使用されると、受信障害を引き起こすことがあります。取扱説明書に従って正しい取り扱いをしてください。VCCI-BCanadian regulatory information (Canada only)This digital apparatus does not exceed the Class B limits for radio noiseemissions from digital apparatus as set out in the Radio InterferenceRegulation of the Canadian Department of Communications.User's Manual 1-4
Note that Canadian Department of Communications (DOC) regulationsprovide, that changes or modifications not expressly approved byTOSHIBA Corporation could void your authority to operate this equipment.This Class B digital apparatus meets all requirements of the CanadianInterference-Causing Equipment Regulations.Cet appareil numérique de la class B respecte toutes les exgences duRèglement sur le matériel brouileur du Canada.Following information is only valid for EU-memberStates:Disposal of productsThe crossed out wheeled dust bin symbol indicates thatproducts must be collected and disposed of separatelyfrom household waste. Integrated batteries andaccumulators can be disposed of with the product. Theywill be separated at the recycling centres.The black bar indicates that the product was placed on themarket after August 13, 2005.By participating in the separate collection of products andbatteries, you will help to assure the proper disposal ofproducts and batteries and thus help to prevent potentialnegative consequences for the environment and humanhealth.For more detailed information about the collection andrecycling programmes available in your country, pleasevisit our website( www.toshiba.eu/recycling ) or contact your local counciloffice or the retail outlet where you purchased the product.User's Manual 1-5
Disposal of batteries and/or accumulatorsThe crossed out wheeled dust bin symbol indicates thatbatteries and/or accumulators must be collected anddisposed of separately from household waste.If the battery or accumulator contains more than thespecified values of lead (Pb), mercury (Hg), and/orcadmium (Cd) defined in the European Battery Directive,then the chemical symbols for lead (Pb), mercury (Hg)and/or cadmium (Cd) will appear below the crossed outwheeled dust bin symbol.By participating in the separate collection of batteries, youwill help to assure the proper disposal of products andbatteries and thus help to prevent potential negativeconsequences for the environment and human health. Toachieve this you should take any battery and/oraccumulator to your local recycling site, or to a retail outletor facility that offers to collect these devices forenvironmentally friendly disposal, ensuring that theterminal contacts are covered by non-conductive tape.For more detailed information about the collection andrecycling programmes available in your country, pleasevisit our website( www.toshiba.eu/recycling ) or contact your local counciloffice or the retail outlet where you purchased the product.These symbols may not stick depending on the country and region whereyou purchased.REACH - Compliance StatementThe European Union (EU) chemical regulation, REACH (Registration,Evaluation, Authorization and Restriction of Chemicals), entered into forceon 1 June 2007, with phased deadlines to 2018.Toshiba will meet all REACH requirements and is committed to provide ourcustomers with information about the presence in our articles ofsubstances included on the candidate list according to REACH regulation.Please consult the following websitewww.toshiba.eu/reach for information about the presence in our articles ofsubstances included on the candidate list according to REACH in aconcentration above 0.1% weight by weight.Following information is only for Turkey:Disposal of products:User's Manual 1-6
The crossed wheelie bin symbol means that this productshould not be collected and disposed with otherhousehold wastes. When product become waste at theend- of-life, to protect environment and human health, itshould be given to nearest collection recycling ordisposal center. For more information about collectionand recycling programs in your country please contactyour local authority or the retailer where the product waspurchased.Compliant with AEEE Directive.The number of possible pixel failures of your display is definedaccording to ISO 9241-307 standards. If the number of pixel failures isless than this standard, they will not be counted as defect or failure.Battery is a consumption product, since the battery time depends onthe usage of your computer. If the battery can not be charged at all,then it is a defect or failure. The changes in battery time is not a defector failure.Following information is only for India:The use of this symbol indicates that this product may notbe treated as household waste.By ensuring this product is disposed of correctly, you willhelp prevent potential negative consequences for theenvironment and human health, which could otherwise becaused by inappropriate waste handling of this product.For more detailed information about recycling of thisproduct, please visit our website( http://www.toshiba-india.com ) or contact call center(1800-200-8674).These symbols may not stick depending on the country and region whereyou purchased.Video Standard NoticeTHIS PRODUCT IS LICENSED UNDER THE AVC, THE VC-1 ANDMPEG-4 VISUAL PATENT PORTFOLIO LICENSE FOR THE PERSONALAND NON-COMMERCIAL USE OF A CONSUMER FOR (I) ENCODINGVIDEO IN COMPLIANCE WITH THE ABOVE STANDARDS ("VIDEO")AND/OR (II) DECODING AVC, VC-1 AND MPEG-4 VIDEO THAT WASENCODED BY A CONSUMER ENGAGED IN A PERSONAL ANDNONCOMMERCIAL ACTIVITY AND/OR WAS OBTAINED FROM AVIDEO PROVIDER LICENSED BY MPEG LA TO PROVIDE SUCHVIDEO. NO LICENSE IS GRANTED OR SHALL BE IMPLIED FOR ANYUser's Manual 1-7
OTHER USE. ADDITIONAL INFORMATION INCLUDING THATRELATING TO PROMOTIONAL, INTERNAL AND COMMERCIAL USESAND LICENSING MAY BE OBTAINED FROM MPEG LA, L.L.C. SEEHTTP://WWW.MPEGLA.COM.OpenSSL Toolkit License IssuesLICENSE ISSUES==============The OpenSSL toolkit stays under a dual license, i.e. both the conditions ofthe OpenSSL License and the original SSLeay license apply to the toolkit.See below for the actual license texts. Actually both licenses are BSD-styleOpen Source licenses. In case of any license issues related to OpenSSLplease contact openssl-core@openssl.org.OpenSSL License------------------------/*=====================================================Copyright (c) 1998-2011 The OpenSSL Project. All rights reserved.Redistribution and use in source and binary forms, with or withoutmodification, are permitted provided that the following conditions are met:1. Redistributions of source code must retain the above copyright notice,this list of conditions and the following disclaimer.2. Redistributions in binary form must reproduce the above copyrightnotice, this list of conditions and the following disclaimer in thedocumentation and/or other materials provided with the distribution.3. All advertising materials mentioning features or use of this softwaremust display the following acknowledgment:"This product includes software developed by the OpenSSL Project foruse in the OpenSSL Toolkit. "( http://www.openssl.org/ )4. The names "OpenSSL Toolkit" and "OpenSSL Project" must not beused to endorse or promote products derived from this softwarewithout prior written permission. For written permission, please contactopenssl-core@openssl.org.5. Products derived from this software may not be called "OpenSSL" normay "OpenSSL" appear in their names without prior written permissionof the OpenSSL Project.6. Redistributions of any form whatsoever must retain the followingacknowledgment:"This product includes software developed by the OpenSSL Project foruse in the OpenSSL Toolkit"( http://www.openssl.org/ )THIS SOFTWARE IS PROVIDED BY THE OpenSSL PROJECT ``AS IS''AND ANY EXPRESSED OR IMPLIED WARRANTIES, INCLUDING, BUTUser's Manual 1-8
NOT LIMITED TO, THE IMPLIED WARRANTIES OF MERCHANTABILITYAND FITNESS FOR A PARTICULAR PURPOSE ARE DISCLAIMED. INNO EVENT SHALL THE OpenSSL PROJECT OR ITS CONTRIBUTORSBE LIABLE FOR ANY DIRECT, INDIRECT, INCIDENTAL, SPECIAL,EXEMPLARY, OR CONSEQUENTIAL DAMAGES (INCLUDING, BUT NOTLIMITED TO, PROCUREMENT OF SUBSTITUTE GOODS ORSERVICES; LOSS OF USE, DATA, OR PROFITS; OR BUSINESSINTERRUPTION) HOWEVER CAUSED AND ON ANY THEORY OFLIABILITY, WHETHER IN CONTRACT, STRICT LIABILITY, OR TORT(INCLUDING NEGLIGENCE OR OTHERWISE) ARISING IN ANY WAYOUT OF THE USE OF THIS SOFTWARE, EVEN IF ADVISED OF THEPOSSIBILITY OF SUCH DAMAGE.=====================================================This product includes cryptographic software written by Eric Young(eay@cryptsoft.com). This product includes software written by TimHudson (tjh@cryptsoft.com).*/Original SSLeay License----------------------------------/* Copyright (C) 1995-1998 Eric Young (eay@cryptsoft.com)All rights reserved.This package is an SSL implementation written by Eric Young(eay@cryptsoft.com).The implementation was written so as to conform with Netscapes SSL.This library is free for commercial and non-commercial use as long as thefollowing conditions are aheared to. The following conditions apply to allcode found in this distribution, be it the RC4, RSA, lhash, DES, etc., code;not just the SSL code. The SSL documentation included with thisdistribution is covered by the same copyright terms except that the holderis Tim Hudson (tjh@cryptsoft.com).Copyright remains Eric Young's, and as such any Copyright notices in thecode are not to be removed.If this package is used in a product, Eric Young should be given attributionas the author of the parts of the library used.This can be in the form of a textual message at program startup or indocumentation (online or textual) provided with the package.Redistribution and use in source and binary forms, with or withoutmodification, are permitted provided that the following conditions are met:1. Redistributions of source code must retain the copyright notice, this listof conditions and the following disclaimer.2. Redistributions in binary form must reproduce the above copyrightnotice, this list of conditions and the following disclaimer in thedocumentation and/or other materials provided with the distribution.User's Manual 1-9
3. All advertising materials mentioning features or use of this softwaremust display the following acknowledgement:"This product includes cryptographic software written by Eric Young(eay@cryptsoft.com)"The word 'cryptographic' can be left out if the rouines from the librarybeing used are not cryptographic related :-).4. If you include any Windows specific code (or a derivative thereof) fromthe apps directory (application code) you must include anacknowledgement:"This product includes software written by Tim Hudson(tjh@cryptsoft.com)"THIS SOFTWARE IS PROVIDED BY ERIC YOUNG ``AS IS'' AND ANYEXPRESS OR IMPLIED WARRANTIES, INCLUDING, BUT NOT LIMITEDTO, THE IMPLIED WARRANTIES OF MERCHANTABILITY ANDFITNESS FOR A PARTICULAR PURPOSE ARE DISCLAIMED. IN NOEVENT SHALL THE AUTHOR OR CONTRIBUTORS BE LIABLE FORANY DIRECT, INDIRECT, INCIDENTAL, SPECIAL, EXEMPLARY, ORCONSEQUENTIAL DAMAGES (INCLUDING, BUT NOT LIMITED TO,PROCUREMENT OF SUBSTITUTE GOODS OR SERVICES; LOSS OFUSE, DATA, OR PROFITS; OR BUSINESS INTERRUPTION) HOWEVERCAUSED AND ON ANY THEORY OF LIABILITY, WHETHER INCONTRACT, STRICT LIABILITY, OR TORT (INCLUDING NEGLIGENCEOR OTHERWISE) ARISING IN ANY WAY OUT OF THE USE OF THISSOFTWARE, EVEN IF ADVISED OF THE POSSIBILITY OF SUCHDAMAGE.The licence and distribution terms for any publically available version orderivative of this code cannot be changed. i.e. this code cannot simply becopied and put under another distribution licence [including the GNU PublicLicence.]*/FreeType License IssuesThe FreeType Project LICENSE----------------------------2006-Jan-27Copyright 1996-2002, 2006 byDavid Turner, Robert Wilhelm, and Werner LembergIntroduction============The FreeType Project is distributed in several archive packages; some ofthem may contain, in addition to the FreeType font engine, various toolsand contributions which rely on, or relate to, the FreeType Project.User's Manual 1-10
This license applies to all files found in such packages, and which do notfall under their own explicit license. The license affects thus the FreeTypefont engine, the test programs, documentation and makefiles, at the veryleast.This license was inspired by the BSD, Artistic, and IJG (Independent JPEGGroup) licenses, which all encourage inclusion and use of free software incommercial and freeware products alike. As a consequence, its mainpoints are that:We don't promise that this software works. However, we will beinterested in any kind of bug reports. (`as is' distribution)You can use this software for whatever you want, in parts or full form,without having to pay us. (`royalty-free' usage)You may not pretend that you wrote this software. If you use it, or onlyparts of it, in a program, you must acknowledge somewhere in yourdocumentation that you have used the FreeType code. (`credits')We specifically permit and encourage the inclusion of this software, with orwithout modifications, in commercial products.We disclaim all warranties covering The FreeType Project and assume noliability related to The FreeType Project.Finally, many people asked us for a preferred form for a credit/disclaimer touse in compliance with this license. We thus encourage you to use thefollowing text:"""Portions of this software are copyright (C) <year> The FreeType Project( www.freetype.org ). All rights reserved."""Please replace <year> with the value from the FreeType version youactually use.Legal Terms============0. Definitions--------------Throughout this license, the terms `package', `FreeType Project', and`FreeType archive' refer to the set of files originally distributed by theauthors (David Turner, Robert Wilhelm, and Werner Lemberg) as the`FreeType Project', be they named as alpha, beta or final release.`You' refers to the licensee, or person using the project, where `using' is ageneric term including compiling the project's source code as well aslinking it to form a `program' or `executable'. This program is referred to as`a program using the FreeType engine'.This license applies to all files distributed in the original FreeType Project,including all source code, binaries and documentation, unless otherwisestated in the file in its original, unmodified form as distributed in the originalUser's Manual 1-11
archive. If you are unsure whether or not a particular file is covered by thislicense, you must contact us to verify this.The FreeType Project is copyright (C) 1996-2000 by David Turner, RobertWilhelm, and Werner Lemberg. All rights reserved except as specifiedbelow.1. No Warranty--------------THE FREETYPE PROJECT IS PROVIDED `AS IS' WITHOUTWARRANTY OF ANY KIND, EITHER EXPRESS OR IMPLIED,INCLUDING, BUT NOT LIMITED TO, WARRANTIES OFMERCHANTABILITY AND FITNESS FOR A PARTICULAR PURPOSE. INNO EVENT WILL ANY OF THE AUTHORS OR COPYRIGHT HOLDERSBE LIABLE FOR ANY DAMAGES CAUSED BY THE USE OR THEINABILITY TO USE, OF THE FREETYPE PROJECT.2. Redistribution--------------This license grants a worldwide, royalty-free, perpetual and irrevocableright and license to use, execute, perform, compile, display, copy, createderivative works of, distribute and sublicense the FreeType Project (in bothsource and object code forms) and derivative works thereof for anypurpose; and to authorize others to exercise some or all of the rightsgranted herein, subject to the following conditions:Redistribution of source code must retain this license file (`FTL.TXT')unaltered; any additions, deletions or changes to the original files mustbe clearly indicated in accompanying documentation. The copyrightnotices of the unaltered, original files must be preserved in all copiesof source files.Redistribution in binary form must provide a disclaimer that states thatthe software is based in part of the work of the FreeType Team, in thedistribution documentation. We also encourage you to put an URL tothe FreeType web page in your documentation, though this isn'tmandatory.These conditions apply to any software derived from or based on theFreeType Project, not just the unmodified files. If you use our work, youmust acknowledge us. However, no fee need be paid to us.3. Advertising--------------Neither the FreeType authors and contributors nor you shall use the nameof the other for commercial, advertising, or promotional purposes withoutspecific prior written permission.We suggest, but do not require, that you use one or more of the followingphrases to refer to this software in your documentation or advertisingmaterials: `FreeType Project', `FreeType Engine', `FreeType library', or`FreeType Distribution'.User's Manual 1-12
As you have not signed this license, you are not required to accept it.However, as the FreeType Project is copyrighted material, only this license,or another one contracted with the authors, grants you the right to use,distribute, and modify it. Therefore, by using, distributing, or modifying theFreeType Project, you indicate that you understand and accept all theterms of this license.4. Contacts--------------There are two mailing lists related to FreeType:freetype@nongnu.orgDiscusses general use and applications of FreeType, as well as futureand wanted additions to the library and distribution. If you are lookingfor support, start in this list if you haven't found anything to help you inthe documentation.freetype-devel@nongnu.orgDiscusses bugs, as well as engine internals, design issues, specificlicenses, porting, etc.Our home page can be found athttp://www.freetype.orgUser's Manual 1-13
ENERGY STAR® ProgramYour Computer model may be ENERGY STAR®compliant. If the model you purchased is compliant, it islabeled with the ENERGY STAR logo on the computer andthe following information applies.TOSHIBA is a partner in the ENERGY STAR Program andhas designed this computer to meet the latest ENERGYSTAR guidelines for energy efficiency. Your computerships with the power management options preset to aconfiguration that will provide the most stable operatingenvironment and optimum system performance for bothAC power and battery modes.To conserve energy, your computer is set to enter the low-power Sleep Mode which shuts down the system anddisplay within 15 minutes of inactivity in AC power mode.TOSHIBA recommends that you leave this and otherenergy saving features active, so that your computer willoperate at its maximum energy efficiency. You can wakethe computer from Sleep Mode by pressing the powerbutton.Your ENERGY STAR certified computer should be set bydefault to enter a low-power "sleep mode" after a period ofinactivity. Simply touching the mouse or keyboard "wakes"the computer in seconds. These sleep features can saveyou up to $23 per year (200 kWh per year in electricity)and prevent up to 300 pounds of greenhouse gasemissions annually.To learn how to adjust or activatethese sleep settings on your computer, please go to:www.energystar.gov/sleepinstructionsTo activate sleep settings organization-wide quickly andeasily through network tools, please go towww.energystar.gov/powermanagementDisposing of the computer and the computer'sbatteriesThe computer's battery is not user-accessible. Contact an authorizedTOSHIBA service provider for details regarding how to dispose of thecomputer and the batteries.General PrecautionsTOSHIBA computers are designed to optimize safety, minimize strain andwithstand the rigors of portability. However, certain precautions should beUser's Manual 1-14
observed to further reduce the risk of personal injury or damage to thecomputer.Be certain to read the general precautions below and to note the cautionsincluded in the text of the manual.Provide adequate ventilationAlways make sure your computer and AC adaptor have adequateventilation and are protected from overheating when the power is turned onor when an AC adaptor is connected to a power outlet (even if yourcomputer is in Sleep Mode). In this condition, observe the following:Never cover your computer or AC adaptor with any object.Never place your computer or AC adaptor near a heat source, such asan electric blanket or heater.Always provide sufficient space around the computer.Overheating your computer or AC adaptor could cause system failure,computer or AC adaptor damage or a fire, possibly resulting in seriousinjury.Creating a computer-friendly environmentTo keep your computer in prime operating condition, protect your work areafrom:Dust, moisture, and direct sunlight.Equipment that generates a strong electromagnetic field, such asstereo speakers (other than speakers that are connected to thecomputer) or speakerphones.Rapid changes in temperature or humidity and sources of temperaturechange such as air conditioner vents or heaters.Extreme heat, cold, or humidity.Liquids and corrosive chemicals.Stress injuryCarefully read the Instruction Manual for Safety and Comfort. It containsinformation on the prevention of stress injuries to your hands and wriststhat can be caused by extensive use. It also includes information on workspace design, posture and lighting that can help reduce physical stress.Heat injuryAvoid prolonged physical contact with the computer. If the computer isused for long periods, its surface can become very warm. While thetemperature will not feel hot to the touch, if you maintain physicalcontact with the computer for a long time, for example if you rest thecomputer on your lap or if you keep your hands on the palm rest, yourskin might suffer a low-heat injury.User's Manual 1-15
If the computer has been used for a long time, avoid direct contactwith the metal plate supporting the various interface ports as this canbecome hot.The surface of the AC adaptor can become hot when in use but thiscondition does not indicate a malfunction. If you need to transport theAC adaptor, you should disconnect it and let it cool before moving it.Do not lay the AC adaptor on a material that is sensitive to heat as thematerial could become damaged.Pressure or impact damageDo not apply heavy pressure to the computer or subject it to any form ofstrong impact as this can damage the computer's components or otherwisecause it to malfunction.Cleaning the computerTo help ensure long, trouble-free operation, keep the computer free of dustand dirt, and use care with all liquids around it.Be careful not to spill liquids into the computer. If the computer doesget wet, turn the power off immediately and let the computer drycompletely - in these circumstance you should get the computerinspected by an authorized service provider in order to assess thescope of any damage.Clean the plastics of the computer using a slightly water dampenedcloth.You can clean the display screen by spraying a small amount of glasscleaner onto a soft, clean cloth and then wiping the screen gently withthe cloth.Never spray cleaner directly onto the computer or let liquid run into any partof it. Never use harsh or caustic chemical products to clean the computer.Moving the computerWhile the computer is designed for flexible day-to-day usage you shouldexercise a few simple precautions when moving it in order to help ensuretrouble-free operation.Make sure all disk activity has ended before moving the computer.Turn off (shut down) the computer.Disconnect the AC adaptor and all peripherals before moving thecomputer.Before carrying your computer, shut it down, disconnect the ACadaptor and allow it to cool down - a failure to follow this instructionmay result in minor heat injury.User's Manual 1-16
Be careful not to subject the computer to impact or shock - a failure tofollow this instruction could result in damage to computer, computerfailure or loss of data.Never transport your computer with any cards installed - this maycause damage to either the computer and/or the card resulting incomputer failure.Always use a suitable carry case when transporting the computer.When carrying your computer, be sure to hold it securely so that itdoes not fall or hit anything.Do not carry your computer by holding any of its protruding elements.Mobile phonesPlease be aware that the use of mobile phones can interfere with the audiosystem. The operation of the computer will not be impaired in any way, butit is recommended that a minimum distance of 30cm is maintained betweenthe computer and a mobile phone that is in use.Instruction Manual for Safety and ComfortAll important information on the safe and proper use of this computer isdescribed in the enclosed Instruction Manual for Safety and Comfort. Besure to read it before using the computer.Safety IconsSafety icons are used in this manual to bring important information to yourattention. Each type of message is identified as shown below.Indicates a potentially hazardous situation, which could result in death orserious injury, if you do not follow instructions.A caution informs you that improper use of equipment or failure to followinstructions may cause data loss, equipment damage, or may result inminor or moderate injury.Please read. A note is a hint or advice that helps you make best use ofyour equipment.User's Manual 1-17
Chapter 2Getting StartedThis chapter provides an equipment checklist, and basic information tostart using your tablet.Some of the features described in this manual may not functionproperly if you use an operating system that was not pre-installed byTOSHIBA.In this manual, both words "tablet" and "computer" refer to theTOSHIBA tablet.Equipment checklistCarefully unpack your tablet, taking care to save the box and packagingmaterials for future use.HardwareCheck to make sure you have all the following items:TOSHIBA TabletAC adaptor (2-pin plug or 3-pin plug)Micro-USB cableUSB Data and Charge Y-Cable (provided with some models)DocumentationUser Information GuideInstruction Manual for Safety and ComfortIf any of the items are missing or damaged, contact your dealerimmediately.ConventionsThis manual uses the following formats to describe, identify, and highlightterms and operating procedures.Charm By swiping in from the right edge of your screen,you will find a list of charms: Search, Share,Start, Devices and Settings.Desktop Tap the Desktop tile from the Start screen toaccess the desktop.User's Manual 2-1
Start screen You can go back to the Start screen from an appor the desktop by the following ways:Press the Windows® button (   ) on yourtablet.Tap the Start charm.Tap the Start button (   ) in the lower-leftcorner of the screen (Only on Desktop).For detailed information, please refer to theWindows Help and Support.Apps view You can find all of your apps including desktopprograms in the Apps view.To get to the Apps view:Slide up from the middle of the Start screen.Slide leftwards until the   icon appears onthe lower-left corner of the Start screen, andthen tap   .Using your tablet for the first timeBe sure to read the enclosed Instruction Manual for Safety and Comfort forinformation on the safe and proper use of this tablet. It is intended to helpyou be more comfortable and productive while using a tablet. By followingthe recommendations in it you may reduce your chance of developing apainful or disabling injury to your hand, arms, shoulders or neck.This section provides basic information to start using your tablet. It coversthe following topics:Connecting the AC adaptorTurning on the powerInitial setupUse a virus-check program and make sure it is updated regularly.Never format storage media without checking its content - formattingdestroys all stored data.It is a good idea to periodically back up the internal storage of thetablet to external media. General storage media is not durable orstable over long periods of time and under certain conditions mayresult in data loss.Before you install a device or application, save any data in memory tothe internal storage or other storage media. Failure to do so may resultin the loss of data.User's Manual 2-2
Connecting the AC adaptorAttach the AC adaptor when you need to charge the battery or you want tooperate from AC power. It is also the fastest way to get started, becausethe battery pack will need to be charged before you can operate frombattery power.The AC adaptor can automatically adjust to any voltage ranging from 100to 240 volts and to a frequency of either 50 or 60 hertz, enabling you to usethis tablet in almost any country/region. The adaptor converts AC power toDC power and reduces the voltage supplied to this tablet.Always use the TOSHIBA AC adaptor that was included with yourtablet, or use AC adaptors specified by TOSHIBA to avoid any risk offire or other damage to the tablet. Use of an incompatible AC adaptorcould cause fire or damage to the tablet possibly resulting in seriousinjury. TOSHIBA assumes no liability for any damage caused by useof an incompatible adaptor.Never plug the AC adaptor into a power source that does notcorrespond to both the voltage and the frequency specified on theregulatory label of the unit. Failure to do so could result in a fire orelectric shock, possibly resulting in serious injury.Always use or purchase power cables that comply with the legalvoltage and frequency specifications and requirements in the countryof use. Failure to do so could result in a fire or electric shock, possiblyresulting in serious injury.The supplied power cord conforms to safety rules and regulations inthe region the tablet is bought and should not be used outside thisregion. For use in other regions, please buy power cords that conformto safety rules and regulations in the particular region.Do not use a 3-pin to 2-pin conversion plug.When you connect the AC adaptor to the tablet, always follow thesteps in the exact order as described in this User’s Manual.Connecting the power cable to a live electrical outlet should be the laststep otherwise the adaptor DC output plug could hold an electricalcharge and cause an electrical shock or minor bodily injury whentouched. As a general safety precaution, avoid touching any metalparts.Never place your tablet or AC adaptor on a wooden surface, furniture,or any other surface that could be marred by exposure to heat sincethe tablet base and AC adaptor's surface increase in temperatureduring normal use.Always place your tablet or AC adaptor on a flat and hard surface thatis resistant to heat damage.Refer to the enclosed Instruction Manual for Safety and Comfort fordetailed precautions and handling instructions.User's Manual 2-3
1. Plug the USB connector of the Micro-USB cable into the AC adaptor.Figure 2-1 Plugging the Micro-USB cable into the AC adaptor2-pin3-pinEither a 2-pin or 3-pin adaptor/cord will be included with the tabletdepending on the model.User's Manual 2-4
2. Plug the other smaller connector of the Micro-USB cable into theMicro-USB port on your tablet.You can also eatablish connection through the provided "USB Dataand Charge Y-Cable". Please refer to the USB device section for moredetails.Figure 2-2 Plugging the Micro-USB cable into tablet (WT10-A)2-pin3-pinFigure 2-3 Plugging the Micro-USB cable into tablet (WT8-B)2-pin3-pinProduct appearance depends on the model you purchased.The Micro-USB connector of the Micro-USB cable must be correctlyplugged into the Micro-USB port on the tablet. Failure to do so correctlymay result in possible damage to the Micro-USB port.3. Plug the AC adaptor into a live wall outlet.Turning on the powerThis section describes how to turn on the power.After you turn on the power for the first time, do not turn it off until youhave set up the operating system.Volume cannot be adjusted during Windows Setup.User's Manual 2-5
The tablet can not be powered on by pressing the power button if thebattery power is completely exhausted. It is recommended to chargethe battery pack by connecting the AC adaptor for 30 minutes beforeturning on the power.Press and hold the power button for 2-10 seconds to turn on the tablet.Figure 2-4 Turning on the power (WT10-A)1Figure 2-5 Turning on the power (WT8-B)11. Power buttonProduct appearance depends on the model you purchased.Initial setupThe Windows Startup Screen will be the first screen displayed when youturn on the power. Follow the on-screen instructions on each screen inorder to properly install the operating system.When it is displayed, be sure to read the License Terms carefully.User's Manual 2-6
Getting to know WindowsFor detailed information on what is new and how to operate Windows,please refer to the Windows Help and Support.Start screenThe Start screen is the launching pad for everything you can do in theWindows operating system, providing new and easy ways to accesseverything from your favorite apps and Web sites to your contacts andother important information.From the Start screen, you can just start typing to search for what youwant. From there, you can easily switch between results for apps, files, andmore.CharmsUse the Windows charms to start apps, find documents, set up systemcomponents, and perform most other computing tasks.By swiping in from the right edge of your screen, you will find a list ofcharms: Search, Share, Start, Devices and Settings.Search This charm allows you to search your tablet(apps, settings and files), the web, or within anapp. You can also find the Search icon on theupper right of the Start screen.Share This charm allows you to share items (links,photos, and more).Start This charm takes you to the Start screen or, ifalready on the Start screen, returns you to yourlast app.Devices This charm allows you to manage your hardware.Settings This charm allows you to access your tablet’ssettings (volume, brightness, connecting to theinternet, and more).TilesTiles can be accessed and launched from the Start screen.Typical Start screen tiles are the Desktop tile and Mail tile, as well as tilesrepresenting all other applications downloaded to your system.User's Manual 2-7
Windows StoreAlthough many applications will be pre-installed or built-in to your tablet,you will also have the ability to download many other applications.In the Windows Store you can search for and browse thousands of apps,all grouped into easy to find categories.Sign-in optionsWindows offers a number of sign-in options including Password ( ),PIN ( ) and Picture password ( ) authentication to prevent fromunauthorized access. You are allowed to select an option on the Windowslogin screen by clicking sign-in options if you have multiple sign-inmethods set for a user account. Password authentication is the defaultsign-in option.Turning off the powerThe power can be turned off in one of the following modes, either ShutDown Mode, Sleep Mode or Hibernation Mode.Shut Down ModeWhen you turn off the power in Shut Down Mode, no data will be savedand the tablet will boot to the operating system's main screen the next timeit is turned on.1. If you have entered data, either save it to the internal storage or toother storage media.2. Never turn off the power while an application is running. Doing socould cause loss of data.Never turn off the power, disconnect an external storage device orremove storage media during data read/write. Doing so can causedata loss.In any emergency case, you can also press and hold Power button forabout 10 seconds to force power off.3. Tap the Settings charm.4. Tap Power and then select Shut down. Or press and hold the powerbutton for about 2-10 seconds till the screen shows Slide to shut down your PC appears and then slide down the screen to shut downthe tablet.5. Turn off any peripheral devices connected to your tablet.Do not turn the tablet or peripheral devices back on immediately - wait ashort period to avoid any potential damage.User's Manual 2-8
Restarting the tabletCertain conditions require that you reset the tablet, for example if:You change certain tablet settings.If you need to restart the tablet, tap Power and then select Restart in theSettings charm.Sleep ModeIf you have to interrupt your work, you are able to turn off the power withoutexiting from your software by placing the tablet into Sleep Mode. In thismode data is maintained in the tablet's main memory so that when you turnon the power again, you can continue working right where you left off.Your system supports Connected Standby function, which starts workingafter your tablet goes into Sleep Mode. Connected Standby function is toprovide a constant connectivity while delivering long battery life, and at thesame time, some activities are allowed to run to ensure that the supportedConnected Standby scenarios (for example, receiving emails, updating tilesalive with fresh content, downloading/uploading a file from/to a website,and playing music) are functioning properly.When you have to turn off your tablet aboard an aircraft or in places whereelectronic devices are regulated or controlled, always completely shutdown the tablet. This includes turning off any wireless communicationfunctionalities, and cancelling settings that reactivate the tabletautomatically, such as a timer recording function. Failure to completely shutdown the tablet in this way could allow the operating system to reactivateand run pre-programmed tasks or preserve unsaved data, which couldinterfere with aviation or other systems, possibly causing serious injury.Before entering Sleep Mode, be sure to save your data.Do not switch to Sleep Mode while transferring data to external media,such as USB devices, memory media or other external memorydevices. Data will be lost.When the AC adaptor is connected, the tablet will go into Sleep Modeaccording to the settings in the Power Options (to access it, tapDesktop Assist -> Control Panel -> System and Security -> Power Options on the desktop).To restore the operation of the tablet from Sleep Mode, press thepower button.If the tablet enters Sleep Mode while a network application is active,the application might not be restored when the tablet is next turned onand the system returns from Sleep Mode.User's Manual 2-9
To prevent the tablet from automatically entering Sleep Mode, disableSleep Mode within the Power Options.Benefits of Sleep ModeThe Sleep Mode feature provides the following benefits:Restores the previous working environment more rapidly than theHibernation Mode feature.Saves power by shutting down the system when the tablet receives noinput or hardware access for the time period set by the System SleepMode feature.Executing Sleep ModeYou can enter Sleep Mode in one of following ways:In the Settings charm, tap Power and then select Sleep.Press the power button. Please note that this feature must be enabledwithin the Power Options.When you turn the power back on, you can continue where you left offwhen you shut down the tablet.Sleep Mode limitationsSleep Mode will not function under the following conditions:Power is turned back on immediately after shutting down.Memory circuits are exposed to static electricity or electrical noise.Hibernation ModeThe Hibernation Mode feature saves the contents of memory to the internalstorage when the tablet is turned off so that, the next time it is turned on,the previous state is restored. Please note that the Hibernation Modefeature does not save the status of any peripheral devices connected to thetablet.Save your data. While entering Hibernation Mode, the tablet saves thecontents of memory to the internal storage. However, for safety sake,it is best to save your data manually.Data will be lost if you disconnect the AC adaptor before the save iscompleted.Automatic Hibernation ModeThe tablet can be configured to enter Hibernation Mode automatically whenbattery power is exhausted to the point that tablet operation cannot becontinued. This can be specified in the Power Options. In order to definethis setting, you can follow the steps as described below:User's Manual 2-10
1. Tap Desktop Assist -> Control Panel -> System and Security ->Power Options -> Change when the computer sleeps -> Change advanced power settings on the desktop.2. Tap Low battery action or Critical battery action under Battery andthen select Hibernate from the list with the condition of On battery orPlugged in.Benefits of Hibernation ModeThe Hibernation Mode feature provides the following benefits:Saves data to the internal storage when the tablet automatically shutsdown because of a low battery condition.You can return to your previous working environment immediatelywhen you turn on the tablet.Saves power by shutting down the system when the tablet receives noinput or hardware access for the time period set by the SystemHibernate feature.User's Manual 2-11
Chapter 3The Grand TourThis chapter identifies the various components of the tablet - it isrecommended that you become familiar with each before you operate thetablet.Legal Footnote (Non-applicable Icons)For more information regarding Non-applicable Icons, please refer to theLegal Footnotes section.Please handle your tablet carefully to avoid scratching or damaging thesurface.The Grand Tour for WT10-AThe following figure shows each important component of the tablet.User's Manual 3-1
Figure 3-1 Grand tour of the tablet (WT10-A)878910113 4 51621213141. Display screen 8. Speakers2. Web Camera (front) 9. Memory media slot3. Power button 10. Micro HDMI port4. Volume up/down button 11. Micro-USB port5. Windows button 12. Strap hole for pen6. Microphone 13. Web Camera (back)7. Headphone/Microphone combo jack 14. Wireless communication antennas(not shown)Product appearance depends on the model you purchased.Display screen 25.6cm (10.1") LCD screen, configured with thefollowing resolutions:HD, 1280 horizontal x 800 vertical pixelsPlease be aware that, when the tablet isoperating on the AC adaptor, the imagedisplayed on the internal screen will besomewhat brighter than when it operates onbattery power. This difference in brightnesslevels is intended to save power when operatingon battery.Legal Footnote (LCD)User's Manual 3-2
For more information regarding LCD, please refer to the Legal Footnotessection.Web Camera (front) Web Camera is a device that allows you torecord video or take photographs with yourtablet. You can use it for video chatting or videoconferences using a communication tool.Do not point the web camera directly at the sun.Do not touch or press strongly on the web camera lens. Doing so mayreduce image quality. Use an eyeglass cleaner (cleaner cloth) or othersoft cloth to clean the lens if it becomes dirty.Power button Press and hold this button to turn on/off thetablet.Volume up/downbuttonPress the button to increase or decrease thevolume.Windows button Press this button to open the Start screen or, ifalready on the Start screen, returns you to yourlast app.Microphone The built-in microphone allows you to import andrecord sounds for your application - please referto the Sound System and Video mode section formore information.Headphone/Microphone combojackA 3.5 mm mini headphone/microphone combojack enables connection of a monauralmicrophone or a stereo headphone.Speakers The speakers emit sound generated by yoursoftware as well as audio alarms, such as lowbattery condition, generated by the system.Memory media slot This slot lets you insert a micro SD™/SDHC™/SDXC™ memory card. Refer to the Memorymedia section for more information.Keep foreign metal objects, such as screws, staples and paper clips, out ofthe Memory media slot. Foreign metal objects can create a short circuit,which can cause damage and fire, possibly resulting in serious injury.User's Manual 3-3
Micro HDMI port The micro HDMI port can connect to HDMI cablewith Type D connector.An HDMI cable sends video and audio signals.Micro-USB port The tablet acts as a host via this port. Whenacting as a host, the tablet can fast and directlycommunicate with other client devices withoutthe assistance of a computer.Please refer to the USB device section for moredetails.Please note that it is not possible to confirm the operation of allfunctions of all USB devices that are available. Some functionsassociated with a specific device might not operate properly.The Micro-USB port does not support external optical disc drivewithout its own power adapter.Keep foreign metal objects, such as screws, staples and paper clips, out ofthe Micro-USB port. Foreign metal objects can create a short circuit, whichcan cause damage and fire, possibly resulting in serious injury.Strap hole for pen This hole is used for hanging your pen with arope.Web Camera (back) Your tablet is also equipped with a back WebCamera used for recording video or takingphotographs.Do not point the web camera directly at the sun.Do not touch or press strongly on the web camera lens. Doing so mayreduce image quality. Use an eyeglass cleaner (cleaner cloth) or othersoft cloth to clean the lens if it becomes dirty.WirelesscommunicationantennasThe tablet is equipped with the Wireless LAN andBluetooth antennas.The Grand Tour for WT8-BThe following figure shows each important component of the tablet.User's Manual 3-4
Figure 3-2 Grand tour of the tablet (WT8-B)67891313314521110121. Display screen 8. Memory media slot2. Web Camera (front) 9. Microphone3. Micro-USB port 10. Strap hole for pen4. Windows button 11. Web Camera (back)5. Headphone/Microphone combo jack 12. Wireless communication antennas(not shown)6. Power button 13. Speakers7. Volume up/down button  Product appearance depends on the model you purchased.Display screen 20.3cm (8") LCD screen, configured with thefollowing resolutions:HD, 800 horizontal x 1280 vertical pixelsPlease be aware that, when the tablet isoperating on the AC adaptor, the imagedisplayed on the internal screen will besomewhat brighter than when it operates onbattery power. This difference in brightnesslevels is intended to save power when operatingon battery.Legal Footnote (LCD)For more information regarding LCD, please refer to the Legal Footnotessection.Web Camera (front) Web Camera is a device that allows you torecord video or take photographs with yourtablet. You can use it for video chatting or videoconferences using a communication tool.User's Manual 3-5
Do not point the web camera directly at the sun.Do not touch or press strongly on the web camera lens. Doing so mayreduce image quality. Use an eyeglass cleaner (cleaner cloth) or othersoft cloth to clean the lens if it becomes dirty.Micro-USB port The tablet acts as a host via this port. Whenacting as a host, the tablet can fast and directlycommunicate with other client devices withoutthe assistance of a computer.Please refer to the USB device section for moredetails.Please note that it is not possible to confirm the operation of allfunctions of all USB devices that are available. Some functionsassociated with a specific device might not operate properly.The Micro-USB port does not support external optical disc drivewithout its own power adapter.Keep foreign metal objects, such as screws, staples and paper clips, out ofthe Micro-USB port. Foreign metal objects can create a short circuit, whichcan cause damage and fire, possibly resulting in serious injury.Windows button Press this button to open the Start screen or, ifalready on the Start screen, returns you to yourlast app.Headphone/Microphone combojackA 3.5 mm mini headphone/microphone combojack enables connection of a monauralmicrophone or a stereo headphone.Power button Press and hold this button to turn on/off thetablet.Volume up/downbuttonPress the button to increase or decrease thevolume.Memory media slot This slot lets you insert a micro SD™/SDHC™/SDXC™ memory card. Refer to the Memorymedia section for more information.Keep foreign metal objects, such as screws, staples and paper clips, out ofthe Memory media slot. Foreign metal objects can create a short circuit,which can cause damage and fire, possibly resulting in serious injury.User's Manual 3-6
Microphone The built-in microphone allows you to import andrecord sounds for your application - please referto the Sound System and Video mode section formore information.Strap hole for pen This hole is used for hanging your pen with arope.Web Camera (back) Your tablet is also equipped with a back WebCamera used for recording video or takingphotographs.Do not point the web camera directly at the sun.Do not touch or press strongly on the web camera lens. Doing so mayreduce image quality. Use an eyeglass cleaner (cleaner cloth) or othersoft cloth to clean the lens if it becomes dirty.WirelesscommunicationantennasThe tablet is equipped with the Wireless LAN andBluetooth antennas.Speakers The speakers emit sound generated by yoursoftware as well as audio alarms, such as lowbattery condition, generated by the system.Internal Hardware ComponentsThis section describes the internal hardware components of your tablet.The actual specifications may vary depending on the model youpurchased.Battery pack This tabet includes one battery pack inside.However, please do not attempt to dismount orreplace it by yourself. Please contact anauthorized TOSHIBA service provider, ifnecessary.The rechargeable lithium-ion battery packprovides power to the tablet when the ACadaptor is not connected.For more detailed information on the use andoperation of the battery pack please refer to theBattery section.Legal Footnote (Battery Life)For more information regarding Battery Life, please refer to the LegalFootnotes section.User's Manual 3-7
CPU The processor type varies depending on model.To check which type of processor is included inyour model, tap Desktop Assist -> Control Panel -> System and Security -> System onthe desktop.Legal Footnote (CPU)For more information regarding CPU, please refer to the Legal Footnotessection.Video RAM The memory in a tablet's graphics adaptor, usedto store the image displayed on a bitmap display.The amount of Video RAM available isdependent on the tablet's system memory.Tap Desktop Assist -> Control Panel ->Appearance and Personalization -> Display ->Adjust resolution on the desktop.The amount of Video RAM can be verified bytapping the Advanced settings button in theScreen Resolution window.Memory This tablet may be equipped with a 1GB or 2GBmemory on board depending on the model. Theactual amount of usable system memory will beless than the installed memory modules. Thistablet does not support memory expansion.Legal Footnote (Memory (Main System))For more information regarding Memory (Main System), please refer to theLegal Footnotes section.Graphics ProcessingUnitGraphics processing unit (GPU) performancemay vary depending on product model, designconfiguration, applications, power managementsettings and features utilized. GPU performanceis only optimized when operating in AC powermode and may decrease considerably whenoperating in battery power mode.Legal Footnote (Graphics Processing Unit (GPU))For more information regarding Graphics Processing Unit (GPU), pleaserefer to the Legal Footnotes section.User's Manual 3-8
Chapter 4Operating BasicsThis chapter describes the basic operations of your tablet, and highlightsthe precautions that should be taken when using it.Using the Touch ScreenYou can use your finger to manipulate icons, buttons, menu items, theonscreen keyboard, and other items on the touch screen.Tap Simply tap your finger once on the touch screento activate an item, such as an app.Press and hold Press your finger down and leave it there for afew seconds. This will show information to helpyou learn more about an item or will open amenu specific to what you are doing.Pinch or stretch Touch the screen or an item with two or morefingers, and then move the fingers toward eachother (pinch) or away from each other (stretch).This will show different levels of information orvisually zooms in or out.Rotate Put two or more fingers on an item and then turnyour hand to rotate things in the direction youturn your hand. Only some items can be rotated.Slide Drag your finger on the touch screen to movethrough what's on the screen.User's Manual 4-1
Swipe Quickly move your finger in from the edge of thescreen, without pausing when you first touch it.Swipe from the left edge: shows your recentlyopened apps, and so on.Swipe from the right edge: opens or closes thecharms (Search, Share, Start, Devices, Settings).Swipe from the top edge: opens or closes theapp command bar.For details and more advanced touch screen gestures to interact withWindows operating system, please refer to Help and Support.Do not press or push with excess force on the touch screen.Do not apply excess force when cleaning the touch screen.Never touch the screen with a sharp object such as a ball-point penwhich may scratch or damage the surface.Do not use a protecting sheet for the touch screen as it may decreaseits sensitivity to gestures.3D Playback on an External 3D Device3D playback on an external 3D device feature is only provided withWT10-A models.Effect of 3D can be shown only on an external 3D devices connected viaan HDMI output. It cannot be shown on the internal display. In order for 3Dplayback to work on external display/TV, you need a 3D enabled display/TV that has an HDCP compliant HDMI port.3D playback feature supports the following resolutions:1920x1080 24Hzand 1280x720 60Hz.Please change the Screen Resolution to one of the above before using 3Dplayback function.Important Safety Information for 3D FunctionPlease refrain from or stop viewing if you feel ill or experiencediscomfort before or while watching 3D video images.Please refrain from viewing 3D video images if you experienceconvulsions, photosensitivity reaction, or heart disease.Due to the possibility of impact on vision development, viewers of 3Dvideo images should be aged 6 or older. Children and teenagers maybe more susceptible to health issues associated with viewing in 3Dand should be closely supervised to avoid prolonged viewing withoutrest.User's Manual 4-2
Avoid use of the 3D function when under the influence of alcohol.Please read the user’s manual that comes with the tablet carefullybefore using the 3D playback function.The 3D effect differs between individuals.BatteryThis section explains battery types, use, recharging methods and handling.Battery packWhen the AC adaptor is not connected, the tablet's main power source isthis lithium ion battery pack, also referred to in this manual as the mainbattery.Real Time Clock (RTC) functionThe Real Time Clock (RTC) function is supported. The main batteryprovides power for the internal real time clock and calendar function andalso maintains the system configuration while the tablet is turned off. If theRTC lasting time completely runs out, the system will lose this informationand the real time clock and calendar will stop working.You can change the Real Time Clock settings in the BIOS setup utility.Please refer to Troubleshooting for further information.Care and use of the battery packThis section provides the important safety precautions in order to handleyour battery pack properly.Refer to the enclosed Instruction Manual for Safety and Comfort fordetailed precautions and handling instructions.The battery pack can explode if not used, handled or disposed ofproperly. Dispose of the battery as required by local ordinances orregulations.Charge the battery pack only in an ambient temperature between 5and 35 degrees Celsius. Otherwise, the electrolyte solution might leak,battery pack performance might deteriorate and the battery life mightbe shortened.Charging the batteryWhen the power in the battery pack becomes low, the tablet will enableHibernation Mode so that you do not lose any data, and automatically turnitself off.You must recharge a battery pack when it becomes discharged.User's Manual 4-3
ProceduresTo recharge the battery pack, connect the AC adaptor to the Micro-USBport on the tablet and plug the other end into a working outlet.Use only the tablet connected to an AC power source or optional TOSHIBABattery charger to charge the battery pack. Never attempt to charge thebattery pack with any other charger.Charging TimeThe following table shows the approximate time required to fully charge adischarged battery.Please be aware that the charging time when the tablet is on is affected byambient temperature, the temperature of the tablet and how you are usingthe tablet - if you make heavy use of external devices for example, thebattery might scarcely charge at all during operation.Charging time for  WT10-ABattery type Power off Power onBattery pack (22.5Wh, 2 cell) about 6 hours about 8 hoursCharging time for WT8-BBattery type Power off Power onBattery pack (15Wh, 1 cell) about 6 hours about 8 hoursBattery charging noticeThe battery may not begin charging immediately under the followingconditions:The battery is extremely hot or cold (if the battery is extremely hot, itmight not charge at all). To ensure the battery charges to its fullcapacity, you should charge it at room temperature of between 5°C to35°C (41°F to 95°F).The battery is nearly completely discharged. In this instance youshould leave the AC adaptor connected for a few minutes and thebattery should begin charging.The battery may have a rapid decrease in battery operating time when youtry to charge a battery under the following conditions:The battery has not been used for a long time.The battery has completely discharged and been left in the tablet for along time.User's Manual 4-4
In such cases you should follow the steps as detailed below:1. Fully discharge the battery by leaving it in the tablet with the power onuntil the system automatically turns itself off.2. Connect the AC adaptor to the Micro-USB port of the tablet, and to awall outlet that is supplying power.3. Charge the battery until the battery reaches its full capacity.Repeat these steps two or three times until the battery recovers normalcapacity.Monitoring battery capacityRemaining battery power can be monitored using the following methods.Tapping the battery icon on the Windows TaskbarVia the Battery Status in the Windows Mobility Center windowPlease be aware that the actual remaining operating time may differslightly from the calculated time.With repeated discharges and recharges, the battery's capacity willgradually decrease. In view of this it will be noted that an often used,older battery will not operate for as long as a new battery even whenboth are fully charged.Maximizing battery operating timeA battery's usefulness depends on how long it can supply power on asingle charge, while how long the charge lasts in a battery depends on:Processor speedScreen brightnessSystem Sleep ModeSystem Hibernation ModeDisplay power off periodHow much charge the battery contained to begin with.How you use optional devices, such as a USB device, to which thebattery supplies power.Whether you enable Sleep Mode, which can conserve battery power ifyou are frequently turning the tablet off and on.Where you store your programs and data.The environmental temperature - operating time decreases at lowtemperatures.Batteries exhausted timeWhen you turn off the power of your tablet with battery fully charged, thebattery will be exhausted within the following approximate period.User's Manual 4-5
Battery exhausted time for WT10-ABattery type Sleep Mode Shut Down ModeBattery pack (22.5Wh, 2 cell) about 10 days about 6 weeksBattery exhausted time for WT8-BBattery type Sleep Mode Shut Down ModeBattery pack (15Wh, 1 cell) about 6 days about 6 weeksExtending battery lifeTo maximize the life of your battery pack:At least once a month, disconnect the tablet from a power source andoperate it on battery power until the battery pack fully discharges. Beforedoing so, follow the steps as detailed below.1. Turn off the tablet's power.2. Disconnect the AC adaptor and turn on the tablet's power - if it doesnot turn on then go to Step 4.3. Operate the tablet on battery power for five minutes. If you find thatthe battery pack has at least five minutes of operating time, continueoperating until the battery pack is fully discharged, however, if there iswarning to indicate a low battery condition, go to Step 4.4. Connect the AC adaptor to the Micro-USB port of the tablet, and toa wall outlet that is supplying power.5. Charge the battery pack until the battery reaches its full capacity.The tablet can not be powered on by pressing the power button if thebattery power is completely exhausted. It is recommended to charge thebattery pack by connecting the AC adaptor for 30 minutes before turning onthe power.GPS FunctionYour tablet may include a built-in GPS (Global Positioning System).The performance of GPS will vary depending on the environment. It mighthappen that a location cannot be determined.Your current location may not be shown depending on the status of GPS orthe location. If you are obtaining your current location information from thetablet, your current location may not be detected due to the informationUser's Manual 4-6
accuracy. Specifically, your current location may not be detected in thefollowing places or situations:Inside or directly under a buildingInside a bag or boxAmong dense treesWhen there is an obstacle (person or object) in the front of theantennaUnderground tunnel, underground, or underwaterBuildings streets or residential areasNear to the high voltage cablesBad weather such as heavy rain or snowMemory mediaThe tablet is equipped with a memory media slots that can accommodatesome kinds of memory media with various memory capacities so that youcan easily transfer data from devices, such as digital cameras andPersonal Digital Assistants.Keep foreign objects out of the memory media slot. Never allow metalobjects, such as screws, staples and paper clips, to enter the tablet orKeyboard. Foreign metal objects can create a short circuit, which cancause tablet damage and fire, possibly resulting in serious injury.This Memory media slot supports the following memory media:microSD/SDHC/SDXC Card.Please note that not all memory media have been tested and verifiedto work correctly. Therefore, it is not possible to guarantee that allmemory media will operate properly.Figure 4-1 Example of memory media (microSD card)Points to note about the memory media cardmicroSD/SDHC/SDXC memory cards comply with SDMI (Secure DigitalMusic Initiative), which is a technology adopted to prevent unlawful copy orplayback of digital music. For this reason, you cannot copy or playbackprotected material on another tablet or other device, and you may notreproduce any copyrighted material except for your personal enjoyment.The supported maximum capacity of memory card is 128GB.User's Manual 4-7
Memory media formatNew media cards are formatted according to specific standards. If you wishto reformat a media card, be sure to do so with a device that uses mediacards.Formatting a memory media cardMemory media cards are sold already formatted in conformity to specificstandards. If you reformat a memory card, be sure to reformat it with adevice such as digital camera or digital audio player that uses the memorycards, not with the format command provided within Windows.Should you need to format all areas of the memory card, including theprotected area, you will need to obtain an appropriate application thatapplies the copy protection system.Media careObserve the following precautions when handling the card.Do not twist or bend cards.Do not expose cards to liquids or store in humid areas or lay mediaclose to containers of liquid.Do not touch the metal part of a card or expose it to liquids or let it getdirty.After using card, return it to its case.The card is designed so that it can be inserted only one way. Do nottry to force the card into the slot.Do not leave a card partially inserted in the slot. Press the card untilyou hear it click into place.Memory cards have a limited lifespan, so it is important to backupimportant data.Do not write to a card if the battery power is low. Low power couldaffect writing accuracy.Do not remove a card while read/write is in progress.For more details on using memory cards, see manuals accompanying thecards.Inserting memory mediaThe following instructions apply to all types of supported media devices. Toinsert memory media, follow the steps as detailed below:1. Turn the memory media so that the contacts (metal areas) face down.2. Insert the memory media into the memory media slot on the side ofthe tablet.User's Manual 4-8
3. Press the memory media gently until it clicks into place.Figure 4-2 Inserting memory media (WT10-A)12Figure 4-3 Inserting memory media (WT8-B)1 21. Memory media slot 2. Memory mediaProduct appearance depends on the model you purchased.Make sure the memory media is oriented properly before you insert it.If you insert the media in wrong direction, you may not be able toremove it.When inserting the memory media, do not touch the metal contacts.You could expose the storage area to static electricity, which candestroy data.Do not turn the tablet off or switch to Sleep Mode or Hibernation Modewhile files are being copied - doing so may cause data to be lost.Removing memory mediaThe following instructions apply to all types of supported media devices. Toremove memory media, follow the steps as detailed below:1. Tap the Safely Remove Hardware and Eject Media icon on theWindows Taskbar.2. Tap memory media to eject.3. Push the memory media until you hear a click to partially release it.4. Grasp the media and pull it out of the slot.If you remove the memory media or turn off the power while the tabletis accessing the memory media, you may lose data or damage themedia.User's Manual 4-9
Do not remove the memory media while the tablet is in Sleep orHibernation Mode. The tablet could become unstable or data in thememory media could be lost.USB deviceThis tablet is equipped with a Micro-USB port that complies with USB 2.0standard.You can connect the USB device into the Micro-USB port on your tabletdirectly or through the USB port on the provided "USB Data and Charge Y-Cable" depending on the USB device.Make sure the connector is properly aligned with the socket. Do not try toforce the connection, doing so can damage the connecting pins.As the port operation of all USB devices has not been confirmed, someUSB devices may not function properly.Using the "USB Data and Charge Y-Cable"The "USB Data and Charge Y-Cable" is provided with some models and itcan be used for the following scenarios:Charging onlyCharging the tablet as a charging cable connected with the ACadaptor.Charging and Data transferCharging the tablet as a charging cable connected with the ACadaptor and connecting to a standard USB device at the same time.Figure 4-4 USB Data and Charge Y-Cable (WT10-A for example)1231. USB Data and Charge Y-Cable 3. Universal Serial Bus (USB 2.0) port2. Micro-USB port (Charge only)  Data transfer onlyConnecting to a standard USB device only.User's Manual 4-10
Charging the tablet via connecting the "USB Data and Charge Y-Cable" may take longer.The AC adaptor should not be disconnected with the "USB Data andCharge Y-Cable" if it is connecting with USB device and tablet at thesame time. If the USB device works with USB bus power, whichcomes from "USB Data and Charge Y-Cable", the disconnection of ACadaptor would cause power loss. Even if the USB device has its ownpower source, the device will stop around 60 miliseconds becauseUSB controller would detect with “no bus power” due to suddendisconnection with AC adaptor. The disconnection may cause dataloss and thus Windows may detect error and start data recovery.Charging the tablet via connecting the "USB Data and Charge Y-Cable" will need 1.5A for charging, and if a USB device is connectedto the tablet, it will need 2A for charging. In this case, when chargingfrom PC’s USB port which only supports 1A, the power supply maystop working.Tablets other than WT10-A and WT8-B cannotsupport "USB Data and Charge Y-Cable".External DisplayYour tablet video capabilities can be enhanced with additional displays.External displays allows you to share your desktop or extend the desktoparea.HDMI deviceHDMI feature is only provided with WT10-A models.The tablet is equipped with a Micro HDMI port that can send video byconnecting with external devices. Your tablet supports 1080p, 720p signalformat. The available format depends on the HDMI device you areconnected to.To connect an HDMI-compatible display device, follow the steps asdetailed below:As the port operation of all external display devices have not beenconfirmed, some devices may not function properly.To connect a device to the Micro HDMI port, you must purchase asuitable HDMI cable.1. Plug one end of the HDMI cable into the HDMI in port of the HDMIdisplay device2. Plug the other smaller end of the HDMI cable into the Micro HDMI porton your tablet.3. Turn the HDMI display device's power on.User's Manual 4-11
Figure 4-5 Connecting an HDMI cable121. Micro HDMI port 2. HDMI cable (Type D connector)Please do not plug/unplug an HDMI device under the following conditions:The system is starting up.The system is shutting down.When you connect a television or external monitor to the Micro HDMI port,the display output device is set to HDMI.When you unplug the HDMI cable and re-plug it, please wait at least 5seconds before you re-plug the HDMI cable again.When you change the display output device, the playback device may notswitch automatically. In this case, in order to set the playback device to thesame device as the display output device, please adjust the playbackdevice manually by the following steps:1. Tap Desktop Assist -> Control Panel -> Hardware and Sound ->Sound on the desktop.2. In the Playback tab, select the playback device which you want toswitch to.3. To use the internal speakers on your tablet, select Speakers. To use thetelevision or the external monitor that you have connected to the tablet,select a different playback device.4. Tap the Set Default button.5. Tap OK to close the Sound dialog.Settings for display video on HDMITo view video on the HDMI display device, be sure to configure thefollowing settings otherwise you may find that nothing is displayed.Be sure to select the display device before starting to play video. Do notchange the display device while playing video.Do not change the display device under the following conditions.While data is being read or written.While communication is being carried out.User's Manual 4-12
Selecting HD FormatTo select the display mode, follow the steps as detailed below:1. Tap Desktop Assist -> Control Panel -> Appearance and Personalization -> Display -> Change display settings ->Advanced settings -> List All Modes2. Select one of the modes at List All Modes.Wireless displayYour tablet supports Wireless display, a wireless technology which utilizesWi-Fi to allow the tablet to be wirelessly connected to external displaysincluding TVs as extended screens. With Wireless display, documents,streamed/local media contents or other online contents can be sharedwirelessly with others.To use Wireless display, either one of the following devices is required:A compatible external display with built-in support for Wireless display.An external display with HDMI port and a Wireless display adaptor.The Wireless display adaptor is a device that connects to the externaldisplay via HDMI port and can receive Wi-Fi signals from your tablet.To wirelessly connect to an external display, you can follow the steps asdescribed below:1. Tap Settings charm.2. Tap Change PC settings -> PC and devices -> Devices.3. Tap Add a device. Your tablet will start searching for the Wirelessdisplay device.4. After the Wireless display device is searched, follow the on-screeninstructions to finish connection.After the connection is established, the name of the Wireless displaydevice will appear under Projectors.To disconnect the Wireless display device, tap the Wireless display devicename and then tap Remove device.Changing the display settingsAfter one or more external displays are connected, the operating systemcan automatically detect, identify and setup the display settings.You can also manually manage how the external displays will work andchange the display settings by tapping Projector in the Devices charm. Ifyou disconnect the external display before you turn the tablet's power off,be sure to switch to the internal display.Optional TOSHIBA AccessoriesYou are able to add a number of options and accessories in order to makeyour tablet even more powerful and convenient to use. For reference, theUser's Manual 4-13
following list details some of the items that are available from your reselleror TOSHIBA dealer:Universal AC Adaptor If you frequently use your tablet at more than onesite, it may be convenient to purchase anadditional AC adaptor to be kept at each site inorder to remove the need to always carry theadaptor with you.Sound System and Video modeThis section describes some of the audio control functions.Volume MixerThe Volume Mixer utility lets you control the audio volume for playback ofdevices and applications under Windows.To launch the Volume Mixer utility, tap Desktop and press and holdon the speaker icon on the Windows Taskbar, and then select Open Volume Mixer from the sub menu.To adjust the volume level of speakers or headphones, move theSpeakers slider.To adjust the volume level of an application that you are using, movethe slider for the corresponding application.Microphone LevelFollow the steps below to change the microphone recording level.1. Press and hold on the speaker icon on the Windows Taskbar, andselect Recording devices from the sub menu.2. Select Microphone, and tap Properties.3. On the Levels tab move the Microphone slider to increase ordecrease the microphone volume level.If you feel the microphone volume level is inadequate, move theMicrophone Boost slider to a higher level.Video modeVideo mode settings are configured via the Screen Resolution dialog.To open the Screen Resolution dialog, tap Desktop Assist -> Control Panel -> Appearance and Personalization -> Display -> Change display settings on the desktop.If you are running some applications (for example a 3D application or videoplayback), you may see some disturbance, flickering or frame dropping onyour screen.User's Manual 4-14
If that occurs, adjust the resolution of display, lowering it until the screen isdisplayed properly.User's Manual 4-15
Chapter 5Utilities and Advanced UsageThis chapter describes the utilities and special features of this tablet, andthe advanced usage of some utilities.Utilities and ApplicationsThis section describes the pre-installed utilities that come with the tabletand details how to start them. For further information on their operation,you may refer to each utility's online manual, help files or README.TXT file(if applicable).TOSHIBA DesktopAssistTOSHIBA Desktop Assist is a graphical userinterface that provides access to specific toolsand TOSHIBA utilities and applications that makethe use and configuration of the tablet easier.To access this utility, tap Desktop Assist on thedesktop.TOSHIBA DisplayUtilityDesktop Text Size allows you to make the textsize bigger or smaller on the desktop accordingto your usage and favorite. You can change thetext size on the display and on the title bar ofwindows by changing the scaling of the text size.When the scaling is smaller, more information willappear on the display simultaneously but the textsize becomes smaller. When the scaling islarger, less information will appear on the displaysimultaneously but the text size becomes larger.To access this utility, tap Desktop Assist ->Tools & Utilities -> Display Utility on thedesktop.For details on this utility, see the help file.TruCapture This software is a camera application with specialfeatures to take improved photographs ofwhiteboards, books, printed material, notebooks,etc.To access it, tap the TruCapture icon in theApps view.For details, please refer to the TruCapturesection.User's Manual 5-1
TOSHIBA SetupUtilityTOSHIBA Setup Utility is a BIOS setup utility thatprovides you a menu-based user interface sothat you can easily view and change BIOSsettings.For details, please refer to the TOSHIBA SetupUtility section.TOSHIBA ServiceStationThis application allows your tablet toautomatically search for TOSHIBA softwareupdates or other alerts from TOSHIBA that arespecific to your tablet system and its programs.When enabled, this application periodicallytransmits to our servers a limited amount ofsystem information, which will be treated in strictaccordance with the rules and regulations as wellas applicable data protection law.To access this utility, tap Desktop Assist ->Support & Recovery -> Service Station on thedesktop.Dolby® Digital Plus™Advanced Audio™Dolby® Digital Plus™ Advanced Audio™ is asuite of audio technologies that enables a PC todeliver a crisp, clear cinematic surround soundexperience over its built-in speakers. It also addsclarity to sound from headphones.To access this utility, tap the Dolby Digital Plusicon in the Apps view.You may not have all the software listed above depending on the modelyou purchased.To access the setup files of the drivers/utilities, tap Applications andDrivers in the Apps view.Special featuresThe following features are either unique to TOSHIBA computers or areadvanced features which make the computer more convenient to use.Access each function using the following procedures.*1 To access the Power Options, tap Desktop Assist -> Control Panel ->System and Security -> Power Options on the desktop.Display automaticpower off *1This feature automatically cuts off power to thecomputer's display panel when there is nokeyboard input for a specified time, with powerbeing restored the next time a key is pressed.This can be specified in the Power Options.User's Manual 5-2
Power on password Two levels of password security, supervisor anduser, are available to prevent unauthorizedaccess to your computer.Battery save mode *1 This feature lets you configure the computer inorder to save battery power. This can bespecified in the Power Options.Low batteryautomatic HibernationMode *1When battery power is exhausted to the pointthat computer operation cannot be continued, thesystem automatically enters Hibernation Modeand shuts itself down. This can be specified inthe Power Options.TruCaptureTruCapture is a camera application with special features to improve thereadability of whiteboards, books, etc. in photographs taken by TruCapture.Those features include reflection reduction, color enhancement andcropping.To open TruCapture, tap TruCapture in Apps view.A Tutorial will appear on the screen which provides the basic informationabout how to use this feature.Tap next if you want to continue viewing the Tutorial.For more detailed information on the use of this feature, tap more information. You can also find it by swiping from the right edge of thescreen, and then tap Settings -> Help.TOSHIBA Setup UtilityTOSHIBA Setup Utility is a BIOS setup utility that provides you a menu-based user interface so that you can easily view and change BIOSsettings.To enter the BIOS setup utility, follow the steps below:1. Save your work.2. In the Settings charm, tap Power and then select Shut down .3. After completely shut down the tablet, wait for about 10 seconds. Thenhold down the Power button and Volume down buttonsimultaneously.Please make sure that fast startup is disabled in the Power Options byfollowing the steps below:1. Tap Desktop Assist -> Control Panel -> System and Security ->Power Options on the desktop.2. Tap Choose what the power button does.3. Tap Change settings that are currently unavailable.User's Manual 5-3
4. Deselect the Turn on fast startup check box from Shutdown settings.5. Tap the Save changes button.To save the changes and exit the utility, select Save and Exit -> Exit Saving Changes -> Yes. The tablet will restart immediately.Navigating the utilityTOSHIBA Setup Utility can be navigated through the touch screen.Some buttons on the tablet are also designated to execute thecorresponding function. Details are described as follows:Button FunctionWindows Proceed or confirm operationVolume up Select an itemVolume down Select an itemSystem RecoveryThere is a hidden partition allocated on the tablet for the System RecoveryOptions in the event of a problem.You can also create recovery media and restore the system.The following items will be described in this section:Creating Recovery MediaRestoring the pre-installed software from your created RecoveryMediaRestoring the pre-installed software from the Recovery PartitionCreating Recovery MediaThis section describes how to create Recovery Media.Be sure to connect the AC adaptor when you create Recovery Media.Be sure to close all other software programs.Do not run software such as screen savers which can put a heavyload on the CPU.Operate the tablet at full power.Do not use power-saving features.Do not write to the media when the virus check software is running.Wait for it to finish, then disable virus detection programs including anysoftware that checks files automatically in the background.User's Manual 5-4
Do not use utilities, including those intended to enhance internalstorage access speed. They may cause unstable operation anddamage data.Do not shut down/log off or Sleep/Hibernate while writing or rewritingthe media.Set the tablet on a level surface and avoid places subjected tovibrations such as airplanes, trains, or cars.Do not use on an unstable surface such as a stand.A recovery image of the software on your tablet is stored on a dedicatedrecovery partition on your tablet, and can be copied to a USB FlashMemory by using the following steps:To connect a USB Flash Memory to the Micro-USB port, you mustpurchase a suitable Micro USB to USB Converter Cable.USB Flash Memory will be formatted and all the data in the USB FlashMemory will be lost when proceeding.1. Turn on your tablet and allow it to load the Windows operating systemas normal.2. Insert the USB Flash Memory into Micro-USB port on your tablet byusing the Micro USB to USB Converter Cable.3. Tap Desktop Assist -> Control Panel -> System and Security ->Action Center -> Recovery -> Create a recovery drive on thedesktop.4. Follow the on-screen instructions to finish creating the RecoveryMedia.Restoring the pre-installed software from your createdRecovery MediaIf the pre-installed files are damaged, you are able to use the RecoveryMedia you have created to restore the tablet to the state it was in when youoriginally received it. To perform this restoration, follow the steps below:Make sure that the AC adaptor are connected during the restoring process.When you reinstall the Windows operating system, the storage space willbe reformatted and all data will be lost.1. Insert the recovery USB Flash Memory into Micro-USB port on yourtablet by using the the Micro USB to USB Converter Cable.2. In the Settings charm, tap Power and then select Shut down.User's Manual 5-5
3. After completely shut down the tablet, wait for about 10 seconds. Thenhold down the Power button and Volume up button simultaneouslyuntil the Boot menu is loaded.4. Use the Volume up and the Volume down button to select theappropriate option from the menu according to your actual recoverymedia and press the Windows button to confirm the selection.5. A menu will be displayed from which you should follow the on-screeninstructions.Refresh, Reset and Bare metal recovery buttons will be displayed asoptions for recovery. However, only Bare metal recovery is supportedwhen booting from the recovery media. For detailed information,please refer to the Windows Help and Support.Office will no longer be present after the recovery completes. Toenable users to reinstall Office, please follow the instructionsdescribed below:If you have a product key for an Office 365 product, you can enterthe key at https://officesetup.getmicrosoftkey.com/You can also go directly to your Office Account athttps://office.microsoft.com/MyAccount.aspx to install.If you have a product key for Office Home and Student, OfficeHome and Business or Office Professional, you can go to https://downloadoffice.getmicrosoftkey.com/ to install.The recovery partition can be removed depending on the model. For themodels that the recovery partition can be removed, if you have previouslychosen to remove the recovery partition without creating "Recovery Media",the "Recovery Media" cannot be created.However, if you have already created a "Recovery Media", you can use itto restore the recovery partition.If you have not created "Recovery Media", please contact TOSHIBAsupport for assistance.Restoring the pre-installed software from theRecovery PartitionA portion of the total storage space is configured as a hidden recoverypartition. This partition stores files which can be used to restore pre-installed software in the event of a problem.If you subsequently set up your storage space again, do not change, deleteor add partitions in a manner other than specified in the manual, otherwiseyou may find that space for the required software is not available.User's Manual 5-6
In addition, if you use a third-party partitioning program to reconfigure thepartitions on your storage space, you may find that it becomes impossibleto setup your tablet.Make sure that the AC adaptor are connected during the restoring process.When you reinstall the Windows operating system, the storage space maybe reformatted and all data may be lost.1. In the Settings charm, tap Power and then select Shut down.2. After completely shut down the tablet, wait for about 10 seconds. Thenhold down the Power button and Volume up button simultaneouslyuntil the Boot menu is loaded and then select HDD Recovery.3. A dialog box will appear asking if you are sure you wan to continue.Select Yes.4. Select Troubleshoot.5. Select Reset your PC.6. Follow the on screen instructions to finish the recovery.You can also perform the restoration through PC settings in the operatingsystem:1. Tap the Settings charm and tap Change PC settings.2. Tap Update and recovery under PC settings and then tap Recovery.3. Click Get started under Remove everything and reinstall Windows.4. Follow the on screen instructions to finish the recovery.Enabling System Protection for System RestoreDepending upon your system, the Windows® System Protection feature,that automatically creates restore points, may be disabled to conservespace on your system. You can enable this feature by the following steps:1. Tap Desktop Assist -> Control Panel -> System and Security ->System -> System protection on the desktop.2. In the System Protection tab, tap Configure, and then tap Turn on system protection to enable the function.After the System Protection feature is enabled, you can undo changes byreverting your tablet to a previous state by creating a restore point.User's Manual 5-7
Chapter 6TroubleshootingTOSHIBA has designed this computer for durability, however, shouldproblems occur you are able to use the procedures detailed in this chapterto help determine the cause.All users should become familiar with this chapter as knowing what mightgo wrong can help prevent problems from occurring in the first place.Problem solving processResolving problems will be much easier if you observe the followingguidelines:Stop immediately when you recognize a problem exists as takingfurther action may result in data loss or damage, or you may destroyvaluable problem related information that can help solve the problem.Observe what is happening - write down what the system is doing andwhat actions you performed immediately before the problem occurred.Make a screenshot of the current display.Please also be aware that the questions and procedures described in thischapter are meant only as a guide, they are not definitive problem solvingtechniques. In reality many problems can be solved simply, but a few mayrequire help from TOSHIBA Support - if you find you need to consultothers, be prepared to describe the problem in as much detail as possible.Preliminary checklistYou should always consider the simplest solution first - the items detailedin this checklist are easy to fix and yet can cause what appears to be aserious problem:Make sure you turn on all peripheral devices before you turn on thecomputer - this includes your printer and any other external device youare using.Before you attach an external device you should first turn thecomputer off, then when you turn the computer back on again it willrecognize the new device.Make sure all optional accessories are configured properly in thecomputer's setup program and that all required driver software hasbeen loaded (please refer to the documentation included with theoptional accessories for further information on its installation andconfiguration).User's Manual 6-1
Check all cables to ensure they are correctly and firmly attached to thecomputer - loose cables can cause signal errors.Inspect all connecting cables for loose wires and all connectors forloose pins.Always try to make detailed notes of your observations and keep them in apermanent error log - this will help you to describe your problems toTOSHIBA Support. In addition, if a problem recurs, the log you have madewill help to identify the problem faster.Analyzing the problemSometimes the computer will give you clues that can help you identify whyit is malfunctioning. In view of this you should keep the following questionsin mind:Which part of the computer is not operating properly - keyboard, HardDisk Drive, display panel, Touch Pad, Touch Pad control buttons - aseach device will produce different symptoms.Check the options within the operating system to ensure that itsconfiguration is set properly.What appears on the display? Does it display any messages orrandom characters? Make a screenshot of the current display and, ifpossible, look up the messages in the documentation included with thecomputer, software or operating system.Check that all connecting cables are correctly and firmly attached asloose cables can cause erroneous or intermittent signals.Do you hear any beeps, if so how many, are they long or short and arethey high pitched or low pitched? In addition, is the computer makingany unusual noises? Write down what you hear.Record your observations so you can describe them in detail to TOSHIBASupport.Software The problems may be caused by your software. Ifyou cannot load a software package, the mediamay be damaged or the program might becorrupted - in these instances try loading anothercopy of the software if possible.If an error message appears while you are usinga software package you should refer to thedocumentation supplied with it as this will usuallyinclude a problem solving section or a summaryof error messages.Next, you should check any error messagesagainst the operating system documentation.User's Manual 6-2
Hardware If you cannot find a software problem, you shouldthen check the setup and configuration of yourhardware. First run through the items in thepreliminary checklist as described previouslythen, if you still cannot correct the problem, try toidentify the source - the next section provideschecklists for individual components andperipherals.Before using a peripheral device or application software that is not anauthorized TOSHIBA part or product, make sure the device or software canbe used with your computer. Use of incompatible devices may cause injuryor may damage your computer.If something goes wrongYour program stops respondingIf you are working with a program that suddenly freezes all operations,chances are the program has stopped responding. You can exit the failedprogram without shutting down the operating system or closing otherprograms.To close a program that has stopped responding:1. Press and hold the Windows Taskbar, and then select Task Managerfrom the sub menu. The Windows Task Manager window appears.2. Select the program you want to close, then tap End Task. Closing thefailed program should allow you to continue working. If it does not,continue with the next step.3. Close the remaining programs one by one by selecting the programname, then End Task. Closing all programs should allow you tocontinue working. If it does not, power off your computer and thenrestart it.The computer will not startMake sure you attached the AC adaptor and power cord/cable properly.If you are using the AC adaptor, check that the wall outlet is working byplugging in another device, such as a lamp.Verify that the computer is on.Also, try turning the computer off and then on.If you are using an AC adaptor, verify that the computer is receiving powerfrom the external power source.The computer will not load advanced options during startupThe advanced option will be loaded when you hold down the followingbuttons as described during startup.User's Manual 6-3
Advanced option Key & button operationsBIOS utility Hold down Power button and Volume downbutton simultaneously.Boot menu Hold down Power button and Volume upbutton simultaneously.If your computer starts to load the Operating System instead of desiredadvanced options, follow the steps below:Please make sure that fast startup is disabled in the Power Options byfollowing the steps below:1. Tap Desktop Assist -> Control Panel -> System and Security ->Power Options on the desktop.2. Tap Choose what the power button does.3. Tap Change settings that are currently unavailable.4. Deselect the Turn on fast startup check box from Shutdown settings.5. Tap the Save changes button.1. In the Setting charm, tap Power and then select Restart.2. Hold down the corresponding buttons until the advanced option isloaded.3. Follow the on-screen instructions to proceed.Hardware and system checklistThis section discusses problems caused by your computer’s hardware orattached peripherals. Basic problems may occur in the following areas:PowerInternal display panelMemory Media CardUSB deviceSound systemExternal monitorWireless LANBluetoothPowerWhen the computer is not plugged into an AC power outlet, the batterypack is the primary power source. Your computer also has Real TimeClock (RTC) function. All of the power resources are interrelated withanyone having the ability to produce apparent power problems.Overheating power downIf the processor's temperature reaches an unacceptably high level witheither setting, the computer will automatically shut down to prevent anydamage - in this instance all unsaved data in memory will be lost.User's Manual 6-4
Problem ProcedureComputer shutsdown automatically.Leave the computer off until it reaches the roomtemperature. If the computer has reached roomtemperature and it still does not start, or if it startsbut shuts down quickly, contact TOSHIBA Support.AC powerProblem ProcedureAC adaptor doesn’tpower the computerCheck the connections to make sure that thecable/adaptor is firmly connected to the computerand a working power outlet.Check the condition of the cable and terminals. Ifthe cable is frayed or damaged it should bereplaced, while if the terminals are soiled, theyshould be cleaned with a clean cotton cloth.If the AC adaptor still does not power thecomputer, you should contact TOSHIBA Support.BatteryProblem ProcedureBattery doesn’tpower the computerThe battery may be discharged - connect the ACadaptor to recharge the battery.Battery doesn’tcharge when the ACadaptor is attached.If the battery is completely discharged, it will notbegin charging immediately, in these instances youshould wait a few minutes before trying again. Ifthe battery still does not charge, you should checkthat the power outlet the AC adaptor is connectedto is supplying power - this can be tested byplugging another appliance into it.Battery doesn’tpower the computeras long as expectedBattery doesn’t power the computer as long asexpectedUser's Manual 6-5
Real Time ClockProblem ProcedureThe BIOS settingand system date/time are lost.The lasting time of the Real Time Clock (RTC) hasrun out - you will need to set the date and time inthe BIOS setup utility by using the following steps:1. Launch the BIOS setup utility.Please refer to TOSHIBA Setup Utility sectionfor further information.2. Set the date in the System Date field.3. Set the time in the System Time field.4. Select Save and Exit -> Exit Saving Changes- a confirmation message will bedisplayed.5. Select Yes - the BIOS setup utility will endand the computer will restart.Internal display panelApparent computer's display panel problems may be related to thecomputer's setup and configuration.Problem ProcedureMarkings appear onthe computer'sdisplay panel.These marks may have come from contact withtouch screen. You should try to remove the marksby gently wiping the display panel with a clean drycloth or, if this fails, with a good quality LCD screencleaner. In this latter instance you should alwaysfollow the instructions with the screen cleaner andalways ensure you let the display panel dryproperly.Memory Media CardFor further information, please refer to Operating Basics.Problem ProcedureMemory media carderror occursRemove the memory media card from thecomputer and then reinsert it in order to ensure it isfirmly connected.If the problem persists, then you should refer to thedocumentation supplied with your memory mediacard for further information.User's Manual 6-6
Problem ProcedureYou cannot read afileCheck to ensure the required file is actually on thememory media card that is inserted into thecomputer.If you are still unable to resolve the problem,contact TOSHIBA Support.USB deviceIn addition to the information in this section, please also refer to thedocumentation supplied with your USB device.Problem ProcedureUSB device does notworkRemove the USB device from the computer andthen reconnect it to the Micro-USB port in order toensure it is firmly attached.Ensure that any required USB device drivers areproperly installed - to achieve this you should referto both the device documentation and theoperating system documentation.Sound systemIn addition to the information in this section, please also refer to thedocumentation supplied with your audio device.Problem ProcedureNo sound is heard Adjust the volume.Check the software volume settings.Please check to see if Mute is turned to OffCheck to make sure the headphone connection issecure.Check within the Windows Device Managerapplication to ensure the sound device is enabledand that the device is properly working.User's Manual 6-7
Problem ProcedureAnnoying sound isheardIn this instance you may be experiencing feedbackfrom either the internal microphone or an externalmicrophone connected to the computer - pleaserefer to Sound System and Video mode for furtherinformation.Volume cannot be adjusted during Windows startup or shut down.If you are still unable to resolve the problem,contact TOSHIBA Support.External monitorPlease also refer to Operating Basics, and to the documentation suppliedwith your monitor for further information.Problem ProcedureMonitor does notturn onAfter confirming that the monitor's power switch ison, you should check the connections to makesure that the cable/adaptor is firmly connected tothe monitor and to a working power outlet.No display Try adjusting the contrast and brightness controlson the external monitor.Change the display priority and ensure that it is notset for the internal display only.Check to see if the external monitor is connected.When the external monitor is set as the primarydisplay device in extended desktop mode, it will notdisplay when the computer wakes up from SleepMode if the external monitor has beendisconnected while in Sleep Mode.To keep this from happening, do not disconnectthe external monitor while the computer is in Sleepor Hibernation Mode.Remember to turn off the computer beforedisconnecting the external monitor.When the display panel and an external monitorare set to clone mode and they are turned off bythe timer, the display panel or the external monitormay not display when turned on again.If this occurs, re-set the display panel and externalmonitor to clone mode.User's Manual 6-8
Problem ProcedureDisplay error occurs Check that the cable connecting the externalmonitor to the computer is firmly attached.If you are still unable to resolve the problem,contact TOSHIBA Support.Wireless LANProblem ProcedureCannot accessWireless LANMake sure the computer's Wireless communicationfunction is on.If problems persist, contact your LANadministrator.BluetoothProblem ProcedureCannot accessBluetooth deviceCheck to ensure the computer's WirelessCommunication function is on.Check to ensure the Bluetooth Managerapplication is running on the computer and thatpower to the external Bluetooth device is turnedon.Check to ensure that no optional Bluetooth Adaptoris installed in the computer - the built-in Bluetoothhardware cannot operate simultaneously withanother Bluetooth controller.If you are still unable to resolve the problem,contact TOSHIBA Support.TOSHIBA supportIf you require any additional help using your computer or if you are havingproblems operating the computer, you may need to contact TOSHIBA foradditional technical assistance.Before you callSome problems you experience may be related to software or theoperating system so it is important that you investigate other sources ofassistance first. Before contacting TOSHIBA, try the following:Review troubleshooting sections in the documentation supplied withyour software and/or peripheral devices.User's Manual 6-9
If a problem occurs when you are running software applications,consult the software documentation for troubleshooting suggestionsand consider calling the software company's technical supportdepartment for assistance.Consult the reseller or dealer from where you purchased yourcomputer and/or software - they are your best resource for currentinformation and support.TOSHIBA technical supportIf you are still unable to solve the problem and suspect that it is hardwarerelated, visit TOSHIBA technical support website http://www.toshiba.co.jp/worldwide/User's Manual 6-10
Chapter 7AppendixSpecificationsThis section summarizes the tablet’s technical specifications.Physical DimensionsPhysical Dimensions shown below do not include parts that extend beyondthe main body. The physical dimensions may vary depending on the modelyou purchased.WT10-A                Approximately 258.8 (w) x 175 (d) x 8.98 (h)millimeters(not including parts that extend beyond the mainbody).WT8-B               Approximately 132 (w) x 210.62 (d) x 9.48 (h)millimeters(not including parts that extend beyond the mainbody).Environmental RequirementsConditions Ambient temperature Relative humidityOperating 5°C (41°F) to 35°C(95°F)20% to 80%(noncondensing)Non-operating -20°C (-4°F) to 60°C(140°F)10% to 90%(noncondensing)Wet-bulb temperature 29°C maximumConditions Altitude (from sealevel)Operating -60 to 3,000 metersNon-operating -60 to 10,000 metersmaximumUser's Manual 7-1
Power RequirementsAC adaptor 100-240V AC50 or 60 Hz (cycles per second)Computer 5V DC   AC Power Cord and ConnectorsThe power cord’s AC input plug must be compatible with the variousinternational AC power outlets and the cord must meet the standards forthe country/region in which it is used. All cords must meet the followingspecifications:Wire size: Minimum 0.75 mm2Current rating: Minimum 2.5 amperes   Certification agenciesChina: CQCU.S. and Canada: UL listed and CSA certifiedNo. 18 AWG, Type SVT or SPT-2Australia: ASJapan: DENANHOEurope:Austria: OVE Italy: IMQBelgium: CEBEC The Netherlands: KEMADenmark: DEMKO Norway: NEMKOFinland: FIMKO Sweden: SEMKOFrance: LCIE Switzerland: SEVGermany: VDE United Kingdom: BSI       In Europe, two conductors power cord must be VDE type, H05VVH2-F orH03VVH2-F and for three conductors power cord must be VDE type,H05VV-F.User's Manual 7-2
For the United States and Canada, two pin plug configuration must be a2-15P (250V) or 1-15P (125V) and three pin plug configuration must be6-15P (250V) or 5-15P (125V) as designated in the U.S. National Electricalcode handbook and the Canadian Electrical Code Part II.The following illustrations show the plug shapes for the U.S.A. andCanada, the United Kingdom, Australia, Europe and China.USAUL approvedUnited KingdomBS approvedAustraliaAS approvedEuropeApproved by the appropriateagencyCanadaCSA approvedChinaCCC approvedInformation for Wireless DevicesWireless Technology InteroperabilityThe Wireless LAN is compatible with other LAN systems Direct SequenceSpread Spectrum (DSSS) /Orthogonal Frequency Division Multiplexing(OFDM) radio technology, and is compliant to:The IEEE 802.11 Standard on Wireless LANs (Revision a/b/g/n, b/g/nor Revision a/b/g/n/ac), as defined and approved by the Institute ofElectrical and Electronics Engineers.Bluetooth® Modules are designed to be interoperable with any product withBluetooth wireless technology that is based on Frequency Hopping SpreadSpectrum (FHSS) radio technology, and is compliant to:Bluetooth Specification (depending on the model you purchased), asdefined and approved by the Bluetooth Special Interest Group.Logo certification with Bluetooth wireless technology as defined by theBluetooth Special interest Group.This Bluetooth product is not compatible with devices using BluetoothVersion 1.0B specifications.User's Manual 7-3
The wireless devices have not completed verification of connection andoperation with all devices which are using the Wireless LAN or Bluetoothradio technology.Bluetooth and Wireless LAN devices operate within the same radiofrequency range and may interfere with one another. If you use Bluetoothand Wireless LAN devices simultaneously, you may occasionallyexperience a less than optimal network performance or even lose yournetwork connection.If you should experience any such problem, immediately turn off either oneof your Bluetooth or Wireless LAN.Please visithttp://www.pc.support.global.toshiba.com , if you have any questions aboutusing Wireless LAN or Bluetooth Module.In Europe visithttp://www.toshiba-europe.com/computers/tnt/bluetooth.htmWireless Devices and your healthWireless products, like other radio devices, emit radio frequencyelectromagnetic energy. The level of energy emitted by Wireless productshowever is far much less than the electromagnetic energy emitted bywireless devices like for example mobile phones.Because Wireless products operate within the guidelines found in radiofrequency safety standards and recommendations, TOSHIBA believesWireless products are safe for use by consumers. These standards andrecommendations reflect the consensus of the scientific community andresult from deliberations of panels and committees of scientists whocontinually review and interpret the extensive research literature.In some situations or environments, the use of Wireless products may berestricted by the proprietor of the building or responsible representatives ofthe organization. These situations may for example include:Using the Wireless products equipment on board of airplanes, orIn any other environment where the risk of interference to otherdevices or services is perceived or identified as harmful.If you are uncertain of the policy that applies on the use of wireless devicesin a specific organization or environment (e.g. airports), you areencouraged to ask for authorization to use the Wireless device prior toturning on the equipment.Wireless LAN TechnologyThe computer’s wireless communication function supports some wirelesscommunication devices.User's Manual 7-4
Only some models are equipped with both Wireless LAN and Bluetoothfunctions.Do not use the Wireless LAN (Wi-Fi) or Bluetooth functionalities near amicrowave oven or in areas subject to radio interference or magneticfields. Interference from a microwave oven or other source can disruptWi-Fi or Bluetooth operation.Turn all wireless functionalities off when near a person who may havea cardiac pacemaker implant or other medical electric device. Radiowaves may affect pacemaker or medical device operation, possiblyresulting in serious injury. Follow the instruction for your medicaldevice when using any wireless functionality.Always turn off wireless functionality if the computer is near automaticcontrol equipment or appliances such as automatic doors or firedetectors. Radio waves can cause malfunction of such equipment,possibly resulting in serious injury.It may not be possible to make a network connection to a specifiednetwork name using the ad hoc network function. If this occurs, thenew network (*) will have to be configured for all computers connectedto the same network in order to re-enable network connections.* Please be sure to use new network name.SecurityTOSHIBA strongly recommend that you enable encryptionfunctionality, otherwise your computer will be open to illegal access byan outsider using a wireless connection. If this occurs, the outsidermay illegally access your system, eavesdrop, or cause the loss ordestruction of stored data.TOSHIBA is not liable for the loss of data due to eavesdropping orillegal access through the wireless LAN and the damage thereof.Card SpecificationsCompatibility IEEE 802.11 Standard for Wireless LANsNetwork OperatingSystemMicrosoft Windows NetworkingMedia AccessProtocolCSMA/CA (Collision Avoidance) withAcknowledgment (ACK)Radio CharacteristicsRadio Characteristics of Wireless LAN module may vary according to:Country/region where the product was purchasedType of productUser's Manual 7-5
Wireless communication is often subject to local radio regulations.Although Wireless LAN wireless networking products have been designedfor operation in the license-free 2.4GHz band, local radio regulations mayimpose a number of limitations to the use of wireless communicationequipment.Radio Frequency Band 2.4GHz (2400-2483.5 MHz) (Revisionb/g and n)The range of the wireless signal is related to the transmit rate of thewireless communication. Communications at lower transmit range maytravel larger distances.The range of your wireless devices can be affected when theantennas are placed near metal surfaces and solid high-densitymaterials.Range is also impacted due to "obstacles" in the signal path of theradio that may either absorb or reflect the radio signal.Bluetooth wireless technologySome computers in this series have Bluetooth wireless communicationfunction which eliminates the need for cables between electronic devicessuch as computers, printers and mobile phones. When it is enabled,Bluetooth provides the wireless personal area network environment whichis safe and trustworthy, that is quick and easy.You cannot use the computer's built-in Bluetooth functions and an externalBluetooth adaptor simultaneously. For reference, Bluetooth wirelesstechnology has the following features:SecurityTwo advanced security mechanisms ensure a high level of security:Authentication prevents access to critical data and makes it impossibleto falsify the origin of a message.Encryption prevents eavesdropping and maintains link privacy.Worldwide operationThe Bluetooth radio transmitter and receiver operate in the 2.4GHz band,which is license-free and compatible with radio systems in most countriesin the world.Radio linksYou can easily establish links between two or more devices, with theselinks being maintained even if the devices are not within a line-of-sight ofeach other.User's Manual 7-6
Radio Regulatory InformationThe Wireless device must be installed and used in strict accordance withthe manufacturer’s instructions as described in the user documentation thatcomes with the product. This product complies with the following radiofrequency and safety standards.EuropeRestrictions for Use of 2400.0-2483.5MHz Frequencies in EuropeFrance: Outdoor uselimited to 10mWe.i.r.p. within theband2454-2483.5MHzMilitary Radiolocationuse.Refarming of the 2.4GHz bandhas been ongoing in recent years toallow current relaxed regulation Fullimplementation planned 2012.Italy: - For private use, a generalauthorization is required if WAS/RLAN’s are used outside ownpremises. For public use, a generalauthorization is required.Luxembourg: Implemented General authorization required fornetwork and service supply.Norway: Implemented This subsection does not apply forthe geographical area within aradius of 20 km from the centre ofNy-Alesund.RussianFederation:- Only for indoor applications.   To remain in conformance with European spectrum usage laws forWireless LAN operation, the above 2.4GHz channel limitations apply foroutdoor usage. The user should use the wireless LAN utility to check thecurrent channel of operation. If operation is occurring outside of theallowable frequencies for outdoor use, as listed above, the user mustcontact the applicable national spectrum regulator to request a license foroutdoor operation.Canada - Industry Canada (IC)This device complies with RSS-210 of the Industry Canada Rules.Operation is subject to the following two conditions: (1) This device may notcause harmful interference, and (2) this device must accept anyinterference received, including interference that may cause undesiredoperation.User's Manual 7-7
Ce dispositif est conforme à la norme CNR-210 d'Industrie Canadaapplicable aux appareils radio exempts de licence. Son fonctionnementestsujet aux deux conditions suivantes: (1) le dispositif ne doit pas produiredebrouillage préjudiciable, et (2) ce dispositif doit accepter tout brouillagereçu, y compris un brouillage susceptible de provoquer un fonctionnementindésirable.The term “IC” before the equipment certification number only signifies thatthe Industry Canada technical specifications were met.USA-Federal Communications Commission (FCC)This equipment has been tested and found to comply with the limits for aClass B digital device, pursuant to Part 15 of FCC Rules. These limits aredesigned to provide reasonable protection against harmful interference in aresidential installation.Refer to the FCC information section for the detailed information.The radiated output power of the Wireless device is far below the FCCradio frequency exposure limits. Nevertheless, the Wireless device shall beused in such a manner that the potential for human contact during normaloperation is minimized.In the usual operating configuration, the distance between the antenna andthe user should not be less than 20cm. Please refer to the computer user’smanual for the details regarding antenna location.The installer of this radio equipment must ensure that the antenna islocated or pointed such that it does not emit RF field in excess of HealthCanada limits for the general population; consult Safety Code 6, obtainablefrom Health Canada’s websitewww.hc-sc.gc.caTaiwanArticle 12 Without permission granted by the NCC, anycompany, enterprise, or user is not allowed tochange frequency, enhance transmitting power oralter original characteristic as well as performanceto an approved low power radio frequency devices.User's Manual 7-8
Article 14 The low power radio-frequency devices shall notinfluence aircraft security and interfere legalcommunications;If found, the user shall cease operatingimmediately until no interference is achieved.The said legal communications means radiocommunications is operated in compliance with theTelecommunications Act.The low power radio-frequency devices must besusceptible with the interference from legalcommunications or ISM radio wave radiateddevices.   Using this equipment in JapanIn Japan, the frequency bandwidth of 2,400MHz to 2,483.5MHz for secondgeneration low-power data communication systems such as this equipmentoverlaps that of mobile object identification systems (premises radio stationand specified low-power radio station).1. Important noticeThe frequency bandwidth of this equipment may operate within the samerange as industrial devices, scientific devices, medical devices, microwaveovens, licensed radio stations and non-licensed specified low-power radiostations for mobile object identification systems (RFID) used in factoryproduction lines (Other Radio Stations).1. Before using this equipment, ensure that it does not interfere with anyof the equipment listed above.2. If this equipment causes RF interference to other radio stations,promptly change the frequency being used, change the location ofuse, or turn off the source of emissions.3. Contact an authorized TOSHIBA service provider if you haveproblems with interference caused by this product to Other RadioStations.2. Indication for Wireless LANThe indication shown below appears on this equipment.(1)(2) (3)(4)(5)User's Manual 7-9
1. 2.4 : This equipment uses a frequency of 2.4GHz.2. DS : This equipment uses DS-SS modulation.3. OF : This equipment uses OFDM modulation.4. 4 : The interference range of this equipment is less than 40m.5.  : This equipment uses a frequency bandwidth from 2,400MHzto 2,483.5MHz. It is possible to avoid the band of mobile objectidentification systems.3. Indication for BluetoothThe indication shown below appears on this equipment.(4)(1) (2) (3)81. 2.4 : This equipment uses a frequency of 2.4 GHz.2. FH : This equipment uses FH-SS modulation.3. 1 : The interference range of this equipment is less than 10m.4.  : This equipment uses a frequency bandwidth from 2,400 MHzto 2,483.5 MHz. It is impossible to avoid the band of mobile objectidentification systems.Device AuthorizationThis device obtains the Technical Regulation Conformity Certification and itbelongs to the device class of radio equipment of low-power datacommunication system radio station stipulated in the TelecommunicationsBusiness Law of Japan.Realtek® RTL8723BS 802.11n Wireless LAN and BluetoothThe Name of the radio equipment: RTL8723BSDSP Research, Inc.Approval Number: D140063003The following restrictions apply:Do not disassemble or modify the device.Do not install the embedded wireless module into other device.Radio approvals for wireless devicesThis equipment is approved to the radio standard by the countries/regionsin the following table.If you use this equipment in the countries/regions which are not listed in thetable blow, please contact TOSHIBA Support.User's Manual 7-10
As of May 2014Austria Belgium Bulgaria CanadaCyprus Czech Rep Denmark EstoniaFinland France Germany GreeceHong Kong Hungary Iceland IndiaIndonesia Ireland Italy JapanKorea Latvia Liechtenstein LithuaniaLuxemburg Malta Monaco NetherlandsNorway Philippines Poland PortugalRomania Slovak Republic Slovenia SpainSweden Switzerland UK USALegal FootnotesNon-applicable IconsCertain computer chassis are designed to accommodate all possibleconfigurations for an entire product series. Therefore, please be aware thatyour selected model may not have all the features and specificationscorresponding to all of the icons or switches shown on the computerchassis.CPUCentral Processing Unit (CPU) Performance Legal Footnotes.CPU performance in your computer product may vary from specificationsunder the following conditions:use of certain external peripheral productsuse of battery power instead of AC poweruse of certain multimedia, computer generated graphics or videoapplicationsuse of standard telephone lines or low speed network connectionsuse of complex modeling software, such as high end computer aideddesign applicationsuse of several applications or functionalities simultaneouslyuse of computer in areas with low air pressure (high altitude >1,000meters or >3,280 feet above sea level)use of computer at temperatures outside the range of 5°C to 30°C(41°F to 86°F) or >25°C (77°F) at high altitude (all temperaturereferences are approximate and may vary depending on the specificcomputer model - contact TOSHIBA support for details).User's Manual 7-11
CPU performance may also vary from specifications due to designconfiguration.Under some conditions, your computer product may automatically shut-down. This is a normal protective feature designed to reduce the risk of lostdata or damage to the product when used outside recommendedconditions. To avoid risk of lost data, always make back-up copies of databy periodically storing it on an external storage medium. For optimumperformance, use your computer product only under recommendedconditions. Read additional restrictions in your product documentation.Contact TOSHIBA technical service and support, refer to TOSHIBA supportsection for more information.Memory (Main System)Part of the main system memory may be used by the graphics system forgraphics performance and therefore reduce the amount of main systemmemory available for other computing activities. The amount of mainsystem memory allocated to support graphics may vary depending on thegraphics system, applications utilized, system memory size and otherfactors.Battery LifeBattery life may vary considerably depending on product model,configuration, applications, power management settings and featuresutilized, as well as the natural performance variations produced by thedesign of individual components. Published battery life numbers areachieved on select models and configurations tested by TOSHIBA at thetime of publication. Recharge time varies depending on usage. Battery maynot charge while computer is consuming full power.After going through many charge and discharge cycles, the battery will loseits ability to perform at maximum capacity and will need to be replaced.This is a normal phenomenon for all batteries. To purchase a new batterypack, see the accessories information that is shipped with your computer.LCDOver a period of time, and depending on the usage of the computer, thebrightness of the LCD screen will deteriorate. This is an intrinsiccharacteristic of LCD technology.Maximum brightness is only available when operating in AC power mode.Screen will dim when the computer is operated on battery power and youmay not be able to increase the brightness of the screen.Graphics Processing Unit (GPU)Graphics processing unit (GPU) performance may vary depending onproduct model, design configuration, applications, power managementsettings and features utilized. GPU performance is only optimized whenUser's Manual 7-12
operating in AC power mode and may decrease considerably whenoperating in battery power mode.Total Available Graphics Memory is the total of, as applicable, DedicatedVideo Memory, System Video Memory and Shared System Memory.Shared System Memory will vary depending on system memory size andother factors.Wireless LANThe transmission speed over the wireless LAN and the distance over whichwireless LAN can reach may vary depending on surroundingelectromagnetic environment, obstacles, access point design andconfiguration, and client design and software/hardware configurations.The actual transmission speed will be lower than the theoretical maximumspeed.Copy ProtectionApplicable copy protection standards included in certain media mayprevent or limit recording or viewing of the media.GlossaryThe terms in this glossary cover topics related to this manual. Alternatenaming is included for reference.AbbreviationsAC: Alternating CurrentAMT: Intel Active Management TechnologyASCII: American Standard Code for InformationInterchangeBIOS: Basic Input/output SystemBD-ROM: Blu-ray Disc Read-only Memorybps: bits per secondCD: Compact DiscCD-ROM: Compact Disc Read-only MemoryCD-RW: Compact Disc-rewritableCMOS: Complementary Metal-oxide SemiconductorCPU: Central Processing UnitDC: Direct CurrentDDR: Double Data RateDIMM: Dual Inline Memory ModuleDVD: Digital Versatile DiscUser's Manual 7-13
DVD-R: Digital Versatile Disc-recordableDVD-RAM: Digital Versatile Disc-random Access MemoryDVD-R DL: Digital Versatile Disc Recordable Dual LayerDVD-ROM: Digital Versatile Disc-read Only MemoryDVD-RW: Digital Versatile Disc-rewritableDVD+R DL: Digital Versatile Disc Recordable Double LayerFAT: File Allocation TableFCC: Federal Communications CommissionFHD: Full High DefinitionGB: gigabyteGBps: gigabytes per secondHD: High DefinitionHD+: High Definition PlusHDD: Hard Disk DriveHDMI: High-definition Multimedia InterfaceHDMI CEC: High-definition Multimedia Interface ConsumerElectronics ControlHTML: Hypertext Markup LanguageIEEE: Institute of Electrical and Electronics EngineersI/O: Input/OutputIRQ: interrupt requestISP: Internet Service ProviderKB: kilobyteLAN: Local Area NetworkLCD: Liquid Crystal DisplayLED: Light Emitting DiodeMB: megabyteMBps: megabytes per secondMMC: Multi Media CardOCR: Optical Character Recognition (Reader)PC: Personal ComputerPCI: Peripheral Component InterconnectPCMCIA: Personal Computer Memory Card InternationalAssociationRAM: Random Access MemoryUser's Manual 7-14
RGB: Red, Green, and BlueRFI: Radio Frequency InterferenceROM: Read Only MemoryRTC: Real Time ClockS/P DIF: Sony/philips Digital Interface FormatSD: Secure DigitalSDHC: Secure Digital High CapacitySDXC: Secure Digital Extended CapacitySDRAM: Synchronous Dynamic Random Access MemorySSD: Solid State DriveTFT: Thin-film TransistorURL: Uniform Resource LocatorUSB: Universal Serial BusWAN: Wide Area NetworkWQHD: Wide Quad High Definitionwww: World Wide WebUser's Manual 7-15
IndexAAC adaptoradditional 4-14connecting 2-3 BBatteryextending life 4-6monitoring capacity 4-5save mode 5-3 Bluetooth 7-6CCleaning the computer 1-16Cooling vents 3-7DDisplayautomatic power off 5-2screen 3-2, 3-5 Documentation list 2-1EEquipment checklist 2-1External monitorproblems 6-8 GGraphics Processing Unit 3-8HHDMI out port 3-4MMedia careCard care 4-8 memory media cardinserting 4-8removing 4-9 Memory media slot 4-7Moving the computer 1-16MultiMediaCardremoving 4-9 PPasswordpower on 5-3 PowerHibernation Mode 2-10Shut Down mode 2-8Sleep Mode 2-9turning off 2-8turning on 2-5 ProblemsAnalyzing the problem 6-2Battery 6-5User's Manual Index-1
External monitor 6-8Hardware and systemchecklist 6-4Internal display panel 6-6Memory Media Card 6-6Overheating powerdown 6-4Power 6-4Real Time Clock 6-6Sound system 6-7TOSHIBA support 6-9USB device 6-7 RRecovery hard disk drive 5-6Recovery Media 5-5Restarting the computer 2-9SSD/SDHC/SDXC Cardformatting 4-8note 4-7 Sleep Modesetting 2-9 Sound systemproblems 6-7 TTOSHIBA Desktop Assist 5-1Touch Screen UUSB deviceproblems 6-7 VVideo mode 4-14Video RAM 3-8WWeb Camera 3-3, 3-5Wireless communication 7-4User's Manual Index-2

Navigation menu