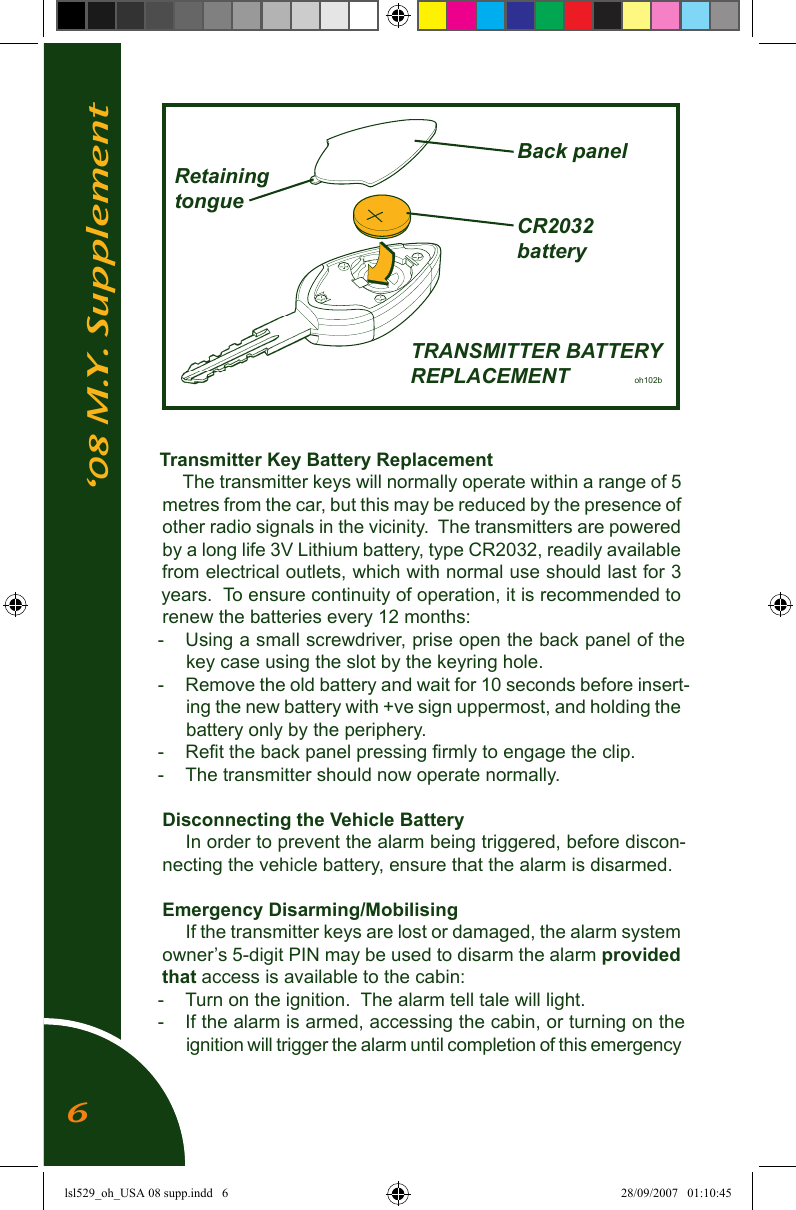
PFK Electronics 457800 AUTOMOTIVE KEY FOB User Manual lsl529 oh USA 08 supp indd

PFK Electronics (Pty) Limited AUTOMOTIVE KEY FOB lsl529 oh USA 08 supp indd
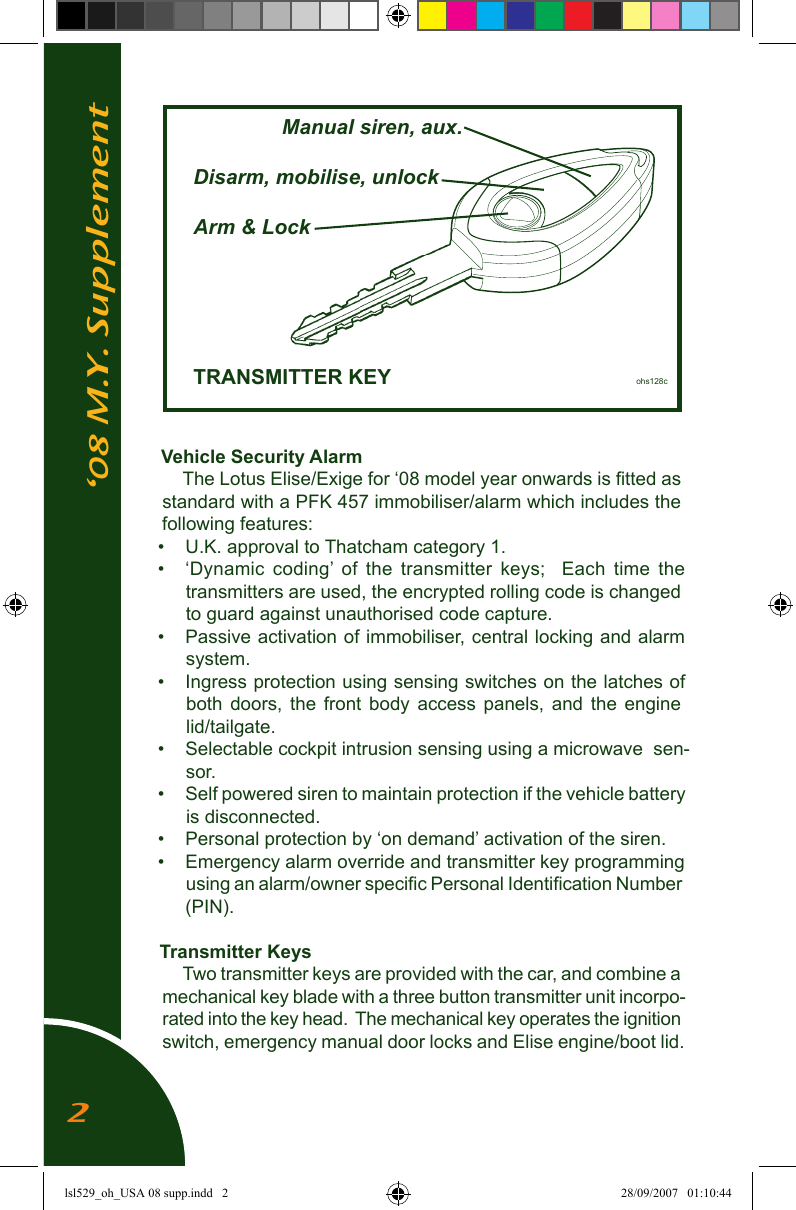
USERS MANUAL

 intro18eandOWNER’S HANDBOOK2008 M.Y. SUPPLEMENTTo be read in conjunction with handbook D121T0324LSL529lsl529_oh_USA 08 supp.indd   1 28/09/2007   01:10:43
‘08 M.Y. SupplementVehicle Security AlarmThe Lotus Elise/Exige for ‘08 model year onwards is fitted as standard with a PFK 457 immobiliser/alarm which includes the following features:•  U.K. approval to Thatcham category 1.•  ‘Dynamic  coding’  of  the  transmitter  keys;    Each  time  the transmitters are used, the encrypted rolling code is changed to guard against unauthorised code capture.•  Passive activation of immobiliser, central locking and alarm system.•  Ingress protection using sensing switches on the latches of both  doors,  the  front  body  access panels, and the  engine lid/tailgate.•  Selectable cockpit intrusion sensing using a microwave  sen-sor. •  Self powered siren to maintain protection if the vehicle battery is disconnected.•  Personal protection by ‘on demand’ activation of the siren.•  Emergency alarm override and transmitter key programming using an alarm/owner specific Personal Identification Number (PIN). Transmitter KeysTwo transmitter keys are provided with the car, and combine a mechanical key blade with a three button transmitter unit incorpo-rated into the key head.  The mechanical key operates the ignition switch, emergency manual door locks and Elise engine/boot lid.      Manual siren, aux.  Disarm, mobilise, unlock  Arm & Lock         TRANSMITTER KEY         ohs128c2lsl529_oh_USA 08 supp.indd   2 28/09/2007   01:10:44
‘08 M.Y. SupplementThe transmitter operates the electronic immobiliser, alarm system and the central locking.  The two transmitter keys should be kept separate, and a replacement obtained immediately after any loss to ensure that a spare is always available.The  4-digit  code  for  the  mechanical  key, the unique serial number of the immobiliser/alarm, and the vehicle owner’s 5-digit alarm  Personal  Identification  Number  (PIN),  are  supplied  on plastic tags attached to the key ring of a new vehicle.  In order to allow replacement transmitter keys to be ordered, it is essential that these numbers are recorded and kept safely with the vehicle documents.  If the codes are not available on receipt of the car, enquire with the dealer immediately.Disarming the Alarm/Unlocking When  approaching  the  car,  it  is  likely  that  the  vehicle  is locked and the alarm armed.  The alarm red tell tale lamp in the speedometer face will be triple flashing.  To disarm the alarm and unlock the doors:-  Press the central, unlock, button on the transmitter key.  The first press will unlock just the driver’s door.  Two presses in quick succession will unlock both the driver and passenger doors.  -  This command will be acknowledged by a double flash of the hazard lamps.-  The engine will be mobilised (see below).-  The interior lamp will fade on, and remain lit for up to 2 minutes (if set to the ‘courtesy’ position).-  The alarm tell tale will be extinguished.If a door is not opened within 2 minutes, the doors will pas-sively re-lock and the alarm system re-arm. Passive ImmobilisationIn order to provide a measure of automatic vehicle security, independent of  any driver initiative, the system will ‘passively’ immobilise the engine’s cranking and fuel pump circuits after the ignition has been turned off for 40 seconds, or a similar period has elapsed since the last mobilising command.  With the ignition off, the alarm tell tale will indicate that immobilisation is in effect by briefly flashing every second.  With ignition on, immobilisation is indicated by a continuously lit tell tale.3lsl529_oh_USA 08 supp.indd   3 28/09/2007   01:10:44
‘08 M.Y. SupplementTo mobilise the car (i.e. allow engine starting) with ignition on or off, press once the transmitter centre button; the alarm tell tale will be extinguished.Arming the Alarm/Locking the DoorsTo lock the doors and arm the alarm, remove the ignition key, close both doors, and check that the engine lid/tailgate and body front access panels are secure:  -  Press once the raised logo button on the transmitter fob.  -  This command will be acknowledged by a single flash of the hazard lamps.-  Both  doors  will  be  locked, the engine  immobilised  and  the alarm system armed.  A settling period of 40 seconds must expire before the ingress sensors become active.-  The alarm tell tale will repeatedly triple flash.Note:i)  If the system is armed when a door is  not fully shut, three triple beeps will sound as a warning and the doors will not be locked.  Opening a door will not trigger the alarm.ii)  If the system is armed when the engine lid/tailgate or a front access panel is not fully closed, three warning double beeps will be heard, and the doors will not be locked.  Opening a door in this instance will trigger the alarm. iii) If one transmitter is used to disarm the alarm, and a second transmitter to re-arm, a system test mode will be initiated, and operational variations will occur.  Allow an undisturbed period of 2 minutes to elapse to restore normal operation.When fully armed, and after the settling period of 40 seconds has expired, the alarm will be triggered by any of the following actions:-  Interruption of the car battery power supply or siren cables.-  Energising the ignition circuit (‘hot wiring’).-  Opening a door;-  Opening the engine lid/tailgate or a front access panel.-  Movement detected within the cabin (unless de-selected).If the alarm is triggered, the hazard warning lamps will flash and the wailing siren will sound for a period of approximately 30 seconds before closing down and resetting, ready for any further triggering input. If a trigger is continuously present (e.g. door left 4lsl529_oh_USA 08 supp.indd   4 28/09/2007   01:10:44
‘08 M.Y. Supplementopen), the alarm will repeat for a maximum of eight 30 second cycles before excluding the triggering sensor for the remainder of the armed period.To silence  the  siren,  press once  the  central,  disarm  button on  the  transmitter  key.   If  necessary, press  a  second  time  to disarm the alarm.Alarm Tell Tale SummaryTell tale off;        Alarm disarmed, engine mobilised.Tell tale on;         Immobilised with ignition on.Brief flash every second; Immobilised with ignition off.Repeating triple flash;  Alarm armed.Turning Off the Interior Movement SensorA  microwave  sensor  is  mounted  behind  the  cabin  rear bulkhead trim panel, and is able to detect substantial physical movement within the cockpit, and trigger the alarm. Microwave transmissions are blocked by metal objects, so it is important not to shield the signal by placing such items on the bulkhead ledge.If  an  animal  is  to  be  left  in  the  vehicle,  or  if  for  any  other reason  it  is  desired  to  exclude  the  interior  movement  sensor when the alarm is set, press once the transmitter logo button in the normal way to set the alarm, and then press a second time (within 2 seconds) to exclude the interior movement sensor.  A single beep will be heard as confirmation.  This exclusion will be automatically cancelled when the alarm is disarmed.Manual Activation of SirenIf,  for  personal  security  reasons,  it  is  desired  to  manually activate the siren at any time when the ignition is off, press for 3 seconds the transmitter auxiliary (3rd) button.  The wailing siren will sound, and the hazard lamps flash for a period of 30 seconds.  To stop the siren, press once any of the transmitter buttons.Manual siren activation will not affect the status of the alarm arming.5lsl529_oh_USA 08 supp.indd   5 28/09/2007   01:10:44
‘08 M.Y. SupplementTransmitter Key Battery ReplacementThe transmitter keys will normally operate within a range of 5 metres from the car, but this may be reduced by the presence of other radio signals in the vicinity.  The transmitters are powered by a long life 3V Lithium battery, type CR2032, readily available from electrical outlets, which with normal use should last for 3 years.  To ensure continuity of operation, it is recommended to renew the batteries every 12 months:-  Using a small screwdriver, prise open the back panel of the key case using the slot by the keyring hole.-  Remove the old battery and wait for 10 seconds before insert-ing the new battery with +ve sign uppermost, and holding the battery only by the periphery.-  Refit the back panel pressing firmly to engage the clip.-  The transmitter should now operate normally.Disconnecting the Vehicle BatteryIn order to prevent the alarm being triggered, before discon-necting the vehicle battery, ensure that the alarm is disarmed.Emergency Disarming/MobilisingIf the transmitter keys are lost or damaged, the alarm system owner’s 5-digit PIN may be used to disarm the alarm provided that access is available to the cabin:-  Turn on the ignition.  The alarm tell tale will light.  -  If the alarm is armed, accessing the cabin, or turning on the ignition will trigger the alarm until completion of this emergency             Back panel  Retaining  tongue            CR2032            battery                  TRANSMITTER BATTERY                  REPLACEMENT        oh102b6lsl529_oh_USA 08 supp.indd   6 28/09/2007   01:10:45
‘08 M.Y. Supplementprocess.-  Within 10 seconds, turn the ignition off; the tell tale will begin to flash.-  After a number of flashes  corresponding to  the first digit of the PIN, turn on the ignition  Note that the first flash may not be of full duration (but is still to be counted) dependent on the waveform position at time of ignition switch off.-  Turn off the ignition and after a number of flashes correspond-ing to the second digit of the PIN, turn on the ignition.  Repeat this process until all 5 digits have been completed.  Note that 10 flashes correspond to a zero digit.-  If the PIN is entered correctly, the alarm will now be overridden and the engine mobilised.  However, passive immobilisation will still occur after an ignition off time of 40 seconds, requiring a repeat of the above procedure to mobilise.  Passive arming and passive door locking cannot occur until a transmitter is used to operate the alarm.  If, at any stage of the process, a number is entered incorrectly, the system will immediately revert to the start, so that the whole PIN must be re-entered.Programming Additional TransmittersA maximum of 6 transmitters may be programmed to the car, any thereafter overwriting the first to have been programmed.-   With the engine immobilised (tell tale flashes briefly once per second), turn on the ignition.-  Enter the PIN as detailed above, followed by the additional two digits 1, 1.-  The tell tale will flash rapidly for one second, then turn off.-  Within 8 seconds, press any button on the transmitter to be programmed.  The tell tale will then pulse rapidly and the siren will beep.-  Within 10 seconds press any button on the next transmitter to be programmed (if applicable), and repeat this process for all remaining transmitters.-  When  all  transmitters  have  been  programmed,  wait  for  10 seconds, or turn off the ignition.To disable a lost or stolen transmitter from the system, use the above procedure to programme 6 transmitters, if necessary repeatedly reprogramming the same transmitter if less than 6 programmed transmitters are to be used.7lsl529_oh_USA 08 supp.indd   7 28/09/2007   01:10:45
‘08 M.Y. SupplementThe  following  statement  is  mandated  by  the  Federal  Com-munications Commission:THIS  DEVICE  COMPLIES  WITH  PART 15  OF  THE  FCC RULES. OPERATION IS SUBJECT TO THE FOLLOWING TWO CONDITIONS: (1) THIS DEVICE MAY NOT CAUSE HARMFUL INTERFERENCE, AND (2) THIS DEVICE MUST ACCEPT ANY INTERFERENCE  RECEIVED,  INCLUDING  INTERFERENCE THAT MAY CAUSE UNDESIRED OPERATION.NOTE:  THE  MANUFACTURER  IS  NOT  RESPONSIBLE FOR ANY RADIO OR TV INTERFERENCE CAUSED BY UN-AUTHORIZED MODIFICATIONS TO THIS EQUIPMENT. SUCH MODIFICATIONS COULD VOID THE USER’S AUTHORITY TO OPERATE THE EQUIPMENT.8lsl529_oh_USA 08 supp.indd   8 28/09/2007   01:10:45
‘08 M.Y. SupplementTire Pressure Monitoring System (TPMS) All Elise/Exige models from ‘08 model year onwards are fitted with a tire pressure monitoring system.  A sensor incorporated into each of the tire valves, monitors the air pressure inside the tire, and supplies an onboard control module with this data by radio transmission.  If any tire pressure should fall below 75% of the recommended value, an alert message is sent to the instru-ment panel, and the tire pressure tell tale  will light up amber.  The fuel gauge  display will then be overwritten with a message to indicate which tire is concerned, with text such as: LF Low (left hand front tire low pressure).  This message will show for 5 seconds before the display reverts to the fuel level bar graph, but will repeat for 5 seconds at 30 second intervals.If this warning should occur, stop the car as soon as it is safe so to do, and examine the affected tire.  If there is no visible damage and a tire pump is available, correct the pressure to that stated in the Technical Data section of this handbook, and proceed with caution to a tire dealer for professional inspection and advice.  Note that the tell tale will automatically be extinguished when the correct pressure is restored.  If the tire is punctured, or no inflation equipment is available, consider using the emergency tire inflator aerosol (see page 128), but observe the associated WARNINGS and be aware that the TPMS sensor in the tire must subsequently be renewed.The  TPMS  incorporates  self-malfunction  recognition,  and if a fault is detected, the tell tale will flash for one minute and then remain constantly lit.  The LCD panel will also flash ‘TPMS FAULT’ for 5 seconds, and repeat at 30 second intervals.  See your dealer without delay, and be aware that no indication of low tire pressure will be displayed.Be sure to advise any tire fitters or service technicians that TPMS is fitted, and that the tire valves include pressure sensors.  If a fault is indicated after wheel or tire replacement, it is likely that a sensor has been incorrectly fitted or damaged.  If a tire valve is renewed, or is moved to a different wheel position, the TPMS will automatically identify the new configuration.Note that the pressure sensors are powered by integral batter-ies, with an average service life of 10 years.  It is recommended to renew all pressure sensors at this time interval.9lsl529_oh_USA 08 supp.indd   9 28/09/2007   01:10:46
‘08 M.Y. SupplementThe following text is required by NHTSA regulation 571.138:****************************Each tire, including the spare (if provided), should be checked monthly when cold and inflated to the inflation pressure recom-mended by the vehicle manufacturer on the vehicle placard or tire inflation pressure label. (If your vehicle has tires of a different size than the size indicated on the vehicle placard or tire inflation pressure  label,  you  should  determine  the  proper  tire  inflation pressure for those tires.)As an added safety feature, your vehicle has been equipped with a tire pressure monitoring system (TPMS) that illuminates a  low  tire  pressure  telltale  when  one  or  more  of  your  tires  is significantly under-inflated. Accordingly, when the low tire pres-sure telltale illuminates, you should stop and check your tires as soon as possible, and inflate them to the proper pressure. Driving on a significantly under-inflated tire causes the tire to overheat and can lead to tire failure. Under-inflation also reduces fuel ef-ficiency and tire tread life, and may affect the vehicle’s handling and stopping ability.Please note that the TPMS is not a substitute for proper tire maintenance, and it is the driver’s responsibility to maintain cor-rect tire pressure, even if under-inflation has not reached the level to trigger illumination of the TPMS low tire pressure telltale.Your vehicle has also been equipped with a TPMS malfunction indicator to indicate when the system is not operating properly.  The TPMS malfunction indicator is combined with the low  tire pressure telltale. When the system detects a malfunction, the telltale will flash for approximately one minute and then remain continuously  illuminated.  This  sequence  will  continue  upon subsequent vehicle start-ups as long as the malfunction exists.  When the malfunction indicator is illuminated, the system may not be able to detect or signal low tire pressure as intended. TPMS malfunctions may occur for a variety of reasons, including the installation of  replacement or alternate  tires  or wheels on  the vehicle that prevent the TPMS from functioning properly. Always check the TPMS malfunction telltale after replacing one or more tires or wheels on your vehicle to ensure that the replacement or  alternate  tires  and  wheels  allow  the  TPMS  to  continue  to function properly.****************************10lsl529_oh_USA 08 supp.indd   10 28/09/2007   01:10:46
‘08 M.Y. SupplementWARNING ‘TELL TALE’ LAMPSThe positions of the tell tales on ‘08 cars differs from that shown on page 48.  See new layout in illustration above. The symbols and functionality are unchanged apart from those described in this supplement.Security Tell TaleThe security function is separated from the combined security/rpm tell tale and is moved into the face of the speedometer.High RPM Tell TalesThree red tell tales are incorporated into the tachometer face to warn that maximum engine speed is being approached.  Maxi-mum transient engine speed in all gears is 8,500 rpm (at normal running  temperature),  at  which  point  the  engine  is  governed, but as the rate of rpm increase is potentially greater in the lower gears, the tell tale trigger points are tailored to accommodate the reaction time available.  As maximum rpm is approached, the tell tales will light in the following left to right sequence:-  one red light-  two red lights-  three rapidly flashing lightsWhen exploiting maximum acceleration, gearchange upshifts should be made immediately the three flashing lights appear.  Tachometer     Service tell tale      Speedometer   Security                                   tell tale  High rpm  tell tales  LCD  panel  INSTRUMENT PANEL                 ohs127bA16:30000123 90 CE       F11lsl529_oh_USA 08 supp.indd   11 28/09/2007   01:10:47
‘08 M.Y. SupplementNOTICE:-  A 6,000 rpm limit is imposed on a cold engine to reduce pos-sible damage and wear from an unsympathetic driving style.-  At normal running temperature, maximum continuous engine speed is 8,000 rpm.-  Using  maximum  rpm  and  the  above  tell  tale  facility  should be  restricted  to  occasions  when  maximum  acceleration  is required.  Overuse will compromise powertrain service life.-  The  engine  is  not  protected  from  overspeeding  caused  by erroneous or premature downchanging.  Such misuse could  result in catastrophic failure, not covered by the vehicle war-ranty.Scheduled Service Tell Tale (if fitted)Under normal usage conditions, a routine maintenance service should be performed at the first occurring of 7,500 miles or 6 months from the previous service (see separate Maintenance Record booklet).  The approved service period extends to 500 miles before/after or one month before/after the stipulated dis-tance/time.As a driver aid to distance servicing, an amber wrench icon in the face of the speedometer will flash for 10 seconds follow-ing each ignition turn on, when within 500 miles of the service period, allowing plenty of time for booking arrangements to be made.  Once the service period is reached, the tell tale will remain constantly lit with ignition until reset by your dealer.Note that  this  feature  is  provided  only  as a  secondary  aid, and uses only distance criteria, and not the time factors which may predominate.  It is the owner’s responsibility to ensure that servicing is carried out at the prescribed intervals..Trip Distance/Digital Speed Display/Time ClockThe top left portion of the LCD panel may be cycled through the following displays:-  Trip distance.-   Digital road speed in km/h (alternative units to mph analogue display) .-  Digital time clock (if fitted).To cycle, one at a time, through these three displays, briefly press  the  small  button  on  the  right  hand  side  of  the  steering column shroud.  Note that this button also adjusts the brightness of the instrument and heater/a.c. panel illumination {see page 12lsl529_oh_USA 08 supp.indd   12 28/09/2007   01:10:47
‘08 M.Y. Supplement58} if held pressed when road speed is selected. Trip distance: Units displayed are miles, and range from 000.0 to 999.9.  To reset to zero; when the trip function is displayed, press the button on the column shroud for longer than 1 second.Time clock setting: To adjust the 24 hour time clock (if fitted);-  When the time function is displayed, press the button on the column shroud for longer than 1 second.  The hour display will then flash.  -  Repeated brief presses of the button will increment the hour figure.  Pressing the button for longer then 1 second will store the hour setting and start the minute display flashing.  -  Further brief button presses will increment the minute figure.  -  When the correct time is displayed, press the button for longer than 1 second to store the setting and start the clock.Variable Traction & Launch Control (if fitted)Exige S models specified with the ‘Performance Pack’ option, include variable Lotus Traction Control  (LTC), allied  with  Vari-able Launch Control (see below), and have a rotary control knob mounted on the left hand side of the steering column shroud.Each time the ignition is turned on, normal full LTC is activated.  To enable variable traction control, turn on the ignition and hold the LTC ‘off’ button pressed for 2 seconds.  Check that the tell tale in the switch button is lit.  Start the engine.  Note that if the ignition is switched off (e.g. prior to a second start attempt), the above procedure must be repeated in sequence.With the switch button tell tale lit and the engine running, the rotary knob may then be used to select the degree of traction control desired, with the setting shown on the instrument panel LCD in the form ‘#% SLIP’, with a possible range between 0 and 9%.  The display will revert to showing the fuel level after a few seconds.•  For  maximum  traction  control  (0%  slip)  turn  the  knob  fully counterclockwise to ‘MAX’.•  To reduce traction control  (to  allow up to  9% slip), turn  the knob progressively clockwise.  •  Fully clockwise (‘0’), traction control is disabled, as indicated by the lighting of the instrument panel tell tale, and an LCD message of ‘LTC OFF’.If at any time during that ignition cycle,  the control knob is turned, the LCD will again show the traction control setting for 13lsl529_oh_USA 08 supp.indd   13 28/09/2007   01:10:47
‘08 M.Y. Supplementa few seconds.When the ignition is next turned on, normal full LTC will be activated unless the above procedure is repeated. WARNING: •  The enhanced vehicle control that LTC provides should not induce any relaxation of caution or vigilance by the driver.  Physical limits of cornering and braking still apply, and excessive speed may result in loss of control and an accident.  The driver is at all times responsible for the judgement of appropriate speed. •   When  fitted,  Lotus  Traction  Control  should  always  be active  when  driving  on  the  public  highway  in  normal conditions.•  If  the  system  is  switched  off  when  driving  off-highway, be aware of the consequent change in vehicle behaviour and modify driving style accordingly.Variable Launch ControlNOTICE:  This feature is designed for competition use, and as such, its employment will invalidate vehicle warranty on any components subject to the extreme loads associated with racing starts.Variable Launch Control allows the engine rpm to be limited during  a  competition  start  in  order  to  balance  engine  power against available grip and provide a controlled degree of wheel-spin for the first moment of acceleration, until superseded by the traction control system at around 6 mph.To enable this feature, turn on the ignition and hold the LTC ‘off’ button pressed for 2 seconds.  Check that the tell tale in the switch button is lit.  Then;•  With ignition on,  engine  stopped,  fully  depress  the  throttle pedal for 5 seconds.•  Tacho will  now  show  launch  rpm.   Turn the  rotary  knob  as necessary to select any desired launch rpm between 2000 and 8000.•  Release throttle and start engine.•  Turn  the  rotary  knob  to  select  the  desired  level  of  traction control (see above), noting that the launch control setting will not be affected.14lsl529_oh_USA 08 supp.indd   14 28/09/2007   01:10:47
‘08 M.Y. Supplement•  Engage first gear, apply full throttle (ECU limits engine speed to selected launch rpm), and rapidly ‘drop’ clutch.•  Maintain full throttle throughout the transition from launch to traction control (at around 6 mph) until the first gear change is required.•  To disable launch control when variable traction control is still required, reset launch rpm to 8,000.  WARNING:  Under  no  circumstances  should  this  track feature be employed on the public road.NOTICE:•  Do  not  attempt  to  slip  the  clutch  during  this  process,  as overheating or damage to the clutch mechanism may occur.  An instant clutch engagement is required to ‘break’ rear tyre traction and initiate wheelspin.•  Do not attempt LC starts in any gear other than first.•  Do not hold the engine at or near maximum rpm for more than a few seconds.•  Use of Launch Control is an ultimate technique designed to produce the fastest possible race start.  Always allow the clutch to cool and recover before repeating a launch controlled start.  The extreme loads associated with such starts will result in reduced transmission component life cycles. •  At  the  next  key-on,  the  system  will  default  to  full  LTC  and Launch Control off.  Turning on the ignition and holding the LTC 'off' button pressed for 2 seconds will restore the previous traction and launch settings.Adjustment TipsNote that the optimum settings for variable traction and launch control will differ for each set of track surface, tyre and ambient conditions.  A suggested adjustment logic follows:•  Set the traction control to a mid position.•  Start with a low launch rpm e.g. 4,000 rpm.•  Trial launch and assess initial wheelspin control and transition into traction control. •  If launch control is set too low, the engine may ‘bog down’ and fall out of the power band.  If set too high, too much initial wheelspin may result, with poor step off from the line.•  Similar logic applies to traction control adjustment when this system takes over above about 6 mph.15lsl529_oh_USA 08 supp.indd   15 28/09/2007   01:10:47
Optional Adjustable SuspensionExige  and  Exige  S  models  fitted  with  the  optional  adjust-able suspension, are equipped with Bilstein dampers featuring adjustable  spring  platforms  and  a  combined  bump/rebound damper adjustment  facility.  For details  of  these features and recommended settings, refer to the Service Manual A120T0327J available from your dealer.Technical Data (where different)WheelsSize - front - Elise option (A048) & Exige forged                    6.0J x 16EnginePeak power - Performance Pack  240 bhp (179 kW) @                     8,000 rpmPeak torque - Performance Pack  170 lbf.ft (230 Nm) @                    5,500 rpmBrakesPerformance Pack          A.P. Racing 4-piston front                      callipers;                     308mm front discs*                    Uprated brake pads* Note that the larger front brakes require longer wheelbolts than standard cars, and are not fitted with security bolts.  Ensure that only the correct bolts are used.‘08 M.Y. Supplement16lsl529_oh_USA 08 supp.indd   16 28/09/2007   01:10:48

Navigation menu