PIONEER Plasma Television Manual L0409081
User Manual: PIONEER PIONEER Plasma Television Manual PIONEER Plasma Television Owner's Manual, PIONEER Plasma Television installation guides
Open the PDF directly: View PDF ![]() .
.
Page Count: 110 [warning: Documents this large are best viewed by clicking the View PDF Link!]
sound, vision.sou/
m
i _ i i i i i i i i
Operating Instructions
Mode d'emploi
Manual de instrucciones
DIGITAL
$R$(@) _
E.'YZ,,
PDP5040HD-Eng (Cover) 7/24/03,1:56 PM
IMPORTANT
The lightning flash wth arrowhead symbol, within an
equilateral triangle, is ntended to alert the user to the
presence of lninsulated "dangerous voltage" within the
product's enclosure that may be of sufficient magnitude
to const tute a risk of electric shock to persons.
CAUTION
CAUTION:
TO PREVENT THE RISK OF ELECTRIC SHOCK, DO NOT
REMOVE COVER (OR BACK). NO USER-SERVICEABLE
PARTS INSIDE. REFER SERVICING TO QUALIFIED
SERVICE PERSONNEL.
The exclamat on poil,t within an equilateral triangle s
intended to alert the user to the presence of important
operating and maintena/,ce (servic ng) nstruct ons in the
literature accompanying the appliance.
IMPORTANT SAFETY INSTRUCTIONS
1) Read these instructions 11)
2) Keep these instructions
3) Heed all warnings. 12)
4) Follow aEIinstructions,
5) Do not use this apparatus near water
6) Clean only with dry cloth.
7) Do not bEock any ventilation openings. Install in
accordance with the manufacturer's instructions
8) Do not install near any heat sources such as
radiators, heat registers, stoves, or other apparatus
(including amplifiers) that produce heat
9) Do not defeat the safety purpose of the polarized
or grounding-type plug A polarized plug has two
blades with one wider than the other A grounding
type plug has two bEades and a third grounding 13)
prong. The wide blade or the third prong are
provided for your safety. If the provided plug does 14)
not fit into your outlet, consult an electrician for
replacement of the obsolete outlet
10) Protect the power cord from being walked on or
pinched particularly at plugs, convenience
receptacles, and the point where they exit from the
apparatus
Only use attachments/accessories specified by the
manufacturer
Use only with the cart, stand, tripod, bracket, or
table specified by the manufacturer, or sold with
the apparatus. When a cart is used, use caution
when moving the cart/apparatus combination to
avoid injury from tip-over.
Unplug this apparatus during lightning storms or
when unused for long periods of time.
Refer all servicing to qualified service personnel.
Servicing is required when the apparatus has been
damaged in any way, such as power-supply cord or
plug is damaged, liquid has been spilled or objects
have fallen into the apparatus, the apparatus has
been exposed to rain or moisture, does not operate
normally, or has been dropped
Nots to CATV system installer.
This reminder is provided to call the CATV system insta!ler's attention to Article 820-40 of the NEC that provides
guidelines for proper grounding and, in particular, specifies that the cable ground-shall be connected to the
grounding system of the building, as close to the point of cable entry as practical,
PDP5040HD-Eng (02-03) 7/24/03, 1:56 PM
WARNUNG: THE APPARATUS IS NOT WATER-
PROOFS.TO PREVENT FIREOR SHOCK HAZARD, DO
NOT EXPOSE THIS APPLIANCE TO RAIN OR MOIS-
TURE AND DO NOT PUTANY WATER SOURCE NEAR
THIS APPARATUS, SUCH AS VASE, FLOWER POT.
COSMETICS CONTAINER AND MEDICINE BOTTLE
ETC,
WARNUNG: Handling the cord on this product or
cords associated with accessories sold with the prod-
uct will expose you to lead, a chemical known to the
State of Califorrfia and other governmental entities to
cause cancer and birth defects or other reproductive
harm, Wash hands after handling.
NOTE: This equipment has been tested and found to
comply with the limits for a class B digital device, pur-
suant to Part 15 of the FCC Rules, These limits are
designed to provide reasonable protection against
harmful interference in a residential installation, This
equipment generates, uses, and can radiate radio fre-
quency energy and, if not installed and used in accor-
dance with the instructions, may cause harmful inter-
ference to radio communications, However, there is
no guarantee that interference will not occur in a par-
ticular installation, If this equipment does cause harm-
ful interference to radio or television reception, which
can be determined by turning the equipment off and
on, the user is encouraged to try to correct the inter-
ference by one or more of the following measures:
-- Reorient or relocate the receiving antenna,
-- Increase the separation between the equipment and
receiver,
-- Connect the equipment into an outlet on a circuit
different from that to which the receiver is connected,
-- Consult the dealer or an experienced radio/TMtech-
nician for help,
CAUTION:
This product satisfies FCC regulations when shielded
cables and connectors are used to connect the unit to
other equipment. To prevent electromagnetic interfer-
ence with electric appliances such as radios and televi-
sions, use shielded cables and connectors for connec-
tions.
FEDERALCOMMUNICATIONS COMIVIISSION
DECLARATION OF CON FORM ITY
This device complies with part 15of the FCC Rules, Op-
eration is subject to the following two conditions: (1)
This device may not cause harmful interference, and
(2) this device must accept any interference received,
including interference that may cause undesired op-
eration,
Product Name: Plasma Display System
(Media Receiver)
Model Number: PDP-5040HD /PDP-4340HD
(PDP-504PU)/(PDP-434PU)
(PDP-R04U) /(PDP-R04U)
Product Category: Class B Personal Computers & Pe-
Responsible Party Name: PIONEER ELECTRONICS
(USA), INC,, Customer Support Div,
Address: RO, BOX 1760, LONG BEACH, CA,, 90801-1760
U,S,A,
Phone: (800) 421-1625
For Business Customer URL
http://www, PioneerUSA,com
@iiiiiBiiiiiiiWi_iWi_iWi_iWi_iWi_iWi_iWi_iWi_iWi@
m
Information to lJser
Alteration or modifications carried out without appro-
priate authorization may invalidate the user's right to
operate the equipment,
[For Canadian model]
This Class B digital apparatus complies with Canadian
ICES-003,
PDP5040HD-Eng (02@3) 7/24/03,1:56 PM

Thank you for buying this Pioneer product,
Please read through these operating instructions so you will know how to operate your model properly, After you
have finished reading the instructions, put them away in a safe place for future reference,
In some countries or regions, the shape of the power plug and power outlet may sometimes differ from that shown
in the explanatory drawings, However the method of connecting and operating the unit is the same,
ER
(}1 l_portant User Guidance Information
02 Safety Precautions
03 Operational Precautions
04 Features
05 Supplied Accessories
Plasma Display ...................................................................12
Media Receiver....................................................................12
06 Part Names
Plasma Display ...................................................................13
Media Receiver....................................................................14
Remotecontrol unit ............................................................16
O2 Preparation
Allowed operation rangeof the remote control unit .......17
Installing the Plasma Display ............................................17
Installing the Media receiver .............................................18
Installing the Media Receiververtically ......................19
Setting the system ..............................................................20
Routingcables ....................................................................21
Using the remote control unit ...........................................22
Cautions regarding the remote control unit ..............22
Inserting batteries.........................................................22
Cautions regarding batteries .......................................23
Cable connections for watching conventional TV
channels ..............................................................................24
Connecting a VHF/UHFantenna .................................24
Connecting a Cable Converter ....................................24
Connecting a VHF/UHFantenna and Cable
Converter .......................................................................25
Switching betweentuner A and B ..............................25
Cable connections for watching digital TVchannels ......26
Connecting a VHF/UHFantenna .................................26
Connecting for cableS! ...............................................26
Connecting the power cord ...............................................27
08 Basic Operations
-[(Jrningon the power ..........................................................28
]_Jrningoff the power ..........................................................29
Watching conventional TVchannels .................................30
Selecting the antenna ..................................................30
Changing channels ......................................................30
Changing the volume and sound ................................31
Setting MTS/SAPmode ...............................................32
Watching digital TVchannels ............................................34
Selecting the digital TV input .......................................34
Changing channels ......................................................34
Changing the volume and sound ................................35
Changing the language................................................35
Viewing DTVbanners ...................................................36
Using the multiscreen functions .......................................36
Splitting the screen ......................................................36
Freezingimages ............................................................37
09 Basic Adjustment Settings
Using the menu ..................................................................38
AV mode menus............................................................38
PC mode menus ...........................................................39
Menu operation keys ....................................................40
Setting up conventional R/channels ...............................41
Using Auto Channel Preset.........................................41
Setting for skipping unwanted channels....................42
Setting your favorite channels .....................................43
Setting up digital [V channels ...........................................44
Using Auto Channel Preset.........................................44
Setting for skipping unwanted channels....................45
Checking signal strength .............................................45
Languagesetting ................................................................46
Clock setting ........................................................................46
AVSelection ........................................................................47
Picture adjustments ...........................................................48
PureCinerna ..................................................................49
Color temperature ........................................................50
MPEGNR.......................................................................50
DNR ...............................................................................51
C]I ..................................................................................51
DRE................................................................................52
Soundadjustments ............................................................52
FOCUS...........................................................................53
FrontSurround ..............................................................53
PowerControl ......................................................................54
PowerControl for AVsource........................................54
PowerControl for PC source .......................................55
10 Electronic Program Guide (J:PG)
(for DTV Only}
EPGdisplayformat .............................................................56
Using the EPG.....................................................................58
Presetting]-V programs using the EPG............................59
Using auto channel select ...........................................59
RecordingTV programs using a D-VHSrecorder ......60
RecordingTV programsvia aVCR
controller .......................................................................61
Settingthe timer manually ................................................62
Priority rules for overlapped presettings...........................63
Changing/canceling TV program presettings .................64
Using the EPG...............................................................64
Using the menu ............................................................64
PDP504OHD-Eng (O4-05} 4 7/24/03, 1:57 PM
Contents
11 Enjoying through E×temaJ Equipment
Watching a DVDimage ......................................................65
Connecting a DVDplayer,............................................65
Displaying a DVDimage ..............................................65
Watching a VCRimage ......................................................66
Connecting a VCR ........................................................66
Displaying a VCRimage ...............................................66
Enjoying a game console or watching
camcorder images..............................................................67
Connecting a game console or camcorder ................67
Recording digital TVprograms using a VCRor DVD
recorder ...............................................................................68
Connecting a recorder .................................................68
Connecting other audio equipment ..................................69
Connecting an AV receiver ..........................................69
Switching the optical audio signal type......................69
Watching a D-VHSimage...................................................70
What is i,LINK?..............................................................70
Which i,LINK devicesare connectable? .....................70
What can be recorded through i,LINK?......................70
Connecting D-VHSrecorders ......................................70
Displaying a D-VHSimage ...........................................72
Useful and important notification ...............................72
Setting up for controlling a D-VHSrecorder, .............73
Operating the control panel screen ............................74
Editing the i,LINK list ....................................................74
Setting up for kLINK standby.......................................76
Watching an image from a personal computer ...............77
Connecting a personal computer ...............................77
Displaying an image from a personal computer, ......77
Connecting a VCRcontroller .............................................78
The lists of controllable recording
equipment manufactures ............................................79
Connecting control cords ..................................................80
About SR+ ....................................................................80
12 UsefuJ Adjustment Settings
Adjusting imagepositions (AVmode only) ......................81
Adjusting image positions and clock automatically
(PC mode only)....................................................................81
Adjusting imagepositions and clock manually
(PC mode only)....................................................................82
Selecting a screen size.......................................................83
Changing the brightness at both sidesof the screen
(SideMask) ..........................................................................84
SleepTimer ..........................................................................85
Closedcaption for conventional ]V channels ..................86
Activating the closed caption ......................................86
Selecting the type of closed captions .........................86
Closedcaption for digital TVchannels .............................87
Activating the closed caption ......................................87
Selecting tile type of conventional closed captions
(for digital TVchannels) ...............................................87
Selecting digital closed captions ................................88
Selecting digital closed caption parameters .............88
Parental Control (setting the V-CHIPlevel).......................g0
Activating the Parental Control ...................................90
Setting the voluntary moving rating
system (MPAA) .............................................................91
Blocking Not Rated(NR)TV programs .......................91
Setting the 1_/ParentalGuidelines (TVGuidelines)_, 92
Canadian rating systems.............................................92
Setting Canadian English ratings ...............................93
Setting Canadian Frenchratir/gs ................................93
Temporarilydeactivating the V-CHIPBlock ................94
Reactivatingthe V-CHIPBlock ....................................94
Programming a password (AVmode only) .......................95
Setting and changing the password ...........................95
Resettingthe password ...............................................96
13 UsefuJ Features
Learningfunction of the remotecontrol unit ...................97
Presetting manufacture codes....................................97
Usingthe learning function .........................................98
Using the remotecontrol unit to control
other devices .....................................................................100
Recei,_ercontrol button.............................................o100
Cable control buttons .................................................101
SA] control buttons ....................................................102
VCRcontrol buttons ...................................................103
DVD/DVRcontrol buttons ..........................................104
14 Appendix
Tro_bleshooFng ................................................................106
Computer compatibility chart ..........................................107
Specifications ....................................................................108
m
EF/
7/24/o3, 1:57 PMPDP504OHD-Eng (04-05)
i i
l portant User Guidance information
In order to obtain maximum enjoyment from this Pioneer
PureVision PDP-5040HD/PDP-4340HD Plasma Display
System, please first read this information carefully.
With the Pioneer PureVision PDP-5040HD/PDP-4340HD,
you can be assured of a high quality Plasma Display
System with long-life and high reliability. To achieve
images of exceptional quality, this Pioneer Plasma Display
System incorporates state-of-the-art design and
construction, as well as very precise and highly advanced
Over the course of its lifetime, the luminosity of the
Pioneer PDP-5040HD/PDP-4340HD Plasma Display
System will diminish very slowly, such as with all
phosphopbased screens (for example, a traditional tube-
type television). ]o enjoy beautiful and bright images on
your Pioneer Plasma Display System for many years to
come, please carefully read and follow the usage
guidelines below.
All phosphor-based screens (including conventional tube-
type televisions) can be affected by displaying static
images for a prolonged period. Plasma Display Systems
are no exception to this rule. After-image and permanent
effects on the screen can be avoided by taking some basic
precautions. By following the recommendations listed
below, you can ensure longer and satisfactory results from
your plasma:
Whenever possible, avoid frequently displaying the
same irnage or virtually still moving pictures (e.g.
closed-captioned images or video game images which
have static portions).
Avoid viewing the On Screen Display for extended
periods, from a DVD player, VCR, and all other
Do not leave the same picture freeze-framed or paused
continuously over a long period of time, when using
the still picture mode from a 'fV, VCR, DVD player or
any other component,
Images which have both very bright areas and very dark
areas side by side should not be displayed for a
prolonged period of time,
When playing a game, the "GAME" mode setting within
"AV SELECTION" is strongly recommended, However,
please limit its use to less than 2 hours at a time,
After playing a game, or displaying a PC image or any
still image, it is best to view a normal moving picture in
the "WIDE" or "FULL" screen setting for over 3 times
longer than the previous still/movin.(l image.
. After using the Plasma Display System, always switch
the display to "STANDBY" mode.
Installation guidelines
The Pioneer PureVision PDP-5040HD/PDP-4340HD
Plasma Display System incorporates a very thin design.
'fo ensure safety, please take the proper measures to
mount or install the Plasma Display, in order to prevent
the unit from tipping over in the event of vibration or
accidental movement.
This product should be installed by using only parts and
accessories designed by PIONEER. Use of accessories
other than the PIONEER stand or installation bracket may
result in instability, and could cause injury. For custom
installation, please consult the dealer where the unit was
purchased. To ensure correct installation, experienced
and qualified experts must install the unit. PIONEER will
not be held responsible for accident or damage caused
by the use of parts and accessories manufactured by other
'fo avoid malfunction and overheating when installing,
make sure that the vents on the main unit are not blocked.
To ensure proper heat emission:
Distance the unit slightly from other equipment, walls,
etc. For the minimum space required around the unit,
see pages 17 and 18.
Do not fit the unit inside narrow spaces where
ventilation is poor.
Do not cover with a cloth, etc.
Clean the vents on the sides and rear of the unit to
remove dust build-up by using a vacuum cleaner set to
Do not place the product on a carpet or blanket.
Do not leave the product tilted over except the case of
vertical installation of the Media Receiver.
Do not reverse the product.
Using the unit without proper ventilation may cause the
internal temperature to rise, and could result in possible
malfunction. When the surrounding or internal
temperature exceeds a certain degree, the display will
automatically power off in order to cool the internal elec-
tronics and prevent a hazardous occurrence.
Malfunction can be caused by many factors: inappropriate
installation site, improper assembly/installation/
mounting, improper operation of or modifications made
to this product. However. PIONEER cannot be held
responsible for accidents or malfunction caused by the
above.
_"_ NOTE
'f_/pical effects and characteristics of a phosphor-based
matrix display such as permanent residual images upon
the phosphors of the panel and the existence of a minute
number of inactive light cells in the screen are not covered
ER
PDP5040H D-Eng (06-12) 6 7/24/03, 1:57 PM

l portant User Guidance information
_k CAUTUON
Panel sticking and after-image lag
Displaying the same images such as still images for a
long time may cause after-image lagging. This may
occur in the following two cases.
1. After-image lagging due to remaining electric load
When image patterns with very high peak luminance are
displayed more than 1 minute, after-image lagging may
occur due to the remaining electric load. The after-images
remaining on the screen will disappear when moving
images are displayed. The time for the after-images to
disappear depends on the luminance of the still images
and the time they had been displayed.
2, After-image (lag image} doe to boming
Avoid displaying the same image on the Plasma Display
continuously over a long period of time. If the same image
is displayed continuously for several hours, or for shorter
periods of time over several days, a permanent after-image
may remain on the screen due to burning of the fluores-
cent materials. Such images may become less noticeable
if moving images are later displayed, bet they will not
disappear completely.
, The Energy save function can be set to help prevent
damage from screen burning (see page 54).
Aboot operations throogh i,l.JNK
PIONEER shall not always assure normal video/audio
recording or playback when a D-VHS is operated through
i.LINK.
_iii_i]i_ii_i_i1_iiiiiiiiii1iii_iii_i_iii_i_iii_i_iii_i_iii_i_iii_i_iii_i_iii_i_iii_i_iii_i_iIi_i¸,
m
DO NOT PLACE THIS PRODUCT ON AN UNSTABLE
CART. STAND, TRIPOD, BRACKETI OR TABLE. THE
PRODUCT MAY FALL, CAUSING SERIOUS PERSONAL
INJURYAND SERIOUS DAMAGETOTHE PRODUCT USE
ONLY WITH A CART. STAND, TRIPOD, BRACKET. OR
'[ABLE RECOMMENDED BY THE MANUFACTURER, OR
SOLD WITH THE PRODUCT. FOLLOW THE
MANUFACTURE'S INSTRUCTIONS WHEN INSTALLING
THE PRODUCT AND USE MOUNTING ACCESSORIES
RECOMMENDED BYTHE MANUFACTURER.
A PRODUCT AND CART COMBINATION SHOULD BE
MOVED WITH THE CARE. QUICK STOPS, EXCESSIVE
FORCE, AND UNEVEN SURFACES MAY CAUSE THE
PRODUC] AND CART COMBINATION TO OVERTURN.
ER
PDP5040HD-Eng (06-12) 7 7/24/03,1:57 PM
Safety Precautions
Electricity is used to perform many useful functions, but
it can also cause personal injurbs and proper_y damage
if improperly handled, This product has been engineered
and manufactured with the highest priority on safety,
However, improper use can result in electric shock and/
or fire, In order to prevent potential danger, please ob-
serve the following instructions when installing, operat-
ing and cleaning the product, To ensure your safety and
prolong the service life of your product, please read the
following precautions carefully before using the product,
1, Read instructions--All operating instructions must be
read and understood before the product is operated,
2, Keep tiffs manual in a safe place--These safety and
operating instructions must be kept in a safe place
for future reference,
3, ©bserve warnings--All warnings on the product and
in the instructions must be observed closely,
4, Follow instructions--All operating instructions must
be followed,
5, Cleaning--Unplug the power cord from the AC outlet
before cleaning the product, Use a damp cloth to clean
the product, Do not use liquid cleaners or aerosol
cleaners,
6, Attachments--Do not use attachments not recom-
rnended by the manufacturer, Use of inadequate at-
tachments can result in accidents,
7, Water and moisture--Do not use the product near
water, such as bathtub, washbasin, kitchen sink and
laundry tub, swimming pool and in a wet basement,
8, Stand--Do not place the product on an unstable cart,
stand, tripod or table, Placing the product on an un-
stable base can cause the product to fall, resulting in
serious personal injuries as well as damage to the
product, Use only a cart, stand, tripod, bracket or table
recommended by the manufacturer or sold with the
product, When mounting the product on a wall, be
sure to follow the manufacturer's instructions, Use
only the mounting hardware recommended by the
manufacturer,
,When relocating the product placed on a cart, it must
be moved with utmost care, Sudden stops, excessive
force and nueven floor surface can cause the product
to fall frorn the cart,
10,Ventilation--The vents and other openings in the cabi-
net are designed for ventilation, Do not cover or block
these vents and openings since insufficient ventila-
tion can cause overheating and/or shorten the life of
the product, Do not place the product on a bed, sofa,
rug or other similar surface, since they can block ven-
tilation openings, This product is not designed for built-
in installation', do not place the product in an enclosed
place such as a bookcase or rack, unless proper ven-
tilation is provided orthe manufacturer's instructions
are followed,
11, Power source--This product must operate on a power
source specified on the specification label, If you are
not sure of the type of power supply used in your home,
consult your dealer or local power company,
12, Power cord protection--The power cords must be
routed properly to prevent people from stepping on
them or objects from resting on them, Check the cords
atthe plugs and product,
13, The plasma Display used in this product is made of
glass, Therefore, it ('an break when the product is
dropped or applied with impact, Be careful not to be
injured by broken glass pieces in case the plasma
14, Overloading--Do not overload AC outlets or extension
cords, Overloading can cause fire or electric shock,
15, Entering of objects and liquids--Never insert an ob-
ject into the product through vents or openings, High
voltage flows in the product, and inserting an obiect
can cause electric shock and/or short internal parts,
For the same reason, do not spill water or liquid on
16,Servicing--Do not attempt to service the product your-
self, Removing covers can expose you to high voltage
and other dangerous conditions, Request a qualified
service person to perform servicing,
17, Repair--If any of the following conditions occurs, un-
plug the power cord from the AC outlet, and request a
qualified service person to perform repairs,
a, When the power cord or plug is damaged,
b, When a liquid was spilled on the product or when
objects have fallen into the product,
c, When the product has been exposed to rain orwa-
ter,
d, When the product does not operate properly as de-
scribed in the operating instructions,
Do not touch the controls other than those de-
scribed in the operating instructions, Improper ad-
justment of controls not described in the instruc-
tions can cause damage, which often requires ex-
tensive adjustment work by a qualified technician,
e, When the product has been dropped or damaged,
f, When the product displays an abnormal condition,
Any noticeable abnormality in the product indicates
that the product needs servicing,
En
PDP5040H D-Eng (06-12) 8 7/24/03, 1:57 PM
Safety Precautions
18, Replacement parts--In case the product needs re-
placement parts, make sure that the servk'e person
uses replacement parts specified by the manufacturers
or those with the same characteristics and perfor-
mance as the original parts, Use of unauthorized parts
can result in fire, electric shock and/or other danger,
19,Safety cheeks--Upon completion of service or repair
work, request the service technician to perform safety
checks to ensure that the product is in proper operat-
ing condition,
20,Wall or ceiling mounting--When m,ounting the prod-
uct on a wall or ceiling, be sure to install the product
according to the method recommended by the manu-
facturer,
21, Heat sources--Keep the product away from heat
sources such as radiators, heaters, stoves and other
heat- generating products (including amplifiers),
22, Unplug the power cord from the AC outlet before in-
stalling the speakers,
23, Never expose the screen of the Plasma Display to a
strong impact, for example, by hitting it, The screen
may be broken, resulting in fire or personal injury,
24, Do not expose the Plasma Display to direct sunlight
for a long period of time, The optical characteristics
of the front protection panel changes, resulting in dis-
coloration or warp,
25,The Plasma Display weighs about 38 kg (83,8 Ibs,) for
the PDP-504PU and about 30,5 kg (67,3 Ibs,) for the
PDP-434PU, Because it has small depth and is un-
stable, unpack, carry, and install the product with one
more person at least and use the handles,
26, Use M8 screws, which go 12 to 18 mm in depth from
the mounting surface of the Plasma Display,
@iiiiiBiiiiiiiWi_iWi_iWi_iWi_iWi_iWi_iWi_iWi_iWi_iWi_i_ili_i¸,
m
En
PDP5040HD-Eng (06-12) 9 7/24/03, 6:00 PM
Operationa Precautions
,_ CAUTUON
PIONEER bears no responsibility for any damages aris-
ing from incorrect use of the product by yoo or other
people, malfunctions when in use, other product related
problems, and use of the product except in cases where
the company most be liable,
Plasma Display protection function
When still images (such as photos and computer images)
stay on the screen for an extended period of time, the
screen will be slightly dimmed, This is because the pro-
tection function of the Plasma Display automatically ad-
justs the brightness to protect the screen when detecting
still images', so this does not designate malfunction, The
screen is dimmed when a still irr_,ageis detected for about
three minutes,
infrared rays
The Plasma Display releases infrared rays because of its
characteristics, Depending on how the Plasma Display is
in use, the remote controls of nearby equipment may be
adversely affected or wireless headphones osing infrared
rays are interfered by noise, If this is the case, place that
equipment at a location where its remote control sensor
is not affected,
Radio interference
While this product meets the required specifications, it
emits a small amount of noise. If you place such equip-
merit as an AM radio, personal compoter, and VCR close
to this product, that eqoipment may be interfered, If this
happens, place that eqoipment far enoogh from this prod-
oct,
Fan motor noise
When ambient temperature of the Media Receiver be-
comes high, the rotation speed of the cooling fan motor
increases, This may make you feel that the fan motor is
noisy at soch an occasion,
Do not attach soch items as labels and tape to the
prodoct.
This may result in the discoloration or scratch of the
cabinet,
When not osing the prodoct for a long period of time
If you do not use the product for a long period of time,
the fonctions of the product may be adversely affected,
Switch on and run the product occasionally,
Condensation
Condensation may take place on the surface or inside
of the product when the product is rapidly moved from
a cold place to a warm place or just after a heater is
switched on in winter morning, for exam pie, When con-
densation takes place, do not switch on the prodoct
and wait until condensation disappears, Using the prod-
oct with condensation may resolt in malfonction,
Cleaning the screen
When cleaning the screen of this product, gently wipe
it with a dry soft cloth', the sopplied cleaning cloth or
other similar cloths (e,g. cotton and flannel), If you use
a hard cloth or rub the screen hard, the surface of the
screen will be scratched,
If you clean the surface of the screen with a wet cloth,
water droplets on the surface may enter into the prod-
uct, resulting in malfunction,
Cleaning the cabinet
The cabinet of this product is mostly composed of plas-
tic, Do not use chemicals such as benzine or thinner to
clean the cabinet, Using these chemicals may result in
quality deterioration or coating removal,
Do not expose the product to volatile gas or fioid such
as pesticide, Do not make the product contact with rub-
ber or vinyl products for a long period of time, The ef-
fect of plasticizer in the plastic may result in quality
deterioration or coating removal,
If you clean the surface of the cabinet with a wet cloth,
water droplets on the surface may enter into the prod-
uct, resulting in malfunction,
Handles at the rear of the Plasma Display
Do not remove the handles from the rear of the
Plasma Display,
When moving the Plasma Display, ask another
person for help and use the handles attached to the
rear of the Plasma Display, Do not move the Plasma
Display by holding only a single handle, Use the
handles as shown,
Do not use the handles to hang the prodoct when
installing or carrying the prodoct, for example, Do not
ose the handles for the porpose of preventing the
product from tilting over,
ER
PDP5040H D-Eng (06-12) 10 7/24/03, 1:57 PM
Features
oBuilt-in Digita_ Television (DTV) Tuner
o EPG for DTV programs
• New WIDE XGA Plasma Pane_
PDP-S040HD: 1280 x 788 (H x V) pixels
PDP-4340HD: 1024 x ?88 (H x V) pixels
•PureCinema
. TruBass, FOCUS, and SRS sound systems
Dual TV Tuner
.Multi-screen display (2-screen/picture-in-picture)
•Still image function
•4-Language On Screen Display
o4-Video input and PC (XGA) input
•3-Component Video Input
• 2-i.LINK interface
o Parental Control System (V-CHIP)
•Power-Saving Design
_iiiiiii_ii_i;i1_iiiiiiiiii1iii_iii_i_iii_i_iii_i_iii_i_iii_i_iii_i_iii_i_iii_i_iii_i_iii_i?`i¸,
m
For U.S. Model
ER
PDP5040HD-Eng (06-12) 11 7/24/03,1:57 PM
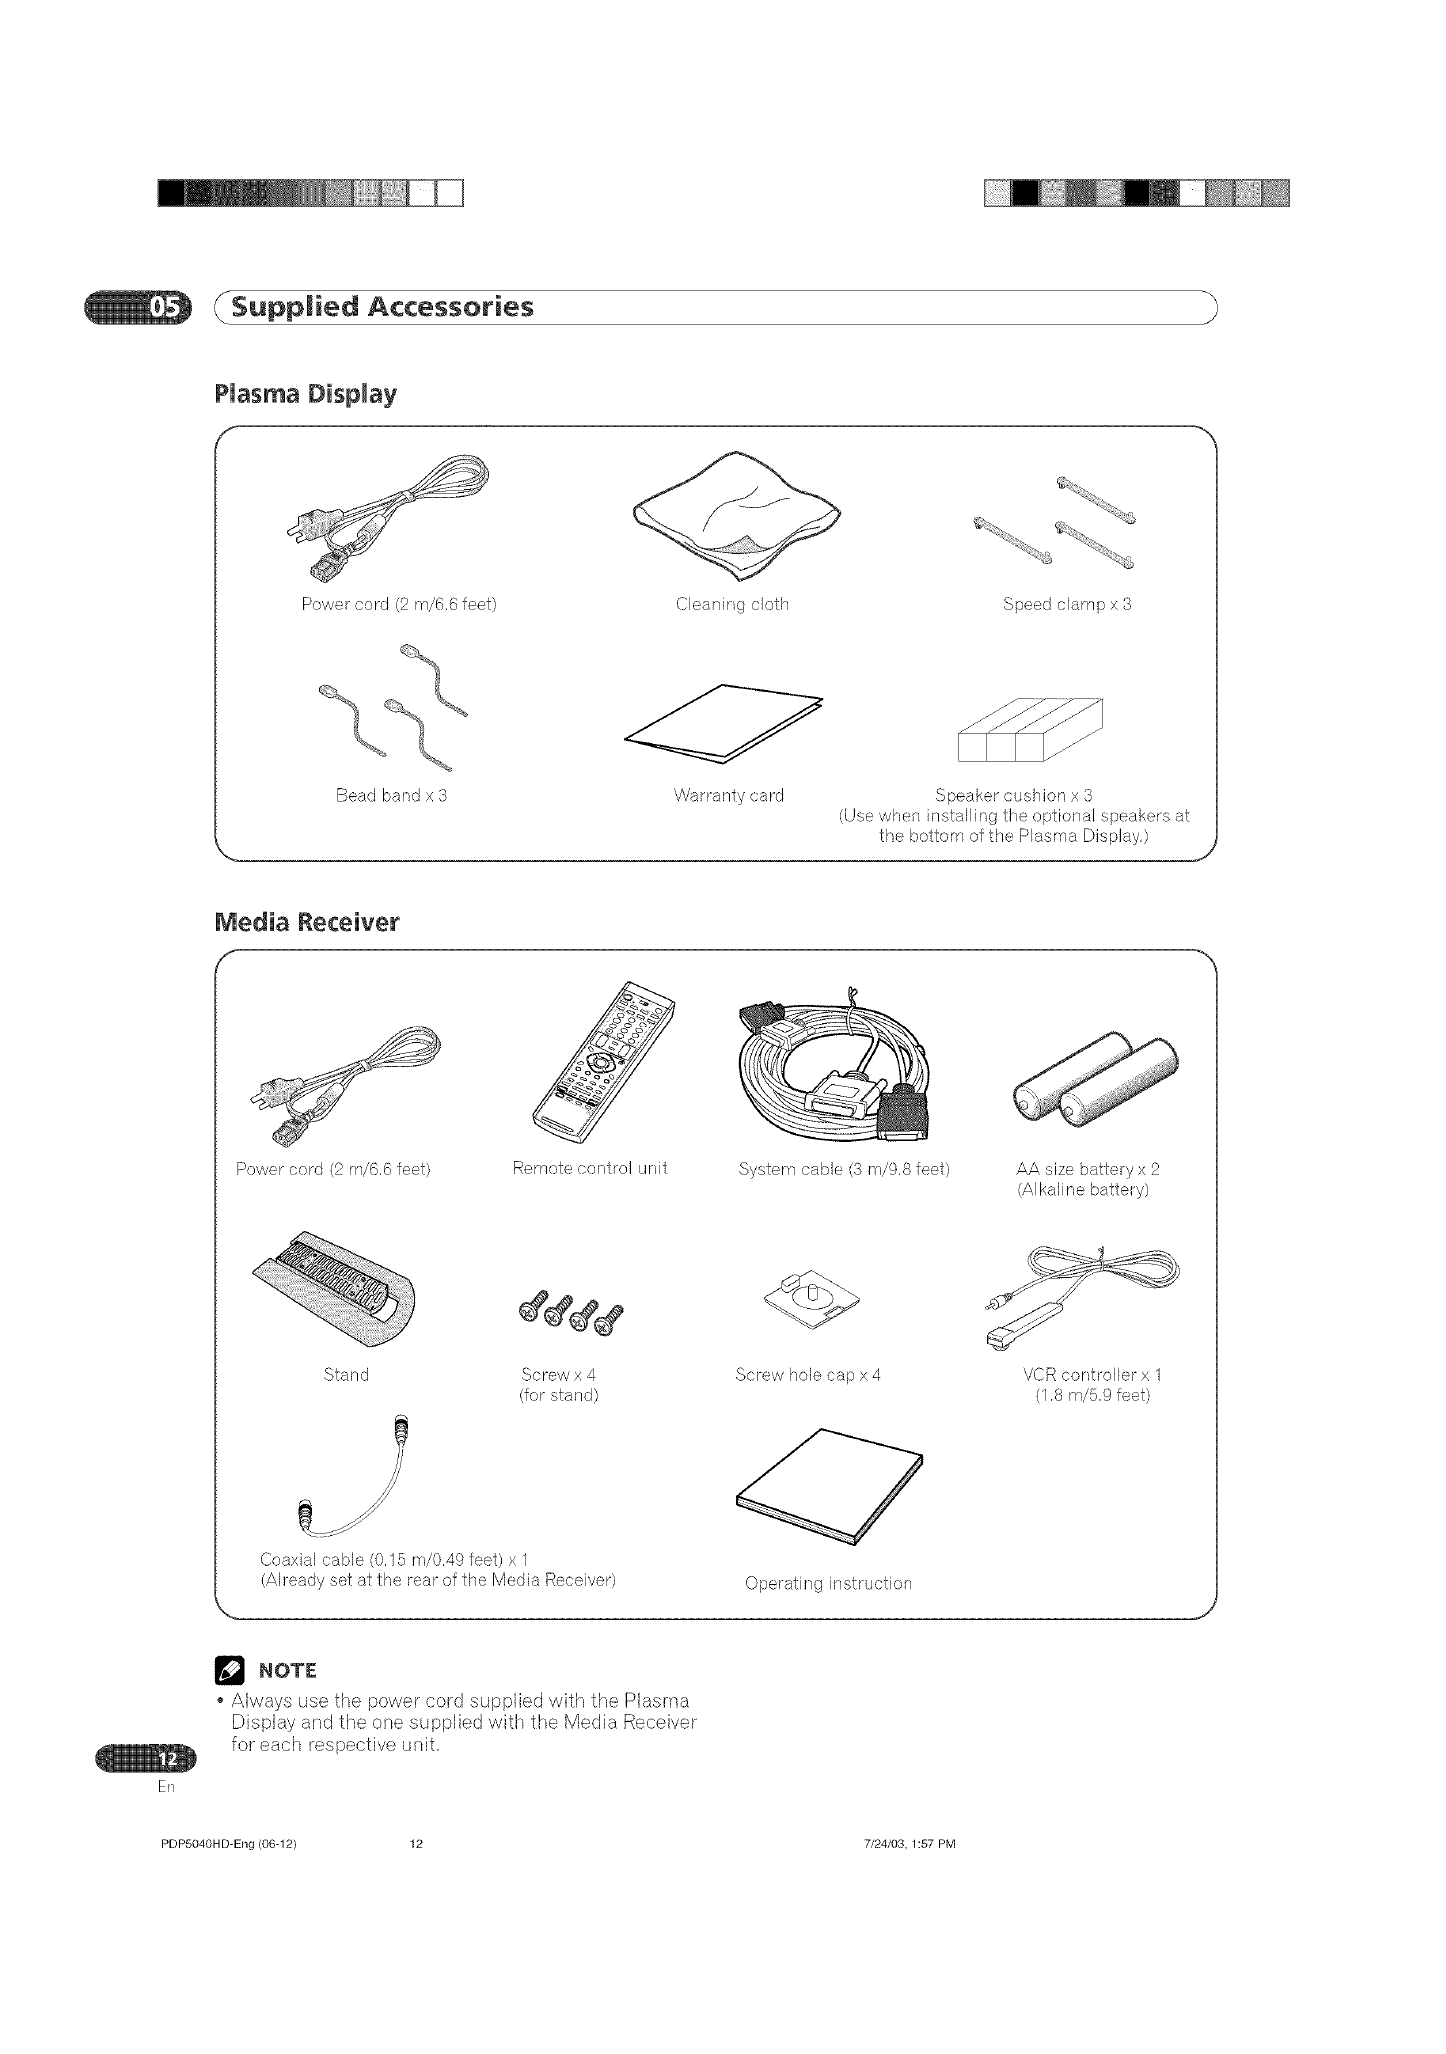
Supplied Accessories
PUasma DispUay
Power cord (2 m/6.6 feet) Cleaning cloth Speed clamp x 3
Bead band x 3 Warranty card Speaker cushion x 3
(Use when installing the optional speakers at
the bottom of the Plasma Display,)
Media Receiver
f
Power cord (2 m/6,6 feet)
#o o°¸
Remote control unit System cable (3 m/9.8 feet) AA size battery x 2
(AIkaline battery)
Stand Screw x 4 Screw hole cap x 4 VCR controller x 1
(for stand) (1.8 m/5.9 feet)
ER
Coaxial cable (0,15 m/0.49 feet) x 1
(Already set at the rear of the Media Receiver)
NOTE
Always use the power cord supplied with the Plasma
Display and the one supplied with the Media Receiver
for each respective unit,
Operating instruction
PDP5040H D-Eng (06-12) 12 7/24/03, 1:57 PM
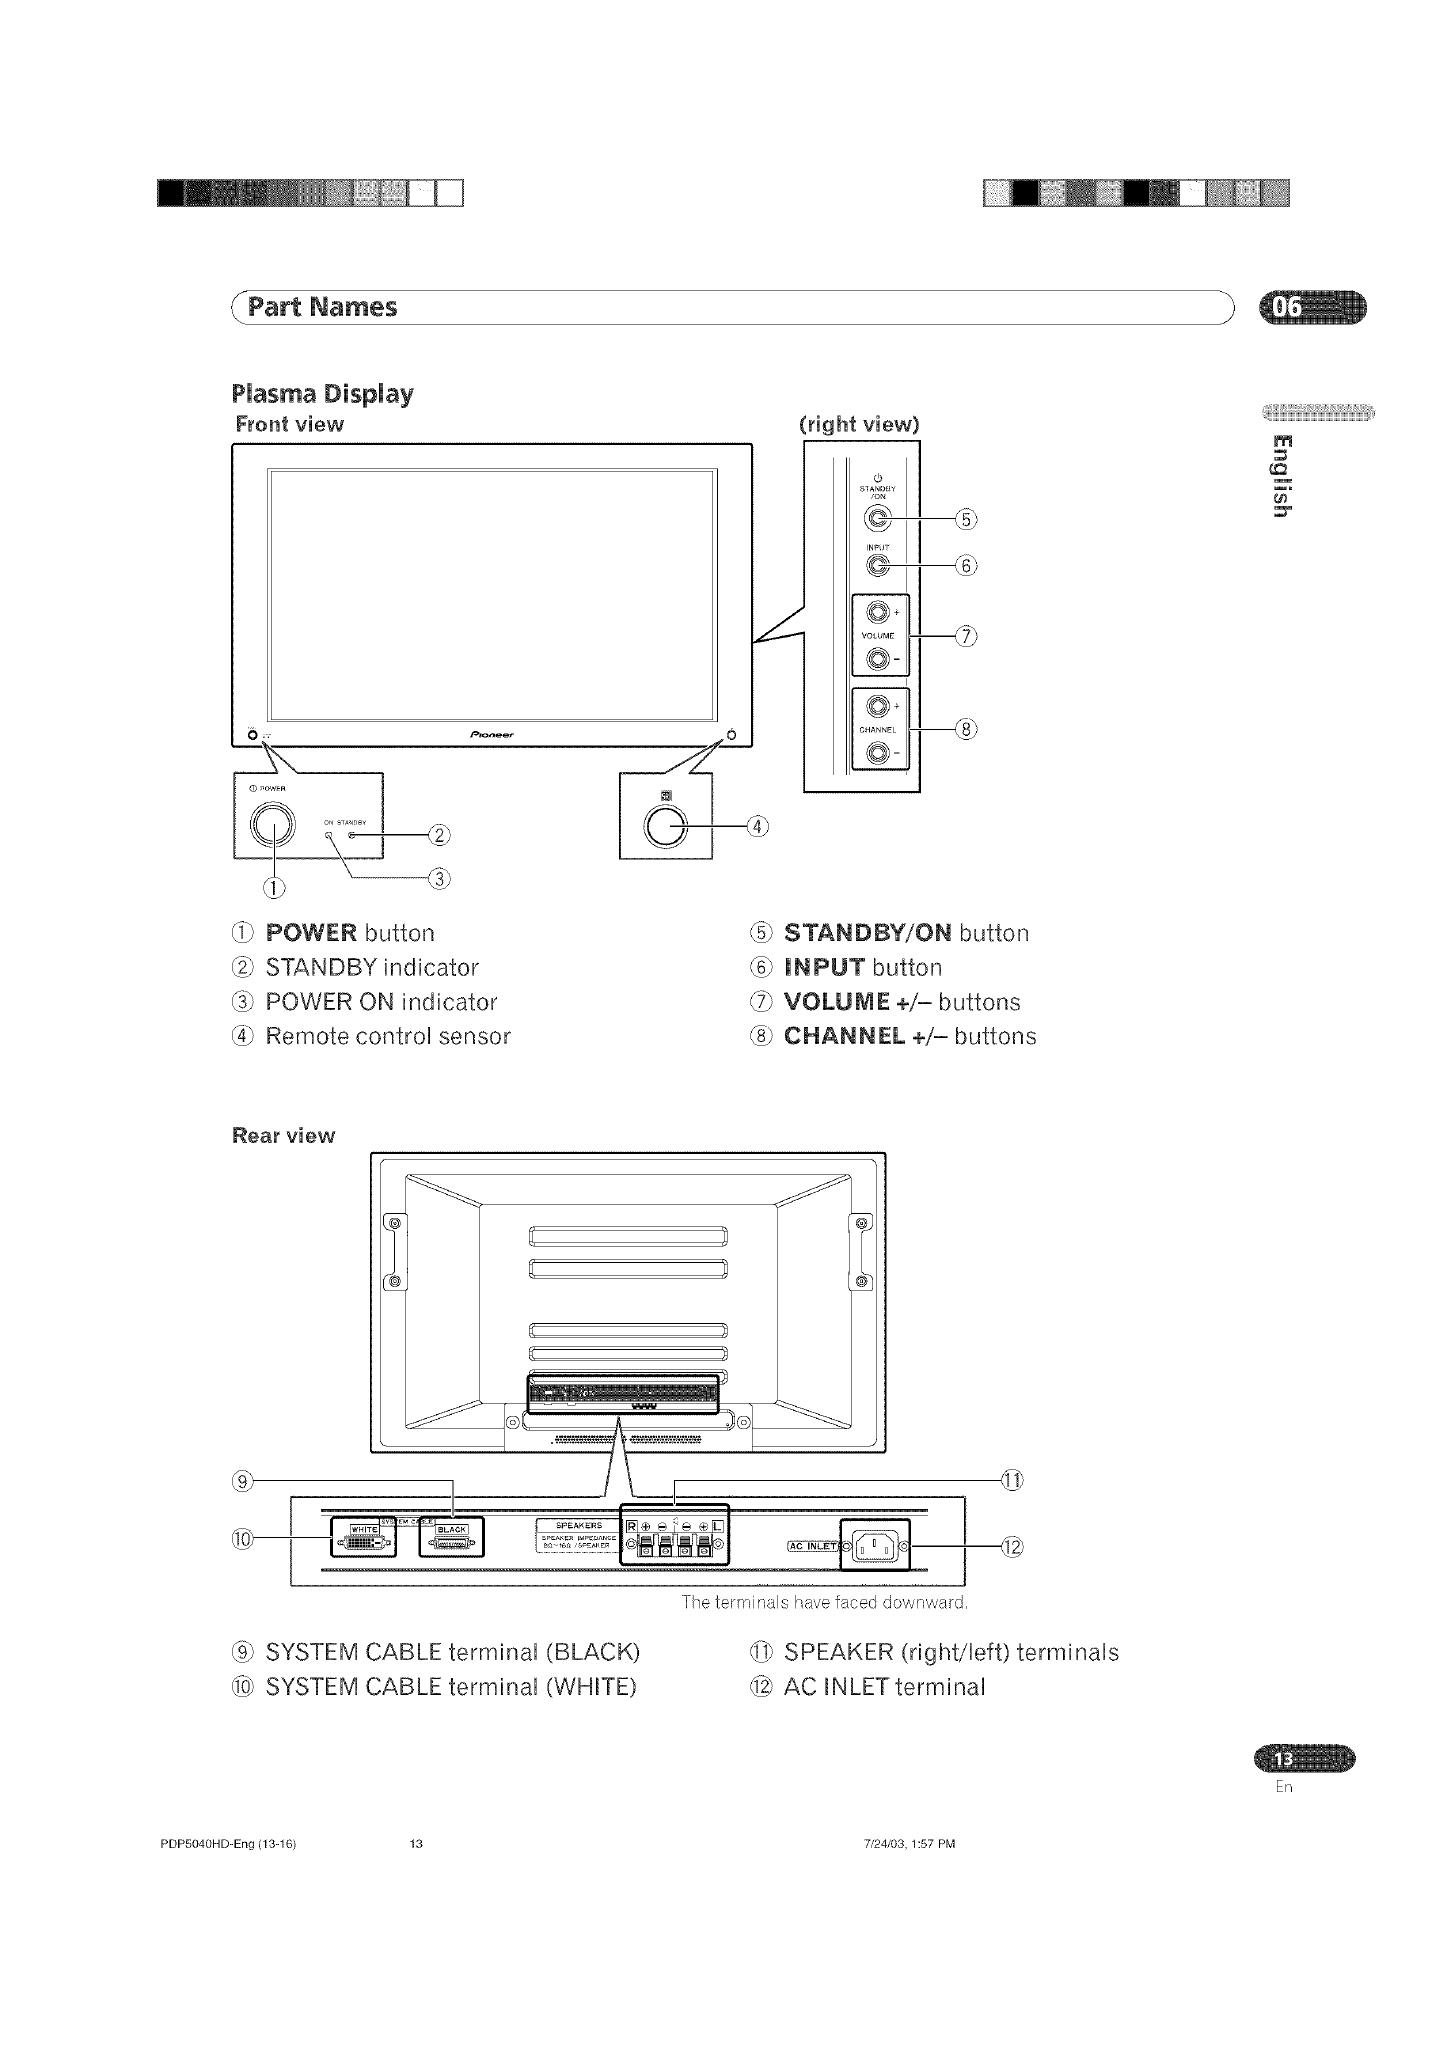
(Part Names
PUasma DispUay
Front view
b
POWER button
_} STANDBY indicator
_) POWER ON indicator
Remote control sensor
(_} STANDBY/ON button
(67 UNPUT button
_} VOLUME +/= buttons
(S_}CHANNEL +/= buttons
_iiiiiii_ii_i;i1_iiiiiiiiii1iii_iii_i_iii_i_iii_i_iii_i_iii_i_iii_i_iii_i_iii_i_iii_i_iii_i_iIi_i¸,
m
Rear view
mL
The terminals have faced downward=
@
(9} SYSTEM CABLE terminal (BLACK)
_¢ SYSTEM CABLE terminal (WHITE)
SPEAKER (right/left) terminals
AC INLET terminal
ER
PDP5040HD-Eng (13-16) 13 7/24/03,1:57 PM
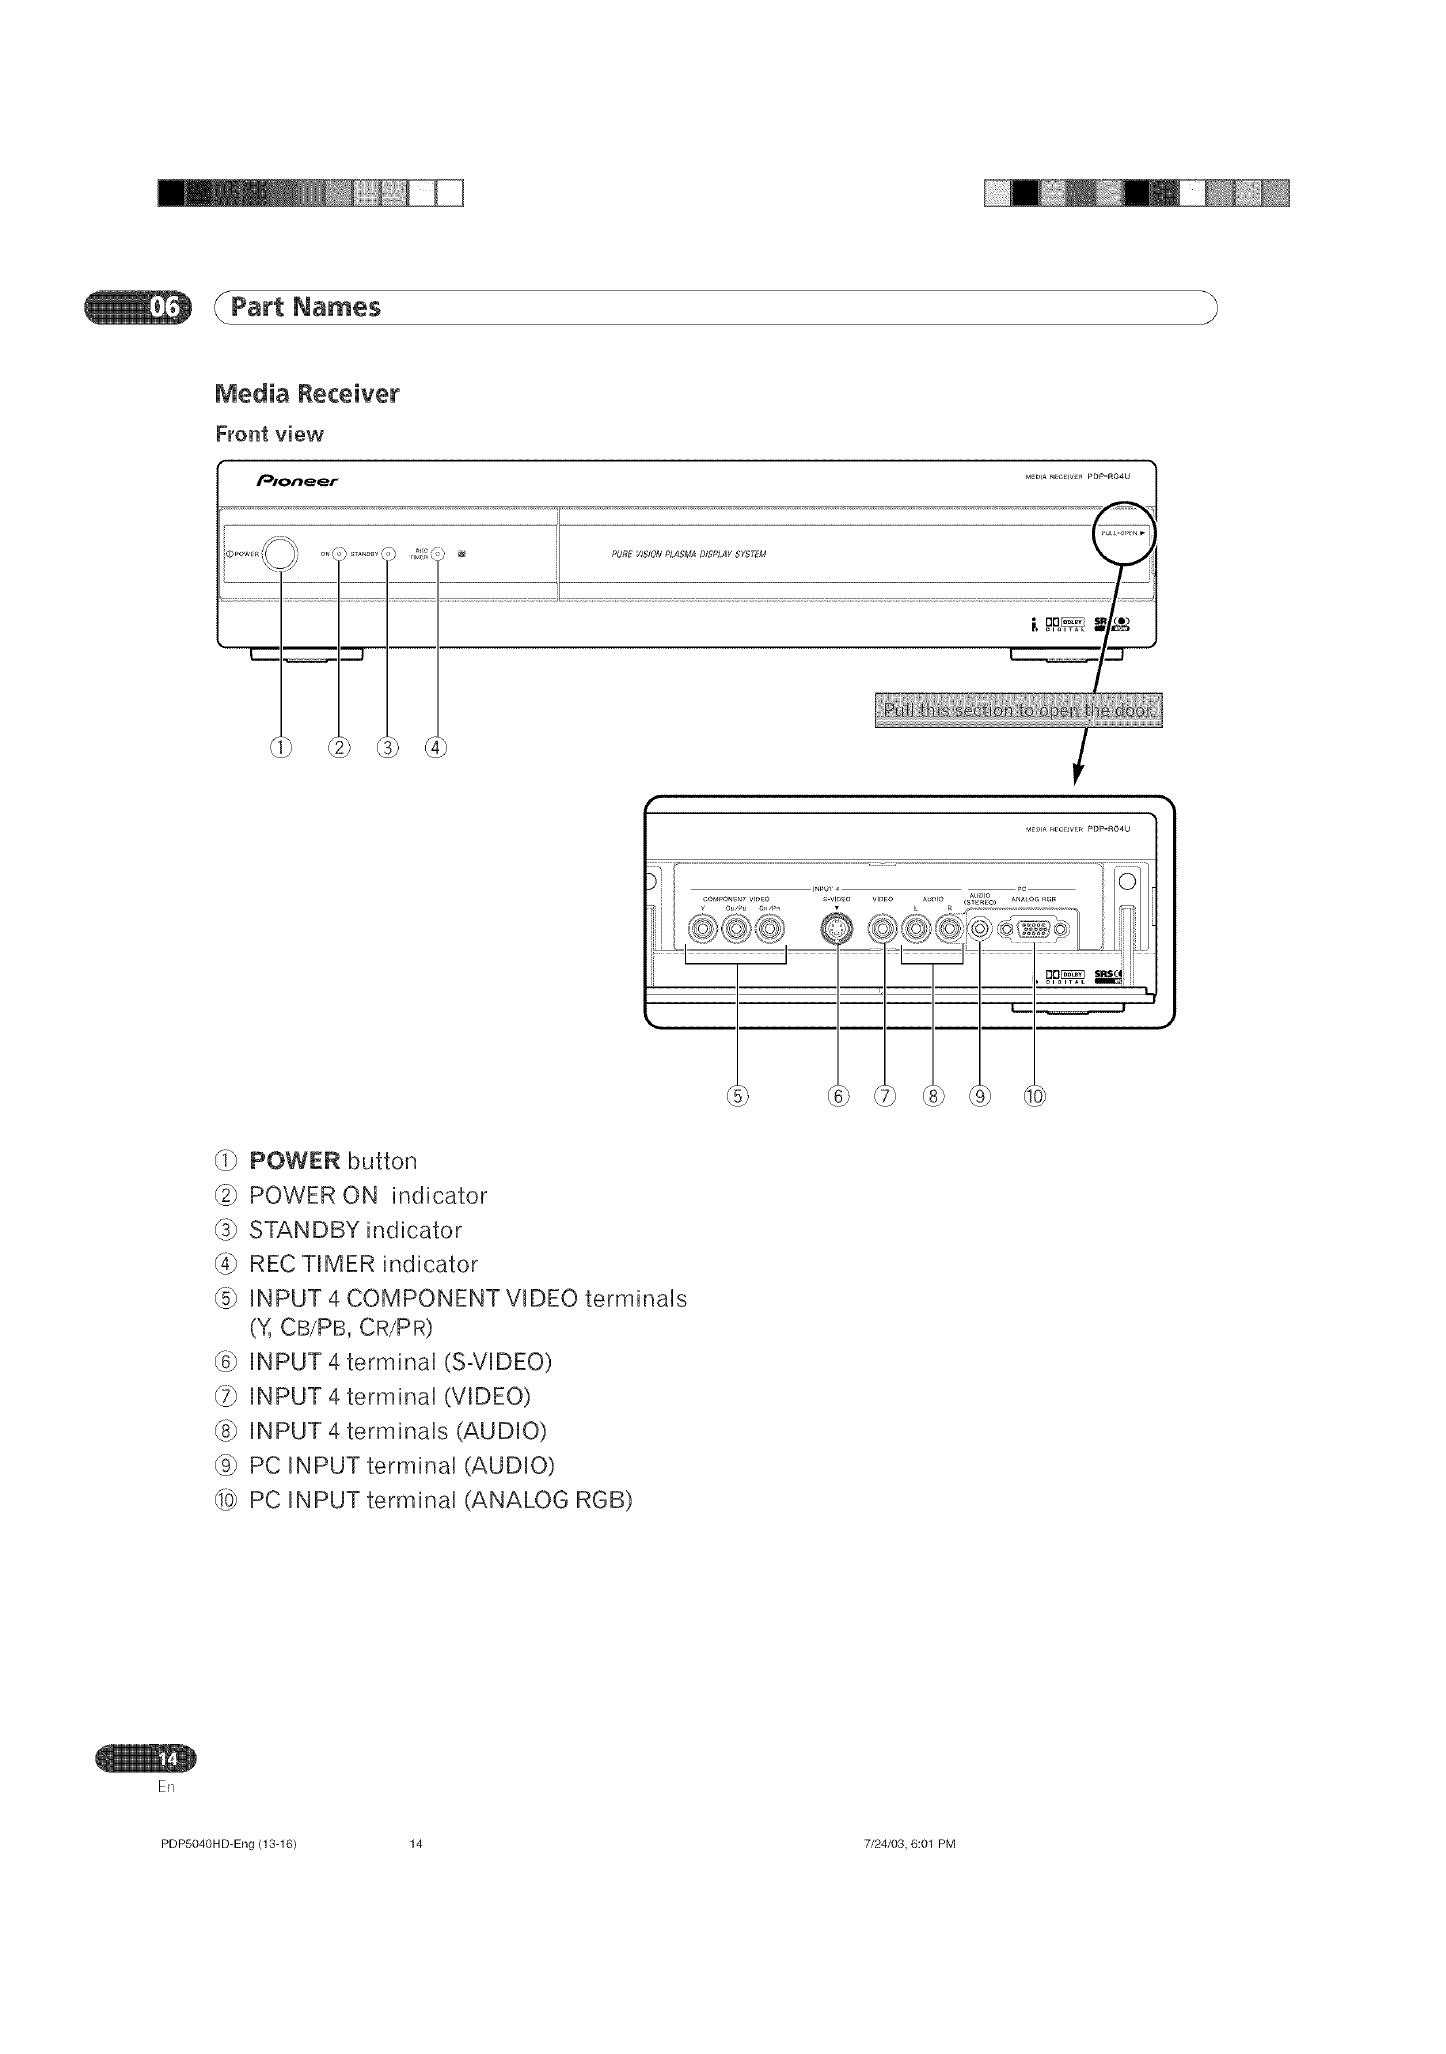
Part Na_es
PURE :/ISION PLASMA DISPLAY SYSTEM
POWER button
POWER ON indicator
STANDBY indicator
REC TIMER indicator
INPUT 4 COMPONENT VIDEO terminaUs
(Y, CB/PB, CR/PR)
_) INPUT 4 terminaU (S-VIDEO)
INPUT 4 terminaU (VIDEO)
(85 INPUT 4 terminaUs (AUDIO)
(95 PC INPUT terminaU (AUDIO)
_¢ PC INPUT terminaU (ANALOG RGB)
ER
PDP504OHD-Eng (13-16) 14 7/24/03, 6:01 PM
(/Part Na_es
Rear view
@
-I-@
@
@
@
m
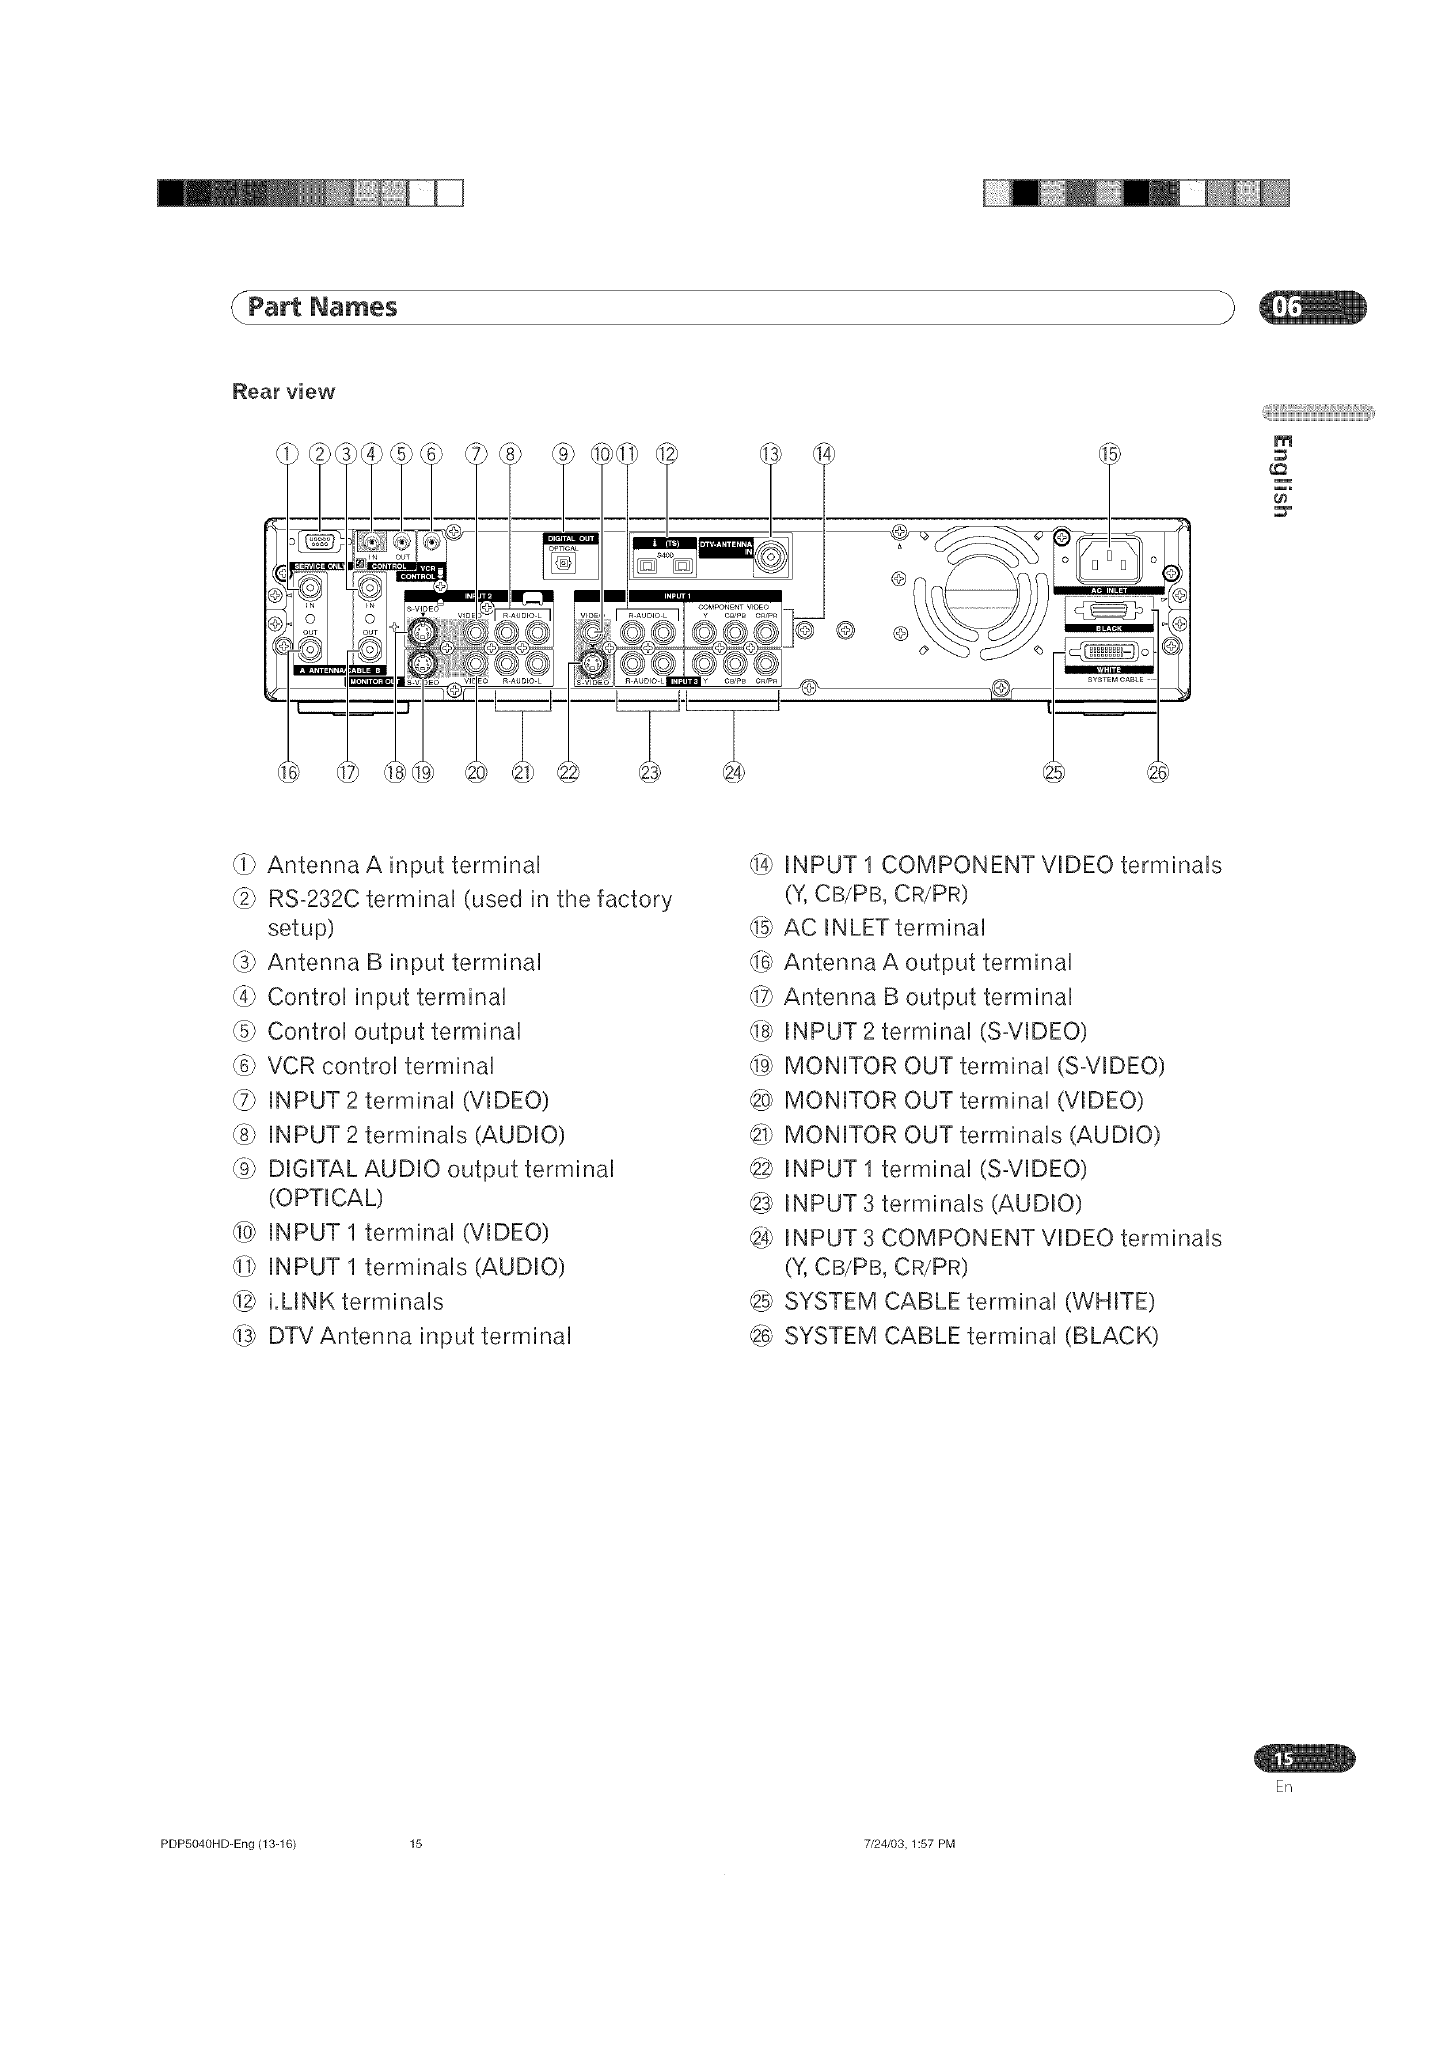
Antenna A input terminal
RS-232C terminal (used in the factory
setup)
Antenna B input terminal
Control input terminal
Control output terminal
(6} VCR control terminal
iNPUT 2 terminal (VIDEO)
_8} iNPUT 2 terminals (AUDIO)
DiGiTAL AUDIO output terminal
(OPTICAL)
INPUT 1 terminal (VIDEO)
iNPUT 1 terminals (AUDIO)
@ i.LINK terminals
DTV Antenna input terminal
{4} iNPUT 1 COMPONENT VIDEO terminals
(Y,CB/PB, CR/PR)
AC INLET terminal
Antenna A output terminal
Antenna B output terminal
@ iNPUT 2 terminal (S-VIDEO)
_ MONITOR OUT terminal (S-VIDEO)
MONITOR OUT terminal (VIDEO)
MONITOR OUT terminals (AUDIO)
@ INPUT1 terminal (S-VIDEO)
iNPUT 3 terminals (AUDIO)
@ iNPUT 3 COMPONENT VIDEO terminals
(Y,CB/PB, CR/PR)
@ SYSTEM CABLE terminal (WHITE)
_ SYSTEM CABLE terminal (BLACK)
ER
PDP5040HD-Eng (13-16) 15 7/24/03,1:57 PM
Part Na es
ER
Remote controUunit
Mode switch (with
_2_ "TV" semected)
r lr ,-
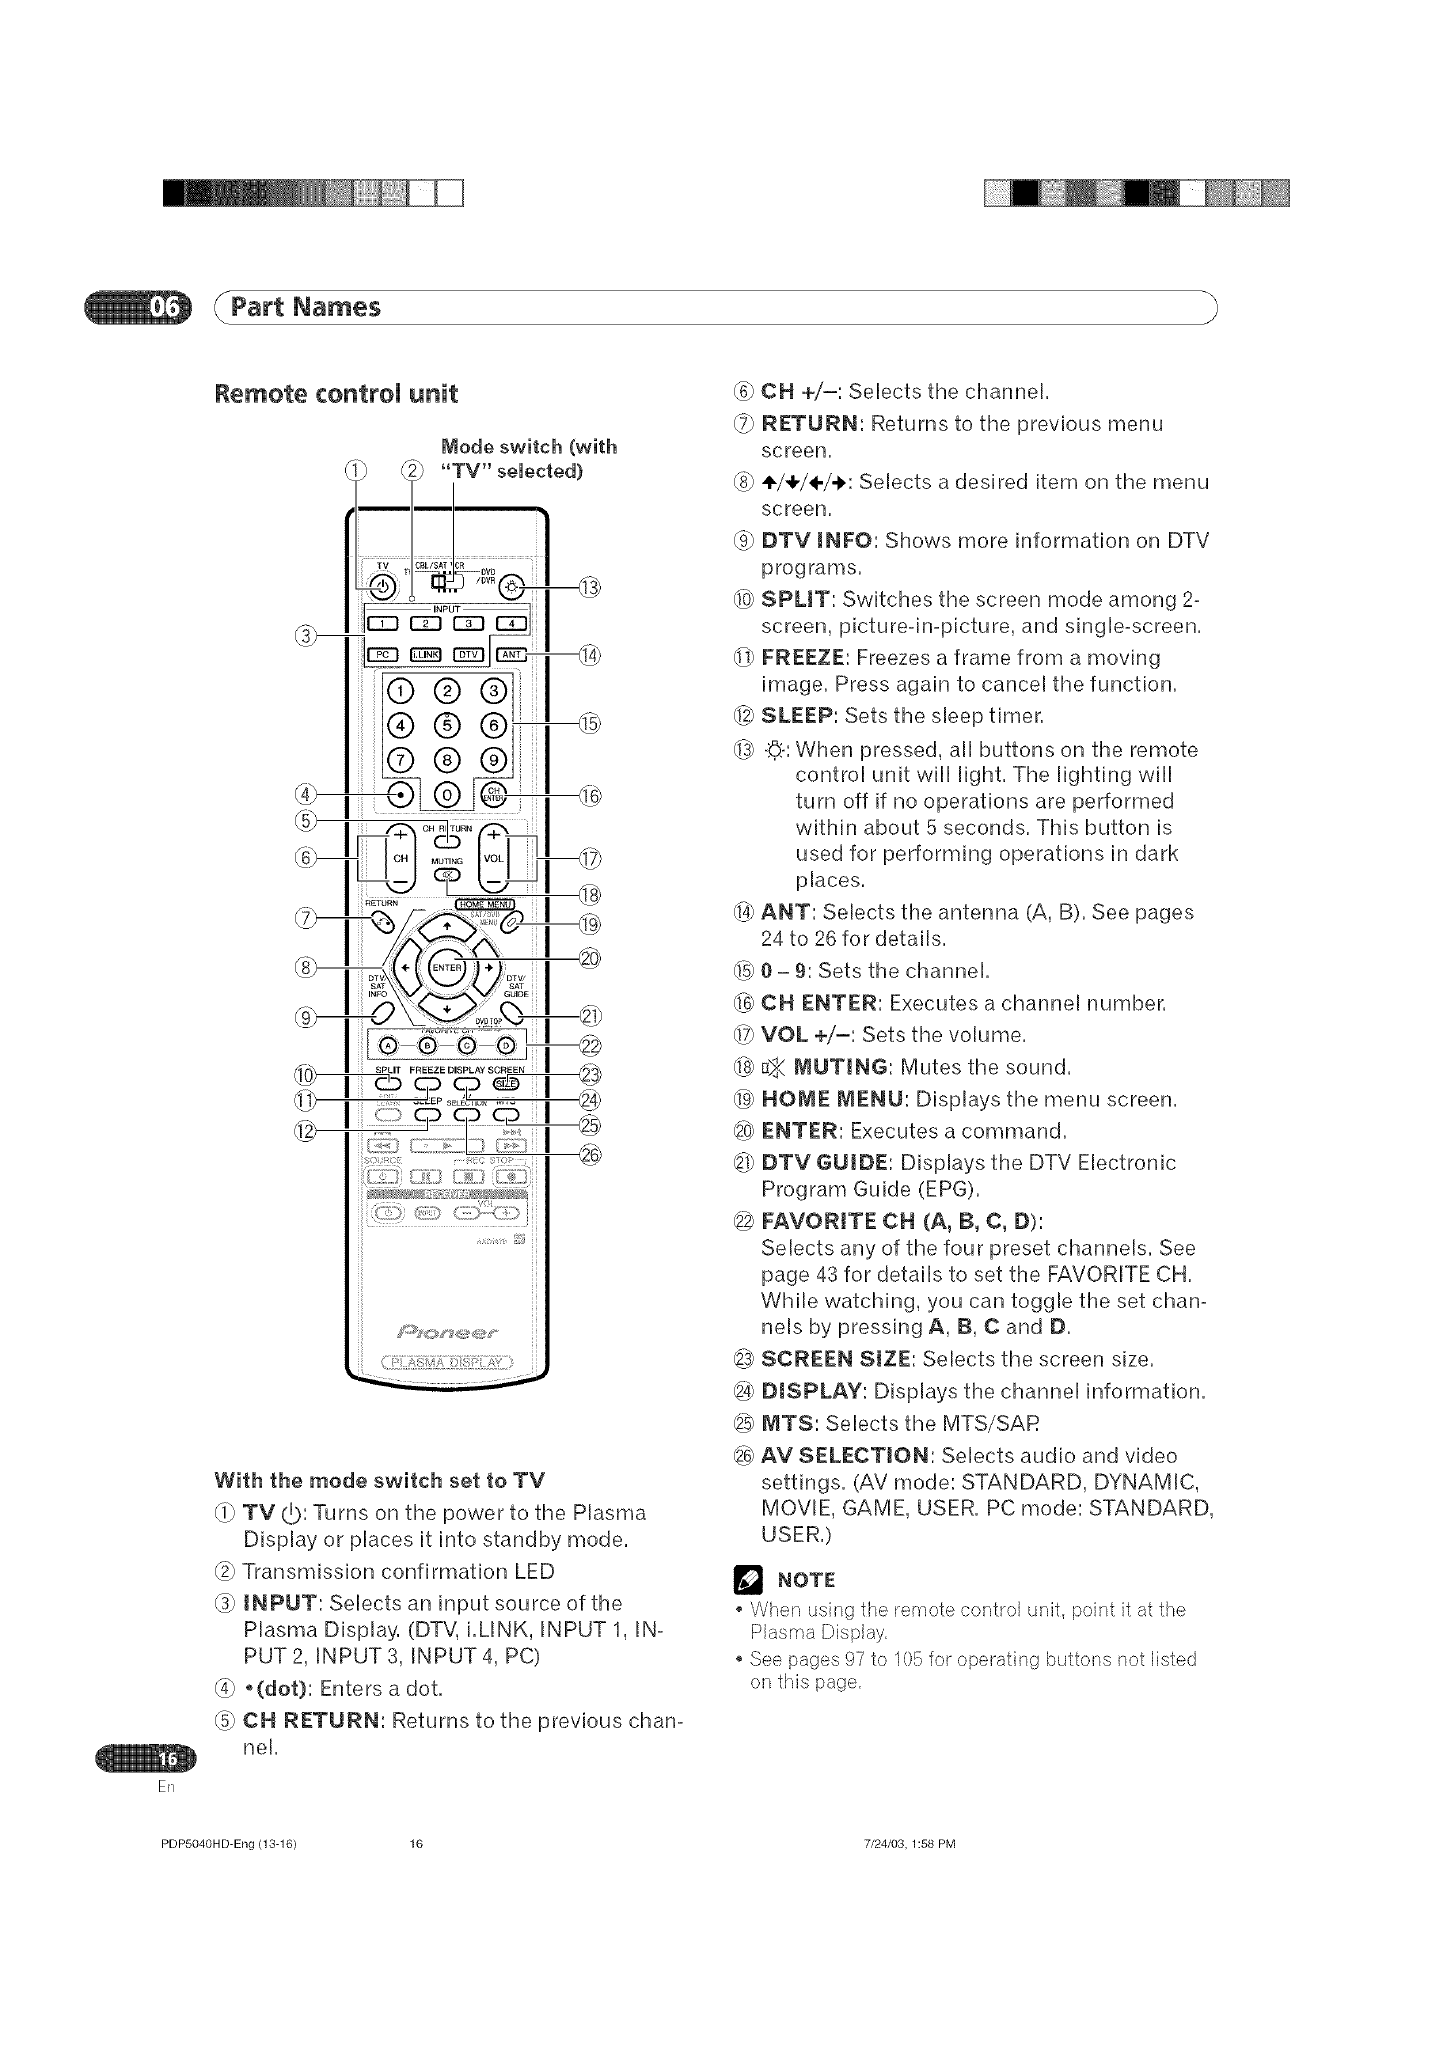
With the mode switch set to TV
TV _: Turns on the power to the Plasma
Display or places it into standby mode.
Transmission confirmation LED
iNPUT: Selects an input source of the
Plasma Display. (DTV, i.MNK, INPUT 1, IN-
PUT2, INPUT 3, INPUT 4, PC)
°(dot): Enters a dot.
CN RETURN: Returns to the previous chan-
nel.
CH +/=: Selects the channel.
RETURN: Returns to the previous menu
screen.
÷/÷/÷/-_: Selects a desired item on the menu
screen.
(_ DTV iNFO: Shows more information on DTV
programs.
_0_SPLIT: Switches the screen mode among 2-
screen, picture-in-picture, and single-screen.
FREEZE: Freezes a frame from a moving
image. Press again to cancel the function.
_2_SLEEP: Sets the sleep timer.
-_]: When pressed, all buttons on the remote
control unit will light. The lighting will
turn off if no operations are performed
within about 5 seconds. This button is
used for performing operations in dark
places.
d..4_ANT: Selects the antenna (A, B). See pages
24 to 26 for details.
0 = 9: Sets the channel.
_ CH ENTER: Executes a channel number.
_ VOL +/=: Sets the volume.
_f_ _ IVlLITIN6: Mutes the sound.
HOME NIENU: Displays the menu screen.
_ ENTER: Executes a command.
@ DTV 6LIIDE: Displays the DTV Electronic
Program Guide (EPG).
@ FAVORITE CH (A, B, C, D):
Selects any of the four preset channels. See
page 43 for details to set the FAVORITE CH.
While watching, you can toggle the set chan-
nels by pressing A, B, C and D.
@ SCREEN SIZE: Selects the screen size.
DISPLAY: Displays the channel information.
@ MTS: Selects the MTS/SAR
@ AV SELECTION: Selects audio and video
settings. (AV mode: STANDARD, DYNAMIC,
MOVIE, GAME, USER. PC mode: STANDARD,
USER.)
NOTE
When using the remote control unit, point it at the
Plasma Display,
See pages 97 to 105 for operating buttons not listed
on this page,
PDP5040H D-Eng (13-16) 16 7/24/03, 1:58 PM
Preparation
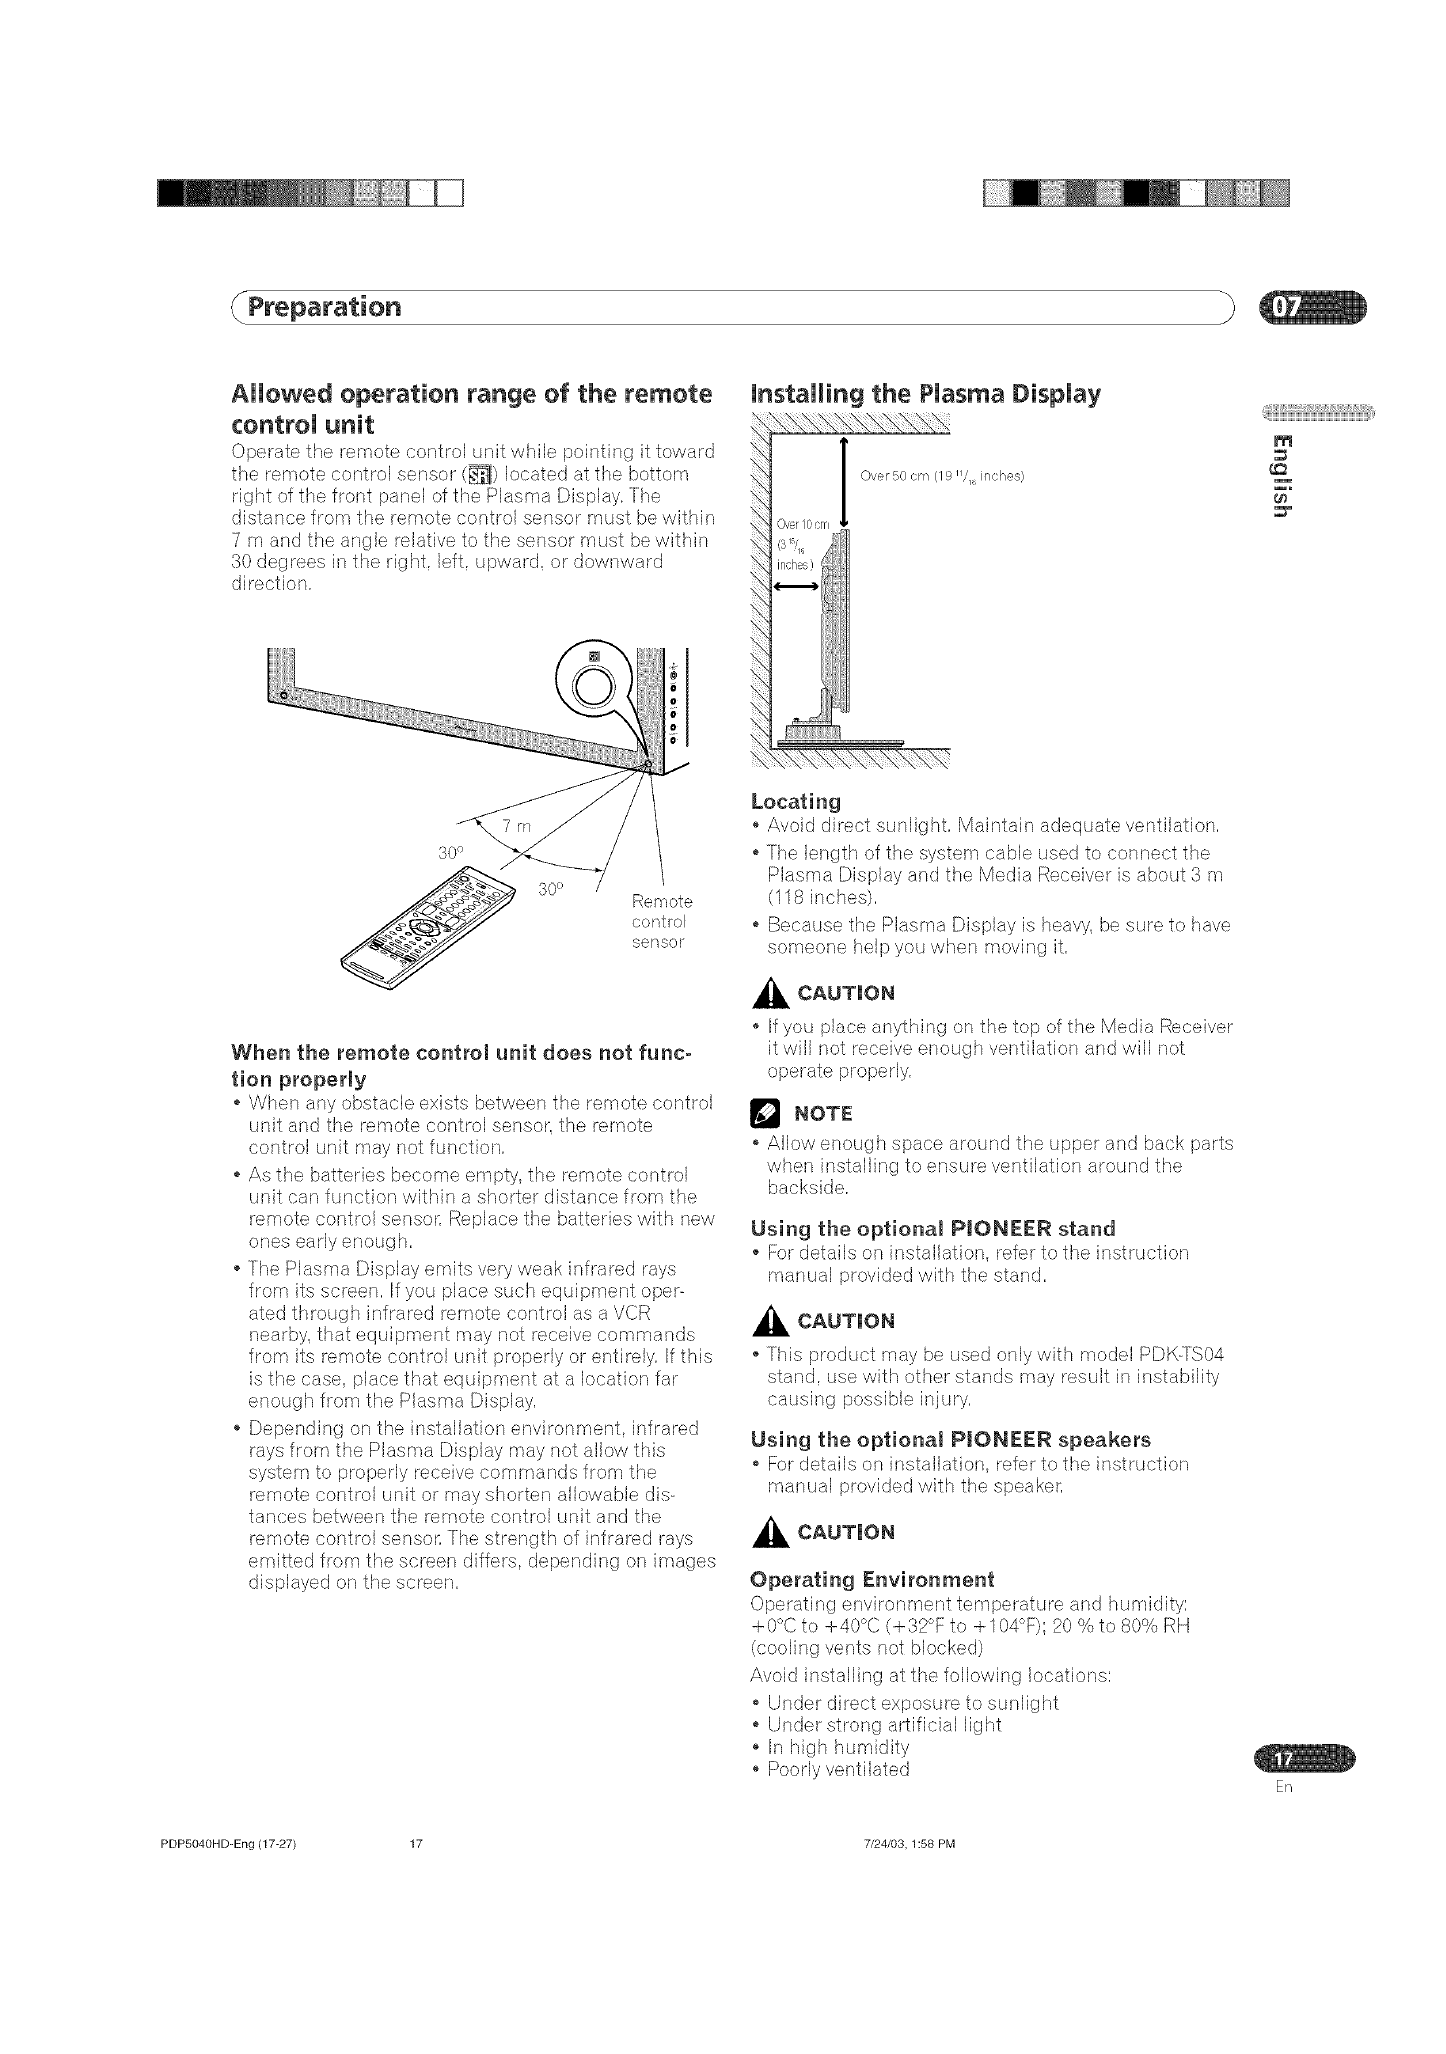
AHewed operation range of the remote
controU unit
Operate the remote control unit while pointing it _oward
the remote control sensor (_I) located at the bottom
right of the front panel of the Plasma Dlsplay_The
distance from the remote control sensor must be within
7 m and the angle relative to the sensor must be within
30 degrees in the right, left, upward, or downward
direction,
@ii;iiBiiiiiiiWi_iWi_iWi_iWi_iWi_iWi_iWi_iWi_iWi@
m
300
Remote
control
set/sot
When the remote controm unit does not func-
tion properly
.When any obstacle exists between the remote control
unit and the remote control sensor, the remote
control unit may not function,
As the batteries become empty, the remote control
unit can function within a shorter distance from the
remote control sensor, Replace the batteries with new
ones early enough,
The Plasma Display emits very weak infrared rays
from its screen, Jfyou place such equipment oper-
ated through infrared remote control as a VCR
nearby, that equipment may not receive commands
from its remote control unit properly or entirely, If this
is the case, place that equipment at a location far
enough from the Plasma Display,
, Depending on the installation environment, infrared
rays from the Plasma Display may not allow this
system to properly receive commands from the
remote control unit or may shorten allowable dis-
tances between the remote control unit and the
remote control sensol: The strength of infrared rays
emitted from the screen differs, depending on images
displayed on the screen,
Locating
Avoid direct sunlight, Maintain adequate ventilation,
The length of the system cable used to connect the
Plasma Display and the Media Receiver is about 3 m
(118 inches),
Because the Plasma Display is heavy, be sure to have
someone help you when rnoving it,
_k CAUTUON
If you place anything on the top of the Media Receiver
it will not receive enough ventilation and will not
operate properly,
NOTE
Allow enough space around the upper and back parts
when installing to ensure ver_tilation around the
backside,
Osing the optional PIONEER stand
For details on installation, refer to the instruction
manual provided with the stand,
,_ CAUTUON
This product may be used only with model PDK:TS04
stand, use with other stands may result in instability
causing possible injury,
Using the optional PIONEER speakers
For details on installation, refer to the instruction
manual provided with the speaker,
,_k CAUTION
Operating Environment
Operating environment temperature and humidity:
+0°C to +40°C (+32°F to + 104°F): 20 % to 80% RH
(cooling vents not blocked)
Avoid installing at the following locations:
Under direct exposure to sunlight
Under strong artificial light
In high humidity
, Poorly ventilated En
PDP5040HD-Eng (17-27) 17 7/24/03,1:58 PM
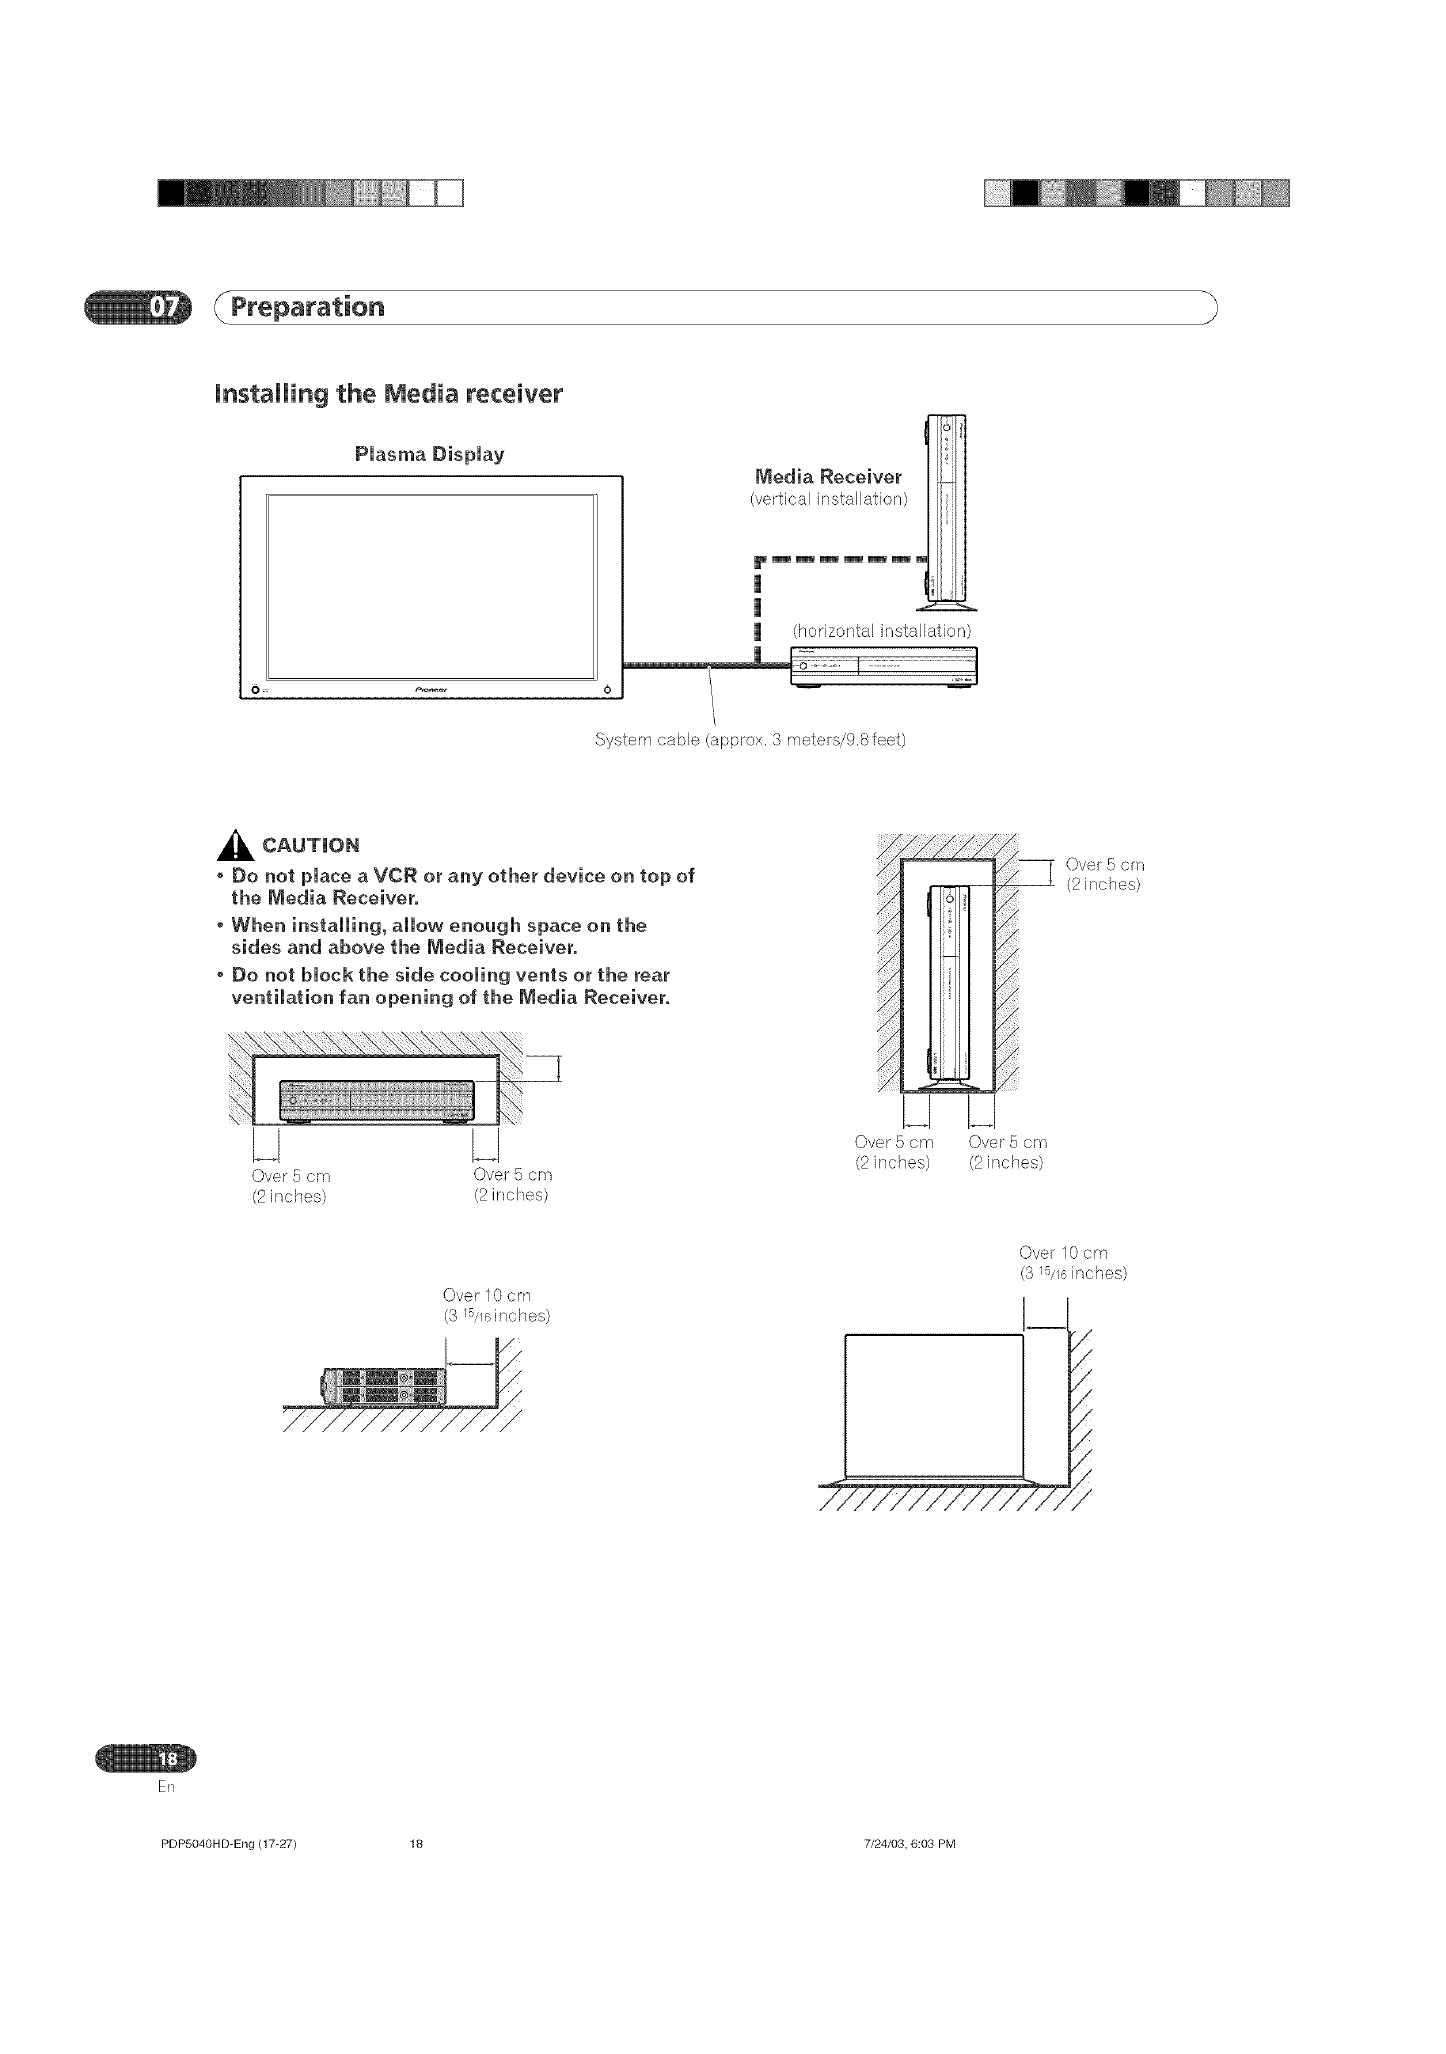
UnstaHin9 the Media receiver
Plasma Display Media Receiver
(vertical installation)
(horizontal installation)
System cable (approx. 8 meters/9.8feet)
,_ CAUTUON
,Do not place a VCR or any other device on top of
the Media Receiver.
,When installing, allow enough space on the
sides and above the Media Receiver.
,Do not block the side cooling vents or the rear
ventilation fan opening of the Media Receiver.
Overs cm
(2 inches)
N
Over5 ors
(2inches)
Over5 cm
(2inches)
_[ Over 5 cm
(2 inches)
I__
Over orn
(2inches)
Over 10 cm
(3 /5//6 inches)
Over 10 cm
(3 /5//6 inches)
/
/
/
/
/
%
ER
PDP5040H D-Eng {17-27} 18 7/24/03, 6:03 PM
Preparation
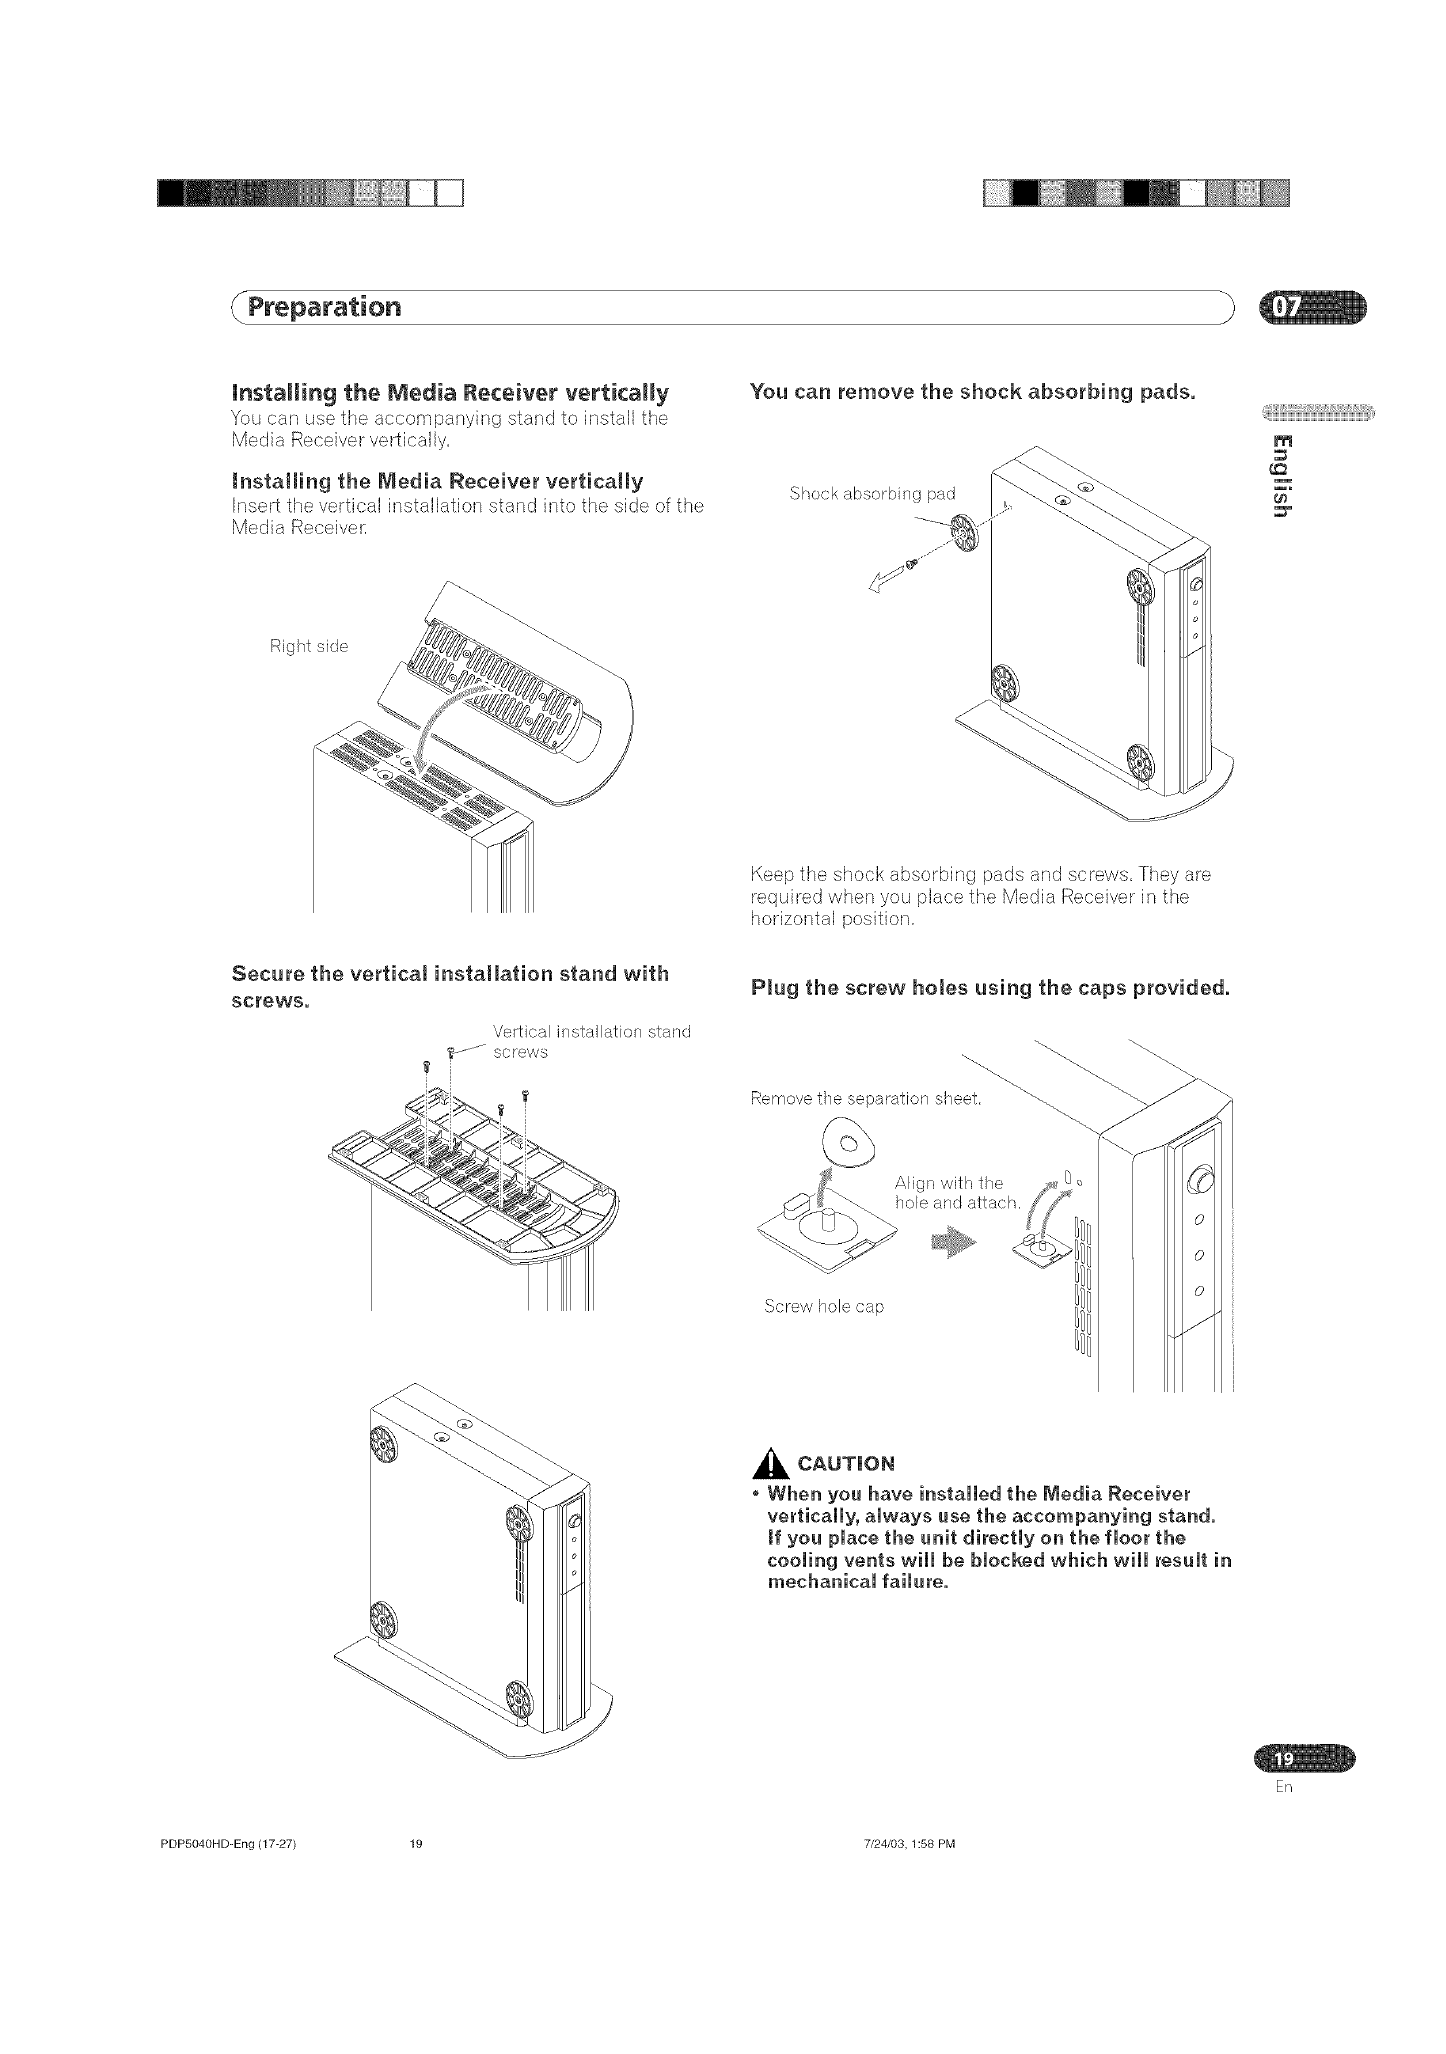
installing the Media Receiver vertically
You can use the accompanyh-_g stand to hqstall the
Media Receiver vertbally,
Installing the Media Receiver vertically
Insert the vertical hqstallation stand into the side of the
Media Receiver,
Right side
You can remove the shock absorbing pads.
Shockabsorbing pad
.J
@iiiiiBiiiiiiiWi_iWi_iWi_iWi_iWi_iWi_iWi_iWi_iWi@
m
Keep the shock absorbing pads and sc_'ews,They are
required when you place the Media Receiver in the
horizontal position,
Secure the vertical installation stand with
screws. P(ug the screw holes using the caps provided.
Vertical installation stand
_J"" sc[ews
_J_J_ll TRemovethe separation sheet.
' _ Align with the
/ole and attach.
Screw hole cap
,_ CAUTUON
"When you have installed the Media Receiver
vertically, always use the accompanying stand.
Jf you place the unit directly on the floor the
cooling vents will be blocked which will result in
mechanical failure.
En
PDPS040HD-Eng (17-27) 19 7/24/03,1:58 PM
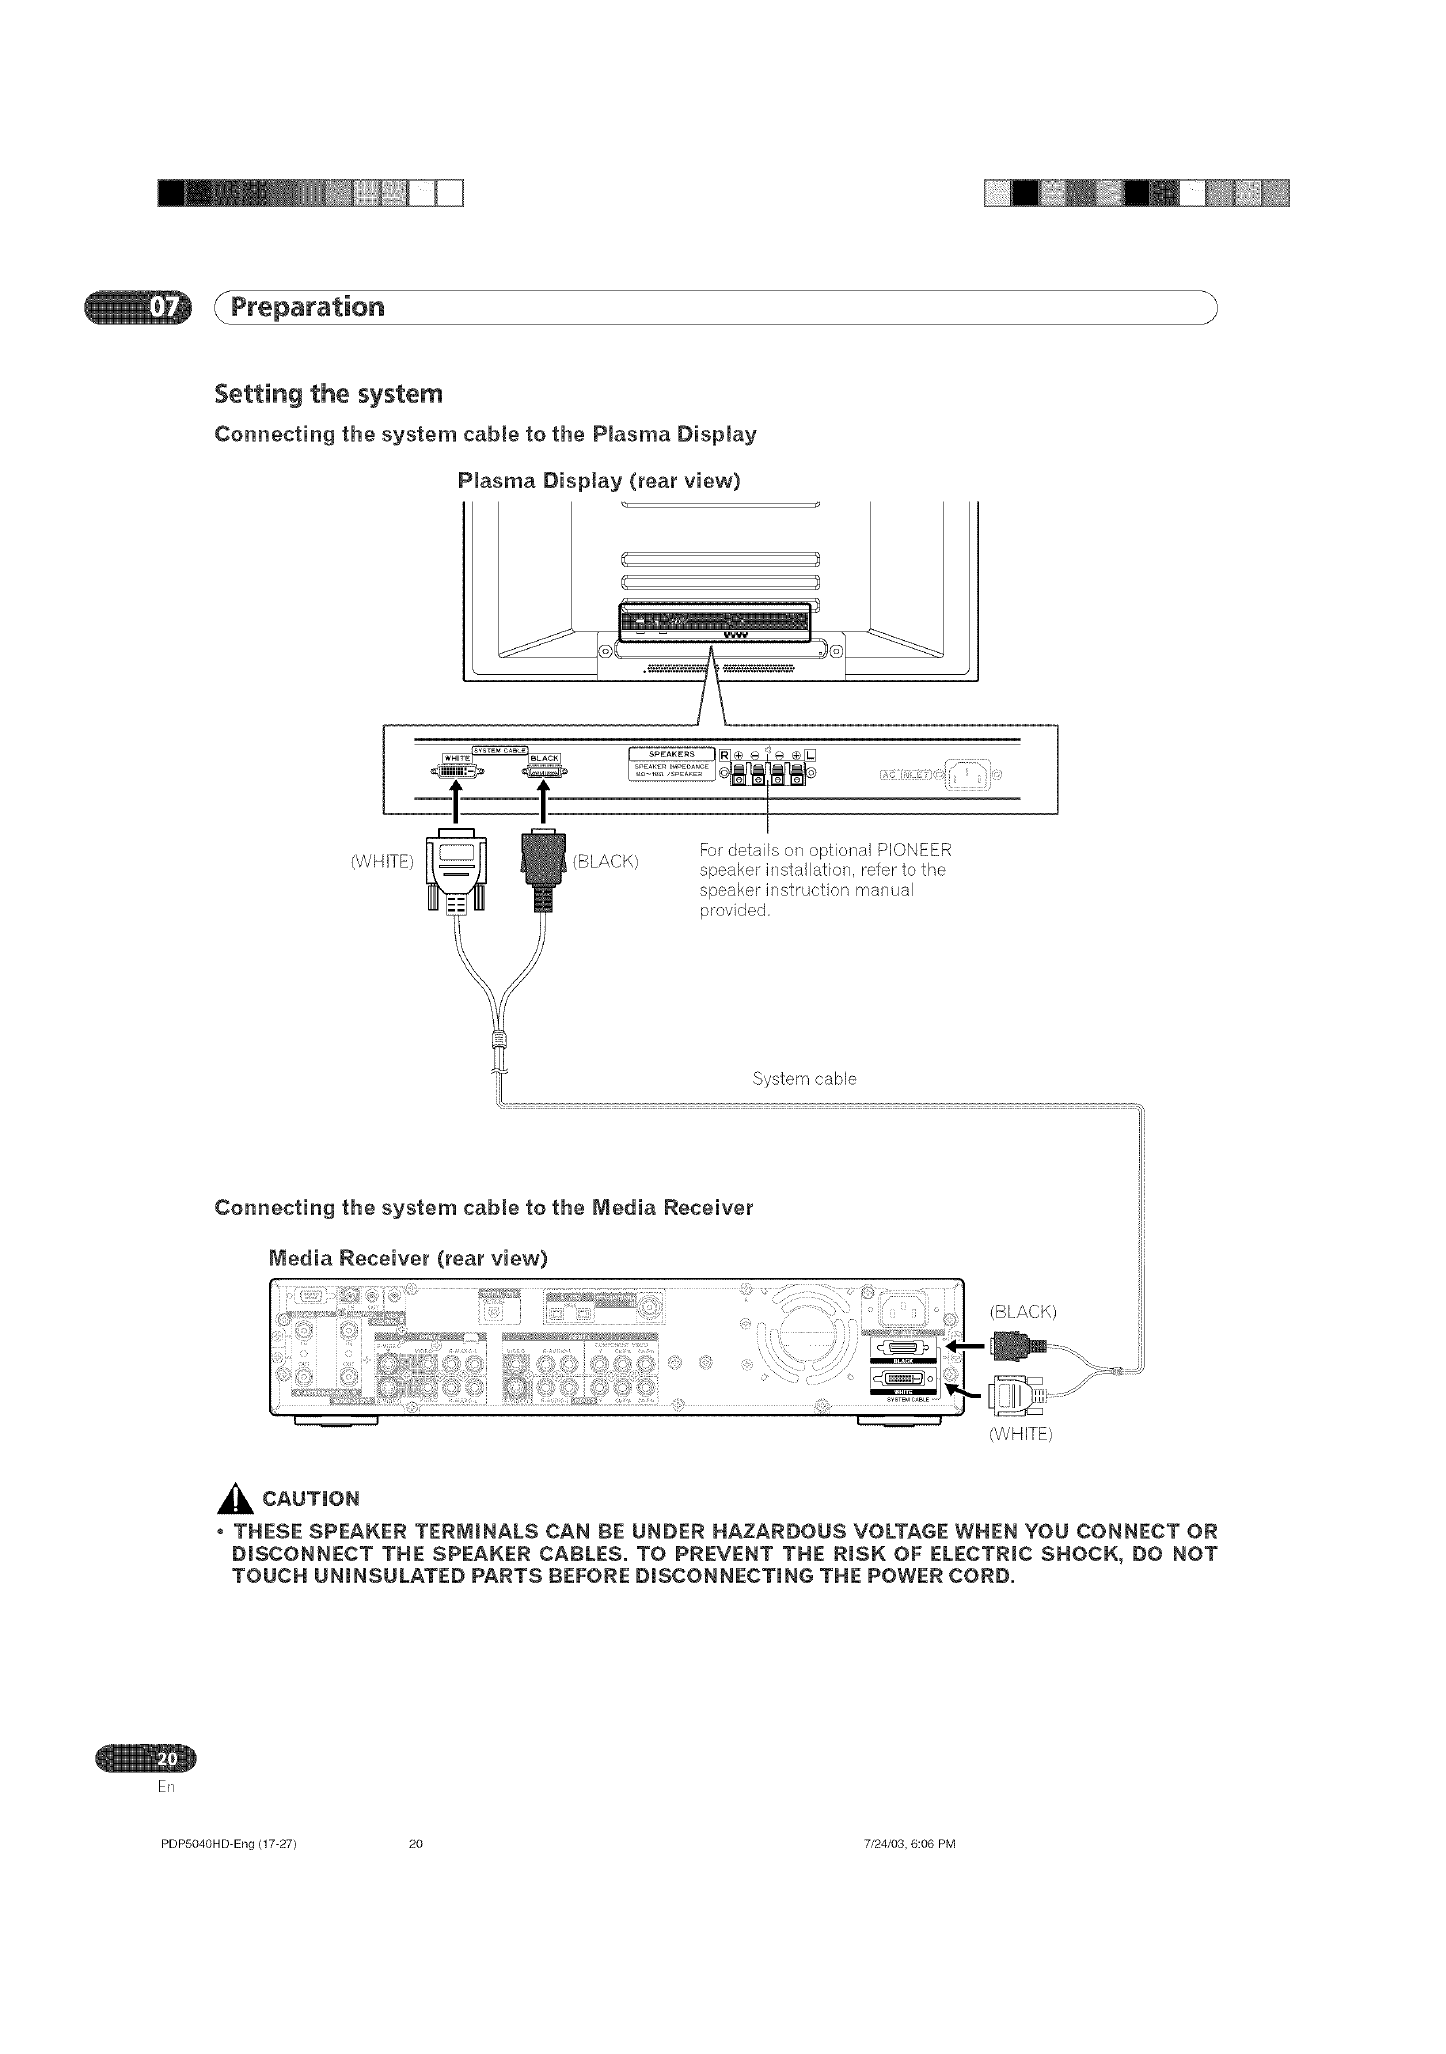
Setting the system
Connecting the system cable to the Plasma Dispmay
Plasma Disptay (rear view)
(WHITE) i
(BLACK)
I
Fordetails on optional PIONEER
speakerinstallation, refer to the
speaker instruction manual
provided.
Connecting the system cable to the Media Receiver
Media Receiver (rear view)
!
(BLACK)
j-- ........
(WHITE)
_CAUTUON
THESE SPEAKER TERMINALS CAN BE UNDER HAZARDOUS VOLTAGE WHEN YOU CONNECT OR
DISCONNECT THE SPEAKER CABLES. TO PREVENT THE RISK OF ELECTRIC SHOCK, DO NOT
TOUCH UNINSULATED PARTS BEFORE DISCONNECTING THE POWER CORD.
ER
PDP5040HD-Eng (17-27} 20 7/24/03, 6:06 PM
Preparation
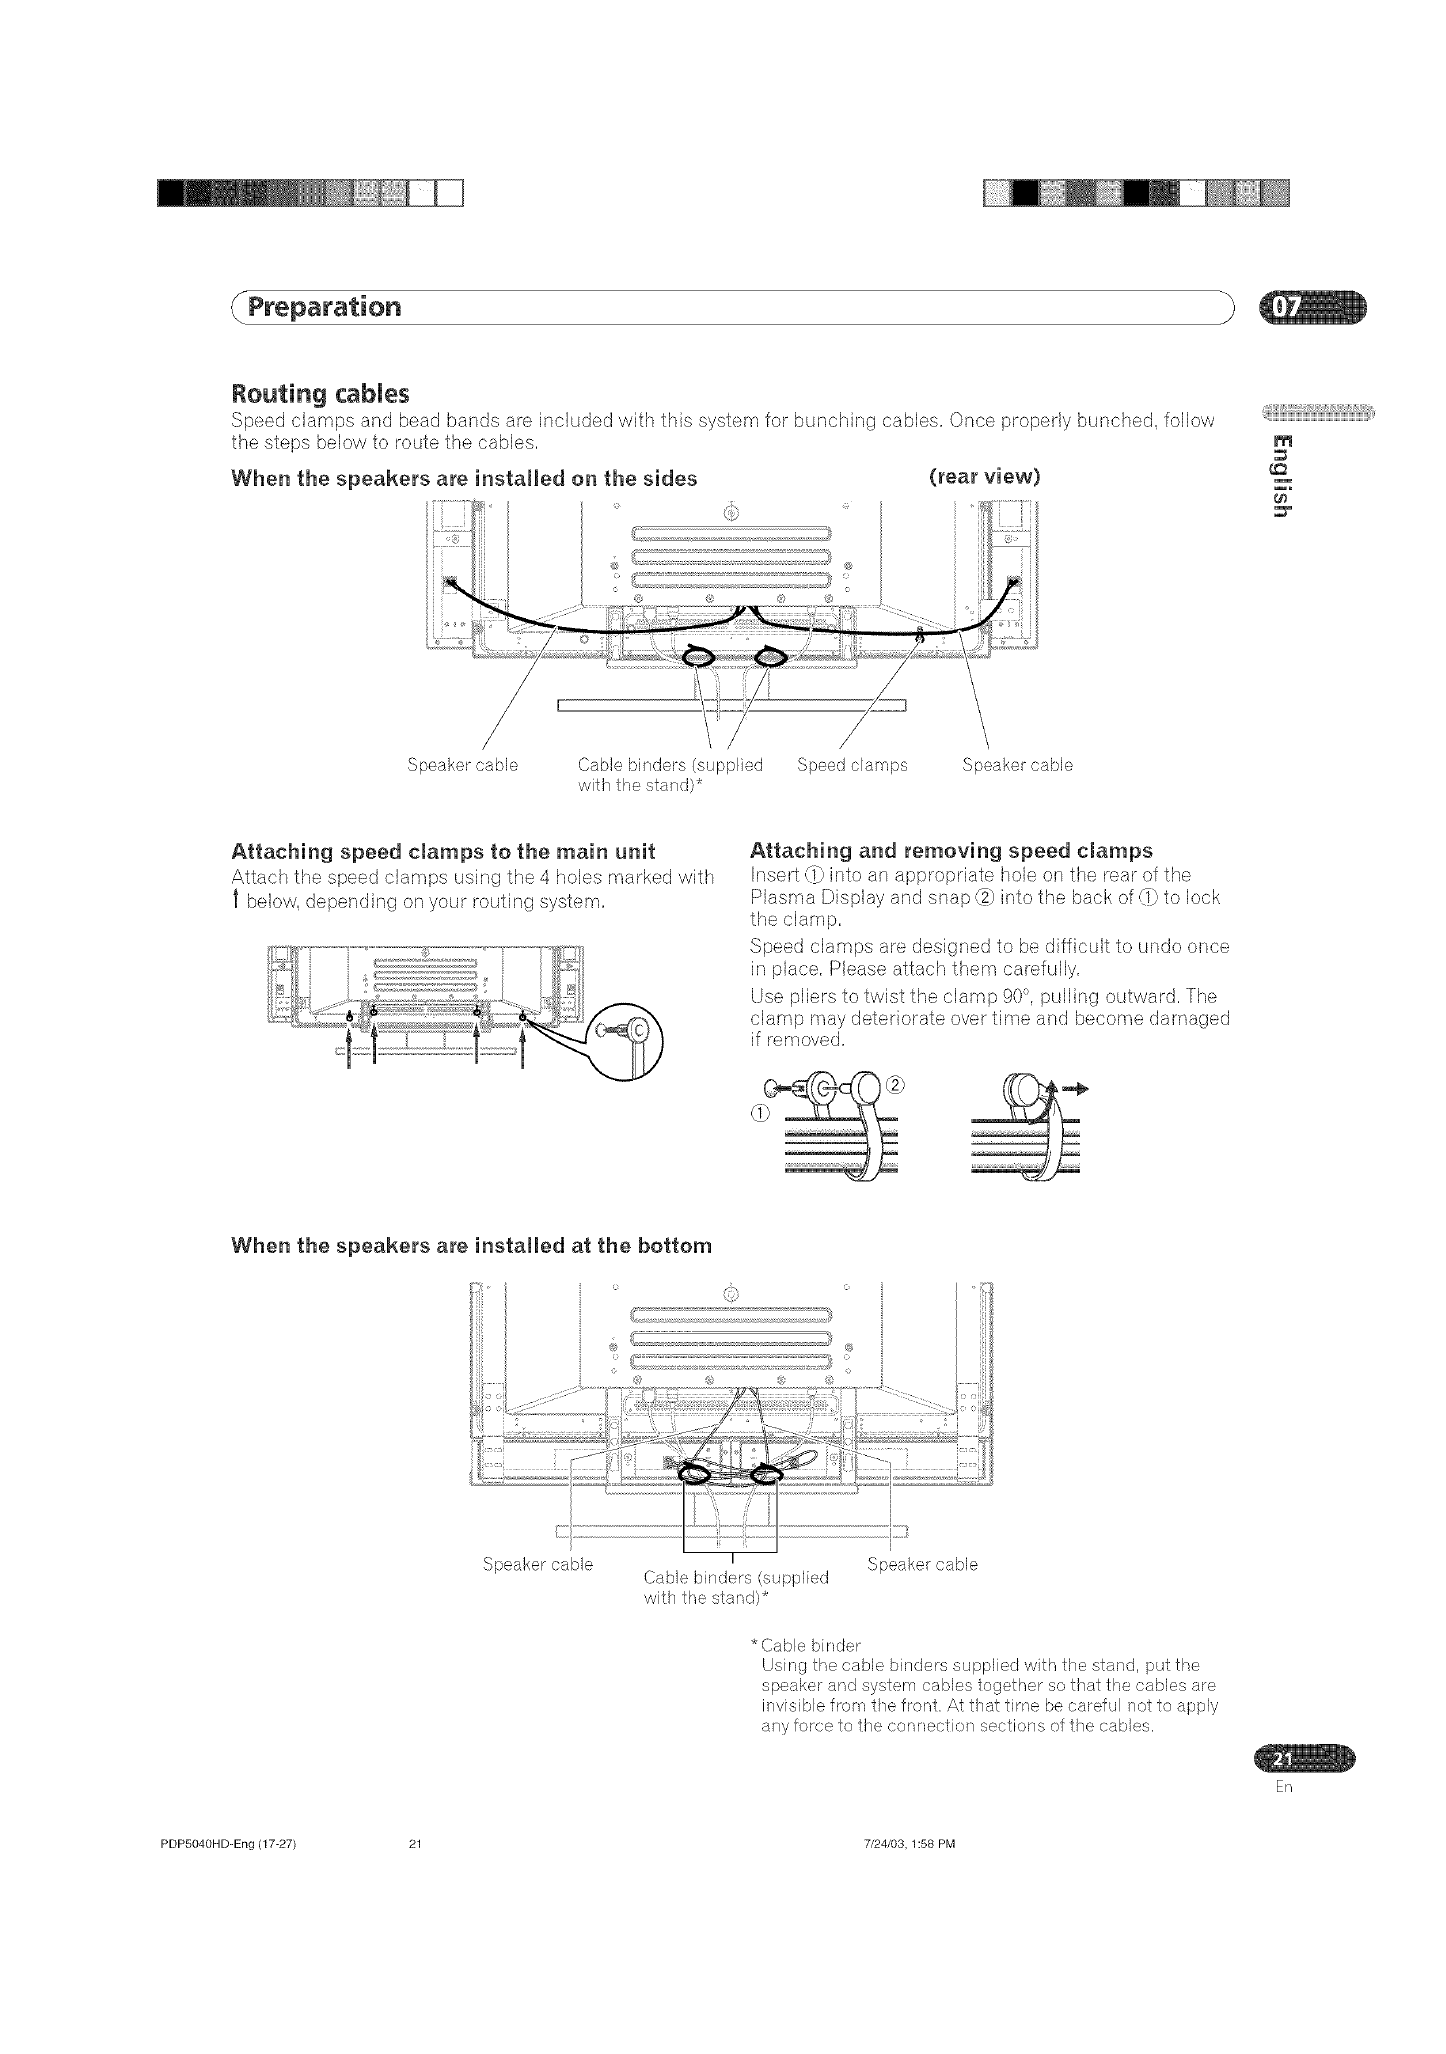
Routing cabUes
Speed clamps and bead bands are included with this system for bunching cabbs, Once propedy bunched, follow
the steps below to route the cables,
When the speakers are installed on the sides (rear view)
@ii;HiBiiiiiiiWi_iWi_iWi_iWi_iWi_iWi_iWi_iWi_iWi_iWi_i_ili,i¸,
m
Speaker cable {}able binders (supplied Speed clamps Speaker cable
with the stand)*
Attaching speed clamps to the main unit
Attach the speed clamps using the 4 hobs marked with
I below, depending on your routing system,
Attaching and removing speed clamps
Insert (_ into an appropriate hole on the rear of the
Plasma Display and snap _} into the back of {1} to lock
the clamp,
Speed damps are designed to be difficult to undo once
in place, Please attach them carefully,
Use pliers to twist the clamp 90°, pulling outward, The
clamp may deteriorate over time and become damaged
if removed,
When the speakers are installed at the bottom
Speaker cable I
Cable binders (supplied
with the stand)*
Speaker cable
* Cable binder
Using the cable binders supplied with the stand, put the
speaker and system cables together so that the cables are
invisible from the front= At that time be careful not to apply
any force to the connection sections of the cables.
En
PDP5040HD=Eng (17-27) 21 7/24/03,1:58 PM

Using the remote centreU unit
Use the remote centrol unit by pointing it towards the
remote sensor window, Objects between the remote
control unit and sensor window may prevent proper
Cautions regarding the remote contro_
unit
.Do not expose the remote control unit to shock, In
addition, do not expose the remote control unit to
liquids, and do not place in an area with high humid-
ity,
.Do not install or place the remote control unit under
direct sunlight, The heat may cause deformation of
the unit,
.The remote control unit may not work properly if the
remote sensor window of the Plasma Display is under
direct sunlight or strong lighting, In such case,
change the angle of the lighting or Plasma Display
set, or operate the remote control unit closer to the
remote sensor window,
inserting batteries
If the remote control unit fails to operate Plasma
Display System functions, replace the batteries in the
remote control unit,
t Open timebattery cover,
2 Insert timetwo AA size batteries supplied witl_ time
product.
Place batteries with their terminals corresponding
to the (+) and (-) indicators in the battery compal't-
ment,
3Close timebattery cover.
ER
PDP5040H D-Eng (17-27) 22 7/24/03, 1:58 PM

Preparation
Cautions regarding batteries
Improper use of batteries can result in chemical
leakage or explosion, Be sure to follow the instructions
below,
Do not use manganese batteries, When you replace
the batteries, use alkaline ones,
Place the batteries with their terminals correspond-
ing to the (+) and (-) indicators,
Do not mix batteries of different types, Different types
of batteries have different characteristics,
Do not mix old and new batteries, Mixing old and new
batteries can shorten the life of new batteries or
cause chemical leakage in old batteries,
Remove batteries as soon as they have worn out,
Chemicals that leak from batteries can cause a rash,
If you find any chemical leakage, wipe thoroughly
with a cloth,
The batteries supplied with this product may have a
shorter life expectancy due to storage conditions,
If you will not use the remote control unit for an
extended period of time, remove the batteries from it,
,_ CAUTUON
oWHEN DISPOSING OF USED BATTERIES, BE
SURE TO COMPLY WiTH GOVERNMENT
REGULATIONS AND ENVJRONmVIENTAL PRO-
TECTION GUIDELINES THAT APPLY iN YOUR
COUNTRY OR AREA.
_iIi_ii_i;i1_iiiiiiiiii1iii_iii_i_iii_i_iii_i_iii_i_iii_i_iii_i_iii_i_iii_i_iii_i_iii_i_iIi_i¸,
m
En
PDP5040HD-Eng (17-27) 23 7/24/03,1:58 PM
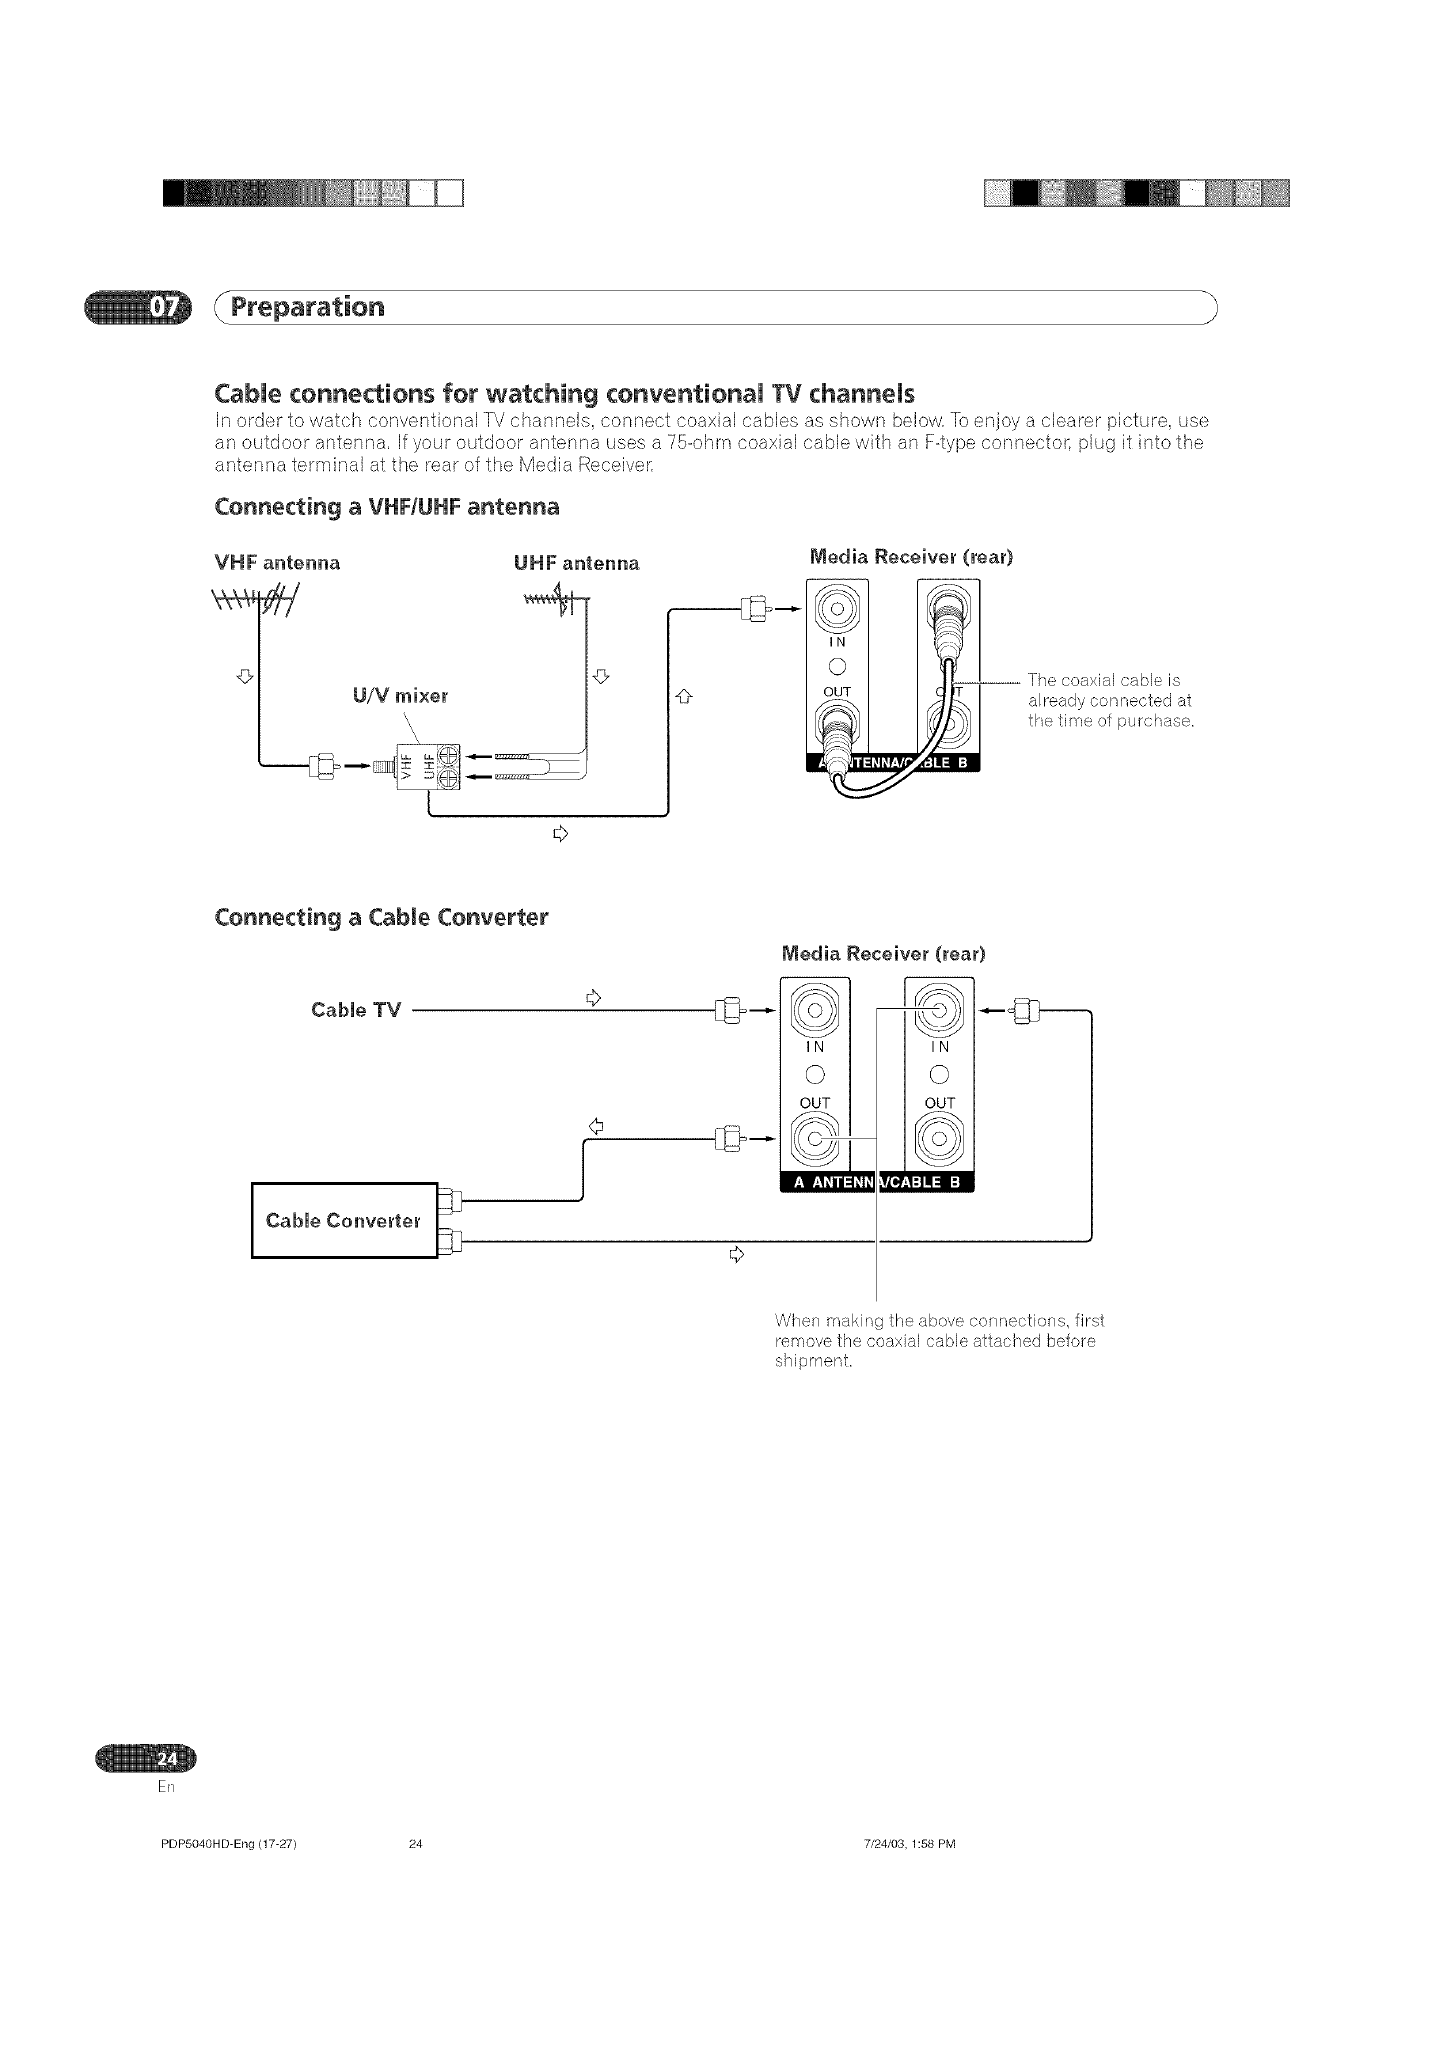
CabUe connections for watching conventionaU TV channeUs
In order to watch conventional TV channels, connect coaxial cables as shown below. To enjoy a clearer picture, use
an outdoor antenna. If your outdoor antenna uses a 75-ohm coaxial cable with an F-type connector, plug it into the
anterma terminal at the rear of the Media Receiver.
Connecting aVHFIUHF antenna
VHF antenna
U/V mixer
\\
0-- The coaxial cable is
already co nnetted at
the tirae of purchase=
Connecting a Cable Converter
Cable TV
Cable Converter
Media Receiver (rear)
When making the above connections, first
remove the coaxial cable attached before
shipment=
ER
PDP5040H D-Eng (17-27) 24 7/24/03, 1:58 PM
Preparation
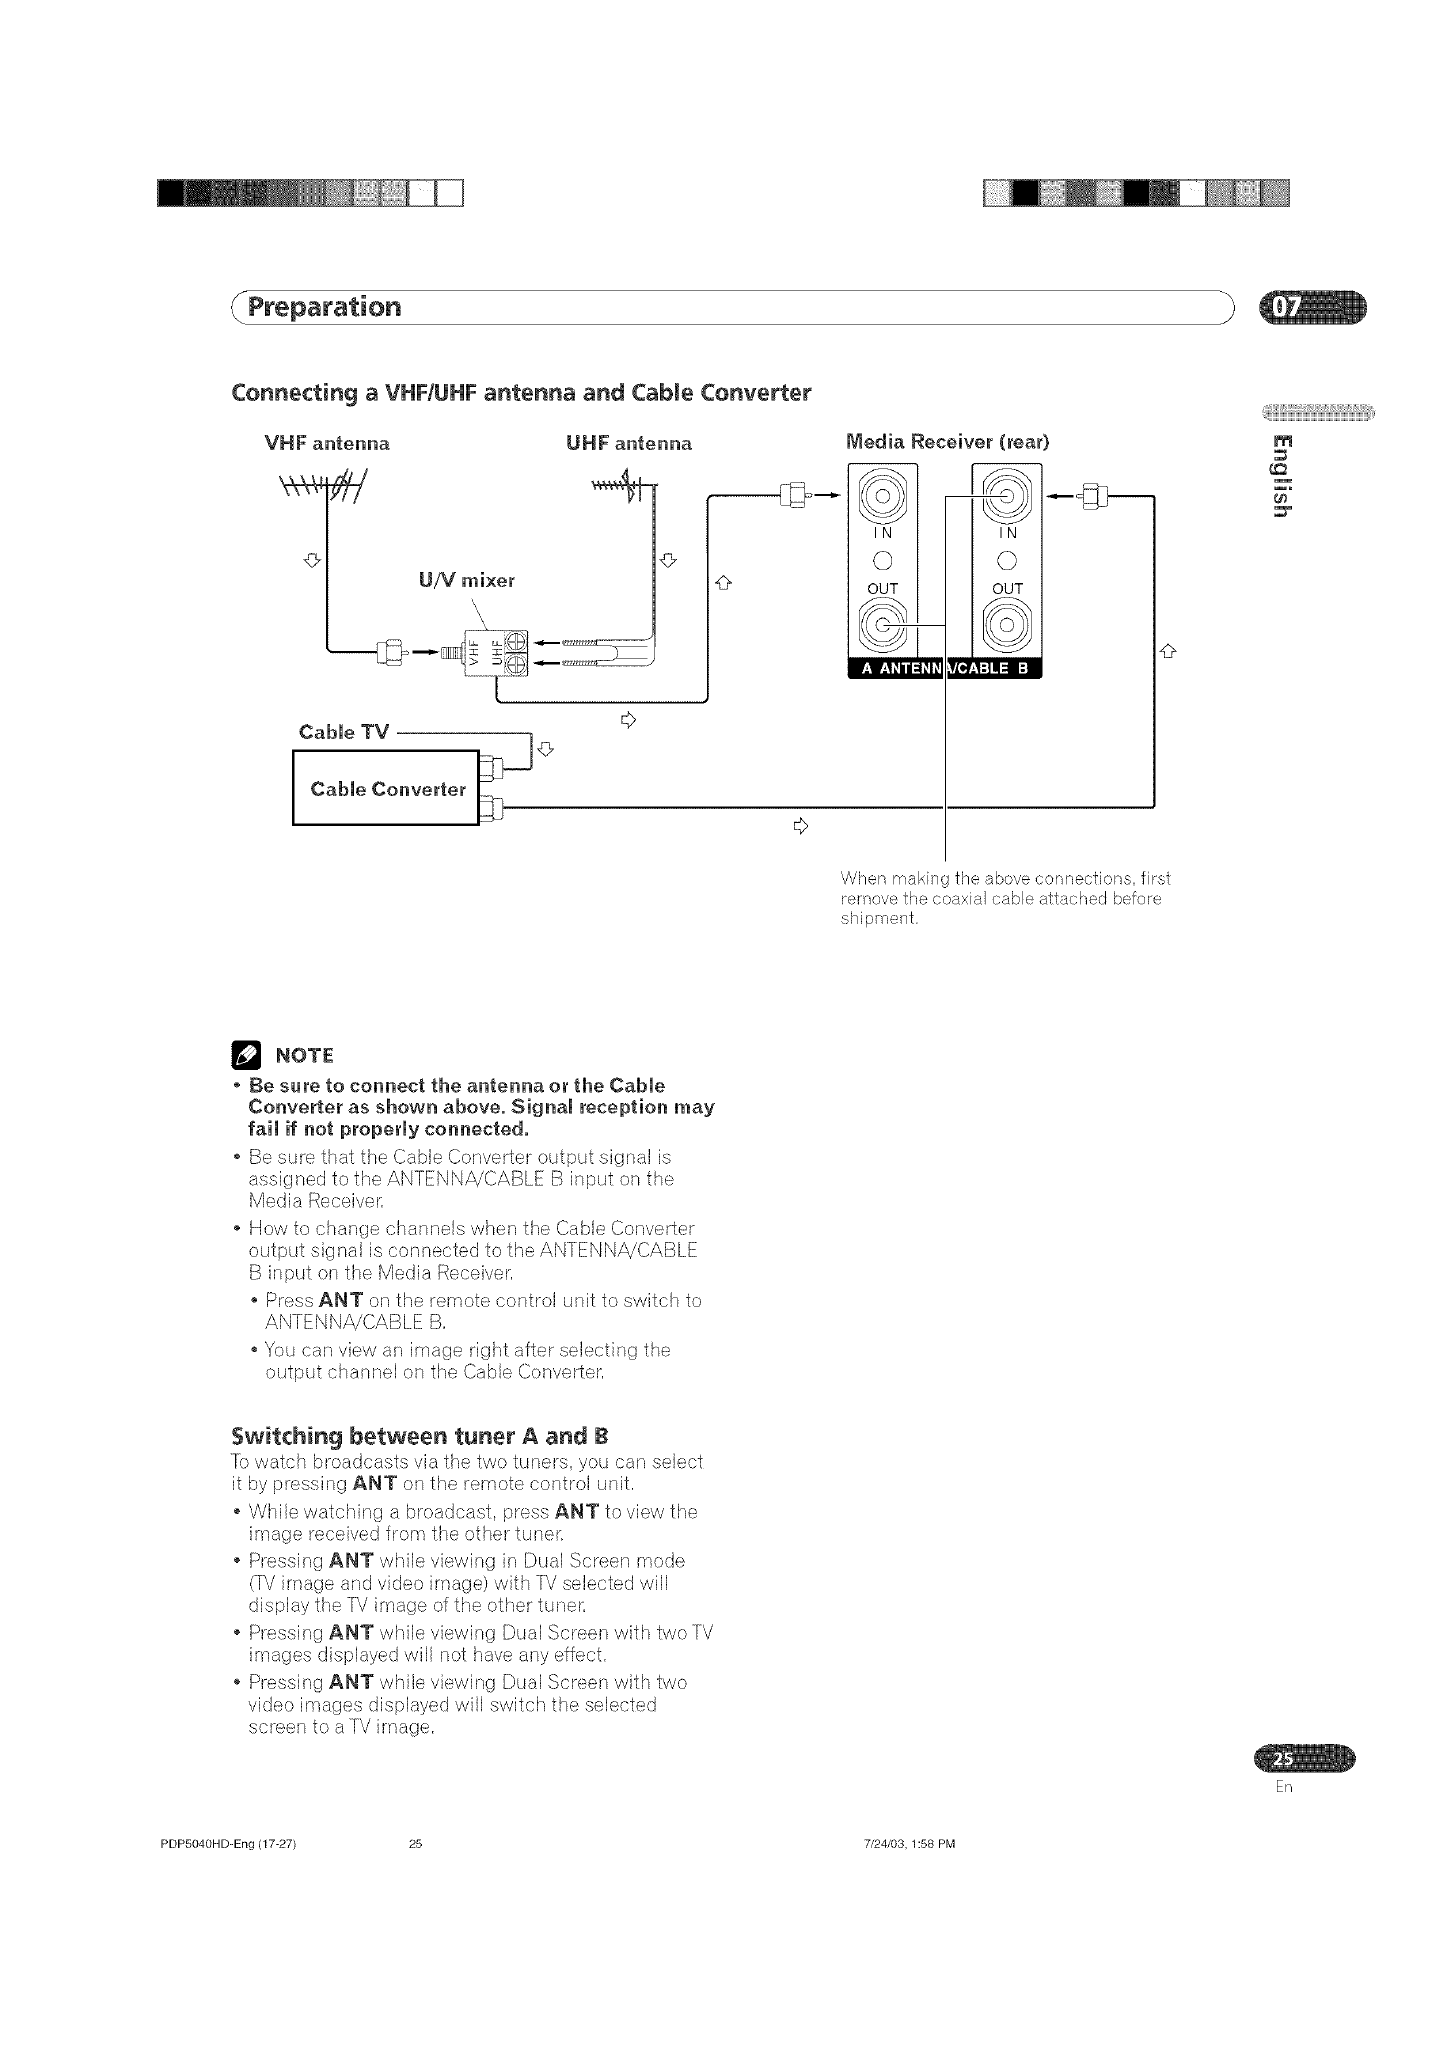
Connecting a VHFIUHF antenna and Cable Converter
VHF antenna UHF antenna
U/V mixer
\\
Cable TV
Cable Converter ¢'_
Media Receiver (rear)
@ii;HiBiiiiiiiWi_iWi_iWi_iWi_iWi_iWi_iWi_iWi_iWi_iWi_i_ili,i¸,
m
When making the above connections, first
remove the coaxial cable attached before
shipmenL
NOTE
• Be sure to connect the antenna or the Cable
Converter as shown above. Signal reception may
fail if not properly connected.
•Be sure that the Cable Converter output signal is
assigned to the ANTENNA!CABLE B input on the
Media Receiver,
How to change channels when the Cable Converter
output signal is connected to the ANTENNA/CABLE
B input on the Media Receiver,
Press ANT on the remote control unit to switch to
ANTENNA/CABLE B,
You can view an image right after selecting the
output channel on the Cable Converter,
Switching between tuner Aand B
]b watch broadcasts via the two tuners, you can select
it by pressing ANT on the remote control unit,
While watching a broadcast, press ANT to view the
image received from the other tunel_
Pressing ANT while viewing in Dual Screen rsode
(TV image and video image) with TV selected will
display the TV image of the other tuner,
Pressing ANT while viewing Dual Screen with two TV
images displayed will not have any effect,
Pressing ANT while viewing Dual Screen with two
video images displayed will switch the selected
En
PDP5040HD=Eng (17-27) 25 7/24/03,1:58 PM
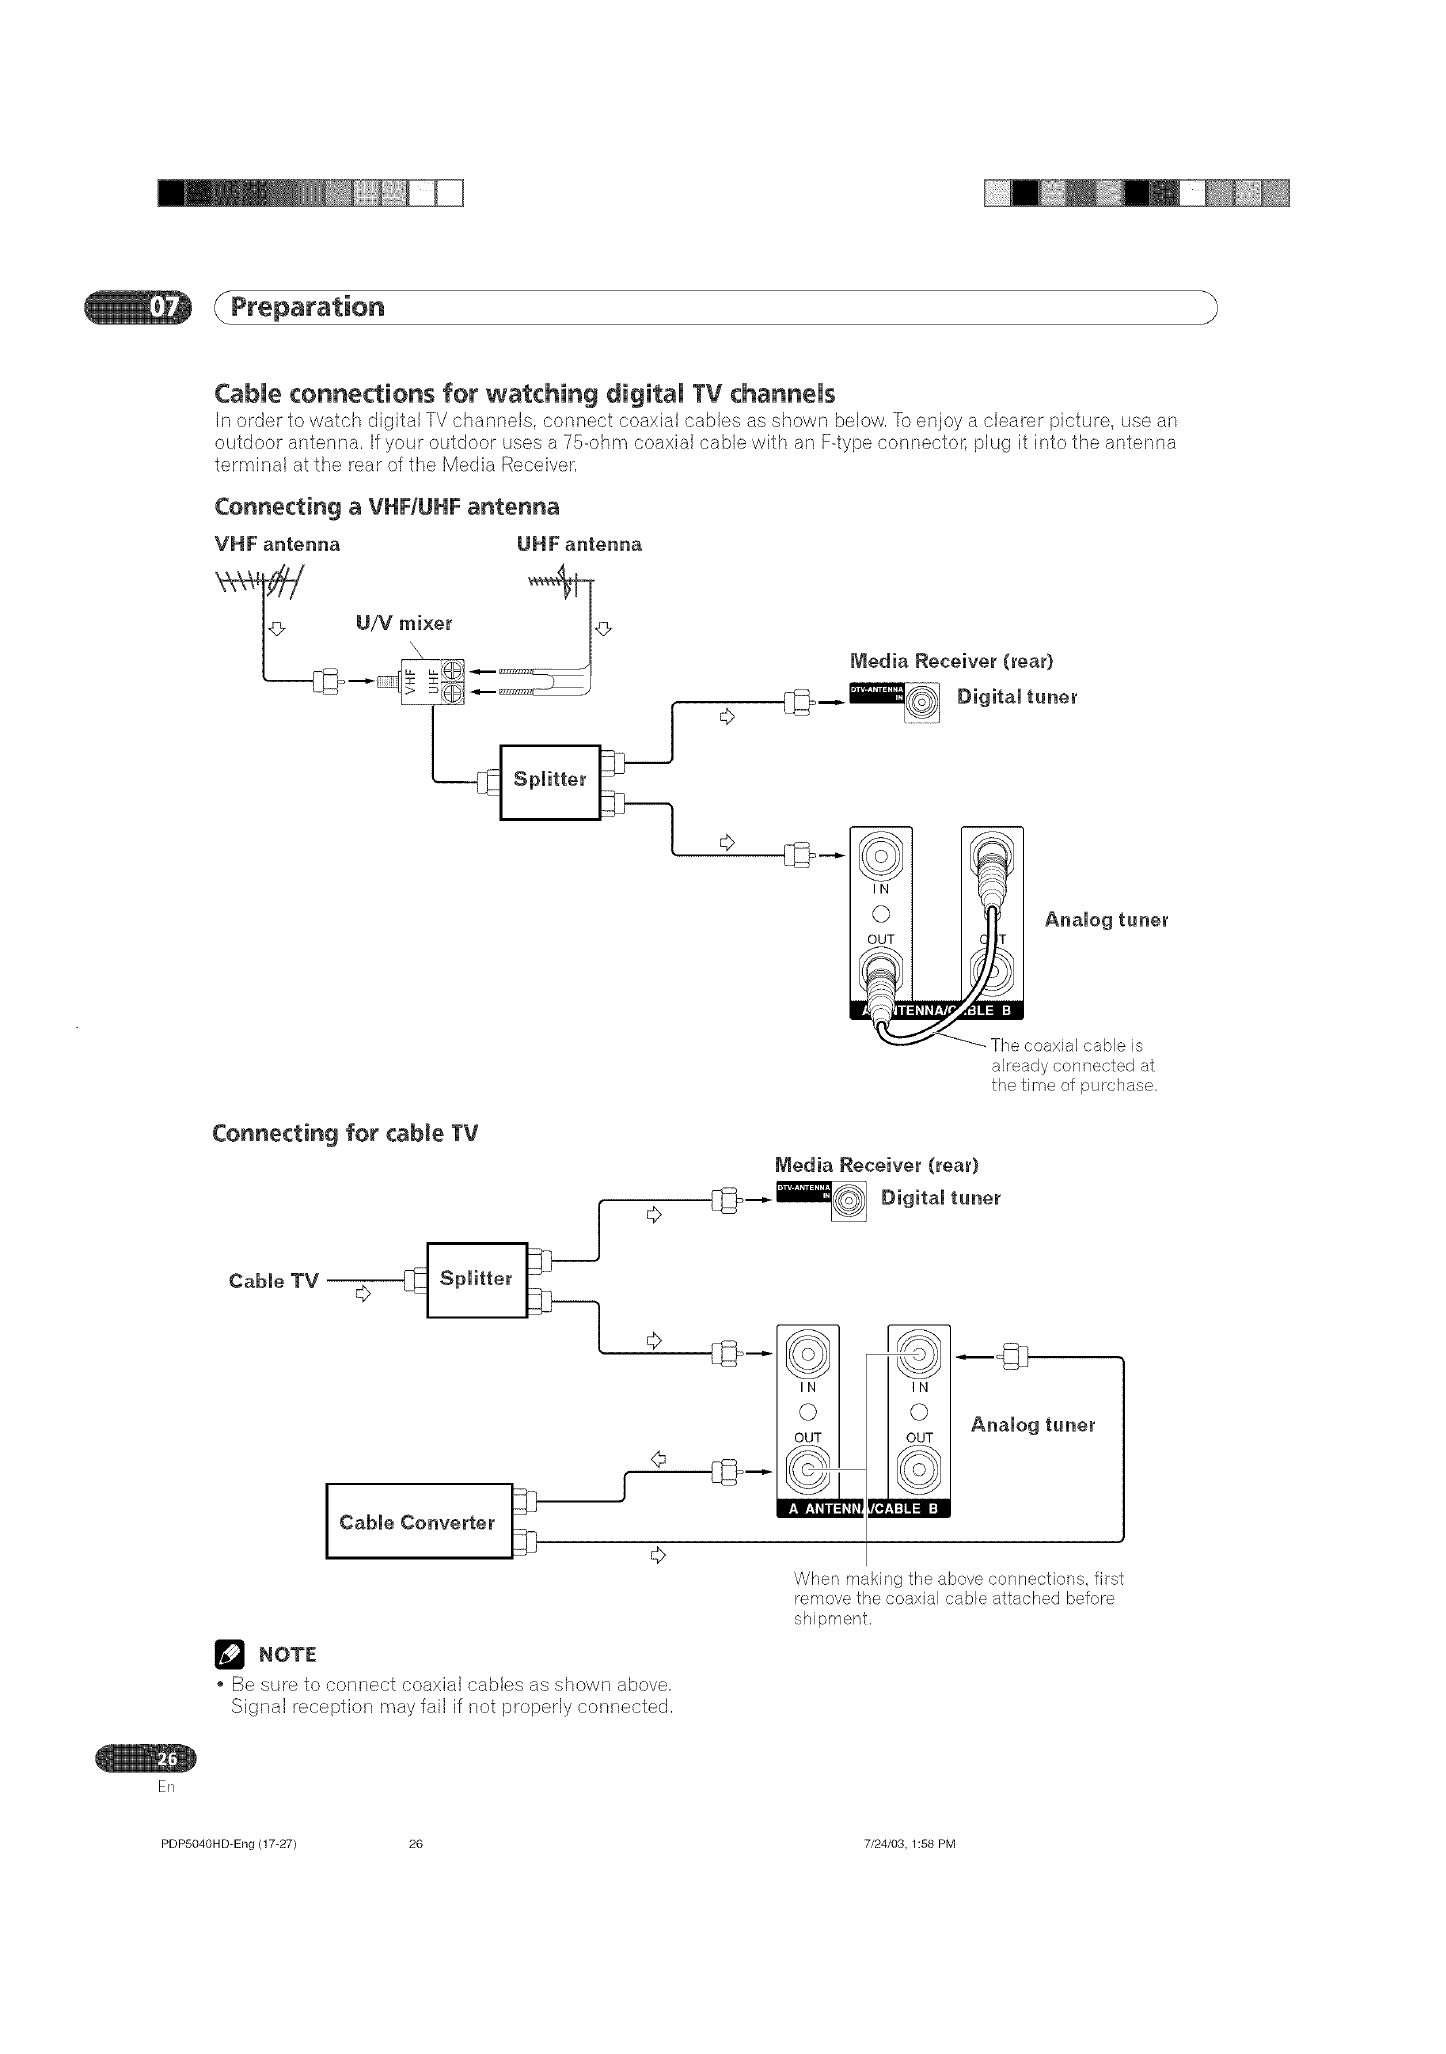
CabUe connections for watching digitaU TV channeUs
In order to watch digital TV channels, connect coaxial cables as shown below, ]b enioy a clearer picture, use an
outdoor antenna, If your outdoor uses a 75-ohm coaxial cabJewith an F-type cormector, pJug it into the antenna
terrninal at the rear of the Media Receiver,
Connecting aVHFIUHF antenna
VHF antenna UHF antenna
Media Receive|' (|'ea|')
o,o,,o,,°oo,
c>
0 I _ Analogt.ne_
__ The coaxial cable is
alreadyconnected at
the time of purchase.
Connecting for cable TV
Cable TV Splitter
:>
ICable Converter
Media Receive|' (|'ea|')
4_1_--__ Digital tune|'
IN
Analog tuner
NOTE
Be sure to connect coaxial cables as shown above,
Signal receptior_ may fail if not propedy connected,
When making the above connections, first
remove the coaxial cable attached before
shipment.
ER
PDP5040H D-Eng (17-27) 26 7/24/03, 1:58 PM
Preparation
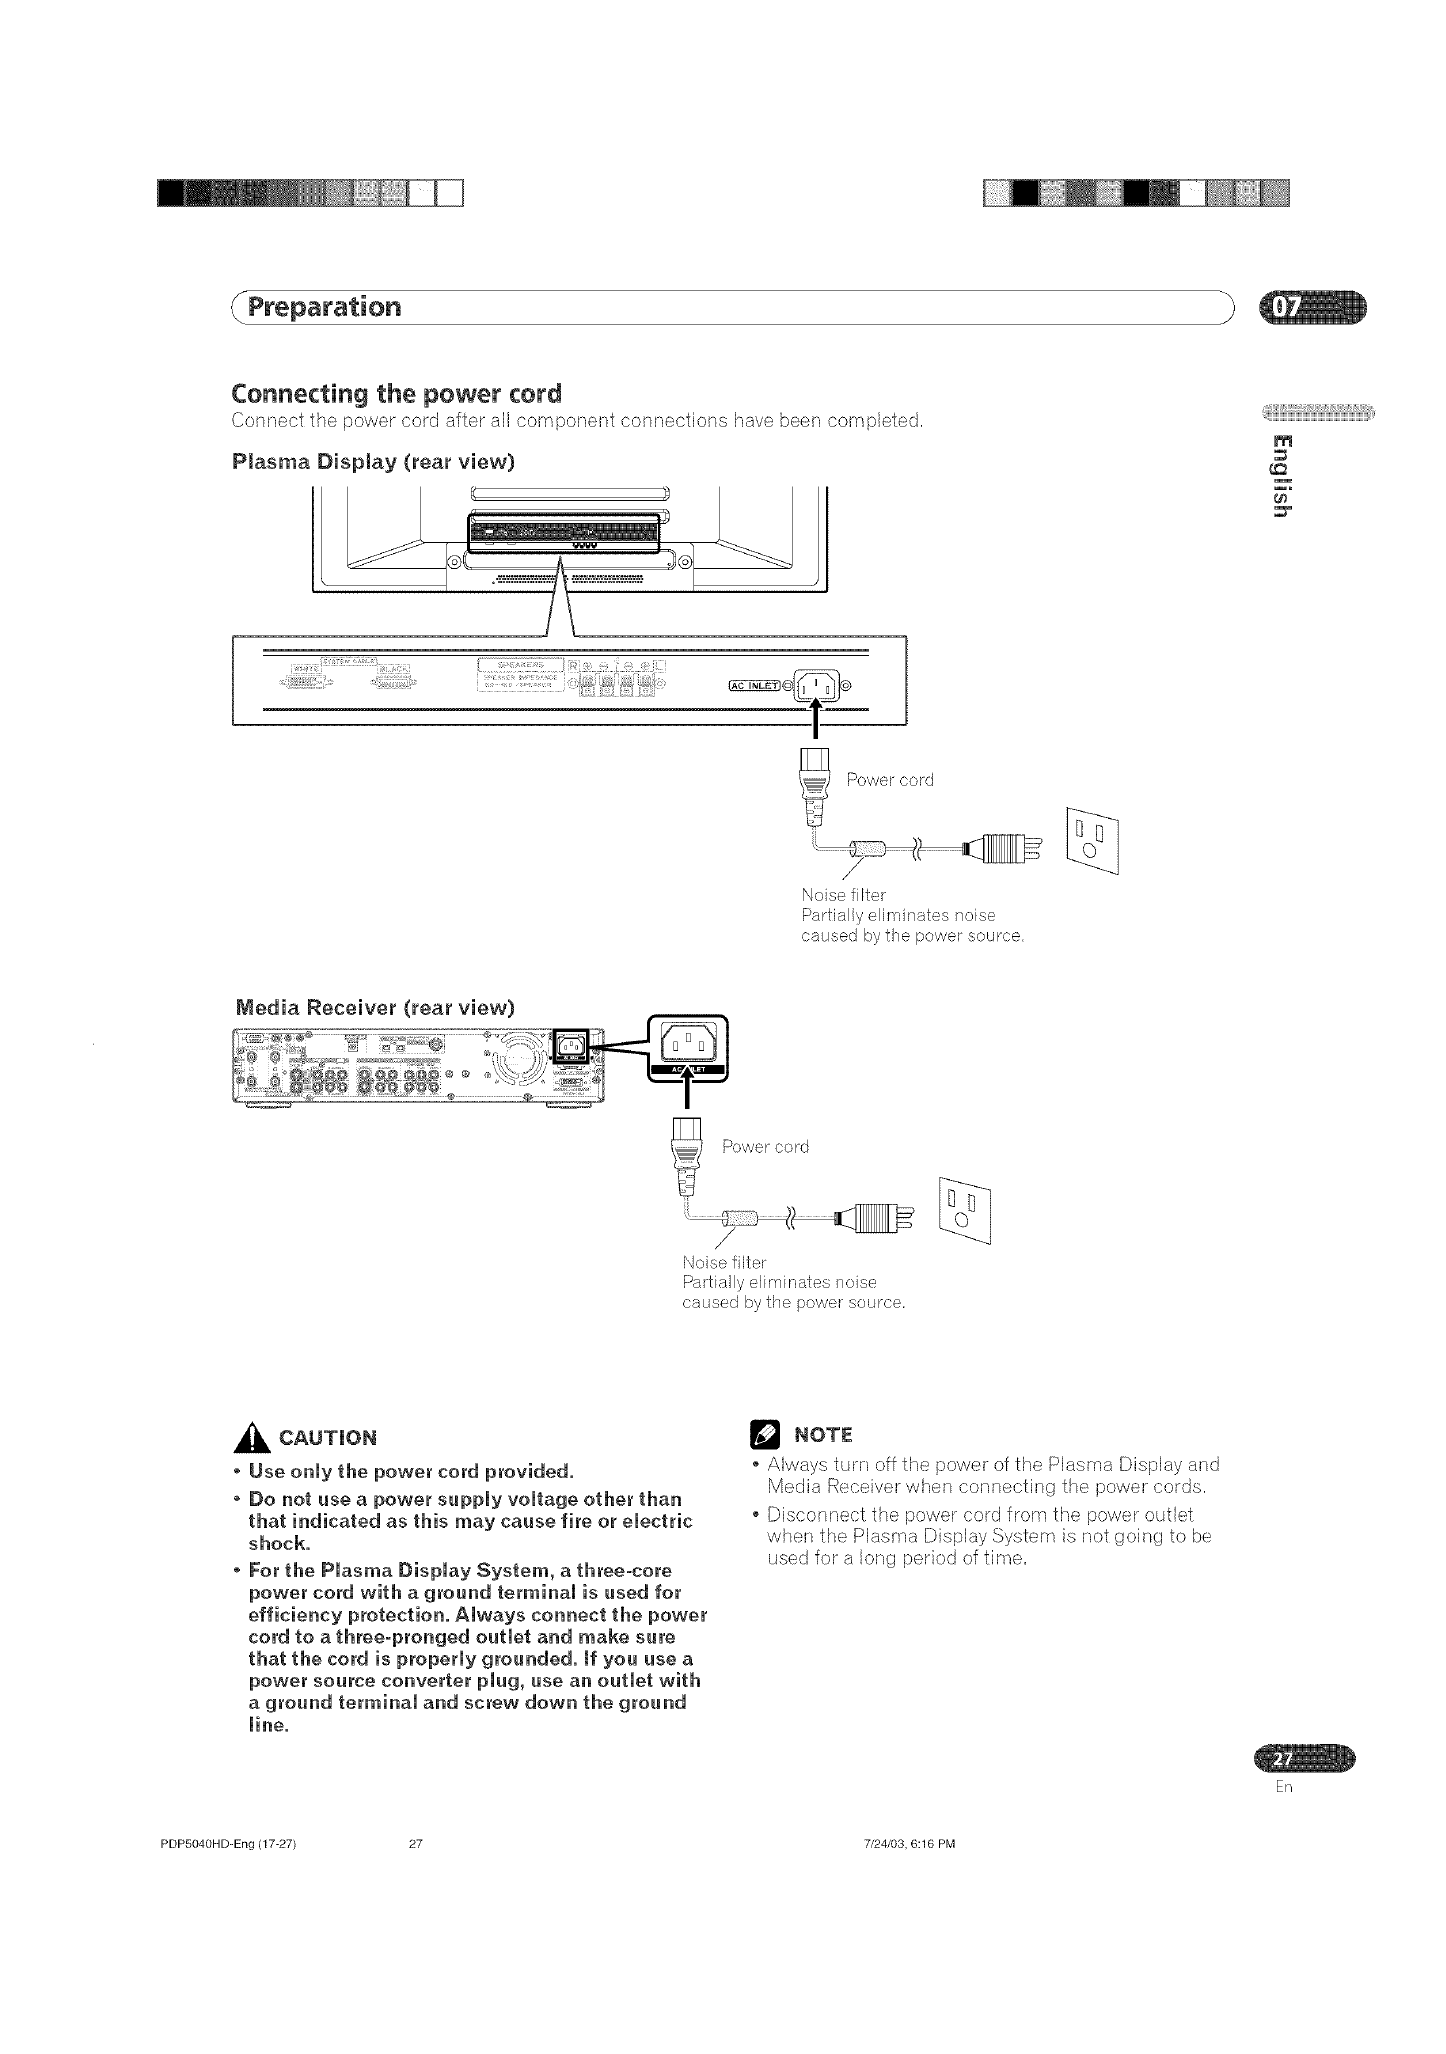
Connecting the power cord
Connect the power cord after all corr,,portent connections have been completed, _iii_i]i_ii_i;i1_iiiiilii1iii_iii_i_iii_i_iii_i_iii_i_iii_i_iii_i_iii_i_iii_i_iii_i_iii_i_iIi`i¸,
m
,; {/ ) ; ........]1;:71 _1;: /:, _,
Power cord
Noise filte_
Partially eliminates i/oise
caused by the powel _ source.
Media Receiver (rear vmew)
Power cord
/
Noise filter
Partiallyeliminates noise
caused by the power source,
_CAUTUON
• Use only the power cord provided.
• Do not use a power supply voltage other than
that indicated as this may cause fire or electric
shock.
• For the Plasma Display System, a three-core
power cord with a ground terminal is used for
efficiency protection. Always connect the power
cord to a three-pronged outlet and make sure
that the cord is properly grounded. If you use a
power source converter plug, use an outlet with
a ground terminal and screw down the ground
line.
NOTE
Always turn off the power of the Plasma Display and
Media Receiver when connecting the power cords,
Disconnect the power cord from the power outlet
when the Plasma Display System is not going to be
used for a long period of time,
ER
PDP5040HD=Eng (17-27) 27 7/24/03, 6:16 PM
Basic Operations
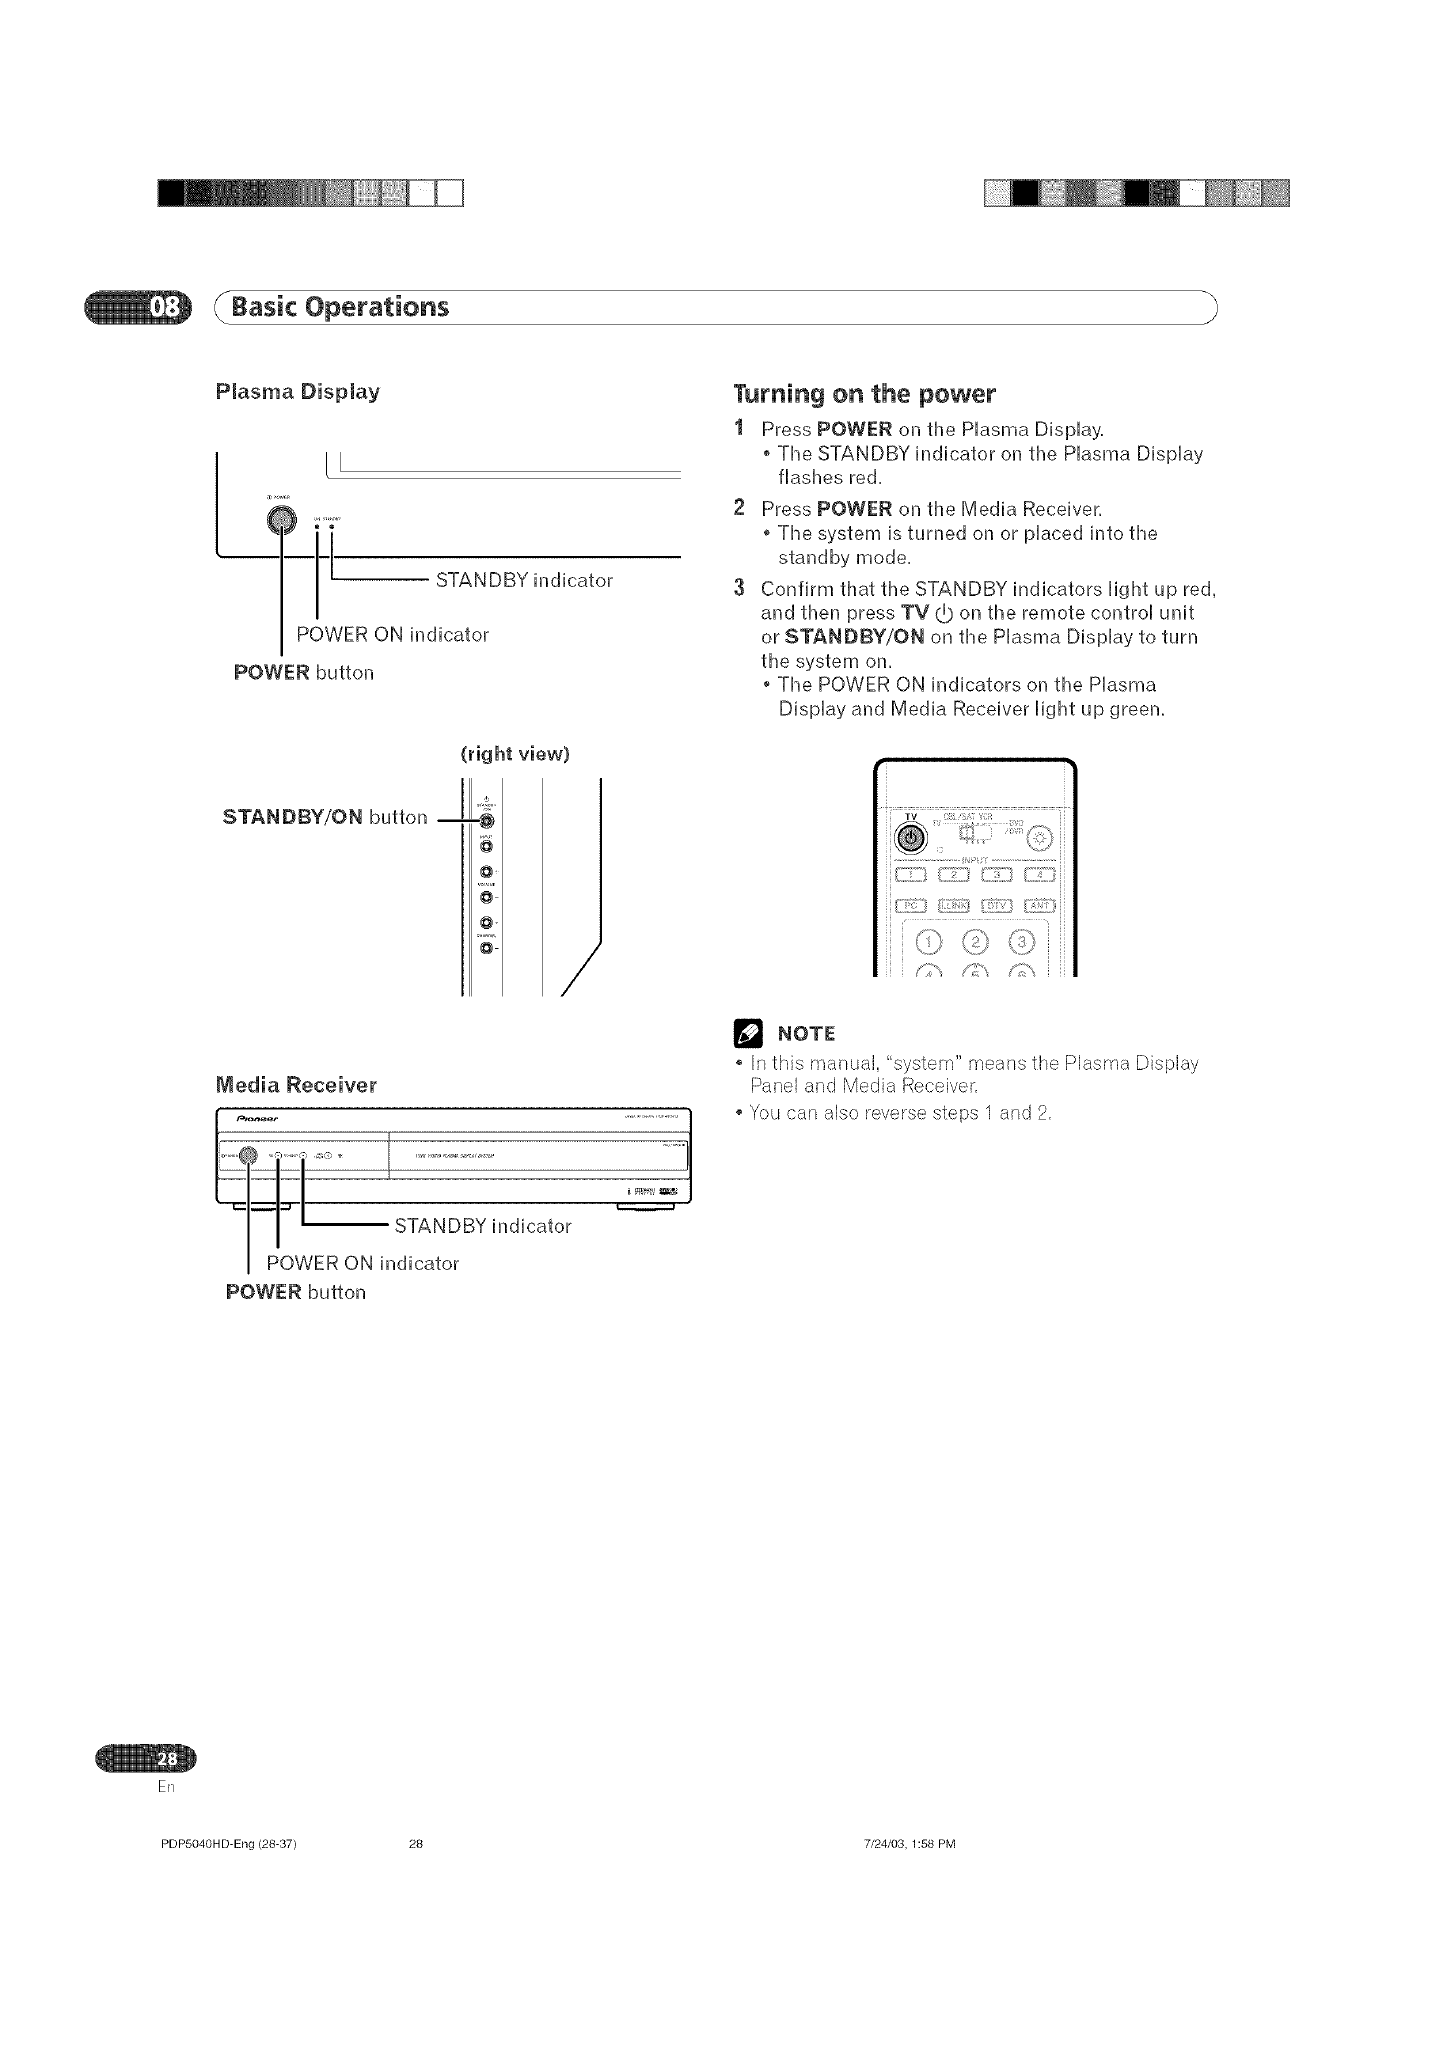
Plasma Display
[i
r_o,,,,
I-" STANDBY indicator
POWER ON indicator
POWER button
(right view)
Turning on the power
I Press POWER on timePlasma Display.
TimeSTANDBY indicator on timePlasma Display
flasl_es red.
2 Press POWER on timeMedia Receiver.
Timesystem is turned on or placed into time
standby mode.
3Confirm tl_at timeSTANDBY indicators ligl_t up red,
and tl_en press TV_ on timeremote control unit
or STANDBY/ON on timePlasma Display to turn
timesystem on.
TimePOWER ON indicators on timePlasma
Display and Media Receiver ligl_t up green.
STAN DBY/ON button
/
Media Receiver
_,sq
(s! a
+_:,,<< _, 7,</ ,.::/,i
NOTE
In this manual, "system" means the Plasma Display
Panel and Media Receiver,
" You can also reverse steps 1 and 2,
POWER button
ER
PDP5040HD-Eng (28-37) 28 7/24/03, 1:58 PM
÷
(/Basic Operations
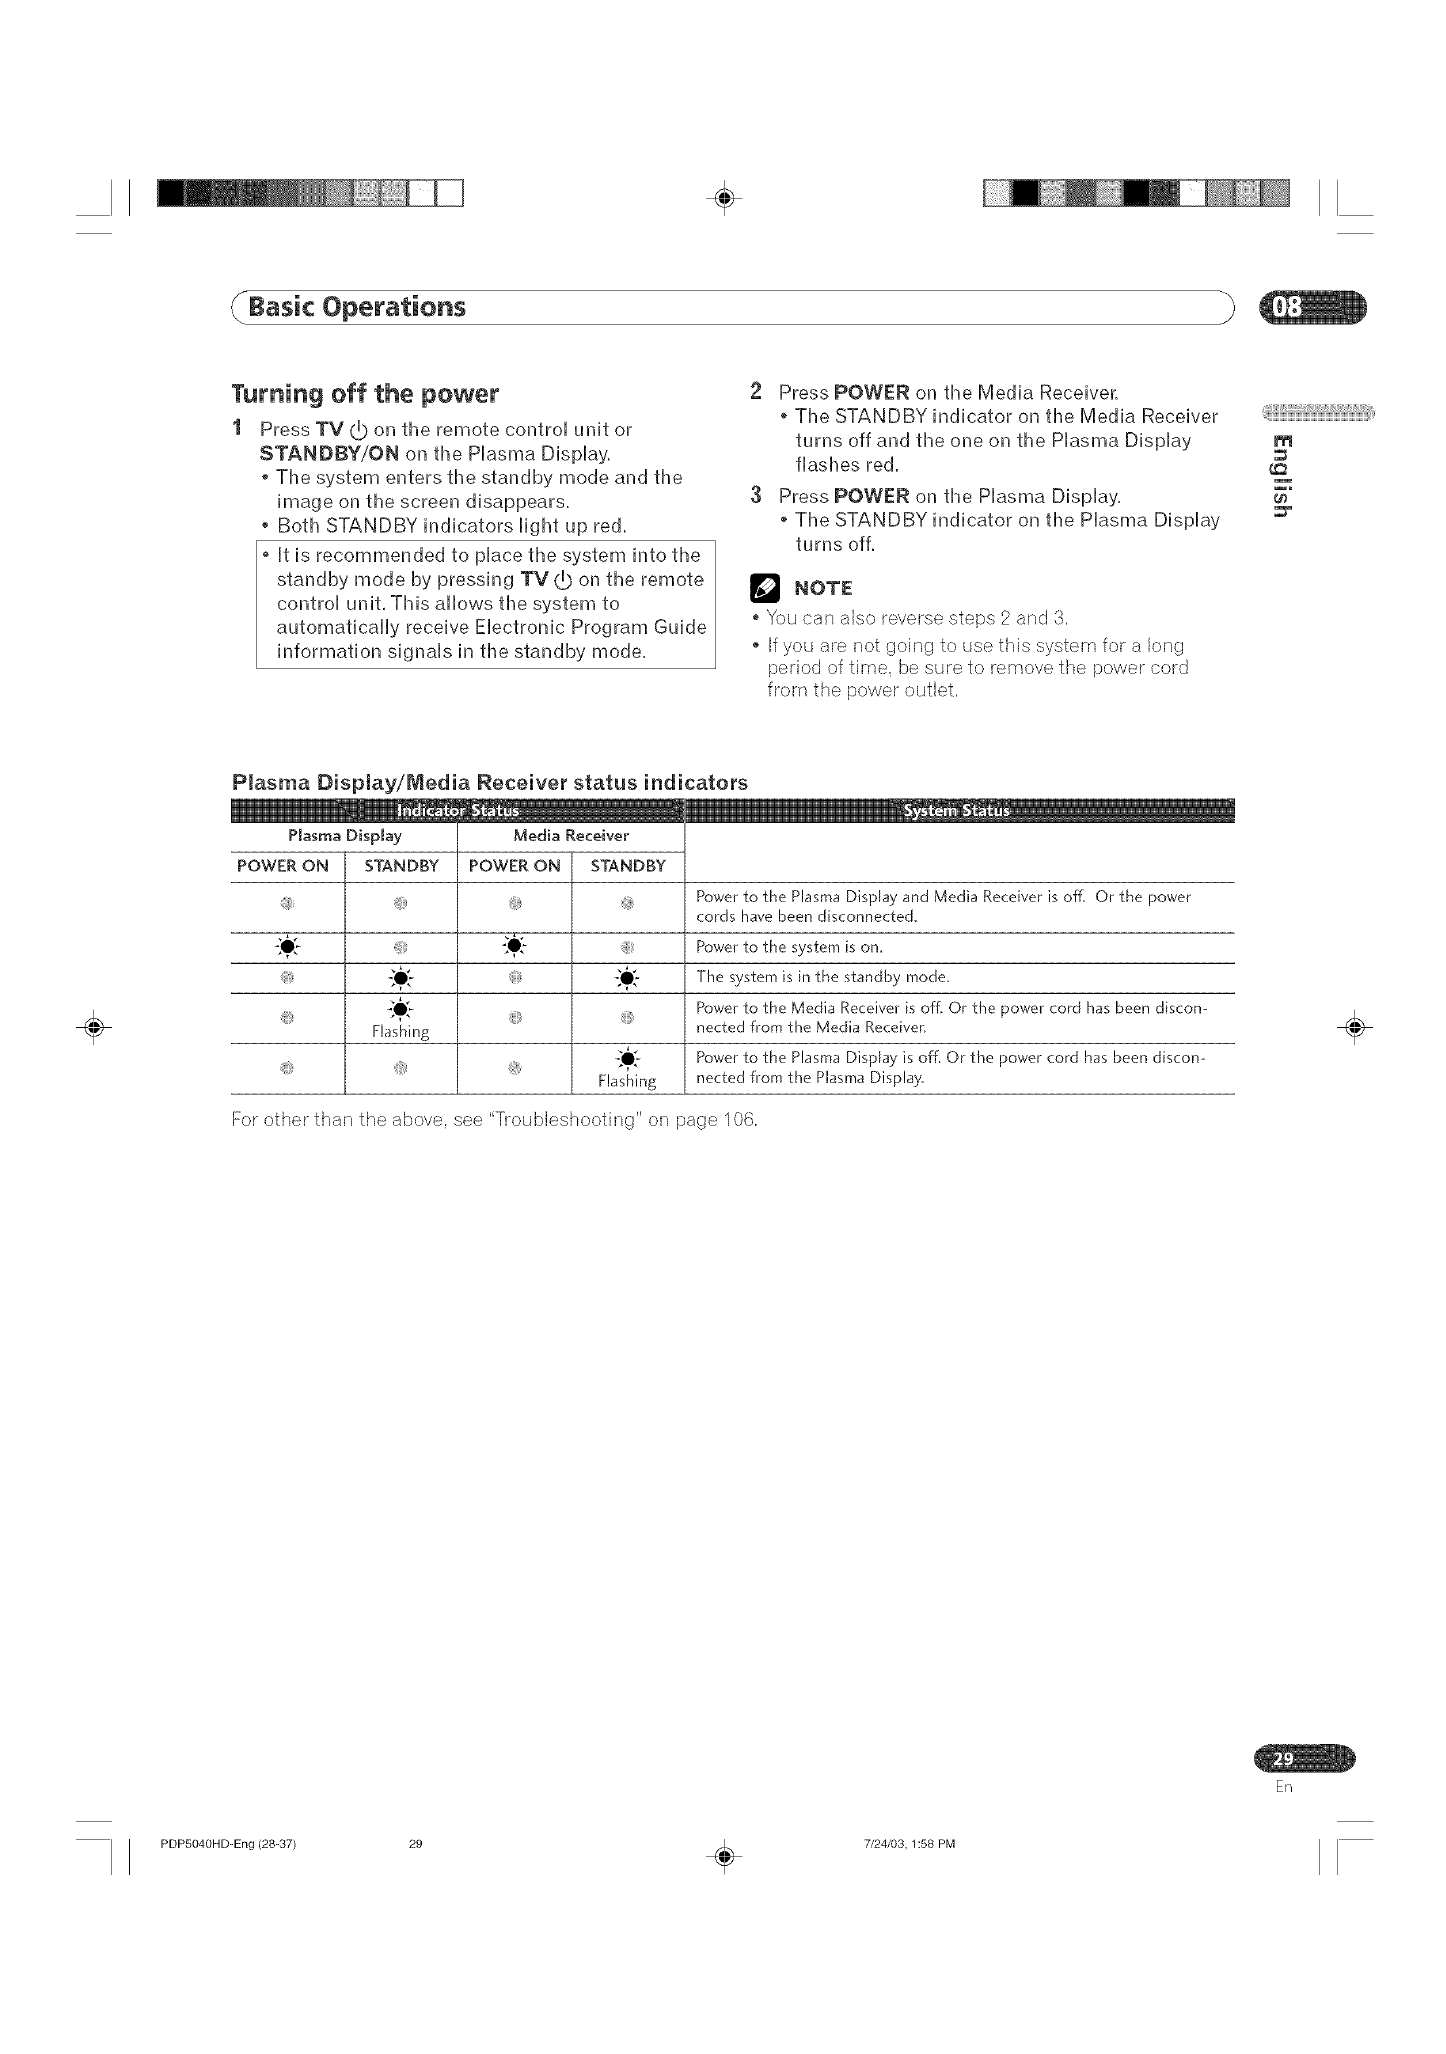
Turning off the power
I Press TV (!) on the remote control unit or
STANDBY/ON on the Plasma Display.
o The system enters the standby mode and the
image on the screen disappears.
o Both STANDBY indicators Hght up red.
Utis recommended to pUacethe system into the
standby mode by pressing TV (_)on the remote
control unit. This allows the system to
automatically receive Electronic Program Guide
information signals in the standby mode.
2 Press POWER on the Media Receiver.
The STANDBY indicator on the Media Receiver
turns off and the one on the Plasma Display
flashes red.
3Press POWER on the Plasma Display.
, The STANDBY indicator on the Plasma Display
turns off.
NO'rl:
You can also reverse steps 2 and 3.
If you are not going to use this system for a long
period of time, be sure to remove the power cord
from the power outlet.
_iiiiiii_ii_i;i1_iiiiiiiiii1iii_iii_i_iii_i_iii_i_iii_i_iii_i_iii_i_iii_i_iii_i_iii_i_iii_i_iIii¸,
m
÷
Plasma DispiayilVledia Receiver status indicators
Plasma Display
POWER ON STANDBY
Power to the Plasma Display and Media Receiver is off, Or the power
) cords have been disconnected,
Power to the system is on,
The system is in the standby mode,
Power to the Media Receiver is off. Or the power cord has been discon-
Flashing netted #ore the Media Receiven
Power to the Plasma Display is off. Or the power cord has been discon-
nected from the Plasma Display,
Media Receiver
POWER ON STANDBY
_ iiiiiiiii_
_iiiiiiii _
} }
Flashing
For other than the above, see "Troubleshooti _g' o-_page 106.
÷
EN
PDP504OHD-Eng (28-37) 29 _ 7/24/03,1:58 PM
÷
Basic Operations
÷
(right view)
_ ÷*_==*_==_,__,=_,__*_*_ _***_=**% ¢****_===_!
@@
@®
®@
@@
N
i _,+ii ; )
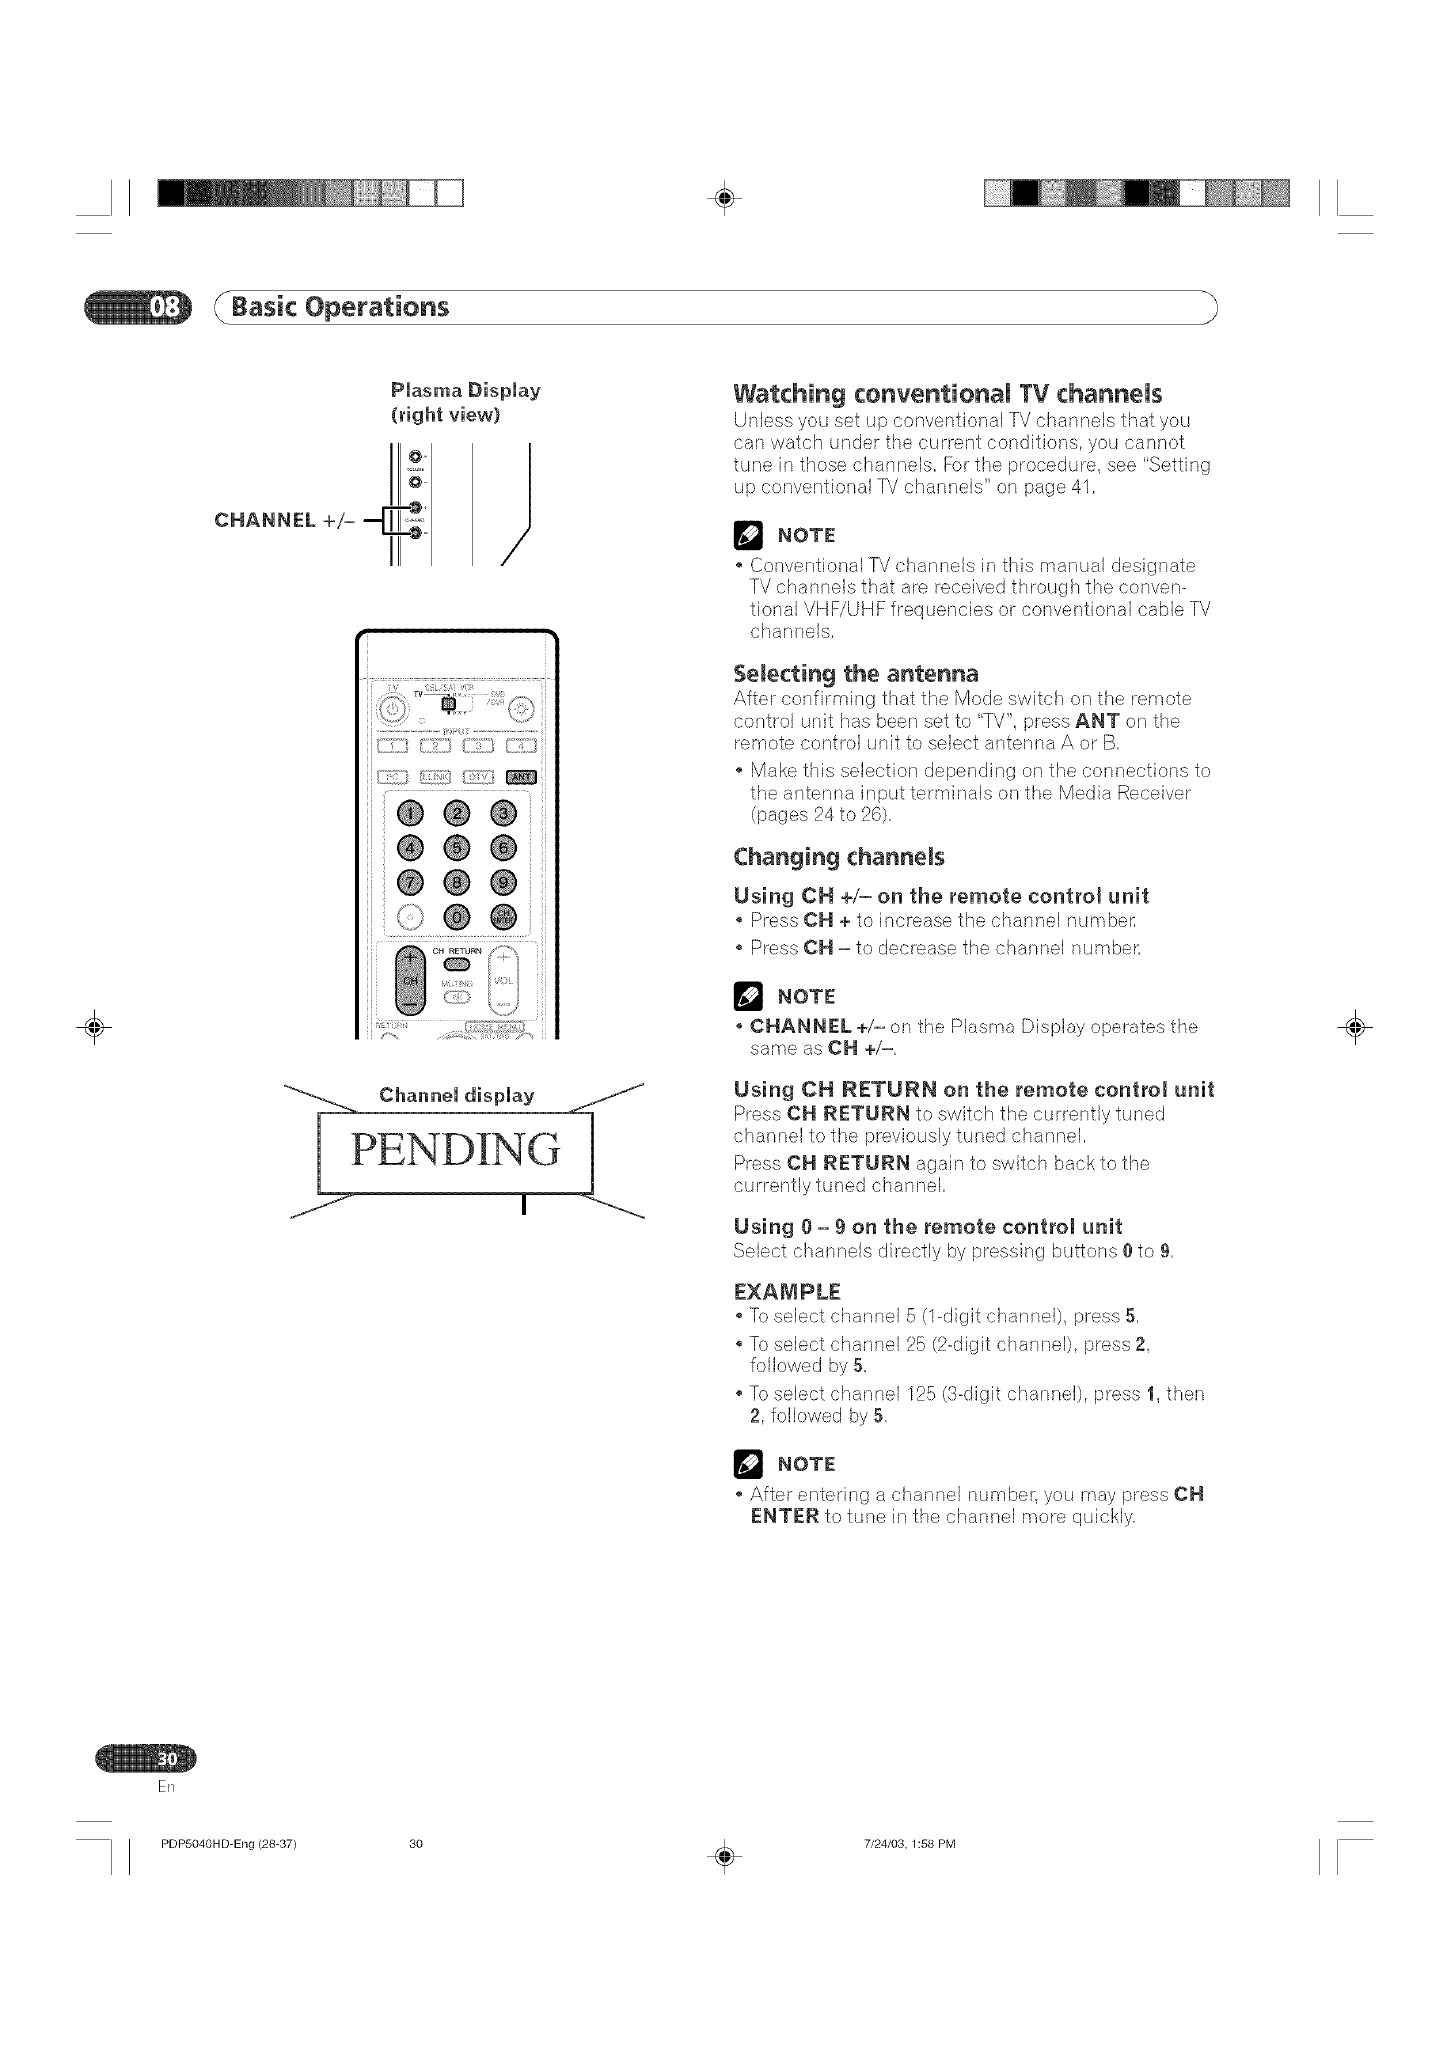
Watching conventional TV channels
Unless you set up conventional TV channels that you
can watch under the current conditions, you cannot
tune in those channels, For the procedure, see "Setting
up conventional ]M channels" on page 41,
NOTE
Conventional TV channels in this manual designate
TV channels that are received through the conven-
tional VHF/UHF frequencies or conventional cable TV
channels,
$emecting the antenna
After confirming that the Mode switch on the remote
control unit has been set to "TV", press ANT on the
remote control unit to select antenna A or B,
.Make this selection depending on the connections to
the antenna input terminals on the Media Receiver
(pages 24 to 26),
Changing channels
Using CH +/- on the remote control unit
. Press CH + to increase the channel numbe_:
. Press CH = to decrease the channel number,
_'_ NOTE
-CHANNEL +/- on the Plasma Display operates the
sarr,_,_-_as CH +/-,
Using CH RETURN on the remote control unit
Press CH RETURN to switch the currently tuned
channel to the previously tuned channel,
Press CH RETURN again to switch back to the
currently tuned channel,
Using O= 9 on the remote control unit
Select channels directly by pressing buttons 0 to 9,
EXAMPLE
. 'R) select channel 5 (1-digit channel), press 5,
. TL_select channel 25 (2-digit channel), lsmss 2,
followed by 5,
. To select channel 125 (3-digit channel), press 1, then
2, followed by 5,
NOTE
After entering a channel number, you may press CH
ENTER to tune in the channel more quickly,
÷
ER
PDP5040HD-Eng (28-37) 30 _ 7/24/03, 1:58 PM
÷
(_Basic Operations
÷
Plasma Display
(right view)
II ,_+1
voLu=E÷/-4Z.I;'
....... ]]J
s;,)x ,}:,
ii
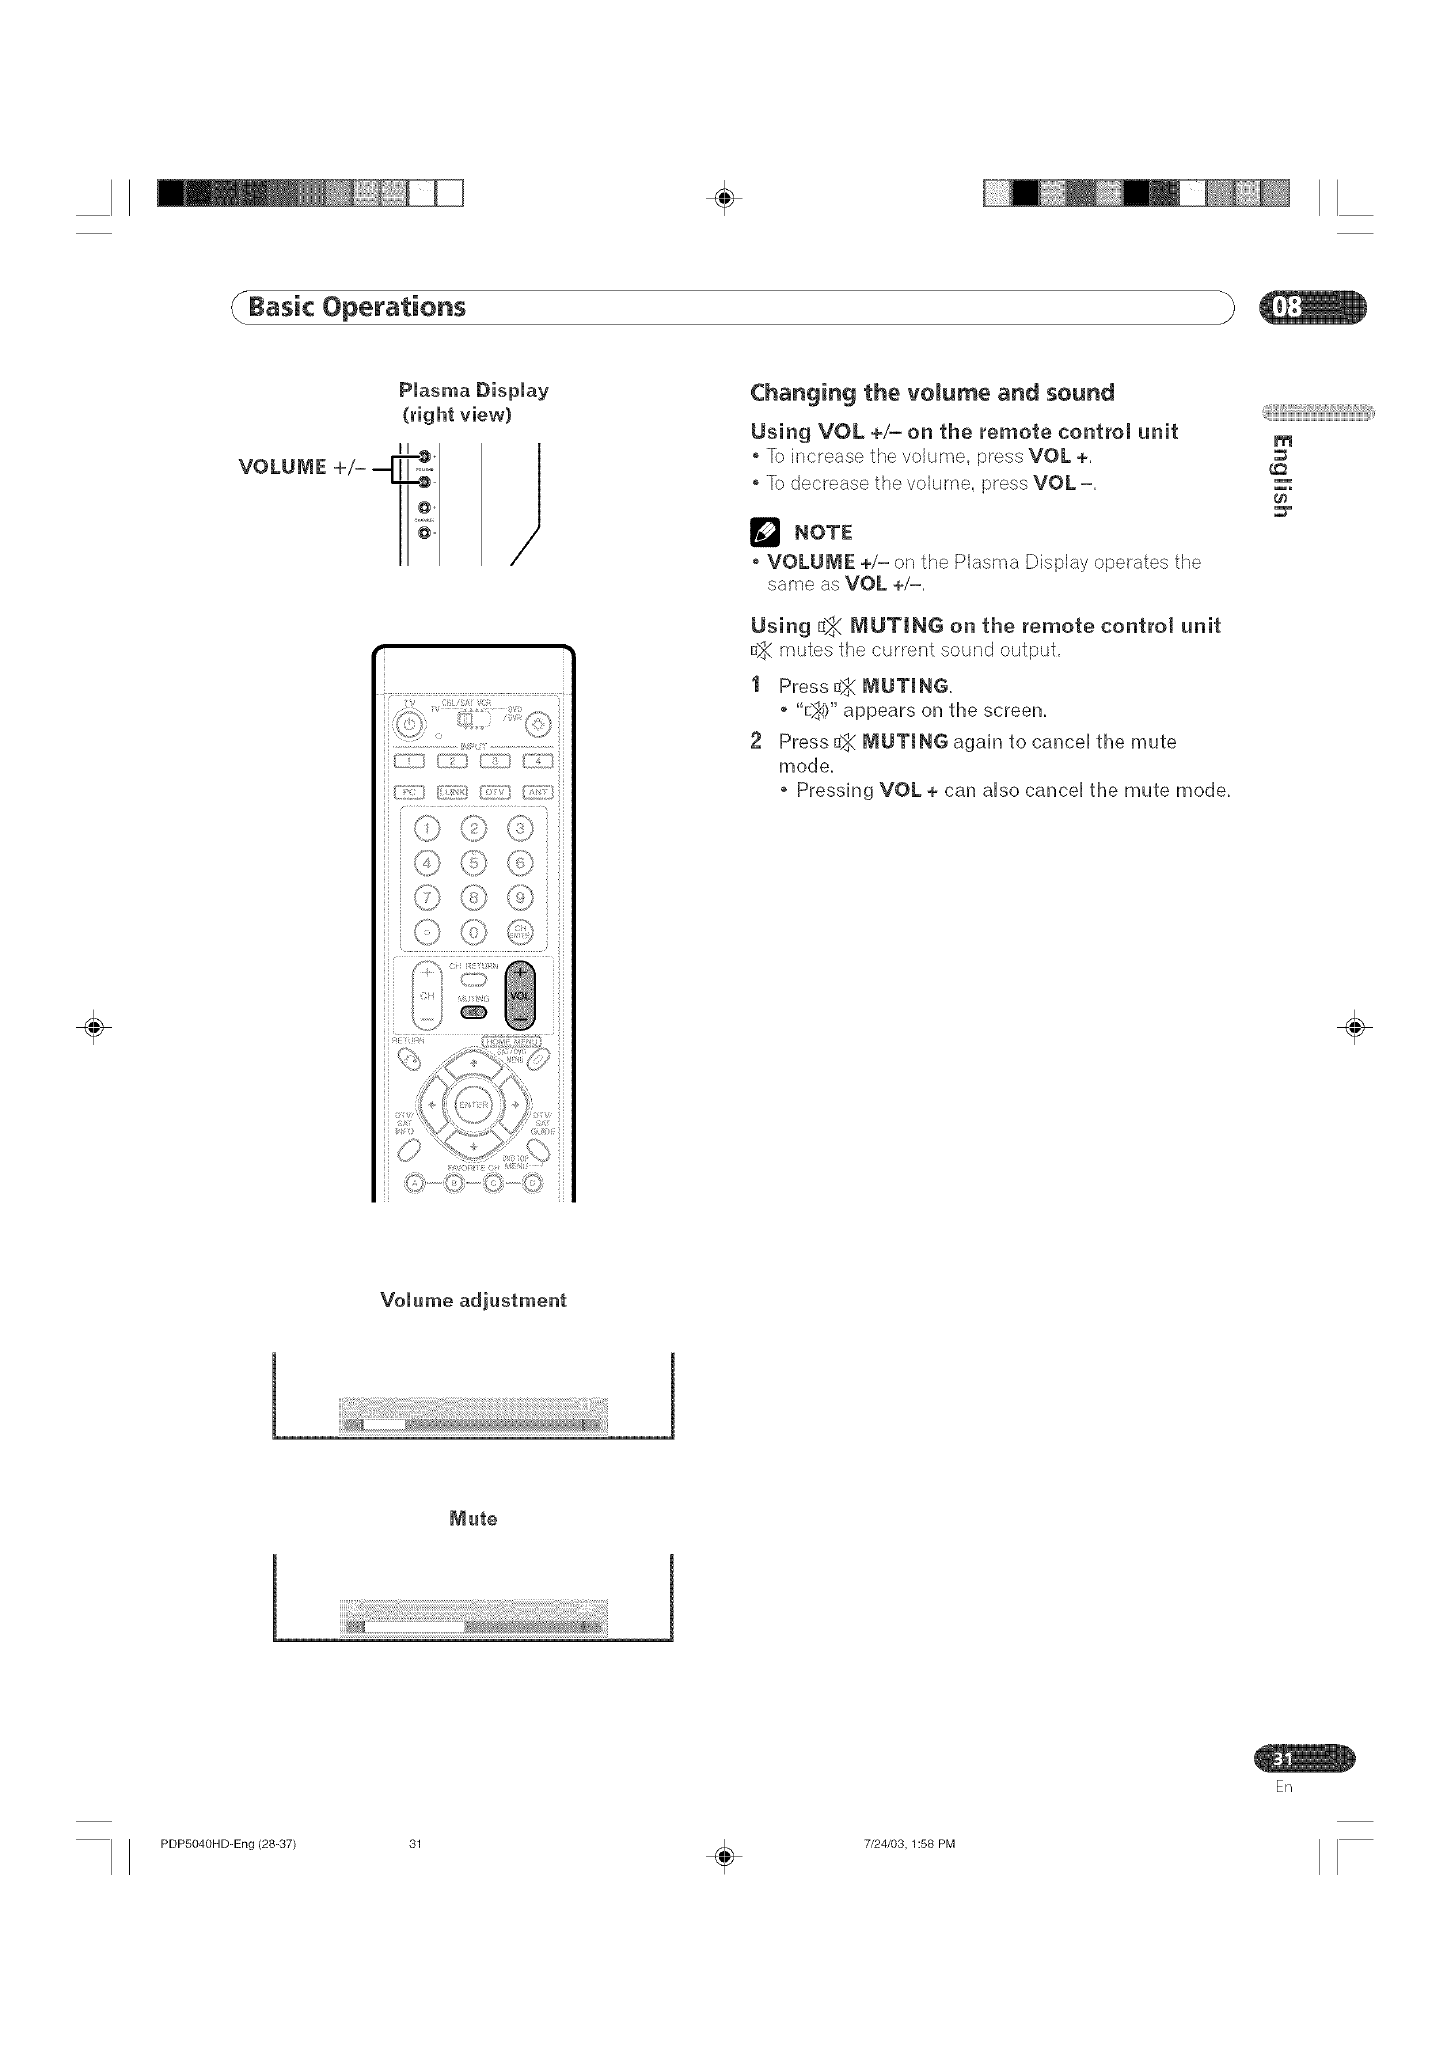
Changing the volume and sound
Using VOL +/- on the remote control unit
To increase the volume, press VOL +,
To decrease the velurne, press VOL =,
NOTE
VOLUIVJE +/= on the Plasma Display eperates the
same as VOL +/=.
Using _ B/lUTING on the remote control unit
D_ mutes the current sound output,
I Press_ MUTING,
o "E_)" appears on the screen.
2 Press D_ iVJUTJNGagain to cancel tl_e mute
mode.
• Pressing VOL + can also cancel tl_e mute mode.
_iiiilllllliiiiiiilililililililililili_ili_i¸,
m
÷
!!!_iiiiiiiiiiiiiiiiiiiiiii !;! 1
_te
!!!%¸i¸i=i!!11!!!!11!!!11!!!!11!!!11!!!11!!!!11!!!11!!!11!!!!11!i! 1
ER
PDP5040HD-Eng (28-37) 31 _ 7/24/03,1:58 PM
÷
Basic Operations
÷
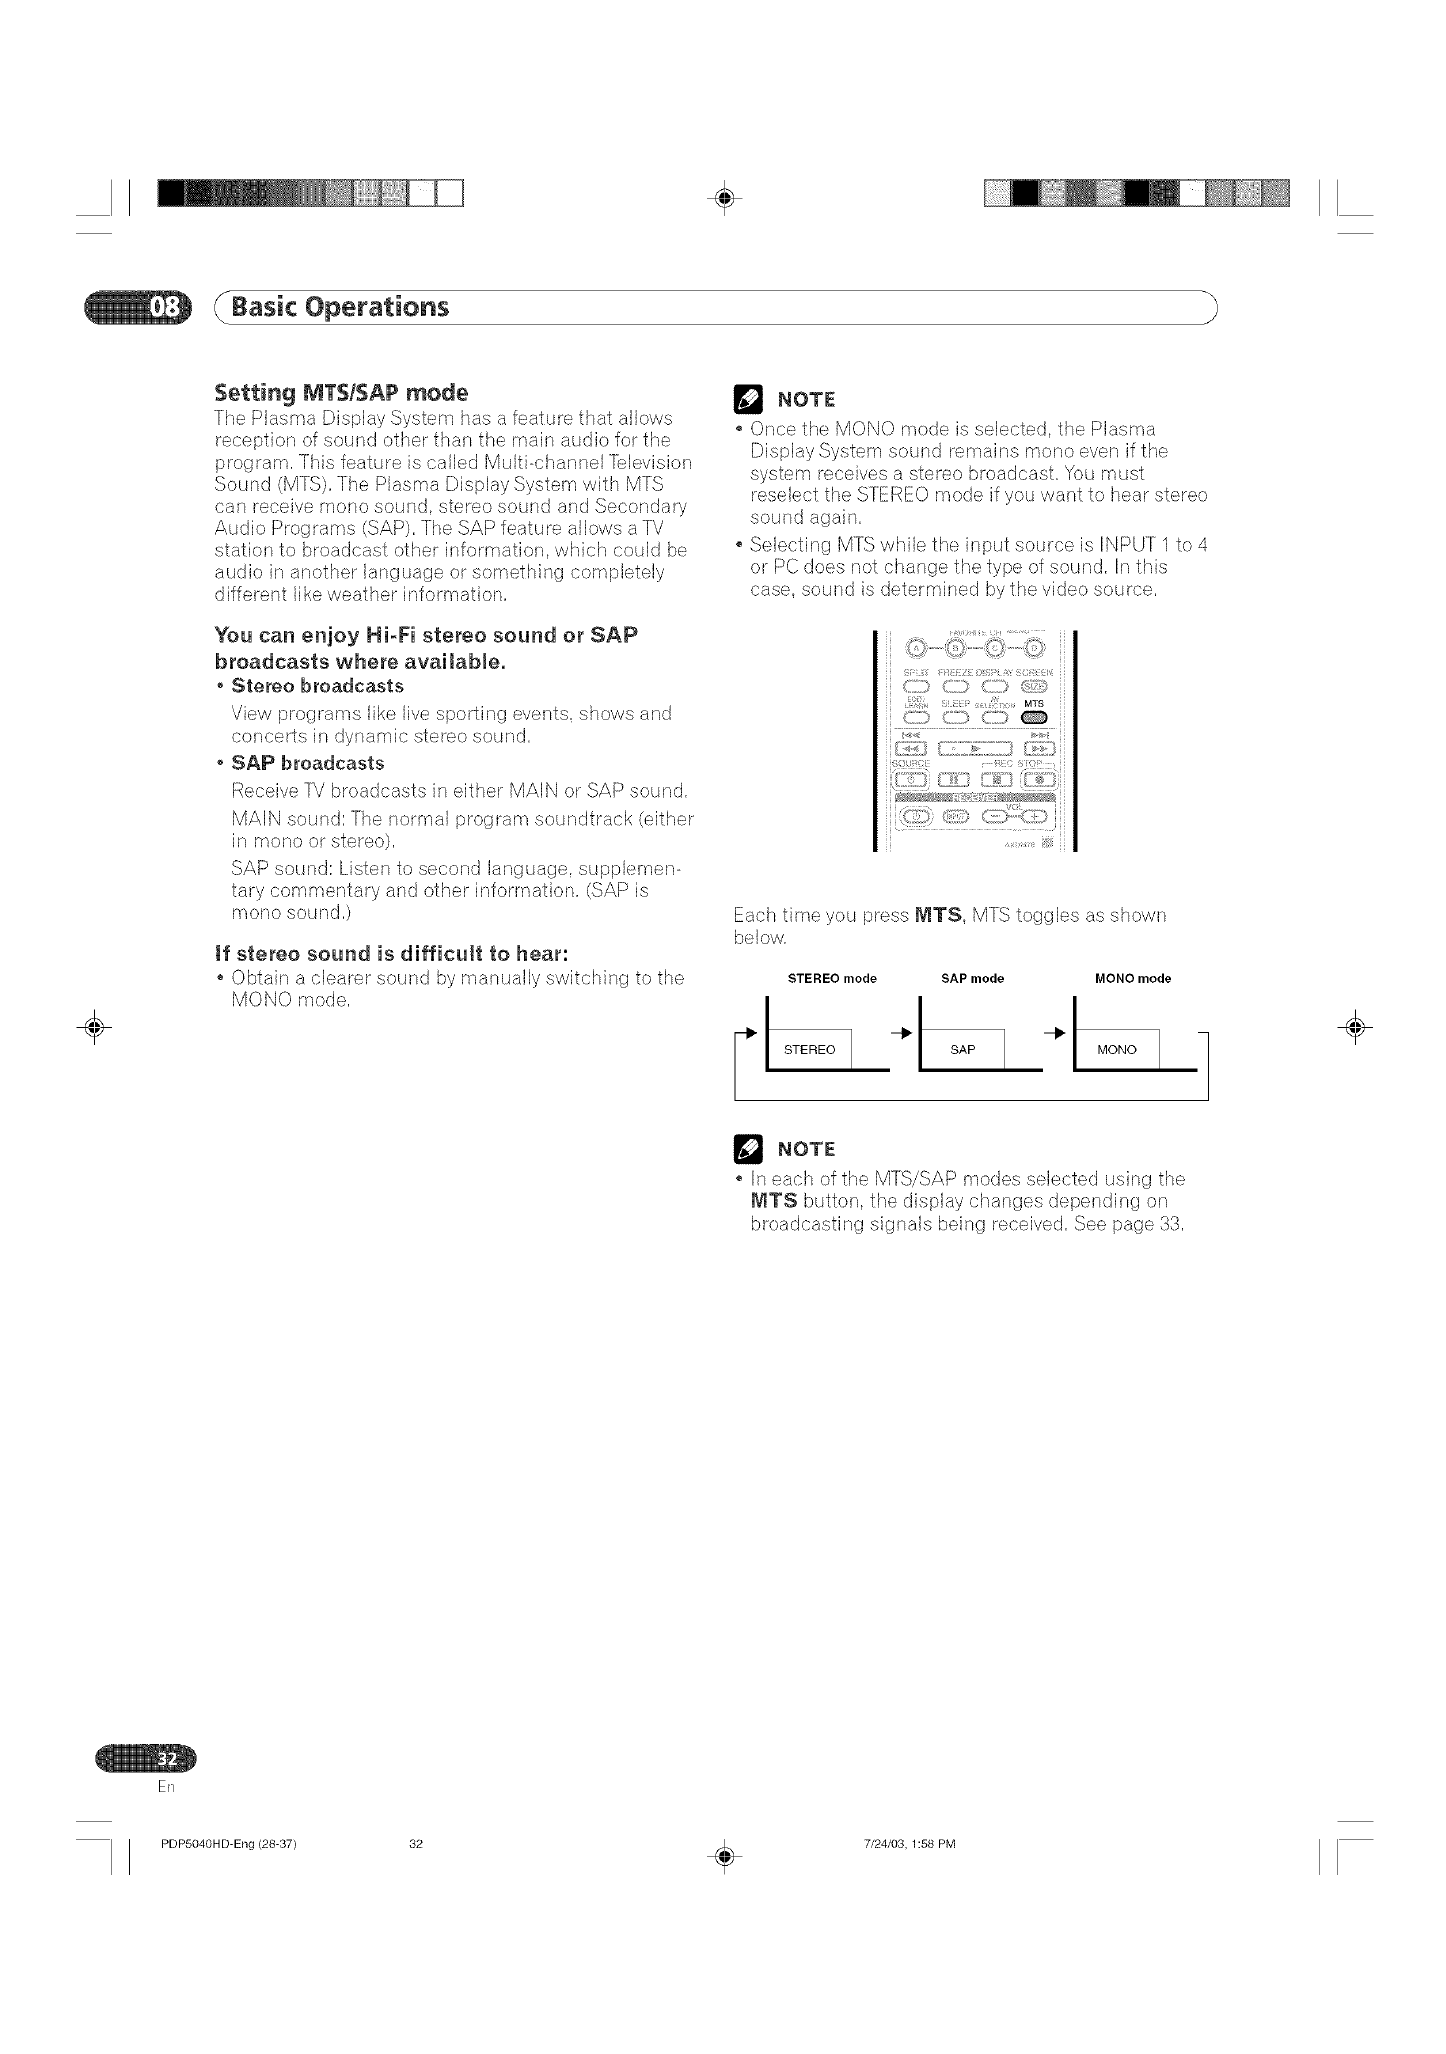
Setting IVIT$!$AP mode
The Plasma Display System has a feature that allows
reception of sound other than the main audio for the
program, This feature is called Multi-channel ]_levision
Sound (MrS), The Plasma Display System with MTS
can receive mono sound, stereo sound and Secondary
Audio Programs (SAP), The SAP feature allows a TV
station to broadcast other information, which could be
audio in another language or something completely
different like weather information,
You can enjoy Hi-Fi stereo sound or SAP
broadcasts where available.
,Stereo broadcasts
View programs like live sporting events, shows and
concerts in dynamic stereo sound,
, SAP broadcasts
Receive _/broadcasts in either MAIN or SAP sound,
MAIN sound: The normal program soundtrack (either
in mono or stereo),
SAP sound: Listen to second language, suppbmen-
tary commentary and other information, (SAP is
mono sound,)
if stereo sound is difficult to hear:
*Obtain a clearer sound by manually switching to the
MONO rhode,
NOTE
Once the MONO mode is selected, the Plasma
Display System sound remains mono even if the
system receives a stereo broadcast, You must
resebct the STEREO mode if you want to hear stereo
Selecting MTS while the input source is INPUT 1 to 4
or PC does not change the type of sound, In this
case, sound is determined by the video source,
& '\;;
{; MTS
} 's..... ........C]D @
f£;_ (E_i}
...._,._ _iiii
Each time you press NITS, MTS toggles as shown
below,
r
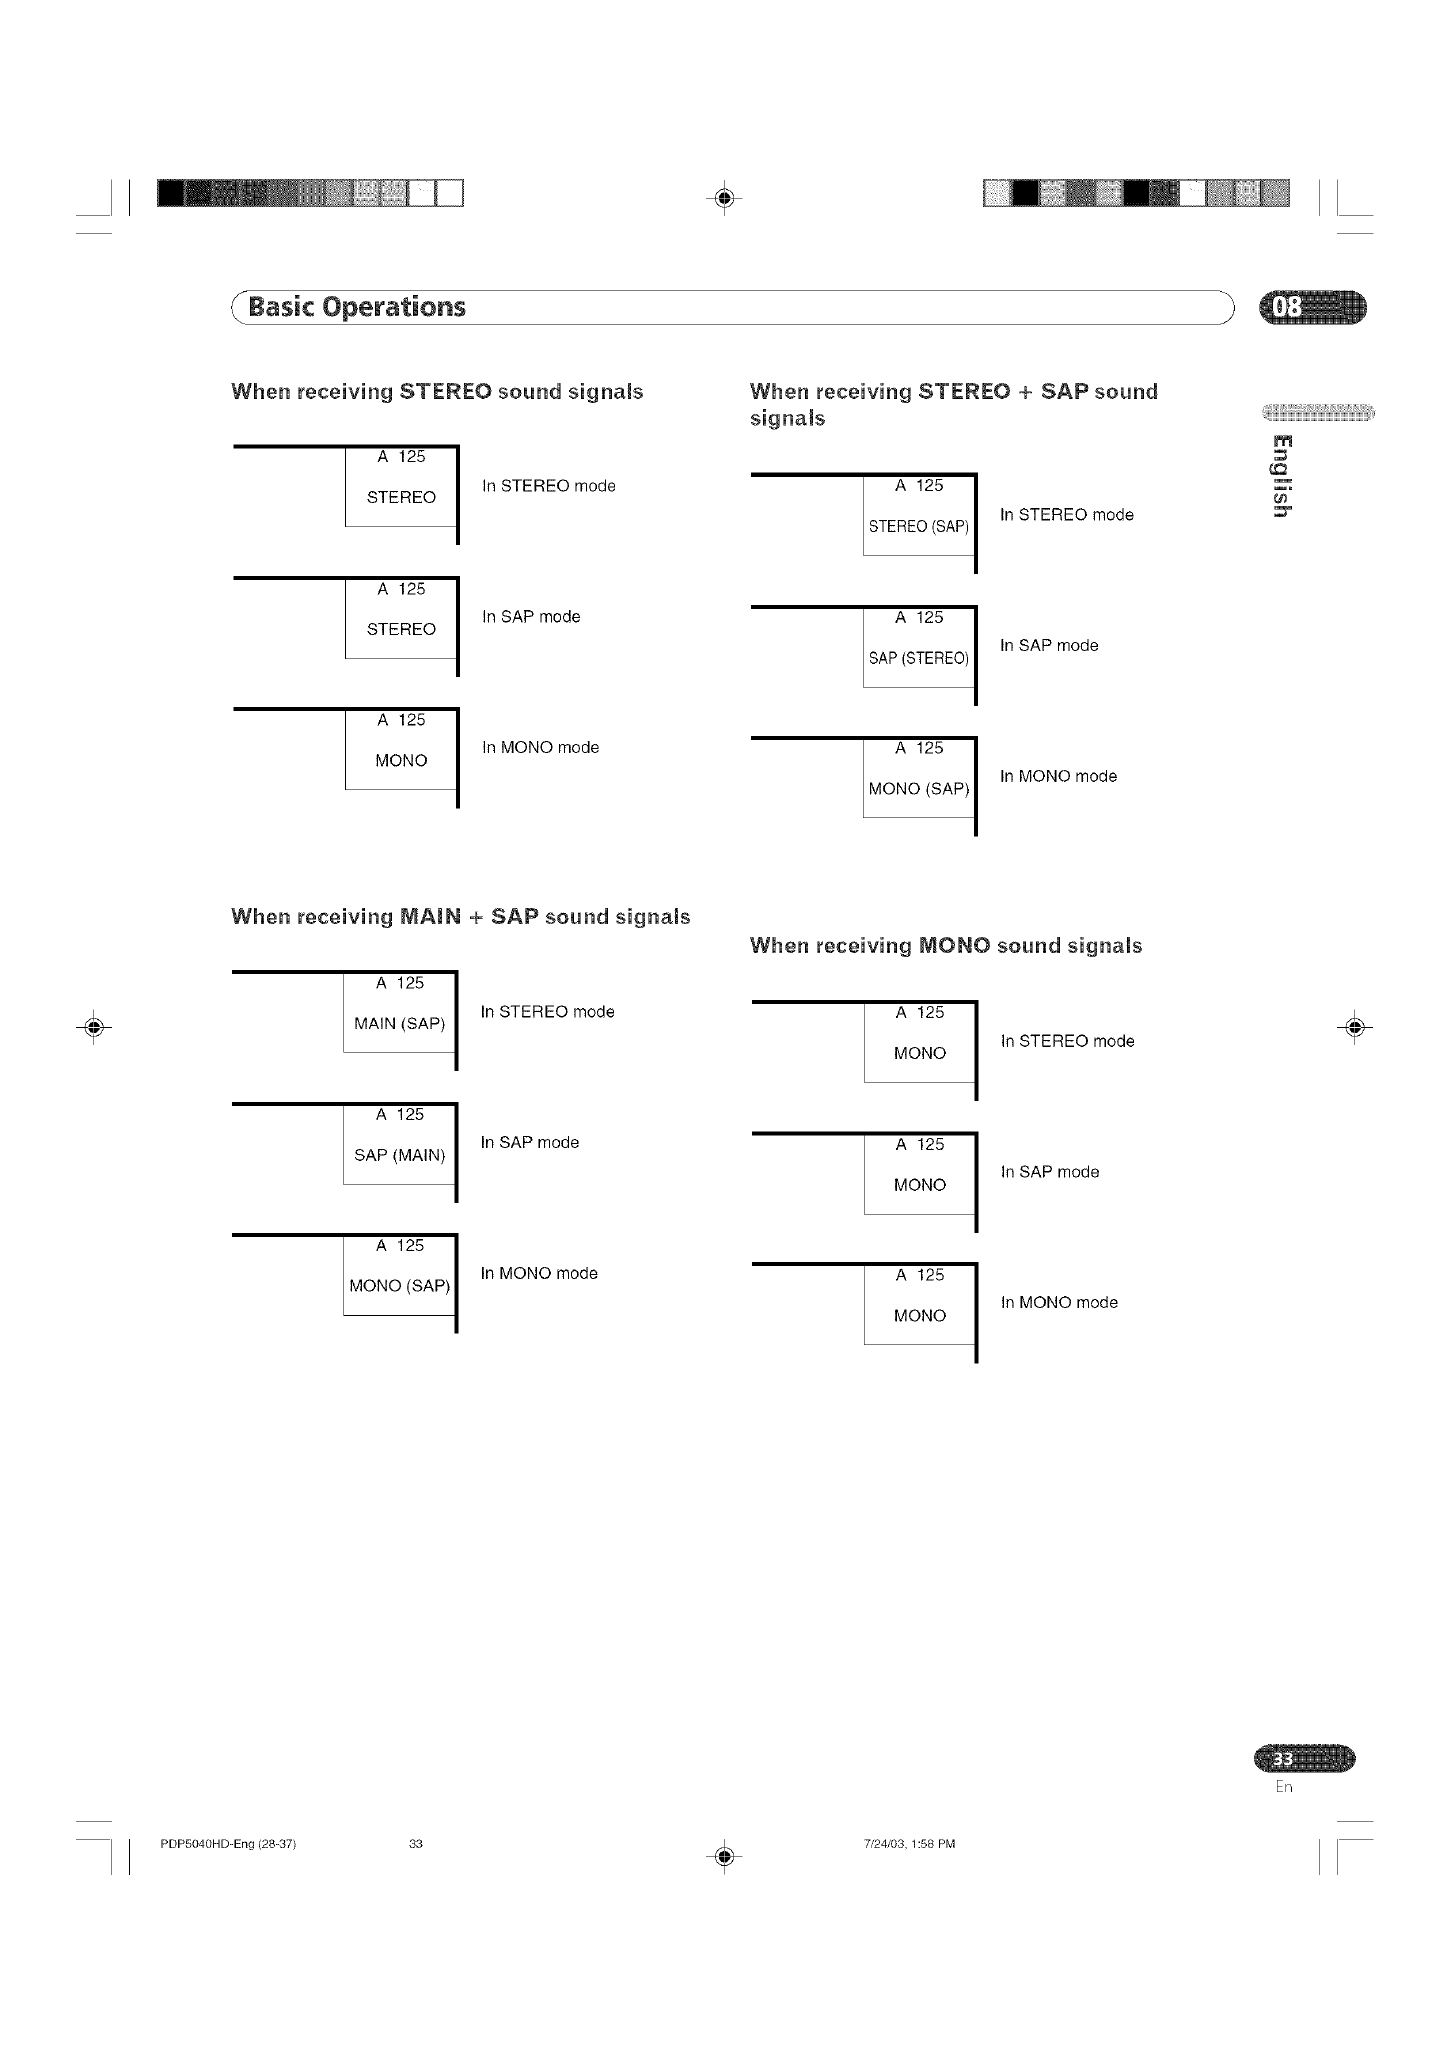
STEREO mode SAP mode MONO mode
STEREO SAP MONO
NOTE
In each of the MTS/SAP modes selected using the
NITS button, the display changes depending on
broadcasting signals being received, See page 33,
÷
ER
PDPh040HD-Eng (28-37) 32 _ 7/24/03, 1:58 PM
÷
(/Basic Operations
When receiving STEREO sound signams
A 125
In STEREO mode
STEREO
When receiving STEREO + SAP sound
signams
A 125
In STEREO mode
STEREO (SAP)
_iiiiiii_Hii_i_H1_iiiiiiiiii1iii_iif_i_iif_i_iii_i_iii_i_iii_i_iii_i_iii_i_iii_i_iii_i_iii_i_iIi`i¸,
m
A 125
STEREO
A 125
MONO
In SAP mode
In MONO mode
A 125 I
SAP (STEREO) I
A 125 I
MONO (SAP) I
In SAP mode
In MONO mode
÷
When receiving MAiN + SAP sound signats
A 125 I
MAIN (SAP) In STEREO mode
A 125 I In SAP mode
SAP (MAIN) I
A 125 I
MONO (SAP) I
In MONO mode
When receiving MONO sound signals
A 125
MONO In STEREO mode
A 125
In SAP mode
MONO
A 125
In MONO mode
MONO
÷
ER
PDP5040HD=Eng (28=37) 33 _ 7/24/03,1:58 PM
÷
Basic Operations
÷
(right view)
@@@
@®
®@
@@
i < 1_, <711 _ )
J
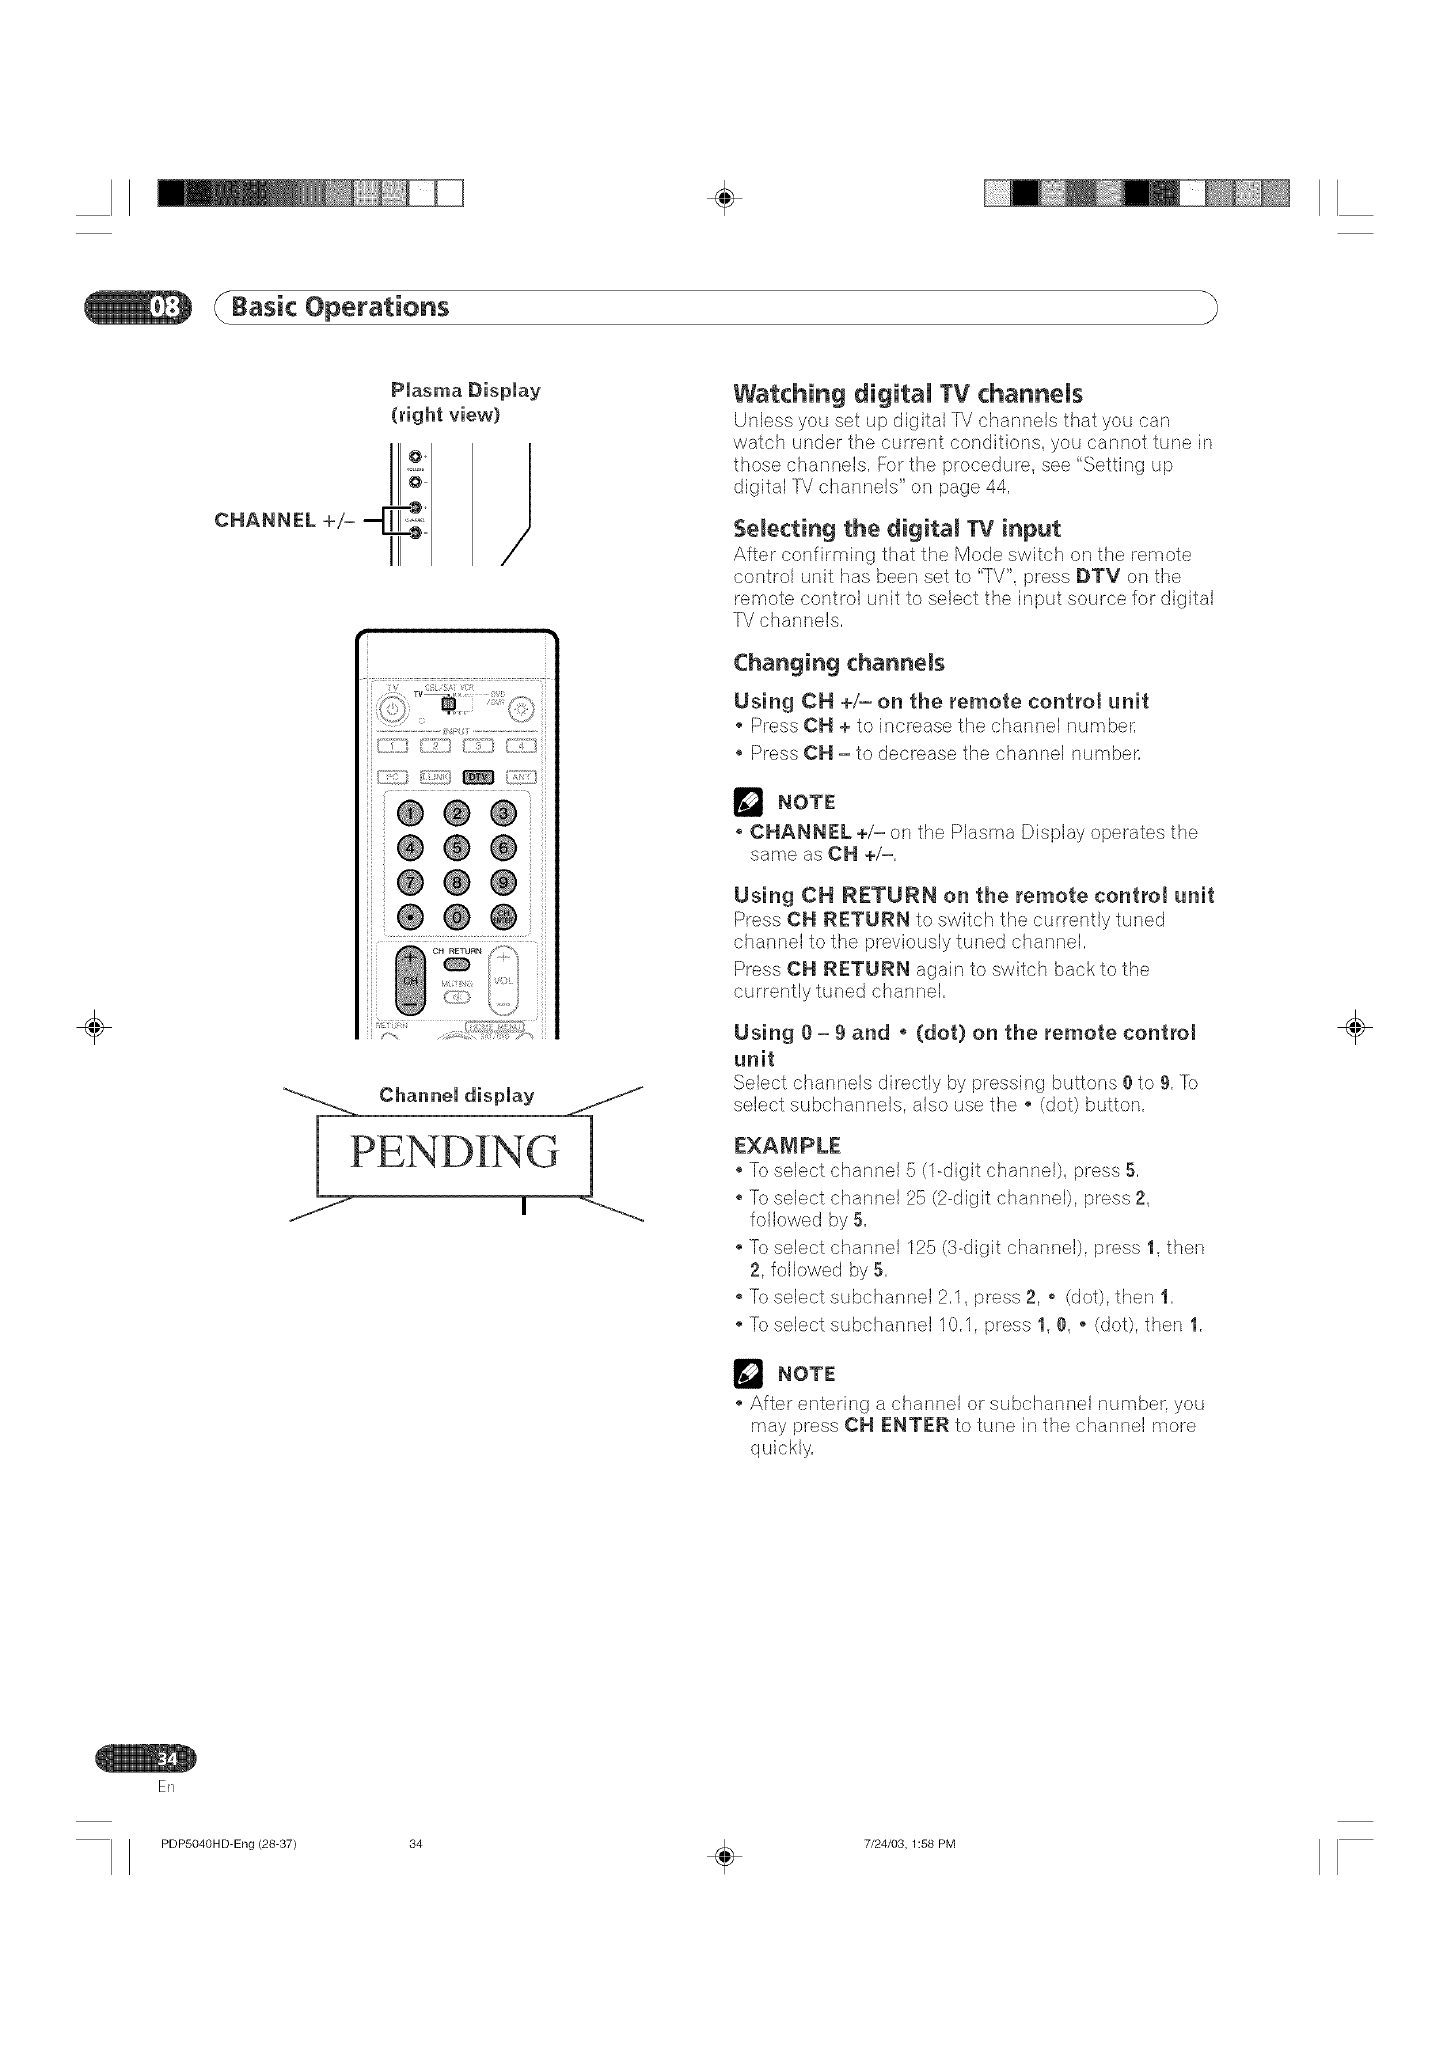
Watching ti!ital TV channels
Unless you set up difjital TV channels that you can
watch under the current conditions, you cannot tune in
those channels, For the procedure, see '<Setting up
digital 'IV channels" on page 44,
Selecting the digital lV input
After confirming that the Mode switch on the remote
control unit has been set to "TV", press DTV on the
remote control unit to select the input source for digital
TV channels,
Changing channels
Using OH +/- on the remote control unit
Press CH + to increase the channel nurnbe_:
Press CH = to decrease the channel number,
NOTE
.CHANNEL +/= on the Plasma Display operates the
same as CH +/=,
Using CH RETURN on the remote control unit
Press CH RETURN to switch the currently tuned
channel to the previously tuned channel,
Press CH RETURN again to switch back to the
currently tuned channel,
Using 1)= 9 and , (dot) on the remote control
unit
Select channels directly by pressing buttons t) to 9, 7b
select subchannels, also use the, (dot) button,
EXAMPLE
. To select channel 5 (1-dicjit channel), press 5,
To select channel 25 (2-digit channel), press 2,
followed by 5,
To select channel 125 (3-digit channel), press 1, then
2, followed by 5,
To select subchannel 2,1, press 2, _ (dot), then 1,
To select subchanne110,1, press 1, I), _ (dot), then 1,
NOTE
After entering a channel or subchannel number, you
rnay press CH ENTER to tune in the channel rnore
÷
EN
PDP5040HD-Eng (28-37) 34 _ 7/24/08, 1:58 PM
÷
( Basic Operations
÷
Plasma Display
(right view)
II ,_+1
voLu=E÷j=qZ.I;'
....... ]]J
/7;?"
s;,)x ,}:,
ii
!!!_2111111111111111 !;! I
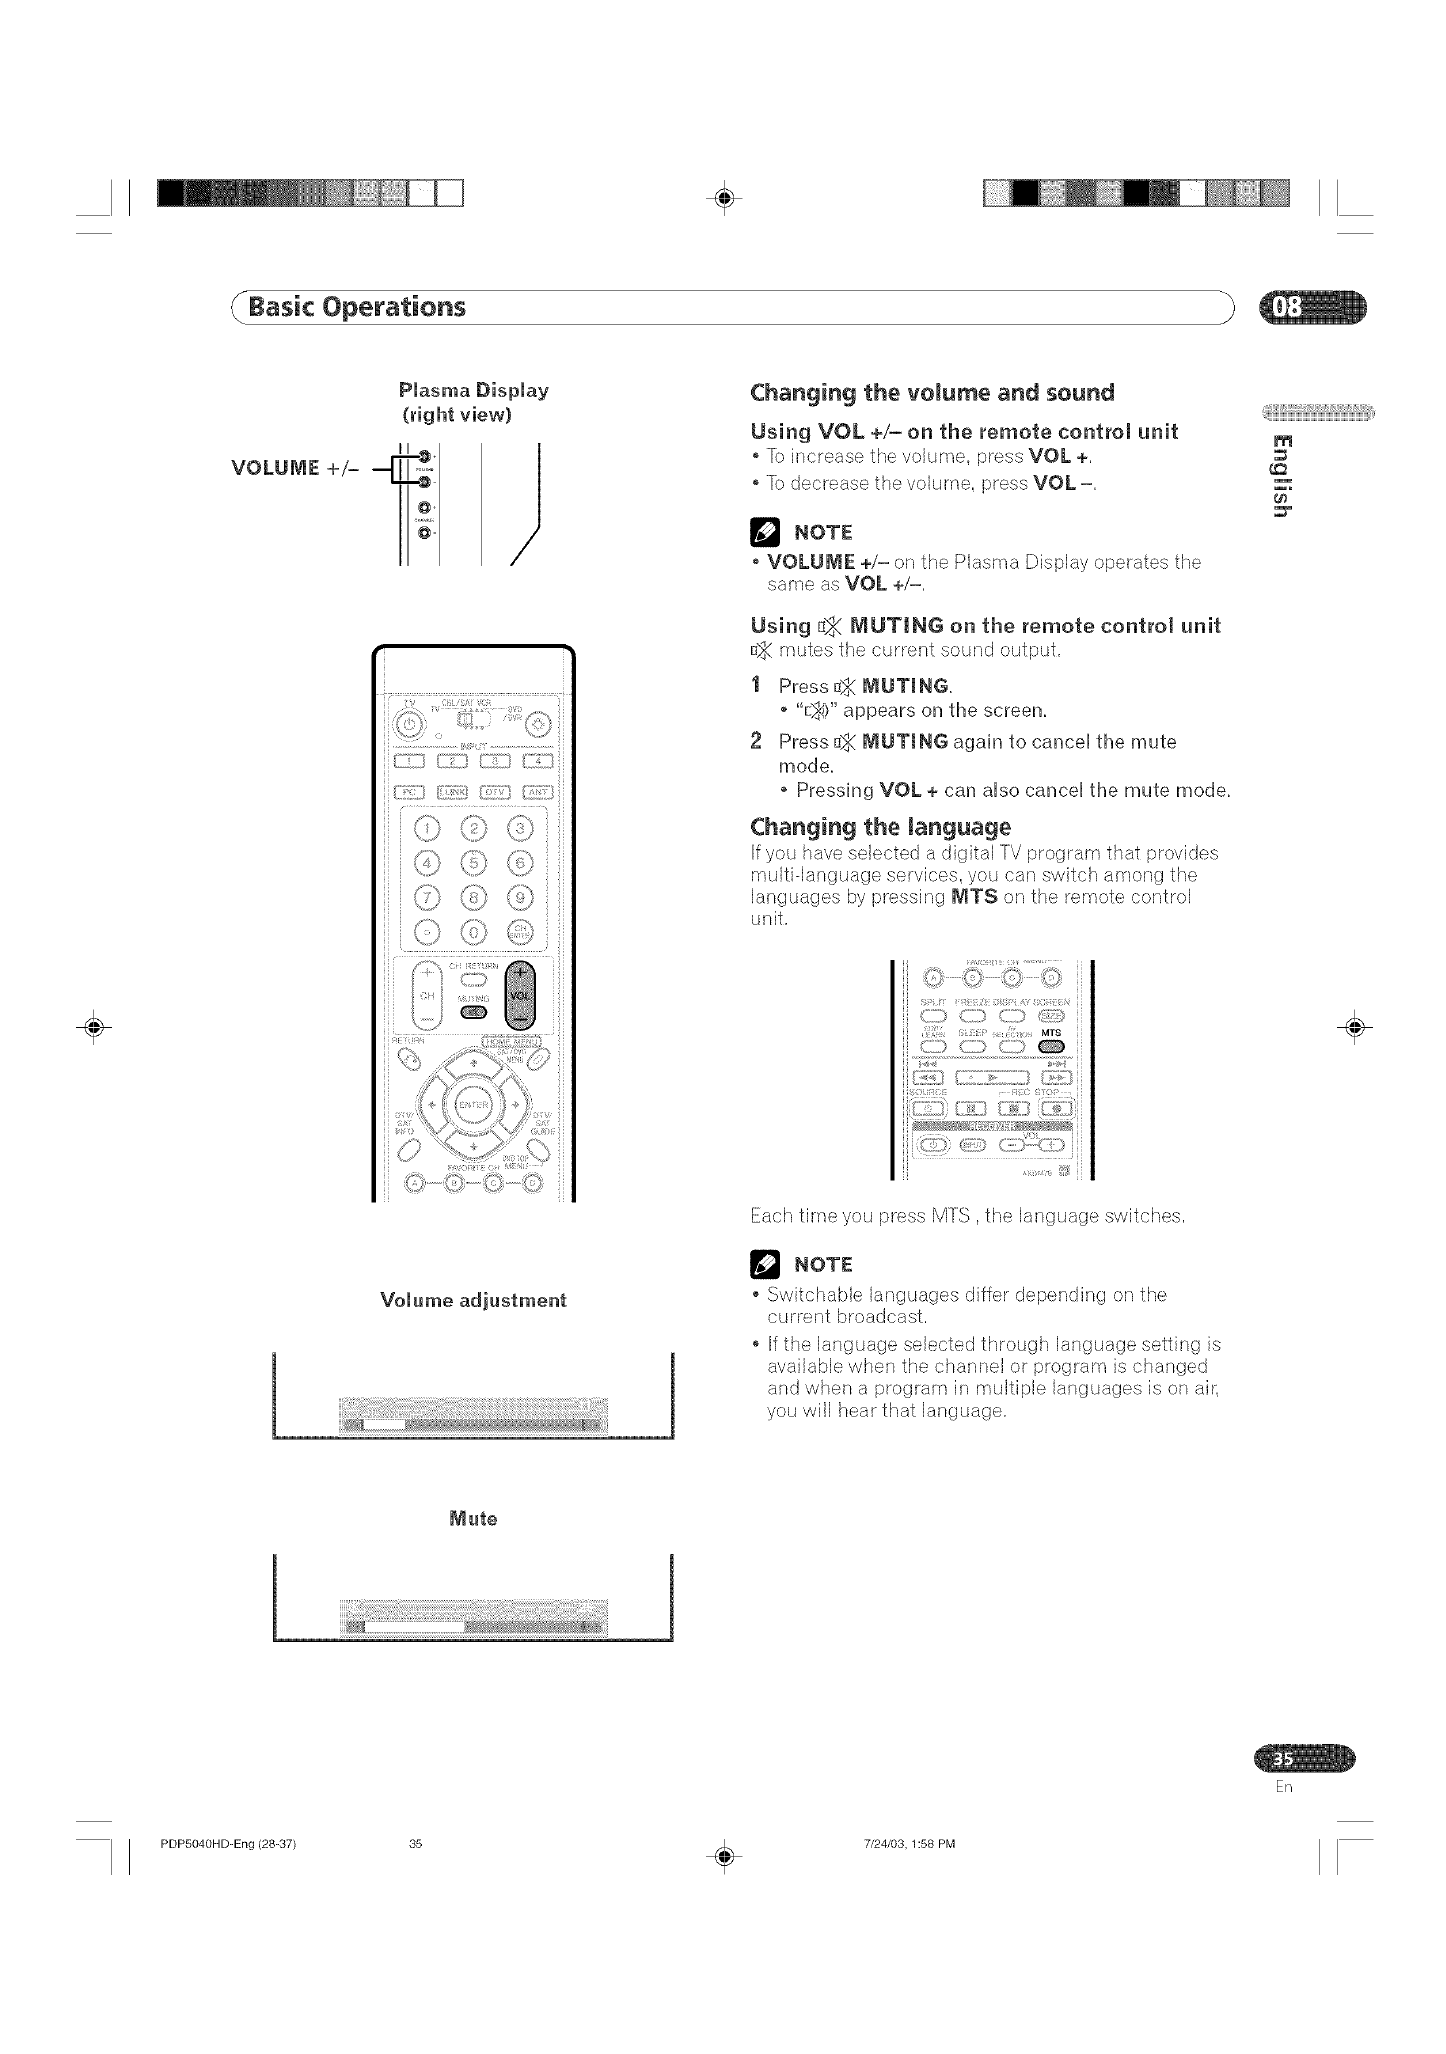
Changing the volume and so_nd
Using VOL +/- on the remote control unit
To increase the volume, press VOL +,
To decrease the volume, press VOL =,
NOTE
VOLU_E +/= on the Plasma Display eperates the
same as VOL +/=.
Using _ B/lUTING on the remote control unit
_ mutes the current sound output,
I Press_ _UTJNG,
o "_@" appears on the screen.
2 Press _ _UTJNG again to cancel tl_e mute
mode.
• Pressing VOL + can also cancel tl_e mute mode.
Changing the language
If you have selected a digital TV program that provides
multidanguage services, you can switch among the
languages by pressing _TS on the remote control
unit.
'ii Y :II!IZ i311;;i 'i()_(Rii;v
C;;) CE) CZ;) (_i!)
s _i so, MTI
C]D CE) (_]D @
_1] I:IL]I[ii;II;C3_1]]ii
Each time you press MTS, the language switches.
NOTE[
Switchable languages differ dependir_g on the
current broadcast.
, If the language selected through language setting is
available when the channel or program is changed
and when a program in multiple languages is on aht
you will hear that language,
qilIIIIIIIiliiiWiWiWiWiWiWiWiWiWiWi_ili_i¸,
m
÷
_te
!!!%ff!!!!ii!!!ii!!!!ii!!!ii!!!ii!!!!ii!!!ii!!!ii!!!!il!i! 1
En
PDP5040HD-Eng (28-37) 35 _ 7/24/03,1:58 PM
÷
Basic Operations
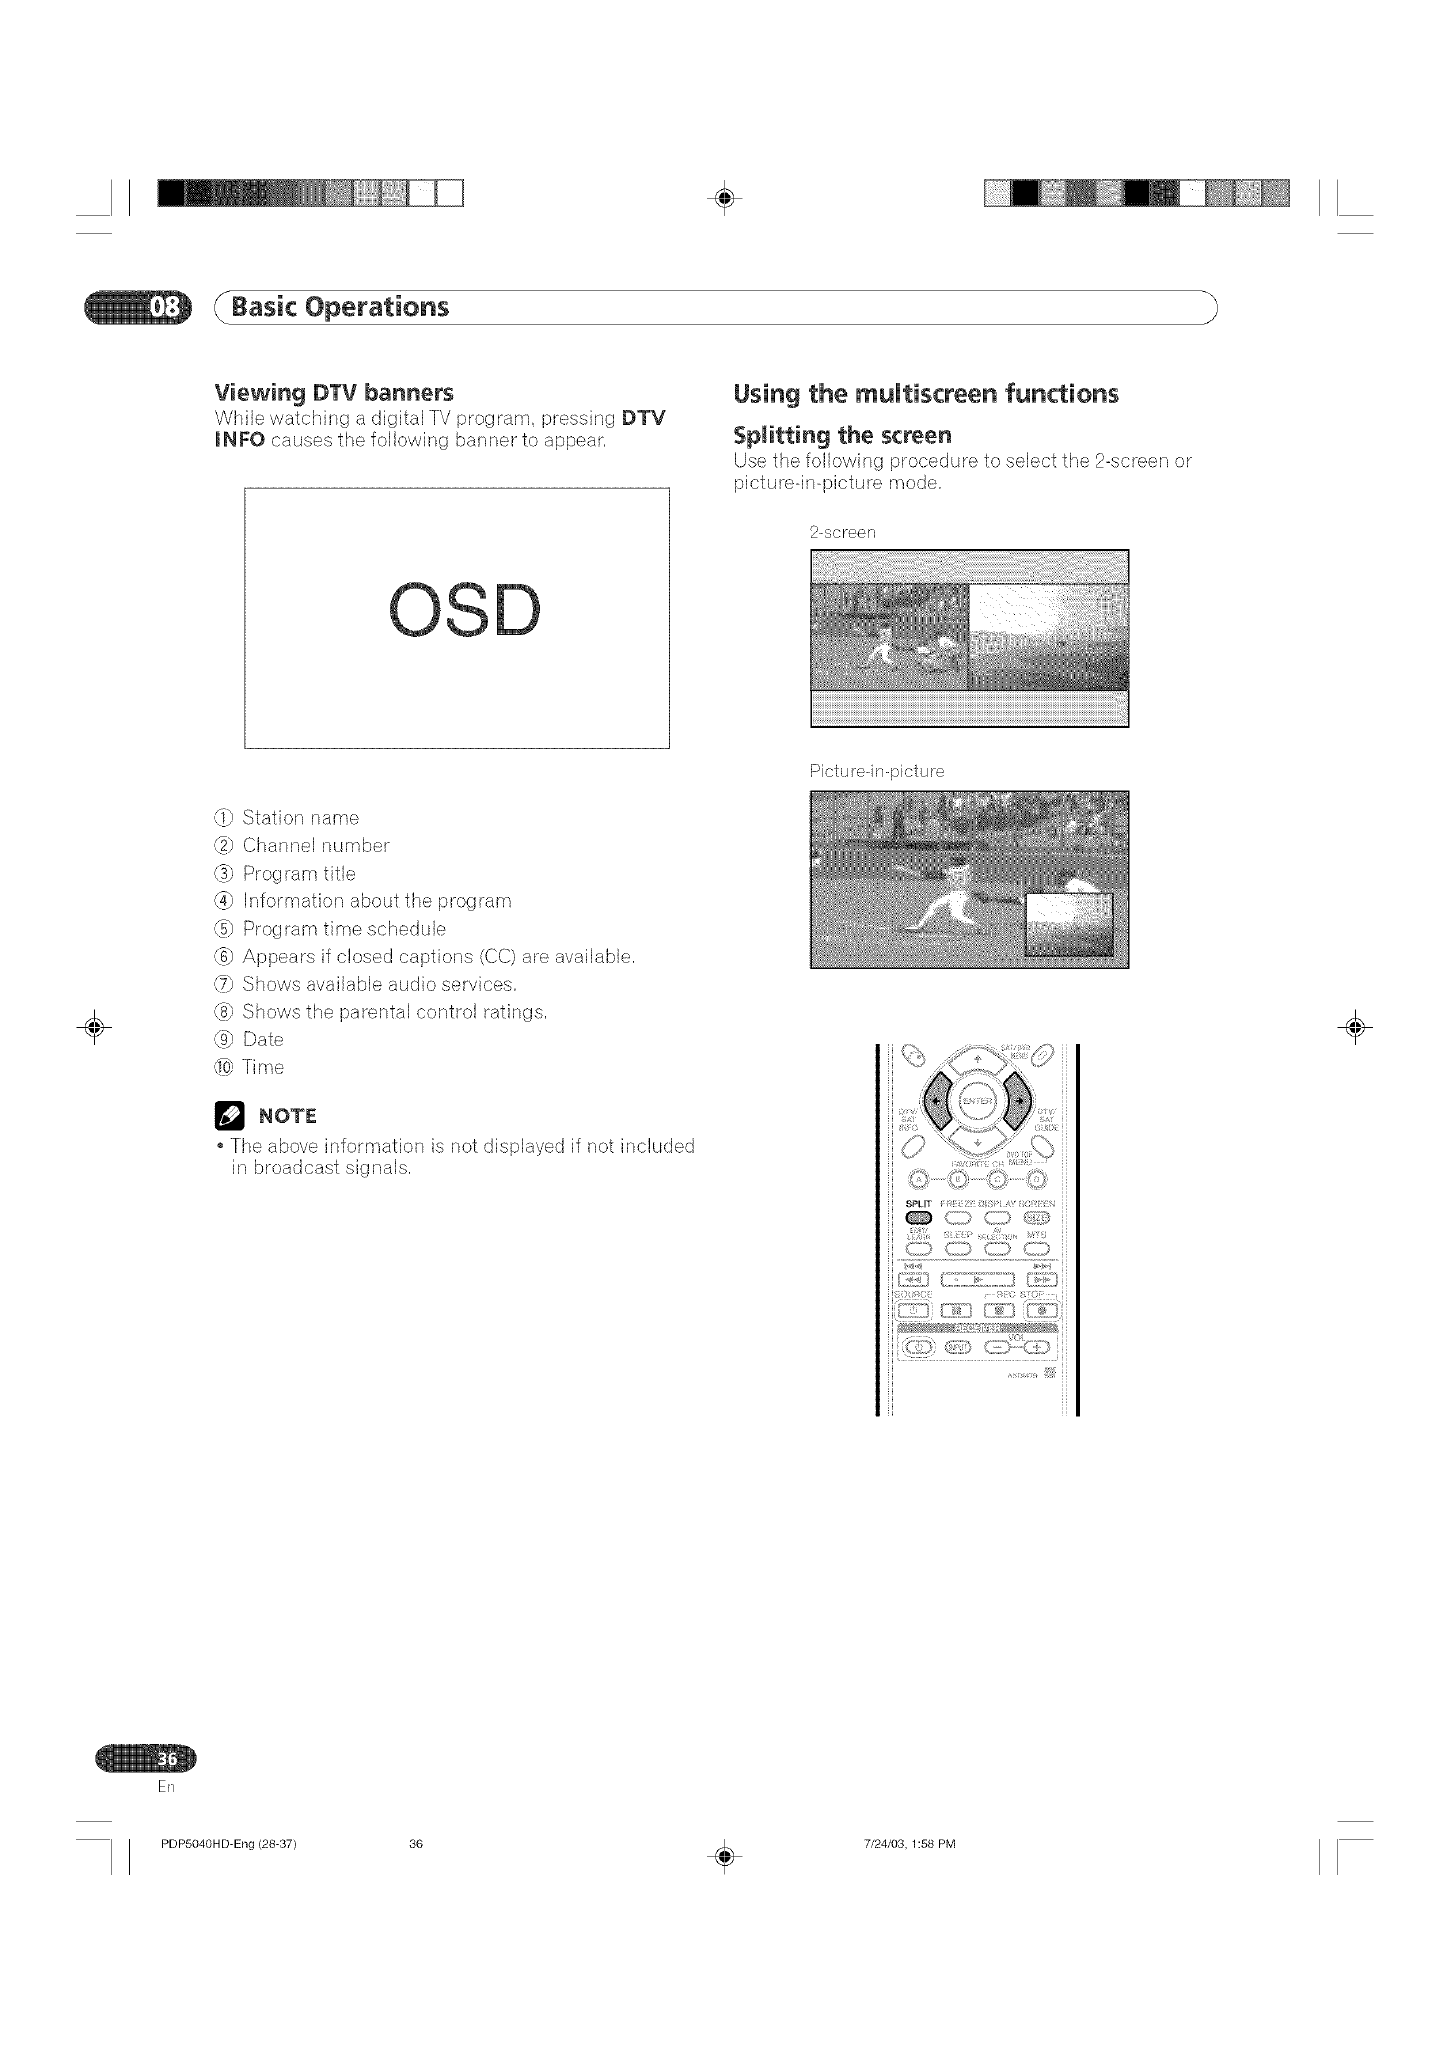
Viewing DTV banners
While watching a digital TV program, pressing DTV
INFO causes the following banner to appear,
OSD
Using the multiscreen functions
Splitting the screen
)rocedure to select the 2-screen or
pictureqn-picture mode,
2-screen
÷
(1) Station name
_) Channel number
()) Program title
(4) Information about the program
_} Program time schedule
(6} Appears if closed captions (CC) are available,
_) Shows available audio services,
(s) Shows the 'aarental control ratings,
(_ Date
,ff_Time
NOTE
The above information is not displayed if not included
in broadcast signals,
Pictureqn@icture
÷
Eli
PDP5040HD-Eng (28-37) 36 _ 7/24/03, 1:58 PM
÷
Basic Operations
÷
t Press SPLIT to seUectthe dispUay mode.
*Each time you press SPLIT, the dispUay mode is
switched among 2-screen, picture-in-picture,
and singUe-screen.
2 When in the 2-screen or pbture-in@icture mode,
press ÷/-_ to seUect a screen to be active,
.".b" appears on the active screen, which
outputs sound,
3To seUectthe desired input source, press the
appropriate input source button,
*If watching TV programs, press CN +/= to
clmange timeclmannel.
_'_ NOTE
*The multiscreen function cannot display images from
the same input source at the same time, If you make
such an attempt, a warning message appears,
oWhen you press HOME IVlENU, DTV GUIDE, or
DTV INFO, the single-screen mode is restored and
the corresponding menu is displayed,
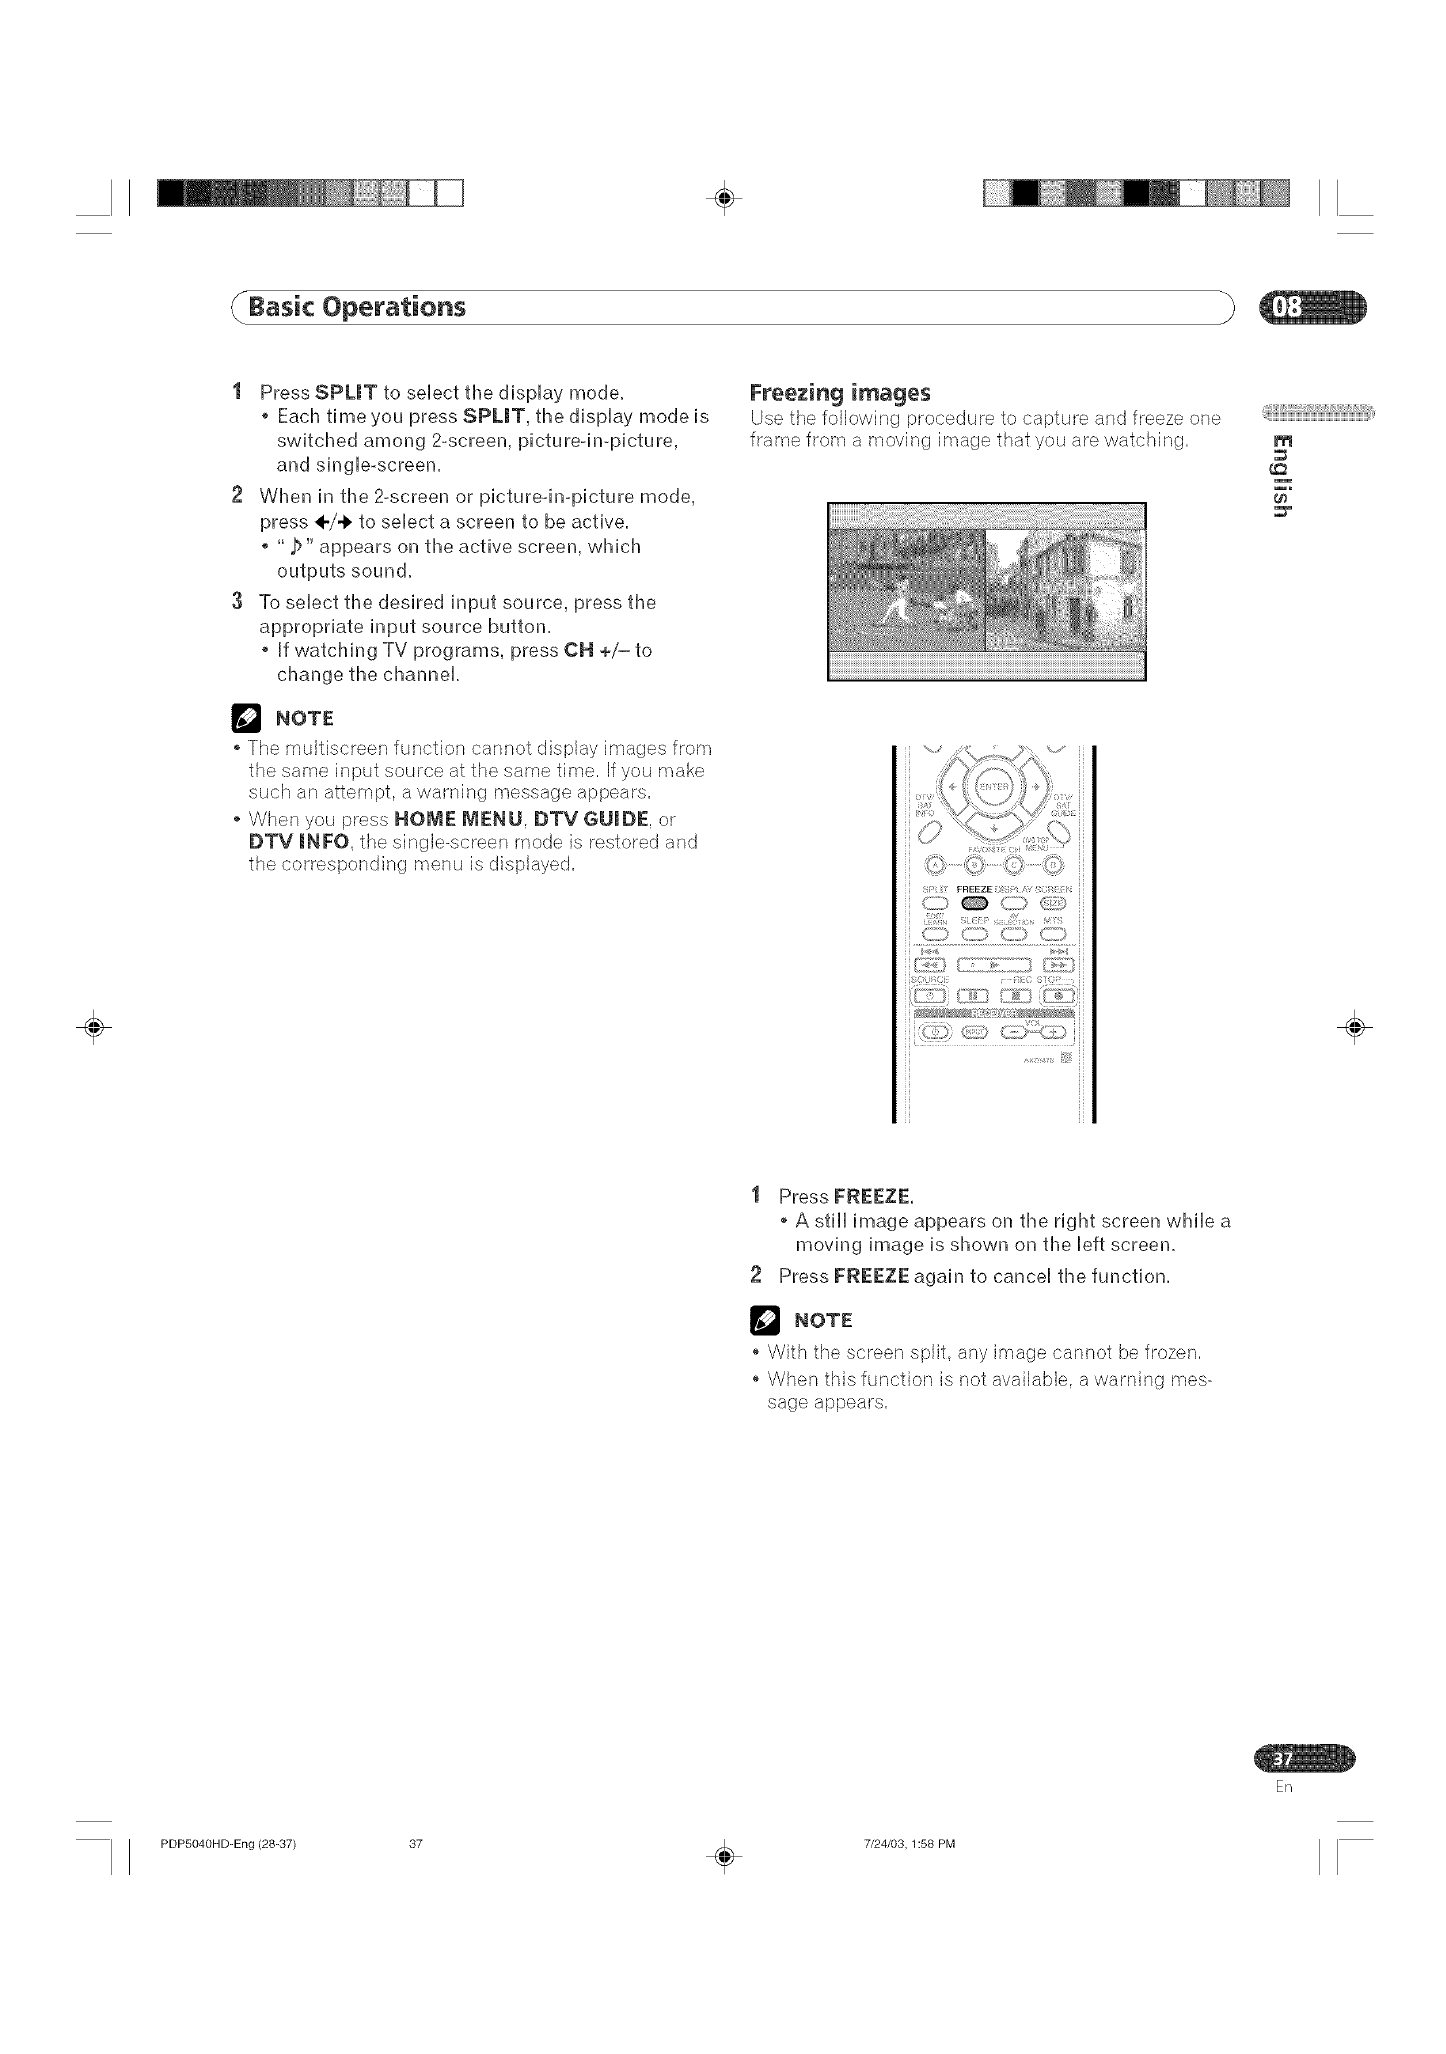
Freezing images
Use the following procedure to capture and freeze one
frame from a rnoving image that you are watching,
@iiiiiBiiiiiiiWi_iWi_iWi_iWi_iWi_iWi_iWi_iWi_iWi_iWi_i_ili_i¸,
m
÷
t Press FREEZE.
*A still image appears on timeriglmt screen wlmile a
moving image is slmown on timeleft screen,
2Press FREEZE again to cancel timefunction,
NOTE
*With the screen split, any image cannot be frozen,
*When this function is not available, a warning mes-
sage appears,
En
PDP5040HD-Eng (28-37) 37 _ 7/24/03,1:58 PM
÷
Basic Adjustment Settings
÷
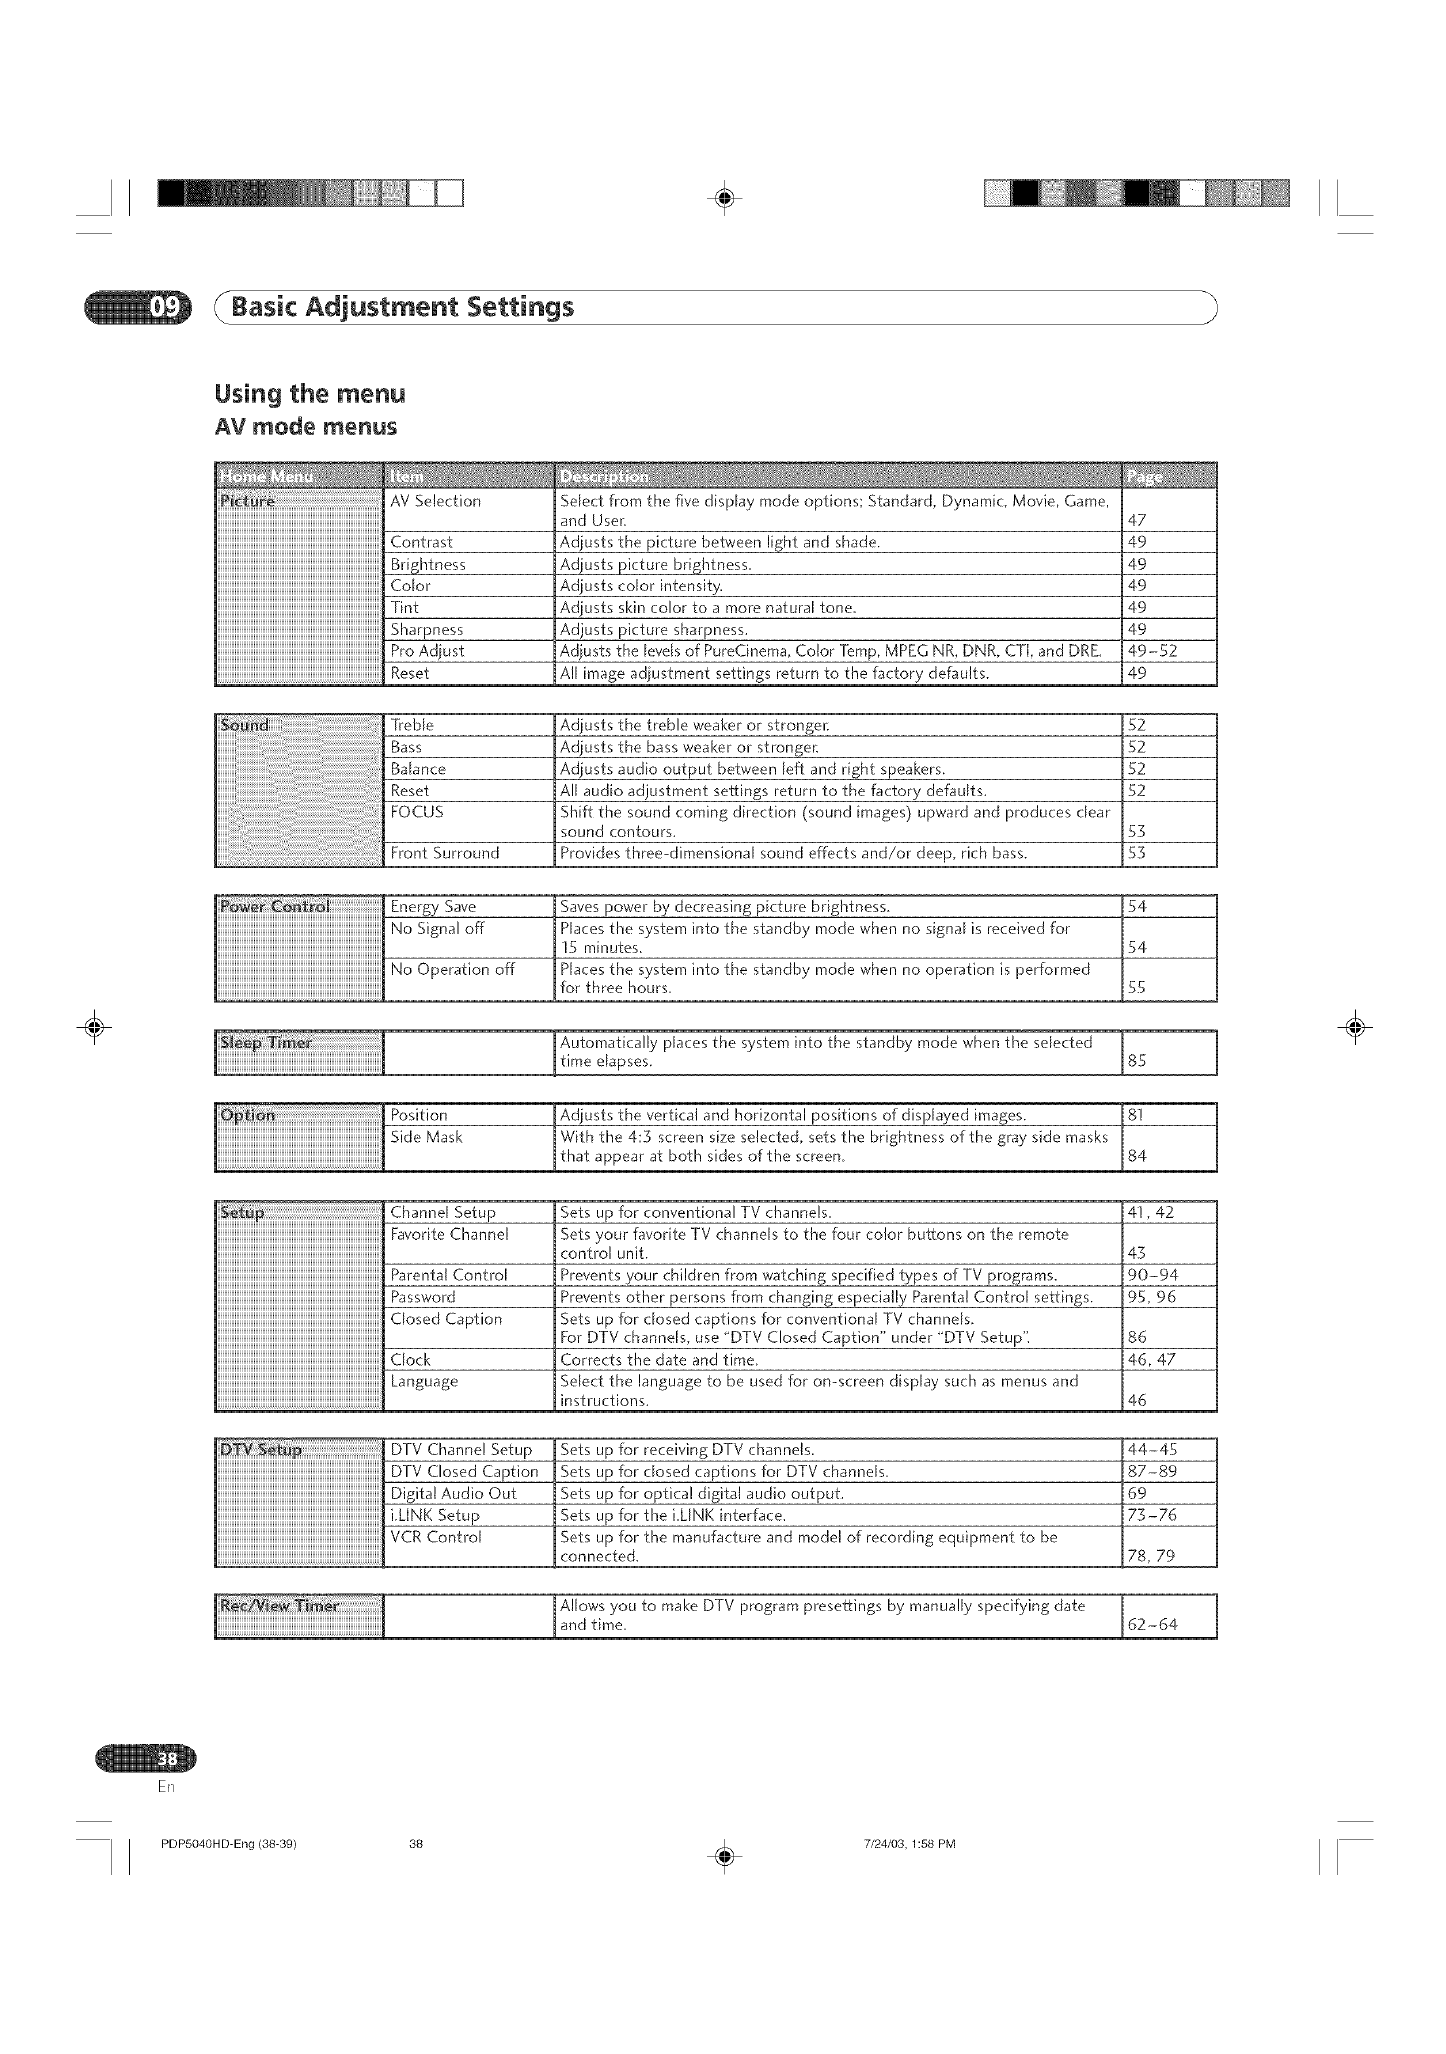
Using the menu
AV mode menus
ii_!iii _;_! i;i!ii!ii!ii!ii!ii!ii!ii!ii!ii!ii!ii!ii!ii!ii!ii!ii!ii!ii!ii!ii!ii!ii!ii!ii!ii!ii!ii!ii!ii!ii!ii!ii!ii!ii!ii!ii!ii!ii!ii!ii!ii!ii!ii!ii!ii!ii!ii!ii!ii!ii!ii!ii!ii!ii!ii!ii!ii!ii!AV Selection
HHHHHHHHHHHHHHHHHHHHHHHHHHHHHHHHHHHHHHHHHHHHHHi
iiiiiiiiiiiiiiiiiiiiiiiiiiiiiiiiiiiiiiiiiiiiiiiiiiiiiiiiiiiiiiiiiiiiiiiiiiiiiiiiiiiiiiiiiiiiiContrast
iiiiiiiiiiiiiiiiiiiiiiiiiiiiiiiiiiiiiiiiiiiiiiiiiiiiiiiiiiiiiiiiiiiiiiiiiiiiiiiiiiiiiiiiiiiiiBr_shtness
iiiiiiiiiiiiiiiiiiiiiiiiiiiiiiiiiiiiiiiiiiiiiiiiiiiiiiiiiiiiiiiiiiiiiiiiiiiiiiiiiiiiiiiiiiiiiColor
iiiiiiiiiiiiiiiiiiiiiiiiiiiiiiiiiiiiiiiiiiiiiiiiiiiiiiiiiiiiiiiiiiiiiiiiiiiiiiiiiiiiiiiiiiiiiTint
iiiiiiiiiiiiiiiiiiiiiiiiiiiiiiiiiiiiiiiiiiiiiiiiiiiiiiiiiiiiiiiiiiiiiiiiiiiiiiiiiiiiiiiiiiiiiSharpness
iiiiiiiiiiiiiiiiiiiiiiiiiiiiiiiiiiiiiiiiiiiiiiiiiiiiiiiiiiiiiiiiiiiiiiiiiiiiiiiiiiiiiiiiiiiiiProAdjust
iiiiiiiiiiiiiiiiiiiiiiiiiiiiiiiiiiiiiiiiiiiiiiiiiiiiiiiiiiiiiiiiiiiiiiiiiiiiiiiiiiiiiiiiiiiiiReset
Select from the five display mode options; Standard, Dynamic, Movie, Game,
and User,
Adjusts the picture between light and shade.
Adjusts picture brightness.
Adjusts color intensity.
Adjusts skin color to a more natural tone,
Adjusts picture sharpness.
Adjusts the levds of PureCinema, Color Temp, MPEG NR, DNR, CTI, and DRE,
All image adjustment settings return to the factory defaults.
Treble
Bass
Balance
Reset
FOCUS
Front Surround
Adjusts the treble weaker or stronger,
Adjusts the bass weaker or strongen
Adiusts audio output between left and right speakers.
All audio adjustment settings return to the factory def_ults,
Shift the sound coming direction (sound images) upward and produces dear
sound contours,
Provides three-dimensional sound effects and/or deep, rich bass.
iiiiiiiiiiiiiiiiiiiiiiiiiiiiiiiiiiiiiiiiiiiiiiiiiiiiiiiiiiiiiiiiiiiiiiiiiiiiiiiiiiiiiiiiiiiii
iiiiiiiiiiiiiiiiiiiiiiiiiiiiiiiiiiiiiiiiiiiiiiiiiiiiiiiiiiiiiiiiiiiiiiiiiiiiiiiiiiiiiiiiiiiii
iiiiiiiiiiiiiiiiiiiiiiiiiiiiiiiiiiiiiiiiiiiiiiiiiiiiiiiiiiiiiiiiiiiiiiiiiiiiiiiiiiiiiiiiiiiii
Energy Save
No Signal off
No Operation off
47
49
49
49
49
49
49-52
49
52
52
52
52
Pos_t_on
iiiiiiiiiiiiiiiiiiiiiiiiiiiiiiiiiiiiiiiiiiiiiiiiiiiiiiiiiiiiiiiiiiiiiiiiiiiiiiiiiiiiiiiiiiiiiS_deMask
HHHHHHHHHHHHHHHHHHHHHHHHHHHHHHHHHHHHHHHHHHHHHHi
53
53
Saves power by decreasing picture brightness 54
Places the system into the standby mode when rto signal is received for
15 minutes. 54
Places the system into the standby mode when no operation is performed
for three hours. SS
Automatically @aces the system into the standby mode when the selected
time elapses.
Adjusts the vertical and horizontal positions of displayed images.
With the 4:3 screen size selected, sets the brightness of the gray side masks
that appear at both sides of the screen,
i8S
8!
84
÷
_i]_]_]_]_{_{_{_{_{_{_{_{_{_{_{_{_{_{_{_{_{_{_{_{_{_{_{_{_{_{_{_{_{_{_{_{_{_{_{_{_{_{_{_{_{_{_{_{_{_{_{_{_{_{_{_{_{_{_{_{_{_{_ChanndSetup
iiiiiiiiiiiiiiiiiiiiiiiiiiiiiiiiiiiiiiiiiiiiiiiiiiiiiiiiiiiiiiiiiiiiiiiiiiiiiiiiiiiiiiiiiiiiiFavor,teChanne,
iiiiiiiiiiiiiiiiiiiiiiiiiiiiiiiiiiiiiiiiiiiiiiiiiiiiiiiiiiiiiiiiiiiiiiiiiiiiiiiiiiiiiiiiiiiii
iiiiiiiiiiiiiiiiiiiiiiiiiiiiiiiiiiiiiiiiiiiiiiiiiiiiiiiiiiiiiiiiiiiiiiiiiiiiiiiiiiiiiiiiiiiiiParental Control
iiiiiiiiiiiiiiiiiiiiiiiiiiiiiiiiiiiiiiiiiiiiiiiiiiiiiiiiiiiiiiiiiiiiiiiiiiiiiiiiiiiiiiiiiiiiiPassword
iiiiiiiiiiiiiiiiiiiiiiiiiiiiiiiiiiiiiiiiiiiiiiiiiiiiiiiiiiiiiiiiiiiiiiiiiiiiiiiiiiiiiiiiiiiiicIosedCaption
iiiiiiiiiiiiiiiiiiiiiiiiiiiiiiiiiiiiiiiiiiiiiiiiiiiiiiiiiiiiiiiiiiiiiiiiiiiiiiiiiiiiiiiiiiiii
iiiiiiiiiiiiiiiiiiiiiiiiiiiiiiiiiiiiiiiiiiiiiiiiiiiiiiiiiiiiiiiiiiiiiiiiiiiiiiiiiiiiiiiiiiiiiClock
iiiiiiiiiiiiiiiiiiiiiiiiiiiiiiiiiiiiiiiiiiiiiiiiiiiiiiiiiiiiiiiiiiiiiiiiiiiiiiiiiiiiiiiiiiiii anguage
Sets up for conventional TV channels,
Sets your favorite TV channds to the four color buttons on the remote
control unit.
Prevents your children from watching specified types of TV programs.
Prevents other persons from changing especially Parental Control settings.
Sets up for closed captions for conventional TV channels.
For DTV channels, use "DTV Closed Caption" under "DTV Setup':
Corrects the date and time,
Select the language to be used for on-screen display such as menus and
instructions.
DTV Channel Setup
DTV Closed Caption
Digital Audio Out
iilNK Setup
VCR Control
4!, 42
43
90-94
95, 96
86
46, 47
46
Sets up for receiving DTV channels. 44-45
Sets up for dosed captions for DTV channels. 87-89
Sets up for optical digital audio output. 69
Sets up for the iiINK interface, 73-76
Sets up for the manufacture and model of recording equipment to be
connected, 78, 79
Allows you to make DTV program presettings by manually specifying date l
and time, 62-64
ER
PDP504OHD-Eng (38-39) 38 _ 7/24/08, 1:58 PM
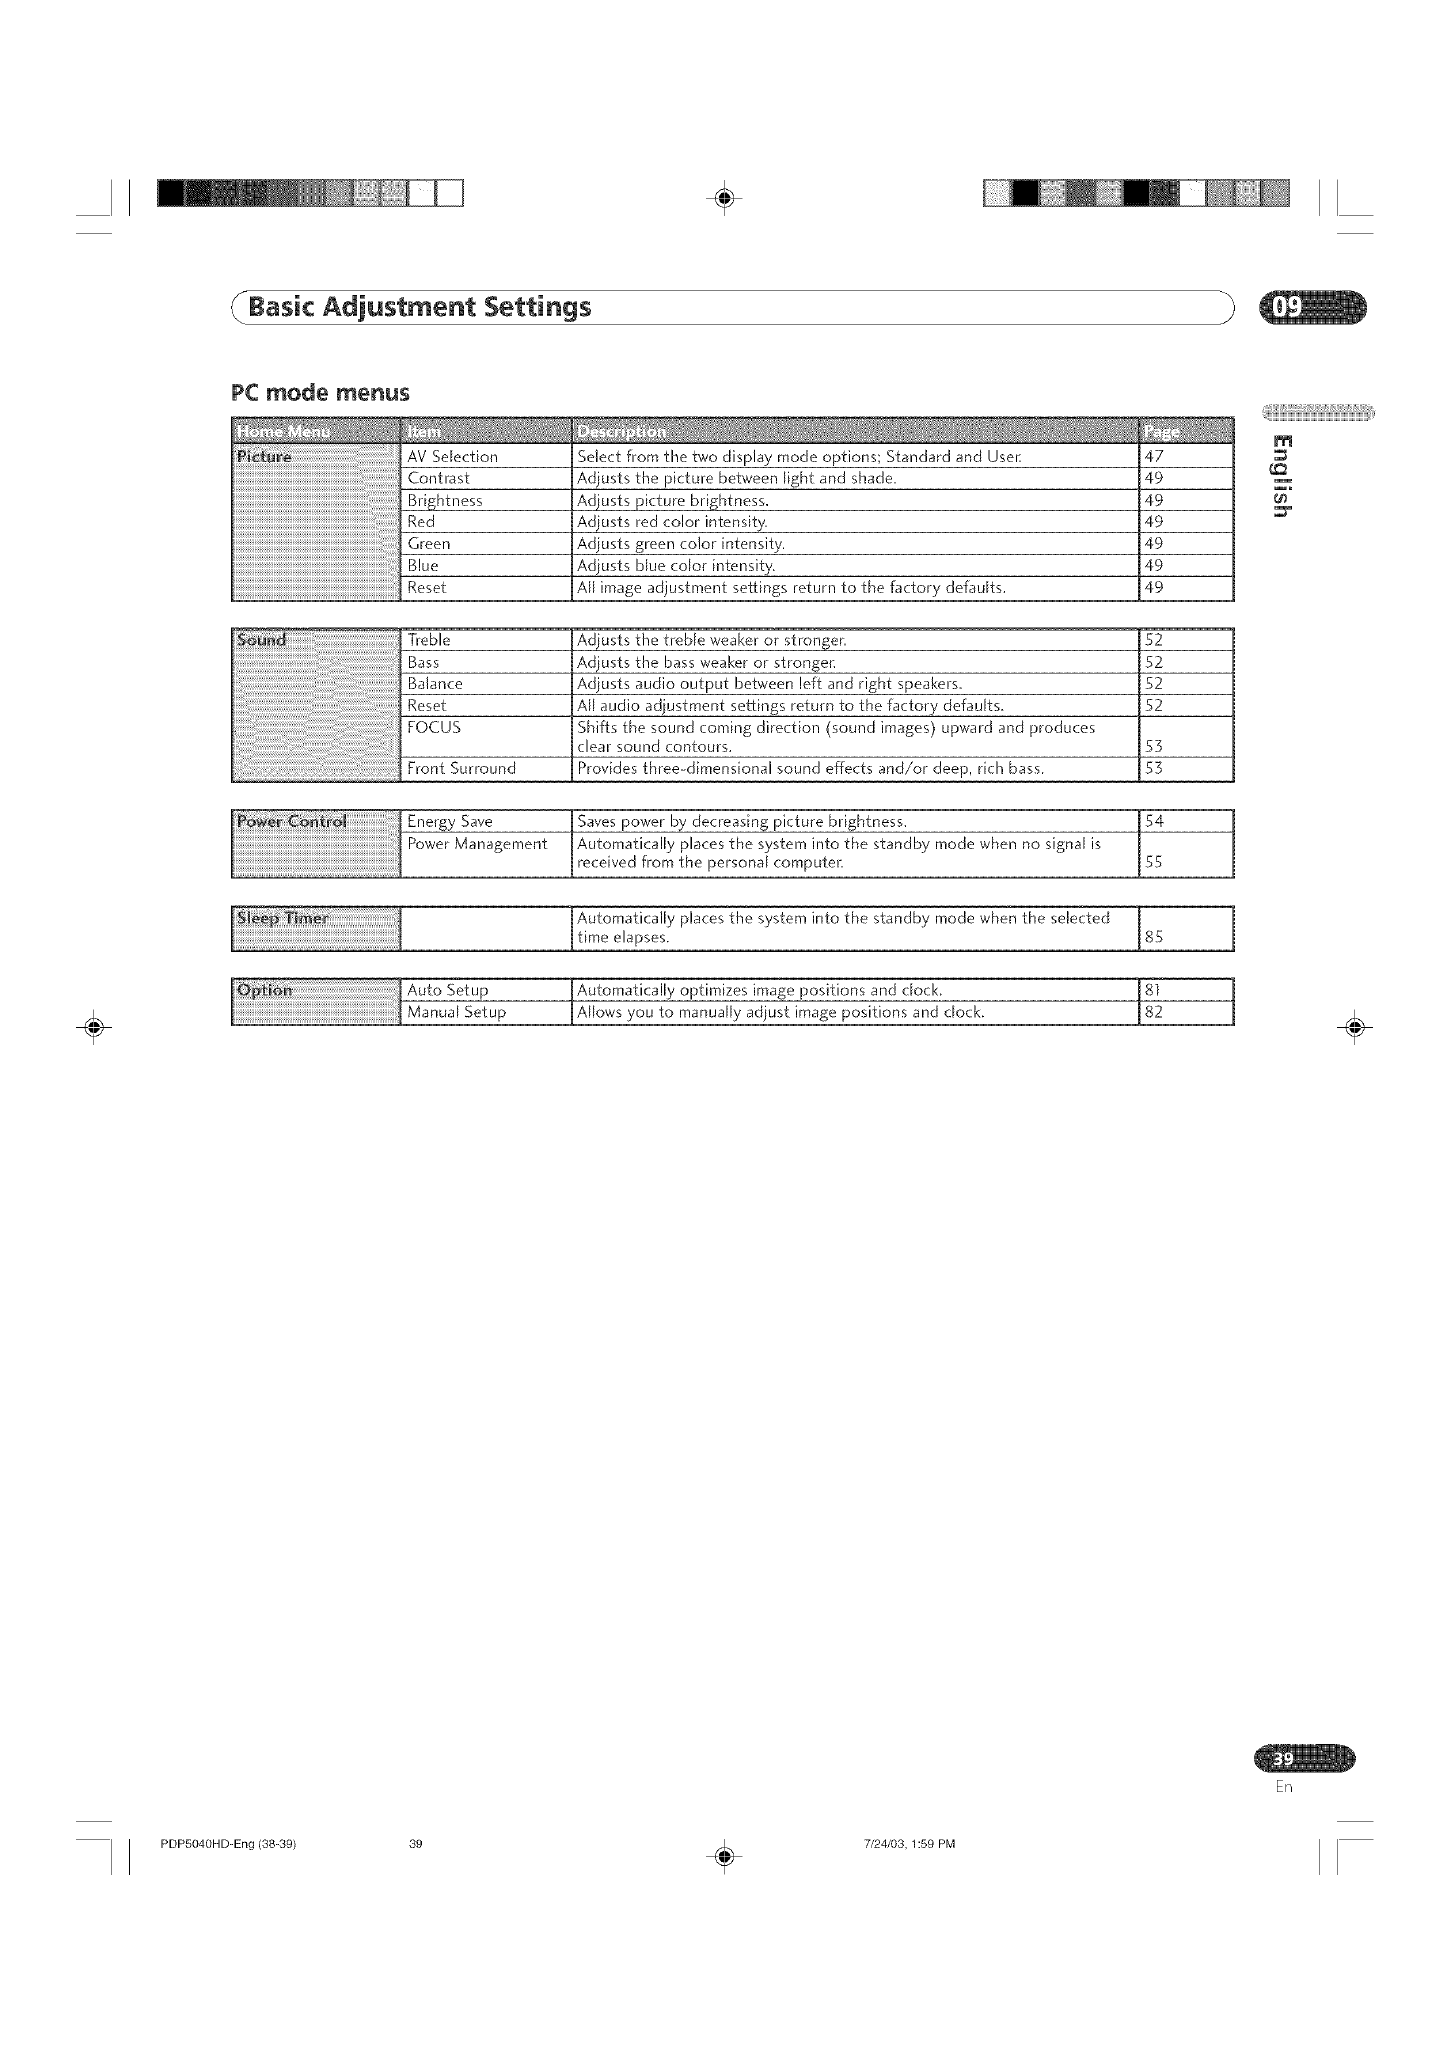
÷
(Basic Adjustment Settings
÷
PC mode menus
AV Selection
Contrast
Brightness
Red
Green
..........................................................................................Blue
Reset
Select from the two display mode options; Standard and Usen
Adjusts the picture between light and shade.
Adiusts picture brightness.
Adjusts red color intensity.
Adjusts green color intensi_y.
Adjusts blue color intensity.
All image adjustment settings return to the factory defaults.
47
49
49
49
49
49
49
Treble Adjusts the treble weaker or stronger. 52
Bass Adjusts the bass weaker or stronger. 52
Balance Adjusts audio output between left and right speakers. 52
Reset All audio adjustment settings return to the factory defaults. 52
FOCUS Shifts the sound coming direction (sound images) upward and produces
clear sound contours. 53
Front Surround Provides three-dimensional sound effects and/or deep, rich bass_ 53
Energy Save Saves power by decreasing picture brightness, 54
Power Management Automatically places the system into the standby mode when no signal is
..............................................................................................received from the personae computer. 55
Automatically places the system into the standby mode when the selected
time elapses.
Automatically optimizes image positions and clock.
A ows you to manua y adjust mage post ons and cock.
85
m
÷
En
PDP5040HD-Eng (88-80) 39 _ 7/24/03,1:59 PM
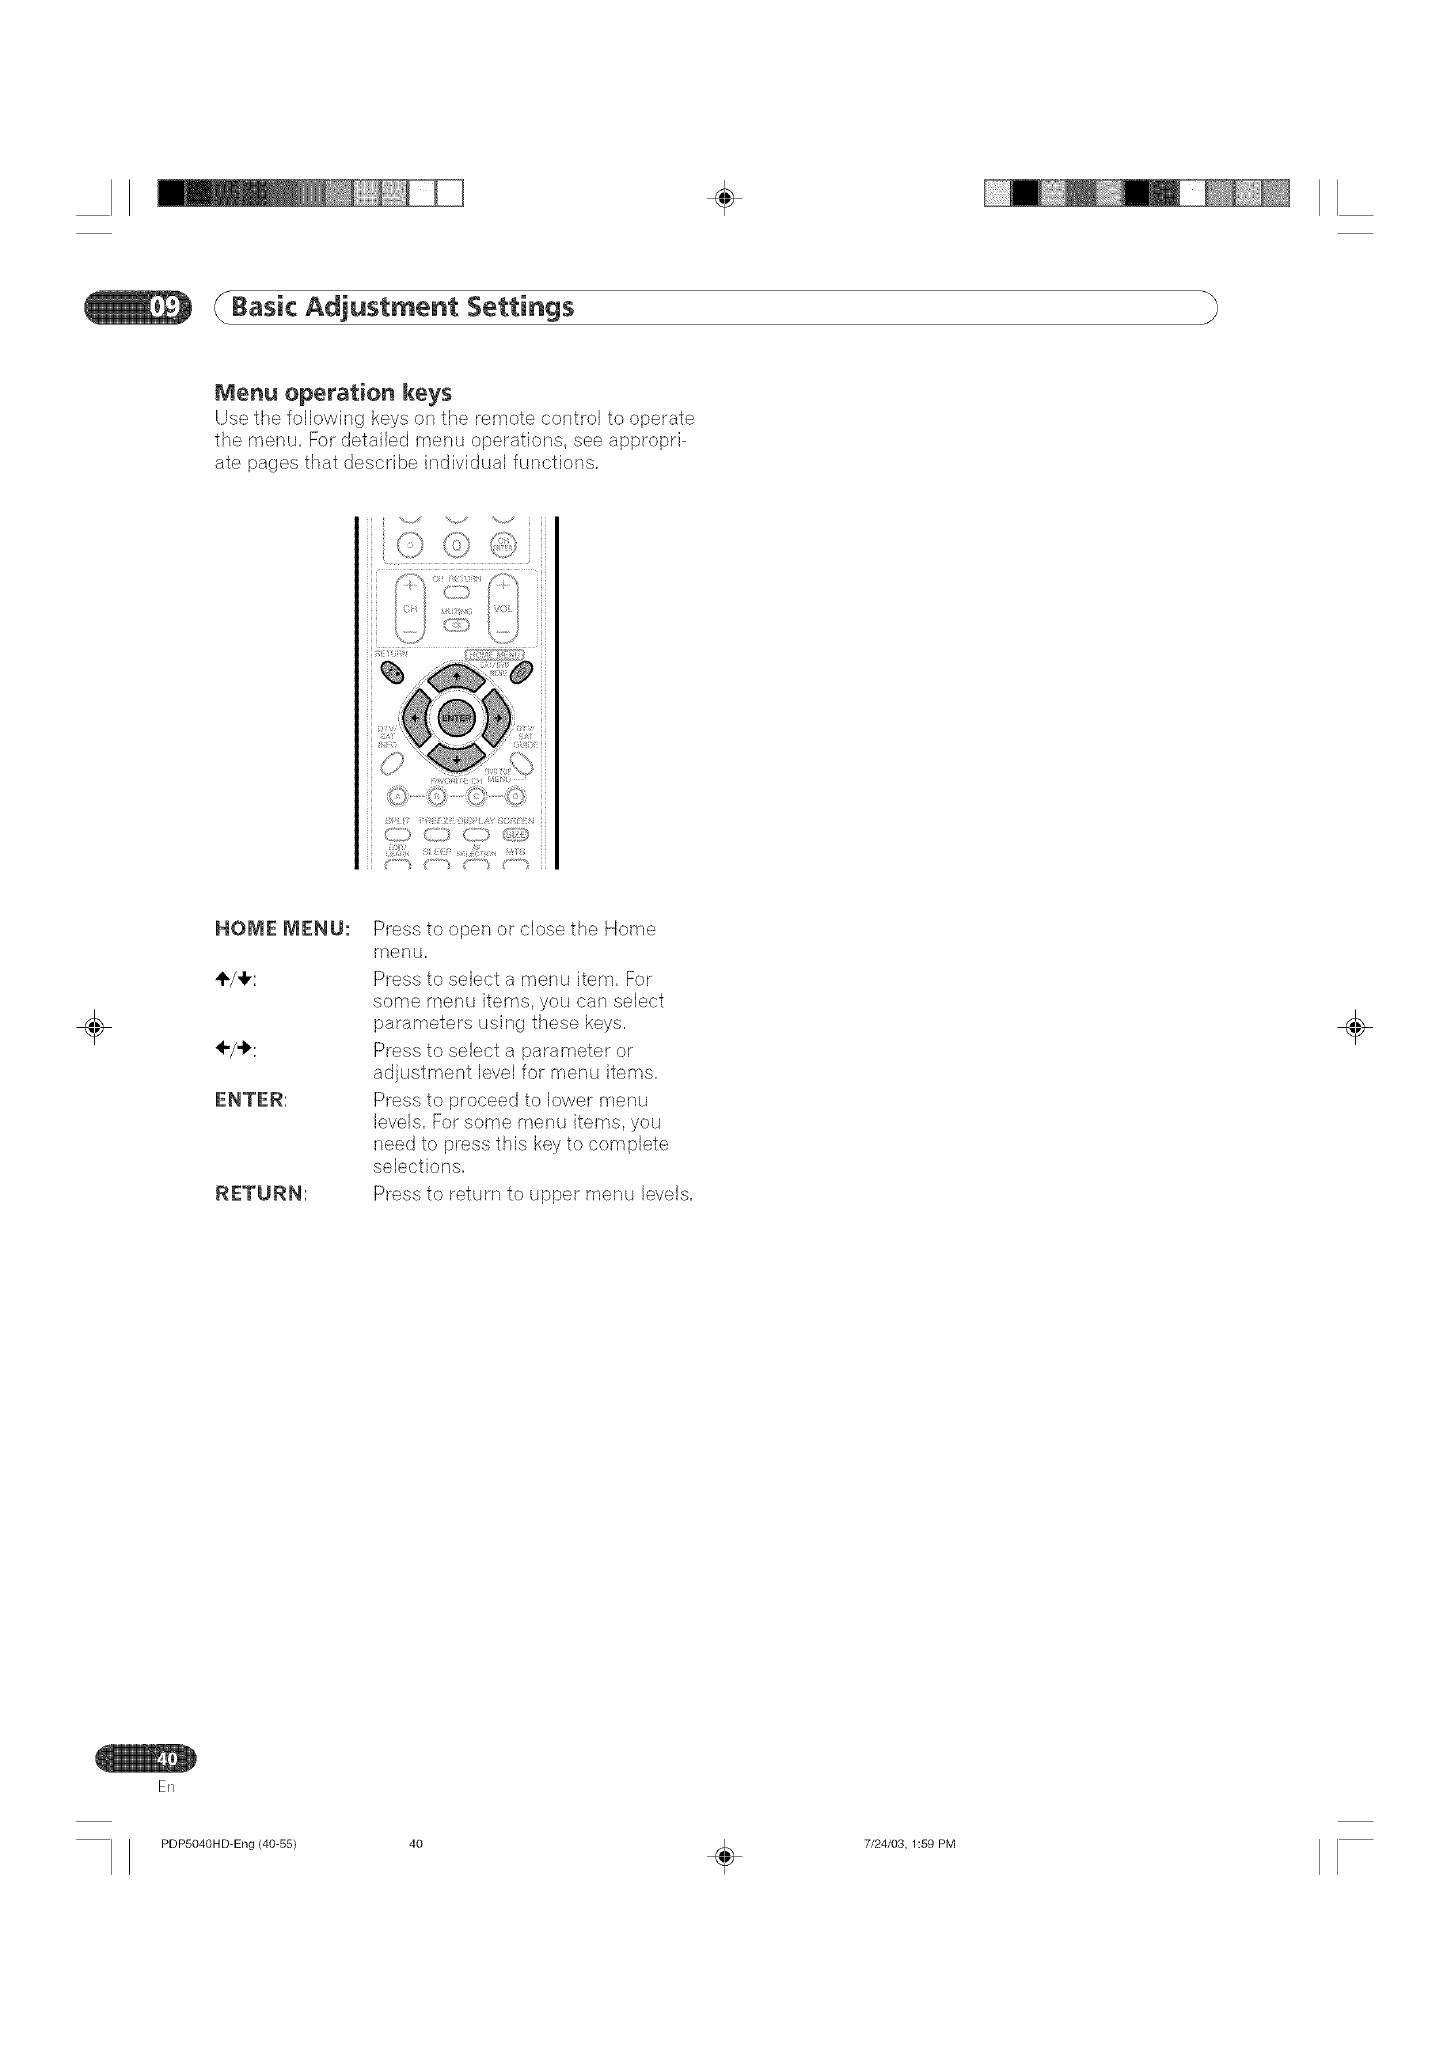
÷
Basic Adjustment Settings
IVienu operation keys
Use the followh-hg keys on the remote control to operate
the menu, For detailed menu operations, see appropri-
ate pages that describe individual functions,
i Ir :I/i !,
(i} CS) [C[)
=!711=1ii
F°"3 [""% ["='S ('°'"3
÷
HOME MEHIJ:
÷/÷:
÷/•:
ENTER:
RETURN:
Press to open or close the Home
rnenu,
Press to select a mentJ item. For
some menu items, you can select
parameters using these keys.
Press to select a parameter or
adjustment level for menu items.
Press to proceed to lower menu
levels. For some menu items, you
need to press this key to complete
selections.
Press to return to upper rnenu levels.
÷
EN
PDP5040HD-Eng (40-55) 40 _ 7/24/03, 1:59 PM
÷
(/Basic Adjustment Settings
÷
Setting up corwer_tionaU TV channeUs
Thb section describes how to search and set up
conventional TV channels that you can watch under the
current conditions, Unless you set up conventional TV
channels using Auto channel Preset, you may not be
able to tune in those channels,
_'_ NOTE
Conventional TV channels in this manual designate
TV channels that are received through the conven-
tional VHF/UHF frequencies or conventional cable TV
channels,
Using Auto Channe_ Preset
Auto Channel Preset auk)matically searches and sets
up conventional TV channels,
t Press HOME MENU.
2 Press ÷/4, to select "Setup", and tl_en press
ENTER.
3Press ÷/4, to select "Cl_annel Setup", and tl_en
press ENTER.
4 Press ÷/4, to select "Auto Cl_annel Preset", and
tl_en press ENTER.
5 Press ÷/4, to select "Antenna", and tl_en
press ÷/._ to select "A" or "B'.
7 Press ÷/4, to select "Preset:Start', and tl_en press
ENTER.
OS
Cl_annel searcl_ automatically starts,
QS
@ii;iiBiiiiiiiWi_iWi_iWi_iWi_iWi_iWi_iWi_iWi_iWi_iWi_i_ili,i¸,
m
÷
OS To quit Auto Cl_annel Preset I_alfway, press
RETURN.
After Auto Channel Preset has been finished,
press HOME MENU to exit tl_e menu.
NOTE
When using the Cable Converter, you may need to
manually add Cable Converter output channels.
6 Press ÷/4, to select "Air/Cable', and tl_en
press ÷/-_ to select "Air" or "Cable'.
En
PDP5040HD-Eng (40-55) 41 _ 7/24/03,1:59 PM
÷
Basic Adjustment Settings
Setting for skipping unwanted charmers
From among cenventional 'r\/ channels searched and
set up using Auto Channel Preset, you can select
channels to be skipped when OH +/- are operated.
t Press HOME MENLI,
2 Press ,1,/41,to select "Setup", and then press
ENTER
3Press 4/+ to select "Channel Setup", and then
4 Press ÷/,1, to select "Channel ADD/DEI", and then
5 Press ÷/÷ to select "Antenna", and then
press ÷/.t, to select "A" or "B".
7 Press ÷/÷ to select "Add/Delete", and then
press ÷/-_ to select '<Delete".
OSD
8 Press HOME MENU to exit the menu.
II_ NOTE
'[L_restore skipped channels, use the above procedure
except that you select "Add" in step 7.
When using the Cable Convertec you may need to
rnanually add Cable Converter output channels.
÷
Press +/4, to select "Channel", and then
press ÷/.t, to select a channel to be skipped.
÷
OSD
E_G
PDP5040HD-Eng (40-55) 42 _ 7/24/03, 1:59 PM

÷
( Basic Adjustment Settings
$ettin 9 your favorite channems
Set up to feur TV channels to each of the four color
bu_tens orsthe remote control unit (16 channels in
total), You can then quickly select from only your
favorite channels, You can program these buttons with
conventional channels,
1 Select and tune to aTV channel to be registered.
2 Press Hor_IE MENU.
3 Press 41,/4,to select "Setup", and then press
ENTER.
4 Press ÷/4, to select "Favorite Channel", and then
press ENTER,
6 Press ENTER to execute the registration.
Before pressing ENTER, you can also change a
TV channel to be registered. Press "1_/÷to select
ANT A or ANT B, and then press ÷/÷ to select a
TV channel. To clear the channel registered at
the current location, select "-" by pressing ÷/_,
and then press ENTER.
, To register another TV channel at a different
location, select a TV channel, and then repeat
steps 5 and 6.
7 Press HOME MENU to exit the menu.
NOTE
You cannot program the four color buttons with
di,cjitalTV channels,
_iii_i]i_ii_i_i1_iiiiiiiiii1iii_iii_i_iii_i_iii_i_iii_i_iii_i_iii_i_iii_i_iii_i_iii_i_iii_i_iIi_i¸,
m
÷5 Press ÷/÷ and ÷/_ to select a location where the
TV channel is to be registered, and then press
ENTER.
÷
OS
ER
PDP5040HD-Eng (40-55) 43 _ 7/24/03,1:59 PM
÷
Basic Adjustment Settings
÷
Setting up digitaU TV channeUs
Tills section describes hew to search and set up
digital TV channels that you can watch under the
current conditions. Unless you set up digital TV
channels using Auto Channel Preset, you cannot
tune in those channels.
Using Auto Channel Preset
Auto Channel Preset automatically searches and
sets up digital TV channels.
I Press HOME MENU,
2 Press ÷/,1, to select "DTV Setup", and then
3Press ÷/_1, to select "DTV Channel Setup",
and then press ENTER.
4 Press +/41, to select "Auto Channel Preset",
and then press ENTER.
5 Press ÷/-I, to select "Air" or "Cable".
OSD
6 Press +/4, to select "Start", and then press
ENTER.
o Channel search automatically starts.
7Press HOME MENU to exit the menu.
NOTE
With "Cable" selected, this system can receive only
digital 'IV signals with the 8VSB modulation. This
system does not support the QAM modulatior_.
÷
PDP5040HD-Eng (40-55) 44 _ 7/24/03, 1:59 PM
÷
(/Basic Adjustment Settings
÷
$ettin 9 for skipping unwanted channems
From among digital TV channels searched and set up
using Auto Channel Preset, you can select channels to
be skipped when CH +/= are operated.
t Press HOME MENU.
2 Press +/4, to seUect"DTV Setup", and then press
ENTER,
3Press÷/4, to select "DTV Channel Setup", and
tl_en press ENTER.
4 Press ÷/4, to select "Cl_annel Add/Del', and tl_en
press ENTER.
5 Press ÷/4, to select "Cl_annel'.
6 Press ÷/-_ to select a cl_annel to be skipped.
QSD
7 Press ÷/4, to select "Add/Delete'.
8 Press ÷/-I, to select "Delete'.
ChecMng signa_ strength
When watching a digital TV program, you can check its
current signal strength.
I Press HOME MENU.
2 Press ÷/_1,to select "DTV Setup", and then press
ENTER.
3Press ÷/_, to select "DTV Channel Setup", and
then press ENTER,
4 Press ÷/_1,to select "Signal Strengtl_', and tl_en
OS
o Adjust the direction of the antenna so that the
current signal strength reaches as close to the
maximum signal strength as possible.
Press HOME MENU to exit the menu.
_iiiiiii_ii_i;i1_iiiiiiiiii1iii_iii_i_iii_i_iii_i_iii_i_iii_i_iii_i_iii_i_iii_i_iii_i_iii_i_iIi`i¸,
m
÷
OS
9 Press HOME MENU to exit the menu.
_'_ NOTE
, 'It restore skipped channels, use the abow_ procedure
except that you select "Add" in step 8.
ER
PDP5040HD-Eng (40-55) 45 _ 7/24/03,1:59 PM
÷
Basic Adjustment Settings
÷
Language setting
You can select a language to be used for on-screen
dispJay such as menus from among four languages:
English, French, Spanish, and Korean,
t Press HOME MENU,
2 Press +/4, to select "Setup", and tlmen press
ENTER,
3Press 4"/+ to select "Language", and tlmenpress
ENTER,
4 Press ÷/-I, to select a language.
OSD
5 Press HOIVIE IVIENLI to exit timemenu.
CUocksetting
Use the following procedure to set the time correctly.
If you disconnect the power cord from the power
outlet or power blackout occurs after setting the time,
the set time is cleared. With "Auto" selected for Clock
Setting, time information is then acquired and set
automatically. With "ManuaP selected, you then need to
manually set the correct time again.
I Press HOME N1ENU.
2 Press ÷/÷ to select "Setup", and tlmenpress
ENTER
3Press +/,I, to select "Clock", and tlmenpress
ENTER,
4 Press ÷/,!, to select "Clock Setting", and timen
press ÷/-I, to select "Auto" or "Manual".
D
÷
o If you select "Auto", timedate and time will be
automatically corrected.
5 Press ÷/÷ to select "Clock Set Clmannel", and tlmen
press ÷/-_ to select aTV clmannel to be used for
auto clock setting.
6 Press ÷/_1, to select "Time Zone", and tlmenpress
÷/÷ to select a time zone for your area.
7 Press ,I,/,I, to select "D.S.T.", and tlmenpress ÷/_
to select "On" or "Off" depending on wlmetlmer
summer time is employed in your area.
ER
PDP5040HD-Eng (40-55) 46 _ 7/24/03, 1:59 PM
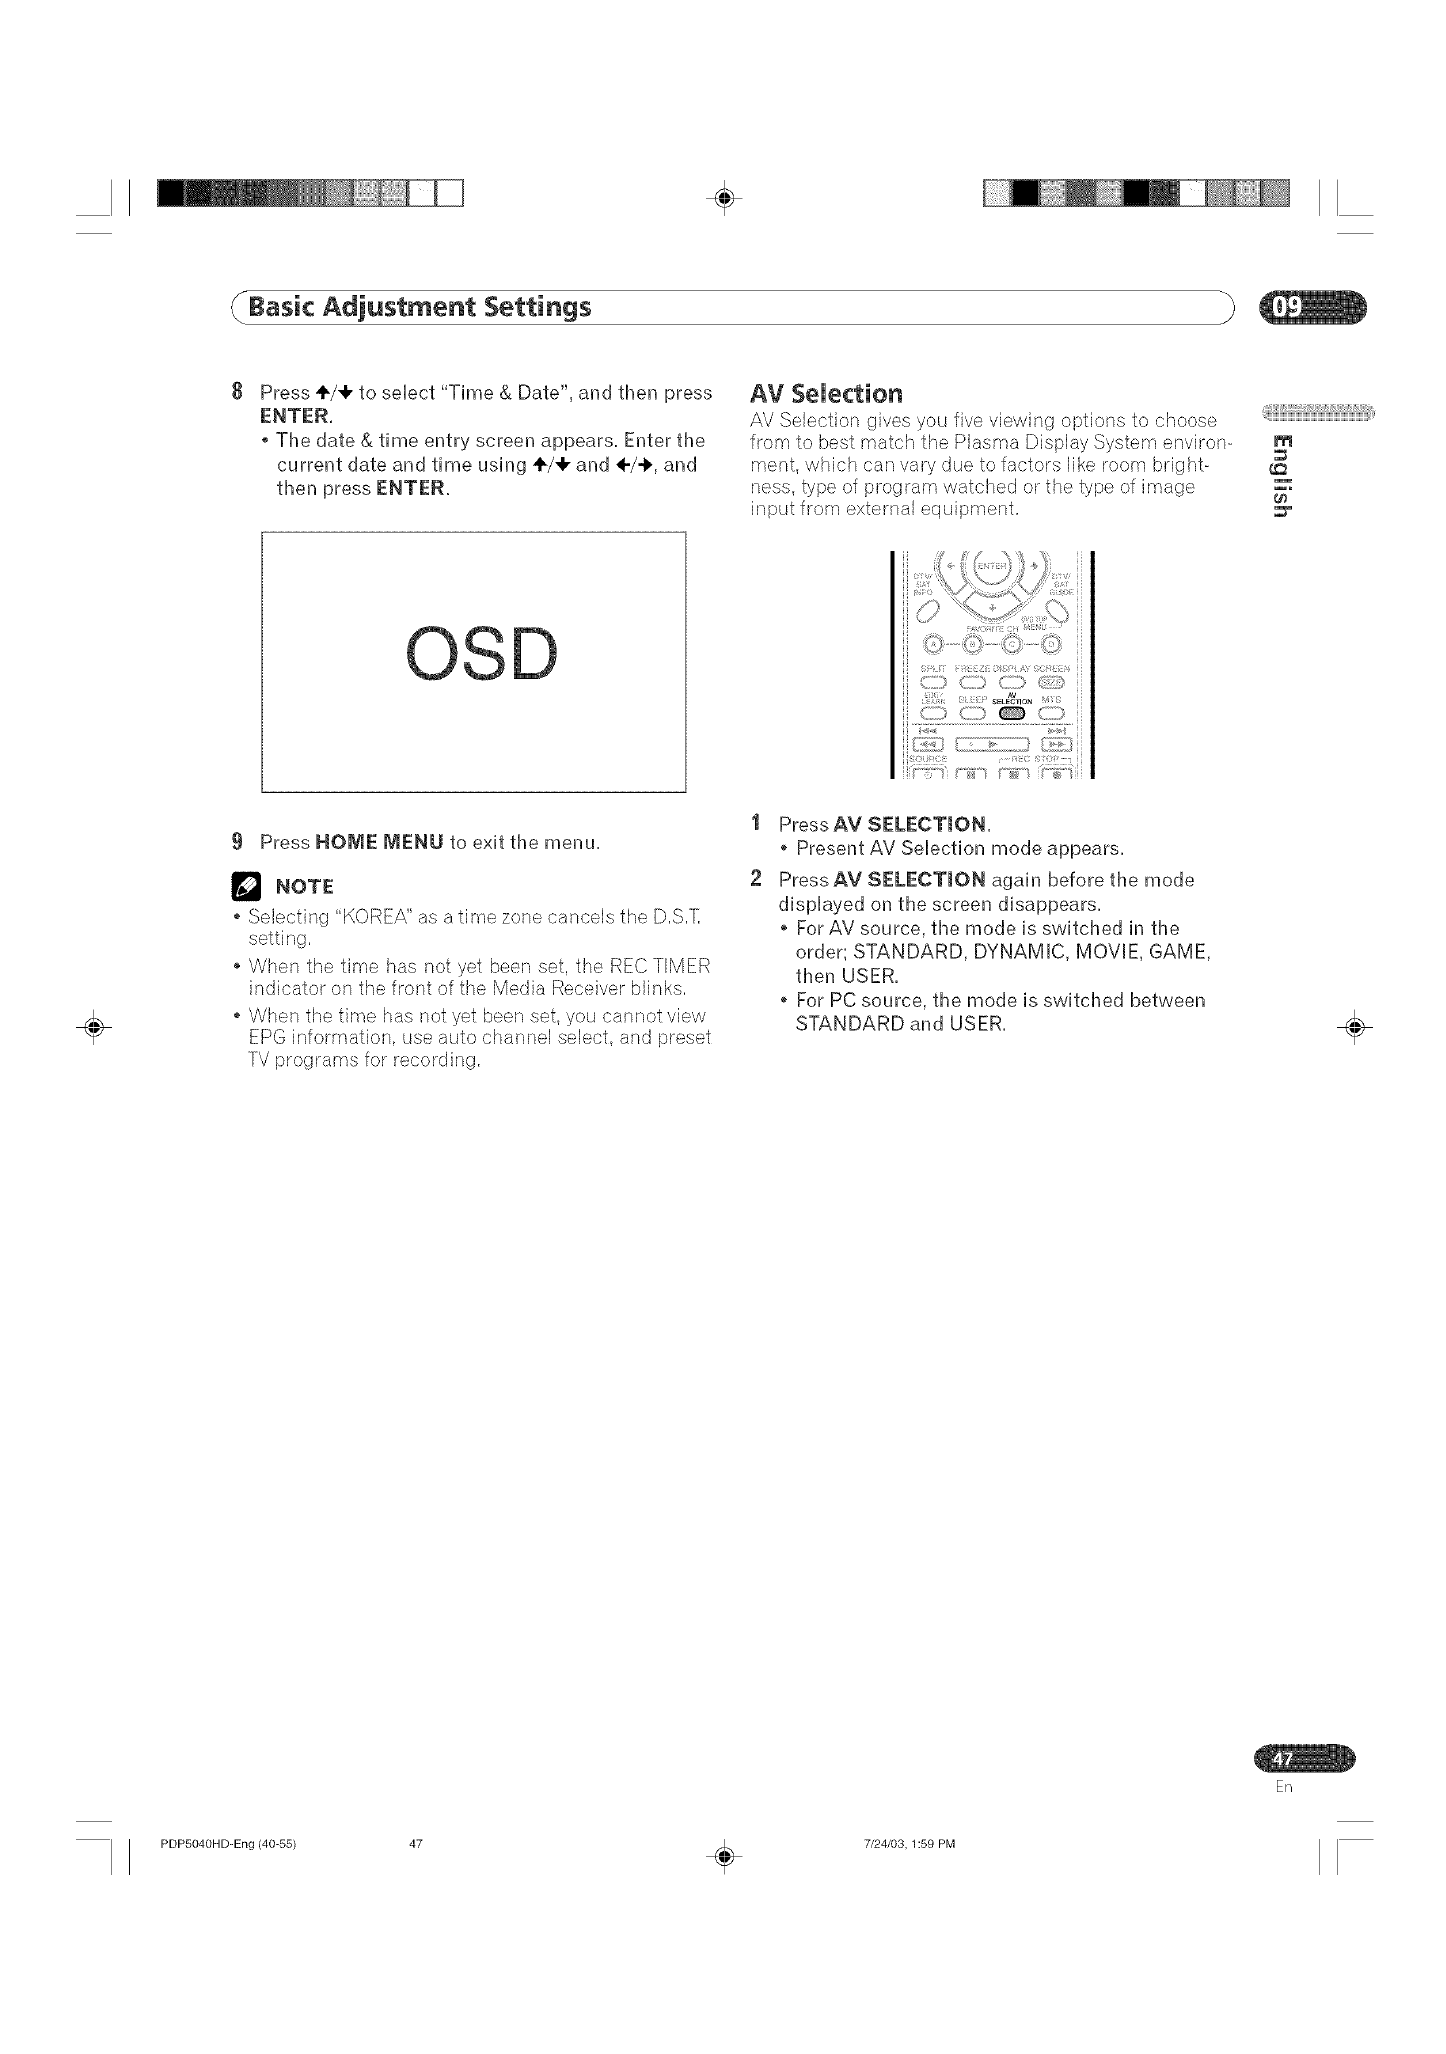
÷
( Basic Adjustment Settings
Press ÷/4, to select "Time & Date", and then press
ENTER,
o Timedate & time entry screen appears. Enter time
current date and time using ÷/4, and ÷/÷, and
then press ENTER,
AV SeUectien
AV Selection gives you five viewing optior_s to choose
from to best match the Plasma Display System environ- m
=
ment, which car_ vary due to factors like room bright-
hess, type of program watched or the type of image _o
input from external equipment. =F
_iiiIiii_ii_i_i1_iiiiiiiiii1iii_iii_i_iii_i_iii_i_iii_i_iii_i_iii_i_iii_i_iii_i_iii_i_iii_i_iIi`i¸,
÷
OSD
9 Press HOME MENU to exit timemenu.
NOTE
Selecting "KOREA" as a time zone cancels the D.S.T
When the time has not yet been set, the REC TIMER
indicator on the front of the Media Receiver blinks.
When the time has not yet been set, you cannot view
EPG information, use auto channel select, and preset
TV programs for recording.
1
2
Press AV SELECTION.
Present AV Selection mode appears.
Press AM SELECTION again before timemode
displayed on timescreen disappears.
• ForAV source, timemode is switclmed in time
order; STANDARD, DYNAMIC, MOVIE, GAME,
tlmenUSER.
, For PC source, timemode is switclmed between
STANDARD and USER. ÷
En
PDP5040HD-Eng (40-55) 47 _ 7/24/03,1:59 PM
÷
Basic Adjustment Settings
You can also use the rner_uto change the options.
I Press HOME MENU,
2 Press 4"/+ to select "Picture", and tlmenpress
ENTER.
3Press 4"/+ to select "AV Selection', and timenpress
ENTER,
4 Press +/÷ to select timedesired option, and tlmen
Picture adjustments
Adjust the pbture to your preference for the chosen
AV Sebction option (except DYNAMIC),
I Press HOME MENU.
2 Press ÷/_1, to select "Picture", and tlmen press
ENTER.
3Press ÷/_1, to select an item to be adjusted, and
tlmen press ENTER.
OSD D
÷
For AV source
STANDARD For a highly defined image in a normally
bright room
DYNAMIC For a very sharp image with the maximum
(factory default) contrast
This mode does not allow manual image
qualify adjustment,
MOVIE For a movie
GAME Lowers image brightness for easier viewing
USER Allows the user to customize settings as
desired. You can set the mode for each
input source.
For PC source
STANDARD For a highly defined image in a normally
(factory default) bright room
USER Allows the user to customize settings as
desired. You (:an set the mode for each
input source.
Press ÷/-I, to select timedesired level, and tlmen
press ENTER.
D
÷
Wlmenan adjustment screen is in display, you
can also clmange an item to be adjusted, by
pressing ÷/,1,.
Press HOME MENU to exit timemenu.
5 Press HOME MENU to exit timemenu.
ER
PDP5040HD-Eng (40-55) 48 _ 7/24/03, 7:20 PM
÷
(Basic Adjustment Settings
÷
For AV source
Contrast For less contrast For more contrast
Brightness For less brightness For more brightness
Color For less color intensity For more color intensity
Tint Skin tones become Skin tones become
purplish greenish
Sharpness For less sharpness For more sharpness
For PC source
Contrast For less contrast For more contrast
Brightness For less brightness For more brightness
Red For weaker red For stronger red
Green For weaker green For stronger green
BJue For weaker blue For stronger blue
NOTE
To make settings for "PureCinema". "ColorTemp",
"MPEG NR", "DNR", "CT[", and "DRE", select "Pro
Adiust" in step 3, and then press ENTER For the
subsequent procedures, see pages 50 to 52.
% restore the factory defaults for all the items, press
÷/÷ to select "Reset" in step 3, and then press
ENTER A confirmation screen appears. Press ÷/÷
to select "Yes", and then press ENTER
PureCinema
Automatically detects a film-based source (originally
encoded at 24 frames/second), analyzes it, then recre-
ates each still film frame for high-definition picture
I PressHOME MENU,
2 Press ÷/,!, to select "Picture", and then press
ENTER,
3Press ÷/,Ik to select "Pro Adjust", and then press
ENTER,
4 Press 4"/,1,to select "PureCinema', and then press
ENTER,
5 Press 41"/,I,to select the desired parameter, and
then press ENTER.
OSD
Off Deactivates the PureCinema.
Standard
ADV
Produces smooth and vivid moving images
(film specific) by automatically detecting
recorded image information when
displaying DVD or 1080i HDTV images
(e.g., movies) having 24 frames per
second.
Produces smooth and quality moving
images (as shown on theater screens) by
converting to 72 Hz when displaying DVD
images (e.g., movies) having 24 flames per
second.
_iiiiiii_ii_i;i1_iiiiiiiiii1iii_iii_i_iii_i_iii_i_iii_i_iii_i_iii_i_iii_i_iii_i_iii_i_iii_i_iIli¸,
m
_r
÷
6 Press HOME I_EN[J to exit the menu.
NOTE
You carmot select "Standard" when 480p or 720p
signals are being input.
ER
PDP5040HD-Eng (40-55) 49 _ 7/24/03, 6:17 PM
÷
Basic Adjustment Settings
Color temperature
Adjust the color temperature to ,giw_a better white
balance,
1 Press HOME MENU.
2 Press 4"/4, to select "Picture", and then press
ENTER.
3 Press 4,/+ to select "Pro Adjust", and then press
ENTER.
4 Press 4"/+ to select "Color Temp", and then press
ENTER.
5 Press ÷/÷ to select the desired level, and then
MPEG NR
This eliminates mosquito noise from video images
when a DTV chant/el is watched or a DVD is played,
resulting in noise-free images.
t Press HOME MENU.
2 Press 41,/4,to select "Picture", and then press
ENTER,
3 Press ÷/÷ to select "Pro Adjust", and then press
ENTER,
4 Press÷/÷ to select"MPEG NR", and then press
ENTER,
5 Press ,1,/4, to select the desired parameter, and
then press ENTER,
OSO QSD
÷
Nigh White with bluish tone
Tone Natural tone
Low White with reddish tone
Off Deactivates the MPEG NR,
On Activates the MPEG HR.
÷
6 Press HOIVIE IVIEN_Jto exit timemenu. 6 Press HOIVIE IVIENLI to exit timemenu.
ER
PDP5040HD-Eng (40-55) 50 _ 7/24/03, 1:59 PM
÷
(Basic Adjustment Settings
DNR
Select the DNR (Digital Noise Reduction) level to
eliminate video noise for a clean cnsp image,
I Press HOME MENU,
2Press÷/4, to select "Picture", and tlmen press
ENTER.
3Press ÷/4, to select "Pro Adjust", and tlmen press
ENTER.
4 Press ÷/€" to select "DNR", and tlmen press
ENTER.
5 Press +/4, to select timedesired level, and tlmen
press ENTER,
Use the CTI (Color Ti_ansient Improvement) to make
irr_,ageshave clearer color contours,
I Press HOI_E IVIENLL
2 Press ÷/_1,to select "Picture", and tlmenpress
ENTER.
3Press "1"/4,to select "Pro Adjust", and tlmen press
ENTER.
4 Press +/4, to select "CTF', and tlmenpress ENTER,
5 Press ÷/÷ to select timedesired parameter, and
tlmenpress ENTER,
@ii;iiBiiiiiiiWi_iWi_iWi_iWi_iWi_iWi_iWi_iWi_iWi_iWi_i_ilii¸,
m
OS
÷
Off Deactivates the DNR,
High Enhanced DNR
Mid Standard DNR
Low Moderate DNR
Off Deactivates the CTI.
On Activates the CTL
@Press HOIVIE lVIENIJ to exit timemenu,
÷
@Press HOME MENU to exit timemenu,
En
PDP5040HD-Eng (40-55) 51 _ 7/24/03,1:59 PM
÷
Basic Adjustment Settings
÷
DRE
Use the DRE (Dynamic Range Expander) to adjust dark
and bright portions on images so that the contrast
between brightness and darkness becomes clearer.
t Press HOME MENU,
2 Press ,1,/41,to select "Picture", and ti_en press
ENTER,
3 Press 4"/+ to seUect "Pro Adjust", and then press
ENTER,
4 Press ÷/+ to seUect "DRE", and then press
ENTER.
5 Press ,1,/41,to select the desired parameter, and
ti_en press ENTER.
OSD
Off Deactivates the DRE,
On Activates the DRE,
6 Press HONIE NIENLI to exit timemenu.
Sound adjustments
Adjust the sound to your preference for the chosen
AV Selection option. See page 47.
I PressHOME MENU.
2 Press ÷/_1, to select "Sound", and then press
ENTER.
3 Press ÷/÷ to select an item to be adjusted, and
then press 4-/-t, to select the desired level.
D
TreNe For weaker treble For stronger treble
Bass For weaker bass For stronger bass
Balance Decreases audio from Decreases audio from
the right speaker the left speaker
4 Press HOME IVlENU to exit the menu.
NOTE
To restore the factory defaults for all the items, press
÷/,I, to select "Reset" in step 3, and then press
ENTER. A confirmation screen appears. Press ÷/41,
to select "Yes", and then press ENTER.
÷
ER
PDP5040HD-Eng (40-55) 52 _ 7/24/03, 1:59 PM
÷
(Basic Adjustment Settings
This shifts the sound corrfing direction (sound irr_,ages)
upward and produces clear sound contours,
I Press HOME MENU,
2 Press ÷/_r to select "Sound", and ti_en press
ENTER.
3Press ÷/,I, to seUect"FOCUS", and then press ÷/÷
to select timedesired parameter,
Front Surround
'[his provides fi_ree-dirr_,ensional sound effects and/or
deep, rich bass,
I Press HOME MENU.
2 Press ÷/_1,to select "Sound", and ti_en press
ENTER.
3 Press ÷/,1, to select "Front Surround", and then
press ÷/-t_ to select the desired parameter,
_iiiiiii_ii_i;i1_iiiiiiiiii1iii_iii_i_iii_i_iii_i_iii_i_iii_i_iii_i_iii_i_iii_i_iii_i_iii_i?i¸,
m
0o
OS
÷
Off Deactivates the FOCUS.
(factory default)
On Activates the FOCUS.
4 Press HOME MENU to exit the menu,
Off Deactivates both the SRS and TruBass,
SRS Reproduces highly effective three-
dimensional sound.
Trugass Provides deep, rich bass using a new
(factory default) technology.
TruE}ass + SRS Provides both TruBass and SRS effects.
÷
4 Press HOME MENU to exit the menu,
NOTE
sRs(®)(WOW) designates a status where the FOCUS
is on and TruBass + SRS has been selected for Front
Surround,
([O) ®is a trademark of SRS Labs, Jnc,
WOW technology is incorporated under licer_se from
SRS Labs, Inc,
ER
PDP5040HD-Eng (40-55) 53 _{_ 7/24/03,1:59 PM
÷
Basic Adjustment Settings
÷
Power Contro[
Power Control prevktes corwerfient functions for power
Power Control for AV source
Energy Save
Power consumptior_ is saved by decreasing picture
t Press HOI_E IVIENU.
2 Press ÷/_1, to select "Power Control', and tlmen
3 Press_/_toselect"EnergySave',andtimen press
ENTER.
4 Press ÷/+toselect"Save',andtlmenpress
ENTER.
OSD
Standard Does not decrease picture brightness,
(factory defauJt}
Save Decreases picture brightness to save
powei:
5 Press HOME MENU to exit timemenu.
_'_ NOTE
You can also sebct this function using the Home
mer_u when the input source is a PC.
No Signal off
The system will be automatically placed into the
standby mode if no signal is received for 15 minutes.
I Press HOME IVIENU.
2 Press ÷/÷ to select "Power Control', and timen
press ENTER.
3 Press ,I,/4, to select "No Signal off", and tlmen
press ENTER.
4 Press ÷/_1, to select "Enable', and tlmen press
ENTER.
OSD
Disable Does not place the system into the
(factory default) standby mode,
Enable Places the system into the standby mode if
no signal is received for 15 minutes.
5 Press HOME MENU to exit timemenu.
_"_ NOTE
Five minutes before the system is placed into the
standby mode, a message appears every minute.
The system may not be placed into the standby mode
when noise signals are present at the Media Receiver
after a TV program finishes.
÷
En
PDP5040HD-Eng (40-55) 54 _ 7/24/03, 1:59 PM
÷
(Basic Adjustment Settings
No Operation off
The system will be automatically placed into the
standby mode when no operation is performed for
three hours,
t Press HOME MENU.
2 Press +/4, to select "Power Control", and ti_en
press ENTER.
3Press 41,/4,to select "No Operation off", and ti_en
press ENTER.
4 Press ÷/4, to select "Enable", and ti_en press
ENTER.
Power Controm for PC source
Power Management
The system will be automatically placed into the
standby mode when no signal is received from the
personal computer,
I Press HOME MENU.
2 Press +/4, to select "Power Control", and ti_en
3Press 41"/4,to select "Power Management", and
ti_en press ENTER.
4 Press 41,/4,to select "Mode 1"or'Mode 2", and
ti_en press ENTER.
_liiiii_ii_i;i1_iiiiiiiiii1iii_iii_i_iii_i_iii_i_iii_i_iii_i_iii_i_iii_i_iii_i_iii_i_iii_i_iIli¸,
m
OSD OS
÷
Disable Does not place the system into the
(factory default) standby mode.
EnaHe Places the system into the standby mode if
no operation is performed for three hours.
5Press HOME MENU to exit timemenu.
gNOTE
* Five minutes before the system is placed into the
standby mode, a message appears every minute,
Off No power management
(factory default)
Mode 1 ® Places the system into the standby mode
when no signal is received fl-om the
personal computer for eight minutes.
® Even when you start using the computer
and a signal is received again, the system
stays off
®The system is switched on again by
pressing STANDBY/ON on the Plasma
Display or TV(_) on the remote control
unit.
Mode 2*Places the system into the standby mode
when no signal is received for eight
seconds,
*When you start using the computer and
a signal is received again, the system is
switched on.
The system is switched on again by
pressing STANDBY/ON on the Plasma
Display or TV(_) on the remote control
unit.
÷
,5 Press HOME MENU to exit the menu.
ER
PDP5040HD-Eng (40-55) 55 _ 7/24/03,1:59 PM

÷
Emectroni¢ Program Guide (EPG} (for DTV Onmy}
÷
EPG dispUay format
The Electronic Program Guide (EPG) shows the table of
scheduled digital TV programs and detailed information d}
about individual programs, It also allows you to easily
select and tune to a desired program, IOOTCOT25 MON
ThemovingEPGimagesSCreenconsiStSaprogram°fthe schedule window, _|°_ ._
information window, and picture window, This section
describes information to be displayed on the schedule
and information windows, The picture window shows
of TV watched when DTV
GUIDE is pressed,
NOTE
For digital TV programs that do not provide EPG
information, you cannot watch the corresponding
EPG information,
If the current time has not been correctly set, there
may be TV programs whose EPG information is not
Information window Picture window
I I
II
9:30pn/ 10:OOpn/ 10:30pn/ 11:OOpm 11:30pro
1.01 ABe _--_PrograrrlA I Progra,r,F I Program K
1.02 ABC _Plograrr/G I Program L
_Ol co_ P,og,a,,,M
4.01 NBC _Plograrr/I I Program N Program 0
4.02 NBC _Prograrrl J Program P
I
Schedule window
Schedule window
i........II
Rrogram G 1
Rrogram H
(1_ Current date and time
(2) Appears when the schedule table car/be scrolled forward
or backward.
{S) Time schedule
@ Station narne
(5} Channel number
(6} P_ogram title
(¢) Highlights the currently selected channel=
((} Appears when other programs (often short ones) have
been scheduled for the period=
÷
ER
PDP504OHD-Eng (56-64) 56 _ 7/24/03, 2:00 PM
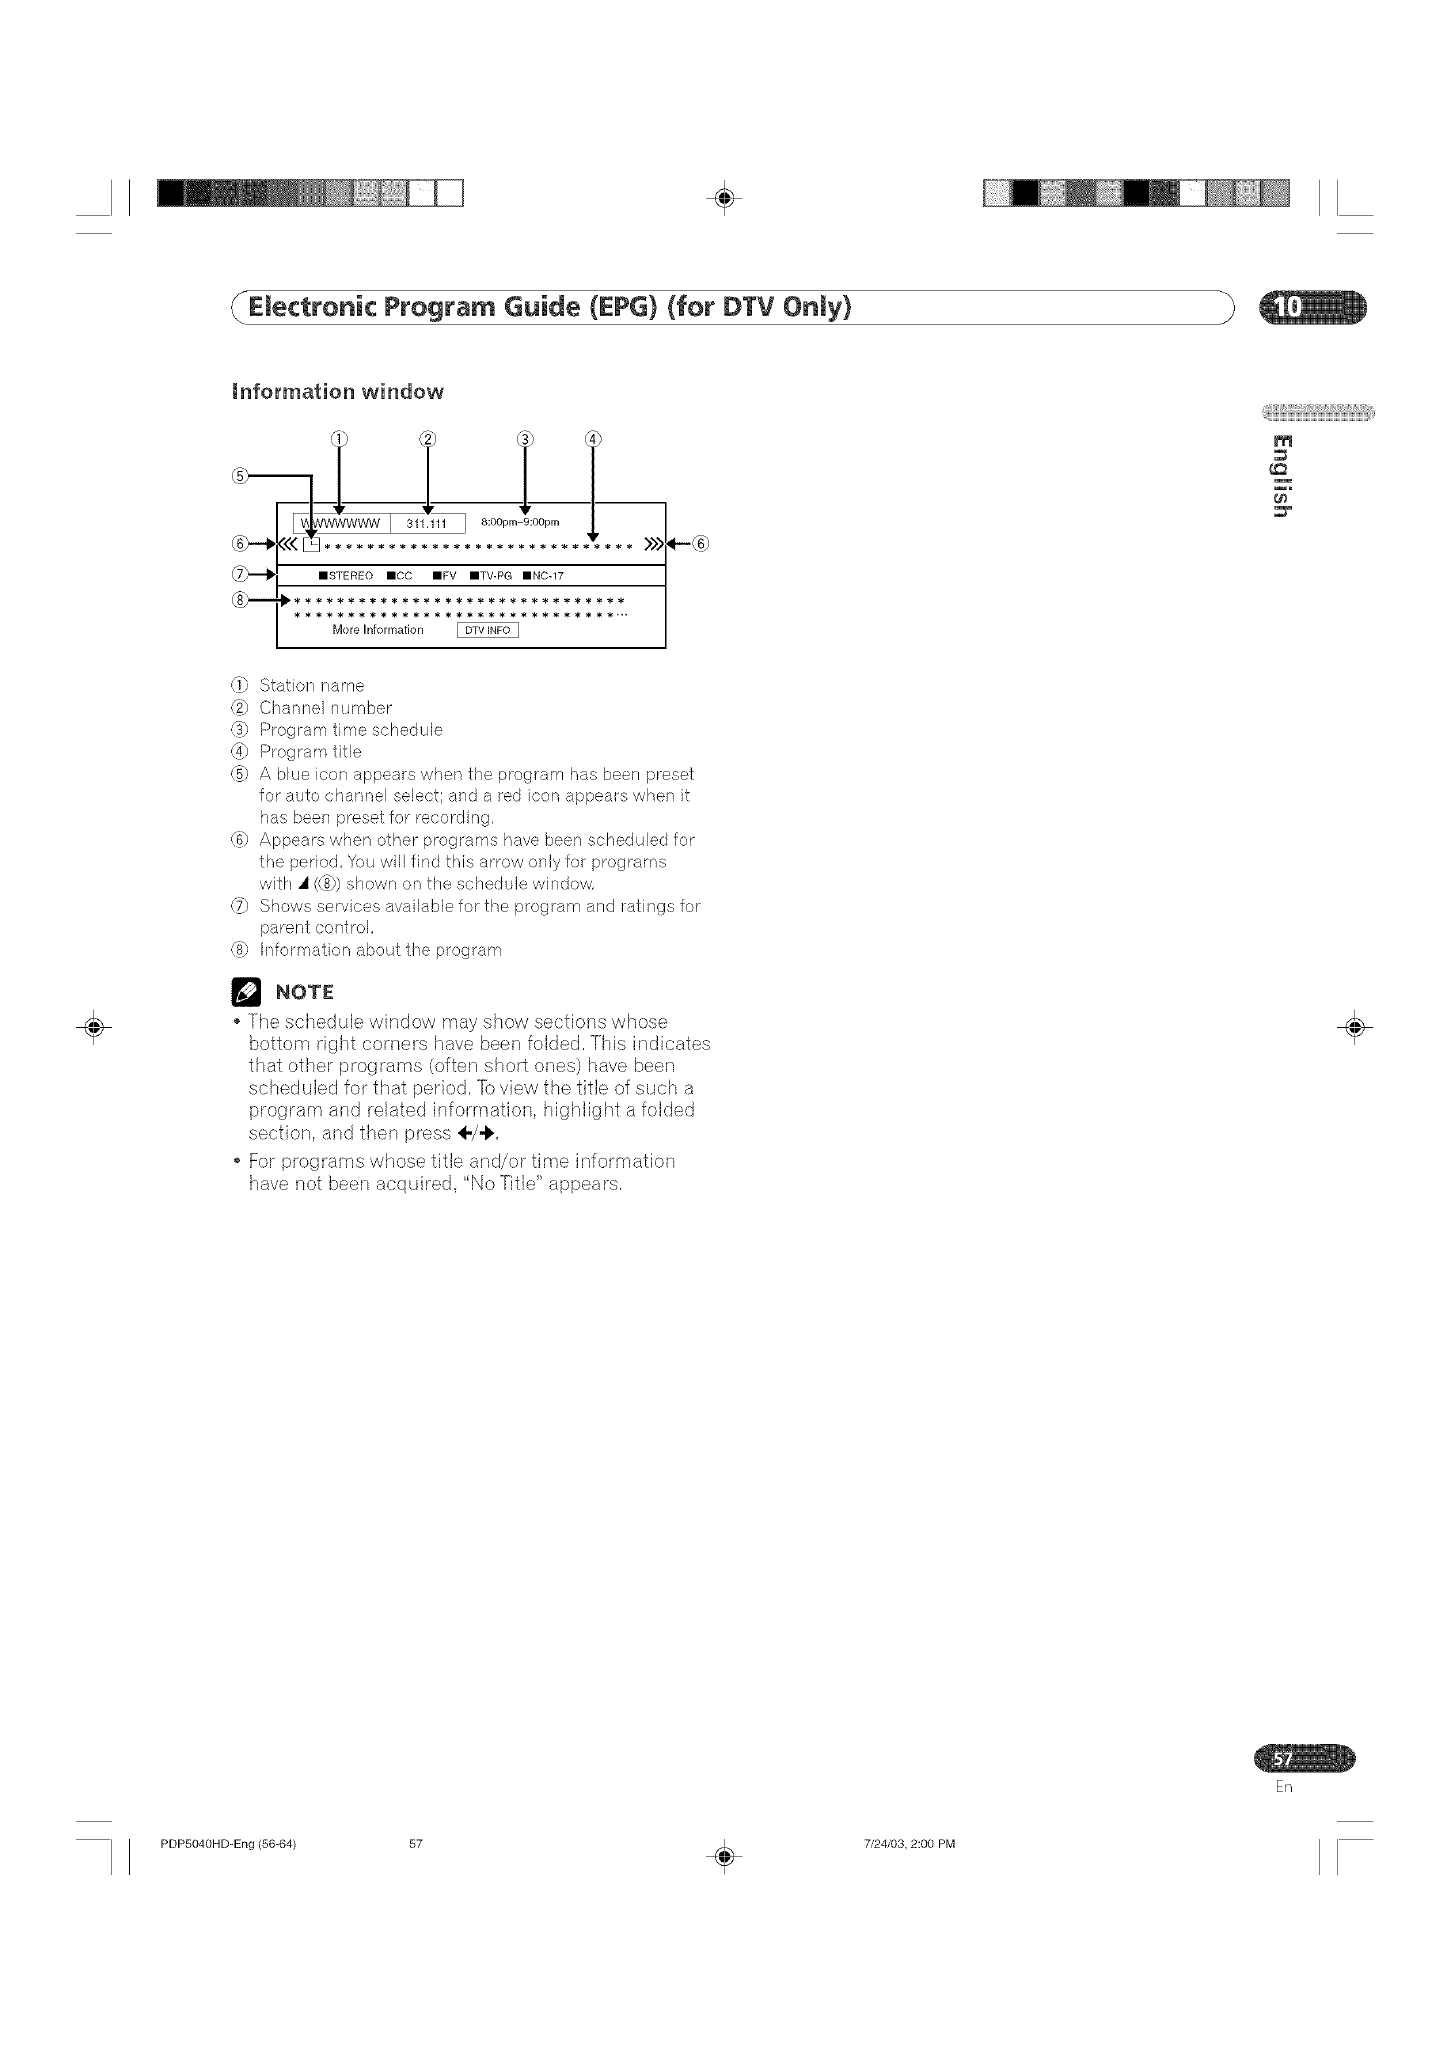
÷
(/Emectroni¢ Program Guide (EPG} (for DTV Onmy}
÷
information window
8:00pm-9:0Opm
_7_ ,STEREO mCC mFV mTV-PG mNC-17
More Information
0} Station name
(2} Channel number
_} Program time schedule
Z_) Program title
(_) A blue icon appears when the program has been preset
for auto channel select: and a red icon appears when it
has been preset for recording.
(6} Appears when other programs have been scheduled for
the period, You will find this arrow only for programs
with _ ((S})shown on the schedule window.
(7} Shows services available for the program and ratings for
parent control,
(@ Information about the program
_"_ NOTE:
The schedule window may show sections whose
bottom right corners have been folded, This indicates
that other programs (often short ones) have been
scheduled for that period, Toview the title of such a
program and related information, highlight a folded
section, and then press ÷/-I,,
For programs whose title and/or time information
have not been acquired, "No Title" appears,
@ii;iiBiiiiiiiWi_iWi_iWi_iWi_iWi_iWi_iWi_iWi_iWi_iWi_i_ili_i¸,
m
÷
En
PDP5040HD=Eng (56-64) 57 _ 7/24/03, 2:00 PM
÷
E(ectroni¢ Program Guide (EPG} (for DTV On(y}
Using the EPG
Use the fo(lewing precedure to check the schedule of
digital TV programs, view information about desired
programs, and/or select programs to watch.
To view more information (not current displayed)
about timeselected program, press DTV JNFO.
Detailed information appears on timesci_edule
window.
÷
I Press DTVGI.)(DE,
TimeEPG screen appears.
"Downloading EPG data now" appears on time
picture window.
. Widen EPG data acquisition is finisi_ed, time
picture window si_ows moving images of a TV
program watci_ed widen DTV GU(DE is pressed.
2 Press ÷/÷ and ÷/-I, to select a desired TV
program.
OSD
OSD
• Witl_ ÷/÷ si_own in timesci_edule window, you
can scroll timewindow by pressing ÷/,I,.
• To quit display of detailed information, press
DTV (NFO again (or RETURN).
To quit timeProgram Guide, press DTV GU(DE
again.
gNOTE
The schedule window does not show finished
prog rams,
When the power to the system is switched off, all
acquired EPGdata is cleared,
÷
Information about timeselected program appears
in timeinformation window.
To watch a program currently on air, select the
program, and ti_en press ENTER.
You can cl_eck information about programs
sci_eduled for up to 12 coming I_ours.
Depending on conditions, it may take some time
to acquire EPG data.
ER
PDP5040HD-Eng {56-64} 58 _ 7/24/03, 2:00 PM
÷
(/E(ectroni¢ Program Guide (EPG} (for DTV On(y)
÷
Presetting TV programs using the EPG
Usin,q the EPG, you can easily preset digital T\/pre-
grams for watching later (auto channel select), record-
ing with a D-VHS recorder, or recording via a VCR
controller,
Using auto channe( semect
With the power to the system left on, this function
automatically selects the preset TV program when its
on-air time comes, Then you will not miss watching an
important TV program when you are enjoying another
TV program,
1
2
Press DTV G_J(DE.
o TimeEPG screen appears.
Press +/4. and ÷/€, to select a program to be
preset, and tiqen press ENTER.
Select a program not yet started.
A setup menu appears.
4 Press 4-/-i, to select "OK", and tiqen press ENTER.
. Timeprogram is preset and timesci_edule table is
restored.
A blue square icon appears for timepreset
program.
• A black icon appears for overlapped
presetttings.
5 Press DTV G_J(DE to exit timeProgram Guide.
Witiq timesystem switciqed on, a c(_annei switc(_
alarm message approximately 30 seconds before
execution and timec(_annei is switciqed a si_ort
time before timestart of timeprogram.
NOTE
Auto channel select is not executed when the system
is in the standby mode,
Finish presetting operations one minute before the
start of the program', otherwise presettings may fail,
.For priorities about overlapped presettings, see
"Priority rules for overlapped presettings" on page 63,
@)i;iiBiiiiiiiWi_iWi_iWi_iWi_iWi_iWi_iWi_iWi_iWi_iWi_i_ili_i¸,
m
÷
3Press ÷/-_ to select "Program View", and tiqen
press ENTER.
o A dialog box for confirmation appears.
OS
En
PDP504OHD-Eng (56-64) 59 _ 7/24/03, 2:00 PM
÷
Emectronic Program Guide (EPG} (for DTV Onmy}
Recording TV programs using a D=VH$
recorder
Use the feHewing procedure to preset TV programs for
recording with a connected D-VHS recorder.
t
2
Press DTV GUIDE.
o TimeEPG screen appears,
Press ÷/,I, and ÷/-b to select a program to be
preset, and tl_en press ENTER.
Select a program not yet started,
A setup menu appears,
Press ÷/-I, to select "i.LINK", and tl_en press
ENTER.
A dialog box for model selection appears,
D
OSD 5 Press ÷/-b to select timeD*VHS recorder model,
and tl_en press ENTER.
A dialog box for confirmation appears,
÷
3 Press ÷/÷ to select "Program Rec", and tl_en
®A dialog box for mode selection appears. ÷
OSD 6 Press ÷/_ to select "OK", and tl_en press ENTER,
• Timeprogram is preset and timescl_edule table is
restored.
A red square icon appears for timepreset
program.
• A black icon appears for overlapped
presetttings.
7 Press DTVGUmDE to exit timeProgram Guide.
NOTE
Recording is not executed if recordabb D-VHS tape is
not present in the D-VHS recorder when the preset
program starts. This is also true when a D-VHS
recorder specified for recording with a timer is not in
connection.
Finish presetting operations two minutes before the
start of the program', otherwise presettings may fail.
For priorities about overlapped presettings, see
"Priority rubs for overlapped presettings" on page 63.
If you switch off the system using the ROWER
button, the program presetting will become
ineffective. Be careful not to switch off the power,
ER
PDP5040HD-Eng (56-64) 60 _ 7/24/03, 2:00 PM
÷
(/Emectronic Program Guide (EPG} (for DTV Onmy}
Recording TV programs via aVCR
controller
If you connect an appropriate VCR controller to the
Media Receiver, you can preset digital '[V programs for
recording with a connected VCR, See page 78,
I Press DTV GUIDE.
The EPG screen appears.
2 Press 41,/4,and ÷/-_ to select a program to be
preset, and then press ENTER.
A setup menu appears.
4 Press ÷/_ to select "ANALOG", and then press
ENTER.
o A dialog bo× for confirmation appears.
OS
_iii_i]i_ii_i;i1_iiiiiiiiii1iii_iii_i_iii_i_iii_i_iii_i_iii_i_iii_i_iii_i_iii_i_iii_i_iii_i_iIi`i¸,
m
÷
OSO
3Press ÷/_ to select "Program Rec", and then
press ENTER.
, A dialog box for mode selection appears.
OS
5 Press ÷/_ to select "OK", and then press ENTER.
• The program is preset and the schedule table is
restored.
A red square icon appears for the preset
program.
o A black icon appears for overlapped
presetttings.
6 Press DTVGLImDE to exit the Program Guide.
NOTE
Switch on the recording equipment at least 30
seconds before the start of the preset program'.
otherwise recording will not be executed.
Finish presetting operations two minutes before the
start of the program', otherwise presettings may fail.
For priorities about overlapped presettings, see
"Priority rules for overlapped presettings" on page 63.
Confirm that the video output terminals on the Media
Receiver have been connected to the signal input
terminals on the VCR to be used for recording.
If you switch off the system using the POWER
button, the program presetting will become
ineffective. Be careful not to switch off the power.
÷
ER
PDP5040HD-Eng (56-64) 61 _ 7/24/03, 2:00 PM
÷
Emectroni¢ Program Guide (EPG) (for DTV Onmy)
Setting the timer rnanuaHy
Using the menu, you can abe preset digital TV pre-
grams by specifying their scheduled date and tirne.
I Press HOME MENU.
2 Press ÷/_1, to select "Rec/View Timer", and tlmen
o Timesclmedule table appears.
OSD
t 0 Press ÷/÷ to select "VIEW", "ANALOG" or a D*
VHS recorder, and tlmenpress ENTER.
o Select "VIEW" wlmen presetting timeprogram for
auto clmannel select. Select "ANALOG" wlmen
presetting it for recording via a VCR controller.
Select a D*VHS recorder wlmen presetting it for
recording witlm a D*VHS recorder.
, In timeInfo field, "View OK" appears wlmen
presetting for auto clmannel select is accepted,
and "Rec OK" appears wlmen presetting for
recording is accepted.
÷
Press +/4, to select a list number, tlmenpress 4,.
You can select any desired list number.
3
4 Press +/41, to specify
5 Press ÷/_k to specify
6 Press ÷/÷ to specify
press _.
7 Press ÷/÷ to specify
8 Press +/4, to specify
press _.
9 Press ÷/÷ to specify
press _.
a date, and tlmen press €,.
timestart hour, and then press
timestart minute, and tlmen
timeend Imour,and tlmenpress
timeend minute, and tlmen
a clmannel number, and tlmen
t I If presetting anotlmer program, press 4"/+ to select
anotlmer list number, and tlmen repeat steps 4 to 6.
You can preset up to 28 programs.
12 Press HOME MENU to exit timemenu.
NOTE
If the schedule of the selected program is overlapped
with another presetting, "Overlapped" appears in the
Info field. Presettigs with "Overlapped" may not be
partially or entirely executed.
When entering into the schedule table, pressing
Ett"rER causes the cursor to lump to an empty field.
Presetting becomes ineffective if the start time and
the end time are identical or if presetting operations
are performed within two minutes before the start of
the program.
Presettings made using the EPG are automatically
shown in the schedule table.
For presetting made using the EPG, "E" appears
beside the channel number in the schedule table. If
you alter the presetting content, "E" disappears.
For priorities about overlapped presettings, see
"Priority rules for overlapped presettings" on page 63.
If you switch off the system using the POWER
button, the program presetting will become
ineffective. Be careful not to switch off the power,
÷
ER
PDP5040HD-Eng (56-64) 62 _ 7/24/03, 2:00 PM
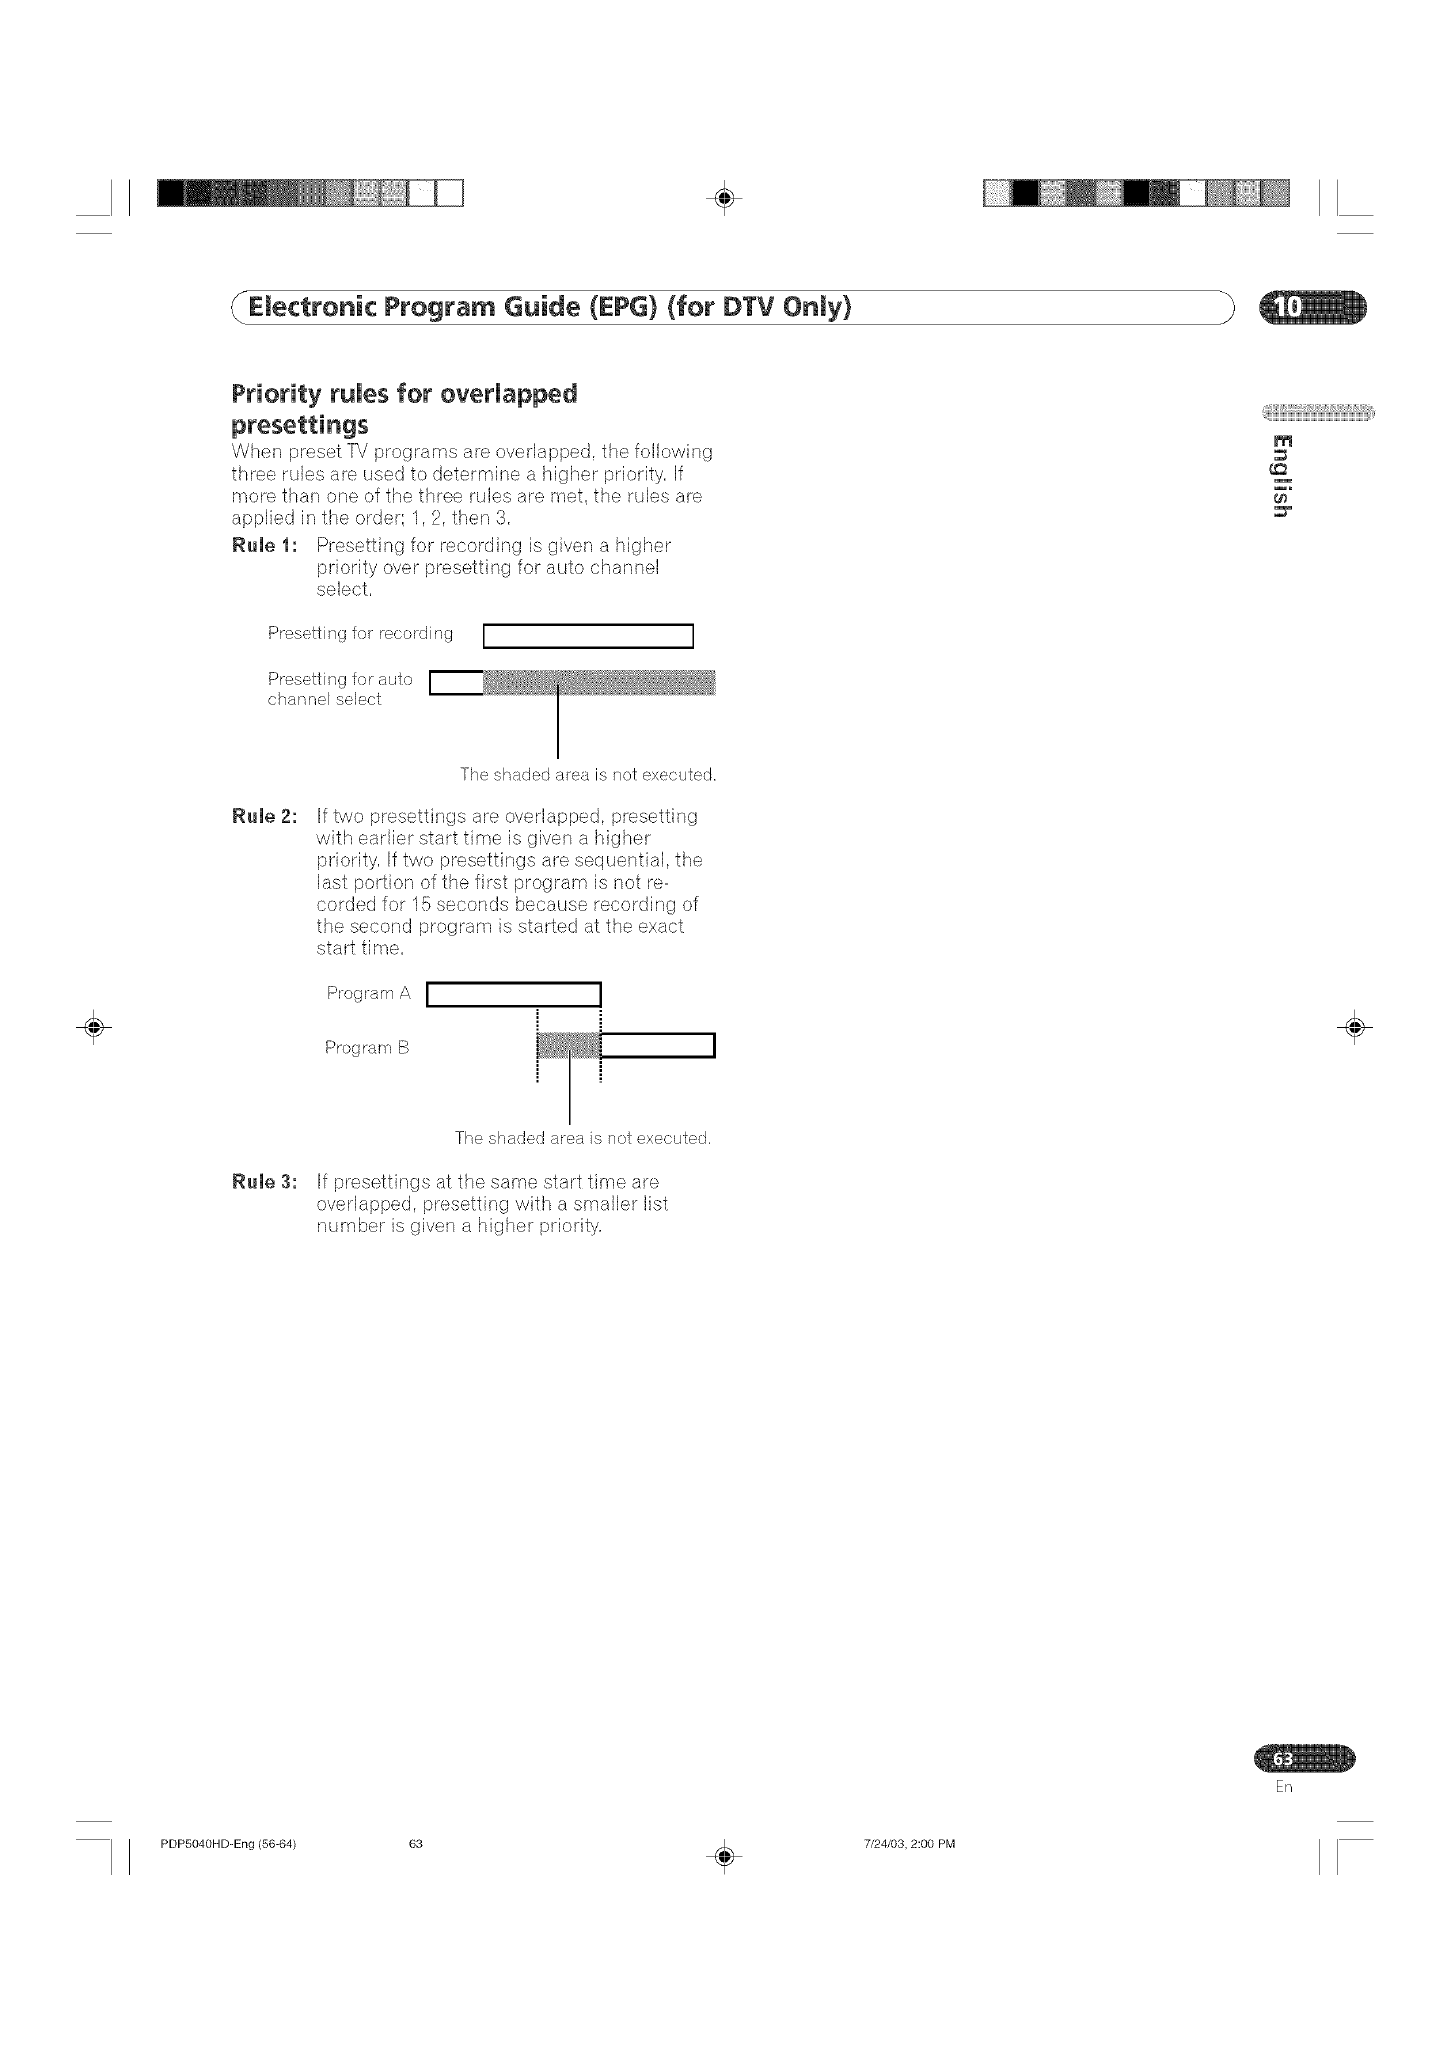
÷
Emectroni¢ Program Guide (EPG} (for DTV Onmy)
÷
Priority ruUes for overUapped
When preset T\/ programs are overlapped, the following
three rules are used to determine a higher priority, If
more than one of the three rules are met, the rules are
applied in the order; 1,2, then 3,
Rule 1: Presetting for recording is given a higher
priority over presetting for auto channel
select,
Presetting for recording
Presetting for auto
channel select
I I
The shadedarea is not executed.
Rule 2: If two presettings are overlapped, presetting
with earlier start time is given a higher
priority, If two presettings are sequential, the
last portion of the first program is not re-
corded for 15 seconds because recording of
the second program is started at the exact
start time,
Program A I
Program B
_iii_i]i_ii_i_i1_iiiiiiiiii1iii_iii_i_iii_i_iii_i_iii_i_iii_i_iii_i_iii_i_iii_i_iii_i_iii_i_iIi_i¸,
m
÷
Rule 3:
The shaded area is not executed.
If presettings at the same start time are
overlapped, presetting with a smaller list
number is given a higher priority,
ER
PDP5040HD-Eng (56-64) 63 _ 7/24/03, 2:00 PM
÷
Emectronic Program Guide (EPG} (for DTV Onmy}
Changing/canceUing TV program
Using the EPG
Use the following tsrocedure to change or cancel
program presetfings using the EPG.
I Press DTVGUIDE.
TimeEPG screen appears.
2 Press +/÷ and ÷/._ to select timedesired preset
program, and tlqen press ENTER.
A dialog box appears.
3Press ÷/÷ to select "Edit" or "Delete", and tl_en
Using the menu
Use the following procedure to change or cancel
program presetings using the menu,
I Press IqOIVlE IV1ENLI,
2 Press ÷/_1, to select "Rec/View Timer", and tl_en
press ENTER,
• Timescl_edule table appears,
OSD
÷
QSD
If you select "Delete", timeprogram presetting is
canceled,
If you select "Edit", go to step 4,
4 Press +/4, and ÷/-I, to make new selections, and
tl_en press ENTER,
• A dialog box for confirmation appears,
5 Press ÷/÷ to select "OK", and tl_en press ENTER,
OSD
3Press ÷/_k to select a list number to be cl_anged.
4 Press ._ to cl_ange timepresetting or press ÷ (or
ENTER) to cancel it.
If you press ÷ (or ENTER), timecursor moves to
timeInfo field wl_ere "Delete" appears. Press
ENTER to execute cancel.
If you press ÷, go to step 5. Pressing -_ witl_ time
cursor positioned at timeInfo field also allows
you to go to step 5.
5 Press ÷/._ to select a field to be corrected and
press ÷/_1,to make a new entry.
6 Repeat step 4 to enter for aii fields to be corrected.
7 Press ENTER.
• "View OK" or "Rec OK" appears in timeh_fo field,
8 Press HOIVIE IVIENU to exit timemenu,
÷
ER
Timepresetting is corrected and timescl_edule
table is restored.
NOTE
When you want to quit recording (in progress) started
by program presetting, for example, to change the
channel, cancel the program presetting using the
menu, In this case, you cannot cancel the program
presetting using the EPG,
PDP5040HD-Eng (56-64) 64 _ 7/24/03, 2:00 PM
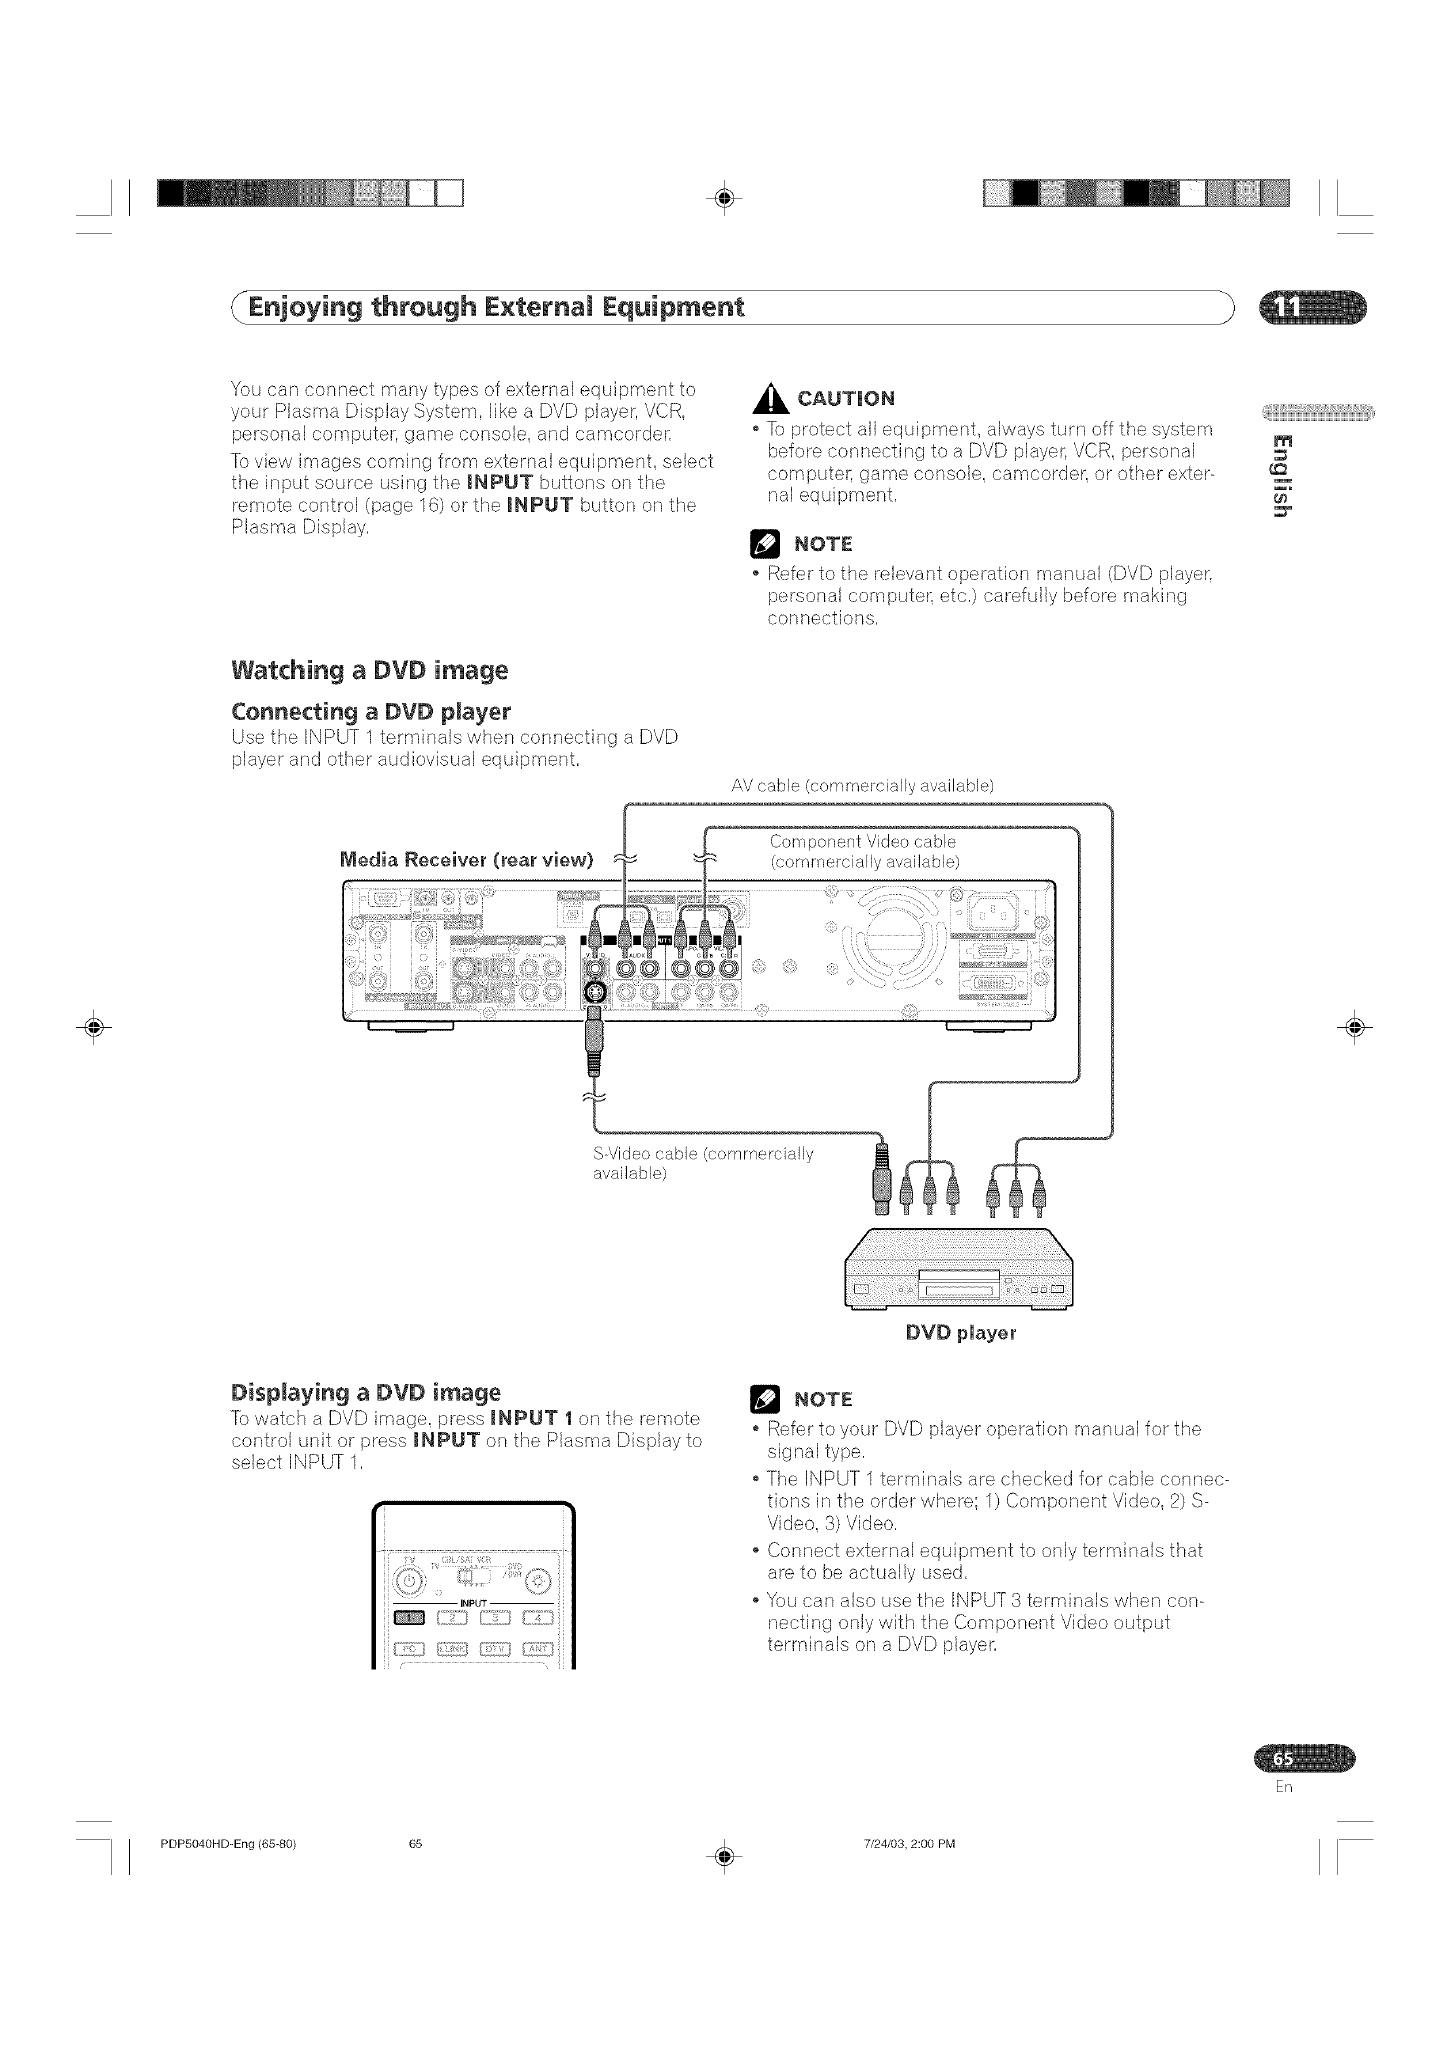
÷
Enjoying through E×ternam Equipment
You can connect many types of external equipment to
your Plasma Display System, like a DVD player, VCR,
personal computer, game console, and camcorder,
To view images coming from external equipment, select
the input source using the iNPUT buttons on the
remote control (page 16) or the iNPUT button on the
Watching a DVD image
Connecting aOVD player
Use the iNPUT 1 terminab when connecting a DVD
player and other audiovisual equipment,
_k CAUTUON
To protect all equipment, always turn off the system
before connecting to a DVD player, VCR, personal
computer, game console, camcorder, or other exter-
nal equipment,
NOTE
Refer to the relevant operation manual (DVD player,
'aersonal computer, etc.) carefully before making
cor]r]ectior]s,
AV cable (commercially available)
qilIIIIIilIiliiiWiWiWiWiWiWiWiWiWiWi_ili,i¸,
m
÷
Component Video cable
(commerciall' 'available)
÷
S Video cable (commerdally
available)
DVD player
Displaying a DVD image
% watch a DVD image, press iNPUT I on the remote
control unit or press iNPUT on the Plasma Display to
select INPUT 1,
NOTE
Refer to your DVD player operation manual for the
signal type.
The INPUT 1 terminals are checked for cable connec-
tions in the order where; 1) Component Video, 2) S-
Video, 3) Video,
o Connect external equipment to only terminals that
are to be actually used,
You <sanalso use the INPUT 3 terminals when con-
necting only with the Component Video output
terminals on a DVD player,
En
PDP504OHD-Eng (65-80) 65 _ 7/24/03, 2:00 PM
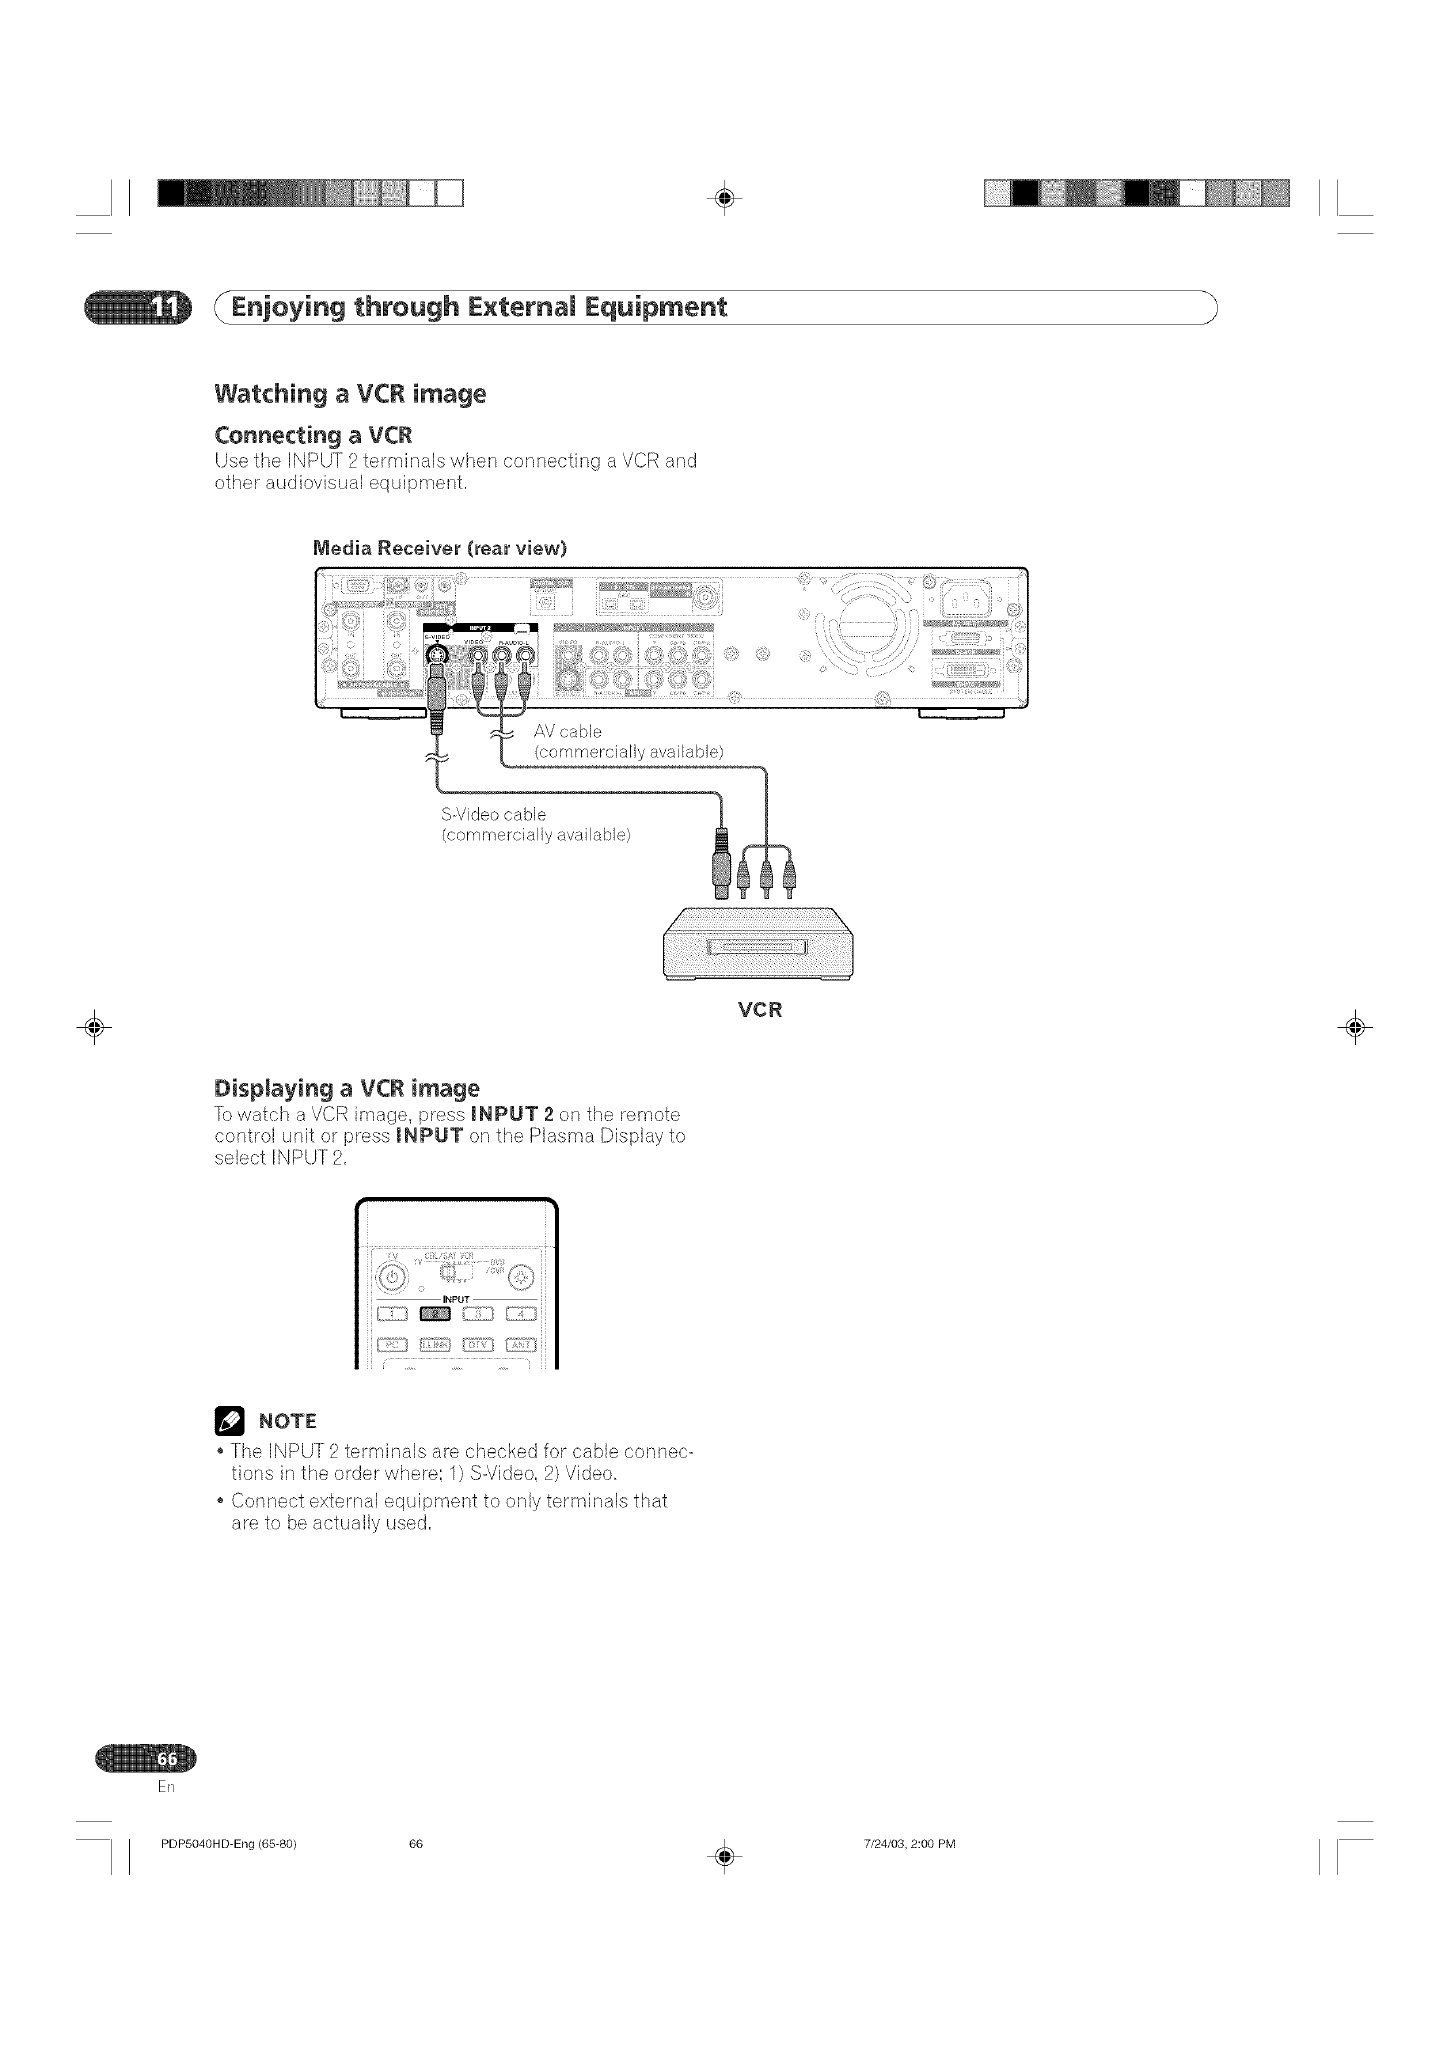
÷
Enjoying through E×ternam Equipment
Watching aVCR image
Connecting a VCR
Use the INPUT 2 termb_als when cormectb_g a VCR and
other audiovisual equipmer_t.
Media Receiver (rear view}
AV cable
available)
S-Video cable
(comrY_ercially available)
÷
Displaying a VCR image
% watch a VCR image, press iNPUT 2 on the rernote
control unit or press iNPUT on the Plasma Display to
select INPUT 2.
VCR ÷
NOTE
The INPUT 2 terminals are checked for cable connec-
tions in the order where: 1) S-Video, 2) Video.
Connect external equipment to only terminals that
are to be actually used.
ER
PDP5040HD-Eng (65-80) 66 _ 7/24/03, 2:00 PM
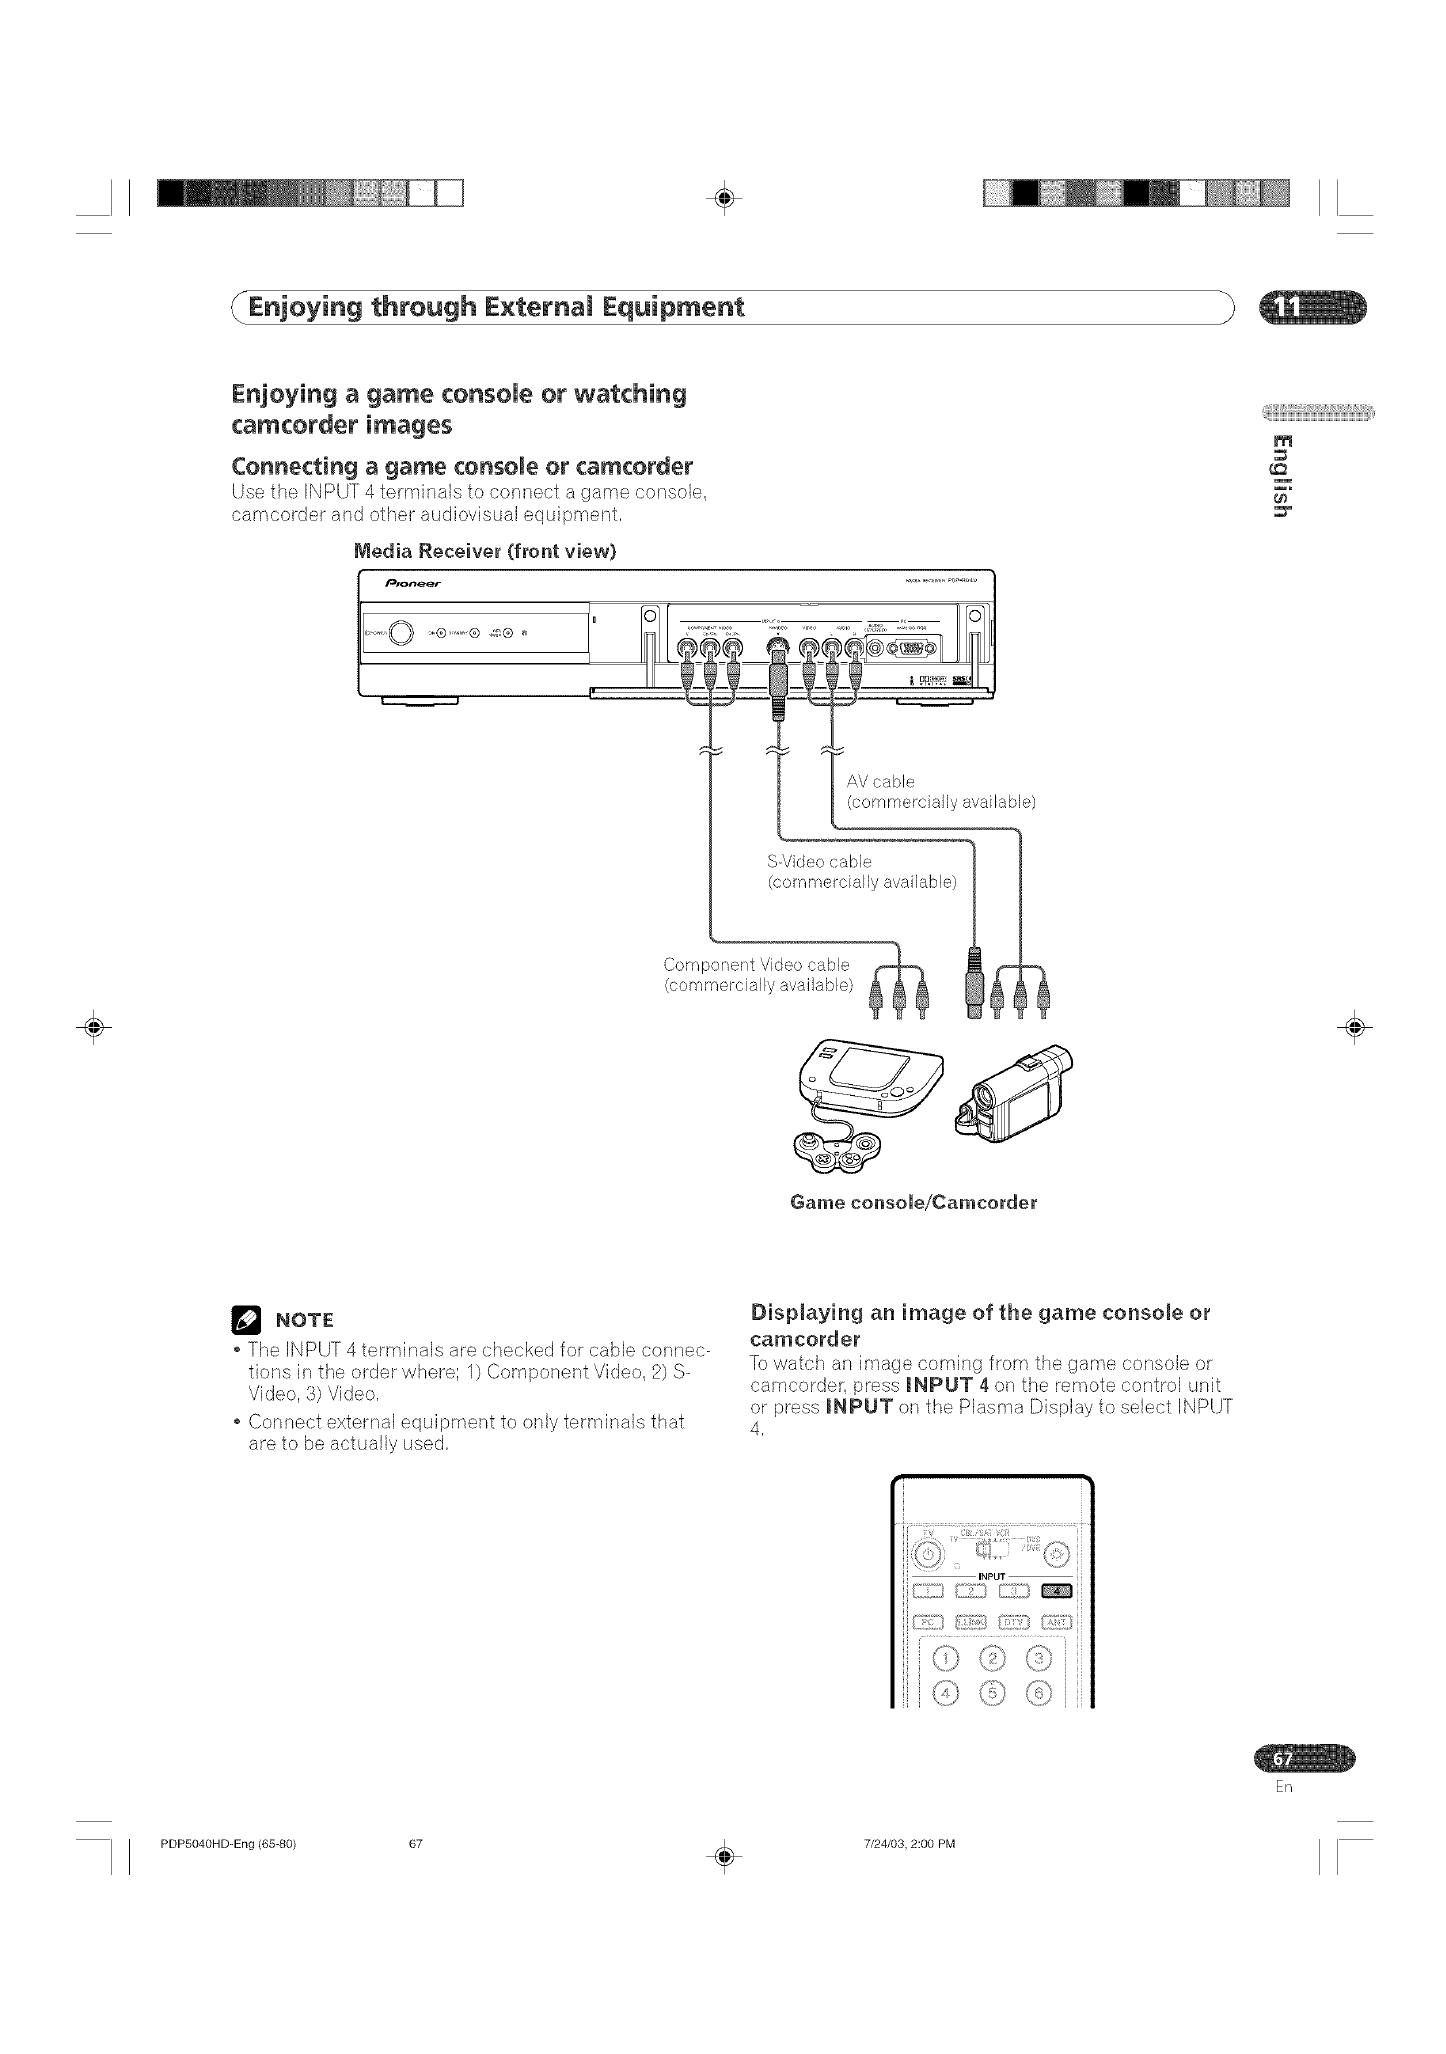
÷
Enjoying through E×ternam Equipment
÷
Enjoying a game consoUe or watching
camcorder images
Connecting agame console or camcorder
Use fi_e INPUT 4 terminals to connect a game console,
camcorder and other audiovisual equipment,
Media Receiver (front view)
[ ,.
AVcable
(commercially available)
S-Video cable
(commercially avaiLble)
Component Video cable
(commercially available)
Game console/Camcorder
_iii_i]i_ii_i;i1_iiiiiiiiii1iii_iii_i_iii_i_iii_i_iii_i_iii_i_iii_i_iii_i_iii_i_iii_i_iii_i_iIi_i¸,
m
÷
NOTE
The INPUT 4 terminals are checked for cable connec-
tions in the order where', 1) Component Video, 2) S-
Video, 3) Video,
Connect external equipment to only terminals that
are to be actually used,
Displaying an image of the game console or
camcor_er
'[o watch an image coming from the game console or
camcorder, press INPUT 4 on the remote control unit
or press INPUT on the Plasma Display to select INPUT
4,
ER
PDP5040HD=Eng (65-80) 67 _ 7/24/03, 2:00 PM
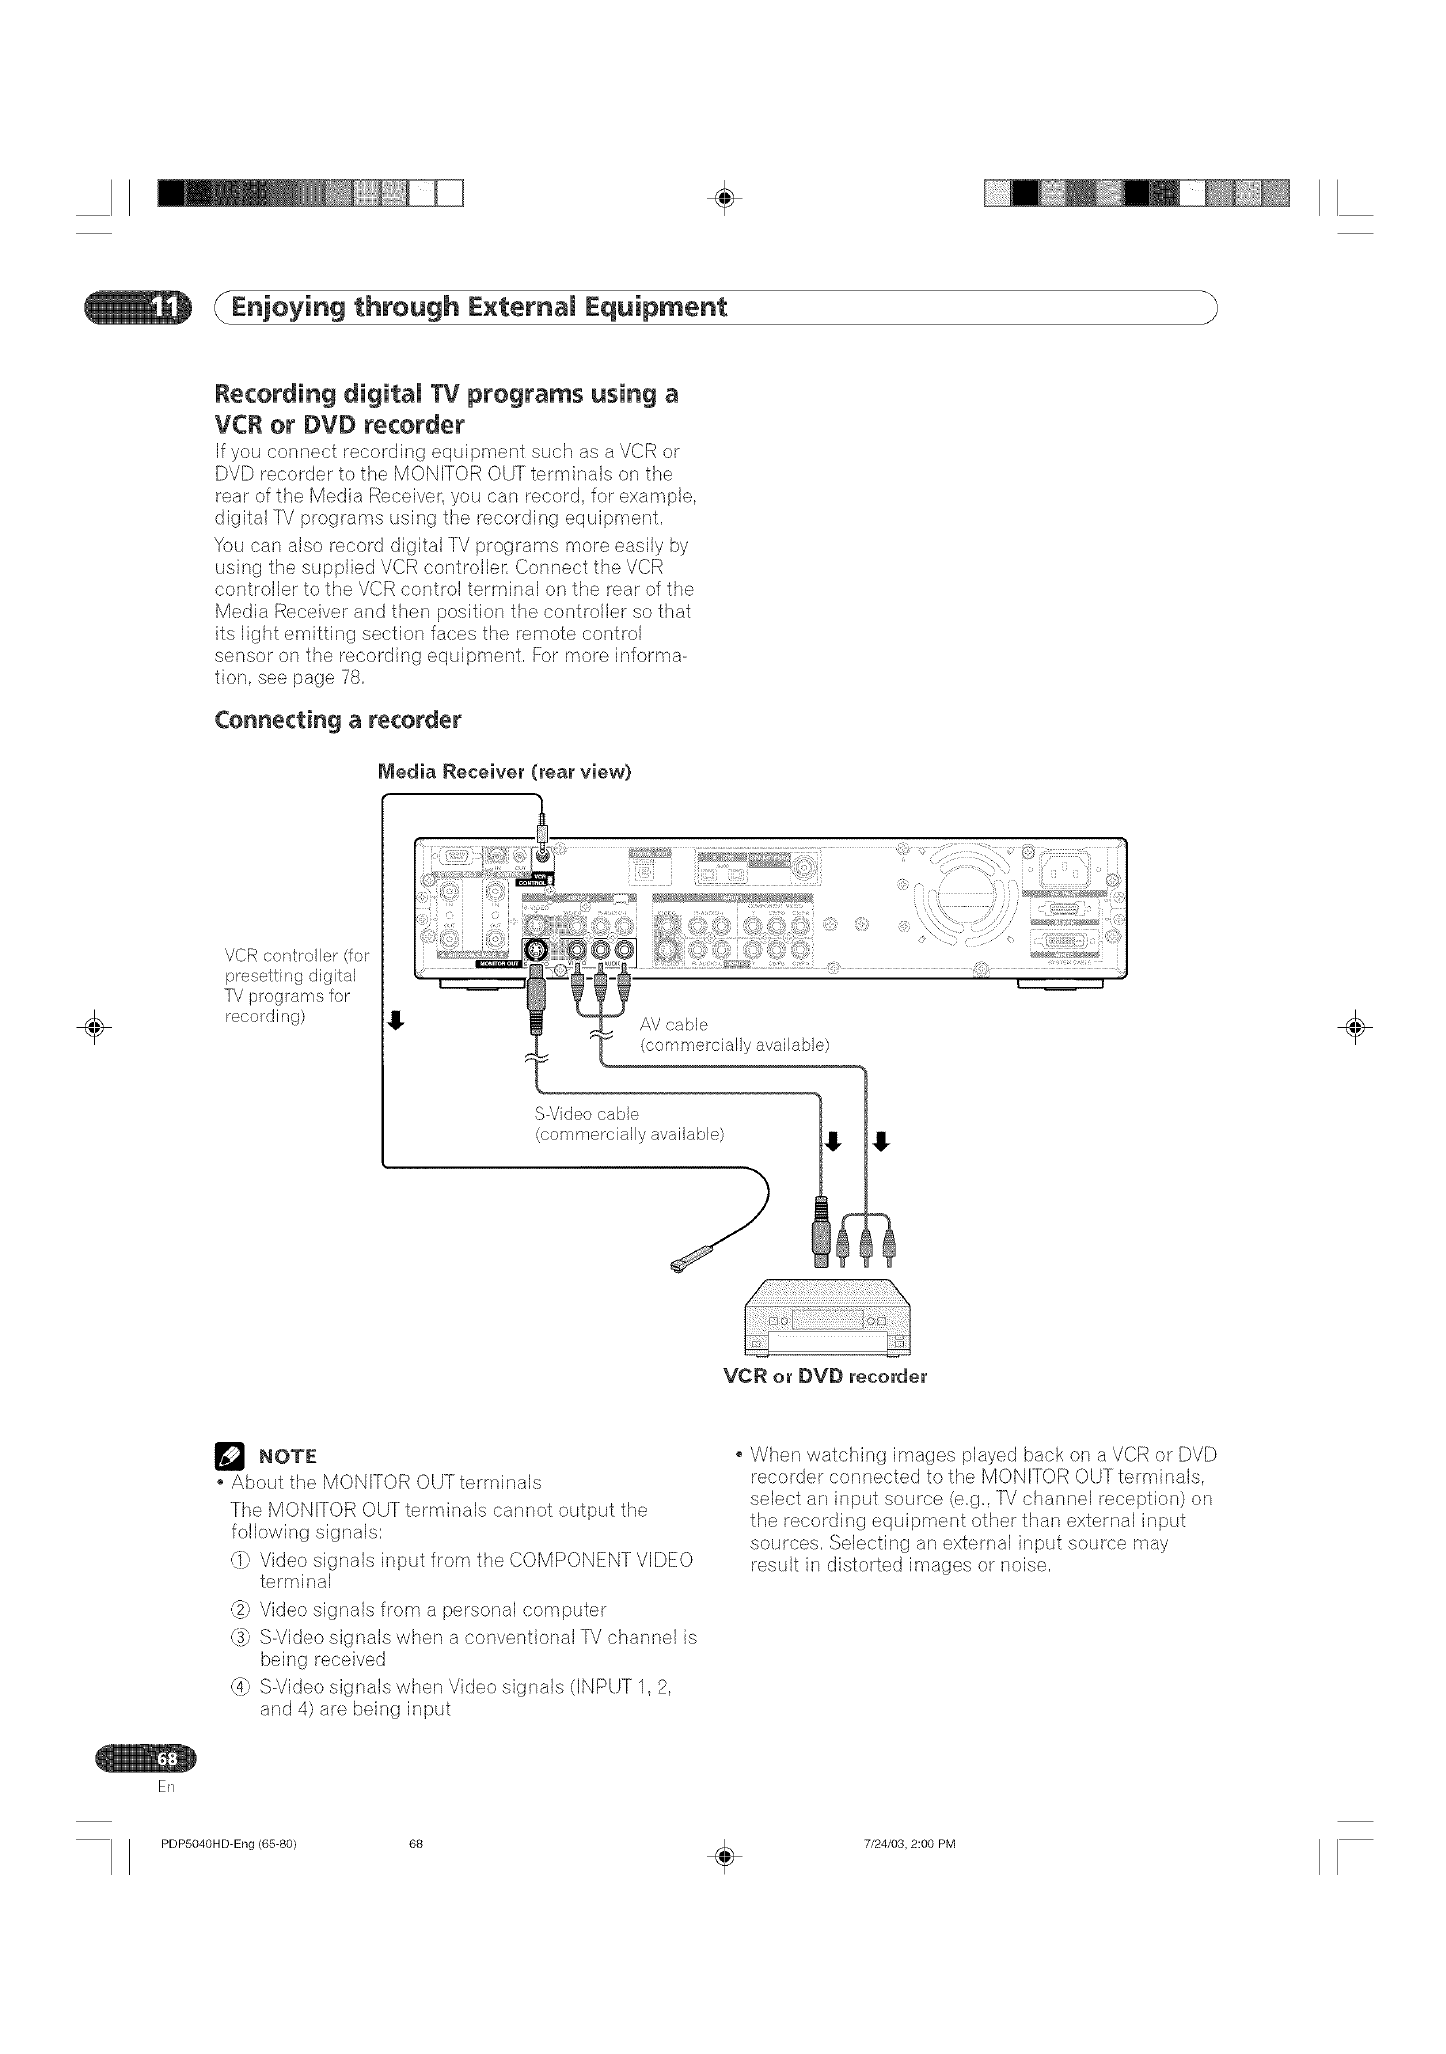
÷
Enjoying through E×ternam Equipment
Recording digitaU TV programs using a
VCR or DVD recorder
If you connect recording equipment such as a VCR or
DVD recorder to tile MONITOR OUT terminals on the
rear of the Media Receiver, you car/record, for example,
digital TV programs using the recording equipment,
You can also record digital TV programs more easily by
using tile supplied VCR controller, Connect the VCR
controller to tile VCR control terminal on the rear of tile
Media Receiver and then position tile controller so that
its light emitting section faces tile remote control
sensor on the recording equipment, For more informa-
tion, see page 78,
Connecting arecorder
Media Receiver (rear view)
÷
VCR controller (for
presetting digital
TV p_ograms for
recoldi ng) AV cable
y available)
S-Video cable
(commercially available)
÷
VCR or DVD recorder
NOTE
About the MONITOR OUT terminab
The MONITOR OUT terminab cannot output the
following signals:
{1} Video signals input from the COMPONENT VIDEO
terminal
_) Video signals from a personal computer
{S} S-Video signals when a conventional 'IV channel is
being received
{4} S-Video signals when Video signals (INPUT 1,2,
and 4) are being input
When watching images played back on a VCR or DVD
recorder connected to the MONITOR OUT terminals,
select an input source (e,g,, ]\/channel reception) on
the recording equipment other than external input
sources, Selecting an external input source may
result in distorted irr_,agesor noise,
ER
PDP504OHD-Eng (65-80) 68 _ 7/24/03, 2:00 PM
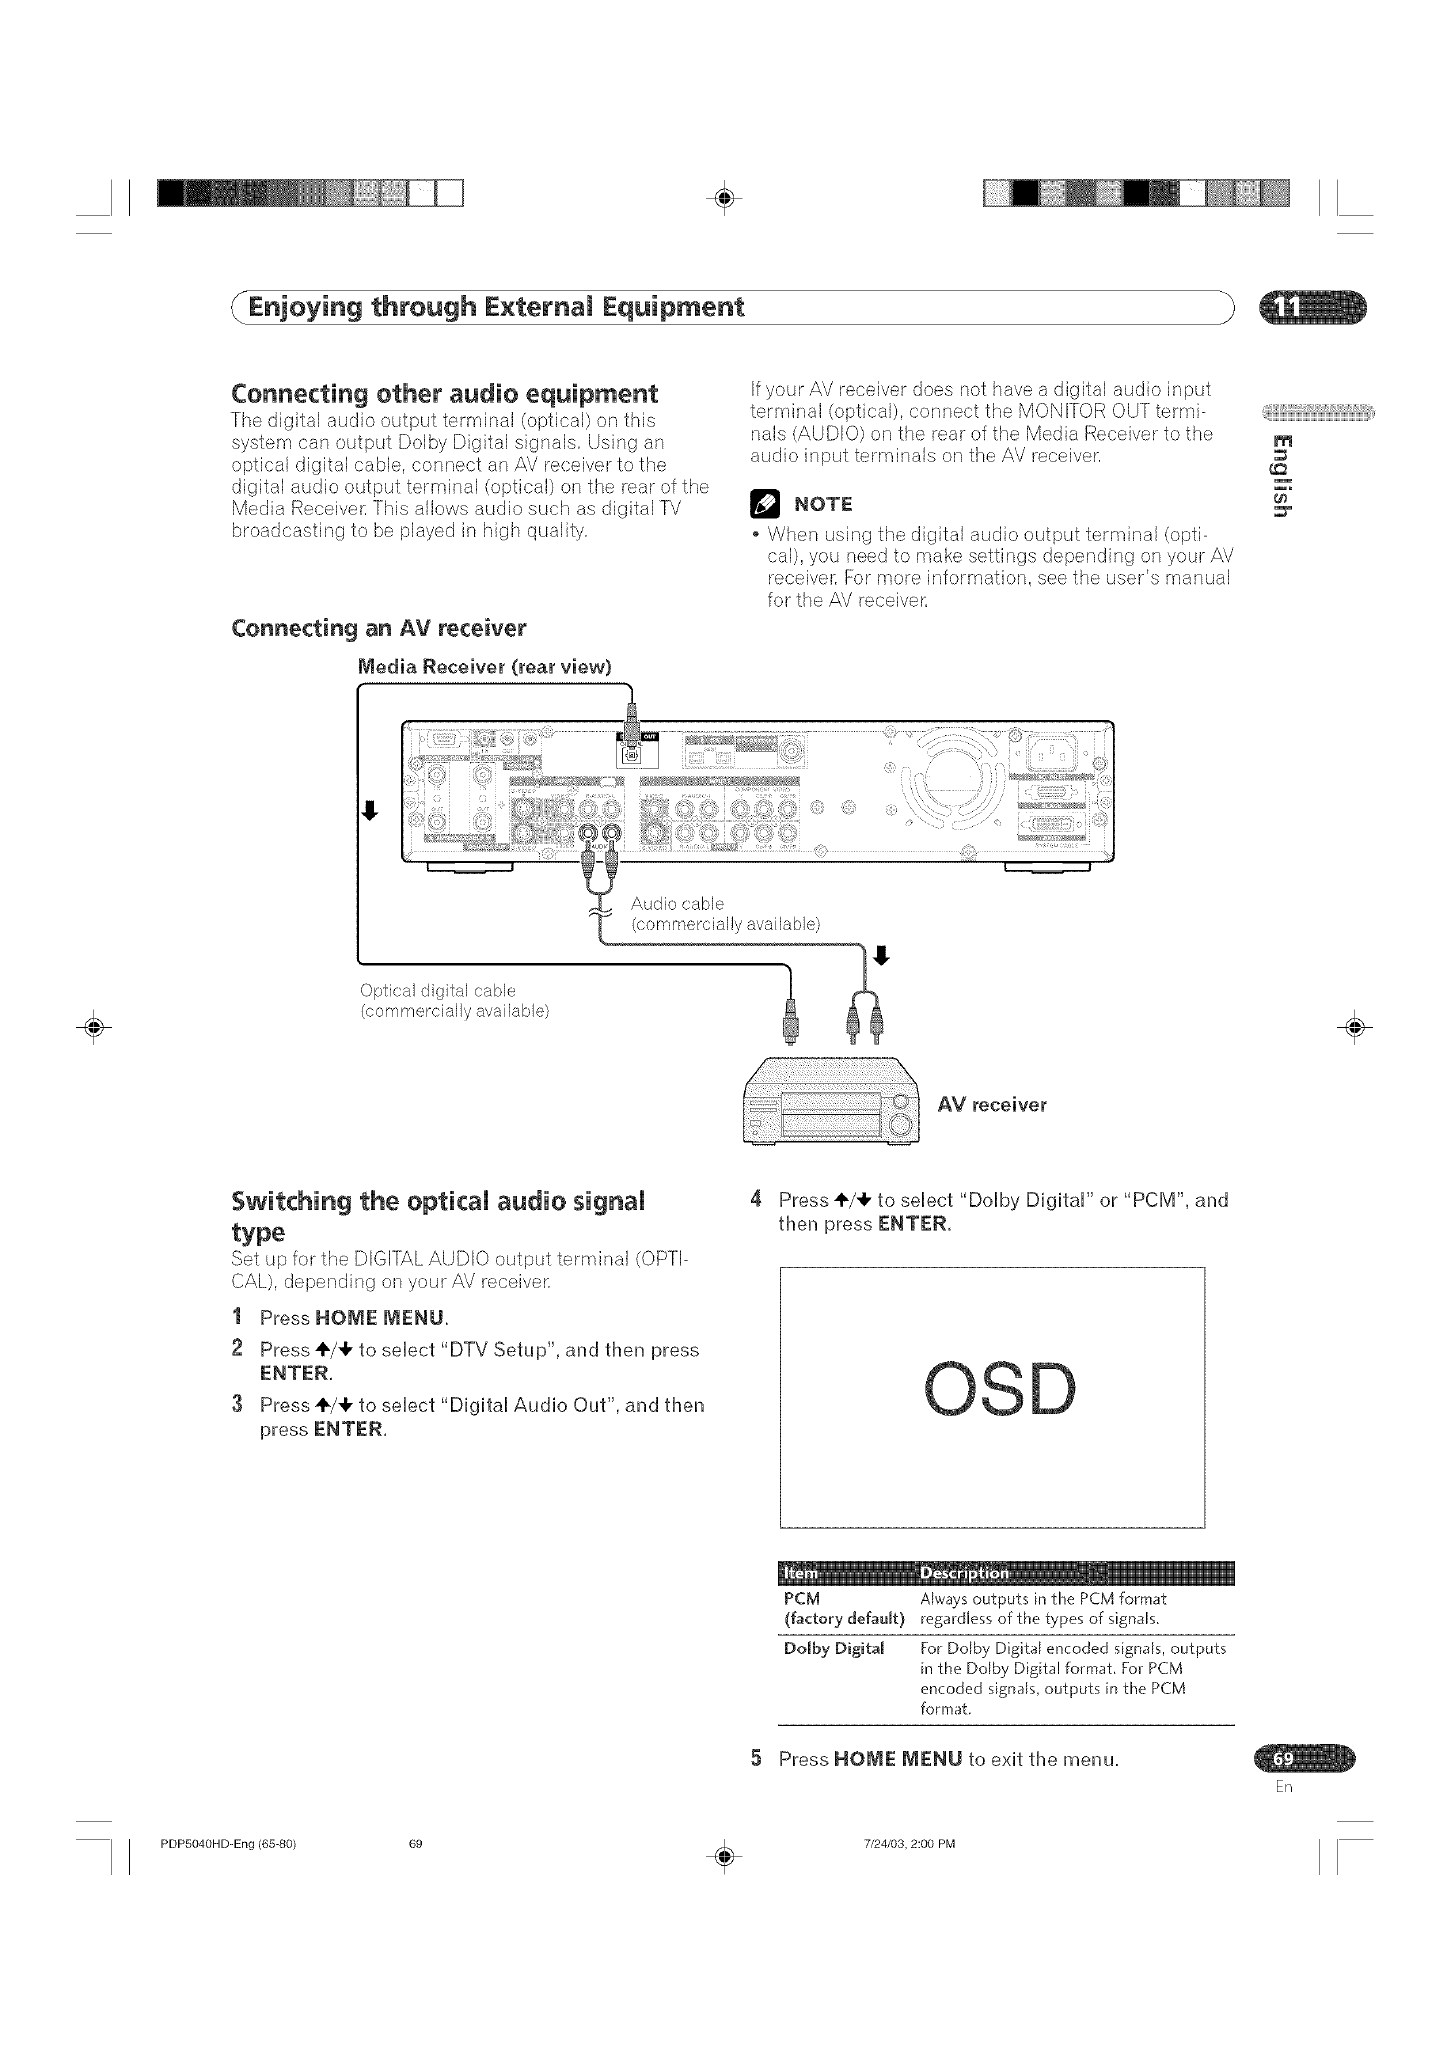
÷
Enjoying through E×ternam Equipment
Connecting other audio equipment
The digital audio eutput terminal (optical) on this
system can output Dolby Digital signals. Using an
optical digital cable, connect an AV receiver to the
digital audio output terminal (optical) on the rear of the
Media Receiver. This allows audio such as digital TV
broadcasting to be played in high quality.
Connecting an AV receiver
media Receiver (rear view)
If your AV receiver does not have a digital audio input
terminal (optical), connect the MONITOR OUT termi-
nals (AUDIO) on the rear of the Media Receiver to the
audio input terminals on the AV receiver.
_"_ NOTE
When using the digital audio output terminal (opti-
cal), you need to make settings depending on your AV
receiver. For more information, see the user's manual
for the AV receiver,
_iiiiiii_ii_i;i1_iiiiiiiiii1iii_iii_i_iii_i_iii_i_iii_i_iii_i_iii_i_iii_i_iii_i_iii_i_iii_i_iIil¸,
m
Audio cable
(comrnercially available)
÷Optical digital cable
(commercially available) ÷
AV receiver
Switching the opticaU audio signaU
type
Set up for the DIGITAL AUDIO output terminal (OPTI-
CAL), dependir_g on your AV receiver,
IPressHOmE mENU.
2 Press÷/÷to select "DTV Setup", and then press
ENTER
3Press ÷/4, to select "Digital Audio Out", and tl_en
press ENTER.
4 Press +/4, to select "Dolby Digital" or "PCM", and
tl_en press ENTER.
OSD
PCM Always outputs in the PCM format
(factory default) regardless of the types of signaK
Dolby Digital For Dolby Digital encoded signals, outputs
in the Dolby Digital format For PCM
encoded signals, outputs in the PCM
format.
5 Press HOmE mENU to exit the menu.
En
PDP504OHD-Eng (65-80) 69 _ 7/24/03, 2:00 PM
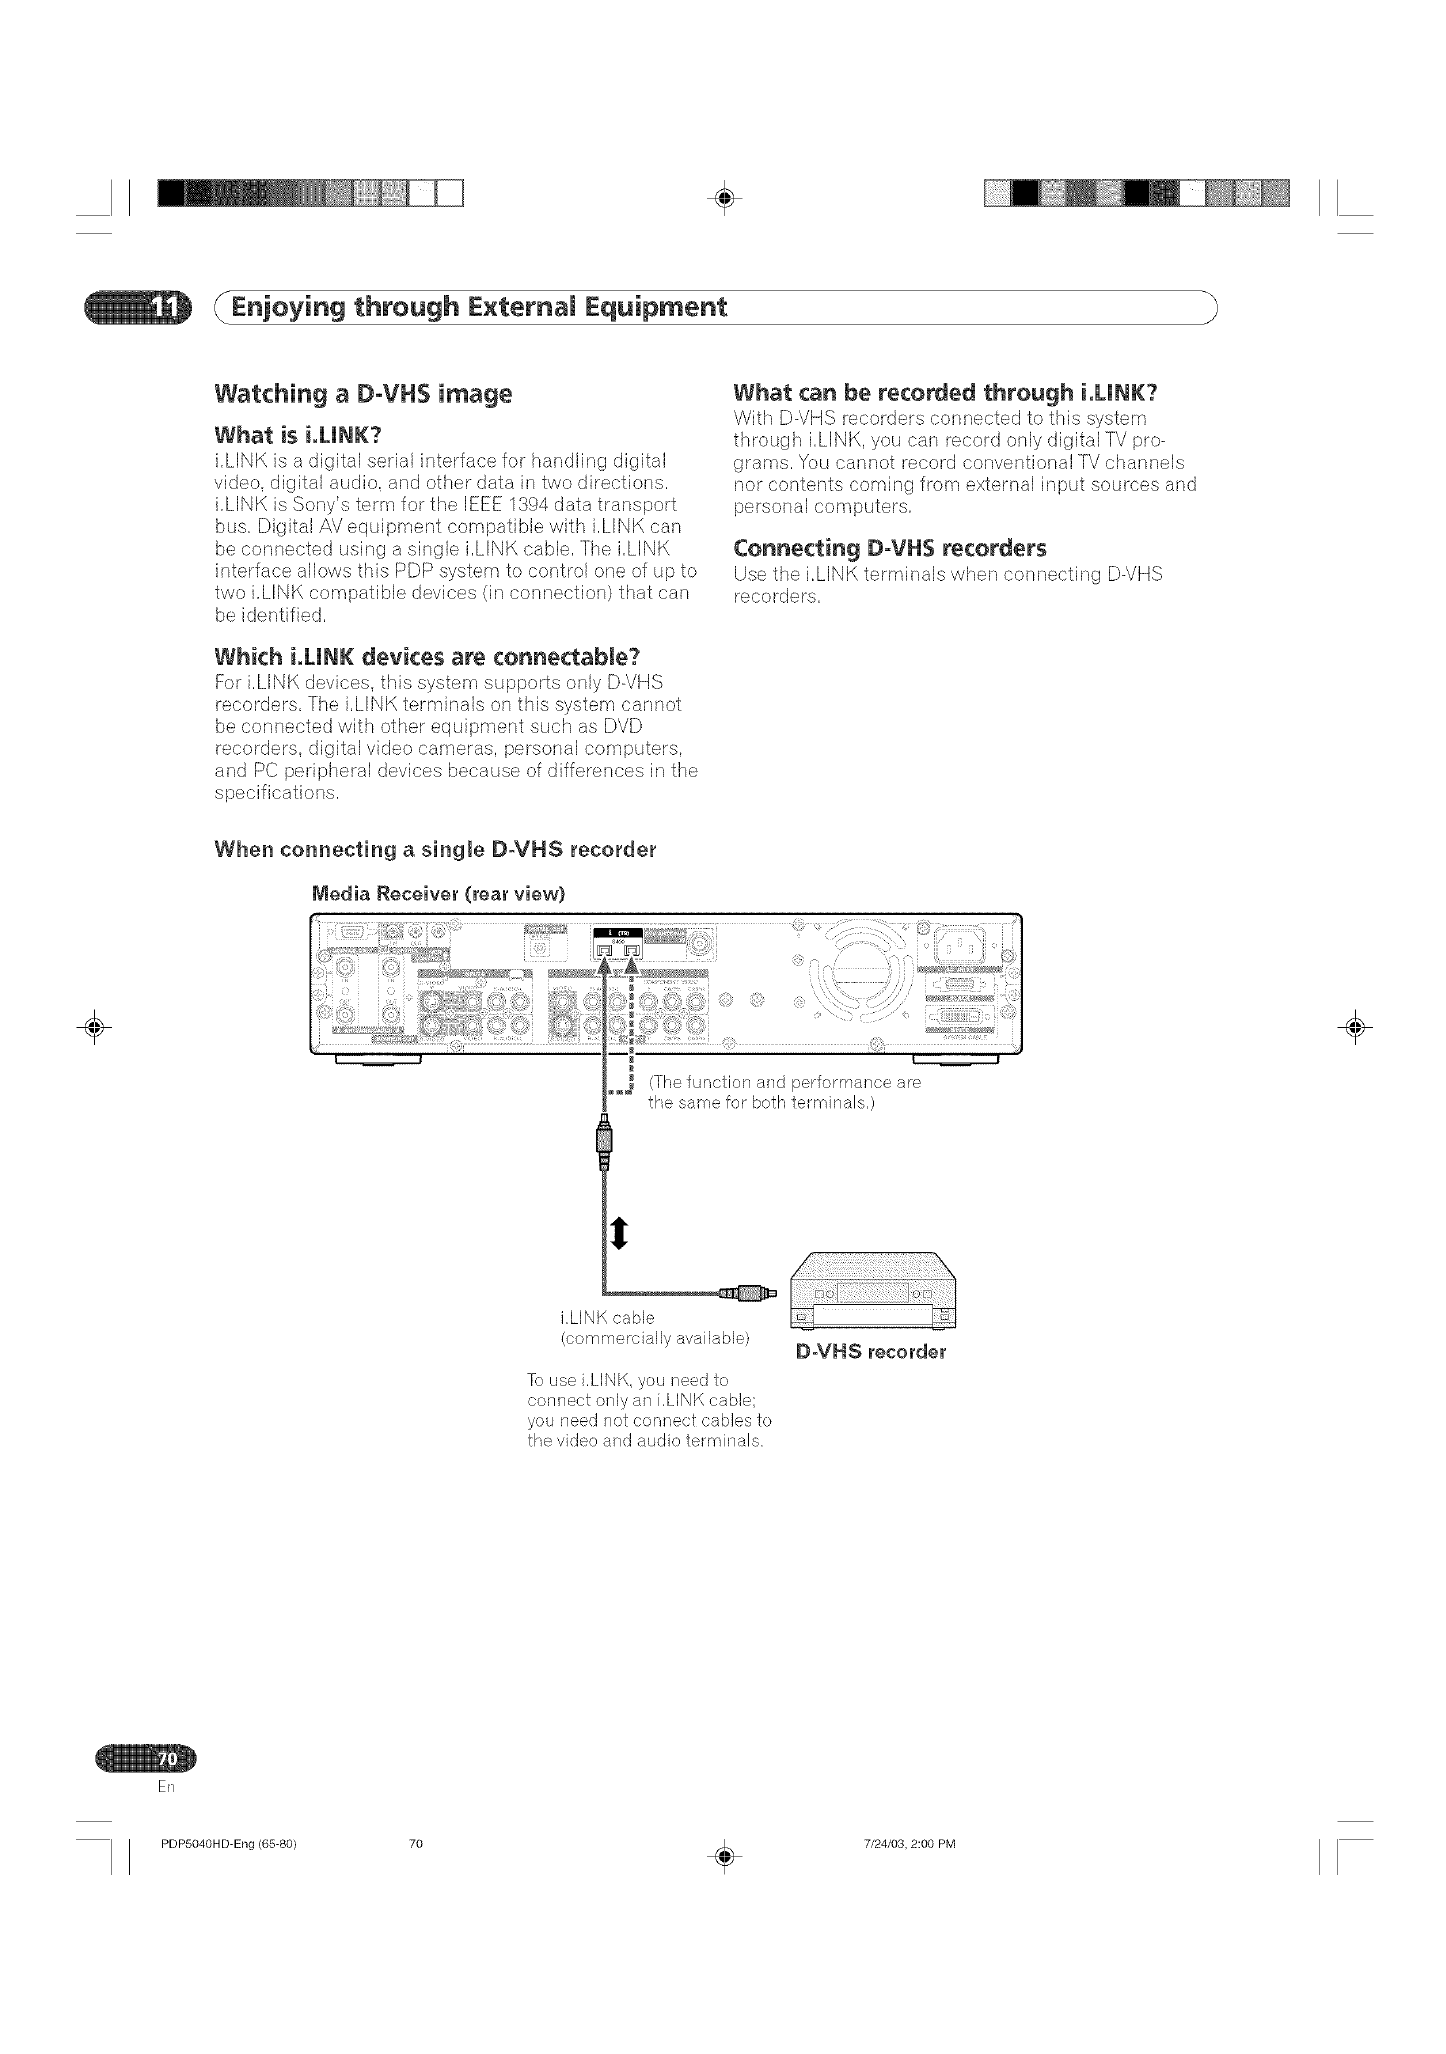
÷
Enjoying through E×ternaJ Equipment
Watching aD-VH$ image
What is i.LJNK?
i,LINK is a digital sedal h_terface for handling digital
video, digital audio, and other data in two directions,
i,LINK is Sony's terra for the IEEE 1394 data transport
bus, Digital AV equipment compatible with i,LINK can
be connected using a single i,LINK cable, The i,LINK
interface allows this PDP system to control one of up to
two i,LINK compatible devices (in connection) that can
be identified,
Which i.MNK devices are connectable?
For i,LINK devices, this system supports only D-VHS
recorders, The i,LINK terminals on this system cannot
be connected with other equipment such as DVD
recorders, digital video cameras, personal computers,
and PC peripheral devices because of differences in the
What can be recorded through i.MNK?
With D-VHS recorders connected to this system
through i,LINK, you can record only digital TV pro-
grams, You cannot record conventional TV channels
nor contents coming from external input sources and
Connecting D=VH$ recorders
Use ff_e kLINK terminals when connecting D-VHS
recorders,
When connecting a singJe D-VHS recorder
IVledia Receivem' (rear view}
÷
o_ (Thefunction and performance are
the same for both terrainals,)
i.LINK cable
(commercially available)
To use i,LlNK, ouneedto
connect only an i.LINK cable;
you need not connect cables to
the video and audio terminals,
D-VHS recorder
÷
ER
PDP504OHD-Eng {65-80} 70 _ 7/24/03, 2:00 PM
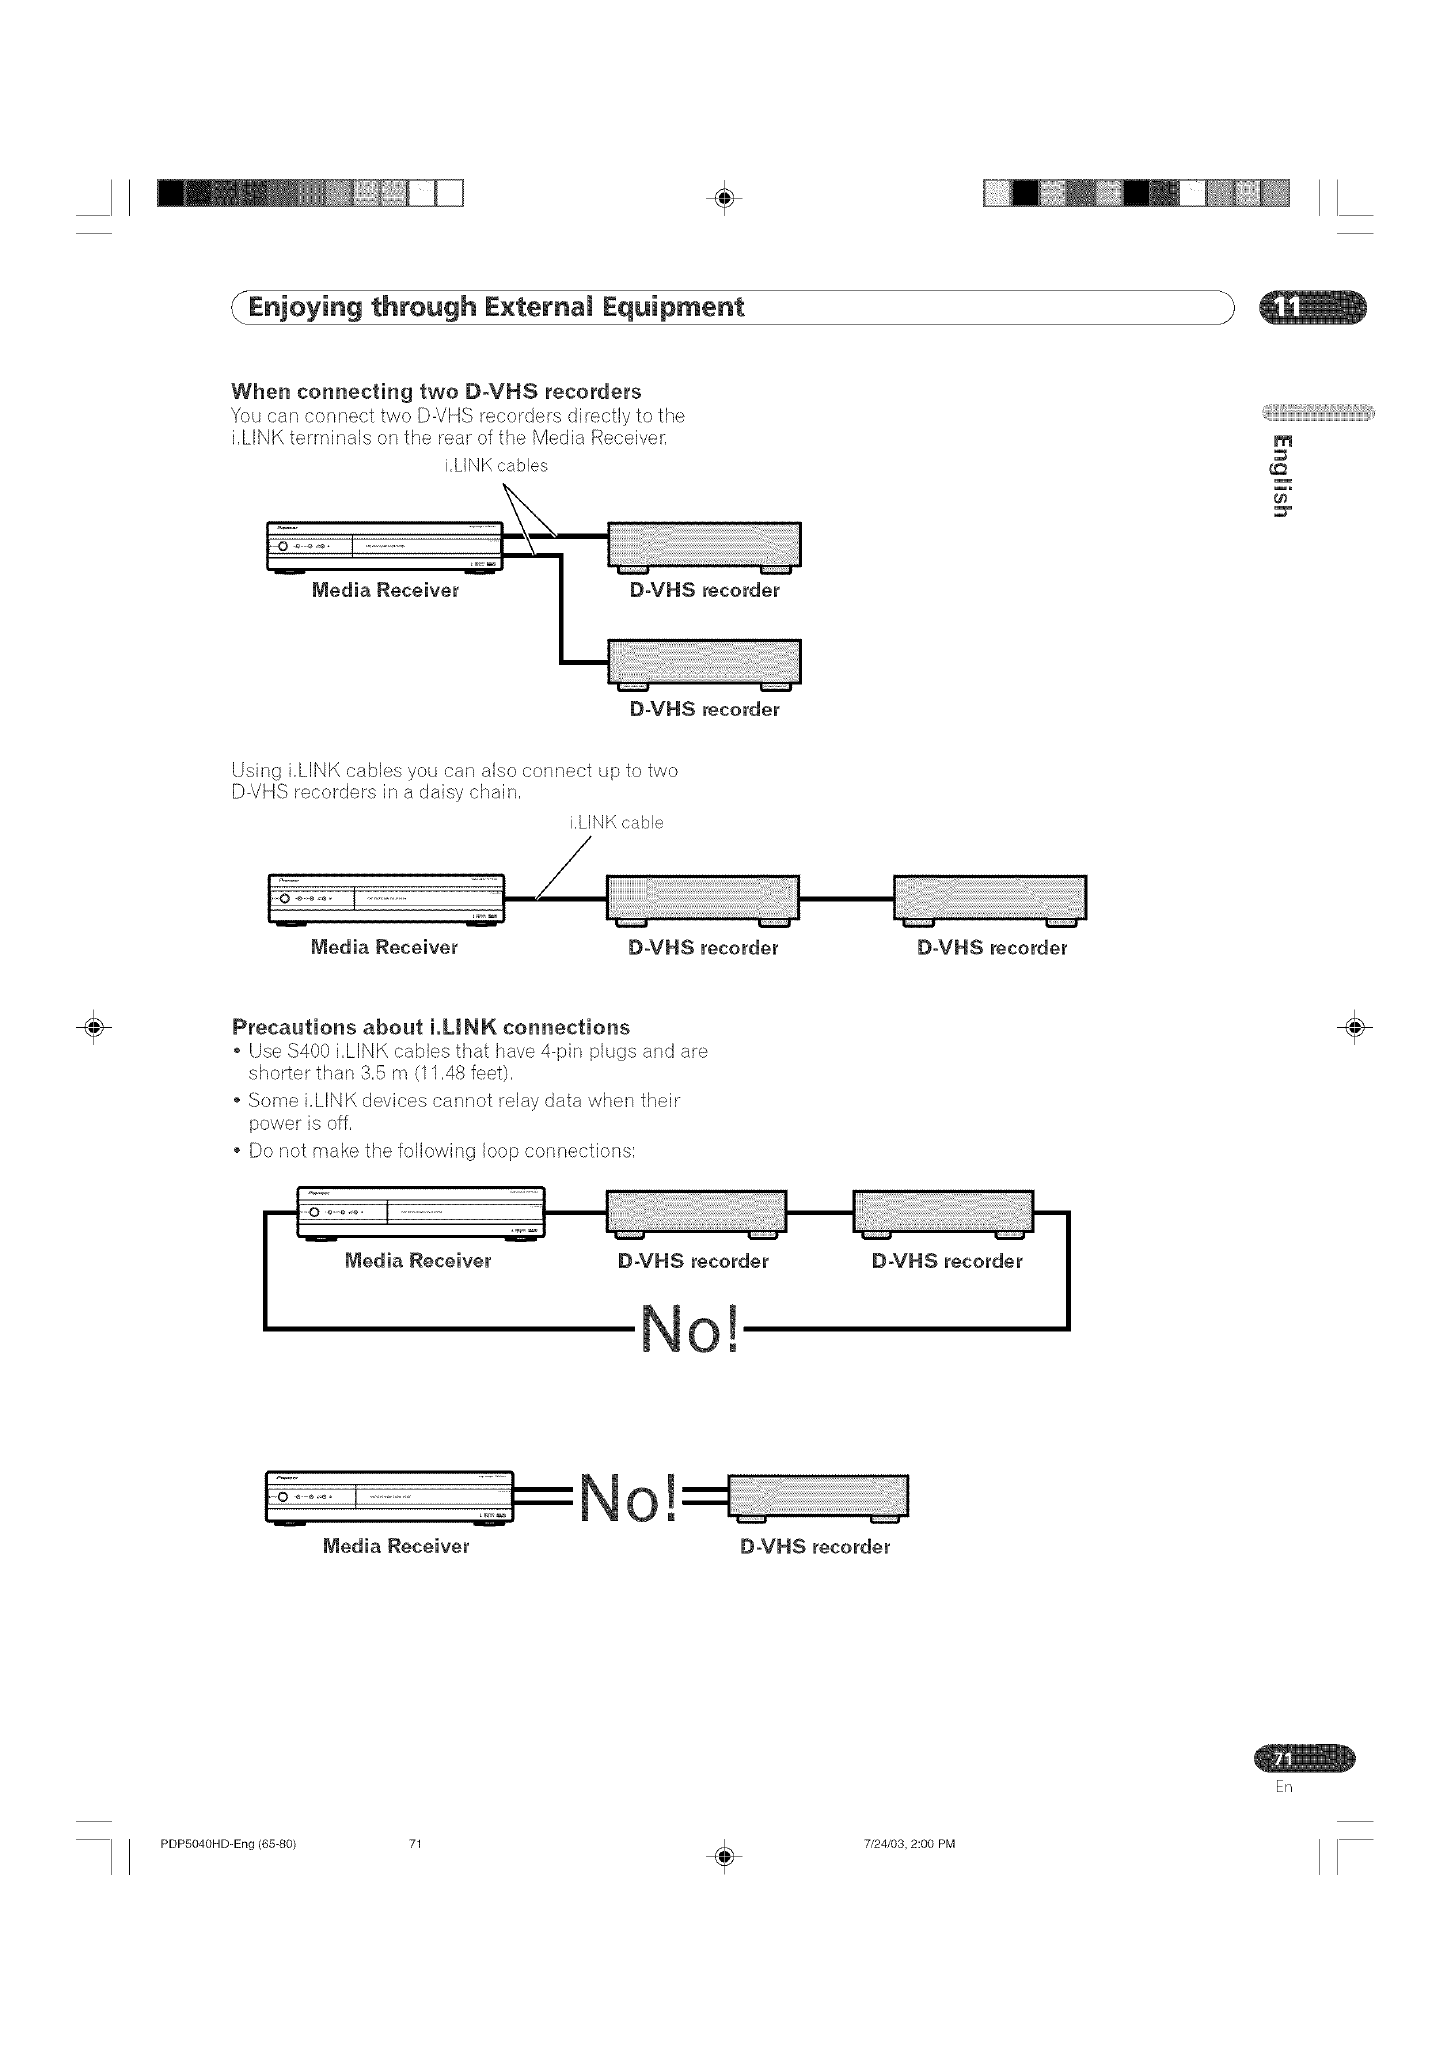
÷
Enjoying through E×ternam Equipment
When connecting two D-VHS recorders
You can connect two D-VHS recorders directly to the
kLINK terminals on the rear of the Media Receiver,
i,LINKcables
@ii;iiBiiiiiiiWi_iWi_iWi_iWi_iWi_iWi_iWi_iWi_iWi_iWi_i_ili,i¸,
m
D-VHS recorder
Using i,LINK cables you can also connect up to two
D-VHS recorders in a daisy chain,
i,LINK cable
D-VHS recorder D-VHS recorder
÷Precautions about i,LINK connections
Use $400 i,LINK cables that have Spin plugs and are
shorter than 3,5 m (11,48 feet),
Some i,LINK devices cannot relay data when their
power is off,
Do not make the following loop connections;
D-VHS recorder
÷
I ..................::_-I
Media Receiver
0 _I
O:VHS recorder
En
PDP5040HD-Eng (65-80) 71 _ 7/24/03, 2:00 PM
÷
Enjoying through E×ternam Equipment
÷
Displaying aD=VHSimage
'[b watch a D-\/ItS image, press i.LINK on the remote
control unit or press mNPUT on the Plasma Display to
select i,LINK,
Usefu_ and important notification
Useful information
D-VHS recorders connected through i,LINK can play
back digital TV programs recorded using this system,
.D-VHS recorders connected through i,LINK can
record only digital TV programs, Using i,LINK, those
recorders cannot record conventional TV channels
nor contents coming from external input sources,
.This system can be simultaneously connected with
up to two D-VHS recorders that support i,LINK, You
can control one of these D-VHS recorders (basic
functions only),
.Some D-VHS recorders connected through i,LINK
may not allow this system to control through the
control panel screen or to display images and output
sound,
.'R) record digital TV programs using connected D-VHS
recorders, use D-VHS tape, You cannot use VHS tape
Some D-VHS recorders connected though i,LINK may
not allow this system to play back images and sound
recorded on VHS tape, S-VHS tape, or (if with analog
signals) D-VHS tape, If this is the case, connect the
analog output terminals on the D-VHS recorder to
INPUT 1,2, 3, or 4 terminals on this system, See
pages 65 to 67,
This system supports the Digital ]]'ansmission Con-
tent Protection (DTCP) technology, The DTCP is a
copy protection technology that presents data coding
and device authentification,
i,LINK may not allow copy-restricted video, audio, and
other data to be copied from one i,LINK device to
another, It also may not allow video, audio, and other
data to be transferred with equipment that does not
support the DTCR
Precautions
While one D-VHS recorder connected through i,LINK
is recording or playing back, do not switch on or off
the other connected D-VHS recorder (not in use) or
do not connect or disconnect the i,LINK cable from
that D-VHS recorder, Doing so can result in irr_,age
and sound interruption,
Some D-VHS recorders that support i,LINK cannot
relay data when their power is off, Check the user's
manual for your D-VHS recorde__,This system allows
you to change the setting for data relay in the standby
mode, See "Setting up for i,LINK standby" on page 76,
÷
ER
PDP5040HD-Eng (65-80) 72 _ 7/24/03, 2:00 PM
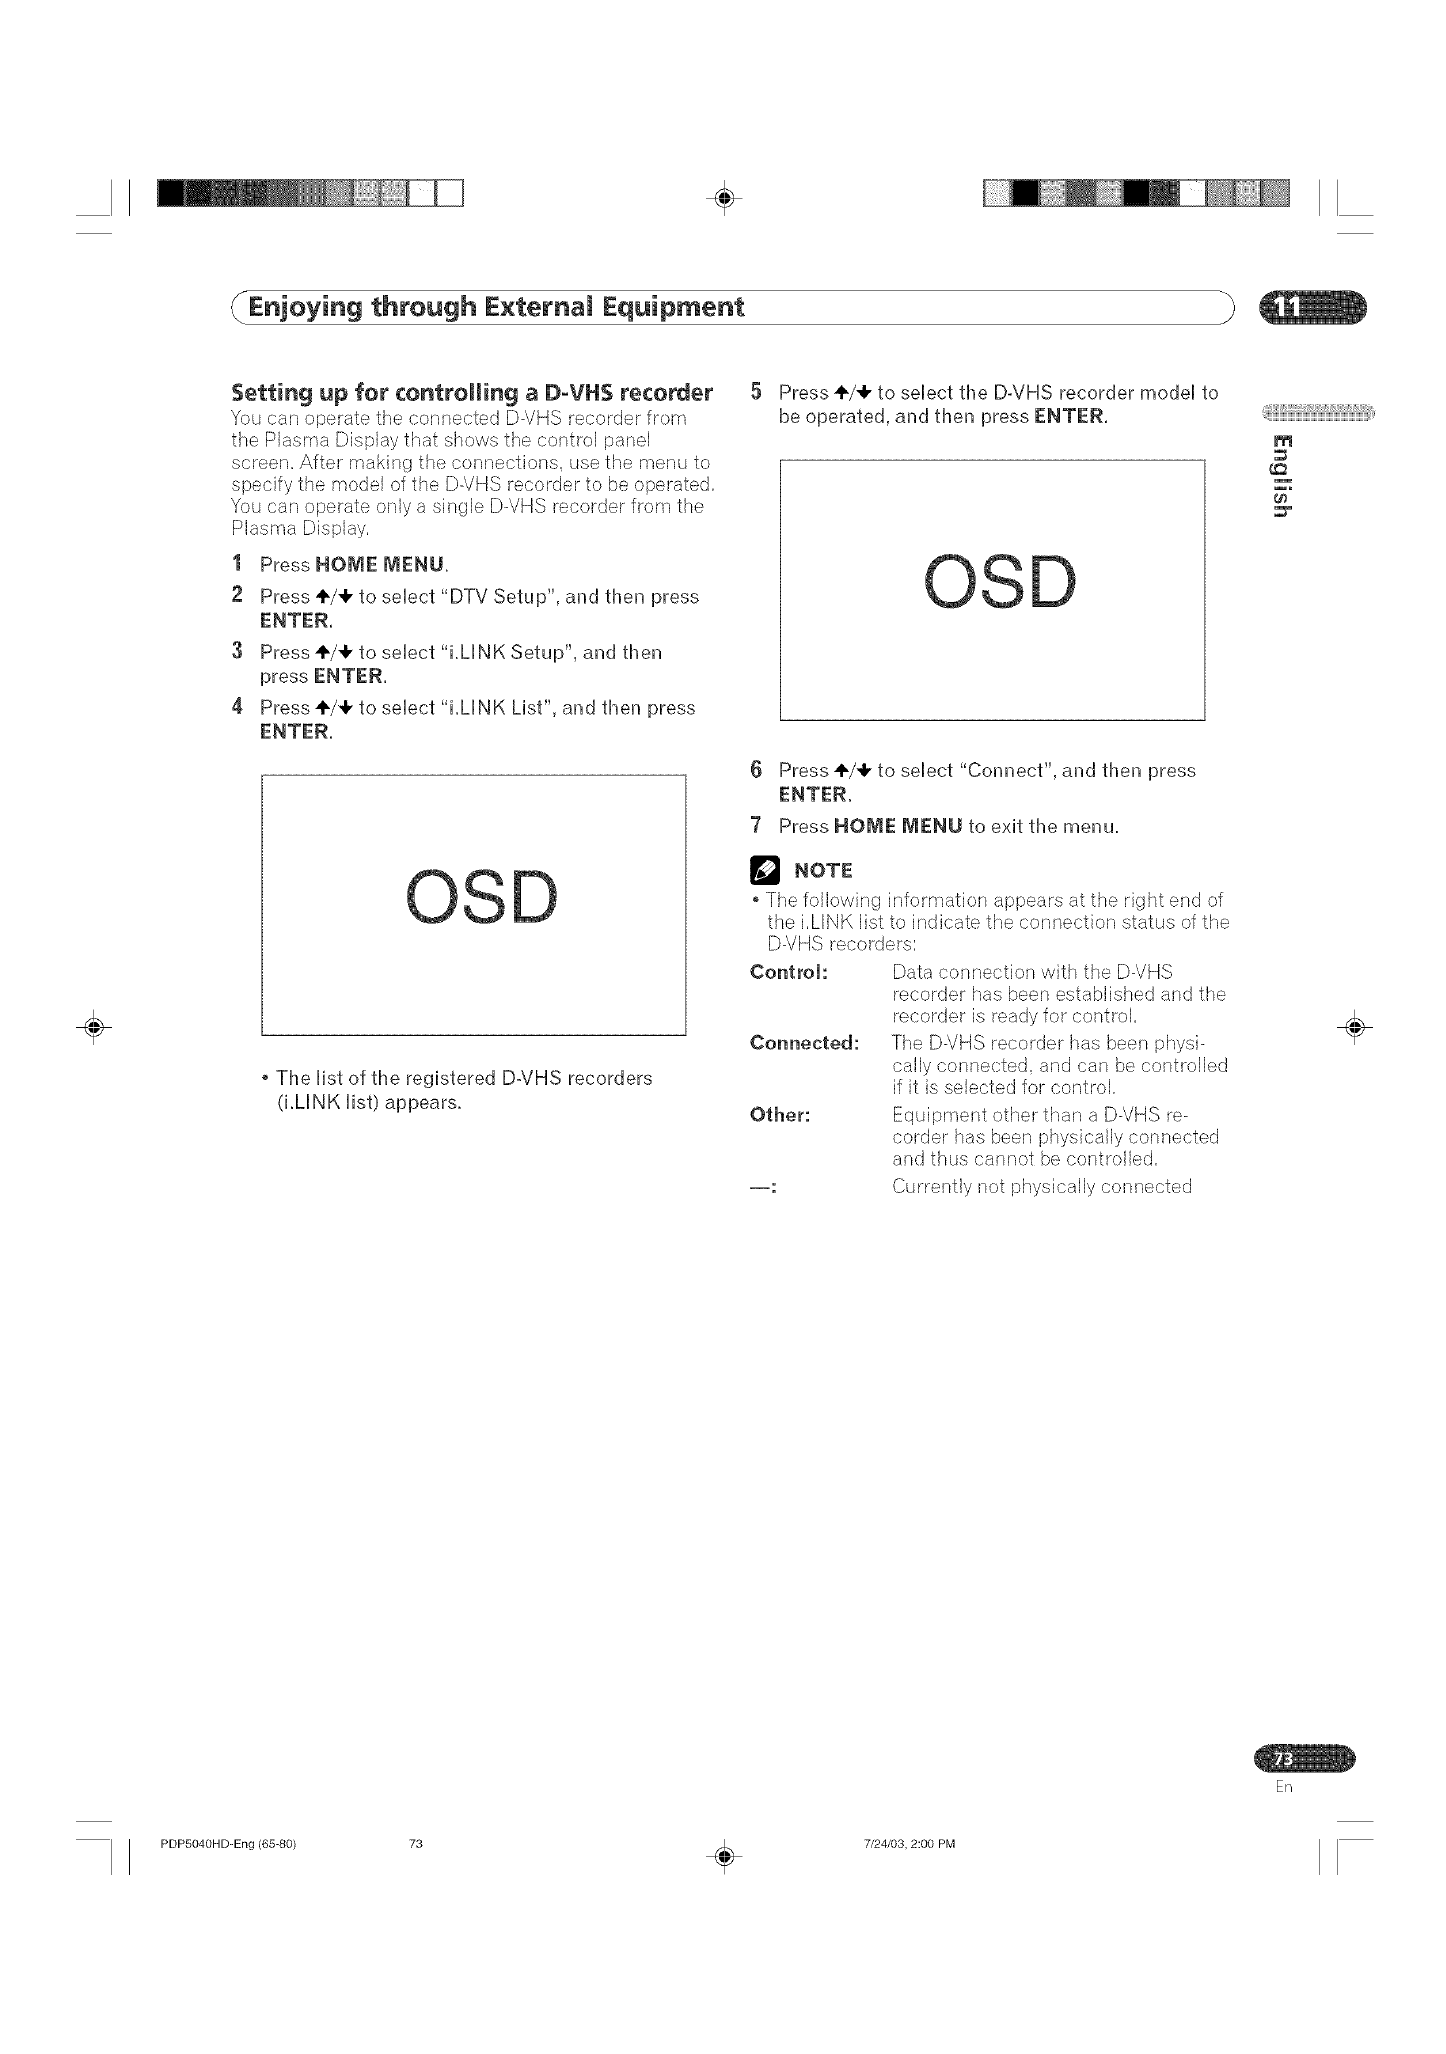
÷
Enjoying through E×ternam Equipment
÷
Setting up for controlling aD=VH$ recorder
Yeu can operate the conneCed D-\/HS recorder frem
the Plasma Display that shows the control panel
screen, After making the connections, use the menu to
specify the model of the D-VHS recorder to be operated,
You can operate only a single D-VHS recorder from the
I Press HOME MENU.
2 Press +/4, to select "DTV Setup", and timen press
ENTER,
3Press 41"/+to select "i.LINK Setup", and tlmen
press ENTER,
4 Press ÷/4, to select "i.LINK List", and tlmen press
ENTER,
OSD
o Timelist of timeregistered D*VHS recorders
(i.MNK list) appears.
5 Press +/4, to select timeD-VHS recorder model to
be operated, and tlmen press ENTER,
OS
(} Press ÷/4, to select "Connect", and tlmenpress
ENTER.
7 Press HOME MENU to exit timemenu.
NOTF
The following information appears at the right end of
the i.LINK list to indicate the connection status of the
D-VHS recorders:
Control: Data connection with the D-VHS
recorder has been established and the
recorder is ready for control.
Connected: The D-VHS recorder has been physi-
cally connected, and can be controlled
if it is selected for control.
Other: Equipment other than a D-VHS re-
corder has been physically connected
and thus cannot be controlled.
--: Currently not physically connected
@ii;iiBiiiiiiiWi_iWi_iWi_iWi_iWi_iWi_iWi_iWi_iWi_iWi_i_ili_i¸,
m
÷
En
PDP5040HD=Eng (65-80) 73 _ 7/24/03, 2:00 PM
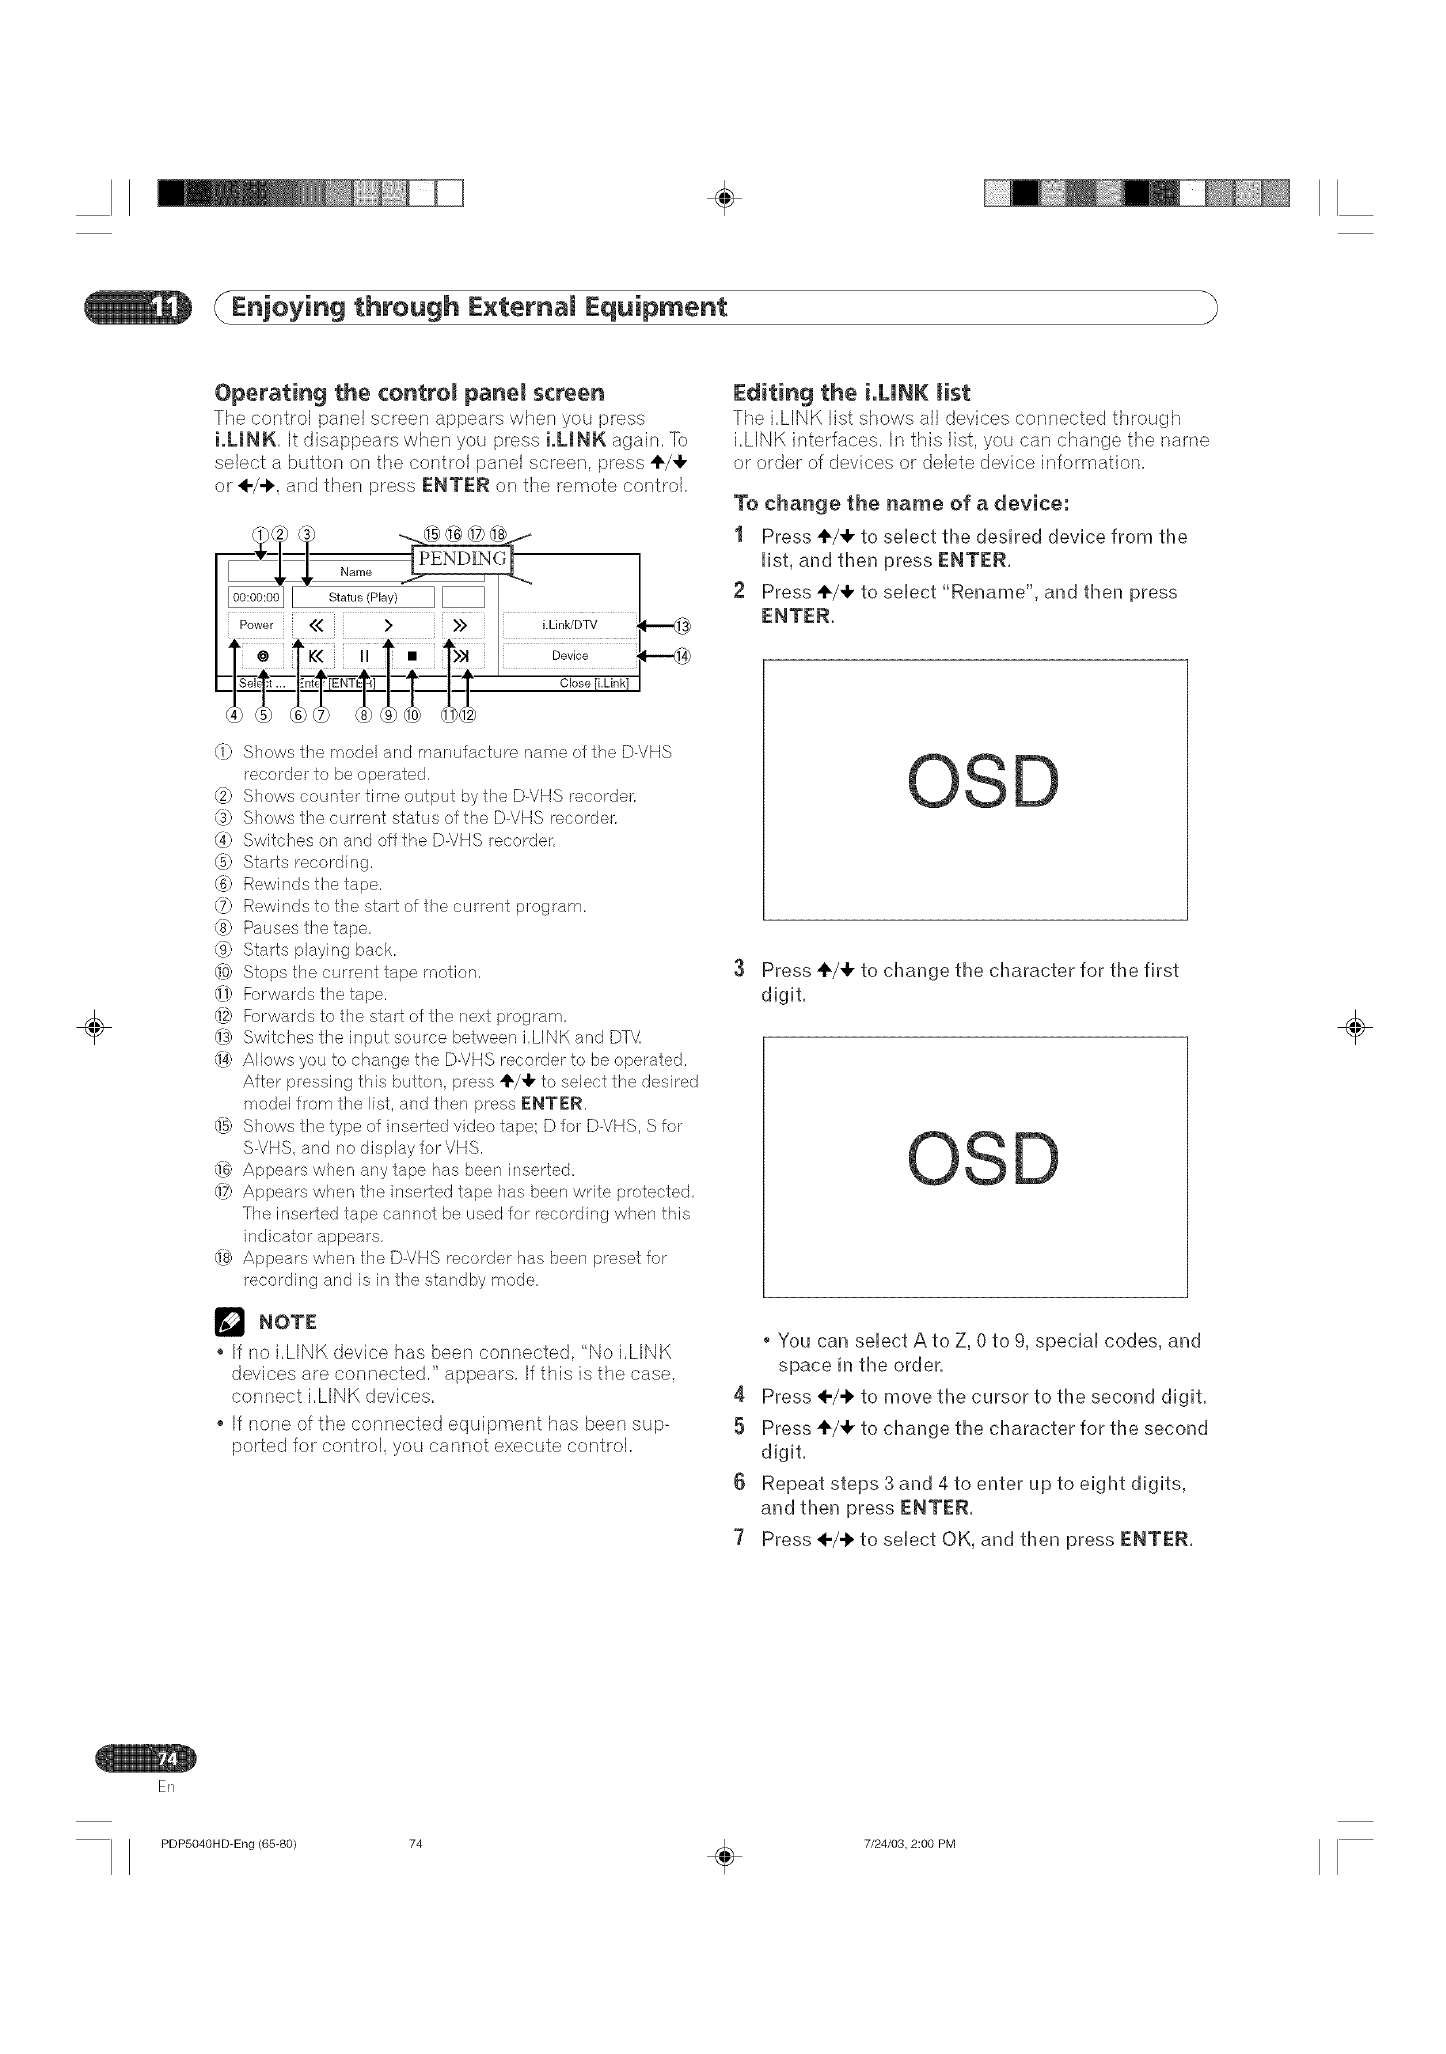
÷
Enjoying through E×ternam Equipment
÷
Operating the controm panem screen
The control panel screen appears when you press
i.LJNK. It disappears when you press i.LINK again. %
select a button on the control panel screen, press 4,/,1,
or ÷/-I,, and then press ENTER on the remote control.
#1}(2)(3) -._@ @ @ @j
!iwii
o,ose [ i l L i [] k,
(_} Shows the model and manufacture name of the D-VHS
recorder to be operated,
(2) Shows counter time output by the D-VHS recorder=
@) Shows the current status of the D-VHS recorder.
(4} Switches on and off the D-VHS recorder,
(5) Starts recording,
(6} Rewinds the tape,
(7) Rewinds to the start of the cmrent program=
@) Pauses the tape,
(0) Starts playing back.
do) Stops the current tape motion,
,11}!Forwards the tape,
{8 Forwards to the start of the next program=
@ Switches the input source between i.LINK and [)T_
d4) Allows you to change the D-VHS recorder to be operated=
After pressing this button, press ÷/_ to select the desired
model from the list, and then press FNTER.
1_5}Shows the type of inserted video tape; D for D_VHS, S for
S-VHS, and no display for VHS.
@ Appears when any tape has been inserted.
d7) Appears when the inserted tape has been write protected,
The inserted tape cannot be used for recording when this
indicator appears.
@ Appears when the D-VHS recorder has been preset for
recording and is in the standby mode.
NOTE
If no i.LINK device has been connected, "No i.LINK
devices are connected." appears. If this is the case,
connect i.LINK devices.
If none of the connected equipment has been sup-
ported for control, you cannot execute control.
Editing the i.MNK list
The i,LINK list shows all devices connected through
i,LINK interfaces, In this list, you can change the name
or order of devices or delete d(-wice inforrnation.
To change the name of a device:
I Press ÷/÷ to select the desired device from the
list, and then press ENTER.
2 Press÷/÷ to select "Rename", and then press
ENTER.
D
3Press +/,k to change the character for the first
digit.
D
You can select A to Z, 0 to 9, special codes, and
space in the order.
4 Press ÷/.t, to move the cursor to the second digit.
5 Press ÷/_1, to change the character for the second
digit.
6 Repeat steps 3 and 4 to enter up to eight digits,
and then press ENTER.
7 Press ÷/-t, to select OK, and then press ENTER.
÷
ER
PDP5040HD-Eng (65-80) 74 _ 7/24/03, 2:00 PM
÷
Enjoying through E×ternam Equipment
To change the order of devices:
I Press 41/4, to seUectthe desired device from the
Hst, and then press ENTER.
2 Press 41/4, to seUect"RepUace", and then press
ENTER.
To delete information about a single device:
I Press 41/4,to seUectthe desired device from the
Hst, and then press ENTER.
2 Press 41/4,to seUect "DeUete" and then press
ENTER.
_iiiiiii_ii_i;i1_iiiiiiiiii1iii_iii_i_iii_i_iii_i_iii_i_iii_i_iii_i_iii_i_iii_i_iii_i_iii_i_iIi_i¸,
rrl
OSD
÷
3Press 41/4, to select the new desired position, and
then press ENTER.
The selected device is moved to the selected
position.
A confirmation message appears.
A warning message appears if the selected
device has been preset for recording with the
timer or if its power is on. If this is the case, you
cannot delete the device that you have selected.
Press 4-/+ to select "OK", and then press ENTER.
QSD
÷
ER
PDP5040HD=Eng (65-80) 75 _ 7/24/03, 2:00 PM
÷
Enjoying through E×ternam Equipment
To delete information about all devices:
1 Press ÷/,1, to seUect "DeUete AH", and then press
ENTER,
2 Press ÷/-I, to seUect "DeUete" and then press
ENTER.
OSD
Setting up for i,UNK standby
Use the following procedure to enabb data transfer
between multipb i.LINK devices even when the system
is in the standby mode.
t Press HOME MENU.
2 Press 4,/_1,to select "DTV Setup", and then press
ENTER.
3Press 4"/+ to select "i.LINK Setup", and then
press ENTER.
4 Press 4,/÷ to select "i.MNK Standby", and then
press ENTER.
5 Press 4,/+ to select "Enable", and then press
ENTER.
3
A confirmation message appears.
A warning message appears if the selected
device has been preset for recording with the
timer or if its power is on. If you delete a device
that has been preset for recording, its all
presettings are deleted.
Press ÷/-_ to select "OK", and then press ENTER.
OSD
OSO
6 Press HOIVIE MENU to exit the menu.
NOTE
With "Enable" selected, the system relays data
between multiple i.LINK devices even when in the
standby mode', the i.LINK circuits are energized in
that mode.
With "Disable" (factory default) selected, less power
is consumed when the system is in the standby
mode: however the system does not relay data
between multipb i.LINK devices. When i.LINK de-
vices are not in connection, select "Disable", result-
ing in less power consumption.
in standby mode
i.LINKdevice Media Receiver
No data relay
i.LlNK device
÷
ER
PDP5040HD-Eng (65-80) 76 _ 7/24/03, 2:00 PM
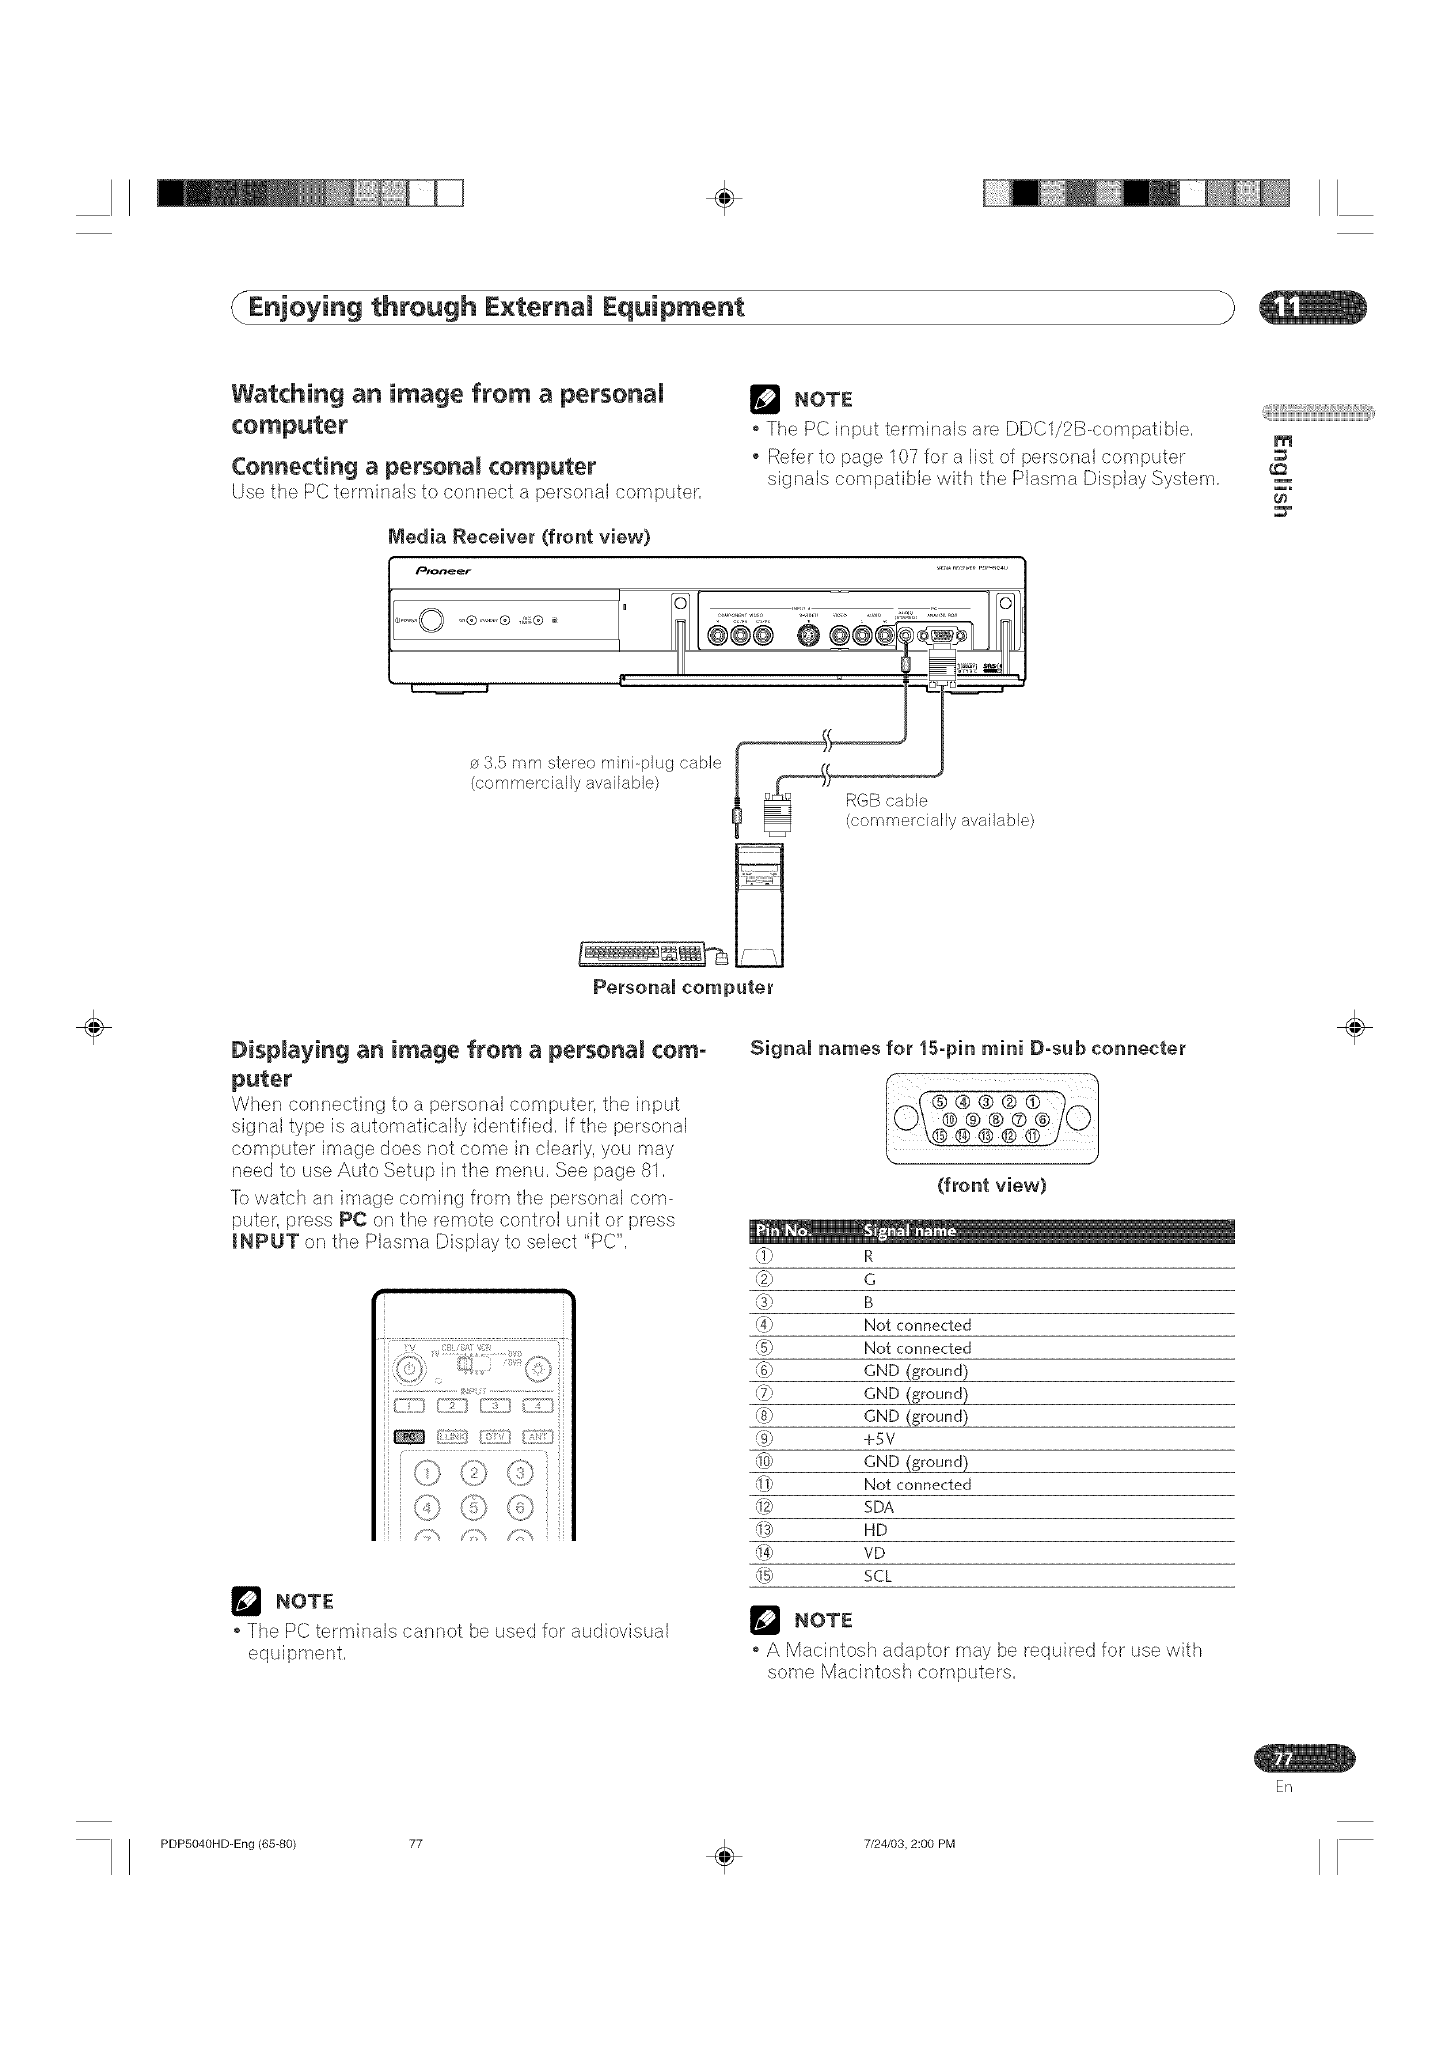
÷
Enjoying through E×ternam Equipment
Watching an image from a personaU
Connecting apersonal computer
Use the PC terrnh-_alsto connect a personal computer,
NOTE
The PC input terminab are DDC1/2B-compatibb,
Refer to page 107 for a list of personal computer
signals compatible with the Plasma Display System,
Media Receiver (front view)
......... ® ,.,,,® ,,a®
I'
o 3,5 rnm stereo mini-plug cable
(commercially availabb)
@@@
_ RGBcable
(commercially available)
qilIIIIIIIiliiiWiWiWiWiWiWiWiWiWiWiTi,i¸,
m
÷Personal computer
Displaying an image from a personal com-
puter
When connecting to a personal computer, the input
signal type is automatically identified, If the personal
computer image does not come in clearly, you may
need to use Auto Setup in the menu, See page 81,
To watch an image coming from the personal com-
puter, press PC on the remote control unit or press
mNPUT on the Plasma Display to select "PC",
NOTE
The PC terminals cannot be used for audiovisual
(front view)
,,% R
@ c
@ B
90 Not connected
(5_ Not connected
(@ GND (ground)
(Z} GND (ground)
(8} GND (ground)
_9) +sv
@ GND (ground)
,,_1} Not connected
_S SDA
_ HD
_4) VD
k_ SCL
NOTE
A Macintosh adaptor may be required for use with
som,e Macintosh cornputers,
÷
En
PDP5040HD-Eng (65-80) 77 . 7/24/03, 2:00 PM
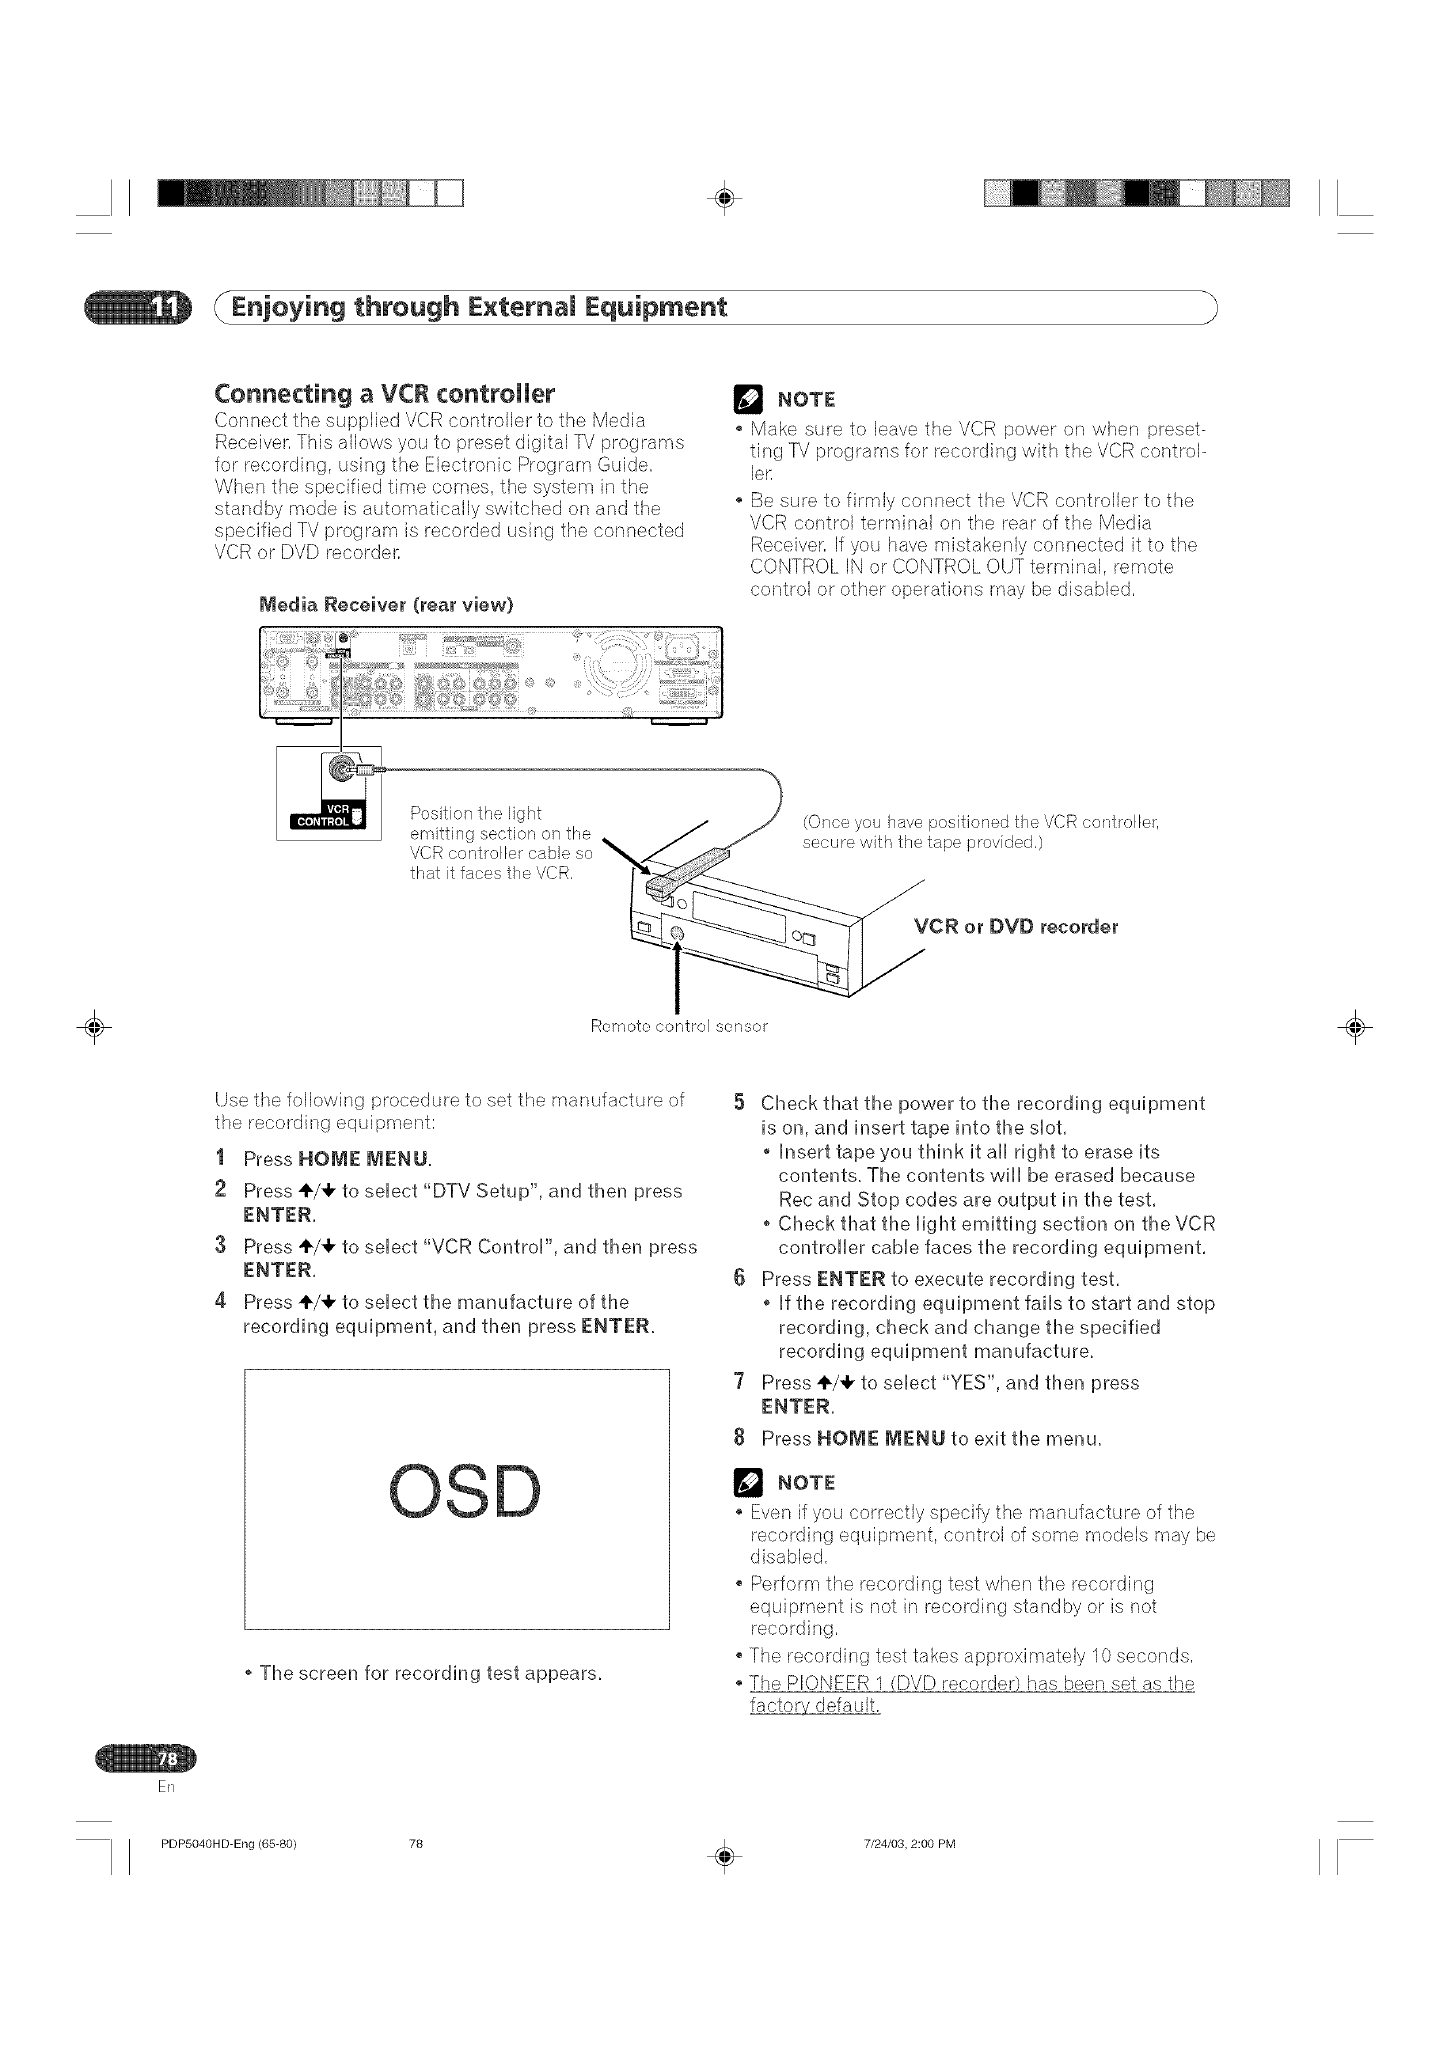
÷
Enjoying through E×ternam Equipment
Connecting aVCR controller
Connect the supplied VCR controller to the Media
Receiver, This allows you to preset digital T\/ programs
for recording, using the Electronic Program Guide,
When the specified time comes, the system in the
standby mode is automatically switched on and the
specified TV program is recorded usinf_ the connected
VCR or DVD recorder,
Position the light
emitting section on the
VCR controller cable so
that it faces the VCR.
NOTE
Make sure to leave the VCR power on when preset-
ting TV programs for recording with the VCR control-
let.
Be sure to firmly connect the VCR controller to the
VCR control terrninal on the rear of the Media
Receiver. If you have rnistakenly connected it to the
CONTROL IN or CONTROL OUT terminal, remote
control or other operations may be disabled.
(Once you have positioned the VCR controller,
secure with the tape provided.)
÷Remoto control sensor ÷
Use the following procedure to set the rnanufacture of
the recording equipment;
I Press HOME MENU.
2 Press ÷/_1, to select "DTV Setup", and then press
ENTER.
3Press +/÷ to select "VCR Control", and then press
ENTER.
4 Press +/÷ to select the manufacture of the
recording equipment, and then press ENTER,
OSD
• The screen for recording test appears.
5 Check that the power to the recording equipment
is on, and insert tape into the slot.
Insert tape you think it all right to erase its
contents. The contents will be erased because
Rec and Stop codes are output in the test.
• Check that the light emitting section on theVCR
controller cable faces the recording equipment.
6 Press ENTER to execute recording test.
• If the recording equipment fails to start and stop
recording, check and change the specified
recording equipment manufacture.
7 Press 4,/÷ to select "YES", and then press
ENTER.
8 Press HOME MENU to exit the menu.
NOTE
Even if you correctly specify the manufacture of the
recording equipment, control of some rnodels rnay be
disabled.
Perform the recording test when the recording
equiprnent is not in recording standby or is not
The recording test takes approximately 10 seconds.
The PIONEER 1 (DVD recorder) has been set as the
factory default.
ER
PDP504OHD-Eng (65-80) 78 _ 7/24/03, 2:00 PM
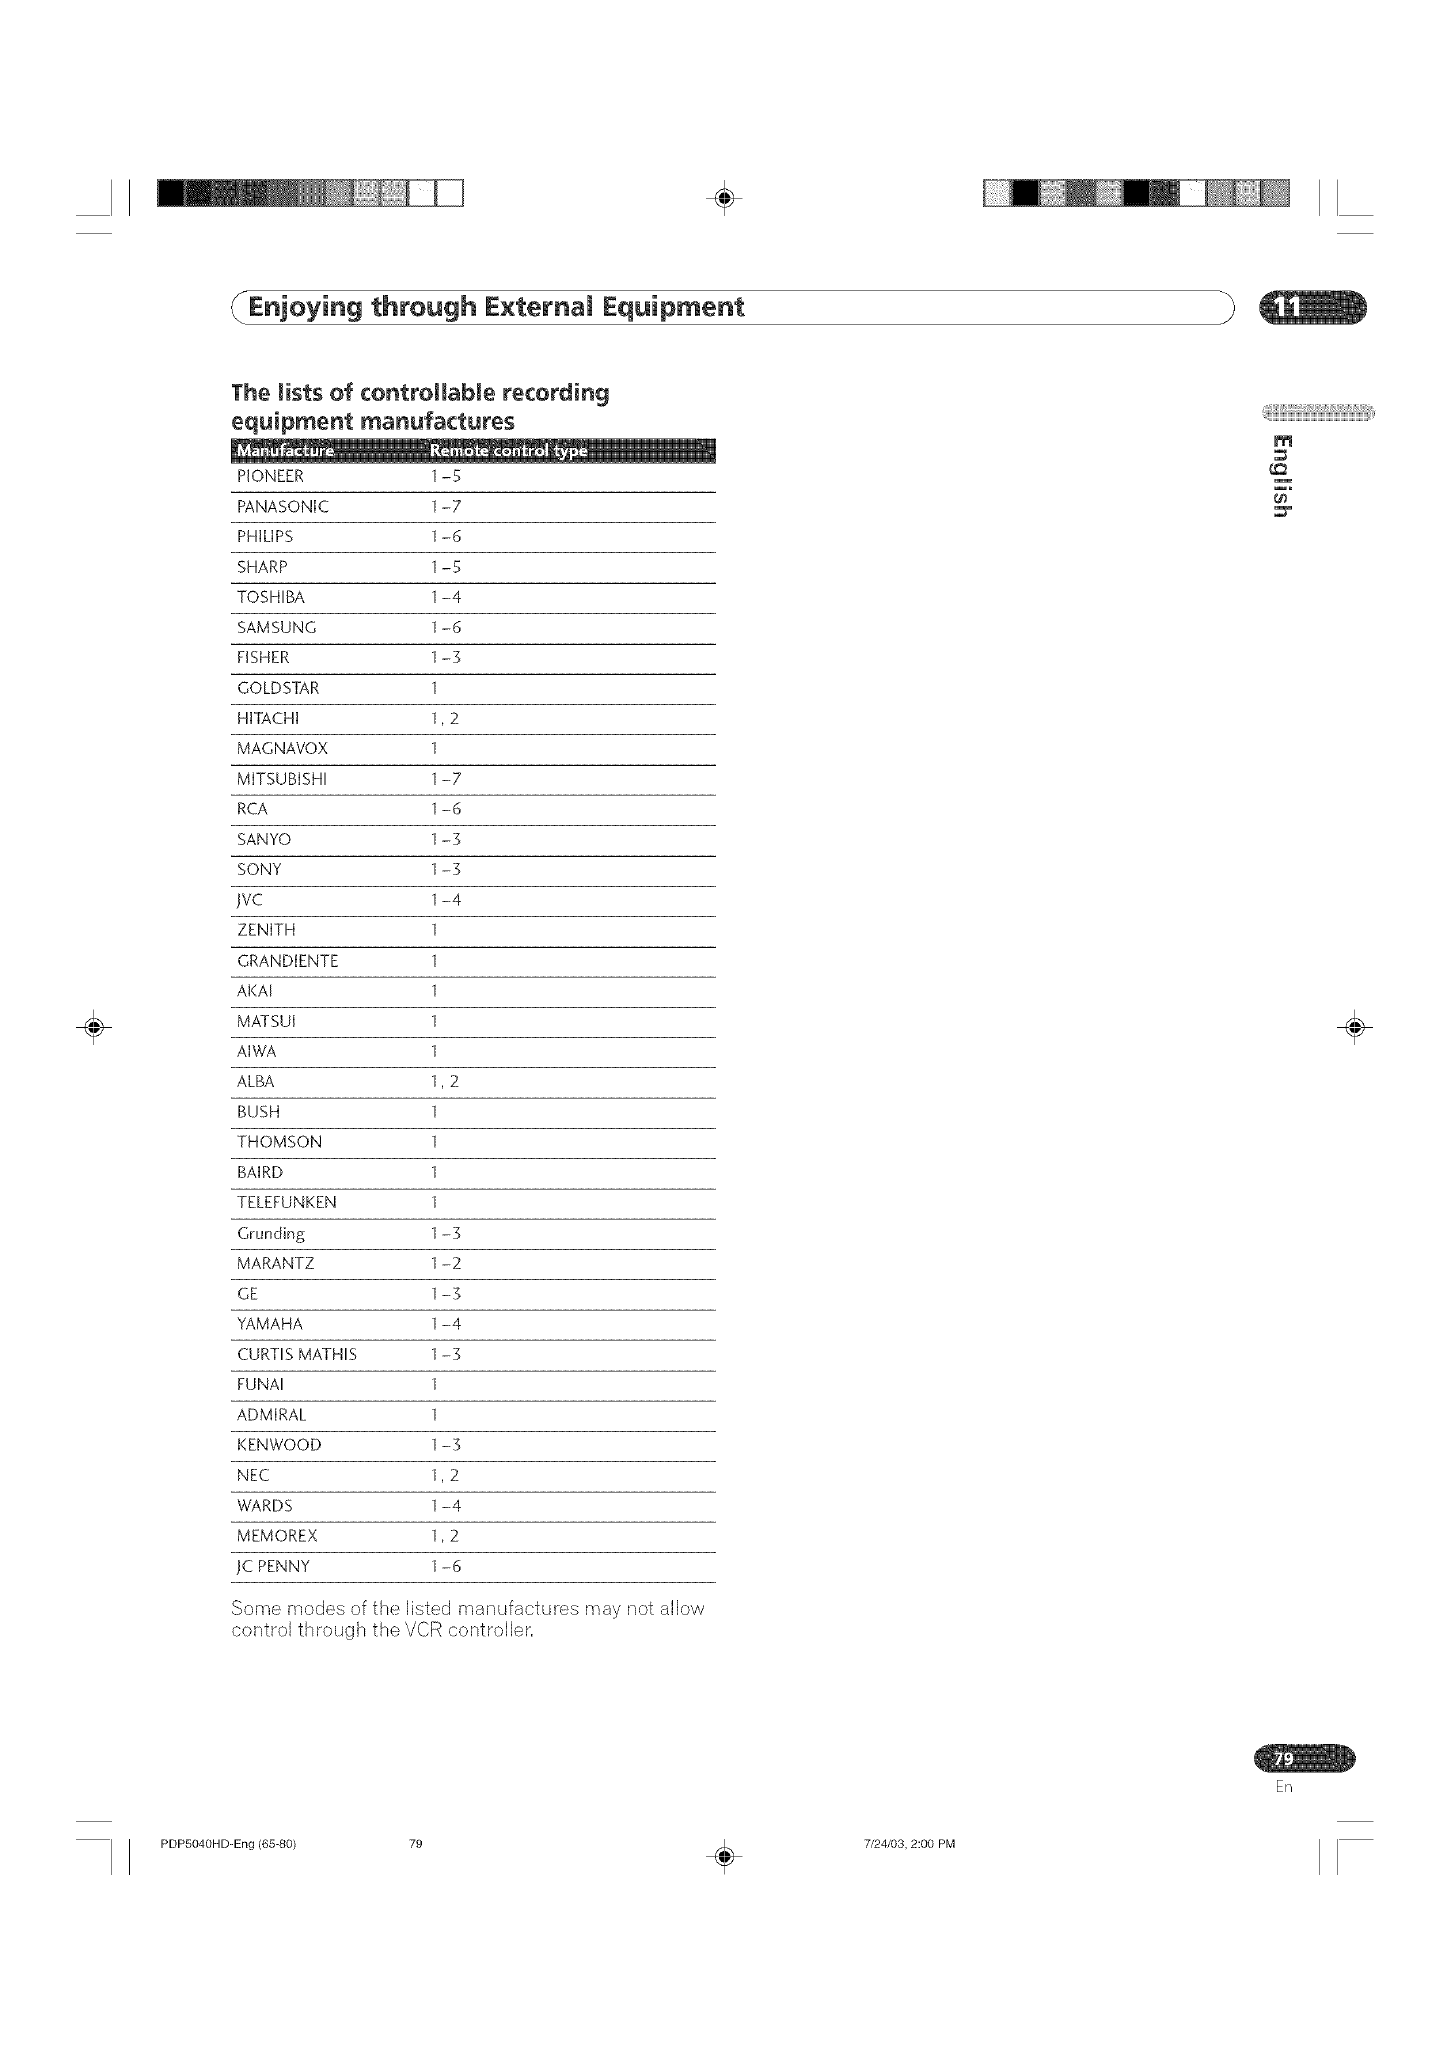
÷
Enjoying through E×ternaJ Equipment
÷
The Hsts of controllable recording
equipment manufactures
PIONEER
PANASONIC
PHILIPS
SHARP
TOSHIBA
SAMSUNG
FISHER
GOLDSTAR
HITACHI
MAGNAVOX
MITSUBISHI
RCA
SANYO
SONY
]VC
ZENITH
GRANDIENTE
AKAI
MATSUI
AIWA
ALBA
BUSH
THOMSON
BAIRD
TELEFUNKEN
Grunding
MARANTZ
GE
YAMAHA
CURTIS MATHIS
FUNAI
ADMIRAL
KENWOOD
NEC
WARDS
MEMOREX
]C PENNY
]-S
]-7
]-6
]-S
]-4
]-6
]-3
]
],2
]
]-7
]-6
]-3
]-3
]-4
],2
]-3
]-2
]-3
]-4
]-3
]
]
]-3
],2
]-4
],2
]-6
Some modes of the Ibted manufactures may not allow
control through the VCR controller,
m
÷
Er/
PDP5040HD-Eng (65-80) 79 _{_ 7/24/03, 2:00 PM
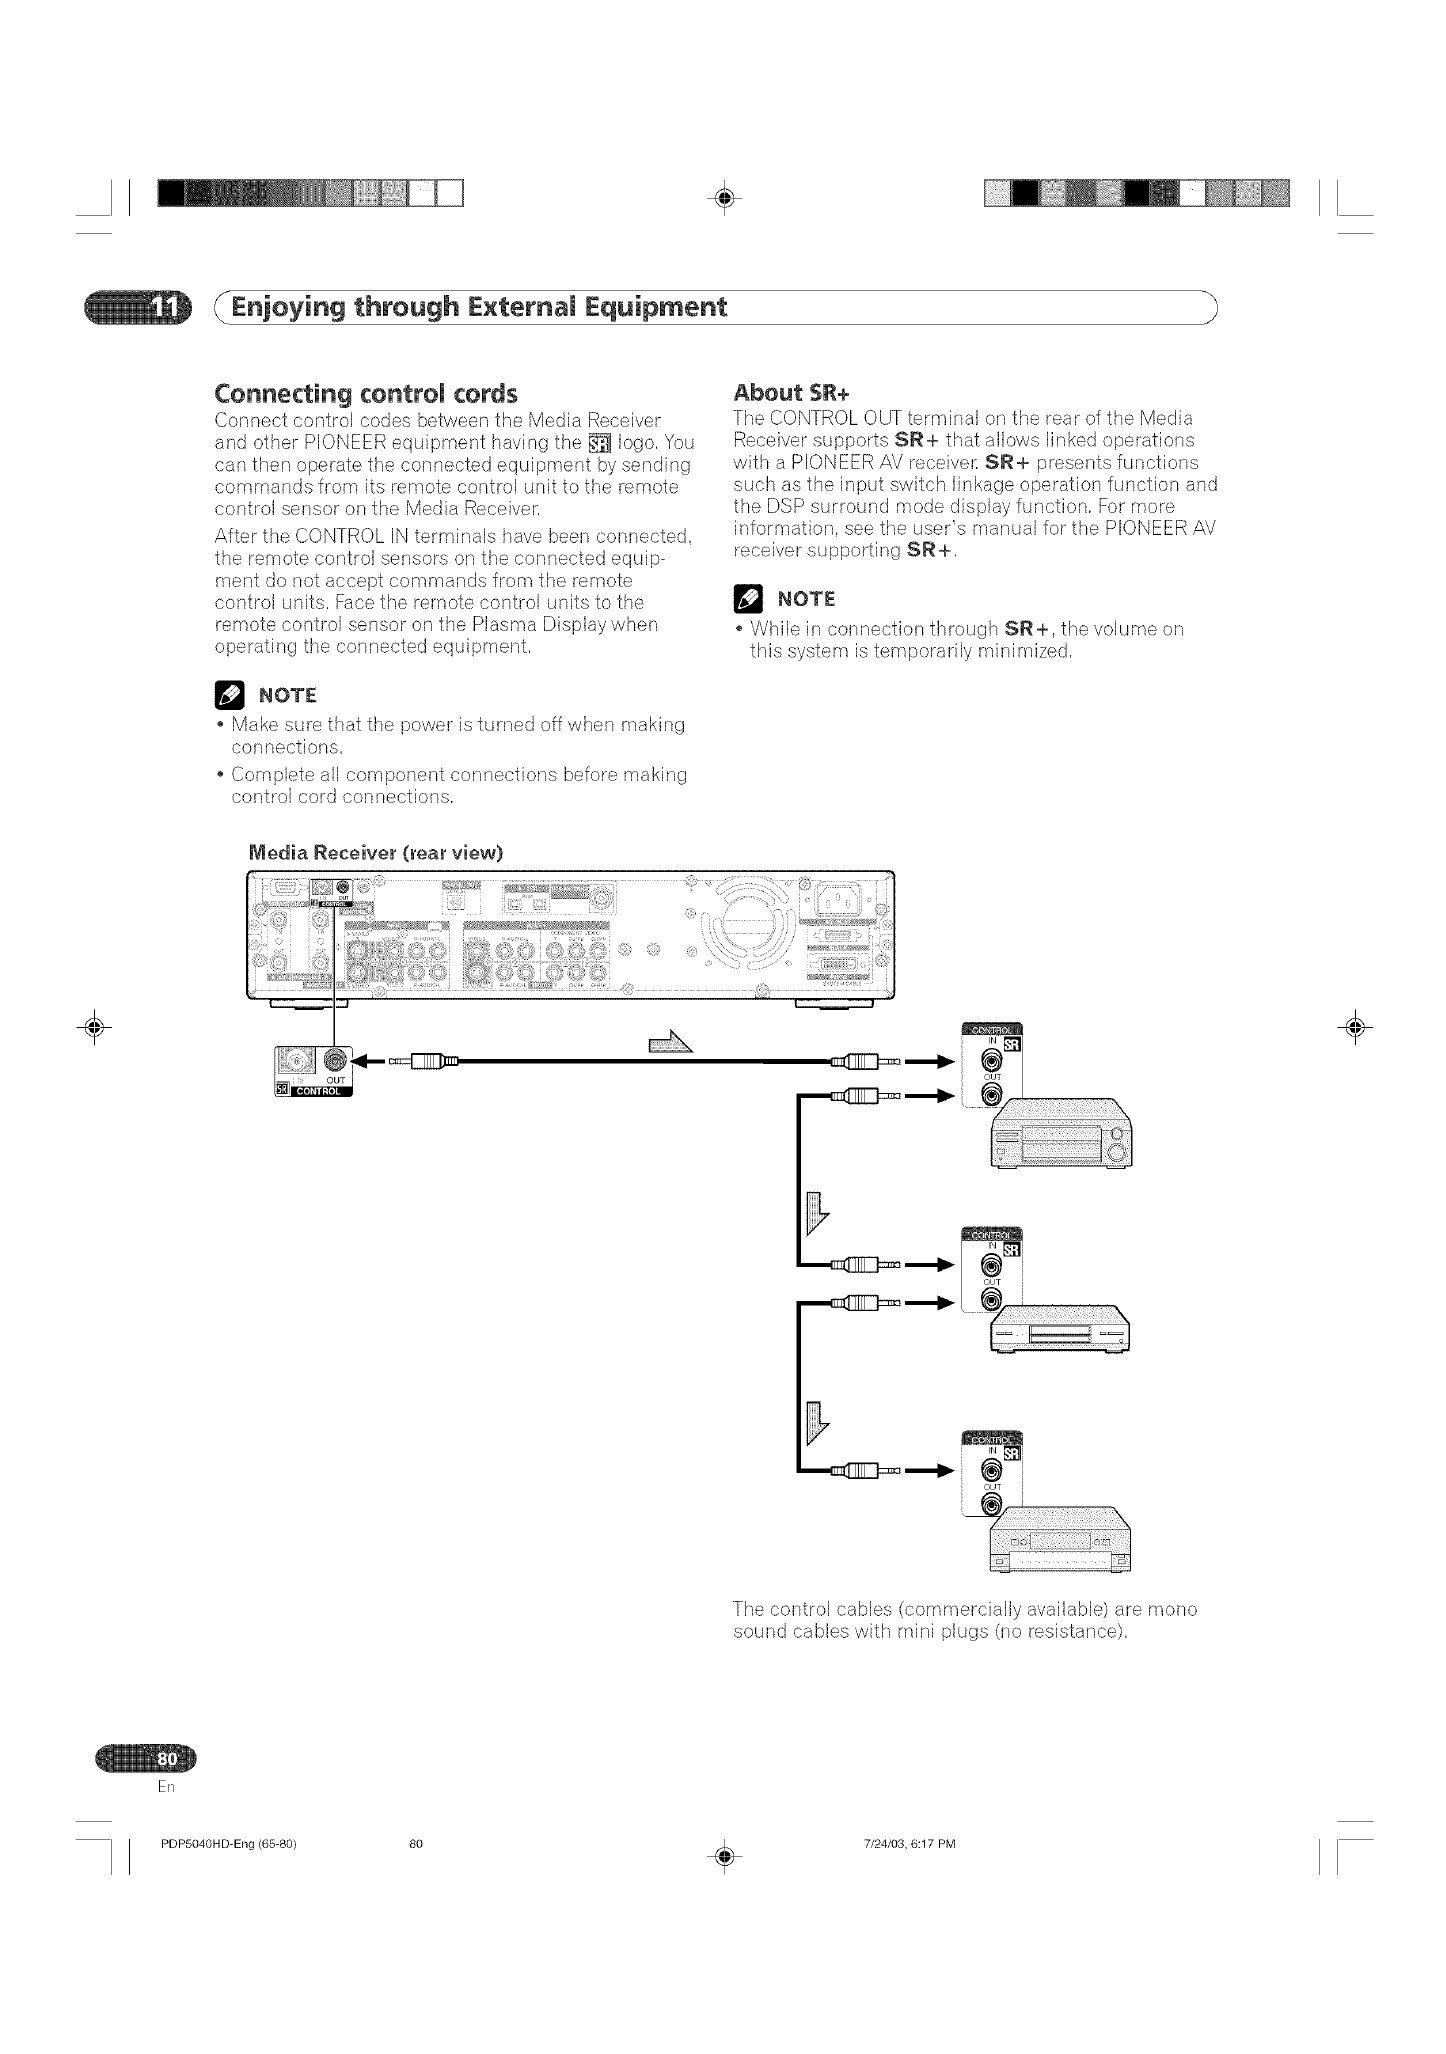
÷
Enjoying through E×ternaJ Equipment
Connecting controU cords
Connect control codes between the Media Receiver
and other PIONEER equipment having the _ logo. You
can then operate the connected equipment by sending
commands from its remote control unit to the remote
control sensor on the Media Receiver.
After the CONTROL IN terminals have been connected.
the remote control sensors on the connected equip-
ment do not accept commands from the remote
control units. Face the remote control units to the
remote control sensor on the Plasma Display when
operating the connected equipment.
r_ NOTE
Make sure that the power is turned off when making
connections.
Complete all component connections before making
control cord connections.
The CONTROL OUT terminal on the rear of the Media
Receiver supports SR+ that allows linked operations
with a PIONEER AV receiver. SR+ presents functions
such as the input switch linkage operation function and
the DSP surround mode display function. For more
information, see the user's manual for the PIONEER AV
receiver supporting SR+.
NOTE
While in connection through SR+, the volume on
this system is temporarily minimized.
Nledia Receiver (rear view}
÷ ÷
IN i
[]
OUT l
The control cables (commercially available) are mono
sound cables with mini plugs (no resistance).
ER
PDP504OHD-Eng (65-80} 80 _ 7/24/03, 6:17 PM
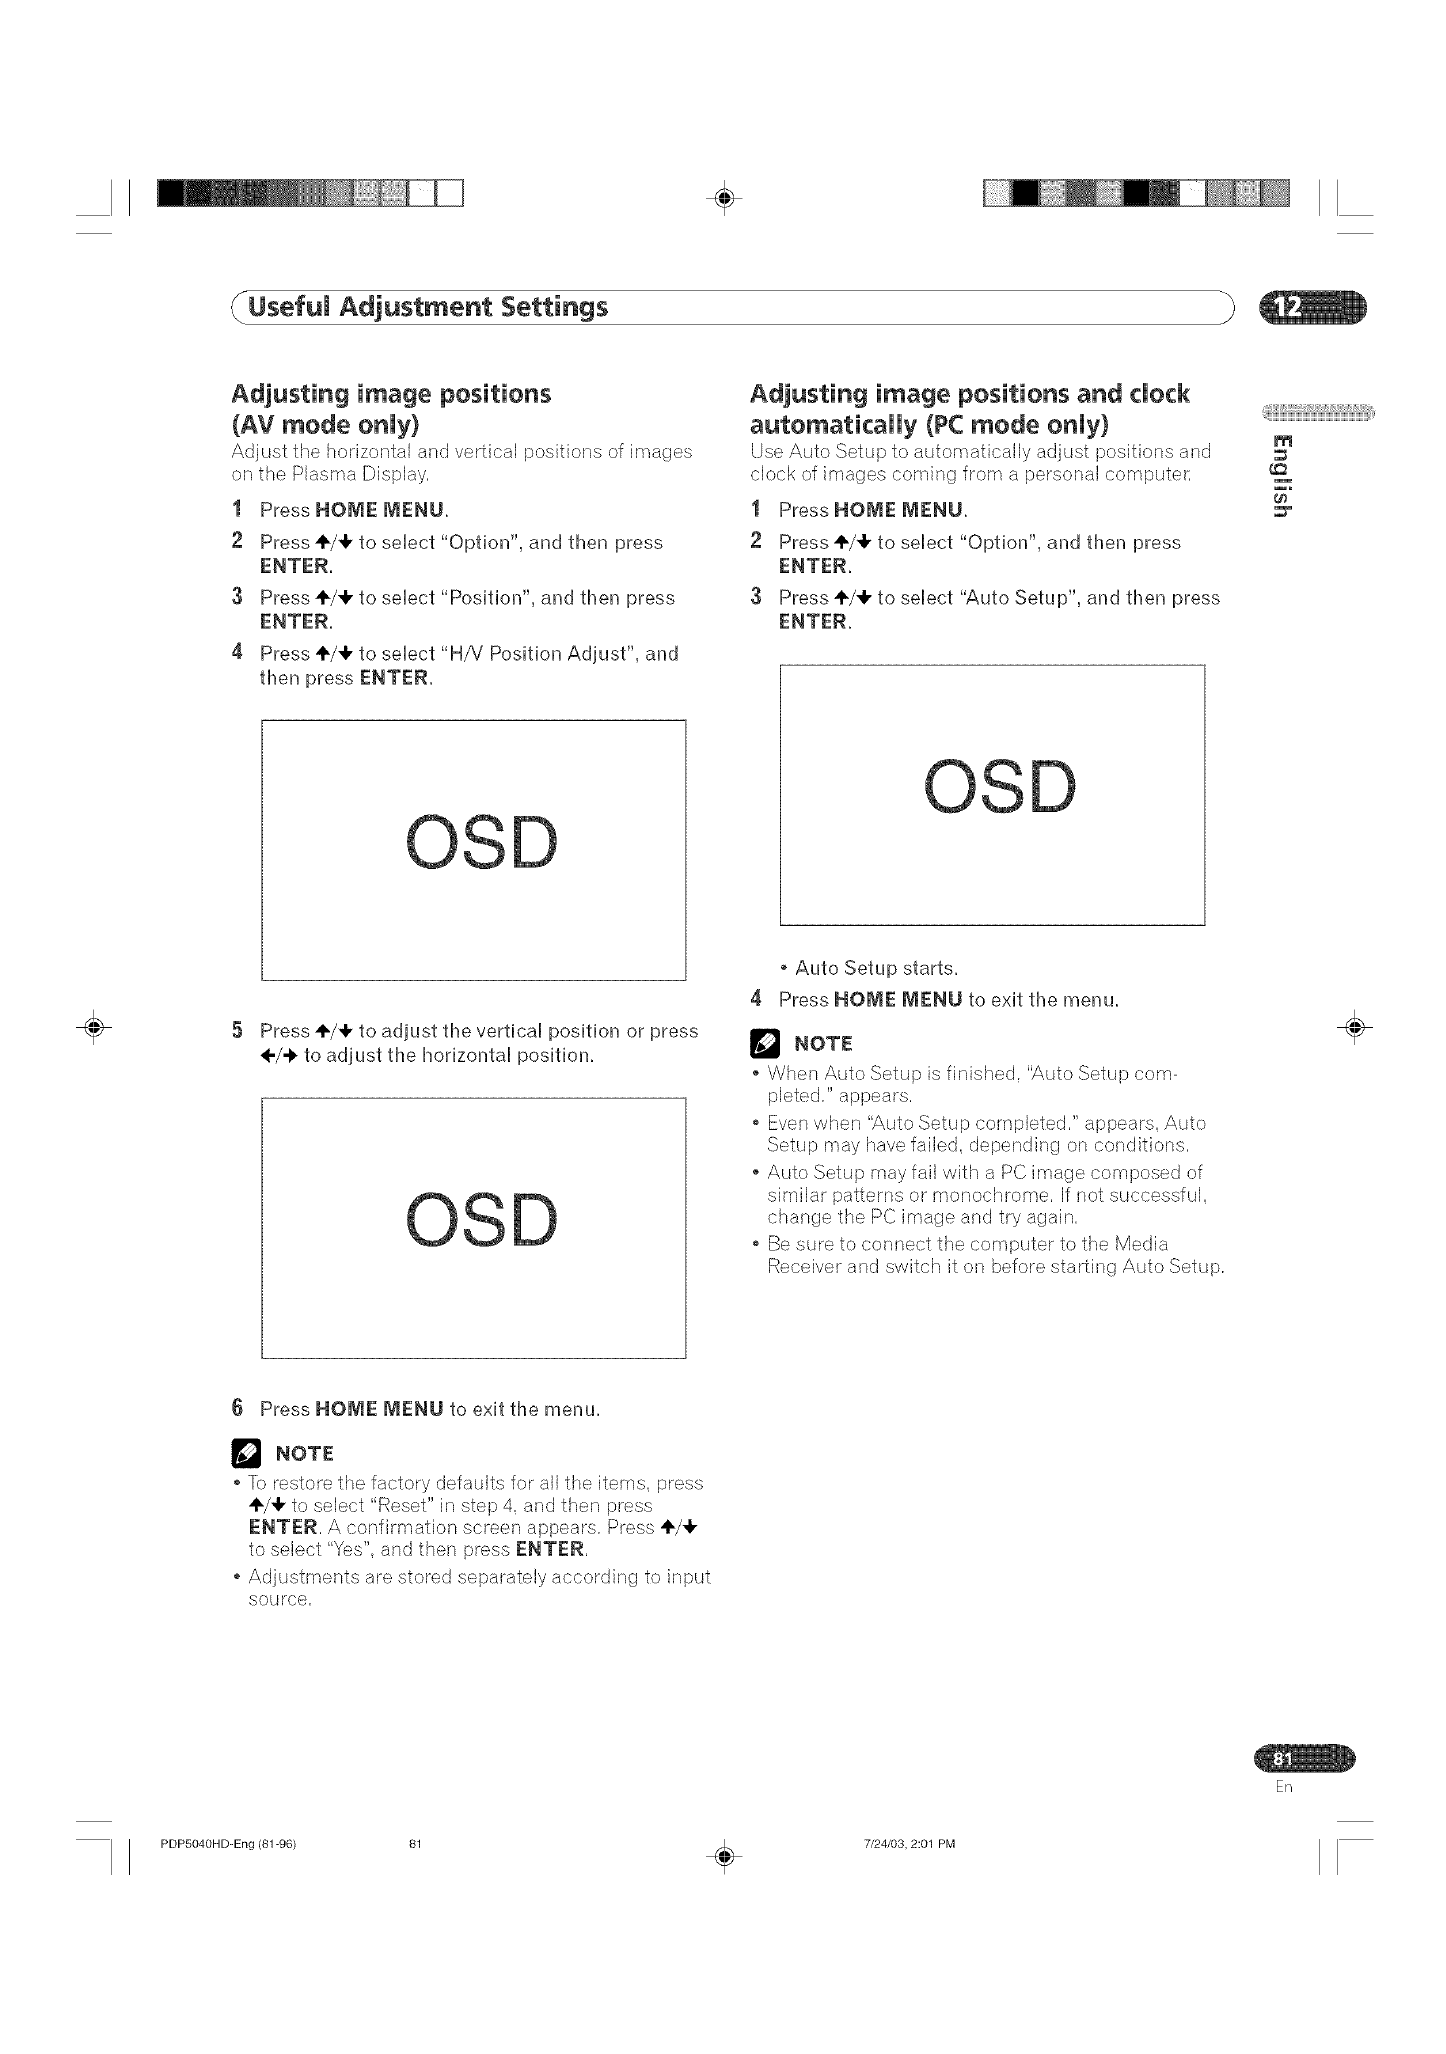
÷
(/Usefum Adjustment Settings
Adjusting image positions
(AV mode onUy)
Adjust the hedzontal and vertical Dositie[]s of irr_,afjes
on the Plasma Display,
t Press HOME MENU,
2 Press ,1,/4, to select "Option", and tl_en press
ENTER
3Press ÷/4, to select "Position", and then press
ENTER.
4 Press +/4, to select "H/V Position Adjust", and
tl_en press ENTER,
Adjusting image positions and dock
automatically (PC mode onUy}
Use Auto Setup to automatically adiust positions and
clock of images coming from a personal computer,
t Press HOIVIE IVIENU,
2 Press "1"/4,to select "Option", and then press
ENTER,
3Press ÷/4, to select "Auto Setup", and then press
ENTER.
OSD
_iiiiiii_ii_i;i1_iiiiiiiiii1iii_iii_i_iii_i_iii_i_iii_i_iii_i_iii_i_iii_i_iii_i_iii_i_iii_i_iIi_i¸,
m
÷5 Press +/4, to adjust the vertical position or press
÷/._ to adjust the horizontal position,
Auto Setup starts,
4 Press HOME MENU to exit the menu.
NOTE
.When Auto Setup is finished, "Auto Setup com-
pleted," appears,
.Even when "Auto Setup completed," appears, Auto
Setup may have failed, depending on conditions,
.Auto Setup may fail with a PC image composed of
similar patterns or monochrome, If not successful,
change the PC image and try again,
.Be sure to connect the computer to the Media
Receiver and switch it on before starting Auto Setup,
÷
6 Press HOME MENU to exit the menu.
NOTE
'f_)restore the factory defaults for all the items, press
÷/4, to select "Reset" in step 4, and then press
ENTER, A confirmation screen appears, Press ÷/4,
to select "Yes", and then press ENTER,
Adjustments are stored separately according to input
SOUrCe,
ER
PDP5040HD-Eng (81-96) 81 _ 7/24/03, 2:01 PM
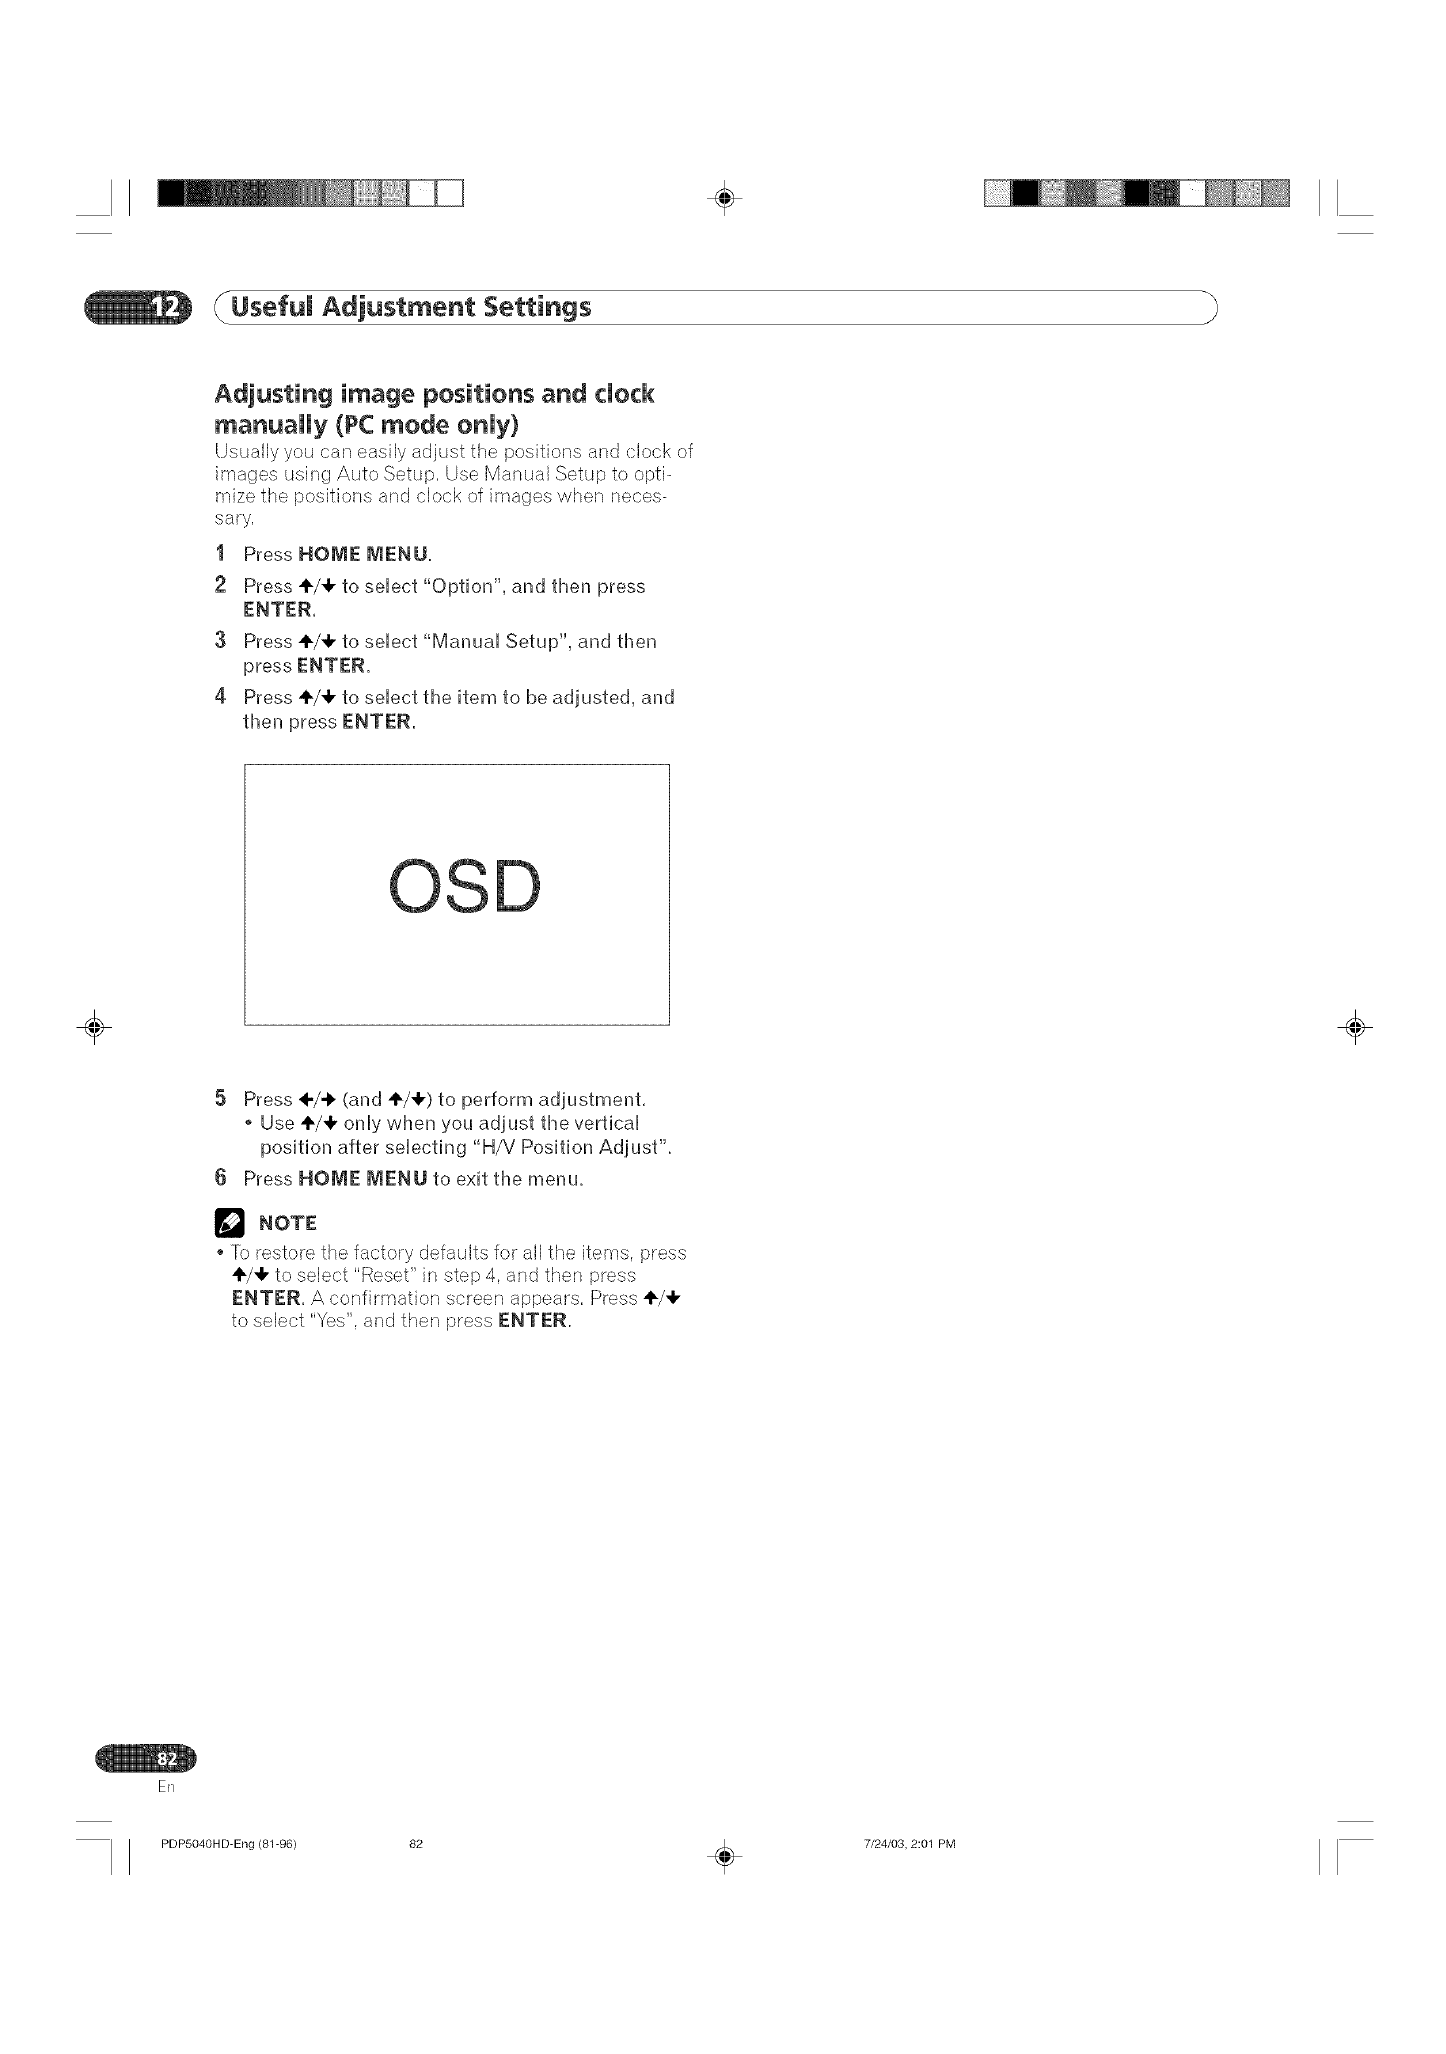
÷
Usefum Adjustment Settings
Adjusting image positions and dock
manually (PC mode onUy)
Usually you can easily adjust the positions and clock of
images using Auto Setup, Use Manual Setup to opti-
mize the positions and clock of images when neces-
sary,
I Press HOI_E I_ENU,
2 Press ÷/.k to select "Option", and tlmen press
ENTER.
3Press ÷/.k to select "Manual Setup", and then
4 Press +/÷ to select timeitem to be adjusted, and
tlmenpress ENTER.
OSD
÷ ÷
5 Press ÷/-I, (and ÷/÷) to perform adjustment.
o Use ÷/,k only wlmenyou adjust timevertical
position after selecting "H/V Position Adjust".
6 Press HOIVIE IVlENU to exit timemenu.
NOTE
'R} restore the factory defaults for all the items, press
÷/€. to select "Reset" in step 4, and then press
ENTER, A confirmation screen appears, Press ÷/÷
to select "Yes", and then press ENTER,
ER
PDP5040HD-Eng (81-96) 82 _ 7/24/03, 2:01 PM
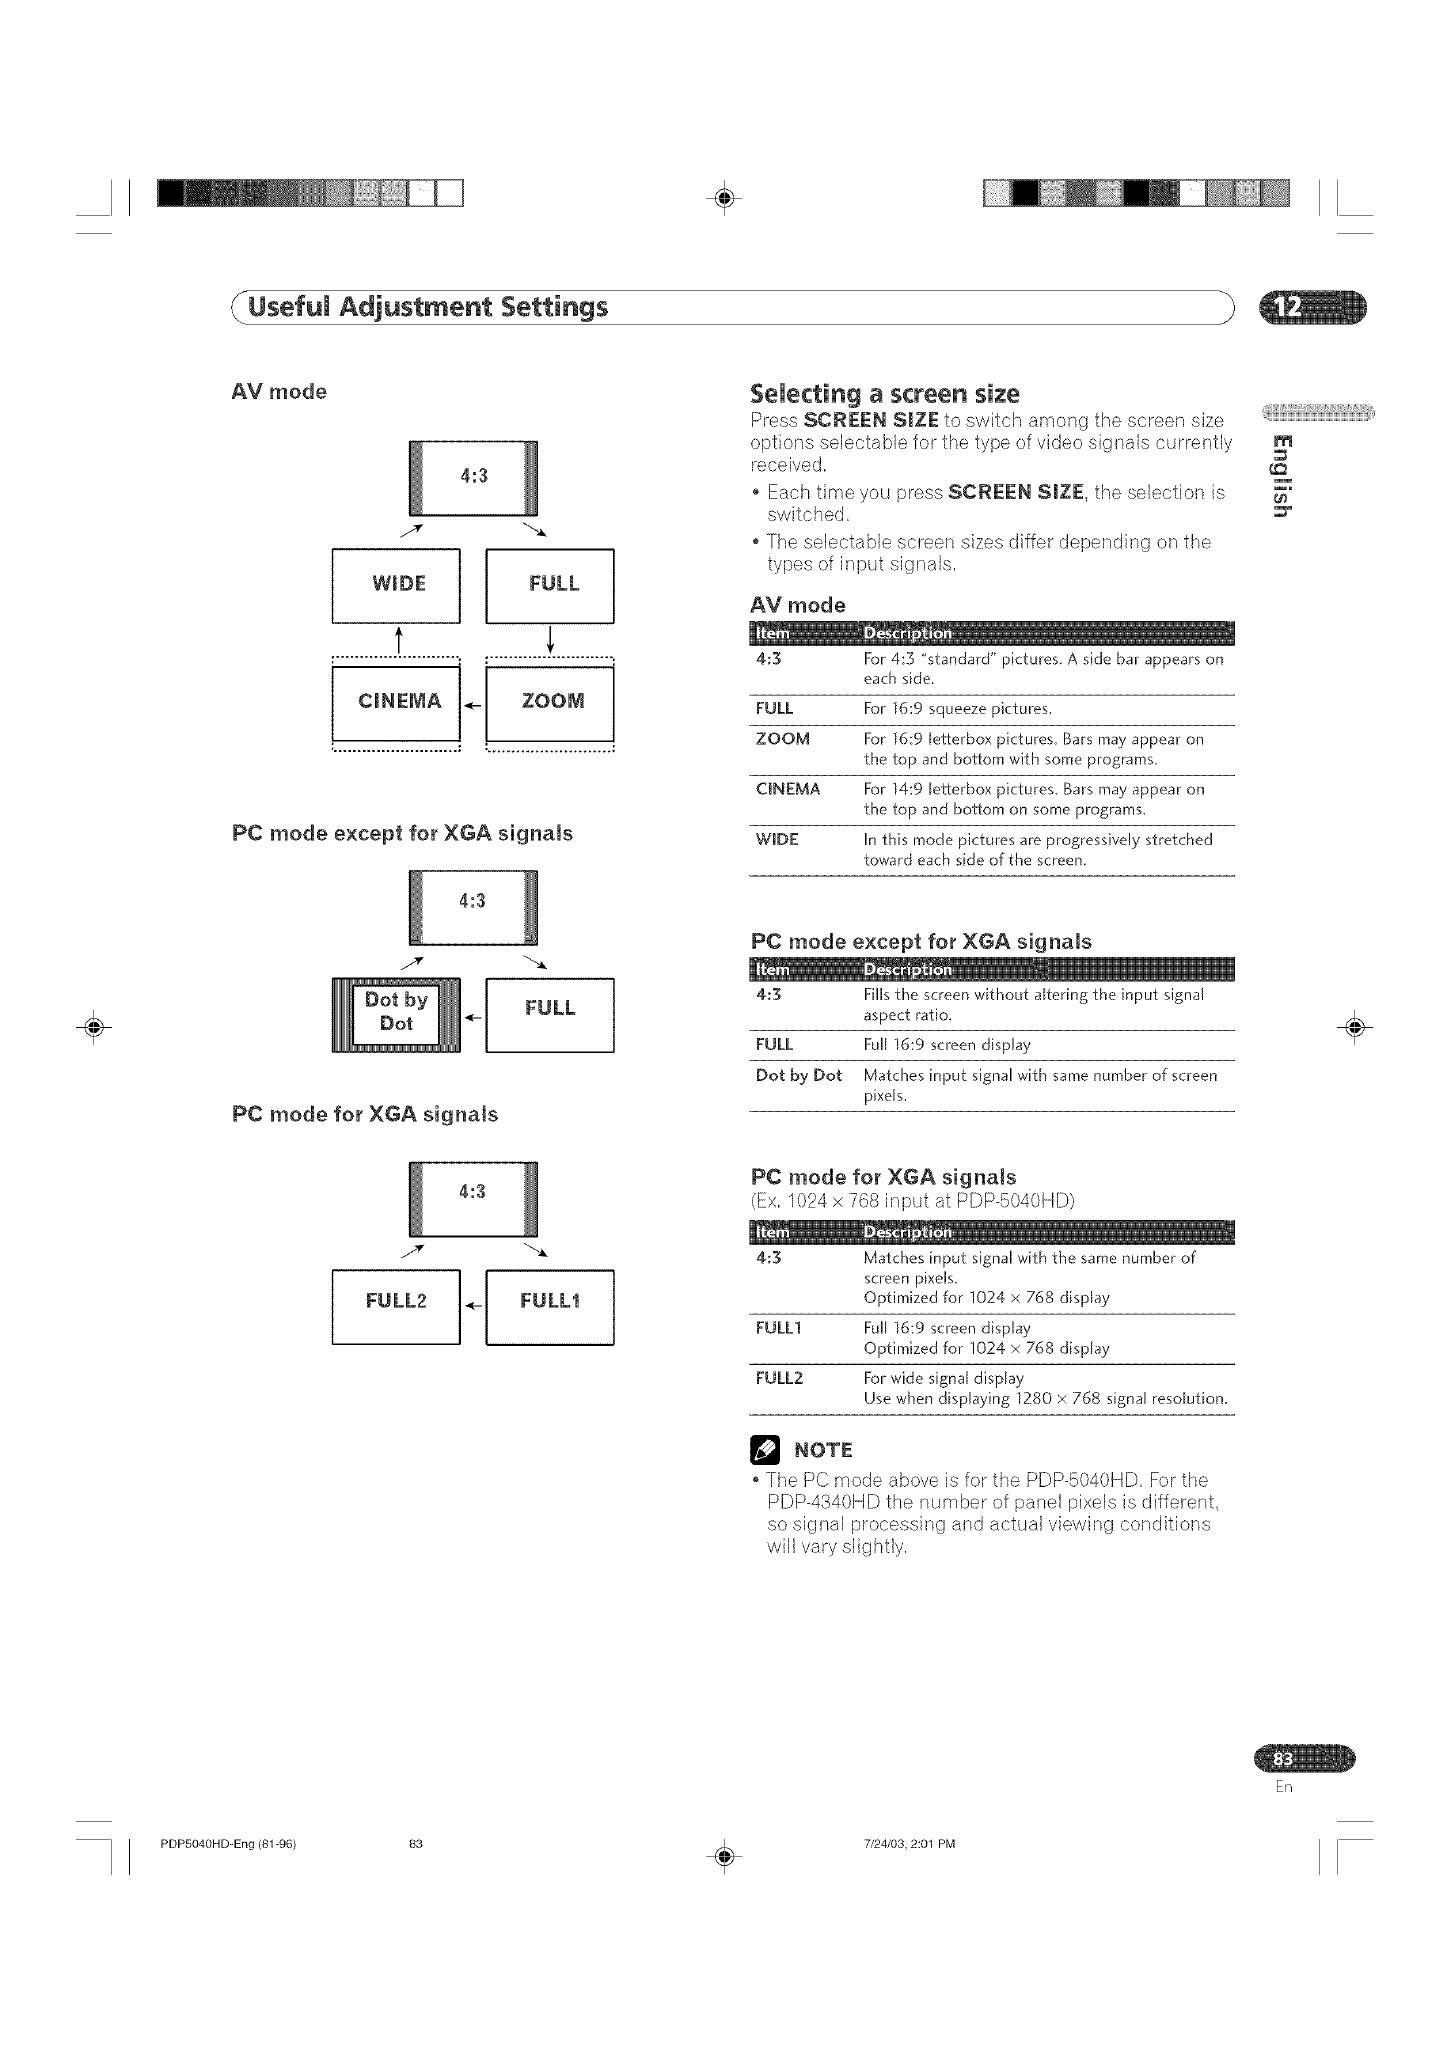
÷
(Usefum Adjustment Settings
÷
AV mode
4:3
WmDE FULL
t ,
CmNENA _-1 ZOON
PC mode except for XGA signals
4:3
PC mode for XGA signals
$eUecting ascreen size
Press SCREEN SiZE to switch among the screen size
options selectable for the type of video signals currently
received,
, Each time you press SCREEN SIZE, the selection is
switched,
, The selectable screen sizes differ depending on the
types of input signals,
AV mode
4:3 For 4:3 "standard" pictures. A side bar appears on
each side.
FULL For 16:9 squeeze pictures,
ZOOM For 16:9 letterbox pictures, Bars may appear on
the top and bottom with some programs,
CINEMA For 14:9 le_ferbox pictures, Bars may appear on
the top and bottom on some programs,
WiDE In this mode pictures are progressively stretched
toward each side of the screen.
PC mode except for XGA signals
4:3 Fills the screen without altering the input signal
aspect ratio.
FULL Full 16:9 screen display
Dot by Dot Matches input signal with same number of screen
pixels.
_iiiii]iilliiii;iiiiiiiiiiilii_iiliiliiliiliiliiliiliiliiliiliIii¸
m
÷
1
4:3
FULL2 .-1 FULL1
PC mode for XGA signals
(Ex, 1024 x 768 input at PDP-B040HD)
4:3 Matches input signal with the same number of
screen pixels,
Optimized for 1024 x 768 display
FULL1 Full 16:9 screen display
Optimized for 1024 x 768 display
FULL2 For wide signal display
Use when displaying 1280 × 768 signal resolution.
NOTE
The PC mode above is for the PDP-B040HD, For the
PDP-4340HD the number of panel pixels is different,
so signal processing and actual viewing conditions
will vary slightly,
ER
PDP5040HD-Eng (81-96) 83 _ 7/24/03, 2:01 PM
÷
Usefum Adjustment Settings
Changing the brightness at both sides
of the screen (Side Mask)
'JVifi_the <3 screen size selected for the AV mode, you
can change the brightness of the gray side masks that
appear at both sides of the screen,
I Press HOME MENU,
2 Press +/4" to select "Option", and tlmen press
ENTER
3Press ,1/4, to select "Side Mask", and timenpress
ENTER.
4Press ,1/4, to select timedesired parameter, and
tlmenpress ENTER,
D
÷
Fixed Always sets the same brightness for the
(factory default) gray side masks_
Auto Adjusts the brightness of the gray side
masks according to the brightness of
images.
÷
5 Press HOME MENU to exit timemenu.
PDP5040HD-Eng (81-96) 84 _ 7/24/03, 2:01 PM

÷
(Usefum Adjustment Settings
SUeepTimer
When the selected time elapses, the Sleep Timer
automatically places the system into the standby m,ede,
Press SLEEP to select the desired time,
You can also use the menu to set the Sleep Timer,
I Press HOME MENU, m
2 Press ,1,/4,to select "Sleep Timer", and tl_en press
ENTER,
Press ÷/÷ to select tl_e desired time, and tl_en
OS
@ii;iiBiiiiiiiWi_iWi_iWi_iWi_iWi_iWi_iWi_iWi_iWi_iWi_i_ili_i¸,
÷
The timer starts counting.
Each time you press SLEEP, the selection is switched
as below:
30 ---_ 60 ---_ 90
(cancel) Off_ 120 (minutes)
The factory default is "Off".
NOTE
To cancel the Sleep Timer. select "Off" by pressing
SLEEP,
Five minutes before the selected time elapses, the
remaining time appears every minute,
4 Press HOME MENU to exit tl_e menu.
÷
Er/
PDP5040HD-Eng (81-96) 85 _ 7/24/03, 2:01 PM
÷
Usefum Adjustment Settings
÷
CUosed caption for cenventienaU
TV channeUs
Your Plasma Dbplay System is equipped with an
internal closed caption decoder, Closed caption is a
system which allows you to view conversations, narra-
tion, and sound effects in TV programs and home
videos as subtitles on your Plasma Display screen,
Not all programs and videos offer closed caption,
Please look for the "[_" symbol to ensure that
captions will be shown,
Activatin9 the dosed caption
t Press HOME MENU.
2 Press +/41, to select "Setup", and tlmen press
ENTER.
3Press ÷/_1, to select "Closed Caption", and tlmen
4 Press ÷/÷ to select "Setting", and tlmen press
ENTER.
5 Press +/÷ to select "On" or "On If Mute", and tlmen
OSD
Semectin9 the type of dosed captions
."CC1" or "CC2" displays subtitles of TV dramas and
news programs while allowing a full view of the
"T1" or "T2" superimposes on the picture other
information (e,g, TV guide, weather) that is ir_deper_-
dent of the TV in progress,
t Press HOME MENU.
2 Press ÷/4, to select "Setup", and tlmenpress
ENTER.
3Press +/4" to select "Closed Caption", and tlmen
press ENTER,
4 Press ÷/_1, to select "CImannel', and tlmenpress
ENTER.
5 Press +/4, to change timeselection, and then press
ENTER.
D
Timefactory default is "CC-I ".
@ Press HOME MENU to exit timemenu.
÷
Off Does not show closed captions.
(factory default)
Ou Always shows closed captions,
Ou mfMute Shows closed captions only while sound is
being muted,
@Press HOME MENU to exit timemenu.
En
PDP5040HD-Eng (81-96) 86 _ 7/24/03, 2:01 PM
÷
(/Usefum Adjustment Settings
÷
CUosed caption for digitaU TV channeUs
Your Pbsma Display System is equipped with an
internal closed caption decoder also for digital 'IV
channels,
You can enjoy digital closed captions whenever their
services are provided, Digital closed captions allow you
to change parameters such as fonts and colors, How-
ever, some digital TV programs may provide you with
only conventional closed captions, If this is the ease,
conventional closed captions are displayed,
Activating the closed caption
Use the fellewirLg procedure to activate the closed
I Press HOME MENU.
2 Press÷/4, to select "DTV Setup", and tl_en press
ENTER.
3Press +/4, to select "DTV Closed Caption", and
tl_en press ENTER
4 Press +/4, to select "Setting", and tl_en press
ENTER,
5 Press ÷/4, to select "On" or "On If Mute", and tl_en
press ENTER,
OS
Selecting the type of conventional closed
captions (for digital TV channels)
Use the following procedure to select the type of
conventional closed captions. You will watch the
selected type of closed captions when the selected
digital TV program provides only conventional closed
1 Press HOME MENU
2 Press ÷/41,to select "DTV Setup", and tl_en press
ENTER,
3Press ÷/4, to select "DTV Closed Caption", and
tl_en press ENTER.
4 Press +/41,to select "Analog Caption", and tl_en
5 Press ÷/4, to cl_ange tl_e selection, and tl_en press
ENTER.
OSD
Tl_e factory_ default is "CC-I ".
6 Press HOME MENU to exit tl_e menu.
@ii;iiBiiiiiiiWi_iWi_iWi_iWi_iWi_iWi_iWi_iWi_iWi_iWi_i_iIii¸,
m
÷
U_ _ _ _
Off Does not show dosed captions.
(factory default)
On Always shows closed captions
On If Mute Shows dosed captions only while sound is
being muted.
6 Press HOME MENU to exit tl_e menu.
NOTE
For MONITOR OUT, only conventional closed caption
signals are output; digital closed caption signals are
not output,
En
PDP5040HD=Eng (81-96) 87 _ 7/24/03, 2:01 PM

÷
Usefum Adjustment Settings
÷
$emecting digita_ dosed captioas
Use the felk_wh-_gprocedure to sebct digital closed
I Press HOME MENU,
2 Press +/4, to select "DTV Setup", and tlmenpress
ENTER,
3Press ÷/,I, to select "DTV Closed Caption", and
tlmenpress ENTER,
4 Press ÷/,1, to select "Digital Caption", and tlmen
5 Press ÷/4, to clmange timeselection, and tlmen press
ENTER,
OSO
Timefactory default is "Service 1"
6 Press HOME MENU to exit timemenu.
_"_ NOTE
The Primary Caption Service is usually offered for
Service 1, and the Secondary Language Service is
usually offered for Service 2 if these services are
available.
Selecting digita_ dosed caption param-
eters
Use the following procedure to change such param-
eters of digital closed captions as font size, font type,
foreground and background colors.
I Press HOME MENU.
2 Press ÷/+ to select "DTV Setup", and tlmenpress
ENTER.
3Press ÷/÷ to select "DTV Closed Caption", and
tlmen press ENTER.
4 Press÷/÷ to select "Digital Caption Setup", and
tlmen press ENTER.
5 Press ÷/4, to select timeitem, and tlmenpress ÷/_
to change the parameter.
D
Timeflew at timebottom of timedialog box slmows
Imowclosed captions will appear,
6 Repeat step 5 as necessary, and tlmenpress
ENTER.
7 Press HOME MENU to exit timemenu.
÷
ER
PDP5040HD-Eng (81-96) 88 _ 7/24/03, 2:01 PM
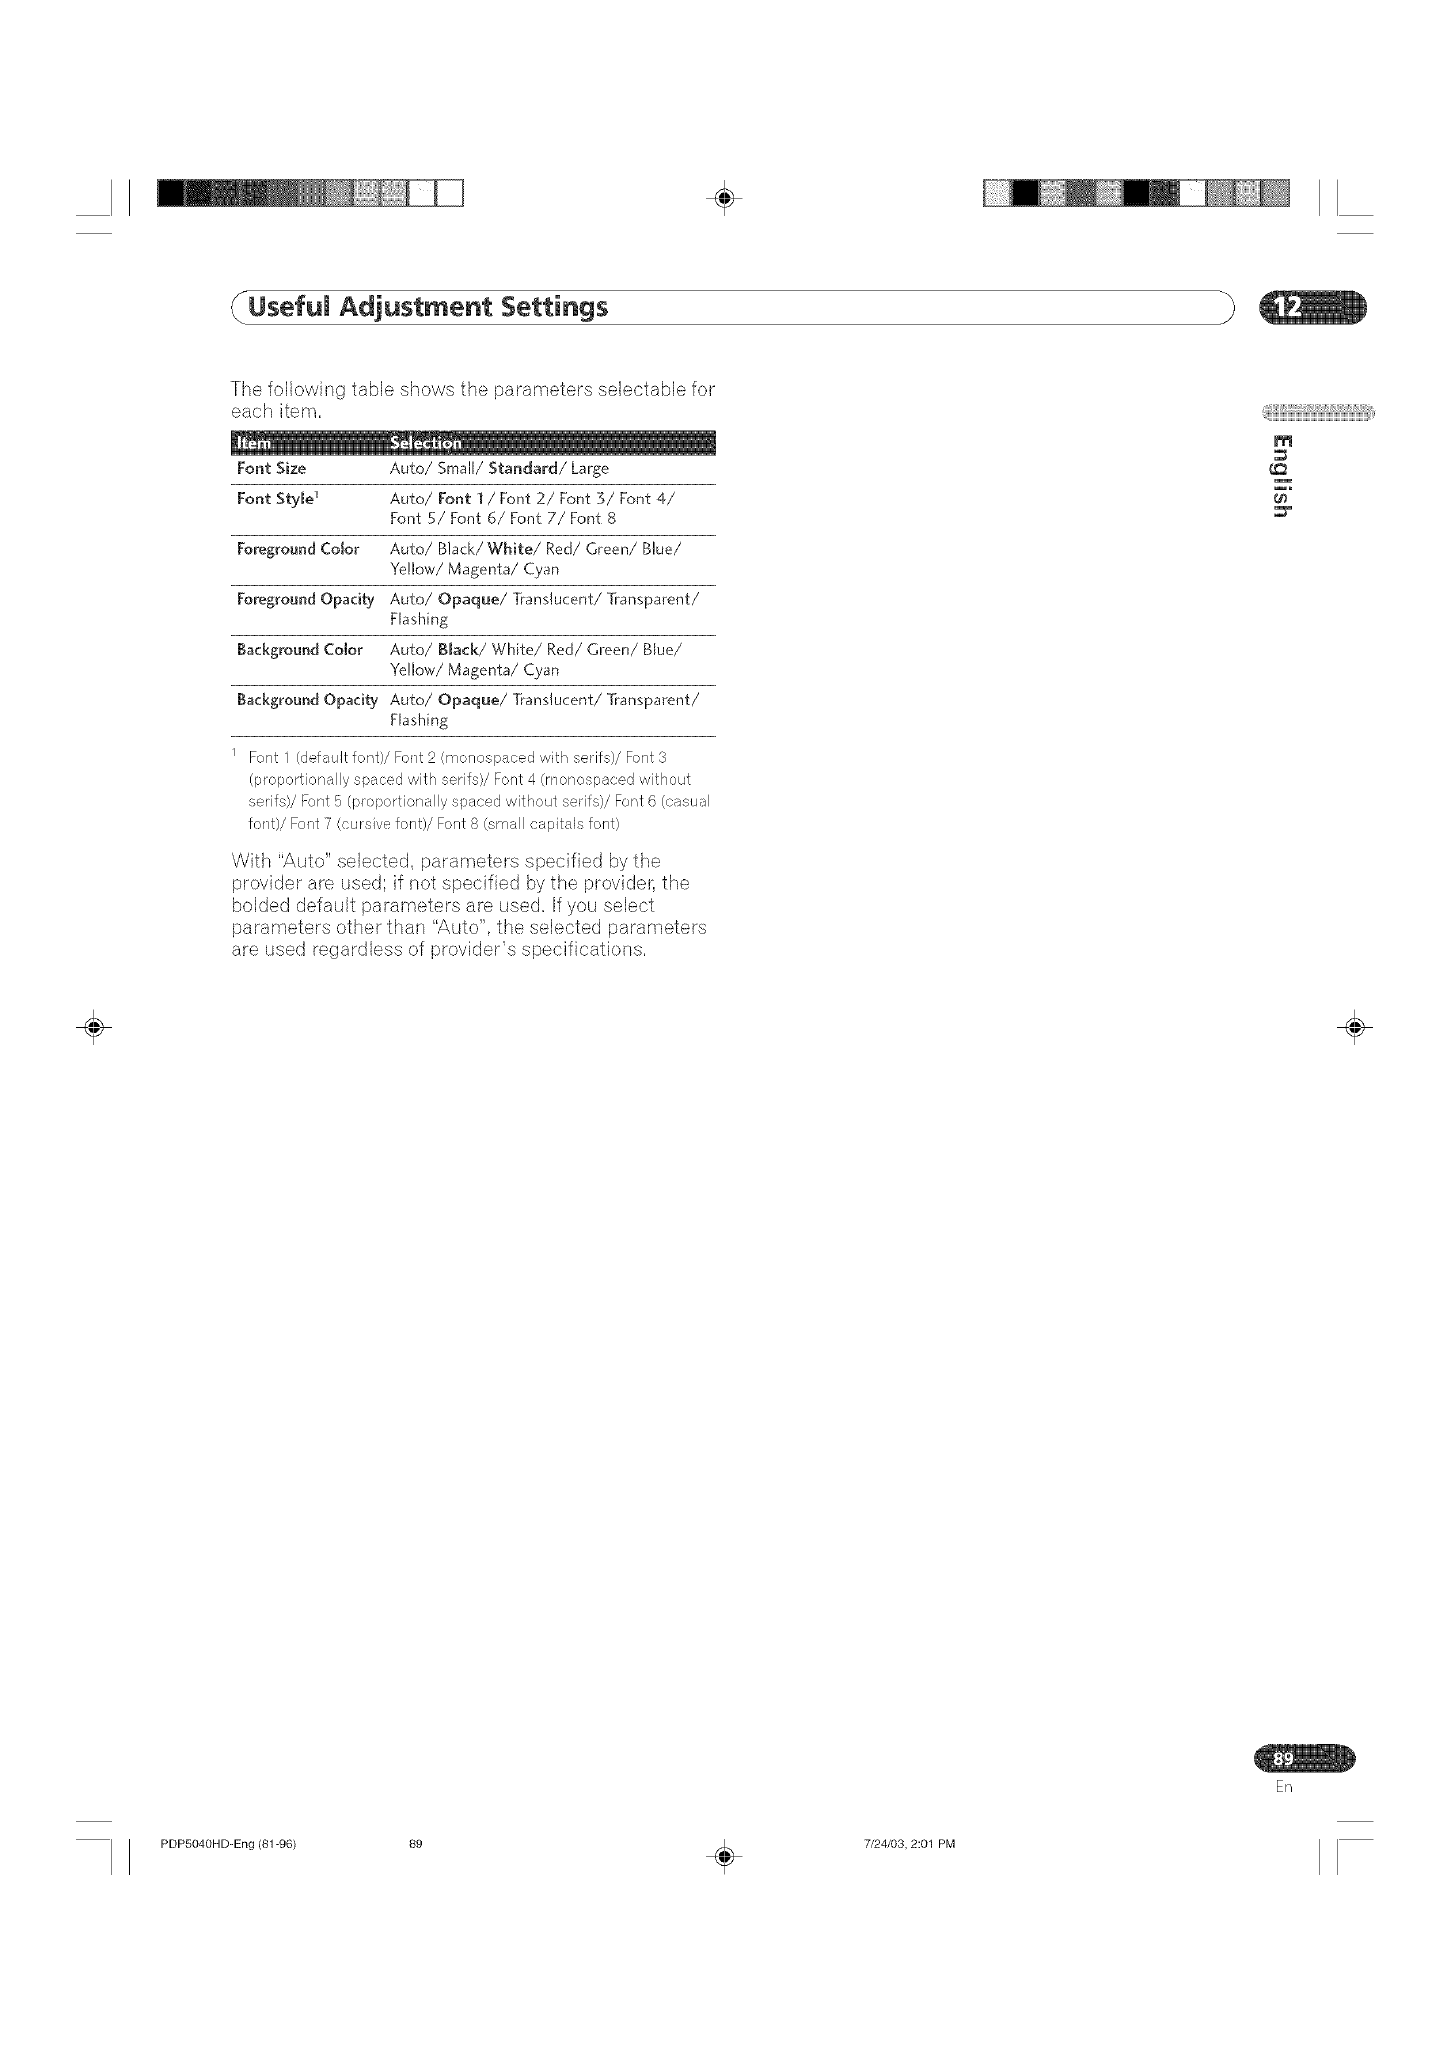
÷
(Useful Adjustment Settings
The following table shows the parameters selectabJe for
each item,
Font Size Auto/Small/Standard/Large
Font Style 1 Auto/Font 1 /Font 2/Font 3/Font 4/
Font 5/Font 6/Font 7/Font 8
Foreground Color Auto/Black/White/Red/Green/Blue/
Yellow/Magenta/Cyan
Foreground Opadty Auto/Opaque/_-anslucent/]_-ansparent/
Flashing
Background Color Auto/Black/White/Red/Green/Blue/
Yellow/Magenta/Cyan
Background Opacity Auto/Opaque/Trans]ucent/Transparent/
Hashing
/ Fot/t 1 (default font)/Font 2 (rnonospaced with serifs)/Font 3
(proportionally spaced with serifs)/Font 4 (rnonospaced without
serifs)//ont 5 (proportionally spaced without serifs)/Font 6 (casual
font)i Font 7 (cursive font)/Font 8 (small capitals font)
With "Auto" selected, parameters specified by the
provider are used', if not specified by the providers the
bolded default parameters are used, [f you select
parameters other than "Auto", the selected parameters
are used regardless of provider's specifications,
_liiiii_ii_i;i1_iiiiiiiiii1iii_iii_i_iii_i_iii_i_iii_i_iii_i_iii_i_iii_i_iii_i_iii_i_iii_i_iIli¸,
m
÷ ÷
En
PDP5040HD-Eng (81-96) 89 _ 7/24/03, 2:01 PM
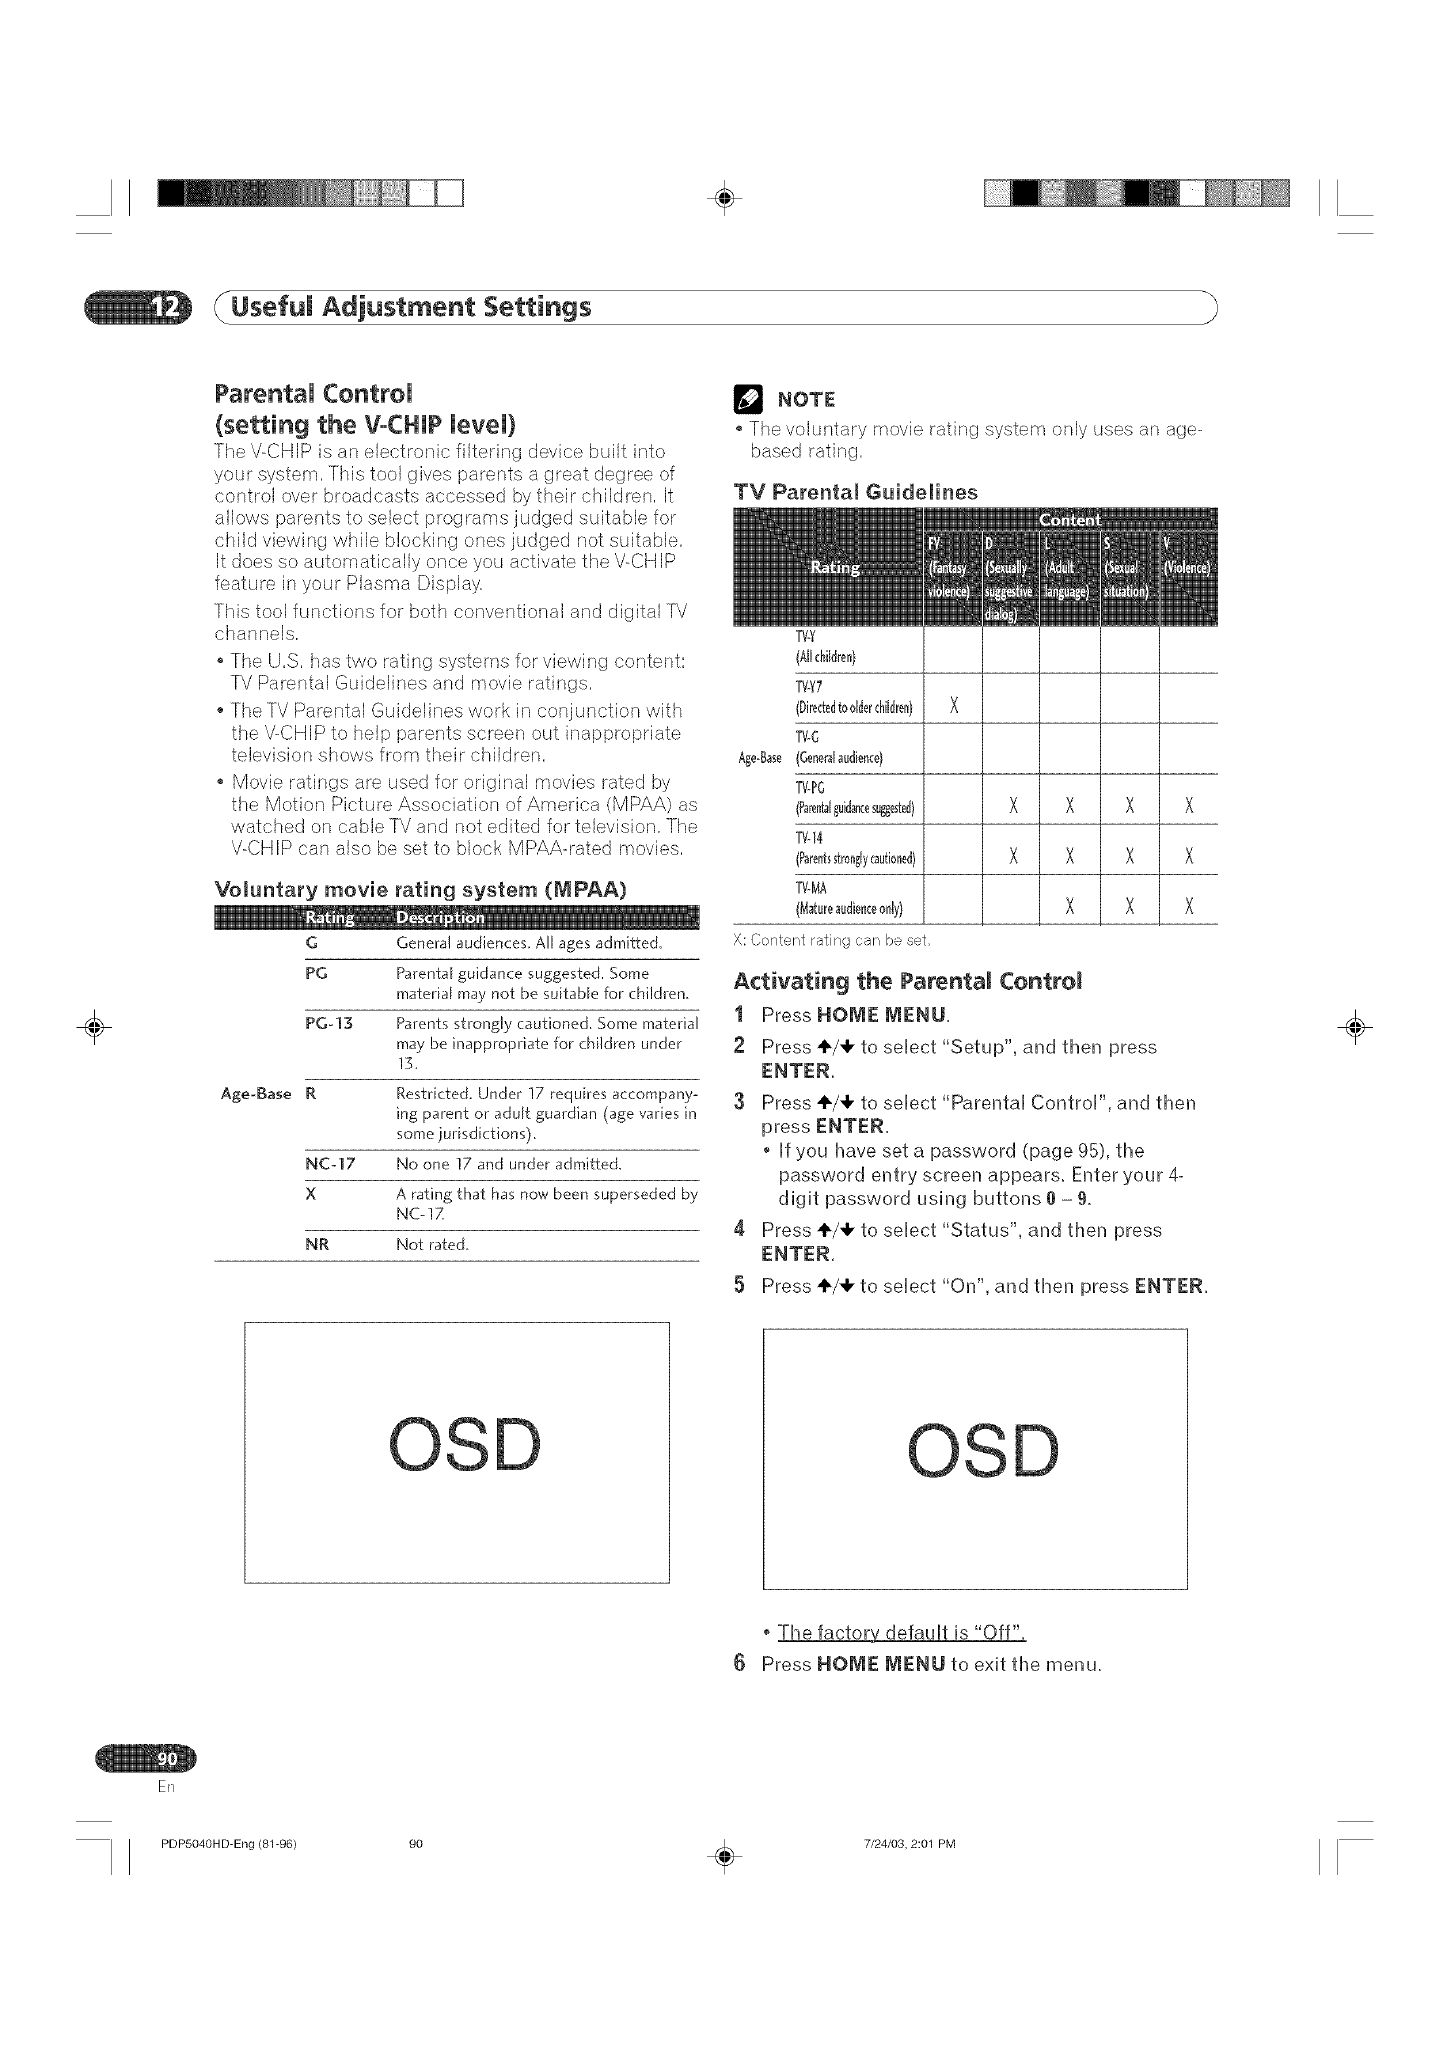
÷
Usefum Adjustment Settings
÷
Parenta[ Contro[
(setting the VoCHUP[eve[)
The V-CHIP is an electronic filtering devkse built into
your system, This tool gives parents a great degree of
control over broadcasts accessed by their children, It
allows parents to select programs judged suitable for
child viewing while blocking ones judged not suitable,
It does so automatically once you activate the V-CHIP
feature in your Plasma Display,
This tool functions for both conventional and digital 'fV
channels,
The U,S, has two rating systems for viewing content;
TV Parental Guidelines and movie ratings,
The TV Parental Guidelines work in conjunction with
the \/-CHIP to help parents screen out inappropriate
television shows from their children,
Movie ratings are used for original movies rated by
the Motion Picture Association of America (MPAA) as
watched on cable TV and not edited for television, The
V-CHIP can also be set to block MPAA-rated movies,
Voluntary movie rating system (MPAA)
G General audiences. All ages admitted,
PG Parental guidance suggested. Some
material may not be suitable for children.
PG-]3 Parents strongly cautioned, Some material
may be inappropriate for children under
13,
Age-Base R Restricted. Under !7 requires accompany-
ing parent or aduff guardian (age varies in
some jurisdictions).
NC-17 No one 17 and under admitted,
X A rating that has now been superseded by
NC-1Z
NR Not rated.
NOTE
oThe voluntary movie rating system only uses an age-
based rating.
TV Parental Guidelines
T_t¥
(Alloh@an)
TV¥7
(Dirededtoelderchildren}
TV-6
Age-Base(Generalaodieneet
TV-P6
(hrentalguidanesugested)
T_tl4
(Parentsstronglycautioned)
T_tMA
(Maturea_dieeceoely}
X: Content rating can be set,
X
X
X
Activating the Parental Control
1 Press HOME MENU.
2 Press 41,/,I,to select "Setup", and tl_en press
ENTER.
3 Press 41"/,1,to select "Parental Control", and ti_en
press ENTER.
, If you I_ave set a password (page 95), tl_e
password entry screen appears. Enter your 4-
digit password using buttons e - 9,
4 Press ÷/÷ to select "Status", and tl_en press
ENTER.
5 Press ÷/_ to select "On", and ti_en press ENTER.
÷
OSD OSD
Ti_e factory default is "Off".
(} Press HOME MENU to exit ti_e menu.
En
PDP5040HD-Eng t81-96) 90 _ 7/24/03, 2:01 PM
÷
(Usefum Adjustment Settings
Setting the voluntary moving rating sys=
tern (MPAA)
1 Press HOME MENU.
2 Press ÷/+ to seUect"Setup", and then press
ENTER.
3Press ÷/,1, to seUect"Parental ControF, and then
press ENTER.
, Ufyou have set a password (page 95), the
password entry screen appears. Enter your 4-
digit password using buttons e - 9,
4 Press ÷/_1, to seUect"MPAA Ratings", and then
press ENTER,
5 Press ÷/4, to seUectthe desired rating, and then
press ÷/+ to select "View" or "Block",
8mocking Not Rated (NR) TV programs
Use the following procedure to block movies not rated
by the MPAA.
I Press HOI_E IVIENU.
2 Press ÷/÷ to select "Setup", and tl_en press
ENTER,
3Press ÷/,1, to select "Parental Control", and then
4
5
o If you I_aveset a password (page 95), time
password entry screen appears. Enter your 4-
digit password using buttons 0 - 9,
Press ÷/,1, to select "MPAA NR", and tl_en press
ENTER,
Press ÷/÷ to select "View" or "Block", and then
_iiiiiii_ii_i;i1_iiiiiiiiii1iii_iii_i_iii_i_iii_i_iii_i_iii_i_iii_i_iii_i_iii_i_iii_i_iii_i_iIi_i¸,
m
÷
OS OSD
÷
The factor_z defaults for all the ratings are
"View",
6 Press HOME MENU to exit the menu,
The factory_ default is "View".
6 Press HOIVIE IVIENiJ to exit the menu.
ExampJe t:
Changing "R" from "Block" to "View" causes "View" to
be automatically selected also for "G", "PG", and "PG-
13".
Example 2:
Changing "R" from "View" to "Block" causes "Block" to
be automatically selected also for "NC-17" and "X".
ER
PDP5040HD-Eng (81-96) 91 _ 7/24/03, 2:01 PM
÷
Usefum Adjustment Settings
÷
Setting the TV Parental Guidelines {TV
Guidelines)
1 Press HOME MENU,
2 Press +/41, to seUect "Setup", and then press
ENTER.
3Press ÷/÷ to seUect "ParentaU ControF, and then
o If you have set a password (page g5), the
password entry screen appears. Enter your 4-
digit password using buttons 0 - 9.
Press +/41, to select "TV Parental Guidelines", and
then press ENTER.
OSD
S Press ÷/÷ or ÷/-I, to select the desired cell
(rating).
6 Press ENTER to select "V" (View) or "B" (Block).
OSD
o Each time you press ENTER, the selection is
switched.
The factor_t defaults for all the ratinQs_are "V"
Press HOIVlE IVlENU to exit the menu.
NOTE
Blocking a low rated program will cause all higher
rated lsro,cjramsto be blocked,
Canadian rating systems
TheTV ratinfl systems in Canada are based on the
Canadian Radio-Television and '[_lecommunications
Commission (CRTC)policy on violence in television
While violence is the most important content element
to be rated, the structure developed takes into consid-
eration other program content like lanftuage, nudity,
sexuality and mature themes,
When setting the \/-CHIP on the Canadian system you
can chose either the Canadian En,glish ratin,gs orthe
Canadian French ratings,
Canadian English ratings
E Exempt: Includes news, sports, documen-
taries and other information programming;
talk shows, music videos, and variety
programming,
C8+
Children: Intended for younger children
under the age of 8 years. Pays careful
attention to themes that could threaten
their sense of security and well-being.
Children over 8 years old: Contains no
portrayal of violence as the preferred,
acceptable, or only way to resolve conflict;
nor encourage children to imitate danger
ous acts which they may see on the
screen,
G
Age-Base PG
14+
18+
General: Considered acceptable for all age
groups. Appropriate viewing for the entire
family, contains very little violence.
physical, verbal or emotional.
Parental Guidance: Intended for a general
audience, but may not be suitable f_)r
younger children (under the age of 8)
because it could contain controversial
themes or issues.
Over 14 Years: Could contain themes
where violence is one of the dominant
elements of the storyline, but it must be
integral to the development of plot or
character. Language usage could be
profane and nudity present within the
context of the theme.
Adults: Intended for viewers 18 years and
older and might contain depictions of
violence, which while related to the
development of plot, character or themes.
are intended for adult viewing. Could
contain graphic language and portrayals of
sex and nudity,
÷
Ell
PDP5040HD-Eng (81-96) 92 _ 7/24/03, 2:01 PM
÷
(Useful Adjustment Settings
÷
Canadian French ratings
E Exempt programming. 2
G General: All ages and children, contains
minimal direct violence, but may be
integrated into the plot in a humorous or 3
unrealistic mannei:
Age-Base
8arts+ General but inadvisable for young children:
May be viewed by a wide public audience,
but could contain scenes disturbing to
chiFdren under eight who cannot distin-
guish between imaginary and real situa- 4
tions. Recommended for viewing with
parent. 5
13arts+ Over ]3 years: Could contain scenes of
frequent violent scenes and therefore
recommended for viewing with parent.
16arts+ Over 16 years: Could contain frequent
violent scenes and intense violence.
18arts+ Over 18 years: Only for adult viewing.
Could contain frequent violent scenes and
extreme violence.
getting Canadian EngJish ratings
1 Press HOME MENU.
2 Press ÷/_1, to select "Setup", and then press
ENTER.
3Press÷/÷to select "Parental Control', and then
press ENTER.
• If you have set a password (page 95), the
password entry screen appears. Enter your 4-
digit password using buttons 9 - 9.
4 Press ÷/,I, to select "Canadian English Ratings",
and then press ENTER.
5 Press ÷/,I, to select the desired rating, and then
press ÷/-!, to select "View" or "Block".
getting Canadian French ratings
Press HOME MENU.
Press ÷/41,to select "Setup", and then press
ENTER.
Press ÷/,1, to select "Parental Control', and then
o If you have set a password (page 95), the
password entry screen appears. Enter your 4-
digit password using buttons 9 - 9,
Press ÷/_1,to select "Canadian French Ratings",
and then press ENTER.
Press ÷/41,to select the desired rating, and then
press ÷/-I, to select "View" or "Block".
OS
• The factoD, defaults for a[[ the ratings are
"View".
Press HOME MENU to exit the menu.
_iiiii1})))ii)i;i1))iiiiiiiiii1iii_iii_i_iii_i_iii_i_iii_i_iii_i_iii_i_iii_i_iii_i_iii@i¸
m
÷
The factory defaults for a[[ the ratings are
"View".
6 Press HOME MENU to exit the menu.
ER
PDP5040HD-Eng (81-96) 93 _ 7/24/03, 2:01 PM
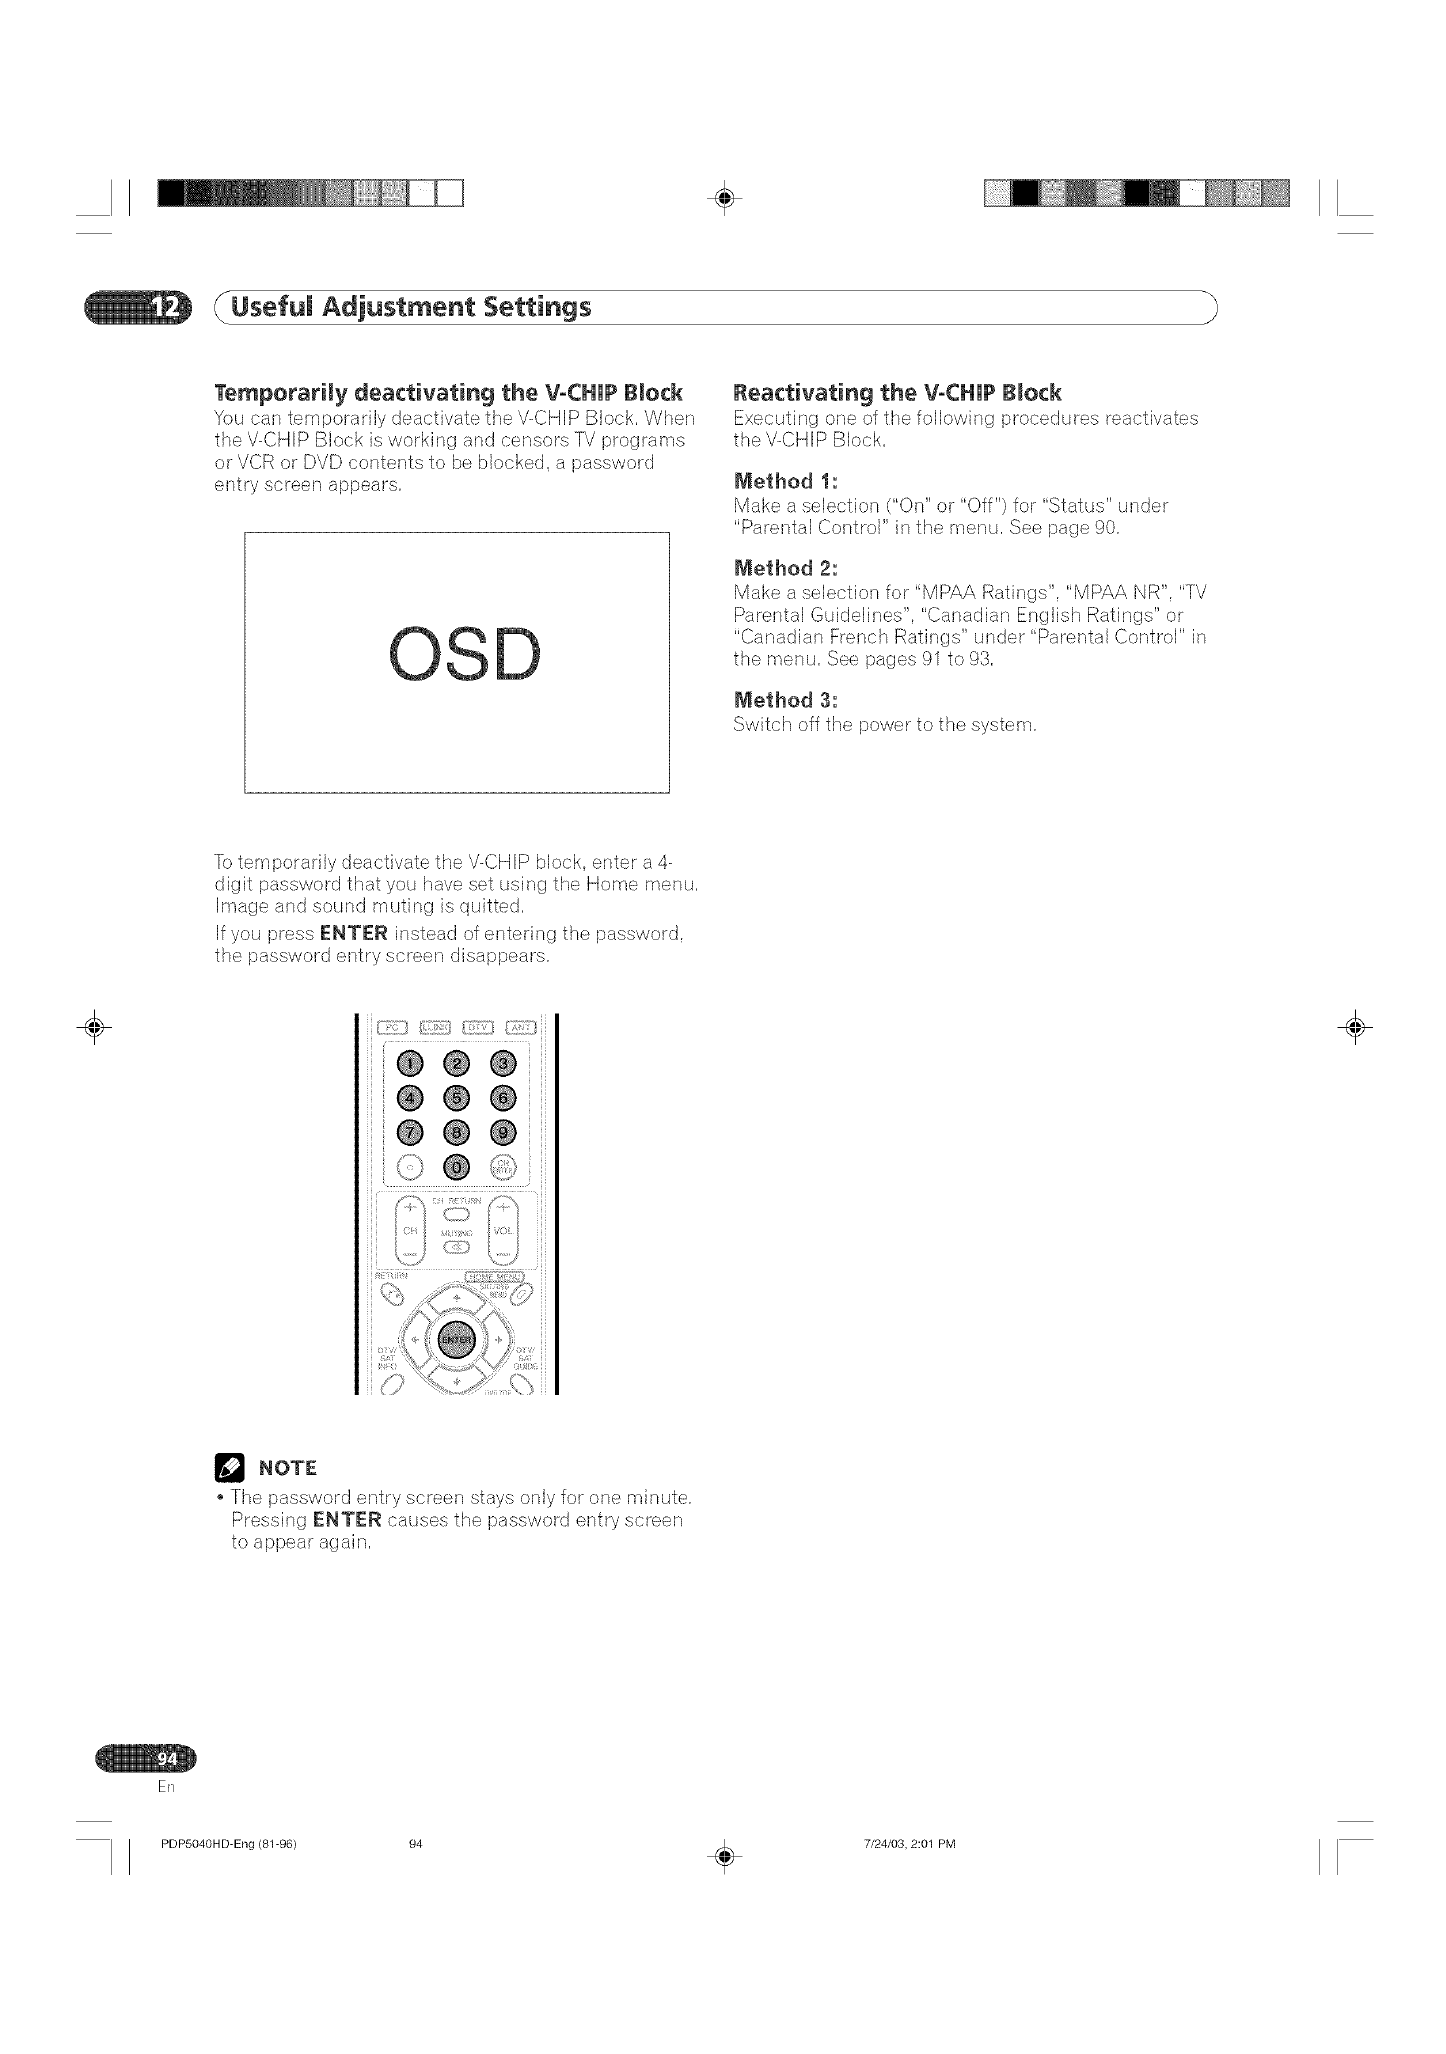
÷
Usefum Adjustment Settings
Temporarily deactivatin 9 the V=CHJPBlock
You can temporarily deactivate the V-CHIP Block, When
the V-CHIP Block is working and censors TV programs
or VCR or DVD contents to be blocked, a password
entry screen appears,
OSD
Reactivating the V-CHiP Block
Executin,g one of the following procedures reactivates
the V-CHIP Block,
Method 1:
Make a selection ("On" or "Off") for "Status" under
"Parental Control" in the rr_,enu,See page 90,
Method 2:
Make a selection for "MPAA Ratings", "MPAA NR", "TV
Parental Guidelines", "Canadian English Ratings" or
"Canadian French Ratings" under "Parental Control" in
the menu, See pages 91 to 93,
Method S:
Switch off the power to the system,
'ltotersporarily deactivate the V-CHIP block, enter a 4-
digit password that you have set using the Horse menu,
Image and sound muting is quitted,
If you press ENTEt_ instead of entering the password,
the password entry screen disappears,
÷ ÷
NO'r'E
The password entry screen stays only for one minute,
Pressing ENTEt_ causes the password entry screen
to appear again,
ER
PDP5040ItD-Eng (81@6) 94 _ 7/24/03, 2:01 PM
÷
(/Usefum Adjustment Settings
Programming apassword
(AV mode onUy)
You can program a passwerd to prevent ether persons
frorn changing especially Parental Control settings,
Setting and changing the password
Use the following procedure to newly set or change the
t Press HOME MENU,
2 Press ÷/4, to select "Setup", and then press
ENTER.
3 Press ,1,/4, to select "Password", and then press
ENTER.
If you have set a password, the password entry
screen appears, Enter your 4-digit password
using buttons 0- 9,
o The factory default is "1234",
4 Press "I'/4, to select "Change Password", and then
press ENTER.
5 Enter a 4-digit password to be newly set, using
buttons e - 9,
6 Enter the same password that you have entered in
step 4, using buttons 0 - 9,
OS
7 Press HOME MENU to exit the menu,
NOTE
, _ke a note of the newly set password and keep it
_iiiiiii_ii_i_i1_iiiiiiiiii1iii_iii_i_iii_i_iii_i_iii_i_iii_i_iii_i_iii_i_iii_i_iii_i_iii_i_iIi_i¸,
m
÷ ÷
ER
PDP5040HD-Eng (81-96) 95 _ 7/24/03, 2:01 PM

÷
Usefum Adjustment Settings
Resetting the password
1 Press HOME MENU,
2 Press ÷/41, to seUect "Setup", and then press
ENTER.
3 Press ÷/÷ to seUect "Password", and then press
ENTER,
,The password entry screen appears, Enter your
4-digit password ush_g buttons e - 9,
4 Press ÷/+ to seUect "Reset", and then press
ENTER,
OSD
÷5 Press ÷/41, to seUect "Yes", and then press ENTER.
6 Press HOME MENU to exit the menu.
NOTE
The above procedure will reset the password to the
÷
En
Cut along the dotted line and file after reading and filling out.
mmmmmmmmmmmmmmmmmmmmmmmmmmmmmmmmmmmmmmmmmmmmmmmmmmmmmmmmmmmmmmmmmmm
[]
[] We suggested you write down your password so you don't forget it.
[]
[]
[]
[]
[]
[]
[]
[]
[]
[]
[]
[]
[]
[]
[]
[]
[]
[]
[]
PDP5040HD-Eng (81-96)
} } }
] D]-5040HD/] DP-4340HD
Your password No.:
UUUU
_f yo_ forget the password
When the message "Please Input Your Password" is
displayed in step 3 above, press the ENTER button on the
remote control unit and hold it down for 3 seconds or
longer,
The password reverts to "1234".
96 ÷7/24/03, 2:01PM

÷
_Usefum Features
Learning function of the remote
controU unit
You can operate the connected AV products (AV Re-
ceiver. Cable Box SAT tuneis VCR, DVD, DVD recorder,
LD) using the learning function of your remote control
unit. This remote control unit has a function that can
memorize each remote control code.
2 to 5 cm (0.8 to 2.0 inches)
NOTE
1:oexit the Edit mode halfway, press EDiT/LEARN
If the Mode switch selection is changed when in the
Edit mode, the Edit mode is cancelled.
If no operation is performed for more than one
minute, the Edit mode is cancelled.
When you enter a code not listed, the LED flashes
If the table on page 99 does not include your desired
rnanufacturer or the remote control does not work,
you can make the memory learn its signal by the
Learn mode.
The initial mode is "000" (PIONEER).
@ii;iiBiiiiiiiWi_iWi_iWi_iWi_iWi_iWi_iWi_iWi_iWi_iWi_i_ili,i¸,
m
/////////////////////////////////////////
Remote control
(Supplied accessory)
Remote control of
AV product
÷
Presetting manufacture codes
1 Slide tl_e Mode switch to matcl_ tl_e device to
wl_icl_ you want to preset tl_e remote control
signal.
2 Press EDmT/LEARN and I at tl_e same time.
•Tl_e LED flasl_es.
3Press e- 9 to enter tl_e manufacture code. See
page 99.
, Preset mode is finisl_ed once tl_e LED no longer
ligl_ts up.
÷
En
PDP5040HD=Eng (97-105) 97 _ 7/24/03, 2:01 PM
÷
Usefum Features
÷
Using the _earning function
I SUde the Mode switch to match the device whose
remote controU signaU you want to be Uearned.
2 Press EDiT/LEARN and 2 at the same th_ne.
• The LED flashes.
3 Press a button to be Uearned.
, The LED Ughts up.
• For the functions that can be learned, see pages
100 to 105.
• When learning is finished, the LED starts
flashing again.
4 Press EDiT/LEARN again to exit the Learn mode.
NOTE
,To exit the Learn mode halfway, press Er)mT/LEARN
again.
, If the IViode switch selection is changed when in the
Learn mode, the Learn mode is cancelled.
, If no operation is performed for more than one
minute, the Learn mode is cancelled.
, It takes about 2 seconds to finish code transmission.
Do not interrupt it halfway. Wait until the LED flashes
You can reset all learned codes to the factory de-
faults. When not in the Learn mode, press and hold
TV(j), and then press -:G.:-and + at the same time. ÷
ER
PDP5040HD-Eng (97-105) 98 _ 7/24/03, 2:01 PM
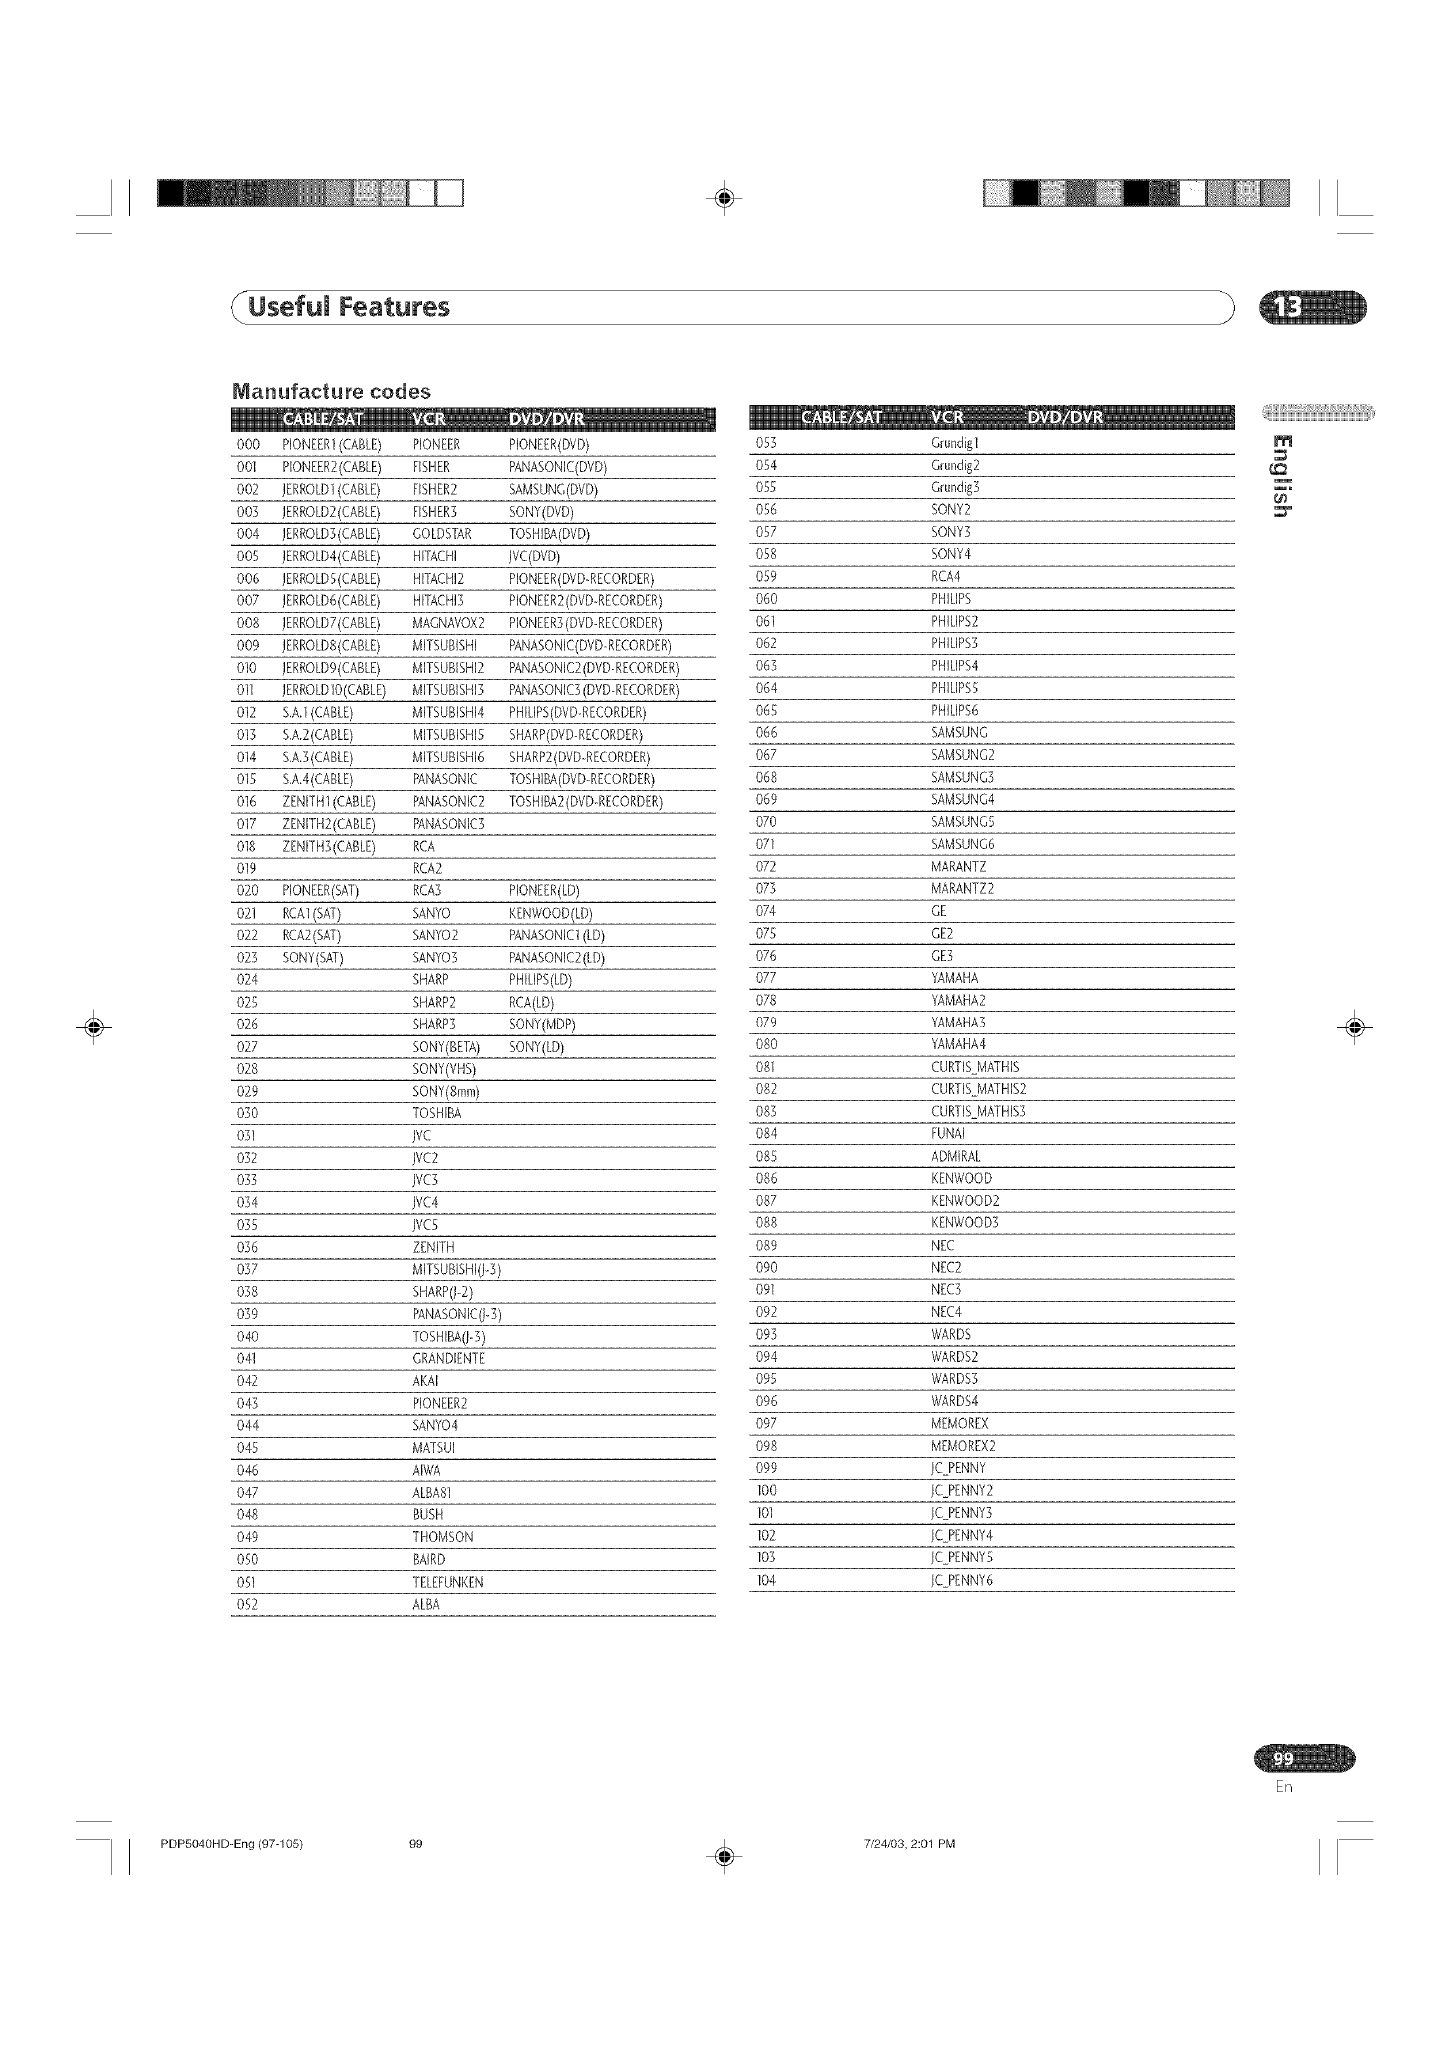
÷
(Usefum Features
÷
Manufacture codes
OOO PIONEER1(CABLE) PIONEER P[ONEER(DVD) 053 Qundigl
001 PIONEER2(CABLE) FISHER PANASONffZ(DVD) 054 Qundig2
002 JERROLDI (CABLE) FISHER2 SAMSUNG(DVD) 055 Grundig3
003 JERROLD2(CABLE)FISHER3 SONY(DVD) 056 SONY2
004 JERROLD3(CABLE)GOLDSTAR TOSHIBA(DVD) 057 SONY3
005 ;ERROLD4(CABLE) HITACHI ;VC(DVD) 058 SONY4
OOB ;ERROLDS(CABLE) HITACHI2 P[ONEER(DVD-RECORDER) 059 RCA4
007 ;ERROLDB(CABLE) HffACHI3 P[ONEER2(DVDRECORDER) OBO PHILIPS
OOB ;ERROLD7(CABLE) MAGNAVOX2 P[ONEER3(DVD-RECORDER) OB1 PHILIPS2
009 ;ERROLDB(CABLE) M[TSUBISHI PANASON[C(DVD-RECORDER) 062 PHILIPS3
010 ;ERROLD9(CABLE) M[TSUBISHI2 PANASONIC2(DVD-RECORDER) 063 PHILIPS4
011 ;ERROLDIO(CABLE) MITSUBISHI3 PANASONIC3(DVDRECORDER) 064 PHILIPS5
012 S.A.I(CABLE) M[TSUB[SHI4 PH[L[PS(DVD-RECORDER) 065 PHILIPSB
013 S.A.2(CABLE) M[TSUBBHI5 SHARP(D\/D-RECORDER) OB6 SAMSUNG
014 S.A,3(CABLE) MITSUBISHIB SHARP2(DVDRECORDER) 067 SAMSUNG2
015 S.A.4(CABLE) PANASON[C TOSHI%(DVD-RECORDER) OBB SAMSUNG3
016 ZENITH1(CABLE) PANASON[C2 TOSHI%2(DVD-RECORDER) 069 SAMSUNG4
017 ZEN[TH2(CABLE) PANASON[C3 070 SAMSUNG5
018 ZEN[TH3(CABLE) RCA 071 SAMSUNG6
019 RCA2 072 MARANTZ
020 PIONEER(SAT) RCA3 P[ONEER(LD) 073 MARANTZ2
021 RCA1(SAT) SANYO KENWOOD(LD) 074 GE
022 RCA2(SAT) SANY02 PANASONICI (LD) 075 GE2
023 SONY(SAT) SANY03 PANASONIC2(LD) 076 GE3
024 SHARP PHILIPS(LD) 077 YAMAHA
025 SHARP2 RCA(LD) 078 YAMAHA2
026 SHARP3 SONY(MDP) 079 YAMAHA3
027 SONY(BETA) SONY(LD) OBO YAMAHA4
028 BONY(VHS) 081 CURTISMATHIS
029 SONY(gram) 082 CURTISMATH[S2
030 TOSHIBA 083 CURTISMATH[S3
031 ;VC 084 FUNA[
032 ;VC2 085 ADMIRAL
033 ;VC3 OBB KENWOOD
034 ;VC4 087 KENV¢OOD2
035 ;VC5 OgB KENg!OOD3
036 ZENITH 089 NEC
037 M[TSUBISHI(;-3) 090 NEC2
038 SHARP(;_2) 091 NEC3
039 PANASON[C(J-3) 092 NEC4
040 TOSHIBA(J-3) 093 WARDS
041 GRANDIENTE 094 WARDS2
042 AKA[ 095 WARDS3
043 PIONEER2 096 WARDS4
044 SANY04 097 MEMOREX
045 MATSUI 098 MEMOREX2
046 A[WA 099 ;CPENNY
047 ALBAB] 100 ;C PENNY2
048 BUSH 101 ;C PENNY3
049 THOMSON 102 ;C PENNY4
050 BAIRD 103 ;C PENNY5
051 TELEFUNKEN 104 ;C PENNYB
052 ALBA
@iiiBiiiiiiiWi_iWi_iWi_iWi_iWi_iWi_iWi_iWi_iWi@i¸,
m
÷
Er/
PDP5040HD-Eng (97-105) 99 . 7/24/03, 2:01 PM
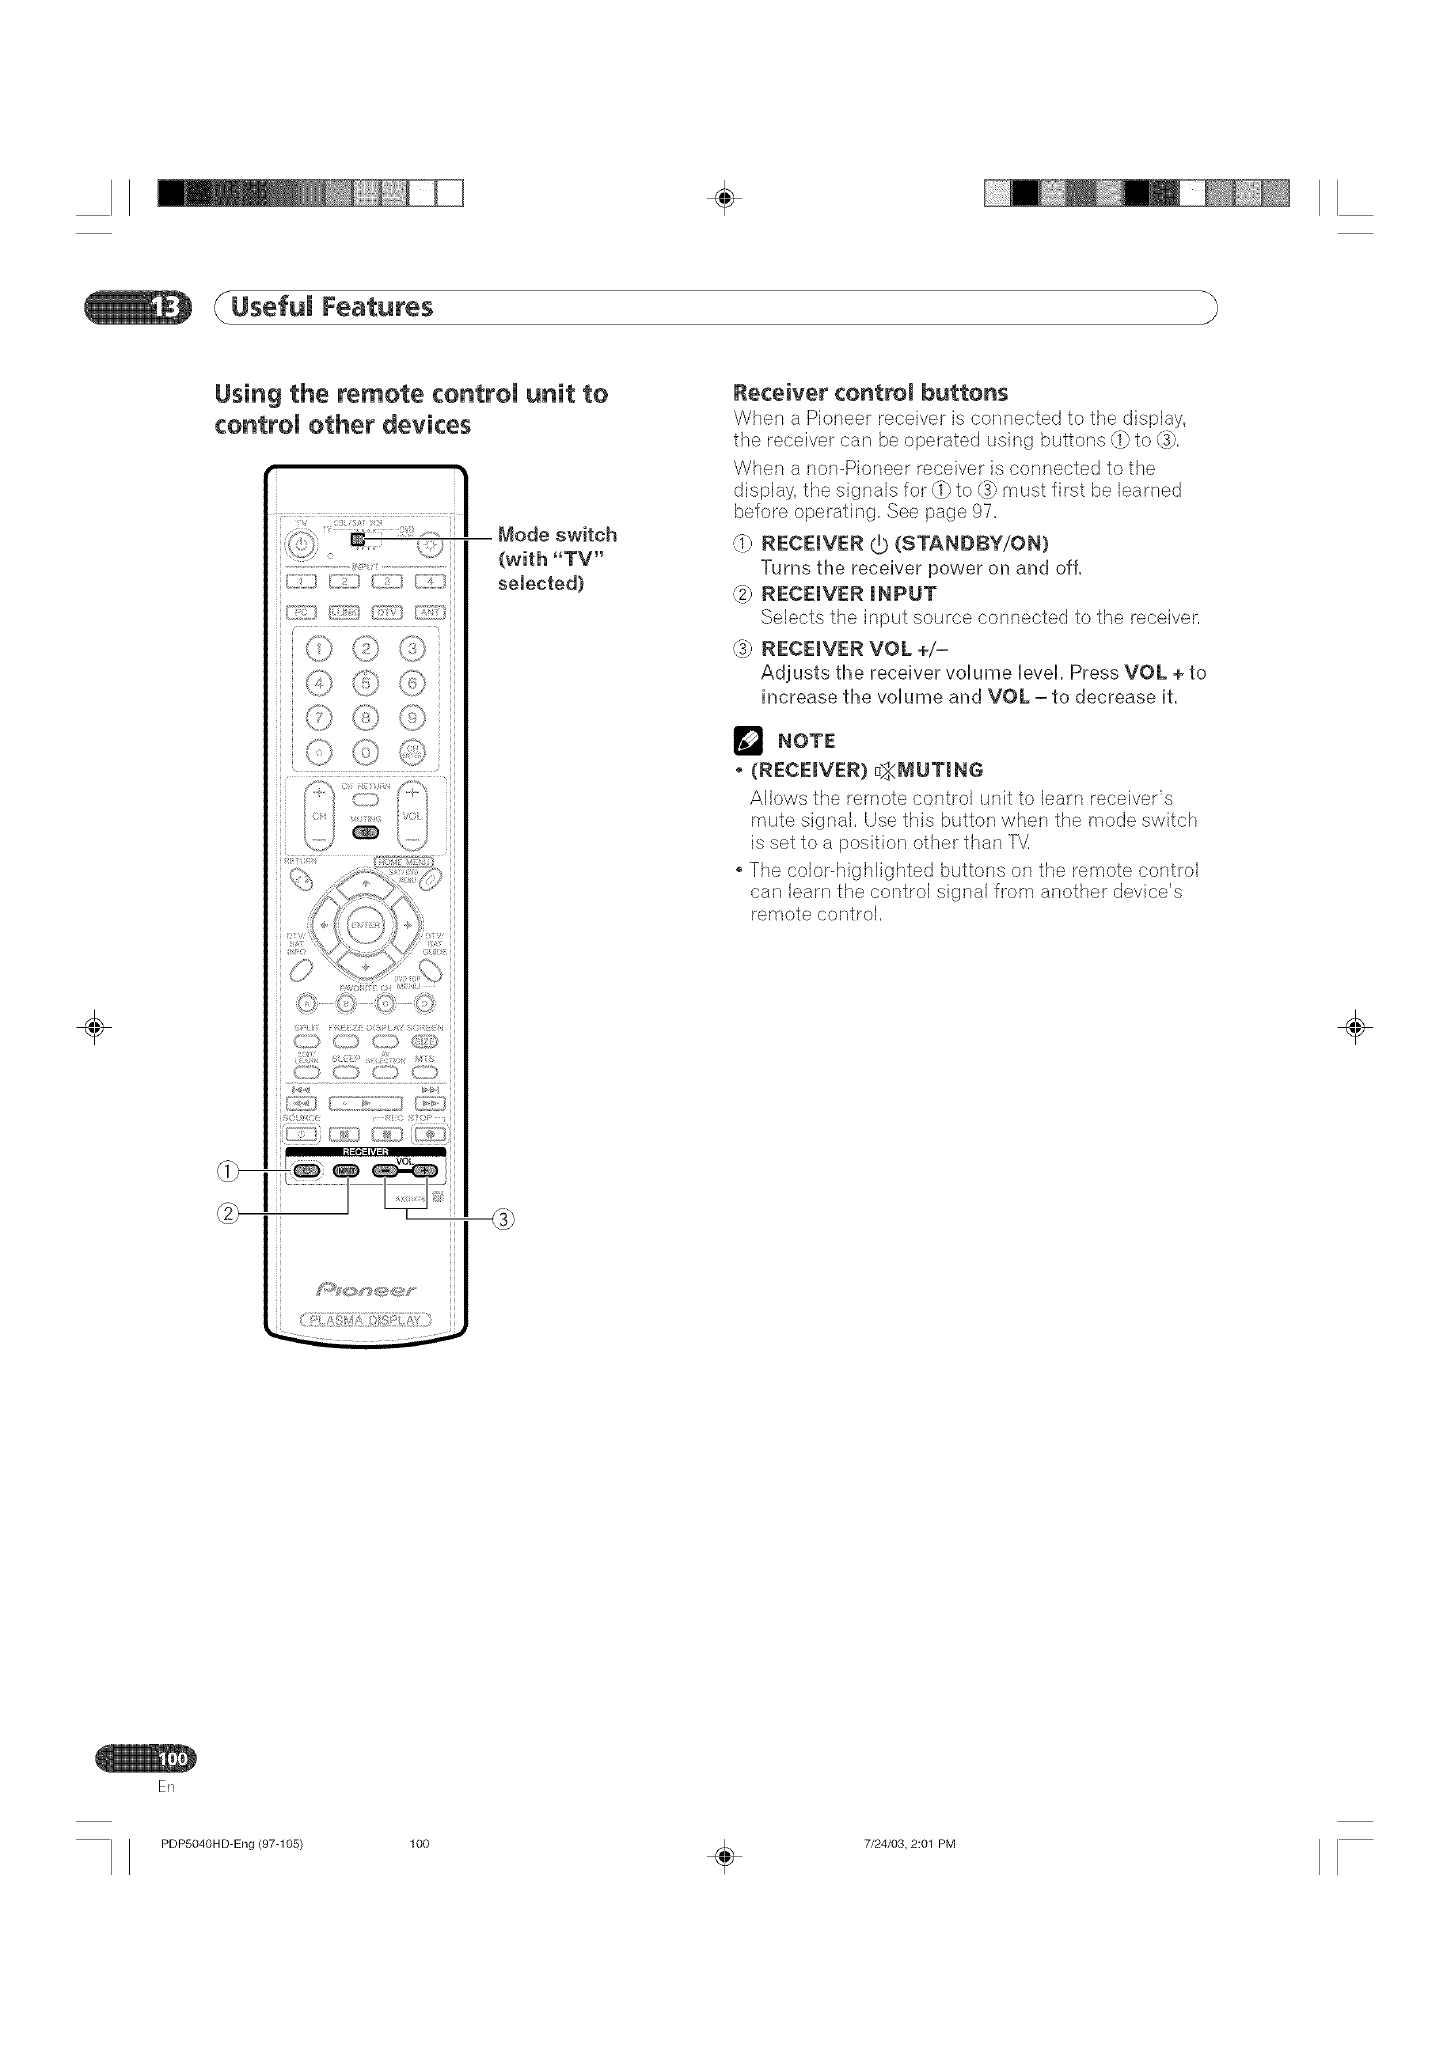
÷
_Usefum Features
÷
Using the remote controU unit to
controU other devices
(:;/ -- ,!_,
_"b (;;;;_(;D ;i_S;_,
i 7" ..............s .......................
Mode switch
(with "IV"
selected)
lteceivet control buttons
When a Pioneer receiw_r is connected to the display,
the receiw_,_rcan be operated using buttons (f} to (_},
When a r_or_-Pioneerreceiver is connected to the
display, the si,gnals for (b to (is}must first be learned
before operating, See page 97,
@ RECEWER _) (STANI)BY/ON)
Turns the receiver power on and off.
_) RECEIVER INPUT
Selects the input source connected to the receiver,
(7} RECEIVER VOI. +/-
Adjusts the receiver volume level. Press VOL + to
increase tl_e volume and VOL - to decrease it,
NOTE
,(RECEIVER) ¢_MIJTING
Allows the remote control unit to learn receiver's
mute signal, Use this button when the mode switch
is set to a position other than TV,
The color-highlighted buttons on the remote control
can learn the control signal from another device's
remote control,
÷
ER
PDP5040HD-Eng (97-105) 100 _ 7/24/03, 2:01 PM
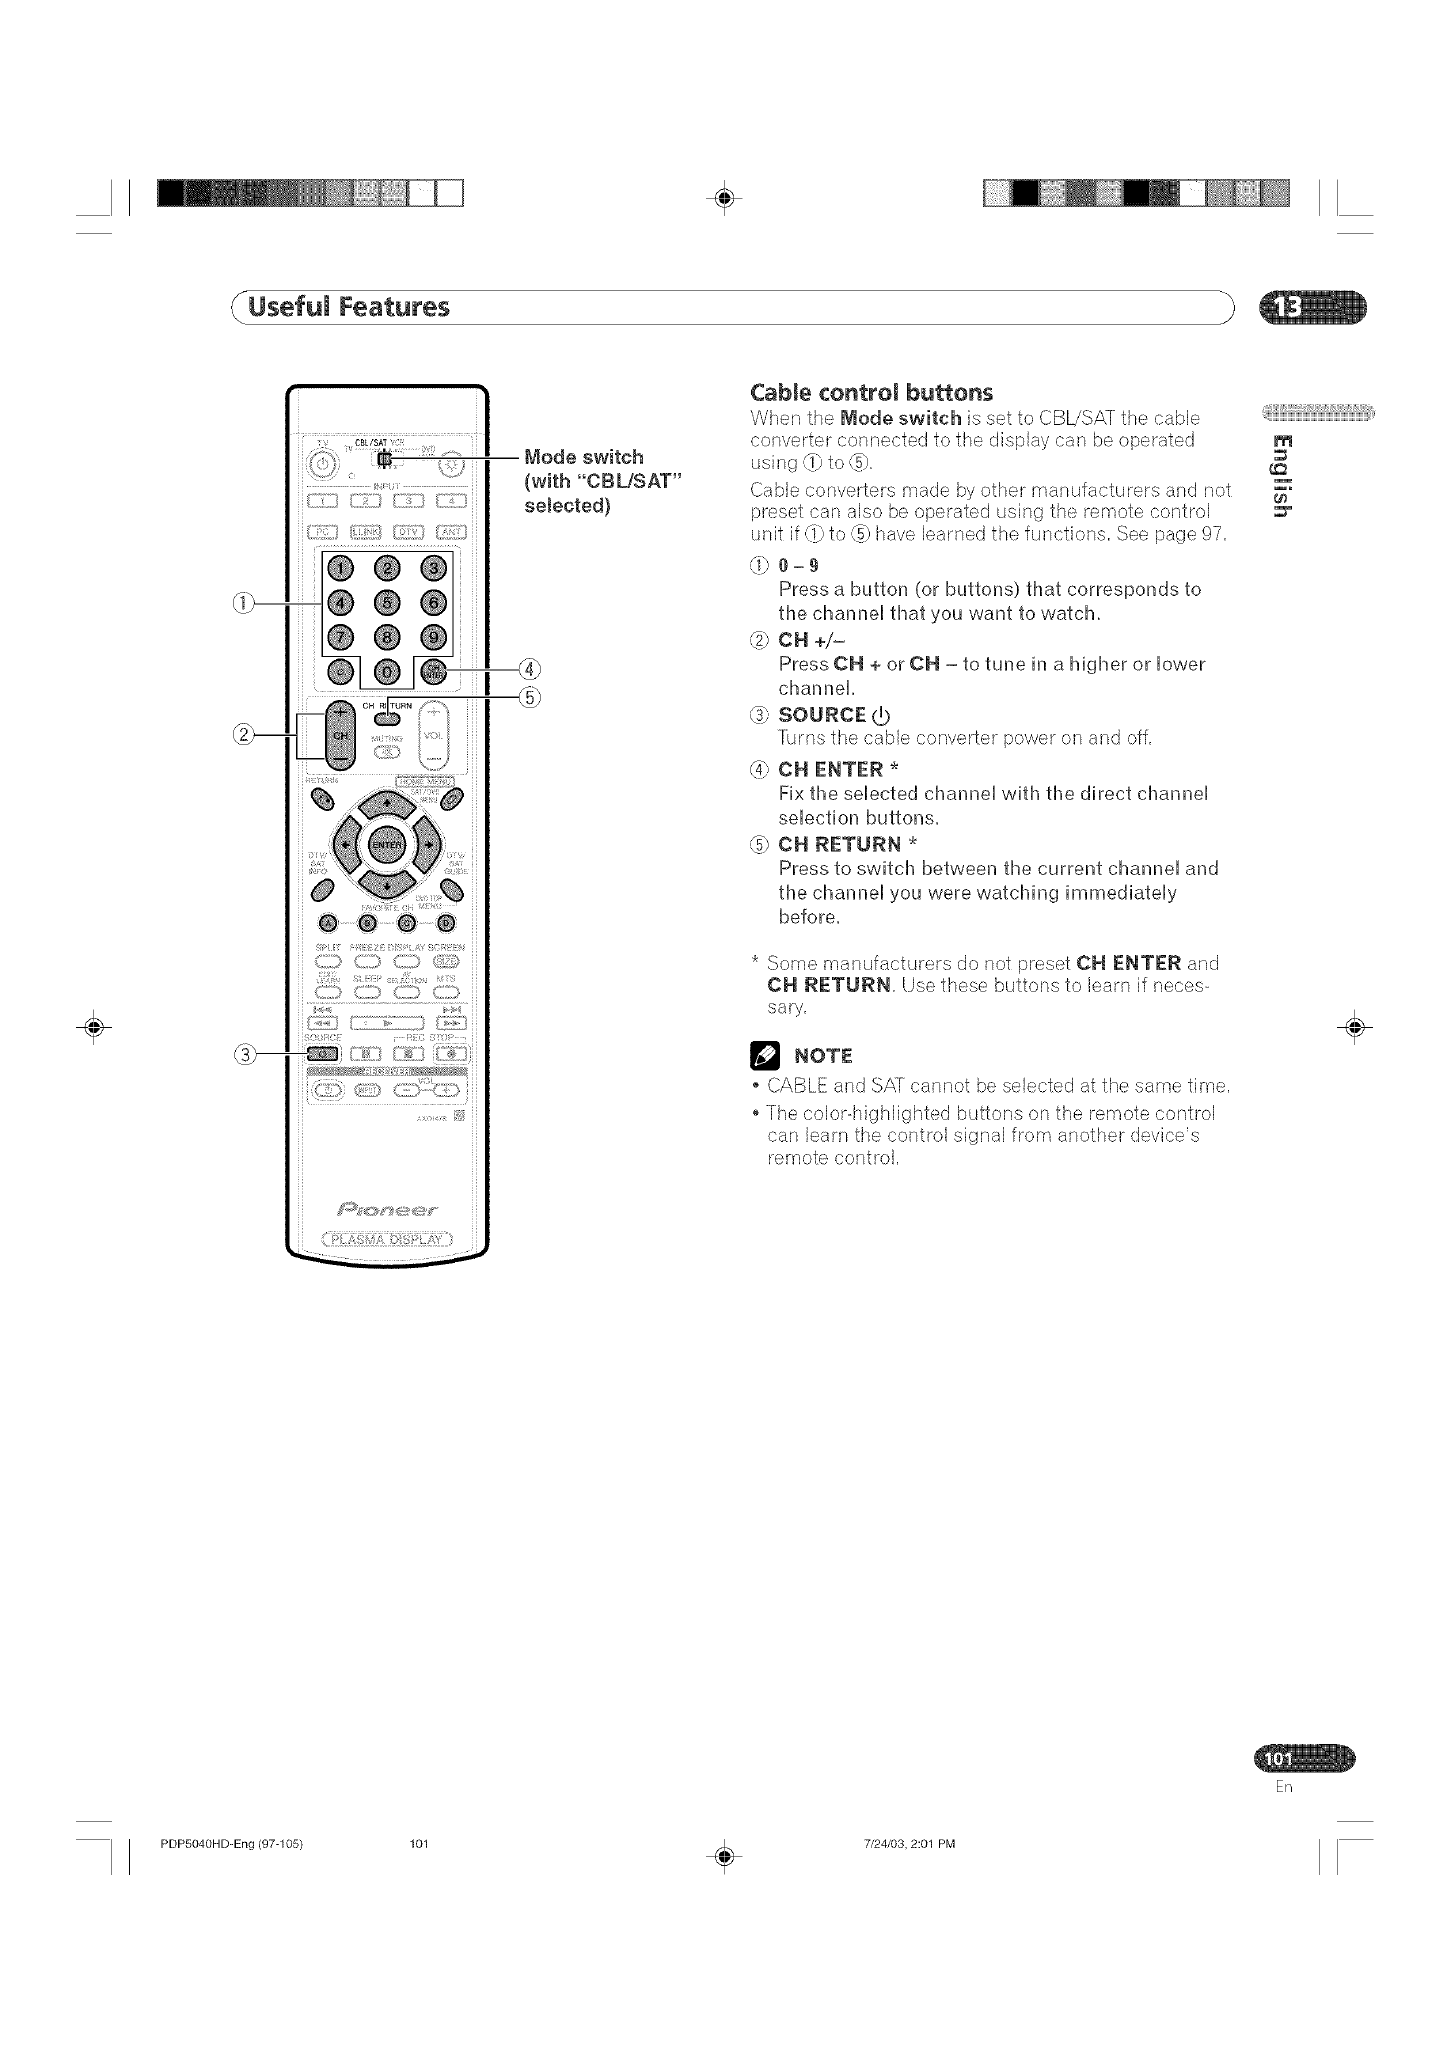
÷
_UsefuJ Features
÷
®®®
@@
...... '_,3 .....
(i_} (Z}i}
Mode switch
(with "CB L/SAT"
selected)
CabJe contreJ buttons
When the Jlaode switch is set to CBL/SAT the cabb
converter connected to the display can be operated
usi no _1)to _),
Cable converters made by other manufacturers and not
preset can also be operated using the remote control
unit if _1)to _} have learned the functions, See page 97,
(be-9
Press a button (or buttons) that corresponds to
the channel that you want to watch,
@ CH +/-
PressCN + or CN -to tune in a higher or lower
cl_annel.
@SOURCE (b
'furns the cable converter power on and off,
(47 CN ENTER *
Fix the selected channel with the direct channel
sebction buttons.
_} CN RETURN *
Press to switch between the current channel and
the channel you were watching immediately
before.
* Some manufacturers do not preset CN ENTER and
CN RETURN, Use these buttons to learn if neces-
sary,
NOTE
CABLE and SA-[ cannot be selected at the same time,
The color-higNighted buttons on the remote control
can learn the control signal from another device's
remote control,
@iiiBiiiiiiiWi_iWi_iWi_iWi_iWi_iWi_iWi_iWi_iWi_iWi_i_ili,i¸,
m
÷
En
PDP5040HD-Eng (97-105} 101 _ 7/24/03, 2:01 PM
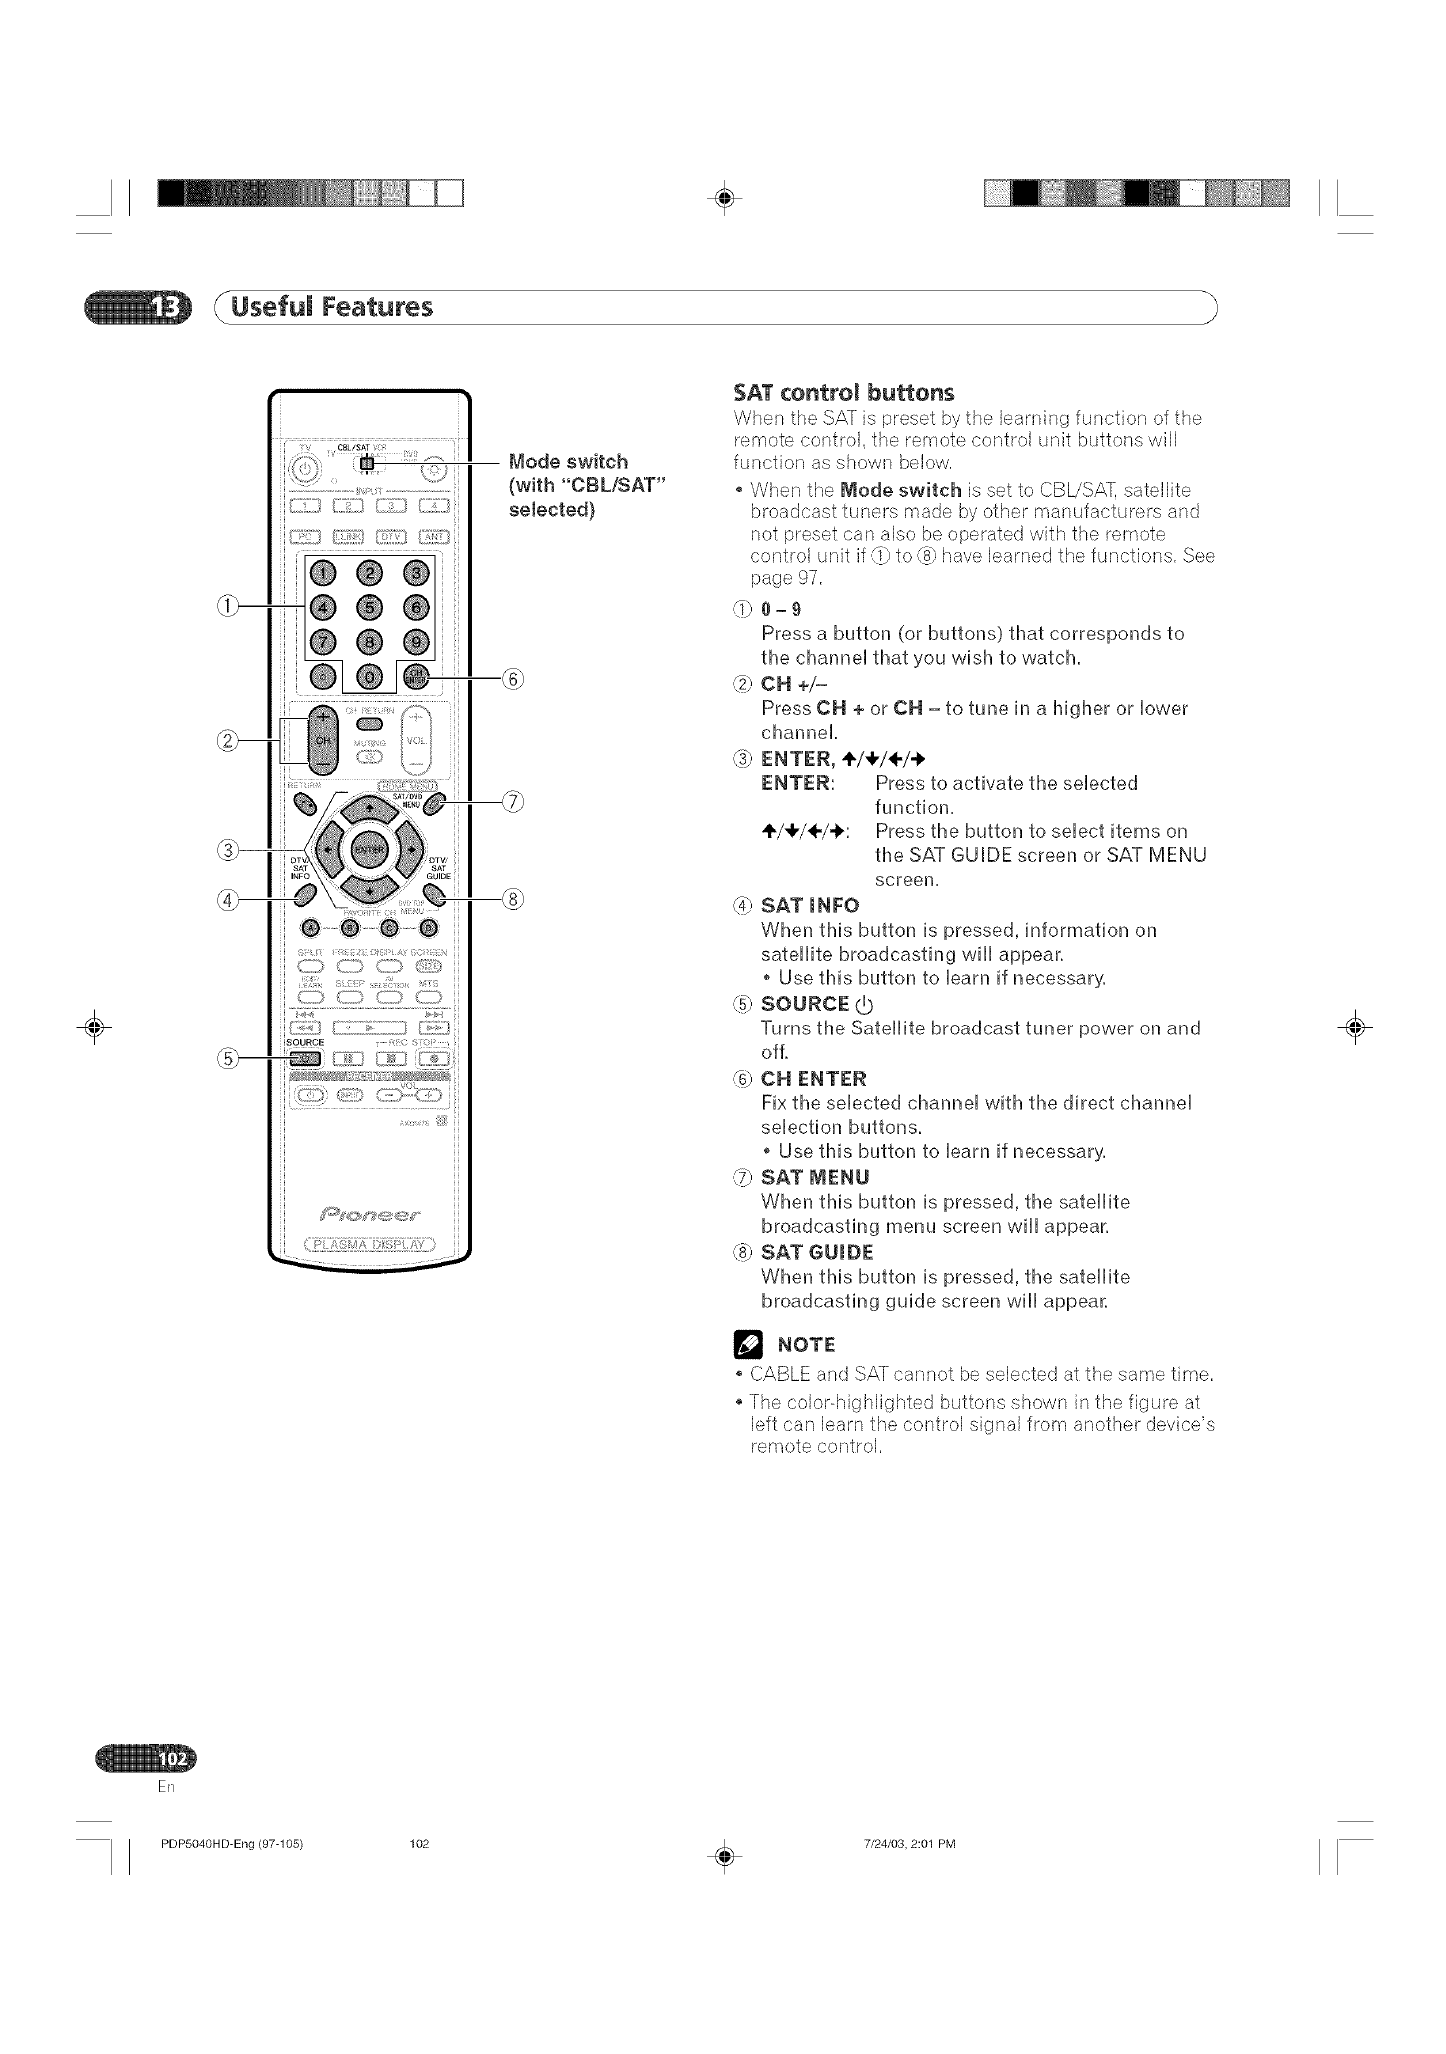
÷
UsefuJ Features
÷Gb....... _LD""GD
JSOURCE
Mode switch
(with "CBL/SAT"
selected)
SAT controJ buttons
When the SAT is preset by the learning function of the
remote control, the remote control unit buttons will
function as shown below.
When the Mode switch is set to CBL!SA-Esatellite
broadcast tuners made by other manufacturers and
not preset can also be operated with the remote
control unit if 71}to _ have learned the functions. See
page 97.
be-9
Press a button {or buttons) that corresponds to
the channel that you wish to watch.
_ CH +/-
PressCH + or CH-to tune in a higher or lower
channel.
_ ENTER, ÷/÷/÷/-i,
ENTER: Press to activate the selected
function.
÷/÷/÷/÷: Press the button to select items on
the SAT GUIDE screen or SAT MENU
screen.
_4_SAT JNFO
When this button is pressed, information on
satellite broadcasting will appear.
Use this button to learn if necessary.
SOURCE (5
Turns the Satellite broadcast tuner power on and
off.
(6) CH ENTER
Fix the selected channel with the direct channel
selection buttons.
• Use this button to learn if necessary.
_?)SAT MENU
When this button is pressed, the satellite
broadcasting menu screen will appear.
(_ SAT GUIDE
When this button is pressed, the satellite
broadcasting guide screen will appear.
NOTE
CABLE and SAT cannot be selected at the same time.
The color-highlighted buttons shown in the figure at
left can learn the control signal from another device's
remote control.
÷
ER
PDPb040HD-Eng (97-105) 102 _ 7/24/03, 2:01 PM
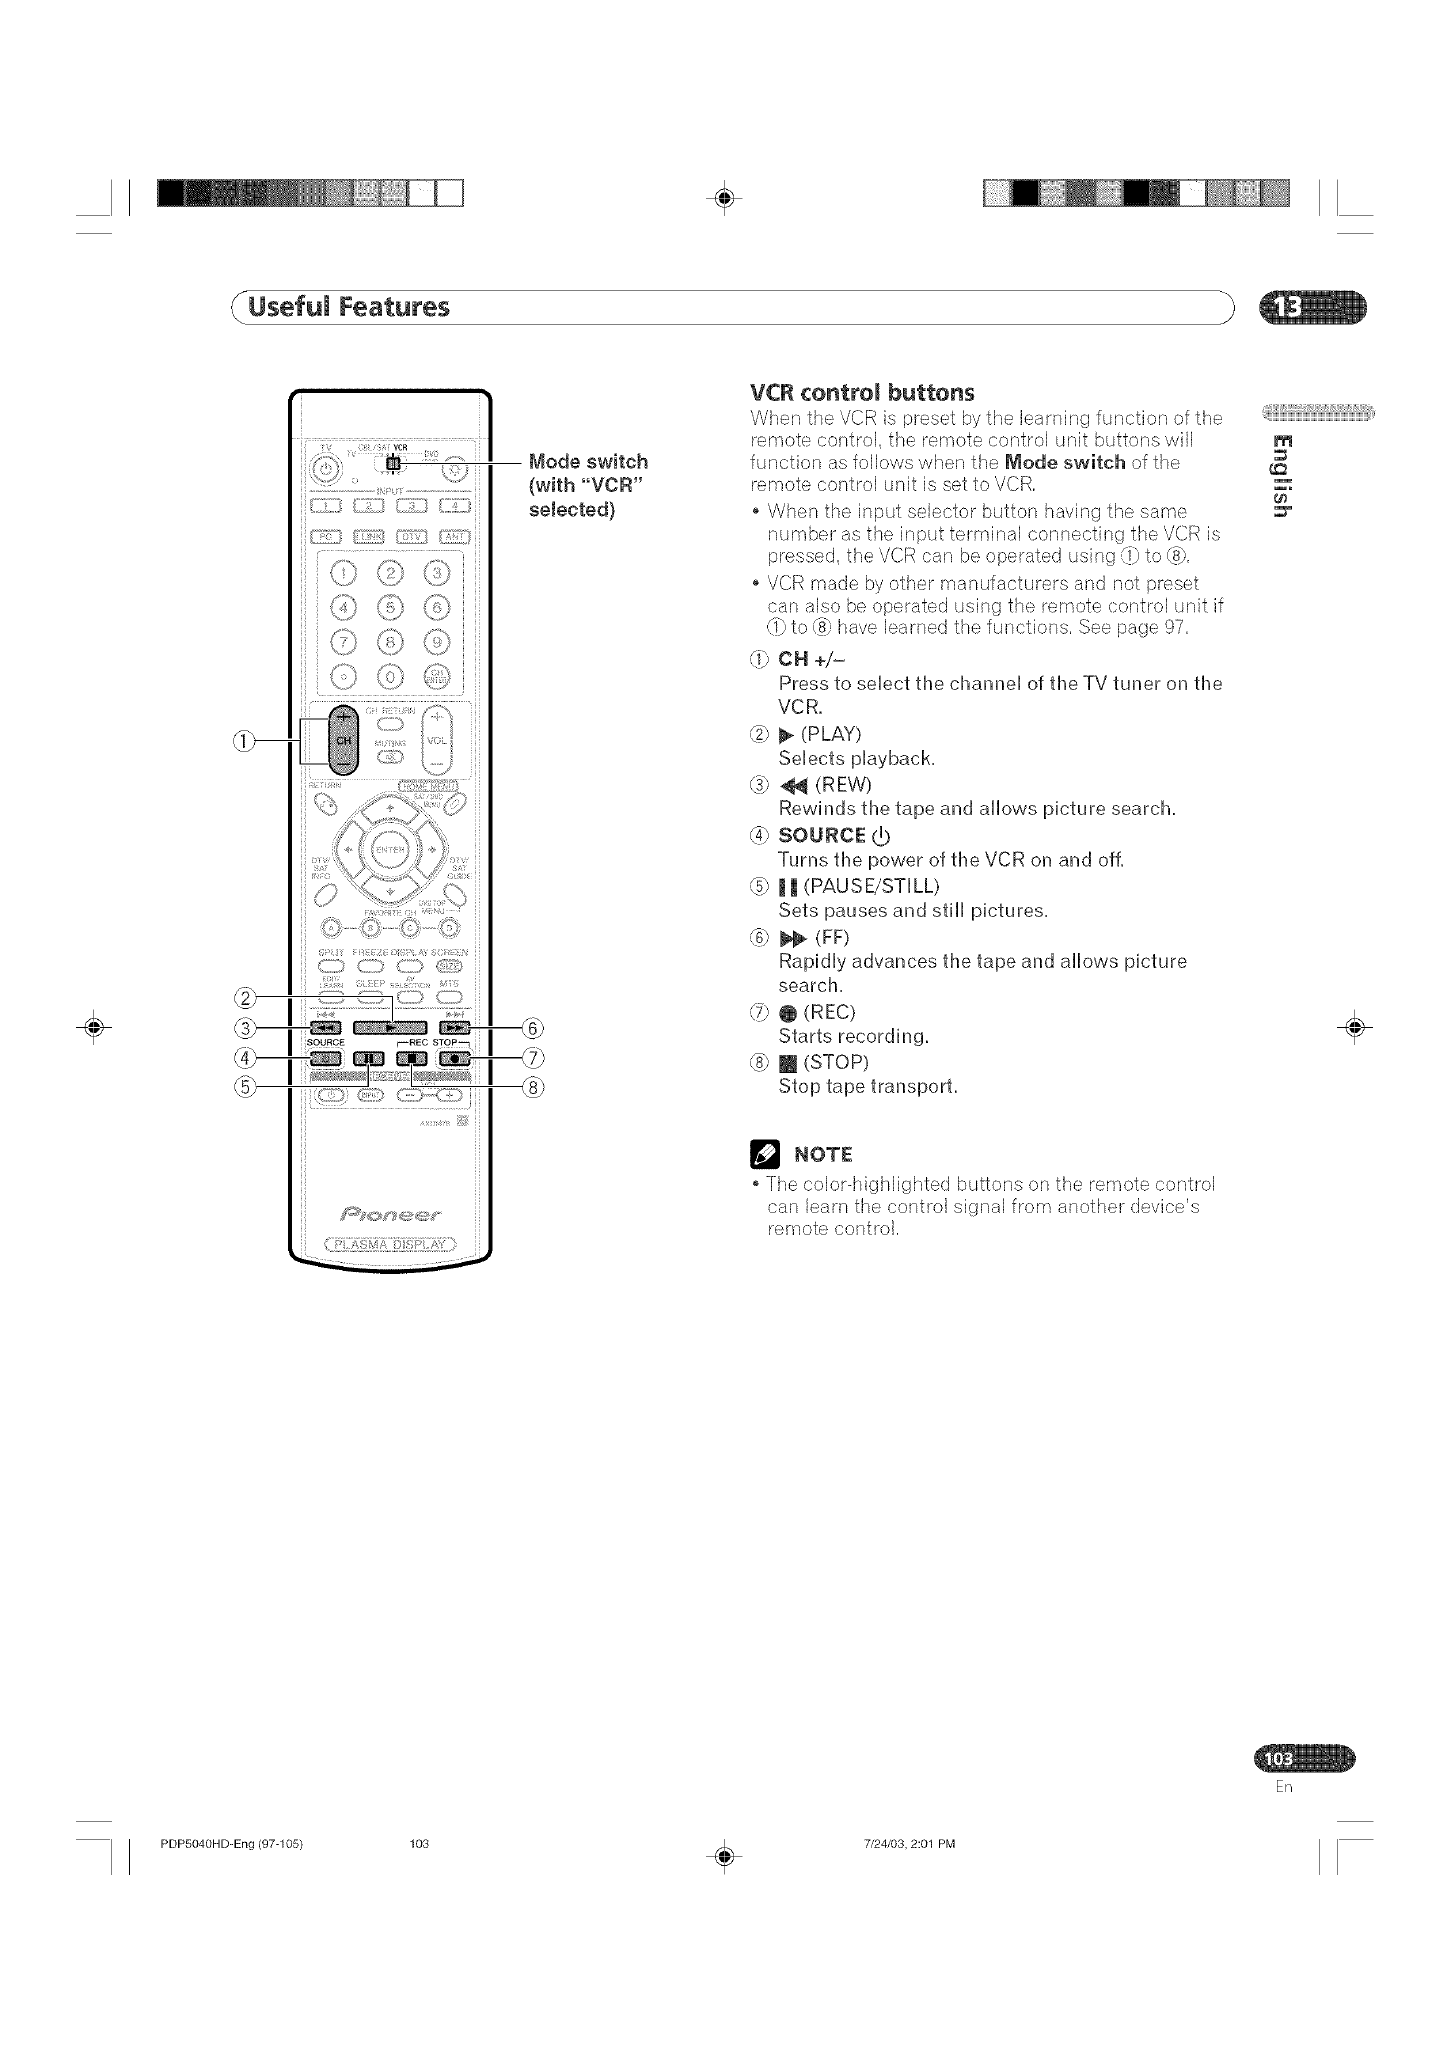
÷
(UsefuJ Features
÷
_ode switch
(with "VCR"
selected)
VCR ¢ontroJ b_ttons
When the VCR is preset by the learning function of the
remote control, the remote control unit buttons will
function as follows when the Mode switch of the
remote control unit is set to VCR,
When the input selector button having the same
number as the input terminal connecting the VCR is
pressed, the VCR can be operated using (1}to _,
VCR made by other manufacturers and not preset
can also be operated using the remote control unit if
(1}to @ have learned the functions, See page 97,
d} CH+/-
Press to select timecl_annel of timeTV tuner on time
VCR.
,,_} _ (PLAY)
Selects playback.
(_} _ (REW)
Rewinds timetape and allows picture searcL
_ sou_c_ (b
Turns timepower of timeVCR on and off.
_ |_ (PAUSE/STILL)
Sets pauses and still pictures.
5} _ (FF)
Rapidly advances timetape and allows picture
searcL
(?) @ (REC)
Starts recording.
@} _ (STOP)
Stop tape transport.
NOTE
o The color-highlighted buttons on the remote control
can learn the control signal from another devbe's
rernote control.
@iiiiiBiiiiiiiWi_iWi_iWi_iWi_iWi_iWi_iWi_iWi_iWi@i¸,
m
÷
En
PDP5040HD-Eng (97-105} 103 _ 7/24/03, 2:01 PM
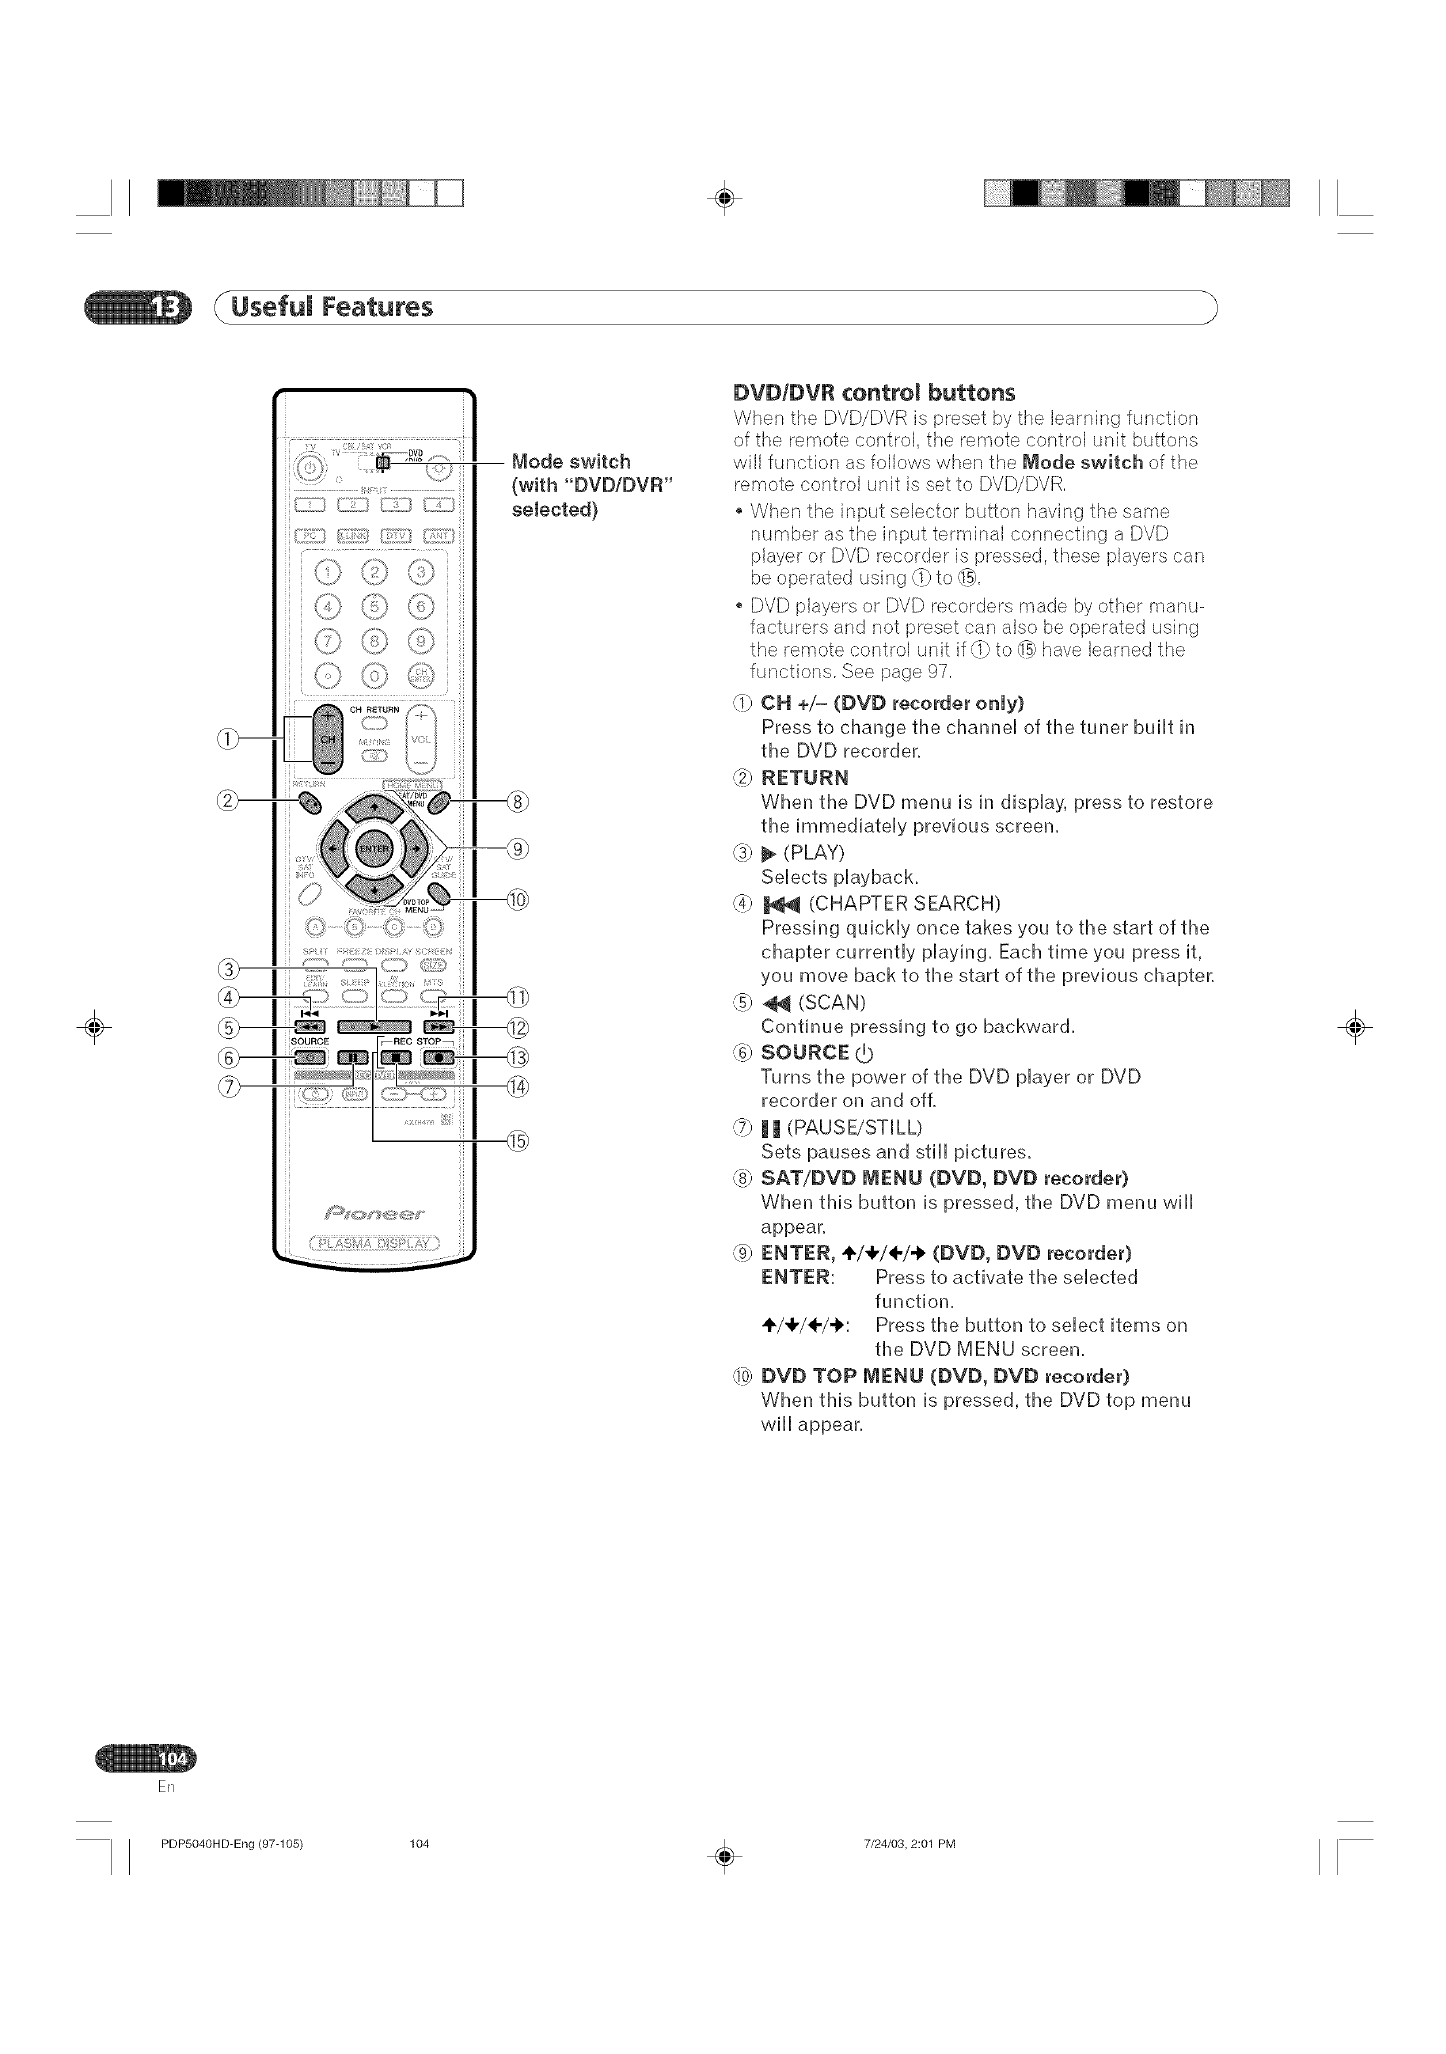
÷
(Useful Features
÷
S_h
\_j7
©©
©©
©@
©©
Mode switch
(with "DVD/DVR"
selected)
DVD/DVR control buttons
When the DVD/DVR is preset by the learnin.g function
of the remote control, the remote control unit buttons
will function as follows when the Mode switch of the
remote control unit is set to DVD/DVR,
When the input selector button having the same
number as the input terminal connecting a DVD
player or DVD recorder is pressed, these players can
be operated using (b to q_,
DVD players or DVD recorders made by other manu-
facturers and not preset can also be operated using
the remote control unit if(l} to d_ have learned the
functions. See page 97,
_1_CH +/= (DVD recorder o_my)
Press to change the channel of the tuner built in
the DVD recorder.
,._) RETURN
When the DVD menu is in display, press to restore
tl_e immediately previous screen.
(_} 1_ (PLAY)
Selects playback.
_ _ (CHAPTER SEARCH)
Pressing quickly once takes you to tl_e start of tl_e
cl_apter currently playing. Eacl_ time you press it,
you move back to tl_e start of tl_e previous cl_apter.
_) .@_(SCAN)
Continue pressing to go backward.
SOURCE
Turnsthe power oftheDVD playeror DVD
recorderon and off,
,_J|I (PAUSE/STILL)
Sets pauses and still pictures.
_) SAT/DV{) mVIENU(OVD, DVD recorder)
When this button is pressed, the DVD menu will
appear.
(@ ENTER, ÷/÷/÷/@ (_VD, _V_ recorder)
ENTER: Press to activate tl_e selected
function.
÷/÷/÷/÷: Press the button to select items on
the DVD MENU screen.
,I_) DVD TOP MENU (DVD, DV_ recorder)
When this button is pressed, the DVD top menu
will appear.
÷
ER
PDP5040HD-Eng (97-105) 104 _ 7/24/03, 2:01 PM
÷
Usefum Features
QI] _ (CHAPTER SEARCH)
Pressing quicMy once takes you to the start of the
next chapter, Each time you press it, you move
ahead to the start of the next chapter,
@ _ (SCAN)
Continue pressing for fast forward,
@ @ (REC)
Starts recording,
(# m (STOP)
PUayback stops when pressing once,
With some DVD pUayers or DVD recorders,
pressing the button twice may open the disc tray,
d_ m (REC STOP)
Press and how O, and then press this button to
stop recording, This operation is true of only
Pioneer DVD recorders,
_iiiiiii_ii_i;ii_iiiiiiiiiiiiii_iii_i_iii_i_iii_i_iii_i_iii_i_iii_i_iii_i_iii_i_iii_i_iii_i_iIi_i¸,
m
10 NOTE
o The DVD player or DVD recorder cannot be selected
at the same time,
The color-highlighted buttons on the remote control
can learn the control signal from another device's
remote control,
÷ ÷
En
PDP5040HD-Eng (97-105) 105 _ 7/24/03, 2:01 PM
÷
TroubUesheoting
÷
No power. Make sure the Plasma Display and the Media Receiver are connected correctly. (See page 20.)
®Is the power cord disconnected? (See page 2Z)
®Has the main power been turned on? (See page 28.)
Check if you pressed TV (_) on the remote control unit (See page 28.)
If the indicator on the system lights up red press TV (_.
o Green and red rectangles appear on o Check if the system cable has been disconnected or almost disconnected? (See page 20.)
the screen alternately.
o The system cannot be operated. _ External influences such as lightning, static electricity, etc, may cause improper operation.
[n this case. operate the system af_terfirst turning the power of the Plasma Display and the
Media Receivel; or unplugging the power- cord and re-plugging it in after 1 or 2 minutes.
, Remote control unit does not
operate.
Is the Mode switch set correctly? Slide it to the TV setting position. (See page 16.)
®Are batteries inserted with polarity (+, -) aligned? (See page 22.)
Are batteries worn out? (Replace with new bafteries.) (See page 22_)
®Operate the remote control unit while pointing it toward the remote control sensor on the
Plasma Display. (See page 1Z)
Are you using it under strong or fluorescent lighting?
o Is a fluorescent light illuminated near the remote control sensor?
o No image and audio is presenteG ®Check if the input source for video or PC has been unintentionally selected although you want
to watch a TV channek (See page 50.)
Check if you have activated the Parental Control function. (See page 90.)
Enter a password to temporarily cancel the Parental Control function, (See page 94,)
No picture. Is connection to other components correct? (See pages 65 to 7Z)
®is the correct input selected? (See pages 16, 6.5 to 7Z)
is a non-compatible PC signal being input? (See page IOZ)
®Is picture adjustment correct? (See pages 48 to .52,)
o Images are presented but no audio
is outpu£
®Check if you have selected the minimum volume, (See page 51 .)
Check if you have muted sound, (See page 51 _)
®When using a video or PC input source, check that the audio terminal is atso in connection. (See
pages 65 to 67 and 7Z)
Sound is reversed between the right
and left.
Sound is output from only a single
speaker:
o Picture is cut off.
Check if the speaker cable connections have been reversed between the right and lef# or if the
speaker cable from either speaker has been disconnected. (See pages 15 and 20,)
®Has the balance been correctly adjusted? (See page 52,)
Is the image position correct? (See pages 8! and 82.)
Has the correct screen size been selected? (See page 85,)
o Strange colour, light coloui; dark or
colour misalignment,
Power is suddenly turned off.
Adjust the pkture tone, (See pages 48 to 52.)
Is the room too bright? The picture may look dark in a room that is too bright,
Is the sleep timer set? (See page 85.)
Check the power control setting. (See pages 54 and 55,)
®The system's internal temperature has increased, Remove any objects blocking vent or clean,
(See pages 17 to 19.)
÷
SD04 Powering ofT. Internal temperature too high, Check if the ambient temperature of the Plasma Display is high,
Check temperature around PDP
SD05 Powering of[ Internal protection cimuits activated, Check the speaker cable connections between the Plasma Display
is there a short in speaker cable? and the speakers.
SDll Powering ofT. internal temperature too high. Check if the ambient temperature of the Plasma Display and the
Check temperature around media receive_ Media Receiver is high.
En
PDP5040H D-Eng (106-109) 106 _ 7/24/03, 1:57 PM
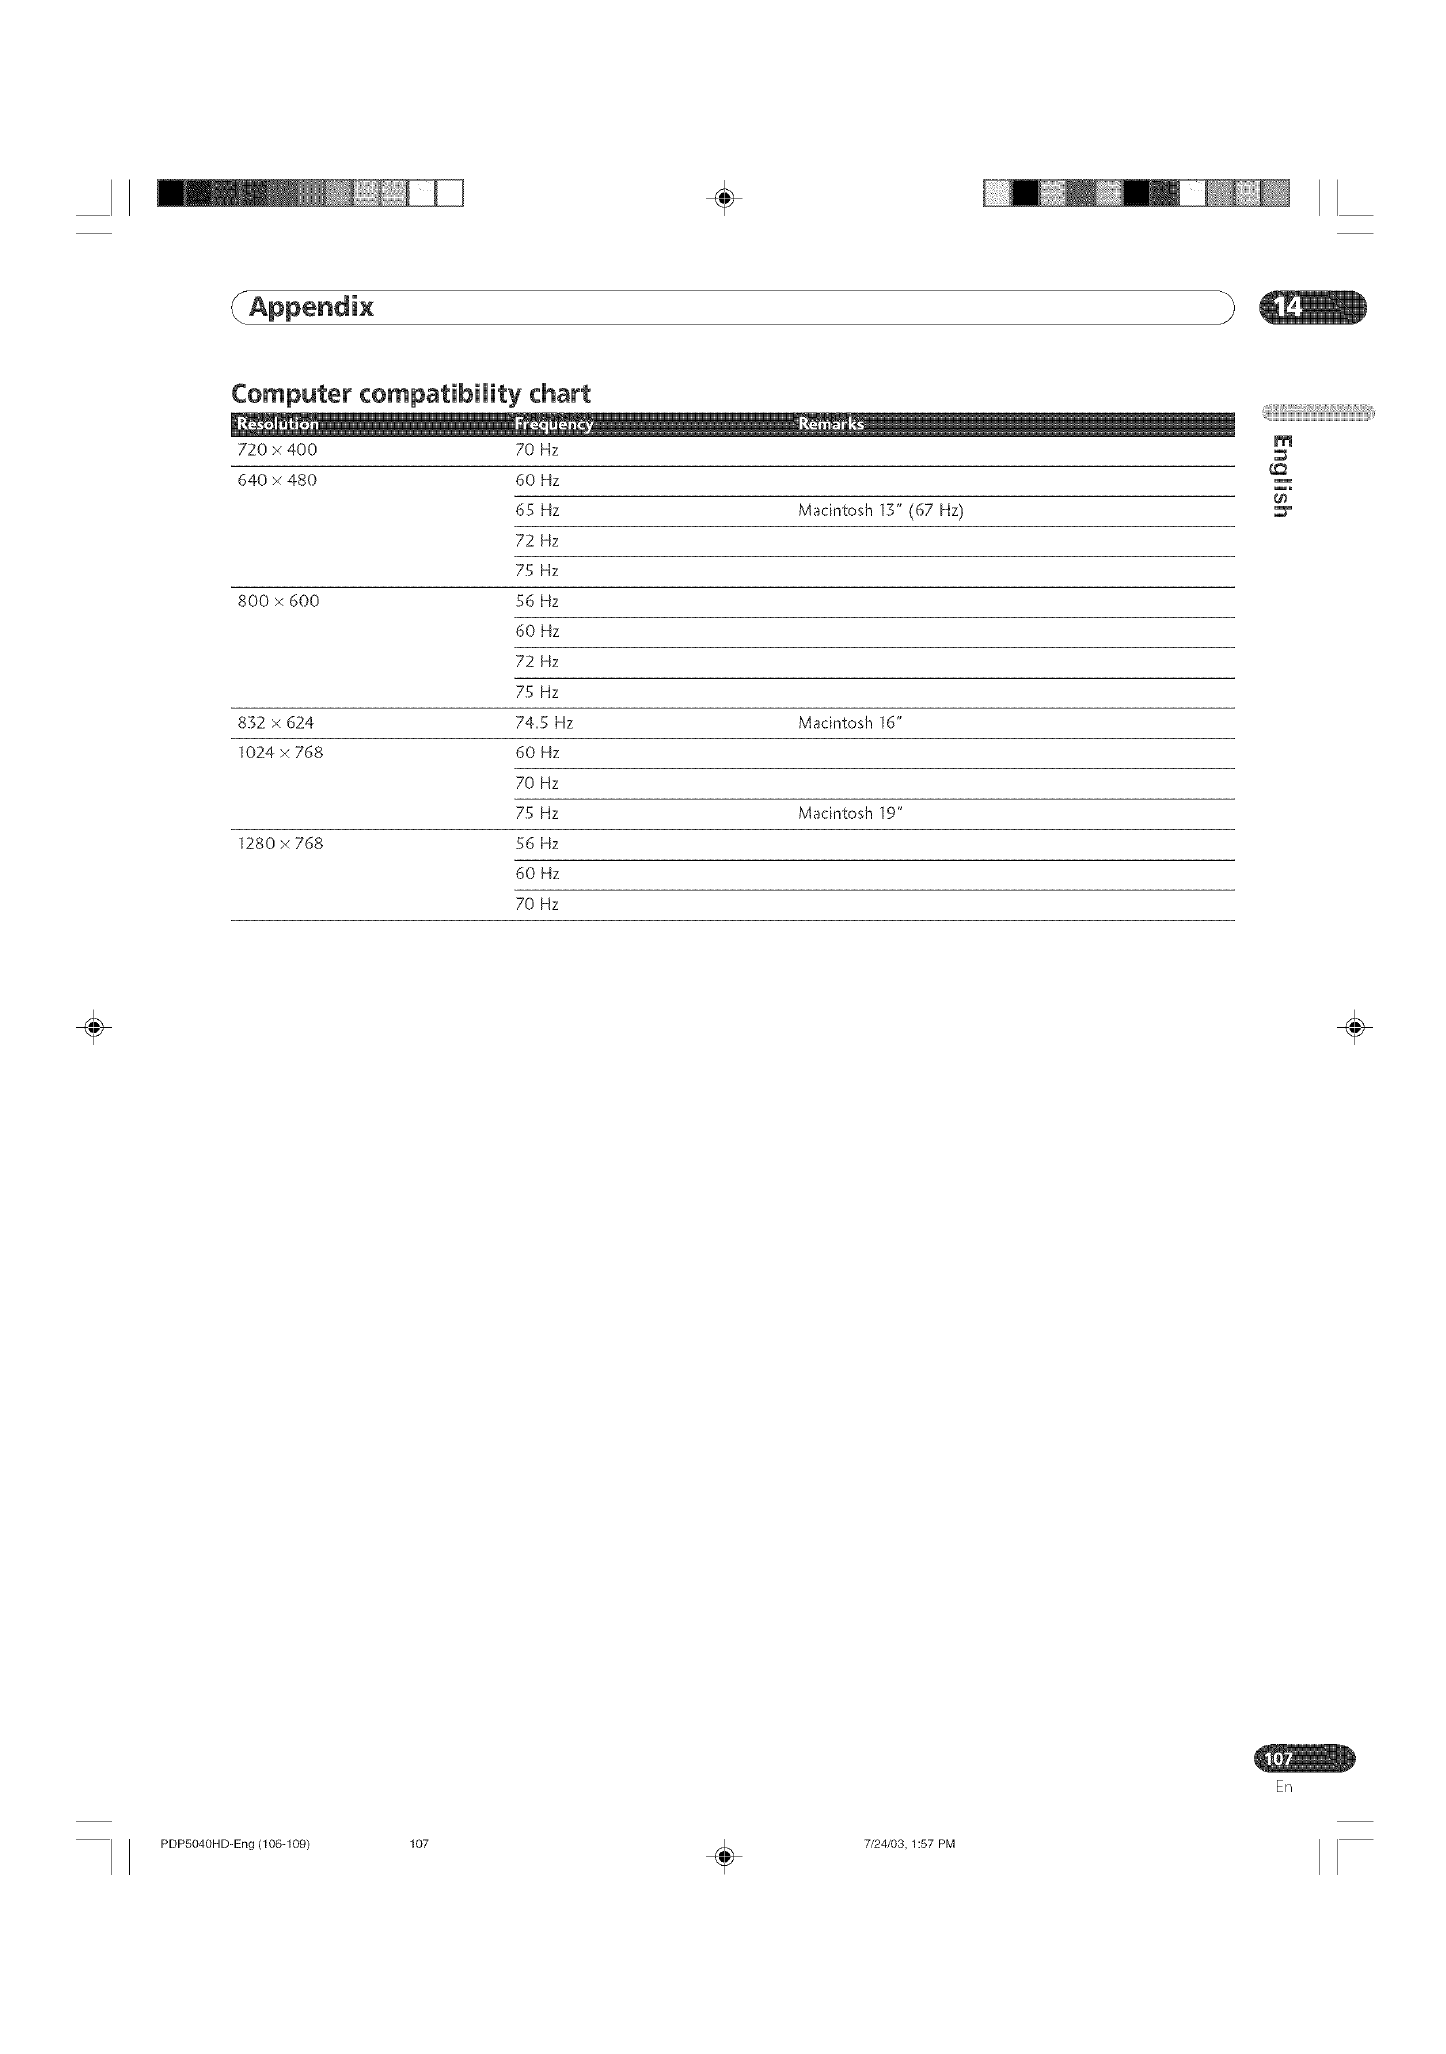
÷
_Appendi×
Computer compatibility chart
720 × 400 70 Hz
640 × 480 60 Hz
65 Hz Macintosh 13" (67 Hz)
72 Hz
75 Hz
800 x 600 56 Hz
60 Hz
72 Hz
75 Hz
832 x 624 74.5 Hz Macintosh 16"
1024 × 768 60 Hz
70 Hz
75 Hz Macintosh 19"
1280 ×768 56 Hz
60 Hz
70 Hz
÷ ÷
ER
PDP5040HD-Eng (106-10% 107 _ 7/24/03,1:57 PM
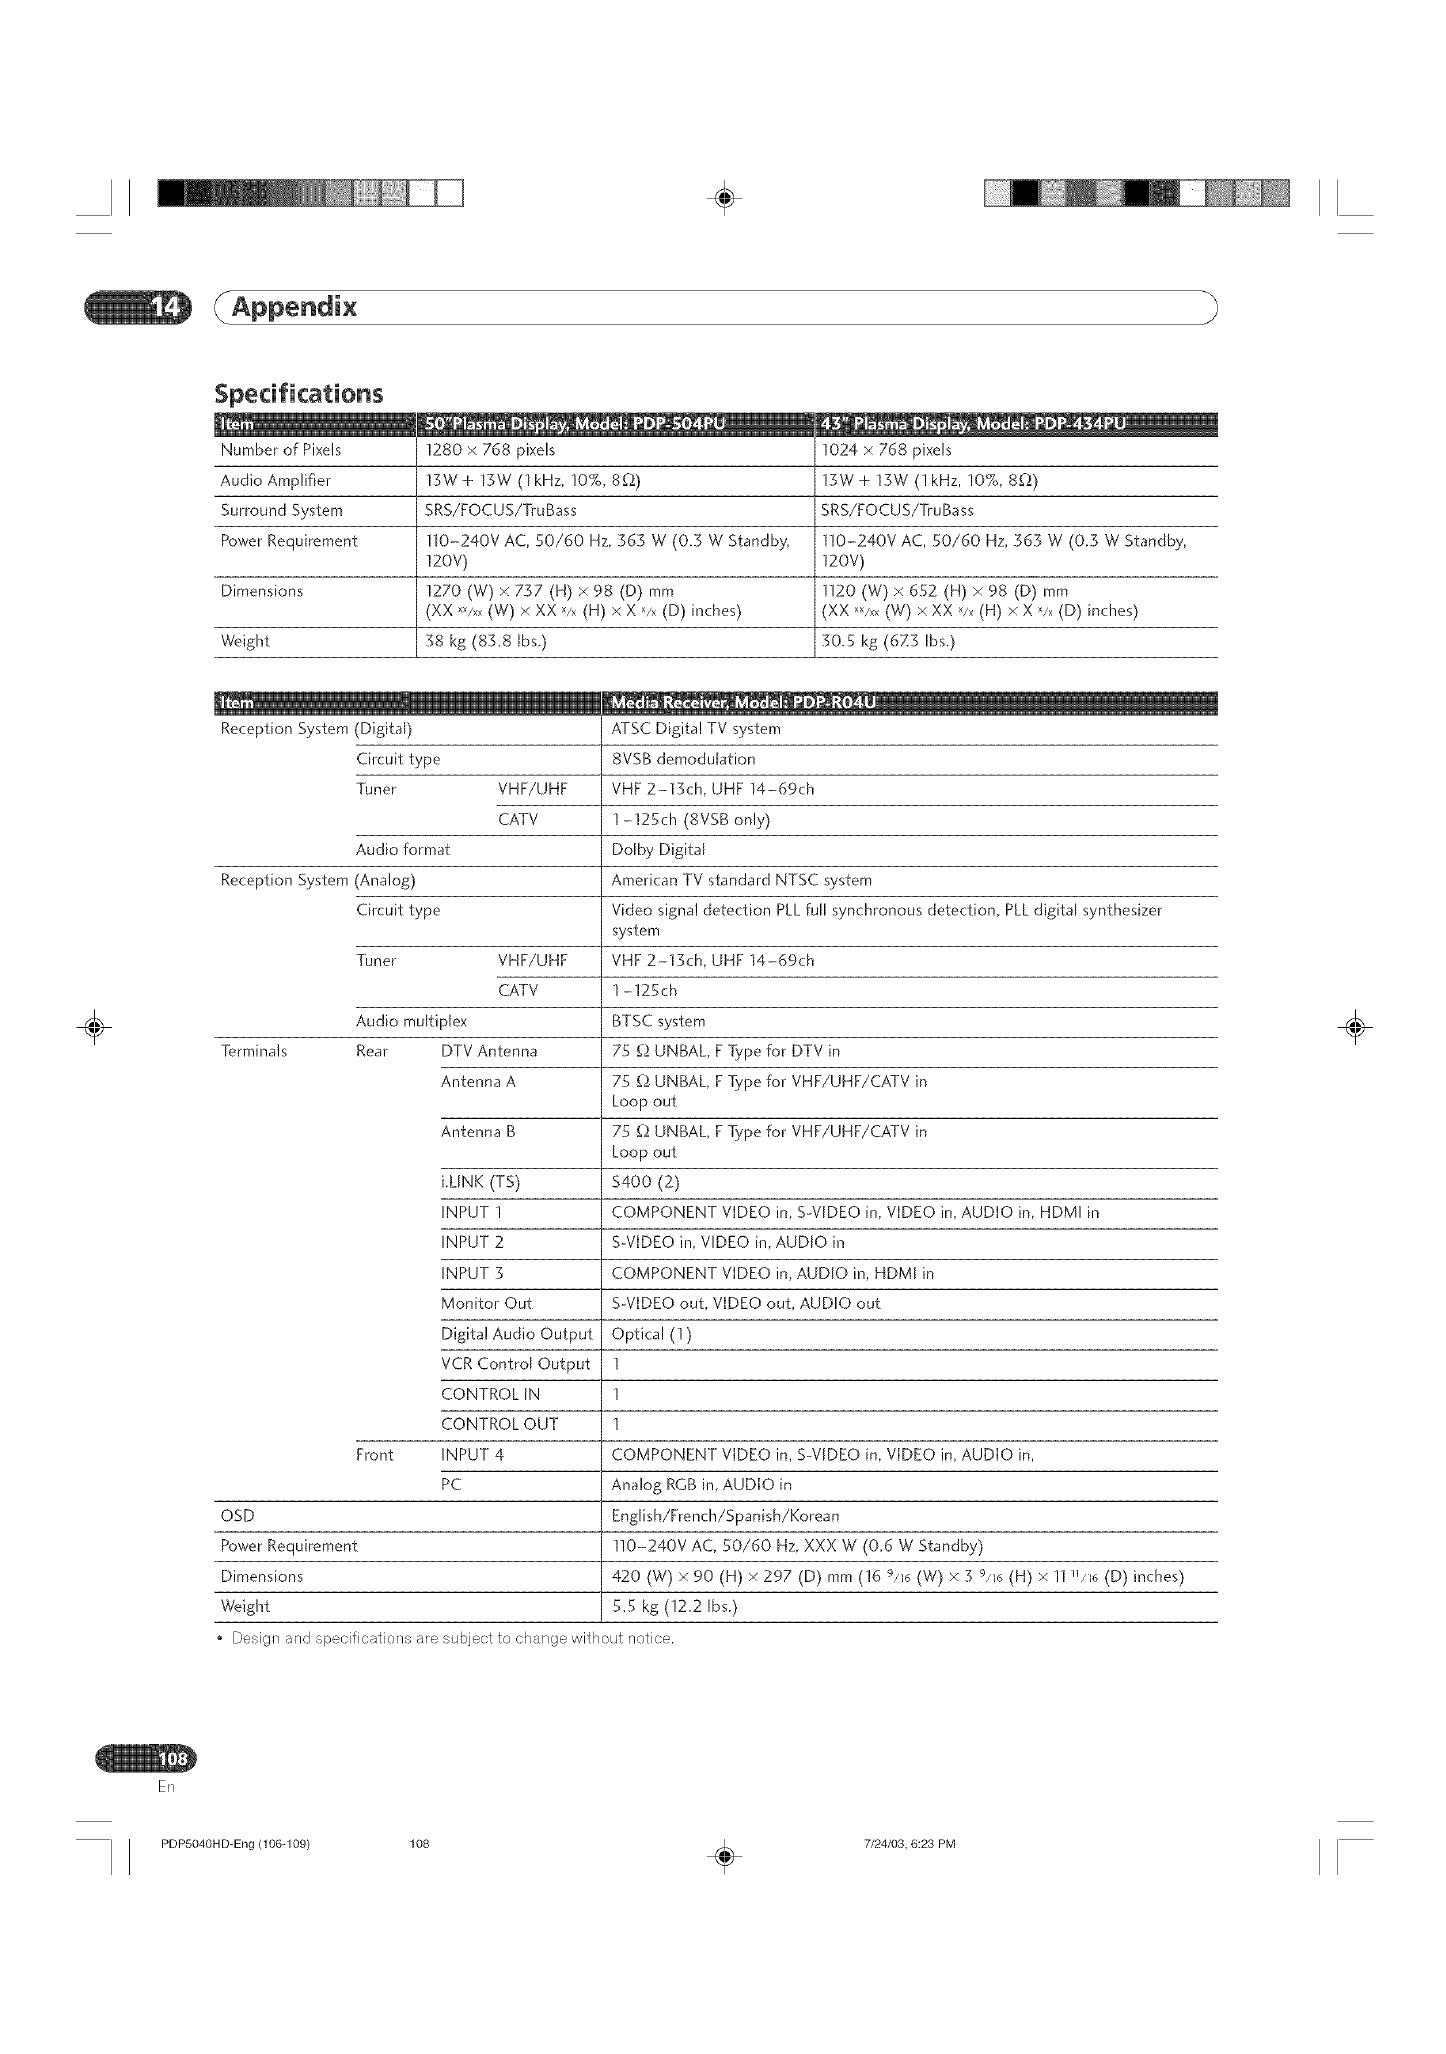
÷
÷
Number of Pixds
Audio Amplifier
Surround System
Power Requirement
Dimensions
Weight
1280 × 768 pixels
13W + 13W (1 kHz, !0%, 8_2)
SRS/FOCUS/TruBass
110-240V AC, .50/60 Hz, 363 W (0.3 W Standby,
120V)
1270 (W) x 737 (H) × !)8 (D) mm
(XX XX/x×(W) × XX X/x(H) x X X/x(D) inches)
38 kg (83.8 Ibs.)
1024 × 768 pixels
13W + 13W (lkHz, 10%, 8_2)
SRS/FOCUS/TruBass
1!0-240V AC, ._0/60 Hz, 363 W (0.3 W Standby,
120V)
1120 (w) x 682 (H) x 98 (D) rnm
(xx XX/x×(w) x xx x/x (H) x X X/x(D) inches)
30.5 kg (6Z3 Ibs.)
ATSC Digital TV system
8VSB demodulation
VHF/UHF VHF 2-13ch, UHF 14-69ch
CATV 1-12._ch (SVSB only)
Audio format Dolby Digital
Reception System (AnaJog) American TV standard NTSC system
Circuit type Video signal detection PLL full synchronous detection, PLL digital synthesizer
system
Tuner VHF/UHF VHF 2-15ch, UHF 14-69ch
CATV 1-125ch
Audio multiplex BTSC system
Terminals Rear DTV Antenna 7.5 _2 UNBAL F Type for DTV in
Antenna A 75 _2 UNBAL, F Type for VHF/UHF/CATV in
Loop out
Antenna B 75 _2 UNBAL F Type for VHF/UHF/CATV in
Loop out
i.LINK (TS) $400 (2)
INPUT 1 COMPONENT VIDEO in, S-VIDEO in, VIDEO in, AUDIO in, HDMI in
INPUT 2 S-VIDEO in, VIDEO in, AUDIO in
INPUT S COMPONENT VIDEO in, AUDIO in, HDMI in
Monitor Out S-VIDEO out, VIDEO out, AUDIO out
Digital Audio Output Optical (1)
VCR Control Output 1
CONTROL IN 1
CONTROL OUT 1
Front INPUT 4 COMPONENT VIDEO in, S-VIDEO in, VIDEO in, AUDIO in,
PC Analog RCB in, AUDIO in
OSD English/French/Spanish/Korean
Power Requirement 110-240V AC, S0/60 Hz, XXX W (0.6 W Standby)
Dimensions
Weight
_L
Reception System (Digital)
Circuit type
Tuner
420 (W) × 90 (H) × 297 (D) mm (!6 9/16 (W) x 39/16 (H) x 11 n/Io (D) inches)
5,5 kg (12.2 Ibs.)
o Design and specifications are subject to change without notice.
÷
ER
PDP5040HD-Eng 006-109)
108 _ 7/24/08,6:23 PM
÷
Appendi×
Trademarks
SRS and the (0) ®symbol are trademarks of SRS Labs, Inc,
SRS technology is incorporated under license from SRS Labs, Inc,
FOCUS and the (0) ® symbol are trademarks of SRS Labs, Inc,
FOCUS technology is h-_corporated under license from SRS Labs, Inc,
s_(®) _is a trademark of SRS Labs, Inc,
WOW technology is h-_corporated under licer_sefrom SRS Labs, Inc,
o DOLBY DIGITAL
Manufactured under license from Dolby Laboratories, "Dolby" and the double-D symbol are trademarks of Dolby
Laboratories,
This product includes FontAvenue@ fonts licensed by NEC Corporation,
FontAvenue is a registered trademark of NEC Corporation,
The i,LINK logo and i,LINK are registered trademarks of Sony Corporation,
D-VHS is a registered trademark of Victor Company of Japan, Limited,
Apple and Macintosh are registered trademarks of Apple Computer, Inc,
Microsoft is a registered trademark of Microsoft Corporation,
DDC is a registered trademark of Video Electronics Standards Association,
Power Management is a registered trademark of Sun Microsystems, Inc,
VGA and XGA are registered trademarks of International Business Machines Co,, Inc,
The names of the cornpanies or institutions are trademarks or registered trademarks of the respective companies
or institutions,
_iiiiii_ii_i;i1_iiiiiiiiii1iii_iii_i_iii_i_iii_i_iii_i_iii_i_iii_i_iii_i_iii_i_iii_i_iii_i_iIi_i¸,
m
÷ ÷
Er/
PDP504OHD-Eng (106-10% 109 _ 7/24/03,1:57 PM
÷
÷
FShould ths product require service in the U.S.A. and you wish to locate the nearest Pioneer
Authorized independent Service Company, or if you wish to purchase replacement parts, operating
instructions, service manuaUs, or accessories, please caUUthe number shown beUow.
800-421-1404
Please do not ship your product to Pioneer without first calling the Customer Support Divis on at the
above Isted number for assistance.
Pioneer EUectronics (USA) Inc.
Customer Support Division
P.O. BOX 1760, Long Beach,
CA 90801q760, O.S.A.
For warranty information please see the Limited Warranty sheet included with your product.
Sho(_ld this product require service in Canada, please contact a Pioneer Canadian Authorized Dealer
to Uocate the nearest Pioneer Authorized Service Company rn Canada.
Alternatwely, please contact the Customer Satisfaction Department at the following address:
Pioneer Electronics of Canada, Inc.
Customer Satisfaction Department
300 AlUstate Parkway, Markham, Ontario L3R OP2
(905)479-4411
1(877)283=5901
For warranty information please
Si ce produit doiL 6tre r6par6 au
Canada pour obtenir Ue nora du Centre de Service Autods6 Pioneer le plus pr6s de chez-vous. Vous
pouvez aussl contacter le Service _ la cl entc',_le de Pioneer:
see the Limited Warranty sheet h]cluded with your product.
Canada, veuillez vous adresser a un distributeur autoris6 Pioneer du
Pioneer Electroniques du Canada, Inc.
Service a JacUienteJe
300, Allstate Parkway, Markham, Ontario L3R OP2
(905)479-4411
1(877)283=5901
Pour obtenir des renseignements sur la garantie, veuillez vous reporter au feuillet sur la garantie
resFeinte qui accompagne le produit, soIsB e_
L
÷
Published by Pioneer Corporation.
Copyright © 2003 Pioneer Corporation.
Ail rights reserved.
PIONEER CORPORATION 4-1, Meguro 1-Cho/ee, Meguro-ku, ]bkyo 153-8654, Japan
PIONEER ELECTRONICS [USA] INC. PO. BOX 1540, Long Beach, California 90801-1540, U,S,A.
PIONEER ELECTRONICS OF CANADA, INC. 300 Allstate Parkway, Markharn, Ontario L3R OP2, Canada
PIONEER EUROPE NV Haven 1087, KeetbergJaan 1, B-9120 Melsele, Belgium TEL: 03/5700511
PIONEER ELECTRONICS AUSTRALIA PTY. LTD. 178-184 Boundary Road, Braeside, Victoria 3195, Australia, TEL: [03] 9586-6300
PIONEER ELECTRONICS DE MEXICO S,A, DE C,V, Blvd Manuel Avila Caraacho 138, 10 piso Col Lornas de Chapultepec, Mexico, DF 11000
TEL: 52-55-9178-4270 FAX: 52-55-5202-3714
<XXXXX/XXX00000> Printed in <ARE1367_A>
PDP5040HD-Eng (Back) 1 _ 7/24/03, 2:05 PM
