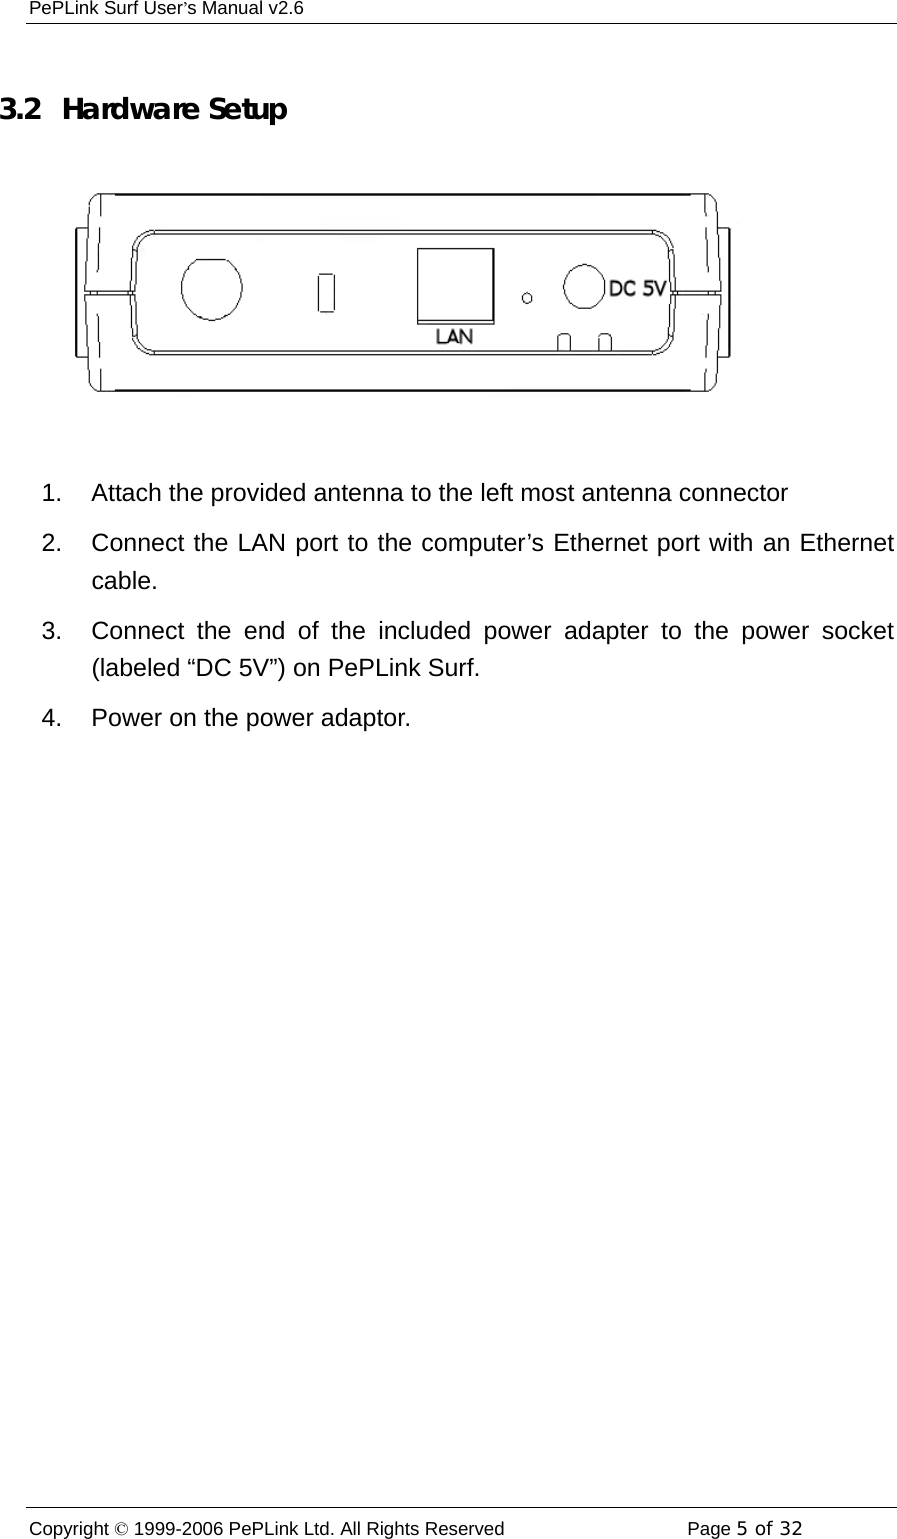
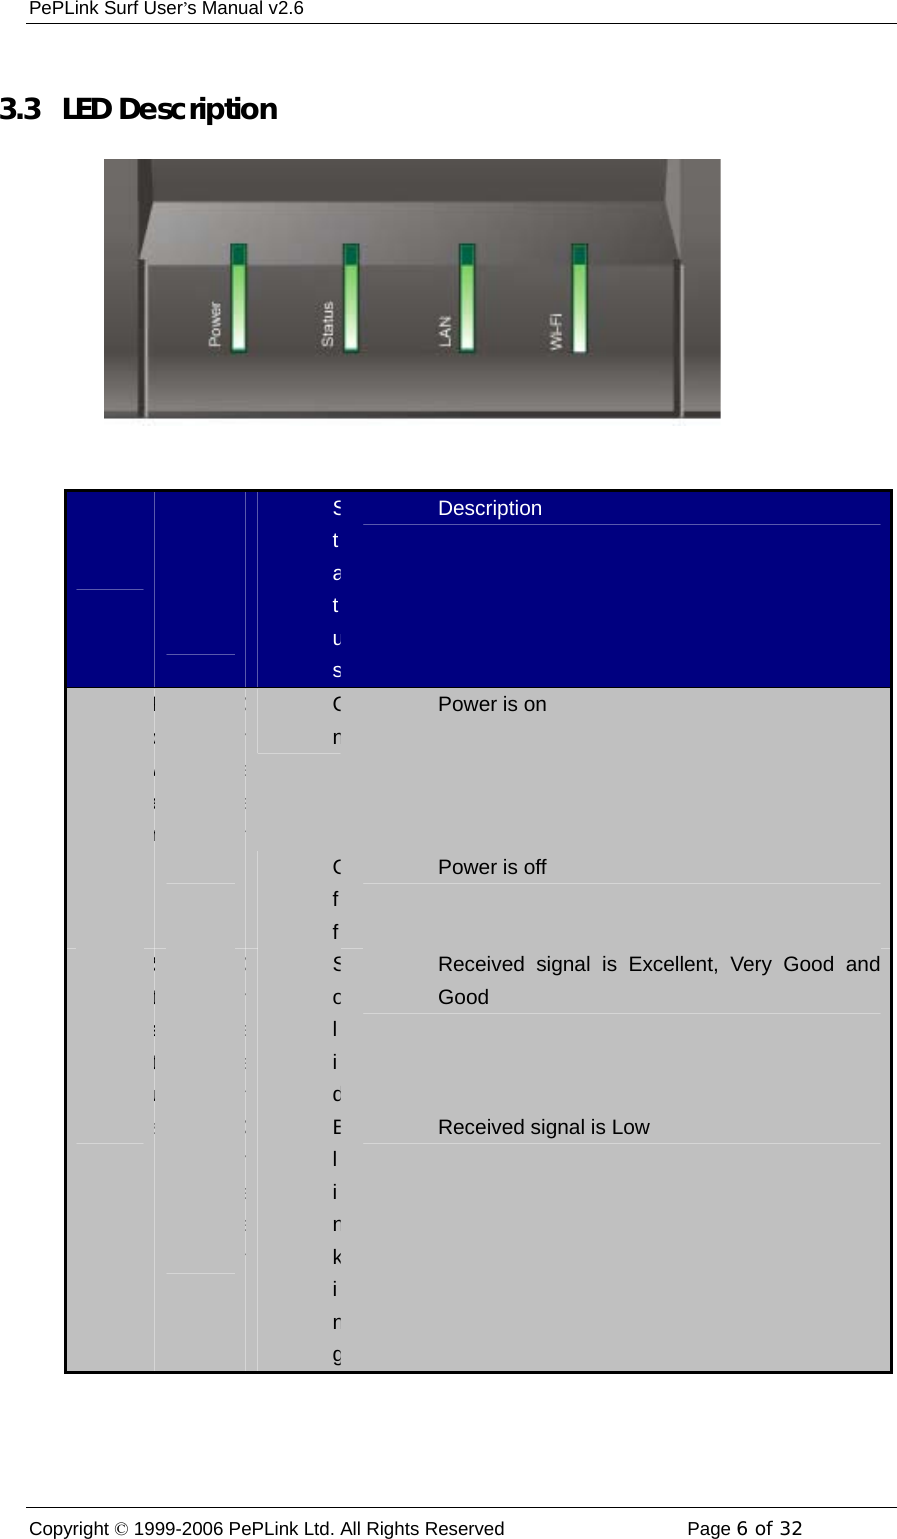
Pismolabs Technology SF400BG PePWave Surf AP400, PePWave Surf 400 User Manual peplink surf User Menu

Pismo Labs Technology Limited PePWave Surf AP400, PePWave Surf 400 peplink surf User Menu

Manual

           PePLink Surf   User’s Manual    Document Version  : 2.6 Firmware Version    : 6.0.4 Date     : 2006-02-10
PePLink Surf User’s Manual v2.6 Copyright © 1999-2006 PePLink Ltd. All Rights Reserved  Page 2 of 32    Table of Content 1 Copyright  3 2 Disclaimer  3 3 Product Description  4 3.1 Features  4 3.2 Hardware Setup  5 3.3 LED Description  6 4 Using the PePLink Surf  9 4.1 First Time Setup  10 4.2 Settings Details  13 4.3 Advanced Settings: Port Forward  15 4.4 WPA/WPA2 with 802.1x Authentication  16 4.5 Test the Setup  19 4.6 Firmware Upgrade  20 4.7 Debug Page  21 4.8 Restore to Factory Defaults  22 4.9 System Settings  23 5 Appendix - Demo CA and Server Certification Generation Instructions  28 5.1 Prerequisite  28 5.2 Create your own Certificate Authority (CA)  28 5.3 Create a server certificate request from your servers  29 5.4 Sign the server certificate with your own CA  31
PePLink Surf User’s Manual v2.6 Copyright © 1999-2006 PePLink Ltd. All Rights Reserved  Page 3 of 32     1  Copyright Copyright © 2006 by PePLink Ltd. The content of this documentation may not be reproduced in any part or as a whole without the prior written permission of PePLink Ltd.  2  Disclaimer PePLink does not assume any liability arising out of the application or use of any products, or software described herein.  Neither does it convey any license under its patent right nor the patent rights of others.   PePLink further reserves the right to make changes in any products described herein without notice.  This documentation is subject to change without notice.
PePLink Surf User’s Manual v2.6 Copyright © 1999-2006 PePLink Ltd. All Rights Reserved  Page 4 of 32     3  Product Description PePLink Surf, formerly known as MANGA Surf, is a Wi-Fi Station Mode (Client) Router with WPA, WPA2 and 802.1x supplicant support.    It is designed to act as a Wireless router which connects to Wireless Broadband Internet Service and allows LAN users to access the Internet via it.  It associates to a service provider and authenticates using 802.1x (if needed) on start up.    Upon successful association and authentication, it will acquire an IP address from the service provider using DHCP.   A DHCP server is built-in on its LAN port.  Network Address Translation is performed for all outbound connections.  Thus it supports multiple terminals to access the Internet simultaneously.   3.1  Features •  10/100 Ethernet interface with auto-crossover detection •  Reset button for restoring settings to factory defaults •  Signal strength LED for showing the current signal strength •  WPA/WPA2-Personal and WPA/WPA2-Enterprise support •  Network Address Translation (NAT) routing •  Built-in DHCP server •  Inbound port range forwarding
PePLink Surf User’s Manual v2.6 Copyright © 1999-2006 PePLink Ltd. All Rights Reserved  Page 5 of 32     3.2   Hardware Setup  1.  Attach the provided antenna to the left most antenna connector 2.  Connect the LAN port to the computer’s Ethernet port with an Ethernet cable. 3.  Connect the end of the included power adapter to the power socket (labeled “DC 5V”) on PePLink Surf. 4.  Power on the power adaptor.
PePLink Surf User’s Manual v2.6 Copyright © 1999-2006 PePLink Ltd. All Rights Reserved  Page 6 of 32     3.3   LED Description  LEDColorStatusDescription GreenOnPower is on Power  Off Power is off GreenSolidReceived signal is Excellent, Very Good and Good StatusGreenBlinkingReceived signal is Low
PePLink Surf User’s Manual v2.6 Copyright © 1999-2006 PePLink Ltd. All Rights Reserved  Page 7 of 32    AmberBlinkingReceived signal is Very Low AmberSolidNo wireless signal is detected    Off Booting up / Upgrading firmware GreenOnEthernet is connected GreenBlinkingSending/Receiving data LAN  Off Ethernet is not connected Wi-FiGreenOnAssociated with an access point
PePLink Surf User’s Manual v2.6 Copyright © 1999-2006 PePLink Ltd. All Rights Reserved  Page 8 of 32    GreenBlinkingSending/Receiving data    Off Not associated with any access point This is the Signal Strength and Status LED state conversion table. Received Signal Strength Status LED Indication on the web based power meter > -70  Solid Green Excellent -70 to -74  Solid Green Very good -75 to -79  Solid Green Good -80 to -84  Blinking Green Low -85 to -87  Blinking Amber Very Low -87 to -89  Blinking Amber Very Low -89 <  Blinking Amber Very Low
PePLink Surf User’s Manual v2.6 Copyright © 1999-2006 PePLink Ltd. All Rights Reserved  Page 9 of 32    4  Using the PePLink Surf You should set up your computer’s LAN interface to obtain an IP address automatically.    If you do so, you should have set it up correctly.  In order to do so, select the “Start” menu, “Control Panel” and then “Network Connections”.  Right click on the “Local Area Connection” icon, choose “Properties”, double click on the item “Internet Protocol (TCP/IP)” from the list.   On the screen, just set it as follows:  Click the “OK” button to confirm the change.
PePLink Surf User’s Manual v2.6 Copyright © 1999-2006 PePLink Ltd. All Rights Reserved  Page 10 of 32    4.1   First Time Setup  On your PC, start a web browser, e.g. Internet Explorer, Mozilla Firefox, etc.  Visit an Internet web site.  If you are not associated to an access point, you should be redirected to a logon page.    Or you can go also go to this URL http://192.168.20.1/ The page will look like this.  Once it is associated to an access point, you can also access the page from this URL: https://wan.ip.addr.here:8000/ Login ID and password are “admin” and “MSurf000”.
PePLink Surf User’s Manual v2.6 Copyright © 1999-2006 PePLink Ltd. All Rights Reserved  Page 11 of 32     Click the “Advanced Config” button to enter the parameters of the access point to associate to.    You should see this screen:  In the field “SSID” under Wireless Settings, input the access point’s SSID (sometimes it is called “network name”).  According to the setting of the Access Point you are associating to, you may choose different “Authentication setting”.  If “Static WEP key” or “WPA/WPA2-Personal” is selected, input the Encryption Key field as well.  Click the “Save” button at the bottom to complete.  You can now click the “Connect” link on the top bar and then click the “Connect” button to associate with the access point.  There are also options of “802.1x with dynamic WEP key” and “WPA/WPA2-Enterprise”.  For their details, please refer to chapter 4.4 .
PePLink Surf User’s Manual v2.6 Copyright © 1999-2006 PePLink Ltd. All Rights Reserved  Page 12 of 32     At this point, you are associated with the access point.  You may now close the web browser and open a new one to start web browsing.
PePLink Surf User’s Manual v2.6 Copyright © 1999-2006 PePLink Ltd. All Rights Reserved  Page 13 of 32     4.2  Settings Details LAN Interface: To configure the LAN interface’s IP address and subnet mask.  DHCP Server: To configure to enable the built-in DHCP server or not.  If enabled, the IP address range can be configured. Wireless Settings: SSID: To configure the SSID / ESSID / Network Name of the wireless network to associate to.  Radio Mode: It allows the user to choose between radio modulations support.   E.g. 802.11b/g, 802.11g only, 802.11b, etc.    The available settings depend on the Wi-Fi module installed on the device.  Note: Under 802.11g only mode, 802.11b rates are used duringaccess point association.
PePLink Surf User’s Manual v2.6 Copyright © 1999-2006 PePLink Ltd. All Rights Reserved  Page 14 of 32    Bit Rate: To fix the 802.11 transmit bit rate.    Available options depend on the Radio Mode chosen.   If “auto” is chosen, the device will choose the best bit rate dynamically and automatically.  Authentication: Available options are Open, Static WEP Key, 802.1x with dynamic WEP key, WPA/WPA2-Enterprise and WPA/WPA2-Personal.  The selection should be according to the setting of the access point you are associating to.  Data transferred are encrypted under all modes except the Open mode.    When Static WEP Key or WPA/WPA2-Personal is chosen, you should enter an encryption key in the Encryption Key field.  For 802.1x and WPA/WPA2-Enterprise options, please refer to chapter 4.4 .  Preferred AP: The MAC address of a preferred access point can be entered here.  When the preferred access point is found and its signal strength is higher than the “Min Signal Strength”, it will connect to this preferred access point, no matter the other access points are found even they have higher signal strength or the same SSID.  WAI redirection: If the device is not connected to an access point, and the user is accessing an Internet web site, the settings control whether to redirect the web access to the web admin interface page or not.    If this is disabled and the device is not connected, the browser will then show web access error.  The user can still access the web admin interface by accessing to the device’s LAN IP address.    By default, it’s http://192.168.20.1 .    Restore factory settings: To restore the device to factory default settings.  After clicked, the settings will be restored to factory defaults and the device will be restarted.  Reboot: To restart the device.
PePLink Surf User’s Manual v2.6 Copyright © 1999-2006 PePLink Ltd. All Rights Reserved  Page 15 of 32     4.3   Advanced Settings: Port Forward The PePLink Surf supports forwarding inbound TCP and UDP connections to servers on the LAN.  For example, if your PC is hosting a web server and you want to let Internet users access it, you should define a rule on a role.    Enter “80” and “80” for the Port Range.    Select “TCP” for the protocol.    Enter the PC’s IP address to the “IP Address” field.  Click the “Save” button to save and apply the changes.
PePLink Surf User’s Manual v2.6 Copyright © 1999-2006 PePLink Ltd. All Rights Reserved  Page 16 of 32    4.4   WPA/WPA2 with 802.1x Authentication The PePLink Surf supports authentication and encryption methods of “802.1x with dynamic WEP key encryption” and WPA/WPA2-Enterprise.  A radius server can be used to perform authentication based on the IEEE standard 802.1x with EAP-TTLS.  To set it up, you have to configure the PePLink Surf, the access point and a radius server.  By default, EAP-TTLS/CHAP is used as the EAP authentication method.    You can change this setting in the System Settings page.    Please refer to chapter 4.9.3 .  4.4.1   Configure the PePLink Surf To enable the 802.1x authentication, you can go to the CPE Setup page, choose “WPA” for the Authentication setting and leave the WEP key setting empty.   Certificate checking By default, the PePLink Surf does not verify the radius server’scertificate. If you would like to check the certificate, you can use acommand-line based FTP client to upload your certificate to thePePLink Surf. 1. ftp to the PePLink Surf (default IP is 192.168.20.1) 2.  Type the login ID and password: “root” and “MSurf000”3. cd /etc/1x 4. put root.pem 5. bye
PePLink Surf User’s Manual v2.6 Copyright © 1999-2006 PePLink Ltd. All Rights Reserved  Page 17 of 32    4.4.2   Access Point Access point set up procedure is different from one brand to the others.    Here are some necessary configuration parameters to be configured in the access point: -  Enable WPA2 with 802.1x authentication -  Enter the radius server IP address, port number and the secret (for the provided radius server config mentioned in 4.4.3 , the secret is “testing123”)  4.4.3   Radius Server The commercial radius server, Radiator, is used in the set up.    It is a product of Open System Consultants Pty Ltd.      Radiator version 3.9 is known to be interoperable.  Any version above 3.9 should work too.  Just follow the server’s installation guide to install it on a server.  After installed, you should put the root cert file and server cert file to a directory, update radiator’s configuration file and the users files.  A demo CA cert file (cacert.pem), a server cert file (server_cert.pem) and a server key file (/etc/radiator/server_key.pem) are pre-generated and attached.    You can generate them by yourself by following the instructions in the Appendix.  Put the files to the directory /etc/radiator. A sample Radiator configuration file is as follows.  Save it as radius.cfg and put it under /etc/radiator.
PePLink Surf User’s Manual v2.6 Copyright © 1999-2006 PePLink Ltd. All Rights Reserved  Page 18 of 32     To change user login name and password, just edit the file /etc/radiator/users.    A sample user entry is like this:  Then start the radius server by executing this:  Now the Radiator server’s setup completed. AuthPort        1812 AcctPort        1813 LogDir          /var/log/radius DbDir           /etc/radiator Trace          4 <Client DEFAULT>         Secret testing123         DupInterval 0 </Client> <Realm DEFAULT>         <AuthBy FILE>                 Filename /etc/radiator/users                 EAPType TTLS                 EAPTLS_CAFile /etc/radiator/cacert.pem                 EAPTLS_CertificateFile /etc/radiator/server_cert.pem EAPTLS CertificateType PEMdemoid1 User-Password=demopass1 /usr/bin/radiusd -config_file/t/ dit / di f
PePLink Surf User’s Manual v2.6 Copyright © 1999-2006 PePLink Ltd. All Rights Reserved  Page 19 of 32    4.5   Test the Setup To test to setup, you can now go to the PePLink Surf’s Main page, enter the user name and password.    The realm (the text box next to the “@” sign) value can be left empty.    Then click the Connect button.   After connected, you should see:
PePLink Surf User’s Manual v2.6 Copyright © 1999-2006 PePLink Ltd. All Rights Reserved  Page 20 of 32    4.6   Firmware Upgrade  The PePLink Surf is able to check whether a newer firmware (the software running on the PePLink Surf) is available.   To do so, click the link “Firmware Upgrade” on the top bar.    You will see this screen:  Click the “Check for new firmware” on the screen.  If there is a firmware available, you can simply click a “Download and Upgrade” button.  During an upgrade, please do not interrupt the process.
PePLink Surf User’s Manual v2.6 Copyright © 1999-2006 PePLink Ltd. All Rights Reserved  Page 21 of 32     4.7  Debug Page A debug page is provided for advanced network troubleshooting.      This page shows the unit’s firmware version, hardware version, serial number, LAN MAC address, Wi-Fi MAC address, supported Wi-Fi modes, scanned access points’ information and WAN connection information.  For the Scanned AP section, the scanned result may not be up to date.    You can click the “Scan again” button to update the scanned AP list.    But note that, while it is connected to an AP, clicking the button may drop the connection.  On the page bottom, you are allowed to download a debug dump file and configuration file.    In case you need to contact PePLink for technical support, you can send the debug dump file to support@peplink.com.
PePLink Surf User’s Manual v2.6 Copyright © 1999-2006 PePLink Ltd. All Rights Reserved  Page 22 of 32     4.8   Restore to Factory Defaults  To restore the PePLink Surf to factory defaults, there are two methods.  If you are able to access the web admin interface, go to the “CPE Setup” page, and click the “Restore and Reboot” button.  Otherwise, you can also power up the unit and wait for about 1 min.  Then press the Reset button at the rear side of the unit using a pin and then hold it for 5 secs.    The unit will restore the settings to factory defaults and reboot.
PePLink Surf User’s Manual v2.6 Copyright © 1999-2006 PePLink Ltd. All Rights Reserved  Page 23 of 32    4.9  System Settings Some system settings are hidden from the end users.  They are for the service provider to change some system specific settings  To access the page, type this URL on your browser: http://192.168.20.1/ss/  The page’s login ID and password are “admin” and “MSurf000”.  The page is like this:
PePLink Surf User’s Manual v2.6 Copyright © 1999-2006 PePLink Ltd. All Rights Reserved  Page 24 of 32     4.9.1   Web via WAN with HTTPS This is to enable or disable the secure web administration server to be accessible from WAN (wireless side) or not.  If enabled, the HTTPS port number is entered here.  It must be between 1024 and 65535.  The default port number is 8000.  4.9.2   Web Administration Password This is to change the web administration interface’s access password when accessing to http://ip.addr/ss/ (from LAN) or https://wan.ip.addr/ (from WAN).    The login name is “admin”.  4.9.3   EAP Types For the authentication methods “802.1x with dynamic WEP key” and “WPA/WPA2-Enterprise”, the EAP type can be chosen here.  Available options are CHAP, MSCHAP, MSCHAPV2 and PAP.
PePLink Surf User’s Manual v2.6 Copyright © 1999-2006 PePLink Ltd. All Rights Reserved  Page 25 of 32     4.9.4   SNMP Settings The unit has a built-in SNMP agent.  It allows the administrator to get some basic system information and to toggle the unit’s Status LED for troubleshooting.  The agent can only be accessed from administration network only.  Please refer to chapter 4.9.5 .  This section is for configure the SNMP agent’s access permission.  Toggling theLED The unit’s StatusLED can betoggled by usingSNMP.  Thepurpose is for
PePLink Surf User’s Manual v2.6 Copyright © 1999-2006 PePLink Ltd. All Rights Reserved  Page 26 of 32     4.9.5   Admin Network Settings This section is for configuring which network’s IP addresses are allowed to access the ssh server and the SNMP agent.   4.9.6  PePLink Management System settings The Surf units can be managed by the PePLink Management System (PMS). The PMS is divided into several sub systems.    This section is for configuring which sub system the Surf should communicate to.  They include Firmware server, Status Server, Configuration Server and Custom Message Server.
PePLink Surf User’s Manual v2.6 Copyright © 1999-2006 PePLink Ltd. All Rights Reserved  Page 27 of 32    4.9.7   Wireless Settings The CTS/RTS threshold value 2347 means this setting is disabled.  If the packet that the Surf is transmitting is larger than the threshold, it will initiate the CTS/RTS function. The up stream and down stream bandwidth are for controlling the maximum up link and down link bandwidth that the user can consume.   The unit is bit per second.  Setting them to “0” will disable the bandwidth control.  The default value is “0”.
PePLink Surf User’s Manual v2.6 Copyright © 1999-2006 PePLink Ltd. All Rights Reserved  Page 28 of 32    5  Appendix - Demo CA and Server Certification Generation Instructions  5.1  Prerequisite OpenSSL v0.9.7a or above Note: The illustration below is based on Linux.  5.2   Create your own Certificate Authority (CA) 1. Create a working directory (e.g. ~/demoCA)  mkdir ~/demoCA  chmod 700 ~/demoCA  cd ~/demoCA  mkdir private certs newcerts  echo -n 01 > serial  touch index.txt  2. Create a private key for your CA, for example:  openssl genrsa -des3 -passout pass:democa -out private/cakey.pem 2048     (A CA private key called "cakey.pem" is then created in the directory "private".  This is a 2048bit RSA private key with pass phrase 'democa'.)  3. Create the server certificate for your CA, for example:  openssl req -new -x509 -days 8000 -key private/cakey.pem -passin pass:democa -out cacert.pem    Then a series of questions will be asked:  You are about to be asked to enter information that will be incorporated into your certificate request.
PePLink Surf User’s Manual v2.6 Copyright © 1999-2006 PePLink Ltd. All Rights Reserved  Page 29 of 32    What you are about to enter is what is called a Distinguished Name or a DN. There are quite a few fields but you can leave some blank For some fields there will be a default value, If you enter '.', the field will be left blank. ----- Country Name (2 letter code) [GB]:US State or Province Name (full name) [Berkshire]:US   Locality Name (eg, city) [Newbury]:US Organization Name (eg, company) [My Company Ltd]: Organizational Unit Name (eg, section) []: Common Name (eg, your name or your server's hostname) []:demoCA Email Address []:        (The CA server certificate is now generated in "cacert.pem")  4. In some applications (e.g. Microsoft Windows), DER version of server certificate is needed:  openssl x509 -outform DER -in cacert.pem -out cacert.der        (The CA server certificate in DER format is now ready in "cacert.der")  5.3   Create a server certificate request from your servers 1. Create your working directory (e.g. ~/myCert)  mkdir ~/myCert  chmod 700 ~/myCert  cd ~/myCert  2. Create the private key of your server, for example:   openssl genrsa -des3 -passout pass:demoserver -out server_key.pem 2048        (The private key for CA called "server_key.pem" is then created.   This is 2048bit RSA private key with pass phrase 'demoserver'.)
PePLink Surf User’s Manual v2.6 Copyright © 1999-2006 PePLink Ltd. All Rights Reserved  Page 30 of 32     3. Create the certificate singing request of your server, for example:  openssl req -new -key server_key.pem -passin pass:demoserver -out server_req.pem    Then a series of questions will be asked: You are about to be asked to enter information that will be incorporated into your certificate request. What you are about to enter is what is called a Distinguished Name or a DN. There are quite a few fields but you can leave some blank For some fields there will be a default value, If you enter '.', the field will be left blank. ----- Country Name (2 letter code) [GB]:US State or Province Name (full name) [Berkshire]:US Locality Name (eg, city) [Newbury]:US Organization Name (eg, company) [My Company Ltd]: Organizational Unit Name (eg, section) []: Common Name (eg, your name or your server's hostname) []:myserver.com Email Address []:  Please enter the following 'extra' attributes to be sent with your certificate request A challenge password []: An optional company name []:     (Your server certificate request for "myserver.com" is now generated in "server_req.pem")
PePLink Surf User’s Manual v2.6 Copyright © 1999-2006 PePLink Ltd. All Rights Reserved  Page 31 of 32    5.4   Sign the server certificate with your own CA    Assume server request is also in the same server's ~/myCert/server_req.pem   openssl ca -policy policy_anything -passin pass:democa -in ~/myCert/server_req.pem -days 8000 -out ~/myCert/server_cert.pem    Then a series of questions will be asked (details will vary in your case): Using configuration from /usr/share/ssl/openssl.cnf Check that the request matches the signature Signature ok Certificate Details:         Serial Number: 1 (0x1)         Validity             Not Before: Aug 24 04:58:01 2005 GMT             Not After : Jul 20 04:58:01 2027 GMT         Subject:             countryName               = US             stateOrProvinceName       = US             localityName              = US             organizationName          = My Company Ltd             commonName                = myserver.com         X509v3 extensions:             X509v3 Basic Constraints:              CA:FALSE             Netscape Comment:              OpenSSL Generated Certificate             X509v3 Subject Key Identifier:              0E:D5:E9:F6:A5:B6:88:51:EB:22:8C:ED:C3:AA:17:A1:A8:FC:EC:92             X509v3 Authority Key Identifier:              keyid:85:B5:08:F3:21:1B:99:5D:E1:4B:D1:57:2C:EC:9C:00:A2:F4:24:9B             DirName:/C=US/ST=US/L=US/O=My Company Ltd/CN=demoCA             serial:00  Certificate is to be certified until Jul 20 04:58:01 2027 GMT (8000 days) Sign the certificate? [y/n]:y   1 out of 1 certificate requests certified, commit? [y/n]y Write out database with 1 new entries
PePLink Surf User’s Manual v2.6 Copyright © 1999-2006 PePLink Ltd. All Rights Reserved  Page 32 of 32    Data Base Updated       (The signed server certificate is now in "~/myCert/server_cert.pem")  Federal Communication Commission Interference Statement This equipment has been tested and found to comply with the limits for a Class B digital device, pursuant to Part 15 of the FCC Rules.  These limits are designed to provide reasonable protection against harmful interference in a residential installation.    This equipment generates, uses and can radiate radio frequency energy and, if not installed and used in accordance with the instructions, may cause harmful interference to radio communications.  However, there is no guarantee that interference will not occur in a particular installation.    If this equipment does cause harmful interference to radio or television reception, which can be determined by turning the equipment off and on, the user is encouraged to try to correct the interference by one of the following measures: - Reorient or relocate the receiving antenna. - Increase the separation between the equipment and receiver. - Connect the equipment into an outlet on a circuit different from that to which the receiver is connected. - Consult the dealer or an experienced radio/TV technician for help. This device complies with Part 15 of the FCC Rules. Operation is subject to the following two conditions: (1) This device may not cause harmful interference, and (2) this device must accept any interference received, including interference that may cause undesired operation. FCC Caution: Any changes or modifications not expressly approved by the party responsible for compliance could void the user's authority to operate this equipment.  IMPORTANT NOTE: FCC Radiation Exposure Statement: This equipment complies with FCC radiation exposure limits set forth for an uncontrolled environment. This equipment should be installed and operated with minimum distance 20cm between the radiator & your body. This transmitter must not be co-located or operating in conjunction with any other antenna or transmitter. IEEE 802.11b or 802.11g operation of this product in the U.S.A. is firmware-limited to channels 1 through 11.

Navigation menu