PLANER CHEVAL TECH A2105AH Tablet PC User Manual
PLANER CHEVAL TECH PTE. LTD. Tablet PC
Contents
User manual

IdeaTab
A2105A-H
Read the safety notices and important tips in the
included manuals before using your computer.
©Lenovo China 2012
New World. New Thinking.TM
www.lenovo.com
User Guide V1.0
V1.0_en-US

First Edition (March 2012)
© Copyright Lenovo 2012.
Before using the product, be sure to read Lenovo Safety and General
Information Guide first.
The features described in this guide are common to most models.
Some features may not be available on your computer and/or your
computer may include features that are not described in this user
guide.
Some instructions in this guide may assume that you are using
Windows® 7. If you are using other Windows operating system, some
operations may be slightly different. If you are using other operating
systems, some operations may not apply to you.
LENOVO products, data, computer software, and services have been developed exclusively at private
expense and are sold to governmental entities as commercial items as defined by 48 C.F.R. 2.101 with
limited and restricted rights to use, reproduction and disclosure. LIMITED AND RESTRICTED
RIGHTS NOTICE: If products, data, computer software, or services are delivered pursuant a General
Services Administration “GSA” contract, use, reproduction, or disclosure is subject to restrictions set
forth in Contract No. GS-35F-05925.
Notes
•
•
•
To refer to it, go to http://consumersupport.lenovo.com/ and click
User guides and manuals.
Regulatory Notice
•
i
Chapter 1. Getting to know your
computer................................... 1
Front view .......................................1
Left-side view .................................2
Right-side view...............................3
Top view..........................................4
Back view.........................................5
Chapter 2. Learning the
basics........................................ 6
First use............................................6
Using AC adapter and battery .....8
Connecting external devices.......10
Chapter 3. Connecting to the
Internet....................................11
Wireless connection .....................11
Appendix A. Notices ..............12
Important safety information .....12
Specifications.........................17
Contents
1
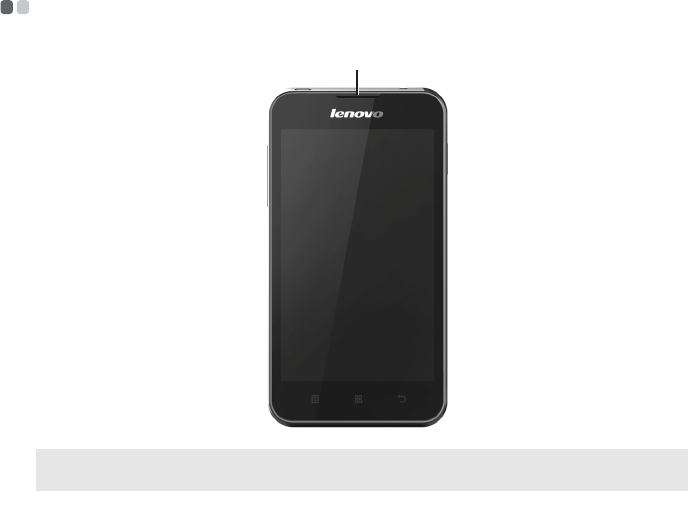
Chapter 1. Getting to know your computer
Front view - - - - - - - - - - - - - - - - - - - - - - - - - - - - - - - - - - - - - - - - - - - - - - - - - - - - - - - - - - - - - - - - - - - - - - - - - - - - - - - - - - - - - - - - - - - - - - -
Notes:The illustrations in this manual may differ from the actual product. Please refer to
the actual product.
Handset
a
a

2
Chapter 1. Getting to know your computer
Left-side view - - - - - - - - - - - - - - - - - - - - - - - - - - - - - - - - - - - - - - - - - - - - - - - - - - - - - - - - - - - - - - - - - - - - - - - - - - - - - - - - - - - - - -
Volume Button Adjusts the volume.
a
a

Chapter 1. Getting to know your computer
3
Right-side view - - - - - - - - - - - - - - - - - - - - - - - - - - - - - - - - - - - - - - - - - - - - - - - - - - - - - - - - - - - - - - - - - - - - - - - - - - - - - - - - - -
Power button
Press this button to turn on the IdeaTab.
a
a
4
Chapter 1. Getting to know your computer
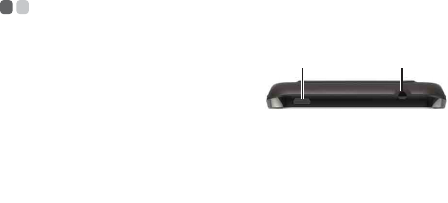
Top view - - - - - - - - - - - - - - - - - - - - - - - - - - - - - - - - - - - - - - - - - - - - - - - - - - - - - - - - - - - - - - - - - - - - - - - - - - - - - - - - - - - - - - - - - - - - - - - - - - -
Micro USB port
Headphone jack Connects to external headphones.
Attention:
•Listening to music at high volume over extended periods of time may damage your
hearing.
a b
a
b
Chapter 1. Getting to know your computer
5
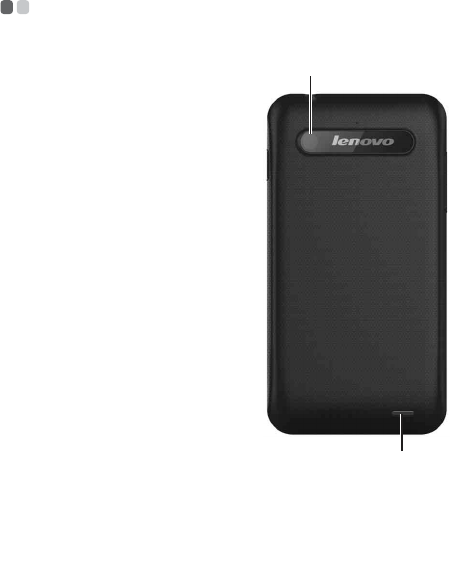
Back view - - - - - - - - - - - - - - - - - - - - - - - - - - - - - - - - - - - - - - - - - - - - - - - - - - - - - - - - - - - - - - - - - - - - - - - - - - - - - - - - - - - - - - - - - - - - - - - -
Integrated
camera
Use the camera for video communication.
Microphone
a
b
a
b

6
Chapter 2. Learning the basics
First use
- - - - - - - - - - - - - - - - - - - - - - - - - - - - - - - - - - - - - - - - - - - - - - - - - - - - - - - - - - - - - - - - - - - - - - - - - - - - - - - - - - - - - - - - - - - - - - - - - - - - - - -
Reading the manuals
Read the supplied manuals before using your computer.
Connecting to the power
The supplied battery pack is not fully charged at purchase.
To charge the battery and begin using your computer, insert the battery pack
and connect the computer to an electrical outlet. The battery is automatically
charged while the computer is running on AC power.
Installing the battery pack
Refer to the supplied Setup Poster to install the battery pack.
Connecting the computer to an electrical outlet
1
Connect the power cord to the AC adapter.
2
Connect the AC adapter to the AC power adapter jack of the computer
firmly.
3
Plug the power cord into an electrical outlet.
Turning on the computer
Press the power button to turn on the computer.
Configuring the operating system
You may need to configure the operating system when it is first used. The
configuration process may include the procedures below.
• Accepting the end user license agreement
• Configuring the Internet connection
• Registering the operating system
• Creating a user account

Chapter 2. Learning the basics
7
Putting your computer into sleep state or shutting it down
When you finish working with your computer, you can put it into sleep state
or shut it down.
Putting your computer into sleep state
If you will be away from your computer for only a short time, put the
computer into sleep state.
When the computer is in sleep state, you can quickly wake it to resume use,
and bypass the startup process.
To wake the computer, do one of the following.
• Press the power button.
• Press any key on the keyboard.
Shutting down your computer
If you are not going to use your computer for a day or two, shut it down.
To shut down your computer, click and select Shut down from the Start
menu.
Note: Wait until the power indicator light starts blinking (indicating that the computer is
in sleep state) before you move your computer. Moving your computer while the
hard disk is spinning can damage the hard disk, causing loss of data.

8
Chapter 2. Learning the basics
Using AC adapter and battery
- - - - - - - - - - - - - - - - - - - - - - - - - - - - - - - - - - - - - - - - - - - - - - - - - - - - - - - - - -
Checking battery status
You can determine the percentage of battery power remaining by checking
the battery icon in the notification area.
Charging the battery
When you find that the battery power is low, you need to charge the battery
or replace it with a fully charged one.
You need to charge the battery in any of the following situations:
• When you purchase a new battery
• If the battery status indicator starts blinking
• If the battery has not been used for a long time
Note: As each computer user has different habits and needs, it is difficult to predict how
long a battery charge will last. There are two main factors:
• The amount of energy stored in the battery when you commence work.
• The way you use your computer: for example, how often you access the hard disk
drive and how bright you make the computer display.
Notes:
•You are advised to insert the battery pack when using your computer to prevent small
particles from entering the inside of your computer.
•To increase the life of the battery pack, the computer does not start recharging the
battery immediately after it drops from fully charged.
•Charge the battery at a temperature between 50 °F and 86 °F (10 °C-30 °C).
•Full charge or discharge is not required.
Chapter 2. Learning the basics
9
Removing the battery pack
If you are not going to use the computer for an extended period of time, or if
you need to send your computer to Lenovo for service, etc. remove the
battery pack from the computer. Before removing the battery pack, make
sure the computer has been shut down.
Handling the battery
If the rechargeable battery pack is replaced with an incorrect type, there may
be danger of an explosion. The battery pack contains a small amount of
harmful substances. To avoid possible injury and detriment to the
environment, pay attention to the following points:
• Replace only with a battery of the type recommended by Lenovo.
• Keep the battery pack away from fire.
• Do not expose the battery pack to water or rain.
• Do not attempt to disassemble the battery pack.
• Do not short-circuit the battery pack.
• Keep the battery pack away from children.
• Do not put the battery pack in trash that is disposed of in landfills. When
disposing of the battery, comply with local ordinances or regulations and
your company’s safety standards.

10
Chapter 2. Learning the basics
Connecting external devices
- - - - - - - - - - - - - - - - - - - - - - - - - - - - - - - - - - - - - - - - - - - - - - - - - - - - - - - - - - - -
Your computer has a wide range of built-in features and connection
capabilities.
Using memory cards (not supplied)
Inserting a memory card
1
Push the dummy card until you hear a click. Gently pull the dummy card
out of the memory card slot.
2
Slide the memory card in until it clicks into place.
Removing a memory card
1
Push the memory card until you hear a click.
2
Gently pull the memory card out of the memory card slot.
Connecting a universal serial bus (USB) device
Your computer comes with three USB ports compatible with USB devices.
Connecting Bluetooth enabled devices (on select models)
If your computer has an integrated Bluetooth adapter card, it can connect to
and transfer data wirelessly with other Bluetooth enabled devices, such as
notebook computers, PDAs and cell phones. You can transfer data between
these devices without cables and up to 10 meters range in open space.
Note: The dummy card is used for preventing dust and small particles from entering the
inside of your computer when the memory card slot is not in use. Retain the dummy
card for future use.
Note: Before removing the memory card, disable it via Windows safely remove hardware
and eject media utility to avoid data corruption.
Note: When using a high power consumption USB device such as USB ODD, use the
external device’s power adapter. Otherwise, the device may not be recognized, and
system shut down may result.
Note: The actual maximum range may vary due to interference and transmission barriers. To
get the best possible connection speed, place the device as near your computer as
possible.

11
Chapter 3. Connecting to the Internet
As a global network, the Internet connects computers worldwide, providing
services such as e-mailing, information searching, electronic commerce, Web
browsing and entertainment.
You can connect the computer to the Internet in the following ways:
Wireless network technology: connect without wiring.
Wireless connection - - - - - - - - - - - - - - - - - - - - - - - - - - - - - - - - - - - - - - - - - - - - - - - - - - - - - - - - - - - - - - - - - - - - - - - - - - - -
Wireless connections provide mobile access to the Internet, allowing you to
stay online anywhere the wireless signal covers.
Divided by the signal scales, wireless connection to the Internet can be built
based on the following standards.
Using WLAN (on select models)
Software configuration
Consult your Internet Service Provider (ISP) and search Windows Help and
Support Center for details on how to configure your computer.
WLAN WLAN networks cover a small physical area, like a
home, office, or small group of buildings. An access
point is necessary for the connection.
Note: Your computer may not support all wireless connection methods.

12
Appendix A. Notices
Important safety information - - - - - - - - - - - - - - - - - - - - - - - - - - - - - - - - - - - - - - - - - - - - - - - - -
Important: Changes or modifications to this product not authorized could
void the EMC and wireless compliance and negate your authority to operate
the product. This product has demonstrated EMC compliance under
conditions tehat included the use of compliant peripheral devices and
shielded cables between system components. It is important that you use
compliant peripheral devices and shielded cables between system
components to reduce the possibility of causing interference to radios,
televisions, and other electronic devices.
FCC Compliance Statement
This device complies with part 15 of the FCC rules. Operation is subject to
the following two conditions: (1) this device may not cause harmful
interference, and (2) this device must accept any interference received,
including interference that may cause undesired operation.
FCC Radiation Exposure Statement
This equipment complies with FCC RF radiation exposure limits set forth an
uncontrolled environment. This transmitter must not be co-located or
operating in conjunction with any other antenna or transmitter.
The device was tested and complies to measurement standards and
procedures specified in FCC OET Bulletin 65, Supplement C
Note: This equipment has been tested and found to comply with the limits for a Class B
digital device, pursuant to part 15 of the FCC Rules. These limits are designed to
provide reasonable protection against harmful interference in a residential installation.
This equipment generates, uses and can radiate radio frequency energy and, if not
installed and used in accordance with the instructions, may cause harmful interference
to radio communications. However, there is no guarantee that interference will not
occur in a particular installation. If this equipment does cause harmful interference to
radio or television reception, which can be determined by turning the equipment off
and on, the user is encouraged to try to correct the interference by one or more of the
following measures:
- Reorient or relocate the receiving antenna.
- Increase the separation between the equipment and receiver.
- Connect the equipment into an outlet on a circuit different from that to which the
receiver is connected.
- Consult the dealer or an experienced radio/TV technician for help.

Appendix A. Notices
13
European Community Compliance Statement
This equipment is marked with the 0560 symbol and can be used
throughout the European community.
This indicates compliance with the R&TTE Directive 1999/5/EC and meets
the relevant parts of following technical specifications:
EN 300 328 – Electromagnetic compatibility and Radio spectrum Matters
(ERM); Wideband Transmission Systems; Data transport equipment
operating in the 2.4 GHz ISM band and using wide band modulation
techniques; Harmonized EN covering essential requirements under article
3.2 of the R&TTE Directive
EN 301 489-1 - Electromagnetic compatibility and Radio spectrum Matters
(ERM); Electromagnetic Compatibility (EMC) standard for radio equipment
and services; Part 1: Common technical requirements
EN 301 489-7 - Electromagnetic compatibility and Radio spectrum Matters
(ERM); Electromagnetic Compatibility (EMC) standard for radio equipment
and services; Part 7: Specific conditions for mobile and portable radio and
ancillary equipment of digital cellular radio telecommunications
system(GSM and DCS)
EN 301 489-17 - Electromagnetic compatibility and Radio spectrum Matters
(ERM); Electromagnetic Compatibility (EMC) standard for radio equipment
and services; Part 17: Specific conditions for 2.4 GHz wideband transmission
systems and 5 GHz high performance RLAN equipment
EN 301 489-24 - Electromagnetic compatibility and Radio spectrum Matters
(ERM); Electromagnetic Compatibility (EMC) standard for radio equipment
and services; Part 24: Specific conditions for IMT-2000 CDMA Direct
Spread(UTRA) for Mobile and portable (UE) radio and ancillary equipment
EN 301 511- Global System for Mobile communications(GSM): Harmonized
EN for mobile stations in the GSM 900 and GSM 1800 bands covering
essential requirements under article 3.2 of the R&TTE directive(1999/5/EC)
14
Appendix A. Notices
EN 301 908-1- Electromagnetic compatibility and Radio spectrum Matters
(ERM): Base Stations (BS). Repeaters and User Equipment (UE) for IMT-2000
Third- Generation cellular networks: Part 1: Harmonized EN for IMT-2000,
introduction and common requirements, covering essential requirements of
article 3.2 of the R&TTE Directive
EN 60950-1- Information technology equipment - Safety - Part 1: General
requirements
IEC 62209-2-Human exposure to radio frequency fields from hand-held and
body-mounted wireless communication devices - Human models,
instrumentation, and procedures - Part 2: Procedure to determine the specific
absorption rate (SAR) for wireless communication devices used in close
proximity to the human body (frequency range of 30 MHz to 6 GHz)
Marking by the symbol indicates that usage restrictions apply.
France - 2.4GHz for Metropolitan France:
In all Metropolitan départements, wireless LAN frequencies can be used
under the following
conditions, either for public or private use:
• Indoor use: maximum power (EIRP*) of 100 mW for the entire 2400-2483.5
MHz frequency band
• Outdoor use: maximum power (EIRP*) of 100 mW for the 2400-2454 MHz
band and with maximum power (EIRP*) of 10 mW for the 2454-2483 MHz
band
Appendix A. Notices
15
Certification information (SAR) The device meets guidelines for expo-
sure to radio waves.
Your device is a radio transmitter and receiver. It is designed not to exceed
the limits for exposure to radio waves recommended by international
guidelines. These guidelines were developed by the independent scientific
organization ICNIRP and include safety margins designed to assure the
protection of all persons, regardless of age and health.
The exposure guidelines for devices employ a unit of measurement known
as the Specific Absorption Rate or SAR. The SAR limit stated in the ICNIRP
guidelines is 2.0 watts/kilogram (W/kg) averaged over 10 grams of tissue.
Tests for SAR are conducted using standard operating positions with the
device transmitting at its highest certified power level in all tested frequency
bands.
This equipment complies with the European Council Recommendation of 12
July 1999 on the Limitation of Exposure of the General Public to
Electromagnetic Fields [1999/519/EC].
This model phone meets the government’s requirements for exposure to
radio waves. This phone is designed and manufactured not to exceed the
emission limits for exposure to radio frequency (RF) energy set by the
Federal Communications Commission of the U.S. Government: The
exposure standard for wireless mobile phones employs a unit of
measurement known as the Specific Absorption Rate, or SAR. The SAR limit
set by the FCC is 1.6 W/kg. Tests for SAR are conducted using standard
operating positions accepted by the FCC with the phone transmitting at its
highest certified power level in all tested frequency bands. Although the SAR
is determined at the highest certified power level, the actual SAR level of the
phone while operating can be well below the maximum value. This is
because the phone is designed to operate at multiple power levels so as to
use only the power required to reach the network. In general, the closer you
are to a wireless base station antenna, the lower the power output.

16
Appendix A. Notices
The highest SAR value for this model phone as reported to the FCC when
tested for use at the ear is 0.396 W/kg and when worn on the body, as
described in this user guide, is 1.23 W/kg (Body-worn measurements differ
among phone models, depending upon available enhancements and FCC
requirements.) While there may be differences between the SAR levels of
individual phones and at various positions, they all meet the government
requirement. The FCC has granted an Equipment Authorization for this
model phone with all reported SAR levels evaluated as in compliance with
the FCC RF exposure guidelines. SAR information on this model phone is on
file with the FCC and can be found under the Display Grant section of
http://www.fcc.gov/oet/ea/fccid after searching on.
FCC ID: YDUA2105AH
For body worn operation, this phone has been tested and meets the FCC RF
exposure guidelines for use with an accessory that contains no metal and
that positions the handset a minimum of 1.5 cm from the body. Use of other
enhancements may not ensure compliance with FCC RF exposure guidelines.
If you do not use a body-worn accessory and are not holding the phone at the
ear, position the handset a minimum of 1.5 cm from your body when the
phone is switched on.

17
Specifications
Model Name: IdeaTab A2105A-H
Machine Type: 60014, 2288
Note:
The following specifications may contain technical inaccuracies or typographical errors.
Lenovo reserves the right to improve and/or change specifications at any time without notice.
Form Factor
Dimensions Appr. 148 mm × 78 mm × 11.2 mm
Weight 180 g
LCD size 5" WVGA LED
Platform
Freescale iMX51 Qualcomm 7227A
Memory
Type and speed LP DDR2
Maximum
supported capacity
512 MB
Hard disk drive
Interface eMMC/Nand flash
Display
Display
resolution (LCD)
800 × 480 pixels
LCD screen LED backlight
I/O Ports
USB Micro USB × 1
Audio Headphone jack × 1
Communication 3G WWAN (Select models only)
Memory card slot Micro SD × 1

18
Specifications
Battery pack
Typ e Li-Ion polymer
Cells/Capacity 8.8 Wh
AC adapter
Input 100-240V ~ 0.2A
Output voltage 5W (5V 1A)
Miscellaneous
Camera 0.3 mega pixels for front
5.0 mega pixels for back
First Edition (June 2011)
© Copyright Lenovo 2011.
Before using the product, be sure to read Lenovo Safety and General
Information Guide first.
The features described in this guide are common to most models.
Some features may not be available on your computer and/or your
computer may include features that are not described in this user
guide.
Some instructions in this guide may assume that you are using
Windows® 7. If you are using other Windows operating system, some
operations may be slightly different. If you are using other operating
systems, some operations may not apply to you.
LENOVO products, data, computer software, and services have been developed exclusively at private
expense and are sold to governmental entities as commercial items as defined by 48 C.F.R. 2.101 with
limited and restricted rights to use, reproduction and disclosure. LIMITED AND RESTRICTED
RIGHTS NOTICE: If products, data, computer software, or services are delivered pursuant a General
Services Administration “GSA” contract, use, reproduction, or disclosure is subject to restrictions set
forth in Contract No. GS-35F-05925.
Notes
•
•
•
To refer to it, go to http://consumersupport.lenovo.com/ and click
User guides and manuals.
Regulatory Notice
•

IdeaTab A2105A
Read the safety notices and important tips in the
included manuals before using your computer.
©Lenovo China 2012
New World. New Thinking.TM
www.lenovo.com
User Guide V1.0
V1.0_en-US