PQI MPack ....(....) User Manual To The 8178af78 839a 422c A0c7 Ed5ee169e650
User Manual: PQI mPack to the manual
Open the PDF directly: View PDF ![]() .
.
Page Count: 48
mPack TM
user’s manual
Portable
Multimedia Player
ENG

ENG
11
Introduction
Thank you for purchasing the mPack portable multimedia player, a state-of
-the-art, portable hard disk, multimedia player by Power Quotient
International. We hope you enjoy using your new mPack with various
multimedia, anytime, anywhere.
This manual is designed to help you to use the product safely and
correctly. Please read it completely and carefully before using your new
mPack player.
Thank you.
33
ENG
22
Copyrights/Certification/
Trademarks/Exemptions
[Copyrights]
●Power Quotient International has the rights of all patents, trademarks,
copyrights and other intellectual property rights relating to this manual. No
part of the manual may be copied or reproduced in any form by any means
without a prior authorization of PQI. Unauthorized use of all or part of the
manual may be subject to corresponding legal actions.
●All copyrighted contents, including software and audio/video sources, are
protected by the relevant laws and regulations such as the copyright law.
The user takes full legal responsibility when reproducing or distributing the
copyrighted contents without authorization.
●All of the companies, institutions, products, people and events that are
referred to in the examples of this manual, other than PQI, are fictitious.
There is no connection to any actual companies, institutions, products,
people or events, and no assumption as to such a connection shall be made.
It is the user's responsibility to comply with the relevant copyright laws.
Copyright
ⓒ
2004 Power Quotient International Co., Ltd. All Rights Reserved.
[Certification]
CE, FCC, and MIC
●THIS DEVICE COMPLIES WITH PART 15 OF THE FCC RULES.|
OPERATION IS SUBJECT TO THE CONDITIONS:
(1) THIS DEVICE MAY NOT CAUSE HARMFUL INTERFERENCE, AND
(2) THIS DEVICE MUST ACCEPT ANY INTERFERENCE RECEIVED,
INCLUDING INTERFERENCE THAT MAY CAUSE UNDESIRED
OPERATION.
●Caution : Changes or modifications not expressly approved by the party
responsible for compliance could void the user's authority to operate the
equipment.
●NOTE : This equipment has been tested and found to comply with the
limits for a Class B digital device, pursuant to Part 15 of the FCC Rules.
These limits are designed to provide reasonable protection against harmful
interference in a residential installation. This equipment generates, uses
and can radiate radio frequency energy and, if not installed and used in
accordance with the instructions, amy cause harmful interference to radio
communications. However, there is no guarantee that interference will not
occur in a particular installation. If this equipment does cause harmful
interference to radio or television reception, which can be determined by
turning the equipment off and on, the user is encouraged to correct the
interference by one or more of the following measures:
Safety Guidelines
Please read and follow all safety information before attempting to use this
product. These safety guidelines contain important information regarding the
safe and proper operation of the mPack. The safety categories are separated
into "DANGER", "WARNING", and "CAUTION".
The manufacturer is not liable for any injury, accident, or product damage
resulting from operation not in accordance with these safety guidelines.
The categories are as follows:
DANGER!
WARNING!
CAUTION!
If not handled as directed, serious injury or death may result.
If not handled as directed, serious or minor injury and/or
product or property damage may result.
If not handled as directed, minor damage may result.
-Reorient or relocate the reveiving antenna.
-Increase the separation between the equipment and reveiver.
-Connect the equipment into an outlet on a circuit different from that to
which the receiver is connected.
-Consult the dealer or an experienced radio/TV technician for help.
[Registered Trademarks]
●mPack is the registered trademark of Power Quotient International Co., Ltd.
●Windows, Windows 98, Windows 2000 and Windows XP are the registered
trademarks of Microsoft Corp.
[Exemptions]
●The manufacturer, trader and agent are not be responsible for any
accidental damage including physical harm, injury, or other damages
caused by improper use or operation of the product.
●The information in this manual has been prepared based on the current
product specifications. The product manufacturer, PQI, is adding new
features to the product and will continue to do so in the future. As a result,
the specification may be changed without prior notice to each user.
55
ENG
44
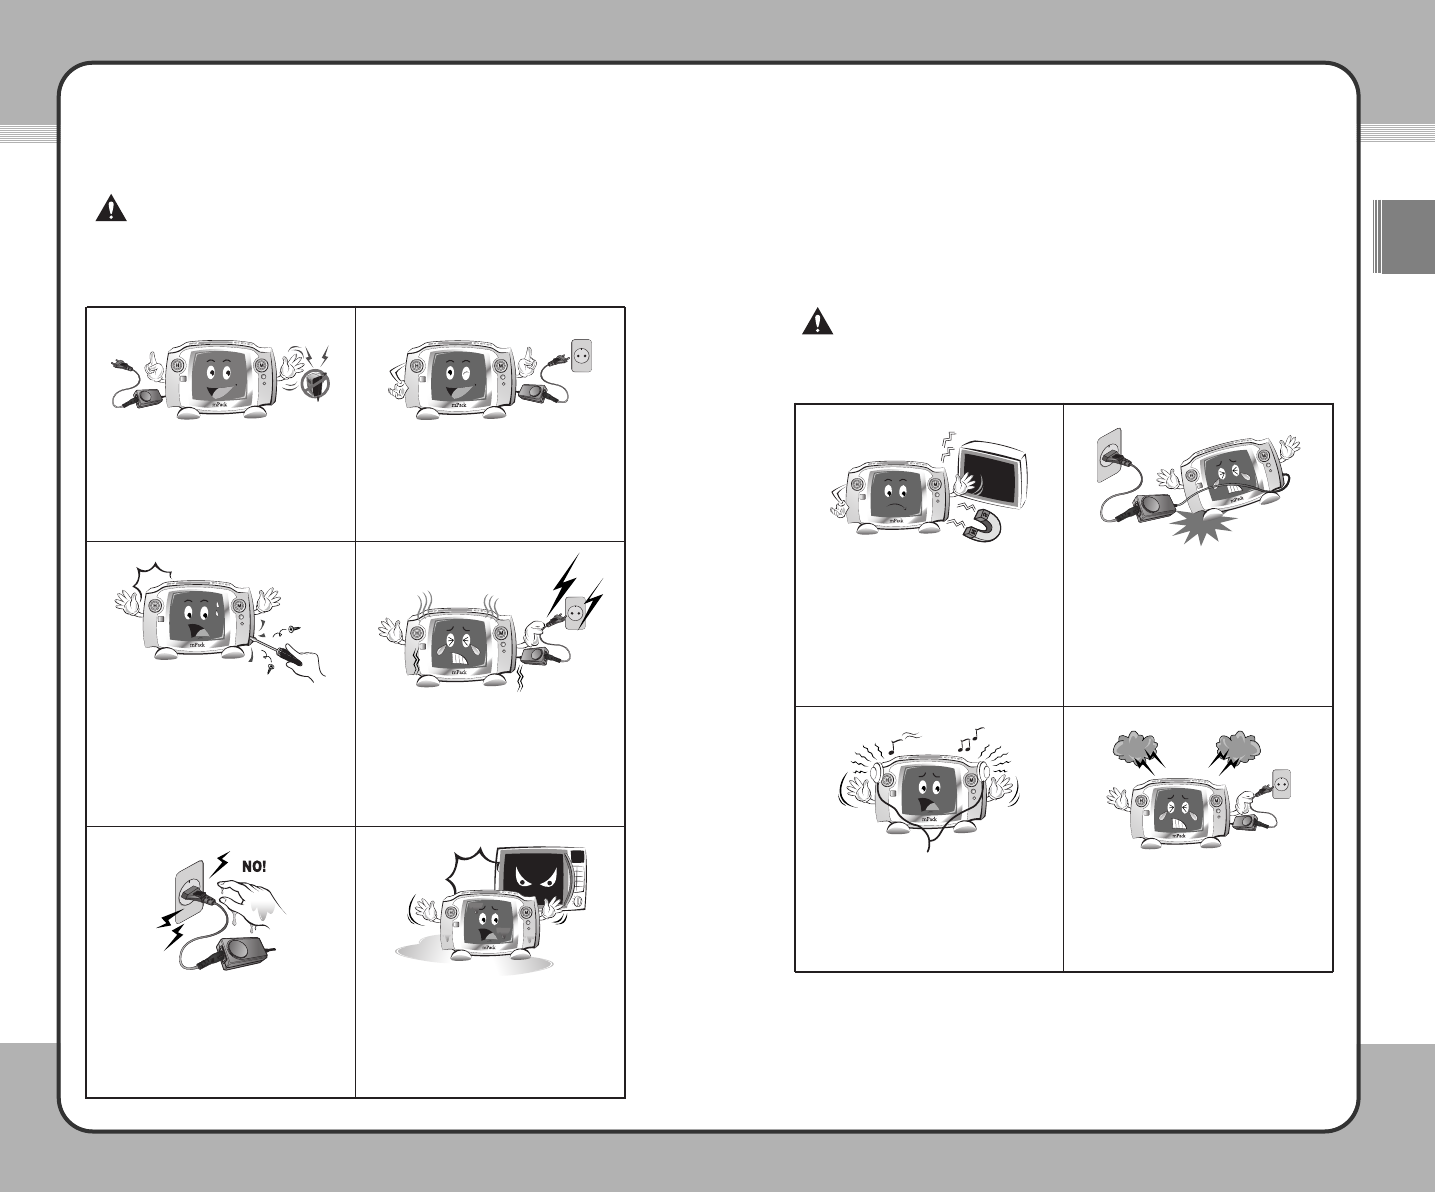
DANGER!
These guidelines are to protect you from potentially deadly electrical shock
hazards as well as the equipment from accidental damage. Failure to comply
may result in serious injury or death.
Use only the AC adaptor that came with
this product. Using any other AC adaptor
may cause fire or electric shock.
Only connect the AC adaptor to a power
outlet as rated in this manual. Connecting
to any other type of outlet may cause fire
or electric shock.
Do NOT attempt to repair, disassemble,
or modify the product yourself. This may
cause fire or electric shock.
If smoke, or an unusual smell or noise is
detected from the product, turn the power
off immediately and unplug the AC
adaptor from the outlet. Continued use of
the product under abnormal conditions
may cause fire or electric shock.
Do NOT connect or disconnect the AC
adaptor with wet hands. Keep unit away
from wet surfaces or areas where it is likely
to get wet. If the product gets wet, either
inside or outside, electric shock may result.
If the product becomes wet with water or
any other liquid, do NOT attempt to dry it
using a heater or a microwave oven as it
may cause explosion, deformation, or
malfunction of the product.
❖When a foreign object or liquid gets inside of the product, turn off the power immediately
and disconnect the AC adaptor from the outlet to avoid fire or electric shock.
❖Keep the product and the AC adaptor out of the reach of children. Responsible adult
supervision is necessary to avoid damage to either the product or the children.
WARNING!
If not handled as directed below, serious or minor injury and/or product or
property loss may result:
Do NOT place the product near sources of
strong magnetic fields, such as a magnet,
TV, a computer monitor, a speaker, or a
hands-free electronic device. Since the
product uses a magnetic disk as a storage
device, product damage may result from
exposure to magnetic fields.
Do NOT place the AC adaptor cable or
any other cable in a walkway because it
can create a tripping hazard which can
result in injury or product damage.
When using earphones or a headset, do
NOT set the volume too high. Avoid using
the product for extended periods of time.
Failure to comply with these warnings
may result in hearing loss.
If lighting occurs while the product in
plugged into an outlet, turn off the power
immediately and disconnect the AC
adaptor from the outlet. Lighting may
cause product damage.
❖Data loss may occur due to external shock or lightning strike. The user is responsible
for data safety through regular backup -- WE DO NOT ACCEPT ANY LIABILITY FOR
LOSS OF DATA.
❖If a bad sector occurs due to a physical shock, the product may not function
normally. The user can use the scan disk utility included in Windows OS to correct
the error.
77
ENG
66
❖Do NOT use the product in the following places or conditions in order to avoid product
malfunctioning:
•Extreme temperatures
•Excessive humidity
•Direct sunlight
•Excessive dust or dirt
•Sudden temperature changes - for example, in front of an air conditioner or a
ventilation outlet
•Where heat dissipation of the product is not allowed (a closed area)
❖After recharging is complete, do NOT leave the AC adaptor connected to the power
outlet for an extended period of time. This may cause product damage.
❖When using the product or the remote control, do NOT press two buttons
simultaneously because it may cause a product malfunction.
❖Do NOT place one or more heavy object(s) on the product. This may cause a product
malfunction or damage.
❖When product damage is too severe to repair, or the product life span has been
reached, dispose of the product in accordance with local electrical/electronic waste
regulations.
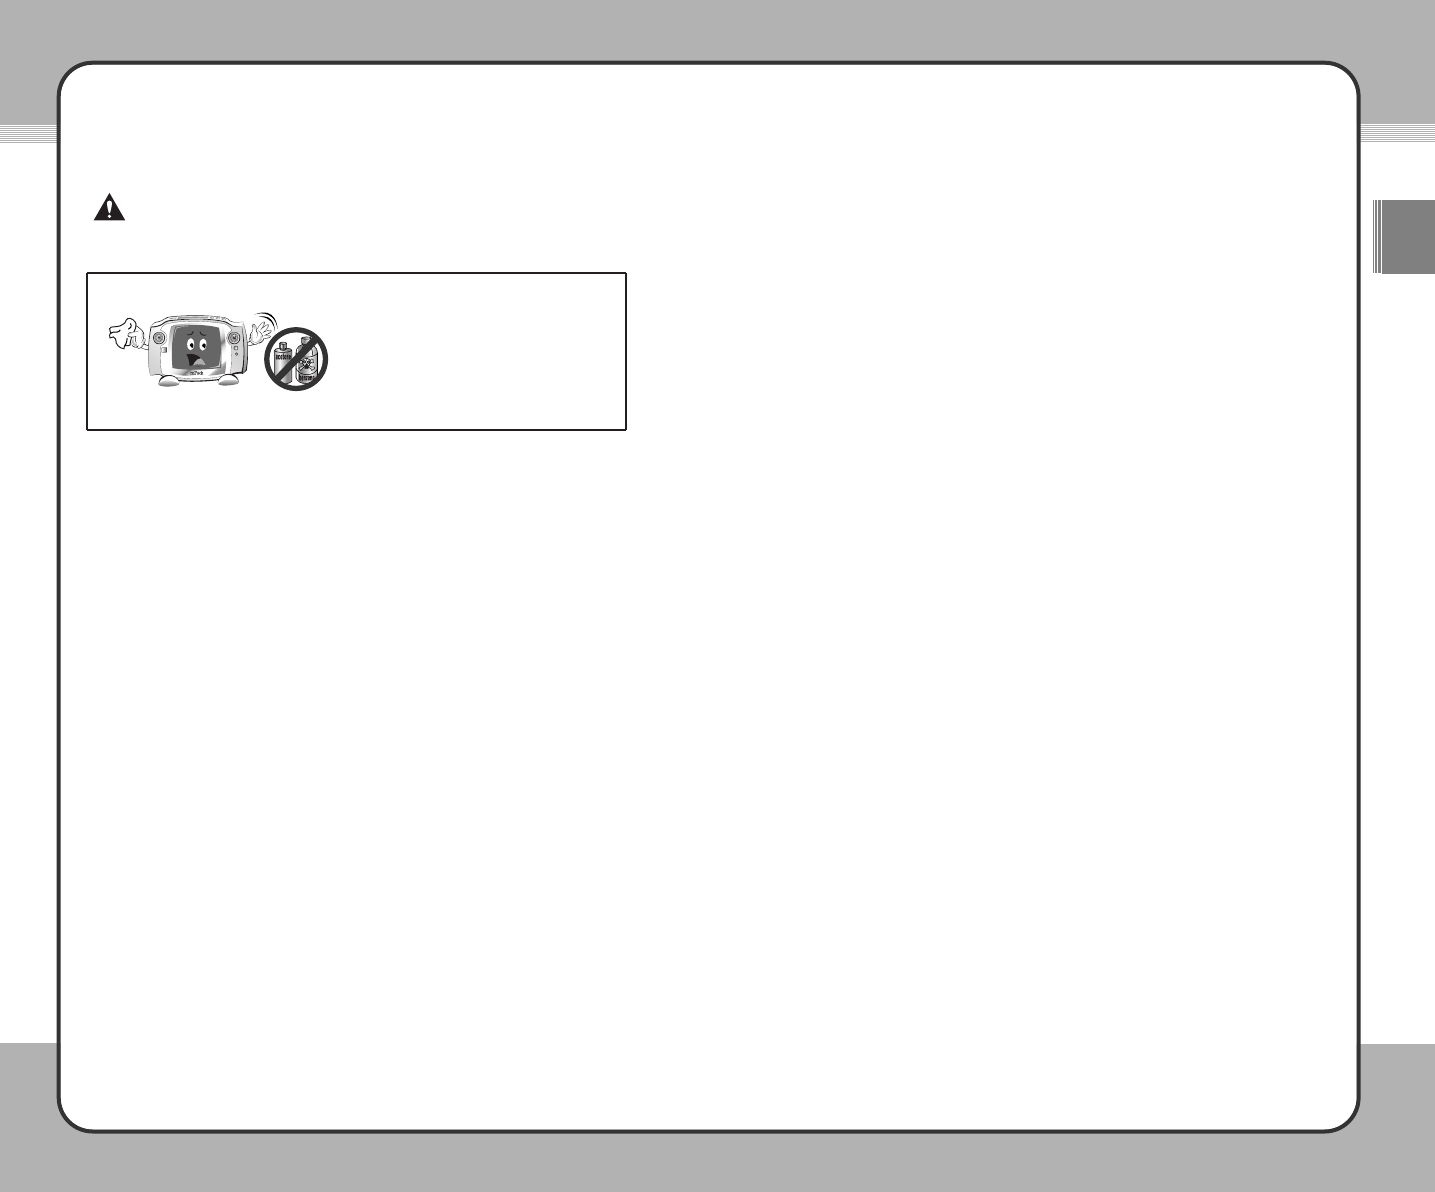
Use a dry, soft cloth or towel to clean the
product. Do NOT use chemical cleaners
such as benzene, thinner, or acetone
because they may discolor, deteriorate, or
peel off the product surface coating.
Contents
Introduction ...................................................................................................1
Copyrights/Certification/Trademarks/Exemptions .......................................2
Safety Guidelines ........................................................................................3
Contents .......................................................................................................7
1. Before Using the Product
Introduction to mPack...................................................................................8
mPack Features ...........................................................................................9
Product Components .................................................................................11
2. Getting Started
mPack Parts ...............................................................................................12
Connecting the mPack ...............................................................................15
Software Installation ...................................................................................24
Running the PQI mPack PC Program .......................................................28
Firmware Upgrade......................................................................................38
3. Useful Functions
Audio...........................................................................................................40
Video...........................................................................................................48
Photo...........................................................................................................53
Radio...........................................................................................................60
Recorder .....................................................................................................63
Text .............................................................................................................69
Browser.......................................................................................................70
4. Applications
Game ..........................................................................................................75
Calendar .....................................................................................................75
Clock ...........................................................................................................76
實用視聽華語 (conversational Chinese)...................................................76
Address Book .............................................................................................77
5. Setup
Audio Setup ................................................................................................80
Video Setup ................................................................................................81
Photo Setup................................................................................................82
Radio Setup................................................................................................83
System Setup .............................................................................................84
Troubleshooting..........................................................................................86
Specifications..............................................................................................89
Information..................................................................................................90
Limited Warranty Statement ......................................................................91
CAUTION!
If not handled as directed below, minor damage may result:

8899
Before Using the Product Before Using the Product
ENG
Introduction to mPack
mPack is the portable hard disk multimedia player developed by Power
Quotient International (PQI). It's state-of-the-art features distinguishes it from
other portable multimedia players, resulting in increasing worldwide demands.
Because of its USB 2.0 compatibility, the mPack is capable of transferring
data at high speeds to and from your computer as well as reading and
transferring data to and from any inserted memory card (some cards require
an adaptor). In addition, you can play a wide variety of video/audio/image
formats and record in wma/wmv formats. You can also save TV/camcorder
contents as digital data or record an FM radio program from a broadcast,
which makes it a perfect tool for e-learning.
The mPack is customizable, allowing you to personalize your screen with
wallpaper, icons and screen savers. Through continuous firmware upgrade,
you can add new features as they become available.
We hope you enjoy this new world of richer multimedia along with the powerful
features of the mPack portable multimedia player.
mPack Features
3.5" Color TFT LCD Wide screen
The mPack employs a 3.5", 260k-color, TFT LCD which is wider than
traditional LCDs. This allows you to view information at a glace and allows
for various color icons and menus, making them more user-friendly.
Multifunction Port
The A/V OUT port provides a connection to a TV, an audio headset or a
remote control headset.
Massive 30 GB, 40 GB, 80 GB HDD, able to handle a large data
The mPack contains a 30 GB (mPack P800(HD030)), 40 GB (mPack
P800(HD040)), or 80 GB (mPack P800(HD080)) HDD, giving the user an
ability to transfer and transport large amounts of data.
Memory Card (CF; Compact Flash) compatible
You can mount your memory card directly into the card slot in order to
save and view your data without any need to connect to a PC.
USB 2.0 Supported for faster file transfer
The mPack supports a USB 2.0 interface, with speeds up to 480 Mbps to
maximize its file storage capability. High-speed data transfer between the
mPack and a PC has never been easier.
Firmware Upgrades for better performance
You can add new features or change the background and icons according
to your own taste through continuous firmware upgrades.
Built-in Speaker
Using the built-in speaker, you can enjoy quality sound without
headphones or ear buds.
3D Sound Chip for truer sound effects
With the 3D sound chip, you can hear more realistic sounds for true-to-life
quality sound effects.
Five-level equalizer for personal music preferences
Five preset equalizer levels allow you to enjoy music according to your
own preferred style (Normal, Jazz, Pop-up menu, Rock and Classic).
SPDIF 5.1-channel supported connection to external speakers
Using the SPDIF port and a surround sound speaker system, you can feel
the dynamic range of 5.1-channel Digital Theatre Surround Sound.

1111
Before Using the Product
ENG
1100Before Using the Product
Product Components
Please ensure you receive all of the following components in the product
package:
Instruction on figure-handling
The above components may change without prior notice due to
enhancement of the product performance and quality.
NOTE
mPack
SCART Adaptor
(option)
Remote Control
User Manual Installation CD USB Cable
Earphones AC Adaptor AC Adaptor Cable
Carrying Bag (Large)
SPDIF Cable
A/V Cable Carrying Bag (Small)
Infrared Remote Control
Plays a wide variety of formats
You can play a wide variety of video/audio formats including MPEG, WMV,
ASF, MP3, WMA, OGG, and AC3.
TV & Camcorder Recording/Saving
Using the video recording feature, you can save the contents from a TV or
camcorder as digital data.
FM Radio Reception/Recording
Listen to and record your favorite FM programs.
Raw image supported for high-end camera users
Those who use a high-end digital camera can view a photo file stored in a
raw image format. The mPack supports various raw image formats for
various digital camera models.
Multi-tasking capabilities
You can view, zoom-in, zoom-out, and rotate photos while listening to
background music.
Text Viewer
You can read lyrics or e-books using the Text Viewer feature.
Games supported for your enjoyment
The mPack comes pre-installed with games for your relaxation and
enjoyment. Additional games are provided through the PQI web site.
A variety of applications supported
You can run many PDA applications, such as an address book, calendar,
clock and Text Viewer.
(1)
(2)
(3)
(4)
(5)
(6)
(7)
(8)
(9)
(10)
(11)
(12)
(13)
(14)
(15)
(16)
▲Button
▼Button
◀Button
▶Button
(M) Button
+Button
-Button
■Button
▶||||
Button
(H) Button
RUN LED
Power Button
Record/Copy Button
CHARGE LED
IrDA Port
MIC.In
Power on/off
To turn the product on/off, press the power button once.
NOTE
Press the (M) button to display the pop-up menu as shown below:
Help, mPack Info, and Company Info are shown on the screen. Select
each item using the ▲or ▼. When the desired item is highlighted, press
▶to display its corresponding information on the screen.
NOTE
Rear
Top
Press the (H) button to display the pop-up menu items shown below:
NOTE
Description
Select Home to display the screen that you registered as
your home screen. Typically, this is the most common
screen you use. If you haven't chosen a Home screen to
register, then this link will not be active.
Select Main to display the main menu screen. This is the
default screen when you first start the mPack.
Select Link1/Link2 to display the screen that you
registered. If you haven't chosen a Link1 or Link2 screen to
register, then these links will not be active on the screen.
To register the current screen as Home, Link1, or Link2,
select Register.
Function
Home
Main
Link1/Link2
Register
1133
Getting Started
ENG
1122Getting Started
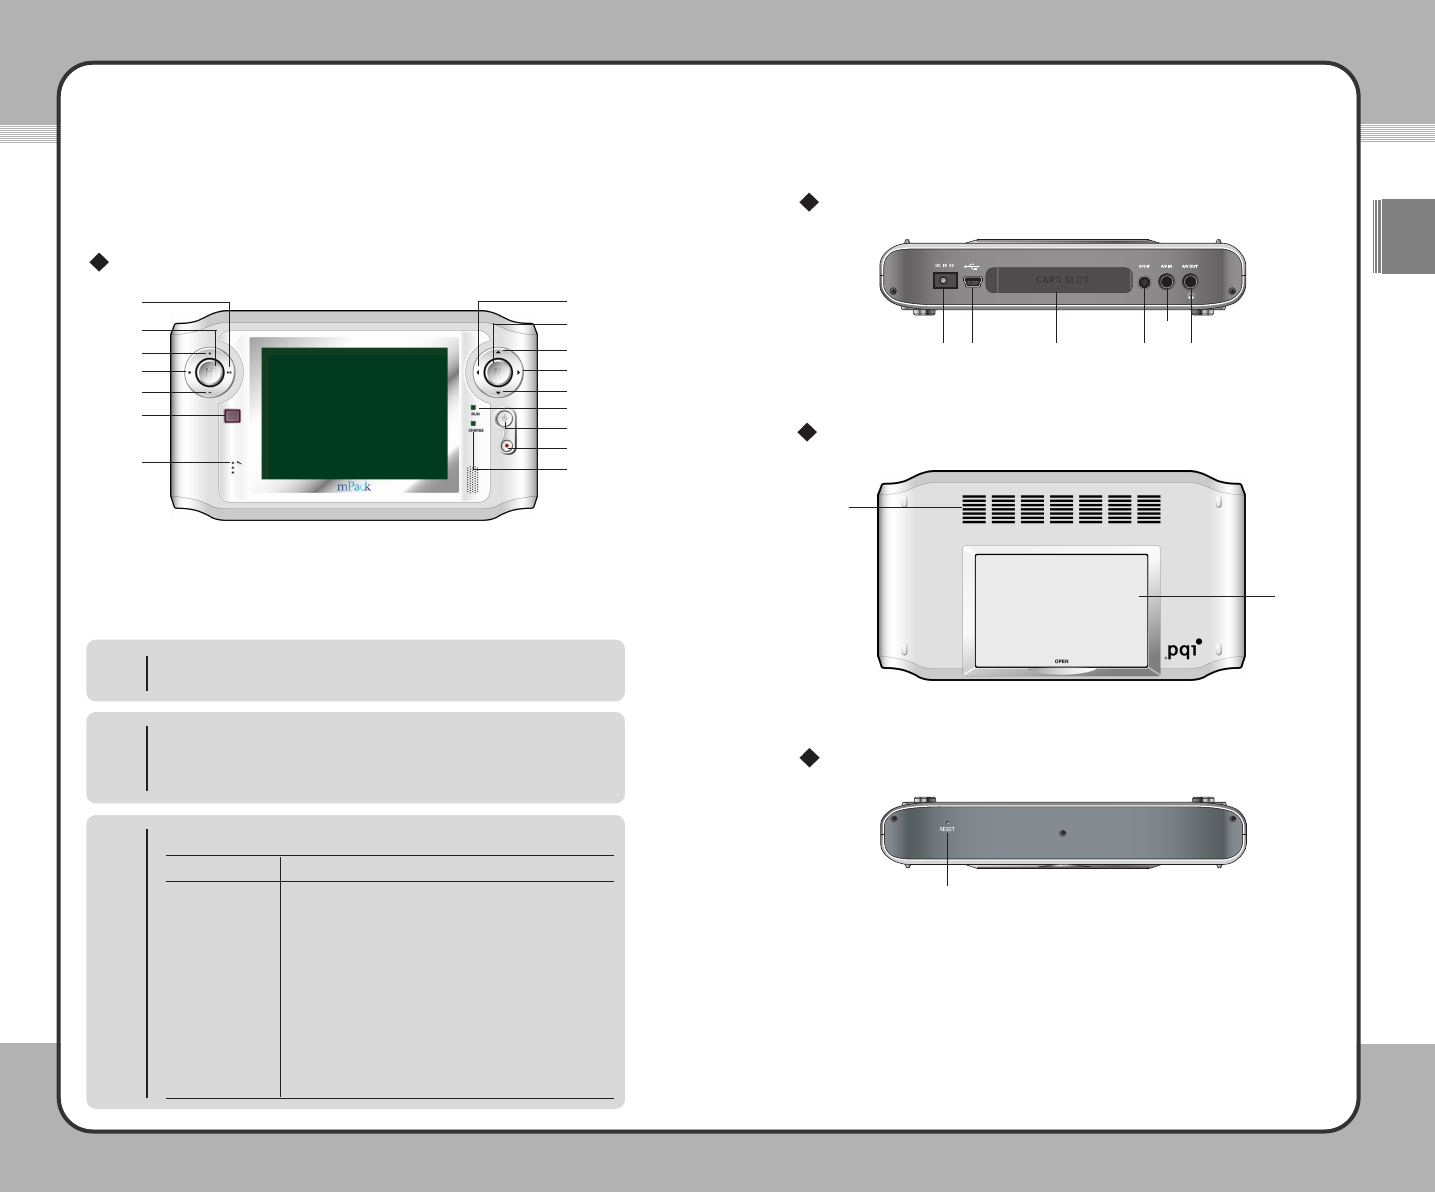
mPack Parts
Main Body
Front
(9)
(10)
(6)
(8)
(7)
(15)
(16)
(3)
(5)
(1)
(4)
(2)
(11)
(12)
(13)
(14)
(7)
(8)
(1) (2) (3) (4)
(5)
(6)
(1)
(2)
(3)
(4)
(5)
(6)
(7)
(8)
(9)
DC IN 5V Terminal
USB2.0/1.1 Terminal
CF type II Card Slot
SPDIF Terminal
A/V IN Terminal
A/V OUT/Earphone w/
Remote Control/Earphone Terminal
Air Inlet
Tray
Reset
Bottom
(9)
1155
Getting Started
ENG
1144Getting Started
(3)
(4) (5) (6)
(1) (2)
Only use the AC adaptor that came with the mPack. Using other AC
adaptors may damage the product.
CAUTION
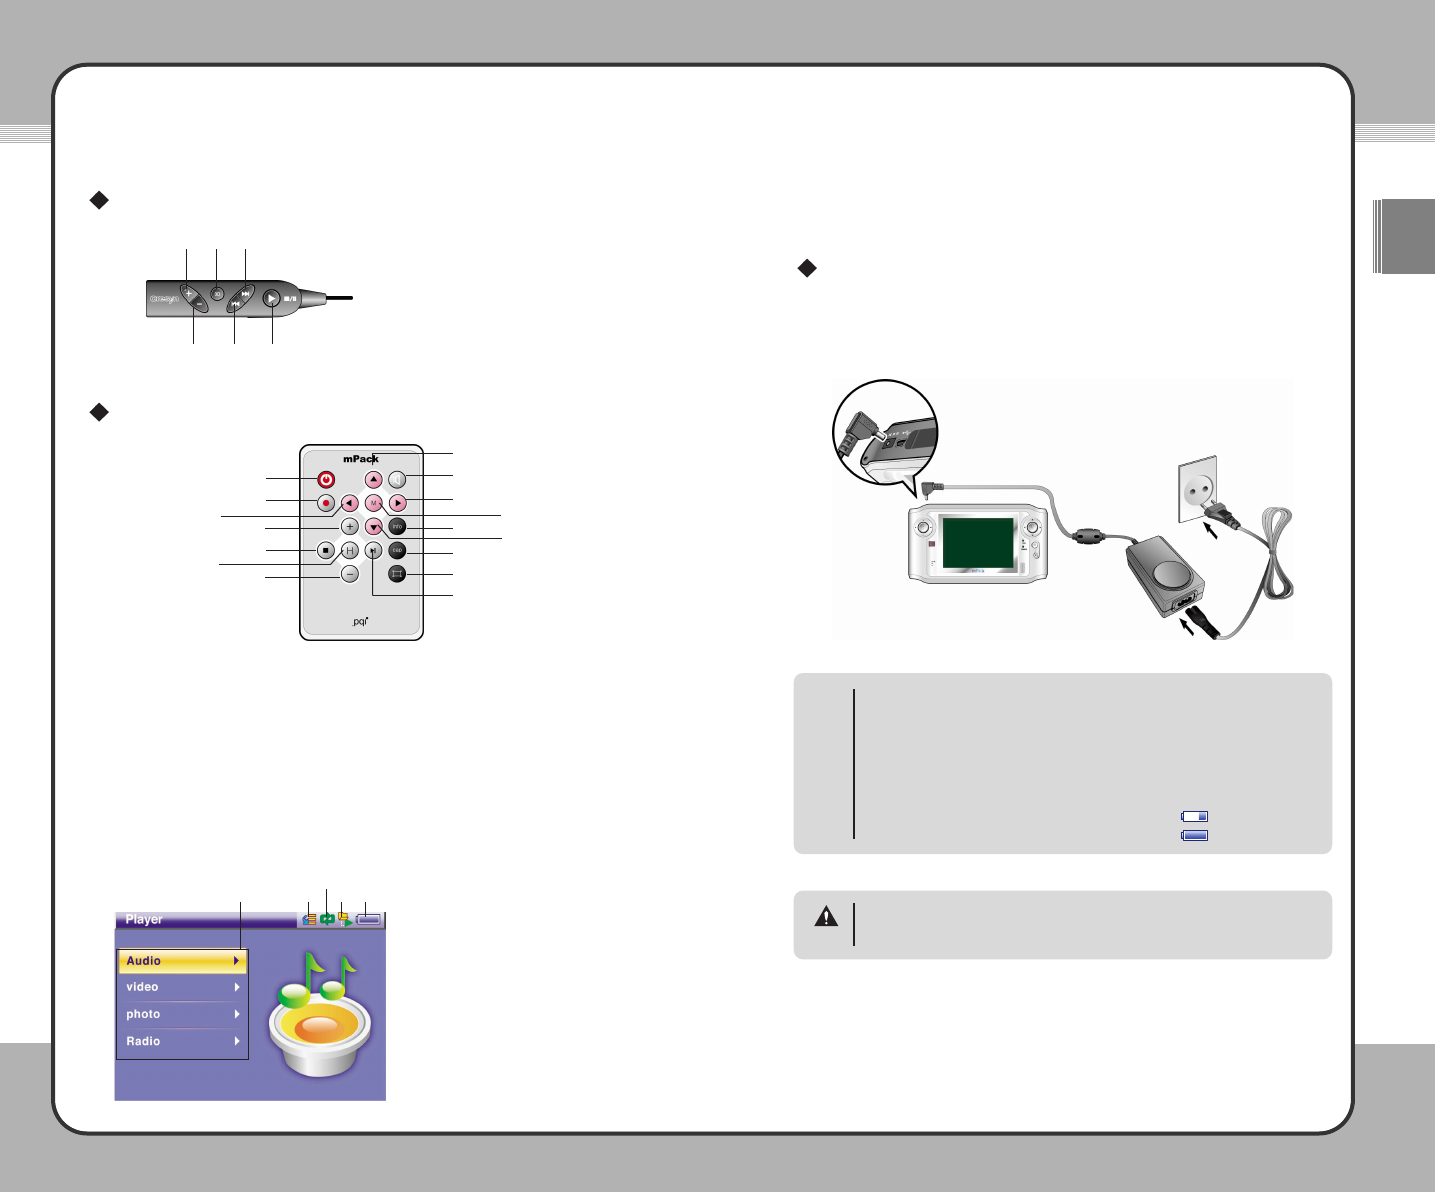
Remote Control
(1)
(2)
(3)
(4)
(5)
(6)
Increase Button
3D Sound Button
Next Button
Decrease Button
Prev. Button
Start/Pause/Stop Button
(1)
(2)
(3)
(4)
(5)
(6)
(7)
(8)
(9)
(10)
(11)
(12)
(13)
(14)
(15)
(16)
▲Button
▼Button
◀Button
▶Button
(M) Button
+Button
-Button
■Button
▶||||
Button
(H) Button
Power Button
Record/Copy Button
Info Button
Sound Button
Caption Button
Screen Button
Main Body LCD
(1)
(2)
(3)
(4)
(5)
Sequential/Random Play Indication
Repeat Play Indication
Play by Folder Indication
Battery Indication
Menu
Connecting the mPack
Connecting to Power Supply
Connecting the AC adaptor
After connecting the AC adaptor to the DC IN 5V port on the product, plug it
into a power outlet. The AC adaptor specifications for this product are 100-
250V, 50-60Hz.
External LED
•The Charge LED turns green when the batteries are completely charged.
Its color is red when the batteries are charging.
Main Body LCD
•When the mPack is on, the charging status is shown on the screen in
the upper right hand corner. If the mPack is charging while in use, the
remaining amount of battery charge is shown as .
•When charging is complete, the icon changes to .
NOTE
(5) (3) (4)
(1) (2)
(11)
(12)
(3)
(6)
(8)
(10)
(7)
(1)
(14)
(4)
(5)
(13) (2)
(15)
(16)
(9)
Infrared Remote Control
1177
Getting Started
ENG
1166Getting Started
Connecting the Earphone with the Wired
Remote Control
Connecting the earphone with remote control
The wired remote is used for audio control when wearing the ear buds.
Complete the following steps to use the wired remote:
Connecting the earphone without the wired remote control
The mPack ear buds can be used with or without the wired remote control. To
connect the ear buds without the wired remote control, complete the following
step:
Connecting the mPack to an External Device
The A/V In Port
The mPack can record data from external devices, such as a VCR, using the
A/V Out port.
To record data from an external device, complete the following procedure:
A/V OUT
Data from the mPack can be shared through external devices, such as a
VCR, using the A/V In port on the top of the unit.
To share data from the mPack to an external device, complete the following
procedure:
The A/V OUT port provides multi-connectivity for TV with audio, ear buds
with remote control, or ear buds only with a single port.
NOTE
Though the size and shape of A/V cables are identical, their features may
be different. Please use the cables provided by PQI, otherwise the product
may not function properly.
CAUTION
Connect the wired remote control to the A/V OUT ( ) port on the top
of the mPack.
Connect the earphone to the port on the wired remote control.
Plug the earphone connector into the A/V Out ( ) port.
To control the audio output, use the controls through the mPack screen. For
further information, please refer to the Audio section of this manual.
Connect the single jack side of the A/V cable to the A/V In port on the top
of the mPack unit.
Connect the triple jack side of the A/V cable to the Line Out jacks on the
external device. Typically these jacks are color coded for easier use.
Match each plug color and jack color.
Connect the single jack side of the A/V cable to the A/V Out port on the
top of the mPack unit.
Connect the triple jack side of the A/V cable to the Line In jacks on the
external device. Typically these jacks are color coded for easier use.
Match each plug color and jack color.
1199
Getting Started
ENG
1188Getting Started
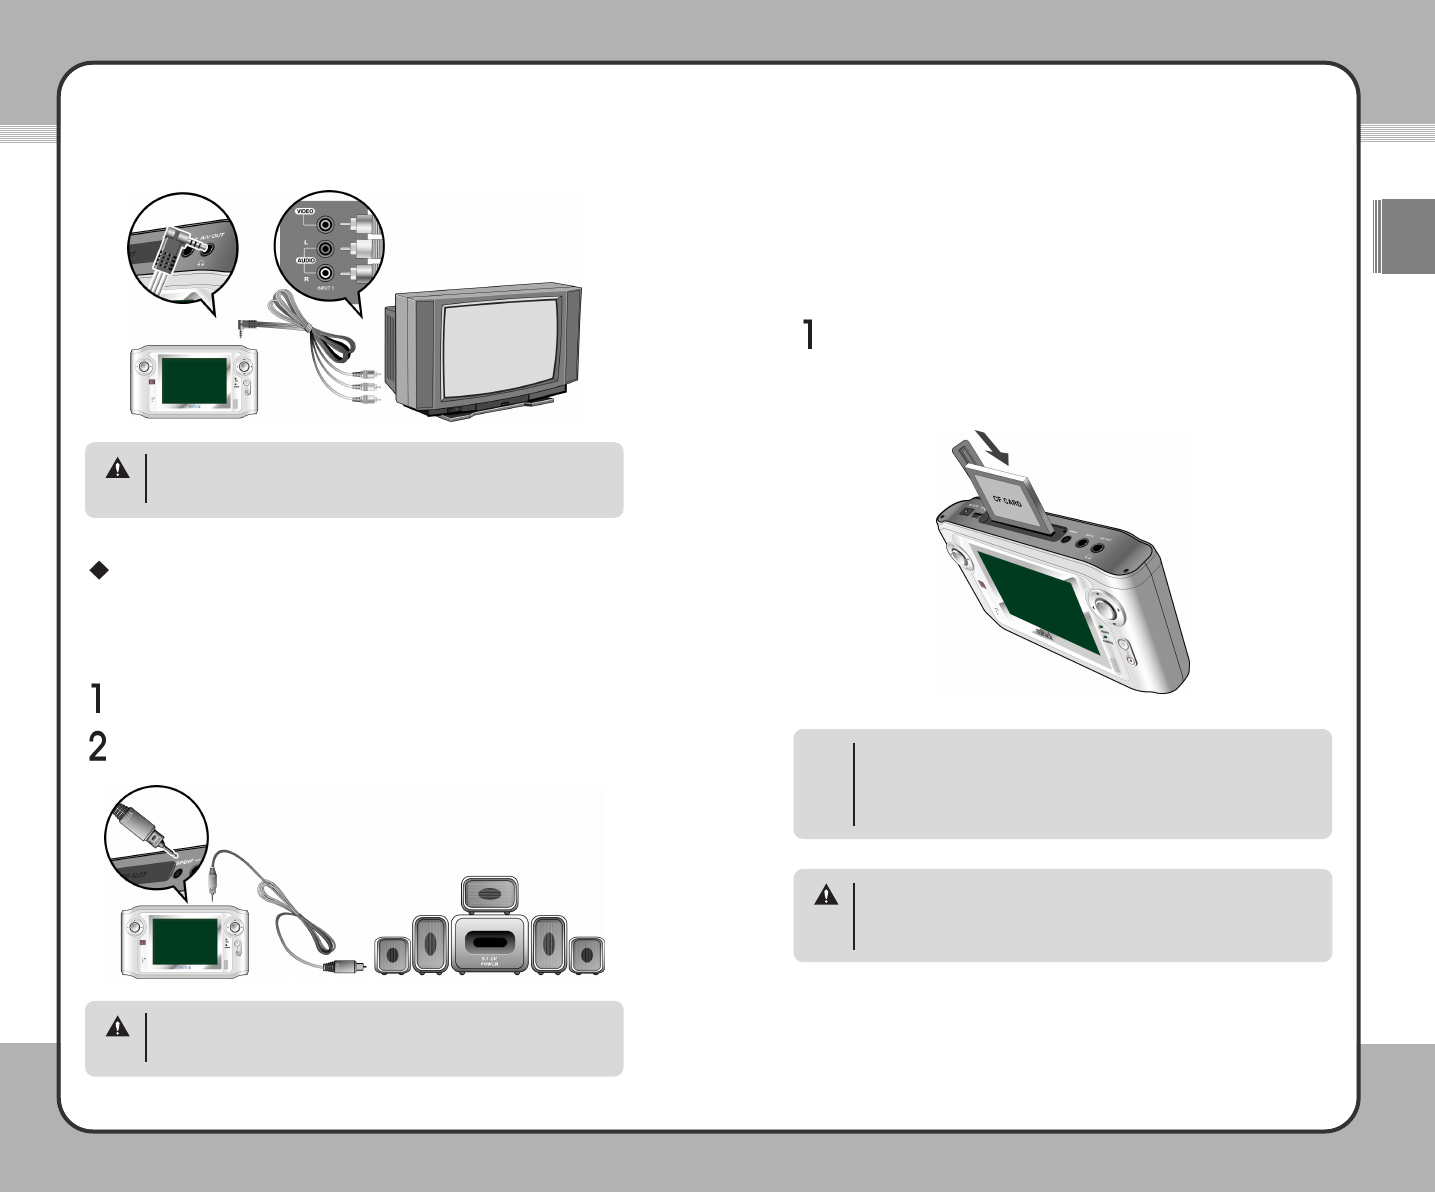
Sony Phillips Digital Interface Function (SPDIF)
The mPack is capable of supporting 5.1 Digital Theatre Surround Sound
through the SPDIF port.
To connect an external speaker system to the mPack, complete the following
steps:
Inserting a CompactFlash (CF) Card
The mPack is built to accept CF cards directly (and other flash media cards
through the optional 4-in-1 adaptor) without the need for a computer.
To read data from a CF card, complete the following step:
Though the size and shape of A/V cables are identical, their features may
be different. Please use the cables provided by PQI, otherwise the product
may not function properly.
CAUTION
Though the size and shape of SPDIF cables are identical, their features
may be different. Please use the cables provided by PQI, otherwise the
product may not function properly.
CAUTION
Make sure that the CF card is correctly oriented when inserting it into the
card slot. Insert the card with its back side shown when the mPack screen
is facing front. If the card is inserted the other way, pins on the card slot
may get bent, causing damage to the card slot and making it unusable.
CAUTION
Insert the CF card into the card slot with the front, colored label facing
toward the back of the mPack.
To use the 4-in-1 adaptor, follow the steps included in its packaging.
You can upgrade firmware using a CF card. After turning the product off,
insert a CF card that contains a firmware upgrade file into the card slot
and turn the power on. The firmware is automatically upgraded. Once
upgrading is complete, the user settings may be changed. For more
information, please refer to the Firmware Upgrade section of this manual.
NOTE
Connect the slender end of the SPDIF cable to the SPDIF port on the top
of the unit.
Connect the wider end of the cable to the Optical In of the speaker
receiver unit.
2211
Getting Started
ENG
2200Getting Started
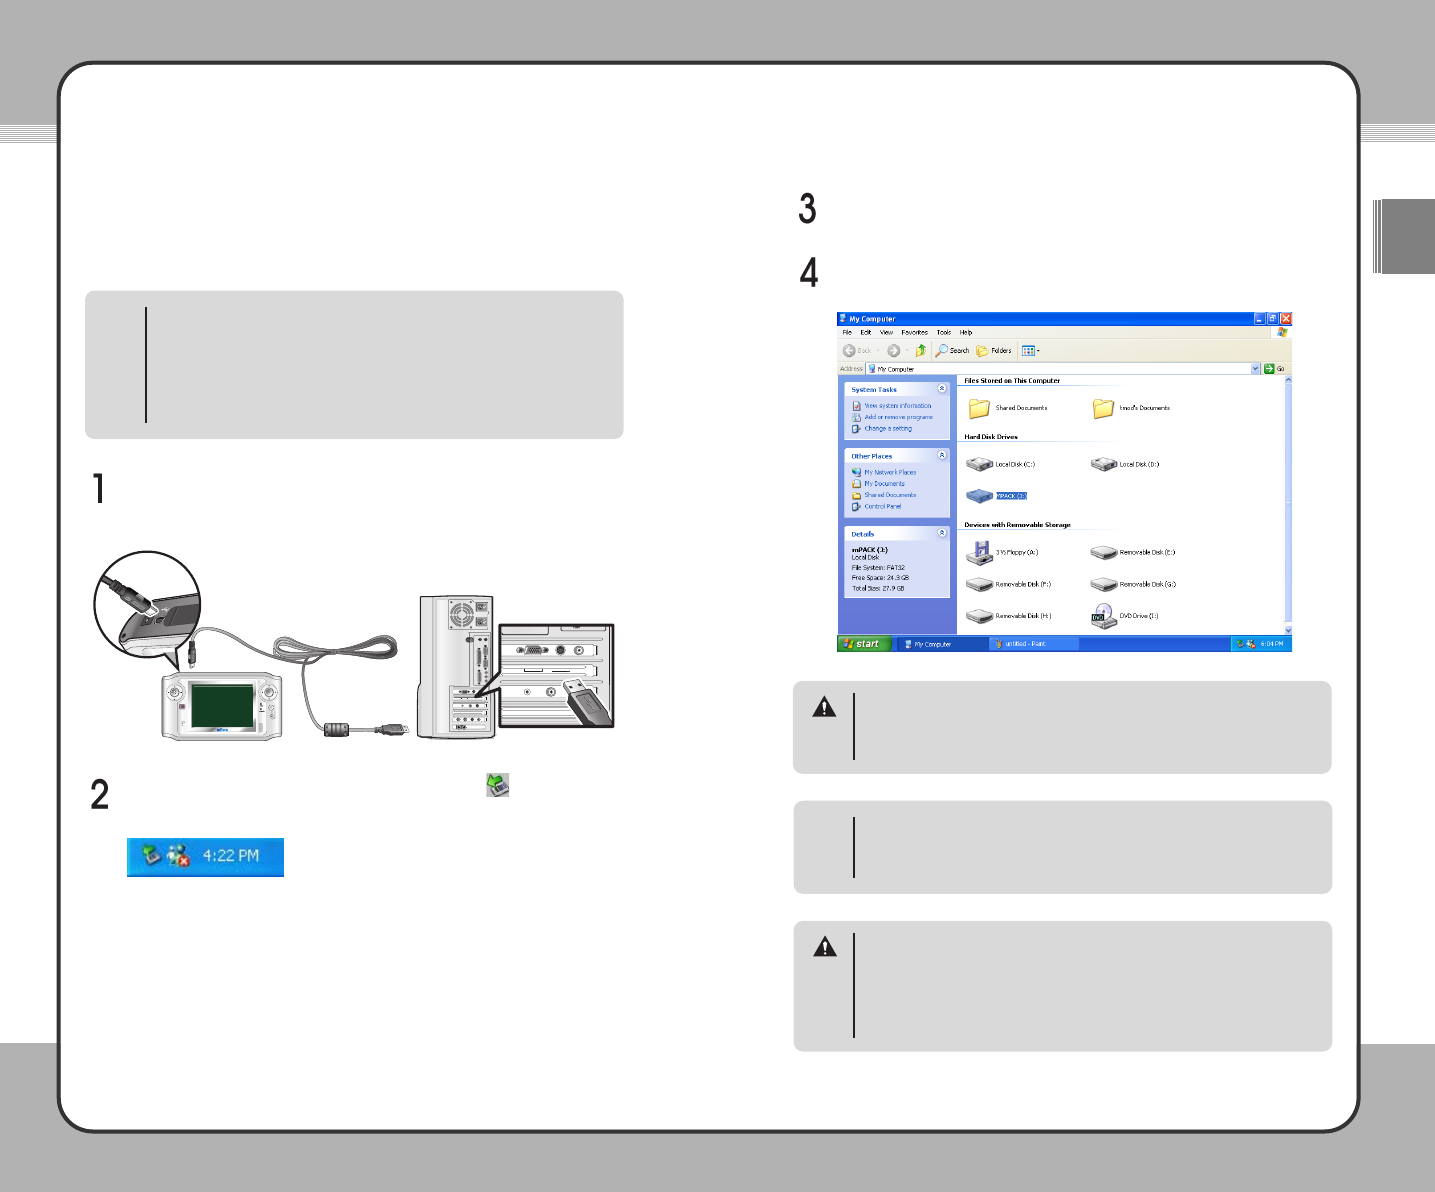
Connecting the mPack to a PC
By connecting the mPack to a PC with the USB cable included in the
package, you can directly transfer data between the two.
•Even when the power is on, you still can connect the product to a PC
for its use.
•After connecting the product to a PC with its power off, it powers on
automatically. If you run Windows' safe removal of hardware tool and
unplug the USB cable after completing all the tasks, the product
powers off automatically. For more information on safe removal of
hardware, please refer to Disconnecting the mPack from a PC(22p.).
NOTE
Connect the product to the PC with the USB cable provided. The smaller
end connects to the mPack, the larger end directly into a USB port on
the PC.
When the connection has been made properly, the icon appears in
the Windows System Tray as shown below.
Open "My Computer". You will see a new hard drive available, named
"mPack".
For Windows 98 systems, the product may not be automatically detected
by the system. If this happens, install the driver provided. For more
information on device drivers, please refer to [Getting Started - Program
Installation - Device Driver Installation on page 26].
NOTE
The default folders on the hard disk drive of the mPack are Video, Photo,
Game, System, Backup, and &#^ Contents ^%. These folders are needed
to ensure corrent operation of the mPack. They should not be deleted or
renamed or the mPack will not function correctly.
WARNING
Do not remove the USB cable when downloading or uploading files or
without running Windows' safe removal of hardware tool. This may cause
file system errors on the hard disk drive of your PC or the product. Should
this occur, you must run the scan disk utility on the PC to correct the
errors. Data loss may result when you continue to use the product without
correcting errors.
WARNING
Drag and drop data to and from the mPack and the PC.
2233
Getting Started
ENG
2222Getting Started
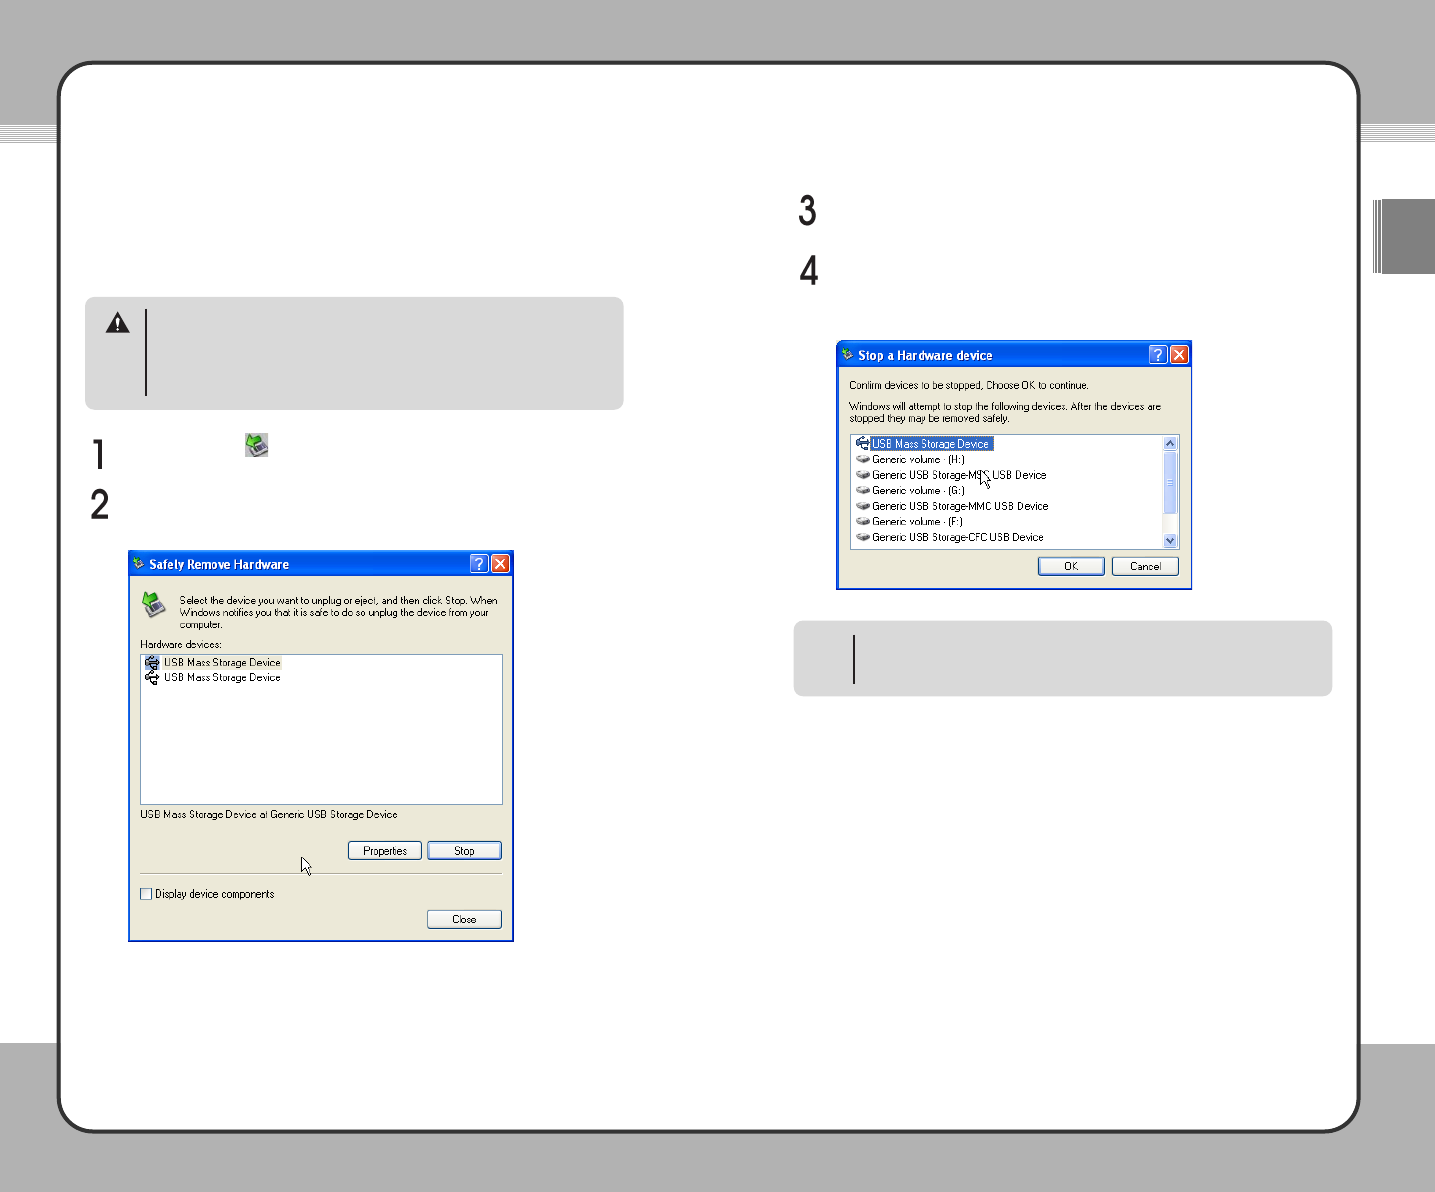
Disconnecting the mPack from PC
Disconnect the product from a PC safely after uploading/downloading is
complete.
Double-click the icon displayed on the Windows System Tray.
When the Safely Remove Hardware window appears, click the Stop
button.
After selecting the large storage USB device in the Stop Hardware
window, click the OK button.
In some operating systems, Windows XP for example, the drive icon is
hidden by the system after a certain period of time has passed. Click
"Show hidden icons" to display the hidden icons, then click the drive icon.
NOTE
Removing the USB cable without running Windows' safe removal of
hardware tool may cause file system errors on the hard disk drive or the
card of the product. Should this occur, you must run the scan disk utility on
the PC to correct the error. Data loss may result when you continue to use
the product without correcting errors.
CAUTION
A message will appear above the System Tray that it is now safe to
remove the mass storage device. Only after this message has appeared
is it safe to remove the USB cable.
2255
Getting Started
ENG
2244Getting Started
Software Installation
PC Program Installation
The IPV PC program should be installed to use media files, downloads and
address book.
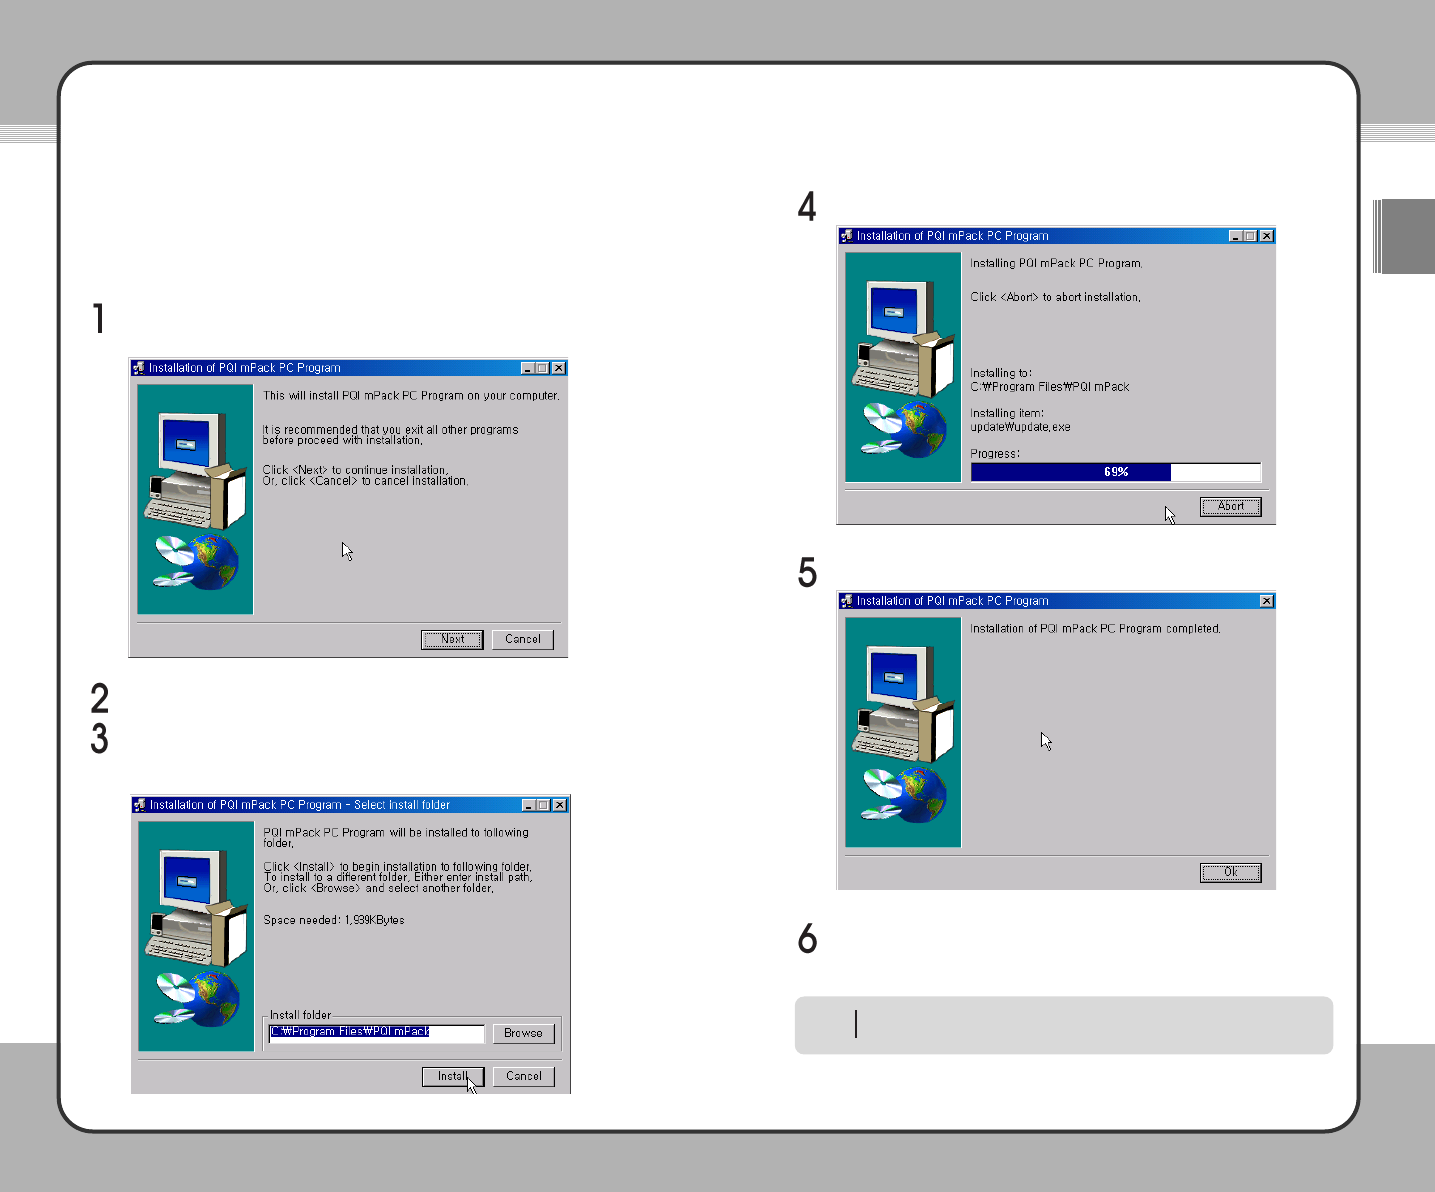
Insert the installation CD. The setup.exe file runs automatically and the
PQI mPack program installation window appears on the screen.
In the program installation window, click the Next button.
You can change the default installation path if you want. Just specify the
folder in which you wish to save the software, and click the Start
Installation button.
The installer proceeds with installation automatically.
When the program installation is complete, click the Finish button.
To run PQI mPack PC Program, click Start in the Windows task bar and
then Program, PQI, mPack_PC in the stated order.
For more information on the PC program, refer to the "Running the PQI
mPack PC Program" section on page 28.
NOTE
2277
Getting Started
ENG
2266Getting Started
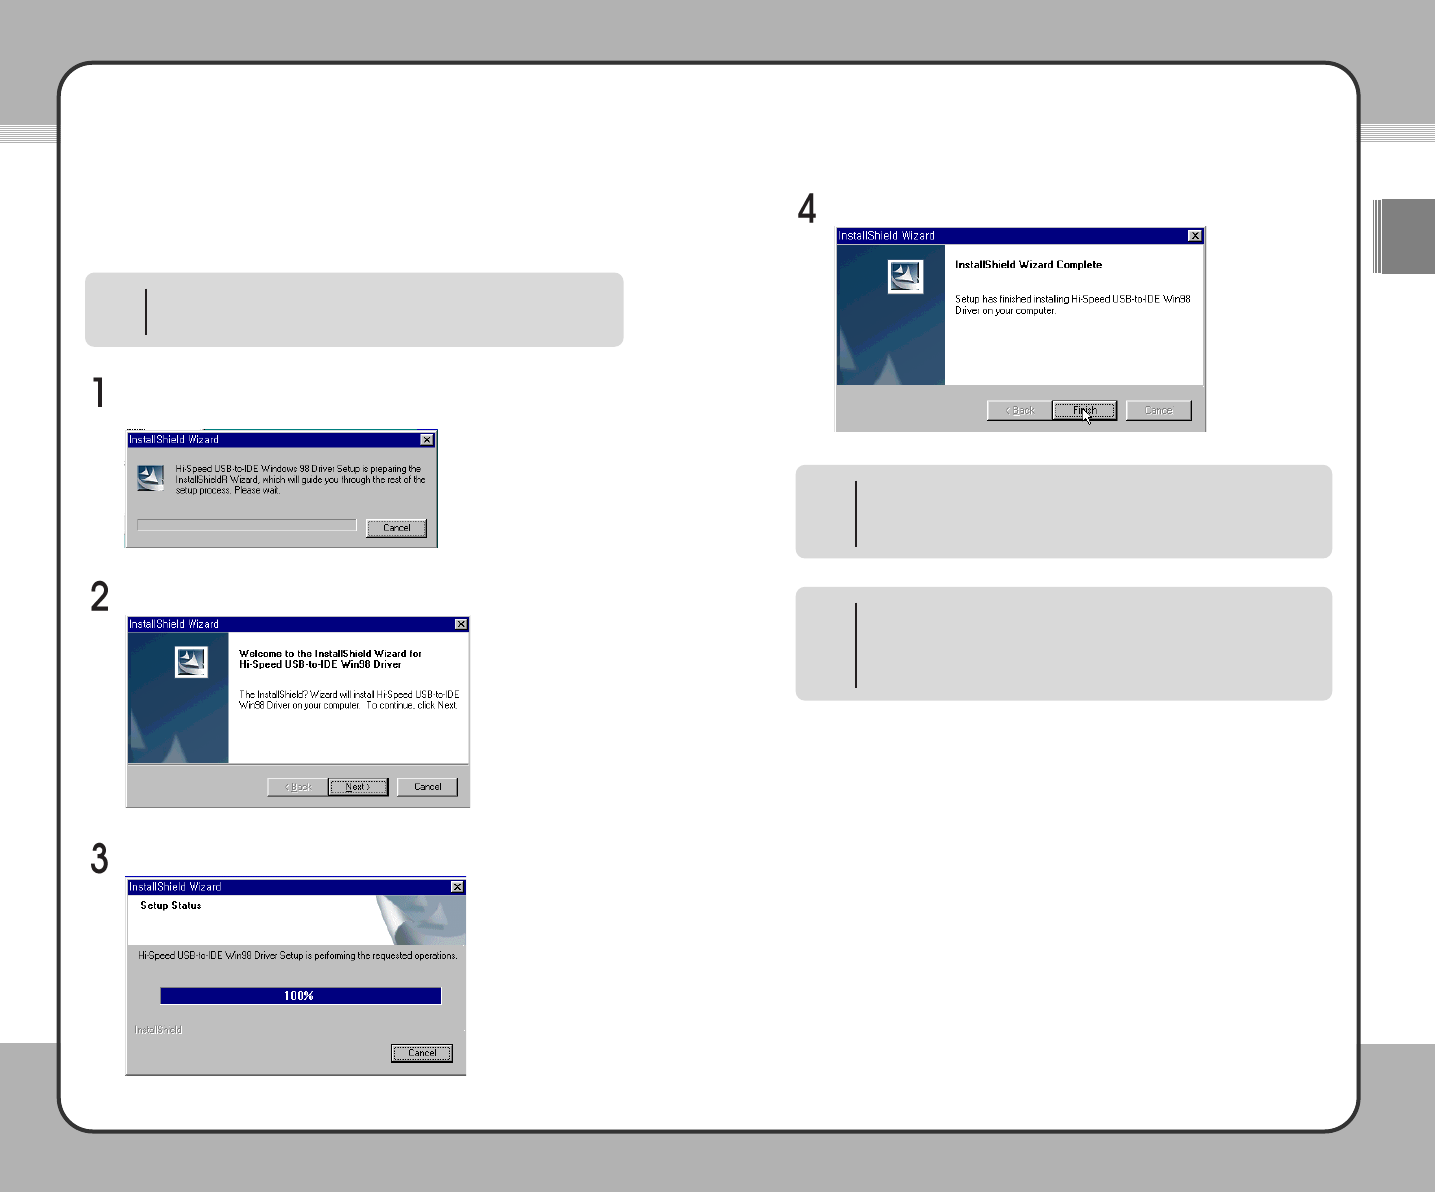
Device Driver Installation
In Windows 98 system, a device driver must be installed separately.
After inserting the installation CD, run the setup.exe file in the
"driver\win98" folder, and the installation wizard starts on the screen.
After reading the text in the window, click the Next button.
The installation wizard proceeds with installation automatically.
When installation is complete, click the Finish button.
In windows 2000 or XP systems, separate device driver installation is not
needed because the required device driver is automatically detected and
installed by the systems.
NOTE
•All users, including Windows 98 users, should install this program in
order to use media files, downloads and address book. For detailed
information on program installation, please refer to [2. Getting Started-
Program Installation on page 24].
NOTE
•The product supports USB 2.0/1.1 storage devices. In Windows 2000
or XP, a portable storage device may be used without separate
program installation.
•For a PC that runs Windows 98, the device driver must be installed
separately in order to use the mPack as a portable device.
NOTE
2299
Getting Started
ENG
2288Getting Started
Running the PQI mPack PC
Program
The PQI mPack PC program was created to help the user download and
manage data on the mPack hard drive.
Each of these tabs will be described in the following sections.
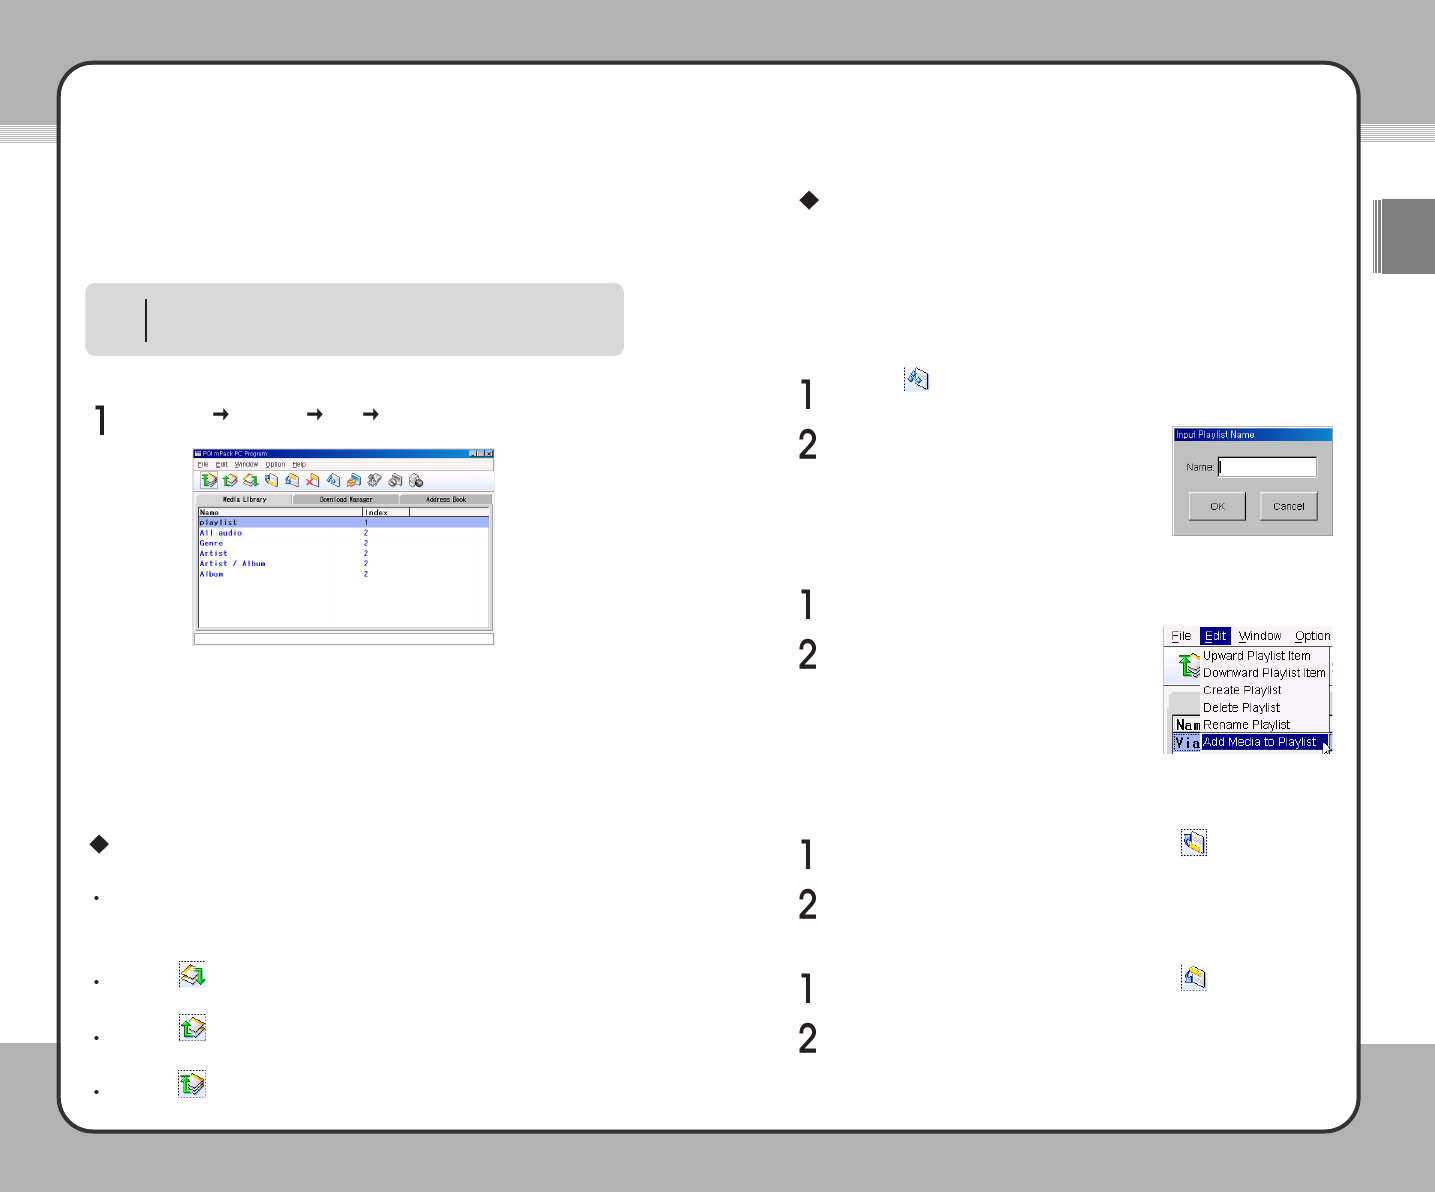
Media Library
The Media Library tab is where you can manage your music, movie and file
databases.
Managing theVideo/Audio Player Database (DB)
The mPack allows you to manage your audio files by the following categories:
Playlist /All Audio / Genre / Artist / Artist/Album / Album
Browsing the Video/Audio DB
Click the button to move to the next level down of the selected folder.
If the lowest level has been reached, this button is grayed out.
Click the button to move to the next level up of the current directory.
If the top level of the directory has been reached, this button is grayed out.
Click the button to move to the top level.
Enter a new playlist name in the name field
and click OK. The playlist name is added to
the Audio Database.
Adding Files to a Playlist
Select an audio file from the database.
Click Edit in the top menu and select Add
Media to Playlist from the sub menu.
Organizing Your Playlists
To move an item up in the list:
Select an audio file in the playlist list and click the button in the tool
bar.
Move the selected audio file up in the list.
Managing Playlists
The following sections explain how to use the mPack PC program to manage
your audio files and arrange them into playlists.
Creating a Playlist
Creating a playlist is the most basic use of the mPack PC program with your
audio files. A playlist is used to organize and control music.
Click the playlist button in the toolbar. The Input Playlist Name
window appears.
To run the mPack PC program, the mPack must be connected to the PC.
PQI recommends using the AC adaptor when connecting the mPack to
your PC.
NOTE
To begin using the mPack PC Program, complete the following step:
Click Start Program PQI mPack_PC. The PQI mPack PC
Program window appears on the screen.
To move an item down in the list:
Select an audio file in the playlist list and click the button in the tool
bar.
Move the selected audio file down in the list.
3311
Getting Started
ENG
3300Getting Started
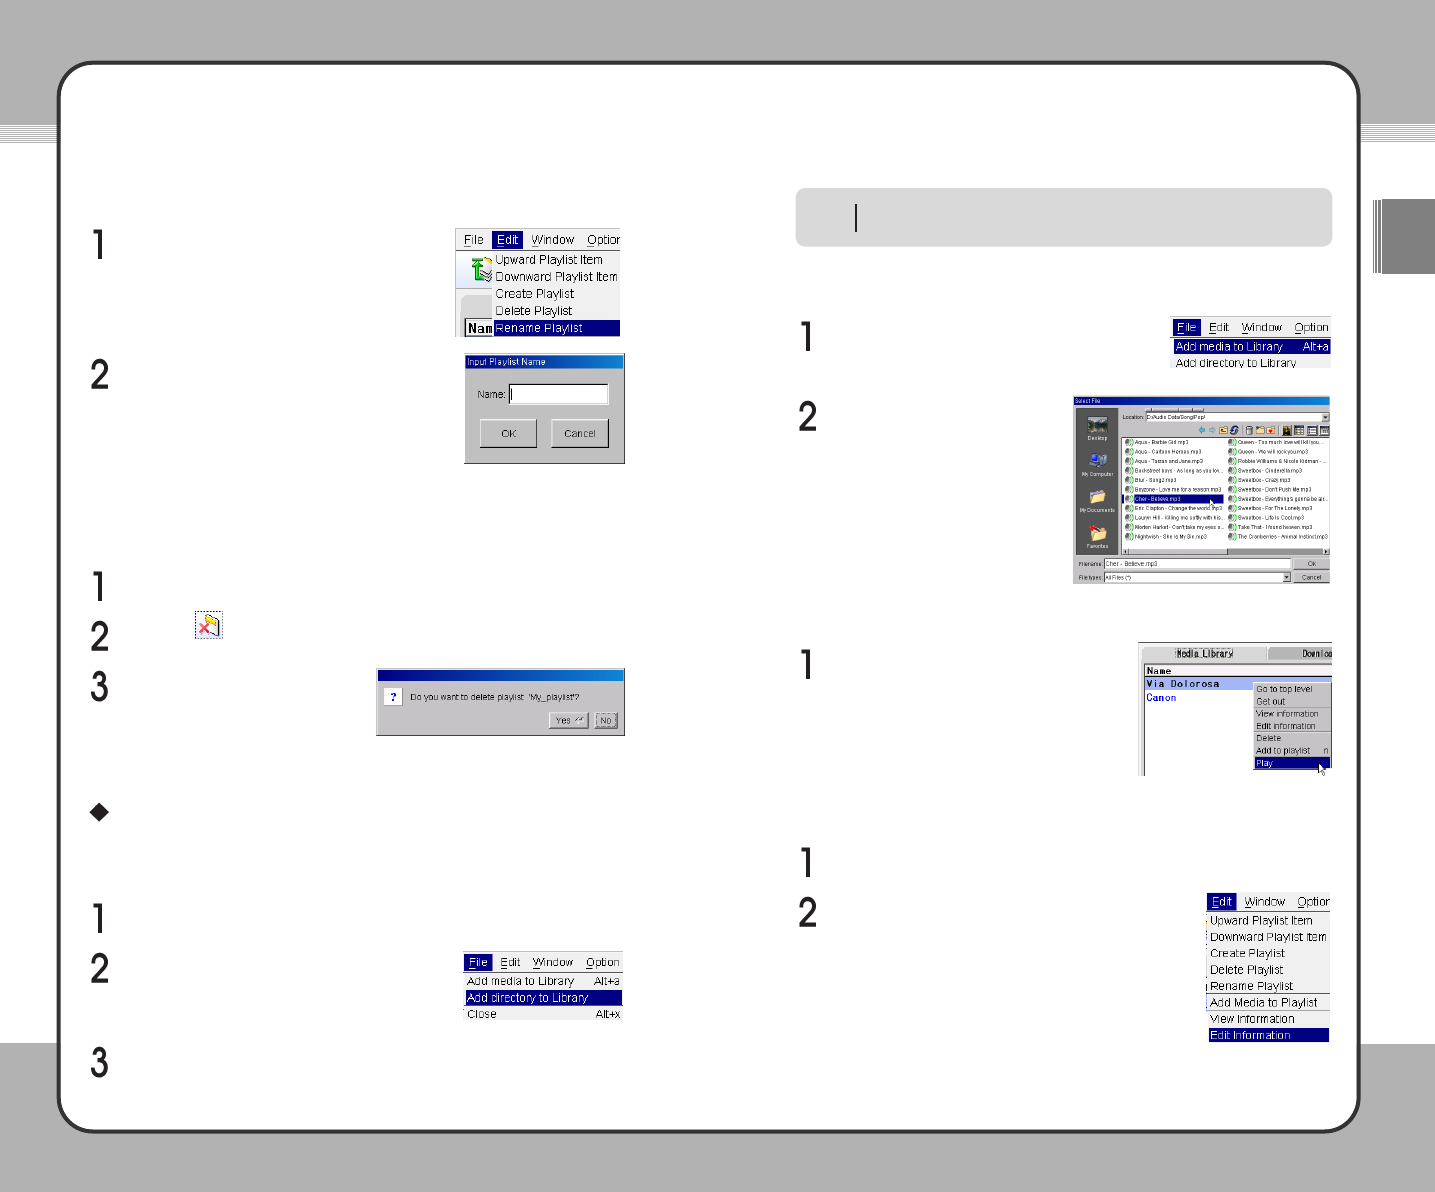
Deleting a Playlist
If you no longer listen to a specific playlist or simply wish to get rid of a playlist,
complete the following steps:
Managing DB Data
Adding a Directory to the Library
To add a new directory, complete the following steps:
To register a media file into the DB, select
File in the top menu and choose Add media
to Library in its sub menu.
Select a file to register from the
file selection window and click
OK.
Add Media to Library
Select File in the top menu.
Play Audio
To play a selected file at PC, select a file
to play from the DB and click the right
mouse button. When the pop-up menu
appears, choose the Play button.
Edit Information
Select Edit Information from the sub menu.
Renaming a Playlist
Enter a new playlist name in the name field
and click OK.
Click Edit in the top menu and choose
Rename Playlist in the sub menu.
Select the playlist to delete from the Audio database.
Click the button in the tool bar.
A confirmation window appears
asking for the user's confirmation
to delete the selected playlist. To
delete, click the Yes Button.
Choose Add directory to Library in the sub
menu.
Enter a directory to register in the file selection window and click OK.
Includes all the audio files included in sub folders. It may take a while to
process it when there are a lot of files. Please be patient
NOTE
Select Edit from the top menu
3333
Getting Started
ENG
3322Getting Started
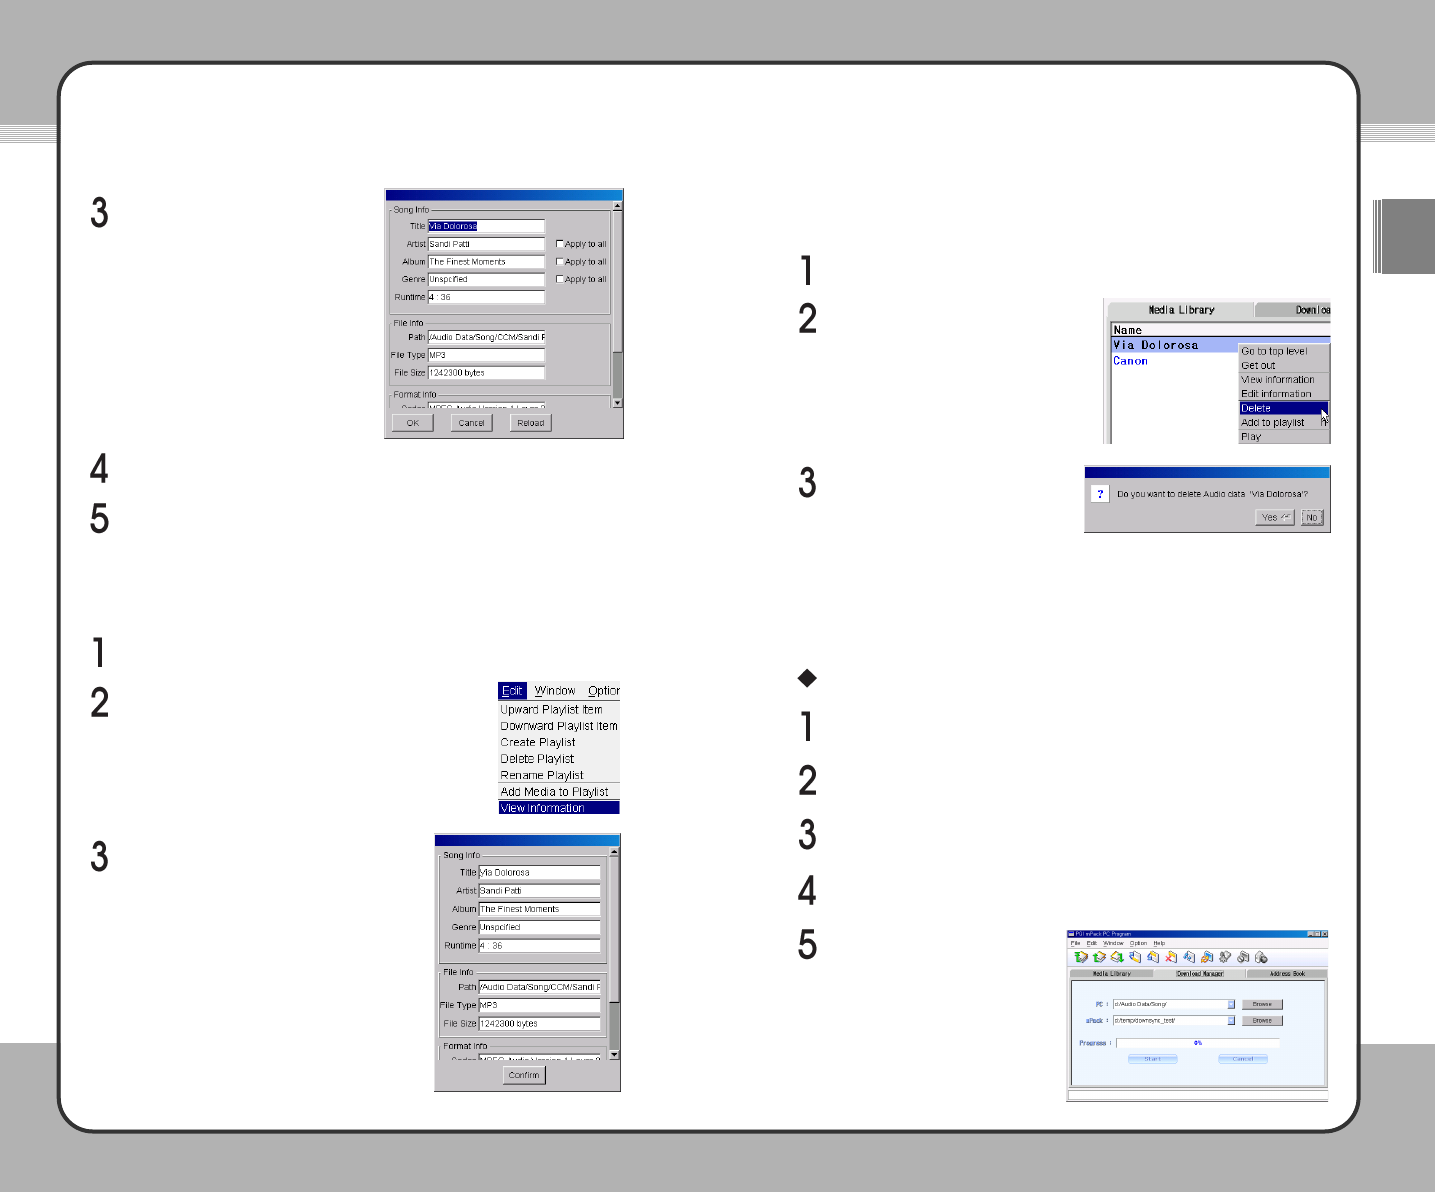
When the Edit Information
window appears, make the
desired changes. To apply the
changes to all audio files within
the same category in the DB,
check the Apply to All check box.
To save the changes, click OK.
View Information
To see audio file information:
Select View Information from the sub menu.
After checking the audio file info, click
the Confirm button. To edit the audio
file information, see the Edit Information
section on page 31.
Delete Data
To Delete an audio file, complete the following steps:
Select the Delete button. A
confirmation dialog screen will
appear.
To delete the info on a selected
audio file, click the Yes button.
This deletes only its entry in the
DB and not the actual audio file.
Download Manager
Download Audio/Video/Photo Files from PC to mPack
To cancel the download, click
the Cancel button.
Click the Reload button to initialize the information.
Select Edit from the top menu.
Select the audio file you wish to delete from the DB.
Select the Download Manager tab from the mPack PC Program
window.
Specify a file from your PC by typing the file path or clicking the browse
button and locating the specific file.
Specify a target directory file on the mPack by typing the file path or
clicking the browse button and locating the specific file.
Click the Start button. Downloading starts automatically.
3355
Getting Started
ENG
3344Getting Started
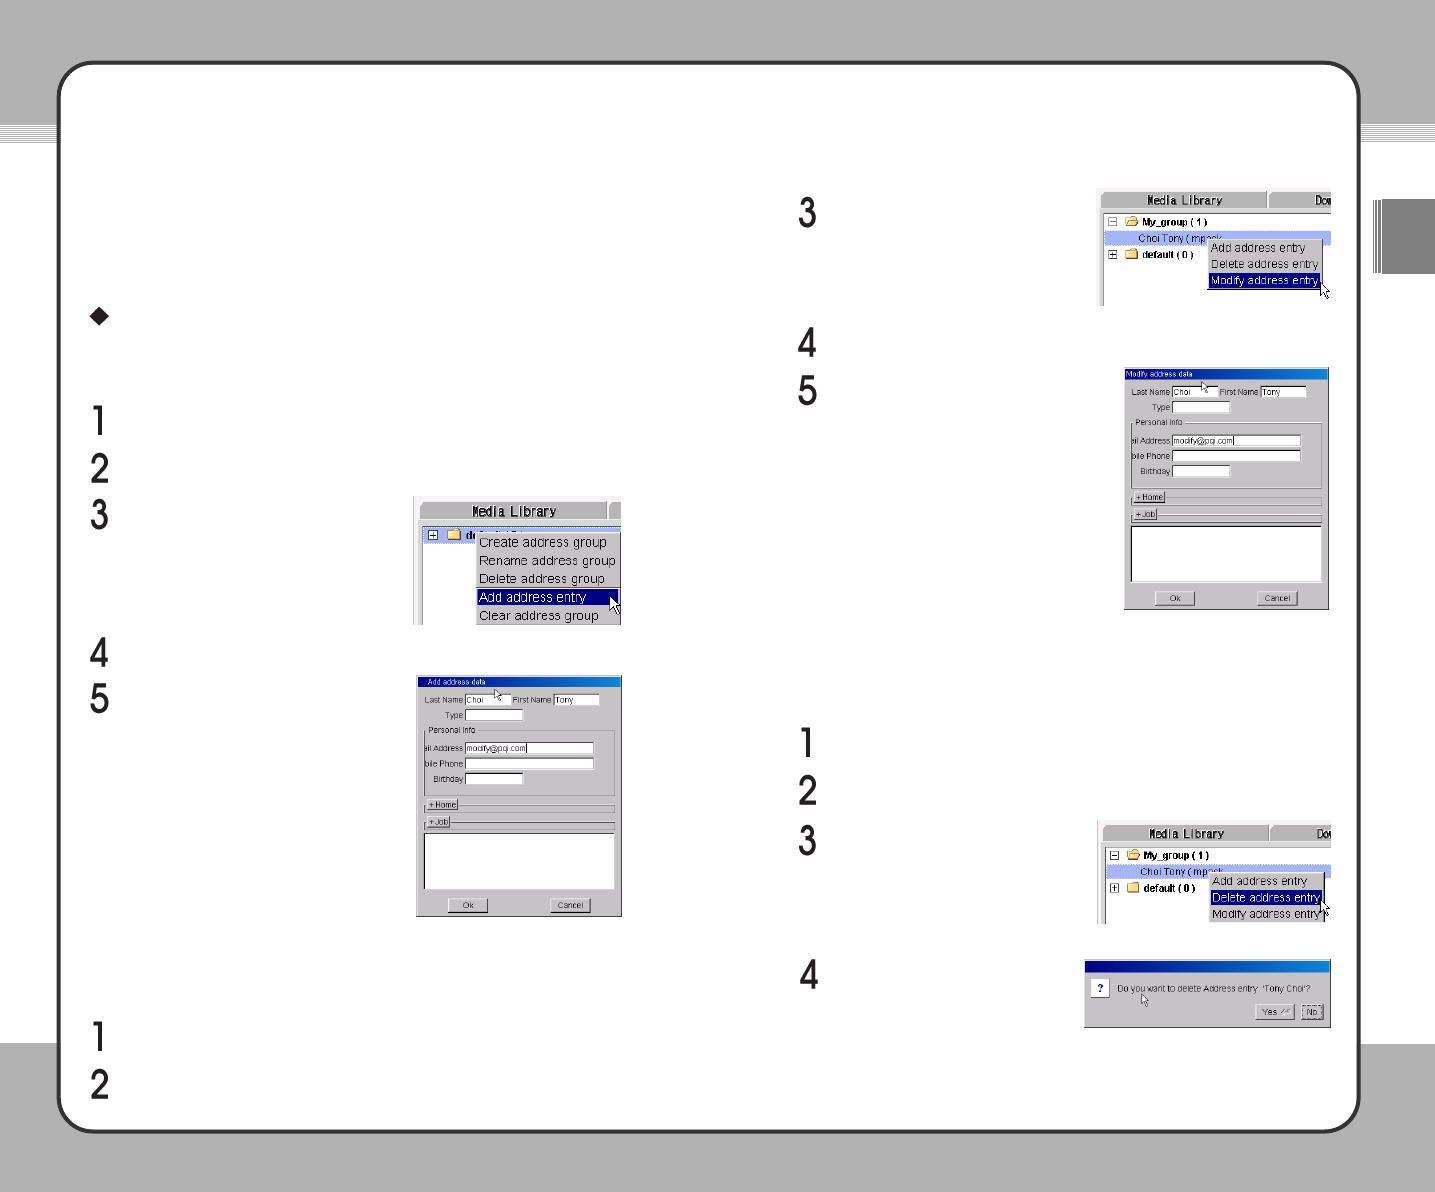
Address Book Management Module
The mPack is contains a complete address book for easy access and
transportation of all your contact information.
Managing Contacts
Add a New Contact
To add a contact:
Select Add address entry from the
pop-up menu. The Input New
Address Entry window will appear.
Click OK.
Select the Address Book tab from the mPack PC Program window.
Right-click on an existing group.
Enter the address information.
Modify a Contact
To modify a contact in the address list:
Select the Address Book tab from the mPack PC Program window.
Right-click on an existing contact.
Select Add address entry from
the pop-up menu. The Modify
Address Data window will appear.
Click OK.
Modify the address information.
Delete a contact
To delete a contact from the address list:
Select Delete address entry from
the pop-up menu. A confirmation
dialog window will appear.
To delete the selected contact,
click the Yes Button. Once an
entry is cleared, it cannot be
recovered.
Select the Address Book tab from the mPack PC Program window.
Right-click on an existing group.
3377
Getting Started
ENG
3366Getting Started
Smart Auto Update
When the mPack is connected to a PC with internet access, the Smart Auto
Update feature will connect to the internet and check for firmware updates as
well as updates to the mPack PC Program. If updates are available, the
mPack Smart Auto Update will automatically download and update its
firmware and software.
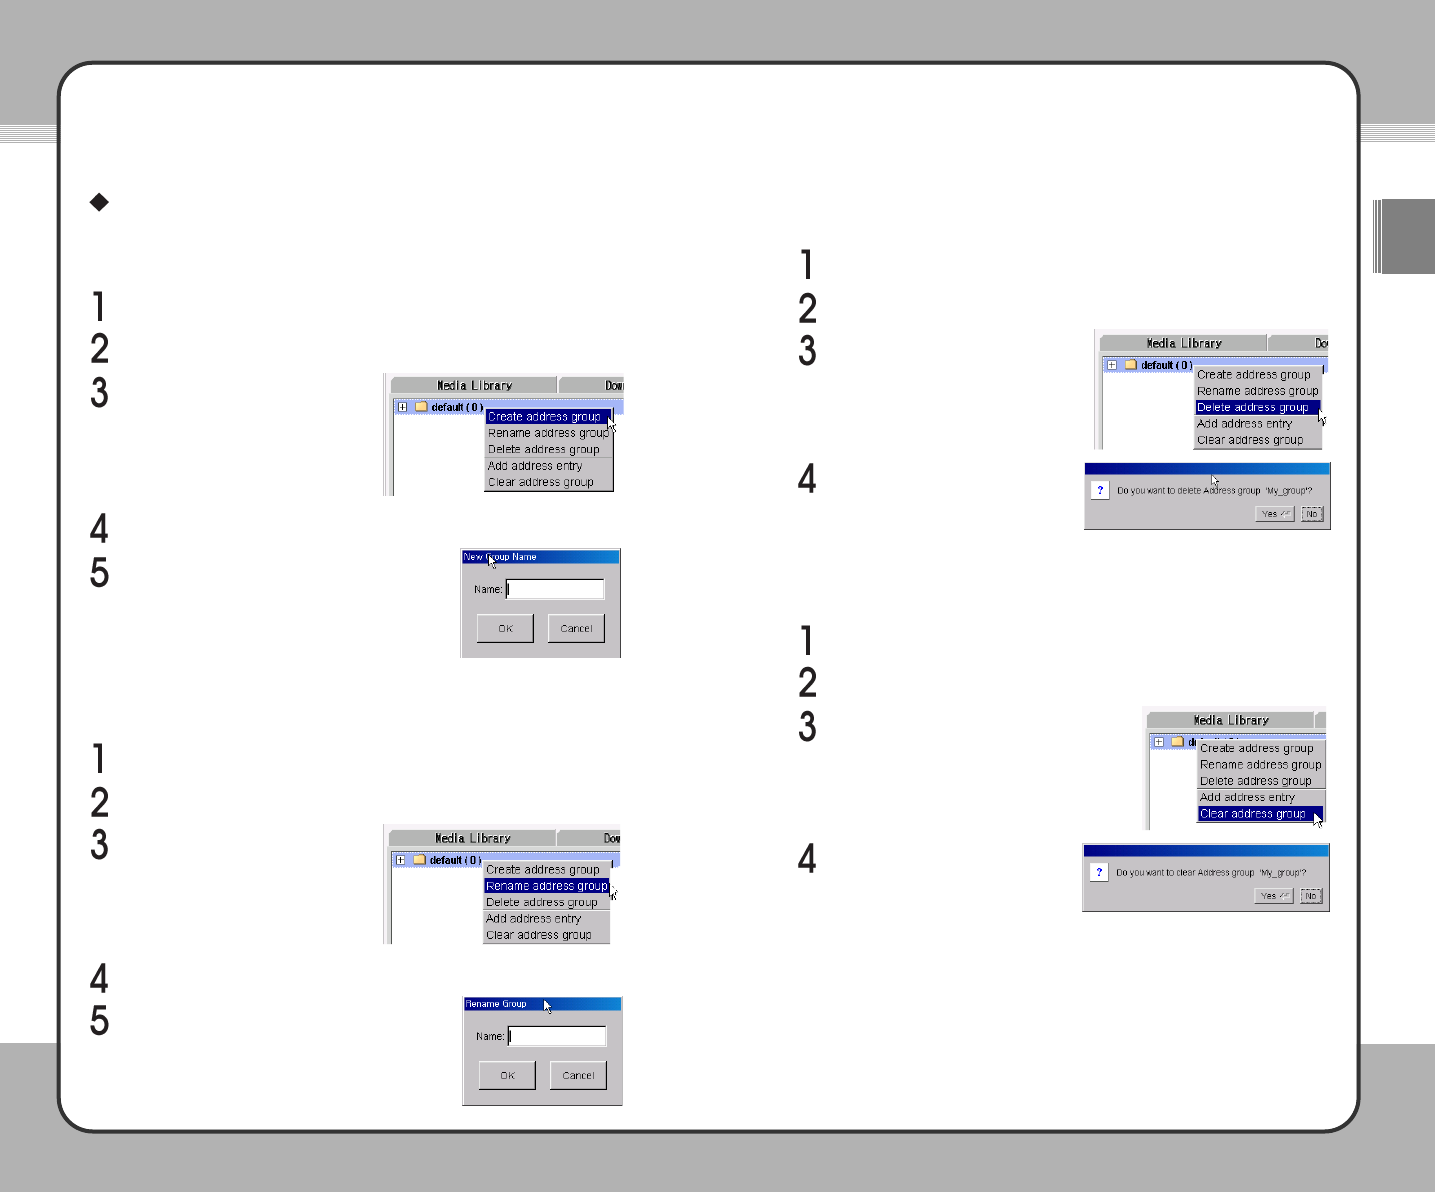
Managing Groups
Create a New Group
To create a new address group:
Select Create address group
from the pop-up menu. The New
Group Name window will appear.
Click OK.
Select the Address Book tab from the mPack PC Program window.
Right-click on an existing group.
Enter a new group name in the name field.
Rename Group
To rename an existing address group:
Select Rename address group
from the pop-up menu. The
Rename Group window will
appear.
Click OK.
Select the Address Book tab from the mPack PC Program window.
Right-click on the group you want to rename.
Enter a new group name in the name field.
Delete Group
To delete a group:
Select Delete address group
from the pop-up menu. A
confirmation dialog window will
appear.
Select the Address Book tab from the mPack PC Program window.
Right-click on the group you want to delete.
To delete the selected group,
click the Yes Button. Once
group data is deleted, it cannot
be recovered.
Clear Group
To clear an address group:
Select Clear address group from the
pop-up menu. A confirmation dialog
window will appear.
Select the Address Book tab from the mPack PC Program window.
Right-click on the group you want to delete.
To clear the selected group,
click the Yes Button. Once a
group is cleared, it cannot be
recovered.
3399
Getting Started
ENG
3388Getting Started
Firmware Upgrade
Firmware upgrades allow the mPack to keep up to date with new and
improved applications.
Upgrade Using the PC Program
The easiest and most convenient way to upgrade the mPack firmware is by
using the update feature in the mPack PC program. To update the firmware
using the mPack PC program, complete the following steps:
Click Start PQI mPack PC. The PQI mPack_PC Program
window appears on the screen.
From the top menu, choose Option Firmware Upgrade. If there is a
firmware update available for your mPack, the Select Language
window appears.
Select the desired language from the drop list.
Click the Start button to download the firmware upgrade file from the
Internet directly to the mPack.
Manual Upgrade by Downloading
To manually upgrade firmware by downloading a file through the
Internet, visit our web site www.pqi.com.tw.
Via the USB port, download the upgrade file that matches to your
language from the web site.
Copy the downloaded upgrade file to the root directory of the mPack via
USB port.
After removing mPack from the PC by running the "Safe Removal of a
USB Device" tool, turn its power on. mPack upgrades the current
firmware to the latest version using the installed firmware upgrade file.
To see the version information for the firmware installed on your mPack,
turn its power on and press the (M) button on the initial screen. Choose
About in the pop-up menu. The current version information will be
displayed.
NOTE
Manual Upgrade with a CD
The CD provided contains firmware upgrade files for various languages.
Copy the upgrade file that matches to your language to the root directory
of the mPack. A firmware file for each language is located in
ENG(English), KOR(Korean), CHN(Chinese) and JPN(Japanese) sub-
folders within the Firmware folder in the CD.
After removing mPack from the PC by running the "Safe Removal of a
USB Device" tool, turn its power on. mPack upgrades the current
firmware to the latest version using the installed firmware upgrade file.
To install firmware, the mPack must be connected to a PC via a USB port.
For more information, refer to the "Connecting the Product" section 20p.).
NOTE
Please make sure the AC adaptor is connected before upgrading.
Interrupting power to the mPack while a firmware upgrade is in progress
can cause serious damage to the product.
CAUTION
Make sure that the mPack is correctly connected to the PC and the
Internet prior to attempting a firmware upgrade. If it is not correctly
connected to the Internet, the mPack cannot download the upgrade file.
CAUTION
The firmware upgrade file provided on the CD may not be the latest
version. To upgrade to the latest version, follow the instructions in
Upgrade with the PC Program, or Manual Upgrade by Downloading.
CAUTION
When the firmware upgrade is complete, use the "Safe Removal of a
USB Device" tool to remove the mPack from the PC and turn its power
on. mPack upgrades the current firmware to the latest version using the
installed firmware upgrade file.
4411
Useful Functions
ENG
4400Useful Functions
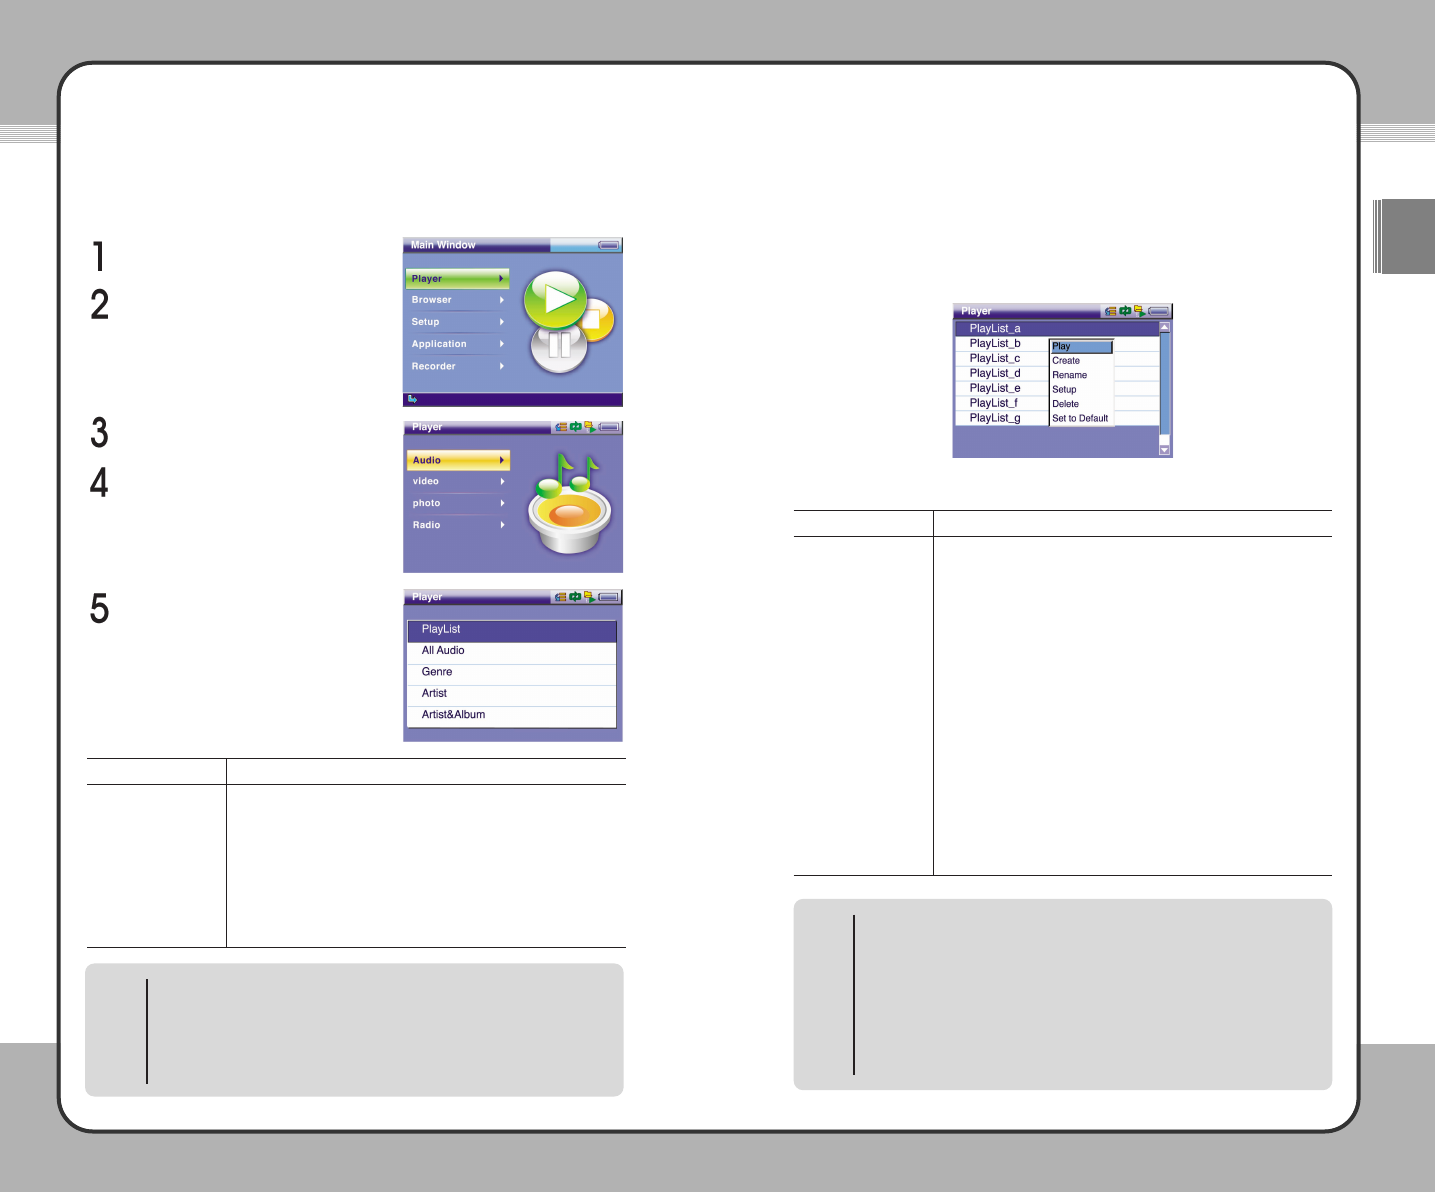
Audio
The mPack can play audio files recorded in the following formats: MP3, WMA,
AC3, AAC, WAV, and OGG. To play audio files, complete the following steps:
Select Player from the Main window.
Press the ▶button.
Select Audio from the Player menu.
Press the ▶button.
Select one of the options in the
Audio menu: PlayList, All Audio,
Genre, Artist, Artist&Album or
Album.
PlayList
Select PlayList in the Audio menu to create/manage a playlist or to play audio
files in a playlist. Press the (M) button to bring up a pop-up menu in the list of
playlists as shown in the following picture:
The pop-up menu procedures are described below:
Description
To play a playlist, select a playlist and press the (M) button. At
the pop-up menu, choose Play.
To create a playlist, press the (M) button on a playlist and
choose Create at the pop-up menu.
To rename a playlist, select a playlist and press the (M) button.
At the pop-up menu, choose Rename. Enter a new name using
the on-screen keyboard.
To configure audio setup, press the (M) button and choose
Setup at the pop-up menu. The Audio Setup window appears
on the screen.
To delete a playlist, select a playlist and press the (M) button. At
the pop-up menu, choose Delete. This deletes only the selected
playlist and not the actual files referenced by the playlist.
To set a playlist as the default playlist, select a playlist and press
the (M) button. At the pop-up menu, choose Set to Default.
Function
Play
Create
Rename
Setup
Delete
Set to Default
Description
Play audio files from the playlist created.
Play all the audio files registered in the audio DB.
Play audio files by genre.
Play audio files by artist.
Play audio files by album for the selected musician.
Play audio files by album.
Option
PlayList
All Audio
Genre
Artist
Aritst&Album
Album
Joy Stick Button Operation
▲: Previous List +: Previous Page
▼: Next List
-
: Next Page
◀: Previous Screen ■: Stop/Cancel
▶: Select/Run/Next Screen ▶||||: Macro Function
(M) : Pop-up Menu (H) : Shortcut Menu
NOTE
Message Window
A message window may appear when a function item is selected from the
pop-up menu. The following actions will occur with each function:
1. YesToAll :When the same task is performed repeatedly, a
confirmation message does not appear after the first
execution. The product is initialized to default when it is
restarted.
2. Yes :Run/set the changes.
3. Cancel :Cancel a task.
NOTE
4433
Useful Functions
ENG
4422Useful Functions
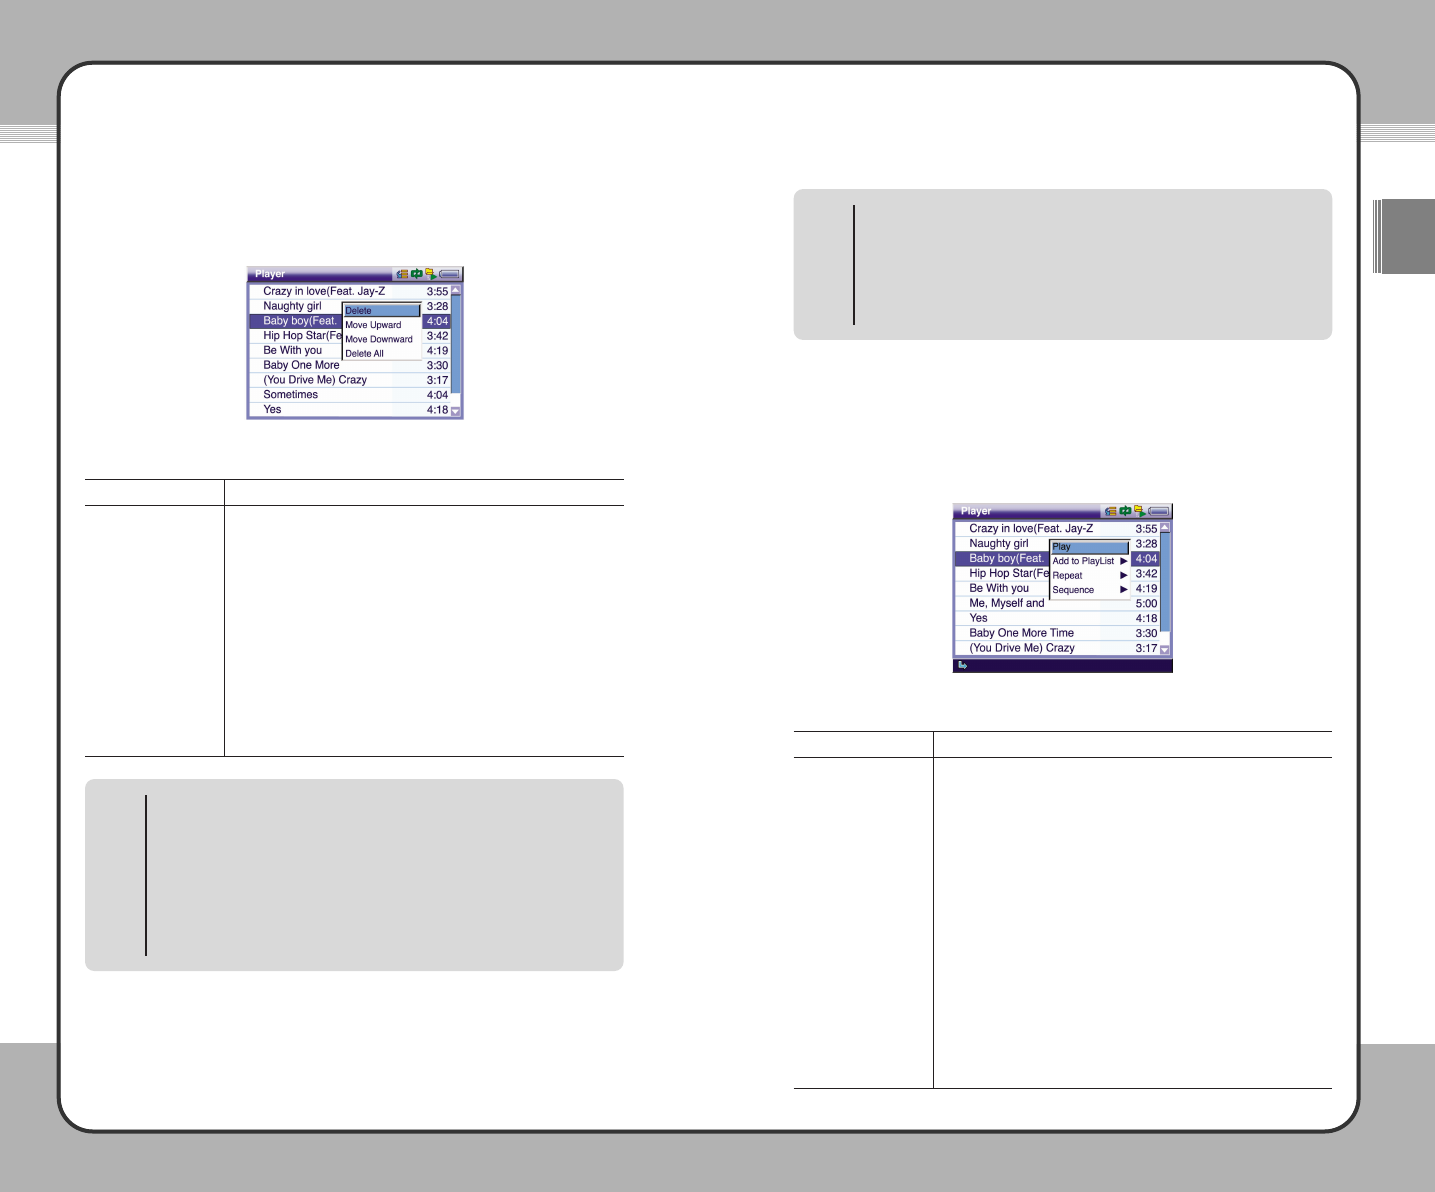
Select a playlist from the list of playlists and press the ▶button to display a
list of audio files for the selected playlist. Press the (M) button to bring up a
pop-up menu as shown in the following picture:
Pop-up menu functions are described in the following table:
Description
To delete an audio file from a playlist, select a file to be deleted
from a playlist. Press the (M) button and choose Delete at the
pop-up menu. This deletes only the shortcut of the audio file in
the playlist and not the actual file referenced by the playlist.
To change the play sequence of a playlist, select an audio file to
be replaced in the play sequence. Press the (M) button and, at
the pop-up menu, choose Move Upward/Move Downward to
move the file up or down.
To delete all the audio files from a playlist, press the (M) button
in a playlist and choose Delete All at the pop-up menu. This
deletes only the shortcuts of the audio files in the playlist and not
the actual files referenced by the playlist.
Function
Delete
Move Upward/
Move Downward
Delete All
All Audio
Select All Audio from the Audio menu to play all or a part of the audio files
listed in the audio DB. Press the (M) button to show a pop-up menu in the list
of audio files as shown in the following picture:
Pop-up menu functions are described below:
Description
To play an audio file, select it and press the (M) button. At the
pop-up menu, choose Play. Or, alternatively, select an audio file
and press the ▶button to play the file.
To add an audio file to a playlist, select the audio file and press
the (M) button. At the pop-up menu, choose Add to PlayList.
To add an audio file to the default playlist, choose Default
Playlist. To select another playlist and add an audio file to it,
choose Select PlayList.
To enable repeat play, press the (M) button in the list of audio
files and choose Repeat at the pop-up menu. Select All to
repeat all files and Single to repeat a single file. To disable
repeat play, select Off.
To set a play sequence, press the (M) button in the list of audio
files and choose Sequence at the pop-up menu. To play audio
files in a random order, select Random. To play audio files in a
sequential order, select Sequential.
Function
Play
Add to PlayList
Repeat
Sequence
Macro Function
When either Delete, Move Upward or Move Downward has been executed,
the most recently executed function is set as the macro function. If a
function has been cancelled while it was being executed, it is not set as
the macro function. A function set as the macro function is initiated not
through a pop-up menu but by pressing the ▶|||| button. Once a function is
set to the macro function, it remains so until the playlist is exited.
NOTE
Message Window
A message window may appear when a function item is selected from the
pop-up menu. The following actions will occur with each function:
1. YesToAll :When the same task is performed repeatedly, a
confirmation message does not appear after the first
execution. The product is initialized to default when it is
restarted.
2. Yes :Run/set the changes.
3. Cancel :Cancel a task.
NOTE
4455
Useful Functions
ENG
4444Useful Functions
Genre/Artist/Artist&Album/Album
The mPack allows you to organize and play auto files by category. You can
select a genre, artist, artist&album, or album then play an audio file from the
selected category. The (M) button opens a pop-up menu with the following
functions which apply to all the categories:
Description
To play audio files by category, select a genre, an artist, an artist
& an album or an album. Press the (M) button and choose Play
at the pop-up menu.
To add an audio file to a playlist, choose a genre, an artist, an
artist & an album or an album. Select an audio file from the
selected category and press the (M) button. At the pop-up
menu, Choose Add to PlayList. To add an audio file to the
default playlist, choose Default PlayList. To select another
playlist and add an audio file to it, choose Select PlayList.
To enable repeat play, select a genre, an artist, an artist & an
album or an album. Press the (M) button in the selected
category and choose Repeat at the pop-up menu. Select All to
repeat all files and Single to repeat a single file. To disable
repeat play, select Off.
To set a play sequence, select a genre, an artist, an artist & an
album or an album. Press the (M) button in the selected
category and choose Sequence at the pop-up menu. To play
audio files in a random order, select Random. To play audio
files in a sequential order, select Sequential.
Function
Play
Add to PlayList
Repeat
Sequence
Audio Player
The mPack comes equipped with a built in, proprietary Audio Player. Audio
files are played with Audio Player as shown in the following picture.
Button operations for Audio Player are shown in the following table:
Audio DB
When the "No List Available" message is displayed, the audio DB has not
been created. The audio DB can be created either by creating a playlist
within mPack or by configuring it with the program installed on your PC via
USB cable.
NOTE
Artist&Album
To play by Artist & Album, after an artist has been selected, the artist's
album must be selected as well. Playing an audio file is not possible when
only an artist has been selected in the Artist & Album category.
NOTE
Function
Play the previous track. If the current track is the first track, the last
track will play.
Play the next track. If the current track is the last track, the first
track will play.
Rewind based on F/F Step settings.
Fast forward based on F/F Step settings.
Open a pop-up menu.
Increase the volume level of Audio Player.
Decrease the volume level of Audio Player.
Exit Audio Player.
Stop playing an audio file. Press it once more to resume playing.
N/A.
Joy Stick Button
▲
▼
◀
▶
(M)
+
-
■
▶||||
(H)
4477
Useful Functions
ENG
4466Useful Functions
Description
To rewind or fast forward while playing audio, press the ◀/▶
button as desired. (Holding the button pressed accelerates
rewinding/fast forwarding.) You can set the skip interval using
the F/F Step value at the Audio Setup menu.
To select another audio file while playing, press the (M) button
and then, at the pop-up menu, choose Search to open the
Audio File Search window. Select a desired audio file at the
search window and press the ▶or (M) button. Then, Audio
Player starts to play the newly selected file instead of the file
being played. Press the ■button at the search window to
cancel search and close the search window.
To display lyrics at the Lyrics window, set Caption to On at the
Audio Setup menu. When the relevant lyrics are not available, a
bitmap image is displayed instead. If Caption is set to Off at the
Audio Setup menu, the list of audio files being played is
displayed.
To pause audio playing, press the ▶||||button. To resume
playing, press the ▶||||button one more time.
To play the previous/next file while playing audio, press the ▲/▼
button.
To exit Audio Player while playing audio, press the (M) button
and choose Quit at the pop-up menu. Or press the ■button
while playing.
To adjust the volume level while playing audio, press +/- button
to increase/decrease the volume level.
Function
Rewind/
Fast Forward
Search
Caption
Pause/Resume
Play Previous/
Next File
Exit Audio Player
Adjust Volume
Audio player functions are described below:
Description
To add an audio file to a playlist, select an audio file and press
the (M) button. At the pop-up menu, choose Add to PlayList.
To add an audio file to the default playlist, choose Default
PlayList. To select another playlist and add an audio file to it,
choose Select PlayList.
To select another audio file during playing, press the Mbutton
and, at the pop-up menu, choose Search to open the Audio File
Search window. At the search window, select a desired audio
file and press the ▶or (M) button. Then the audio player starts
to play the newly selected file instead of the file being played.
Press the ■button to cancel the search mode and close the
search window.
To configure audio settings, press the (M) button and, at the pop-
up menu, choose Setup to open the Audio Setup window(80p.).
To display lyrics at the Lyrics window, set Caption to On at the
Audio Setup menu. When the relevant lyrics are not available, a
bitmap image is displayed instead. If Caption is set to Off at the
Audio Setup menu, the list of audio files being played is
displayed.
To enable repeat play, press the (M) button in the list of audio
files and choose Repeat at the pop-up menu. Select All to
repeat all files and Single to repeat a single file. To disable
repeat play, select Off.
To exit Audio Player, choose the (M) button in the list of audio
files and choose Quit at the Pop-up menu.
Function
Add to PlayList
Search
Setup
Caption
Repeat
Quit
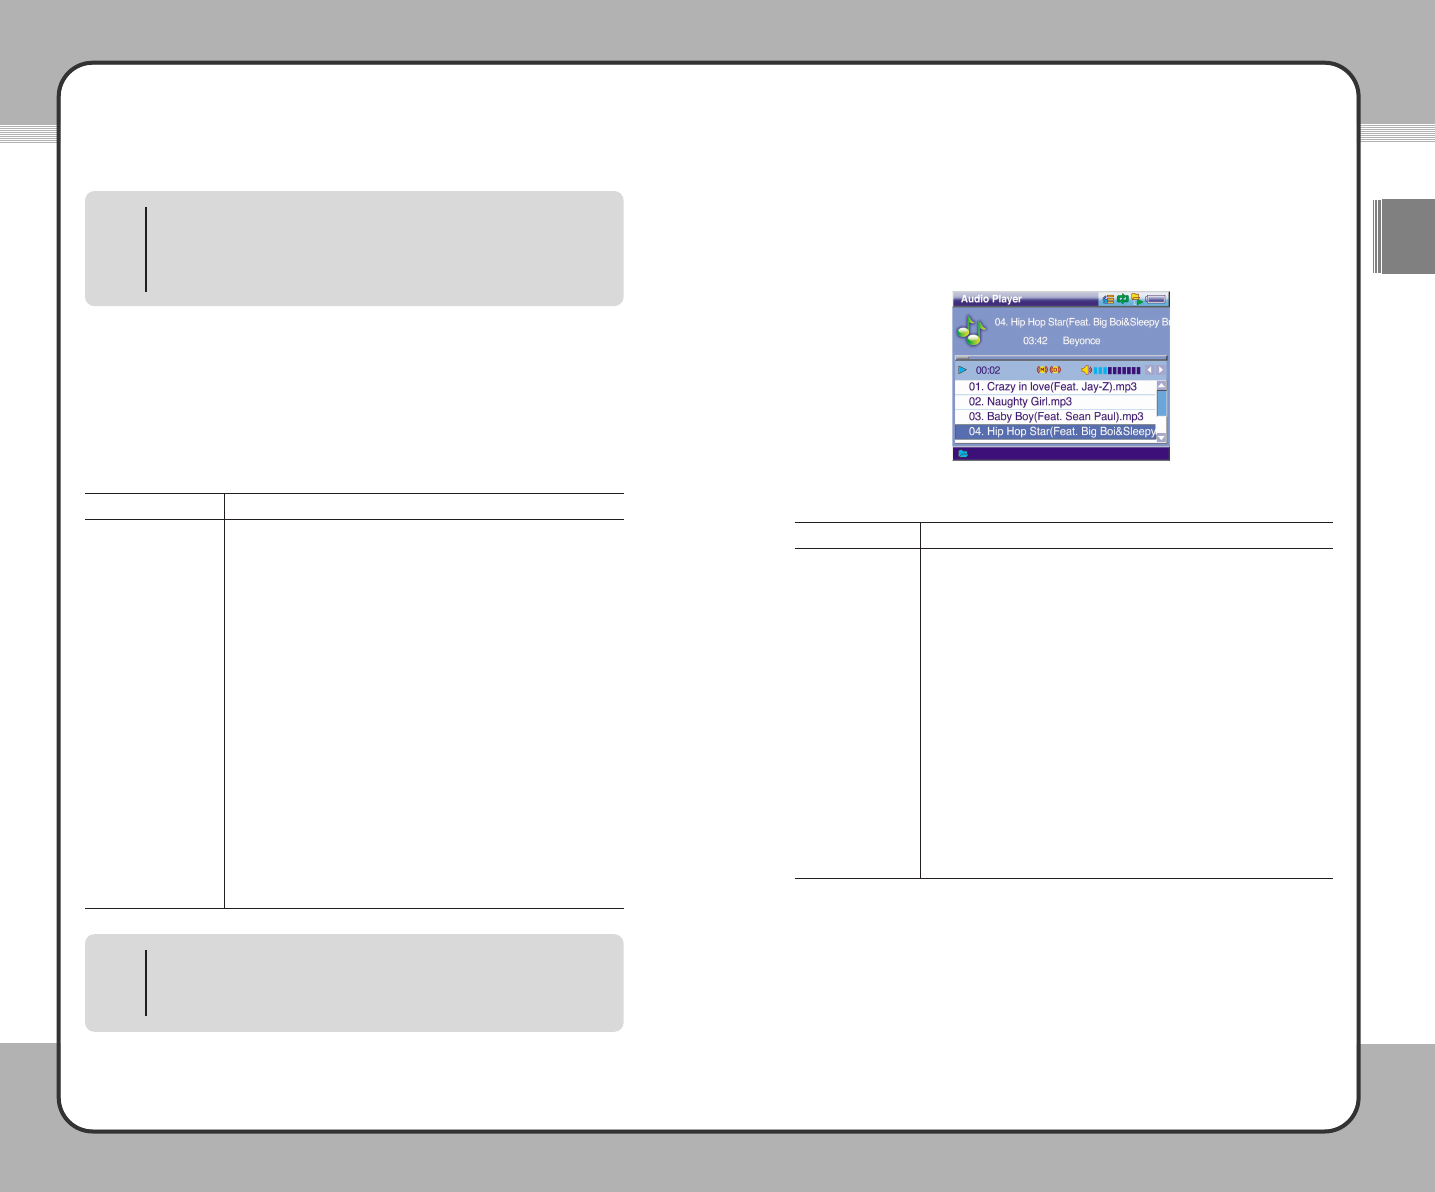
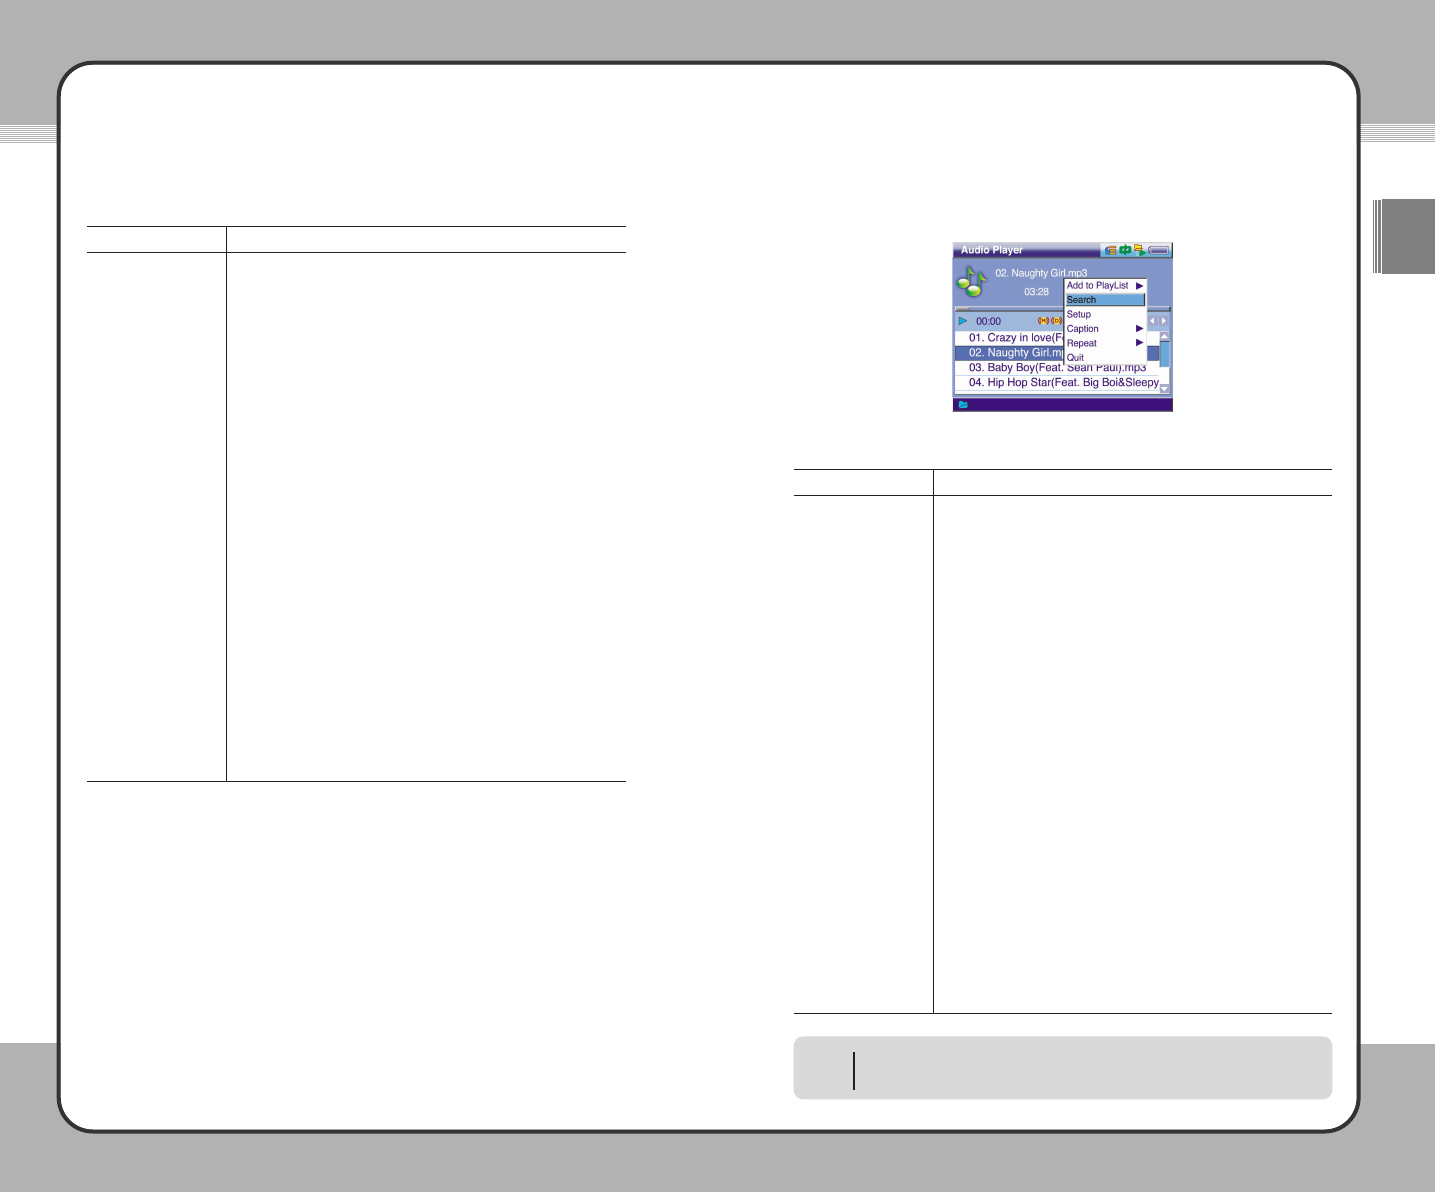
Press the (M) button to open a pop-up menu in the Audio Player screen as
shown in the following picture.
Pop-up menu functions are described below:
Editing m3u playlist
Please refer to the browser function for editing m3u playlist (70p.).
NOTE
4499
Useful Functions
ENG
4488Useful Functions
Video
The mPack can play video files recorded in the following formats: MPEG1/2/4,
XviD, WMV, and ASF ( up to 720 x 576, 30fps).
To play video files, complete the following steps:
To play video, select Player in the
main window.
Select Video on the Player menu.
Select a video file from the video list
and press the ▶button to play the
file. The video file is played with
Video Player.
Video File List
The video file list only shows the folders and video files within the "Video"
folder on your hard drive. To play a video file located in another folder, use the
browser to play it. Press the (M) button to open a pop-up menu in the video
file list as shown in the following picture:
Pop-up menu functions are described below:
Description
To delete a folder or a video file, select a folder or a video file
and press the (M) button. Then choose Delete at the Pop-up
menu. If you choose a folder, all files within the folder are
deleted together along with the folder. Once they are deleted,
they cannot be recovered.
To rename a folder or a file, select a folder or a file and press the
(M) button. Then select Rename at the pop-up menu. Change
the name of the folder or the video file using the on-screen
keyboard.
To see the video info, press the (M) button while playing a video
and choose Info on the pop-up menu. After checking the Info,
press the (M) button to return to the video file list.
To configure video settings, press the (M) button and, at the pop-
up menu, choose Setup to open the Video Setup window(79p.).
Function
Delete
Rename
Info
Setup
Macro function
When either Delete, Rename, or Info has been executed, the most
recently executed function is set as the macro function. If a function is
cancelled while it is being executed, It is not set as the macro function. A
function set as the macro function is initiated -- not through a pop-up menu
-- but by pressing the ▶||||.
NOTE
Joy Stick Button Operation
▲: Previous List +: Previous Page
▼: Next List
-
: Next Page
◀: Previous Screen ■: Stop/Cancel
▶: Select/Run/Next Screen ▶||||: Macro Function
(M) : Pop-up Menu/OK (H) : Shortcut Menu
NOTE
Message Window
A message window may appear when a function item is selected from the
pop-up menu. The following actions will occur with each function:
1. YesToAll :When the same task is performed repeatedly, a
confirmation message does not appear after the first
execution. The product is initialized to default when it is
restarted.
2. Yes :Run/set the changes.
3. Cancel :Cancel a task.
NOTE
5511
Useful Functions
ENG
5500Useful Functions
Video Player
A video file is played with Video Player. The following picture shows Video
Player playing a video file.
Button operations of Video Player are described below:
Description
To rewind or fast forward while playing video, press the ◀/▶
button. You can set the skip interval using the F/F step value in
the video setup menu. Press and hold it down to display a slide
bar and use the ◀/▶button for navigation.
To pause video playing, press the ▶||||button. To resume
playing, press the ▶||||button one more time.
When a caption file is available, it is automatically played along
with video by default. To play video without caption, set Caption
to Off in the Video Setup window.
Function
Rewind/
Fast Forward
Pause
Caption
Video Player functions are shown below:
Function
Play the previous video file.
When Caption Sync Start has been enabled, the caption is
displayed 1 second earlier.
Play the next video file.
When Caption Sync Start has been enabled, the caption is
displayed 1 second later.
Rewind based on F/F Step settings.
When Caption Sync Start has been enabled, the caption is
displayed 0.5 second later.
Fast forward based on F/F Step settings.
When Caption Sync Start has been enabled, the caption is
displayed 0.5 second earlier.
Open a pop-up menu.
When Caption Sync Start has been enabled, it is disabled.
Increase the volume level of Video Player.
When Caption Sync Start has been enabled, caption is displayed
10 seconds earlier.
Decrease the volume level of Video Player.
When Caption Sync Start has been enabled, caption is displayed
10 seconds later.
Exit Video Player. Cancel changes when adjusting caption sync.
Pause playing video. Press it one more time to resume playing.
N/A
Joy Stick Button
▲
▼
◀
▶
(M)
+
-
■
▶||||
(H)
5533
Useful Functions
ENG
5522Useful Functions
Description
To enable the caption sync start while playing video, press the
(M) button and choose Caption Sync Start at the pop-up menu.
For more information on the caption sync start, refer to each
button function.
When a caption file is available, it is automatically played along
with video by default. To play video without caption, press the
(M) button and set Caption to Off at the pop-up window. To
enable caption again, press the (M) button and set Caption to
On at the pop-up menu.
To change the screen size, press the (M) button while playing
video and choose Screen Size at the pop-up menu. To play in
the normal screen size in full screen mode, choose Normal. To
fit player to the video size and play the video in full mode,
choose Full.
To see the video info, press the (M) button while playing video
and, at the pop-up menu, choose Info.
To configure video settings, press the (M) button and, at the pop-
up menu, choose Setup to open the Video Setup window(81p.).
To change playing speed, press the (M) button and choose
Speed Change at the pop-up menu. Choose 2xForward for 2x-
playing and 2xBackward for 2x-reverse playing. To play video
at normal speed, choose Normal.
To exit Video Player, press the (M) button in the video file list
and, at the pop-up menu, choose Quit.
Function
Caption Sync Start
Caption
Screen Size
Info
Setup
Speed Change
Quit
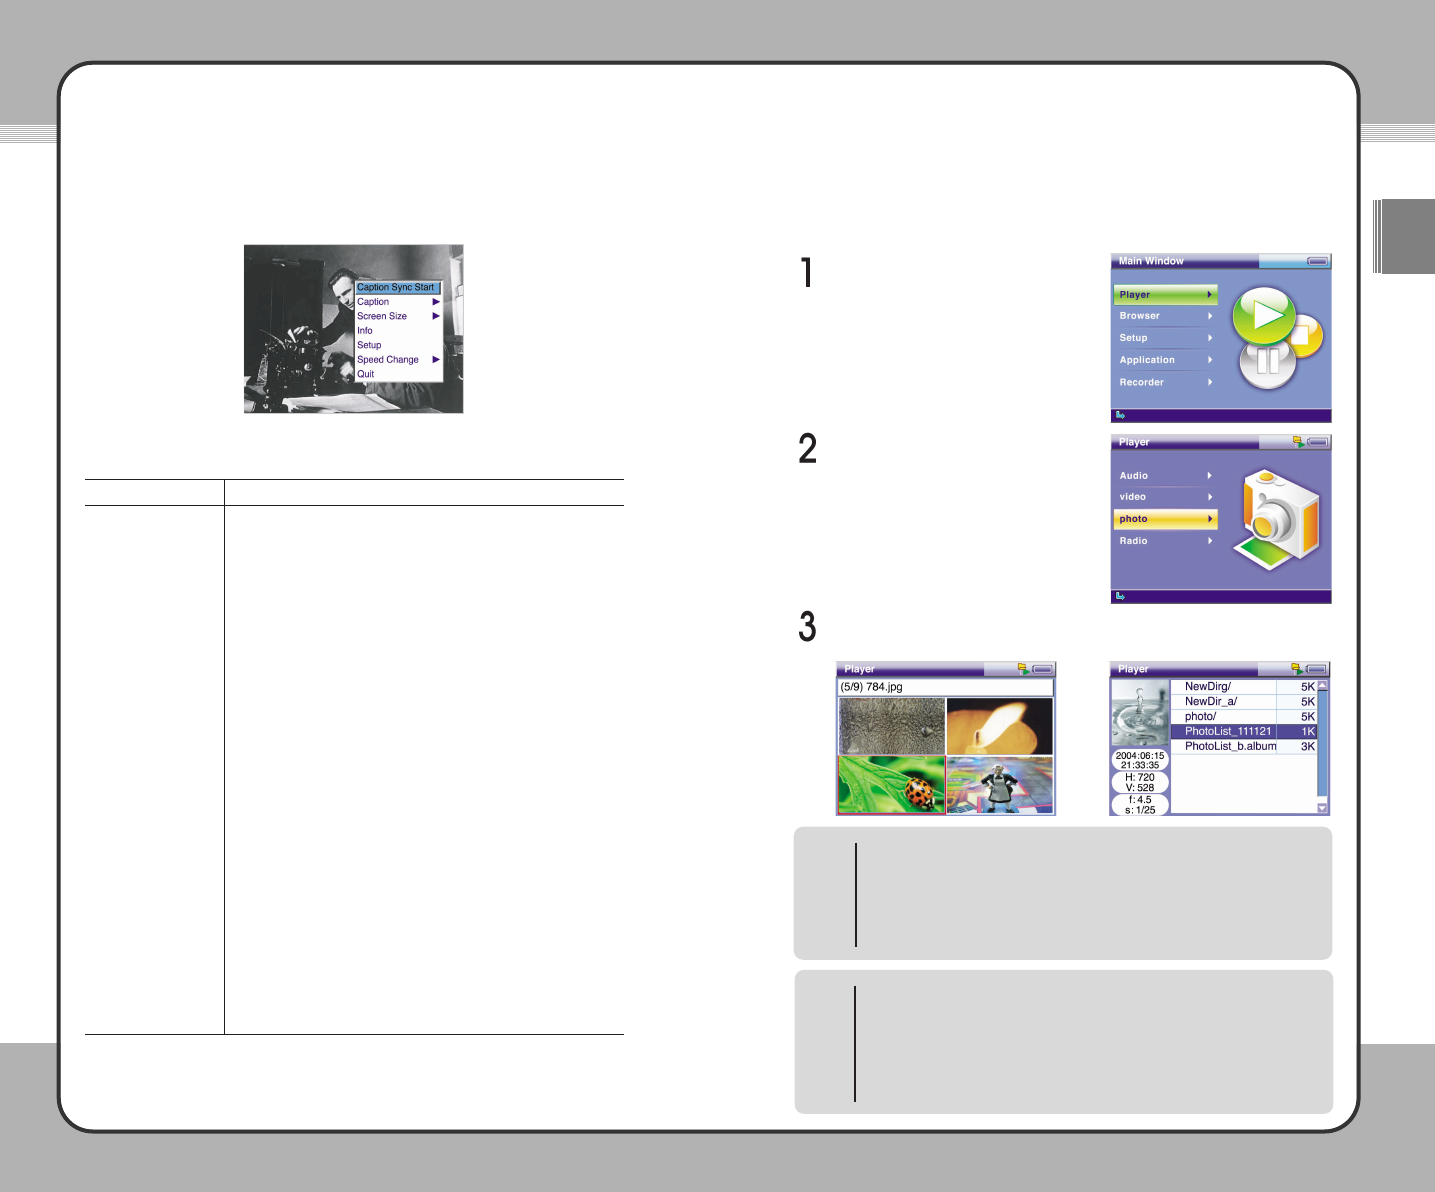
While playing video, press the (M) button to open a pop-up menu as shown in
the following picture:
Pop-up menu functions are described below:
Photo
The mPack is a walking photo gallery, allowing you to share your digital
pictures on the 3.5" TFT LCD screen or directly to your TV without the need of
a computer. To view your digital photos, complete the following steps:
Select Player from the Main Window.
Select Photo from the Player menu.
Photo Preview or the list of photo files appears on the screen depending
on Thumbnail/FileList settings in the Photo Setup menu.
Joy Stick Button Operation
▲: Previous List +: Previous Page
▼: Next List
-
: Next Page
◀: Previous Screen ■: Stop/Cancel
▶: Select/Run/Next Screen ▶||||: Macro Function
(M) : Pop-up Menu (H) : Shortcut Menu
NOTE
Macro function
When Delete, Rename, or Info has been executed, the most recently
executed function is set as the macro function. If a function is cancelled
while it is being executed, It will not be set as the macro function. A
function set as the macro function is initiated by pressing the ▶|||| button.
Once a function is set as the macro function, it remains so until the
playList is exited.
NOTE
5555
Useful Functions
ENG
5544Useful Functions
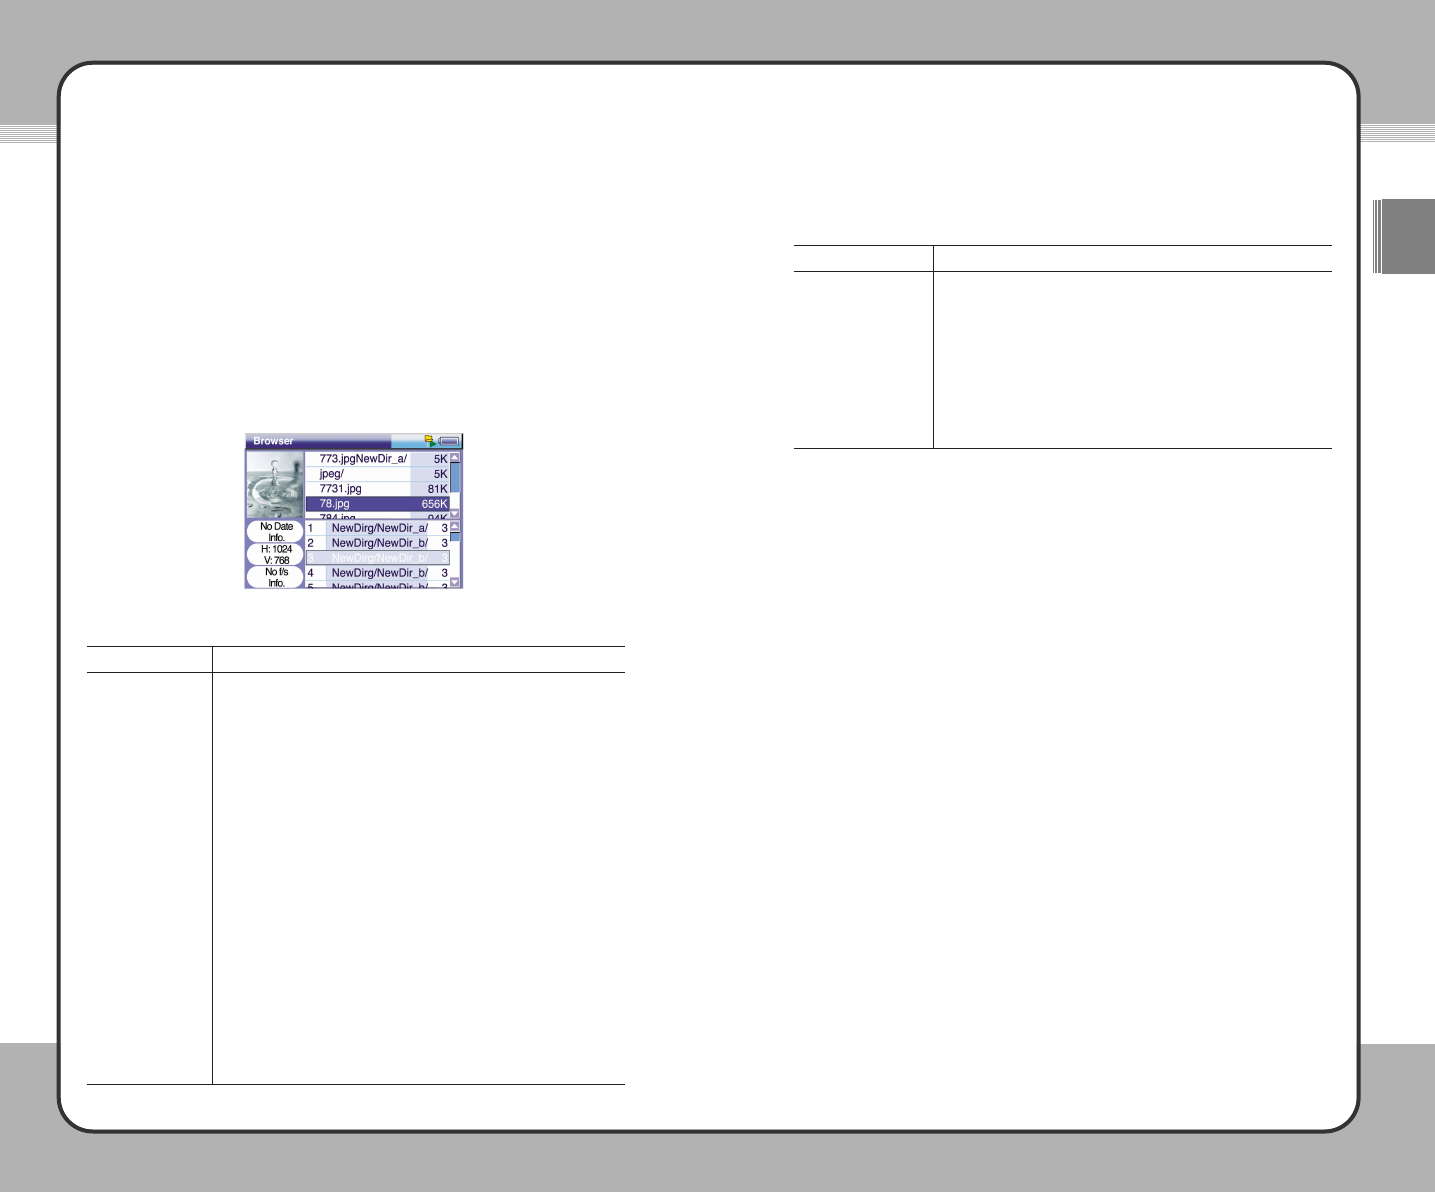
Photo Preview/List of Photo Files
The mPack is able to show digital photos in either Photo Preview (thumbnail)
or list mode. Both of these modes require that the photo files, folders and
albums be saved in the "Photo" folder on the mPack. Otherwise, the browser
function must be used to view a photo or an album file saved elsewhere on
the mPack.
The following pictures show Photo Preview and the list of photo files with the
pop-up menu opened.
Press the (M) button to open the pop-up menu.
In Photo Preview, four photo thumbnails, along with their file names, are
displayed on the screen as shown in the left picture below.
In the list of photo files, the file preview and the photo file info are shown on
the left and the list of photo files on the right.
The pop-up menus for both Photo Preview and the list of photo files are
identical. Their functions are provided below.
Album files have a different functionality from photo files or folders. The
functions available for album management are View Photo, Slide Show and
Generate. For more information regarding Album files, please refer to the
Album Files section on page 55.
Description
To view photos in a slide show, press the (M) button and choose
Slide Show at the pop-up menu. To exit the slide show, press
the ■button or, alternatively, press the (M) button and choose
Exit at the pop-up menu. The default slide show delay is initially
set to 3 seconds.
To manage albums, press the (M) button and select Album from
the pop-up menu. Choose Generate to configure an album with
photo files within the current folder. Choose New to create and
configure a new album. Choose Edit to edit an existing album(59p.).
Function
Slide Show
Album
Description
To view a photo file using Photo Viewer, select a photo file and
press the ▶button.
To delete a photo file, select a photo file. Press the (M) button
and choose Delete at the pop-up menu.
To rename a photo file, select a photo file. Press the (M) button
and choose Rename at the pop-up menu. Rename the name of
the selected photo file using the on-screen keyboard.
To see the info of a photo file, select a photo file. Press the (M)
button and choose Info at the pop-up menu.
To setup photo settings, press the (M) button and choose Setup
at the pop-up menu to open the Photo Setup window.
Function
View
Delete
Rename
Info
Setup
Description
To view a photo file within an album in full screen mode, select an
album. Press the (M) button and choose View to run Photo Viewer.
To view an album in a slide show, select an album. Press the (M)
button and choose Slide Show to begin. To quit the slide show,
press the ■button or press the (M) button and choose Exit at
the pop-up menu. The default slide show delay is initially set to 3
seconds.
To set an album as the default album, select an album. Press the
(M) button and choose Set to Default at the pop-up menu.
To edit an album, select an album. Press the (M) button and
choose Edit at the pop-up menu(see 59p.).
Function
View
Slide Show
Set to Default
Edit
Message Window
A message window may appear when a function item is selected from the
pop-up menu. The following actions will occur with each function:
1. YesToAll :When the same task is performed repeatedly, a
confirmation message does not appear after the first
execution. The product is initialized to default when it is
restarted.
2. Yes :Run/set the changes.
3. Cancel :Cancel a task.
NOTE
Select an album file from the list of photo files and press the (M) button to
open the pop-up menu as shown in the following picture.
5577
Useful Functions
ENG
5566Useful Functions
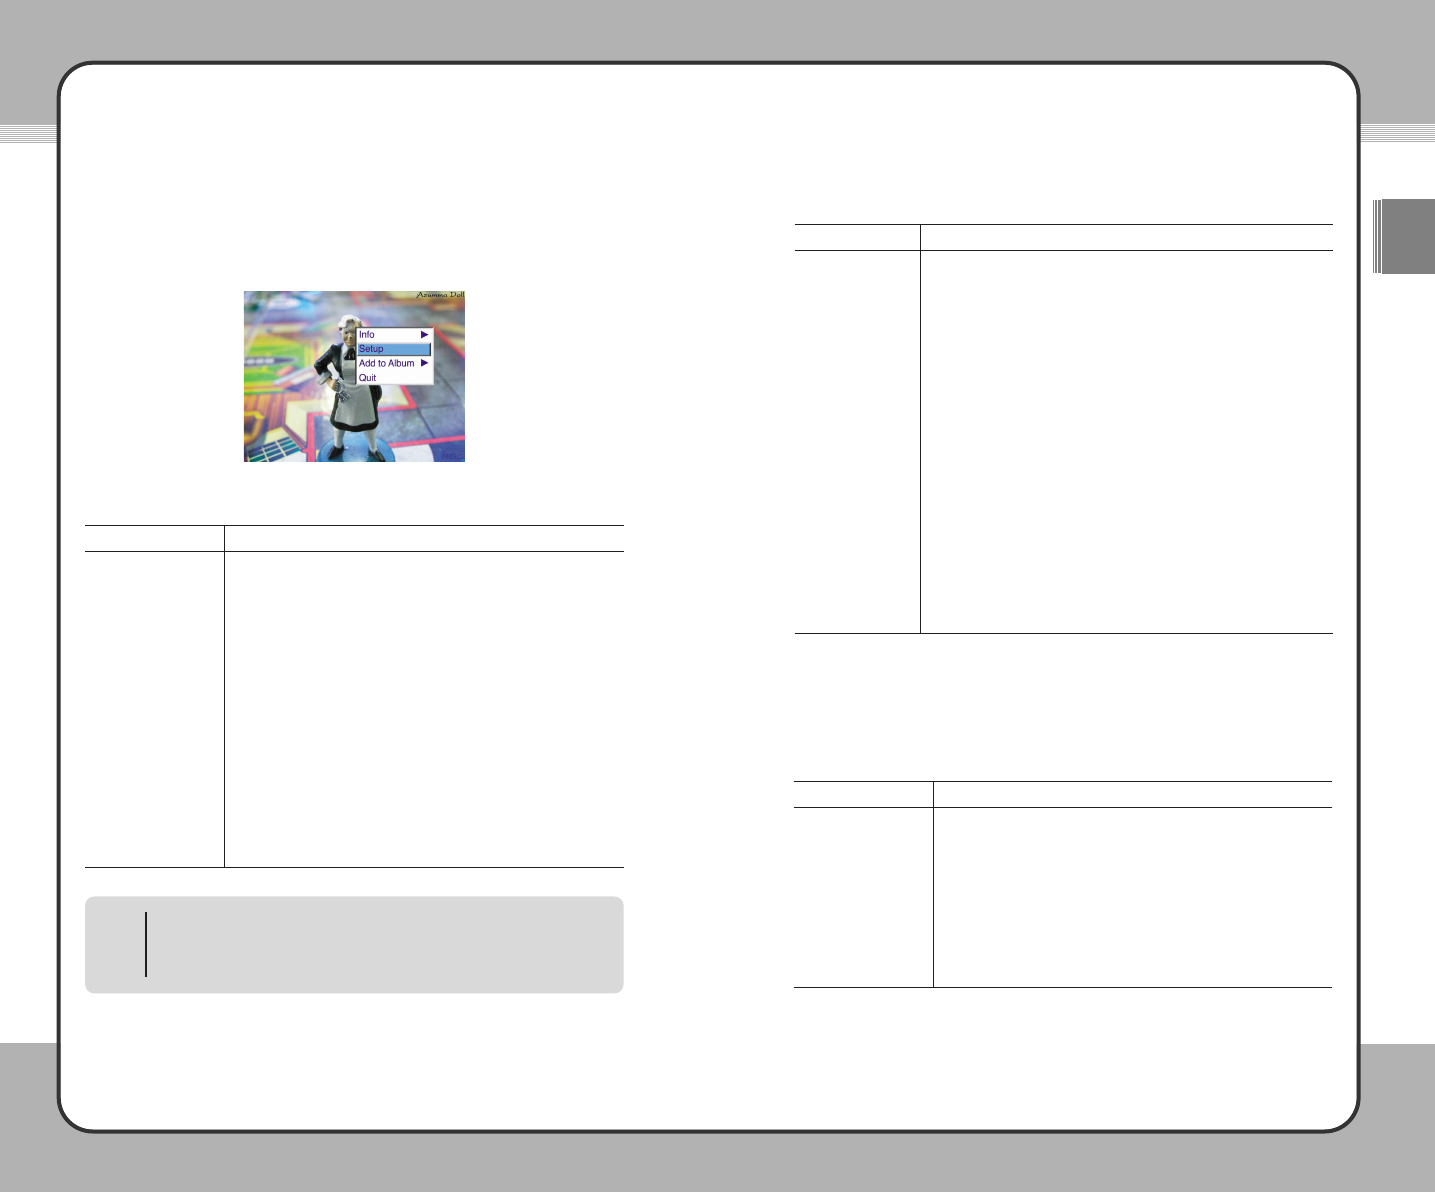
Photo Viewer
You can view a photo file with Photo Viewer. Press the (M) button in Photo
Viewer to open the pop-up menu as shown in the following picture.
The pop-up menu functions for Photo Viewer are provided below:
Description
Press the (M) button in Photo Viewer and choose Info at the
pop-up menu. Choose Exif to display the photo resolution
author, file type and date & time information. Choose
Histogram-Y to display brightness histogram. Choose
Histogram-RGB to display color information.
To configure the photo settings, press the (M) button and
choose Setup at the pop-up menu to open the Photo Setup
window (82p.).
To add a photo file to an album, select a photo file. Press the
(M) button and choose Add to Album at the pop-up menu.
Choose Default Album to add it to the default album. To add it
to one of the previous albums, choose Select Album.
To quit Photo Viewer, press the (M) button to open the pop-up
menu and choose Quit. After quitting Photo Viewer, return to
Photo Preview or the list of photo files.
Function
Info
Setup
Add to Album
Quit
The button operations for Photo Viewer are provided below:
Zoom Mode
The mPack allows you to zoom in on your photo files. The pop-up menu
functions in zoom mode are provided in the below:
Description
To view the previous/next photo file, press the (M) button to
open the pop-up menu and choose Prev/Next to view the file.
To quit zoom mode, press the (M) button to open the pop-up
menu and choose Normal View. After quitting zoom mode,
return to normal view mode.
To quit Photo Viewer, press the (M) button to open the pop-up
menu and choose Quit. After quitting Photo Viewer, return to
Photo Preview or the list of photo files.
Function
Prev/Next
Normal View
Quit
Add to Album
To add a photo to an album, the photo and the album should exist on the
same storage device (i.e. on the mPack hard drive or on a CompactFlash
card). Otherwise, the photo cannot be added to the album.
NOTE
Function
View the previous file.
When in zoom mode, move to the top of the photo.
View the next file.
When in zoom mode, move to the bottom of the photo.
Rotate the photo counter-clockwise.
When in zoom mode, move to the left of the photo.
Rotate the photo clockwise.
When in zoom mode, move to the right of the photo.
Open the pop-up menu.
Enter into zoom mode and zoom the photo.
Enter into zoom mode and un-zoom the photo.
Quit Photo Viewer.
Exit the zoom screen and return to the previous screen.
N/A.
N/A.
Joy Stick Button
▲
▼
◀
▶
(M)
+
-
■
▶||||
(H)
5599
Useful Functions
ENG
5588Useful Functions
Album Editor
Using Album Editor, you can create an album with your favorite photos and
manage the photos by album. To use Album Editor, select an album file and
press the (M) button. Then, choose Album-New or Album-Edit at the pop-up
menu. Alternatively, select an album file and press the ▶button and select Edit.
The following picture shows the Album Editor screen. Photo Preview and the
file info windows appear on the left and the list of photo files appears in top
and bottom windows on the right. The top list (the folder window) displays the
list of photo files in a folder and the bottom list (the album window) shows the
list of photo files in an album.
The button operations for Album Editor are provided below:
The pop-up menu functions for Album Editor are provided in the below. Press
the (M) button to open the pop-up menu.
Description
To get help, press the (M) button to open the pop-up menu.
Then choose Help.
To change the file list order, select a photo file to replace within
the list and press the (M) button. At the pop-up menu, choose
Upward/Downward to move the file up or down.
To quit Album Editor, press the (M) button to open the pop-up
menu and choose Quit. After quitting Album Editor, return to
Photo Preview or the list of photo files.
Function
Help
Upward/Downward
Quit
Function
Go to the previous list. If the current list is the first list, go to the
last list.
Go to the next list. If the current list is the last list, go to the first list.
When in the folder window, return to the previous screen.
When in the album window, change the slide show delay. (1, 3, 7
or 10 seconds)
When in the folder window, run Photo Viewer or go to the selected
folder.
When in the album window, change the slide show delay. (1, 3, 7
or 10 seconds)
Open the pop-up menu.
When in the folder window, add a photo file to an album.
When in the album window, remove a photo file from an album.
Exit Album Editor.
Each time the ▶||||button is pressed, the folder and the album
window are toggled.
N/A
Joy Stick Button
▲
▼
◀
▶
(M)
+
-
■
▶||||
(H)
6611
Useful Functions
ENG
6600Useful Functions
Radio
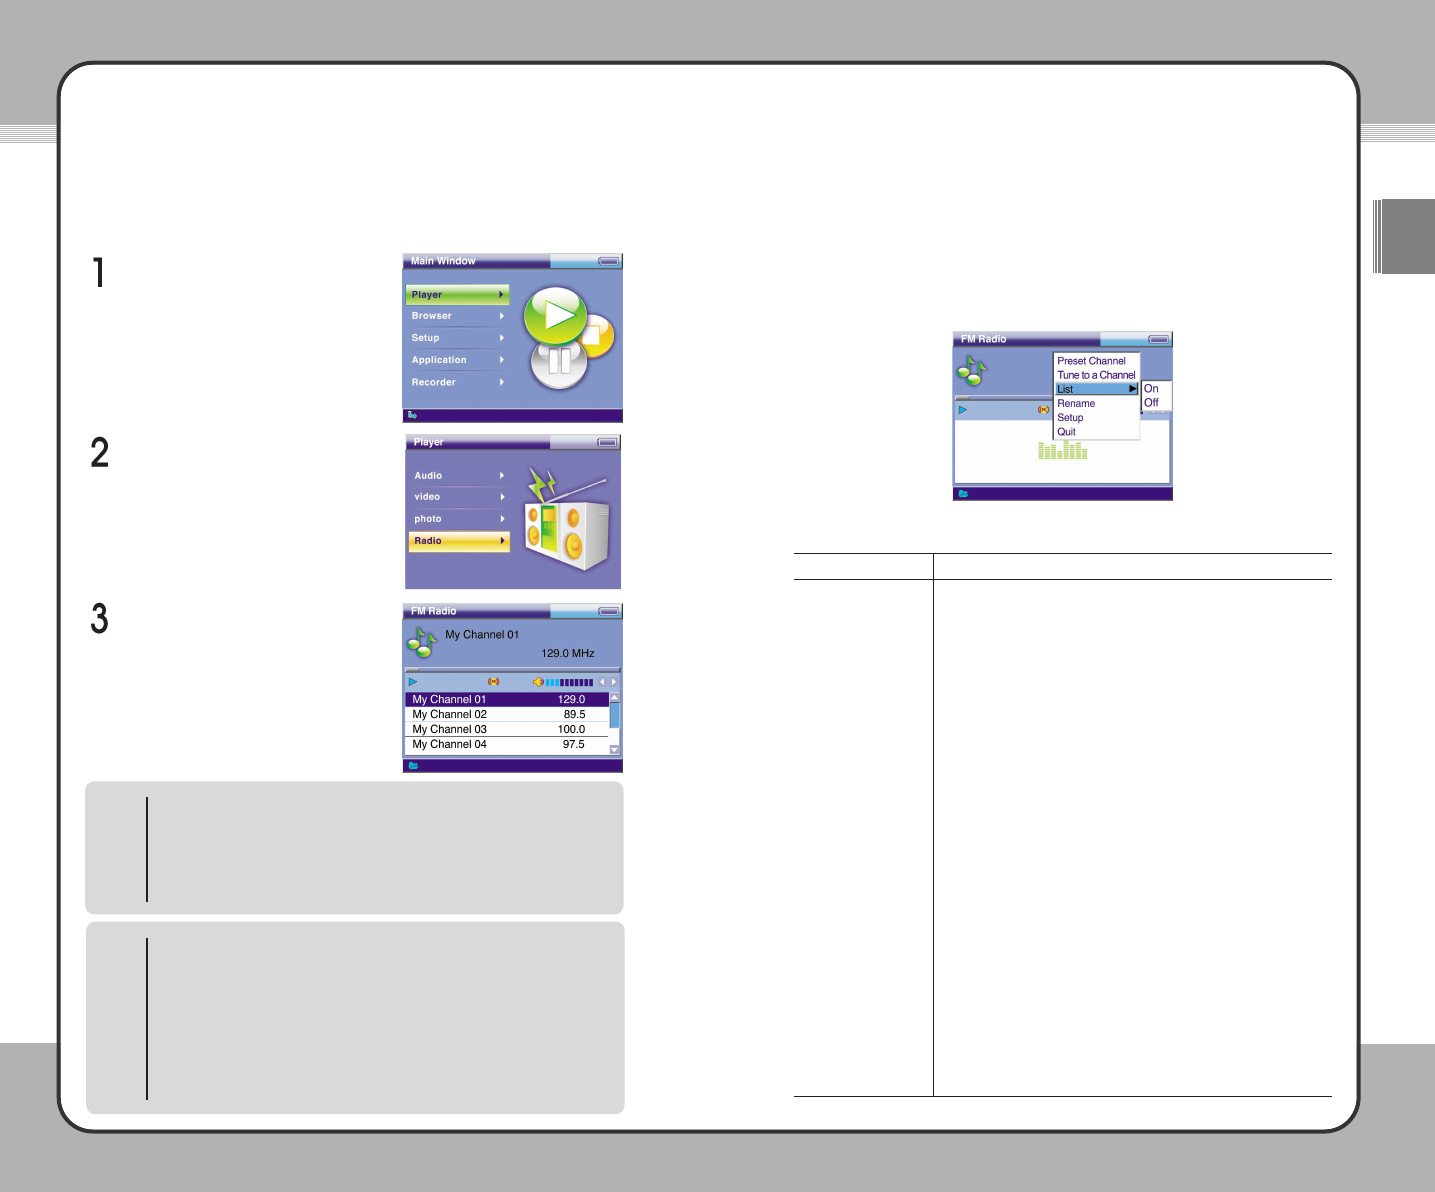
The mPack contains an FM tuner for radio reception. Simply tune in to your
favorite station and listen to current music, weather, sports or whatever you
enjoy. To listen to the FM radio, complete the following procedure:
Select Player in the Main Window.
Select Radio in the Player menu.
The FM Radio Player starts to play
the most recently played channel.
FM Radio Player
At the top of FM Radio Player, a channel name, frequency (MHz), mute
(On/Off), stereo/mono and volume level are displayed. A channel list appears
at the bottom. The following picture shows the FM Radio Player with its pop-
up menu activated. To open the pop-up menu, press the (M) button.
FM Radio Player functions are described below:
Description
To manage a channel, press the (M) button and choose Preset
Channel at the pop-up menu. This displays the preset channel
list. At the channel list, you can register a new channel, replace
channel frequency, rename and delete a channel. Please refer
to the Preset Channel section on the next page for more
information.
To tune to a channel manually, press the (M) button and choose
Tune to a Channel at the pop-up menu. Then set a channel
manually using the joy stick buttons. Please refer to the Tune to
a Channel section on the next page for more information
regarding button operations.
To configure Channel List View while listening to the radio with
the FM Radio Player, press the (M) button and choose List at the
pop-up menu. To view the channel list while playing the radio,
set it to On. To play radio without displaying the list, set it to Off.
To change the channel name, first, select the channel to change
as you wish. Then press the (M) button, and choose Rename at
the pop-up menu. Change the name of the selected channel
name using the on-screen keyboard. The channel name can be
a maximum of 24 English characters.
To configure Radio Setup, press the (M) button and choose Setup
at the pop-up menu to open the Radio Setup window(83p.).
To exit the FM Radio Player, press the (M) button to open the
pop-up menu and choose Quit to exit Radio Player and return to
the previous screen.
Function
Preset Channel
Tune to a Channel
List
Rename
Setup
Quit
Joy Stick Button Operation
▲: Previous Preset Channel +/
-
: Adjust Volume
▼: Next Preset Channel
◀: Channel Search (Down) ■: Exit Radio
▶: Search Channel (Up) ▶||||: Mute (On/Off)
(M) : Pop-up Menu (H) : N/A
NOTE
Message Window
A message window may appear when a function item is selected from the
pop-up menu. The following actions will occur with each function:
1. YesToAll :When the same task is performed repeatedly, a
confirmation message does not appear after the first
execution. The product is initialized to default when it is
restarted.
2. Yes :Run/set the changes.
3. Cancel :Cancel a task.
NOTE
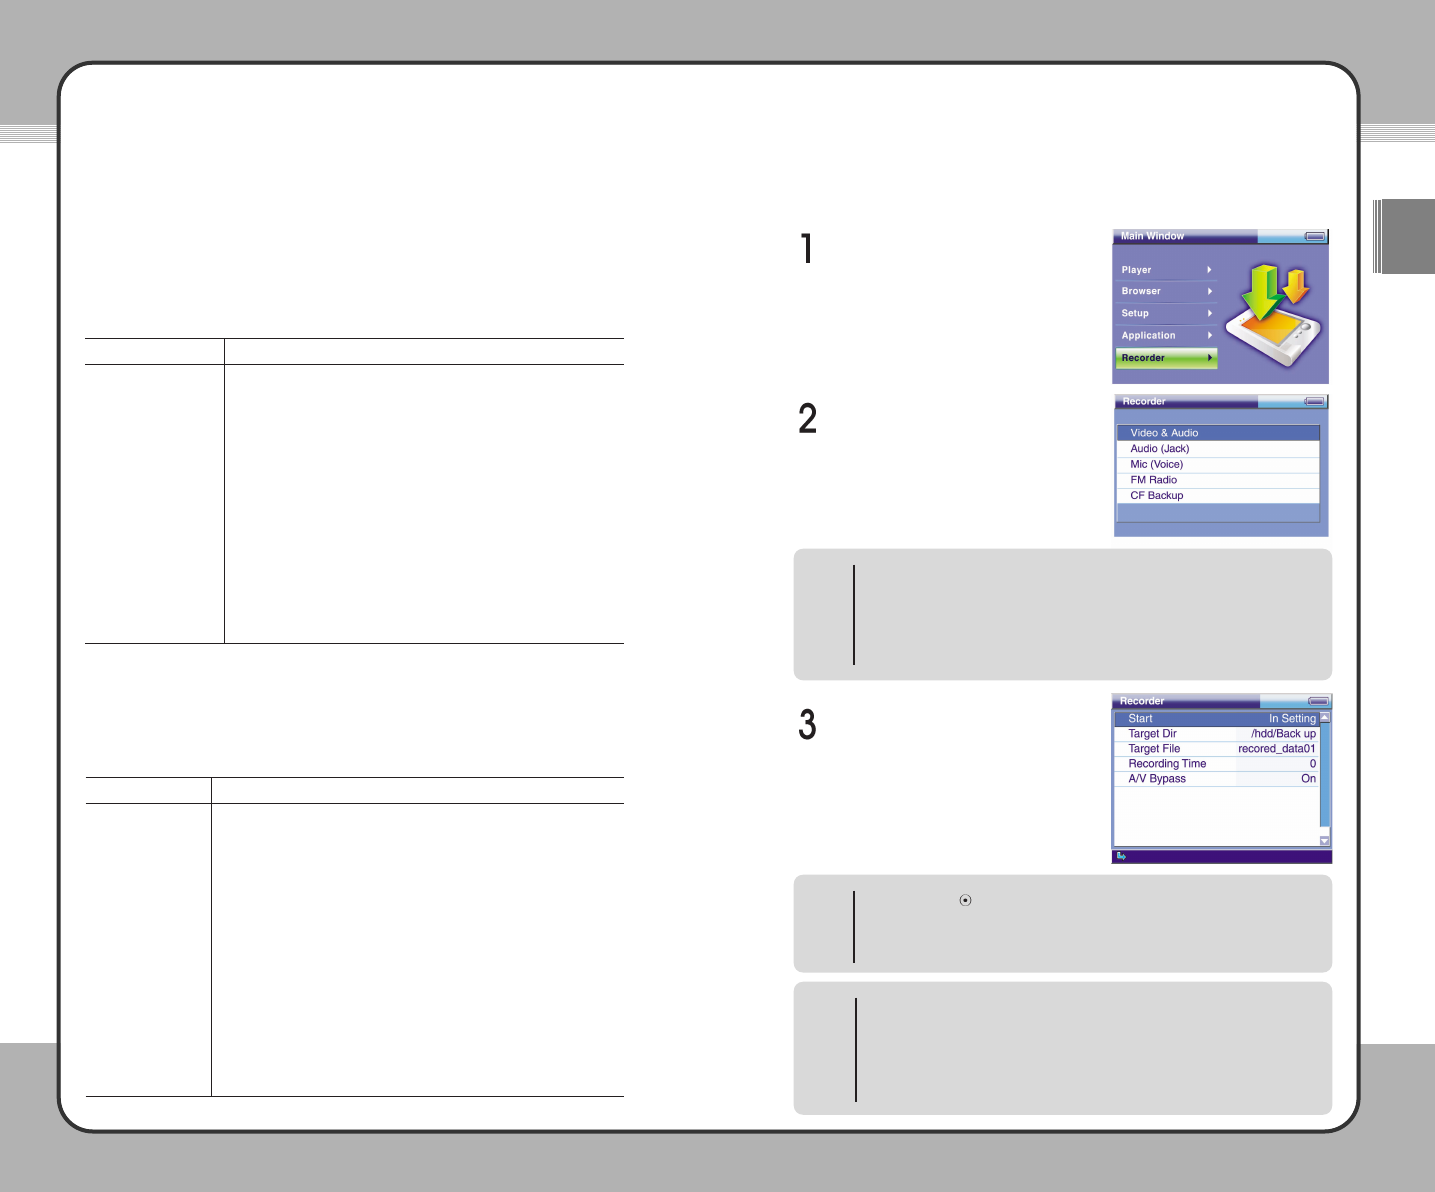
6633
Useful Functions
ENG
6622Useful Functions
Preset Channel
The mPack allows you to save your favorite radio station frequencies in the
Preset Channel function so you can quickly move from one station to another.
You can also give these stations a personalized name instead of relying on
the radio frequency alone to tell which station is which.
The pop-up menu functions for Preset Channel are described below:
Description
To register the current frequency as a new channel, press the
(M) button to choose Register at the pop-up menu. Then use
the on-screen keyboard to change the channel name.
To change channel frequency, select a channel. Press the (M)
button and choose Replace at the pop-up menu to set it as the
current frequency.
To rename a channel, select a channel to rename. Press the (M)
button and choose Rename at the pop-up menu. Use the on-
screen keyboard to change the name of the selected channel.
The channel name cannot exceed 24 English characters.
To delete a channel, select a channel to delete. Press the (M)
button and choose Delete at the pop-up menu to delete the
channel.
Function
Register
Replace
Rename
Delete
Tune to a Channel
The mPack allows you to tune to your favorite radio stations by using .the
buttons as described below.
Recorder
The mPack allows recording of Video, Audio, microphone, and FM Radio from
live broadcasts or other playback devices.
To make a recording, select
Recorder at the Main Window.
The Recording items include Video
& Audio, Audio, Mic and FM Radio.
CF Backup is for backup of a CF
media card. Press the ▶button on
an item to make your selection. For
more information on each item, refer
to the following page.
To start a recording, choose Start
on a recording item and press the ▶
button. For more information on
each recording item, refer to the
following page.
Recorder Button Operation
The red ◉Recorder button, located below the Power button, can only be
used when you are in the Recorder screen. The button is deactivated when
using any other programs on the mPack (game, address book, clock,
calendar, Chinese conversation), Video/Audio Player, Photo Viewer/Editor,
or when a message window is active to prevent accidental recording.
NOTE
▶|||| Button & Button Operation
When recording, use the ▲/▼buttons to choose Start or Pause from the
menu and, instead of pressing the ▶button, press the ▶||||or ◉button to
start or pause recording.
NOTE
Function
Increase frequency by 0.1MHz.
Decrease frequency by 0.1MHz.
Decrease frequency by 1MHz.
Increase frequency by 1MHz.
Save the changed frequency and exit Tune to a Channel.
Increase frequency by 0.01MHz.
Decrease frequency by 0.01MHz.
Exit Tune to a Channel without changing a frequency.
N/A
N/A
Joy Stick Button
▲
▼
◀
▶
(M)
+
-
■
▶||||
(H)
Joy Stick Button Operation
▲: Previous List +: Previous Page
▼: Next List
-
: Next Page
◀: Previous Screen ■: Stop/Cancel
▶: Select/Run/Next Screen ▶||||: Macro Function
(M) : Pop-up Menu (H) : Shortcut Menu
NOTE
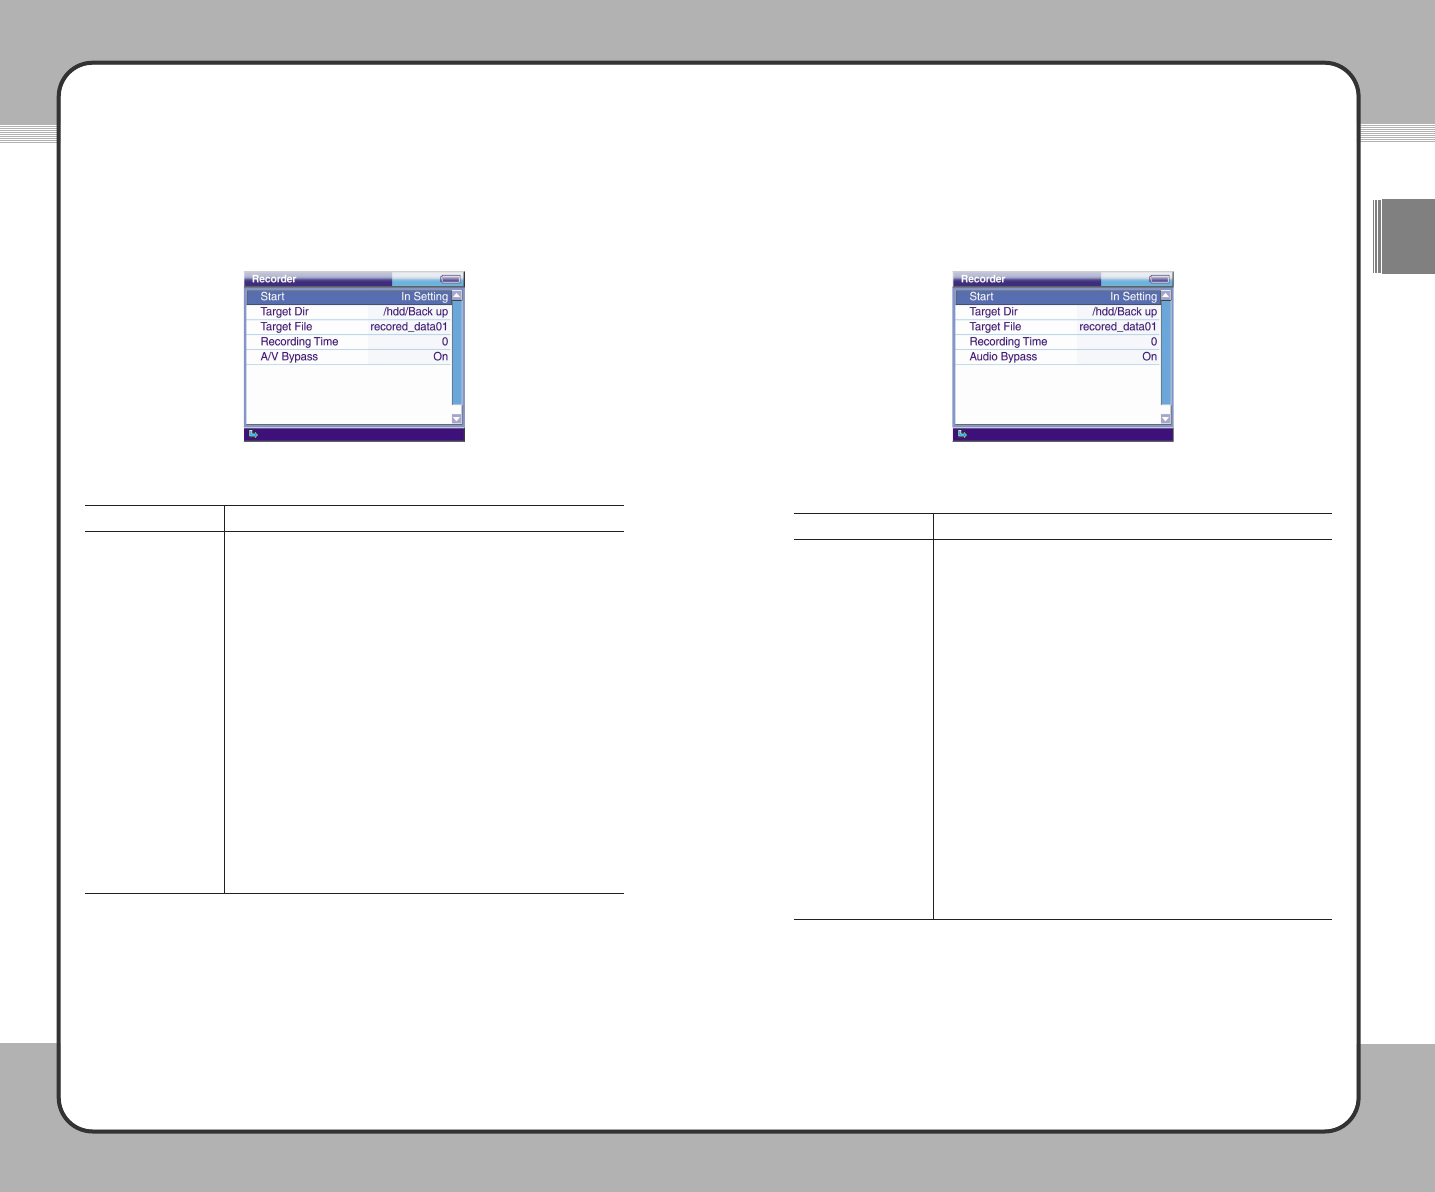
6655
Useful Functions
ENG
6644Useful Functions
Video/Audio Recorder
Record video and audio signals from an external input into a video/audio file.
The Video & Audio Recorder functions are described below:
Description
To start video/audio recording, select Start. To play video/audio
on the LCD screen during recording, set A/V Bypass to On. To
make a recording without playing, set it to Off.
To change the path, select Target Dir. Then select a new path
in the folder selection window. The default target directory is
/hdd/Backup/Video.
To create a recording file, choose Target File. Then create a
new file in the file management window. When recording without
creating a new file, recordings are overwritten to the existing file.
To set the recording time, select Recording Time. To change
the setup value, increase/decrease the time by 10 minutes by
pressing the ▲/▼buttons. To save the changes, press the ▶
button. To cancel the changes during setup, press the ■button.
If the setup value is user mode, a recording continues to be
made until you press the ■button.
To play video/audio on the LCD screen during recording, set A/V
Bypass to On. To make a recording without playing, set it Off.
Function
Start
Target Dir
Target File
Recording Time
A/V Bypass
Audio Recorder
Record audio signals from an external input into an audio file.
Audio Recorder functions are described below:
Description
To start audio recording, choose Start. To play audio during
recording, set Audio Bypass to On. To make a recording
without playing, set it to Off.
To change the path, choose Target Dir. Then select a new path
in the folder selection window. The default target directory is
/hdd/Backup/Audio.
To create a recording file, select Target File. Then create a new
file in the Folder Management Window. When recording without
creating a new file, recordings are overwritten to the existing file.
To set the recording time, select Recording Time. To change
the setup value, increase/decrease the time by 10 minutes by
pressing the ▲/▼buttons. To save the changes, press the ▶
button. To cancel the changes during setup, press the ■
button. If the setup value is user mode, recording continues
until you press the ■button.
To play video/audio on the LCD screen during recording, set
Audio Bypass to On. To make a recording without playing, set
it Off.
Function
Start
Target Dir
Target File
Recording Time
Audio Bypass
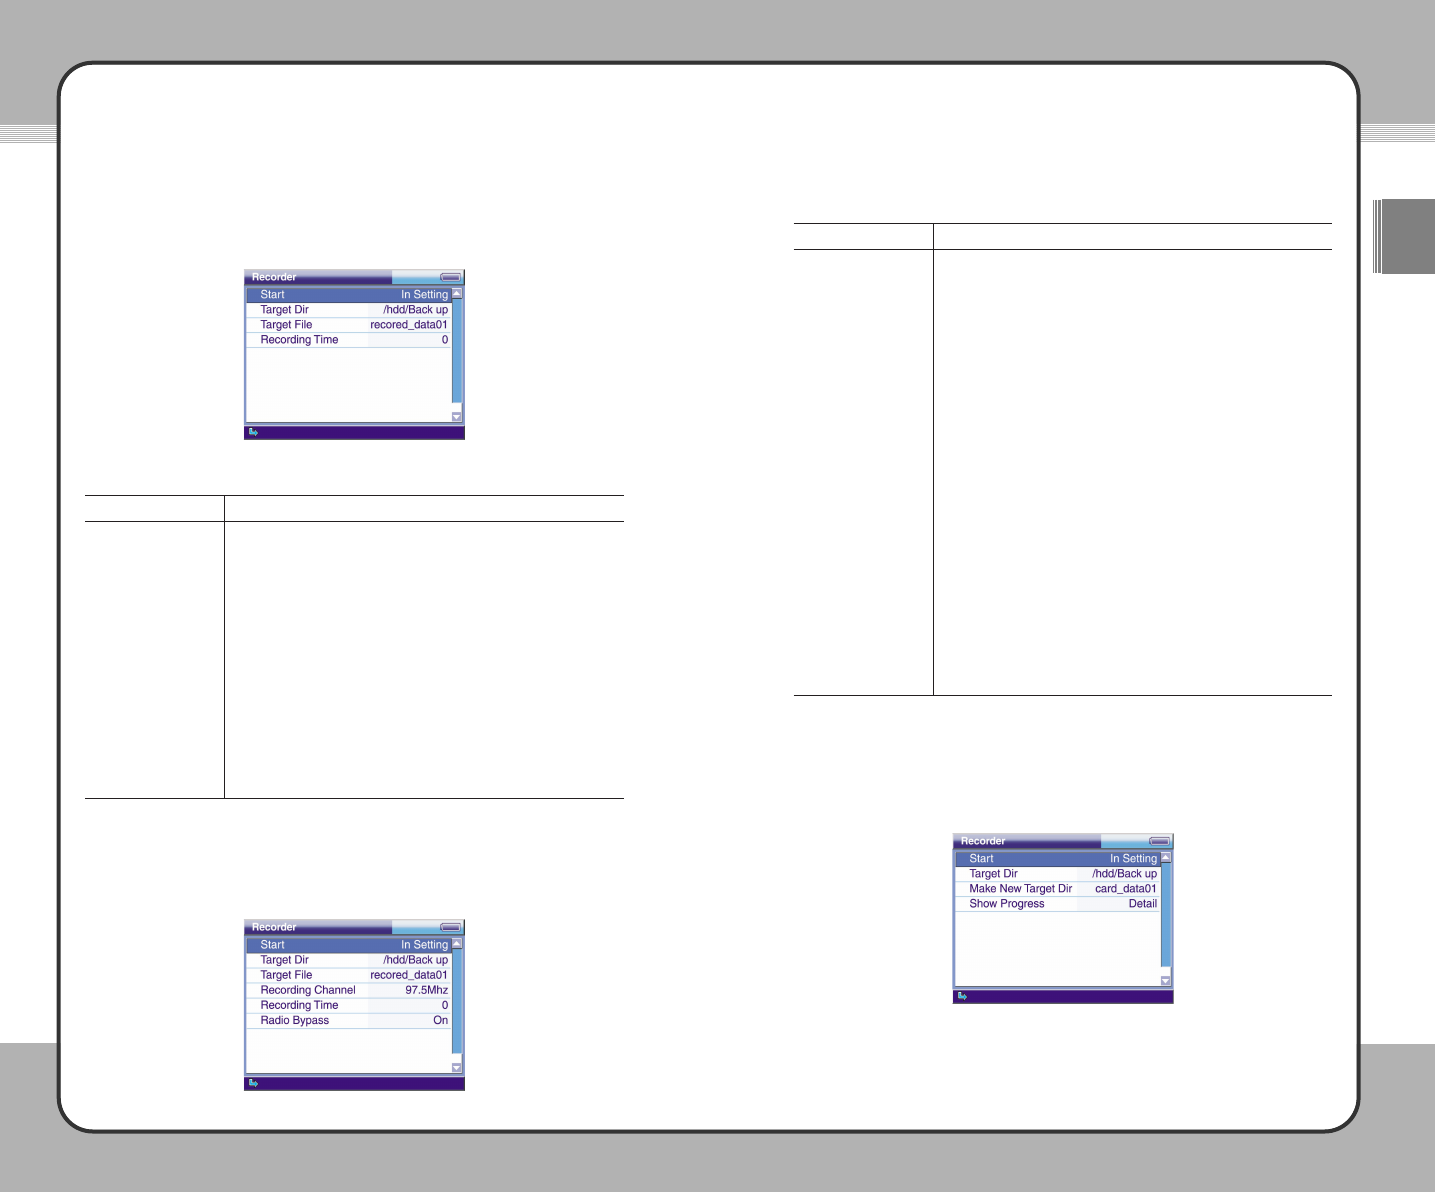
6677
Useful Functions
ENG
6666Useful Functions
Mic Recorder
Record signals from the built-in microphone into an audio file.
Mic Recorder functions are described below:
Description
To start Mic Recording, choose Start.
To change the path, choose Target Dir. Then select a new path
in the folder selection window. The default target directory is
/hdd/Backup/Voice.
To create a recording file, select Target File. Then create a new
file in the Folder Management Window. When recording without
creating a new file, recordings are overwritten to the existing file.
To set the recording time, select Recording Time. To change
the setup value, increase/decrease the time by 10 minutes by
pressing the ▲/▼buttons. To save the changes, press the ▶
button. To cancel the changes during setup, press the ■button.
If the setup value is user mode, recording continues to be made
until you press the ■button.
Function
Start
Target Dir
Target File
Recording Time
FM Radio Recorder functions are described below:
Description
To start FM radio recording, choose Start. To play radio during
recording, set Radio Bypass to On. To make a recording
without playing, set it to Off.
To change the path, choose Target Dir. Then select a new path
in the folder selection window. The default target directory is
/hdd/Backup/Radio.
To create a recording file, select Target File. Then create a new
file in the Folder Management Window. When recording without
creating a new file, recordings are overwritten to the existing file.
To change a recording channel, select Recording Channel and
press the ▲/▼buttons to increment/decrement a frequency. To
save the changed channel, press the ▶button. To cancel the
changes, press the ■button.
To set the recording time, select Recording Time. To change
the setup value, increase/decrease the time by 10 minutes by
pressing the ▲/▼buttons. To save the changes, press the ▶
button. To cancel the changes during setup, press the ■button.
If the setup value is user mode, recording continues to be made
until you press the ■button.
To play radio during recording, set Radio Bypass to On. To
make a recording without playing, set it to Off.
Function
Start
Target Dir
Target File
Recording Channel
Recording Time
Radio Bypass
FM Radio Recorder
Record FM radio programs into an audio file.
CF Media Card Backup
Backup the contents of a media card on a hard disk.

6699
Useful Functions
ENG
6688Useful Functions
Text
The mPack is text capable, allowing you to store and view all your text files in
.txt format. To read a text file:
Select Browser from the Main
Window.
Select a text file on the Browser
screen and press the ▶button to
open it with Text Viewer. For
information on how to use the
Browser, refer to the Browser
section on the next page 70.
You can view the contents of the file
with Text Viewer.
Button operations for the Text Viewer are described below:
CF Media Card Backup functions are described below:
Description
To backup a CF media card on a hard disk, choose Start.
To change the path, choose Target Dir. Then select a new path
in the folder selection window. The default target directory is
/hdd/Backup/MediaCard. You can create a new folder by
selecting Make New Target Dir.
To create a new backup folder, select Make New Target Dir.
Then create a new folder in the folder management window.
When making a backup without creating a new folder, the
backup file is placed into the existing folder.
To display detailed backup progress during backup, select
Detail. To display backup progress briefly in the form of a
progress bar, select Simple.
Function
Start
Target Dir
Make New Target
Dir
Show Progress
Recording Progress Screen
The following screen appears when you do not play video/audio/FM radio
during recording.
The recording time info is displayed in Recording Time. It indicates the
elapsed recording time and the total recording time. When Recording Time is
user mode, the total recording time is not displayed. You can see the name of
a recording file in Target File.
Function
Move the cursor up a line.
Move the cursor down a line.
Move the cursor to the left one character position.
Move the cursor to the right one character position.
N/A
Move the cursor up a page.
Move the cursor down a page.
Exit Text Viewer.
Move the cursor to the last line.
Move the cursor to the first line.
Joy Stick Button
▲
▼
◀
▶
(M)
+
-
■
▶||||
(H)

7711
Useful Functions
ENG
7700Useful Functions
Play/Edit a File using Browser
To play/view either an audio, video, photo, text or a game file, select the
media you wish to play and press the ▶button.
Select an m3u file and press the ▶button to display the pop-up menu as
shown in the following picture. From the pop-up menu, Select Play to play an
m3u file. Select Edit to edit the m3u file.
Select an album file and press the ▶button to display the pop-up menu as
shown in the following picture. From the pop-up menu, choose View to play
an album. Choose Slide Show to view a slide show. Choose Edit to edit the
file.
Browser
Moving around the mPack hard drive is very similar to moving around a PC
hard drive when you use the Browser function. To use the browser function:
Select Browser from the Main
Window.
The initial screen of Browser shows
the media card folder(card/) and the
hard disk folder(hdd/). The card
folder may be selected only when a
media card is available. Only the
Info and Setup items of the pop-up
menu are accessible in the media
card and hard disk folders. Press the
(M) button to open the pop-up menu.
For more information on the pop-up
menu, refer to the pop-up menu
section on the following page 71.
With Browser, you can search and
play audio, video, view a photo, text
or a game file and play or edit an
album file or an m3u file. For more
information, refer to Play/Edit a File
using Browser section on the
following page 71.
Joy Stick Button Operation
▲: Previous List +: Previous Page
▼: Next List
-
: Next Page
◀: Previous Screen ■: Stop/Cancel
▶: Select/Run/Next Screen ▶||||: Macro Function
(M) : Pop-up Menu (H) : Shortcut Menu
NOTE
7733
Useful Functions
ENG
7722Useful Functions
Macro function
When either Copy, Move, Delete, Rename or Info has been executed,
the most recently executed function is set as the macro function. If a
function is cancelled while it is being executed, it is not set as the macro
function. A function set as the macro function is initiated not through a
pop-up menu but by pressing the ▶||||button. Once a function is set to the
macro function, it remains so until you exit Browser. The macro function
is available only when the Macro On/Off setting is set to "On" at the Setup
menu.
NOTE
Create Album function
When Generate is selected to create an album or an m3u, a sub folder
may or may not be included, depending on the ThisFolder/AllFolder
setting in the Setup menu. Please refer to the Setup section for more
information.
NOTE
Press the (M) button in the Browser to open the pop-up menu as shown in the
following picture:
The pop-up menu functions for Browser are described below:
Description
To see the file or folder information, select a file or a folder.
Press the (M) button and choose Info at the pop-up menu. If it is
a hard disk or a media card, the storage device information
appears.
To copy a file or a folder, press the (M) button and choose Copy
at the pop-up menu. The folder selection window appears on the
screen. Press the (M) button at the place to copy a file or a
folder into and choose Paste at the pop-up menu. To create a
new folder and copy the selected file or folder into it, select New
Folder instead of Paste.
To move a file or a folder, press the (M) button and choose
Move at the pop-up menu. The folder selection window appears
on the screen. Press the (M) button at the place to move a file or
folder into and choose Paste at the pop-up menu. The original
file or folder is automatically deleted. To create a new folder and
move the selected file or folder into it, select New Folder.
To configure the setup, press the (M) button and choose Setup
at the pop-up menu. The Setup Window appears on the screen.
Follow the same setup procedures as with the Main Setup
Window. For more information, refer to [5. Setup].
To delete a file or a folder, press the (M) button and choose
Delete at the pop-up menu to delete it. Once it is deleted, it
cannot be recovered.
To rename a folder or a file, select a folder or a file. Press the
(M) button and choose Rename at the pop-up menu. Rename
the selected folder or file using the on-screen keyboard.
Function
Info
Copy
Move
Setup
Delete
Rename
Description
To create a new folder, press the (M) button. At the pop-up
menu, choose New and then select Folder.
To create an album or an m3u, press the (M) button and choose
New and then Edit New at the pop-up menu. The window
where the newly created album or m3u can be edited appears
on the screen. To create an album or an m3u with all the files
and albums within the current folder, choose New at the pop-up
menu and select Generate.
Function
New
Message Window
A message window may appear when a function item is selected from the
pop-up menu. The following actions will occur with each function:
1. YesToAll :When the same task is performed repeatedly, a
confirmation message does not appear after the first
execution. The product is initialized to default when it is
restarted.
2. Yes :Run/set the changes.
3. Cancel :Cancel a task.
NOTE
7744Applications 7755
Applications
ENG
Applications
The mPack comes with many built in applications that just make life a little
more convenient, such as Games, Address Book, Calendar, Clock, and
Chinese Conversation. To use an application, complete the following steps:
Select Application at the Main
Window.
Select either Games, Address
Book, Calendar, Clock or 實用視聽
華語(Chinese conversation) under
Application. Please refer to the next
pages for more information on these
applications.
Game
The mPack comes pre-loaded with games similar to the ones available on cell
phones.
To play a game, select Game and choose a game to play from the game list.
Press the ▶button to start the game. The button operations vary depending
on the particular game chosen and are presented at the start of a game. The
following screen is displayed when Game is selected:
Calendar
The mPack includes a Calendar function.
To view the calendar, select Calendar and press the ▶button. On the
Calendar screen, press the ◀/▶button to move by day, the ▲/▼button by
week, the (H)/▶||||button by month, and the +/-button by year. To exit the
calendar function and return to the previous menu, press the ■button. The
following screen is displayed when Calendar is selected:
Joy Stick Button Operation
▲: Previous List +: Previous Page
▼: Next List
-
: Next Page
◀: Previous Screen ■: Stop/Cancel
▶: Select/Run/Next Screen ▶||||: Macro Function
(M) : Pop-up Menu (H) : Shortcut Menu
NOTE
7777
Applications
ENG
7766Applications
Clock
The mPack contains a clock function to help keep track of time when a clock
isn't available.
To display the clock, select Clock and press the ▶button. To exit the clock
function and return to the previous menu, press the ■button. The following
screen is displayed when Clock is selected. Press the (M) button to display
the pop-up menu. Choose Clock Setting to view setup details. Choose Quit
to exit. Use ◀/▶/▲/▼to adjust time and press the (M) button to apply the
changed time.
* Option
實用視聽華語 (conversational Chinese)
The mPack comes equipped with an application to help you learn other
languages, such as conversational Chinese.
To learn conversational Chinese (or any other language that may be loaded),
select 實用視聽華語(conversational Chinese) and press the ▶button to
display its contents. Select an item and press the ▶button to see its contents.
Press the ■button to return to the previous screen. The following screen is
displayed when 實用視聽華語(conversational Chinese) is selected:
Address Book
The mPack comes equipped with Address Book capabilities. There are two
ways to manage the Address Book feature for the mPack. The first way is
through the mPack PC program found on page 28. The second is through the
mPack applications window.
To manage your address book, select Address Book and press the ▶
button. You can manage your contacts more conveniently with the address
book feature. Press the ■button to exit address book. The following screen
is displayed when Address Book is selected:
Press the (M) button in the group list to display the pop-up menu as shown below:
The pop-up menu functions are provided below:
Description
To create a group, press the (M) button and choose New Group
at the pop-up menu. Then, enter a new group name using the
on-screen keyboard. To finish the entry, press the ▶||||button.
To rename a group, press the (M) button and choose Rename
at the pop-up menu. Then, change the group name using the
on-screen keyboard. To finish the entry, press the ▶||||button.
To delete a group, press the (M) button and choose Delete at
the pop-up menu. Once a group is deleted, all the address data
within the group are also deleted and cannot be undeleted.
To search an address by name, press the (M) button and
choose Search at the pop-up menu. To search a name in the
entire groups, select All Group. To search a name in the
currently selected group, select This Group. Then, enter a
name using the on-screen keyboard. To finish the entry, press
the ▶||||button and the list of names found is displayed.
Function
New Group
Rename
Delete
Search
7799
Setup
ENG
7788Applications
Setup
The mPack can be personalized to a configuration that best suits you. You
can configure options for Audio, Video, Photo, Radio, and System functions.
To configure the setup, complete the following steps:
Select Setup from the Main Window.
Different setup menu items are
provided for each of the following:
Audio, Video, Photo, Radio and
System.
Pop-up Menu
Press the (M) button in the Audio, Video, Photo, Radio or System Setup to
open the pop-up menu. At the pop-up menu, choose About to view the
general information on mPack. Choose Company to view the company
information. Choose Help to view the help text.
NOTE
Press the (M) button in an address list within a group list to display the pop-up
menu as shown in the below:
The pop-up menu functions are provided below:
To edit an address, press the ▶button to move to the Address View screen.
Select a desired item and edit it using the on-screen keyboard. When editing is
complete, return to the address list. An address is edited on the following screen:
Press the ■button to exit address book.
Message Window
A message window may appear when a function item is selected from the
pop-up menu. The following actions will occur with each function:
1. YesToAll :When the same task is performed repeatedly, a
confirmation message does not appear after the first
execution. The product is initialized to default when it is
restarted.
2. Yes :Run/set the changes.
3. Cancel :Cancel a task.
NOTE
Description
To add an address, press the (M) button and choose Add at the
pop-up menu. Then enter a new address using the on-screen
keyboard. To finish the entry, press the ▶||||button.
To delete an address, press the (M) button and choose Delete at
the pop-up menu. Once it is deleted, it cannot be undeleted.
To search an address by name, press the (M) button and choose
Search at the pop-up menu. Then, enter the name to search
using the on-screen keyboard. To complete the entry, press the
▶||||button. Now, the list of names found is displayed on the screen.
Function
Add
Delete
Search
Joy Stick Button Operation
▲: Previous List +: Previous Page
▼: Next List
-
: Next Page
◀: Previous Screen ■: Stop/Cancel
▶: Select/Run/Next Screen ▶||||: Macro Function
(M) : Pop-up Menu (H) : Shortcut Menu
NOTE
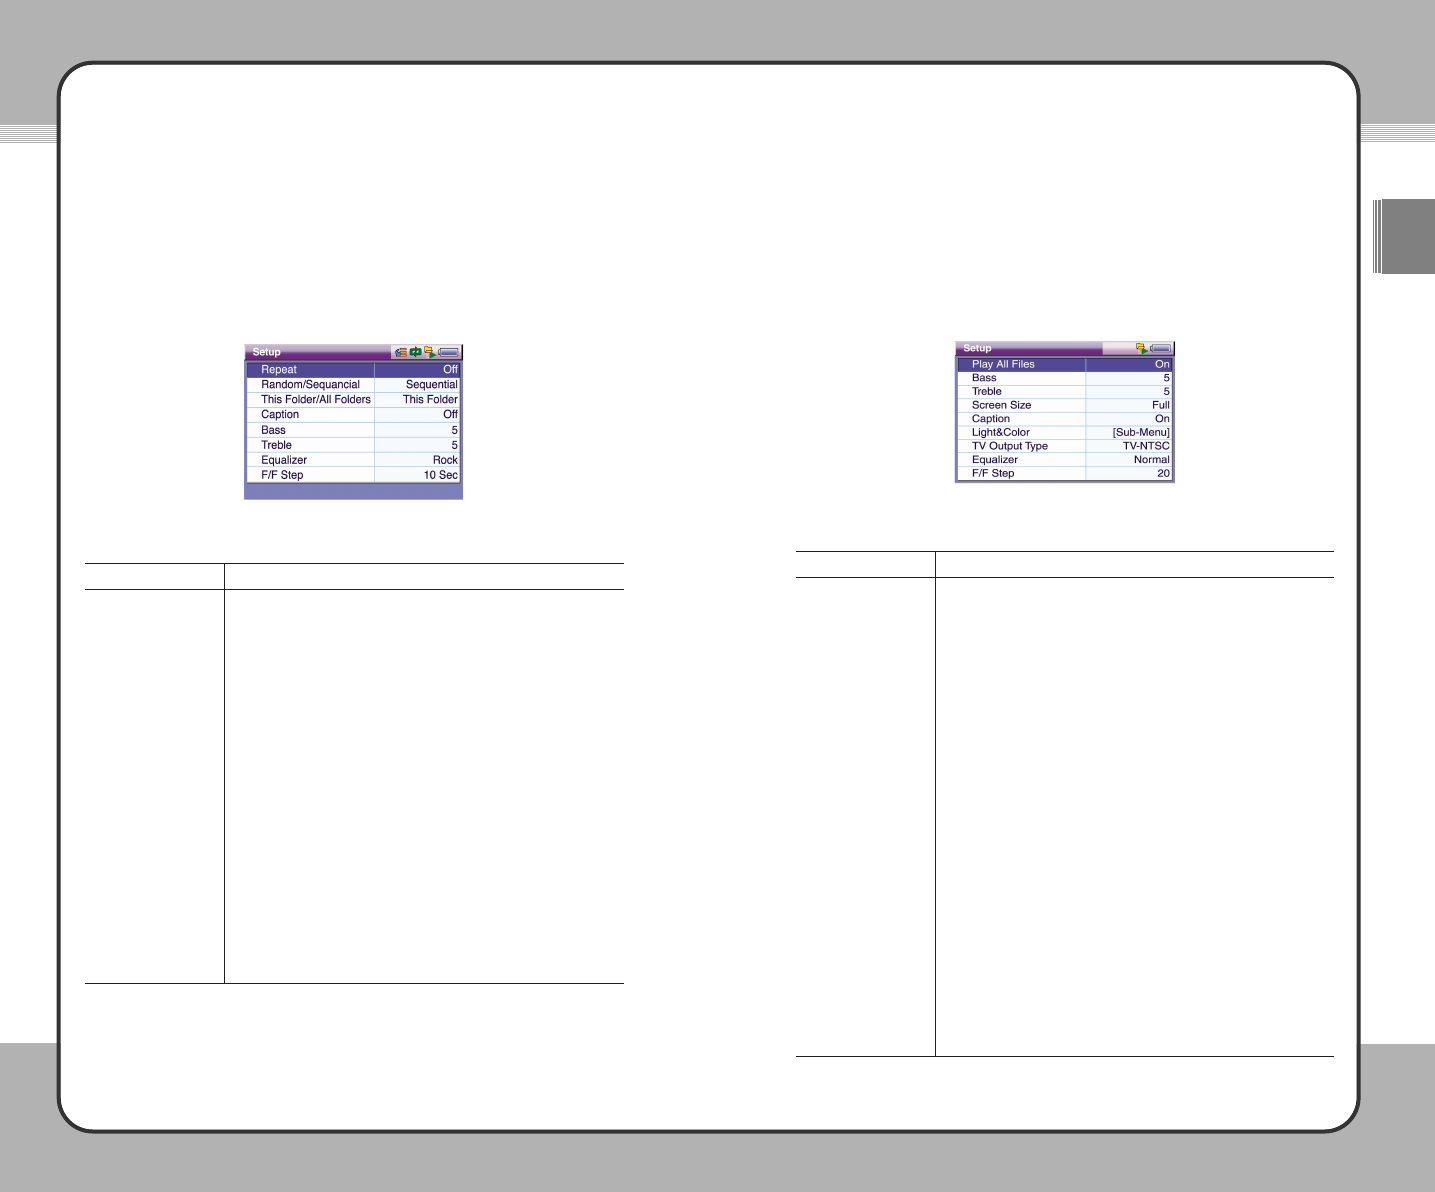
8811
Setup
ENG
8800Setup
Video Setup
The following picture shows the Video Setup window with option items and
their current settings. To change a setting, select an item and press the ▶
button. Then, use the ▲/▼button to select the desired value. To apply the
changed value, press the ▶button again. To cancel your selection, press the
◀or ■button.
Video options and their functions are provided below:
Function
Set it On to play all video files in the Video folder one after
another. Set it Off to play a single video file.
To increase bass, change the setting (0~12).
To increase Treble, change the setting (0~12).
Choose Normal to play video in full screen mode with the player
fitted to the original resolution of the video. Choose Full to play
video in full screen mode with the player fitted to the current
resolution of the video.
To display captions while playing video, set it to On. When
captions are not available, they do not appear. Set it to Off not
to display captions.
To adjust the brightness of the screen, select LCD Brightness
and change its setting (0 ~ 100 with an increment of 10). To
adjust the contrast of the screen, select LCD Contrast and
change its setting (0 ~ 100 with an increment of 10).
When connecting to a TV, select either TV-NTSC or TV-PAL
depending on the type of your TV.
You can select the most suitable preset tone from options of
Normal, Jazz, Pop, Rock and Classic.
You can specify the skip interval for rewinding/fast-forwarding
(20, 40, 60, 80 and 100 seconds).
Option
Play All Files
Bass
Treble
Screen Size
Caption
Light&Color
TV Output Type
Equalizer
F/F Step
Audio Setup
The following picture shows the Audio Setup window with option items and
their current settings. To change a setting, select an item and press the ▶
button. Then, use the ▲/▼button to select the desired value. To apply the
changed value, press the ▶button again. To cancel your selection, press the
◀or ■button.
Audio options and their functions are provided below:
Function
Select All to repeat all files and Single to repeat a single file. To
disable repeat play, select Off.
To play audio files in a random order, select Random. To play
audio files in a sequential order, select Sequential.
To create a play list only with the files included in the current
folder, select This Folder. To create a play list with the files
included in the sub folders as well, select All Folder.
To display lyrics while playing audio, select On. When lyrics are
not available for an audio file, a bitmap image is displayed at the
Lyrics window. To display the list of the audio files being played
instead of lyrics, select Off.
To increase bass, change the setup value (0~12).
To increase treble, change the setup value (0~12).
You can select the most suitable preset tone from options of
Normal, Jazz, Pop, Rock and Classic.
You can specify the skip interval for rewinding/fast-forwarding
(10, 20, 30, 40, 50 and 60 seconds).
Option
Repeat
Random/Sequential
This Folder/
All Folder
Caption
Bass
Treble
Equalizer
F/F Step
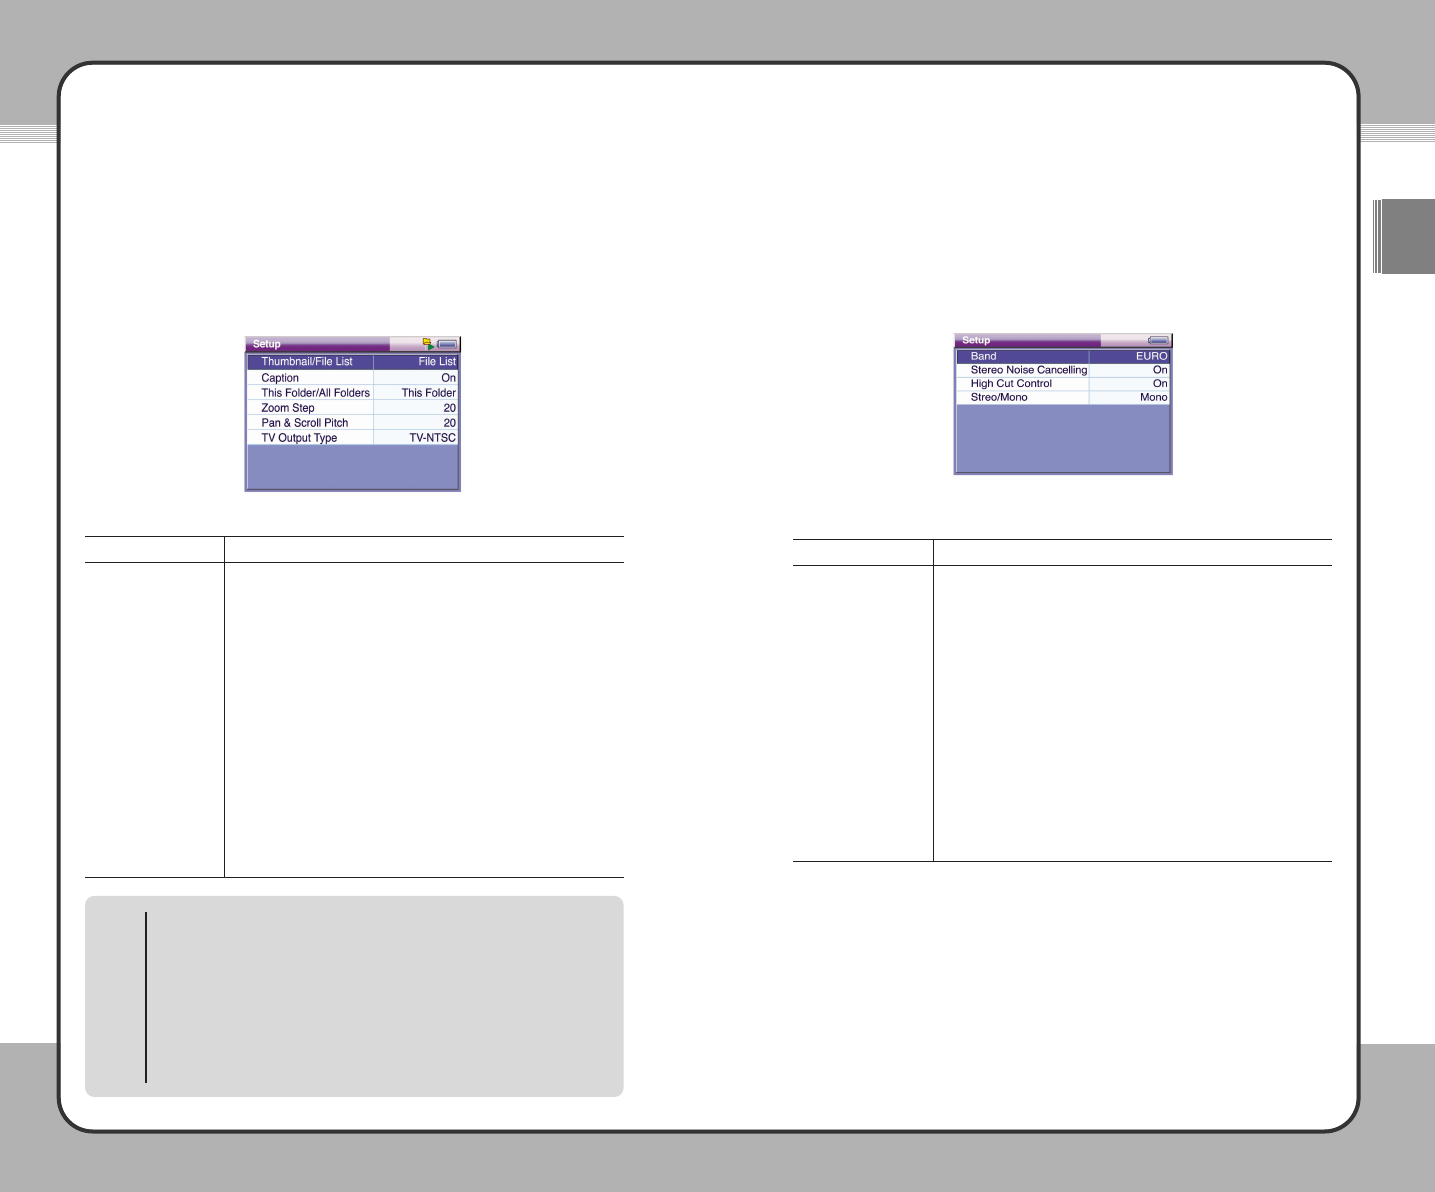
8833
Setup
ENG
8822Setup
Radio Setup
The following picture shows the Radio Setup window options and their current
settings. To change a setting, select an item and press the ▶button. Then,
use the ▲/▼button to select the desired value. To apply the changed value,
press the ▶button again. To cancel your selection, press the ◀or ■button.
Option items and their functions are provided below:
Function
Each country uses different bandwidth for FM broadcasting.
Select EURO to listen to radio in Korea and JAPAN in Japan.
To automatically switch stereo to mono when the radio signal is
weak, set it to On. This will help to reduce the noise that occurs
when the signal is weak. It automatically switches back to stereo
when the signal becomes strong enough. In general, it is
recommended to keep it On to obtain more clear radio sound.
To disable the feature, set it to Off.
To eliminate the high-frequency noise that occurs when the
radio signal is weak, set it to On. In general, it is recommended
to keep it On to obtain more clear radio sound. To disable the
feature, set it to Off.
Select Stereo to listen to the radio in stereo mode and select
Mono to listen in mono mode.
Option
Band
Stereo Noise
Cancelling
High Cut Control
Stereo/Mono
Photo Setup
The following picture shows the Photo Setup window with option items and
their current settings. To change a setting, select an item and press the ▶
button. Then, use the ▲/▼button to select the desired value. To apply the
changed value, press the ▶button again. To cancel your selection, press the
◀or ■button.
Option items and their functions are provided below:
Function
To manage photo files with Photo Preview, select Thumbnail.
To manage photo files in the list of photo files, select FileList.
To display the place of the current photo in the file list when
viewing the photo with Photo Viewer and to display the
zoom/unzoom percentage in zoom mode, set it to On. To
disable this feature, set it to Off.
To create an album with only the files included in the current
folder, select This Folder. To create an album with the files
included in the sub folders as well, select All Folder.
To adjust the zoom/unzoom range in zoom mode, change the
setting (0 ~ 50, with an increment of 10).
To change the zoom/unzoom unit in zoom mode, change the
setting (0 ~ 50, with an increment of 10).
When connecting to a TV, select either TV-NTSC or TV-PAL
depending on the type of your TV.
Option
Thumbnail/FileList
Caption
This Folder/
All Folder
Zoom Step
Pan & Scroll Pitch
TV Output Type
Display the place of a photo in the file list and the zoom/unzoom
percentage
In the zoom/unzoom screen, the location of a photo in the file list, the
screen mode and the zoom/unzoom percentage are displayed as below:
Ex. 1: "(2/50) Normal 25(%)" - This means it is the second photo in the list
from 50 photos in the folder. The current screen is in normal mode and its
size is 25% of the original size of the photo.
Ex. 2: "(2/50) Zoom 50(%)" - This means it is the second photo in the list
from 50 photos in the folder. The current screen is in zoom mode and its
size is 50% of the original size of the photo.
NOTE
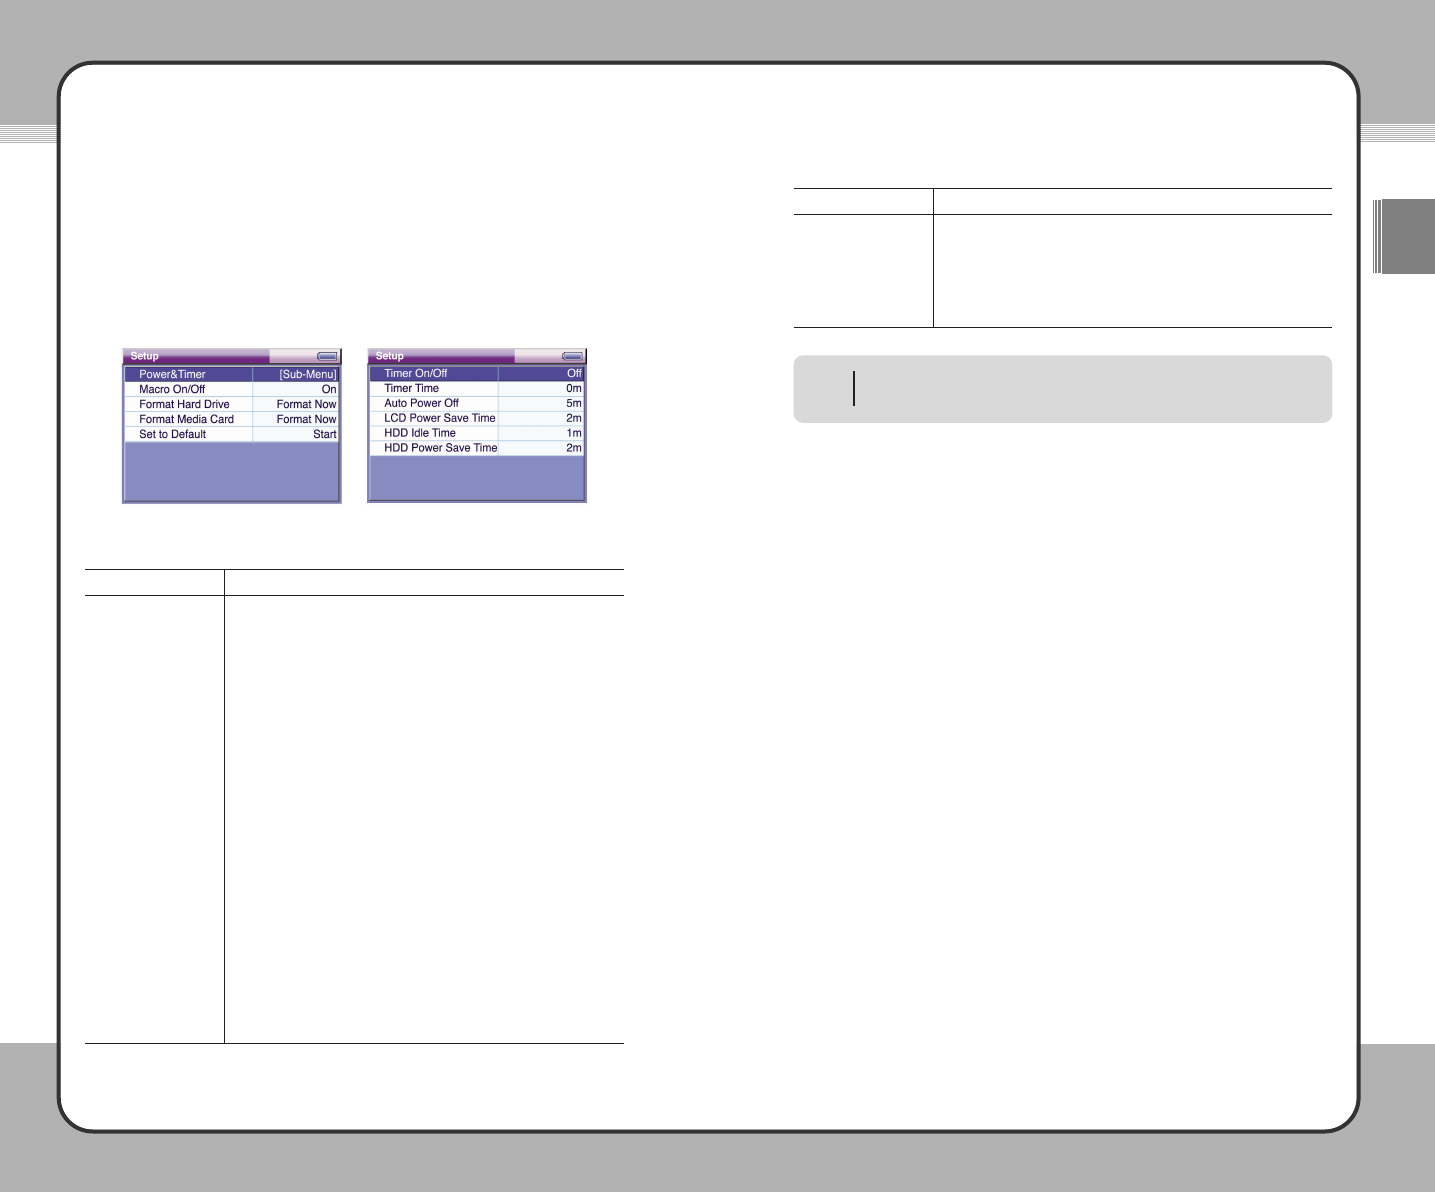
8855
Setup
ENG
8844Setup
Function
To format a media card, select Format Now. Once it is
formatted, previous files or folders cannot be recovered.
To set the settings back to the factory default, select Set to
Default. Once they are set to default, they cannot be changed
back to the previous settings.
Option
Format Media Card
Set to Default
Power&Timer Setup
It is recommended to keep the factory settings for the Power&Timer value.
NOTE
System Setup
The following pictures shows the System Setup window options and their
current settings. To change a setting, select an item and press the ▶button.
Then, use the ▲/▼button to select the desired value. To apply the changed
value, press the ▶button again. To cancel your selection, press the ◀or ■
button.
Option items and their functions are provided below:
Function
To turn the product off automatically in a specified time, set
Timer On/Off to On. Set it to Off to disable the automatic shut off
function.
To turn the product off automatically in a specified time, set the
power-off time at Timer Time.
To turn the product off automatically when there is no user input
for a certain period of time, set the power-off time at Auto
Power Off.
To turn the monitor off automatically when there is no user input
for a certain period of time, set the power-off time at LCD Power
Save Time.
To turn the hard disk into power save mode automatically when
there is no user input for a certain period of time, set the time at
LCD Power Save Time.
To turn the hard disk off automatically when there is no user
input for a certain period of time, set the power-off time at HDD
Power Save Time.
(Always On, 1m, 2m., 3m, 4m, 5m, 10m, 15m, 20m, 25m, 30m,
40m, 50m, 1h, 2h, 3h, 4h, 5h)
To enable the macro function, set Macro On/Off to On. To
disable it, set it to Off.
To format a hard disk, select Format Now. Once it is formatted,
previous data cannot be recovered.
Option
Power&Timer
Macro On/Off
Format Hard Drive
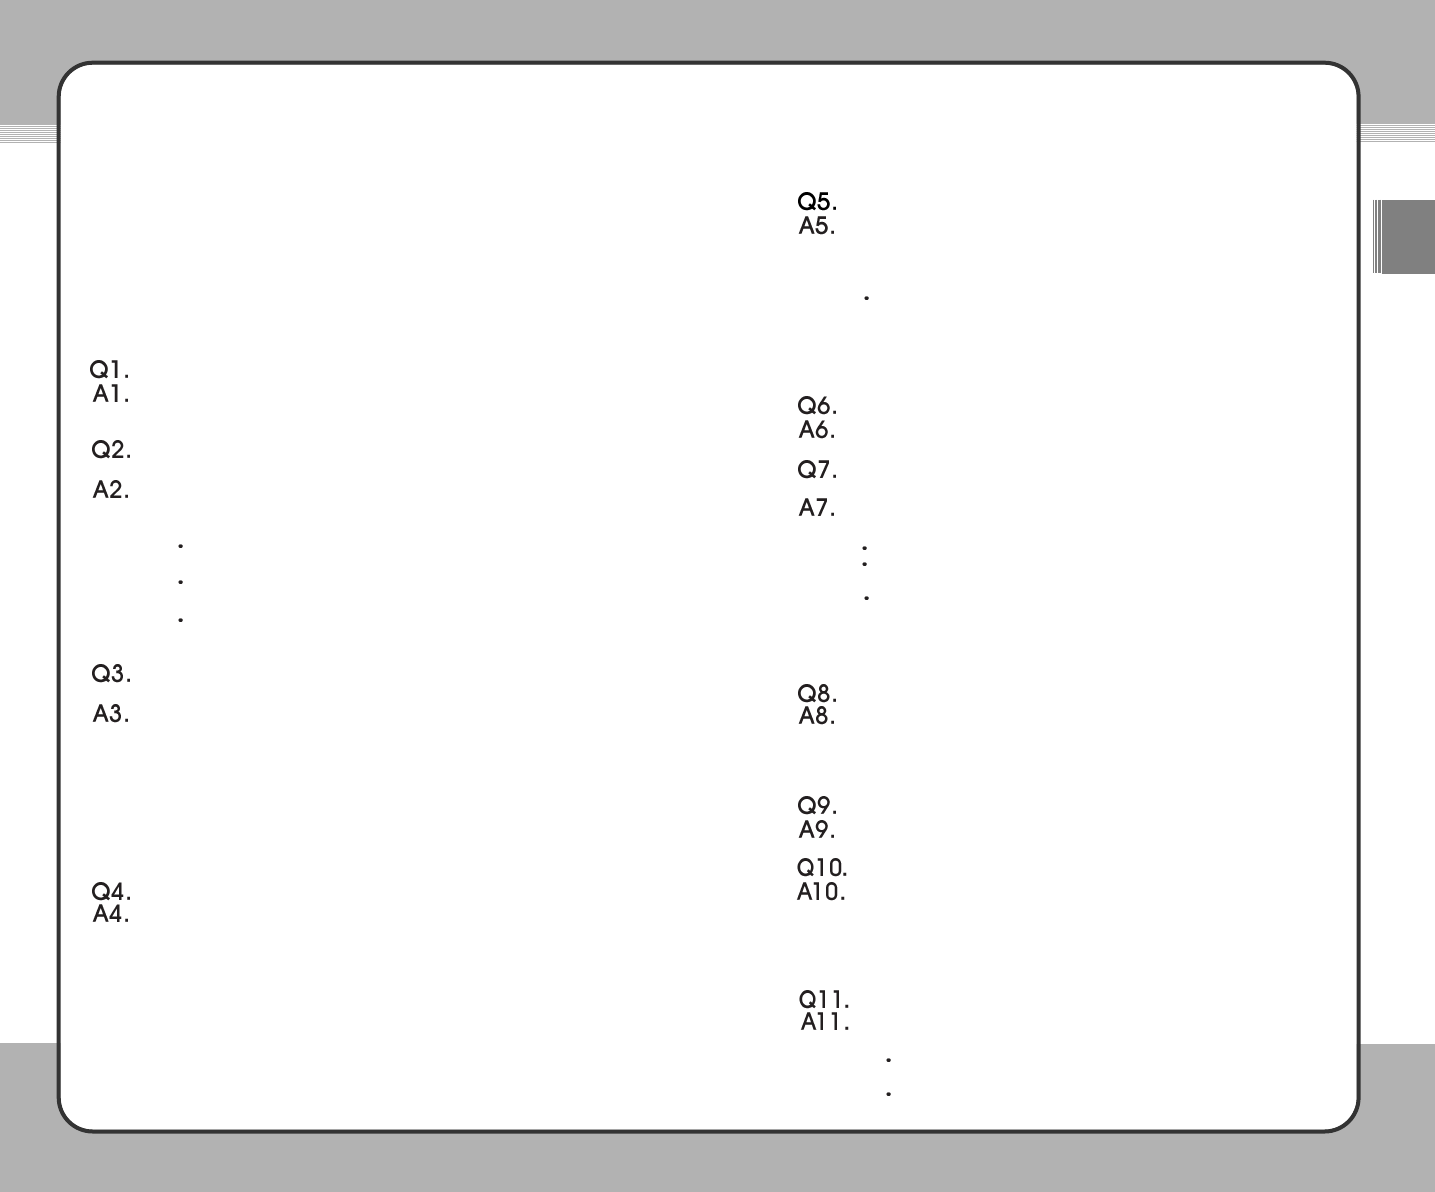
8877
ENG
8866
The mPack won't detect my memory card.
Because memory cards from different manufacturers have different
characteristics, certain cards may not be detected. You can check
"www.mpack.com.tw" to see the list of memory cards that are compatible
with the mPack.
If a memory card on the list is not detected, test the mPack with a
different memory card.
Through firmware upgrades, PQI is adding new cards on a continuous
basis to the list of memory cards that are compatible with the mPack.
Always upgrade your mPack with the latest firmware version.
The firmware won't upgrade.
Call customer service.
The files on the terminal just disappear or they appear but their
contents are corrupted.
This happens when the hard disk file system on the mPack has been
damaged. The main cause for damage to the hard disk file system include:
A strong physical impact to the product (dropping it).
Removing the cable without running the "Safe Removal of Hardware"
tool.
The power going off while copying, moving, or deleting a file.
When this occurs, check for a file system error. If you continue to use the
hard disk with a file system error, it may result in loss of important files.
PQI is not responsible for any loss of data.
My mPack is not detected as a USB hard disk.
Test the mPack with a different PC to see if it is detected as a USB hard
disk.
If it is, the problem lies with your PC.
If it is not ?
Power goes off during the mPack's operation.
Verify the batteries have a full charge. Then refer to A1.
The LCD screen goes off during use.
To minimize power consumption, the mPack has been configured to turn
the LCD screen off automatically. This can be changed from the Setup
menu. For more information on how to disable this option, please refer to
Section 5. Setup. If this does not resolve the problem, turn the power off
and try it again.
I cannot play a video or audio file.
This could be due to an incompatible format or a corrupted file.
1. Try playing a different video or audio file.
If you can play the other video or audio file, the file that you cannot
play is in an incompatible file format or has been corrupted.
If you cannot play the other video or file, ?
Troubleshooting
Do not disassemble or tamper with the mPack in any way. If an mPack has been
disassembled by anyone other than an authorized technician, it becomes ineligible
for free after-sales service. Please read through the following troubleshooting
guide. If you cannot solve the problem using the guide or if the problem persists,
please contact us to request after-sales service.
Frequently Asked Questions (FAQ)
When I press the power button, the mPack does not turn on.
Check the batteries and verify a full charge. If not using batteries, connect
the AC adaptor to the product, and press the power button again.
When I press the power button, the mPack turns on but the initial
screen doesn't appear. (Nothing appears on the screen).
1. Connect the mPack to the AC adaptor and plug it in.
2. Connect the mPack to the PC with a USB cable.
3. Verify whether the mPack is detected as a USB hard disk.
If it is detected, run the "Safe Removal of Hardware" tool and press
the power button on the terminal again.
If the initial screen does not show up after pressing the power button,
refer to A3.
If the mPack is not detected, run the "Safe Removal of Hardware"
tool and try it again.
The mPack is detected as a USB hard disk but the initial screen does
not show up.
This could be cause by a firmware upgrade that was interrupted. The AC
adaptor must be plugged in to perform the firmware upgrade. Keep an
emergency CF card with the firmware upgrade available at all times.
1. Insert a CF card that contains the firmware upgrade file into the CF card
slot on the mPack.
2. Connect the AC adaptor, plug it in, and press the power button.
Normally, the firmware of the terminal is upgraded to the version that
the CF card contains.
3. When upgrading is complete, the initial screen appears.
The initial screen appears but the hard disk is not detected.
This can happen when the mPack has had a strong physical impact (been
dropped too often) causing a malfunction of its hard disk. Since payment
is required for after-sales service due to a hard disk failure, use care when
handling the mPack.
1. First, check the batteries and verify a full charge.
2. Refer to A1.
3. If the hard disk is still not detected, verify whether the mPack is detected
as a USB hard disk at your PC.
4. If the problem still occurs, refer to A2.
5. If the terminal is detected as a USB hard disk, check for any file system
error.
6. After checking for a file system error, turn the power on again.
8899
ENG
8888
Display
TV-Out
Speaker
Microphone
FM Radio
Interface
HDD
Battery
DC Power
PC Software
Accessory
Dimension (mm)
Video Decoding
Video Encoding
Audio Decoding
Audio Encoding
Image Decoding
Text Viewer
PIMS
Language
Specifications
External Appearances
3.5" 320 x 240 Full Color TFT LCD
NTSC/PAL
Earphone Out 70mW (L/R 35mW)
Internal Mono Microphone
US/Japan Band
A/V Out (Also Earphone & Controller Functions), A/V In
SPDIF Out
IrDA Remote Controller
CF Type II Card Slot
USB 2.0/1.1
2.5" 30GB, 40GB, 80GB
Rechargeable Li-Ion 2200mAh Battery x 2
Battery Life : Video - 5 Hours, Audio - 10 Hours
Charge Time : 6 Hours
5V, 3A
Download Manager
Media Library
Address Book Manager
Smart Auto Upgrade
CD(Manual, PC Software, Windows 98 USB Driver), AC/DC Adaptor,
A/V Cable, SPDIF Cable, USB Cable, Stereo Earphones with
Controller, IrDA Remote Controller, Carrying Bag and Pouch
SCART Adaptor(option)
146 x 82 x 25
MPEG1/2/4, XviD, WMV, ASF (upto 800 x 576, 30fps)
Support
MP3 CBR/VBR, WMA, AC3, AAC, WAV, OGG
Equalizer: Normal, Jazz, Pop, Rock, Classic
Function : 3D Sound (Music), Digital Theater Sound (Movie, SPDIF)
Support
JPEG, GIF, BMP, Raw Image(CRW, NEF, ORF, RAF, MRW, etc.)
Function : Slide Show, Thumb Nail View, Album, BGM, Histogram, etc.
Plain Text Viewer
Game, Address Book, Calendar, Clock, Chinese Language Guide
English, Chinese, Korean, Japanese
Functions
The previously configured system settings have been changed.
When the firmware is upgraded or the batteries are completely
discharged, some system settings may be changed back to default
settings. To re-configure these changed settings, please refer to Section
5. Setup.
I cannot enter a key input.
The software may malfunction for various reasons. Reboot the mPack
and try again. If the symptoms persist, call customer service.
The remote control does not work.
The most common reason for the remote control to malfunction is dead
batteries. Try replacing the batteries first. If the remote still doesn't work,
call customer service.
The power will not go off.
This usually indicates that the mPack has had a firmware malfunction (the
screen is frozen). Press and hold the power button down for about 10
seconds. If the mPack still doesn't respond, call customer service.
The batteries discharge very quickly.
Batteries are consumable items. Their usage time decreases through time
as they are used and reused. Try these remedies:
Allow the mPack to completely discharge its battery pack before
recharging it.
Some batteries acquire false "memories" after several recharges if
they've been recharged with a partial charge.
Buy a replacement battery.
If the battery usage time dramatically decreases within a short time
span, call customer service.
The batteries will not recharge.
See A16.
Leave the power for the mPack on for more than one minute and then
turn the power off. Try recharging again.
If problem persists, call customer service.
I cannot find a cause for my problem, no answer solves my problem,
and none of these questions address my problem.
Call our customer service center at 1-800-xxx-xxxx.

9911
ENG
9900
Information
Taiwan Headquarters
Power Quotient International Co., Ltd.
14F, No. 16, Jian Ba Road Chung Ho
City, Taipei, Taiwan
Tel: +886-2-8226-5288
Fax: +886-2-8226-5268
www.pqi.com.tw
E-Mail: sales@pqi.com.tw
USA
PQI Corporation
46661 Fremont Blvd. Fremont, CA
94538, U.S.A.
Tel: +1-510-651-7281
Fax: +1-510-651-7240
www.pqimemory.com
E-Mail : sales@pqi1st.com
The Netherlands
PQI Europe B. V.
Helftheuvelweg 11, 5222 AV Den Bosch,
The Netherlands
Tel: +31-73-627-3555
Fax: +31-73-623-4033
www.pqieurope.com
E-Mail: info@pqieurope.com
Japan
POWERGLOBAL iNDEX Co., Ltd.
Segi Blvd. 7F 1-7-1 Iwamoto-Cho,
Chiyoda-Ku, Tokyo 101-0032 Japan
Tel: +81-3-5835-4545
Fax: +81-3-5835-4540
www.pg-index.com
E-Mail: info@pg-index.com
China
Shanghai
No.100, Tong Yuan Rd, Suzhou Industrial
Park 215021, China
Tel: +86-21-6440-3280
Fax: +86-21-6440-3279
www.pqi.com.cn
Shenzhen
Tel: +86-755-8328-7509
Fax: +86-755-8327-7582
Suzhou
Tel: +86-512-6288-2999
Fax: +86-512-6288-3000
E-mail: info@pqi.com.cn
Hong Kong
Flat F, 4/F, Yeung Yiu Chung(NO.8)
Industrial Building,
20 Wang Hoi Road, Kowloon Bay,
Kowloon, H.K.
Tel: 852-2707-4118
Fax: 852-2707-4308
E-Mail: sales@pqi.com.hk
Limited Warranty Statement
POWER QUOTIENT INTERNATIONAL COMPANY LIMITED and all of its subsidiaries
("PQI") value your business and always attempt to provide you the very best of service.
Note the following information when requesting PQI customer service department for its
assistance.
Warranty Policy
●PQI warrants that PQI branded products, under normal circumstances of usage, are
free from defects in material and workmanship. For any unit proved to be defective,
PQI will, at its discretion, either repair or replace the unit, free of charge. The
replacement unit will be either new or repaired, at PQI's option.
●Willful damage to the product, damage due to neglect or ignorance, tampering with the
product components or product labels will void the warranty.
●This warranty is subject to the conditions and limitations set forth below.
Warranty Period
For product purchased on or after August 1, 2004
●Lifetime Warranty: Computer memory module
●Five-Year Warranty: CompactFlash, Secure Digital, MultiMediaCard, SmartMedia and
DiskOnModule
●Three-Year Warranty: Intelligent Stick, 2.5" IDE flash disk and PC card adaptors
●Two-Year Warranty: Memory Stick and xD-Picture Card, USB readers, Travel Viewer,
and all USB flash drives excluding the Intelligent Stick and any MP3 players
●One-Year Warranty*: MP3 Player, Intelligent Frame, mPack and mTrix
*Extended warranty is offered in certain countries as required by the local government.
Warranty Procedure
To request PQI for servicing or repair assistance, please do the following:
●Contact the PQI customer service department near your location.
●Please have your proof of purchase and the product serial number, if any, ready when
you contact the PQI customer service department. The proof of purchase can be your
purchase receipt, invoice or the PQI warranty card signed and dated by the store.
●You may also download the RMA request form, fill it out and fax it back to us.
●Our service personnel will provide a returned merchandise authorization (RMA)
number and shipping instructions for returning the product. No return will be accepted
without the pre-authorization, the RMA number clearly marked outside the shipping
box, and the freight prepaid at your expense.
●The RMA number is valid for 30 days only from the date it is issued. It is your
responsibility to ensure PQI receives your product within the 30-day period. After the
30-day period, either you have to follow the above procedure and request a new RMA
number, or PQI reserves the rights to refusing the product return.
●The warranty period for the repaired or replacement unit is the remaining of the
warranty period based on the original purchase, or 30days after the repair or
replacement is complete, whichever is longer.
9922
Disclaimer
●PQI is not liable for damage caused by fire, natural disaster (such as flood, thunder,
lightning, earthquake, etc.), use by third party, accidents, improper temperature or
humidity, or damage caused by misuse or malfunction through simultaneous use of
the PQI product and the connected equipment.
●This warranty supersedes all other warranties or representations, oral or written. In no
event will PQI be liable to anyone for any damages, expenses, lost revenues, lost
savings, lost profits, or any other incidental or consequential damages as results of the
purchase, use or inability to use of the PQI product, even if PQI has been advised of
the possibility of such damages.
