Packo Gift 16HD0173 16HD0173 User Manual HOMEBASE 1 7
Packo Gift Co.,Ltd 16HD0173 HOMEBASE 1 7
User Manual
ASSEMBLY & USE INSTRUCTIONS
IMPORTANT SAFETY WARNINGS
1.Read these instructions before using this product.
2.Save these instructions for future reference.
3.For indoor use only. To reduce the risk of fire or electric shock, do not expose this product to rain or
moisture. The product shall not be exposed to rain, dripping or splashing and that objects filled with liquids,
such as vases, shall not be placed on product.
4.DO NOT block any ventilation opening. Install in accordance with the manufacturer’s instructions.
5.DO NOT install near any heat sources such as radiators, heat registers, stoves, or other apparatus
(including amplifiers) that produce heat.
6.THIS PRODUCT IS NOT A TOY; PLEASE KEEP AWAY FROM THE REACH OF CHILDREN.
7.DO NOT use this product other than its intended use.
8.This seasonal use product is not intended for permanent use or installation.
9.UNPLUG this apparatus when leaving the house, retiring for the night, or if left unattended.
10.DO NOT secure the wiring of the product with staples or nails, or place on sharp hooks or nails.
11.DO NOT hang ornaments or other objects from cord, wire, or light string.
12.DO NOT close doors or windows on the product or extension cords as this may damage the wire insulation
13.DO NOT cover the product with cloth, paper or any material not provided with the product when in use.
14.DO NOT let lamps rest on the supply cord or on any wire.
15.DO NOT use the adaptor supplied with any other products.
16.Only power this product with the adaptor supplied.
17.Always connect the adaptor to an indoor socket.
18.Protect the power cord from being walked on pinched particularly at plugs. Convenience receptacles and
the point where they exit from the apparatus.
19.Only use attachments/accessories specified by the manufacturer.
20.Refer all servicing to qualified service personnel. Service is required when the apparatus has been dama
-ged in any way, such as power supply cord or plug is damaged, liquid has been spilled or objects have fallen
into the apparatus, the apparatus has been exposed to rain or moisture, does not operate normally, or has
been dropped.
To reduce the risk of fire and electric shock:
SPECIAL CAUTIONS
DO NOT install on trees having needles, leaves or branch coverings or metal or material that look like metal.
DO NOT mount or support strings in a manner that can cut or damage wire insulation.
DO NOT connect the chain to the supply while it is in the packing,
The bulbs are replaceable.
The external flexible cable or cord of this lighting chain cannot be replaced’ if the cord is damaged, the
luminaries shall be destroyed.
Use only the lighting chain provided.
21.Always position your tree and cable and any extension leads so that they will not be a hazard to the elde
-rly,pets and children.
22.Caution- Atificial trees have small parts which may cause a choking hazard if detached from the branches.
7FT to 10FT LED Pre-Lit
Rising Artificial Spruce Tree
SKU#
23.Electronic component must be handled with care.
24.Do not adjust the tree height once it is decorated.
1001777085
THIS PRODUCT IS SUITABLE FOR INDOOR USE ONLY.
BATTERY SAFETY WARNINGS
Never try to short-circuit the battery terminals.
DO not charge non-rechargeable batteries.
Batteries are to be inserted with the correct polarity as indicated inside the battery compartment.
CAUTION: danger of explosion if battery is incorrectly replaced.
Do not mix batteries of different types.
Remove batteries during long period of non-use.
Always remove exhausted batteries from the product.
Dispose batteries safely. DO not dispose this product or any batteries in a fire.
WARNING: The battery shall not be exposed to excessive heat such as sunshine, fire or the like.
BATTERY REPLACEMENT
Pull out the battery compartment cover at the base of the remote control.(see page 1)
Replace the battery with the same type and take care the correct polarity as indicated inside the battery
compartment.
Place back the battery compartment cover.
The tree or lights do not respon to your remote , it’s time for an adult to change the batteries
Clean only with dry cloth
For indoor use only, keep away from rain and water
DO NOT block any ventilation opening
WARNING: Contains small parts. Risk of suffocation. Keep the remote control out of the reach of children.
BULB REPLACEMENTE INSTRUCTIONS
1. Unplug light string from power source.
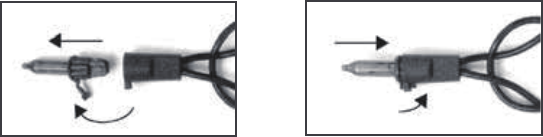
2. Pull up on the bulb lock unlatching the bulb from the bulb socket. Gently pull the bulb straight out ( Fig.1 ) .
3. Before inderting the new bulb into socket, make sure that the two wires on either side of the bul base are
staight up and flush with the base.
4. Carefully insert new bul into socket and push down bulb lock until it snaps into place ( Fig. 2 ).
Fig.1 Fig.2
ALWAYS UNPLUG FROM THE MAINS SUPPLY BEFORE CHANGING A BLUG. DO not remove or insert
lamps while the chains are connected supply.
Replacement lamps must be of the same type, rated voltage and wattage as those delivered originally or of
a type specified by the manufacturer.
Ensure all lamp holders fitted with a lamp.
DO NOT attempt to connect any lighting chains other than the one supplied. It may overload the product and
adaptor and result to risk of fire.
4. Carefully insert new bul into socket and push down bulb lock until it snaps into place ( Fig. 2 ).
HOW TO ASSEMBLE THE TREE
BEFORE YOUR START
Decide on appropriate lacation which at lease have 10FT hight spacing for your prodcut.
Remove all plastic bags and dispose of safety out of the reach of children & animals.
Tree is heavy. Recommend at least two people set up.
Each carton contains two tree sections , one adapter , two piece 23A batteries
and twenty four replace bulb.
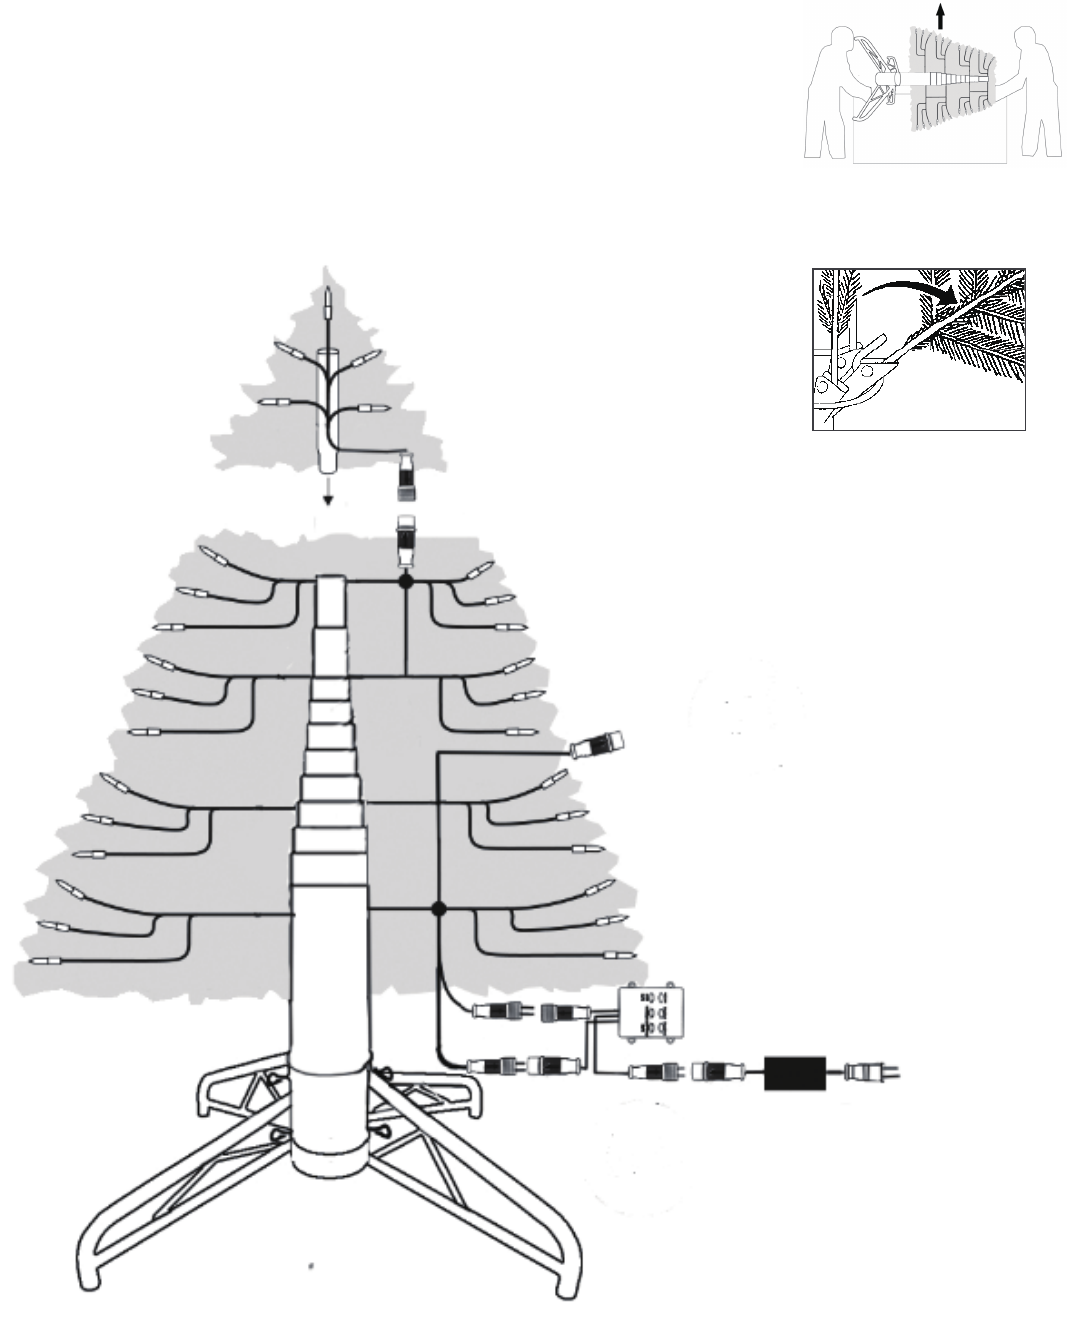
1. Take out the tree from carton . ( see Fig 3 )
2. Put the tree bottom & stand on the groud.
3. Insert tree top into the bottom section ( see Step 1) .
4. Plug the light string cords from the bottom section to tree top ( see Step 2) .
Step 1 Step 2
Step3 adapter
Spare connector
5. Connect the power cord of the receiver to adapter ( see Step 3 ) .
Receiver
6. Shape the tree : All hinged branches should fall into lowered position. (Fig 4 )
Any branches that remain upright should be gently lowered by hand Please refer
to Shaping Instructions for proper branch shaping technique.
Fig 4
Fig 3.
7. Plug the power adaptor to the mains .
Fig 4.
OPERATION GUIDE
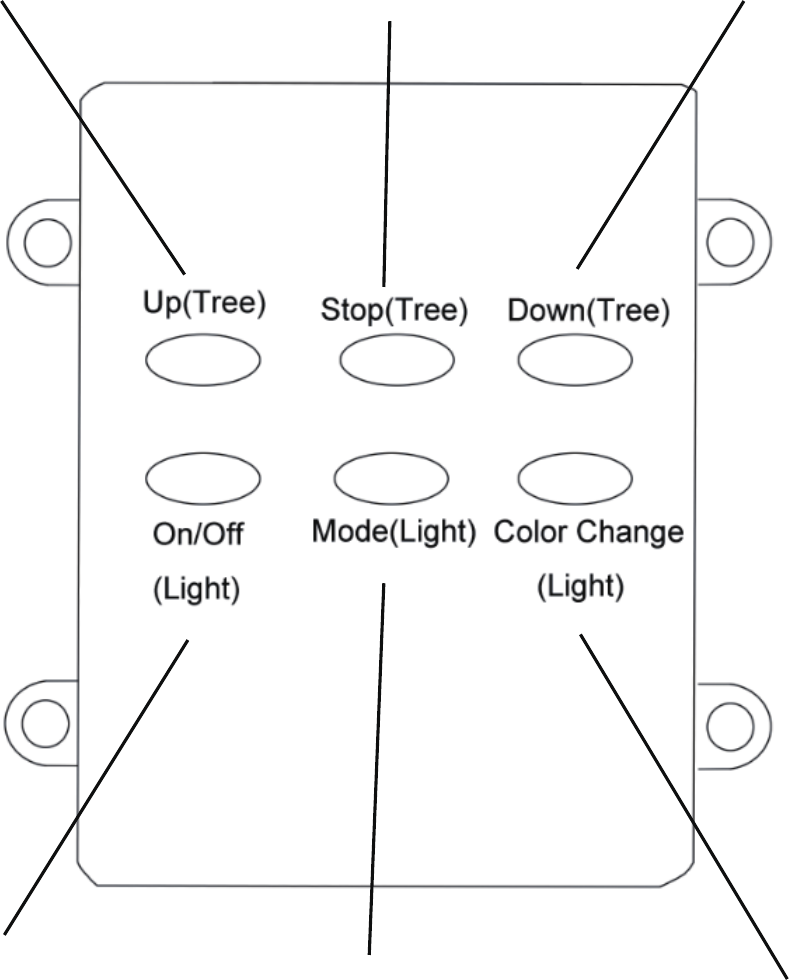
1.1 OPERATING WITH THE KEY CONTROLS ON RECEIVER.
There 8 light functions as below
* Stead On
* Slow Sparkling
* Quick Sparkling
* Slow Fade
* Quick Fade
* Slow Glow
* Flashing
* Color Swtiching
The tree will
keep rising to
10FT until you press
stop button .
By pressing button STOP ,
the tree will stop rising at
any heigh .
The tree will
keep going down to
7FT until you press
stop button .
Press once to turn light ON.
Press again to turn light OFF. There are two clolors
for the lights ( Warm white
& Multi ).
Press buttom COLOR
CHANGE to selected the
color required.
Noted: Do not adjust the tree hight once it is decorated.
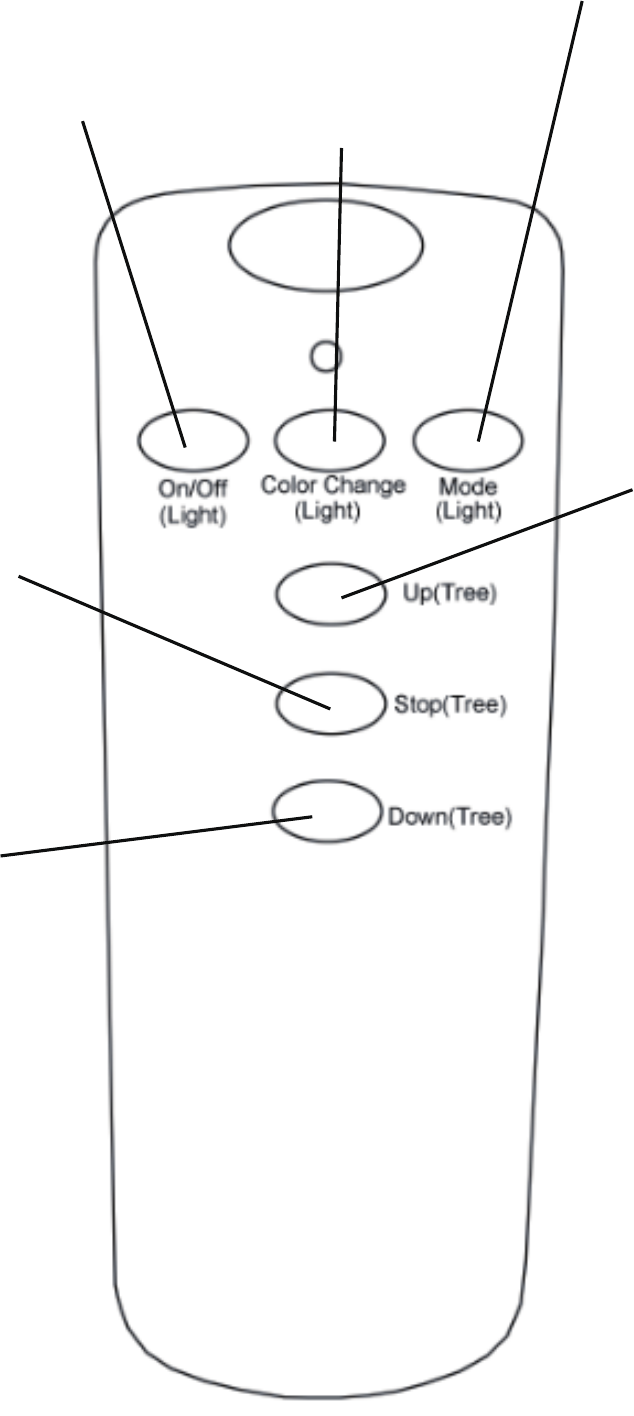
1.2 OPERATING WITH THE REMOTE CONTROL .
Noted: Do not adjust the tree hight once it is decorated.
There 8 light functions as below
* Stead On
* Slow Sparkling
* Quick Sparkling
* Slow Fade
* Quick Fade
* Slow Glow
* Flashing
* Color Swtiching
The tree will
keep rising to
10FT until you press
stop button .
By pressing button
STOP the tree will
stop rising in any height .
The tree will
keep going down to
7FT until you press
stop button .
Press once to turn light ON.
Press again to turn light OFF.
There are two clolors
lights ( Warm white
& Multi ).
Press buttom COLOR
CHANGE to selected the
color required.

Problem Possible Cause Solution
No Light
1. No power.
2. Light ON button is not pressed.
3. Light bulb is missing or burn-out in
the chain.
4. Adapter is not connected properly.
1. Check the adapter is plugged to mains.
2. Press light ON button once.
3. Check not missing or burn-out of light
bulb in the tree.
4. Reconnect the adapter and make sure it'
s
connected properly.
Remote control not
working
1. Battery dead.
2. You might be out of effective range.
1. Replace the battery on the remote.
2. Ensure the remote is operated within the
range (8 meter).
LOUD noise
1. Oil on tree trunk is dry. 1. Apply
#3 grease on tree trunk by
small brush carefully.
The tree TILTS 1. The screw is not tightening. 1. Tighten the Screw in the base.
The tree will not
rise to 10FT. 1. Some tree trunk section is jamed.
1. Firstly, press DOWN button let tree
down, press UP button make tree rising
after it down to lowest.Third, Press DOWN
button let tree down again.
TROUBLE SHOOTING
1.3 FOR MORE OPERATING GUIDE
C. Call toll-free: 1-844 946 8733 for help.
B. Write to email:customerservice@winnersarts.com for help.
A. Scan below QR code to get set up video for easy reference.
Operation Hours - Weekdays: 9:00 am - 5:00 pm
D. Visit : http://www.winnerstree.com
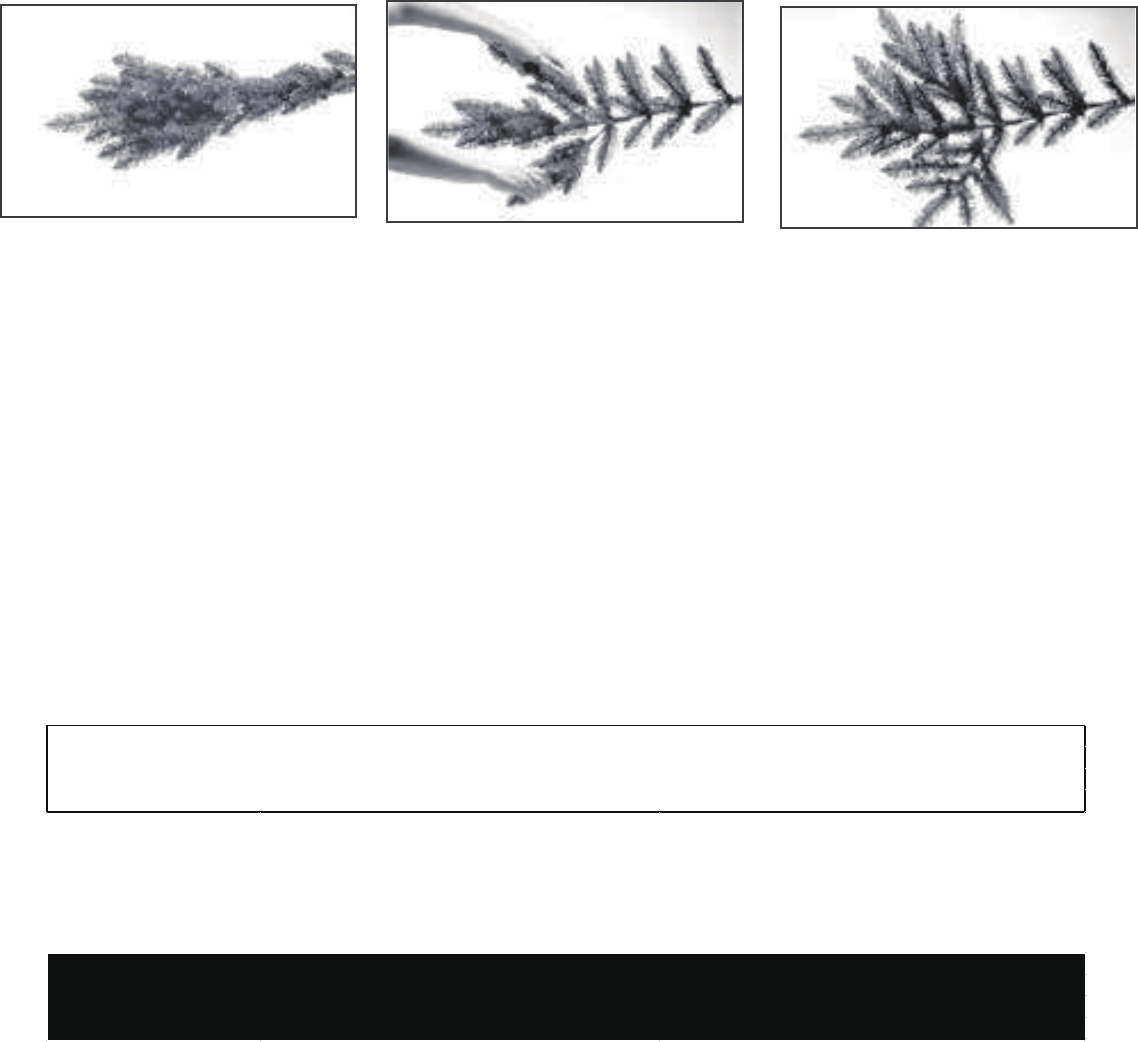
SHAPING INSTRUCTIONS
Shaping the tree branches is the last step of assembly. The care and attention given to this final
process will result in a genuinely beautiful and appealing holiday centerpiece.
1.Every tree style is shipped from the factory with the tips of each branch
compressed to the center ( Fig5 ).
2.Each branch tip must be shaped to it’s proper position to give the tree
natural look. Spread tips away from the branch gently( Fig6 )
3.Each individual tip should then be spread out separately. Tips
should then be bent slightly upward to add a more natural looking appearance.
Fig. 7 shows a typical tree branch after shaping . Branch tips should be carefully pressed
back toward center tip when tree is disassembled for storage in original carton.
.
Fig .5 Fig 6 Fig.7
Retain carton only for storage purposes.
These instructions are for your proper use and your safety.
Please read them thoroughly before use and retain forfuture reference.
The appliance is not to be used by persons (including children) with reduced physical,sensory or metal
capabilities,or lack of experience and knowledge, unless they have been given supervision or instruction.
Children should be supervised to ensure that they do not play with the appliance.
SAVE THESE INSTRUCTIONS
CUSTOMER AID FOR CHRISTMAS TREE
For any questions, comments, problems or missing parts, it's recommended not return to place of purchase.
Please call Winners at 1-844-946-8733 or email us at customerservice@winnersarts.com
Warning: Changes or modifications to this unit not expressly approved by the party responsible for
compliance could avoid the user’s authority to operate the equipment.
NOTE: This equipment has been tested and found to comply with the limits for a Class B digital device,
pursuant to Part 15 of the FCC Rules. These limits are designed to provide reasonable protection against
harmful interference in a residential installation. This equipment generates, uses and can radiate radio
frequency energy and, if not installed and used in accordance with the instructions, may cause harmful
interference to radio communications.
However, there is no guarantee that interference will not occur in a particular installation. If this
equipment does cause harmful interference to radio or television reception, which can be determined
by turning the equipment off and on, the user is encouraged to try to correct the interference by one or
more of the following measures:
Reorient or relocate the receiving antenna.
Increase the separation between the equipment and receiver.
Connect the equipment into an outlet on a circuit different from that to which the receiver is connected.
Consult the dealer or an experienced radio/TV technician for help.
This device complies with part 15 of the FCC Rules. Operation is subject to the condition that
this device does not cause harmful interference (1) this device may not cause harmful
interference, and (2) this device must accept any interference received, including interference
that may cause undesired operation.