Palm NYNY2 Handspring Treo Handheld Computer User Manual User Guide Treo 180 and 180g

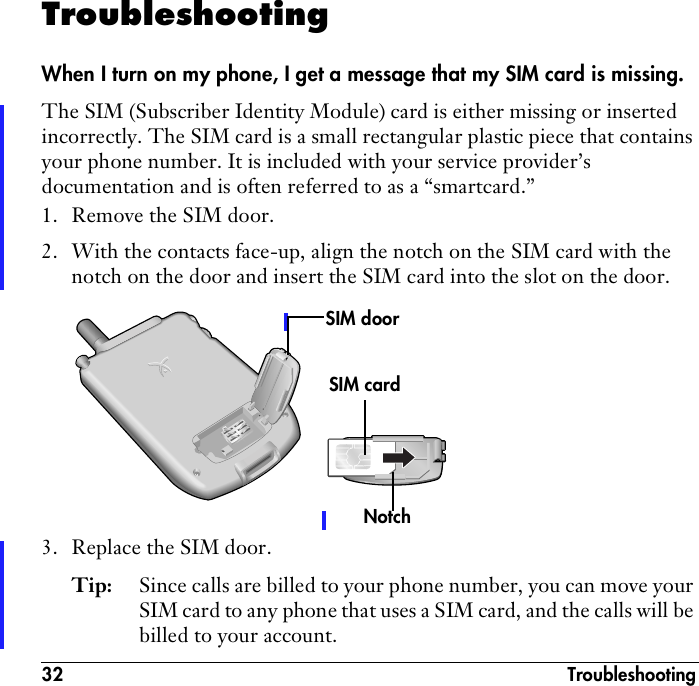
Palm Inc Handspring Treo Handheld Computer User Guide Treo 180 and 180g
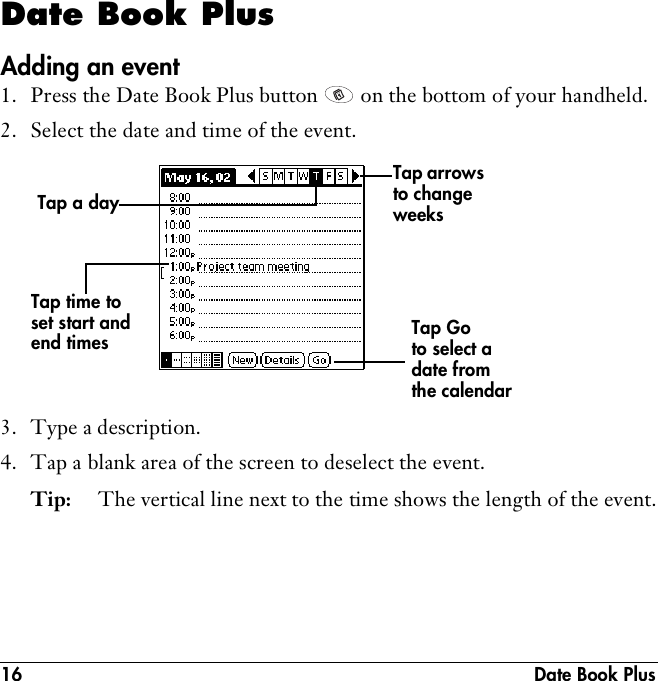
Contents

User Guide Treo 180 and 180g

Contents iContentsGetting Up and Running ................................................1Charging the Battery .....................................................5Using the Keyboard ......................................................6Adjusting the Screen Display..........................................8Using Your Phone..........................................................9Date Book Plus............................................................16Blazer Web Browser....................................................19SMS Messages ............................................................20Preferences and Other Settings ....................................22Synchronizing Data with Your Computer ......................25Beaming Information...................................................29Resetting Your Handheld .............................................30Using the Electronic User Guide....................................31Troubleshooting ..........................................................32FCC Statement.............................................................35
ii CopyrightCopyright © 2001 Handspring, Inc. All rights reserved. Handspring and the Handspring logo are trademarks of Handspring, Inc., and may be registered in some jurisdictions. Graffiti, HotSync, and Palm OS are registered trademarks, and Palm is a trademark of Palm, Inc. or its subsidiaries. All other trademarks are the property of their respective owners.Disclaimer and limitation of liabilityHandspring, Inc. and its suppliers assume no responsibility for any damage or loss resulting from the use of this guide.Handspring, Inc. and its suppliers assume no responsibility for any loss or claims by third parties which may arise through the use of this software. Handspring, Inc. and its suppliers assume no re-sponsibility for any damage or loss caused by deletion of data as a result of malfunction, dead battery, or repairs. Be sure to make backup copies of all important data on other media to protect against data loss.Important: For warranty information and a copy of the End User License Agreement applicable to your Handspring product, please see the Handspring web site at www.handspring.com/support/ug_warranties.jhtml. If you would like a copy of these materials mailed to you, or if you have any questions, please contact Handspring Customer Support.The information included on this web site sets forth Handspring's sole and complete warranty and software licensing obligations with respect to your Handspring product. Use of the product indicates your acceptance of the terms of the warranty and the End User License Agreement.Software download availablePalm™ Desktop software and the electronic User Guide are supplied on a CD-ROM disc. If you do not have access to a CD-ROM drive for your computer, you can download both of these items from www.handspring.com.Part #:  ##-####-##
Getting Up and Running 1Getting Up and RunningCongratulations on the purchase of your new Manhattan™ handheld computer. Here’s how to get up and running quickly:■Complete all the steps on the Manhattan Start Here card.■Use this Quick Reference Guide to learn how to enter text and perform basic tasks.■Check the electronic User Guide in the Handspring folder on your computer to learn more about using your handheld.Tip: If you’re upgrading from another Palm OS® handheld, see page 26 for upgrade instructions.
2  Getting Up and RunningGetting to know your Manhattan handheld computerSpeakerJog rockerBlazer/Find buttonSMS Messages/Application Launcher buttonHeadset jackPhone buttonDate Book Plus button Scroll buttonsMicrophone
Getting Up and Running 3The color of the LED and the blink state indicate the following:Green/solid = Charging completeGreen/fast blink = Call in progressGreen/slow blink = Radio on; in coverage areaRed/solid = Charging batteryRed/fast blink = Low batteryRed/slow blink = Radio on; no coverageNo light = Radio offStylusIR portPower buttonLEDRinger switchAntenna
4  Getting Up and RunningTurning your Manhattan on and offYour Manhattan is both a handheld computer and a radio for wireless communications. You can turn the handheld and the radio on and off independently of each other. When you turn on the handheld, you can use the various applications while the radio is off. However, to make or receive a call, you need to turn on the radio.Turning the handheld on and offDo any of the following:■Open the lid to turn it on, or close the lid to turn it off.■Press and release the power button.Turning the radio on and off■Hold down the power button until you hear the confirmation tones to turn the radio (and other wireless features) on and off. The ascending tone indicates the radio is on and the descending tone indicates the radio is off.
Charging the Battery 5Charging the BatteryYour handheld battery provides approximately 2 hours of talk time or 72 hours of standby time. If the battery drains to the reserve level, you can still use your handheld applications for about 1 day, but there is not enough power to use the phone and other wireless features. It takes approximately 1 hour to charge a fully drained battery. To charge the battery do one of the following:■When you’re near your computer, connect your handheld to the HotSync® cable with the AC adapter connected to a wall outlet as shown on page 27.■When travelling, connect the AC adapter cable directly to your handheld as shown here.Tip: The LED is solid red while your handheld charges. When the LED turns green, your handheld is charged. If the LED does not turn on, make sure the AC adapter cable is connected to a wall outlet.LED
6  Using the KeyboardUsing the KeyboardEntering textUse your thumbs to press the keys. Each letter key has three modes:■Normal: types a lowercase letter.■Shift: types an uppercase letter.■Option: types the number/symbol, or activates the function, that appears in blue above the letter on the key.Tips:■To insert an uppercase letter, press   then the letter key.■To turn Shift Lock on and off, press the Option key   then  .■To turn Option Lock on and off, press the Option key   then  .% Q  @ W  $ E  & A  ( S  ) D  : Z  ? X  / R  – F  ! C  * T  + G  ’ V   "P    #O    3I    2U    1Y    'L    6K   5J    4H    9M   0.  8N    7B  CAPS NUMSYMBOLiOptionSpaceCaps Shift Num ShiftBackspaceReturnMenu
Using the Keyboard 7Entering accented and symbol characters1. Type the letter to which you want to add the accent, or press   to enter a symbol.2. Press the Option key   then  .3. Use the scroll buttons or jog rocker to highlight the accent or symbol on the list.4. Continue typing to insert the accented character or symbol.Using Menus1. Press   to open the menus.2. Press the scroll up button to switch between menus.3. Press the scroll down button to select a command.4. Press   to run the selected command.Tips:  You can also do any of the following:■Press   again to close the menus without running a command. ■Type shortcut letters to select menu commands. Shortcut letters appear next to the command on each menu.■Roll the jog rocker to select a command and press the jog rocker to run the selected command.
8  Adjusting the Screen DisplayAdjusting the Screen DisplayUsing the backlightAdjusting the Contrast1. Press the Option key   and   at the same time. 2. Press the scroll buttons.3. Tap Done.Press the power button twice to turn the backlight on or off
Using Your Phone 9Using Your PhoneMaking a call■Press the Phone button   on the bottom of your handheld repeatedly to switch between the various views, then use any of the following methods to make a call:Speed Dial viewTap the numbers then tap the handset buttonTap a speed dial buttonDial Pad viewContacts viewType a contact’s name Call History viewTap a name or number then tap Dial
10  Using Your PhoneAnswering a callYou can answer a call using either of the following methods:■If the lid is closed, open the lid to answer the call, or press the power button to silence the ring before answering the call.■If the lid is open, tap Answer.Ignoring a callYou can ignore a call using either of the following methods:■If the lid is closed, press any application button to silence the ring and send the call to voicemail.■If the lid is open, tap Ignore.Adjusting call volumeWhile a call is in progress, you can adjust the volume using either of the following methods:■Roll the jog rocker up or down.■Press the scroll buttons.Ending a callYou can end a call using either of the following methods:■Close the lid.■Tap Hang Up.
Using Your Phone 11Using the status barThe status bar icons indicate the following:Displays the name of your wireless service provider. If you are outside a coverage area, “No Service” appears instead.Appears when you have new voicemail messages.Displays the signal strength. The stronger the signal, the more bars appear. If you are outside a coverage area, the bars are flat.Appears when the phone is ringing or a call is in progress.Displays the battery status. As the battery drains, the icon changes from black to clear.Appears when your handheld is connected to an AC adapter and the battery is charging.Status bar
12  Using Your PhoneDefining speed dial buttons1. In the Speed Dial view, tap a blank speed dial button. 2. Press the scroll buttons to move between fields as you type.3. Tap Done.Tips:■To edit an existing speed dial entry, press  , under Edit, select Edit Speed Dial, tap the entry you want to edit, and after editing tap Done.■To insert a pause between Extra Digits when dialing, type a comma (,). Each comma represents a one second pause. ■To delete an existing speed dial entry, press  , under Edit, select Edit Speed Dial, tap the entry you want to delete, and tap Delete.Type a name for the buttonTap Lookup to find a number in your Contact listType the phone numberType digits to dial after placing the call (such as an extension or access code)
Using Your Phone 13Adding a contact1. In the Contacts view, tap New.2. Press the scroll buttons to move between fields as you type.3. Tap Done.Tip:  You can also import addresses from popular software applications on your computer. See the electronic User Guide for instructions.Type the information Tap arrows to enter moreTap Details to set display optionsTap here to place entry in a category
14  Using Your PhoneViewing or changing contact information1. In the Contacts view, press the scroll buttons to select the entry you want to view or edit.2. Tap Edit and make changes to the entry as necessary.3. Tap Done.Deleting a contact1. In the Contacts view, tap the name of the entry you want to delete.2. Tap Details.3. Tap Delete.4. Tap OK.Tap name you want to view or editJump to a name by typing the first or last nameTap to view another category
Using Your Phone 15Using a headsetYou can connect a headset for hands-free operation. If you need to use your phone while driving, we recommend using a headset. You can press the headset button to perform any of the following functions:■Answer an incoming call.■Switch between two active calls.■End an active call by holding down the button until you hear a beep.Tip: You can also dial a number in your speed dial list when the lid is closed and the headset is attached. Press the jog rocker to open the Speed Dial view, roll the jog rocker to select the speed dial entry, and press the jog rocker to dial the selected entry.INSERT ILLUSTRATION SHOWING HOW TO CONNECT HEADSET WITH CALLOUT TO HEADSET BUTTON
16  Date Book PlusDate Book PlusAdding an event1. Press the Date Book Plus button   on the bottom of your handheld.2. Select the date and time of the event.3. Type a description.4. Tap a blank area of the screen to deselect the event. Tip: The vertical line next to the time shows the length of the event.Tap a day Tap time to set start and end times Tap Go to select a date from the calendarTap arrows to change weeks
Date Book Plus 17Scheduling an untimed eventYou can schedule events that occur on a particular date, but are not associated with a particular time, such as a birthday or anniversary.1. Select the date of the event.2. Tap New and select Appointment from the list.3. Tap No Time and tap OK.4. Type a description.Tip: The event appears next to a diamond at the top of the Day view.Scheduling a repeating event1. Create the event as described on page 16, and tap the event to select it.2. Tap Details.3. Tap the Repeat box and tap a repeat interval.4. Type a number on the Every line to show how often the event repeats.Tip:  For Weekly events, also tap the day(s) the event repeats, and for Monthly events, tap Day or Date as the repeat method. 5. (Optional) Tap the End on pick list, tap Choose Date, and select an end date.6. Tap OK to return to the Details dialog and tap OK again.Tip: A Repeat icon   appears next to the event.
18  Date Book PlusRescheduling an event1. Tap the event you want to reschedule.2. Tap Details.3. Tap the Time box and select a new time.4. Tap the Date box and select a new date.5. Tap OK.Displaying your calendarDeleting an event1. Tap the event you want to delete.2. Press the  .3. Under Record, select Delete Event.4. Tap OK.Tap Go to select a dateTap arrows to change weeksTap and drag stylus below date to display timeTap icons to change views: day, week, week with text, month, year, and listTap a day
Blazer Web Browser 19Blazer Web BrowserSurfing the Web■Press the Blazer button   on the bottom of your handheld repeatedly to switch between the Web Page and Bookmark views.Tips:■To view a bookmarked page, tap the bookmark you want to view from the Bookmark view.■To rearrange the bookmark list or edit a bookmark, tap Edit from the Bookmark view.■To add a new bookmark, select Add Bookmark from the menu or tap an empty slot from the Bookmark view.■To scroll through a page, press the scroll buttons or roll the jog rocker.Tap to enter a URLTap arrows to view next and previous pagesTap to go to home pageBookmark viewWeb Page view
20 SMS MessagesSMS MessagesCreating and sending a message1. Press the SMS Messages button   on the bottom of your handheld.2. Tap New.Tip: You can also type a number by pressing the Option key   followed by   then typing the numbers. Press the Option key  then   again to return to typing letters.3. Type your message or tap Text to select from frequently-used boilerplate messages. 4. Tap Send. Note: If you are outside a coverage area, the message is stored in the Pending folder. When you return to a coverage area, your message is sent automatically.Tap To to select from the quick list Tap Lookup to select from your Contacts listTap Edit List to add a number to the quick list
SMS Messages 21Receiving a messageWhen you receive a message, the New SMS Message alert dialog appears.Viewing messages1. Press the SMS Messages button   on the bottom of your handheld.2. Press the scroll buttons to scroll through the messages. Number of messagesTap to reply to sender Tap to call to senderTap to delete messageTap to save messageTap to reply to sender Tap to delete messageTap to view Inbox, Pending, or Sent messagesSelected message
22  Preferences and Other SettingsPreferences and Other SettingsSetting General Preferences1. Press the Option key   then the Application Launcher button  . 2. Tap the Prefs icon  . 3. Tap the pick list in the upper-right corner and select General.Tap here to set time and dateTap here to set the screen shut-off delayTap here to set sound levelsTap here to enable IR beam receptionTap here to select General
Preferences and Other Settings 23Selecting the ringer settings1. Press the Option key   then the Application Launcher button  . 2. Tap the Prefs icon  .3. Tap Ringer in the pick list in the upper-right corner.4. Select the ringer settings you want to use.  Tips:■The slider on top of your handheld has two positions   and  . The two Ringer Preferences columns control the behavior of the corresponding slider position. ■You can use both a ring tone and vibrate alert or use them separately. For example, you can set one position to ring softly and vibrate, and the other position to vibrate only. ■To preview a new sound, select Play ring when changed.Tap Call and SMS pick lists to select ring styleTap Volume pick lists to select volume levelTap Vibrate pick lists to turn vibrate mode on or offTap here to select Ringer
24  Preferences and Other SettingsSetting Formats Preferences1. Press the Option key   then the Application Launcher button  . 2. Tap the Prefs icon  . 3. Tap the pick list in the upper-right and select Formats.Changing the screen fonts1. Open the application in which you want to change the font.2. Press . 3. Under Options, select Font.4. Tap OK.Tap here to set time formatTap here to set date formatTap here to set week formatTap here to set number formatTap here to set countryTap here for large fontTap here for small fontTap here for bold font
Synchronizing Data with Your Computer 25Synchronizing Data with Your ComputerYou can use the Palm Desktop software and your HotSync cable to exchange data between your handheld and your computer. This process is called a HotSync operation. Each time you perform a HotSync operation, any information you entered or changed on your handheld is copied to your computer and vice versa. This backs up your data and is strongly advised.Before you perform a HotSync operation, you need to install the Palm Desktop software from the Handspring CD and connect the HotSync cable to your computer. You can connect the USB cable that comes with your handheld, or you can purchase a serial cable at www.handspring.com. See “Computer system requirements” below.Computer system requirementsUSB cable■Windows 98/ME/2000/XP, or Mac OS 8.5 or later■Available USB portSerial cable■Windows 95/98/ME/2000/NT 4.0/XP, or Mac OS 7.5.3 or later■Available serial port
26  Synchronizing Data with Your ComputerUpgrading from a Palm OS handheld1. Synchronize your old handheld with your old desktop software.2. Install your new Palm™ Desktop software from your Handspring CD.3. Synchronize your new handheld with your new desktop software, and select the user name for your old handheld when prompted.4. If any third party applications do not get installed, beam them from your old handheld to your Manhattan, or install them from the original files.Tip: After you upgrade you have two handhelds with the same user name. Since each handheld must have a unique name, perform a hard reset on your old handheld to remove the user name and avoid problems synchronizing with that device. The next time you synchronize that device, be sure to assign it a new name.Installing the Palm Desktop software1. Insert the Handspring CD in the CD-ROM drive on your computer.2. When the installation screen appears, follow the onscreen instructions to begin the installation.3. When prompted to connect the cable to your computer, follow the instructions on page 27 in this guide.4. Complete the Palm Desktop software installation process.When the set up process is done, the installation screen closes automatically.
Synchronizing Data with Your Computer 27Connecting the HotSync cable1. Connect the AC adapter cable to the short end of the USB or Serial cable. Be sure to match the sides of the connectors labeled “UP.”2. Connect the USB HotSync cable to a USB port on your computer, or connect the Serial HotSync cable to a Serial port on your computer.3. Connect the long end of the HotSync cable to your handheld with the button facing up.Tip: The AC adapter does not need to be plugged into a wall outlet to perform a HotSync operation.Serial cableUSB cable
28  Synchronizing Data with Your ComputerSynchronizing data1. Connect your handheld to the HotSync cable. 2. Press the HotSync button on the cable.Tip: The first time you synchronize, you must select a user name and click OK. Every handheld needs a unique name. Never synchronize more than one handheld to the same user name on your computer.3. Wait for a message on your handheld to indicate the process is done.4. Remove your handheld from the cable.HotSyncsynchronization button
Beaming Information 29Beaming Information1. Select the item you want to beam.2. Press .3. Under Record, select Beam.4. When the Beam Status dialog appears, point the IR port at the IR port of the receiving handheld.5. Wait for a message that indicates the transfer is done.Tips:■To beam an application, press the Option key   then the Application Launcher button  , press  , under App, select Beam, tap the application you want to send, and tap Beam.■To receive a beam, turn on your handheld, point the IR port at the transmitting IR port, and when the Beam Status dialog appears, tap Yes.Hold handhelds with IR ports facing one another and keep path between devices clear of obstacles
30  Resetting Your HandheldResetting Your HandheldPerforming a soft resetIf your handheld is not responding, you can perform a soft reset to restart it. A soft reset does not affect your data.Performing a hard resetA hard reset erases all data and third-party software on your handheld. Never perform a hard reset unless a soft reset doesn’t fix the problem. You can restore previously synchronized data with the next HotSync operation.1. While pressing the power button, use the reset tool (or the tip of a paper clip) to gently press the reset button.2. Release the power button.3. When the warning appears press the top scroll button.Use the reset tool to gently press the reset buttonUnscrew the stylus tip to access the reset tool
Using the Electronic User Guide 31Using the Electronic User GuideIn addition to providing more information about the topics in this guide and valuable troubleshooting tips, the electronic User Guide also walks you through using the other applications on your Manhattan handheld:1. Open the Handspring or Palm folder on your computer.2. Double-click the User Guide.PDF file.■Calculator■City Time■Expense■E-mail applications■Memo Pad■SIM applicationsClick the binoculars to search for specific textClick the arrows to turn pagesClick the printer to print pagesClick a + or -  to expand or collapse the outlineClick a title to jump to that section
32 TroubleshootingTroubleshootingWhen I turn on my phone, I get a message that my SIM card is missing.The SIM (Subscriber Identity Module) card is either missing or inserted incorrectly. The SIM card is a small rectangular plastic piece that contains your phone number. It is included with your service provider’s documentation and is often referred to as a “smartcard.”1. Remove the SIM door.2. With the contacts face-up, align the notch on the SIM card with the notch on the door and insert the SIM card into the slot on the door.3. Replace the SIM door.Tip: Since calls are billed to your phone number, you can move your SIM card to any phone that uses a SIM card, and the calls will be billed to your account.SIM cardSIM doorNotch
Troubleshooting 33My Blazer web browser and other wireless features don’t workMake sure you installed the Palm Desktop software on the Handspring CD and performed a HotSync operation after the installation. This CD contains components required by the wireless features. Performing a HotSync operation installs these components on your handheld.I can’t open the electronic User GuideMake sure you installed the Adobe Acrobat Reader software on the Handspring CD. To install this software, insert the Handspring CD in the CD-ROM drive on your computer, select Acrobat Installer from the menu, and follow the onscreen instructions.I get an error when connecting to the Internet or using E-mail■Contact your service provider to confirm that data services are active on your account. ■Make sure you installed the Palm Desktop software on the Handspring CD and performed a HotSync operation after the installation. This CD contains components required by the wireless features. Performing a HotSync operation installs these components on your handheld. ■Confirm that you are dialing the correct number to access your service provider’s server. Some service providers require that you have an ISP account to handle this.■Check your user name, password and other settings.
34 Troubleshooting
FCC Statement 35FCC StatementThis device complies with part 15 of the FCC Rules. Operation is subject to the following two conditions:(1) This device may not cause harmful interference, and (2) this device must accept any interference received,including interference that may cause unwanted operation.This equipment has been tested and found to comply with the limits for a Class B digital device, pursuant toPart 15 of the FCC rules. These limits are designed to provide reasonable protection against harmful inter-ference in a residential installation. This equipment generates, uses and can radiate radio frequency energyand, if not installed and used in accordance with the instructions, may cause harmful interference to radiocommunications.  However, there is no guarantee that interference will not occur in a particular installation.If this equipment does cause harmful interference to radio or television reception, which can be determinedby turning the equipment off and on, the user is encouraged to try to correct the interference by one or moreof the following safety measures.■Reorient or relocate the receiving antenna.■Increase the separation between the equipment and the receiver.■Consult the dealer or an experienced radio/modem technician for help.Exposure To Radio Frequency Energy (SAR)In order to comply with FCC RF exposure safety guidelines users MUST use a Handspring brand body-worn accessory during body-worn operation. Use of accessories not provided by Handspring or that havenot been tested for RF exposure compliance with this product may not comply with the FCC RF exposuresafety guidelines and should not be used.See http://www.fcc.gov/oet/rfsafety/ for more information on RF exposure safety.Responsible Party:Handspring, Inc.189 Bernardo Avenue Mountain View, California 94043-5203 United States of America (650) 230-5000

Navigation menu