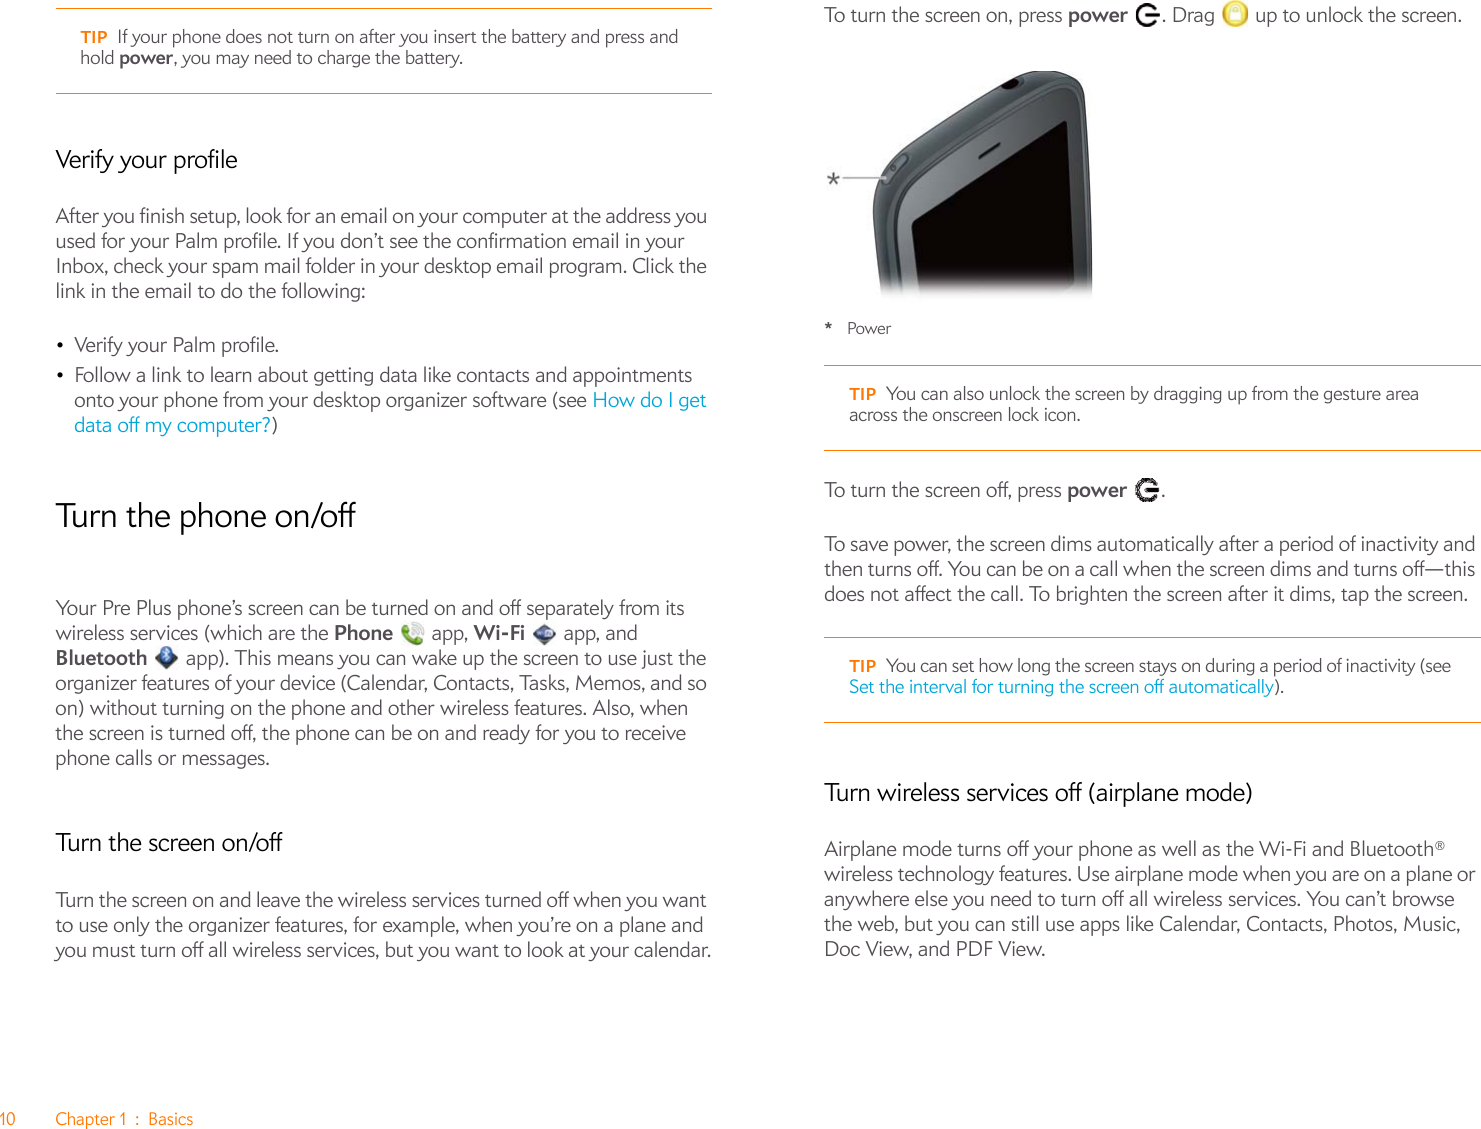
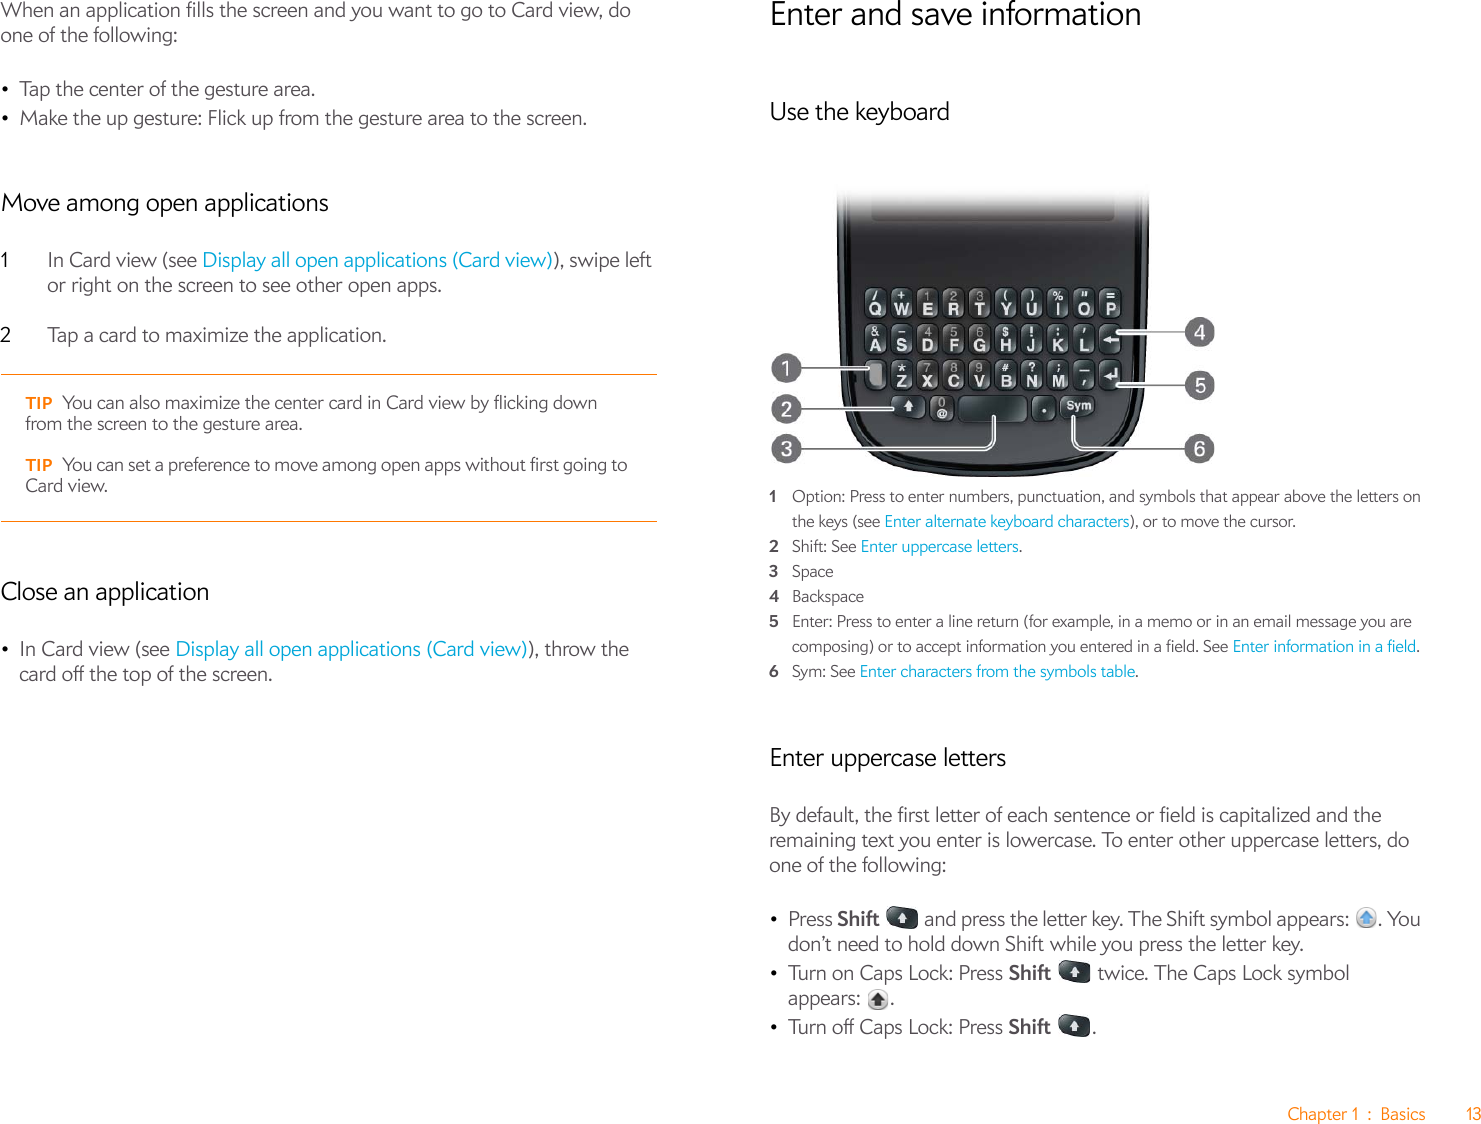
Palm PIXUW GSM/UMTS Phone with 802.11 b/g and Bluetooth User Manual Palm Pixi Plus User Guide

Palm Inc GSM/UMTS Phone with 802.11 b/g and Bluetooth Palm Pixi Plus User Guide

User Manual

User Guide
Intellectual property notices© 2010 Palm, Inc. All rights reserved. Palm, Pixi, Synergy, Touchstone, webOS, and the Palm and Pixi logos are among the trademarks or registered trademarks owned by or licensed to Palm, Inc. Microsoft and Outlook are trademarks of the Microsoft group of companies. Exchange ActiveSync Enabled. Facebook® is a registered trademark of Facebook, Inc. Google and Google Maps are trademarks of Google, Inc. Amazon, Amazon MP3, and the Amazon MP3 logo are trademarks of Amazon.com, Inc. or its affiliates. Doc View and PDF View are provided by Documents To Go®, a product of DataViz, Inc. (dataviz.com). All other brand and product names are or may be trademarks of, and are used to identify products or services of, their respective owners.Disclaimer and limitation of liabilityPalm, Inc. and its suppliers assume no responsibility for any damage or loss resulting from the use of this guide. Palm, Inc. and its suppliers assume no responsibility for any loss or claims by third parties that may arise through the use of this software. Palm, Inc. and its suppliers assume no responsibility for any damage or loss caused by deletion of data as a result of malfunction, dead battery, or repairs. Be sure to make backup copies of all important data on other media to protect against data loss.Patent pending. This product also is licensed under United States patent 6,058,304.Use of this device requires providing a valid email address, mobile phone number, and related information for account setup and activation. A data plan is also required. An unlimited-usage data plan is strongly recommended, or additional data charges may apply.Open Source License informationYou can view the Open Source License terms on your phone. Tap the center of the gesture area, and then tap the Launcher icon. Swipe left until the PDF View icon appears. Tap PDF View and then tap Open Source Information.pdf.You can also view the file on your computer. Connect your phone to your computer with the USB cable. On your phone, tap USB Drive. On your computer, locate and double-click the removable drive name for your phone. To locate the drive, do the following for your operating system:•Windows Vista/Windows 7: Open Computer.•Windows XP: Open My Computer.•Mac: Open Finder.• Linux (Ubuntu): The drive is displayed on the desktop.• Other Linux distribution: The location of the drive may vary by system.After you open the drive, double-click the file Open Source Information.pdf.Recycling and disposalThis symbol indicates that Palm products should be recycled and not be disposed of in unsorted municipal waste. Palm products should be sent to a facility that properly recycles electrical and electronic equipment. For information on environmental programs visit palm.com/environment or recyclewirelesss.com/.As part of Palm’s corporate commitment to be a good steward of the environment, we strive to use environmentally friendly materials, reduce waste, and develop the highest standards in electronics recycling. v. 0.0
Contents 3ContentsChapter 1 Basics6 Get to know your phone7Set up your phone10 Turn the phone on/off11 Open applications12 Work with applications13 Enter and save information15 Use the menus16 Search to find info and make calls16 View and respond to notificationsChapter 2 Phone20 Make calls21 Receive calls21 Use voicemail21 What can I do during a call?22 Set up and use a Bluetooth® hands-free deviceChapter 3 Email and other messages24 Email25 MessagingChapter 4 Personal information30 Contacts31 CalendarChapter 5 Photos, videos, and music34 Camera34 Photos34 Videos35 MusicChapter 6 Web and wireless connections38 Wi-Fi38 Web38 Bluetooth® wireless technologyChapter 7 Documents40 Doc View40 PDF ViewChapter 8 Preferences44 Screen & Lock44 Sounds & RingtonesChapter 9 Learn More48 While using your phoneRegulatory and Safety InformationIndex
4Contents
Chapter 1 : Basics 5BasicsYou’re about to discover the many things about your Palm® Pixi Plus phone that can help you better manage your life and have fun, too. As you become more familiar with your phone, you’ll want to personalize the settings and add applications to make it uniquely yours.But first, take the few easy steps in this chapter to set up your phone and get it running. Then learn about the key features that make moving around on your phone and accessing your information easy: gestures, menus, search, notifications, and more.In this chapter6Get to know your phone7 Set up your phone10 Turn the phone on/off11 Open applications12 Work with applications13 Enter and save information15 Use the menus16 Search to find info and make calls16 View and respond to notifications
6Chapter1:BasicsGet to know your phoneFront view1Earpiece2Touchscreen: Tap and make other gestures directly on the screen. See To u c h s c re e n .3Gesture area: Make the back gesture and begin other gestures here.4Keyboard: See Use the keyboard.5Microphone6Ringer switch: Slide to turn the ringer and notification sounds on or off. (Red means off.) The ringer switch does not affect music or video playback sounds.7Volume8Charger/microUSB connectorIMPORTANT Be careful not to scratch, crush, or apply too much pressure on the touchscreen. Do not store your phone in a place where other items might damage it. Do not use harsh chemicals, cleaning solvents, or aerosols to clean the phone or its accessories.Keyboard1Option: Press to enter numbers, punctuation, and symbols that appear above the letters on the keys (see Enter alternate keyboard characters), or to move the cursor.2Shift: See Enter uppercase letters.3Space4Backspace5Enter: Press to enter a line return (for example, in a memo or in an email message you are composing) or to accept information you entered in a field. See Enter information in a field.6Sym: Press to enter symbols and accented characters that don't appear on the keys. See Enter characters from the symbols table.To u c h s c re e n1Application name: Displays the name of the currently open application. Drag down over the app name to open the application menu.
Chapter 1 : Basics 72Launcher: See Open an application in the Launcher.3Scroll arrow: Swipe up or down to see icons that are on the page but hidden.4Quick Launch: See Open an application in Quick Launch.5Connection icons: Show the status of wireless service connections and battery strength . Tap the icons to open the connection menu. 6Page indicators: Show how many Launcher pages are to the right or the left of the currently displayed page. Swipe left or right on the screen to see other pages.7Notification icons: Show missed calls, new voicemail and email messages, and more. Tap the bottom of the screen to view notification details (see View all your notifications).Back view1Camera flash2Camera lens3SpeakerTo p  v i ew13.5mm headset jack2Power: Press to wake up or turn off the screen. Press and hold to turn wireless services on and off, replace the battery, or turn your device completely on and off. Turn your device completely off before you remove the battery.Set up your phoneInsert the SIM cardYour SIM (Subscribe Identity Module) card contains information on your wireless account. Depending on your wireless service provider, this information might include your phone number and voicemail access number. To make calls or use your phone’s email or web features, you need to insert a SIM cardIf you don’t have a SIM card, contact your wireless service provider.To take advantage of the high-speed data connection available on your phone, you may need to have a 3G SIM card. Check with your wireless service provider for information.WARNING You must remove the battery first whenever you insert or remove the SIM card.1If the USB cable is attached to the phone, disconnect the USB cable.2If a wired headset is attached to the phone, disconnect the headset.
8Chapter1:Basics3Turn the phone completely off (see Turn everything (the screen and wireless services) on/off).4To begin separating the back cover from the body of the phone, use your thumbnail to release the clasp at the midpoint of the left side of the phone (see a in step 5).5Run your thumbnail around the hairline opening to release the upper-left and top clasps. You may hear a sound when the clasp releases.6Run your thumbnail around the hairline opening to release the bottom-left and bottom clasps. End at (b).7Swing the body of the phone out of the back cover as if the right side were a hinge.
Chapter 1 : Basics 98Remove the battery by sliding your finger under the groove at the side of the battery.WARNING You must remove the battery first whenever you insert or remove the SIM card.9Insert the SIM card.*Notch10 Replace the battery. 11 To replace the back cover: Insert the ringer switch into the hole provided for it on the right side of the back cover.12 Press the back cover and the body of the phone together at each pair of clasps. You can feel the clasps engage.
10 Chapter 1 : BasicsVerify your profileAfter you finish setup, look for an email on your computer at the address you used for your Palm profile. If you don’t see the confirmation email in your Inbox, check your spam mail folder in your desktop email program. Click the link in the email to do the following:•Verify your Palm profile.•Follow a link to learn about getting data like contacts and appointments onto your phone from your desktop organizer software (see How do I get data off my computer?)Tu rn t h e  p h o n e  o n /offYour Pre Plus phone’s screen can be turned on and off separately from its wireless services (which are the Phone  app, Wi-Fi   app, and Bluetooth   app). This means you can wake up the screen to use just the organizer features of your device (Calendar, Contacts, Tasks, Memos, and so on) without turning on the phone and other wireless features. Also, when the screen is turned off, the phone can be on and ready for you to receive phone calls or messages.Turn the screen on/offTurn the screen on and leave the wireless services turned off when you want to use only the organizer features, for example, when you’re on a plane and you must turn off all wireless services, but you want to look at your calendar.To turn the screen on, press power  . Drag   up to unlock the screen.*PowerTo turn the screen off, press power .To save power, the screen dims automatically after a period of inactivity and then turns off. You can be on a call when the screen dims and turns off—this does not affect the call. To brighten the screen after it dims, tap the screen.Turn wireless services off (airplane mode)Airplane mode turns off your phone as well as the Wi-Fi and Bluetooth® wireless technology features. Use airplane mode when you are on a plane or anywhere else you need to turn off all wireless services. You can’t browse the web, but you can still use apps like Calendar, Contacts, Photos, Music, Doc View, and PDF View.TIP If your phone does not turn on after you insert the battery and press and hold power, you may need to charge the battery. TIP You can also unlock the screen by dragging up from the gesture area across the onscreen lock icon.TIP You can set how long the screen stays on during a period of inactivity (see Set the interval for turning the screen off automatically).
Chapter 1 : Basics 11Do one of the following: •Tap the upper-right corner of any screen to open the connection menu. Tap Turn on Airplane Mode.•Press and hold power   and tap Airplane Mode.When your phone is in airplane mode, the airplane mode   icon appears at the top of every screen, and Airplane Mode appears in the upper-left corner of the screen in the Launcher, Card view, and Phone. Your phone is not connected to any mobile network.Turn wireless services onWhen you turn on your phone, it automatically connects to your mobile network so that you can make and receive phone calls and use other wireless services (if supported by the local network).BEFORE YOU BEGIN To use the phone, you must have an active SIM card from your wireless service provider inserted into your phone (see Insert the SIM card).•If airplane mode is turned on, you need to turn it off before you can connect to your mobile network. Tap the upper-right corner of any screen to open the connection menu. Tap Tu rn  o f f  Ai r p l an e  Mo d e.When your phone locates a signal, your wireless service provider appears in the upper-left corner of the screen in the Launcher, Card view, and Phone, and the signal-strength  icon appears at the top of the screen.When you are inside a phone coverage area, the bars on the signal-strength  icon are filled in. If you’re outside a coverage area, the bars in the signal-strength icon appear dimmed with an X.Turn everything (the screen and wireless services) on/offUsually, turning your phone off and/or putting it in airplane mode is sufficient for normal periods when you have the phone with you but you’re not using it. On rare occasions, however, you may want to put your phone into deep sleep because you are not going to use it for an extended period. At those times, do one of the following:•Open Device Info   and tap Reset Options. Tap Shut Down, and tap Shut Down again.•Press and hold power  , and tap Power. Tap Shut Down/Swap Battery, and tap Shut Down.NOTE When you turn everything off, the phone’s alarms, ringer, and notifications are also turned off.To turn both the screen and wireless services back on, press and hold power .Open applicationsYou can have as many applications open at one time as you like, limited only by the amount of memory available on your phone at the time.Open an application in Quick LaunchQuick Launch is the bar of five icons that is always available at the bottom of Card view and the Launcher. To open an application from Quick Launch, just tap the icon.Quick Launch can display no more than five icons. By default it displays, from left to right, Phone, Contacts, Email, Calendar, and the Launcher. You can change the order of icons (except the Launcher icon) in Quick Launch TIP When your phone is in airplane mode, you can turn the Wi-Fi and Bluetooth features on individually (see Turn Wi-Fi on and off and Tu rn  t h e Bluetooth feature on/off). To turn your phone back on, you must turn airplane mode off.
12 Chapter 1 : Basics(see Reorder Quick Launch icons), or swap in whatever applications you like (see Change the applications that appear in Quick Launch).When an application fills the whole screen, make the following gesture to display Quick Launch and open one of its applications.1Drag up slowly from the gesture area to the screen. NOTE Don’t confuse this “drag up” with the up gesture, which is a flick up from the gesture area to the screen that displays Card view.2Move your finger to the application icon. When you see the app name appear, lift your finger. The application opens.Open an application in the LauncherThe Launcher displays all your applications that are not in Quick Launch. The Launcher includes multiple pages, which you can organize to group apps the way you want (see Reorder Launcher icons).1If you’re in an app, tap the center of the gesture area to display Card view.2In Card view, tap  .3To find the app you want, swipe up or down to see all the icons on a page. Swipe left or right to see other pages. 4Tap the application icon.To close the Launcher, do one of the following:•Tap the center of the gesture area.•Tap  .•Make the up gesture: Flick up from the gesture area to the screen.Open an application using search1Tap the center of the gesture area to open Card view.2Enter the name of or a keyword for the application.3When the application icon appears in the search results, tap it.Work with applicationsGo up one level in an app (back gesture)The back gesture takes you up one level from a detailed level to a more general view of the application you’re working in. For example, when you finish reading an email message, make the back gesture to close the message and return to your list of messages. Or when you finish writing a memo, make the back gesture to close and save the memo and return to the display of all your memos. When you make the back gesture in an application and that’s the only screen of that app that’s open, you minimize the app and go back to Card view.To make the back gesture, swipe right to left anywhere in the gesture area.Display all open applications (Card view)Card view displays open applications as small cards, so that you can easily scroll through them and drag them to change their order. TIP You can also open the Launcher by flicking up twice from the gesture area to the screen. If you are in Card view, just flick up once to open the Launcher.
Chapter 1 : Basics 13When an application fills the screen and you want to go to Card view, do one of the following: •Tap the center of the gesture area. •Make the up gesture: Flick up from the gesture area to the screen. Move among open applications1In Card view (see Display all open applications (Card view)), swipe left or right on the screen to see other open apps. 2Tap a card to maximize the application.Close an application•In Card view (see Display all open applications (Card view)), throw the card off the top of the screen.Enter and save informationUse the keyboard1Option: Press to enter numbers, punctuation, and symbols that appear above the letters on the keys (see Enter alternate keyboard characters), or to move the cursor.2Shift: See Enter uppercase letters.3Space4Backspace5Enter: Press to enter a line return (for example, in a memo or in an email message you are composing) or to accept information you entered in a field. See Enter information in a field.6Sym: See Enter characters from the symbols table.Enter uppercase lettersBy default, the first letter of each sentence or field is capitalized and the remaining text you enter is lowercase. To enter other uppercase letters, do one of the following:•Press Shift   and press the letter key. The Shift symbol appears:  . You don’t need to hold down Shift while you press the letter key.•Turn on Caps Lock: Press Shift   twice. The Caps Lock symbol appears: . •Turn off Caps Lock: Press Shift .TIP You can also maximize the center card in Card view by flicking down from the screen to the gesture area.TIP You can set a preference to move among open apps without first going to Card view.
14 Chapter 1 : BasicsEnter alternate keyboard charactersNumbers, punctuation, and symbols appear above the letters on the keys. To enter these characters, do one of the following:•Press Option   and press the key for the character. The alternate character symbol appears:  . You don’t need to hold down Option while pressing the second key.•Enter a series of alternate characters: Press Option   twice to turn on Option Lock. The Option Lock symbol appears:  .•Tu rn  o ff  Op ti on  Lo ck :  Pre s s  Option .Enter passwordsYou can see each character of a password only as you enter it, so be careful. Be sure Caps Lock and Option Lock are off unless you need them. For information on how to enter characters, see Enter uppercase letters and Enter alternate keyboard characters.Enter characters from the symbols tableYou can enter symbols and accented characters that don’t appear on the keys by using the symbols table. 1Press Sym   to display the symbols table.2Narrow the list by pressing the key that corresponds to the character you want. For example, to enter an é, press e. See the table below for a list of corresponding characters.3Scroll to find the character you want.4Tap the character to insert it.Enter information in a fieldYou can enter information in a field by typing or by pasting previously copied information. Applications with text fields support the auto-correct feature. If the app recognizes a common misspelling, it auto-corrects the word. To cancel the auto-correction, press Backspace .To accept the information you entered, do one of the following:•Tap outside the field.•Press Enter  . If a screen contains multiple fields, pressing Enter accepts the information you just entered and jumps the cursor to the next field.•When you are done entering information on the screen containing the field, make the back gesture to accept the information and back out of the screen (see Go up one level in an app (back gesture)).TIP The symbols and accented characters are grouped according to their similarity to the corresponding key. In some cases, the symbol is related to the alternate character on the key, not the letter. For example, to type a ¢ or other currency symbol, press Sym + h. Why? Because the alternate character on the H key is $. TIP If you press the wrong key, press Backspace to return to the full list of symbols and accented characters. You can then press another key.
Chapter 1 : Basics 15Select items in a listLists enable you to select from a range of options. Lists are different from menus (see Use the menus), which give you access to additional features.Lists are hidden until you tap the currently displayed option for that list.1Tap the currently displayed option to open the list. For example, when creating a new event in Calendar, tap 15 minutes before to display the list of reminder options.2Ta p  th e l ist  i t e m yo u w a nt .Save information•On most screens, your information is saved automatically. Just make the back gesture to close the screen (see Go up one level in an app (back gesture)), and your info is saved at the same time.•Your info is also saved if you minimize an app screen to a card and throw the card off the top of the screen to close the app.•On screens with a Done button, tap Done to save your information.Use the menusMost applications have an application menu hidden in the upper-left corner, which provides access to additional features. There is also a connection menu hidden in the upper-right corner, which provides access to wireless services.Some applications have additional menus. For example, in Photos, tap an open picture and tap   to display a menu of tasks you can do with the picture (see Photos).To get the most out of your phone, it’s a good idea to familiarize yourself with the additional features available through the menus in various applications.Open the application menuThe application menu contains items for the application you are working in, such as Cut and Copy, Preferences, Help, and other application-specific commands.1In an app, do one of the following:•Drag down from the upper-left corner of the phone (above the screen) onto the screen. •Tap the application name in the upper-left corner of the screen.2Tap a menu item to open it. If a menu item displays a right-pointing arrow  , tap the item to display the submenu for that item—for example, tap the Edit menu item to open a submenu containing Cut, Copy, and Paste items. If you see a downward-pointing arrow   at the bottom of the menu, scroll down to see additional menu items.3To close the menu without selecting an item, repeat one of the options in step 1.Open the connection menuThe connection menu lets you manage wireless services—the phone, Wi-Fi, and Bluetooth® wireless technology.DID YOU KNOW?The connection menu also displays the current day and date and the battery charge level.
16 Chapter 1 : Basics1Do one of the following:•Drag down from the upper-right corner of the phone (above the screen) onto the screen. •Tap the upper-right corner of the screen.2Tap a menu item to turn that wireless feature on or to display a list of menu items for that feature (see Turn wireless services off (airplane mode)). If you see a downward-pointing arrow  at the bottom of the menu, scroll down to see additional menu items.3To close the menu without selecting an item, repeat one of the options in step 1.Search to find info and make callsUse universal searchYou can search for contacts and applications on your phone, or search the web.1Open Card view (see Display all open applications (Card view)) or the Launcher (see Open an application in the Launcher).2Begin typing a search term or keyword. As you type, search displays any contact names and application names that match the character or application names that are associated with the keyword. As you continue typing, the search results narrow.3Do one of the following:•To look up or get in touch with someone: Tap a contact name to open the person’s contact information. Tap a phone number to dial it, an email address to send a message, and so on. If only the contact name is displayed, tap the name to display ways to get in touch. You can also tap Add Reminder to add a reminder message to the contact.•To search your company's Global Address List (GAL) for a contact: Ta p   Global Address Lookup.•To perform a web search: Tap the search term you entered to open a list of web search options, and tap the option. If your search returns no contacts or applications, the web search options are displayed automatically.•To open an application: Tap the application.Search within an applicationIn applications such as Contacts, Email, Memos, Doc View, and PDF View, you can search for entries or files. From the list view, enter the file name; a few words from a memo; or a contact name, initials, address, or number. See the individual application sections for details.You can also enter a search term in the Help application to search for help content related to the term.View and respond to notificationsRespond to a notificationNotifications show up at the bottom of the screen to notify you of new voicemail and messages, upcoming appointments, missed calls, and more. By default, if a notification arrives when the screen is off, the gesture area light pulses. You can turn this feature off.TIP You can also start a search by copying text in another application, opening the Launcher, and pasting the text. The text appears at the top of the screen as the search term. Note that you can’t paste text in Card view.
Chapter 1 : Basics 17Do one of the following:•Tap the notification to act on it. •For some types of notifications, throw the notification off the side of the screen to dismiss it.View all your notificationsFor most types of notifications, if you do not tap a notification after a few seconds, it becomes an icon in the lower-right portion of the screen.1Tap anywhere on the bottom of the screen to display your notifications.2Tap a notification to act on it.
18 Chapter 1 : Basics
Chapter 2 : Phone 19PhoneYo u r P al m ® Pixi Plus phone enables you to effectively manage multiple calls. You can answer a second call, swap between calls, and set up a six-way conference call. You can also work with other applications while on a call. Your Pre Plus phone helps you to do all these tasks with ease.In this chapter20 Make calls21 Receive calls21 Use voicemail21 What can I do during a call?22 Set up and use a Bluetooth® hands-free device
20 Chapter 2 : PhoneMake callsFor information on turning the phone off and back on, see Turn the phone on/off.Dial using the onscreen dial padThe onscreen dial pad is useful when you need to dial numbers that are expressed as letters and when you need large, brightly lit numbers that you can tap.1Open Phone .2Tap the dial pad numbers to enter the number.3Ta p   to  d i al .Dial by contact name using universal searchWhen you search for contacts, your phone returns both matching contact entries that are stored in the Contacts application, and those that are stored on your SIM card. 1Open Card view (see Display all open applications (Card view)) or the Launcher (see Open an application in the Launcher).2Begin typing the contact first or last name, or initials.3Tap one of the contact’s phone numbers to dial it. If only the contact name appears, tap the name to display the phone numbers for that contact, and then tap the number.Dial using the keyboard1In the Launcher, Card view, or Phone, use the keyboard to enter the number. You do not need to press Option   to enter numbers, *, or #.2When you finish entering the number, tap it to dial.Dial using a speed dialSee Assign a speed dial to a contact for instructions on creating a speed dial.•In the Launcher, Card view, or Phone, press and hold the speed-dial key you assigned to the number.Dial by contact name in the Phone application1Open Phone .2Using the keyboard, enter a name or initials until the contact you want appears.3Tap the number.Redial the last number dialed1Open Phone .2Tap  . When the contact name or number appears at the top of the screen, tap   again to dial.TIP If you turn off the preference to show contact matches in the dial pad, this changes how you dial using the keyboard in the Phone application. In Phone, after you enter the number with the keyboard, tap the onscreen dial icon to dial.
Chapter 2 : Phone 21Receive callsIf you want to answer calls, your phone must be on. This is different from having only the screen turned on (see Turn the phone on/off). When your phone is off, your calls go to voicemail.Answer a callDo one of the following:•If the screen is on when the phone starts ringing, tap  . •If the screen is off, drag   up to unlock the screen and answer the call.Ignore a callTo send a call immediately to voicemail, do one of the following:•Ta p  .•Press power  twice.To reply to a caller who is in your Contacts list after you ignore a call, tap the ignored call notification. This opens the caller’s contact entry, where you can select a reply method. To reply to a caller who’s not in your Contacts list, go to your call history.Use voicemailSet up voicemail1In the Launcher, Card view, or Phone, press and hold 1 . When the search results screen appears, continue holding 1   until the Phone application appears.2Follow the voice prompts to set up your voicemail.Listen to voicemail messages1Do one of the following: •In the Launcher, Card view, or Phone, press and hold 1 .•Tap a voicemail notification at the bottom of the screen.•Open Phone  . Then tap  .•Open Phone  . Then tap and hold 1 onscreen.2Follow the voice prompts to listen to your messages.What can I do during a call?Manage a callDo any of the following:•Put the call on speakerphone: Tap  .•Mute the microphone so you can’t be heard: Tap  .TIP You can pick the ringtone for incoming calls (see Select the ringtone for incoming calls). You can set a ringtone for individual contacts as well.DID YOU KNOW?If you are playing music or a video on your phone and a call arrives, playback pauses automatically and resumes when you hang up or ignore the call.
22 Chapter 2 : Phone•Open the dial pad to enter numbers for navigating phone trees, responding to prompts, and so on: Tap  .•Add a call: See Make a second call.•Adjust call volume: Press volume up or volume down.End a call•Ta p  .Set up and use a Bluetooth® hands-free deviceYour phone is compatible with many headsets and car kits (sold separately) enabled with Bluetooth® wireless technology version 2.1, with EDR and stereo (with AVRCP media controls).After you set up a connection with a Bluetooth headset or hands-free car kit, you can communicate using that device whenever it is within range and the Bluetooth feature on your phone is turned on. The range varies greatly, depending on environmental factors. The maximum is about 30 feet (10 meters).NOTE You can use a stereo (A2DP-enabled) Bluetooth headset or speakers to listen to music files on your phone. You cannot, however, use a mono Bluetooth headset to listen to music files.1Open Bluetooth .2If the Bluetooth setting at the top of the screen is off, tap Off to switch the Bluetooth feature from Off to On.3Ta p   Add device and tap the device name.4To use a Bluetooth device with your phone, follow the instructions that came with the Bluetooth device.5To switch to another Bluetooth device while on a call: Tap   and tap the new device name. You can also tap Handset or Speaker to use your phone without the headset.TIP You don’t need an on-hold button to put a call on hold. Just tap the mute icon to mute your end of the line.
Chapter 3 : Email and other messages 23Email and other messagesEnjoy the ease and speed of keeping in touch with friends, family, and colleagues by email anywhere you can access your wireless service provider’s data network. You can send and receive attachments as well. And keep the Messaging app in mind for times when you need to send a short text, multimedia, or instant message to a mobile phone number—especially handy when you’re in a meeting that’s running late.In this chapter24 Email25 Messaging
24 Chapter 3 : Email and other messagesEmailSet up emailFollow this procedure if you have a common email provider, for example, AOL, EarthLink, or Yahoo! If you are setting up the Email application to work with your corporate email account that uses Microsoft Exchange. If the email account you set up takes advantage of the Synergy feature, then setting up email also synchronizes the provider's calendar and contacts.1Open Email .2The first time you open Email, do one of the following:•If this is the first email account you are setting up: The email address you used for your Palm profile is entered by default. Use that address, or enter an address for one of your other email accounts. Enter your password for the account, tap Sign In, and tap Done.•If you have already set up an account that takes advantage of the Synergy feature and want to set up another one: Tap Add An Account and enter the email address and password. Tap Sign In.3Any other time you open Email, open the application menu, tap Preferences & Accounts, and tap Add An Account. Enter the email address and password and tap Sign In.Create and send an email message1Open Email .2If this is the first time you have opened the Email application, and you have set up at least one email account, tap Done. If you have not set up an email account, see Set up email.3Ta p  .4(Optional) Tap From to change the email account you are using to send the message. This option appears only if you have more than one email account set up on your phone.5In the To field, do one of the following to address the message:•Enter a contact name, initials, or email address. Tap the email address when it appears.•Tap   to open the full contact list. Tap the contact you want, or enter a name or address to narrow the list.•Enter the full email address for a recipient who is not a contact.6(Optional) Tap To  to open the Cc and Bcc fields, and enter an address.7(Optional) Repeat steps 5 and 6 to enter additional addresses.8Enter the subject, press Enter  , and enter the body text.9(Optional) To format body text, do one of the following:•To enter bold, italic, or underlined text: Open the application menu and tap Edit > [the option you want]. Enter the text. To turn off the formatting, open the application menu and tap Edit > [the option you want to turn off].•To enter colored text: Open the application menu and tap Edit > scroll down > Te x t C ol o r . Tap the color and enter the text.•To format text you already entered: Select the text (see Te x t  se le ct i on  gestures), open the application menu, and tap Edit > [the option you want]. To turn off a formatting option, open the application menu and tap Edit > [the option you want to turn off]. For text color, tap the black square. 10 (Optional) To set the priority for the message: Open the application menu and tap Set As Normal Priority or Set As High Priority. 11 Tap  .
Chapter 3 : Email and other messages 25Receive and read email messagesThe Email application synchronizes messages anytime you open a mail folder. It also synchronizes messages on an automatic schedule—the default interval is every 20 minutes.Follow these steps to manually retrieve messages.1Open Email .2If the folders for the account you want are hidden, tap   to display the folders.3Tap the folder you want to check messages for. If synchronization doesn’t start, tap  .How can you tell if sync is happening? Look for the animated circular movement around the number of messages in the upper-right corner of the screen.4Tap a message to open it.5Tap   or   in the subject line to view the previous or next message.6To view messages for another account, make the back gesture (see Go up one level in an app (back gesture)) to return to the account list, and tap the account name.MessagingCreate and send a text or multimedia messageEach text message can have up to 160 characters. You can send a message of more than 160 characters, but the message may be split into several messages. If you send a text message to an email address, the email address is deducted from the 160-character count.Multimedia messages consist of both text and pictures. You can include pictures in JPG format. BEFORE YOU BEGIN Make sure that your phone is on and that you’re inside a coverage area (see Tu rn  w ire l es s  se rv ice s  o n ).1Open Messaging .2The first time you open Messaging, tap Done to send a text or multimedia message. Thereafter, skip to step 3. 3Tap  . The cursor is in the To field. Do one of the following to address the message:•Enter a contact’s first or last name or initials, screen name, phone number, or email address. Tap the phone number you want to use to send the message when it appears.•Tap   to open your full contact list. Tap the contact you want or enter a name or address to narrow the list.•Enter a phone number for a recipient who is not a contact.•Do you need to enter a short code that contains letters—for example, to text a vote to a TV poll or to make a donation to a charity? Use the keyboard to enter it; just press the letter keys and tap the code that appears under Short Code. This is not the same as dialing a number that contains letters—for example, (555) 256 PALM. To dial a number like this, you must use the onscreen dial pad and tap the numbers that correspond to the letters P, A, L, M—which would be 7256.•Enter a contact’s first or last name or initials, screen name, phone number, or email address. Tap the IM or email address you want to use to send the message when it appears.4Tap  t h e To  field and repeat step 3 to enter additional recipients.DID YOU KNOW?You can send and receive text messages even while you are on a phone call. This is easiest when using a hands-free headset or the speaker.
26 Chapter 3 : Email and other messages5To attach a picture in JPG format to a multimedia message, do one of the following:•If you did not yet enter the message text, tap  . Tap the album containing the picture you want. Tap the picture, or tap New Photo and take the picture. Tap Attach Photo.•If you already entered the message text, open the application menu and tap Add Picture. Tap the album containing the picture you want and tap the picture, or tap New Photo and take the picture. Ta p   Attach Photo. 6To attach a video to a multimedia message, do one of the following:•Before entering the message text: Tap  , and tap  . Tap the album containing the video and tap the video, or tap New Video. If you tap New Video, tap   to start recording, tap   to stop, and then tap the new video.•After entering the message text: Open the application menu, tap Add Picture, and tap  . Tap the album containing the video and tap the video, or tap New Video. If you tap New Video, tap   to start recording, tap   to stop, and then tap the new video.7Enter the message text and tap  .Receive and view text and multimedia messagesYou can view pictures and videos and listen to music files included in a multimedia message. You can save pictures in JPG format to your phone for viewing in the Photos application.1Open Messaging .2Tap a conversation to view messages. 3To view an attached file in a multimedia message: Tap a music, video, or vCard file name. (Attached pictures are displayed within the message.) Tap Copy Photo to save an attached JPG picture. 4(Optional) Do any of the following: •To call a number: Tap the number, and tap  .•To send a text message: Tap and hold the number, and tap Te x t .•To send an email: Tap and hold the email address, and tap Send Email.•To go to a web address: Tap it.Set up an instant messaging (IM) accountTo use an IM account on your phone, such as a GoogleTalk IM account, you must already have the account online. If you have an IM account with a provider that takes advantage of the Synergy feature, that IM account is automatically added to your phone when you enter your username and password for that provider in Email, Calendar, or Contacts.1Open Messaging .2Do one of the following:•The first time you open Messaging: Tap Add An Account.•Any other time: Open the application menu and tap Preferences & Accounts. Tap Add IM Account.3Tap the account type and enter your username and password.4Ta p   Sign In.Sign in to an IM account1Open Messaging .2Ta p   Buddies.3Tap   to the left of the text Offline and tap Available.
Chapter 3 : Email and other messages 27Send and receive IM messagesBEFORE YOU BEGIN Make sure that your phone is on and that you’re inside a coverage area (see Tu rn  w ire l es s  se rv ic e s  on ).1Open Messaging .2Do one of the following to start or continue a conversation:•In Buddies view, tap a buddy name and enter a new message. If there's more than one account for that buddy, the most recently used IM account is opened.•In Conversations view, tap an existing conversation and enter a new message.•In Conversations or Buddies view, if you tap , you start a new text message. To switch to IM, tap the icon in the upper-right corner of the screen, enter an IM address from your Contacts, and then tap the address.3Enter the message text and tap  . 4When the message recipient replies, the reply appears below your message in the conversation. Repeat step 3 to reply to that person.5(Optional) Do any of the following from a message you receive:•To call a number: Tap the number, and tap  .•To send a text message: Tap and hold the number, and tap Te x t .•To send an email: Tap and hold the email address, and tap Send Email.•To go to a web address: Tap it.
28 Chapter 3 : Email and other messages
Chapter 4 : Personal information 29Personal informationYo u r P al m ® Pixi Plus phone makes it easy to organize your personal information and keep it with you wherever you go.All your personal information is backed up and kept private either in your Palm profile or in one of your online accounts.In this chapter30 Contacts31 Calendar
30 Chapter 4 : Personal informationContactsUse Contacts for the first time1Open Contacts .2Do one of the following:•To set up your first online account to sync: Tap the account type, enter the account information, and tap Sign in.•To set up a second online account to sync: Tap Add An Account, tap the account type, enter the account information, and tap Sign In.•To open Contacts without creating an online account: Tap Done. This opens your Palm profile account, and you can start creating contacts in this account.Create a contactIf you are using Contacts for the first time, you go through a few different steps to add or access the contacts on your phone (see Use Contacts for the first time). Follow this procedure to add contacts directly on your phone after the first time you use Contacts.1Open Contacts .2Ta p  .When you add a contact, if you don’t specify the account, the new contact is added to your default account.3(Optional) Tap the account icon to the right of Name to change the account to which the new contact will be added.4Tap fields to enter contact details, select a ringtone for that contact, add notes, or add birthday details for the contact. Scroll to see all of the fields available for contact info.5To add detailed name information—such as a prefix, suffix, or middle name—open the application menu and tap Name Details.6In some fields, such as New Phone Number, when you enter the information a label button appears on the right. Tap the button to change the label for your entry—for example, to identify a number as a mobile or work phone.7Ta p   Done.Find a contactYou can find a contact from Card view or the Launcher view. To learn how, see Use universal search. To find a contact within the Contacts app, use these steps.1Open Contacts .2Begin typing any of the following:•First, middle, or last name•First and last initial (no space between)•Company•Nickname3For more search options, tap Global Address Lookup. (This option is available if you are using Microsoft Exchange ActiveSync with a Global Address List.)4Tap the contact.
Chapter 4 : Personal information 31Assign a speed dial to a contactYou can assign a speed dial to any contact phone number. You can assign up to 26 speed dials.1Open Contacts .2Search for a contact (see Find a contact to learn how), and tap the contact name.3Open the application menu and tap Set Speed Dial. 4Tap the phone number you want to assign a speed dial to, and then tap the key to use as a speed dial. You may have to scroll to find the key you want.CalendarUse Calendar for the first time1Open Calendar .2Do one of the following:•To set up your first online account to sync: Tap the account type, enter the account information, and tap Sign In.•To set up a second online account to sync: Tap Add An Account, tap the account type, enter the account information, and tap Sign In.•To open Calendar without creating an online account: Tap Done. This opens your Palm profile account, and you can start creating events in this account.Create an eventYou can add an event to calendar accounts. If you don’t specify an account, the new event is added to your default calendar. 1Open Calendar .2Ta p   All or an online account name in the upper-right corner, and tap the calendar you want to use for this event. If you create an event in All Calendars view, the event is created in the calendar set as the default.3Go to the day you want and tap a blank time slot.4Enter the event name and press Enter .In Day view, available time slots between events are compressed and labeled X Hrs Free. To expand free time so you can enter an event, tap X Hrs Free.Don’t look for a save button—your info is automatically saved when you make the back gesture to close the event.DID YOU KNOW?You cannot assign 1 (the E key) as a speed dial. The number 1 is reserved for dialing your voicemail system.
32 Chapter 4 : Personal information
Chapter 5 : Photos, videos, and music 33Photos, videos, and musicThere’s no need to carry a separate media player; you can play music and videos, and view photos, on your Palm® Pixi Plus phone. Listen to music through the built-in speaker or through a 3.5mm headset or headphones (both sold separately).In this chapter34 Camera34 Photos34 Videos35 Music
34 Chapter 5 : Photos, videos, and musicCameraYour phone comes with an easy-to-use, 2-megapixel camera with an LED flash. You can use the camera to take pictures, and then use the Photos app to view them and send them to your friends and family. To add a personal touch to your phone, use your pictures as your wallpaper and as caller ID images.1Open Camera .2If   is hidden, tap   to display it.3The camera is set to automatically determine if the flash is needed. If you want to change the flash setting, tap   to keep the flash on, and tap again to keep the flash off.4To take the picture in landscape view, turn your phone 90 degrees.5Press Space  or tap .The picture you took is automatically saved in JPG format. Keep snapping pictures, and then go to Photos to look at them and delete the ones you don’t want.PhotosTo get pictures on the phone, you can do any of the following:•Take a picture with your phone’s camera.•Copy pictures from your computer.•Receive pictures as email attachments.•Receive pictures as part of a multimedia message.•Copy a picture from a web page.You can view a picture as an email attachment in JPG, GIF, BMP, or PNG format. You can view a picture as part of a multimedia message in JPG format. In the Photos application, you can view pictures you take with the camera or copy from your computer in JPG, BMP, or PNG format.You can also look at pictures on the web directly in the web browser (see Web).1Open Photos .2Tap the album containing the picture, and tap the thumbnail of the picture. The Photo roll album contains pictures you took with your phone’s camera.3Swipe left or right on the screen to look at other pictures in the album.VideosTo get videos on your phone, you can do any of the following:•Record a video.•Copy videos from your computer.•Receive videos as email attachments.•Receive videos as part of a multimedia message.You can view DRM-free videos that you receive as email attachments or that you copy from your computer in the MPEG4, H.263, H.264, MP4, M4V, 3GP, 3GPP, 3G2, and 3GP2 formats. You can view videos you open in a multimedia message in MP4 format. Videos play on your phone in landscape orientation.1Open Videos .2Tap  t h e v i de o.
Chapter 5 : Photos, videos, and music 35MusicYou can listen to music through the speaker on the back of your phone or through a 3.5mm headset or headphones, stereo headset equipped with Bluetooth® wireless technology, or speakers (all sold separately). To get music onto your phone, you can do any of the following:•Copy music files from your computer.•Receive music files as email attachments.•Receive music files as part of a multimedia message (see Receive and view text and multimedia messages). •Buy music from the Amazon MP3 app on your phone.You can also listen to streaming music from the web directly in the web browser (see Web).You can play music that you copy from your computer or stream from the web in the following formats: MP3, AAC, or AAC+ format. You can play music that you receive as an email attachment if it is in the MP3, AAC, AAC+, WAV, or AMR format. You can play music that you receive in a multimedia message or that you buy from Amazon MP3 if it is in the MP3 format.1Open Music .2Do one of the following:•To listen to all songs on your phone: Tap Shuffle All.•To listen to a specific song: Tap Artists, Albums, Songs, Genres, or Playlists to search that category. Continue making selections until the song you want appears. Tap the song name.•To listen to all songs from an artist: Tap Artists and tap the artist name. To listen to the artist’s songs in the order they are displayed onscreen, tap the first song. The songs play one after the other in sequence. To listen to the songs in random order, tap Shuffle All.•To listen to an album: Tap Albums and tap the album name. To listen to the album’s songs in the order they are displayed onscreen, tap the first song. The songs play one after the other in sequence. To listen to songs in random order, tap Shuffle All.•To listen to all songs in a genre: Tap Genres and tap the genre name. To listen to the songs in the order they are displayed onscreen, tap the first song. The songs play one after the other in sequence. To listen to the songs in random order, tap Shuffle All.•To listen to playlists you have synced to your phone: Tap Playlists. Go to palm.com/sync-solutions for a list of third-party solutions (sold separately) that you can use to sync music and playlists from your computer to your phone.•To browse a music store to preview or purchase songs (if available): Tap the music store name. Continue making selections until the song you want appears. Tap the song name.
36 Chapter 5 : Photos, videos, and music
Chapter 6 : Web and wireless connections 37Web and wireless connectionsWith your wireless service provider’s network and your Palm® Pixi Plus phone’s web browser, you can take the web with you almost anywhere you go.The Bluetooth® wireless technology on your phone helps you easily set up wireless connections to a number of devices.In this chapter38 Wi-Fi38 Web38 Bluetooth® wireless technology
38 Chapter 6 : Web and wireless connectionsWi-FiTurn Wi-Fi on and offDo one of the following:•Open Wi-Fi  , and tap On or Off.•From any screen: Open the connection menu at the upper-right corner, tap Wi-Fi, and tap Tu r n  o n W i- Fi  or Tu rn  o f f  Wi -F i .If your phone finds the network you want, tap the network name to connect to it. WebGo to a websiteThe web browser on your phone is capable of displaying most web content. The browser features the latest web standard technologies such as HTML 4.01, CSS 2.1, Ajax, and JavaScript. It does not support plug-ins such as Flash or Java applets.1Open Web .2Enter the address of the page. You don’t need to enter the prefix http://www. If the page appears in the list of viewed pages, tap it to go there again. If not, press Enter3To cancel a page while it is loading, tap  .Go to a website using searchYou can also search the web from the Launcher or Card view (see Search to find info and make calls).1Open Web  .2Enter the search term and tap a search option.Bluetooth® wireless technologyTurn the Bluetooth feature on/offDo one of the following:•Open Bluetooth , and tap On or Off. •From any screen: Open the connection menu, tap Bluetooth, and tap Tu rn  o n B l ue to ot h or Turn off Bluetooth.
Chapter 7 : Documents 39DocumentsYo u r P al m ® Pixi Plus phone enables you to take your office with you—including your Microsoft Office files. You can view and search Microsoft Word, Excel®, and PowerPoint® files on your phone. You can also view PDF files on your phone.In this chapter40 Doc View40 PDF View
40 Chapter 7 : DocumentsDoc ViewWith Doc View, you can view Microsoft Word, Excel®, and PowerPoint® files on your phone. Open a fileYou can view a file that you copy from your computer or receive as an email attachment. You can view files in DOC, DOCX, TXT, XLS, XLSX, PPT, and PPTX formats.BEFORE YOU BEGIN Before you put files on your phone, make sure you have enough storage space on your phone to fit the file. Open Device Info  and look at the Available field under Phone.1Open Doc View  . The list of the Microsoft Office files that are on your phone appears onscreen.2To search for a file, begin typing the name. Tap the file when it appears.3To open a second file: Open the application menu and tap Open. Tap the file.Change the display sizeFor information on zooming in and out, see Zoom gestures.•Pinch out to enlarge items onscreen.•Pinch in to decrease the size of items onscreen.•Double-tap the screen to zoom in or out a specified amount.•Turn on horizontal scroll (Word documents only): Open the application menu and tap Wide View. In Wide view, text does not wrap on the right side of the screen. You can scroll horizontally to see more text.PDF ViewWith PDF View, you can view PDF (Adobe Acrobat) files on your phone.Open a fileYou can view a PDF file that you copy from your computer or receive as an email attachment.BEFORE YOU BEGIN Before you put files on your phone, make sure you have enough storage space on your phone to fit the file. Open Device Info  and look at the Available field under Phone.1Open PDF View  . The list of your files appears onscreen.2To search for a file, begin typing the name. Tap the file when it appears.If the PDF file was created with a password, enter the password to open the file.3To open a second file: Open the application menu and tap Open. Tap the file.Move around in a file•Go to the next or preceding page: Tap   or  .•Jump to a different page: Tap the current page number at the bottom of the screen. Enter the page number you want and press Enter .•Move a part of the current page to the center of the display: Tap and hold on the part of the page you want, and drag it to the center.
Chapter 7 : Documents 41Change the display sizeFor information on zooming in and out, see Zoom gestures.•Pinch out to enlarge items onscreen.•Pinch in to decrease the size of items onscreen.•Double-tap the screen to zoom in or out a specified amount.
42 Chapter 7 : Documents
Chapter 8 : Preferences 43PreferencesThere are lots of ways to make your Palm® Pixi Plus phone work better for you. Personalize your phone to make it match your lifestyle.You can easily customize many features of your phone like the wallpaper, screen brightness, ringtone for incoming calls, and more. In this chapter44 Screen & Lock44 Sounds & Ringtones
44 Chapter 8 : PreferencesScreen & LockChange screen brightness1Open Screen & Lock .2Under Screen, drag the Brightness slider to the preferred level.Set the interval for turning the screen off automaticallyBy default, your screen turns off after one minute of inactivity to save battery power. You can change this interval.1Open Screen & Lock .2In Tu r n  Of f  A ft e r , tap the interval shown, and then tap the number of seconds or minutes.Change your wallpaperYour wallpaper is the screen background in Card view. You can customize the wallpaper to show a favorite picture.1Open Screen & Lock .2Ta p   Change Wallpaper.3Do one of the following:•Use an existing picture as the background: Tap the album containing the picture, and tap the picture.•Use a new picture as the background: Tap New Photo and take the picture.4(Optional: applies to new pictures only) Do either or both of the following:•To zoom out or in on a part of the picture, pinch in or out on the picture.•To capture the portion of the picture you want for your wallpaper, tap and hold the picture, and then drag the portion you want to the center of the onscreen box.5Ta p   Set Wallpaper.Sounds & RingtonesManage system sounds and notificationsYou can turn system sounds, such as transition sounds and notification alerts, on or off. You can also set the volume for system sounds.Sliding the ringer switch off not only turns off the ringer for incoming phone calls, it also turns off system sounds like the shutter click when you take a picture. The ringer switch does not affect music and video sound. By default, when the ringer switch is off, you can still hear the Clock alarm. If you want to change this setting so that turning off the ringer switch also turns off the Clock alarm sound, go to Clock > Preferences. Under Ringer Switch Off, change Play alarm anyway to No.1Open Sounds & Ringtones .2In Ringer Switch Off, tap Vibrate or Mute to set whether your phone vibrates when you slide the ringer switch off.3Under Ringer Switch On, set any of the following:Rings & Alerts: Select Sound & Vibrate or Sound. To change the ringtone for incoming calls, see Select the ringtone for incoming calls. Tap, hold, and drag the Ringtone Volume slider to set the ringtone volume.
Chapter 8 : Preferences 45System Sounds: Set whether to turn on systemwide sounds for general actions such as transitions and alarms set in Clock. Tap, hold, and drag the Volume slider to set the system sounds volume. Select the ringtone for incoming callsThe ringtone you select here applies globally to all incoming calls. You can also set a unique ringtone for a contact.1Open Sounds & Ringtones .2Tap the displayed ringtone to open the full list of tones.3Tap the name of the ringtone to select it.4Tap   to listen to the ringtone. 5To set the ringtone volume, drag the Ringtone Volume slider.
46 Chapter 8 : Preferences
Chapter 9 : Learn More 47Learn MoreIn this chapter48 While using your phone
48 Chapter 9 : Learn MoreWARNING Please refer to Regulatory and Safety Information for information that helps you safely use your phone. Failure to read and follow the important safety information in this guide may result in serious bodily injury, death, or property damage.While using your phone •On-device Help: Read short how-tos and watch animations on your new phone.To view all Help: Open Help .To view Help topics for a single application: Open the application, open the application menu, and tap Help.•Online support from Palm:  Visit palm.com/support to edit your Palm profile, watch how-to animations, learn about transferring data, and read comprehensive information about your phone.
 Regulatory and Safety Information 49Regulatory and Safety InformationFCC StatementsThis equipment has been tested and found to comply with the limits for a Class B digital device, pursuant to part 15 of the FCC Rules. These limits are designed to provide reasonable protection against harmful interference in a residential installation. This equipment generates, uses, and can radiate radio frequency energy and, if not installed and used in accordance with the instructions, may cause harmful interference to radio communications. However, there is no guarantee that interference will not occur in a particular installation. If this equipment does cause harmful interference to radio or television reception, which can be determined by turning the equipment off and on, the user is encouraged to try to correct the interference by one or more of the following measures:• Reorient or relocate the receiving antenna.• Increase the separation between the equipment and receiver.• Connect the equipment into an outlet on a circuit different from that to which the receiver is connected.• Consult the dealer or an experienced radio/TV technician for help.This device complies with Part 15 of the FCC Rules. Operation is subject to the following two conditions: (1) this device may not cause harmful interference, and (2) this device must accept any interference received, including interference that may cause undesired operation.This phone meets the FCC Radiofrequency Emission Guidelines and is certified with the FCC as:FCC ID: O8F-PIXUWThe FCC ID on your Palm phone is located on a label inside the battery compartment. The battery must be removed as shown below to view the label.Changes or modifications not expressly approved by the party responsible for compliance could void the user's authority to operate the equipment.Antenna Care/Unauthorized ModificationsUse only the supplied integral antenna. Unauthorized antenna modifications or attachments could damage the unit and may violate FCC regulations.Industry CanadaOperation is subject to the following two conditions: (1) This device may not cause harmful interference, and (2) this device must accept any interference received, including interference that may cause undesired operation.The term “IC” before the equipment certification number only signifies that the Industry Canada technical specifications were met.IC: 3905A-PIXUW (Model: P121UNA)This Class B digital apparatus complies with Canadian ICES-003.L'utilisation de ce dispositif est autorisée seulement aux conditions suivantes: (1) il ne doit pas produire de brouillage et (2) l'utilisateur du dispositif doit étre prêt à accepter tout brouillage radioélectrique reçu, même si ce brouillage est susceptible de compromettre le fonctionnement du dispositif.Cet appareil numérique de la classe [*] est conforme à la norme NMB-003 du Canada.Radio Frequency (RF) Safety ExposureGeneral statement on Radio Frequency (RF) energy: Your phone contains a transmitter and a receiver. When it is ON, it receives and transmits RF energy. When you communicate with your phone, the system handling your call controls the power level at which your phone transmits.Specific Absorption Rate (SAR): Your mobile device is a radio transmitter and receiver. It is designed not to exceed the limits for exposure to radio waves recommended by international guidelines. These guidelines were developed by the independent scientific organization ICNIRP
50 Regulatory and Safety Informationand include safety margins designed to assure the protection of all persons, regardless of age and health.In order to certify this unit for sale to the public, this unit has been tested for RF exposure compliance at a qualified test laboratory and found to comply with the regulations regarding exposure to RF Energy under the recommendations of the International Commission on Non-Ionizing Radiation Protection (ICNIRP). The tests are preformed in positions and locations as required by the FCC and IC for each model. As SAR is measured utilizing the device's highest transmitting power, the actual SAR of this device while operating is typically below that indicated below. This is due to automatic changes to the power level of the device to ensure it only uses the minimum power required to communicate with the network.The SAR limit for mobile devices set by FCC/IC is 1.6 W/kg averaged over 1 gram of tissue for the body or head (4.0 W/kg averaged over 10 grams of tissue for the extremities—hands, wrists, ankles, and feet). The highest reported SAR values of the Palm® Pixi Plus phone are:In order to comply with FCC and IC RF exposure safety guidelines, users MUST use one of the following types of body-worn accessories:1A Palm® brand body-worn accessory that has been tested for (specific absorption rate) SAR compliance and is intended for use with this product.2An accessory that contains NO metal (snaps, clips, etc.) and provides AT LEAST 1.5 cm (0.6 in.) of separation between the user’s body and the unit.Do NOT use the device in a manner such that it is in direct contact with the body (i.e., on the lap or in a breast pocket). Such use will likely exceed the FCC RF safety exposure limits. See fcc.gov/oet/rfsafety for more information on RF exposure safety.Body-worn operation: Important safety information regarding radio frequency (RF) radiation exposure: To ensure compliance with RF exposure guidelines the phone must be used with a minimum of 1.5 cm (0.6 in.) separation from the body. Failure to observe these instructions could result in your RF exposure exceeding the relevant guideline limits.Limiting exposure to radio frequency (RF) fields: For individuals concerned about limiting their exposure to RF fields, the World Health Organization (WHO) provides the following advice:Precautionary measures: Present scientific information does not indicate the need for any special precautions for the use of mobile phones. If individuals are concerned, they might choose to limit their own or their children’s RF exposure by limiting the length of calls, or using “hands-free” devices to keep mobile phones away from the head and body.Further information on this subject can be obtained from the WHO home page who.int/mediacentre/factsheets/fs193/en/index.html WHO Fact sheet 193: June 2000.Hearing Aid Compatibility (HAC)Using Your Phone With a Hearing DeviceYour device has been tested for hearing aid compatibility. Your Palm® Pixi Plus phone has an M3/T3 rating.When some wireless phones are used near some hearing devices (hearing aids and cochlear implants), users may detect a buzzing, humming, or whining noise. Some hearing devices are more immune than others to this interference noise, and phones also vary in the amount of interference they generate. The wireless telephone industry has developed ratings for some of their mobile phones, to assist hearing-device users in finding phones that may be compatible with their hearing devices. Not all phones have been rated. Phones that have been rated have a label on the box. These ratings are not guarantees. Results will vary, depending on the level of immunity of your hearing device and the degree of your hearing loss. If your hearing device happens to be vulnerable to interference, you may not be able to use a rated phone successfully. Trying out the phone with your hearing device is the best way to evaluate it for your personal needs.M-Ratings: Phones rated M3 or M4 meet FCC requirements and are likely to generate less interference with hearing devices than phones that are not labeled. M4 is the better/higher of the two ratings.T-Ratings: Phones rated T3 or T4 meet FCC requirements and are likely to be more usable with a hearing device's telecoil (“T switch” or “Telephone Switch”) than unrated phones. T4 is the better/higher of the two ratings.The more immune your hearing aid device is, the less likely you are to experience interference noise from your wireless phone. Hearing aid devices should have ratings similar to those of phones. Ask your hearing health care professional for the rating of your hearing aid. Add the rating of your hearing aid and your phone to determine probable usability:• Any combined rating equal to or greater than six offers the best use.• Any combined rating equal to five is considered normal use.• Any combined rating equal to four is considered usable.Thus, if you pair an M3 hearing aid with an M3 phone, you will have a combined rating of six for “best use.” This is synonymous for T ratings.Palm further suggest that you experiment with multiple phones (even those not labeled M3/T3 or M4/T4) while in the store to find the one that works best with your hearing aid device. If you experience interference or find the quality of service unsatisfactory after purchasing your device, promptly return it to the store within 30 days of purchase. With the Palm 30-day Ta b l e  1 .Maximum scaled SAR values (W/kg) FCC Head 1.43Body 1.35
Regulatory and Safety Information 51Risk-Free Guarantee, you may return the device within 30 days of purchase for a full refund, and you will only be responsible for charges based on your actual usage.Getting the Best Hearing Device Experience With Your DeviceTo further minimize interference:• Set the phone’s screen and keyboard backlight settings to ensure the minimum time interval.• Move the phone around to find the point with the least interference.For more information, please go to the FCC’s Consumer Alert on accessibility of digital wireless phones at fcc.gov/cgb/consumerfacts/hac_wireless.html.Battery Handling• Do not disassemble or open; crush, bend, or deform; puncture or shred the battery.• Do not modify or remanufacture; attempt to insert foreign objects into the battery; immerse or expose to water or other liquids; expose to fire, explosion, or other hazard.• Only use the battery for the system for which it is specified.• Only use the battery with a charging system that has been qualified with the system per the IEEE/CTIA-1725 standard. Use of an unqualified battery or charger may present a risk of fire, explosion, leakage, or other hazard.• Do not short-circuit a battery or allow metallic conductive objects to contact battery terminals.• Replace the battery only with another battery that has been qualified with the system per IEEE/CTIA-1725. Use of an unqualified battery may present a risk of fire, explosion, leakage, or other hazard.• Promptly dispose of used batteries in accordance with local regulations.• Battery usage by children should be supervised.• Avoid dropping the phone or battery. If the phone or battery is dropped, especially on a hard surface, and the user suspects damage, take it to a service center for inspection.• Do not handle a damaged or leaking Lithium-Ion (LI-ion) battery as you can be burned.• Improper battery use may result in a fire, explosion, or other hazard.Based on DOT rules, spare batteries must not be transported in checked luggage on commercial flights. Spare batteries can only be transported in carry-on luggage. For more information: http://safetravel.dot.gov/whats_new_batteries.html.Protecting Your BatteryThe guidelines listed below help you get the most out of your battery’s performance.Recently there have been some public reports of wireless phone batteries overheating, catching fire, or exploding. It appears that many, if not all, of these reports involve counterfeit or inexpensive, aftermarket-brand batteries with unknown or questionable manufacturing standards. Use only manufacturer-approved batteries and accessories found at Carrier Stores or through your device’s manufacturer. Buying the right batteries and accessories is the best way to ensure they are genuine and safe.• In order to avoid damage, charge the battery only in temperatures that range from 32° F to 113° F (0° C to 45° C).• Don’t use the battery charger in direct sunlight or in high humidity areas, such as the bathroom.• Never dispose of the battery by incineration.• Keep the metal contacts on top of the battery clean.• Don’t attempt to disassemble or short-circuit the battery.• The battery may need recharging if it has not been used for a long period of time.• It’s best to replace the battery when it no longer provides acceptable performance. It can be recharged hundreds of times before it needs replacing.• Don’t store the battery in high temperature areas for long periods of time. It’s best to follow these storage rules:Less than one month: -4° F to 140° F (-20° C to 60° C)More than one month: -4° F to 113° F (-20° C to 45° C)Power SpecificationsUse only Palm-approved power accessories such as AC-power adapters and batteries. Unauthorized and non-approved batteries will NOT operate with the Pre Plus phone.AC Power Adapter source: PalmPart Number: 157-10108-00Input Rating: 100-240Vac, 50/60Hz, 0.2AOutput Rating: 5Vdc, 1000mAAC Power Adapter source: Palm (North America only)Part Number: 157-10124-00Input Rating: 100-240Vac, 50/60Hz, 0.2AOutput Rating: 5Vdc, 1000mA
52 Regulatory and Safety InformationAC Power Adapter source: Palm (North America only)Part Number: 157-10130-00Input Rating: 100-240Vac, 50/60Hz, 0.2AOutput Rating: 5Vdc, 1000mABattery Source: PalmType: Rechargeable Li-ion PolymerModel: 157-10119-00Rating: 3.7Vdc, 1150mAh (minimum)Recycling and DisposalThis symbol indicates that Palm products should be recycled and not be disposed of in unsorted municipal waste. Please return Palm products to the electrical and electronic equipment collection points in your municipality or county or to a facility that properly recycles electrical and electronic equipment. These collection points are available free of charge. For detailed information please contact your municipality or county. For information on Palm’s environmental programs, visit palm.com/environment.Hazardous substances that may be included in electronic products can potentially affect human health and the environment. Recycling benefits the environment by diverting waste from landfills and by recovering materials that may be recycled into other products. Responsible recycling ensures materials are properly collected and disposed. Palm is committed to supporting the collection and recycling of its products. Palm is committed to participate and support the European Union WEEE Directive (2002/96/EC) and the protection of the environment for future generations. For more information on the WEEE Directive implementation in the various EU member states please see weee-forum.org.It is everyone’s responsibility to ensure that electrical and electronic products are properly reused, recycled, or recovered.As part of Palm’s corporate commitment to be a good steward of the environment, we strive to use environmentally friendly materials, reduce waste, and collaborate with our channel partners to raise awareness and help keep Palm handheld devices, phones, and mobile companions out of landfills through evaluation and disposition for reuse and recycling. Visit palm.com/recycle for additional details and information about how you can help reduce electronic waste.User SafetyOperational WarningsIMPORTANT INFORMATION ON SAFE AND EFFICIENT OPERATION. Read this information before using your phone. For the safe and efficient operation of your phone, observe these guidelines:Potentially explosive atmospheres: Turn off your phone when you are in any areas with a potentially explosive atmosphere, such as fueling areas (gas or petrol stations, below deck on boats), storage facilities for fuel or chemicals, blasting areas and areas near electrical blasting caps, and areas where there are chemicals or particles (such as metal powders, grains, and dust) in the air.Interference to medical and personal electronic devices: Most but not all electronic equipment is shielded from RF signals and certain electronic equipment may not be shielded against the RF signals from your phone.Pacemakers: The Health Industry Manufacturers Association recommends that a minimum separation of 15 centimeters (6 inches) be maintained between a phone and a pacemaker to avoid potential interference with the pacemaker. These recommendations are consistent with the independent research by the recommendations of Wireless Technology Research.Persons with pacemakers should:• ALWAYS keep the phone more than six inches (15 centimeters) from their pacemaker when the phone is turned ON. • Not carry the phone in a breast pocket.• Use the ear opposite the pacemaker to minimize the potential for interference.• Turn the phone OFF immediately if you have any reason to suspect that interference is taking place.Audio safety: This phone is capable of producing loud noises which may damage your hearing. When using the speakerphone feature, it is recommended that you place your phone at a safe distance from your ear.Other medical devices, hospitals: If you use any other personal medical device, consult the manufacturer of your device to determine if it is adequately shielded from external RF energy. Your physician may be able to assist you in obtaining this information. Turn your phone OFF in health care facilities when any regulations posted in these areas instruct you to do so. Hospitals or health care facilities may be using equipment that could be sensitive to external RF energy.Repetitive motion injuries: When using the keyboard or playing games on your phone, you may experience discomfort in your neck, shoulders, hands, arms, or other parts of the body. To avoid any injury, such as tendonitis, carpal tunnel syndrome, or other musculoskeletal disorder, make sure to take necessary breaks from use, take longer rests (such as several hours) if discomfort or tiring begins, and see a doctor if discomfort persists. To minimize the risk of Repetitive Motion Injuries, when texting or playing games with your phone:• Do not grip the phone too tightly.• Press the buttons lightly.• Make use of the special features in the handset which minimize the number of buttons which have to be pressed, such as message templates and predictive text.• Take lots of breaks to stretch and relax.Blackouts and seizures: Blinking lights, such as those experienced with television or playing video games, may cause some people to experience blackout or seizure, even if never experienced before. In the event a phone user should experience any disorientation, loss of awareness, convulsion, eye or muscle twitching, or other involuntary movements, stop use immediately and consult a doctor. Individuals with personal or family history of such events should consult a doctor before using the device. To limit the possibility of such symptoms,
Regulatory and Safety Information 53wherever possible every hour take a minimum break of 15 minutes, use in a well lighted area, view the screen from the farthest distance, and avoid exposure to blinking lights if you are tired.Operating machinery: Do not use your phone while operating machinery. Full attention must be given to operating the machinery in order to reduce the risk of an accident.Aircraft: While in aircraft, follow all instructions regarding the operation of your phone. Use of your phone while on board an aircraft must be done in accordance and in compliance with airline instructions and regulations.Vehic les with air  bags: Your phone should not be placed in a position that would affect the operation of air bag deployment or in a position that, should the air bag inflate, could propel the phone. Air bags will inflate with great force and care should be taken to protect within a vehicle that has air bags. Do not place a phone in the area over an air bag or in the air bag deployment area. Store the phone safely before driving the vehicle.Hearing aids: People with hearing aids or other cochlear implants may experience interfering noises when using wireless devices or when one is nearby. The level of interference will depend on the type of hearing device and the distance from the interference source. Increasing the separation between them may reduce the interference. You may also consult your hearing aid manufacturer to discuss alternatives.Small children: Do not leave your phone and its accessories within the reach of small children or allow them to play with it. They could hurt themselves or others, or could accidentally damage the phone. Your phone contains small parts with sharp edges that may cause an injury or which could become detached and create a choking hazard.Keep the device away from the abdomens of pregnant women and adolescents, particularly when using the device hands-free.To reduce exposure to radiation, use your device in good reception areas, as indicated by the bars on your phone, at least 3 to 4 bars. Caution: Avoid potential hearing loss Prolonged exposure to loud sounds (including music) is the most common cause of preventable hearing loss. Some scientific research suggests that using portable audio devices, such as portable music players and cellular telephones, at high volume settings for long durations may lead to permanent noise-induced hearing loss. This includes the use of headphones (including headsets, ear buds, and Bluetooth® or other wireless devices). Exposure to very loud sound has also been associated in some studies with tinnitus (a ringing in the ear), hypersensitivity to sound, and distorted hearing. Individual susceptibility to noise-induced hearing loss and other potential hearing problems varies. The amount of sound produced by a portable audio device varies depending on the nature of the sound, the device, the device settings, and the headphones. You should follow some common sense recommendations when using any portable audio device:• Set the volume in a quiet environment and select the lowest volume at which you can hear adequately.• When using headphones, turn the volume down if you cannot hear the people speaking near you or if the person sitting next to you can hear what you are listening to.• Do not turn the volume up to block out noisy surroundings. If you choose to listen to your portable device in a noisy environment, use noise-cancelling headphones to block out background environmental noise.• Limit the amount of time you listen. As the volume increases, less time is required before your hearing could be affected.• Avoid using headphones after exposure to extremely loud noises, such as rock concerts, that might cause temporary hearing loss. Temporary hearing loss might cause unsafe volumes to sound normal.• Do not listen at any volume that causes you discomfort. If you experience ringing in your ears, hear muffled speech, or experience any temporary hearing difficulty after listening to your portable audio device, discontinue use and consult your doctor.• You can obtain additional information on this subject from the following sources:American Academy of Audiology 11730 Plaza America Drive, Suite 300Reston, VA 20190Voice: (800) 222-2336Email: info@audiology.orgInternet: audiology.orgNational Institute on Deafness and Other Communication Disorders National Institutes of Health31 Center Drive, MSC 2320Bethesda, MD USA 20892-2320Voice: (301) 496-7243Email: nidcdinfo@nih.govInternet: nidcd.nih.gov/health/hearingNational Institute for Occupational Safety and Health 395 E Street, S.W., Suite 9200Patriots Plaza BuildingWashington, DC 20201Voice: 1-800-CDC-INFO (1-800-232-4636)Internet: http://www.cdc.gov/niosh/topics/noise/Product Handling and SafetyGeneral statement on handling and use: You alone are responsible for how you use your phone and any consequences of its use.You must always switch off your phone wherever the use of a phone is prohibited. Use of your phone is subject to safety measures designed to protect users and their environment.• Always treat your phone and its accessories with care and keep it in a clean and dust-free place.• Do not expose your phone or its accessories to open flames or lit tobacco products.• Do not expose your phone or its accessories to liquid, moisture, or high humidity.
54 Regulatory and Safety Information• Do not drop, throw, or try to bend your phone or its accessories.• Do not use harsh chemicals, cleaning solvents, or aerosols to clean the device or its accessories.• Do not paint your phone or its accessories.• Do not attempt to disassemble your phone or its accessories; only authorized personnel must do so.• Do not expose your phone or its accessories to extreme temperatures, minimum 32° F and maximum 113° F (0° C to 45° C).• Please check local regulations for disposal of electronic products.• Do not carry your phone in your back pocket as it could break when you sit down.Battery: Your phone includes an internal lithium-ion or lithium-ion polymer battery. Please note that use of certain data applications can result in heavy battery use and may require frequent battery charging. Any disposal of the phone or battery must comply with laws and regulations pertaining to lithium-ion or lithium-ion polymer batteries. Demagnetization: To avoid the risk of demagnetization, do not allow electronic devices or magnetic media close to your phone for a long time.Normal use position: When making or receiving a phone call, hold your phone to your ear, with the bottom towards your mouth or as you would a fixed line phone.Emergency calls: This phone, like any wireless phone, operates using radio signals, which cannot guarantee connection in all conditions. Therefore, you must never rely solely on any wireless phone for emergency communications.Phone heating: Your phone may become warm during charging and during normal use.Accessories: Use only approved accessories. Do not connect with incompatible products or accessories. Take care not to touch or allow metal objects, such as coins or key rings, to contact or short-circuit the battery terminals.Connection to a car: Seek professional advice when connecting a phone interface to the vehicle electrical system.Faulty and damaged products: Do not attempt to disassemble the phone or its accessory. Only qualified personnel must service or repair the phone or its accessory. If your phone or its accessory has been submerged in water, punctured, or subjected to a severe fall, do not use it until you have taken it to be checked at an authorized service center.Interference in cars and to other electronic devices: Please note that because of possible interference to electronic equipment, some vehicle manufacturers forbid the use of mobile phones in their vehicles unless a hands-free kit with an external antenna is included in the installation. RF energy may affect improperly installed or inadequately shielded electronic operating and entertainment systems in motor vehicles. Check with the manufacturer or representative to determine if these systems are adequately shielded from external RF energy. Also check with the manufacturer of any equipment that has been added to the vehicle.Driving SafetyDriving Safety Tips Overview Always obey all laws and regulations on the use of the phone in your driving area.Safety—Your most important call. The Wireless Industry reminds you to use your phone safely when driving.1Get to know your phone and its features, such as speed-dial and redial.2Use a hands-free device where it is allowed. In some areas, you may not use your phone while driving even with a hands-free accessory.3Position your phone within easy reach.4Let the person you are speaking to know you are driving; if necessary, suspend the call in heavy traffic or hazardous weather conditions.5Do not take notes, look up phone numbers, read/write email, or surf the Internet while driving.6Dial sensibly and assess the traffic; if possible, place calls when you are not moving or before pulling into traffic.7Do not engage in stressful or emotional conversations that may divert your attention from the road.8Dial your national emergency number to report serious emergencies. This is a free call from your phone.9Use your phone to help others in emergencies.10 Call roadside assistance or a special non-emergency wireless number when necessary.Driving Safety Tip Details 1Get to know your phone and its features such as speed-dial and redial. Carefully read your instruction manual and learn to take advantage of valuable features most phone models offer, including automatic redial and memory dial. Also, work to memorize the phone keyboard so you can use the speed-dial function without taking your attention off the road.2Use a hands-free device. A number of hands-free phone accessories are readily available today. Whether you choose an installed mounted device for your phone or a speaker accessory, take advantage of these devices. If driving while using a phone is permitted in your area, we recommend using a phone headset or a hands-free car kit (sold separately). However, be aware that use of a headset that covers both ears impairs your ability to hear other sounds. Use of such a headset while operating a motor vehicle or riding a bicycle may create a serious hazard to you and/or others, and may be illegal. If you must use a stereo headset while driving, place a speaker in only one ear. Leave the other ear free to hear outside noises, and do so only if it is legal and you can do so safely.3Make sure you place your phone within easy reach and where you can grab it without removing your eyes from the road. If you get an incoming call at an inconvenient time, let your voicemail answer it for you.4Suspend conversations during hazardous driving conditions or situations. Let the person you are speaking to know you are driving; if necessary, suspend the call in heavy traffic or hazardous weather conditions. Rain, sleet, snow, and ice can be hazardous, but so is heavy traffic. As a driver, your first responsibility is to pay attention to the road.
Regulatory and Safety Information 555Do not take notes, look up phone numbers, read/write e-mail, or surf the internet while driving. If you are reading an address book or business card while driving a car, or writing a to-do list, then you are not watching where you are going. It’s common sense. Do not get caught in a dangerous situation because you are reading or writing and not paying attention to the road or nearby vehicles.6Dial sensibly and assess the traffic; if possible, place calls when you are not moving or before pulling into traffic. Try to plan your calls before you begin your trip, or attempt to schedule your calls with times you may be temporarily stopped or otherwise stationary. But if you need to dial while driving, follow this simple tip: dial only a few numbers, check the road and your mirrors, then continue.7Do not engage in stressful or emotional conversations that may be distracting. Stressful or emotional conversations and driving do not mix—they are distracting and even dangerous when you are behind the wheel. Make people you are talking with aware you are driving and if necessary, suspend phone conversations which have the potential to divert your attention from the road.8Use your phone to call for help. Your phone is one of the greatest tools you can own to protect yourself and your family in dangerous situations—with your phone at your side, help is only three numbers away. Dial your national emergency number in the case of fire, traffic accident, road hazard, or medical emergencies. Remember, your national emergency number is a free call on your phone.9Use your phone to help others in emergencies. If you see an auto accident, crime in progress, or other serious emergency where lives are in danger, call your national emergency number, as you would want others to do for you.10 Call roadside assistance or a special wireless non-emergency assistance number when necessary. Certain situations you encounter while driving may require attention, but are not urgent enough to merit a call to your national emergency number. But you can still use your phone to lend a hand. If you see a broken-down vehicle posing no serious hazard, a broken traffic signal, a minor traffic accident where no one appears injured, or a vehicle you know to be stolen, call roadside assistance or other special non-emergency wireless number.General Operation Prolonged views of screen: If you are driving, do not access any function requiring a prolonged view of the screen. Pull over in a safe and legal manner before attempting to access a function of the system requiring prolonged attention. Even occasional short scans to the screen may be hazardous if your attention has been diverted away from your driving task at a critical time.Volume setting: Do not raise the volume excessively. Keep the volume at a level where you can still hear outside traffic and emergency signals while driving. Driving while unable to hear these sounds could cause an accident.Let your judgment prevail: The Device Software is only an aid. Make your driving decisions based on your observations of local conditions and existing traffic regulations. The Device Software is not a substitute for your personal judgment.Hands-Free Capability All CTIA Certified portable products provide the consumer with a toll-free number for the purchase of a compatible hands-free device, 1-800-881-7256.ESD SafetyElectrostatic discharge (ESD) can cause damage to electronic devices if discharged into the device, so you should take steps to avoid such an occurrence.Description of ESD Static electricity is an electrical charge caused by the buildup of excess electrons on the surface of a material. To most people, static electricity and ESD are nothing more than annoyances. For example, after walking over a carpet while scuffing your feet, building up electrons on your body, you may get a shock—the discharge event—when you touch a metal doorknob. This little shock discharges the built-up static electricity.ESD-susceptible equipment Even a small amount of ESD can harm circuitry, so when working with electronic devices, take measures to help protect your electronic devices, including your Palm phone, from ESD harm. While Palm has built protections against ESD into its products, ESD unfortunately exists and, unless neutralized, could build up to levels that could harm your equipment. Any electronic device that contains an external entry point for plugging in anything from cables to docking stations is susceptible to entry of ESD. Devices that you carry with you, such as your phone, build up ESD in a unique way because the static electricity that may have built up on your body is automatically passed to the device. Then, when the device is connected to another device such as a docking station, a discharge event can occur.Precautions against ESD Make sure to discharge any built-up static electricity from yourself and your electronic devices before touching an electronic device or connecting one device to another. The recommendation from Palm is that you take this precaution before connecting your phone to your computer, placing the phone in a docking station, or connecting it to any other device. You can do this in many ways, including the following:• Ground yourself when you’re holding your mobile device by simultaneously touching a metal surface that is at earth ground. For example, if your computer has a metal case and is plugged into a standard three-prong grounded outlet, touching the case should discharge the ESD on your body.• Increase the relative humidity of your environment.• Install ESD-specific prevention items, such as grounding mats.Conditions that enhance ESD occurrences Conditions that can contribute to the buildup of static electricity in the environment include the following:•Low relative humidity.• Material type. (The type of material gathering the charge. For example, synthetics are more prone to static buildup than natural fibers like cotton.)• The rapidity with which you touch, connect, or disconnect electronic devices.
56 Regulatory and Safety InformationWhile you should always take appropriate precautions to discharge static electricity, if you are in an environment where you notice ESD events, you may want to take extra precautions to protect your electronic equipment against ESD.Owner’s record The model number, regulatory number, and serial number are located on a nameplate inside the battery compartment. Record the serial number in the space provided below. This will be helpful if you need to contact us about your phone in the future.Product: Palm® Pixi Plus phoneModel: Serial No.:
Index 57IndexAaccented characters 14Acrobat Reader files. See PDF filesAdd An Account optionCalendar 31Contacts 30Email 24Add device option 22airplane mode 10–11Turn off Airplane Mode option 11Turn on Airplane Mode option 11alarms 16All Calendars view 31alternate characters 14animations in Help 48answering phone 21antenna 49AOL accounts 24application menu 15applicationsclosing 13Help 48opening 11–12searching in 16attachmentsopening 26sending music as 35auto-correct feature 14auto-shut off interval 44Bbatteryreplacing 7–??battery, caring for 51Bluetooth devicesadding 22enabling airplane mode and 10, 11making phone calls and 22turning on and off 38Bluetooth technology 22Brightness slider 44browser. See Web browserCcalendarsadding events 31getting started with 31saving 31synchronizing 31camera 34–??capitalization 13Caps Lock 13car kits 22Card view 12, 13See also wallpaperChange Wallpaper option 44character searches 20cleaning phone 6Clips (animations in Help) 48colors for email message text 24compatibility information 7connectionsBluetooth devices and 22enabling wireless 11Internet 37contactsadding ??–30displaying 31editing 31getting started with 30ringtones for 45saving information for 30searching 30selecting 21speed dials for 31synchronizing 30conversationsSee also instant messagescoverage areas 11creatingmessages ??–26customer support 48Ddial pad 20dialing 20–??, 31displayingcontacts 31multimedia messages 26pictures 34text messages 26videos 34Doc View 40–??documentation 48downloadingemail 25pictures 34driving safety tips 54
58 IndexEEarthLink accounts 24editingcontacts 31emailattaching music to 35creating 24receiving 25sending 24synchronizing 25email accountscreating multiple 24email addressesentering 24email service providers 24eventsadding to calendar 31saving 31synchronizing 31Excel files 40Ffile typesopening files and 40playing music and 35viewing pictures and 34watching videos and 34filesSee also specific typechanging display size 40copying to phone 40opening 40searching for 40finding information. See searchingformatting for email message text 24Hhands-free devicessetting up 22headsets ??–22helpSee also troubleshootingHelp application 48Iinformationsaving 30instant messagescreating 27sending 27setting up accounts 26signing into accounts 26JJPG files 26Kkeyboard 20Llabels 30Launcherpages 7lighted dial pad 20lowercase letters 13Mmessages. See email; multimedia messages; text messages; voicemailmisspelled words 14mobile network connections. See connectionsmultimedia messagesaddressing 25attachments and 26creating 25–26displaying 26sending 26multitasking 11musicanswering phone and 21listening to 22, 35Music application 35–??Nnetwork connections. See connectionsnotifications 7, 16–??responding to 16selecting contacts from 21numbers 14Oonline calendars 31online support 48openingapplications 11–12attachments 26files 40web pages 38Option key. See orange key 14orange key 6, 13, 14organizer features 29PPalm online support 48passwordsentering 14opening PDF files and 40PDF filesnavigating through 40opening 40PDF View 40–??phoneSee also phone callsanswering 21caring for 53cleaning 6dialing 20–??, 31disposing of 52Help 48redialing 20setting up 7–??Turn off Airplane Mode option 11Turn on Airplane Mode option 11turning on or off 10, 11volume 22phone callscreating ringtones for 45
Index 59driving and 54making 20–??placing on hold 22receiving 21replying to 21sending and receiving messages during 25sending to voicemail 21switching to hands-free devices 22phone headsets ??–22photos. See picturesPhotos application 34–??picturesdisplaying 34downloading 34sending 25, 26specifying as wallpaper 44taking 34–??playingvoicemail messages 21power accessories 51power button 7PowerPoint files 40power-saving feature 10priority settingsemail 24punctuation 14Rredialing phone numbers 20Ringer switch 6ringer switch 44ringtones 45Ssafety information 49savingcalendar events 31contacts 30information 30screenadjusting brightness 10brightness 44caring for 6turning on or off 10, 11, 44Screen & Lock application 44–??scroll gesture 7securitylocking the screen 44sendingemail 24instant messages 27multimedia messages 26music 35pictures 25, 26text messages 25, 26Set speed dial command 31setting up phone 7–??Shift 13short codes 25signal-strength icon 11SIM card 7songs. See musicsounds. See specific typeSounds & Ringtones application 44–??speed dialing 20, 31spelling errors 14stereo headsets 22streamingmusic 35Sym key 6symbols 14synchronizationemail 25online calendars 31online contacts 30Ttechnical support 48textformatting for email messages and signatures 24text messagesaddressing 25creating 25–26displaying 26sending 25, 26Tips (Help application) 48touchscreen. See screenTurn off Airplane Mode option 11Turn on Airplane Mode option 11turning Bluetooth on and off 38turning Wi-Fi on and off 38Uuppercase letters 13URLs 38user safety information 52Vvideosanswering phone and 21sending 26watching 34Videos application 34–??voicemaillistening to 21sending calls to 21setting up 21volumeadjusting for phone calls 22system sounds 44Wwallpaper 44See also Card viewweb addresses 38Web browser 38–??web pagesopening 38websitesaccessing customer support 48connecting to 38playing music from 35searching for 38Wide View 40Wi-Fiturning on and off 38wireless services 10, 11Word files 40YYahoo! accounts 24
60 Index

Navigation menu