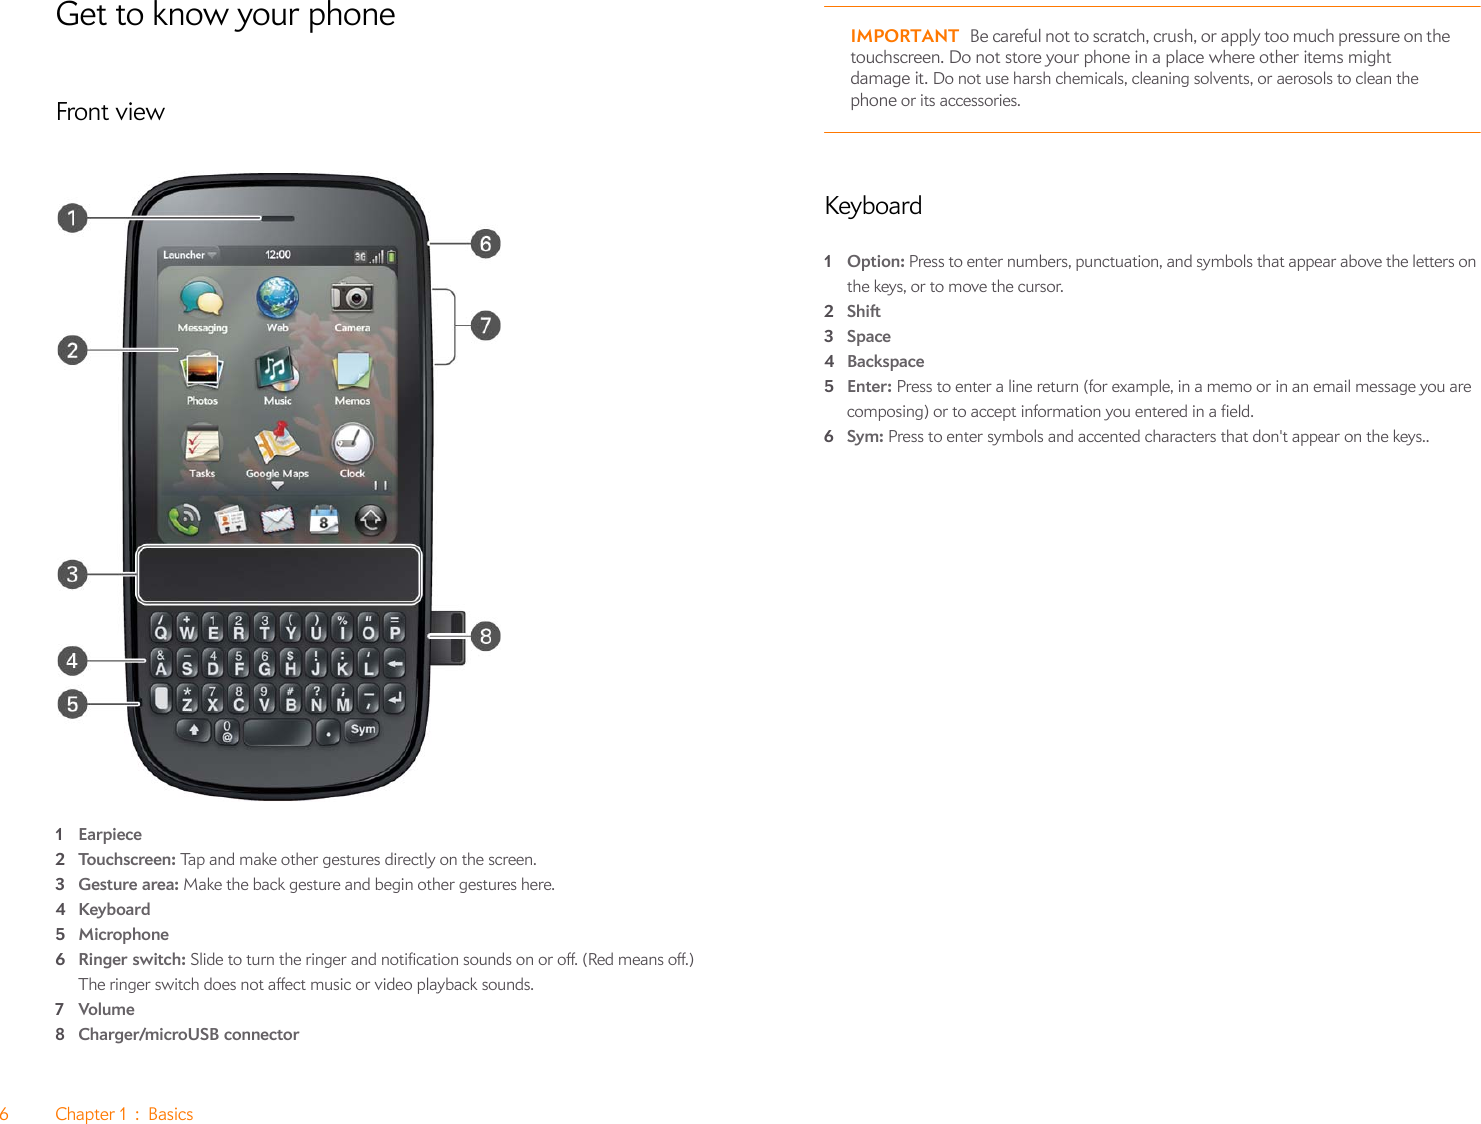
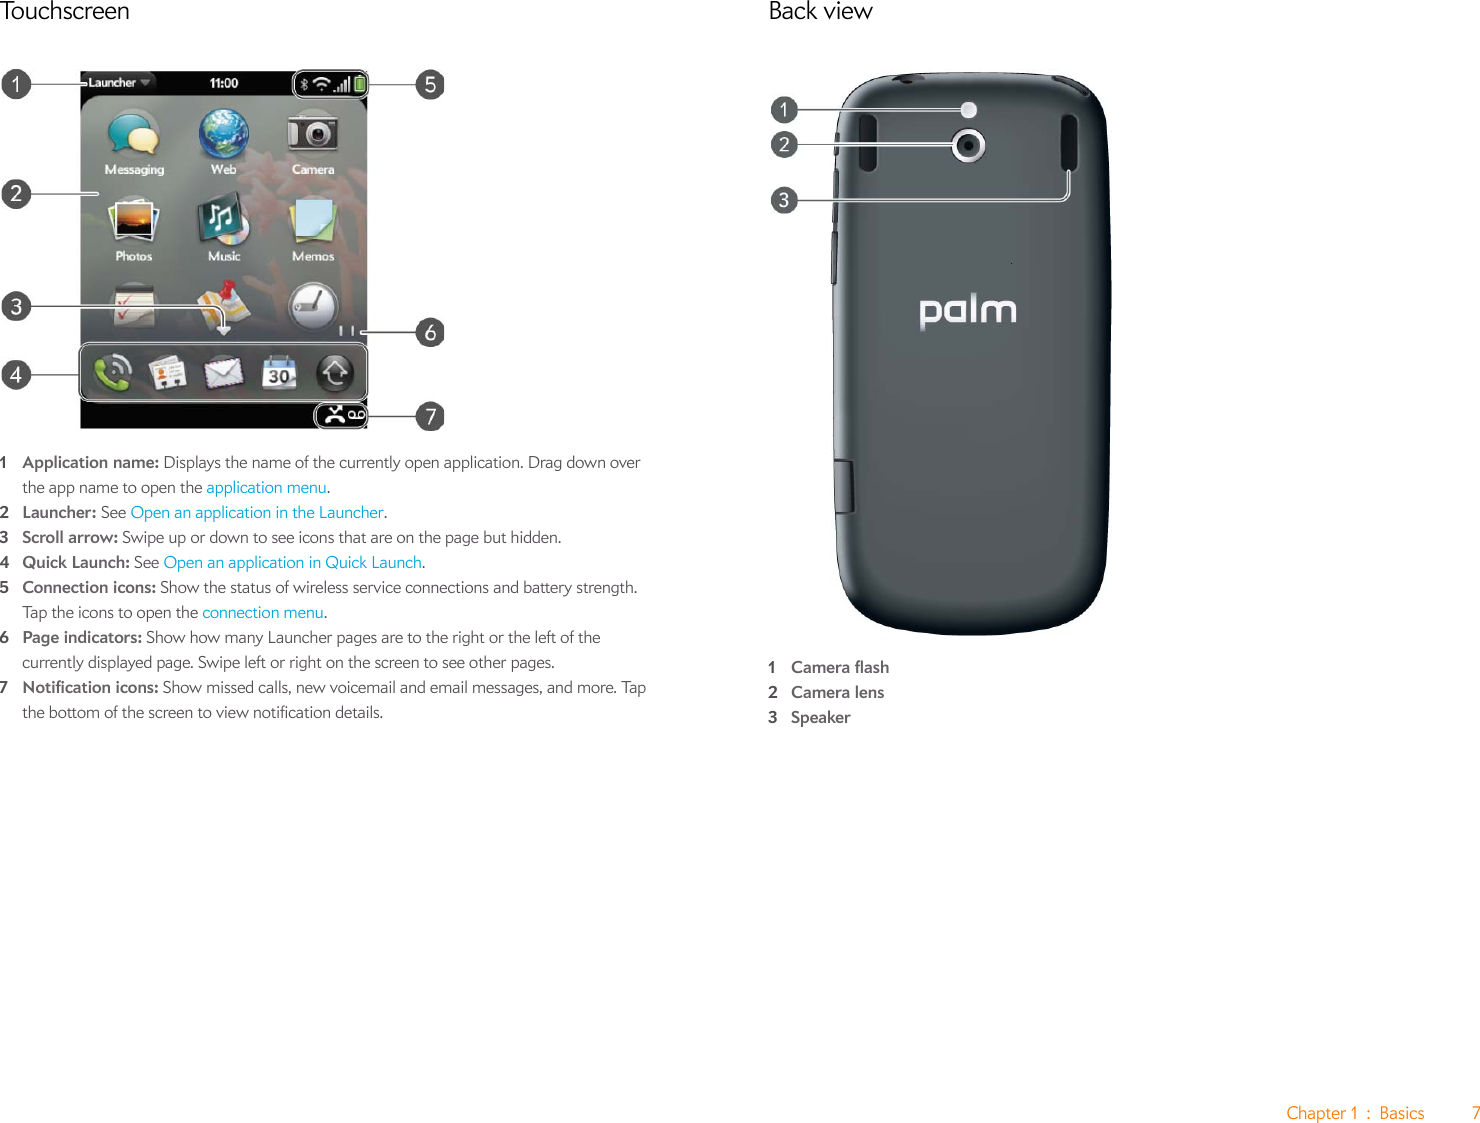
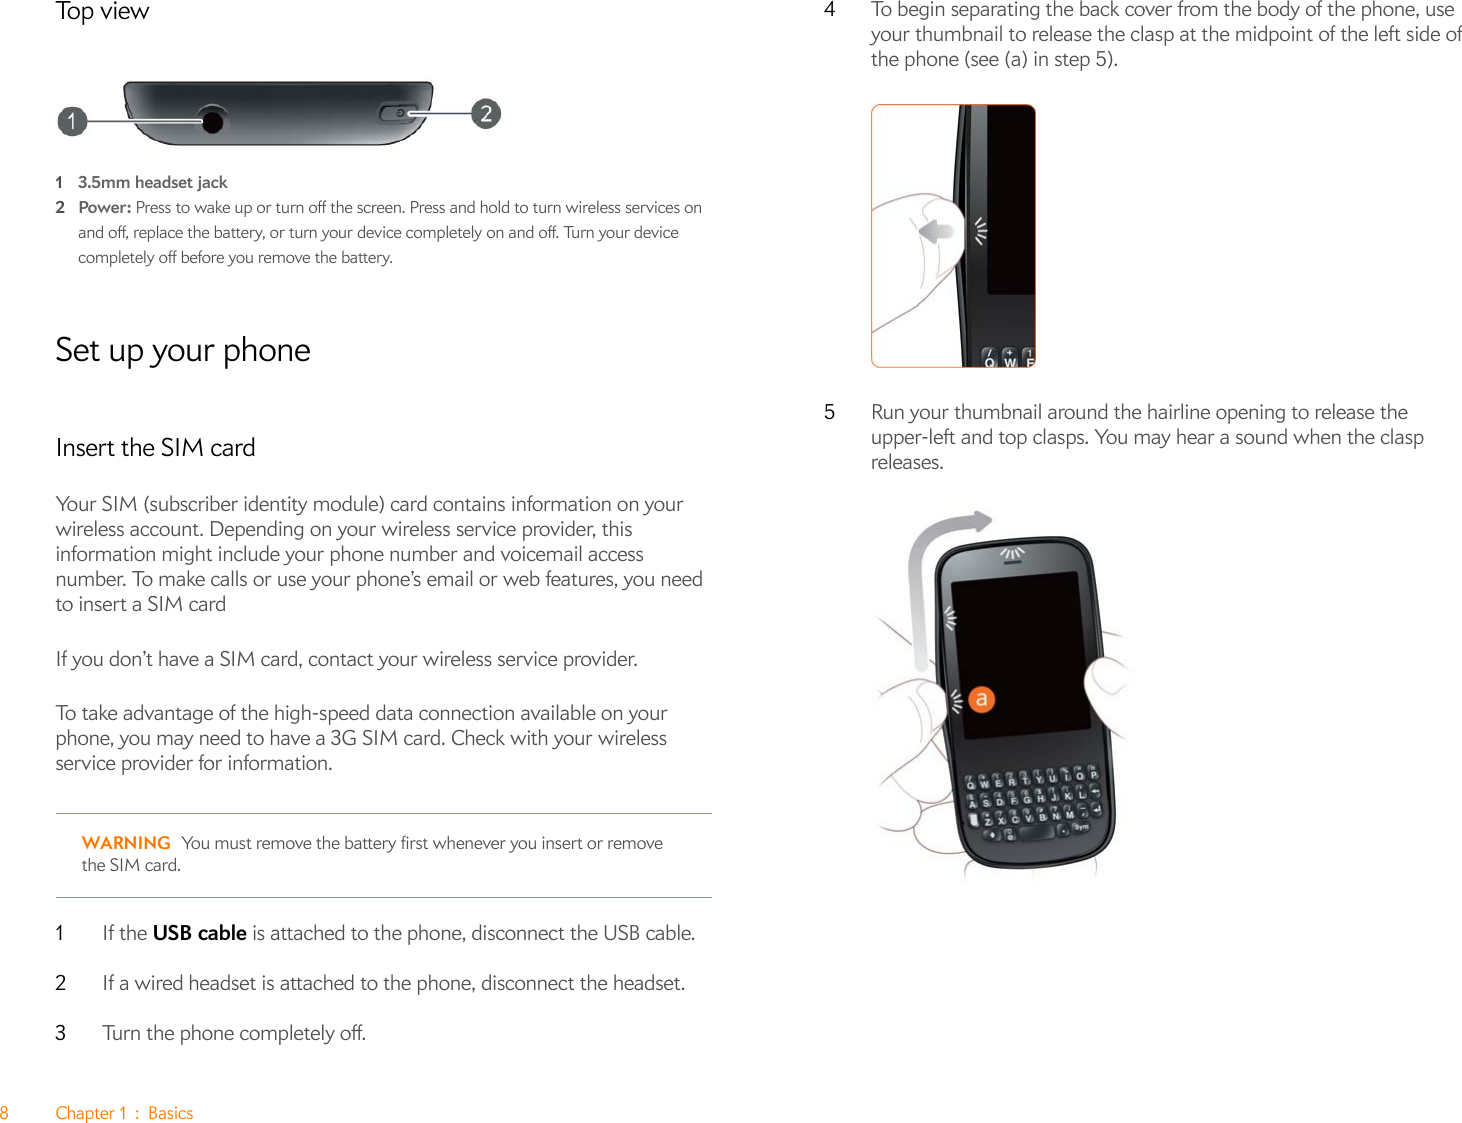
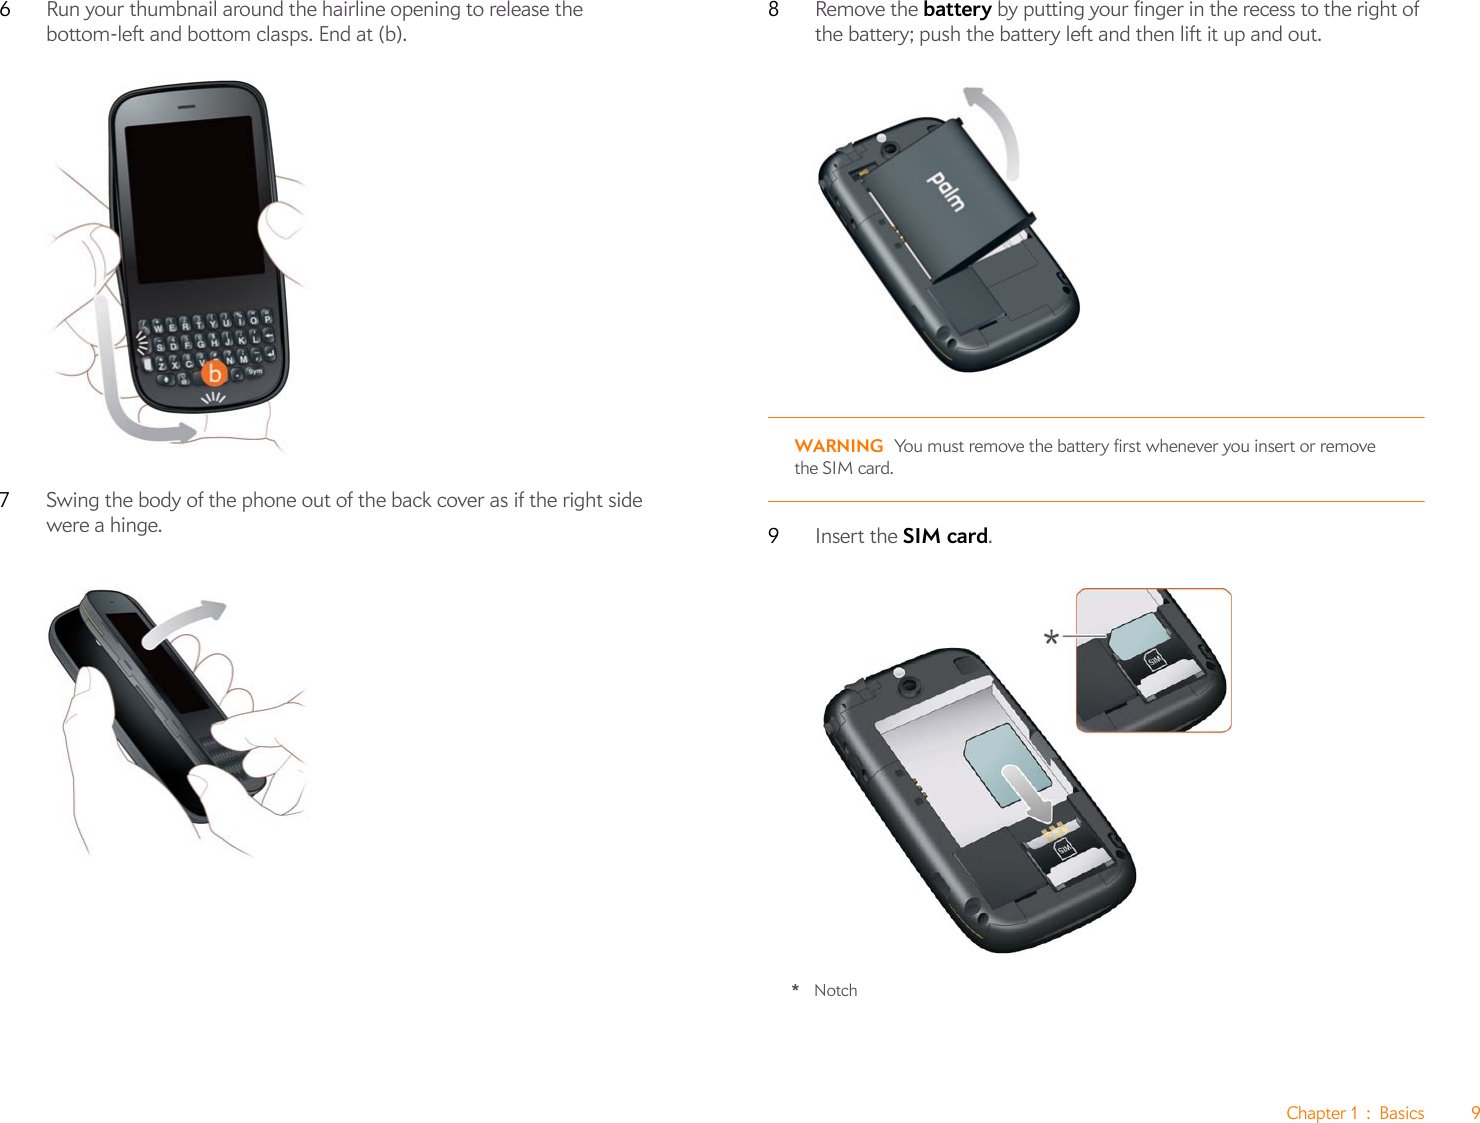
Palm PIXYW GSM phone with 802.11 b/g and Bluetooth User Manual PixiePlus EU UMTS mini User Guide
Palm Inc GSM phone with 802.11 b/g and Bluetooth PixiePlus EU UMTS mini User Guide
UserManual.wiki
>
Palm
>
PIXYW User Manual
Users Manual
Navigation menu
Upload a User Manual
Namespaces
Wiki Guide
HTML
PDF
Info
Views
User Manual
Discussion / Help
Navigation

![24 Chapter 3 : Email, text, multimedia, and instant messagingEmailSet up emailFollow this procedure if you have a common email provider, for example, AOL, EarthLink, or Yahoo! If you are setting up the Email application to work with your corporate email account that uses Microsoft Exchange. If the email account you set up takes advantage of the Synergy feature, then setting up email also synchronizes the provider's calendar and contacts.1Open Email .2The first time you open Email, do one of the following:•If this is the first email account you set up, the email address you used for your Palm profile is entered by default. Use that address, or enter an address for one of your other email accounts. Enter your password for the account, tap Sign In, and tap Done.•If you already set up an account that takes advantage of the Synergy feature and want to set up another one, tap Add An Account and enter the email address and password. Tap Sign In.3Any other time you open Email, open the application menu, tap Preferences & Accounts, and tap Add An Account. Enter the email address and password and tap Sign In.NOTE If automatic setup fails for your email account, an error message appears. Ta p OK, tap Manual Setup, gather the settings info you need, and enter the account settings.Create and send an email message1Open Email .2If this is the first time you opened the Email application, and you set up at least one email account already, tap Done. If you did not set up an email account, see Set up email.3Tap .4(Optional) Tap From to change the email account you are using to send the message. This option appears only if you have more than one email account set up on your phone.5In the To field, do one of the following to address the message:•Enter a contact name, initials, or email address. Tap the email address when it appears.•Tap to open the full contact list. Tap the contact you want, or enter a name or address to narrow the list.•Enter the full email address for a recipient who is not a contact.6(Optional) Tap To to open the Cc and Bcc fields, and enter an address.7(Optional) Repeat steps 5 and 6 to enter additional addresses.8Enter the subject, press Enter , and enter the body text.9(Optional) To format body text, do one of the following:•To enter bold, italic, or underlined text: Open the application menu and tap Edit > [the option you want]. Enter the text. To turn off the formatting, open the application menu and tap Edit > [the option you want to turn off].•To enter colored text: Open the application menu and tap Edit > scroll down > Te x t Co l o r . Tap the color and enter the text.•To format text you already entered: Select the text, open the application menu, and tap Edit > [the option you want]. To turn off a formatting option, open the application menu and tap Edit > [the option you want to turn off]. For text color, tap the black square. 10 (Optional) To set the priority for the message: Open the application menu and tap Set As Normal Priority or Set As High Priority. 11 Tap .](https://usermanual.wiki/Palm/PIXYW/User-Guide-1268080-Page-24.png)
![Chapter 4 : Contacts, Calendar, and other personal information 31Assign a speed dial to a contactYou can assign a speed dial to any contact phone number. You can assign up to 26 speed dials.NOTE You cannot assign 1 (the E key) as a speed dial. The number 1 is reserved for speed dialing your voicemail system.1Open Contacts .2Search for a contact, and tap the contact name.3Open the application menu and tap Set Speed Dial. 4Tap the phone number you want to assign a speed dial to, and then do one of the following:•To assign a speed dial: Tap the key to use as a speed dial.•To reassign a speed dial to the selected number: Tap the assigned speed dial and then tap Reassign To [Name].CalendarConnect to an online calendar: If you have a calendar in an online account that works with the Palm® Synergy™ feature (for example, Google or Microsoft Exchange), you can set up Calendar on your phone to synchronize and display events in the online calendar. Set up synchronization the first time you open Calendar (see Use Calendar for the first time) or anytime after that. After you set up the connection to the online calendar, events you enter online show up automatically in Calendar, and events you enter on your phone sync to the online account, provided the account allows writing from the phone to the online account.Use Calendar for the first time1Open Calendar .2Do one of the following:•To set up your first online account to sync: Tap the account type, enter the account information, and tap Sign In.•To set up a second online account to sync: Tap Add An Account, tap the account type, enter the account information, and tap Sign In.•To open Calendar without creating an online account: Tap Done. This opens your Palm profile account, and you can start creating events in this account.Create an eventIf you are using Calendar for the first time, you go through a few different steps to add or access the calendar events on your phone (see Use Calendar for the first time). Follow this procedure to add events directly on your phone after the first time you use Calendar. For information on managing your phone’s time settings1Open Calendar .2Ta p All or an online account name in the upper-right corner, and tap the calendar you want to use for this event. NOTE If an account doesn’t appear in the list, you can’t add data to that account from your phone.If you create an event in All Calendars view, the event is created in the calendar set as the default3Go to the day you want and tap a blank time slot.](https://usermanual.wiki/Palm/PIXYW/User-Guide-1268080-Page-31.png)


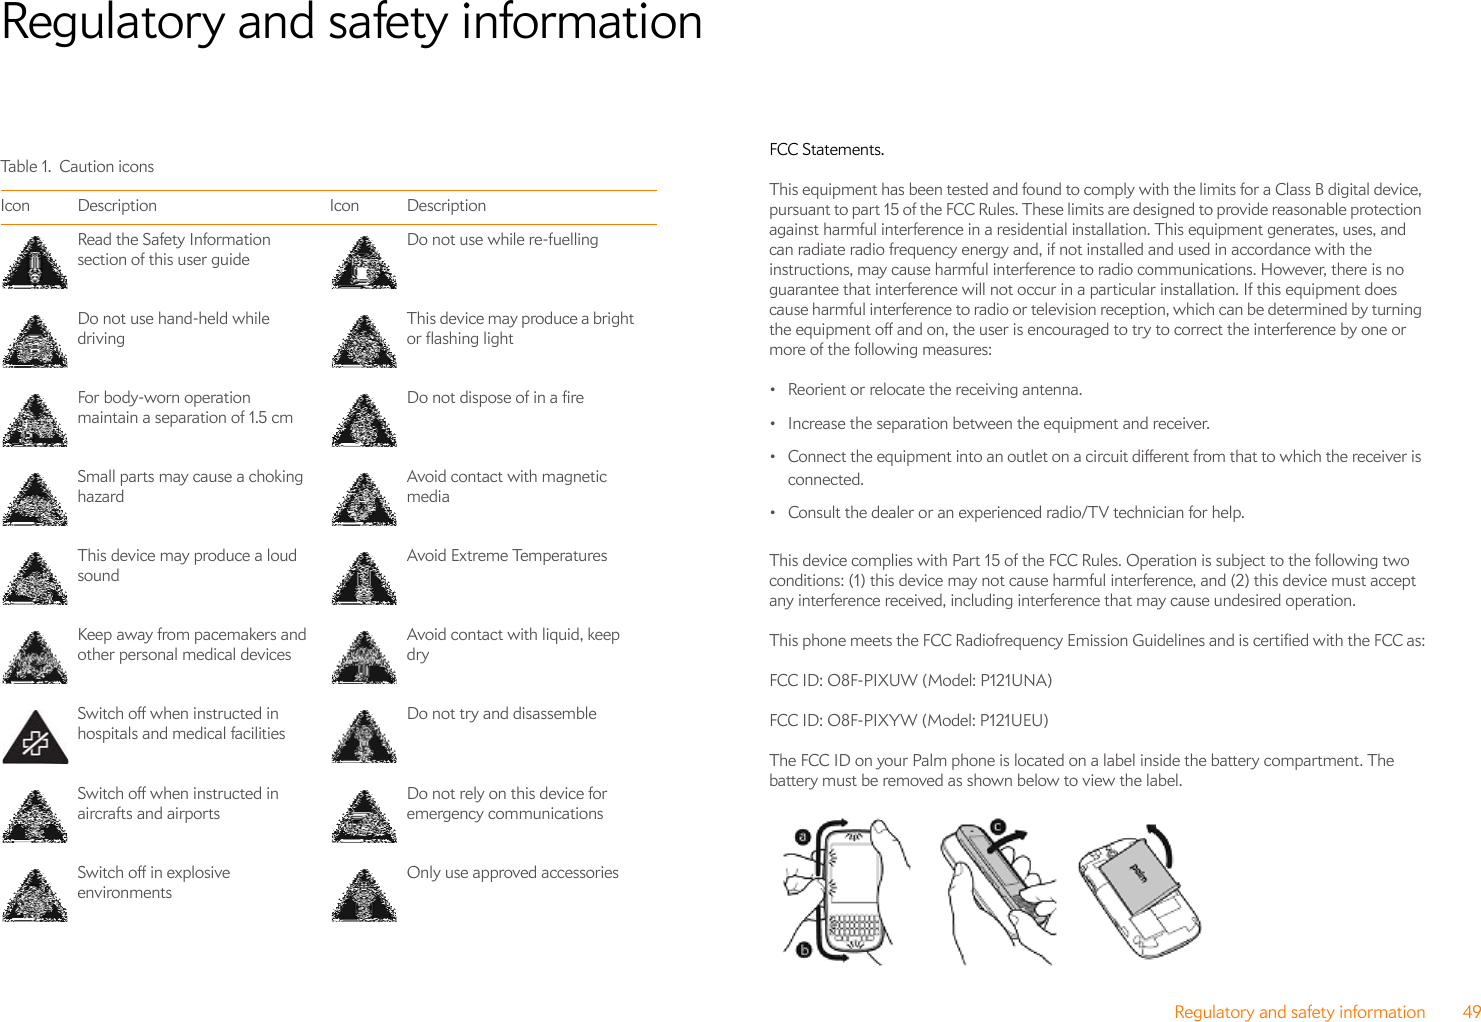
![50 Regulatory and safety informationChanges or modifications not expressly approved by the party responsible for compliance could void the user's authority to operate the equipment.Antenna Care/Unauthorized ModificationsUse only the supplied integral antenna. Unauthorized antenna modifications or attachments could damage the unit and may violate FCC regulations.Industry CanadaOperation is subject to the following two conditions: (1) This device may not cause harmful interference, and (2) this device must accept any interference received, including interference that may cause undesired operation.The term “IC” before the equipment certification number only signifies that the Industry Canada technical specifications were met.IC: 3905A-PIXUW (Model: P121UNA)This Class B digital apparatus complies with Canadian ICES-003.L'utilisation de ce dispositif est autorisée seulement aux conditions suivantes: (1) il ne doit pas produire de brouillage et (2) l'utilisateur du dispositif doit étre prêt à accepter tout brouillage radioélectrique reçu, même si ce brouillage est susceptible de compromettre le fonctionnement du dispositif.Cet appareil numérique de la classe [*] est conforme à la norme NMB-003 du Canada.EU Regulatory ConformanceWe, Palm, Inc., hereby declare that this device is in conformance to all essential requirements of the R&TTE Directive 1999/5/EC.This equipment is marked with the 0984 symbol and can be used throughout the European community.This indicates compliance with the R&TTE Directive 1999/5/EC and meets the relevant parts of following technical specifications:•ETSI EN 301 511• ETSI EN 301 908-1• ETSI EN 301 908-2• ETSI EN 300 328•ETSI EN 301 489-1/-7/-17/-24• EN 60950-1•EN 50360•EN 50371Marking by the symbol indicates this equipment uses non-harmonized frequency bands.France - 2.4GHz for Metropolitan France:In all Metropolitan departments, wireless LAN frequencies can be used under the following conditions, either for public or private use:• Indoor use: maximum power (EIRP*) of 100 mW for the entire 2400-2483.5 MHz frequency band• Outdoor use: maximum power (EIRP*) of 100 mW for the 2400-2454 MHz band and with maximum power (EIRP*) of 10 mW for the 2454-2483 MHz bandPrecaution against hearing loss: Protect your hearing. Listening to this device at full volume for a long period of time can damage your hearing.A pleine puissance, l’écoute prolongée du baladeur peut endommager l’oreille de l’utilisateur. Consultez notre site web www.palm.com/fr pour plus d’informations.Responsible party(North America)Palm, Inc.950 W. Maude Ave.Sunnyvale, CA 94085 USA www.palm.com (Europe)Palm Europe ltd.*59-60 Thames StreetWindsor, Berkshire, SL4-1TXUKRadio Frequency (RF) Safety ExposureGeneral statement on Radio Frequency (RF) energy: Your phone contains a transmitter and a receiver. When it is ON, it receives and transmits RF energy. When you communicate with your phone, the system handling your call controls the power level at which your phone transmits.Specific Absorption Rate (SAR): Your mobile device is a radio transmitter and receiver. It is designed not to exceed the limits for exposure to radio waves recommended by international guidelines. These guidelines were developed by the independent scientific organization ICNIRP and include safety margins designed to assure the protection of all persons, regardless of age and health.In order to certify this unit for sale to the public, this unit has been tested for RF exposure compliance at a qualified test laboratory and found to comply with the regulations regarding exposure to RF Energy under the recommendations of the International Commission on Non-Ionizing Radiation Protection (ICNIRP). The tests are preformed in positions and locations as required by the FCC and IC for each model.](https://usermanual.wiki/Palm/PIXYW/User-Guide-1268080-Page-50.png)