Palmer Environmental P3 Permalog 3 User Manual New manual
Palmer Environmental Ltd Permalog 3 New manual
User manual
2
Contents
Scope...............................................................................................................3
Introduction ......................................................................................................3
Safety warning .................................................................................................3
Battery installation............................................................................................5
Checking Battery voltage .................................................................................5
Connections and interfaces to the Patroller .....................................................6
Operating the Patroller.....................................................................................8
On-Screen Menus............................................................................................9
Specifications.................................................................................................16
Fuse information ............................................................................................17
Conditions of Use of Permalog® System ........................................................18
Permalog 1 Deployment Instructions .............................................................19
Redeployment................................................................................................19
Permalog 2 Deployment Instructions .............................................................20
Redeployment................................................................................................20
Warranty ........................................................................................................21
Patents...........................................................................................................21
3
Permalog® Patroller User’s Guide
Scope
This manual covers the use of the Permalog® Patroller in conjunction with
Permalog® 1 and Permalog® 2 leak noise loggers.
Introduction
Permalog® leak noise loggers are deployed throughout the water distribution
system to provide continuous surveying of leakage. Each Permalog® unit
adapts itself automatically to its environment. If no leak is present a signal is
transmitted to indicate normal background conditions (NO LEAK). However,
as soon as a possible leak is detected, the Permalog® unit enters an alarm
state and transmits a signal to indicate a LEAK condition.
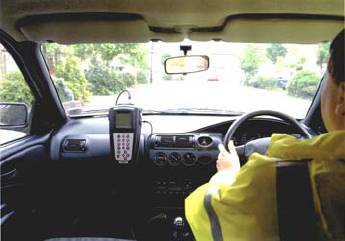
Patroller used to survey an area
Following a rise in unaccounted-for water,
or at standard intervals, a leakage patrol is
carried out in the area using the Permalog®
Patroller module. This module receives,
analyses and “homes in” on signals to
identify the location of units in LEAK mode
and thereby the approximate position of
the leaks. Information from the loggers is displayed on the LCD screen and
held in memory. Data from loggers in LEAK mode can be downloaded to a
PC or printed out directly. The Permalog® Patroller may optionally be
integrated with GPS or GIS data to enhance the LEAK list with geographical
or system specific information.
Safety warning
The Permalog® noise logger contains a high strength magnet and should not
be carried by anyone with a heart pacemaker. This magnet can permanently
corrupt magnetic storage media such as floppy discs, hard discs, tapes etc. It
can also damage TV and PC monitor screens and some watches. See
“Conditions of use”.
Caution.
The Patroller contains a lithium backup battery. There is a danger of
explosion if this battery is incorrectly replaced. It must only be replaced with
the same or equivalent type recommended by the manufacturer. Used
batteries must be disposed of according to the manufacturers instructions.
Warning
When charging from a 12v vehicle supply, if the engine is switched off, the
unit must be disconnected before restarting the vehicle; otherwise permanent
damage to the charge circuits may result. Once the engine is running, it safe
to re-connect the Patroller.
4
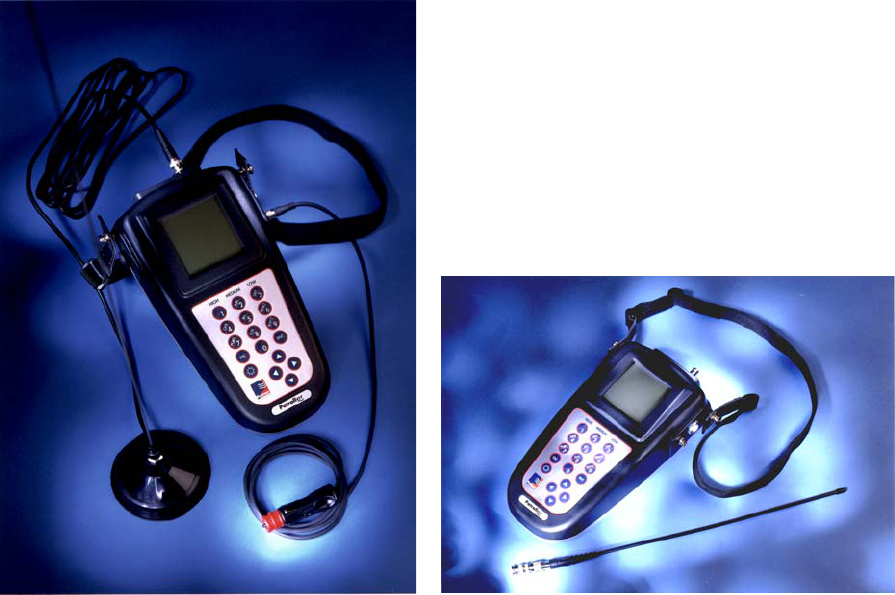
Patroller equipment supplied
The Patroller is supplied with cables and accessories required for normal
operation.
Patroller with magmount antenna with Patroller, carry strap and short
integral lead, carry strap and vehicle antenna (used for surveying on foot).
power supply/charge lead.
The following equipment is supplied as standard:
1 Patroller unit fitted with rechargeable battery pack
1 12V DC power cable with vehicle lighter interface
1 PC download cable
1 Carry strap
1 Small antenna for portable use
1 Mag-mount antenna with integral co-axial lead
1 Mains-powered charger unit
The following equipment is not supplied as standard but may be supplied as
accessories to the Patroller:-
• Carry satchel
• Replacement battery set
• Portable printer with cable
• Right-angled connector for antenna
• Transit case
5
Battery installation
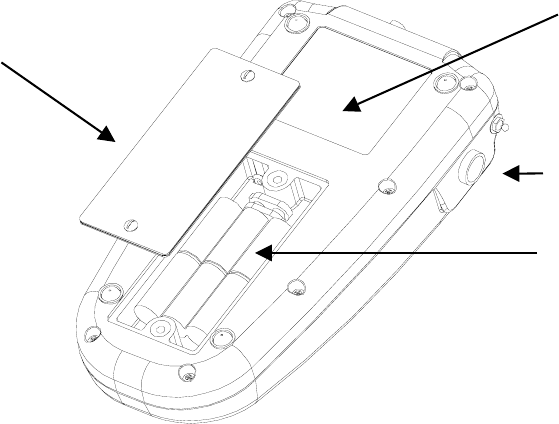
The Patroller is powered by a rechargeable battery pack located in the back of
the unit. To install the battery pack, use a screwdriver to undo the two panel
screws a quarter turn.
Remove the panel, insert the battery pack and clip the battery and Patroller
connectors together. Ensure the leads do not become trapped when
replacing the panel. Refit the panel and tighten the screws.
WARNING: DO NOT ALLOW ANY METAL OBJECT TO CONNECT THE
TWO BATTERY TERMINALS ON THE CONNECTOR. This would cause a
short circuit and would rapidly generate intense heat in these special
batteries.
Checking Battery voltage
To check battery voltage, switch on the Patroller, then press ESC to access
the main menu. Select Setup, then System Info to display battery voltage.
Nominal battery voltage is 7.2V. When the battery voltage drops to 6.5V the
Patroller will start to issue low battery warnings. When the voltage drops to
6.0V the unit will power off automatically and can not be used until the battery
is recharged, or an external power supply is connected. Even when the
Patroller is powered off, the data is preserved.
In the event of a battery failure, the data stored in the Patroller is maintained
by a small backup battery for up to one year.
Battery panel cover
Rechargeable
battery pack
On/Off button
Back of Patroller unit
Serial Number
6
Connections and interfaces to the Patroller
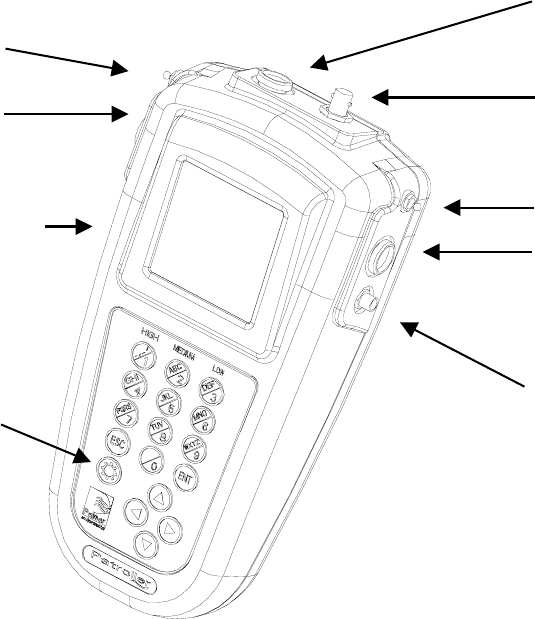
The various connections and interfaces of the Patroller unit are identified on
the diagram below:-
Patroller unit: connections and interfaces
Carry strap lug
Communications
connector to PC or
printer
Power supply and
charger connection
BNC connection to
antenna
On/Off
button
9 Way connector for
GPS communications
Carry
strap lug
LCD display
Back
lighting
button for
LCD
display
7
Connections for in-vehicle use
Place the mag-mount antenna on the roof of the vehicle and connect the
antenna lead to the connector on top of the Patroller. Connect the external
power lead to the Patroller and plug into the cigar lighter socket of the vehicle.
Connections for hand-held use
Connect the short antenna to the top of the Patroller. Clip on the carry strap.
Connection to a Printer (optional)
The Patroller uses plain text printing and requires a printer that will support
this. Most dot matrix, inkjet and laser printers will, but Windows Printing
System (WPS) printers will not. Check the printer specifications to see that it
supports printing from MS-DOS.
Connect the printer lead to the Communications port. The lead supplied is
terminated with a 9 pin serial connector suitable for most printers with a serial
port. For printers with a parallel port, a serial-to-parallel converter is available.
Connection to a PC (optional)
Connect the PC lead to the Patroller Communications port, and then to one of
the 9-way COM ports on the PC.
8
Operating the Patroller
The Patroller uses on-screen menus for most of its operational functions. The
key required for each function is highlighted on the display in inverse video.
ESC can be used to exit a function and return to the menu above. Pressing
ESC several times will always return you to the Main Menu.
Press the on-off button to switch the Patroller on. The unit will display the
Palmer logo and firmware version number for 5 seconds then switch
automatically to Leak Patrol mode. During the 5 second period, pressing ENT
takes you directly to Leak Patrol mode and pressing any other key takes you
to the Main Menu.
The backlight for the display will remain on when switched on if the Patroller is
connected to a DC supply. When powered by the Patroller only, the backlight
will switch off after 10 seconds to conserve power.
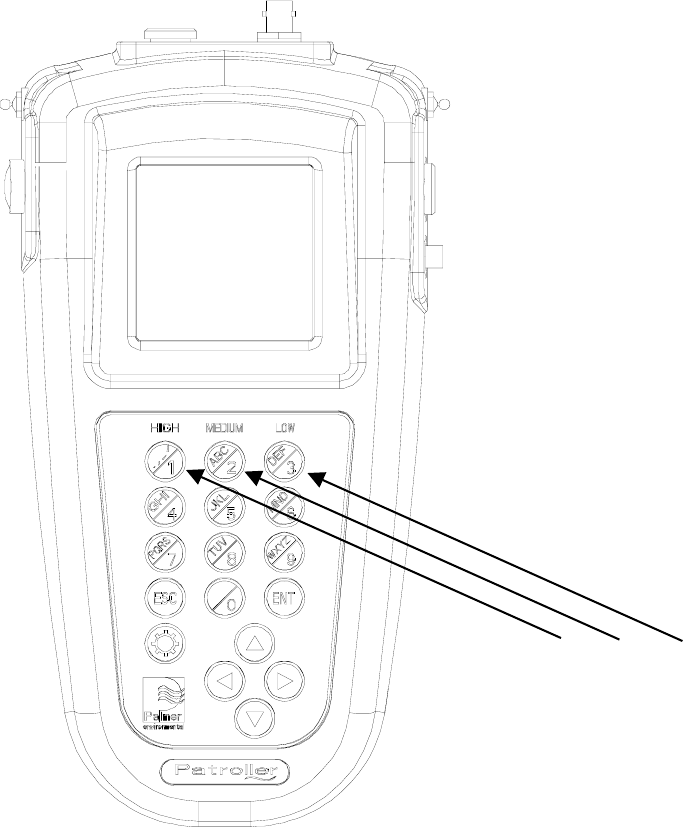
Front view of
Patroller
High, Medium and Low
sensitivity ranges
9
On-Screen Menus
Main Menu
Patroller Main Menu
1. Leak Patrol
2. Patrol Menu
3. Deployment
4. Communications
5. Setup
This allows access to each of the Patroller’s modes of operation. These are
as follows:-
1. Leak Patrol
This is the normal mode of operation in the field where data received from
Permalog® loggers is displayed on the screen. The Patrol Menu is normally
accessed directly from Leak Patrol and offers a range of special functions
whilst a patrol is in progress.
Leak Patrol
Serial Lv Sp Time
08990980 54 6 16:24 L
08990127 44 22 16:27 L
08994513 62 1 16:27 L
08970655 46 14 16:27 L
03984502 40 23 16:21 L
05816442 44 21 16:26 W
03991720 40 6 24Apr L
Leak
NoLk
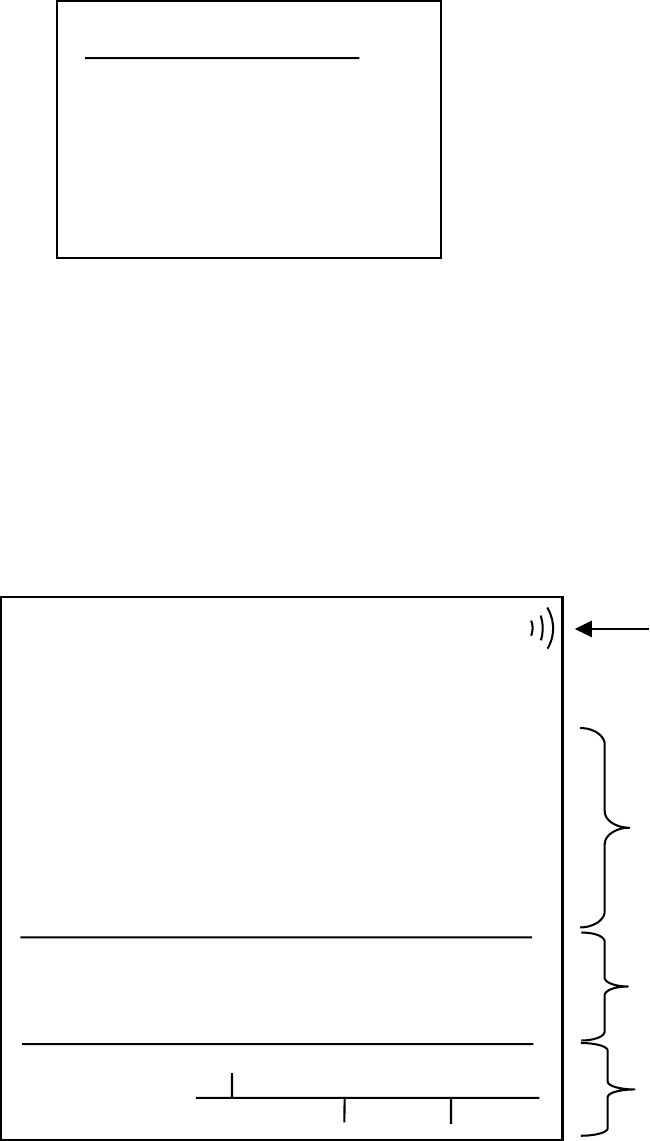
Leak Patrol Display
Details of loggers
indicating leak
Deployment
information for
highlighted logger
(if entered)
Scrolling cursor
and LEAK/NO
LEAK signals
received.
.Radio sensitivity
range
Low ,
Medium or
High
10
The display shows :-
• The serial number of loggers in leak mode
• The noise level in dB from the logger; Lv
• The noise spread in dB from the logger Sp
• The time or date the data was received from the logger. The
time is shown for data received today. If the data was received
on a previous day AND more than 12 hours ago, then the date is
displayed.
• The characters on the right hand side of the display are L for
leak and W for warning. Statistically, the probability of a leak
being present is greater for L than for W. However, all logger
results require further investigation to confirm a leak.
All patrol activities are carried out from this screen. The Patroller is fitted with
two sounders. A high pitched beep indicates no-leak and a low-pitched beep
indicates a leak. This information is also shown graphically on the lower part
of the screen where a cursor scans across the screen over a period of 5
seconds. A vertical bar marks each leak/no-leak event received, with the
height of the bar indicating the received signal strength. When full radio data
is received (serial number, noise level and spread), the bar is marked with a
pennant.
The main part of the screen shows a list of loggers whose full radio data have
been received. One of these is highlighted with an inverting cursor and the
deployment details of the highlighted logger (if entered previously) are shown
in the box below. Use the up and down arrows to move the cursor and select
a different logger.
The number keys each have a specific function assigned. These functions
can be accessed directly by pressing the key in the Leak Patrol screen, or by
first pressing ENT to show the Patrol Menu which lists these functions. The
ENT key toggles between the Leak Patrol Screen and the Patrol Menu
screen.

11
2. Patrol menu
Patrol Menu
1. Max Range
2. Mid Range
3. Min Range
4. Logger Details
5. Closest Loggers
6. Patrol Setup
7. Clear Display
8. Restore Display
9. Print Results
0. Reset Logger Entry
Ent Leak Patrol
Esc Main Menu
1. High/Max range
Sets high sensitivity on the radio receiver to achieve maximum range,
typically greater than 50 m.
2. Medium range
Sets medium sensitivity on the radio receiver for a range of typically 15 m.
In an area where many loggers are in range, this can be used to limit the
number of received signals.
3. Low/Minimum range
Sets low sensitivity on the radio receiver for a typical range of 5 m. This
may be used to ‘home-in’ on one particular logger.
4. Logger Details
Press 4, then enter a serial number and press Ent to view the stored
results for a given logger. The default serial number is the currently
highlighted logger. The display shows the level, spread and date received
of the last 6 results, along with the deployment details. Press Esc to return
to the Patrol menu.
5. Closest Loggers
To find the closest loggers to a particular logger, first select the Leak
Patrol screen and check the appropriate logger is selected. Alternatively,
select the Patrol menu and press 4 to enter logger details. Type in the
serial number of the logger you are interested in and press Ent to search
for it. The selected logger details are displayed. Press Esc to return to
the Patrol Menu. Press 5
12
The screen then shows the grid reference of the selected logger by
default. You may either use this grid reference or enter a different one.
Press Ent to search for the closest loggers. The display then shows a list
of loggers within 1000 m of this point. The list of loggers shows serial
number, distance from the reference point (in metres), noise level and
time/date last received. From this list of loggers, the up and down arrows
can be used to move a highlight bar. Press ENT to view logger details and
history for the highlighted logger. (This feature will only work if the correct
grid reference has been entered for each logger). Press Esc to return to
this list.
6. Patrol Setup
Press 6 to go to the Patrol Setup screen. Use the left/right arrows to
change the sounder options, allowing sound for both leak and no-leak,
leak only, or neither (sound disabled). Press Ent to return.
7. Clear Display
This option removes the highlighted logger and those below it from the
display (but not from the database) in order to keep only the most recent
acquisitions.
8. Restore display
Undoes the effect of Clear Display and restores all loggers to the display.
9. Print Results
Sends the Leak Patrol results to a connected printer. There are 4 options
to limit the number of loggers printed.
a. Display only – prints only those loggers in the display list.
b. Today – prints only results received today.
c. Date Range – prints only results received between the two dates
specified.
d. All Loggers – prints results from all loggers in the database.
0. Reset Logger Entry
When a leak has been repaired and the logger switches back to no-leak
mode (this happens automatically), it stops transmitting its serial number
information. This option is used to inform the Patroller that a particular
logger is no longer indicating leak mode. Press ESC to return to the main
menu.
NOTE: When no external power supply is connected, returning to the main
menu will switch off the radio receiver to conserve battery power.

13
3. Deployment
Deployment
Serial 03997244
G.Ref SK 4321 6542
Area DMA 1625
Comment OUTSIDE 27 PARK AVE
Ent Accept
Esc Cancel
This is used when deploying Permalog® loggers on the network. It allows the
location details of each logger to be entered and stored in the internal
database. It also allows logger details to be edited or deleted from the
database.
Enter the logger serial number. Press Ent.
If the same serial number is re-entered, then a Deployment Error Screen is
displayed. You can either delete the entry or confirm it.
Enter the Grid reference of this logger. The first two characters must be
letters*. These are followed by numbers for the rest of the grid reference.
Press Ent.
Then enter the area details, up to 8 numbers or characters*.
Two seconds after entering a number, the cursor jumps along one digit.
Alternatively you can use the left/right arrow keys.
* To enter letters instead of numbers, press the relevant keypad button
twice or more as required. The numbers and letters step through in sequence
and return to the start point again. For the area details the first character to
appear is always a number. In the Comments section, this is reversed so that
letters come up first.
The system works as shown in this example:-
Press button 2. The number 2 appears.
Press button 2 again. The letter A appears.
Press button 2 again. The letter B appears.
Press button 2 again. The letter C appears.
Press button 2 again. The number 2 reappears.
To enter a space, press 0 (zero) twice.

14
4. Communications
This menu enables the Patroller to download the logger database to a PC or
to upload the database from a PC. The screen will show the number of
packets of data transmitted and the number of retries attempted if data
transmission was not completed.
5. Setup
This configures the Patroller for the area of operation.
Setup menu
1. Set date & time
2. LCD Contrast
3. Power Saving
4. Map Refs
5. Language
6. System Info
7. Check database
8. Delete database
Esc Return
1. Set date & time
Set date and time including daylight saving time option.
2. LCD Contrast
Adjust display contrast as required
3. Power Saving
Adjust the time to automatically power off the display back-light when
not used.
4. Map Refs
Select map reference system required.
5. Language
The default language is UK English.
15
6. System Info
This gives battery status information, the firmware version, the number
of loggers on the database and the archive status. If the screen
displays a message saying “Archive out of date”, this means
data has been received from loggers since the database was
transmitted to a PC. In other words, changes have been made that
have not been saved to a PC.
7. Check database
This option checks the database is intact and will state if it has been
corrupted or not.
8. Delete database
This option should be used when the Patroller is about to be used in a
different area and the latest version of the existing database has
already been downloaded to a PC. This enables the user to make a
fresh start, knowing that all logger data entered is relevant to the latest
survey.

16
Specifications
Permalog® leak noise logger specification
Scope of supply
Logger unit with integral sensor, magnet and aerial (minimum quantity 10
units)
Dimensions
Permalog 1 193mm x 60mm diameter (without antenna)
Permalog 2 From bottom of magnet to top of logger 110mm
From bottom of magnet to top of antenna 135mm
Diameter 60mm
Antenna length
Permalog 1 70mm (standard) or 140mm (option for increased range)
Permalog 2 55mm
Weight (Permalog 1 and 2)
1kg
Power source (Permalog 1 and 2)
Internal battery - up to 10 years' operation (guaranteed 5 years)
Construction materials
(Permalog 1) Hostaform C2521 black case, Stainless steel sensor assembly
(Permalog 2) Hostaform C9021 black case , Stainless steel sensor assembly
Environmental Protection (Permalog 1 and 2)
IP68
Communications (Permalog 1 and 2)
Signal LEAK/NO LEAK
Visible LED indicator

17
Patroller Specification
Scope of supply
Patroller unit including 12V DC power cable with vehicle lighter socket
connector, magnetic vehicle-mounted antenna and cable, short antenna, PC
download cable and printer cable.
Dimensions
290mm x 150mm x 82mm
Weight
1.8kg
Construction material
ABS
Environmental protection
IP65
Standard antenna
Magnetically-attached vehicle mounting antenna with 3 metre connection
cable
User interface
Membrane keypad with backlit LCD
Power source
Rechargeable/replaceable battery
12V DC vehicle battery power
Communications
Audible LEAK and NO LEAK signals
RS232 serial output to PC, printer
Antenna input
(optional) GPS receiver interface
Fuse information
Surface mount fuse part no. FUS4040 1.0 Amp, 125 V (F)
Standard accessories
12V DC power cable with vehicle lighter interface
PC download cable
Carry strap
Small antenna for portable use
Optional accessories
Carry satchel
Mains-powered charger unit
Replacement battery set
Portable printer

18
Conditions of Use of Permalog® System
1. Deployment of Permalog® units should be carried out in accordance with
Palmer Environmental document PDI(E) Issue 1. Mishandling the logger
could result in damage to the antenna (if incorrectly used to lower or raise
the logger) or the sensor (connecting the logger to, or removing it from, the
fitting). Such damage is not covered by Palmer Environmental’s 3-year
warranty and customers are warned that damage to the sensor in
particular is unlikely to be economic to repair.
2. During handling and transportation of Permalog® units from place to place,
care must be taken not to bring the communications window into the
magnetic field of a medium or strong strength magnet. Continuous
exposure to a magnetic field can result in variation in the Permalog®‘s
internal clock, which will lead to an increased possibility of false alarms.
Particular care must be taken to avoid packing Permalog® units “head to
tail”. Remedial work by Palmer Environmental required to correct loggers
that have been affected in this way is not covered by warranty and will be
charged.
3. Due to the strength of the magnet used with Permalog®, large quantities of
Permalog® units should not be carried by staff with heart pacemakers.
4. The magnet keeper fitted to Permalog loggers should be left attached to
the magnet until the unit is ready to be placed in its logging position. If the
unit is to be moved for any reason the keeper should be refitted to the
magnet. All Permalog units should be transported with the keeper
attached to the magnet.
19
Permalog 1 Deployment Instructions
Permalog units have no user serviceable parts. The enclosure protects the user from electrical shock
and other hazards. Servicing must be referred to competent personnel. If any unit does not appear to
function correctly then it must be returned to Palmer Environmental or an authorised Palmer
representative. Caution: Permalog units contain batteries. There is a danger of explosion if they are
incorrectly replaced. They must only be replaced with the same or equivalent type recommended by the
manufacturer. Used batteries must be disposed of according to the manufacturers instructions.
Redeployment
• Ensure you have sufficient keepers for the magnets and pieces of card to put between the
keepers and the logger magnets. Removing keepers from logger magnets takes some effort.
Always insert a piece of thin card between the keeper and the magnet to make this job easier.
• On retrieval, always grasp the main body of the logger. Do not pull loggers by the aerials.
• Ensure the magnet from one logger is kept more than 3 inches (8cms) away from the window
of the nearest logger. If any magnet is held too close to the logger window, the logger will
continually reset causing an incorrect internal clock setting.
• An option during transport is to magnetically attach the loggers to a large piece of metal. This
will act as a keeper and prevent the loggers from moving.
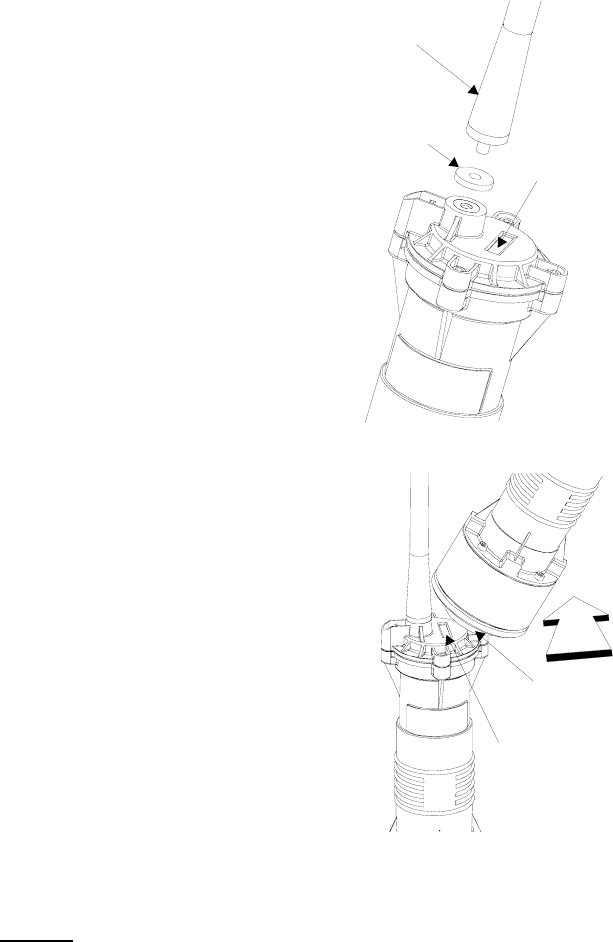
1. Ensure that both the screw thread on the
aerial and the screw hole on top of the Permalog are
clean.
3. Reset the Permalog by passing a magnet
close to, and across, the communications window.
(Fig 2). Look into the communications window to see
a faint red LED flash every 5 seconds. If the LED
does not flash, then pass the magnet across the
window again and look into the window to verify.
4. Attach the Permalog to a metal pipe fitting
using the magnet on the base. Always ensure that
the contact point is free from dirt so that the magnet
makes a good contact.
5. The Permalog must remain in an upright/
vertical position when installed. The aerial is flexible
and may be bent out of the way to refit a manhole
cover.
the aerial into the top of the Permalog
firmly by hand. Ensure that the rubber washer is
fitted to make a watertight seal (Fig 1).
Resetting the Permalog erases the internal memory.
Should the logger be moved from one location to
another, it must be reset to remove historical data.
This is the only way to reset the unit - it cannot be
switched off even if a magnet is passed over it many
times. Once reset, it will operate continuously for the
life of the batteries. The guaranteed battery life is 5
years. Any medium strength magnet will reset the
Permalog; for convenience, the magnet on another
Permalog may be used (Fig 2).
Do not attempt to remove the magnet from the
bottom of any Permalog - it is loctited on and should
not be removed.
Only aerials supplied by Palmer Environmental may
be used. Permalog units have no user serviceable
parts. If any unit does not appear to function
correctly then it must be returned to Palmer
Environmental or an authorised Palmer
representative.
2. Screw
Permalog is a permanently installed
leak noise monitoring unit.
It transmits a short 1mW radio
signal at 173MHz every 5 seconds.
AERIAL
RUBBER
WASHER
COMMUNICATIONS
WINDOW
MAGNET
FLASHING LED
Fig 1
Fig 2
20
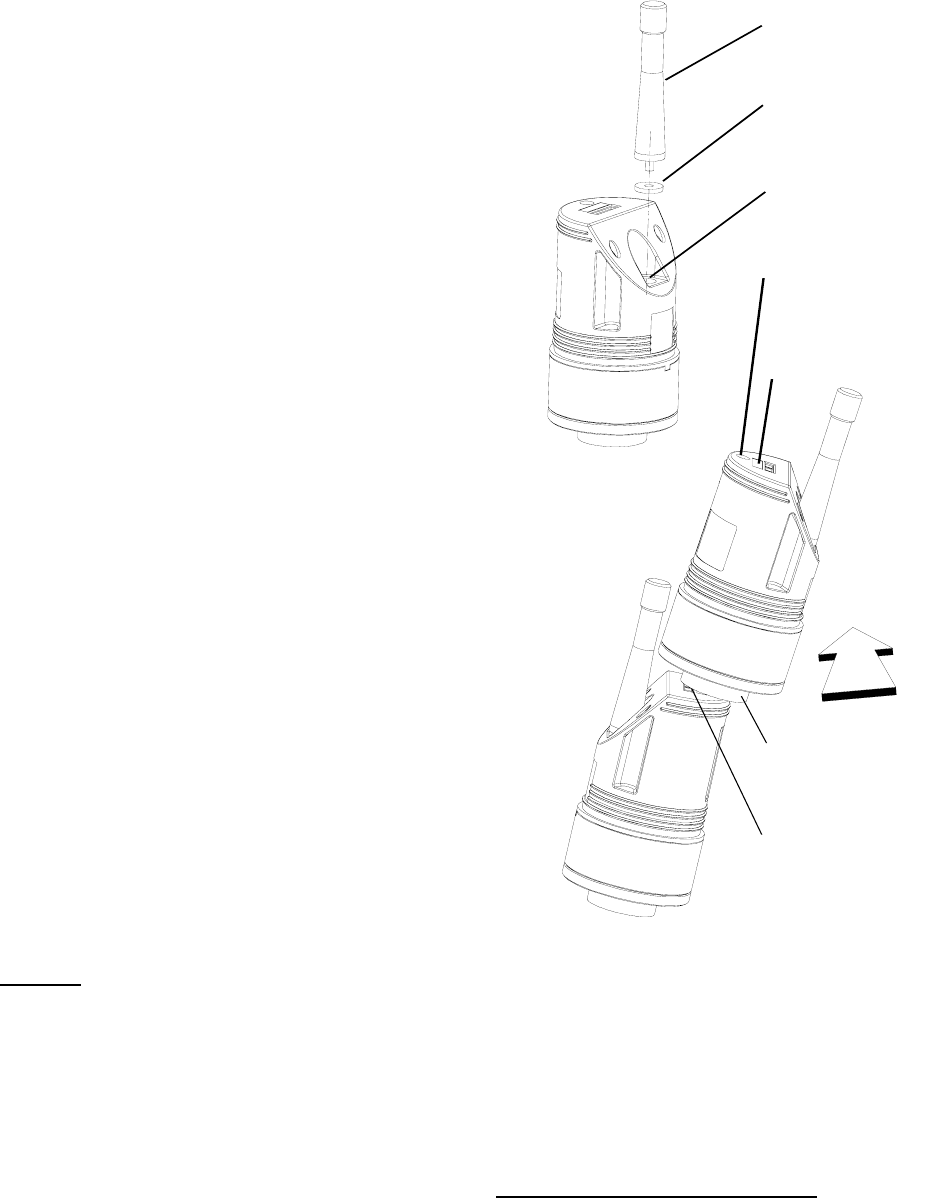
Aerial
Rubber
washer
Communications
window
Fig 1
Fig 2
Magnet
Flashing LED
Screw thread for
optional hook
Lower recessed
screw thread for
aerial
Permalog 2 Deployment Instructions
1. Ensure that both the screw thread on the aerial
and the lower recessed screw hole in the Permalog are
clean, then screw the aerial into the lower screw hole
firmly by hand. Ensure that the rubber washer is fitted to
make a watertight seal (Fig 1). Remove the magnet
keeper and store for later use.
2. Start/Reset the Permalog by passing a magnet
close to, and across, the communications window. (Fig 2).
Look into the communications window to see a faint red
LED flash 5 consecutive times and then once every 5
seconds. If the LED does not flash, then pass the magnet
across the window again and look into the window to
verify.
Resetting the Permalog erases the internal memory.
Should the logger be moved from one location to another,
it must be reset to remove historical data.
This is the only way to reset the unit. Once reset, it will
operate continuously for the life of the batteries. It can only
be switched off using a Permalog interrogator unit. The
guaranteed battery life depends on factory settings. Any
medium strength magnet will reset the Permalog; for
convenience, the magnet on another Permalog may be
used (Fig 2).
Do not attempt to remove the magnet from the bottom of
any Permalog - it is loctited on and should not be removed.
3. Attach the Permalog to a metal pipe-fitting using
the magnet on the base. Always ensure that the contact
point is free from dirt so that the magnet makes a good
contact. If an eye-hook (optional accessory) is used, this
must be screwed into the top of the logger.
4. For best performance, it is recommended that the
Permalog unit is deployed in a vertical/upright position.
Only use aerials supplied by Palmer Environmental. A
right angled connector (optional accessory) is available to
enable horizontally positioned loggers to transmit signals
vertically.
Permalog units have no user serviceable parts. The
enclosure protects the user from electrical shock and other
hazards. Servicing must be referred to competent
personnel. If any unit does not appear to function correctly
then it must be returned to Palmer Environmental or an
authorised Palmer representative.
Caution: Permalog units contain batteries. There is a danger of explosion if they are
incorrectly replaced. They must only be replaced with the same or equivalent type
recommended by the manufacturer. Used batteries must be disposed of according to the
manufacturers instructions.
Redeployment
Ensure you have sufficient keepers for the magnets. Removing keepers from logger magnets
takes some effort. Always insert a piece of thin card between the keeper and the magnet to
make this job easier.
On retrieval, always grasp the main body of the logger. Do not pull loggers by the aerials.
Ensure the magnet from one logger is kept more than 3 inches (8cms) away from the window
of the nearest logger. If any magnet is held too close to the logger window, the logger
will continually reset causing an incorrect internal clock setting and subsequent
erroneous results.
An option during transport is to magnetically attach the loggers to a large piece of metal. This
will act as a keeper and prevent the loggers from moving.
21
Warranty
Permalog® loggers are warrantied 3 years.
Permalog® Patrollers are warrantied 1 year.
All equipment is warranted by Palmer Environmental Ltd to be free from
defects in materials and workmanship for a period of one year (unless
otherwise stated) from the date of shipment to the original customer. This
warranty is only valid if the equipment has been installed and used in the
correct manner as described in this manual.
Repair or replacement (at Palmer Environmental’s option) will be made
without charge provided the above conditions have been met.
If any problems occur, notify Palmer Environmental Ltd or its authorised
representative giving full details of the problem, and the model and serial
number of the equipment. You will receive technical advice and/or shipping
instructions depending upon the nature of the problem.
Patents
The Permalog® system is patented in the United Kingdom (GB2335041,
GB2361062, GB2361319, GB2361540, GB2361541).
Patents pending in Europe, United States, Hong Kong, Japan.
Palmer Environmental Ltd
Ty Coch House
Llantarnam Park Way
Cwmbran
NP44 3AW
United Kingdom
Tel: +44 (0) 1633 489479
Fax: +44 (0) 1633 877857
email:info@palmer.co.uk
http://www.palmer.co.uk
