PaloSanto Solutions LXP100 IP PHONE User Manual LXP100 usermanual 1 0 5 23
PaloSanto Solutions IP PHONE LXP100 usermanual 1 0 5 23
UserManual.wiki
>
PaloSanto Solutions
>
LXP100 User Manual
User Manual
Navigation menu
Upload a User Manual
Namespaces
Wiki Guide
HTML
PDF
Info
Views
User Manual
Discussion / Help
Navigation
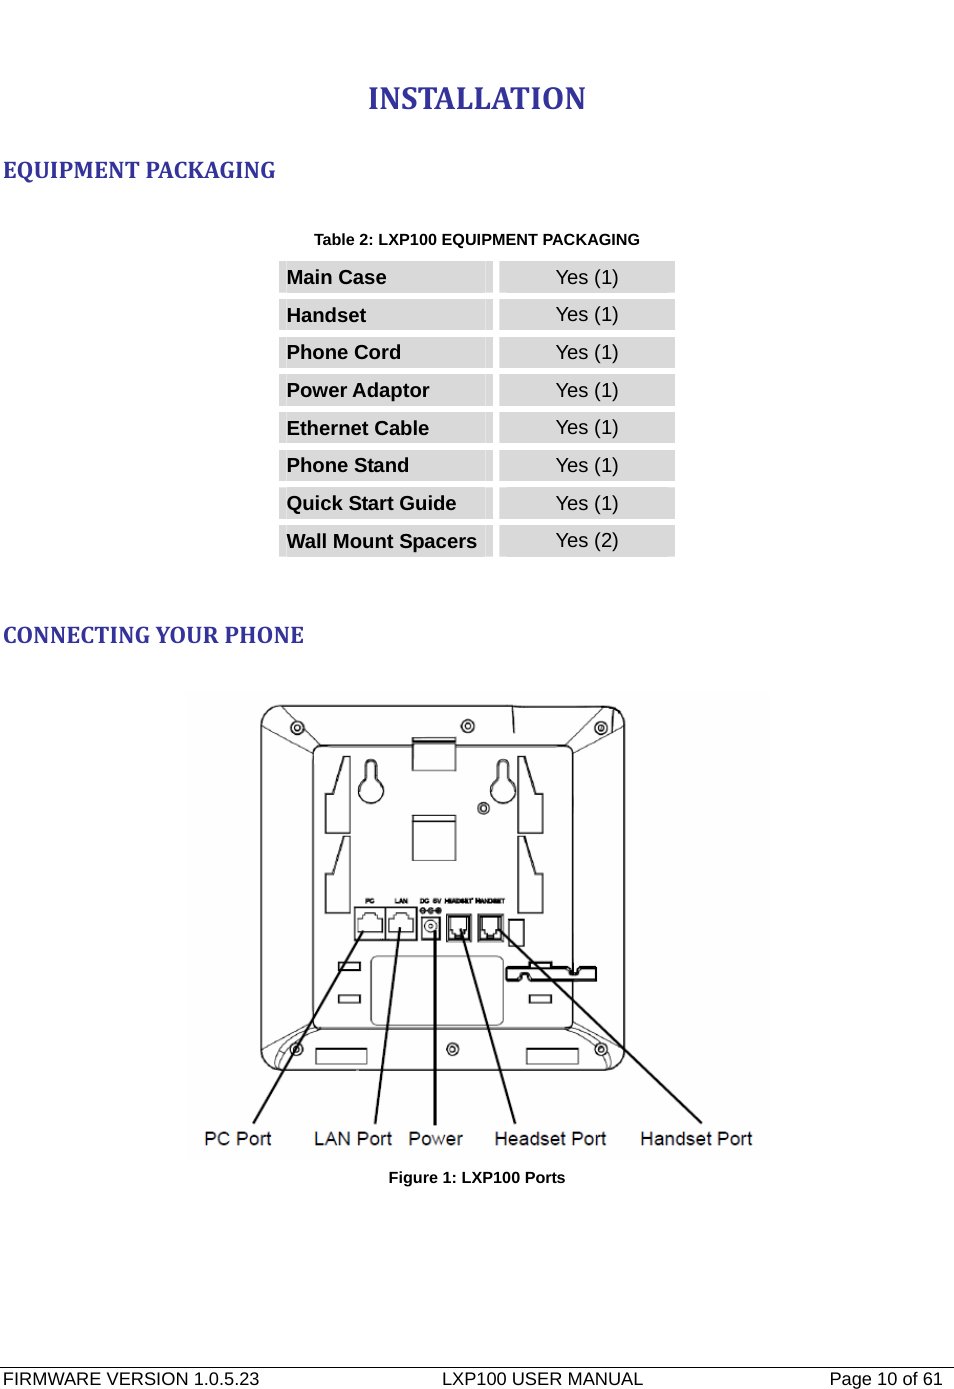
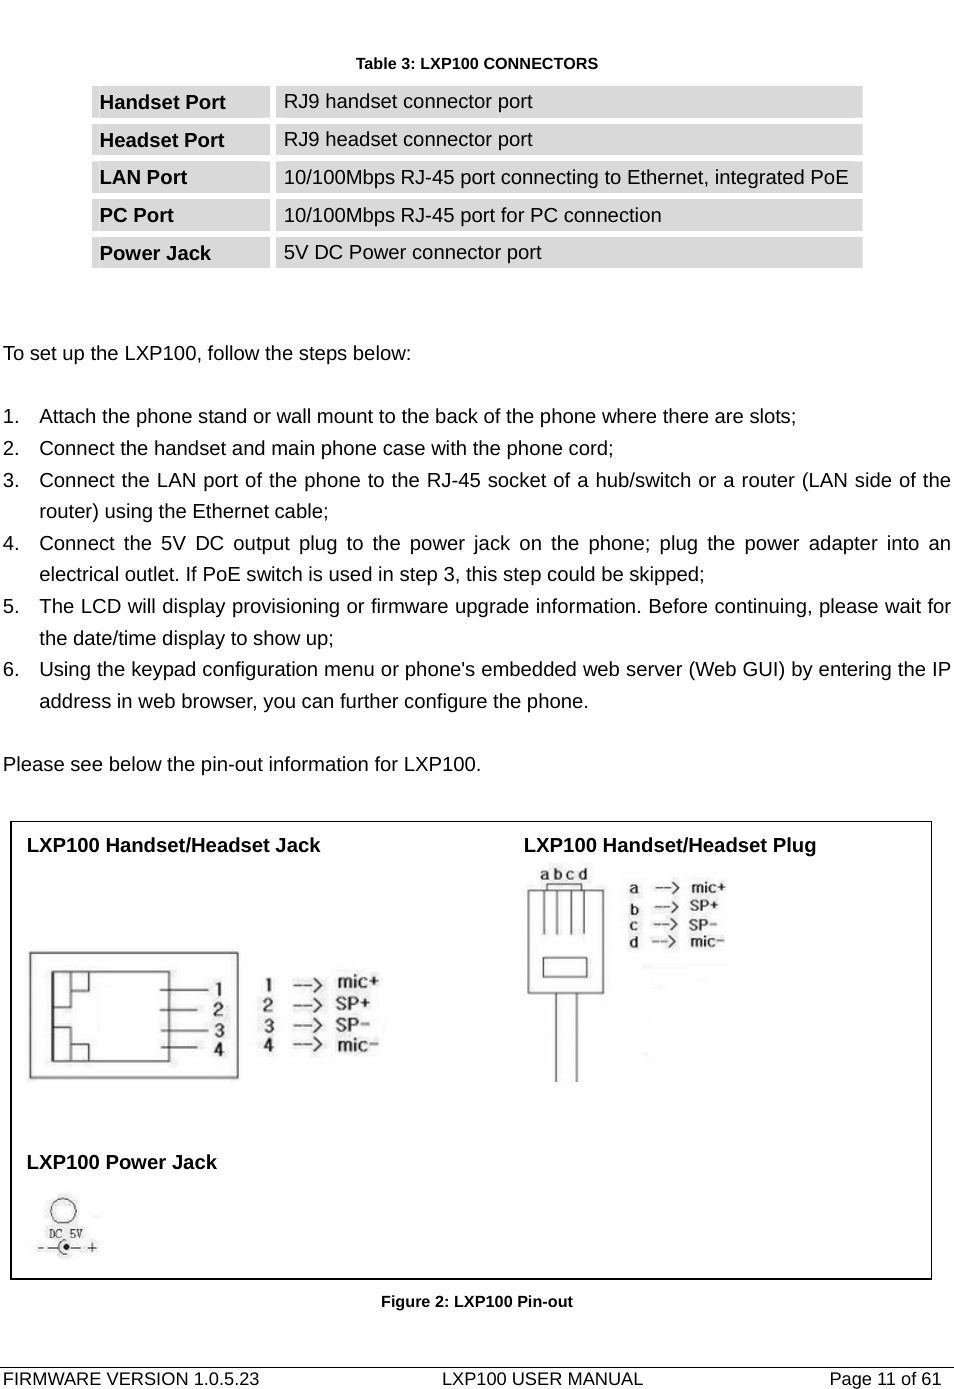


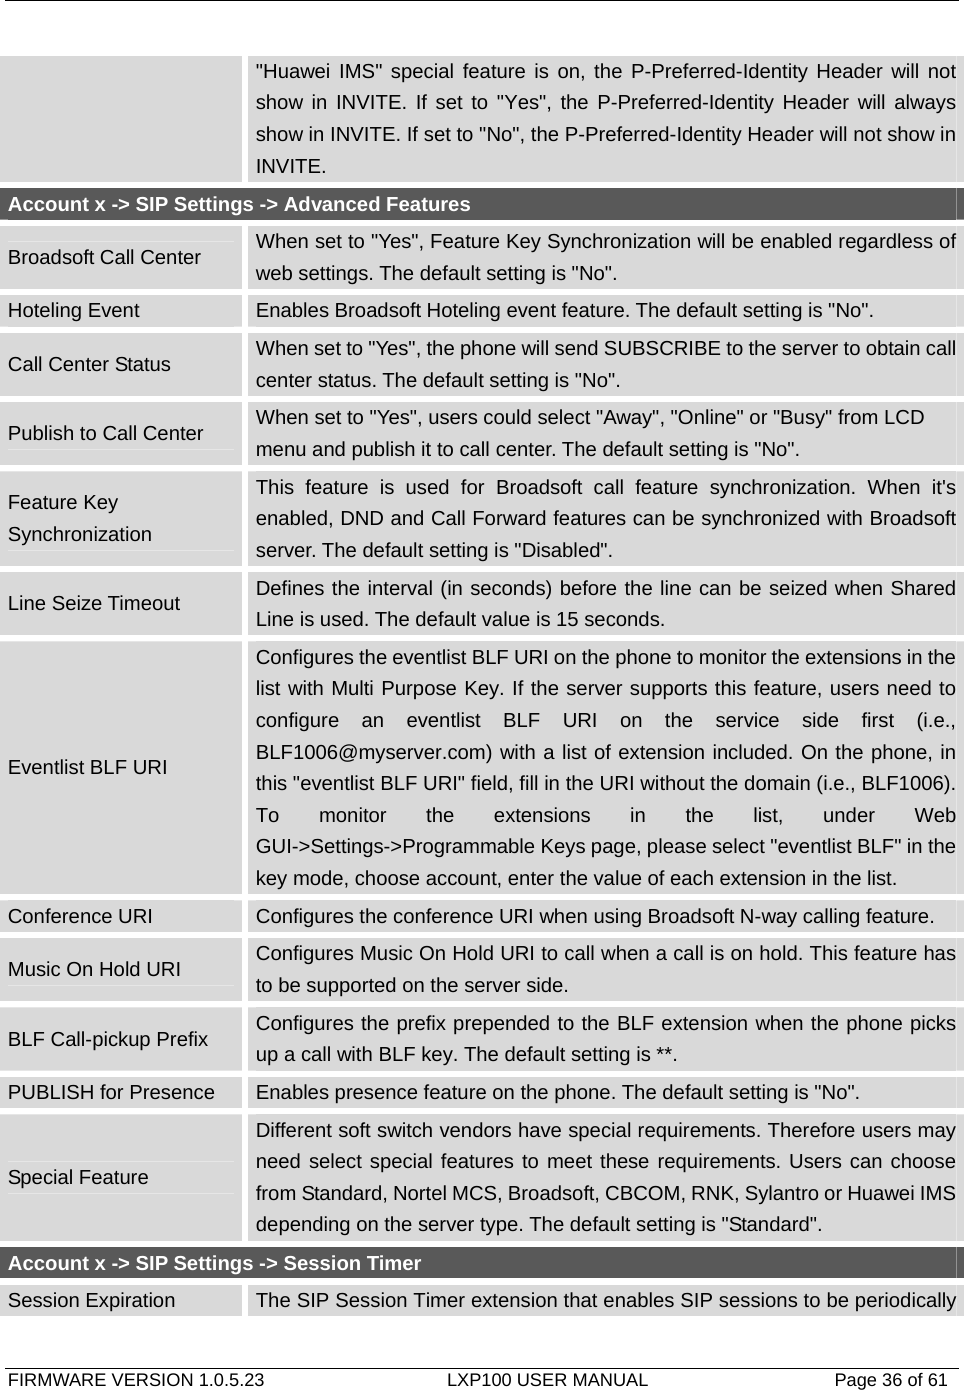
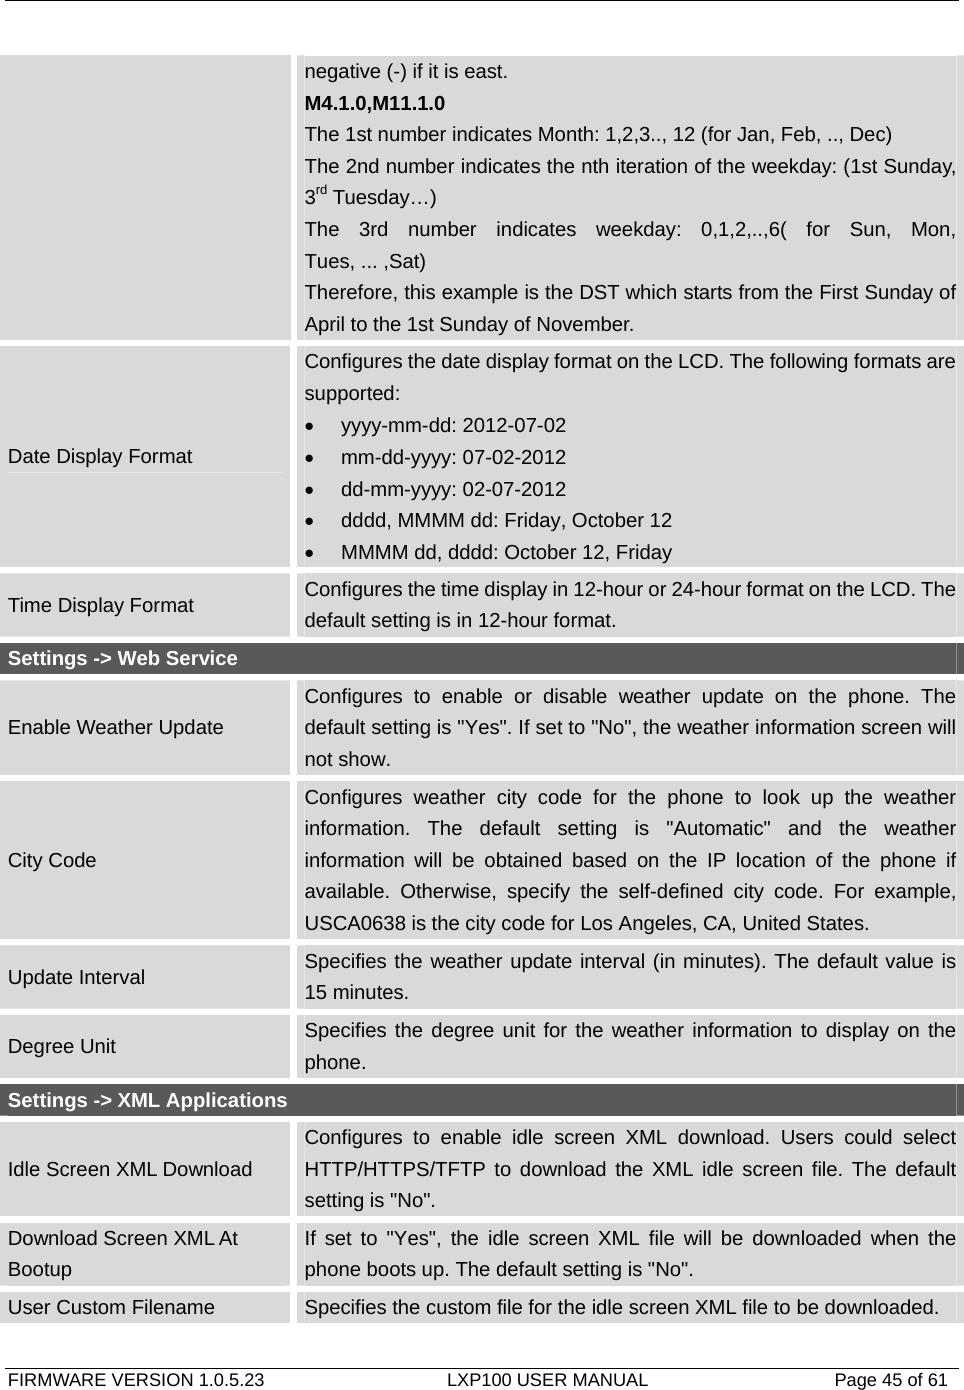
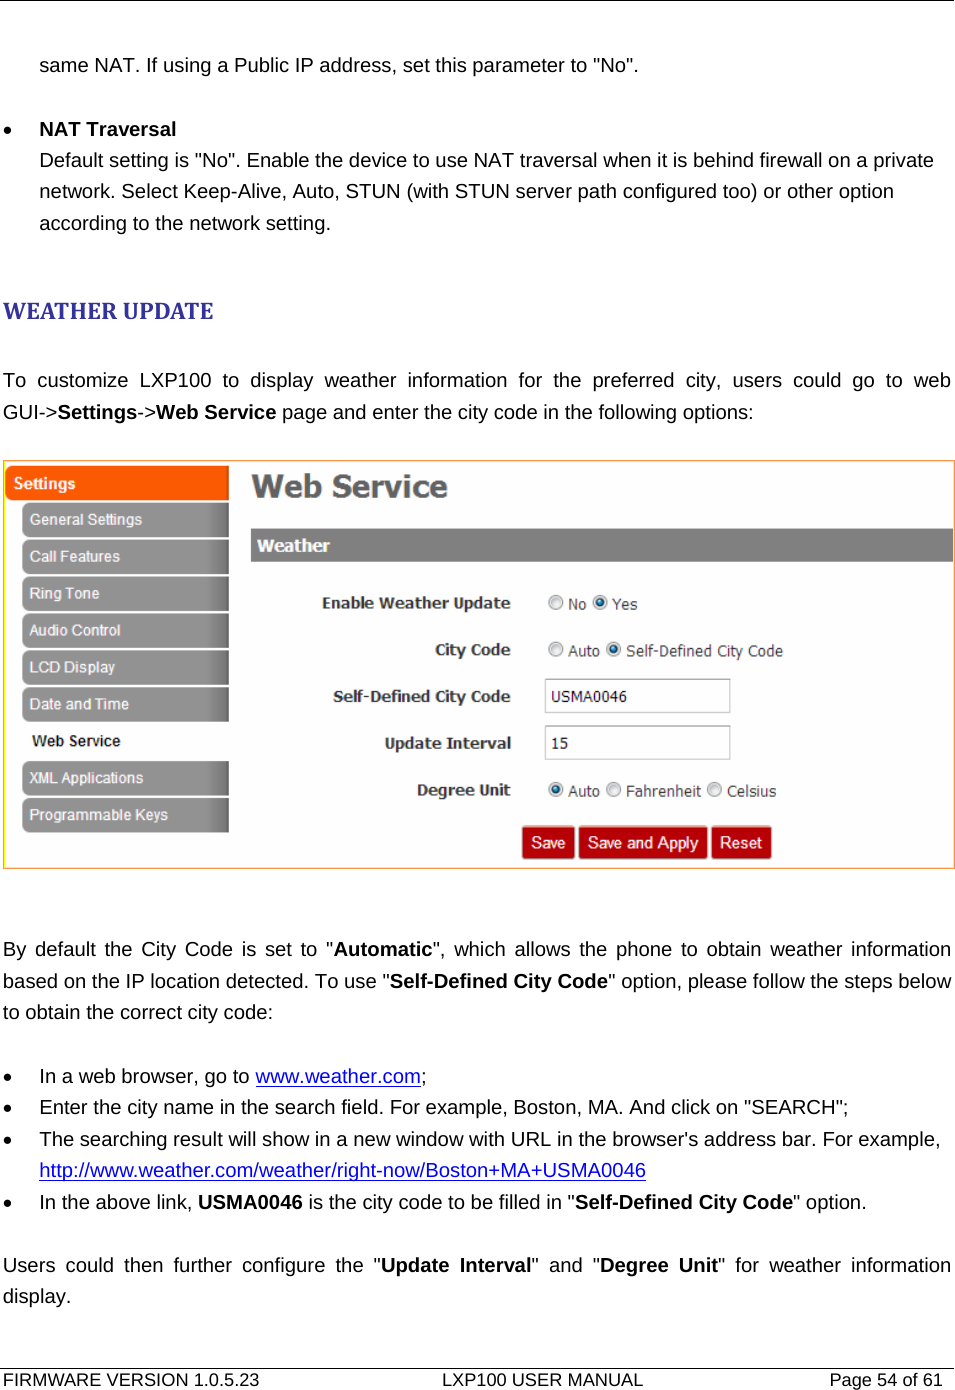
![FIRMWARE VERSION 1.0.5.23 LXP100 USER MANUAL Page 39 of 61 telephone number. This parameter configures the allowed dial plan for the phone. Dial Plan Rules: 1. Accepted Digits: 1,2,3,4,5,6,7,8,9,0 , *, #, A,a,B,b,C,c,D,d; 2. Grammar: x - any digit from 0-9; a) xx+ - at least 2 digit numbers b) xx. - only 2 digit numbers c) ^ - exclude d) [3-5] - any digit of 3, 4, or 5 e) [147] - any digit of 1, 4, or 7 f) <2=011> - replace digit 2 with 011 when dialing g) | - the OR operand • Example 1: {[369]11 | 1617xxxxxxx} Allow 311, 611, and 911 or any 10 digit numbers with leading digits 1617; • Example 2: {^1900x+ | <=1617>xxxxxxx} Block any number of leading digits 1900 or add prefix 1617 for any dialed 7 digit numbers; • Example 3: {1xxx[2-9]xxxxxx | <2=011>x+} Allows any number with leading digit 1 followed by a 3 digit number, followed by any number between 2 and 9, followed by any 7 digit number OR Allows any length of numbers with leading digit 2, replacing the 2 with 011 when dialed. Example of a simple dial plan used in a Home/Office in the US: { ^1900x. | <=1617>[2-9]xxxxxx | 1[2-9]xx[2-9]xxxxxx | 011[2-9]x. | [3469]11 } Explanation of example rule (reading from left to right): • ^1900x. - prevents dialing any number started with 1900; • <=1617>[2-9]xxxxxx - allows dialing to local area code (617) numbers by dialing 7 numbers and 1617 area code will be added automatically; • 1[2-9]xx[2-9]xxxxxx |- allows dialing to any US/Canada Number with 11 digits length; • 011[2-9]x - allows international calls starting with 011; • [3469]11 - allows dialing special and emergency numbers 311, 411, 611 and 911.](https://usermanual.wiki/PaloSanto-Solutions/LXP100/User-Guide-1944406-Page-39.png)
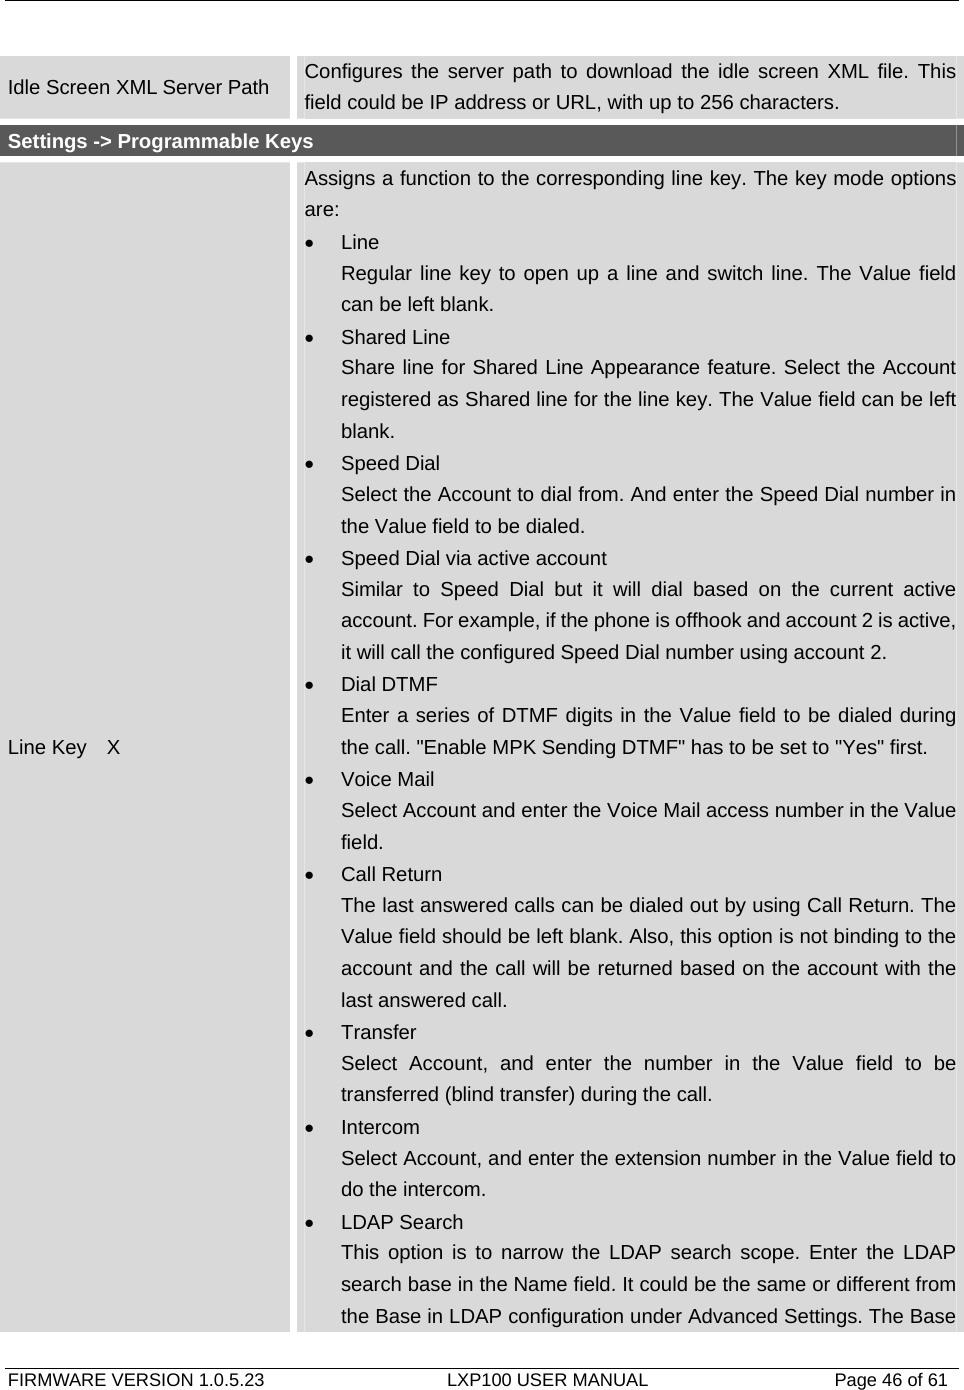
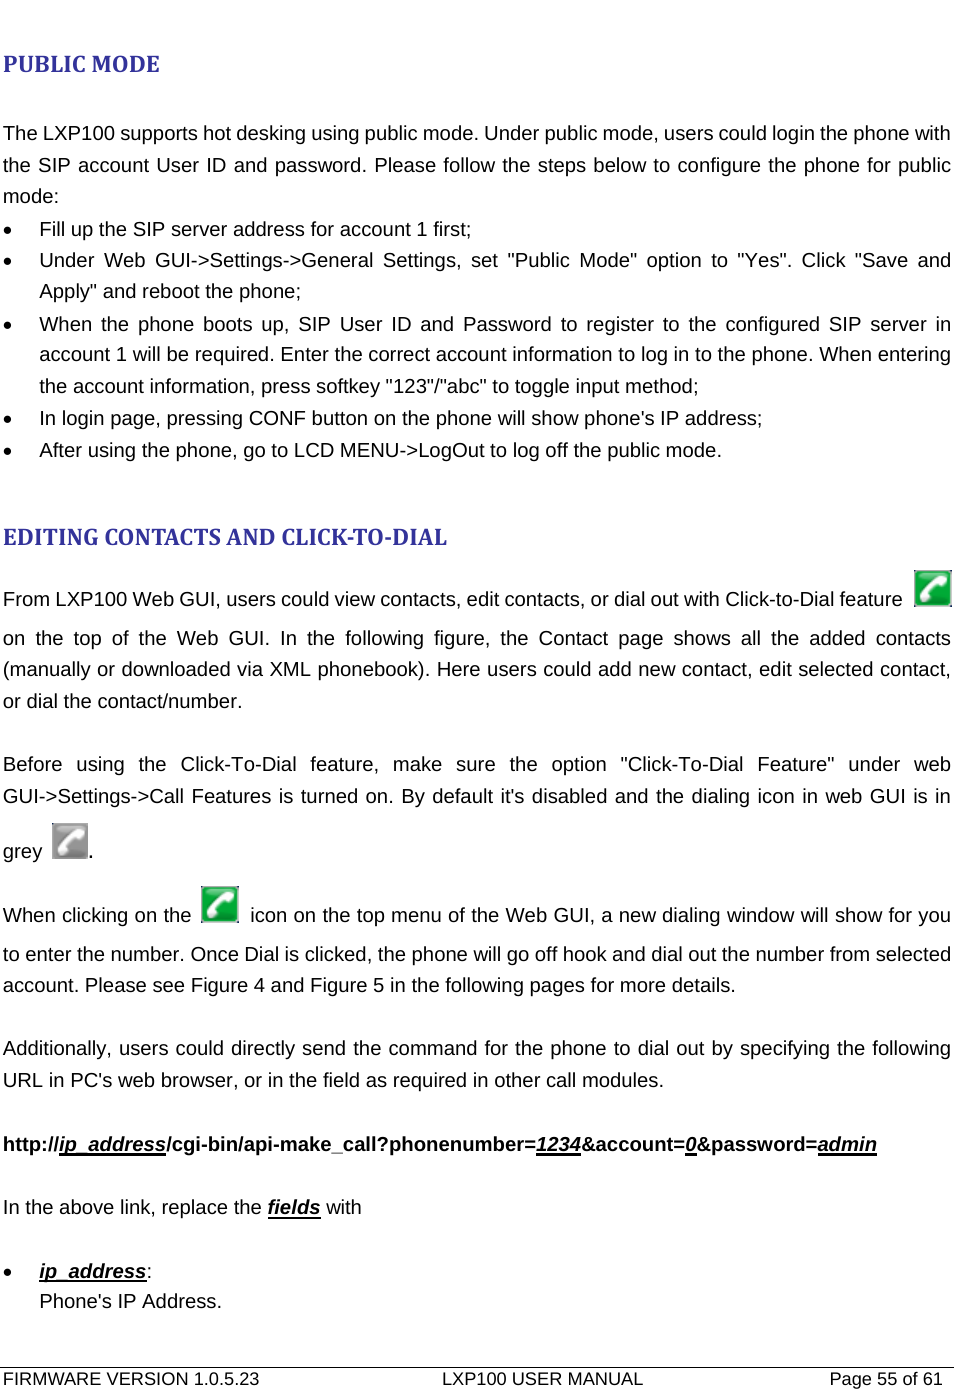
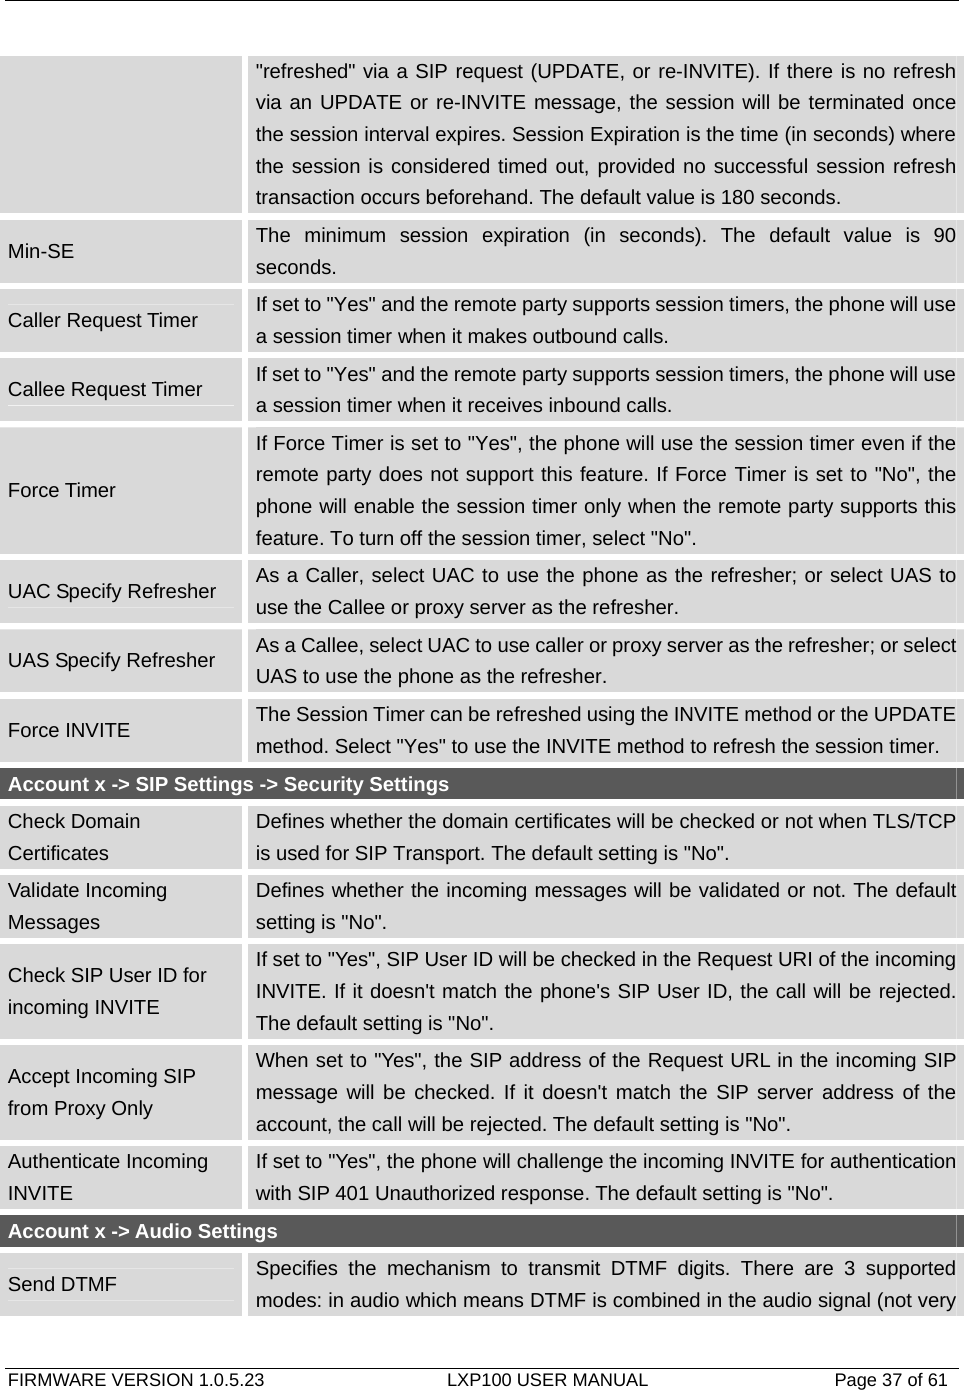
![FIRMWARE VERSION 1.0.5.23 LXP100 USER MANUAL Page 40 of 61 Note: In some cases where the user wishes to dial strings such as *123 to activate voice mail or other applications provided by their service provider, the * should be predefined inside the dial plan feature. An example dial plan will be: { *x+ } which allows the user to dial * followed by any length of numbers. Delayed Call Forward Wait Time Defines the timeout (in seconds) before the call is forwarded on no answer. The default value is 20 seconds. Enable Call Features When enabled, Do No Disturb, Call Forward and other call features will be supported locally provided ITSP support those features. The default setting is "Yes". If set to "No", ForwardAll softkey will be hidden for Account 1. Call Log Configures Call Log setting on the phone. You can log all calls, only log incoming/outgoing calls or disable call log. The default setting is "Log All Calls". Account Ring Tone Allows users to configure the ringtone for the account. Users can choose from different ringtones from the dropdown menu. Matching Incoming Caller ID Specifies matching rules with number, pattern or Alert Info text. When the incoming caller ID or Alert Info matches the rule, the phone will ring with selected distinctive ringtone. Matching rules: • Specific caller ID number. For example, 8321123; • A defined pattern with certain length using x and + to specify, where x could be any digit from 0 to 9. Samples: xx+ : at least 2-digit number; xx : only 2-digit number; [345]xx: 3-digit number with the leading digit of 3, 4 or 5; [6-9]xx: 3-digit number with the leading digit from 6 to 9. • Alert Info text Users could configure the matching rule as certain text (e.g., priority) and select the custom ring tone mapped to it. The custom ring tone will be used if the phone receives SIP INVITE with Alert-Info header in the following format: Alert-Info: <http://127.0.0.1>; info=priority Selects the distinctive ring tone for the matching rule. When the incoming caller ID or Alert Info matches the rule, the phone will ring with the selected ring. Ring Timeout Defines the timeout (in seconds) for the rings on no answer. The default setting is 60 seconds. Send Anonymous If set to "Yes", the "From" header in outgoing INVITE messages will be set to anonymous, essentially blocking the Caller ID to be displayed.](https://usermanual.wiki/PaloSanto-Solutions/LXP100/User-Guide-1944406-Page-40.png)
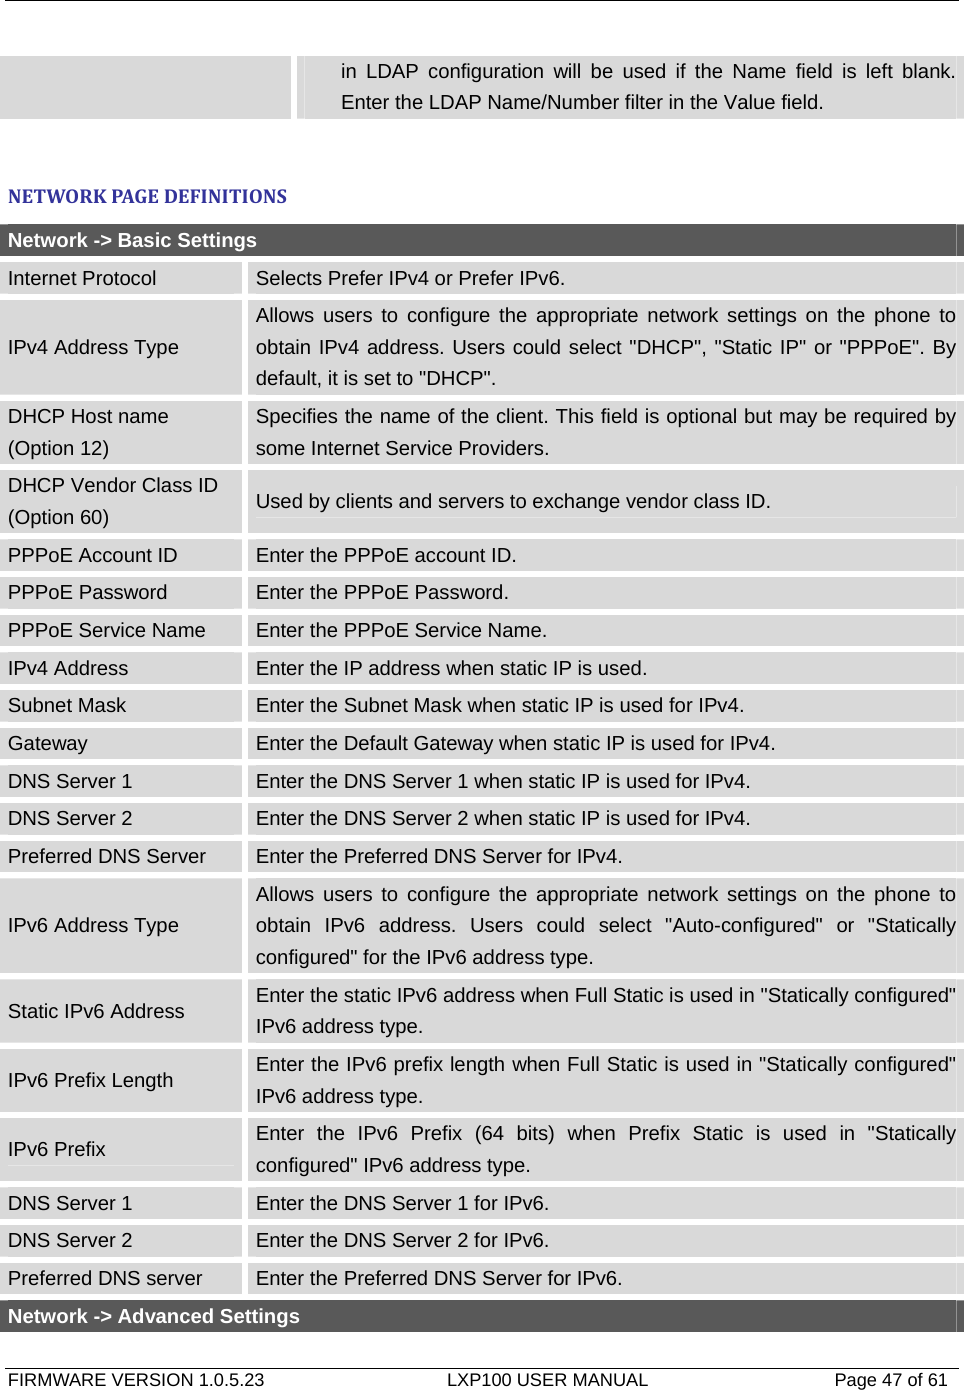
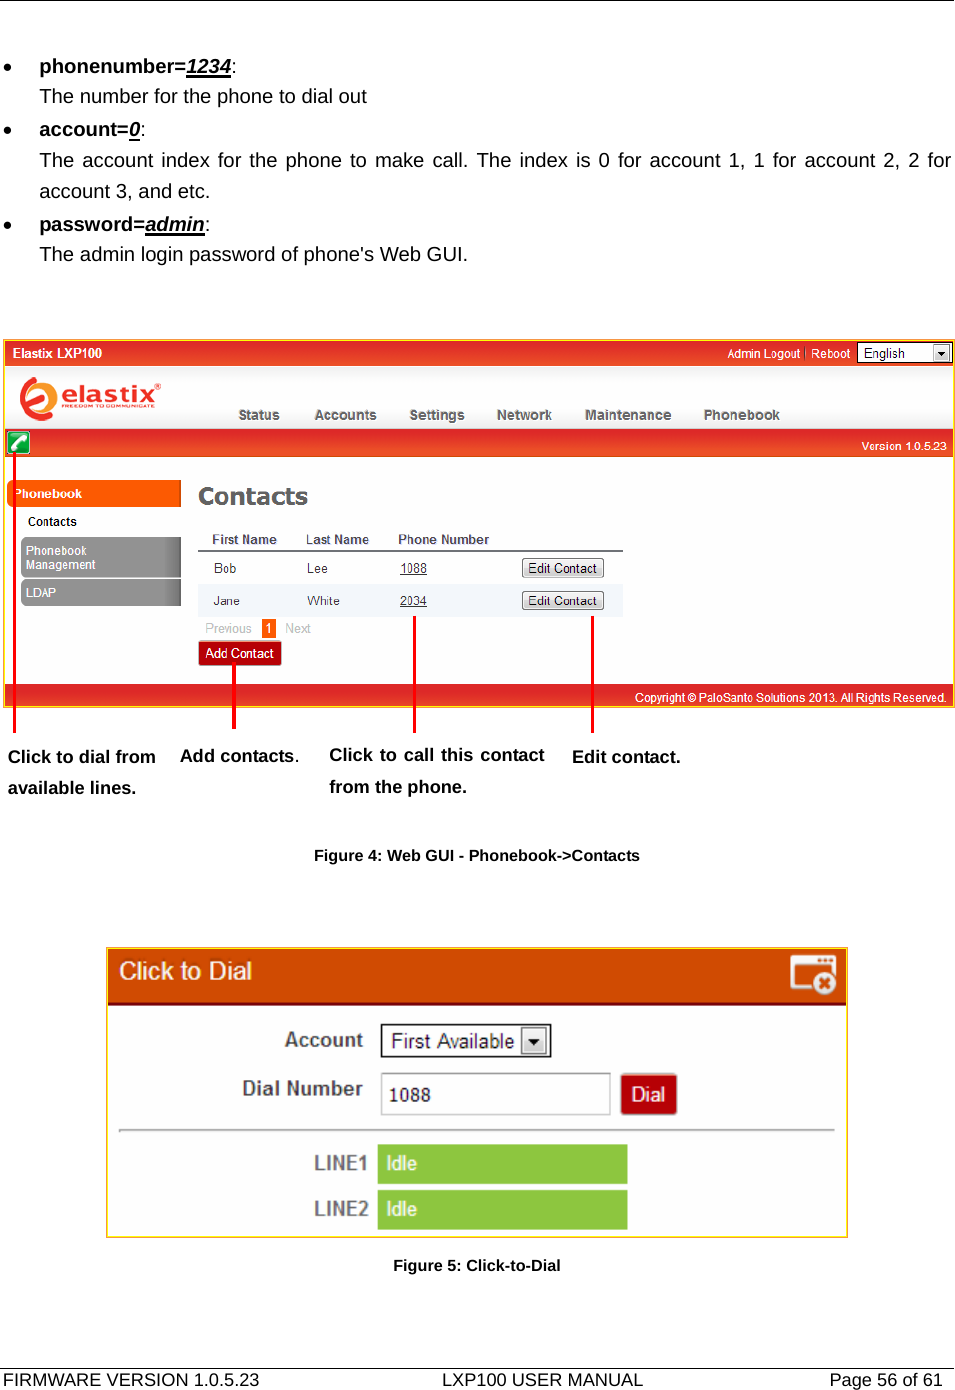
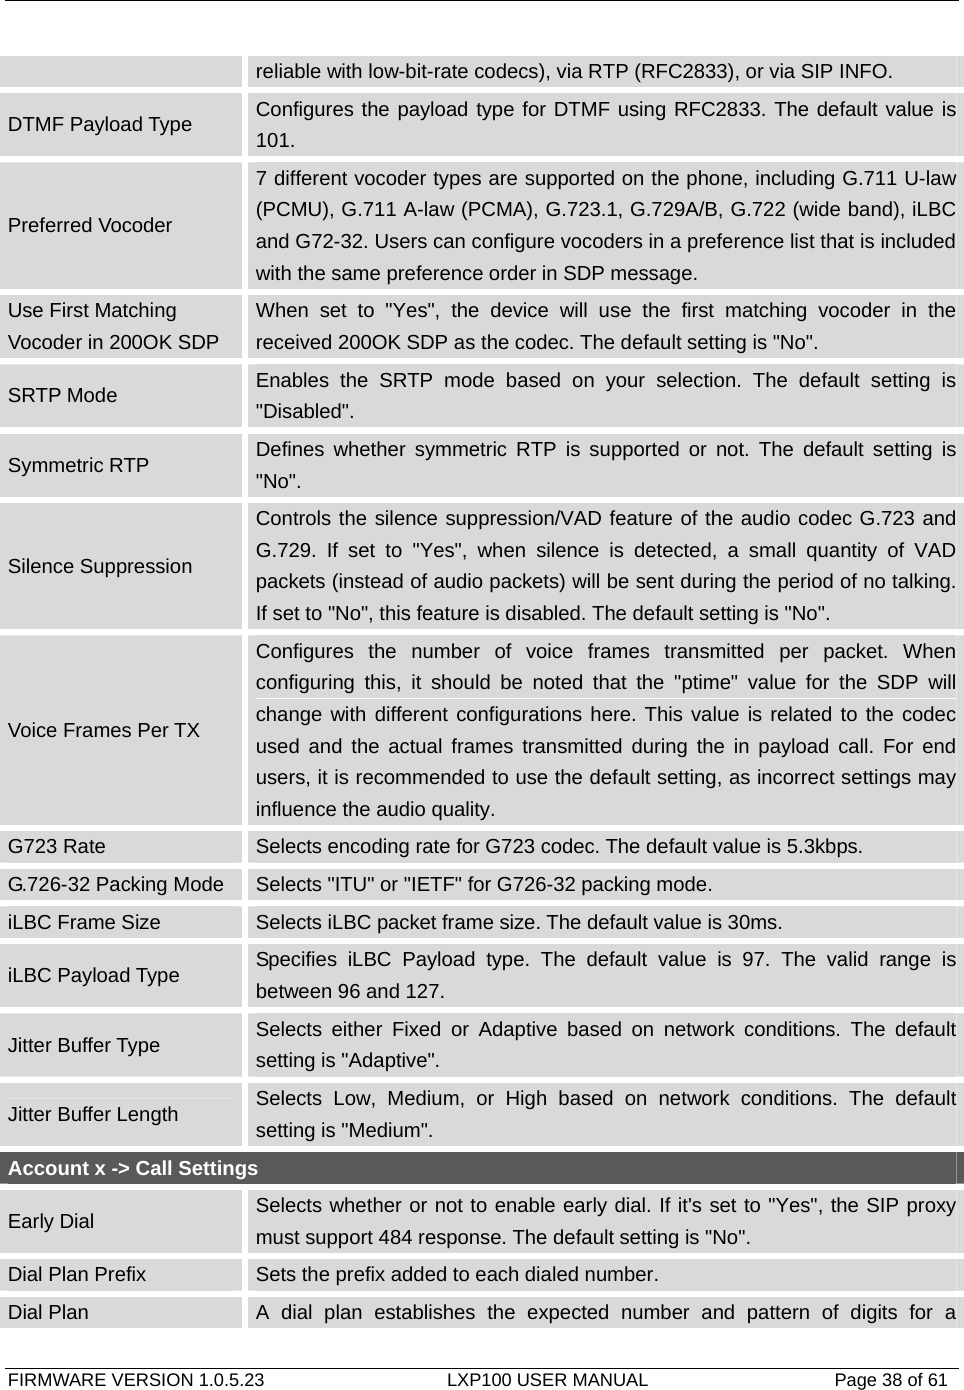
![FIRMWARE VERSION 1.0.5.23 LXP100 USER MANUAL Page 43 of 61 In-call dial number on pressing transfer key Configures the number for the phone to dial as DTMF during the call using TRAN button. Auto-Attended Transfer If set to "Yes", the phone will use attended transfer by default. The default setting is "No". Do Not Escape # as %23 in SIP URI Specifies whether to replace # by %23 or not for some special situations. The default setting is "No". Click-To-Dial Feature Enables Click-To-Dial feature. The default setting is "Disabled". Call History Flash Writing: Write Timeout Defines the interval (in seconds) to save the call history to phone's flash. The default value is 300 seconds. Call History Flash Writing: Max Unsaved Log Defines the number of unsaved logs before written to phone's flash. The default value is 200 entries. Settings -> Ring Tone Call Progresses Tones: System Ring Tone Dial Tone Message Waiting Ring Back Tone Call-Waiting Tone Busy Tone Reorder Tone Configures ring or tone frequencies based on parameters from local telecom. The default value is North American standard. Frequencies should be configured with known values to avoid uncomfortable high pitch sounds. Syntax: f1=val,f2=val[,c=on1/off1[-on2/off2[-on3/off3]]]; (Frequencies are in Hz and cadence on and off are in 10ms) ON is the period of ringing (“On time” in ‘ms’) while OFF is the period of silence. In order to set a continuous ring, OFF should be zero. Otherwise it will ring ON ms and a pause of OFF ms and then repeat the pattern. Up to three cadences are supported. Call Waiting Tone Gain Configures the call waiting tone gain to adjust call waiting tone volume. The default setting is "Low". Settings -> Audio Control Headset Key Mode When headset is connected to the phone, users could use the HEADSET button in "Default Mode" or "Toggle Headset/Speaker". • Default Mode: ¾ When the phone is in idle, press HEADSET button to off hook the phone and make calls by using headset. Headset icon will display on the screen in dialing/talking status. ¾ When there is an incoming call, press HEADSET button to pick up the call using headset. ¾ When there is an active call using headset, press HEADSET button to hang up the call. ¾ When Speaker/Handset is being used in dialing/talking status,](https://usermanual.wiki/PaloSanto-Solutions/LXP100/User-Guide-1944406-Page-43.png)
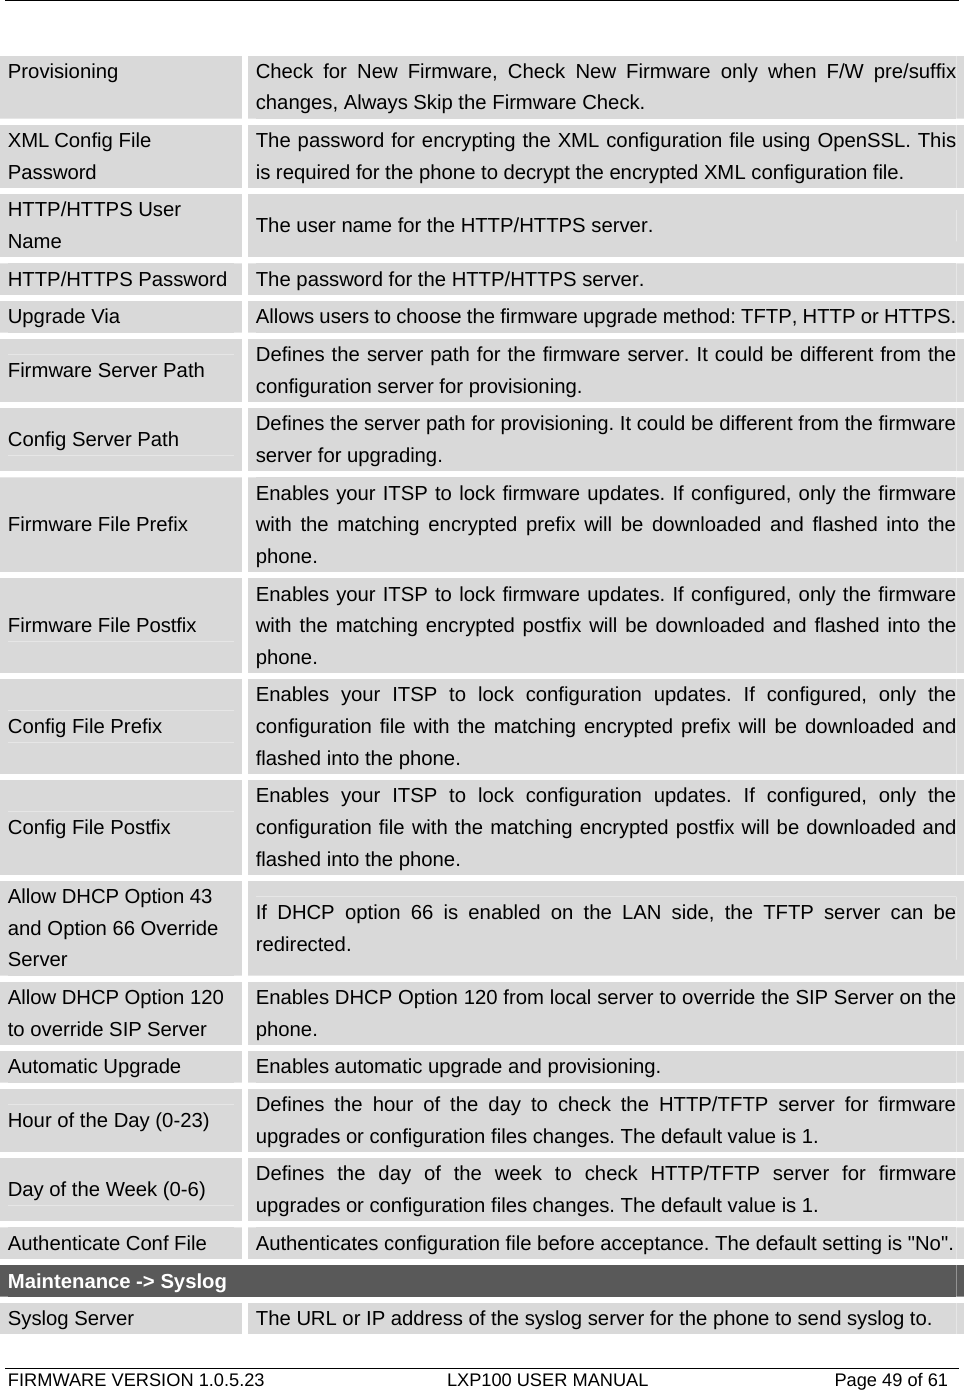
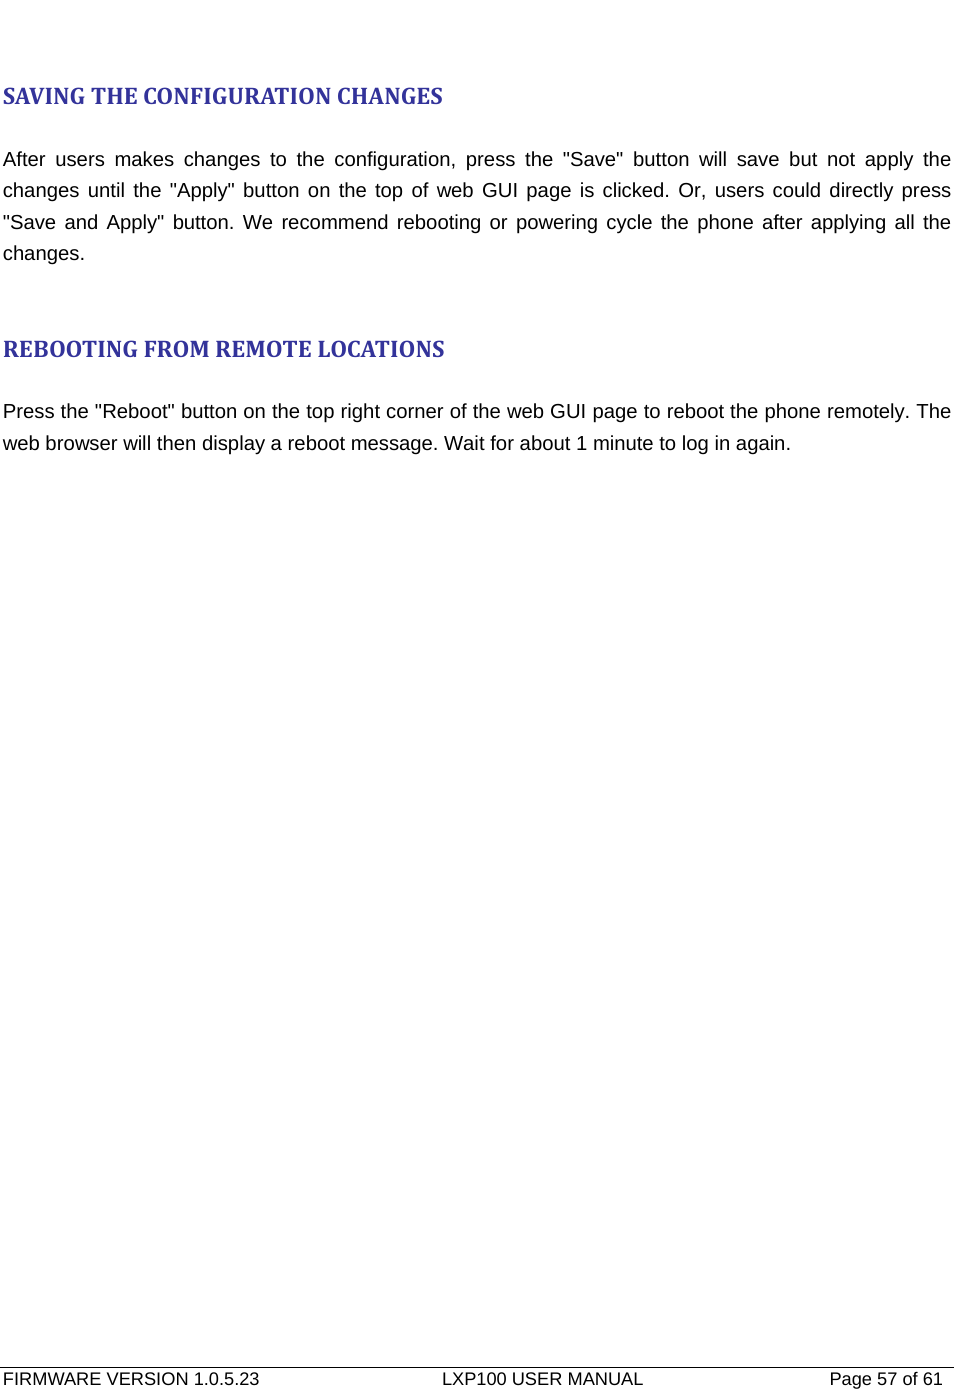
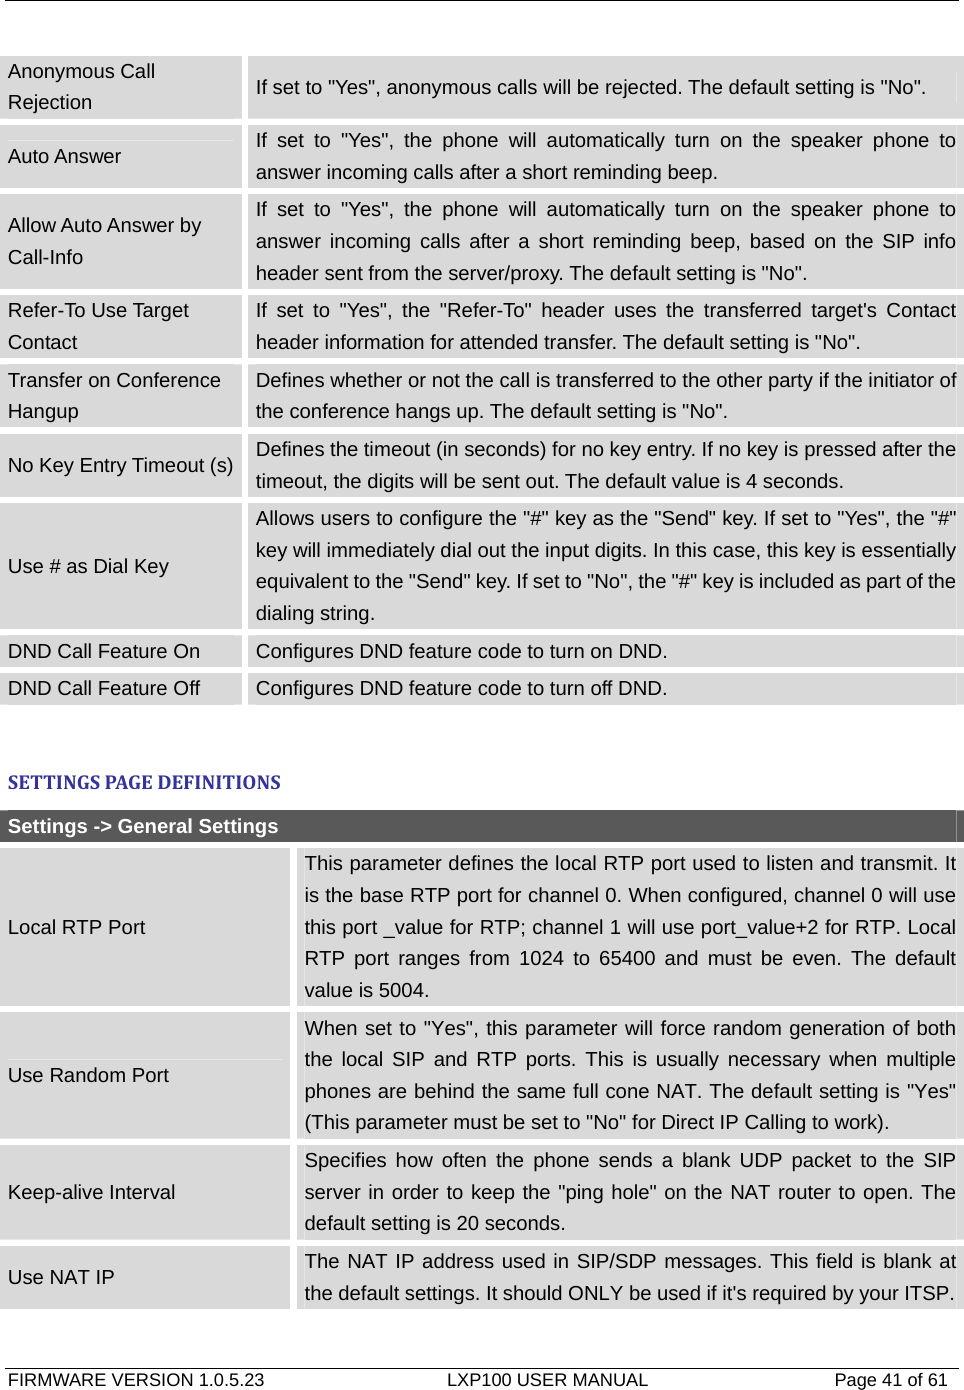
![FIRMWARE VERSION 1.0.5.23 LXP100 USER MANUAL Page 44 of 61 press HEADSET button to switch to headset. Press it again to hang up the call. Or press speaker/Handset to switch back to the previous mode. • Toggle Headst/Speaker: ¾ When the phone is in idle, press HEADSET button to switch to Headset mode. The headset icon will display on the left side of the screen. In this mode, if pressing Speaker button or Line key to off hook the phone, headset will be used. ¾ When there is an active call, press HEADSET button to toggle between Headset and Speaker. Always Ring Speaker Configures to enable or disable the speaker to ring when headset is used on "Toggle Headset/Speaker" mode. If set to "Yes", when the phone is in Headset "Toggle Headset/Speaker" mode, both headset and speaker will ring on incoming call. The default setting is "No". Headset TX gain Configures the transmission gain of the headset. The default value is 0dB. Headset RX gain Configures the receiving gain of the headset. The default value is 0dB. Handset TX gain Configures the transmission gain of the handset. The default value is 0 dB. Settings -> LCD Display LCD Contrast Configures the LCD contrast level (from 0 to 20). The default value is 10.Settings -> Date and Time NTP Server Defines the URL or IP address of the NTP server. The phone may obtain the date and time from the server. Allow DHCP Option 42 Override NTP Server Defines whether DHCP Option 42 should override NTP server or not. When enabled, DHCP Option 42 will override the NTP server if it's set up on the LAN. The default setting is "Yes". Time Zone Configures the date/time used on the phone according to the specified time zone. Self-Defined Time Zone This parameter allows the users to define their own time zone. The syntax is: std offset dst [offset], start [/time], end [/time] Default is set to: MTZ+6MDT+5,M4.1.0,M11.1.0 MTZ+6MDT+5 This indicates a time zone with 6 hours offset with 1 hour ahead which is U.S central time. If it is positive (+) if the local time zone is west of the Prime Meridian (A.K.A: International or Greenwich Meridian) and](https://usermanual.wiki/PaloSanto-Solutions/LXP100/User-Guide-1944406-Page-44.png)