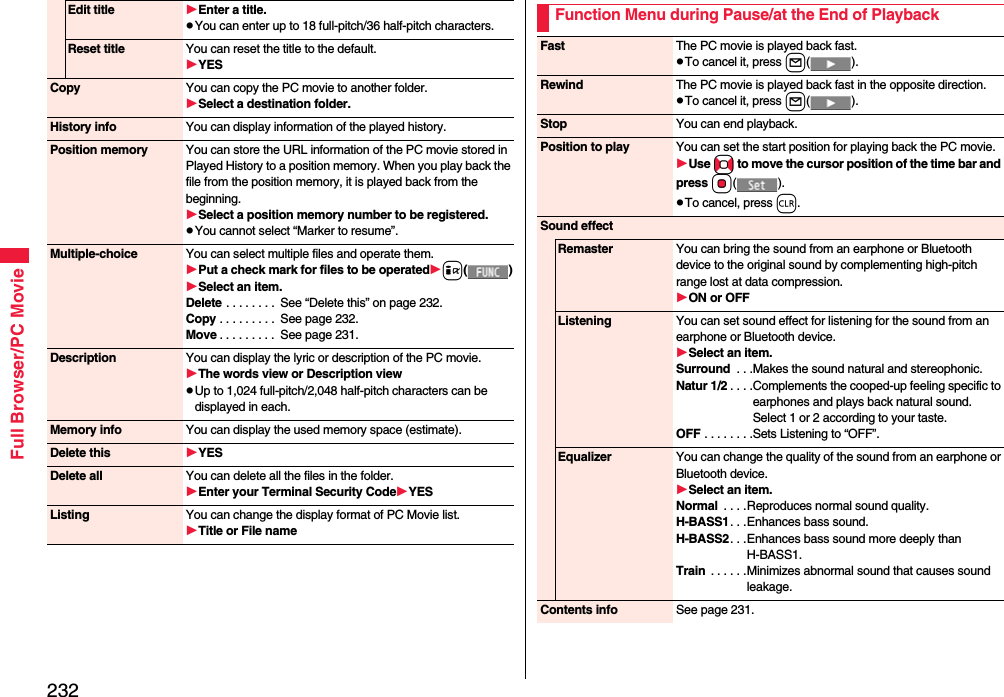
Panasonic Connect 208009A UMTS/ GSM Cellular Mobile with Bluetooth® and RFID User Manual 000 P 01A
Panasonic Mobile Communications Development of Europe Ltd UMTS/ GSM Cellular Mobile with Bluetooth® and RFID 000 P 01A
Contents
User Manual Part 2
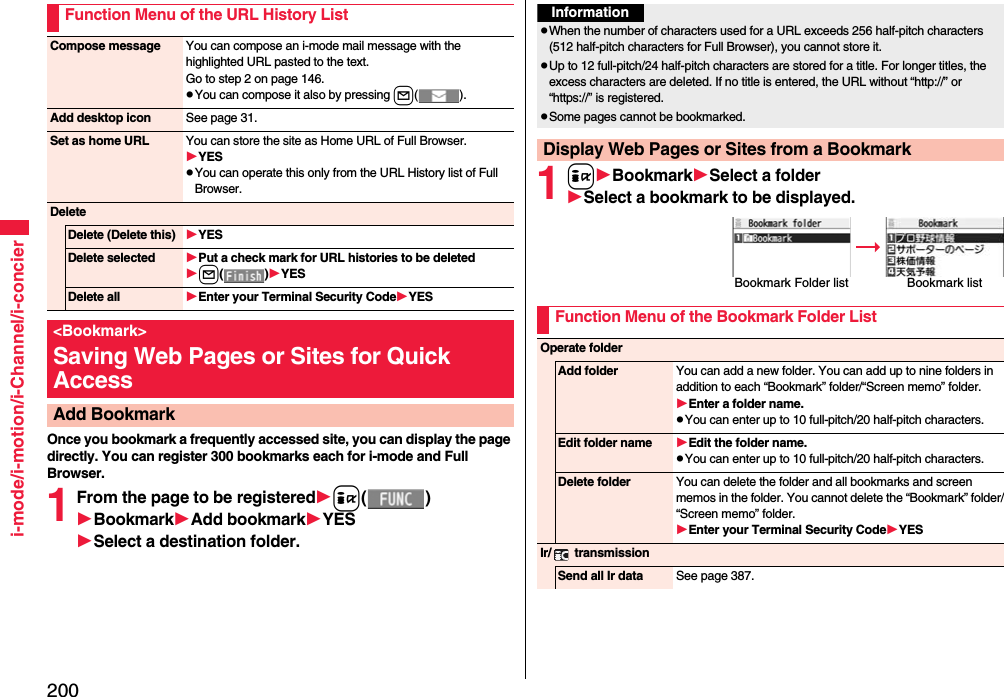


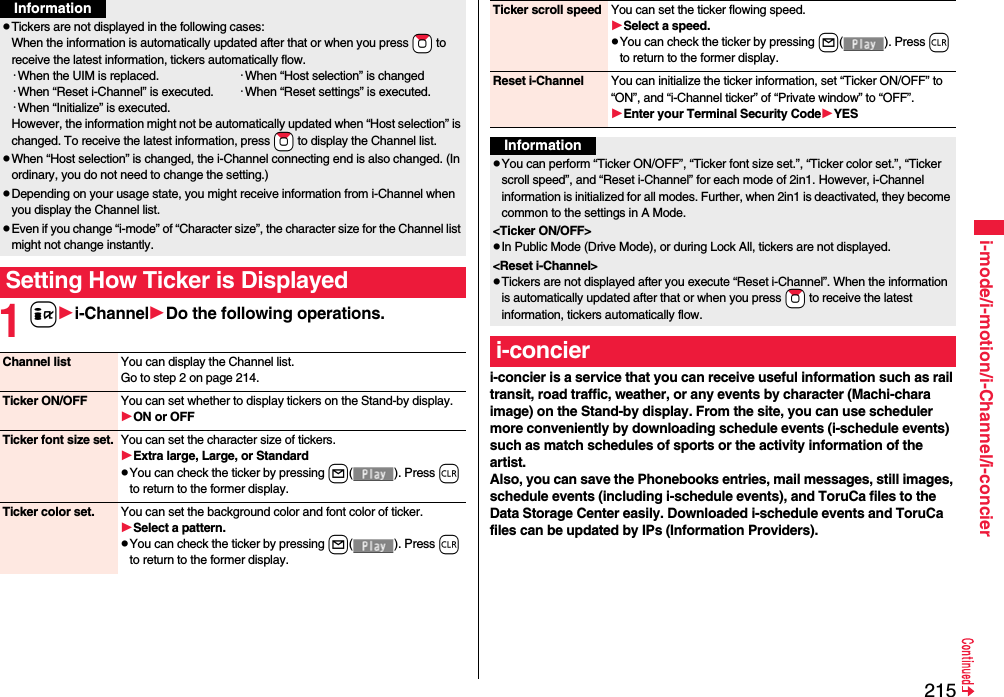
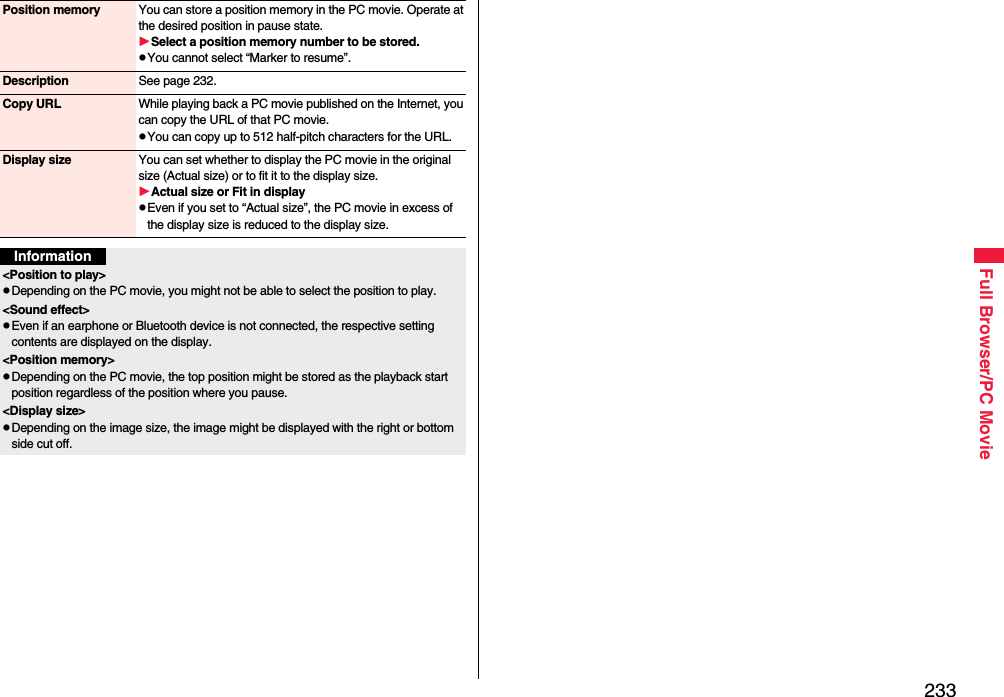
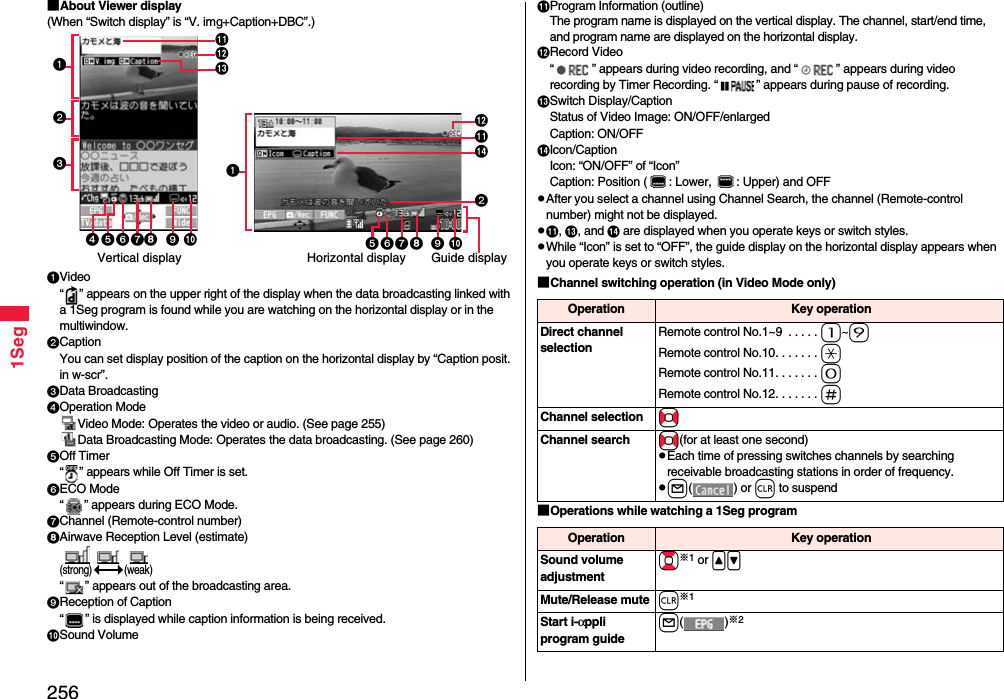
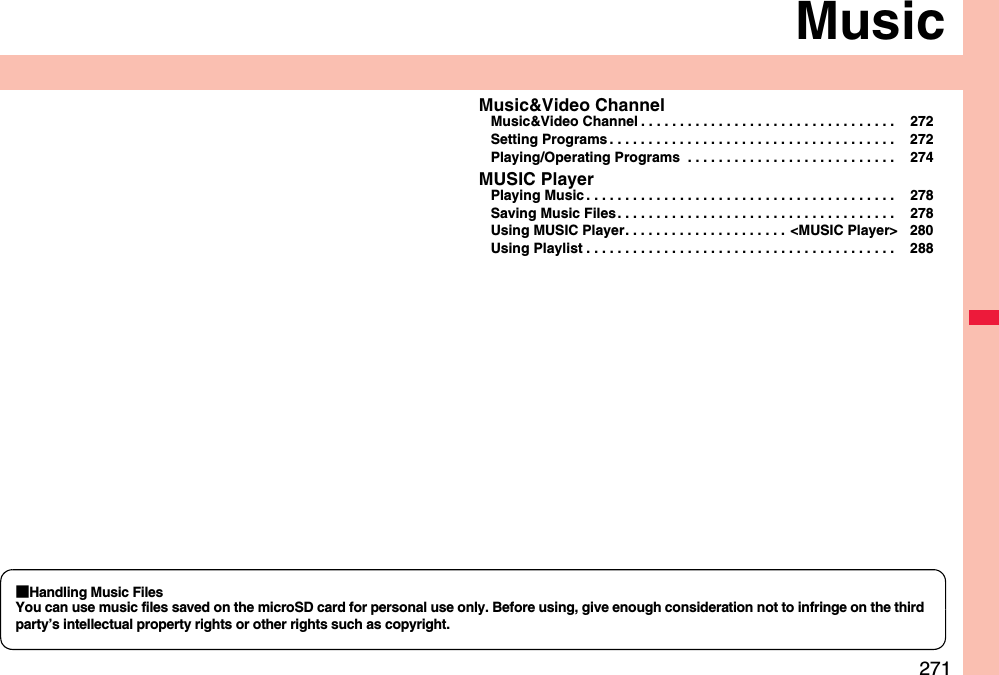
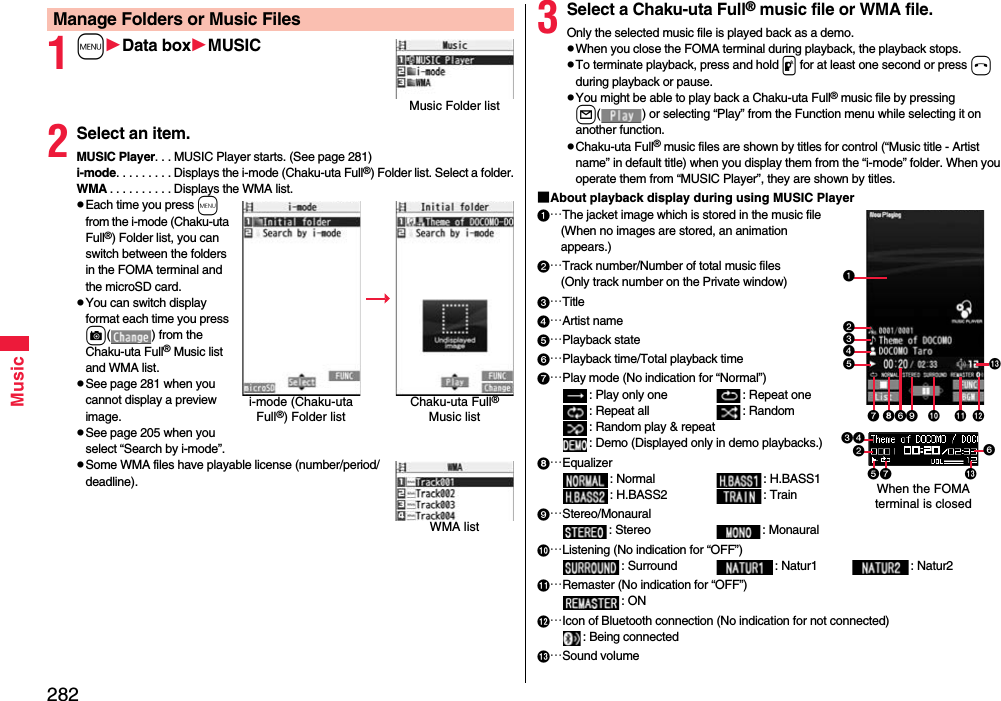
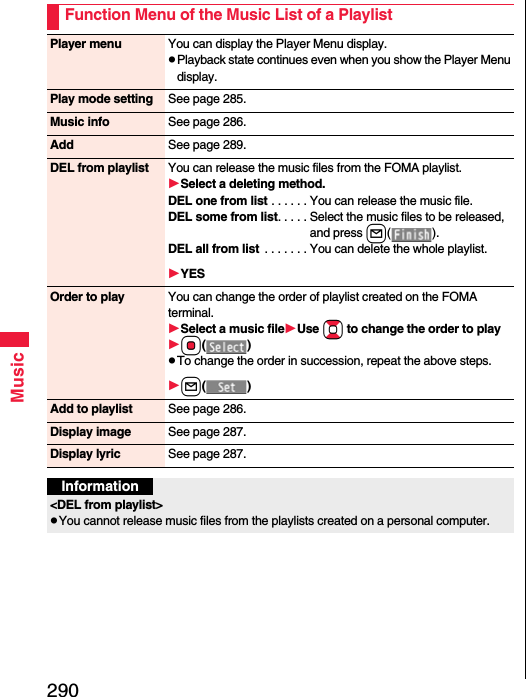
![214i-mode/i-motion/i-Channel/i-concierYou can set whether to play back an i-motion movie automatically, for when you have obtained a standard (normal) type of i-motion movie from a site or have selected a screen memo which contains a standard (normal) type of i-motion movie.1ii-mode settingsAutomatic replay set.ON or OFFThis service distributes information such as news and weather forecast to i-Channel mobile phones. The automatically received latest information flows on the Stand-by display by tickers. You can read it on the i-Channel list by pressing the i-Channel key. (See page 214)Further, two types of channels, “Basic channel” provided by DOCOMO and “Favorite channel” provided by IPs (Information Providers) are available. You are not charged a packet communication fee for auto-updates of “Basic channel” information.You are charged a packet communication fee for auto-updates of “Favorite channel” information which is enabled by registering your favorite channels. For both of “Basic channel” and “Favorite channel”, note that you are separately charged a packet communication fee for browsing detailed information. When you use the international roaming service, you are charged a packet communication fee for both auto-update and browsing detailed information.i-Channel is a pay service which is available on a subscription basis (You need to subscribe to i-mode to apply for i-Channel).For details on i-Channel, refer to “Mobile Phone User’s Guide [i-mode] FOMA version”.The i-Channel service is provided in Japanese only.<Automatic Replay Setting>Setting Automatic Replay of i-motionInformationNote that a streaming type of i-motion movie is played back automatically even if this function is set to “OFF”.i-ChannelWhen “Ticker ON/OFF” is set to “ON”, up to 10 ticker files for the latest information flow repeatedly on the Stand-by display. If you want to know more about the information, you can obtain the details from the Channel list.1Press Zo.The Channel list appears regardless of the “Ticker ON/OFF” setting.“ ” blinks during receiving information.You cannot show the Channel list even by pressing Zo from the horizontal Stand-by display.2Select an item (link).InformationWhen the FOMA terminal is turned off or if radio wave conditions are bad such as when it is out of the service area, you may not be able to receive information even if you have contracted to the i-Channel service. In that case, select the channel for unsigned subscribers that appears by pressing +Zo; then you can now receive information, and tickers flow on the Stand-by display. If your FOMA terminal remains in the default state, you may not be able to receive information. Press +Zo, and then information is received and tickers flow on the Stand-by display.To receive i-Channel information overseas, you are charged a communication fee by channel (domestic talk-free service does not apply).After you cancel the contract for the i-Channel service, the ticker setting is automatically set to off.If you cancel the contract for the i-mode service before you cancel the contract for the i-Channel service, the ticker setting remains on.Using i-ChannelChannel listInformationThe ring tone does not sound and the vibrator does not work even when information comes in. In addition, the Call/Charging indicator does not light or flicker.](https://usermanual.wiki/Panasonic-Connect/208009A.User-Manual-Part-2/User-Guide-1019763-Page-15.png)
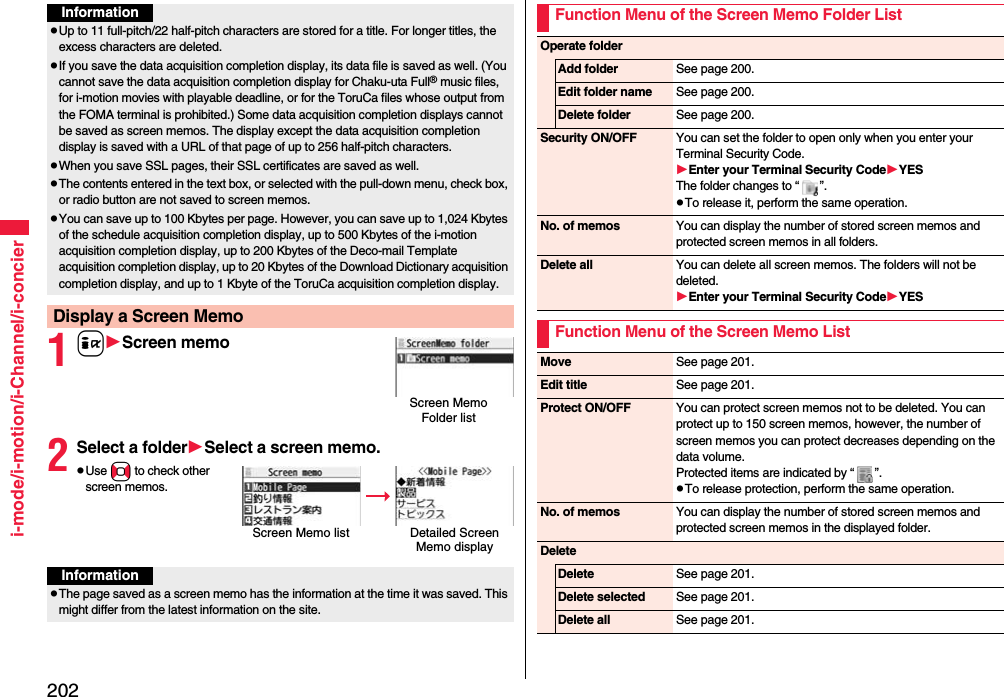
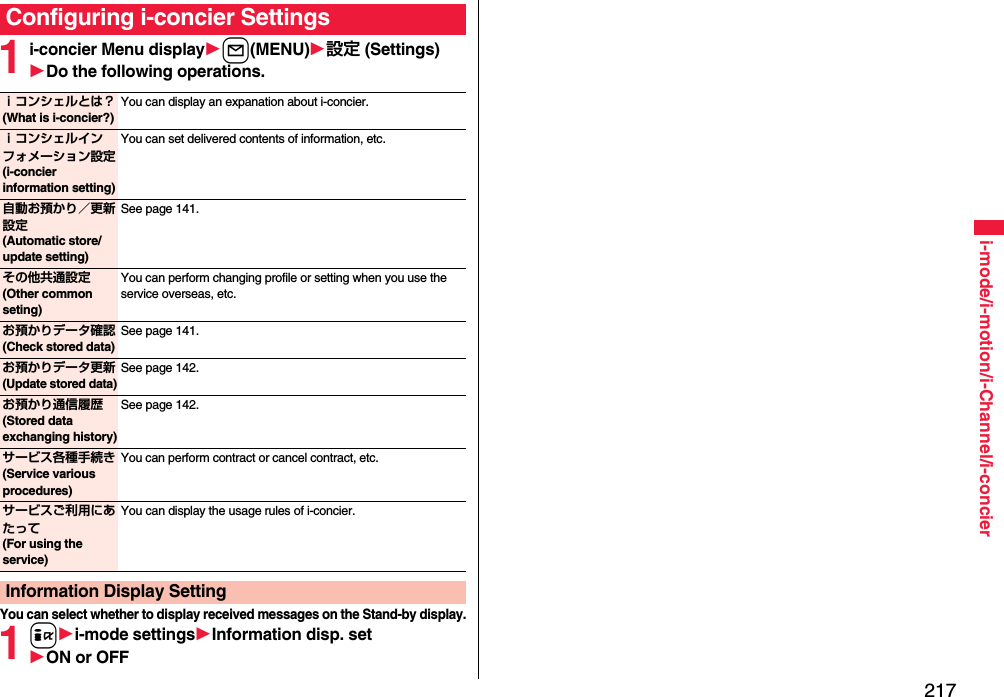
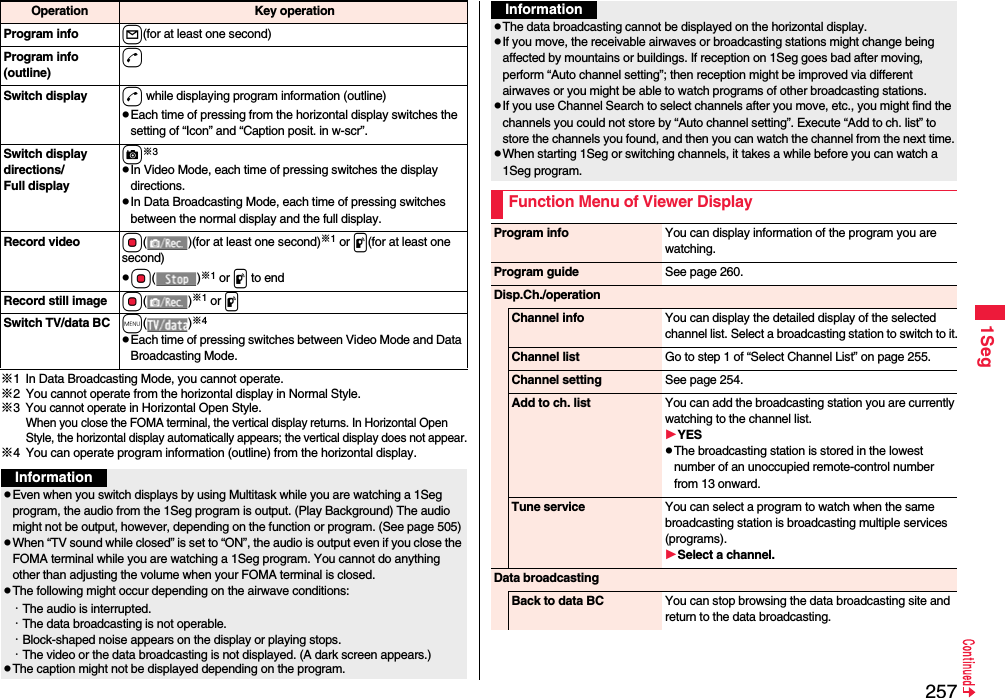
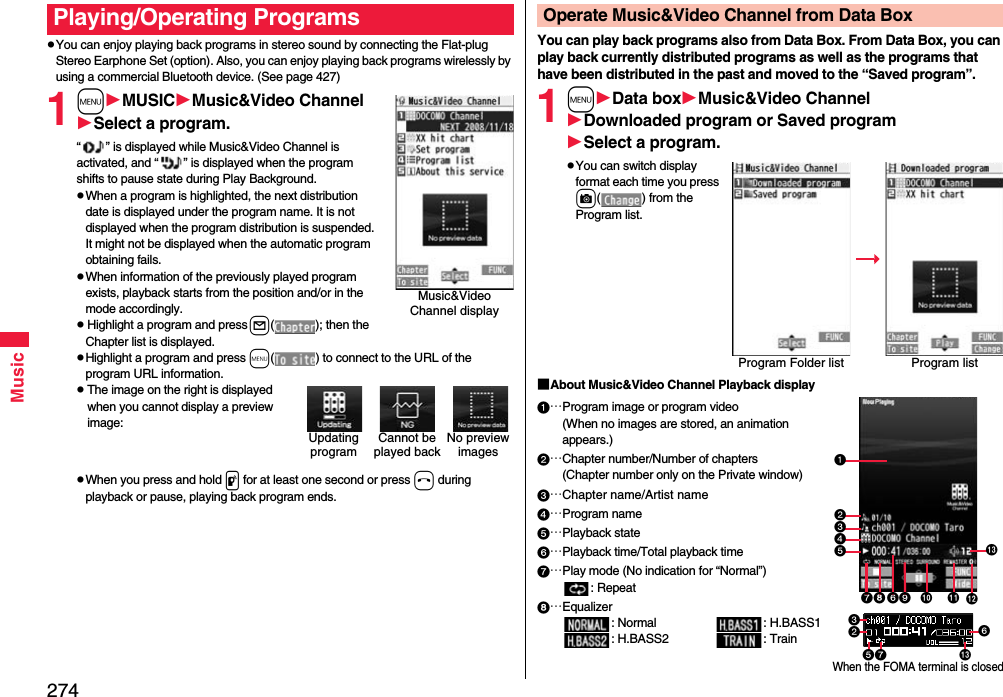
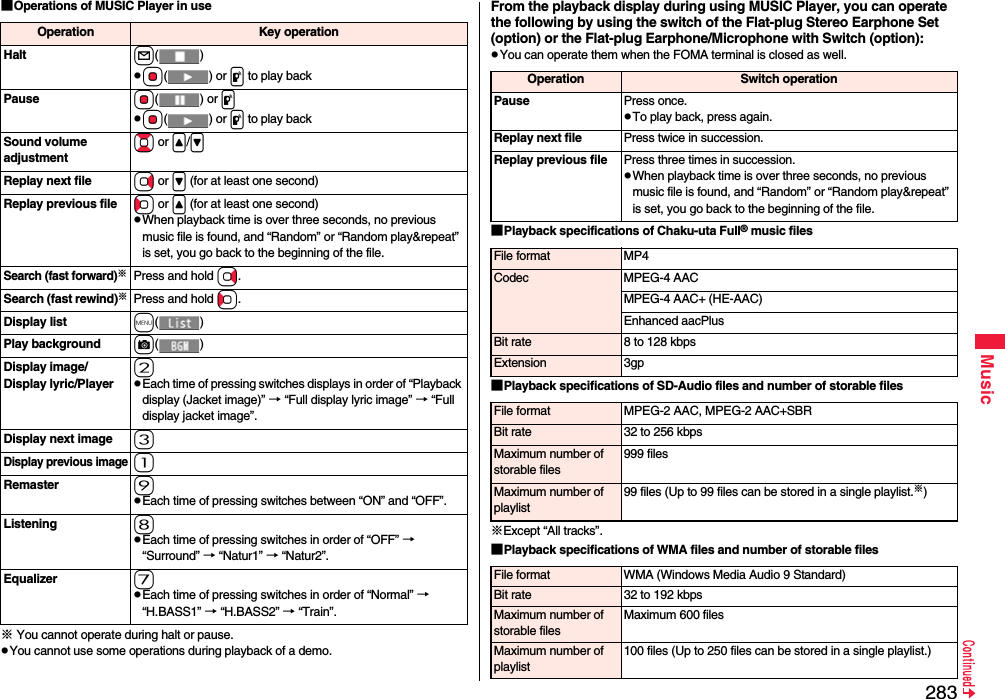
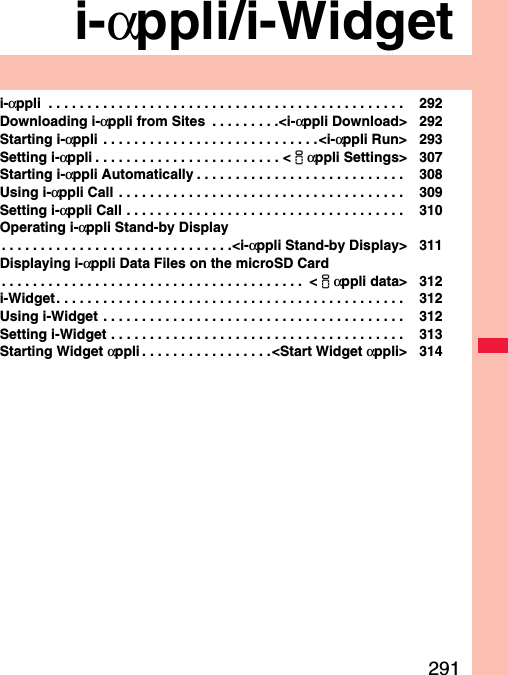
![216i-mode/i-motion/i-Channel/i-concierWhen your FOMA terminal is in the service area, you can receive information reports automatically.When information comes in, “ ” appears at the top of the display.You can save up to 50 received information. They are overwritten from the oldest one in order.1When information arrives, “ ” blinks and contents of information is displayed on the Stand-by display.≥When multiple information received at a time, the latest one is displayed on the Stand-by display.≥Message telling information arrival appears while a display other than the Stand-by display is shown or during horizontal Stand-by display. Select “Confirm” to check the details of the information.■Before Using i-concier≥i-concier is pay service which is available on a subscription basis (You need to subscribe to i-mode and Data Security Service to apply for i-concier).≥The information in this service is provided by DOCOMO or IPs (Information Providers). You are not charged a packet communication fee for receiving the information provided by DOCOMO. You are charged a packet communication fee for receiving the information provided by IPs (Information Providers).≥You are separately charged a packet communication fee for browsing detailed information.≥When you use the international roaming service, you are charged a packet communication fee for both auto-update and browsing detailed information.≥Other than the service fee for using i-concier, you might be separately charged an information fee depending on the i-schedule.≥You are separately charged a packet communication fee for auto-updates of i-schedule events, ToruCa files and Phonebook entries.≥For details on i-concier, refer to “Mobile Phone User’s Guide [i-mode] FOMA version”.Receive Information2Select a message.≥You can erase a message by pressing h from the Stand-by display or highlighting a message and pressing r or h.≥You can show the display for selecting desktop icons by highlighting a message and pressing l( ). (See page 32)1m1i-concier1Select information.≥An unread mark appears for unread information.≥Schedule event files or ToruCa files might be attached to information, or links are embedded in it for visiting a site of more detailed or related information. Select information with an unread mark to check these contents.1i-concier Menu display1l(MENU)1スケジューラへ (To scheduler) or トルカへ (To ToruCa)スケジューラへ (To scheduler). . . Displays the Calendar display. (See page 408)トルカへ (To ToruCa). . . Displays the ToruCa Folder list. (See page 320)Displaying i-concier Screeni-concier Menu displayDisplay Schedule/ToruCa](https://usermanual.wiki/Panasonic-Connect/208009A.User-Manual-Part-2/User-Guide-1019763-Page-17.png)

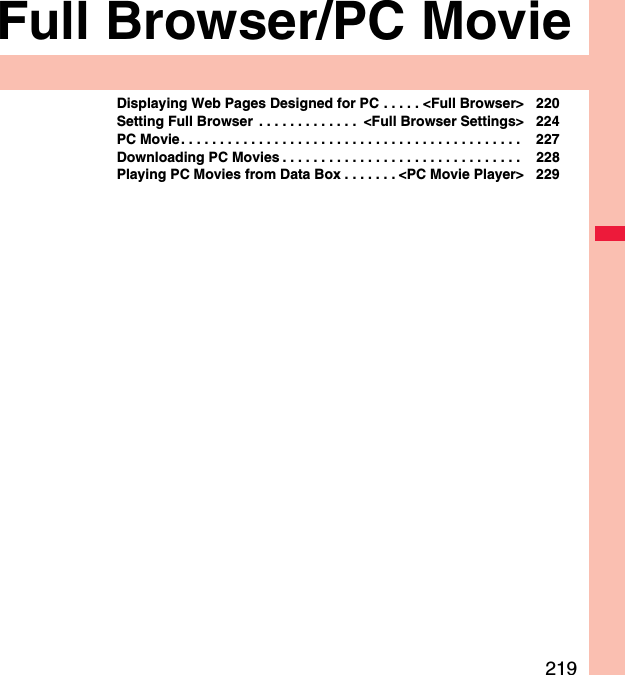
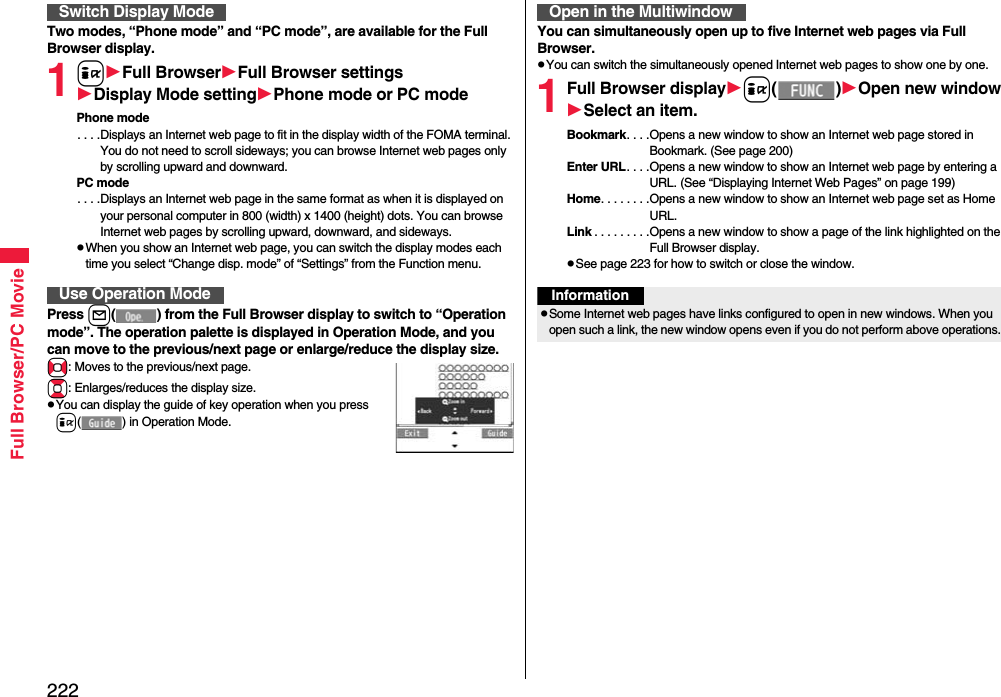
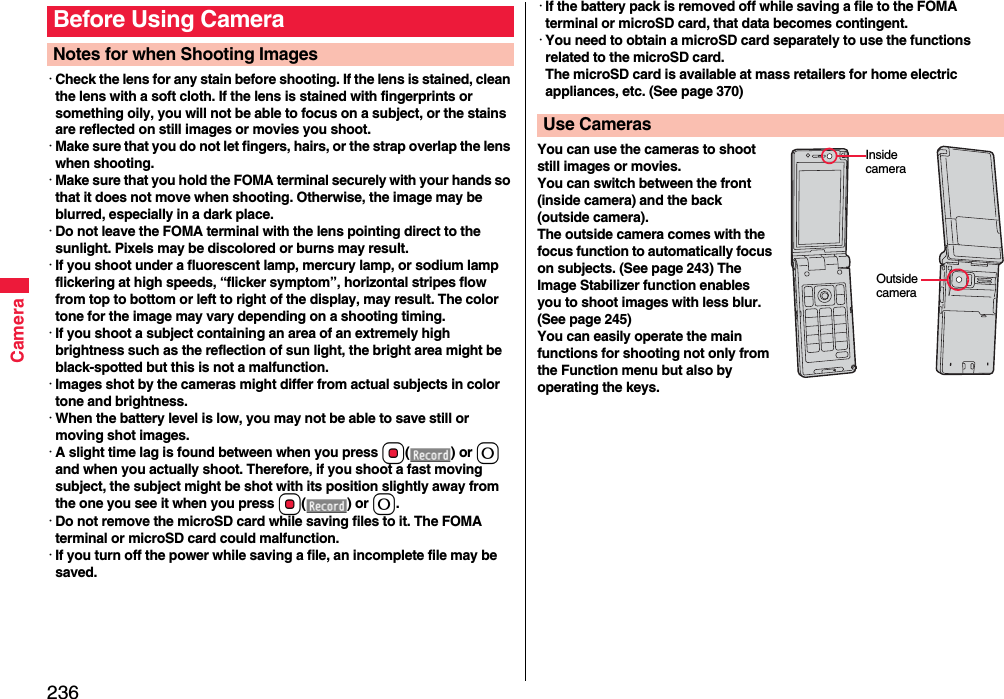
![220Full Browser/PC Movie You can browse Internet web pages designed for PCs using the Full Browser function. You can display even the Internet web pages that cannot be correctly displayed by i-mode. However, you cannot display or correctly display some Internet web pages.If you change the style while running Full Browser, the display automatically switches between the vertical display and the horizontal display. When you switch it manually, select “CHG wide scr. mode” from the Function menu.The data such as Home URL or Bookmarks registered via Full Browser cannot be used via i-mode. The contents set by Full Browser are invalid for i-mode, either.Note that you are charged a high communication fee for the massive data communication such as browsing Internet web pages having many images or downloading data files. For details on the packet communication fee, refer to “Mobile Phone User’s Guide [i-mode] FOMA version”.You can browse Internet web pages composed of frames. You can select a frame to display it as well. (See page 223)You can display SSL/TLS※-compatible pages via Full Browser.※SSL and TLS are the methods of safer data communication using authentication/encryption technology to protect your privacy. SSL/TLS pages prevent eavesdropping and information alteration during communication by exchanging encrypted data files. Further, server authentication prevents web spoofing, thus making your personal information such as credit card number or postal address exchanged safer.<Full Browser>Displaying Web Pages Designed for PC1iFull BrowserSelect an item.Home. . . . . . . . . . . . Displays an Internet web page set as Home URL.Bookmark. . . . . . . . Displays an Internet web page stored in Bookmark. (See page 200)Last URL. . . . . . . . . Displays an Internet web page you viewed last time.Go to location . . . . Displays an Internet web page by entering a URL. (See “Displaying Internet Web Pages” on page 199)Full Browser settings. . . . . . . . . . . . . . . . . Configures Full Browser settings. (See page 224)When “Access setting” is set to “No”, the confirmation display appears asking whether to start Full Browser. Highlight “Yes” and select “OK” to switch setting of “Access setting”, then Full Browser starts up.Further, you can connect to a site for signing up a packet flat-rate service via i-mode by selecting “To sign up a packet flat-rate service, click here”. To end Full Browser, press h with an Internet web page displayed and select “YES”.InformationYou can display up to 1 Mbyte per page. However, you can download the Flash movie up to 10 Mbytes.It may take long to display some Internet web pages.You cannot use the following functions in Full Browser:・Phone To function ・Screen memos ・PDF files](https://usermanual.wiki/Panasonic-Connect/208009A.User-Manual-Part-2/User-Guide-1019763-Page-21.png)
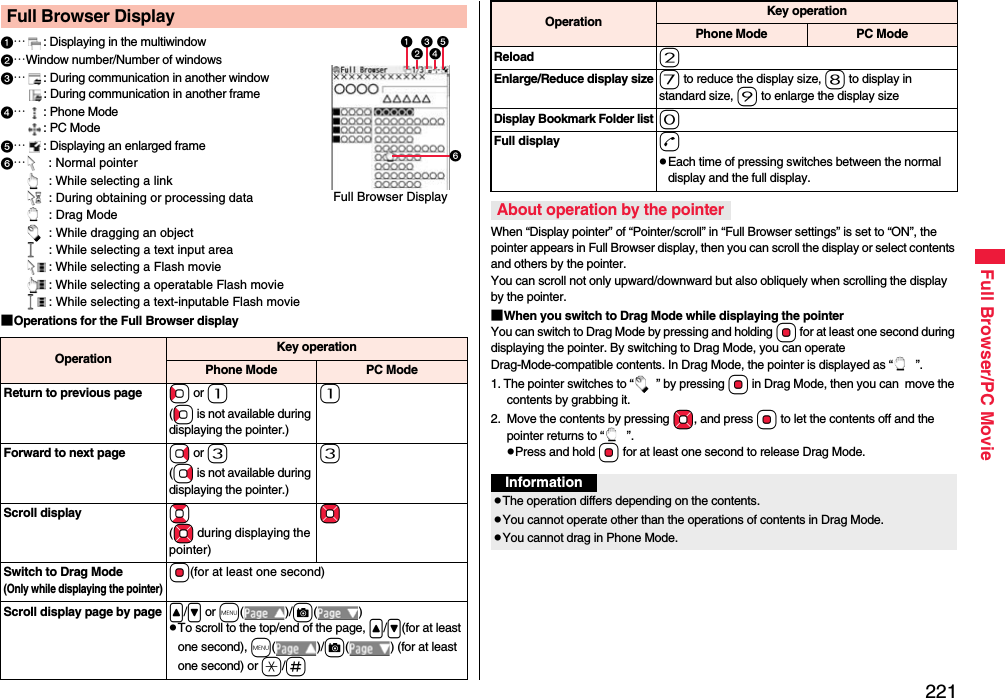
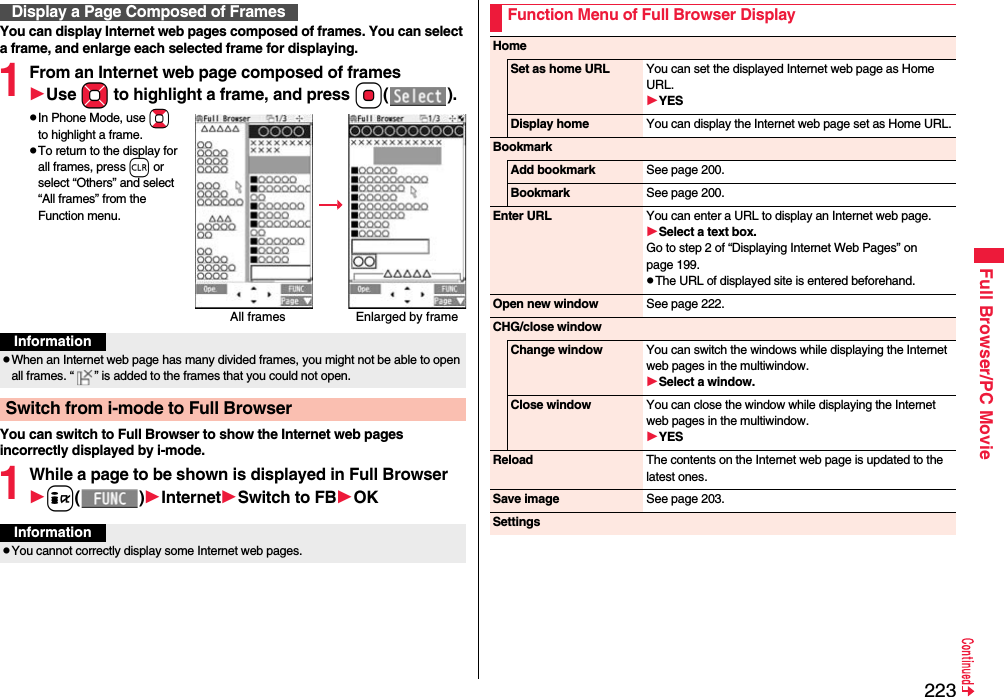
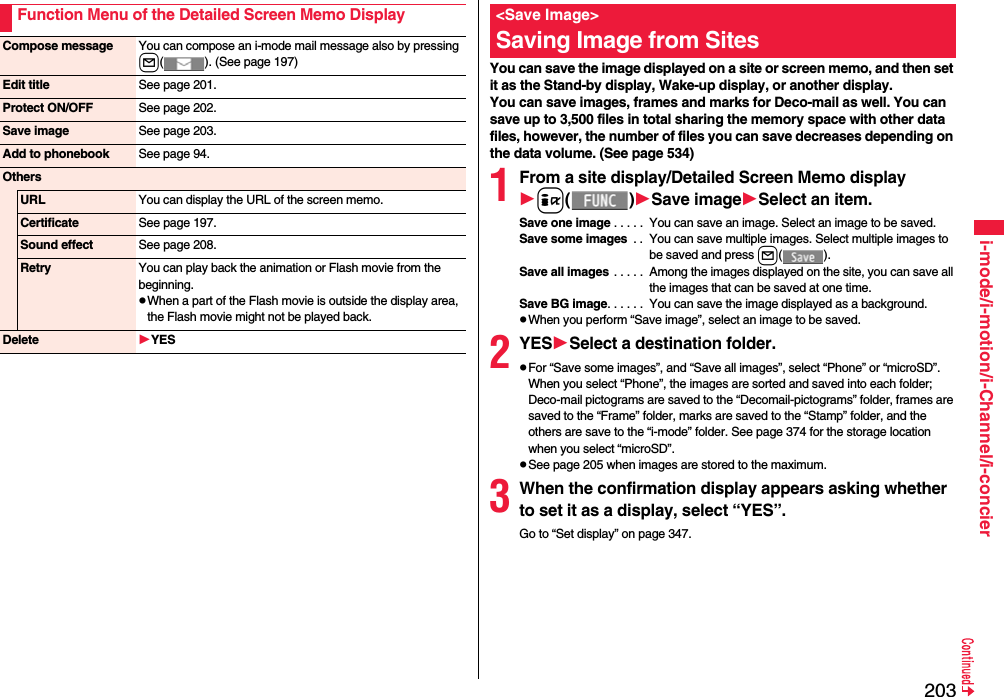
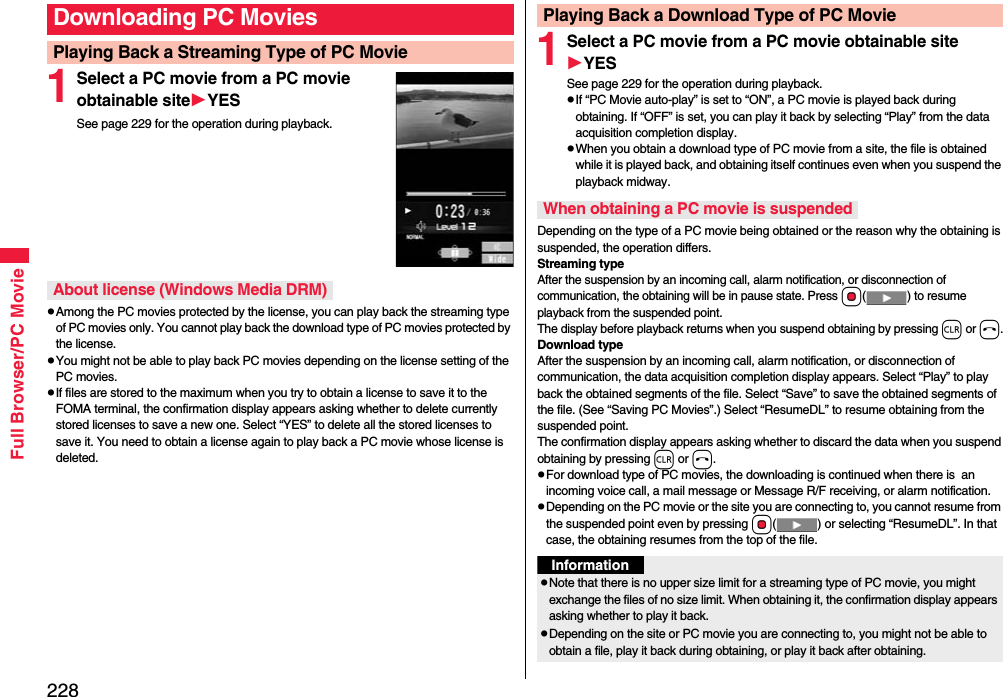
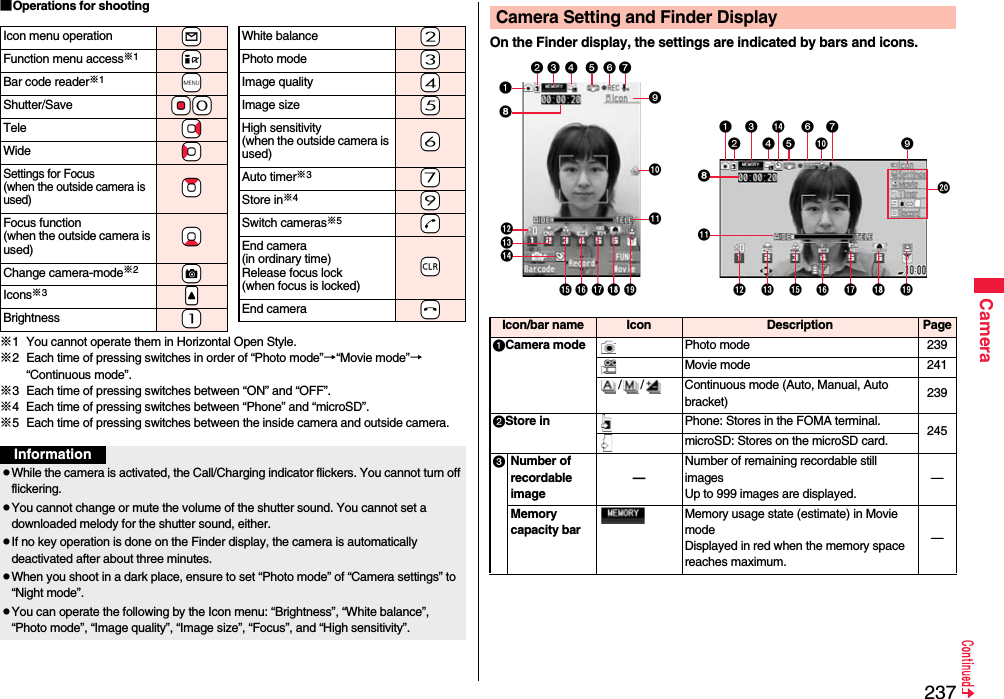
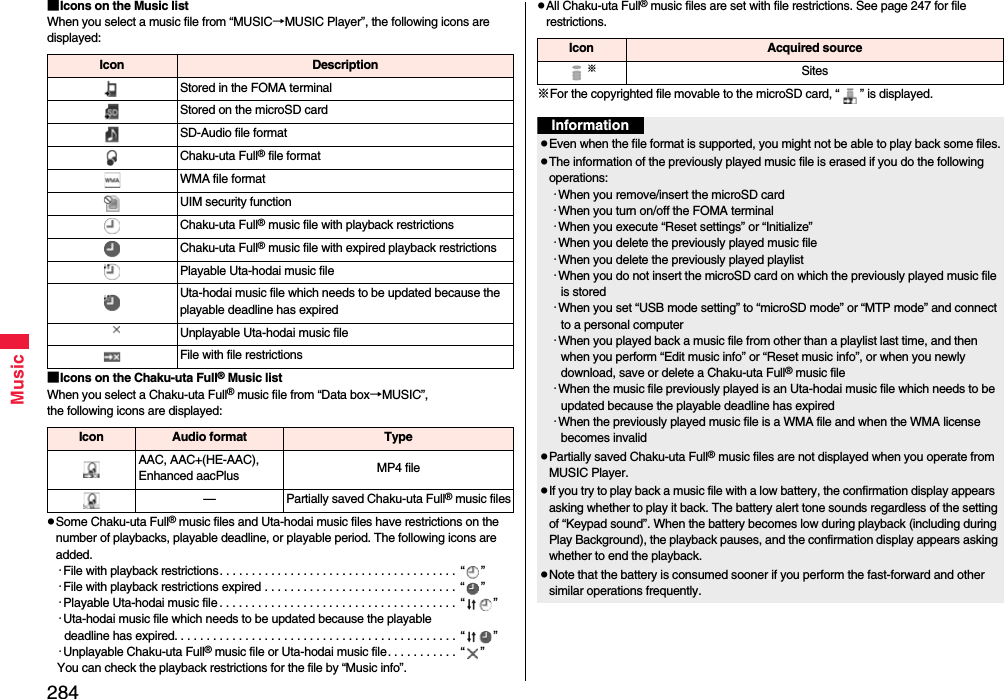
![227Full Browser/PC Movie1iFull BrowserFull Browser settingsCookieDelete CookiesEnter your Terminal Security CodeYESThe referer denotes the link source information. When a referer is sent, the information about from which page you have accessed it is sent to the site. Note that even if your information is detected by a third party by sending a referer, we cannot be held responsible for that.You can set whether to send a referer while an Internet web page is open.1iFull BrowserFull Browser settingsReferer settingSelect an item.Send . . . . . .Sends a referer.Unsend . . . .Does not send a referer.Notify. . . . . .When a referer is sent, the confirmation display appears asking whether to send it.Delete CookiesSetting RefererReferer SettingInformationWhen “Notify” is set, the confirmation display might consecutively appear asking whether to send a referer depending on the Internet web page. By using high speed communication, you can play back smooth and high-quality PC movies provided by portal sites, movie specialty sites and other sites on the Internet.PC Movie Player supports playback of Windows Media® Video.When downloading or streaming a PC movie, you might receive a bulky size of file. Note that you are charged a high packet communication fee for a bulky sent/received file such as a streaming type file whose size is not limited. For the details of the packet communication fee and billing plan, refer to “Mobile Phone User’s Guide [i-mode] FOMA version”.The distribution server for streaming type supports Windows Media Services 4.1 and Windows Media Services 9. You cannot play back a streaming type of PC movie distributed from other than Windows Media Services 4.1 and Windows Media Services 9.Some sites check the operating environment (browser type, OS type, etc.) are checked and you might not be able to play back PC movies.See page 230 for the supported file format of PC movies.PC MovieCategories DescriptionType Playback typeStreaming type(cannot be saved)Plays back while obtainingYou can play back a PC movie while obtaining it. A long time playback is available.Download type(can be saved)Plays back while obtainingWhen “PC Movie auto-play” is set to “ON”, you can play back a PC movie while obtaining it. You can save it to the microSD card after download and play it back without re-connection. Up to 10 Mbytes of a file can be downloaded.Plays back a file saved to the microSD cardTo the microSD card, you can save not only data files obtained by the FOMA terminal but also PC movies obtained or created on a personal computer, and then play them back. You can save a bulky file of up to the space size of microSD card.](https://usermanual.wiki/Panasonic-Connect/208009A.User-Manual-Part-2/User-Guide-1019763-Page-28.png)
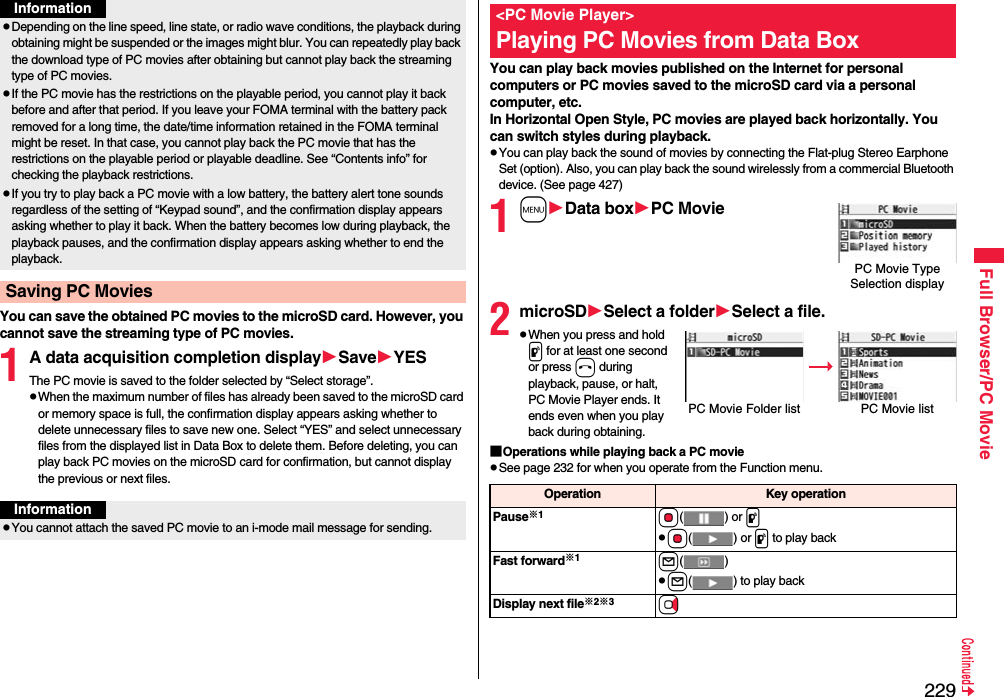
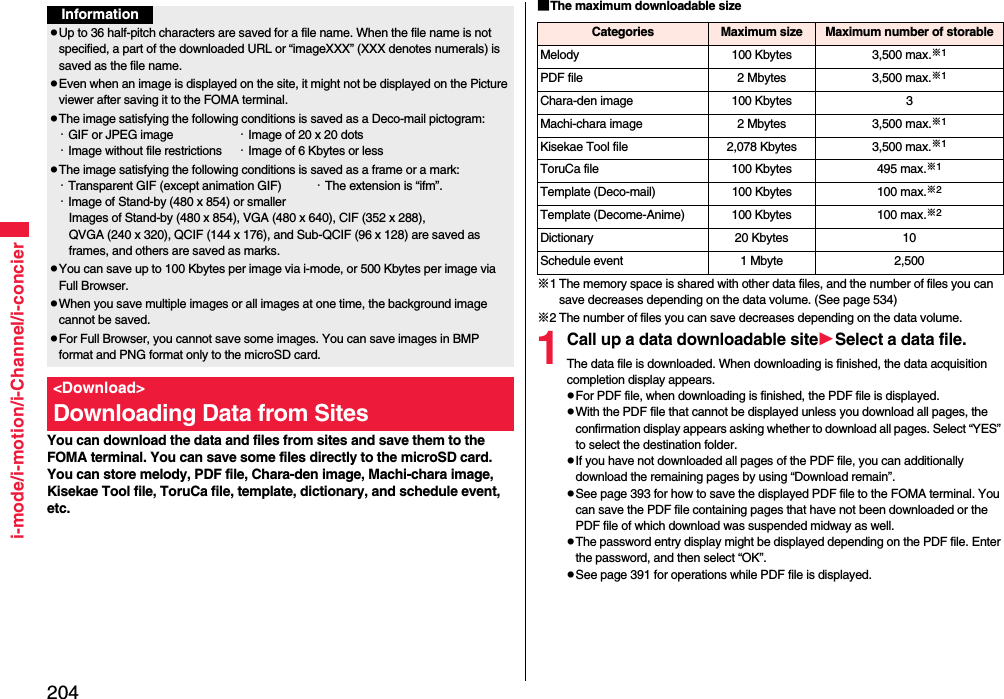
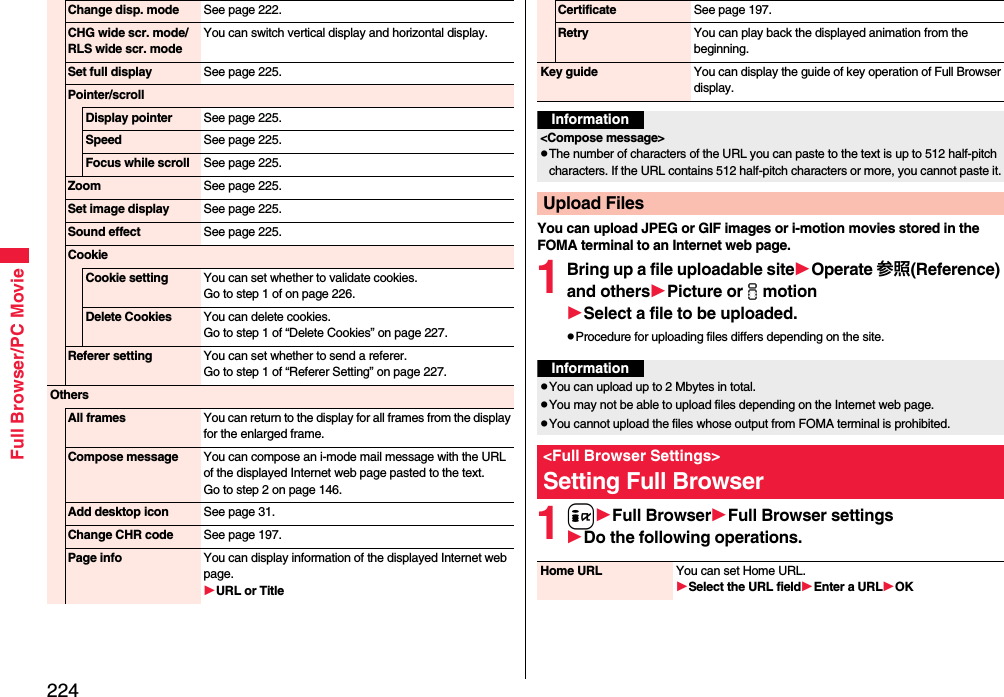
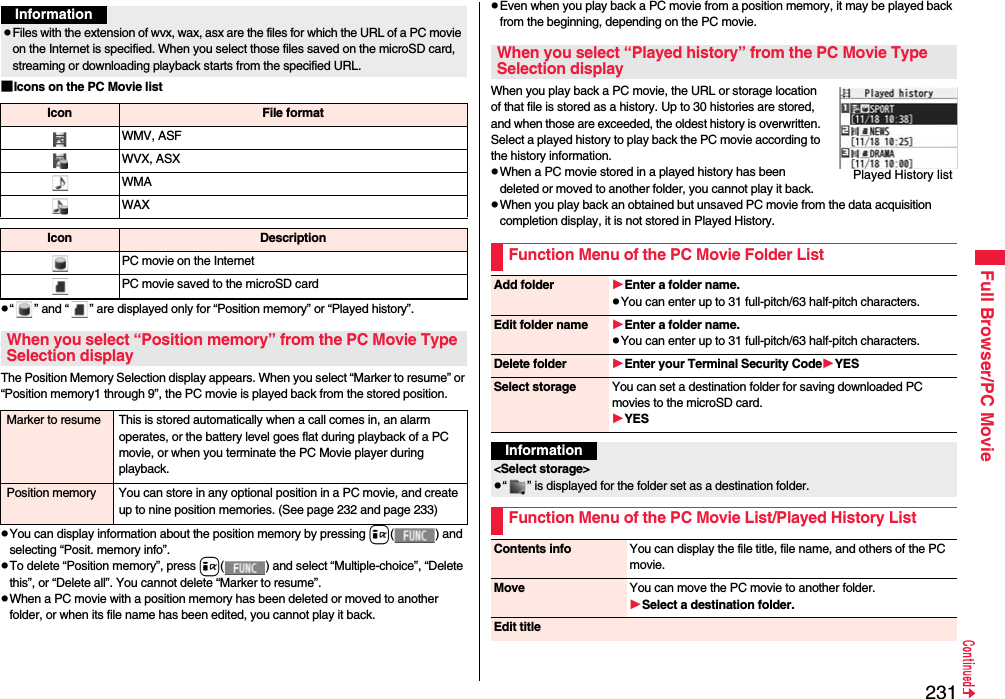
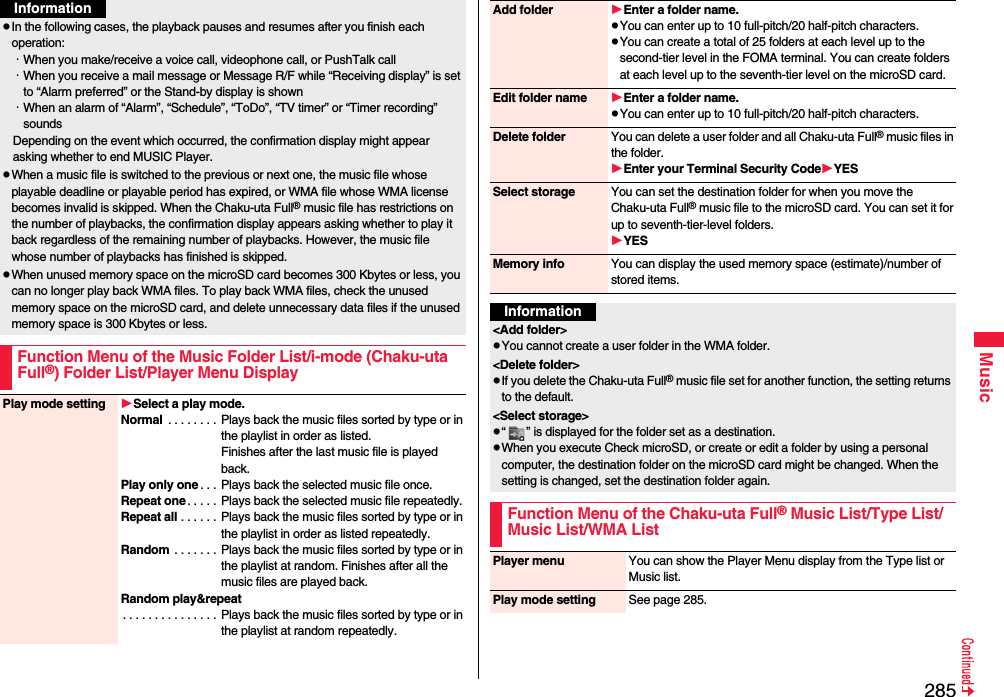
![230Full Browser/PC Movie※1 You might not be able to operate this for some PC movies.※2 You cannot operate this for a streaming type of PC movie, or when you are playing back a PC movie while obtaining it. You cannot operate this when you play back an obtained but unsaved PC movie from the data acquisition completion display, either.※3 The files are displayed in the order on the PC Movie list. You can operate this when you play back from the PC Movie list. However, PC movies in WVX, ASX, and WAX formats are skipped.※4 When three seconds have elapsed after starting playback, you go back to the beginning of the file. However, you might not be able to operate this for a streaming type of PC movie or when you are playing back a PC movie while obtaining it.※5 You cannot operate this during fast-rewinding.※6 The horizontal playback is valid during playback only. When you close the playback display, the vertical display returns.Display previous file※2※3Co※4Select position to play※1※5Press and hold No.Sound volume adjustment Bo or </>Mute/Release mute iSwitch vertical display/horizontal display※6※7[Normal Style only]c()Each time of pressing switches display directions.Icon[Horizontal Open Style only]m※8Each time of pressing switches whether to display icons and navigations.Remaster 9Each time of pressing switches between “ON” and “OFF”.Listening 8Each time of pressing switches in order of “OFF” → “Surround” → “Natur1” → “Natur2”.Equalizer 7Each time of pressing switches in order of “Normal” → “H-BASS1” → “H-BASS2” → “Train”.Operation Key operation ※7 You cannot operate this for PC movies with incompatible video data or voice-only PC movies.※8 Even if you set the icons not to be displayed, the icon such as “ ”, “ ”, “ ” or “ ” appears during communication or when an i-mode mail message or Message R/F comes in.If you play back on the horizontal display from the pause state, the display might become dark, however, the video appears soon after you resume the playback.You can perform the following operations when you play back or pause a PC movie using the switch of Flat-plug Stereo Earphone Set (option) or Flat-plug Earphone/Microphone with Switch (option).■Specification for PC movie playback※1The complex profile of Windows Media Video 9 is not supported.You might be able to play back the files that exceed the bit rates described above.Even when the file format is supported, you might not be able to obtain files, play back during obtaining, or play back after obtaining depending on the file.If the file format of either video or audio is not supported, the file of the supported format only might be output.Operation Switch operationPause Press once.To play back, press again.Play back next file Press twice in succession.Play back previous file Press three times in succession.When playback time is over three seconds, you go back to the beginning of the file.File format WMV, WMA, WVX, WAX, ASF, ASXExtension wmv, wma, wvx, wax, asf, asxCodec Video Windows® Media Video 8 through 9※1Audio Windows® Media Audio 2 through 9Bit rate Video WMV 8 768 kbpsWMV 9 2 MbpsVoice 384 kbpsVideo size WMV 8 352 dots x 288 dotsWMV 9 800 dots x 480 dotsFrame rate 30 fps](https://usermanual.wiki/Panasonic-Connect/208009A.User-Manual-Part-2/User-Guide-1019763-Page-31.png)


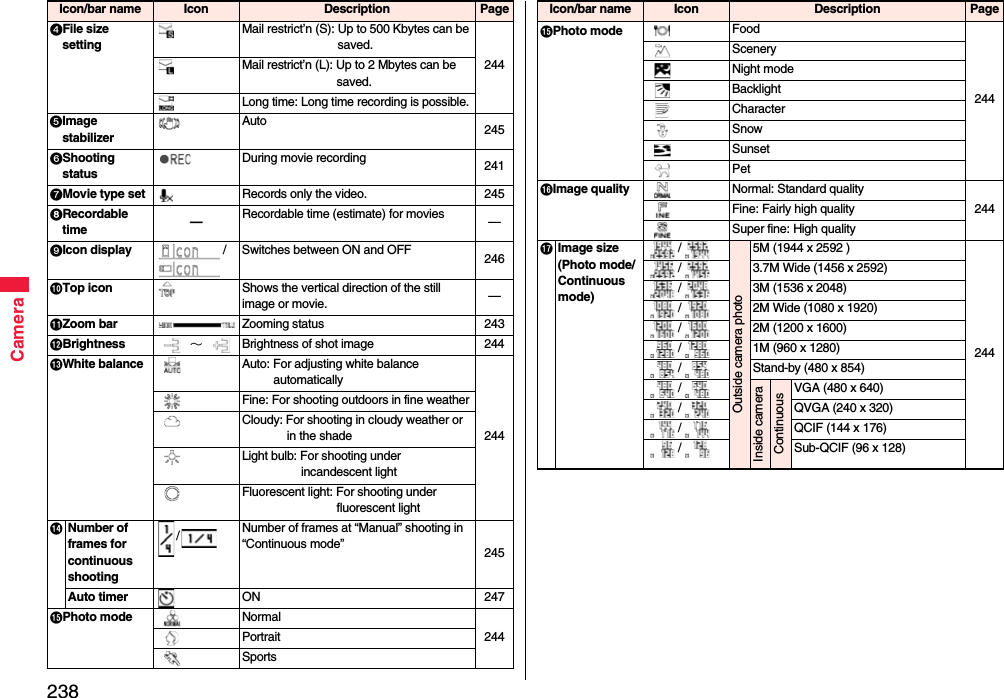

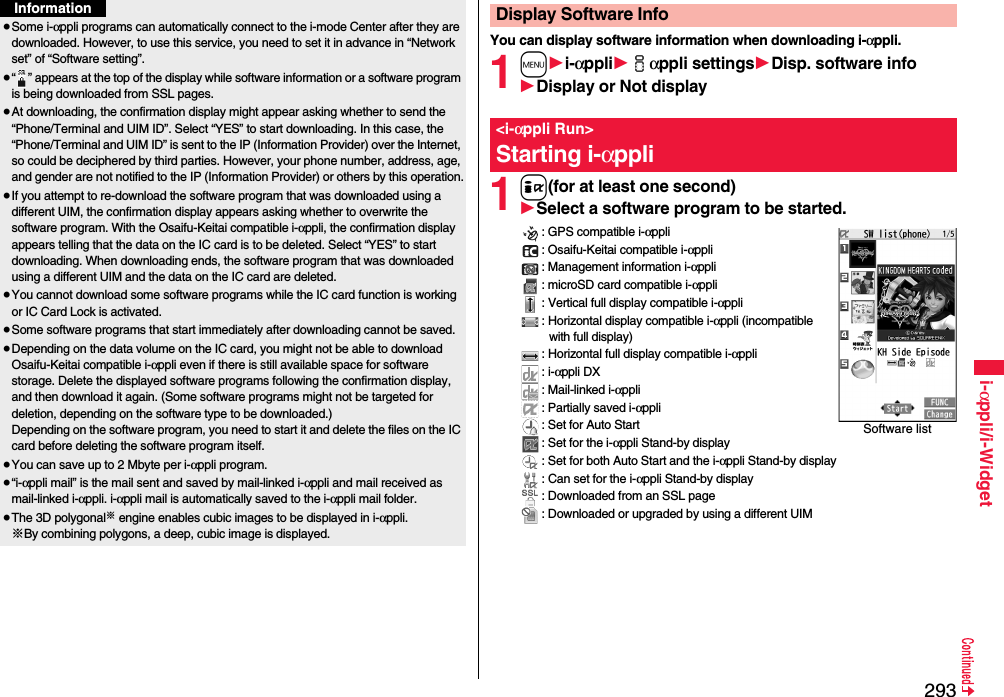
![244CameraSetting Image Size and Image QualityFunction Menu of the Finder DisplayInside camera/Outside cameraYou can switch between the inside camera and outside camera.CHG camera-mode Select a mode.When you select “Continuous mode”, the camera starts in the mode you used last time, “Auto”, “Manual”, or “Auto bracket”.Image size Select an image size.File size setting[Movie Mode only]Select an item.Mail restrict’n (S). . . You can shoot up to 500 Kbytes.Mail restrict’n (L) . . . You can shoot up to 2 Mbytes.Long time . . . . . . . . . You can shoot for a long time. The movie is saved to the microSD card.Image quality You can set the image quality for saving.Select an image quality.Camera settingsBrightness You can adjust to -3 (dark) through +3 (bright).Select a brightness level.White balance You can adjust the coloring of the image on the Finder display to create a natural color tone.Select an item.Auto . . . . . . . . . . . . . .For adjusting white balance automaticallyFine . . . . . . . . . . . . . . .For shooting outdoors in fine weatherCloudy . . . . . . . . . . . .For shooting in cloudy weather or in the shadeLight bulb . . . . . . . . . .For shooting under incandescent lightFluorescent light. . . .For shooting under fluorescent lightAt Camera start-up±0At Camera start-upAutoColor mode set Select a color mode.Normal . . . . . . . . For shooting in normal color.Sepia . . . . . . . . . . For shooting in sepia color.Monochrome . . . For shooting in monochrome.Vivid . . . . . . . . . . For shooting with the vivid contours and raised saturation.Natural . . . . . . . . For shooting with the smooth contours and lowered saturation.Whitening . . . . . . For shooting faces in bright color.Suntan. . . . . . . . . For shooting faces in dark color.Photo mode You can set a photo mode suitable for the place. Select a photo mode.Normal . . . . . . Standard modePortrait . . . . . . For shooting portraitsSports . . . . . . . For shooting moving subjects such as athletesFood . . . . . . . . For shooting dishesScenery. . . . . . For shooting sceneryNight mode. . . For shooting in dark places such as in nighttimeBacklight. . . . . For shooting against the sun (from behind)Character . . . . For shooting charactersSnow . . . . . . . . For shooting in snowy placesSunset. . . . . . . For shooting in sunsetPet . . . . . . . . . . For shooting pets, etc.At Camera start-upNormalAt Camera start-upNormal](https://usermanual.wiki/Panasonic-Connect/208009A.User-Manual-Part-2/User-Guide-1019763-Page-45.png)
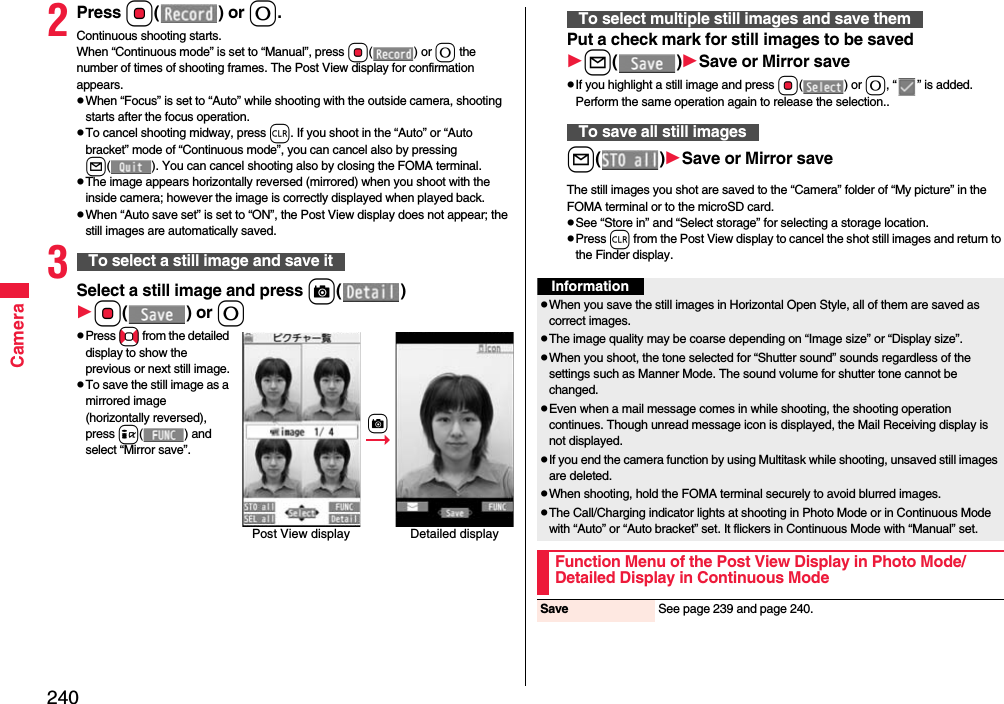
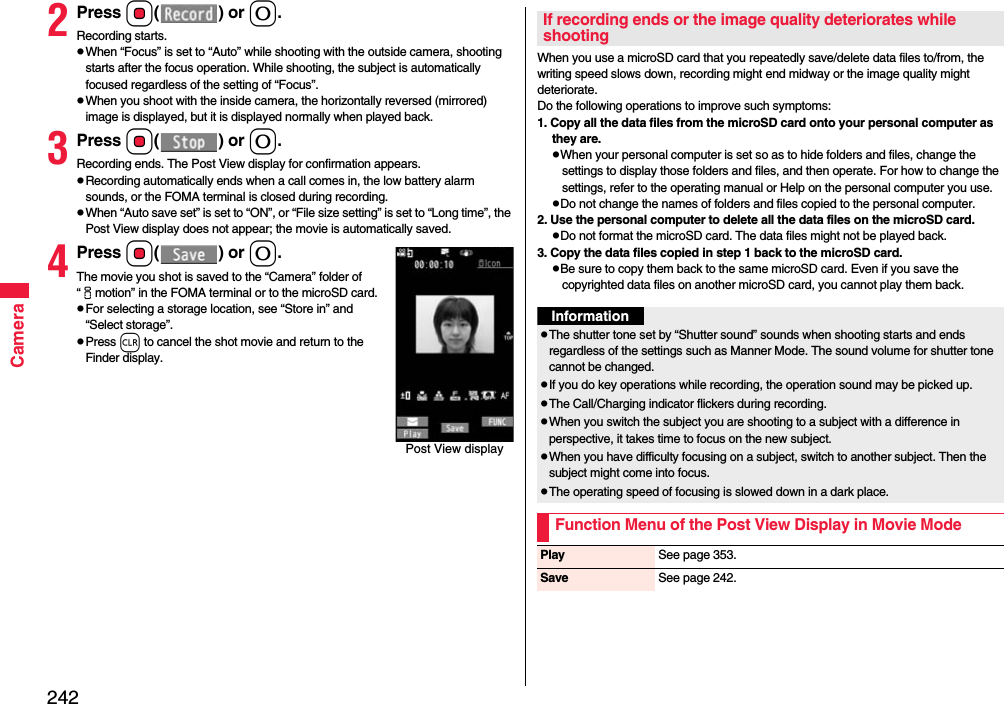
![245CameraFocus You can set the focus of the outside camera.Select an item.Face detection . . . For focusing on a person’s faceAuto . . . . . . . . . . . . For focusing automatically before shooting (See page 243)Close-up . . . . . . . . For focusing on a subject in a short distanceLandscape . . . . . . For focusing on a landscape in a long distance“Face detection” is available only in Photo Mode.Img. stabilizer[Photo/Movie Mode]You can correct camera shake for when shooting with the outside camera.Auto or OFFShoot with frame[Photo Mode only]You can shoot a still image with a frame.ON or OFFSelect a frame.Shutter sound You can set a shutter sound. You can set a shutter sound each for Photo Mode (Continuous Mode) and Movie Mode.Select a shutter sound.While you are selecting, the shutter tone sounds for confirmation.Flicker correction You can suppress blur on the Finder display for shooting with the outside camera.Auto, Mode 1 (50Hz) or Mode 2 (60Hz)Storage settingStore in You can set the storage location for the still images or movies you shot.Phone or microSDAuto save set You can set whether to automatically save the image after shooting. When “Store in” is “Phone”, the image is saved to the “Camera” folder. When “Store in” is “microSD”, the image is saved to the folder set by “Select storage”.ON or OFFFile restriction See page 247.At Camera start-upPhoto Mode:Face detectionContinuous/Movie Mode: AutoAt Camera start-upOFFHigh sensitiv.[Photo Mode only]You can shoot with high-sensitivity when shooting with the outside camera.ON or OFFAuto timer See page 247.Cont. shooting set.Continuous mode[Continuous Mode only]Select a mode.Auto . . . . . . . . . . Shoots automatically at an interval and with the number of frames as specified by “Shot interval” and “Shot number”.Manual . . . . . . . . Shoots one by one manually with the number of frames specified by “Shot number”.Auto bracket . . . Shoots automatically nine still images at an interval of about 0.3 second while changing the brightness and color tone one by one.Select “Manual” to display the number of frames for continuous shooting.Shot interval[Continuous Mode only]Select a shooting interval.You can set this only in “Auto” of Continuous Mode.Shot number[Continuous Mode only]Enter the number of photos.When “Image size” is set to “VGA (640 x 480)”, you cannot change “Shot number”.You can set this only in “Auto” or ”Manual” of Continuous Mode.Display size You can set whether to display a still image or movie in the original size (Actual size) or to fit to the screen size on the Finder display.Actual size or Fit in displayMovie type set[Movie Mode only]You can select whether to record both the video and voice, or one of them when you shoot the movie.Normal, Video, or VoiceAt Camera start-upOFFAt Camera start-upNormal](https://usermanual.wiki/Panasonic-Connect/208009A.User-Manual-Part-2/User-Guide-1019763-Page-46.png)
![246CameraCommon replay mode[Movie Mode only]You can set a shooting size appropriate for attaching to i-mode mail. YESImage Size is set to “QCIF”, File Size Setting is set to “Mail restrict’n (S)”, and Image Quality (Movie Mode) is set to “Normal”.Icon You can set whether to display icons.ON or OFFMemory info You can display the used memory space (estimate)/number of stored items.Information<Inside camera/Outside camera>When “Image size” is set to larger than “Stand-by (480 x 854)”, and you switch to the inside camera, the camera starts up in “VGA (480 x 640)”.<File size setting>When “File size setting” is set to “Long time”, “Store in” is set to “microSD”.<Photo mode>Even if you change the setting of “Brightness”, “White balance”, “Color mode set”, or “Focus”, the setting appropriate for each “Photo mode” applies when you change “Photo mode”Note that the image may blur in Night Mode because the exposure takes a longer time.<Img. stabilizer>Image Stabilizer function is only for decreasing the degree of camera shake, so its effect differs depending on the subject or condition.Image Stabilizer might not work effectively in the following cases:・When the camera shakes to a great extent・When zooming is in use・When shooting moving subjectsWhen “Photo mode” of “Camera settings” is set to “Sports”, “Night mode”, or “Pet” in Photo Mode, “Img. stabilizer” becomes invalid.Residual images might remain in the area where the subject is moving, or noise might be found in overall area. In that case, set this function to “OFF”.In Movie Mode, the shooting range varies depending on the “Auto” or “OFF” setting because peripheral pixels are used for the processing by Image Stabilizer.When this function is activated in Photo Mode, the processing after shooting might be about two seconds longer due to the processing by Image Stabilizer.You cannot use Image Stabilizer for the inside camera.<Shoot with frame>When “Image size” is set to larger than “1M (960 x 1280)”, you cannot shoot with a frame.If you shoot a still image with a frame using the inside camera and save it, the frame is also horizontally reversed when the still image is automatically reversed as a correct image.You cannot save the still image shot with a frame as the mirrored image.<Flicker correction>If you set to “Auto”, it may take a while to automatically adjust the image quality. In this case, switch to Mode 1 or Mode 2 according to the power frequency provided in the shooting location.<Storage setting>See “Select storage” for how to set a storage location on the microSD card.If you change “File size setting” to “Long time”, “Store in” is set to “microSD” and “Storage setting” cannot be operated.When “Auto save set” is set to “ON”, the image is saved to the latest folder if “Select storage” is not set or the folder set as a destination folder is deleted.<High sensitiv.>When you set “High sensitiv.” to “ON” while setting “Image size” to larger than “2M (1200 x 1600)”, “Image size” is changed to “1M (960 x 1280)”. In this case, if you switch “High sensitiv.” to “OFF” without changing the setting of “Image size”, it returns to the former setting before switching “High sensitiv.” to “ON”.You cannot set “Image size” to larger than “2M (1200 x 1600)” while setting this function to “ON”. <Cont. shooting set.>You cannot set “Continuous mode” to “Auto bracket” for the inside camera. When switch to the inside camera while setting to “Auto bracket”, “Continuous mode” is set to “Auto”. The number of shots that can be set differs depending on the image size. The number of shots that can be set is as follows:VGA (480 x 640): 4QVGA (240 x 320): 5 through 10QCIF (144 x 176): 5 through 20Sub-QCIF (96 x 128): 5 through 20Information](https://usermanual.wiki/Panasonic-Connect/208009A.User-Manual-Part-2/User-Guide-1019763-Page-47.png)


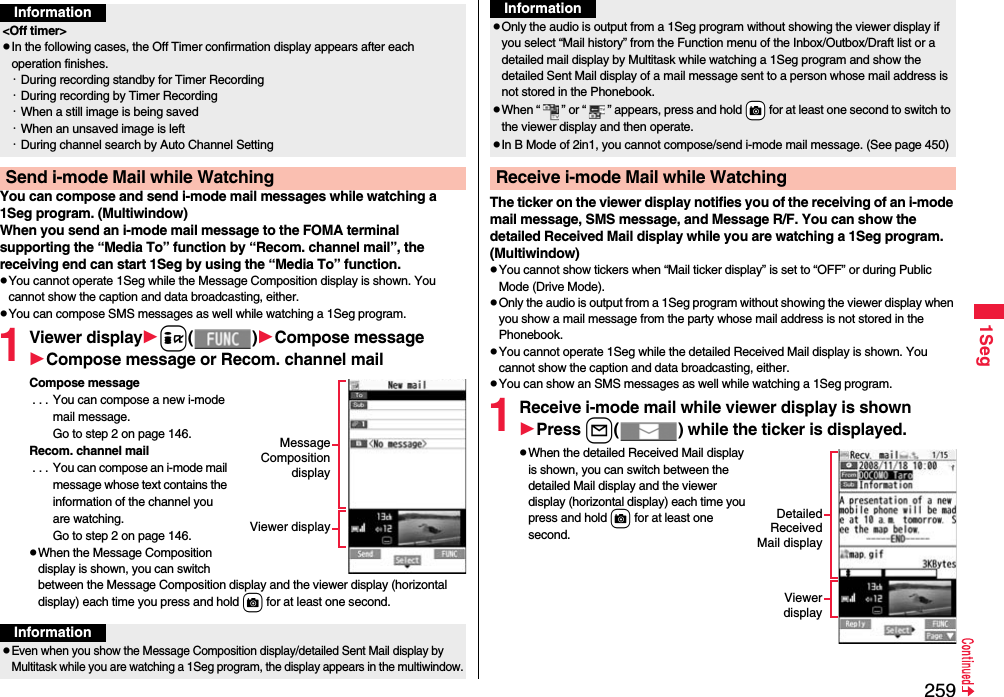
![2601SegBy using the i-αppli Program Guide, you can select a program from the program guide to start 1Seg or set TV Timer/Timer Recording. (See page 302)1m1SegProgram guidePress l( ) from the display of “Gガイド番組表リモコン (G Guide Program List Remote Control)” to watch the program currently broadcast on the selected channel.For details, refer to “Mobile Phone User’s Guide [i-mode] FOMA version”.InformationEven if “Mail ticker display” is set to “Sender+subject”, the titles are not displayed for Messages R/F, i-mode mail messages, and SMS messages received from the parties not stored in the Phonebook.Even when you show the detailed Received Mail display by Multitask while you are watching a 1Seg program, the display appears in the multiwindow. When “Mail ticker display” is set to “OFF” and “Receiving display” is set to “Alarm preferred” and you receive a mail message while watching a 1Seg program, the Reception Result display appears. The mail message is shown in the multiwindow even when you show it from the Reception Result display. However, the viewer display does not appear and the audio from a 1Seg program is not output when you show a mail message from the party whose mail address is not stored in the Phonebook.When “ ” or “ ” appears, press and hold +c for at least one second to switch to viewer display and then operate.<i-αppli Program Guide>Using i-αppli Program GuideInformationYou can set the i-αppli Program Guide by “Program guide key” of “Software setting”.When you use “Gガイド番組表リモコン (G Guide Program List Remote Control)” for the first time, you need to do initial settings.1Seg enables you to use the data broadcasting in addition to the video and audio. Various information including still images/movies is available from the site linked with TV programs.1Viewer display (Video Mode)m()Video Mode switches to Data Broadcasting Mode and “ ” appears.Audio from a 1Seg program is output even during Data Broadcasting Mode.You can display only data broadcasting when you press c( ) in Data Broadcasting Mode. Press c( ) to return to the former display.2Select an item (link).The confirmation display appears asking whether to connect to i-mode depending on the data broadcasting and data broadcasting site.See page 195 for the operation while a site is displayed.This software program is not available when the mode of 2in1 is set to B Mode.<Data Broadcasting>Using Data BroadcastingInformationInformationEach time you press +m( ), Video Mode and Data Broadcasting Mode are switched.You cannot display the data broadcasting on the horizontal display.You cannot enter pictographs when you enter characters on data broadcasting or data broadcasting site.Depending on the program, the audio might be output while the i-mode site is displayed. However, the 1Seg video is not displayed.Depending on the program, a tone might be output when you display the data broadcasting or data broadcasting site. In that case, the output of the 1Seg audio temporarily stops, and the tone of the data broadcasting is preferentially output.](https://usermanual.wiki/Panasonic-Connect/208009A.User-Manual-Part-2/User-Guide-1019763-Page-61.png)
![2661SegThe icon appears on the desktop.“ ” . . . . Displayed when an alarm is set for today (except the setting for past time).“ ” . . . . Displayed when an alarm is set for tomorrow or onward only.If you set TV Timer with “Alarm” set to “OFF”, the icons are not displayed.“ ” appears on the viewer display during recording by Timer Recording.The audio from a 1Seg program is not output during recording started by Timer Recording. You can output the audio by pressing -r or adjusting the sound volume, however.Function Menu while the TV Timer List or the Timer Recording List is DisplayedInformationNew Go to step 1 of “TV Timer List” on page 263 for TV Timer.Go to step 1 on page 264 for Timer Recording.Edit Go to step 1 of “TV Timer List” on page 263 for TV Timer.Go to step 1 on page 264 for Timer Recording.Sort You can change the display order.Select an order.Delete this YESDelete past You can delete the setting of TV Timer/Timer Recording whose start date/time or end date/time is set for the past date/time.YESDelete selected Put a check mark for the setting of TV Timer/Timer Recording to be deletedl()YESDelete all Enter your Terminal Security CodeYESMemory info[Timer Recording list only]You can display the used memory space (estimate).When you set an alarm for “TV Timer” or “Timer recording”<TV Timer>If you set “Act. TV w/ alarm” to other than “Auto ON”, the alarm sounds for about five minutes, and illumination lights. The vibrator works as the same setting for “Phone” of “Vibrator”. The set start date/time, channel, program name and an animation appear on the display.If you set “Alarm” to “ON” and “Act. TV w/ alarm” to “Auto ON”, 1Seg automatically starts when the specified time comes. The alarm does not sound.To end watching, press h and select “End 1Seg”.If you set “Off timer”, the confirmation display appears asking whether to continue watching when the specified time elapses. If you select “NO” or do nothing for about 15 seconds, 1Seg automatically terminates.<Timer Recording>About one minute before starting time, the alarm sounds for about two seconds, and illumination lights. The vibrator works as the same setting for “Phone” of “Vibrator”. The set start date/time, end date/time, channel, program name and an animation appear on the display, then the viewer display appears. If you do nothing for about one minute after the recording starts, the Stand-by display appears. You can show the viewer display by pressing x and selecting “Activate 1Seg”.To end recording started by Timer Recording to save video, press p from the viewer display and select “YES”. In Video Mode, you can end recording to save video also by pressing Oo ( ) and selecting “YES”.During a callThe alarm sounds from the earpiece.During operations<TV Timer>When “Alarm setting” is set to “Operation preferred”, the timer alarm sounds only when the Stand-by display is shown. When it is set to “Alarm preferred”, the timer alarm sounds even while you are operating another function or during a call. (See page 413)<Timer Recording>Timer Recording works according to the setting of “Priority”. (see page 265) However, Timer Recording might not work when you are reading to/writing from the microSD card, or accessing the Data Storage Center.When the time specified for “TV Timer” or “Timer recording” comes](https://usermanual.wiki/Panasonic-Connect/208009A.User-Manual-Part-2/User-Guide-1019763-Page-67.png)
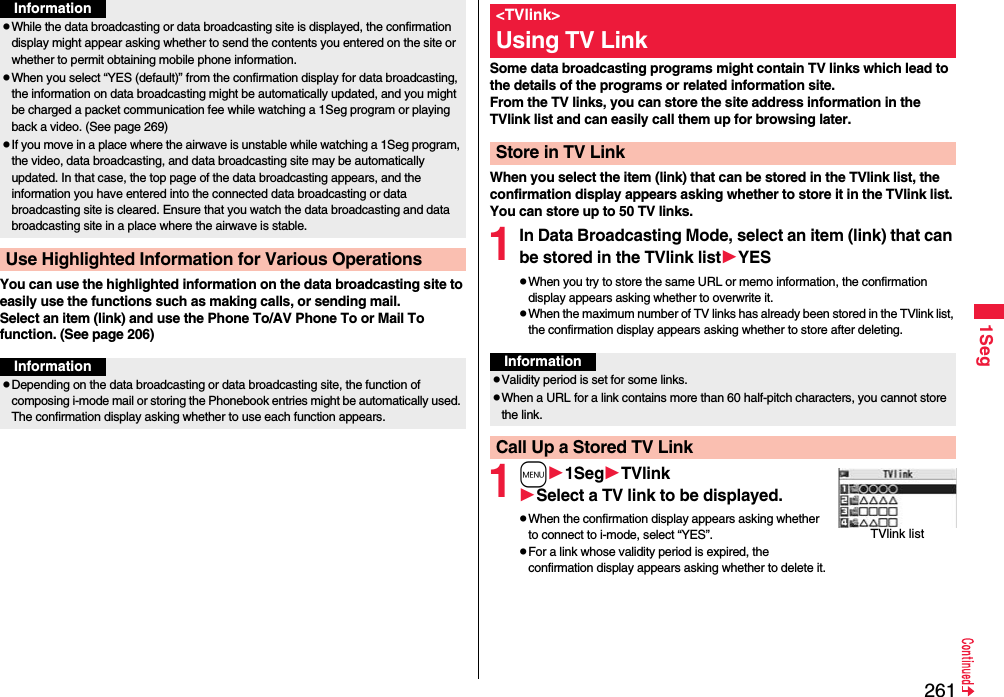
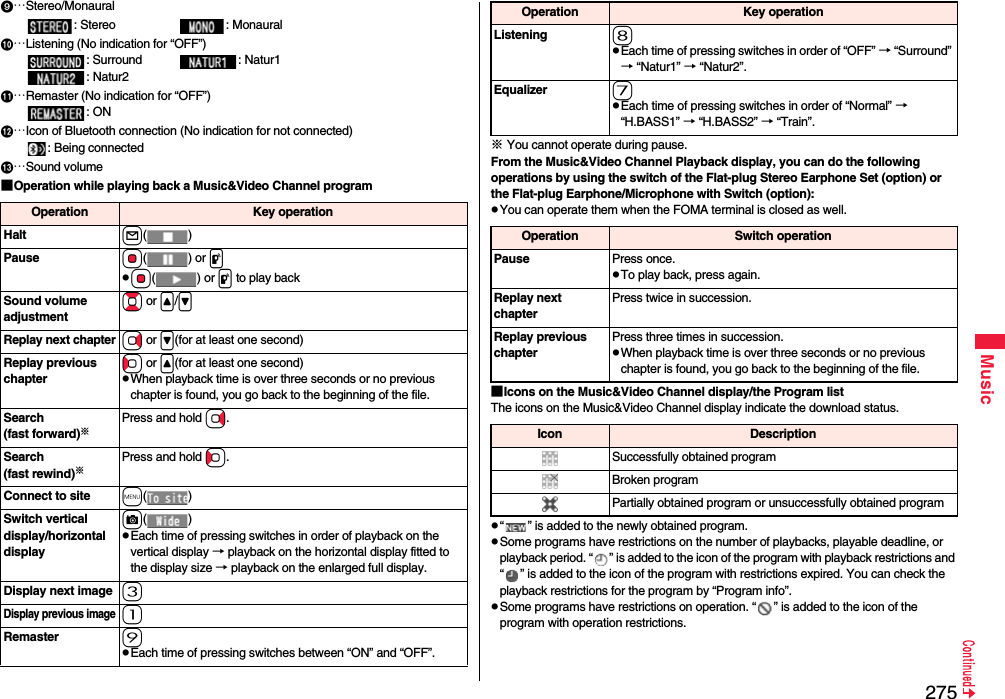
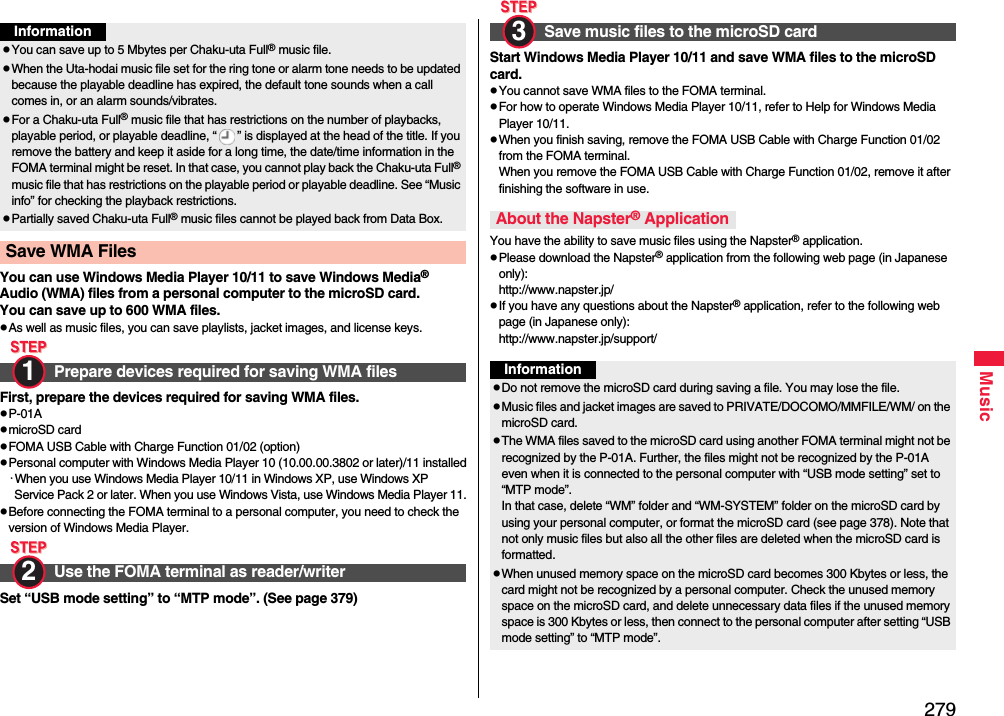
![272MusicMusic&Video Channel is a service which automatically delivers up to about one-hour programs at night by just setting your favorite music programs in advance. Further, you can enjoy high-quality movie program of up to about 30 minutes. Programs are updated periodically and you can enjoy the delivered programs at your convenient time such as on commuting.■Before using Music&Video ChannelMusic&Video Channel is a pay service which is available on a subscription basis. (You need to subscribe to i-mode and Pake-Houdai, Pake-Houdai Full or Pake-Houdai Double to apply for it.)Other than the service fee for using Music&Video Channel, you might be separately charged an information fee depending on the program.If you insert the UIM to the Music&Video Channel incompatible FOMA terminal after you subscribe to Music&Video Channel, you cannot use Music&Video Channel Service. Note that the service fee applies unless you cancel the Music&Video Channel subscription.You cannot obtain or set programs during international roaming.※ Take procedures to halt the distribution of programs before departure to overseas. Then, after homecoming, resume receiving distribution.※When you try to obtain or set programs during international roaming, note that you are charged a packet communication fee for the i-mode communication. You can use mail functions, display i-mode sites, and so on, while listening to program using Music&Video Channel (Play Background).See page 505 for the combination patterns of simultaneously usable functions.For the details on Music&Video Channel, refer to “Mobile Phone User's Guide [i-mode FOMA version]”.Music&Video ChannelIf you previously set a program that you want to watch, the FOMA terminal automatically downloads the program data at night.1mMUSICMusic&Video Channel2Set programFollow the instructions on the display to set a program.For details, refer to “Mobile Phone User’s Guide [i-mode] FOMA version”.See page 205 when data files are stored to the maximum.“ ” appears on the Stand-by display 12 hours before the time the program obtaining starts. However, it does not appear if you have inserted a UIM which is different from the one you used to set the program.Programs are automatically obtained at night. The display for obtaining programs does not appear but “ ” appears on the desktop when they are successfully obtained. Press Oo, highlight “ ”, and press Oo( ) to display the Music&Video Channel display. When obtaining fails, “ ” appears.Setting ProgramsWhen a program is setInformationWhen the communication is disconnected during obtaining a program, re-obtaining is automatically tried up to five times by an interval of about three minutes. When a display for obtaining a program is shown, however, the confirmation display appears asking whether to re-obtain the program.The ring tone does not sound and the vibrator does not work to notify that obtaining programs starts or is completed. When you set “Music&Video Ch illum.” of “Illumination” to “ON”, the Call/Charging indicator flickers when obtaining programs is completed. (See page 120)You can set up to two programs at once.Note that a newly obtained program overwrites a saved program and you can no longer play back that saved program afterward. To avoid overwriting, perform “Move program” to move the program to the “Saved program” folder.You cannot save the obtained program to the microSD card.](https://usermanual.wiki/Panasonic-Connect/208009A.User-Manual-Part-2/User-Guide-1019763-Page-73.png)
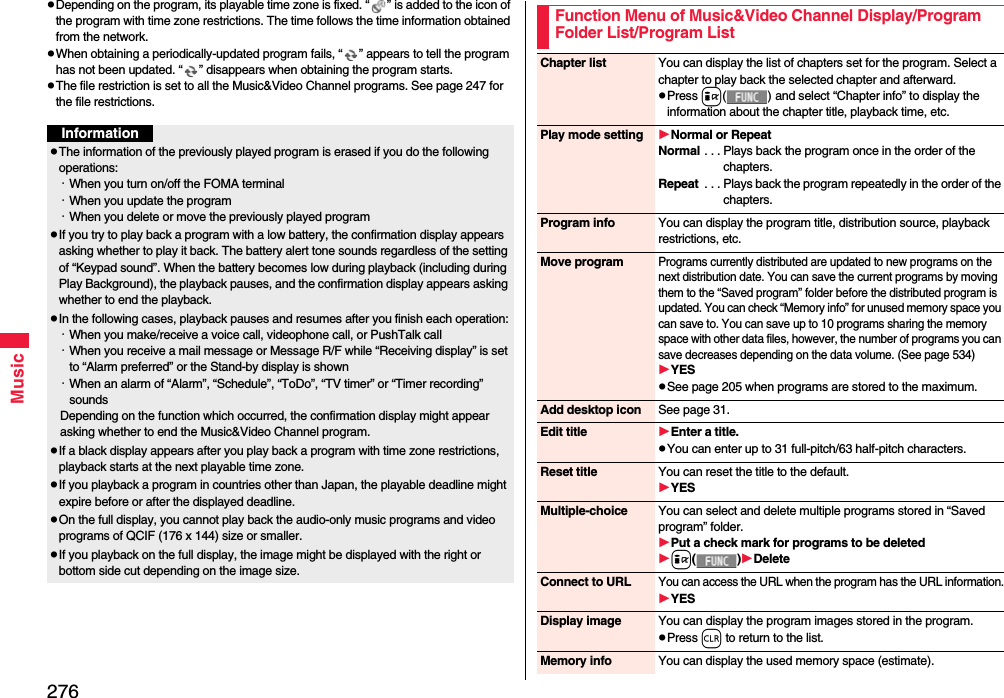
![273Music1Music&Video Channel displaySet programFollow the instructions on the display.You can check or cancel the set program. For details, refer to “Mobile Phone User’s Guide [i-mode] FOMA version”.To set programs, you need to register the site which offers Music&Video Channel programs to your My Menu. (See page 198)If you have not subscribed to Music&Video Channel, select “About this service” to see the Music&Video Channel introduction page.When the programs could not be obtained due to “power off” or “low battery” at the start time of program obtaining, re-obtaining is performed at night of the following day.It may take a time to obtain programs, so fully charge the battery and operate in the good radio wave conditions.You cannot perform the setting operation and automatic obtaining of the program selected on the Music&Video Channel display or the program in use.When you cancel Music&Video Channel, the programs other than those moved by “Move program” are deleted.If you insert a UIM which is different from the one you used to set programs, programs cannot be automatically obtained. Set the programs again from the Music&Video Channel display.When you select a service menu for Music&Video Channel, the message “Confirm set up information?” appears. If you select “YES”, the programs that have been distributed might be deleted. However, they will not be deleted while the distribution is set to be halted.If you insert the UIM of the FOMA terminal that you have been set for programs into another Music&Video Channel compatible FOMA terminal, the programs cannot be obtained automatically. Select “Set program” again from the Music&Video Channel display to automatically update the program setting on the FOMA terminal, then the programs can be obtained automatically.Check/Cancel the Set ProgramInformationInformationEven if the setting of a program is canceled, My Menu is not deleted. “ ” appears on the Stand-by display when the automatic program obtaining fails or the program is not updated even after the program distribution date. When the automatic obtaining fails, you can manually obtain the program.1Music&Video Channel displaySelect a programYESFor a partially obtained program, select “Play” to play it back.For a program which has not been updated, select “Play” to play it back.See page 205 when data files are stored to the maximum.Obtain a Program ManuallyInformationWhen obtaining of a program is suspended, the part of the program obtained up to that point is saved. To obtain remaining part, you can manually obtain it except in some time zones. When a program has been updated or switched to another program, obtaining starts not from the suspended point but from the beginning.You cannot re-obtain the program whose playable deadline has expired. Such a program cannot be updated until the next distribution date.You may not be able to manually obtain programs depending on the time zone.](https://usermanual.wiki/Panasonic-Connect/208009A.User-Manual-Part-2/User-Guide-1019763-Page-74.png)

![292i-αppli/i-WidgetBy downloading i-αppli programs from sites, you can use the FOMA terminal more conveniently. Some i-αppli programs enable you to directly store data in the Phonebook or Schedule and some are linked to Data Box to save/obtain images.Also, you can enjoy playing the large capacity mega i-αppli such as high-resolution 3D games and full-length role playing game or i-αppli online compatible i-αppli programs such as match games and chat application program.Further, the FOMA terminal supports i-αppli call that enables you to play match games with your acquaintance, and to be received event notification from the i-αppli distributer.See “Using i-αppli Call” on page 309 for setting whether to receive notification from i-αppli call.For details on i-αppli, refer to “Mobile Phone User’s Guide [i-mode] FOMA version”.You can download software programs from sites to the FOMA terminal. You can save up to 100 files, however, the number of files you can save decreases depending on the data volume because the memory space is shared with other data files. (See page 534)1Call up an i-αppli downloadable siteSelect a software program.2Select “OK” when downloading ends.See page 205 when i-αppli programs are stored to the maximum.When downloading ends, the display for Software Setting (Network Set, Stand-by Set, Location Usage, Program Guide Key, or iαppli call) might appear. These settings can be done also from the Software list.3YES or NOYES . . . . Starts i-αppli.NO . . . . . Returns to the site display.i-αppli<i-αppli Download>Downloading i-αppli from SitesWhen you press r or h to suspend downloading an i-αppli program of 100 Kbytes or more, or when downloading is suspended by the radio wave conditions, the confirmation display appears asking whether to resume downloading. Select “YES” to resume downloading the remaining part. Select “NO” to show the confirmation display asking whether to save the file downloaded halfway. Select “YES” to partially save the file.You can re-download the rest of the partially saved i-αppli program from the Software list.An i-αppli mail folder is created automatically each in the Inbox/Outbox Folder list, and the title of the downloaded mail-linked i-αppli becomes the name of the folder.You can save up to five mail-linked i-αppli programs.You cannot download the software program if the mail-linked i-αppli using the same folder is already in the Software list.You cannot download mail-linked i-αppli while Mail Security is set.You cannot download mail-linked i-αppli if the Inbox/Outbox Folder list contains five i-αppli mail folders.When re-downloading mail-linked i-αppli whose folder only remains, the confirmation display appears asking whether to use the existing i-αppli mail folder. If you select “YES”, the existing folder is used. If you select “NO” because you do not use it, the confirmation display appears asking whether to delete an existing folder and create a new one. You cannot download mail-linked i-αppli without creating a new folder.When downloading is suspendedWhen you downloaded mail-linked i-αppliInformationYou can download pre-installed i-αppli programs from the “P-SQUARE” site (in Japanese only).iMenu→メニューリスト (Menu List)→ケータイ電話メーカー (Mobile Phone Maker)→P-SQUAREDownloading is not available from some accessed sites.QR code for accessing the site](https://usermanual.wiki/Panasonic-Connect/208009A.User-Manual-Part-2/User-Guide-1019763-Page-93.png)
![298i-αppli/i-WidgetYou can play pre-installed only episode of “Olympus Colosseum” that is a world of “Kingdom Hearts Coded”. Further, you can also play an introduction for main story “Traverse Town Special Edit Version” by upgrading.© Disney. Developed by SQUARE ENIX1Software listキングダムハーツ (Kingdom Hearts)OoWhen you activate this i-αppli program in Normal Style, the confirmation display appears telling that you are advised to play the game in Horizontal Open Style.2Select a menu.オリンポスコロシアム∼SIDE EPISODE∼ (Olympus Colosseum ~SIDE EPISODE~). . .You can play original short episode.トラヴァースタウン∼SPECIAL EDIT VERSION∼(アップグレード)[Traverse Town ~SPECIAL EDIT VERSION~ (Upgrade)]. . .You can upgrade to “Traverse Town ~SPECIAL EDIT VERSION~” that enables you to play the main story. (You can also play “Olympus Colosseum” even after upgrading.)You are charged a packet communication fee for when you connect to the site.The complete version data is saved to the microSD card.When you upgrade the program, bulky data are downloaded, so you need to subscribe to Pake-Houdai, Pake-Houdai Full or Pake-Houdai Double.キングダムハーツコーデッド (Kingdom Hearts Coded)This is a fantasy adventure puzzle game to advance the story by solving puzzles asked by the inhabitants of the curious village.In the complete version, you can enjoy the whole story and mini games with animations and voice of characters.© 2007-2008 LEVEL-5 Inc.1Software listレイトン 不思議な町 序章 (Professor Layton Curious Village Prologue)00When you activate this i-αppli program in Normal Style, the confirmation display appears telling that you are advised to play the game in Horizontal Open Style.2Select a menu.はじめから (From the beginning) . . .Start the game from the beginning.オプション (Option) . . . . . . . . . . . . . .Set the volume level and vibration.アップグレード (Upgrade) . . . . . . . . .Upgrades the program.You are charged a packet communication fee for when you connect to the site.The complete version data is saved to the microSD card.When you upgrade the program, bulky data are downloaded, so you need to subscribe to Pake-Houdai, Pake-Houdai Full or Pake-Houdai Double.レイトン教授と不思議な町 序章(Professor Layton and the Curious Village Prologue)](https://usermanual.wiki/Panasonic-Connect/208009A.User-Manual-Part-2/User-Guide-1019763-Page-99.png)

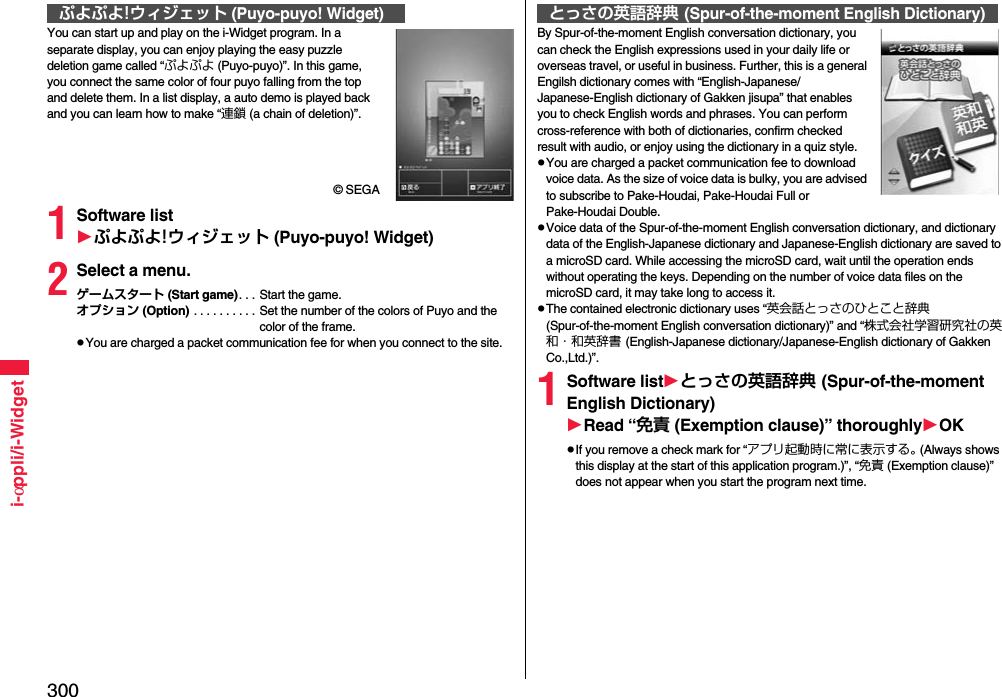
![301i-αppli/i-Widget2Select a dictionary to be used.英会話とっさのひとこと辞典(Spur-of-the-moment English conversation dictionary) . . . The Spur-of-the-moment English conversation dictionary starts. Check the English expressions by specifying a scene or keyword you encounter or use in your daily life. Further, you can confirm those English expressions with audio.学研 辞スパ英和辞典(English-Japanese dictionary of Gakken jisupa) . . . The English-Japanese dictionary starts. Enter the English spelling you want to check into the input box. When the English-Japanese dictionary is not downloaded, the confirmation display appears telling that it will be downloaded.学研 辞スパ和英辞典(Japanese-English dictionary of Gakken jisupa) . . . The Japanese-English dictionary starts. Enter the Japanese readings you want to check into the input box. When the Japanese-English dictionary is not downloaded, the confirmation display appears telling that it will be downloaded.英会話とっさのひとことクイズ(Spur-of-the-moment English conversation quiz) . . . You can enjoy quizzes based on the title expressions.If you select l() → “お気に入り登録 (Store as bookmark)” from the search result display, you can bookmark the results.Further, if you press Oo or select l() → “音声データ管理 (Manage voice data)” → “章毎ダウンロード (Download by chapter)”/“一括ダウンロード (Download at one time)”, you can download voice data to play back.You can return to the previous display by pressing i when “ ” is displayed at the lower right of the display.Just by speaking a phrase to be translated into your FOMA terminal, this application program translates it from Japanese to English or Chinese and vice versa.You can use all the functions charge free for 60 days from when you start using this application program. Some phrases available for translation are restricted on and after the 61st day. To use all the services, you need to register in My Menu (charged) from the “しゃべって翻訳 (Speech Translation)” site by ATR-Trek Co., Ltd. (in Japanese only)[How to access: iMenu→メニューリスト (Menu List)→辞書/便利ツール (Dictionary/Convenient Tool)→便利ツール (Convenient Tool)→しゃべって翻訳 (Speech Translation)]You are separately charged a packet communication fee for using.1Software list日英しゃべって翻訳_P (J-E Speech Translation_P) or 日中しゃべって翻訳_P (J-C Speech Translation_P)SKIPSelect “日英しゃべって翻訳_P (J-E Speech Translation_P)” for using J-E version, or select “日中しゃべって翻訳_P (J-C Speech Translation_P)” for using J-C version.2Read “しゃべって翻訳とは (What is Speech Translation?)” and “ご利用規約 (Usage rules)” thoroughly同意する (Agree)You need to agree with “ご利用規約 (Usage rules)” when you use the program for the first time.3Read “ご利用注意事項 (Cautions in use)” thoroughlyOKはい (YES)If you select “いいえ (NO)”, “しゃべって翻訳とは (What is Speech Translation?)”, “ご利用規約 (Usage rules)”, and “ご利用注意事項 (Cautions in use)” do not appear when you start the program next time.4はい (YES)OK“iアプリの使い方 (How to use i-αppli)” appears at the first startup.日英版/日中版 しゃべって翻訳 for P(J-E/J-C Speech Translation for P)The display is for J-E version.© ATR-Trek Co., Ltd.](https://usermanual.wiki/Panasonic-Connect/208009A.User-Manual-Part-2/User-Guide-1019763-Page-102.png)
![302i-αppli/i-Widget5Select a menu item.日→英 翻訳 (Translate Japanese to English). . . Starts translation from Japanese to English.英→日 翻訳 (Translate English to Japanese). . . Starts translation from English to Japanese.日→中 翻訳 (Translate Japanese to Chinese). . . Starts translation from Japanese to Chinese.中→日 翻訳 (Translate Chinese to Japanese). . . Starts translation from Chinese to Japanese.シーンを変更 (Change scene). . . Select a scene suitable for words to be translated.≥Press i to switch between Japanese and English or Chinese.This is a convenient i-αppli program that bundles the TV program list and AV remote control function and the monthly charge is free.Anytime and anywhere you are, you can easily obtain the terrestrial digital, terrestrial analog or BS digital TV program information for the desired time zone. You can know about titles, contents, and start/end times of TV programs. Further, you can start a 1Seg program from the program list and vice versa.If there is any program you want to watch, you can set timer recordings of the program on a DVD recorder, etc. over the Internet. (You need to have a DVD recorder, etc. that supports the remote timer recording function. And you need to perform initial settings of this application program.) Further, you can search for the program information by keywords such as program genres or celebrities you like, or pickup keywords on the top of the display. You can also remote-control a TV, video recorder, and DVD player. (Some models are not supported.)You can browse the program guide even on the horizontal display. (Some functions are not supported on the horizontal display.)≥See “Using Infrared Remote Control Function” on page 388 for details on the infrared remote control.≥You need to make the initial settings and to agree with the usage rules for the first time.≥You are separately charged a packet communication fee.≥To use this application program overseas, set the FOMA terminal’s clock to Japan time.≥For details, refer to “Mobile Phone User’s Guide [i-mode] FOMA version”.≥This software program is not available when the mode of 2in1 is set to B Mode.Gガイド番組表リモコン (G Guide Program List Remote Control)※The display is for reference. The actual one may differ. Local programs according to your region appear on your display.You can set 1Seg TV Timer for programs you want to watch by selecting from the program list of this application program.How to set TV Timer1. Software list1Gガイド番組表リモコン (G Guide Program List Remote Control)1Highlight a program you want set TV Timer for and press i()1視聴予約 (TV Timer)1予約実行 (Execute booking)1Operate following the instructions on the display.You can select a program you want to record and set a timer recording from the program list of this application program.How to set a timer recording1. Software list1Gガイド番組表リモコン (G Guide Program List Remote Control)1Highlight a program to be set for a timer recording and press i()1♯ワンセグ録画予約 (1Seg timer recording)1予約実行 (Execute booking)1Operate following the instructions on the display.(You can set a timer recording also by highlighting a program and pressing s.)If you have a DVD recorder, etc. that supports the remote timer recording function, you can set timer recordings from the program list of this application program over the Internet even if you are away. For remote timer recording, you need to make initial settings of this application program.How to make initial settings1. Set the Internet connection for the DVD recorder, etc.(Refer to the instruction manual of the DVD recorder, etc. you use.)2. Software list1Gガイド番組表リモコン (G Guide Program List Remote Control)1i()1リモート録画予約 (Remote timer recording)1Operate following the guidance.How to set timer recordingsAfter the initial settings, specify your desired program and select “リモート録画予約 (Remote timer recording)”. Then, the DVD recorder, etc. specified on this application program is connected via the Internet, and you can set timer recordings.≥You are separately charged a packet communication fee.About TV timer functionAbout timer recording functionAbout remote timer recording function](https://usermanual.wiki/Panasonic-Connect/208009A.User-Manual-Part-2/User-Guide-1019763-Page-103.png)
![304i-αppli/i-WidgetFor service contents and details of subscriptions, refer to the i-mode site of DCMX (in Japanese only).・i-mode site: iMenu→DCMX iD“楽オク出品アプリ2 (Rakuoku Exhibition Application 2)” enables you to easily exhibit your goods on Rakuoku whenever you want wherever you are. Even if you are a beginner, an instruction guides you through exhibition procedures, so you can use it easily. The convenient functions such as shooting/editing photos and saving records are available so that you can exhibit your goods in a shorter time than you do on sites.You need to agree with “利用規約 (Usage rules)” for the first time.You are separately charged a packet communication fee.For details on Rakuoku, refer to “Mobile Phone User’s Guide [i-mode] FOMA version”.To exhibit on Rakuoku, you need to register with the Rakuten membership and exhibitor membership.For the information about Rakuoku, refer to i-mode site (in Japanese only).i-mode site: iMenu→オークション (Auction)QR code for accessing the siteInformationTo start this application program for the first time, you need to agree with “ご利用上の注意 (Cautions in use)”.You are charged a packet communication fee for settings and operations. ■Cautions on Osaifu-Keitai compatible i-αppliNote that we take no responsibility for any information set on your IC card.楽オク出品アプリ2 (Rakuoku Exhibition Application 2)※The display is for reference.The actual one may differ.QR code for accessing the siteBy using the GPS function and map, you can read the map of the place you are currently in or you specify, or check area information. You can then navigate yourself to the destination by vehicle, on foot, or by car. Further, you can easily get transfer information by voice input. You are separately charged a packet communication fee. You are advised to use Pake-Houdai, Pake-Houdai Full or Pake-Houdai Double for using this software program.If you delete this software program and then when you want to resume it, download it from “iエリアー周辺情報ー (i-area -Area Information-)”.This software program is not available when the mode of 2in1 is set to B Mode.Note that we are not held responsible for the accuracy and promptness of the map and route information.While driving, ensure that a person other than the driver operates this application program.This software program supports motion tracking.See page 329 for details on operations.This is an i-αppli program that enables you to conveniently use mobile banking. Mobile banking enables you to use your FOMA terminal to check the account balance, check the deposits/withdrawals, and transfer/shift money whenever you want and wherever you are. By entering your specified password at the start of this application program, you can use the mobile banking services for up to two banks. To use mobile banking, you need to have the bank account and subscribe to the mobile banking service of each bank.You are separately charged a packet communication fee.For details on i-αppli Banking, refer to “Mobile Phone User’s Guide [i-mode] FOMA version”.For the information about i-αppli Banking, refer to i-mode site (in Japanese only).i-mode site: iMenu→メニューリスト (Menu List)→モバイルバンキング (Mobile Banking)→iアプリバンキング (i-αppli Banking)地図アプリ (Map Application)iアプリバンキング (i-αppli Banking)※The display is for reference.The actual one may differ.QR code for accessing the site](https://usermanual.wiki/Panasonic-Connect/208009A.User-Manual-Part-2/User-Guide-1019763-Page-105.png)
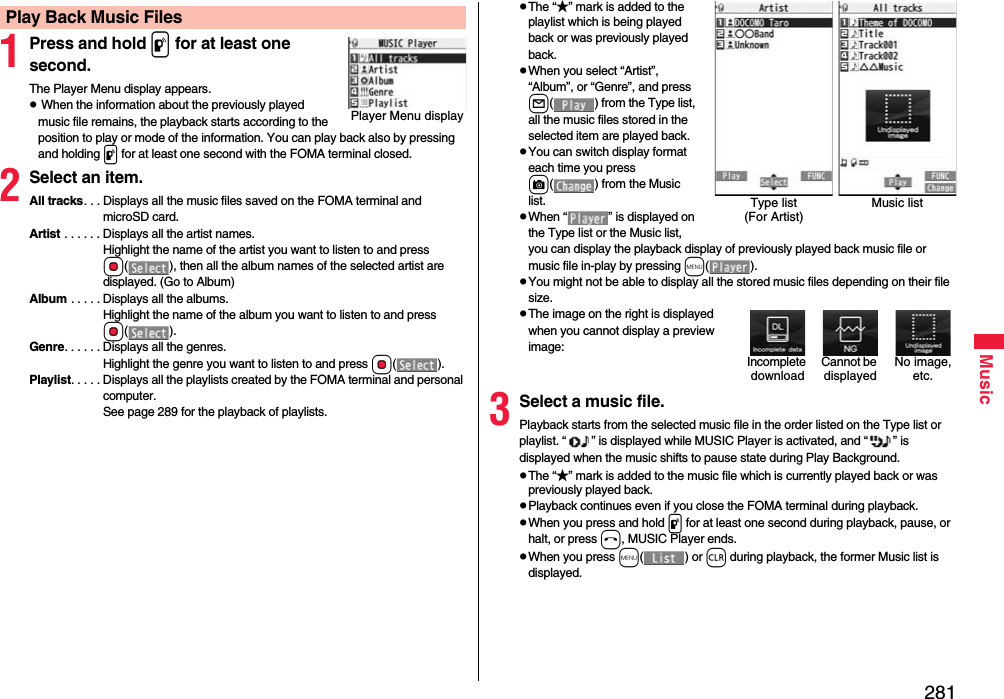
![312i-αppli/i-WidgetWhen the i-αppli Stand-by display does not end successfully, you can check the date/time and its reason.1m1i-αppli1iαppli info1End stand-by info≥When “ ” is displayed on the End Stand-by Info display, press i( ), and select “Copy info” to copy the information. Select “Delete info”, and select “YES” to delete the information.Depending on the i-αppli program, you can save its data files on the microSD card. You can display the i-αppli data files saved on the microSD card.1m1i-αppli1iαppli(microSD)1iαppli dataEnd Stand-by Info<iαppli data>Displaying i-αppli Data Files on the microSD CardFunction Menu while i-αppli Data File is DisplayedFolder info You can display the information of the software program that uses the selected folder, available/unavailable for folder usage, and the reason if unavailable.Delete folder You can delete the selected folder and files in the folder.1Enter your Terminal Security Code1YESi-Widget is a convenient function that enables you to access to any frequently used contents such as calculator, clock, memopad, or stock prices information (Widget αppli).You can add Widget αppli by downloading from sites offered by IPs (Information Providers). (See page 292) Also, you can paste multiple (up to eight) Widget αppli programs to i-Widget display, and you can create your own display.≥Multiple Widget αppli programs might communicate when you show the i-Widget display.≥You are separately charged a packet communication fee for downloading Widget αppli or showing the i-Widget display.≥To communicate overseas, you are charged a communication fee by communication of Widget αppli.≥For details on i-Widget, refer to “Mobile Phone User’s Guide [i-mode] FOMA version”.If you start i-Widget, you can simultaneously start multiple Widget αppli programs. You can simultaneously display multiple started Widget αppli programs on the i-Widget display.1Press r.i-Widget starts, and the i-Widget menu is displayed.When you have started Widget αppli already, the list of the started Widget αppli appears.≥You can start i-Widget also by selecting a Widget αppli program on the Software list.i-WidgetUsing i-WidgetStart i-Widgeti-Widget display](https://usermanual.wiki/Panasonic-Connect/208009A.User-Manual-Part-2/User-Guide-1019763-Page-113.png)