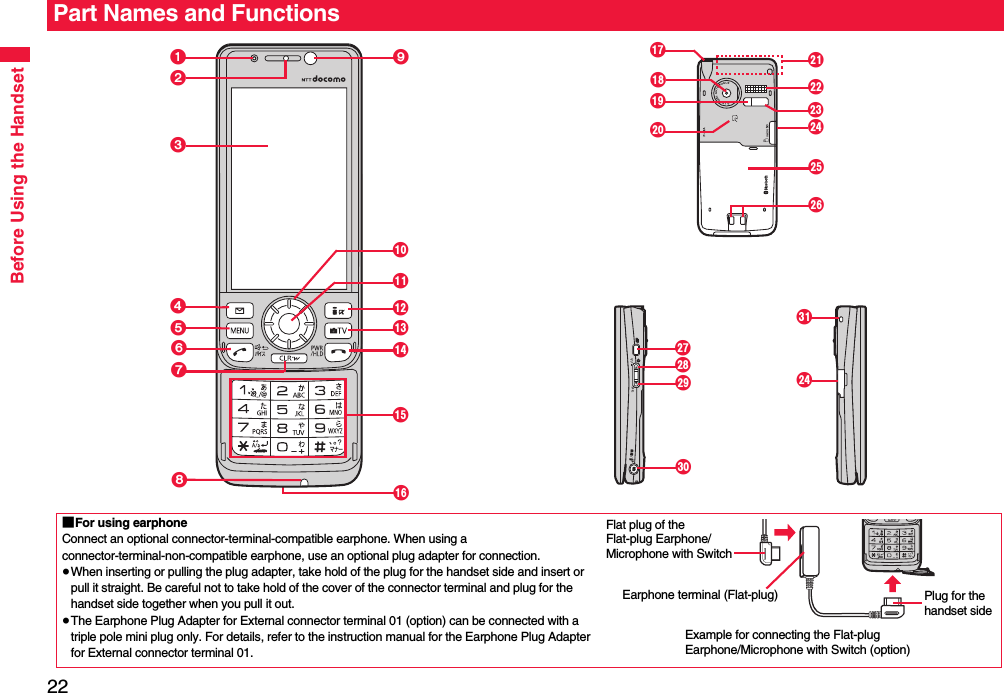
Panasonic Connect 208012A UMTS/ GSM Cellular Mobile with Bluetooth® and RFID User Manual Part 1
Panasonic Mobile Communications Development of Europe Ltd UMTS/ GSM Cellular Mobile with Bluetooth® and RFID Part 1
Contents
- 1. User Manual Part 1
- 2. User Manual Part 2
- 3. User Manual Part 3
User Manual Part 1


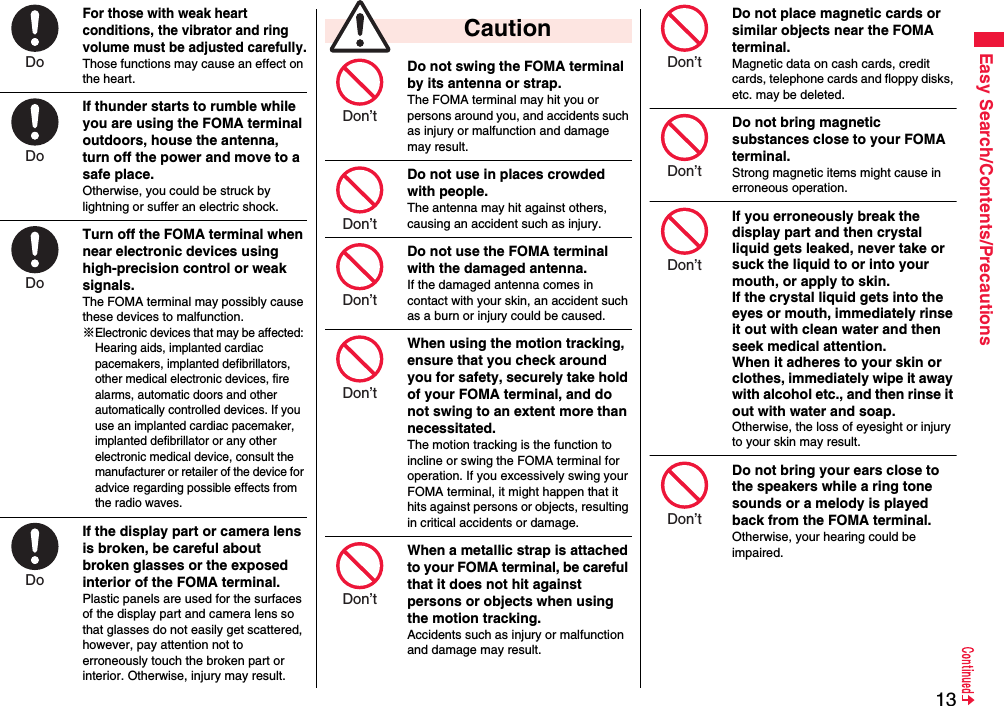
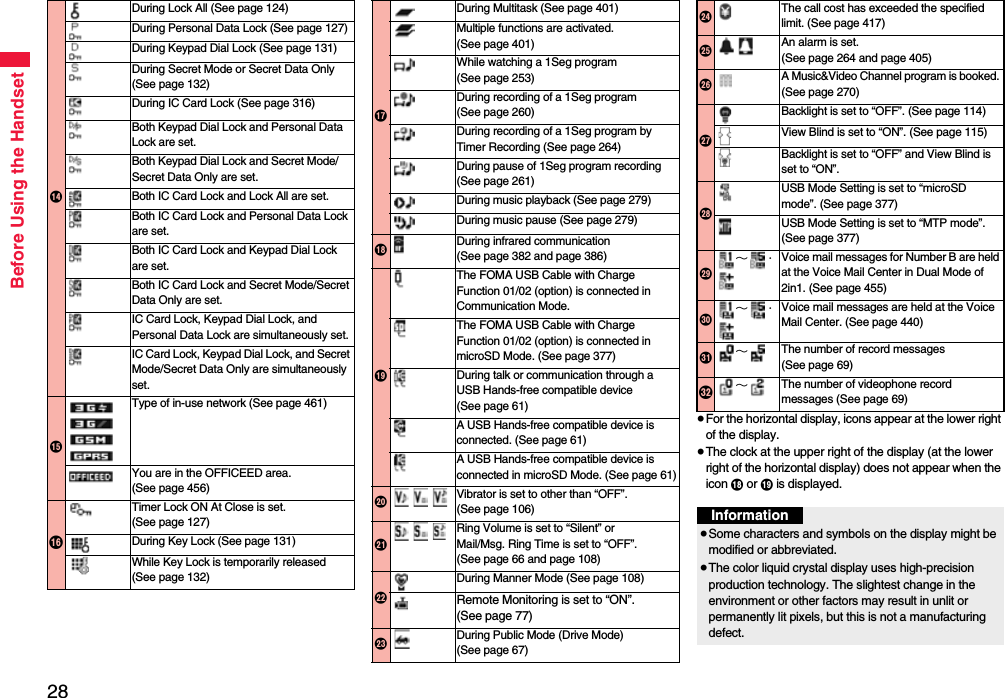
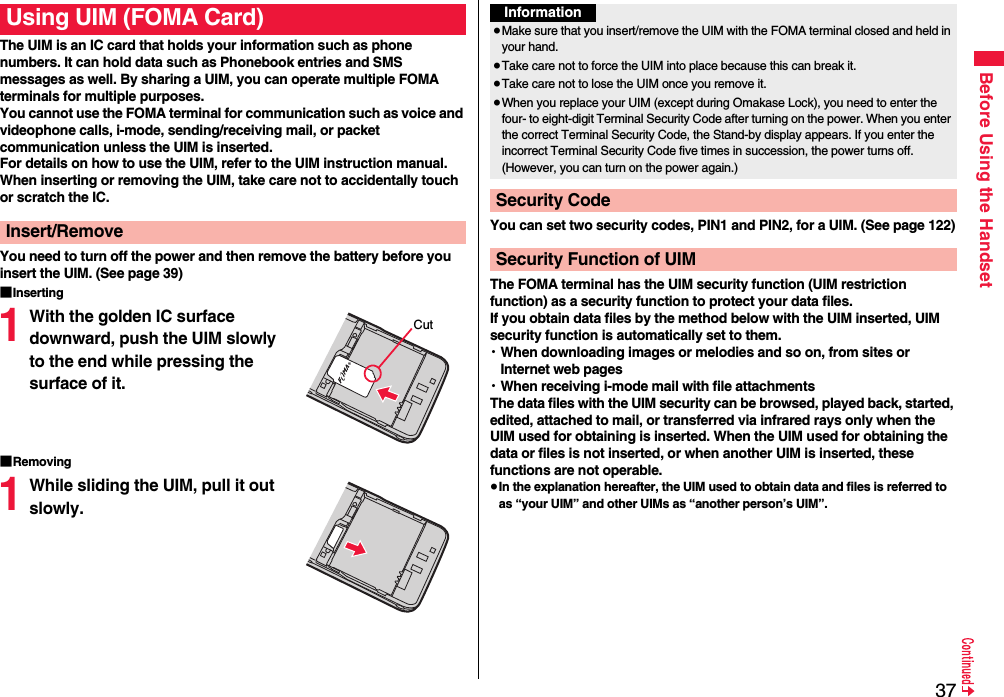
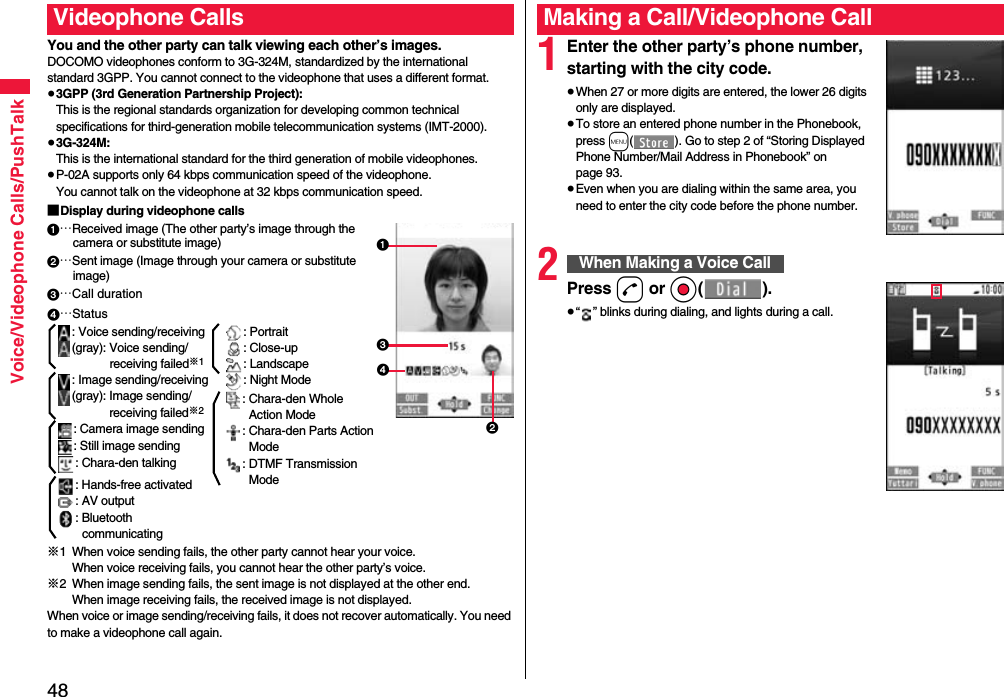
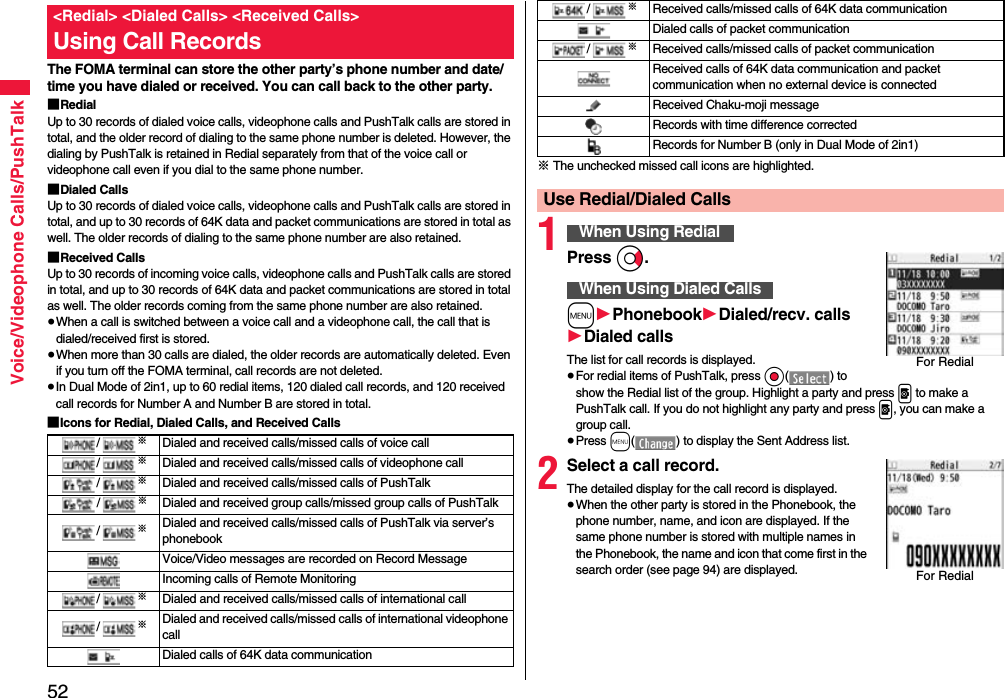
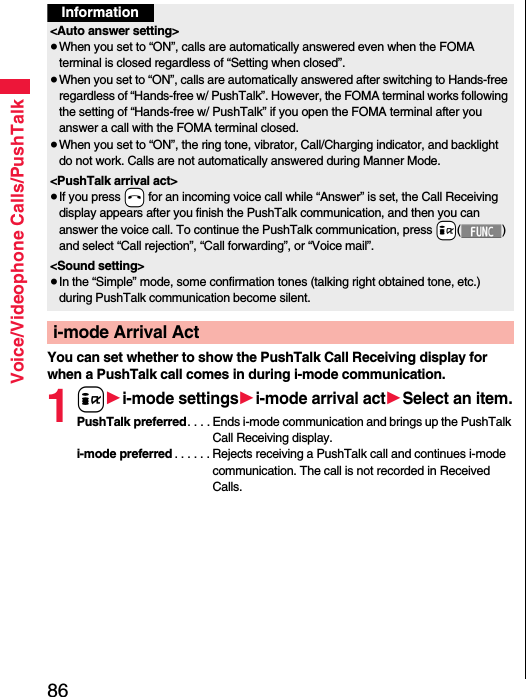
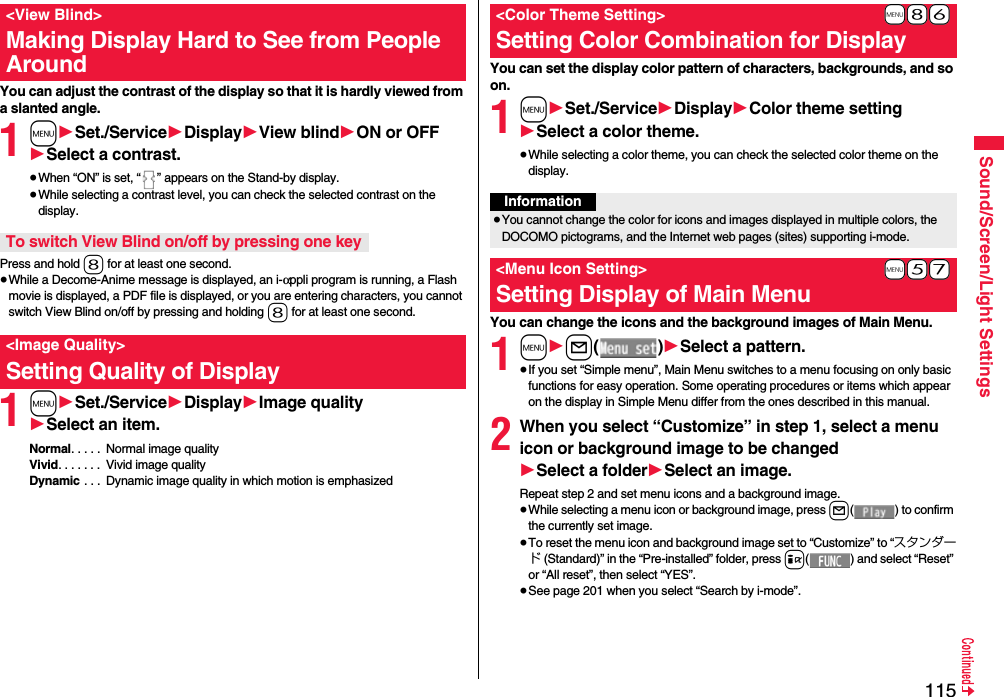
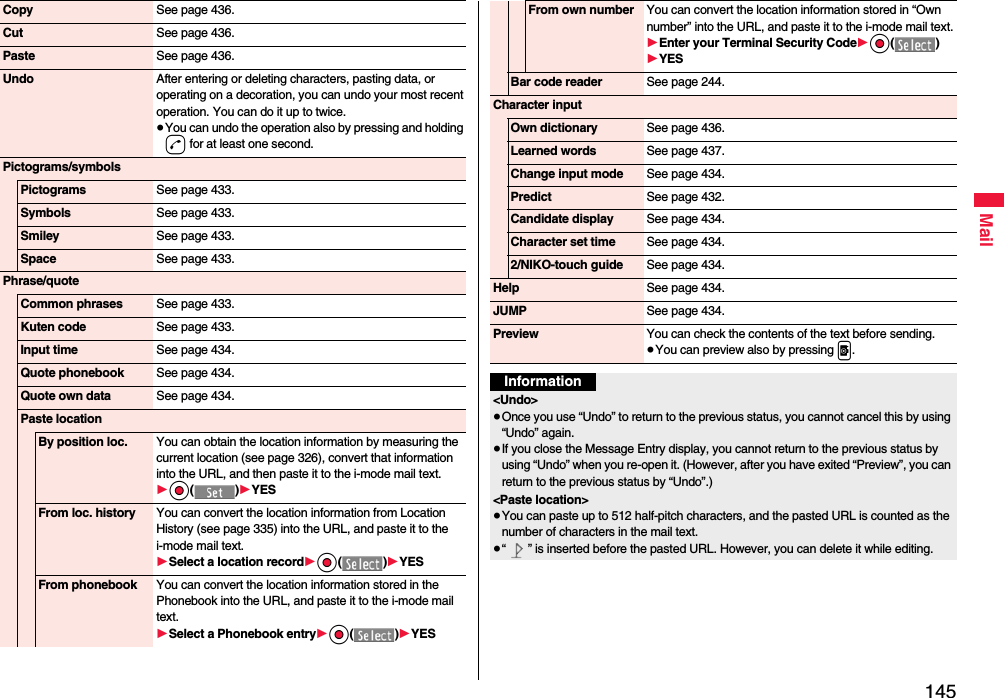
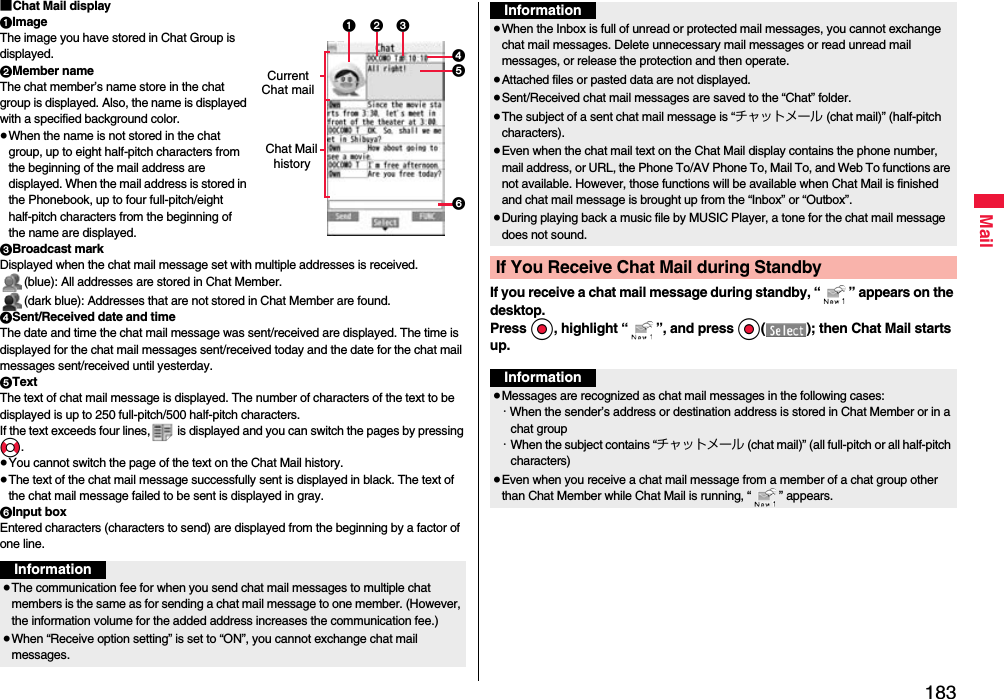
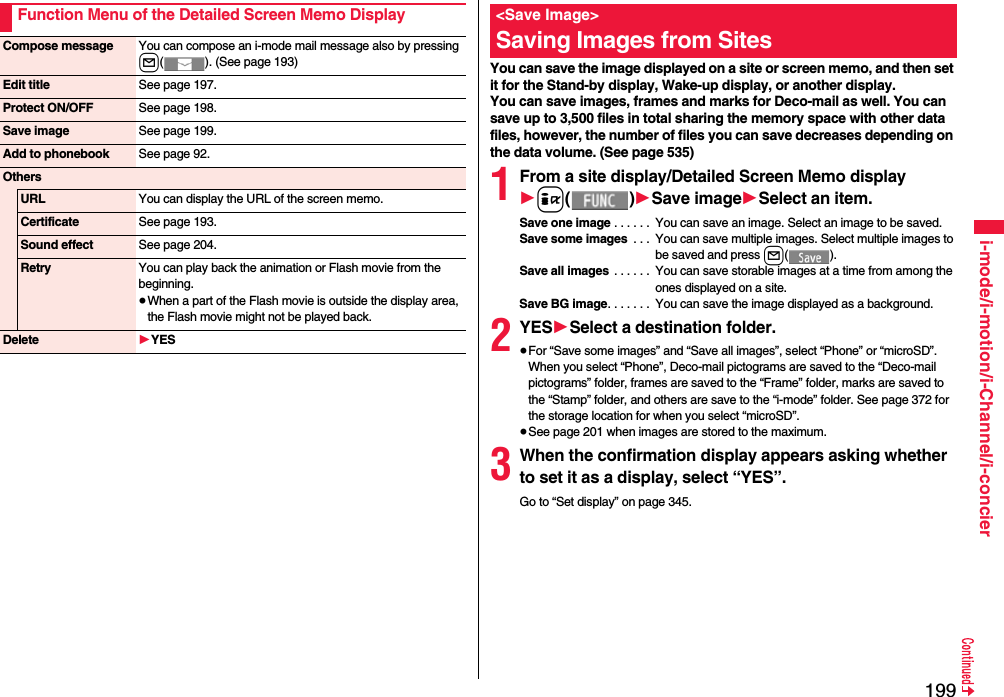
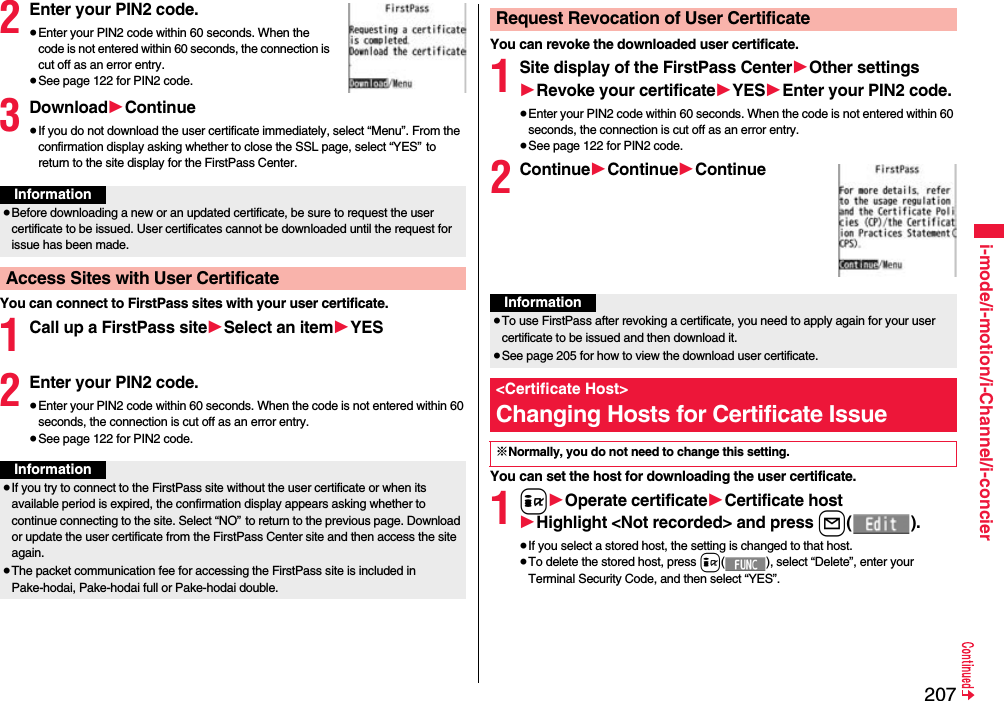
![15Easy Search/Contents/PrecautionsAn exhausted battery should not be disposed of with other waste.The battery may catch fire or damage the environment. After insulating the battery terminals with tape, take the unneeded battery to a handling counter such as a docomo shop or dispose of it in accordance with local waste disposal regulations.Do not charge the wet battery. The battery pack may overheat, catch fire, or burst.If the battery fluid comes in contact with skin or clothes, immediately stop using, then rinse it out thoroughly with clean water.Skin injury may result.Do not use a damaged adapter/charger cord or power cord.Electric shock, overheating or fire may result.Do not use the AC adapter and desktop holder in steamy places such as a bathroom.Electric shock may occur. CautionPrecautions for adapters/chargers WarningDon’t Don’t Do Don’t Don’t The DC adapter is for use only in a negative (-) grounded vehicle. Do not use it in a positive (+) grounded vehicle.Fire may result.If it starts to thunder, do not touch the FOMA terminal and adapter/charger.You might be struck by lighting or suffer an electric shock.Never short-circuit the charging terminal when the adapter is plugged into the power outlet or cigarette lighter socket. Also, never touch the charging terminal with fingers or other bare skin.Fire, malfunction, electric shock or injury may result.Place the charger and desktop holder on a stable location during charging. Do not cover or wrap the charger and desktop holder in cloth or bedding.The FOMA terminal may drop off, or the charger and desktop holder may overheat, causing fire or malfunction.Do not place something heavy on the adapter/charger cord and power cord.Electric shock or fire may result.Do not touch the power cord of the adapter/charger, or power outlet with wet hands.Electric shock may result.Don’t Don’t Don’t Don’t Don’t Not wet hands Use the adapter/charger at the specified V AC.If you use it at a wrong voltage, fire or malfunction may result. When using the FOMA terminal overseas, use FOMA AC adapter available overseas.AC adapter: 100 V ACDC adapter: 12/24 V DC[For negative (-) grounded vehicles only]AC adapter available overseas: 100 V to 240 V AC[Connect only to household AC outlet]If a fuse of the DC adapter has blown, replace it with a specified fuse.If you use an unspecified fuse, fire or malfunction may result. For the specified fuse, refer to each instruction manual.Keep the power plugs dust-free.Otherwise, fire may result.When pulling the AC adapter into the power outlet, firmly plug it in, taking care not to contact with metal straps or the like.Otherwise, electric shock, short-circuit or fire may result.Do Do Do Do](https://usermanual.wiki/Panasonic-Connect/208012A.User-Manual-Part-1/User-Guide-1045203-Page-17.png)
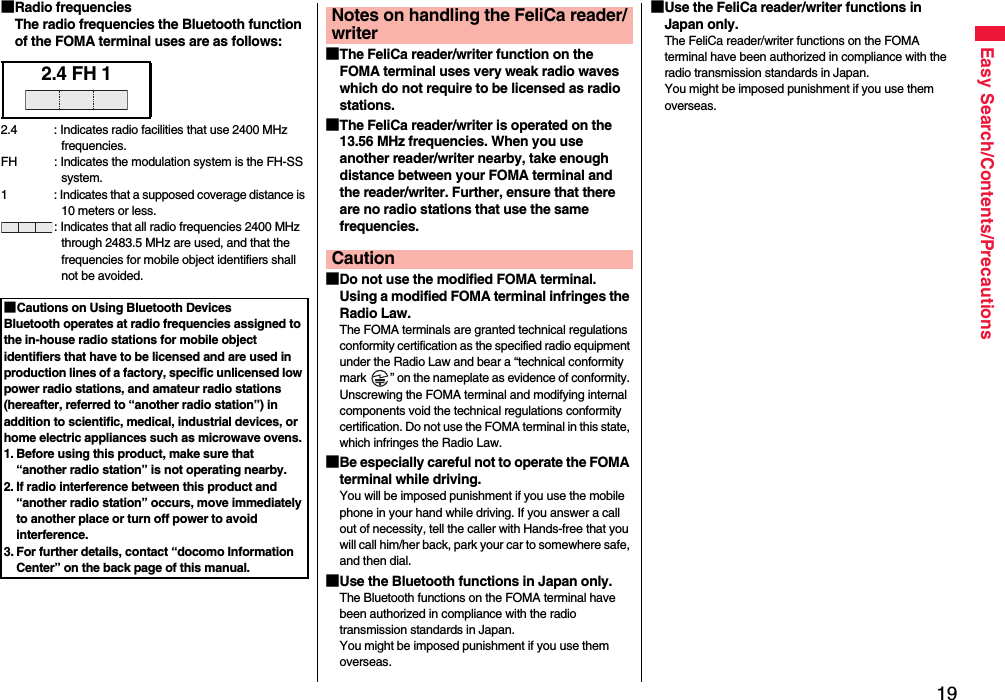
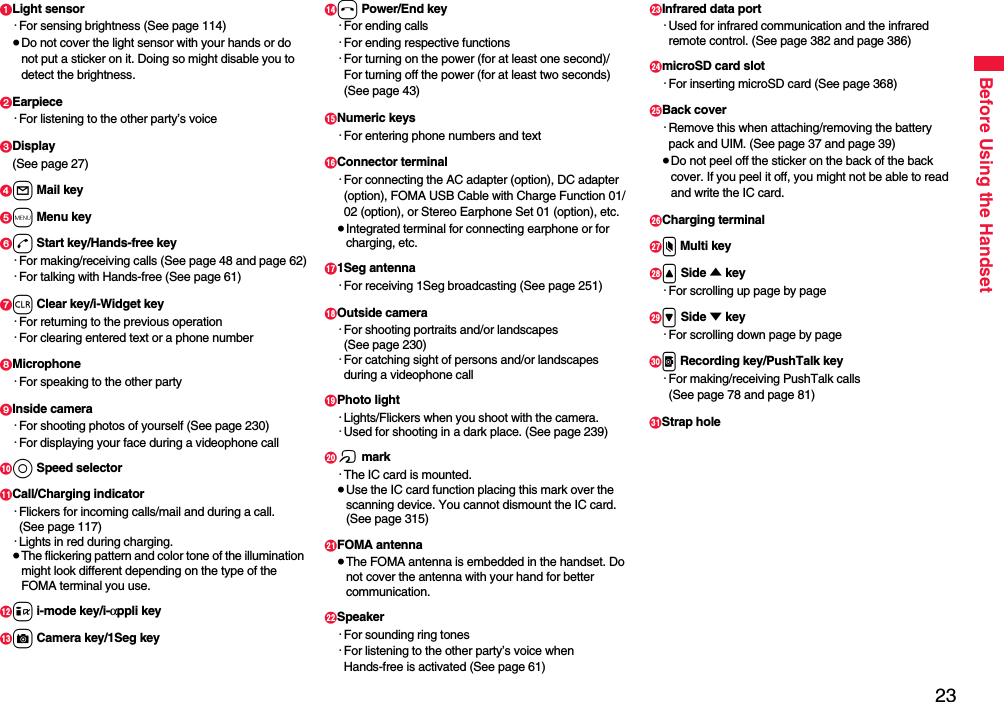


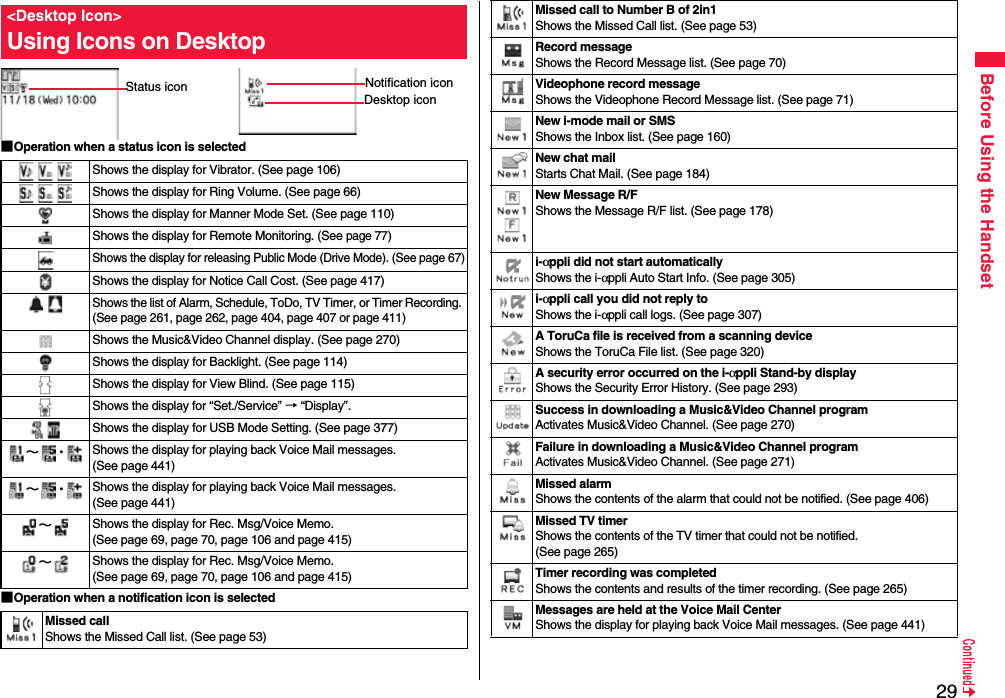
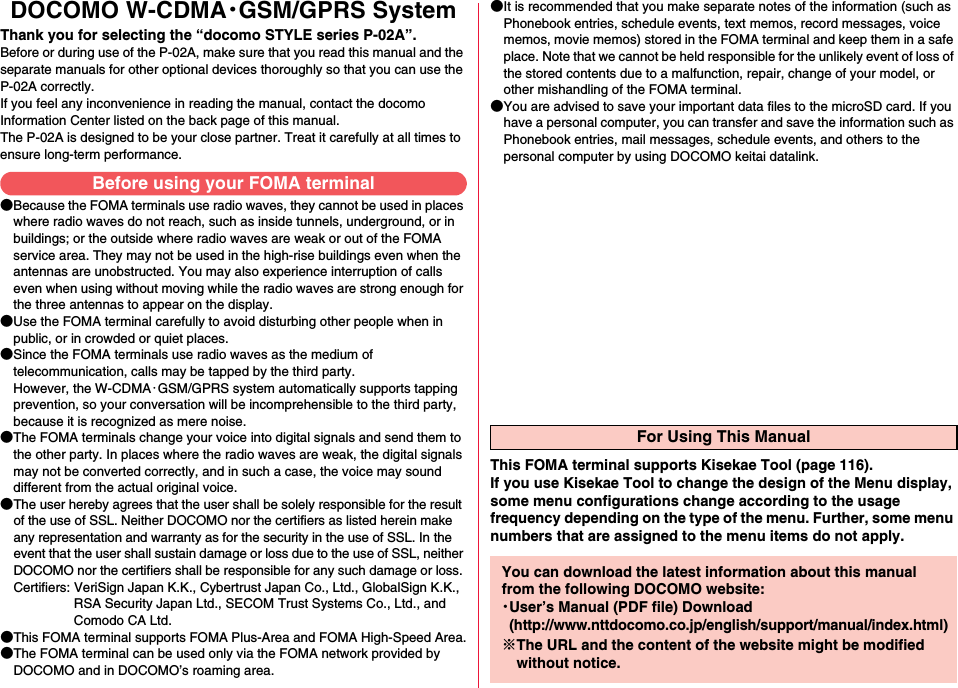
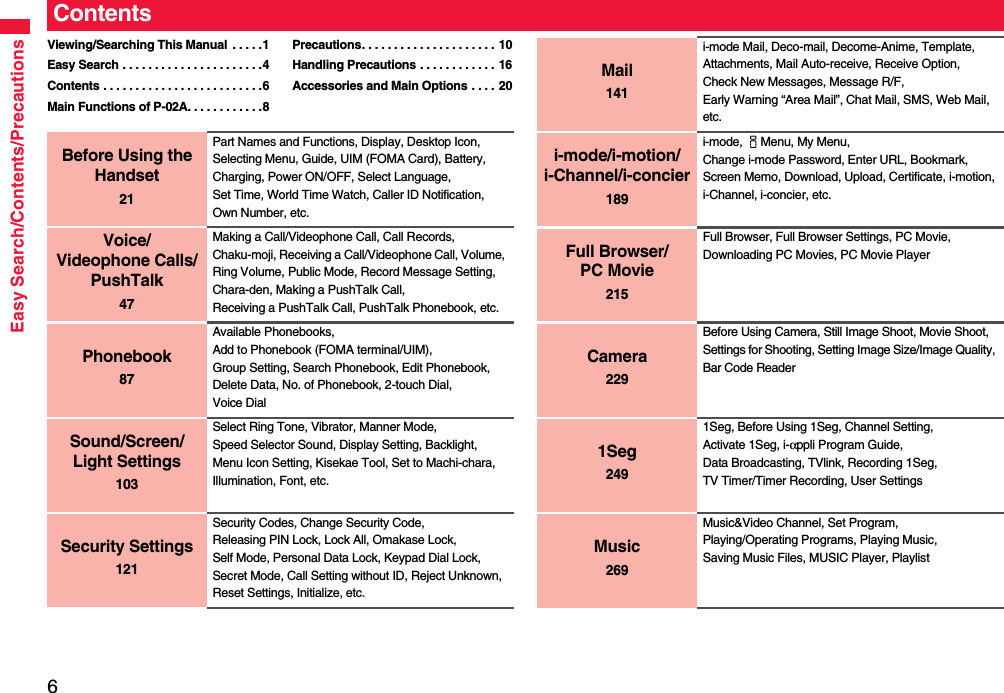
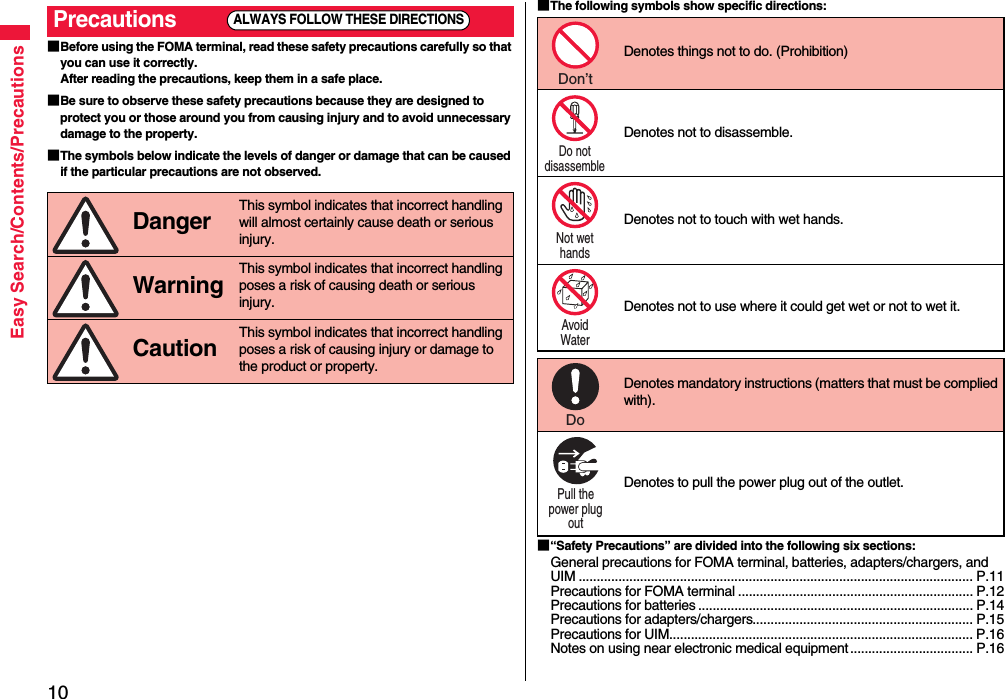
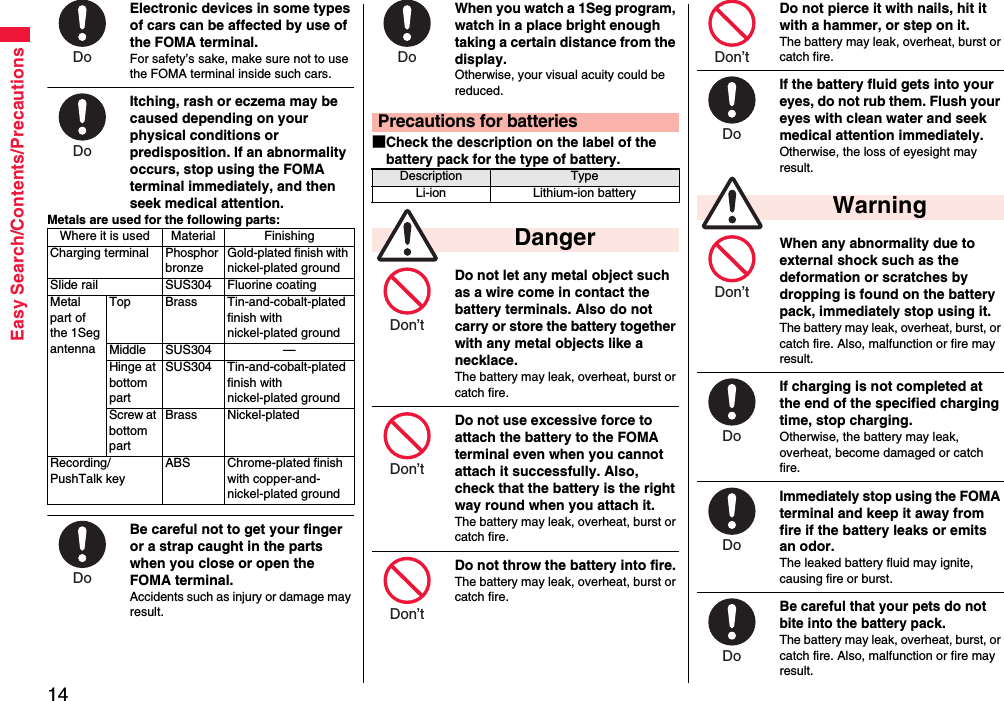
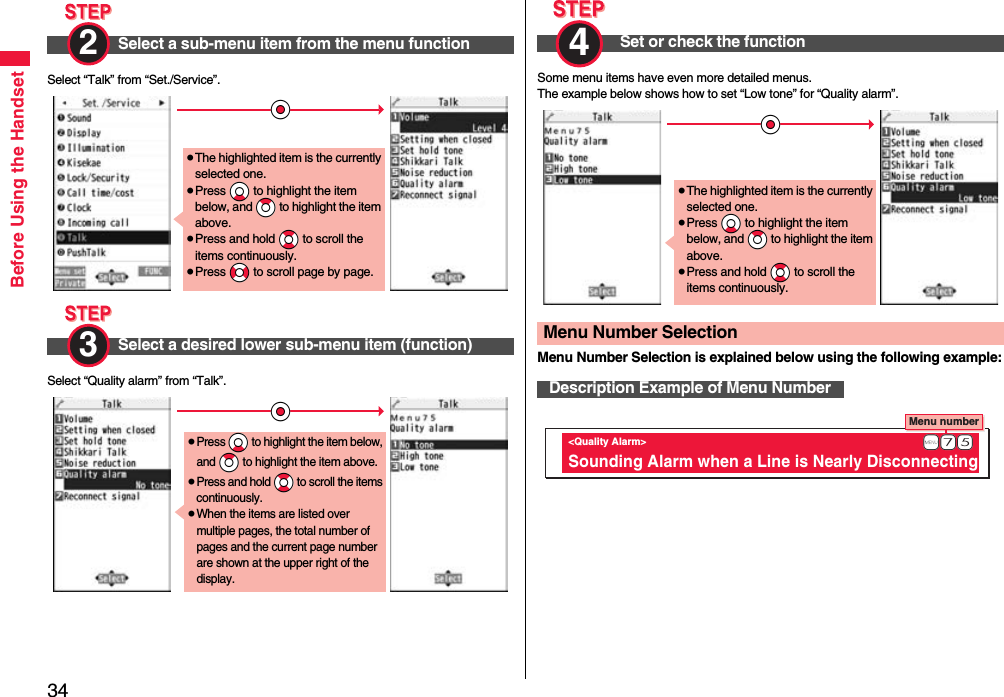
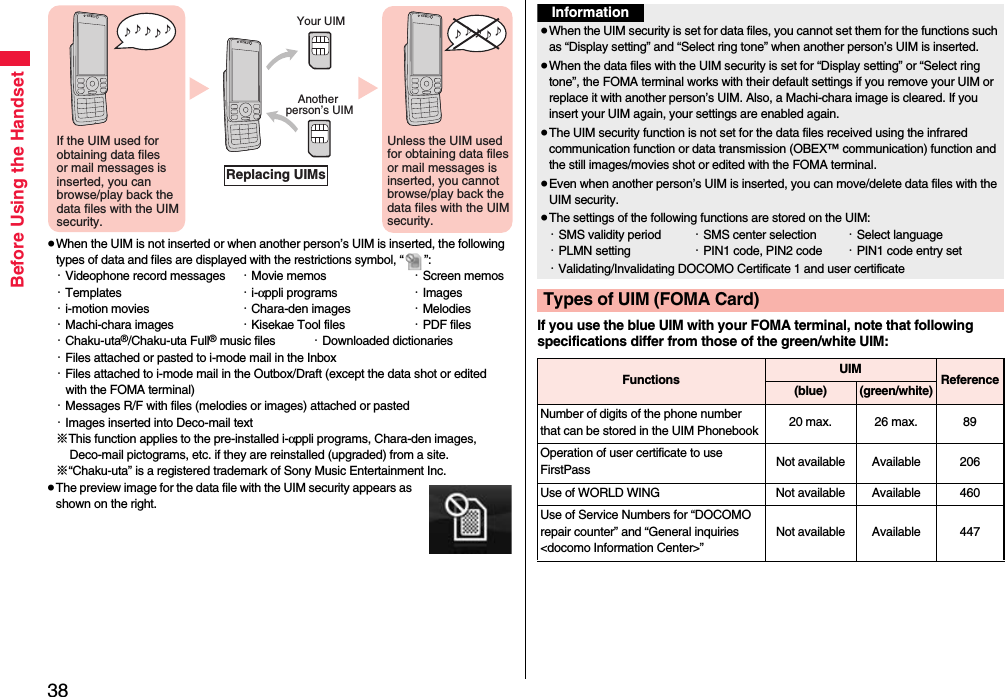
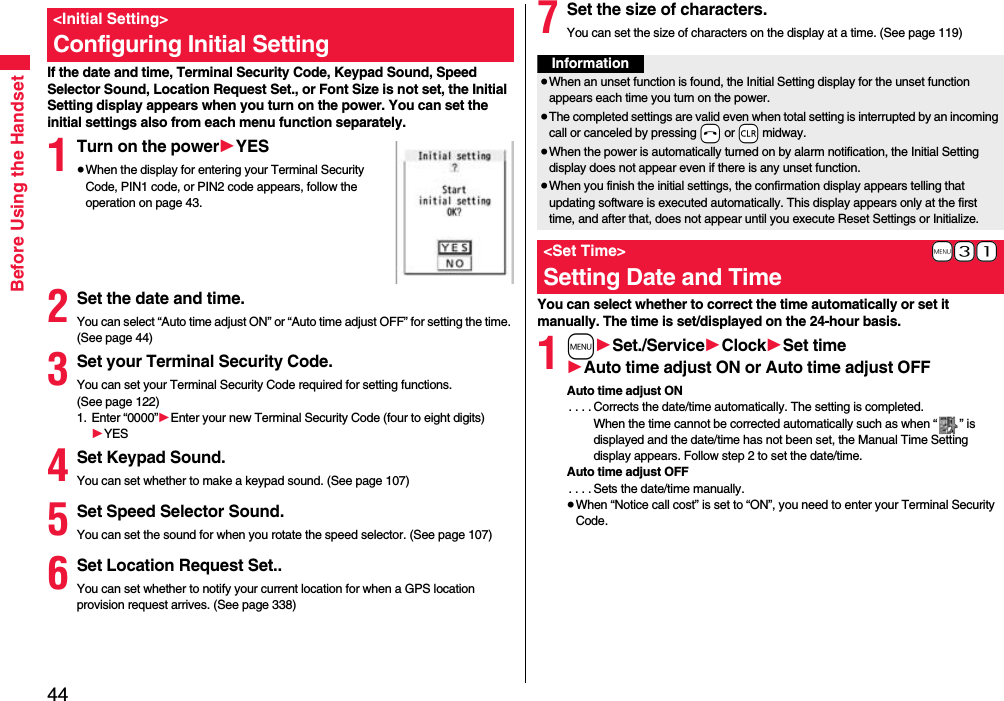
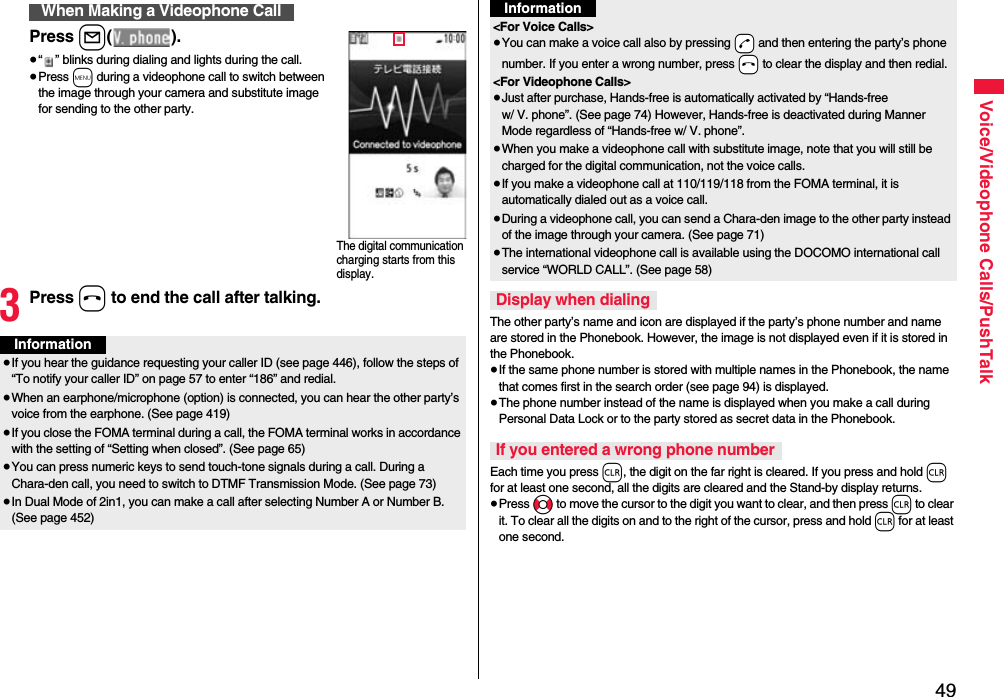
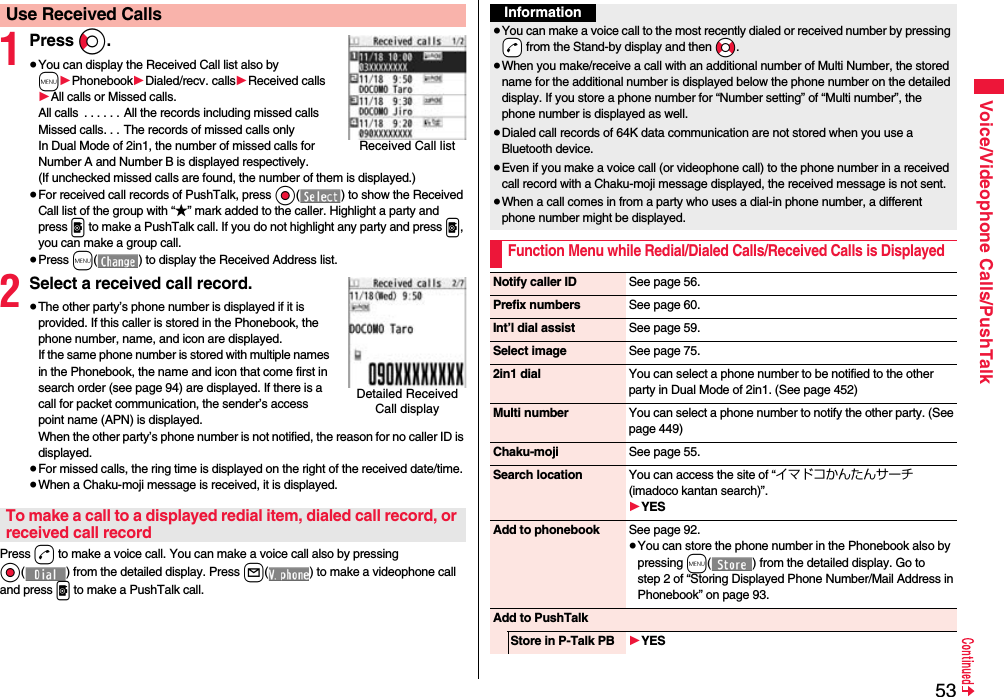
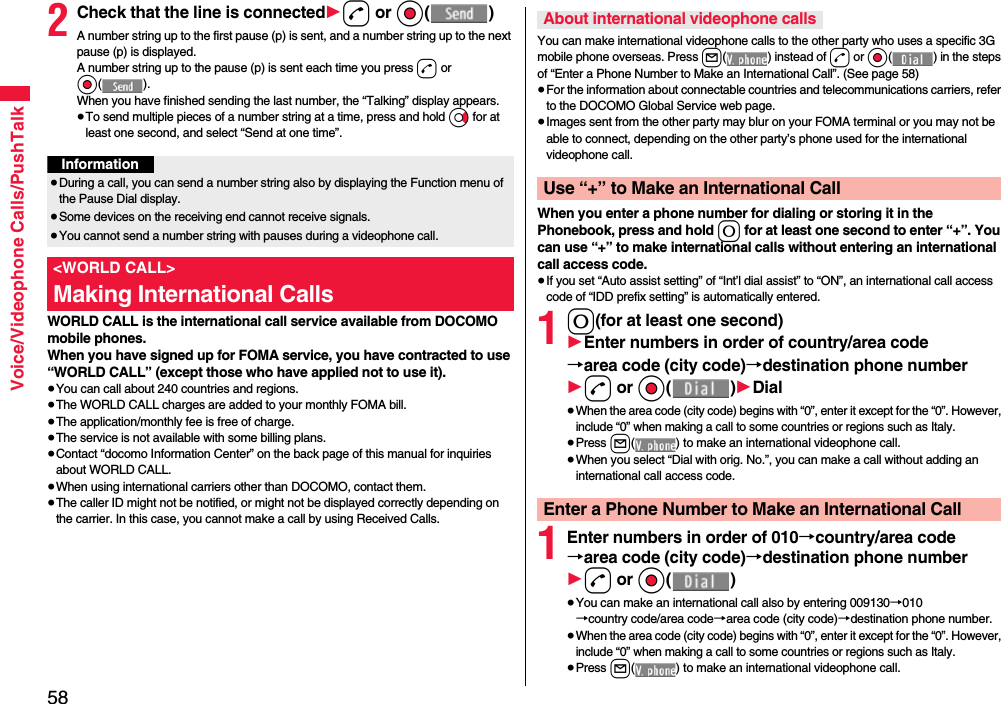
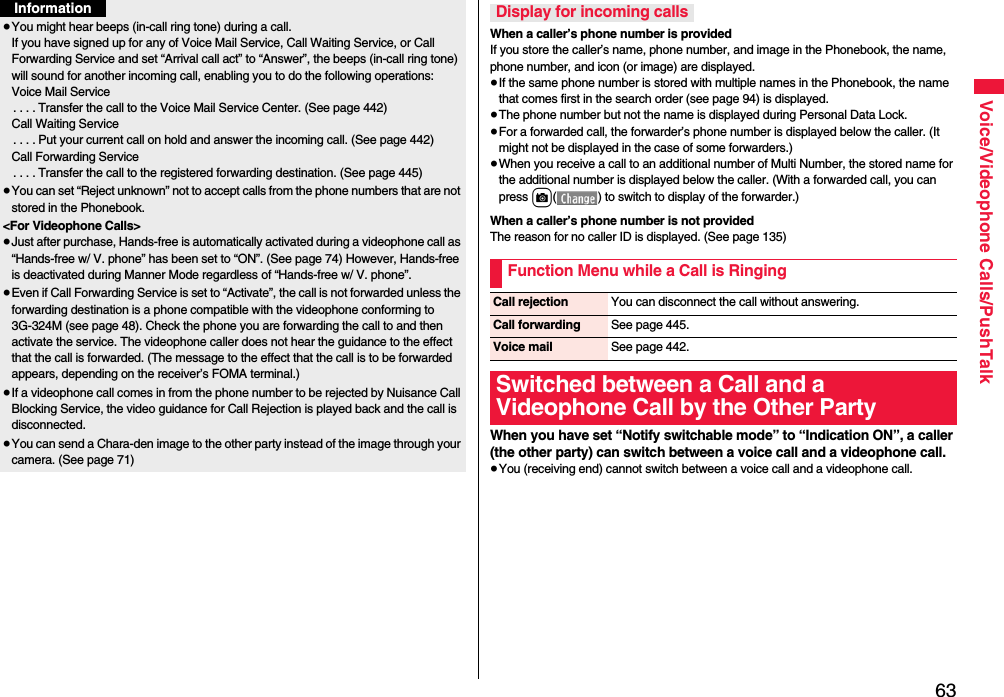
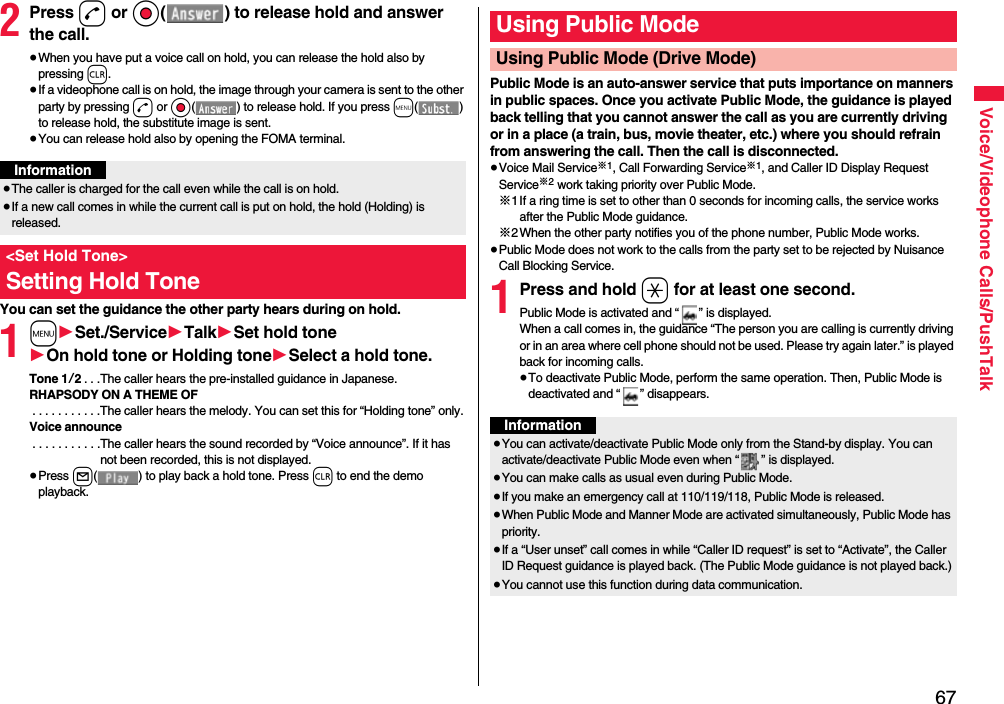
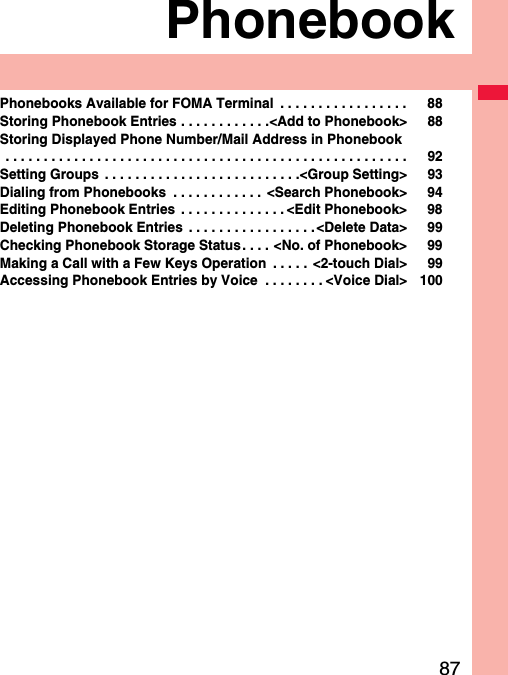
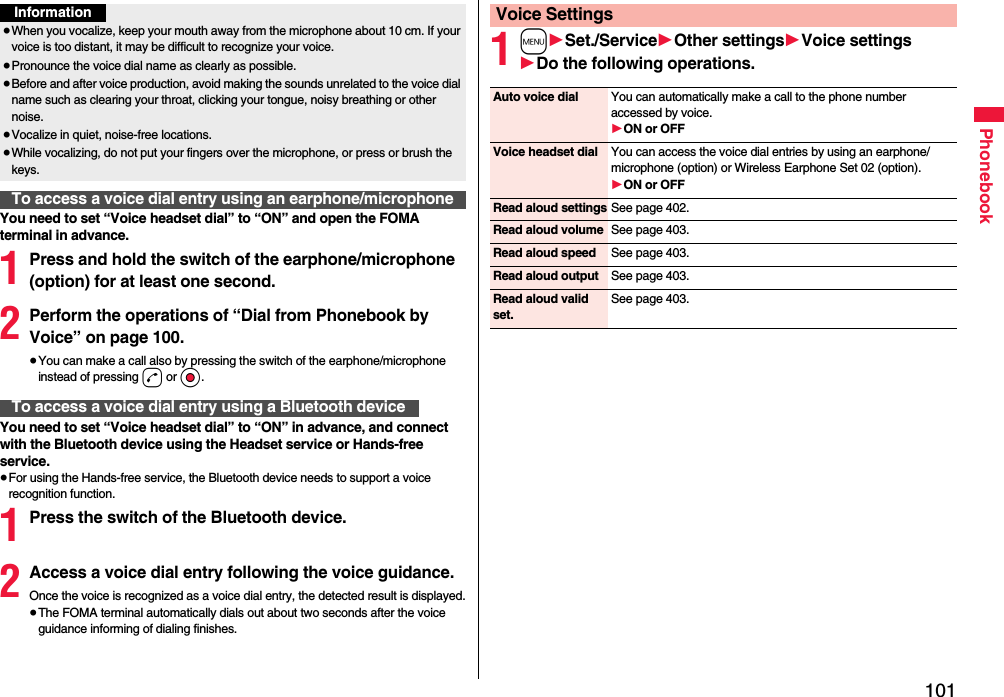
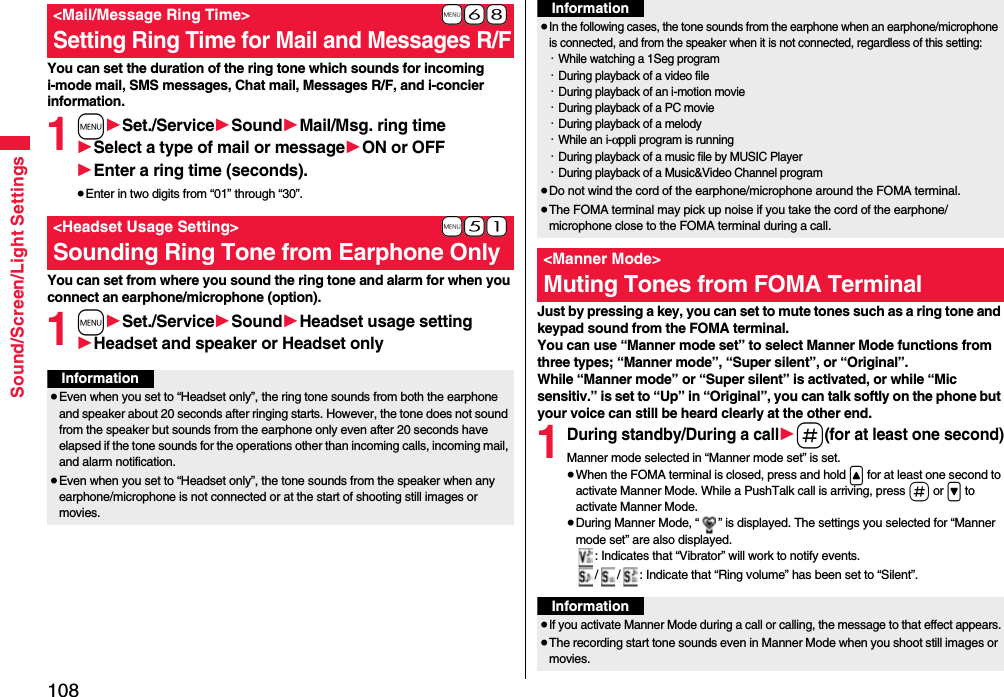
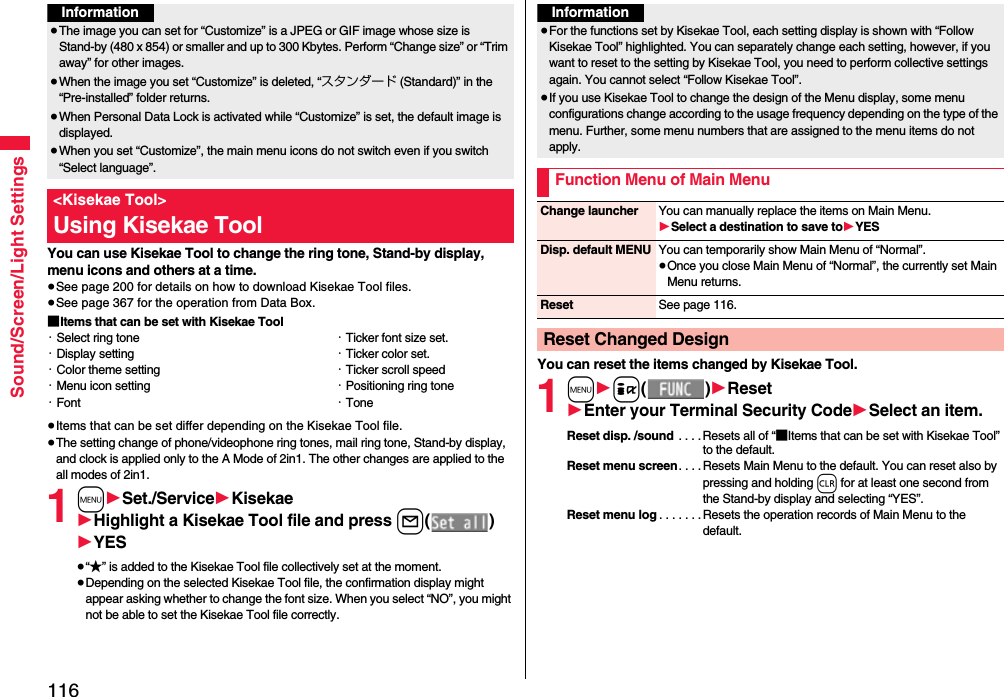
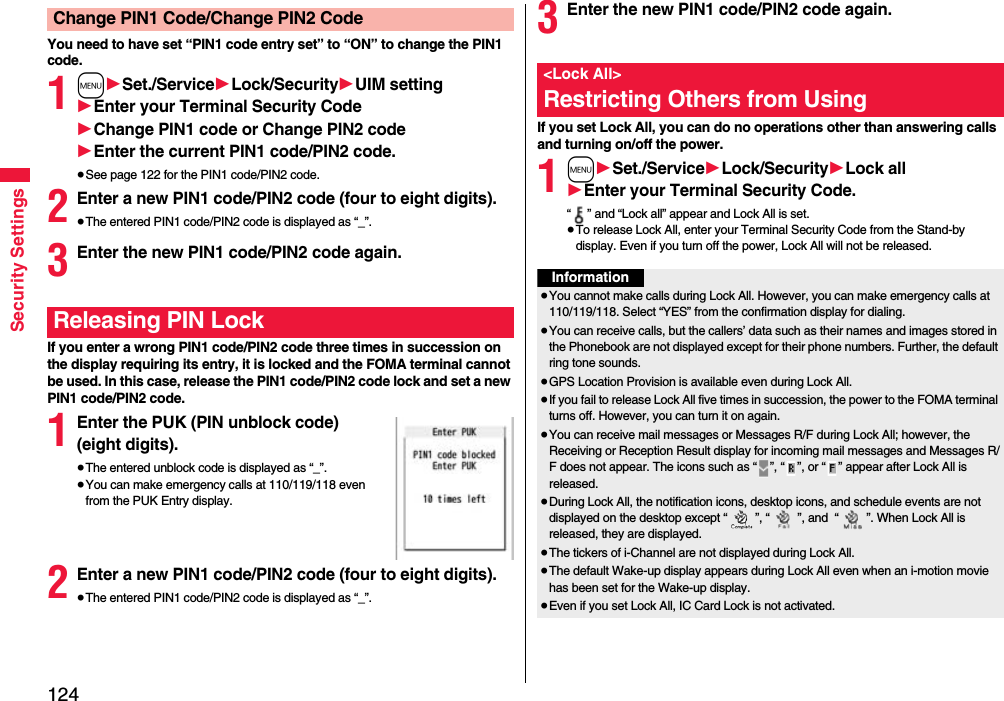
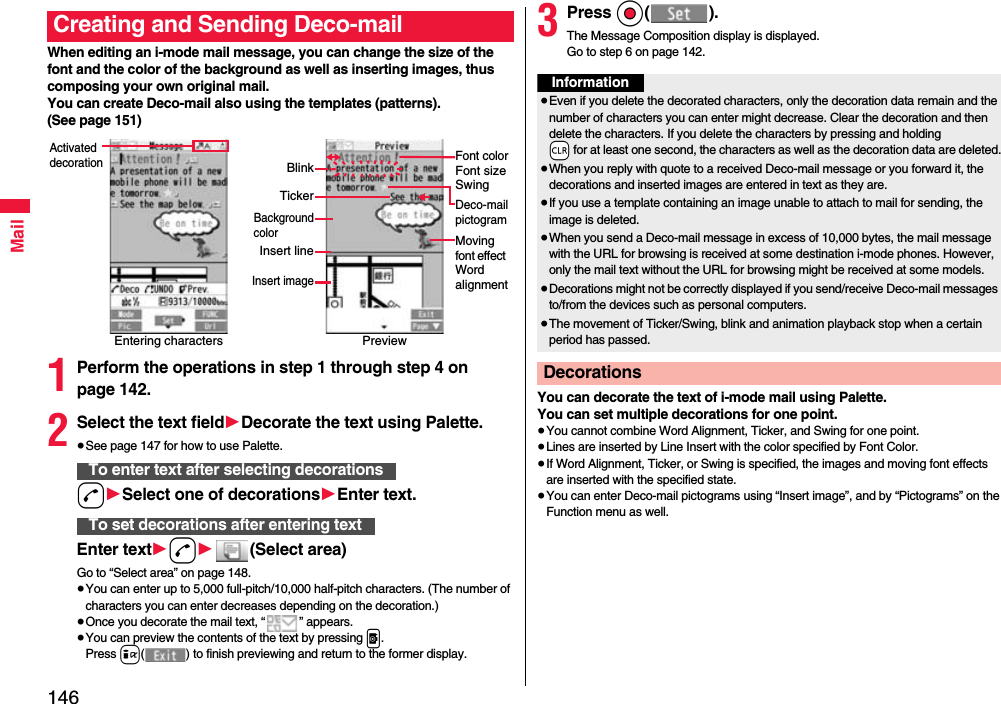
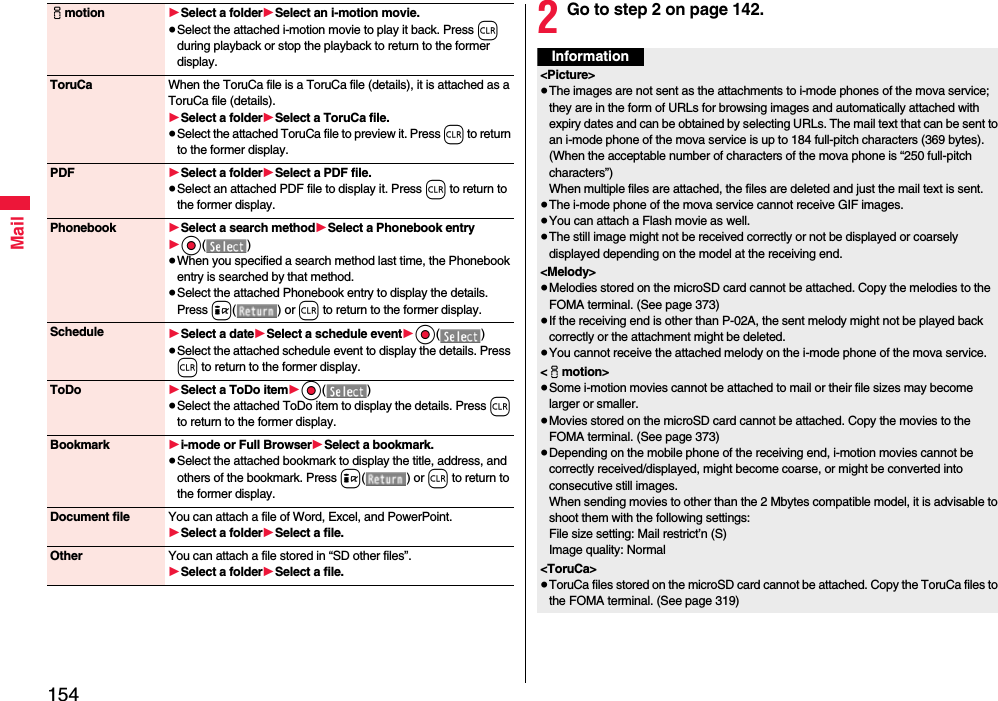
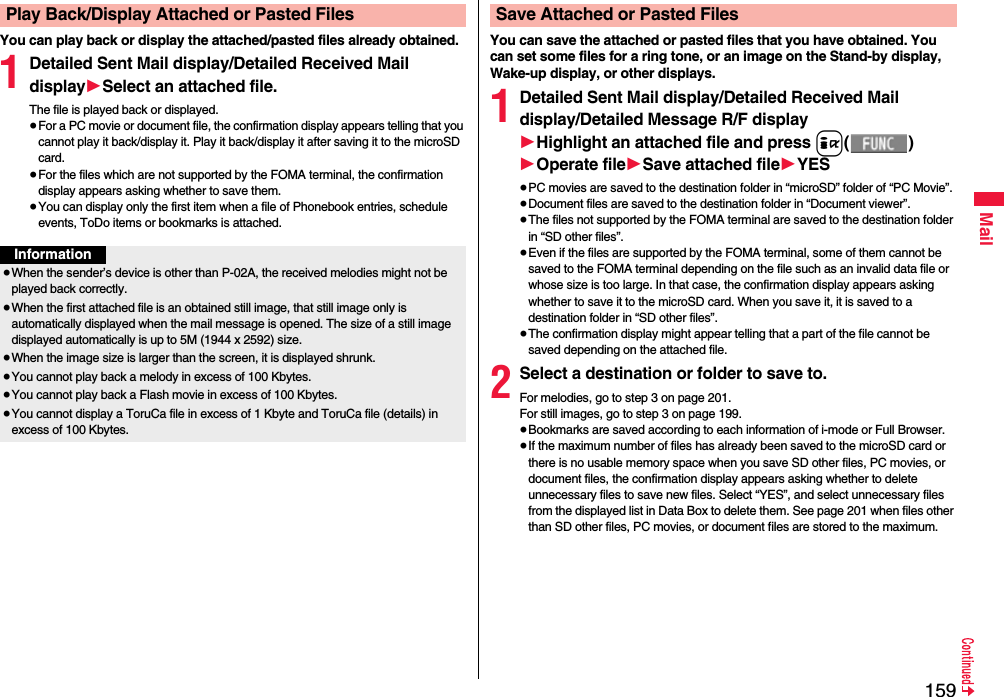
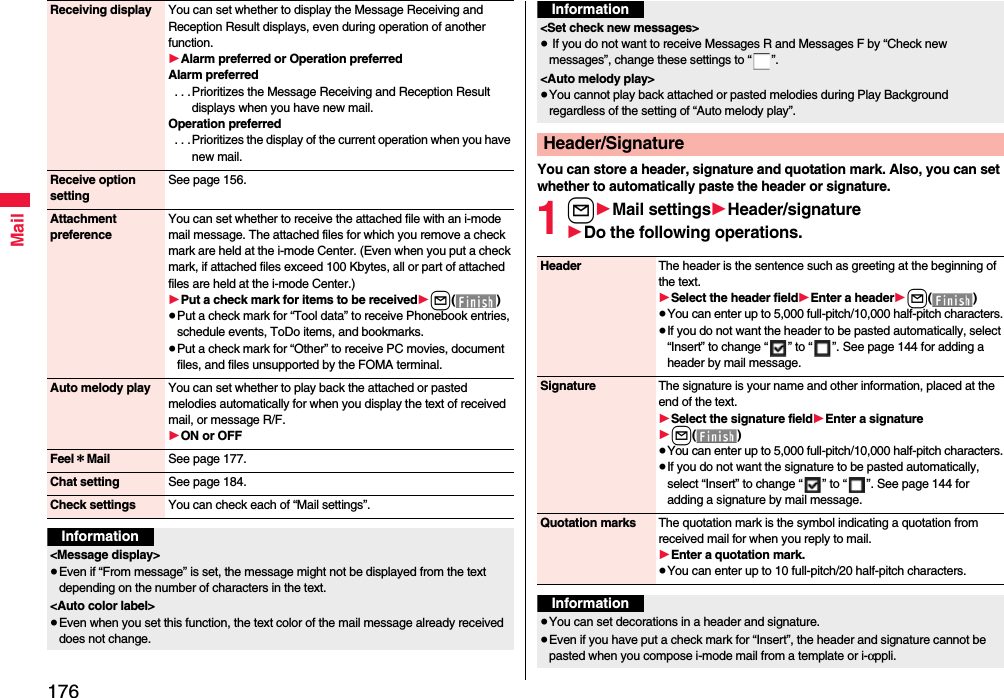
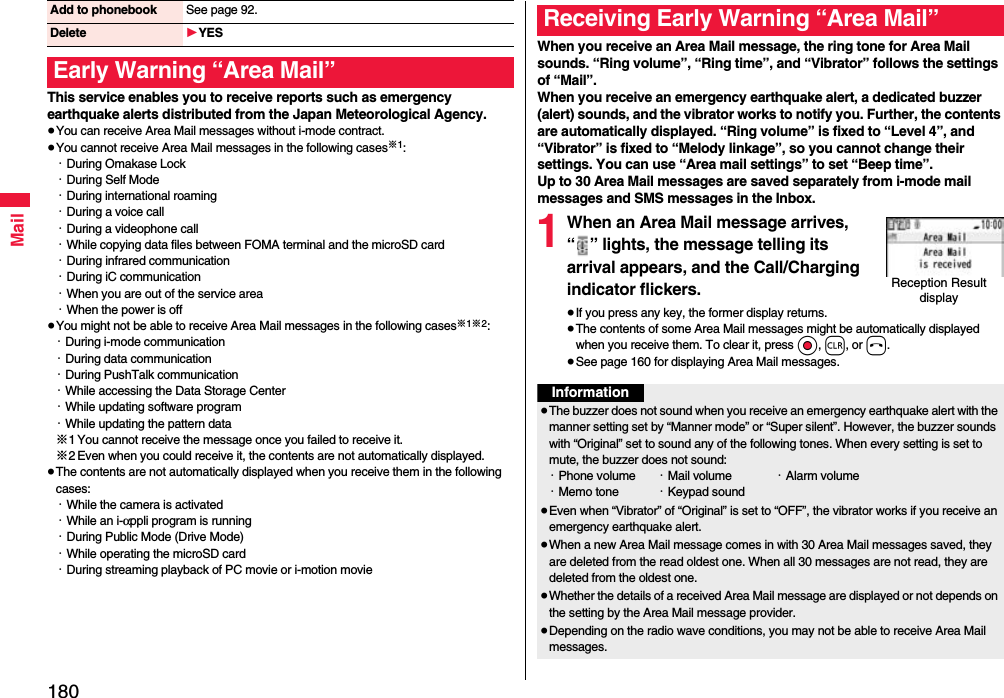
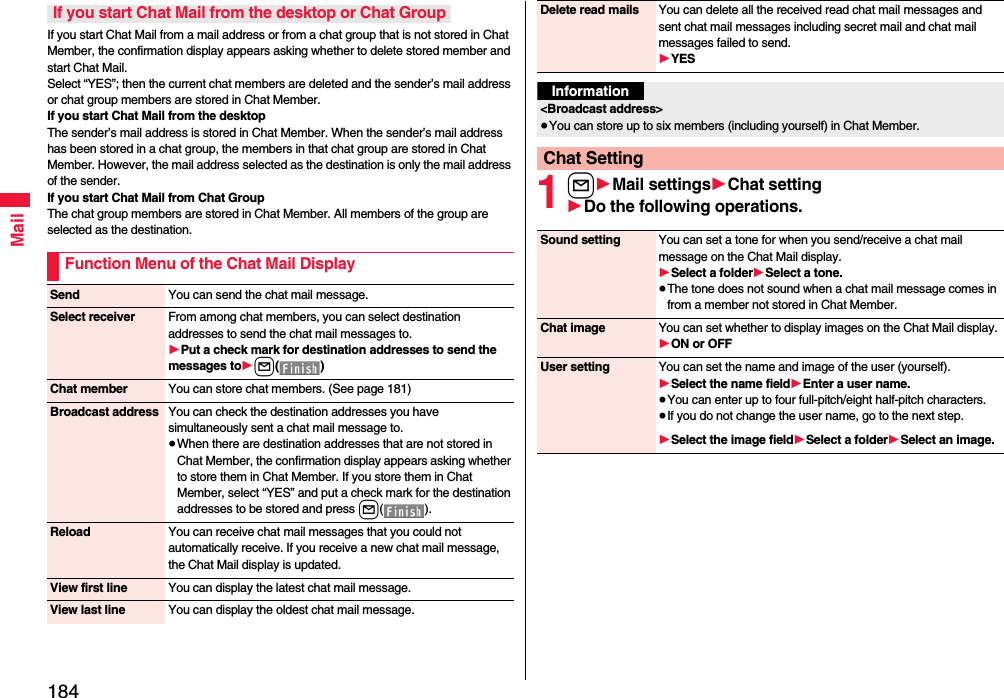
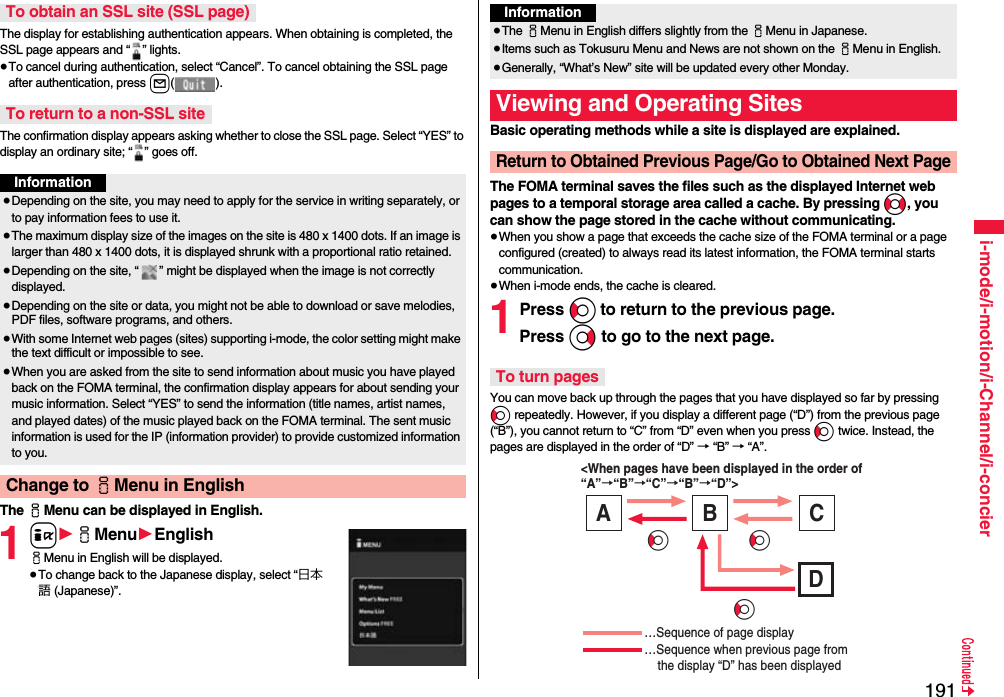
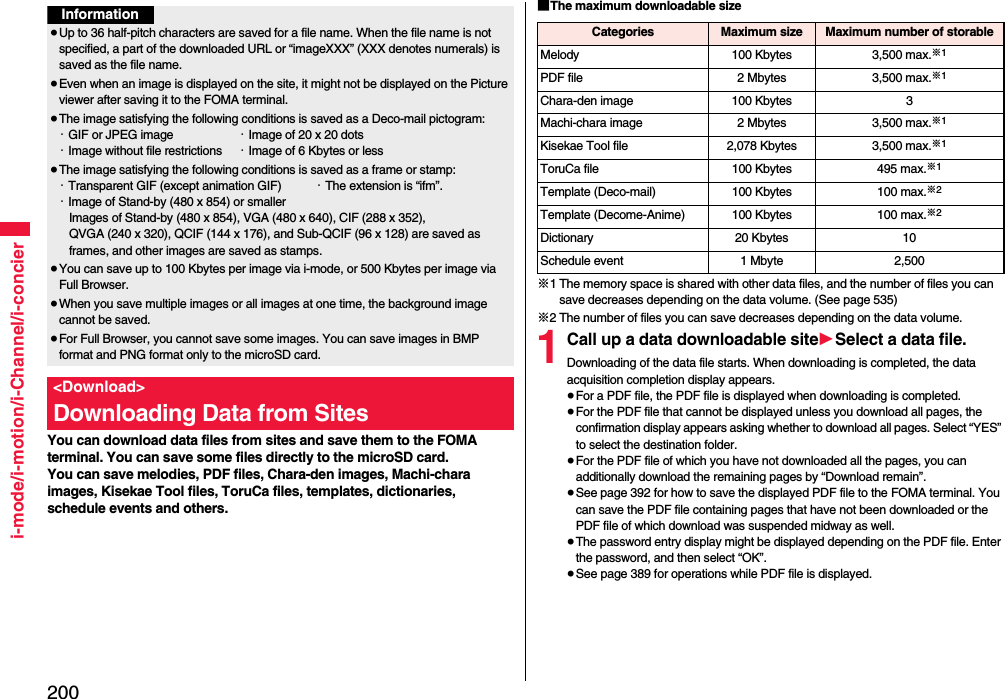
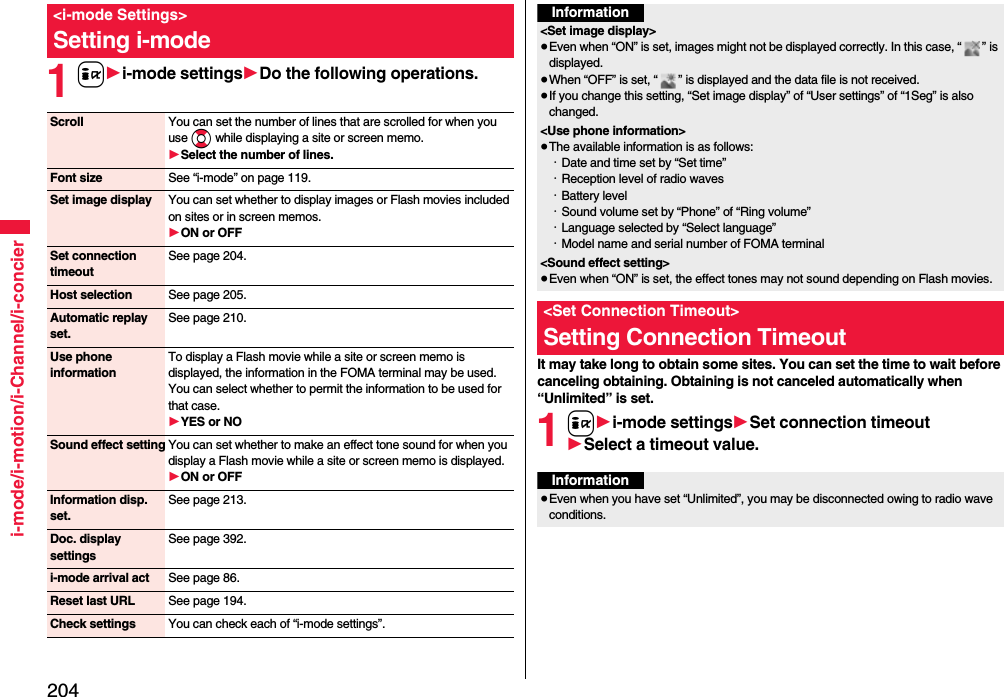
![32Before Using the HandsetFrom the i-Widget display, you can simultaneously start multiple Widget αppli programs and show them on a list.1Widget αppliYou can show a Widget αppli program. You can show the Widget αppli operation display by selecting it.2Navigation displaysNavigations corresponding to the key operations are indicated.≥You can randomly change the display order of Widget αppli programs by pressing i[シャッフル (Shuffle)] from the i-Widget display.≥See page 310 for detailed operations of i-Widget.Edit title 1Enter a title.≥You can enter up to 16 full-pitch/32 half-pitch characters. However, the number of characters for the title displayed when you highlight the icon is up to 11 full-pitch/ 22 half-pitch characters from the beginning of the title.Sort 1Select a desktop icon1Use Bo to change the order1Oo()≥To change the order in succession, repeat the above steps.1l()1YESReset desktop The desktop icons are reset to the default.1YESDelete this 1YESDelete all 1YESi-Widget Display and Operationsi-Widget display12The symbols on the display (such as , , and ) are called icons. You can check the meanings of them on the display.1m1Set./Service1Display1Icons1Use Mo to highlight an icon.Press m of the FOMA terminal to show Main Menu and then execute, set, or check respective functions.≥Some functions can be selected also by the operation other than pressing m. In this manual, the operation by the easier way is described.≥You can also switch to Simple Menu focusing on only basic functions for easy operation. (See page 115)≥This FOMA terminal supports Kisekae Tool (see page 116). If you use Kisekae Tool to change the design of the Menu display, some menu configurations change according to the usage frequency depending on the type of the menu. Further, some menu numbers that are assigned to the menu items do not apply.■Scroll SelectionMain Menu is composed of 12 main menu icons indicating each function.≥If you select a main menu icon, the Sub-menu Item Selection display appears. If you further select a sub-menu item, the Lower Sub-menu Item Selection display appears. ≥By repeating selecting, you can set and check the function.■Menu Number SelectionYou can display some functions by pressing m + menu number (see page 476).■Multitask is Supported≥You can simultaneously use some functions in Main Menu. (See page 401)+m-3-6<Icons>Displaying Description of IconsSelecting Menu](https://usermanual.wiki/Panasonic-Connect/208012A.User-Manual-Part-1/User-Guide-1045203-Page-34.png)
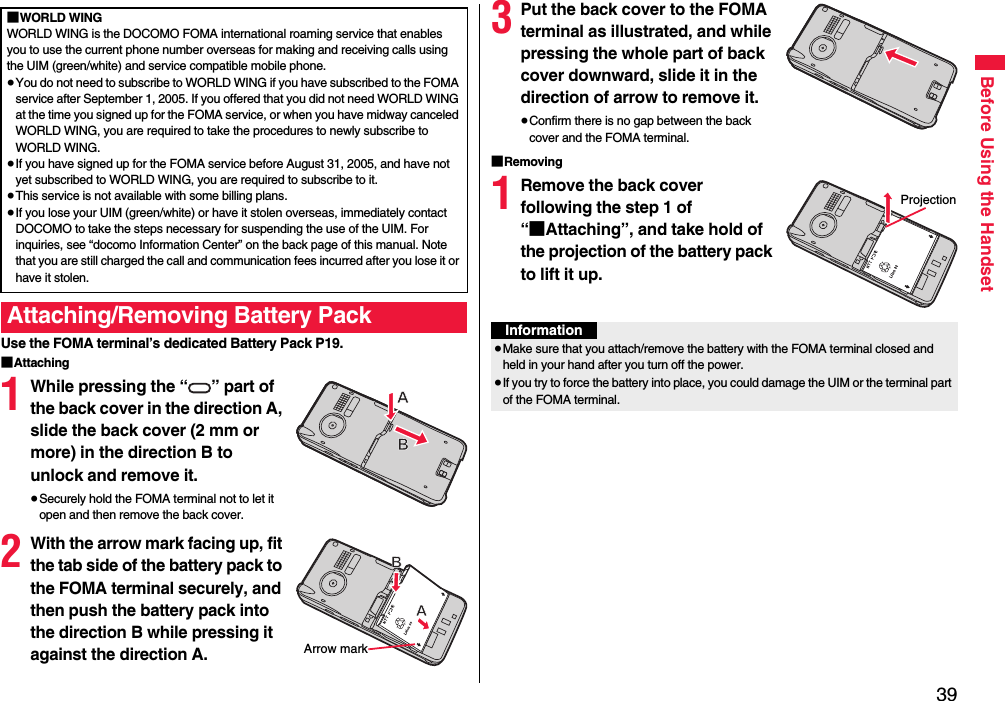
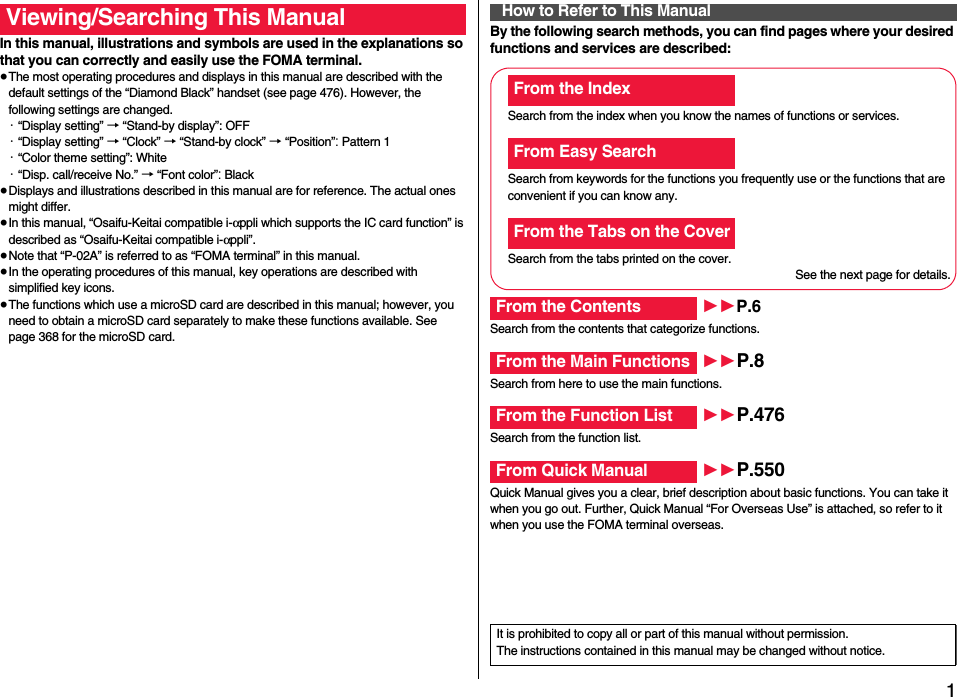
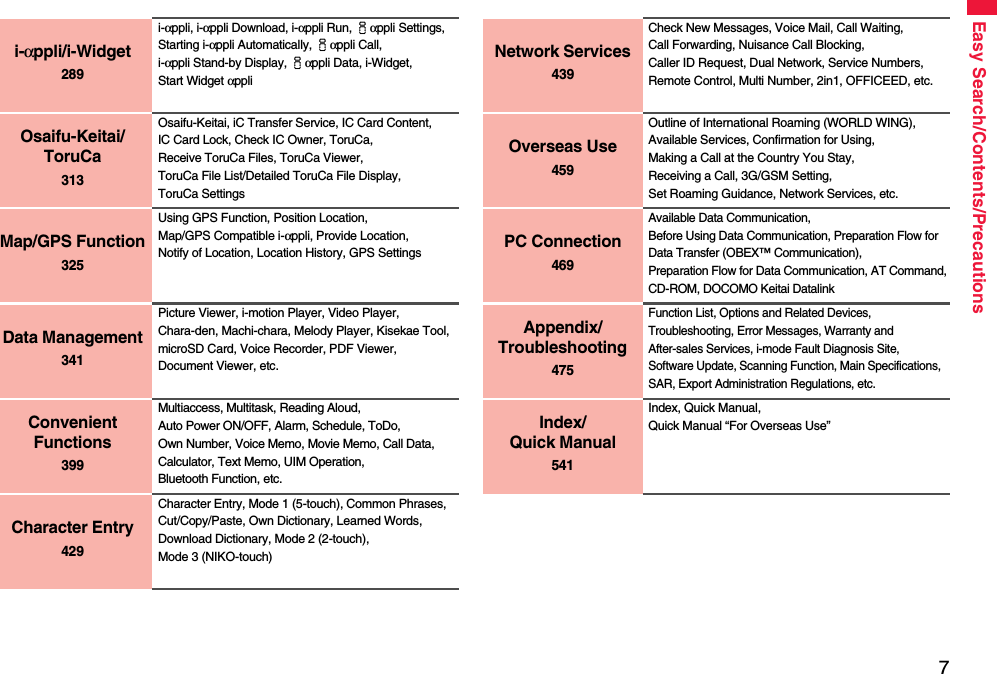
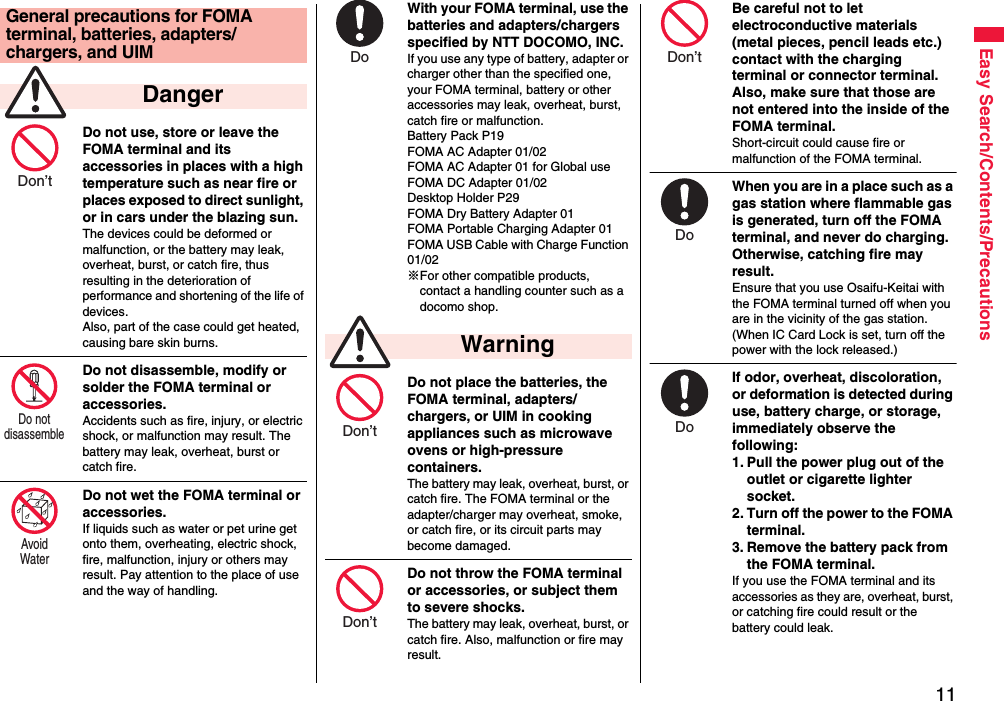
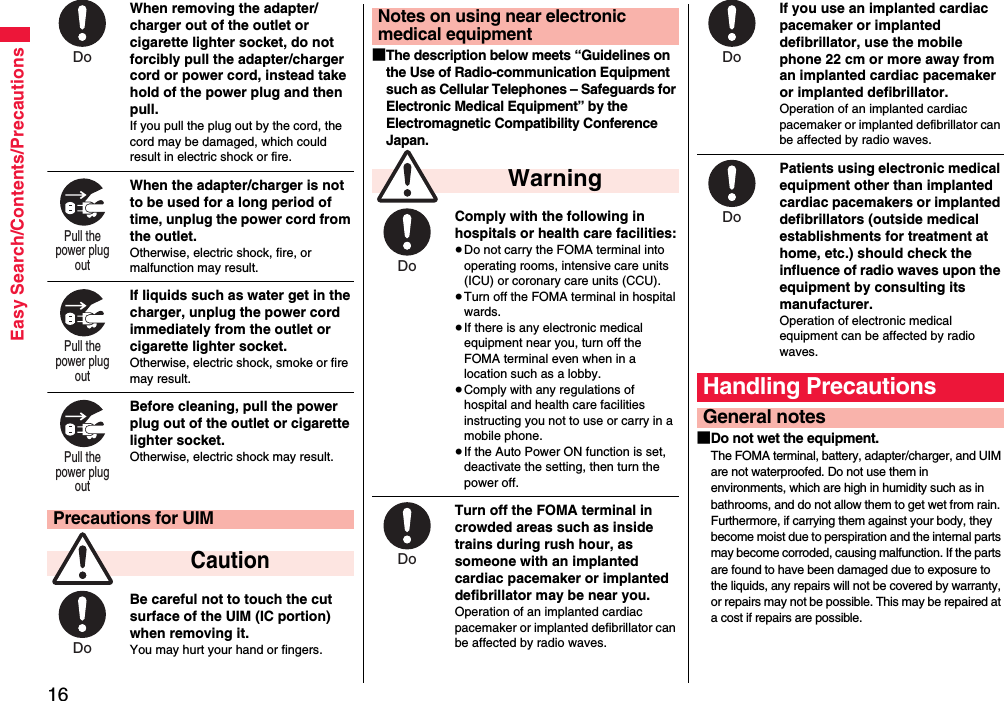
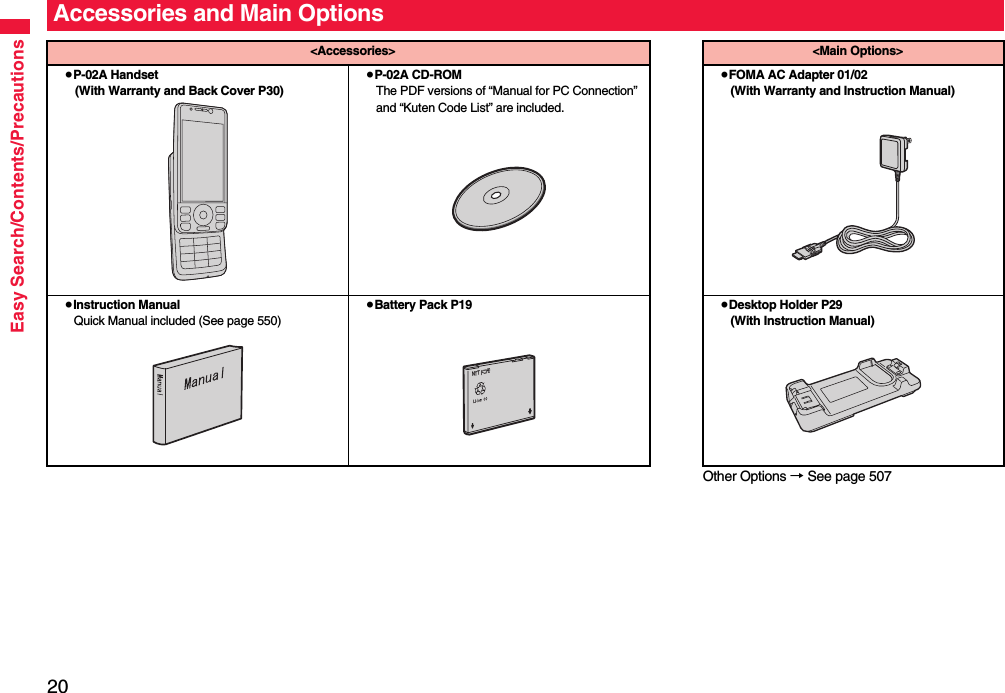
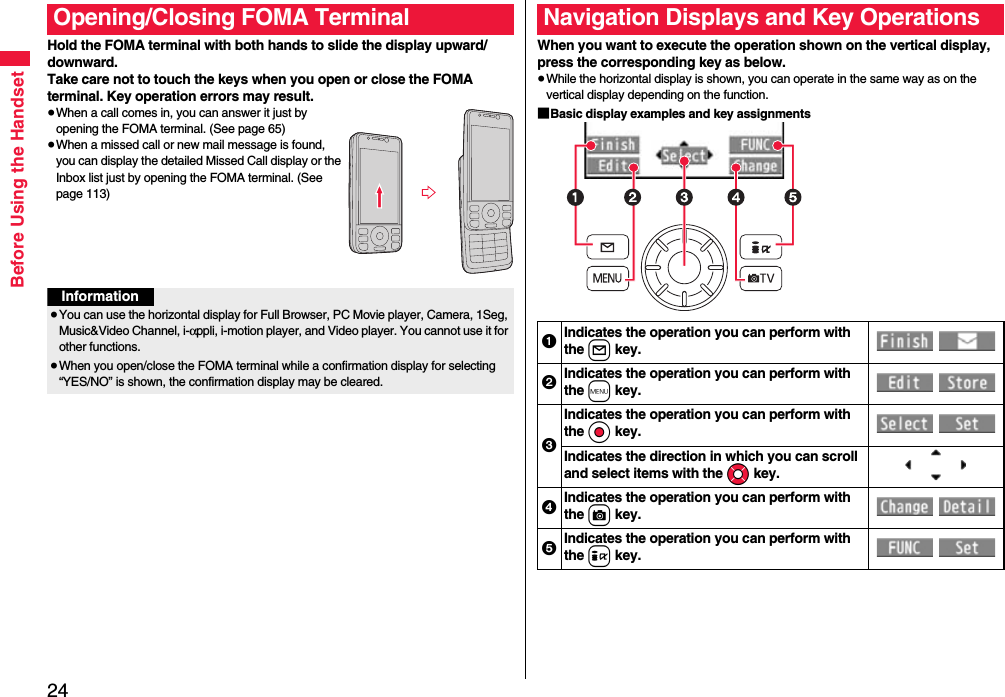
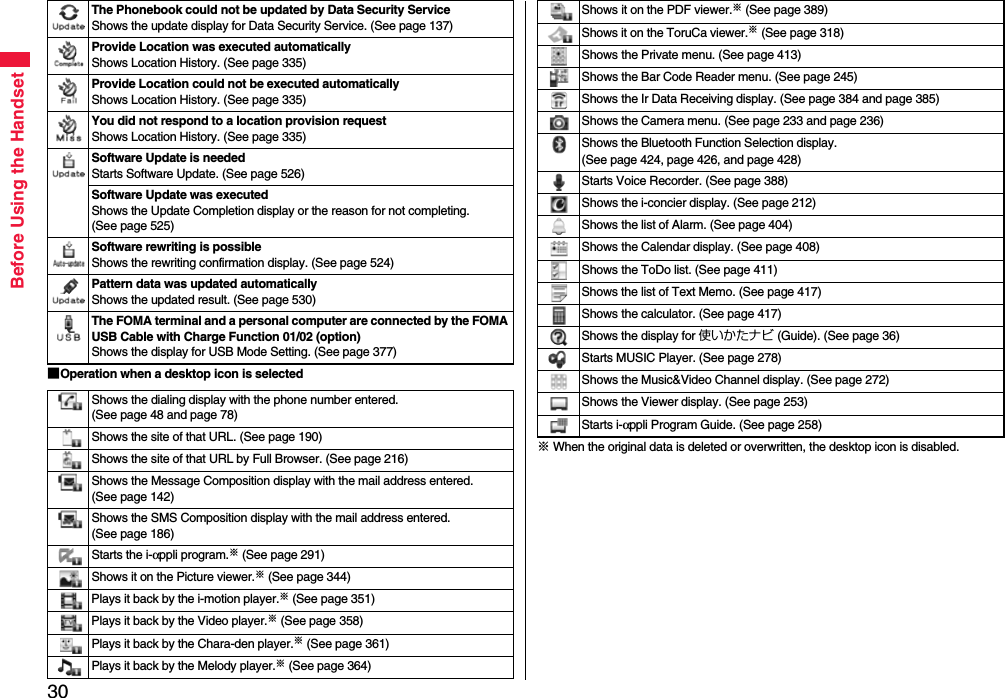
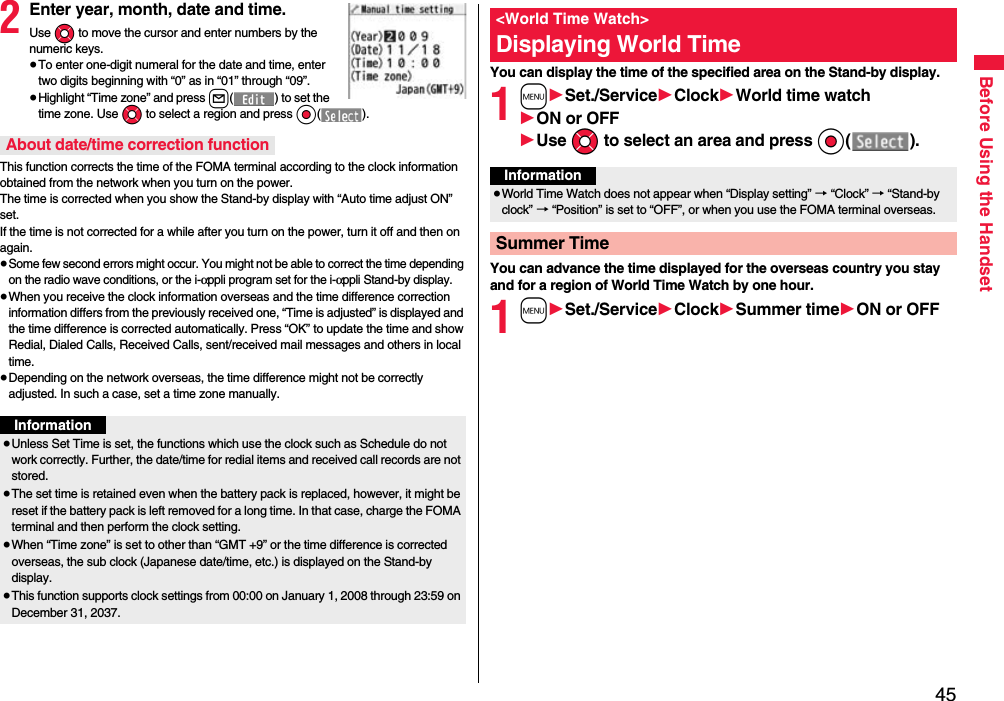
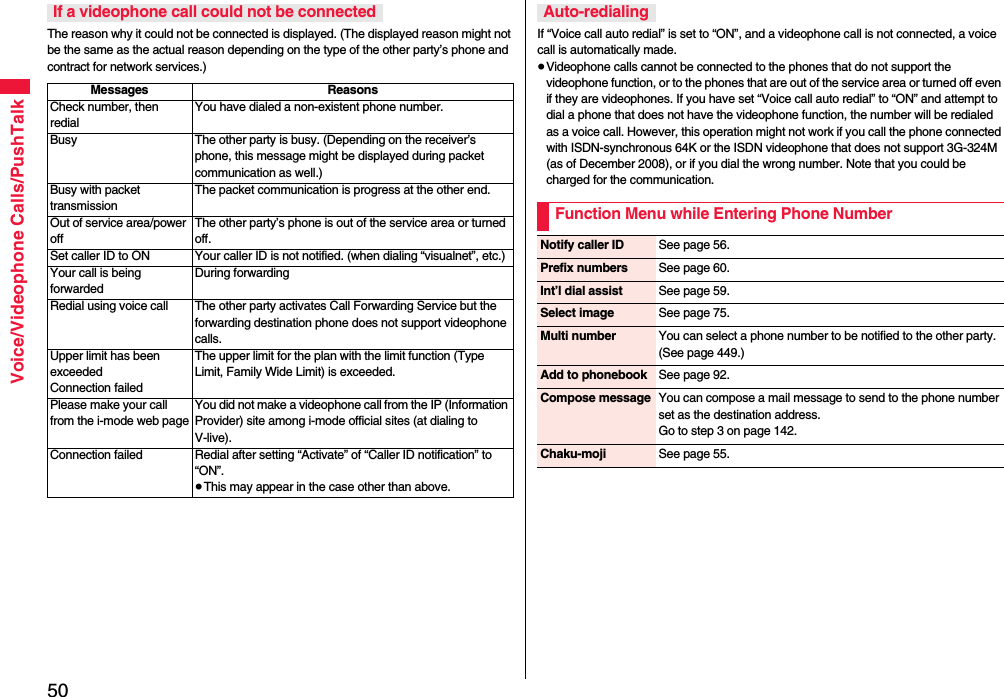
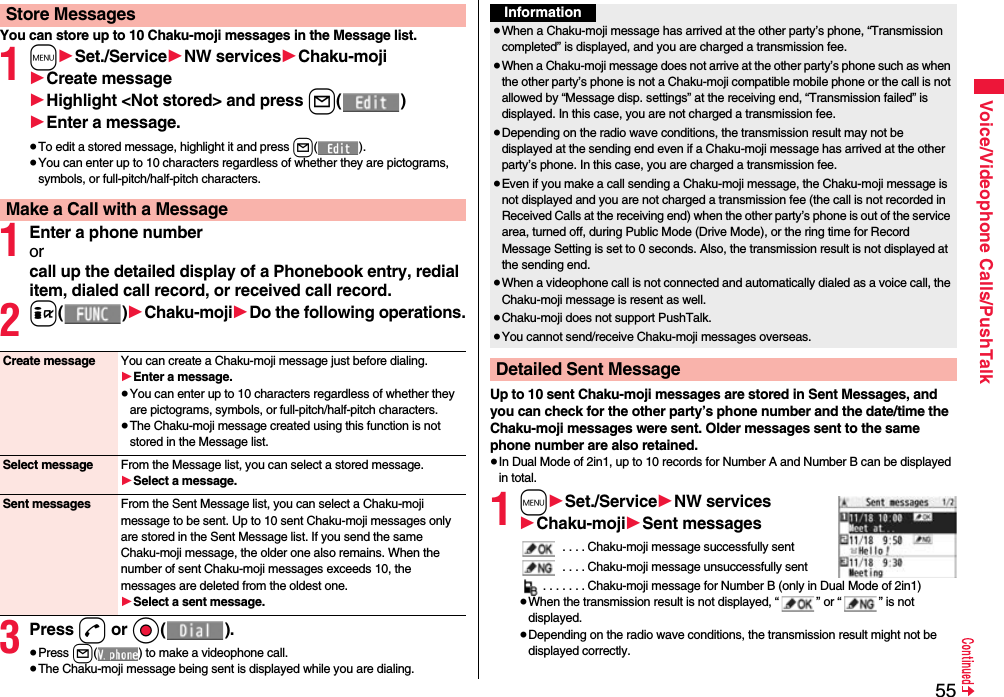
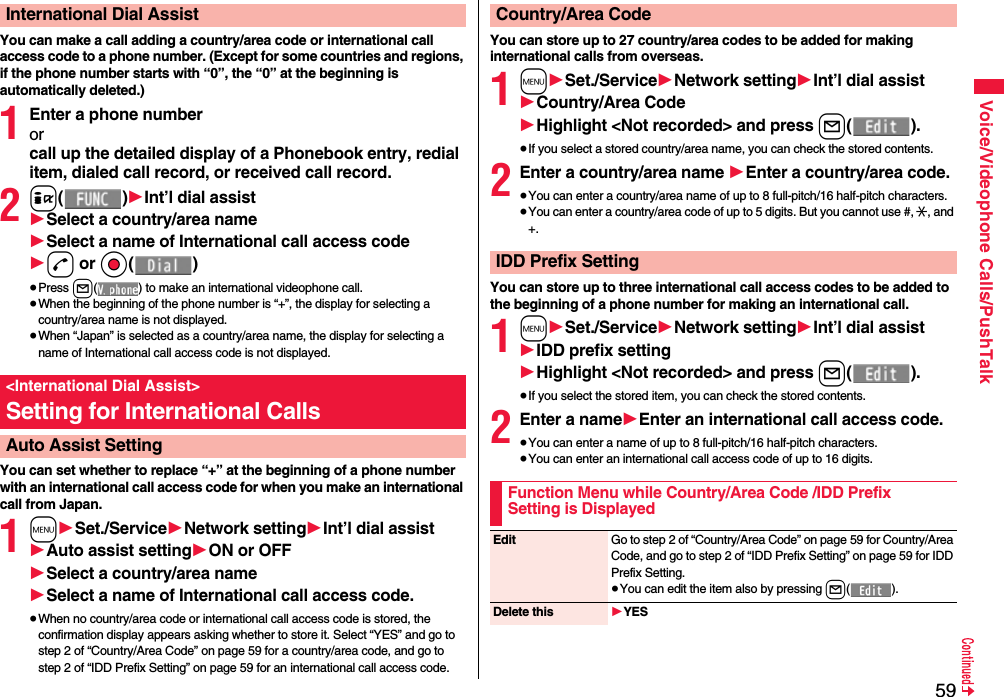
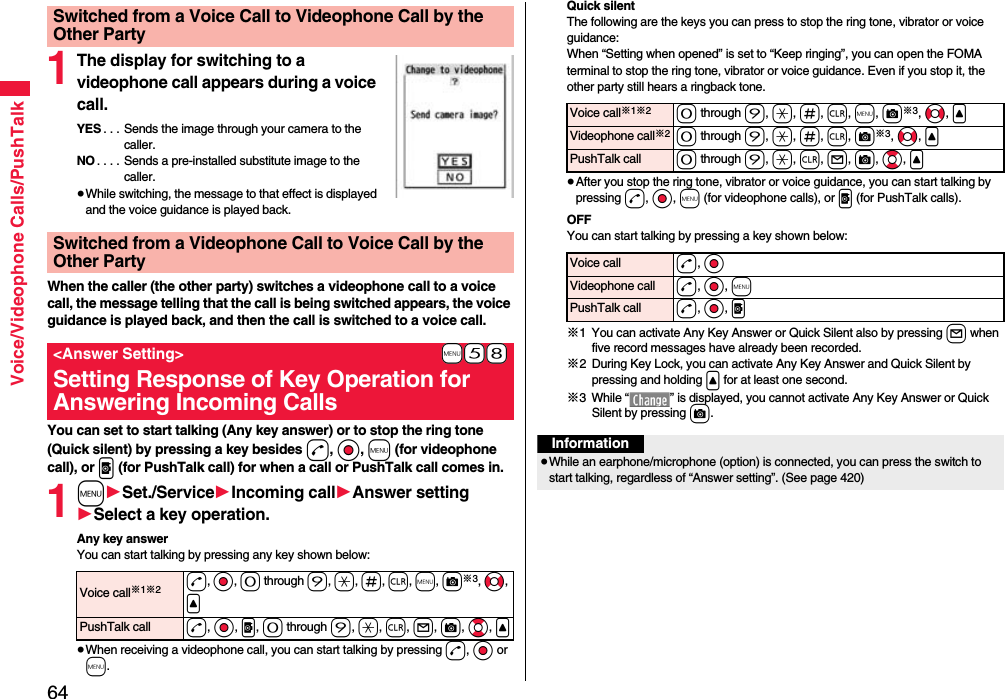
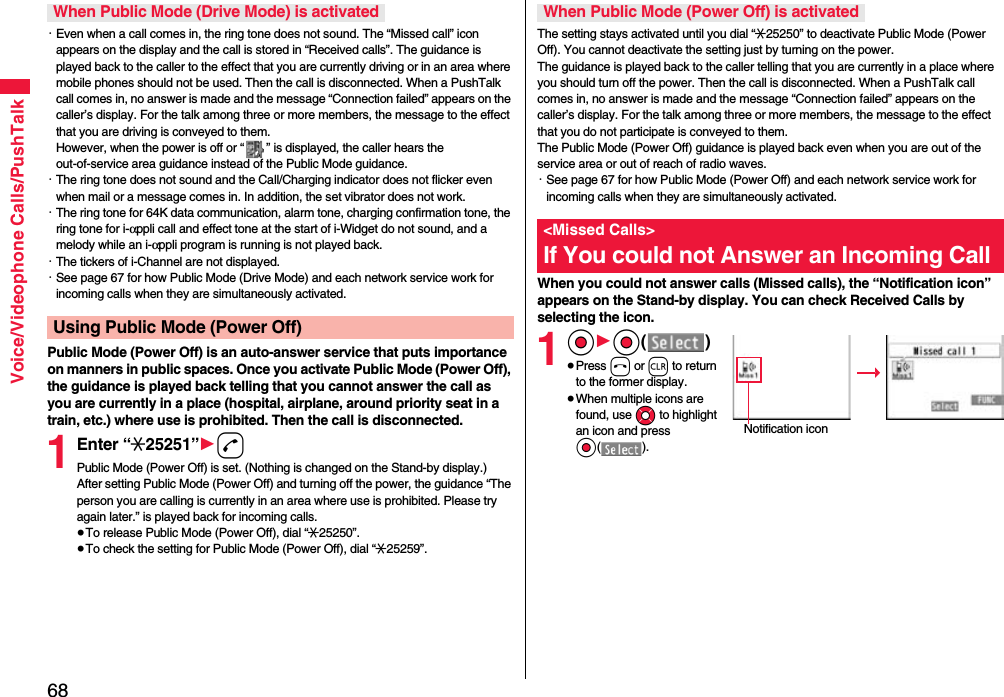
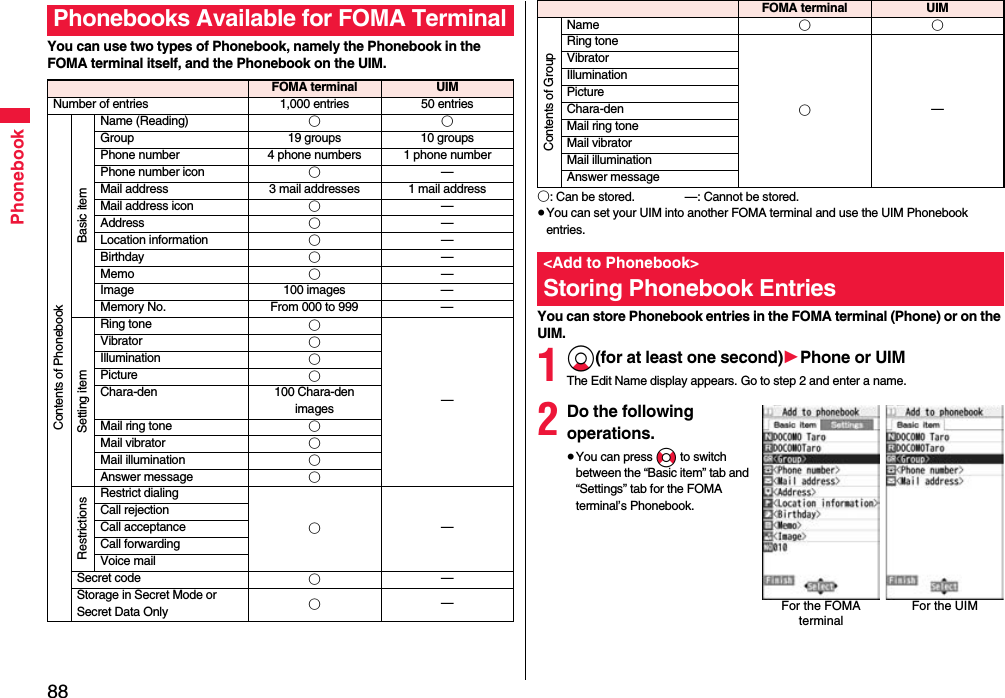
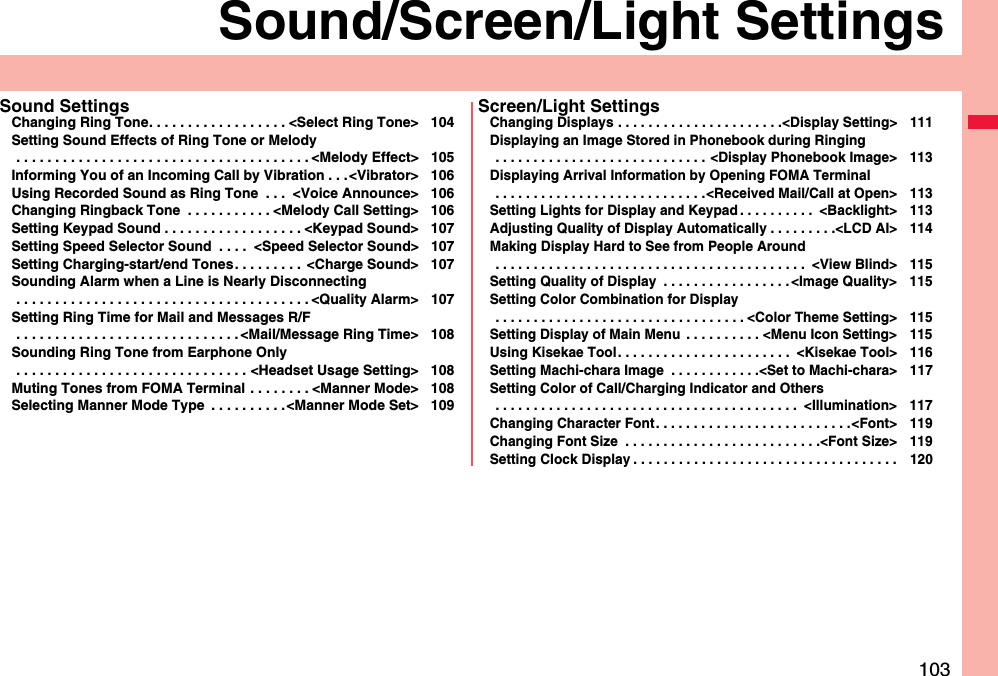
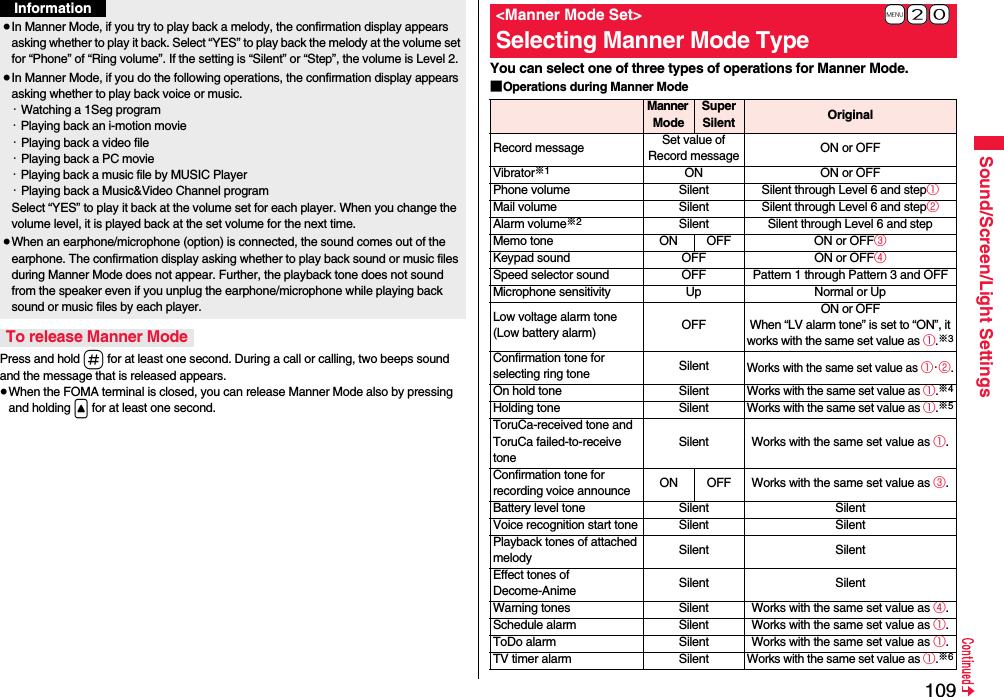
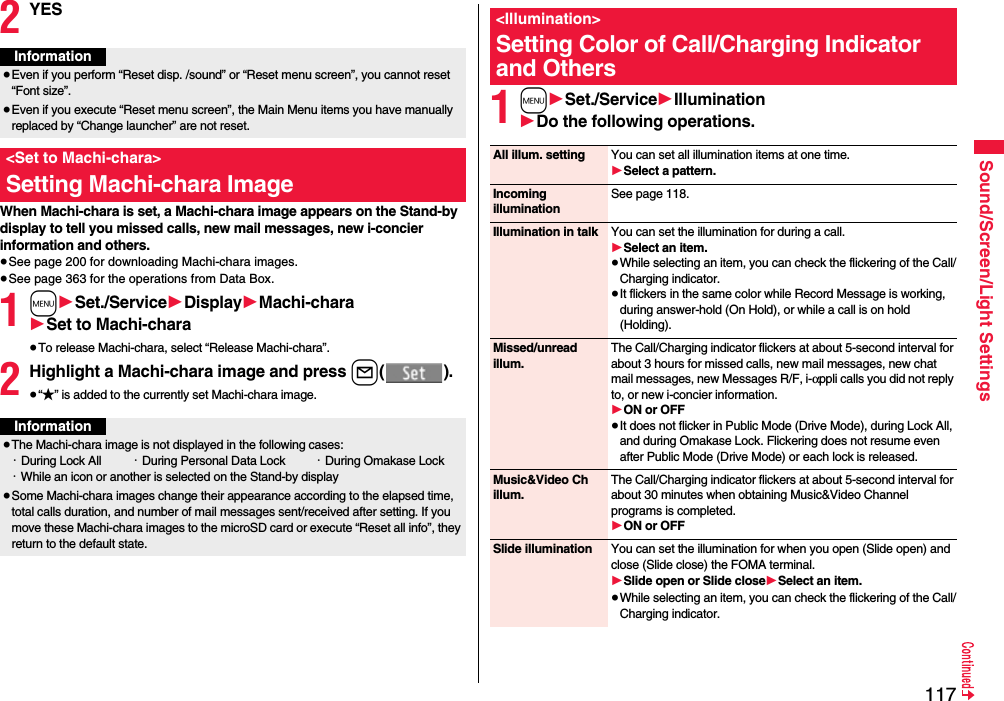
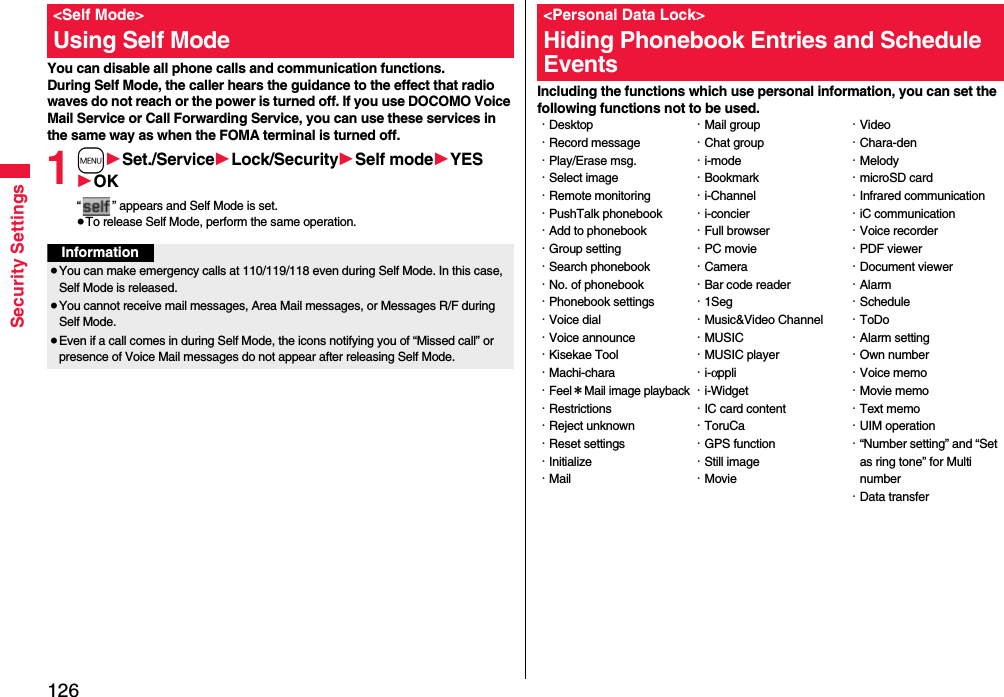
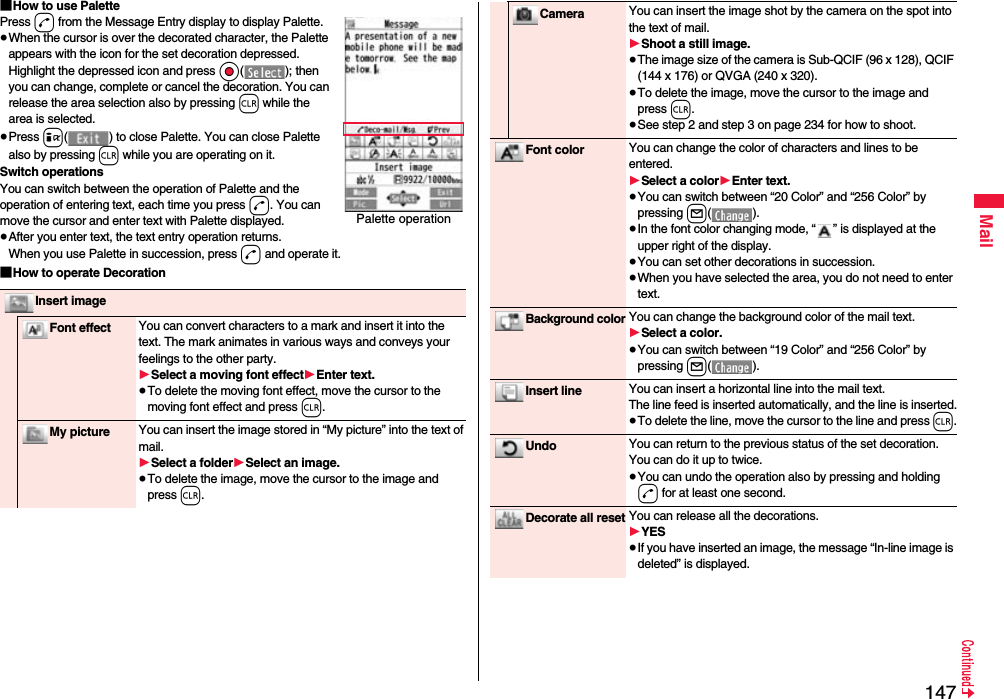
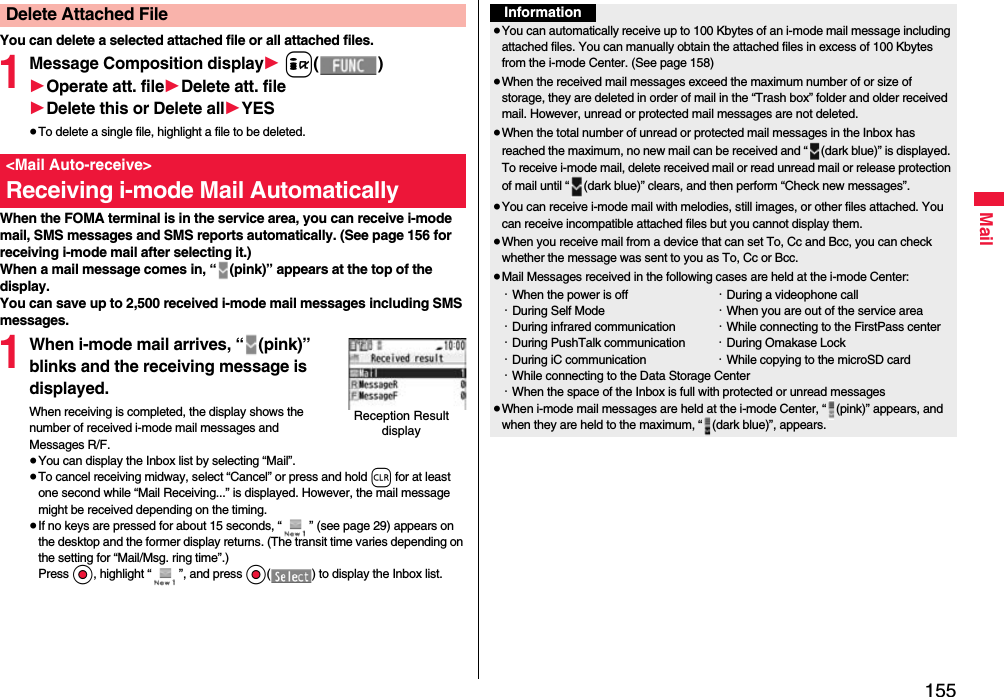
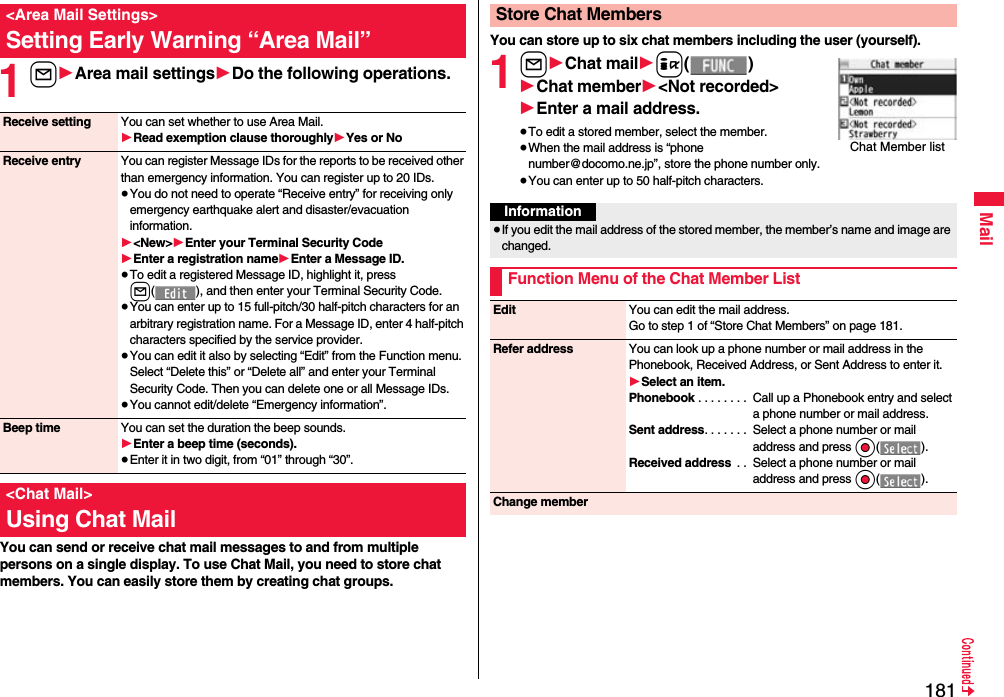
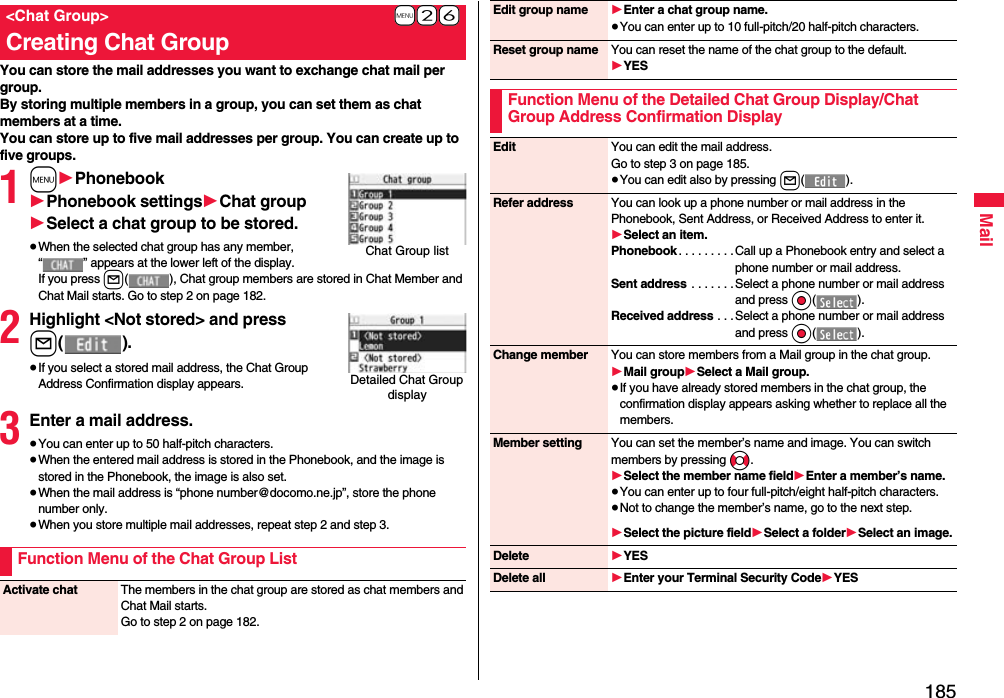
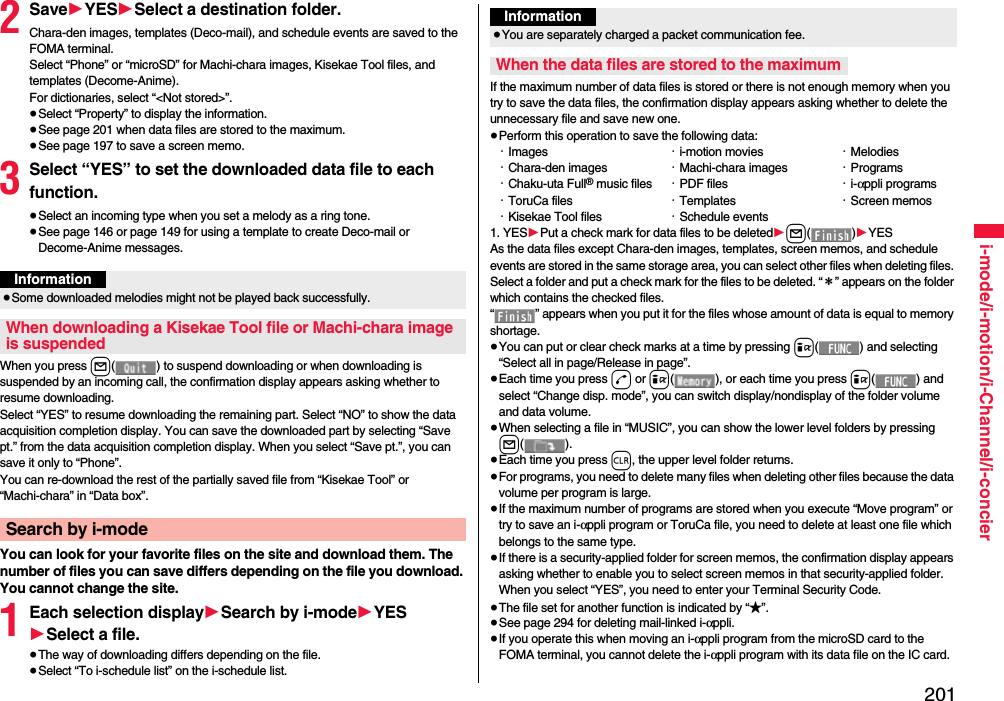
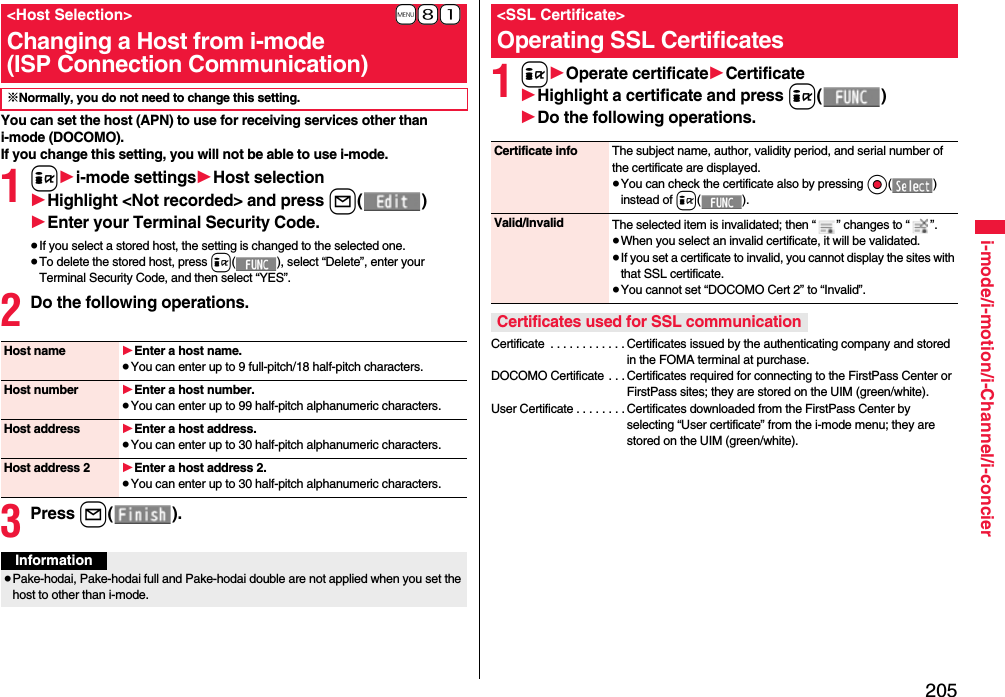
![40Before Using the HandsetUse the FOMA terminal’s dedicated Battery Pack P19.Life of battery pack≥Battery packs are consumables. The usable time shortens slightly each time they are charged.≥When the usable time of the battery pack becomes half the time it was purchased, replacing is recommended because the battery pack is nearing the end of its life. Depending on the use conditions, the battery pack may swell as it nears the end of its life, but this is not a problem.≥The life of the battery pack may shorten if you use i-αppli programs, talk on the videophone, watch 1Seg programs and so on for a long time during charging.Charging≥For details, refer to the instruction manuals for the FOMA AC Adapter 01/02 (option), FOMA AC Adapter 01 for Global use (option), and FOMA DC Adapter 01/02 (option).≥The FOMA AC Adapter 01 supports 100 V AC only. The FOMA AC Adapter 02 and FOMA AC Adapter 01 for Global use support from 100 V AC through 240 V AC.≥The shape of the plug for the AC adapter is for 100 V AC (for domestic use). To use the AC adapter that supports from 100 V AC through 240 V AC overseas, you need to have a conversion plug adapter that is compatible with the voltage of the country you stay. Do not use a transformer for overseas travel to charge the battery pack.≥Even during charging, you can still answer calls if the FOMA terminal is turned on. This will consume the charged amount so that charging will take longer. Also, the standby time or talk time might be shorter if you charge the battery pack with your FOMA terminal open.≥If you have a long time videophone call during charging, the temperature in the FOMA terminal may rise and charging may be suspended. In such a case, wait for a while and try charging again.≥Remove and insert the connector slowly and carefully, without using unnecessary force.≥Do not remove the battery pack during charging.ChargingTo prevent damage to the environment, bring used battery packs to a docomo service counter, a docomo agent or a recycle center.Li-ion 00Do not charge for long periods of time (several days) with the FOMA terminal turned on.≥If you leave the FOMA terminal powered on for long periods of time during charging, you may not be able to use the FOMA terminal for long duration as expected and the low battery alarm may sound soon, because the FOMA terminal receives the power from the battery pack after charging is completed. If this happens, charge the battery pack correctly. When charging the battery pack again, first remove the FOMA terminal from the AC adapter (or desktop holder) or DC adapter and then set it again.Estimated usable time for battery pack (The usable time for the battery pack varies with the charging time and the remaining life of the battery pack.)※The continuous talk time is the estimated time that the FOMA terminal can be used for calls when radio waves can be sent and received normally.※The 1Seg watching time is the estimated time for when radio waves can be received normally with the Stereo Earphone Set 01 (option) connected.※The continuous standby time is the estimated time when radio waves can be received normally. The standby time and talk/communication time could be about half of the estimate and 1Seg watching time could be shorter depending on the charge level of the battery pack, function settings, other ambient conditions such as temperature, and the status of radio waves in the area (weak or no radio waves, for instance). When you use i-mode communication, the talk/communication time and standby time will be shorter. Further, even if you do not make calls or not execute i-mode communication, the talk/communication time and standby time will be shorter if you watch 1Seg programs, compose i-mode mail, start up a downloaded i-αppli program or the i-αppli Stand-by display, execute data communication or Multiaccess, use the camera, play back music, or use Bluetooth connections.※The continuous talk time and the continuous standby time may be shortened depending on the network environment in the country you stay.※The continuous standby time for standstill is the average number of hours you can use the FOMA terminal in standstill status when it is closed and can receive radio waves normally.※The continuous standby time for in motion is the average number of hours you can use the FOMA terminal in the combined status of “standstill” “moving” and “out of the service area” when it is closed, in an area where it can receive radio waves normally.Continuous standby timeFOMA/3G3G/GSM setting[3G]In motion: Approx. 370 hours3G/GSM setting[Auto]Standstill: Approx. 600 hoursIn motion: Approx. 360 hoursGSM3G/GSM setting[Auto]Standstill: Approx. 250 hoursContinuous talk timeFOMA/3G Voice call: Approx. 200 minutesVideophone call: Approx. 110 minutesGSM Voice call: Approx. 250 minutes1Seg watching time Approx. 260 minutes(In ECO Mode: Approx. 410 minutes)](https://usermanual.wiki/Panasonic-Connect/208012A.User-Manual-Part-1/User-Guide-1045203-Page-42.png)


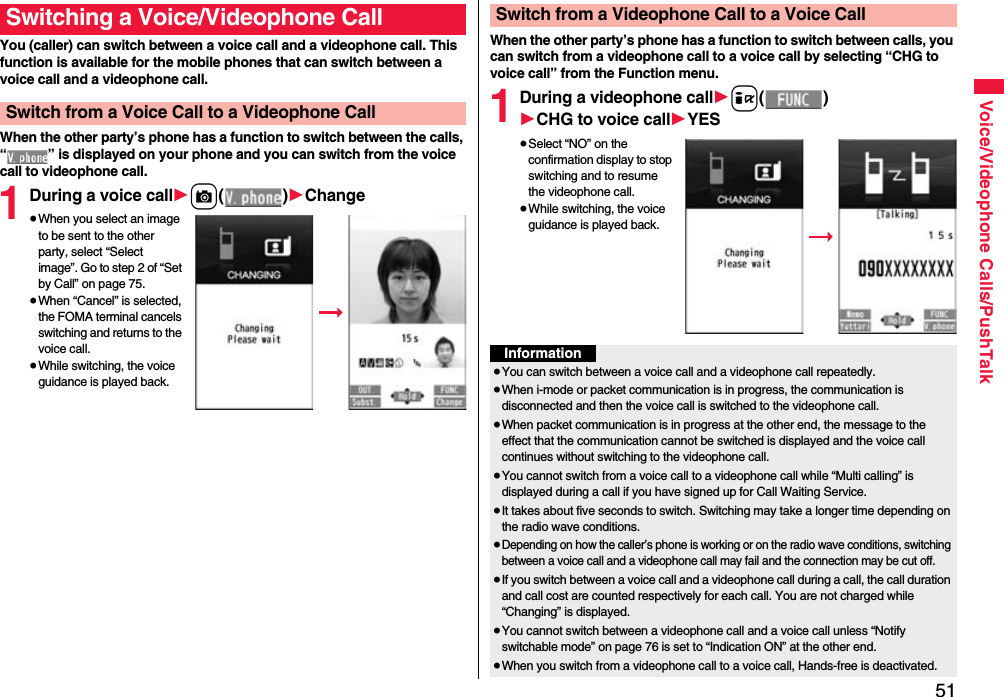
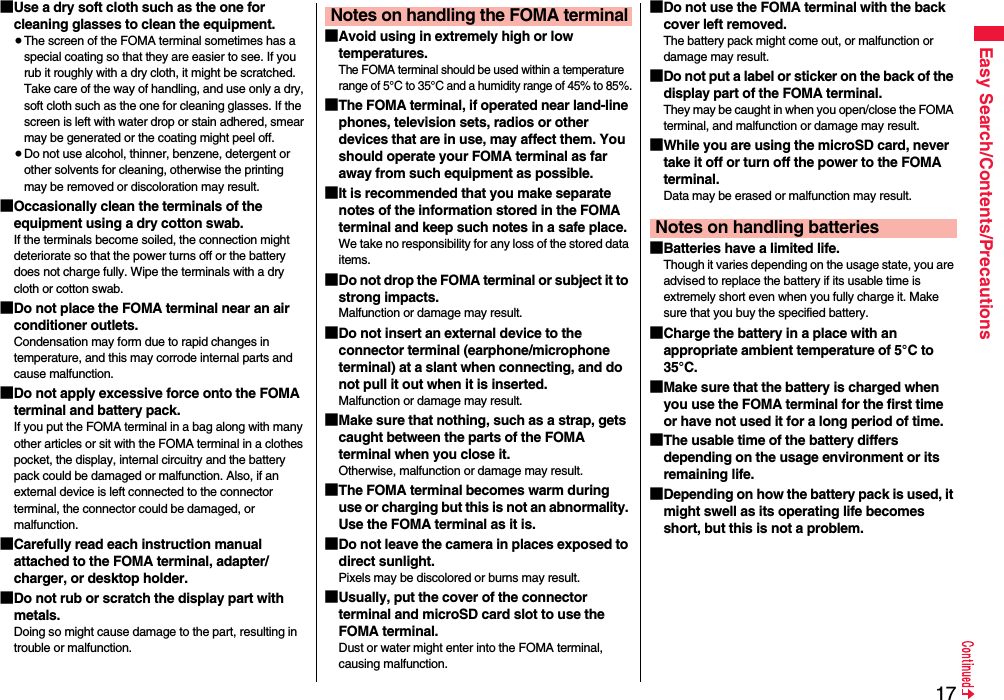
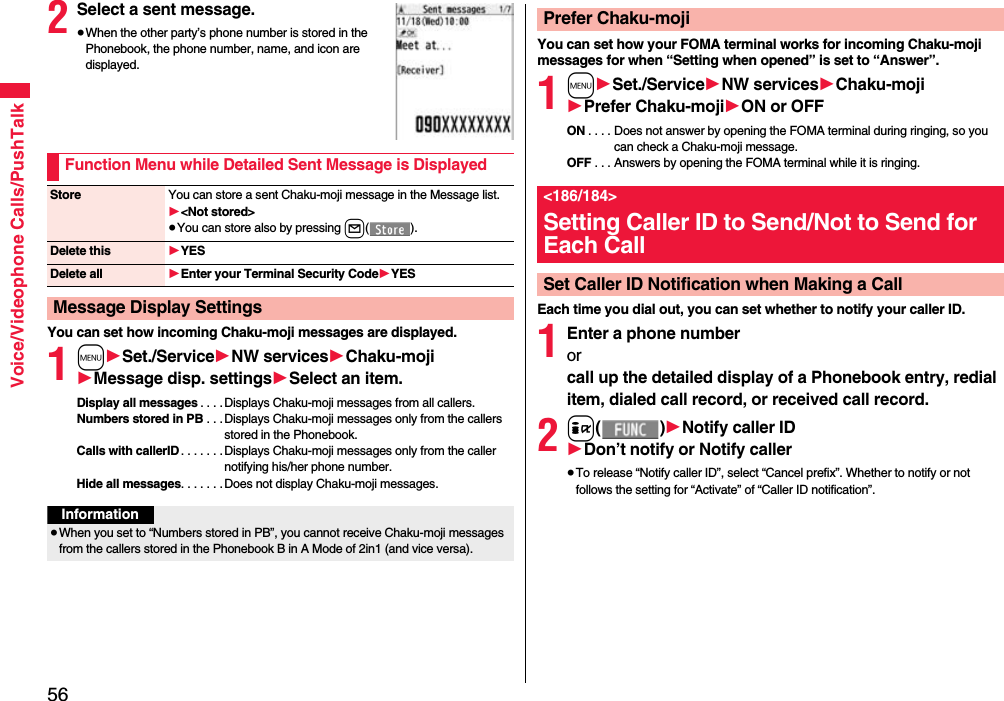
![54Voice/Videophone Calls/PushTalkStore P-Talk group 1Select a group.≥When members who are not stored in the PushTalk Phonebook are found, the confirmation display appears asking whether to store them.1Enter a group name.≥You can enter up to 16 full-pitch/32 half-pitch characters.MailCompose message You can compose a mail message to send to the phone number set as the destination address.Go to step 3 on page 142.Compose SMS You can compose an SMS message to send to the phone number set as the destination address.Go to step 3 on page 186.Ring time[Received Call list only]You can display the ring time for missed calls. Even if you have set “Missed calls display” of “Ring time” to “Not display”, the missed calls which stopped ringing within the ring start time and their ring times are displayed.Font size You can switch font sizes for Redial, Dialed Calls, Received Calls, Sent Address, and Received Address. (See “Dialed/recv. calls” on page 120)Add desktop icon See page 31.Sent address[Redial/Dialed Calls only]See page 171.Received address[Received Calls only]See page 171.DeleteDelete this 1YESDelete selected 1Put a check mark for redial items, dialed call records, or received call records to be deleted1l()1YESDelete all 1Enter your Terminal Security Code1YESInformation<Store in P-Talk PB>≥You cannot store from the call record for the party who is not stored in the Phonebook.When making a voice call or videophone call, you can send your text message to tell the subject during calling.≥For details on Chaku-moji or compatible models, refer to DOCOMO website or “Mobile Phone User’s Guide [Network Services]”.≥The sending end is charged, but the receiving end is not charged.A Chaku-moji message is displayed below a caller. The Chaku-moji message is stored in Received Calls as well.≥The Chaku-moji message is displayed only during ringing. It is not displayed during a call.≥Even when a Chaku-moji message comes in within the ring start time set by “Ring time”, it is received and recorded in Received Calls.≥The Chaku-moji message is not displayed during Lock All, Omakase Lock, or Personal Data Lock. However, you can check the Chaku-moji message from Received Calls after the lock is released.<Store P-Talk group>≥You cannot store in a PushTalk group unless all the members are stored in the FOMA terminal’s Phonebook.<Delete>≥If you execute “Delete all” from the Function menu of Redial/Dialed Calls, all records in both Redial and Dialed Calls are deleted. Even if you execute “Delete this” or “Delete selected” of Redial, the records are not deleted from Dialed Calls and they are retained. To delete the dialed call records, delete them from the Function menu while “Dialed calls” is displayed.<Chaku-moji>Using Chaku-mojiWhen a message is receivedInformation](https://usermanual.wiki/Panasonic-Connect/208012A.User-Manual-Part-1/User-Guide-1045203-Page-56.png)

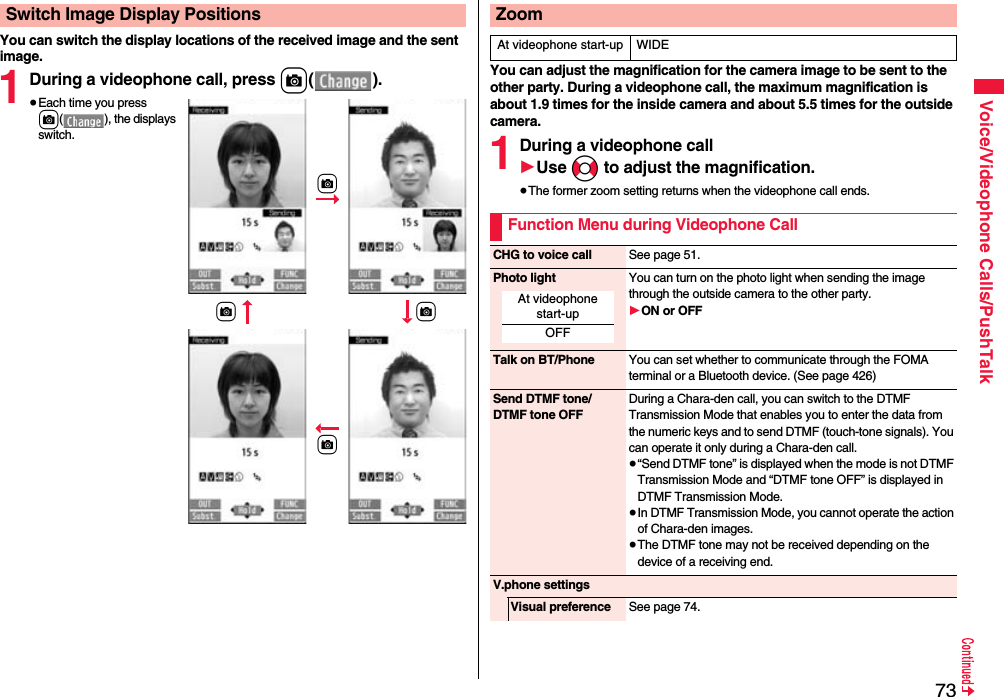
![71Voice/Videophone Calls/PushTalkEach time you press > during playback, messages are played back in the following order: the next new record message → the oldest record message → a voice memo.Press Oo() or r.1m1LifeKit1Rec. msg/voice memo1Play/Erase VP msg.1Select a videophone record message or movie memo.≥On the Videophone Record Message list, recorded items are indicated by “★”.≥It is played back at the same volume of the playback sound of i-motion movies.≥The date and time the message/memo was recorded are displayed during playback.From the Stand-by display, press and hold > for at least one second to play back the latest videophone record message. When videophone record messages are not recorded, the latest movie memo is played back.Press Oo() or r.To skip to next messageTo cancel playback midwayPlay Back/Erase Videophone Record Messages/Movie MemosVideophone Record Message listTo play back using .>To cancel playback midwayFunction Menu of the Record Message List/Videophone Record Message ListPlay You can play back the message.Erase this 1YES≥You can erase the message/memo also by pressing i( ) during playback.You can set up for sending a Chara-den image to the other party.≥See page 361 for Chara-den images.You can set a Chara-den image to be sent to the other party for making a videophone call.1Chara-den display/Chara-den list1l()Enter the destination phone number and press l( ) to make a videophone call.≥When the other party’s phone number is stored in the Phonebook, you can retrieve it selecting from the Search Phonebook display by pressing Bo.≥You can search for the phone number also from Received Calls by pressing Co or from Redial by pressing Vo.Erase rec. msg. You can erase all record messages from the Record Message list, and can erase all videophone record messages from the Videophone Record Message list.1YESErase movie memo[Videophone Record Message list only]You can erase all movie memos.1YESErase all You can erase all record messages and a voice memo from the Record Message list, and can erase all videophone record messages and movie memos from the Videophone Record Message list.1YESUsing Chara-denSet by CallInformation≥The priority order of substitute images to be sent to the other party is as follows: “Setting by call” → “Setting for Phonebook entry” →“Group setting” → “Select image”.](https://usermanual.wiki/Panasonic-Connect/208012A.User-Manual-Part-1/User-Guide-1045203-Page-73.png)

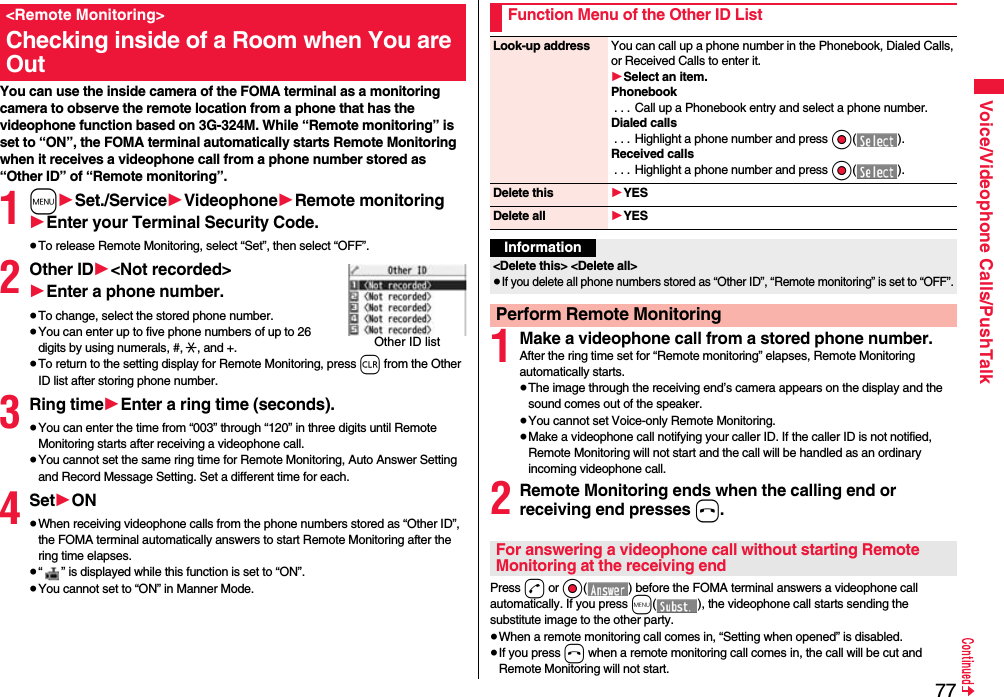
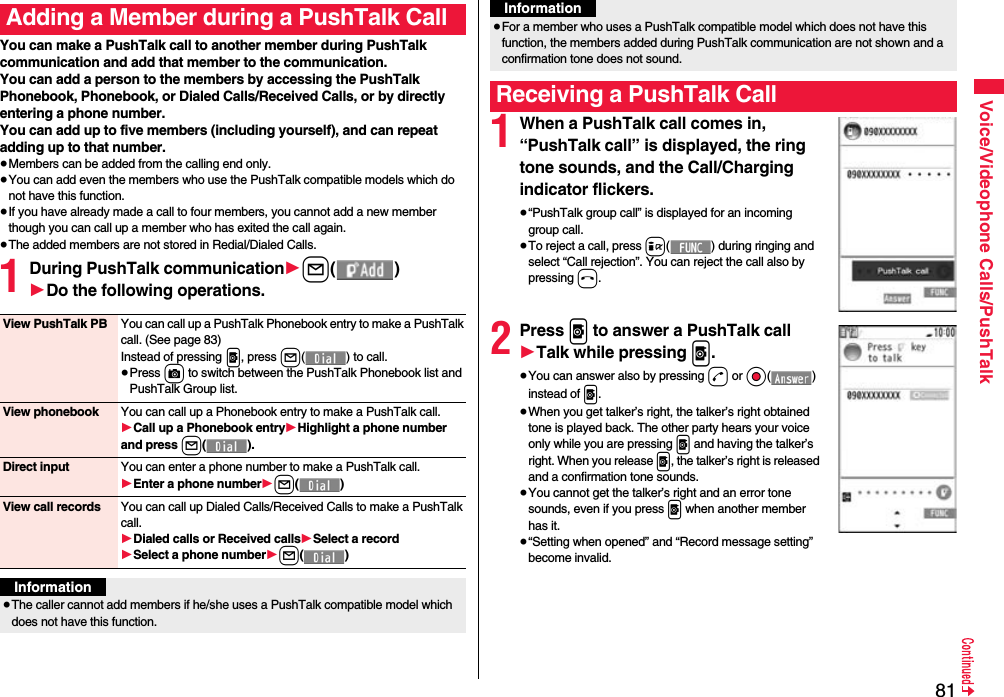
![78Voice/Videophone Calls/PushTalk≥You may be imposed punishment according to the law and rule (such as the nuisance prevention ordinance) if you use the FOMA terminal to give a remarkable nuisance and misdeed to the public.Information≥When your FOMA terminal is used for the receiving end, an image through the caller’s camera appears, and sound comes out. (You cannot switch to a substitute image.)≥Remote Monitoring does not start during Manner Mode and Public Mode (Drive Mode). However, it starts even during Lock All.≥When Remote Monitoring is set to “ON” and a videophone call comes in from the phone number set as “Other ID”, Remote Monitoring starts after the set ring time, even when “Ring time”, “Auto answer setting”, or “Record message setting” is set and regardless of their ring times.≥When Remote Monitoring is not performed, it is recorded in Received Calls as a missed videophone call.≥If an earphone/microphone (option) is connected when a remote monitoring call comes in, the ring tone sounds from both the earphone and the speaker, even when “Headset usage setting” is set to “Headset only”.≥The ring tone for Remote Monitoring sounds. (You cannot change the ring tone for Remote Monitoring.)The ring tone sounds at the volume set for “Videophone” of “Ring volume”, but at “Level 2” if you have set “Step”, “Level 1” or below. The color is “Gradation”, and its lighting pattern is “Standard”, regardless of the Incoming Illumination setting.≥You cannot put incoming remote monitoring calls on answer-hold (On Hold).≥If you set both Call Forwarding Service and Remote Monitoring, and give priority to Remote Monitoring, set its ring time shorter than that for Call Forwarding Service.≥To use Call Forwarding Service for Remote Monitoring, store the phone number of dialing side as “Other ID” and set a 3G-324M videophone as the forwarding destination.Please be considerate of the privacy of individuals around you when shooting and sending photos using camera-equipped mobile phones.This service provides you a pleasurable group calls among multiple parties (two to five persons including yourself). The participants can speak by turns by pressing the PushTalk key.※You are charged a PushTalk communication fee each time you press the PushTalk key (speak).≥For details on PushTalk or compatible models, refer to DOCOMO website or “Mobile Phone User’s Guide [Network Services]”.■PushTalkPlus※This service enables you to have a PushTalk call with up to 20 persons including you. You can use the shared Phonebook on the network, and can check the members for their status, thus PushTalk becomes more useful.※You need to subscribe separately.≥For details such as how to operate, refer to the booklet which is supplied at subscription.1Enter the other party’s phone number1pWhen you are dialing, a confirmation tone for starting a PushTalk call sounds for a few seconds, and then the same ringback tone as the voice (videophone) call sounds.≥You can make a group call to multiple persons using the PushTalk Phonebook. (See page 82 and page 83)PushTalkMaking a PushTalk Call](https://usermanual.wiki/Panasonic-Connect/208012A.User-Manual-Part-1/User-Guide-1045203-Page-80.png)
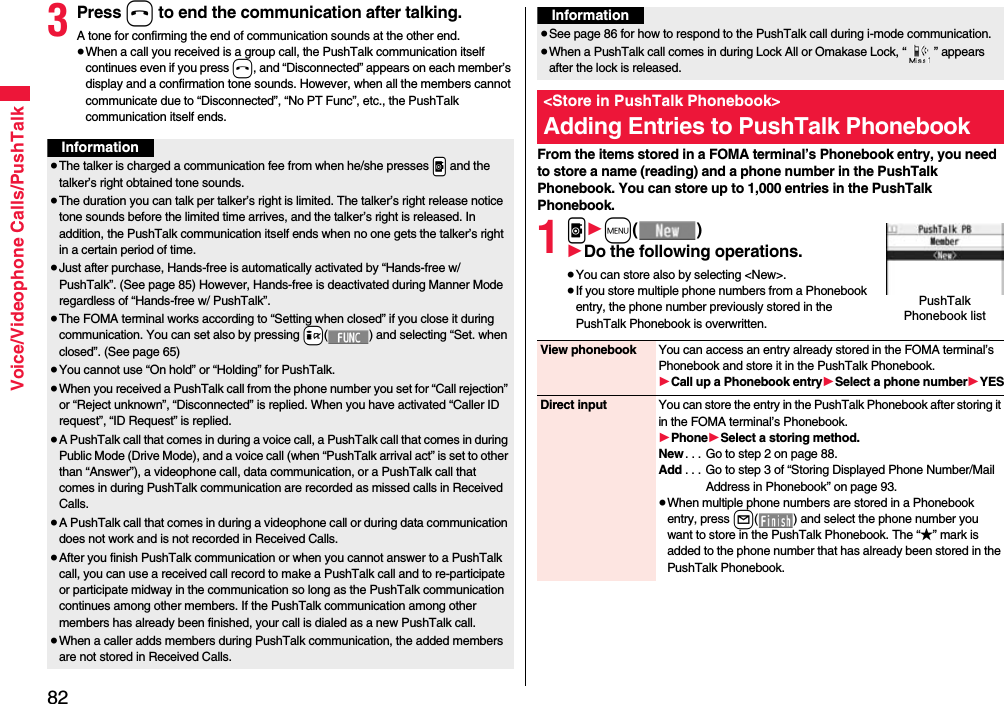
![84Voice/Videophone Calls/PushTalk2Put a check mark for members you want to make a call to1p or l()≥When you do not check any members, the call is made to the highlighted member.Group Member listInformation≥When five or more members are stored in a group, you cannot make a call to all the members by selecting the group.Function Menu of the PushTalk Phonebook List/PushTalk Group List/Group Member ListMembers to call When the PushTalk Phonebook list or Group Member list is displayed, you can display the checked members only.≥Press p or Oo( ) to make a PushTalk call.≥Press i( ) to select “Notify caller ID” and then you can select whether to notify your phone number. When “Cancel prefix” is selected, the FOMA terminal works according to the setting by “Caller ID notification”.Search PushTalk PB[Phonebook list only]1Select a search method.Reading? . . . See page 94.Group?. . . . . See page 94.1Select a member.You can display the PushTalk Phonebook list with the searched members selected.Store in P-Talk PB[Phonebook list only]See page 82.DEL from P-Talk PB[Phonebook list only]See page 85.Edit group members[Group list/Member list]You can edit the members in the group.Go to step 2 on page 83.Edit group name[Group list only]1Enter a group name.≥You can enter up to 16 full-pitch/32 half-pitch characters.DEL from PT group[Group list only]See page 85.DEL group members[Member list only]See page 85.Sound setting See page 85.Vibration setting See page 85.Auto answer set. See page 85.Ring time setting See page 85.Hands-Free See page 85.Set. when closed See page 65.i-mode arrival act See page 86.P-Talk arrival act See page 85.Network connection You can connect to the network to use PushTalkPlus. This is available only when you have singed up for PushTalkPlus. (See page 78)](https://usermanual.wiki/Panasonic-Connect/208012A.User-Manual-Part-1/User-Guide-1045203-Page-86.png)
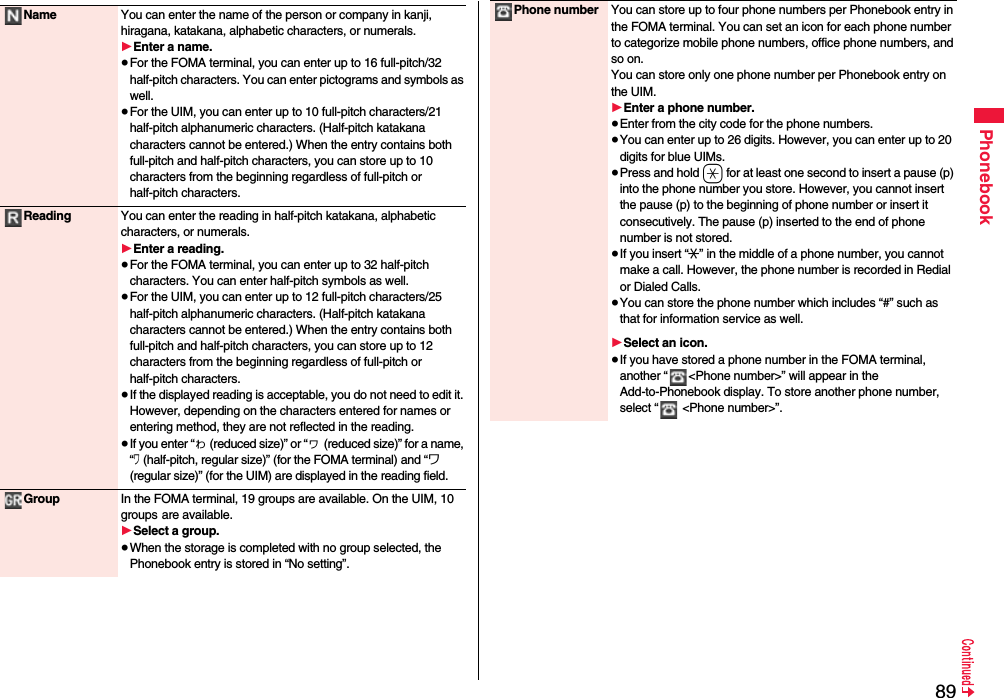
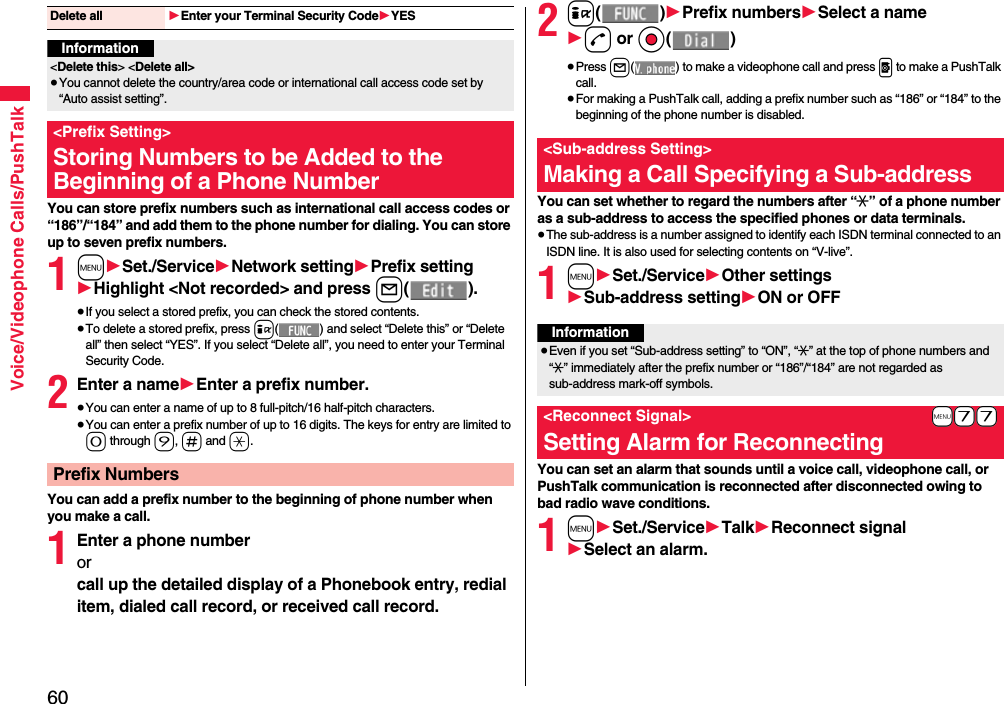
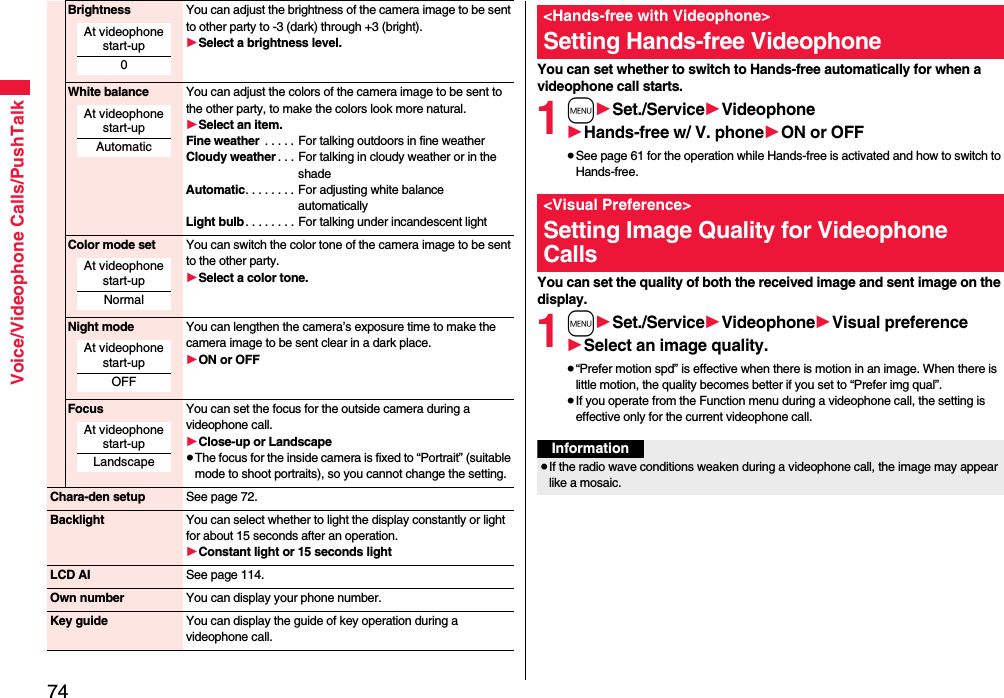
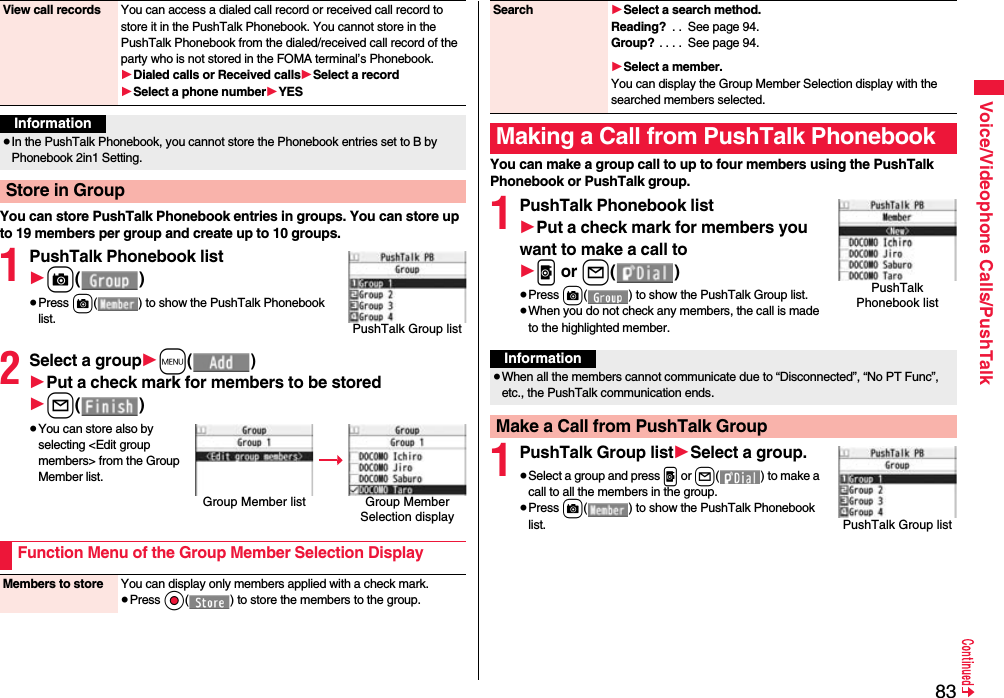
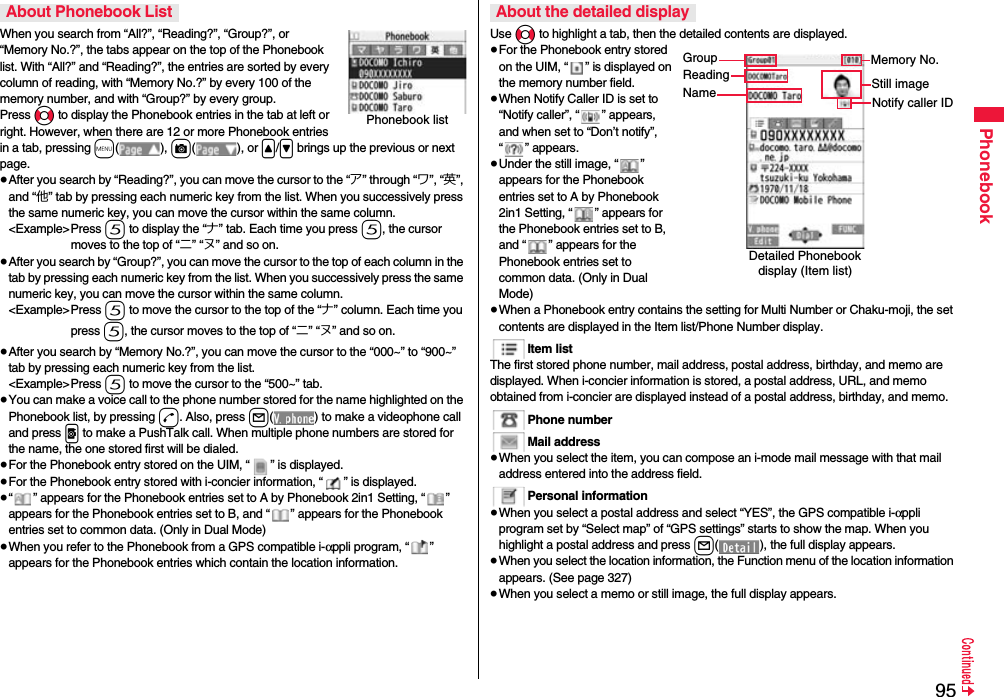
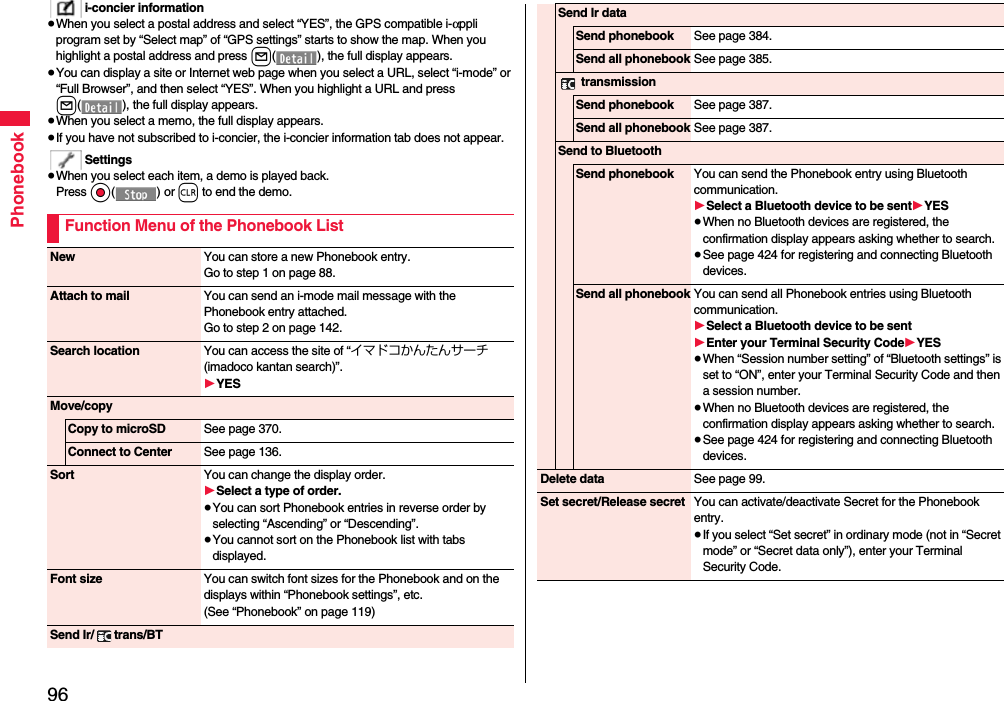
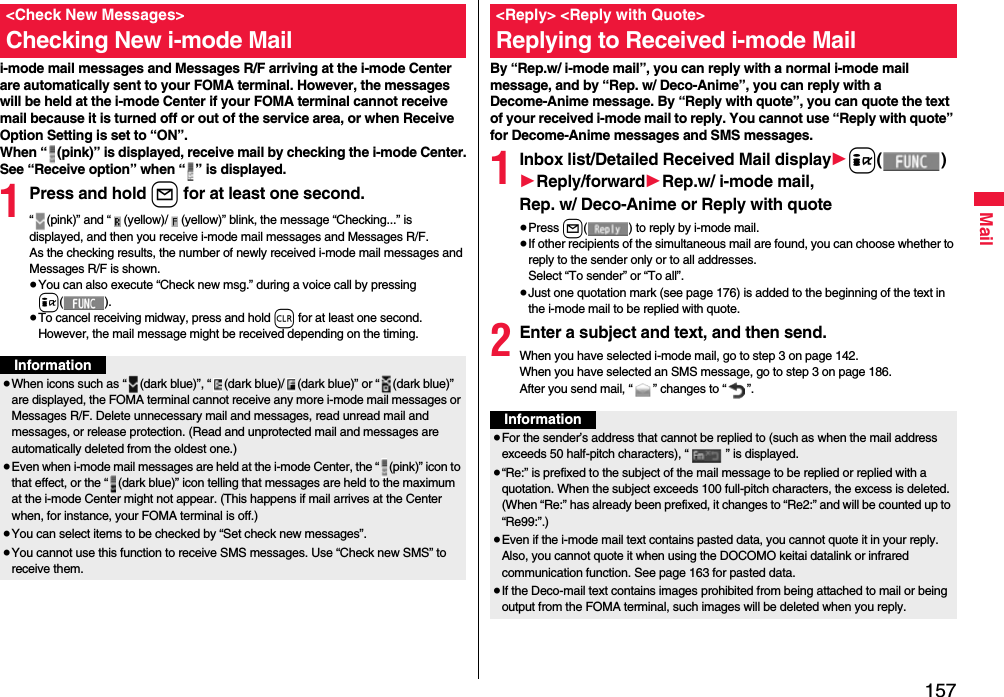
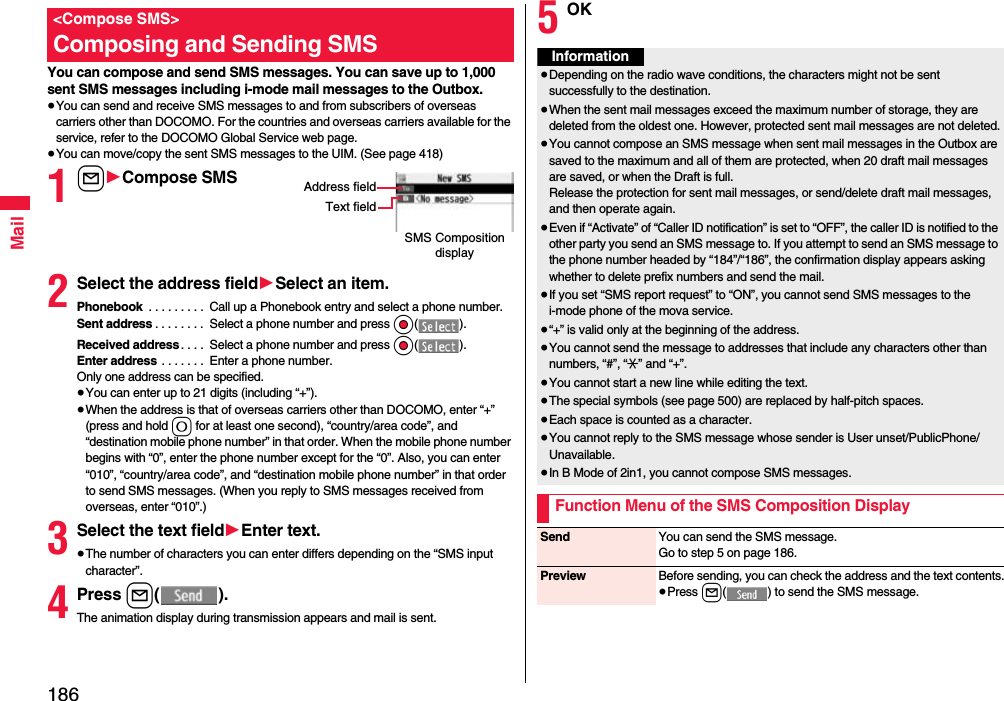
![94PhonebookYou can retrieve stored Phonebook entries by eight search methods.1Xo1Do the following operations.≥The display for the same search method as the previous one appears once you have carried out a search. Press r to show the Search Phonebook display.<Search Phonebook>Dialing from PhonebooksSearch Phonebook display All? You can show all Phonebook entries.≥The tabs appear on the top of the Phonebook list. (See page 95)Reading? You can enter the reading of the other party’s name from the first character and search. You do not need to enter the full reading.1Enter a part of the reading1Bo≥The tabs appear on the top of the Phonebook list. (See page 95)Group? You can show Phonebook entries stored in a specified group.1Select a group.≥The tabs appear on the top of the Phonebook list. (See page 95)≥If you press i( ) on the Group list, the Function menu for “Group setting” is displayed.Memory No.?[FOMA terminal only]You can search for the entry by the memory number assigned when it was stored in the Phonebook.1Enter the memory number.≥Enter from “000” through “999” in three digits.≥The tabs appear on the top of the Phonebook list. (See page 95)≥From the Stand-by display, you can press d and then press Bo to display the Memory No. Dial display. From there you can make a voice call by entering the memory number of the phone number.Name? You can enter the other party’s name from the first character and search. You do not need to enter the full name.1Enter a part of the name1Bo2Select an entry1d or Oo()≥When the entry contains multiple phone numbers, or when you searched by “Mail address?”, press Mo from the detailed display to select a phone number.≥You can make a videophone call by pressing l( ) or PushTalk call by pressing p.The Phonebook entries are searched in the order of readings you entered for storing, as follows: “Space at the beginning of the reading” → “Japanese syllabary (ア、イ、ウ、エ、オ、... ン)” → “Alphabet (A, a, B, b, ...Z, z)” → “Numerals (0 through 9)” → “Symbols” → “No reading”.For “All?” and “Reading?”, searching is done in the following order:“Japanese syllabary (ア、イ、ウ、エ、オ、... ン)” → “Alphabet (A, a, B, b, ...Z, z)” → “Space at the beginning of the reading” → “Numerals (0 through 9)” → “Symbols” → “No reading”.※The Memory No. Search searches in the order of the memory numbers.Phone number? You can enter a part of the other party’s phone number and search. You can search for the entry even from the middle of phone number.1Enter a part of the phone number1Bo≥You can display the Phonebook list also by entering a part of the phone number from the Stand-by display or the “Talking” display, and pressing Bo.Mail address?You can enter a part of the other party’s mail address and search. You can search for the entry even from the middle of mail address.1Enter a part of the mail address1Bo2-touch dial?[FOMA terminal only]You can show the list of Phonebook entries in memory number 000 through 009.≥Phonebook entries not yet stored or being set with secret are displayed as <−−−>.Information≥In a search method other than “Group?” and “2-touch dial?”, enter nothing and press *Bo; then you can search all through the Phonebook.≥When no Phonebook entry is found that matches the condition you entered by “Reading?” or “Memory No.?”, the entry that is the closest to the condition is displayed.Search order](https://usermanual.wiki/Panasonic-Connect/208012A.User-Manual-Part-1/User-Guide-1045203-Page-96.png)


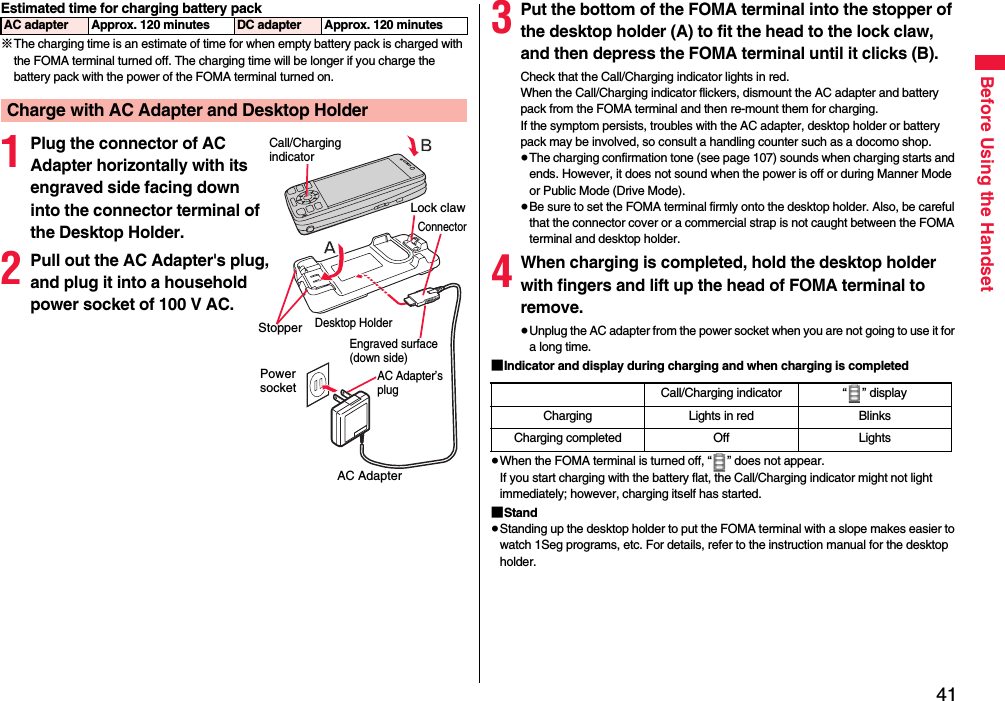
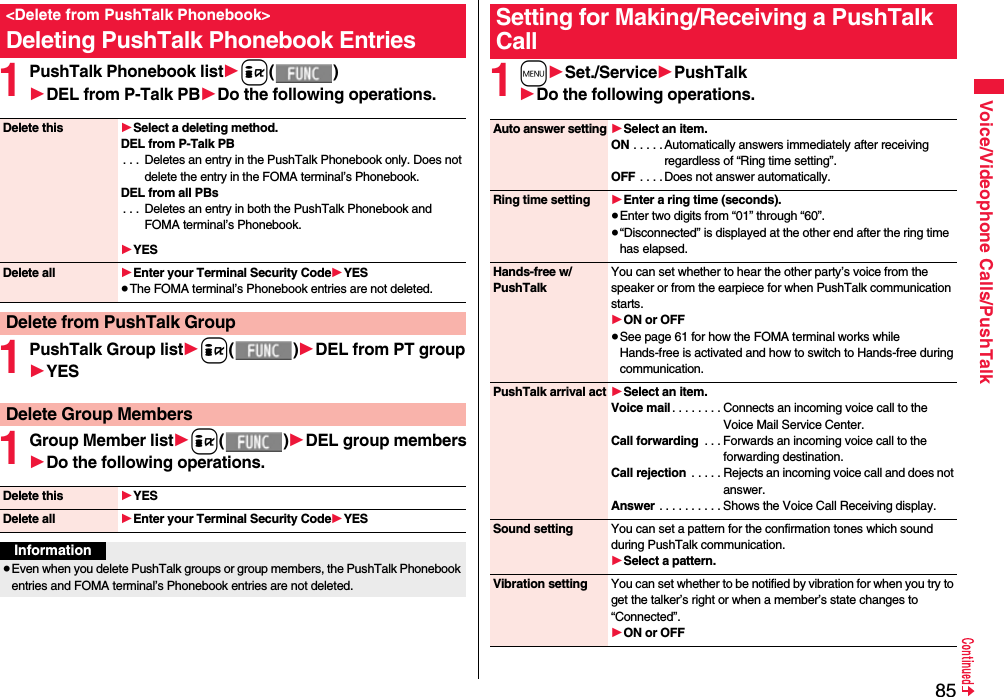
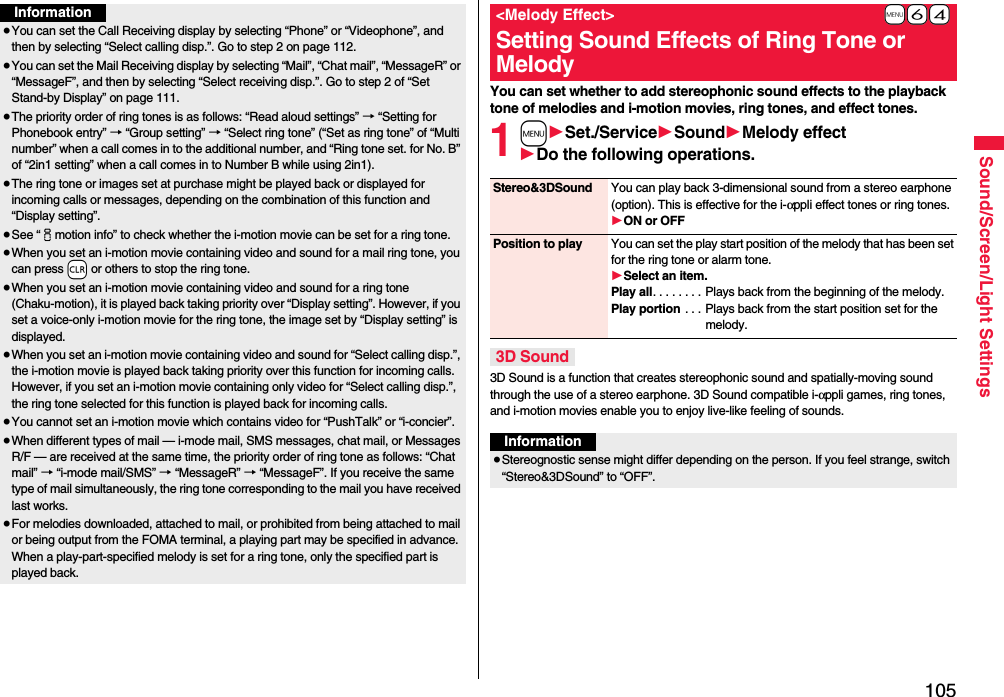
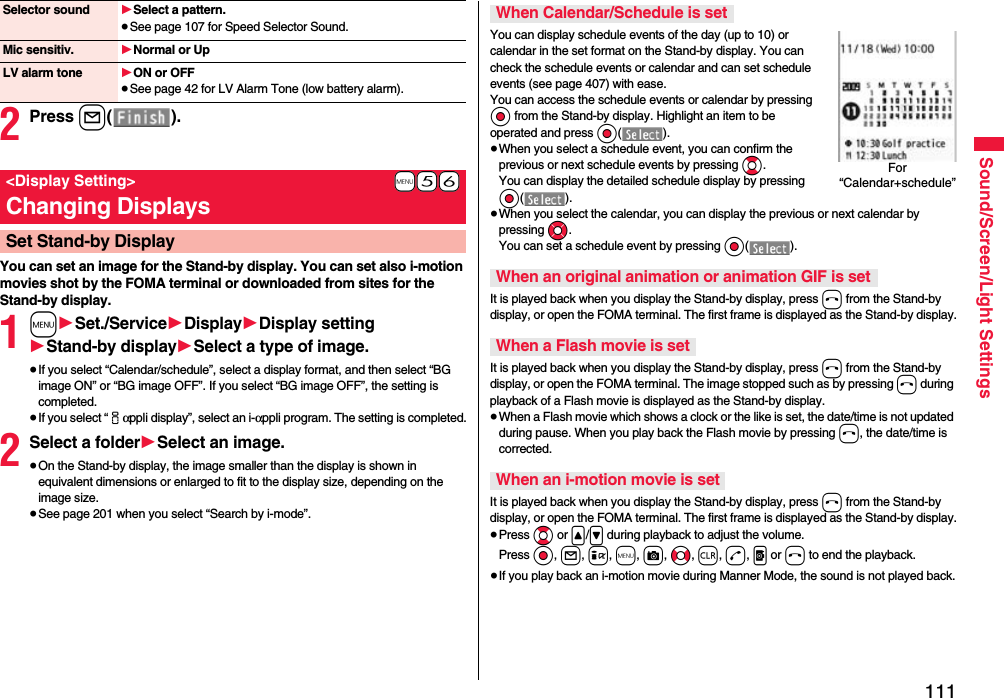
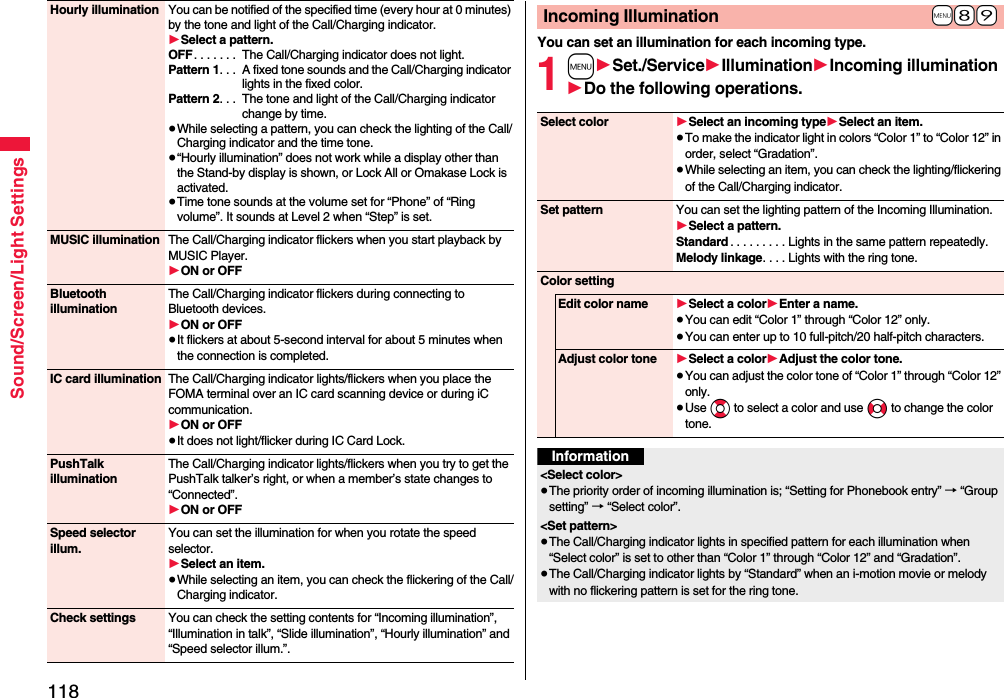
![104Sound/Screen/Light SettingsYou can set a ring tone for each incoming type.If you select an i-motion movie, the i-motion movie and sound are played back for incoming calls/messages. (Chaku-motion)≥The ring tone is the PCM sound source, chord of 128 tones, and ADPCM compliant.≥See “Add to Phonebook” on page 88 for setting a ring tone by Phonebook entry, and see “Group Setting” on page 93 for setting it by group.■Ring Tone List (pre-installed)+m-1-3<Select Ring Tone>Changing Ring ToneDisplay Title Name of Lyricist/ComposerPattern 1 ーーPattern 2 ーーPattern 3 ーーPattern 4 ーーPattern 5 ーーHEIGH HO // SNOW WHIHEIGH HO // SNOW WHITE AND THE SEVEN DWARFS /INSTComposer: CHURCHILL FRANK ESYMFONIE NR 9 Z NOVESYMFONIE NR 9 Z NOVEHO SVETA OP 95Composer: DVORAK ANTONINSONATINE※SONATINEComposer: WOLFGANG AMADEUS MOZARTTechno Techno ーPARADE OF THE WOODEN※PARADE OF THE WOODEN SOLDIERSComposer: JESSEL LEONSUMMERTIME※SUMMERTIME Composer: GERSHWIN GEORGESOMEDAY MY PRINCE WISOMEDAY MY PRINCE WILL COMEComposer: CHURCHILL FRANK EPEER GYNT SUITE NR 1※PEER GYNT SUITE NR 1 OP 46/MORGENSTEMNINGComposer: GRIEG EDVARD HAGERUPKIRAKIRA ーElectrical ーーAcoustic Guitar ーーMinimal ーーMagical Stick ーー※3D sound is supported. See page 105 for 3D sound.(Note) The names of lyricists and composers are described conforming to the JASRAC web page.Whole part of long titles may not be displayed due to restriction of the display size.■i-motion (pre-installed)≥You cannot set the pre-installed i-motion “「マンマ・ミーア!」予告編 (Preview of [MAMMA MIA!])” for a ring tone.1m1Set./Service1Sound1Select ring tone1Select an incoming type.≥Select an item and press l( ) to check the contents actually played back or displayed.2Select ring tone1Select a type of ring tone.Melody . . . . . . . . . . . Sets a melody as a ring tone.MUSIC. . . . . . . . . . . . Sets a Chaku-uta Full® music file as a ring tone.imotion . . . . . . . . . Sets an i-motion movie as a ring tone. (Chaku-motion/Chaku-uta®)Voice announce . . . Sets the sound recorded by “Voice announce” as a ring tone. The setting is completed.OFF . . . . . . . . . . . . . . Sets a ring tone off. The setting is completed.3Select a folder1Select a ring tone.≥If you select “MUSIC” in step 2, select “Fullsong ring tone” or “Point ring tone”. (See page 284)≥See page 201 when you select “Search by i-mode”.Smart Beep ーーUkulele ーーWaterdrop ーーDisplay Title Name of Lyricist/ComposerDisplay Title Name of Lyricist/Composer「マンマ・ミーア!」予告編 ーー](https://usermanual.wiki/Panasonic-Connect/208012A.User-Manual-Part-1/User-Guide-1045203-Page-106.png)
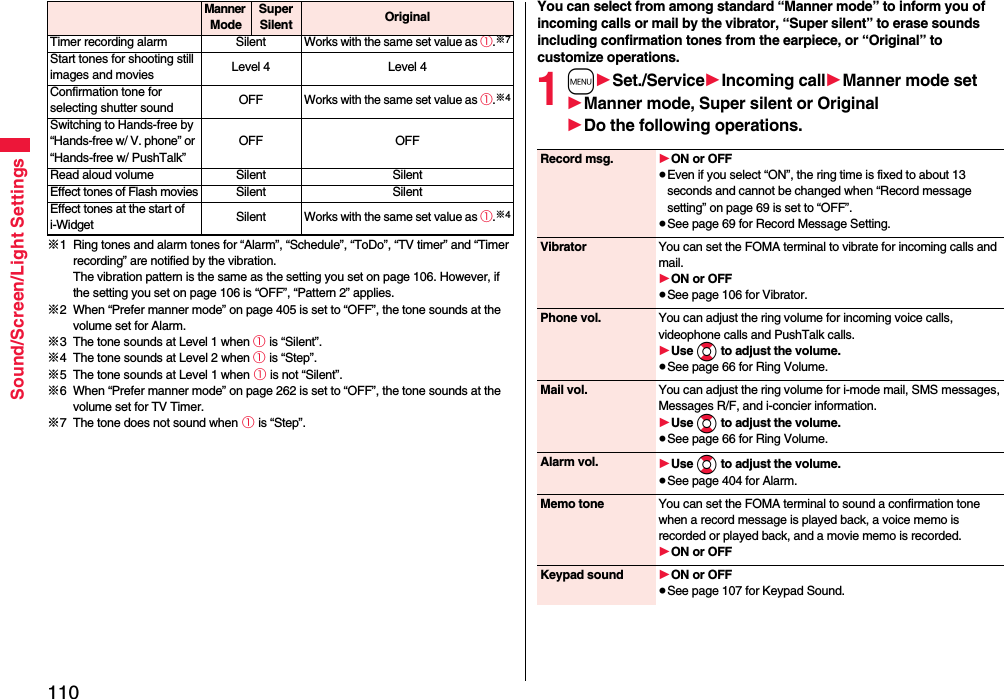
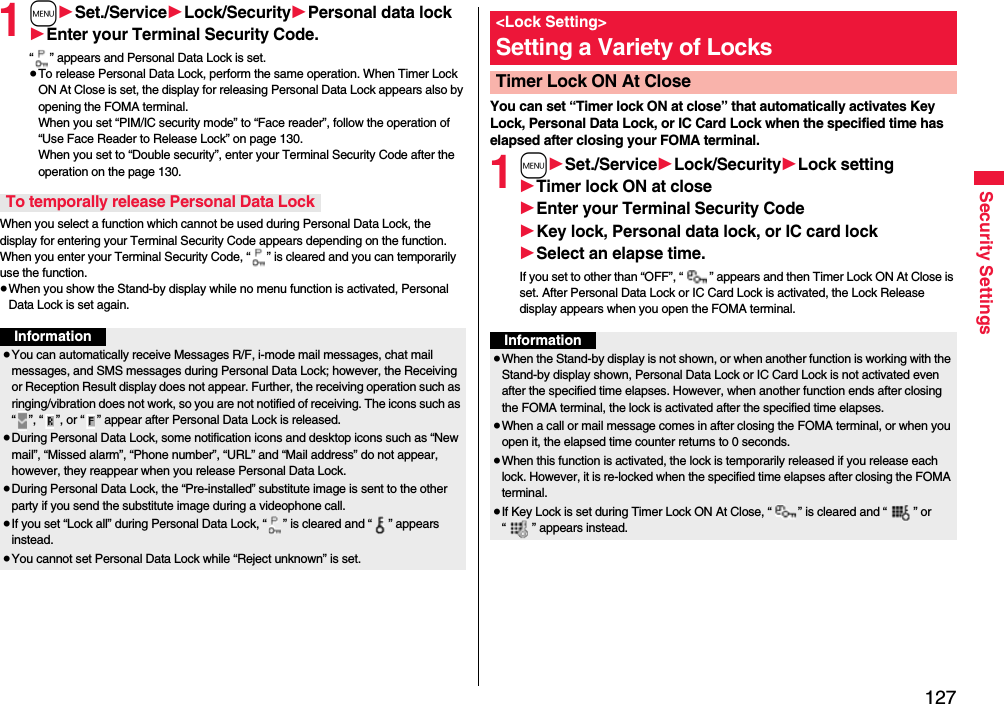
![106Sound/Screen/Light SettingsYou can set the vibrator to notify you of incoming calls and mail.1m1Set./Service1Incoming call1Vibrator1Select an incoming type1Select a vibration pattern.Pattern 1. . . . . . . . . Alternates between vibration on (about 0.5 second) and off (about 0.5 second).Pattern 2. . . . . . . . . Alternates between vibration on (about 1 second) and off (about 1 second).Pattern 3. . . . . . . . . Alternates between vibration on (about 3 seconds) and off (about 1 second).Melody linkage . . . Vibrates in time with the vibration pattern stored in the melody.OFF . . . . . . . . . . . . .Does not vibrate.≥While selecting a vibration pattern, you can check the selected vibration. However, you cannot check the vibration when you select “Melody linkage”.≥The following icons are displayed on the Stand-by display while “Vibrator” is set to other than “OFF”:: You set “Phone”, “PushTalk”, or “Videophone”.: You set “Mail”, “Chat mail”, “MessageR”, “MessageF”, or “i-concier”.: You set “Phone”, “PushTalk”, or “Videophone”, and set “Mail”, “Chat mail”, “MessageR”, “MessageF”, or “i-concier”.+m-5-4<Vibrator>Informing You of an Incoming Call by VibrationInformation≥The priority order of vibrators is as follows: “Setting for Phonebook entry” → “Group setting” → “Vibrator”.≥Even when “Melody linkage” is set, the FOMA terminal vibrates with “Pattern 2” if an i-motion movie or melody with no vibration pattern is set for the ring tone.≥Be careful not to leave the FOMA terminal on a desk or similar places with the vibrator activated; when a call comes in, the FOMA terminal might move and fall by vibration.You can set the sound recorded with the FOMA terminal for a ring tone (including a ring tone for Number B of 2in1), On-hold tone/Holding tone, alarm for “Alarm”, “Schedule”, “ToDo”, and “TV timer”, and answer message for Record Message.You can record only one item for about 15 seconds.1m1LifeKit1Rec.msg/voice memo1Voice announce1Record≥To suspend recording midway, press Oo(), h, or r. The contents recorded to that point are saved.≥The tone beeps about 5 seconds before the recording time (for about 15 seconds) ends. When recording ends, the tone beeps twice, and the former display returns.≥The recording is suspended when a call comes in, when an alarm for “Alarm”, “Schedule”, “ToDo”, “TV timer”, or “Timer recording” sounds, or when you switch displays using Multitask while recording. (The contents recorded to that point are saved.)≥To play back the recorded sound, select “Play”. To suspend playback midway, press Oo(), h, or r.≥To erase the recorded sound, select “Erase”, then select “YES”.Melody Call is a service that enables you to change the ringback tone phone the callers hear to a melody you like.For details, refer to “Mobile Phone User’s Guide [Network Services]”.≥Melody Call is a pay service which is available on a subscription basis.1m1Set./Service1Incoming call1Melody Call setting1YES1Operate following the instructions on the display.+m-5-5<Voice Announce>Using Recorded Sound as Ring Tone<Melody Call Setting>Changing Ringback Tone](https://usermanual.wiki/Panasonic-Connect/208012A.User-Manual-Part-1/User-Guide-1045203-Page-108.png)
![125Security SettingsWhen you have lost your FOMA terminal or in other cases, you can lock your personal data (such as Phonebook entries) and the IC Card function of Osaifu-Keitai by contacting DOCOMO. Omakase Lock protects your important privacy and Osaifu-Keitai. Also, if Omakase Lock cannot be set at subscription but the communication to your FOMA terminal becomes available within one year, the lock will be automatically set. However, if you cancel the contract, halt getting the service, change your phone number, or change your contract to mova, the lock will not be automatically set even within one year.To release the lock, contact DOCOMO by phone, etc.※Omakase Lock is a pay service. However, you are not charged if you apply for this service at the same time as applying for the suspension of the line or during suspension, or if you are a member of DOCOMO Premier Club. Further, if you have signed up for Keitai Anshin Pack (Mobile Phone Security Package), you can use Omakase Lock within the flat-rate fee of Keitai Anshin Pack (Mobile Phone Security Package).※Even during Omakase Lock, your FOMA terminal corresponds to the location provision request of GPS function if “Location request set.” is set for permission.≥For details on Omakase Lock, refer to “Mobile Phone User’s Guide [i-mode] FOMA version”.<Omakase Lock>Using Omakase Lock■Setting/Releasing Omakase Lock0120-524-360 Business hours: 24 hours※You can set/release also from My docomo site via a personal computer or other devices. “Omakase lock” is displayed on the Stand-by display and Omakase Lock is set.≥During Omakase Lock, all the key operations are locked and respective functions (including IC card functions) are disabled, except for answering voice calls/videophone calls, putting them on answer-hold (On Hold), turning on/off the power, adjusting the earpiece volume and adjusting the ring volume.≥You can receive voice calls and videophone calls (except PushTalk calls), but the callers’ data such as names and images stored in the Phonebook are not displayed except for their phone numbers. In addition, the ring image and ring tone are reset to the default. When you release Omakase Lock, the former settings return.≥Mail messages received during Omakase Lock are held at the i-mode Center.≥You can turn on/off the power, however, Omakase Lock is not released by turning off the power.≥GPS Location Provision is available even during Omakase Lock.≥Note that neither the UIM nor the microSD card is locked.If Omakase Lock startsInformation≥Even while another function is working, Omakase Lock applies after finishing that function.≥Omakase Lock can be set even when another lock function is set. However, if you have set Public Mode (Drive Mode) before setting Omakase Lock, you cannot receive voice calls and videophone calls.≥Omakase Lock cannot be set when the FOMA terminal is out of the service area, turned off, or during Self Mode. Besides Omakase Lock might not be set depending on your use, etc.≥When you have signed up for Dual Network Service and are using the mova phone, Omakase Lock cannot be set.≥Even when the contractor and the user of the FOMA terminal differ, the FOMA terminal will be locked if the contractor offers to DOCOMO.≥You can release Omakase Lock only when the UIM of the same phone number at locking is inserted in your FOMA terminal. If you cannot release it, contact “docomo Information Center” on the back page of this manual.](https://usermanual.wiki/Panasonic-Connect/208012A.User-Manual-Part-1/User-Guide-1045203-Page-127.png)

![136Security SettingsYou can reject voice calls, videophone calls, and PushTalk calls from the party whose phone number is not stored in the Phonebook. This function is valid only when the other party notifies his/her phone number. It is advisable to activate “Caller ID request” and “Call setting w/o ID” simultaneously.1m1Set./Service1Lock/Security1Reject unknown1Enter your Terminal Security Code1Accept or Reject<Reject Unknown>Rejecting Incoming Calls from Phone Numbers which are not Stored in PhonebooksInformation≥If a call comes in from the party whose phone number is stored as secret data, the call is not rejected, regardless of this setting.≥If you simultaneously activate “Reject unknown” and “Call acceptance” of “Restrictions”, the latter has priority.≥When a call comes in from anyone whose phone number is not stored in the Phonebook while you set this function to “Reject”, the call is stored in “Received calls” as a missed call record, and the “Missed call” icon appears on the Stand-by display. Also, the caller hears a busy tone even if you have set Voice Mail Service or Call Forwarding Service to “Activate”. However, if you set the ring time for Voice Mail Service or Call Forwarding Service to 0 seconds, when the FOMA terminal is out of the service area, or when the power is turned off, the busy tone will not be played back, activating Voice Mail Service or Call Forwarding Service.≥Even when this function is set to “Reject”, the FOMA terminal follows the setting of “Call setting w/o ID” if each setting of “Call setting w/o ID” is set to “Accept”.≥You can receive SMS and i-mode mail messages regardless of this setting.≥You cannot set “Reject unknown” during Personal Data Lock.≥You cannot set “Reject unknown” to “Reject” while “Ring start time” of “Ring time” is set to “ON”.This service enables you to save the Phonebook, images, mail messages, ToruCa files※, and schedule events※ (hereafter, “saved data files”) in your FOMA terminal to the DOCOMO’s Data Storage Center and to restore them when you unexpectedly lose your handset or change models. Further, you can notify the concerned parties of your mail address change at a time. You are not charged a packet communication fee for sending the multi-address notice mail. If you have a personal computer (My docomo), you can use this service more conveniently.※You need to subscribe to i-concier to save the ToruCa files and schedule events to the Center. (As of December 2008)≥For details on Data Security Service, refer to “Mobile Phone User’s Guide [i-mode] FOMA version”.≥Data Security Service is a pay service that is available on a subscription basis (You need to subscribe to i-mode to apply for Data Security Service).1Display of the data file to be saved1i()1Move/copy1Connect to Center or Store in Center1Enter your Terminal Security Code1YES≥You do not need to select “Move/copy” depending on the function.≥When you operate from the Inbox list, Outbox list, Draft list, or Still Image list, put a check mark for the data files to be saved and press l().You can select up to 10 data files.<Data Security Service>Using Data Security ServiceSave to Data Storage CenterInformation≥You cannot save the data files stored on the UIM or microSD card.≥You cannot save the files attached to mail.≥You cannot save the following images:・Images whose sizes exceed 100 Kbytes・Images whose output from the FOMA terminal is prohibited・Images other than in JPEG or GIF format](https://usermanual.wiki/Panasonic-Connect/208012A.User-Manual-Part-1/User-Guide-1045203-Page-138.png)
![140Security SettingsBesides introduced in this chapter, the following functions/services for the Security Settings are available:Other Security SettingsFunctions/Service name If you wantReference pageIC Card Lock To protect the IC card function from being used illegally 316Nuisance Call Blocking Service To prevent crank calls or vicious sales calls from incoming 445Caller ID Request To prevent the incoming call that does not notify a caller ID 446FirstPass To ensure safe and reliable data communication by using electronic authentication services※Limited to FirstPass sites206Software Update To update software programs in the FOMA terminal when necessary 523Scanning Function To protect the FOMA terminal from data liable to cause trouble 529Receive Option To receive necessary mail only from among the large volume of incoming mail156i-mode Disaster Message Board ServiceRefer to “Mobile Phone User’s Guide [i-mode] FOMA version”Change Mail AddressSpam Mail Prevention (Reject Mail with URL)(Reject/Receive Mail Settings)(Easy Mail Setting)(Reject Mass i-mode Mail Senders)(SMS Rejection Settings)(Reject Unsolicited Ad Mail※)(Confirm Settings)Suspend/reactivate MailLimit Mail SizeKeitai-Osagashi Serviceイマドコかんたんサーチ (imadoco kantan search)Functions/Service name If you wantReference pageInformation≥The priority order of functions simultaneously set to prevent nuisance calls is as follows: “Nuisance Call Blocking Service” → “Call rejection” → “Reject unknown/Call setting w/o ID” → “Ring time”.](https://usermanual.wiki/Panasonic-Connect/208012A.User-Manual-Part-1/User-Guide-1045203-Page-142.png)
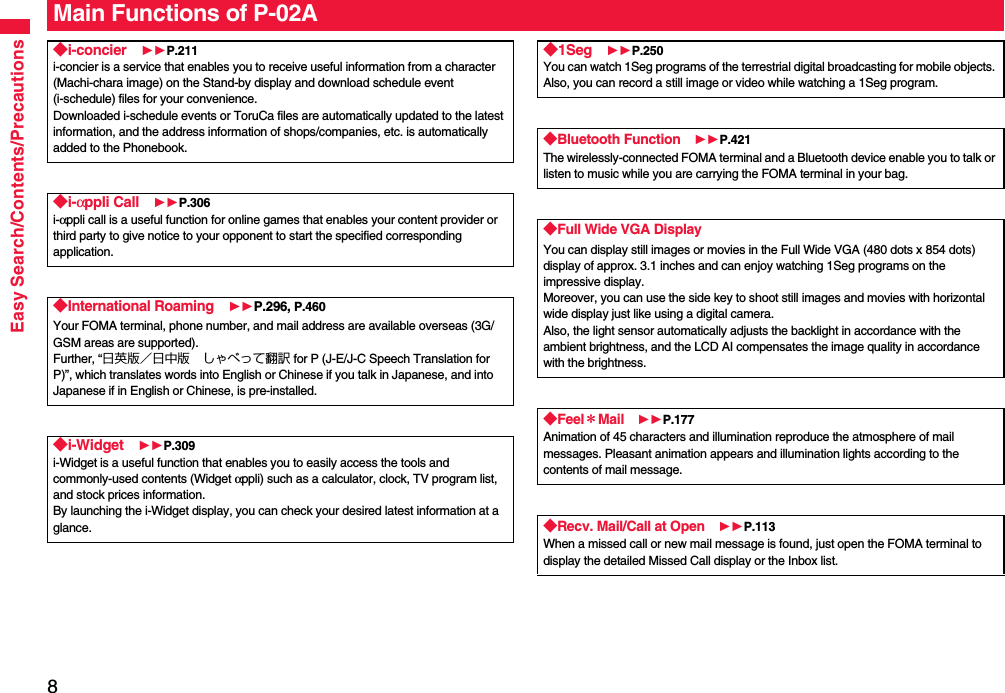
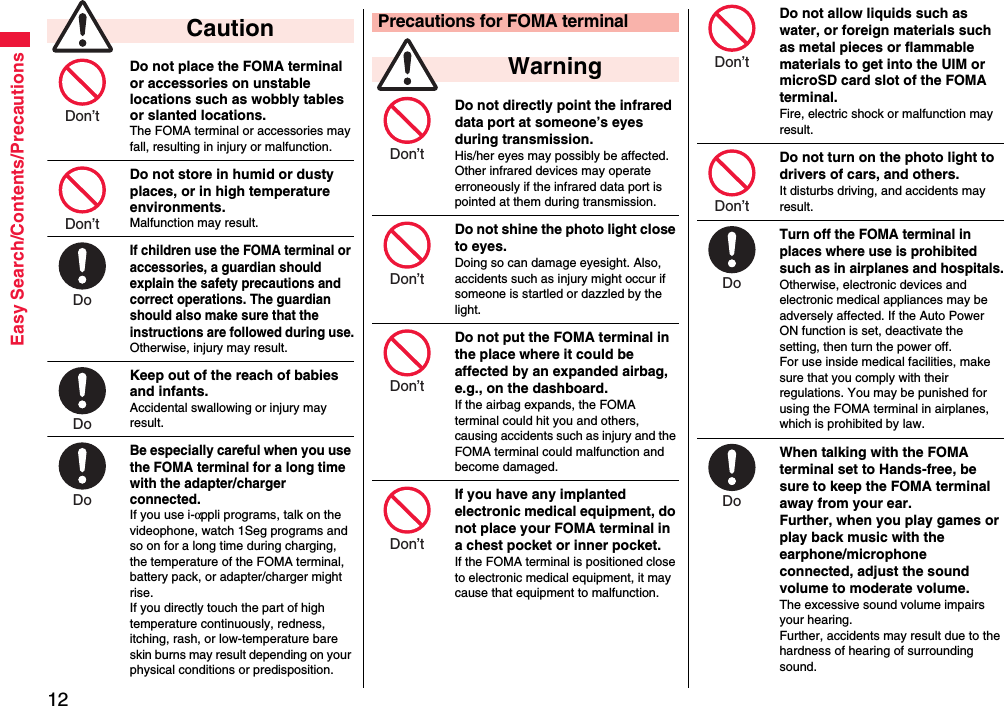
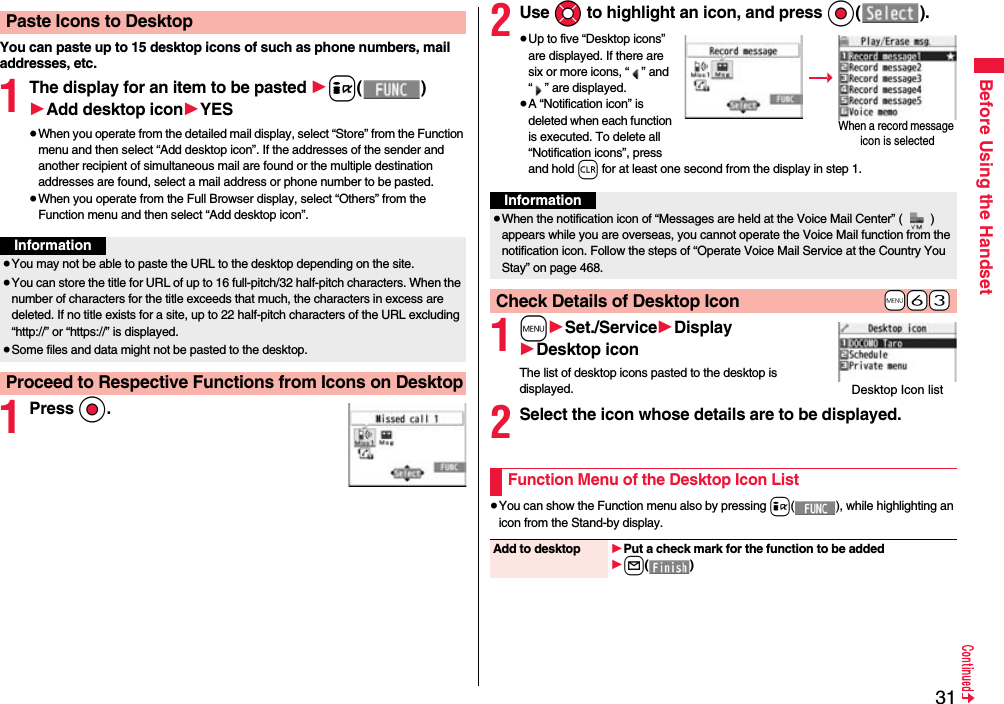
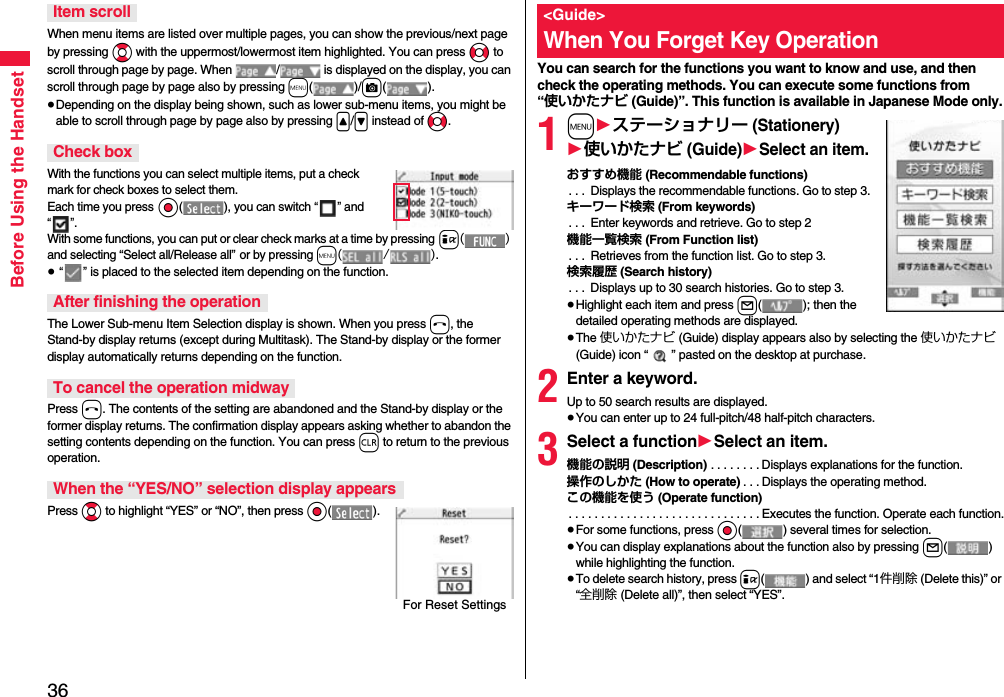
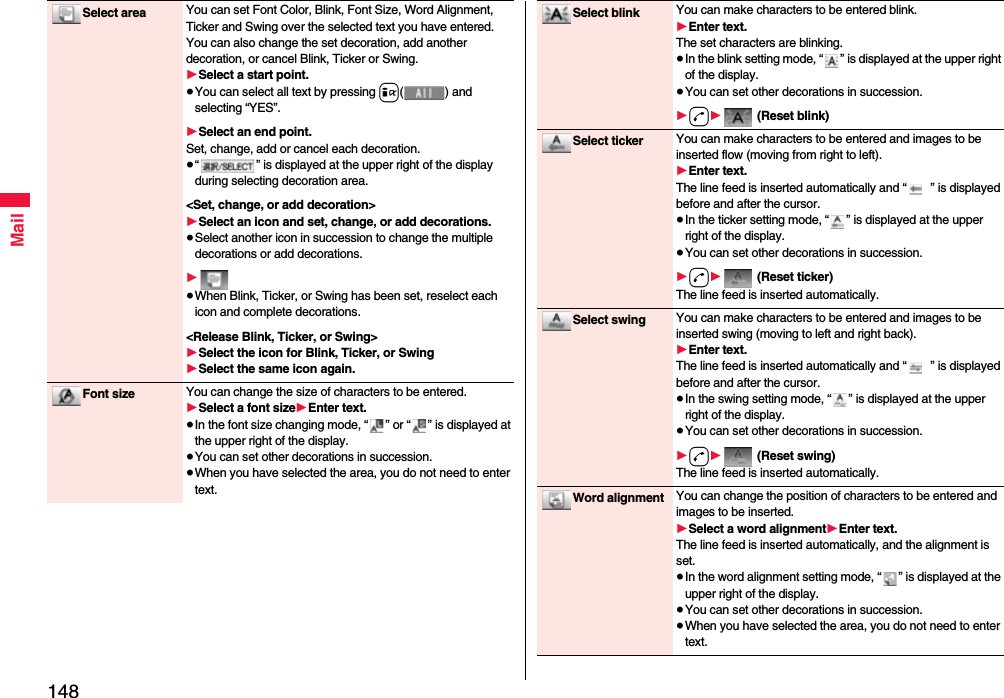
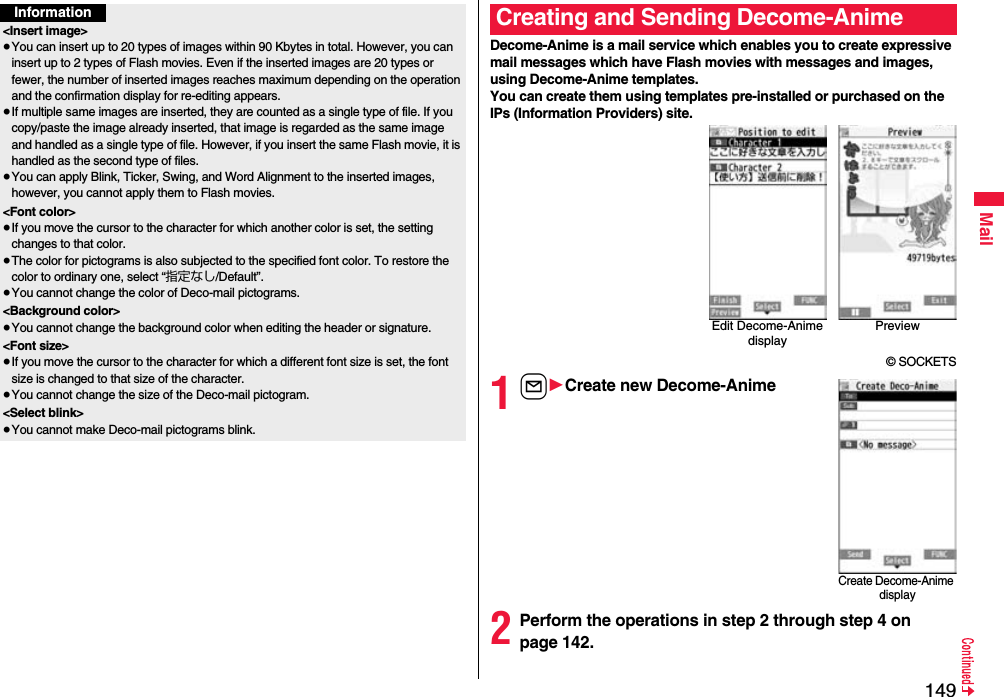
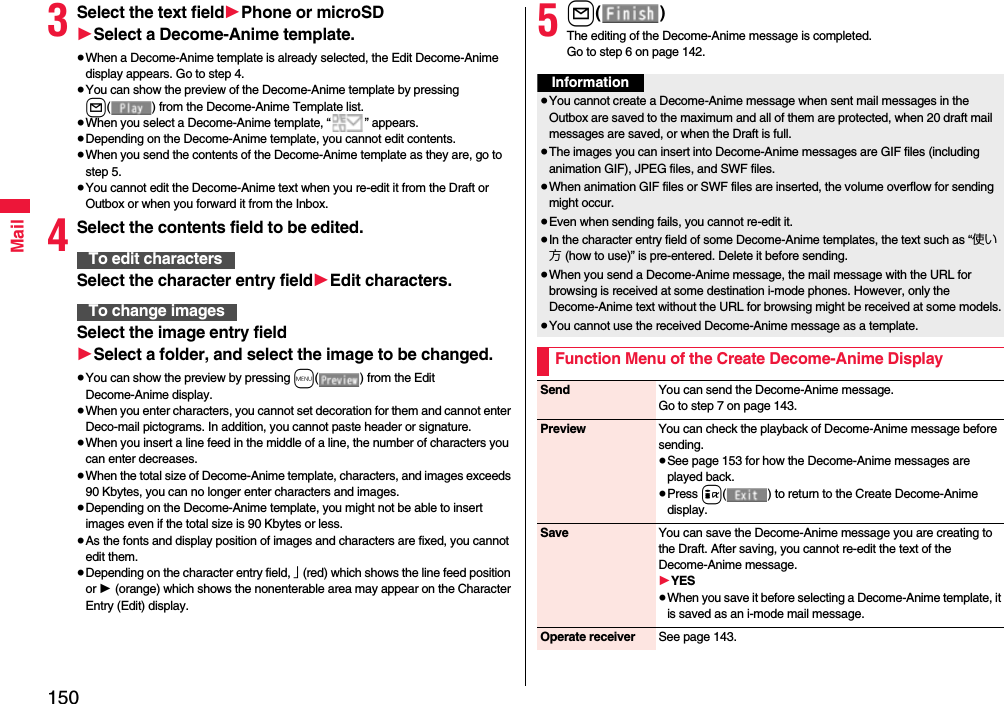
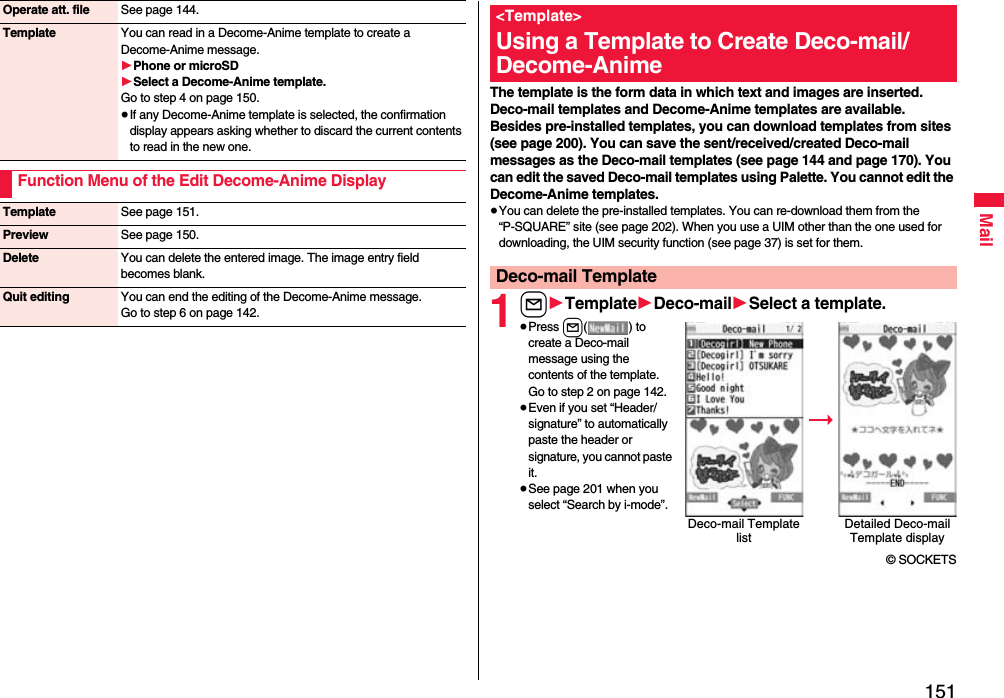
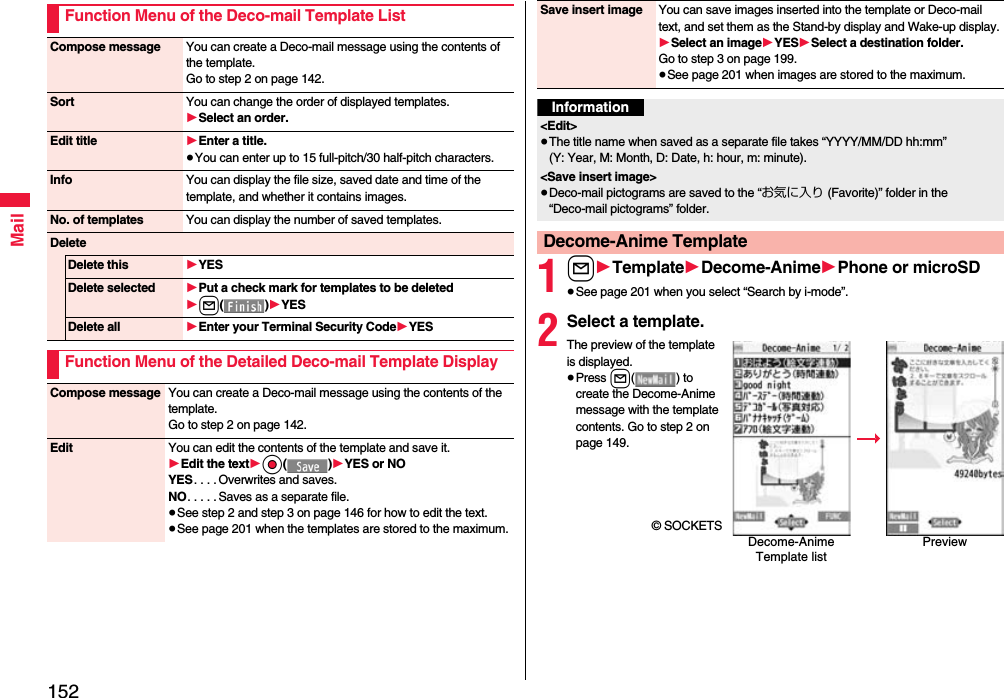
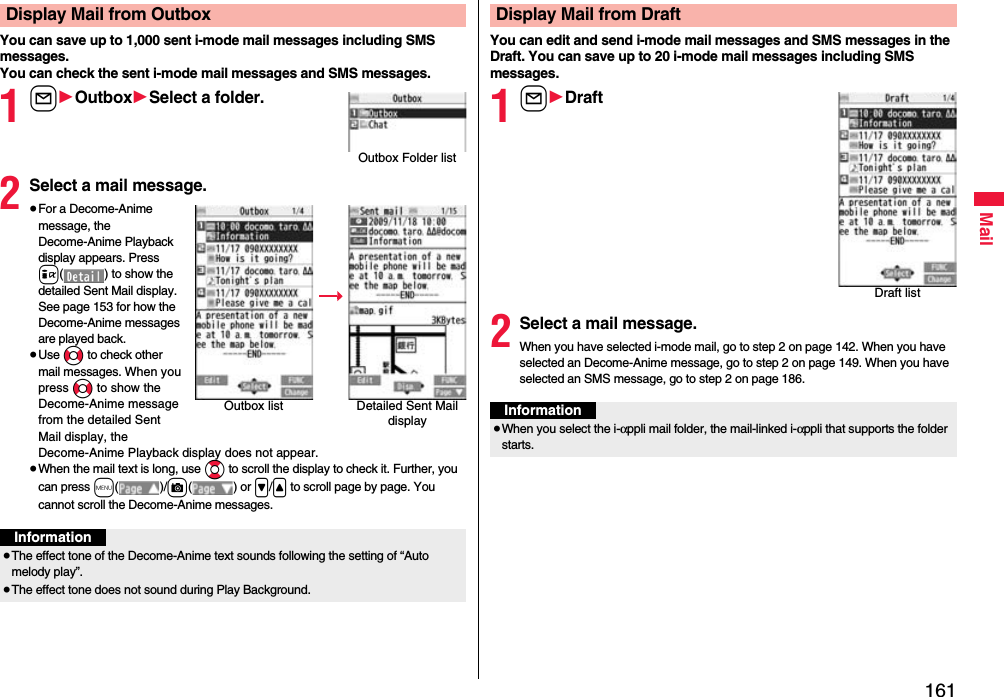
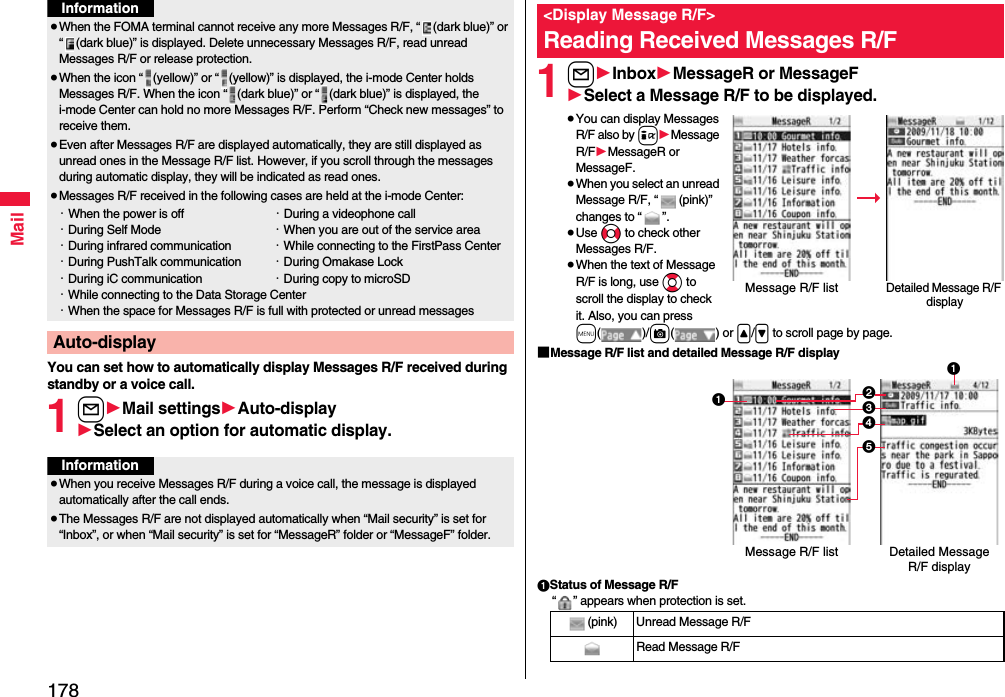
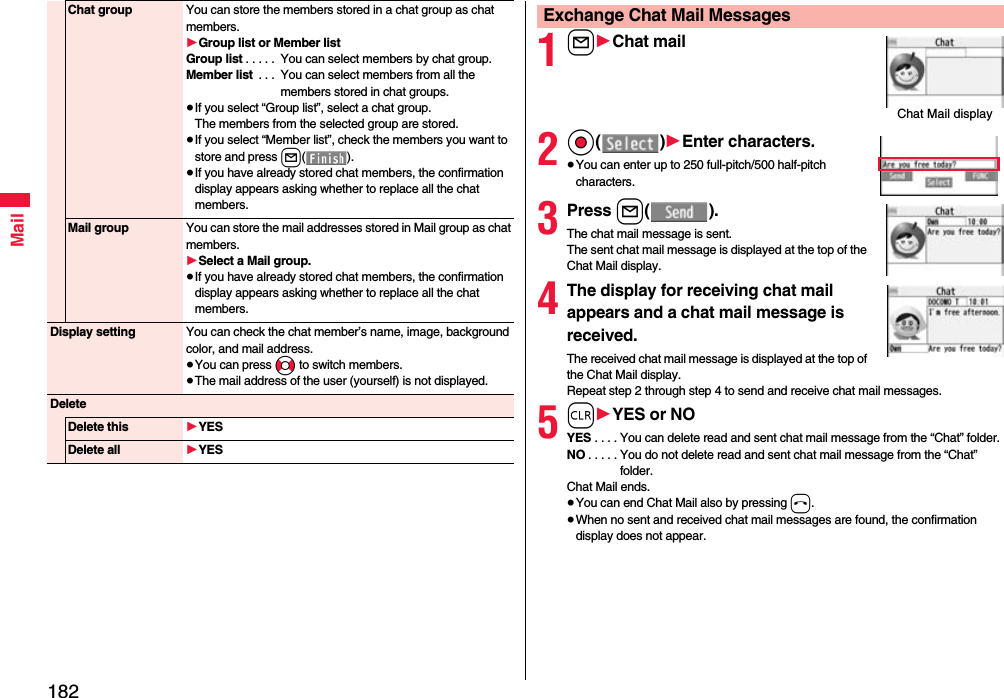
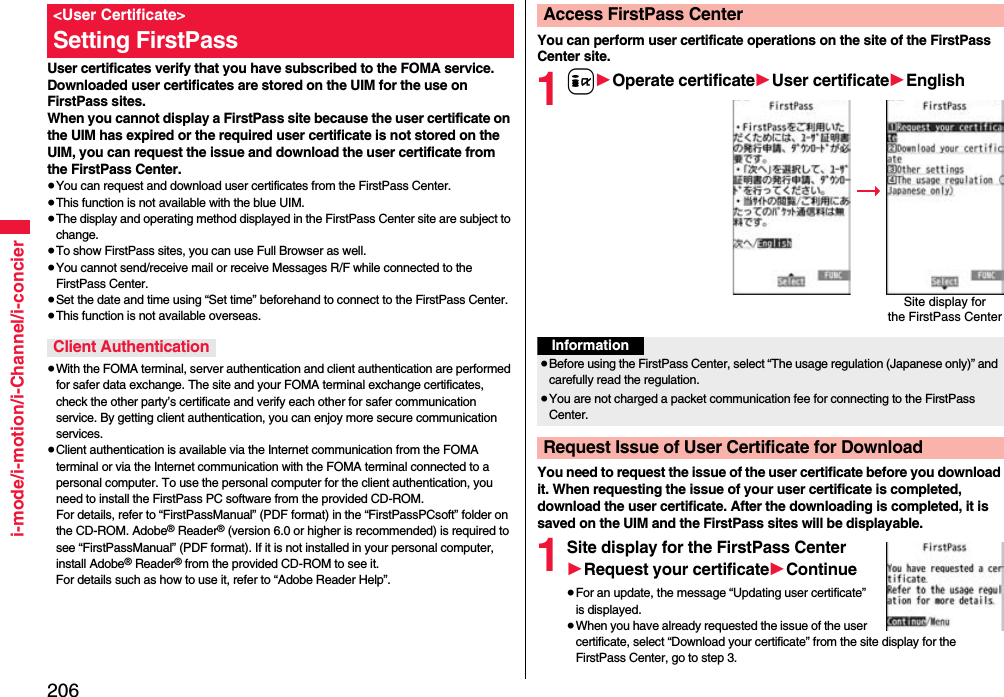
![142MailOnce you subscribe to i-mode, you can exchange e-mails over the Internet as well as among i-mode phones.You can attach files (photos, movie files, etc.) within 2 Mbytes in total (up to 10 files) besides mail text. The i-mode mail also supports Deco-mail, so you can change the font color, font size, and background color of mail text. Further, you can use the Deco-mail pictograms, so you can easily send expressive messages.≥For details on i-mode mail, refer to “Mobile Phone User’s Guide [i-mode] FOMA version”.You can compose and send i-mode mail messages.You can save up to 1,000 sent i-mode mail messages including SMS messages to the Outbox.See page 146 for creating a Deco-mail message.1l1l()i-mode Mail<Compose Message>Composing and Sending i-mode MailMessage Composition displayAddress fieldSubject fieldText field(When you enter text, the number of bytes is displayed.)Attachment field2Select the address field1Select an item.Phonebook. . . . . . . . . Call up a Phonebook entry and select a phone number or mail address.Sent address . . . . . . . Select a phone number or mail address and press Oo().Received address . . . Select a phone number or mail address and press Oo().Mail group . . . . . . . . . Select a mail group.Enter address . . . . . . Enter a mail address or phone number.≥You can enter up to 50 half-pitch characters.≥If the destination is an i-mode phone, you can send mail also by entering only the part preceding the “@” mark of a mail address.≥See page 143 for sending to multiple destination addresses.≥See page 144 for deleting an added address.3Select the subject field1Enter a subject.≥You can enter up to 100 full-pitch/200 half-pitch characters.4Select the attachment field1Select an item.≥See page 153 for how to select an attachment.5Select the text field1Enter text.≥You can enter up to 5,000 full-pitch/10,000 half-pitch characters.≥See page 144 for pasting a header or signature.6Press l().The animation display during transmission appears and the mail message is sent.≥To cancel sending midway, press Oo( ) or press and hold r(for at least one second). However, the mail message might be sent depending on the timing.Message Entry display](https://usermanual.wiki/Panasonic-Connect/208012A.User-Manual-Part-1/User-Guide-1045203-Page-144.png)

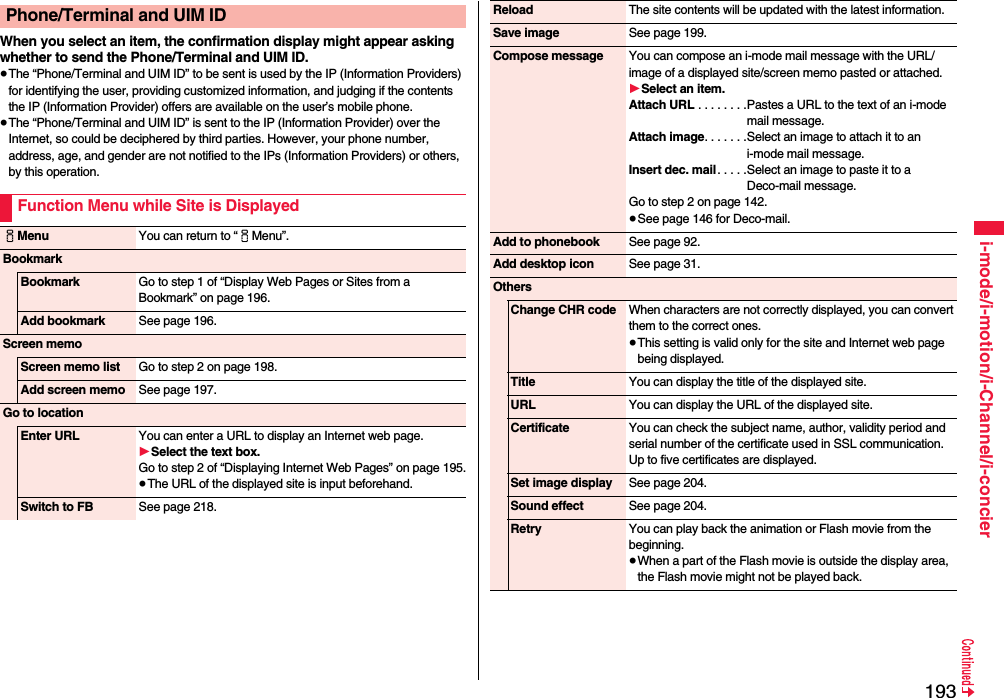
![156Mail1Reception Result display1Mail1Select an i-mode mail message to be displayed.≥For a Decome-Anime message, the Decome-Anime Playback display appears. Press i( ) to show the detailed display.≥Press and hold No for at least one second from the detailed i-mode mail display to change the size of characters. (See “Mail” on page 119.)Display Newly Received i-mode MailInformation≥Undisplayable characters are replaced by spaces, etc.≥When the number of characters in the text of received i-mode mail exceeds the maximum, “/” or “//” is inserted at the end of the text and the excess part is deleted automatically.≥The still image automatically displayed at opening might not be correctly displayed. When the image is larger than the screen size, it is displayed shrunk with a proportional ratio retained.≥Some decorations inserted into the decorated mail (HTML mail) sent from a personal computer might not be displayed correctly.You can check the titles of i-mode mail messages held at the i-mode Center and select them to receive, or delete them at the Center before receiving.To use this function, set “Receive option setting” to “ON” beforehand.When “Receive option setting” is set to “ON”, you cannot receive i-mode mail messages automatically. When a mail message comes in the i-mode Center, “ ” is displayed.You can set whether to select and receive necessary i-mode mail only.1l1Mail settings1Receive option setting1ON or OFF1l1Receive option1Operate following the procedure described in “Mobile Phone User’s Guide [i-mode] FOMA version”.≥When “Receive option setting” is set to “OFF”, the display to the effect that it will be set to “ON” appears.Press Oo( ) to set “Receive option setting”.≥You can show the Receive Option display also by i1iMenu1メニューリスト (Menu List)1メール選択受信 (Receive Option).<Receive Option>Receiving i-mode Mail SelectivelyReceive Option SettingSelect and Receive Mail MessagesInformation≥Even when Receive Option Setting is set to “ON”, you will still receive all mail messages if you execute “Check new messages”. If you do not want to receive all mail messages, remove a check mark from “Mail”. (See page 175)≥When you show the Receive Option display, the “ ” icon goes off. Also, the “ ” icon goes off if you turn the power off or show the mail display.≥You cannot select SMS messages for receiving.](https://usermanual.wiki/Panasonic-Connect/208012A.User-Manual-Part-1/User-Guide-1045203-Page-158.png)
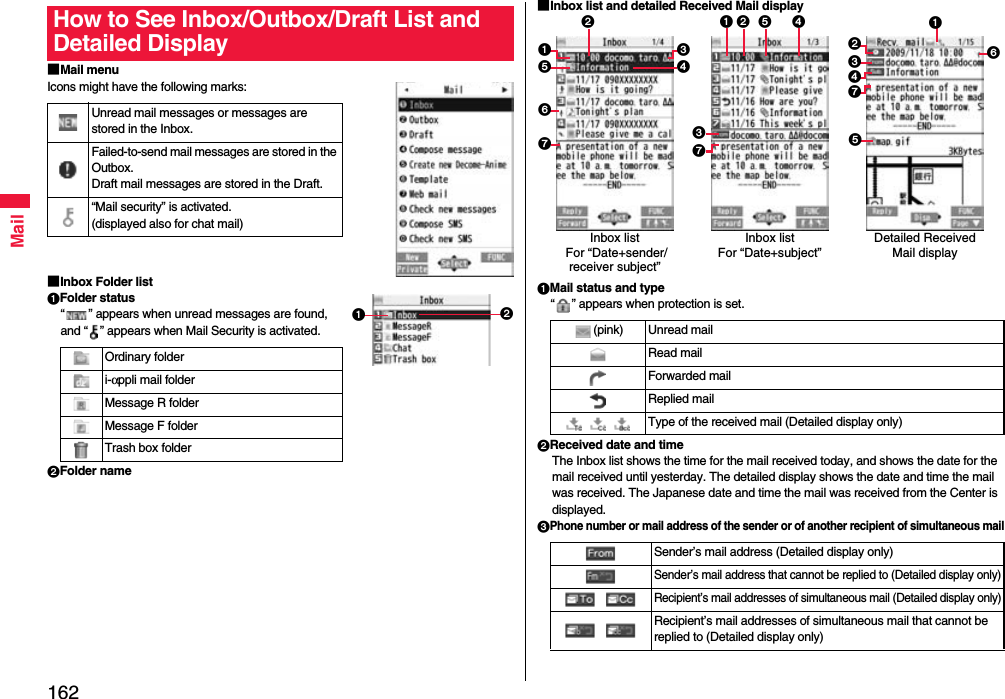

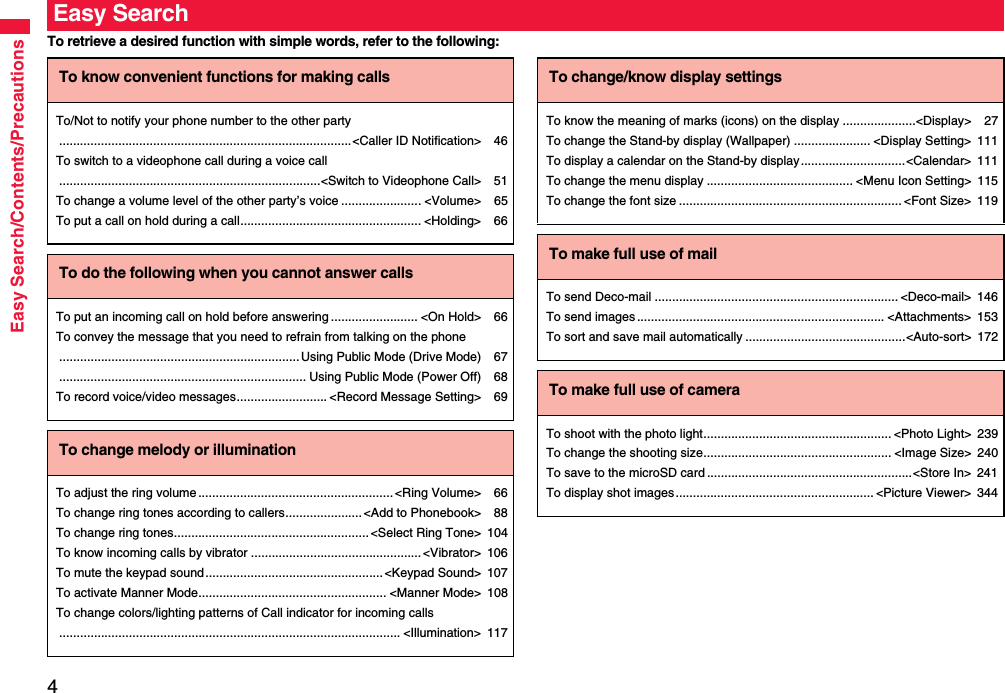
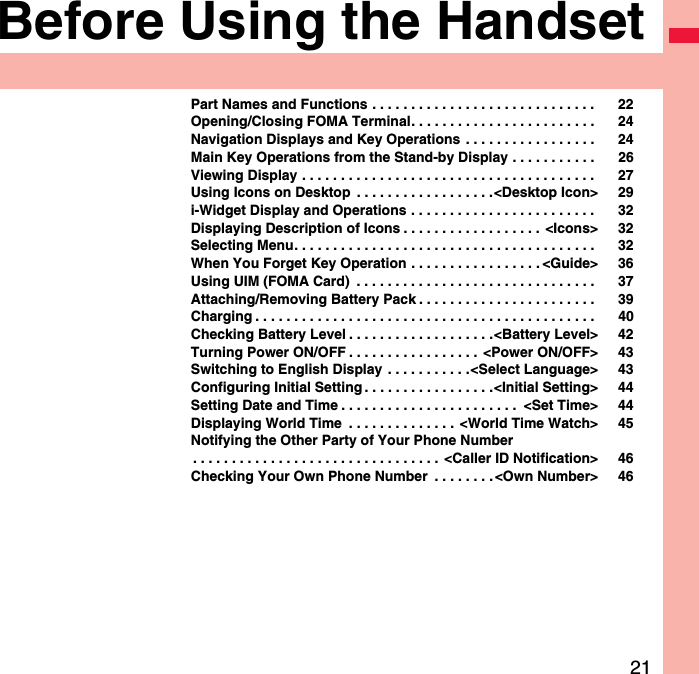
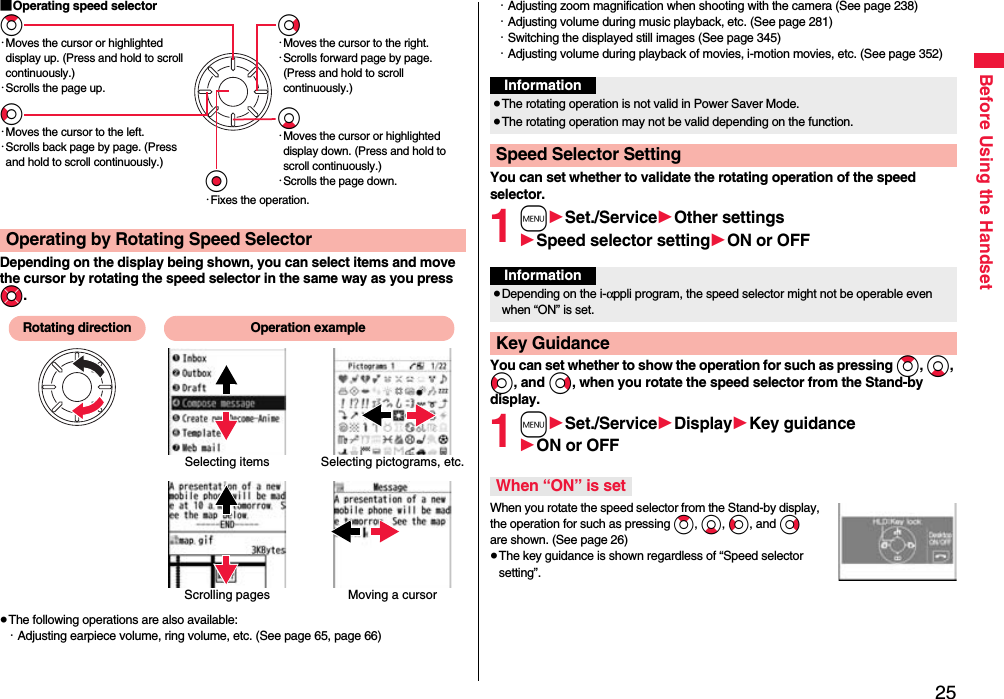
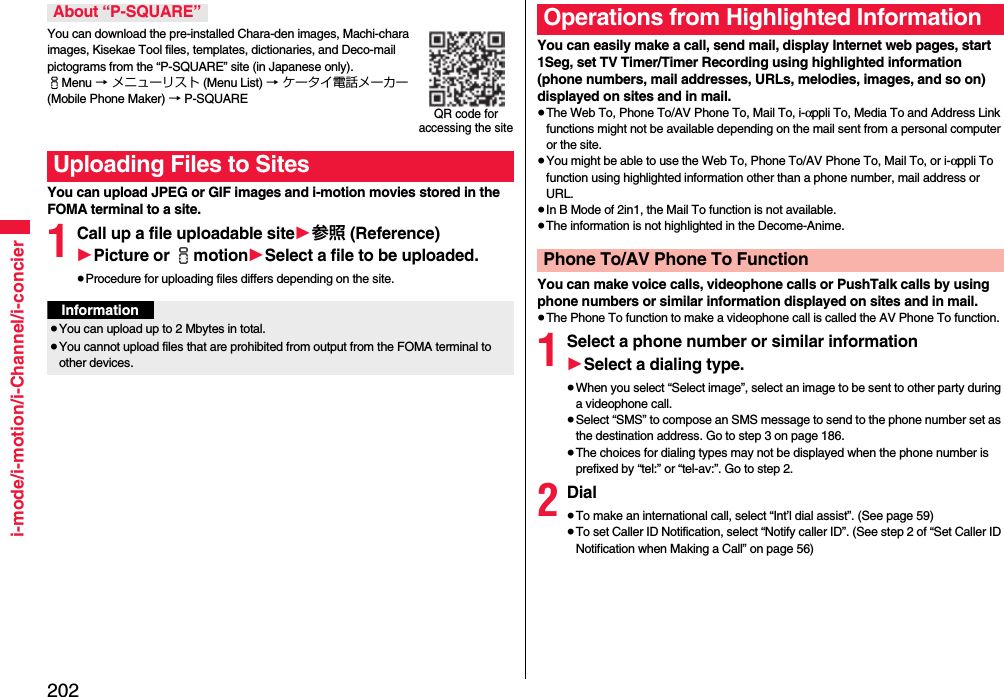
![164Mail■Outbox list and detailed Sent Mail display1Mail status“ ” appears when protection is set.2Sent date and timeThe Outbox list shows the time for the mail sent today, and shows the date for the mail sent until yesterday. The detailed display shows the date and time the mail was sent. “ ” appears when the date/time is corrected.3Recipient’s phone number or mail address(pink) Mail successfully sentMail failed to be sentSimultaneous mail successfully sent to all addresses(gray) Simultaneous mail sent to some addresses(pink) Simultaneous mail failed to be sent to all addresses Mail address successfully sent (Detailed display only) Mail address failed to be sent (Detailed display only)643251Outbox listFor “Date+sender/receiver subject”21 5 436Outbox listFor “Date+subject”153426Detailed Sent Mail display4SubjectThe number of characters you can display on the list varies depending on the setting of “Mail list display”, and “Mail” of “Font size”. When a file is attached, it is decreases by 1 full-pitch/2 half-pitch character/s as the icon is added at the top.For SMS messages, the beginning of the text is displayed. (“SMS” is displayed on the detailed display.)5Attached dataThe detailed display shows the data volume as well.<For Outbox list (Date+sender/receiver subject) and detailed Sent Mail display>“ ” is added to each icon when you execute “Delete att. file” (Detailed display only).<For Outbox list (Date+subject) (Date+sender/receiver)>6Text of mail(blue) SMS messages in the FOMA terminalSMS messages on the UIMSMS report received [List (Date+sender/receiver subject) and detailed display only]Melody fileImage fileInserted image file (List only)i-motion movie filePC movie fileToruCa filePDF fileDocument filePhonebook entry fileSchedule event or ToDo item fileBookmark fileOther filesi-αppli mail (List only)Multiple files (List only)File with the UIM securityAttached filei-αppli mailFile with the UIM security](https://usermanual.wiki/Panasonic-Connect/208012A.User-Manual-Part-1/User-Guide-1045203-Page-166.png)
![166MailManaging Mail MessagesFunction Menu of the Inbox Folder List/Outbox Folder ListOperate folderAdd folder You can add a new folder. You can add up to 22 folders to each of “Inbox” and “Outbox”.1Enter a folder name.≥You can enter up to 10 full-pitch/20 half-pitch characters.Edit folder name You can edit the names of the added folders only.1Edit the folder name.≥You can enter up to 10 full-pitch/20 half-pitch characters.Sort folder You can sort folders. You can sort the added folders, Message R/F folder, and the i-αppli mail folders.1Use Bo to sort the order1Oo()Delete folder All the mail messages including secret mail in the folder will be deleted as well.1Enter your Terminal Security Code1YESOpen folder You can display the mail messages in the i-αppli mail folder without running mail-linked i-αppli.Read all[Inbox Folder only]You can change unread mail in the folder to already-read mail.1YESSortRe-sort in this You can resort mail messages following the sorting conditions specified by “Auto-sort”.1YES≥When the folder is applied with Mail security (see page 166), you need to enter your Terminal Security Code.Re-sort in all You can resort mail messages in all Inbox/Outbox folders following the sorting conditions specified by “Auto-sort”.1YES≥When the folder applied with Mail security (see page 166) is found, you need to enter your Terminal Security Code.Auto-sort See page 172.Mail security You can set the folder to open only when you enter your Terminal Security Code.1Enter your Terminal Security Code1YES≥To release it, perform the same operation.Ir/ transmissionSend all Ir data See page 385.All transmission See page 387.No. of messages You can display the number of stored received mail messages, Messages R/F, and sent mail messages.DeleteDEL all read mails[Inbox Folder only]You can delete all the read mail messages including secret mail in all Inbox folders. All the read SMS messages on the UIM are deleted as well.1Enter your Terminal Security Code1YESDEL all recv. mails[Inbox Folder only]You can delete all the mail messages including secret mail in all Inbox folders. All the received SMS messages on the UIM are deleted as well.1Enter your Terminal Security Code1YESDEL all sent mails[Outbox Folder only]You can delete all the mail messages including secret mail in all Outbox folders. All sent SMS messages on the UIM are deleted as well.1Enter your Terminal Security Code1YES](https://usermanual.wiki/Panasonic-Connect/208012A.User-Manual-Part-1/User-Guide-1045203-Page-168.png)
![167MailInformation<Delete folder>≥You cannot delete an i-αppli mail folder if corresponding mail-linked i-αppli exists.If the software program does not exist, you can delete the i-αppli mail folder, but this will delete both folders created in the Outbox Folder list and Inbox Folder list.<Re-sort in this> <Re-sort in all>≥You cannot re-sort the mail messages in the “Chat” folder and “Trash box” folder.≥Mail messages which are not applied to the sorting conditions are sorted into the “Inbox” or “Outbox” folder.<Mail security>≥You can neither delete the Mail-Security-activated folder nor edit its name.Function Menu of the Inbox List/Outbox List/Draft ListReply/forwardRep.w/ i-mode mail[Inbox only]See page 157.Rep. w/ Deco-Anime[Inbox only]See page 157.Reply with quote[Inbox only]See page 157.Forward[Inbox only]See page 158.Edit[Outbox only]You can re-edit the sent mail message and send it again.When you have selected an i-mode mail message, go to step 2 on page 142.When you have selected a Decome-Anime message, go to step 2 on page 149.When you have selected an SMS message, go to step 2 on page 186.ProtectProtect ON/OFF[Inbox/Outbox]You can protect the mail message so that it is not overwritten and deleted. You can protect all the received and sent messages. (2,500 received messages, 1,000 sent messages)The protected one is indicated by “ ”.≥To release protection, perform the same operation.≥You can switch between protected and unprotected also by pressing 1 from the detailed Received Mail display or detailed Sent Mail display.ProtectSLCT. ON/OFF[Inbox/Outbox]1Put/Remove a check mark for mail messages to be protected/unprotected1l()≥A check mark is placed to the mail already protected.Move/copyMove[Inbox/Outbox]1Select a destination folder1Put a check mark for mail messages to be moved1l()1YESMove to trash[Inbox only]You can move mail messages to the “Trash box” folder. The mail messages moved to the “Trash box” folder are preferentially overwritten (deleted).1Put a check mark for mail messages to be moved to the trash box1l()1YESUIM operation[Inbox/Outbox]You can copy or move the mail message to the UIM or FOMA terminal. (See page 419)Copy to microSD See page 370.Store in Center See page 136.Search/sortSearch mail](https://usermanual.wiki/Panasonic-Connect/208012A.User-Manual-Part-1/User-Guide-1045203-Page-169.png)
![168MailSearch sender/Search receiver[Inbox/Outbox]You can retrieve mail messages with a mail address or phone number of a sender or recipient.“Search sender” for received mail and “Search receiver” for sent mail are displayed respectively.1Select an item.Phonebook . . . . . . . . .Call up a Phonebook entry and select a phone number or mail address.Received address . . .Select a phone number or mail address and press Oo().Sent address . . . . . . .Select a phone number or mail address and press Oo().Enter address. . . . . . . Enter the mail address or phone number.≥You can enter up to 50 half-pitch characters.Search subject[Inbox/Outbox]You can retrieve mail messages with a subject.1Enter a subject.≥You can enter up to 100 full-pitch/200 half-pitch characters.Search subject+msg[Inbox/Outbox]You can retrieve mail messages with a subject or text.1Enter a part of a subject or text.≥You can enter up to 100 full-pitch/200 half-pitch characters.Sort[Inbox/Outbox]You can change the order of displayed mail messages.1Select an order.Filter[Inbox/Outbox]You can display the mail messages only that satisfy the condition.1Select a type.Display all[Inbox/Outbox]You can re-display all mail messages in “By date↑” order after using Search Mail, or the Sort or Filter function.Mail history[Inbox/Outbox]You can display the history of sent/received mail from the sender or to the recipient being selected or displayed. Up to 1,000 histories are displayed in the chronological order from the most recent one.1Select a sender’s or destination address.The target sent/received mail histories are displayed.. . . . .Sent mail. . . . .Received mail≥Select a history to show the detailed Received Mail display or detailed Sent Mail display. Press r to return to the former display.≥You can display also by pressing 7 on the detailed Received Mail display or detailed Sent Mail display.Color label[Inbox/Outbox]You can color the characters on the Inbox list and Outbox list for classifying mail. Select “Default” to set ordinary font color.1Select a color.List setting You can select the item to be displayed on the list. You can also switch between the name stored in the Phonebook and the mail address/phone number for the display in the sender’s/destination address field.You can set to list the mail messages by subject depending on the setting of “Mail list display”.1Select an item to be displayed.≥You can switch each time you press c() from the Outbox list and Draft list.Ir/ transmissionSend Ir data See page 384.Send all Ir data[Draft only]See page 385. transmission See page 387.All transmission[Draft only]See page 387.](https://usermanual.wiki/Panasonic-Connect/208012A.User-Manual-Part-1/User-Guide-1045203-Page-170.png)
![169MailNo. of messages You can display the number of stored received mail messages, sent mail messages and draft mail messages.DeleteDelete this 1YESDelete selected 1Put a check mark for mail messages to be deleted1l()1YESDelete read mails[Inbox only]You can delete all the read mail messages in the folder.1YESDelete all SMS-R[Inbox only]You can delete all the SMS reports. While SMS reports are displayed by the Search Mail function or Filter function, only the displayed SMS reports are deleted.1Enter your Terminal Security Code1YESDEL all frm folder[Inbox/Outbox]You can delete all mail messages in the folder.1Enter your Terminal Security Code1YESDelete all[Draft only]You can delete all the draft mail messages.1Enter your Terminal Security Code1YESInformation<Edit>≥To use “Mail group” for destination addresses, delete all the entered addresses, press +l( ) to complete the deletion, and then re-select the address field. <Protect>≥You cannot protect mail messages in the “Trash box” folder.≥If you protect all the sent messages which are stored to the maximum, you can no longer compose i-mode mail messages.<Move to trash>≥If you move unread mail to the Trash box, it changes to read mail.<Search subject> <Search subject+msg>≥Even if you set “No title”, you cannot search for the i-mode mail whose subject is not entered and displayed as “No title”.<Color label>≥Color Label applied to the mail messages is released when they are copied to the microSD card, copied/moved to the UIM, copied/moved from the UIM or sent via infrared rays or iC transmission.≥Color Label applied to the SMS messages on the UIM is released when the UIM is dismounted and then mounted.Function Menu of the Detailed Received Mail Display/Detailed Sent Mail DisplayInformationReply/forwardRep.w/ i-mode mail[Received Mail only]See page 157.Rep. w/ Deco-Anime[Received Mail only]See page 157.Reply with quote[Received Mail only]See page 157.Forward[Received Mail only]See page 158.Edit[Sent Mail only]See page 167.Resend[Sent Mail only]You can re-send the sent mail message.1YESProtect ON/OFF See page 167.Move/copyCopy 1Select an item to be copied.≥See page 436 for how to copy.≥When the addresses of the sender and another recipient of simultaneous mail are found or the multiple destination addresses are found, select a mail address or phone number to be copied.Move 1Select a destination folder.](https://usermanual.wiki/Panasonic-Connect/208012A.User-Manual-Part-1/User-Guide-1045203-Page-171.png)
![170MailMove to trash[Received Mail only]You can move the mail to the “Trash box” folder. The mail messages moved to the “Trash box” folder are preferentially overwritten (deleted).1YESUIM operation You can copy or move the mail to the UIM or FOMA terminal. (See page 419)Copy to microSD See page 370.Store in Center See page 136.Operate fileSave attached file See page 159.Save insert image See page 152.Save D-pictograms[Received Mail only]You can save Deco-mail pictograms in the mail text at once. You can save up to 20 of them.1YES≥See page 201 when the Deco-mail pictograms are stored to the maximum.≥See page 344 for how to check the stored Deco-mail pictograms.Save as template You can save the sent/received Deco-mail message as a template.1YES≥See page 201 when the templates are stored to the maximum.≥See page 151 for how to check the stored template.Property You can display the file name and file size of the image inserted into the text.1Select an image.Delete att. file 1YESStoreStore address See page 92.Add to phonebook See page 92.Auto-sort You can store a sender or subject as a sort condition. (See page 172)Add desktop icon See page 31.Mail history See page 168.Color label See page 168.DisplayName/address You can display the sender’s/destination address by the name stored in the Phonebook or by the mail address/phone number.≥You can switch also by pressing 5.Scroll See page 175.Font size See “Mail” on page 119.Display SMS report[Sent Mail only]You can check the result of the SMS message you sent, or the date and time it arrived at the destination. To receive the SMS report, set “SMS report request” to “ON”.Ir/ transmissionSend Ir data See page 384. transmission See page 387.Delete 1YES≥You can delete the mail message also by pressing 0.Information<Resend>≥If you re-send a failed-to-send mail message, it is saved as the sent mail message. If you re-send the failed-to-send simultaneous message to all addresses, it is saved as the sent mail message.](https://usermanual.wiki/Panasonic-Connect/208012A.User-Manual-Part-1/User-Guide-1045203-Page-172.png)
![172MailYou can automatically save the mail messages that satisfy the set conditions to the specified folder. This function applies to only the added folders and i-αppli mail folders.1Inbox Folder list/Outbox Folder list1i()1Sort1Auto-sortFollow the operation of the Function menu list on page 173 to set “Auto-sort”.If you select a folder for which Auto-sort conditions have been set, the Auto-sort Setting display appears.Feel*Mail[Received Address only]The Feel*Mail image is played back. See page 177 for Feel*Mail.≥You can play back the Feel*mail image also by pressing c().Font size You can switch the font sizes for Redial, Dialed Calls, Received Calls, Sent Address, and Received Address. (See “Dialed/recv. calls” on page 120)Redial/Dialed calls[Sent Address only]You can display the Redial list or the Dialed Call list.Received calls[Received Address only]You can display the Received Call list. All received calls (all calls) are displayed.Add desktop icon See page 31.DeleteDelete this 1YESDelete selected 1Put a check mark for records to be deleted1l()1YESDelete all 1Enter your Terminal Security Code1YES<Auto-sort>Sorting Mail Automatically to Each FolderYou can specify a sort condition and folder from the detailed Sent/Received Mail display.1Detailed Sent Mail display/Detailed Received Mail display1i()1Store1Auto-sort1Do the following operations.The confirmation display appears asking whether to change the condition or to overwrite it. Select “YES” to release the set condition and set the new one.The confirmation display appears asking whether to change the condition. Select “YES” to release the condition set for another folder and to set it for the selected folder.≥You cannot change the setting for a Mail-Security-activated folder.The confirmation display appears asking whether to add the address.Auto-sort StoringAddress sort You can set the displayed sender’s/recipient’s address for a sorting condition.1Select a folder.≥When multiple addresses are found, select an address.Subject sort You can edit the displayed subject and set it for a sorting condition.1Edit the subject1Select a folder.To change the conditionWhen the same condition is set for another folderWhen storing another address for the folder set for “Address sort”Information≥You can store a total of 700 addresses in all folders.](https://usermanual.wiki/Panasonic-Connect/208012A.User-Manual-Part-1/User-Guide-1045203-Page-174.png)

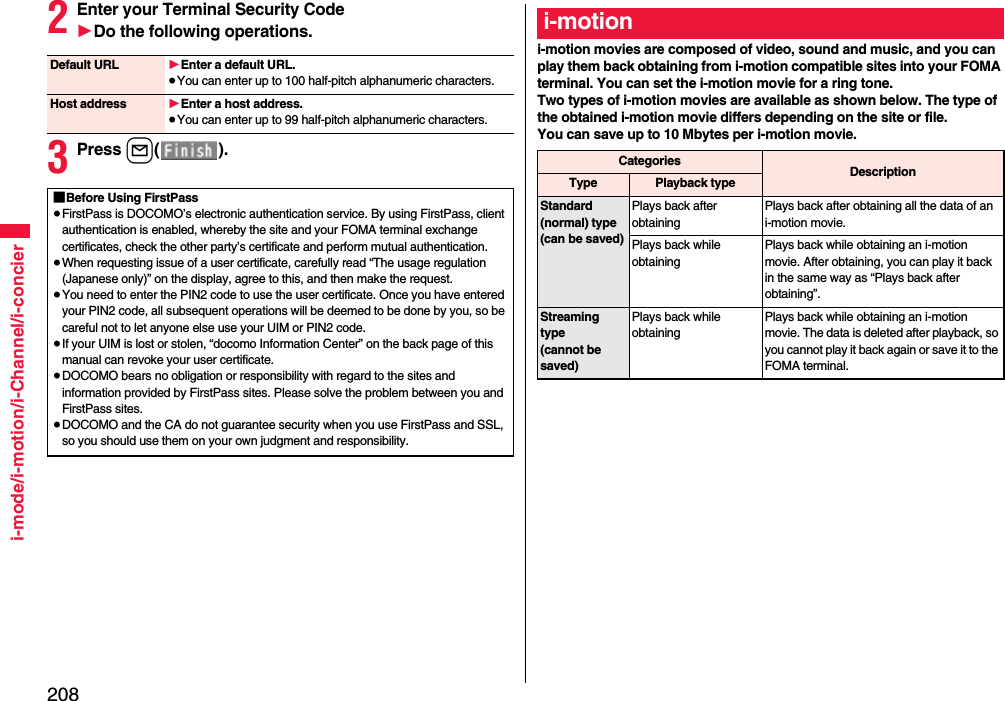
![188MailYou can set whether to request an SMS report for when sending an SMS message.The SMS report lets you know that your SMS message was delivered to the destination.You can check received SMS reports in the “Inbox” folder.1l1SMS settings1SMS report request1ON or OFF≥When you operate from the Function menu of the SMS Composition display, the setting is effective only for the SMS message you are composing.You can set the period that the SMS Center holds an SMS message sent but unsuccessfully delivered due to the out-of-service area, etc.1l1SMS settings1SMS validity period1Select a holding period.≥If you select “None”, the stored SMS message is re-sent after a certain period of time and deleted from the SMS Center.≥When you operate from the Function menu of the SMS Composition display, the setting is effective only for the SMS message you are composing.≥When “ (dark blue)” or “ (dark blue)”, etc. are displayed, you cannot receive any more SMS messages. Delete unnecessary mail, read unread mail, or release protection. (Read and unprotected messages are automatically deleted from the oldest one.)≥You cannot use this function to receive i-mode mail or Messages R/F. Use “Check new messages” to receive i-mode mail or Messages R/F.<SMS Settings>Setting SMSSMS Report RequestInformationSMS Validity PeriodYou can set the characters you can enter into the text of SMS messages. You can set to enter only half-pitch alphanumeric characters and half-pitch symbols.1l1SMS settings1SMS input character1Select an item.Japanese (70char.) . . . You can enter full-pitch and half-pitch characters. You cannot enter pictograms except “ ” and “ ” (see page 496). You can enter up to 70 characters for the text.English (160char.). . . . You can enter only half-pitch alphanumeric characters and half-pitch symbols. You can enter up to 160 characters for the text.≥When you operate from the Function menu of the SMS Composition display, the setting is effective only for the SMS message you are composing.You can set the address and “Type of number” for the SMS Center. This setting is for getting any service other than SMS Service you currently use.1l1SMS settings1SMS center selection1User setting1Enter an address1International or Unknown≥You can enter up to 20 half-pitch characters for the address. However, if “#” or “:” is included, you cannot set it for “International”.≥You can reset User Setting to “DOCOMO” by Reset1Enter your Terminal Security Code1YES.You can send mail messages or browse received mail messages on the i-mode site.≥You can use only in B Mode or Dual Mode of 2in1.≥For details on Web mail, refer to “Mobile Phone User’s Guide [2in1]”.1l1Web mail1Operate following the instructions on the display.SMS Input CharacterSMS Center Selection※Normally, you do not need to change this setting.<Web Mail>Using Web Mail](https://usermanual.wiki/Panasonic-Connect/208012A.User-Manual-Part-1/User-Guide-1045203-Page-190.png)

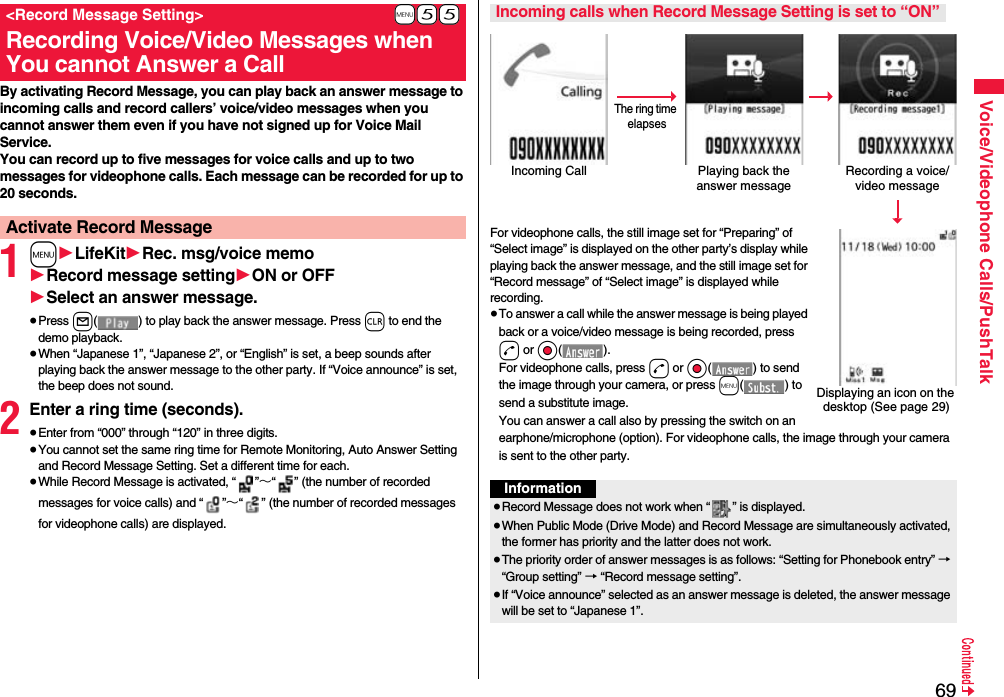
![190i-mode/i-motion/i-Channel/i-concieri-mode is the service that makes use of the display of the FOMA terminal supporting i-mode (i-mode phone) to enable you to use online services such as site (program) access, Internet access, and i-mode mail.≥i-mode is a pay service that is available on a subscription basis.≥For details on i-mode, refer to “Mobile Phone User’s Guide [i-mode] FOMA version”.i-mode■Before Using i-mode≥Contents of sites (programs) and web pages (Internet web pages) are generally protected by copyrights law. Data such as text and images that you obtained to the i-mode phone from sites (programs) and Internet web pages can be used for personal entertainment but cannot be used in whole or in part, as it is or after modification, for commercial purposes or sent as e-mail attachments or output from your i-mode phone to other devices, unless you have permission from the copyright holders.≥If you replace the UIM with another one or turn on the power with the UIM not inserted, you cannot display/play back files depending on the model, such as still images/movies/melodies obtained from sites, attached files (still images/movies/melodies and other files) sent/received by mail, screen memos, or Messages R/F.≥When the file whose display and/or playback is restricted by the UIM is set for the Stand-by display or specified ring tone, the FOMA terminal works with the default contents when you replace the existing UIM with new one or turn on the power with the UIM not inserted.You can use a variety of services offered by IPs (Information Providers). From the display of the FOMA terminal, you can check your bank balance, reserve tickets, and do similar tasks. (IPs offer different types of services. Some of them need to be applied for separately.)1i1iMenuWhile you are online, “ ” blinks.≥“ ” blinks while you are using the i-mode service (during i-mode standby).≥To cancel during the connection, select “Cancel”. To cancel while obtaining a page, press l().≥To end i-mode, press h and select “YES” while the site is displayed. “ ” goes off and i-mode ends. It may take longer to end i-mode.2Select an item (link).Repeat selecting items (links) to display the desired site.≥You can select underscored items on the displayed site. When you select an item, it is highlighted.≥If there is a number at the head of the item showing the link, you can connect to that link directly by pressing the numeric key corresponding to that number. (Some sites cannot be connected.)≥While the site is displayed, press Bo to scroll through line by line. Press m()/c() or </> to scroll through page by page.<iMenu>Accessing Sitesi-mode menu](https://usermanual.wiki/Panasonic-Connect/208012A.User-Manual-Part-1/User-Guide-1045203-Page-192.png)

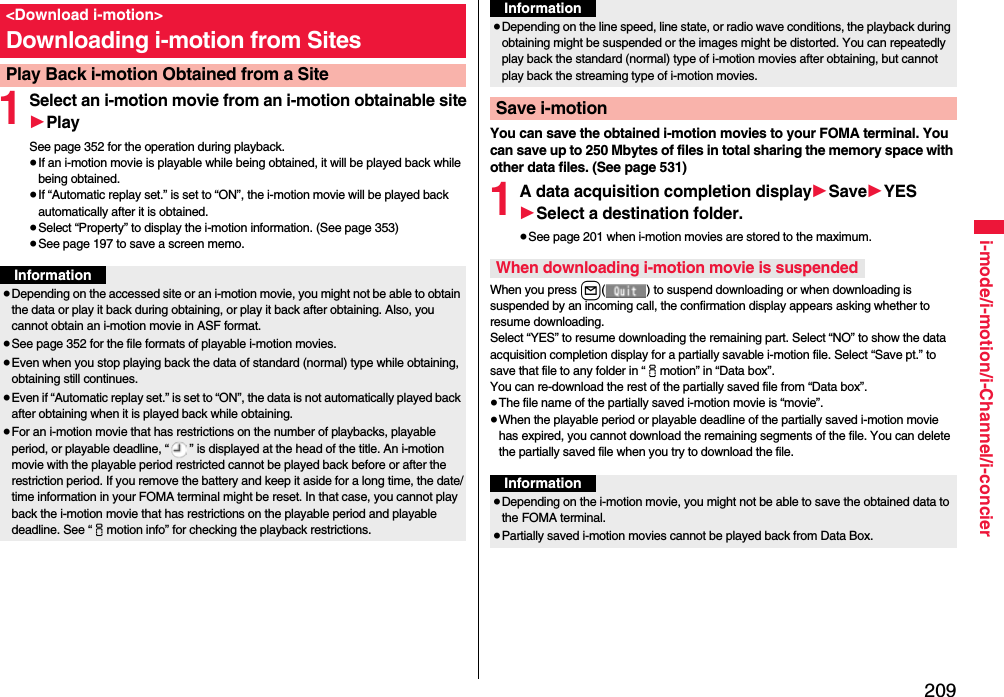
![210i-mode/i-motion/i-Channel/i-concierYou can set whether to play back an i-motion movie automatically, for when you have obtained a standard (normal) type of i-motion movie from a site or have selected a screen memo which contains a standard (normal) type of i-motion movie.1i1i-mode settings1Automatic replay set.1ON or OFFThis service distributes information such as news and weather forecast to i-Channel mobile phones. The automatically received latest information flows on the Stand-by display by tickers. You can read it on the i-Channel list by pressing the i-Channel key. (See page 210)Further, two types of channels, “Basic channel” provided by DOCOMO and “Favorite channel” provided by IPs (Information Providers) are available. You are not charged a packet communication fee for auto-updates of “Basic channel” information.You are charged a packet communication fee for auto-updates of “Favorite channel” information which is enabled by registering your favorite channels. For both of “Basic channel” and “Favorite channel”, note that you are separately charged a packet communication fee for browsing detailed information. When you use the international roaming service, you are charged a packet communication fee for both auto-update and browsing detailed information.≥i-Channel is a pay service which is available on a subscription basis (You need to subscribe to i-mode to apply for i-Channel).≥For details on i-Channel, refer to “Mobile Phone User’s Guide [i-mode] FOMA version”.≥The i-Channel service is provided in Japanese only.<Automatic Replay Setting>Setting Automatic Replay of i-motionInformation≥Note that a streaming type of i-motion movie is played back automatically even if this function is set to “OFF”.i-ChannelWhen “Ticker ON/OFF” is set to “ON”, up to 10 ticker files for the latest information flow repeatedly on the Stand-by display. If you want to know more about the information, you can obtain the details from the Channel list.1Press Zo.The Channel list appears regardless of the “Ticker ON/OFF” setting.≥“ ” blinks during receiving information.2Select an item (link).Information≥When the FOMA terminal is turned off or if radio wave conditions are bad such as when it is out of the service area, you may not be able to receive information even if you have contracted to the i-Channel service. In that case, select the channel for unsigned subscribers that appears by pressing *Zo; then you can now receive information, and tickers flow on the Stand-by display. If your FOMA terminal remains in the default state, you may not be able to receive information. Press *Zo, and then information is received and tickers flow on the Stand-by display.≥To receive i-Channel information overseas, you are charged a communication fee by channel (domestic talk-free service does not apply).≥After you cancel the contract for the i-Channel service, the ticker setting is automatically set to off.≥If you cancel the contract for the i-mode service before you cancel the contract for the i-Channel service, the ticker setting remains on.Using i-ChannelChannel listInformation≥The ring tone does not sound and the vibrator does not work even when information comes in. In addition, the Call/Charging indicator does not light or flicker.](https://usermanual.wiki/Panasonic-Connect/208012A.User-Manual-Part-1/User-Guide-1045203-Page-212.png)