Panasonic Connect 209025A UMTS/ GSM Cellular Mobile User Manual 1 of 5
Panasonic Mobile Communications Development of Europe Ltd UMTS/ GSM Cellular Mobile 1 of 5
Contents
- 1. User Manual 1 of 5
- 2. User Manual 2 of 5
- 3. User Manual 3 of 5
- 4. User Manual 4 of 5
- 5. User Manual 5 of 5
User Manual 1 of 5

![ixGuide SymbolsPress the corresponding key to execute the function or operation indicated at the bottom of Display.Example: Softkey labels vary by menu.Multi Selector (❶)Use Multi Selector to select items, navigate menus, etc. In this guide, Multi Selector operations are indicated as shown below.Softkeys (❷❸)In this guide, Softkey operations are indicated as shown below.Example ❷❸: A [Chg.Menu], S [Back] [Chg.Menu] and [Back] are Softkey label examples; Softkey labels vary by menu.Japanese Functions & ServicesWhen "(Japanese)" appears in a title, Japanese ability is required to use full range of the function or service.UpUp/Down Up/Down/Left/RightDownLeftLeft/Right CenterRightLeft RightUpDown Center](https://usermanual.wiki/Panasonic-Connect/209025A.User-Manual-1-of-5/User-Guide-1228967-Page-11.png)
![xOperation Descriptions The following examples are for reference only and may differ from actual operations.Basic OperationsOperations are expressed as shown here.Example 1:Main Menu 4 Phone 4 Group1 Highlight a group 7 A[Menu] 7 Rename 7 Enter group nameAMenu Selection BStepsAMenu Selection❶.Press in Standby to open Main Menu.❷.Use to highlight Phone; then press .❸.Use to highlight Group; then press .BSteps❶.Use to highlight a group; then press A[Menu]❷.Use to highlight Rename; then press .❸.Enter Group name.Example 2:CCheck Box Selection❶.Use to highlight an item; then press . changes to .Repeat to select multiple items.❷.To deselect an item, use to highlight item; then press .Check mark disappears.1 A[ ] 7 Settings2 Universal Settings 7 Mail Security Setting3 Enter Phone Password 7 Check items 7 A[OK]CCheck Box Selection](https://usermanual.wiki/Panasonic-Connect/209025A.User-Manual-1-of-5/User-Guide-1228967-Page-12.png)
![xiAdvanced OperationsFor advanced features and settings, go to pages indicated under Tip.Example:Tip#Operations Available during a Voice Call (ZP.2-9)#Making Calls from Call Log (ZP.2-11)#Save Entered Phone Number (ZP.4-5)#Making Calls from Phone Book (ZP.4-6)#Speed Dial (ZP.4-8)Settings #Call Time & Call Cost #End Calls by Closing Handset (ZP.15-10)Settings Refer to Chapter 15 "Settings."Abbreviated DescriptionsFor advanced settings (Chapter 15), initial operations may be abbreviated or omitted.Example:From Main Menu 4 Media 4 Audio or Video 4 Playlist Delete Playlists >Follow the steps belowItem Operation/DescriptionOne >Highlight a Playlist 7 A[Menu] 7 Delete 7 One 7 A[YES]Selected files >A[Menu] 7 Delete 7 Selected Files 7 Check Playlists 7 A[OK] 7 A[YES]AAbbreviated StepsInitial steps are abbreviated.BStepsFollow these steps after Abbreviated Steps.COmitted StepsInitial steps are omitted. Start operations from specified window. Use Other Graphic Mail Settings >In S! Mail text entry window, J 7 Select an arrange item (See below)](https://usermanual.wiki/Panasonic-Connect/209025A.User-Manual-1-of-5/User-Guide-1228967-Page-13.png)


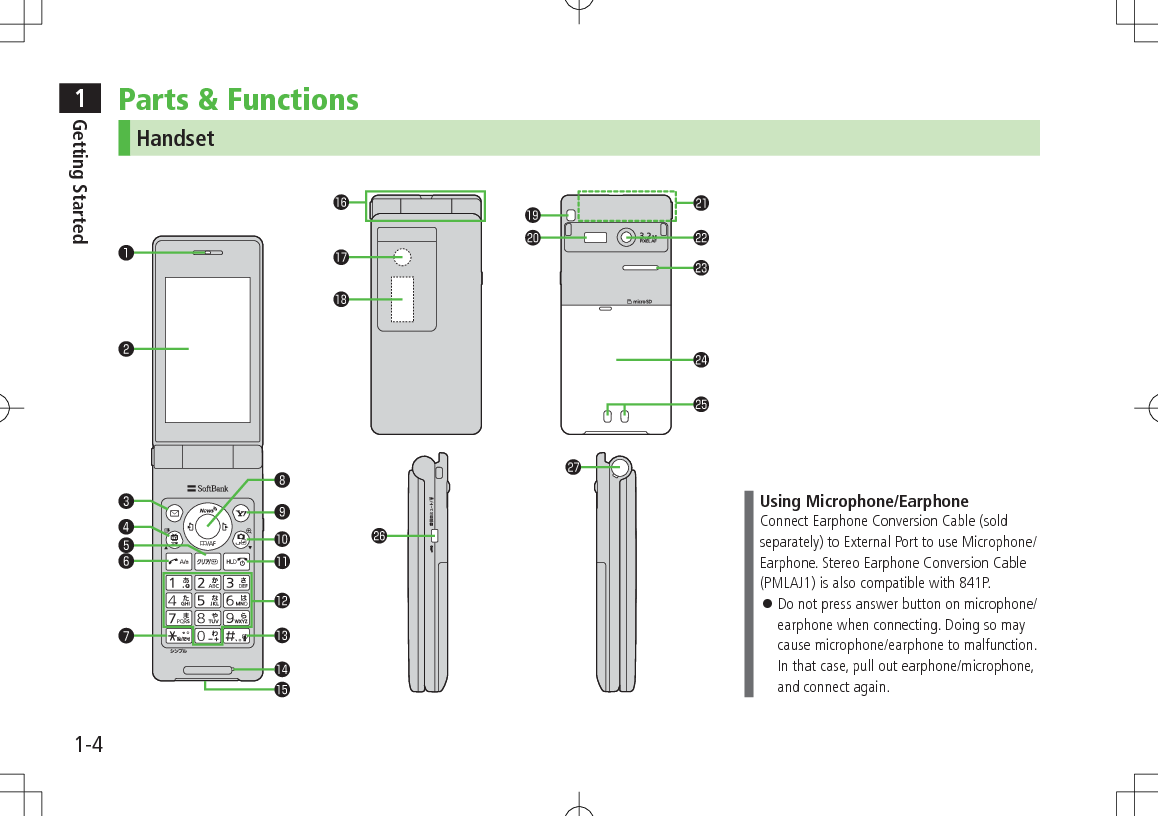
![1Getting Started1-5❶ Earpiece❷ Main Display❸ AMail Key Open Messaging menu Execute Left Softkey function (ZP.ix)❹ 1 TV/Input Mode Key Activate TV Toggle input mode in text entry windows Access saved URLs❺ KClear/Memo Key Delete characters Cancel menus Open Answer Phone message list; Toggle Answer Phone on/off❻ JSend Key Initiate or answer calls Toggle upper/lower case in text entry windows❼ Ge/Pictograph/Symbol/Simple Mode Key Enter "e" Access pictographs in text entry windows Access symbol list from pictograph list Toggle Simple Mode❽ Multi Selector Scroll up/down/left/right to navigate menus and text (ZP.ix) Open/Select Standby Window (Unavailable in Simple Mode) Open Phone Book; set Auto Focus Lock Open Incoming Call Logs Open Outgoing Call Logs❾ SYahoo! Keitai Key Open Yahoo! Keitai Main Menu Execute Right Softkey function (ZP.ix) FCamera/Line Break Key Activate Camera; activate Magnifying Loupe Enter a line break Toggle letters in reverse order in a text entry window LEnd/Escape & Power Key Power on/off (ZP.1-15) End calls Return to Standby Place Call on hold P – OKeypad Enter phone number/text H#/Manner Mode Key Enter "r" Toggle Manner Mode Microphone External Port Connect AC Charger (sold separately) or other accessories here Hinge Notification Light/Charging Indicator Flashes for incoming transmissions; flashes while Camera is active Lights in red for charging External Display Strap Eyelet Infrared Port Transfer data via Infrared Antenna Camera Speaker Battery Cover Charging Terminals +Side Key Press to mute ringer[Open Position] Open Private Menu (Unavailable while Simple Mode is active) Toggle View Blind on/off[Closed Position] Toggle External Display Activate/cancel Manner Mode One-push Open Button (ZP.1-6)](https://usermanual.wiki/Panasonic-Connect/209025A.User-Manual-1-of-5/User-Guide-1228967-Page-31.png)

![1Getting Started1-17Activating Emission OFF ModeTemporarily suspend all handset transmissions; when active, all calls/messages and incoming information are blocked. When Emission OFF Mode is active, appears.Main Menu 4 Settings 4 Call Settings 4 Emission OFF Mode1 ON or OFFNote Emission OFF Mode disables Infrared transmissions. Emergency numbers (110, 119, 118) cannot be dialed.Activating Drive ModeHandset does not ring for incoming transmission. Voice guidance informs the caller you are unavailable and handset records messages. When Drive Mode is active, appears.1 In Standby, press and hold D To cancel: Press and hold D againHandset MenusMain Menu1 In Standby, Main Menu appears. To change Main Menu Theme: A[Chg.Menu] 7 Select a Theme 7 2 to highlight an icon 7 Selected function menu appears. To return to Standby: LMain MenuLStandby](https://usermanual.wiki/Panasonic-Connect/209025A.User-Manual-1-of-5/User-Guide-1228967-Page-43.png)
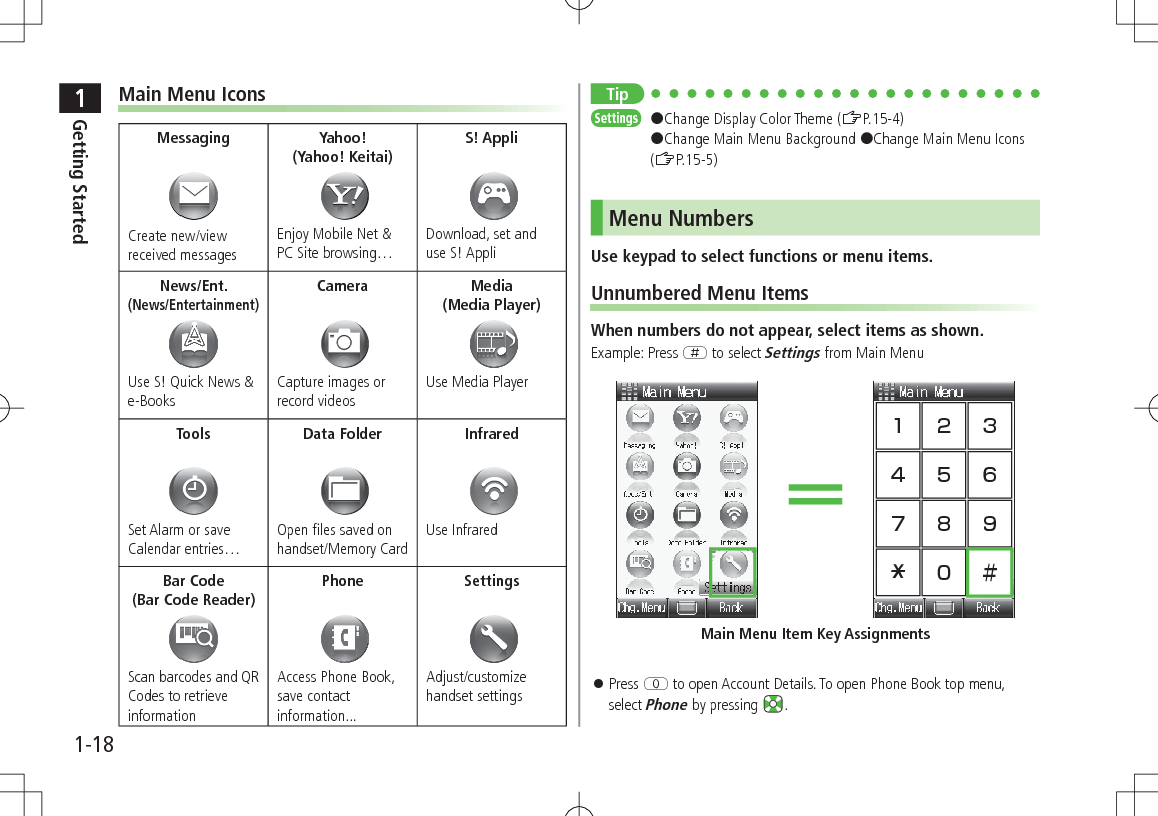
![1Getting Started1-19Numbered Menu ItemsPress key corresponding to menu number to select a menu.Example: In Display Settings (from Settings Top Menu), press U to select ThemesUsing KeysPress a key corresponding to a menu to open in Standby (ZP.1-6). Change or deactivate the functions assigned to D, F and (ZP.15-6). While Simple Mode is active, settings may return to defaults.Standby OptionsInformation WindowIn Standby, Information window opens for missed calls, messages, etc.1 to select an item To close Information window: L, S[Exit] or K EventsCall Missed calls (ZP.2-10)MessageNew messages (ZP.12-12) When Feeling Mail is received, a pictograph that shows emotion set by sender, and sender name, mail address or phone number appearAnswer Phone Recorded caller messages (ZP.2-13)Voice Mail New Voice Mail messages (ZP.2-16)Missed CallIf Missed Call Notification is active, Information window opens for calls missed while handset is off,out-of-range, engaged, etc. (ZP.2-16)Update Results Received software update results (ZP.16-10)New S! Information ChannelReceived S! Information Channel updates (ZP.6-2)S! Information ChannelFailed to receive S! Information Channel updates (ZP.6-2)New Weather Received weather forecast updates (ZP.6-3)Weather Failed to receive weather forecast updates (ZP.6-4)](https://usermanual.wiki/Panasonic-Connect/209025A.User-Manual-1-of-5/User-Guide-1228967-Page-45.png)
![1Getting Started1-20Standby WindowAccess S! Quick News or Shortcuts from Standby Window. S! Quick News: ZP.6-5Show/Hide Standby WindowFrom Standby, press to show Standby Window; press L to show/hide Standby Window. Press K to deselect a shortcut icon or ticker. Set Standby Window On/Off: ZP.15-4Changing Templates<Default> Shortcuts & S! Quick NewsSet to appear both or either S! Quick News/Shortcuts.1 In Standby, 7 A[Menu] 7 Change Templates 7 Select an itemChanging Transparency Level of Standby Window<Default> Light1 In Standby, 7 A[Menu] 7 Background of Panel 7 Select a levelS! Quick NewsAdding Content & Changing SettingsAdd or Set S! Quick News in Standby Window.1 In Standby, 7 highlight ticker 7 A[Menu]2 Add ContentAdd S! Quick NewsHandset connects to the Network.Follow onscreen instructions. SettingsS! Quick News Settings 7 Auto Refresh or Display SettingGo to P.15-17 and follow steps.Accessing Functions from Shortcuts1 In Standby, 7 Select an iconThe selected function name appears at top of panel. To deselect: K2 to access function](https://usermanual.wiki/Panasonic-Connect/209025A.User-Manual-1-of-5/User-Guide-1228967-Page-46.png)
![1Getting Started1-21Adding ShortcutsAdd frequently used functions to Shortcuts. Following shortcuts are set by default: (Menu List)* (Manage Account/Fees)* (Machi-Uta®)*One Touch Guide Pictures (Data Folder) Alarms Calculator Calendar Web Search* Requires network connection. Available in Japanese only.1 In Standby, 7 highlight target 7 A[Menu] 7 Set Shortcut2 Select an item 7 Highlight a function, bookmark or Phone Book entry 7 A[Entry] Move Icons >In Step 1, highlight an icon 7 A[Menu] 7 Move Shortcut 7 Select a position Delete Icons >In Step 1, highlight an icon 7 A[Menu] 7 Remove Shortcut 7 Private MenuSave frequently used functions in Private Menu. Up to 12 items can be saved. Change preset functions as needed.Opening Private Menu1 In Standby, press and hold Private Menu appears. To return to Standby: S[Back]2 Select a menuPrivate Menu Window](https://usermanual.wiki/Panasonic-Connect/209025A.User-Manual-1-of-5/User-Guide-1228967-Page-47.png)
![1Getting Started1-22Customizing Private Menu 1 In Standby, press and hold 2 Highlight target 7 A[Menu] 7 Set Shortcut3 Select an item4 Highlight an item 7 A[Entry] Change Menu Order >After Step 2, highlight a function 7 A[Menu] 7 Move Shortcut 7 Select a position Delete Functions >After Step 2, highlight a function 7 A[Menu] 7 Remove Shortcut 7 Reset Private Menu >After Step 2, A[Menu] 7 Reset Defaults7 Private Menu Setting WindowSimple ModeActivate Simple menu to limit mode options to basic ones. Enlarge fonts in Messaging, Phone Book, Call Log and Browser menus, and maximize volume. Handset is limited to basic operations (ZP.1-22). Font size cannot be changed. To change volume: ZP.1-22Font Size: LargeEarpiece Volume: Volume 6Normal Mode WindowSimple Mode Window](https://usermanual.wiki/Panasonic-Connect/209025A.User-Manual-1-of-5/User-Guide-1228967-Page-48.png)
![1Getting Started1-23Activating Simple Mode1 In Standby, press and hold G 7 To cancel: Press and hold G 7 again Change Earpiece Volume >During a call, / or / Position Clock in Standby >In Simple Mode, Main Menu 4 Settings 4 Standby Display Clock 4 Lower Center Cancel Simple Menu >In Standby, 7 A[Normal] 7 Note While switching between modes, other functions are not available. Turning off the power does not cancel Simple Mode. Standby Window and Private Menu is not available in Simple Mode, and Key settings temporarily return to defaults. Alternatively, Main Menu 4 Settings 4 Phone Settings 4 Change Simple Mode 4 .Simple ModeSimple Mode Menu PagePhoneView Phone Book 4-6Create New Entry 4-3Mail & Call Log 2-10Message List 2-12Voice Mail 2-15One Touch Key 4-8Account Details 1-24MessagingIncoming Mail 12-12Create New S! Mail 12-4Drafts 12-18Retrieve New 12-17Sent Messages 12-18Unsent Messages 12-18Create New SMS 12-8Yahoo! KeitaiYahoo! Keitai 13-3Bookmarks 13-8Saved Pages 13-8Enter URL 13-4CameraTake Photos 5-5View Photos 5-8Record Movies 5-6View Movies 5-8Simple Mode Menu PageToolsOne Touch Guide 11-12Alarms 11-6Bar Code Reader 11-10Calculator 11-7Notepad 11-8Voice Recorder 11-9Infrared 9-2SettingsRinger Volume 15-2Assign Ringtone 15-2Vibration Alert 15-2Wallpaper 15-4Standby Display Clock LeftDate & Time 15-8Data FolderView Photos 8-2View Movies 8-2Ring Songs&Tones 8-2S! Appli 8-2Books 8-2Templates 8-2Memory Status 8-3](https://usermanual.wiki/Panasonic-Connect/209025A.User-Manual-1-of-5/User-Guide-1228967-Page-49.png)


![Call22-2Making/Answering Voice CallsMaking Voice CallsBefore Calling Confirm signal strength (ZP.1-8) If any of these indicators appear: (red) 7Calls cannot be made (ZP.1-8, P.1-9, P.16-10)1 Enter a phone number Include area code for all numbers.2 Confirm the number, then J To adjust volume: or 3 L to end callCall Time appears.Correcting MisentriesUse to place cursor after digit(s) to delete, then press K.Press and hold K to delete all digits.Note Do not cover antenna area (ZP.1-5) with hand or sticker; may weaken signal strength and cause calls/transmissions to be unavailable.Tip#Operations Available during a Voice Call (ZP.2-9)#Making Calls from Call Log (ZP.2-11)#Save Entered Phone Number (ZP.4-5)#Making Calls from Phone Book (ZP.4-6)#Speed Dial (ZP.4-8)Settings #Call Time & Call Cost (ZP.15-10)#End Calls by Closing Handset (ZP.15-11)Outgoing Call FunctionsShowing/Hiding Caller ID1 Enter a phone number 7 A[Menu] 7 My Caller ID2 Show or Hide To always show/hide Caller ID: (Caller ID: ZP.2-20)Sending Touch-tone SignalsSend touch-tone signals for services such as reserving tickets, checking bank balance, etc. Save number strings to be sent as a touch-tone signal.1 When entering a phone number, press and hold G 7 Enter a number string](https://usermanual.wiki/Panasonic-Connect/209025A.User-Manual-1-of-5/User-Guide-1228967-Page-54.png)
![Call22-4Answering Voice CallsWhen a Call Arrives…Handset rings; Notification Light flashes.If Caller ID is sent, number appears in Display; if saved in Phone Book, caller's name appears.1 J to talk To adjust volume: or 2 L to end callCall Time appears.Note When Caller ID is not sent, Withheld appears.Tip#Operations Available during a Voice Call (ZP.2-9)#Rejecting Calls by Call-type #Rejecting Specific Numbers (ZP.10-5)Settings #Press Any Key to Answer Calls #Answer Calls by Opening Handset #End Calls by Closing Handset (ZP.15-11)Incoming Call FunctionsFollowing operations are available for incoming calls.Mute Ringtones >[Mute]Place Calls on Hold >LAnswer Phone* >KCall Rejection >S[Reject]Call Forwarding >A[Forward] Activate Call Forwarding (ZP.2-14) beforehand to forward incoming calls to a preset number. If Call Forwarding is not active, call is rejected.* Voice Call only](https://usermanual.wiki/Panasonic-Connect/209025A.User-Manual-1-of-5/User-Guide-1228967-Page-56.png)
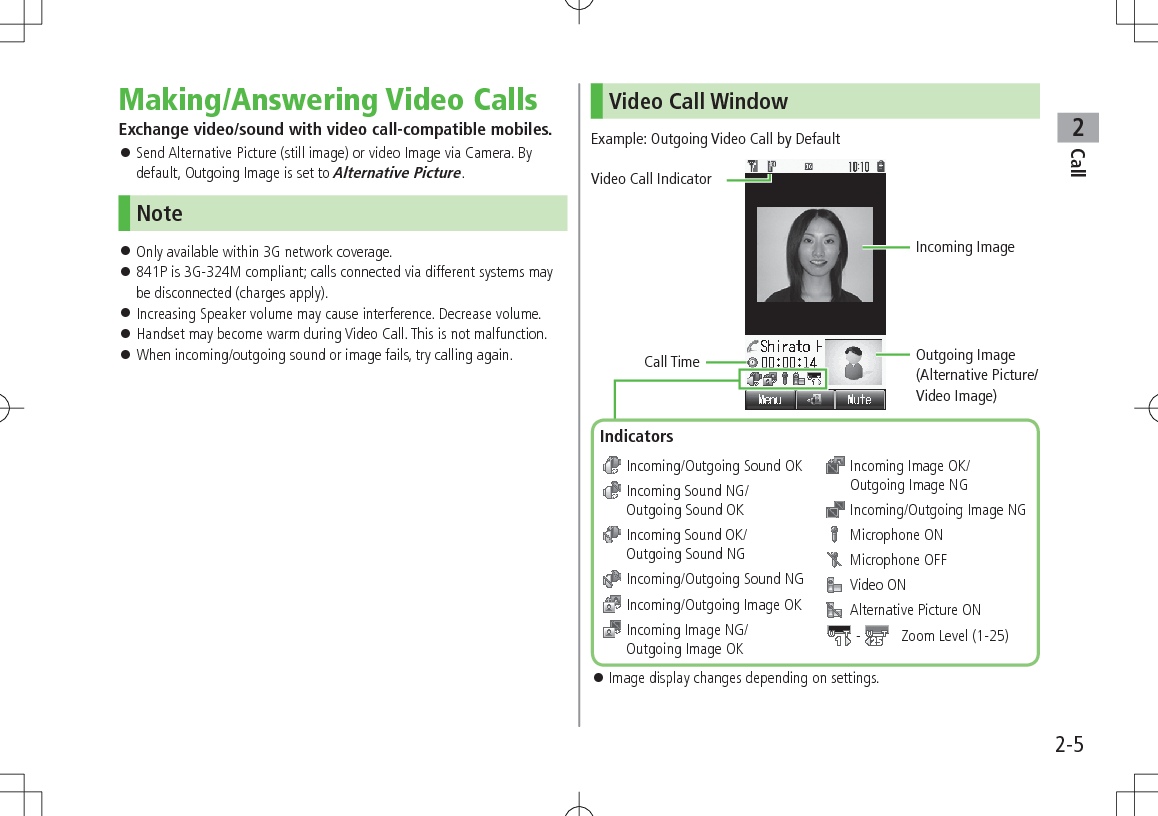
![Call22-6Making Video CallsBefore Calling Confirm signal strength (ZP.1-8) If any of these indicators appear: (red) 7 Video Calls cannot be made (ZP.1-8, P.1-9, P.16-10)1 Enter a phone number2 Confirm the number, then DWhen answered, outgoing (alternative) and incoming images appear; other party's voice sounds via Speaker. To adjust volume: To switch to Video Image: 7 Video Image3 L to end callNote Other party's voice sounds via Earpiece in Manner Mode; activate Speaker (ZP.2-10).Tip#Outgoing Call Functions (ZP.2-2)#Operations Available during a Video Call (ZP.2-10)#Making Calls from Call Log (ZP.2-11)#Save Entered Phone Numbers (ZP.4-5)#Making Calls from Phone Book (ZP.4-6)Settings #Change Alternative Picture (ZP.15-14)Answering Video CallsWhen a Video Call Arrives…Handset rings; Notification Light flashes.If Caller ID is sent, number appears in Display; if saved in Phone Book, caller's name appears.1 J or D2 Send Video ImageA[YES]Video Image is sent.](https://usermanual.wiki/Panasonic-Connect/209025A.User-Manual-1-of-5/User-Guide-1228967-Page-58.png)
![Call22-7 Send Alternative PictureS[NO]Alternative Picture is sent.3 L to end call Note When no image is selected in Step 2, Alternative Picture is sent. Other party's voice sounds via Earpiece in Manner Mode; activate Speaker (ZP.2-10).Tip#Incoming Call Functions (ZP.2-4)#Operations Available during a Video Call (ZP.2-10)Settings #Change Alternative Picture (ZP.15-14)International CallsCalling Abroad from Japan Application not required. For details, go to: http://mb.softbank.jp/en/global_services/call/1 Enter a phone number2 A[Menu] 7 International CallCountry/Area Number List appears.3 Select a country/region4 Voice CallJ Video CallD Enter Country/Region Code Directly >J 7 Press and hold P to display "+(IDD Prefix)" 7 Enter a country/region code 7 Enter a number (omit first 0) 7 Voice Call: J/Video Call: D International Code is set to 0046010 by default. The number can be changed if required (ZP.15-9). Do not omit leading 0 to call to Italy (country code: 39).](https://usermanual.wiki/Panasonic-Connect/209025A.User-Manual-1-of-5/User-Guide-1228967-Page-59.png)
![Call22-9Global Roaming Settings Add to Country/Area Number List >In Japan: Enter a number 7 A[Menu] 7 International Call 7 A[Menu] 7 Add 7 Enter a country/region name 7 Enter country/region code >Outside Japan: Enter a number 7 Voice Call: J/Video Call: D 7 Call to Other Country/Area 7 A[Menu] 7 Add 7 Enter a country/region name 7 Enter country/region code Network Mode<Default> Automatic >Main Menu 4 Settings 4 Call Settings 4 Optional Services 4 International Setting 4 Select Network 4 Select an item (See below)Item Operation/DescriptionAutomatic Handset automatically selects 3G network in Japan, and available network (3G or GSM) when abroad.Manual >Select an item3G/GSM : 3G/GSM service area in Japan or abroad.Handset selects an available network automatically.3G : 3G service area in Japan or abroad.GSM : GSM service area abroad. Unavailable in Japan. Automatic is recommended.Tip#Change International Code #Edit Country/Region Code #Select Operator #Set Operator Priority for Automatic Search #Deactivate Roaming Dial Assistant (ZP.15-9)Engaged Call FunctionsOperations Available during a Voice CallAdjust Volume >/ Adjust volume within one second. Adjusted volume is retained even after calls end or handset is turned off.Place Call on Hold >J To resume call:J Call Waiting or Group Calling subscription required to use Hold (ZP.2-18).Speaker ON/OFFToggle Speaker or Earpiece >A[Menu] 7 Speaker ON or Speaker OFFRecord ConversationRecord up to 60 seconds of a call > To end recording: Recorded data is saved to Ring Songs·Tones folder (ZP.8-2). Alternatively, A[Menu] 7 Record.Open Phone Book >A[Menu] 7 Phone Book 7 Select a Phone Book entrySend SMS >A[Menu] 7 Create New SMS 7 Create an SMS 7 S[Send]](https://usermanual.wiki/Panasonic-Connect/209025A.User-Manual-1-of-5/User-Guide-1228967-Page-61.png)
![Call22-10Operations Available during a Video CallAdjust Volume > Adjust volume within one second. Adjusted volume is retained even after calls end or handset is turned off.Speaker ON/OFFToggle Speaker or Earpiece >A[Menu] 7 Speaker ON or Speaker OFFSwitch Image Priority >A[Menu] 7 Image Priority 7 Priority Incoming or Priority OutgoingImage & Sound SettingsChange Outgoing Image and sound settings > 7 Select an item (See below)Send Voice & Video : Send video image and soundAlternative Picture : Send Alternative Picture and soundMute Voice : Send video image onlyAlt. Picture & Mute Voice : Send Alternative Picture onlyMute >S[Mute] appears. To cancel Mute: S[Mute OFF]Zoom >(zoom in) or (zoom out)Open Phone Book >A[Menu] 7 View Phone Book 7 Select a Phone Book entryCall LogIncoming and outgoing call records appear here. Use these records to call back.All Calls: All dialed/received callsIncoming: All received calls (up to 50 records)Outgoing: All dialed calls (up to 50 records)Status Indicators Answered Voice Call Missed Voice Call Rejected Voice Call Outgoing Voice Call Answered Video Call Missed Video Call Rejected Video Call Outgoing Video Call](https://usermanual.wiki/Panasonic-Connect/209025A.User-Manual-1-of-5/User-Guide-1228967-Page-62.png)
![Call22-11Viewing Call Logs1 7 Select a Log2 To view entry details, select an entry Switch to Mail Log >After Step 1, S[Switch] Mail Log: ZP.12-15Note Newest record appears at top of list. Names appear if saved in Phone Book. When a number is called more than once, only last record appears. Call Log records remain even if handset is turned off. When the maximum number of records are saved, oldest is deleted first. Alternatively, Main Menu 4 Phone 4 Mail & Call Log.TipSettings #Open Incoming Call Log for Missed Calls by Opening Handset (ZP.15-11)#Change Font Size by Function (ZP.15-5)Making Calls from Call Log1 to select a Log2 Highlight a record 7 A[Menu] 7 Call3 Voice CallsVoice Call Video CallsVideo Call International CallsInternational Call 7 Select a country/region 7 Voice Calls: J/Video Calls: D Show/Hide Caller ID >In Step 3, Show Number or Hide Number 7 A[Menu] 7 Call 7 Voice Call or Video Call](https://usermanual.wiki/Panasonic-Connect/209025A.User-Manual-1-of-5/User-Guide-1228967-Page-63.png)
![Call22-12Call Log FunctionsPress A[Menu] for following operations while viewing a mail/call record.Item Operation/DescriptionView View detailsCall Make callsCreate Message* >S! Mail or SMS 7 Create message (S! Mail: ZFrom Step 4 on P.12-4/SMS: ZFrom Step 4 on P.12-8)Add to Phone Book >Create New Entry or select an entry to add 7 (ZFrom Step 2 on P.4-3)Delete >One or All 7 A[YES] ( 7 For All, enter Phone Password)* Available for SoftBank handset numbers only.Answer PhoneRecord up to eight voice messages on handset. When Answer Phone is active, appears in Standby. Unavailable when: handset is off or in Emission OFF Mode; or (red) appears. Use Voice Mail (ZP.2-15).Activating/Canceling Answer Phone<Default> ON1 Press and hold K Toggles ON/OFF. Redirect a Call to Answer Phone >K Answer Phone is activated and recording starts. Answer Phone remains active.Note Alternatively, activate/cancel from Main Menu 4 Tools 4 Answer Phone 4 Settings 4 ON/OFF. When full, new messages cannot be recorded even if Answer Phone is activated. Delete old messages. Answer Phone does not respond to Video Calls.](https://usermanual.wiki/Panasonic-Connect/209025A.User-Manual-1-of-5/User-Guide-1228967-Page-64.png)
![Call22-13Playing MessagesWhen a new message is recorded, Information window opens (ZP.1-18) and appears in Standby.1 In Information window, Answer Phone2 Select a messagePlayback starts.After playback ends, Information window and disappear.Note Alternatively, press K in Standby, or Main Menu 4 Tools 4 Answer Phone 4 Message List 4 Select a message.Answer Phone FunctionsFrom Main Menu 4 Tools 4 Answer Phone Set Answer Time<Default> 18 secondsSet time before which call is redirected to Answer Phone. >Settings 7 Answer Time 7 Enter ring time When Answer Phone and an Optional Service (Voice Mail or Call Forwarding) are both active, function with shorter ring time takes priority. For example, if Answer Time is 18 seconds and Optional Service is 20 seconds, Answer Phone responds first. (Priority may change due to signal conditions.) Even if Answer Phone takes priority, call is forwarded to Voice Mail or forwarding number when Answer Phone is full. Call Sender >Message List 7 Highlight a message 7 A[Menu] 7 Call Delete Messages >Message List 7 Highlight a message 7 A[Menu] 7 Delete or Delete All 7 A[YES] 7 For Delete All, enter Phone Password Save to Phone Book >Message List 7 Highlight a message 7 A[Menu] 7 Add to Phone Book 7 Create New Entry or select an entry to add 7 (ZFrom Step 2 on P.4-3)](https://usermanual.wiki/Panasonic-Connect/209025A.User-Manual-1-of-5/User-Guide-1228967-Page-65.png)
![Call22-15 Check Call Forwarding Status >Main Menu 4 Settings 4 Call Settings 4 Optional Services 4 Voice Mail/Call Forwarding 4 Confirm Status Cancel Call Forwarding >Main Menu 4 Settings 4 Call Settings 4 Optional Services 4 Voice Mail/Call Forwarding 4 Cancel All 4 Note Toll free numbers and international call numbers cannot be saved as a destination number. When using Call Forwarding together with Answer Phone, the function with shorter ring time takes priority. (Priority may change due to signal conditions.) When Ringer On is set, following operations are available while handset is ringing/vibrating (within ring time). To answer a call: J To forward a call: A[Forward]Voice Mail Calls are forwarded to Voice Mail Center via Call Forwarding function; Call Forwarding and Voice Mail cannot be set simultaneously. Voice Mail is not available for Video Calls.Activating Voice MailMain Menu 4 Settings 4 Call Settings 4 Optional Services 4 Voice Mail/Call Forwarding 4 Voice Mail ON1 Select an item (See below)Item Operation/DescriptionRinger Off Forward all calls without ringing/vibratingRinger On Forward missed calls >Select a ring time Check Voice Mail Status >Main Menu 4 Settings 4 Call Settings 4 Optional Services 4 Voice Mail/Call Forwarding 4 Confirm Status Cancel Voice Mail >Main Menu 4 Settings 4 Call Settings 4 Optional Services 4 Voice Mail/Call Forwarding 4 Cancel All 4](https://usermanual.wiki/Panasonic-Connect/209025A.User-Manual-1-of-5/User-Guide-1228967-Page-67.png)
![Call22-16Note When using Voice Mail together with Answer Phone, the function with shorter ring time takes priority. (Priority may change due to signal conditions.) When Ringer On is set, following operations are available while handset is ringing/vibrating (within ring time). To answer a call: J To forward a call: A[Forward]Checking Voice Mail MessagesInformation window (ZP.1-18) and appear in Standby when new messages are recorded.1 In Information window, select Voice MailFollow voice guidance.Information window and disappear after messages are checked. View DetailsView callers' phone numbers and date/time Voice Mail messages were left before playing messages. Activate Missed Call Notification beforehand. (ZRight) > to open Incoming Call Log 7 Select a Voice Mail notification 7 View details 7 A[Menu] 7 Listen to Voice MailNote Alternatively, follow these steps to check Voice Mail: Main Menu 4 Settings 4 Call Settings 4 Optional Services 4 Voice Mail/Call Forwarding 4 Listen to Voice MailMissed Call NotificationWhen Missed Call Notification function is active, Information window appears for calls missed while handset was off, out-of range, engaged etc. Available only when Voice Mail is active.Main Menu 4 Settings 4 Call Settings 4 Optional Services 4 Missed Call Notification1 Handset connects to the Network. Follow voice guidance.When Calls are Received while Missed Call Notification is Active…Information window appears for missed calls when handset is turned on or comes into range.Select Missed Call in Information window to view Incoming Call Log. Voice Mail appears in Information window when Voice Mail messages were recorded (ZLeft).](https://usermanual.wiki/Panasonic-Connect/209025A.User-Manual-1-of-5/User-Guide-1228967-Page-68.png)
![Call22-17Call WaitingActivating/Canceling Call Waiting Main Menu 4 Settings 4 Call Settings 4 Optional Services 4 Call WaitingCurrent status appears.1 A[Menu] 7 Activate or Deactivate Check Call Waiting Status >Main Menu 4 Settings 4 Call Settings 4 Optional Services 4 Call WaitingAnswering Second Call1 When tone sounds, J Press J to alternate between calls. When the party hangs up, active call ends. Press J to re-engage the party on hold. Press L to disconnect active call. Reject Second Call >When tone sounds, S[Reject]Note When Voice Mail or Call Forwarding is set to Ringer On while Call Waiting is active, unanswered calls are transferred to Voice Mail Center or the forwarding number. When Voice Mail or Call Forwarding is set to Ringer Off, Call Waiting is disabled.](https://usermanual.wiki/Panasonic-Connect/209025A.User-Manual-1-of-5/User-Guide-1228967-Page-69.png)
![Call22-18Group Calling Separate subscription is required for this service.Dialing New Number during a Call1 Enter a phone number during a call 7 JThe line switches. The other line is placed on hold. Use Phone Book >During a call, A[Menu] 7 Phone Book 7 Select an entry 7 Select a number 7 JSwap Calls1 During a call, J Press J to toggle lines. When the party hangs up, the call ends. Press J to re-engage the line on hold. Press L to disconnect all lines.Connecting to Multiple Parties1 While switching between two lines, A[Menu] 7 Speak with All Connect up to five lines simultaneously. Press L to disconnect all lines. Add a New Party to a Call >Enter a number during Group Calling 7 J 7 After the party is connected, A[Menu] 7 Speak with All Check Members >Enter a number during Group Calling 7 A[Menu] 7 Member Talk with One Party >Highlight a member 7 A[Menu] 7 Split End Calls Individually >Highlight a member 7 S[End]](https://usermanual.wiki/Panasonic-Connect/209025A.User-Manual-1-of-5/User-Guide-1228967-Page-70.png)
![Call22-19Call Barring When Call Forwarding or Voice Mail is active, Bar All Outgoing Calls and Bar All Incoming Calls are not available. (Call Forwarding or Voice Mail takes priority.) Call Barring Password specified at initial subscription (ZP.1-23) is required to change Call Barring settings.Activating/Deactivating Call BarringMain Menu 4 Settings 4 Call Settings 4 Optional Services 4 Call Barring1 Outgoing Calls or Incoming Calls 7 Select an item (See below)Item Operation/DescriptionBar All Outgoing Calls Restrict all non-emergency callsBar All International CallsAllow only domestic callsBar International Calls Restrict all international calls except to JapanBar All Incoming Calls Reject all callsBar All If Roamed Reject calls when outside Japan2 A[Menu] 7 ON or OFF3 Enter Call Barring Password Check Call Barring Status >In Step 1, Confirm Status 7 Select an item (ZAbove) Cancel All Call Barring >In Step 1, Cancel All Barring 7 Enter Call Barring Password Change Call Barring Password >In Step 1, Call Barring Password 7 Enter current Call Barring Password 7 Enter new Call Barring Password 7 Reenter new Call Barring PasswordNote Emergency numbers (110, 119, 118) are dialable when Call Barring for outgoing calls is active. If call is attempted when Call Barring is active, warning message appears. It may take longer to appear in some areas. Check Call Barring settings if the message does not appear.](https://usermanual.wiki/Panasonic-Connect/209025A.User-Manual-1-of-5/User-Guide-1228967-Page-71.png)
![Text Entry33-2Text EntryEnter alphanumerics, hiragana, kanji, katakana, symbols and pictographs.❶.Input Modes Operation漢: Kanji (Hiragana)カナ: Katakanaabc: Alphanumerics123: NumbersD❷.Double-byte/Single-byte Operation1/1: Double-byte1/2: Single-bytePress and hold D❸.Character/Byte Count Remaining number of enterable characters appears, regardless of input mode.Remaining number of enterable byte appears.Note Follow the steps below to toggle input modes and single-/double-byte at the same time. A[Menu] 7 Input Options 7 Change Input Mode HelpHelp describes text entry operations. >In text entry window, A[Menu] 7 Help 7 Select an item❶❷❸Entering TextEntering CharactersExample: Enter 鈴木1 In alphanumerics mode, Dtwice to switch to kanji (hiragana) mode: E three time: * 7 E three times 7 G: W twice*When the next character is on the same key, press first to move cursor.2 to enter Forecast List To change word before converting, press K. There are four types of word suggestion list: Forecast, Normal, E-1-Kana and Prediction (ZP.3-5)3 to select ](https://usermanual.wiki/Panasonic-Connect/209025A.User-Manual-1-of-5/User-Guide-1228967-Page-74.png)

![Text Entry33-4Pictograph/Symbol List In Symbol Log, single-byte symbols appear in upper half of window; double-byte symbols in lower half. In List Log, pictographs appear in upper half of window; My Pictograms in lower half (only in S! Mail text entry window). Functions Available in Pictograph/Symbol ListToggle pictograph typesIn pictograph list, A[Switch] Toggle as follows: (List Log 7 ) Universal1 7 Full List 7 My Pictogram2 Alternatively, press Q to R.Toggle Symbol types In symbol list, A[Switch] Toggle as follows: (Symbol Log 7 ) Single-byte 7 double-byte Alternatively, press Q to E.Jump to next page In pictograph/symbol list, FJump to previous page In pictograph/symbol list, DToggle pictograph/ symbol listIn pictograph list, GS[Symbol]In symbol list, GS[Pict.]Close list K1 In S! Mail Subject field and S! Mail/SMS Text field only 2 In S! Mail Text field onlyPictogram Type Universal (Cross-carrier) Pictographs All Pictographs My PictogramsNote Alternatively, follow the steps below to access pictograph or symbol: A[Menu] 7 Pictograph or SymbolAdditional Features Emoticons >In text entry window, A[Menu] 7 Emotions 7 Select an emoticon Use Info from Phone Book/Account Details/Notepad/String Templates >In text entry window, A[Menu] 7 Insert 7 Select an item (See below)Item Operation/DescriptionPhone Book Data* >Select an entry 7 Select an itemAccount Details* >Select an itemNotepad >Highlight a note 7 A[Set] Alternatively, in kanji (hiragana), katakana and alphanumerics (double-/single-byte) mode, press and hold G 7 Highlight a note 7 A[Set].String TemplatesInsert web and mail extensions >Select an extension* Available Items: Last Name/First Name, Reading, Phone Number, Email Address, Address or Note. Enter Kuten Code >In text entry window, A[Menu] 7 Input Options 7 Kuten Code 7 Enter a character code (4 digits) (ZP.16-14)TipSettings #Change Input Font Size (ZP.15-12)](https://usermanual.wiki/Panasonic-Connect/209025A.User-Manual-1-of-5/User-Guide-1228967-Page-76.png)
![Text Entry33-5Conversion Methods (Japanese)Predictive ConversionThe following suggestion lists appear while entering text orafter a word is fixed.Before Entering Text*Forecast (Pre-text Predict)Suggests salutations/opening wordsExample:, , etc.While Entering TextForecastLists likely conversions and matching conversions. Likely Conversions: 7 , , etc.Matching Conversions: 7 , , etc.Normal Suggests only matching conversions Example: 7 , , etc.E-1-Kana Lists alphanumerics/katakana assigned to key (ZP.3-7)After a Word is FixedPredictionSuggests words likely to follow Example: is fixed 7 , , , etc.* Available when you open Message Text window or cursor is at top of Text window. Note that handset Language must be set to 日本語. Predictions change with each letter entered. Press A[Forecast]/[Normal] to toggle Forecast List and Normal List.Predictive Candidates Time Season Predict function suggests words appropriate for current season and time. Set word suggestions for formal or informal words. (ZP.15-13)Note 841P learns entered characters and suggests them for future conversions.TipSettings #Disable Learning (Kana Conversions) #Reset Learned Words #Change Candidate Font Size #Hide Predictive Candidates #Hide Context Forecast List #Fix Entered Characters Automatically (ZP.15-12) #Deactivate Pre-text Predict #Deactivate Time Season Predict #Activate Text Expression (ZP.15-13)](https://usermanual.wiki/Panasonic-Connect/209025A.User-Manual-1-of-5/User-Guide-1228967-Page-77.png)
![Text Entry33-6Example: Enter 私の鼻1 In kanji (hiragana) mode, P is entered and Forecast List appears.2 to move to Forecast List 7 to select is entered and Prediction List appears.3 to move to Prediction List 7 to select is entered and Prediction List appears.4 Y 7 T is entered and Forecast List appears.5 A[Normal]Normal List appears.6 to move to Normal List 7 to select If the Word is Not ListedPress K to return to hiragana, and segment hiragana to convert separately.Example: Segment into and , then convert to Move cursor to , then convert to 7 Convert to 7 Using Previously Entered WordsEnter the first one or two hiragana to access previously enteredwords in the list.](https://usermanual.wiki/Panasonic-Connect/209025A.User-Manual-1-of-5/User-Guide-1228967-Page-78.png)
![Text Entry33-7Converting Hiragana to Katakana/AlphanumericsEnter katakana and alphanumerics in kanji (hiragana) mode. Date and time can be entered quickly.Example 1: Enter OKStep 1 2 3 4Key Y(3 times)T(twice) S[E-1-Kana]Display ふ ふに E-1-Kana List OK Highlight OK and press .Example 2: Enter 10:30 or 10/30Step 1 2 3Key QPEP S[E-1-Kana]Display あわさわ E-1-Kana List10/3010:3010月30日etc. Highlight a suggestion and press .Narrowing Down Predictive Candidates by Number of CharactersIn kanji (hiragana) mode, narrow down Predictive Candidates by specifying minimum number of characters.Example: Suggest words with a minimum of seven characters, starting with かさ1 Enter 7 2 (five times)Word suggestions of seven or more characters appear. Press to change number of characters. To show word suggestions of only seven characters: A[Switch]](https://usermanual.wiki/Panasonic-Connect/209025A.User-Manual-1-of-5/User-Guide-1228967-Page-79.png)
![Text Entry33-8Editing TextDeleting & Replacing1 Delete Characters within LinesPlace cursor before a character 7 KA character after cursor is deleted. Press and hold K to delete all characters after cursor. Delete Characters from the End of TextPlace cursor at the end of text 7 KA character before cursor is deleted. Press and hold K to delete all characters before cursor.2 Enter another characterCopy/Cut & Paste Up to seven copied/cut entries are stored; six text entries and one Graphic Mail entry.1 In text entry window, A[Menu] 7 Copy or Cut2 Select Text to Copy/CutPlace cursor before (or after) text to select 7 7 Place cursor after (or before) text 7 Select AllS[All] 73 Paste TextPlace cursor at target location 7 Press and hold F Paste Previously Copied/Cut TextPlace cursor at target location 7 A[Menu] 7 Paste 7 Select text dataNote Turning off power deletes stored text data. Graphic Mail entry is deleted when S! Mail text entry window is closed.](https://usermanual.wiki/Panasonic-Connect/209025A.User-Manual-1-of-5/User-Guide-1228967-Page-80.png)
![Text Entry33-9User's DictionarySave frequently used words/phrases (up to 100 entries). Saved words/phrases appear among word suggestions.Saving User's Dictionary Entries1 In text entry window, A[Menu] 7 Input Options 7 User's Dictionary2 A[Create] When saved items exist: A[Menu] 7 Create3 Enter a word 7 Enter reading Edit User's Dictionary Entries >After Step 1, highlight a word 7 A[Menu] 7 Edit 7 Edit word 7 Edit reading Delete User's Dictionary Entries >After Step 1, A[Menu] 7 Delete 7 Select an item (See below)Item Operation/DescriptionOne >Selected Words >Check entries 7 A[OK] 7 All >A[YES] 7 Enter Phone PasswordNote Alternatively, Main Menu 4 Settings 4 Phone Settings 4 Dictionaries 4 User's Dictionary.Download DictionaryDownload dictionaries from P-egg, a download site for 841P users (see below). Activate downloaded dictionaries to add character conversions to conversion suggestions (Japanese). P-egg (as of November 2009) Main Menu 4 Yahoo! 4 Bookmarks 4 Panasonic Site (P-egg)Activating Downloaded DictionariesMain Menu 4 Settings 4 Phone Settings 4 Dictionaries 4 Download Dictionary1 Select a dictionary 7 ON To cancel, select OFF. Change Title >In Step 1, highlight a dictionary 7 A[Menu] 7 Rename 7 Edit View Details >In Step 1, highlight a dictionary 7 A[Menu] 7 Property Delete Dictionaries >In Step 1, (highlight a dictionary 7 ) A[Menu] 7 Delete 7 Select an item (See below)Item Operation/DescriptionOne >Selected Files >Check dictionaries 7 A[Delete] 7 A[YES]All >A[YES] 7 Enter Phone Password](https://usermanual.wiki/Panasonic-Connect/209025A.User-Manual-1-of-5/User-Guide-1228967-Page-81.png)


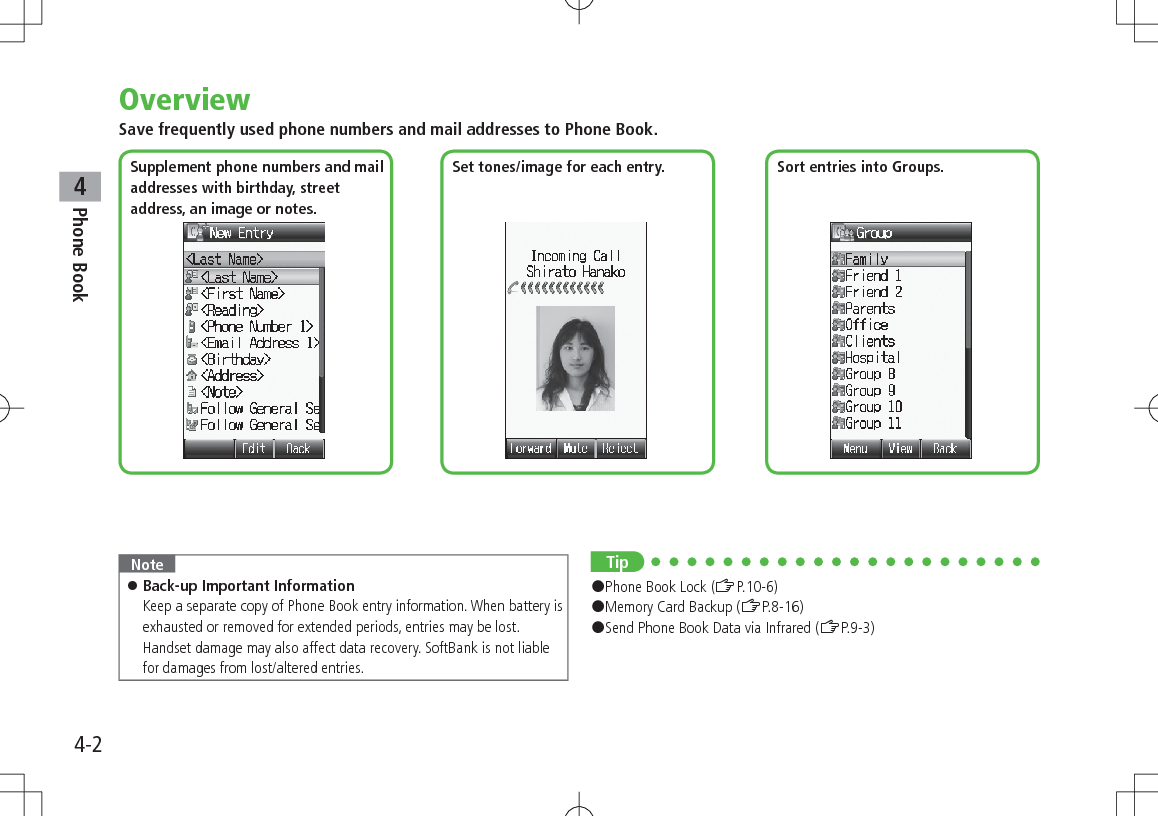
![Phone Book44-3Saving to Phone BookPhone Book Entry ItemsSave up to 1000 entries in handset Phone Book; 50 entries to USIM Card Phone Book.Available entry items are as follows.Phone Book Entry Items Handset USIM CardLast Name/First Name Reading Phone Number 5 2Email Address 5 1Birthday Address Note Voice Call Ringtone Video Call Ringtone Message Ringtone Notification Light Picture Group Secret Setting : Can be saved : Cannot be saved Phone Book entries in USIM Card can also be used in another SoftBank handset.Creating New EntrySave new entries to handset or USIM Card Phone Book. When saving to USIM Card Phone Book, set Save Settings to USIM or Ask Each Time beforehand (ZP.15-13).1 7 A[Menu] 7 New Entry When no Phone Book entries exist: 7 A[Create] When Save Settings is set to Ask Each Time: Select Phone or USIM2 Select an item (See below)Item Operation/DescriptionLast Name1Save last name. For USIM Card, enter both first name and last name in Name >Enter last nameFirst Name1 Save first name >Enter first nameReading Automatically entered when Last Name and First Name are entered >To change Reading, [Edit] 7 EditHandset Phone Book](https://usermanual.wiki/Panasonic-Connect/209025A.User-Manual-1-of-5/User-Guide-1228967-Page-85.png)
![Phone Book44-4Item Operation/DescriptionPhone Number 1-51 >Enter phone number ( 7 For handset, select an icon)Email Address 1-51 >Enter mail address ( 7 For handset, select an icon)Birthday >Enter birthdayAddress Enter postal code, country/region, state/province, city, street address or additional information >Select an item 7 Enter text 7 A[Decide] to exit Address fieldNote >Enter noteVoice Call RingtoneSet Incoming call/message ringtone >Select an itemFollow General Setting2Select a folder in Data Folder 7 Highlight a file 7 A[Set]Video Call RingtoneMessage RingtoneNotification LightSet Incoming call/message light color >Follow General Setting3 or select a color Picture Save a still image. Captured still images can be set >Select an itemPictures 7 Highlight a file 7 A[Set]Take Picture 7 to shoot 7 To delete the image: No Pictures Saved still image appears for incoming calls. (Saved still image may not appear while using other functions.)Item Operation/DescriptionGroup Categorize/search entries by group >Select a group Change group names or set ringtones for individual groups. (ZP.4-5)Secret Setting Set to show or hide saved entries >Show or Hide When Secret Setting is set to Hide, activate Secret Mode/Secret Data Only to open entries. (ZP.10-7)1 To save an entry, enter at least one of the fields2 General Ringtone settings apply (ZP.15-2)3 General Notification Light settings apply (ZP.15-12)3 A[Save]](https://usermanual.wiki/Panasonic-Connect/209025A.User-Manual-1-of-5/User-Guide-1228967-Page-86.png)
![Phone Book44-5Other Ways to Add New EntriesSave currently displayed phone numbers or mail addresses to Phone Book.1 Save Entered Phone NumberEnter a phone number 7 A[Menu] 7 Add to Phone Book Save from Mail & Call Log 7 Select a Call Log 7 Highlight a record 7 A[Menu] 7 Add to Phone Book Save from Sent/Received MessagesA[ ] 7 Sent Messages or Incoming Mail ( 7 Select a folder) 7 Highlight a message 7 A[Menu] 7 Add Destination to Phone Book or Add Sender to Phone Book2 New EntryCreate New Entry 7 Enter details (ZFrom Step 2 on P.4-3) Add to Existing EntrySelect an existing entry 7 Enter details (ZFrom Step 2 on P.4-3)3 A[Save]Setting GroupsSort entries by Group. Custom set ringtones/notifications per group. Handset Phone Book or USIM Card Phone Book Groups appear according to Change View setting. Assign Phone Book entries to Groups (ZP.4-4); otherwise, entries will be automatically assigned to Ungrouped. Main Menu 4 Phone 4 Group1 Highlight a group 7 A[Menu] 7 Rename 7 Enter group name When Change View is set to USIM : Highlight a group 7 A[Rename]2 A[Menu] 7 Sound & Notification Light3 Set RingtoneVoice Call Ringtone, Video Call Ringtone or Message Ringtone 7 Follow General Setting or select a folder in Data Folder 7 Highlight a file 7 A[Set] Selecting Follow General Setting applies Ringtone settings (ZP.15-2). Set Notification LightNotification Light 7 Follow General Setting or select a color Selecting Follow General Setting applies Notification Light settings (ZP.15-12).](https://usermanual.wiki/Panasonic-Connect/209025A.User-Manual-1-of-5/User-Guide-1228967-Page-87.png)
![Phone Book44-64 A[Set] Switch Between Handset & USIM CardWhen Change View is set to Phone & USIM (ZP.15-13), follow these steps to switch view. >Main Menu 4 Phone 4 Group 4 A[Menu] 4 Change to Group(Phone) or Change to Group(USIM) Reset Group Setting >Highlight a group 7 A[Menu] 7 Reset Defaults 7 Note Ringtones/Notification Light settings are unavailable for USIM Card Phone Book Groups. Ringtone/Notification Light settings for each Phone Book entry take priority.Searching/Using Phone BookChanging Phone Book Search Method<Default> A-KA-SA-TA…Search for an entry using one of these search methods: A-KA-SA-TA-NA, Reading or Group.Main Menu 4 Phone 4 Settings 4 Search Method1 Select a search method Note Alternatively, for A-KA-SA-TA... and Reading, 7 A[Menu] 7 Search Method. Making Calls from Phone Book To change search method: ZAbove1 2 Search Phone Book (See below)Search Method Operation/DescriptionA-KA-SA-TA... >Select a page of the required reading Alternatively, enter partial reading.Reading >Enter partial readingGroup >Select a group](https://usermanual.wiki/Panasonic-Connect/209025A.User-Manual-1-of-5/User-Guide-1228967-Page-88.png)
![Phone Book44-73 Select an entry4 Voice CallsHighlight a phone number 7 J Video CallsHighlight a phone number 7 D International CallsHighlight a phone number 7 A[Menu] 7 Call 7 International Call 7 Select a country/region 7 Voice Call: J/Video Call: D Show/Hide Caller ID >In Step 4, highlight a number 7 A[Menu] 7 Call 7 Show Number or Hide Number 7 Voice Call: J/Video Call: DOpen Phone Book Entries in Standby (Quick Phone Book Search)In Standby, press and hold Q - O and P to open entries assigned to that key.Example: "NA" page: Press and hold T When Search Method is set to Group, Group 1-10 open. When pressing key for page without any entry, the next page with entries appears. Change One Touch Key setting to Speed Dial. (ZP.4-8)Sending Messages from Phone Book1 7 Select an entry2 Use Mail AddressSelect a mail address Use Phone Number*Highlight a phone number 7 A[Menu] 7 Create Message 7 S! Mail or SMS* SoftBank handset numbers only3 Create message (S! Mail: ZFrom Step 4 on P.12-4/SMS: ZFrom Step 4 on P.12-8)](https://usermanual.wiki/Panasonic-Connect/209025A.User-Manual-1-of-5/User-Guide-1228967-Page-89.png)
![Phone Book44-8Quick Phone Book Search/Speed DialSet Quick Phone Book Search or Speed Dial to One Touch Key.Use Keypad (Q-O, P) to access functions as follows.Quick Phone Book SearchIn Standby, press and hold Keypad (Q-O, P) to open entries assigned to that key. When Search Method is set to Group, Group 1-10 open.Speed DialSet phone numbers to Keypad (Q-O). Press and hold a key to dial the number assigned to that key.Set a Function to One Touch Key<Default> Quick Phone Book SearchMain Menu 4 Phone 4 One Touch Key 4 One Touch Key1 Quick Phone Book Search or Speed DialSaving Numbers to Speed DialMain Menu 4 Phone 4 One Touch Key 4 Speed Dial1 Select a key number [1] - [9] To enter phone number directly: Highlight a key number [1] - [9] 7 A[Edit] 7 Enter number2 Select a Phone Book entry 7 Select a phone number Note Before saving secret entries, activate Secret Mode or Secret Data Only. When Secret Mode or Secret Data Only modes are deactivated, the saved secret entries appear as Empty. Be careful of accidentally overwriting secret entries.](https://usermanual.wiki/Panasonic-Connect/209025A.User-Manual-1-of-5/User-Guide-1228967-Page-90.png)
![Phone Book44-9Using Phone Book Some functions may not be available depending on entries/entry items. > 7 (Highlight an entry 7 ) A[Menu] 7 Select an item (See below)or > 7 Select an entry 7 (Highlight an item 7 ) A[Menu] 7 Select an item (See below)Item Operation/DescriptionView View detailsCall Make calls >Select an item 7 Operate selected item (ZFrom Step 3 on P.2-11)Create MessageCreate New S! Mail/SMS >S! Mail or SMS 7 Create message (S! Mail: ZFrom Step 4 on P.12-4/SMS: ZFrom Step 4 on P.12-8)Edit >Select an item 7 Edit entry 7 A[Save] To delete Birthday/Address/Picture: ZP.4-10New Entry Create new entry (ZFrom Step 2 on P.4-3)Send Send Phone Book entries via S! Mail/Infrared >Attach to S! Mail or Infrared 7 Operate selected item (S! Mail: ZFrom Step 2 on P.12-4/Infrared: ZP.9-3)Change View Switch Phone Book to open >Select an itemSearch Method >Select a search methodSpeed Dial Set phone numbers to Speed Dial (ZP.4-8) for easy dialing >(Select a number 7 ) Select a key number ([1] - [9])Item Operation/DescriptionCopy to USIM/Copy to Phone (ZP.4-10)Delete >A[YES]](https://usermanual.wiki/Panasonic-Connect/209025A.User-Manual-1-of-5/User-Guide-1228967-Page-91.png)
![Phone Book44-10Managing Phone BookEditing Phone Book Entries1 7 Highlight a Phone Book entry 7 A[Menu] 7 Edit2 Edit entry 7 A[Save] Delete Birthday >Highlight Birthday field 7 A[Menu] 7 Clear Birthday Delete All Items in Address Field >Highlight Address field 7 A[Menu] 7 Clear Address Delete Picture >Select Picture field 7 No PicturesDeleting Phone Book EntriesDeleting a Phone Book Entry1 7 Highlight a Phone Book entry 7 A[Menu]2 Delete 7 Deleting All Phone Book Entries Main Menu 4 Phone 4 Memory Manager 4 Delete All(Phone) or Delete All(USIM)1 A[YES] 7 Enter Phone PasswordCopying Phone Book Data Entry items unsupported by USIM Card are not copied.Copying One by One1 7 Highlight a phone Book entry 7 A[Menu] 7 Copy to Phone or Copy to USIMCopying All Entries Main Menu 4 Phone 4 Memory Manager 4 Copy All from USIM or Copy All to USIM1 Note Some entry items are not supported by USIM Card. While Secret Data Only is active, Copy All from USIM is not available.](https://usermanual.wiki/Panasonic-Connect/209025A.User-Manual-1-of-5/User-Guide-1228967-Page-92.png)
![Phone Book44-13Auto Synchronization Main Menu 4 Phone 4 S! Addressbook Back-up 4 Auto Sync Settings1 ON/OFF2 Enter Phone Password 7 ON To cancel, select OFF.3 Select an item (See below)Item Operation/DescriptionWeekly Synchronize weekly at specified time of the day >Select a day 7 Set start timeMonthly Synchronize monthly at specified time of the date >Enter a date 7 Set start timeAfter Editing Phone BookSynchronize ten minutes after editing4 Select a Sync type 7 View Auto Sync Settings >In Step 1, Confirm SettingsView Sync LogView synchronization/back-up/restoration logs.Main Menu 4 Phone 4 S! Addressbook Back-up 4 Sync Log1 Select a log Delete Sync Log >In Step 1, (highlight a log 7 ) A[Menu] 7 Delete One or Delete All 7 ( 7 For Delete All, enter Phone Password)](https://usermanual.wiki/Panasonic-Connect/209025A.User-Manual-1-of-5/User-Guide-1228967-Page-95.png)
![Phone Book44-14Account DetailsSave phone number, mail address, street address, etc. in Account Details.Editing Account Details1 7 P2 A[Menu] 7 Edit3 Select an item 7 Edit 7 A[Save] Your subscribing phone number cannot be edited or deleted.Account Details FunctionsIn Account Details, press A[Menu] for following operations.Item Operation/DescriptionEdit Edit Account Details (ZFrom Step 3 above)Send Send details via S! Mail/Infrared >Attach to S! Mail or Infrared 7 Operate selected item (S! Mail: ZFrom Step 2 on P.12-4/Infrared: ZP.9-3) Image cannot be sent.Reset Reset Account Details (handset number remains) >Note Insert Account Details information to a message (ZP.3-4).](https://usermanual.wiki/Panasonic-Connect/209025A.User-Manual-1-of-5/User-Guide-1228967-Page-96.png)
![5-2Digital TV5Basics841P supports One Seg terrestrial digital TV broadcasting.One SegOne Seg is a digital TV broadcasting service for mobile phones.For more information, visit The Association for Promotion of Digital Broadcasting Website:[PC] http://www.dpa.or.jp/[Handset] http://www.dpa.or.jp/1seg/k/(Japanese only)FeaturesWatch TV Programs (ZP.5-5)Watch One Seg Digital TV on handset.View Data Broadcast (ZP.5-7)Access a variety of program-related information.Precautions Digital TV is available only in Japan. Incoming calls/messages may affect TV image or audio quality while TV is activated. Digital TV may be disabled if USIM Card is not installed or SoftBank subscription is terminated. SoftBank is not liable for damages from accidental loss/alteration of handset information. Data saved to handset (TV Links, Channel List, etc.) cannot be restored after repairs or handset replacement. Back up important information.](https://usermanual.wiki/Panasonic-Connect/209025A.User-Manual-1-of-5/User-Guide-1228967-Page-98.png)
![5-4Digital TV5Channel SettingsAutomatic Channel SetupMain Menu 4 TV 4 Channel Settings 4 Set from Current Location1 2 After channel search, 7 Enter title If title is not entered, date (year/month/day/hour/minute) is automatically saved as title.Using Channel ListFrom Main Menu 4 TV 4 Channel List Set Channels >Select a Channel List Channel List is set, and available channels appear. Select a channel to access the station. Delete Channel List >Highlight a Channel List 7 A[Menu] 7 Delete One 7 Selected Channel List cannot be deleted. Delete Channels from Channel List >Highlight a Channel List 7 A[Menu] 7 Channel Information 7 Highlight a channel 7 A[Menu] 7 Delete One 7 Channels in selected Channel List cannot be deleted. Edit Title >Highlight a Channel List 7 A[Menu] 7 Edit title 7 Edit Reassign a Remote Control Number (Keypad) to a Channel >Highlight a Channel List 7 A[Menu] 7 Channel Information 7 A[Menu] 7 Set Remote Control No. 7 Select a channel 7 Select a new remote control number 7 A[Complete] 7](https://usermanual.wiki/Panasonic-Connect/209025A.User-Manual-1-of-5/User-Guide-1228967-Page-100.png)
![5-5Digital TV5Watching TV Set channels beforehand (ZP.5-3). Change default view (ZP.16-15)1 1Viewer appears. To change view: S2 Select a channelDirect Channel AccessQ - OG (Channel 10)P (Channel 11)H (Channel 12)Previous/ Next ChannelChannel Search Press and hold To stop:S[Cancel] / K3 To end TV, L 7 ViewerNote Alternatively, Main Menu 4 TV 4 Watch TV. After TV pauses for incoming calls in Wide Screen, TV restarts in Normal Screen. To toggle screens, press S.](https://usermanual.wiki/Panasonic-Connect/209025A.User-Manual-1-of-5/User-Guide-1228967-Page-101.png)
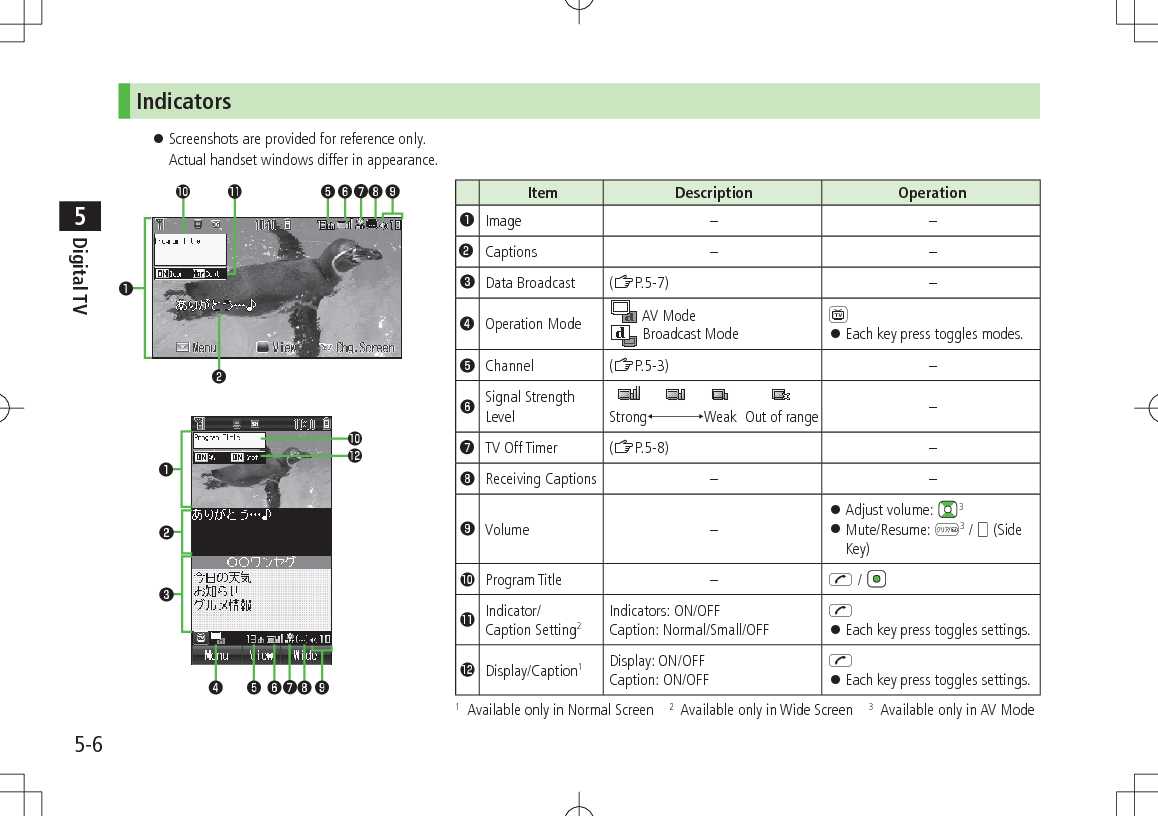
![5-7Digital TV5Program List (Japanese)Check program schedules to view TV programs.Main Menu 4 TV 4 Program List Confirmation appears when using Program List for first time. Follow onscreen instructions. See Program List Help menu for usage information. View Program List while TV is Active >A[Menu] 7 Program List Alternatively, press F in Normal Screen.Data Broadcast (Japanese) Access a variety of program-related information such as still images and videos. Data Broadcast is not available in Wide Screen.1 Activate TV (AV Mode) 7 1 appears. to select information To deactivate Data Broadcast Mode: 1Note Viewing Data Broadcast information requires no fees: however, accessing websites will incur connection fees.](https://usermanual.wiki/Panasonic-Connect/209025A.User-Manual-1-of-5/User-Guide-1228967-Page-103.png)
![5-8Digital TV5Functions while Viewing TV Sound Settings >While TV is active, A[Menu] 7 Select an item (See below)Item Operation/DescriptionChannel InformationView channel details. Select a channel to watch that stationProgram InformationView current program informationChannel List View current Channel List (ZP.5-4)Channel SettingsSet channels for your area (ZP.5-3)Add to Channel ListAdd current station to Channel List > Assign current station to lowest available number key.Program List View program listSwitch SettingsSwitch screen/operation mode >Select an itemSwitch Display : Change display viewSwitch Operation Mode : Switch AV Mode/ Broadcast Mode in Normal ScreenItem Operation/DescriptionMisc. Settings >Select an itemTV Off Timer : Deactivate TV automatically after specified time elapsesBacklight Settings (ZP.16-15)Sound Settings : Set main/sub soundIcon Always Display (ZP.16-15)Data BroadcastingSound Effect : Turn on/off sounds from Data Broadcast/sitesReset Confirmation Display : Show confirmation on Data BroadcastReturn to DBC* End Data Broadcast site and return to Data BroadcastwindowTuning Service Select a program when multiple programs are available from the same broadcasting company >Select a station or its affiliateTV Link Show TV Link details* Available only when Data Broadcast Mode is on](https://usermanual.wiki/Panasonic-Connect/209025A.User-Manual-1-of-5/User-Guide-1228967-Page-104.png)
![5-9Digital TV5TV Links (Japanese)Saving TV Links Following function is not available in Wide Screen.1 Switch Data Broadcast Mode on 7 Select a link2 Follow onscreen instructions to save link.Opening TV LinksMain Menu 4 TV 4 TV Link1 Select a TV Link Confirmation appears when Internet access is required. Press to proceed. If TV Link is expired, confirmation appears asking whether to delete link.Functions Available in TV Link ListMain Menu 4 TV 4 TV Link1 A[Menu] 7 Select an item (See below)Item Operation/DescriptionDetailed DisplayShow TV Link title, URL, summary, content type, expiration dateNumber of TV LinkShow number of saved TV LinksDelete >Select an itemOne 7 Selected Files 7 Check TV link(s) 7 A[Menu] 7 Delete 7 All 7 A[YES] 7 Enter Phone Password](https://usermanual.wiki/Panasonic-Connect/209025A.User-Manual-1-of-5/User-Guide-1228967-Page-105.png)
