Panasonic Connect 210029A UMTS/ GSM Cellular Mobile with RFID User Manual 1 of 2
Panasonic Mobile Communications Development of Europe Ltd UMTS/ GSM Cellular Mobile with RFID 1 of 2
Contents
- 1. User Manual 1 of 2
- 2. User Manual 2 of 2
User Manual 1 of 2
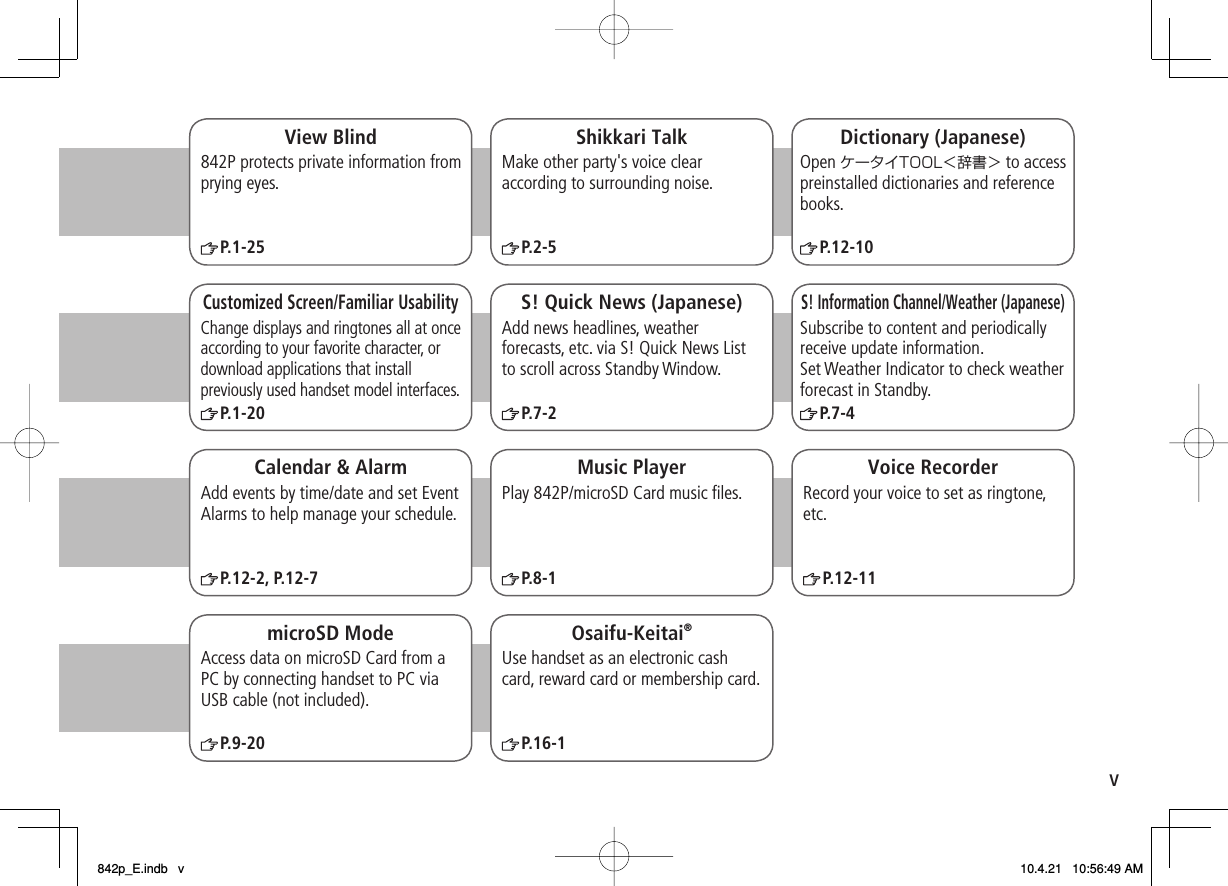
![ixGuide SymbolsPress the corresponding key to execute the function or operation indicated at the bottom of Display.Example:❶❸❺❹❷❶❸❺❹❷Multi Selector Operations (❶)* Softkey labels vary by menu.Multi Selector (❶)Use Multi Selector to select items, navigate menus, etc. In this guide, Multi Selector operations are indicated as shown below.Softkeys (❷❸❹❺)In this guide, Softkey operations are indicated as shown below.Example ❷❸: Q [V. Call], R [Menu][V. Call] and [Menu] are Softkey label examples;Softkey labels vary by menu.Japanese Functions & ServicesWhen "(Japanese)" appears in a title, Japanese ability is required to use full range of the function or service.Operations Softkey Label*Press to select an itemPress Operations Softkey Label*Press to select an itemPress UpUp/Down Up/Down/Left/RightDownLeftLeft/Right CenterRightLeft RightUpDown CenterUpUp/Down Up/Down/Left/RightDownLeftLeft/Right CenterRightLeft RightUpDown Center842p_E.indb ix842p_E.indb ix 10.4.21 10:56:50 AM10.4.21 10:56:50 AM](https://usermanual.wiki/Panasonic-Connect/210029A.User-Manual-1-of-2/User-Guide-1282107-Page-11.png)
![xOperation DescriptionsFollowing are examples of operation descriptions. Please note, actual operations may differ.Basic OperationsOperations are expressed as shown here.Example:Menu Selection❶ Press in Standby to open Main Menu.❷ Use to highlight Phone Book; then press [Select].❸ Use to highlight Group; then press [Select].Steps❶ Use to highlight a group; then press [Edit].❷ Use to highlight an item; then press [Select].❸ Set respective items.Menu Selection StepsMain Menu Phone Book Group appears for USIM Card Group.1Highlight a group [Edit]Select an item Set itemMenu Selection❶ Press in Standby to open Main Menu.❷ Use to highlight Phone Book; then press [Select].❸ Use to highlight Group; then press [Select].Steps❶ Use to highlight a group; then press [Edit].❷ Use to highlight an item; then press [Select].❸ Set respective items.Menu Selection StepsMain Menu Phone Book Group appears for USIM Card Group.1Highlight a group [Edit]Select an item Set itemAdvanced OperationsFor advanced features and settings, go to pages indicated under Tip.Example:Tip●Operations Available during a Voice Call ( P.2-11) ●Making Calls from Call Log ( P.2-14) ●Saving Entered Numbers to Phone Book ( P.4-5)Settings●Set Handset Response when Closed during Call ( P.17-8)SettingsRefer to Chapter 17 "Settings."Tip●Operations Available during a Voice Call ( P.2-11) ●Making Calls from Call Log ( P.2-14) ●Saving Entered Numbers to Phone Book ( P.4-5)Settings●Set Handset Response when Closed during Call ( P.17-8)SettingsRefer to Chapter 17 "Settings."842p_E.indb x842p_E.indb x 10.4.21 10:56:51 AM10.4.21 10:56:51 AM](https://usermanual.wiki/Panasonic-Connect/210029A.User-Manual-1-of-2/User-Guide-1282107-Page-12.png)
![xiAbbreviated DescriptionsFor advanced settings (Chapter 17), initial operations may be abbreviated or omitted.Example:StepsFollow these steps after Abbreviated Steps.Abbreviated StepsInitial steps are abbreviated.From Main Menu Tools CalendarFunctions Available in Calendar Window■Highlight a date >[Menu] Select an item (See below)Item Operation/DescriptionNew Create a new entry ( P.12-2, P.12-3)Weeklydisplay/1 MonthToggle Monthly/Weekly viewIcon display Entries in category of selected icon appearSelect an icon>StepsFollow these steps after Abbreviated Steps.Abbreviated StepsInitial steps are abbreviated.From Main Menu Tools CalendarFunctions Available in Calendar Window■Highlight a date >[Menu] Select an item (See below)Item Operation/DescriptionNew Create a new entry ( P.12-2, P.12-3)Weeklydisplay/1 MonthToggle Monthly/Weekly viewIcon display Entries in category of selected icon appearSelect an icon> Omitted StepsInitial steps are omitted. Start operations from specified window.Use Other Graphic Mail Settings■In S! Mail text entry window,> Select an arrange item(See below) Omitted StepsInitial steps are omitted. Start operations from specified window.Use Other Graphic Mail Settings■In S! Mail text entry window,> Select an arrange item(See below)842p_E.indb xi842p_E.indb xi 10.4.21 10:56:52 AM10.4.21 10:56:52 AM](https://usermanual.wiki/Panasonic-Connect/210029A.User-Manual-1-of-2/User-Guide-1282107-Page-13.png)


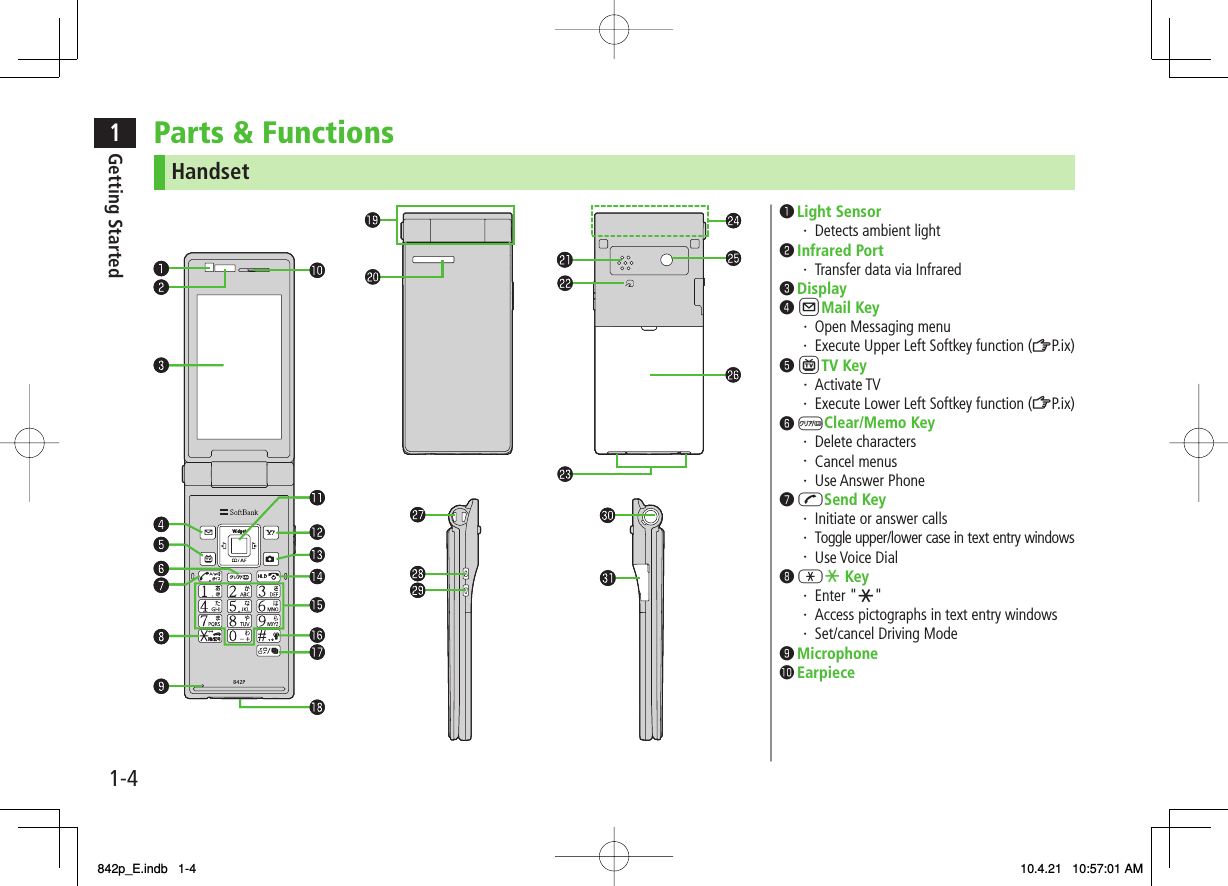
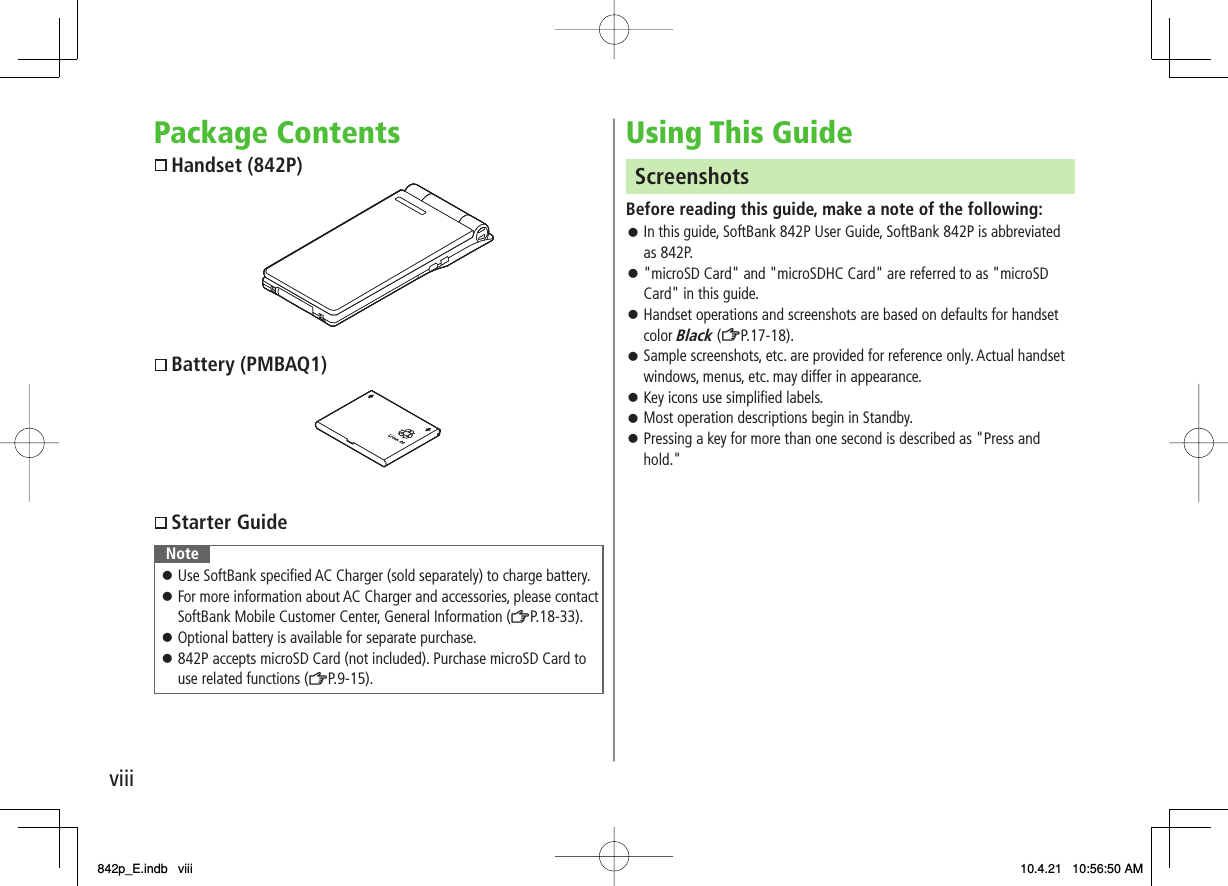
![1-51Getting Started IMulti Selector・ Scroll up/down/left/right to navigate menus and text (ZP.ix)・ AI Select widgets/S! Quick News・ BI Open Phone Book・ CI Open Incoming Call Logs・ DI Open Redial logs RYahoo! Keitai Key・ Open Yahoo! Keitai Main Menu・ Execute Upper Right Softkey function (ZP.ix) OCamera Key・ Activate Camera/Video Camera・ Execute Lower Right Softkey function (ZP. ix) KEnd/Escape & Power Key・ Power on/off (ZP.1-14)・ End calls・ Return to Standby 0 − 9Keypad・ Enter phone number/text ;#/Manner Key・ Enter "#"・ Set/cancel Manner Mode MMULTI Key・ Open TASK MENU・ Open list of available widgets External Port・ Connect AC Charger (sold separately), Earphone Microphone or other accessories here Hinge Notification Light/Charging Indicator・ Flashes for incoming transmissions・ Flashes while Camera is active・ Lights in red for charging Speaker Logo・ Place Logo over a reader/writer when using Osaifu-Keitai® (ZP.13-11) Charging Terminals Antenna Camera Battery Cover Strap Eyelet UUpper Side Key・ Increase earpiece/TV volume・ Open Yahoo! Keitai Bookmarks list [Handset Closed]・ Turn on illumination VLower Side Key・ Decrease earpiece/TV volume [Handset Closed]・ Set/cancel Manner Mode・ Check missed calls/new messages One-push Open Button (ZP.1-6) microSD Card Slot・ Insert microSD Card here (ZP.10-17)NoteWhen connecting Earphone Microphone, do not press the answer button on the microphone. Doing so may cause it to malfunction. In that case, pull out Earphone Microphone, and connect it again.842p_E.indb 1-5842p_E.indb 1-5 10.4.21 10:57:01 AM10.4.21 10:57:01 AM](https://usermanual.wiki/Panasonic-Connect/210029A.User-Manual-1-of-2/User-Guide-1282107-Page-31.png)


![1-171Getting StartedS! Quick News (Japanese)By default, S! Quick News appears at bottom of Display.S! Quick News: ZP.7-2Show/hide S! Quick News: ZP.17-13S! Quick NewsS! Information Channel/Weather (Japanese)Subscribe to content and periodically receive updates. Set Weather Indicator to appear on Standby.S! Information Channel/Weather: ZP.7 -4ShortcutsAccess frequently used functions from Standby.S-1 battle and Content Value Package shortcuts are set by default. Both services available only in Japanese.ShortcutsShortcutsAdding ShortcutsShortcuts may not be available for some functions.1 Open a function, R[Menu] Y Add shortcut icon Y YESAccessing Functions from Shortcuts1 In Standby, AI Y Select an iconThe selected function name appears above icon.To clear: K or L Editing/Deleting Shortcuts1 In Standby, AI Y Highlight an icon Y R[Menu]2 Edit TitleEdit title Y Edit title Delete Shortcut(s)Delete this or Delete all Y YES842p_E.indb 1-17842p_E.indb 1-17 10.4.21 10:57:10 AM10.4.21 10:57:10 AM](https://usermanual.wiki/Panasonic-Connect/210029A.User-Manual-1-of-2/User-Guide-1282107-Page-43.png)
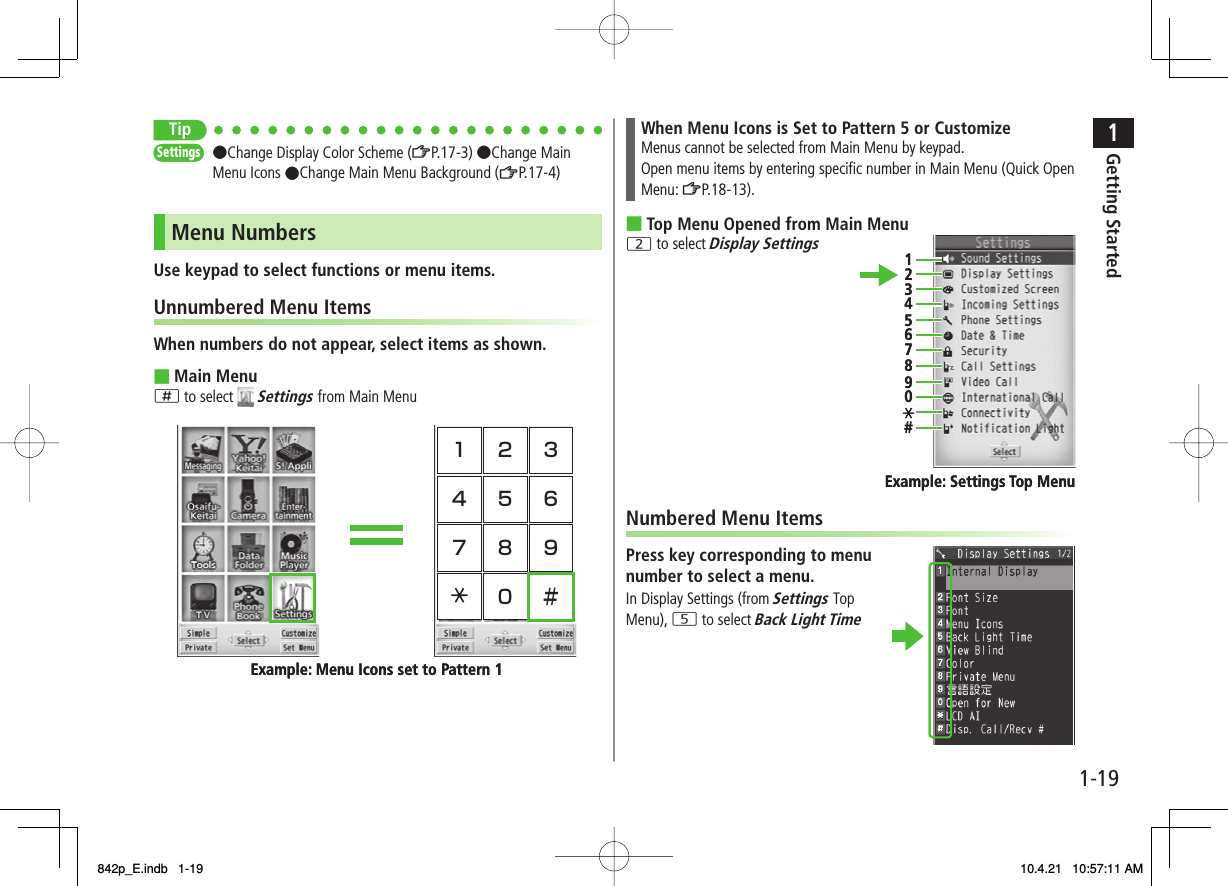
![1-181Getting StartedHandset MenusMain Menu1 In Standby, HIMain Menu appears.To change Main Menu theme:O[Set Menu] Y Select a pattern2 EI to highlight an icon Y HISelected function menu appears.To return to Standby: KNoteStandby window returns after 15 seconds of inactivity in Main Menu.Main MenuStandbyMain MenuStandbyMain Menu IconsMessagingCreate new/view received messagesYahoo! KeitaiEnjoy Mobile Net &PC Site browsing…S! AppliDownload, set and use S! AppliOsaifu-KeitaiUse Osaifu-Keitai®CameraCapture images or record videosEntertainmentUse S! Quick News or E-BooksToolsSet Alarm or save Calendar entries…Data FolderOpen files saved on 842P/microSD CardMusic PlayerUse Music PlayerTVView TV or record/timer-record programsPhone BookSave entries to call or send messages…SettingsAdjust/customizehandset settingsMessagingCreate new/view received messagesYahoo! KeitaiEnjoy Mobile Net &PC Site browsing…S! AppliDownload, set and use S! AppliOsaifu-KeitaiUse Osaifu-Keitai®CameraCapture images or record videosEntertainmentUse S! Quick News or E-BooksToolsSet Alarm or save Calendar entries…Data FolderOpen files saved on 842P/microSD CardMusic PlayerUse Music PlayerTVView TV or record/timer-record programsPhone BookSave entries to call or send messages…SettingsAdjust/customizehandset settings842p_E.indb 1-18842p_E.indb 1-18 10.4.21 10:57:11 AM10.4.21 10:57:11 AM](https://usermanual.wiki/Panasonic-Connect/210029A.User-Manual-1-of-2/User-Guide-1282107-Page-44.png)
![1-201Getting StartedCustomizing User InterfaceCustomized Screen/Familiar UsabilityCustomized Screen Download and set Customized Screen to personalize user interface, ringtone, etc., to a selected theme.Familiar Usability Download Familiar Usability applications that mimic the interface design of other handsets.Downloading Customized Screen/Familiar UsabilityDownload characters or applications from websites.Main Menu ▶ Data Folder ▶ Customized Screen1 Customized Screen or Familiar Usability Y YESWebsite providing characters or applications appears.Follow onscreen instructions.To manage Customized Screen applications in Data Folder:ZP.9-10Setting Customized Screen/Familiar Usability1 In Standby, HI2 R[Customize] Y Customized Screen or Familiar Usability3 Highlight a theme Y Q[Set]To toggle thumbnail and list: O[Change]4 YESNoteCustomized Screen or Familiar Usability cannot be set when battery is low.Other functions are not available while switching. For some seconds after switching is complete, all calls/messages may be blocked.Familiar Usability does not completely remake handset.Alternatively, Main Menu ▶ Settings ▶ Customized ScreenTo cancel, select Release Settings.When Simple menu is active, Customized Screen and Familiar Usability settings are not reflected. To reflect settings, cancel Simple menu.842p_E.indb 1-20842p_E.indb 1-20 10.4.21 10:57:12 AM10.4.21 10:57:12 AM](https://usermanual.wiki/Panasonic-Connect/210029A.User-Manual-1-of-2/User-Guide-1282107-Page-46.png)
![1-211Getting StartedPrivate MenuSave frequently used functions in Private Menu.Up to 12 items can be saved.Change preset functions as needed.Opening Private Menu1 In Standby, HI Y P[Private]Private Menu appears.To return to Main Menu: P[Normal]2 Select a menuChange Private Menu BackgroundAfter Step1, R[Set] Y R[Menu] Y Change BG image Y Select a folder Y Select an image■>Private Menu WindowPrivate Menu WindowCustomizing Private Menu1 In Standby, HI Y P[Private] Y R[Set]2 Highlight a target Y R[Menu] Y Add to menu3 Select an itemCancel FunctionsIn Step 3, (highlight a function Y) R[Menu] Y Release this or Release all Y YESReset Private MenuIn Step 3, R[Menu] Y Reset menu Y YESAdding Shortcuts1 In Standby, HI Y P[Private] Y R[Set]2 R[Menu] Y Add shortcut icon Y YESNoteAlternatively, open Private Menu setting window from Main Menu ▶ Settings ▶ Display Settings ▶ Private Menu■>■>Private Menu Setting WindowPrivate Menu Setting Window842p_E.indb 1-21842p_E.indb 1-21 10.4.21 10:57:12 AM10.4.21 10:57:12 AM](https://usermanual.wiki/Panasonic-Connect/210029A.User-Manual-1-of-2/User-Guide-1282107-Page-47.png)
![1-221Getting StartedSimple MenuActivate Simple menu to limit menu options to basic ones.Handset is limited to basic operations (ZP.1-23).Normal Mode Window Simple Menu Simple Menu WindowNormal Mode Window Simple Menu Simple Menu WindowActivating Simple Menu1 In Standby, HI Y Q[Simple] Y YES2 YES or NOSelect YES to set all items in Font Size (ZP.17-5) to Large.To open Simple menu: HI in Standby.Cancel Simple MenuIn Standby, HI Y Q[Normal] Y YESNoteTurning off the power does not cancel Simple menu.S! Quick News is not available in Simple menu. Customized Screen or Familiar Usability setting is canceled.■>842p_E.indb 1-22842p_E.indb 1-22 10.4.21 10:57:13 AM10.4.21 10:57:13 AM](https://usermanual.wiki/Panasonic-Connect/210029A.User-Manual-1-of-2/User-Guide-1282107-Page-48.png)
![1-241Getting StartedSecurity Code4-digit number specified at initial subscription, required to restrict handset services (ZP.2-20).Enter number within 15 seconds.If entered incorrectly three times, Security Code settings lock; Security Code & Center Access Code must be changed. Reach SoftBank Mobile Customer Center, General Information (ZP.18-33) for details.Security Code can be changed on handset (ZP.2-20).NoteWrite down Phone Password, Center Access Code and Security Code. Do not reveal Phone Password, Center Access Code and Security Code. SoftBank is not liable for misuse or damages.For details, contact SoftBank Mobile Customer Center, General Information (ZP.18-33).Multi TaskActivate up to three functions from four different groups at the same time.Group Function❶ Messaging Group Messaging❷ Yahoo! Keitai/ S! Appli Group Yahoo! Keitai/S! Appli/Entertainment /Osaifu-Keitai (Lifestyle-Appli)❸ Tools Group Music Player*/Camera/Tools/Data Folder/TV/ Phone Book❹ Settings Group Settings/Osaifu-Keitai (IC Card Settings)* Functions other than Tools Group are included.[▼] appears above the icons of an active group. appears for single function in use; for multiple functions in use.Tip●Other Functions while Watching TV (ZP.5-8)●Using Other Functions while Listening to Music (Play Background) (ZP.8 -7)❶❸❷❹❶❸❷❹842p_E.indb 1-24842p_E.indb 1-24 10.4.21 10:57:14 AM10.4.21 10:57:14 AM](https://usermanual.wiki/Panasonic-Connect/210029A.User-Manual-1-of-2/User-Guide-1282107-Page-50.png)
![1-251Getting StartedActivating Another FunctionActivate another function from a different group. Multi Task is unavailable when Simple menu is active.1 M Y Open Menu Y Select a functionNoteIf another function is selected from same group, confirmation appears. Select YES to cancel current function and start a new function.Switching Functions1 M Y Select a functionEach press cycles through activated functions.Ending Current Functions1 KEnd All Active FunctionsM Y R[ ] Y YES■>TASK MENU WindowTASK MENU WindowView BlindActivate View Blind to protect Display from prying eyes.Main Menu ▶ Settings ▶ Display Settings ▶ View Blind1 ON2 Select a levelSet level 1-3 (Level 3 is the highest level).NoteAlternatively, press and hold 8 to activate/cancel. Previously selected level takes priority.View Blind cannot be activated: While in Standby; while S! Appli is active; while Privacy Key Lock is active; during All Reset842p_E.indb 1-25842p_E.indb 1-25 10.4.21 10:57:14 AM10.4.21 10:57:14 AM](https://usermanual.wiki/Panasonic-Connect/210029A.User-Manual-1-of-2/User-Guide-1282107-Page-51.png)
![2Call2-3Outgoing Call FunctionsShowing/Hiding Caller IDEnter a number Y R[Menu] Y Notify caller ID Y OFF or ONSetting Caller ID on/off (Caller ID: ZP.2-21)Adding Prefix to Phone NumberSave PrefixMain Menu ▶ Settings ▶ Call Settings ▶ Prefix ▶ Highlight <Not Recorded> ▶ Q[Edit] ▶ Enter a name ▶ Enter a prefix numberUp to seven entries can be saved.To check entries: Select a saved prefix.To delete entries: Highlight a prefix Y R[Menu] Y Delete this or Delete all (Y For Delete all, enter Phone Password) Y YESMake Calls Using PrefixEnter a number Y R[Menu] Y Prefix numbers Y Select an entry Y Voice Calls: J / Video Calls: Q[V. Call]Alternatively, in detail window of Phone Book, Redial, Outgoing Call Logs or Incoming Call Logs, R[Menu] Y Prefix numbers Y Select an entry Y Voice Calls: J / Video Calls: Q[V. Call]Example: Save "186" and "184" as prefixes, and add them to phone numbers to show/hide your caller ID when making calls.>■>■>Sending Touch-tone SignalsSend touch-tone signals for services such as reserving tickets, checking bank balance, etc. Save number strings to be sent as a touch-tone signal. Use P (pause) to separate numbers when saving.Save Pause DialMain Menu ▶ Settings ▶ Phone Settings ▶ Pause Dial ▶ Q[Edit] ▶ Enter a number stringTo enter a pause (p): Press and hold *To delete: In Pause Dial window, R[Menu] Y Delete Y YESSend Pause DialMain Menu ▶ Settings ▶ Phone Settings ▶ Pause Dial ▶ HI[Send] ▶ Enter a phone number ▶ J / HI[Dial] ▶ Once line is connected, press HI[Send] Number string is sent each time HI[Send] is pressed.To send all number strings at one time: Once line is connected, press and hold DI Y Send at one time■>■>842p_E.indb 2-3842p_E.indb 2-3 10.4.21 10:57:16 AM10.4.21 10:57:16 AM](https://usermanual.wiki/Panasonic-Connect/210029A.User-Manual-1-of-2/User-Guide-1282107-Page-55.png)
![2Call2-5Answering Voice CallsWhen a Call Arrives…842P rings; Notification Light flashes.If Caller ID is sent, number appears in Display; if saved in Phone Book, caller's name appears.When an International call arrives, appears at upper left of caller's phone number in Display.1 J to talkTo adjust volume: GI or UV2 K to end callCall Time appears.Adjust Ringer VolumeWhile 842P is ringing, GIVolume adjustment is disabled in following cases:・ During Manner Mode (ZP.1-15)・ While Ringer Volume is set to Escalating Tone (ZP.17-2) NoteWhen Caller ID is not sent, Withheld appears.■>Tip●Operations Available during a Voice Call (ZP.2-11)●Rejecting Unknown Callers●Rejecting Calls without Caller ID (ZP.11-11)●Answer Calls by Opening Handset ●Change Answer Setting(ZP.17-6)Incoming Call FunctionsFollowing operations are available for incoming calls.Place Calls on HoldK>Answer Phone Q / V>Call Rejection R[Menu] Y Call RejectionRejecting Unknown Callers/Rejecting Calls without Caller ID (ZP.11-11)>Call ForwardingR[Menu] Y Call ForwardingActivate Call Forwarding (ZP.2-17) beforehand to forward incoming calls to a preset number.If Call Forwarding is not active, call is rejected.>Making Voice Clear (Shikkari Talk)<Default> ONMake other party's voice clear according to surrounding noise.Main Menu ▶ Settings ▶ Call Settings ▶ Shikkari Talk1 ON or OFFSettingsSettings842p_E.indb 2-5842p_E.indb 2-5 10.4.21 10:57:16 AM10.4.21 10:57:16 AM](https://usermanual.wiki/Panasonic-Connect/210029A.User-Manual-1-of-2/User-Guide-1282107-Page-57.png)
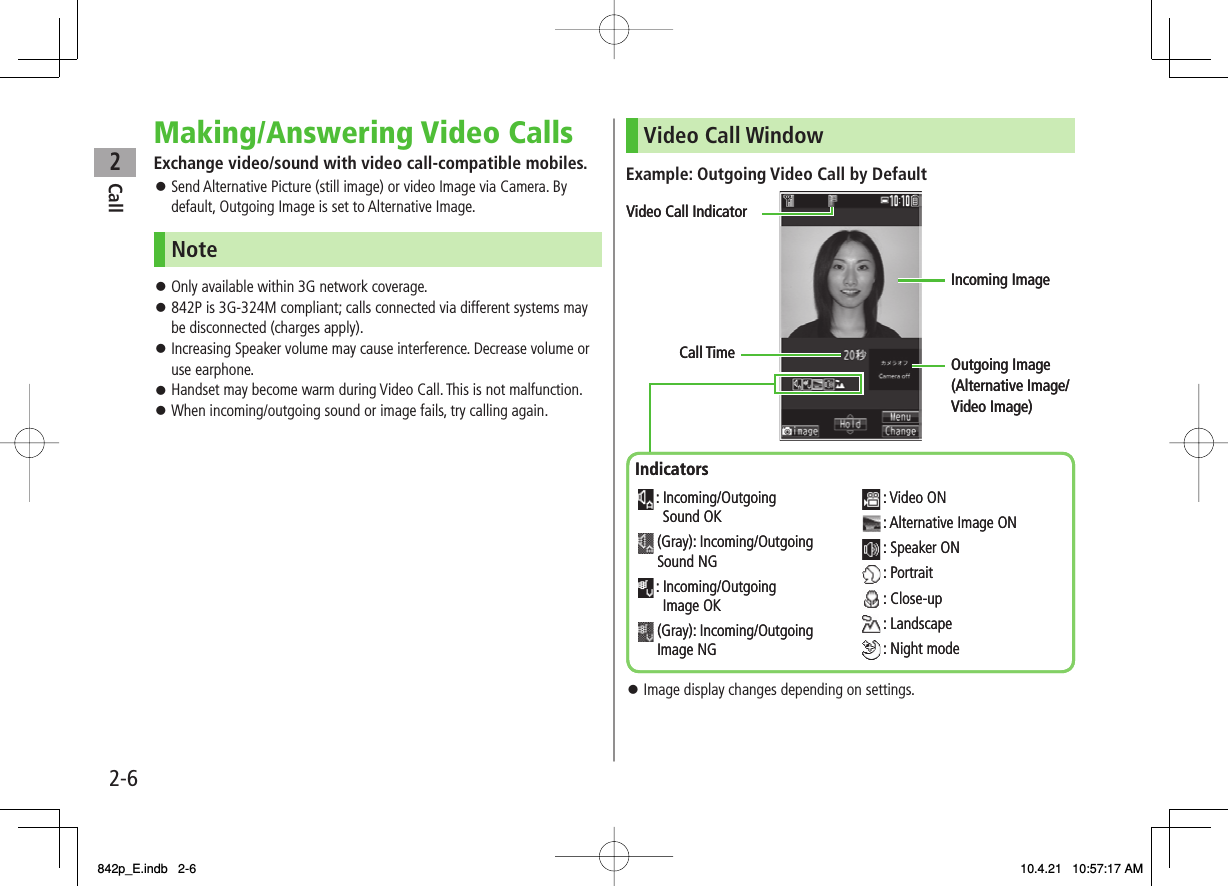
![2Call2-7Making Video CallsBefore CallingConfirm signal strength (ZP.1-8)If any of these indicators appear: Video Calls cannot be made (ZP.1-8, P.1-9, P.18-11)1 Enter a phone number2 Confirm the number, then Q[V. Call]When answered, outgoing and incoming images appear; other party's voice sounds via Speaker.To adjust volume: GI or UV3 K to end callNoteOther party's voice sounds via Earpiece in Manner Mode; activate Speaker (ZP.2-12).Tip●Outgoing Call Functions (ZP.2-3)●Operations Available during a Video Call (ZP.2-12)●Making Calls from Call Log (ZP.2-14)●Other Ways to Add New Entries (ZP.4-5)●Making Calls from Phone Book (ZP.4-6)●Change Outgoing Alternative Image ●Switch to Voice Call when Video Call Fails (ZP.17-10)SettingsSettings842p_E.indb 2-7842p_E.indb 2-7 10.4.21 10:57:17 AM10.4.21 10:57:17 AM](https://usermanual.wiki/Panasonic-Connect/210029A.User-Manual-1-of-2/User-Guide-1282107-Page-59.png)
![2Call2-8Answering Video CallsWhen a Video Call Arrives…842P rings; Notification Light flashes.If Caller ID is sent, number appears in Display; if saved in Phone Book, caller's name appears. When an International call arrives, appears at upper left of caller's phone number in Display.1 JAlternative Image is sent.To send Video Image:P[ ]2 K to end callNoteOther party's voice sounds via Earpiece in Manner Mode; activate Speaker (ZP.2-12).Tip●Adjust Ringer Volume ●Incoming Call Functions (ZP.2-5)●Operations Available during a Video Call (ZP.2-12)842p_E.indb 2-8842p_E.indb 2-8 10.4.21 10:57:18 AM10.4.21 10:57:18 AM](https://usermanual.wiki/Panasonic-Connect/210029A.User-Manual-1-of-2/User-Guide-1282107-Page-60.png)
![2Call2-9International CallsCalling Abroad from JapanApplication not required. For details, go to:http://mb.softbank.jp/en/global_services/call/1 Enter a phone number2 R[Menu] Y Int'l dial assistCountry/region code list appears.3 Select a country/region4 Voice CallsJ Video CallsQ[V. Call]Enter Country/Region Code Directly0 Y Press and hold 0 to display "+ (IDD Prefix)" Y Enter a country/region code Y Enter a number (omit first 0) Y Voice Calls: J / Video Calls: Q[V. Call]Do not omit leading 0 to call Italy (country code: 39).■>Calling while AbroadMay require application to Global Roaming Service. Download and take Global Roaming Guide when traveling abroad. For details, go to:http://mb.softbank.jp/en/global_services/global_roaming/Example: Calling Japan from Another Country/RegionAuto Assist (ZP.2-10) is set to ON and Japan (+81) by default.Only number starting with 0 is valid.1 Voice CallsEnter a phone number Y J Video CallsEnter a phone number Y Q[V. Call]2 DialFirst 0 is replaced by +81.To call a number just as saved in Phone Book: Dial with orig.No.Calling Other Countries/Regions Using Country/Region CodeFollow the same steps as calling abroad from Japan (ZLeft).Calling within the Same Country/RegionFollow the same steps as making a Voice Call/Video Call within Japan (ZP.2-2, 2-7).842p_E.indb 2-9842p_E.indb 2-9 10.4.21 10:57:18 AM10.4.21 10:57:18 AM](https://usermanual.wiki/Panasonic-Connect/210029A.User-Manual-1-of-2/User-Guide-1282107-Page-61.png)
![2Call2-10Global Roaming SettingsMain Menu ▶ Settings ▶ International CallInternational Call SettingsInt'l Dial Assist Y Select an item (See below)Item Operation/DescriptionAuto Assist Replace IDD Prefix with +ON or OFF (Y For ON, select a country/region)>Country/Area Code Save up to 27 country/region codesHighlight <Not Recorded> Y Q[Edit] Y Enter a country/region name Y Enter a country/region codeTo view an entry: Select a saved country/region nameTo delete: Highlight a country/region name Y R[Menu] Y Delete this or Delete all (Y For Delete all, enter Phone Password) Y YES>IDD Prefix Edit IDD Prefix. IDD Prefix is set to 0046010 by defaultR[Menu] Y Edit Y Edit IDD Prefix>■>FromFromNetwork Mode<Default> AutomaticallySelect Network Y Select an item (See below)Item Operation/DescriptionAutomatically3G/GSM service area in Japan or abroad.842P selects 3G network in Japan or an available network automatically using area (network condition) abroad.Manually:3G/GSM 3G/GSM service area in Japan or abroad.842P selects an available network using area (network condition).Manually: 3G 3G service area in Japan or abroad.Manually: GSMGSM service area abroad. Unavailable in Japan.Automatically is recommended.Select Operator<Default> AutoSelect Operator Y Select an item (See below)Item Operation/DescriptionAuto Select an operator automaticallyManual Select an operator manuallySelect an operatorOperators with X are not available.To show operator list: Q[Update]>NetworkRe-search Search available networksWhen Auto is set, 842P selects an available operator automatically. When Manual is set, operator list appears.■>■>842p_E.indb 2-10842p_E.indb 2-10 10.4.21 10:57:19 AM10.4.21 10:57:19 AM](https://usermanual.wiki/Panasonic-Connect/210029A.User-Manual-1-of-2/User-Guide-1282107-Page-62.png)
![2Call2-11Operator Priority for Automatic SearchPLMN Setting Y R[Menu] Y Select an item (See below)Item Operation/DescriptionAdd your network Save currently connected operatorQ[Finish] Y YES>Add from list Select an operator Y HI[Set] Y Select a network type Y Q[Finish] Y YESTo search operators by country/region: Q[Search] Y Select a country/region (To search again in country/ region list: Q[Search] Y Enter a country/region name)>Direct input Save unlisted operators by entering country/region code and operator codeEnter country/region code (3 digits) and operator code (2 to 3 digits) Y Select a network type Y Q[Finish] Y YES>Change priority Select a priority Y Q[Finish] Y YES>Delete this/ Delete allYES Y Q[Finish] Y YES>View Operator Name in Standby<Default> OFFOperator Name Y ON or OFFWhen ON is set, Clock Position is set to Pattern 1 even when Pattern 2 - Pattern 12 is set (ZP.17-4).■>■>Engaged Call FunctionsOperations Available during a Voice CallAdjust Volume GI / UVAdjust volume within two seconds.Adjusted volume is retained even after calls end or handset is turned off.>Place Call on HoldHI[Hold]To resume call: J>Speaker ON/OFF Toggle Speaker or EarpieceJ>Record Conversation Record for about three minutes per callPress and hold V or Q[Rec]To end recording: HI[Stop], L or press and hold VTo play back recorded data: ZP.2-15>Manner Mode ON/OFF Press and hold ;>842p_E.indb 2-11842p_E.indb 2-11 10.4.21 10:57:19 AM10.4.21 10:57:19 AM](https://usermanual.wiki/Panasonic-Connect/210029A.User-Manual-1-of-2/User-Guide-1282107-Page-63.png)
![2Call2-12Operations Available during a Video CallAdjust Volume GI / UVAdjust volume within two seconds.Adjusted volume is retained even after calls end or handset is turned off.>Place Call on HoldHI[Hold]To resume call: J>Speaker ON/ OFF Toggle Speaker or EarpieceJ>Record Conversation Record up to five calls for about 20 seconds eachPress and hold VTo end recording: HI[Stop] or press and hold VTo play back recorded data: ZP.2-15>Camera/ Alternative ImageToggle Camera Image and Alternative ImageP[ /Subst.]>Incoming/ Outgoing ImageToggle Incoming Image and Outgoing ImageO[Change]>Zoom DI (zoom in) or CI (zoom out)>Toggle Manner Mode Press and hold ;>Backlight SettingR[Menu] Y Back light Y Constant light or 15 seconds light>Video Call SettingR[Menu] Y V. Call settings Y Follow the steps for selected item (ZP.17-11)>LCD AI Activate/deactivate auto image compensationR[Menu] Y LCD AI Y ON or OFF>Account DetailsR[Menu] Y Account details>Key Guide R[Menu] Y Key guide>842p_E.indb 2-12842p_E.indb 2-12 10.4.21 10:57:19 AM10.4.21 10:57:19 AM](https://usermanual.wiki/Panasonic-Connect/210029A.User-Manual-1-of-2/User-Guide-1282107-Page-64.png)
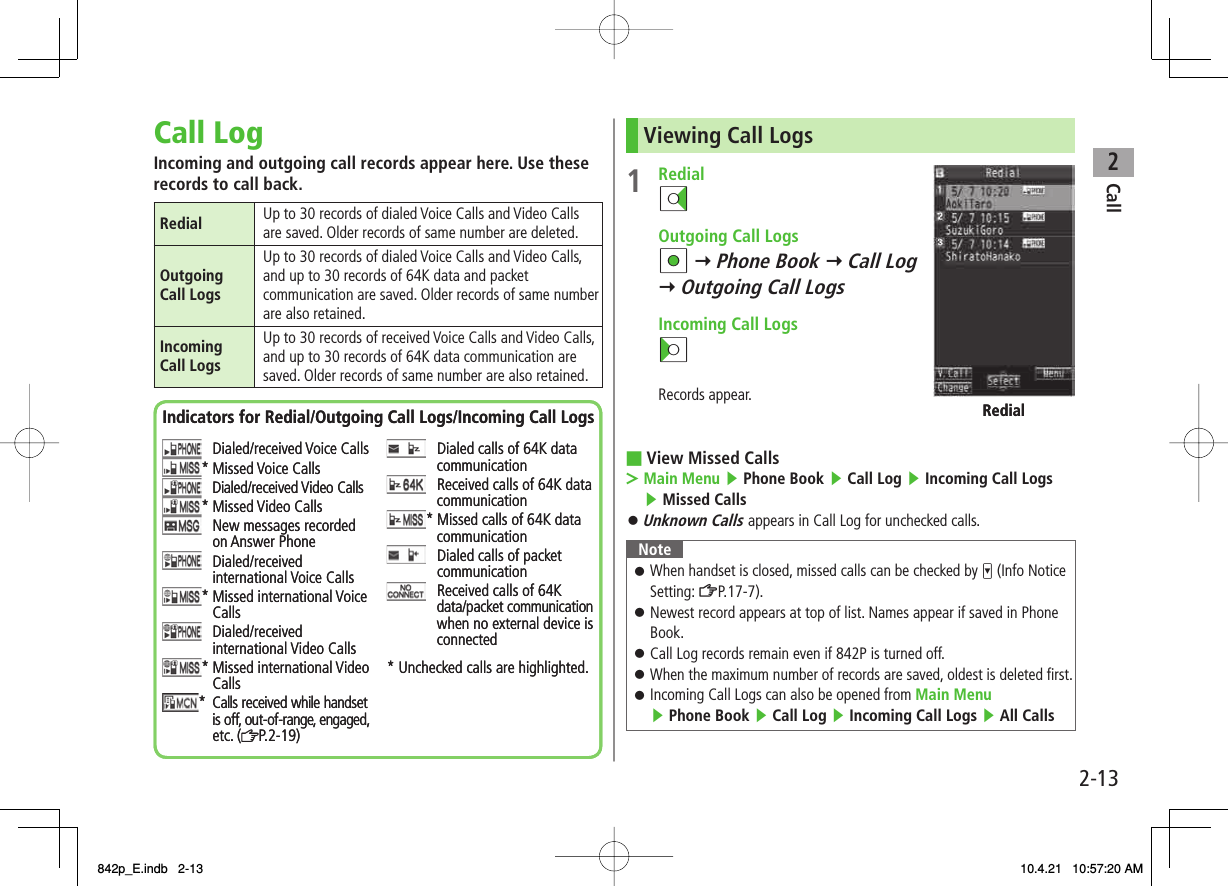
![2Call2-14Making Calls from Call Log1 Open Call Logs (ZP.2-13) 2 Voice CallsHighlight a phone number or name Y J Video CallsHighlight a phone number or name Y Q[V. Call] International Calls Select a phone number or name Y R[Menu] Y Int'l dial assist Y Select a country/region Y J/Q[V. Call]Functions Available from Call LogHighlight a call record and press R[Menu].Available functions vary by selected log/record.Item Operation/DescriptionNotify caller IDNotify or withhold your Caller ID (ZP.2-3)Prefix numbers Add a prefix to phone number before dialingSelect an entry Y J>Int'l dial assist Add international dialing prefixSelect a country/region Y J>Character size Toggle font sizeAdd to Phone Book Save number to Phone Book (ZP.4-5)Ring time 1Show ring time (missed calls)Add shortcut icon Create a shortcut (ZP.1-17)Compose S! Mail Create S! Mail(ZFrom Step 4 on P.13-4)Compose SMS 2Create SMS(ZFrom Step 4 on P.13-7)Received address/Sent addressShow Received/Sent address logDelete this/ Delete selected/ Delete allDelete record(s) in selected list>1 Available only for Incoming Call Logs2 Message can be sent to SoftBank handsets only842p_E.indb 2-14842p_E.indb 2-14 10.4.21 10:57:21 AM10.4.21 10:57:21 AM](https://usermanual.wiki/Panasonic-Connect/210029A.User-Manual-1-of-2/User-Guide-1282107-Page-66.png)
![2Call2-15Answer PhoneRecord up to five voice messages for Voice Calls or up to two for Video Calls (up to 20 seconds per message) on 842P.When Answer Phone is active, – (Voice Call) or – (Video Call) appears in Standby.Unavailable when: handset is off or in Emission OFF Mode; appears. Use Voice Mail (ZP.2-18).Activating/Canceling Answer Phone<Default> OFF1 Press and hold L To cancel: Press and hold L again.Redirect a Call to Answer PhoneQ[Ans. Ph] or VNoteAlternatively, activate/cancel from Main Menu ▶ Tools ▶ Sound Recorders ▶ Answer Phone Setting ▶ ON or OFFWhen full, new messages cannot be recorded even if Answer Phone is activated. Delete old messages.■>Playing MessagesWhen a new message is recorded, Event Indicator appears (ZP.1-16) in Standby. 1 Select indicator2 Select a messagePlayback starts.After playback ends, indicator disappears.NoteAlternatively, press L in Standby (for Voice Call messages) or Main Menu ▶ Tools ▶ Sound Recorders ▶ Voice Call Data or Video Call Data ▶ Select a recordingPlay Recorded Caller's Voice/VideoMain Menu ▶ Tools ▶ Sound Recorders ▶ Voice Call Data or Video Call Data ▶ Call Data■842p_E.indb 2-15842p_E.indb 2-15 10.4.21 10:57:21 AM10.4.21 10:57:21 AM](https://usermanual.wiki/Panasonic-Connect/210029A.User-Manual-1-of-2/User-Guide-1282107-Page-67.png)
![2Call2-16Answer Phone FunctionsMain Menu ▶ Tools ▶ Sound RecordersSelect Outgoing Message/Set Ring TimeAnswer Phone Setting Y ON Y Select a message Y Enter ring timeWhen Answer Phone and Voice Mail or Call Forwarding are both active, function with shorter ring time takes priority.For example, if Answer Phone ring time is 18 seconds and Optional Service is 20 seconds, Answer Phone responds first (Priority may change due to signal conditions.).Delete Recorded Call DataVoice Call Data or Video Call Data Y (Highlight an item) R[Menu] Y Erase this, Erase rec. msg., Erase Call Data* or Erase all Y YES* Video Call Data only■>■>FromFromOptional ServicesOverviewFor details, visit SOFTBANK MOBILE Corp. Website(http://www.softbank.jp).Call Forwarding (zZP.2-17)Forward unanswerable calls to a preset number when handset is off, out-of-range, etc.Voice Mail (zZP.2-18)Unanswered calls are forwarded to Voice Mail Center as set or when handset is off, out-of-range, engaged, etc.Missed Call Notification (ZP.2-19)Call Waiting* (zZP.2-19)Place the current call on hold and answer a second, or alternate between calls.Call Barring (zZP.2-20)Restrict calls by condition.While Call Forwarding or Voice Mail Service is active, Bar All Outgoing and Bar All Incoming are not available (Call Forwarding or Voice Mail Service is prioritized.).Caller ID (zZP.2-21) Show or hide your number when calling.* Separate subscription required.842p_E.indb 2-16842p_E.indb 2-16 10.4.21 10:57:21 AM10.4.21 10:57:21 AM](https://usermanual.wiki/Panasonic-Connect/210029A.User-Manual-1-of-2/User-Guide-1282107-Page-68.png)
![2Call2-17Call ForwardingCall Forwarding and Voice Mail cannot be set simultaneously.When forwarding Video Calls, set a destination phone that supports 3G-324M standard video calls. If not, Video Calls are not forwarded.Activating Call ForwardingMain Menu ▶ Settings ▶ Call Settings ▶ Voice Mail/Call Fwding ▶ Call Forwarding ON1 Select a type2 Enter a destination phone numberGI to select number from Phone Book.3 Select an item (See below)Item Operation/DescriptionRinger ON Forward missed callsSelect a ring time Y YES>Ringer OFF Forward all calls without ringing/vibratingYES>Check Call Forwarding StatusMain Menu ▶ Settings ▶ Call Settings ▶ Voice Mail/Call Fwding ▶ Get Status■>Cancel Call ForwardingMain Menu ▶ Settings ▶ Call Settings ▶ Voice Mail/Call Fwding ▶ Deactivate All ▶ YESNoteToll free numbers and international call numbers cannot be saved as a destination number.When using Call Forwarding together with Answer Phone, the function with shorter ring time takes priority (Priority may change due to signal conditions.).When Ringer ON is set while 842P is ringing/vibrating (within ring time), the following operations are available:・ To answer call: J・ To forward call: R[Menu] Y Call Forwarding■>842p_E.indb 2-17842p_E.indb 2-17 10.4.21 10:57:22 AM10.4.21 10:57:22 AM](https://usermanual.wiki/Panasonic-Connect/210029A.User-Manual-1-of-2/User-Guide-1282107-Page-69.png)
![2Call2-18Voice MailCalls are forwarded to Voice Mail Center via Call Forwarding function; Call Forwarding and Voice Mail cannot be set simultaneously.Voice Mail is not available for Video Calls.Activating Voice MailMain Menu ▶ Settings ▶ Call Settings ▶ Voice Mail/Call Fwding ▶ Voice Mail ON1 Select an item (See below)Item Operation/DescriptionRinger ON Forward missed callsSelect a ring time Y YES>Ringer OFF Forward all calls without ringing/vibratingYES>Check Voice Mail StatusMain Menu ▶ Settings ▶ Call Settings ▶ Voice Mail/Call Fwding ▶ Get StatusCancel Voice MailMain Menu ▶ Settings ▶ Call Settings ▶ Voice Mail/Call Fwding ▶ Deactivate All ▶ YES■>■>NoteWhen using Voice Mail together with Answer Phone, the function with shorter ring time takes priority (Priority may change due to signal conditions.).When Ringer ON is set while 842P is ringing/vibrating (within ring time), the following operations are available:・ To answer call: J・ To forward call: R[Menu] Y Call ForwardingChecking Voice Mail MessagesEvent Indicator (ZP.1-16) and appear in Standby when new messages are recorded.1 AI Y Select indicator Y YESFollow voice guidance.Indicator and disappear after messages are checked.View DetailsView callers' phone numbers and date/time Voice Mail messages were left before playing messages.Activate Missed Call Notification beforehand.CI Y Voice Mail Notif. Y O[ ]Delete IndicatorMain Menu ▶ Settings ▶ Call Settings ▶ Voice Mail/Call Fwding ▶ Delete Voice Mail Icon ▶ YES■>■>842p_E.indb 2-18842p_E.indb 2-18 10.4.21 10:57:22 AM10.4.21 10:57:22 AM](https://usermanual.wiki/Panasonic-Connect/210029A.User-Manual-1-of-2/User-Guide-1282107-Page-70.png)
![2Call2-19NoteAlternatively, follow these steps to check Voice Mail: Main Menu ▶ Settings ▶ Call Settings ▶ Voice Mail/Call Fwding ▶ Listen to Voice Mail ▶ YESMissed Call NotificationWhen Missed Call Notification function is active, Event Indicator appears for calls missed while 842P was off, out-of range, engaged etc.Available only when Voice Mail is active.Main Menu ▶ Settings ▶ Call Settings ▶ Missed Call Notifi.1 YES842P connects to the Network.Follow voice guidance.When Calls are Received while Missed Call Notification is Active…Event Indicator appears for missed calls when 842P is turned on or comes into range. Select indicator to view Missed Calls.Voice mail indicator appears when Voice Mail messages are recorded (ZP.2-18).Call WaitingActivating/Canceling Call WaitingMain Menu ▶ Settings ▶ Call Settings ▶ Call Waiting1 Activate or Deactivate Y YESCurrent status appears.Check Call Waiting StatusMain Menu ▶ Settings ▶ Call Settings ▶ Call Waiting ▶ Get StatusAnswering Second Call1 When tone sounds, JJ to alternate between calls.K to disconnect active call.When the party hangs up, active call ends.J to re-engage the party on hold.When a second call comes in while first call is on hold, hold status is canceled and first call resumes.Reject Second CallWhen tone sounds, R[Menu] Y Call Rejection■>■>842p_E.indb 2-19842p_E.indb 2-19 10.4.21 10:57:23 AM10.4.21 10:57:23 AM](https://usermanual.wiki/Panasonic-Connect/210029A.User-Manual-1-of-2/User-Guide-1282107-Page-71.png)

![3-23Text EntryText EntryEnter alphanumerics, hiragana, kanji, katakana, symbols and pictographs.Three types of character input methods are available: Mode 1 (5-touch), Mode 2 (2-touch), Mode 3 (NIKO-touch)In this guide, examples are described in Mode 1 (5-touch).Mode 2 (2-touch)/Mode 3 (NIKO-touch)Press two numeric keys to enter a character.List of Key Assignments (ZP.18-14 to 16)HelpHelp describes text entry operations.In text entry window, R[Menu] Y Help Y Select an item■>* Operations in Mode 3 (NIKO-touch): ZP.18-16 ❶❷❸❹❶❷❸❹❶Character Input Methods Operations: Mode 2 (2-touch): Mode 3 (NIKO-touch)No icon appears for Mode 1 (5-touch).Press and hold[Mode]❷Input Modes* Operationsabc: Alphanumerics123: Numbers漢: Kanji (hiragana)カナ: Katakana[Mode]❸Double-byte/Single-byte* Operations1/1: Double-byte1/2: Single-byte[Menu]2bytes character(1byte character)❹Remaining/Maximum Bytes in MessageDepending on functions, number of entered characters may appear. ❶Character Input Methods Operations: Mode 2 (2-touch): Mode 3 (NIKO-touch)No icon appears for Mode 1 (5-touch).Press and hold[Mode]❷Input Modes* Operationsabc: Alphanumerics123: Numbers漢: Kanji (hiragana)カナ: Katakana[Mode]❸Double-byte/Single-byte* Operations1/1: Double-byte1/2: Single-byte[Menu]2bytes character(1byte character)❹Remaining/Maximum Bytes in MessageDepending on functions, number of entered characters may appear. 842p_E.indb 3-2842p_E.indb 3-2 10.4.21 10:57:24 AM10.4.21 10:57:24 AM](https://usermanual.wiki/Panasonic-Connect/210029A.User-Manual-1-of-2/User-Guide-1282107-Page-76.png)
![3-33Text EntryEntering TextEntering Characters√Example: Enter 鈴木1 In alphanumerics mode, Q twice to switch to kanji (hiragana) modeす: 3 three timesず: DI* 3 three times *き: 2 twice* When the next character is on the same key, press DI first to move cursor.2 BI to enter Predictive Candidates ListTo change word before converting, press L.There are four types of word suggestion lists: Predictive Candidates, Conversion Candidates, Context Forecast and abc/123/Kana Candidates (ZP.3-6) 3 EI to select 鈴木 Other Input FunctionsEnter katakana/ alphanumerics Press Q[Mode] several times to select an input mode Y Enter charactersEnter small kana (っ, ッ, etc.)Enter a character Y J to convert to small characterAlternatively, press a key repeatedly to enter an assigned small kana.Enter upper case charactersEnter a character Y JAlternatively, press a key repeatedly to enter an assigned upper case character.Add ゛or ゜Enter a character to add ゛or ゜ Y * for ゛or * twice for ゜In single-byte katakana mode, ゛and ゜ are entered as a single-byte character.Insert line break Press O[Line FD] to insert line breaks in textInsert space at end of text DIInsert space within textPress ; repeatedly until single-byte space appears*, or R[Menu] Y Pictograms/symbols Y Space to enter a space (Double-byte (single-byte) space is entered in 2 bytes (1 byte) input mode.)Toggle characters in reverse orderO[Rev]Example: From c, press to toggle as follows: c Y b Y a Y 2…Move cursor to beginning/ end of sentenceR[Menu] Y Jump Y To beginning or To endUndo P[Undo]* Space cannot be entered within text in number mode by following the steps above. Use symbol list.■842p_E.indb 3-3842p_E.indb 3-3 10.4.21 10:57:25 AM10.4.21 10:57:25 AM](https://usermanual.wiki/Panasonic-Connect/210029A.User-Manual-1-of-2/User-Guide-1282107-Page-77.png)
![3-43Text EntryPictographs & SymbolsPictographs do not appear in messages sent to incompatible SoftBank handsets or e-mail.1 PictographsIn kanji (hiragana)/katakana/alphanumerics mode, *SoftBank pictograph list appears. SymbolsPress and hold ;Single-byte symbol list appears.2 EI to select a pictograph or symbolSymbol List: ZP.18-17 NoteAlternatively, follow the steps to access pictograph or symbol: R[Menu] Y Pictograms/symbolsList Log may appear first.Entering Cross-carrier PictographsPress P or O to toggle lists (Universal pictograph list, Log, Full pictograph list and My Pictograms).Functions Available in Pictograph/Symbol ListEnter same pictograph or symbol again Q[Cont.]Toggle pictograph/symbol list R[Pict./Symbol]Jump to previous/next page U/VToggle full screen/standard screen JToggle double/single-byte symbol and log [symbol list only]O[1byte/2bytes/Log]P to toggle in reverseToggle pictograph lists [pictograph list only]O[Univrsl. 1/Full/My Pict. 2/Log]P to toggle in reverseClose list L1 In S! Mail Subject/Text/Signature field or Subject field for Auto-sort Setting only2 In S! Mail Text field only■842p_E.indb 3-4842p_E.indb 3-4 10.4.21 10:57:25 AM10.4.21 10:57:25 AM](https://usermanual.wiki/Panasonic-Connect/210029A.User-Manual-1-of-2/User-Guide-1282107-Page-78.png)
![3-53Text EntryTemplatesInsert templates (greetings, URLs, emoticons) or edit preinstalled templates.Inserting Templates1 In text entry window, press and hold *Not available in number mode.2 Select a category Y Select a templateNoteAlternatively, in text entry window, R[Menu] Y Input assistance Y Templates to enter a templateEditing TemplatesMain Menu ▶ Tools ▶ Templates/Users Dic. ▶ Templates1 Select a category2 Highlight a template Y Q[Edit] Y Edit templateReset Edited TemplatesAfter Step 1, (highlight a template Y) R[Menu] Y Reset this or Reset all (Y For Reset all, enter Phone Password) Y YES ■>Manage Template FoldersIn Step 1, highlight a category Y R[Menu] Y Edit folder name Y Edit folder nameTo reset folder name, R[Menu] Y Reset name Y YESAdditional Features1 In text entry window, R[Menu] Y Input assistance2 Select an item (See below)Item Operation/DescriptionKuten Code Enter a character code (ZP.18-18)Enter a character code (4 digits)>Input date/ time Select a style to enter date/timeSelect a display style Y Enter date/time>Quote phone book Quote Phone Book entry detailSelect an entry Y Check item(s) to quote Y Q[Finish]>Quote accnt detls Quote Account DetailsEnter Phone Password Y Check item(s) to quote Y Q[Finish]>Bar code reader Activate Bar Code Reader to insert scanned result (ZP.12-12)■>842p_E.indb 3-5842p_E.indb 3-5 10.4.21 10:57:26 AM10.4.21 10:57:26 AM](https://usermanual.wiki/Panasonic-Connect/210029A.User-Manual-1-of-2/User-Guide-1282107-Page-79.png)
![3-63Text EntryConversion Methods (Japanese)Predictive ConversionThe following suggestion lists appear while entering text or after a word is fixed.While Entering TextPredictive CandidatesLists likely conversions (Predictive Candidates) and matching conversions (Conversion Candidates)Predictive Candidates: わ Y 私, わたし, etc.Conversion Candidates: わ Y 和, 輪, etc.Conversion Candidates Suggests matching conversionsExample: わ Y 和, 輪, etc.abc/123/ Kana CandidatesLists alphanumerics/katakana assigned to key (ZP.3-7)After a Word is FixedContext Forecast Suggests words likely to followExample: 私 is fixed Y です, の, は, etc.Predictions change with each letter entered.Press Q[Pred.]/[Conv.] to toggle Predictive Candidates List and Conversion Candidates List.Note842P learns entered characters and suggests them for future conversions (ZP.3-8).Example: Enter 私の鼻1 In kanji (hiragana) mode, 0わ is entered and Predictive Candidates List appears.2 GI to move to Predictive Candidates List Y EI to select 私私 is entered and Context Forecast List appears.3 GI to move to Context Forecast List Y EI to select のの is entered and Context Forecast List appears.4 6 Y 5はな is entered and Predictive Candidates List appears.5 Q[Conv.]Conversion Candidates List appears.842p_E.indb 3-6842p_E.indb 3-6 10.4.21 10:57:26 AM10.4.21 10:57:26 AM](https://usermanual.wiki/Panasonic-Connect/210029A.User-Manual-1-of-2/User-Guide-1282107-Page-80.png)
![3-73Text Entry6 GI to move to Conversion Candidates List Y EI to select 鼻If the Word is Not ListedPress L to return to hiragana, and segment hiragana to convert separately.Example: Segment はるか into はる and か, then convert to 春香① Move cursor to る, then convert はる to 春 Y HI② Convert か to 香 Y HIUsing Previously Entered WordsEnter the first one or two hiragana to access previously entered words in the list.Converting Hiragana to Katakana/AlphanumericsEnter katakana and alphanumerics in kanji (hiragana) mode.Date and time can be entered quickly.Example 1: Enter OKStep 1 2 3 4Key 6(3 times)5(twice) R[a1Kana] EIDisplay ふふにabc/123/Kana Candidates OKPress HI after highlighting OK.Example 2: Enter 10:30 or 10/30Step 1 2 3Key 1030 R[a1Kana] EIDisplay あわさわ abc/123/Kana Candidates10:30or 10/30Press HI after highlighting 10:30 or 10/30.842p_E.indb 3-7842p_E.indb 3-7 10.4.21 10:57:26 AM10.4.21 10:57:26 AM](https://usermanual.wiki/Panasonic-Connect/210029A.User-Manual-1-of-2/User-Guide-1282107-Page-81.png)
![3-83Text EntryConversionViewing Learned Words1 In text entry window, R[Menu] Y Text entry setting Y Learned words2 Select a row Y Select a logDelete Learned WordsIn Step 2, (highlight a log Y) R[Menu] Y Delete this or Delete all (Y For Delete all, enter Phone Password) Y YES Tip●Set Learning Feature Off for Secret Mode/Secret Data Only●Delete All Learned Words (ZP.17-9) ■>SettingsSettingsActivating/Canceling Prediction List<Default> ON1 In text entry window, R[Menu] Y Text entry setting2 Select an item (See below)Item Operation/DescriptionPredict Activate/cancel Predictive Candidates and Context Forecast lists.Candidate display Activate/cancel Context Forecast list.2/NIKO-touch guide Activate/cancel Conversion Candidates guidance for 2/NIKO-touch input method.3 ON or OFFFixing Entered Characters Automatically<Default> ONFix character in Mode 1 (5-touch) automatically after specified time elapses.1 In text entry window, R[Menu] Y Text entry setting2 Character set time Y Select a speed842p_E.indb 3-8842p_E.indb 3-8 10.4.21 10:57:27 AM10.4.21 10:57:27 AM](https://usermanual.wiki/Panasonic-Connect/210029A.User-Manual-1-of-2/User-Guide-1282107-Page-82.png)
![3-93Text EntryEditing TextDeleting & Replacing1 Delete Characters within LinesPlace cursor before a character Y LA character after cursor is deleted.Press and hold L to delete all characters after cursor. Delete Characters from the End of TextPlace cursor at the end of text Y LA character before cursor is deleted.Press and hold L to delete all characters before cursor.2 Enter another characterCopy/Cut/PasteCopy/cut text (up to 5000 double-byte/10000 single-byte) and paste to another place.1 In text entry window, R[Menu] Y Copy or Cut2 Select Text to Copy/Cut Place cursor before (or after) text to select Y HI[Start] Y Place cursor after (or before) text Y HI[End] Select AllR[All] Y HI[End]3 Place cursor at target location Y R[Menu] Y Paste842p_E.indb 3-9842p_E.indb 3-9 10.4.21 10:57:27 AM10.4.21 10:57:27 AM](https://usermanual.wiki/Panasonic-Connect/210029A.User-Manual-1-of-2/User-Guide-1282107-Page-83.png)
![3-103Text EntryUser's DictionarySave frequently used words/phrases (up to 100 entries).Saved words/phrases appear among word suggestions.Saving User's Dictionary Entries1 In text entry window, R[Menu] Y Text entry setting Y User's Dictionary2 <New>3 Enter a word Y Enter readingEdit User's Dictionary EntriesAfter Step 1, highlight a word Y Q[Edit] Y Edit word Y Edit readingDelete User's Dictionary EntriesAfter Step 1, R[Menu] Y Delete Y Delete this or Delete all (Y For Delete all, enter Phone Password) Y YES NoteAlternatively, Main Menu ▶ Tools ▶ Templates/Users Dic. ▶ User's Dictionary■>■>842p_E.indb 3-10842p_E.indb 3-10 10.4.21 10:57:28 AM10.4.21 10:57:28 AM](https://usermanual.wiki/Panasonic-Connect/210029A.User-Manual-1-of-2/User-Guide-1282107-Page-84.png)
![4Phone Book4-43 Select an item (See below)Item Operation/DescriptionName (First/Last) Save first and last names separately. For USIM Card, enter both names togetherEnter name>Reading (First/Last) Save first and last name readings separately. For USIM Card, enter both readings togetherEnter reading>Group Select a group>Phone number Enter phone number (Y For 842P, select an icon)>Mail address Enter mail address (Y For 842P, select an icon)Save only phone number if mail address is "phone number@softbank.ne.jp".>Address Enter zip code Y Enter address>Birthday Enter birthday>Memo Enter memo>Image Save a still image to appear for incoming callsSelect an item・Select image Y Select a folder Select a file・ Shoot image Y Capture still images (ZStep 2 to 4 on P.6-5)Saved still image appears for an incoming call only when Phone Book Image (ZP.17-6) is ON. If there is an image saved for Screen, the image preferentially appears.>Memory number Enter memory number>Ring toneRing Tones Y Select a type Y Select a folder Y Select a ringtone>VibratorSelect vibrator Y Select a pattern>Item Operation/DescriptionNotification LightSelect illumination Y Select a pattern>Screen*SEL picture Y Select a screen type Y Select a folder Y Select an imageStill image saved for Screen appears for an incoming call whether Phone Book Image is ON or OFF. Phone Book Image setting applies only when still image is saved for Image.>Msg RingtoneRing Tones Y Select a type Y Select a folder Y Select a ringtone>Msg VibratorSelect vibrator Y Select a pattern>Msg Notif. LightSelect illumination Y Select a pattern>Answer messageSelect answer message Y Select a message>* To cancel: Select RLS picture4 Q[Finish]842p_E.indb 4-4842p_E.indb 4-4 10.4.21 10:57:29 AM10.4.21 10:57:29 AM](https://usermanual.wiki/Panasonic-Connect/210029A.User-Manual-1-of-2/User-Guide-1282107-Page-88.png)
![4Phone Book4-5Other Ways to Add New EntriesSave currently displayed phone numbers, mail addresses or still images to Phone Book.Example: Saving Numbers from Incoming Call Logs1 CI Y Highlight a record Y R[Menu] Y Add to Phone Book2 New EntryNew Y Enter details (ZFrom Step 3 on P.4-4) Add to Existing EntryAdd Y Select entry Y Enter other details (ZStep 3 on P.4-4)When saving to USIM Card, Overwrite appears instead of Add.3 When complete, Q[Finish] Y YESNotePress R[Menu] from a function. If Add to Phone Book appears, the information is savable to Phone Book. From a text message window, select Add Address to save entries; from still image list/still image, select Set display Y Phone Book to save entries.When adding still images, entries are saved to handset regardless of Save Settings.When saving new entries in Secret Mode or Secret Data Only, entries are saved to handset regardless of Save Settings.842p_E.indb 4-5842p_E.indb 4-5 10.4.21 10:57:29 AM10.4.21 10:57:29 AM](https://usermanual.wiki/Panasonic-Connect/210029A.User-Manual-1-of-2/User-Guide-1282107-Page-89.png)
![4Phone Book4-6Setting GroupsSort entries by Group. Custom set ringtones/vibrators/ notifications per group.Main Menu ▶ Phone Book ▶ Group appears for USIM Card Group.1 Highlight a group Y Q[Edit] Y Select an item Y Set itemEnter group name for " Group name."For other item operations: ZP.4-4Custom settings unavailable for USIM Card Groups.2 When complete, Q[Finish]Check SettingsSelect a group entry, or R[Menu] Y Check settingSettings cannot be checked in USIM Card Group Phone Book.Reset Group SettingHighlight a group Y R[Menu] Y Reset group Y YES ■>■>Searching/Using Phone BookMaking Calls from Phone Book<Default> A-KA-SA-TA-NA1 BI2 Search Phone Book (See below)To change search method: L Y Select a search method (See below)Search MethodOperation/DescriptionA-KA-SA-TA-NA Search entries by katakana syllabary. Names saved in Roman characters are saved under the 英 tab.Reading Enter partial reading Y GI>Group Select a group>Memory Number*Enter memory (entry) number to search for an entryEnter a memory number>Name Enter partial name Y GI>Phone Number Enter partial phone number Y GGI>Mail Address Enter partial mail address Y GGI>2-touch Dial*Show entries with memory (entry) numbers 000 - 009* 842P Phone Book only3 Select an entry4 DI842p_E.indb 4-6842p_E.indb 4-6 10.4.21 10:57:29 AM10.4.21 10:57:29 AM](https://usermanual.wiki/Panasonic-Connect/210029A.User-Manual-1-of-2/User-Guide-1282107-Page-90.png)
![4Phone Book4-75 Voice CallsHighlight a phone number Y J Video CallsHighlight a phone number Y Q[V. Call]NoteTo scroll through entries, enter nothing and press GI (not available in Group or 2-touch Dial).If no matches are found in Reading or Memory Number method, entries closest to condition appear.Once a method is selected, same method retains.Additional Search/Dialing MethodsOpen Tab Assigned to Key from Standby Press and hold 0 – 9Open search window assigned to key.Enter Partial Number from Standby or during Call Enter partial number Y GIBy Memory Number J Y GI Y Enter a memory numberBy Single-digit Memory Number (2-touch Dial) Enter last digit (0 – 9) of memory number 000-009 Y J/HI[Dial] (Q[V. Call] for Video Calls)■Using Phone BookUse Phone Book EntriesBI Highlight an entry Y R[Menu] Y Select an item (See below)Item Operation/DescriptionNew Add a new entry (ZFrom Step 2 on P.4-3)Sort Change display orderSelect an orderAvailable only when search method (ZP.4-6) is Name, Phone Number or Mail Address.>Send Ir data*(ZP.10-3)IC transmission*(ZP.10-5)Copy to microSD*Copy an entry to microSD CardYESTo display copied data: ZP.9-17>Delete phone book Select an item Y Follow steps for selected option (ZP.4-9)>Character size Switch character size to large/standardSet secret mode/ Release secret*Set/cancel Secret Mode for selected entryEntries saved as secret data appear only when Secret Mode or Secret Data Only is active (ZP.11-9).* Not available in USIM Card Phone Book■>842p_E.indb 4-7842p_E.indb 4-7 10.4.21 10:57:30 AM10.4.21 10:57:30 AM](https://usermanual.wiki/Panasonic-Connect/210029A.User-Manual-1-of-2/User-Guide-1282107-Page-91.png)
![4Phone Book4-8Use Entry DetailsBI Y Select an entry Y R[Menu] Y Select an item (See below)Item Operation/DescriptionNotify caller ID Show/hide caller ID (ZP.2-3)Prefix numbers Make a call using a prefix number (ZP.2-3)Int'l dial assist Set International dial assist (ZP.2-10)Restrictions* Activate restrictions on specified entry (ZP.11-10)Edit Phone Book Edit entry (ZFrom Step 3 on P.4-4)Delete phone bookPhone number or Delete this Y YES Item names vary by selected item:Mail address/Address/Birthday/Memo/Image>Add shortcut icon Create a shortcut (ZP.1-17)Compose S! Mail Create a message to mail address of selected entry (ZFrom Step 4 on P.13-4)Compose SMS Create an SMS message to phone number of selected entry (ZFrom Step 4 on P.13-7)Message can be sent to SoftBank handsets only.Send Ir data*(ZP.10-3)IC transmission*(ZP.10-5)Copy to microSD*Copy an entry to microSD CardYESTo display copied data: ZP.9-17>Copy names Copy a name■>Item Operation/DescriptionCopy phone numbers Copy an itemItem names vary by selected item.Copy mail add./Copy address/Copy birthday/ Copy memoCharacter size Switch character size to large/standardSet secret mode/ Release secret*Set/cancel Secret Mode for selected entryEntries saved as secret data appear only when Secret Mode or Secret Data Only is active (ZP.11-9).Copy to USIM/Copy from USIMCopy an entry to USIM CardYES>* Not available in USIM Card Phone BookNoteInsert entry details to a message (ZP.3-5).842p_E.indb 4-8842p_E.indb 4-8 10.4.21 10:57:30 AM10.4.21 10:57:30 AM](https://usermanual.wiki/Panasonic-Connect/210029A.User-Manual-1-of-2/User-Guide-1282107-Page-92.png)
![4Phone Book4-9Managing Phone BookEditing Phone Book Entries1 BI Y Select an entry Y P[Edit]2 Edit (ZFrom Step 3 on P.4-4) Y YESDeleting Phone Book Entries1 BI Y Highlight an entry Y R[Menu] Y Delete phone book2 Select an item (See below)Item Operation/DescriptionDelete thisYES>Delete select Check entries to delete Y Q[Finish] Y YESR[Menu] Y Select all in tab*, Select all, Release all in tab* or Release all to check/uncheck all entries at a time>Delete all in tab*YES>Delete all Delete all entries (842P/USIM Card Phone Book) includingSecret Mode entriesEnter Phone Password Y YES Y YES>* Available in A-KA-SA-TA-NA, Reading, Group and Memory Number search methods (ZP.4-6)Copying/Deleting Phone Book DataMain Menu ▶ Phone Book ▶ Memory Manager1 Enter Phone Password2 Select an item (See below)Item Operation/DescriptionCopy Copy data between 842P/USIM Card Phone BookCopy to USIM or Copy from USIM>Delete Delete data in 842P/USIM Card Phone BookPhone or USIM>3 Phone Book Y Select an entry* * To clear, repeat operation.4 Q[Finish] Y YES842p_E.indb 4-9842p_E.indb 4-9 10.4.21 10:57:30 AM10.4.21 10:57:30 AM](https://usermanual.wiki/Panasonic-Connect/210029A.User-Manual-1-of-2/User-Guide-1282107-Page-93.png)
![4Phone Book4-12Auto SynchronizationMain Menu ▶ Phone Book ▶ S! Addressbook BkUp ▶ Auto Sync Settings ▶ ON/OFF1 Enter Phone Password Y ONTo cancel, select OFF2 Select an item (See below)Item Operation/DescriptionEvery week Synchronize weekly at specified time of the daySelect a day Set start time Select a sync type>Every month Synchronize monthly at specified time of the dateEnter a date Set start time Select a sync type>After Editing PB Synchronize ten minutes after entries are editedSelect a sync type>3 YESView Auto Sync SettingsMain Menu ▶ Phone Book ▶ S! Addressbook BkUp ▶ Auto Sync Settings ▶ Confirm Settings■>Viewing Sync LogView synchronization/back-up/restoration logs.Main Menu ▶ Phone Book ▶ S! Addressbook BkUp ▶ Sync Log1 Select a logDelete Sync LogIn Step 1, (highlight a log Y) R[Menu] Y Delete this or Delete all (Y For Delete all, enter Phone Password) Y YES■>842p_E.indb 4-12842p_E.indb 4-12 10.4.21 10:57:31 AM10.4.21 10:57:31 AM](https://usermanual.wiki/Panasonic-Connect/210029A.User-Manual-1-of-2/User-Guide-1282107-Page-96.png)
![4Phone Book4-13Account DetailsSave phone number, mail address, street address, etc. in Account Details.Editing Account Details1 HI Y 02 Q[Edit] Y Enter Phone Password3 Edit Y Q[Finish]Your subscribing phone number cannot be edited or deleted.Account Details FunctionsIn Account Details, press R[Menu] for following operations.Item Operation/DescriptionEdit* Edit Account Details (ZFrom Step 3 above)>Character size Switch character size to large/standardDisplay all data*View all saved items such as phone numbers and mail addressesCopy names Copy a nameCopy phone numbers Copy an itemItem names vary by selected item.Copy mail add./Copy address/Copy birthday/ Copy notepadItem Operation/DescriptionSend Ir data Send details via Infrared (ZP.10-3)Alternatively, while Account Details is open, press O[Ir].IC transmission Send details via IC transmission (ZP.10-5)Alternatively, while Account Details is open, press P[ICtrans].Copy to microSD Copy details to microSD CardYES To display copied data: ZP.9-17Account Details is saved as a Phone Book entry.>Erase phone number*Select an item Y YESDelete items saved in Account DetailsItem names vary by selected item.Erase mail add./Erase address/Erase birthday/ Erase memorandums/Delete image>Reset* Reset all Account Details except your subscribing phone numberYES>* Enter Phone Password if required.NoteQuote a content from Account Details to a message (ZP.3-5).842p_E.indb 4-13842p_E.indb 4-13 10.4.21 10:57:32 AM10.4.21 10:57:32 AM](https://usermanual.wiki/Panasonic-Connect/210029A.User-Manual-1-of-2/User-Guide-1282107-Page-97.png)
![4Phone Book4-14Voice DialMake a call by saying a voice dial name.NoteKeep microphone about 10 cm away from your mouth, and pronounce a Voice Dial name clearly. If microphone is too distant, your voice may not be recognized.Avoid making sounds unrelated to Voice Dial names (clearing your throat, clicking your tongue, heavy breathing, etc.).Say Voice Dial names in quiet places.Avoid pressing or brushing keys, or covering microphone with fingers when pronouncing a Voice Dial name.Adding Entries to Voice DialMain Menu ▶ Phone Book ▶ Settings ▶ Voice Dial1 <New> Y Select a Phone Book entryEntries with ★ are already saved in Voice Dial list.2 Enter a Voice Dial nameOnly katakana entry is available for Voice Dial names.Edit Voice Dial NamesIn Step 1, highlight a Voice Dial name Y Q[Edit] Y Edit name Y YESDelete Voice Dial EntriesIn Step 1, (highlight a Voice Dial name Y) R[Menu] Y Delete this or Delete all Y YES ■>■>Searching Entries by Voice Dial1 Press and hold J Y Say a Voice Dial nameSay the name within four seconds after voice recognition tone sounds. Once Voice Dial is recognized, result appears.2 Q[Detail] Y DI to show phone number3 Voice CallsHighlight phone number Y J or HI[Dial] Video CallsHighlight phone number Y Q[V. Call]Tip●Activate Voice Dial Automatically (ZP.17-10)SettingsSettings842p_E.indb 4-14842p_E.indb 4-14 10.4.21 10:57:32 AM10.4.21 10:57:32 AM](https://usermanual.wiki/Panasonic-Connect/210029A.User-Manual-1-of-2/User-Guide-1282107-Page-98.png)
![5-25Digital TVBasics842P supports One Seg terrestrial digital TV broadcasting.One SegOne Seg is a digital TV broadcasting service for mobile phones.For more information, visit The Association for Promotion of Digital Broadcasting Website:[PC] http://www.dpa.or.jp/[Handset] http://www.dpa.or.jp/1seg/k/(Japanese only)FeaturesWatch TV Programs (zZP.5-5)Watch One Seg Digital TV on handset.View Data Broadcast (zZP.5-7)Access a variety of program-related information.Record TV Programs (zZP.5-11)Record program/capture still image while watching the program.Set Timer (zZP.5-13)Use Timer to view/record programs. You can easily set Timer by using Program Guide (ZP.5 -7 ).Mobile W-SpeedFrame rate of Digital TV images are automatically enhanced. Enjoy smooth image flow (ZP.17-11). Mobile W-Speed is set to OFF by default.When this function is set to ON, full effect of Image Quality may not be achieved.Depending on broadcasting condition, full effect of this function may not be achieved.Disabled during ECO Mode (ZP.17-12).Disabled for playing back videos recorded with Mobile W-Speed set to ON.PrecautionsDigital TV is available only in Japan.Incoming calls/messages may affect TV image or audio quality while TV is activated.Digital TV may be disabled if USIM Card is not installed or SoftBank subscription is terminated.SoftBank is not liable for damages from accidental loss/alteration of handset/microSD Card information.Data saved to handset (TV Links, Channel List, etc.) cannot be restored after repairs or handset replacement. Back up important information.842p_E.indb 5-2842p_E.indb 5-2 10.4.21 10:57:33 AM10.4.21 10:57:33 AM](https://usermanual.wiki/Panasonic-Connect/210029A.User-Manual-1-of-2/User-Guide-1282107-Page-100.png)
![5-45Digital TVInitial SetupSet channels for your area.Up to ten Channel Lists can be saved.Main Menu ▶ TV ▶ Channel Setting ▶ Select Area1 Select a region Y Select a prefecture2 YES NoteIf manual setup fails, try automatic channel setup (ZBelow).842P detects a change in reception area after moving to a different area. Set Channel List for that area.Channel SettingsAutomatic Channel SetupMain Menu ▶ TV ▶ Channel Setting ▶ Automatic1 YES 2 After channel search, YES Enter titleIf title is not entered, date (year/month/day/hour/minute) is automatically saved as title.Using Channel ListMain Menu ▶ TV ▶ Channel ListSet ChannelsSelect a Channel ListChannel List is set, and available channels appear.Select a channel to access the station.Delete Channel ListHighlight a Channel List Y R[Menu] Y Delete this Y YES Selected Channel List cannot be deleted.Delete Channels from Channel ListHighlight a Channel List Y Q[Detail] Y Highlight a channel Y R[Menu] Y Delete this Y YES Channels in selected Channel List cannot be deleted.Edit TitleHighlight a Channel List Y R[Menu] Y Edit title Y EditReassign a Remote Control Number (Keypad) to a ChannelHighlight a Channel List Y Q[Detail] Y R[Menu] Y Remote control # Y Select a channel Y Select a new remote control number Y Q[Finish] Y YES ■>■>■>■>■>FromFrom842p_E.indb 5-4842p_E.indb 5-4 10.4.21 10:57:33 AM10.4.21 10:57:33 AM](https://usermanual.wiki/Panasonic-Connect/210029A.User-Manual-1-of-2/User-Guide-1282107-Page-102.png)
![5-55Digital TVWatching TVSet channels beforehand (ZP.5-4).Change Default View (ZP.17-11) 1 P Viewer2 Select a channelDirect Channel Access 1 – 9*(Channel 10)0(Channel 11);(Channel 12)Previous/ Next Channel FI 1/GI 2 Channel Search Press and hold FI 1/press and hold GI 2To stop: Q[Cancel] / L1 Available only in Portrait View2 Available only in Landscape View3 To end TV, K Y YES NoteAlternatively, Main Menu ▶ TV ▶ Watch TV842p_E.indb 5-5842p_E.indb 5-5 10.4.21 10:57:33 AM10.4.21 10:57:33 AM](https://usermanual.wiki/Panasonic-Connect/210029A.User-Manual-1-of-2/User-Guide-1282107-Page-103.png)
![5-75Digital TVOperations while Viewing TVOperations Landscape View Portrait ViewVolume FI/UV GI*/UVMute/Cancel Mute*LProgram Guide –Q[EPG]Program Info Press and hold QTo return to Viewer: LProgram Title P/Q/R/JP[Disp.]Indicator/Caption ViewWhile Program Title appears: PEach key press toggles indicators (icons) and captions on/off.–Information View –While Program Title appears, P[Change]Portrait/Landscape View*OEach key press toggles view.Record Programs*HI[Record] (ZP.5-11)To stop: HI[Stop]Capture Still Images* Press and hold O (ZP.5-12)Data Broadcast Mode On/Off –J* Available when Data Broadcast Mode is offProgram GuideCheck program schedules and set timer to view/record TV programs.Main Menu ▶ TV ▶ Program ListConfirmation appears when using Program Guide for first time. Follow onscreen instructions.See Program Guide Help menu for usage information.Data Broadcast (Japanese)Access a variety of program-related information such as still images and videos.Data Broadcast is not available in Landscape View. Press O to switch to Portrait View.1 Activate TV (Data Broadcast Mode off) Y J appears.GI to select information.To deactivate Data Broadcast Mode: JNoteViewing Data Broadcast information requires no fees: however, accessing websites will incur connection fees.842p_E.indb 5-7842p_E.indb 5-7 10.4.21 10:57:35 AM10.4.21 10:57:35 AM](https://usermanual.wiki/Panasonic-Connect/210029A.User-Manual-1-of-2/User-Guide-1282107-Page-105.png)
![5-85Digital TVFunctions while Viewing TVSound SettingsWhile TV is active, R[Menu] Y Settings Y Sound Y Sound Effect Y Select an item (See below)Item Operation/DescriptionAuto Volume Automatically increase to optimum volumeON or OFF>Remaster Adjust sound quality to reproduce original soundON* or OFF>Listening Adjust to natural sound when using earphoneSelect an item・ Surround: Reproduce natural and stereophonic sound・ Natur 1* or Natur 2*: Complement sound specific to earphone to reproduce natural sound・OFF: Turn off Listening setting >Equalizer* Change sound quality when using earphoneSelect an item・Normal: Reproduce normal sound・H. BASS1: Enhance low-pitched sound・H. BASS2: Enhance low-pitched sound even more・Voice: Make voice clear・Train: Minimize sound leakage>* Available only when earphone is connected■>Other FunctionsWhile TV is active, follow the steps below.Item Operation/DescriptionAccess InternetM Y Open Menu Y Yahoo! Keitai Y Yahoo! Keitai or PC Site BrowserFollow onscreen instructions>Make a Voice Call/Video CallM Y Stand-by display Y Enter a number Y J/HI[Dial] (For Video Call, Q[V. Call]) Interrupt TV during call. After call, TV resumes.Recording will not be interrupted.>Use MessagingM Y Stand-by display Y Q>■>842p_E.indb 5-8842p_E.indb 5-8 10.4.21 10:57:35 AM10.4.21 10:57:35 AM](https://usermanual.wiki/Panasonic-Connect/210029A.User-Manual-1-of-2/User-Guide-1282107-Page-106.png)
![5-95Digital TVNext PageFunctions Available while Viewing TVWhile TV is active, R[Menu] Select an item (See below)Item Operation/DescriptionChannel info 1View channel details. Select a channel to watch that stationProgram info View current program informationChannel List 1View channel list (ZP.5-4)Channel Setting 1Set channels for your area (ZP.5-4)Add to ch. list 1Add current station to Channel ListYESAssign current station to lowest available number key.>Program list 1View program listSwitch display 1Switch view (switch image size/image off)Select an item>Switch TV/data BC 1In Portrait View, toggle Data Broadcast Mode on/off (ZP.5-7)Icons 2Set Guide Display in Landscape ViewON or OFF>Compose S! Mail Create S! Mail while listening to sound (ZFrom Step 2 on P.13-4)■>Item Operation/DescriptionSettings Select an item・ Brightness: Set Back Light brightness・ Mobile W-Speed 2: Enhance frame rate of TV images automatically・ Image Quality 2: Select an image quality・ LCD AI : Activate image compensation according to Back Light・ Sound Y Sound Effect 2 (ZP.5-8)・ Sound Y Main/sub sound: Set main/sub sound・ Sound Y Switch audio data: Available only when multiple audio data are supported・ Sound Y TV Sound W/Closed 2 : Set whether to keep speaker on when closing 842P while viewing TV・ ECO Mode 2: Set power saving mode (ZP.17-12)>Data Broadcasting 1Select an item・ Reload contents: Reload page (Data Broadcast link)・ Certificate: View owner, author, validity period and serial number of certificate used in SSL communication・ Images 2: Show/hide images on Data Broadcast sites・ Sound Effect 2: Turn on/off sounds from Data Broadcast/sites・ Reset Settings 2: Show confirmation on Data Broadcast>842p_E.indb 5-9842p_E.indb 5-9 10.4.21 10:57:35 AM10.4.21 10:57:35 AM](https://usermanual.wiki/Panasonic-Connect/210029A.User-Manual-1-of-2/User-Guide-1282107-Page-107.png)
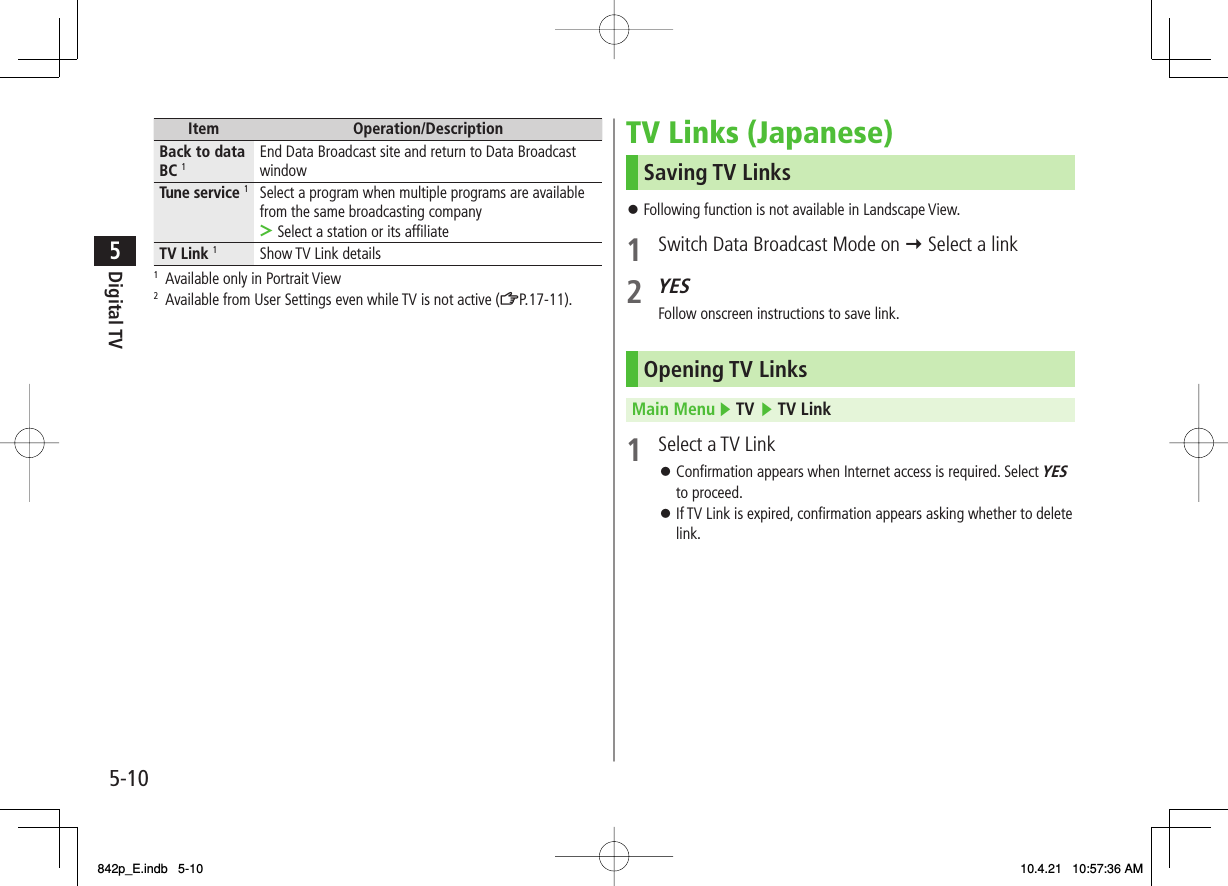
![5-115Digital TVFunctions Available in TV Link ListMain Menu ▶ TV ▶ TV Link1 R[Menu] Y Select an item (See below)Item Operation/DescriptionDisplay detail Show TV Link title, URL, summary, content type, expiration dateNo. of TVlink Show number of saved TV LinksDelete thisYES>Delete selected Check TV Links to delete Y Q[Finish] Y YES>Delete all Enter Phone Password Y YES>Recording/Playing ProgramsRecording Current ProgramSave programs as videos or still images.Recordings are saved to microSD Card.microSD Card:ZP.9-15Save up to 2GB of data at a time.Recording Time (total)* Approx. 740 minutesSavable Files 99 files* Average recordable time per 2GB of dataRecording is unavailable when signal strength drops to .1 Activate TV (Data Broadcast Mode off) HI[Record] appears, and recording starts.2 HI[Stop] to stop recordingProgram is saved to microSD Card.NoteIn the following cases, recording ends and recorded portion is automatically saved:・ File size is over 2GB・ microSD Card memory is fullRecorded files are not saved to handset.Do not remove microSD Card while recording.Recording continues even if signal strength level is ; however, images and audio are not saved.Data Broadcast information cannot be recorded.842p_E.indb 5-11842p_E.indb 5-11 10.4.21 10:57:36 AM10.4.21 10:57:36 AM](https://usermanual.wiki/Panasonic-Connect/210029A.User-Manual-1-of-2/User-Guide-1282107-Page-109.png)
![5-125Digital TVCapturing ScreenshotsCaptured screenshots are saved to handset.This feature is unavailable when signal strength is or Data Broadcast Mode is on.1 Activate TV (Data Broadcast Mode off) Y press and hold ONoteCaptions cannot be captured.Playing Recorded ProgramsMain Menu ▶ Data Folder ▶ TV ▶ Video1 Select a filePlayback starts.2 L to stop playbackExample: Video FolderExample: Video FolderPlayback OperationsOperations Landscape View Portrait ViewVolume FI/UV GI/UVMute/Cancel Mute R[ / ]Play Previous FileGIFIPress AI/CI to play back from beginning when playback time is over ten secondsPause/Resume HI[ / ]Play Frame by Frame Pause playback Y Q[Frame]Play back frame by frame.Skip Rewind (30 Seconds) 2Press and hold AI 1/ *Press and hold CI/ *Skip Forward (30 Seconds) 2Press and hold BI 1/ ;Press and hold DI/ ;Toggle Playback Speed Q[ / / ]View TitleP[Disp.]In Landscape View, indicator/caption setting display appears.Toggle Caption Display title Y P[Change]In Landscape View, each key press toggles indicators (icons) and captions on/off.Portrait/Landscape ViewOEach key press switches view.Close handset while in Landscape View to switch to Portrait View.1 Use opposite key when Display faces right.2 Unavailable if file is under 30 seconds long.842p_E.indb 5-12842p_E.indb 5-12 10.4.21 10:57:36 AM10.4.21 10:57:36 AM](https://usermanual.wiki/Panasonic-Connect/210029A.User-Manual-1-of-2/User-Guide-1282107-Page-110.png)
![5-135Digital TVNext PageViewing Captured ScreenshotsMain Menu ▶ Data Folder ▶ TV ▶ Image1 Select an imageTimerSet up to 100 timer entries to watch or record programs.Main Menu ▶ TV1 Timer Watching or Timer Recording2 Q[New] Y Select an item (See below)Item Operation/DescriptionStart date setting Set date and time to start viewing/recording a programSelect an item・Enter date Y Enter a date・Choose date Y Select a date >End date setting 1Channel Select a channel>Edit title Enter a program name>Repeat Select a repetition Y For Select day, select a day (days) Y Q[Finish]>Alarm (Alarm notice) 2ON or ON/Set time Y For ON/Set time, select an alarm time>Alarm tone 2Select an alarm type Y Select a folder Y Select an alarm>Alarm (Alarm on/off) 1ON or OFF>Alarms (Alarm volume)GI to adjust volumeFor Timer Recording, Escalating Tone cannot be set.>Activate TV w/ alarm 2ON or OFFWhen ON is set, Digital TV activates from alarm notification window.>842p_E.indb 5-13842p_E.indb 5-13 10.4.21 10:57:37 AM10.4.21 10:57:37 AM](https://usermanual.wiki/Panasonic-Connect/210029A.User-Manual-1-of-2/User-Guide-1282107-Page-111.png)
![5-145Digital TVItem Operation/DescriptionPriority 1Set handset response when Timer Recording startsRecording or OperationWhen Recording is set, active function suspends/ ends, and recording starts.When Operation is set, confirmation appears.To suspend/end active function, select YES and HI to start recording.>1 Timer Recording only2 Timer Watching only3 Q[Finish] Y For Timer Recording, select YES or YES (confirm once)NoteSelect timer entries to check details; Q[Edit] to edit details.Timer Recording does not start if Internet and two other functions are active simultaneously.Alarm does not sound for Timer Watching/Timer Recording in following functions. For Timer Recording, complete followings (in parentheses) one minute before timer starts; otherwise, recording does not start.・ While handset is off (Turn on handset)・While Privacy Key Lock is active (Cancel lock)・While Personal Data Lock is active (Cancel/change lock)・During data transfer (Complete transfer)・During Infrared transmission or IC transmission (Complete transmission)・During software update (Complete update)Other Timer OperationsMain Menu ▶ TV 1 Timer Watching or Timer Recording2 R[Menu] Y Select an item (See below)Item Operation/DescriptionNew Set a timer entry to watch/record a program (ZP.5-13)Edit Edit entry details (ZP.5-13)Sort Sort timer entriesSelect an order>Delete thisYES>Delete past Timer entries with start/end time set prior to current date/ time are deletedYES>Delete selected Check timer entries to delete Y Q[Finish] Y YES>Delete all Enter Phone Password Y YES>Memory Status [Timer Recording only]Show memory statusChecking Timer Recording ResultsMain Menu ▶ TV 1 Recording Result Y Select a resultDetails appear.842p_E.indb 5-14842p_E.indb 5-14 10.4.21 10:57:37 AM10.4.21 10:57:37 AM](https://usermanual.wiki/Panasonic-Connect/210029A.User-Manual-1-of-2/User-Guide-1282107-Page-112.png)
![6Camera6-3Camera Display IndicatorsPicture Preview Window■❺❻❼❸ ❹❽❾❶❷Item Description Operation❶Toggle Camera mode Camera mode / / Action mode (Auto/Auto bracket/Manual) (Cont. shooting set.: %P.6-8)[Video/Cont./Camera]Switch Action mode:%P.6-8❷Storage setting Phone microSD Card❸No. of frames Show number of remaining frames —❹Image stabilizer Correct camera shake (%P.6-8)❺Indicator Turn indicators on/off❻Auto Focus Lock Lock focus on the subject (%P.6-10)❼Top indicator Indicate vertical direction —❽Focus Guide Adjust focus automatically —❾Zoom bar Indicate zoom level (%P.6-7) zoom in/ zoom outLong press: continuous zoomBrightness* Adjust brightness (Level -3 to +3) Select a levelWhite balance* Auto Fine Cloudy Light bulb Fluorescent light Select a modePhoto mode* Normal Portrait SportsFood Scenery Night mode Backlight Character SnowSunset Pet Select a modeImage quality* Normal Fine Super fine Select a modeImage size* 3M 2M Wide 2M 1M VGA Stand-by QVGA QCIF Sub-QCIF Select a sizeHigh Sensitive* ON OFF Select on/offFocus* (%P.6-9) Face Detection Auto Close-up Landscape Select a modeAuto timer (%P.6-6) Toggle on/off* Alternatively, [ ] to highlight an item to select a setting❺❻❼❸ ❹❽❾❶❷Item Description Operation❶Toggle Camera mode Camera mode / / Action mode (Auto/Auto bracket/Manual) (Cont. shooting set.: %P.6-8)[Video/Cont./Camera]Switch Action mode:%P.6-8❷Storage setting Phone microSD Card❸No. of frames Show number of remaining frames —❹Image stabilizer Correct camera shake (%P.6-8)❺Indicator Turn indicators on/off❻Auto Focus Lock Lock focus on the subject (%P.6-10)❼Top indicator Indicate vertical direction —❽Focus Guide Adjust focus automatically —❾Zoom bar Indicate zoom level (%P.6-7) zoom in/ zoom outLong press: continuous zoomBrightness* Adjust brightness (Level -3 to +3) Select a levelWhite balance* Auto Fine Cloudy Light bulb Fluorescent light Select a modePhoto mode* Normal Portrait SportsFood Scenery Night mode Backlight Character SnowSunset Pet Select a modeImage quality* Normal Fine Super fine Select a modeImage size* 3M 2M Wide 2M 1M VGA Stand-by QVGA QCIF Sub-QCIF Select a sizeHigh Sensitive* ON OFF Select on/offFocus* (%P.6-9) Face Detection Auto Close-up Landscape Select a modeAuto timer (%P.6-6) Toggle on/off* Alternatively, [ ] to highlight an item to select a setting842p_E.indb 6-3842p_E.indb 6-3 10.4.21 10:57:38 AM10.4.21 10:57:38 AM](https://usermanual.wiki/Panasonic-Connect/210029A.User-Manual-1-of-2/User-Guide-1282107-Page-115.png)
![6Camera6-4Video Preview Window■Item Description Operation❼❽❾ ❷❸❹❺❶❻❶Toggle Camera mode Video camera mode[Video/Cont./Camera]❷Storage setting Phone microSD Card❸Memory capacity bar Indicate memory status (appears in red when memory is full) —❹File size setting Mail restrict'n(S) Long time (%P.6-8)❺Recordable time Indicate recordable time —❻Movie type set Records only video (%P.6-8)❼Indicator Turn indicators on/off❽Auto Focus Lock Lock focus on the subject (%P.6-10)❾Top indicator Indicate vertical direction —Focus Guide Adjust focus automatically —Zoom bar Indicate zoom level (%P.6-7) zoom in/ zoom outLong press: continuous zoomBrightness* Adjust brightness (Level -3 to +3) Select a levelWhite balance* Auto Fine Cloudy Light bulb Fluorescent light Select a modePhoto mode* Normal Portrait SportsFood Scenery Night mode Backlight Character SnowSunset Pet Select a modeImage quality* Normal Fine Super fine Select a modeImage size* VGA HVGA Wide QVGA QCIF Sub-QCIF Select a sizeFocus* (%P.6-9) Auto Close-up Landscape Select a modeAuto timer (%P.6-6) Toggle on/off* Alternatively, [ ] to highlight an item to select a settingItem Description Operation❼❽❾ ❷❸❹❺❶❻❶Toggle Camera mode Video camera mode[Video/Cont./Camera]❷Storage setting Phone microSD Card❸Memory capacity bar Indicate memory status (appears in red when memory is full) —❹File size setting Mail restrict'n(S) Long time (%P.6-8)❺Recordable time Indicate recordable time —❻Movie type set Records only video (%P.6-8)❼Indicator Turn indicators on/off❽Auto Focus Lock Lock focus on the subject (%P.6-10)❾Top indicator Indicate vertical direction —Focus Guide Adjust focus automatically —Zoom bar Indicate zoom level (%P.6-7) zoom in/ zoom outLong press: continuous zoomBrightness* Adjust brightness (Level -3 to +3) Select a levelWhite balance* Auto Fine Cloudy Light bulb Fluorescent light Select a modePhoto mode* Normal Portrait SportsFood Scenery Night mode Backlight Character SnowSunset Pet Select a modeImage quality* Normal Fine Super fine Select a modeImage size* VGA HVGA Wide QVGA QCIF Sub-QCIF Select a sizeFocus* (%P.6-9) Auto Close-up Landscape Select a modeAuto timer (%P.6-6) Toggle on/off* Alternatively, [ ] to highlight an item to select a setting842p_E.indb 6-4842p_E.indb 6-4 10.4.21 10:57:39 AM10.4.21 10:57:39 AM](https://usermanual.wiki/Panasonic-Connect/210029A.User-Manual-1-of-2/User-Guide-1282107-Page-116.png)
![6Camera6-5Pictures/VideosConfirm battery strength (ZP.1-9) and memory (ZP.6-8) before recording. When battery is low, video cannot be recorded.Captured images and videos are automatically saved to Data Folder. To select save location each time, turn Auto save set to OFF (ZP.6-8).Capturing Still Images (Camera Mode)1 Press O to activate Camera2 Frame subject3 HI[Record] or 0 to capture the imageShutter click sounds at fixed volume.Image is automatically saved.When Focus is set to Auto or Face Detection, Camera automatically focuses on subject before capturing image.4 K to exitReturn to Standby.Picture Preview WindowPicture Preview WindowContinuous ShootingCapture a succession of up to 20 still images automatically with a single press.1 In Picture Preview Window, O[Video] Y O[Cont.] appears (Indicators vary by Action mode). To set Continuous Shooting: ZP.6-8 2 Frame subject Y HI[Record] or 0Images are automatically saved.When Focus is set to Auto, Camera automatically focuses on subject before capturing image.To stop shooting halfway: L842p_E.indb 6-5842p_E.indb 6-5 10.4.21 10:57:40 AM10.4.21 10:57:40 AM](https://usermanual.wiki/Panasonic-Connect/210029A.User-Manual-1-of-2/User-Guide-1282107-Page-117.png)
![6Camera6-6Recording Videos (Video Camera Mode)1 Press and hold O to activate Video Camera 2 Frame subject3 HI[Record] or 0 to start recordingTone sounds.When Focus is set to Auto, Camera automatically focuses on subject before recording begins. During recording, auto focus functions regardless of Focus setting.4 HI[Stop] or 0 to end recordingTone sounds.Video is automatically saved.Recording stops automatically at maximum recording time.5 K to exitReturn to Standby.NoteAlternatively, O Y O[Video] to activate Video CameraVideo Preview WindowVideo Preview WindowFunctions Available while ShootingCamera mode: NOAction mode: NO ▶ NO[Video] ▶ NNO[Cont.]Video camera mode: Press and hold NOAuto TimerR[Menu] Y Auto timer Y ON Y Enter time (seconds) Y HI[Record] or 0 (Y For video, HI[Stop] or 0)Auto timer tone sounds. After set period of time, shutter is released and recording starts.When Auto timer is active, Q[Quit] or L to return to preview window without canceling Auto timer.Auto timer is not available when Cont. shooting set. is set to Manual.■>FromFrom842p_E.indb 6-6842p_E.indb 6-6 10.4.21 10:57:40 AM10.4.21 10:57:40 AM](https://usermanual.wiki/Panasonic-Connect/210029A.User-Manual-1-of-2/User-Guide-1282107-Page-118.png)
![6Camera6-7ZoomDI (zoom in) or CI (zoom out) to adjust zoom Y HI[Record] or 0Press and hold FI for continuous zoom.Zoom is available during video recording.Zoom is disabled when Image size is set as follows:・3M or 2M Wide (Camera mode)Zoom may change image quality.Maximum zoom levels for individual image size are as follows.Camera mode Size Zoom level Max. level (approx.)Camera (High sensitiv.: OFF)3M (1536×2048) 1 level 1.0 times2M Wide (1920×1080) 1 level 1.0 times2M (1200×1600) 6 levels 1.3 times1M (960×1280) 11 levels 1.6 timesVGA (640×480) 21 levels 3.2 timesStand-by (240×427) 21 levels 2.4 timesQVGA (240×320) 21 levels 3.2 timesQCIF (176×144) 31 levels 5.3 timesSub-QCIF (128×96) 31 levels 8.0 timesCamera (High sensitiv.: ON)VGA (640×480) 11 levels 1.6 timesStand-by (240×427) 21 levels 2.4 timesQVGA (240×320) 21 levels 3.2 timesQCIF (176×144) 31 levels 5.3 timesSub-QCIF (128×96) 31 levels 8.0 timesContinuous shooting VGA (480×640) 11 levels 1.6 timesQVGA (240×320) 21 levels 3.2 timesQCIF (144×176) 31 levels 5.3 timesSub-QCIF (96×128) 31 levels 8.0 times■>Camera mode Size Zoom level Max. level (approx.)Video camera VGA (640×480) 11 levels 1.6 timesHVGA Wide (640×352) 11 levels 1.6 timesQVGA (320×240) 21 levels 2.4 timesQCIF (176×144) 31 levels 4.4 timesSub-QCIF (128×96) 31 levels 6.0 times842p_E.indb 6-7842p_E.indb 6-7 10.4.21 10:57:41 AM10.4.21 10:57:41 AM](https://usermanual.wiki/Panasonic-Connect/210029A.User-Manual-1-of-2/User-Guide-1282107-Page-119.png)
![6Camera6-8Functions Available in Preview WindowChange settings before initiating image capture. Some functions are changeable with simple key operations (ZP.6-3, P.6-4).Some operations are not available depending on camera mode or image size.R[Menu] Select an item (See below)Item Operation/DescriptionCHG camera- modeCamera mode, Video camera mode, Action mode or Bar code reader>Folder jump Open destination folderImage size Select a size>File size setting Select Mail restrict'n(S) for S! Mail attachments or Long time for long-time recordingImage quality Select an itemIn Video camera mode, this function is available only when File size setting is set to Long time.>Camera settings Select an item・ Brightness Y FI・ White balance: Adjust color tone・ Color mode set: Select a color mode・ Photo mode: Select a mode suitable for the place・ Focus: ZP.6-9・ Img. stabilizer: Minimize camera shake automatically・ Shoot with frame: Add frame to image・ Shutter sound: Select a shutter click sound・ Flicker correction: Minimize flicker while shooting near fluorescent light>Storage setting Select an item・ Store in Phone or microSD・ Auto save set Y ON or OFF>■>Item Operation/DescriptionHigh sensitiv.ON or OFF>Auto timer (ZP.6-6)Cont. shooting set. Select an item・ Action mode: Manual captures one picture at a time. Auto bracket captures nine different still images automatically.・ Shot interval: Select an interval when Action mode is set to Auto.・ Shot number: Set number of images to be captured when Action mode is set to Auto or Manual. Details are as follows: VGA (480×640): 4 QVGA (240×320): 5 to 10 QCIF (144×176): 5 to 20 Sub-QCIF (96×128): 5 to 20>Movie type setNormal or Video>Display size Select preview window sizeActual size or Fit in display>Attach S!Mail modeYES or NOImage size, File size setting and Image quality are set to following (respectively): QCIF, Mail restrict'n(S), Normal>Icon Show/hide display indicatorsON or OFF>Memory Status View memory information842p_E.indb 6-8842p_E.indb 6-8 10.4.21 10:57:41 AM10.4.21 10:57:41 AM](https://usermanual.wiki/Panasonic-Connect/210029A.User-Manual-1-of-2/User-Guide-1282107-Page-120.png)
![6Camera6-9Functions Available after ShootingAvailable only when Auto save set (ZP.6-8) is OFFSome operations are not available depending on camera mode or image size.R[Menu] Y Select an item (See below)Item Operation/DescriptionPlay Play back recorded videoSave Select a folder>Store all/ animat'nSave or Mirror save Y Select a folder Y <New>>Mirror save Select a folder>Attach to S! Mail Send file via S! MailSelect a folder Y Create a message (ZFrom Step 2 on P.13-4)>Set display Set as wallpaper, Phone Book image, etc.Select a folder Y Select an item>Change frame*Select a frame Y HI[Set] YHI[Save] Y Select a folder>Store inPhone or microSD>Mirror display/ Normal displaySwitch Mirror/Normal displayDisplay size Set image size in preview windowActual size or Fit in display>Icon Show/hide display indicatorsON or OFF>Cancel Discard image to return to preview window* Available only when shooting with frame■>Focus FunctionsChanging Focus Settings<Default> Camera mode: Face DetectionVideo camera/Action mode: AutoSelect a focus setting according to occasion.Focus on Individual scenes automatically.Face Detection (Camera mode only): For portraitsAuto: Auto detectionClose-up: For nearby objectsLandscape: For distant landscapes1 In Picture/Video Preview Window, AI2 GI to select a setting Y HIFace DetectionDetect up to three faces within 2.5 meters.Show yellow Focus Guide when a face is detected.Automatically focus on one face when more than one is detected (Focus guide turns yellow once focus is on the face.).Faces may not be detected in following conditions:・ Face is tilted.・ A part of face is covered by glasses, hat, mask or shadow.・ Face is too small, big or dark for screen.・ Face is at edge of screen.Shoot with Auto focus if detection fails.842p_E.indb 6-9842p_E.indb 6-9 10.4.21 10:57:42 AM10.4.21 10:57:42 AM](https://usermanual.wiki/Panasonic-Connect/210029A.User-Manual-1-of-2/User-Guide-1282107-Page-121.png)
![6Camera6-10Auto Focus LockBring focus on subject at center of display automatically.Lock focus on subject, and recompose your picture.1 In Picture/Video Preview Window, adjust Focus Guide to subject Y BI① When in focus, handset sounds.② Focus Guide turns green, and focus is locked.When out of focus, Focus Guide turns red.To try again: L2 Determine composition3 Capture image in selected camera mode (Camera/ Action mode: ZP.6-5 / Video camera mode: ZP.6-6)Viewing Saved ImagesMain Menu ▶ Camera1 Open PicturesPictures Open VideosVideos2 Select a folder3 Select a fileOpen Pictures Saved on microSD CardAfter selecting Pictures in Step 1, P[microSD] Y Select a folderOpen Videos Saved on microSD CardAfter selecting Videos in Step 1, P[microSD] Y Select a folderTip●Editing Still Images (ZP.9-12)■>■>Example: PicturesExample: Pictures842p_E.indb 6-10842p_E.indb 6-10 10.4.21 10:57:42 AM10.4.21 10:57:42 AM](https://usermanual.wiki/Panasonic-Connect/210029A.User-Manual-1-of-2/User-Guide-1282107-Page-122.png)
![7-37EntertainmentOpening S! Quick News ListIconsUnread Quick newsRead Quick newsAuto Refresh disabledUnread General newsRead General newsUnread Special newsRead Special newsIconsUnread Quick newsRead Quick newsAuto Refresh disabledUnread General newsRead General newsUnread Special newsRead Special newsMain Menu ▶ Entertainment ▶ S! Quick News ▶ S! Quick News List1 Select an itemContent list appears.2 Select informationDetailed information appears.3 To connect to the Network, select a title Y YES Update ManuallyIn Step1, R[Menu] Y Update or All Update Y YES View SummaryIn Step 1, highlight information Y R[Menu] Y Summary DisplayDelete Registered ItemsIn Step 1, (highlight information Y) R[Menu] Y Delete or All Delete Y YES (Y For All Delete, enter Phone Password)NoteAlternatively, Main Menu ▶ Entertainment ▶ S! Quick News ▶ Settings ▶ Del S! Quick News List▶ YES to delete all informationTip●Automatically Update S! Quick News List●Delete S! Quick News Information (ZP.17-13)■>■>■>SettingsSettings842p_E.indb 7-3842p_E.indb 7-3 10.4.21 10:57:43 AM10.4.21 10:57:43 AM](https://usermanual.wiki/Panasonic-Connect/210029A.User-Manual-1-of-2/User-Guide-1282107-Page-125.png)
![7-47EntertainmentS! Information Channel/Weather (Japanese)Subscribe to content and periodically receive updates. Set Weather Indicator to appear on Standby.Transmission fees apply for updates.Registering/CancelingMain Menu ▶ Entertainment ▶ S! Info Ch./Weather1 Register/Cancel Y YES 842P connects to the Network.Follow onscreen instructions.Using S! Information ChannelUp to seven updates are saved.Viewing New InformationWhen information arrives, and Event Indicator appear in Standby.1 Select Event IndicatorInformation appears.Follow onscreen instructions.Option Menu Items (ZP.7-6)Manually Retrieve InformationSelect Event Indicator "Failed to download"Alternatively, Main Menu ▶ Entertainment ▶ S! Info Ch./Weather ▶ Get Latest Contents ▶ YESDelete InformationMain Menu ▶ Entertainment ▶ S! Info Ch./Weather ▶ Highlight What's New? ▶ R[Menu] ▶ Delete ▶ YESNoteAlternatively, Main Menu ▶ Entertainment ▶ S! Info Ch./Weather ▶ What's New? to retrieve informationIf there is unread information in both S! Quick News and S! Information Channel, does not appear. Only Event Indicator appears.Viewing Previously Received InformationMain Menu ▶ Entertainment ▶ S! Info Ch./Weather1 History Y Select a date for unread news and for read news appear.Delete HistoryMain Menu ▶ Entertainment ▶ S! Info Ch./Weather ▶ History ▶ (Highlight a History) ▶ R[Menu]▶ Delete or Delete all ▶ YES (▶ For Delete all, enter Phone Password)■■>■>842p_E.indb 7-4842p_E.indb 7-4 10.4.21 10:57:43 AM10.4.21 10:57:43 AM](https://usermanual.wiki/Panasonic-Connect/210029A.User-Manual-1-of-2/User-Guide-1282107-Page-126.png)

![7-67EntertainmentOption Menu ItemsWhile viewing a content, press R[Menu] for these options.Item Operation/DescriptionForward Go to next pageText Copy Copy page textSelect File View, play or save file to Data Folder (From Step 2 in Downloading Image/Sound Files: ZP.14-11)Jump in this page Jump to top/end of pageYahoo! Keitai View top menuFont Size* Change character sizeExit viewing this Exit content* Linked with Font Size setting in Internet option menu.E-Books (Japanese)Use BookSurfing® to acquire/view e-books, comics, photo books, etc. or e-Book Viewer to view XMDF files on 842P.BookSurfing® and e-Book Viewer are S! Appli.Download Content Keys (ZP.9-5) to read CCF/XMDF files.Some copy protected files have extensions different from the ones below.Application File FormatBookSurfing®CCF (.ccf)e-Book Viewer XMDF (.zbf, .zbk, .zbs)Some PC content may not be viewable via e-Book Viewer.Main Menu ▶ Entertainment1 BookSurfing or e-Book ViewerSee application Help menu for usage information.NoteLaunch BookSurfing®/e-Book Viewer via S! Appli, or select a file from Books in Data Folder.842p_E.indb 7-6842p_E.indb 7-6 10.4.21 10:57:45 AM10.4.21 10:57:45 AM](https://usermanual.wiki/Panasonic-Connect/210029A.User-Manual-1-of-2/User-Guide-1282107-Page-128.png)

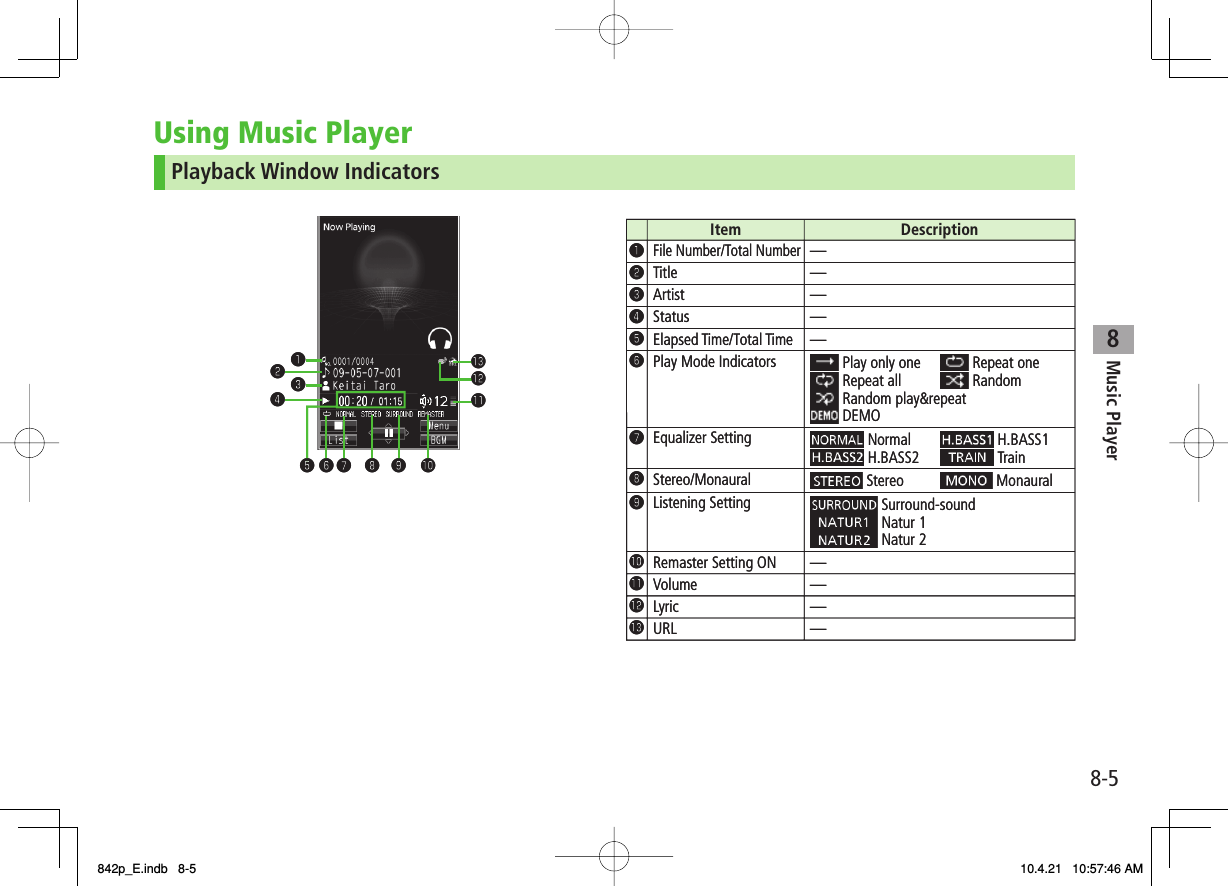
![8Music Player8-6Playing MusicMain Menu ▶ Music Player1 PlayerPlayer Menu window appears.Last playback window appears.To open Player menu: L twice.2 Select a category (See below)Item Operation/DescriptionAll Tracks Select files from 842P & microSD CardArtist Select files from Artist folderAlbum Select files from Album folderGenre Select files from Genre folderPlay List Select group of files saved to Play List"★" appears for currently/previously played Play List.3 Select a fileSelected file plays."★" appears for currently/previously played file.Playback Window Operations: ZP.8-7To end playback, Q[ ] Player Menu WindowPlayer Menu WindowNotemp4/3gp files in Ring Songs&Tones folder can also be played in Music Player.When playing back files with handset closed, missed calls or new messages cannot be checked by V even if Info Notice Setting (ZP.17-7) is ON.Changing Play ModeMain Menu ▶ Music Player1 PlayerPlayer Menu window appears.Last playback window appears. To open Player menu: L twice.2 R[Menu] Y Play mode setting3 Select an item (See below)Item Operation/DescriptionNormal Play all files in selected category/Play ListPlay only one Play selected fileRepeat one Repeat selected fileRepeat all Repeat all files in selected category/Play ListRandom Play selected category/Play List files randomlyRandom play&repeat Repeat selected category/Play List files randomly842p_E.indb 8-6842p_E.indb 8-6 10.4.21 10:57:46 AM10.4.21 10:57:46 AM](https://usermanual.wiki/Panasonic-Connect/210029A.User-Manual-1-of-2/User-Guide-1282107-Page-134.png)
![8Music Player8-7Using Other Functions while Listening to Music (Play Background)Use Phone Book, Messaging, Internet, etc. while listening to music.1 While playing file, O[BGM]2 To end, K in Standby Y End playerNoteSome functions cannot operate simultaneously.Volume or play mode change is not available during Play Background.Playing Chaku-Uta Full®/WMA Files as DemoMain Menu ▶ Music Player ▶ Data Manager1 Select an item (See below)Item Operation/DescriptionMain Folder View Chaku-Uta Full® listSelect a folderTo view file list in handset/microSD Card: P[Phone/microSD]>WMA View WMA listO[Change] to toggle display view in Chaku-Uta Full® and WMA list.2 Select a Chaku-Uta Full® or WMA fileDemonstration playback starts.Playback Window OperationsAdjust Volume GI or UVPlay Previous*CI or press and hold UWhen playback time is over three seconds, previous file plays from beginning.Play Next*DI or press and hold VRewind Press and hold CIForward Press and hold DIPause/Resume HI[ / ]Stop Q[ ]View Next Jacket/Lyric 3View Previous Jacket/Lyric 1Switch Jacket/Lyric Display 2Switch Playlist/Playback Window*P[List/Player]Play Background*O[BGM]Switch Remaster (zZP.8-8) 9Switch Listening (zZP.8-8) 8Switch Equalizer (zZP.8-8) 7* Not available for playback as a demo842p_E.indb 8-7842p_E.indb 8-7 10.4.21 10:57:47 AM10.4.21 10:57:47 AM](https://usermanual.wiki/Panasonic-Connect/210029A.User-Manual-1-of-2/User-Guide-1282107-Page-135.png)
![8Music Player8-8Functions while Playing FilesSet Sound EffectWhile playing file, R[Menu] Y Sound effect Y Select an item (See below)Item Operation/DescriptionRemaster Complement sound from earphone to bring close to original soundON or OFF>Listening Add listening effect to sound from earphoneSelect an item・ Surround-sound: Reproduce natural and stereophonic sound・ Natur 1 or Natur 2: Complement sound specific to earphone to reproduce natural sound・ OFF: Turn off Listening setting>Equalizer Change quality of sound from earphoneSelect an item・ Normal: Reproduce normal sound・ H. BASS1: Enhance low-pitched sound・ H. BASS2: Enhance low-pitched sound even more・ Train: Minimize sound leakage>■>Functions Available in Playback WindowWhile playing file, R[Menu] Y Select an item (See below)Item Operation/DescriptionPlayer menu Show Player menuPlay mode setting Change play mode (ZP.8-6)Sound effect (ZLeft)Music info Show song title, artist and playback timeConnect to Website Open site linkYES>Display image/Display lyricShow jacket or lyricPrevious image/Previous lyricShow previous jacket or lyricNext image/Next lyric Show next jacket or lyric■>842p_E.indb 8-8842p_E.indb 8-8 10.4.21 10:57:47 AM10.4.21 10:57:47 AM](https://usermanual.wiki/Panasonic-Connect/210029A.User-Manual-1-of-2/User-Guide-1282107-Page-136.png)
![8Music Player8-9Chaku-Uta Full®/WMA ListMain Menu ▶ Music Player ▶ Data ManagerConfirm Memory StatusR[Menu] Y Memory StatusFunctions Available in Chaku-Uta Full® Folder ListMain Folder Y Highlight a folder Y R[Menu] Y Select an item (See below)Item Operation/DescriptionAdd folder Enter folder name>Edit folder name Enter folder name>Delete folder Enter Phone Password Y YES>Memory Status Confirm memory status/total files>Functions Available in Chaku-Uta Full®/WMA File ListMain Folder or WMA (Y Select a folder) Y Highlight a file Y R[Menu] Y Select an item (See below)Item Operation/DescriptionSet as ring tone (Fullsong ring tone) 1Set Chaku-Uta Full® as ringtoneFullsong ring tone Y Select an item>Set as ring tone (Point ring tone) 1Set a segment of Chaku-Uta Full® as ringtonePoint ring tone Y Select a segment Y Select an itemTo confirm segment: Q[Play]>Music info Show song title, artist and playback timeMove 1Select a storage>■>■>■>FromFromItem Operation/DescriptionMove to microSD 1Move a Chaku-Uta Full® to microSD CardAdd folder 1Enter folder name>Multiple-choice 1Select multiple Chaku-Uta Full®Check Chaku-Uta Full® Y R[Menu] Y Delete, Move or Send Ir data Y Operate selected item>Connect to Website 1Open site linkYES>Display image Show jacketMemory Status Memory status/total number of files appearsDEL all licenses 2Delete all WMA licensesEnter Phone Password Y YES>Delete thisYES>Delete all Delete all files in folderEnter Phone Password Y YES>Attach to S! Mail 1Send a file via S! Mail (ZFrom Step 2 on P.13-4)Send Ir data 1(ZP.10-3)IC transmission 1(ZP.10-5)Take contents key 1(ZP.9-5)1 Chaku-Uta Full® files only2 WMA files only842p_E.indb 8-9842p_E.indb 8-9 10.4.21 10:57:48 AM10.4.21 10:57:48 AM](https://usermanual.wiki/Panasonic-Connect/210029A.User-Manual-1-of-2/User-Guide-1282107-Page-137.png)
![8Music Player8-10Using Play ListUse Play List to organize Data Folder music files.Select Music folder files to create Play List links to each file in its original folder.Creating New Play ListsMaximum number of Play Lists to create and songs to save is as follows:Combined Play Lists: 30 Play Lists; 100 songs per listWMA Play Lists: 100 Play Lists; 250 songs per listSD Audio Play Lists: 99 Play Lists; 99 songs per listMain Menu ▶ Music Player1 PlayerPlayer menu appears.Last playback window appears. To open Player menu: L twice2 Play List Y R[Menu] Y Create play list Y Select a category and show file list Y Check files to save to Play List Y Q[Finish]3 Enter a Play List namePlay Lists WindowPlay Lists WindowPlaying Songs from Play ListMain Menu ▶ Music Player1 PlayerPlayer menu appears.Last playback window appears. To open Player menu: L twice2 Play List Y Select a Play ListTo play back selected Play List from the beginning: Q[Play]3 Select a fileSelected file plays back.Notemp4/3gp files in Ring Songs&Tones folder can also be added to Play List.Play List Contents WindowPlay List Contents Window842p_E.indb 8-10842p_E.indb 8-10 10.4.21 10:57:48 AM10.4.21 10:57:48 AM](https://usermanual.wiki/Panasonic-Connect/210029A.User-Manual-1-of-2/User-Guide-1282107-Page-138.png)
![8Music Player8-11Play ListMain Menu ▶ Music Player ▶ Player▶ Play ListFunctions Available in Play Lists Window(Highlight a Play List) R[Menu] Y Select an item (See below)Item Operation/DescriptionPlayer menu Open Player menuPlay mode setting Change play mode (ZP.8-6)Create play list Create a new Play List (ZP.8-10)Copy play list Copy a Play ListEnter a Play List name>Edit pl. list name Edit a Play List nameEdit Play List name>Add Add files to a Play ListSelect a category, and show file list Y Check files to add Y Q[Finish]>Delete play list Select an item Y Operate selected item>■>FromFromFunctions Available in Play List Contents WindowSelect a Play List Y (Highlight a file) Y R[Menu] Y Select an item (See below)Item Operation/DescriptionPlayer menu Open Player menuPlay mode setting Change play mode (ZP.8-6)Music info Show song title, artist and playback timeAdd Add files to a Play ListSelect a category, and show file list Y Check files to add Q[Finish]>DEL from play list Delete files from Play ListSelect an item Y Operate selected item>Order to play Select a file from a Play List to change playing order Y GI to change order Y HI[Select]Repeat steps above to change order Y Q[Set].>Add to play list Add files to another Play ListAdd one or Add some (Y For Add some, check files Y Q[Finish]) Y Select a Play List>Display image Show jacket■>842p_E.indb 8-11842p_E.indb 8-11 10.4.21 10:57:49 AM10.4.21 10:57:49 AM](https://usermanual.wiki/Panasonic-Connect/210029A.User-Manual-1-of-2/User-Guide-1282107-Page-139.png)
![9-39Managing FilesFolder Function/Saved Data File Format 1Videos Download Videos Connect to download site MP4 (including .mp4, .3gp, SDV), ASF (.asf)Main Folder Downloaded video files, etc.Camera Video files recorded by CameraPre-installed Preinstalled video filesPlay List Play back Play ListPosition Memory Play back video files from saved resume positionmicroSD 2Video files recorded by Camera or copied from SoftBank handsetsPC Movies microSD 3PC movies saved using PC WMA (.wma), WMV (.wmv), ASF (.asf)Position Memory Play back PC movies from saved resume positionPlay History Playback records of PC moviesTV Image Still images recorded by Digital TV JPEG (.jpg)Video 3Copy-protected video files (One-Seg compatible) TOD (.tod), MOI (.moi), MAI (.mai), PGI (.pgi)Position Memory Play back video files from saved resume positionLifestyle-Appli Download Connect to download site (Osaifu-Keitai®: ZP.16-2) –Books Download Books Connect to download site CCF (.ccf), XMDF (.zbf, .zbk, .zbs)microSD 2E-Books downloaded or moved from SoftBank handsetsCustomized Screen Customized Screen Connect to download site CUSR (.xcsf)Familiar Usability UIE (.uie)microSD 2Customized Screen/Familiar Usability downloaded or moved/copied from SoftBank handsetsCUSR (.xcsf), UIE (.uie)Templates Download Templates Connect to download site –Other Documents Main Folder Incompatible files attached to mail 4–microSD 2Incompatible files downloaded or copied from SoftBank handsets1 Some copy protected files have extensions different from above.2 When microSD Card is installed, press P[microSD] in Folder list.3 Available only when microSD Card is installed.4 Some attachment files cannot be saved in Other Documents.842p_E.indb 9-3842p_E.indb 9-3 10.4.21 10:57:50 AM10.4.21 10:57:50 AM](https://usermanual.wiki/Panasonic-Connect/210029A.User-Manual-1-of-2/User-Guide-1282107-Page-143.png)
![9-49Managing FilesUsing Copy Protected FilesPlaying/forwarding/saving may be restricted and Content Key (ZP.9-5) may be required for usage.See file information to confirm restrictions such as expiry term or usage limitation (Respective file information in "Options": ZP.9-7). or (Silver) appears for copy protected files requiring Content Keys. files are inaccessible.Files downloaded on 842P cannot be used on PCs.Network setting may be required for usage.File usage may require insertion of USIM Card in use at time of download.842P holds up to 1000 Content Keys. Multiple Keys may be required to use a file. Expired Keys are deleted automatically.Interrupted playback (by incoming calls or Alarm) of copy protected WMA files with limited usage in Data Folder is also counted as one usage.Opening FilesViewing & Playing FilesMain Menu ▶ Data Folder1 Select a folder In Folder List, press P to toggle handset folder and microSD Card folder.2 Select a folder Y Select a fileFile appears/plays.To toggle file list view: O[Change]When Shortcut to a Download Site is SelectedHandset connects to a download site on Internet.Operations while Playing Back Ring Songs&TonesStop HI[Stop]Volume*GI/UVAttach files (during playback) to S! Mail Q[ ]* To use UV with handset closed, set Info Notice Setting (ZP.17-6) to OFF.■Pictures FolderPictures FolderStill Image List WindowStill Image List Window842p_E.indb 9-4842p_E.indb 9-4 10.4.21 10:57:50 AM10.4.21 10:57:50 AM](https://usermanual.wiki/Panasonic-Connect/210029A.User-Manual-1-of-2/User-Guide-1282107-Page-144.png)
![9-59Managing FilesVideos/PC Movies Playback OperationSome operations are not available depending on files.Adjust Volume GI or UVPlay PreviousCIStarts from beginning when playback time is over three seconds.Play Next DIRewind 1Press and hold CIForward 1Press and hold DISelect Position 2FI repeatedlyChange Speed Q[ / 1/ ]Mute/Resume R[ / ]Pause/Resume HI[ / ]Play Frame by Frame 1While pausing, Q[Frame]Play back frame by frameSwitch Portrait/Landscape View (Full Screen)ORemaster (zZP.8-8) 9Listening (zZP.8-8) 8Equalizer (zZP.8-8) 71 Videos only2 PC Movies onlyTip●File Display/Playback Functions (ZP.9-6)■Content KeyIf Content Key is expired, a message appears when the file is opened. To obtain a new Key, select YES. 842P connects to Content Key site.Copy Protected Files: ZP.9-4 or (Silver) appear for files requiring Content Keys. files are inaccessible. appears on images in Thumbnail view of expired files (Original icon appears for Books folder.).NoteAlternatively, obtain Content Key as follows: Highlight a file Y R[Menu] Y Take contents keyDepending on contents, some Content Keys may not be obtained from websites even when warning for expired contents appears.When 1000 Content Keys have been saved, a message appears. Delete old Keys; otherwise downloads may fail (Connection fees apply).842p_E.indb 9-5842p_E.indb 9-5 10.4.21 10:57:50 AM10.4.21 10:57:50 AM](https://usermanual.wiki/Panasonic-Connect/210029A.User-Manual-1-of-2/User-Guide-1282107-Page-145.png)
![9-69Managing FilesFile Display/Playback FunctionsEnlarge Still ImagesMain Menu ▶ Data Folder ▶ Pictures ▶ Select a folder ▶ Select a file ▶ R[Menu] ▶ Display size ▶ Fit in displayPlay Back from a Resume PositionResume playback (videos/PC Movies) from a saved position.Main Menu ▶ Data Folder ▶ Videos or PC Movies ▶ Position Memory ▶ Select an itemSave a resume position: ZRightMarker to resume is a resume position automatically saved when a call comes in, alarm goes off, battery runs low, or playback is terminated.Functions Available in Video/PC Movie Playback WindowSome operations are not available depending on files.While playback is paused, R[Menu] Y Select an item (See below)Item Operation/DescriptionNormal play 1Play at normal speedSlow 1Play at slow speedQuick View (1.25x) 1Play 1.25 times faster than normalQuick View(2x) 1Play at double speedFast 2ForwardRewind 2RewindStop Return to Videos/PC Movies List windowPosition to play Start playback from specified pointFI to highlight a play point Y HI[Set]>Connect to Website 1Open site linkYES>■>■>■>Item Operation/DescriptionSound effectRemaster, Listening or Equalizer (ZP.8-8)Contents info 2Show title, file name, etc.Position memory Save resume positionSelect a resume positionTo play back from a saved position: ZLeft>Attach to S! Mail 1Send file via S! Mail(ZFrom Step 2 on P.13-4)Register (Ringtones) 1Set as ringtoneRingtones Y Select a type"★" is added to item set as ringtone.>Register (Start-up Window) 1Save a file as Start-up WindowStart-up Window Y YES>Video info 1Show title, file name, etc.Send Ir data 1Send file via Infrared (ZP.10-3)IC transmission 1Send file via IC transmission (ZP.10-5)Add shortcut icon 1Create a shortcut (ZP.1-17)Description 2Show file informationThe words view or Description view>Copy URL 2Copy URLDisplay size Select a display sizeActual size or Fit in display>Play on full disp. 1Switch to Landscape View. Full screen playback startsTo toggle views: O1 Video files only2 PC movies only842p_E.indb 9-6842p_E.indb 9-6 10.4.21 10:57:51 AM10.4.21 10:57:51 AM](https://usermanual.wiki/Panasonic-Connect/210029A.User-Manual-1-of-2/User-Guide-1282107-Page-146.png)
![9-79Managing FilesNext PageOptionsCopy Protected FilesWhen set as wallpaper or ringtone, settings may return to defaults if license has expired or different USIM Card is inserted.Limited use files cannot be set as wallpaper or ringtone.Highlight a file in Data Folder Y R[Menu] for the following operations.Some functions may not be available depending on files.PicturesItem Operation/DescriptionEdit picture Edit files (ZP.9-12)Display pictureOpen filesSet display* Set as wallpaper, Phone Book image, Menu Icons, etc.Select an item"★" is added to item.>Picture info Show file name, file size, etc.Attach to S! Mail Send files via S! Mail (ZFrom Step 2 on P.13-4)Graphic mail Add selected files to Graphic Mail (ZP.13-5)Send Ir data Send files via Infrared (ZP.10-3)IC transmissionSend files via IC transmission (ZP.10-5)Add shortcut icon Create shortcuts (ZP.1-17)Copy to microSD Copy files to microSD CardMove to microSD Move files to microSD CardPositioning Set where to paste files in StandbySelect a position>■Item Operation/DescriptionEdit file name Edit file namesMove Move files to other foldersSlideshow Show files in a folder continuously. Select display speedNormal or Slow>Delete this Delete a fileYES>Delete all Delete all filesEnter Phone Password Y YES>Multiple-choice Select multiple files to useCheck files to use Y R[Menu] Y Select an item>Memory Status Show memory informationSort Change display order of filesSelect an order>Pictures/File names Toggle list viewAlternatively, O[Change] to toggleTake contents key Connect to site for Content Key* Before setting a file as Video Call related item (except for Incoming/Outgoing Video Calls), set Select Images to Original (Change Outgoing Alternative Image: ZP.17-10).To set a file as Menu Icon related item, set Menu Icons to Customize (ZP.17-4).842p_E.indb 9-7842p_E.indb 9-7 10.4.21 10:57:52 AM10.4.21 10:57:52 AM](https://usermanual.wiki/Panasonic-Connect/210029A.User-Manual-1-of-2/User-Guide-1282107-Page-147.png)
![9-89Managing FilesIf incoming calls arrive or handset is turned off while My Pictograms package file (.gpk) is being uncompressed, some pictograms in package file may not open. Retry uncompressing.Tip●Enlarge Still Images (ZP.9-6)●Editing Still Images (ZP.9-12)●Creating Animations ●Saving Still Images to Phone Book (ZP.9-13)Ring Songs&TonesItem Operation/DescriptionEdit file name Edit file namesPlay melody Play back filesSet as ring tone Set as ringtone"★" is added to item.>Add shortcut icon Create shortcuts (ZP.1-17)Attach to S! Mail Send files via S! Mail (ZFrom Step 2 on P.13-4)Send Ir data Send files via Infrared (ZP.10-3)IC transmissionSend files via IC transmission (ZP.10-5)Copy to microSD Copy files to microSD CardSong·Toneinfo Show titles, file names, etc.MemoryStatus Show memory information■Item Operation/DescriptionDelete Select a type・ Delete this Y YES・ Delete select Y Check files to delete Y Q[Finish] Y YES・ Delete all Y Enter Phone Password Y YES>Sort Change display order of filesSelect an order>Move Move files to other foldersMove to microSD Move files to microSD CardTake contents key Connect to site for Content KeyS! Appli/Lifestyle-AppliItem Operation/DescriptionStart Activate S! Appli or Lifestyle-AppliSecurity level Set security level (ZP.15-4)S! Appli info Show file names, file sizes, etc.Add shortcut icon Create shortcuts (ZP.1-17)Move to microSD Move files to microSD Card(Lifestyle-Appli cannot be moved)Delete Delete filesYES>MusicSee "Functions Available in Chaku-Uta Full®/WMA File List" (ZP.8-9)■■842p_E.indb 9-8842p_E.indb 9-8 10.4.21 10:57:52 AM10.4.21 10:57:52 AM](https://usermanual.wiki/Panasonic-Connect/210029A.User-Manual-1-of-2/User-Guide-1282107-Page-148.png)
![9-99Managing FilesVideosItem Operation/DescriptionRegister Set as ringtones or Start-up displayVideo info Show titles, file names, etc.Attach to S! Mail Send files via S! Mail (ZFrom Step 2 on P.13-4)Send Ir data Send files via Infrared (ZP.10-3)IC transmissionSend files via IC transmission (ZP.10-5)Copy to microSD Copy files to microSD CardMove to microSD Move files to microSD CardMove Move files to other foldersAdd shortcut icon Create shortcuts (ZP.1-17)Edit file name Edit file namesDelete this Delete a fileYES>Delete all Delete all filesEnter Phone Password Y YES>Multiple-choice Select multiple files to useCheck files to use Y R[Menu] Y Select an item>Memory Status Show memory informationSort Change display order of filesSelect an order>Listing Change list viewO[Change] to toggle viewsTake contents key Connect to site for Content Key■PC MoviesItem Operation/DescriptionContents info Show titles, file names, etc.Move Move files to other foldersCopy Copy files to other foldersMultiple-choice Select multiple files to useCheck files to use Y R[Menu] Y Select an item>Comment view Show descriptionsMemory StatusShow memory informationDelete this Delete a fileYES>Delete all Delete all filesEnter Phone Password Y YES>TVSee Pictures folder for still images.Item Operation/DescriptionEdit title Enter titles>Video info Show titles, channel names, etc.Add shortcut icon Create shortcuts (ZP.1-17)Delete this Delete a fileYES>Delete selectedCheck files to delete Y Q[Finish] Y YES>Delete all Delete all filesEnter Phone Password Y YES>Memory StatusShow memory informationListing Change list viewO[Change] to toggle views■■842p_E.indb 9-9842p_E.indb 9-9 10.4.21 10:57:52 AM10.4.21 10:57:52 AM](https://usermanual.wiki/Panasonic-Connect/210029A.User-Manual-1-of-2/User-Guide-1282107-Page-149.png)
![9-109Managing FilesBooksItem Operation/DescriptionPlay Play back filesConnect to Website Open site linkBook info Show file names, file sizes, etc.Copy to microSDCopy files to microSD CardMove to microSDMove files to microSD CardAdd folder Add foldersEdit file name Edit file namesMove Move files to other foldersTake contents key Connect to site for Content KeyDelete Delete filesYES>■Customized ScreenItem Operation/DescriptionPreview Preview filesCollective Setting Set Customized Screen all at onceFile info Show titles, file names, etc.Copy to microSDCopy files to microSD CardMove to microSDMove files to microSD CardEdit file name Edit file namesDelete this Delete a fileYES>Delete all Delete all filesEnter Phone Password Y YES>Multiple-choice Select multiple files to useCheck files to use Y R[Menu] Y Select an item>Memory Status Show memory informationSort Change display order of filesSelect an order>Listing Change list viewO[Change] to toggle viewsTake contents key Connect to site for Content KeyConnect to Website Open site link■842p_E.indb 9-10842p_E.indb 9-10 10.4.21 10:57:53 AM10.4.21 10:57:53 AM](https://usermanual.wiki/Panasonic-Connect/210029A.User-Manual-1-of-2/User-Guide-1282107-Page-150.png)
![9-119Managing FilesTemplatesItem Operation/DescriptionCompose S! Mail Send files via S! Mail (ZP.13-5)Edit title Edit titlesTemplate Info Show title and file sizeDelete thisYES>Delete selected Check files to delete Y Q[Finish] Y YES>Delete All Enter Phone Password Y YES>Other DocumentsItem Operation/DescriptionFile info Show file names, file sizes, etc.Attach to S! Mail Send files via S! Mail (ZFrom Step 2 on P.13-4)Copy to microSD Copy files to microSD CardEdit file name Edit file namesMove Move files to other foldersDelete this Delete a fileYES>Delete all Delete all filesEnter Phone Password Y YES>Multiple-choice Select multiple files to useCheck files to use Y R[Menu] Y Select an item>Memory StatusShow memory informationSort Change display order of filesSelect an order>■■NoteTitles of mp4/3gp Ring Songs&Tones files and Videos/Music/Customized Screen files appear in respective lists. Files without titles appear with file names (created when files are saved to handset). Titles cannot be changed; edited file names may not appear in lists.842p_E.indb 9-11842p_E.indb 9-11 10.4.21 10:57:53 AM10.4.21 10:57:53 AM](https://usermanual.wiki/Panasonic-Connect/210029A.User-Manual-1-of-2/User-Guide-1282107-Page-151.png)
![9-129Managing FilesUsing/Editing Still ImagesEditing Still ImagesEdit features are not available for all file types.Main Menu ▶ Data Folder ▶ Pictures1 Select a folder Y Select a file Y R[Menu] Y Edit picture2 R[Menu] Y Select an item (See below)Item Operation/DescriptionMarker stamp Select a stamp Y EI to move stamp Y HI[Put]Following options are available when positioning a stamp:・ To rotate or scale up/down: R[Menu] Y Select an item・ To start over: Q[Cancel]To add: Q[Add]>Frame Select a frame・ To rotate 180 degrees: R[Menu] Y180° rotation・ To change frame: FI・ To return to frame list: Q[Cancel]>Character stamp Enter text Y EI to move text Y HI[Put]To change content/color/font/size: When positioning stamp, R[Menu] Y Operate selected itemTo start over: Q[Cancel] after positioning>Item Operation/DescriptionChange size Select a sizeTo start over: Q[Cancel]>Trim away Specify a size Y EI to specify area Y HI[Set]To start over: After specifying area, Q[Cancel]>Retouch Select an itemTo start over: Q[Cancel]>Rotate90° to right, 90° to left or 180°To start over: Q[Cancel]>Brightness FI to adjust brightness>Attach to S! Mail*Create S! Mail with edited still images.HI[Set] Y Create S! Mail (ZFrom Step 2 on P.13-4)Edited files are automatically saved.Alternatively, Q[] to attach pictures to S! Mail>Save* Overwrite/rename to save edited files.* Available after other editing operations.3 HI[Set] Y HI[Save]4 YES (Overwrite) or NO (Save as)842p_E.indb 9-12842p_E.indb 9-12 10.4.21 10:57:53 AM10.4.21 10:57:53 AM](https://usermanual.wiki/Panasonic-Connect/210029A.User-Manual-1-of-2/User-Guide-1282107-Page-152.png)
![9-139Managing FilesCreating AnimationsSaving Original AnimationMain Menu ▶ Data Folder ▶ Pictures ▶ Original Animation1 <New> Y <1st> - <20th>2 Select a folder Y Select a fileRepeat Step 2.3 Q[Finish]Functions Available in Original Animation ListIn Original Animation list, press R[Menu] for following operations.Item Operation/DescriptionEdit title Enter title>Org. animation Add more files to an Original Animation (ZAbove)Display picture Play back an Original AnimationAlternatively, select an Original Animation from list to play back.Set display Set an Original Animation as Standby display, etc.Select item to set Original Animation as>Picture info View item set for Set displayRelease animation Cancel a saved Original AnimationYES>Saving Still Images to Phone BookSavable sizes: Standby (240 x 427) or smaller in JPEG, GIF or PNG format (up to 300 Kbytes)Save images to up to 100 Phone Book entries.Still images cannot be saved to USIM Card Phone Book entries.Main Menu ▶ Data Folder ▶ Pictures1 Select a folder Y Select a file Y R[Menu] Y Set display Y Phone Book2 New Entry New Y Enter details (Y From Step 3 on P.4-4) Y Q[Finish] Add to Existing Entry Add Y Select entry Y Q[Finish] Y YES842p_E.indb 9-13842p_E.indb 9-13 10.4.21 10:57:54 AM10.4.21 10:57:54 AM](https://usermanual.wiki/Panasonic-Connect/210029A.User-Manual-1-of-2/User-Guide-1282107-Page-153.png)
![9-149Managing FilesManaging Folders/FilesManaging FoldersThe following operations are available in Pictures, Music, Books, Videos, Ring Songs&Tones, PC Movies and Other Documents.Main Menu ▶ Data Folder 1 Select a folder Y R[Menu] Y Select an item (See below)Item Operation/DescriptionAdd folder Create user foldersEdit folder name Edit user folder namesDelete folder Delete a user folderEnter Phone Password Y YES Y YES>Delete all image 1Enter Phone Password Y YES Y YES>Edit Play List 2Edit Play ListsRelease Play List 2Cancel edited Play ListsYES>Select storage 3Specify folders on microSD Card to save files toYESFolders cannot be specified when saving Books files.>Memory Status 4View memory capacity/number of saved files1 Pictures folder only2 Play List folder in Ring Songs&Tones folder only3 microSD Card only4 Music folder onlyUsing Play ListUse Play List to organize Data Folder Ring Songs&Tones/Videos files.Select Ring Songs&Tones, Music or Videos folder files to create Play List links to each file in its original folder.Creating Ring Songs&Tones Play ListsMain Menu ▶ Data Folder ▶ Ring Songs&Tones1 Highlight Play List Y R[Menu] Y Edit Play List2 Select a number Y Select a folder Y Select a fileRepeat Step 2.3 Q[Finish]Play Back Play ListMain Menu ▶ Data Folder ▶ Ring Songs&Tones ▶ Play ListFiles are played back in the saved order.Delete a FileAfter Step 1, select a file Y Release this■>■>842p_E.indb 9-14842p_E.indb 9-14 10.4.21 10:57:54 AM10.4.21 10:57:54 AM](https://usermanual.wiki/Panasonic-Connect/210029A.User-Manual-1-of-2/User-Guide-1282107-Page-154.png)
![9-159Managing FilesDelete All FilesAfter Step 1, R[Menu] Y Release Play List Y YESNotemp4/3gp files cannot be added to Play List except in Music Player Play List.Creating Video Play ListsMain Menu ▶ Data Folder ▶ Videos ▶ Play List1 Select a Play List2 Select a number Y Select a folder Y Select a fileRepeat Step 2.3 Q[Finish]Play Back Play ListsMain Menu ▶ Data Folder ▶ Videos ▶ Play List ▶ Highlight Play List Y Q[Play]Files are played back in the saved order.Delete a FileAfter Step 1, (highlight a file Y) R[Menu] Y Delete this or DEL all from list Y YESChange OrderAfter Step 1, R[Menu] Y Oder to play Y Select a file Y Select a target Y Q[Finish] Y Q[Finish]■>■>■>■>microSD Card842P is compatible with up to 2 GB commercial microSD Cards and up to 16 GB commercial microSDHC Cards (as of March 2009).For information on memory card compatibility, visit the website below (Japanese). Note that microSD Cards not listed on the website may not function properly.・ From Yahoo! Keitai P-egg (as of April 2009) Yahoo! Keitai top page Y メニューリスト Y 辞書・ツール Y ケータイメーカー Y P-egg・ From PC http://panasonic.jp/mobile/ Not all operations are guaranteed by the microSD/microSDHC Cards listed.Format new microSD/microSDHC Cards for use with 842P (ZP.9-17).NoteSoftBank is not liable for damages from accidental loss/alteration of microSD Card information. Keep a copy of Phone Book entries, etc. in a separate place.microSD Card has no write protect feature; there is a risk of accidental erasure/overwriting of files.842p_E.indb 9-15842p_E.indb 9-15 10.4.21 10:57:54 AM10.4.21 10:57:54 AM](https://usermanual.wiki/Panasonic-Connect/210029A.User-Manual-1-of-2/User-Guide-1282107-Page-155.png)
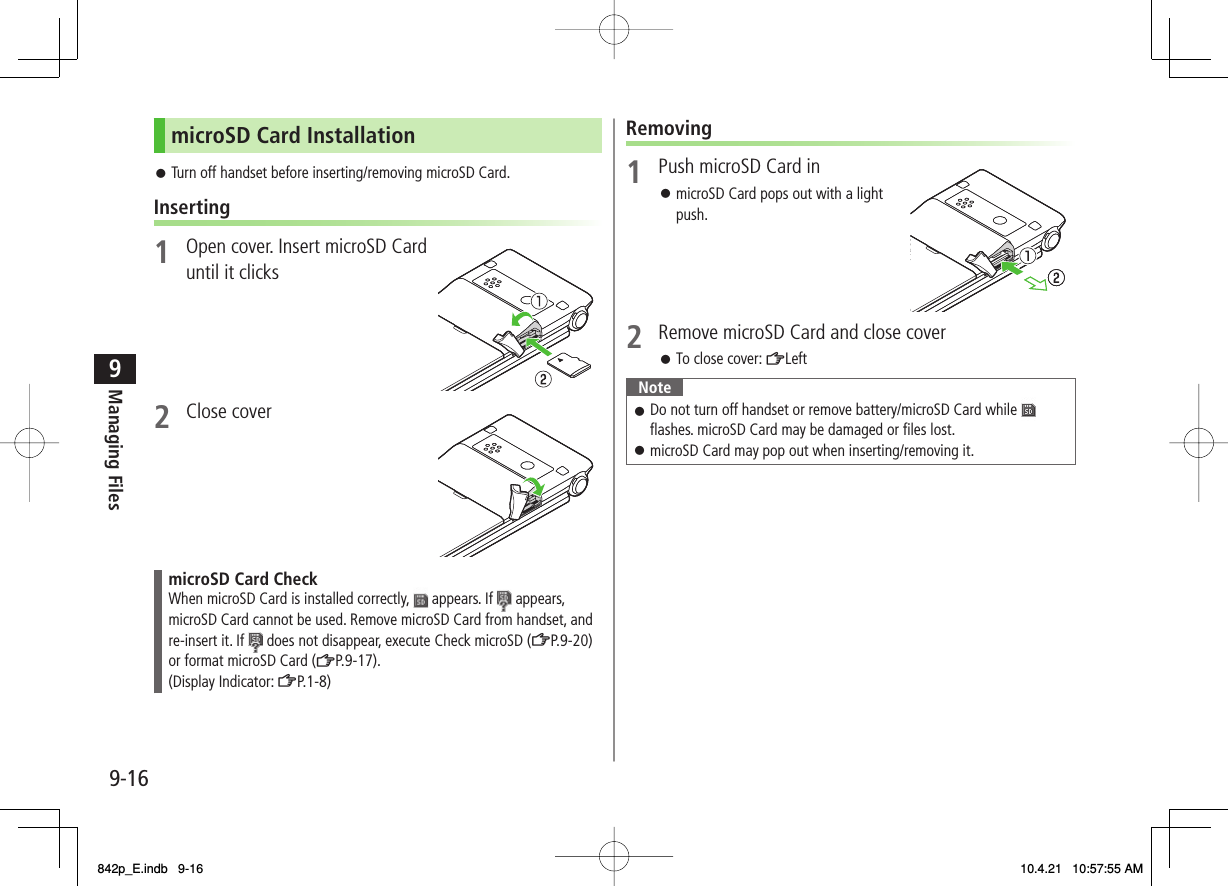
![9-179Managing FilesFormat microSD CardFormatting microSD Card deletes all saved files/data.Main Menu ▶ Tools ▶ microSD Backup1 R[Menu] Y microSD format2 Enter Phone Password Y YESNoteDo not turn handset power off or remove microSD Card or battery while formatting; may damage handset or microSD Card.microSD Cards formatted on other devices may not be used. Format microSD Card on 842P before use.842P cannot format incompatible microSD Cards.If format fails, turn power off and remove microSD Card from 842P. Reinsert microSD Card and format it again.Viewing microSD Card FilesView Phone Book entries, Calendar events, Tasks, mail messages, Notepads and Bookmarks backed up on microSD Card.Main Menu ▶ Tools ▶ microSD Backup1 Select a category 2 Select a file Backup date appears as file name.3 Select a data NoteIf messages on microSD Card do not appear correctly, copy messages to handset (ZP.9-18) and execute Charset Conversion (ZP.13-22).Category ListCategory ListFile ListFile ListData ListData ListDetailed DataDetailed Data842p_E.indb 9-17842p_E.indb 9-17 10.4.21 10:57:56 AM10.4.21 10:57:56 AM](https://usermanual.wiki/Panasonic-Connect/210029A.User-Manual-1-of-2/User-Guide-1282107-Page-157.png)
![9-189Managing FilesHandset Data BackupBack up handset data (Phone Book, Calendar, Tasks, Messages, Notepad, Bookmarks, Content Keys) to microSD Card; restore handset data after accidental loss/alteration.Back up Content Key: ZP.9-21Backing up to microSD CardMain Menu ▶ Tools ▶ microSD Backup1 Highlight a category Y R[Menu] Y Copy to microSD (Y For Bookmarks, select an item)2 Enter Phone Password Y YESAll files of selected category are backed up to microSD Card.One File BackupOpen a file Y R[Menu] Y Copy to microSD Y YESRestoring from microSD CardMain Menu ▶ Tools ▶ microSD Backup1 Select a category■>2 Restore One Item Select a file Y Highlight an item Y R[Menu] Y Add to phone Restore One File Highlight a file Y R[Menu] Y Add to phone or Overwrite to phone Y Enter Phone Password Restore All Files R[Menu] Y Add all to phone or Overwr. all to ph. Y Enter Phone Password3 YESNoteNote that Overwrite to phone or Overwr. all to ph. erases all files of same category on handset.Files of 10 MB or larger cannot be moved/copied from microSD Card to handset.Data backed up in other SoftBank handsets may not be restored in 842P depending on type and size.Tip●Delete Items from microSD Card ●View microSD Card Memory Capacity (ZP.9-20)842p_E.indb 9-18842p_E.indb 9-18 10.4.21 10:57:56 AM10.4.21 10:57:56 AM](https://usermanual.wiki/Panasonic-Connect/210029A.User-Manual-1-of-2/User-Guide-1282107-Page-158.png)
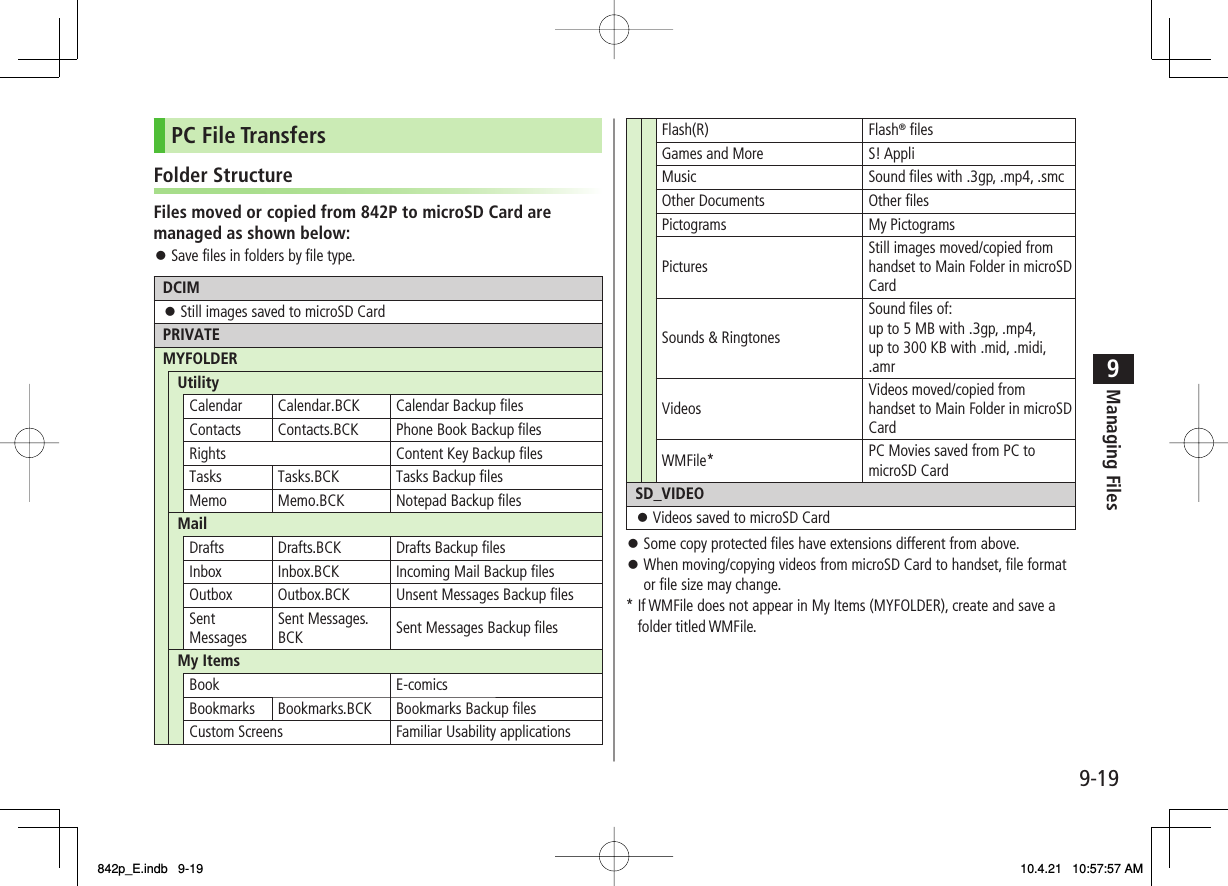
![9-209Managing FilesUsing Data on microSD CardWith a microSD Card inserted, connect handset with a PC via USB cable (not included) to read/write data from/onto microSD Card.Following equipment is required:Connector Cable: USB cablePC: PC with USB port (Universal Serial Bus Specification Rev 1.1 compliant)Compatible Operating Systems: Windows® 2000, Windows® XP, Windows Vista® (Japanese version in each)Main Menu ▶ Settings ▶ Connectivity ▶ USB Mode ▶ microSD Mode1 Connect handset to PC via USB cable while 842P is onPC recognizes microSD Card. appears in Standby (handset).NoteEven if incoming call arrives, reading/writing data continues during calls. After calls, check indicators on PC to see if reading/writing is complete.File names saved in microSD Card may not properly appear if changed on PC.microSD Card FunctionsRestore microSD Card items (Check microSD)Main Menu ▶ Tools ▶ microSD Backup ▶ R[Menu] ▶ Check microSD ▶ YES Do not turn handset power off or remove microSD Card or battery while formatting; may damage handset or microSD Card.It may take 30 seconds or longer to complete Check microSD depending on data volume on microSD Card.842P cannot check incompatible or unformatted microSD Cards.842P may delete files and folders that fail to be restored.Delete Items from microSD CardMain Menu ▶ Tools ▶ microSD Backup ▶ Select a category ▶ (Highlight a file Y) R[Menu] ▶ Delete this or Delete all (▶ For Delete all, enter Phone Password) ▶ YESContent Key cannot be deleted.View microSD Card Memory CapacityMain Menu ▶ Tools ▶ microSD Backup ▶ R[Menu] ▶ microSD info ■>■>■>842p_E.indb 9-20842p_E.indb 9-20 10.4.21 10:57:57 AM10.4.21 10:57:57 AM](https://usermanual.wiki/Panasonic-Connect/210029A.User-Manual-1-of-2/User-Guide-1282107-Page-160.png)

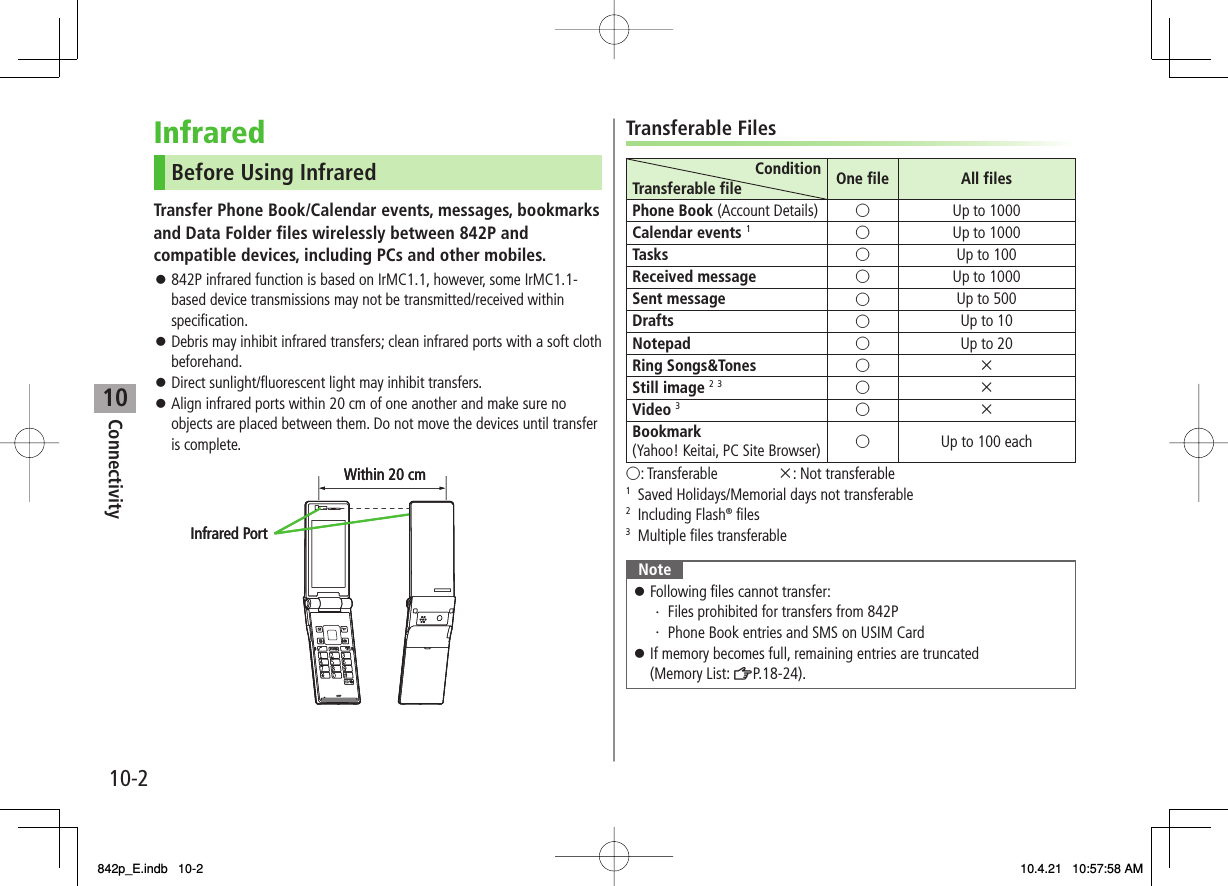
![10Connectivity10-3One/Multiple File TransferTransferable Files: ZP.10-2Sending1 Highlight a file, and follow the steps belowFiles to Send Operation/DescriptionPhone Book R[Menu] Y Send Ir data Y Send phonebook>Account DetailsO[Ir]>Messages R[Menu] Y Send Ir data Y Send This>Bookmarks R[Menu] Y Send to ExtrnlDvcs Y Send Ir data Y Send This>Still Images/VideosR[Menu] Y Send Ir dataTo send multiple files: R[Menu] Y Multiple-choice Y Select files to send Y R[Menu] Y Send Ir data>Other Files R[Menu] Y Send Ir data>2 YESReceivingMain Menu ▶ Tools ▶ Receive via Infrared ▶ Receive1 When a file is received, YESSend files from sender side within 30 seconds.To receive subsequent files, select YES.All File TransfersPrecautionReceiving all files overwrites all saved files including secret/protected files.Files saved in Secret Mode are also deleted.Sending all Phone Book entries sends Account Details as well.User-edited information is overwritten (handset number remains).Session NumberSession number (4 digits) is required for all file transfers via Infrared and IC transmission. Sender and recipient must enter same Session number to complete transfers.Sending1 Highlight a file, and follow the steps belowFiles to Send Operation/DescriptionPhone Book R[Menu] Y Send Ir data Y Send all phonebookMessages R[Menu] Y Send Ir data Y Send AllBookmarks R[Menu] Y Send to ExtrnlDvcs Y Send Ir data Y Send AllOther Files R[Menu] Y Send all Ir data2 Enter Phone Password Y Enter Session number Y YESRecipient must enter the same Session number to start transfers.842p_E.indb 10-3842p_E.indb 10-3 10.4.21 10:57:58 AM10.4.21 10:57:58 AM](https://usermanual.wiki/Panasonic-Connect/210029A.User-Manual-1-of-2/User-Guide-1282107-Page-165.png)
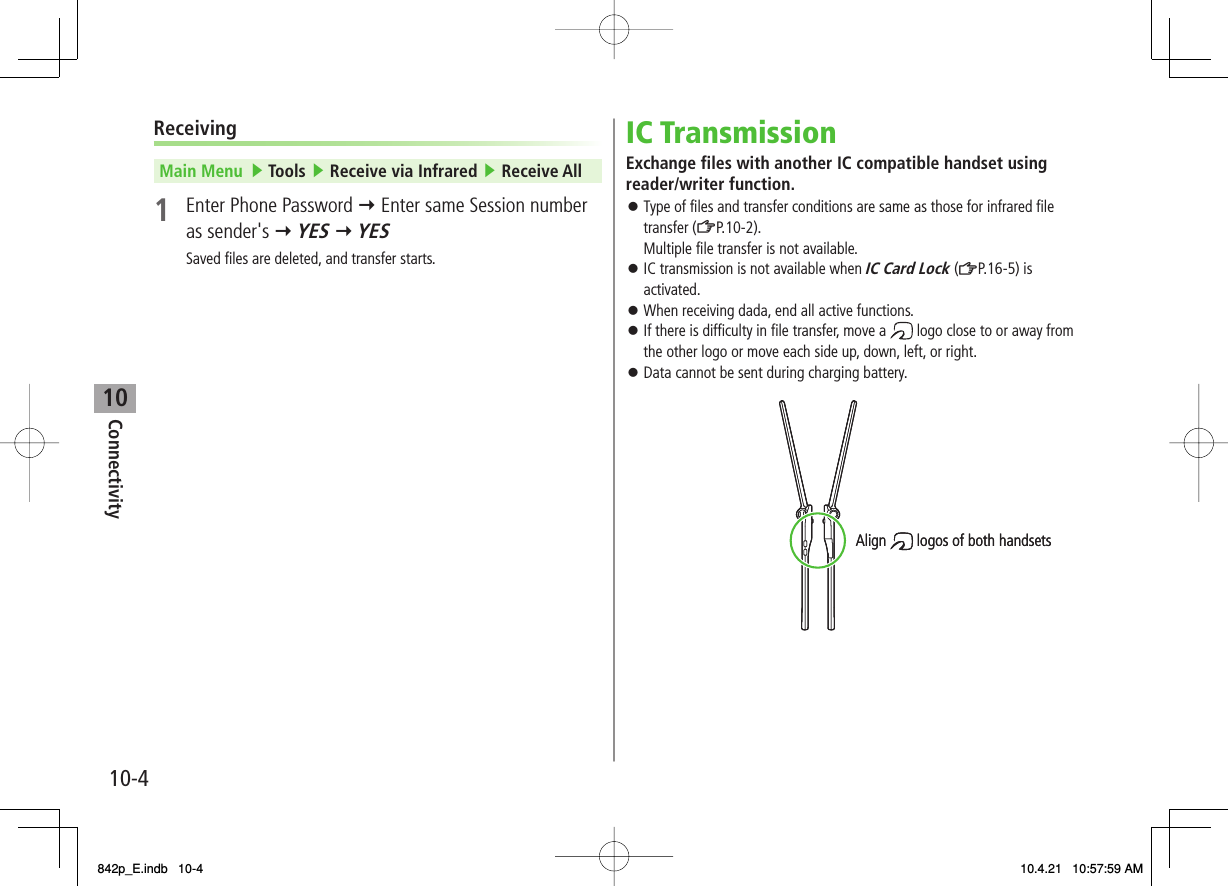
![10Connectivity10-5One File TransferBefore Receiving a FileReceive IC Datum is set to ON by default. When Receive IC Datum is OFF, One File Transfer is unavailable.To set Receive IC Datum on:Main Menu ▶ Osaifu-Keitai ▶ IC Card Settings ▶ Receive IC Datum ▶ ONSending1 Highlight a file, and follow the steps belowFiles to Send Operation/DescriptionPhone Book R[Menu] Y IC transmission Y Send phonebook>Account DetailsP[ICtrans]>Messages R[Menu] Y IC Transmission Y Send This>Bookmarks R[Menu] Y Send to ExtrnlDvcs Y IC transmission Y Send This>Other Files R[Menu] Y IC transmission>2 YESReceiving1 Align logo on sender side with 842P (recipient) Y YESAll File TransfersPrecautions/Session number (ZP.10-3)Sending1 Highlight a file, and follow the steps belowFiles to Send Operation/DescriptionPhone Book R[Menu] Y IC transmission Y Send all phonebook>Messages R[Menu] Y IC Transmission Y Send All>Bookmarks R[Menu] Y Send to ExtrnlDvcs Y IC transmission Y Send All>Other Files R[Menu] Y AllIC transmission>2 Enter Phone Password Y Enter Session number Y YESRecipient must enter the same Session number to start transfers.Receiving1 Align logo on sender side with 842P (recipient)2 YES Y Enter Phone Password Y Enter same Session number as sender'sSaved files are deleted. Transfer starts.842p_E.indb 10-5842p_E.indb 10-5 10.4.21 10:57:59 AM10.4.21 10:57:59 AM](https://usermanual.wiki/Panasonic-Connect/210029A.User-Manual-1-of-2/User-Guide-1282107-Page-167.png)
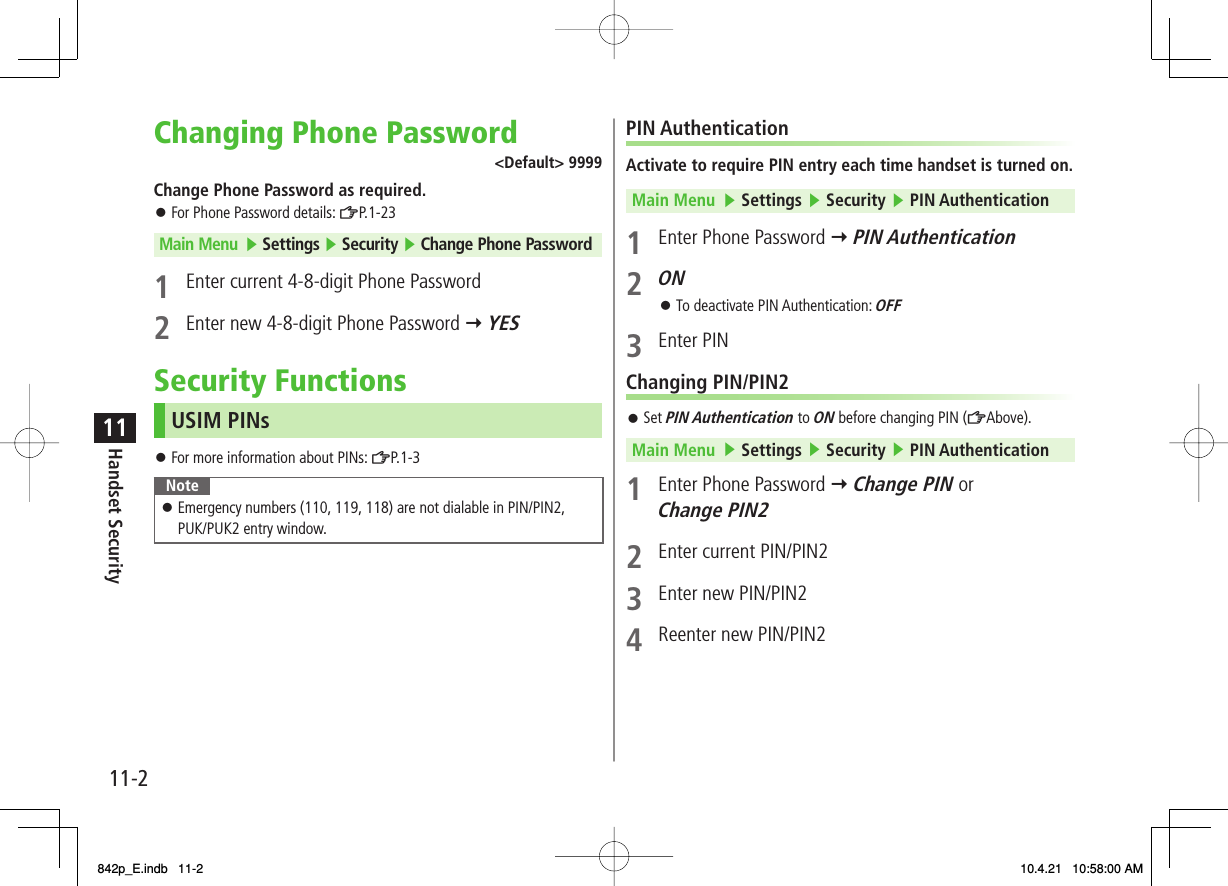
![11-911Handset SecuritySecret Mode/Secret Data Only<Default> DeactivatePhone Book entries and calendar events saved as secret data appear only when 842P is in Secret Mode/Secret Data Only.Set Phone Book or Calendar events as secret data (Phone Book: ZP.4-7, 4-8 / Calendar events: ZP.12-5)Main Menu ▶ Settings ▶ Security1 Select an item (See below)Item Operation/DescriptionSecret Mode View all data including secret dataSecret Data Only View only secret data2 Enter Phone PasswordFor Secret Data Only, number of saved secret data appears.When Secret Mode/Secret Data Only is set, appears (For Secret Data Only, indicator flashes.).Cancel Secret Mode/Secret Data OnlyIn Standby, K or follow Step 1 above.Cancel Secret SettingIn Phone Book/Calendar event window, R[Menu] Y Release secret■>■>NoteSelect whether to save data edited/saved in Secret Mode as secret data. Data saved/edited in Secret Data Only are saved as secret data.Tip●Set Learning Feature Off for Secret Mode/Secret Data Only (ZP.17-9)Setting Secret Mail<Default> ONSet messages from secret Phone Book entries to appear only when handset is set to Secret Mode or Secret Data Only.1 Q Y Settings2 Universal Settings Y Secret Mail Display3 Enter Phone Password4 OFFNoteWhen both Spam Filter and Secret Mail Display are set, messages from Phone Book entries saved as secret mode are sorted into Spam Folder (Safe List: ZP.13-17).SettingsSettings842p_E.indb 11-9842p_E.indb 11-9 10.4.21 10:58:02 AM10.4.21 10:58:02 AM](https://usermanual.wiki/Panasonic-Connect/210029A.User-Manual-1-of-2/User-Guide-1282107-Page-179.png)
![11-1011Handset SecurityMail SecuritySet handset to require Phone Password for opening mail boxes or operating Server Mail.1 Q Y Settings2 Universal Settings Y Mail Security3 Enter Phone Password Y Repeat item selection* Y Q[Finish]* To cancel: press HI again.Set/Cancel Mail Security by Incoming Mail FolderQ Y Incoming Mail Y Highlight a folder Y R[Menu] Y Mail Security Y Enter Phone PasswordCall RestrictionsReject/accept/forward calls from specified phone numbers, or restrict calling unspecified phone numbers.1 BI Y Search Phone Book2 Select an entry Y R[Menu] Y Restrictions3 Enter Phone Password4 Select an item (See right)■>Item Operation/DescriptionRestrict Dialing Allow calls only to set numbersCall Rejection Reject specified numbersCall Acceptance Accept from specified numbers onlyCall Forwarding Automatically forward specified numbersSet destination numbers (Call Forwarding: ZP.2-17)To cancel, repeat operation.View/Cancel Phone Book RestrictionsMain Menu ▶ Phone Book ▶ Restrictions ▶ Enter Phone Password ▶ Select an item* ▶ Select a Phone Book entry ▶ Select a number ▶ YES* "★" appears for set item.Highlight an item, R[Menu] Y Release Settings Y YES to cancel restriction on all specified numbers.NoteMissed call indicator appears in Standby for calls from rejected numbers.■>842p_E.indb 11-10842p_E.indb 11-10 10.4.21 10:58:03 AM10.4.21 10:58:03 AM](https://usermanual.wiki/Panasonic-Connect/210029A.User-Manual-1-of-2/User-Guide-1282107-Page-180.png)

![12Tools12-2CalendarView by day, week or month; set Alarms for events.Opening CalendarMain Menu ▶ Tools ▶ CalendarCurrent month appears.When a date with Calendar events is selected, number of AM and PM events and up to three contents appear.P[Prev.] or O[Next] to show previous/next month calendar.To switch Monthly/Weekly view: ZP.12-4Monthly ViewMonthly ViewCreating Calendar EventsSave up to 1000 entries.Main Menu ▶ Tools ▶ Calendar1 EI to highlight a date Y Q[New] Y Schedule2 Select an item (See below)Item Operation/DescriptionSelect icon/Edit summary Select an icon Y Edit subject>Whole day settingOFF or ONWhen ON is set, Alarm goes off at 0:00 a.m.>Date (from) Enter start date and time>Date (to) Enter end date and time>Repeat Select a repetition Y (For Select day, check days Y Q[Finish])>Alarm Select an Alarm type (Y For ON/Set time, enter time)Alarm Tone: ZP.12-7>Alarm tone Select an Alarm tone type Y Select a folder Y Select an Alarm tone>Contents Enter event description>842p_E.indb 12-2842p_E.indb 12-2 10.4.21 10:58:04 AM10.4.21 10:58:04 AM](https://usermanual.wiki/Panasonic-Connect/210029A.User-Manual-1-of-2/User-Guide-1282107-Page-184.png)
![12Tools12-33 Q[Finish]NoteCalendar events between 00:00 on 2000/01/01 and 23:59 on 2037/12/31 can be saved on 842P.Alarm tone does not sound when Privacy Key Lock or Personal Data Lock is set. However, settings can be changed even while Personal Data Lock is set (ZP.11-5).Calendar Event IndicatorsFollowing indicators appear in Calendar Window. (Blue): Morning event (Orange):Afternoon event _ (Underscore): Event that lasts for two days or longerFollowing indicators appear on Display.: Alarm : Monthly : Daily : Yearly: WeeklyCalendar Event IndicatorsFollowing indicators appear in Calendar Window. (Blue): Morning event (Orange):Afternoon event _ (Underscore): Event that lasts for two days or longerFollowing indicators appear on Display.: Alarm : Monthly : Daily : Yearly: WeeklySaving Holidays/Memorial DaysSave up to 100 entries (one entry a day) each for Holidays or Memorial days.Main Menu ▶ Tools ▶ Calendar1 Highlight a date Y Q[New] Y Holidays or Memorial days2 Select an item (See below)Item Operation/DescriptionDate setting Enter a date>Repeat Select a repetition type1 time does not repeat Holidays/Memorial days events.>Edit holiday/anniversary Enter description>3 Q[Finish]IndicatorsHolidays appear in red.Memorial days are marked with a red circle.Following indicators appear in Calendar/Calendar Event List Window:: Holidays : Memorial days : Yearly repeatIndicatorsHolidays appear in red.Memorial days are marked with a red circle.Following indicators appear in Calendar/Calendar Event List Window:: Holidays : Memorial days : Yearly repeat842p_E.indb 12-3842p_E.indb 12-3 10.4.21 10:58:04 AM10.4.21 10:58:04 AM](https://usermanual.wiki/Panasonic-Connect/210029A.User-Manual-1-of-2/User-Guide-1282107-Page-185.png)
![12Tools12-4Viewing/Editing Calendar Event DetailsMain Menu ▶ Tools ▶ Calendar1 EI to select a date 2 Select an event To edit: HI[Edit] Y Edit selected item (Schedule: ZFrom Step 2 on P.12-2/Holiday, Anniversary: ZFrom Step 2 on P.12-3)Calendar Event ListCalendar Event ListCalendar Event DetailsCalendar Event DetailsCalendar FunctionsMain Menu ▶ Tools ▶ CalendarFunctions Available in Calendar WindowHighlight a date Y R[Menu] Y Select an item (See below)Item Operation/DescriptionNew Create a new entry (ZP.12-2, P.12-3)Weekly display/1 MonthToggle Monthly/Weekly viewIcon display Entries in category of selected icon appearSelect an icon>No. of schedules Display number of saved Schedule, Holiday or Anniversary entriesAdd shortcut icon Create a shortcut (ZP.1-17)Send all Ir data (ZP.10-3)AllIC transmission (ZP.10-5)Delete past Select a category to delete Y YES>Delete all Enter Phone Password Y Select an item Y YES>Reset holidays Restore deleted HolidaysYES>■>FromFrom842p_E.indb 12-4842p_E.indb 12-4 10.4.21 10:58:05 AM10.4.21 10:58:05 AM](https://usermanual.wiki/Panasonic-Connect/210029A.User-Manual-1-of-2/User-Guide-1282107-Page-186.png)
![12Tools12-5Functions Available in Calendar Events List/DetailsSelect a date (Y Select a Schedule, Holiday or Anniversary) Y R[Menu] Y Select an item (See below)Item Operation/DescriptionNew Create a new entry (ZP.12-2, P.12-3)Edit Edit selected item (ZP.12-4)Copy Copy an entry to another dayEnter date and time to copy an entry to>Calendar display Switch from Icon display to Calendar displayIcon display Entries in category of selected icon appearSelect an icon>Set secret mode/Release secretActivate/deactivate Secret ModeYES (Y For Set secret mode, enter Phone Password)Secret entries appear only in Secret Mode or Secret Data Only (ZP.11-9).>Compose S! Mail Create S! Mail by copying event date and content to message text (ZFrom Step 2 on P.13-4)Send Ir data (ZP.10-3)Send all Ir data (ZP.10-3)IC transmission (ZP.10-5)AllIC transmission (ZP.10-5)Copy to microSD Copy an entry to microSD CardYESTo display data on microSD Card: ZP.9-17>Delete thisYES>■>Item Operation/DescriptionDelete past Delete selected category entries up to the highlighted dateSelect a category to delete Y YES>Delete select Check entries to delete Y Q[Finish] Y YES>842p_E.indb 12-5842p_E.indb 12-5 10.4.21 10:58:06 AM10.4.21 10:58:06 AM](https://usermanual.wiki/Panasonic-Connect/210029A.User-Manual-1-of-2/User-Guide-1282107-Page-187.png)
![12Tools12-6TasksMake quick notes of task to manage in Task list.Saving a TaskMain Menu ▶ Tools ▶ Tasks1 Q[New] Y Select an item (See below)To check saved Tasks, select a Task. To edit, press HI[Edit] in detail window.Item Operation/DescriptionEdit Tasks Enter content>Due date Select how to enter due date Y Enter due dateSelect No date to enter none.>Priority Select a priority level>Category Select a category>Alarm Select an Alarm type (Y For ON/Set time, enter time)Alarm Tone: ZP.12-7>Alarm tone Select an Alarm tone type Y Select a folder Y Select an Alarm tone>2 Q[Finish]When content is not entered, Tasks cannot be saved.NoteAlarm tone does not sound when Privacy Key Lock or Personal Data Lock is set. However, settings can be changed even while Personal Data Lock is set (ZP.11-5).Using TasksIn Tasks window, press R[Menu] for following operations.Item Operation/DescriptionNew Create a new entry (ZLeft)Edit Edit an entry (ZLeft)Change status Change status indicator shown in Tasks listSelect a status (Y For Completion, select an item Y Enter Completion date)Overdue status indicator turns red.>Show by category Select a category>Sort/Filter Sort list by due date, entry order, status, etc.Select a condition>Add shortcut icon Create a shortcut (ZP.1-17)Send Ir data (ZP.10-3)Send all Ir data (ZP.10-3)IC transmission(ZP.10-5)AllIC transmission (ZP.10-5)Copy to microSD Copy a Task to microSD CardYESTo display data on microSD Card: ZP.9-17>Delete thisYES>Delete select Check entries Y Q[Finish] Y YES>Delete completed Delete an entry in Completion statusYES>Delete all Enter Phone Password Y YES>842p_E.indb 12-6842p_E.indb 12-6 10.4.21 10:58:06 AM10.4.21 10:58:06 AM](https://usermanual.wiki/Panasonic-Connect/210029A.User-Manual-1-of-2/User-Guide-1282107-Page-188.png)
![12Tools12-7Next PageAlarmsAlarm ToneWhen scheduled time arrives, alarm tone sounds and Notification Light illuminates. Alarm image corresponding to icon appears on Display.To Stop Alarm Tone for Calendar Events, Tasks or AlarmPress any key.Missed Alarm"Missed Alarm" Event Indicator appears in Standby for alarms missed during Privacy Key Lock, Personal Data Lock or Infrared transmission once locks are canceled or transmission ends. Select indicator to view content.NoteWhen one or more Alarms are set to the same time, alarm sounds in the order of : "Alarm" Y "Timer Recording" Y "Tasks" Y "Calendar" Y "Timer Watching"For Tasks, "Missed Alarm" indicator appears.Setting AlarmSet up to five alarms. Alarm tone sounds at the specified time once, everyday or weekly as set.Main Menu ▶ Tools ▶ Alarms1 Highlight an Alarm Y Q[Edit] 2 Follow the steps belowItem Operation/DescriptionAlarm (Alarm on/off) Activate or cancel AlarmON or OFF>Time setting Set Alarm time>Repeat Select a repetition (Y For Select day, check days Y Q[Finish])>Alarm tone Select an Alarm tone type Y Select a folder Y Select an Alarm tone>Alarms (Alarm volume) GI to set Alarm tone volume>Snooze settingON or OFF (Y For OFF, enter time)When Snooze is set to ON, Alarm tone sounds for 60 seconds, repeating up to six times at five minute intervals.>Prefer manner modeON or OFFSet Manner Mode or Alarm priority.>842p_E.indb 12-7842p_E.indb 12-7 10.4.21 10:58:06 AM10.4.21 10:58:06 AM](https://usermanual.wiki/Panasonic-Connect/210029A.User-Manual-1-of-2/User-Guide-1282107-Page-189.png)
![12Tools12-83 Q[Finish] appears.Cancel & Reactivate AlarmIn Alarms list, press R[Menu] Y Select set this or Release this Y YESCancel or reactivate an alarm entry as required.Highlight an entry Y HI to reactivate/cancel Alarm.Cancel SnoozePress any key Y KNoteCopy protected files may not be set as Alarm tone.Alarm tone does not sound when Privacy Key Lock or Personal Data Lock is set. However, settings can be changed even while Personal Data Lock is set (ZP.11-5).■>■>Alarm IndicatorsFollowing indicators appear:: Repeats daily : Repeats weeklyAlarm IndicatorsFollowing indicators appear:: Repeats daily : Repeats weeklyCalculatorMain Menu ▶ Tools ▶ CalculatorExample:-17+28.5=11.5CI 1 7 DI 2 8 Q 5 HIOperation Assigned keyNumber (0 - 9)+–x÷=Decimal point%Clear - Operation Assigned keyNumber (0 - 9)+–x÷=Decimal point%Clear - 842p_E.indb 12-8842p_E.indb 12-8 10.4.21 10:58:07 AM10.4.21 10:58:07 AM](https://usermanual.wiki/Panasonic-Connect/210029A.User-Manual-1-of-2/User-Guide-1282107-Page-190.png)
![12Tools12-9NotepadSave up to 20 notes.Saving a NoteMain Menu ▶ Tools ▶ Notepad1 <Not Recorded> Select a saved note to view content. HI[Edit] to edit.2 Enter textUp to 256 double-byte or 512 single-byte characters can be entered.Notepads WindowNotepads WindowNotepad FunctionsIn Notepad list window, press R[Menu] for following operations.Item Operation/DescriptionEdit Edit a saved noteCompose S! Mail Create S! Mail by copying content to message text (ZFrom Step 2 on P.13-4)Edit schedule Copy a note to Schedule to create a Calendar eventSchedule Y Save a new note (ZFrom Step 2 on P.12-2)>Add shortcut icon Create a shortcut (ZP.1-17)Send Ir data (ZP.10-3)Send all Ir data (ZP.10-3)IC transmission (ZP.10-5)AllIC transmission (ZP.10-5)Copy to microSD Copy a note to microSD CardYESTo display data on microSD Card: ZP.9-17>Notepad Info Display entry date, latest modified date and category of noteCategory Select a categoryWhen no category applies, select None.>Delete thisYES>Delete selected Check notes Y Q[Finish] Y YES>Delete all Enter Phone Password Y YES>842p_E.indb 12-9842p_E.indb 12-9 10.4.21 10:58:07 AM10.4.21 10:58:07 AM](https://usermanual.wiki/Panasonic-Connect/210029A.User-Manual-1-of-2/User-Guide-1282107-Page-191.png)
![12Tools12-10Dictionary (Japanese)Use ケータイTOOL<辞書> to access preinstalled dictionaries and reference books.ケータイTOOL<辞書> is an S! Appli.The following dictionaries are preinstalled.Dictionary applications英会話とっさのひとことクイズ, 英会話とっさのひとこと辞典, 学研「辞スパ」英和/和英/国語辞典Refer to 使い方 (ZRight) for details.E-Book Other filesView by using E- Book Viewer. Refer to E-Book Viewer Help for details.Activating Dictionary1 Press and hold M Y Read 免責 (disclaimer) Y OKケータイTOOL<辞書> activates.To forbid showing 免責 each time: Uncheck アプリ起動時に常に表示する。2 Select a dictionaryNoteAlternatively, Main Menu ▶ Tools ▶ Dictionary to activatePress and hold M to activate Dictionary while another function is active (creating messages, viewing TV, etc.). Dictionary may not activate, however, during a call, while another S! Appli is active, etc.Dictionary FunctionsAfter Step 1, press Q[メニュー] for following operations.Item Operation/Description文字サイズ変更Change font sizeSelect a size>使い方 View detailsSelect an item>免責 View disclaimerライセンス View licenseDictionary ApplicationsEnter a word and corresponding definitions appear from all dictionaries.1 In Step 2 (ZLeft), 学研「辞スパ」英和/和英/国語辞典2 HI Y Enter a wordSearch results appear.To scroll pages: CI/DITo switch dictionaries: 1/3To search again: R[再検索]3 Select a wordDetails appear.4 To end, K Y StoppedNoteWhile Dictionary application is active, press Q[メニュー] for useful functions.■842p_E.indb 12-10842p_E.indb 12-10 10.4.21 10:58:08 AM10.4.21 10:58:08 AM](https://usermanual.wiki/Panasonic-Connect/210029A.User-Manual-1-of-2/User-Guide-1282107-Page-192.png)
![12Tools12-11Sound RecordersVoice RecorderSet recorded sounds for ringtones.Record for about 60 seconds each.Main Menu ▶ Tools ▶ Sound Recorders ▶ Voice Recorder1 YES2 HI[Stop]/L/K (Y OK) to stop recordingRecorded sounds are saved in Ring Songs&Tones folder.Voice AnnounceSet recorded sound for on hold tone/holding tone, Alarm, Calendar event alarm, Tasks alarm, ringtones, Answer Phone message, Timer Watching (Digital TV), Ring Songs&Tones Play List.Record only one item for about 15 seconds.Select Voice Announce in individual window to set Voice Announce as specific tone.Main Menu ▶ Tools ▶ Sound Recorders ▶ Voice Announce1 RecordRecording starts.Tone beeps five seconds before recording ends.2 To end recording, HI[Stop]After recording ends, tone beeps twice and previous screen returns.To play back: PlayTo delete: Erase Y YES842p_E.indb 12-11842p_E.indb 12-11 10.4.21 10:58:08 AM10.4.21 10:58:08 AM](https://usermanual.wiki/Panasonic-Connect/210029A.User-Manual-1-of-2/User-Guide-1282107-Page-193.png)
![12Tools12-12Bar Code ReaderScan barcodes (JAN) or QR Codes with built-in camera.Access websites, send messages, etc. from QR Codes.JAN CodesJAN Code is a one-dimensional bar code denoting numerals with bars and spaces of different widths.QR CodesQR Code is a two-dimensional bar code containing information.Scanning BarcodesUp to five scanned barcodes can be saved.For split data, scan up to 16 divided QR Codes.Main Menu ▶ Tools ▶ Bar Code Reader ▶ Scan Barcodes1 Frame barcode in the center of DisplayTo adjust Display brightness: R[Menu] Y Brightness Y Adjust to -3 (dark) - +3 (light)To zoom: FITo use Focus Lock: BIQR CordsQR Cords2 HI[Start] Scanning starts, and scanned results appear when completed.For split data, OK Y Repeat Step 1 and 2To use scanned data: ZStep 2 on P.12-133 R[Menu] Y Save result Y OKNote842P cannot read barcodes or two-dimensional codes other than JAN/ QR Codes.Some barcodes cannot be read depending on code type or size.Barcode recognition may be slow. Hold handset steady while scanning.Barcodes may not be correctly read owing to scratch, dirt, damage, quality of printed material, light reflection, or QR code version.Example: Scanned Results Window(QR Code (Left))Example: Scanned Results Window(QR Code (Left))842p_E.indb 12-12842p_E.indb 12-12 10.4.21 10:58:08 AM10.4.21 10:58:08 AM](https://usermanual.wiki/Panasonic-Connect/210029A.User-Manual-1-of-2/User-Guide-1282107-Page-194.png)
![12Tools12-13Viewing/Editing Scanned DataMain Menu ▶ Tools ▶ Bar Code Reader ▶ Saved Data List1 ViewSelect an item Edit TitleHighlight an item Y R[Menu] Y Edit title Y EditDelete Saved DataIn Step 1, (highlight an item Y) R[Menu] Y Delete Y Delete this or Delete all (Y For Delete all, enter Phone Password) Y YES■>Using Scanned DataMain Menu ▶ Tools ▶ Bar Code Reader ▶ Saved Data List1 Select an item2 R[Menu] Y Select an item (See below)Item Operation/DescriptionSave result Save scanned resultsDisplay list Display Saved Data ListInternet Connect to URLYahoo! Keitai or PC Site Browser Y YESAlternatively, select URL to connect to Internet.>Compose S! Mail Create S! Mail to selected address (ZFrom Step 4 on P.13-4)Alternatively, select address to create S! Mail.Dialing Call selected phone numberSelect a dialing method Y DialAlternatively, select phone number to dial.>Add to Phone Book Save scanned results to Phone Book (ZFrom Step 2 on P. 4-5)Add bookmark Save URL to BookmarkYES Y HI[OK]>Copy Copy selected characters to another place (ZFrom Step 2 on P.3-9)842p_E.indb 12-13842p_E.indb 12-13 10.4.21 10:58:09 AM10.4.21 10:58:09 AM](https://usermanual.wiki/Panasonic-Connect/210029A.User-Manual-1-of-2/User-Guide-1282107-Page-195.png)

![13-213MessagingBasicsSend messages via S! Mail or SMS.S! Mail [Separate subscription required]Exchange text messages with SoftBank or e-mail compatible handsets, PCs, etc.; attach image or sound files etc.842P is compatible with Graphic Mail (ZP.13-5)SMS Exchange short text messages with SoftBank handsets.For more information, visit SOFTBANK MOBILE Corp. Website (http://www.softbank.jp).Available Entry Items & Character Entry LimitsItem S! Mail SMSAddressE-mail address ○Up to 246 single-byte alphanumerics/Up to 20 recipients×‒Phone number 1○○Up to 21 single-byte alphanumerics/Up to 1 recipientSubject ○Up to 256 double-byte/Up to 512 single-byte alphanumerics×‒Text ○30 KB ○Up to 70 double-/single-byte alphanumerics 2Attachment ○Up to approx. 300 KB ×‒1 SoftBank handset numbers only2 When text entry mode is set to English (160char.) (ZP.17-14), up to 160 single-byte alphanumerics can be entered.NoteSend up to 300 KB including subject, message text and attachment via S! Mail. Message text character limit differs by attachment size.When number of entered characters exceeds limit in SMS, S! Mail conversion option message appears.S! Mail cannot be converted to SMS.842p_E.indb 13-2842p_E.indb 13-2 10.4.21 10:58:09 AM10.4.21 10:58:09 AM](https://usermanual.wiki/Panasonic-Connect/210029A.User-Manual-1-of-2/User-Guide-1282107-Page-198.png)
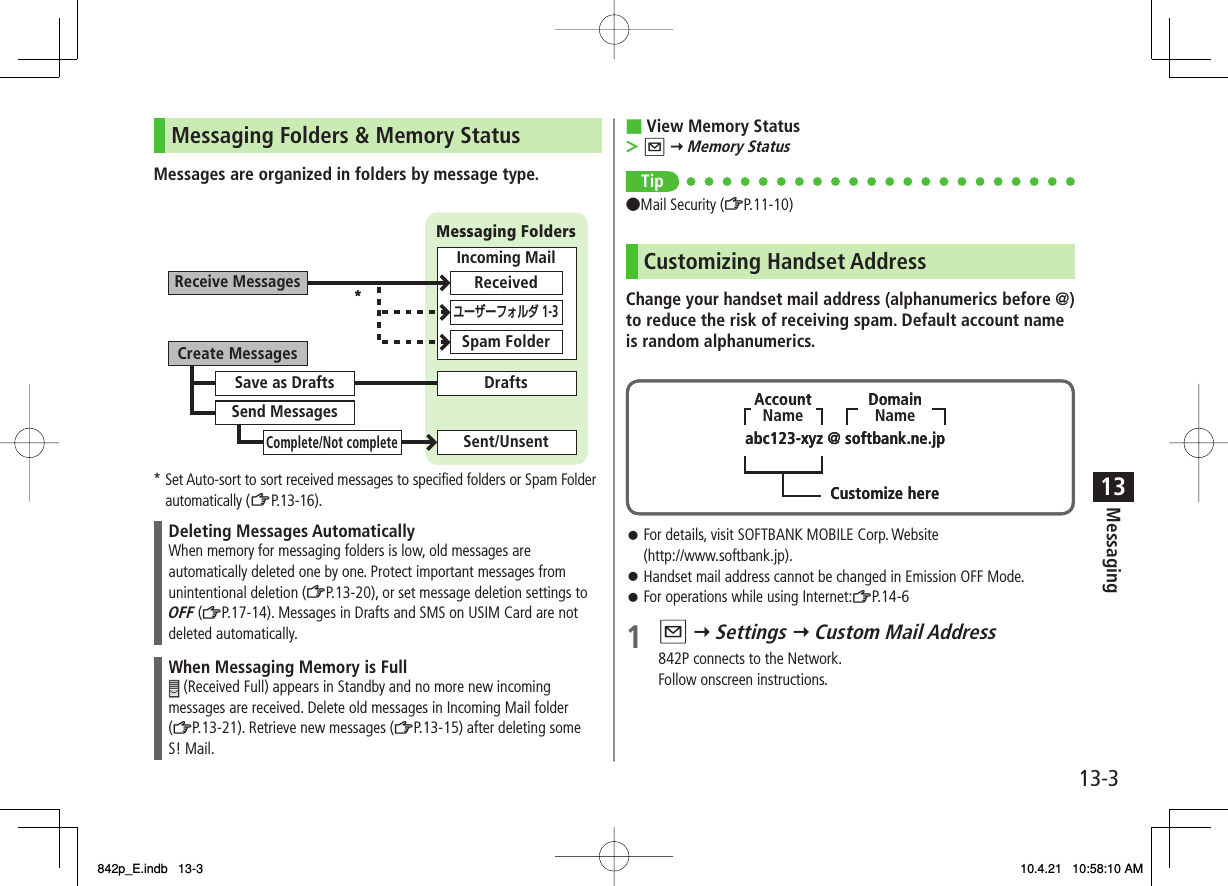
![13-413Messaging4 Select Subject field Y Enter subject5 Select Text field6 Enter text 7 Q[Send] Tip●Addresses ●Functions Available while Creating Messages (ZP.13-8) ●Sending Options (ZP.13-9) ●Sending Messages (ZP.13-10)●Confirm Message Delivery (ZP.17-14)Text Entry WindowText Entry WindowSettingsSettingsSending S! Mail & SMSSending S! MailExample: Select a Phone Book entry to send S! Mail.1 Press and hold Q2 Select Address field Y Phone Book3 Select a Phone Book entry Y Select a SoftBank handset number or mail addressPress FI to toggle tabs if both mail addresses and phone numbers are saved.Composition WindowAddress fieldSubject fieldAttachment fieldText fieldComposition WindowAddress fieldSubject fieldAttachment fieldText field842p_E.indb 13-4842p_E.indb 13-4 10.4.21 10:58:10 AM10.4.21 10:58:10 AM](https://usermanual.wiki/Panasonic-Connect/210029A.User-Manual-1-of-2/User-Guide-1282107-Page-200.png)
![13-513MessagingNext PageAdding AttachmentsExample: Attach Picture files to S! Mail.1 After Step 6 on P.13-4, select Attachment field 2 Select a folder in Data Folder Y Select a file3 Q[Send] Attach Captured Pictures/VideosAfter Step1, Activate Camera Y Photo mode or Video mode Y Frame subject Y HI[Record] or 0 (Y For video, HI[Stop] or 0) Y HI[Save] or 0 (Y For still image, select a folder)NoteSome files can not be attached depending on the file format or size.Some copy protected files can not be sent.Ring Songs&Tones, Music and Videos files cannot be attached directly from microSD Card. Move files to handset before attaching to messages.Tip●Attachments (ZP.13-8)■>Graphic MailCreate HTML messages; select font color/size, background color, or insert images, etc.Example: Use various Templates to create Graphic Mail.Change font sizeScroll text1 After Step 4 on P.13-4, press R[Menu] Y Load Template Y Select a templateTo view template: Highlight template Y Q[View]2 Select Text field Y Delete "ココに文字をいれてネ"3 J Y Font Size Alternatively, R[Menu] Y Set Graphic Mail to open Graphic PaletteGraphic PaletteGraphic Palette842p_E.indb 13-5842p_E.indb 13-5 10.4.21 10:58:11 AM10.4.21 10:58:11 AM](https://usermanual.wiki/Panasonic-Connect/210029A.User-Manual-1-of-2/User-Guide-1282107-Page-201.png)
![13-613Messaging4 Select a font size Y Enter text 5 J Y Select Arrange Area6 Place cursor before a sentence to scroll Y HI[Start] Y Move cursor to end of sentence Y HI[End]7 Set Scrolling Y R[Exit]8 U to preview Y L Alternatively, R[Menu] Y Preview to view text field9 HI Y Q[Send]Reset OperationsTo cancel previous operation: Close Graphic Palette Y R[Menu] Y UndoTo reset all Graphic Mail operations: J Y Graphic mail all reset Y YES Y YESUsing My Pictograms1 After Step 5 on P.13-4, in text entry window, * Y P[My Pict.]My Pictogram list appears.Previously used pictogram list appears first.Functions in pictogram list (ZP.3-4)2 Select a My PictogramMy Pictogram is entered.3 Enter text Y Q[Send]Use My Pictograms from Graphic PaletteIn text entry window, J Y My Pictograms Y P[My Pict.] Y Select a My Pictogram Y R[Exit]Use My Pictograms Saved in microSDIn text entry window, J Y Insert files Y File Select Y Pictures Y P[microSD] Y My Pictograms Y Select a folder Y Select a My PictogramTip●Use Other Graphic Mail Settings (ZP.13-9)●Download Templates via Internet (ZP.13-10)■>>■>■>842p_E.indb 13-6842p_E.indb 13-6 10.4.21 10:58:12 AM10.4.21 10:58:12 AM](https://usermanual.wiki/Panasonic-Connect/210029A.User-Manual-1-of-2/User-Guide-1282107-Page-202.png)
![13-713MessagingSending SMS MessagesExample: Select a Phone Book entry to send SMS.1 Q Y Create New SMS2 Select Address field Y Phone Book3 Select a Phone Book entry Y Select a SoftBank handset numberAddress fieldText fieldComposition WindowAddress fieldText fieldComposition Window4 Select Text field5 Enter text When number of entered character exceeds limit, S! Mail conversion option message appears.6 Q[Send]Manual Mail ConversionIn SMS Composition window, R[Menu] Y Change mail typeNoteWhen a single-byte text message including | { } [ ] ~ ^ is sent or a draft including such text is edited, some characters may be cut out of text field.Tip●Addresses ●Functions Available while Creating Messages (ZP.13-8)●Confirm Message Delivery ●Change SMS Center Number ●Set Input Character to English (ZP.17-14)■>Text Entry WindowText Entry WindowSettingsSettings842p_E.indb 13-7842p_E.indb 13-7 10.4.21 10:58:13 AM10.4.21 10:58:13 AM](https://usermanual.wiki/Panasonic-Connect/210029A.User-Manual-1-of-2/User-Guide-1282107-Page-203.png)
![13-813MessagingCreating MessagesAddressesS! Mail: Press and hold NQ ▶ Select Address field SMS: NQ ▶ Create New SMS ▶ Select Address fieldEnter Address DirectlyDirect Entry Y Enter a SoftBank handset number/mail addressSelect Address from Sent Address/Received Address LogsSent Address or Received Address Y Select a logAdd/Edit/Delete AddressFollow the steps (See below)Item Operation/DescriptionAdd recipients*<Not entered> Y Select an address selection method Y Select an address or enter directly>Edit Select an address Y Direct Entry Y Edit address>Delete*Highlight an address Y R[Menu] Y Delete receiver Y YES>* S! Mail onlyChange To/Cc/BccS! Mail onlyHighlight an address Y R[Menu] Y Destination types Y Select a typeAttachmentsAfter attaching a file, select Attachment fieldOpen/Play Attached FilesSelect a file■>■>■>■>■>FromFromFromFromAdd AttachmentsR[Menu] Y Add Attached Files Y (Select a folder Y Select a file)* Y Q[Finish]* To capture still images or videos: Activate Camera Y Photo mode or Video mode Y Frame subject Y HI[Record] or 0 (Y For video, HI[Stop] or 0) Y HI[Save] or 0 (Y For still image, select a folder)Delete AttachmentsHighlight a file Y R[Menu] Y Del Attached Files Y YESOther FunctionsFunctions Available while Creating MessagesS! Mail: Press and hold Q Y R[Menu] Y Select an item (See below)SMS: Q Y Create New SMS Y R[Menu] Y Select an item (See below)Item Operation/DescriptionSend Send messagePreview Preview message while creatingSave as Drafts Save message to Drafts box without sendingAttached files 1View attached file listLoad Template 1Select a template>Save Template 1Save edited templateYES>Add Signature 1Add signatureCreate and save signature beforehand (ZP.13-9).Send Settings: Priority 1Notify recipient of message priority levelSelect a level>■>■>■>>842p_E.indb 13-8842p_E.indb 13-8 10.4.21 10:58:13 AM10.4.21 10:58:13 AM](https://usermanual.wiki/Panasonic-Connect/210029A.User-Manual-1-of-2/User-Guide-1282107-Page-204.png)
![13-913MessagingNext PageItem Operation/DescriptionSend Settings: Confirm Delivery 1Check whether S! Mail is sent to recipientON>Send Settings: Set Reply Address 1Set reply-to addressONSpecify reply-to address beforehand (ZBelow).>Confirm Delivery 2Check whether SMS is sent to recipientON>Input character 2Select character input modeJapanese or English>Change mail type 2Switch SMS to S! Mail while creating1 S! Mail only2 SMS onlySending OptionsNQ ▶ Settings ▶ S! Mail Settings▶ Sending OptionsSet Reply-to AddressSet Reply-To Y ON Y Select reply-to address entry field Y Select a reply-to address or enter directly Y Q[Finish]Set SignatureSet Signature Y Select an item (Y ON or ON When New Y Select signature entry field Y Enter signature Y Q[Finish])■>■>FromFromGraphic Mail FunctionsUse Other Graphic Mail SettingsIn S! Mail text entry window, J Y Select an arrange item (See below)Item Operation/DescriptionInsert files: File Select Insert still images, Flash® or music filesSend inserted music files as BGMSelect a folder Y Select a file>Insert files: CameraActivate camera to insert picturesCapture a sill image>Insert files: Delete BGM Delete inserted music fileYES>Font Color Change font color>Background color Change background color>Insert Lines Insert separator lineMy PictogramsInsert My Pictograms (ZP.13-6)Graphic mail all reset Cancel all Graphic Mail SettingsYES Y YES>Select Arrange Area Specify text to be arrangedPlace cursor before text Y HI[Start] Y Specify area Y HI[End] Y Select other items Y Follow the steps for selected itemsTo cancel selection: HI[End] Y HI>Font Size Change font size>Select Blinking Flash textSet Scrolling Scroll textSet Swinging Swing textAlignment Select a type>■>842p_E.indb 13-9842p_E.indb 13-9 10.4.21 10:58:14 AM10.4.21 10:58:14 AM](https://usermanual.wiki/Panasonic-Connect/210029A.User-Manual-1-of-2/User-Guide-1282107-Page-205.png)
![13-1013MessagingOne file of BGM or Flash®, and up to 40 types of My Pictograms or images can be inserted per Graphic Mail.To delete inserted images, lines, My Pictograms, etc.: Close Graphic Palette Y Move cursor before images, etc. Y LRing Songs&Tones or Music files cannot be inserted directly from microSD Card. Move files to handset beforehand.Download Templates via InternetQ Y Templates Y Download Templates Y YES842P connects to Internet, and a website appears. Follow onscreen instructions.Sending MessagesS! Mail: Press and hold NQ ▶ NR[Menu] SMS: NQ ▶ Create New SMS ▶ NR[Menu]Confirm Delivery(For S! Mail, Send Settings Y) Confirm Delivery Y ONConfirm Message Delivery (ZP.17-14)Save to DraftsSave as DraftsMessages are saved to Drafts (ZP.13-15).■>■>■>FromFromReceiving & Viewing MessagesOpening New MessagesWhen a new message is received, and Event Indicator appear in Standby. By default, the complete message and any attachments are automatically downloaded.This setting also applies while abroad.Transmission fees are incurred; adjust to use (To change auto download settings: ZP.17-14).1 Select indicator2 Select a folder Incoming MailUnread CountIncoming MailUnread CountMessage List WindowMessage List Window842p_E.indb 13-10842p_E.indb 13-10 10.4.21 10:58:14 AM10.4.21 10:58:14 AM](https://usermanual.wiki/Panasonic-Connect/210029A.User-Manual-1-of-2/User-Guide-1282107-Page-206.png)
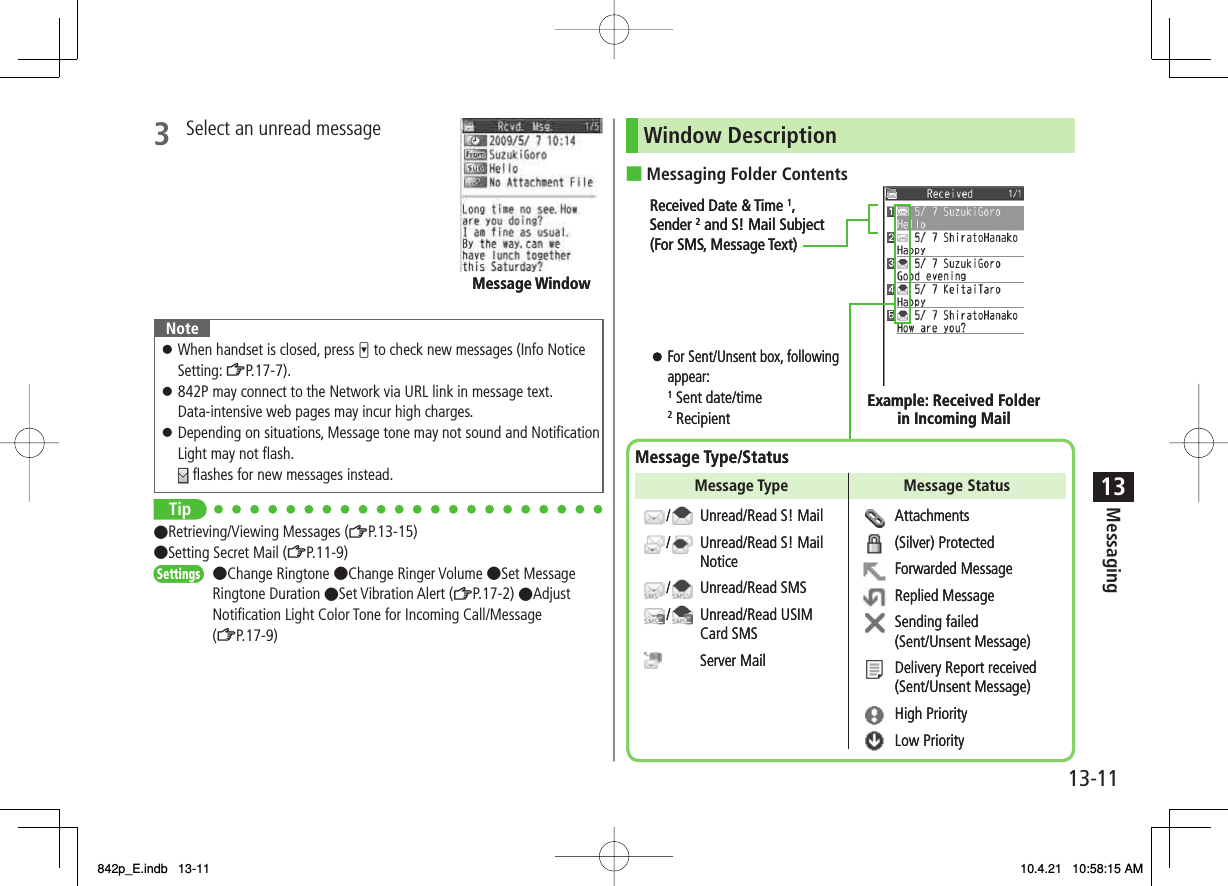
![13-1213MessagingMessage ContentsFor a sent message, the following appear:1 Sent date/time 2 Recipient 3 Number/all sent messagesNoteStatus indicators for forwarded/replied SMS messages (saved in USIM Card) do not appear.After retrieving complete messages, S! Mail Notice icons with (Forwarded) or (Replied) change to / (S! Mail).Messages remain protected after complete messages are retrieved via protected S! Mail Notices.If messages on microSD Card do not appear correctly, copy messages to handset (ZP.9-18) and execute Charset Conversion (ZP.13-22).Tip●Functions Available for Received/Sent/Draft Message List (ZP.13-20)●Functions Available in Received/Sent Message Window (ZP.13-21)●Change Font Size (ZP.17-14)■Sender 2SubjectNumber of AttachmentsMessage TextThe number of files (images, sounds, videos, text, etc.) appears.Example: Received MessageReceived Date/Time 1Number/All ReceivedMessages 3Sender 2SubjectNumber of AttachmentsMessage TextThe number of files (images, sounds, videos, text, etc.) appears.Example: Received MessageReceived Date/Time 1Number/All ReceivedMessages 3SettingsSettingsRetrieving Complete S! MailDuring Video Calls or outgoing mail, complete S! Mail is not downloaded. When notification arrives, retrieve complete message. Note: Depending on download setting, complete message is not downloaded.1 At the end of message text, highlight Continue Retrieve from Message ListIn received message list, R[Menu] Y Retrieve Y This oneRetrieve Multiple MessagesIn received message list, R[Menu] Y Retrieve Y Selected Y Repeat: Select a message* Y Q[Finish] Y YES* To cancel selection, press HI again.■>■>842p_E.indb 13-12842p_E.indb 13-12 10.4.21 10:58:16 AM10.4.21 10:58:16 AM](https://usermanual.wiki/Panasonic-Connect/210029A.User-Manual-1-of-2/User-Guide-1282107-Page-208.png)
![13-1313MessagingOpening & Saving Attachments1 In Message window, R[Menu] Y Attached files 2 Select a file Y L3 To save the file, highlight the file Y Q[Save] Y YES4 Select a folderNoteWhen messages are opened, attached image files appear/play automatically. (Silver) appears with file requiring a Content Key. If Content Key has expired, warning appears when opening a file. Acquire new Content Key (ZP.9-5).Incompatible files are saved to Other Documents in Data Folder. Some files may not be saved to 842P.File Formats Supported by Auto PlaybackImage files (JPEG, GIF, PNG)Music files (SMAF, AMR, SMF, SP-MIDI)Tip●Play Attached Music Files Automatically (ZP.17-14)SettingsSettingsShowing Sent/Received Mail Address1 Sent AddressPress and hold DI Received AddressPress and hold CI : SMS (successfully sent) : S! Mail (successfully sent)To show Redial/Incoming Call Logs: P[Change]2 Select a log to showTo send S! Mail/SMS to addresses shown: HI Y Mail composition operation (S! Mail: ZFrom Step 4 on P.13-4 or SMS: ZFrom Step 4 on P.13-7)To save to Phone Book: P[Store] Y Operation for saving to Phone Book (ZFrom Step 2 on P.4-5)Tip●Sent/Received Address (ZP.13-19)842p_E.indb 13-13842p_E.indb 13-13 10.4.21 10:58:17 AM10.4.21 10:58:17 AM](https://usermanual.wiki/Panasonic-Connect/210029A.User-Manual-1-of-2/User-Guide-1282107-Page-209.png)
![13-1413MessagingUsing Server MailRetrieve mail list stored at the Center to view Server Mail.Viewing Server Mail1 Q Y Server Mail2 Retrieve Mail List Y YESUpdate Server Mail ListAfter Step1, Retrieve Mail List Y Q[Update] Y YESRetrieving Server Mail1 Q Y Server Mail Y Retrieve Mail ListIf no Server Mail is in the list, YES Y Back2 Retrieve a New MessageSelect S! Mail Retrieve Multiple Messages R[Menu] Y Retrieve Y Retrieve Selected Y Select S! Mail* Y Q[Finish] Y YES* To clear, repeat same operation.Retrieve All MessagesQ Y Server Mail Y Retrieve All■>■>Tip●Mail Security (ZP.11-10)●Server Mail Functions (ZP.13-15) 842p_E.indb 13-14842p_E.indb 13-14 10.4.21 10:58:17 AM10.4.21 10:58:17 AM](https://usermanual.wiki/Panasonic-Connect/210029A.User-Manual-1-of-2/User-Guide-1282107-Page-210.png)
![13-1513MessagingRetrieving/Viewing MessagesManually Retrieving New MessagesRetrieve S! Mail messages saved on Server while handset is off/out-of-range.Q Y Retrieve NewServer Mail functions NQ ▶ Server MailDelete One/Selected Server MailRetrieve Mail List Y Highlight a message Y R[Menu] Y Del Server Mail Y Delete This or Delete Selected (Y For Delete This, select messages* Y Q[Finish]) Y YES* To clear, repeat same operation.Delete All Server MailDelete All Y Enter Phone Password Y YESForward Server MailRetrieve Mail List Y Highlight a message Y R[Menu] Y Fwd Server Mail Y Compose S! Mail Y Q[Send]Sort Server MailRetrieve Mail List Y R[Menu] Y Sort Y Select a conditionView Server Mail InformationRetrieve Mail List Y Highlight a message Y R[Menu] Y Mail InformationView Server Mail MemoryServer Mail Memory>■>■>■>■>■>■>FromFromOrganizing/Using MessagesChecking Messages in Messaging Folders1 Q Y Incoming Mail, Drafts, Sent/UnsentIn Incoming Mail folder, select a folder then message.Messaging Folders: ZP.13-32 Select a messageIn Received/Sent Message window, toggle ;/* to view previous/next messages.Tip●Functions Available in Incoming Mail Box ●Functions Available for Received/Sent/Draft Message List (ZP.13-20)842p_E.indb 13-15842p_E.indb 13-15 10.4.21 10:58:18 AM10.4.21 10:58:18 AM](https://usermanual.wiki/Panasonic-Connect/210029A.User-Manual-1-of-2/User-Guide-1282107-Page-211.png)
![13-1613MessagingAuto-sortPreviously received messages are not sorted.Incoming messages are sorted by subject if both address and subject match sort condition applied to specific folder. Messages with no subject are sorted by address.Either address or mail subject can be specified per folder.1 Q Y Incoming Mail2 Highlight ユーザーフォルダ 1-3 Y R[Menu] Y Auto-sort 3 R[Menu] Y Select an item (See below)Item Operation/DescriptionAdd Address Sort received messages by sender's addressSelect an address selection method Y Select/enter an addressSave up to 10 addresses per folder.>Item Operation/DescriptionAdd Subject Sort received messages by mail subjectEnter a subjectSave one subject per folder.SMS cannot be sorted by mail subject.>Add Group Sort received messages by Group in Phone BookSelect a groupSave up to 10 groups per folder.>Edit Sort ConditionsAfter Step 2, highlight an item Y HI[Edit] Y Edit address, subject or mail groupChange Auto-sort List ViewSwitch Name view or Address view for Auto-sort.After Step 2, R[Menu] Y Display the List Y Name or AddressDelete Auto-sort SettingsAfter Step 2, (highlight an item Y) R[Menu] Y Auto-sort Y Delete or Delete All (Y For Delete All, enter Phone Password) Y YES■>■>■>842p_E.indb 13-16842p_E.indb 13-16 10.4.21 10:58:18 AM10.4.21 10:58:18 AM](https://usermanual.wiki/Panasonic-Connect/210029A.User-Manual-1-of-2/User-Guide-1282107-Page-212.png)
![13-1713MessagingFilter SpamSort messages from unidentifiable handsets into Spam Folder without incoming notification.NoteSome messages from addresses saved in Phone Book as secret data may be sorted into Spam Folder. Be careful when deleting messages from Spam Folder.Setting Spam Folder<Default> OFF1 Q Y Settings Y Universal Settings Y Anti-Spam Measures2 Spam Filter Y Enter Phone Password3 ON Y YESSafe ListSpecify up to 20 addresses and domains (for example, @softbank.ne.jp) to receive messages from without sorting into Spam Folder.1 Q Y Settings Y Universal Settings Y Anti-Spam Measures Y Safe List2 Add Addresses R[Menu] Y Add Address Y Received Address or Direct Entry Y Select or enter an address Add Domains R[Menu] Y Add Domain Y Enter a domain (character string after @)3 Q[Finish]Edit Saved AddressesAfter Step 1, highlight an address Y HI[Edit] Y Edit addressDelete AddressesAfter Step 1, (highlight an address Y) R[Menu] Y Delete or Delete All (Y For Delete All, enter Phone Password) Y YESTip●Report Spam (ZP.13-22)■>■>842p_E.indb 13-17842p_E.indb 13-17 10.4.21 10:58:18 AM10.4.21 10:58:18 AM](https://usermanual.wiki/Panasonic-Connect/210029A.User-Manual-1-of-2/User-Guide-1282107-Page-213.png)
![13-1813MessagingReplying to Messages1 Via S! Mail In Message window, Q[Reply] Y Reply to Sender or Reply to AllReceived message text is quoted.Re: appears before Subject of reply. Via SMS In Message window, Q[Reply]Received message text is quoted.2 Complete message Y Q[Send]Without Quoting Message Text when ReplyingIn Step 1, R[Menu] Y Reply Y Reply to Sender or Reply to All Y Compose S! Mail or Compose SMSSelectable items differ by mail type.NoteAlternatively, select a message in message list to reply to (ZP.13-20)■>Using Mail GroupsSave mail addresses by group. Messages can be sent to specified group of recipients.Save up to five recipients per group.Create up to 20 groups.Creating Mail GroupsMain Menu ▶ Phone Book ▶ Settings ▶ Mail Group1 Select a group to save 2 Enter Mail Address Directly Highlight <Not stored> Y Q[Edit] Y Enter mail address Select Mail Address from Phone Book or Sent/Received Address Logs Highlight <Not stored> Y R[Menu] Y Look-up address Y Select an item Y Select an entryRepeat Step 2 to save mail addresses.Mail Group ListMail Group List842p_E.indb 13-18842p_E.indb 13-18 10.4.21 10:58:19 AM10.4.21 10:58:19 AM](https://usermanual.wiki/Panasonic-Connect/210029A.User-Manual-1-of-2/User-Guide-1282107-Page-214.png)
![13-1913MessagingChange Group NamesIn Step 1, highlight a mail group Y R[Menu] Y Edit group name Y Edit nameReset Group NamesIn Step 1, highlight a mail group Y R[Menu] Y Reset group name Y YESEdit Mail AddressesAfter Step 1, highlight a mail address Y Q[Edit] Y EditDelete Saved Mail AddressesAfter Step 1, (highlight a mail address Y) R[Menu] Y Delete this or Delete all (Y For Delete all, enter Phone Password) Y YESSending a Message to All Group MembersMain Menu ▶ Phone Book ▶ Settings ▶ Mail Group1 Highlight a group Y Q[ ] Y OK2 Compose a message (ZFrom Step 4 on P.13-4)■>■>■>■>Sent/Received AddressSent address logs: Press and hold DI Y Highlight an address Y R[Menu] Y Select an item (See below)Received address logs: Press and hold CI Y Highlight an address Y R[Menu] Y Select an item (See below)Item Operation/DescriptionCharacter size Toggle character sizeAdd to Phone Book Save selected mail address/number to Phone Book (ZFrom Step 2 on P.4-5)Add shortcut icon Create a shortcut (ZP.1-17) Select a shortcut in Standby to open composition window with selected mail address/number in Address fieldCompose S! Mail Create S! Mail to selected address/phone number (ZFrom Step 4 on P.13-4)Compose SMS Create SMS to selected phone number (ZFrom Step 4 on P.13 -7)Dialing Select a dialing method Y Dial>Dialed calls 1Show Redial logsReceived calls 2Show Incoming Call LogsDelete thisYES>Delete selected Check logs to be deleted Y Q[Finish] Y YES>Delete all Enter Phone Password Y YES>1 Sent address logs only2 Received address logs only>>842p_E.indb 13-19842p_E.indb 13-19 10.4.21 10:58:19 AM10.4.21 10:58:19 AM](https://usermanual.wiki/Panasonic-Connect/210029A.User-Manual-1-of-2/User-Guide-1282107-Page-215.png)
![13-2013MessagingOrganizing MessagesFunctions Available in Incoming Mail BoxQ Y Incoming Mail Y Highlight a folder Y R[Menu] Y Select an item (See below)Item Operation/DescriptionAdd folder Enter folder name>Edit folder name*Edit folder name>Auto-sort*Sort received messages (Auto-sort: ZFrom Step 3 on P.13-16)>Mail Security Set to enter Phone Password for opening a folderEnter Phone PasswordTo cancel: repeat the step>Delete folder* Enter Phone Password Y YES>* ユーザーフォルダ onlyFunctions Available for Received/Sent/Draft Message ListQ Y Incoming Mail, Drafts or Sent/Unsent (Y For Incoming Mail, select a folder) Y Highlight a message Y R[Menu] Y Select an item (See below)Item Operation/DescriptionEdit 1 2Edit message to send (S! Mail: ZFrom Step 2 on P.13-4/SMS: ZFrom Step 2 on P.13-7)Send 2Send DraftsRetrieve 3Retrieve complete S! MailThis one or Selected (Y For Selected, select multiple messages* Y Q[Finish] Y YES)* To cancel: press HI again>■>■>Item Operation/DescriptionReply 3Reply to Sender or Reply to All Y Compose S! Mail or Compose SMS Y Compose a message(S! Mail: ZFrom Step 4 on P.13-4/SMS: ZFrom Step 4 on P.13-7)Items to be selected differ by mail type.>Reply with Quote 3Quote received message to replyReply to Sender or Reply to All Y Compose S! Mail or Compose SMS Y Compose a message (S! Mail: ZFrom Step 4 on P.13-4/SMS: ZFrom Step 4 on P.13-7)Selectable items differ by mail type.>Forward 3Forward/Fwd Server Mail Y Select Address field Y Select an item Y Select/enter an address Y Q[Send]Forward Server Mail (ZP.13-15)When forwarding S! Mail, "Fw:" appears before Subject. Dotted line appears in the first line of Text field.Attachments are also forwarded (Messages with copy protected attachments may not be forwardable.).>Dial Select an item Y Make a call/compose a message/add to Phone Book>Add Address 1 3Save addresses to Phone BookSelect phone number or mail address Y YES(ZFrom Step 2 on P.4-5)>Protect/Unprotect 1 3Protect received/sent messagesThis one or Selected (Y For Selected, select multiple messages* Y Q[Finish])* To cancel: press HI againTo unprotect, repeat the step.>842p_E.indb 13-20842p_E.indb 13-20 10.4.21 10:58:20 AM10.4.21 10:58:20 AM](https://usermanual.wiki/Panasonic-Connect/210029A.User-Manual-1-of-2/User-Guide-1282107-Page-216.png)
![13-2113MessagingNext PageItem Operation/DescriptionUnread/Read 3Switch status to Unread/ReadMove 3Move messages to specific foldersMove This or Move Selected (Y For Move Selected, select multiple messages* Y Q[Finish] Y YES) Y Select a folder* To cancel: press HI again>Delete Select an item Y Operate selected itemIf messages are received while selecting multiple messages, message deletion may fail.>Confirm Delivery 1View Delivery reportSend Ir data (ZP.10-3)IC Transmission (ZP.10-5)Copy to microSD Copy messages to microSD CardYES>Copy to USIM/Copy to Phone 3Copy SMS to USIM Card/handsetYES>Move to USIM/Move to Phone 3Move SMS to USIM Card/handsetYES>Sort Change display orderSelect a display order>Mail Information View detailed information (Subject, From, To, etc.)1 Sent messages only2 Drafts only3 Received messages onlyUsing MessagesFunctions Available in Received/Sent Message WindowIn Message Window, R[Menu] Y Select an item (See below)Item Operation/DescriptionRetrieve 1Retrieve complete S! MailEdit 2Edit message to send (S! Mail: ZFrom Step 2 on P.13-4/SMS: ZFrom Step 2 on P.13-7)Reply 1Reply to Sender or Reply to All Y Compose S! Mail or Compose SMS Y Compose a message(S! Mail: ZFrom Step 4 on P.13-4/SMS: ZFrom Step 4 on P.13-7)Items to be selected differ by mail type.>Reply with Quote 1Quote received message to replyReply to Sender or Reply to All Y Compose S! Mail or Compose SMS Y Compose a message (S! Mail: ZFrom Step 4 on P.13-4/SMS: ZFrom Step 4 on P.13-7)Selectable items differ by mail type.>Forward 1Forward or Fwd Server MailForward Server Mail (ZP.13-15)>Dial Select an item Y Make a call/compose a message/add to Phone Book>Add Address Save addresses to Phone BookSelect phone number or mail address Y YES (ZFrom Step 2 on P.4-5)>Add to Phone Book Save highlighted phone number/mail address to Phone BookYES (ZFrom Step 2 on P.4-5)>■>842p_E.indb 13-21842p_E.indb 13-21 10.4.21 10:58:20 AM10.4.21 10:58:20 AM](https://usermanual.wiki/Panasonic-Connect/210029A.User-Manual-1-of-2/User-Guide-1282107-Page-217.png)
![13-2213MessagingItem Operation/DescriptionAttached files Show attached filesSave Templates Save templatesYES>Add Shortcut Icon Create a shortcut (ZP.1-17) Select a shortcut in Standby to open composition window with selected mail address/number in Address fieldFont Size Select a size>Scroll Unit Change scroll unitHalf Screen or Whole Screen>Charset Conversion 1Convert characters when not properly shownSelect an item>Delete Select an item Y Operate selected item>Confirm Delivery 2View Delivery reportMail Information View detailed information (Subject, From, To, etc.)Send Ir data (ZP.10-3)IC Transmission (ZP.10-5)Copy to microSD Copy messages to microSD CardYES>Copy to USIM or Copy to Phone 1Copy SMS to USIM Card/handsetYES>Move to USIM or Move to Phone 1Move SMS to USIM Card/handsetYES>Report Spam 1Report received mail as Spam MailQ[Send]Change destination to report to (ZP.17-14).>1 Received Message Window only2 Sent Message Window only842p_E.indb 13-22842p_E.indb 13-22 10.4.21 10:58:20 AM10.4.21 10:58:20 AM](https://usermanual.wiki/Panasonic-Connect/210029A.User-Manual-1-of-2/User-Guide-1282107-Page-218.png)
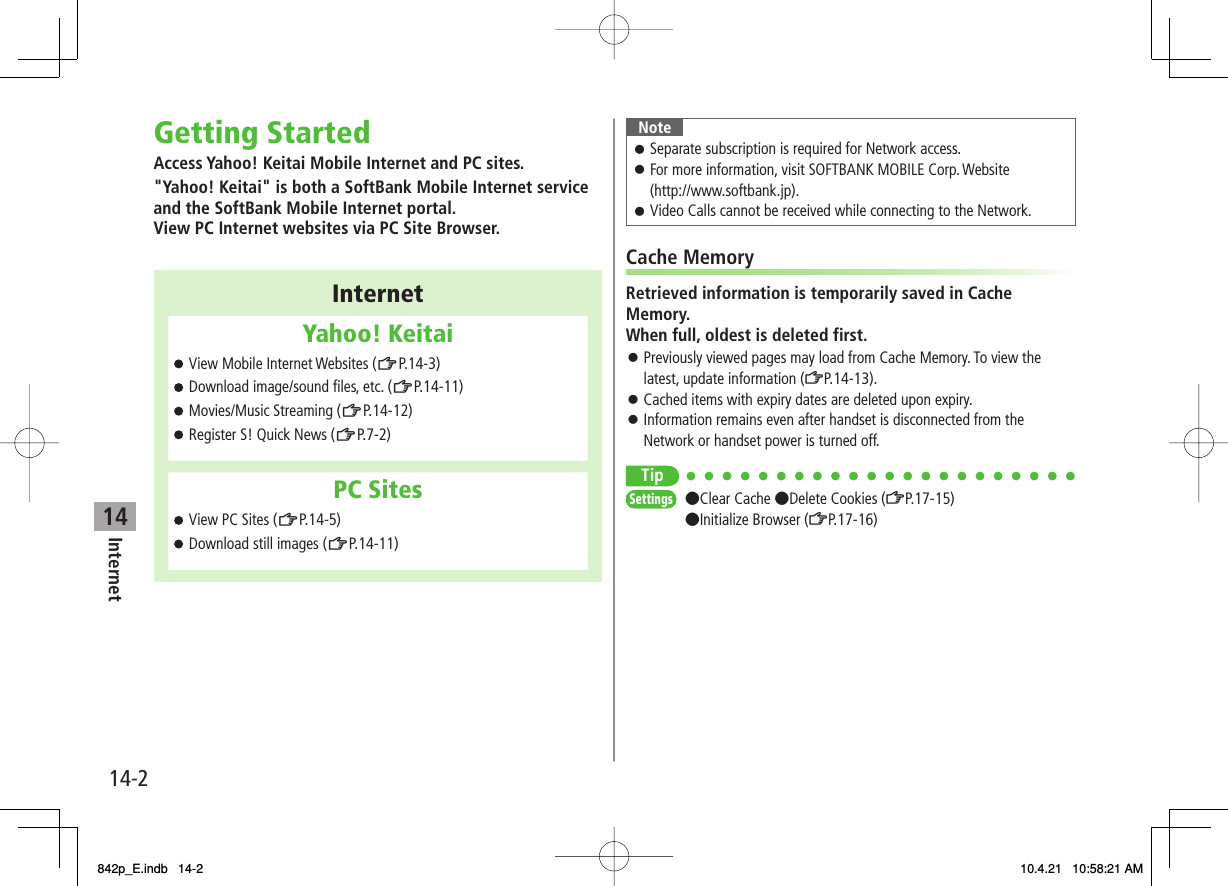
![14Internet14-4Entering URLEnter URLs (addresses beginning with "http://" or "https://") directly to access websites, or open previously viewed pages using URL histories.Up to 20 URL histories are stored.Main Menu ▶ Yahoo! Keitai ▶ Enter URL1 Enter URL Directly Direct Entry Y Enter URL Use URL History URL History List Y Select a URLDelete URL HistoriesIn Step1, URL History List Y (Highlight a URL Y) R[Menu] Y Delete or Delete All Y YES■>URL History List WindowURL History List WindowUsing Access HistoriesOpen previously viewed pages using access histories.Up to 100 access histories are stored (The number of savable histories varies depending on data amount.).Main Menu ▶ Yahoo! Keitai ▶ History1 Select a historyDelete Access HistoriesIn Step 1, (highlight a history Y) R[Menu] Y Delete or Delete All Y YES (Y For Delete All, enter Phone Password)Show Access History URLsIn Step 1, highlight a history Y R[Menu] Y Display URLExiting Mobile Internet1 K Y YESNoteClosing handset does not affect active browser.■>■>History WindowHistory Window842p_E.indb 14-4842p_E.indb 14-4 10.4.21 10:58:22 AM10.4.21 10:58:22 AM](https://usermanual.wiki/Panasonic-Connect/210029A.User-Manual-1-of-2/User-Guide-1282107-Page-222.png)

![14Internet14-6Basic OperationsUsing CursorMove CursorUse cursor to select underlined menu items.DI to move rightCI to move leftAI to move to previous lineBI to move to next lineScroll PagesScroll bar appears on right side or at bottom of Display when page content continues beyond view.GI scroll up/downFI scroll left/rightP scroll page up by a screenfulO scroll page down by a screenfulMove to previous page/next pagePreviously viewed pages are temporarily saved in Cache Memory (ZP.14-2).Q[Back]: Return to previous pageR[Menu] Y Forward: View next pageSome web pages may not appear after performing the steps above.When Authentication is RequiredSome pages require user authentication for access.If required, enter user ID or password.Tip●Font Size ●Scroll Unit ●Images Off ●Sound Off ●Delete User ID or Password Entered when Authentication is Required (ZP.17-15)SettingsSettings842p_E.indb 14-6842p_E.indb 14-6 10.4.21 10:58:23 AM10.4.21 10:58:23 AM](https://usermanual.wiki/Panasonic-Connect/210029A.User-Manual-1-of-2/User-Guide-1282107-Page-224.png)
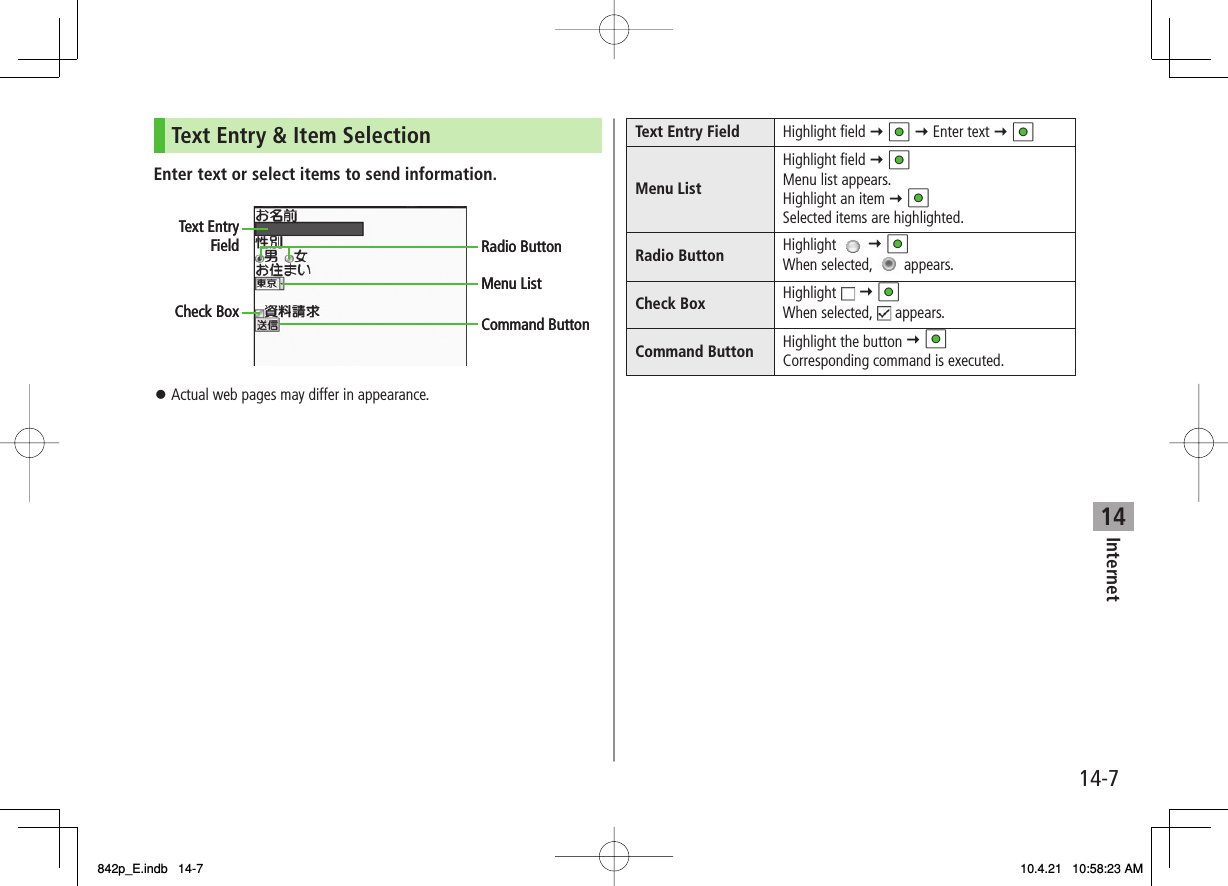
![14Internet14-8Using InformationBookmarks & Saved PagesBookmark websites or save page content to Saved Pages.Some copy protected materials cannot be saved.Bookmarks Save links to websites. 842P connects to the Network to open the link.Saved Pages Save page content. 842P opens saved pages without connecting to the Network.Saving Web Pages1 Open a web page Y R[Menu] Y Bookmarks or Saved Pages Y Add2 Select title Y Edit title3 R[Set] Y OKSaved Bookmarks/Saved Pages are saved to Bookmarks List/Saved Pages List (ZRight)Open Bookmarks/Saved Pages in Web PageOpen a web page Y R[Menu] Y Bookmarks or Saved Pages Y View List■>Viewing Bookmarks & Saved PagesMain Menu ▶ Yahoo! Keitai (▶ PC Site Browser)1 Bookmarks or Saved Pages Y Select an itemExample: Yahoo! Keitai BrowserNoteCreate folders in Bookmarks/Saved Pages List to organize Bookmarks/Saved Pages (ZP.14-9).Tip●Send Bookmarks via Infrared (ZP.10-3) ●Send Bookmarks via IC Transmission (ZP.10-5) ●Add Bookmark Shortcuts to Standby ●Save URLs to Bookmarks ●Send Bookmark URLs (ZP.14-10)Saved Pages List WindowBookmarks List Window Saved Pages List WindowBookmarks List Window842p_E.indb 14-8842p_E.indb 14-8 10.4.21 10:58:24 AM10.4.21 10:58:24 AM](https://usermanual.wiki/Panasonic-Connect/210029A.User-Manual-1-of-2/User-Guide-1282107-Page-226.png)
![14Internet14-9Managing Bookmarks & Saved PagesFollow the steps below to open Bookmarks or Saved pages list:Yahoo! KeitaiMain Menu ▶ Yahoo! Keitai ▶ Bookmarks or Saved PagesPC Site BrowserMain Menu ▶ Yahoo! Keitai ▶ PC Site Browser ▶ Bookmarks or Saved PagesNoteWhen a different USIM Card is inserted, Saved Pages do not appear or title name cannot be changed.Creating New Bookmark/Saved Pages FoldersFolders cannot be created within existing folders.1 Bookmarks In Bookmarks list window, R[Menu] Y Create New Y Folders Y Enter title Saved Pages In Saved Pages list window, R[Menu] Y New Folder Y Enter title■■Move Bookmarks/Saved Pages to Folder① Before moving to folders, set Sort to Saved/Moved Order (ZP.14-10)② In Bookmarks/Saved Pages list window (ZP.14-8), highlight a bookmark/saved page Y R[Menu] Y Move to Y Select a folder Y Select a destinationEdit Folder TitleIn Bookmarks/Saved Pages list window (ZP.14-8), highlight a folder Y R[Menu] Y Edit Y Edit folder titleEditing Bookmark Titles/URLs1 In Bookmarks list window, highlight a bookmark Y R[Menu] Y Edit2 Edit title/URLRenaming Saved Pages1 In Saved Pages list window, highlight a saved page Y R[Menu] Y Edit2 Edit titleTip●Delete Bookmarks/Saved Pages/Folders ●Display Bookmark/Saved Page URLs ●Change Bookmarks/Saved Pages/Folders Display Order ●Sort Bookmarks/Saved Pages/Folders (ZP.14-10)■■>842p_E.indb 14-9842p_E.indb 14-9 10.4.21 10:58:24 AM10.4.21 10:58:24 AM](https://usermanual.wiki/Panasonic-Connect/210029A.User-Manual-1-of-2/User-Guide-1282107-Page-227.png)
![14Internet14-10Bookmarks/Saved Pages FunctionsMain Menu ▶ Yahoo! Keitai (▶ PC Site Browser) ▶ Bookmarks or Saved PagesAdd Bookmark Shortcuts to StandbyHighlight a bookmark Y R[Menu] Y Add shortcut icon Y YESSave URLs to BookmarksR[Menu] Y Create New Y Bookmarks Y Enter a title/URL Y R[Set]Delete Bookmarks/Saved Pages/FoldersFollow the steps belowItem Operation/DescriptionDelete Highlight a bookmark, saved page or folder Y R[Menu] Y Delete Y YES>Delete Selected ItemsSelect items to deleteR[Menu] Y Delete selected Y Check items to delete Y R[Delete] Y YES>Delete All R[Menu] Y Delete All Y YES Y Enter Phone Password>Display Bookmark/Saved Page URLsHighlight a bookmark/saved page Y R[Menu] Y Display URLChange Bookmarks/Saved Pages/Folders Display OrderHighlight a bookmark/saved page/folder Y R[Menu] Y Move to Y GI to select a positionBefore changing order, set Sort (ZRight) to Saved/Moved Order.■>■>■>■>■>FromFromSort Bookmarks/Saved Pages/FoldersR[Menu] Y Sort Y Select a conditionSend Bookmark URLsHighlight a bookmark Y R[Menu] Y Send URL Y S! Mail or SMS Y Create a message (S! Mail: ZFrom Step 2 on P.13-4/SMS: ZFrom Step 2 on P.13-7)■>■>842p_E.indb 14-10842p_E.indb 14-10 10.4.21 10:58:24 AM10.4.21 10:58:24 AM](https://usermanual.wiki/Panasonic-Connect/210029A.User-Manual-1-of-2/User-Guide-1282107-Page-228.png)
![14Internet14-11Downloading Image/Sound FilesSave images, sounds, etc. to Data Folder or microSD Card.For PC Site Browser, only still images can be saved.1 Open a web page Y R[Menu] Y Select File2 Select a file3 Save Y YESAvailable menu items vary by saved content.Save location is determined by Save Settings (ZP.17-15). However, save location may change depending on situations. Check confirmation when download is complete.Confirmation appears when downloading images or sound files. Select YES for image/sound setting.NoteDo not remove/install microSD Card while saving files to it.Do not turn 842P power off while downloading or saving files.Files may be damaged.Some copy protected files may not be saved.Using Number, Address or URLUse linked numbers, addresses or URLs to make calls, send messages, access websites, or save directly to Phone Book.1 Open a web page containing phone numbers, mail addresses or URLs2 Phone NumberSelect a phone number Y Select an item (See below)Item Operation/DescriptionVoice call Make a Voice CallVideo call Make a Video CallSelect image Select outgoing imageAdd to Phone Book Save a number to Phone Book (ZFrom Step 2 on P.4-5) E-mail AddressSelect an address Y Select an item (See below)Item Operation/DescriptionCompose S! Mail Create S! Mail (ZFrom Step 4 on P.13-4)Compose SMS Create SMS (ZFrom Step 4 on P.13-7)Add to Phone Book Save mail address to Phone Book (ZFrom Step 2 on P.4-5) URL Select URL842P connects to the Network.842p_E.indb 14-11842p_E.indb 14-11 10.4.21 10:58:25 AM10.4.21 10:58:25 AM](https://usermanual.wiki/Panasonic-Connect/210029A.User-Manual-1-of-2/User-Guide-1282107-Page-229.png)
![14Internet14-12StreamingSupported by compatible files on Yahoo! Keitai sites only.Streaming files cannot be saved.Main Menu ▶ Yahoo! Keitai ▶ Yahoo! Keitai1 Open a web page Y Select a fileStreaming starts.2 L or K to exitEngaged Streaming OperationsMute/Release Mute R[ / ]Pause/Resume*HI[ / ]Volume GI/UVSet Playback Position*FI to start playback from specified pointToggle Display PositionOToggle Portrait/Landscape view.* Not available during playback for live events such as live sports programs.■NoteStreaming requires a continuous Network connection. Network remains connected even during a pause (Transmission fees apply).Paused streams may stop after three minutes of inactivity.When roaming abroad, streaming may be unavailable or not be performed properly.Incoming Voice Calls while StreamingIncoming call pauses an active stream.Video Calls cannot be received while streaming.842p_E.indb 14-12842p_E.indb 14-12 10.4.21 10:58:25 AM10.4.21 10:58:25 AM](https://usermanual.wiki/Panasonic-Connect/210029A.User-Manual-1-of-2/User-Guide-1282107-Page-230.png)
![14Internet14-13Option Menu ItemsIn Yahoo! Keitai, press R[Menu] for following operations.Some functions may not be available depending on web pages.Item Operation/DescriptionForward Go to next page (ZP.14-6)Bookmarks View Bookmarks list, add bookmarks, or add bookmark shortcuts to StandbySaved Pages View Saved Pages list or save page content to Saved PagesText Copy Copy page textReload Page Refresh page informationEnter URL Enter URL directly or use URL History to access pagesSelect File View, play or save file to Data Folder (Downloading Images/Sounds to Save: ZFrom Step 2 on P.14-11)Item Operation/DescriptionHandy FunctionsSwitch PC Browser 1/Switch Browser 2: Toggle Yahoo! Keitai/PC siteInternet Search: Search text in InternetSearch In Page: Search text within pageJump in this page: Jump to top/end of pageSend URL: Send URL via S! Mail/SMSHistory: Open previously viewed pagesExpand/Shrink 2: Zoom page in/outSet Display Range 2: Specify displayed area of pageFlash(R) Menu: Playback/pause Flash® filesProperties: View page details or electronic certificates for secure pagesYahoo! Keitai 1/Homepage 2View top menuSettingsFont Size: Change character sizeEncoding: Change encoding typeSwitch screen 2Toggle between Small Screen and PC ScreenExit Browser Exit Browser1 Yahoo! Keitai only2 PC Site Browser only842p_E.indb 14-13842p_E.indb 14-13 10.4.21 10:58:25 AM10.4.21 10:58:25 AM](https://usermanual.wiki/Panasonic-Connect/210029A.User-Manual-1-of-2/User-Guide-1282107-Page-231.png)

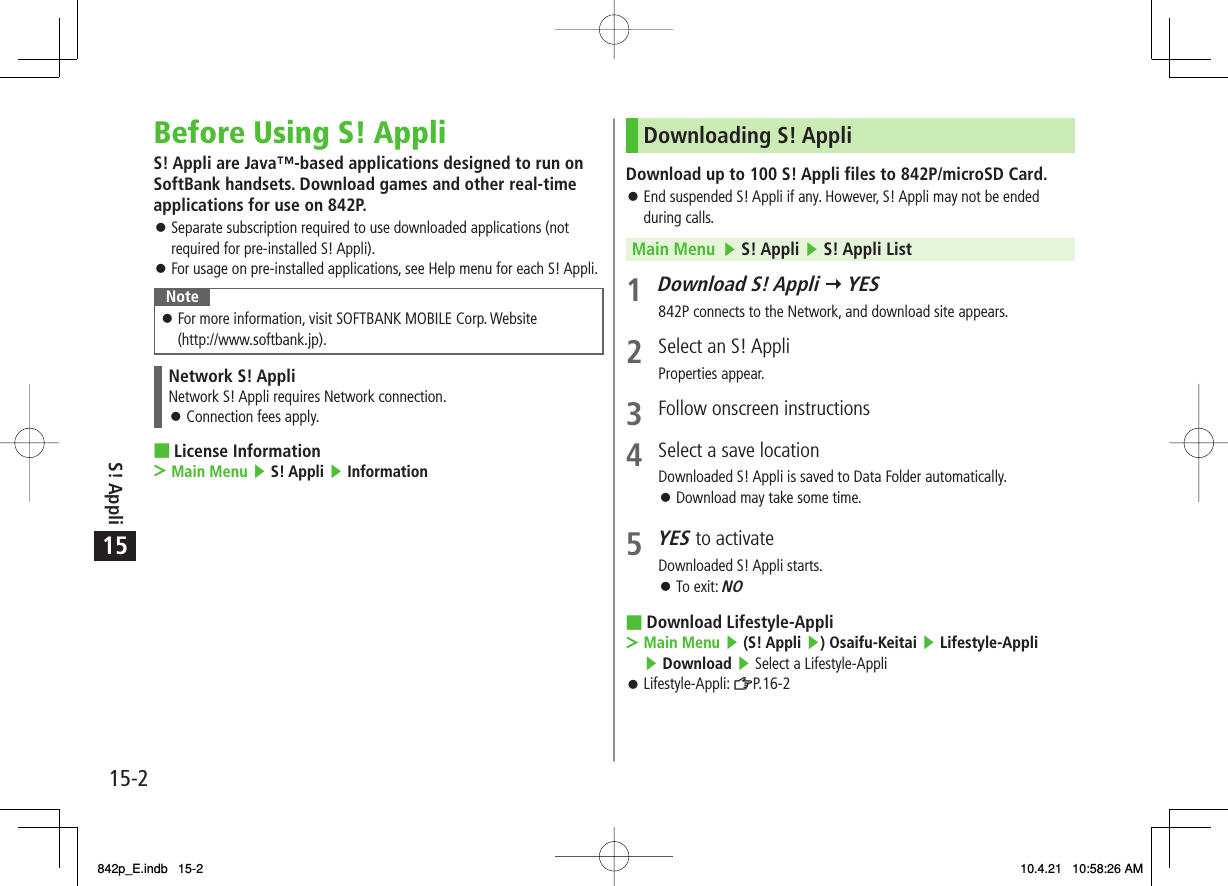
![15S! Appli15-3Using S! AppliActivating S! AppliMain Menu ▶ S! Appli ▶ S! Appli List 1 Select an S! AppliApplication starts and appears.See application Help menu for usage information.Confirmation appears when selecting Network S! Appli.For a microSD Card S! Appli, press P[microSD] before Step 1.NoteActivate an S! Appli; Main Menu ▶ Data Folder ▶ S! Appli ▶ Select an S! Appli Applications with in S! Appli List are intended for Landscape View.Incoming transmissions pause S! Appli.If handset is closed while S! Appli is active, S! Appli pauses.Tip●Volume ●Backlight On/Off ●Deactivate Vibration ●Sync microSD Card with S! Appli Library (ZP.17-17) SettingsSettingsSettingsSettingsSettingsSettingsSettingsSettingsTerminate/Suspend & ResumeTerminating/Pausing S! Appli1 While running an S! Appli, K2 Suspended or Stopped appears for a suspended application.Resuming/Terminating Paused S! AppliMain Menu ▶ S! Appli ▶ S! Appli List 1 Replayed or StoppedResumed application starts from paused point.Using S! Appli Startup HistoryMain Menu ▶ S! Appli ▶ S! Appli History 1 Highlight a record Y R[Menu] Y Start, S! Appli info or Delete842p_E.indb 15-3842p_E.indb 15-3 10.4.21 10:58:26 AM10.4.21 10:58:26 AM](https://usermanual.wiki/Panasonic-Connect/210029A.User-Manual-1-of-2/User-Guide-1282107-Page-235.png)
![15S! Appli15-4Setting Security Level while Running S! AppliSecurity Level cannot be set for some applications.Main Menu ▶ S! Appli ▶ S! Appli List 1 Highlight an S! Appli Y R[Menu] Y Security level2 Select an item (See below)Item Operation/DescriptionNetwork Access Connect to the NetworkAuto Invocation Activate S! AppliMultimedia Recording Record multimedia dataData Reading Access Read Phone Book, Calendar events, etc.Data Rewrtng Accss Write/delete Phone Book, Calendar events, etc.Location Access Retrieve Location information3 Always Allowed, Ask First Time*, Ask Every Time or Not Allowed* Confirmation appears the first time application is activated.Reset Security Level SettingsReset security level settings to default or condition when downloading.In Step 2, Reset Sec. Setting Y YES■>Managing ApplicationsMoving S! Appli between 842P and microSD CardMain Menu ▶ S! Appli ▶ S! Appli List 1 Highlight an S! Appli Y R[Menu] Y Move to microSD or Move to phoneSome S! Appli may not be moved to microSD Card.Deleting S! AppliMain Menu ▶ S! Appli ▶ S! Appli List 1 Highlight an S! Appli Y R[Menu] Y Delete Y YESSome pre-installed S! Appli may not be deleted.Viewing S! Appli PropertiesMain Menu ▶ S! Appli ▶ S! Appli List 1 Highlight an S! Appli Y R[Menu] Y S! Appli info842p_E.indb 15-4842p_E.indb 15-4 10.4.21 10:58:27 AM10.4.21 10:58:27 AM](https://usermanual.wiki/Panasonic-Connect/210029A.User-Manual-1-of-2/User-Guide-1282107-Page-236.png)
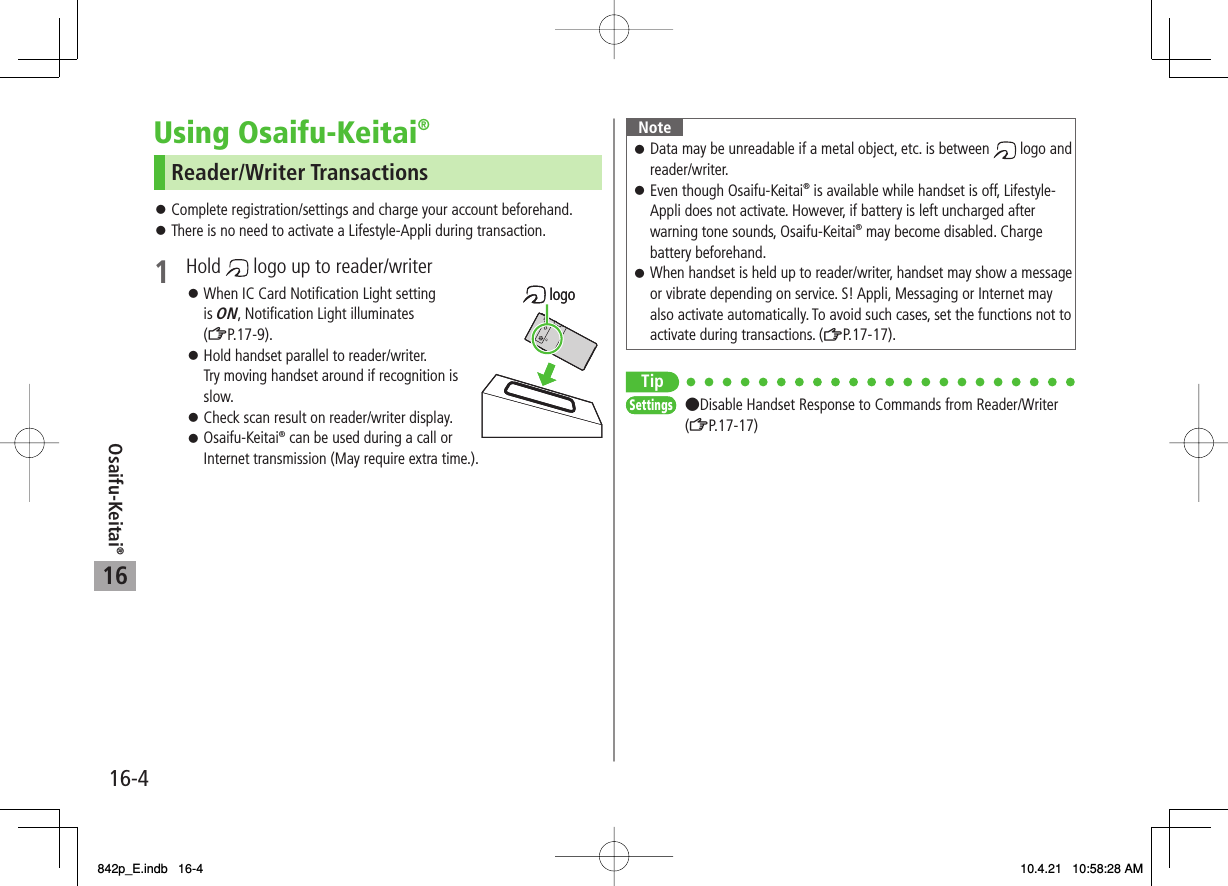
![16Osaifu-Keitai®16-5IC Card Lock FunctionsActivating IC Card Lock<Default> OFF1 Press and hold P Y Enter Phone Password appears in Standby.Repeat the step as required to unlock.NoteAlternatively, Main Menu ▶ Osaifu-Keitai ▶ IC Card Settings ▶ IC Card Lock or Main Menu ▶ Settings ▶ Security ▶ IC Card LockRemote Lock<Default> OFFSaving Numbers to Activate Remote LockSave up to three phone numbers to enable Remote Lock.Main Menu ▶ Osaifu-Keitai ▶ IC Card Settings ▶ Remote Lock1 Enter Phone Password Y ON Y Numbers to Permit2 <Not Recorded> Y Enter phone numbersTo save numbers from Phone Book/Incoming Call Logs or to use a payphone number: R[Menu] Y Refer to or Payphone3 Q[Return] Y Q[Set]842p_E.indb 16-5842p_E.indb 16-5 10.4.21 10:58:28 AM10.4.21 10:58:28 AM](https://usermanual.wiki/Panasonic-Connect/210029A.User-Manual-1-of-2/User-Guide-1282107-Page-241.png)
![16Osaifu-Keitai®16-6Number of Calls to Activate Remote Lock<Default> Three timesSpecify the number of incoming calls for activating IC Card Lock.Main Menu ▶ Osaifu-Keitai ▶ IC Card Settings ▶ Remote Lock1 Enter Phone Password Y ON2 # of Incoming Call Y Enter a number (03-10) Y Q[Set]Activating Remote Lock1 Call 842P from one of the specified numbers (Send Caller ID)2 Hang up after 842P receives the call3 Repeat Steps 1-2 until specified number of incoming calls is reached (within three minutes)After specified number of incoming calls, IC Card Lock is set and a message informs you IC Card Lock is activated.NoteWhen setting IC Card Lock, call 842P from the same specified phone number. Incoming calls from different phone numbers cannot be counted.Specified incoming calls may not be counted when Call Forwarding is active.Remote Lock is not available when ring time for Answer Phone is set to 0 or Driving Mode is active.842p_E.indb 16-6842p_E.indb 16-6 10.4.21 10:58:29 AM10.4.21 10:58:29 AM](https://usermanual.wiki/Panasonic-Connect/210029A.User-Manual-1-of-2/User-Guide-1282107-Page-242.png)
![17Settings17-4ClockFrom Main Menu ▶ Settings ▶ Display Settings▶ Internal Display ▶ ClockSetting/Operation DefaultChange Standby Clock Pattern 1Stand-by Clock Y R[Pattern] Y Select a pattern Y HI[Set]■>(ZP.17-18)Change Standby Clock Position 1 2Stand-by Clock Y Q[Position] Y Select a pattern Y HI[Set]■>(ZP.17-18)Change Standby Clock Size 1Stand-by Clock Y P[Size] Y Large or Small Y HI[Set]■>(ZP.17-18)Change Standby Clock at Upper Right (lower right in Landscape View)Icon Clock Y Select a pattern■>(ZP.17-18)1 Highlight Stand-by Clock Y Q[Play] to view Standby Clock.2 Even if clock position is set to Pattern 2 - Pattern 12, clock appears in Pattern 1 when: Calendar, World Clock or Operator Name is set to appear in Standby Time zone is set to other than GMT+9 Privacy Key Lock is activeMain MenuFrom Main Menu ▶ Settings ▶ Display Settings▶ Menu IconsSetting/Operation DefaultChange Main Menu ThemeSelect a pattern■>(ZP.17-18)Change Main Menu IconsCustomize Y Select a menu Y Select a folder Y Select an image■>−Change Main Menu BackgroundCustomize Y Background Image Y Select a folder Y Select an image■>−842p_E.indb 17-4842p_E.indb 17-4 10.4.21 10:58:30 AM10.4.21 10:58:30 AM](https://usermanual.wiki/Panasonic-Connect/210029A.User-Manual-1-of-2/User-Guide-1282107-Page-246.png)

![17Settings17-6Settings Manner ModeFrom Main Menu ▶ Settings ▶ Incoming Settings▶ Manner Mode TypeSetting/Operation DefaultSet Manner Mode TypeManner Mode, Super Silent or User Mode (Y For User Mode, set individual items Y Q[Finish])■>Manner ModeDefault Settings by ModeManner Mode Super Silent Driving Mode User ModeAnswer PhoneValue set for Answer PhoneValue set for Answer Phone ON OFFVibratorON ON OFF ONIn. CallsSilent Silent Silent SilentMsg Ring T.Silent Silent Silent SilentAlarmSilent Silent Silent SilentRec. Check ToneON OFF ON ONKey ToneOFF OFF * OFFMic Sensitiv.Up Up Up UpLVA Tone (Low battery alarm)OFF OFF OFF OFF* Based on Key Tone setting (ZP.17-2)■Settings Incoming SettingsFrom Main Menu ▶ Settings▶ Incoming SettingsSetting/Operation DefaultChange Answer Setting (ZP.17-7)Answer Setting Y Quick Silent or OFF■>Any Key AnswerAnswer Calls by Opening HandsetOpen-to-Ans. Call Y Phone or Video Call Y Answer■>Keep RingingHide Caller Image Saved in Phone BookPhone Book Image Y OFF■>ONSet V Response (ZP.17-7) for Missed Call/New Message NotificationInfo Notice Setting Y ON or OFF■>ONActivate Auto Answer with EarphoneAuto Answer Y ON Y Enter ring time■>OFFSet Call Waiting ResponseIn-call Management Y Call Forwarding or Call Rejection■>Answer842p_E.indb 17-6842p_E.indb 17-6 10.4.21 10:58:31 AM10.4.21 10:58:31 AM](https://usermanual.wiki/Panasonic-Connect/210029A.User-Manual-1-of-2/User-Guide-1282107-Page-248.png)
![17Settings17-7Answer Setting Key OperationsAny Key Answer To answer a call, press any of the following keys:Voice Call: HI, J, 0 - 9, *, ;, L, Q, P, O, FI, UVideo Call: HI, JQuick SilentTo cancel ringtone/vibration, press any of the following keys:Voice Call/Video Call: 0 - 9, *, ;, L, Q, P, O, FI, UOFF To answer a call, press any of the following keys:Voice Call/Video Call: HI, JWhen [Voice Mail] is assigned to Q indicated at the bottom of Display, press Q to start voice or video recording.Info Notice Setting ResponseON No Missed Calls/No Received Messages: Triple-beep soundsMissed Calls/Received Messages: Double-beep sounds twiceボイス (Voice)*No Missed Calls/No Received Messages: Triple-beep soundsMissed Calls: Double-beep sounds; voice message announces that you have a missed callReceived Messages: Double-beep sounds; voice message announces that you have a new messageWhen Vibrator is set for Incoming Settings, vibration activates with beeps. In Manner Mode, only vibration activates.Set Side-keys Guard to OFF beforehand (ZP.11-8).* Japanese only■■Settings Date & TimeFrom Main Menu ▶ Settings▶ Date & TimeSetting/Operation DefaultChange Date and TimeDate & Time Y Enter year, date, time and time zone■>−Display World ClockWorld Clock Y ON Y EI to select an area■>OFFActivate Daylight Savings TimeDaylight Savings Y ON■>OFFDeactivate Alarm while Operating Other FunctionsAlarm Tone Y Operation Preferred■>Alarm PreferredDeactivate Automatic Time Correction via Yahoo! KeitaiTime Correction Y OFF■>ON842p_E.indb 17-7842p_E.indb 17-7 10.4.21 10:58:31 AM10.4.21 10:58:31 AM](https://usermanual.wiki/Panasonic-Connect/210029A.User-Manual-1-of-2/User-Guide-1282107-Page-249.png)
![17Settings17-9Settings Notification LightFrom Main Menu ▶ Settings▶ Notification LightSetting/Operation DefaultSet Notification Light by Incoming Type (Voice/Video Calls or Messages)Incoming Y Select Color Y Select a type Y EI to select a color■>(ZP.17-18)Change Notification Light Color Name for Incoming Call/MessageIncoming Y Color Y Edit Color Name Y Select a color Y Edit color name■>−Adjust Notification Light Color Tone for Incoming Call/MessageIncoming Y Color Y Adjust Color Tone Y Select a color Y Adjust color tone■>−Set Notification Light for Other FunctionsSelect a function Y ON or OFF, or EI to select a color■>−View Notification Light Status*Confirm Status■>−* View Notification Light settings for incoming calls/messages, engaged calls or upper Side Key commands.Settings Text EntryFrom Main Menu ▶ Settings ▶ Phone Settings▶ Text Entry MethodSetting/Operation DefaultSet Input ModeInput Mode Y Check input mode(s) to use Y Q[Finish] Y Select a input mode to prioritize■>Input mode: AllPrioritized mode: Mode 1 (5-touch)Hide Predictive Candidates/Context Forecast ListPredict Y OFF■>ONSet Learning Feature Off for Secret Mode/Secret Data OnlyLearn in Secret Mode Y Enter Phone Password Y OFF■>ONDelete All Learned WordsReset Learned Words Y Enter Phone Password Y YES■>−842p_E.indb 17-9842p_E.indb 17-9 10.4.21 10:58:32 AM10.4.21 10:58:32 AM](https://usermanual.wiki/Panasonic-Connect/210029A.User-Manual-1-of-2/User-Guide-1282107-Page-251.png)
![17Settings17-10Settings Phone BookFrom Main Menu ▶ Phone Book▶ SettingsSetting/Operation DefaultChange Save Location for New EntrySave Settings Y USIM or Ask Every Time■>PhoneChange Phone Book Search MethodSearch Method Y Select a method■>A-KA-SA-TA-NAChange Font SizeFont Size Y Phone Book or Call Log Y Large■>StandardForbid Forwarding Phone Book Entry ImagesForwarding Image Y OFF■>ON** If ON is selected, images can be forwarded via Infrared or IC transmission.Settings Voice DialFrom Main Menu ▶ Settings ▶ Phone Settings▶ Voice SettingsSetting/Operation DefaultActivate Voice Dial AutomaticallyAuto Voice Dial Y ON■>OFFActivate Voice Dial via EarphoneVoice Earphone Dial Y ON■>OFFSettings Video CallFunction MenusFrom Main Menu ▶ Settings ▶ Video CallSetting/Operation DefaultChange Incoming Image QualityIncoming Video Qlty Y Quality Prioritized or Motion Prioritized■>StandardChange Outgoing Alternative ImageSelect Images Y Select a category Y Highlight Original Y R[Menu] Y Change setting Y Select a folder Y Select a file Y Q[Play] to view image■>Pre-installedSwitch Earpiece OnLoud Speaker Y OFF■>ONSwitch to Voice Call when Video Call FailsVoice Call Auto Redial Y ON■>OFF842p_E.indb 17-10842p_E.indb 17-10 10.4.21 10:58:33 AM10.4.21 10:58:33 AM](https://usermanual.wiki/Panasonic-Connect/210029A.User-Manual-1-of-2/User-Guide-1282107-Page-252.png)
![17Settings17-11Engaged Video Call SettingsFrom During a Video Call, NR[Menu] ▶ V. Call settingsSetting/Operation DefaultChange Incoming Image QualityVisual preference Y Quality Prioritizd or Motion Prioritized■>NormalChange BrightnessBrightness Y Select a brightness level■>0Adjust Color Tone to Lighting ConditionsWhite balance Y Select an environment■>AutomaticChange Color ToneColor mode set Y Select a color tone■>NormalEnhance Image Quality in Low Light ConditionsNight mode Y ON■>OFFSet FocusFocus Y Select a focus type■>LandscapeSettings Digital TVFrom Main Menu ▶ TV▶ User SettingsSetting/Operation DefaultHide CaptionCaption Y OFF■>ONChange View when Activating TVFirst View Y Normal Screen■>Wide ScreenEnd Recording when Battery Runs LowRec. When Low Battery Y Stop Recording■>Continue RecordingForbid Enhancing Frame Rate AutomaticallyMobile W-Speed Y ON■>OFFChange Image QualityImage Quality Y Select an item■>DynamicDeactivate Auto VolumeSound Y Sound Effect Y Auto Volume Y OFF■>ONRemaster Sounds from EarphoneSound Y Sound Effect Y Remaster 1 Y ON■>OFFAdd Listening EffectSound Y Sound Effect Y Listening 1 Y Select an item■>OFFChange Quality of Sound from EarphoneSound Y Sound Effect Y Equalizer 1 Y Select an item■>NormalTurn Off Speaker by Closing 842P while Watching TVSound Y TV Sound While Closed Y OFF■>ON842p_E.indb 17-11842p_E.indb 17-11 10.4.21 10:58:34 AM10.4.21 10:58:34 AM](https://usermanual.wiki/Panasonic-Connect/210029A.User-Manual-1-of-2/User-Guide-1282107-Page-253.png)
![17Settings17-12Set Power Saving Mode 2ECO Mode Y YES■>ReleasedSet Back Light Duration while Watching TVDisplay Light Y Lighting Duration Y Enter duration (min.)■>Constant LightHide Images on Data Broadcast SitesData Broadcasting Y Images Y OFF■>ONTurn Off Sounds from Data Broadcast/SitesData Broadcasting Y Sound Effect Y OFF■>ONShow Confirmation on Data BroadcastData Broadcasting Y Reset Settings Y YES■>−Hide Guide in Landscape ViewIcons Y OFF■>ONCheck TV SettingsCheck TV Settings■>−Reset Channel ListReset Channel Setting Y Enter Phone Password Y YES■>−Delete Information in Broadcasting Storage AreaReset Storage Area Y (Highlight an affiliated channel Y) R[Menu] Y Delete this or Delete all (Y For Delete all, enter Phone Password) Y YES■>−Reset TV SettingsReset TV Settings Y Enter Phone Password Y YES■>−1 Remaster/Listening/Equalizer Settings: ZP.5-82 To cancel ECO Mode, perform same operation. When ECO Mode is set, following settings automatically activate and cannot be changed. When canceled, original settings return. Mobile W-Speed: OFF Image Quality: Normal Remaster: OFF Listening: OFF Equalizer: Normal842p_E.indb 17-12842p_E.indb 17-12 10.4.21 10:58:34 AM10.4.21 10:58:34 AM](https://usermanual.wiki/Panasonic-Connect/210029A.User-Manual-1-of-2/User-Guide-1282107-Page-254.png)
![17Settings17-14Settings MessagingUniversal SettingsFrom Main Menu ▶ Messaging ▶ Settings ▶ Universal SettingsSetting/Operation DefaultChange Font Size*Font Size Y Small or Large■>NormalSet Scroll Unit in Text Entry/Preview WindowScroll Unit Y Half Screen or Whole Screen■>Single LineConfirm Message Delivery (Available when messaging to SoftBank handset numbers)Delivery Report Y ON■>OFF (Not confirm)Change Anti-Spam Measures SettingAnti-Spam Measures Y Report Spam Y Edit recipient address Y Q[Finish] Y YES■>stop@meiwaku.softbankmobile.co.jpReset Anti-Spam Measures SettingAnti-Spam Measures Y Report Spam Y R[Menu] Y Reset Address Y Q[Finish] Y YES■>−Set Auto Delete Off (For Drafts or Sent/Unsent)Auto Sent Msg Del Y OFF■>ONSet Auto Delete Off (For Incoming Mail)Auto Received Msg Del Y OFF■>ON* Character size in SMS or S! Mail subject field does not change. Check preview to see actual size.S! Mail SettingsFrom Main Menu ▶ Messaging ▶ Settings ▶ S! Mail Settings ▶ Incoming OptionsSetting/Operation DefaultSet S! Mail Download Condition (within Japan)Home Auto Setting Y Download by Numbers or Manual Retrieval■>Auto Download AllRetrieve S! Mail Manually while AbroadRoaming Auto Setting Y Manual Retrieval■>Auto DownloadPlay Attached Music Files Automatically*Auto Sound Play Y ON■>OFF (Not play back)* When multiple sound files are attached, the first file plays.SMS SettingsFrom Main Menu ▶ Messaging ▶ Settings ▶ SMS SettingsSetting/Operation DefaultChange SMS Center Number*Message Center Y Enter SMS Center number■>−Set Input Character to EnglishSet Input Character Y English (160char.)■>Japanese (70char.)* Changing Message Center number may disable SMS.842p_E.indb 17-14842p_E.indb 17-14 10.4.21 10:58:35 AM10.4.21 10:58:35 AM](https://usermanual.wiki/Panasonic-Connect/210029A.User-Manual-1-of-2/User-Guide-1282107-Page-256.png)
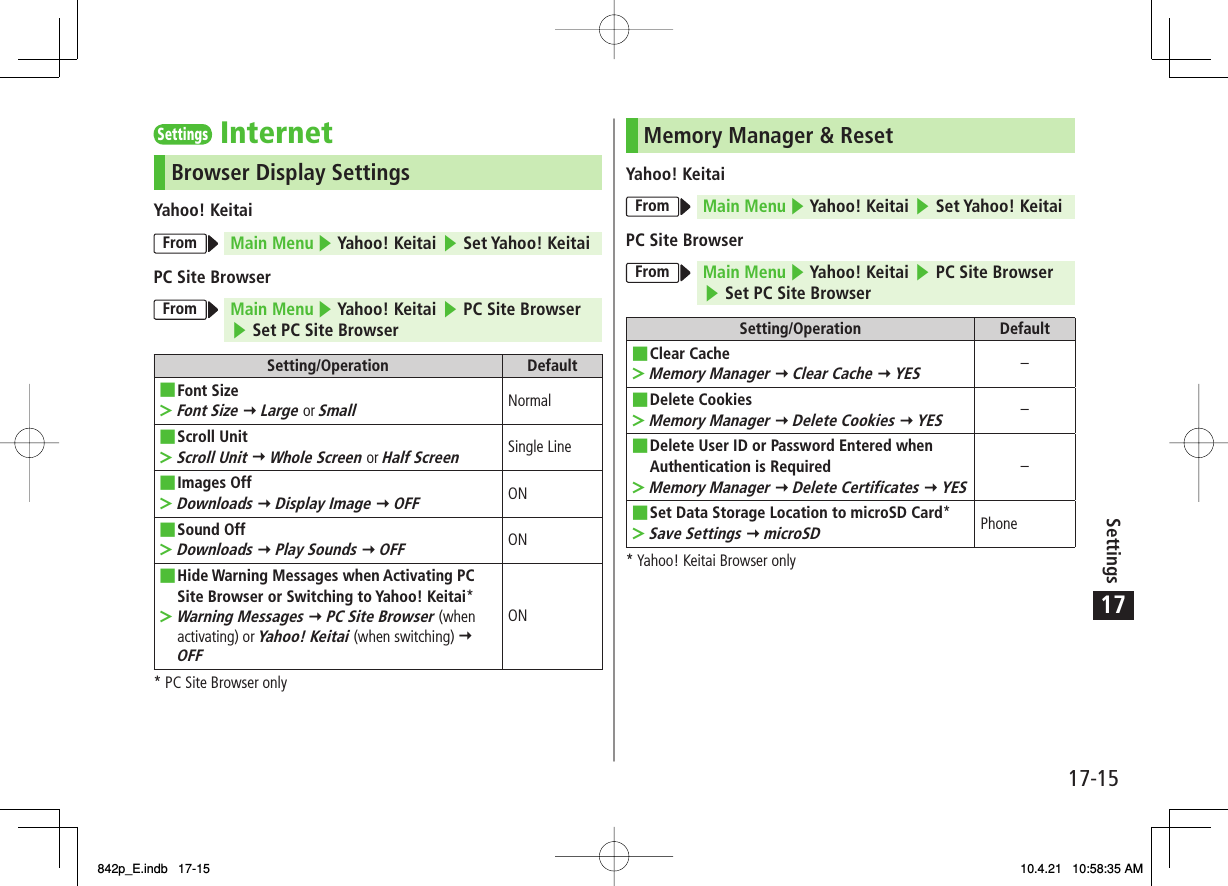

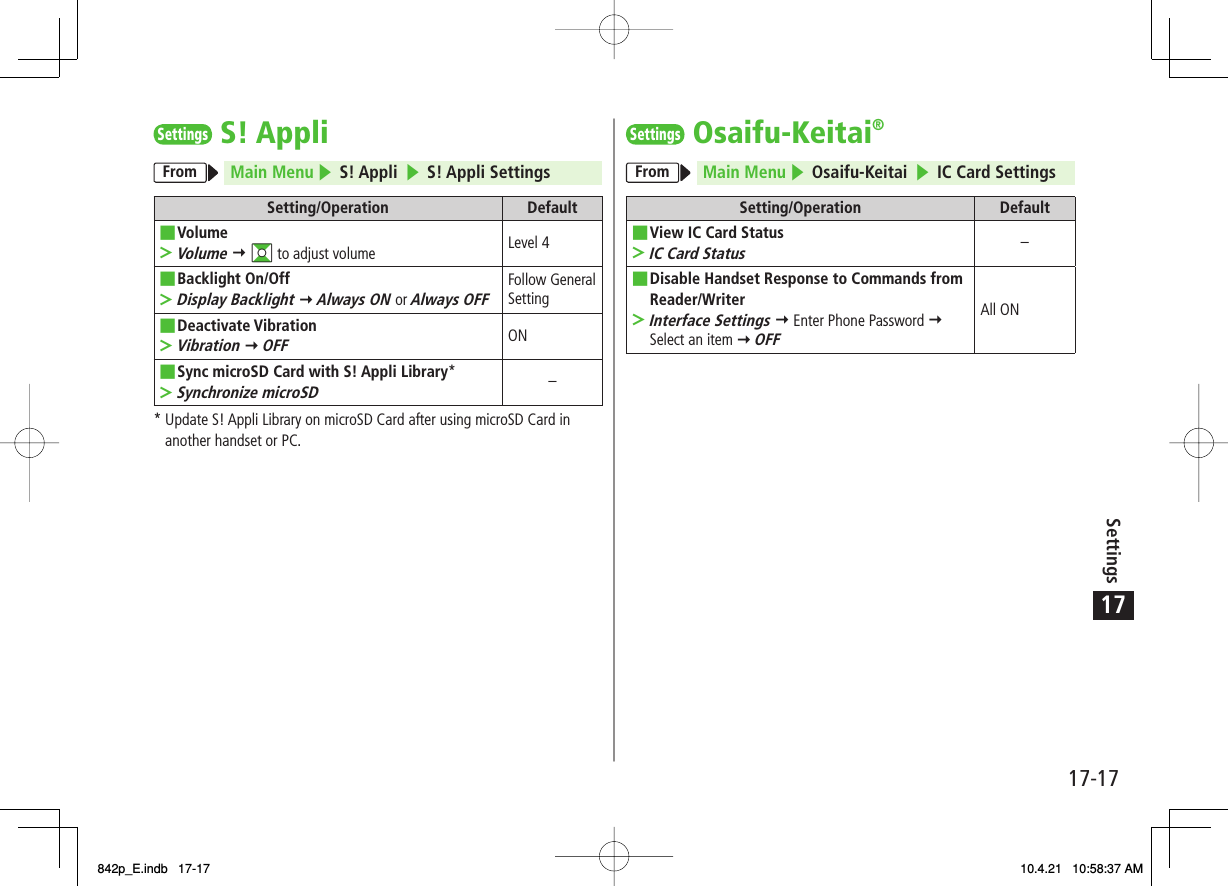


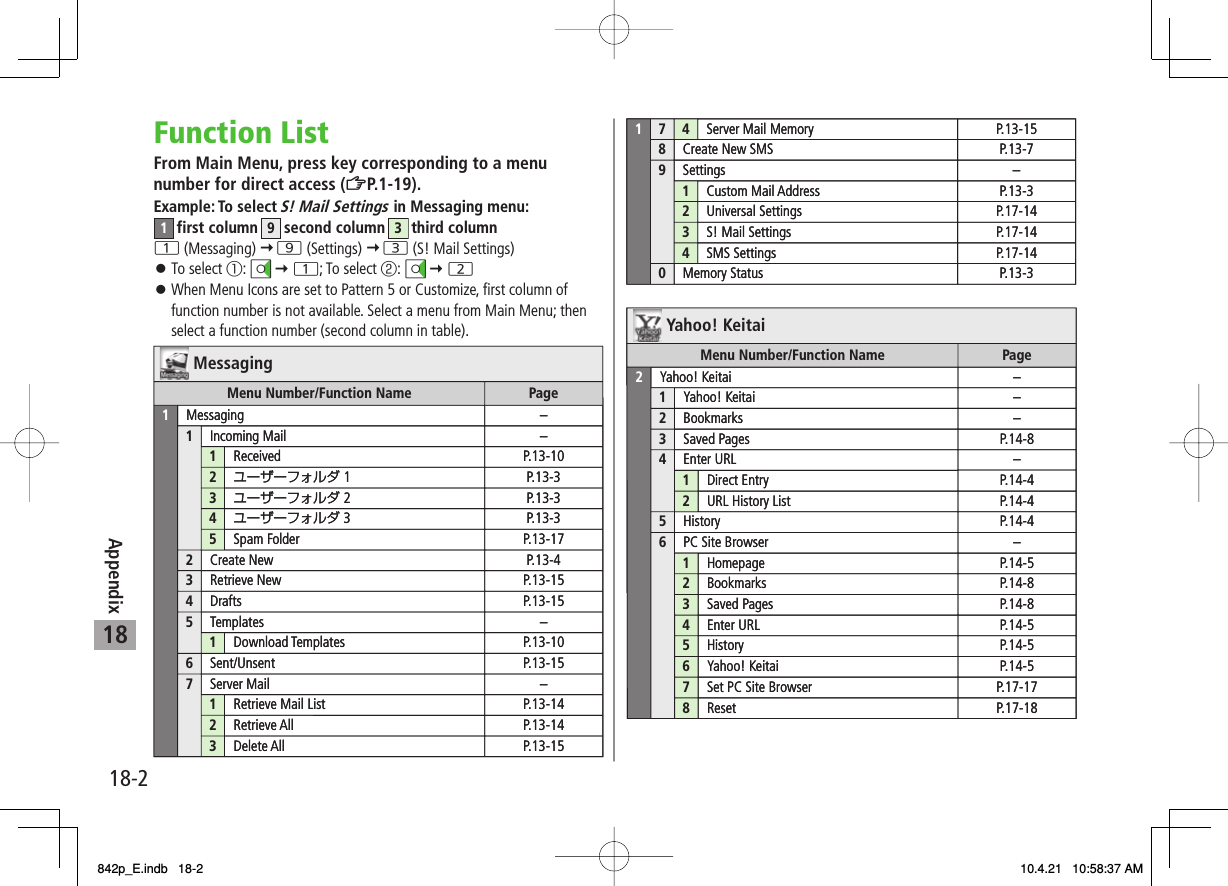
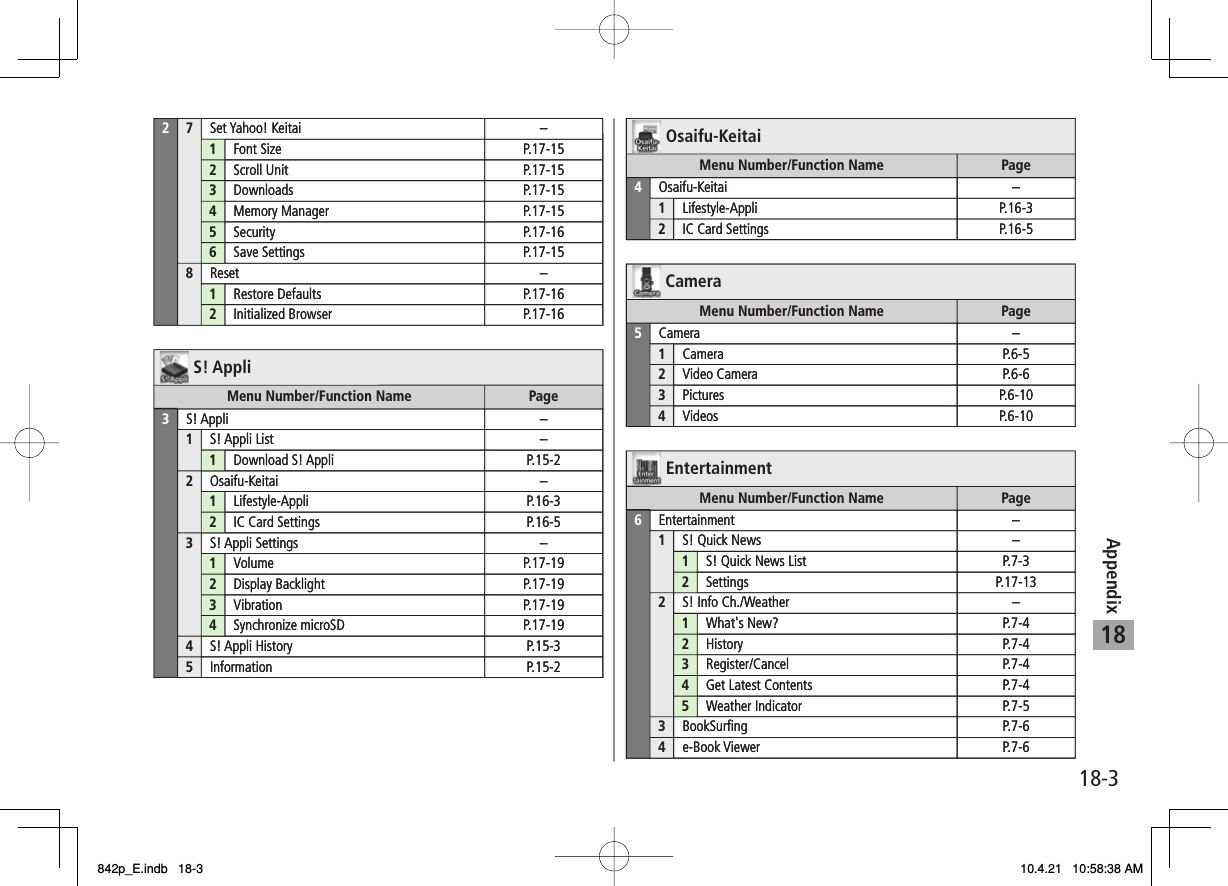
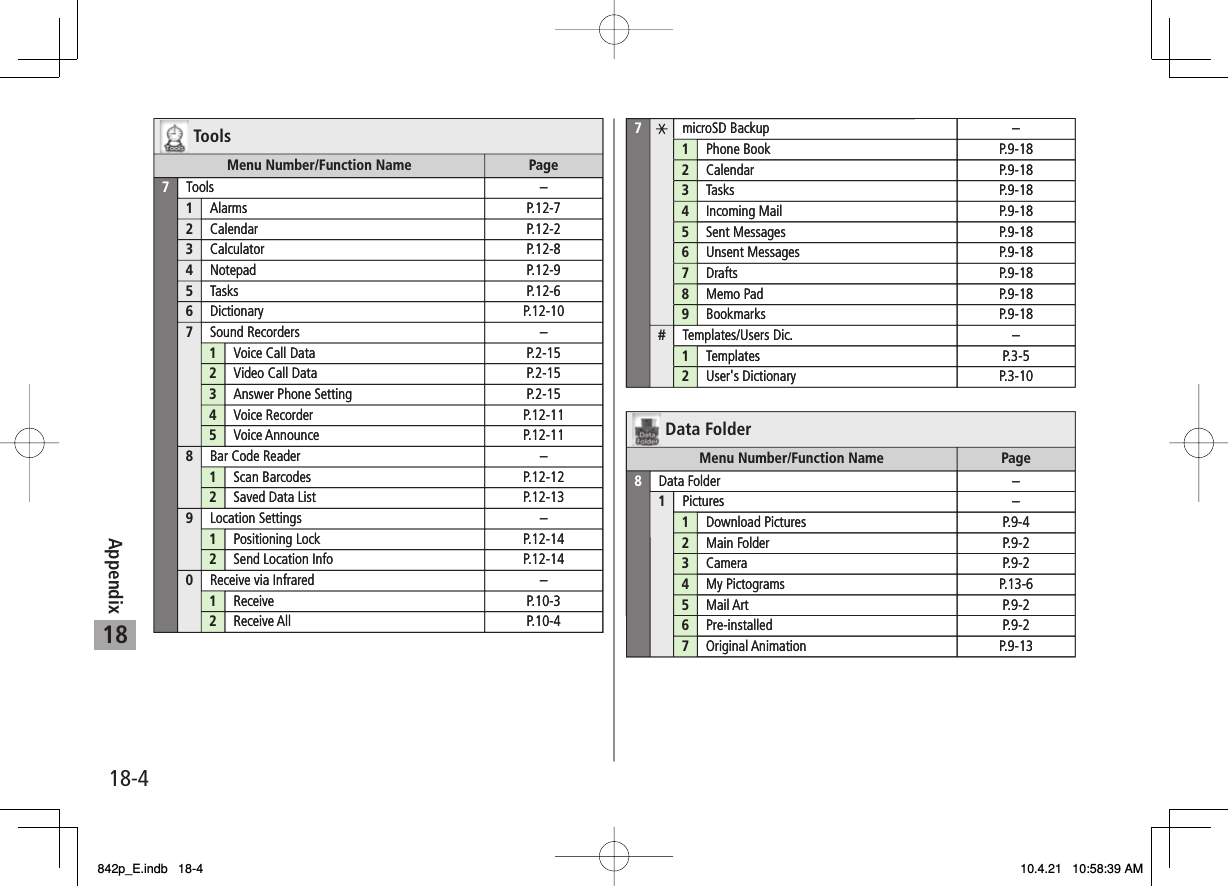
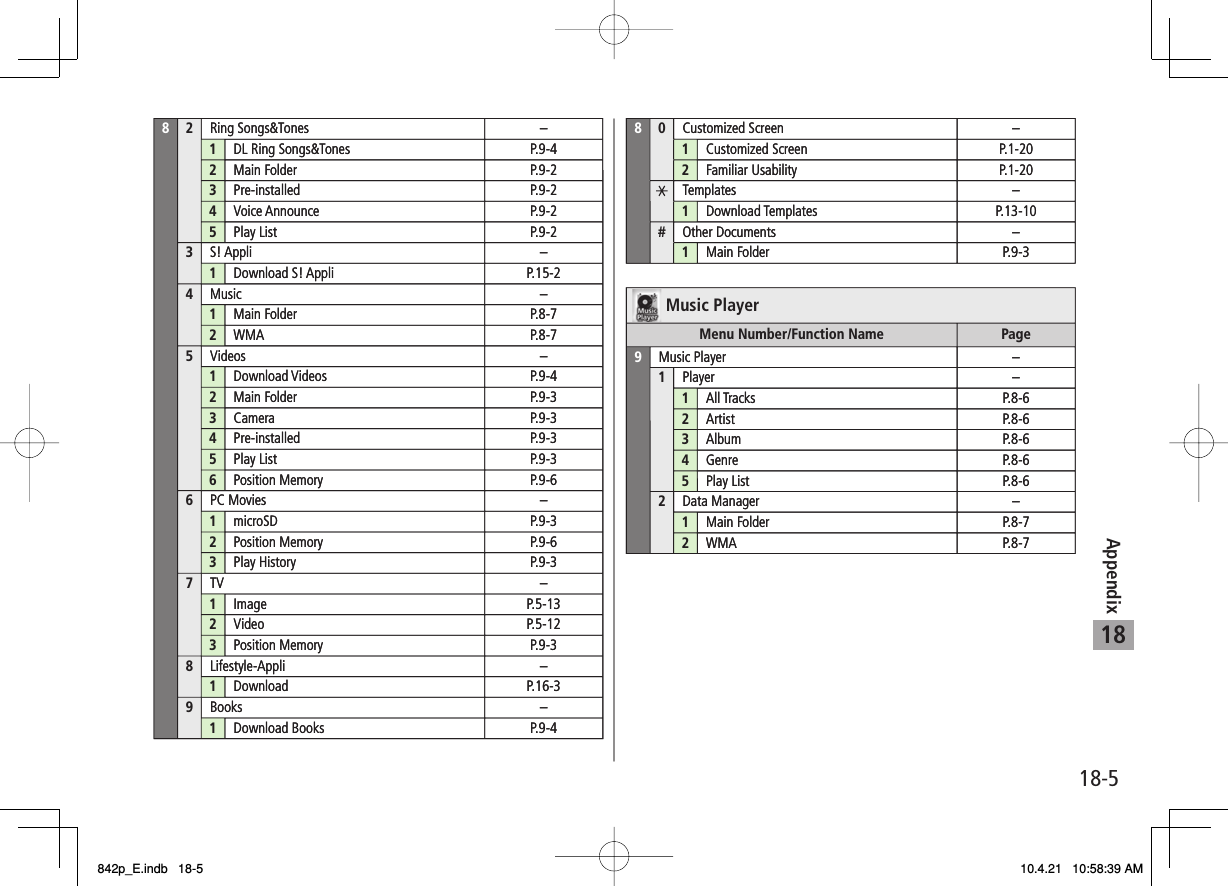
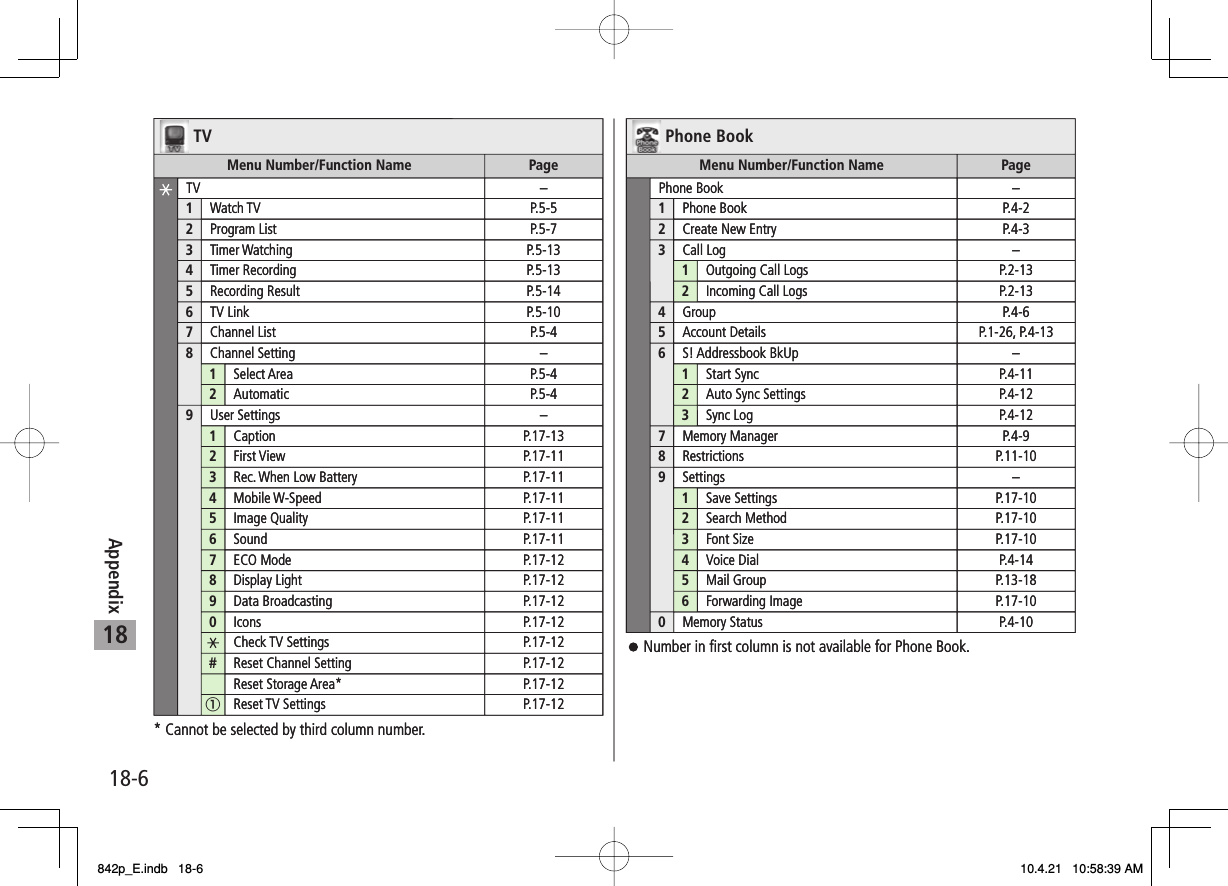
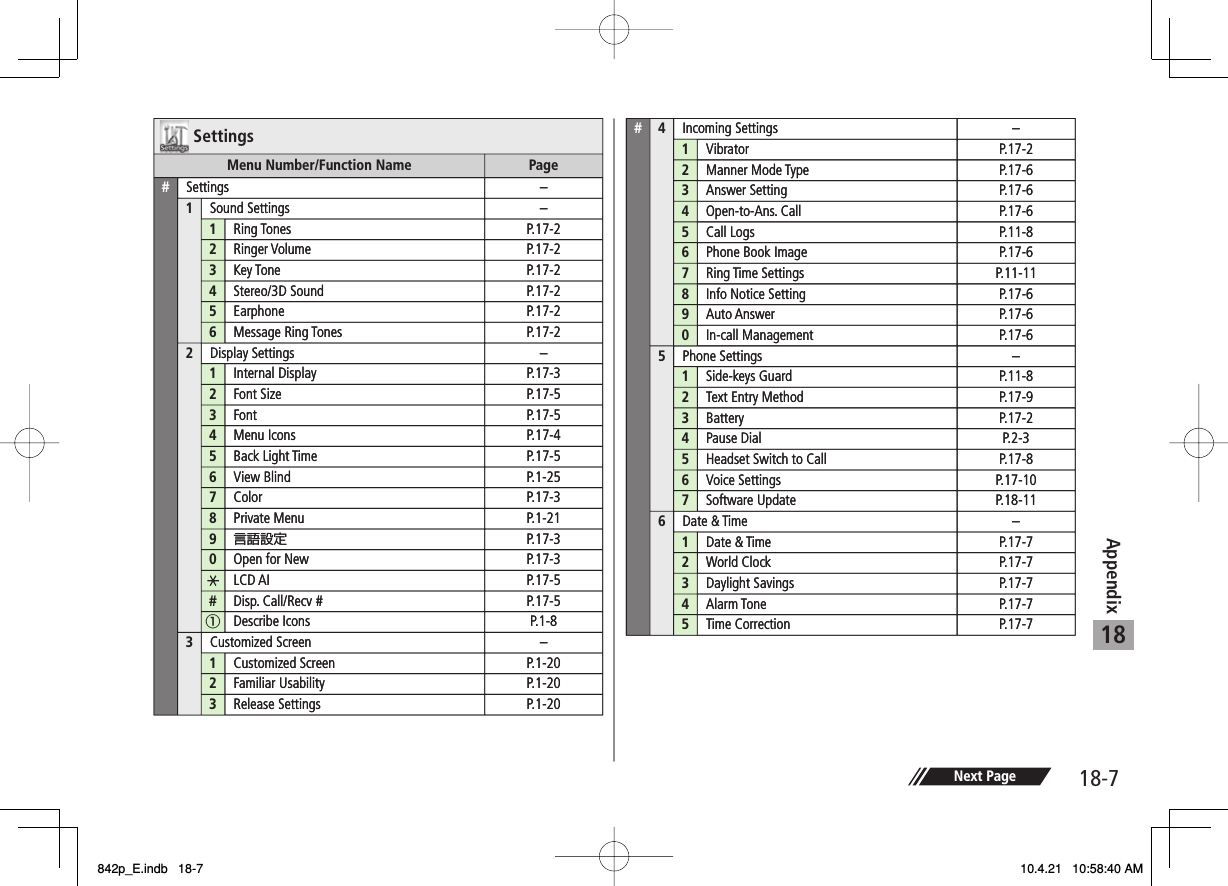
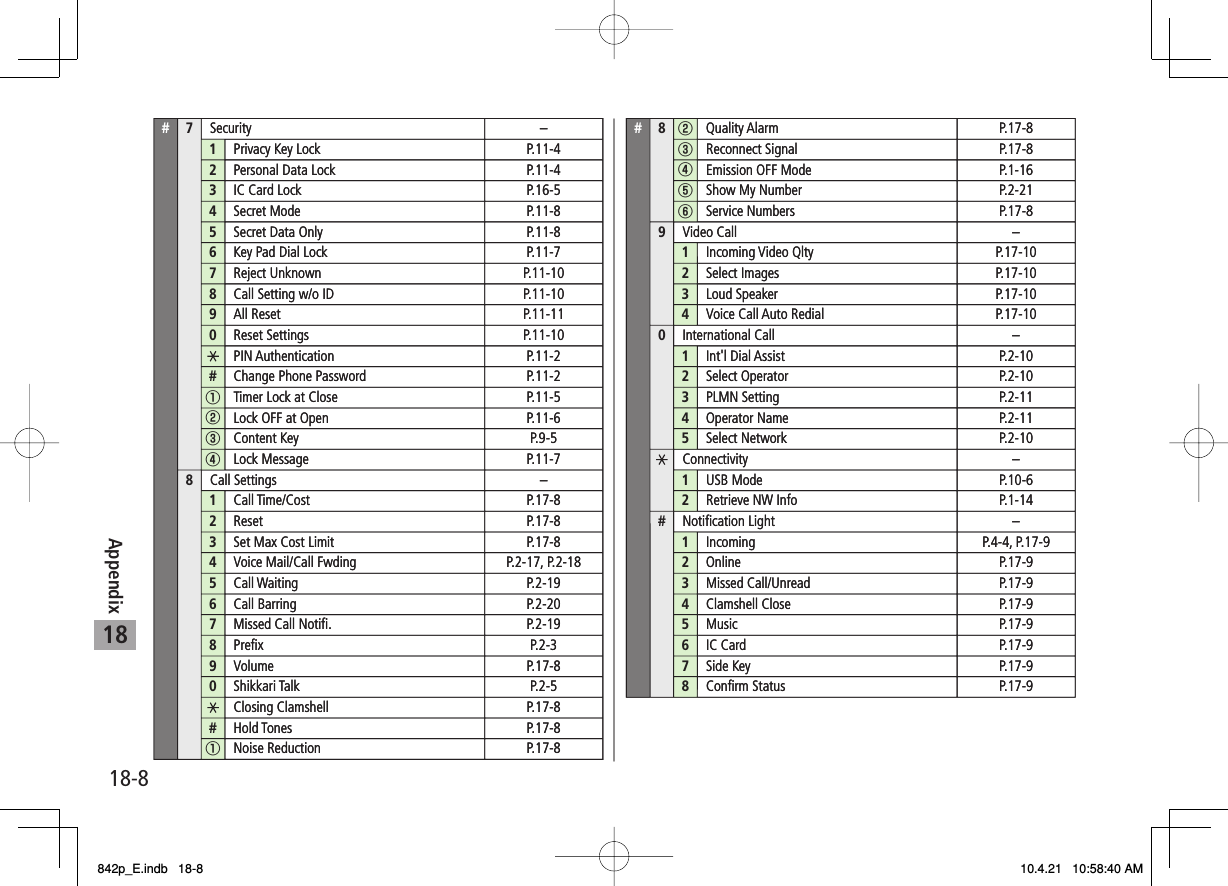

![18-1118AppendixWarning SignsProblem Causes and Remedies appears Handset is out-of-range.Move to a location where signal is strong. appears Side-keys Guard is ON (ZP.11-8).To activate Side Keys while handset is closed, set Side-keys Guard OFF. or appearsKeyguard (ZP.11-3) or Privacy Key Lock (ZP.11-4) is active. Cancel it to use handset.Answer calls even if Keyguard or Privacy Key Lock is active.Low battery message appears and battery alarm tone soundsBattery is low.Charge (ZP.1-13) or replace battery (ZP.1-12).Software UpdateCheck for handset software updates and download as required.Choose to begin update or schedule update.Connection fees do not apply to updates (including checking for updates, downloading and rewriting).Fully charge battery beforehand. Even if appears, low battery message may appear. In this case, charge battery until Charging Indicator goes out.Select a place where signal is strong and stable.Do not remove battery during the update. Update will fail.Other functions are not available during Software Update.The update may take some time.Updating Software ManuallyMain Menu ▶ Settings ▶ Phone Settings ▶ Software Update ▶ Software Update1 Q[YES] Y Follow onscreen instructionsAfter download is complete, handset automatically turns off and restarts before Software Update begins.After Software Update is complete, handset automatically turns off and restarts before information appears for successful update (This process takes approximately 60 seconds.).842p_E.indb 18-11842p_E.indb 18-11 10.4.21 10:58:42 AM10.4.21 10:58:42 AM](https://usermanual.wiki/Panasonic-Connect/210029A.User-Manual-1-of-2/User-Guide-1282107-Page-271.png)
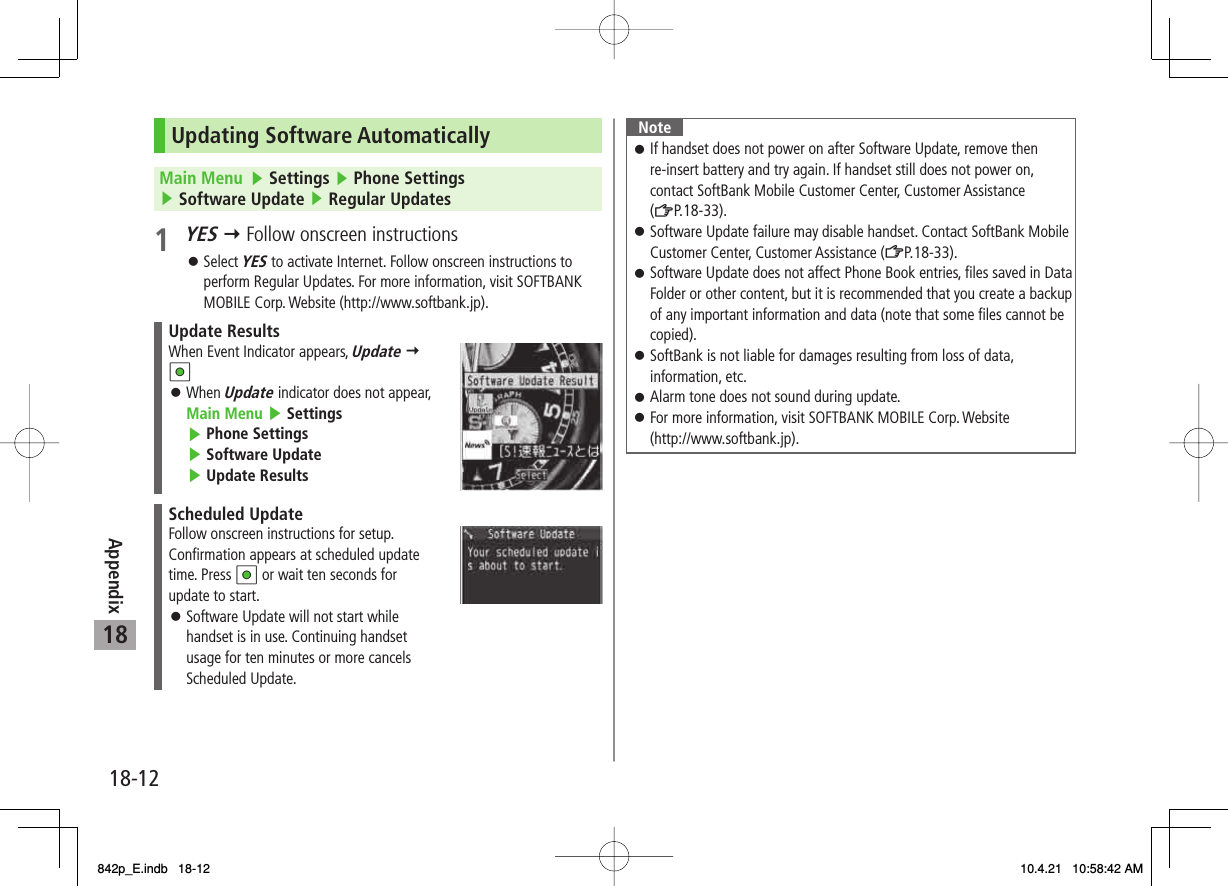
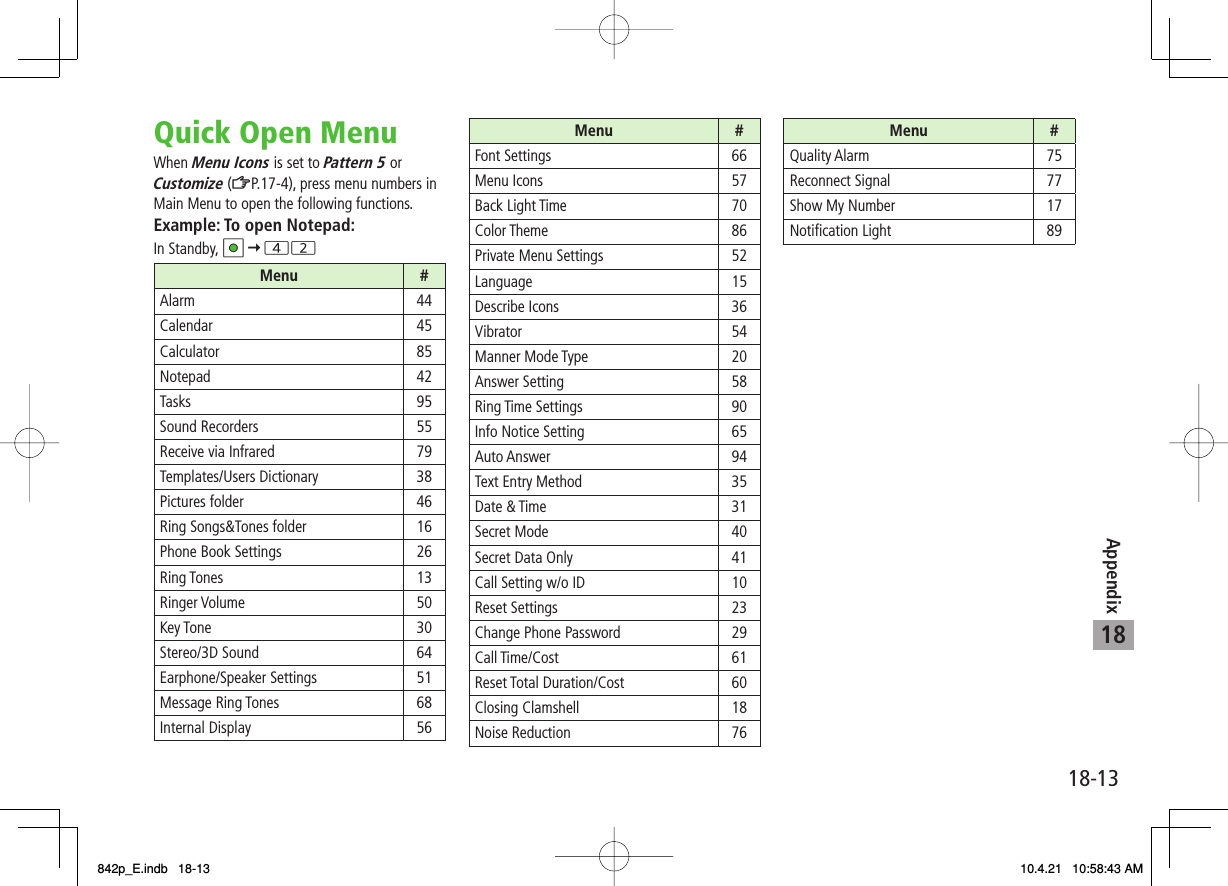
![18Appendix18-14Key Assignments (5-touch Mode)4DisplayKey カナ漢 abc 123あいうえおぁぃぅぇぉ アイウエオァィゥェォ1かきくけこ カキクケコ2さしすせそ サシスセソ3たちつてとっ タチツテトッ4なにぬねの ナニヌネノ5はひふへほ ハヒフヘホ6まみむめも マミムメモ7やゆよゃゅょ ヤユヨャュョ8らりるれろ ラリルレロ9わをんゎー./ @ -: abcABC 2defDEF 3ghiGHI 4jklJKL 5mnoMNO 6pqrsPQRS 7tuvTUV 8wxyzWXYZ 90Pictograms[Press and hold] Templates11234567890*#1∼~ 2_2ー0゛゜3゛゜3、。?!・□(Space)、。?!・□(Space) □(Space)[Press and hold] Symbols 41Appears when entering single-byte character.2Appears when entering double-byte character.3Added to highlighted character. Press to display pictographs after determining character.4In number mode, symbol list may not be displayed.While entering character, press to toggle characters at cursor in reverse order.After entering hiragana, katakana or alphanumerics, press to toggle upper/lower case.In number mode, press and hold to enter "+" (not available in S! Mail text field).In alphanumerics mode, characters entered after an upper-case character appear in order of: upper case lower case.ワヲンヮ4DisplayKey カナ漢 abc 123あいうえおぁぃぅぇぉ アイウエオァィゥェォ1かきくけこ カキクケコ2さしすせそ サシスセソ3たちつてとっ タチツテトッ4なにぬねの ナニヌネノ5はひふへほ ハヒフヘホ6まみむめも マミムメモ7やゆよゃゅょ ヤユヨャュョ8らりるれろ ラリルレロ9わをんゎー./ @ -: abcABC 2defDEF 3ghiGHI 4jklJKL 5mnoMNO 6pqrsPQRS 7tuvTUV 8wxyzWXYZ 90Pictograms[Press and hold] Templates11234567890*#1∼~ 2_2ー0゛゜3゛゜3、。?!・□(Space)、。?!・□(Space) □(Space)[Press and hold] Symbols 41Appears when entering single-byte character.2Appears when entering double-byte character.3Added to highlighted character. Press to display pictographs after determining character.4In number mode, symbol list may not be displayed.While entering character, press to toggle characters at cursor in reverse order.After entering hiragana, katakana or alphanumerics, press to toggle upper/lower case.In number mode, press and hold to enter "+" (not available in S! Mail text field).In alphanumerics mode, characters entered after an upper-case character appear in order of: upper case lower case.ワヲンヮ842p_E.indb 18-14842p_E.indb 18-14 10.4.21 10:58:43 AM10.4.21 10:58:43 AM](https://usermanual.wiki/Panasonic-Connect/210029A.User-Manual-1-of-2/User-Guide-1282107-Page-274.png)
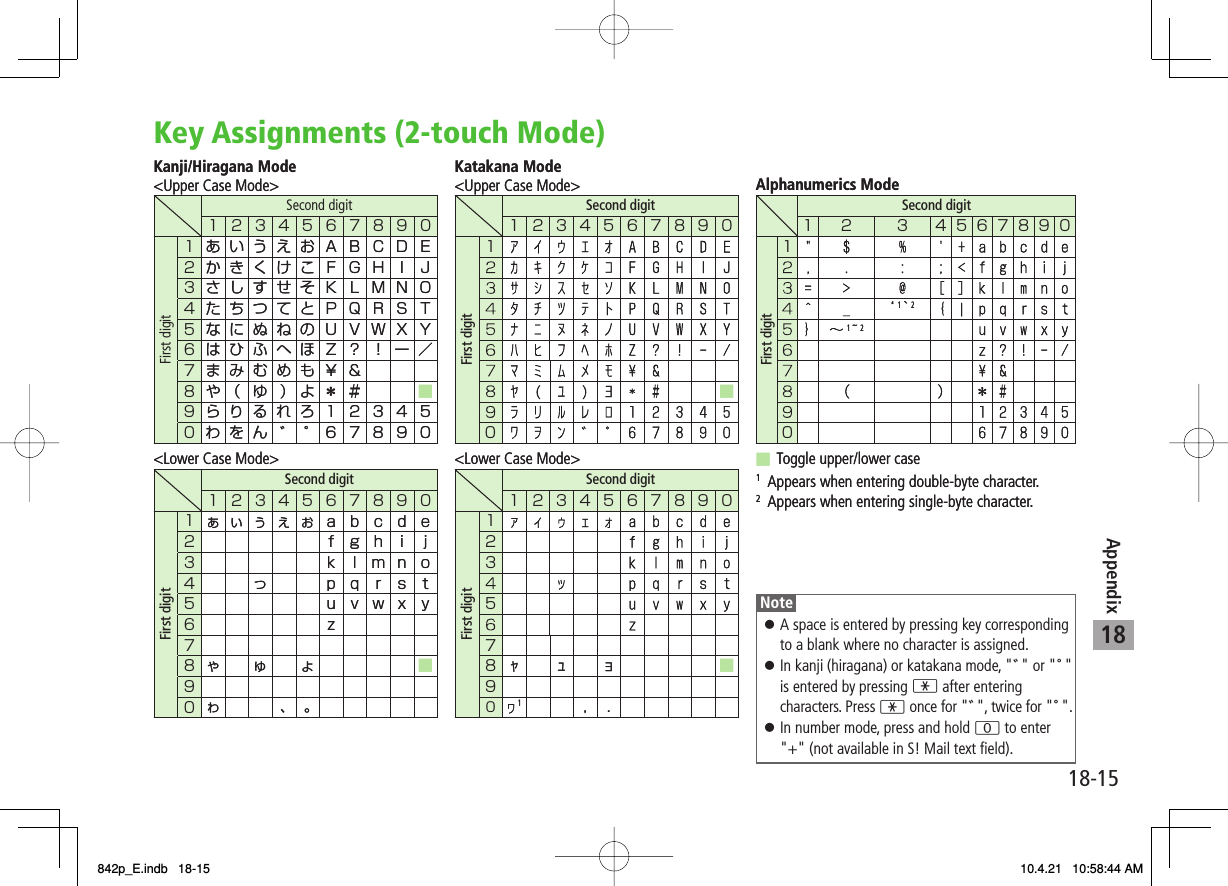
![18Appendix18-16Key Assignments (NIKO-touch Mode)Kanji/Hiragana Mode<Upper Case>Second digit1234567890First digit1あいうえお .−@_12 かきくけこ abc 23 さしすせそ def 34 たちつてとっghi 45 なにぬねの jkl 56 はひふへほ mno 67 まみむめもpqrs 78 やゆよゃゅょtuv 89 らりるれろwxyz 90わをん 、。ー・!?0Second digit1234567890First digit10Katakana Mode<Upper Case>Kanji/Hiragana Mode<Upper Case>Second digit1234567890First digit1あいうえお .−@_12 かきくけこ abc 23 さしすせそ def 34 たちつてとっghi 45 なにぬねの jkl 56 はひふへほ mno 67 まみむめもpqrs 78 やゆよゃゅょtuv 89 らりるれろwxyz 90わをん 、。ー・!?0Second digit1234567890First digit10Katakana Mode<Upper Case> NotePress Q[Mode] to toggle kanji (hiragana) and single-byte number modes.To switch to katakana mode: In kanji (hiragana) mode, R[Menu] Y 1 byte characterTo switch to lower case: Enter a character Y JA space is entered by pressing key corresponding to a blank where no character is assigned.Press * once for "゛", twice for "゜". In kanji (hiragana) mode, enter characters before pressing *.In number mode, press and hold 0 to enter "+" (not available in S! Mail text field).842p_E.indb 18-16842p_E.indb 18-16 10.4.21 10:58:44 AM10.4.21 10:58:44 AM](https://usermanual.wiki/Panasonic-Connect/210029A.User-Manual-1-of-2/User-Guide-1282107-Page-276.png)