Panasonic Healthcare 9TB081CRB DVD-ROM Drive User Manual 8586BC Text Eng
Panasonic Healthcare Co., Ltd. DVD-ROM Drive 8586BC Text Eng
Exhibit E Users Manual
DVD-ROM DRIVE UNIT
SR-8586-B / SR-8586-C
INSTRUCTION MANUAL
Please read through these instructions before operating this unit.
Interface : ATAPI
iii
ENGLISH
DVD-ROM DRIVE UNIT
SR-8586-B / SR-8586-C
INSTRUCTION MANUAL
Please read through these instructions before operating this unit.
Interface : ATAPI
TABLE OF CONTENTS
IMPORTANT SAFETY NOTICE ................................................................................ iv
LASER SAFETY INFORMATION ............................................................................. A-1
INTRODUCTION........................................................................................................ A-4
1. PRECAUTIONS WHEN OPERATING................................................................... A-5
1.1 PRECAUTIONS WHEN TRANSPORTING...................................................... A-5
1.2 INSTALLATION LOCATION ............................................................................ A-5
1.3 PRECAUTIONS FOR USE .............................................................................. A-5
1.4 PRECAUTIONS FOR OPERATION ................................................................ A-5
1.5 PRECAUTIONS WHEN HANDLING DISCS.................................................... A-5
2. PARTS AND FUNCTIONS .................................................................................... A-7
2.1 FRONT VIEW................................................................................................... A-7
2.2 REAR VIEW ..................................................................................................... A-7
3. CONNECTIONS..................................................................................................... A-8
3.1 CONNECTING VIEW ....................................................................................... A-8
4. GUIDE TO OPERATION ....................................................................................... A-8
4.1 INSTALLATIONS ............................................................................................. A-8
5. GENERAL DESCRIPTION .................................................................................... A-9
5.1 FEATURE SUMMARY ..................................................................................... A-9
5.2 SYSTEM SET UP ............................................................................................ A-9
5.3 POWER SAVING ............................................................................................. A-9
6. SPECIFICATION SUMMARY ................................................................................ A-9
6.1 PERFORMANCE ............................................................................................. A-9
6.2 ERROR RATES ............................................................................................... A-10
6.3 AUDIO PERFORMANCE .................................................................................A-10
6.4 GENERAL PERFORMANCE ........................................................................... A-11
6.5 ENVIRONMENTAL CONDITIONS ...................................................................A-11
6.6 PICK UP LASER ..............................................................................................A-11
7. BEFORE REQUESTING SERVICE....................................................................... A-11
7.1 TROUBLESHOOTING .....................................................................................A-11

iv
IMPORTANT SAFETY NOTICE
NOTICE
(1) You may not reproduce or transcribe any part of this publication without permission.
(2) We reserve the right to revise this document at any time without notice.
(3) If you have any questions about this document, contact your sales representative.
SAFETY NOTICE
(1) To prevent fire or electric shock, do not expose this appliance to rain or moisture.
(2) To avoid electric shock or damage to the eyes due to laser beam, do not attempt to
disassemble the cabinet.
FEDERAL COMMUNICATIONS COMMISSION (FCC) RADIO
FREQUENCY INTERFERENCE STATEMENT
Class B Computing Device
NOTE : This equipment has been tested and found to comply with the limits for a Class B
digital device, pursuant to part 15 of the FCC Rules. These limits are designed to provide
reasonable protection against harmful interference in a residential installation. This
equipment generates, uses and can radiate radio frequency energy and , if not installed
and used in accordance with the instructions, may cause harmful interference to radio
communications. However, there is no guarantee that interference will not occur in a
particular installation. If this equipment does cause harmful interference to radio or
television reception, which can be determined by turning the equipment off and on, the
user is encouraged to try to correct the interference by one or more of the following
measures :
- - Reorient or relocate the receiving antenna.
- - Increase the separation between the equipment and receiver.
- - Connect the equipment into an outlet on a circuit different from that to which the
receiver is connected.
- - Consult the dealer or an experienced radio/TV technician for help.
FCC WARNING : Changes or modifications not expressly approved by the party
responsible for compliance could void the user's authority to operate the equipment.
For USA (Model SR-8586-B only)
A-1
ENGLISH
LASER SAFETY INFORMATION
Class 1 LASER Product
This equipment is certified to comply with DHHS Rule 21 CFR Chapter 1, Subchapter J in
effect as of date of manufacture.
Elsewhere, the drive is certified to conform to the requirements of the International
Electrotechnical Commission (IEC) 825 and CENELEC EN60825 for Class 1 laser
products.
Class 1 laser products are not considered to be hazardous. To ensure continued product
safety, the following precautions should be heeded. This equipment has the Optical Pickup
which has the Dual Lasers (DVD & CD).
Caution :
(1) The use of controls or adjustments or performance of procedures other than those
specified herein may result in hazardous radiation exposure.
(2) The drive is designed to be incorporated into a computer-based system or unit which
has an enclosing cover. The drive may not be used as a stand-alone unit.
(3) Do not open the drive unit; no user adjustments or serviceable parts are inside.
• This label is attached to the upper shield at the top of the drive unit.
• Märkningen återfinns på den översta kåpan överst på drivenheten. (For Swedish)
• Denne merkelappen er festet til det øverste dekselet på toppen av spilleren. (For Norwegian)
• Denne etiket er sat fast på den øverste skærm på drev-enhedens top. (For Danish)
• Tämä etiketti on liimattu voimayksikön yläosan suojalevyyn. (For Finnish)
CAUTION–
Laser radiation when open.
DO NOT STARE INTO BEAM.
• This label is attached to the inner side of the rear wall on the Mechanism chassis in the drive
unit.
CLASS 1 LASER PRODUCT
LASER KLASSE 1
LUOKAN 1 LASERLAITE
KLASS 1 LASER APPARAT
APPAREIL A LASER DE CLASSE 1
EN60825
A-2
VAROITUS! Laitteen käyttäminen muulla kuin tässä käyttöohjeessa mainitulla tavalla
saattaa altistaa käyttäjän turvallisuusluokan 1 ylittävälle näkymättömälle
lasersäteilylle.
VARNING! Om apparaten används på annat sätt än i denna bruksanvisning
specificerats, kan användaren utsättas för osynlig laserstrålning, som
överskrider gränsen för laserklass 1.
For Finnish
For Swedish
• This label is attached to the bottom of the drive unit.
• Märkningen återfinns på drivenhetens undersida. (For Swedish)
• Denne merkelappen er festet til undersiden av spilleren. (For Norwegian)
• Denne etiket er sat fast i bunden af drev-enheden. (For Danish)
• Tämä etiketti on liimattu laitteen pohjaan. (For Finnish)
CAUTION – INVISIBLE
LASER RADIATION WHEN OPEN
DO NOT STARE INTO BEAM OR VIEW
DIRECTLY WITH OPTICAL INSTRUMENTS
VORSICHT– UNSICHTBARE
LASERSTRAHLUNG, WENN ABDECKUNG
GEOFFNET NICHT IN DEN STRAHL BLICKEN
AUCH NICHT MIT OPTISCHEN INSTRUMENTEN
ADVARSEL– USYNLIG
LASERSTRALING VED ABNING.
SE IKKE IND I STRALEN – HELLER
IKKE MED OPTISKE INSTRUMENTER.
ADVARSEL – USYNLIG
LASERSTRALING NAR DEKSEL APNES.
STIRR IKKE INN I STRALEN ELLER SE
DIREKTE MED OPTISKE INSTRUMENTER.
VARNING – OSYNLIG LASERSTRALNING
NAR DENNA DEL AR OPPNAD.
STIRRA EJ IN I STRALEN OCH BETRAKTA
EJ STRALEN MED OPTISKA INSTRUMENT.
VARO ! NAKYMATONTA AVATTAESSA
OLET ALTTIINA LASERSATEILYLLE.
ALA TUIJOTA SATEESEEN ALAKA
KATSO SITA OPTISEN LAITTEEN L API.
CAUTION–
LASER RADIATION WHEN OPEN
DO NOT STARE INTO BEAM
VORSICHT– LASERSTRAHLUNG,
WENN ABDECKUNG GEOFFNET
NICHT IN DEN STRAHL BLICKEN
ADVARSEL–
LASERSTRALING VED ABNING
SE IKKE IND I STRALEN
ADVARSEL – LASERSTRALING
NAR DEKSEL APNES
STIRR IKKE INN I STRALEN
VARNING – LASERSTRALNING
NAR DENNA DEL AR OPPNAD
STIRRA EJ IN I STRALEN
VARO ! AVATTAESSA OLET
ALTTIINA LASERSATEILYLLE
ALA TUIJOTA SATEESEEN
..
..
..
.. ..
.. .. ..
º
ºº
º
º
º
ºº
º
..
.. .. .. ..
..
.. .. .. .. .. ..
....
.. .. ..
ººº
º
º
º
º
ºº
º

A-3
ENGLISH
for DVD
LASER Specification
Type: Semiconductor laser InGaAlP or InGaAlP / GaAs
Wave Length: 650 ± 15 nm
Divergence:
θ
= 20 ° ~ 35 ° (Typical 27 °)
Output Power: 0.33 mW
Laser-Daten: (For German)
Typ: InGaAlP oder InGaAlP / GaAs-Halbleiter-Laser
Wellenlänge: 650 ± 15 nm
Divergenz:
θ
= 20 ° ~ 35 ° (Typical 27 °)
Ausgangsleistung: 0,33 mW
LASER: (For French)
Type:Laser semi-conducteur InGaAlP ou InGaAlP/ GaAs
Longueur d’ondes: 650 ± 15 nm
Divergence:
θ
= 20 ° ~ 35 ° (Typical 27 °)
Puissance de sortie: 0,33 mW
Laser- specifikationer: (For Swedish)
Typ: Laserhalvedare InGaAlP eller InGaAlP / GaAs
Våglängd: 650 ± 15 nm
Divergens:
θ
= 20 ° ~ 35 ° (Typical 27 °)
Uteffekt: 0,33 mW
LASER Spesifikasjon: (For Norwegian)
Type: Halvleder laser InGaAlP eller InGaAlP / GaAs
Bølgelengde: 650 ± 15 nm
Divergens:
θ
= 20 ° ~ 35 ° (Typical 27 °)
Utgangseffekt: 0,33 mW
Laser Specifikationer: (For Danish)
Type: Semiconductor InGaAlP eller InGaAlP / GaAs
Bølge-længde: 650 ± 15 nm
Divergens:
θ
= 20 ° ~ 35 ° (Typical 27 °)
Udgang-effekt: 0,33 mW
LASERin tekniset tiedot: (For Finnish)
Tyyppi: Laserpuolijohdin InGaAlP eli InGaAlP / GaAs
Aallon pituus: 650 ± 15 nm
Hajaantuminen:
θ
= 20 ° ~ 35 °
(Tyypillinen 27 °)
Teho: 0,33 mW
for CD
LASER Specification
Type: Semiconductor laser GaAs
Wave Length: 790 ± 20 nm
Divergence:
θ
= 20 ° ~ 45 ° (Typical 39 °)
Output Power: 0.33 mW
Laser-Daten: (For German)
Typ: GaAs-Halbleiter-Laser
Wellenlänge: 790 ± 20 nm
Divergenz:
θ
= 20 ° ~ 45 ° (Typisch 39 °)
Ausgangsleistung: 0,33 mW
LASER: (For French)
Type: Laser semi-conducteur GaAs
Longueur d’ondes: 790 ± 20 nm
Divergence:
θ
= 20 ° ~ 45 ° (Environ 39 °)
Puissance de sortie: 0,33 mW
Laser- specifikationer: (For Swedish)
Typ: Laserhalvedare GaAs
Våglängd: 790 ± 20 nm
Divergens:
θ
= 20 ° ~ 45 ° (Typiskt 39 °)
Uteffekt: 0,33 mW
LASER Spesifikasjon: (For Norwegian)
Type: Halvleder laser GaAs
Bølgelengde: 790 ± 20 nm
Divergens:
θ
= 20 ° ~ 45 ° (Typisk 39 °)
Utgangseffekt: 0,33 mW
Laser Specifikationer: (For Danish)
Type: Semiconductor GaAs
Bølge-længde: 790 ± 20 nm
Divergens:
θ
= 20 ° ~ 45 ° (Typisk 39 °)
Udgang-effekt: 0,33 mW
LASERin tekniset tiedot: (For Finnish)
Tyyppi: Laserpuolijohdin GaAs
Aallon pituus: 790 ± 20 nm
Hajaantuminen:
θ
= 20 ° ~ 45 °
(Tyypillinen 39 °)
Teho: 0,33 mW
A-4
INTRODUCTION
DVD-ROM is read-only memory using a CD-ROM disc system and an audio compact
disc system as a media package which handles digital data. To enjoy audio CD, please
insert the Headphone plug into the Headphone jack.(Model SR-8586-B only)
This drive unit uses DVD-ROM discs which bear the following mark.
This drive unit uses CD-ROM discs which bear the following mark.
This drive unit uses CD-R discs which bear the following mark (read only).
This drive unit uses audio compact discs which bear the following mark.
TM
COMPACT
COMPACT
Recordable
COMPACT
DIGITAL AUDIO
or
A-5
ENGLISH
CHAPTER 1 PRECAUTIONS WHEN OPERATING
1.1 PRECAUTIONS WHEN TRANSPORTING
To avoid damage
* Keep the original packing materials for the drive unit.
* Before you transport the drive unit, remove the disc from the drive unit and repack
the drive unit in its original packing.
1.2 INSTALLATION LOCATION
Do not place unit in the following environments.
* High-temperature, high-humidity, extreme temperature changes.
* Dusty
* Excessive vibration/ sudden shock.
* Inclined place.
* Direct sunlight.
1.3 PRECAUTIONS FOR USE
* Never push objects of any kind through the Cabinet slots, never spill liquid of any
kind on the unit.
* Do not place objects on the product.
* Do not attempt to service this product yourself.
* Do not open or remove covers.
* Do not place foreign objects in the disc insertion slot and attempt to operate.
* Do not use DVD-ROM drive when vertically installed. (Horizontal installation type only)
1.4 PRECAUTIONS FOR OPERATION
To avoid error
* Do not move the drive unit during operation.
* Do not operate the unit directly after a sudden increase in temperature.
NOTE :
A great proportion of problems are usually caused by the following.
➀ Dust or Finger-prints on the surface of the disc.
➁ Random Electrical Noise.
➂ Scratches and Defects on the surface of the disc.
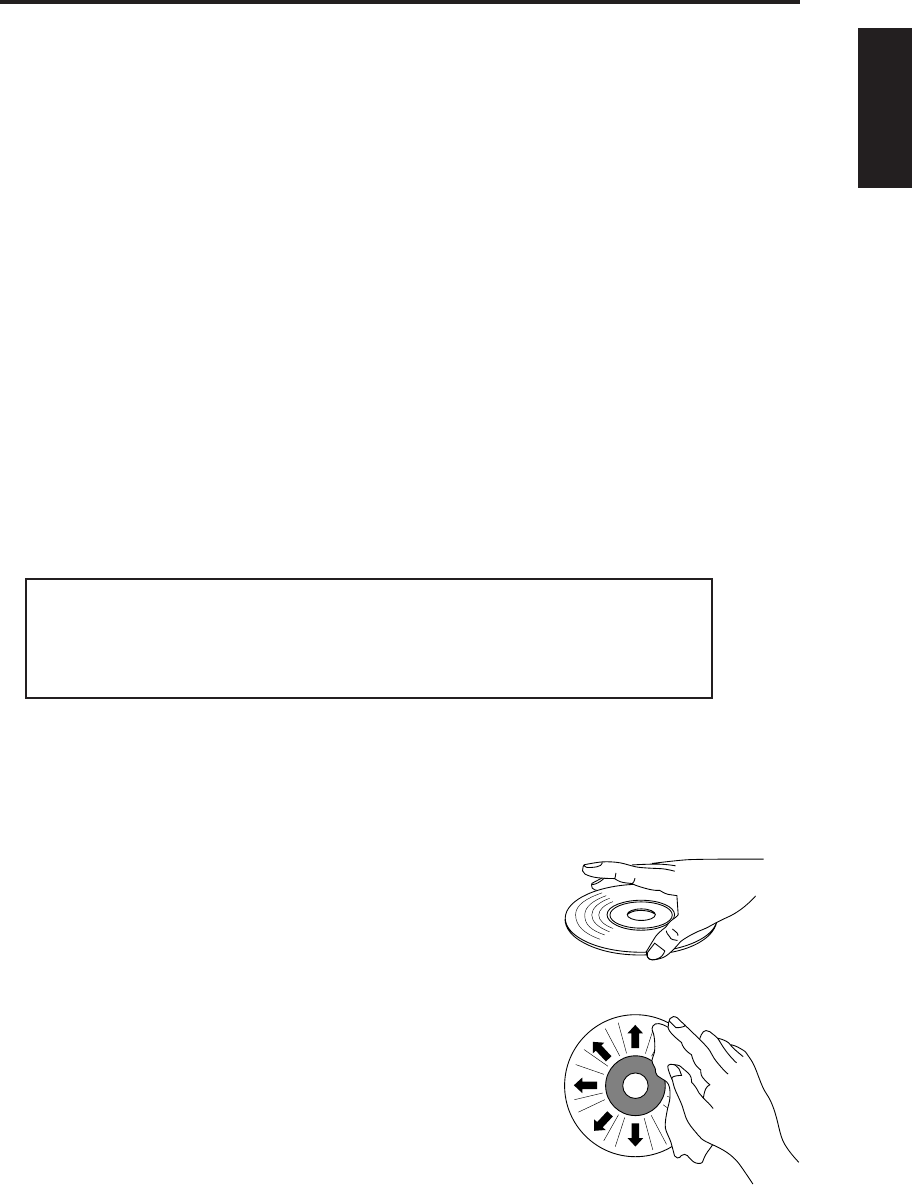
1.5 PRECAUTIONS WHEN HANDLING DISCS
➀Hold the disc by the edges, do not touch
the surface of the disc.
➁To remove dust or fingerprint, use a clean,
soft, dry cloth.
A-6
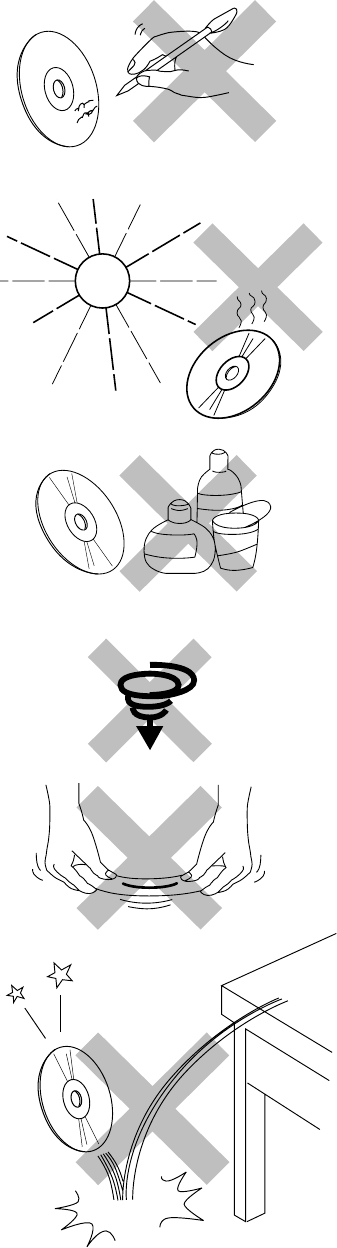
➂Do not write on, or paste paper
to the surface of the disc.
Should not paste a large or thick
label to the outer back surface
(the label side) of the disc, or it
generates drive vibration due to
imbalance of the disc.
➃Do not store the disc in a place where
the temperature is high.
➄Do not use benzine, thinners and
cleaners, etc.
➅Do not make the center hole larger.
➆Do not bend the disc.
➇Do not drop the disc, or subject it to
shock.
T
h
i
n
n
e
r
s
C
l
e
a
n
e
r
s
B
e
n
z
i
n
e
A-7
ENGLISH
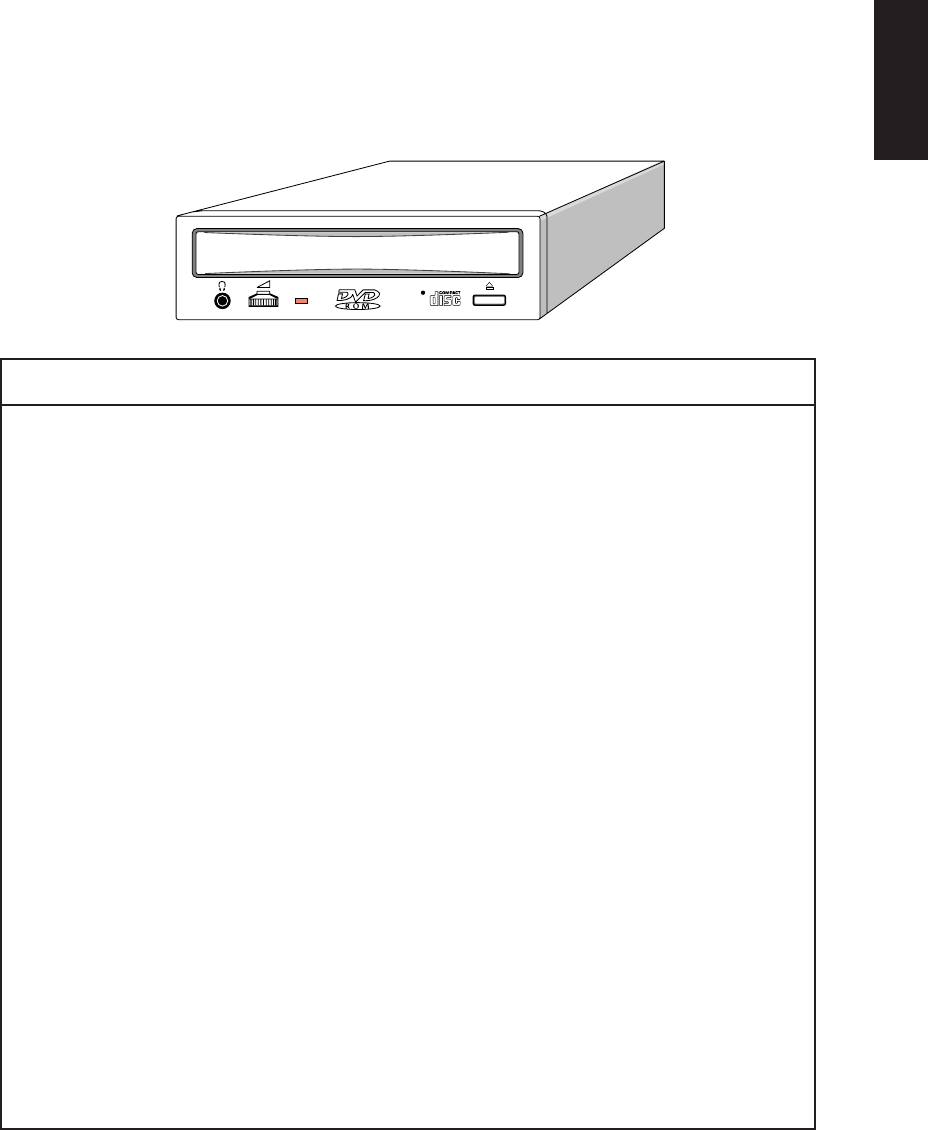
CHAPTER 2 PARTS AND FUNCTIONS
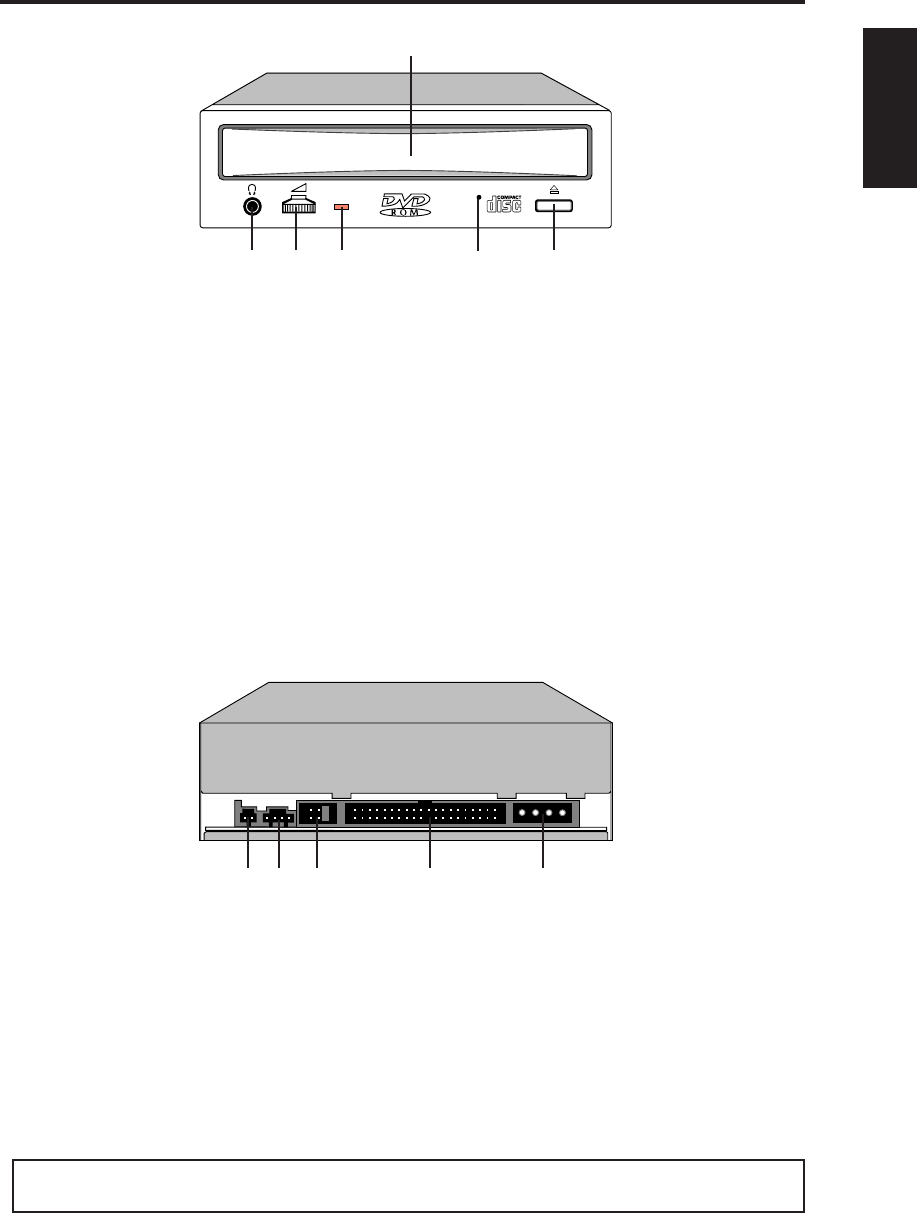
2.1 FRONT VIEW
➀ DISC TRAY
Accepts a disc.
➁ HEAD PHONE JACK (Model SR-8586-B only)
Headphone can be connected using a 3.5mm stereo mini plug.
➂ VOLUME (Model SR-8586-B only)
Adjusts audio output level of Headphone.
➃ BUSY INDICATOR
Lights when data is being accessed from the disc, or the drive is playing an audio CD.
➄ EJECT/LOAD BUTTON
Ejects and loads the disc tray.
➅ EMERGENCY EJECT HOLE
Insert an instrument such as straightened paper clip into this hole to manually
eject the tray. (See 4.1)
➀
➁➂ ➃ ➄➅
2.2 REAR VIEW
➀ INTERFACE CONNECTOR
Connects to host computer’s interface connector.
➁ DC (IN) CONNECTOR
➂ AUDIO OUT CONNECTOR (Analog)
➃ JUMPER PIN
Insert the jumper according to the Master / Slave / CSEL drive.
(See the figure in the next page.)
➄ DIGITAL AUDIO OUT CONNECTOR
NOTE:
The serial format of digital data (not Audio data) output functions with some models.
➀➁➂➃
➄
A-8
CHAPTER 3 CONNECTIONS
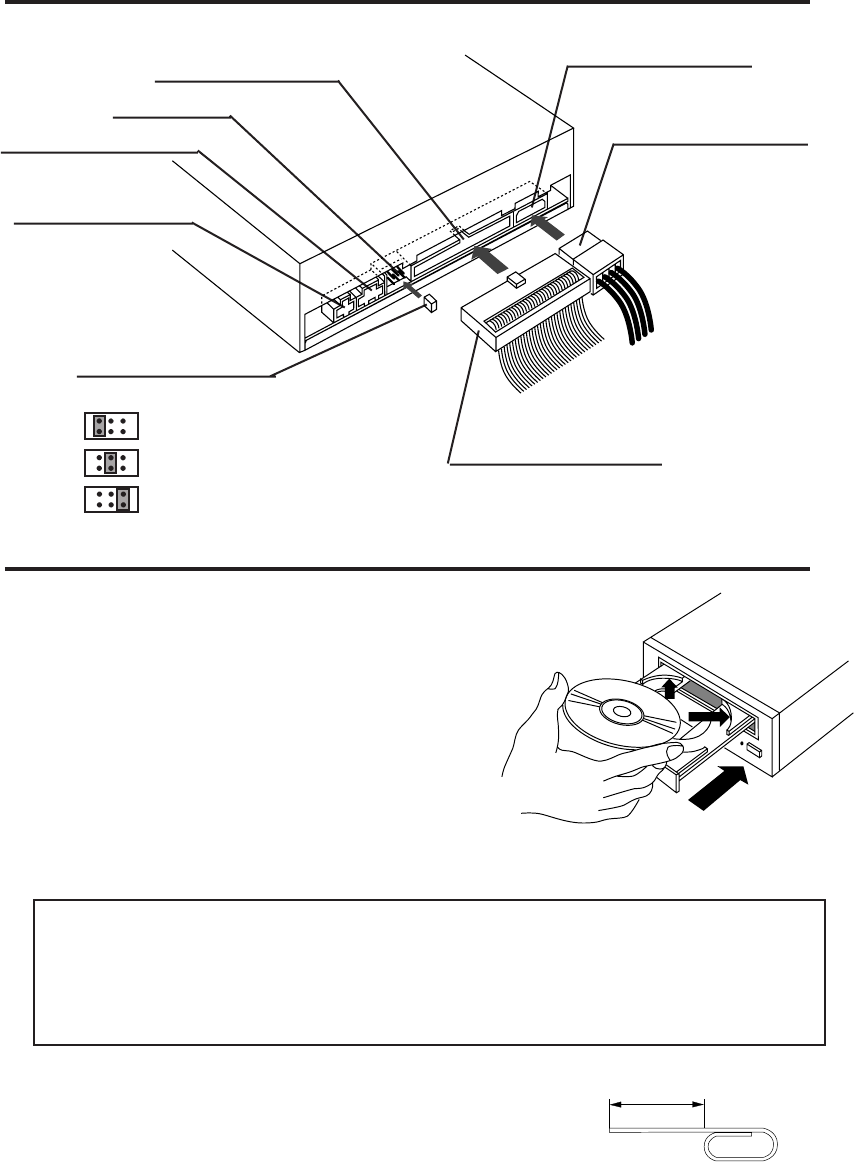
3.1 CONNECTING VIEW
CHAPTER 4 GUIDE TO OPERATION
4.1 INSTALLATIONS
• Starting the drive.
➀Turn on the power supply.
➁Press the eject button. The tray is ejected
from the drive.
➂Place the disc in the tray with the disc’s label
facing up.
➃Press the eject button or press the tray
lightly as in the following figure.
The tray is retracted automatically.
➄Loading start.
CAUTION:
• Do not insert any foreign objects into the disc tray. This could result in a
malfunction.
• Do not manually force the tray to open.
• When the drive is not in use, keep the tray closed to protect against dust and dirt.
• Do not press down hard on the tray when loading a disc, since this may result
in damage to or malfunction of the tray.
• In case of emergency, eject the tray manually
If for some reason the tray will not eject automatically, press
the eject-bar (for example, insert a straightened paper clip
minimum straight length = 45 mm, Diameter = 1 ~ 1.5 mm)
into the emergency eject hole to manually eject the tray.
(Before proceeding with this emergency step, make sure
that the power is switched OFF.)
* This figure shows in case of
Horizontal Installation.
Min. 45 mm
Paper clip
Jumper Pin
Audio Out Connector
DC (IN) Connector
DC Power Connector
Digital Audio Out
Connector
Jumper
Drive-Select (Master/Slave/CSEL)
Cable select (CSEL)
Slave
Master
Interface Connector
Interface Cable

A-9
ENGLISH
CHAPTER 5 GENERAL DESCRIPTION
5.1 FEATURE SUMMARY
➀Embedded ATAPI Interface.
➁Automatic Loading with tray.
➂Horizontal and Vertical Installation.
(Vertical : Vertical installation type only, 12 cm Disc only)
➃Audio Playback Capability.
➄MS-DOS CD-ROM Extensions Available.
➅5 1/4” Half Height Design.
5.2 SYSTEM SET UP
The ATAPI Devices are selected by the Address field in the Drive Select Register. When
a single Device is attached to the interface, it shall be set as Device 0. When the ATAPI
Device is attached along with an ATA Mass Storage Device, the ATAPI Device will be
set as Device 1 and respond as a Slave.
5.3 POWER SAVING
➀When the drive waits for a command from the Host for more than two minutes,
then the drive enters Power Save Mode. Laser and Spindle motor stop.
➁Re-start is automatic when the Host Command is received or eject button is
pushed.
NOTE :
• ATAPI : AT Attachment Packet Interface.
• MS-DOS and MS Windows are trademarks or registered trademarks of Microsoft
Corporation.
• IBM PC-AT is a registered trademark of International Business Machines
Corporation.
CHAPTER 6 SPECIFICATION SUMMARY
6.1 PERFORMANCE
➀ Disc diameter 12cm, 8cm
➁ Disc speed
(DVD CAV mode) 9200 r/min (CAV) *1
(CD CAV mode) 9480 ~ 11064 r/min (CAV)
➂ Data capacity 4.7 GBytes (DVD Single Layer)
8.5 GBytes (DVD Dual Layer)
540 MBytes typical (12 cm CD Disc)
180 MBytes typical (8 cm CD Disc)
➃ Data transfer Rate
Sequential (DVD CAV mode) 8960 ~ 21640 KBytes/s
Sequential (CD CAV mode) 3108 ~ 7200 KBytes/s (Mode 1)
From buffer 16.67 MBytes/s (PIO Mode 4 without IORDY)
16.67 MBytes/s (Multi-word DMA Mode 2)
33.3 MBytes/s (Ultra DMA Mode 2) *2

A-10
➄ Access time
Random access time (DVD CAV mode) *3 110 ms typical
Fullstroke access time (DVD CAV mode) *4 250 ms typical
Random access time (CD CAV mode) *5 90 ms typical
Fullstroke access time (CD CAV mode) *6 180 ms typical
➅ Buffer Size 512 KBytes
MTBF 125,000 POH (duty 20%)
NOTE:
*1 CAV : Constant Angular Velocity
*2 This performance functions with some models.
*3 Random access time (DVD) :Average Data read over the complete area from
starting data recorded area(LBA:0) to maximam data
recorded area(LBA:23197F), more than 2000 times
including latency and layered error correction time.
*4 Fullstroke access time (DVD) : From starting data recorded area (LBA:0) to
maximam data recorded area (LBA:23197F)
including latency and layered error
correction time.
*5 Random access time (CD) : Average Data read over the complete area from
00 min. 02 sec. 00 block to 59 min. 58 sec.
74 blocks, more than 2000 times including
latency and layered error correction time.
*6 Fullstroke access time (CD) :From 00 min. 02 sec. 00 block to 59 min. 58 sec.
74 blocks including latency and layered error
correction time.
6.2 ERROR RATES
• Soft read errors Less than 10 -9
• Hard read errors Less than 10 -12
6.3 AUDIO PERFORMANCE
(1) Analog audio
➀ Number of channels 2
➁ Frequency response 100 Hz ~ 20 kHz (Headphone)
20 Hz ~ 20 kHz (Line-out)
➂ SN Ratio More than 80 dB (Headphone/ Line-out)
➃ Distortion
• Line-out Less than 0.1 % (1 kHz)
• Headphone Less than 0.2 % (1 kHz)
➄ Output level 0.60 Vrms typ. (Headphone/ Line-out)
(2) Digital audio
➀ Output level 3.3V CMOS level
➁ Data format Base a decision on IEC-958

A-11
ENGLISH
6.4 GENERAL PERFORMANCE
➀ Power requirement +5 V 1.0 A
+12 V 2.0 A
➁ Dimensions (W x H x D) 146 x 41.3 x 190 mm(exclude Front Bezel)
➂ Weight 890 g typical
6.5 ENVIRONMENTAL CONDITIONS
Operating
• Temperature 5 ~ 50 °C
• Humidity 5 ~ 90 %RH
(Max. wet bulb temp. is 29 °C, Non-condensation)
Non-operating
• Temperature – 30 ~ 65 °C
• Humidity 5 ~ 90 %Rh
(Non-condensation)
6.6 PICK UP LASER
➀ for DVD
• Type Semiconductor laser GaAs
• Wave Length 663 ± 13 nm
• Divergence
θ
= 73.7 ° ± 3 °
• Output power 0.8 mW
➁ for CD
• Type Semiconductor laser GaAlAs
• Wave Length 775 ~ 815 nm (Typical 790 nm)
• Divergence
θ
= 53.4 ° ± 3 °
• Output power 0.28 mW
CHAPTER 7 BEFORE REQUESTING SERVICE
(1) There are many kinds of problems caused by misuse. When a problem occurs,
check the table below which describes possible problems occurring with your
DVD-ROM drive.
(2) If the DVD-ROM drive is not operating correctly and you cannot restore operation
by following the detailed procedures in the table below, do not remove the cover of
the units or adjust further.
(3) In the case of (2) above, unplug the unit and consult with your dealer or the nearest
service station.
TROUBLE
• DVD-ROM drive does not
operate and Busy Indicator
does not light.
CORRECTION
➀Confirm that the connection between the DVD-ROM
drive and the host computer is correct.
➁Confirm that the program is correct.
➂Confirm that the setting drive select switch is correct.
➃Confirm that the disc has been inserted label side up.
➄Confirm that foreign objects have not been inserted.
7.1 TROUBLESHOOTING
Weight and dimensions shown are approximate.
Specifications are subject to change without notice.
LMQT00432 Created in Japan