Panasonic Healthcare 9TB083CRS DVD-ROM Drive User Manual 624D B Cover Eng
Panasonic Healthcare Co., Ltd. DVD-ROM Drive 624D B Cover Eng
UserManual.wiki
>
Panasonic Healthcare
>
9TB083CRS User Manual
Exhibit E Instruction Manual
Navigation menu
Upload a User Manual
Namespaces
Wiki Guide
HTML
PDF
Info
Views
User Manual
Discussion / Help
Navigation
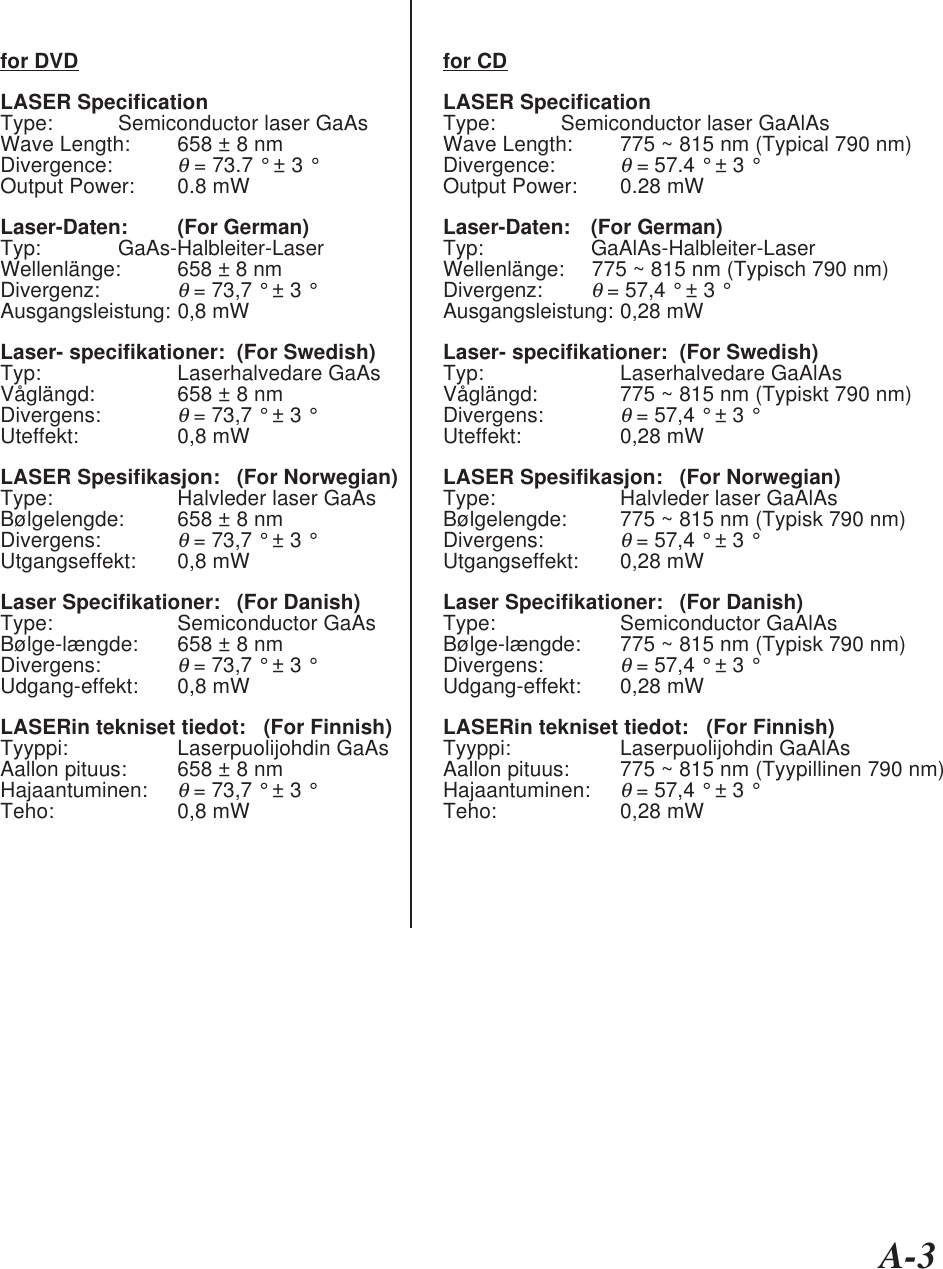

![A-136.2 ERROR RATES• Soft read errors Less than 10 -9• Hard read errors Less than 10 -126.3 AUDIO PERFORMANCE • Analog audio (Headphone)➀ Number of channels 2➁ Frequency response 100 Hz ~ 20 kHz➂ SN Ratio More than 70 dB➃ Distortion Less than 0.2 % (1 kHz)➄ Output level 0.60 Vrms [ typical ]6.4 GENERAL PERFORMANCE➀ Power requirement +5 V 1.8 A➁ Dimensions (W x H x D) 129 x 23 x 138.5 mm➂ Weight 275 g [ typical ]6.5 ENVIRONMENTAL CONDITIONSOperating• Temperature 5 ~ 40 °C• Humidity 20 ~ 80 %RH(Max. wet bulb temp. is 29 °C, Non-condensation)Non-operating• Temperature – 10 ~ 60 °C• Humidity 5 ~ 90 %Rh(Non-condensation)6.6 PICK UP LASER➀ for DVD• Type Semiconductor laser GaAs• Wave Length 658 ± 8 nm• Divergenceθ = 73.7 ° ± 3 °• Output power 0.8 mW➁ for CD• Type Semiconductor laser GaAlAs• Wave Length 775 ~ 815 nm (typical 790 nm)• Divergenceθ = 57.4 ° ± 3 °• Output power 0.28 mW](https://usermanual.wiki/Panasonic-Healthcare/9TB083CRS/User-Guide-84443-Page-16.png)