Panasonic of North America 11BT1301 Transmitter Module User Manual OI Manual SC HTB370 RQT9777 P 121011

Panasonic Corporation of North America Transmitter Module OI Manual SC HTB370 RQT9777 P 121011

Contents

OI Manual_SC-HTB370_RQT9777-P_121011
Owners ManualHome Theater Audio SystemModel No. SC-HTB370Thank you for purchasing this product.Please read these instructions carefully before using this product,and save this manual for future use.If you have any questions, contact:U.S.A. and Puerto Rico: 1-800-211-PANA (7262)Canada: 1-800-561-5505RQT9777-P
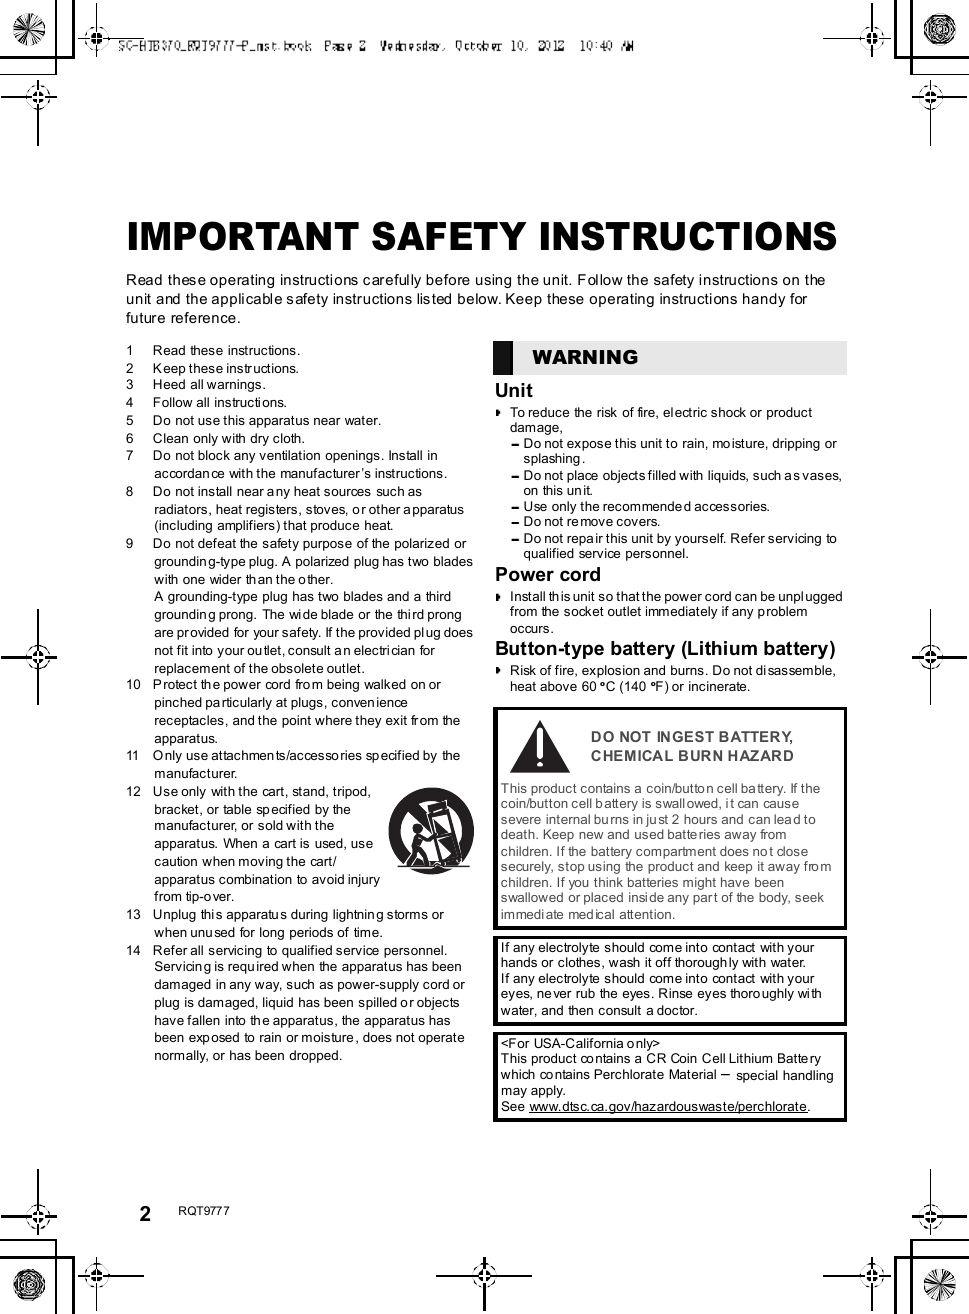
2R QT977 7IMPORTANT SAFETY INSTRUCTIONSRead these operating instructions carefully before using the unit. Follow the safety instructions on theunit and the applicable safety instructions listed below. Keep these operating instructions handy forfuture reference.1 Read these instructions.2 Keep these instructions.3 Heed all warnings.4 Follow all  instructions.5 Do not use this apparatus near water.6 Clean only with dry cloth.7 Do not block any ventilation openings. Install inaccordan ce with the manufacturer s instructions.8 Do not install near a ny heat sources such asradiators, heat registers, stoves, or other apparatus(including amplifiers) that produce heat.9 Do not defeat the safety purpose of the polarized orgrounding-type plug. A polarized plug has two bladeswith one wider than the o ther.A grounding-type plug has two blades and a thirdgrounding prong.  The wide blade or the thi rd prongare provided for  your safety. If the provided plug doesnot fit into your outlet, consult a n electri cian forreplacement of the obsolete outlet.10 Protect the power cord fro m being walked on orpinched pa rticularly at plugs, conveniencereceptacles, and the point where they exit from theapparatus.11 Only use attachments/accessories sp ecified by themanufacturer.12 Use only with the cart, stand, tripod,bracket, or table specified by themanufacturer, or sold with theapparatus. When a cart is used, usecaution when moving the cart/apparatus combination to avoid injuryfrom tip-over.13 Unplug thi s apparatu s during lightning storms orwhen unu sed for long periods of time.14 Refer all servicing to qualified service personnel.Servicin g is required when the apparatus has beendamaged in any way, such as power-supply cord orplug is damaged, liquid has been spilled or objectshave fallen into th e apparatus, the apparatus hasbeen exposed to rain or moisture, does not operatenormally, or has been dropped.UnitTo reduce the risk of fire, electric shock or productdamage,Do not expose this unit to rain, moisture, dripping orsplashing .Do not place objects filled with liquids, such a s vases,on this un it.Use only the recommended accessories.Do not re move covers.Do not repa ir this unit by yourself. Refer servicing toqualified service personnel.Power cordInstall this unit so that the power cord can be unpl uggedfrom the socket outlet immediately if any problemoccurs.Button-type battery (Lithium battery)Risk of fire, explosion and burns. Do not di sassemble,heat above 60 oC (140 oF) or incinerate.WARNINGDO NOT INGEST BATTERY,CHEMICAL BURN HAZARDThis product contains a coin/button cell battery. If thecoin/button cell battery is swallowed, it can causesevere internal bu rns in just 2 hours and can lead todeath. Keep new and used batteries away fromchildren. If the battery compartment does no t closesecurely, stop using the product and keep it away fromchildren. If you think batteries might have beenswallowed or placed inside any par t of the body, seekimmediate med ical attention.If any electrolyte should come into contact with yourhands or clothes, wash it off thoroughly with water.If any electrolyte should come into contact with youreyes, never rub the eyes. Rinse eyes thoroughly wi thwater, and then consult a doctor.<For USA-California o nly>This product co ntains a CR Coin Cell Lithium Batterywhich contains Perchlorate Material  special handlingmay apply.See www.dtsc.ca.gov/hazardouswaste/perchlorate.
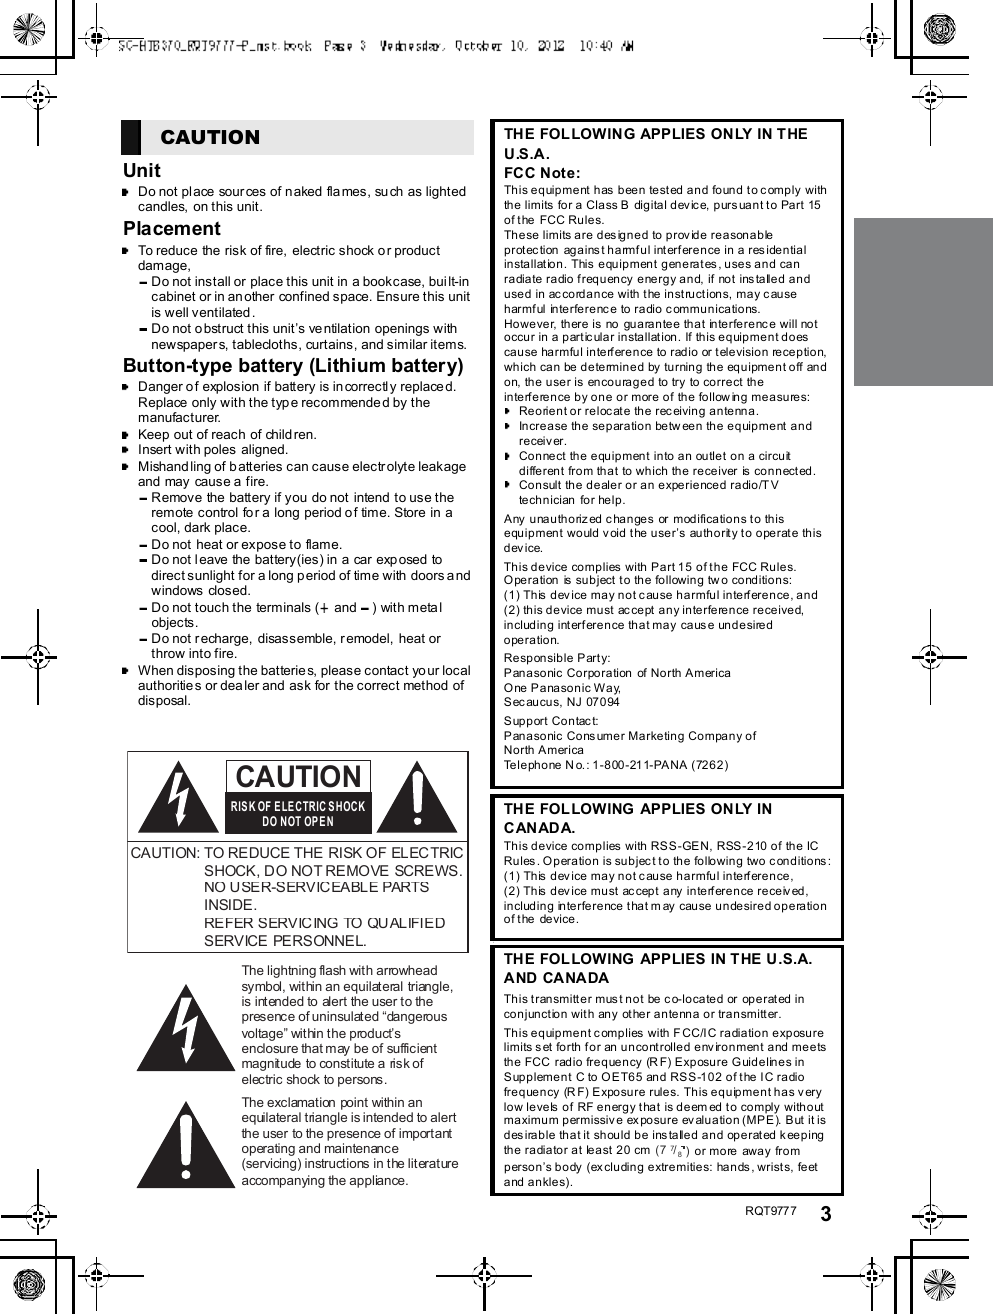
R QT977 7 3UnitDo not pl ace sour ces of naked flames, such as lightedcandles, on this unit.PlacementTo reduce the risk of fire, electric shock o r productdamage,Do not install or place this unit in a bookcase, built-incabinet or in an other confined space. Ensure this unitis well ventilated.Do not o bstruct this units ve ntilation openings withnewspapers, tablecloths, curtains, and similar items.Button-type battery (Lithium battery)Danger o f explosion if battery is incorrectly replace d.Replace only with the type recommended by themanufacturer.Keep out of reach of child ren.Insert with poles  aligned.Mishandling of b atteries can cause electrolyte leakageand may cause a fire.Remove the battery if you do not intend to use theremote control for a long period of time. Store in acool, dark place.Do not  heat or expose to flame.Do not leave the battery(ies) in a car exp osed todirect sunlight for a long p eriod of time with  doors andwindows closed.Do not touch the terminals (  and ) with metalobjects.Do not r echarge, disassemble, remodel,  heat orthrow into fire.When disposing the batteries, please contact yo ur localauthoritie s or dealer and ask for the correct method ofdisposal.CAUTION            THE FOLLOWING APPLIES ONLY IN THEU.S.A.FCC Note:This equipment has been tested and found to comply withthe limits for a Cla ss B  digital dev ic e, p urs uan t to Pa rt 15of the FCC Rules.These limits are designed to provide reasonableprotection against harmful interference in a residentialinstallation. This equipment generates, uses and canradiate radio frequency energy and, if not installed andused in accordance with the instructions, may causeharmful interference to radio communications.However, there is no guarantee that interference will notoccur in a particular installation. If this equipment doescause harmful interference to radio or television reception,which can be determined by turning the equipment off andon, the user is encouraged to try to correct theinterference by one or more of the following measures:Reorient or relocate the receiving antenna.Increase the separation between the equipment andreceiver.Connect the equipment into an outlet on a circuitdifferent from that to which the receiver is connected.Consult the dealer or an experienced radio/TVtechnician for help.Any unauthorized changes or modifications to thisequipment would void the users authority to operate thisd ev i ce.This device complies with Part 15 of the FCC Rules.Operation is subject to the following tw o conditions:(1) This device may not cause harmful interference, and(2) this device must accept any interference received,including interference that may cause undesiredoperation.Responsible Party:Panasonic Corporation of North AmericaOne Panasonic Way,S ec au cu s, NJ 07 0 94Support Contact:Panasonic Consumer Marketing Company ofNorth AmericaTelephone No.: 1-800-211-PANA (7262)THE FOLLOWING APPLIES ONLY INCANADA.This device complies with RSS-GEN, RSS-210 of the ICRules. Operation is subject to the following two conditions:(1) This device may not cause harmful interference,(2) This device must accept any interference received,including interference that may cause undesired operationof the device.THE FOLLOWING APPLIES IN THE U.S.A.AND CANA DAThis transmitter must not be co-located or operated inconjunction with any other antenna or transmitter.This equipment complies with FCC/IC radiation exposurelimits set forth for an uncontrolled environment and meetsthe FCC radio frequency (R F) Exposure Guidelines inSupplement C to OET65 and RSS-102 of the IC radiofrequency (RF) Exposure rules. This equipment has verylow levels of RF energy that is deem ed to comply withoutmaximu m permi ssiv e ex po su r e ev alua ti o n (M P E ). B ut  it isdesirable that it should be installed and operated keepingthe radiator at least 20 cm (7 7/8)or more away frompersons body (excluding extremities: hands, wrists, feetand ankles).
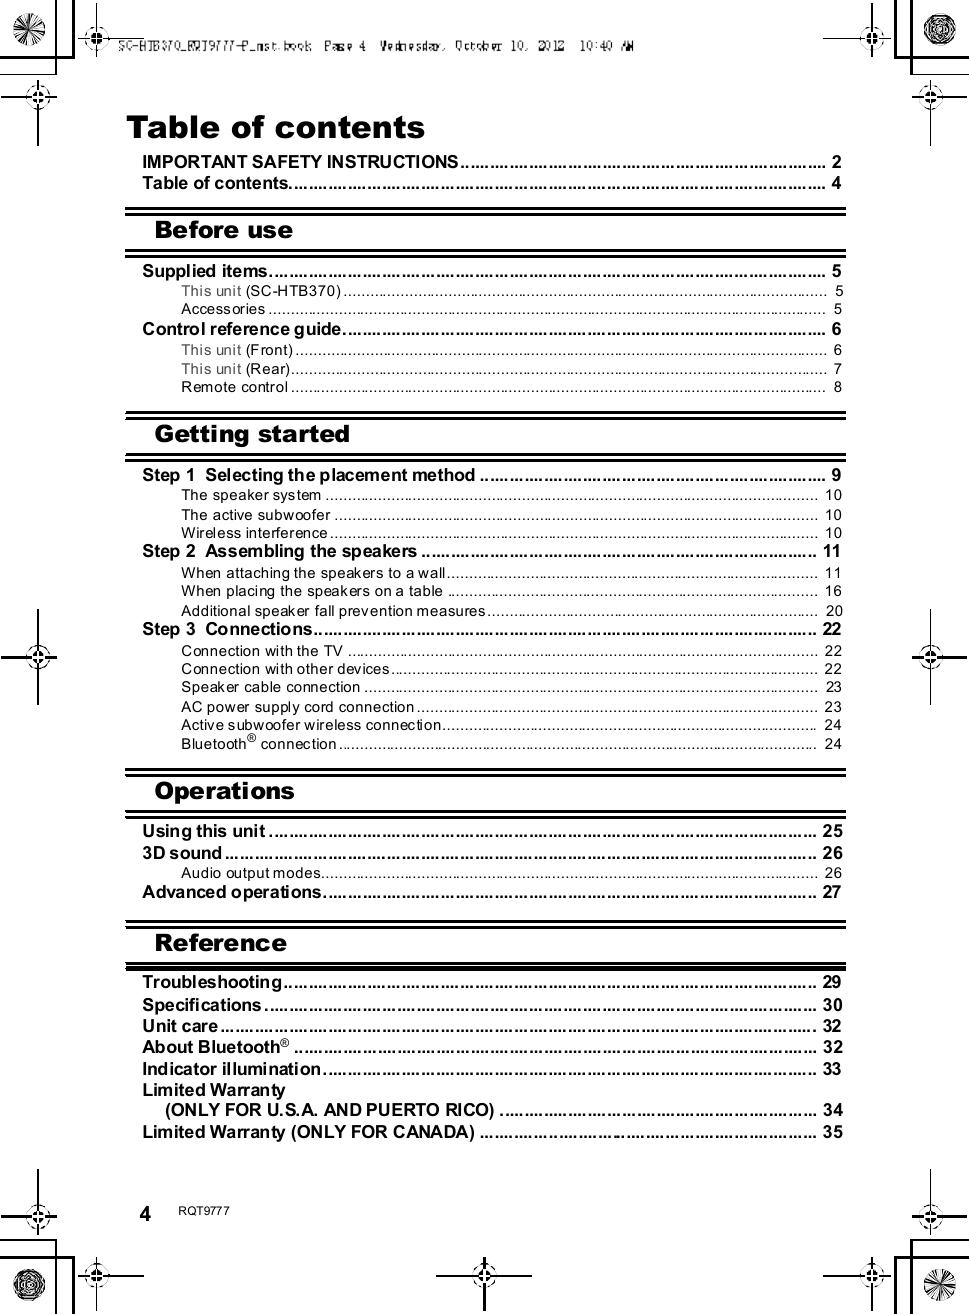
4R QT977 7Table of contentsIMPORTANT SAFETY INSTRUCTIONS........................................................................... 2Table of contents.............................................................................................................. 4Before useSupplied items.................................................................................................................. 5This unit (SC-HTB370) ...............................................................................................................  5Accessories ................................................................................................................................  5Control reference guide................................................................................................... 6This unit (Front) ..........................................................................................................................  6This unit (Rear)...........................................................................................................................  7Remote control ...........................................................................................................................  8Getting startedStep 1  Selecting the placement method ....................................................................... 9The speaker system .................................................................................................................  10The active subwoofer ...............................................................................................................  10Wireless interference ................................................................................................................ 10Step 2  Assembling the speakers ................................................................................. 11When attaching the speakers to a wall.....................................................................................  11When placing the speakers on a table ..................................................................................... 16Additional speaker fall prevention measures............................................................................  20Step 3  Connections....................................................................................................... 22Connection with the TV ............................................................................................................  22Connection with other devices..................................................................................................  22Speaker cable connection ........................................................................................................  23AC power supply cord connection............................................................................................  23Active subwoofer wireless connection......................................................................................  24Bluetooth® connection..............................................................................................................  24OperationsUsing this unit ................................................................................................................ 253D sound ......................................................................................................................... 26Audio output modes..................................................................................................................  26Advanced operations..................................................................................................... 27ReferenceTroubleshooting............................................................................................................. 29Specifications ................................................................................................................. 30Unit care .......................................................................................................................... 32About Bluetooth®........................................................................................................... 32Indicator illumination..................................................................................................... 33Limited Warranty(ONLY FOR U.S.A. AND PUERTO RICO) ................................................................. 34Limited Warranty (ONLY FOR CANADA) ..................................................................... 35
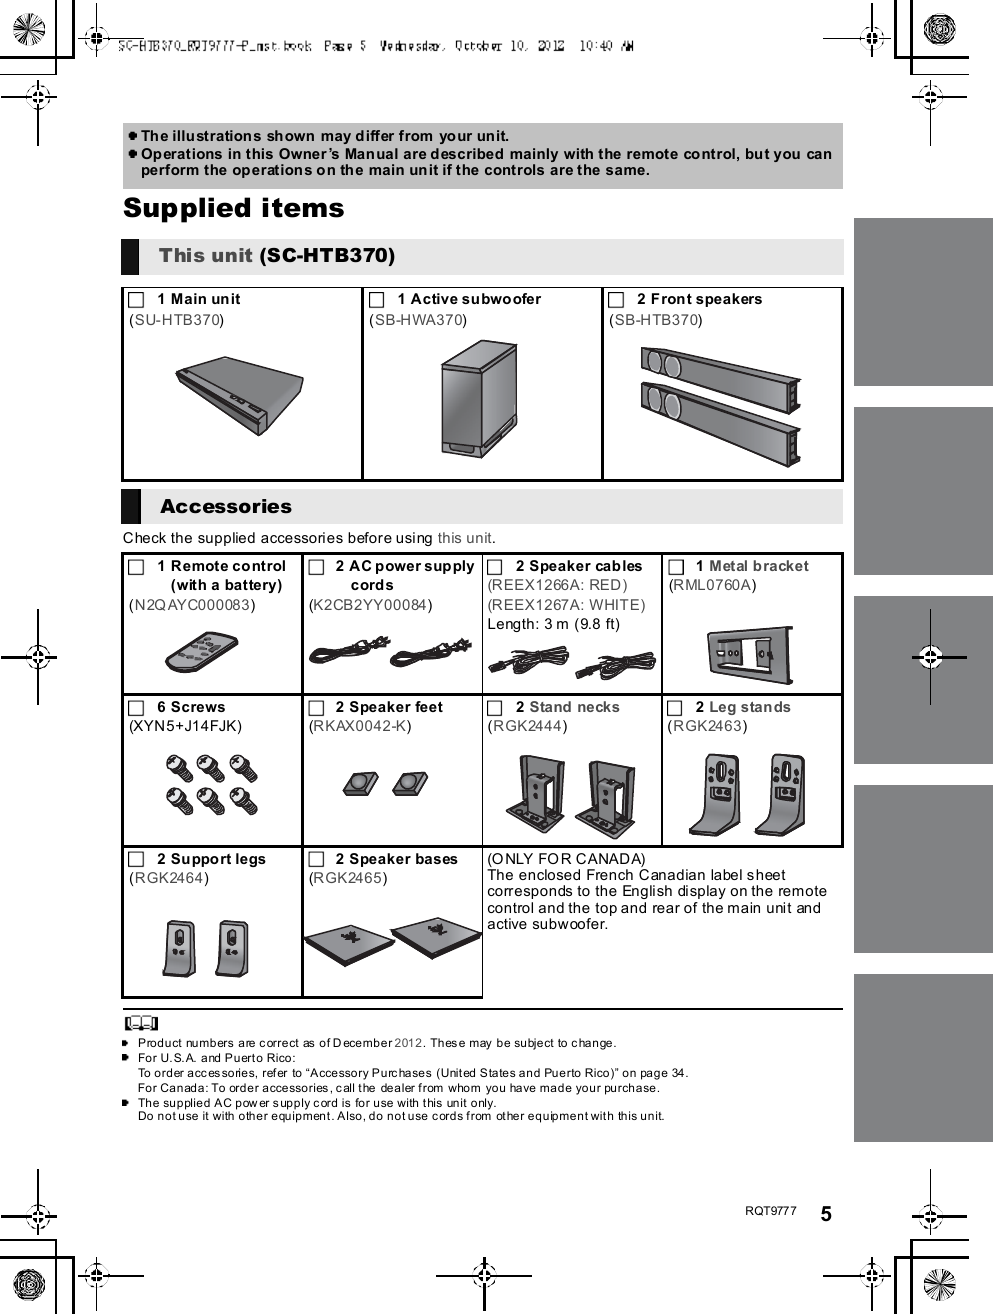
R QT977 7 5Supplied itemsCheck the supplied accessories before using this unit.Product numbers are correct as of December2012. These may be subject to change.For U.S.A. and Puerto Rico:To order accessories, refer to Accessory Purchases (United States and Puerto Rico) on page 34.For Canada: To order accessories, call the dealer from whom you have made your purchase.The supplied AC power supply cord is for use with this unit only.Do not use it with other equipment. Also, do not use cords from other equipment with this unit.The illustrations shown may differ from  your unit.Operations in this Owners Manual are described mainly with the remote control, but you canperform the operations on the main unit if the controls are the same.This unit (SC-HTB370)1 Main unit(SU-HTB370)1 Active subwoofer(SB-HWA370)2 Front speakers(SB-HTB370)Accessories1 Remote co ntrol(with a battery)(N2QAYC000083)2 AC power supplycords(K2CB2YY00084)2 Speaker cables(REEX1266A: RED)(REEX1267A: WHITE)Length: 3 m (9.8 ft)1Metal bracket(RML0760A)6 Screws(XYN5+J14FJK)2 Speaker feet(RKAX0042-K)2Stand necks(RGK2444)2Leg stands(RGK2463)2 Su pport legs(RGK2464)2 Speaker bases(RGK2465)(O NLY FOR CANADA)The enclosed French Canadian label sheetcorresponds to the English display on the remotecontrol and the top and rear of the main unit andactive subwoofer.
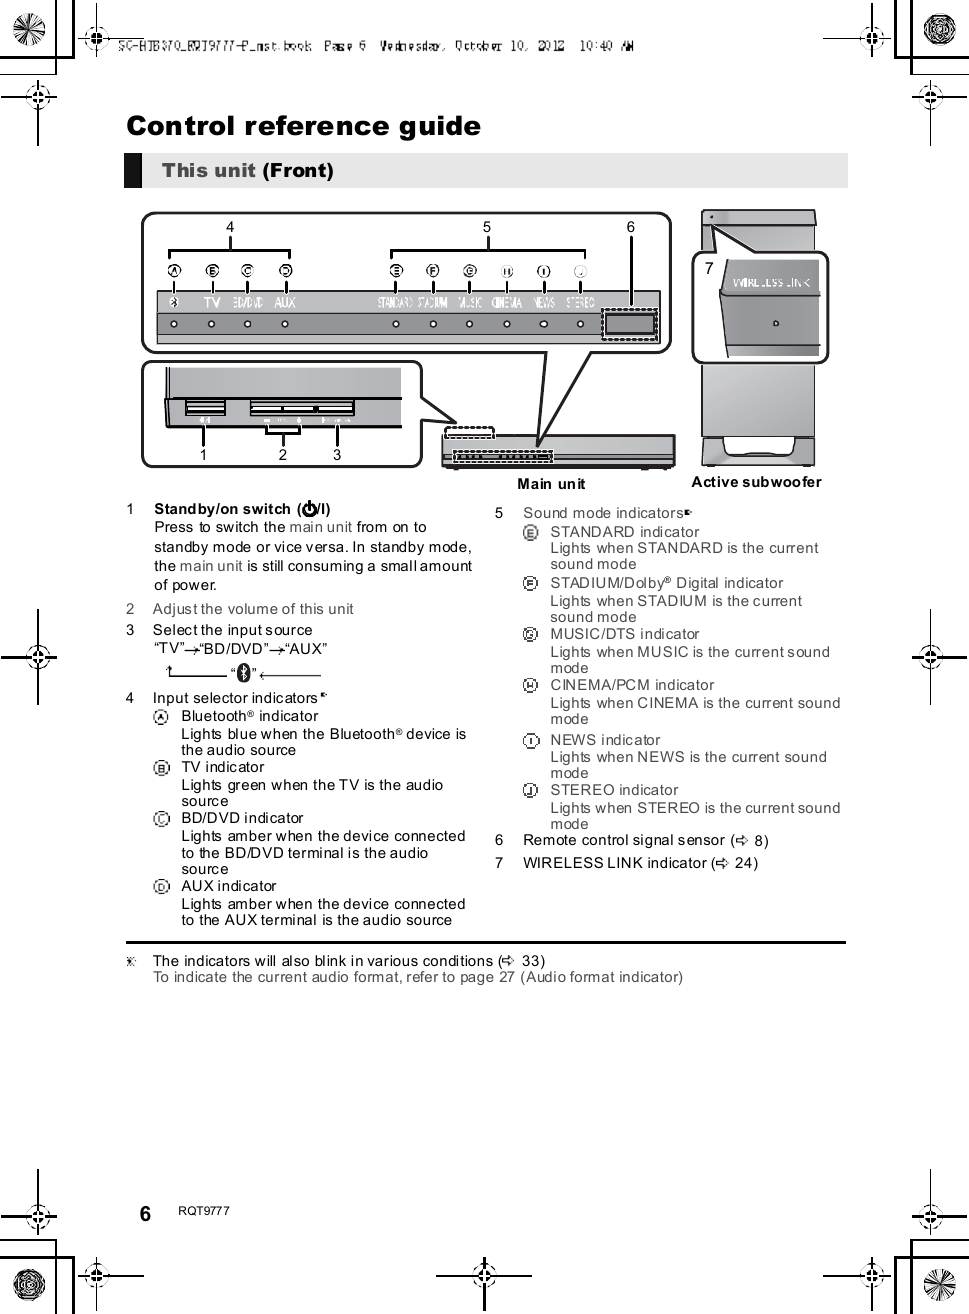
6R QT977 7Control reference guide1Standby/on switch ( /I)Press to switch the main unit from on tostandby mode or vice versa. In standby mode,the main unit is still consuming a small amountof power.2 Adjust the volume of this unit3 Select the input sourceTVBD/DVDAUX4 Input selector indicatorsBluetooth® indicatorLights blue when the Bluetooth® device isthe audio sourceTV indicatorLights green when the TV is the audiosourceBD/DVD indicatorLights amber when the device connectedto the BD/DVD terminal is the audiosourceAU X i n di ca torLights amber when the device connectedto the AUX terminal is the audio source5Sound mode indicatorsSTANDARD indicatorLights when STANDARD is the currentsound modeSTADIUM/Dolby® Digital indicatorLights when STADIUM is the currentsound modeMUSIC/DTS indicatorLights when MUSIC is the current soundmodeCINEMA/PCM indicatorLights when CINEMA is the current soundmodeNEWS indicatorLights when NEWS is the current soundmodeSTEREO indicatorLights when STEREO is the current soundmode6 Remote control signal sensor ( 8)7 WIRELESS LINK indicator ( 24)  The indicators will also blink in various conditions ( 33)To indicate the current audio format, refer to page 27 (Audio format indicator)This unit (Front)71234 56M a in  un itActive subwoofer
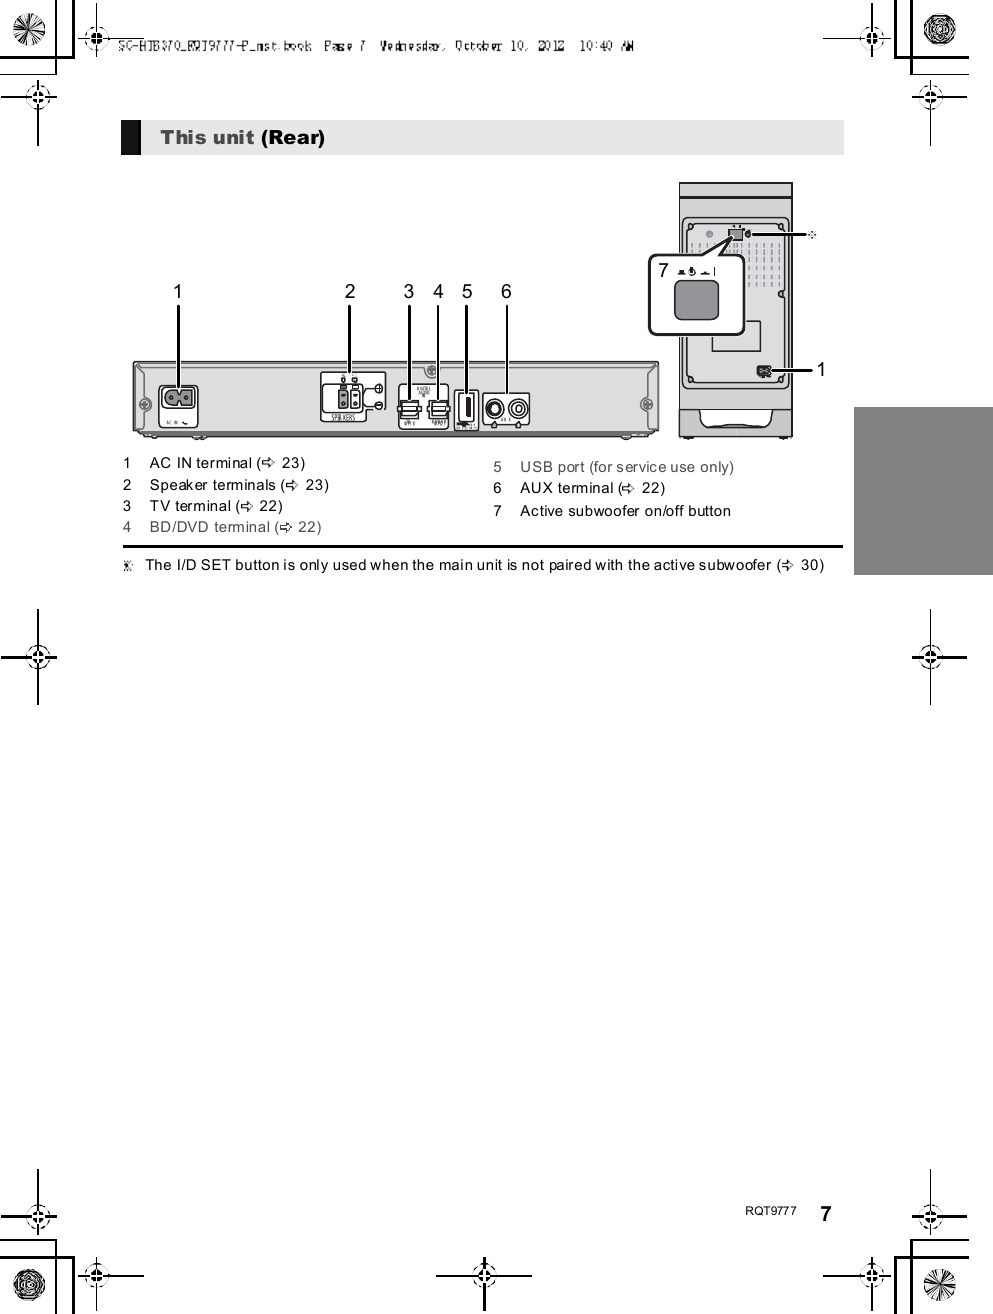
R QT977 7 71 AC IN terminal ( 23)2 Speaker terminals ( 23)3 TV terminal ( 22)4 BD/DVD terminal ( 22)5 USB port (for service use only)6 AUX terminal ( 22)7 Active subwoofer on/off button  The I/D SET button is only used when the main unit is not paired with the active subwoofer ( 30)This unit (Rear)A C  IN FORSER VICE ON LYAUXR LD IGITA LA U DIOINTV(O PT 1) BD/DVD(O PT2 )SPEA KERS6 6R1 2 3 4 5 671
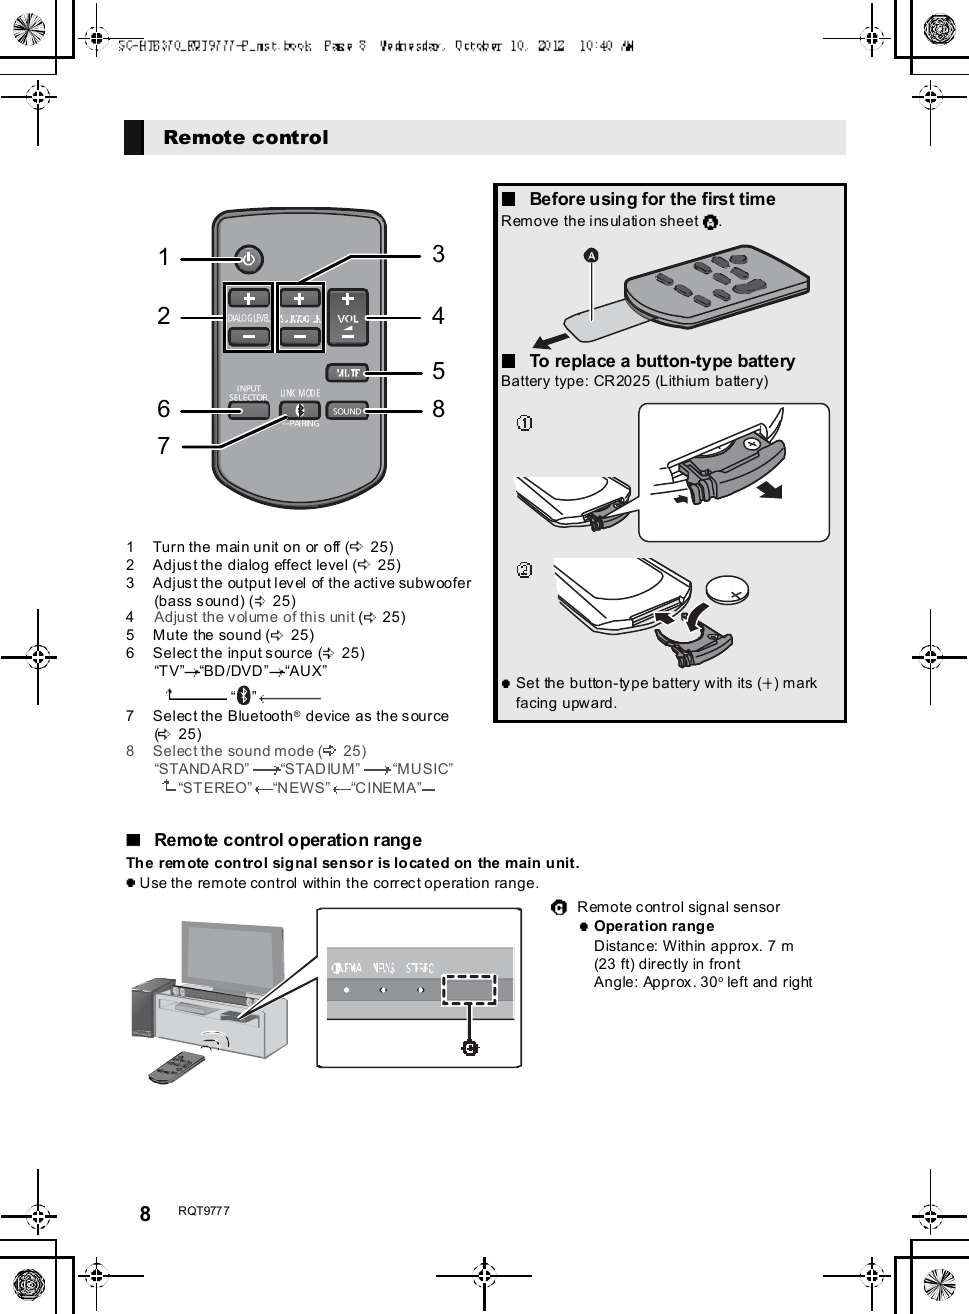
8R QT977 71 Turn the main unit on or off ( 25)2 Adjust the dialog effect level ( 25)3 Adjust the output level of the active subwoofer(bass sound) ( 25)4Adjust the volume of this unit (25)5 Mute the sound ( 25)6 Select the input source ( 25)TVBD/DVDAUX7 Select the Bluetooth® device as the source(25)8 Select the sound mode ( 25)STANDARDSTADIUMMUSICSTEREO NEWS CINEMARemote control  Before using for the first timeRemove the insulation sheet .To replace a button-type batteryBattery type: CR2025 (Lithium battery)Set the button-type battery with its ( ) markfacing upward.Remote control operation rangeThe remote control signal sensor is located on the main unit.Use the remote control within the correct operation range.Remote control signal sensorOperation rang eDistance: Within approx. 7 m(23 ft) directly in frontAngle: Approx. 30oleft and right
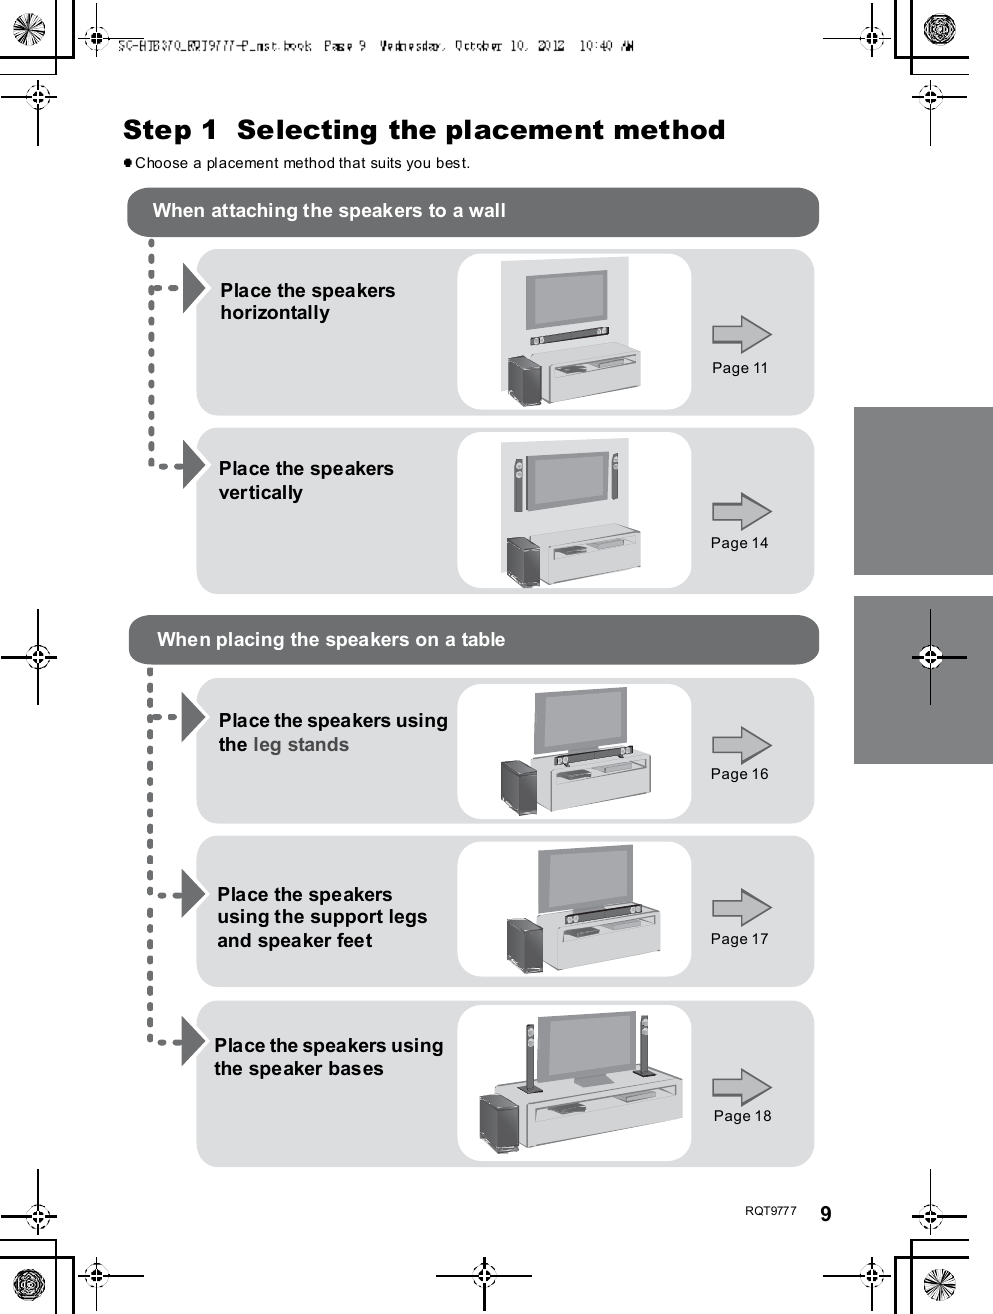
R QT977 7 9Step 1  Selecting the placement methodChoose a placement method that suits you best.When attaching the speakers to a wallWhen placing the speakers on a tablePlace the speakershorizontallyPage 11Place the speakersverticallyPlace the speakers usingthe leg standsPlace the speakers usingthe speaker basesPage 14Page 16Page 17Page 18Place the speakersusing the support legsand speaker feet
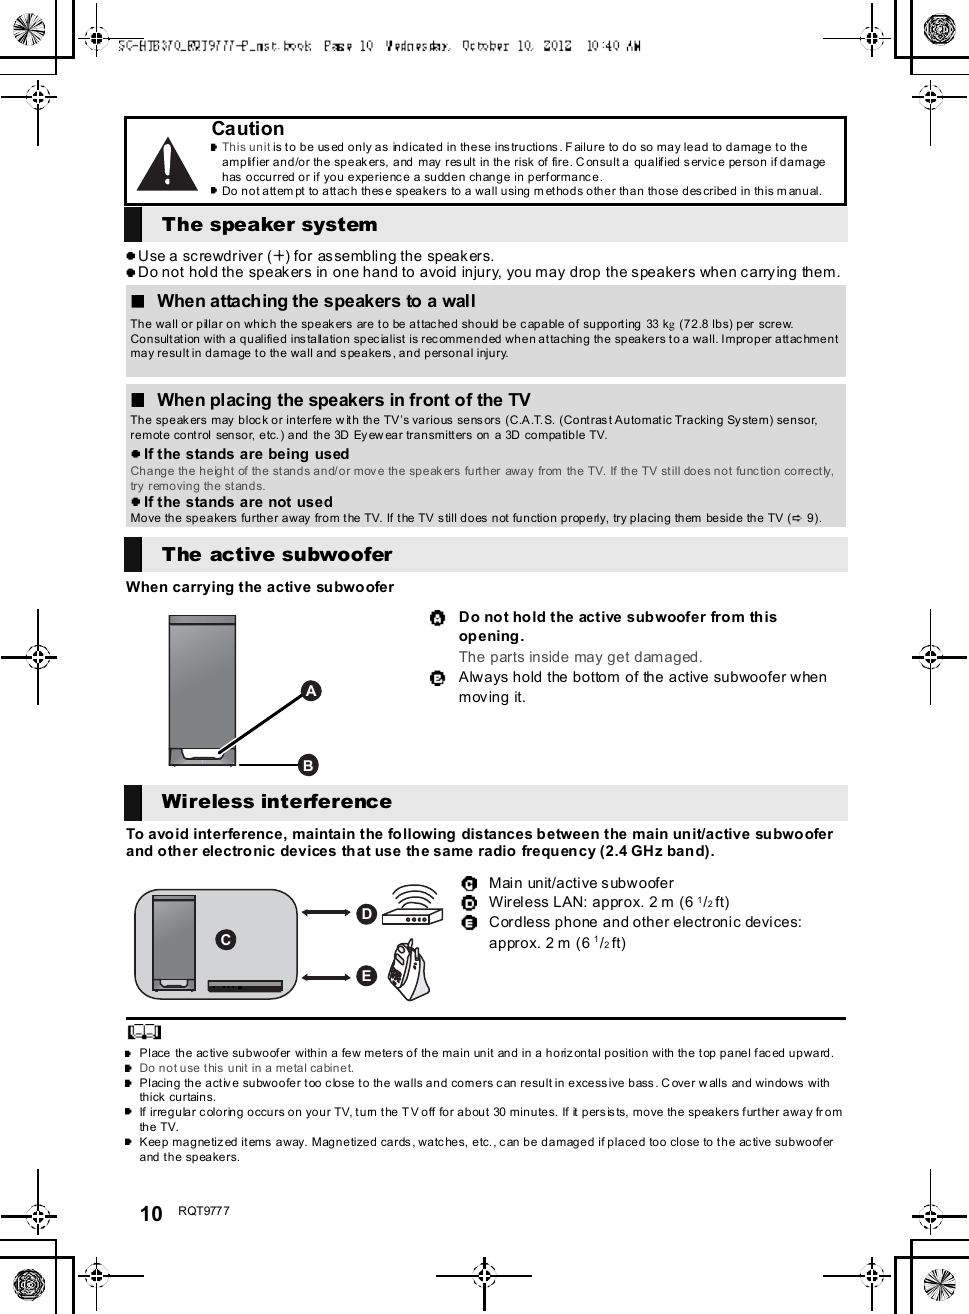
10 R QT977 7Use a screwdriver ( ) for assembling the speakers.Do not hold the speakers in one hand to avoid injury, you may drop the speakers when carrying them.When carrying the active subwooferTo avoid interference, maintain the following distances between the main unit/active subwooferand other electronic devices that use the same radio frequency (2.4 GHz band).Place the active subwoofer within a few meters of the main unit and in a horizontal position with the top panel faced upward.Do not use this unit in a metal cabinet.Placing the active subwoofer too close to the walls and corners can result in excessive bass. Cover walls and windows withthick curtains.If irregular coloring occurs on your TV, turn the TV off for about 30 minutes. If it persists, move the speakers further away fr omthe TV.Keep magnetized items away. Magnetized cards, watches, etc., can be damaged if placed too close to the active subwooferand the speakers.CautionThis unit is to be used only as indicated in these instructions. Failure to do so may lead to damage to theamplifier and/or the speakers, and may result in the risk of fire. Consult a qualified service person if damagehas occurred or if you experience a sudden change in performance.Do not attem pt to attach these speakers to a wall using methods other than those described in this manual.The speaker systemWhen attaching the speakers to a wallThe wall or pillar on which the speakers are to be attached should be capable of supporting 33 kg (72.8 lbs) per screw.Consultation with a qualified installation specialist is recommended when attaching the speakers to a wall. Improper attachmentmay result in damage to the wall and speakers, and personal injury.When placing the speakers in front of the TVThe speakers may block or interfere with the TVs various sensors (C.A.T.S. (Contrast Automatic Tracking System) sensor,remote control sensor, etc.) and the 3D Eyewear transmitters on a 3D compatible TV.If the stands are being usedChange the height of the stands and/or move the speakers further away from the TV. If the TV still does not function correctly,try removing the stands.If the stands are not usedMove the speakers further away from the TV. If the TV still does not function properly, try placing them beside the TV ( 9).The active subwooferDo not hold the active subwoofer from thisopening .The parts inside may get damaged.Always hold the bottom of the active subwoofer whenmoving it.Wireless interferenceMain unit/active subwooferWireless LAN: approx. 2 m (6 1/2ft)Cordless phone and other electronic devices:approx. 2 m (6 1/2ft)
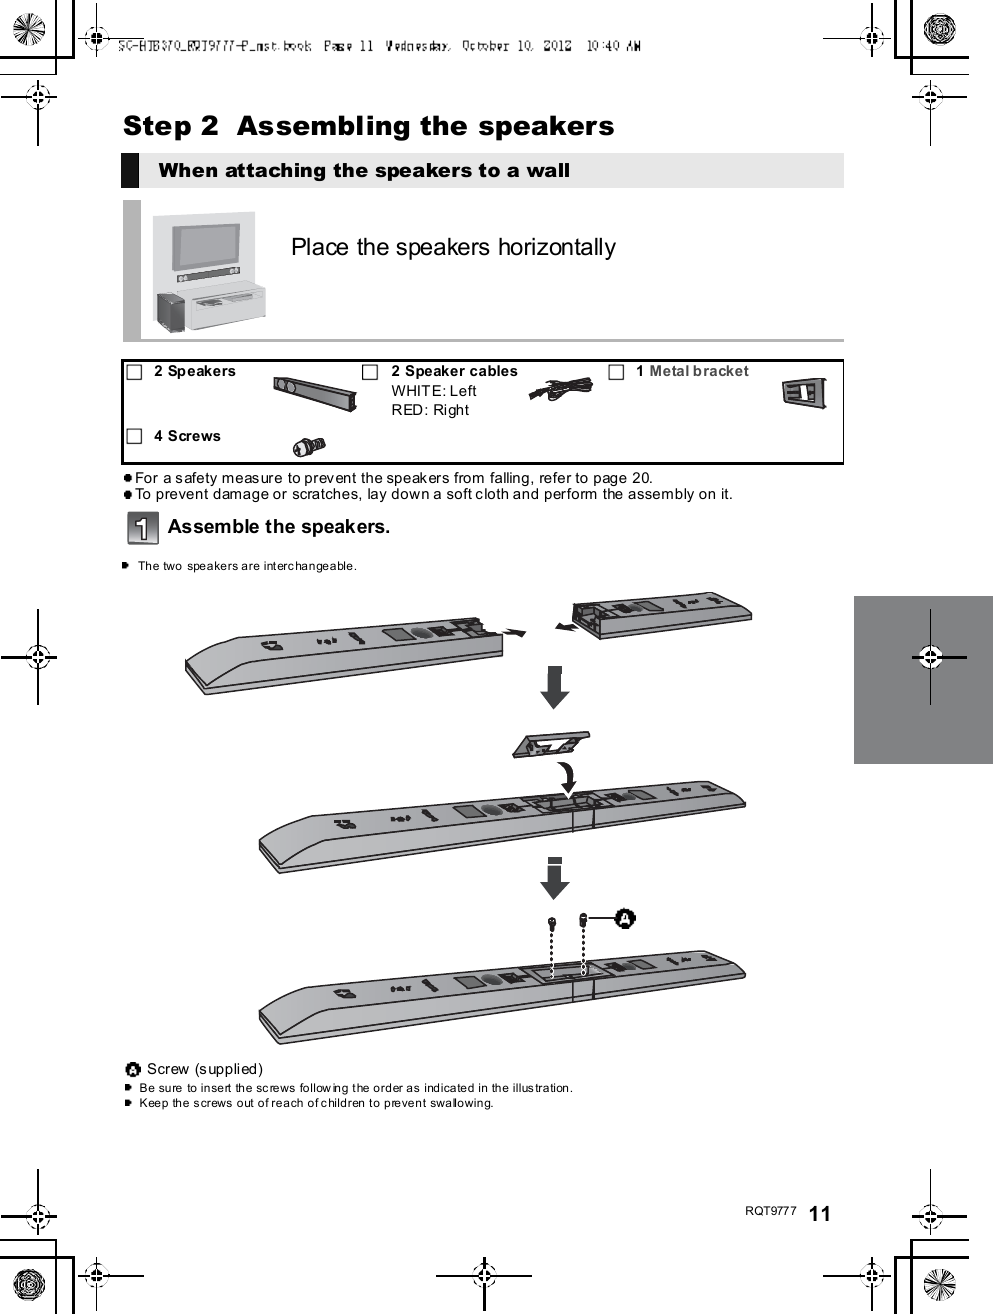
R QT977 7 11Step 2  Assembling the speakersFor a safety measure to prevent the speakers from falling, refer to page 20.To prevent damage or scratches, lay down a soft cloth and perform the assembly on it.Assemble the speakers.The two speakers are interchangeable.When attaching the speakers to a wallPlace the speakers horizontally2 Speakers 2 Speaker cablesWHITE: LeftRED: Right1Metal bracket4 ScrewsScrew (supplied)Be sure to insert the screws following the order as indicated in the illustration.Keep the screws out of reach of children to prevent swallowing.
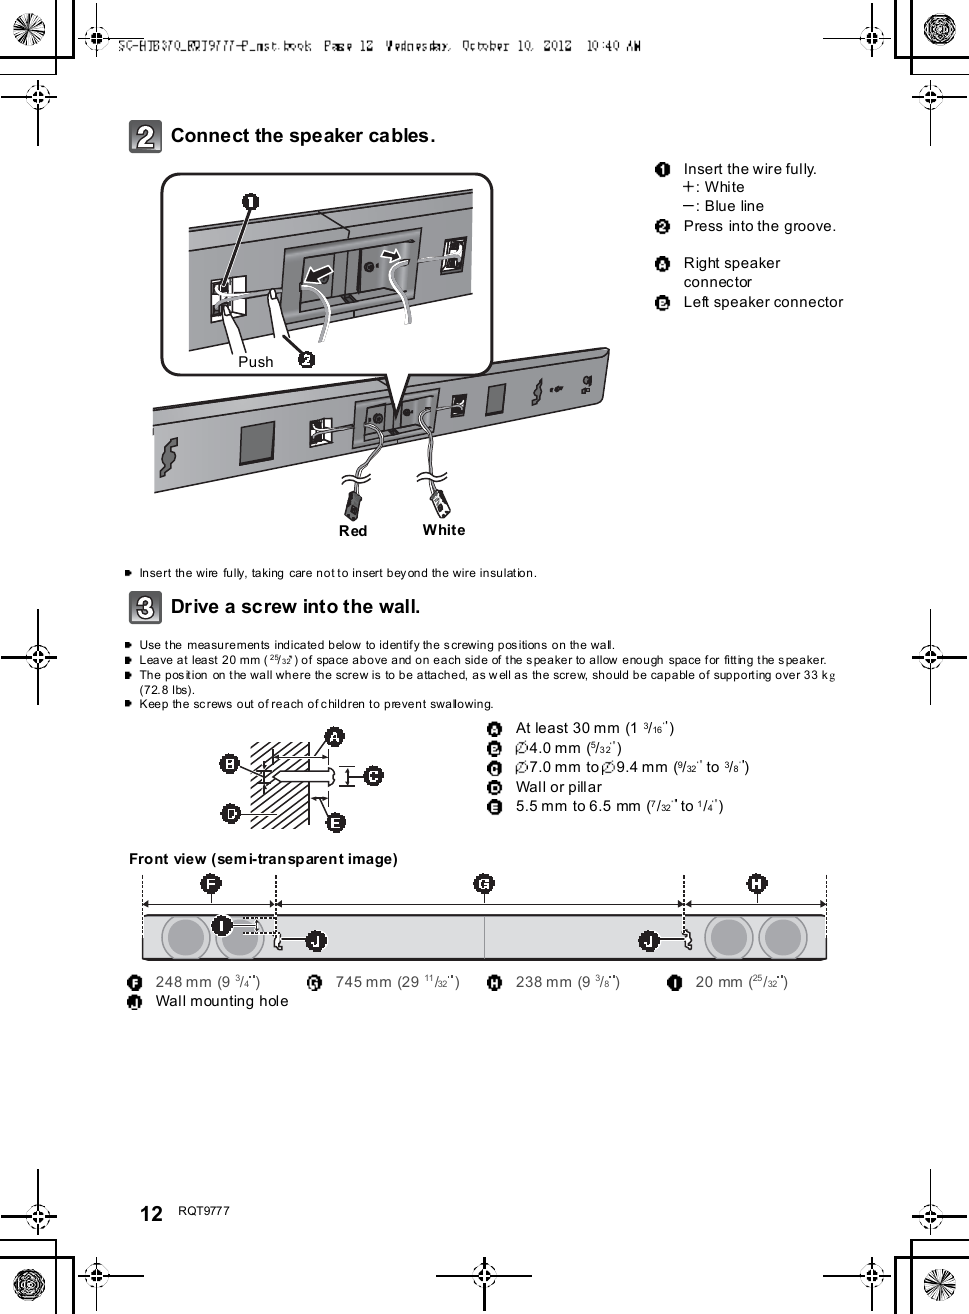
12 R QT977 7Connect the speaker cables.Insert the wire fully, taking care not to insert beyond the wire insulation.Dr ive a screw into the wall.Use the measurements indicated below to identify the screwing positions on the wall.Leave at least 20 mm (25/32 ) of space above and on each side of the speaker to allow enough space for fitting the speaker.The position on the wall where the screw is to be attached, as w ell as the screw, should be capable of supporting over 33 kg(72.8 lbs).Keep the screws out of reach of children to prevent swallowing.Insert the wire fully.: White: Blue linePress into the groove.Right speakerconnectorLeft speaker connectorAt least 30 mm (1 3/16 )4.0 mm (5/32 )7.0 mm to 9.4 mm (9/32 to 3/8)Wall or pillar5.5 mm to 6.5 mm (7/32 to 1/4)248 mm (9 3/4)745 mm (29 11 /32 )238 mm (9 3/8)20 mm (25 /32 )Wall mounting holePushR ed WhiteFront view (semi-transparent image)
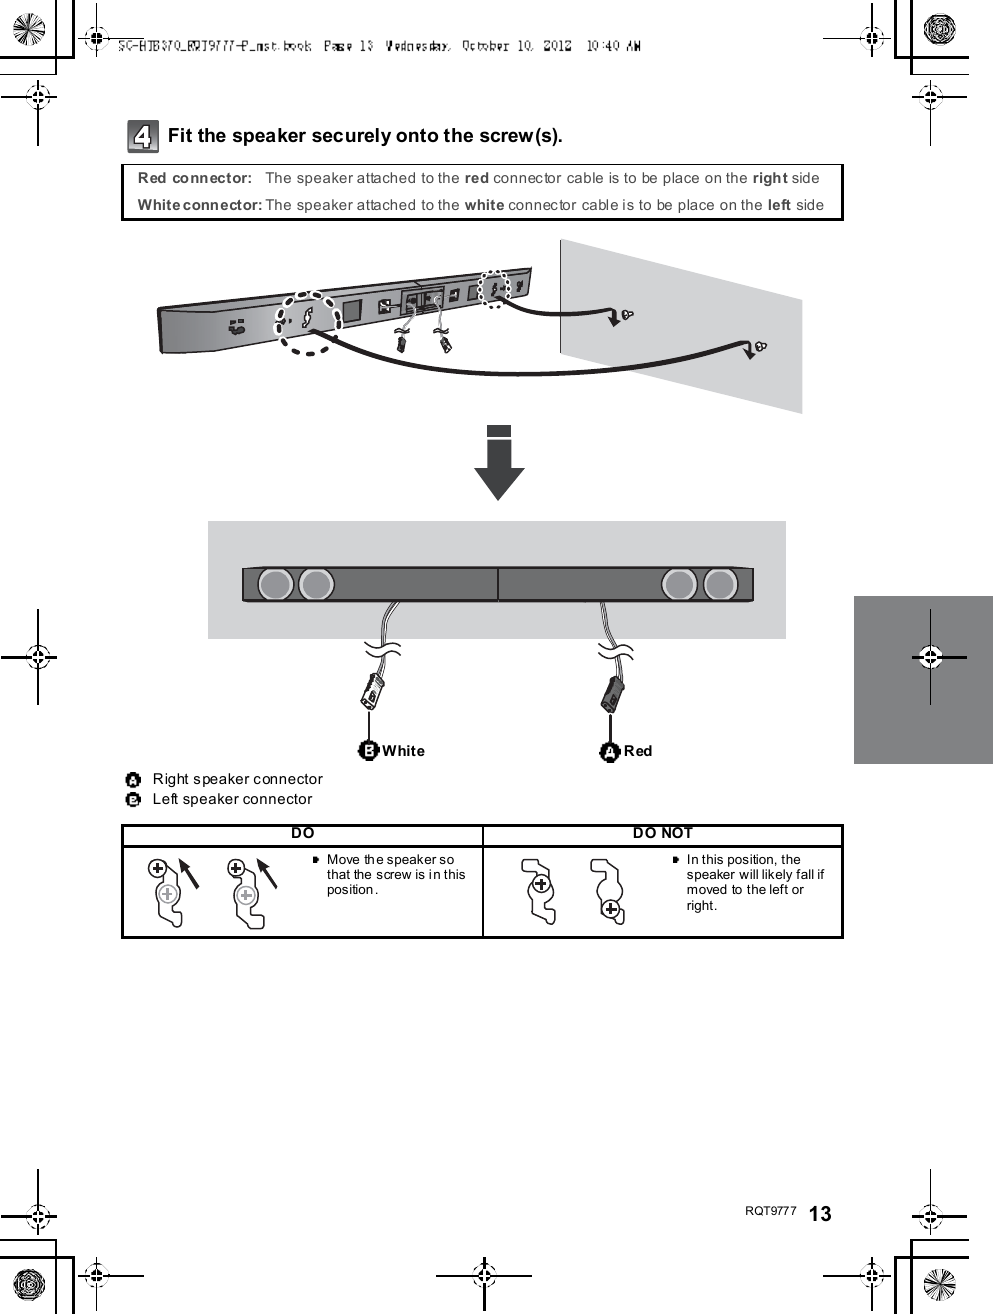
R QT977 7 13Fit the speaker securely onto the screw(s).R ed  co nn ect or: The speaker attached to the red connector cable is to be place on the right sideWhite conn ector: The speaker attached to the white connector cable is to be place on the left  sideRight speaker connectorLeft speaker connectorDO DO NOTMove the speaker sothat the screw is i n thisposition .In this position, thespeaker will likely fall ifmoved to the left orright.R edWhite
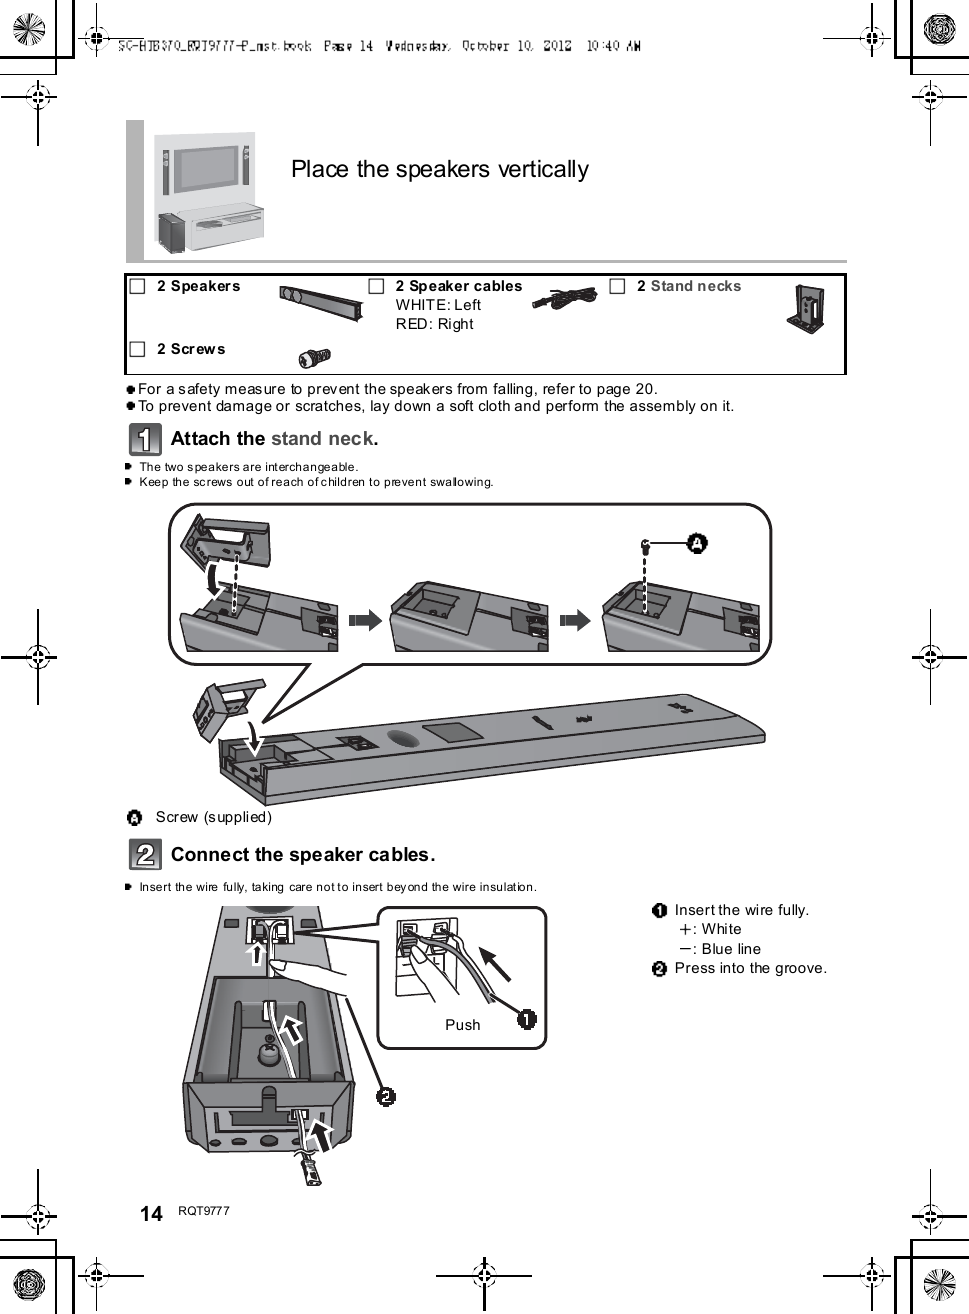
14 R QT977 7For a safety measure to prevent the speakers from falling, refer to page 20.To prevent damage or scratches, lay down a soft cloth and perform the assembly on it.Attach the stand neck.The two speakers are interchangeable.Keep the screws out of reach of children to prevent swallowing.Connect the speaker cables.Insert the wire fully, taking care not to insert beyond the wire insulation.Place the speakers vertically2Speakers 2 Speaker cablesWHITE: LeftRED: Right2Stand necks2 Scr ew sScrew (supplied) Insert the wire fully.: White: Blue line Press into the groove.Push
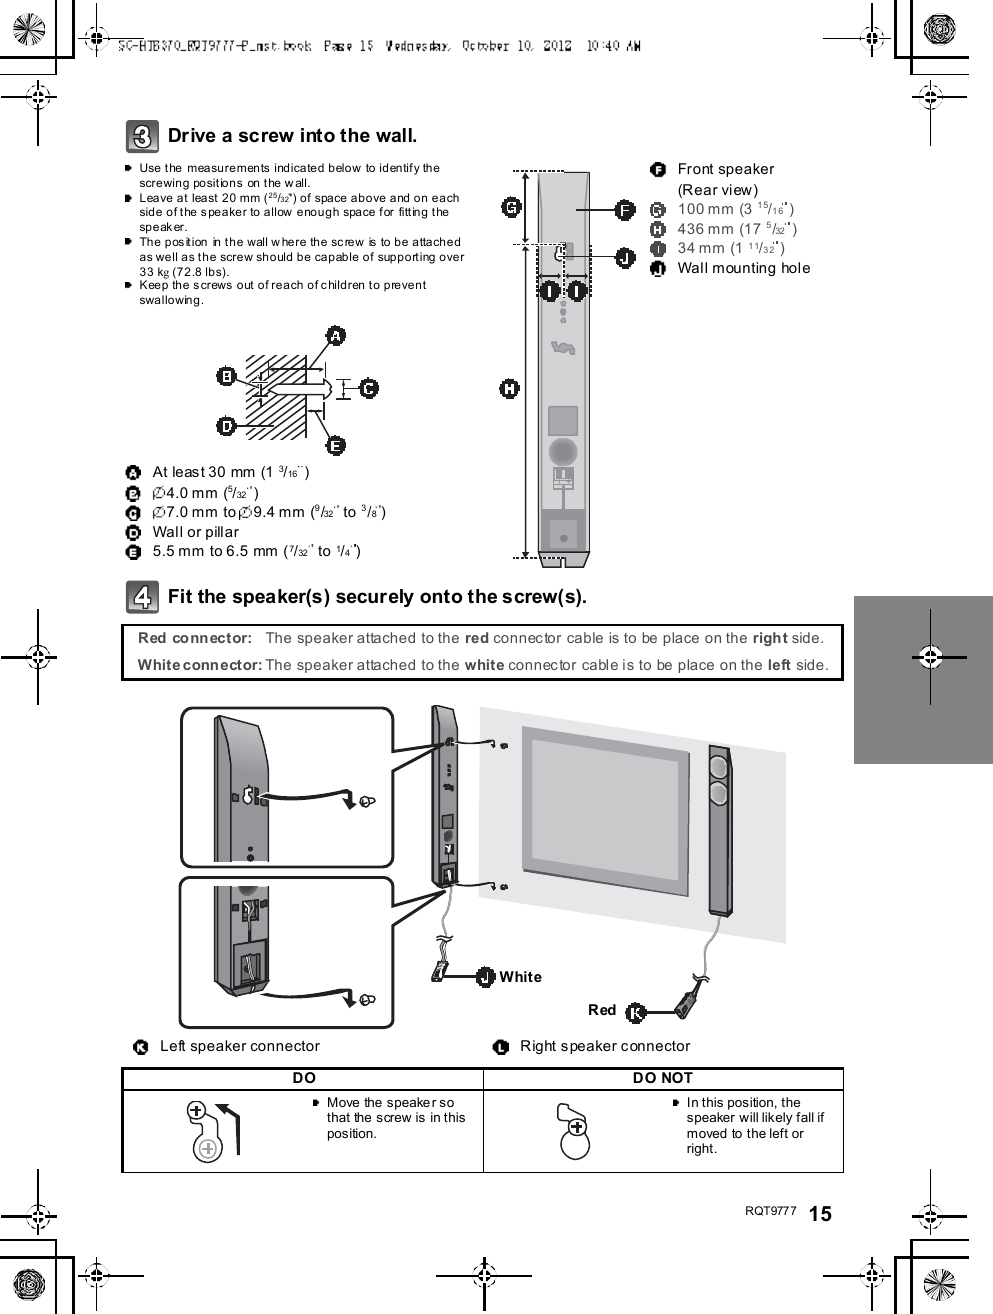
R QT977 7 15Dr ive a screw into the wall.Fit the speaker(s) securely onto the screw(s).Use the measurements indicated below to identify thescrewing positions on the wall.Leave at least 20 mm (25/32 ) of space above and on eachside of the speaker to allow enough space for fitting thesp e ak er .The position in the wall where the screw is to be attachedas well as the screw should be capable of supporting over33kg (72.8 lbs).Keep the screws out of reach of children to preventswallowing.At least 30 mm (1 3/16 )4.0 mm (5/32 )7.0 mm to 9.4 mm (9/32 to 3/8)Wall or pillar5.5 mm to 6.5 mm (7/32 to 1/4)Front speaker(Rear view)100 mm (3 15/16 )436 mm (17 5/32 )34 mm (1 11/32 )Wall mounting holeR ed  co nn ect or: The speaker attached to the red connector cable is to be place on the right side.White conn ector: The speaker attached to the white connector cable is to be place on the left  side.Left speaker connector Right speaker connectorDO DO NOTMove the speaker sothat the screw is in thisposition.In this position, thespeaker will likely fall ifmoved to the left orright.R edWhite
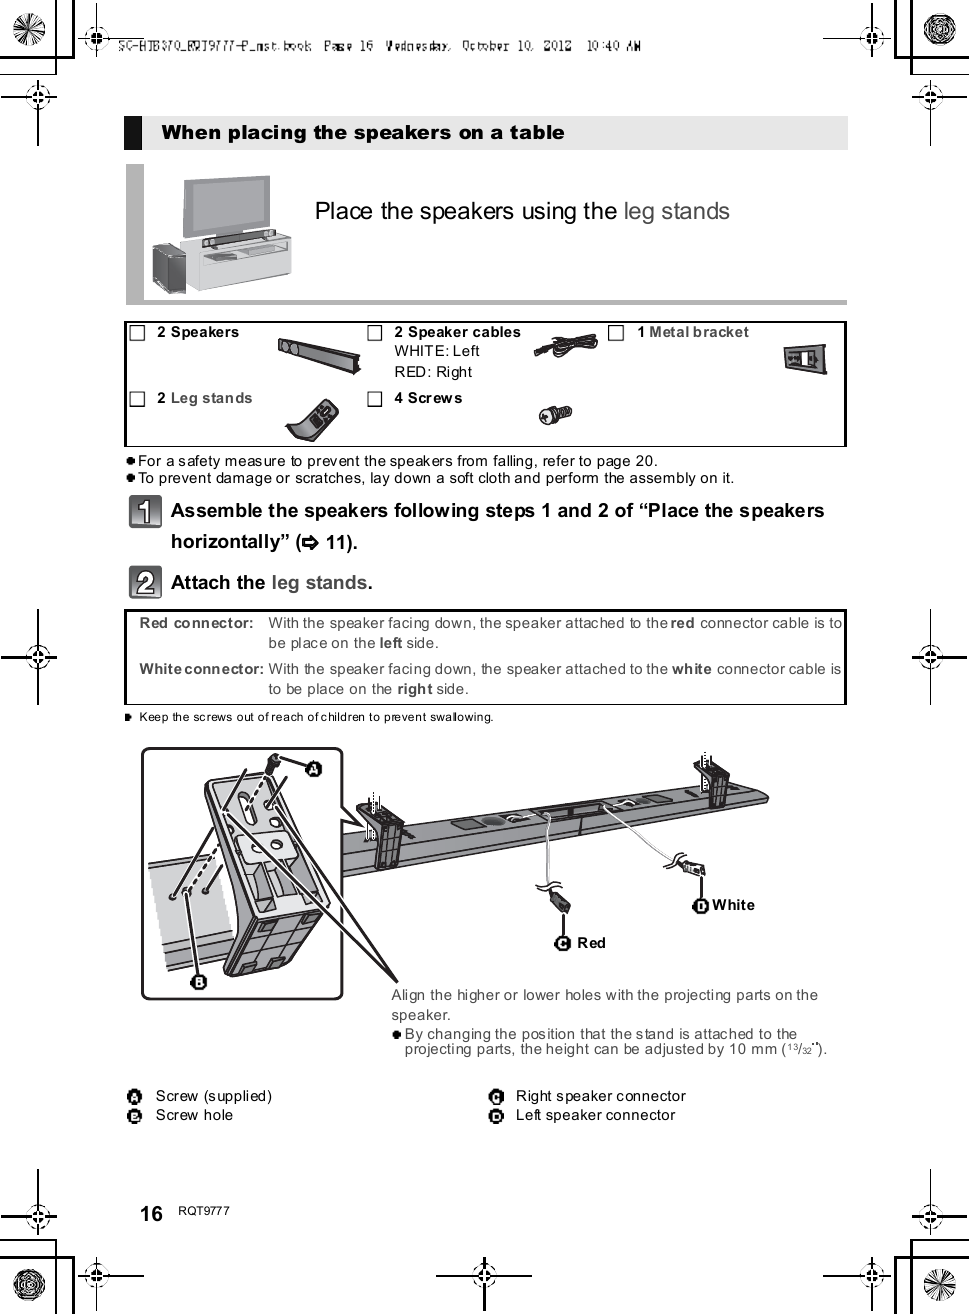
16 R QT977 7For a safety measure to prevent the speakers from falling, refer to page 20.To prevent damage or scratches, lay down a soft cloth and perform the assembly on it.Assemble the speakers following steps 1 and 2 of Place the speakershorizontally ( 11).Attach the leg stands.Keep the screws out of reach of children to prevent swallowing.When placing the speakers on a tablePlace the speakers using the leg stands2 Speakers 2 Speaker cablesWHITE: LeftRED: Right1Metal bracket2Leg stands 4 Scr ew sR ed  co nn ect or: With the speaker facing down, the speaker attached to thered connector cable is tobe place on the left side.White conn ector: With the speaker facing down, the speaker attached to the white connector cable isto be place on the right side.Screw (supplied)Screw holeRight speaker connectorLeft speaker connectorAlign the higher or lower holeswith the projecting parts on thespeaker.By changing the position that the stand is attached to theprojecting parts, the height can be adjusted by 10 mm (13/32).R edWhite
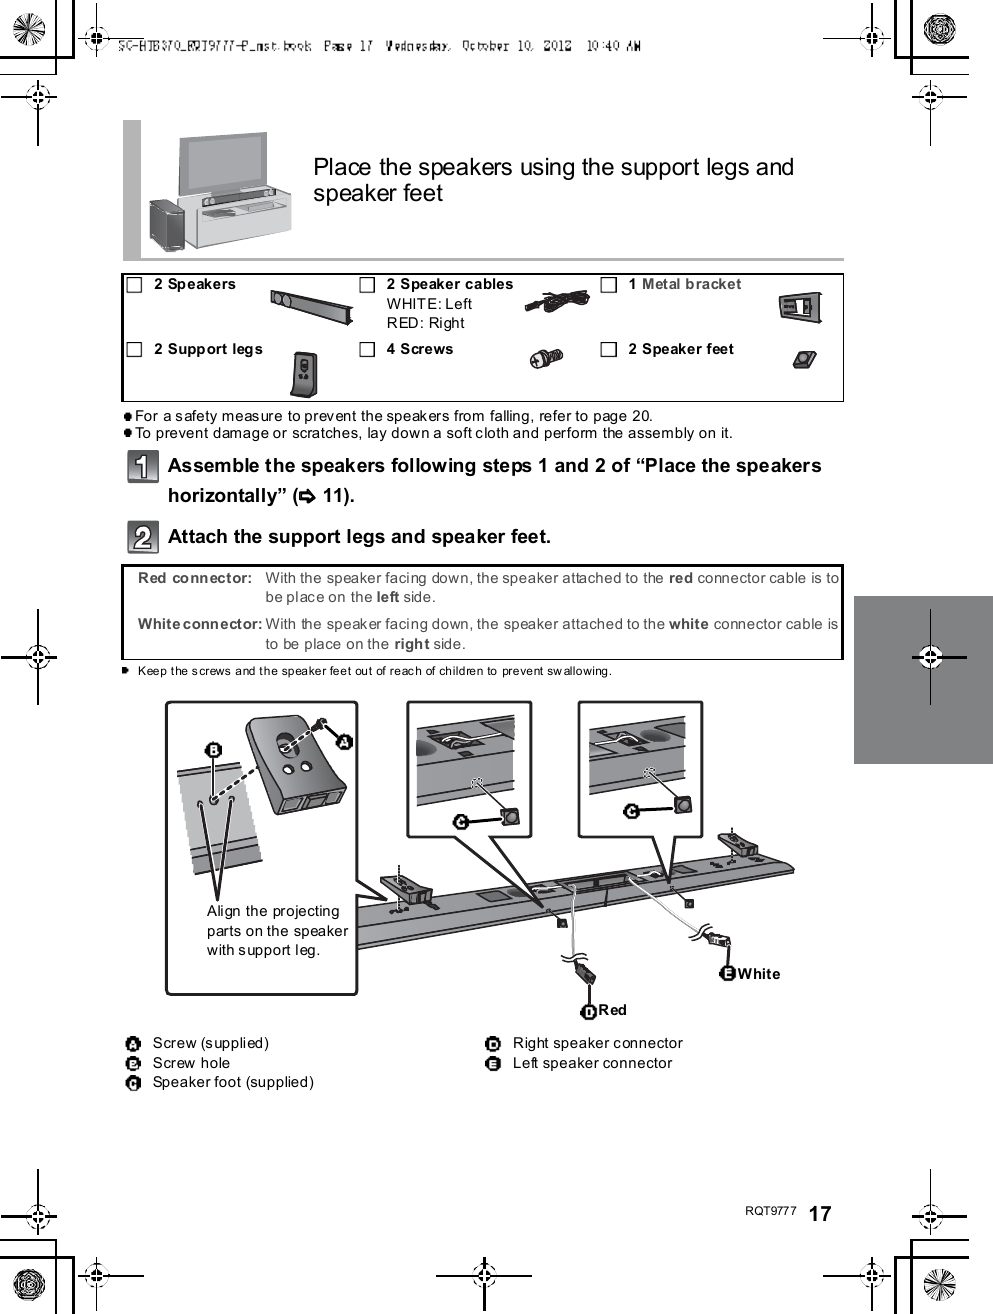
R QT977 7 17For a safety measure to prevent the speakers from falling, refer to page 20.To prevent damage or scratches, lay down a soft cloth and perform the assembly on it.Assemble the speakers following steps 1 and 2 of Place the speakershorizontally ( 11).Attach the support legs and speaker feet.Keep the screws and the speaker feet out of reach of children to  prevent swallowing.Place the speakers using the support legs andspeaker feet2 Speakers 2 Speaker cablesWHITE: LeftRED: Right1Metal bracket2 Support legs 4 Screws 2 Speaker feetR ed  co nn ect or: With the speaker facing down, the speaker attached to the red connector cable is tobe place on the left side.White conn ector: With the speaker facing down, the speaker attached to the white connector cable isto be place on the right side.Screw (supplied)Screw holeSpeaker foot (supplied)Right speaker connectorLeft speaker connectorAlign the projectingparts on the speakerwith support leg.R edWhite
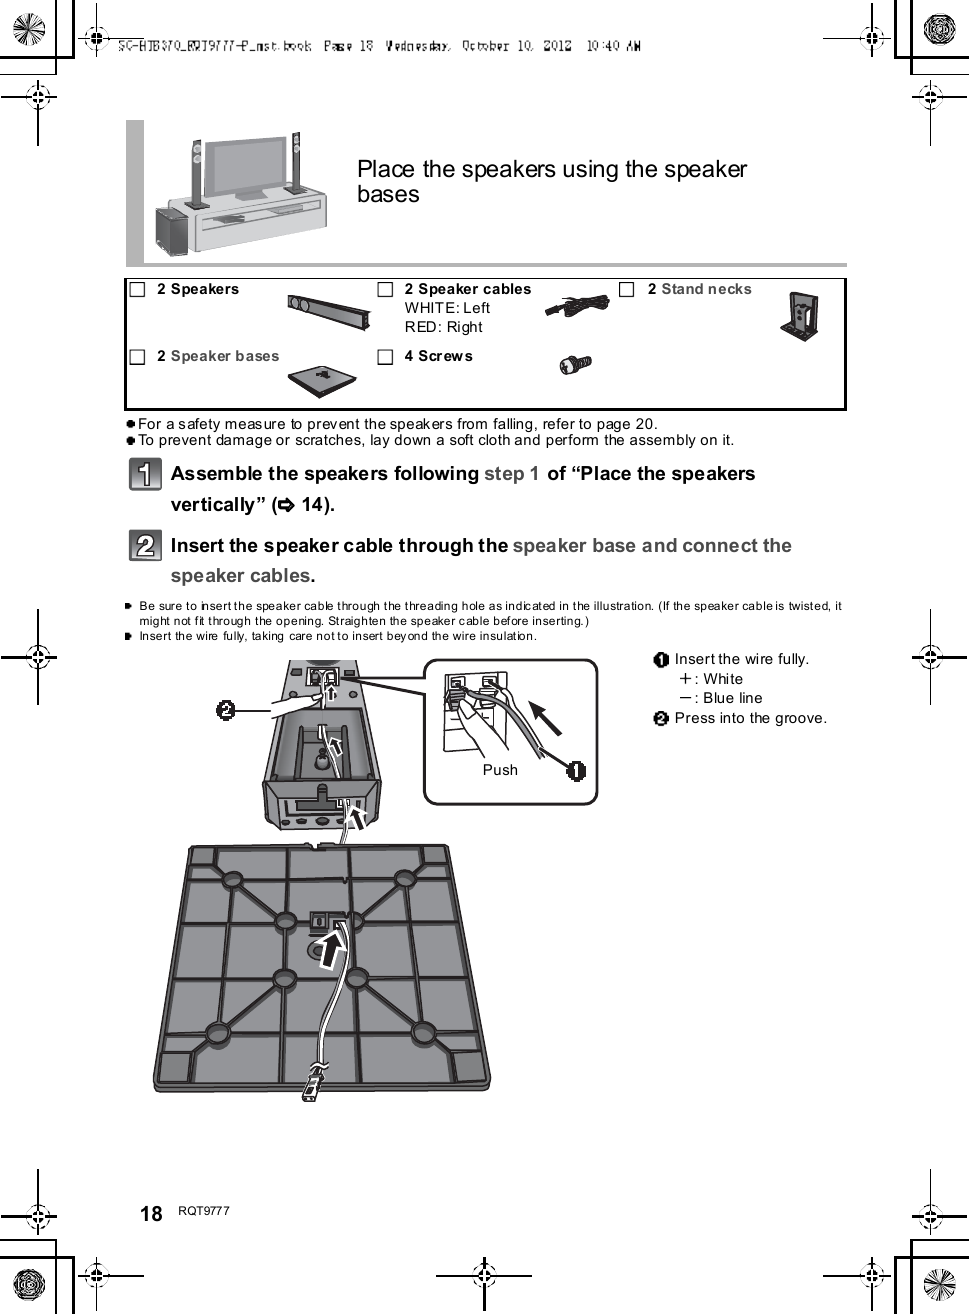
18 R QT977 7For a safety measure to prevent the speakers from falling, refer to page 20.To prevent damage or scratches, lay down a soft cloth and perform the assembly on it.Assemble the speakers following step 1 of Place the speakersvertically ( 14).Insert the speaker cable through the speaker base and connect thespeaker cables.Be sure to insert the speaker cable through the threading hole as indicated in the illustration. (If the speaker cable is twisted, itmight not fit through the opening. Straighten the speaker cable before inserting.)Insert the wire fully, taking care not to insert beyond the wire insulation.Place the speakers using the speakerbases2 Speakers 2 Speaker cablesWHITE: LeftRED: Right2Stand necks2Speaker bases 4 Scr ew s Insert the wire fully.: White: Blue line Press into the groove.Push
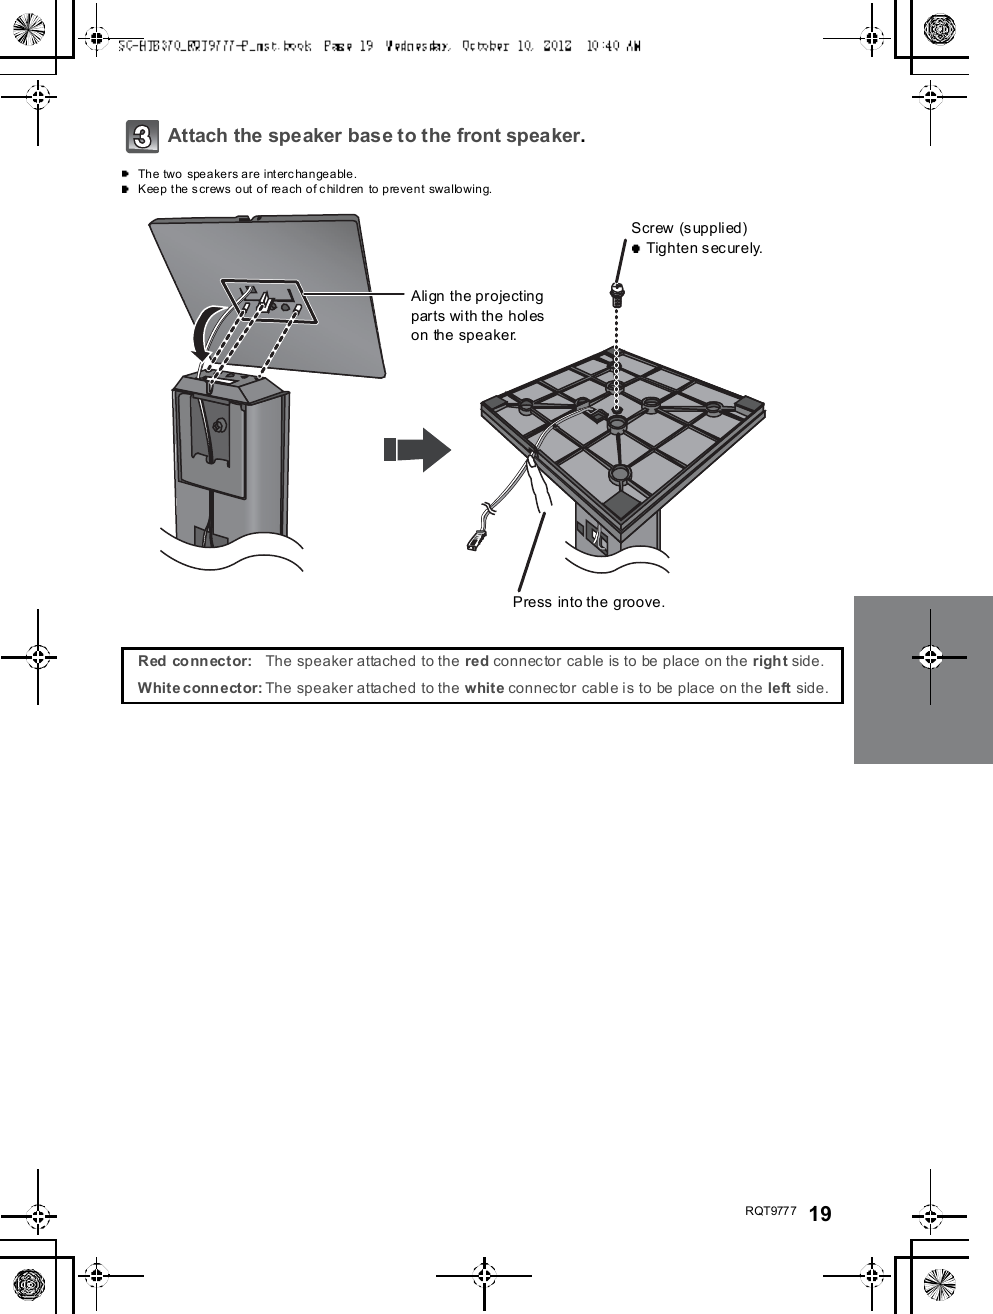
R QT977 7 19Attach the speaker base to the front speaker.The two speakers are interchangeable.Keep the screws out of reach of children  to prevent swallowing.R ed  co nn ect or: The speaker attached to the red connector cable is to be place on the right side.White conn ector: The speaker attached to the white connector cable is to be place on the left  side.Align the projectingparts with the holeson the speaker.Press into the groove.Screw (supplied)Tighten securely.
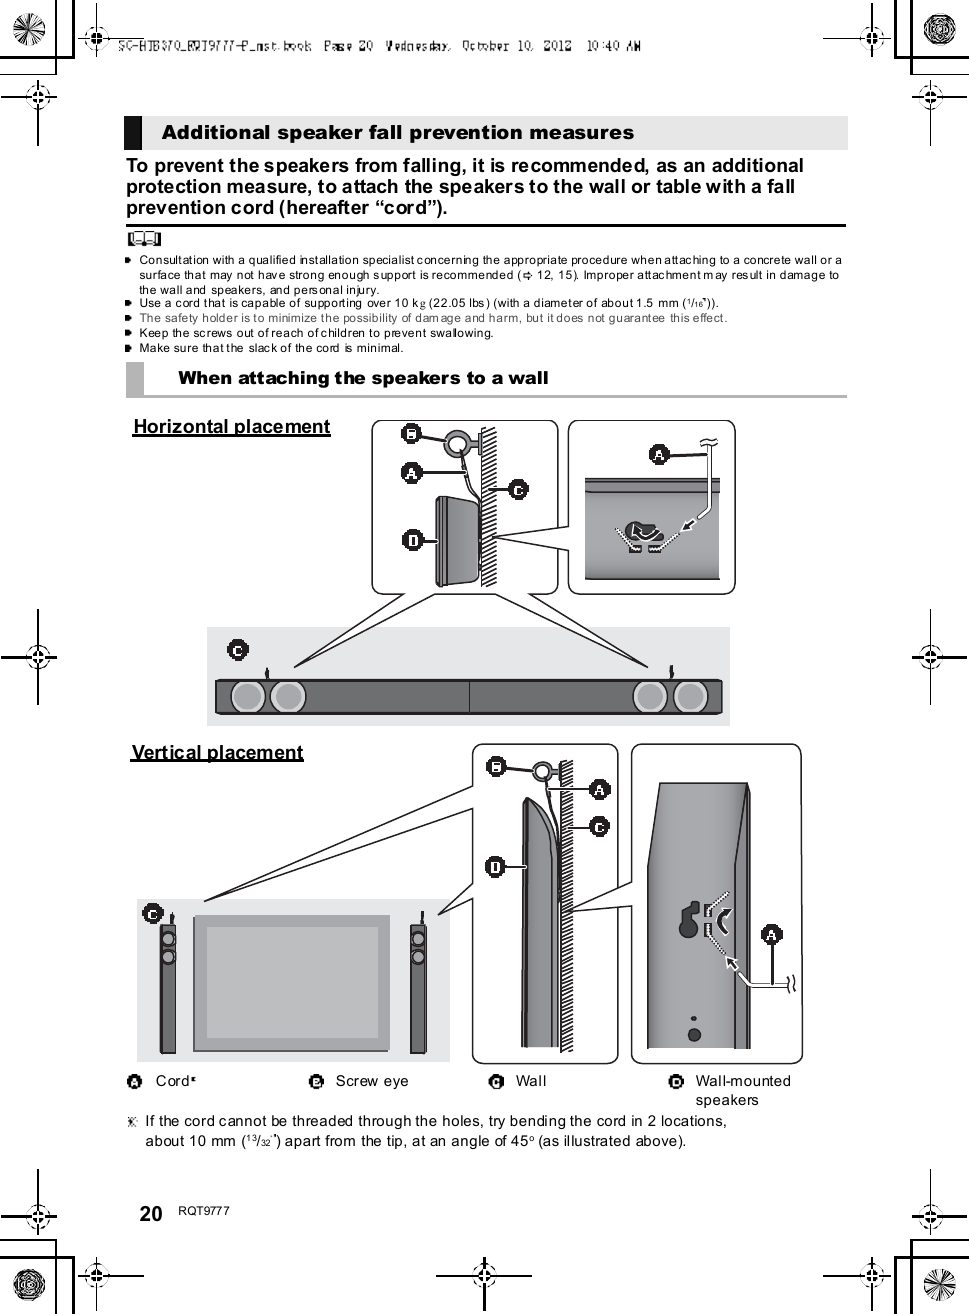
20 R QT977 7To prevent the speakers from falling, it is recommended, as an additionalprotection measure, to attach the speakers to the wall or table with a fallprevention cord (hereafter cord).Consultation with a qualified installation specialist concerning the appropriate procedure when attaching to a concrete wall or asurface that may not have strong enough support is recommended ( 12, 15). Improper attachment may result in damage tothe wall and speakers, and personal injury.Use a cord that is capable of supporting  over 10 kg (22.05 lbs) (with a diameter of about 1.5 mm (1/16 )).The safety holder is to minimize the possibility of dam age and harm, but it does not guarantee this effect.Keep the screws out of reach of children to prevent swallowing.Make sure that the slack of the cord is minimal.Additional speaker fall prevention measuresWhen attaching the speakers to a wallCord Screw eye Wall Wall-mountedspeakers If the cord cannot be threaded through the holes, try bending the cord in 2 locations,about 10 mm (13/32 ) apart from the tip, at an angle of 45o (as illustrated above).Horizontal placementVertical placement
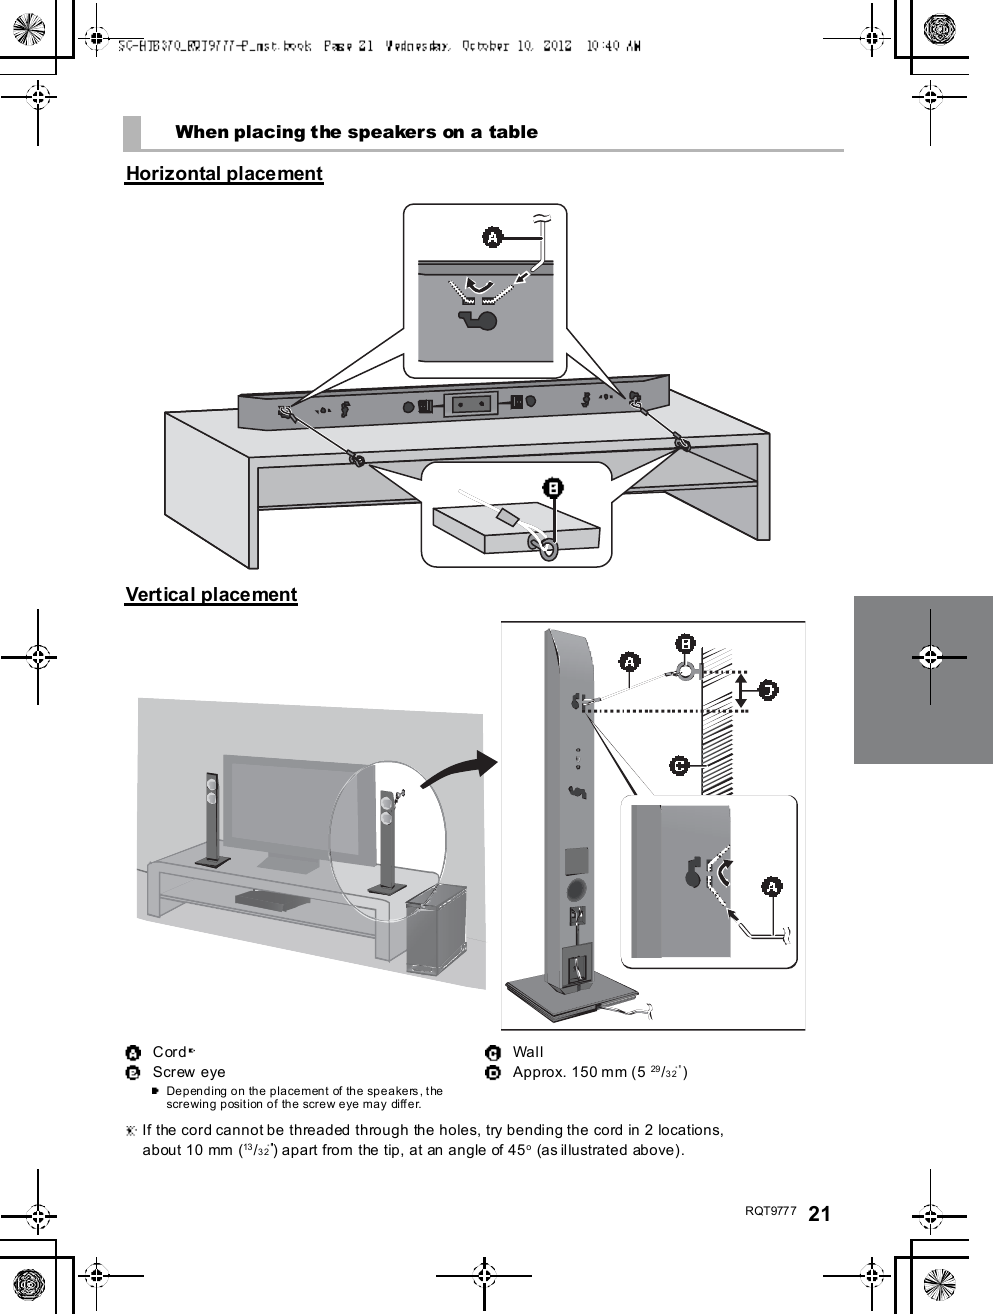
R QT977 7 21When placing the speakers on a tableHorizontal placementVertical placementCordScrew eyeDepending on the placement of the speakers, thescrewing position of the screw eye may differ.WallApprox. 150 mm (5 29 /32 ) If the cord cannot be threaded through the holes, try bending the cord in 2 locations,about 10 mm (13 /32 ) apart from the tip, at an angle of 45o (as illustrated above).
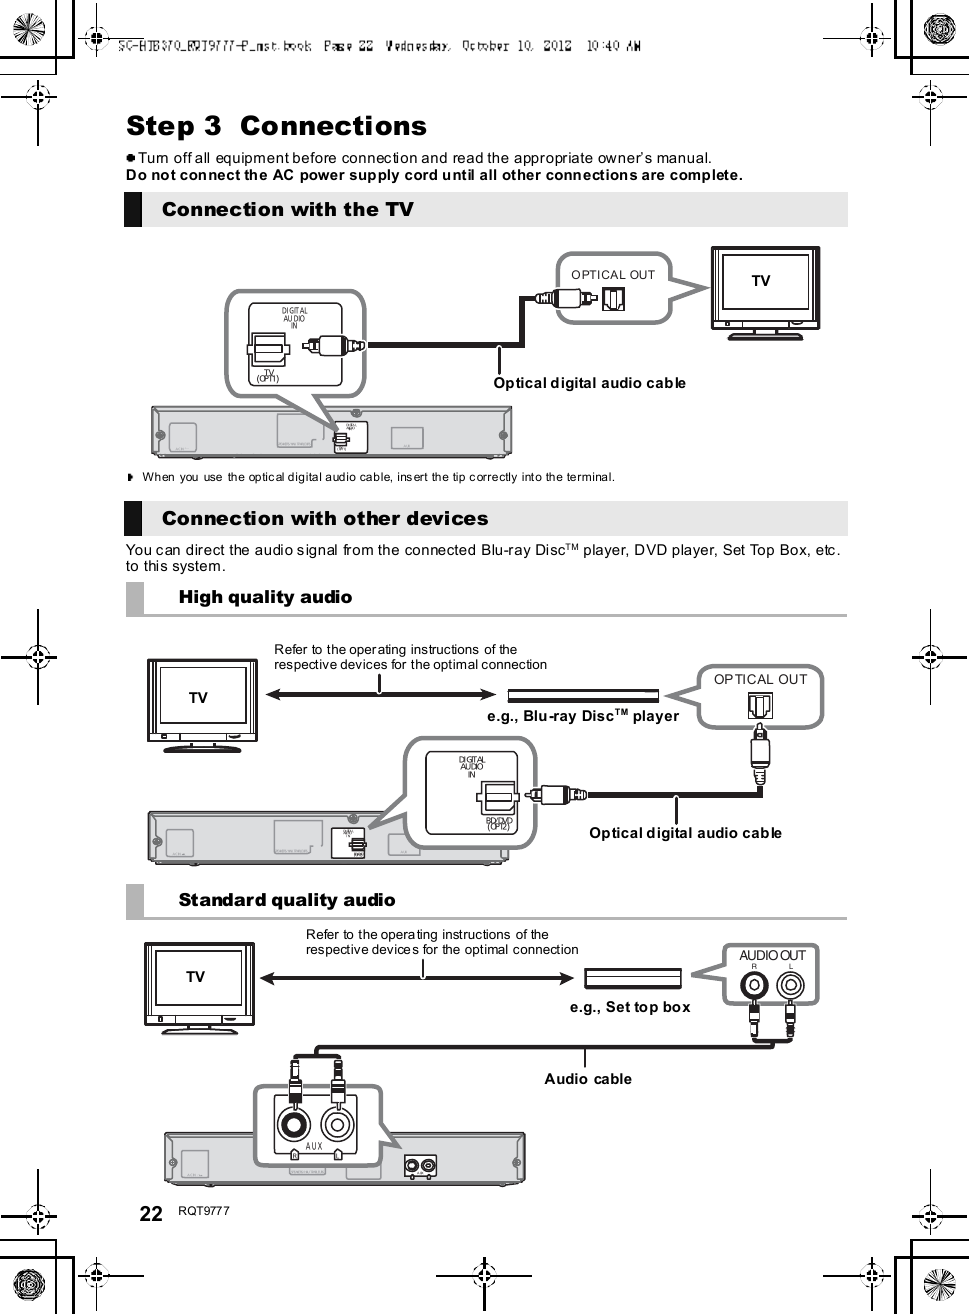
22 R QT977 7Step 3  ConnectionsTurn off all equipment before connection and read the appropriate owners manual.Do not connect the AC power supply cord until all other connections are complete.You can direct the audio signal from the connected Blu-ray DiscTM player, DVD player, Set Top Box, etc.to this system.Connection with the TVWhen you use the optical digital audio cable, insert the tip correctly into the terminal.A C IN A UXDIGITALAUD IOINTV( OPT1)S P E AKE RS / HAU T -P ARL EUR SOPTICAL OUTDI GIT ALAU DIOINTV(OPT1)TVOptical digital audio cableConnection with other devicesHigh quality audioStandard quality audio                     e.g., Blu-ray DiscTM playerTVRefer to the operating instructions of therespective devices for the optimal connectionOptical digital audio cableA C IN A UXR LDIGITALAUD IOINS P E AKE RS / HAU T -P ARL EUR S   AUXR Le.g., Set top boxTVAudio cableRefer to the operating instructions of therespective devices for the optimal connection
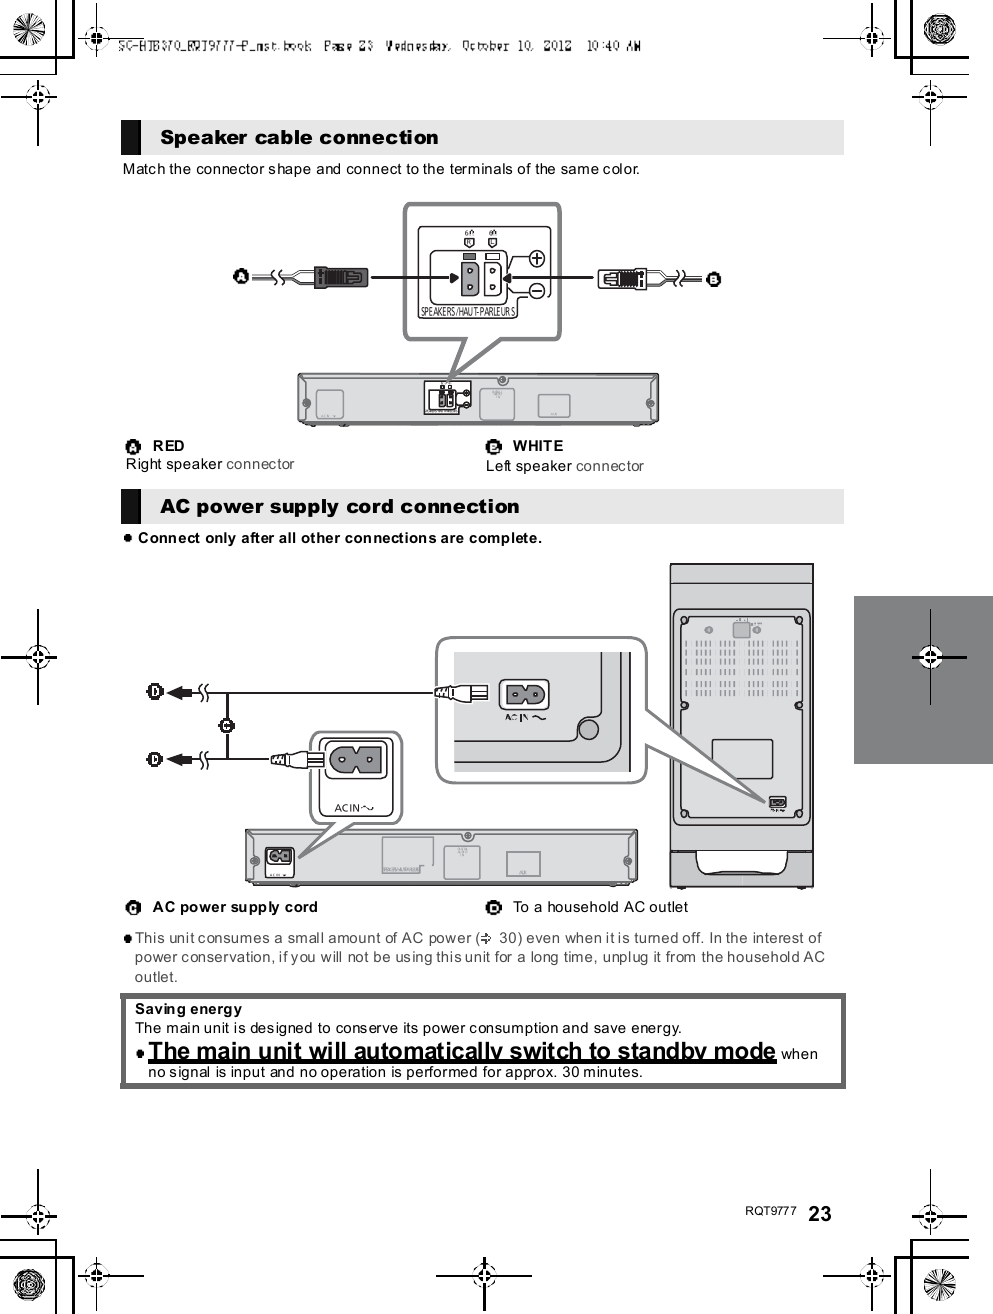
R QT977 7 23Match the connector shape and connect to the terminals of the same color.Connect only after all other connections are complete.This unit consumes a small amount of AC power ( 30) even when it is turned off. In the interest ofpower conservation, if you will not be using this unit for a long time, unplug it from the household ACoutlet.Speaker cable connectionR EDRight speaker connectorWHITELeft speaker connectorAC power supply cord connectionAC power su pp ly cord To a household AC outletSaving energyThe main unit is designed to conserve its power consumption and save energy.The main unit will automatically switch to standby mode whenno signal is input and no operation is performed for approx. 30 minutes.                                 
24 R QT977 7PreparationTurn on the main unit.Press [ I].Active subwoofer on /off button [ , I]Use this button to turn the active subwoofer on andoff. I:The active subwoofer is on:The active subwoofer is offThe active subwoofer will still consume a smallamount of power even when it is turned off ( , )Check that the wireless link isactivated.WIRELESS LINK indicator lightsRed:The wireless link is not activated.Green:The wireless link is activated.By using the Bluetooth® connection, you can listento the sound from the Bluetooth® audio devicefrom this unit wirelesslyPreparationTurn on the Bluetooth® feature of the device andplace the device near this unit.Press [ ,  PAIRING].indicator will blink quickly.Select SC-HTB370 from theBluetooth® devices Bluetooth®menu.O nc e t he  B l u et oo th ® device is connected, the   indicatorstops flashing and lights up.Refer to the operating instructions of the Bluetooth® device forfurther instruction on how to connect a Bluetooth® device.If prompted for the passkey on the Bluetooth® device, enter0000.Press [ ,  PAIRING].Press and hold the [ ,  PAIRING]until the   indicator flashesqui ckly.Repeat step 2 of Pairin g a device.You can register up to 8devices  with  this u nit . If  a 9th deviceis paired, the device that has not been used for the longesttime will be replaced.This unit can only be connected to one device at a time.To change the sound quality, refer to Bluetooth®communication mode on page 27.Active subwoofer wirelessconnection Bluetooth® connectionPairing a devicePairing additional devices
R QT977 7 25Using this unitPreparationTurn on the active subwoofer.Turn on the TV and/or connected device.Press [ ] to turn on the main unit.Sel ect the source.This remote control cannot be used to control the operationsof the connected devices.When   is sel ected as the so urceOn the Bluetooth® device:Select th is unit as the ou tput source of  the Bluetooth®device and start the playback.Make sure that the Bluetooth® device is already paired withthis  unit. ( 2 4)Playback may pause when a different source is selected.When BD/DVD is selected as thesourceOn the connected device:Select the TVs input for this unit and start the playback onthe connected device.When AUX is selected as the sourceOn the connected device:Select the TVs input for the device connected to AUXterminal and start the playback on the co nnected device.Adjust the volume and sound effectlevel.To adjust the volume of this unitPress [ VOL ].Volum e range: 1 to 100To adj ust the dial og effect levelThis setting will change the level of the Clear-mode dialog effect. ( 26)1 Press [ DIALOG LEVEL ] to display thecurrent level.2 While the level is displayed:Press [ DIALOG LEVEL ] to adjust thelevel.To adjust the subwoofer level1 Press [ SUBWOOFER ] to display thecurrent level.2 While the level is displayed:Press [ SUBWO OFER ] to adjust thelevel.The level indication pattern is the same as dialog effectlevel.To mute the soundPress [MUTE].While muting, the sound mode indicators blinksimultaneously.To cancel, press the button again or adjust the volume.Muting is canceled if the main unit is turned off.The sound mode indicators blink fro m le ft  to  right  ( ) or from righ t to left ( ) while a djustin g.The indicators will not blink when it has reached the maximum or minimum.If there is sound coming out of the TVs speakers, reduce the volume of the TV to its minimum.If the main unit is turned off with the volume setting in the greater half (above  50), the main unit will automatically lower thevolume to the middle (50) when  the main unit is turned on (Volume limitation).To turn this function off, refer to page 28.Press To select[IN PUTSELECTOR]TVBD/DVDAUX[]   (Bluetooth®)       Indication Effect level4Highest321LowestIf the main unit does not operate as expected or sound is unusual, return the settings to thefactory preset and operate the system again. ( 29)
26 R QT977 73D soundThis unit provides a feel in g that the sound and the imageare as one.To change the applied effect, refer to Audio outputmodes. ( right)To turn off Dolby Virtual Speaker and the 3D surroundeffects, select STEREO as the audio output mode.(right)To turn off the 3D surround and the Clear-mode dialogeffects, refer to Only using the Dolby Virtual Speakere ffect .  ( 2 8)By changing the audio output mode, it is po ssible to enjoythe soun d that is su itable to the TV  program or image fromthe connected device.To select the sound modePress [SOUND].STANDARDSTADIUMMUSICSTEREO NEWS CINEMAThe indicator for the selected sound mode lights.E.g., STANDARDThe setting is maintained until it is changed again.When using the optical digital audio cable, D olby VirtualSpeaker and the 3D surround effect will be temporarilycanceled if the audio signals sampling frequency is greaterthan 48 kHz.3D sou ndDolby VirtualSpeakerWith this effect you can enjoy asurround sound effect similar to5.1ch.3D surr oundeffectAdding to  the Dolby VirtualSpeaker effect, Pan asonic h asapplied its own sou nd fieldcontrollin g technology to expandthe sound field fo rwards,backwards, upwards, anddownwards, providing a soundwith depth and fo rce that bettermatches 3D images.Clear-modedialogSports commentary and dialogsfrom TV dramas are heard as if thesound is coming from the TV,giving the feeling that the soundand the image are one.Also, the dialog will stand out fromthe other sounds during normalvolume playback and when thevolume is lowered for night timeviewing.e.g., Image of 3D sound fieldAudio output modesSound m odeSTANDARD(Factory preset)Produces a soun d best suited fordramas and comedy shows.STAD IUMProduces a highly realistic soundfor live broadcasts  of sports.MUSICRe-creates the sound of musicalinstruments and songs with anexpansive sound.CINEM AProduces a powe rful, three-dimention al sound unique tomovies.NEWSEnhances the voices of news andsports commentaries for clearerhearing.STEREOYou can play any source in stereo.Dolby Virtua l Speaker and 3Dsurround effects are turned off.
R QT977 7 27Advanced operationsTo display the current au dio format,Press and hold [SOUND] for more than4 sec.The current audio format is indicated for 5 sec.The audio format status is also indicated for 5 sec if theaudio format on the selected source (TV, Blu-ray Disc/DVD Player, etc.) is changed.Change the dual audio from main to secondary.This setting will only work if the audio outp ut settin g onthe connected TV or player, etc. is set to "Bitstream"and dual audio is available in the audio source.Press  and h old [MUTE] for more than4 sec.While the setting is displayed, press[MUTE] to change the setting.The indicator for the selected setting blinks for 20 sec andthen exits the setting mode.The setting is maintained until it is changed again.The same setting is used for all digital audio sources.With this function, you can prevent sudden loud sounds.The output will be reduced automatically when the inputexceeds a certain level.Press and hold [INPUT SELECTOR]on remote controller for more than4sec.While the setting is displayed, press[INPUT SELECTOR] to change thesetting.The indicator for the selected setting blinks for 20 sec andthen exits the setting mode.The setting changes each time [INPUT SELECTOR] ispressed.The setting is maintained until it is changed again.Default se t ting  of th is f unc tion  is  O FF.You can select different modes to suit the type ofconnections which emphasis on connectivity or highquality audio.Make su re that a Bluetoo th® device is already pairedwith this unit. ( 24)Disable the Bluetooth® connection ofthe device.indicator will blink slowly.Press [LINK MODE,  ] to display thecurrent mode.While the mode is displayed, press[LINK MODE,  ] to select the mode.The setting changes each time [LINK MODE,  ] ispressed.The indicator for the selected setting blinks for 10 sec andthen exits the setting mode.The setting is maintained until it is changed again.Audio format indicatorSTADIUM indicator blinks:Dolby Digital is the audio format.MUSIC indicator blinks:DTS is the audio format.CINEMA indicator blinks:PCM or LPCM is the audio format.Changing the dual audioSTANDARD indicator blinks ( ):M a in (Factory preset)STEREO indicator blinks ( ):Secondary(SAP: Secondary Audio Program), : Main and secondaryAuto gain controlSTANDARD indicator blinks:Auto gain control is on.STEREO indicator blinks:Auto  gain control is off.(Factory preset)Bluetooth® communicationmodeSTANDARD indicator blinks:MODE1 (Factory preset)Emphasis on connectivitySTEREO indicator blinks:MODE2Emphasis on audio quality
28 R QT977 7Depending on your preferen ce, It is possible to turn off the3D surround effect a nd the clear-mode dialog effect.While pressing and holding [SOUND]on the remote control, press andhold [VOL ] on the main unit formore than 4 sec.Whi le th e setti ng is di spl ayed, press[SOUND] to change the setting.The setting changes each time [SOUND] is pressed.The indicator for the selected setting blinks for 20 sec andthen exits the setting mode.This setting will be reset to on when this unit is turned off.When off is selected, the dialog effect level cannot beadjusted.You can turn off dimmer mode and keep the LEDindicators bright.While pressing and holding [INPUTSELECTOR] on the remote control, pressand hold [ VOL] on the main unit to turnoff Dimmer mode.The indicator for the current condition will turn brighter.The setting is maintained until it is changed again.Default setting of this function is on.To turn on dimmer mode, repeat the operation above.After performancing the operation, the indicator for thecurrent condition will be dim.Remote control codeWhen other Panasonic devices respond to this unitsremote control, change the remote control code on themain un it and the remote control.PreparationTurn off all other Panasonic products.Turn on the main unit.Change the remote control code to code 2:1 Aim the remote control at this units remotecontrol sensor.2 Press and hold [MUTE] and [ ] on the remotecontrol for more than 4 sec.All the indicators will blink for 10 sec when the code ofthis unit is changed.The setting is maintained until it is changed again.If this unit does not operate after changing the code, repeatsteps 1  and 2.To change the remote control code to code 1, repeat thesteps above, but replace []with [INPUT SELECTOR].To reduce the clear-mode dialog effectWhen the dialog does not sound natural while the volumeis set low, it is p ossible to reduce the dialog enhancingeffect as follows:While pressing and holding [SOUND] on theremote control, press and hold [ VOL] on themain unit for more than 2 sec.All the indicators will blink once when the clear-mode dialogeffect is reduced.Even if clear-mode dialog effect is reduced, dialog effectlevel is still adjustable.To reset th e setting, re turn to the f ac to ry p res et. ( 2 9)To turn off the volume limitationIf a state of the lowered volume disturbs you every timethis unit turns on, for example, it is possible to turn off thisfunction as follows:While pressing and holding [MUTE] on the remotecontrol, press and hold [VOL ] on the main unitfor more than 2 sec.All the indicators will blink once when the volume limitationis turned off.To reset th e setting, re turn to the f ac to ry p res et. ( right)Only using the DolbyVirtual Speaker effectSTANDARD indicator blinks:3D surround effect and clear-modedialog effect is on.STEREO indicator blinks:3D surround effect and clear-modedialog effect is off.Dimmer modeOthers
R QT977 7 29TroubleshootingBefore requesting service, make the following che cks. Ifyou are in doubt about some of the check points, or if thesolutions  indicated in the following guide do not solve theproblem, refer to Customer Services Directory (UnitedStates and Puerto Rico) on page 34 if you reside in theU.S.A. or Puerto Rico, or refer to WARRANTY SERVICEon page 35 if you reside in Canada.No power.Insert the AC power supply cord securely. ( 23)After turning th e main un it o n, if the indicators blink a ndthe main unit immediately turns off, unplug th e ACpower supply cord and consult your dealer.The rem ote control does not work properly.The batte ry is depleted. Replace it with a new one.(8)It is possible that the insulation sheet has not beenremoved. Remove the insulation sheet. ( 8)It may be necessary to set the code of the remotecontrol again after changing the battery of th e remotecontrol. ( 28)Use the remote control within th e correct operationrange. ( 8)The TV indicator blinks.Remove the AC power supply cord and consult yo urdealer. If there are any other indicators blinking, b e sure toinform your dealer about the blinking indicators.The main unit is automatically switched tostandby mode.The main unit will automatically switch to standby modewhen no signal is input and no operation is performed forapprox. 30 minutes. ( 23)Pairing cannot be don e.Check the Bluetooth® device condition.The device cannot be connected.The pairing of the device was unsuccessful. Try pairingthe device again.The pairing of the device h as been rep laced. P air thedevice again. ( 24)This unit might be connected to a different device.Disconnect the other device and try pairing the deviceagain.The device is connected  but audio  cannot beheard through this unit.For some built-in Bluetooth® devices, you have to set theaudio output to SC-HTB370 manually. Read theoperating instructions for the device for details.Sound from  the device is uneven.The device is out of the 10 m (33 ft) communicationrange. Br ing the device closer to the main unit.Remove any obstacle between the main unit and thedevice.Switch off any wireless LAN device.Select MODE1 for stable communication. ( 27)No sound (or image).Turn muting off. ( 25)Check the connections to the other devices. ( 22)Make sure that the received audio signal is compatiblewith this unit. ( 30)Turn this unit off and the n on again.If the connections are cor rect, there might be a problemwith the cables. Redo the connections with differentcables.Check the audio output settings on the connecteddevice.The dual audio cannot be changed from mainto secondary.If the audio received from the connected de vice is notDolby Dual Mono or the output setting is not Bitstream,the setting cannot be changed from this unit. Change thesetting on the connected device.The volume is lowered when this unit is turnedon.If the main unit is turned off with the volume setting in thegreater half (above 50), the main unit will automaticallylower the volume to the mi ddle (50) when the main unit isturned on . ( 28)The dialog is too persistent or the dialog doesnot sou nd natural.This un it has a function to make the dialog stand ou t whenthe volume is low. ( 28)To return to the factory preset.While the main unit is on, press [ /I] on the mainunit for more than 4 sec.(All the indicators will blink twice when the mainunit is reset.)If this unit does not operate as expected,returning the settings to the factory presetmay solve the problem.The remote control code will return to  whenthe main unit is returned to the factory preset.To change the remote control code, refer topage 28.General operationBluetooth®Sound
30 R QT977 7There is no audio.The power of the main un it  turns offautomatically.(When the main unit detects a problem, a safety measureis activated and the main unit automatically switches tostandby mode.)There is  a problem with the amplifier.Is the vo lume extremely high?If so, lower the vo lume.Is this unit placed in an extr emely h ot place?If so, move this unit to a cooler place and wa it a fewmoments and then try to turn it on again.If the problem persists, confirm the TV indicator andBD/DVD indicator blink, turn this unit off, remove the ACpower supply cord and consult yo ur dealer. Please besure to remember the indicators that were blinking andinform th e dealer.No power.Ensure the AC power supply cord of the active subwooferis connected properly.After turning the subwoofer on, it immediatelytu rns off.Unplug the AC power supply cord and consult your dealer.No sound from the subwoofer.Check that the active subwoofer is turned on.Check that the wireless link indicator lights green.(24)The wireless link indicator lights red.There is  no link  between this unit and the activesubwoofer.Check that this unit is turned on.Turn the active subwoofer off and then back on.Alternatively, turn the active subwoofer off,disconne ct the AC power supply cord and thenreconnect it.The active subwoofer an d the main unit may not bepaired corr ectly. Try the following ope ration. (Wirelesspairing)Turn on the ma in unit and active subwoofer.Press [ID SET] on the rear of the active subwoofe r.(The WIRELESS LINK indicator wi ll light red andgreen alternately.)While pressing and holding [INPUT SELECTOR] onremote control, press and hold [VOL ] on the mainunit for more than 4 sec. (The BD/DVD indicator willblink and sound mode indicators light up insequence.)When the wireless pairing is successful, BD/DVDindicator will stop flashing and WIRELESS LINKindicator lights green.Turn the main unit off and on.Consult your dealer if the problem persists.SpecificationsActive SubwooferAMPLIFIER SECTIONRMS output power10 % total harmonic distortionSubwoofer ch120 W per channel (100 Hz, 8 )Fro nt ch (L, R ch)60 W per channel (1 kHz, 6 )Total RMS Dolby Digital mode power300 WFTC output pow er1.0 % total harmonic distortionSubwoofer ch60Hzto120Hz40W(8 )Fro nt ch (L, R ch)120 Hz to 20 kHz 25 W (6 )Total FTC Dolby Digital mode power115 WWIRELESS SECTIONWireless moduleFrequency Range 2.4 GHz bandNumber of channels 3TERMINAL SECTIONDigital audio inputOptical digital input (TV, BD/DVD) 2Sampling frequency32 kHz, 44.1 kHz, 48 kHz88.2 kHz, 96 kHz (only LPCM)Audio  form atLPCM, Dolby Digital, DTSSPEAKER SECTIONFront speakers2 way, 2 speaker system (Bass reflex type)Speaker unit(s) Impedance 6Woofer6.5 cm (2 1/2) cone type 1Tweeter2.5 cm (1 ) semi-dome type 1Frequency range 100 Hz to 30 kHz ( 16 dB)150 Hz to 25 kHz ( 10 dB)Active subwoofer1 way, 1 speaker system (Bass reflex type)Woofer 16 cm (6 1/2) cone type 1Frequency range 30 Hz to 180 Hz ( 16 dB)35 Hz to 160 Hz ( 10 dB)
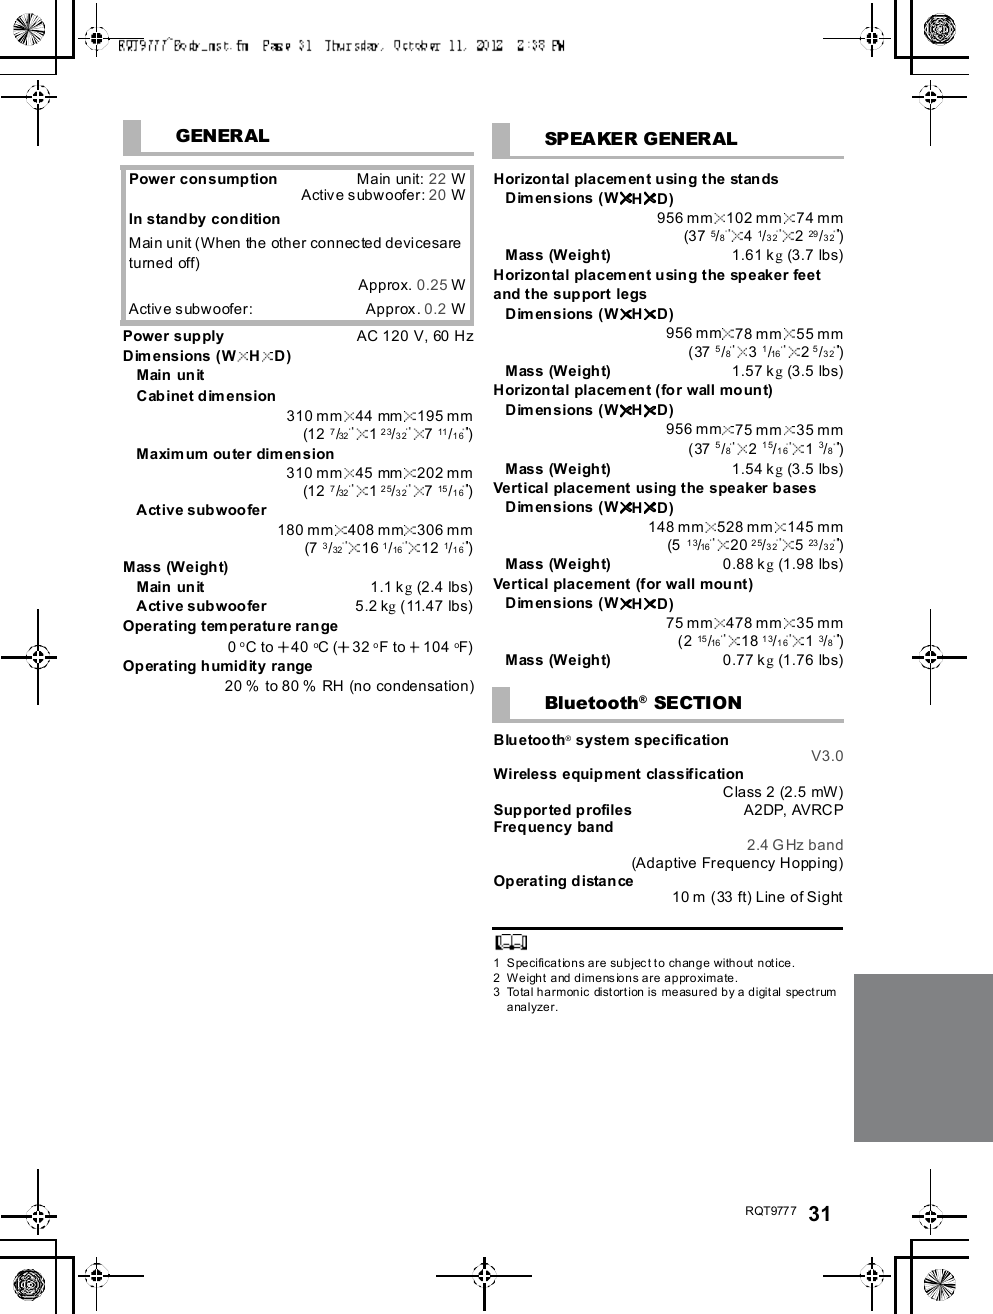
R QT977 7 311 Specifications are subject to change without notice.2 Weight and dimensions are approximate.3 Total harmonic distortion is measured by a digital spectrumanalyzer.GENER ALPower con sumption Main unit: 22 WActive subwoofer: 20 WIn stand by conditionMain unit (When the other connected devicesareturned off)Approx. 0.25 WActive subwoofer: Approx. 0.2 WPower sup ply AC 120 V, 60 HzDimensions (W HD)Main unitCabinet dim ension310 mm 44 mm 195 mm(12 7/32 123/32 711 /16 )Maximum outer dimension310 mm 45 mm 202 mm(12 7/32 125/32 715 /16 )Active subwoofer180 mm 408 mm 306 mm(7 3/32 16 1/16 12 1/16 )Mass (Weight)Main unit 1.1kg(2.4 lbs)Active subwoofer 5.2kg(11.47 lbs)Operating temperature range0oC to 40 oC  ( 32 oF to 104 oF)Op erating humidity range20 % to 80 % RH (no condensation)SPEA KER GENER ALHorizontal placement using the standsDimensions (W HD)956 mm 102 mm 74 mm(37 5/841/32 229 /32 )Mass (Weight) 1.61 kg(3.7 lbs)Horizontal placement using the speaker feetand the support  legsDimensions (W HD)956 mm 78 mm 55 mm( 37 5/831/16 25/32 )Mass (Weight) 1.57 kg(3.5 lbs)Horizontal placement (for wall mount)Dimensions (W HD)956 mm 75 mm 35 mm( 37 5/8215/16 13/8)Mass (Weight) 1.54 kg(3.5 lbs)Vertical placement using the speaker basesDimensions (W HD)148 mm 528 mm 145 mm(5 13/16 20 25/32 523 /32 )Mass (Weight) 0.88 kg(1.98 lbs)Vertical placement (for wall mount)Dimensions (W HD)75 mm 478 mm 35 mm(2 15 /16 18 13/16 13/8)Mass (Weight) 0.77 kg(1.76 lbs)Bluetooth® SECTIONB lu etoo th® system specificationV3.0Wireless equipment classificationClass 2 (2.5 mW)Suppor ted profiles A2DP, AVRCPFrequency band2.4 GHz band(Adaptive Frequency Hopping)Op era t ing d istan ce10 m (33 ft) Line of Sight
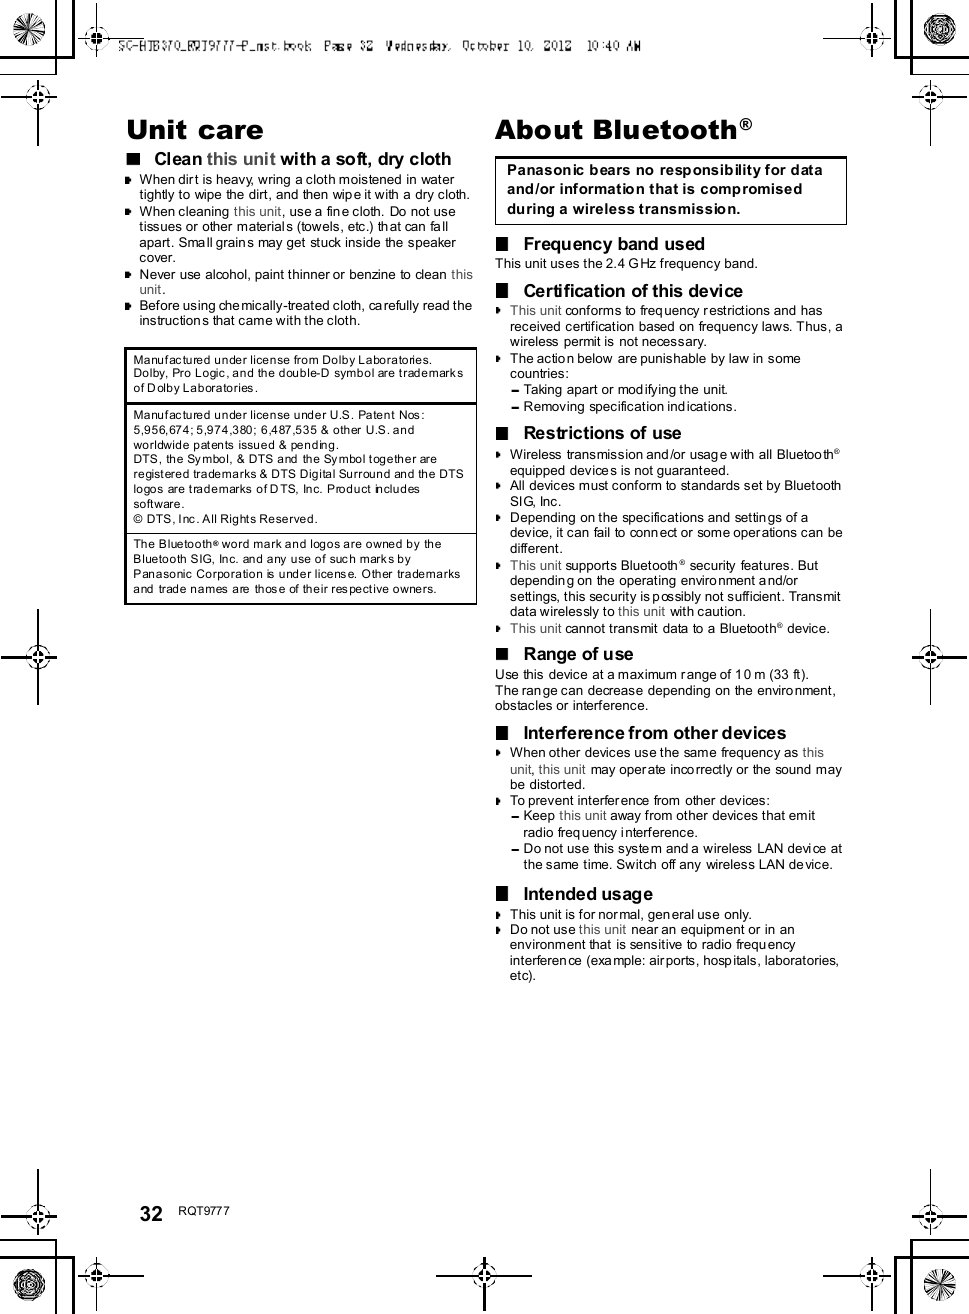
32 R QT977 7Unit careClean this unit with a soft, dry clothWhen dir t is heavy, wring a cloth moistened in watertightly to wipe the dirt, and then wip e it with a dry cloth.When cleaning this unit, use a fine cloth. Do not usetissues or other materials (towels, etc.) that can fallapart. Small grains may get stuck inside the speakercover.Never use alcohol, paint thinner or benzine to clean thisunit.Before using chemically-treated cloth, carefully read theinstructions that came with the cloth.About Bluetooth®Frequency band usedThis unit uses the 2.4 G Hz frequency band.Certification of this deviceThis unit conforms to freq uency r estrictions and hasreceived certification based on frequency laws. Thus, awireless permit is not necessary.The actio n below  are punishable by law in somecountries:Taking apart or mod ifying the unit.Removing specification indications.Restrictions of useWireless transmission and /or usag e with all Bluetoo th®equipped device s is not guaranteed.All devices must conform to standards set by BluetoothSIG, Inc.Depending on the specifications and settin gs of adevice, it can fail to connect or some operations can bedifferent.This unit supports Bluetooth® security features. Butdepending on the operating environment a nd/orsettings, this security is p ossibly not sufficient. Transmitdata wirelessly to this unit with caution.This unit cannot transmit data to a Bluetooth® device.Range of useUse this device at a maximum range of 10 m (33 ft).The range can decrease depending on the enviro nment,obstacles or interference.Interference from other devicesWhen other devices use the same frequency as thisunit,this unit may operate inco rrectly or the sound maybe distorted.To prevent interference from other devices:Keep this unit away from other devices that emitradio freq uency interference.Do not use this system and a wireless  LAN device atthe same time. Switch off any  wireless LAN de vice.Intended usageThis unit is for normal, gen eral use only.Do not use this unit near an equipment or in anenvironment that is sensitive to radio frequencyinterferen ce (example: airports, hospitals, laboratories,etc).Manufactured under license from Dolby Laboratories.Dolby, Pro Logic, and the double-D symbol are trademarksof Dolby Laboratories.Manufactured under license under U.S. Patent Nos:5,956,674; 5,974,380; 6,487,535 & other U.S. andworldwide patents issued & pending.DTS, the Symbol, & DTS and the Symbol together areregistered trademarks & DTS Digital Surround and the DTSlogos are trademarks of DTS, Inc. Product includessoftware.©  DTS , I nc . All Rig hts Reserved.The Bluetooth® word mark and logos are owned by theBluetooth SIG, Inc. and any use of such marks byPanasonic Corporation is under license. Other trademarksand trade names are those of their respective owners.Panasonic bears no responsibility for dataand/or information that is compromisedduring a wireless transmission.
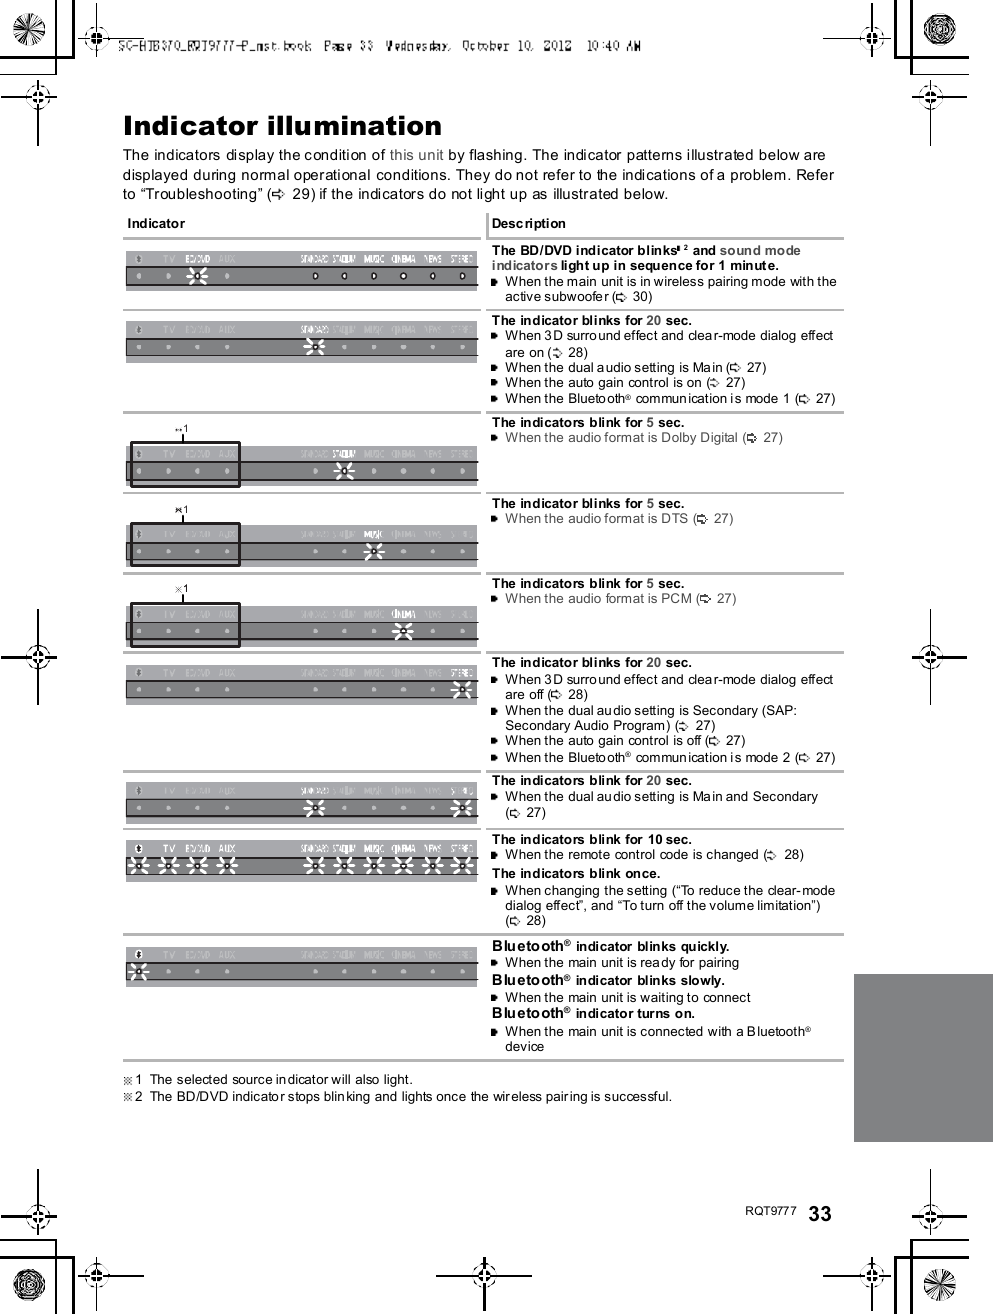
R QT977 7 33Indicator illuminationThe indicators display the condition of this unit by flashing. The indicator patterns illustrated below aredisplayed during normal operational conditions. They do not refer to the indications of a problem. Referto Troubleshooting ( 29) if the indicators do not light up as illustrated below.1  The selected source in dicator will also light.2  The BD/DVD indicator stops blin king and lights once the wireless pair ing is successful.Indicator DescriptionThe BD/DVD indicator blinks 2 and soun d modeindicators light up in sequence for 1 minute.When the main unit is in wireless pairing mode with theactive subwoofe r ( 30)The indicator blinks for 20 sec.When 3D surround effect and clea r-mode dialog effectare on ( 28)When the dual audio setting is Ma in ( 27)When the auto gain control is on ( 27)When the Bluetooth® communication i s mode 1 ( 27)The indicators blink for 5 sec.When the audio format is Dolby Digital ( 27)The indicator blinks for 5 sec.When the audio format is DTS ( 27)The indicators blink for 5 sec.When the audio format is PCM ( 27)The indicator blinks for 20 sec.When 3D surround effect and clea r-mode dialog effectare off ( 28)When the dual audio setting is Secondary (SAP:Secondary Audio Program) ( 27)When the auto gain control is off ( 27)When the Bluetooth® communication i s mode 2 ( 27)The indicators blink for 20 sec.When the dual audio setting is Ma in and Secondary(27)The indicators blink for 10 sec.When the remote control code is changed ( 28)The indicators blink once.When changing the setting (To reduce the clear-modedialog effect, and To turn off the volume limitation)(28)B lu eto oth® indicator blinks quickly.When the main unit is rea dy for pairingB lu eto oth® indicator blinks slowly.When the main unit is waiting to connectB lu eto oth® indicator turns on.When the main unit is connected with a Bluetooth®device
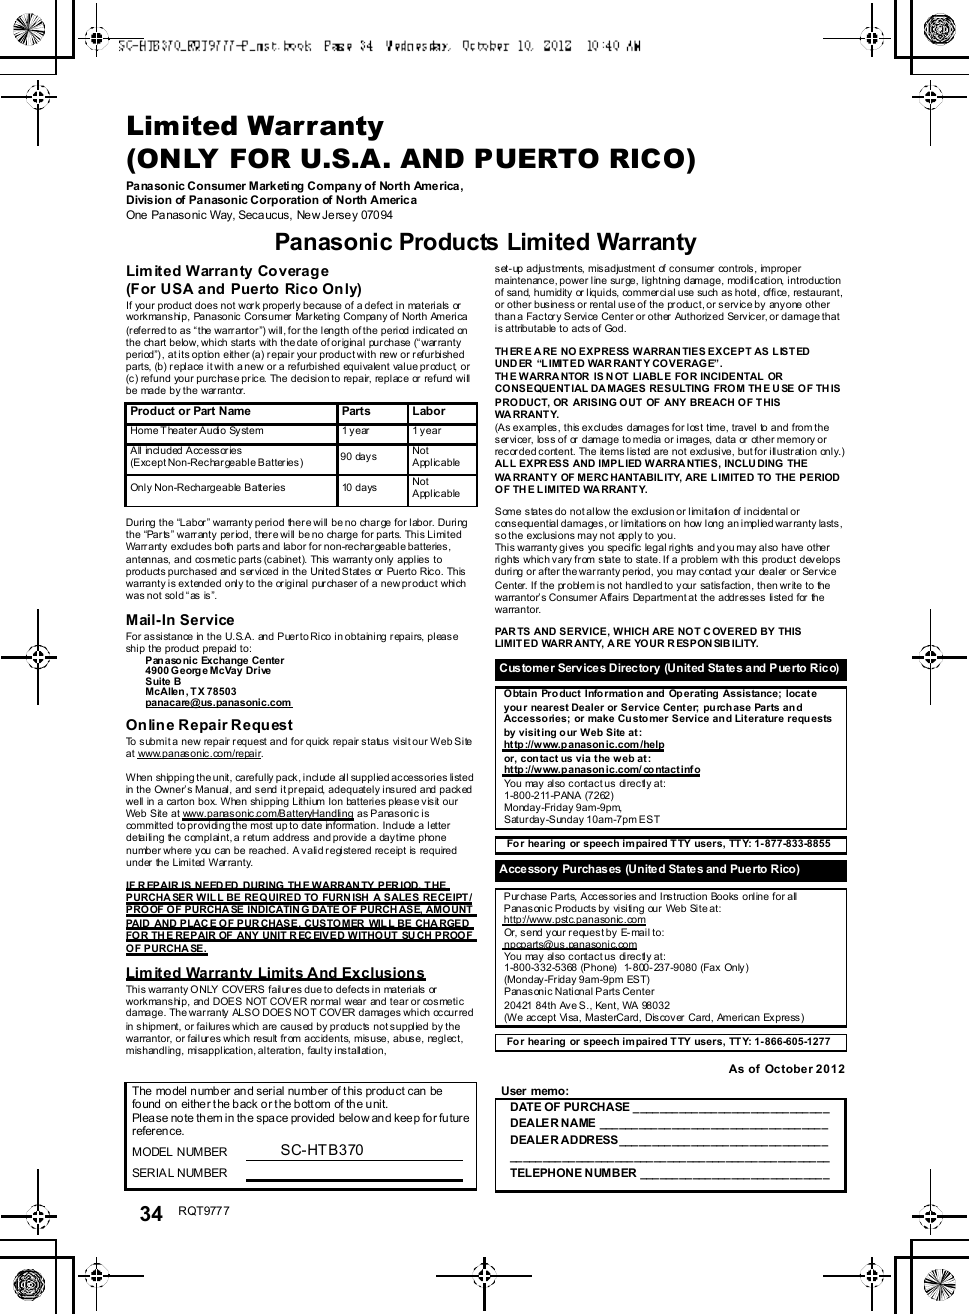
34 R QT977 7Limited Warranty(ONLY FOR U.S.A. AND PUERTO RICO)Panasonic Consumer Marketing Company of North America,Division of Panasonic Corporation of North AmericaOne  Pa nasonic Way, Secaucus,  New Je rse y 070 94Panasonic Products Limited WarrantyLimited Warranty Coverage(For USA and Puerto Rico Only)If your product does not work properly because of a defect in materials orworkmanship, Panasonic Consumer Marketing Company of North America(referred to as the warrantor) will, for the length of the period indicated onthe chart below, which starts with the date of original purchase (warrantyperiod), at its option either (a) repair your product with new or refurbishedparts, (b) replace it with a new or a refurbished equivalent value product, or(c) refund your purchase pr ice. The decision to repair, replace or refund willbe made by the warrantor.During the Labor warranty period there will be no charge for labor. Duringthe Parts warranty per iod, there will be no charge for parts. This LimitedWarranty excludes both parts and labor for non-rechargeable batteries,antennas, and cosmetic parts (cabinet). This warranty only applies toproducts purchased and ser viced in the United States or  Puerto Rico. Thiswarranty is extended only to the original purchaser of a new product whichwas not sold as is.Mail-In ServiceFor assistance in the U.S.A. and Puerto Rico in obtaining repairs, pleaseship the product prepaid to:Pan asonic Exchange Center4900 George McVay DriveSuite BMcAllen , TX 78503panacare@us.panasonic.comOnline Repair RequestTo submit a new repair request and for quick  repair status visit our Web Siteat www.panasonic.com/repair.When shipping the unit, carefully pack, include all supplied accessories listedin the Owners Manual, and send it prepaid, adequately insured and packedwell in a carton box. When shipping Lithium Ion batteries please visit ourWeb Site at www.panasonic.com/BatteryHandling as Panasonic iscommitted to providing the most up to date information. Include a letterdetailing the complaint, a r eturn address and provide a daytime phonenumber where you can be reached. A valid registered receipt is requiredunder the Limited War ranty.IF REPAIR IS NEED ED  DURING THE WARRAN TY PER IOD, THEPURCHA SER WIL L BE REQ UIRED TO FURN ISH  A SALES RECEIPT/PROOF OF PURCHA SE INDICATIN G DATE OF PURCH ASE, AMOUNTPAID  AND PLAC E OF PUR CHASE. CUSTOMER  WIL L BE CHA RGEDFOR TH E REPAIR OF ANY UNIT R EC EIVED WITHOUT  SUCH PROOFOF PURCHA SE.Limited Warranty Limits And ExclusionsThis warranty ONLY COVERS failures due to defects in materials orworkmanship, and DOES NOT COVER normal wear and tear or cosmeticdamage. The warranty ALSO DOES NOT COVER damages which occurredin shipment, or failures which are caused by products not supplied by thewarrantor, or failures which result from accidents, misuse, abuse, neglect,mishandling, misapplication, alteration, faulty installation,set-up adjustments, misadjustment of consumer controls, impropermaintenance, power line surge, lightning damage, modification, introductionof sand, humidity or liquids, commercial use such as hotel, office, restaurant,or other business or rental use of the product, or service by  anyone otherthan a Factory Service Center or other Authorized Servicer, or damage thatis attributable to acts of God.THERE A RE NO EXPRESS WARRANTIES EXCEPT AS LISTEDUND ER  LIMIT ED WARRANTY COVERAG E.THE WARRA NTOR  IS N OT  LIABLE FOR INCIDENTAL ORCONSEQUENT IAL DA MAGES RESULTING FROM THE U SE OF TH ISPRODUCT, OR ARISING OUT  OF ANY BREACH O F THISWA RRANT Y.(As examples, this excludes damages for lost time, travel to and from theservicer, loss of or damage to media or images, data or other memory orrecorded content. The items listed are not exclusive, but for illustration only.)ALL EXPR ESS AND IMPL IED WARRA NTIES, INCLU DING  THEWA RRANT Y OF MERC HANTABIL ITY, ARE L IMITED TO THE PERIODOF THE L IMITED WA RRANT Y.Some states do not allow the exclusion or limitation of incidental orconsequential damages, or limitations on how long an implied warranty lasts,so the exclusions may not apply to you.This warranty gives you specific legal rights and you may also have otherrights which vary from state to state. If a problem with this product developsduring or after the warranty period, you may contact your  dealer  or ServiceCenter. If the problem is not handled to your  satisfaction, then write to thewarrantors Consumer Affairs Department at the addresses listed for thewarrantor.PAR TS AND SERVICE, WHICH ARE NOT C OVERED BY THISLIMITED WARR ANTY, A RE YOUR RESPON SIB ILITY.As of October 2012Product or Part Name Parts LaborHome Theater Audio System 1 year 1 yearAll included Accessories(Except Non-Rechargeable Batteries) 90 days NotApplicableOnly Non-Rechargeable Batteries 10 days NotApplicableCustomer Services Directory (United States and Puerto Rico)Obtain Pro duct Informatio n and Operating  Assistance; locateyour nearest Dealer or Service Center; purch ase Parts andAccessories; or make Customer Service an d Literature requestsby visiting our Web Site at:http://www.p anasonic.com/helpor, contact us via the web at:ht tp ://www.p anasonic.com/ contact inf oYou may also contact us directly at:1-800-211-PANA (7262)Monday-Friday 9am-9pm,Saturday-Sunday 10am-7pm ESTFor hearing or speech impaired TTY users, TTY: 1-877-833-8855Acce ssory  Purchases (Unite d Sta te s and Puerto Rico)Purchase Parts, Accessories and Instruction Books online for allPanasonic Products by visiting our Web Site at:http://www.pstc.panasonic.comOr, send your request by E-mail to:npcparts@us.panasonic.comYou may also contact us directly at:1-800-332-5368 (Phone)  1-800- 237-9080 (Fax Only)(Monday-Friday 9am-9pm EST)Panasonic National Parts Center20421 84th Ave S., Kent, WA 98032(We accept Visa, MasterCard, Discover Card, American Express)For hearing or speech impaired TTY users, TTY: 1-866-605-1277The  mo del number an d serial nu mber of t hi s pr odu ct can  befo und  on  eithe r the back o r t he b ott om of th e u nit.Please no te th em in th e spa ce provi ded  below and keep fo r fu tur er efer en ce.MODEL NUMBER SC-HTB370SERIA L NUMBERUser memo:DATE OF PURCHA SE _ ___ ___ ___ ___ __ ___ ___ ___ ___ __ _DEA LER NAME ___ ___ ___ __ ___ ___ ___ ___ ___ __ ___ ___ _DEA LER ADDRESS ___ __ ___ ___ ___ ___ ___ ___ __ ___ ___ ___ ___ ___ __ ___ ___ ___ ___ __ ___ ___ ___ ___ __ ___ ___ ___ __TELEPHONE NUMBER  ___ ___ __ ___ ___ ___ ___ ___ __ ___ _
R QT977 7 35Limited Warranty (ONLY FOR CANADA)Panasonic Canada Inc.5770 Ambler Drive, Mississauga, Ontario L4W 2T3PANASONIC PRODUCT - LIMITED WARRANTYPanasonic Canada Inc. warrants this prod uct to be free from defects in material and workma nship under normal useand for a period as stated below from the date of original purchase agrees to, at its option either (a) repair your productwith new or refurbished parts, (b) replace it with a new or a refurbi shed equivalent value product, or (c) refun d yourpurchase price. The decision to repair, replace or refund will be made by Panasonic Canada Inc.Technics Audio Product - One (1) year, parts and labourPanasonic BD/DVD Product - One (1) year, parts and labourPanasonic Audio Receivers - One (1) year, parts and labourHome Theater Systems Product - One (1) year, parts and labourThis war ranty is given only to the orig inal purch aser, or the person for whom it was purchased as a gift, of a Panasonicbrand product me ntioned above sold by an authorized Panasonic dealer in Canada and purchased and used inCanada, which product was not sol d as is, and which product was delivered to you in new condition in the originalpackaging.IN ORDER TO BE ELIGIBLE TO RECEIVE WARRANTY SERVICE HEREUNDER, A PURCHASE RECEIPT OROT HER P ROOF  OF DATE OF ORIGINA L PU RC HASE,  SHOW ING AMOU NT PAI D AN D PL ACE OF PURCHASE  ISREQUIREDLIMITATIONS AND EXCLUSIONSThis war ranty ONLY COVERS failures due to defects in materials or wor kmanship, and DOES NOT COVE R normalwear and tear or co smetic damage. The warranty ALS O DOES NOT COVER damages which occurred in shipment, orfailures which are caused by products not supplied by Panasonic Canada Inc., or failures which result from accidents,misuse, abuse, negle ct, mishandling, misapplication, alteration, faulty installation, set-up adju stments, misadjustment ofconsumer controls, impr oper maintenance , power line sur ge, lightning damage, mo dification, introdu ction of sand,humidity  or liquids, commercial use such as hotel, office, restaurant, or other business or renta l use of the product, orservice by anyone other than an Authorized Servicer, or damage that is attributable to acts of God.Dry cell batteries are also excluded from coverage under this warranty.THIS EXPRESS, LIMITED WARRANTY IS IN L IEU OF ALL OTHER WARRANTIES,  EXPRESS OR IMPLIED,INCLUDING ANY IMPLIED WARRANTIES OF MERCHANTABILITY AND FITNESS FOR A PARTICULAR PURPOSE.IN NO EVENT WILL PANASONIC CANADA INC. BE LIABLE FOR ANY SPECIAL, INDIRECT OR CONSEQUENTIALDAMAGE S RESULTING FROM THE USE OF THIS PRODUCT OR ARISING OUT OF  ANY BREACH OF ANYEXPRESS OR IMPLIED WARRANTY. (As exampl es, this warranty excludes dama ges for lost time, travel to and fromthe Authorized Servicer, l oss of or damage to media or ima ges, data or other memory or recorde d content. This list ofitems is not exha ustive, but for illustration o nly.)In certain instances, some jur isdictions do not allow th e exclusion or limitation of incidental or consequential da mages,or the exclusion of implied warranties, so the above limitations and exclusions may not be applicable. This warr antygives you specific legal rights and you may have other rights which vary depending on your p rovince or territory.WARRANTY SERVICEFor product operation and information assistance, please contact:PRO DU CT OPERATION ASSISTAN CECustomer Care Centre: Telephone #: 1-800-561 -5505Fax #: (905) 238-2360Email lin k: Supp ort  contact us  email on www.panasonic.caPRO DU CT REPAIRSPlease lo cate your nearest Author ized Servicentre.Link: Support  Panasonic Servicentre® locator on www.panasonic.caIF YOU SHIP THE PROD UCT T O A SE RVI CEN TRECarefully  pack and send prepaid, a dequately insured  and preferably i n the original carton.Include details of the defect claimed, and proof of date of original purchase.
  RQT9777-PF1212RK 0-If you see this symbol-Inform ation o n Disposal in other Countries outside theEuro pean UnionThis symbol is only valid in the European Union.If you wish to discard this product, please contactyour local authorities or dealer and ask for thecorrect method of disposal.    

Navigation menu