Panasonic of North America 11NR1301 Compact Stereo System User Manual
Panasonic Corporation of North America Compact Stereo System
UserManual.wiki
>
Panasonic of North America
>
11NR1301 User Manual
ACJ-11NR1301_ User Manual
Navigation menu
Upload a User Manual
Namespaces
Wiki Guide
HTML
PDF
Info
Views
User Manual
Discussion / Help
Navigation
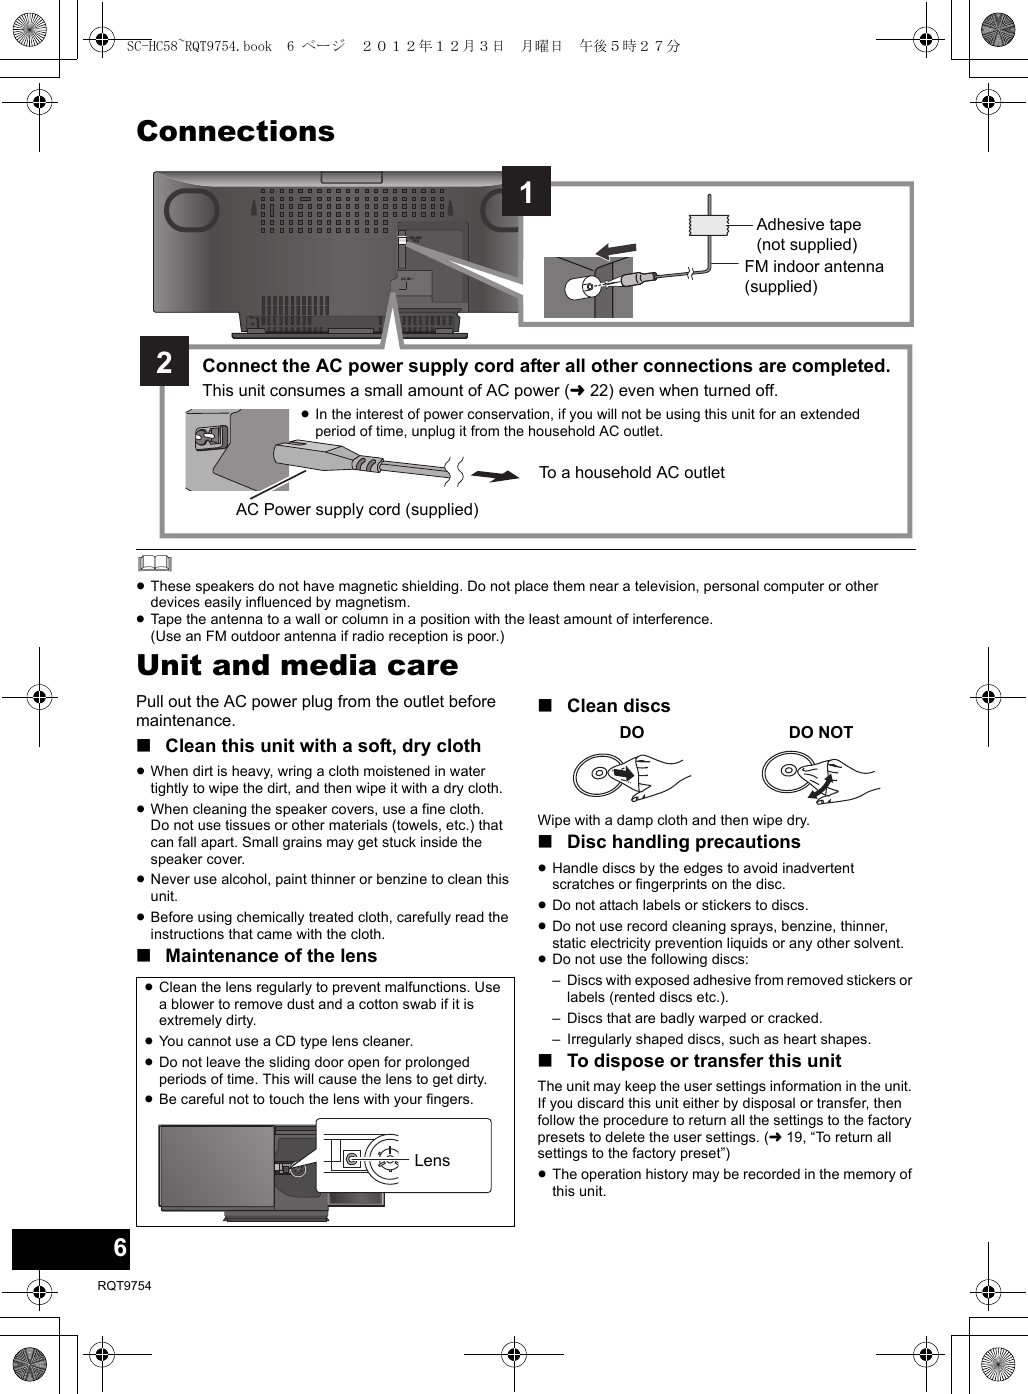
![5RQT9754ENGLISHControl reference guide1 Standby/on switch [Í/I] (Í)Press to switch the unit from on to standby mode or vice versa.In standby mode, the unit is still consuming a small amount of power.2 Select the audio sourceOn the remote control[iPod] : “IPOD_DOCK” ,. “IPOD_PORT”[CD/RADIO] : “CD” ,. “FM”[ ] : “BLUETOOTH”On this unit:“CD” -. “FM” -. “BLUETOOTH” -. “IPOD_DOCK”^------------- “IPOD_PORT” (------------------------b3 Basic playback control buttons4 Enter setup menu5 Enter the iPod/iPhone menu / Change displayed information6 Open or close the sliding door7 Adjust the volume (0 (min) to 50 (max))8 Mute the soundMutes the sound. Press again to cancel. “MUTE” is also canceled when the volume is adjusted or the unit is turned off.9 Enter playback menu10 Enter sound menu11 Selection/OK 12 iPod port for iPod/iPhone/iPad (l7)13 Network setting button (l8)14 Headphone jackPlug type: ‰3.5 mm (1/8q) stereoRecommended plug type: Straight Plug≥Listening at full volume for long periods may damage the user’s ears.Excessive sound pressure from earphones and headphones can cause hearing loss.15 Power on indicator16 Wi-Fi® status indicator17 Display18 Sliding door19 Remote control signal sensorDistance:Within approx. 7 m (23 ft) directly in front.≥To avoid interference, please do not put any objects in front of signal sensor.CD/RADIOSELECTORiPad12136732161517 18 191416Top view∫Before using for the first timeRemove the insulation sheet A.∫To replace a button-type batteryBattery type: CR2025 (Lithium battery)≥Set the button-type battery with its (i) mark facing upward.≥Keep the button-type battery out of reach of children to prevent swallowing.SC-HC58~RQT9754.book 5 ページ 2012年12月3日 月曜日 午後5時27分](https://usermanual.wiki/Panasonic-of-North-America/11NR1301/User-Guide-1865427-Page-5.png)
![7RQT9754ENGLISHInserting media*1: Refer to “Playable media” for compatible models. (l23)*2: Do not connect the following models to this unit’s iPod port:– iPod classic, iPod [4th (color display), and 5th (video) generation]Unexpected behavior may occur.*3: When using the Lightning connector:≥Be sure to remove the iPod/iPhone from its case.≥Do not push or pull the dock manually.≥Make sure that the iPod/iPhone is fully inserted and its back is resting against the cushion pad.≥Make sure to hold the dock when removing the iPod/iPhone.*4: Make sure to tilt the disc so as not to touch the sliding door.≥Do not open the sliding door manually.≥Make sure that the unit does not fall when inserting or removing media.≥When moving this unit, be sure to remove all media and turn this unit to standby mode.Charging starts when an iPod*2/iPhone/iPad is connected to this unit.≥During standby mode, charging will not start from the USB cable connection, however it will start as usual from the Lightning connector.– To charge from the USB cable connection, start the charging before turning this unit to standby mode.≥Check the iPod/iPhone/iPad to see if the battery is fully charged. (Once fully recharged, additional recharging will not occur.)≥If this unit is switched to standby mode“IPOD CHARGING” is shown on the unit’s display.4iPad3Select “IPOD_DOCK” as the sourceConnect Lightning connector models *1Select “IPOD_PORT” as the sourceConnect using the dedicated USB cable (not supplied) *1, 2Select “CD” as the sourceCharging an iPod/iPhone/iPadSC-HC58~RQT9754.book 7 ページ 2012年12月3日 月曜日 午後5時27分](https://usermanual.wiki/Panasonic-of-North-America/11NR1301/User-Guide-1865427-Page-7.png)
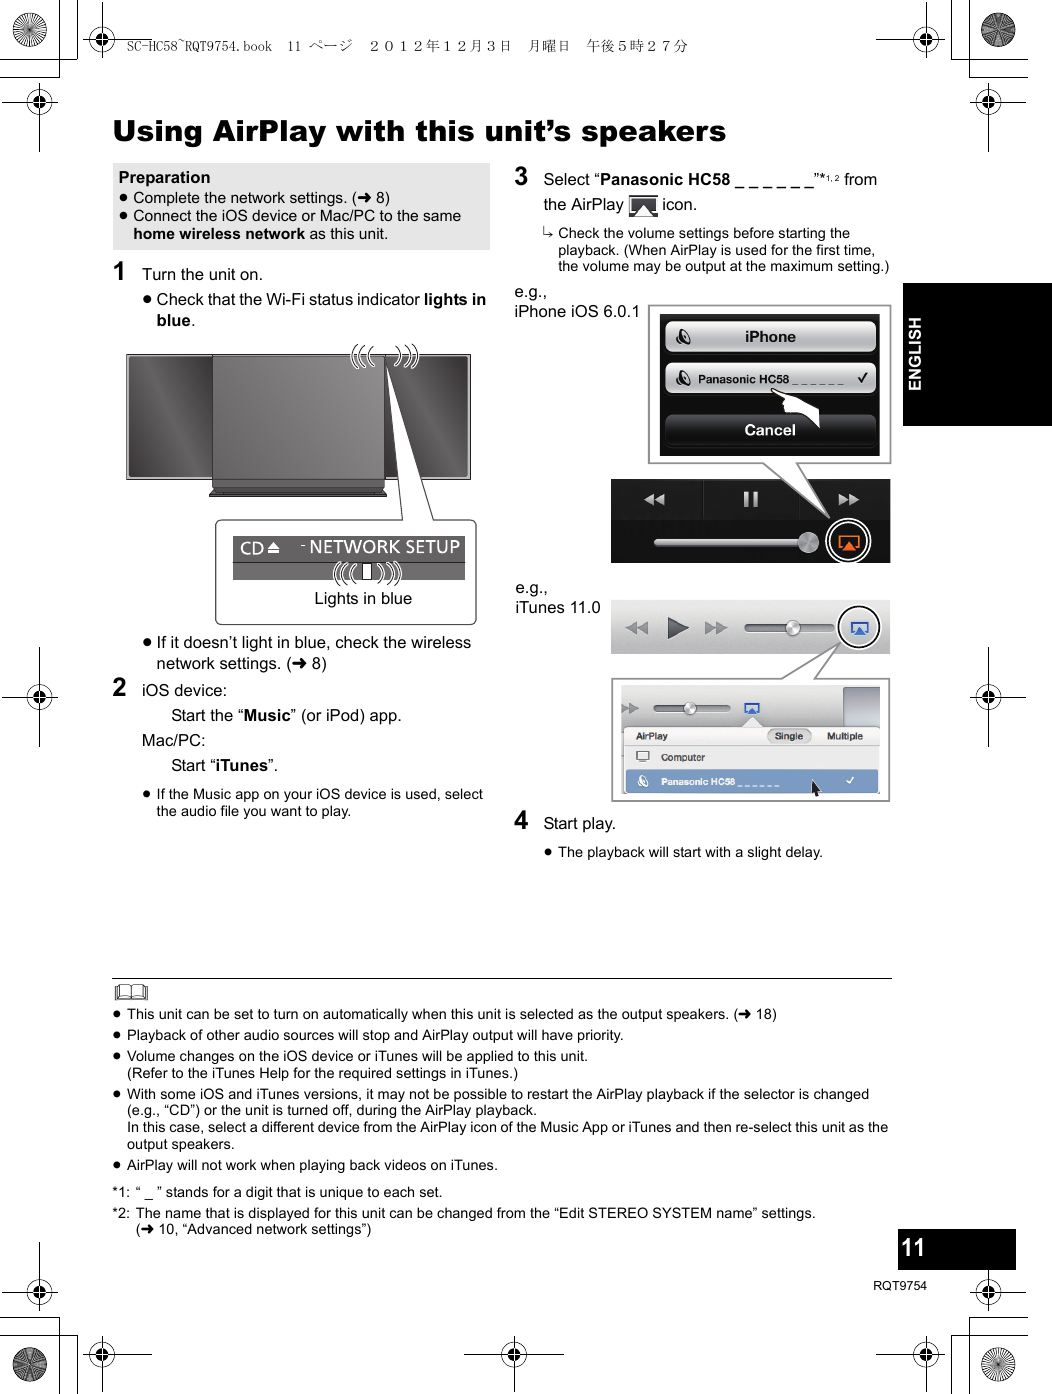
![8RQT9754Network settingsWith this feature you can wirelessly stream music from an iOS device (iPhone, iPod, iPad) or a Mac/PC to this unit’s speakers.To use this feature (AirPlay), this unit must join the same 2.4 GHz wireless network as the AirPlay compatible device (l23).≥It is also possible to use AirPlay without a wireless network router. (l12, “Directly streaming to this unit”)Preparation≥Place this unit close to the wireless network router.1Turn this unit on.2Follow the chart below to choose the network setting method.≥To cancel this setting in the middle, press [Í] to turn off the unit.*1: Depending on the network environment or the wireless network router settings, it may take more than 10 mins. to complete the settings.With this method you will share the wireless network settings of your iPod touch/iPhone/iPad with this unit.≥The following explanations are based on an iPhone.1Connect the iPhone to your home wireless network.2Connect the iPhone to this unit.Choose one of the following connections.Lightning connector compatible iPod touch/iPhoneiPod touch/iPhone/iPad with iOS 5.0 or later3Unlock your iPhone and then press and hold [– NETWORK SETUP] on this unit for more than 3 seconds.≥If “NOT SUPPORTED” or “SET WI-FI” is displayed, check that the iPhone is connected to the wireless network and try again from step 1.4A message will pop-up on your iPhone.Allow the iPhone to share the wireless network settings.*15The unit’s settings are completed when “SUCCESS” is displayed and the Wi-Fi status indicator stops blinking and lights in blue.6Press [OK] on the remote control to exit the settings.7To use AirPlay, turn to page 11.Does your wireless network router support WPS?YesAre you using an iPod touch/iPhone/iPad?Is the iOS version 5.0 or later?lright,“Method 1”l8,“Method 2”l9,“Method 3”NoYes No / Do not knowMethod 1If you're using an iPod touch/iPhone/iPad.(iOS version 5.0 or later.)If “FAIL” is displayed press [OK] and try the setting again. If “FAIL” is still displayed, try “Method 2” or “Method 3”.≥If the iPhone was disconnected midway through, try again without disconnecting it.iPadSC-HC58~RQT9754.book 8 ページ 2012年12月3日 月曜日 午後5時27分](https://usermanual.wiki/Panasonic-of-North-America/11NR1301/User-Guide-1865427-Page-8.png)
![9RQT9754ENGLISH∫Using the WPS Push Button Configuration (PBC)1Disconnect any devices connected to this unit.2Press and hold [– NETWORK SETUP] on the unit.≥Complete step 2 within 2 mins.3After “WPS” is indicated, press the WPS button on the wireless network router.4The unit’s settings are completed when “SUCCESS” is displayed and the Wi-Fi status indicator stops blinking and lights in blue.5Press [OK] on the remote control to exit the setting.6To use AirPlay, turn to page 11.≥To use the WPS PIN code, refer to the notes on page 10.*1: WPS stands for “Wi-Fi Protected SetupTM”.*2: “ _ ” stands for a digit that is unique to each set.*3: Make sure that DHCP is enabled for the network setting on the iPhone.With this method, you will access this unit’s wireless network settings from the Internet browser of your compatible device.≥The following explanations are based on an iPhone.1Press [SETUP] on the remote control repeatedly to select “NET SETUP” and then press [OK].2After “SETTING” is indicated, connect your iPhone to this unit’s wireless network called “00_Setup _ _ _ _ _ _”*2, 3.3Start “Safari” on your iPhone and type “http://192.168.1.12/” into the URL address field and display the page.{. This unit’s setup window is displayed.Method 2If your wireless network router supports WPS*1.The WPS identifier markWPS Push Button Configuration (PBC) compatible wireless network router may have this mark.“FAIL” may be displayed if the connection was not made within the set time limit. Try the setting again. If “FAIL” is still displayed, try “Method 3”.Blinks purpleBlinks blueMethod 3Setting the network connection from an Internet browser.Blinks purpleBlinks purpleSC-HC58~RQT9754.book 9 ページ 2012年12月3日 月曜日 午後5時27分](https://usermanual.wiki/Panasonic-of-North-America/11NR1301/User-Guide-1865427-Page-9.png)
![10RQT97544Select “Search wireless network”.5Select and input the details.≥Check your home wireless network name (Network name (SSID)) and password for this network. This can often be found on the wireless network router itself.6Select “JOIN” to apply the settings.≥In the pop-up screen, select “OK” to continue.– Select “CANCEL” to return to the setup window.7The unit’s settings are completed when “SUCCESS” is displayed and the Wi-Fi status indicator stops blinking and lights in blue.8Make sure to connect your iPhone back to your home wireless network*2.9To use AirPlay, turn to page 11.*1: If you have set your wireless network to be invisible, select “BACK” and refer to “Alternative settings”.*2: To use the AirPlay function, connect the iPhone to the wireless network selected in step 5. (>above)≥The below settings are the alternative or additional settings for “Method 3”. (l9)≥Enable Java and Cookies in your browser settings.≥This unit can also be set using the WPS PIN code.Replace step 2 of “Method 2” with the following steps.(Before starting, refer to the wireless network router’s operating instructions for details on how to enter the PIN code.)1 While “WPS” is flashing press and hold [– NETWORK SETUP] again to display the 8 digit PIN code.{. Wi-Fi status indicator blinks purple.2 Enter the PIN code into the wireless network router.[1] Select your home wireless network name*1.[2] Type the password.If “FAIL” is displayed press [OK], check the wireless network password and other settings and start again from step 1.Advanced network settingsAlternative settingsInstead of steps 4 and 5Select “Manual settings”.1 Type your home wireless network name into the “Network name (SSID)” field.2 Select the encryption method from the “Security system” drop down list.3 Type the password into the “Password” field and then select “JOIN”.Additional settingsIf your home wireless network has been configured to use specific IP Addresses, Subnet Mask, Default Gateway, Primary DNS, etc.Before step 6Select “Advanced network settings”.{. Input the required addresses into each field and select “JOIN”.≥To change the settings back to DHCP, select “ON” from the “DHCP” drop down list.If you want to change the name of this unit that is displayed as the AirPlay speakers.Before step 4Select “Additional settings”.1 Select “Edit STEREO SYSTEM name”.2 Type a new name into the “STEREO SYSTEM name” field.{. Only ASCII characters can be used.3 Select “OK”.4 If this unit is already connected to your home wireless network:jSelect “EXIT“.If this unit is not connected to your home wireless network:jContinue to step 4 of “Method 3”.SC-HC58~RQT9754.book 10 ページ 2012年12月3日 月曜日 午後5時27分](https://usermanual.wiki/Panasonic-of-North-America/11NR1301/User-Guide-1865427-Page-10.png)
![12RQT9754With this function set to “ON”, you can stream music from an AirPlay compatible device or Mac / PC (iTunes 10.2 or later) to this unit without the need of a wireless network router.≥The following explanations are based on an iPhone.1Press [SETUP] repeatedly to select “D.CONNECT”.2Press [3,4] to select “ON” and then press [OK].3Press [3,4] to select “OK? YES” and then press [OK].4Connect your iPhone to this unit’s wireless network named “HC58 _ _ _ _ _ _”*2.5Enter the password that is indicated on this unit’s display.6Once the iPhone is connected to this unit’s wireless network, the setup is competed.7Continue to step 2 of “Using AirPlay with this unit’s speakers”.≥This setting is reset to “OFF” when other network settings are performed. (l8)≥When “D.CONNECT” is set to “ON”, this unit will not be connected to the Internet. It is not possible to update the software or check the Wi-Fi signal strength.≥This feature is only compatible with the “Open System” authentication method. It is not compatible with “Shared Key” authentication method.*1: “ _ ” stands for a digit*2: “ _ ” stands for a digit that is unique to each set.*3: Steps are based on iOS 6.0.1.The first time “D.CONNECT” is set to “ON”, a password for this unit’s wireless network is randomly created and memorized in this unit.≥This password is memorized until it is changed.1 While “D.CONNECT” is set to “ON”:Press [SETUP] repeatedly to select “D.CONNECT”.2Press [3,4] to select “ON” and then press [OK].3 The current password is displayed.≥The 5 digits after "PW" is the password for this network.4 Press any button to exit.1 Press [SETUP] repeatedly to select “D.CONNECT”.2Press [3,4] to select “CHANGE PW” and then press [OK].3Press [3,4] to select “OK? YES” and then press [OK].4 The new password is displayed.≥The 5 digits after "PW" is the new password for this network.5 Press any button to exit.∫Note about changing the passwordAfter changing this unit’s wireless network password, if you are not prompted to change the password on the other devices, the following changes are required.iOS device (iPod touch/iPhone/iPad)*3:≥Before choosing this unit’s network,1 Select [ ] located beside this unit’s wireless network name2 Select “Forget this Network” and then select “Forget”.3 Select this unit’s wireless network and enter the new password.Mac/PC:≥If the computer has memorized the old password, be sure to change the memorized password for this unit’s wireless network to the new one.≥Refer to the devices’s operating instructions for details.Directly streaming to this unit“PW _ _ _ _ _ _”*1 is displayed.The 5 digits after "PW" is the password for this network.Display the passwordChange the passwordSC-HC58~RQT9754.book 12 ページ 2012年12月3日 月曜日 午後5時27分](https://usermanual.wiki/Panasonic-of-North-America/11NR1301/User-Guide-1865427-Page-12.png)
![13RQT9754ENGLISHBluetooth® operationsBy using the Bluetooth® connection, you can listen to the sound from the Bluetooth® audio device from this unit wirelessly.Preparation≥Turn on the Bluetooth® feature of the device and place the device near this unit.≥If this unit is already connected to a Bluetooth® device, disconnect it.1Press [ ] to select “BLUETOOTH”.≥If “PAIRING” is indicated on the display, go to step 3.2Press [PLAY MENU] to select “NEW DEV.” and then press [OK].{. “PAIRING” is indicated on the display.3Select “SC-HC58” from the Bluetooth® device’s Bluetooth® menu.4Start play on the Bluetooth® device.≥Refer to the operating instructions of the Bluetooth® device for details.If prompted for the passkey, input “0000”.≥You can register up to 8 devices with this unit. If a 9th device is paired, the device that has not been used for the longest time will be replaced.Preparation≥Turn on the Bluetooth® feature of the device and place the device near this unit.≥If this unit is already connected to a Bluetooth® device, disconnect it.1Press [ ] to select “BLUETOOTH”.{. “READY” is indicated on the display.2Select “SC-HC58” from the Bluetooth® device’s Bluetooth® menu.{. The name of the connected device is indicated on the display for 2 seconds.3Start play on the Bluetooth® device.≥This unit can only be connected to one device at a time.≥When “BLUETOOTH” is selected as the source, this unit will automatically try and connect to the last connected Bluetooth® device. The Bluetooth® device will be disconnected if a different audio source (e.g., [CD]) is selected.You can change the transmission speed to prioritize transmission quality or sound quality.Preparation≥Press [ ] to select “BLUETOOTH”.≥If a Bluetooth® device is already connected, disconnect it.1Press [PLAY MENU] repeatedly to select “LINK MODE”.2Press [3,4] to select the mode and then press [OK].MODE 1: Emphasis on connectivityMODE 2: Emphasis on sound quality≥The default setting is “MODE 1”.If the sound input level of the Bluetooth® transmission is too low, change the input level setting.Preparation≥Connect a Bluetooth® device.1Press [PLAY MENU] repeatedly to select “INPUT LEVEL”.2Press [3,4] to select the level and then press [OK].“LEVEL 0” ,. “LEVEL i1” ,. “LEVEL i2”^---------------------------------------------------------------J≥Select “LEVEL 0” if the sound is distorted.≥The default setting is “LEVEL 0”.1While a Bluetooth® device is connected:Press [PLAY MENU] to select “DISCONNECT?”.2Press [3,4] to select “OK? YES” and then press [OK].Pairing Bluetooth® devicesConnecting a paired Bluetooth® deviceBluetooth® transmission modeBluetooth® input levelDisconnecting a Bluetooth® deviceSC-HC58~RQT9754.book 13 ページ 2012年12月3日 月曜日 午後5時27分](https://usermanual.wiki/Panasonic-of-North-America/11NR1301/User-Guide-1865427-Page-13.png)
![14RQT9754Media playback operationsThe following marks indicate the availability of the feature.Preparation≥Turn the unit on.≥Insert the media (l7) or connect the Bluetooth® (l13) / AirPlay (l11) compatible device.≥Press [CD], [iPod] or [ ] to select the audio source.[CD] [Bluetooth] To display informationPress [DISPLAY] repeatedly.≥To use this unit’s remote control with a Bluetooth® device, the Bluetooth® device must support AVRCP (Audio Video Remote Control Profile).Depending on the device or the status of the device, some operations may not work.[iPod] To navigate through the iPod/iPhone menu≥Open the Music App to use this feature with iPod touch/iPhone.–[3,4] : To navigate menu items.– [OK] : To go to the next menu.– [iPod MENU] : To return to the previous menu.≥To view the operation, open the sliding door.≥The operation may vary among iPod/iPhone/iPad models.≥Depending on the model, it may be necessary to select the album, artist, etc. on the iPod/iPhone/iPad.Select the playback mode.1Press [PLAY MENU] to select “REPEAT” or “RANDOM”/“SHUFFLE”.2Press [3,4] to select the setting and then press [OK].≥When using an iPod/iPhone/iPad or Bluetooth® device, use the setting on the device, if available.≥During random/shuffle play, you cannot skip to the previous track.≥[CD] :The mode is canceled when you open the sliding door for discs.[AirPlay] : The applied settings will remain until it is changed.*1: [AirPlay] Perform the settings during playback.[CD] : CD audio in CD-DA format[iPod] : Compatible iPod/iPhone/iPad (l23)[AirPlay] : When connected to an AirPlay compatible device. (l11)[Bluetooth] : Connected Bluetooth® device (l13)Basic play([CD], [iPod], [AirPlay], [Bluetooth])Play(Except [AirPlay])Press [1/;].Stop Press [∫].Pause Press [1/;].Press again to restart play.Skip Press [:/6] or [5/9] to skip track.Search(Except [AirPlay])During play or pausePress and hold [:/6] or [5/9].≥[iPod] : Backwards search is only within the current track.Playback modes ([CD], [AirPlay] *1)REPEAT[CD]OFF: Select to cancel repeat playback.1-TRACK: Only plays the selected track.≥“1, ”, “`” is displayed.(Skip to the desired track)ALL: Plays the contents randomly.≥“`” is displayed.[AirPlay]Refer to the connected device to verify the selected setting.[CD] RANDOMON: Plays the contents randomly.≥“RND” is displayed.≥“RND” will not be displayed when “1-TRACK” is selected.OFF: Random playback is turned off.[AirPlay] SHUFFLERefer to the connected device to verify the selected setting.SC-HC58~RQT9754.book 14 ページ 2012年12月3日 月曜日 午後5時27分](https://usermanual.wiki/Panasonic-of-North-America/11NR1301/User-Guide-1865427-Page-14.png)
![15RQT9754ENGLISHListening to the radioYou can preset up to 30 channels.Preparation≥Make sure that the FM antenna is connected. (l6)≥Turn the unit on.≥Press [RADIO] to select “FM”.A station previously stored is overwritten when another station is stored in the same channel preset.1Press [PLAY MENU] to select “A.PRESET”.2Press [3,4] to select “LOWEST” or “CURRENT” and then press [OK].LOWEST:To begin auto preset with the lowest frequency (FM 87.9 or FM 87.5).CURRENT:To begin auto preset with the current frequency.** To change the frequency, refer to “Manual tuning and presetting”.The tuner starts to preset all the stations it can receive into the channels in ascending order.Preparation1 Press [PLAY MENU] repeatedly to select “TUNEMODE”.2Press [3,4] to select “PRESET” and then press [OK].Press [:/6] or [5/9] to select the channel.∫Manual tuning and presettingSelect a radio broadcast.1 Press [PLAY MENU] repeatedly to select “TUNEMODE”.2Press [3,4] to select “MANUAL” and then press [OK].3Press [:/6] or [5/9] to tune to the required station.≥To start automatic tuning, press and hold [:/6], [5/9] until the frequency starts scrolling. Tuning stops when a station is found.To preset the channel4 While listening to the radio broadcastPress [OK].5Press [3,4] to select the channel and then press [OK].∫To improve FM sound quality1 While receiving FM broadcasts, press [PLAY MENU] repeatedly to select “FM MODE”.2Press [3,4] to select “MONO” and then press [OK].≥This setting can be preset and memorized. To do so, continue to step 4 of “Manual tuning and presetting”.≥Select “STEREO” in step 2 to return to stereo broadcasts.≥“MONO” is canceled if the frequency is changed.≥If “MONO” is selected, regardless of the type of signal this unit is receiving, “FM MONO” is displayed when [DISPLAY] is pressed. (lbelow)∫To display the current signal statusPress [DISPLAY].≥“STEREO” is displayed when this unit tunes to a stereo broadcast.Presetting stations automaticallyListening to a preset channel“FM ST”: The FM signal is in stereo.“FM”: The FM signal is in monaural.≥“FM” is also displayed even if this unit is not tuned to a station.SC-HC58~RQT9754.book 15 ページ 2012年12月3日 月曜日 午後5時27分](https://usermanual.wiki/Panasonic-of-North-America/11NR1301/User-Guide-1865427-Page-15.png)
![16RQT9754Sound adjustmentThe following sound effects can be added to the audio output.1Press [SOUND] repeatedly to select the effect.2Press [3,4] to select the setting and then press [OK].≥You may experience a reduction in sound quality when these effects are used with some sources. If this occurs, turn the sound effects off.Clock and TimerThis is a 12-hour clock.1Press [SETUP] repeatedly to select “CLOCK”.2Press [3,4] to set the time and then press [OK].≥To display the clock, press [SETUP] to select “CLOCK” and then press [OK] once. The time is displayed for 10 seconds.(During standby, press [DISPLAY] once.)≥The clock is reset when there is a power failure or when the AC power supply cord is removed.≥Reset the clock regularly to maintain accuracy.*1: “CD”, “IPOD_DOCK”, “IPOD_PORT” and “FM” can be set as the music source.You can set the timer so this unit turns on at a certain time every day.PreparationSet the clock (lleft).∫Setting the timer1Press [SETUP] repeatedly to select “TIMER ADJ”.2Press [3,4] to set the starting time (“ON TIME”) and then press [OK].3Press [3,4] to set the finishing time (“OFF TIME”) and then press [OK].∫Turn the timer on1Select the music source*1 and set the desired volume.2Press [SETUP] repeatedly to select “TIMER SET”.3Press [3,4] to select “SET” and then press [OK].≥“F” is displayed.≥To turn the timer off, select “OFF”.4Press [Í] to turn the unit off.≥To display the timer settings, press [SETUP] repeatedly to select “TIMER ADJ” and then press [OK] once.The music source and volume will also be displayed if the timer is turned on.≥During standby, if the timer is turned on, press [DISPLAY] twice to display the settings.≥This unit can be used as normal after the timer is set, however:– Turn the unit to standby mode before the timer start time.– Even if the audio source or the volume is changed, the timer will still use the audio source and volume that was set when the timer was turned on.The sleep timer can turn the unit off after a set time.1Press [SETUP] to select “SLEEP”.2Press [3,4] to set the time (in minutes) and then press [OK].“SLEEP 30” ,. “SLEEP 60” ,. “SLEEP 90” ,. “SLEEP 120”^--------------------------. OFF (Cancel) (-----------------------J≥The remaining time is indicated on the unit’s display except when other operations are performed.≥The play timer and sleep timer can be used together. The sleep timer always has priority.Direct-Vocal Surround(D.SURROUND)“LEVEL 1”, “LEVEL 2” or “OFF”.≥The factory preset is “OFF”.Preset EQ(PRESET EQ)“HEAVY” (heavy), “SOFT” (soft), “CLEAR” (clear), “VOCAL” (vocal) or “FLAT” (flat/off).≥The factory preset is “HEAVY”.Bass (BASS) or Treble (TREBLE)Adjust the level (j4 to i4).Dynamic Bass(D.BASS)“ON D.BASS” or“OFF D.BASS”.≥The factory preset is “ON D.BASS”.Setting the clockPlay timerSleep timerSC-HC58~RQT9754.book 16 ページ 2012年12月3日 月曜日 午後5時27分](https://usermanual.wiki/Panasonic-of-North-America/11NR1301/User-Guide-1865427-Page-16.png)
![17RQT9754ENGLISHOthersAs a factory preset, this unit will always turn off automatically if there is no sound output and no operation for approx. 30 minutes.To cancel this function1Press [SETUP] repeatedly to select “AUTO OFF”.2Press [3,4] to select “OFF” and then press [OK].≥To turn automatic standby on, select “ON” in step 2.≥This setting cannot be selected when “FM” is the source.The brightness of this unit’s display can be changed.1Press [SETUP] repeatedly to select “DIMMER”.2Press [3,4] to select “ON” and then press [OK].To cancel the dimmer, select “OFF” in step 2.When other Panasonic equipment responds to the supplied remote control, change the remote control code.1Press [CD] to select “CD”.2While pressing and holding [SELECTOR] on the unit, press and hold [CD/RADIO] on the remote control until the unit's display shows “REMOTE 2”.3Press and hold [OK] and [CD/RADIO] on the remote control for at least 4 seconds.≥To change the mode back to “REMOTE 1”, repeat the steps above but replace the button pressed on the remote control from [CD/RADIO] to [ ].Occasionally, Panasonic may release updated software for this unit that may add or improve the way a feature operates. These updates are available free of charge.Preparation≥Turn the unit on.≥Connect this unit to the wireless network. (l8)jMake sure that the wireless network is connected to the Internet.jIf “D.CONNECT” is set to “ON”, change the setting to “OFF” and connect this unit to a wireless network that is connected to the Internet.1Press [SETUP] repeatedly to select “SW UPDATE” and then press [OK].2Press [3,4] to select “UPDATE? Y” and then press [OK] to start the update.3When the update has finished successfully, “SUCCESS” is displayed.4Disconnect the AC power supply cord and reconnect it after 3 minutes.≥Downloading will require several minutes. It may take longer or may not work properly depending on the connection environment.≥If you do not want to update the unit, select “UPDATE? N” and then press [OK] in step 2.≥If there are no updates, “NO NEED” is displayed after step 2.∫Checking the software version1 Press [SETUP] repeatedly to select “SW VER.” and then press [OK].{. The version of the installed software is displayed.2 Press [OK] to exit.Automatic standbyDisplay brightnessChanging the unit and remote control codeSoftware updateDO NOT DISCONNECT the AC power supply cord while one of the following messages is displayed.– “LINKING”, “UPDATING” or “%” (“ ” stands for a number.)≥During the update process, no other operations can be performed.SC-HC58~RQT9754.book 17 ページ 2012年12月3日 月曜日 午後5時27分](https://usermanual.wiki/Panasonic-of-North-America/11NR1301/User-Guide-1865427-Page-17.png)
![18RQT9754To check the Wi-Fi signal strength where the unit is located.PreparationConnect this unit to the wireless network. (l8)1Press [SETUP] repeatedly to select “SIG.LEVEL” and then press [OK].≥The unit’s display shows “LEVEL ”. (“ ” stands for a number.)2Press [OK] to exit this display mode.≥It is recommended to have a signal strength of “3”. Change the position or angle of your wireless network router or the unit if the indication is “2” or “1” and see if the connection improves.≥If “LEVEL 0” is displayed, this unit cannot establish a link with the wireless network router. (l21)≥This function does not work when “D.CONNECT” is set to “ON”.This unit can turn on automatically from standby mode when this unit is selected as the AirPlay speakers.PreparationConnect this unit to the wireless network. (l8)1Press [SETUP] repeatedly to select “NET STNBY” and then press [OK].2Press [3,4] to select “ON” and then press [OK].≥To cancel this function, select “OFF” in step 2.≥The factory preset is “OFF”. If this function is set to “ON” the standby power consumption will increase.Display the name for the connected wireless network (SSID).1Press and hold [– NETWORK SETUP] on the unit and [OK] on the remote control until the unit's display shows the SSID.2Press [OK] to exit.≥If “NOCONNECT” is displayed this unit is not connected to a wireless network.≥All letters are displayed as capital letters, and characters that cannot be displayed are replaced with “*”.To check the unit’s IP address or the Wi-Fi MAC address.1Press and hold [– NETWORK SETUP] on the unit and [4] on the remote control until the unit’s display shows the IP address.{. The IP address is partially displayed.≥To display the MAC address on the unit, repeat the steps above by replacing [4] with [3].2Press [3,4] on the remote control to show the rest of the IP address.≥To exit the setting, wait 20 sec.≥The “ – ” displayed on the top or bottom left of the display indicate the first and last units respectively.Wi-Fi signal strengthNetwork standbyWireless network name (SSID)IP/MAC AddressSC-HC58~RQT9754.book 18 ページ 2012年12月3日 月曜日 午後5時27分](https://usermanual.wiki/Panasonic-of-North-America/11NR1301/User-Guide-1865427-Page-18.png)
![19RQT9754ENGLISHTroubleshootingBefore requesting service, make the following checks. If you are in doubt about some of the check points, or if the solutions indicated in the following guide do not solve the problem, refer to “Customer Services Directory (United States and Puerto Rico)” on page 30 if you reside in the U.S.A. or Puerto Rico, or refer to “Limited Warranty (ONLY FOR CANADA)” on page 31 if you reside in CanadaDo you have the latest software installed?≥Occasionally, Panasonic may release updated software for this unit that may add or improve the way a feature operates. (l17)Humming heard during play.≥An AC power supply cord or fluorescent light is near the cords. Keep other appliances and cords away from this unit’s cables.Incorrect display or play will not start.≥Make sure that the disc is compatible with this unit.(l23)≥There is moisture on the lens. Wait for about an hour and then try again.A beat sound or noise is heard while receiving radio broadcast.≥Confirm the FM antenna is properly connected. (l6)≥Adjust the position of the antenna.≥Try to keep a certain amount of distance between the antenna and AC power supply cord.≥Try using an outdoor antenna if there are buildings or mountains nearby.≥Switch the television or other audio players off or separate it from this unit.≥Keep this unit away from mobile phones if the interference is apparent.Stations cannot be selected.Change the FM frequency step.1Press [RADIO] to select “FM”.2Press and hold [SELECTOR] on the unit.After a few seconds the display changes to show the current lowest frequency. Continue to hold the button down. The lowest frequency changes and the step is changed.Cannot charge or operate.≥Have you selected the appropriate selector? Press [iPod] to select either “IPOD_DOCK” or “IPOD_PORT”.≥Check that the iPod/iPhone/iPad is connected properly. (l7)≥The battery of the iPod/iPhone/iPad is depleted. Charge the iPod/iPhone/iPad, and then operate again.≥Connect the iPod/iPhone/iPad again or try to restart the iPod/iPhone/iPad.≥When this unit is in standby mode, charging will not start when using the USB cable connection. Turn this unit on and make sure the charging has started before switching this unit to standby mode.Cannot connect to the network≥Confirm the network connection and settings. (l8)≥Your wireless network might be set to be invisible. In this case select “Manual settings” in “Method 3”. (l9)≥This unit cannot join a wireless network using WEP security settings with the WPS methods (“Method 2”). Use “Method 3” to join the wireless network. (l9)≥Make sure that the multicast function on the wireless network router is set to on (enabled).≥When “D.CONNECT” is used, the password of the network is changed each time the function is turned off. Turn the function off and on again to retrieve a new password.To return all settings to the factory presetWhen the following situations occur, reset the memory:≥There is no response when buttons are pressed.≥You want to clear and reset the memory contents.1Disconnect the AC power supply cord. (Wait for at least 3 minutes before proceeding to step 2.)2While pressing and holding down [Í/I] on the unit, reconnect the AC power supply cord.≥“--------” appears on the display.3Release [Í/I].All the settings are returned to the factory preset. You will need to reset the memory items.Common problemsDisc operationsRadioiPod/iPhone/iPad operationsAirPlay operationsSC-HC58~RQT9754.book 19 ページ 2012年12月3日 月曜日 午後5時27分](https://usermanual.wiki/Panasonic-of-North-America/11NR1301/User-Guide-1865427-Page-19.png)
![21RQT9754ENGLISH“CANNOT SET”≥Select an audio source other than “AIRPLAY” or “BLUETOOTH”.“CHECKING CONNECTION”≥The unit is checking the connected iPod/iPhone/iPad. ≥If this display keeps appearing, make sure that the battery of the iPod/iPhone/iPad is not depleted and that the iPod/iPhone/iPad is turned on and connected correctly (l7).“DIMMER”≥Appears 10 seconds after the volume is turned to “0”.“DL ERROR”≥The software download has failed. Press any button to exit. Please try again later.≥The server cannot be found. Press any button to exit. Make sure that the wireless network is connected to the Internet.“ERROR”≥Incorrect operation is performed. Read the instructions and try again.“F ” (“ ” stands for a number.)≥There is a problem with this unit.Note down the displayed number, disconnect the AC supply cord and consult your dealer.“FAIL”≥Updating or setting has failed. Read the instructions and try again.“ILLEGAL OPEN”≥Sliding door is not in correct position. Turn the unit off and on again. If this display appears again, consult the dealer.“IPOD_DOCK OVER CURRENT ERROR”“IPOD_PORT OVER CURRENT ERROR”≥The iPod/iPhone/iPad is drawing too much power. Disconnect the iPod/iPhone/iPad and turn the unit off and on again.“LEVEL 0”≥There is no link between this unit and the wireless network router.Try the following operations:– Check that the wireless network router is turned on.– Turn this unit off and on again.– Reset the wireless network settings. (l8)If the problem persists, consult your dealer.“LINKING”≥This unit is communicating with the wireless network router to complete the network settings.Depending on the wireless network router this process may take a few minutes. Try moving this unit closer to the wireless network router.“NOCONNECT”≥This unit is not connected to the network.Check the network connection. (l8)“NODEVICE”≥The iPod/iPhone/iPad device is not inserted correctly. Read the instructions and try again (l7).≥The battery of the iPod/iPhone/iPad is depleted. Charge the iPod/iPhone/iPad and turn it on before connecting.“NO DISC”≥Insert a disc to be played (l7).“NO PLAY”≥A CD that is not in CD-DA format is inserted. It cannot be played.“NOT SUPPORTED”≥You have connected an iPod/iPhone/iPad that cannot be played (l23).≥If the iPod/iPhone/iPad is compatible, turn it on and connect it correctly.≥The connected iPod touch/iPhone/iPad is not connected to a wireless network. Connect it to a wireless network and try again. (l8)“READING”≥The unit is checking the CD information. After this display has disappeared, start operating.“REMOTE ” (“ ” stands for a number.)≥The remote control and this unit are using different codes. Change the code on the remote control.– When “REMOTE 1” is displayed, press and hold [OK] and [ ] for more than 4 seconds.– When “REMOTE 2” is displayed, press and hold [OK] and [CD/RADIO] for more than 4 seconds.“SET WI-FI”≥The connected iPod touch/iPhone/iPad is not connected to a wireless network. Connect it to a wireless network and try again. (l8)SC-HC58~RQT9754.book 21 ページ 2012年12月3日 月曜日 午後5時27分](https://usermanual.wiki/Panasonic-of-North-America/11NR1301/User-Guide-1865427-Page-21.png)
![22RQT9754Specifications∫GENERAL∫AMPLIFIER SECTION∫TUNER SECTION∫DISC SECTION∫SPEAKER SYSTEM SECTION∫TERMINAL SECTION∫Wi-Fi / AirPlay SECTION∫BLUETOOTH SECTION≥Specifications are subject to change without notice.Mass and dimensions are approximate.≥Total harmonic distortion is measured by a digital spectrum analyzer.*1: When the iPod/iPhone/iPad is not charging and the sliding door is closed.Power consumption 38 WPower consumption in standby mode*1Approx. 0.1 WPower consumption in standby mode(With the iPod dock out)Approx. 0.4 W(With “NET STNBY” set to “ON”)Approx. 6.3 WPower supply AC 120 V, 60 HzDimensions (WkHkD)500 mmk204 mmk84 mm(19 11/16qk81/32qk35/16q)(Depth without stand: 75 mm (3q))Mass (Weight)Approx. 2.6 kg(5.7 lbs)Operating temperature range0oCtor40 oC(r32 oF to r104 oF)Operating humidity range35 % to 80 % RH (no condensation)Output power:RMS Output Power Stereo modeFront Ch (both ch driven)20 W per channel (6 ≠), 1 kHz, 10 % THDTotal RMS Stereo mode power40 WFTC Output Power Stereo modeFront Ch (both ch driven)15 W per channel (6 ≠),20 Hz to 20 kHz, 1 % THDTotal FTC Stereo mode power30 WPreset Memory FM 30 stationsFrequency Modulation (FM)Frequency range87.9 MHz to 107.9 MHz (200 kHz step)87.5 MHz to 108.0 MHz (100 kHz step)Antenna terminals75 ≠(unbalanced)Disc played [8 cm (3q) or 12 cm (5q)]CD, CD-R/RW (CD-DA)Pick upWavelength 790 nm (CD)Audio output (Disc)Number of channels 2 ch (FL, FR)Type1 way, 1 speaker system (Passive Radiator)Speaker unit(s)Full range6.5 cm (2 1/2q) Cone typek1 per channelPassive Radiator8cm(31/8q)k2 per channelImpedance 6≠Lightning Connector DCOUT 5V, 1.0A MAXiPod Port DCOUT 5V, 2.1A MAXPhone jackTerminal Stereo, ‰3.5 mm (1/8q) jackWi-FiWLAN Standards IEEE802.11b/gFrequency range 2.4 GHz bandSecurity WEP, WPATM, WPA2TMWPS versionVersion 2.0 (WEP not support)Bluetooth system specification V3.0Wireless equipment classification Class 2Supported profiles A2DP, AVRCP, GAVDPFrequency band 2402 MHz to 2480 MHz(Adaptive Frequency Hopping)Driving distance 10 m (33 ft) Line of sightSC-HC58~RQT9754.book 22 ページ 2012年12月3日 月曜日 午後5時27分](https://usermanual.wiki/Panasonic-of-North-America/11NR1301/User-Guide-1865427-Page-22.png)
![27RQT9754ESPAÑOL ENGLISHConexiones≥Consumo de energía en Standby (modo de espera): Aprox. 0,1 WInsertar o sacar los mediosOperaciones de reproducción de mediosPreparación≥Encienda la unidad.≥Inserte el medio. (larriba)≥Presione [CD] o [iPod] para seleccionar la fuente de audio.Reloj y temporizadorÉste es un reloj de 12 horas.1Presione [SETUP] para seleccionar “CLOCK”.2Presione [3,4] para seleccionar la hora y luego presione [OK].Spanish Quick Reference / Referencia rápida en español12Cinta adhesiva(no suministrado)Antena interior FM(suministrado)Conecte el cable de alimentación AC después de que todas las demás conexiones estén completas.Hacia el tomacorriente AC Cable de alimentación AC (suministrado)iPadReproducción básicaReproducir Presione [1/;].Detención Presione [∫].Pausa Presione [1/;].Presione nuevamente para reiniciar la reproducción.Saltear Presione [:/6] o [5/9] para saltear una pista.Búsqueda Durante la reproducir o pausa Mantenga presionado [:/6] o [5/9].Ajuste del relojSC-HC58~RQT9754.book 27 ページ 2012年12月3日 月曜日 午後5時27分](https://usermanual.wiki/Panasonic-of-North-America/11NR1301/User-Guide-1865427-Page-27.png)