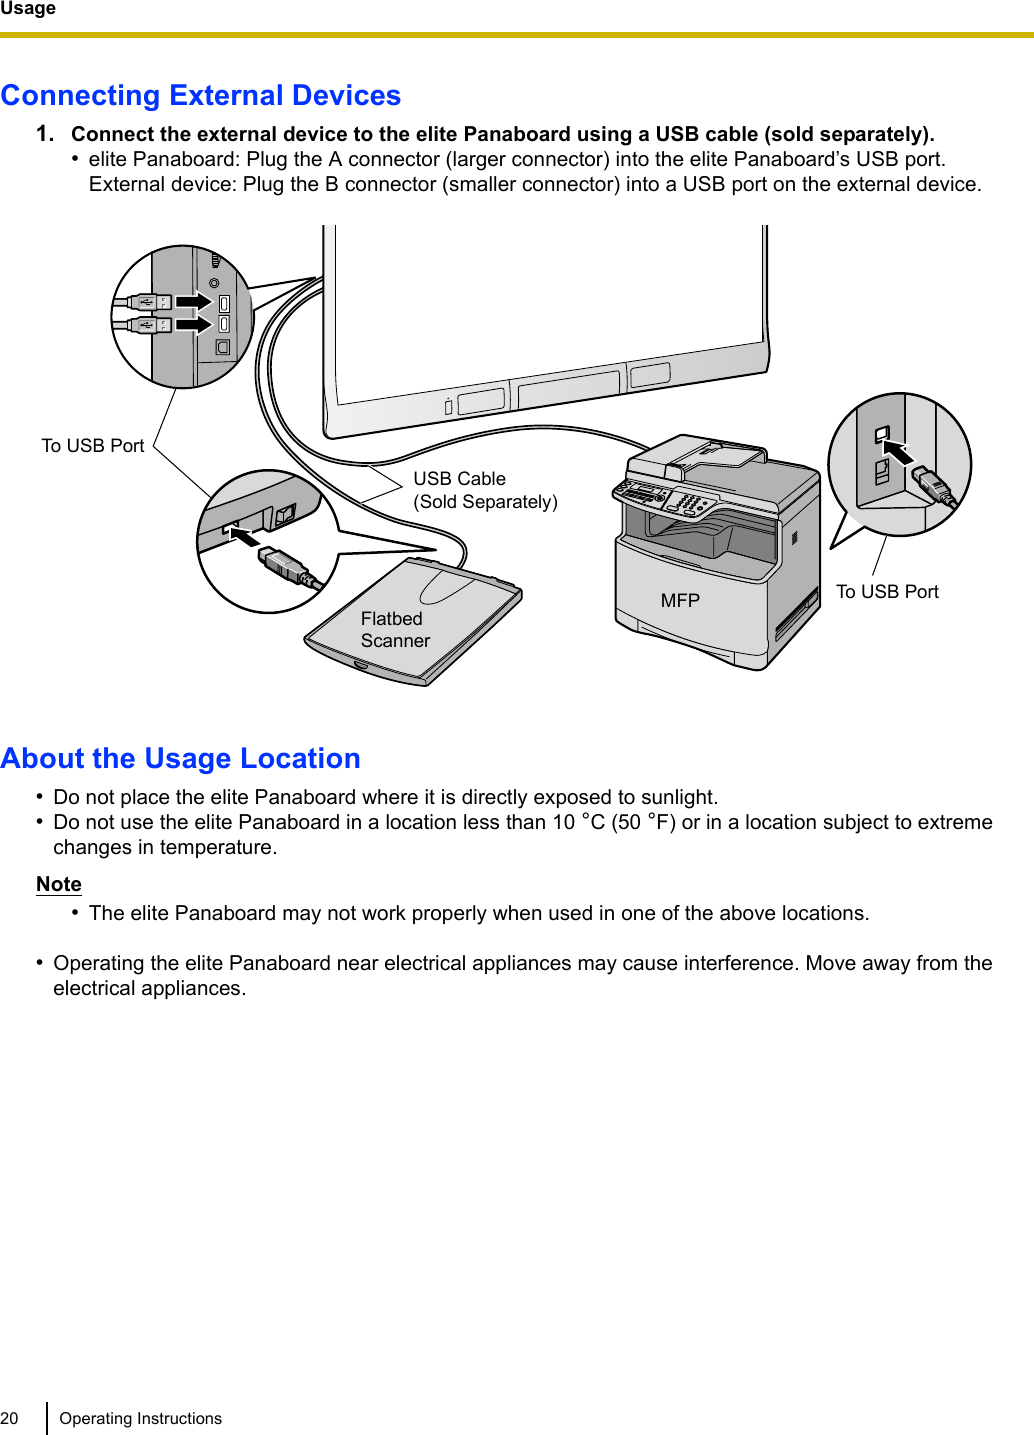
Panasonic of North America 5Z6UE-608049 2.4 GHz USB Wireless Adapter User Manual 06
Panasonic Corporation of North America 2.4 GHz USB Wireless Adapter 06
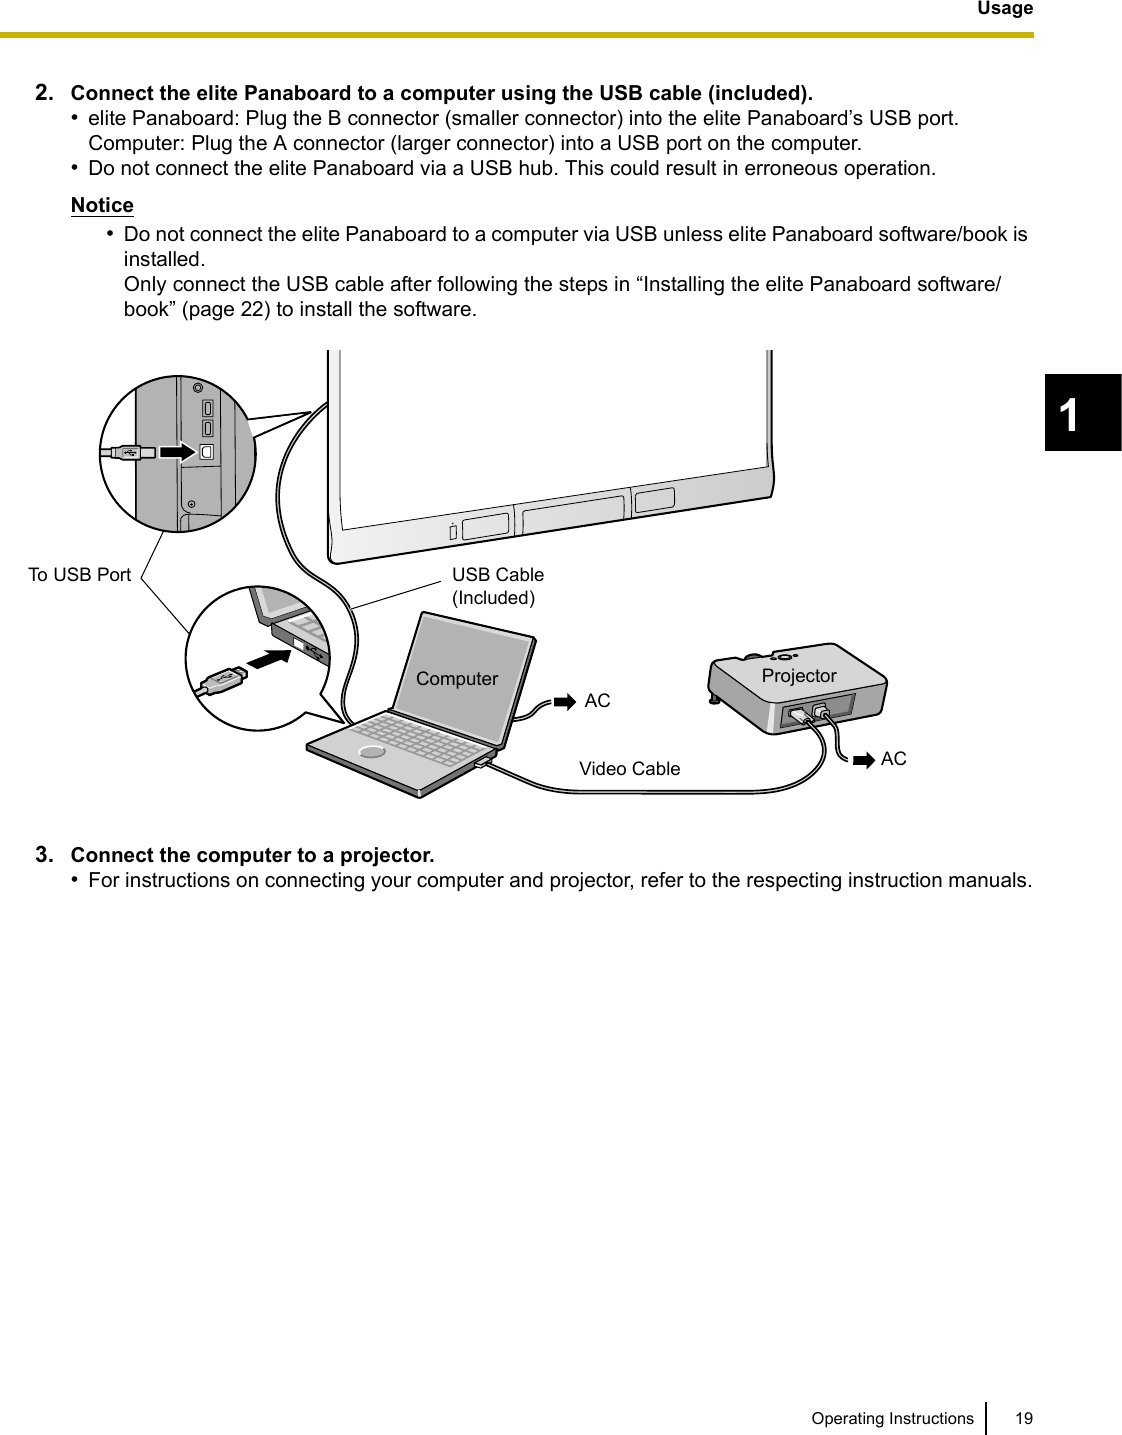
UserManual.wiki
>
Panasonic of North America
>
5Z6UE 608049 User Manual
User Manual
Navigation menu
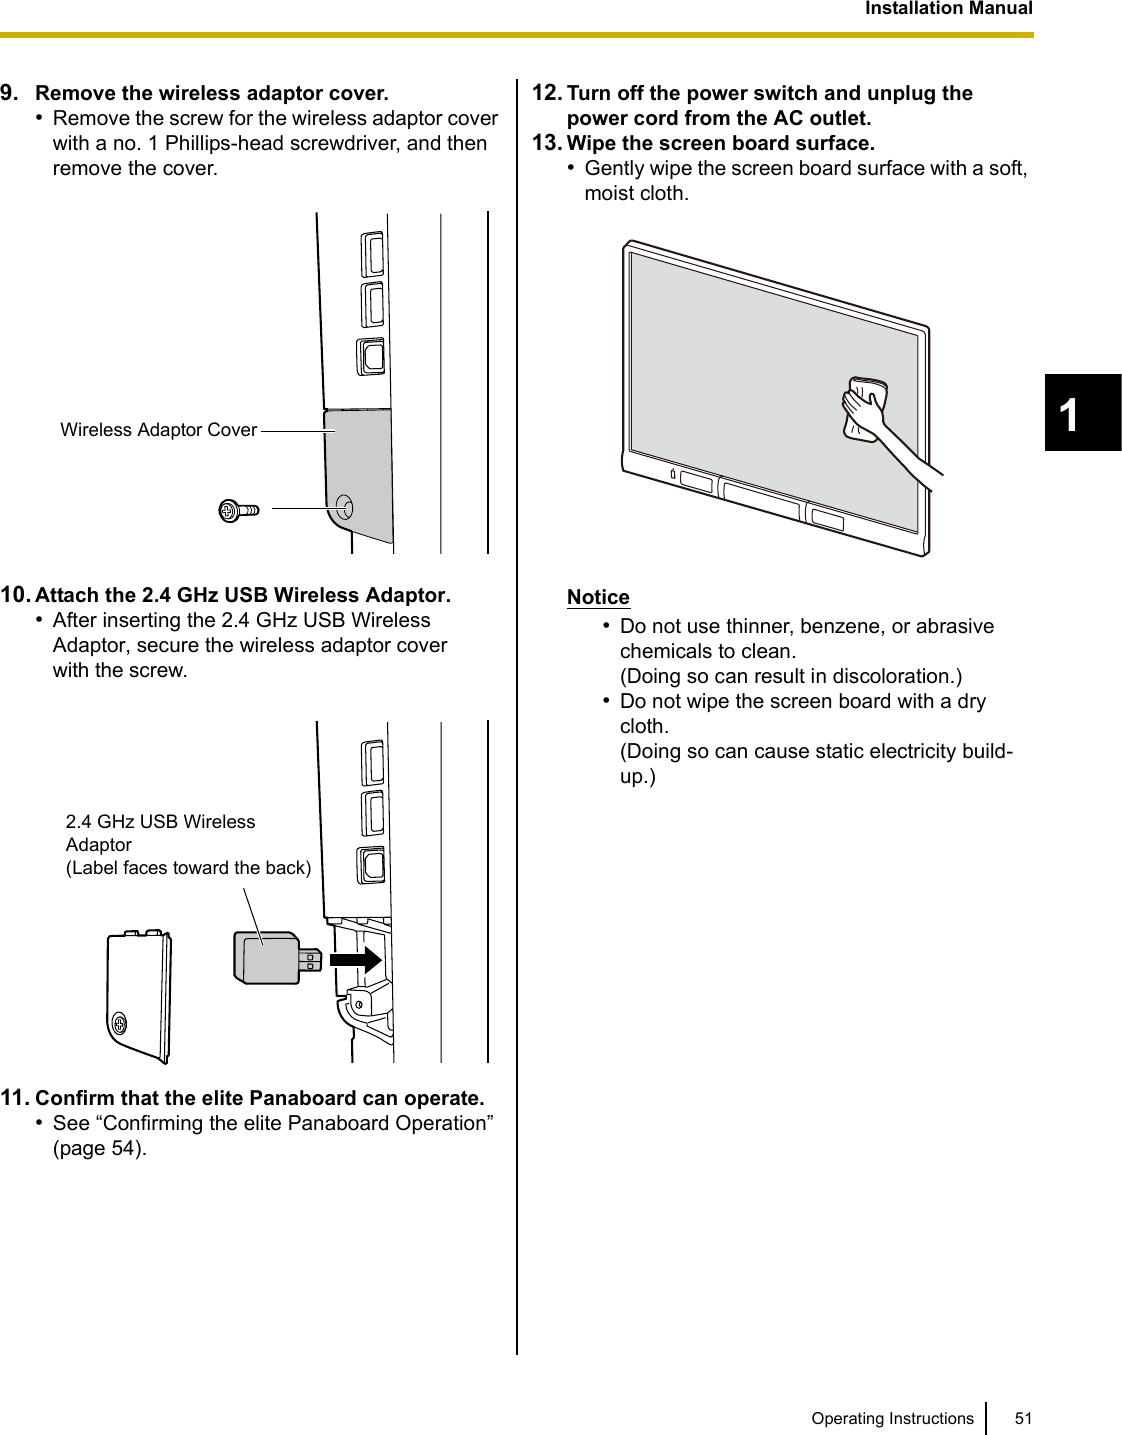
Upload a User Manual
Namespaces
Wiki Guide
HTML
PDF
Info
Views
User Manual
Discussion / Help
Navigation


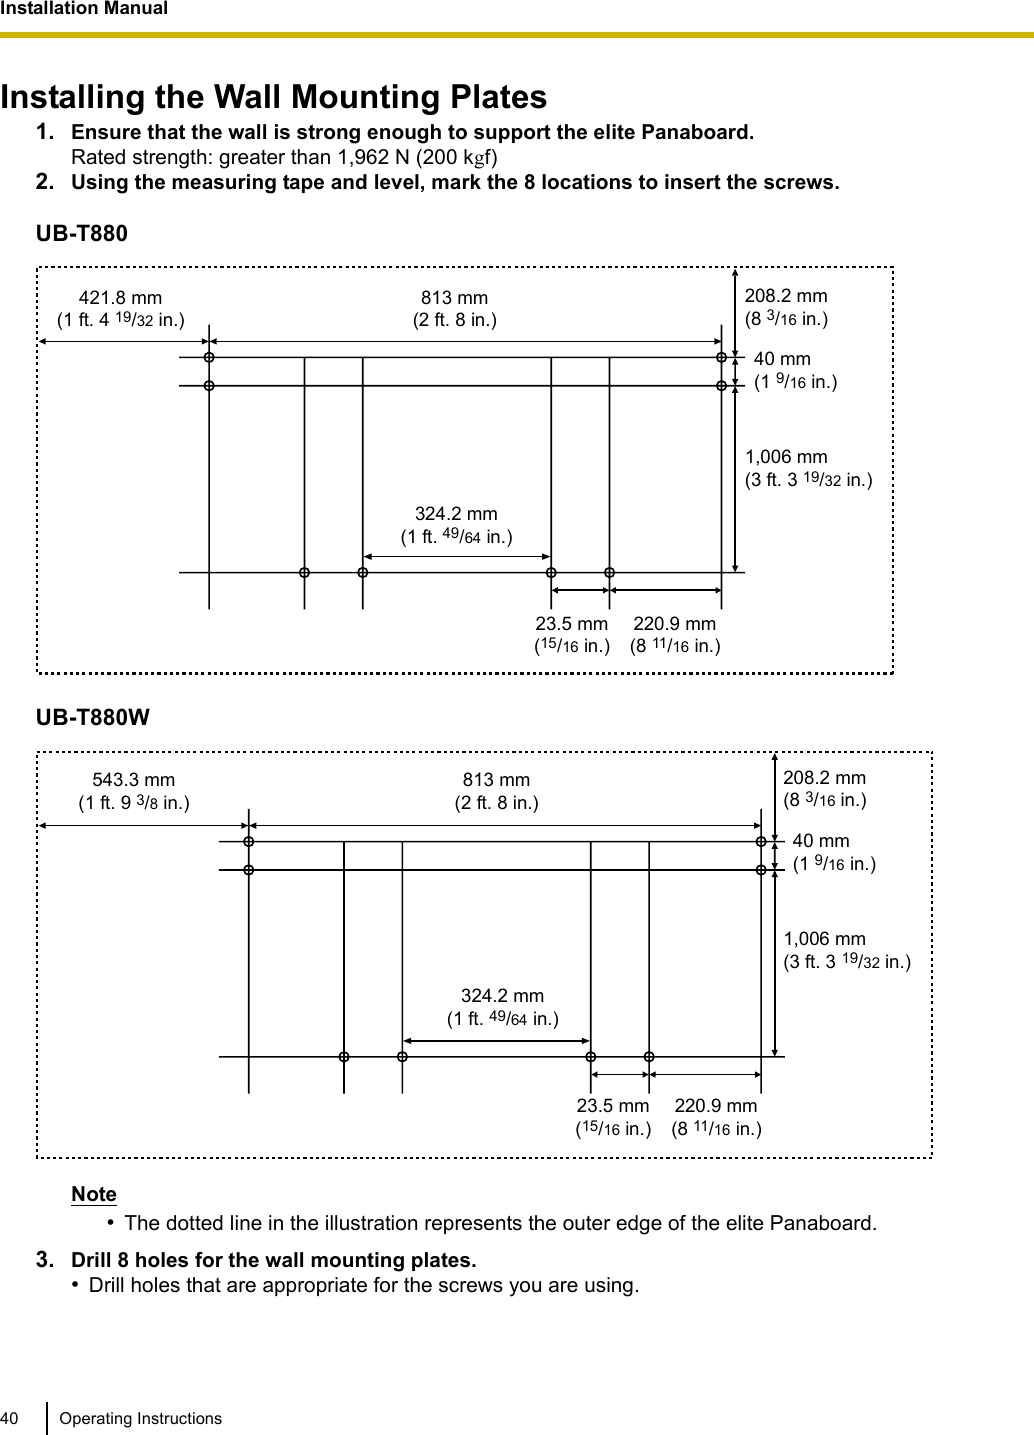
![Usage14 Operating InstructionsUsageIncluded AccessoriesCheck that all of the following items are included with your elite Panaboard.In the event that an item is missing, please contact your dealer.List of Accessories* A 2.4 GHz USB Wireless Adaptor is preinstalled on the elite Panaboard.FCC ID: ACJ5Z6UE-608049 / IC: 216A-UE608049Note•The illustration of the power cord shown above is for the United States. The shape of the plug may vary depending on country/area.•Stand is sold separately.•Store the extra penpoint along with this operating manual.•Replacement penpoints are available for purchase separately (page 34).•The warranty may not be included depending on country/area.About Using the DVD-ROMPower Cord(3 m [9 ft. 10 1/8in.]) 1USB Cable(5 m [16 ft. 4 7/8in.]) 1 Software DVD-ROM 1AAA Battery (LR03)(Disposable) 1Electronic Pen1 Penpoint(Replacement) 2Operating Instructions(this document) 1Warranty12.4 GHz USB Wireless Adaptor* 1To prevent damage to the DVD-ROM:•Do not touch or write on the surface of the disc.•Do not leave the disc out of the protective case.•Do not leave the disc in the direct sunlight or near heat sources.•Do not place heavy objects on the disc case or drop the case.•To clean the disc, hold the disc by its edges and wipe it from the center to the edges with a dry, soft cloth.](https://usermanual.wiki/Panasonic-of-North-America/5Z6UE-608049/User-Guide-1281281-Page-14.png)
![Usage22 Operating InstructionsInstalling the elite Panaboard software/bookYou need to install the elite Panaboard software/book on the computer that will be used with the elite Panaboard.To install the elite Panaboard software/book, follow the procedure below.Notice•Do not connect the USB cable until the installation is completed.•Do not connect more than 1 elite Panaboard to the same computer. (Doing so can cause erroneous behavior on the computer.)1. Turn on your computer and start the Windows operating system.•Log into an account with Administrator privileges.2. Insert the included DVD-ROM into the DVD-ROM drive.•The setup screen will be displayed.•If the setup screen does not appear, select your DVD-ROM drive in Explorer and double-click [Menu.exe].•In Windows Vista or Windows 7, if the Autoplay dialog box is displayed, click [Run Menu.exe].3. When the “Welcome” screen has been displayed, click [Next].4. When the “Model Selections” screen is displayed, click the type of device you are using.5. When the “Menu” screen is displayed, click [Read Me First].•After the system requirements are displayed, make sure that your computer meets the requirements.6. Click [Install elite Panaboard] on the “Menu” screen.7. If you agree to the terms in the “License Agreement”, click [Yes].•In Windows Vista, if the “User Account Control” window is displayed, click [Continue] to continue with the installation.•In Windows 7, if the “User Account Control” window is displayed, click [Yes] to continue with the installation.](https://usermanual.wiki/Panasonic-of-North-America/5Z6UE-608049/User-Guide-1281281-Page-22.png)
![23Operating InstructionsUsage18. When the following screen is displayed, confirm that the USB cable is not connected to your computer or the elite Panaboard, and click [OK].•If the USB cable is connected to the elite Panaboard, disconnect the cable, and click [OK].•If .NET Framework 3.0 or later is not installed, an installation screen will be displayed. Follow the on-screen directions to install these components.9. When the installation wizard is displayed, follow the on-screen instructions and continue with the installation.10. When installation has finished, click [Finish].•Restart your computer if you are prompted to do so.•The group [elite Panaboard] will be created in the [Panasonic] group in the program menu.•The following items will appear in the [elite Panaboard] group:– elite Panaboard software– elite Panaboard book– Electronic Pen Registration Tool– Operating Instructions– Software Help– Download the latest versionNote•To view the Operating Instructions, you must have Adobe® Reader® installed on your computer. If your computer is connected to the Internet, you can download Adobe Reader from Adobe’s web site.](https://usermanual.wiki/Panasonic-of-North-America/5Z6UE-608049/User-Guide-1281281-Page-23.png)
![25Operating InstructionsUsage1.Setting Your System (Calibration)About CalibrationCalibration refers to setting up the elite Panaboard and projector so that lines and comments drawn with your finger or the electronic pen are displayed in the correct position. Be sure to perform calibration before use.After you have set up the elite Panaboard, project an image onto the screen board and use the elite Panaboard software installed on your computer to perform calibration.After CalibrationDo Not Move the elite Panaboard or the Projector•The following changes will bring the position of projection out of alignment with the position of your finger or the electronic pen, and you will need to recalibrate the equipment.– The location of the projector changed.– The location of the elite Panaboard changed.– The image area or placement was changed due to changes in the zoom, focus, etc.– The resolution of the projector or the computer changed.•If you are using the elite Panaboard installed on a stand, be aware that accidentally hitting the elite Panaboard or pushing too strongly with the electronic pen while operating can move the stand’s position, which will result in misalignment of the projected image and the electronic pen’s position.•Make sure to lock the stand’s casters when using the elite Panaboard, as failing to do so can cause misalignment.Note•To perform calibration, click the icon in the notification area and click [Calibration] in the pop-up menu.Starting the elite Panaboard software and Performing Calibration1. Turn on the elite Panaboard.2. Connect the elite Panaboard to your computer with the USB cable.•The elite Panaboard software starts automatically.•Once the elite Panaboard software starts up, the calibration screen is automatically displayed.•Restart your computer if you are prompted to do so. After the computer has restarted, connect the elite Panaboard to your computer with the USB cable.3. Calibrate the equipment by using your finger to touch the center of the indicated points in the order shown for about 2 seconds.•Touch the screen board at a right angle with your finger.•After you touch an indicated point correctly, the next point is shown automatically.•When calibration has finished normally, a completion dialog box is displayed.](https://usermanual.wiki/Panasonic-of-North-America/5Z6UE-608049/User-Guide-1281281-Page-25.png)
![Usage26 Operating Instructions4. Click [OK].•If the elite Panaboard and projector are fixed so that they will not move (Wall mounted case), select the [Always use this calibration information.] check box, and click [OK] to skip calibration from the next time you start the elite Panaboard software.•When calibration is finished, the icon is displayed in the notification area. You can now use the elite Panaboard software.•To display the Select Function Menu, click the Menu Start Tab (left side: / right side: ) on the screen with your finger.•To display the Drawing Menu, touch the screen board while holding the menu button on the electronic pen.Note•For detailed information about using the elite Panaboard software, refer to the help menu. For details on accessing the help information, see “Viewing the Help of the Software” (page 27).Exiting the elite Panaboard softwareClick on the icon in the notification area, and select [Exit] from the menu.Example of the Select Function MenuExample of the Drawing Menu](https://usermanual.wiki/Panasonic-of-North-America/5Z6UE-608049/User-Guide-1281281-Page-26.png)
![27Operating InstructionsUsage1Viewing the Help of the SoftwareFollow the procedure below to view the help of the software installed on your computer.1. Turn on your computer and start Windows.2. Open “Software Help” from the Start menu. ([Start] → [All Programs] → [Panasonic] → [elitePanaboard] → [Software Help])•General help information of the installed software is displayed.Note•To access the help information of elite Panaboard software and Drawing Menu, click the icon in the notification area and select [Help] from the pop-up menu.•To access elite Panaboard book help information, select [Help...] from the elite Panaboard book [Help] menu.•We recommend that you view the help using Internet Explorer® 6.0 or later for Windows.Uninstalling the elite Panaboard software/bookIf it is necessary to uninstall the elite Panaboard software/book, follow the procedure below.1. Turn on your computer and start Windows.•Log into an account with Administrator privileges.2. Select [Add or Remove Programs] from the Control Panel.•In Windows Vista or Windows 7, select [Uninstall a program].3. Select Panasonic elite Panaboard, then remove it.4. Follow the on-screen instructions.5. When uninstallation is complete, restart your computer.Download the Latest SoftwareFollow the procedure below to download the latest version of the software from the download web site.1. Turn on your computer and start Windows.2. On the Start menu, point to [All Programs] → [Panasonic] → [elite Panaboard], and click [Download the latest version].](https://usermanual.wiki/Panasonic-of-North-America/5Z6UE-608049/User-Guide-1281281-Page-27.png)


![Appendix32 Operating InstructionsSpecificationsModel Number UB-T880 / UB-T880WGeneral Power AC 100 V–240 V, 50 Hz/60 HzPower Consumption During Operation: 0.5 A(When power is OFF by the power switch: 0.2 W)Operating Environment Temperature: 10 °C to 35 °C (50 °F to 95 °F)Humidity: 30 % to 80 %Storage Environment Temperature: -20 °C to 40 °C (-4 °F to 104 °F)Humidity: 15 % to 80 %Interface USB 2.0No. of Hub Ports 2 portsElectronic PenTransmission System GFSKElectronic Pen Power LR03 (AAA alkaline dry cell battery) × 1Electronic Pen Battery Life 30 hours (when used continuously at 25 °C [77 °F])* When using Panasonic LR03 alkaline dry-cell batteries.AudioFeaturesAudio Input Input level: 309 mVrms (1 KHz, 0 dB, 10 kΩ)Stereo 1 system, ø 3.5 mm (1/8in.) stereo mini jackAudio Output 2W + 2W (maximum 4W + 4W)](https://usermanual.wiki/Panasonic-of-North-America/5Z6UE-608049/User-Guide-1281281-Page-32.png)
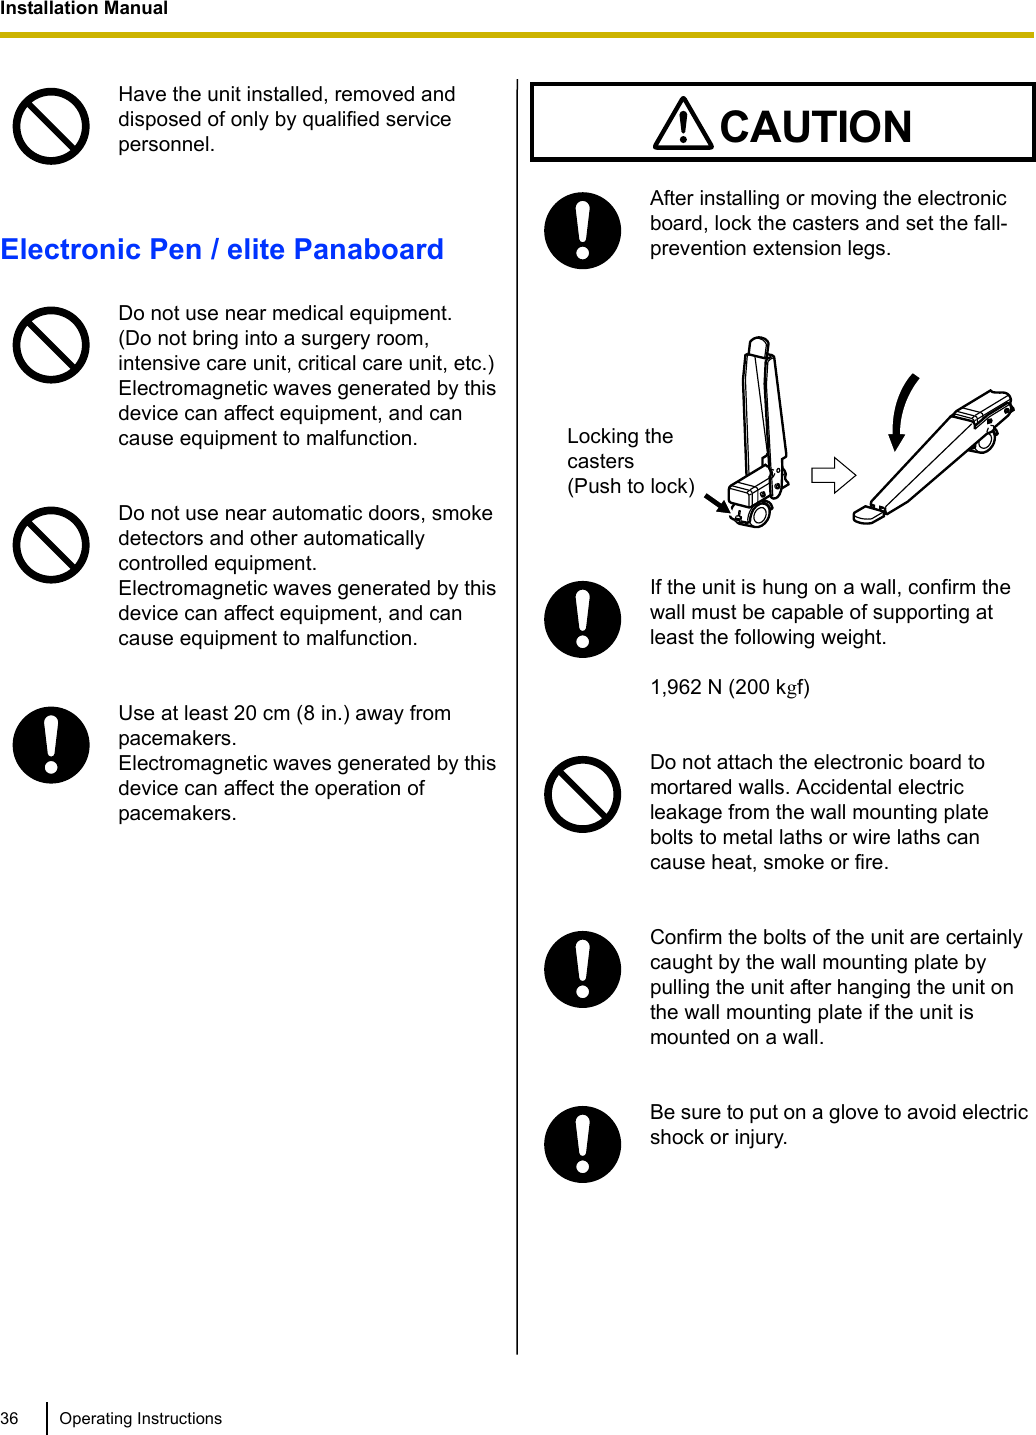
![Installation Manual37Operating Instructions1Installation ManualIncluded AccessoriesConfirm that the following items are included with the elite Panaboard.No. Part Name Illustration Q’ty RemarksPower Cord(3 m [9 ft. 10 1/8in.]) 1The illustration of the power cord is for the United States. The shape of the plug may vary depending on country/area.USB Cable(5 m [16 ft. 4 7/8in.]) 1For computer connectionDVD-ROM 1Operating InstructionsDriversApplication softwareWall Mounting Plate (Left) 1—Wall Mounting Plate (Right) 1—Battery (LR03 AAA alkaline battery) 1For electronic penElectronic Pen 1—Penpoint(Replacement) 2For electronic pen2.4 GHz USB Wireless Adaptor 1A 2.4 GHz USB Wireless Adaptor is preinstalled on the elite Panaboard.FCC ID: ACJ5Z6UE-608049 / IC: 216A-UE608049Operating Instructions 1Operating Instructions (includes Installation Manual)](https://usermanual.wiki/Panasonic-of-North-America/5Z6UE-608049/User-Guide-1281281-Page-37.png)
![Installation Manual44 Operating InstructionsStand KX-B061 Assembly (Sold Separately)Included PartsCheck that the following parts are included with the stand KX-B061.*1Use the two-wing bolts () when securing the elite Panaboard to the stand.*2The included wrench is necessary for tightening and loosening the screw (), so keep it in a safe location.No. Part Name Illustration Q’tyStand Base 2Support Beam 2Cross Bar (A) 2Cross Bar (B) 1Screw (M6 × 45 mm [1 3/4in.]) 10Two-wing Bolt (M5 × 12 mm [1/2in.])*12Support Bracket 2Fall-prevention Extension Leg 4Screw (M6 × 60 mm [2 3/8in.]) 4Nut 4Wrench*21Washer 10](https://usermanual.wiki/Panasonic-of-North-America/5Z6UE-608049/User-Guide-1281281-Page-44.png)

![Installation Manual48 Operating InstructionsAssembly InstructionsPreparing for Removing the elite Panaboard from Its PackagingRemove the 10 joints, open the box, remove the accessory box & packing foam and open the plastic sheet of the elite Panaboard.Notice•When handling the electronic board, hold it by the edge frame and not the screen board. (Holding the screen board can result in damage.)•The packing materials in the shipping box are necessary for repackaging, so keep them in a safe place.Note•The warranty may not be included depending on country/area.Shipping BoxElectronic BoardShipping Box[Accessory Box Contents]•Power Cord ......................... 1•USB Cable .......................... 1•DVD-ROM........................... 1•Wall Mounting Plate (Right, Left) ..............1 (Each)•Battery................................. 1•Electronic Pen..................... 1•Penpoint.............................. 2•Operating Instructions......... 1•Warranty ............................. 1JointCushioning material](https://usermanual.wiki/Panasonic-of-North-America/5Z6UE-608049/User-Guide-1281281-Page-48.png)
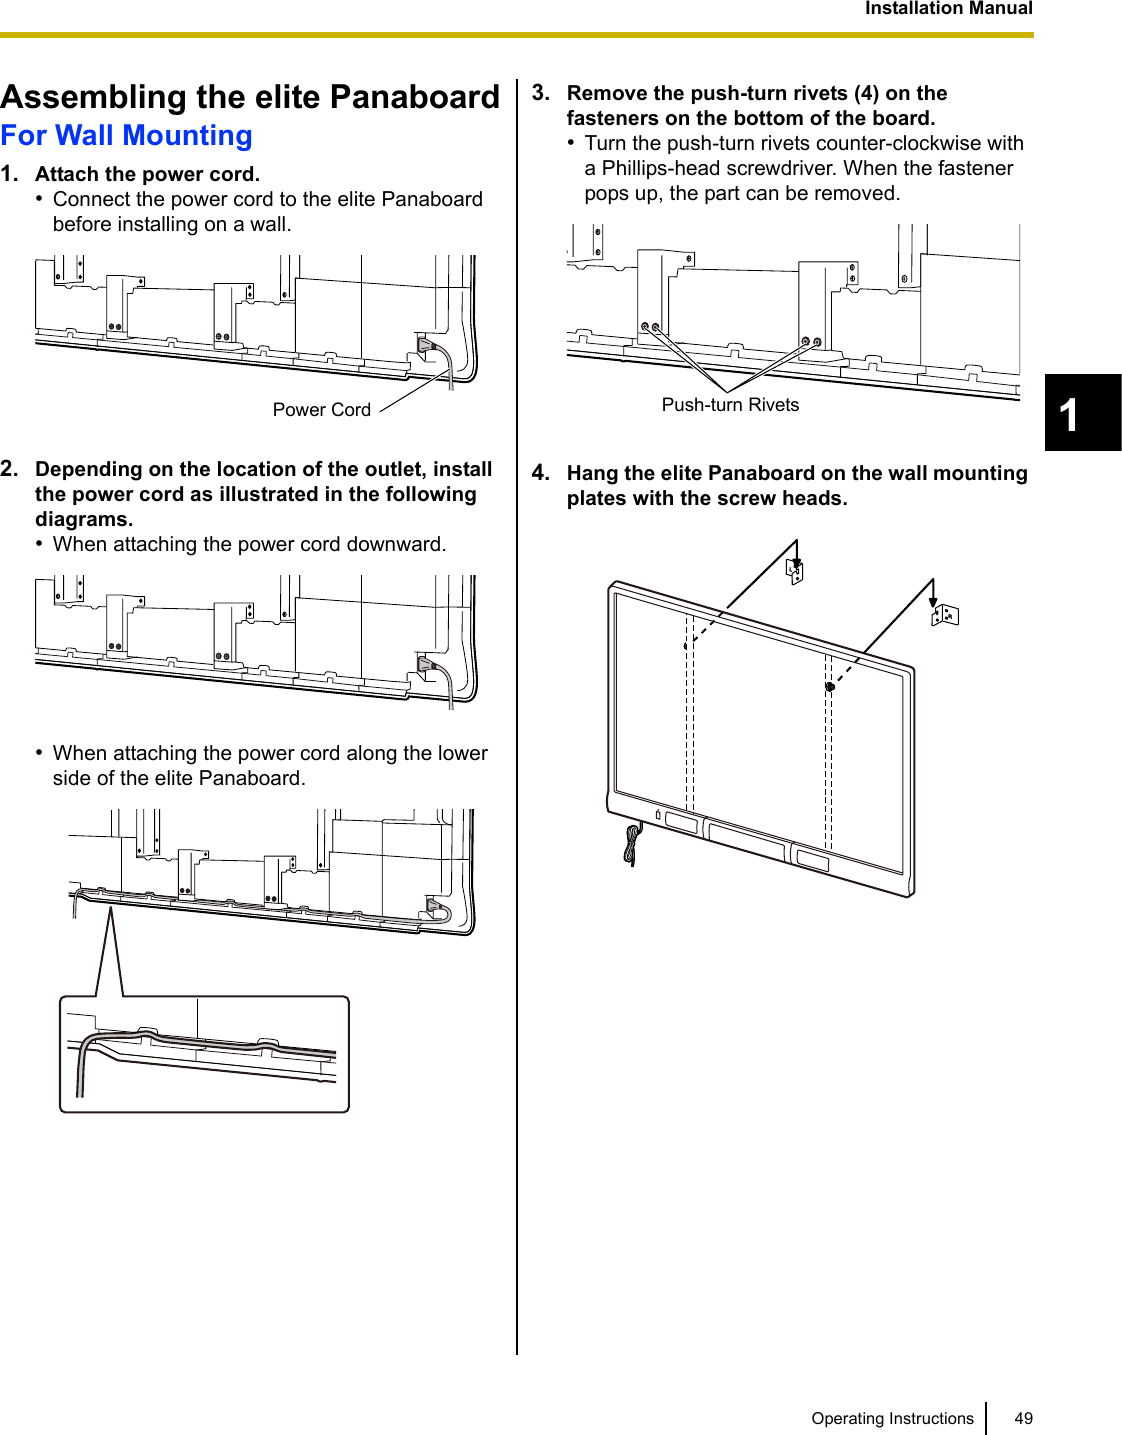
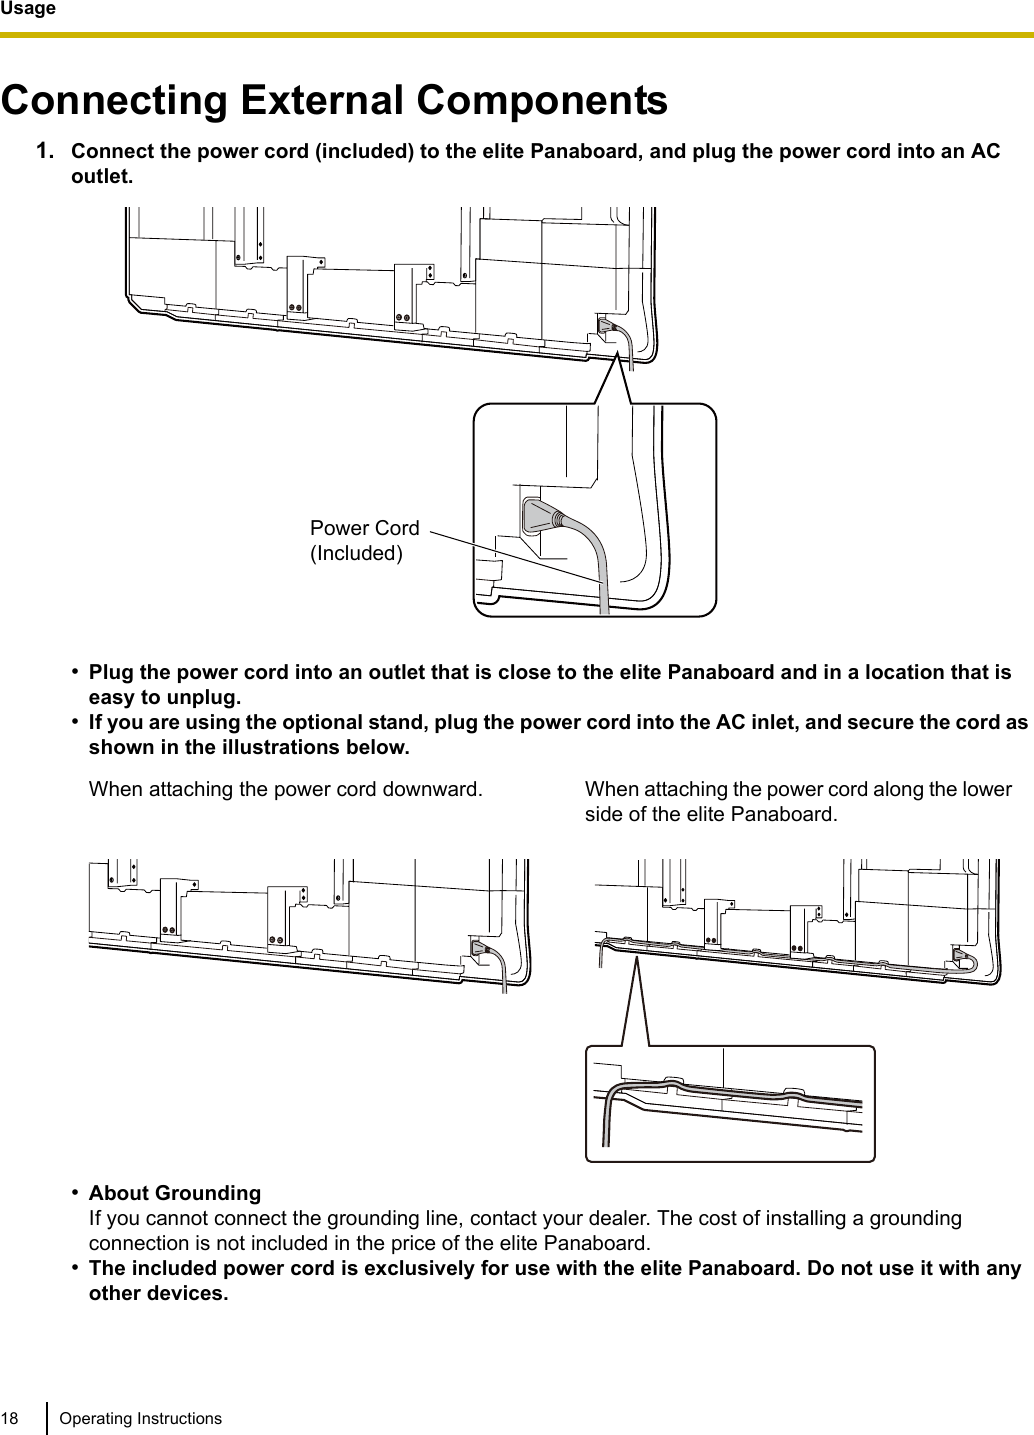
![Installation Manual52 Operating InstructionsFor Mounting on a Stand KX-B061 (Sold Separately)1. Attach the power cord.•Connect the power cord to the elite Panaboard before installing on the stand.2. Depending on the location of the outlet, install the power cord as illustrated in the following diagrams.•When attaching the power cord downward.•When attaching the power cord along the lower side of the elite Panaboard.3. Hang the elite Panaboard on the stand with the screw heads.4. Secure the elite Panaboard to the stand frame using the two-wing bolts (M5 × 12 mm [1/2in.] [2 count]) included with the stand.Power Cord](https://usermanual.wiki/Panasonic-of-North-America/5Z6UE-608049/User-Guide-1281281-Page-52.png)
![53Operating InstructionsInstallation Manual1•When installing the elite Panaboard on the stand, you can adjust its height to 4 different levels. When changing the height, remove the left and right screws from the back of the elite Panaboard, and securely insert them at the desired height. Torque (greater than 1 N•m [10 kgf•cm (9 lbf•in.)]).5. Confirm that the elite Panaboard can operate.•See “Confirming the elite Panaboard Operation” (page 54).6. Turn off the power switch and unplug the power cord from the AC outlet.7. Wipe the screen board surface.•Gently wipe the screen board surface with a soft, moist cloth.Notice•Do not use thinner, benzene, or abrasive chemicals to clean. (Doing so can result in discoloration.)•Do not wipe the screen board with a dry cloth. (Doing so can cause static electricity build-up.)elite Panaboard Height Screw Position-100 mm (-3 7/8in.) HighestStandard 2nd from top+100 mm (+3 7/8in.) 2nd from bottom+200 mm (+7 7/8in.) Lowest](https://usermanual.wiki/Panasonic-of-North-America/5Z6UE-608049/User-Guide-1281281-Page-53.png)