Panasonic of North America 927132K LCD Projector User Manual Copy
Panasonic Corporation of North America LCD Projector Copy
User Manual
English
- 2
Things You Should Know
Date of Purchase
Dealer Purchased From
Dealer Address
Dealer Phone No.
Model No. PT-L759U
Serial No.
On your purchase of one of the most sophisticated and reliable products on the market today. Used properly, we’re
sure it will bring you and your family years of service enjoyment. Please take time to fill in the information below. The
serial number is on the tag located on the back of your LCD Projector. You'll want to keep this manual handy as your
convenient LCD Projector information source. For your own protection and prolonged operation of your LCD Projector,
please be sure to read the “Important Safeguards” carefully, before use.
© 2000 Matsushita Electric Industrial Co., Ltd
All product/brand names are trademarks or registered trademarks of the respective holders.
Caution: This equipment has been tested and found to comply with the limits for a Class B digital device,
pursuant to Part 15 of the FCC Rules. These limits are designed to provide reasonable protection
against harmful interference in a residential installation. This equipment generates, uses, and can
radiate radio frequency energy and, if not installed and used in accordance with the instructions, may
cause harmful interference to radio communications. However, there is no guarantee that interference
will not occur in a particular installation. If this equipment does cause harmful interference to radio or
television reception, which can be determined by turning the equipment off and on, the user is
encouraged to try to correct the interference by one or more of the following measures:
– Reorient or relocate the receiving antenna.
– Increase the separation between the equipment and receiver.
– Connect the equipment into an outlet on a circuit different from that to which the receiver is
connected.
– Consult the dealer or an experienced radio/TV technician for help.
FCC Warning: To assure continued FCC compliance, use only the provided grounded power supply cord and
prevent undesirable interference, use only the provided shielded VGA cable with 2 ferrite cores while
connecting LCD to computer and all other connecting cables should be shielded. Any changes or
modifications not expressly approved by the party responsible for compliance could void the user’s
authority to operate this equipment.
Congratulations
Warning: To assure continued CE Mark compliance, use only the provided earthed power supply cord and
prevent undesirable interference, use only the provided shielded VGA cable with 2 ferrite cores while
connecting LCD to compliance could void the user‘s authority to operate this equipment.

English
- 3
Table of Contents
To
Start!
Use
Now!
Enjoy
more!
Other
Information!
Things You Should Know .................................................................................. 2
Table of Contents ............................................................................................. 3
Important Safeguards....................................................................................... 4
LCD Projector Features.................................................................................... 6
Contents of LCD Projector Box ........................................................................ 7
Product Information .......................................................................................... 8
Before using the Remote Control ................................................................... 10
Menu operation guide .................................................................................... 12
Turning the power on and off.......................................................................... 14
Screen Requirements .................................................................................... 15
Standard Setting-up Positions ........................................................................ 16
Adjusting the Lens.......................................................................................... 18
Setting-up Positions and Changing the Projection Mode ............................... 19
Setting the Screen Type ................................................................................. 20
Digital Variable Compression ( Tele Zoom ) ................................................... 21
Digital Keystone (Keystone Correction).......................................................... 22
Input signal ..................................................................................................... 23
Basic LCD Projector Operation ...................................................................... 27
Selecting the Image Quality ........................................................................... 29
Adjusting the Picture to the Desired Setting................................................... 30
Adjusting the White Balance .......................................................................... 31
Using the Auto Setup Feature ........................................................................ 32
Adjusting the Image Position .......................................................................... 33
Using Other Useful Functions ........................................................................ 36
System Configuration Example (continued) ................................................... 43
Video/ Computer Cables & Adaptors ............................................................. 44
Communication settings ................................................................................. 45
Using the SERIAL connector ......................................................................... 45
Wireless mouse and keyboard ....................................................................... 47
Setting procedure ........................................................................................... 48
Projecting the DTV Format Signal.................................................................. 48
Removing and Attaching the Carrying Handle ............................................... 49
Status Code Display Indications..................................................................... 50
Cleaning the Air Filter..................................................................................... 51
Lamp Replacement ........................................................................................ 52
Lamp Replacement (continued) ..................................................................... 53
Specifications ................................................................................................. 55
Before Requesting Service ............................................................................ 56
Things You Should Know ................................................................................ 57
Wichtige Sicherheitshinweise......................................................................... 58
Benutzung des Laserzeigers der Fernbedienung .......................................... 60
Lampenaustausch .......................................................................................... 60
English
- 4
CAUTION: Please read all of these instructions before you operate your LCD
Projector. Save these instructions for future reference.
Important Safeguards
Electrical energy can perform many useful functions. This LCD Projector has been engineered and manufactured to
meet applicable safety standards. But IMPROPER USE CAN RESULT IN POTENTIAL ELECTRICAL SHOCK OR FIRE
HAZARDS. In order not to defeat the safeguards incorporated into this LCD Projector, observe the following basic rules
for its installation, use and servicing.
1Unplug the LCD Projector from the wall outlet before cleaning.
2Do not use liquid cleaners or aerosol cleaners. Use a soft dry cloth to clean the LCD Projector
unit. If the unit is very dirty, wet a cloth with neutral detergent, squeeze it tight, wipe the unit with
it, and finish by wiping with a dry cloth. Do not use a chemical duster or polisher-cleaner
because it can adversely affect the unit and peel the paint coat.
3Do not use attachments not recommended by Panasonic, as they may cause hazards.
4Do not use the LCD Projector near water; for example, near a bathtub, washbowl, kitchen sink,
laundry tub, in a wet basement, near a swimming pool, etc. Never spill liquid into the LCD
Projector.
5Do not place the LCD Projector on an unstable cart, stand, or table. The LCD Projector may fall,
which may cause serious injury to a child or an adult, and/or serious damage to the unit. Use
only with a cart or stand recommended by its manufacturer, as being suitable for use with the
LCD Projector.
6Ceiling, wall or shelf mounting for installation should use a mounting kit approved
by the manufacturer for use with the LCD Projector and should follow the
manufacturer’s instructions.
7The LCD Projector equipment and cart combinations should be moved with care. Quick stops,
excessive force, and uneven surfaces may cause the equipment and cart combination to
overturn.
8Slots and openings in the cabinet back and bottom are provided for ventilation. To ensure
reliable operation of the LCD Projector and to protect it from overheating, these openings must
not be blocked or covered. These openings should never be covered with cloth or other
material. The bottom opening should not be blocked by placing the LCD Projector on a bed,
sofa, rug, or other similar surface. The LCD Projector should not be placed near or over a
radiator or heating vent. The LCD Projector should not be placed in a built-in installation such as
a bookcase unless proper ventilation is provided.
9The LCD Projector should be operated only from the type of power source indicated on the back
of the LCD Projector or in the specifications. If you are not sure of the type of power supplied to
your home, consult your LCD Projector dealer or local power company.
10
Do not allow anything to rest on the power cord. Do not place the LCD Projector where the cord will
be walked on.
11 Follow all warnings and instructions marked on the LCD Projector.

English
- 5
12 As a safety feature, the LCD Projector is equipped with a 3-prong grounded plug. The 3-prong
grounded plug will fit only into a grounding type power outlet. If the plug does not fit, use an
adaptor that is properly grounded or have an electrician install a grounded type outlet. Do not
attempt to modify this AC plug.
13 For added protection of the LCD Projector during a lightning storm, or when it is left unattended
or not in use for long periods of time, unplug it from the wall outlet and disconnect any cable
systems. This will prevent damage to the projector due to lightning and power-line surges.
14 Do not overload wall outlets and extension cords with too many products, because this can
result in fire or electric shock.
15 Never push objects of any kind into the LCD Projector through cabinet slots as they may touch
dangerous voltage points or short out parts, which could result in a fire or electric shock.
16 Do not attempt to service the LCD Projector yourself. Opening or removing covers may expose
you to dangerous voltage or other hazards. Refer all servicing to qualified service personnel.
17 Unplug the LCD Projector equipment from the wall outlet and refer servicing to qualified service
personnel under the following conditions:
A. When the power cord or plug is damaged or frayed.
B. If liquid has been spilled into the LCD Projector.
C. If the LCD Projector has been exposed to rain or water.
D. If the LCD Projector does not operate normally when you follow the operating instructions.
Adjust only those controls that are covered by the operating instructions; improper adjustment
of other controls may cause damage and will often require extensive work by a qualified
technician to restore the LCD Projector to normal operation.
E. If the LCD Projector has been dropped or the cabinet has been damaged.
F. When the LCD Projector exhibits a distinct change in performance – this indicates a need for
service.
18 Upon completion of any service or repairs to the LCD Projector, ask the service technician to
perform a routine safety check to determine that the LCD Projector is in safe operating
condition.
19 When replacement parts are required, be sure the service technician has used replacement
parts specified by the manufacturer that have the same characteristics as the original parts.
Unauthorized substitutions may result in fire, electric shock, or other hazards.
20 Air filter should be cleaned every 100 lamp on hours.
The LCD Projector may become too hot if filter is not cleaned when required.
21 If lens becomes dirty, or smudged, clean with a clean, dampened cloth. Never touch the lens
with your fingers.
22 Do not look directly into the aperture and lens while operating as this may result in damage to
your eyes.
23 Do not look into the red Laser Pointer transmitter, or aim the Laser beam at a person. Shining
the Laser beam into the eyes could result in eye damage.

English
- 6
LCD Projector Features
1High Brightness and Resolution
786432 (1024 X 768) pixels X 3 panels format, 2500 lumen (ANSI) offers clear images even
when ambient light level is high.
2Compact and Lightweight
Completely portable, you can give attractive presentations at any location by connecting the PT-
L759U to a computer or video equipment.
320 to 300 Inch Screen Capability
Project a screen size of 20″ to 300″ from a distance of 2.79 feet to 44.13 feet (Munual focus.)
(See page 11.)
4Compatible with Most Personal Computers
The RGB input accepts signals from VGA, SVGA, XGA, SXGA (Compression),
UXGA(Compression), and MAC compatible computers with no additional hardware. Other
compatible computers require a separate cable.
5Accommodates 6 different video signal standards
The LCD Projector accepts the input signal of all major video formats, including PAL, SECAM,
NTSC, PAL-M, PAL-N, NTSC4.43, and the higher quality S-Video signals. And, input of DTV
Format Signal, such as the Component (YPBPR) signal from a DVD is also possible with this
Projector. And, the Projector can also display even higher quality Component signals generated
by HDTV equipment.
6On Screen Display
The LCD Projector’s language is set to English at the factory. In addition, you can select
Spanish, French, German, Italian, and Japanese. Information screens and menus make setting
up and operating the LCD Projector extremely easy.
7IR Remote Control
Front and rear sensors allow you to control the LCD Projector from almost anywhere in the
room.
8Laser Pointer on the Remote Control
When the Laser beam is aimed at the screen, the Pointer is displayed on the screen.
9Wireless mouse and the , , and keys on a keyboard
This function lets you use the remote control to control a PC (personal computer) in place of the
PC’s mouse and keyboard , , , . (Only applies for PCs with Windows 98 installed and a
USB port.) (See page 33.)
10 Stereo Audio Output
For external audio equipment connection. Audio follows video source.
11 Automatic Universal Power Supply
This unit has an operating voltage range of AC 100 - 240 V.
12 Digital Zoom function
Pressing the D.ZOOM button allows you to magnify the image up to 25X.

English
- 7
Please confirm that the following items are packed in the LCD Projector box.
They are provided to help you use or set up your LCD Projector.
(1) LCD Projector
(2) Remote Control unit (LRQ90043)
(3) 2 “AA” Batteries
(4) Lens Cap
(5) Carrying Handle
(6) 9.8 Foot UL/CSA Power Cord (VJAS0179)
(7) VGA Cable (LSJA0239)
(8) PS/2 Mouse Cable (LSJA0212)
(9) MAC Mouse Cable (LSJA0214)
(10) USB Cable(LSJA0305)
(11) VGA MAC Adaptor (LSJA0158)
(12) Audio Cable (LSJA0240)
(13) Video Cable (LSJA0074)
(14) Quick use guide (Please read completely before operating.)
(15) CD ROM
(16) Warranty Card
(17) Service Center List
Contents of LCD Projector Box
13 3D
14 Digital variable compression
You can reduce the projected image up to 0.4.
15 Two RGB system input
This projector allows the input of two RGB systems at the same time. To switch between the
systems, press the INPUT button.
16 Digital keystone
You can perform keystone correction using the menu screen, the remote control, or when
starting up the projector.
Equipped with a variety of convenient functions
A variety of functions such as the following have been provided.
• A blue screen is projected when no signal is being input.
• Mute or freeze functions for video and audio signals can be toggled on and off.
• The input signal display function can be toggled on and off.
• 16:9 (wide) screen projection is provided.
• Four direction types are provided.
English
- 8
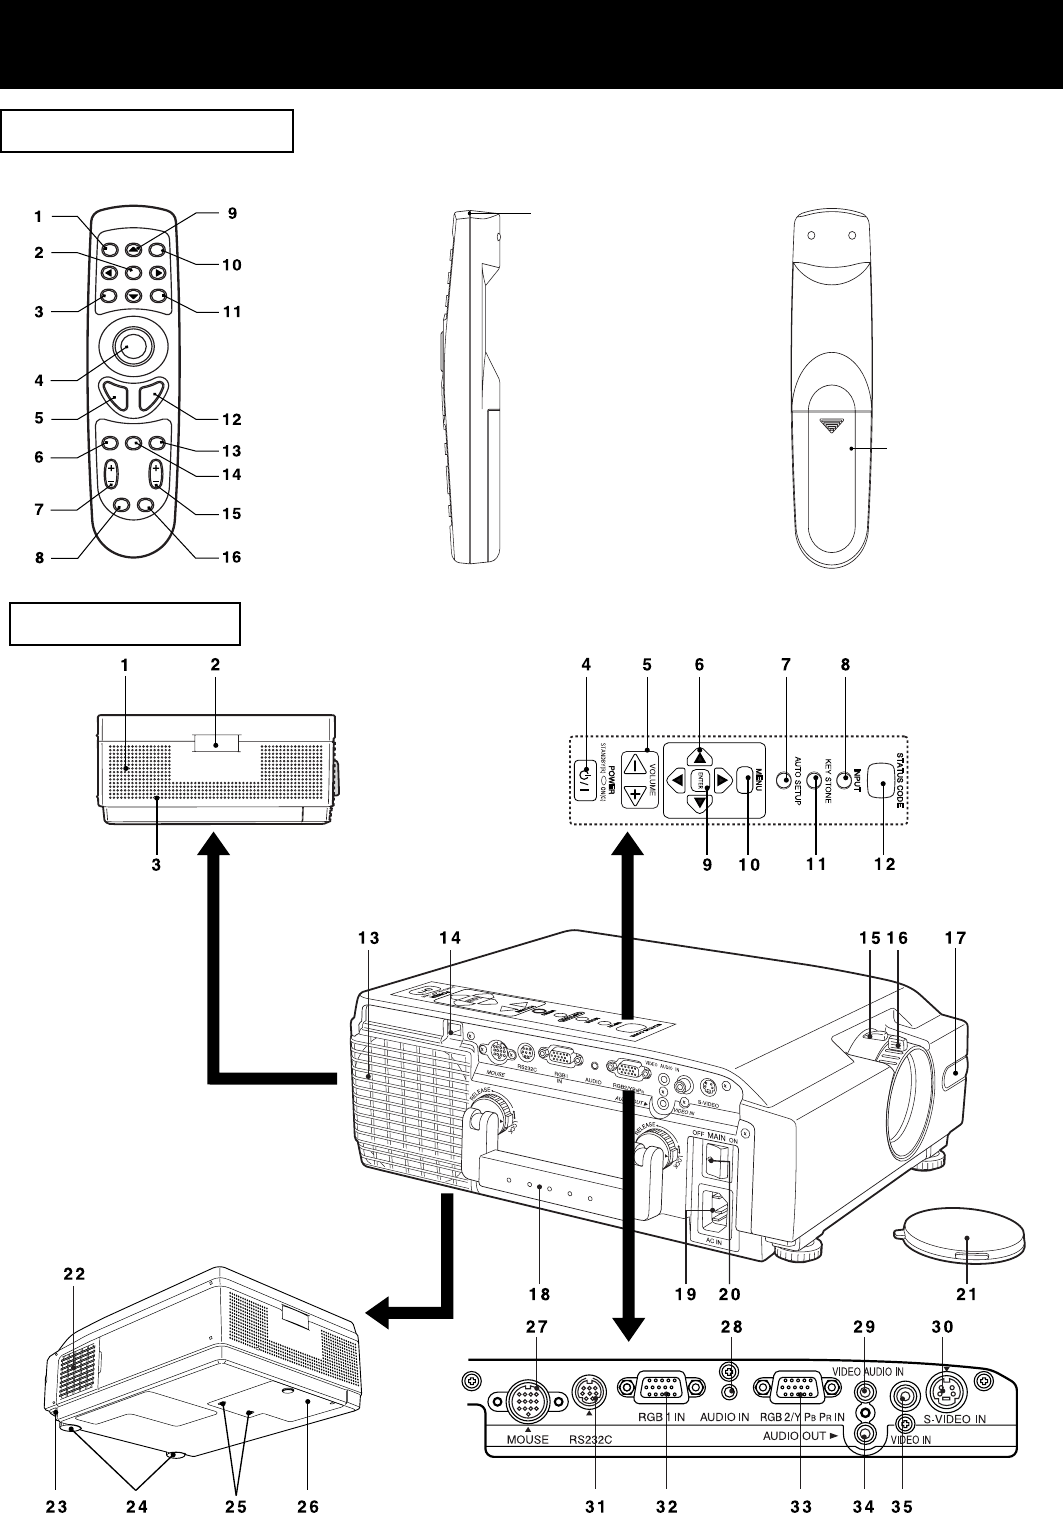
LCD Projector
17
Product Information
[ Side ]
Remote Control unit
[ Front ]
18
[ Back ]
English
- 9
1 Speaker
2 Remote Control Sensor
3 Security Lock
4 POWER Button/STANDBY(R) ON(G) Indicator .............................................................................. See page 9.
5 VOLUME+ - Buttons .......................................................................................See pages 14, 21, 25, 49, 55, 59.
6 Adjust Buttons ..........................................................................................See pages 20, 35, 36, 38, 39.
7 AUTO SETUP Button ..................................................................................................................... See page 29.
8 INPUT Button .................................................................................................................................. See page 16.
9 ENTER Button ................................................................................................................................ See page 13.
10 MENU Button .................................................................................................................................. See page 22.
11 KEY STONE ........................................................................................................................................ See page .
12 STATUS CODE ............................................................................................................................... See page 45.
13 Air outlet port
14 USB connector ............................................................................................................................... See page 35.
15 Zoom Ring ...................................................................................................................................... See page 13.
16 FOCUS Ring ................................................................................................................................... See page 13.
17 Remote Control Sensor
18 Carrying Handle ............................................................................................................................. See page 46.
19 AC Socket (100 - 240 V) ................................................................................................................... See page 9.
20 Main Power Switch .......................................................................................................................... See page 9.
21 Lens Cap
22 Air Filter .......................................................................................................................................... See page 47.
23 Adjuster Button .............................................................................................................................. See page 12.
24 Adjustable legs .............................................................................................................................. See page 12.
25 Lamp Cover Screw ............................................................................................................See pages 49, 55, 59.
26 Lamp Cover .......................................................................................................................See pages 49, 55, 59.
27 MOUSE Connector ......................................................................................................................... See page 30.
28 RGB Audio Input Connector .................................................................................................... See page 30,32.
29 Video Audio Input Connector ...................................................................................................... See page 31.
30 S-Video Input Connector ............................................................................................................... See page 31.
31 RS232C Connector
32 RGB Input Connector .................................................................................................................... See page 30.
33 RGB/ YPBPR Input Connector .................................................................................................. See page 30,32.
34 Audio Output Connector ....................................................................................................... See pages 30- 31.
35 Video Input Connector .................................................................................................................. See page 31.
1 POWER Button ................................................................................................................................. See page 9.
2 ENTER Button ................................................................................................................................ See page 22.
3 MENU Button .................................................................................................................................. See page 16.
4 Mouse Button ....................................................................................................................See pages 14, 19, 23.
5 Click 1 Button ................................................................................................................................. See page 13.
6 SHUTTER Button ........................................................................................................................... See page 33.
7 D.ZOOM Button .............................................................................................................................. See page 21.
8 KEYSTONE Button ......................................................................................................................... See page 20.
9 Adjust Button ..................................................................................................................... See page 20.
10 INPUT Button .........................................................................................................See pages 20, 31, 32, 34, 35.
11 LASER Button .................................................................................................................................. See page 7.
12 Click 2 Button ................................................................................................................................. See page 33.
13 MUTE Button ...................................................................................................................................... See page .
14 FREEZE button ............................................................................................................................... See page 33.
15 VOLUME + - Button ............................................................................................................................ See page .
16 AUTO SETUP Button ......................................................................................................................... See page .
17 Transmitter
18 Battery compartment
MicroSaver and Kensington are registered trademarks of Kensington Technology Group. All product names mentioned in this document are
trademarks or registered trademarks of their respective owners. © 1998 Kensington Technology Group.
Kensington Technology Group
2885 Campus Drive
San Mateo, CA 94403, U.S.A
Phone : (650)572-2700
Fax : (650)572-9675
LCD Projector
Remote Control unit
English
- 10
■ Using the Laser Pointer on the Remote Control
When the Laser beam is aimed at the screen, the Pointer is displayed on the screen.
Press LASER on the remote control to activate Laser.
DO NOT look into the Laser transmitter, or aim the
Laser beam at a person. Shining the Laser beam
into the eyes could result in eye damage.
Laser Aperture
Warning
CAUTION: Use of controls or adjustments or performance of
procedures other than those specified herein may result in
hazardous radiation exposure.
• This product has the following laser radiation specifications:
Wavelength - 650 nm, Max. Output - 1 mW, Class (Class 2).
• Class laser products are normally required to be equipped with
an indicator indicating that the laser beam is being emitted. On
this product, the red beam emitted from the laser point functions
as this indicator.
• Class laser products are normally required to be equipped with
an emergency stop device such as a shutter to stop the laser
immediately. On this product, instead of such a device, the laser
does not stay on unless the laser button is held in continuously.
Note
1Slide the lid in the direction of the arrow.
2Install 2 “AA” batteries as indicated inside the Battery Compartment.
■ Load the 2 “AA” batteries in the Remote Control
Before using the Remote Control
For U.S.A. only
Battery replacement caution
• Do not mix old and new batteries.
Also never mix alkaline with manganese batteries.
3Replace the lid and snap into place.

English
- 11
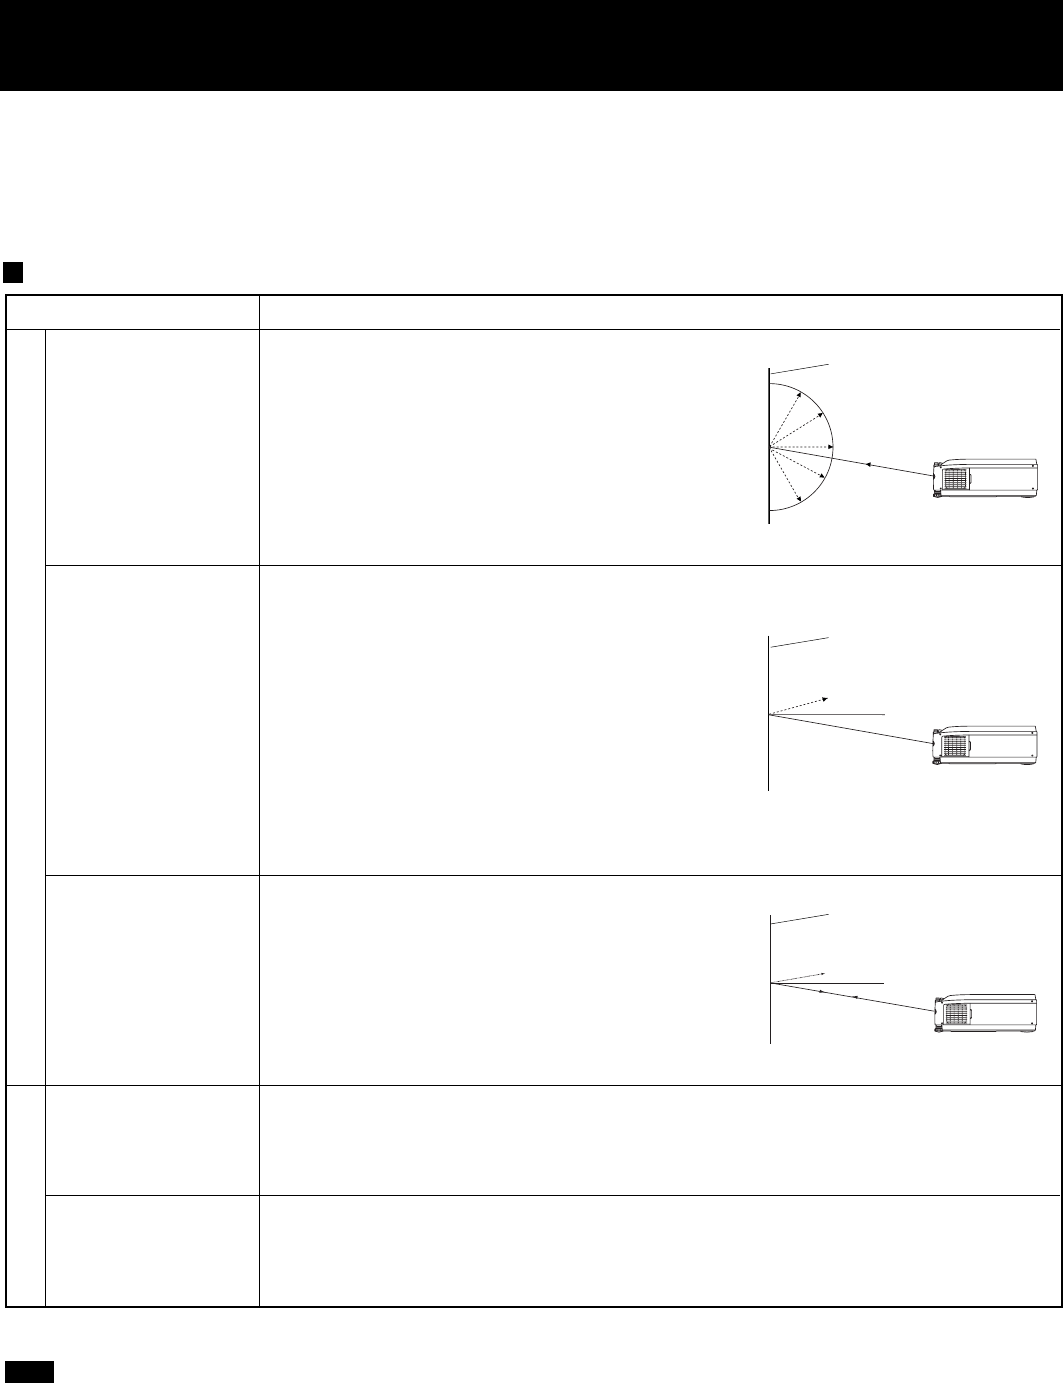
Operating range of the remote control unit
Point the remote control unit toward the remote control signal receptor on the front or the rear of the projector to operate
the projector. Refer to the illustration below for the operating range of the remote control unit.
•The operating distance is within 23.0 feet (approximately 7 meters) from directly in front of the front or rear remote
control signal receptors.
•If strong light is allowed to shine onto the remote control signal receptor, or if there are any obstacles between the
remote control signal receptor and the remote control unit, correct remote control operation may not be possible.
If facing the remote control unit toward the screen
The projector can also be operated by pointing the remote control unit toward the screen as shown in the illustration
below.
If facing the remote control unit toward the screen to operate the projector, the operating range of the remote control unit
will be limited by the amount of light reflection loss caused by the characteristics of the screen used.
Remote control unit Projector Remote control unit
Projector
Remote control unit
Screen
<Top view>
<Side view>
Remote control unit Projector Remote control unit
Note
Note
English
- 12
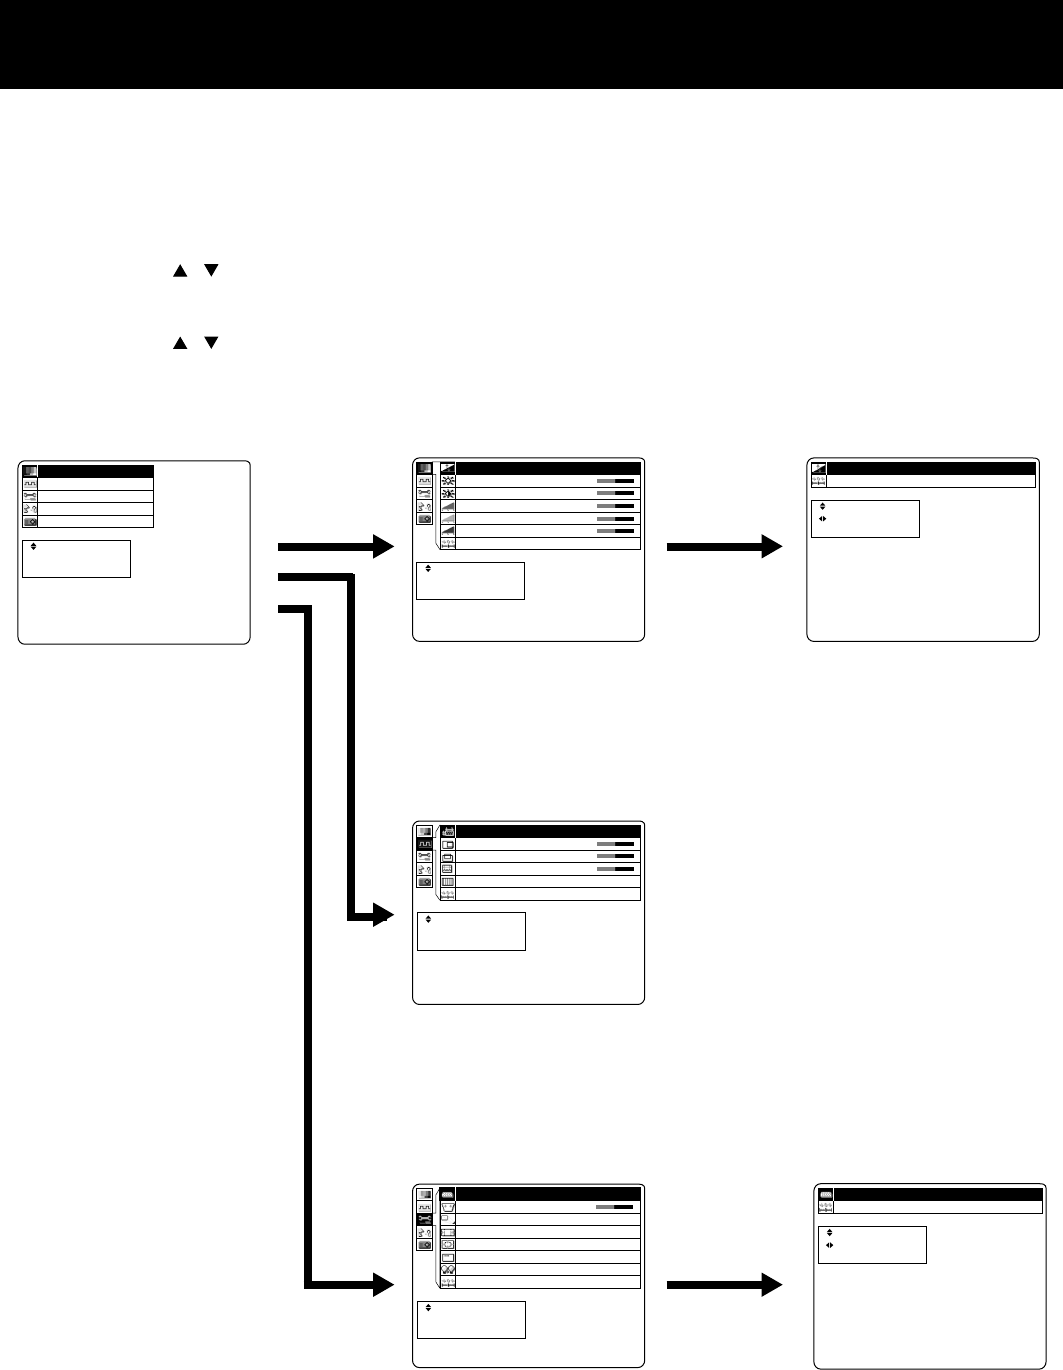
Menu operation guide
1Press the MENU button.
(the Main MENU screen will be displayed.)
2Use the arrow( , ) buttons to select an item, and then press the ENTER button.
(the Second MENU screen will be displayed.)
3Use the arrow( , ) buttons to select an item, and then press the ENTER button.
(the Adjustment MENU screen will be displayed.)
This section explains how to reach the desired selection or setting screens from the MENU screen. Refer to the page
indicated for further details on each screen item.
<Main MENU> <Second MENU> <Adjustment MENU>
t
e
c
r
p
e
e
a
l
t
c
e
n
s
S
E
E
:
:
:
R
E
U
T
N
N
E
E
M
n
o
i
t
n
a
o
z
i
i
n
e
t
e
n
o
g
a
r
o
i
a
m
u
r
t
u
r
t
c
c
g
o
c
n
n
n
f
i
y
u
a
n
P
S
F
L
I
cimany
0
0
0
0
0
D
1
1
1
1
1
+
+
+
+
+
ytil
s
a
s
u
e
t
Q
n
s
l
l
l
t
a
e
e
e
e
h
r
v
v
v
t
g
g
t
e
e
e
e
a
i
n
L
L
L
s
m
r
o
e
I
B
C
R
G
B
R
t
e
c
r
p
e
e
a
l
t
c
e
n
s
S
E
E
:
:
:
R
E
U
T
N
N
E
E
M
teseR
t
t
e
c
s
p
e
u
a
l
j
c
e
d
s
S
A
E
:
:
:
U
N
E
M
cimanyD ytilauQ egamI
When an RGB signal is
being projected
0
0
0
1
1
1
+
+
+
01+
p
n
n
u
o
o
k
t
i
i
c
e
t
t
o
S
i
i
l
s
s
C
e
t
o
o
o
s
e
t
P
P
t
a
s
u
o
h
e
A
H
V
D
P
R
t
e
c
r
p
e
e
a
l
t
c
e
n
s
S
E
E
:
:
:
R
E
U
T
N
N
E
E
M
t
e
c
r
p
e
e
a
l
t
c
e
n
s
S
E
E
:
:
:
R
E
U
T
N
N
E
E
M
1
F
6
N
N
F
.
O
O
P
O
0
Y
x
0
1
y
+
a
e
l
d
p
o
s
f
M
i
f
n
D
O
n
o
o
i
n
p
e
i
s
e
m
P
n
t
s
e
a
Y
o
c
e
r
L
/
t
e
r
c
t
2
s
j
9
p
S
o
e
B
y
o
:
m
t
s
G
e
r
6
o
n
u
e
R
K
P
1
C
O
A
R
R
P
B
R
P
B
t
t
e
c
s
p
e
u
a
l
j
c
e
d
s
S
A
E
:
:
:
U
N
E
M
PY
PY/2BGR
R
P
B
R
P
B
teseR
Picture
Used to picture adjustments
Synchronization
Used to adjust the horizontal and verticalposition of the picture and to
adjust other properties such as the size.
Function
Used to adjust and change the settings of the various functions
available on the projector.
English
- 13
The displayed items on the screen differ according to the input signal.
<Main MENU> <Second MENU>
s
o
h
h
i
l
n
s
c
a
o
a
i
s
ç
ñ
i
l
t
n
a
l
g
u
a
p
a
n
e
r
s
t
E
D
F
E
I
語本
日
t
e
c
p
e
a
l
c
e
s
S
E
:
:
U
N
E
M
8
z
z
h
6
H
H
0
7
K
5
1
9
8
x
.
4
8
2
6
01
e
y
y
m
s
c
c
i
t
n
n
t
o
e
e
n
D
u
u
u
q
q
R
f
e
e
o
r
r
p
.
F
F
m
o
a
N
H
V
L
epacsE:UNEM
Language
Used to seitch the on-screen display language.
Information
Use to display information about the input signal, lamp run time, etc.
When an RGB signal is
being projected
t
e
c
r
p
e
e
a
l
t
c
e
n
s
S
E
E
:
:
:
R
E
U
T
N
N
E
E
M
n
o
i
t
n
a
o
z
i
i
n
e
t
e
n
o
g
a
r
o
i
a
m
u
r
t
u
r
t
c
c
g
o
c
n
n
n
f
i
y
u
a
n
P
S
F
L
I
1Press the MENU button.
(the Main MENU screen will be displayed.)
2Use the arrow( , ) buttons to select an item, and then press the ENTER button.
(the Second MENU screen will be displayed.)
t
e
c
p
e
a
l
c
e
s
S
E
:
:
U
N
E
M
3
4
.
4
M
N
M
O
C
C
-
-
A
T
S
S
L
L
L
C
U
T
T
A
A
A
E
A
N
N
P
P
P
S
0
0
0
1
1
1
+
+
+
01+
p
n
n
u
o
o
k
t
i
i
c
e
t
t
o
S
i
i
l
s
s
C
e
t
o
o
o
s
e
t
P
P
t
a
s
u
o
h
e
A
H
V
D
P
R
t
e
c
r
p
e
e
a
l
t
c
e
n
s
S
E
E
:
:
:
R
E
U
T
N
N
E
E
M
t
e
c
r
p
e
e
a
l
t
c
e
n
s
S
E
E
:
:
:
R
E
U
T
N
N
E
E
M
0
0
0
1
1
1
+
+
+
n
n
o
o
k
i
i
c
t
t
o
i
i
l
s
s
C
t
o
o
e
P
P
t
s
o
e
H
V
D
R
When an RGB signal is
being projected
When an YPBPR signal is
being projected
When an Video/S-Video
signal is being projected
English
- 14
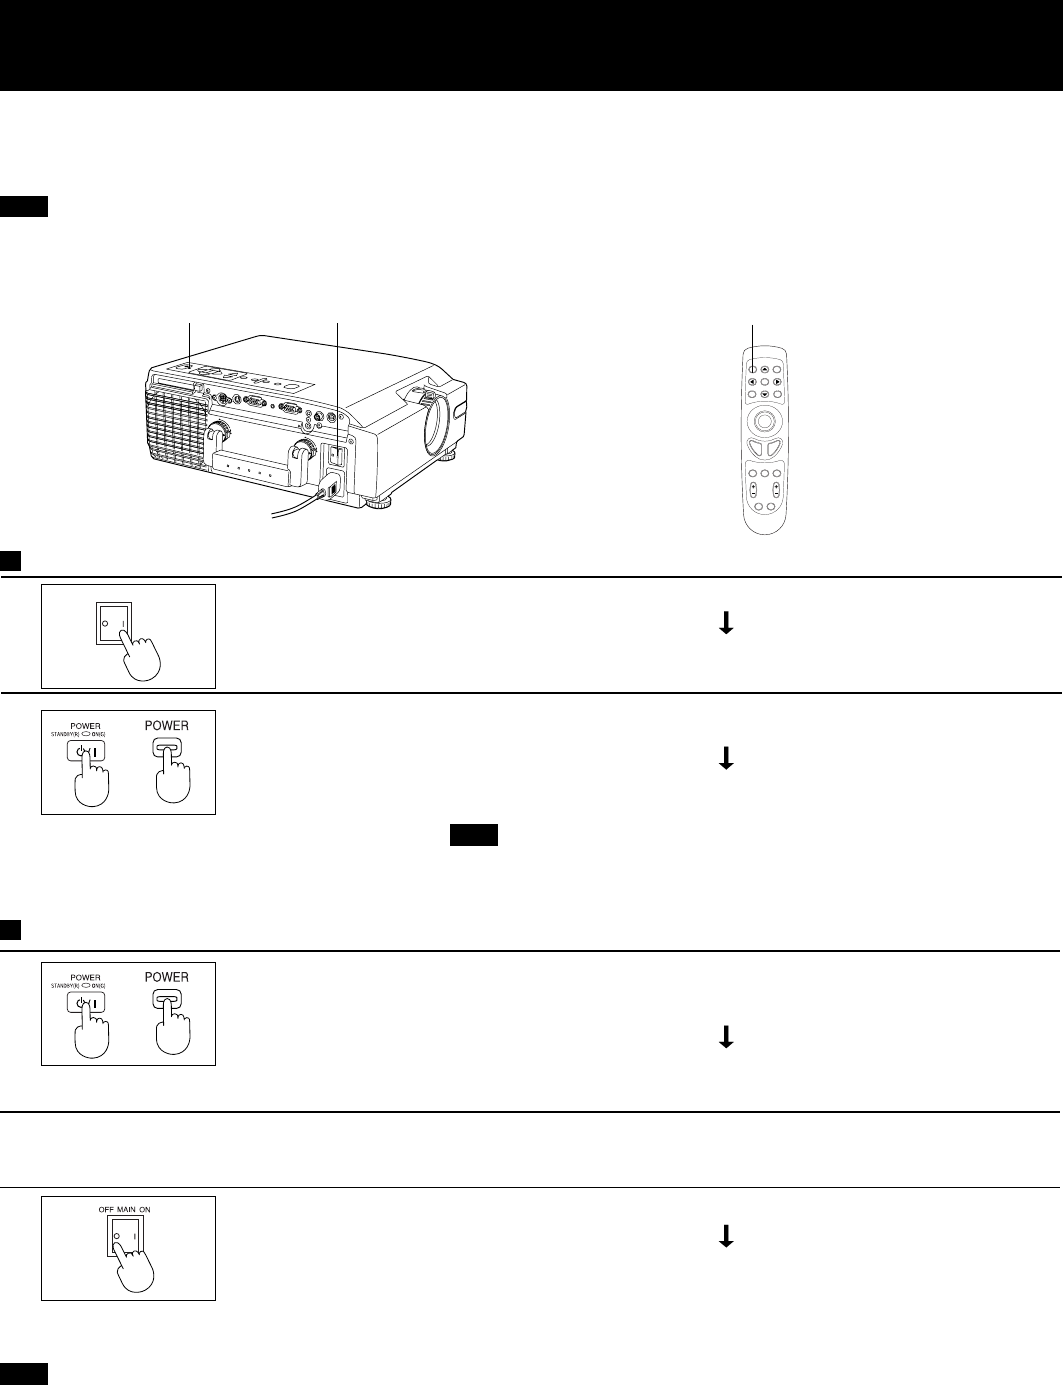
Turning the power on and off
If the MAIN Power switch on the LCD Projector is turned off while the cooling fan is still operating, the operating life of
the projector lamp will be shortened. Be sure to follow the procedures given below when turning the LCD Projector
power supply on and off.
Turning on the power
Press the
MAINPOWER
switch
Press the
POWER button
Press the MAIN POWER switch on the LCD Projector to ON.
The power indicator will illuminate red and the Projector will switch
to standby mode.
Press POWER button on the LCD Projector or remote control.
The power indicator will alternate from red to flashing green.
The power indicator will illuminate solid green and a picture will be
projected onto the screen after about 20 seconds.
Turning off the power
Press the
MAIN POWER
switch
Press the
POWER button
Press the MAIN POWER switch on the LCD Projector to OFF.
The power indicator will switch off and the power supply will be
turned off.
Press POWER button on the LCD Projector or remote control.
“ Please press POWER button again to power off ” is displayed on
the screen, and then Press POWER button again
The power indicator will illuminate flashing red and the Projector
will switch to standby mode.
2Wait for the cooling fan to stop.
Wait for a while (approximately 60 seconds) until the cooling fan stops.
(When the fan stops, the power indicator will illuminate solid red.)
• If the MAIN POWER switch has not been turned off, the Projector will still draw approximately 20 W of power, even
when the POWER button has been turned off and the fan has stopped.
Note
Insert Power Cord into LCD Projector AC socket and connect to properly grounded wall outlet.
Note
STATUS CODE
MENU
MODE
CAPTURE
INPUT
VOLUME
POWER
STANDARD
PC ADJUST
STANDBY(R)ON(G)
/ I
AC IN
OFF
MAIN
ON
MOUSEAUDIO OUT
VIDEO IN
VIDEO AUDIO IN
AUDIO IN
RS232C
S-VIDEO
R
E
L
E
A
S
E
L
O
C
K
R
E
L
E
A
S
E
L
O
C
K
IN
OUT
RGB
/YP
B
P
R
RGB
/YP
B
P
R
POWER button/
STANDBY(R) ON(G) Indicator MAIN Power Switch POWER Button
or
or
MAIN
OFF ON
1
2
1
3
Note
The LCD Projector cannot be turned on for one minute after
turning it off.
English
- 15
Screen Requirements
This Projector is used to project the image onto flat screens. However, the brightness and viewable range will vary
depending on which type of screen is used.
When selecting a screen, check the characteristics of the screen to ensure that it is suitable for the intended place of
use.
Screen characteristics (reference)
Screen type Screen characteristics
White screen
This type of screen can be seen from anywhere,
so there are no limits on the viewing position.
However, the surrounding walls should be
darkened as in a movie theater, otherwise a
clear picture cannot be obtained.
Silver screen
This type of screen gives a picture which is 2-4
times brighter than a white screen. A variety of
types are available from different manufacturers,
and each type has different brightness
characteristics. Some also have restrictions on
the possible range of viewing positions.
* Care should be taken with screens that have
a high gain, as these types of screen can
cause color distortion at the left and right
edges.
* This type of screen is recommended when the
Projector is suspended from the ceiling.
Beaded screen
This type of screen is similar to the silver
screen, except that no color distortion occurs
at the left and right edges. Moreover, most of
the light is reflected at the same angle as the
angle of incidence.
* This type of screen is recommended when
the Projector is placed on the floor.
Flexible
translucent screen
This type of screen is made of PVC (polyvinyl chloride).
It has the same characteristics as silver screens, but sometimes it can have hot
spots.
This type of screen is made of acrylic plastic.
It is extremely durable and has excellent optical characteristics. It performs in the
same way as silver screens.
Rigid-type
translucent screen
Reflective screens
Translucent screens
White screen
Silver screen
Maximum brightness
Beaded screen
Maximum
brightness
Brightness decline
• A Polarized screen can not be use for this LCD Projector, because its polarizing effect will add to the polarization
already designed into the Projector (to increase its efficiency). The resulting image will not appear in its true
color.
Note
English
- 16
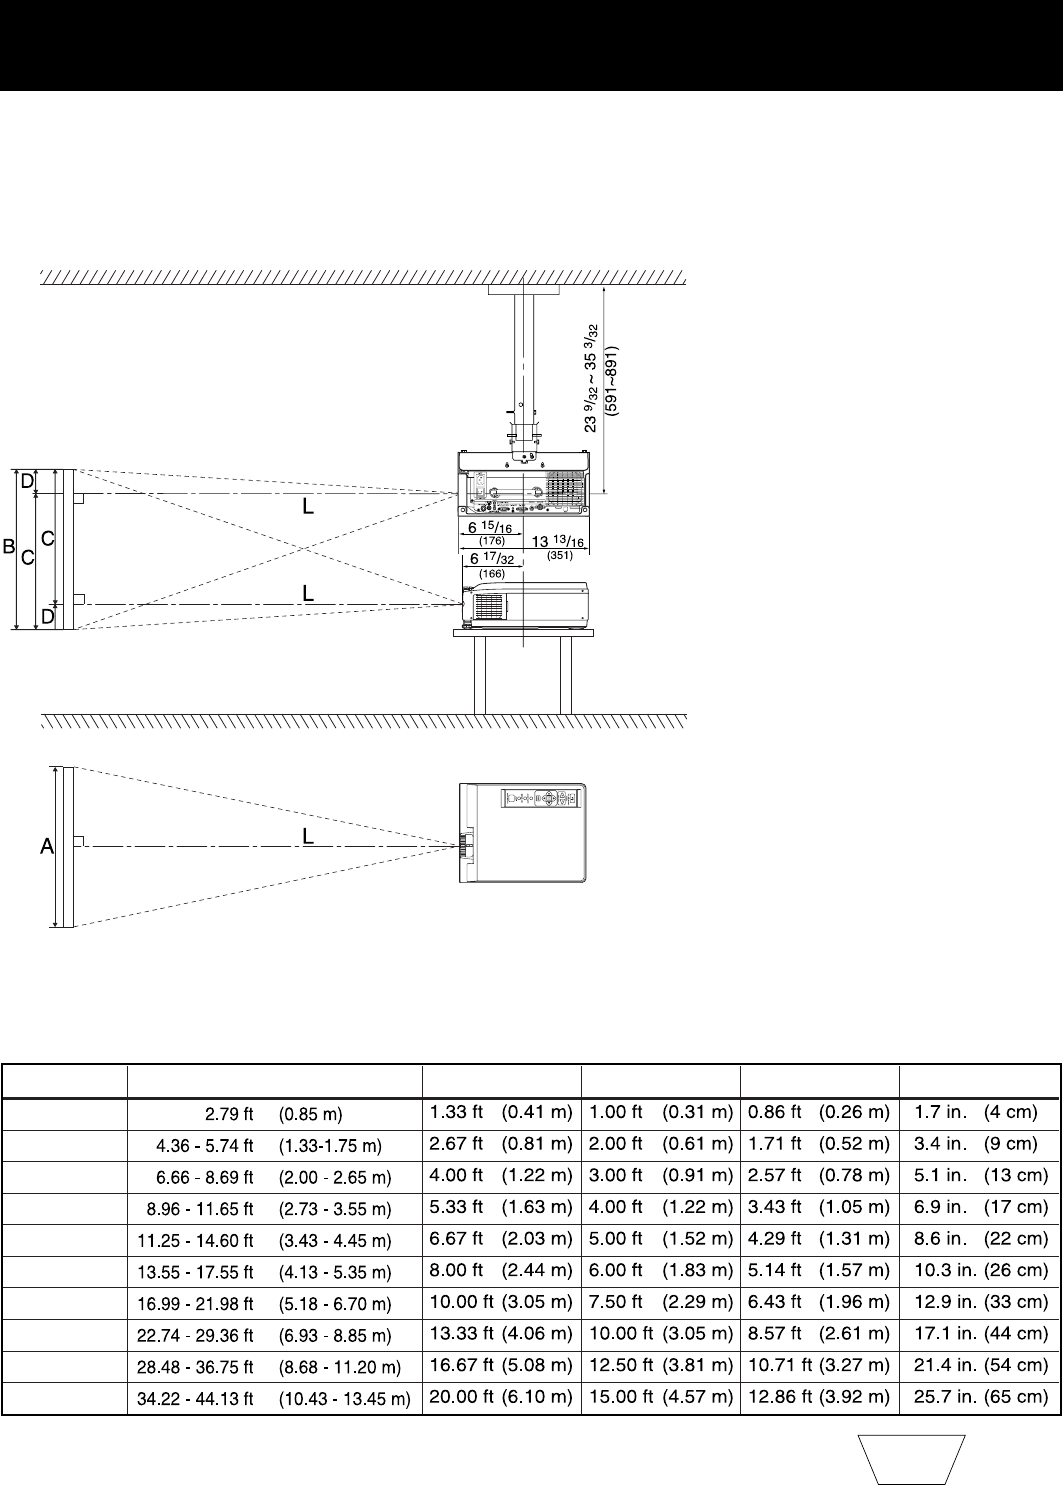
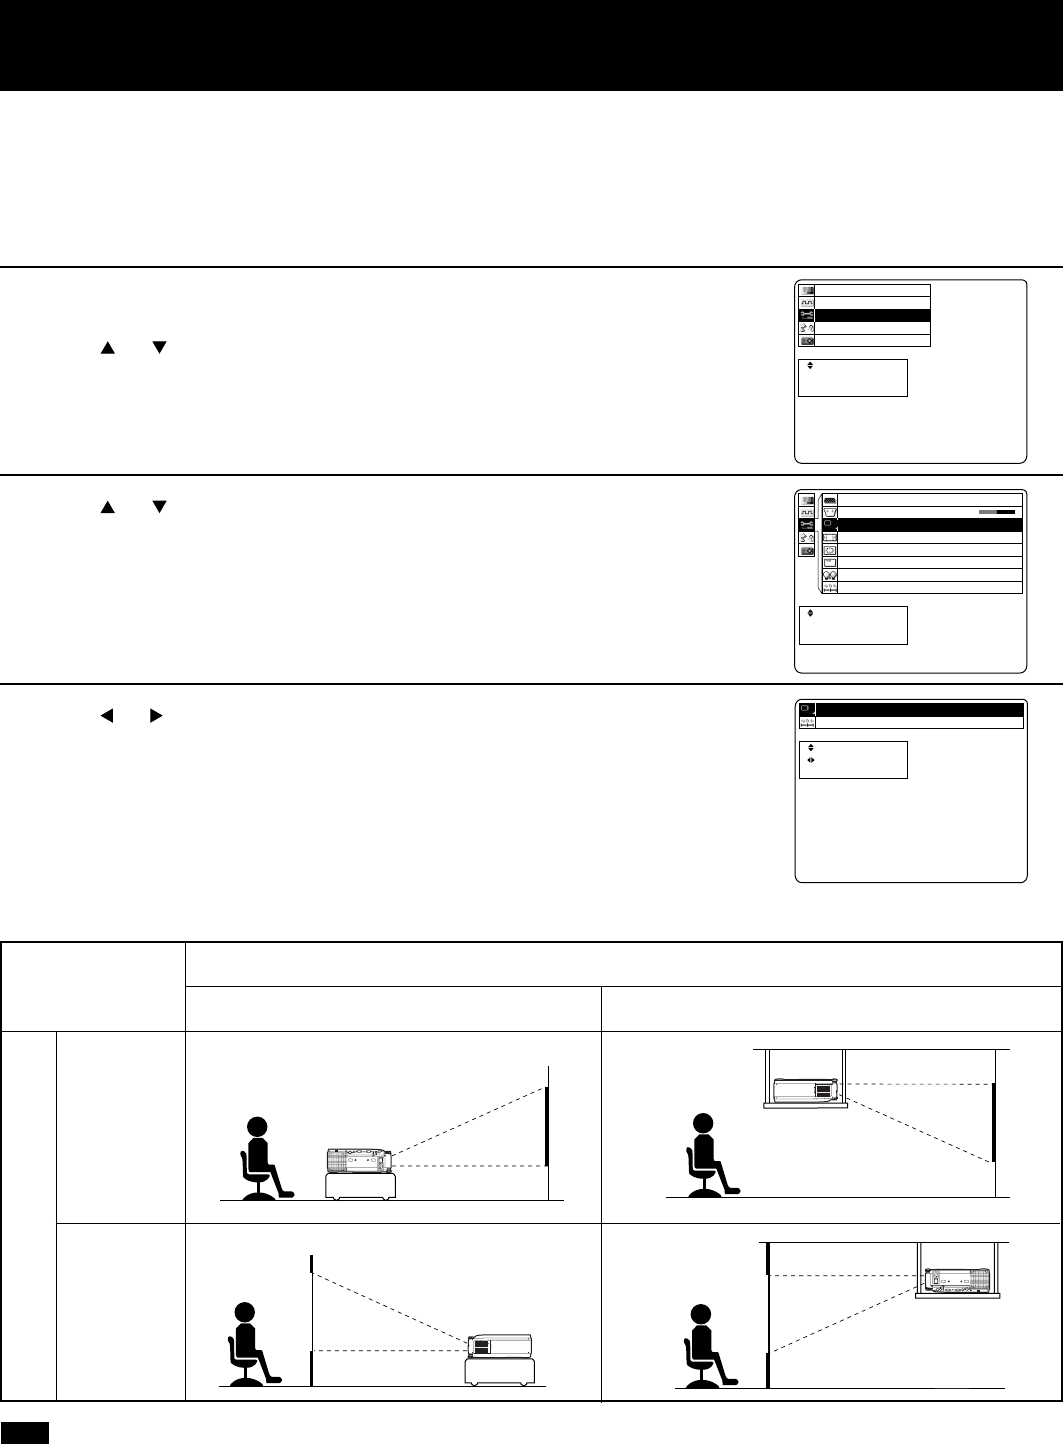
Standard Setting-up Positions
The screen should be positioned so that it is not directly touched by sunlight or room light as this will wash out the colors
of the picture making it hard to see. When possible, close all blinds, curtains, etc. and dim the lights. Also, the LCD
Projector should be at a 90° angle to the screen for the best picture results. To determine the distance for the desired
size, please refer to the LCD Projector/Screen Relationship Chart below.
(By using the tele zoom feature, you can increase the throw distance.)
•Your LCD Projector is
equipped with an image
reverse feature. (See page
14.)
LCD Projector /Screen Relative Position Chart
The picture can be adjusted to the desired size within the range of the zoom lens.
(This chart is based on a reduction ratio of X1)
•If the LCD Projector and the screen are not properly placed, the picture will be distorted
producing a keystoned image as shown at right.
Keystoned Image
When installed using the ET-
PK057 ceiling mount bracket
(sold separately).
Unit : inch (mm)
Measure (C) Measure (D)
Screen size
20 inches
40 inches
60 inches
80 inches
100 inches
120 inches
150 inches
200 inches
250 inches
300 inches
Throw distance (L) Measure (A) Measure (B)
English
- 17
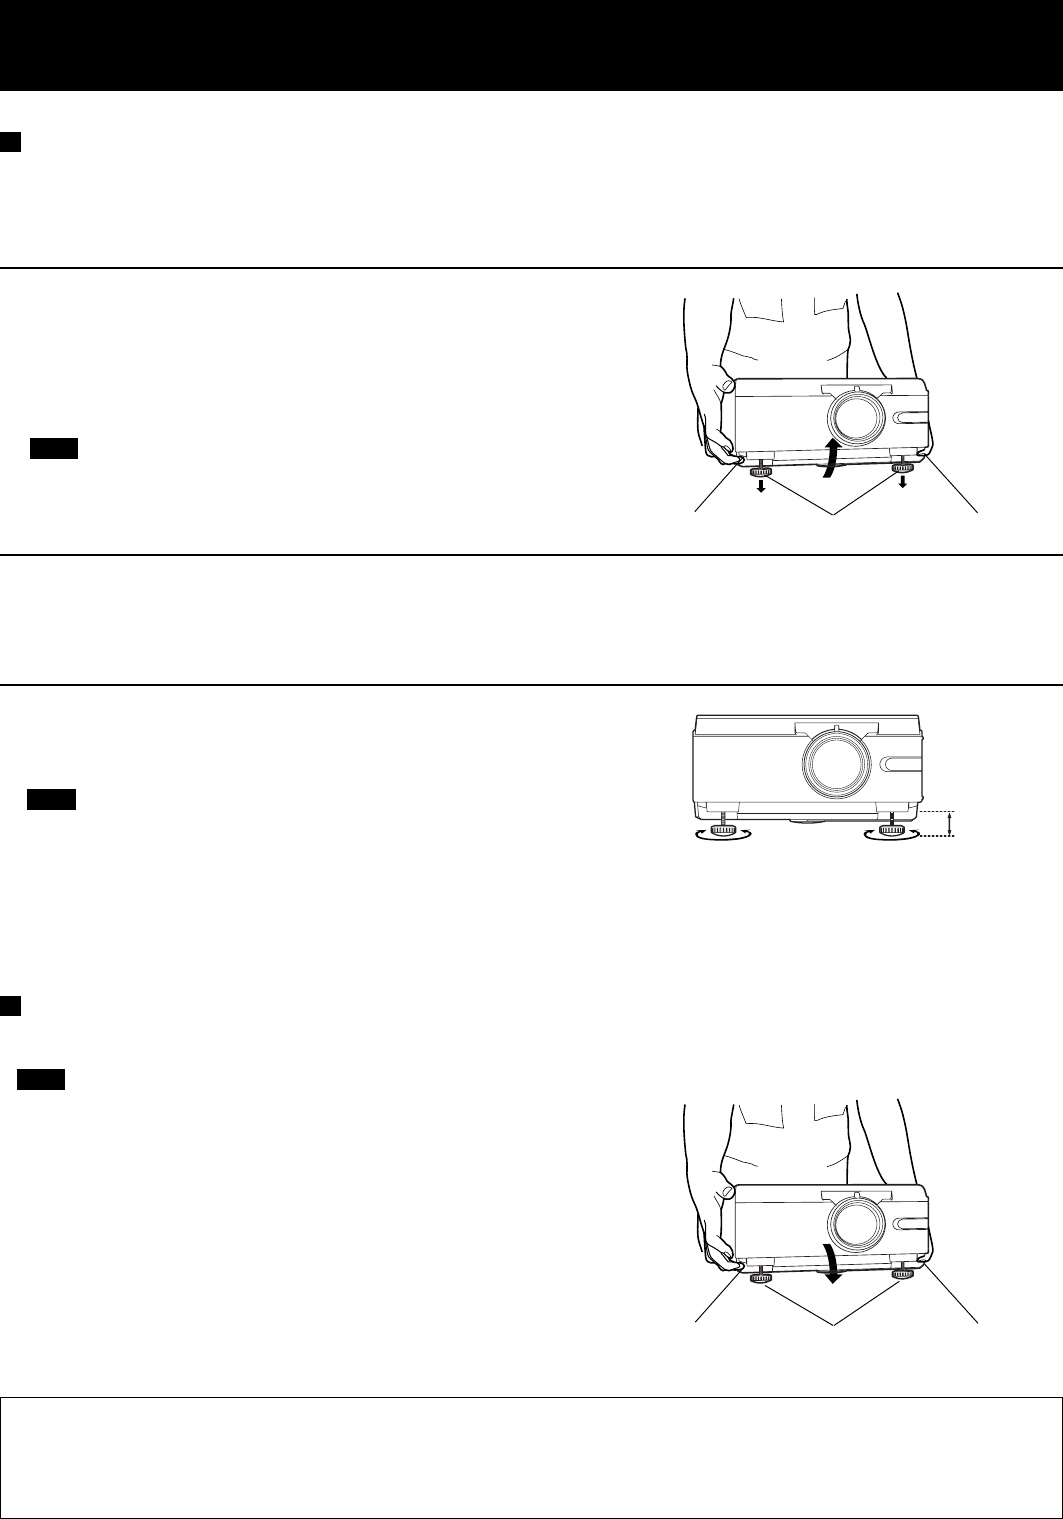
Adjuster button Adjustable legs
52 mm
• Be sure to support the Projector firmly while pressing the
adjuster buttons. If the adjuster buttons are pressed
without supporting the Projector, the adjustable legs will
suddenly unlock and the Projector will fall down, which
could catch your fingers and damage the Projector.
Adjuster button Adjustable legs Adjuster button
Note
Note
Adjuster button
Setting the Projector up horizontally
If the Projector is not set up so that it is horizontal, it will not be possible to obtain a distortion-free picture. If placing the
Projector on top of a table or similar surface, carry out the following procedure below to ensure that no distortion of the
picture occurs.
Note
Retracting the adjustable legs
After lifting the front of the Projector slightly, press and hold the adjuster buttons and then gently lower the Projector.
• Adjustment procedure
1Lift the front of the Projector until the Projector as a whole is
horizontal. While holding it in this position, press the adjuster
buttons under the sides of the Projector (1 each at left and
right). When the buttons are pressed, the left and right
adjustable legs will drop down until they reach the setting-up
surface.
•Do not release the buttons until both legs have reached the
setting-up surface.
2Release the adjuster buttons. (The adjustable legs will lock
as soon as the buttons are released.)
3Turn the adjustable legs by hand in either direction to make
fine adjustments to the level of the Projector so that the
Projector is perfectl horizontal.
•The legs can be extended by up to 52 mm. If you try to
extend them any further than this, they will merely spin
freely.
Caution: When you set up the LCD Projector
•Do not place it in humid or dusty places, or places where the air is sooty or full of cigarette smoke. If the lens, mirror,
or other optical components become dirty, the picture will blur or darken, making viewing difficult.
•Do not expose to extreme heat or cold. Operating temperature: 5°C – 40°C (41°F – 104°F)

English
- 18
If the LCD Projector is not set up so that it is horizontal, it will not be possible to obtain a distortion-free picture. Turn the
adjusters in either direction to make fine adjustments to the level of the Projector so that the Projector is perfectly
horizontal.
ZOOM Ring
FOCUS Ring
Adjusting the Lens
• Adjustment procedure
1Turn the ZOOM Ring to adjust the size of the picture.
•For a larger picture, turn the ring to the right. For a smaller picture,
turn the ring to the left.
2Turn the FOCUS Ring to adjust the focus of the picture.
•Turn the ring to the right or left until the picture is at the optimum
focus.
3Turn the ZOOM Ring again to adjust the size of the picture.
•When you turn the FOCUS Ring, the size of the picture changes.
English
- 19
Setting-up Positions and Changing the Projection Mode
The projection mode used by the Projector can be changed in accordance with the setting-up position. Including ceiling
mounting, you may select from four direction types. At the time of shipment from the factory, the Projector is set to the
No.1 “FLOOR/FRONT” projection mode, but this can be changed if required.
• If the lettering on the screen is projected backwards or upside down, it is because the wrong mode have been
selected.
• Press MENU to remove the setup screen and menu.
Note
DESK/CEILING
DESK CEILING
FRONT/REAR
FRONT
REAR
(Factory setting)
• Setting procedure
t
e
c
r
p
e
e
a
l
t
c
e
n
s
S
E
E
:
:
:
R
E
U
T
N
N
E
E
M
n
o
i
t
a
n
z
o
i
i
n
n
e
t
e
o
o
g
a
r
r
i
a
m
u
h
t
u
r
t
c
c
g
o
c
n
n
n
f
i
y
u
a
n
P
S
F
L
I
t
t
e
c
s
p
e
u
a
l
j
c
e
d
s
S
A
E
:
:
:
U
N
E
M
1 edoM noitcejorP
teseR
t
e
c
r
p
e
e
a
l
t
c
e
n
s
S
E
E
:
:
:
R
E
U
T
N
N
E
E
M
1
F
6
N
N
F
.
O
O
P
O
0
Y
x
0
1
y
+
a
e
l
d
p
o
s
f
M
i
f
n
D
O
n
o
o
i
n
p
e
i
s
e
m
P
n
t
s
e
a
Y
o
c
e
r
L
/
t
e
r
c
t
2
s
j
9
p
S
o
e
B
y
o
:
m
t
s
G
e
r
6
o
n
u
e
R
K
P
1
C
O
A
R
R
P
B
R
P
B
1Press MENU to display the menu.
2Press or to select “Function”, and then ENTER to display the
screen.
3Press or to select “Projection mode”, and then ENTER to
display the screen.
4Press or to select projecting mode from 1 to 4.
•Select 1 ..... DESK/FRONT (Factory setting)
•Select 2 ..... DESK/REAR (Right and Left displays in reverse)
•Select 3 ..... CEILING/REAR (Up and Down displays in reverse)
•Select 4 ..... CEILING/FRONT (Up and Down/Right and Left reverse display.)
English
- 20
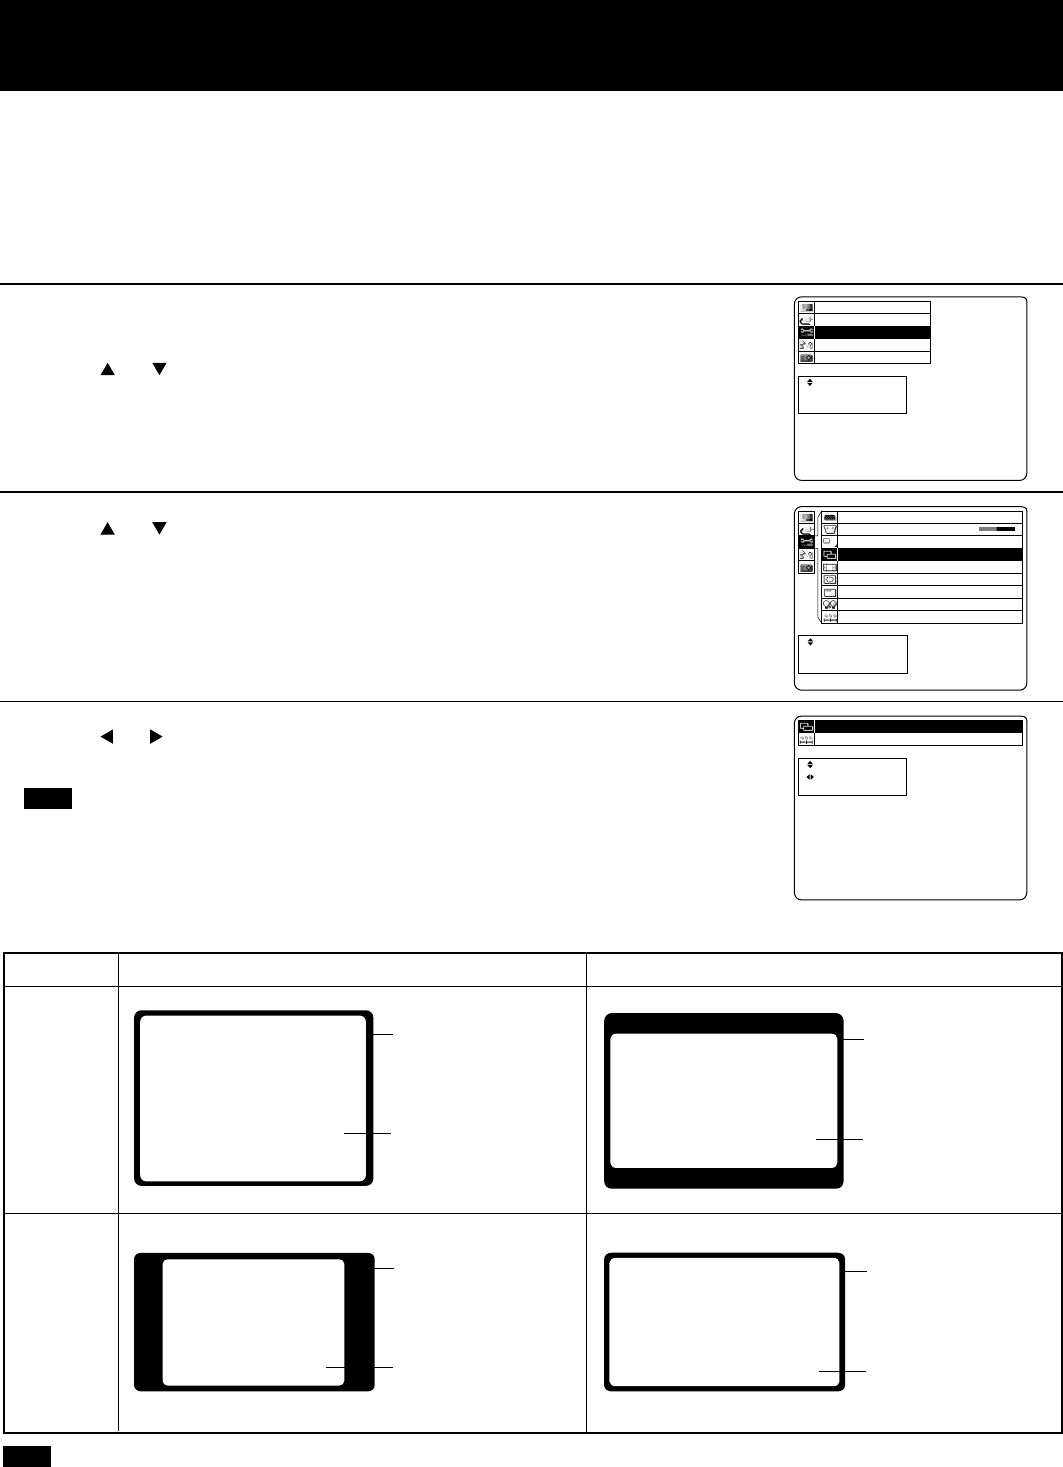
Setting the Screen Type
This LCD Projector is compatible with wide screen (16:9 ratio). If a wide screen is used and you set the screen type to
16:9 in order to project a wide (16:9) picture to fill the entire screen, pictures are correctly projected within the screen
when projecting older (normal) 4:3 ratio pictures.
Please follow the instructions below to set the screen type.
The procedure and on-screen displays below are based on S-Video/Video as the input signal.
Wide Function (OFF) Wide Function (ON)
4:3 Type
Screen
16:9 Type
Screen
Note
Note
•Please refer to “Changing to 16:9 (wide) screen format” on page 28 if you change to the wide (16:9) screen and project
pictures.
• Setting procedure
Screen
Projected pictures
(4:3)
Screen
Projected pictures
(16:9)
Screen
Projected pictures
(4:3)
Screen
Projected pictures
(16:9)
t
e
c
r
p
e
e
a
l
t
c
e
n
s
S
E
E
:
:
:
R
E
U
T
N
N
E
E
M
m
e
n
t
o
s
i
y
n
e
t
e
S
o
g
a
r
i
a
m
u
o
t
u
r
t
e
c
g
o
c
d
n
n
f
i
i
u
a
n
P
V
F
L
I
t
t
e
c
s
p
e
u
a
l
j
c
e
d
s
S
A
E
:
:
:
U
N
E
M
teseR
3:4neercS
1
3
F
6
N
N
:
F
.
O
O
P
4
O
0
Y
x
0
1
y
+
a
e
l
d
p
o
s
f
M
i
f
n
D
O
n
o
o
i
n
p
e
i
s
e
m
P
n
t
s
e
a
Y
o
c
n
e
r
L
/
t
e
e
r
c
t
2
s
j
e
9
p
S
o
e
B
y
o
r
:
m
t
s
G
e
r
c
6
o
n
u
e
R
K
P
S
1
C
O
A
R
R
P
B
R
P
B
t
e
c
r
p
e
e
a
l
t
c
e
n
s
S
E
E
:
:
:
R
E
U
T
N
N
E
E
M
1Press MENU to display the menu.
2Press or to select “Function”, and then ENTER to
display the screen.
3Press or to select “Screen”, and then ENTER to display
the screen.
4Press or to change the screen type.
•The 4:3 type screen is set at the factory.
• Press MENU to remove the setup screen and menu.
English
- 21
Digital Variable Compression ( Tele Zoom )
• Adjustment procedure
t
e
c
r
p
e
e
a
l
t
c
e
n
s
S
E
E
:
:
:
R
E
U
T
N
N
E
E
M
n
o
i
t
a
n
z
o
i
i
n
n
e
t
e
o
o
g
a
r
r
i
a
m
u
h
t
u
r
t
c
c
g
o
c
n
n
n
f
i
y
u
a
n
P
S
F
L
I
t
t
e
c
s
p
e
u
a
l
j
c
e
d
s
S
A
E
:
:
:
U
N
E
M
6.0xnoisserpmoC
teseR
t
e
c
r
p
e
e
a
l
t
c
e
n
s
S
E
E
:
:
:
R
E
U
T
N
N
E
E
M
1
F
6
N
N
F
.
O
O
P
O
0
Y
x
0
1
y
+
a
e
l
d
p
o
s
f
M
i
f
n
D
O
n
o
o
i
n
p
e
i
s
e
m
P
n
t
s
e
a
Y
o
c
e
r
L
/
t
e
r
c
t
2
s
j
9
p
S
o
e
B
y
o
:
m
t
s
G
e
r
6
o
n
u
e
R
K
P
1
C
O
A
R
R
P
B
R
P
B
1Press MENU to display the menu.
2Press or to select “Function”, and then ENTER to
display the screen.
3Press or to select “Compression”, and then ENTER to
display the screen.
4Press or to adjust the compression.
•Image can be reduced up to 0.4.
•When the number of dots of projected image corresponds with 832
X 624, 800 X 600, or 640 X 480, the image dimensions are
displayed.
•When the input signal dot number corresponds with the projected
image, the image dimensions are displayed in blue.
Note
Press ... The image is reduced without
changing the ration.
Press ... The image is enlarged without
changing the ration.
The projected size of the input image can be reduced to the level you select.
This will allow you to increase the throw distance.
When projecting a signal within 1024 X 768, you can reduce the image and adjust it to the original image quality.
The procedure and on-screen displays below are based on RGB as the input signal.
•The maximum optical throw distance can be increased to 1.6.
•Please refer to the throw distance and setting up positions on page 16.
Before adjusting After adjusting
When reducing
an image
When enlarging
an image

English
- 22
• Adjustment procedure
t
e
c
r
p
e
e
a
l
t
c
e
n
s
S
E
E
:
:
:
R
E
U
T
N
N
E
E
M
n
o
i
t
a
n
z
o
i
i
n
n
e
t
e
o
o
g
a
r
r
i
a
m
u
h
t
u
r
t
c
c
g
o
c
n
n
n
f
i
y
u
a
n
P
S
F
L
I
t
t
e
c
s
p
e
u
a
l
j
c
e
d
s
S
A
E
:
:
:
U
N
E
M
e
notsyeK 01+
teseR
t
e
c
r
p
e
e
a
l
t
c
e
n
s
S
E
E
:
:
:
R
E
U
T
N
N
E
E
M
1
F
6
N
N
F
.
O
O
P
O
0
Y
x
0
1
y
+
a
e
l
d
p
o
s
f
M
i
f
n
D
O
n
o
o
i
n
p
e
i
s
e
m
P
n
t
s
e
a
Y
o
c
e
r
L
/
t
e
r
c
t
2
s
j
9
p
S
o
e
B
y
o
:
m
t
s
G
e
r
6
o
n
u
e
R
K
P
1
C
O
A
R
R
P
B
R
P
B
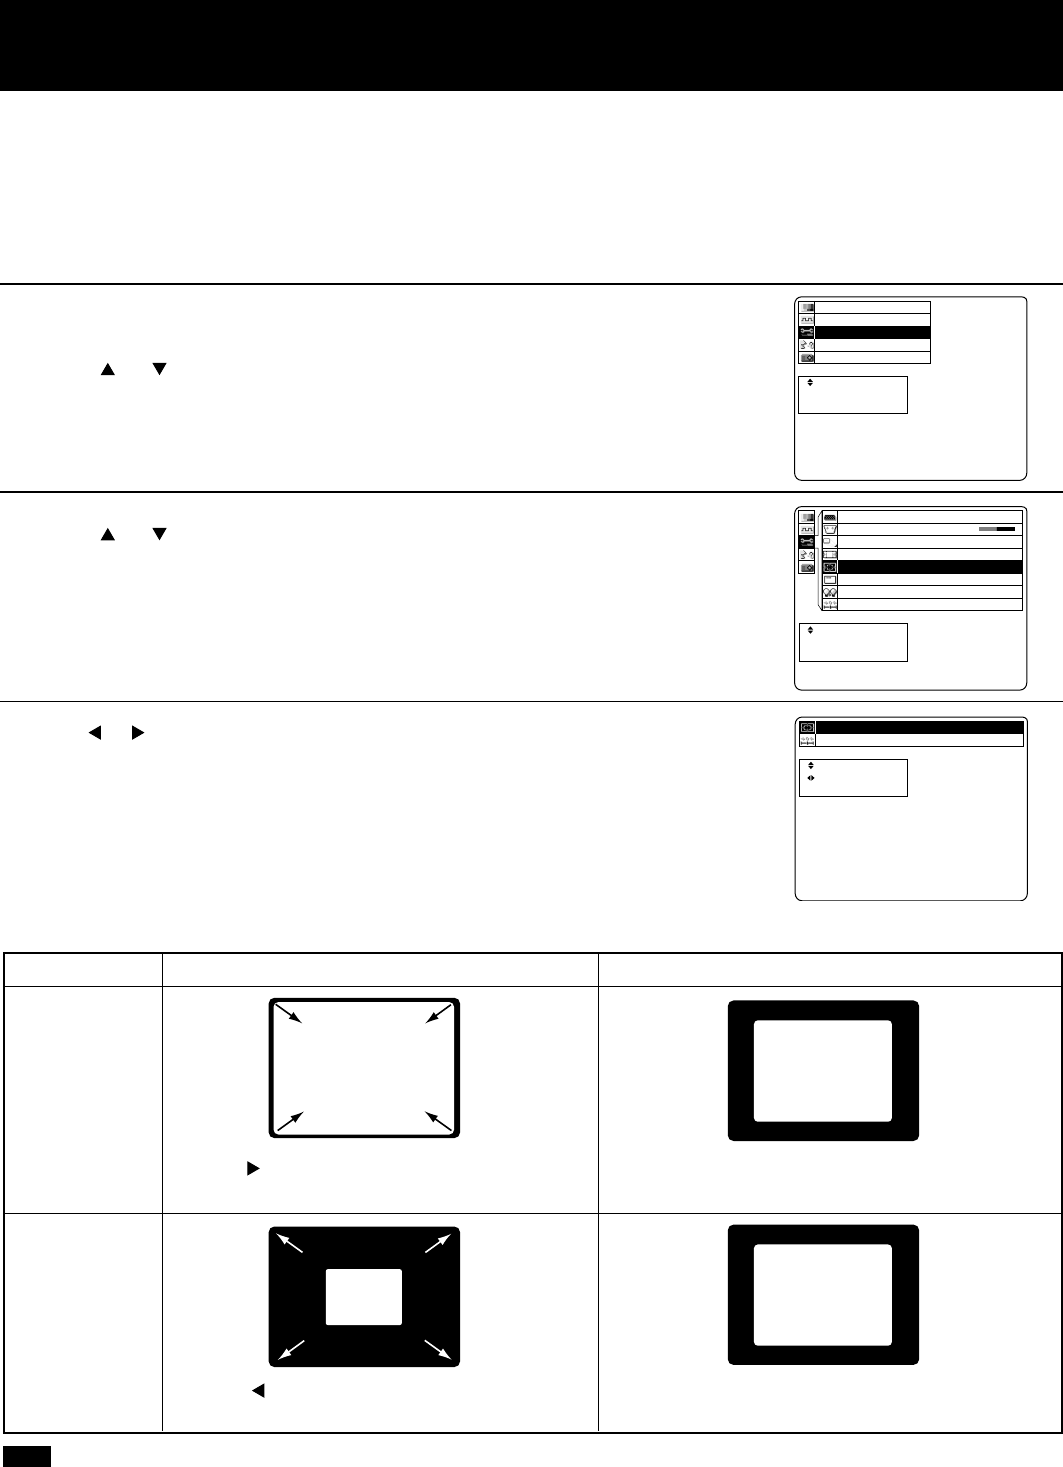
1Press MENU to display the menu.
2Press or to select “Function”, and then ENTER to
display the screen.
3Press or to select “Keystone”, and then ENTER to
display the screen.
4Press or to adjust the Keystone.
• Press MENU to remove the setup screen and menu.
Note
•You can correct a keystone image one the start up screen or by pressing the KEYSTONE button on the remote
control.
•When keystone is corrected, the screen becomes smaller.
Digital Keystone (Keystone Correction)
Screen
Projected
pictures
Screen
Projected
pictures
Screen
Projected
pictures
When the screen and projector are not level, a keystone (trapezoid) image may occur. This can be corrected by doing
the following.
The procedure and on-screen displays below are based on RGB as the input signal.
Keystone
(top : wide)
Keystone
(under : wide)
Keystone Image Corrected Image
Screen
Projected
pictures
Press ... Top becomes narrow.
Press ... Bottom becomes narrow.
Note