Panasonic of North America 932CR-SM4208U CAR AUDIO User Manual Exhibit 8 Users Manual
Panasonic Corporation of North America CAR AUDIO Exhibit 8 Users Manual
User Manual
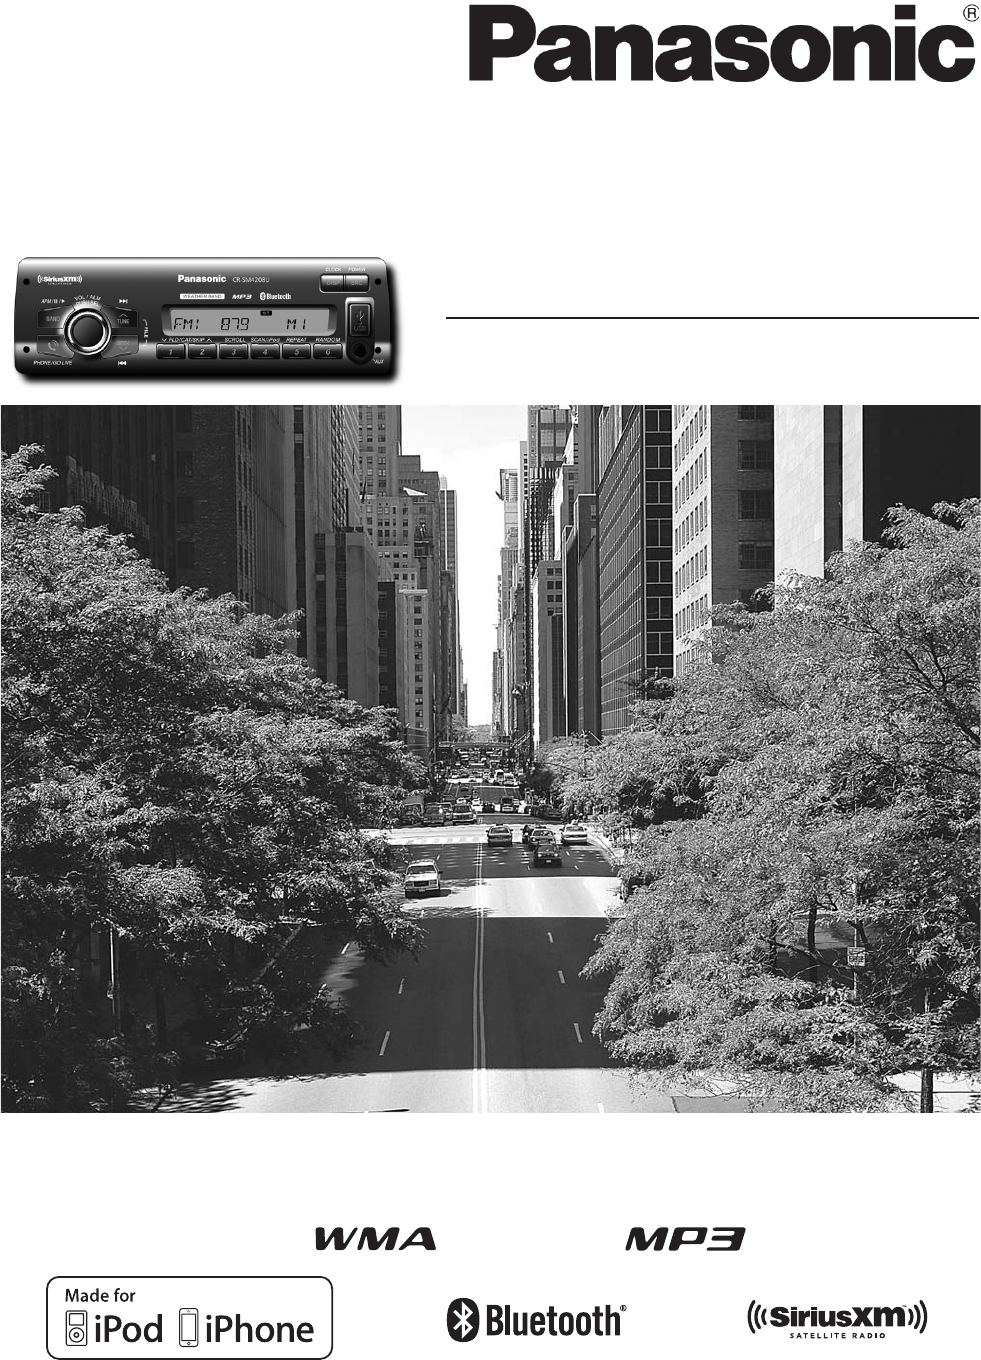
MP3 USB Player/Weather Band Receiver
CR-SM4208U
Operating Instructions
Please read these instructions carefully before using this product and keep this manual for
future reference.

2
Tbgfuz!Jogpsnbujpo
Ȏ Read the operating instructions for the unit and
all other components of your truck audio system
carefully before using the system. They contain
instructions about how to use the system in a safe
and effective manner. We assume no responsibility
for any problems resulting from failure to observe the
instructions given in this manual.
Ȏ This manual uses pictographs to show you how to
use the product safely and to alert you to potential
dangers resulting from improper connections and
operations. The meanings of the pictographs are
explained below. It is important that you fully under-
stand the meanings of the pictographs in order to use
this manual and the system properly.
Warning
Observe the following warnings when
using this unit.
Ȏ The driver should not operate the system while
driving.
Watching the display or operating the system will
distract the driver from looking ahead of the vehicle
and can cause accidents.
Always stop the vehicle in a safe location and use
the parking brake before watching the display or
operating the system.
Ȏ Use the proper power supply.
This product is designed for operation with a
negative grounded 12 V DC battery system. Never
operate this product with other battery systems,
especially a 24 V DC battery system.
Ȏ Do not disassemble or modify the unit.
Do not disassemble, modify the unit or attempt to
repair the product yourself. If the product needs to
be repaired, consult your dealership.
Ȏ Do not use the unit when it is out of order.
If the unit is out of order (no power, no sound) or
in an abnormal state (has foreign objects in it, is
exposed to water, is smoking, or smells), turn it off
immediately and consult your dealership.
Ȏ Any NOAA broadcast weather report, including
?QNNAJP=J@BKNA?=OPOI=UJKPNAŃA?PUKQN
actual weather conditions at your exact time
and location. You should always pay attention
to your actual weather conditions to make safe
decisions accordingly.
Ȏ Keep accessories out of reach of infants.
Accessories can be ingested, so keep them out of
the reach of infants. If an infant ingests accesso-
ries, please seek immediate medical attention.
Observe the following warnings when
installing.
Ȏ Disconnect the lead from the negative (–) bat-
tery terminal before installation.
Wiring and installation with the negative (–) battery
terminal connected may cause electrical shock and
injury due to a short circuit.
Some cars equipped with the electrical safety
OUOPAID=RAOLA?Eł?LNK?A@QNAOKB>=PPANUPANIEJ=H
disconnection.
FAILURE TO FOLLOW THE PROCEDURE MAY
LEAD TO THE UNINTENDED ACTIVATION OF
THE ELECTRICAL SAFETY SYSTEM RESULTING
IN DAMAGE TO THE VEHICLE AND PERSONAL
INJURY OR DEATH.
Ȏ Never use safety-related components for
installation, grounding, and other such func-
tions.
Do not use safety-related vehicle components (fuel
tank, brake, suspension, steering wheel, pedals,
=EN>=CAP?BKNSENEJCKNłTEJCPDALNK@Q?PKNEPO
accessories.
Ȏ Check for piping, gasoline tank, electric
wiring, and other items before installing the
product.
If you need to open a hole in the vehicle chassis to
=PP=?DKNSENAPDALNK@Q?PłNOP?DA?GSDANAPDA
wire harness, gasoline tank, and electric wiring are
located. Then open the hole from outside if pos-
sible.
Ȏ Never install the product in a location where it
EJPANBANAOSEPDUKQNłAH@KBREOEKJ
Ȏ Never have the power cord branched to supply
other equipment with power.
Ȏ After installation and wiring, you should check
the normal operation of other electrical equip-
ment.
The continuation of their using in abnormal condi-
PEKJOI=U?=QOAłNAAHA?PNE?=HODK?GKN=PN=Bł?
accident.
Ȏ Make sure the leads do not interfere with driv-
ing or getting in and out of the vehicle.
Ȏ Insulate all exposed wires to prevent short
circuiting.
This pictograph intends to alert you to
the presence of important operating
instructions and installation instructions.
Failure to heed the instructions may
result in severe injury or death.
This pictograph intends to alert you to the
presence of important operating instruc-
tions and installation instructions. Failure
to heed the instructions may result in injury
or material damage.
Warning Caution

3
Caution
Observe the following cautions when
using this unit.
Ȏ Keep the sound volume at an appropriate
level.
Keep the volume level low enough to be aware of
NK=@=J@PN=Bł??KJ@EPEKJOSDEHA@NEREJC
Ȏ!KJKPEJOANPKN=HHKSUKQND=J@KNłJCANOPK
be caught in the unit.
1KLNARAJPEJFQNU@KJKPCAPUKQND=J@KNłJCANO
caught in moving parts or in the disc slot. Espe-
cially watch out for infants.
Ȏ This unit is designed for use exclusively in
trucks.
Ȏ Do not operate the unit for a prolonged period
with the engine turned off.
Operating the audio system for a long period of
time with the engine turned off will drain the bat-
tery.
Ȏ Do not expose the unit to direct sunlight or
excessive heat.
Otherwise these will raise the interior temperature
KBPDAQJEP=J@EPI=UHA=@PKOIKGAłNAKNKPDAN
damage to the unit.
Ȏ Do not use the product where it will be ex-
posed to water, moisture, or dust.
Exposure of the unit to water, moisture, or dust
I=UHA=@PKOIKGAłNAKNKPDAN@=I=CAPKPDA
unit. Make especially sure that the unit does not get
wet in truck washes or on rainy days.
Ȏ To ensure safety, never attempt to preset sta-
tions while you are driving.
Ȏ
Depending upon the transmission condition
of electro-magnetic waves, the geographical
reasons and/or the weather conditions, you may
not receive the NOAA radio partially or at all.
Ȏ Make sure that your weather radio can receive
properly before driving, especially, before use
in a critical condition.
Ȏ Set the volume level to low enough before the
AUX connection is completed.
Failure to observe this, the loud noise may come
out and damage your speakers and your hearing.
Direct connection of the speaker/headphone output
of an external device without any attenuator may
distort sound or damage the connected external
device.
Ȏ When using this unit, noise may occurs when
there is an electromagnetic-wave generator
such as a cellular phone near this unit, if that
noise is obvious and cannot be eliminated,
please keep an electromagnetic-wave genera-
tor such as a cellular phone away from this
unit.
Observe the following cautions when
installing.
Ȏ/ABANSENEJC=J@EJOP=HH=PEKJPKMQ=HEłA@
service personnel.
Installation of this unit requires special skills and
experience. For maximum safety, have it installed by
the dealership. We are not liable for any problems
resulting from your own installation of the unit.
Ȏ
Follow the instruction to install and wire the prod-
uct.
Not following the instructions to properly install and
SENAPDALNK@Q?P?KQH@?=QOA=J=??E@AJPKNłNA
Ȏ Take care not to damage the leads.
When wiring, take care not to damage the leads.
Prevent them from getting caught in the vehicle
chassis, screws, and moving parts such as seat
rails. Do not scratch, pull, bend or twist the leads.
Do not run them near heat sources or place heavy
objects on them. If leads must be run over sharp
metal edges, protect the leads by winding them
with vinyl tape or similar protection.
Ȏ Use the designated parts and tools for installa-
tion.
Use the supplied or designated parts and appropri-
ate tools to install the product. The use of parts
other than those supplied or designated may result
in internal damage to the unit. Faulty installation
I=UHA=@PK=J=??E@AJP=I=HBQJ?PEKJKNłNA
Ȏ Do not block the air vent or the cooling plate of
the unit.
Blocking these parts will cause the interior of the
QJEPPKKRANDA=P=J@SEHHNAOQHPEJłNAKNKPDAN@=I-
age.
Ȏ Do not install the product where it is exposed
to strong vibrations or is unstable.
Avoid slanted or strongly curved surfaces for
installation. If the installation is not stable, the unit
may fall down while driving and this can lead to an
accident or injury.
Ȏ Installation Angle
The product should be installed in a horizontal posi-
tion with the front end up at a convenient angle, but
JKPIKNAPD=J
The user should bear in mind that in some areas
there may be restrictions on how and where this
unit must be installed. Consult your dealer for
further details.
Ȏ Wear gloves for safety. Make sure that wiring
is completed before installation.
Ȏ To prevent damage to the unit, do not connect
the power connector until the whole wiring is
completed.
Ȏ Do not connect more than one speaker to one
set of speaker leads. (except for connecting to
a tweeter)
4
Tbgfuz!Jogpsnbujpo!)dpoujovfe*
Caution
PLEASE FOLLOW THE LAWS AND REGULATIONS OF YOUR STATE, PROVINCE OR COUNTRY FOR
WIRING, INSTALLATION, AND USE OF THIS UNIT AND THE DEVICES TO BE CONNECTED.
Caution
Observe the following cautions when
using iPod®device/iPhone® model or USB
device.
Do not connect a USB device directly to this unit. If
the USB device is connected directly to this unit
and an accident occurs, or if the brakes are applied
suddenly, the driver or passenger may bump into
the USB device and may get injured.
Position the iPod device/iPhone model/USB device
and USB extension cable so that they do not
obstruct your driving.
Do not connect any device other than iPod device/
iPhone model/USB memory or a USB audio player.
Do not connect multiple USB devices to the USB
connector. Drawing power for multiple USB devices
from the connector could cause overheating and
smoking.
Accessories
1. Operating Instructions.........................................................................................................................................1
2. NOAA Weather Radio Brochure ..........................................................................................................................1
3.Quick Operation Guide of Bluetooth®
Fuction .....................................................................................................1
4. Installation hardware................................................................................................................. 1 set ( page 52)
1
The following applies only in the U.S.A.
Part 15 of the FCC Rules
FCC Warning:
This device complies with Part 15 of the FCC
Rules for Radio Receiver. Operation is subject
to the condition that this device may not cause
harmful interference. Any unauthorized changes
KNIK@Eł?=PEKJOPKPDEOAMQELIAJPI=URKE@PDA
user's authority to operate this device.
IMPORTANT NOTE:
To comply with the FCC RF exposure compli-
ance requirements, no change to the antenna
or the device is permitted. Any change to the
antenna or the device could result in the device
exceeding the RF exposure requirements and
void user’s authority to operate the device.
This transmitter must not be co-located or operated
in conjunction with any other antenna or transmit-
ter.
This equipment complies with FCC radiation
exposure limits set forth for uncontrolled equipment
and meets the FCC radio frequency (RF) Expo-
sure Guidelines in Supplement C to OET65. This
equipment has very low levels of RF energy that it
deemed to comply without maximum permissive
exposure evaluation (MPE). But it is desirable that it
should be installed and operated with at least 20 cm
and more between the radiator and person’s body
(excluding extremities: hands, wrists, feet and legs).
NOTICE
This equipment has been tasted and found to
comply with the limits for a Class B digital device,
pursuant to part 15 of the FCC Rules. These limits
are designed to provide reasonable protection
against harmful interference in a residential
installation. This equipment generates, uses and
can radiate radio frequency energy and, if not
installed and used in accordance with the instruc-
tions, may cause harmful interference to radio
communications. However, there is no guarantee
that interference will not occur in a particular
installation. If this equipment does cause harm-
ful interference to radio or television reception,
which can be determined by turning the equip-
ment off and on, the user is encouraged to try
to correct the interference by one or more of the
following measures:
Reorient or relocate the receiving antenna
Increase the separation between the equipment
and receiver.
Connect the equipment into an outlet on a
circuit different from that to which the receiver
is connected.
Consult the dealer or an experienced radio/ TV
technician for help.

5
Panasonic welcomes you to our constantly growing family of electronic products owners.
We endeavor to give you the advantages of precise electronic and mechanical engineering,
manufactured with carefully selected components, and assembled by people who are proud of
the reputation their work has built for our company. We know this product will bring you many
hours of enjoyment, and after you discover the quality, value and reliability we have built into it,
you too will be proud to be a member of our family.
Before Reading These Instructions
-=J=-=?Eł?
Limited Warranty Agreement
-=J=-=?Eł?S=NN=JPORADE?HA=Q@EKLNK@Q?POEP@EOPNE>QPAOEJPDA2JEPA@0P=PAOPK>ABNAABNKI
defects in material and workmanship, in accordance with the following.
For twelve months after delivery, we will repair or at our option replace at no charge any audio
product which, under normal conditions of use and service proves to be defective in materials
or workmanship. However, this warranty does not cover expenses incurred in the removal or
reinstallation of any audio product, whether or not proven defective. This warranty is limited to
the original consumer purchaser and is not transferable. Repaired and replaced products shall
assume the identity of the original for the purpose of this warranty and this warranty shall not
be extended with respect to such products.
1KK>P=EJLANBKNI=J?AKBPDEOS=NN=JPU?KJP=?P-=J=-=?Eł?S=NN=JPUNAPQNJ?AJPAN>ULDKJA
at 1-800-848-6560. A dated purchase receipt or other proof that the product is within the war-
ranty period will be required in order to honor the claim.
0LA?Eł?=HHUAT?HQ@A@BNKIPDEOS=NN=JPU=NAB=EHQNAO?=QOA@>UIEOQOAJACHA?P=>QOAEI-
proper operation or installation, dropping or damaging a faceplate, unauthorized service or
parts, or failure to follow normal maintenance activities. Also excluded from this warranty are
the correction of improper installation and the elimination of external electromagnetic interfer-
ence including but not limited to satellite radio FM modulation performance.
This warranty sets forth the exclusive remedies with respect to the products covered by it. We
shall not be held liable for any incidental, consequential, special, or punitive damages arising
from the sale, use, or distribution of any audio products. No attempt to alter, modify, or amend
PDEOS=NN=JPUOD=HH>AABBA?PERAQJHAOO=QPDKNEVA@EJSNEPEJC>U=JKBł?ANKB-=J=-=?Eł?&J?
1DEOS=NN=JPUCERAOUKQOLA?Eł?HAC=HNECDPO=J@UKQI=U=HOKD=RAKPDANNECDPOSDE?DR=NU
from state to state in the United States of America. In the event any provision, or any part or
portions of this warranty shall be found invalid, void or otherwise unenforceable, such holding
shall not affect the remaining part or portion of that provision or any other provision hereof.

6
Dpoufout
Safety Information ....................2
Before Reading These Instructions.5
Contents ................................6
Features ................................8
Front AUX terminal (AUX1)
Rear AUX terminal (AUX2)
Sound control
CAN-readiness
#=QHP@APA?PEKJKBATPANJ=H=ILHEłAN
Non-volatile memory
Illumination Interlock Control
Bluetooth®
SiriusXM Satellite Radio
USB connector
Connectable devices .................9
Compatible USB devices
Controls Layout ..................... 10
Preparation .......................... 11
First time power on
Clock Display Setting
Clock adjustment
General ............................... 12
Power On/Off
Source Selection
Volume Adjustment
&J@E?=PEKJ=P?KJJA?PEJCATPANJ=H=ILHEłAN
Sound Controls ...................... 14
Audio modes (Bass/Treble/Balance/Fader/
SQ)
Radio ................................. 16
Operation Flow
Display Change
Station Preset
Manual preset memory
Tuning in a weather band station
USB (MP3/WMA) .................... 18
Notes for USB device
Compatible USB devices
Operation Flow
Display change
Random, Scan, Repeat Play
For use with iPod ................... 21
Operation Flow
Display change
Setting the iPod Control
/ALA=P0DQBŃA-H=U
Bluetooth® - General ............... 25
Registration of a Bluetooth® device to this
unit
Display change
Setting of PIN (Personal Identity Number)
code
Connection of the registered Bluetooth®
device to this unit
Disconnection of the Bluetooth® device
Deletion of the registered data
Bluetooth® - Music Player ......... 27
Music mode activation
Song selection
Pause
Bluetooth® - Hands-Free Phone .. 28
Phone answering
Phone hanging up
Switching between the private mode* and
hands-free mode
Incoming call rejection
Outgoing call termination
Setting of automatic answering function
Use of voice dial
Use of receiving/calling records or telephone
directory (phonebook)
Notes on Bluetooth® ................ 30
Frequency band used
Usage limitations
&JŃQAJ?ABNKIKPDAN@ARE?AO
Application limitations
SiriusXM Satellite Radio Control . 31
Connecting SiriusXM antenna
Getting started
Band selection
Channel selection
Channel unlocking (passcode entry)
Channel preset
Preset channel selection
Selection by category
Display change
System control mode selection
Function settings
SiriusXM antenna aiming mode
SiriusXM instant replay mode
Alarm Setting ........................ 37
Alarm time setting
Turning ON/OFF the alarm
Activating snooze
Troubleshooting ..................... 39
If you suspect something wrong
Common
Radio
USB (MP3/WMA)
Bluetooth®
SiriusXM Satellite Radio Control
Product servicing
Error Display Messages............ 45

7
USB (MP3/WMA)
For use with iPod
Bluetooth®
SiriusXM Satellite Radio Control
Notes on MP3/WMA ................ 48
=QPEKJO=OPK?KILNAOOA@=Q@EKłHAO
Cautions as to the display of this unit
Recording MP3/WMA Files /
USB-Device
Copyright
No warranty
Maintenance ......................... 50
Cleaning this unit
0LA?Eł?=PEKJO ....................... 51
General
FM Stereo Radio
AM Radio
Weather Band Radio
Bluetooth®
0LA?Eł?=PEKJBNKIPDA1ANIEJ=H"J@
(Rear Connector of This Unit) ..... 52

8
Gfbuvsft
Front AUX terminal (AUX1)
Your mobile audio player and other devices are con-
JA?P=>HAPKPDEOQJEPSEPDKQP=JU@EBł?QHPU
Rear AUX terminal (AUX2)
For more convenient connection, rear AUX terminals
are now provided on the unit itself.
Sound control
SQ (Sound Quality)
You have four preset modes (FLAT, ROCK, POP and
VOCAL).
CAN-readiness
This unit is a CAN (Controller Area Network)-ready
device that provides communication with other CAN-
ready units.
#=QHP@APA?PEKJKBATPANJ=H=ILHEłAN
4DAJ=J=JKI=HUKBPDA?KJJA?PA@ATPANJ=H=ILHEłAN
is detected, “AMP FAULT” text appears (the sound
will be mute) and the power of this unit turned off
after 6 seconds to remind taking inspection with the
ATPANJ=H=ILHEłAN
Non-volatile memory
This unit stores the memories of each setting (tuner,
audio, mode, alarm time settings even if the power
supply is shut off or the power cable is unplugged.
Illumination Interlock Control
The intensity/illumination of display and button on
this unit is controlled by a PWM dimming module
located in the vehicle.
This unit is connected in the vehicle to dimming
analog signal (PWM signal). It’s capable of dimming
the backlighting based on a voltage supplied by a
PWM dimming module.
Bluetooth®
This feature allows users to use a hands-free phone
and Bluetooth® audio systems.
Compatible Bluetooth® devices
Bluetooth® Version: 3.0
%#-Ġ%=J@O#NAA-NKłHA
!-Ġ@R=J?A@Q@EK!EOPNE>QPEKJ-NKłHA
v 1.2
AVRCP1.4 (Audio/Video Remote Control
-NKłHA
%0-RĠ%A=@OAP-NKłHA
PBAP•MAP•SPP
SiriusXM Satellite Radio
SiriusXM Satellite Radio Tuner is integrated and
built-in with this unit.
SiriusXM Satellite Radio service requires a subscrip-
tion and the purchase of a SiriusXM Antenna. For
information on SiriusXM Satellite Radio service or
tuner activation please call 1-866-635-2349 or visit
siriusxm.com.
Note: This unit is not compatible with the following
Sirius or XM satellite radio components:
Sirius receiver (SIRPAN1/SC-C1)
Sirius Interface Adaptor
(CA-PANSC1U/CA-LSR01U)
XM receiver (XMD1000/CNP2000UC)
XM Adapter Cable (XMDPAN110/CNPPAN1)
About SiriusXM
Everything worth listening to is on SiriusXM, getting
over 130 channels, including the most commercial-
free music, plus the best sports, news, talk and
entertainment. A SiriusXM Tuner and Subscription
are required. For more information, visit www.
siriusxm.com
SiriusXM and all related marks and logos are trade-
marks of Sirius XM Radio, Inc. All rights reserved.
9
Compatible USB devices
USB Mass Storage Class
For details as to whether your USB memory/
USB Audio is compatible with USB Mass Stor-
age Class, please contact the USB memory/USB
Audio manufacturer.
Caution
We do not guarantee all of the USB devices
(USB memory/USB audio player) on market
are compatible and playable with this unit,
some exceptional USB devices may have
operation problem when connected to this
unit. If such problem occurs, please check
and contact the USB device manufacturer for
its compatible information.
USB Standard Compatibility 1.1/2.0 Full Speed
File System FAT12/16/32
Maximum current less than 1 A
Recommended capacity/partition:
Less than 32 GB/Only supported for 1 partition.
iPod compatibility
This unit supports only the following iPod models.
Supported iPod models are shown below. Older
models can not be supported.
Made for.
Ǹ iPod touch (6th generation)
Ǹ iPod touch (5th generation)
Ǹ iPod touch (4th generation)
Ǹ iPod touch (3rd generation)
Ǹ iPod touch (2nd generation)
Ǹ iPod classic (160 GB only)
Ǹ iPod classic (120 GB only)
Ǹ iPod classic
Ǹ iPod nano (7th generation)
Ǹ iPod nano (6th generation)
Ǹ iPod nano (5th generation)
Ǹ iPod nano (4th generation)
Made for.
Ǹ iPhone SE
Ǹ iPhone 6s Plus
Ǹ iPhone 6s
Ǹ iPhone 6 Plus
Ǹ iPhone 6
Ǹ iPhone 5s
Ǹ iPhone 5c
Ǹ iPhone 5
Ǹ iPhone 4S
Ǹ iPhone 4
Ǹ iPhone 3GS
Ǹ iPhone 3G
* Operation check has been completed with software
available at the end of January, 2017. We do not
guarantee the operation with our future products
or upgraded software.
Dpoofdubcmf!efwjdft
USB connector
The USB connector is equipped on the front panel.
By connecting a USB memory (not included) to the
USB connector via a USB extension cable (USB 2.0,
JKPEJ?HQ@A@UKQ?=JAJFKU*-4*łHAOOPKNA@
on the USB memory (not included) in your vehicle.
By connecting for iPod devices/iPhone models to
USB connector via a USB extension cable for iPod
devices and iPhone models (USB 2.0, not included),
UKQ?=JAJFKUIQOE?łHAOOPKNA@KJPDA?KIL=PE>HA
with iPod devices and iPhone models in your vehicle.
Further information about the compatible with iPod
devices and iPhone models is described below.
E-DKJAE-K@E-K@?H=OOE?E-K@J=JKE-K@ODQBŃA
and iPod touch are trademarks of Apple Inc., regis-
tered in the U.S. and other countries.
“Made for iPod” and “Made for iPhone” mean that
an electronic accessory has been designed to con-
JA?POLA?Eł?=HHUPKE-K@KNE-DKJANAOLA?PERAHU=J@
D=O>AAJ?ANPEłA@>UPDA@ARAHKLANPKIAAPLLHA
performance standards. Apple is not responsible for
the operation of this device or its compliance with
safety and regulatory standards. Please note that the
use of this accessory with iPod or iPhone may affect
wireless performance.
Caution
Correct function of iPhone 5, iPod touch (5th
generation) and iPod nano (7th generation) can
not be guaranteed when connected to this unit.
10
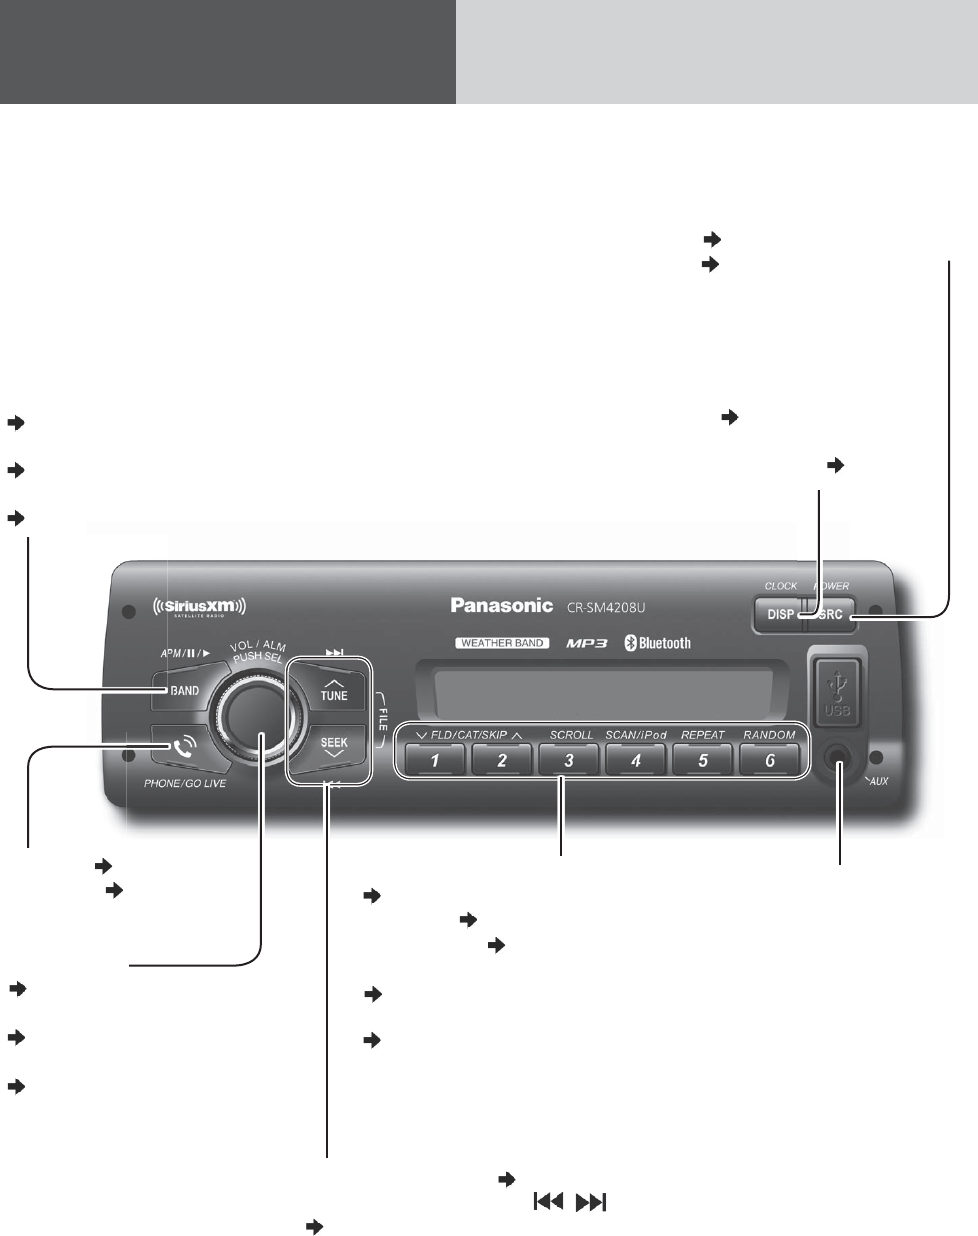
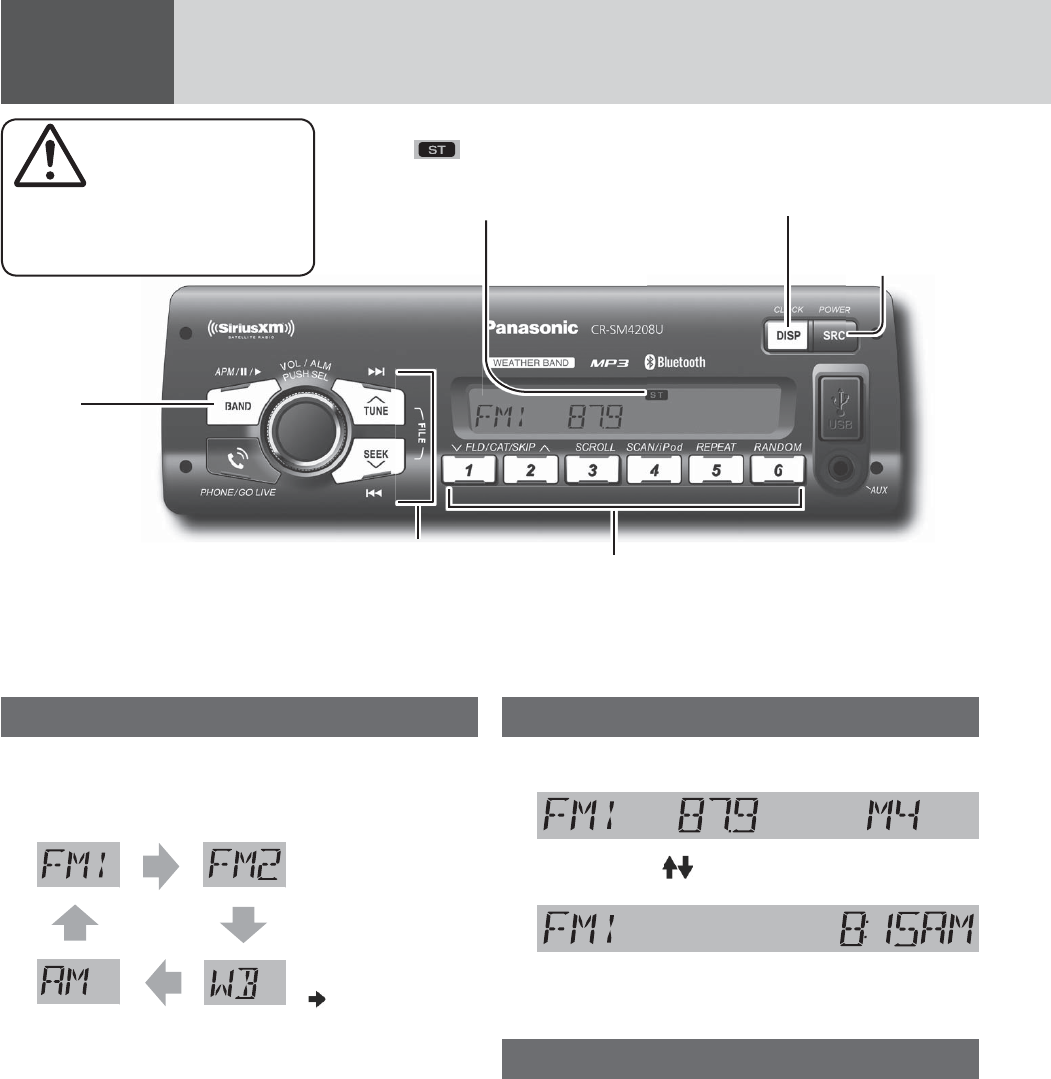
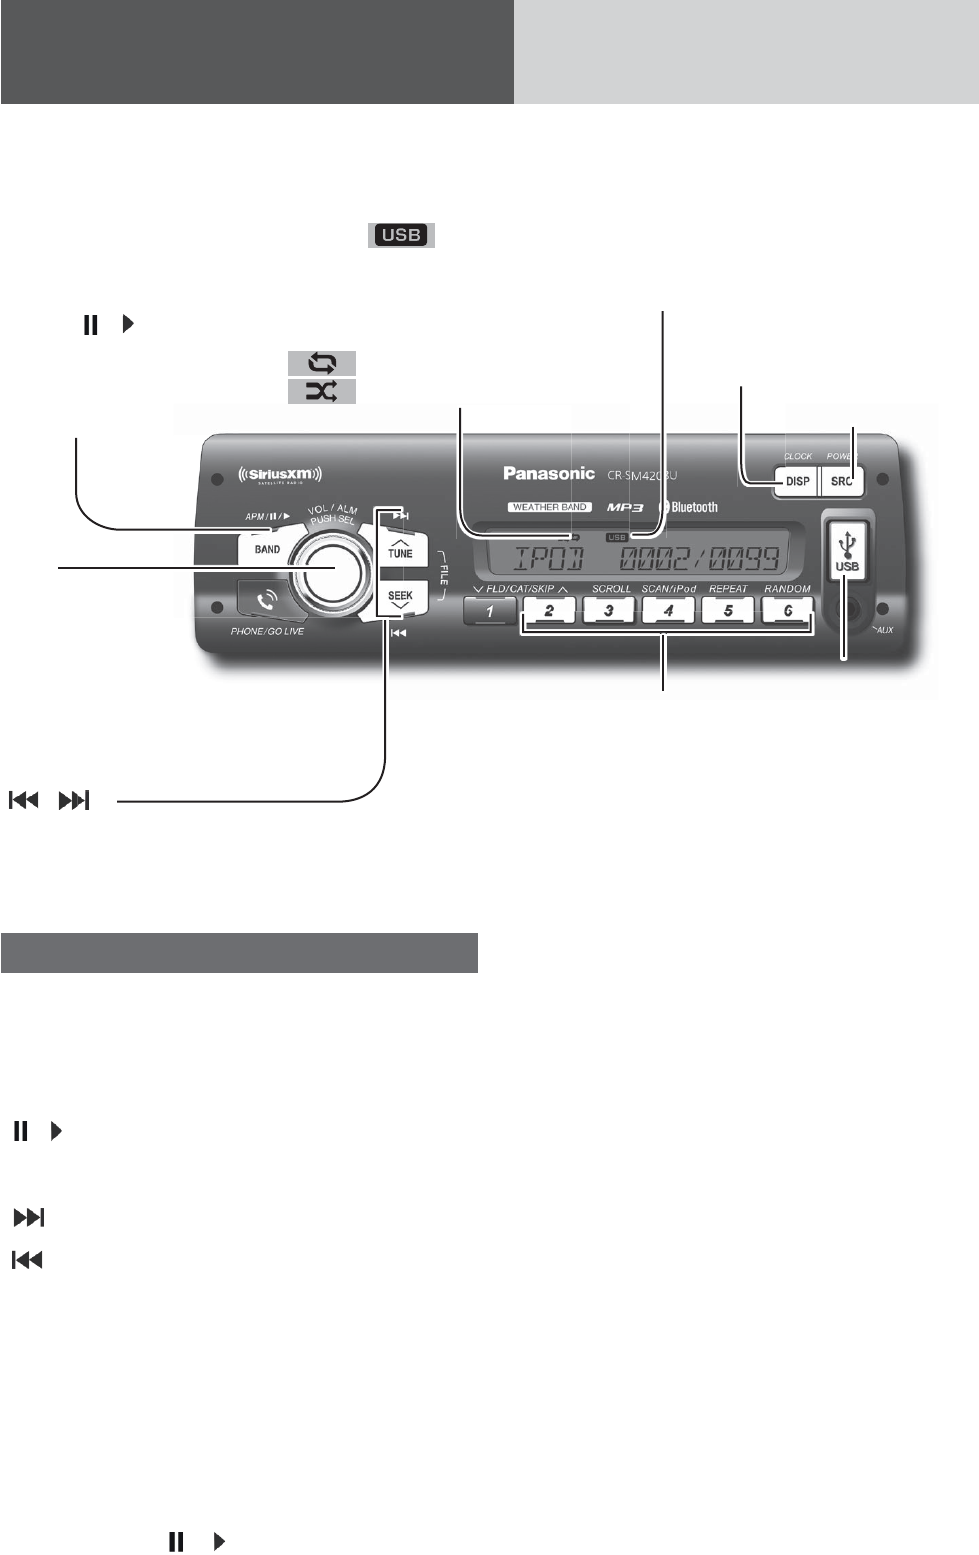
Dpouspmt!Mbzpvu
BAND
(!!!!!!!page 16, 17, 29, 30, 31, 34 - 39)
z / 6 Pause/Play
(!!!!!!!page 18, 21, 24, 32)
APM Auto Preset Memory
(!!!!!!!page 16)
DISP Display
(!!!!!!!page 11, 16, 19, 22,
25, 28, 35, 39)
CLK Clock (!!!!!!!page 11)
AUX
From line output of
external sound/audio
device (ex. Silicon-audio
player, HDD player, etc.)
TUNE/SEEK ŀ/Ŀ (!!!!!!!page 16, 17, 34, 35, 37, 39)
FILE (Track/File/Number) /
(!!!!!!!page 18, 21, 24, 29, 30, 32, 36 - 39)
1 through 6 (Preset Buttons)
(!!!!!!! page 16, 17, 28, 35)
SCROLL (!!!!!!! page 19, 22, 25)
SCAN /iPod(!!!!!!! page 20, 23, 25)
REPEAT/RANDOM
(!!!!!!!! page 20, 23, 26)
FOLDER ŀ/Ŀ
(!!!!!!! page 18, 21, 24, 35, 39)
VOL Volume
(!!!!!!! page 13, 14)
ALM Alarm
(!!!!!!! page 40)
PUSH SEL Select
(!!!!!!!page 11, 14, 24, 28, 29, 31,
36, 37, 38, 40)
PHONE (!!!!!!! page 30, 31)
GO LIVE (!!!!!!! page 38, 39)
SRC Source (!!!!!!! page 12, 16, 18, 21, 24, 29)
PWR Power (!!!!!!!!page 12)
page 30, 31
)
page 38, 39
)
16
,
19
,
2
2
,
,
,
,
!!!
pa
ge
1
1)
)
)
)
)
)
!
!
!
!
!
!
!!
!
!
!!
!
!
!
(
(
(
(
(
!!
(
(
(
(
(
(
!!
!
!
!
!!
11
Qsfqbsbujpo
First time power on
1 Turn the key in the ignition until the ac-
cessory indicator lights.
2 Press [PWR] (Power).
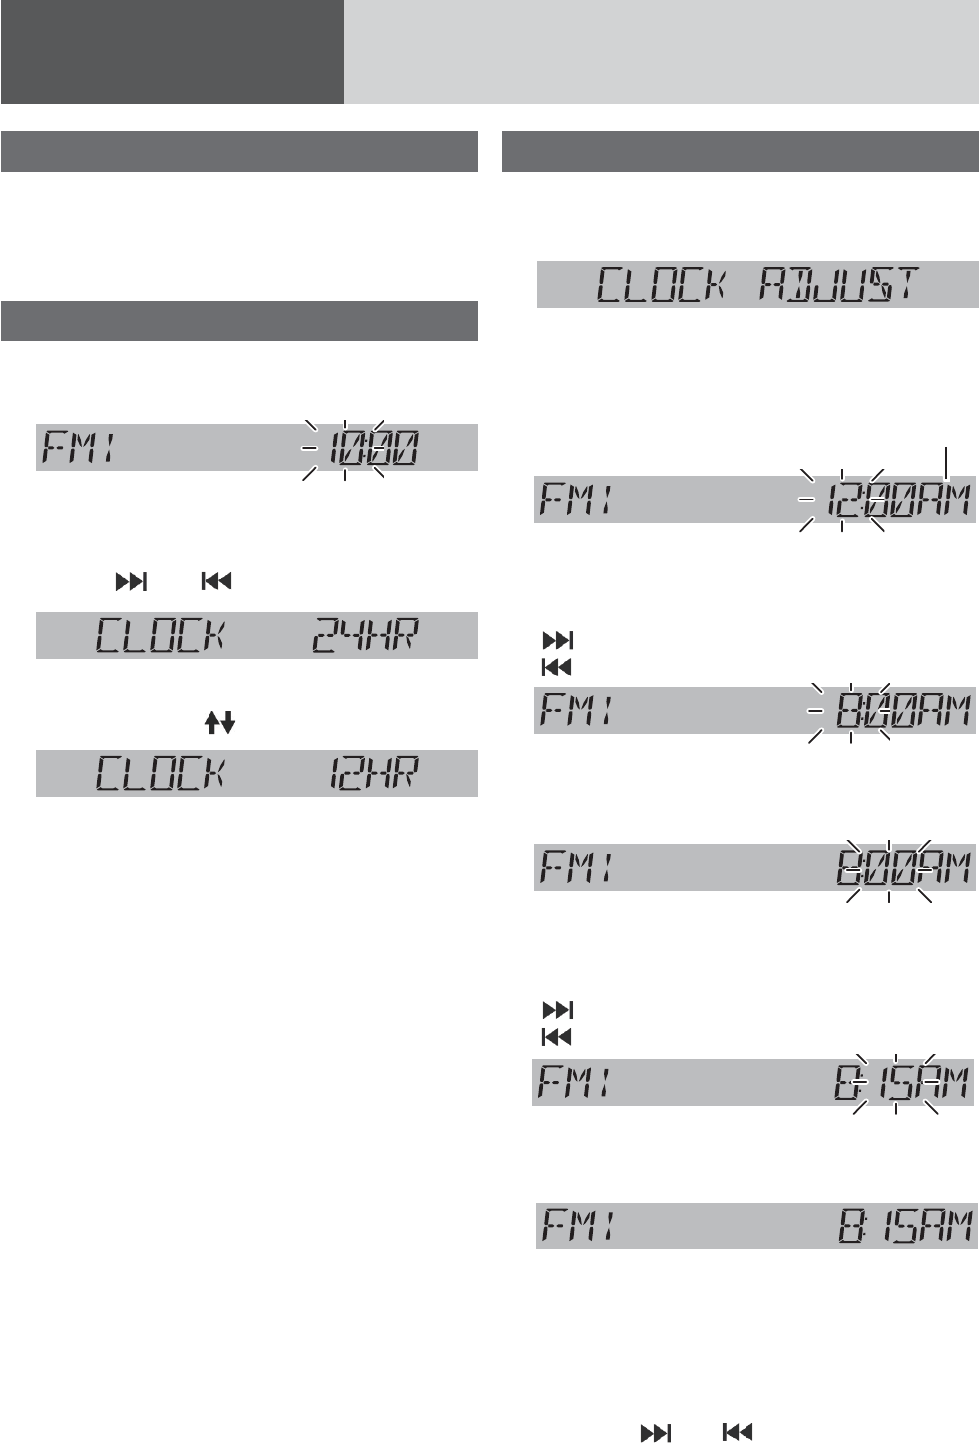
Clock Display Setting
1 Hold down [DISP](CLK) for more than 2
seconds to adjust clock setting.
2 Press [SEL] to open the clock display
setting display.
3 Press [!!!!!!!] or [!!!!!!!] to adjust.
the 24-hour system used (default)
!!
the 12-hour system used
4 Press [SEL] to determine the setting.
Notes:
If no operation takes place for more than 5
seconds in the clock display setting, the display
returns to the regular mode.
Selection of the 12-hour system displays “AM”
during AM hours and “PM” during PM hours.
To exit from the clock display setting, press
[DISP].
Clock adjustment
*The 12-hour system is used for example.
1 Press [DISP](CLK).
(Clock display)
2 Hold down [DISP](CLK) for more than 2
seconds.
*Indicator for AM or PM time
Hour blinks
3 Adjust the hour.
[!!!!!!!!] : Sets ahead.
[!!!!!!!!] : Sets back.
Hour entered
4 Press [DISP](CLK).
Minute blinks
5 Adjust the minute.
[!!!!!!!!] : Sets ahead.
[!!!!!!!!] : Sets back.
Minute entered
6 Press [DISP](CLK).
Completed
Notes:
Clock time is displayed when the unit is power off.
“CLOCK ADJUST” is displayed when the clock is
not adjusted.
Hold down [!!!!!!!!] or [!!!!!!!!] to change numbers
rapidly.
When you want to readjust the time, repeat steps
2 to 6.
!!
o
o
o
o
o
o
o
o
o
o
o
o
o
o
o
o
o
o
o
o
o
o
o
o
o
o
o
o
o
o
o
o
o
o
o
o
o
o
o
o
o
o
o
o
o
o
o
o
o
o
o
o
o
o
o
o
o
o
o
o
o
o
o
o
o
o
o
o
o
o
o
o
o
o
o
o
o
o
o
o
o
o
o
o
o
r
r
r
r
r
r
r
r
r
r
r
r
r
r
r
r
r
r
r
r
r
r
r
r
r
r
r
r
r
r
r
r
r
r
r
r
r
r
r
r
!
!
!
!
!!
!
r
r
r
r
r
r
r
[
[
[
[
[
[
[
[
[
[
[
[
[
[
[
[
[
[
[
[
[
[
[
[
[
[
[
[
[
[
[
[
[
[
[
[
[
[
[
[
[
[
[
[
[
[
[
[
[
[
[
[
[
[
!
!
!
12
Hfofsbm
Power On/Off
Set your car’s ignition switch to the ACC or ON
position.
Power on: Press [PWR] (Power).
Power off: Hold down [PWR] for more than
1 second.
One-Hour Timer
With the ignition off, pressing the [PWR] on this unit
will turn on the receiver and activate the receiver’s
one-hour timer. The receiver will turn off automati-
cally after one hour.
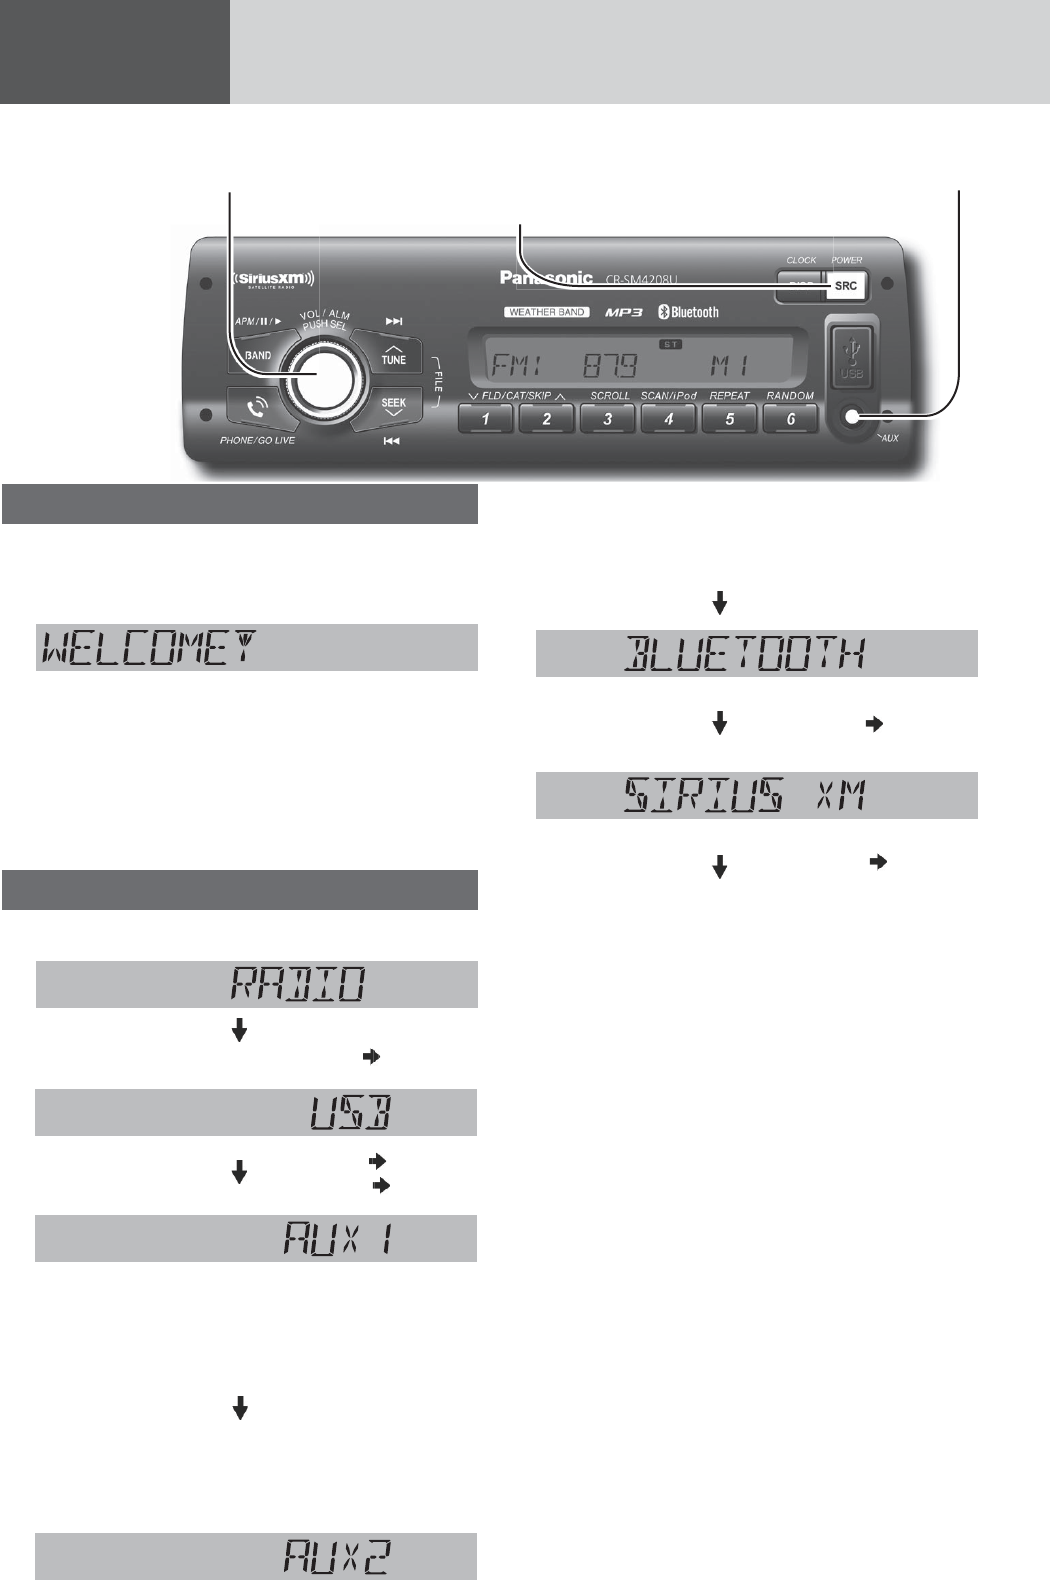
Source Selection
Press [SRC] to change the source.
When device connected to the front AUX terminal of
this unit, the sound of connected audio device can be
output from car speakers.
When device connected to the rear AUX terminal of
this unit, the sound of connected audio device can be
output from car speakers.
Bluetooth®
(!!!!!!!!page 28)
SiriusXM
(!!!!!!!!page 34)
(Return to “RADIO”)
Notes:
!When an output signal from the rear AUX terminal
is detected, this unit automatically changes the
source to AUX2. If this unit no longer detects this
input signal, the source immediately before AUX2
resumes.
!When an output signal from the rear AUX terminal
is detected in the power-off mode of this unit, the
power is turned on with the AUX2 source selected.
If this unit no longer detects this input signal be-
fore manually selecting other sources, the power
of this unit is turned off.
AUX Connector (3.5 mm ø stereo)
From line output of external sound/
audio device (ex. Silicon audio
player, HDD player, etc.)
[SRC]
selects a source.
[PWR] (Power)
toggles power on/off.
c
on au
di
o
tc )
tc
.
)
[VOL] (Volume)
When no external device is connected to rear AUX
terminal, “AUX” is displayed, and press [SRC] to
return to “RADIO”
Radio
(!!!!!!!page 16)
USB (!!!!!!!page 21)
iPod (!!!!!!!!page 24)
AUX1
player HDD player
pl
ay
er
,
HDD
pl
ay
er
(
(
(
(
(
(
(
(
(
(
(
(
(
(
(
(
(
(
(
(
(
(
(
(
(
(
(
!
(
(
(
(
(
!!!
(
(
(
(
(
!!
!
!
!
!
!
!
!
!
AUX2
13
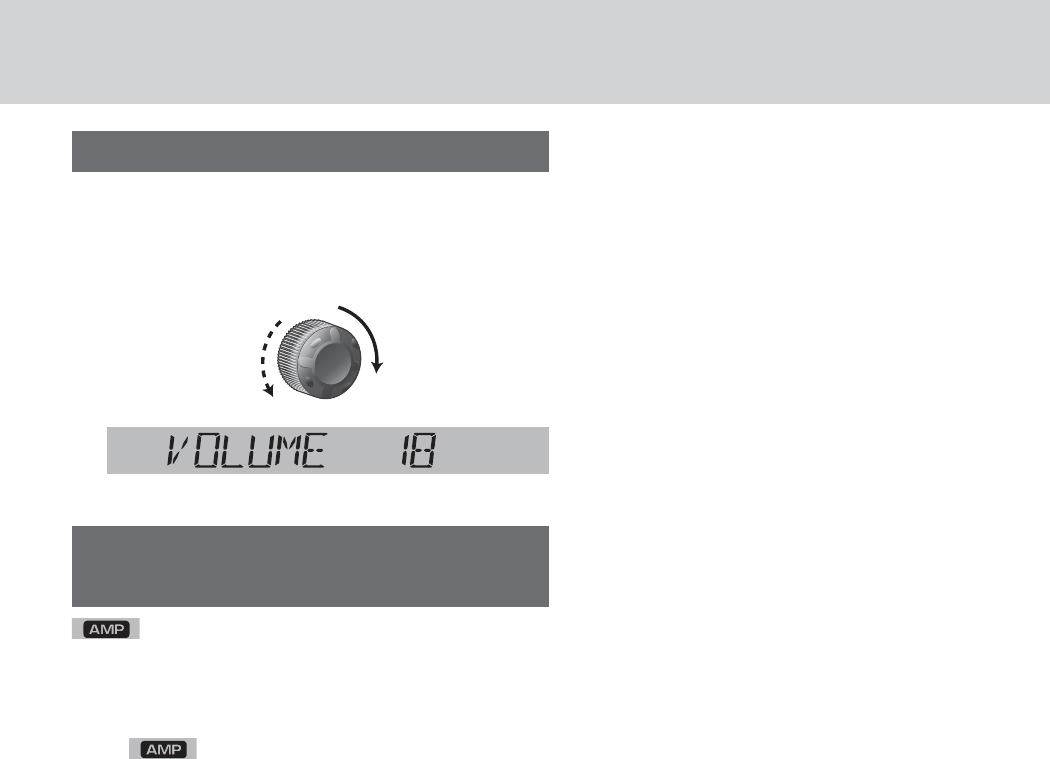
Volume Adjustment
(Setting Range: 0 to 40, Default: 18)
Turn [VOL] clockwise to increase the vol-
ume, and counterclockwise to decrease
the volume.
Indication at connecting external
=ILHEłAN
HECDPOSDAJ=JATPANJ=H=ILHEłANEO?KJ-
nected.
Noteġ4DAJ=J=JKI=HUKBPDAATPANJ=H=ILHEłANEO
detected, “AMP FAULT” appears (the sound will be
mute/ blinks repeatedly) and the power of
this unit is turned off after 6 seconds.
4DAJ=JATPANJ=H=ILHEłANEO?KJJA?PA@PDA=@FQOP-
able volume level: 0 to 33 (Maximum).
Up
Down
14
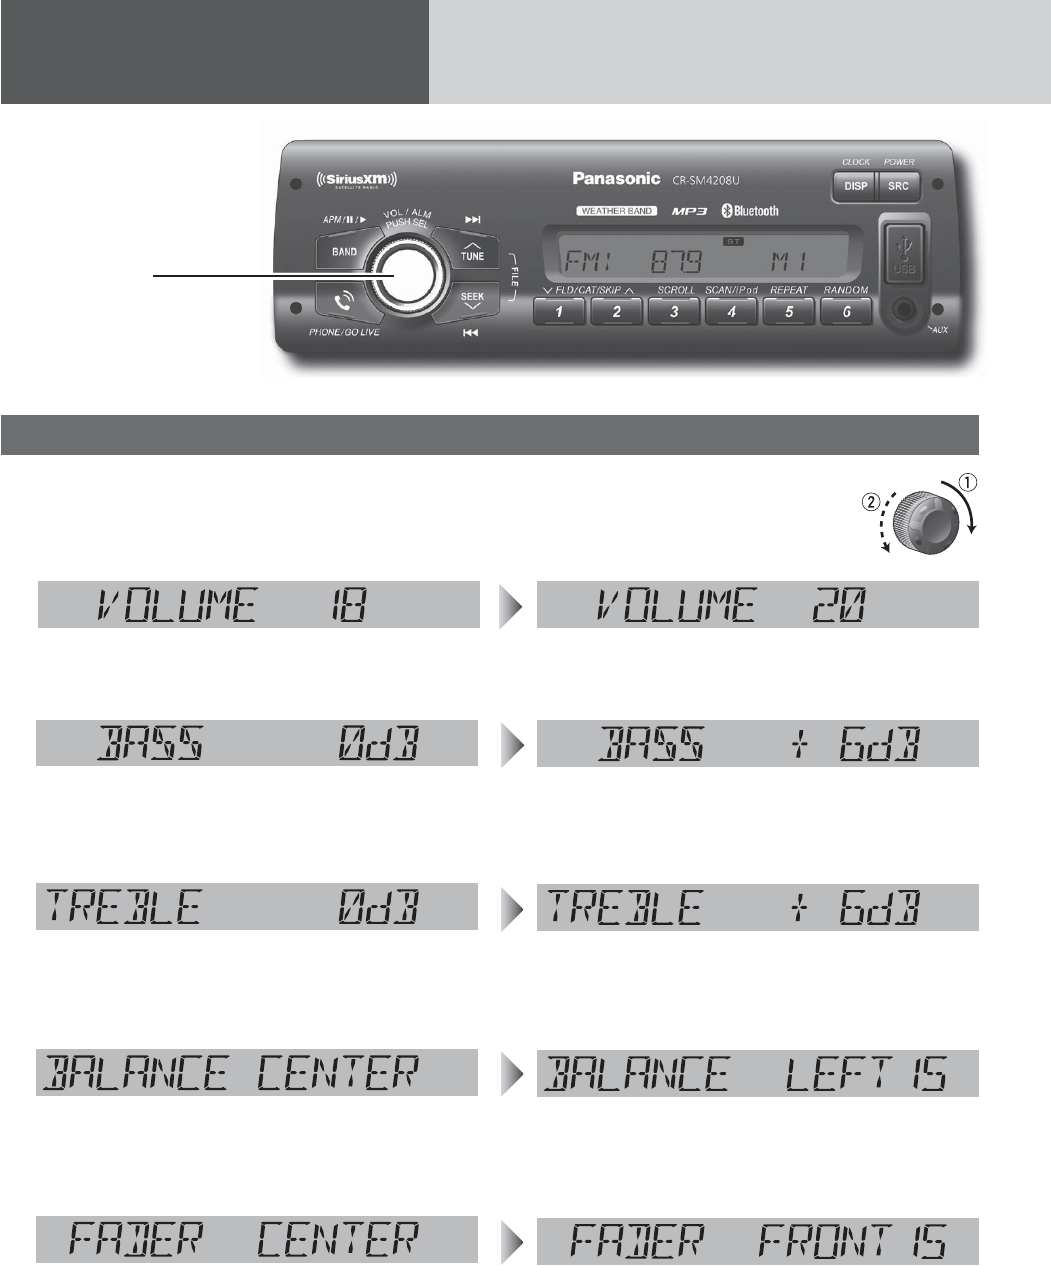
Tpvoe!Dpouspmt
[VOL]
selects a value in the
audio menu.
(PUSH SEL: Select)
selects items in the
audio menu.
Audio modes (Bass/Treble/Balance/Fader/SQ)
1 Push [SEL] (Select) to select the audio
mode in sequence. 2
Turn [VOL] (Volume) clockwise
or counterclockwise to change
each level or select a setting.
Volume
Bass
Treble
Balance
Fader
Ś: Up
ś: Down
Ś: Increased
ś: Decreased
Ś: Increased
ś: Decreased
Ś: Right enhanced
ś: Left enhanced
Ś: Front enhanced
ś: Rear enhanced
(Setting Range: 0 to 40, default: 18)
(Setting Range: –12 dB to +12 dB by 2 dB,
default: 0 dB)
(Setting Range: –12 dB to +12 dB by 2 dB,
default: 0 dB)
(Setting Range: 15 levels each and CENTER,
default: CENTER)
(Setting Range: 15 levels each and CENTER,
default: CENTER)
Note: If no operation takes place for more than 5
seconds in audio mode (2 seconds in volume mode),
the display returns to the regular mode.

15
(FLAT)Ń=PBNAMQAJ?UNAOLKJOAġ
does not emphasize any part. (default)
(ROCK) speedy and heavy sound:
exaggerates bass and treble.
(POP) wide-ranged and deep sound:
slightly emphasizes bass and treble.
(VOCAL) clear sound:
emphasizes middle tone and slightly emphasizes
treble.
SQ (Sound Quality)
Ś, ś: Select
SQ is a function that can call up various sound types
at the touch of button in accordance with your listen-
ing music type.
(Selectable setting: FLAT/ROCK/POP/VOCAL default:
FLAT)
Noteġ0APPEJCOKB0.>=OO=J@PNA>HA=NAEJŃQAJ?A@
KJA=JKPDAN&BOQ?D=JEJŃQAJ?A?=QOAO@EOPKNPEKJPK
the audio signal, readjust bass/treble or volume.
16
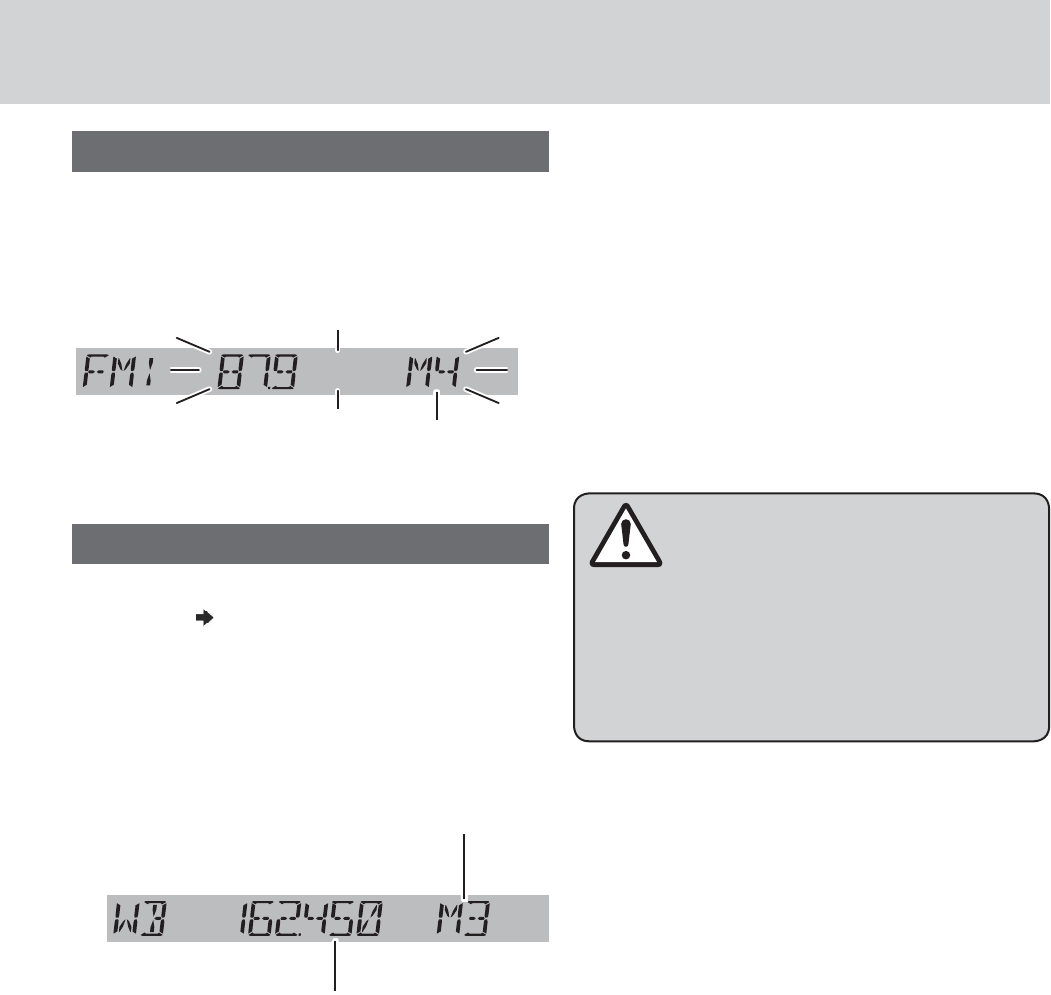
Sbejp
(FM stereo) indicator
lights while receiving an FM
stereo signal.
Operation Flow
1 Press [SRC] to select the radio source.
2 Press [BAND] to select a band.
Weather Band
(!!!!!!! page 17)
3 Select a station.
Frequency Adjustment
[TUNEŀ]: Lower / [TUNEĿ]: Higher
Note: For station search, hold down either of the but-
tons for more than 0.5 seconds and release it.
Preset Station Selection
Press the corresponding preset button
from [1] through [6] to tune in a preset
station.
Display Change
Press [DISP] to change the display.
Radio mode display (Frequency)
Clock display
Station Preset
The 6 stations with good reception will be automati-
cally saved in the memory under preset buttons [1]
through [6].
Preset stations can be simply called up by pressing
[1] through [6].
Auto Preset Memory (APM)
With this operation, stations with good receiving
conditions can be automatically stored in the preset
memory.
1 Select a band.
2 Hold down [BAND] (APM) for more than
2 seconds.
The preset stations under best receiving condi-
tions are received for 5 seconds each after preset-
ting the stations (SCAN). To stop scanning, press
one of the buttons from [1] through [6].
Note: New stations overwrite existing saved stations.
Caution
To ensure safety, never at-
tempt to preset stations while
you are driving. [SRC]
selects a source.
[DISP] (Display)
switches the information
on the display.
[BAND]
selects a band in
the radio source.
(APM) (Auto
Preset Memory)
executes APM in
the radio source
(by holding it
down for more
than 2 seconds).
[TUNEĿ] / [TUNEŀ]
increases/decreases the fre-
quency. (For seek tuning, hold it
down for more than 0.5 seconds
and release it.)
Preset buttons [1] through [6]
select a preset station in the radio source,
preset the current station (by holding it
down for more than 2 seconds).
!
17
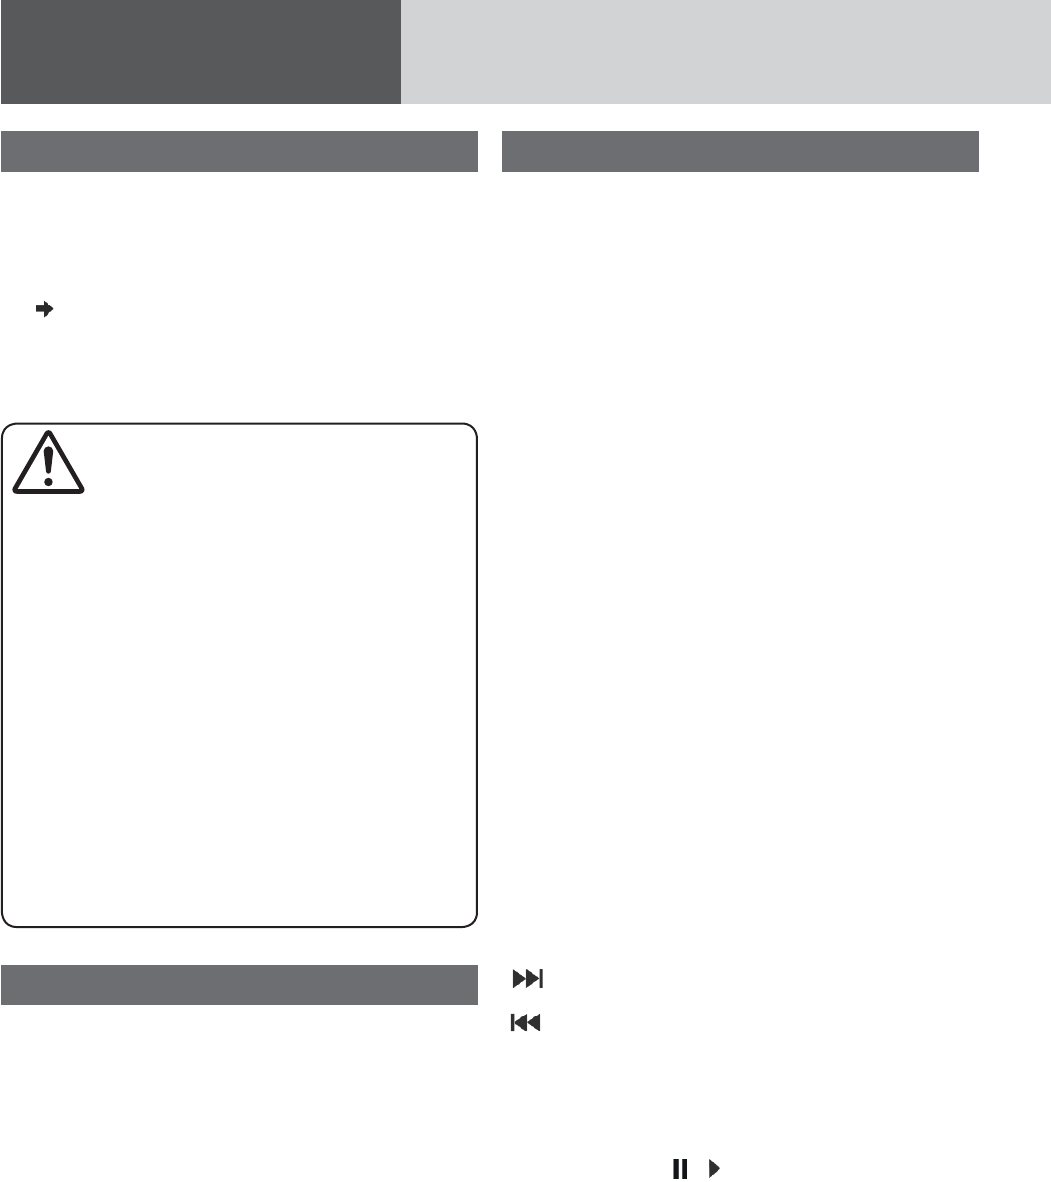
Manual preset memory
17UGOCPWCNQTUGGMVWPKPIVQſPFC
station.
2 Press and hold one of the preset but-
tons [1] through [6] until the display
blinks once.
Preset Number
blinks once
Note: New stations overwrite existing saved stations
Tuning in a weather band station
1 Press [BAND] to select WB (Weather
Band). (!!!!!!!!page 16)
2 Press any of the buttons [1] through [6]
to monitor the preset station.
Note: The weather band (CH1-6) has been preset.
CH7 is selected by pressing [TUNEĿ] or [TUNEŀ].
Weather Band Frequency
(channel) Number
Weather Band Frequency
Weather Band Stations
National Weather Radio Broadcasts from over 380
Iocations throughout the U.S. on seven VHF/FM
frequencies.
Tune to weather band to receive continuous weather
information 24 hours a day on one of the following
frequencies.
1. 162.400 MHz
2. 162.425 MHz
3. 162.450 MHz
4. 162.475 MHz
5. 162.500 MHz
6. 162.525 MHz
7. 162.550 MHz
Note: Further and updated information about the
National Weather Radio station listing, please visit
the web site:
http://www.nws.noaa.gov/nwr/coverage/station_list-
ing.html
Occasionally the frequency of an existing or planned
station must be changed because of unexpected
radio frequency interfere with adjacent NOAA weather
Radio Stations and/or with other Government or
commercial Operations within the area. If you have
a question concerning NOAA Weather Radio, please
?KJP=?PUKQNJA=NAOP+=PEKJ=H4A=PDAN0ANRE?A,Bł?A
Warning
Any NOAA broadcast weather report, includ-
EJC?QNNAJP=J@BKNA?=OPOI=UJKPNAŃA?PUKQN
actual weather conditions at your exact time and
location. You should always pay attention to your
actual weather conditions to make safe decisions
accordingly.
!
18
VTC!)NQ40XNB*
Notes for USB device
1DEOQJEPLH=UO>=?G*-4*łHAOOPKNA@KJ=
USB memory.
Back up any important data beforehand. We can-
not accept responsibility for any lost data.
Refer to the section on “Compatible USB devices”
(!!!!!!! below).
Refer to the section on “Notes on MP3/WMA”.
Connect your USB device to your car audio using
a standard USB extension cable. Use of a 2 m or
shorter USB 2.0 cable is recommended.
Caution for USB
Device
Do not connect a USB device directly to this
unit. If the USB device is connected directly
to this unit and an accident occurs, or if the
brakes are applied suddenly, the driver or pas-
senger may bump into the USB device and may
get injured.
Position the USB device and USB extension
cable/ optional adaptor so that they do not
obstruct your driving.
Do not connect any USB device other than a
USB memory or a USB audio player. Do not
connect multiple USB devices to the USB
connector. Drawing power for multiple USB
devices from the connector could cause over-
heating and smoking.
Compatible USB devices
USB Mass Storage Class
This refers to a type of USB device, which when
connected to a PC can be used as a storage
device without the need for specialized drivers or
software.
For details as to whether your USB memory/
USB Audio is compatible with USB Mass Storage
Class, please contact the USB memory/USB Audio
manufacturer.
USB Standard Compatibility 1.1/2.0 Full Speed
File system is FAT12/16/32
Maximum current less than 1 A
Recommended capacity/partition:
Less than 32 GB/Only supported for 1 partition.
Notes:
1DAQOAKB20@ARE?AOPD=P?KJP=EJ@=P=łHAO
other than MP3/WMA stored is not recommended.
Playback or display may not be possible depend-
ing on the type of the USB device or the condition
of the recording.
Even if PC playback is possible, it may not be pos-
sible on this product, because some USB devices
are not compliant with the USB standard.
Even with a USB device in the Mass Storage Class,
playback may not be possible in some cases.
Operation Flow
1 Press [SRC] to select the USB mode.
2 Open the USB connector cover.
3 Using a USB extension cable, connect
the USB memory to this unit.
Notes:
When connecting (disconnecting) the USB
memory, turn down the volume of the unit.
When connecting the cables, make sure the con-
nector is pushed all the way into the socket.
This unit may not operate correctly, depending on
USB cable’s quality and length. Use of a 2 m or
shorter USB 2.0 cable is recommended.
Notes:
*-4*łHAONA?KCJEVA@>UPDAQJEP=NALH=UA@
back automatically.
If the USB memory is connected to this unit when
the power is turned on, playback starts automati-
cally.
4 Select a desired portion.
Folder Selection
[Ŀ] (FOLDER): Next folder
[ŀ] (FOLDER): Preceding folder
File Selection
[!!!!!!]0GZVſNG
[!!!!!!]2TGEGFKPIſNGRTGUUVYKEG
Note: For fast forward/reverse, hold down either of
them.
Pause
Press [BAND] (!!!!!/ ).
Press again to cancel.
!
!
!!
!
!!

19
USB (Universal
Serial Bus) Con-
nector (inside of
the cover)
[4] (SCAN)/[5] (REPEAT)/[6]
(RANDOM)
toggles on/off each play
mode.
[3] (SCROLL)
scrolls the information on
the display.
[ŀ] [Ŀ] (FOLDER)
skips to the previous/next
folder.
[SRC]
selects a source.
[BAND] (!!!!/ !!!)
(Pause/Play)
toggles between
pause and play with
the USB source.
[!!!!!!!] [!!!!!!!]
OGELPKPDALNAREKQOJATPłHAEJPDA20IK@A#KN
fast reverse/fast forward, hold down either of them.
(Repeat)/
(Random)/
(Folder)
indicator
indicator
lights when a USB
device is loaded.
)
)
)
)
Display change
Press [DISP] to change the display.
Notes:
For scrolling text, press [3](SCROLL).
“NO TEXT” is displayed when there is no informa-
tion on the USB.
* ID3 Tag ON/OFF
Hold down [3](SCROLL) for more than 2 seconds.
TAG ON: album title and song title/artist name are
displayed.
TAG OFFġBKH@ANJ=IAłHAJ=IA=NA@EOLH=UA@
(Default)
Folder number/
File number
Play time
Folder name/
Album*
File name/
Title, artist*
Clock
( lights.)
( lights.)
!
]
]
]
]
]
]
]
]
]
]
]
]
]
]
]
]
]
]
]
]
]
]
]
]
]
]
]
]
]
]
]
]
]
]
]
]
]
]
]
]
]
]
]
]
]
]
]
]
]
]
]
]
]
]
]
]
!
[DISP] (Display)
switches the information on
the display.
20
VTC!)NQ40XNB*!)dpoujovfe*
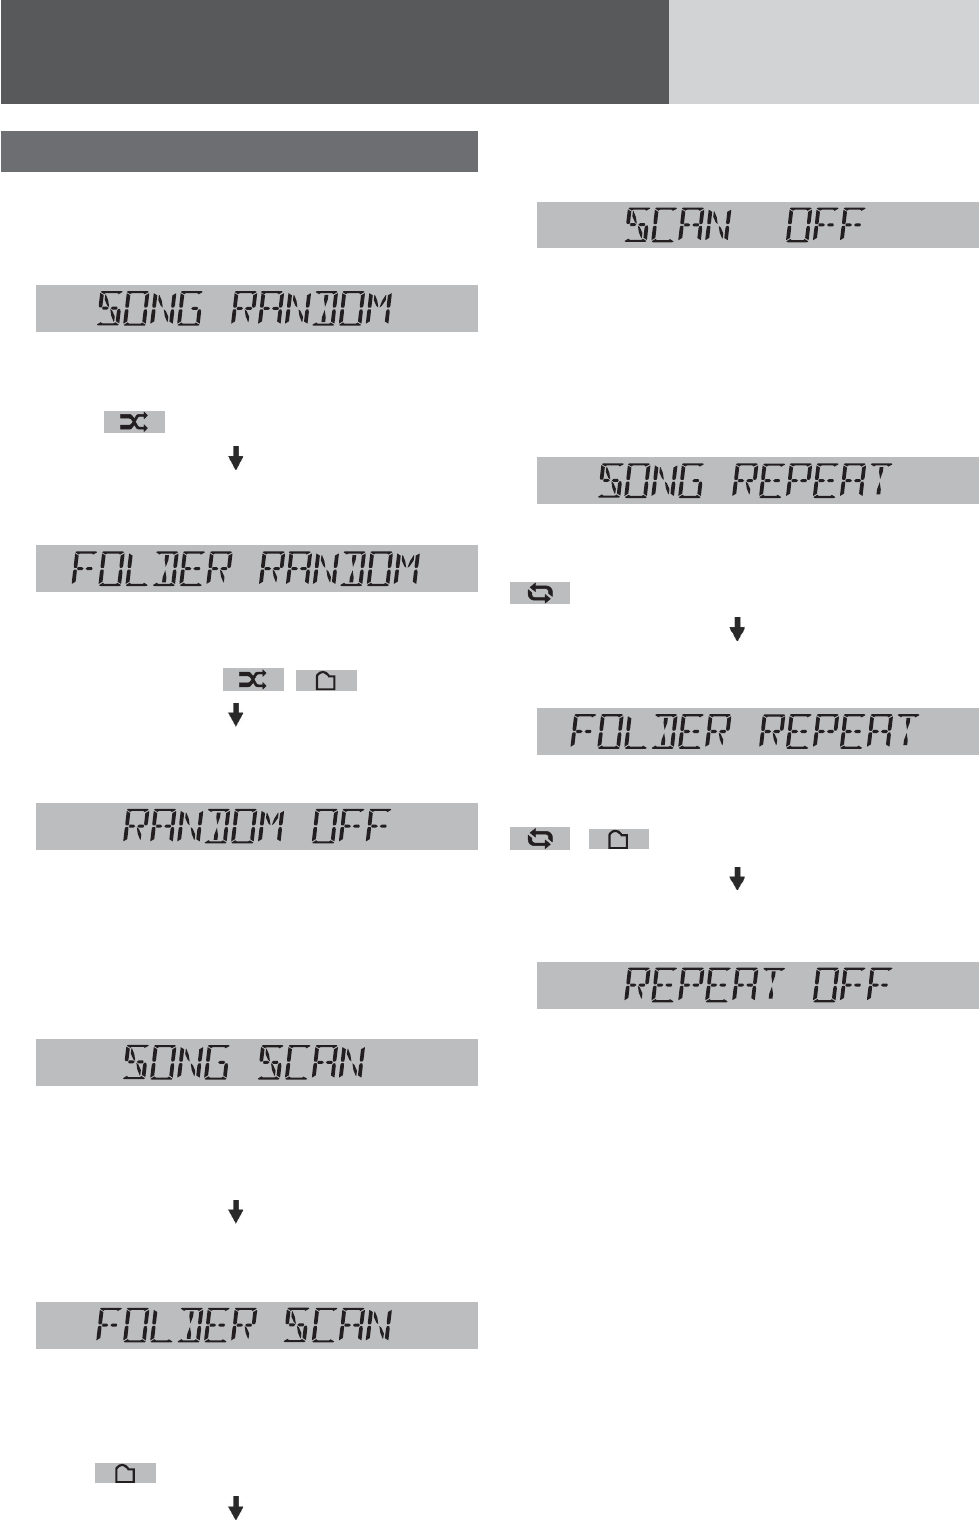
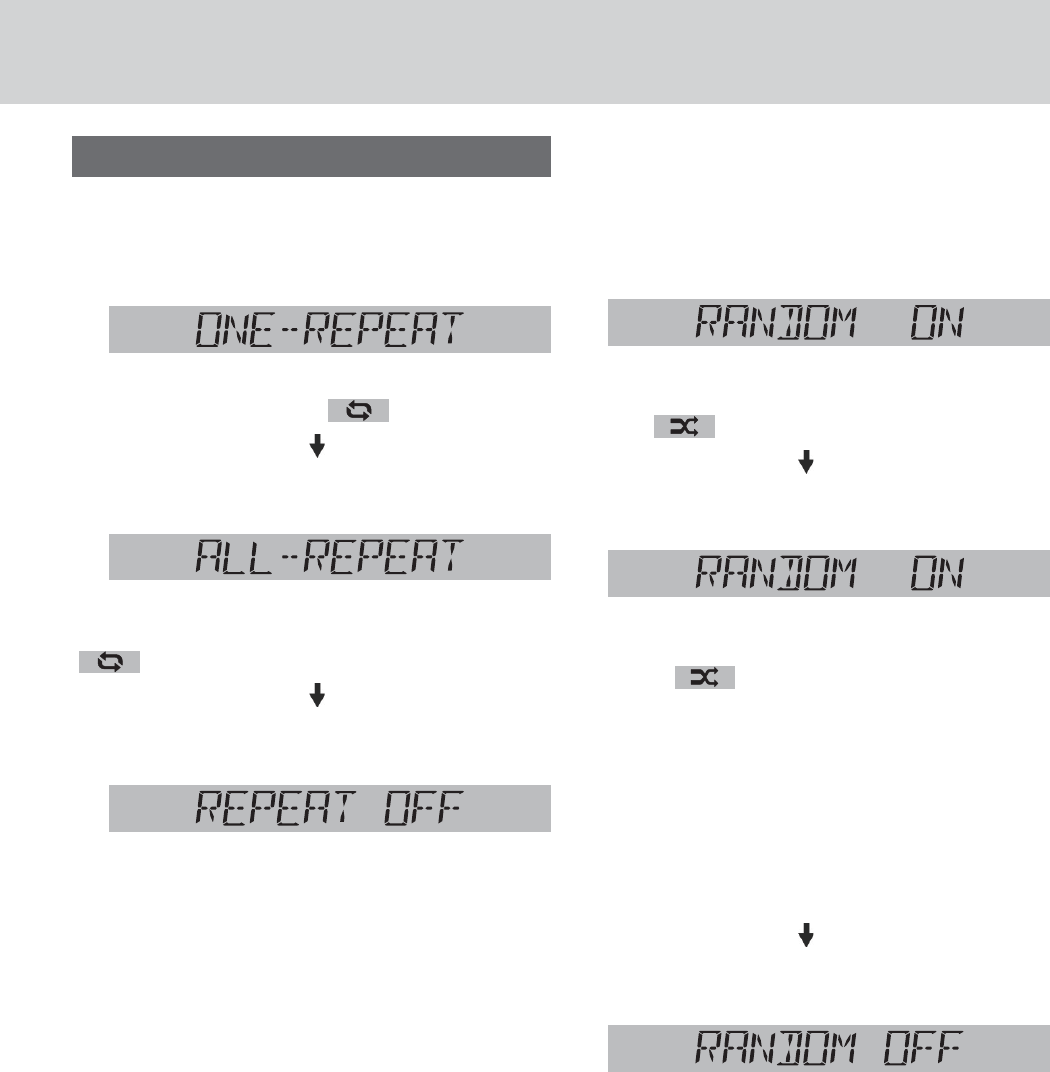
Random, Scan, Repeat Play
Random Play Setting
Press [6] (RANDOM) to select the random
play setting.
Random play
HHPDA=R=EH=>HAOKJCOĠłHAO=NALH=UA@EJ=N=J@KI
sequence. ( lights.)
!!
Press [6] (RANDOM) again to select the
folder random play.
Folder random play
HHPDA=R=EH=>HAłHAOEJPDA?QNNAJPBKH@AN=NALH=UA@
in a random sequence. ( , lights.)
!!
Press [6] (RANDOM) again to turn off
random play.
Random off
Return to regular play.
Scan Play Setting
Press [4] (SCAN) to select the scan play
setting.
Scan play
1DAłNOPOA?KJ@OKBA=?DOKJCĠA=?DłHAEO
played in sequence.
!!
Press [4] (SCAN) again to select the folder
scan play.
Folder scan play
#NKIPDAJATPBKH@ANPDAłNOPOA?KJ@OKB
PDAłNOPłHAEJA=?DBKH@ANEOLH=UA@EJOA-
quence. (
lights.)
!!
Press [4] (SCAN) again to turn off scan
play.
Scan off
Return to regular play.
Repeat Play Setting
Press [5] (REPEAT) to select the repeat
play setting.
Repeat play
1DA?QNNAJPOKJCĠłHAEONALA=PA@
( lights.)
!!
Press [5] (REPEAT) again to select the
folder repeat play.
Folder repeat play
The current folder is repeated.
( , lights.)
!!
Press [5] (REPEAT) again to turn off repeat
play.
Repeat off
Return to regular play.
21
Gps!vtf!xjui!jQpe
Operation Flow
1 Connect an iPod.
2 Press [SRC] to select the iPod (USB)
mode. Playback starts.
Note: If playback does not start, press [BAND]
(!!!!!/ ).
File Selection
[!!!!!!!]0GZVſNG
[!!!!!!!]$GIKPPKPIQHVJGEWTTGPVſNG
(QTVJGRTGEGFKPIſNGRTGUUVYKEG
Notes:
Hold down for fast forward/reverse.
4DAJB=OPBKNS=N@?KIAOPKPDAAJ@KB=łHA
KNB=OPNARANOA?KIAOPKPDA>ACEJJEJCKB=łHA
regular playback starts when the fast forward or
reverse button is released.
Pause
Press [BAND] (!!!!!/ ).
Press again to cancel.
Playing Mode Selection
1 Press [2] (FOLDERĿ) to activate the
Playing Mode Selection mode.
2 Turn [VOL] clockwise or counterclock-
wise to adjust.
PLAYLIST: Playback by playlist (Default)
ARTIST: Playback by artist
ALBUM: Playback by album
GENRE: Playback by genre
3 Press [VOL] (PUSH SEL) to determine
the selection.
4 Turn [VOL] clockwise or counterclock-
wise to select a portion to be played.
5 Press [VOL] (PUSH SEL) to determine
the selection.
Notes:
To exit the selection, press [DISP].
Files without an album name or an artist name are
not playable in the playing mode of the album or
artist display respectively.
Playing Mode Selection is not available when this
unit is switch to iPod control mode.
By connecting compatible with iPod devices to USB connector via a USB extension cable for iPod (USB 2.0,
JKPEJ?HQ@A@UKQ?=JAJFKUIQOE?łHAOOPKNA@KJPDA?KIL=PE>HASEPDE-K@@ARE?AOEJUKQNRADE?HA
Note: Refer to the section on “USB (MP3/WMA)” for connection.
[VOL]
selects a value in
the Playing Mode
Selection mode.
(PUSH SEL :Select)
selects items in the
Playing Mode Selec-
tion mode.
USB (Universal
Serial Bus) Con-
nector (inside of
the cover)
[2] (FOLDERĿ)
activates the Playing Mode Selection mode.
[3] (SCROLL)
scrolls the information on the display.
[4](SCAN/iPod)
toggles iPod control mode between head
unit and iPod.
[5] (REPEAT)/ [6] (RANDOM)
toggles on/off each play mode.
[SRC]
selects a source.
[DISP] (Display)
switches the information
on the display.
[BAND] (!!!!!/ !!!!!)
(Pause/Play)
toggles between
pause and play with
the iPod source.
[!!!!!!] [!!!!!!]
OGELPKPDALNAREKQOJATPłHAEJPDA
player mode.
For fast reverse/fast forward, hold
down either of them.
(Repeat)/
(Random) indicator
indicator
lights when a USB extension cable for iPod and iPod devices is con-
nected with USB connector and the USB source is selected.
Mode
o
de.
S
e
l
ec
t
)
)
s
in t
h
e
e
S
e
l
e
c
-
]
]
]
]
!!
!
!
]
]
]
]
]
]
]
]
]
]
]
]
]
]
]
]
]
]
]
]
]
]
]
]
]
]
]
]
]
]
]
]
]
]
]
]
]
]
]
]
]
]
]
]
]
!!
/
/
/
/
/
/
/
/
/
/
/
/
/
/
/
/
/
/
/
/
/
/
/
/
/
/
/
/
/
/
/
/
/
/
/
/
/
/
/
/
/
/
/
/
/
/
/
/
/
/
/
/
/
/
/
/
/
/
/
/
/
/
/
/
/
/
/
/
/
/
/
/
/
/
/
22
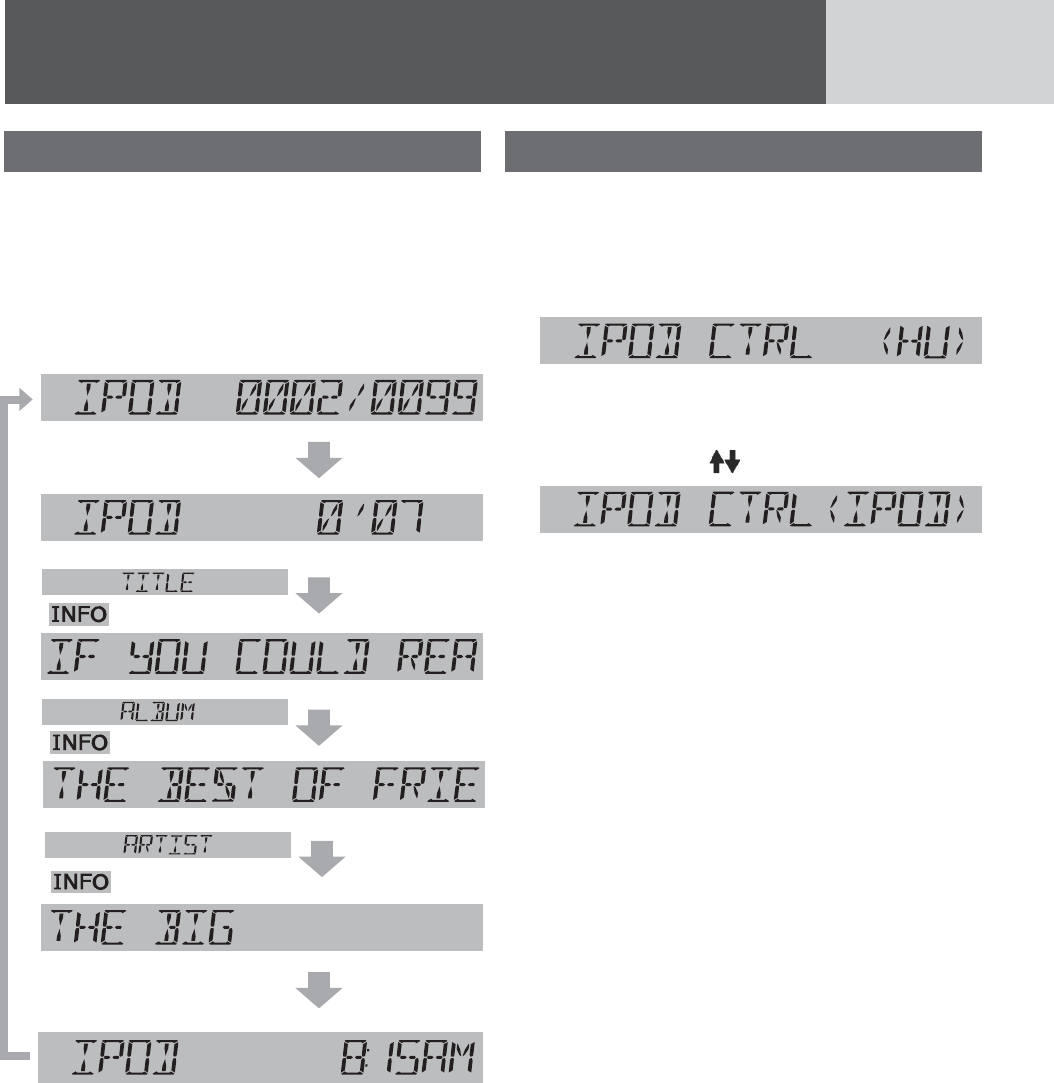
Display change
Press [DISP] to change the display.
Notes:
For scrolling text, press [3](SCROLL).
“NO TEXT” is displayed when there is no informa-
tion on iPod.
Setting the iPod Control
When an iPod/iPhone is connected, operate it from
its own controls or from this head unit can be select-
able.
Press [4] (SCAN) to switch iPod control
mode between this head unit and iPod.
iPod mode (Default):
Operate the iPod/iPhone playback via this head unit.
!!
iPod control mode:
Operate the iPod/iPhone playback using its own
controls.
Note: The iPod control mode (function) may not
be operated/supported on the models other than
compatible models listed on page 9.
Please note the controllable function under “iPod
Mode” and “iPod Control Mode” on head unit may
vary with iPod models.
Song number/
Total song
Play time
Song name
Artist name
Clock
Album name
( lights.)
( lights.)
( lights.)
Gps!vtf!xjui!jQpe!)dpoujovfe*!
23
0DQBŃA-H=U0APPEJC
1DAODQBŃABQJ?PEKJKB=JE-K@?KNNAOLKJ@OPKPDA
RANDOM function of this unit.
Press [6] (RANDOM)VQUGNGEVVJGUJWHƀG
play setting.
Songs
HHPDA=R=EH=>HAłHAO=NALH=UA@EJ=N=J@KIOA-
quence. ( lights.)
!!
Press [6] (RANDOM) again to select the
CNDWOUJWHƀGRNC[
Albums
All the playable albums are played in a random
sequence. ( blinks.)
Notes:
¢ 1DAH>QIODQBŃALH=UBQJ?PEKJEOKJHU=R=EH=>HA
when the unit is switch to iPod control mode or
?KJPNKHHA@@ENA?PHU>UE-K@@ARE?AOH>QIODQBŃA
function is available depending on the connected
E-K@E-DKJAAMQELLA@SEPD=H>QIODQBŃABQJ?PEKJ
¢ When the last selected play list with the iPod is
OKJCOKJCODQBŃALH=UEO=?PER=PA@=J@SDAJEPEO
=H>QI=H>QIODQBŃALH=UEO=?PER=PA@
!!
Press [6] (RANDOM) again to turn off
UJWHƀGRNC[
0DQBŃAKBB
Return to regular play.
Note: Depending on the connected iPod/iPhone,
repeat play or random play function or display may
differ from this unit and your iPod/iPhone.
/ALA=P0DQBŃA-H=U
Repeat Play Setting
Press [5] (REPEAT) to select the repeat
play setting.
One song repeat play
1DA?QNNAJPłHAEONALA=PA@Ġ
lights.)
!!
Press [5] (REPEAT) again to select the all
songs repeat play.
All songs repeat play
The all playable songs are repeated.
(
blinks.)
!!
Press [5] (REPEAT) again to turn off repeat
play.
Repeat play off
Return to regular play.
Note: When using iPod nano (4th generation) and
this unit is under iPod control mode, the
“IPOD CTRL <IPOD>” is always displayed on this unit
when select repeat play setting from this unit. The
repeat play setting is functional even without above
corresponded display.

24
Notes:
1DAODQBŃABQJ?PEKJBKNE-K@?KNNAOLKJ@OPK
the RANDOM function of this unit.
Please make sure to detach the iPod after
turning off the vehicle engine (turning the ACC
to OFF). The iPod devices may not shut down
while still connected, which may result in bat-
tery depletion.
Please do not connect for iPod accessories
such as for iPod remote control unit or head-
phones while connecting for iPod with the unit.
The unit may not operate correctly.
Connect this unit after turning down the vol-
ume for the iPod.
“AUTHENTICATING” appears until for iPod
is recognized after connecting for iPod. This
indicates there is nothing wrong with the main
unit.
We do not guarantee all the operations of con-
nectable devices.
If your iPod or iPhone is not working correctly,
disconnect it from this unit, reset it and then
reconnect it to this unit.
The iPod/iPhone will be recharged while con-
nected to this unit.
Gps!vtf!xjui!jQpe!)dpoujovfe*!
25
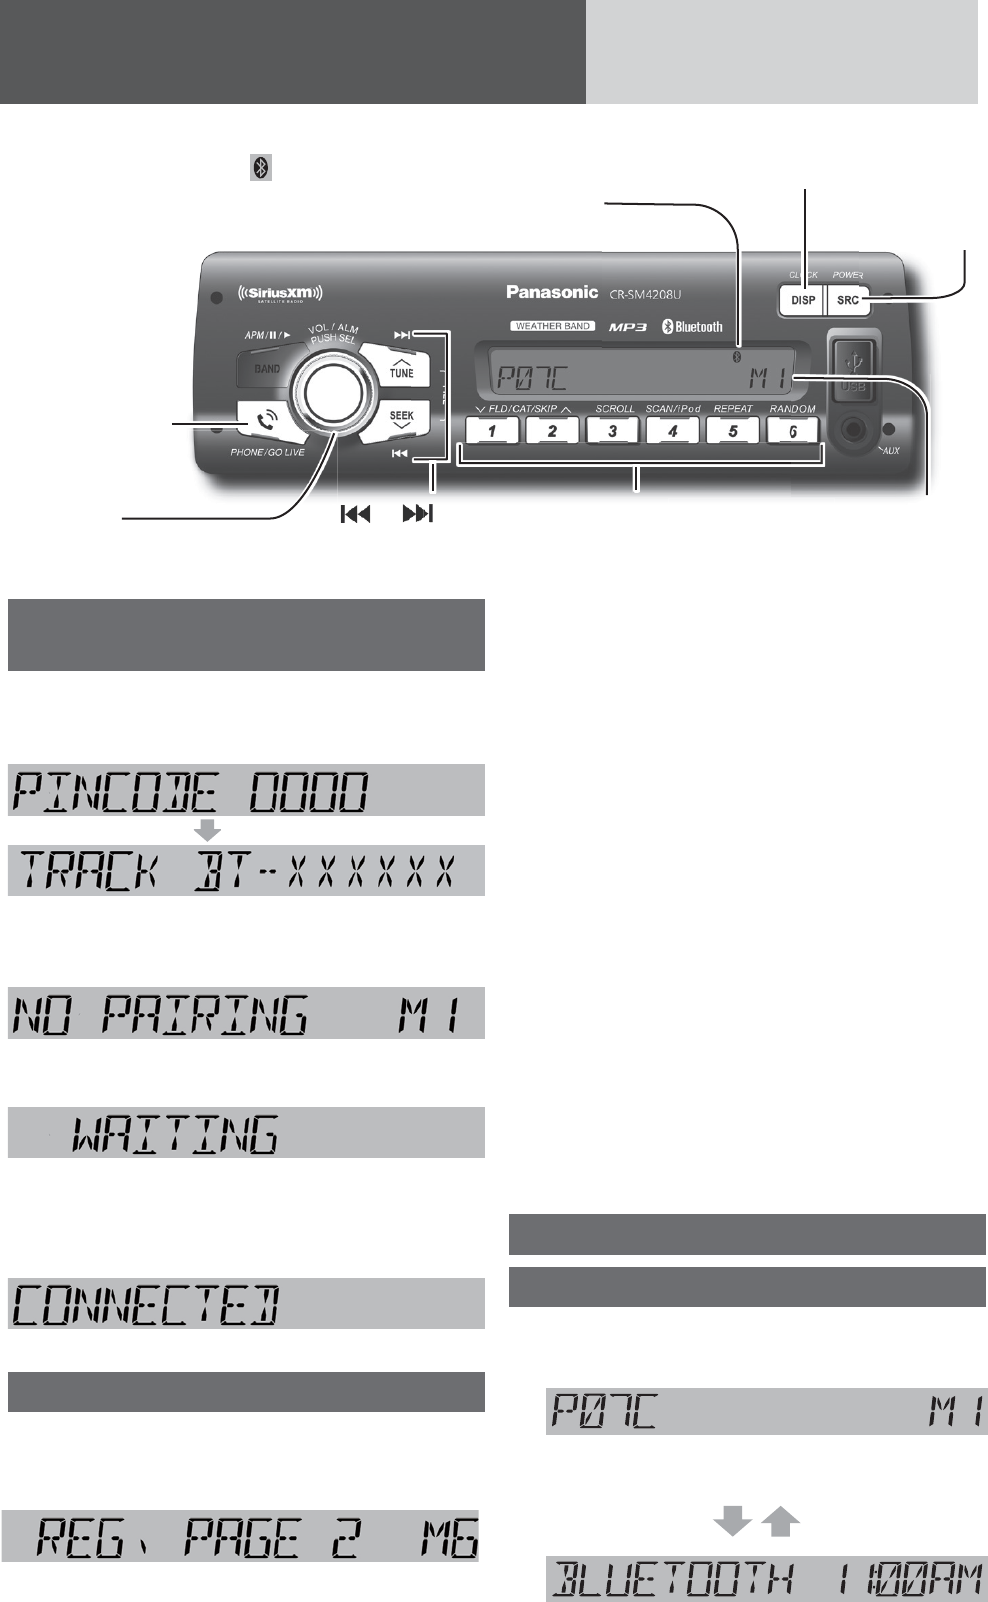
Cmvfuppui¯!.!Hfofsbm
(Bluetooth®) indicator
lights when a Bluetooth® device is con-
nected, and blinks during a call.
Registration
number
(M1 – M8)
Registration of a Bluetooth® device
to this unit
1首先,先查看本機藍牙設備的號碼
長壓[6]並旋轉[SEL]即可顯示藍牙配對號碼
2 進入Bluetooth®模式後按[1] through [6]
(preset buttons)其中一個數字
3 長壓 [PHONE]
Note: To exit waiting status, press [DISP].
4 手機開啟藍牙搜尋本機配對號碼後點選
連結即可完成藍牙配對。
換頁
1preset buttons總共提供8個數字給使用
者配對藍牙,按鍵[6]可顯示切換至第七
及第八個Registration number.
Notes:
The text display of Bluetooth® device name and
telephone directory on this unit is only sup-
ported with English characters, other languages
and undisplayable characters/symbols will be
converted into an asterisk (+).
If registration is not successfully completed within
1 minute, “TIME OUT” appears and the screen for
registration number selection resumes.
If registration fails because of mismatched PIN
code, “B/T PIN ERR” appears and the screen for
registration number selection resumes.
Depending on the communication status, it may
takes 5 to 40 seconds for device connection.
Note on operation:
Some Bluetooth® devices/Phones may not connect
to this unit or, even when connected, the operation
method, displays, and functions may differ from the
instructions within this manual.
For the Bluetooth® devices/Phones to be supported
with this unit, please visit/consult your dealer to
verify compatibility of your Bluetooth® devices or
phones.
Display change
Press [DISP] (Display) to change the
display.
Registered device
name (Example)
!!
[DISP] (Display)
switches the information on the display.
[SRC]
selects a source.
[PHONE]
connect, or discon-
nect a Bluetooth®
device.
[PUSH SEL]
deletes the registration
data.
[1] through [6] (preset buttons)
selects a registration number of a
Bluetooth® device.
[6]: sets the PIN code.
[!!!!!!!!]/[!!!!!!!!]
selects a number.
oo
th
[
[
!
]
]
]
]
]
]
]
]
]
]
]
]
]
]
]
]
]
]
]
]
]
]
]
]
]
]
]
]
]
]
]
]
]
]
]
]
]
]
]
]
]
]
]
]
]
]
]
/
/
/
/
/
/
/
/
/
/
/
/
/
/
/
/
/
/
/
/
/
/
/
/
/
/
/
/
/
/
/
/
/
/
/
/
/
/
/
/
/
/
/
/
/
/
/
/
/
/
/
/
/
/
/
/
/
/
/
/
/
/
/
/
/
/
/
/
/
/
/
/
/
/
/
/
!
!
26
Notes:
We shall not guarantee all the functions of the
Bluetooth® device to be connected. When opera-
tions cannot be performed via this unit, operate
the system via the Bluetooth® device.
Be aware that the battery of a Bluetooth® device
drains faster if the Bluetooth® device is con-
nected to this unit.
Even when the Bluetooth® device that is con-
nected to this unit is located near this unit,
sound may be interrupted or noise may be
generated.
The Bluetooth® device with over 5-digit PIN code
is not operated with this unit.
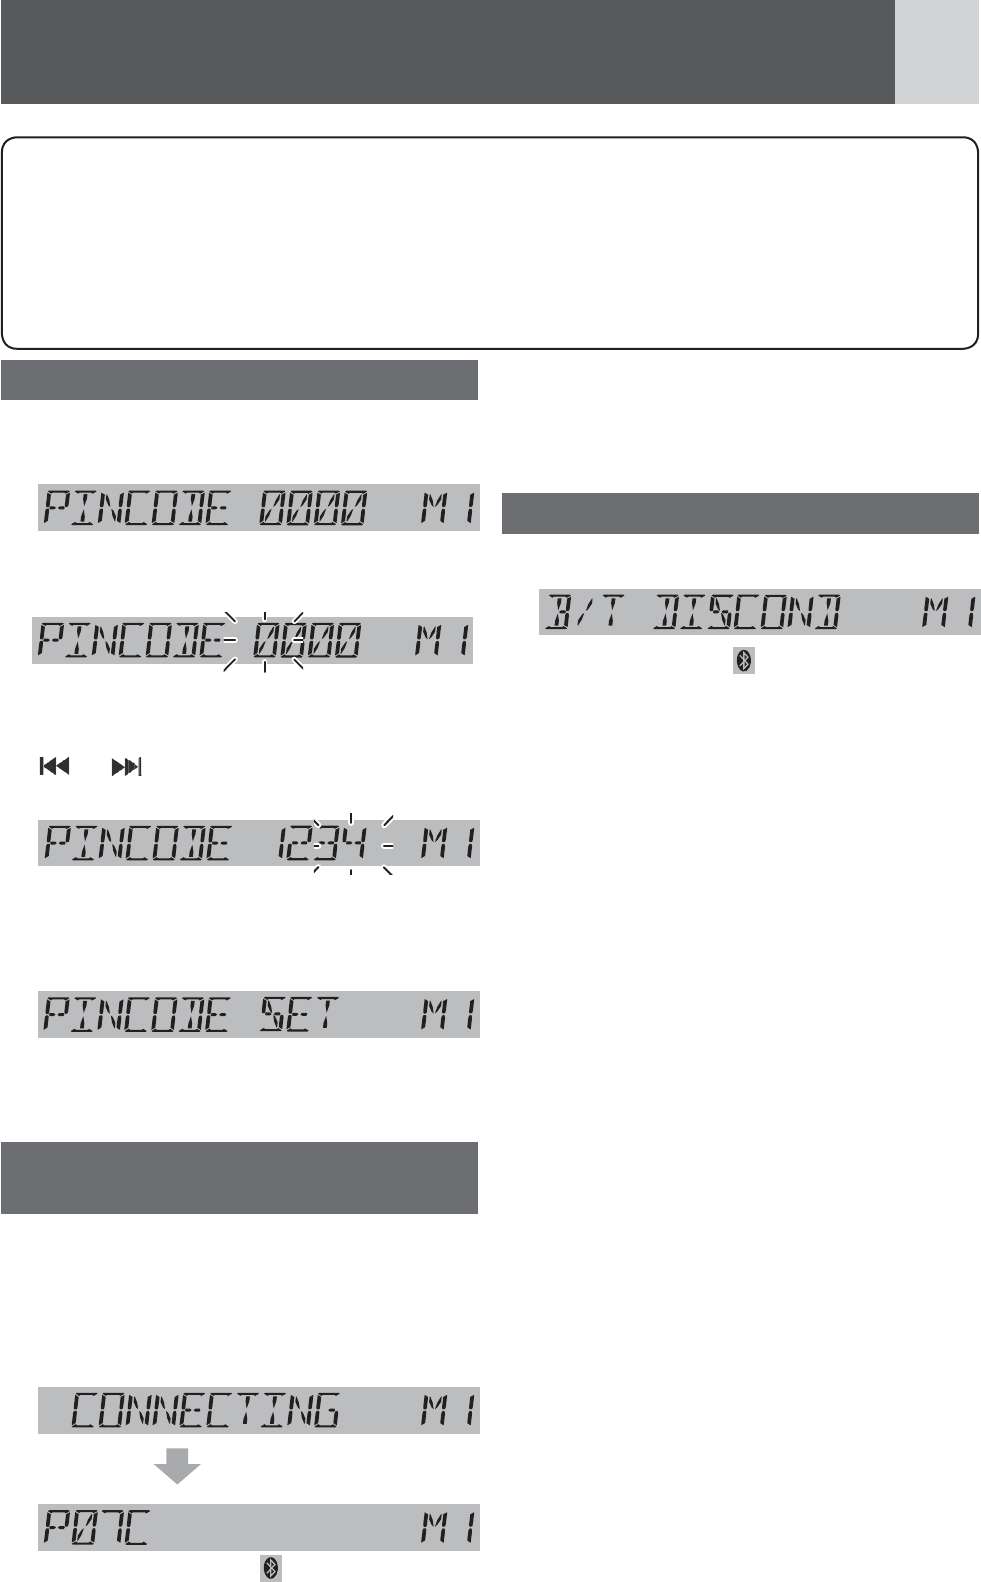
“B/T DISCOND is displayed when the Bluetooth®
device is disconnected.
Setting of PIN (Personal Identity Number) code
1 Hold down [6] for more than 2 seconds
to call the PIN code entry mode.
2 Press [6] to prepare for adjustment.
1st digit blinks
3 Enter a number for each digit.
[!!!!!!!!] / [!!!!!!!!] : Selects number (0 – 9).
[6] : Selects next digit to be entered.
Digit entered
4 Press [6] to determine the PIN code
entry when last digit is entered.
Completed
Note: To check the Bluetooth® address of this head
unit, press [SEL] after step 1.
Connection of the registered
Bluetooth® device to this unit
1First,select the matching Preset No.
Bluetooth® device of interest. (Refer to
the above.)
2 Press [PHONE] and then press [SEL] to
connection.
!
The Bluetooth® indicator ( ) lights.
Notes:
Even if [SRC] (Source) is pressed to change the
source, the connection stays connected.
Depending on the communication status, it may
takes 5 to 40 seconds for device connection.
Disconnection of the Bluetooth
®
device
Press [PHONE] 後再按下 [SEL]確定斷線.
The Bluetooth® indicator ( ) turns off.
Note: When the Bluetooth® device is out of reception
range or encounter serious interference by outer
signal, “ERROR” appears and this unit will automati-
cally disconnect the connections.
]
]
]
]
]
]
]
]
]
]
]
]
]
]
]
]
]
]
]
]
]
]
]
]
]
]
]
]
]
]
]
]
]
]
]
]
]
]
/
/
/
/
/
/
/
/
/
/
/
/
/
Cmvfuppui¯!.!Hfofsbm!)dpoujovfe*!
27
Cmvfuppui¯!.!Nvtjd!Qmbzfs
Pause
Press [!!!!!!/ !!!!!] (Pause/Play)
Press again to cancel.
Note: Some mobile phones automatically switch to
energy saving mode or sleep mode when pause the
music playback, and automatically disconnected the
Bluetooth® connection (“B/T DISCOND” is displayed
on this unit).
But if you want to reconnect the Bluetooth® connec-
tion, performing playback on the mobile phone itself.
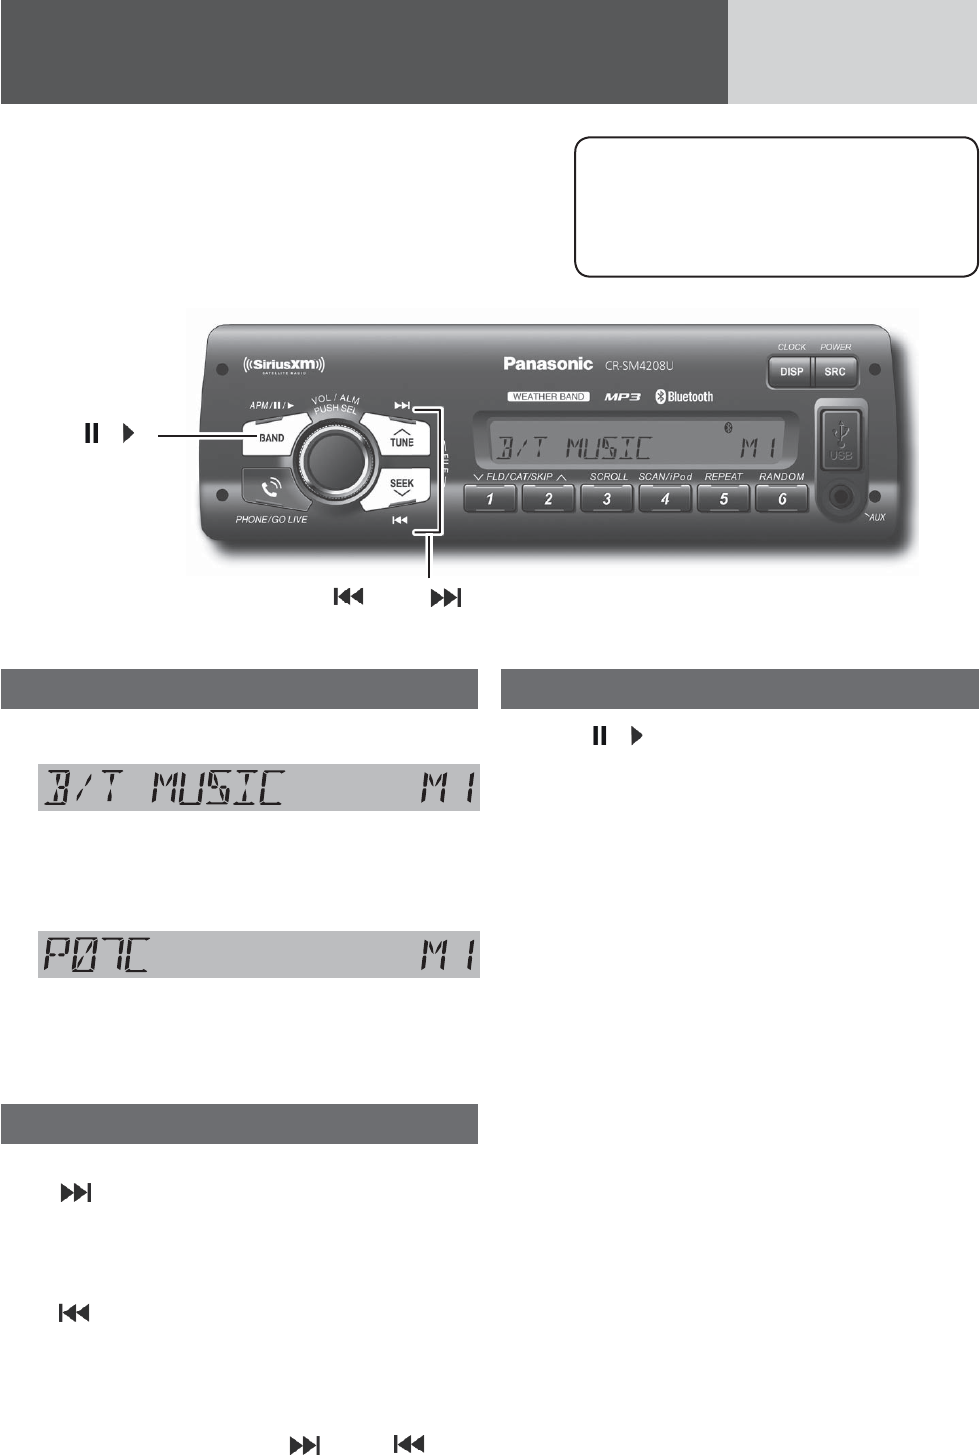
Music mode activation
藍牙連線後便會直接進入藍牙音樂模式
(Music mode)
If [BAND] is held down for more than 2 sec-
onds again, the phone mode is activated.
(Phone mode)
Note: “INVALID” is displayed and the Phone mode
is restored if 1 minute elapse in the Music mode
without detecting A2DP compatible device.
Song selection
[FILE !!!!!!]0GZVſNG
Hold down for fast forward.
Release to resume the regular
play.
[FILE !!!!!!]: Back to the beginning of the
EWTTGPVſNG
$CEMVQVJGRTGXKQWUſNGRTGUU
twice)
Notes:
The control of pressing [FILE !!!!!!] / [FILE !!!!!!] in
IQOE?IK@A@ALAJ@OKJPDAGAU@AłJEPEKJOKB
connected device.
!ALAJ@EJCKJPDAOLA?Eł?=PEKJOKBPDA?KJJA?PA@
audio device, operations may not work.
Note: The Bluetooth® audio devices that
can be played with this unit must be
compatible with A2DP (Advanced Audio
!EOPNE>QPEKJ-NKłHAKN3/ -ĠQ@EK
3E@AK/AIKPA KJPNKH-NKłHA
[BAND] (!!!!!/ )
(Pause/Play)
toggles between
pause and play
with the player
source.
)
)
)
)
[FILE !!!!!!] [FILE !!!!!!]
OGELPKPDALNAREKQOJATPłHAEJPDALH=UANIK@A
F
F
F
F
F
F
F
F
F
F
F
F
F
F
F
F
F
F
F
F
F
F
F
F
F
F
F
F
F
F
F
F
F
F
F
F
F
F
F
F
F
F
F
F
F
IL
IL
L
L
IL
IL
L
L
L
L
IL
L
L
L
L
L
IL
IL
L
L
IL
L
L
L
L
IL
IL
L
L
L
L
L
L
IL
L
L
I
L
L
I
I
L
IL
I
IL
I
L
IL
L
I
I
I
L
L
IL
L
L
L
I
I
IL
I
I
I
IL
L
I
I
L
L
L
L
L
L
IL
L
L
IL
IL
L
I
I
IL
L
L
L
I
I
IL
L
I
L
L
IL
L
L
L
IL
I
L
L
L
L
L
L
L
L
L
L
L
E
E
E
E
E
E
E
E
E
E
E
E
E
E
E
E
E
E
E
E
E
E
E
E
E
E
E
E
E
E
E
E
E
E
E
E
E
E
E
E
E
E
E
E
E
E
E
E
E
E
E
E
E
E
E
E
!
!
!
!
!
GA
GA
GA
GA
GA
G
G
A
GA
G
G
G
GA
G
GA
G
G
GA
GA
G
GA
GA
G
G
GA
G
G
GA
GA
A
A
G
GA
A
A
GA
GA
GA
A
A
GA
A
A
A
A
A
GA
A
A
A
G
A
A
A
A
A
A
A
A
A
A
A
A
A
A
A
A
A
A
GA
A
A
A
A
A
A
A
A
A
A
A
A
A
A
A
G
A
A
A
A
A
A
G
G
A
G
U
U
U
U
U
U
U
U
U
U
U
U
U
U
U
U
U
U
U
U
U
U
U
U
U
U
U
U
U
U
U
U
U
U
U
U
U
U
U
U
U
U
U
U
U
U
U
U
U
U
U
U
U
U
U
U
U
U
U
U
U
U
U
U
U
U
U
U
U
U
U
JO
JO
J
J
JO
JO
JO
JO
O
O
JO
JO
JO
J
J
J
O
O
O
O
O
O
O
O
O
O
O
O
O
JO
JO
O
J
J
J
O
O
J
J
J
J
J
O
J
J
J
O
JO
J
JO
O
JO
J
O
J
J
J
J
J
JO
J
J
O
J
J
O
J
J
J
O
O
J
O
J
J
O
O
O
O
J
O
O
O
J
O
O
O
O
O
O
O
K
K
K
K
K
K
K
K
K
K
K
K
K
K
K
K
K
K
K
K
K
K
K
K
K
K
K
K
K
K
K
K
K
K
K
28
Phone answering
Press [PHONE] during a call incoming.
The Bluetooth® indicator ( ) blinks during a call
incoming/making a call.
Notes:
During a call incoming, the volume of this unit
automatically switches to 18, it restores to the
original volume setting when phone answering or
call rejecting.
If the automatic answering function is activated,
conversation can be automatically started after
receiving a call. (Refer to the below.)
Phone hanging up
Press [PHONE] during a call.
Switching between the private
mode* and hands-free mode
Press [BAND] during a call.
The private mode and hands-free mode switch alter-
nately every time [BAND] is pressed.
(Private mode)
(Hands-free mode)
1DALNER=PAIK@AEO@AłJA@=OPDAIK@ASDANA
conversation is conducted with the mobile phone in
a usual manner without the hands-free function.
Incoming call rejection
Hold down [PHONE] for more than 2 sec-
onds during a call incoming.
Outgoing call termination
Hold down [PHONE] for more than 2 sec-
onds during making a call. (When other
party does not answer the call.)
Setting of automatic answering function
Hold down [6] for more than 2 seconds at
the standby state.
Turn [VOL]
The display changes as follows:
(Automatic answering deactivated)
!
(Automatic answering activated)
[PHONE]
picks up the phone,
makes a call, or rejects
the call.
[VOL]
switch the record
(PUSH SEL :Select)
selects items in the selection mode.
[BAND]
switches between the
private mode and hands-
free mode.
[!!!!!!!!]
activates the voice dial.
E]
p the phone
s
b
etween t
h
e
m
ode and hands
-
d
e.
!!
(Pincode mode)
(Bluetooth Address mode)
Press [SEEK]Ŀŀ
Cmvfuppui¯!.!Iboet.Gsff!Qipof
29
Note: To have a mobile phone conversation with use of this unit, the mobile phone shall be compatible
SEPDPDA%=J@O#NAA-NKłHA
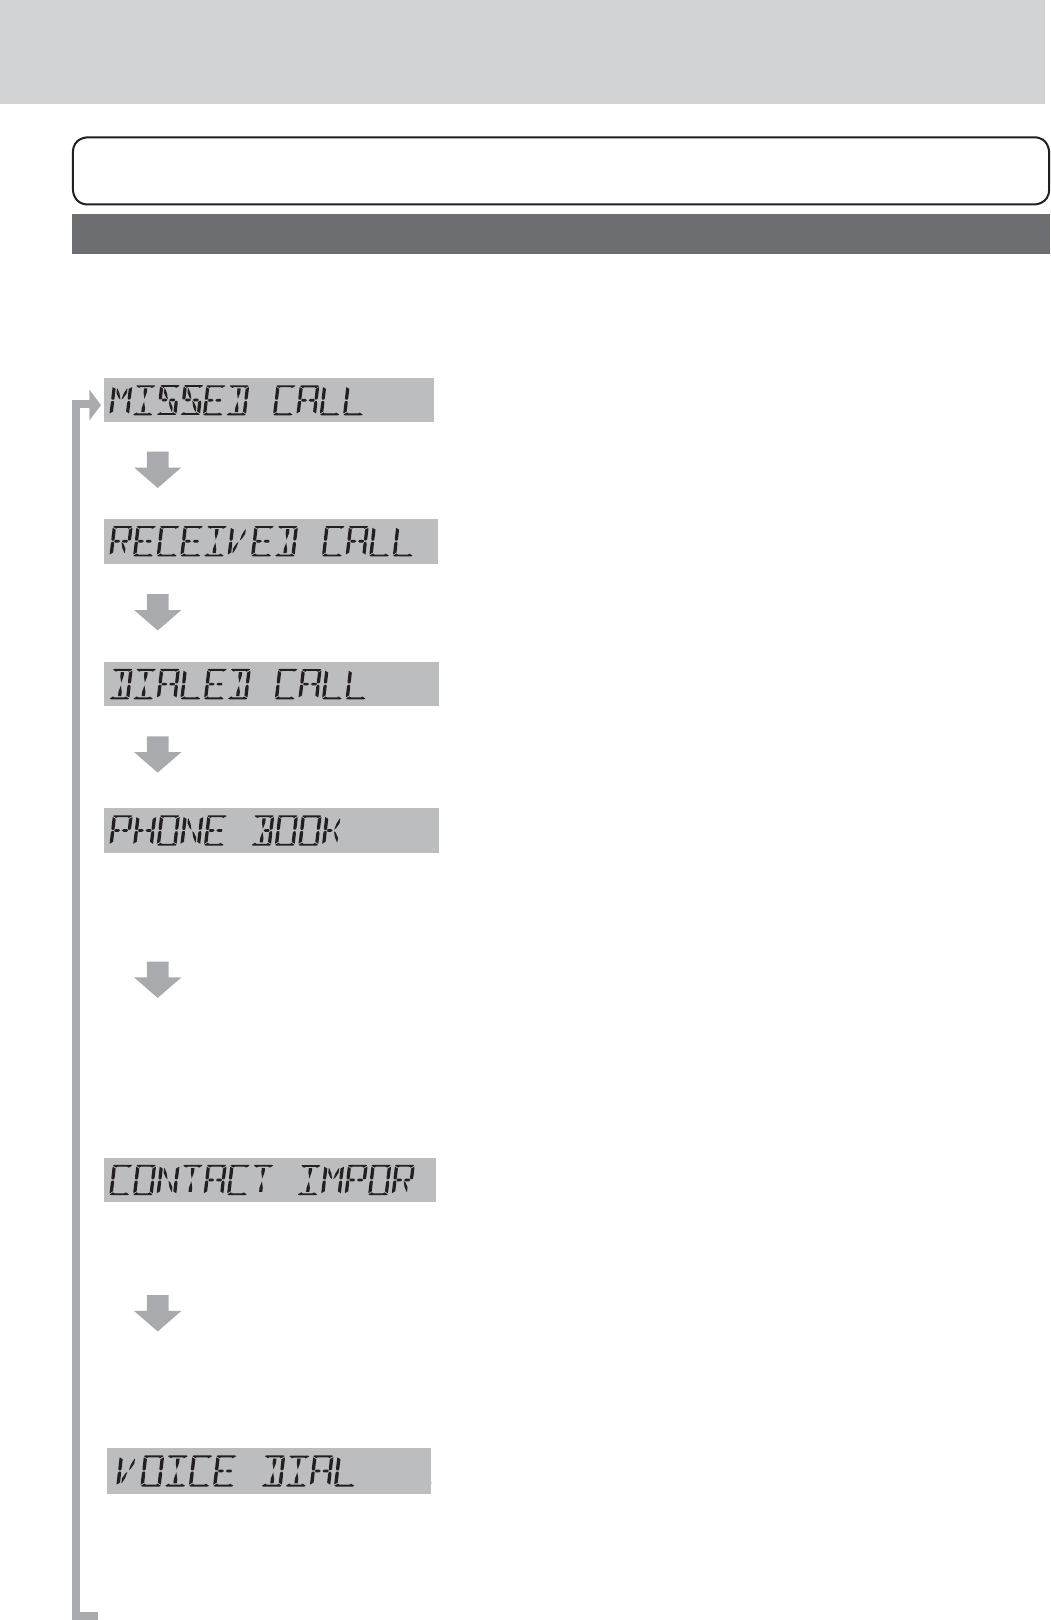
Use of receiving/calling records or telephone directory (phonebook)
1 Press [BAND] at the standby state.
2 Push [SEL] (Select).
The display changes as follows:
The record of receiving calls (up to 5 records) that have not been taken is displayed.
Rotation of [VOL] allows users to switch the record to be displayed.
Pressing [PHONE] allows users to make a call to the displayed record.
The record of receiving calls (up to 5 records) that have been taken is displayed.
Rotation of [VOL] allows users to switch the record to be displayed.
Pressing [PHONE] allows users to make a call to the displayed record.
The calling record (up to 5 records) is displayed.
Rotation of [VOL] allows users to switch the record to be displayed.
Pressing [PHONE] allows users to make a call to the displayed record.
The telephone directory is displayed.
Rotation of [VOL] allows users to switch the data registered on the telephone
directory to be displayed. (up to 6 entries)
Pressing [PHONE] allows users to make a call to the displayed data.
Pressing [BAND] allows the deletion mode to be activated to delete the
displayed data on the telephone directory. If [BAND] is pressed again after
“SURE TO DEL?” appears, the currently displayed one piece of data on the
telephone directory is deleted.
Note: To use this function, the telephone directory must be imported from Bluetooth®
mobile phone to this unit. (Refer to the below)
This unit becomes standby for importing the telephone directory from a Bluetooth
®
mobile
phone. (Each time for single directory data transmission)
Operate the Bluetooth® mobile phone to transmit the telephone directory data
to this unit.
Notes:
Ǹ1KQOAPDEOBQJ?PEKJPDAIK>EHALDKJAIQOP>A?KIL=PE>HASEPDPDA,>FA?P-QOD-NKłHA
Ǹ “IMPORT ERROR” is displayed and the regular mode is restored if 1 minute elapses in
PDAļ&*-,/1Ń=ODEng period without importing the telephone directory from mobile
phone.
Receiving record with no responding
Receiving record with conversation made
Calling record
Telephone directory
Telephone directory manually import mode
Hold down [SEL] ,and Pronounce the name registered on the telephone direc-
tory.
Voice dialing
If the name matches with a piece of data on the telephone directory registered with the mobile
phone, the telephone number of the name is dialed.
Note: The Bluetooth® mobile phone itself must be equipped and support voice dial function.

30
Opuft!po!Cmvfuppui¯
Frequency band used
This product uses the 2.4 GHz frequency band,
but other wireless devices may also use the same
frequency. Note the following to prevent radio waves
interfering with other wireless devices. Microwave
KRAJO=J@KPDANEJ@QOPNE=HO?EAJPEł?=J@IA@E?=H
equipment, in-plant radio stations used for mobile
K>FA?PE@AJPEł?=PEKJKJBKNAT=ILHAPDALNK@Q?PEKJ
HEJAOKBB=?PKNEAOOLA?EłA@HKSLKSANN=@EKOP=PEKJO
that do not require a license, amateur radio stations,
and the like (hereafter abbreviated as “other radio
stations”) operate in the same frequency band as this
product.
Usage limitations
This product is not guaranteed to be able to per-
form wireless communication with all Bluetooth®
compatible devices.
Bluetooth® compatible devices for wireless com-
IQJE?=PEKJ?KILHUSEPDPDAOP=J@=N@@AłJA@>U
Bluetooth®0&$&J?=J@JAA@PKNA?AERA?ANPEł?=-
tion. However, even if a Bluetooth® compatible
device complies with the standard, a connection
may not be possible, or the operating procedure,
display, or operation may differ because of the
OLA?Eł?=PEKJOKNOAPPEJCOKBPDA@ARE?A
This product includes support for security func-
tions compliant with the Bluetooth® standard, but
OA?QNEPUI=UOKIAPEIAO>AEJOQBł?EAJP@ALAJ@EJC
on the operating environment and settings.
Be careful during wireless communication.
We assume no responsibility whatsoever for data
generated or information leaked during wireless
communication.
&JŃQAJ?ABNKIKPDAN@ARE?AO
If this product is used near another Bluetooth®
compatible device or a device that uses the 2.4
GHz frequency band, problems such as the device
not working properly and noise generation are
likely to occur because of radio wave interference.
This product may not work properly if there is a
broadcasting station or the like nearby, and the
surrounding signal is too strong.
Application limitations
To use this product for listening to music or for a
Hands-Free call, the Bluetooth® compatible device
needs to support the following Bluetooth® version.
Bluetooth® Standard Ver. 2.1
To use this product for calling with a mobile
phone, the mobile phone needs to support the
%=J@O#NAA-NKłHA
To transfer the contacts of a mobile phone to this
product, the mobile phone needs to support the
,>FA?P-QOD-NKłHA
A connection may not be possible, or the operat-
ing procedure, display, or operation may differ
>A?=QOAKBPDAOLA?Eł?=PEKJOKNOAPPEJCOKBPDA
Bluetooth® compatible device.
Even if this product and Bluetooth® compatible
device are close to each other, sound may be
intermittent or affected by noise because of the
state of the signal.
Bluetooth®
The Bluetooth word mark and logo are owned by
the Bluetooth SIG, Inc.
31
TjsjvtYN!Tbufmmjuf!Sbejp!Dpouspm
Connecting SiriusXM antenna
Connect the optional SiriusXM antenna.
Getting started
A SiriusXM subscription (sold separately) is required
to receive programming. You can subscribe by call-
ing SiriusXM listener care or by going on line - see
below for details.
1 Check the Radio ID.
To show the Radio ID on the display, tune to
channel 0. (Refer to “Channel Selection”.)
Radio ID display (example)
2 Activate the SiriusXM Satellite Radio
by calling or going on-line:
Web site:
http://www.siriusxm.com/activatenow
Phone number: 1-866-635-2349
Note:
The Radio ID does not use the letter I, O, S, or F.
Band selection
Press [BAND] to change the band.
Featured Favorite Band 1
Featured Favorite Band 2
Featured Favorite Band 3
Channel selection
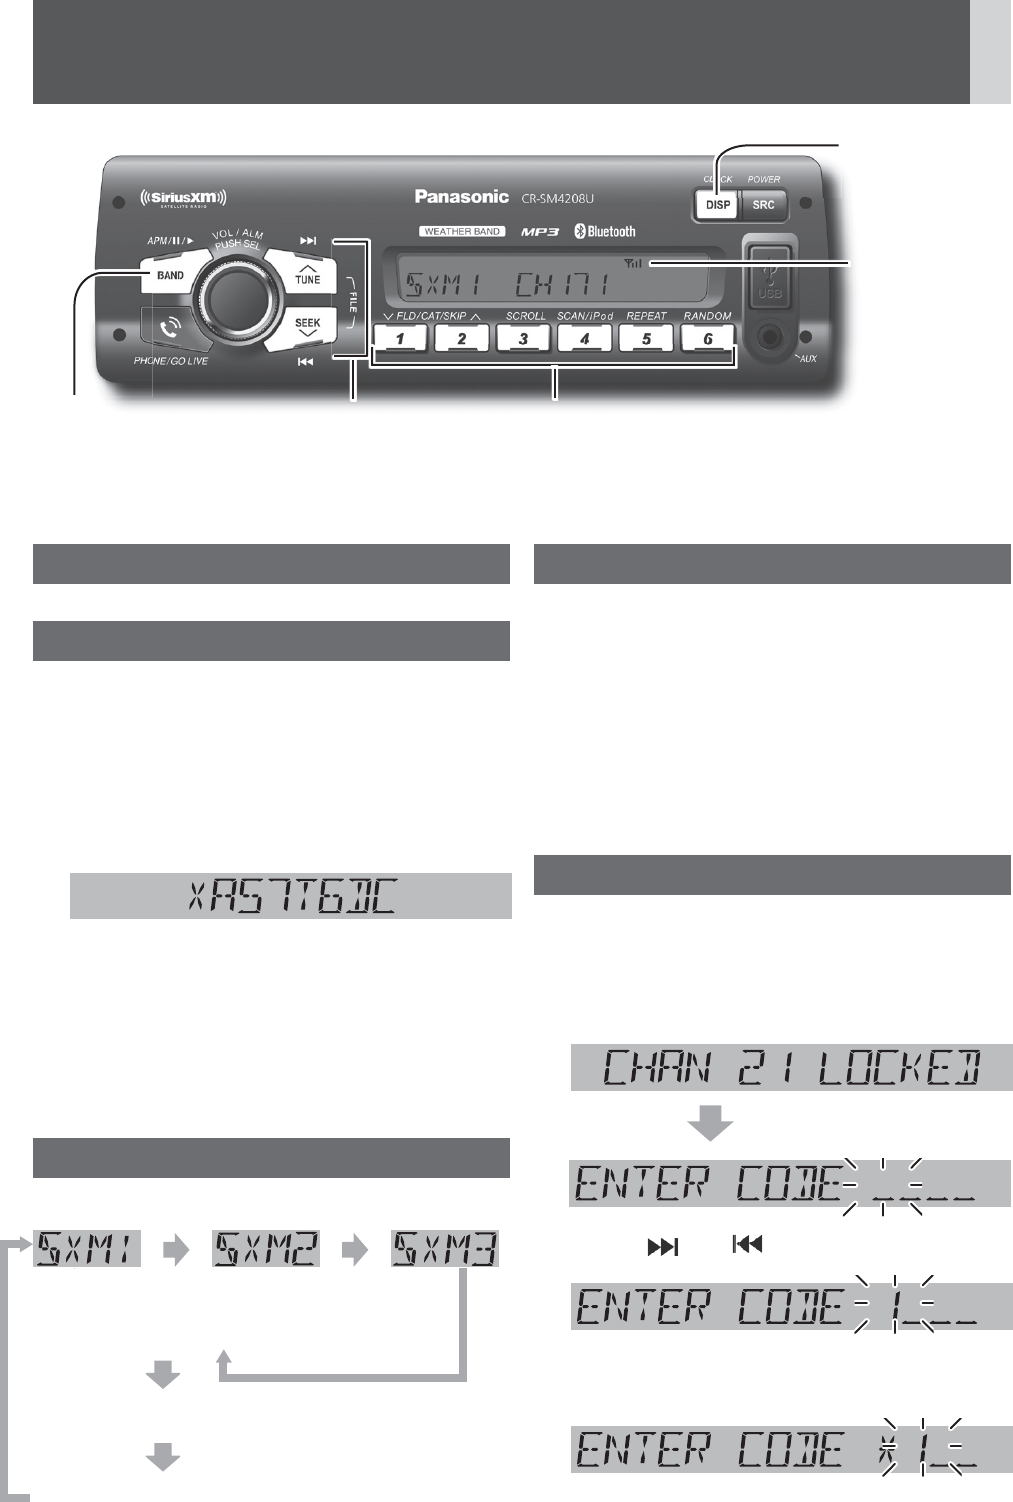
[TUNE Ŀ]:
Next available/subscribed chan-
nel
[TUNE ŀ]: Preceding available/subscribed
channel
Hold down for seek forward/reverse.
Note: “CHAN+++!LOCKED” is displayed if a channel
is selected that has been locked by the parental
lock setting, follow the procedure next on “Channel
unlocking” to unlock the channel.
Channel unlocking (passcode entry)
To receive a channel locked by a parental lock, a
passcode needs to be entered after tuning to the
channel. (Refer to page 37 for parental lock setting.)
1 Tune to a channel locked by a parental
lock.
!
2 Press [!!!!!!] or [!!!!!!] to select a number.
3 Press [BAND] to shift to the right adja-
cent digit.
A digit where entry is determined is indicated as
“+”.
Signal strength
indicator
[BAND]
selects a band
in the SiriusXM
source.
Preset buttons [1] through [6]
select a preset channel in the SiriusXM source, preset the cur-
rent channel (by holding it down for more than 2 seconds).
[ŀ] [Ŀ] (FOLDER)
skip to the previous/next category.
[TUNE ŀ] [TUNE Ŀ]
selects an available/sub-
scribed channel.
[DISP] (Display)
switches the
information on
the display.
!
!
!!
[
[
[
[
[
[
[
[
[
[
[
[
[
[
[
[
[
[
[
[
[
[
[
[
[
[
[
[
[
[
[
[
[
[
[
[
[
[
[
[
[
[
[
[
[
[
[
[
[
[
[
[
[
[
[
[
[
[
[
[
[
[
[
[
[
[
[
[
[
!
!
!
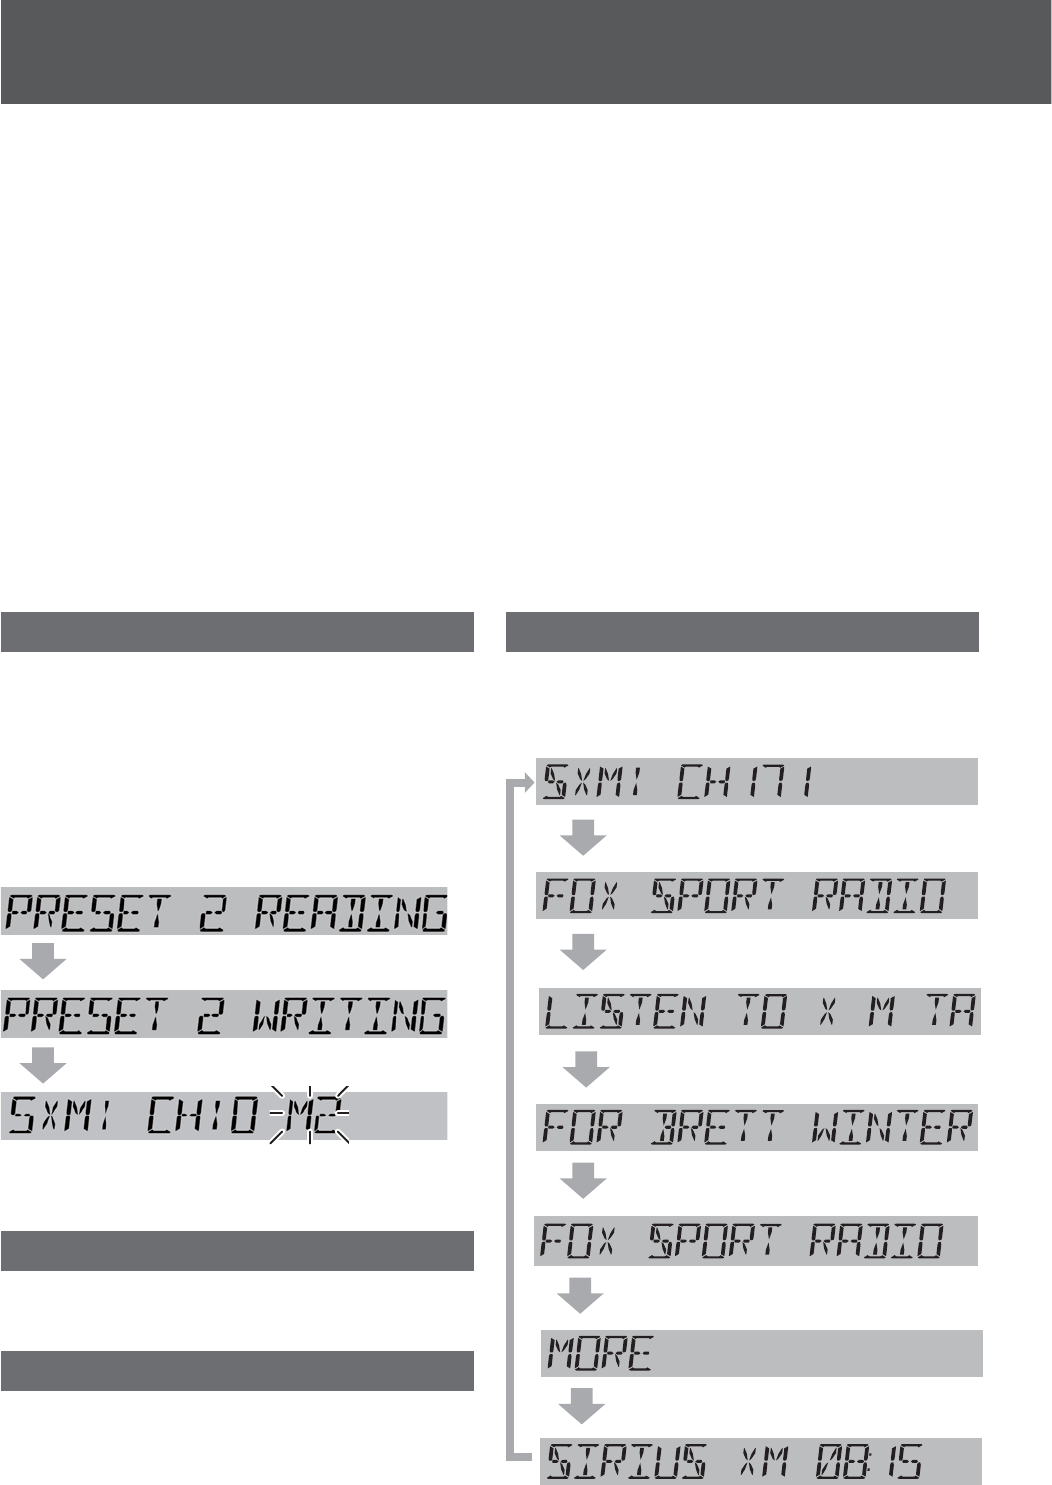
32
4 Repeat the steps 2 and 3 to enter a
4-digit number code.
When a 4-digit number code is correctly entered
and [BAND]EOłJ=HHULNAOOA@PDA=HHHK?GA@
channels are unlocked and start to be received.
(Once turns ACC ON/OFF, the channels return to
previous locked status)
Notes:
If a wrong number code is entered when selects a
locked channel, “WRONG CODE” is displayed and
returns to Channel 1.
If 10 seconds elapse before determining the entry
of the number code, “TIME OUT” is displayed and
returns to previous channel.
To exit the passcode entry, press [DISP] and
returns to previous channel.
To change the parental lock passcode, refer to
page 37 for setting.
Channel preset
Up to 6 channels can be preset in SXM1 to SXM3
respectively.
1 Use manual or seek tuning to tune into
a channel.
2 Press one of the preset buttons from
[1] through [6] to select ,for example:
Press [2]
Press [2]
After 2 seconds.
Note: New channels overwrite existing saved channel
after this procedure.
Preset channel selection
Press the corresponding preset button [1]
through [6] to tune in a preset channel.
Selection by category
Category setting
You can toggle the category selection mode ON and
OFF every time you hold down [BAND] for more than
2 seconds. If the category is set to ON, the unit oper-
ates as follows for each button:
Notes:
When category is set to ON, the letter “c” is
displayed followed by channel number.
When category selection mode is active, as
indicated by “c”, the preset buttons are disabled.
Turn off category selection mode to re-enable the
preset buttons.
Category selection
[FOLDER Ŀ]: Next category
[FOLDER ŀ]: Preceding category
Channel selection
[TUNE Ŀ]: Next available/subscribed
channel in current category
[TUNE ŀ]: Preceding available/subscribed
channel in current category
Note: The simulate category of “All Channel” is
selectable in category selection.
Display change
Press [DISP] (Display) to change the dis-
play of different metadata information.
Band/channel number
Channel name
Artist name
Information of contents
Category name
Song title
Clock
Note: “– – – –” is displayed when there is no infor-
mation on the selected channel.
TjsjvtYN!Tbufmmjuf!Sbejp!Dpouspm!)dpoujo
v
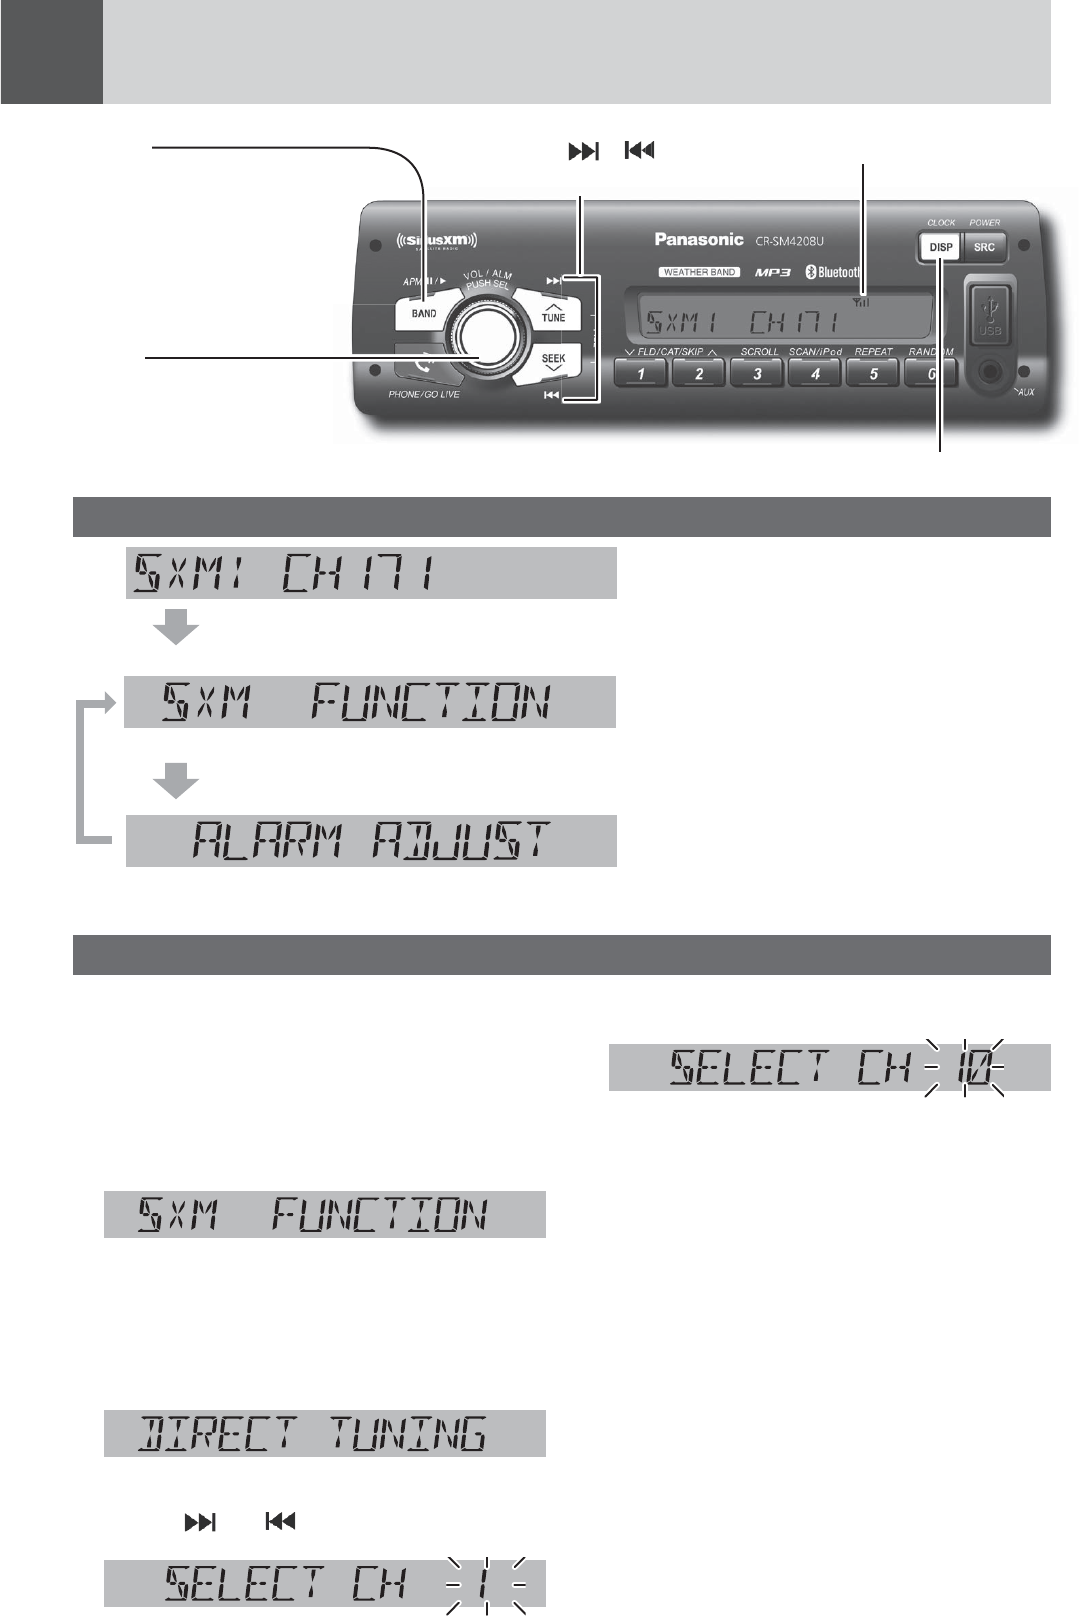
33
System control mode selection
Function settings
SiriusXM radio display
Hold down [SEL] for more than 2 seconds to open SXM function setting
screen.
Turn [VOL] to open alarm time setting screen.
Turn [VOL] back to SXM function setting screen.
SiriusXM function setting mode
Note: See below “Function settings” for its
inside setting.
Alarm time setting mode
Note: Refer page 40 and follow its steps from
2 to 6 to set alarm time if needed.
Channel direct selection mode
A channel is directly selected with the channel
number entry.
1 Hold down [SEL] for more than 2
seconds to open SXM function setting
screen.
2 The radio automatically enters the
SXM direct channel selection mode af-
ter 2 seconds when entering the SXM
function setting screen.
Channel direct selection mode
3 Press [!!!!!] or [!!!!!] to select a number.
4 Press [BAND] to enter the next digit.
5 If necessary, repeat steps 3 and 4 to
enter more digits of the channel num-
ber.
6 Push [SEL] when done entering the
channel number digits and the radio
tunes to the desired channel.
Notes:
”CHAN+++!UNAVAIL” is displayed when the re-
quested channel is not valid. Visit www.siriusxm.
com to see the list of channels available.
”CHAN+++!UNSUB” is displayed when the
requested channel is not part of the current
subscription package. Visit www.siriusxm.com for
information on subscription packages.
Signal strength indicator
[DISP] (Display)
switches the information on the display.
[!!!!!!] [ !!!!!]
selects a number.
[VOL]
opens the function setting.
(PUSH SEL :Select)
opens or exits the function setting.
determines the selection.
[BAND]
shifts to the next digit.
selects the code entry mode.
exits code entry mode.
changes a channel to be locked
or unlocked.
the next digit.
h
e code entry mode.
d
e ent
ry
mod
e.
a channe
l
to be
l
ock
e
e
d
ke
d.
[
!
!
!
!
!
]
]
]
]
]
]
]
]
]
]
]
]
]
]
]
]
]
]
]
]
]
]
]
]
]
]
]
]
]
]
]
]
]
]
]
]
]
]
]
]
]
]
]
]
]
]
]
]
]
]
]
]
]
]
]
!
!
!
!
[
[
[
[
[
[
[
[
[
[
[
[
[
[
[
[
[
[
[
[
[
[
[
[
[
[
[
[
[
[
[
[
[
[
[
[
[
[
[
[
[
[
[
[
[
[
[
[
[
[
[
[
[
[
[
[
[
[
!
!
!
!
v
fe*
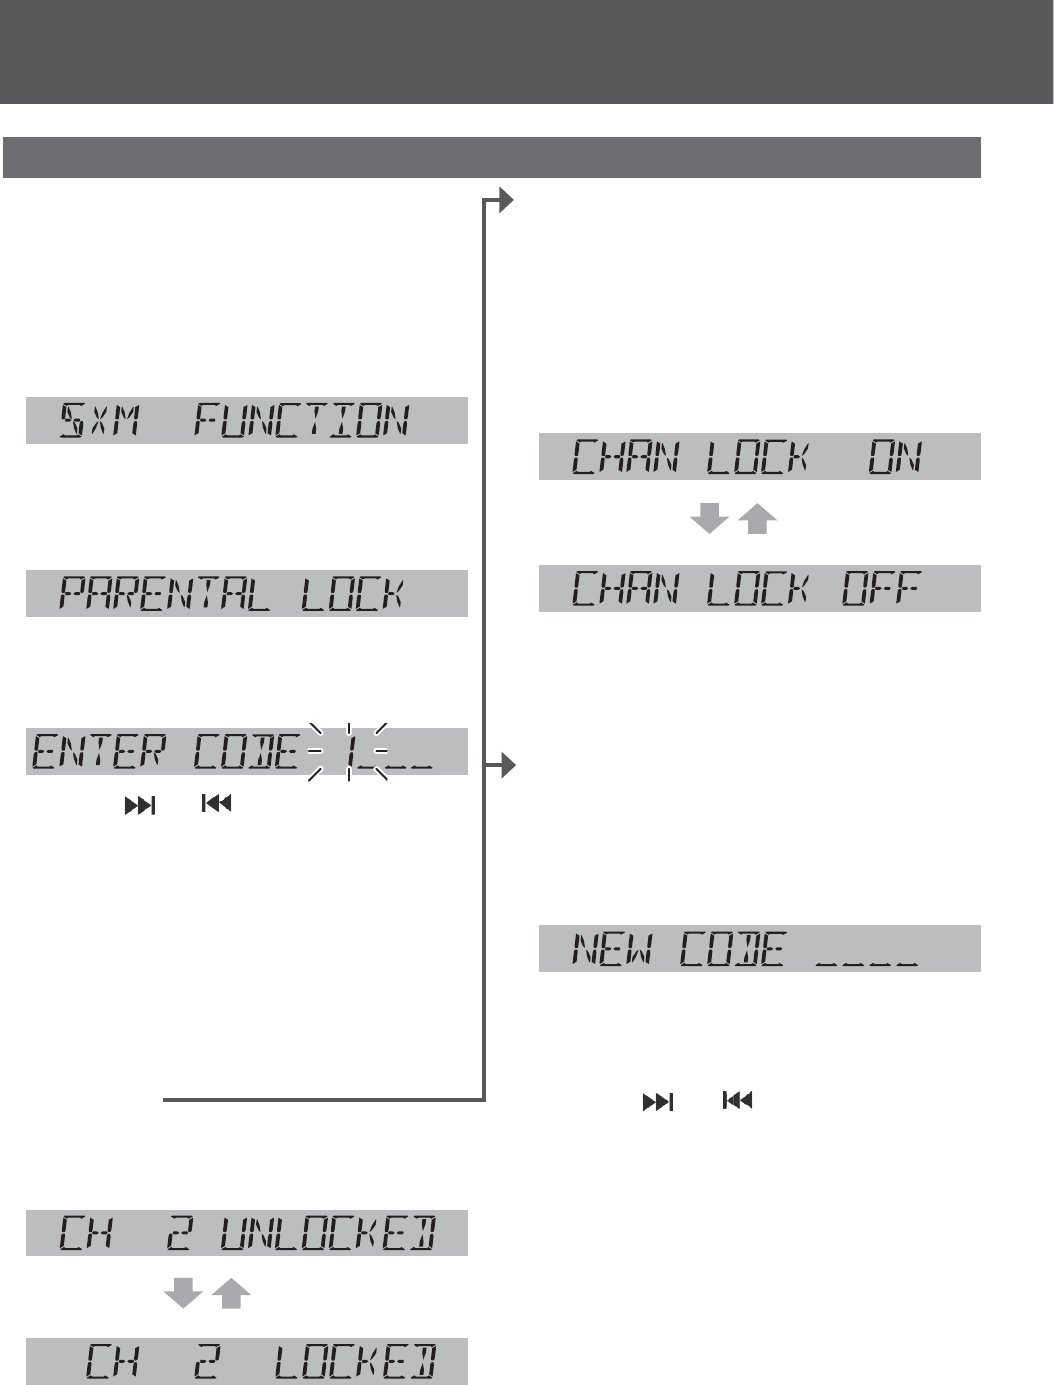
34
TjsjvtYN!Tbufmmjuf!Sbejp!Dpouspm!)dpoujo
v
Parental lock setting mode
This function disables the audience from selecting
the locked channel.
1 Hold down [SEL] for more than 2
seconds to open SXM function setting
screen.
2 When “DIRECT TUNING” is dis-
played, push [SEL] to select parental
lock setting mode.
(Parental lock setting mode)
3 Enter a 4-digit passcode, then press
[BAND]YJGPſPKUJGF
Ś Press [!!!!!!] or [ !!!!!] to select a number.
ś Press [BAND] to shift to the right adjacent
digit.
A digit where entry is determined is indicated
as “+”.
Ŝ Repeat the steps Ś and ś to enter a 4-digit
number.
Note: (Default: 1111). If you want to initialize the
passcode, hold down [DISP] for more than 10
seconds while passcode entry, the 4-digit passcode
will return to the default.
4 Press [TUNE Ŀ] or [TUNE ŀ] to select
a channel.
5 Press [BAND] to switch a select chan-
nel to be locked or unlocked.
unlocked
!
locked
Note: Channel 0 (CH 0) and Channel 1 (CH 1) can
not be locked.
6 When done selecting the locked chan-
nels, press [DISP] to exit the function
setting or push [SEL] to change the
parental lock ON/OFF setting.
OR
To set parental lock ON/OFF:
4 Push [SEL] to open lock ON/OFF
mode after step 3.
5 Turn [VOL] to switch between lock ON
or OFF.
(Default)
!
6 When done selecting the parental lock
ON/OFF setting, push [SEL] to exit the
function setting mode.
OR
To change the parental lock passcode:
4 Hold down [BAND] for more than 2
seconds after step 3.
(New code entry mode)
5 Enter a new 4-digit code, then press
[BAND]YJGPſPKUJGF
Ś Press [!!!!!!!] or [!!!!!!!] to select a number.
ś Press [BAND] to shift to the right adjacent
digit.
A digit where entry is determined is indicated
as “+”.
Ŝ Repeat the steps Ś and ś to enter a 4-digit
number.
6 Repeat step 5VQEQPſTOVJGPGY
code.
“NEW PASSCODE SET” is displayed for 2
OA?KJ@O=J@PDAJAS?K@AOAPPEJCEOłJEODA@
then returns to channel locked/unlocked setting
display.
Function settings (continued)
!
!
!
!
o
o
o
o
o
o
o
o
o
o
o
o
o
o
o
o
o
o
o
o
o
o
o
o
o
o
o
o
o
o
o
o
o
o
o
o
o
o
o
o
o
o
o
o
o
r
r
r
r
r
r
r
r
r
r
r
r
r
r
r
r
r
r
r
r
r
r
r
r
r
r
r
r
r
r
r
r
r
r
r
r
r
r
r
r
r
[
[
[
[
[
[
[
[
[
[
[
[
[
[
[
[
[
[
[
[
[
[
[
[
[
[
[
[
[
[
[
[
[
[
[
[
[
[
[
[
[
[
[
[
[
[
[
[
[
[
!
!
!
!
r
r
r
r
r
r
r
r
r
r
r
r
r
r
r
r
r
r
r
r
r
r
r
r
r
r
r
r
r
r
r
r
r
r
r
r
r
[
[
[
[
[
[
[
[
[
[
[
[
[
[
[
[
[
[
[
[
[
[
[
[
[
[
[
[
[
[
[
[
[
[
[
[
[
[
[
[
[
[
[
[
[
[
[
[
[
[
[
[
[
[
[
!
!
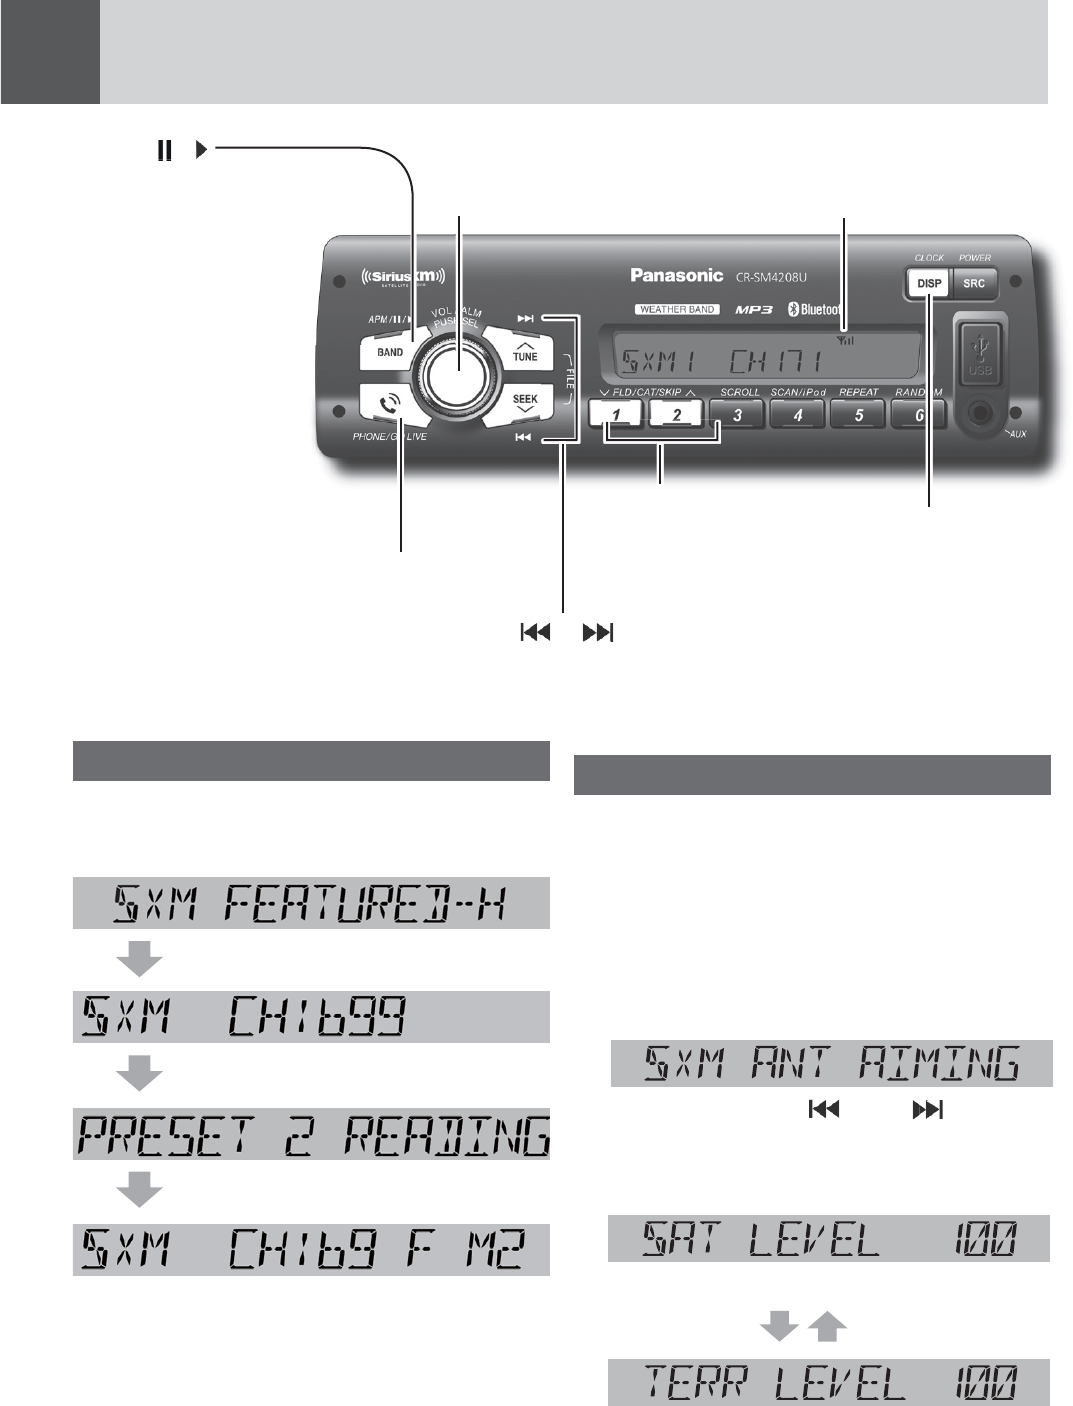
35
v
fe*
Signal strength indicator
[DISP] (Display)
switches the informa-
tion on the display.
[PUSH SEL]
selects “BASS” or “TREBLE” in the
audio menu.
SiriusXM antenna aiming mode
The signal level of the SiriusXM broadcast wave can
be examined to mount the antenna on a place where
the reception state is optimum.
1 Press [SEL] (Select) to select “BASS” or
“TREBLE” for the audio mode.
2 Hold down [BAND] for more than 4
seconds to activate the antenna aiming
mode.
3 Each time when [!!!!!!!!!] or [!!!!!!!!!] is
pressed, the satellite signal level and
terrestrial signal level are alternately
displayed.
(Satellite signal level, range: 0 to 100)
(Terrestrial signal level, range: 0 to 100)
Notes:
To exit from the SiriusXM antenna aiming mode,
press [SEL] (Select) or [DISP].
If “DIAGNOSTIC MODE” display appears, press
[SEL] or [DISP] to exit. (The diagnostic mode is
used for factory adjustment purpose.)
[BAND] (!!!!!/ )
(Pause/Play)
toggles between pause and
play with the instant replay
mode.
activates antenna aiming
mode.
toggles the category selec-
tion mode ON and OFF.
[!!!!!!!!] [!!!!!!!!]
skips to the previous/next channel in the SiriusXM instant
replay mode.
For fast reverse/fast forward, hold down either of them.
[GO LIVE]
SiriusXM instant replay mode.
[ŀ] [Ŀ]
skips to the next/previ-
ous song
!
!!
]
]
]
]
]
]
]
]
]
]
]
]
]
]
]
]
]
]
]
]
]
]
!!
r
r
r
r
r
r
r
r
r
r
r
r
r
r
r
r
r
r
r
r
r
r
r
r
r
r
r
r
r
r
r
r
r
r
r
r
r
r
r
[
[
[
[
[
[
[
[
[
[
[
[
[
[
[
[
[
[
[
[
[
[
[
[
[
[
[
[
[
[
[
[
[
[
[
[
[
[
[
[
[
[
[
[
[
[
[
[
[
[
SiriusXM Featured Favorite
1Press [BAND] 並停留在 "Featured Favorite
Band 1". to "Featured Favorite Band 3"任
何一個您喜愛的單元,畫面會顯示如下
當LED燈顯示跑完字幕後,會顯示
點選任一個按鍵中您想選擇的頻道
當設定完成畫面會顯示您剛才選擇
好的頻道
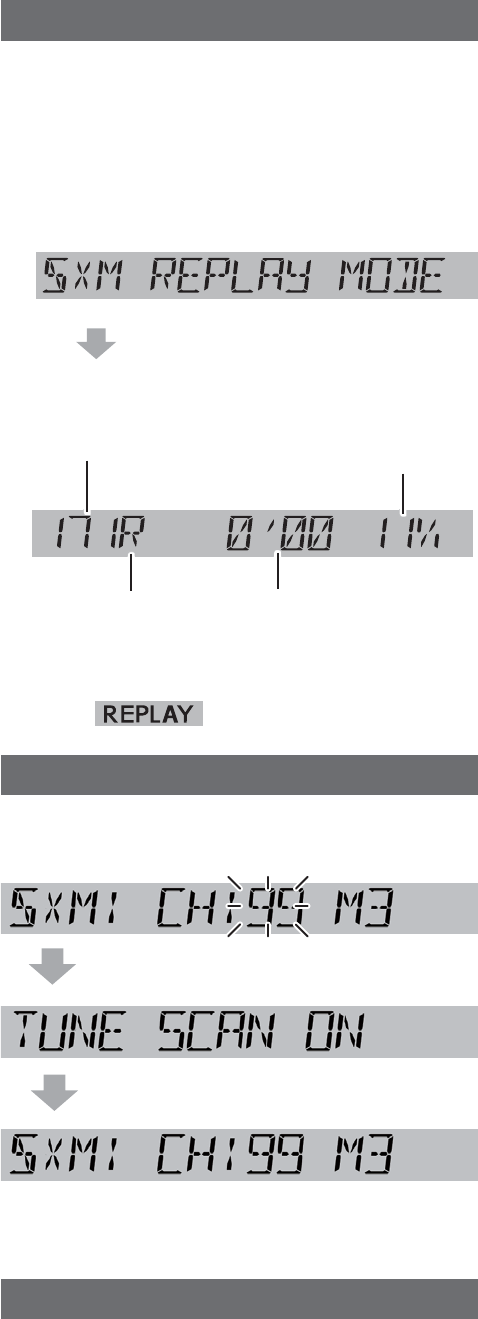
36
SiriusXM instant replay mode
Replay allows the user to pause, rewind and replay
content from the active channel.
Music stored in the IR (Incremental Redundancy)
buffer can be replayed.
1 Hold down [1] button (選目前頻道的
前一首歌曲)to activate the SiriusXM
instant replay mode.
(2 seconds later)
[Example]
Occupied space
in IR buffer (%)
Replay mode
Channel number
Replay time of music
stored in IR buffer
Music stored in the IR buffer is automatically
replayed. (
indicator lights.)
SiriusXM Tune Scan
1 Hold down [4] button 啟動Tune Scan.
Hold down [4].
等待2秒後畫面顯示如下
註:每六秒自動切換頻道一次
SiriusXM Tune Start
Press [1] through [6] to select any of the favorite
channel in Instant Replay mode.
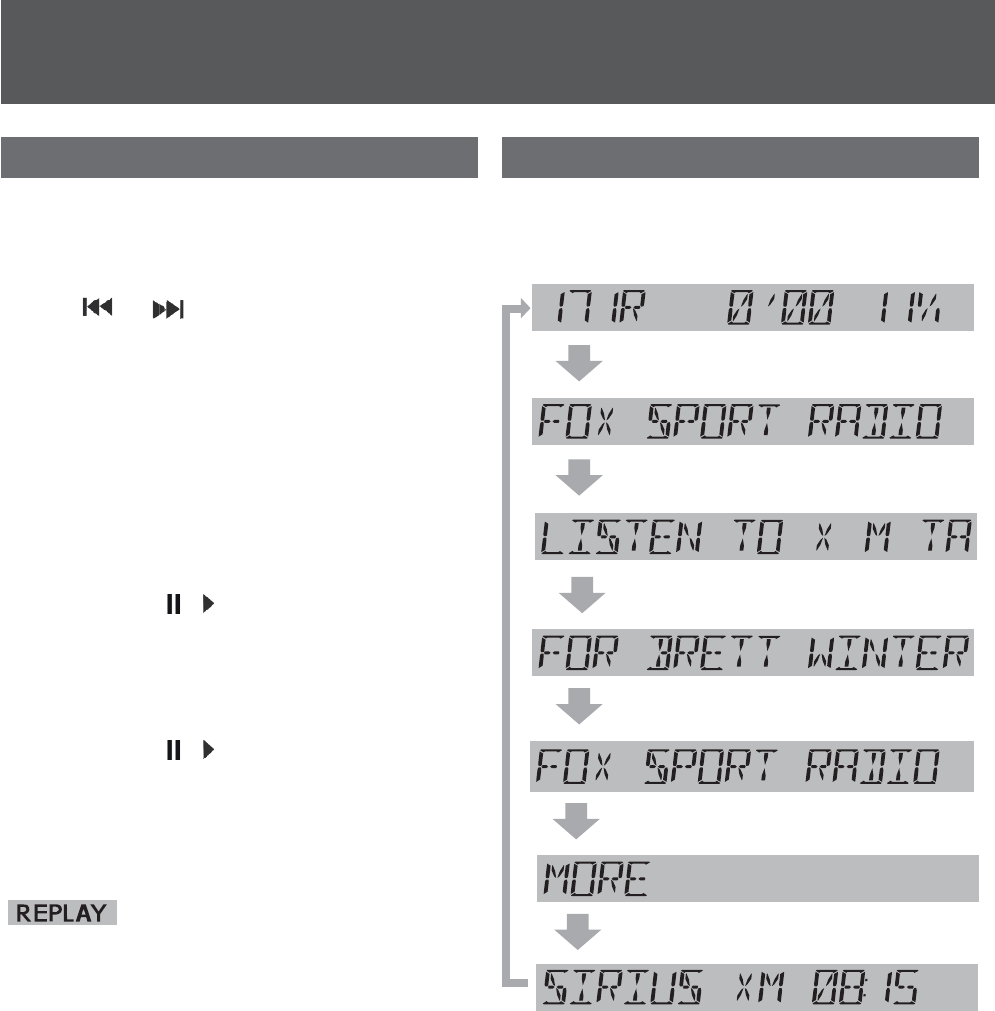
37
TjsjvtYN!Tbufmmjuf!Sbejp!Dpouspm!)dpoujovfe*
SiriusXM instant replay mode (continued)
2 Select a desired portion.
Previous/next Channel Selection
Press [!!!!!!] / [!!!!!!].
Note: To perform fast reverse/forward, hold down
either of them.
Music Selection(Smart Favorite)
[ŀ] : Next song
[Ŀ] : Previous song
Pause
Press [BAND] (!!!!/!!!!).
Press again to cancel.
Category selection mode ON/OFF
Press [BAND] (!!!!/!!!!) for more 2 seconds.
Note: To exit from the SiriusXM instant replay mode
and return to the SiriusXM live mode, press
[REPLAY].
(
indicator turned off.)
Display change
Press [DISP] (Display) to change the dis-
play of different metadata information.
Instant replay display (playing status)
Channel name
Artist name
Information of contents
Category name
Song title
Clock
Note: “– – – –” is displayed when there is no infor-
mation on the selected channel.
Notes:
Do not perform BAND selection (from SXM1 to
Featured Favorite Bond), seek tuning, or preset
memory operation in the SiriusXM instant replay
mode.
When the category is set to ON, the category
selection is disabled (but the signal strength
indicator still operates).
When the replay point of the buffer is catching
up with the live music data and is behind by 20
seconds, “MEMORY NEAR FULL” is displayed for
5 seconds.
When the replay point of the buffer catches up
with the live music data, music replay needs to
be temporarily stopped. “REPLAY MEM FULL”
is displayed for 10 seconds. And then, “REPLAY
MEM FULL” is displayed once every 30 seconds.
!
!
]
]
]
]
]
]
]
]
]
]
]
]
]
]
]
]
]
]
]
]
]
]
]
]
]
]
]
]
]
]
]
]
]
]
]
]
]
]
]
]
]
]
]
]
]
]
]
]
]
/
/
/
/
/
/
/
/
/
/
/
/
/
/
/
/
/
/
/
/
/
/
/
/
/
/
/
/
/
/
/
/
/
/
/
/
/
/
/
/
/
/
/
/
/
/
/
/
/
/
/
/
/
/
/
/
/
/
/
/
/
/
/
/
/
/
/
/
/
/
/
/
/
/
/
/
/
//
/
/
/
/
/
/
/
/
/
/
/
/
/
/
/
/
/
/
/
/
/
/
/
/
/
/
/
/
/
/
/
/
/
/
/
/
/
/
/
/
/
/
/
/
/
/
/
/
/
/
/
/
/
/
/
/
/
/
/
/
/
/
/
/
/
/
/
/
/
/
/
/
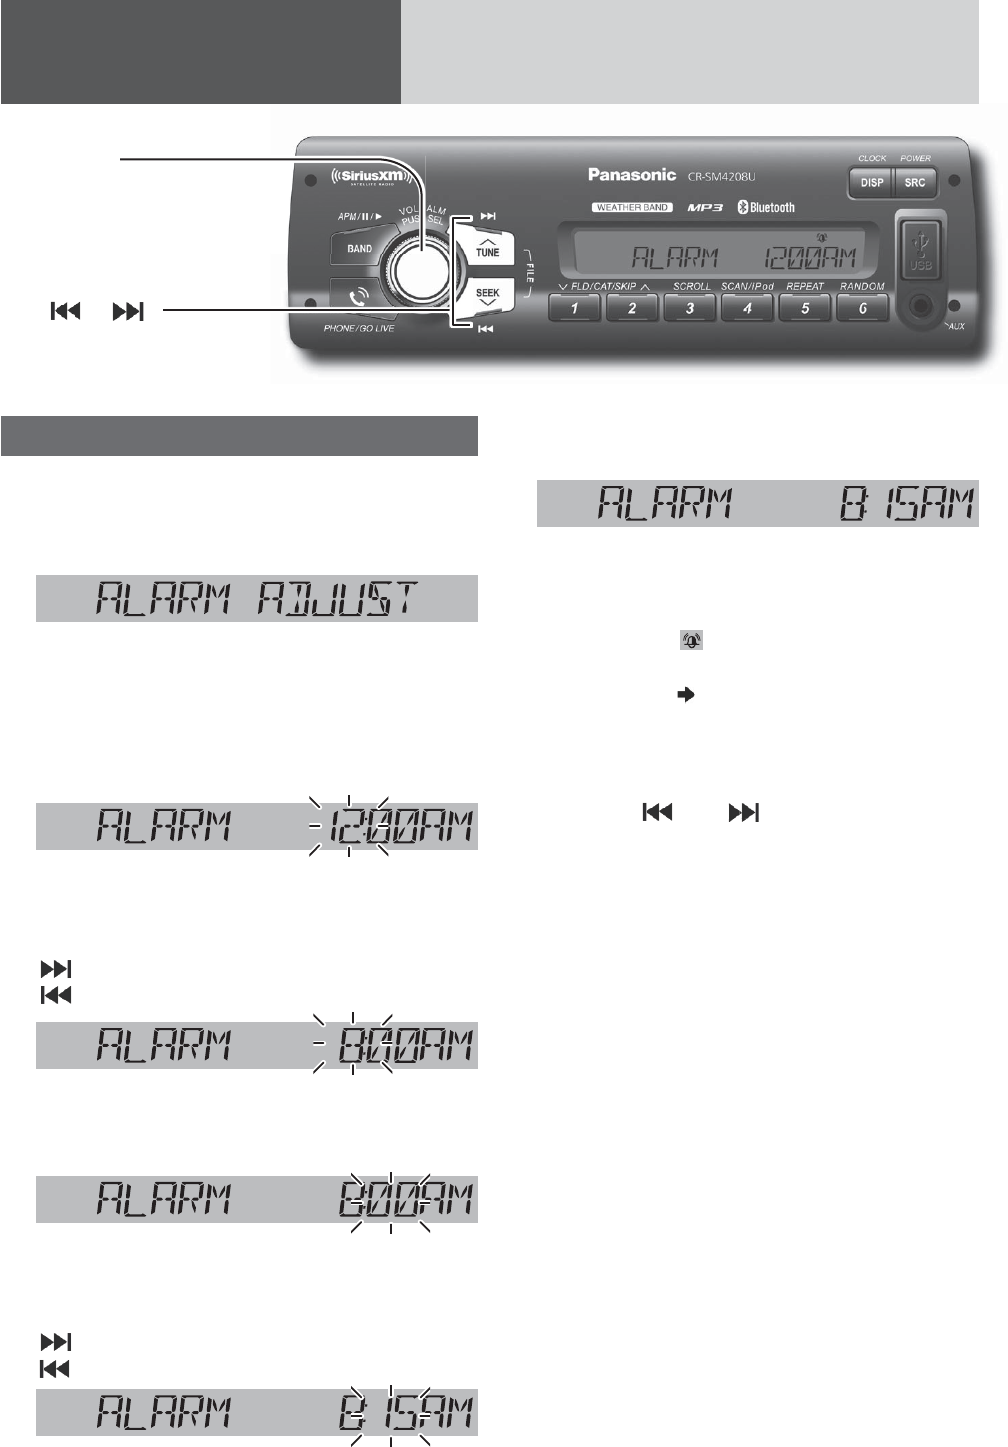
38
Bmbsn!Tfuujoh
Alarm time setting
*The 12-hour system is used for example.
1 Hold down [ALM] (Alarm) for more than
2 seconds.
(Alarm time display)
“ALARM ADJUST” is displayed when the alarm
time is not adjusted.
2 Hold down [ALM] for more than 2 sec-
onds after the above display is shown.
Hour blinks
3 Adjust the hour.
[!!!!!!!!] : Sets ahead.
[!!!!!!!!] : Sets back.
Hour entered
4 Push [ALM].
Minute blinks
5 Adjust the minute.
[!!!!!!!!] : Sets ahead.
[!!!!!!!!] : Sets back.
Minute entered
6 Push [ALM] to complete.
Completed
The alarm is set to ON automatically after com-
plete alarm time setting.
Alarm indicator ( ) lights.
Notes:
When the clock (!!!!!!!!page 11) is not set, perform
and complete the alarm time setting, the clock
time will set to “13:00” automatically. Please
readjust the clock time depending on the actual
clock time.
Hold down [!!!!!!!!!] or [!!!!!!!!] to change numbers
rapidly.
When you want to readjust the alarm time, repeat
steps 1 to 6.
[!!!!!!!!]/[!!!!!!!!]
sets the hour and minute
[ALM]
selects items in the
alarm time setting.
it
ems
in
t
he
i
me setting.
!
!
]
]
]
]
]
]
]
]
]
]
]
]
]
]
]
]
]
]
]
]
]
]
]
]
]
]
]
]
]
]
]
]
]
]
]
]
]
]
]
]
]
]
]
]
]
]
]
]
]
]
]
]
!
r
r
r
r
r
r
r
r
r
[
[
[
[
[
[
[
[
[
[
[
[
[
[
[
[
[
[
[
[
[
[
[
[
[
[
[
[
[
[
[
[
[
[
[
[
[
[
[
[
[
[
[
[
[
[
[
[
[
[
[
[
[
[
[
!!
!
!
!
!!
!
!
!!
!
!!

39
Turning ON/OFF the alarm
1 Hold down [ALM] for more than 2 sec-
onds.
(Alarm time display)
2 Push [ALM].
(Alarm ON/OFF setting)
3 Turn [VOL] (Volume) clockwise or
counterclockwise to select alarm ON or
OFF, then push [ALM]CICKPVQEQPſTO
the setting.
(Select alarm ON, lights.)
Notes:
Before turn ON the alarm, make sure the alarm
time is set. Failure to heed this will cause invalid
selection of alarm ON.
Hold down [ALM] for more than 2 seconds when
the alarm is sounding also turns off the alarm.
Access of alarm ON/OFF is available by push
[ALM] in the “Alarm time display”.
Activating snooze
Press any button on this unit when the
alarm is sounding.
The alarm will sound again in 9 minutes.
Notes:
!If you do not turn the alarm off when the alarm is
sounding, the alarm sound will shut off after an
hour. (Including the amount of time the alarm was
postponed (snooze))
!If you connect with the optional wired remote
control unit (RSA-300), please notice the ALARM
>QPPKJKJ/0KJHUNAŃA?PPDABQJ?PEKJKB
Display Alarm Time. (It’s not feasible for long key
operation)
Bmbsn!Tfuujoh!)dpoujovfe*
40
Common
Problem Possible cause !!!! Possible solution
No power to the unit The power cord (battery, power and ground) is connected in the
wrong way.
!!!! Check the wiring.
Sound is not generated.
Volume is set to zero (0).
!!!! Adjust volume.
There is contact between the external mute lead and the chassis.
!!!! Connect the external mute lead correctly. If the lead is
unused, insulate it.
The wiring of speaker lines are not correct, or a break or poor
contact arises.
!!!! Check the wiring in accordance with the wiring diagram.
Noise
There is an electromagnetic-wave generator such as a mobile
phone near the unit or its electrical lines.
!!!! Keep an electromagnetic-wave generator such as a mobile
phone away from the unit and the wiring of the unit. In case
that noise cannot be eliminated due to the wiring harness of
the vehicle, consult your dealership.
The contact of the ground lead is poor.
!!!! Make sure that the ground lead is connected to an unpainted
part of the chassis securely.
Noise is made in step with engine
revolutions.
Alternator noise comes from the vehicle.
!!!! Change the wiring position of the ground lead.
!!!! *KQJP=JKEOAłHPANKJPDALKSANOQLLHU
Some operations are not
executable.
Some operations are not executable in particular modes such as menu
mode.
!!!! Read the operating instructions carefully and cancel the
mode. If the unit is still out of order, consult your dealership.
No sound from speaker(s)
BALANCE/FADER setting is not appropriate.
!!!! Readjust BALANCE/FADER.
There is a break, a short circuit, poor contact or wrong wiring
regarding the speaker wiring.
!!!! Check the speaker wiring.
If you suspect something wrong
Check and take steps as described below.
If the described suggestions do not solve the prob-
lem, it is recommended to take the unit to your
dealership. The product should be serviced only by
MQ=HEłA@LANOKJJAH-HA=OANABANPDA?DA?GEJC=J@PDA
repair to professionals. We shall not be liable for any
accidents arising out of neglect of checking the unit
or your own repair after your checking.
Never take measures especially for those other than
indicated by italic letters in “Possible Solution”
described below because those are too dangerous
for users to handle themselves.
Warning
Do not use the unit in an irregular condition, for
example, without sound, or with smoke or a foul
smell, which can cause ignition or electric shock.
Immediately stop using the unit and consult your
dealership.
Never try to repair the unit by yourself because it
is dangerous to do so.
!
!!
!!
!!
!!
!
!!
!!
!
!!
Uspvcmftippujoh
41
Uspvcmftippujoh!)dpoujovfe*
The speaker channels are
reversed between
right and left.
The speaker wiring is confused between right and left.
!!!! Perform the speaker wiring in accordance with the wiring
diagram.
1DAOKQJ@łAH@EOJKP?HA=NEJ
the stereo mode. Central sound
does not settled.
The plus and minus terminals at right and left channels of speak-
ers are connected reversely.
!!!! Perform the speaker wiring in accordance with the wiring
diagram.
The power fails unintentionally. The safety device works.
!!!! Consult your dealership.
Clock time is reset.
Battery cable is not correctly connected.
!!!! Connect the battery cable to the terminal that is always ac-
tive.
Radio
Poor reception or noise
Antenna installation or wiring of antenna cable is faulty.
!!!! Check whether the antenna mounting position and its wiring
are correct. In addition, check to see whether the antenna
ground is securely connected to the chassis.
+KLKSANEOOQLLHEA@PKPDA=JPAJJ==ILHEłANĠSDAJQOEJC=łHI
antenna, etc.).
!!!! Check the wiring of the antenna battery lead.
The number of auto preset
stations is less than 6.
The number of receivable stations is less than 6.
!!!! Move to an area where receivable stations number is maxi-
mum, and try presetting.
!
!
!!
USB (MP3/WMA)
Music is not played back even if
a USB device is connected.
The USB device and USB extension cable are not connected cor-
rectly.
!!!! Connect the USB device and USB extension cable correctly.
There is no music stored in a format that is supported on this unit.
!!!! Check if there is any music data that can be played stored on
the USB device.
1DAłHAOUOPAIKBPDA20@ARE?AEOJKP?KIL=PE>HASEPDPDEOQJEP
!!!! 2OA=20@ARE?ASEPD=#1łHAOUOPAI
2OA=20@ARE?ASEPD=#1łHAOUOPAI
!!!! Use a USB device with a current consumption lower than 1 A.
“READING” is displayed but
music is not played back.
A USB hub is connected.
!!!! Do not use a USB hub.
1KKI=JUNA?KN@A@BKH@ANOłHAOATEOP
!!!! 4DAJPDANA=NAPKKI=JUNA?KN@A@BKH@ANOłHAOEPI=UP=GA=
HKJCPEIAPKNA=@=HHKBPDAłHAO
!!
!!
42
43
Bluetooth®
Unable to register, connect, or
call.
!ARE?AOEJ?KIL=PE>HASEPD%#-Ġ%=J@O#NAA-NKłHA?=JJKP>A
used.
!!!! 2OA@ARE?AO?KIL=PE>HASEPD%#-Ġ%=J@O#NAA-NKłHA
The mobile phone is not registered on this product.
!!!! Connecting and calling with an unregistered mobile phone is
not possible. Register the mobile phone on this product.
The mobile phone is not connected.
!!!! Calling is not possible if the mobile phone is not connected to
this product. Connect the mobile phone to this product.
The Bluetooth® device can not pair/register with this unit success-
fully.
!!!! Check the device Bluetooth® setting is set to ON.
!!!! Delete the paired memory within Bluetooth® device and main
unit, then pair again.
!!!! Switch OFF and ON with device Bluetooth® function, then pair
again.
!!!! Check the device PIN code, then input the correct PIN code for
connection.
This unit and Bluetooth® device are too far apart.
!!!! Bring this unit and Bluetooth® device closer together and try
to pair again.
The other party in the call
complains of echoing or noise.
The voice of the other party heard from the car speakers is being
picked up by the microphone and returned to the other party.
!!!! Close the windows.
!!!! Move the microphone away from the car speakers.
!!!! Lower the volume.
Phone voice is of poor quality.
Phone voice is inaudible. Mobile phone reception is poor.
!!!! Check mobile phone reception.
Bluetooth® audio does not work.
The Bluetooth® audio-compliant device does not support A2DP/
AVRCP.
!!!! Check the instruction manual of the Bluetooth® audio-compli-
ant device for support conditions.
Some mobile phones can not play music via Bluetooth® if mobile
phone is not in the music player mode.
!!!! Operate mobile phone, select the music player mode, then
LNAOO-)6PKLH=UPDA@AOENA@IQOE?łHARE=HQAPKKPD® com-
munication.
!
!!
!!
!!
!!
!
!!
!!
!!
!!
!
Uspvcmftippujoh!)dpoujovfe*
44
Bluetooth®
Bluetooth® audio cannot be
heard.
The main unit is not in the Bluetooth® music mode.
!!!! Check and switch to the Bluetooth® music mode.
The Bluetooth® audio is not output from mobile phone or Blue-
tooth® audio device.
!!!! Switch OFF and ON with mobile phone or Bluetooth® audio
device for reestablish the communication.
The music is paused temporarily.
!!!! Press [BAND] button on this unit to resume music play.
Some mobile phones can not restore the A2DP communication
with music mode after ended phone conversation.
!!!! Press [BAND] button twice on this unit to restore the A2DP
communication.
Telephone voice dial does not
work.
The mobile phone does not support the voice dial function.
!!!! Change to another mobile phone which supports the voice
dial function.
The distance between user and microphone is too far apart, the
sound is low, or the surrounding is noisy.
!!!! Speak toward the microphone closer and keep the surround-
ing quiet.
Sound skipping with Bluetooth®
audio
This unit and Bluetooth® device are too far apart.
!!!! Bring the Bluetooth® device closer to this unit.
There is another wireless device near this unit and interference
occurs.
!!!! Switch off the other wireless device and keep it away from
this unit.
Other wireless device is using the Bluetooth®LNKłHAAT?HQ@EJC
from main unit. (Ex. All phonebook transmission)
!!!! Switch off the transmission with wireless device.
Unable to import the telephone
directory.
The mobile phone dose not support Bluetooth® OPP (Object Push
-NKłHABQJ?PEKJ
!!!! Change to another mobile phone which supports Bluetooth®
OPP function.
There is no telephone or name information within exported direc-
tory.
!!!! KJłNIPDA@ENA?PKNUEJBKNI=PEKJEO?KILHAPAHU=J@?KNNA?PHU
The mobile phone is too far apart or communication interference
occurs.
!!!! Bring the mobile phone closer to this unit or switch off the
other wireless device and keep it away from this unit.
!!
!
!!
!
!
!
!!
!
!!
!!
45
SiriusXM Satellite Radio Control
Channel unselectable
No contract with Sirius XM Radio Inc.
!!!! Refer to page 34 of this book and the SiriusXM’s website to
sign up for SiriusXM Radio service.
Check antenna
SiriusXM Antenna is disconnected or damaged.
!!!! Make sure the antenna is properly connected to this main
unit.
No signal
SiriusXM broadcasts unreceivable because of poor receiving condi-
tions.
!!!!
Move to an area where SiriusXM broadcasts can be received
well.
Channel unsubscribed The channel you have selected is not part of your subscription
plan.
!!!! Call SiriusXM Listener Care to subscribe. 1-866-635-2349
Channel unavailable The requested channel is not valid.
!!!! Visit www.siriusxm.com to see the list of channels available.
Product servicing
If the suggestions in the charts do not solve the problem, we recommend that you take it to your dealership.
1DALNK@Q?PODKQH@>AOANRE?A@KJHU>U=MQ=HEłA@PA?DJE?E=J
!
!
!
!
!!
Uspvcmftippujoh!)dpoujovfe*
46
Fssps!Ejtqmbz!Nfttbhft
USB (MP3/WMA)
A USB device is not connected or the connected
device cannot be recognized.
!!!! Use a USB memory that is suitable for this
unit.
+KLH=U=>HAłHAOATEOP
An unsupported USB device is connected.
!!!! Use a USB memory that is suitable for this
unit.
!!!! /A?KN@łHAOPD=P?=J>ALH=UA@>=?GKJPDEO
unit onto the USB memory.
A USB device that exceeds the current capac-
ity that can be supplied is connected. For some
reason, an over-current was detected.
!!!! Use a USB memory that has a consumption
current of less than 1 A.
!!!! Switch the Source, and select the USB (MP3/
4*IK@A=C=EJ
!!!! Switch the power off/on, and select the USB
Ġ*-4*IK@A=C=EJ
!!!!
Check that the USB connector section is not dirty,
and that there is no foreign objects.
!!
!!
!
!
!
!
47
USB (MP3/WMA)
No operation by some cause
!!!! Turn off the power and turn on the power
again, or turn the key to the ACC OFF posi-
tion and turn the key to ACC ON position
again. If this does not solve the problem,
unplug the power cord and plug it in again.
In case the unit is still out of order, consult
your dealership.
1DALH=UAN?=JJKPNA=@PDAłHAUKQ=NAPNUEJCPK
play for some reason. (File recorded in an unsup-
LKNPA@łHAOUOPAI?KILNAOOEKJO?DAIA@=P=
BKNI=PłHAJ=IAATPAJOEKJ@=I=CA@@=P=AP?
!!!! KJłNIPD=PPDA20ATPAJOEKJ?=>HAEO
łNIHU?KJJA?PA@=J@NA?KJJA?PEBJKP
0AHA?P=łHAPD=PPDALH=UAN?=JNA=@ DA?G
the type of data stored in the USB memory.
Format the USB memory if necessary.
1DA4*łHA?=J>A?KLUNECDPA@
!!!! 1DAłHALNKPA?PA@>U?KLUNECDPEOJKPLH=U-
able.
For use with iPod
The iPod is not recognized correctly.
!!!! Some time could be taken for the iPod to be
recognized.
!!!! Check the connection.
!!!! Reset the iPod, and then connect it again.
Your iPod has no playable music.
!!!! Download playable music to your iPod.
The song has no title.
!!!! Name the title to the song.
The connected iPod is not supported by this unit.
!!!! Connect a supported iPod to this unit.
Bluetooth®
The Bluetooth® module for some reason cannot
function.
!!!!
Switch the power or ACC ON/OFF. In case the
unit is still out of order, consult your dealership.
Bluetooth® communication error (Module and
System)
!!!!
Switch the power or ACC ON/OFF. In case the unit
is still out of order, consult your dealership.
!
!
!!
!!
!!
!
!!
!
!!
!!!
48
SiriusXM Satellite Radio Control
No operation by some cause.
!!!! Switch the power or ACC ON/OFF. If this does
not solve the problem or this unit is still out
of order, consult your dealer to ask repairs.
!
!
!
!
(Return to “SUBSCRIPTION”)
The subscription information was updated.
!!!! Pressing [SEL] returns to the previous
screen.
SiriusXM Antenna is disconnected or damaged.
!!!! Make sure the antenna is properly connected
to this main unit.
SiriusXM broadcasts unreceivable because of
poor receiving conditions.
!!!!
Move to an area where SiriusXM broadcasts
can be received well.
The channel you have selected is not part of your
subscription plan.
!!!! Call SiriusXM Listener Care to subscribe.
1-866-635-2349
The requested channel is not valid.
!!!! Visit www.siriusxm.com to see the list of
channels available.
!!
!
!!
49
Opuft!po!NQ40XNB
*-Ġ*-"$Q@EK)=UANEO=BKNI=PBKN?KILNAOOA@=Q@EKłHA1DAOABKNI=PO=HHKSQOANOPKO=RA=HHPDA
łHAO?KJP=EJA@EJ=LLNKTEI=PAHULEA?AOKBATEOPEJC
Note: Each of encoding software is not included with this unit.
*MPEG Layer-3 audio coding technology licensed from Fraunhofer IIS and Thomson.
=QPEKJO=OPK?KILNAOOA@=Q@EKłHAO
High bit rate and high sampling frequency are
recommended for high quality sounds.
Selecting VBR (Variable Bit Rate) is not recom-
mended because playing time is not displayed
properly and sound may be skipped.
The playback sound quality differs depending on
the encoding circumstances. For details, refer to
the user manual of your own encoding software
and writing software.
Be sure to put an extension compatible with the
format.
It is recommended to set the bit rate to “128 kbps
KNIKNA=J@ļłTA@
Caution
+ARANLQP=JATPAJOEKJEJ@E?=PEJC?KILNAOOA@=Q@EKĠOQ?D=OļILPKłHAOKPDANPD=J?KILNAOOA@
=Q@EKłHAO1DEOI=UJKPKJHULNK@Q?AJKEOABNKIPDAOLA=GAN@=I=CA>QP=HOK@=I=CAUKQNDA=NEJC
Display Information
MP3
Folder name,
File name
MP3 (ID3 tag)
Album name,
Title name/artist
name
WMA (WMA tag)
Album name,
Title name/artist
name
Displayable characters
!EOLH=U=>HAHAJCPDKBłHAJ=IABKH@ANJ=IAġ
SEPDEJ?D=N=?PANOĠ2JE?K@A@łHA=J@BKH@AN
names are reduced by half in the number of
displayable characters.)
+=IAłHAO=J@BKH@ANOEJ=??KN@=J?ASEPDPDA
OP=J@=N@KBA=?DłHAOUOPAI/ABANPKPDAEJOPNQ?-
tions of writing software for details.
ASCII character set and special characters in each
language can be displayed.
ASCII character set
A to Z, a to z, digits 0 to 9, and the following
symbols:
(space) ! ” # $ % & ’ ( ) * + , - . / : ; < = > ? @ [ \ ]
ˆ _ ` { | } ~
Notes:
Characters may be garbled depending on encod-
ing software to be used
Undisplayable characters and symbols will be
converted into an asterisk (+).
Cautions as to the display of this unit
Compression formats
Compression method Bit rate VBR Sampling fre-
quency
MPEG 1 audio layer 3 (MP3) 32 k – 320 kbps Yes 32, 44.1, 48 kHz
MPEG 2 audio layer 3 (MP3) 8 k – 160 kbps Yes 16, 22.05, 24 kHz
MPEG 2.5 audio layer 3 (MP3) 8 k – 160 kbps Yes 8, 11.025, 12 kHz
Windows Media Audio Ver. 2, 7, 8, 9* 64 k – 160 kbps Yes 32, 44.1, 48 kHz
* WMA 9 Professional/LossLess/Voice are not supported.
50
Copyright
It is prohibited by copyright laws to copy, distribute
and deliver copyrighted materials such as music
without the approval of copyright holder except
enjoying yourself personally.
No warranty
Above description complies with our investigations
as of January 2013. It has no warranty for reproduc-
ibility and displayability of MP3/WMA.
KILNAOOA@=Q@EKłHASNEPEJC
!KJKPO=RA=J=Q@EKłHA=J@=?KILNAOOA@
=Q@EKłHAKJPDAO=IA@EO?#=EHQNAPKK>OANRA
PDEOI=UNAOQHPEJ@EBł?QHPUEJLH=UEJC
&B?KILNAOOA@=Q@EKłHAOBKNI=PPA@SEPDPSKKN
more types are saved on the same disc, each
format shall have a different folder.
!KJKPSNEPAłHAOKPDANPD=J?KILNAOOA@=Q@EK
łHAO
Playability may depend on the combination of writ-
ing software and disc writer to be used.
This unit does not support the play list function.
4NEPAłHAOEJ=@EO?=PKJ?AI=JJANQJHAOOKPDAN-
wise needed.
You can shorten the duration between data read
=J@LH=U>=?G>U@A?NA=OEJCPDAMQ=JPEPUKBłHAOKN
folders, or the depth of the hierarchy.
0QLLKNPA@łHAOUOPAIO
Ȏ USB-device
File system is FAT12/16/32.
*=TEIQIJQI>ANKBłHAOBKH@ANO
Maximum depth of trees: 8
*=TEIQIJQI>ANKBłHAO
USB device: 65 535
*=TEIQIJQI>ANKBłHAOEJKJABKH@AN
USB device: 512
Maximum number of folders:
128 (Root folder is included.)
Notes:
You can shorten the duration between data read
=J@LH=U>=?G>U@A?NA=OEJCPDAMQ=JPEPUKBłHAOKN
folders, or the depth of the hierarchy.
This unit counts the number of folders irrespective
KBPDALNAOAJ?AKN=>OAJ?AKB=J*-4*łHA
If the selected folder does not contain any MP3/
4*łHAOPDAJA=NAOP*-4*łHAOEJPDA
order of playback will be played.
Playback order may be different from other MP3/
WMA players even if the same disc is used.
“ROOT” appears when displaying the root folder
name.
Empty folders stored on the USB memory are not
included in the folder count.
Depending on the connected USB memory, the
KN@ANEJSDE?DPDAłHAO=NALH=UA@>=?GI=U@EBBAN
PKPDAKN@ANEJSDE?DPDAłHAOSANAOPKNA@
#KH@ANOAHA?PEKJKN@ANłHALH=U-
back order
Ȏ USB-device
Root Folder
(Root Directory)
Folder Selection
File Selection
Tree 1 Tree 2 Tree 3 Tree 4 Tree 8
(Max.)
2
1
3
4
q
q
w
e
r
t
y
y
5
6
8
1 8
7
–In the order
–In the order
Recording MP3/WMA Files on a USB-Device
51
Nbjoufobodf
Cleaning this unit
Your product is designed and manufactured to
ensure a minimum of maintenance. Use a dry soft
cloth for routine exterior cleaning. Never use benzine,
thinner or other solvents.
Alcohol
Pesticide
Wax
Benzine
Thinner
Alcohol
Pesticide
Wax
Benzine
Thinner
To remove stubborn stains
Ś Moisten the soft cloth in dish-
washing soap diluted with water
and wring well.
ś Wipe lightly. Go over the same
surface with a dry cloth.
Notes:
Since there is the possibility of water drops getting
inside of the unit, do not directly apply cleanser to
the surface.
Do not scratch the screen with your nails or other
hard objects. The resulting scratches or marks will
obscure the images.
Caution
If water drops or similar wet substances get
inside the unit, it may cause a malfunction.

52
Installation Guide
WARNING
Ȏ This installation information is designed for professional installers with knowl-
edge of automobile electrical safety systems and is not intended for non-technical,
do-it-yourself individuals. It does not contain instructions on the electrical installa-
tion and avoidance of potential harm to air bag, anti-theft and ABS braking or other
systems necessary to install this product.
Any attempt to install this product in a motor vehicle by anyone other than a profes-
sional installer could cause damage to the electrical safety system and could result
in serious personal injury or death.
Ȏ&BUKQN?=NEOAMQELLA@SEPD=EN>=C=J@KN=JPEPDABPOUOPAIOOLA?Eł?LNK?A@QNAO
may be required for connection and disconnection of the battery to install this prod-
uct.
Before attempting installation of this electronic component against the manufactur-
er’s recommendation, you must contact your car dealer or manufacturer to determine
the required procedure and strictly follow their instructions.
FAILURE TO FOLLOW THE PROCEDURE MAY RESULT IN THE UNINTENDED DEPLOY-
MENT OF AIR BAGS OR ACTIVATION OF THE ANTI-THEFT SYSTEM RESULTING IN
DAMAGE TO THE VEHICLE AND PERSONAL INJURY OR DEATH.
Overview
This product should be installed by a professional.
However, should you decide to install the product
against the manufacturer’s recommendation, these
operating Instructions do not contain electrical
installation instructions. You must contact your car
dealer or manufacturer for electrical connection in-
structions to avoid possible damage to your electrical
safety systems and resulting injury or death. (Please
refer to the “WARNING” statement above).
Your next step is to decide where to install the
unit. The instructions in these pages will guide you
through the remaining steps:
Identify and label the car wires.
Connect the vehicle wires to the wires of the
power connector.
Install the unit in the dashboard.
Check the operation of the unit.
If you encounter problems, please consult your near-
est professional installer.
Before you begin installation, look for the following
items which are packed with your unit.
Operating Instructions
Installation hardware .....Needed for Installation.
!=OD>K=N@OLA?Eł?=PEKJO
Min. 4.75 mm {3/16"}
Max. 5.56 mm {7/32"}
Thickness
53 mm {2-3/32"}
182 mm {7-5/32"}
Warning
This unit operates with a 12 V DC negative !
ground auto battery system only. Do not attempt to
use it with any other system. Doing so could cause
serious damage.
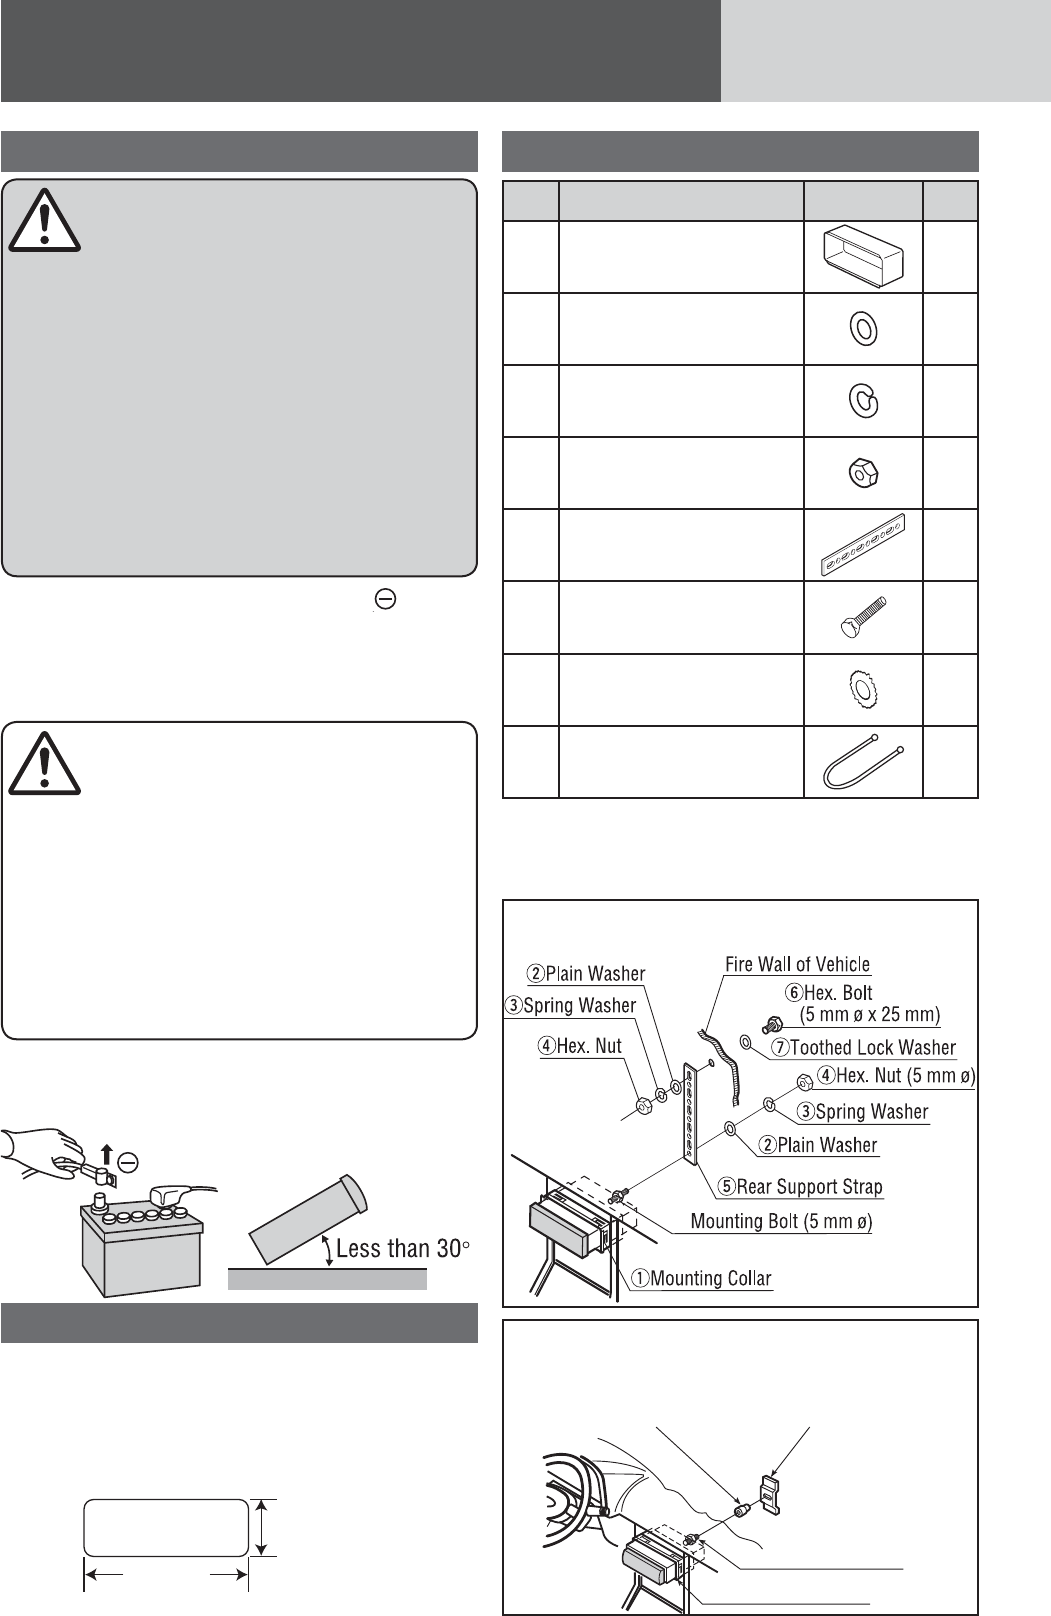
53
(b) Using the rubber cushion (op-
tion)
Preparation Installation hardware
No. Item Diagram Q’ty
ŚMounting Collar* 1
śPlain Washer (5 mm ø) 2
ŜSpring Washer (5 mm ø) 2
ŝHex. Nut (5 mm ø) 2
ŞRear Support Strap 1
şHex. Bolt
(5 mm ø × 25 mm) 1
ŠToothed Lock Washer
(5 mm ø) 1
šRemoval Tool
(U-shaped) 2
Warning
If your vehicle is equipped with air bag and/or anti-
PDABPOUOPAIOOLA?Eł?LNK?A@QNAOI=U>ANAMQENA@
for connection and disconnection of the battery to
install this product.
Before attempting installation of this electronic
component, contact your vehicle dealer or manu-
facturer to determine the required procedure and
strictly follow their instructions.
FAILURE TO FOLLOW THE PROCEDURE MAY
RESULT IN THE UNINTENDED DEPLOYMENT OF
AIR BAGS OR ACTIVATION OF THE ANTI-THEFT
SYSTEM RESULTING IN DAMAGE TO THE VEHICLE
AND PERSONAL INJURY OR DEATH.
Disconnect the cable from the negative !!! battery
terminal (see caution below).
Remove Mounting Collar Ś from the main unit
temporarily, which are already mounted at ship-
ment.*
Unit should be installed in a horizontal position
with the front end up at a convenient angle, but
JKPIKNAPD=J
Caution
Various settings that have been stored in the
memory in other on-board equipment (vehicle
navigation etc.) may be lost if the battery terminals
are disconnected.
Therefore, we recommend to make a record of or
to back up the settings before disconnecting the
terminals.
After completing installation of the main unit, set
the equipment again according to the record.
Dashboard installation
Installation Opening
This unit can be installed in any dashboard having an
opening as shown below. The dashboard should be
4.75 mm {3/16”} – 5.56 mm {7/32”} thick in order to
be able to support the unit.
182 mm
{7-5/32"}
53 mm
{2-3/32"} Mounting bolt
(5 mm ø)
qMounting Collar
Rear support bracket
(provided on the vehicle)
Rubber cushion (option)
(a) Using the rear support strap Ş
Installation Guide (continued)
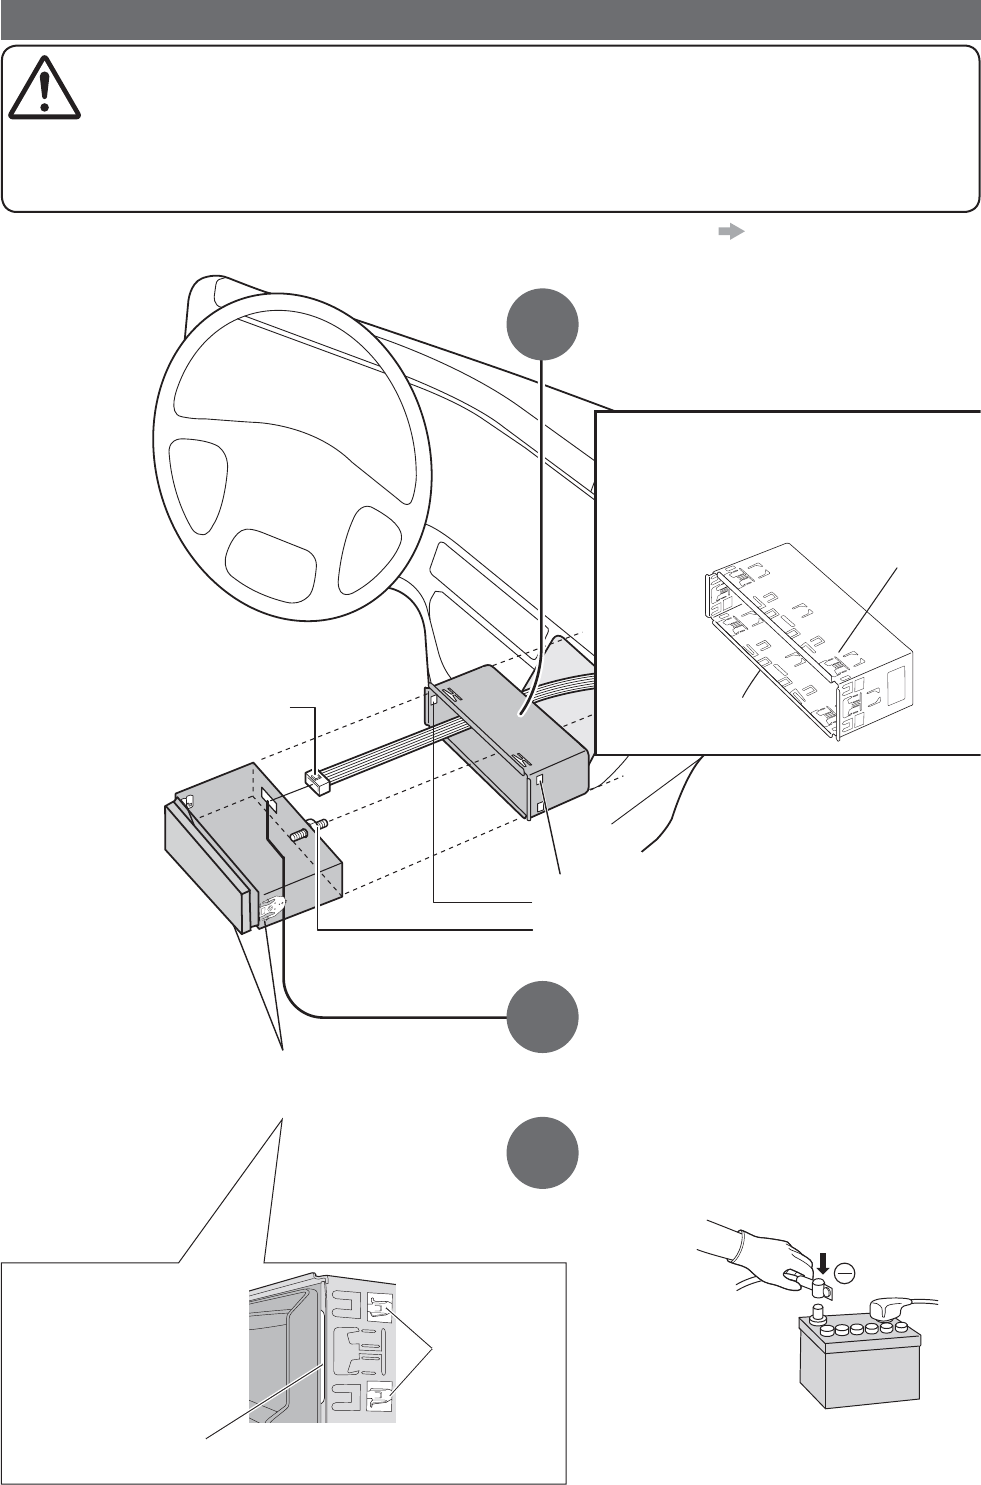
54
Securing of the main unit
Caution
We strongly recommend that you wear gloves for installation work to protect yourself from injuries.
When bending the mounting tab of the mounting collar with a screwdriver, be careful not to injure
UKQND=J@O=J@łJCANO
First complete the electrical connections, and then check them for correctness. (!!!!!!!!!!!!!page 44)
The included Mounting Collar Ś is designed specially for this unit. Do not use it to attach any other
model.
1
2
3
Insert Mounting Collar Ś into the
dashboard, and bend the mounting
tabs out with a screwdriver.
Establish the rear connection of the
unit.
BPANłTEJC-KSAN KJJA?PKNłTPDANA=N
of the unit to the vehicle body by either
method (a) or (b) shown in the previous
page.
After installation reconnect the nega-
tive (–) battery terminal.
The tabs to be bent vary depending on
the vehicle. To securely install the unit,
fully bend a number of the tabs so that
there is no rattling.
Example:
Tab
Ś Mounting
Collar
Power Connector
Mounting Holes
Mounting Bolt
Mounting springs
Engage the Mounting
Springs in the mounting
holes of the Mounting
Collar ŚłNIHU Mounting
Hole
Mounting Spring
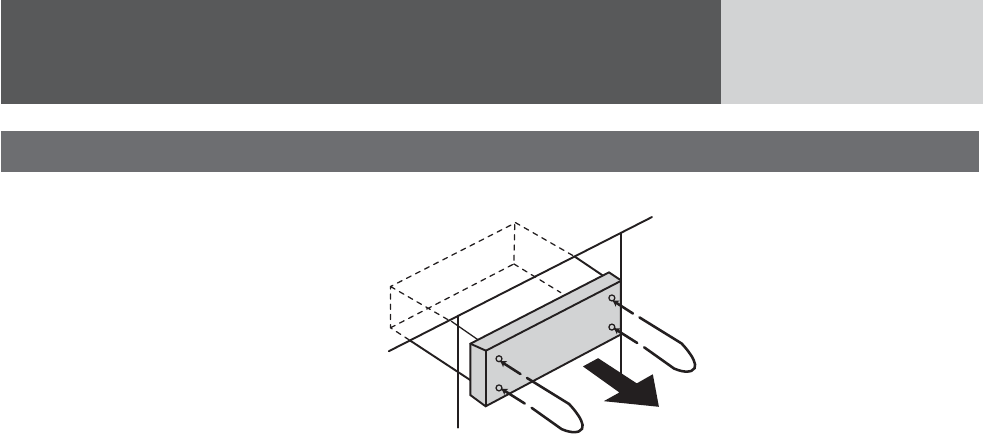
55
Removing the unit from the vehicle’s dashboard
Insert each Removal Tool š and pull.
š Removal Tool
(U-shaped)
Note: Do not lose Removal Tools. They will be needed to remove the unit from the vehicle’s dashboard.
Installation Guide (continued)

56
General
Power Supply: 12 V DC (11 V – 16
V), test Voltage 14.4 V,
Negative A ground
Current consumption: Less than 2.5 A (USB
mode, 0.5 W x 4 chan-
nels)
Maximum Power Output:
45 W × 4 channels at
400 Hz, Volume Control
maximum
Tone adjustment range:
Bass: ± 12 dB at 100 Hz
Treble: ± 12 dB at 10 kHz
Power Output: 18 W per channel into
4 Ω,
40 Hz to 30 000 Hz at
3 % THD
Suitable Speaker
Impedance: 4 Ω
Pre-amp output voltage: 2.0 V
Pre-amp output impedance
:
200 Ω
Dimensions (W x H x D)
: 178(W) x 50(H) x
155(D) mm
{7” x 1-15/16” x 6-1/8”}
Weight: 820 g {2 lbs. 10 oz.}
USB connector
USB standard
compatibility: 1.1/2.0 full speed
File system: FAT12/16/32
Maximum supply
current: 1 A
Playable audio format: MP3/WMA
Recommended
capacity/partition: Less than 32 GB/Only
supported for 1 partition.
Front AUX input
Input impedance: 10 kΩ
Maximum input level: 2.0 V
Connector: 3.5 mm ø Stereo mini
pin
Input sensitivity: 200 mVrms
Rear AUX input
Input impedance: 10 kΩ
Maximum input level: 2.0 V
Input sensitivity: 200 mVrms
FM Stereo Radio
Frequency Range: 87.9 MHz – 107.9 MHz
Usable Sensitivity: 12 dBf (1.1 μV/ 75 Ω,
S/N 30 dB)
50 dB Quieting Sensitivity:
17 dBf (1.8 μV/ 75 Ω)
Frequency Response: 30 Hz – 15 000 Hz
± 3 dB
Alternate Channel
Selectivity: 75 dB
Stereo Separation: 35 dB at 1 kHz
Signal/Noise Ratio: 70 dB (Mono)
AM Radio
Frequency range: 530 kHz – 1 710 kHz
Usable sensitivity: 28 dB/μV (25 μV, S/N 20
dB)
Weather Band Radio
Frequency range: 162.400 MHz – 162.550
MHz
Usable sensitivity: 3 dB/μV (S/N 20 dB)
Signal/Noise Ratio
(40 dB/μV): 50 dB
Bluetooth®
Communication
Frequency: 2 402 MHz – 2 480 MHz
Number of Channels: 79 Channels
Communication Mode: Frequency Hopped
Spread Spectrum Com-
munication
RF Output: 0 dBm (0.8 mW)
Service Area: Within 10 m
Applicable Bluetooth®
Version: Version 3.0
Bluetooth QD ID D023911.
Notes:
0LA?Eł?=PEKJO=J@@AOECJ=NAOQ>FA?PPKIK@Eł?=-
tion without notice due to improvements.
0KIAłCQNAO=J@EHHQOPN=PEKJOEJPDEOI=JQ=HI=U
be different from your product.
>KRAOLA?Eł?=PEKJO?KILHUSEPD"&OP=J@=N@O
Power Output:
16 W RMS x 4 Channels at 4 Ω
and ≤ 1% THD+N
Signal to Noise Ratio:
85 dBA (reference: 1 W into 4 Ω)
Tqfdjgjdbujpot
57
Tqfdjgjdbujpo!gspn!uif!Ufsnjobm!Foe!)Sfbs!Dpoofdups!pg!Uijt!Voju*
0LA?Eł?=PEKJBNKIPDAPANIEJ=HAJ@
(Rear connector of this unit)
Caution
This product is designed without a fuse inside due to
fuses already exist in your vehicle.
If your vehicle is without the fuse or a circuit breaker to
protect this unit, please consult your dealership add the
OLA?EłA@BQOAKN=?EN?QEP>NA=GAN=PPDA11"/6HA=@KB
your vehicle’s harness.
4ASKQH@NA?KIIAJ@PKQOABQOAOKBPDAOLA?EłA@N=PEJC
not exceed (15 A). Using fuses that exceed the prescribed
capacity could cause this product to start smoking, ignite
or other malfunction.
19161310741
20171411852
1
2
3
4
5
6
7
8
1
2
3
4
5
6
7
8
3 6 9 12 15 18
35322926232017
36333027242118
9
10
11
12
13
14
15
16
1
2
3
4
5
6
7
8
19 22 25 28 31 34
Cavity C
Cavity B
Cavity A
Pin #
Cavity Pin # Function I/O
A1 1 J1939 CAN-H* I/O
A2 2 J1939 CAN-L* I/O
A3 3 Park Lights I
A4 4 ACC (Ignition) I
A5 5 Amp Control O
A6 6 Dimmer PWM I
A7 7 Battery I
A8 8 Power Ground I
B1 9 RR+ (Speaker) O
B2 10 RR- (Speaker) O
B3 11 RF+ (Speaker) O
B4 12 RF- (Speaker) O
B5 13 LF+ (Speaker) O
B6 14 LF- (Speaker) O
B7 15 LR+ (Speaker) O
B8 16 LR- (Speaker) O
C1 17 Power Ground I
C2 18 Amp Sense I
C3 19 N/C NA
C4 20 Ext. Mute IN I
C5 21 N/C NA
C6 22 N/C NA
C7 23 L_AUX_IN I
C8 24 AUX_SHIELD_
GND I
C9 25 AUX _COM I
C10 26 R_AUX_IN I
C11 27 AUX _ON_OFF I
C12 28 Power Ground I
C13 29 N/C NA
C14 30 Power Ground I
C15 31 MIC + I
C16 32 MIC – I
C17 33 Pre-out GND_RR O
C18 34 Pre-out GND_RL O
C19 35 Pre-out RL O
C20 36 Pre-out RR O
Note: * This pin (J1939 CAN-H/J1939 CAN-
L) is not available because it is for future
use. Please do not connect to this pin.

58
Nfnpsboevn

59
Nfnpsboevn

60

61
YFM264C357ZA PTW0117-0 Printed in Taiwan
2017
Telephone: 310-783-4124