Panasonic of North America 96NBL-WV10 2.4 GHz Wireless Camera Monitoring System User Manual WV10 GS approval
Panasonic Corporation of North America 2.4 GHz Wireless Camera Monitoring System WV10 GS approval
Users Manual
1
Setup Guide
Wireless Camera Monitoring System
Model No. BL-WV10A
This guide will help you install and configure the BL-WV10A Wireless Camera Monitoring System and your
Network Cameras (sold separately).
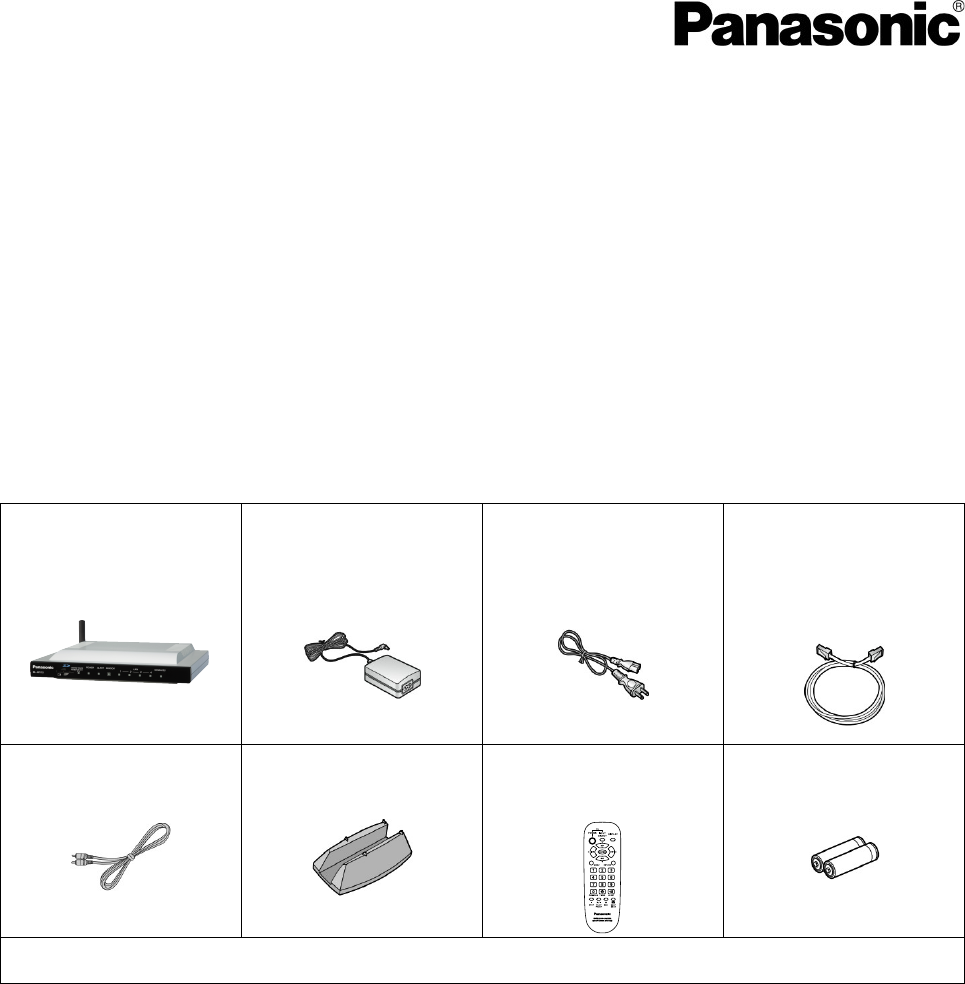
Included Items
Confirm that the following items are included in the product box.
Additional pieces can be ordered by calling 1-800-332-5368.
BL-WV10A
AC adaptor
Part no. PQLV202Y
Cord length: 1.8 m (6 ft.)
AC cord
Part no. PSJA1069Z
Length: 55 cm (1 ft. 10
in.)
Ethernet cable
Part no. PQJA10138Z
(Cat. 5 straight cable)
Length: 1 m (3 ft. 3 in.)
Video cable
Part no.
Length: PSJP01R02Z
Stand
Part no. PSYLWV10N
Remote control
Part no. EUR648057
Batteries (2 AA size)
Part no. R6PNB/2ST
- Operating Instructions
- Warranty
Recommended Accessories (sold separately)
Compatible router: Panasonic BB-HGW700A Network Camera Management System
Compatible Network Cameras*: Panasonic BL-C10A, BL-C30A (firmware version 1.20 or higher**)
* Cameras not listed here (including other Panasonic Network Cameras) may not be compatible with this
product.
** For the latest firmware, visit http://panasonic.co.jp/pcc/products/hnetwk/support/
Setup Guide
2
Setup Overview
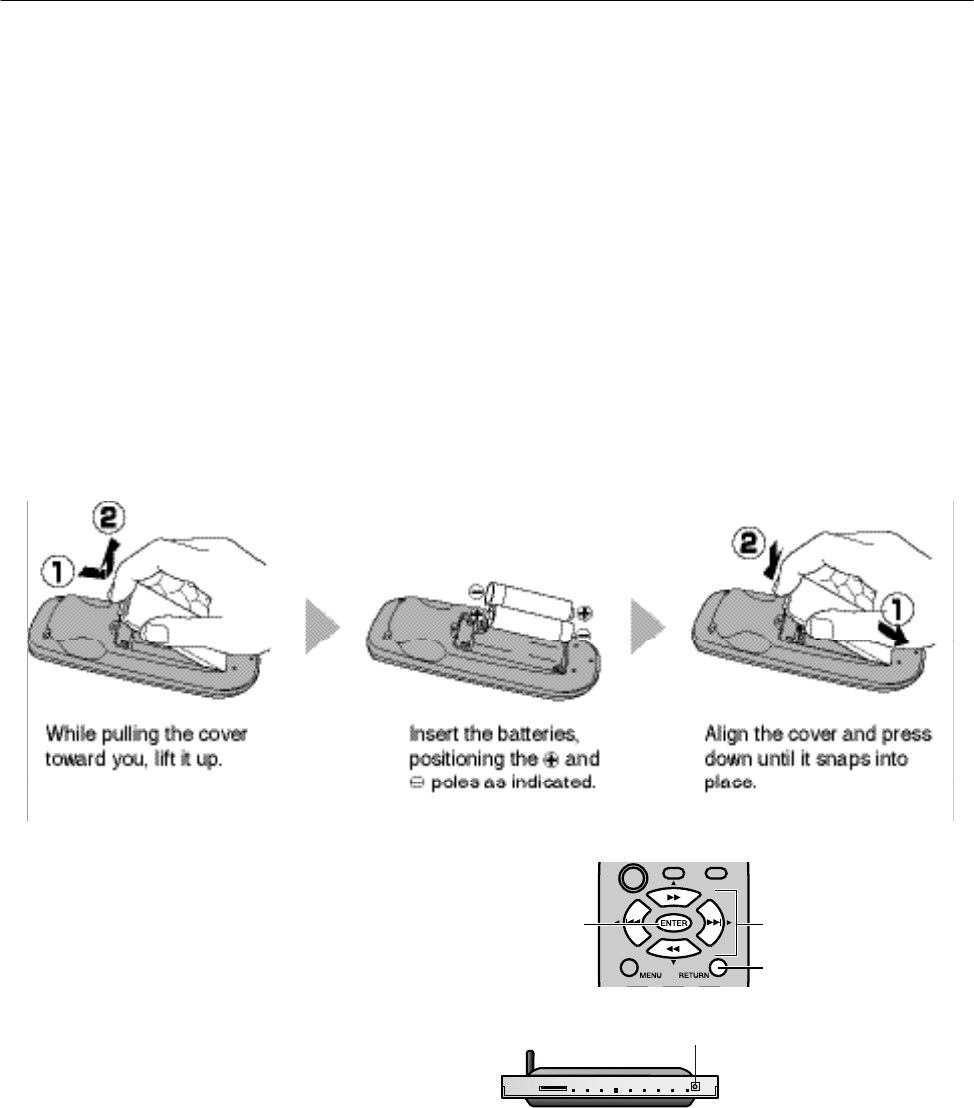
1. Insert the batteries in the remote control.
2. Connect the BL-WV10A to the power outlet and to the TV.
3. Use the BL-WV10A’s Basic Setup utility to configure the BL-WV10A.
4. Connect the cameras (and an optional BB-HGW700A Network Camera Management System, if you are
using one).
5. Use the BL-WV10A’s Quick Setup utility to configure the cameras .
6. Confirm that camera images are viewable on the TV.
7. Place the cameras where you plan to use them.
Preparing the Remote Control
The remote control included with the BL-WV10A is required for most operations.
Insert the included batteries as shown below.
Using the Remote Control
The remote control’s navigator keys are used to
navigate through the BL-WV10A’s on-screen menus
and to select on-screen items. The [RETURN] button
is used to return to the previous menu. The [ENTER]
button is used to select a menu item or parameter.
[RETURN]
Navigator keys
[ENTER]
When using the remote control with the BL-WV10A,
make sure you aim the remote control toward the
unit’s remote control sensor.
Remote control sensor
Setup Guide
3
Connecting the BL-WV10A
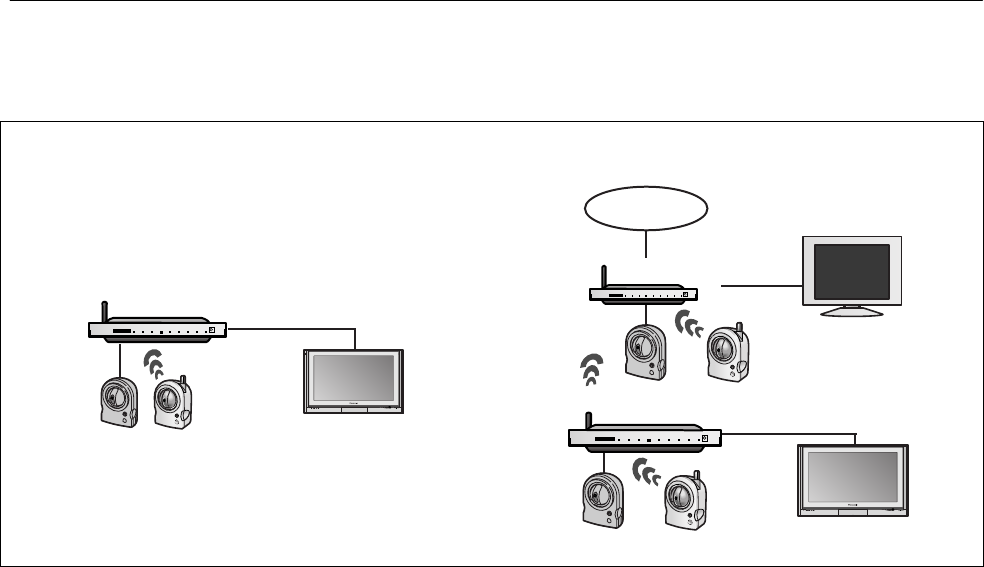
There are 2 ways to connect your cameras to the BL-WV10A. Determine which method you will use, and refer
to the pages in this manual listed below.
Using the BL-WV10A only. Using an optional BB-HGW700A .
BL-WV10A
TV
Internet
BL-BR30A
BL-WV10A
TV
PC

Setup Guide
4
Using the BL-WV10A Only
Connecting Cameras Using the BL-WV10A Only
1. Connect the BL-WV10A to your TV using the included video cable.
2. Turn the TV on and set the TV’s input switch to the external video input (“VIDEO”, “EXT”, “INPUT 1”, etc.)
3. Set the mode switch on the rear of the BL-WV10A to [SETUP].
4. Connect the DC cord to the AC adaptor and to the power outlet.
5. Turn on the BL-WV10A by connecting the DC cord to the unit.
• The startup screen appears on the TV screen.
6. Use an Ethernet cable to connect the camera to one of the LAN jacks on the BL-WV10A.
• If connecting a BL-C30A, set the camera’s mode switch to [WIRED].
7. Connect the camera to the power outlet.
Setup Guide
5
Basic Setup
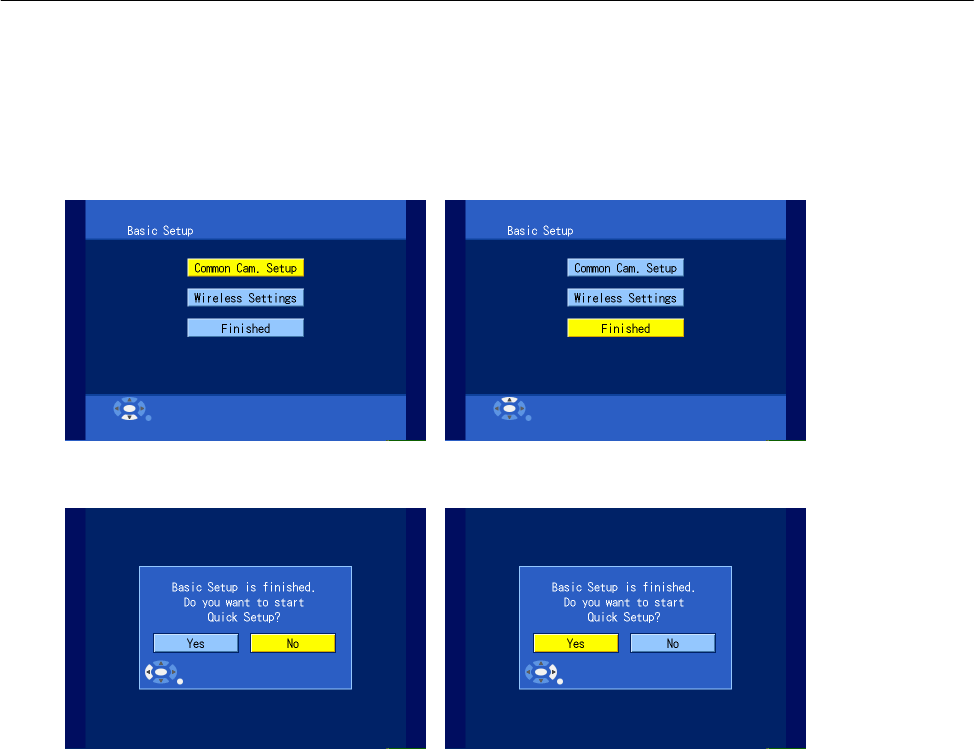
After the BL-WV10A starts up for the first time, the [Basic Setup] screen is displayed. For most installations,
these parameters do not need to be changed. For information regarding Basic Setup settings, see page xx in
the Operating Instructions.
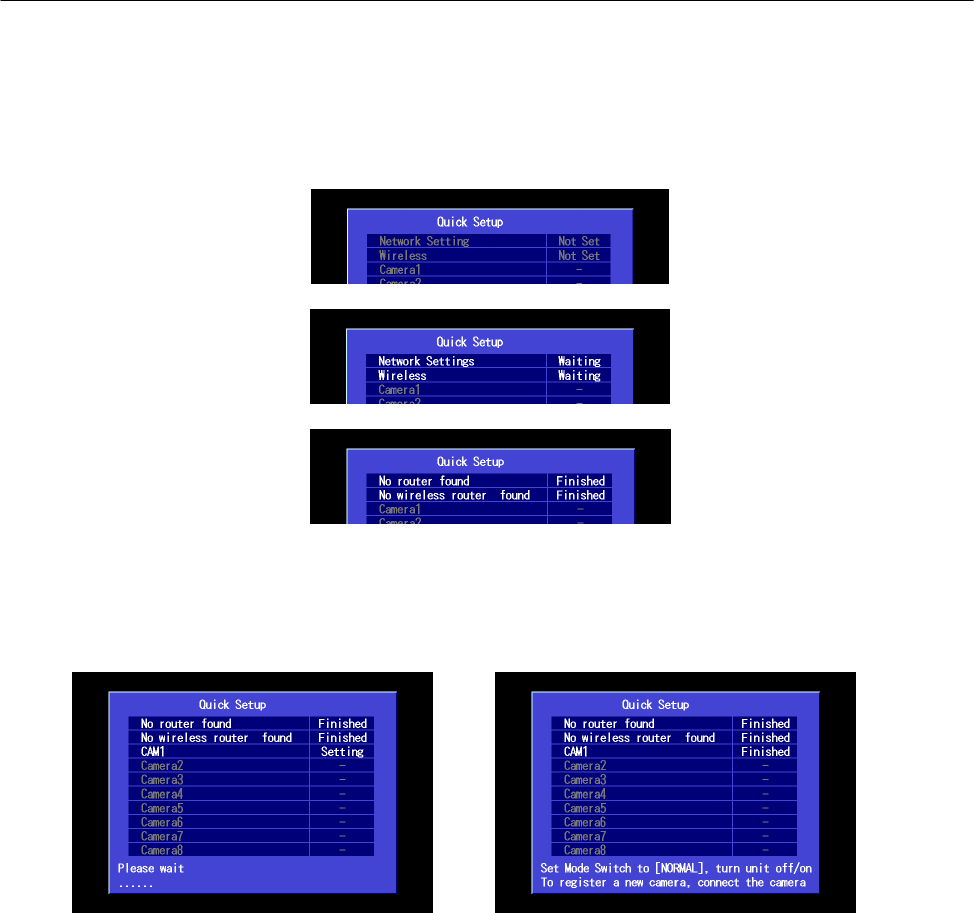
1. Use the navigator keys to select [Finished], then press [ENTER].
2. When the dialog is displayed, select [Yes] then press [ENTER] to start Quick Setup.
• The BL-WV10A restarts.
Setup Guide
6
Quick Setup
To use the BL-WV10A with your cameras, you will need to configure the BL-WV10A and your cameras. The
BL-WV10A’s Quick Setup utility can help you configure the devices easily.
1. After the unit restarts, wait while the Quick Setup utility scans for network and wireless settings.
• When the BL-WV10A has been configured, “Finished” is displayed and the buzzer sounds.
• With this connection setup, it is normal for no router or wireless router to be found.
2. Wait while the Quick Setup utility restarts the camera, then configures and registers the camera.
→
• When the camera has been configured and registered, “Finished” is displayed next to the camera
name (“CAM1”) and the buzzer sounds.
3. To register another camera, connect the camera to one of the LAN jacks of the BL-WV10A, then turn the
camera on by connecting it to the power outlet.
To finish, set the BL-WV10A’s mode switch to [NORMAL], disconnect the DC cord from the rear of the
unit, reconnect the DC cord, then continue from “Viewing Camera Images” on page xx.

Setup Guide
7
Using an Optional BB-HGW700A
Connecting Cameras Using the BB-HGW700A
1. Connect the BL-WV10A to your TV using the included video cable.
2. Turn the TV on and set the TV’s input switch to the external video input (“VIDEO”, “EXT”, “INPUT 1”, etc.)
3. Set the mode switch on the rear of the BL-WV10A to [SETUP].
4. Connect the DC cord to the AC adaptor and to the power outlet.
5. Turn on the BL-WV10A by connecting the DC cord to the unit.
• The startup screen appears on the TV screen.
6. Use an Ethernet cable to connect the BB-HGW700A to one of the LAN jacks on the BL-WV10A.
7. Connect the BB-HGW700A to the power outlet.
Setup Guide
8
Basic Setup
After the BL-WV10A starts up for the first time, the [Basic Setup] screen is displayed. Here you can set the
administrator user name and password. For most installations, other parameters do not need to be changed.
For information regarding Basic Setup settings, see page xx in the Operating Instructions.
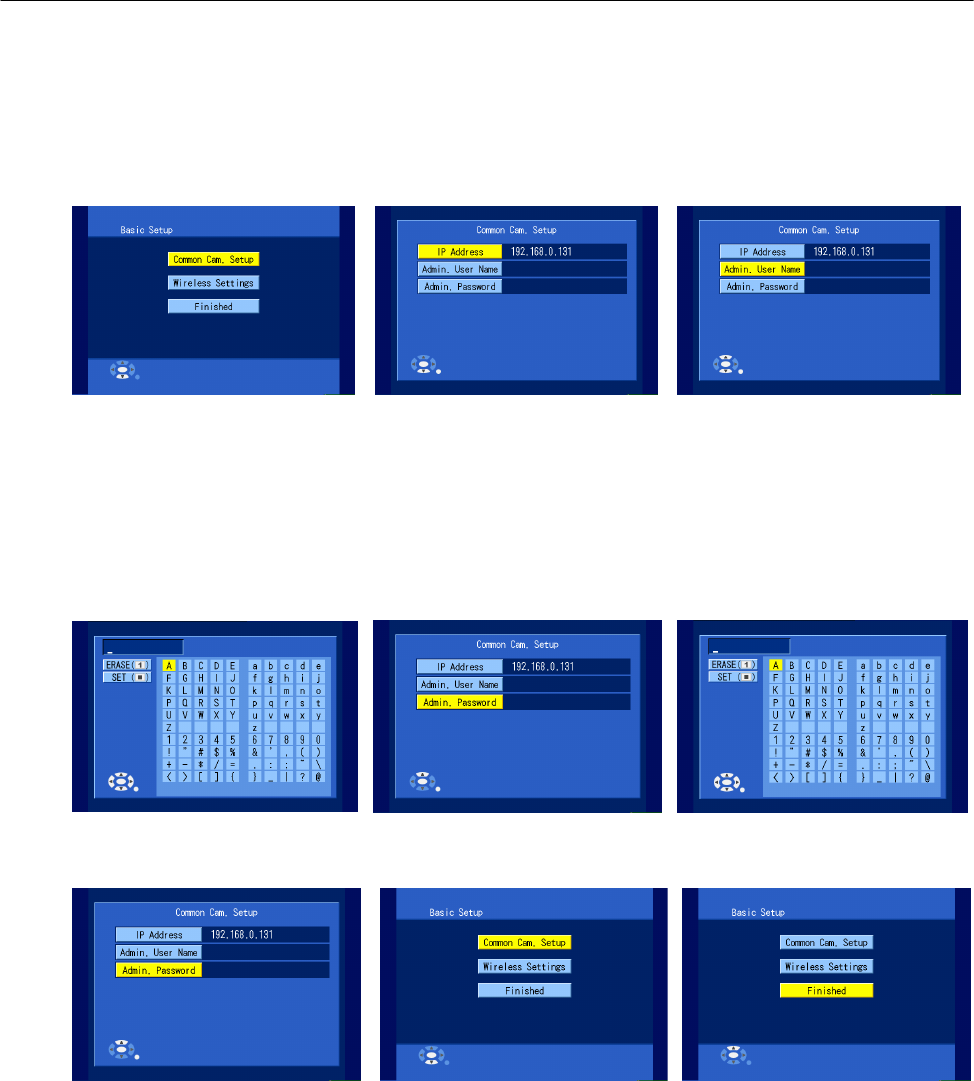
1. Press [ENTER], use the navigator keys to select [Admin. User Name], then press [ENTER].
2. Enter an administrator user name (6 or more characters and/or digits), the press [STOP] to save the
setting.
3. Select [Admin. Password], then press [ENTER].
4. Enter an administrator password (6 or more characters and/or digits), the press [STOP] to save the
setting.
• For instructions on entering characters using the remote control, see page xx.
5. Press [RETURN] to return to the top menu, use the navigator keys to select [Finished], then press
[ENTER].
Setup Guide
9
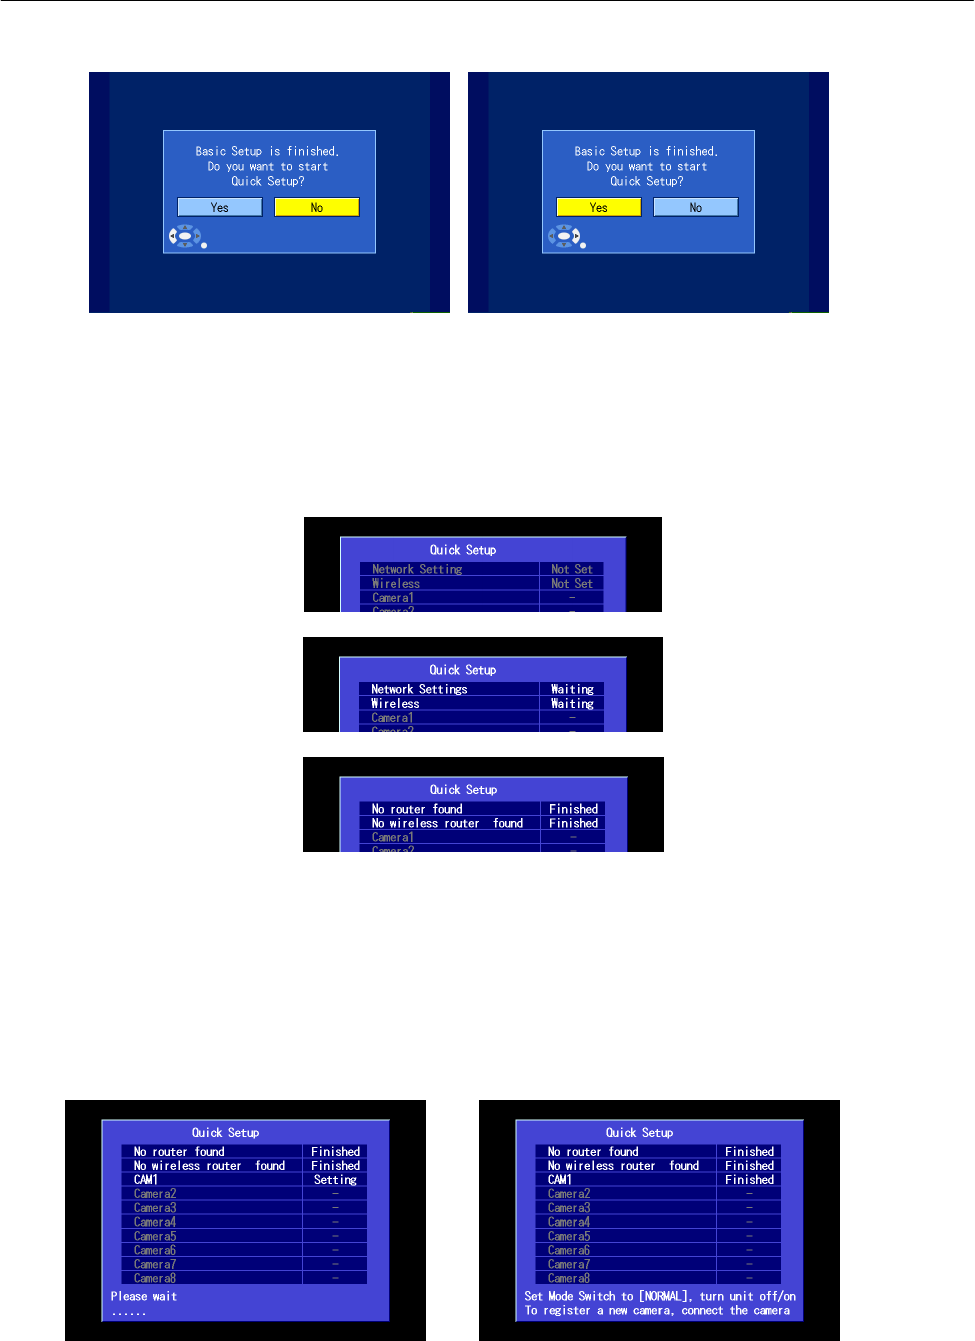
6. When the dialog is displayed, select [Yes] then press [ENTER] to start Quick Setup.
• The BL-WV10A restarts.
Quick Setup
To use the BL-WV10A with your cameras and the BB-HGW700A, you will need to configure the BL-WV10A
and each device. The BL-WV10A’s Quick Setup utility can help you configure the devices easily.
1. After the unit restarts, wait while the Quick Setup utility scans for network and wireless settings.
• When the BL-WV10A and BB-HGW700A have been configured, “Finished” is displayed and the
buzzer sounds.
2. Use an Ethernet cable to connect the camera to one of the LAN jacks on the BL-WV10A or to one of the
LAN jacks on the BB-HGW700A.
3. Connect the camera to the power outlet.
4. Wait while the Quick Setup utility restarts the camera, then configures and registers the camera.
• When the camera has been configured and registered, “Finished” is displayed next to the camera
name (“CAM1”) and the buzzer sounds.
5. To register another camera, connect the camera to one of the LAN jacks of the BL-WV10A or the

Setup Guide
10
BB-HGW700A, then turn the camera on by connecting it to the power outlet.
6. Before placing the cameras and the BB-HGW700A where you plan to use them, disconnect the Ethernet
cables and AC plugs from any cameras you plan to use wirelessly, and from the BB-HGW700A if you
plan to use it wirelessly.
• If connecting a BL-C30A wirelessly, set the camera’s mode switch to [WIRELESS].
7. Without connecting the Ethernet cables, turn on the cameras and BB-HGW700A again.
8. To finish, set the BL-WV10A’s mode switch to [NORMAL], disconnect the DC cord from the rear of the
unit, reconnect the DC cord, then continue from “Viewing Camera Images” on page xx. If images can be
viewed from all cameras, disconnect devices as necessary and place them where you plan to use them.
Setup Guide
11
Adding More Cameras to the System
Up to 8 BL-C10A or BL-C30A cameras can be registered to the BL-WV10A. If you purchase additional
cameras later, you can register them by setting the mode switch of the BL-WV10A to [SETUP], then turning
the unit off and on again. The Quick Setup utility will begin, and you can then follow the same procedure used
to register your existing cameras.
Viewing Camera Images
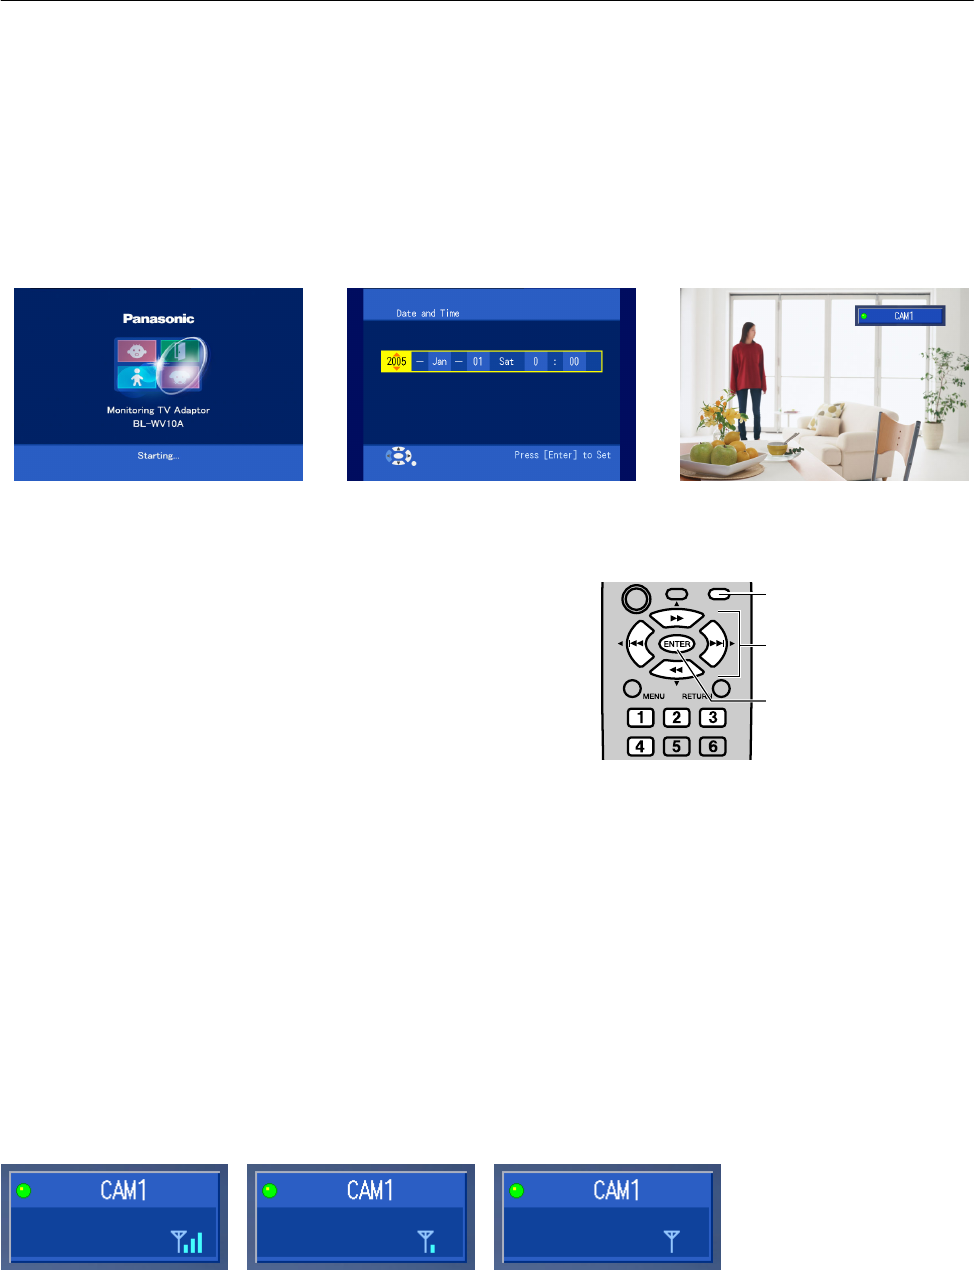
To start up the BL-WV10A to view camera images, make sure the mode switch on the rear of the unit is set to
[NORMAL] and turn on the BL-WV10A. The startup screen will appear. If the [Date and Time] screen appears,
set the date and time, then press [ENTER]. The camera image should then appear.
While camera images, you can aim the camera by
panning and tilting the lens using the navigator keys.
Pressing [DISPLAY] repeatedly displays different camera
and image information.
Pressing [ENTER] aims the camera at the camera’s
Home Position.
Pressing buttons [1]–[4] aims the camera at one of the
Preset Positions. You can change the 4 preset positions
and register 4 additional Preset Positions (5–8) as well.
For more information, see page xx in the Operating
Instructions.
[DISPLAY]
[ENTER]
Navigator keys
If the Camera Images Does Not Appear
If the image from a camera that you registered using Quick Setup does not appear, confirm that the camera is
turned on and that the Ethernet cable is connected to the camera correctly. If the camera is a BL-C30A being
used in wired mode, make sure the camera’s switch is set to [WIRED].
If the camera is a BL-C30A being used wirelessly, make sure the camera’s switch is set to [WIRELESS]. If the
wireless signal from the BL-C30A is too weak, motion images may become disrupted. Confirm the strength of
the signal by pressing [DISPLAY] while viewing the camera. Relocate the camera if the signal is too weak.
Strongest signal Weakest signal No signal

Setup Guide
12
Entering Characters with the Remote Control
Characters (letters, numbers, and symbols) can be entered using the remote control when setting camera
names, user names and passwords, etc.
Use the navigator keys to select the
desired character, then press [ENTER] to
copy the text to the text field in the
upper-left part of the screen.
You can erase characters, beginning with
the last entered character, by pressing
[1]. When you have finished, press
[STOP] to use the entered characters.
You will return to the previous screen
automatically.
Using the Included Stand
Insert the BL-WV10A into the included stand to use the unit in an upright position.
1. Raise the antenna.
2. Align the first and last slot as shown an insert
the BL-WV10A into the stand.
Antenna
First slot

Setup Guide
13
FCC and Other Information
This equipment has been tested and found to comply with the limits for a Class B digital device, pursuant to
Part 15 of the FCC Rules. These limits are designed to provide reasonable protection against harmful
interference in a residential installation. This equipment generates, uses, and can radiate radio frequency
energy and, if not installed and used in accordance with the instructions, may cause harmful interference to
radio communications. However, there is no guarantee that interference will not occur in a particular
installation. If this equipment does cause harmful interference to radio or television reception, which can be
determined by turning the equipment off and on, the user is encouraged to try to correct the interference by
one or more of the following measures:
• Increase the separation between the equipment and receiver.
• Connect the equipment into an outlet on a circuit different from that to which the receiver is
connected.
• Consult the dealer or an experienced radio/TV technician for help.
This product operates at frequencies that may cause interference to nearby TVs and VCRs. To minimize or
prevent such interference, the base of this product should not be placed near or on top of a TV or VCR. If
interference is experienced, move this product further away from the TV or VCR. This will often reduce or
eliminate interference. Operating near 2.4 GHz electrical appliances may cause interference. Move away from
the electrical appliances.
Environment
Do not place the product in a room where the temperature is less than 0 °C (+32 °F) or greater than +40 °C
(104 °F). Allow 10 cm (4 inches) clearance around the product for proper ventilation.
Avoid excessive smoke, dust, mechanical vibration, shock, or direct sunlight.
Routine care
Wipe the product with a soft cloth. Do not use benzine, thinner, or any abrasive powder. When you leave the
product unused for a long period of time, unplug the AC cord plug from the outlet.
If there is any trouble
Consult an authorized Panasonic Factory Service Center.
FCC RF Exposure Warning:
• To comply with FCC RF exposure requirements in uncontrolled environment:
• This equipment must be installed and operated in accordance with provided instructions and a
minimum 20 cm (8 inches) spacing must be provided between antenna and all person's body
(excluding extremities of hands, wrist and feet) during wireless modes of operation.
• This transmitter must not be co-located or operated in conjunction with any other antenna or
transmitter.

Setup Guide
14
Copyright:
This material is copyrighted by Panasonic Communications Co., Ltd., and may be reproduced for
internal use only. All other reproduction, i
n whole or in part, is prohibited without the written
consent of Panasonic Communications Co., Ltd.
Printed in Japan PSQX3750Z KK0205CH0 v.0.2
Medical
Consult the manufacturer of any personal medical devices, such as pacemakers, to determine if they are
adequately shielded from external RF (radio frequency) energy. (The product operates in the frequency range
of 2400 MHz to 2483.5 MHz, and the power output level is 0.1 watts.) Do not use the product in health care
facilities if any regulations posted in the area instruct you not to do so. Hospitals or health care facilities may
be using equipment that could be sensitive to external RF (radio frequency) energy.
Any changes or modifications not expressly approved by the party responsible for compliance could void the
user's authority to operate this device.
This device complies with Part 15 of the FCC Rules. Operation is subject to the following two conditi ons: (1)
This device may not cause harmful interference, and (2) this device must accept any interference received,
including interference that may cause undesired operation.
No responsibility will be taken by our company with respect to consequences resulting from the use and/or the
damage of this product.
Trademarks
• SD mark is a trademark of the SD Card Association.
• QuickTime and the QuickTime logo are trademarks of Apple Computer, Inc.
• All other trademarks identified herein are the property of their respective owners.