Panasonic of North America 96NKX-HDV430 SIP Phone with Bluetooth Transceiver User Manual Operating Instructions
Panasonic Corporation of North America SIP Phone with Bluetooth Transceiver Operating Instructions
UserManual.wiki
>
Panasonic of North America
>
96NKX HDV430 User Manual
User Manual
Navigation menu
Upload a User Manual
Namespaces
Wiki Guide
HTML
PDF
Info
Views
User Manual
Discussion / Help
Navigation
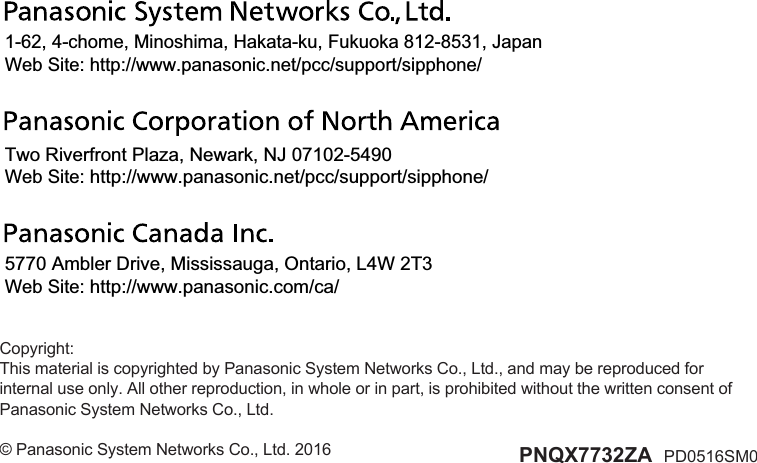
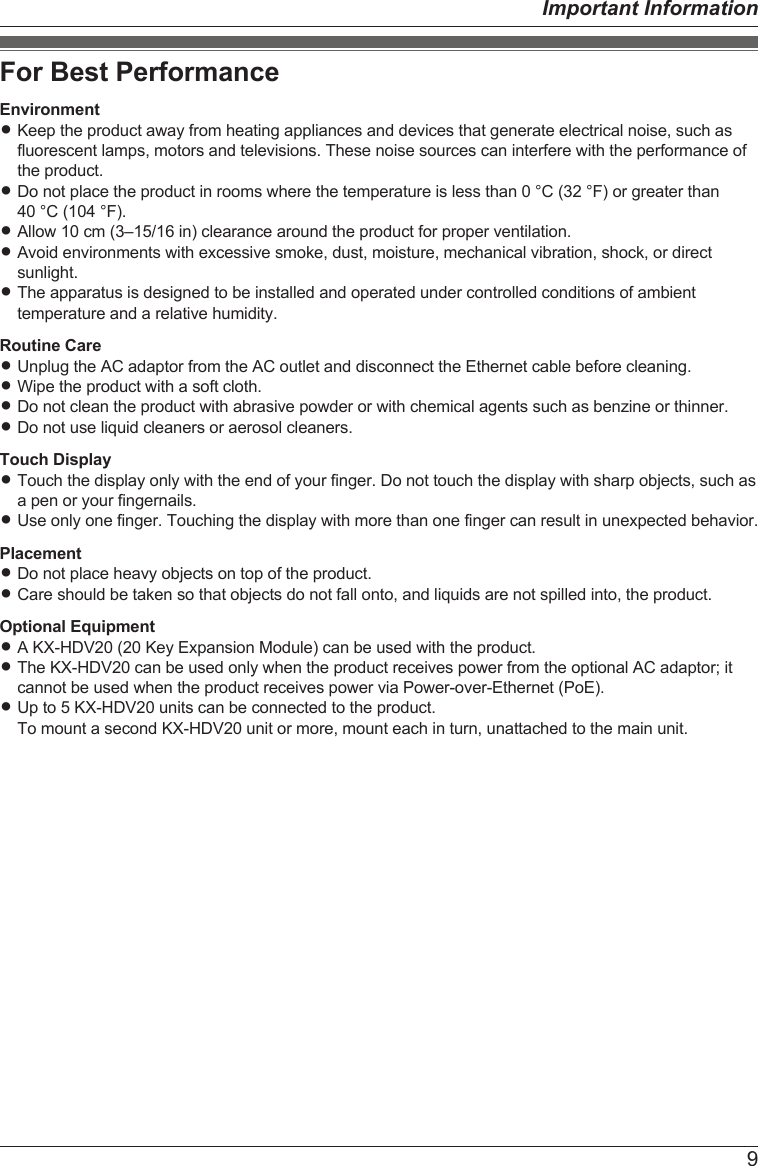
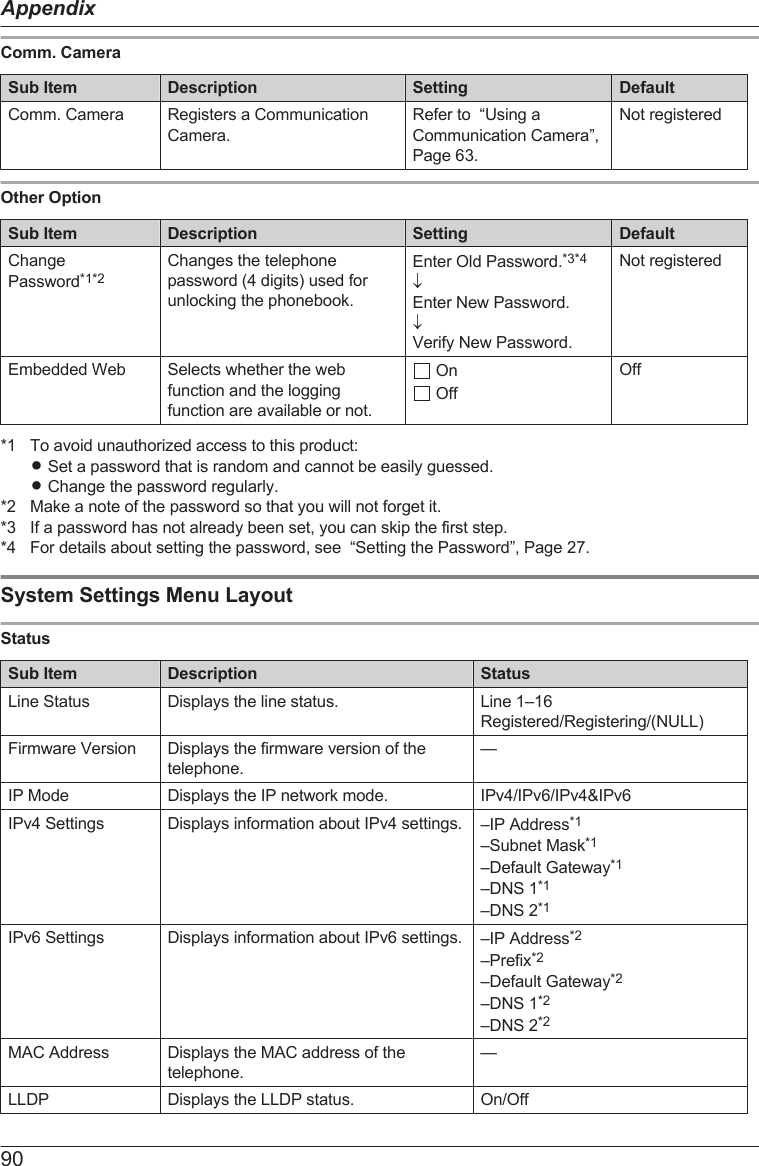
![For Users in European CountriesThe following declaration is applicable to KX-HDV430NE/KX-HDV430X onlyPanasonic System Networks Co., Ltd. declares that this equipment is in compliance with the essentialrequirements and other relevant provisions of Radio & Telecommunications Terminal Equipment(R&TTE) Directive 1999/5/EC.Declarations of Conformity for the relevant Panasonic products described in this manual are available fordownload by visiting:http://www.ptc.panasonic.euContact to Authorized Representative:Panasonic Testing CenterPanasonic Marketing Europe GmbHWinsbergring 15, 22525 Hamburg, GermanyEcodesign informationEcodesign information under EU Regulation (EC) No.1275/2008 amended by (EU) Regulation No.801/2013.=======================================Please visit here: www.ptc.panasonic.euclick [Downloads]® Energy related products information (Public)=======================================Power consumption in networked standby and guidance are mentioned in the web site above.For Users in the United KingdomRThis unit is designed to be installed under controlled conditions of ambient temperature and a relativehumidity.RAvoid installing the unit in damp or humid environments, such as bathrooms or swimming pools.R999 and 112 can be dialed on the product after accessing the outside line for the purpose of makingoutgoing calls to the BT emergency (999) and (112) services.The method for accessing an outside line differs depending on the SIP server. For details, confirm thefeatures of the SIP server.For Users in AustraliaWARNINGRPlease ensure that a separate telephone, not dependent on local power, is available for emergencyuse.RThis equipment will be inoperable when mains power fails.RNo “000” or other calls can be made from this device during a mains power failure.5Important Information](https://usermanual.wiki/Panasonic-of-North-America/96NKX-HDV430/User-Guide-3019853-Page-5.png)
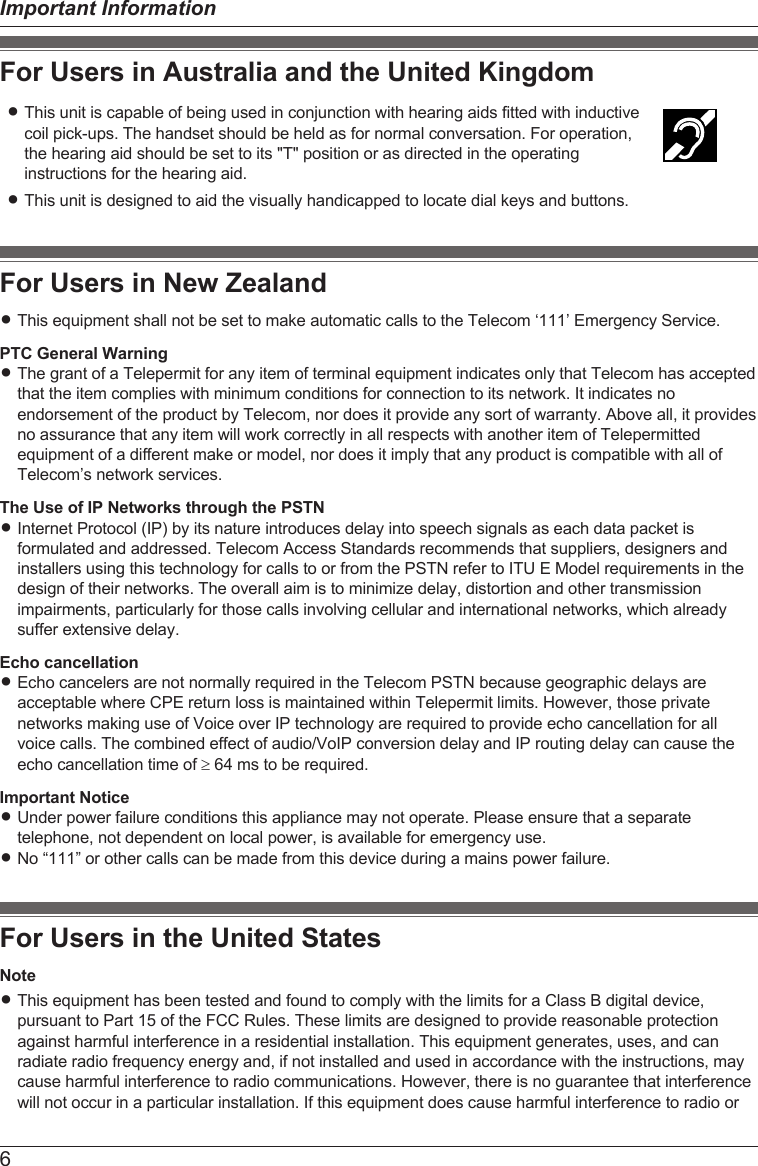

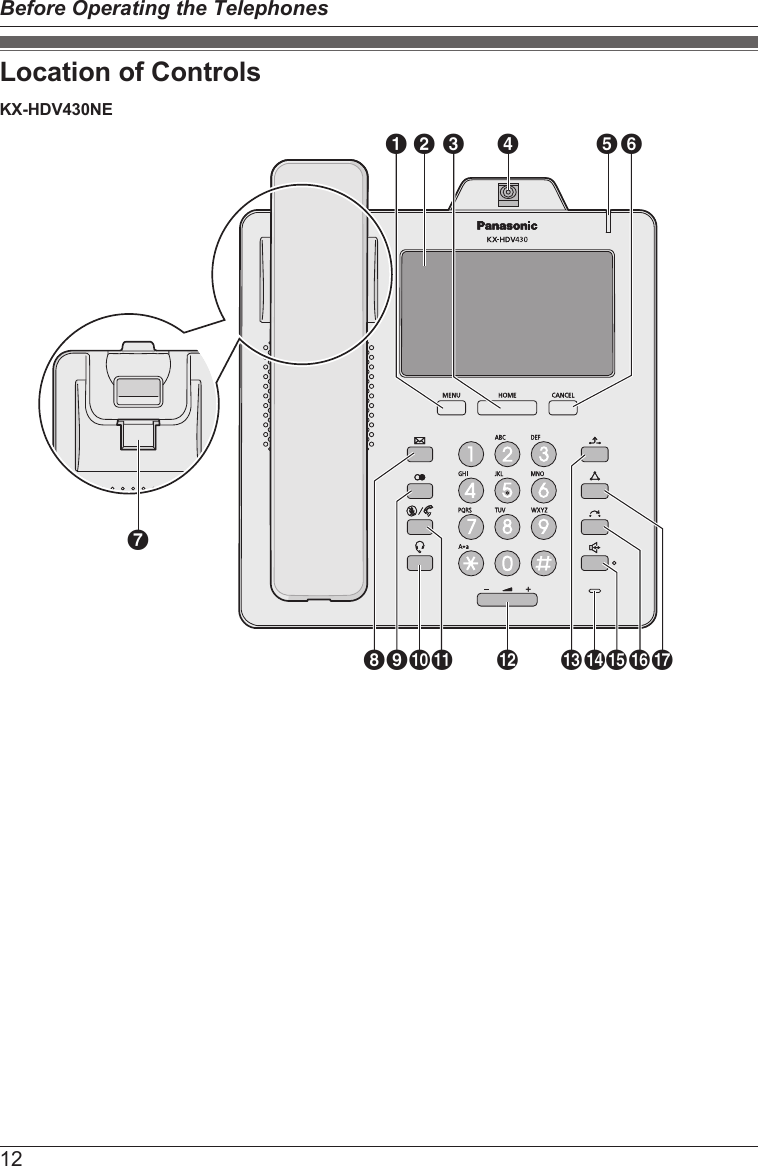
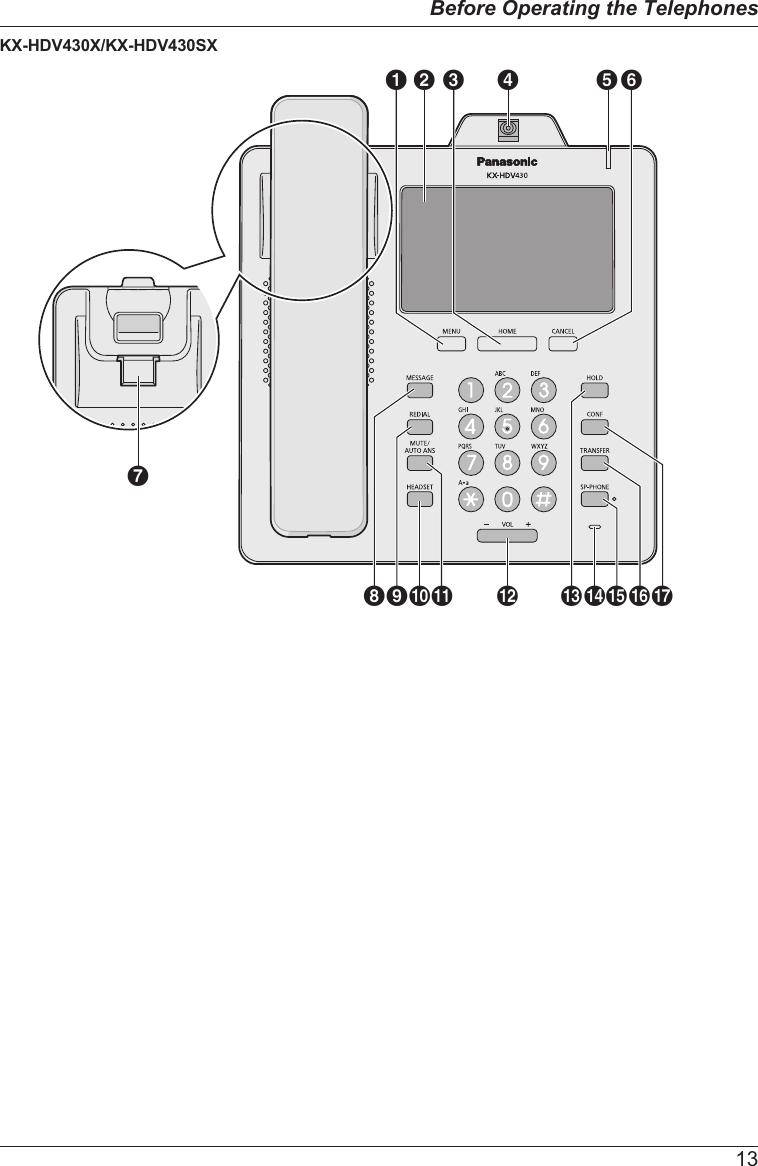
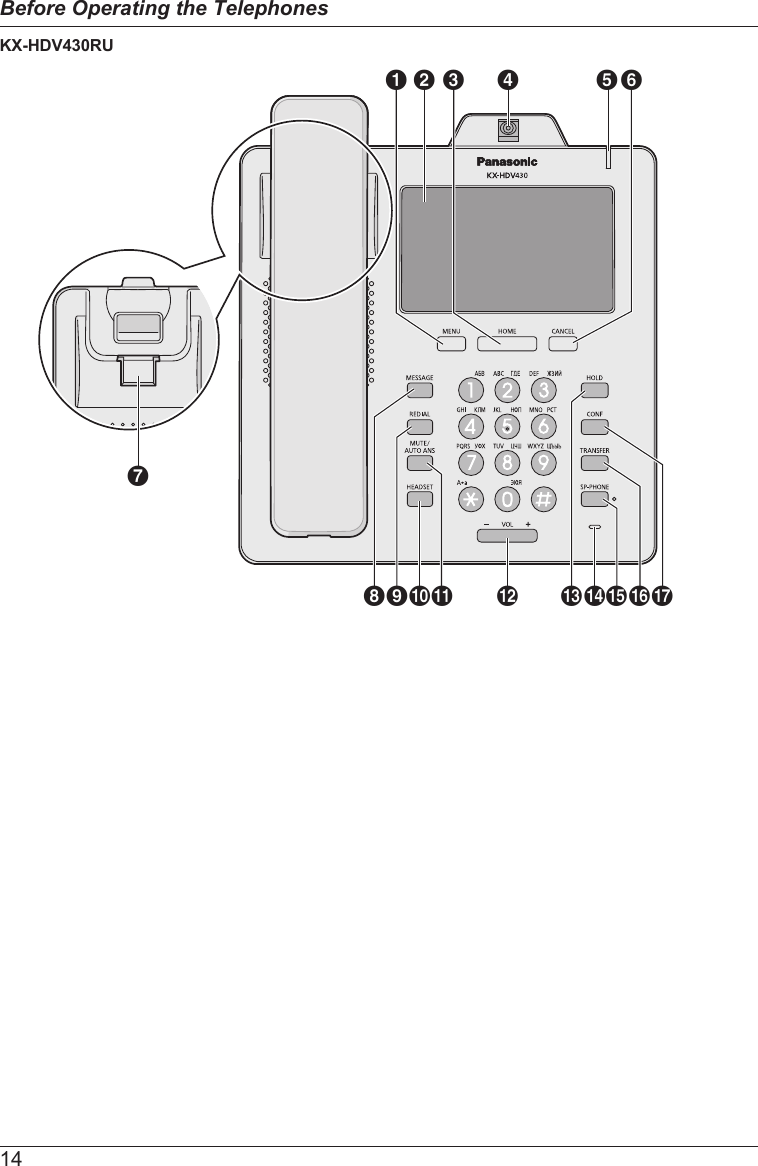
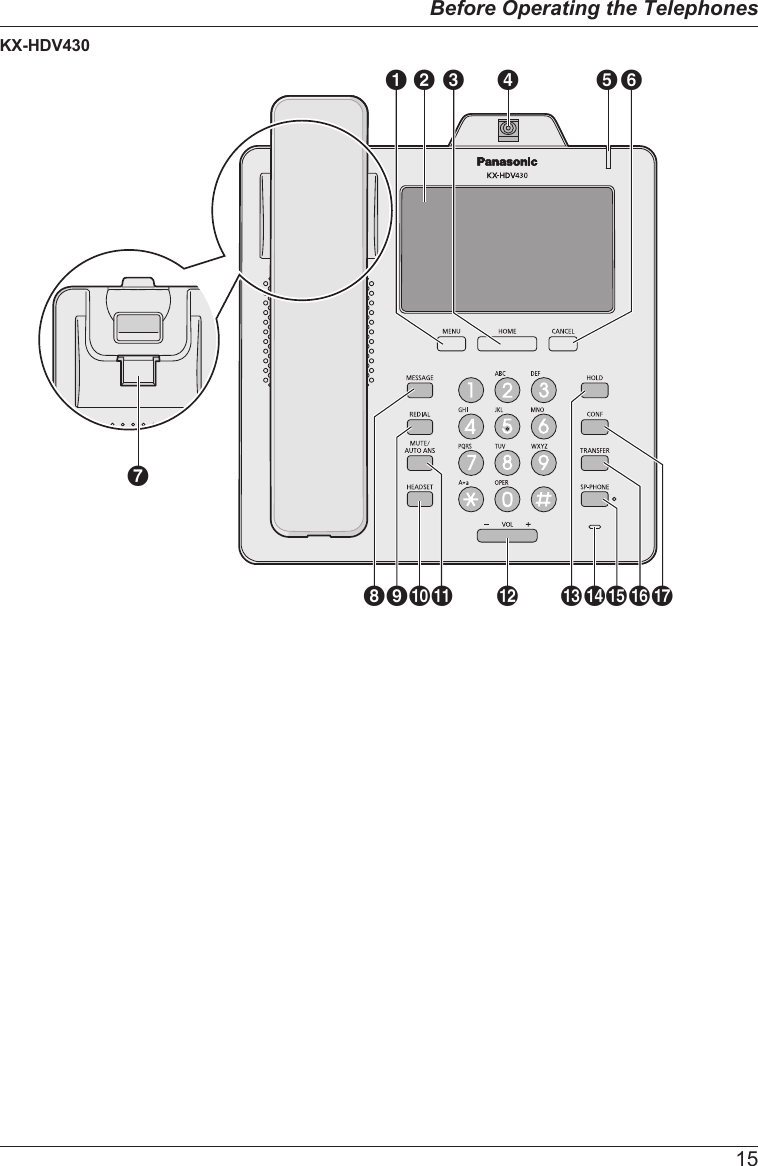

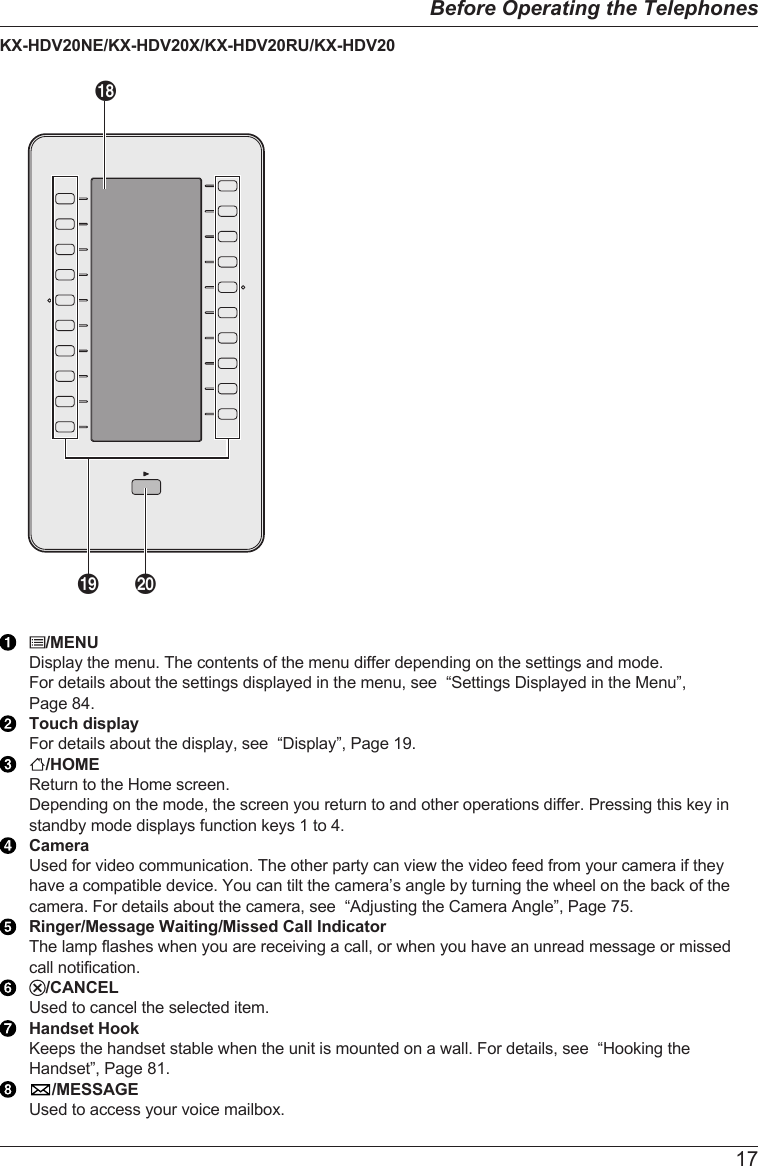
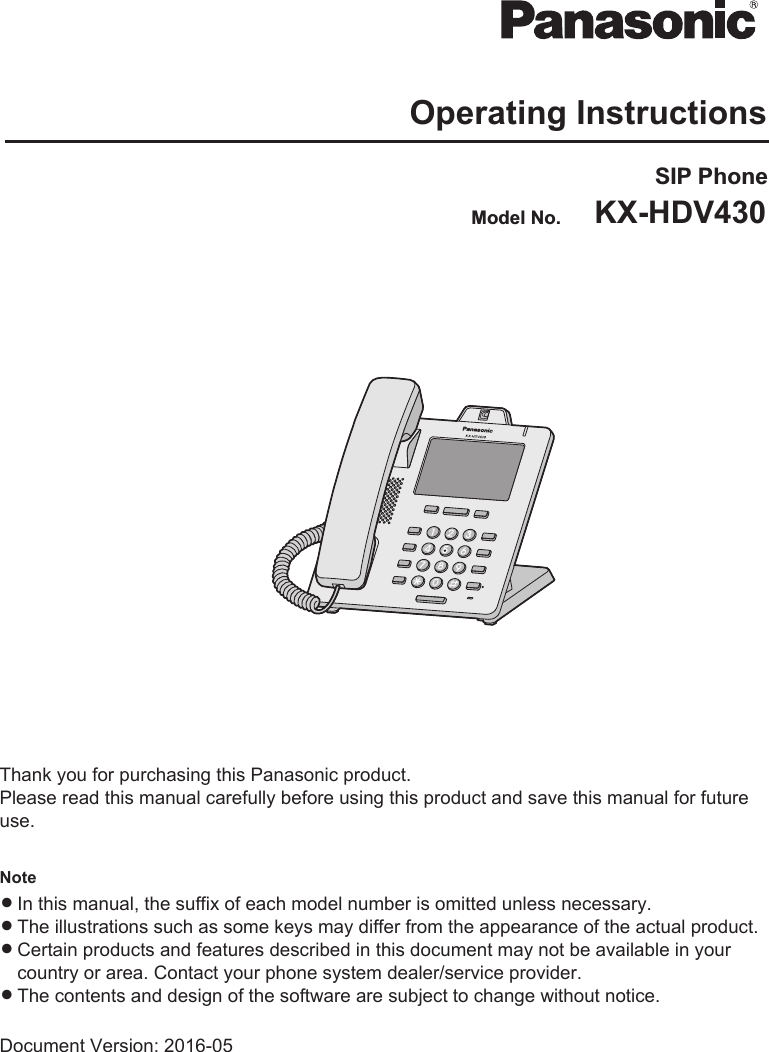
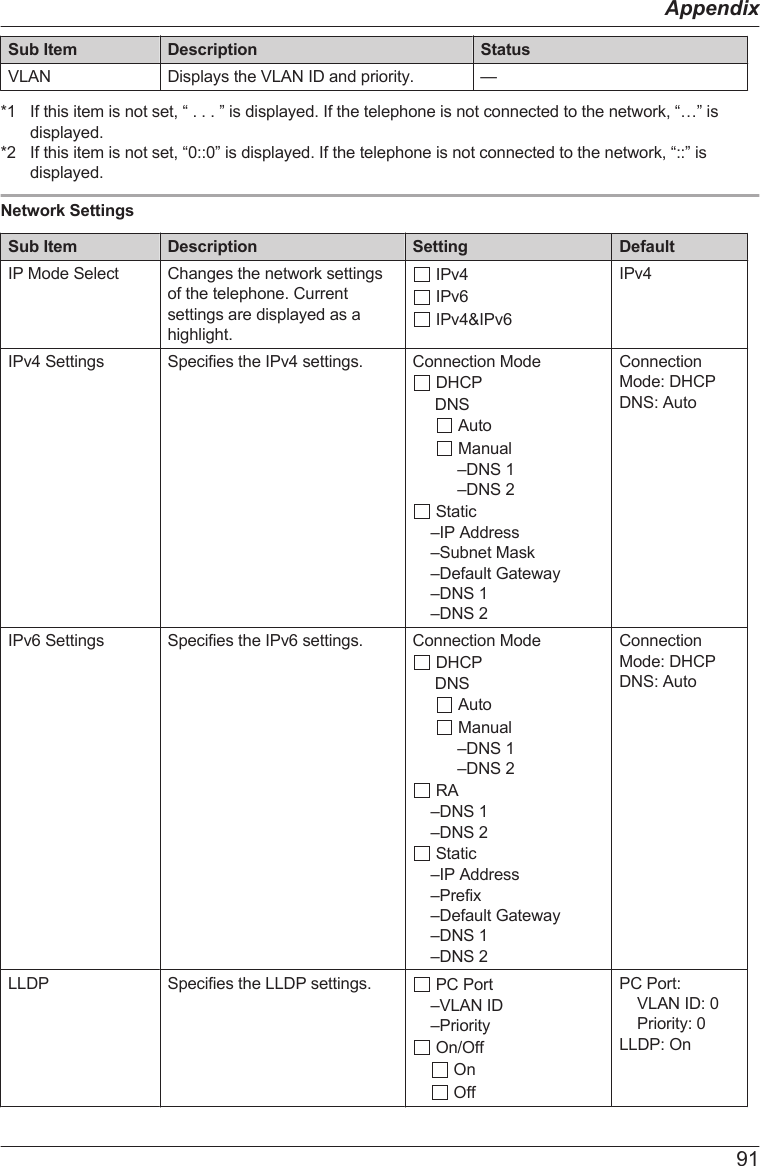
![/ /REDIALUsed to redial the last dialed number./HEADSETUsed for performing headset operations./MUTE/AUTO ANSUsed to receive an incoming call in hands-free mode or mute the microphone/handset during aconversation./VOLUsed to adjust the ringer/receiver volume./ /HOLDDuring talking, used to place a call on Hold. In standby mode, used to retrieve a call on hold if thereis one.MicrophoneUsed for hands-free conversation./SP-PHONEUsed for performing hands-free operations./ /TRANSFERUsed to transfer a call to another party./CONFUsed to establish a multiple-party conversation.Self-labeling LCDFor details about the self-labeling LCD, see “KX-HDV20 Self-labeling LCD”, Page 23.DSS Keys [01–20]*1Used to perform the assigned function. When a key is assigned as a Line key, it can be used toconfirm the status of the line. The key name that you assigned is displayed on the KX-HDV20’sself-labeling LCD. For details about changing the DSS keys, see “Changing the Function Keys(Program Keys and DSS Keys)”, Page 66.DSS Page Key*1Used to switch the page of DSS keys displayed on the KX-HDV20 self-labeling LCD. There are twopages of 20 DSS keys.*1 These keys can be used when you connect a KX-HDV20 to the unit."DSS" stands for "Direct Station Selection".18Before Operating the Telephones](https://usermanual.wiki/Panasonic-of-North-America/96NKX-HDV430/User-Guide-3019853-Page-18.png)
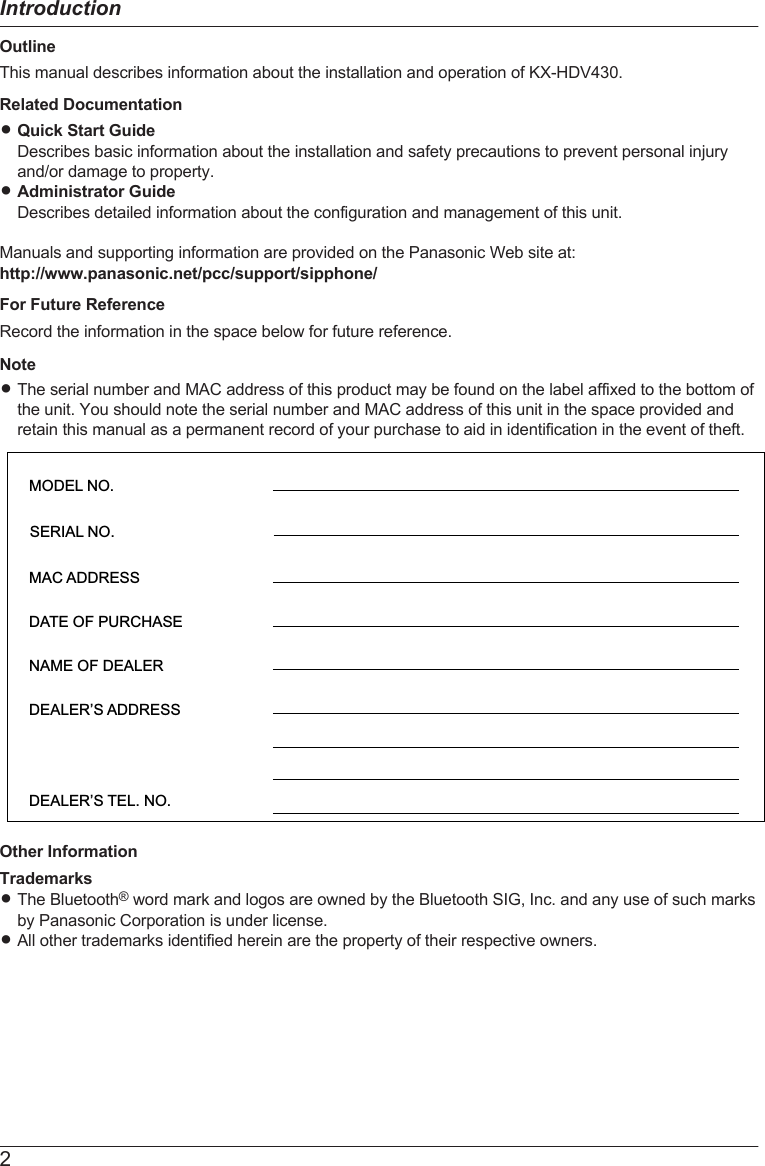
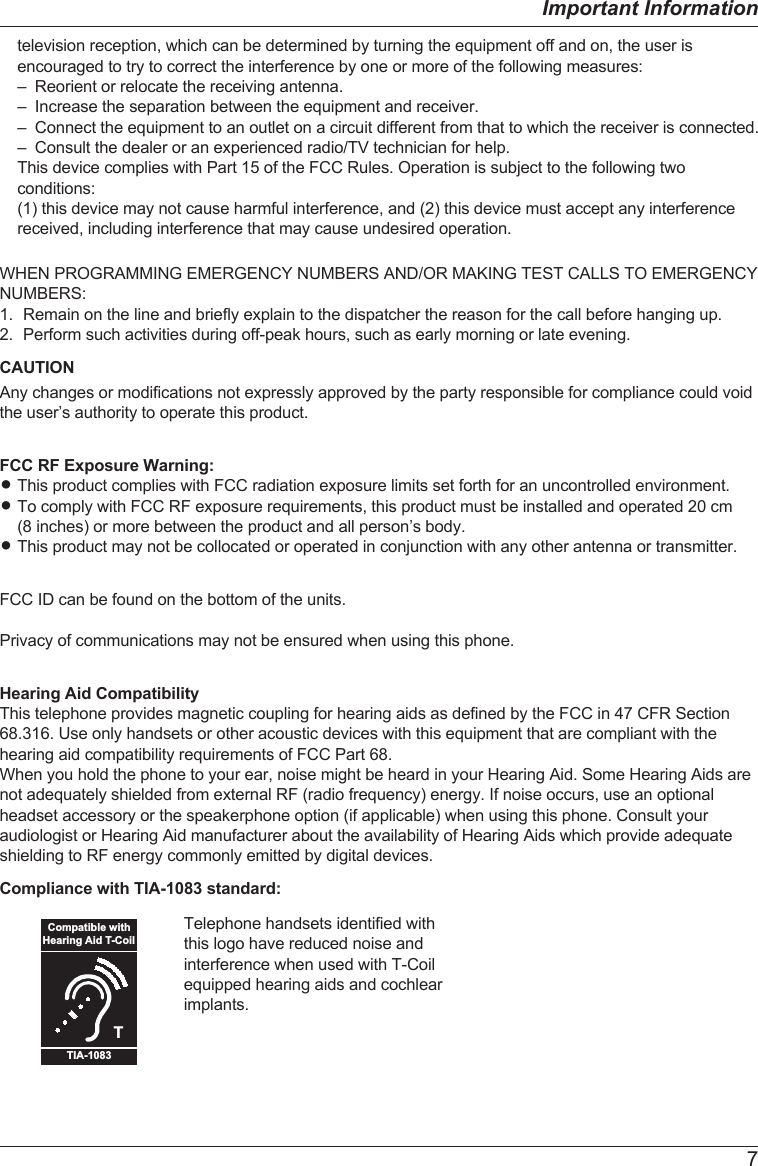
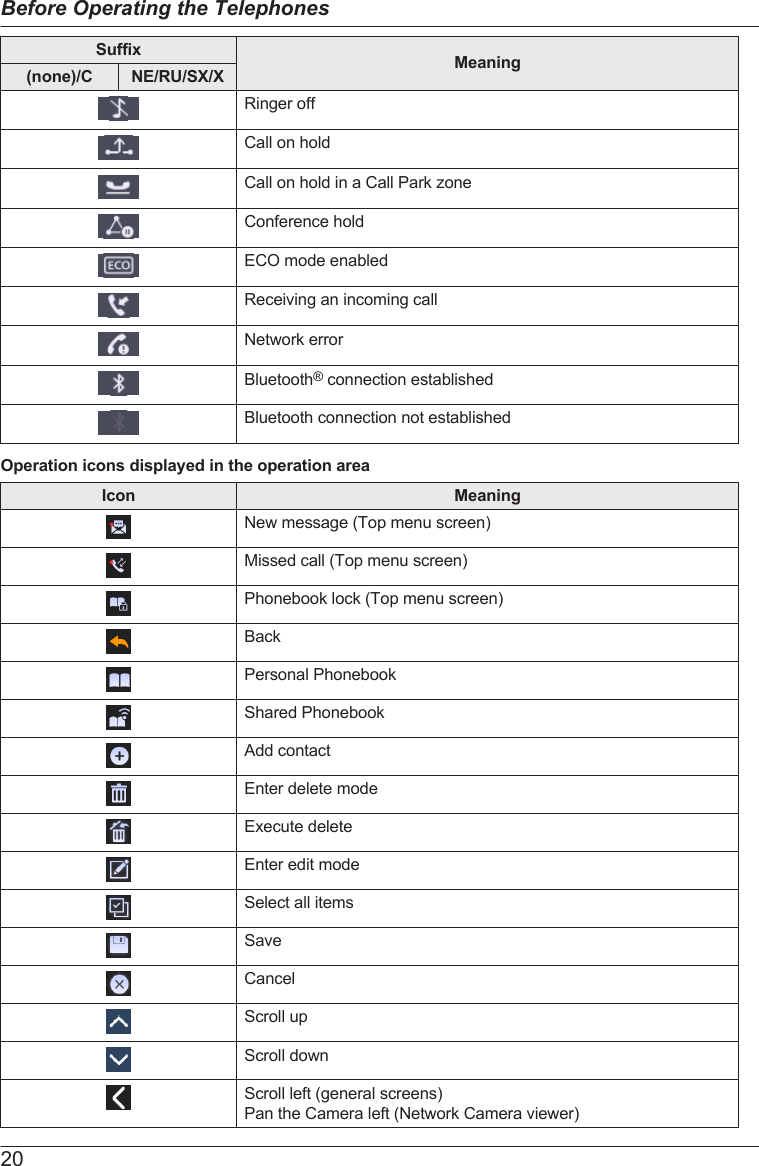
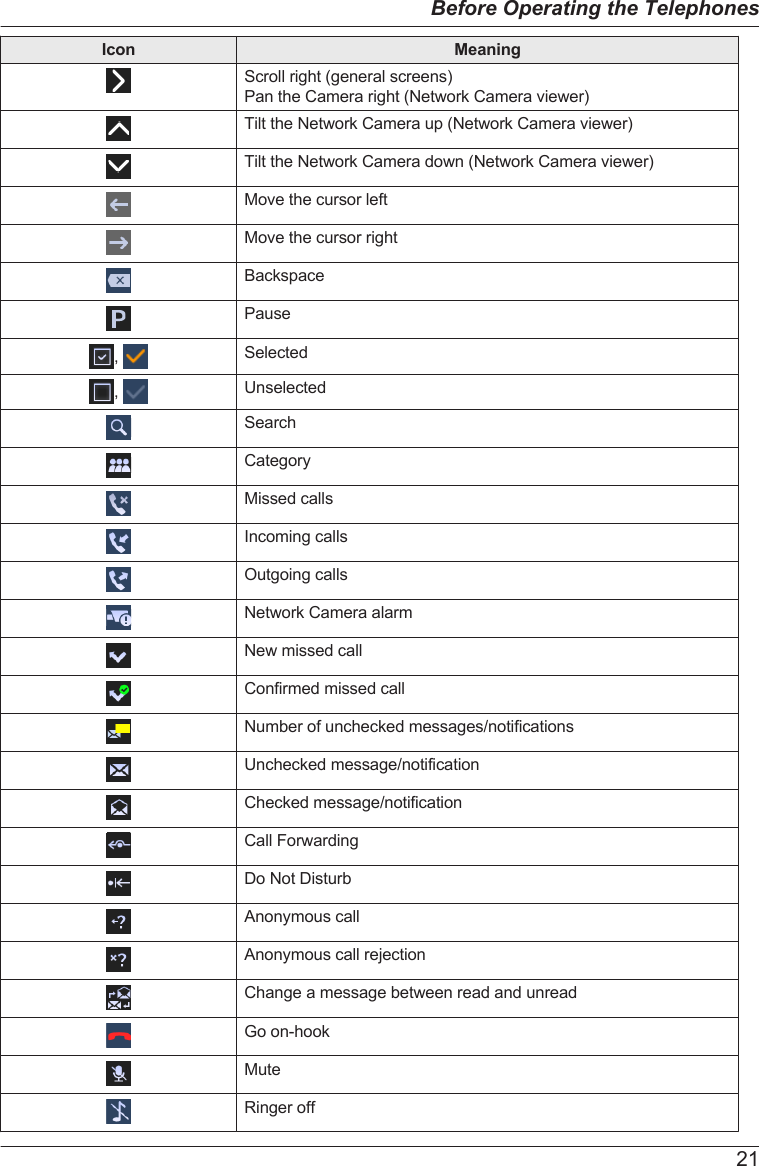
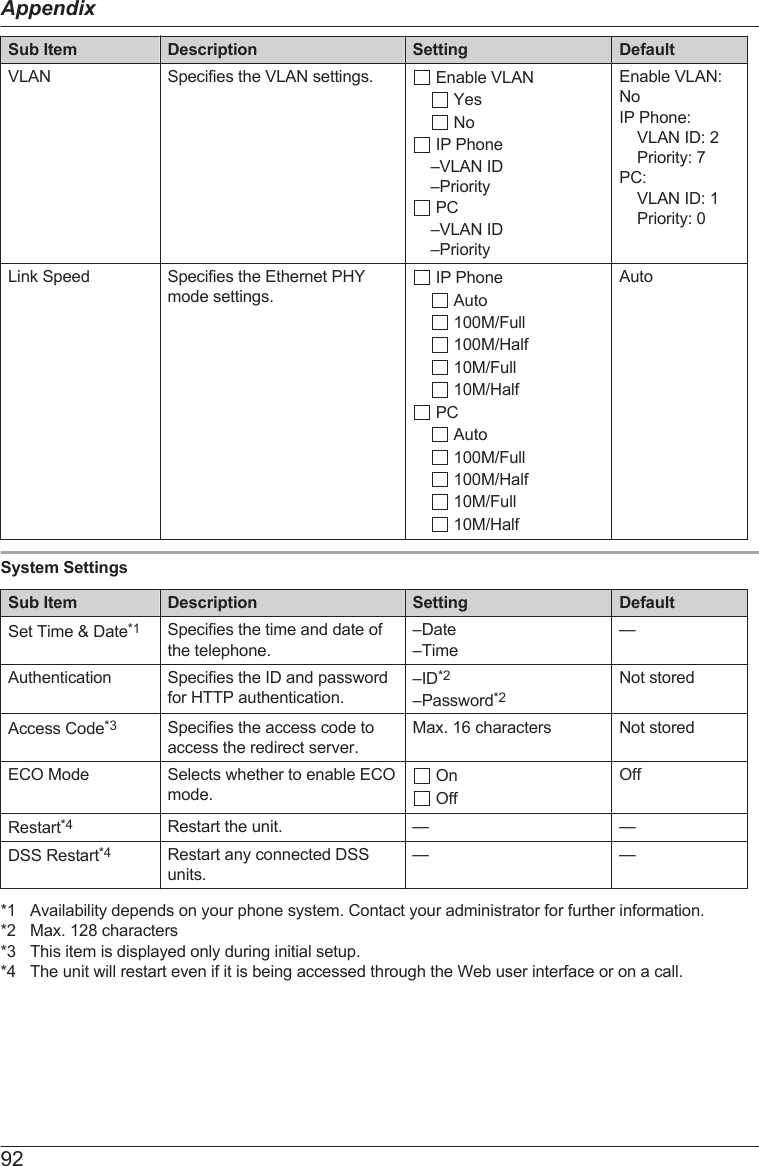
![The Display and IconsDisplay[Example]Status barDisplays the number and name of the telephone line, status icons, communication method icons, themute icon, and the time.On the settings screens, the screen title is displayed.Tapping this area has no effects.If 4 or more icons are displayed, the status bar will alternate between 2 display patterns.Operation areaDisplays the screens for all functions. Tapping here operates the telephone.The touch display responds only to tap operations.The icons for the top screen change depending on the phone’s status.Icons displayed in the status barSuffix Meaning(none)/C NE/RU/SX/XHandset in useHeadset in useUsing speakerphone Off-hook monitor Training modeFwd enabledDND enabledAuto answer enabledMute19Before Operating the Telephones](https://usermanual.wiki/Panasonic-of-North-America/96NKX-HDV430/User-Guide-3019853-Page-19.png)
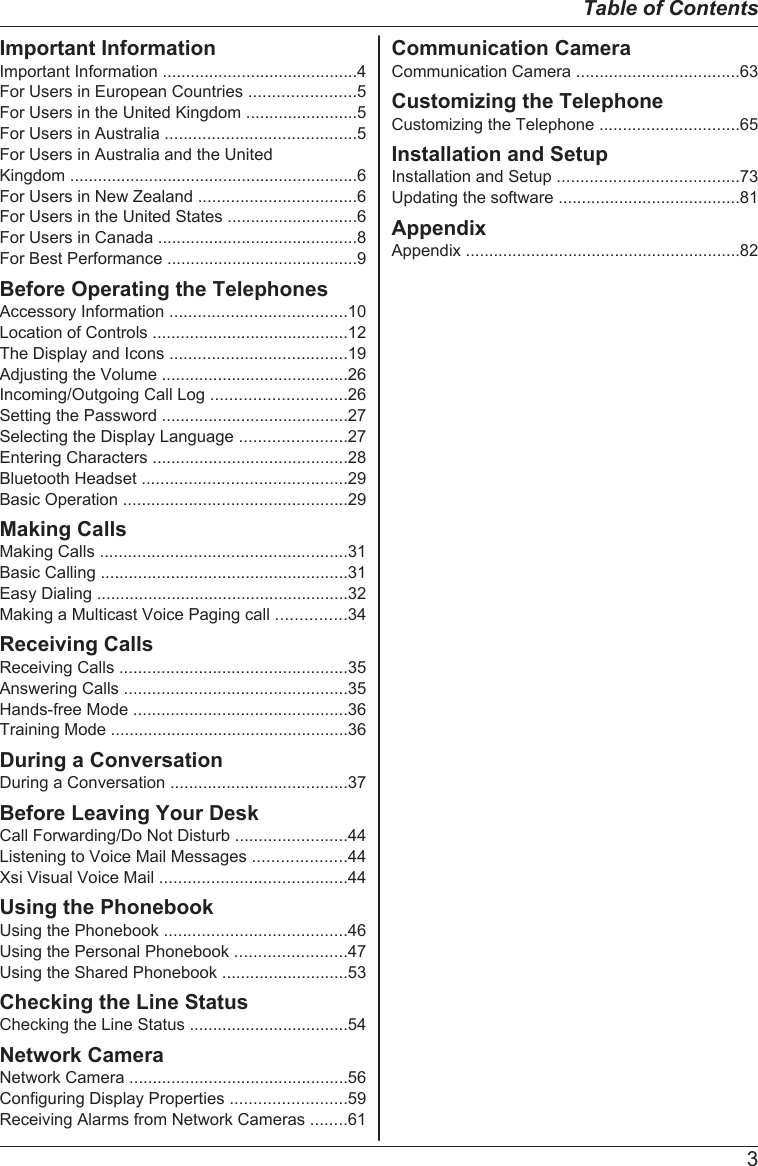
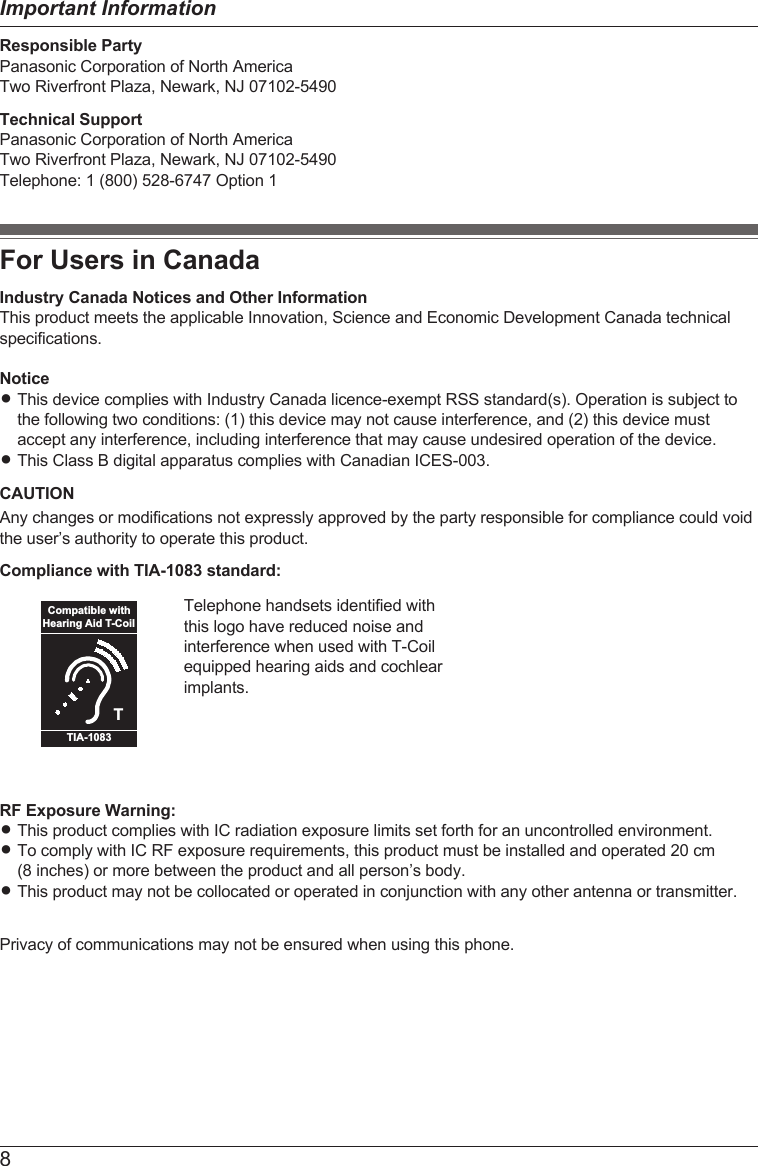
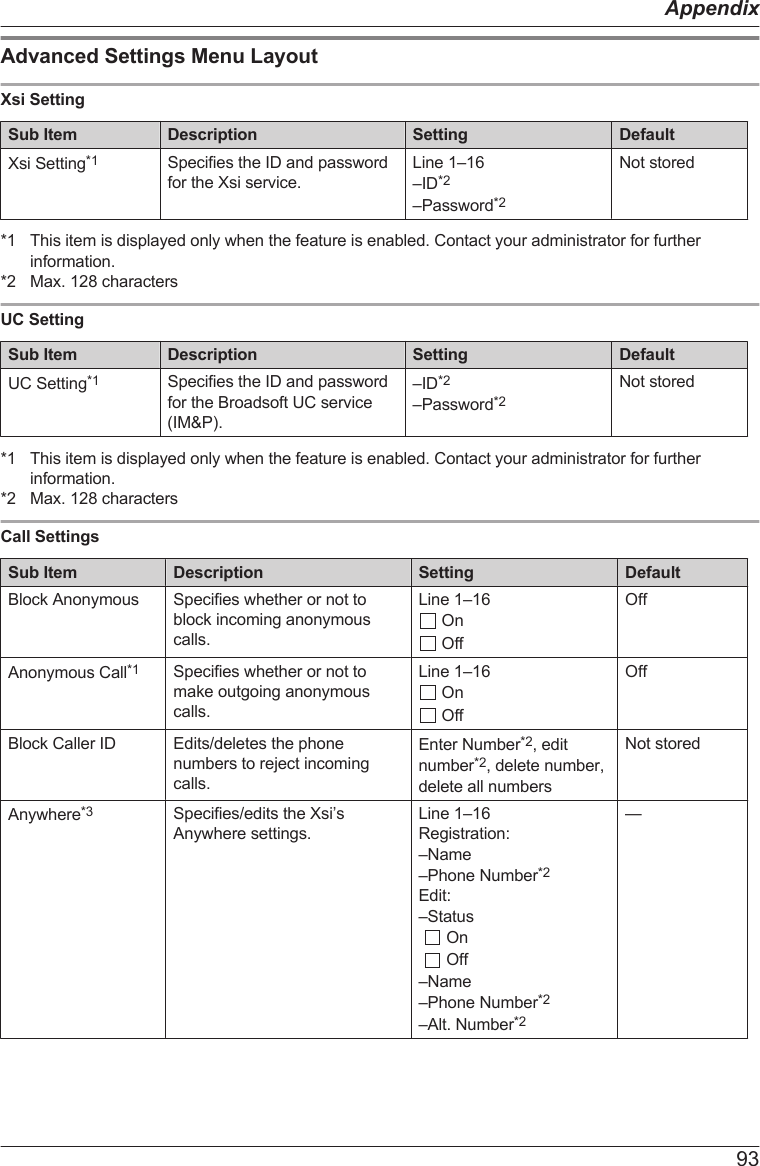
![KX-HDV20 Self-labeling LCD[Example]KX-HDV20 (Optional model)*1020019018016015014013012011010008007006005004003002001ABC*1 Up to 40 keys (20 keys ´ 2 pages) can be registered.PictographsPictograph Meaning Pictograph Meaning(Number) No function is assigned. PhonebookOne Touch Dial Call HistoryLine Simultaneous RingLine Status Wrap UpBLF Directed Call PickupACD (Login/Logout) Call ForwardHoteling/Hospitality TransferConference Blind TransferParkPark RetrieveNetwork Camera ApplicationFunction Label Name23Before Operating the Telephones](https://usermanual.wiki/Panasonic-of-North-America/96NKX-HDV430/User-Guide-3019853-Page-23.png)
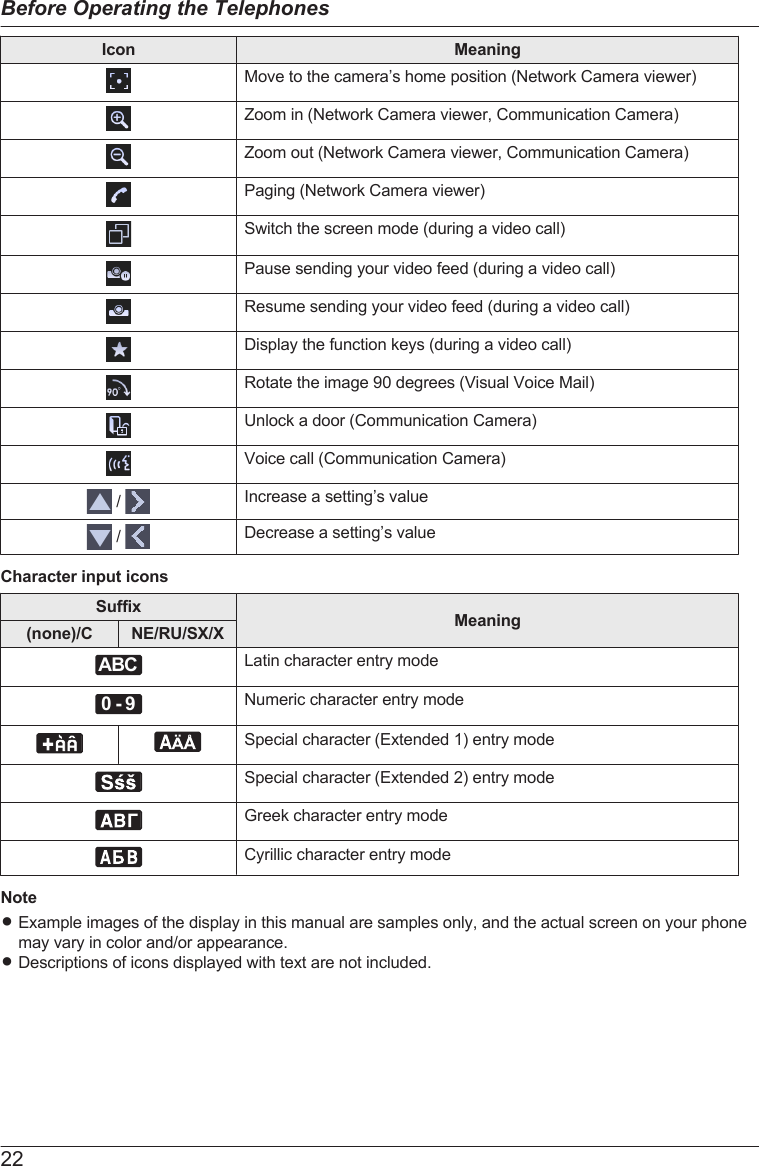
![Presence*1Used to access the Presence feature.Application*1Used to access the Application feature.*1 This item is displayed only when the feature is enabled. Contact your administrator for furtherinformation.Adjusting the VolumeAdjusting the Receiver/Speaker/Headset Volume1. Press [k]/[j] volume key: Adjust the volume during a conversation.NoteRBoth receiver volume and headset volume are adjusted in training mode. See “Training Mode”,Page 36.Adjusting the Ringer Volume or Turning the Ringer Off[In standby mode]1. Press [k]/[j] volume key: Adjust the ringer volume.2. Tap "OK".NoteRFor details about setting the ringer pattern, see “Incoming Option”, Page 85.Adjusting the Ringer Volume or Turning the Ringer Off while RingingWhile receiving a call, do the following to adjust the ringer volume or turn the ringer off:NoteRIf you attach a headset while receiving an incoming call, ringing will be heard from the speaker.To adjust the ringer volume1. Press [k]/[j] volume key: Adjust the ringer volume.NoteRThe adjusted volume level will also be used for subsequent calls.RThe volume can also be adjusted in the pop-up window.To turn the ringer off1. Tap .Incoming/Outgoing Call LogDisplaying the Incoming/Outgoing Call Log[In standby mode]1. Tap / a "Call History"2. Missed Call Log: Tap .Incoming Call Log: Tap .26Before Operating the Telephones](https://usermanual.wiki/Panasonic-of-North-America/96NKX-HDV430/User-Guide-3019853-Page-26.png)
![Outgoing Call Log: Tap .Making a call using the Incoming/Outgoing Call LogSee “Using the Incoming/Outgoing Call Log”, Page 32.Storing an item using the Incoming/Outgoing Call LogSee “Storing an Item Using the Incoming or Outgoing Call Log”, Page 48.Deleting Items in the Incoming/Outgoing Call Log[When the Incoming or Outgoing Call Log is displayed]1. Tap .2. Tap / : Tap the check boxes of the items you want to delete.3. Tap . a "OK"NoteRYou can select all items in the list by tapping .Setting the PasswordThe telephone password is not set by default. You must register a password (4 digits) before use. Youcannot use the following features without setting a password:RPhonebook lock (See “Locking the Phonebook”, Page 52).NoteRTo avoid unauthorized access to this product:– Set a password that is random and cannot be easily guessed.– Change the password regularly.RMake a note of the password so that you will not forget it.To set[In standby mode]1. Tap / a "Basic Settings"2. Tap / a "Other Option"3. Tap "Change Password".4. Enter a new password (4 digits [0–9]).*1 a "OK"5. Verify the password by entering it again as in step 4.*1 If a password is already set, you will need to enter the old password first.Selecting the Display LanguageYou can select the language displayed on your LCD.[In standby mode]1. Tap / a "Basic Settings"2. Tap / a "Display Option"3. Tap / a "Language"27Before Operating the Telephones](https://usermanual.wiki/Panasonic-of-North-America/96NKX-HDV430/User-Guide-3019853-Page-27.png)
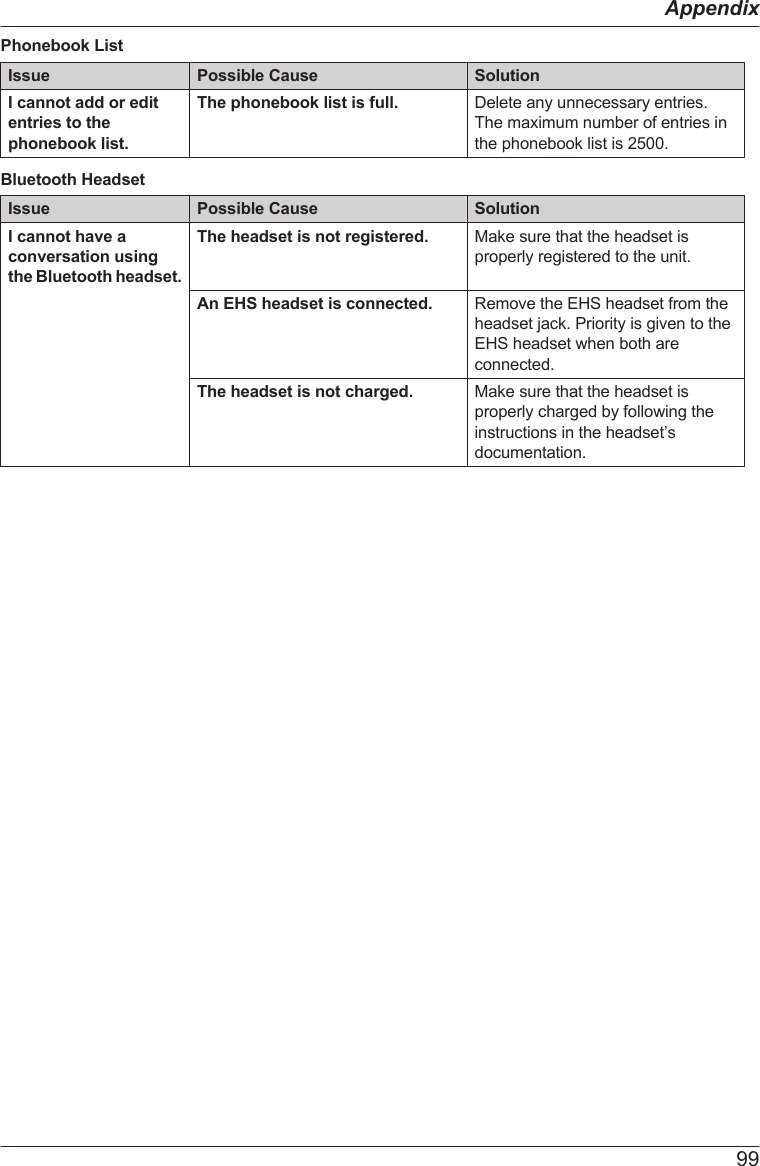
![Bluetooth HeadsetBefore using a Bluetooth headset, you need to register it to the unit.Registering a Bluetooth headsetSet the headset to pairing mode by following the instructions in the headset’s documentation.1. Tap / a "Basic Settings"2. Tap / a "Bluetooth Headset"3. Tap "Add New Device".4. Enter the PIN.*1 a "OK"*1 For more information regarding the PIN, see the documentation for your headset.Deregistering a Bluetooth headset1. Tap / a "Basic Settings"2. Tap / a "Bluetooth Headset"3. Tap "Registration". a "Yes"Connecting a Bluetooth headset1. Tap / a "Basic Settings"2. Tap / a "Bluetooth Headset"3. Tap "Connection". a "On" a "OK"Disconnecting a Bluetooth headset1. Tap / a "Basic Settings"2. Tap / a "Bluetooth Headset"3. Tap "Connection". a "Off" a "OK"NoteRDuring a conversation using a Bluetooth headset, the receiver volume can be adjusted using thevolume key on either the headset or the main unit.RThe connection status can be viewed on the status bar.RSignals are transmitted between the unit and the Bluetooth headset using radio waves. For maximumdistance and noise free operation, it is recommended that the unit be situated away from electricalappliances such as faxes, radios, personal computers, and microwaves.RPrivacy of communications may not be ensured when using the unit.Basic OperationGoing off-hookIn this manual, when you see the phrase "off-hook", you can do any of the following:RLift the corded handset off its cradle.RPress /[SP-PHONE] while the corded handset is on its cradle. This enables hands-free mode.RPress /[HEADSET] when using a headset.RTap the corresponding function key to select a line.*1*1 When a function key is assigned as a Line key or Line Status key, this feature is available.29Before Operating the Telephones](https://usermanual.wiki/Panasonic-of-North-America/96NKX-HDV430/User-Guide-3019853-Page-29.png)
![Going on-hookIn this manual, when you see the phrase "on-hook", you can do any of the following:RReplace the corded handset on its cradle.RPress /[SP-PHONE] when you are in hands-free mode.RPress /[HEADSET] when using a headset.RPress /[CANCEL].RTap "Off".30Before Operating the Telephones](https://usermanual.wiki/Panasonic-of-North-America/96NKX-HDV430/User-Guide-3019853-Page-30.png)
![Making CallsRYou can select whether to make a voice call or a video call. If you make a call by going off-hook, thetype of call that is established depends on the "Call Mode" setting (Page 88).RYou can confirm that the number was dialed correctly before calling (Predialing) by entering thenumber, then going off-hook.RIf an outside call is received from a phone number stored in the phonebook, the number and name ofthe caller will be displayed in the call log.RTo cancel dialing, press /[CANCEL].RTo insert a 3 second pause between phone numbers, tap "Pause".*1It is useful when you want to operate voice mail service without listening to pre-recordedannouncement, for example. Repeat as needed to create longer pauses.RThe "+" symbol (international dialing code) can be entered by pressing and holding the "B" key.*1 This icon is displayed only when configured on the telephone. Contact your administrator for furtherinformation.Basic CallingCalling by Dialing[In standby mode]1. Go off-hook.2. Dial the outside party’s number.3. Tap "Voice Call" to make a voice call.Tap "Video Call" to make a video call.4. Go on-hook to end the call.NoteRYou can use a specific line by pressing a function key assigned to a line (see “Changing the FunctionKeys (Program Keys and DSS Keys)”, Page 66) or by using the Line Status screen (see “Checkingthe Line Status”, Page 54).RTo dial a new number without going on-hook, follow the procedure below.[During a Conversation]1. Press /[MENU].2. Tap "Flash"/"Recall".Predialing[In standby mode]1. Dial while still on-hook.2. Do one of the following:RGo off-hook.*1RTap "Voice Call" to make a voice call.RTap "Video Call" to make a video call.*1 The type of call that is established depends on the "Call Mode" setting.31Making Calls](https://usermanual.wiki/Panasonic-of-North-America/96NKX-HDV430/User-Guide-3019853-Page-31.png)
![Easy DialingMaking a call using the redial listThe last phone number dialed is stored in the redial list (32 digits max.).[In standby mode]1. Press / /[REDIAL].2. Go off-hook.NoteRThe type of call (voice or video) is the same as the previous outgoing call.RIf this procedure is performed during a conversation, the conversation will end, and then redialing isperformed.Hot Key DialingYou can assign a phone number to each number key and then access the desired phone number bysimply pressing and holding the assigned number key.1. Press and hold the dialing key (0–9) assigned as a Hot Key for more than 1 second.2. Do one of the following:RGo off-hook.*1RTap "Phone Number".– Tap "Voice Call" to make a voice call.– Tap "Video Call" to make a video call.*1 The type of call that is established depends on the "Call Mode" setting.NoteRWhile the Hot Key’s information is displayed, you can tap or to select another Hot Key number.RIf Hot Key dialing is set to "Auto", a Hot Key number can also be dialed by pressing and holding theassigned dialing key for a specified number of seconds. For details, see “Selecting the Type of HotKey Dialing”, Page 66.RFor details about assigning Hot Keys, see “Assigning Hot Keys From Phonebook”, Page 65.Using the Hot LineIf your administrator has configured this function, you can make a call to a registered phone numberautomatically. Contact your administrator for further information.[In standby mode]1. Go off-hook.Using the Incoming/Outgoing Call LogUsing the Incoming Call Log[In standby mode]1. Tap / a "Call History"2. Missed Call Log: Tap .Incoming Call Log: Tap .3. Tap / : Select an incoming call log.32Making Calls](https://usermanual.wiki/Panasonic-of-North-America/96NKX-HDV430/User-Guide-3019853-Page-32.png)
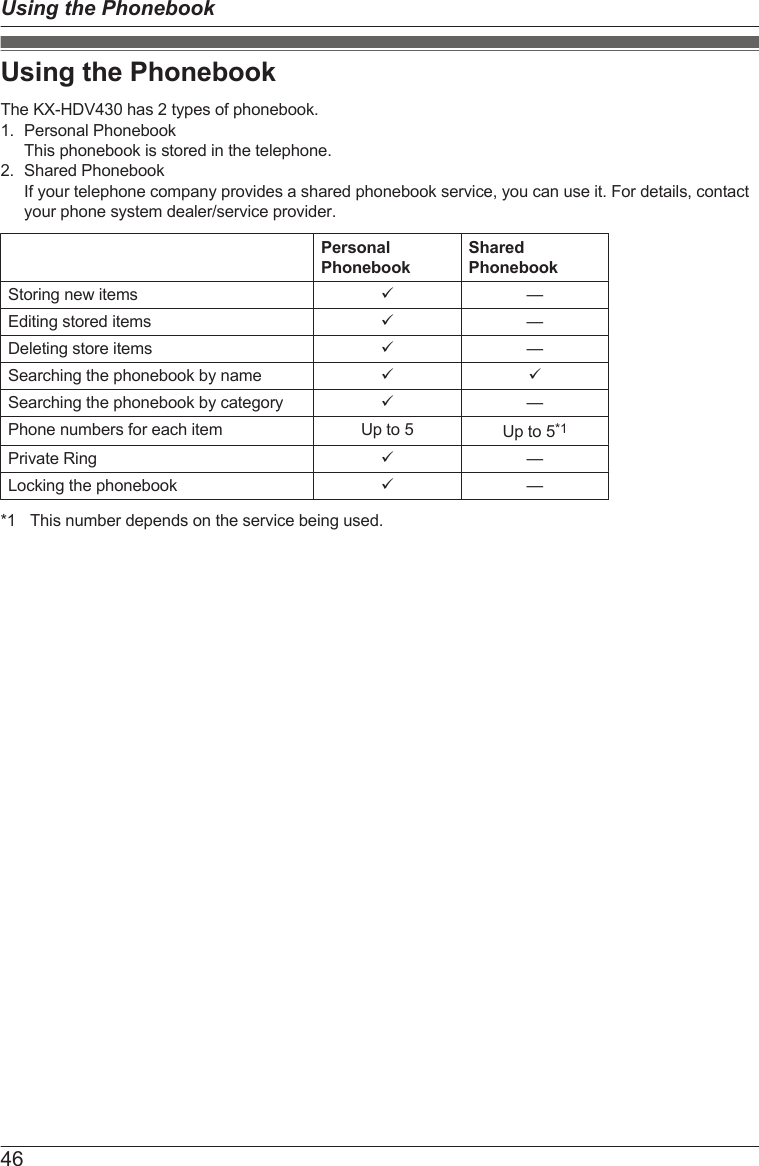
![4. Do one of the following:RGo off-hook.*1RTap "Voice Call" to make a voice call.RTap "Video Call" to make a video call.*1 The type of call that is established depends on the "Call Mode" setting.Using the Outgoing Call Log[In standby mode]1. Tap / a "Call History"2. Tap .3. Tap / : Select an outgoing call log.4. Do one of the following:RGo off-hook.*1RTap "Voice Call" to make a voice call.RTap "Video Call" to make a video call.*1 The type of call that is established depends on the "Call Mode" setting.Using the PhonebookUsing the Personal Phonebook[In standby mode]1. Tap / a "Phonebook"2. Search for the desired item.*13. Tap / : Select the desired item.4. Select the desired phone number.5. Do one of the following:RGo off-hook.*2RTap "Phone Number".– Tap "Voice Call" to make a voice call.– Tap "Video Call" to make a video call.*1 For details, see “Searching for an Item in the Personal Phonebook”, Page 51.*2 The type of call that is established depends on the "Call Mode" setting.NoteRIf the Personal Phonebook is not permitted, this feature cannot be used. Contact your administrator forfurther information.Using the Shared Phonebook[In standby mode]1. Tap / a "Phonebook"2. If "Phonebook" is displayed as the title, tap .*13. Search for the desired item.*24. Tap / : Select the desired item.5. Select the desired phone number.6. Do one of the following:RGo off-hook.*3RTap "Phone Number".– Tap "Voice Call" to make a voice call.– Tap "Video Call" to make a video call.33Making Calls](https://usermanual.wiki/Panasonic-of-North-America/96NKX-HDV430/User-Guide-3019853-Page-33.png)
![*1 If only Shared Phonebook is permitted, this step is skipped.*2 For details, see “Searching for an Item in the Shared Phonebook”, Page 53.*3 The type of call that is established depends on the "Call Mode" setting.NoteRIf the Shared Phonebook is not permitted, this feature cannot be used. Contact your administrator forfurther information.Making a Multicast Voice Paging callWhen you make a paging call, the voice will be heard through the speaker phone of the other telephones.[In standby mode]1. Tap / a "Paging"*12. Select a desired channel group.*23. Go off-hook, or tap "Call".*1 Paging is available only when the feature is enabled. Contact your administrator for furtherinformation.*2 If there is only 1 channel group, paging will start immediately.34Making Calls](https://usermanual.wiki/Panasonic-of-North-America/96NKX-HDV430/User-Guide-3019853-Page-34.png)
![Receiving CallsRIf you receive an incoming video call, you can select whether to receive that call as a video call. If yougo off-hook, the type of call that is established depends on the "Call Mode" setting (Page 88).RYou can select the ringer for each type of incoming call. See “Incoming Option”, Page 85.RYou can also use Auto Answer to answer a call. In standby mode, press /[MUTE/AUTO ANS] totoggle Auto Answer on or off. See “Answer Option”, Page 86.RThe volume of the ringer can be adjusted, or turned off. See “Adjusting the Ringer Volume or Turningthe Ringer Off”, Page 26.RIf you attach a headset while receiving an incoming call, ringing will be heard from the speaker.Depending on the headset, ringing may be heard through the headset.RUp to 24 calls can be received at the same time. The 25th caller will hear a busy tone.Caller IDIf an outside call that contains Caller ID information (a caller’s name and telephone number) is received,this information will be logged in the Incoming Call Log and displayed on the LCD.If a call from a number matching a number entered in the phonebook is received, the name registered inthe phonebook for that number will be displayed along with the number.If caller information is sent by the phone system and there is also information stored in the phonebook forthe same number, the information stored in the phonebook will be displayed.Answering CallsTo answer an incoming call1. Do one of the following:RGo off-hook.*1RTap "Voice Call" to make a voice call.RTap "Video Call" to make a video call.*2*1 When the handset is already off-hook, press and release the hook switch. The type of call that isestablished depends on the "Call Mode" setting.*2 This option is available if the incoming call is a video call.NoteRWhen a call is received while another call is on hold, pressing and releasing the hook switch willanswer the call.To answer an incoming call on a specific line when receiving multiple incoming calls[While receiving a call]1. Tap "Line".2. Tap / : Select an incoming call.To reject an incoming call1. While an incoming call is ringing, tap "Reject".2. The call will be rejected, and the telephone will return to standby mode.NoteRCalls from specific numbers can be automatically rejected. For details, see “Incoming call barring(Caller ID service users only)”, Page 69.35Receiving Calls](https://usermanual.wiki/Panasonic-of-North-America/96NKX-HDV430/User-Guide-3019853-Page-35.png)
![Hands-free ModeIn hands-free mode, you can talk and hear the other party in a conversation without using the handset.This mode is useful for performing other tasks during a conversation, such as writing.Enabling hands-free modeIf you press /[SP-PHONE] in standby mode, you can enable hands-free mode.During a conversation using a headset, you can enable hands-free mode by pressing /[SP-PHONE].Canceling hands-free modeYou can cancel hands-free mode in one of the following ways:RDuring a conversation in hands-free mode, go off-hook.RWhile you are talking in hands-free mode and a headset is attached to the unit, press /[HEADSET] tocontinue the conversation using the headset.Training ModeIn training mode, you can hear the other party in a conversation from both a headset and the handset.This mode is useful for training an operator. While the operator talks to the other party on the headset, atrainer also can listen to the other party on the handset and teach the operator how to respond to thecaller.Starting training mode[During a conversation using a headset]1. Go off-hook by lifting the handset off its cradle.2. Press /[HEADSET] to start training mode.Ending training mode1. Replace the handset on its cradle.The conversation will continue using the headset.36Receiving Calls](https://usermanual.wiki/Panasonic-of-North-America/96NKX-HDV430/User-Guide-3019853-Page-36.png)
![During a ConversationVideo Call Screen: Tap the screen.: After a certain amount of time.Normally, the video feed is displayed in full screen. If you tap the screen, the status bar and operationarea are displayed. After a certain amount of time, the display returns to full screen. (Tap the screenagain to show the status bar and operation area.)Video Call OptionsDuring a video call, you can switch the screen mode and pause/resume sending your video feed.Switching the screen mode[During a video call]1. Tap the screen.2. Tap .The screen mode cycles through normal mode (PiP off) a normal mode (PiP on) a split mode.37During a Conversation](https://usermanual.wiki/Panasonic-of-North-America/96NKX-HDV430/User-Guide-3019853-Page-37.png)
![[Example]Normal mode (PiP off) Normal mode (PiP on)A AB Split modeAB : Tap the screen a Tap .The other party’s video feedYour video feedIn normal mode, you can toggle the display of your video feed (Picture-in-Picture).Turning PiP on and off[During a video call]1. Press /[MENU].2. Tap "PiP".3. Tap "On" or "Off". a "OK"Pausing and resuming sending your video feedTo pause sending your video feed[While sending your video feed]1. Tap the screen.2. Tap . is displayed on your video feed, and sending of your video feed is stopped.To resume sending your video feed[While your video feed is paused ( is displayed)]1. Tap the screen.2. Tap .Your feed will be displayed, and sending of your feed will resume.38During a Conversation](https://usermanual.wiki/Panasonic-of-North-America/96NKX-HDV430/User-Guide-3019853-Page-38.png)
![Switching the call type during a conversationTo switch from a voice call to a video call[During a voice call]1. Tap "Video Call".To switch from a video call to a voice call[During a video call]1. Press /[MENU].2. Tap "Voice Call".Adjusting the Quality of the PictureYou can adjust the quality of your video feed in standby mode or during a video call.[In standby mode]1. Tap / a "Basic Settings"2. Tap / a "Video Options"3. Tap / a "Camera Settings"4. Tap the item you want to adjust.5. Tap / : Change the value of the item. a "OK"6. Tap "Save".[During a video call]1. Press /[MENU].2. Tap "Picture Quality".3. Tap the item you want to adjust.4. Tap / : Change the value of the item. a "OK"5. Tap "Save".NoteRYou can adjust the following values:Brightness Default: 3Saturation Default: 3Contrast Default: 2Sharpness Default: 3Anti-flicker Default: 50HzRYou can reset the values to their defaults by tapping "Reset".Transferring a Call (Call Transfer)You can transfer a call to another destination (extension or outside party).NoteROperation for this feature may differ depending on the telephone’s configuration. If the followingprocedure does not work, contact your administrator for further information.To transfer1. Press / /[TRANSFER] during a conversation.39During a Conversation](https://usermanual.wiki/Panasonic-of-North-America/96NKX-HDV430/User-Guide-3019853-Page-39.png)
![2. Dial the party you want to transfer to.*1 a Tap "Voice Call" to make a voice call. Tap "Video Call" to make a video call.3. Wait until the other party answers to announce the transfer.4. Go on-hook.*1 You can also select a phone number from the call history or the phonebook.NoteRTo return to the call before the transfer destination answers, press /[CANCEL].To do a blind transfer1. Tap "Blind"*1 during a conversation.2. Dial the party you want to transfer to.*2 a Tap "Voice Call" to make a voice call. Tap "Video Call" to make a video call.*1 If blind transfers are not permitted, this icon is not displayed. Contact your administrator for furtherinformation.*2 You can also select a phone number from the call history or the phonebook.Holding a CallYou can put a call on hold by holding the call at your extension.NoteROperation for this feature may differ depending on the telephone’s configuration. If the followingprocedure does not work, contact your administrator for further information.HoldingTo hold the current call1. Press / /[HOLD].NoteRWhen a function key is assigned as a Line key, if you press a Line key other than the one for thecurrent call, the call is put on hold or is disconnected depending on the Automatic Call Hold settings.For details, contact your phone system dealer/service provider.To retrieve a call on hold at your line[When one line is on hold]1. Press / /[HOLD].[When two or more lines are on hold]1. Press / /[HOLD].2. Tap / : Select a line on hold.NoteRWhen a call is received while another call is on hold, pressing and releasing the hook switch willanswer the call.RIf a function key is assigned as a Line key, and a call is on hold on that line, you can retrieve the call onhold by following the step below.1. Press the corresponding function key.Holding in a System Parking Zone (Call Park)You can use this feature as a transferring feature.40During a Conversation](https://usermanual.wiki/Panasonic-of-North-America/96NKX-HDV430/User-Guide-3019853-Page-40.png)
![When Call Park is permitted, the "Park" icon is displayed. However, the Call Park feature number mustbe set beforehand. Also, depending on your phone system, you may need to enter a parking zonenumber to retrieve a parked call. The feature depends on your phone system. Contact your administratorfor further information.To set1. Press /[MENU] during a conversation.2. Tap "Park".To retrieve (Call Park Retrieve)[In standby mode]1. Enter the Call Park Retrieve feature number.2. Go off-hook.NoteRDepending on the telephone system, may be displayed in the status bar. In this case, you canretrieve the call by pressing /[MENU] and then tapping "Park". However, to retrieve a parked callusing the icon, the Call Park Retrieve feature number must be set beforehand. Contact youradministrator for further information.Talking to Two Parties Alternately (Call Splitting)When talking to one party while the other party is on hold, you can swap the calls back and forth(alternately).To alternate between the parties leaving one party on hold temporarily1. Press / /[HOLD] during a conversation.2. Dial the other party’s extension number.Tap "Voice Call" to make a voice call.Tap "Video Call" to make a video call.3. Talk to the other party.4. During a voice call: Tap "Line Status".During a video call: Press /[MENU]. a Tap "Line Status".5. Tap / : Select the original party.6. Talk to the party.Three-party ConferenceDuring a conversation, you can add an additional party to your call and establish a conference call.NoteRYour phone system may support advanced conference features, such as conference calls with four ormore parties. In this case, the procedures for handling a conference call may be different from thoseexplained in this section. For details, contact your phone system dealer/service provider.Making a Conference Call1. Press /[CONF] during a conversation.2. Dial the party you want to transfer to.*1 a Tap "Voice Call" to make a voice call. Tap "Video Call" to make a video call.3. Press /[CONF] after the other party has answered.*1 You can also select a phone number from the call history or the phonebook.41During a Conversation](https://usermanual.wiki/Panasonic-of-North-America/96NKX-HDV430/User-Guide-3019853-Page-41.png)
![NoteRWhen you make a video conference call, images of the other two parties are displayed at the top of thescreen.Removing a Party from the ConferenceDuring a conference, you can remove other parties from the conference. However, this operation isavailable only during conference calls you initiate.1. During a conference call, press / /[HOLD].2. Press / /[HOLD] again to show the conference parties on hold.3. Tap / : Select the party to remove.4. Talk to the party and go on-hook to end the call.5. Press / /[HOLD].Ending a Conference CallTo end the conference call, go on-hook.MuteYou can disable the microphone or the handset to consult privately with others in the room while listeningto the other party on the phone through the speaker or the handset.To set/cancel1. Press /[MUTE/AUTO ANS].NoteRWhen the icon is displayed in the status bar, Mute is on.RDuring Mute, even if you switch from/to speakerphone, Mute will continue.RDuring Mute, even if you connect/disconnect a headset, Mute will continue.Call WaitingDuring a conversation, if a second call arrives, you will hear a call waiting tone. You can answer thesecond call by disconnecting or holding the current call.This is an optional telephone company service. You can receive a call waiting tone and the caller’sinformation. For details, contact your phone system dealer/service provider.To disconnect the current call and then talk to the new party1. Go on-hook.2. Go off-hook.To hold the current call and then talk to the new party1. Tap "Voice Call" to make a voice call.Tap "Video Call" to make a video call.Tap "Camera" to make a voice call with Communication Camera.Off-hook MonitorDuring a two-party conversation with the corded handset, you can allow other people to listen to theconversation through the speaker while you continue the conversation using the corded handset.42During a Conversation](https://usermanual.wiki/Panasonic-of-North-America/96NKX-HDV430/User-Guide-3019853-Page-42.png)
![To start/To cancel1. Press /[SP-PHONE] during a conversation.NoteRWhen off-hook monitor is active, replacing the corded handset to its cradle enables hands-free mode.43During a Conversation](https://usermanual.wiki/Panasonic-of-North-America/96NKX-HDV430/User-Guide-3019853-Page-43.png)
![Call Forwarding/Do Not DisturbYou can have incoming calls automatically forwarded to another destination. You can also have incomingcalls rejected (Do Not Disturb).To access the FWD/DND settings[In standby mode]1. Tap / a "FWD/DND"2. If the unit has multiple lines, tap / to select the desired line.3. Tap / : Select the type of FWD or DND setting to apply.The settings are as follows:RDND: Enable Do Not Disturb(All incoming calls are automatically rejected.)RFwd(All): Enable Forward All Calls(All incoming calls are forwarded.)RFwd(Busy): Enable Forward Busy(Incoming calls are forwarded only when your extension is in use.)RFwd(NA): Enable Forward No answer*1(An incoming call is forwarded if you do not answer the call within a certain amount of time.)4. (Fwd) Tap "On/Off": Select On or Off. a "Next" or "OK"(DND) Tap "On/Off": Select On or Off. a "OK"5. If a Forward setting is selected, enter a new forward phone number, or confirm and modify apreviously set forward phone number. a "OK"*1 Tap "Ring Count" to specify the number of rings before the call is forwarded.NoteRWhen Call Forwarding and/or Do Not Disturb is enabled, / and/or / appears inthe status bar in standby mode.RThis feature is only available when enabled. Contact your administrator for further information.Listening to Voice Mail MessagesWhen you receive a voice message, is displayed, or the Message Waiting indicator flashes slowly.You can check your new messages by accessing your mailbox.[In standby mode]1. Press /[MESSAGE] or tap "Voice Message".2. Tap / : Select the line on which is displayed.Xsi Visual Voice MailWith the Voice Messaging service of Broadsoft-Xsi, you can receive detailed information aboutmessages from the Xsi server. The following operations are available:RDownload messagesRMark messages as read or unreadRDelete messagesFor details, contact your phone system dealer/service provider.44Before Leaving Your Desk](https://usermanual.wiki/Panasonic-of-North-America/96NKX-HDV430/User-Guide-3019853-Page-44.png)
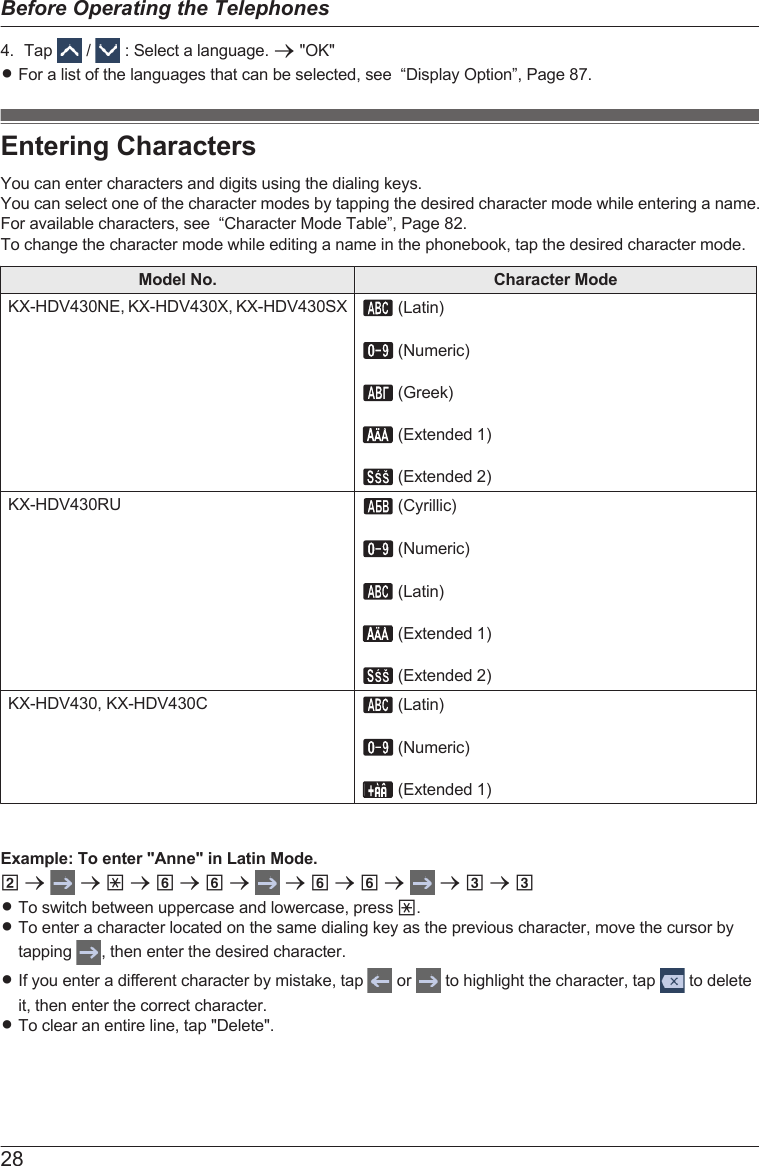
![Using the Personal PhonebookYou can store up to 500 items (5 phone numbers per item, max. 2500 phone numbers) in the telephonealong with names for easy access. You can also set unique ringer patterns for different categories toidentify incoming calls. All phonebook items are stored in alphabetical order. For security purposes, youcan lock the phonebook.RTo search for an item in the phonebook, see “Searching for an Item in the Personal Phonebook”,Page 51.RTo refer to another phonebook that can contain more than 500 items via the network, see “Using theShared Phonebook”, Page 53.NoteRWe recommend that backups are made of the phonebook data, in case the data becomesunrecoverable due to product malfunction.RYou can store information for a maximum of 500 contacts.RPhonebook data can be imported and exported. Contact your administrator for further information.A name can have up to 24 characters. A telephone number can have up to 32 digits.Private RingYou can organize entries in the phonebook into one of 9 Private Ring Categories. It is possible to set adifferent ringer pattern*1 for each category. When the displayed Caller ID*2 matches a phone number orname stored in the phonebook, the telephone rings according to the Private Ring Category settings.*1 For Ringer patterns, see “Incoming Option”, Page 85.*2 For Caller ID information, see “Caller ID”, Page 35.Storing an Item in the Personal PhonebookStoring a New Item[In standby mode]1. Tap / a "Phonebook"2. Tap . a The number of remaining entries is displayed. a "OK"3. Tap "<Enter Name>".4. Enter a name (max. 24 characters). a "OK"5. Tap "<Enter Phone No>".6. Enter the phone number (max. 32 digits). a "OK"7. Repeat steps 5 and 6 to add additional phone number types.8. Tap "Category Off".9. Tap / : Select a category. a "OK"10.Tap of the phone number you want to use as the entry’s default number.The color of the icon for the selected item changes to .11.Tap .NoteRSteps 8 and 9 can be omitted if you do not want to assign a category.RStep 10 can be omitted if you do not want to assign a default number. (The first number entered for anentry will automatically be assigned as the default number.)RThe valid digits are "0" through "9", "G", "B", "J", "P".RIf an item with the same name and number exists, the new information added will be merged with theexisting item.47Using the Phonebook](https://usermanual.wiki/Panasonic-of-North-America/96NKX-HDV430/User-Guide-3019853-Page-47.png)
![RTo enter characters, see “Entering Characters”, Page 28.Storing an Item Using the DialingYou can dial a number first and then add it as a phonebook entry.To add a new entry:[In standby mode]1. Dial a number.2. Tap "Phonebook".3. Tap "Create New Item". a "OK"4. The number of remaining entries is displayed. a "OK"5. Tap "<Enter Name>".6. Enter a name (max. 24 characters). a "OK"7. Tap "Category Off".8. Tap / : Select a category. a "OK"9. Tap of the phone number you want to use as the entry’s default number.The color of the icon for the selected item changes to .10.Tap .NoteRSteps 7 and 8 can be omitted if you do not want to assign a category.RStep 9 can be omitted if you do not want to assign a default number. (The first number entered for anentry will automatically be assigned as the default number.)RThe valid digits are "0" through "9", "G", "B", "J", "P".RIf an item with the same name and number exists, the new information added will be merged with theexisting item.RTo enter characters, see “Entering Characters”, Page 28.To add the phone number to an existing entry:[In standby mode]1. Dial a number.2. Tap "Phonebook".3. Tap "Add Number". a "OK"4. Tap .5. Enter the name or the first character(s) of the desired name. a "OK"6. Tap / : Select the desired name.7. Tap of the phone number you want to use as the entry’s default number.The color of the icon for the selected item changes to .8. Tap .NoteRStep 7 can be omitted if you do not want to assign a default number. (The first number entered for anentry will automatically be assigned as the default number.)RThe valid digits are "0" through "9", "G", "B", "J", "P".RIf an item with the same name and number exists, the new information added will be merged with theexisting item.RTo enter characters, see “Entering Characters”, Page 28.Storing an Item Using the Incoming or Outgoing Call LogYou can add a number listed in the Incoming or Outgoing Call Log to the Personal Phonebook.To add a new entry:48Using the Phonebook](https://usermanual.wiki/Panasonic-of-North-America/96NKX-HDV430/User-Guide-3019853-Page-48.png)
![[In standby mode]1. Display the Incoming or Outgoing Call Log. For details, see “Incoming/Outgoing Call Log”, Page 26.2. Tap / : Select the desired item.3. Tap "Save Phonebook".4. Tap "Create New Item". a "OK"5. The number of remaining entries is displayed. a "OK"6. Tap "<Enter Name>".7. Enter a name (max. 24 characters). a "OK"8. Tap "Category Off".9. Tap / : Select a category. a "OK"10.Tap of the phone number you want to use as the entry’s default number.The color of the icon for the selected item changes to .11.Tap .NoteRSteps 8 and 9 can be omitted if you do not want to assign a category.RStep 10 can be omitted if you do not want to assign a default number. (The first number entered for anentry will automatically be assigned as the default number.)RThe valid digits are "0" through "9", "G", "B", "J", "P".RIf an item with the same name and number exists, the new information added will be merged with theexisting item.RTo enter characters, see “Entering Characters”, Page 28.To add the phone number to an existing entry:[In standby mode]1. Display the Incoming or Outgoing Call Log. For details, see “Incoming/Outgoing Call Log”, Page 26.2. Tap / : Select the desired item.3. Tap "Save Phonebook".4. Tap "Add Number". a "OK"5. Tap .6. Enter the name or the first character(s) of the desired name. a "OK"7. Tap / : Select the desired name.8. Tap of the phone number you want to use as the entry’s default number.The color of the icon for the selected item changes to .9. Tap .NoteRStep 8 can be omitted if you do not want to assign a default number. (The first number entered for anentry will automatically be assigned as the default number.)RThe valid digits are "0" through "9", "G", "B", "J", "P".RIf an item with the same name and number exists, the new information added will be merged with theexisting item.RTo enter characters, see “Entering Characters”, Page 28.Editing a stored item in the Personal PhonebookEditing a Stored Item[In standby mode]1. Tap / a "Phonebook"49Using the Phonebook](https://usermanual.wiki/Panasonic-of-North-America/96NKX-HDV430/User-Guide-3019853-Page-49.png)
![2. Tap .3. Enter the name or the first character(s) of the desired name. a "OK"4. Tap / : Select the desired name.5. Tap .*16. Tap the desired name, phone number, category or default telephone number.7. Edit the data as necessary.8. Repeat steps 5 to 7 and edit the items you want to change.9. Tap .*1 If this icon is not displayed, you are currently viewing the Shared Phonebook. You must be viewingthe Personal Phonebook to edit items. Contact your administrator for further information.NoteRTo change a character or digit, tap or to highlight it, tap to delete it, and then enter the newcharacter or digit.RTo clear an entire line, tap "Delete".RTo move the cursor to the left or right, tap or respectively.RFor details about entering characters, see “Entering Characters”, Page 28.Editing Category NamesYou can edit the names of the categories in the phonebook.[In standby mode]1. Tap / a "Basic Settings"2. Tap / a "Display Option"3. Tap / a "Category Name"4. Tap / : Select the desired category number (1–9).5. Enter a name for the category (max. 13 characters). a "OK"6. Repeat steps 4 and 5 for each category name to edit.NoteFor details about entering characters, see “Entering Characters”, Page 28.Deleting a Stored Item in the Personal PhonebookDeleting a Stored Item[In standby mode]1. Tap / a "Phonebook"2. Tap .3. Enter the name or the first character(s) of the desired name. a "OK"4. Tap / : Select the desired name.5. Tap .*16. Tap / : Tap the check boxes of the items you want to delete.*27. Tap a "OK"*1 If this icon is not displayed, you are currently viewing the Shared Phonebook. You must be viewingthe Personal Phonebook to edit items. Contact your administrator for further information.*2 You can select all items in the list by tapping .50Using the Phonebook](https://usermanual.wiki/Panasonic-of-North-America/96NKX-HDV430/User-Guide-3019853-Page-50.png)
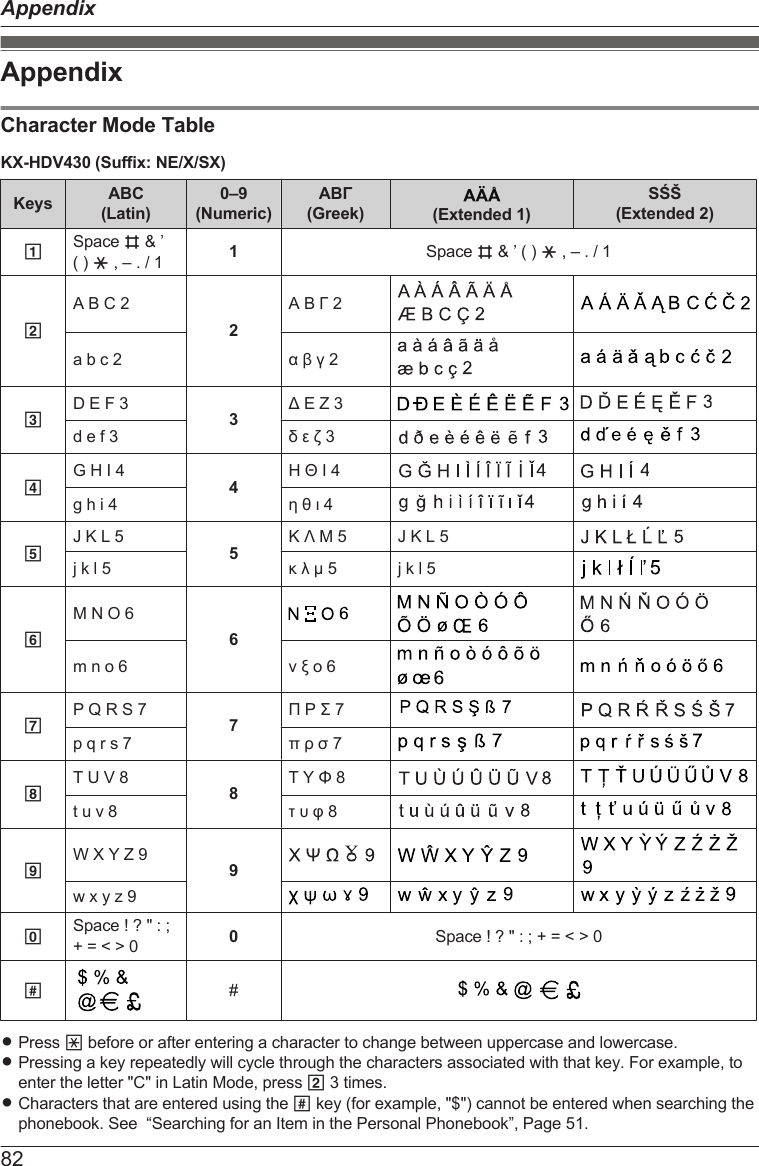
![Searching for an Item in the Personal PhonebookYou can search for an item in the phonebook by following the steps below.Searching by NameYou can also search for an item in the phonebook by entering a name:[In standby mode]1. Tap / a "Phonebook"2. Tap .3. Enter the name or the first character(s) of the desired name. a "OK"4. Tap / : Select the desired name.5. Select the desired phone number.6. To make a call, do one of the following:RGo off-hook.*1RTap "Voice Call" to make a voice call.RTap "Video Call" to make a video call.*1 The type of call that is established depends on the "Call Mode" setting.Searching by CategoryIf items in the phonebook have been assigned categories, you can search by category.[In standby mode]1. Tap / a "Phonebook"2. Tap .3. Tap / : Select a category. a "OK"4. Tap .5. Enter the name or the first character(s) of the desired name. a "OK"6. Tap / : Select the desired name.7. Select the desired phone number.8. To make a call, do one of the following:RGo off-hook.*1RTap "Voice Call" to make a voice call.RTap "Video Call" to make a video call.*1 The type of call that is established depends on the "Call Mode" setting.Searching by pressing Dial KeysYou can also search for an item in the phonebook by pressing multiple dial keys when the phonebook listis displayed:[When the phonebook is displayed]1. Press the dial keys to enter the first character(s) of the desired name in accordance with the charactertables.*1*1 For details about the characters assigned to the dial keys, see the following table.Suffix NE/X/SX/C/(none) NE/X/SX RUKeys ABC (Latin) ΑΒΓ (Greek) АБВ (Cyrillic)1B®G®1B®G®1 А®Б®В®B®G®12A®B®C®2 Α®Β®Γ®2 Г®Д®Е®Ё®2®A®B®C®251Using the Phonebook](https://usermanual.wiki/Panasonic-of-North-America/96NKX-HDV430/User-Guide-3019853-Page-51.png)
![Suffix NE/X/SX/C/(none) NE/X/SX RUKeys ABC (Latin) ΑΒΓ (Greek) АБВ (Cyrillic)3D®E®F®3 Δ®Ε®Ζ®3 Ж®З®И®Й®3®D®E®F®34G®H®I®4 Η®Θ®Ι®4 К®Л®М®4®G®H®I®45J®K®L®5 Κ®Λ®Μ®5 Н®О®П®5®J®K®L®56M®N®O®6Ν®®Ο®6ЮѮҮ6®M®N®O®67P®Q®R®S®7 Π®Ρ®Σ®7 У®Ф®Х®7®P®Q®R®S®78T®U®V®8 Τ®Υ®Φ®8 Ц®Ч®Ш®8®T®U®V®89W®X®Y®Z®9 Χ®Ψ®Ω®9 Щ®Ъ®Ы®Ь®9®W®X®Y®Z®900®Space 0®Space Э®Ю®Я®0®SpaceRPressing a key repeatedly will cycle through the characters associated with that key. For example, toenter the letter "C" in Latin Mode, press 2 3 times.RThe illustrations of the keys in the table may differ in appearance from the actual keys on thetelephone.Example: To enter "ANNE" in Latin Mode.2 a 6 a 6 a a 6 a 6 a 3 a 3NoteRAvailability depends on your phone system. Contact your administrator for further information.Locking the PhonebookYou can lock/unlock the phonebook while in standby mode. If no password has been set, you cannot lockthe phonebook. For details about setting the password, see “Setting the Password”, Page 27.NoteRIf you lock either the Personal Phonebook or the Shared Phonebook, the other one is also locked. Ifyou unlock the phonebook, both phonebooks are unlocked.Locking/Unlocking the Phonebook[In standby mode]To lock1. Tap / a "Phonebook"2. Press /[MENU].3. Tap "Lock Phonebook". a "OK"*1To unlock1. Tap / a "Phonebook"2. Enter your password.*2 a "OK"3. Press /[MENU].4. Tap "Unlock Phonebook". a "OK"5. Enter your password.*2 a "OK"Unlocking the Phonebook Temporarily1. Tap / a "Phonebook"2. Enter your password.*2 a "OK"*1 The call log is also locked.52Using the Phonebook](https://usermanual.wiki/Panasonic-of-North-America/96NKX-HDV430/User-Guide-3019853-Page-52.png)
![*2 If you enter an incorrect password 3 times, you cannot enter another password for approximately 30seconds.Using the Shared PhonebookYou can refer to the Shared Phonebook in addition to the Personal Phonebook, if the Shared Phonebookis available.NoteWe recommend setting this feature with your administrator. Contact your administrator for furtherinformation.Searching for an Item in the Shared PhonebookSearching by Name[In standby mode]1. Tap / a "Phonebook"2. If "Phonebook" is displayed as the title, tap .*13. Tap .4. Enter the name or the first character(s) of the desired name. a "OK"5. Tap / : Select the desired name.6. Select the desired phone number.7. To make a call, do one of the following:RGo off-hook.*2RTap "Voice Call" to make a voice call.RTap "Video Call" to make a video call.*1 If only Shared Phonebook is permitted, this step is skipped.*2 The type of call that is established depends on the "Call Mode" setting.53Using the Phonebook](https://usermanual.wiki/Panasonic-of-North-America/96NKX-HDV430/User-Guide-3019853-Page-53.png)
![Checking the Line StatusYou can check the status of each line (up to 16 lines) on the display.Checking the Line Status[In standby mode]1. Tap / a "Line Status"2. Tap / : Select the line whose status you want to check.3. Press /[CANCEL] to end checking the line status or tap the line to perform an action. See "Linestatus indication" below for details.[During a conversation]1. Tap "Line Status".2. Tap / : Select the line whose status you want to check.3. Press /[CANCEL] to end checking the line status or tap the line to perform an action. See "Linestatus indication" below for details.NoteRWhen a function key is assigned as a Line Status key, you can press that function key to display theline status screen. See "Line status indication" below for details.Line status indicationStatus Display MeaningFree*1The line is idle.Action: seize the line for dialing.In Use The line is on a call.Action: none.Line On Hold The line is on hold.Action: retrieve the call on hold.Incoming Call The line is receiving a call.Action: answer the call.Recall The line is receiving a Hold Recall signal.Action: answer the call.<x> In Use*2A shared line is in use at another unit.Action: join the call.<x> Line On Hold*2A shared line is on hold at another unit.Action: retrieve the call on hold.*1 The following icons are also displayed if the corresponding feature is enabled.Icon MeaningCall ForwardingDo Not DisturbMaking an anonymous callBlock anonymous calls54Checking the Line Status](https://usermanual.wiki/Panasonic-of-North-America/96NKX-HDV430/User-Guide-3019853-Page-54.png)
![Network CameraRegistering Network Cameras allows you to use the phone to view those cameras’ video feeds.You can also control the camera’s pan and tilt, zoom in, zoom out, etc.If a Network Camera is associated with a phone number (Paging Number), you can call that numberwhile viewing the camera’s video feed.Also, if a Network Camera is associated with phone numbers (Linked Numbers), when you begin aconversation, Network Camera viewer starts automatically and you can view the camera’s video feedduring the conversation.NoteRTo view a Network Camera’s video feed from this unit, the Network Camera must be configured to useH.264 as its video codec.RDepending on the camera model, some operations may not be available.RCalls with phone numbers that are associated with Network Cameras are available only as voice calls.RFor up-to-date information about Network Cameras that have been tested with this unit, refer to thefollowing web site:http://www.panasonic.net/pcc/support/sipphone/Registering a Network CameraYou can register up to 16 Network Cameras connected to the network.[In standby mode]1. Tap / a "Basic Settings"2. Tap / a "Network Camera"3. Tap "Camera Registration".4. Tap / : Select the number you want to register.5. Enter the necessary information.RNameSpecify the Network Camera’s name. You can enter up to 20 characters.If you do not specify a name, one is automatically assigned.RAddressSpecify the Network Camera’s IP address (IPv4/IPv6) or host name (FQDN). You can enter up to256 characters.RPort NumberEnter the Network Camera’s port number (1–65535).The default value is 80.RUser IDEnter the user ID to use when connecting to the Network Camera (max. 32 characters).RPasswordEnter the password to use when connecting to the Network Camera (max. 32 characters).RPaging NumberEnter the name and phone number associated with the Network Camera (name: max. 24characters, phone number: max. 32 characters).– To select a number from the phone book: Tap .–To select a number from the call history: Tap .RLinked NumbersEnter the names and phone numbers to associate with the Network Camera so that the video feedautomatically displays when making or receiving a call. You can make up to 5 entries (name: max.24 characters, phone number: max. 32 characters).56Network Camera](https://usermanual.wiki/Panasonic-of-North-America/96NKX-HDV430/User-Guide-3019853-Page-56.png)
![– To select a number from the phone book: Tap .–To select a number from the call history: Tap .RStreamSelect "Stream 1" or "Stream 2" if the Network Camera is configured to output multiple streams.For details, refer to your Network Camera’s documentation.Network Camera ViewerStarting Network Camera Viewer[In standby mode]1. Tap / a "Network Camera"NoteRThe video feed of the Network Camera to which you most recently connected is displayed.RNo video feed is displayed if no Network Cameras have been registered.Closing Network Camera viewer1. Press "Home" or "Cancel". a "OK"Selecting a Network Camera[In standby mode]1. Tap / a "Network Camera"2. Press /[MENU].3. Tap / : Select the desired camera name. a "OK"Controlling a Network Camera[While displaying a video feed from a Network Camera (operation screen)]Centering: While the status bar and operation area are displayed on the screen, tap the spot where youwant to center the video feed.*1Tap the screen to display the icons before performing the following operations.Pan: Tap / .Tilt: Tap / .Zoom in: Tap .Zoom out: Tap .Home position: Tap .*1 Depending on the Network Camera, this feature may not be available.NoteRIf an icon is grayed out, that feature is not available.Switching Automatically among Multiple Network CamerasYou can automatically cycle through the video feeds from registered Network Cameras at a set timeinterval.[While displaying a video feed from a Network Camera (operation screen)]1. Press /[MENU].2. Tap "Camera Selection".3. Tap "Sequential".57Network Camera](https://usermanual.wiki/Panasonic-of-North-America/96NKX-HDV430/User-Guide-3019853-Page-57.png)
![To stop switching1. Tap any camera name.NoteRThe order in which video feeds are displayed follows the order in which the Network Cameras areregistered.Interval switching settings[While displaying a video feed from a Network Camera (operation screen)]1. Press /[MENU].2. Tap "Camera Selection".3. Press /[MENU].4. Tap "Sequential Interval".5. Tap / : Select the desired item. a "OK"Using Phone Numbers Associated with a Network CameraPaging NumberPaging can be performed using a phone number (Paging Number) associated with a Network Camera.[While displaying a video feed from a Network Camera (operation screen)]1. Tap the screen.2. Tap .NoteRA call is a voice call using the speakerphone from the default line.Linked NumberThe video feed of the Network Camera can be viewed by making or receiving a call using a phonenumber (Linked Number) associated with the Network Camera.[In standby mode]1. Dial the Linked Number.2. Tap "Voice Call".The video feed of the Network Camera associated with the Linked Number is displayed.[While receiving a call]1. Tap "Voice Call".If the call received was made using a Linked Number, the video feed of the associated NetworkCamera is displayed.Network Camera PresetsYou can select a viewing position that has been registered in the Network Camera’s settings beforehand.These registered viewing positions are called "presets".NoteRDepending on the Network Camera, this feature may not be available.[While displaying a video feed from a Network Camera (operation screen)]1. Press /[MENU].2. Tap "Preset".3. Tap / : Select the desired item.4. Tap "OK".Displays the selected position image.58Network Camera](https://usermanual.wiki/Panasonic-of-North-America/96NKX-HDV430/User-Guide-3019853-Page-58.png)
![5. To return to the preset selection screen:RTap .To return to the operation screen:RTap "OK".NoteRTapping "Favourites/Favorites" in step 3 displays the presets registered as favorites.RTapping in step 3 displays the camera’s position before a preset was selected.Adding a Preset to Your FavoritesYou can register a preset to your favorites.[While displaying a video feed from a Network Camera (operation screen)]1. Press /[MENU].2. Tap "Preset".3. Tap / : Select the preset you want to register.4. Tap "Edit".5. Tap "Add to Favourites/Favorites". a "OK"Deleting a Preset from Your Favorites[While displaying a video feed from a Network Camera (operation screen)]1. Press /[MENU].2. Tap "Preset".3. Tap / : Select the preset you want to delete.4. Tap "Edit".5. Tap "Remove from Favourites/Favorites". a "OK"Editing a Preset’s Name[While displaying a video feed from a Network Camera (operation screen)]1. Press /[MENU].2. Tap "Preset".3. Tap / : Select the preset to edit its name.4. Tap "Edit".5. Tap "Edit Preset Name".6. Enter the name. a "OK"NoteRIn step 3, you can jump directly to a specific page by tapping "Page Jump" and entering the pagenumber.RYou can edit the name of a preset registered as a favorite by tapping "Favourites/Favorites" after step2.RTo reset a preset’s name:1. Select the preset name.2. Tap "Edit".3. Tap "Delete Preset Name". a "OK"Configuring Display PropertiesYou can adjust the brightness of the Network Camera and set up Automatic Mode.59Network Camera](https://usermanual.wiki/Panasonic-of-North-America/96NKX-HDV430/User-Guide-3019853-Page-59.png)
![NoteRDepending on the Network Camera, this feature may not be available.Adjusting the Brightness of the Picture[While displaying a video feed from a Network Camera (operation screen)]1. Press /[MENU].2. Tap "Camera Settings".3. Tap "Brightness".4. Brighter: Tap "j".Darker: Tap "k".Default: Tap "Reset".Back: Tap "OK".NoteRThe range of brightness and default value depend on the Network Camera.Automatic ModeNoteRDepending on the Network Camera, this feature may not be available.Auto PanThe Network Camera can be set to pan horizontally (left–right) repeatedly over its entire viewing range.[While displaying a video feed from a Network Camera (operation screen)]1. Press /[MENU].2. Tap "Camera Settings".3. Tap "Auto Mode".4. Tap "Auto Pan".*1 a "OK"*1 To cancel Automatic Mode, tap "Off" a "OK".Preset SequenceYou can have the Network Camera display multiple preset viewing positions in a repeating cycle.[While displaying a video feed from a Network Camera (operation screen)]1. Press /[MENU].2. Tap "Camera Settings".3. Tap "Auto Mode".4. Tap "Preset Sequence".*1 a "OK"*1 To cancel Automatic Mode, tap "Off" a "OK".Automatic TrackingYou can have the camera automatically follow a moving object.[While displaying a video feed from a Network Camera (operation screen)]1. Press /[MENU].2. Tap "Camera Settings".3. Tap "Auto Mode".4. Tap "Auto Tracking".*1 a "OK"*1 To cancel Automatic Mode, tap "Off" a "OK".60Network Camera](https://usermanual.wiki/Panasonic-of-North-America/96NKX-HDV430/User-Guide-3019853-Page-60.png)
![Receiving Alarms from Network CamerasWhen an alarm from a Network Camera (movement detection, error, abnormality, etc.) is detected, thisunit can display the video feed from the camera that issued the alarm.NoteRAlarms can be indicated by a sound and/or a pop-up message on the display.RDepending on the Network Camera, this feature may not be available.When an Alarm Notification Appears in a Pop-up MessageTo connect the Network Camera where the alarm occurred1. Tap "OK" on the pop-up message.NoteRTap "Cancel" to not connect to the Network Camera.If you received an alarm during a video call, the call is automatically switched to a voice call.Checking an Alarm[In standby mode]1. Tap / a "Call History"2. Tap .*13. Tap an item to connect to the camera and view its video feed.*1 A list of Network Cameras where an alarm has occurred is displayed.NoteRTo delete an item from the list, tap a tap the check boxes of the items you want to delete atap a "OK"Configuring an Alarm NotificationAlarm Notification Settings[In standby mode]1. Tap / a "Basic Settings"2. Tap / a "Network Camera"3. Tap "Alarm Settings".4. Tap "Notification".5. Tap "Pop Up". a "OK"Alarm Disarm Period SettingsYou can set the period of time in which other alarm notifications are stopped (disarmed) after an alarmoccurs.[In standby mode]1. Tap / a "Basic Settings"2. Tap / a "Network Camera"3. Tap "Alarm Settings".4. Tap "Disarm Time".5. Tap / : Set the disarm time (in seconds). a "OK"61Network Camera](https://usermanual.wiki/Panasonic-of-North-America/96NKX-HDV430/User-Guide-3019853-Page-61.png)
![Alarm Port Number SettingsYou can set the port number for receiving alarms.[In standby mode]1. Tap / a "Basic Settings"2. Tap / a "Network Camera"3. Tap "Alarm Settings".4. Tap "Port Number".5. Enter a port number. a "OK"62Network Camera](https://usermanual.wiki/Panasonic-of-North-America/96NKX-HDV430/User-Guide-3019853-Page-62.png)
![Communication CameraBy registering a Communication Camera and then selecting it from the list, you can make a call tomonitor the camera’s video feed and allow voice communication.When a call is received from a Communication Camera, you can monitor video feed of the other party.You can operate the Communication Camera (pan/tilt), zoom in/zoom out the video feed, and controldevices connected to the Communication Camera (for example, to unlock a door). These features can beused with KX-NTV150 and KX-NTV160 models.This chapter describes the special functions and operations of the Communication Camera.Refer to the relevant sections of this manual for operations not described here.Using a Communication CameraRegistering a Communication CameraYou can register up to 16 Communication Cameras connected to the network.[In standby mode]1. Tap / a "Basic Settings"2. Tap / a "Comm. Camera"3. Tap / : Select the number you want to register.4. Enter the necessary information.RNameSpecify the camera’s name. You can enter up to 20 characters.RPhone NumberEnter the phone number of the Communication Camera.RRinger TypeSet the ringtone for when a call is received by the Communication Camera.The default is "Ringtone 10".Calling a Communication CameraAfter dialing the phone number of a registered Communication Camera, the following operations arepossible.[In standby mode]1. Tap / a "Comm. Camera"2. Tap / : Select the Communication Camera to call.3. Tap "Camera Monitor" to monitor the video.Tap "Camera Call" or go off-hook to make a voice call.NoteRTo make a voice call while monitoring a video feed, tap or go off-hook.Receiving a Call from a Communication CameraRWhen a call is received, only one ring will be heard from the speaker.RWhen a call is received, the camera’s video feed is displayed. Then, to enable voice communication,tap .RWhile on a voice call with a Communication Camera and a call is received from a CommunicationCamera, tap "Camera" to answer the call. The current call will be put on hold.63Communication Camera](https://usermanual.wiki/Panasonic-of-North-America/96NKX-HDV430/User-Guide-3019853-Page-63.png)
![Transferring a Call with a Communication CameraFor details about this operation, see “Transferring a Call (Call Transfer)”, Page 39.NoteRIf the Communication Camera is registered at the transfer destination, the video monitor screen isshown. If it is not registered, the video call screen or voice call screen is shown.Conference Calls when Connected to a Communication CameraFor details about this operation, see “Three-party Conference”, Page 41.NoteRWhen another party is added while monitoring the video feed of a Communication Camera, a call willstart with that party.RWhen a third party is added during a call with a Communication Camera, a three-party conferencestarts.Operation Icons of the Communication Camera ScreenNormally, the video feed is displayed in full screen. If you tap the screen, the status bar and operationarea are displayed. After a certain amount of time, the display returns to full screen. (Tap the screenagain to show the status bar and operation area.)[While displaying the video feed from a Communication Camera (operation screen)]Tap the screen to display the icons before performing the following operations.Pan: Tap / .Tilt: Tap / .Zoom in: Tap .Zoom out: Tap .Unlock*1: Tap .Switch from monitoring the video feed to a call: Tap .Disconnect: Tap .*1 Controlling devices connected to a Communication Camera (for example, unlocking a door).64Communication Camera](https://usermanual.wiki/Panasonic-of-North-America/96NKX-HDV430/User-Guide-3019853-Page-64.png)
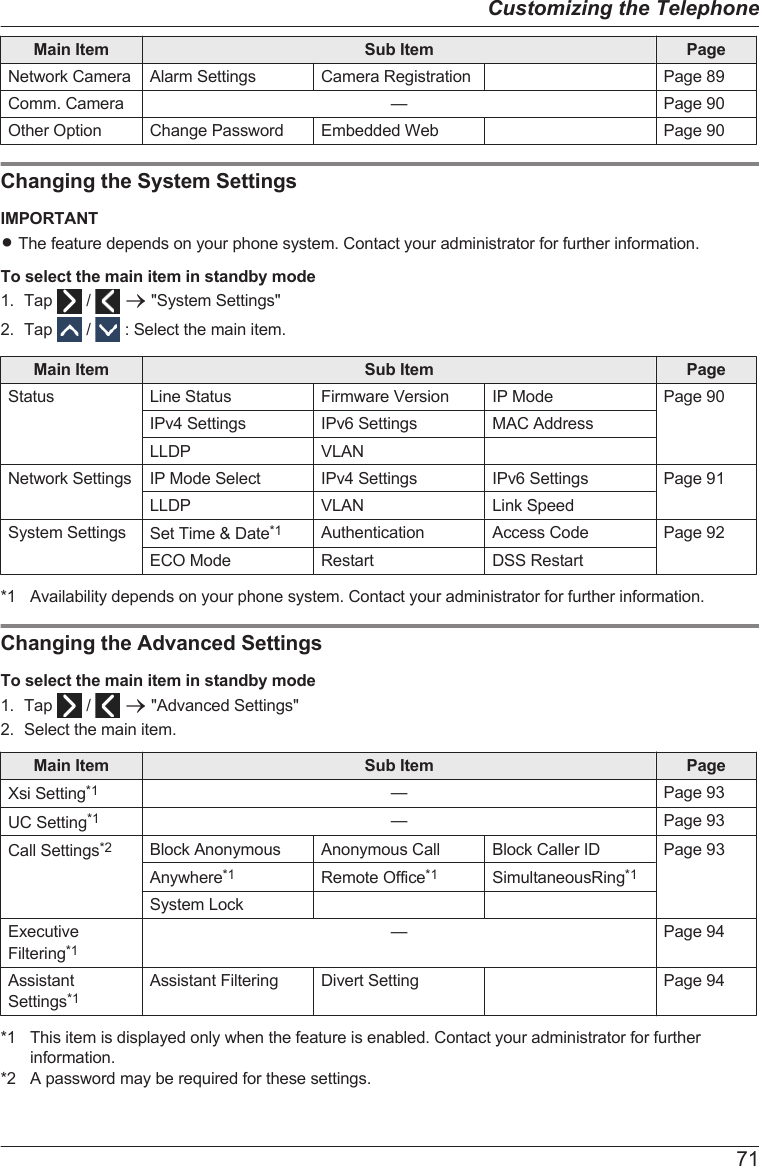
![Customizing the TelephoneECO ModeEnabling this mode reduces the amount of electricity consumed by the unit.NoteRWhen ECO mode is enabled, the "Link Speed" setting (Page 92) changes as follows:– Link Speed: "10M/Full"– PC port cannot be usedRWhen the ECO mode setting is changed, the unit will restart.RWhen ECO mode is enabled, is displayed in the status bar.Setting ECO Mode[In standby mode]1. Tap / a "System Settings"2. Tap "System Settings".3. Tap / a "ECO Mode"4. Tap "On".*1 a "OK"*1 To disable ECO mode, select "Off" (default).Changing the Telephone’s LCD DisplayYou can change what is displayed on the telephone’s LCD while the telephone is in standby mode.[In standby mode]1. Tap / a "Basic Settings"2. Tap / a "Display Option"3. Tap / a "Standby Display"4. Select the desired item. a "OK"Hot KeysBy assigning phone numbers to dial keys, you can make a call by pressing and holding a dial key.R“Hot Key Dialing”, Page 32Assigning Hot Keys From PhonebookYou can assign a phone number stored in the Personal Phonebook to a key to be used as a Hot Key.1. In standby mode, press and hold a dial key (0–9) for more than 1 second.2. Tap .3. Tap .4. Enter the desired name.5. Tap / : Select the desired name.6. Select a desired phone number.7. Tap .65Customizing the Telephone](https://usermanual.wiki/Panasonic-of-North-America/96NKX-HDV430/User-Guide-3019853-Page-65.png)
![NoteRFor details about searching for an item in the phonebook, see “Searching for an Item in the PersonalPhonebook”, Page 51.Editing Hot Keys1. In standby mode, press and hold a dial key (0–9) for more than 1 second.2. Tap .3. Tap "Name", if necessary.4. Edit the name. a "OK"5. Tap "Phone Number", if necessary.6. Edit the phone number. a "OK"7. Tap .Deleting a Hot Key1. In standby mode, press and hold the dialing key assigned as a Hot Key for more than 1 second.*12. Tap .3. Tap the check boxes of the items you want to delete.*24. Tap . a "OK"*1 While the Hot Key’s information is displayed, you can tap or to select another Hot Keynumber.*2 You can select all items in the list by tapping .Selecting the Type of Hot Key DialingYou can select one of 2 types of Hot Key Dialing for each assigned Hot Key.1. In standby mode, press and hold a dial key (0–9) for more than 1 second.2. Tap .3. Tap "Automatic Call".4. Select "Manual" or "Auto". a "OK"RManual:Press and hold the dialing key (0–9) assigned as a Hot Key for more than 1 second, and then gooff-hook. For details, see “Hot Key Dialing”, Page 32.RAuto:Pressing and holding an assigned Hot Key for the set number of seconds will dial that Hot Key’sassigned number immediately.NoteRTo select the number of seconds before the call is automatically made, see "Hot Key Time" in “KeyOption”, Page 86.Changing the Function Keys (Program Keys and DSS Keys)[In standby mode]1. Tap / a "Basic Settings"2. Tap / a "Key Option"3. Tap "Program Key".*14. Tap / : Select the key to change.5. Tap "Function".6. Tap / : Select the new item to assign.*2 a "OK"66Customizing the Telephone](https://usermanual.wiki/Panasonic-of-North-America/96NKX-HDV430/User-Guide-3019853-Page-66.png)
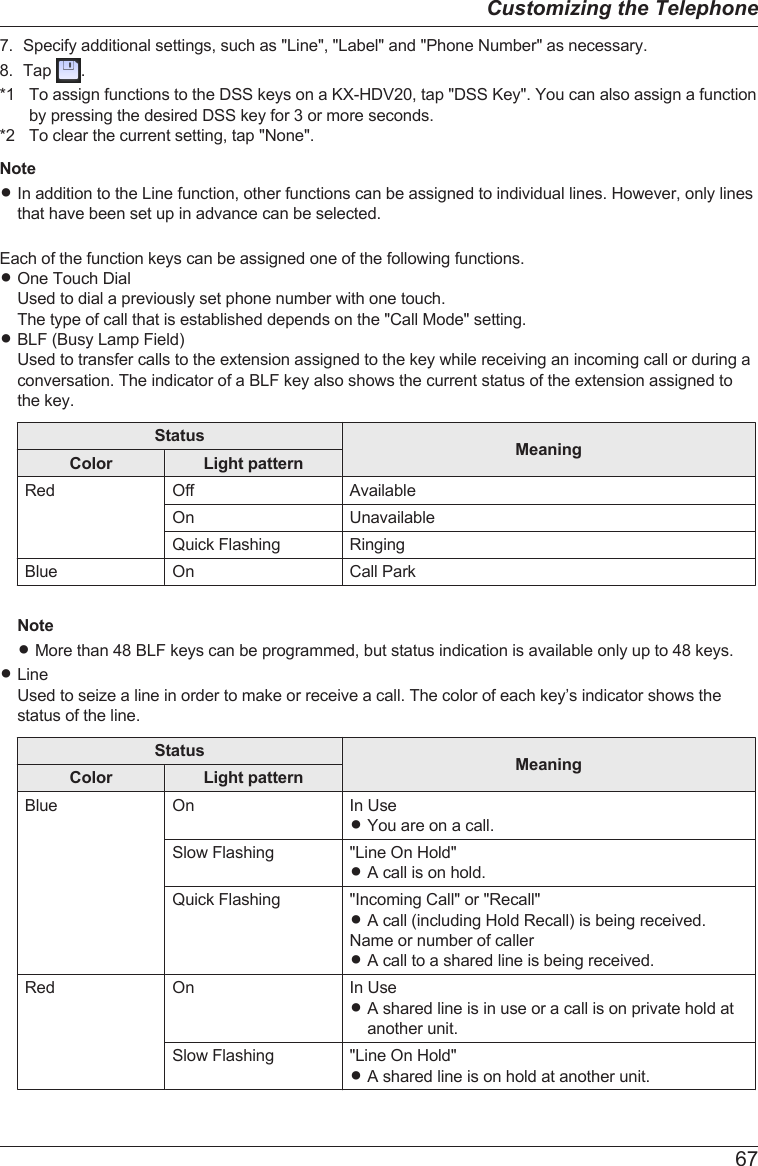
![Status MeaningColor Light patternOff — FreeRThe line is idle.RACD[Login]/ACD[Wrap Up]*1ACD[Login]: Used to log in/log out of an Automatic Call Distribution Group.ACD[Wrap Up]: Used to change the phone’s status from unavailable a wrap up a available.The color of each key’s indicator shows the status of the key.Status MeaningColor Light pattern ACD[Login] ACD[Wrap Up]Red Off Logged In AvailableOn Logged Out UnavailableSlow Flashing — Wrap UpRLine StatusUsed to confirm the status of each line. This allows the function key to work as a Line key such asseizing a line in order to make or receive a call.RCall ForwardUsed to forward incoming calls to the extension assigned to the key.RPhonebook*2Used to open the phonebook.RCall History*2Used to open the Incoming/Outgoing Call Log.RSimultaneous Ring*1Enables parallel ringing. Up to 10 locations can be specified to ring simultaneously when you receive acall.Status MeaningColor Light patternBlue On Simultaneous Ring feature: OnOff Simultaneous Ring feature: OffRHoteling/Hospitality*1Used to log in/log out of the Call Center Hoteling Event.RTransferUsed to transfer a call to the extension assigned to the key with confirmation during a conversation.RBlind Transfer*1Used to transfer a call to the extension assigned to the key without confirmation during a conversation.RConferenceUsed to establish a multiple-party conversation (conference).RDirected Call Pickup*1Used to answer an incoming call arriving at the specified telephone number.RCall Park/Park Retrieve*1Used to park a call or to retrieve a parked call (Call Parking).RNetwork CameraUsed to connect to a Network Camera. This specifies the name of Network Camera to connect to.*1 This item can be used only when the feature is enabled. Contact your administrator for furtherinformation.68Customizing the Telephone](https://usermanual.wiki/Panasonic-of-North-America/96NKX-HDV430/User-Guide-3019853-Page-68.png)
![*2 This item can be selected when the list is registered on the telephone. Contact your administrator forfurther information.Block anonymous callsThis feature allows the unit to reject calls when the unit receives a call without phone number. The defaultsetting is "Off".IMPORTANTRA password may be required for these settings. We recommend setting with your administrator.Contact your administrator for further information.RThis feature is not available on shared lines.[In standby mode]1. Tap / a "Advanced Settings"2. Tap / a "Call Settings"3. Tap / a "Block Anonymous"4. Tap / : Select a desired line.5. Select "On" or "Off". a "OK"Incoming call barring (Caller ID service users only)This feature allows the unit to reject calls from specified phone numbers that you do not want to answersuch as junk calls.When a call is received, the unit does not ring while the caller is being identified. If the phone numbermatches an entry in the call barred list, the unit rejects the call.IMPORTANTRA password may be required for these settings. We recommend setting with your administrator.Contact your administrator for further information.Storing unwanted callersYou can store up to 30 phone numbers in the call barred list by using the caller list or by entering thenumbers directly.[In standby mode]1. Tap / a "Advanced Settings"2. Tap / a "Call Settings"3. Tap / a "Block Caller ID"4. Tap / : Select a blank line.5. Enter the phone number (32 digits max.). a "OK"Editing the phone numbers to reject[In standby mode]1. Tap / a "Advanced Settings"2. Tap / a "Call Settings"3. Tap / a "Block Caller ID"4. Tap / : Select a desired phone number.5. Edit the phone number. a "OK"69Customizing the Telephone](https://usermanual.wiki/Panasonic-of-North-America/96NKX-HDV430/User-Guide-3019853-Page-69.png)
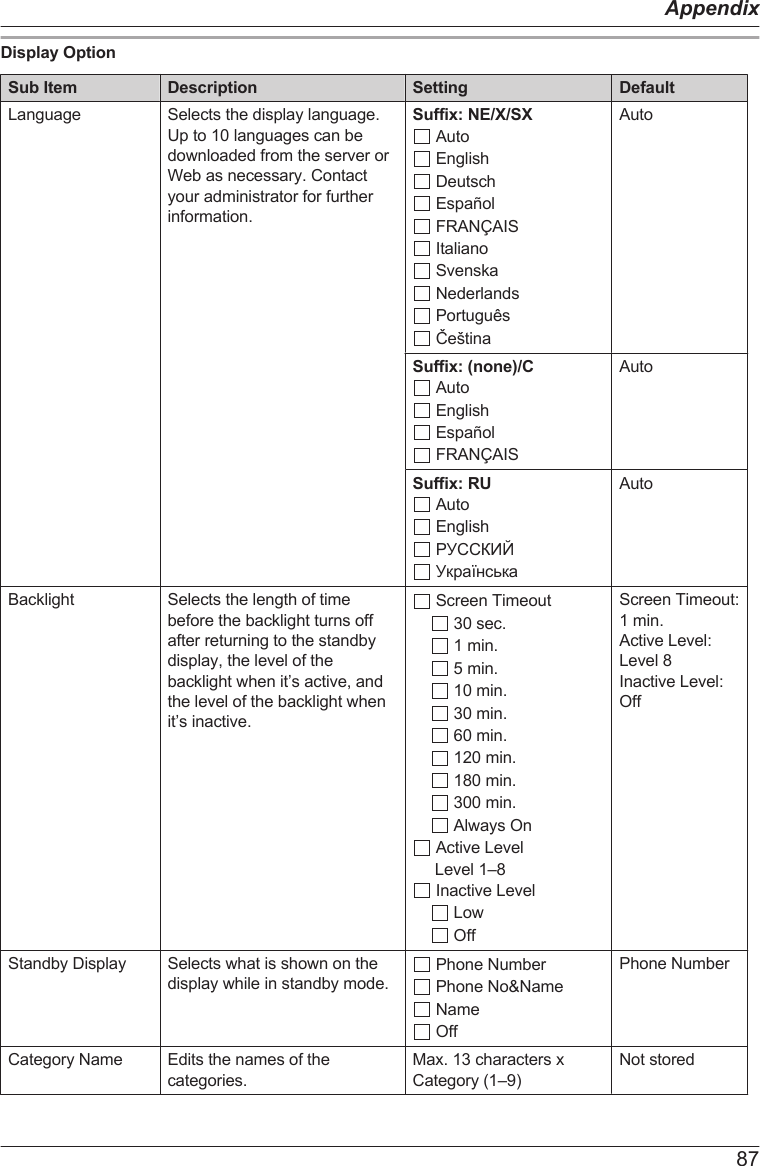
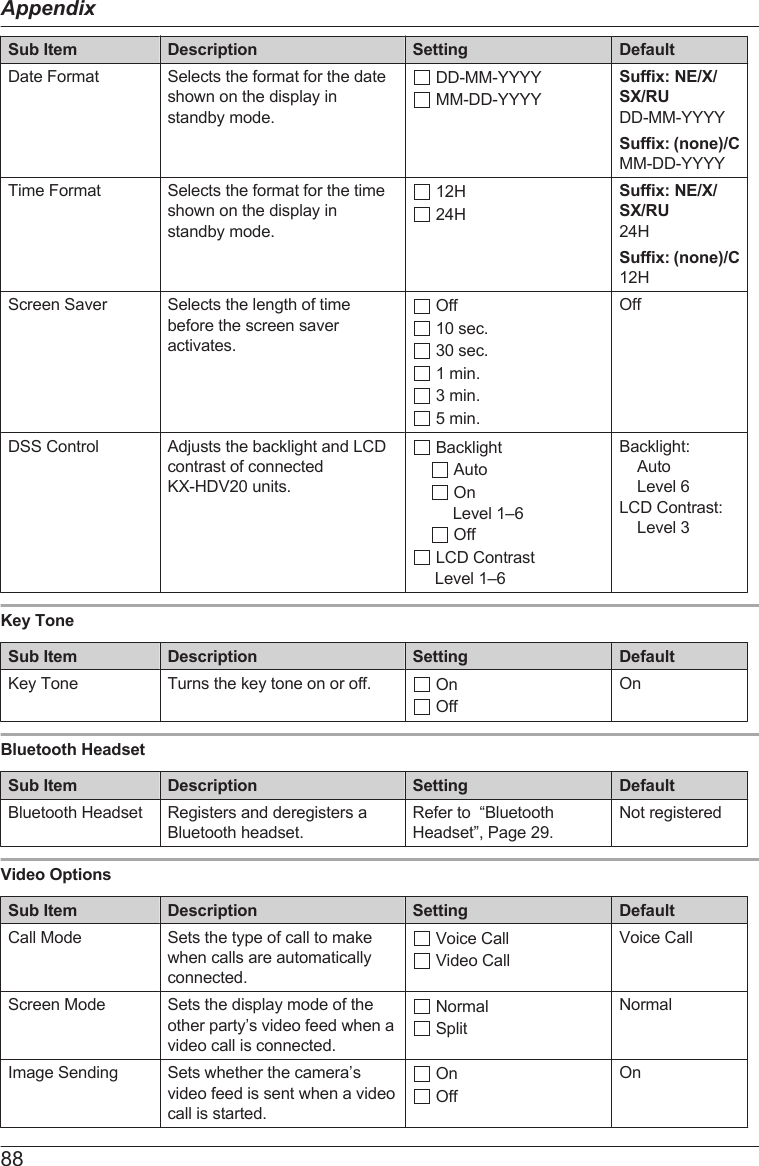
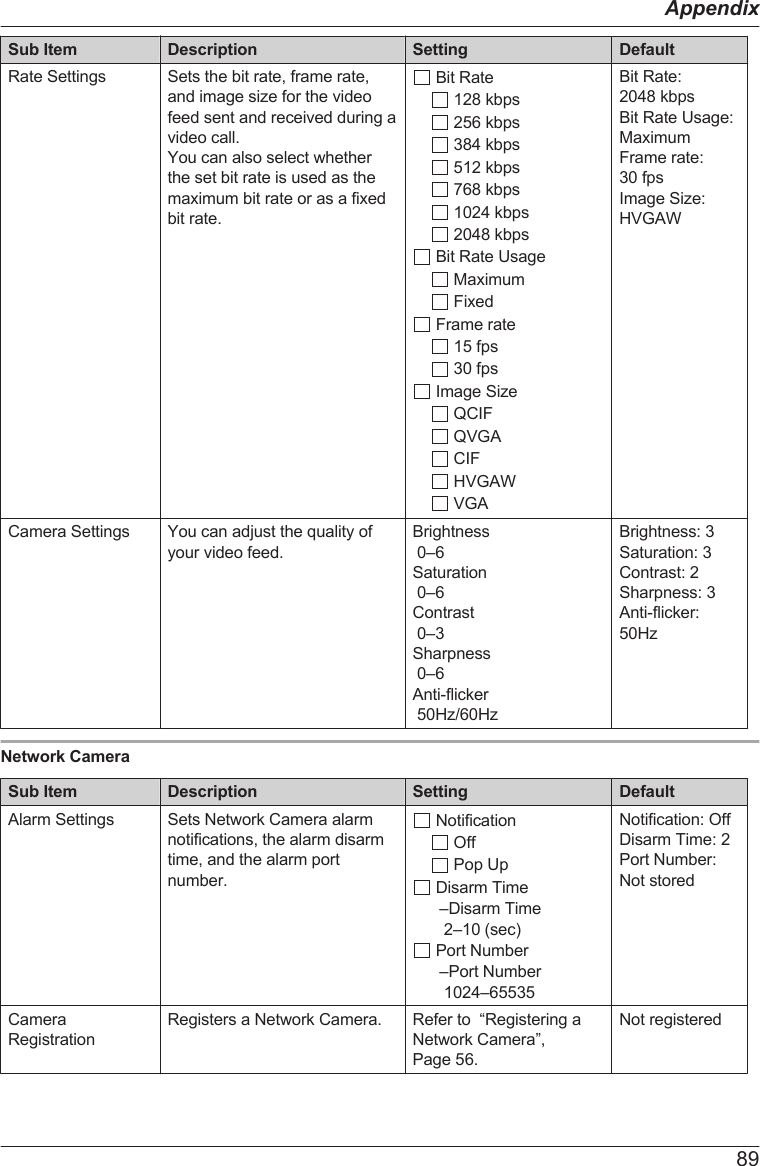
![Deleting the phone numbers to reject[In standby mode]1. Tap / a "Advanced Settings"2. Tap / a "Call Settings"3. Tap / a "Block Caller ID"4. Tap .5. Tap / : Tap the check boxes of the items you want to delete.*16. Tap . a "OK"*1 You can select all items in the list by tapping .Making an anonymous callBefore making a call, specify the following:IMPORTANTRA password may be required for these settings. We recommend setting with your administrator.Contact your administrator for further information.[In standby mode]1. Tap / a "Advanced Settings"2. Tap / a "Call Settings"3. Tap / a "Anonymous Call"4. Tap / : Select a line.5. Select "On" or "Off". a "OK"Changing the Basic SettingsTo select the main item in standby mode1. Tap / a "Basic Settings"2. Tap / : Select the main item.Main Item Sub Item PageIncoming Option Ringer Volume Ringer Type Page 85Talk Option Speaker Volume Handset Volume Headset Volume Page 85Answer Option Auto Ans Device Auto Ans Delay Auto Answer Page 86Key Option Program Key DSS Key Hot Key Time Page 86Display Option Language Backlight Standby Display Page 87Category Name Date Format Time FormatScreen Saver DSS ControlKey Tone — Page 88BluetoothHeadsetConnection Registration Page 88Video Options Call Mode Screen Mode Image Sending Page 88Rate Settings Camera Settings70Customizing the Telephone](https://usermanual.wiki/Panasonic-of-North-America/96NKX-HDV430/User-Guide-3019853-Page-70.png)
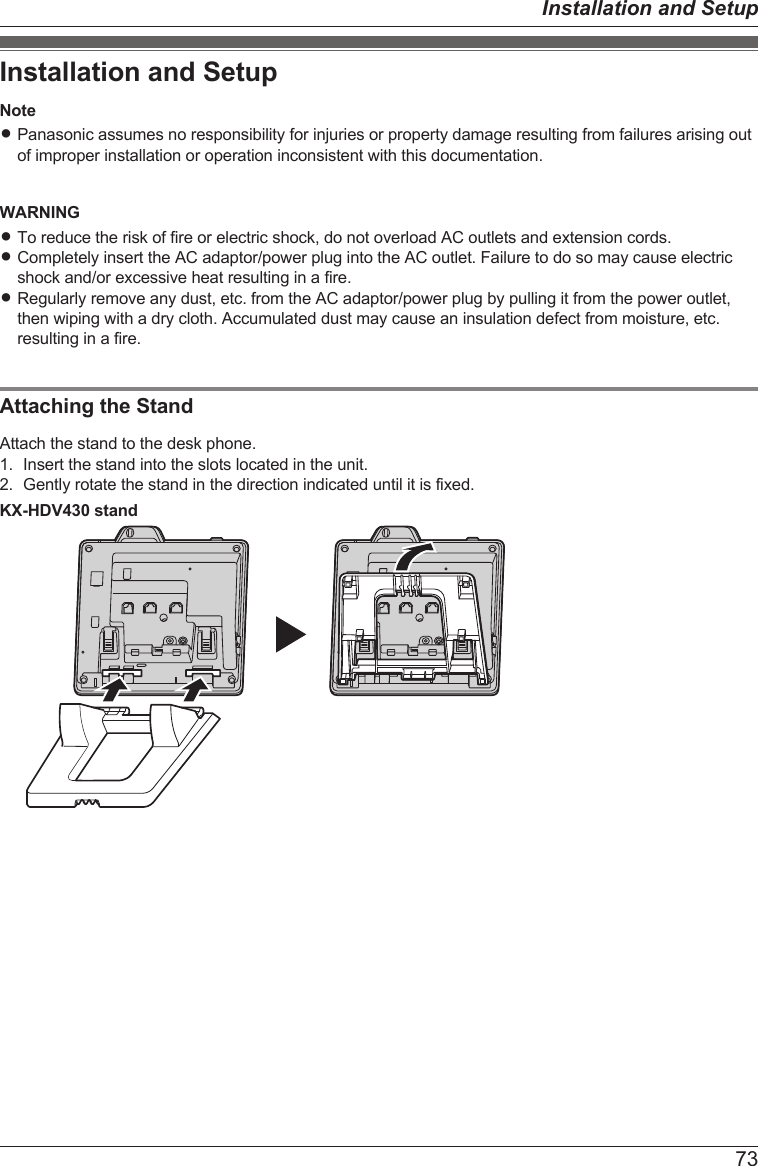
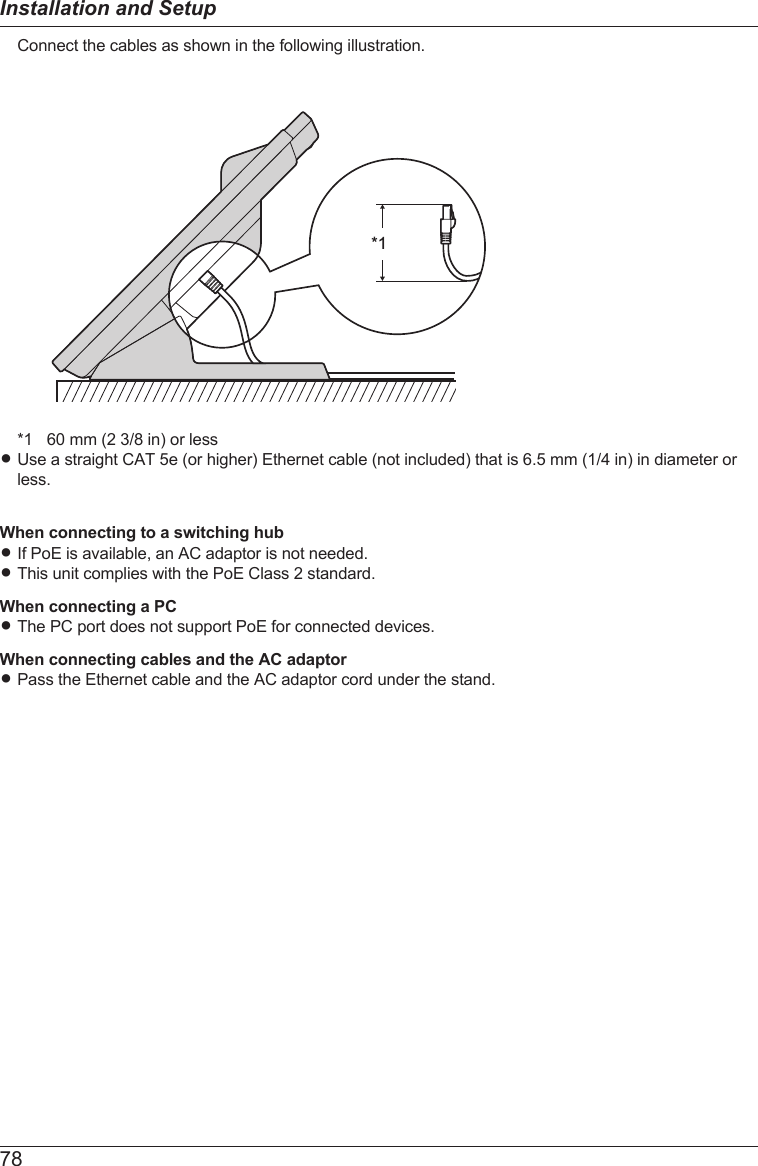
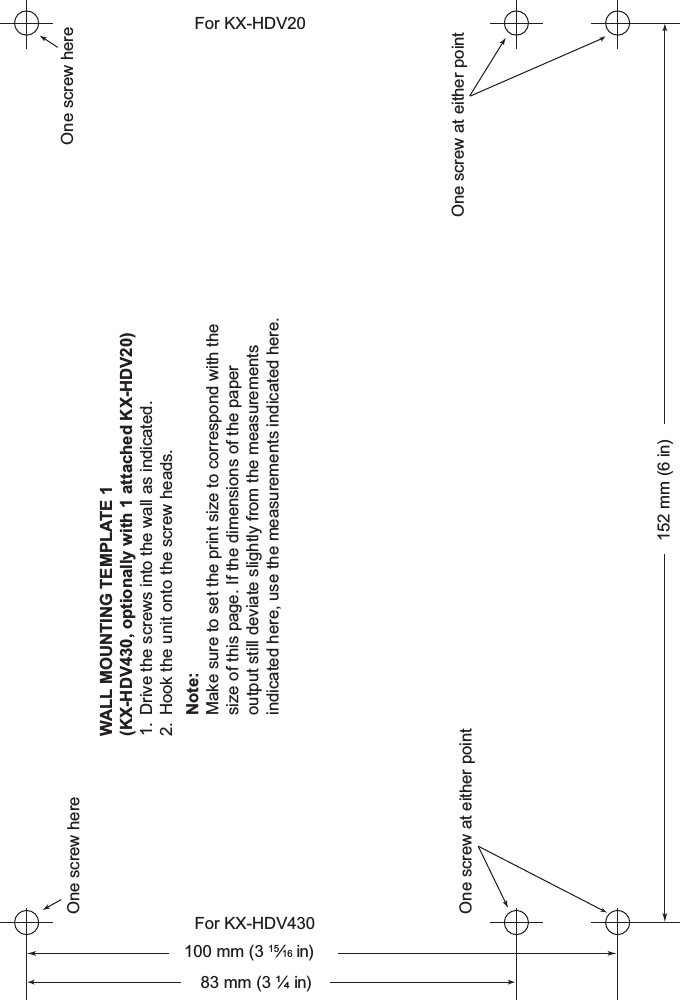
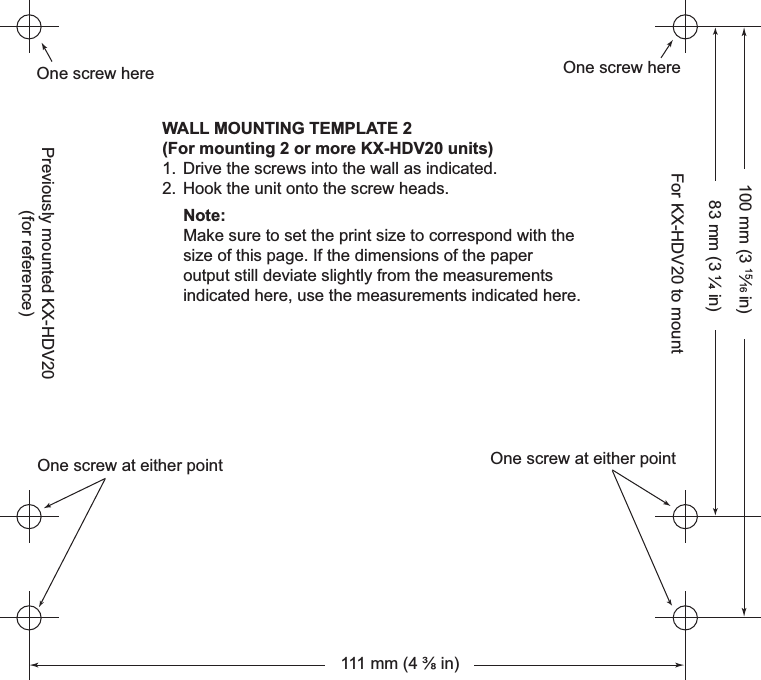
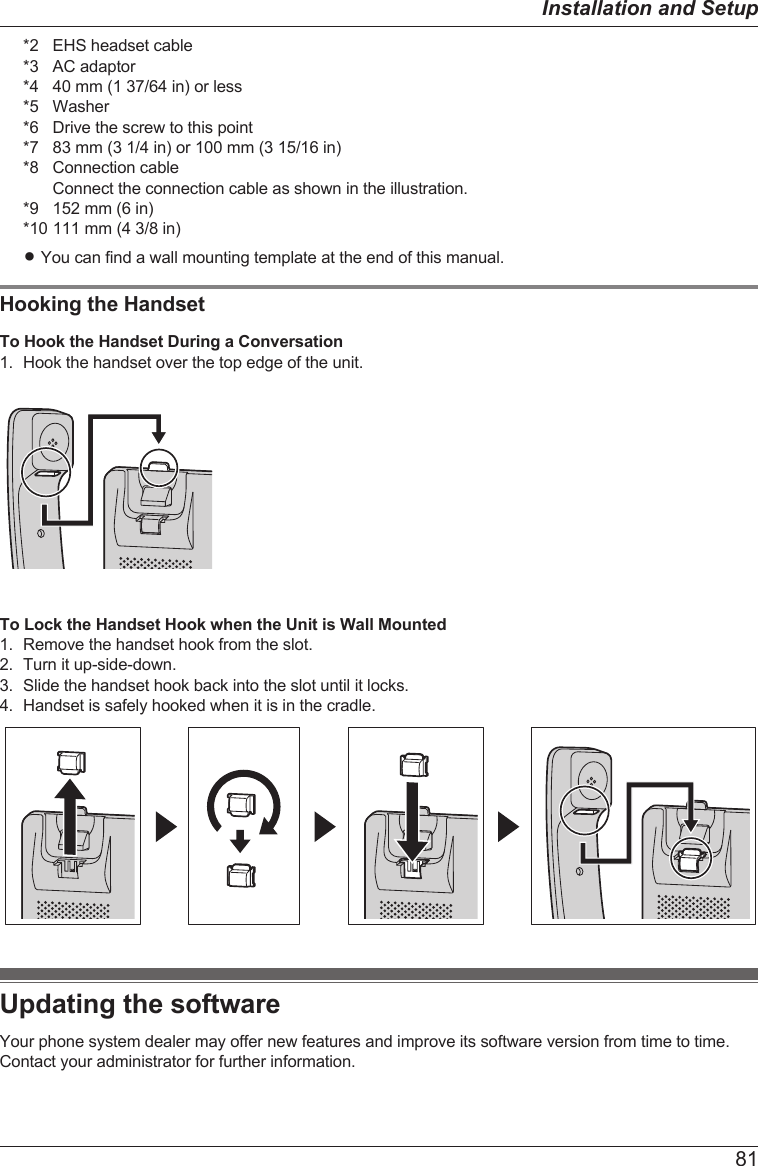
![Wall MountingThe KX-HDV430 and up to 5 optional KX-HDV20 units can be mounted on a wall.IMPORTANTRMake sure that the wall and the fixing method are strong enough to support the weight of the unit. (See“Specifications”, Page 95.)1. Insert the tabs of the wall mounting adaptor into the designated openings in the base, and then slidethe wall mounting adaptor in the direction of the arrow until it clicks.KX-HDV430With optional KX-HDV20For 2nd to 5th KX-HDV20Remove the screw from the DSS cover of the KX-HDV20, and then slide the cover up to remove it.2. Fasten the wall mounting adaptor to the base with the included small screw.(Recommended torque: 0.4 N·m [4.08 kgf·cm/3.54 lbf·in] to 0.6 N·m [6.12 kgf·cm/5.31 lbf·in])3. Connect the AC adaptor, handset cord, Ethernet cables, and connection cable as necessary.4. Drive the large screws into the wall either 83 mm (3 1/4 in) or 100 mm (3 15/16 in) apart, and mountthe unit on the wall.79Installation and Setup](https://usermanual.wiki/Panasonic-of-North-America/96NKX-HDV430/User-Guide-3019853-Page-79.png)

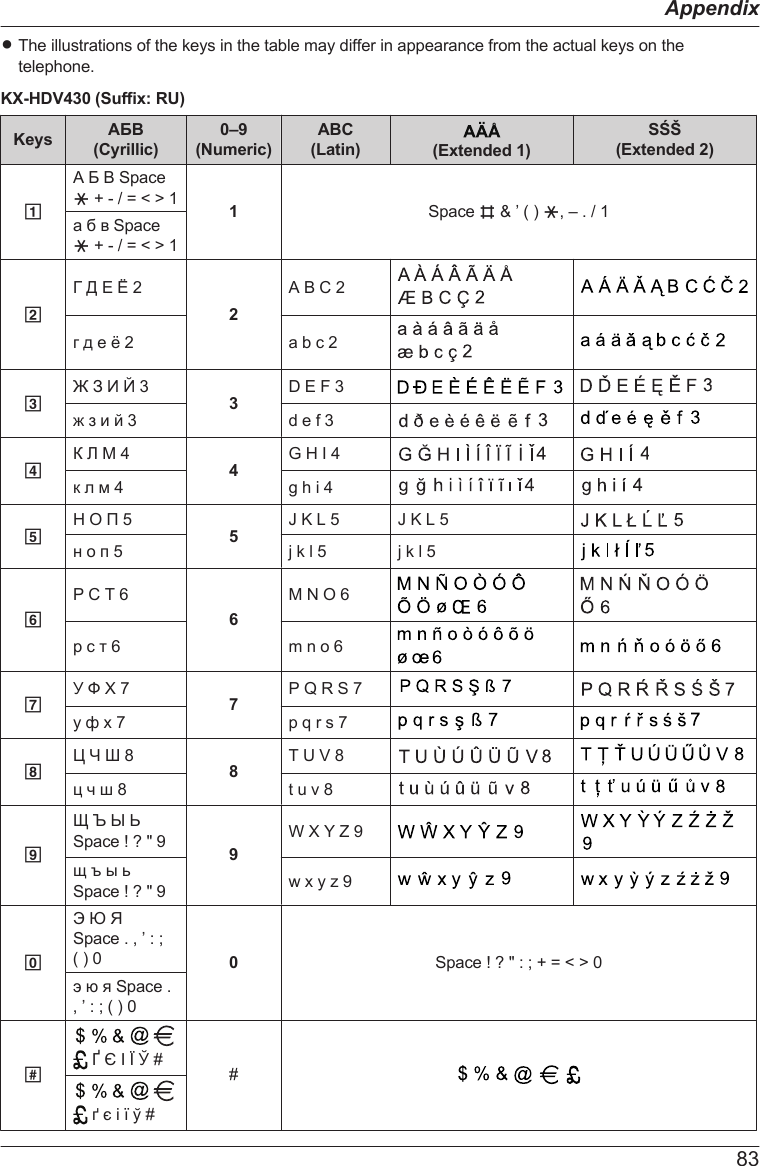
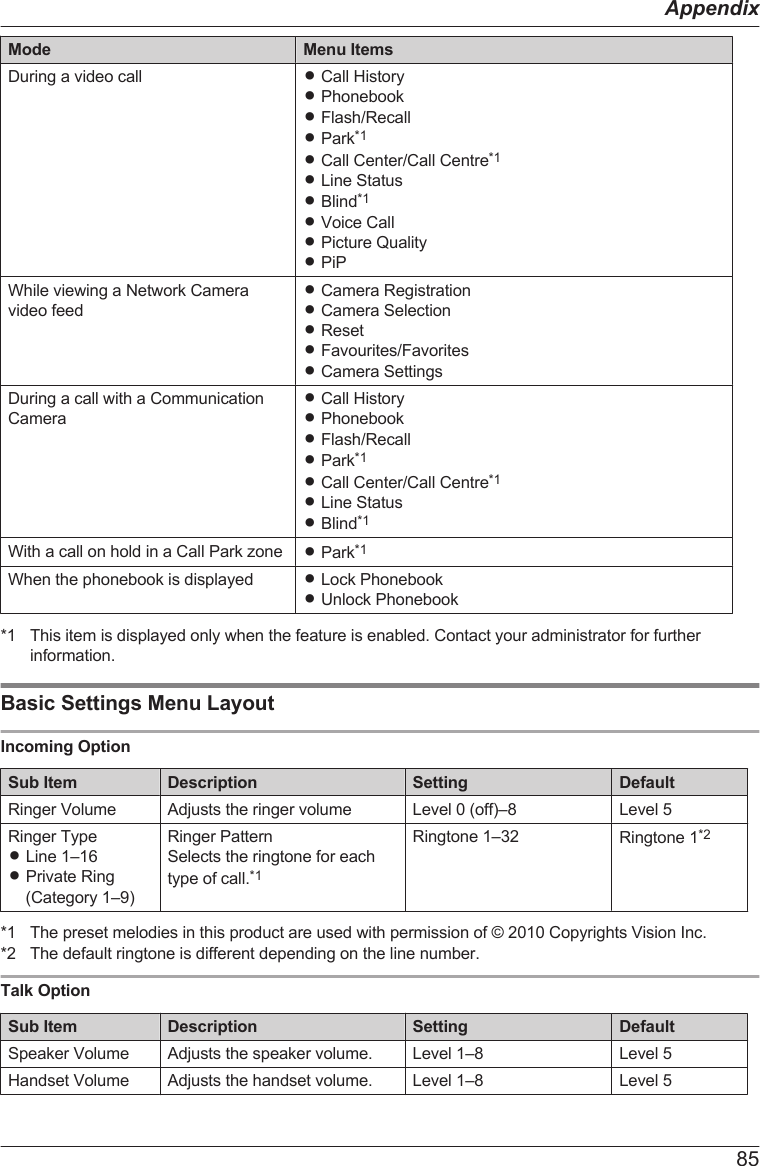
![RPress * before or after entering a character to change between uppercase and lowercase.RPressing a key repeatedly will cycle through the characters associated with that key. For example, toenter the letter "C" in Latin Mode, press 2 3 times.RPressing a key repeatedly will cycle through the characters associated with that key. For example, toenter the letter "E" in Cyrillic Mode, press 2 3 times.RCharacters that are entered using the # key (for example, "$") cannot be entered when searching thephonebook. See “Searching for an Item in the Personal Phonebook”, Page 51.RThe illustrations of the keys in the table may differ in appearance from the actual keys on thetelephone.KX-HDV430 (Suffix: [none]/C)Keys ABC (Latin) 0–9(Numeric)+ÀÂ (Extended 1)Upper Lower Upper Lower1Space B & ’ ( ) G , – . / 1 1Space B & ’ ( ) G , – . / 12A B C 2 a b c 2 23D E F 3 d e f 3 34G H I 4 g h i 4 45J K L 5 j k l 5 5JKL5 jkl56M N O 6 m n o 6 67P Q R S 7 p q r s 7 78T U V 8 t u v 8 89W X Y Z 9 w x y z 9 90Space ! ? " : ; + = < > 0 0Space ! ? " : ; + = < > 0##RPress * before or after entering a character to change between uppercase and lowercase.RPressing a key repeatedly will cycle through the characters associated with that key. For example, toenter the letter "C" in Latin Mode, press 2 3 times.RCharacters that are entered using the # key (for example, "$") cannot be entered when searching thephonebook. See “Searching for an Item in the Personal Phonebook”, Page 51.RThe illustrations of the keys in the table may differ in appearance from the actual keys on thetelephone.Settings Displayed in the MenuMode Menu ItemsDuring a voice call RCall HistoryRPhonebookRFlash/RecallRPark*1RCall Center/Call Centre*1RNetwork Camera84Appendix](https://usermanual.wiki/Panasonic-of-North-America/96NKX-HDV430/User-Guide-3019853-Page-84.png)
![Sub Item Description Setting DefaultHeadset Volume Adjusts the headset speakervolume.Level 1–8 Level 5Answer OptionSub Item Description Setting DefaultAuto Ans Device Selects the types of devicesthat can be answered by AutoAnswer. Speaker Phone HeadsetSpeaker PhoneAuto Ans Delay Selects the number of secondsbefore a call is automaticallyanswered when Auto Answer isturned on.0s–20s 6sAuto Answer Selects the types of calls thatcan be answered by AutoAnswer. Voice Call Voice and VideoVoice CallKey OptionSub Item Description Setting DefaultRProgram KeyRDSS KeyAssigns a function to eachprogram key or DSS key.Refer to “Changing theFunction Keys (Program Keysand DSS Keys)”, Page 66. One Touch Dial BLF Line ACD[Login] ACD[Wrap Up] Line Status Call Forward Phonebook Call History Simultaneous Ring Hoteling/Hospitality Transfer Blind Transfer Conference Directed Call Pickup Call Park Park Retrieve Network CameraNot storedHot Key Time Selects the number of secondsbefore a call is automaticallymade when a Hot Keyassigned to "Auto" is pressedand held.1s–20s 2s86Appendix](https://usermanual.wiki/Panasonic-of-North-America/96NKX-HDV430/User-Guide-3019853-Page-86.png)
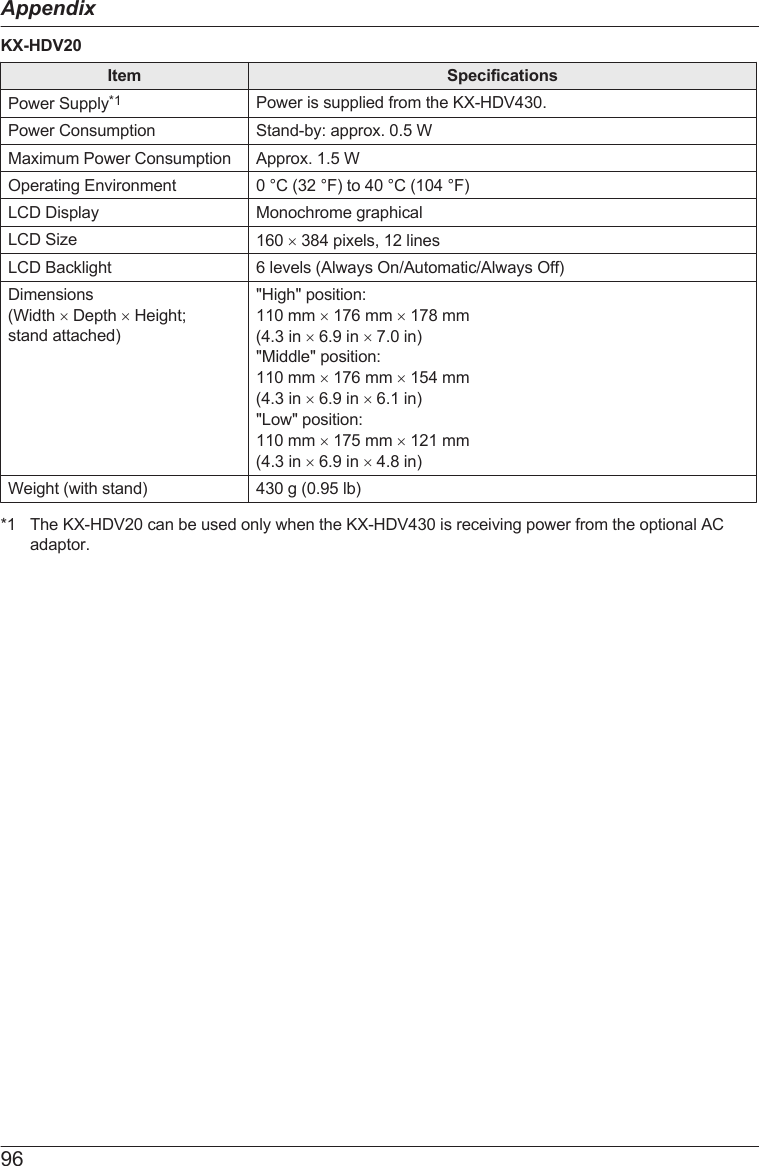
![SpecificationsKX-HDV430Item SpecificationsPower Supply AC adaptor / PoE (IEEE 802.3af)Power Consumption PoEStand-by: approx. 2.7 W (ECO mode off), approx. 2.2 W (ECOmode on)Talking: approx. 3.5 W (ECO mode off), approx. 2.8 W (ECO modeon)AC AdaptorStand-by: approx. 2.6 W (ECO mode off), approx. 1.9 W (ECOmode on)Talking: approx. 3.4 W (ECO mode off), approx. 2.7 W (ECO modeon)Maximum Power Consumption Approx. 4.4 WOperating Environment 0 °C (32 °F) to 40 °C (104 °F)Ethernet Port LAN: 1 (RJ45), PC: 1 (RJ45)Ethernet Interface 10Base-T/100Base-TX/1000Base-T(Auto / 100MB-FULL / 100MB-HALF / 10MB-FULL / 10MB-HALF)Auto MDI / MDIXWideband Codec G.722/G.722.2 (AMR-WB)Narrowband Codec G.711a-law / G.711µ-law / G.729aMultiple Line 16LCD Display 4.3-inch color TFT with touch panel16,772,216 colors (Full color)LCD Size 480 ´ 272 pixelsLCD Backlight 8 levelsVoIP Connection Method SIPSpeaker 1Microphone 1Headset Jack 1 (RJ9)EHS Jack 1 (ø3.5 mm [1/8 in], for EHS only)Bluetooth 1 (Class 1)Compatible CommunicationCameraKX-NTV150/KX-NTV160Dimensions(Width ´ Depth ´ Height;stand attached)"High" position:195 mm ´ 190 mm ´ 209 mm(7.7 in ´ 7.5 in ´ 8.3 in)"Low" position:195 mm ´ 184 mm ´ 188 mm(7.7 in ´ 7.3 in ´ 7.4 in)Weight (with handset, handsetcord and stand)870 g (1.92 lb)95Appendix](https://usermanual.wiki/Panasonic-of-North-America/96NKX-HDV430/User-Guide-3019853-Page-95.png)
![Issue Possible Cause SolutionI cannot make longdistance calls.Your telephone service does notallow you to make long distancecalls.Make sure that you have subscribedto your telephone company’s longdistance service.The unit does not ringwhen a call isreceived.The ringer is turned off. Press the [j] volume key while acall is being received, or change theringer volume setting.While talking to anoutside party, the lineis disconnected.Your phone system/service mayimpose a time limit on outsidecalls.Consult your dealer to extend thetime limit, if necessary.Sound QualityIssue Possible Cause SolutionThe other partycannot hear my voice.The unit is muted. Press /[MUTE/AUTO ANS] toturn off the mute feature.If you are using thespeakerphone, objects may beobstructing the microphone.Do not obstruct the unit’smicrophone during calls. Keep yourhands, as well as common objectssuch as folders, cups, and coffeepots away from the unit during calls.Sound cuts out; I canhear myself throughthe speaker.You are too far away from themicrophone.Try speaking closer to themicrophone. The environment is not suited tospeakerphone calls.RDo not use the unit within 2 m(6 ft 7 in) of projectors, airconditioning devices, fans, orother audible or electrical noiseemitting devices.RIf using the unit in a room withwindows, close the curtains orblinds to prevent echoes.RUse the unit in a quietenvironment. The unit was moved during a call. Do not move the unit while on a call.Objects are obstructing themicrophone.Do not obstruct the unit during calls.Keep your hands, as well ascommon objects such as folders,cups, and coffee pots away from theunit during calls.The other party is using ahalf-duplex speakerphone.If the other party is using ahalf-duplex speakerphone, soundmay cut out occasionally duringcalls. For best performance, theother party should use a full-duplexspeakerphone.98Appendix](https://usermanual.wiki/Panasonic-of-North-America/96NKX-HDV430/User-Guide-3019853-Page-98.png)