Panasonic of North America 96NKX-HNK101 DECT 6.0 Access Keypad User Manual
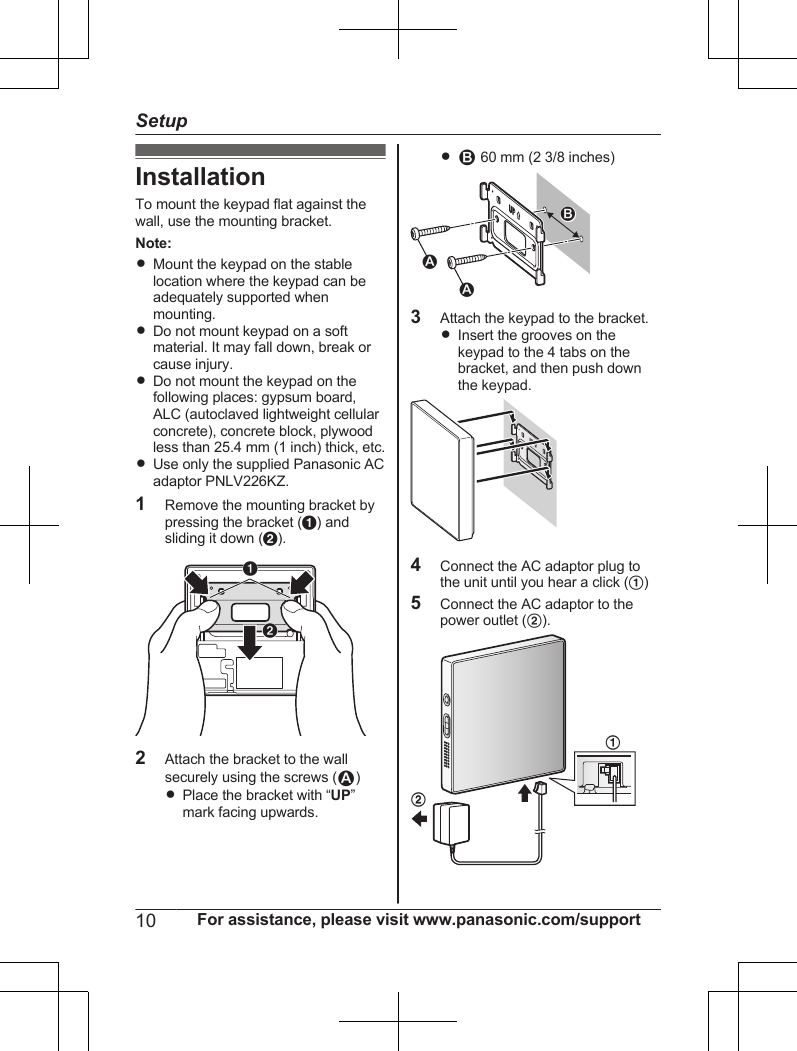
Panasonic Corporation of North America DECT 6.0 Access Keypad Users Manual
UserManual.wiki
>
Panasonic of North America
>
96NKX HNK101 User Manual
Users Manual
Navigation menu
Upload a User Manual
Namespaces
Wiki Guide
HTML
PDF
Info
Views
User Manual
Discussion / Help
Navigation

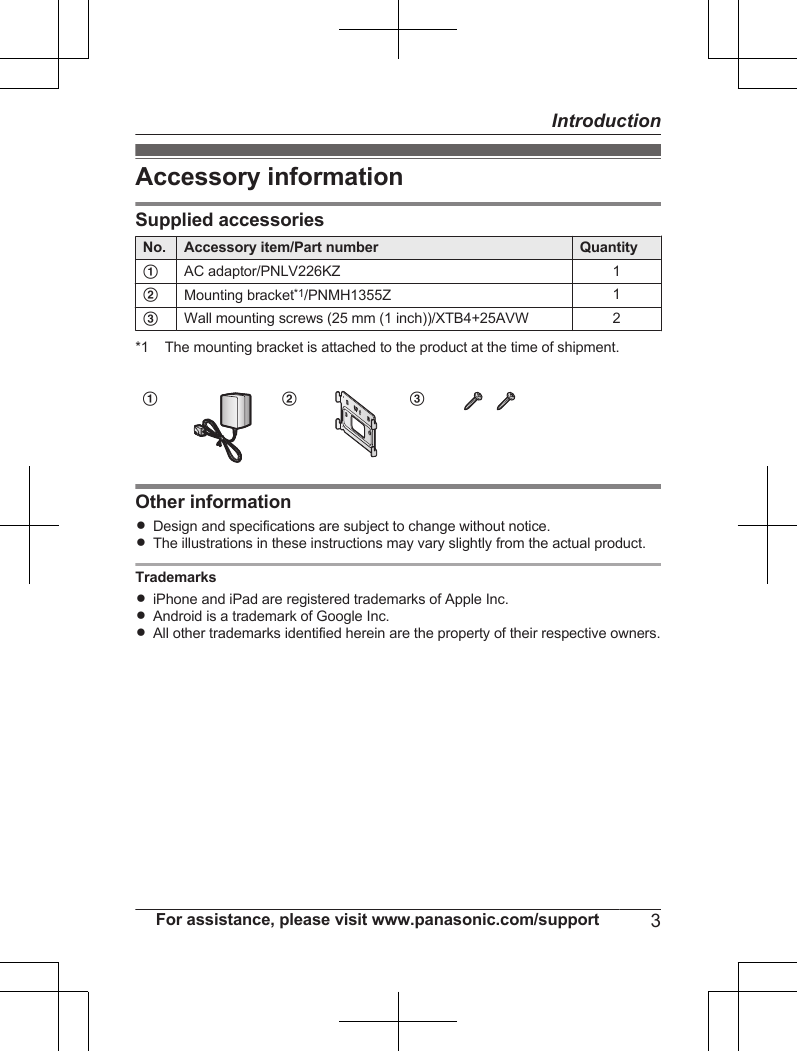
![IntroductionAccessory information ...............3Important InformationAbout this system ......................4For your safety ...........................4Important safety instructions ......5For best performance ................5Other information .......................6SetupPart names and functions ..........7LED indicator .............................7Touchpanel ................................7Setup overview ..........................8Registering the keypad ..............8Confirming the usage area ........9Installation ...............................10Note about powerconnections .............................11AppendixUsing the keypad .....................12Features available when using the[Home Network] app ................12Accessing the User’s Guide ....12Specifications ..........................13FCC and other information ......14Customer services ...................15Warranty (For United States andPuerto Rico) .............................162Table of Contents](https://usermanual.wiki/Panasonic-of-North-America/96NKX-HNK101/User-Guide-2549398-Page-2.png)
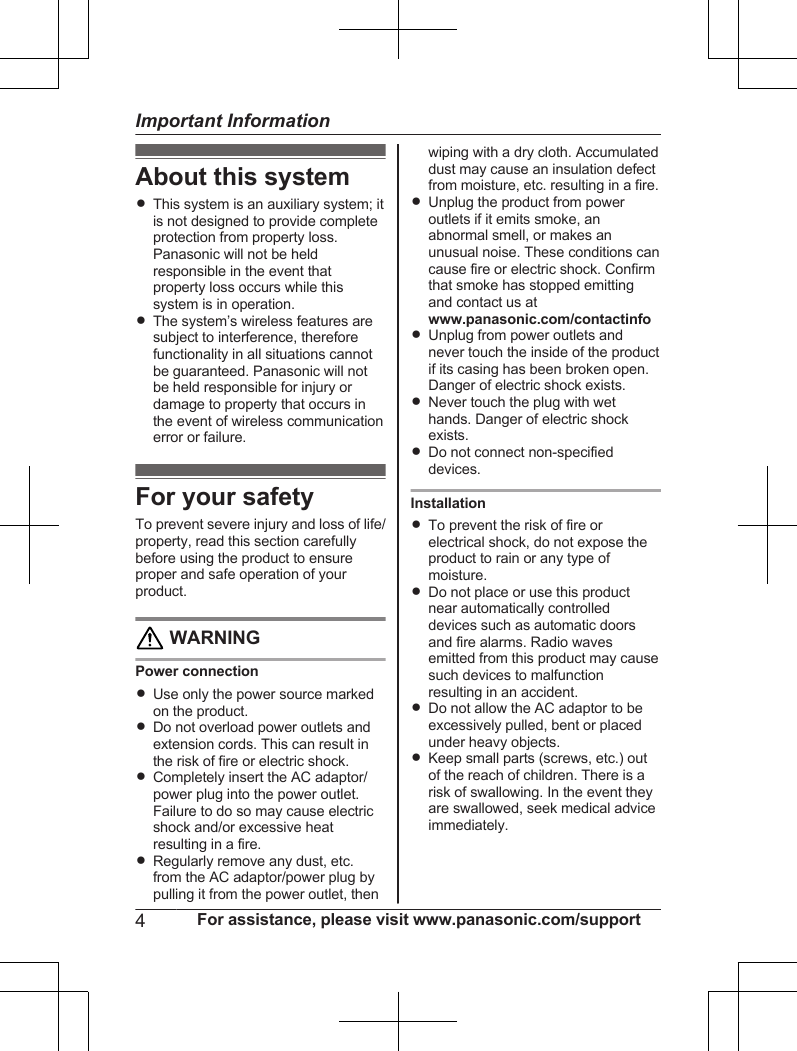
![Part names andfunctionsABCEFDM NUsed when registering the keypadto the hub.VolumeUsed to adjust the volume of thesounds emitted by the keypad.SpeakerLED indicatorTouchpanelDC jackLED indicatorYou can use the LED indicator toconfirm the keypad’s status.Indicator StatusOff Normal operation or nopower.Red,blinkingslowlyKeypad is notregistered to a hub.Indicator StatusRed,blinkingKeypad is out of rangeof the hub.Red,blinkingquicklyAlarm system wastriggered.Green,blinkingRegistration mode(You pressed and heldM N)TouchpanelThe buttons on the touchpanel allowyou to confirm and change thesystem’s current alarm mode.By default, the button corresponding tothe current alarm mode is lit duringnormal operation and no other buttonsare lit. When you tap the touchpanel,the buttons for all the alarm modes lightfor 10 seconds to allow you to controlthe keypad, then dim again.Button StatusNonedisplayedNo power, or buttonsare turned off*1., lit Normal operation,[Arm: At Home] modeis selected., lit Normal operation,[Arm: Away] mode isselected., lit Normal operation,[Disarm] mode isselected.,blinkingAlarm system wastriggered.For assistance, please visit www.panasonic.com/support 7Setup](https://usermanual.wiki/Panasonic-of-North-America/96NKX-HNK101/User-Guide-2549398-Page-7.png)
![Button StatusAll buttonslitYou tapped thetouchpanel within thelast 10 seconds. If thebuttons remain lit after10 seconds, thekeypad is notregistered to a hub.All buttonsblinkingRegistration mode(you pressed and heldM N)*1 You can configure the keypad sothat its alarm mode buttons do notlight during normal operation. Formore information refer to theUser’s Guide (page 12).Setup overview1Initial setupMake sure you can access thesystem using your mobile device.For details, refer to the SystemSetup Guide included with yourhub.2RegistrationRequired only if the keypad waspurchased separately (i.e., not aspart of a bundle).3Confirm the installation areaRead the information in thisdocument to confirm that thedesired installation area is suitableto proper operation.4InstallationInstall the keypad in the desiredlocation.Registering thekeypadThis procedure is not required fordevices that were included as part ofa bundle.Before you can use the keypad, it mustbe registered to the hub.If you purchased devices separately(i.e., not as part of a bundle), you mustregister each device to the hub.You can register each device by usingthe registration buttons or the [HomeNetwork] app.Note:RBefore registering the keypad, makesure the AC adaptors of the hub andkeypad are connected and eachdevice is powered.Using registration buttons1Hub:Press and hold M OTHERDEVICEN until the LED indicatorblinks in green.2Keypad:Press and hold M N until thebuttons displayed on thetouchpanel start blinking.RWhen registration is complete,the hub sounds one long beep.Note:RTo cancel the registration, pressM N on the hub and on thekeypad.RIf registration fails, the hub soundsseveral short beeps.8For assistance, please visit www.panasonic.com/supportSetup](https://usermanual.wiki/Panasonic-of-North-America/96NKX-HNK101/User-Guide-2549398-Page-8.png)
![Using the appWhen you register the keypad by usingthe [Home Network] app, you canassign a name to your devices andgroup them by location. For moreinformation, refer to the User’s Guide(page 12).Confirming theusage areaWireless communicationrangeThe wireless communication range ofeach device in the system from the hubis approximately 50 m (160 feet)indoors and approximately 300 m(1,000 feet) outdoors. Wirelesscommunication may be unreliablewhen the following obstacles arelocated between the hub and otherdevices.RMetal doors or screensRWalls containing aluminum-sheetinsulationRWalls made of concrete orcorrugated ironRDouble-pane glass windowsRMultiple wallsRWhen using each device onseparate floors or in differentbuildingsNote:RThe buttons displayed on thetouchpanel indicate the keypad’scommunication status (page 7).Usage area cautionsUsing the keypad in the following areasmay cause deformation, malfunction, oroperational failure.RIn direct sunlightRAreas exposed to grease or steam,such as kitchensRNear fire or heating devicesRNear magnetic fields (such as nearmicrowaves and magnets)RAreas subject to extremetemperature changes, such as nextto air conditionersRAreas with reflective objects, suchas glass, that can interfere withdetection of temperature variationRAreas where the temperature isaffected by strong illuminatingobjects (such as fluorescent lights)RNear devices that emit strong radiowaves, such as mobile phonesFor assistance, please visit www.panasonic.com/support 9Setup](https://usermanual.wiki/Panasonic-of-North-America/96NKX-HNK101/User-Guide-2549398-Page-9.png)
![Using the keypadChanging the alarm mode1Tap the touchpanel to light thealarm mode buttons.2Tap the button of the desiredalarm mode.RIf you tap to disarm thealarm system, enter the disarmPIN (default: “0000”) and thentap MOKN.Note:RWe recommend changing the PINfrom the default before operating thealarm system. For more information,refer to the User’s Guide(page 12).Confirming the alarm modeBy default, the button corresponding tothe current alarm mode is lit duringnormal operation. If the [HomeNetwork] app was used to change thissetting, the current alarm mode is notdisplayed on the touchpanel.Canceling a triggerWhen the alarm system is triggered,the keypad sounds an alert and blinks. Use the following procedure tostop the alert.1To cancel the trigger, tap ,enter the disarm PIN (default:“0000”), and then tap MOKN.Features availablewhen using the[Home Network] appSome of the keypad’s features that areavailable when using the [HomeNetwork] app are listed below. Formore information, refer to the User’sGuide (page 12).–Alarm systemYou can use the app to arm anddisarm the alarm system.–Device managementYou can use the app to change thekeypad’s name, select whether ornot the touchpanel’s alarm modebuttons are displayed, and turnvoice guidance and key tones onand off.Accessing the User’sGuideThe User’s Guide is a collection ofonline documentation that helps youget the most out of the [HomeNetwork] app.1iPhone®/iPad®Tap in the app’s home screen.Android™ devicesTap or press your mobiledevice’s menu button in the app’shome screen.2Tap [User’s Guide].12 For assistance, please visit www.panasonic.com/supportAppendix](https://usermanual.wiki/Panasonic-of-North-America/96NKX-HNK101/User-Guide-2549398-Page-12.png)