Panasonic of North America 96NKX-PRSA10 DECT 6.0 Handset User Manual Operating Instructions English
Panasonic Corporation of North America DECT 6.0 Handset Operating Instructions English
UserManual.wiki
>
Panasonic of North America
>
96NKX PRSA10 User Manual
User manual
Navigation menu
Upload a User Manual
Namespaces
Wiki Guide
HTML
PDF
Info
Views
User Manual
Discussion / Help
Navigation
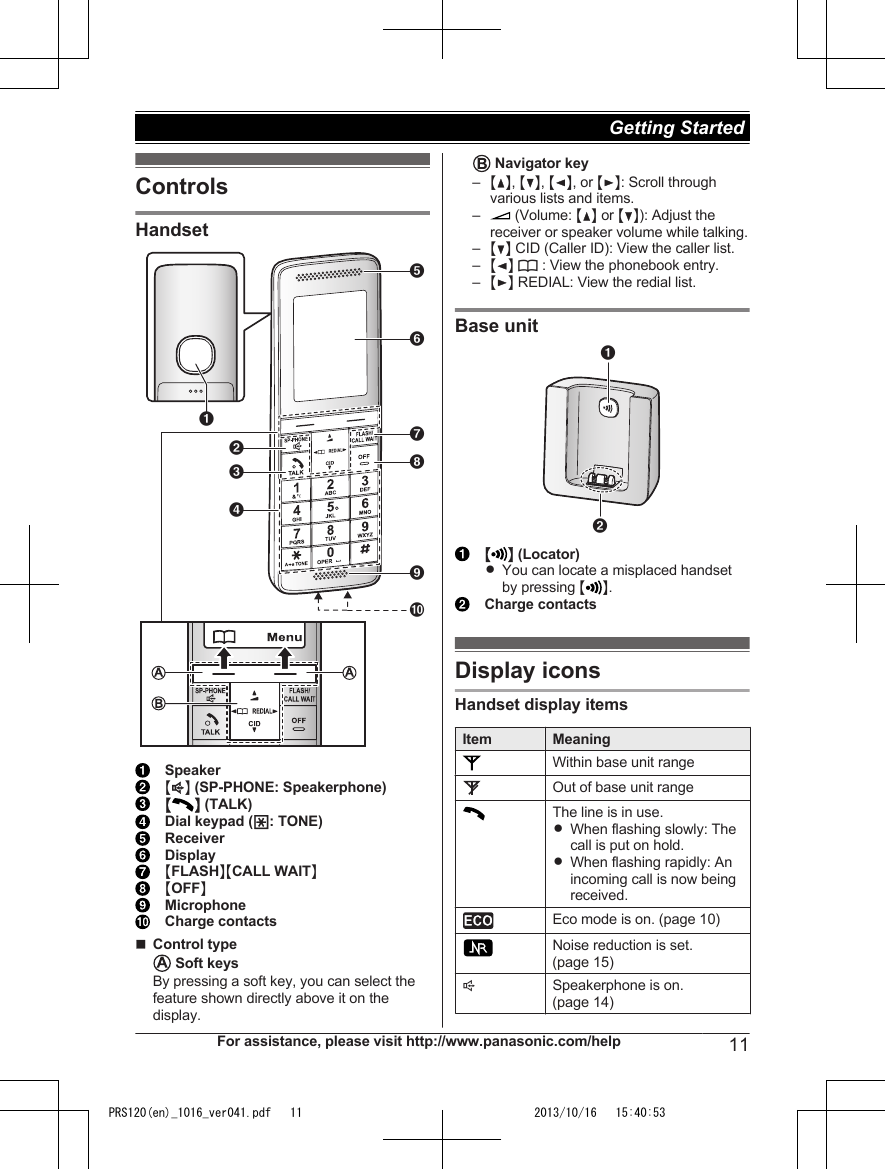


![Sugerencias de operaciónTeclas de funciónTecla navegadora{^}, {V}, {<} o {>}: Navegue por diversas listas y elementos.? (Volumen: {^} o {V}): Ajuste el volumen del receptor o el altavoz mientras habla.{V} CID (identificador de llamadas): Vea la lista de personas que llamaron.{<} k: Vea la entrada del directorio telefónico.{>} REDIAL (Remarcación): Vea la lista de remarcación.Cambio de idiomas (Auricular) (predeterminado: “English”)Idioma de la pantalla{Menú} (tecla de función de la derecha) (11) s {r}: “Español” s {Guardar} s {OFF} Idioma de la guía de voz{Menú} (tecla de función de la derecha) (112 s {r}: “Español” s {Guardar} s {OFF}Fecha y hora (Auricular)1{Menú} (tecla de función de la derecha) (1)12Introduzca el día, mes y año actuales. s {OK}3Introduzca la hora y minuto actuales.4{V}{^}{<}{>}Cuando instale las baterías por primera vez, es posible que aparezca “Date and time Press [Select]”. Oprima {OFF} para salir.{Guardar} s {OFF} Al oprimir una tecla de función, puede seleccionar la función que aparece directamente encima de ella en la pantalla. Preste atención a la pantalla para ver qué funciones están asignadas a las teclas de función durante la operación.50 Para obtener ayuda, visite http://www.panasonic.com/help (solo en inglés)Guía Rápida EspañolaPRS120(en)_1016_ver041.pdf 50 2013/10/16 15:40:55](https://usermanual.wiki/Panasonic-of-North-America/96NKX-PRSA10/User-Guide-2097511-Page-50.png)